Heritage Bamboo Fly Rods
Heritage Bamboo Band Saw Jig James E. (JED) Dempsey – Maker

Congratulations on your purchase of my Heritage Bamboo Band Saw Jig and continuing in the tradition
of famed bamboo rodmakers such as Payne, Leonard, Halstead, Gillum and Uslan. As an apprentice at
Payne under the tutelage of Walt Carpenter, I sawed many bamboo culms in preparation for them going
on the Payne saw beveller.
I am also the owner of the Uslan bamboo saw which uses a table saw blade that is very similar in design
to my current jig except that we are using a band saw instead. Why a band saw? The answer is simple –
less waste. A table saw blade is .125” or more thick and the band saw blade is usually .025” to .030”
thick. That means for every 3 strips you get using a table saw, I get 4 strips or more depending on the
width of strip you choose to cut.
Using the procedures I have laid out below, you will get uniform straight strips that require little or no
straightening. This produces time savings and eliminates a number of issues that split strips present. The
one thing you will discover that “run out” is a myth promulgated by amateur rodmakers to justify
splitting. Again, remember the great production rod companies and great classic rodmakers that today’s
rodmakers try to copy and emulated all sawed cane and run out was never a real issue with them. The
only exception was Garrison.
One of the issues most of today’s rodmakers worry about sawing and working cane is generation of saw
dust. Sawing with a table saw produces a lot of saw dust. I have to credit Chris Bogart for coming up with
the saw dust collection attachment that I include one for each and every Heritage Bamaboo Band Saw
Jig. It is extremely efficient and eliminates almost all dust produced sawing cane. We have now even
angled the attachment for ease of putting the hose on the jig. The dust collection attachment has an
external diameter of 1.5” which couples it with the hoses sold with the Oneida Air”s Dust Deputy
(http://www.oneida-air.com). In his ShopVac he has a dry wall bag that acts like a Hepa filter for fine
dust. This is the system that Chris uses in his shop with his entire router based roughers and CNC finish
mill to eliminate dust in his shop.
Lastly, let me emphasize safety. I have done my best to make the Heritage Bamboo Band Saw Jig as safe
as possible and including the dust collection attachment makes the blade below the jig enclosed and
safe. Using any power equipment has inherent risks. Do not modify this jig or do not use it in ways that it
intended to be used. Make sure your band saw is properly set up (more about this latter) and that all
safety guards are in place. Safety is mandatory and an individual responsibility when using power
equipment.
James E. (Jed) Dempsey
Set up of the Heritage Bamboo Band Saw Jig.
Choice of Band Saw Blades. Most likely the band saw blade you are currently using is not well suited for
sawing bamboo. As we all know bamboo is an amazing material and it is extremely hard on plane blades
and other cutting implements. Buying a cheap blade at the local hardware store most likely will not last
long and dull quickly. In the end, they are the most expensive blades to buy and use.
The choice of a quality blade may seem a bit more expensive, but will outlast a carbon steel blade from
the hardware store up to ten times. The blades I personally use and that other top makers use are from
Detroit Band Saw and they are bi-metal and are custom ordered to the specific length for your band saw
weather it is Delta, Powermatic, Porter Cable or any other brand.
The blade you want is ½” wide bimetal with at least 10tpi – 14tpi. I personally use the 10/14 tpi bimetal.
Here is the link to the website: http://www.detroitbandsaw.com/index.asp?category=22337 These
blades will outlast any others and cut smoothly. I buy my blades 4 at a time (you can get others for any
other projects you have) and get free shipping. It has been my experience that you will have your blades
in about 5 business days. They ship UPS.
Adjusting the Band Saw. This is the one area I have found that will cause you issues using my Heritage
Bamboo Band Saw Jig. Setting up the band saw is an important set and understanding how to properly
set up the band saw operationally and properly adjust blade tension is very important.
Unplug your band saw when changing blades and working on it. Safety First.
Here are two good videos from Fine Woodworking on setting up and tuning up a band saw. I highly
recommend viewing at least the first video. It is a gold mine of information and shows you exactly how
to set up your band saw correctly:
http://www.finewoodworking.com/tool-guide/video/how-to-set-up-a-bandsaw.aspx
http://www.thewoodwhisperer.com/videos/bandsaw-setup-tuneup/
Another good resource is “The Band Saw Book by Lonnie Bird”.
Replace your current blade with the ½” Detroit Band Saw Blade I have recommended. Insure the teeth
are pointing in the correct direction. It is easy to put a band saw blade on backwards. The teeth should
go into the cane. You can feel this with your thumb.
Now that is done, with the wheel covers and blade guard off the band saw you need to first make sure
the blade is tracking in the middle of the wheel. You can adjust the camber of the top wheel to adjust it
on most saws. Spin the wheel with your hand to see that it rides in the middle of your wheels. Good.
Now it is time to set blade tension properly. This is the most misunderstood areas of setting up a band
saw. Band saw blades require considerably more tension than people normally give them for simple
tasks. In my demonstrations using other people’s band saws, I have found this to be true. Most models
of Band saws have a tension gage on them. It is usually a spring gage located on the upper wheel cover
on the back of the band saw. It is a good starting point, but as you will read in the referenced article they
can be wildly off:
http://www.finehomebuilding.com/tool-guide/article/setting-bandsaw-blade-tension.aspx
Another method for setting band saw tension:
http://www.woodmagazine.com/woodworking-tools/power/bandsaw-blade-tension-flutter-method/
A quick google search on setting band saw blade tension will yield a number of additional articles.
Likewise searching on band saw setup yields additional information. Other points include making sure
your band saw table is perpendicular to the band saw blade and so on. I will quickly cover band saw set-
up for those who do not have a computer.
Setting the blade tension is the most important in set up. Insignificant blade tension will cause the blade
to walk and the cane to bind when you use the Heritage Bamboo Band Saw Jig. Remember this if when
you start sawing and the cane starts to bind or climb in the jig. The problem is insignificant band saw
blade tension. After using a band saw, you should reduce the blade tension until you next use. It
reduces the stress and strain on your band saw. You will need to tension the blade again each time you
saw cane.
Now it is time to adjust the guides and bearing. Both above and below the band saw table are guides.
The guides may be either blocks or wheels depending on brand of band saw. Adjust them so they also
just barely touch the blade. This prevents the blade from wandering on it’s own laterally. Again rotate
the band saw blade to double check your work. Depending on brand of band saw you will have a wheel /
bearing that rides against the back of the blade.
Adjust the top and bottom wheel / bearing so they just barely touch the back of the band saw blade.
Turn the band saw wheel and rotate the blade and the wheels should just turn. Put the wheel cover
housing and band saw blade guards back on. Plug it in and run the saw to double check your setup and
that everything is operating correctly.
Between my rudimentary instructions and the detail instructions in the referenced articles, when you
feel your band saw is properly setup with the recommended blade, it is time to install the Heritage
Bamboo Band Saw Jig.
Again, proper band saw set up step is critical to successfully using the Heritage Bamboo Band Saw Jig
and sawing cane. Do not assume your band saw is properly set up because it cuts wood for you. I have
made this mistake. For sawing cane, it needs to be properly set up.

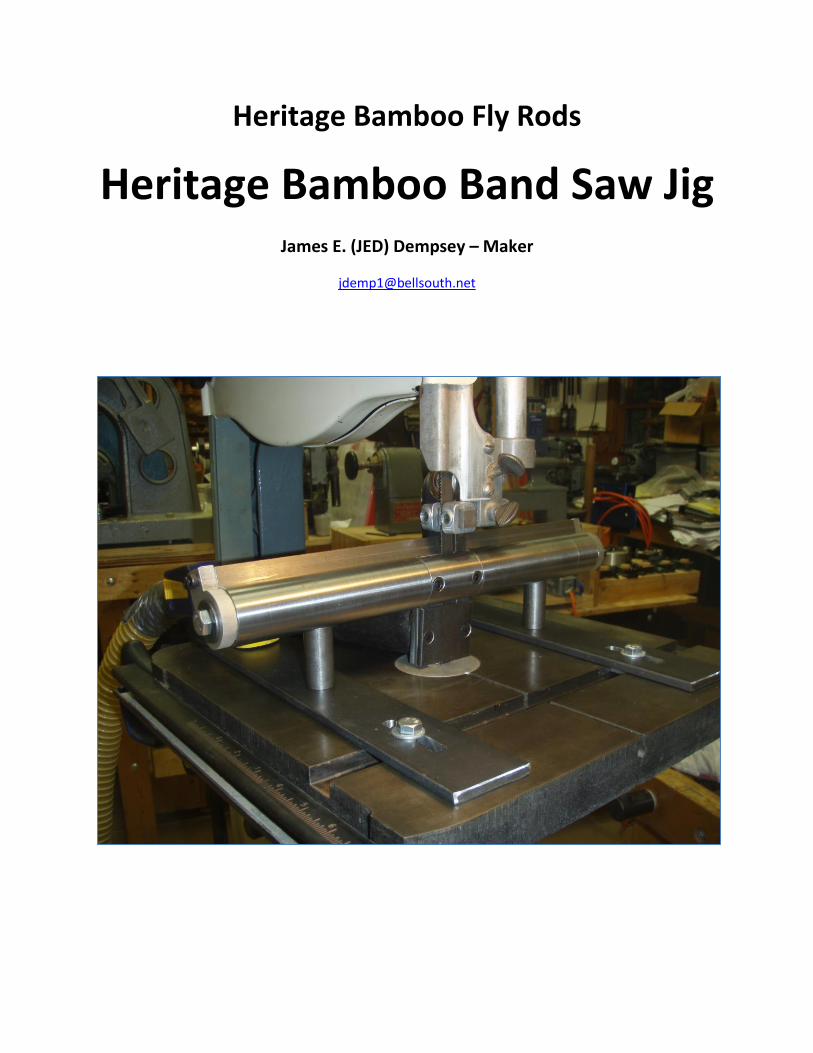
Installing the Heritage Bamboo Band Saw Jig. The Heritage Bamboo Band Saw Jig is a quality piece of
machining and needs to be properly installed for your machine. There is a range of adjustment you can
make prior to sawing cane. There are some minor tweaks to make once it is installed that enhances
performance. We will go over these.
Assemble the jig as pictured. You need to remove the cut out section in order to allow the jig to capture
the band saw blade. Note that there is a “dot” on the bottom side of the insert – this goes down. It may
not make a difference but when it was made, this is the direction it was fitted so there would be no
difference between it and the rest of the jig. It was turned in a large lathe to make everything flat and
even.
Make sure the band saw arm / guide is raised to give you plenty of room to work. The Heritage Bamboo
Band Saw Jig has flat metal arms with “legs” that go into the slot on band saw table. Loosen the bolts to
allow you to adjust the distance of the legs that sit in the table slot easily.

With the blade in the milled slot in the jig, you need to carefully adjust the distance the blade sits from
the back of the milled recess in the jig. Easiest way to do this is to use the right side of the jig that holds
the strip guide as a reference. You should adjust the jig so it just barely touches the blade. Then slide it
forward and then back to make sure the back of this part of the cutout area are even. Then fully tighten
the right side jig arm and leg bot. Now pull the left side of the jig forward a bit so when the blade cuts
the bamboo there is a bit of relief behind the band saw blade. This is done so the jigs strip guide holds
the cut strip against the fence and does not bind.
The rear guide is surface ground to a width of .035”. The flat rear edge is facing the fence. The front of
the guide can be filed or sanded to be less. The front of the strip guide should be right behind the rear of
the band saw blade. It serves to capture the sawn strip against the fence and makes for a straighter and
consistent cut.
We have had people say – you don’t need that guide – the answer is yes you do. When people first set
up the jig, they find that their strips can bind in this guide so they want to eliminate it. Instead you need
to make some minor adjustments and everything works easily and better. So, keep the guide and learn
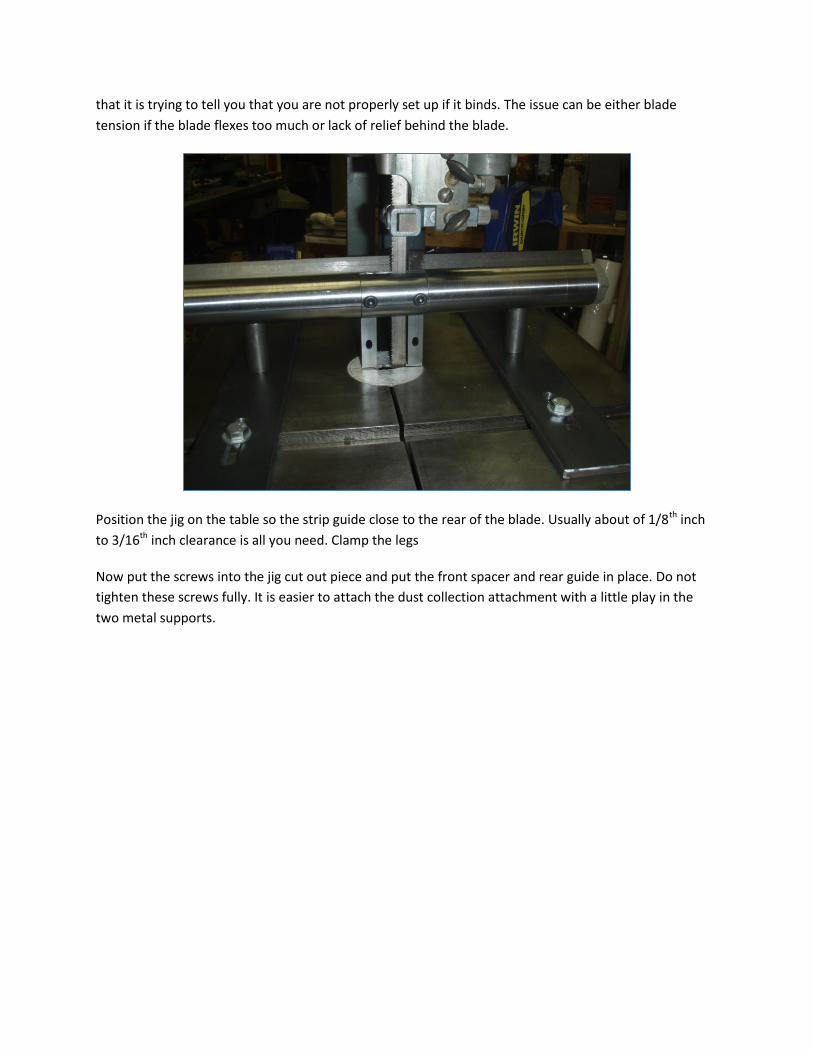
that it is trying to tell you that you are not properly set up if it binds. The issue can be either blade
tension if the blade flexes too much or lack of relief behind the blade.
Position the jig on the table so the strip guide close to the rear of the blade. Usually about of 1/8th inch
to 3/16th inch clearance is all you need. Clamp the legs
Now put the screws into the jig cut out piece and put the front spacer and rear guide in place. Do not
tighten these screws fully. It is easier to attach the dust collection attachment with a little play in the
two metal supports.

Take the front plate off the dust collection attachment that is held on with 2 screws. The dust collection
attachment is behind the jig and the front place in front to sandwich the blade in between. The spacer
and rear guide bars that hang down are .100” thick so there is plenty of room for the blade. The dust
collection guide also serves as a necessary blade guard under the jig. Insert the screw through the front
plate, through the support holes and into the dust collection attachment threaded holes. Once he two
screws are in, tighten them all the way. Now tighten the two jig’s insert bolts fully. Double check the jig
position. Make sure the rear strip guide position has remained the same and fully secure the jig to the
table using the clamps of your choice. C clamps or Irwin speed clamps work equally well.

You can rotate the band saw wheel manually if you want to check that the blade does not hit the jig. If it
does, it is a distance issue that needs to be correct by loosening the jigs leg bolts. Again insure you cant
he jig front to provide relief to the sawn strip passing through the jigs strip guide. If the strip binds you
can achieve more relief by pulling the front of the jig forward. Secondly, if you tilt the band saw table
forward a degree or two it will also provide a greater degree of relief to the sawn strip. Again, the guide
is your friend in telling you if the jig is properly set up. The Heritage Bamboo Band Saw Jig is ready for
use.
Preparing the Culm for Sawing. The key to sawing bamboo is to get one side of the culm straight. When
you pick out a culm it more than likely has a drying split in it. Look at that drying split. It meanders down
the culm. If you split the culm, chances are that all the strips will look like that. So what Uslan did was to
have a culm cradle he made to hold the culm with drying split up to run on a table saw (any size will do)
to get that first straight cut. There is a similar cradle pictured in The Wise Fisherman’s Encyclopedia.

The cradle is made from a straight 2”x4” cut to your desired length. 60” is a good length. Either 3 or
even 5 “U” bolts (4”) hold the cradle sides apart and the sides can move to accommodate different
diameter culms. The bottom of the jig is relieved so the bottom nylon lock bolt is recessed. The top bolt
does not need to be recessed. Once the bottom bolt is on, then you tighten the top bolt.

Cut your culm to your starting lengths. This depends on the size of rod sections you required. 2 piece
versus 3 piece rods required different working lengths. Don’t worry about being too long – the saw and
routers don’t complain.
Note - You can flame and sand nodes either before or after these next steps. People will do it both ways
depending on their cosmetic and strip preparation preferences. You also can choose when you want to
heat treat. You can either heat treat individual sawn strip or either half or whole culms. Again, it does
not matter. I prefer to heat treat half culms in my oven overnight on 250 degrees after I had flamed
them. Then begin the sawing process.
Adjust your table saw fence with the cradle on it, so the table saw blade is centered in the gap between
the sides of the cradle. I use out feed roller stand to catch the end of the cradle to make sawing easier
for me. However, it is not necessary. Now raise the saw blade high enough to cut through one side of
the culm. You can give yourself some extra room and add ¼” above the pith.
Place the culm section into the cradle with the front of the culm aligned with the front of the cradle. Put
the cradle on the table saw and double check your alignment to the blade. Turn on the table saw,
holding the cradle against the fence; push it through the saw blade. You can use one hand to hold he
culm with light downward pressure. Surprising the table saw cuts the culm easily and does not seem to

want to grab it. Once you have done this several times, you will be much more comfortable with this
step.
You need to saw the cane quickly and smoothly for best results. Take the culm section out of the cradle
and look at it. Compare the sawn side versus the split side. Big difference isn’t it? You will need to put
the sawn side against the Heritage Bamboo Band Saw Jig’s fence when you saw strips. This will allow you
to saw straight strips that require little or no straightening.
First you need to remove and sand / grind the node dams down flat to the pith. The enamel side dams
are not a problem. You can sand them at any time. Any number of tools can be used to remove the
dams from the culm sections. You can take care of them first by knocking them out and then grinding
them. I use an elliptical carbide burr in a die grinder. It makes quick work of the dams. A heavy twisted
wire wheel in a drill press also works. Uslan had a round milling bit mounted on a 1750 rpm motor that
he used. Lastly there is always a good sharp chisel.
Once you have the dams completely flattened then they are ready to be sawn using the Heritage
Bamboo Band Saw jig.
Sawing your first strip. I recommend that you first use some old cane for sawing your first test strips
and not strips destined for a rod. Using the bottom cut off of the culm is always a good candidate. You
may have gotten it perfectly set up the first time, but if you didn’t then we need to accomplish some
adjustments based upon how the strip is sawn.
Put the flat sawn edge against the Heritage Bamboo Band Saw Jig’s fence – this may mean turning the
strip around “backwards”. No problem with which side goes in first. I always color code the butt side of
each section – red for tips and black for butts. This way, you can place the strips in the proper section
and the right direction.
Hook up your dust collection hose to the Heritage Bamboo Band Saw Jig’s dust collection attachment.
Turn on the band saw. You will need one hand in front of the culm section in front of the band saw blade
to hold the strip down and against the fence. Do not push with the front hand! You use the other hand
(back hand) to push the culm with it from behind. Again, Do not push with the front hand – use the
rear hand for pushing! The front hand is there only as a guide and support. Hooking a finger(s) to the
jig support insures that it does not move and reduces the chance for injury. Remember safety first. Push
with your rear hand.

In sawing your first strip on the jig it is important to watch and pay attention to see what is happening at
the point of sawing. Having the strip width you desire is not important at this point. We are testing to
see if you have everything properly set-up. When you saw, watch the strip at the point you are sawing
to see if the band saw blade flexes too much. If you see the strip ride up because the blade is wandering.
This is caused by not enough blade tension. You will see the blade flex outwards. If It does, increase the
blade tension and try again. If this does not occur, then the tension is good.
The next issue is if you feel the strip binding against the strip guide. Binding occurs if there is not
enough relief behind the blade for the sawn strip and guide. Two things can be done to check this. Only
do one and does another test strip before doing the second. Look at the jig and see if you have canted it
enough. I usually unclamp the in feed side leg and move it to the left towards the edge of the table and
you can see the jig pull towards you just a bit.

Run the next test strip. If it still binds, then you will need to tilt the band saw table towards you. You
only need to tilt it 2 degrees or so. It gives you relief behind the blade. Now saw another test strip and
this should saw much easier with little or no binding. You can tweak your settings based upon this result
or keep them.
The Heritage Bamboo Band Saw Jig’s should you allow saw easily now. If so, now we will worry about
strip width and adjust the Heritage Bamboo Band Saw Jig’s fence to give you the desired width. I
personally cut my strips a bit wider than desired for milling. This insures good strips. It all depends on
how you desire to prepare the strips after sawing.

To adjust the Heritage Bamboo Band Saw Jig’s fence you loosen the bolts on either end of the Heritage
Bamboo Band Saw Jig’s fence. You then can nudge the fence in the desired direction. Tighten the bolts
and saw your next test strip and measure the width. You can adjust again if necessary.
The easiest way to reset the fence each time is to make you a “standard” that has the desired width for
tip or butt section or both. You put this between the fence and band saw blade and adjust the fence so
it fits. Tighten the bolts and you have returned to sawing the desired width easily and quickly.
Trouble shooting. This is an area that we have covered above. But I will highlight what you need to
watch out for.
Most of the issues with sawing bamboo strips result from band saw set-up. Band saw blade tension is
number one issue. Getting the proper tension for sawing strips is critical without getting excessive
tension. Each band saw is different. Band saw tension guides are problematic at best. So go by feel as to
how tight the blade is. Deflection of the blade over 6” is a good guide. Remember that changing brand
of blade or type of blade will affect the proper amount of tension. Using your band saw for sawing cane
will teach you a lot about it.
Band saw guide alignment is also an issue. The guides prevent excessive wandering. Inspect the guides
each time you saw bamboo.
Secondly it is jig alignment which we have covered above. Feeling drag in sawing the strips is your
indication. Then you need to create some relief behind the blade along the strip guide. As we said either
canting the jig more and / or tilting the table a few degrees relieves this issue.

It is strip preparation. A straight edge will yield straight strips. The table saw cradle will yield a nice
straight side for the section you plan to saw. Node preparation on the pith side is necessary. Sloppy
work leaving bumps will create problems and also uneven width strips.
Finally blade type and sharpness is important. Using an old blade that came with a band saw will not
yield the results you desire. We strongly suggest using the recommended blade. Thin width bi metal
blade with at least 10tpi and up to 14 tpi yield excellent sawn strips.
All blades will dull sawing cane. As we all know, Bamboo is abrasive and hard on cutting tools. A bi-
metal blade will last far longer than cheap carbon steel blades. In the end it is the cheapest when you
figure the cost per culm. You can tell when a blade dulls in that you need greater effort in pushing the
strip. A sharp blade in a properly set up band saw and jig pushes easily. Remember that feel and when
the effort is significantly greater, change the blade. In the end, a sharp blade is cheap and worth the
effort.

Summary. Again, welcome to the fraternity of rodmakers who saw cane. You are following in the
footsteps of many notables. Somewhere above, Nat Uslan will be looking down and smiling at
rodmakers using the tools he created many years ago. Between the table saw cradle and the Heritage
Bamboo Band Saw Jig’s it allows the average rodmaker to saw straight uniform strips. Having these
straight uniform strips makes the rest of your strip preparation easier and less time consuming.
The dust collection brings a formerly dirty task into the rod shop. I find that it works exceptionally well
and supports the small rodmaker who have limited space and needs to keep all his tasks in a confined
space. Previous bamboo sawing apparatus was not intended for in shop use.
I am proud to say that my Heritage Bamboo Band Saw Jig is a quality made piece of rodmaking
equipment that makes strip preparation easier and quicker. Once you have used my jig for a while, I am
confident you will agree.