1130 Elkton Drive, Suite A Colorado Springs, Colorado 80907 USA www.ApogeeRockets.com e-mail: [email protected] phone: 719-535-9335 fax: 719-534-9050 I S S U E 1 4 6 - A U G U S T 1 , 2 0 0 5 INSIDE: • How to Make RockSim Sprites • No Cost Tube Holder • Web Sites to Visit RockSim Receives "Space Certification!"

Welcome message from author
This document is posted to help you gain knowledge. Please leave a comment to let me know what you think about it! Share it to your friends and learn new things together.
Transcript

1130 Elkton Drive, Suite AColorado Springs, Colorado 80907 USAwww.ApogeeRockets.com e-mail: [email protected]: 719-535-9335 fax: 719-534-9050
I S S U E 1 4 6 - A U G U S T 1 , 2 0 0 5
INSIDE:• How to Make RockSim Sprites
• No Cost Tube Holder
• Web Sites to Visit
RockSim Receives"Space Certification!"
A P O G E E R O C K E T S
Page 2
I S S U E 1 4 6 - A U G U S T 1 , 2 0 0 5
About this NewsletterYou can subscribe “FREE” to receive this e-zine at the Apogee Components web site (www.ApogeeRockets.com),
or by sending an e-mail to: [email protected] with “SUBSCRIBE” as the subject line of the message.
Creating Sprites
in RockSim v8.0
One of the neat features in RockSim v.8 is that you are
now able to create rockets in your simulations that look just
like the rockets you designed!
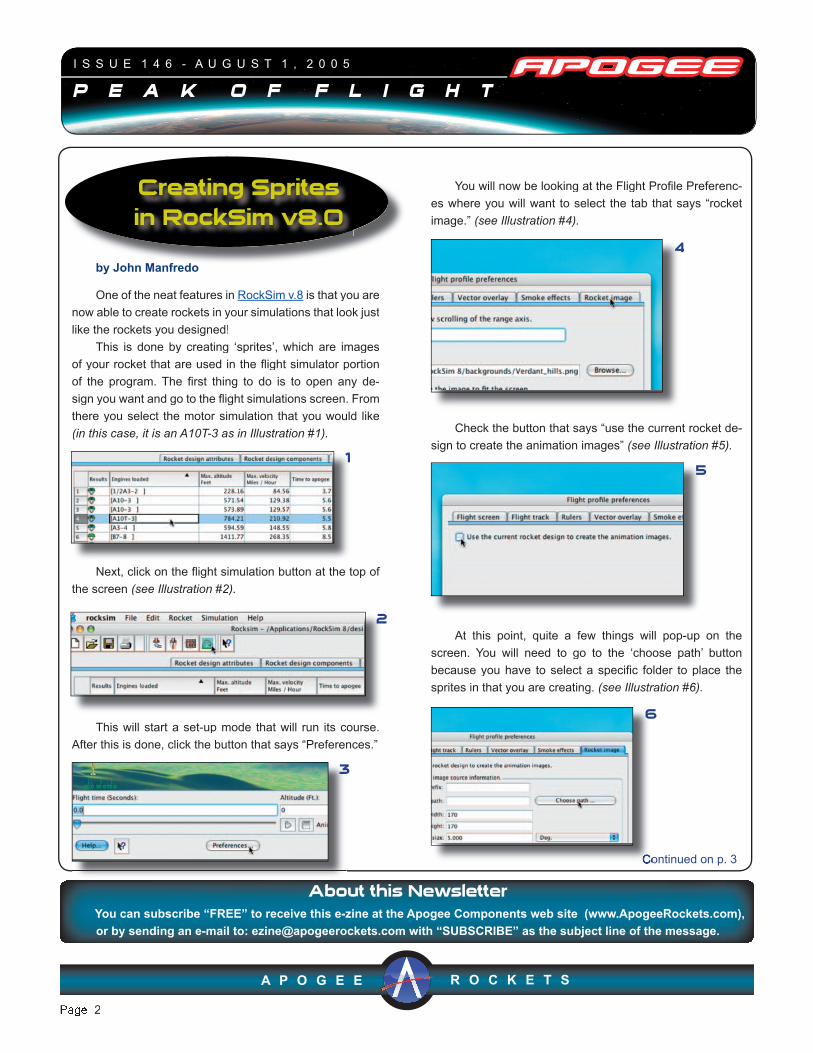
This is done by creating ‘sprites’, which are images
of your rocket that are used in the fl ight simulator portion
of the program. The fi rst thing to do is to open any de-
sign you want and go to the fl ight simulations screen. From
there you select the motor simulation that you would like
(in this case, it is an A10T-3 as in Illustration #1).(in this case, it is an A10T-3 as in Illustration #1).(in this case, it is an A10T-3
Next, click on the fl ight simulation button at the top of
the screen (see Illustration #2).
This will start a set-up mode that will run its course.
After this is done, click the button that says “Preferences.”
You will now be looking at the Flight Profi le Preferenc-
es where you will want to select the tab that says “rocket
image.” (see Illustration #4).
Check the button that says “use the current rocket de-
sign to create the animation images” (see Illustration #5).
At this point, quite a few things will pop-up on the
screen. You will need to go to the ‘choose path’ button
because you have to select a specifi c folder to place the
sprites in that you are creating. (see Illustration #6).
by John Manfredo
Continued on p. 3
3
2
1
Continued on p. 3
6
4
5

A P O G E E R O C K E T S
Page 3
I S S U E 1 4 6 - A U G U S T 1 , 2 0 0 5
This folder will be titled ‘media’ From there, click on the
‘choose’ button to select that path. (see Illustration #7)
The 3 items below are things that will affect the look of
the image in your simulation: (see Illustration #8)
Image width is the width in pixels for the animation
image. Image height is the height in pixels for the animation
image. Image dimensions of 150 X 150 are a good starting
point.
Image angle step size is a series of images created for
each stage of the confi guration. The purpose of this is to ren-
der the images at various angles from 0 to 360 degrees. This
angle step size determines the number of images created for
each stage confi guration. Values between 5 and 10 degrees
are a good starting point. Smaller angle step values produce
more realistic fl ight animations at the expense of memory
and increased load times. Also at this time, it is be a good
idea to title the fi le prefi x with the name of your design.
Now you are ready to create sprites for your rocket! Select
the button that says ‘Generate rocket image data.’ This will start
a process to generate the specifi ed rocket animation images.
A small display window
will open and you will see
a series of images as they
are created. Do not inter-
rupt this process.
(see Illustration #9)
When it is fi nished, click “ok” (see Illustration #10) and
a box will appear that says it is loading the sprite fi les. (see
Illustration #11a)
As soon as it fi nishes, you can click on the play button
and watch your rocket as it blasts-off, deploys the para-
chute, and fl oats gently down to the ground.......you hope!
(see Illustration #11b)
7 7
8 8
9
10
11a 11a
11b
10

A P O G E E R O C K E T S
Page 4
I S S U E 1 4 6 - A U G U S T 1 , 2 0 0 5
Rocket createdusing RockSim Software
The National Space Foundation (http://spacefoundation.
org) has certifi ed RockSim – the model rocket design and
simulation software – as a “Certifi ed Educational Product.”
This is a major endorsement of the software, and indicates to
teachers that RockSim can stimulate a student’s interest and
knowledge about Space.
Tim Van Milligan, president of Apogee Components, the
software’s developer said: “I’m thrilled that RockSim has re-
ceived this special certifi cation from the Space Foundation.
RockSim does more than just getting students interested in
space; it really sparks an interest in learning science. Why?
Because they get hooked on rocketry and want to know more
about how to make them go higher, faster, and straighter. You
need to know some science to do that.”
The RockSim software allows students to design a model
rocket, and then simulate how well it will fl y when launched.
It not only predicts altitude, but the trajectory path the rocket
will likely take on windy days. By using this CAD-like software,
students can get creative and develop high performance rock-
ets. Then they can actually build their design from the blue-
print plans they print out. Finally, they can launch their rockets
and compare the performance against the predictions made
by the software.
“There have been literally tens of thousands of rockets
designed using RockSim,” said Tim Van Milligan. “When stu-
dents have a rocket that fl ies different from what RockSim
predicted, they want to know why. That nagging question
keeps them interested in science even after they’ve fl own
their rockets.”
“The whole process really mimics the real-world pro-
fession of aeronautical engineering,” said Tim Van Milligan.
“That is why teachers will fi nd RockSim such a powerful tool
in their classrooms. In fact, many professional engineers use
RockSim too! They like it because it allows them to quickly
test design concepts and gives them results that are accurate
and reliable. That’s not bad for a inexpensive software that
was created for schools and hobbyists.”
Model rocketry has a long history of sparking student in-
terest in technical careers. Dr. Jay Apt, a former NASA Space
Shuttle astronaut and model rocketeer, said in an interview
with Sport Rocketry magazine that 81 percent of the astro-
nauts he has fl own into space with got their start by fl ying
model rockets. “In a sense, model rocketry is the fi rst step into
Space! And using RockSim in schools insures a extra level of
excitement and safety,” said Tim Van Milligan.
According to Apogee Components, the software is al-
ready in use by over 856 schools throughout the United
States. It simplifi es the rocket design process by allowing stu-
dents to stretch-and-pull common shapes into any size rocket
they desire. Based on the shape, weight, and dimensions, the
software then calculates how high and fast the rocket will fl y
with any commercially available model rocket engine. It also
checks the stability of the rocket prior to fl ight, so that the de-
signs will fl y a straight and safe trajectory path.
The RockSim software is available for both Windows and
Macintosh OS X computers. A free 30-day trial version can be
downloaded at: www.ApogeeRockets.com/rocksim.asp
RockSim Receives "Space Certification" LabelRockSim Receives "Space Certification" Label

A P O G E E R O C K E T S
Page 5
I S S U E 1 4 6 - A U G U S T 1 , 2 0 0 5
By John Manfredo
I was thinking recently about the whole concept of the
term “paying forward” (taking the time to introduce others to
the hobby of rocketry) and remembered the Blue Mountain
Rocketeers club based out of Dayton, Washington. They
have a web site at http://www.bmr615.org/ which shows that http://www.bmr615.org/ which shows that http://www.bmr615.org/
they really know the
meaning of that term.
Created 11 years ago,
the club has 51 mem-
bers ranging in age
from 3 to 73 years old.
One point that sets
the Blue Mountain
group apart is the fact
that they don't charge
any pad fees or mem-
bership dues – quite a unique situation. Section Advisor, Tim
Quigg states, “All of our funding comes from hard work and
lots of volunteerism. Volunteer members of BMR mow the
local Sheriff Department’s gun range, earning the club $200
a year and the use of the gun range as a secondary launch
site when needed. We also receive funding from Seneca
Foods United Way and the local Kiwanis group. The remain-
der of the money we receive through public donations or we
raise through bake sales, car washes and, in the near future,
a community yard sale. Members will donate items for the
yard sale and all proceeds will go to the club's fund. We usu-
ally maintain a balance of about $500 year-round in our club
account, so we must
be doing something
right!” They have an
on-site vendor and
a local scout troop
offers concessions.
The Blue Mountain
Rocketeers is a
rocketry club oper-
ated by youth. The
Board of Directors
of BMR (President, Vice-president, Secretary/Treasurer and
Junior Member at Large) are all boys and girls under the age
of 19. It’s great to see so many young people interested in
this hobby.
The page with “Facts About the Blue Mountain Rock-
eteers” provides a lot of information about the club such as
how it operates and
the different types of
community events it
is involved in. All in
all, this club has it
all together. I hope
many other clubs
can use them to
“model” their rock-
etry after.
they really know the
the club has 51 mem-
from 3 to 73 years old.
the Blue Mountain
that they don't charge
how it operates and
the different types of
community events it
is involved in. All in
all, this club has it
all together. I hope
many other clubs
can use them to
“model” their rock-
etry after.

A P O G E E R O C K E T S
Page 6
I S S U E 1 4 6 - A U G U S T 1 , 2 0 0 5
CHRISTMAS TREE ROCKET ORNAMENTS
By Francis Graham
Retail store owners know that, when it’s July, Christ-
mas is only a short time away.
So it’s time to get creative and plan to decorate the
Christmas tree. Most people use glass bulbs, and that’s
fi ne, unless they have playful kittens about. But times
change; recall only a century or so ago people decorated
their real holiday trees with real burning candles. Then it
was Christmas spirit while today it would be a massive
fi re regulation violation and child endangerment. When
the library here at Kent State East Liverpool switched
to on-line databases, the librarian decorated the tree
with CD-ROMs. That kind of personalized touch and the
need for catharsis after many model rockets landed in a
tree, led me to ask my friend, Joe Peklicz, to construct
a couple dozen mini-motor rockets as Christmas tree
ornaments. He did a fi ne job and painted them orange-
red and holly green to suit! (See example)
And, on New Years’, you can take them out, put
A10-3T’s in them, and fi re them all over the snow-cov-
ered fi eld. Optionally, you can fi nd them in the snow. Or
have Bowser
do it. It’s a
Vinter Vunder-
launch!
The question for this issue is in regard to RockSim v8.0
and one we are asked quite a bit here at Apogee. Customers
call or e-mail us and ask, “Why is it that when I try to open a
design fi le from 5.0 in 8.0, I get an error about being unable to
open the fi le and how can I import my older fi les into version
8.0? Of course, it would be a shame to not be able to open all
of your old designs if you upgrade to version 8.0.
The above error message will appear when you try to
open designs in version 8.0 that were created in version 5.0 or
earlier. They cannot be opened in version 8.0 due to the fact
that the fi les were written in a different format. Apogee Presi-
dent Tim Van Milligan states, "We’re working on a web-based
system that will allow you to upload your old designs, and then
they would be downloaded back to you in the new format."
But in the mean time, e-mail the old designs to me at
[email protected] so that I can convert them for
you and send them back. You can then use your older fi les in
Rocksim 8.0.
The question for this issue is in regard to RockSim v8.0
QUESTION AND ANSWER CORNER
Mid-body ejection is a method of ejecting the recovery
system out of the rocket near the
middle of the body tube. The tube
is separated at that point instead
of near the nose cone as a drag
reduction technique and to reduce
the chances of the “zipper effect.”
In order to incorporate this into
a design you can get couplers and
bulkheads from Apogee Compo-
nents at http://www.apogeerock-
ets.com/body_tubes_and_rings.
asp#airframe-coupler
system out of the rocket near the
middle of the body tube. The tube
is separated at that point instead
of near the nose cone as a drag
reduction technique and to reduce
the chances of the “zipper effect.”
a design you can get couplers and
bulkheads from Apogee Compo-
nents at
ets.com/body_tubes_and_rings.ets.com/body_tubes_and_rings.
asp#airframe-coupler
DEFINING MOMENTS
The above error message will appear when you try to
have Bowser
do it. It’s a
Vinter Vunder-
launch!
A new A new
twist on twist on
an old an old
idea.idea.
A P O G E E R O C K E T S
Page 7
I S S U E 1 4 6 - A U G U S T 1 , 2 0 0 5
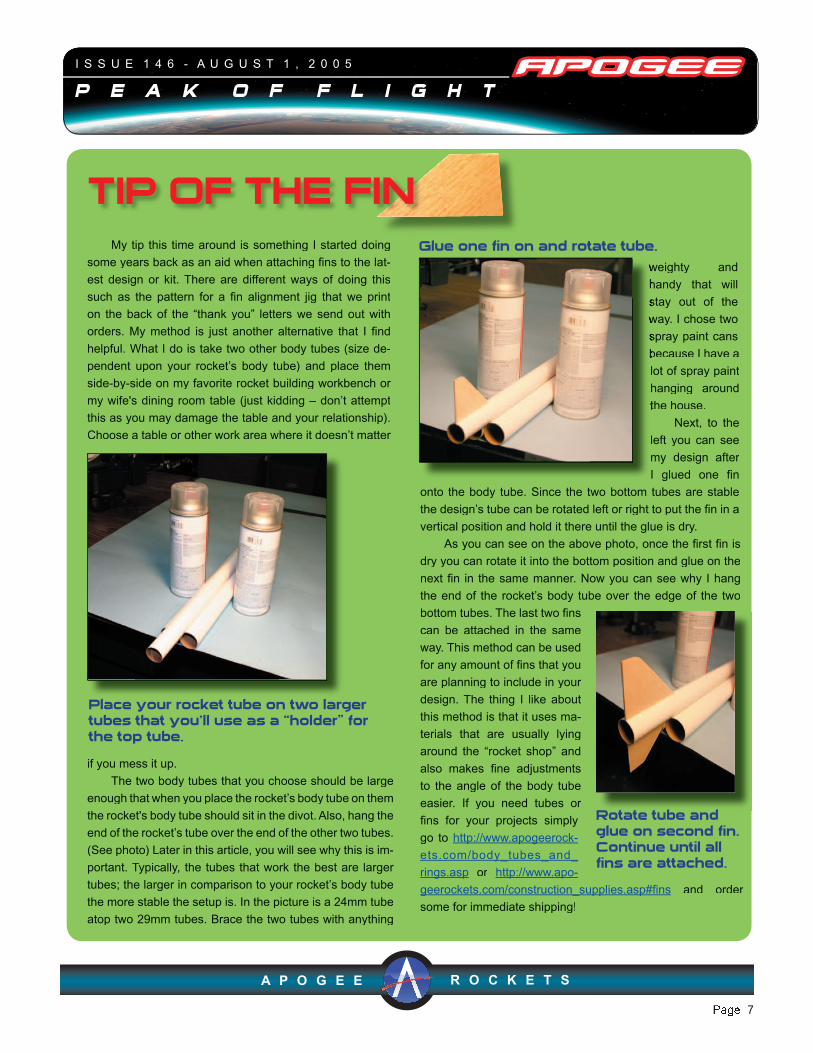
TIP OF THE FINMy tip this time around is something I started doing
some years back as an aid when attaching fi ns to the lat-
est design or kit. There are different ways of doing this
such as the pattern for a fi n alignment jig that we print
on the back of the “thank you” letters we send out with
orders. My method is just another alternative that I fi nd
helpful. What I do is take two other body tubes (size de-
pendent upon your rocket’s body tube) and place them
side-by-side on my favorite rocket building workbench or
my wife's dining room table (just kidding – don’t attempt
this as you may damage the table and your relationship).
Choose a table or other work area where it doesn’t matter
if you mess it up.
The two body tubes that you choose should be large
enough that when you place the rocket’s body tube on them
the rocket's body tube should sit in the divot. Also, hang the
end of the rocket’s tube over the end of the other two tubes.
(See photo) Later in this article, you will see why this is im-
portant. Typically, the tubes that work the best are larger
tubes; the larger in comparison to your rocket’s body tube
the more stable the setup is. In the picture is a 24mm tube
atop two 29mm tubes. Brace the two tubes with anything
weighty and
handy that will
stay out of the
way. I chose two
spray paint cans
because I have a
lot of spray paint
hanging around
the house.
Next, to the
left you can see
my design after
I glued one fi n
onto the body tube. Since the two bottom tubes are stable
the design’s tube can be rotated left or right to put the fi n in a
vertical position and hold it there until the glue is dry.
As you can see on the above photo, once the fi rst fi n is
dry you can rotate it into the bottom position and glue on the
next fi n in the same manner. Now you can see why I hang
the end of the rocket’s body tube over the edge of the two
bottom tubes. The last two fi ns
can be attached in the same
way. This method can be used
for any amount of fi ns that you
are planning to include in your
design. The thing I like about
this method is that it uses ma-
terials that are usually lying
around the “rocket shop” and
also makes fi ne adjustments
to the angle of the body tube
easier. If you need tubes or
fi ns for your projects simply
go to http://www.apogeerock-
ets.com/body_tubes_and_
rings.asp or http://www.apo-
geerockets.com/construction_supplies.asp#fi ns and order
some for immediate shipping!
weighty and
handy that will
stay out of the
way. I chose two
spray paint cans
because I have a
the house.
Glue one fin on and rotate tube.
Place your rocket tube on two larger tubes that you'll use as a “holder” for the top tube.
Rotate tube and glue on second fin. Continue until all fins are attached.
A P O G E E R O C K E T S
Page 8
I S S U E 1 4 6 - A U G U S T 1 , 2 0 0 5
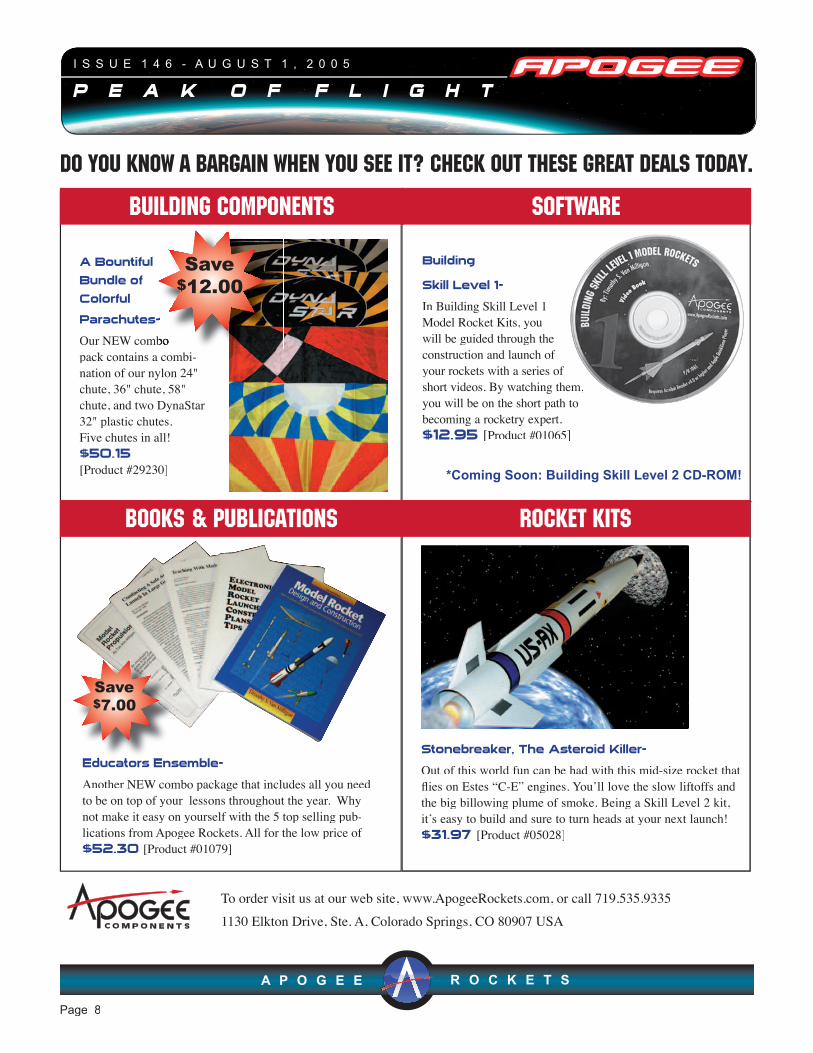
Building
Skill Level 1-
In Building Skill Level 1 Model Rocket Kits, you will be guided through the construction and launch of your rockets with a series of short videos. By watching them, you will be on the short path to becoming a rocketry expert. $12.95 [Product #01065]
*Coming Soon: Building Skill Level 2 CD-ROM!
A Bountiful
Bundle of
Colorful
Parachutes-
Our NEW combo pack contains a combi-nation of our nylon 24" chute, 36" chute, 58" chute, and two DynaStar 32" plastic chutes. Five chutes in all! $50.15 [Product #29230]
Educators Ensemble-
Another NEW combo package that includes all you need to be on top of your lessons throughout the year. Why not make it easy on yourself with the 5 top selling pub-lications from Apogee Rockets. All for the low price of All for the low price of All for the low price of$52.30 [Product #01079]
Stonebreaker, The Asteroid Killer-
Out of this world fun can be had with this mid-size rocket that fl ies on Estes “C-E” engines. Youʼll love the slow liftfl ies on Estes “C-E” engines. Youʼll love the slow liftfl ies on Estes “C-E” engines. Youʼll love the slow lif offs and the big billowing plume of smoke. Being a Skill Level 2 kit, itʼs easy to build and sure to turn heads at your next launch! $31.97 [Product #05028]
To order visit us at our web site, www.ApogeeRockets.com, or call 719.535.9335
1130 Elkton Drive, Ste. A, Colorado Springs, CO 80907 USA
Building Components
Parachutes-
Our NEW combo
Educators Ensemble-
Software
Books & Publications ROCKET Kits
Do You Know A Bargain When You See It? Check Out These Great Deals Today.
Related Documents