This document is prepared for MM Training. If interested for MM training in Pune, Please write to
[email protected] with your contact details.
SAP Installation Guide: � On your hard disk, you will receive following folders
• Virtual Sap-4.7 – This is the actual SAP Folder from where SAP will run
• GUI640 – This is the software that installs SAP Logon Pad on your computer
• VMware-player-1.0.5-56455 – This contains VMWare Player installation file
Step 1: Install VMWare Player � From the VMWare Player folder as mentioned above, run the executable setup file.
� Double click on the file and the installation will begin
� This is a very simple installation and just click on Next on every step and finally finishes the installation.
Step 2: Install SAP Logon Pad � From the GUI640 folder, go into the subsequent folders till the setup file as shown below
� Double Click on the setup file and it will run the installation

This document is prepared for MM Training. If interested for MM training in Pune, Please write to
[email protected] with your contact details.
� Click on next till you reach this screen and there you select only the first option SAP GUI as shown above
� Next to this is a very simple installation and just click Next, Install till you finish the installation
� Once the SAP Logon pad and VMWare Player are installed, you will see the two Icons on desktop
.
Step 3: Add server details to SAP Logon Pad � After installing these two software, we need to add server details to SAP logon pad
� Double click on SAP Logon pad. You will see a blank logon pad
� Click on New Item button
� This will show a pop and add the server details as given in below screen

This document is prepared for MM Training. If interested for MM training in Pune, Please write to
[email protected] with your contact details.
� Enter the server details as shown in above screen and click on Add Button.
� This will add the server to SAP Logon pad
Step 4: Logon to SAP � Connect the hard disk to computer
� We need to connect the Virtual Sap-4.7 folder on hard disk to computer through VMWare player. For this
double click on the VMWare player icon on desktop.
� This will open the browse folder screen in VMWare screen as shown below

This document is prepared for MM Training. If interested for MM training in Pune, Please write to
[email protected] with your contact details.
� Select the location of “Virtual Sap-4.7” folder on your hard disk by going through my computer and then
selecting the hard disk drive and then select the folder
� After entering into the folder you will see the screen as below
� Select the first option SAP 4.7 and click on open.

This document is prepared for MM Training. If interested for MM training in Pune, Please write to
[email protected] with your contact details.
� The VMWare will try to restore the virtual machine status as shown in below screen
� After this, system will show SAPMMC file as shown below.
� Once this window is open, just minimize this window. Don’t close this window, just minimize it.
� Before this screen, if you are using this for the first time, then you will get a pop up showing network
connection type to be used. On this window, choose “Create”. And this will create the connection
� Sometimes, there may be message that Virtual Machine status is different ETC. Click on OK
� This process will connect the computer to virtual sever on hard disk. Then you can log on to SAP.
� SAP Logon: Double click on SAP Logon pad icon on desktop

This document is prepared for MM Training. If interested for MM training in Pune, Please write to
[email protected] with your contact details.
� This will open the logon pad. Select the server which we added in the last step and click on Log On button
� This will open the sap logon window as shown below
� Enter the logon details as Client – 800, Username – sapuser and password – sapuser
� This will logon to SAP
Step 5: Close SAP
� For this always first close all SAP sessions and then close the VMWare window by close button.
� This will close the SAP application on your computer.

This document is prepared for MM Training. If interested for MM training in Pune, Please write to
[email protected] with your contact details.
Network Settings: For connecting the virtual machine through VMWare player, you need to do the following settings in network
Step1: Add Microsoft Loopback Adapter
� We need to add Microsoft Loopback adapter to the network connections list. For this go to control panel and
click on “Add Hardware”.
� One Pop up window will appear. Click on Next button and follow the steps as shown in screens given below
� Select the first option as shown above and click on next button.
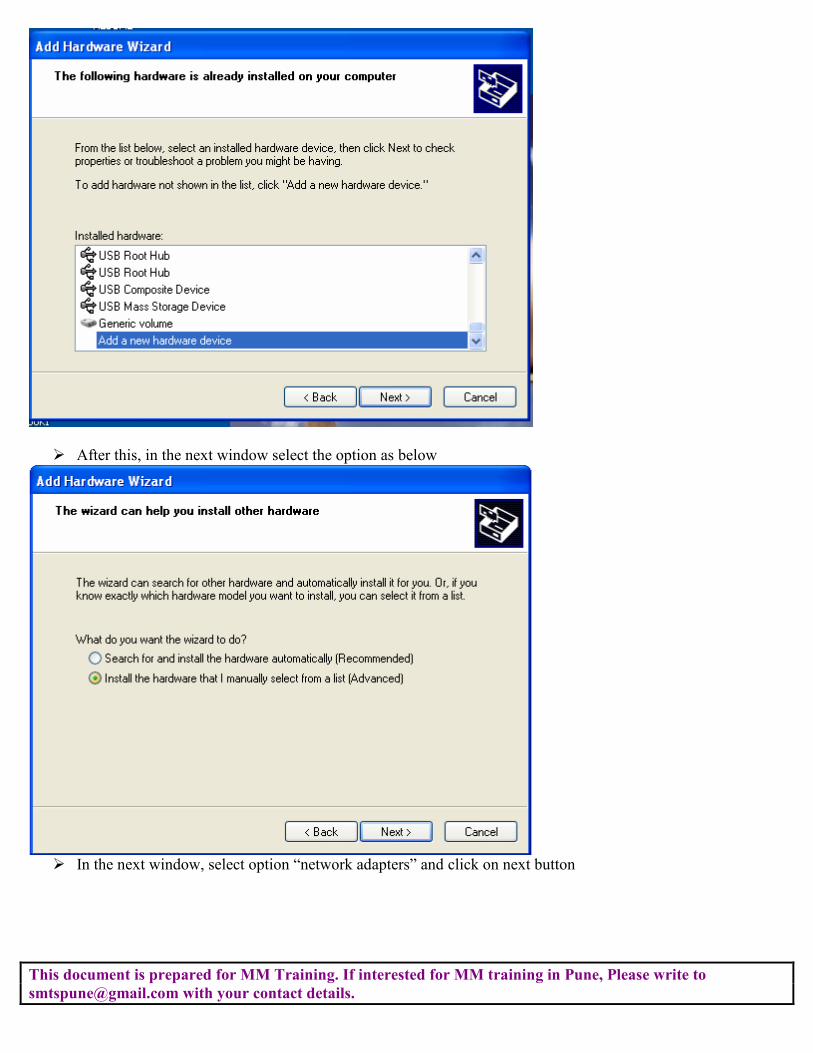
� Next window will appear as below. This is the list of Hardware available. Scroll to the bottom of the list and
select “add a new hardware device” option and click on next as show in below screen.
This document is prepared for MM Training. If interested for MM training in Pune, Please write to
[email protected] with your contact details.
� After this, in the next window select the option as below
� In the next window, select option “network adapters” and click on next button
This document is prepared for MM Training. If interested for MM training in Pune, Please write to
[email protected] with your contact details.
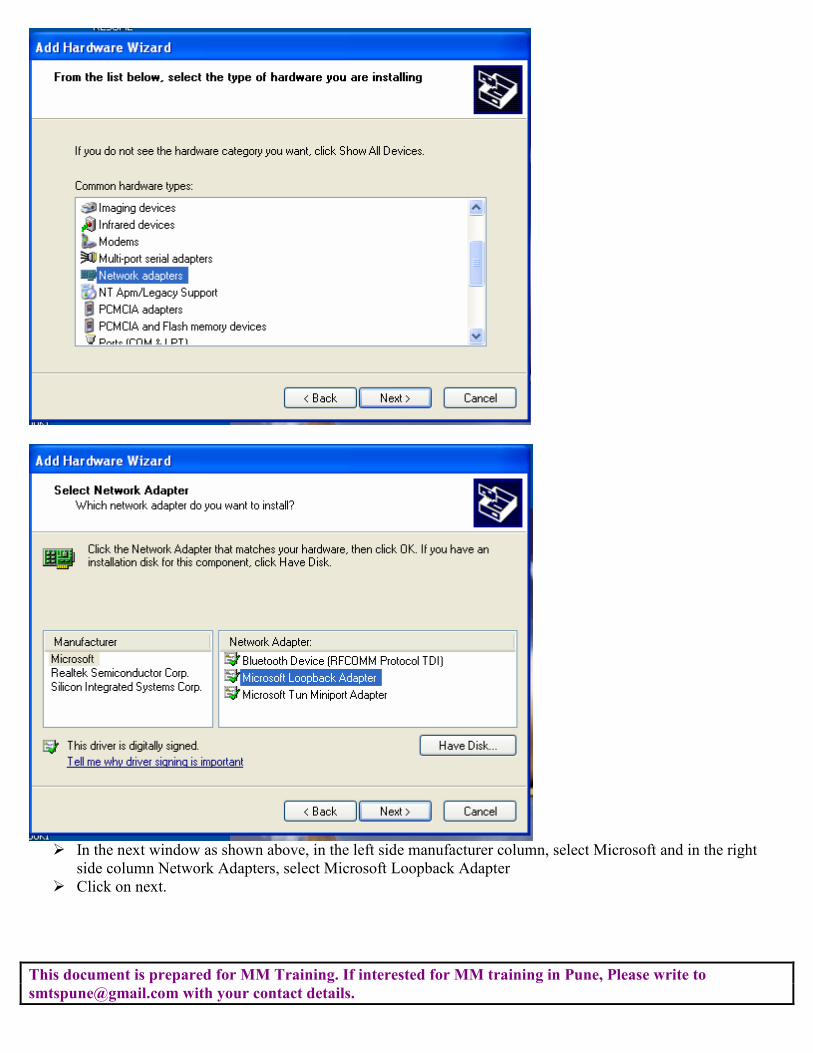
� In the next window as shown above, in the left side manufacturer column, select Microsoft and in the right
side column Network Adapters, select Microsoft Loopback Adapter
� Click on next.
This document is prepared for MM Training. If interested for MM training in Pune, Please write to
[email protected] with your contact details.
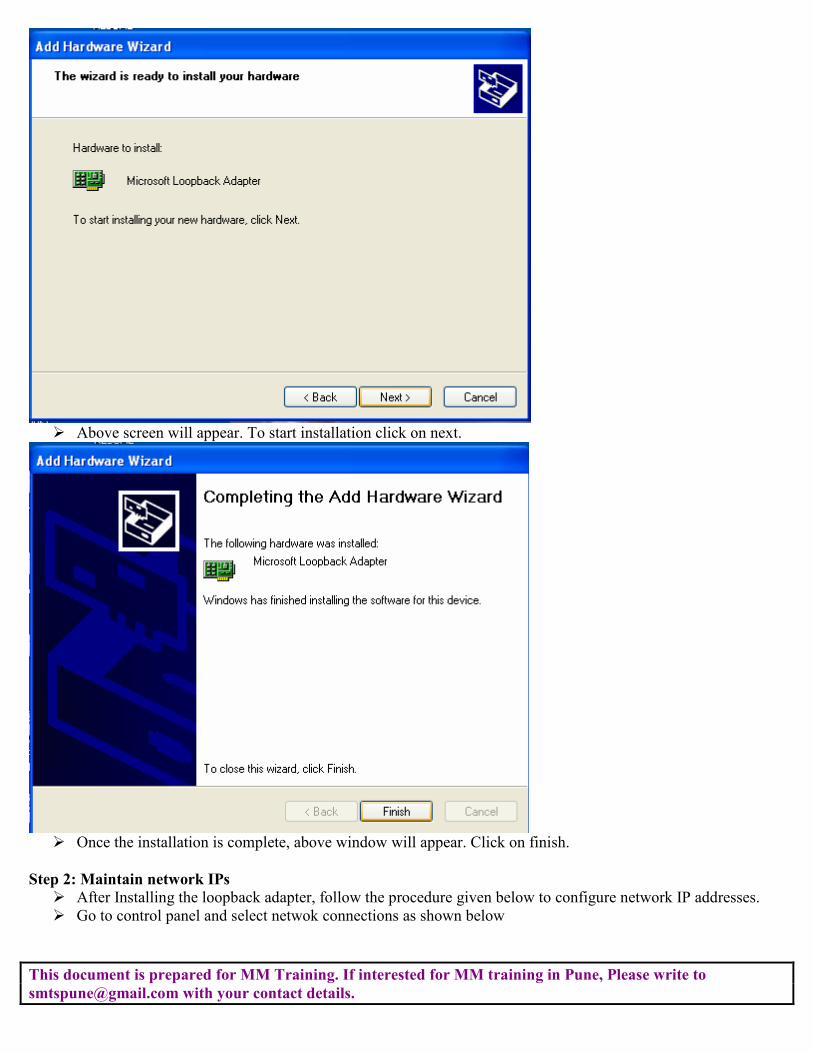
� Above screen will appear. To start installation click on next.
� Once the installation is complete, above window will appear. Click on finish.
Step 2: Maintain network IPs
� After Installing the loopback adapter, follow the procedure given below to configure network IP addresses.
� Go to control panel and select netwok connections as shown below
This document is prepared for MM Training. If interested for MM training in Pune, Please write to
[email protected] with your contact details.
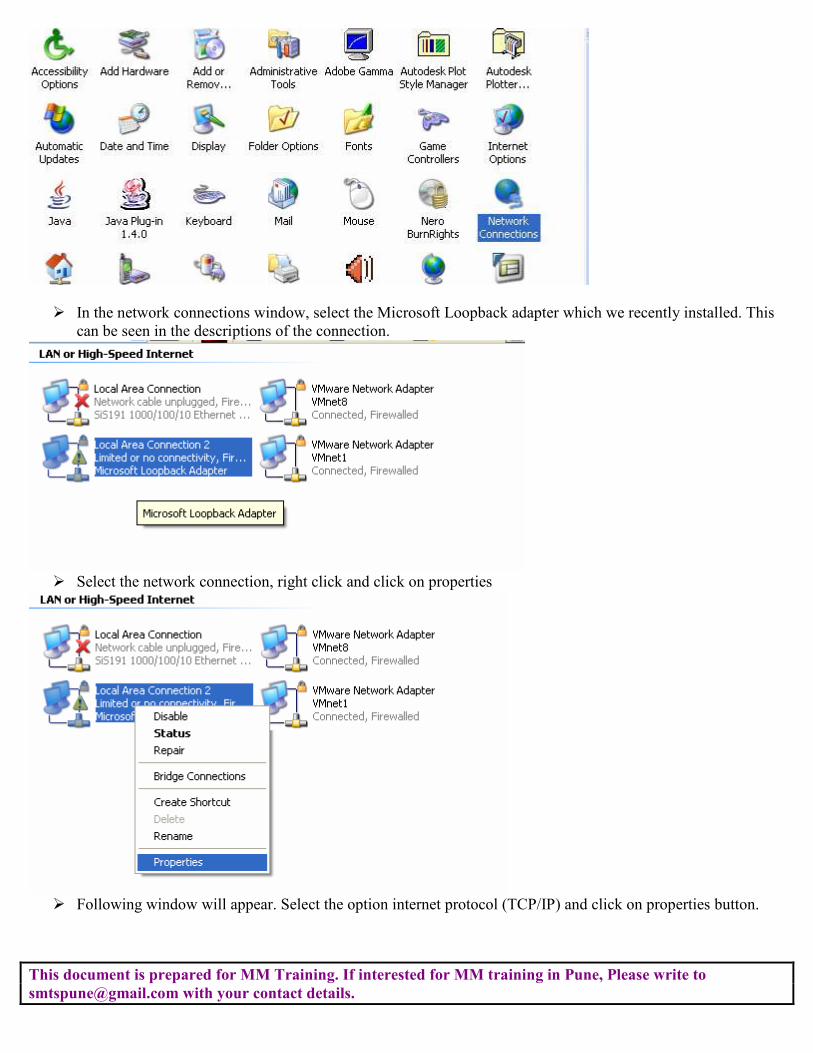
� In the network connections window, select the Microsoft Loopback adapter which we recently installed. This
can be seen in the descriptions of the connection.
� Select the network connection, right click and click on properties
� Following window will appear. Select the option internet protocol (TCP/IP) and click on properties button.

This document is prepared for MM Training. If interested for MM training in Pune, Please write to
[email protected] with your contact details.
� Give the following IP address and click OK.

This document is prepared for MM Training. If interested for MM training in Pune, Please write to
[email protected] with your contact details.
� Simillarly there are other 2 network connection as VMNET1 & VMNET8. We need to maontain IP addresses
for both as follows.
� By following the same procedure of maintaining the IP addresses, give following IP address to VMNET1
adapter
� Maintain following IP address for VMNET8 adapter