1
Designing Effective Instruction Informed by the How People Learn
Framework
A Workshop for CELEST Participants on Designing Effective Instruction
Presented by
Alene H. Harris, Ph.D.
Director of Educational Programs of VaNTH ERC, Vanderbilt University
*Portions of this workshop adapted from materials of Sean Brophy, Ph.D. ,
Asst. Professor of Engineering Education, Purdue University

2
Tell Us about Yourself
(a 30-second sound byte)
1. Your name
2. Your science grade level and subject area
3. The most interesting thing you’ve learned thus far here at BU
4. One interesting fact about yourself

3
Two key goals of the VaNTH ERC
… conduct fundamental research on learning and
instruction … develop research-based K-12 science outreach that
incorporates aspects of bioengineering as it meets national and
state standards. My goal today: To share some things we have learned in VaNTH to help you design lessons that maximize
student learning – and meet standards!

4
But before we get into the VaNTH stuff...
Page 15
So – your task is to take the CELEST modules with which you have been working and translate them into lessons for your class.
What ideas are currently floating through your mind on
how you might do that?
But wait! Did you ever notice that sometimes there are problems when people work in groups?
But wait! Did you ever notice that sometimes there are problems when people work in groups?
In a moment, we will take 10 minutes to share in your group your ideas on page iv, referring
to pages i, ii, and iii as appropriate.

5
ENCOURAGER/PEACE-KEEPER
TURN-MAKER
CLOCK-WATCHER
READER/TASK-FOCUSER
GROUP PROBLEM ROLE SOLUTION
# 1:The group loses
their target focus.
Predicting and Preventing Group Problems
# 4:Some personalities
do not get along.
# 3:The group runs out of
time before finishing.
# 2:One person does
too much talking.Monitor and ensure everyone
participates.
RECORDER/REPORTERTake notes & summarize back to
the whole group.
! ! !# 5:One person ends
up doing all the work.
Read aloud directions, etc. & help group keep on task.
DIRECTIONS
Promote a positive climate & monitor noise.
Monitor the time & pace the group through the task(s).

6
ENCOURAGER/PEACE-KEEPER
TURN-MAKER
CLOCK-WATCHER
READER/TASK-FOCUSERYour group task is for everyone
in the group to take turns
sharing ideas for class
implementation from page iv.
Take 10 minutes to share
and be ready to report.
Applying Group Roles in Our Sharing
Make sure everyone shares their ideas.
RECORDER/REPORTERSummarize briefly high points of
the discussion.
! ! !
Please begin the session by clarifying directions.
DIRECTIONS
Promote a positive climate & monitor noise.
Monitor the time & pace the group through the task(s).
Page 15Please distribute the role cards.

7Page 15
I asked four people who have been working with VaNTH and K-12 education:
“What things would you suggest teachers consider in translating a University experience into classroom
lessons for secondary students?”
HS Physics MS Science HS Biology Eng. Ed. Prof
But before we get into the VaNTH stuff...

8
How People Learn - the HPL framework from current learning theory is the driving framework used to organize our thinking.
Building on Current Theories

9
How People Learn - the HPL framework from current learning theory is the driving framework used to organize our thinking as it allows us to look systematically at what creates an effective learning environment.
Community
Learner-Centered
Assessment-Centered
Knowledge-Centered
Building on Current Theories

10
Overview
Goals: By the end of today you should be able to design and evaluate effective student learning experiences relative to the How People Learn (HPL) Framework.
Events
Part 1 – Examining the design process and how HPL can inform instructional design
Part 2 - Developing innovative methods to refine your current course based on a challenge-based instructional approach
Part 3 – Learning how to use CAPE technology to support Legacy Cycle instruction

11
How Will We Get There?(Workshop Steps)
WS1- Define your goals for your class & share ideas.
WS2- Review the design process.
Planning – What are our goals for instruction and how will we know we’ve met these goals?
Implementation – How can we achieve these goals?
WS3- Consider current learning theory and how to apply it in lesson design and planning.
WS4- See an example from a veteran of HPL lessons how she designed and applied HPL instruction.
WS5- Begin developing challenge-based instruction you can use in your course.

12
WS STEP 1 - Defining Your Goals
Before coming today, you completed pre-workshop Activity 1 of “Defining Course Objectives.” In this activity you identified the following (pp. 5-6):
Pages 3 - 5
PRE-WORKSHOP ACTIVITY 1
Major course objectives
Course sub-objectives
Potential difficulties
Real-world contexts
DESIGN TASK 1

13
Biotransport
application of appropriate:
massspecies
momentumenergycharge
others...
Fick’s Law of diffusionFourier’s law of conductionNewton’s law of viscosityNon-Newtonian relationsNewton’s law of cooling
others...
algebraicgeometricgraphical
ODE, PDE methodsstatistical methods
others...
cell signalingmembrane transport
cell metabolismchemotaxis
others...
blood oxygenatorsdialysis machines
drug deliveryartificial heart
others...
capillary filtrationcirculatory dynamics
respirationglomerular filtration
others...
capillary filtrationcirculatory dynamics
respirationglomerular filtration
others...
to solve problems in:
Conservation Equations Constitutive/Empirical Eqs Math/Computer Methods
Biologyenzyme kinetics
bioreactor designinsulin production
genetic engineeringothers...
Biotech/Environment Medical Devices Physiology
Then in Activity 2-A, you first created a model of knowledge by creating a concept map (pp. 7-10).
Pages 6 - 9
PRE-WORKSHOP ACTIVITY 2-A DESIGN TASK 2

14
And in 2-B (p. 11), you prioritized items from your concept map into
Enduring Understanding - concepts fundamental to achieving the course objectives and funda-mental to the domain in general
Important to Know and Do - ideas and skills necessary for achieving the objectives, but not necessarily requiring mastery by the end of the course
Worth Being Familiar with - things not critical to performing a desired outcome of the course, but students should be aware of their association with the course objectives
Page 10
PRE-WORKSHOP ACTIVITY 2-B DESIGN TASK 2
Think National and State Standards
Think National and State Standards

15
In a few minutes (and four slides) we will begin a group collaboration time for you to share your ideas from
pages 5, 7, and 10.
WS STEP 1 - Defining Your Goals
When we do, please use the role cards to ensure that everyone has the opportunity to share and that there is optimal use of our time.

16
ENCOURAGER/PEACE-KEEPER
TURN-MAKER
CLOCK-WATCHER
READER/TASK-FOCUSERYour group task is for everyone
in the group to take turns
sharing and receiving feedback
on what each developed on
pages 5 and 7:
Class objectives (5)
Class sub-objectives (5)
Potential difficulties (5)
Real-world context(s) (5)
Concept map (7)
Applying Group Roles in Our Sharing
Make sure everyone shares and comments.
RECORDER/REPORTERSummarize briefly each group
member’s project.
! ! !
Please begin the session by clarifying directions.
DIRECTIONS
Promote a positive climate & monitor noise.
Monitor the time & pace the group through the task(s).
Page 14Please distribute the role cards.

17
Applying Group Roles in Our Sharing
Page 14
Please refer to “Sharing Your Ideas Thus Far” on page 14.
You will have 15 minutes to share and discuss pages 5 and 7 and 2 minutes per group
to report a summary of your discussion.
If your group finishes with the content on pages 5 and 7,
decide if members prefer to use the time to revise course
objectives and/or concept maps or go on to page 10 and
share content priorities.

18
WS STEP 2 - Reviewing the Design Process: Working Backwards
(Modified framework from Wiggins & McTighe, 1998)
Objectives Objectives Model of Knowledge
Model of Knowledge Materials Materials Delivery Delivery
4. Identify driving questions and challenges that target knowledge to be learned; this will help identify infor-mation sources
Evidence Evidence
ImplementationPlanning
1. Identify goals of instruction, including major goals and specific sub goals
Page 3
3. Define the assessments for these goals
2. Define model of knowledge that achieves these goals
5. Identify learning activities to meet learning goals

19
WS STEP 2 - Reviewing the Design Process
Page 12
Design Task 3 - Deciding on Evidence of Proof of Learning
Design Task 4 - Selecting Content Materials
Design Task 5 - Determining How To Deliver the Content
Design Task 1 – Determining Objectives
Design Task 2 – Creating a Model of Knowledge
(Page 13 lays out the framework of today’s agenda.)
You completed Design Tasks 1 and 2 before the workshop.
Design Task 1 – Determining Objectives
Design Task 2 – Creating a Model of Knowledge
Design Task 3 - Deciding on Evidence of Proof of Learning
Design Task 4 - Selecting Content Materials
Design Task 5 - Determining How To Deliver the Content
We will address the last three tasks in today’s workshop, and link them to research-based knowledge of
lesson design that increases learning.

20
Objectives Objectives Model of Knowledge
Model of Knowledge Materials Materials Delivery Delivery
4. Identify driving questions and challenges that target knowledge to be learned; this will help identify infor-mation sources
5. Identify learning activities to meet learning goals
Evidence Evidence
ImplementationPlanning
1. Identify goals of instruction, including major goals and specific sub goals
2. Define model of knowledge that achieves these goals
3. Define the assessments for these goals
Thus far, you have addressed tasks 1 and 2.
Page 12

21
Objectives Objectives Model of Knowledge
Model of Knowledge Materials Materials Delivery Delivery
4. Identify driving questions and challenges that target knowledge to be learned; this will help identify infor-mation sources
5. Identify learning activities to meet learning goals
Evidence Evidence
ImplementationPlanning
1. Identify goals of instruction, including major goals and specific sub goals
2. Define model of knowledge that achieves these goals
3. Define the assessments for these goals
Now it is time to address task 3.
Page 12
DESIGN TASK 3

22
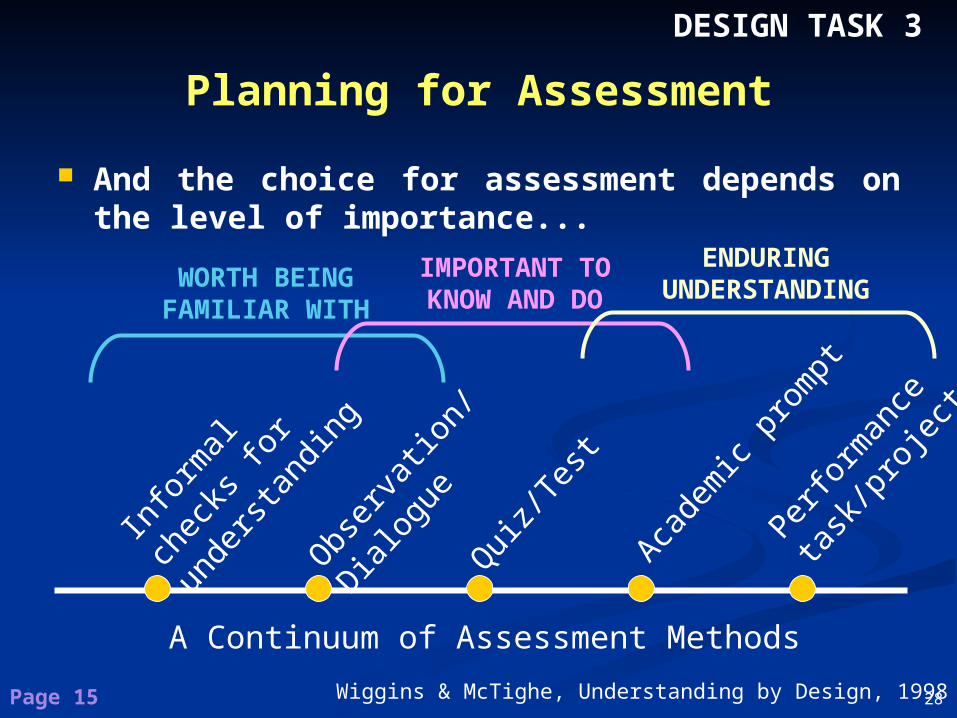
A Continuum of Assessment Methods
Info
rmal
che
cks
for u
nder
stan
ding
Obs
erva
tion/
Dialo
gue
Qui
z/Tes
t
Acade
mic
prom
ptPer
form
ance
task
/pro
ject
Wiggins & McTighe, Understanding by Design, 1998
DESIGN TASK 3
Planning for Assessment
Think of assessment possibilities as being on a continuum --
Page 15

23
ACCEPTABLE EVIDENCE: Assess AppropriatelyACCEPTABLE EVIDENCE: Assess Appropriately
Informal Checks for Understanding
ORAL
-“Why do you say that?
“How do you know?”
WRITTEN
- Single sentence summary
- One minute paper
- Muddiest Point
- Plusses and Deltas
For a super source on formative assessment ideas, check out CATS...
Classroom Assessment Techniques,Angelo & Cross, 1993
Planning for Assessment
Wiggins & McTighe, Understanding by Design, 1998Page 15

24
Observation/DialogueObservation/Dialogue
Observation - the observer must have in mind
criteria that demonstrate
knowledge and proficiency
Dialogue - the person assessing must be
skilled in forming questions that
reveal the other’s knowledge.
ACCEPTABLE EVIDENCE: Assess AppropriatelyACCEPTABLE EVIDENCE: Assess Appropriately
Planning for Assessment
Wiggins & McTighe, Understanding by Design, 1998Page 15

25
Quiz and Test Items - simple, content-focused questionsQuiz and Test Items - simple, content-focused questions
Assess factual information/concepts/discrete skill
Use selected-response or short-answer formats
Typically have a single, best answer (convergent)
Are easily scored
Are typically not known in advance (secure)
ACCEPTABLE EVIDENCE: Assess AppropriatelyACCEPTABLE EVIDENCE: Assess Appropriately
Planning for Assessment
Wiggins & McTighe, Understanding by Design, 1998Page 15

26
Academic Prompts - open-ended questions/problems requiring first critical thinking and then a response, product, or performance.
Academic Prompts - open-ended questions/problems requiring first critical thinking and then a response, product, or performance.
Require constructed response under exam condition
No single best answer or strategy (open)
Often ill-structured, requiring development of strategy
Involve analysis, synthesis, or evaluation
Require explanation/defense of answer/method given
Require judgment-based scoring based on criteria
May or may nor be known in advance
ACCEPTABLE EVIDENCE: Assess AppropriatelyACCEPTABLE EVIDENCE: Assess Appropriately
Planning for Assessment
Wiggins & McTighe, Understanding by Design, 1998Page 15

27
Performance Tasks/Projects - authentic tasks mirroring actual issues/problems requiring production/ performance. They differ from prompts in several ways:
Performance Tasks/Projects - authentic tasks mirroring actual issues/problems requiring production/ performance. They differ from prompts in several ways:
Feature real/simulated setting involving realistic constraints
Typically require addressing an identified audience
Based on a specific purpose relating to the audience
Allow greater opportunity to personalize the task
Task, criteria, and standards are known in advance
ACCEPTABLE EVIDENCE: Assess AppropriatelyACCEPTABLE EVIDENCE: Assess Appropriately
Planning for Assessment
Wiggins & McTighe, Understanding by Design, 1998Page 15
28
A Continuum of Assessment Methods
Info
rmal
che
cks
for u
nder
stan
ding
Obs
erva
tion/
Dialo
gue
Qui
z/Tes
t
Acade
mic
prom
pt
Wiggins & McTighe, Understanding by Design, 1998
DESIGN TASK 3
Planning for Assessment
And the choice for assessment depends on the level of importance...
Perfo
rman
ce
task
/pro
ject
WORTH BEING FAMILIAR WITH
IMPORTANT TO KNOW AND DO
ENDURING UNDERSTANDING
Page 15

29
Objectives Objectives Model of Knowledge
Model of Knowledge Materials Materials Delivery Delivery Evidence Evidence
ImplementationPlanning
Page 15
Assessment should reflect objectives.
FAMILIAR = dialogue, observation, multiple choice
IMPORTANT = short answer, structured problem
ENDURING = concepts synthesis & skills mastery
And the choice for assessment depends on the level of importance...
Planning for Assessment
DESIGN TASK 3

30
DESIGN TASK 3
Planning for Assessment
Remember that there are TWO types of assessment you want to develop...
Page 16
FORMATIVE assessment is designed to “inform” both students and instructor how well they are doing. Its primary purpose is not to give a grade, but to see how much learning and understanding has occurred.
SUMMATIVE assessment is designed to “sum up” a final grade.
THIS IS THE PIECE MOST LIKELY TO BE MISSING IN COLLEGE INSTRUCTION!
Please share with our workshop
any ideas you have about how
one might use technology for formative
assessment.

31
WORKSHOP ACTIVITY A
Enduring Understanding Important To Know and Do Worth Being Familiar with
INDEPENDENT DIRECTIONS: For the next 5 minutes, work independently to list ideas on page 16 of possible assessments you might use -- both formative and summative -- for the priorities in the box on page 17. (No sharing YET.)
If you finish early, go ahead and begin reading page 17.
Page 16
DESIGN TASK 3

32
SHARING DIRECTIONS: Now, in the next 5 minutes share in
your group the ideas you listed for both formative and
summative assessment. Reporters, be prepared to give a 2-
minute summary.
See if you have any suggestions
for one another on additional
ways to check levels of
understanding and mastery
of concepts and skills.
Page 16
DESIGN TASK 3WORKSHOP ACTIVITY A

33
WS STEP 3 - Examining Current Learning TheoryHow People Learn: Brain, Mind, Experience, and School
WWW.NAS.edu
The HPL framework provides a tool
to investigate the effectiveness of a learning
environment.
The authoring committee observed that effective learning environments
involve four major dimensions.
Page 17

34
WS STEP 3 - Examining Current Learning TheoryHow People Learn: Brain, Mind, Experience, and School
WWW.NAS.edu
Community
Learner-Centered
Assessment-Centered
Knowledge-Centered
Page 17

35
WS STEP 3 - Examining Current Learning TheoryHow People Learn: Brain, Mind, Experience, and School
WWW.NAS.edu
Community
Learner-Centered
Assessment-Centered
Knowledge-Centered
Page 17
We use these dimensions as a lens to identify
strengths and weaknesses of materials and of the
implementation of a learning environment.

36
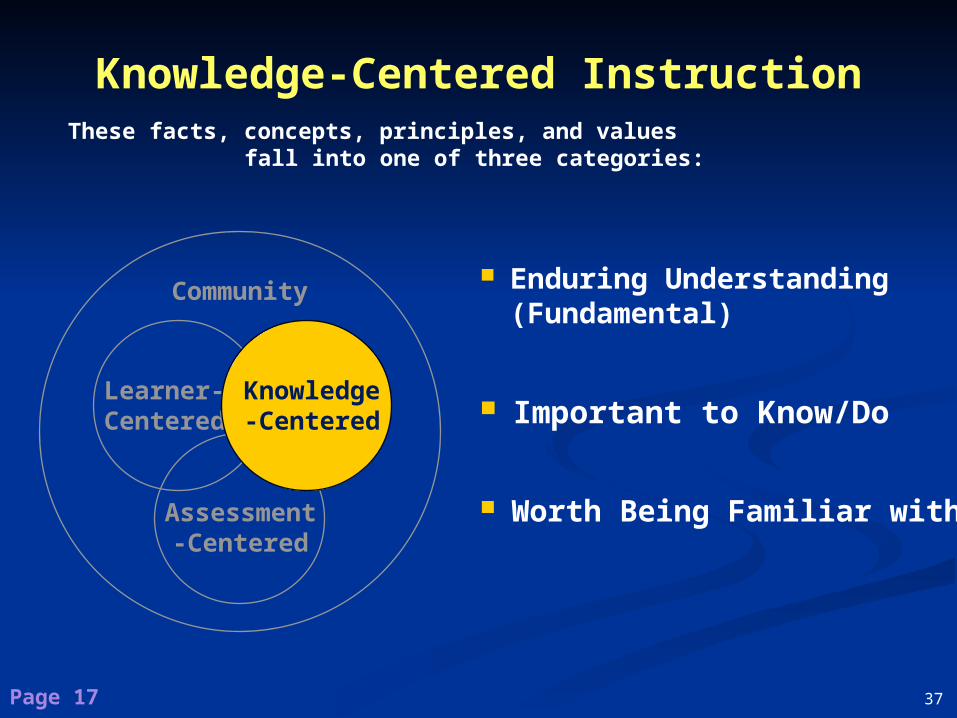
Knowledge-Centered Instruction
Community
Learner-Centered
Assessment-Centered
Knowledge-Centered
Page 17
Provides well-organized and clearly communicated content
Includes facts, concepts, principles, and values that you
want students to take with them from your course
Must be organized to facilitate acquisition and application
Includes an emphasis on “sense-making” – that is,
helping students think about their own thinking
37
Community
Learner-Centered
Assessment-Centered
Knowledge-Centered
Enduring Understanding (Fundamental)
Important to Know/Do
Worth Being Familiar with
These facts, concepts, principles, and values fall into one of three categories:
Page 17
Knowledge-Centered Instruction

38
Community
Assessment-Centered
Learner-Centered
Knowledge-Centered
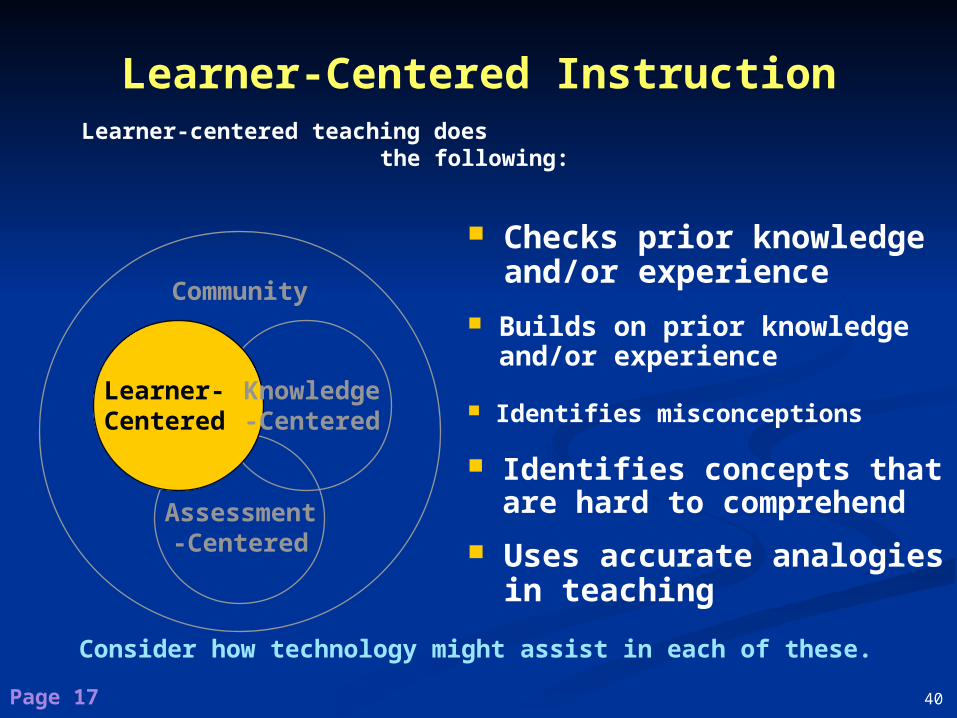
Takes into account what students bring with them in
their heads when they enter the classroom door.
Works to identify MISconceptions students bring with them (and try to build on!)
Page 17
Learner-Centered Instruction
Includes asking students to make predictions about various situations and then explain the reasons for their predictions.

39
Community
Assessment-Centered
Learner-Centered
Knowledge-Centered
Takes into account what students bring with them in their heads when they enter the classroom door.
Works to identify MISconceptions students bring with them (and try to build on!)
Learner-Centered Instruction
Includes asking students to make predictions about various situations and then explain the reasons for their predictions.
Page 17
40Page 17
Learner-Centered Instruction
Checks prior knowledge and/or experience
Learner-centered teaching does the following:
Builds on prior knowledge and/or experience
Identifies misconceptions
Identifies concepts that are hard to comprehend
Uses accurate analogies in teaching
Community
Assessment-Centered
Learner-Centered
Knowledge-Centered
Consider how technology might assist in each of these.

41
Community
Learner-Centered
Assessment-Centered
Knowledge-Centered
Page 17
Assessment-Centered Instruction
Provides students the opportunity to check their
understanding and to revise and improve their thinking
and learning
Provides instructors the opportunity to check
the effectiveness of their teaching and revise and
improve their lesson planning and instruction.
Both Formative and Summative
Formative Assessment

42
Community
Assessment-Centered
Knowledge-Centered
Page 17
Assessment-Centered InstructionBoth Formative and Summative
Formative Assessment Provides students with continuous
opportunities to demonstrate what they know - to self and to teacher
Allows students to reflect on what they know
Facilitates the continued improvement of instruction – e.g., Personal Response
System
Learner-Centered

43
Assessing Preconceptions with the PRS
High
Medium
Low
Level of Confidence
Possible Answers
1A 2B 3C
On/Off
ReceiverReceiver
Page 17

44
Assessment-Centered Instruction
Is a test of mastery at the unit’s end
Is typically sequestered problem-solving
Both Formative and Summative
Summative Assessment
Is used in grading
Community
Learner-Centered
Assessment-Centered
Knowledge-Centered
Page 17

45
Community
Learner-Centered
Assessment-Centered
Assessment-Centered InstructionBoth Formative and Summative
Summative Assessment
Informs the instructor if students have met the learning objectives
Must gather evidence that aligns with the original learning goals – or there can be no conclusion on the teaching effectiveness
Knowledge-Centered
Page 17

46
Community-Centered Instruction
Community
Learner-Centered
Assessment-Centered
Knowledge-Centered
Helps students make connections with the instructor, with peers – and to identify with
the subject area.
Creates norms of expectation – especially useful is the norm of learning from one another and continually trying to improve
Provides students with specific structured in-class opportunities
to collaborate
Page 17

47
Community-Centered Instruction
Using peers as an opportunity to learn & giving students a vision of the kinds of communities they will be a part of in the future
Page 17
Classroom & school Developing identity
Student “scientist”
Community involves a range of issues and oppor-tunities for learning – in and out of the classroom
Understanding of various perspectives E.g., approach to problems and prioritizing
design factors
Community
Learner-Centered
Assessment-Centered
Knowledge-Centered

48
How People Learn (HPL) Framework
The HPL Framework
provides guidelines for
identifying critical factors
associated with effective
learning environments.
Page 17
Community
Learner-Centered
Assessment-Centered
Knowledge-Centered These guidelines have
been translated into
lesson design with the
STAR Legacy Cycle.

49
Challenge Based Instruction with STAR.Legacy
Software
Technology for
Action and
Reflection
Need legacy image
Multiple Perspectives
Generate Ideas
Research & Revise
Test your mettle
Go Public
The Challenge
STAR.Legacy Learning
Cycle
Please follow along with your copy
of Legacy Cycle Glossary of Terms.
Page 18

50
Your grandmother is recovering from a recent right hip injury, and she
needs to learn how to use a cane to help her maintain her
balance. In which hand should she use the cane
and why?
How can a swim team coach best determine the physical
condition of his/her team throughout the season? How can he/she modify practices to
best meet the needs of the individual swimmers? How can an individual swimmer chart his or her progress
during the season?
What muscle strength is needed for an
athlete to hold this position?
SAMPLES FROM HIGH SCHOOL
SCIENCE TEACHERS
55
Begin with a challenge
-- something that asks
students to bring what they currently know to bear on a
problem.
The Legacy Cycle
The Legacy Cycle
Page 18

51
Generate Ideas
The Challenges
Look Ahead&
Reflect Back
Students bring what they
already know to bear on a
problem -- make their best
effort/guess.
The Legacy Cycle
The Legacy Cycle
56Page 18

52
Generate Ideas
The ChallengesGenerate ideas first individually.
In school, the average teacher wait time for a response to a question is 3/5 second!
That’s the model we learned by example.
UNLEARN IT!!!
GIVE THEM TIME!
The Legacy Cycle
The Legacy Cycle
57Page 18

53
Generate Ideas
The ChallengesGenerate ideas first individually.
Then share ideas.
Accept and chart all responses.
Encourage multiple responses.
The Legacy Cycle
The Legacy Cycle
58
Consider how technology
might facilitate students’ individual generation of
ideas before class...
Page 18

54
Generate Ideas
The ChallengesGenerate ideas first individually.
Then share ideas.
Build on prior knowledge.
Try to link previous subjects/lessons.
The Legacy Cycle
The Legacy Cycle
59Page 18

55
The Challenges
Look Ahead&
Reflect Back
Generate Ideas
Multiple Perspectives
Provide some different
perspectives on the problem - give some
data.
In other words, present some
initial information on the topic -- a
couple of “points of view”
if possible.Text or video from experts
should begin to point students in the right direction.
The Legacy Cycle
The Legacy Cycle
60
Consider how technology might be used
to provide your students with multiple
perspectives...Page 18

56
The Challenges
Generate Ideas
Multiple Perspectives
Research &
Revise
Students continue to investigate and revise original ideas
based on findings.
In other words, now you teach --present content
for which the challenge set
the stage.
And now students listen,
read, do research, watch
videos, do simulations,
work problems, etc.
The Legacy Cycle
The Legacy Cycle
The first three have created a “time for telling.”
The first three have created a “time for telling.”
MAJORITY
OF THE
LESSON
TIME IS
HERE
MAJORITY
OF THE
LESSON
TIME IS
HERE
61
Consider how technology
might be used to help students in the
Research and Revise step...
Page 18

57
The Challenges
Generate Ideas
Multiple Perspectives
Research &
Revise
The Legacy Cycle
The Legacy Cycle
Test Your Mettle
Students try out their ideas (among
friends) -- propose a supported
hypothesis -- and get feedback.
Note: You may go back
and forth between Test
Your Mettle and Research and
Revise.
62
What ideas do you currently have
on how technology might be used in out-
of-class activities to help students test their mettle and to remediate?
Page 18

58
The Challenges
Generate Ideas
Multiple Perspectives
Research &
Revise
The Legacy Cycle
The Legacy Cycle
Test Your Mettle
Go Public
Students revisit the
original question and developing a final answer.
63Page 18

59
The Challenges
Generate Ideas
Multiple Perspectives
Research &
Revise
The Legacy Cycle
The Legacy Cycle
Test Your Mettle
Go Public
The “final answer” refers
back to the original
challenge.
Page 18 64

60
The Challenges
Generate Ideas
Multiple Perspectives
Research &
Revise
The Legacy Cycle
The Legacy Cycle
Test Your Mettle
Go Public
And now you are ready to tackle
another challenge -- the next
lesson.
And there you have it!
Page 18 65

61
WS STEP 4a- Learning from an Experienced HPL Instructor in HS Physics
Page 19
Presenting a Legacy Cycle
modules from Dr. Stacy Klein,
HS physics teacher and
Research Asst. Professor of
Biomedical Engineering -- an
experienced HPL instructor who
has literally been there and
done that multiple times.

62
Using a Study of Skin to Teach Stress and Strain in Physics and Biology
Stacy S. Klein, Ph.D.VIBES
Departments of Biomedical Engineering, Radiological Sciences, and Teaching &
LearningVanderbilt University
Stacy S. Klein, Ph.D.VIBES
Departments of Biomedical Engineering, Radiological Sciences, and Teaching &
LearningVanderbilt University
Page 19 67

63
The Legacy Cycle
Need legacy image
Multiple Perspectives
Generate Ideas
Research & Revise
Test your mettle
Go Public
The Challenge
STAR.Legacy Learning
Cycle
Page 19 70

64
Skin Elasticity Challenge:
You are a doctor and you get a phone call at your office from an elderly patient. She tells you that she fell down and has a large wound on her arm above the elbow that appears to be a skin tear. You tell her to come into the office so that she can have it examined, but in the mean time suggest she finds a bandage to protect the wound until she gets there.
What do you suggest she use to close the wound?
What properties of a bandage will be required to close the wound?
Page 19 77

65
Generate Ideas
Take a couple minutes to write down your ideas. What do you already know that is relevant to the question? What do you need to learn about in order to answer the question? What do you think your students would think of?
Page 19 78

66Page 20
Multiple Perspectives
Listen to Dr. Michael Miga, Biomechanics Prof., Vanderbilt University
Interviewer: What do we need to be aware of when approaching the challenge question?
Dr. Miga: Well, you need to know what the nature of force is and what the types of forces are that are acting on the wound. So if you have a wound on your arm and you bend it, you are probably going to apply either a compression of the skin, in a sense of a closing of the skin, or you're going to stretch the skin. If you wanted to stabilize that motion, in other words you don't want the wound to be able to compress into itself or to stretch out, what would you do? Would you place a bandage across the wound? If so, adhering parts of the bandage would adhere before and after the wound. The area of the bandage acts as a little scaffolding that maintains a fixed distance between the two sides of the wound.
Interviewer: What material properties would be important in the bandage?
Dr. Miga: Obviously, the strength of the material – how stiff. Making a bandage with a board is very different than making it out of a flexible structure. You need to know and understand the materials you are going to use to create the bandage. You need to know their properties too. If you make a bandage out of paper versus out of a kind of rubbery substance they have very different properties in that sense that if I apply force to it I can rip paper very easily versus rubber that stretches with the application of force.
79

67
Multiple Perspectives
I’d be sure to consider the elastic properties of the skin. How does it normally stretch and why didn’t it in this case? How and why do objects stretch? (SK, Biomedical Engineer)
You should be sure to consider how to stabilize this type of wound, which is not deep enough to require suturing. In the care of superficial wounds, torn but still viable skin is often left in place to act as a natural bandage for the newly exposed tissue. How can this be accomplished without suturing? (RJM, Dermatologist)
Page 20 80

68
Skin Elasticity Module Goals
Master the anatomy and physiology of skin with special attention to its elastic properties
Calculate stress and strain Understand and apply Hooke’s Law Understand elastic and inelastic deformation
in 1D, 2D, and 3D Create force vs. displacement plots, add lines
of best fit, and interpret the slopes of these lines
Design and implement a testable hypothesis and procedure for a particular problem
Create a scientific posterPage 20 81

69
Research and Revise
Learn about the anatomy and physiology of skin
Use provided teacher notes. If you wish, you may add information here on glands and hair though they are not covered in this module. Be sure to make note of the components of skin that allow it to stretch.
Learn about skin tears
Use provided teacher notes.
Learn about stress & strain
Use teacher notes to discuss these topics. Be sure to relate these topics back to skin.
Assign homework.Page 20 82

70
Test Your Mettle
Design research hypothesis and experimental procedure for go public.
Page 20 83

71
Go Public
Your task is to create, implement, and report on an experiment designed to answer the following problem that relates to the challenge question:
What type of temporary wound care would best mimic natural skin?
You must first design an experiment with a testable hypothesis and experimental procedure. Your teacher must sign off on this hypothesis and procedure before you begin work.
Page 20 84

72
Possible Equipment
Check with your teacher about the availability of these materials. Duct Tape Wooden or metal dowel (to wrap material being tested around, so that
friction is created) Lab Stand(s) Scissors Chicken Skin Mass hangers Medical Gauze (cloth) String and/or yarn Medical Gauze (foam) Pencil (to wrap material being tested around, so that friction is created) Nexcare Active Foam Bandages Binder clip(s) Band-aids Masking tape Nexcare Flexible Clear Tape Needle and thread Paper medical tape Mass set(s) Ace Bandage Ruler(s) Paper Clip(s)
Page 20 85
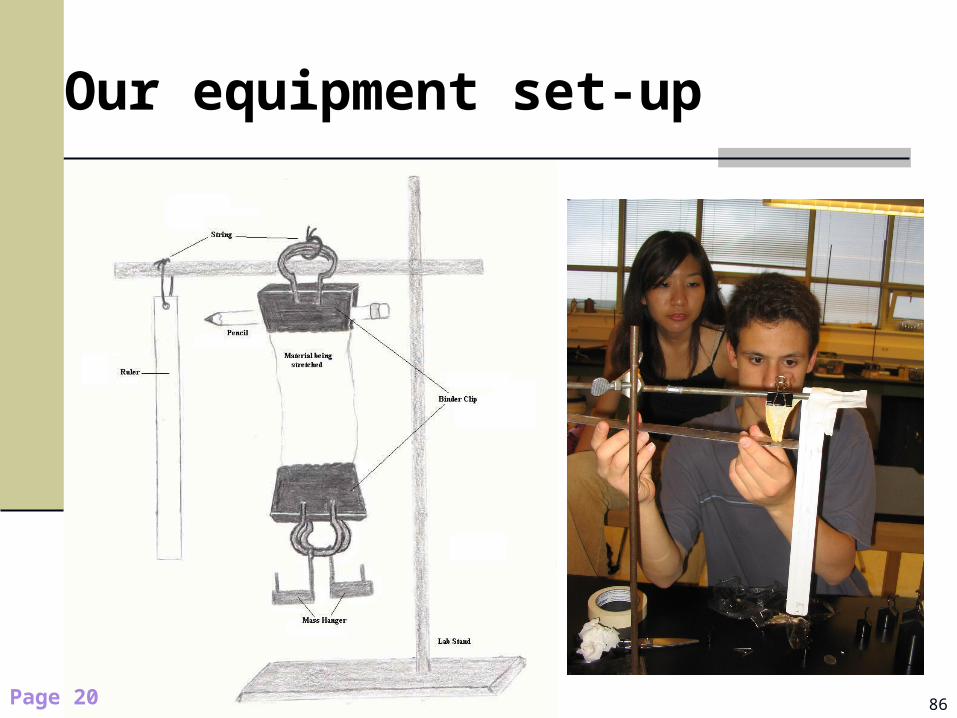
73
Our equipment set-up
Page 20 86

74
Our Results
Chicken Skin
y = 1.2387x
R2 = 0.9908
0
0.5
1
1.5
2
2.5
3
0 0.5 1 1.5 2 2.5
Average displacement (cm)
Wei
gh
t (N
)
Page 20 87

75
Our Results
Nexcare Bandages Active Foam
y = 0.6261x
R2 = 0.9888
0
0.5
1
1.5
2
2.5
3
0 1 2 3 4 5
Average displacement (cm)
Wei
gh
t (N
)
Page 20 88

76
Our Results
Nexcare Flexibile Clear Tape
y = 3.5871x
R2 = 0.9831
0
0.5
1
1.5
2
2.5
3
0 0.1 0.2 0.3 0.4 0.5 0.6 0.7
Average displacement (cm)
Wei
gh
t (N
)
Page 20 89

77
Our Conclusion
In conclusion, the more mass that is added, the farther the material will stretch. The Nexcare Bandages Active Foam could be said to be the best choice for skin care because the properties of stretch and strain in this product are closest to those of skin.
Alternatively, your students might argue that the Nexcare Flexible Clear Tape is the best choice as it is at least as stretchy as skin.
Your students may find other results depending on the materials they chose to test.
The actual product choice the students make is not the most important aspect of this lab, as long as they provide scientific evidence to support any claims that they make.
Page 20 90

78
Other Facts
Last for approximately 2 weeks
Designed for use in Physics and Anatomy & Physiology classrooms
Meets numerous national standards (AAAS, National Science Education Standards, etc.)
Page 20 91

79
Module Overview
And that is an overview of a sample Legacy Cycle module.
As you work through this next part of the workshop, reflect back on this example as a tested and proven lesson implementation.
Page 20 92

80
Consider how you can use the HPL framework to evaluate an instructor’s approach
to designing instruction.
WS STEP 5 - Begin developing challenge-based instruction you can use in your course
Page 21

81
Objectives Objectives Model of Knowledge
Model of Knowledge Delivery Delivery Evidence Evidence
ImplementationPlanning
1. Identify goals of instruction, including major goals and specific sub goals
2. Define model of knowledge that achieves these goals
3. Define the assessments for these goals
Page 21
Now it is time to apply HPL in the last two tasks.
Materials Materials
4. Identify driving questions and challenges that target knowledge to be learned; this will help identify infor-mation sources
5. Identify learning activities to meet learning goals
4. Identify driving questions and challenges that target knowledge to be learned; this will help identify infor-mation sources
5. Identify learning activities to meet learning goals
Materials Materials
5. Identify learning activities to meet learning goals
Delivery Delivery
WS STEP 5 - Begin developing challenge-based instruction you can use in your course

82
Materials Materials Delivery Delivery
If you’ve taught the topic before, you probably have
materials and activities (including lecture) that can be re-used as you design various parts of a Legacy Cycle lesson.
Implementation
Page 21
DESIGN TASKS 4 & 5
The place to begin is developing a challenge with
real-world applications.
The challenge you design will influence both materials
and activities.
Need legacy image
Multiple Perspective
s
Generate Ideas
Research &
Revise
Test your
mettle
Go Public
The Challenge
STAR.Legacy
LearningCycle

83Page 22
A challenge question should be...
- Accessible
HPL instruction in Legacy Cycle starts with a challenge question.
- Motivating/authentic
- Contextual
- Complex “enough”
Your challenge question will lay the groundwork for the materials and
technology you will use.
DESIGN TASKS 4 & 5

84Page 22
Where can you find challenge questions?
HPL instruction in Legacy Cycle starts with a challenge question.
You should already have some ideas of where to start, based on what you wrote
in that bottom box on page 5!
Take a moment and read the last three paragraphs
on page 22.
DESIGN TASKS 4 & 5

85Page 22
HPL instruction in Legacy Cycle starts with a challenge question.
A well-designed challenge question creates a “time for
telling.”
DESIGN TASKS 4 & 5

86
Meet Dr. Bob Roselli – a practiced expert in designing
Legacy Cycle lessons
As a biomedical engineer, you are called to testify as an expert witness on behalf of the defendant, who is accused of murder.
The body of her boyfriend was found at 5:30 AM in a creek behind her house. The prosecutor’s expert witness places the time of death at about midnight. The defendant has witnesses that account for her whereabouts before 11 PM and after 2 AM, but she cannot provide an alibi for the period between 11 PM and 2 AM.
The Challenge: Estimate the Time of Death

87
WORKSHOP ACTIVITY B
Accessible Authentic Contextual Complex “enough”
INDEPENDENT DIRECTIONS: For the next 5 minutes, work to list three possible challenge questions/scenarios in the first column of page 23, and then give your rationale for the question’s effectiveness (look back at the four criteria at the top of page 23).
If you finish early, try to create and give a rationale for two more challenge questions.
Page 23
DESIGN TASKS 4 & 5

88
SHARING DIRECTIONS: In the next 8 minutes share in your group the challenge questions you wrote and your rationale on the possible effectiveness of each. Reporters, be prepared to give a 3-minute summary.
Page 23
WORKSHOP ACTIVITY B DESIGN TASKS 4 & 5
See if you have any suggestions
for one another on possible
challenge questions
and/or rationales.

89
QUESTION: What is the best teaching method for the college classroom?
A. Lecture
B. Collaborative learning
C. Inquiry learning
D. Computer based instruction
Consider the analogy of a musical keyboard. Wouldn’t you
prefer music that is made up of more than one note? Perhaps even chords might be nice…
Page 24

90
So, what teaching strategies are
available for me to design an
HPL-informed learning
environment, and how do I
decide which is the best
method?
Page 24

91
However, there appears to be a wide array of teaching strategies, and the problem is
deciding on which one or ones to use.
Design Task 5 – Delivery (Selecting Learning Activities)
The next step in the process is deciding how to teach.
The HPL framework provides some insights on how to sort through this cacophony of approaches to
instruction.
Page 24

92
oral
written
narrativevideos
drill and practice
Contextualizedpractice
modeling
cases
problems
projects
Learning byDesign
jigsawlearning
cooperativelearning
selfstudy
Communicationenvironments
assessmentopportunities
electronictools
simulation
Bridging the gap between research and practice - Donovan, Bransford, & Pellegrino 1999
Teaching Strategies
Technology-Enhanced
LectureBased
SkillsBased
InquiryBased
Individualvs.
Group
Community
Learner-Centered
Assessment-Centered
Knowledge-Centered
Page 24

93
Technology-Enhanced
Communicationenvironments
assessmentopportunities
electronictools
simulation
Bridging the gap between research and practice - Donovan, Bransford, & Pellegrino 1999
Teaching Strategies
LectureBased
SkillsBased
InquiryBased
Individualvs.
Group
Community
Learner-Centered
Assessment-Centered
Knowledge-Centered
Page 24
oral
written
narrativevideos
drill and practice
Contextualizedpractice
modeling
cases
problems
projects
Learning byDesign
jigsawlearning
cooperativelearning
selfstudy

94
Teaching Strategies
LectureBased
SkillsBased
InquiryBased
Individualvs.
Group
You must decide
when is the best time to use what.
Community
Learner-Centered
Assessment-Centered
Knowledge-Centered
Page 24
Legacy cycle helps frame your thinking about what to use, when, and why.
Need legacy image
Multiple Perspectives
Generate Ideas
Research & Revise
Test your mettle
Go Public
The Challenge
STAR.Legacy Learning
Cycle

95
We have found that
using an inquiry
approach to instruction
is very effective.
InquiryBased
LectureBased
SkillsBased
Individualvs.
Group
The other teaching
strategies have a
place in the sequence
of learning activities.
Community
Learner-Centered
Assessment-Centered
Knowledge-Centered
Page 24
Need legacy image
Multiple Perspectives
Generate Ideas
Research & Revise
Test your mettle
Go Public
The Challenge
STAR.Legacy Learning
Cycle

96
LectureBased
SkillsBased
Individualvs.
Group
The point is that ultimate decisions are based on…
InquiryBased
(1) the learners’ needs
(4) available resources(2) content to be learned
(3) desired learning goals
Community
Learner-Centered
Assessment-Centered
Knowledge-Centered
Page 24
Need legacy image
Multiple Perspectives
Generate Ideas
Research & Revise
Test your mettle
Go Public
The Challenge
STAR.Legacy Learning
Cycle

97
The benefits of inquiry include…
InquiryBased
• Providing authentic process for engineers
• Encouraging question asking
• Designing experiments
• Engaging in research
• Encouraging information
processing and synthesis
Community
Learner-Centered
Assessment-Centered
Knowledge-Centered
Page 24

98
Need legacy image
Multiple Perspectives
Generate Ideas
Research & Revise
Test your mettle
Go Public
The Challenge
STAR.Legacy Learning
Cycle
InquiryBased
Students engage in a process of Problem Formulation
(identify and define problems)
Individual,Group,
Whole Group
Students generate,
sharecompare,
refine
Anchored Inquiry
Instruction organized around the inquiry of driving questions
Page 24
LectureBased
Your lecture becomes a R&R resource, along with many others –
see p. 39 TYPE OF ACTIVITY.
(You have now “created an MP time for
telling.”)
WholeGroup
Test ,reflect, & revise
SkillsBased
Test for outcomes mastery & grade

99
WORKSHOP ACTIVITY C
INDEPENDENT DIRECTIONS: During the next 5 minutes, read page 38 silently or aloud.
Then work silently by yourself to list on page 25 materials and activities you might use for “Multiple Perspectives.”
Use the back of the facing page if you need more space.
Page 25
DESIGN TASKS 4 & 5
If you finish early, peruse the Appendix of your manual for useful ideas in teaching a Legacy Cycle.
A chance to share with your group will come with the next slide.
BRAINSTORMING MULTIPLE PERSPECTIVES FOR A LEGACY CYCLE

100
WORKSHOP ACTIVITY C DESIGN TASKS 4 & 5
SHARING DIRECTIONS: In the next 5 minutes share in your group the ideas you have for Multiple Perspectives.
See if you have any suggestions
for one another.
Page 25
BRAINSTORMING MULTIPLE PERSPECTIVES FOR A LEGACY CYCLE

101
WORKSHOP ACTIVITY D
INDEPENDENT DIRECTIONS: During the next 8 minutes, read the top half of page 39 silently or aloud.
Then work silently by yourself to list on page 26 materials and activities you might use for “Research and Revise.” Consider materials and activities you may have used previously and where and how they might fit into the Legacy Cycle.
Page 26
DESIGN TASKS 4 & 5
If you finish early, peruse the Appendix of your manual for useful ideas in teaching a Legacy Cycle.
A chance to share with your group will come with the next slide.
BRAINSTORMING RESEARCH 8 REVISE ACTIVITIES FOR A LEGACY CYCLE

102
WORKSHOP ACTIVITY D DESIGN TASKS 4 & 5
SHARING DIRECTIONS: In the next 7 minutes share in your group the ideas you have for Research and Revise.
See if you have any suggestions
for one another.
Page 26
BRAINSTORMING RESEARCH & REVISE ACTIVITIES FOR A LEGACY CYCLE

103
In Summary: General Guidelinesfor Creating HPL Learning Experiences
… challenges related to real life that check preconceptions and set the stage for learning
… to generate ideas early
… multiple opportunities to display “what they know”
… multiple opportunities for formative feedback
… multiple opportunities to collaborate and teach/learn from one another
… to know the conditions under which to apply knowledge
… to know multiple perspectives on situations (users, team members)
… linked challenges that lead to progressive refinement
Students need…
Page 27

104
Remember that in moving to HPL instruction, you can start small and build on your existing materials.
In Summary: General Guidelinesfor Creating HPL Learning Experiences
Key component one - the use of “backwards design”: - Begin with the end in mind – the goals - Determine ways to assess - Select materials to use - Determine methods/activities of instruction
1
Key component two - the use of “challenge-based instruction” (Legacy Cycle provides a framework for designing this instruction)
2
Formative assessment – consider PRS and Classroom Assessment Techniques (Angelo & Cross, 1993)
3
Page 27

105
Blended Learning – or Where Does Technology Fit in All
This?Many of our investigators have
experimented with learning activities
that span one or all the
phases of the learning cycles. In many instances, instructors have started
small and guided most of the process within
the classroom.
However, with technology and innovative
ideas, the instructors have identified methods
to distribute the activities beyond just their
classrooms.Page 28

106
Blended Learning
After Class
In Class
Before Class
•Pre-Tests
•Preparatory resources and activities (creating a time for telling)
•Embedded formative assessments
•Real-time assessments
•Responses attributed and recorded •Adaptive exercises
•Remedial resources
•Post-Tests
informs
informs
Need legacy image
Multiple Perspectives
Generate Ideas
Research & Revise
Test your mettle
Go Public
The Challenge
STAR.Legacy Learning
Cycle
Page 28

107
The Challenges
Generate Ideas
Multiple Perspectives
Research &
Revise
The Legacy Cycle
The Legacy Cycle
Test Your Mettle
Go Public
Page 18 65
Page 16
Page 23
Page 25
Page 25

108
WORKSHOP ACTIVITY E
INDEPENDENT DIRECTIONS: For the next 15 minutes, pull from your work before and during this workshop to outline a Legacy Cycle lesson module for your selected course.
Pages 29-30
LEGACY CYCLE
Use the form on page 30. Page 31 is for you to reproduce for future planning.
A chance to share with your group will come with the next slide.
PUTTING IT ALL TOGETHER TO OUTLINE A LEGACY CYCLE LESSON

109
WORKSHOP ACTIVITY E LEGACY CYCLE
SHARING DIRECTIONS: In the next 10 minutes (about 3 minutes per person) share in your group the overall Legacy Cycle plan you have developed.
See if you have any suggestions
for one another.
PUTTING IT ALL TOGETHER TO OUTLINE A LEGACY CYCLE LESSON
Pages 29-30

110
FORMATIVE FEEDBACK FOR THE PRESENTERS
At this point, please take five minutes to share in your groups what things you feel you have learned thus far in your workshop today.
REPORTERS, please be ready to summarize your groups’ ideas.
Thank you for helping your
presenters see what things have
been take-away points for you.
PUTTING IT ALL TOGETHER TO OUTLINE A LEGACY CYCLE LESSON
Pages 29-30

111
LEGACY CYCLE APPENDIX
Pages 32 - 43
Need legacy image
Multiple Perspectives
Generate Ideas
Research & Revise
Test your mettle
Go Public
The Challenge
STAR.Legacy Learning
Cycle
Note that pages 32
through 43 offer
many proven
techniques for
successfully
conducting various
aspects of a Legacy
Cycle lesson in your
classroom.

112
What are some of the advantages and
disadvantages you can imagine in using Legacy
Cycle?
Building on an HPL framework to enhance student learning...

113
At this point, what are you wondering about HPL lessons Legacy Cycle
design?
Please complete the Feedback Sheets. Your presenter would
appreciate some formative assessment
to inform future workshops.
114
Go forth, design lessons, shape minds,
and influence lives!

115
WS STEP 4c - Learning from an Experienced HPL Instructor in Biomechanics
and in Biotransport
Page 20
Presenting Dr. Robert Roselli,
Professor of Biomedical
Engineering and Chemical
Engineering at Vanderbilt
University -- an experienced HPL
instructor who has literally been
there and done that multiple times
– and pioneered many of the CAPE
applications.

116
Example of a Challenge
Organized Around the Legacy Cycle
Course: BiotransportChallenge: Post-mortem
Interval

117
The Challenge: Estimate the Time of Death
As a biomedical engineer, you are called to testify as an expert witness on behalf of the defendant, who is accused of murder.
The body of her boyfriend was found at 5:30 AM in a creek behind her house. The prosecutor’s expert witness places the time of death at about midnight. The defendant has witnesses that account for her whereabouts before 11 PM and after 2 AM, but she cannot provide an alibi for the period between 11 PM and 2 AM.

118
Generate Ideas
How did the prosecutor’s expert witness arrive at the time of death?
What information will you need to challenge the time of death estimate?
Discussion Results:
How? Rate of Body Cooling.
Info? Temperature measurements

119
Research and Revise
Examination of Assumptions

120
Model used from literature by forensic pathologist to
estimate the time of death:
•Where did this come from?•List the assumptions made in developing this equation.•Can you provide a physical interpretation for K?•What data are needed to compute K?
( )a
dTK T T
dt

121
Thermal Energy Balance on Body:
Macroscopic Analysis
Rate ofAccumulation of
ThermalEnergy
=
ThermalEnergyentering
body
-
ThermalEnergyleavingbody
+
Rate ofProductionof Thermal
Energy
dt
dTmCp ( )ahS T T 0 +0
( )ahS T T
Newton’s Law of Cooling
neglect internal resistance to heat transfer: Tcore = Tsurface = T

122
Relating Empirical Coefficient K to Physical
Parameters
( )a
p
dTK T T
dthA
KmC
( )ap
dT hST T
dt mC Thermal
EnergyBalance
Coroner’sEmpirical
Relationship

123
Model and Data used by forensic pathologist to
estimate the time of death:
How did the coroner arrive at midnight as the time of death? K = ? h = ?
( )a
dTK T T
dt
Body temperature at 6 AM (rectal) = 90.5°F Ambient Temperature = 65°F Body removed to coroner’s office (65°F) Body temperature at 8 AM = 88.3°F Assumed pre-death body temperature = 98.6°F

124
Finding T(t)
( )a
dTK T T
dt
0
Kta
a
T Te
T T
Initial Condition: t = 0, T = T0 = 98.6ºF C = ln(T0-Ta)
Solution:
( )
ln( )
a
a
a
d T TKdt
T T
T T Kt C
Separate variables:
Integrate:

125
Finding K from measurements
11
0
22
0
ln
ln
a
a
a
a
T TKt
T T
T TKt
T T
at 6 AM: t = t1, T = T1 = 90.5ºFat 8 AM: t = t2 = t1 + 2hr,
T = T2 = 88.3ºFTa = 65ºF
11 2
2
ln ( )a
a
T TK t t
T T
11 90.5 65ln 0.0451
2 88.3 65K hr
hr
1
2 1 2
1ln
( )a
a
T TK
t t T T
subtract:
Solve for K in terms of two temperature measurements:

126
Estimating Time of Death
0
1ln a
a
T Tt
K T T
at 6 AM, t = t1, T = T1 = 90.5ºFTa = 65ºF, T0 = 98.6ºF
11 1
0
1 1 90.5 65ln ln 6.11
.0451 98.6 65a
a
T Tt hr
K T T hr
So, the estimated time of death occurred 6.11 hr before 6 AM (at 11:53 PM)

127
Are there any assumptions made in deriving the equation
used by the pathologist that may be
inappropriate for this case?

128
Your own Investigation
You visit the crime scene. What will you do there?
You visit the coroner’s office. What information do you request?
Any other information you might need?

129
Investigation determines:
When found, body was almost completely submerged
Body was pulled from the creek when discovered at 5:30 AM
Creek water temperature was 65°F No detectable footprints other than the
victim’s and the person that discovered the body.
Water velocity was nearly zero. Victim’s body weight = 80 kg Victim’s body surface area = 1.7 m2
Cause of death: severe concussion Medical Records: victim in good health,
normal body temperature = 98.6ºF

130
Your investigation also reveals typical heat
transfer coefficients: Heat transfer from a body to a stagnant fluid (W/(m2 °C))
h for air: 2 – 23 h for water: 100 - 700
Based on these coefficients, you might expect temperature of a body in stagnant water at 65°F to fall at:
1. About the same rate as in air at 65°F 2. At a faster rate than in air at 65°F 3. At a slower rate than in air at 65°F

131
Estimating the heat transfer coefficient h from prosecutor’s
datapmC K
hS
m = body mass = 80 kgCp = body specific heat = 1.16 Whr/kg°CS = body surface area = 1.7 m2
K = 0.0451 hr-1
1
2 2
(80 )(1.16 / )(.0451 )2.46
1.7
kg Whr kg C hr Wh
m m C

132
New estimate of time of death
Provide a procedure that can be used to find the time of death assuming that:
the body was in the creek (h = 100 W/m2ºC) from the time of death until discovered at 5:30 AM.
the body was removed from the creek at 5:30 AM and body temperature measurements made at 6 AM & 8 AM while the body cooled in air (h = 2.46 W/m2ºC).

133
Typical heat transfer coefficients: Heat transfer in a stagnant fluid (W/(m2
°C)) h for air: 2 – 23 h for water: 100 - 700
p
hSK
mC
Cooling in water:S=1.7 m2
Cp = 1.16 Whr/kg°Cm = 80 kg
h = 100 W/m2C
K = 1.83 hr-1

134
Estimating Temperature at 5:30 AM
Cooling in Air
at 6 AM, t = 6.11hr, T = T1 = 90.5ºFTa = 65ºF, T0 = 98.6ºF
at 5:30 AM, t = 5.611hr, T = T2 = ?
2 .0451(5.61)2
0
2
.776
65 .776(98.6 65) 91.1
Kta
a
T Te e
T T
T F
0
Kta
a
T Te
T T

135
Estimating time in water
-10
(5 : 30 A )1ln
1.83 hra
a
T M Tt
T T
Find T(5:30 AM) = 91.1F
Find: t = 0.138 hr = 8.27 min!
Time of death ≈ 5:22 AM
The defendant must be innocent!Not looking good for the person who discovered the body.
0
p
hSt
mCa
a
T Te
T T

136
Summary: Macroscopic Approach (Lumped
Parameter Analysis) Time of death estimated by coroner
assuming cooling in air was about midnight (guilty!)
Time of death estimated by your staff assuming initial cooling in water was about 5:22 AM (innocent!).
0
p
hSt
mCa
a
T Te
T T
2 3 4 5 6 7 8 AM
T=98.6°F
T=91.1°F
T=90.5°FT=88.3°F
0
ln a
a
T T
T T
112
T(5:30 AM)

137
PRS: An estimate of Post Mortem Interval (PMI) based on hwater
using this method is probably:
1. Accurate2. Too long3. Too short

138
The prosecutor gets wise and hires a biomedical
engineer!
Your model prediction is criticized because a lumped analysis (macroscopic) was used.
The witness states that internal thermal resistance in the body cannot be neglected.
They claim the body takes longer to cool than you predicted .
They present experimental evidence that body temperature varies with position and time.
139
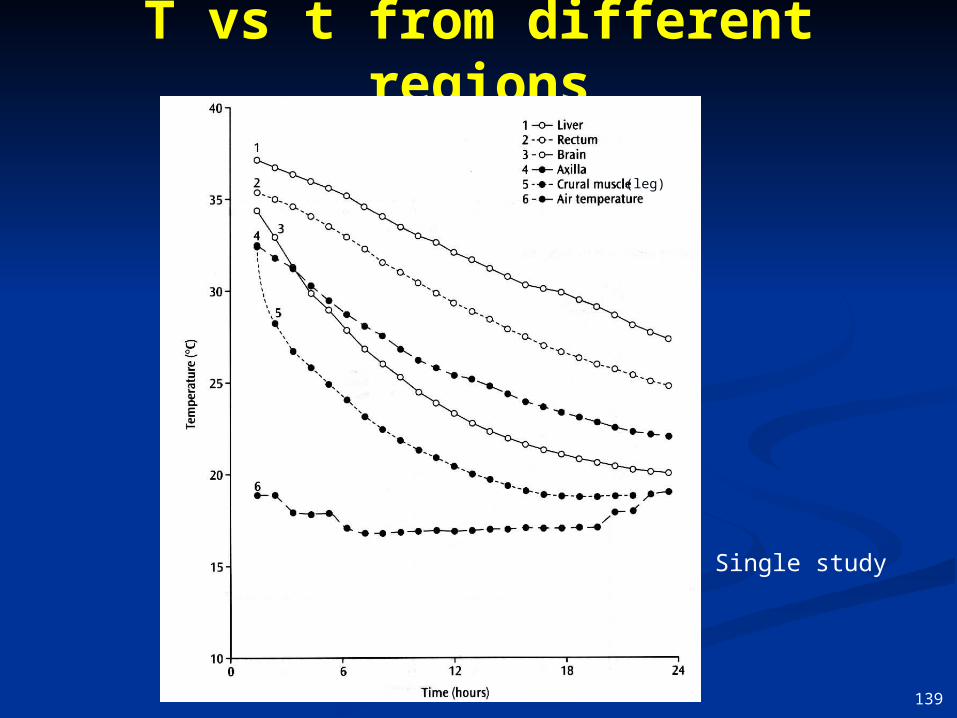
T vs t from different regions
Single study
(leg)

140
How can we find the ratio of internal to external thermal resistance for heat transfer
from a cylinder?
QH
int
c R RH
ernal external
T T T TQ
R R
Tc
TS = TR
T∞
R
L
conduction to outside surface
c Rr R body body
r R
c RH r R body
internalbody
T TdTq k k
dr R
T TQ Sq Sk
R
RR
Sk
conduction from outside surface
1
H R
external
Q hS T T
RhS

141
Ratio of internal to external thermal resistance for
steady-state heat transfer from a heated cylinder?
QH
int
c R RH
ernal external
T T T TQ
R R
Tc
TS = TR
T∞
R
Linternal
external body
R Rh
R k
QH = hS(TR - T∞)

142
Biot Number (Bi)
Bi = h(V/S)/kbody V = Volume, S = Surface area
Bi = h(πR2L/2πRL)/kbody = hR/2kbody (cylinder)
Bi = One half the ratio of internal resistance due to conduction to external resistance due to convection and conduction.
If Bi<0.1, we can neglect internal resistance (5%)
If Bi >0.1, we should account for radial variations (low external resistance or high internal resistance)

143
Estimate Biot number for heat loss from body to
water
2
2
2
1.70.15
2 (1.8 )
S RL
SR
L
mR m
m
h = 100 W/m2ºCkbody =0.5 W/mºC
152(0.5)
)(100)(0.15
2k
hRBi
body
Can’t
NeglectInternal
Resistance

144
Cooling of Cylindrical Body:
Assume Radial Symmetry
Sz
TT
rr
Tr
rrk
Tv
TvTvC
t
TC zrpp
2
2
2
2
2
11
zrr-
0vr 0
z
v z
()0v
0
()
0z
()0S
R T
h
TR
Apply assumptions:
We wish to find how temperature varies in the solid body as a function of radial position and time.Evaluate equation term by term
keep
T(r,t)
keep
1p
T TC k r
t r r r

145
Cooling of a CylinderCenterline Temperature vs.
Time
x1 = R; = (k/ρCp)body; m = 1/2Bi = kbody/hR
Assuming Centerline Temperature = Rectal Temperature:Design a procedure to find the time of death from this chart

146
Using the Graphical Solution to Estimate the
Time of Death.
Core Temperature at 5:30 AM = 91.1°F(Tc-T∞)/(T0-T∞)=(91.1-65)/(98.6-65)=0.777
m=k/hR=0.5/(100 x .15) = 0.033
Time of death = 12:30 AM +/-
Fo = 0.12t = FoR2/ = (.12)(.15m)2/(.54x10-3 m2/hr) = 5 hr
Guilty!

147
Should the Defense Rest?
Are there any other confounding factors?
Different radiusDifferent hNot a cylinder

148
Tc vs. t for R = .2 m
CoreTemp(ºF)
Time since death (hr)
h = 100 W/m2ºCR = 0.2 m
91.1ºF at 5:30 AM
Time of death about 8:15 PM

149
Table 1. Module Coverage of Course Topics
Taxomnomy/Topics Intr
o t
o B
ME
101, H
PL
Mech
an
ics R
evie
w
Intr
o t
o B
iom
ech
an
ics
An
thro
po
metr
y &
Scalin
g
Scalin
g F
orc
es a
nd
Defo
rmati
on
Vert
eb
ra F
ailu
re in
1D
& 2
D L
oad
ing
Jo
int
& M
uscle
Mech
an
ics
Lo
co
mo
tio
n:
Walk
ing
& R
un
nin
g
Bala
nce a
nd
Sta
bilit
y
Bala
nce a
nd
Mo
tio
n
Bu
ng
ee J
um
pin
g &
Pen
nsylv
an
ia L
aw
Desig
n o
f R
ing
s A
pp
ara
tus
Iro
n C
ross -
Mu
scle
Str
en
gth
Hip
In
jury
fro
m A
ccid
en
tal F
all
Accele
rati
on
, D
ecele
rati
on
an
d In
jury
Ju
mp
ing
Tib
ia F
ractu
re in
So
ccer/
Skiin
g
Fundamentals
Fundamental Laws of Mechanics X X X X X X X X
Dimensions, Units, Conversions X X X X X X X X X X
Anthropometry X X X X X X X X X X X X X X X X
Musculoskeletal System X X X X X X X X X X X X X X X
Vector Operations X X X X X X X X X X X X X
Forces, Moments & Couples X X X X X X X X X X X X X X X
Resultant Force Systems X X X X X X X X X X X X
Equivalent Force Systems X X X X X X X X X X
Center of Gravity, Distributed Loads X X X X X X X X X X X X X
Statics
Equilibrium X X X X X X X X X X
Free Body Diagrams X X X X X X X X X X X X X
Friction X X X X X X X X
Constraints, Supports and Reactions X X X X X X X X X X X X X
Statically Indeterminant Systems X X X
Machines, Lever Systems X X X X X X
Method of Sections X X X X X X X X X X X X
Muscle and Joint Reaction Forces X X X X X X X X X
Dynamics
Impulse-Momentum Principle X X X X X X X X X
Conservation of Momentum X X X X X X X X
Linear Kinetics X X X X X X X
Angular Kinetics, Limb Rotation X X X X X X X X X
Mass Moment of Inertia, Radius of Gyration X X X X X
Kinetics of Linkage Systems X X X X X
Strength of Materials
Stress & Strain X X X X X X X X X X X
Stress Transformation, Principal Stresses X X X
Properties of Biological Materials, Failure X X X X X X X X X X X X X
Models of Material Behavior, Hooke's Law X X X X X X X X X
Stress Concentration X X X X
The process:
1 - Review Taxonomy
2 - Define Learning Objectives
3 - Design Modules and Challenges
Note how one professor used a series of Legacy Cycle modules to cover the requirements in a biomechanics course.
Taxonomy/Topics
Modules/Mosaics
93