Table of Contents Heavy-Duty Workbench � � � � � � � � � � � � � � � � � � � � � � � � � � � � � � � � 2 Heavy-Duty Shelving Unit � � � � � � � � � � � � � � � � � � � � � � � � � � � � � � 4 Work Table � � � � � � � � � � � � � � � � � � � � � � � � � � � � � � � � � � � � � � � � � �6 Outdoor Storage Center � � � � � � � � � � � � � � � � � � � � � � � � � � � � � � � � 8 Over-Car Garage Shelving Unit� � � � � � � � � � � � � � � � � � � � � � � � � � 10 Log Holder � � � � � � � � � � � � � � � � � � � � � � � � � � � � � � � � � � � � � � � � � 12 Outdoor Potting Bench� � � � � � � � � � � � � � � � � � � � � � � � � � � � � � � � 14 Chicken Coop � � � � � � � � � � � � � � � � � � � � � � � � � � � � � � � � � � � � � � � 16 Home Project Ideas Using Simpson Strong-Tie ® RTC2Z Rigid Tie ® Connectors © 2017 Simpson Strong-Tie Company Inc� DIY-HDPDFSET17 For more inspiration, visit diydoneright.com

Welcome message from author
This document is posted to help you gain knowledge. Please leave a comment to let me know what you think about it! Share it to your friends and learn new things together.
Transcript
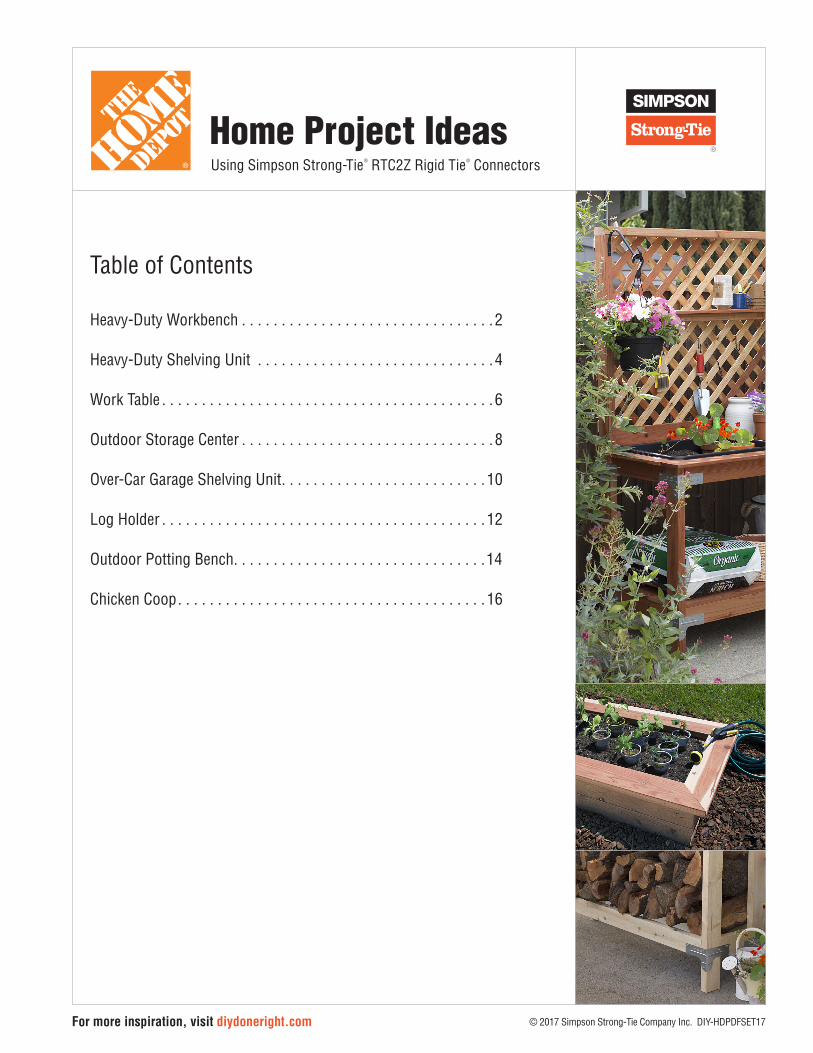
Table of Contents
Heavy-Duty Workbench � � � � � � � � � � � � � � � � � � � � � � � � � � � � � � � �2
Heavy-Duty Shelving Unit � � � � � � � � � � � � � � � � � � � � � � � � � � � � � �4
Work Table � � � � � � � � � � � � � � � � � � � � � � � � � � � � � � � � � � � � � � � � � �6
Outdoor Storage Center � � � � � � � � � � � � � � � � � � � � � � � � � � � � � � � �8
Over-Car Garage Shelving Unit � � � � � � � � � � � � � � � � � � � � � � � � � �10
Log Holder � � � � � � � � � � � � � � � � � � � � � � � � � � � � � � � � � � � � � � � � �12
Outdoor Potting Bench � � � � � � � � � � � � � � � � � � � � � � � � � � � � � � � �14
Chicken Coop � � � � � � � � � � � � � � � � � � � � � � � � � � � � � � � � � � � � � � �16
Home Project IdeasUsing Simpson Strong-Tie® RTC2Z Rigid Tie® Connectors
© 2017 Simpson Strong-Tie Company Inc� DIY-HDPDFSET17For more inspiration, visit diydoneright.com
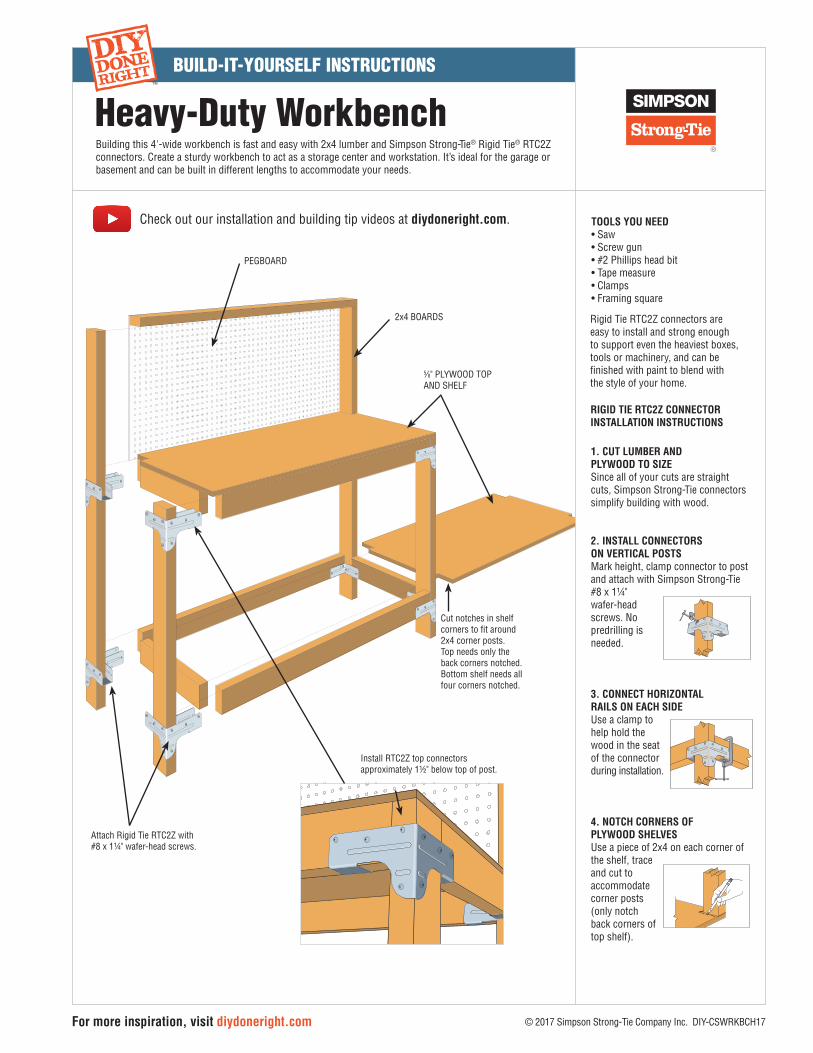
1. CUT LUMBER AND PLYWOOD TO SIZESince all of your cuts are straight cuts, Simpson Strong-Tie connectors simplify building with wood.
2. INSTALL CONNECTORS ON VERTICAL POSTS Mark height, clamp connector to post and attach with Simpson Strong-Tie#8 x 1¼" wafer-headscrews. No predrilling is needed.
3. CONNECT HORIZONTAL RAILS ON EACH SIDE Use a clamp to help hold the wood in the seat of the connector during installation.
4. NOTCH CORNERS OF PLYWOOD SHELVESUse a piece of 2x4 on each corner of the shelf, trace and cut to accommodate corner posts(only notch back corners of top shelf).
Install RTC2Z top connectors approximately 1½" below top of post.
Cut notches in shelf corners to fit around 2x4 corner posts. Top needs only the back corners notched. Bottom shelf needs all four corners notched.
PEGBOARD
2x4 BOARDS
5⁄8" PLYWOOD TOP AND SHELF
TOOLS YOU NEED• Saw • Screw gun• #2 Phillips head bit • Tape measure• Clamps• Framing square
Rigid Tie RTC2Z connectors are easy to install and strong enough to support even the heaviest boxes, tools or machinery, and can be finished with paint to blend with the style of your home.
RIGID TIE RTC2Z CONNECTOR INSTALLATION INSTRUCTIONS
Attach Rigid Tie RTC2Z with #8 x 1¼" wafer-head screws.
Check out our installation and building tip videos at diydoneright.com.
Building this 4'-wide workbench is fast and easy with 2x4 lumber and Simpson Strong-Tie® Rigid Tie® RTC2Z connectors. Create a sturdy workbench to act as a storage center and workstation. It’s ideal for the garage or basement and can be built in different lengths to accommodate your needs.
Heavy-Duty Workbench
© 2017 Simpson Strong-Tie Company Inc. DIY-CSWRKBCH17
BUILD-IT-YOURSELF INSTRUCTIONS
For more inspiration, visit diydoneright.com
TM
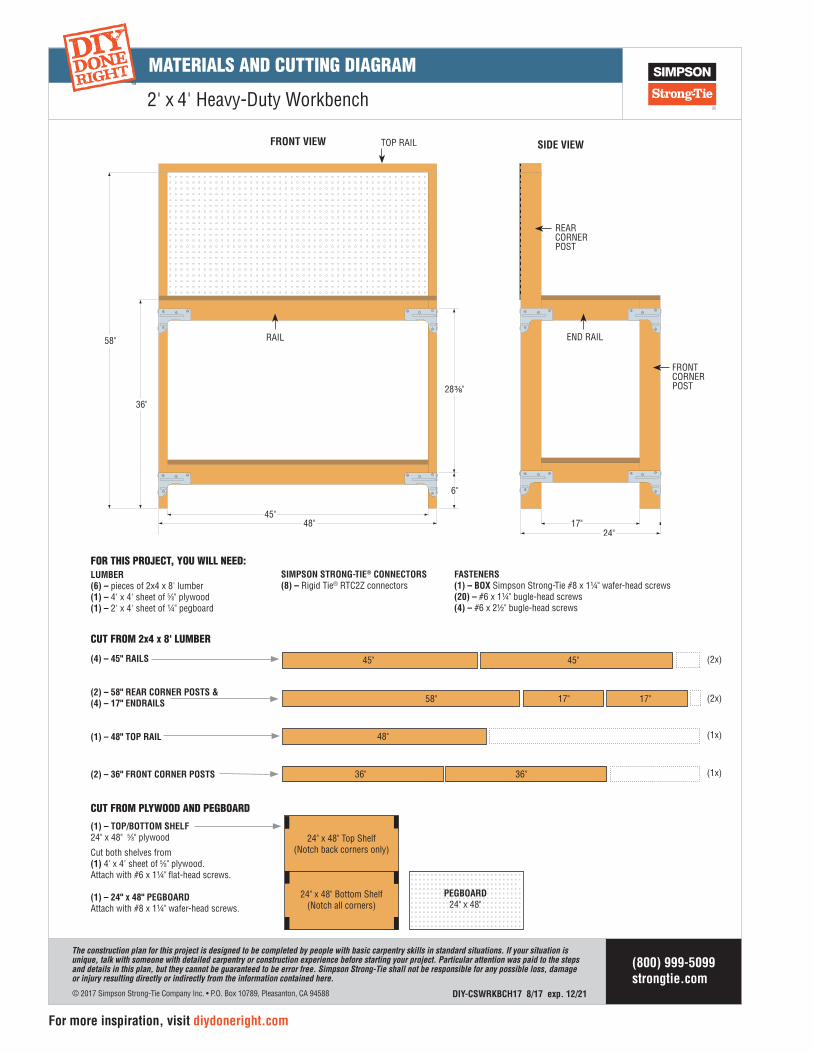
SIDE VIEWFRONT VIEW TOP RAIL
48"
58"
45"
36"
6"
28⅜"
24"17"
RAIL
REAR CORNER POST
END RAIL
FRONT CORNER POST
24" x 48" Top Shelf(Notch back corners only)
24" x 48" Bottom Shelf(Notch all corners)
48"
36" 36"
(4) – 45" RAILS
(2) – 58" REAR CORNER POSTS & (4) – 17" ENDRAILS
(1) – 48" TOP RAIL
(2) – 36" FRONT CORNER POSTS
(1) – TOP/BOTTOM SHELF24" x 48" 5⁄8" plywood
Cut both shelves from (1) 4' x 4' sheet of 5⁄8" plywood.Attach with #6 x 1¼" flat-head screws. (1) – 24" x 48" PEGBOARDAttach with #8 x 1¼" wafer-head screws.
...............................................................................................................................................................................................................................................................................................................................................
45" 45"
PEGBOARD24" x 48"
SIMPSON STRONG-TIE® CONNECTORS(8) – Rigid Tie® RTC2Z connectors
FASTENERS(1) – BOX Simpson Strong-Tie #8 x 1¼" wafer-head screws(20) – #6 x 1¼" bugle-head screws(4) – #6 x 2½" bugle-head screws
LUMBER(6) – pieces of 2x4 x 8' lumber(1) – 4' x 4' sheet of 5⁄8" plywood(1) – 2' x 4' sheet of ¼" pegboard
58" 17" 17"
CUT FROM PLYWOOD AND PEGBOARD
FOR THIS PROJECT, YOU WILL NEED:
(2x)
(1x)
(2x)
(1x)
CUT FROM 2x4 x 8' LUMBER
2' x 4' Heavy-Duty Workbench
MATERIALS AND CUTTING DIAGRAM
For more inspiration, visit diydoneright.com
(800) 999-5099 strongtie.com
© 2017 Simpson Strong-Tie Company Inc. • P.O. Box 10789, Pleasanton, CA 94588 DIY-CSWRKBCH17 8/17 exp. 12/21
The construction plan for this project is designed to be completed by people with basic carpentry skills in standard situations. If your situation is unique, talk with someone with detailed carpentry or construction experience before starting your project. Particular attention was paid to the steps and details in this plan, but they cannot be guaranteed to be error free. Simpson Strong-Tie shall not be responsible for any possible loss, damage or injury resulting directly or indirectly from the information contained here.
TM
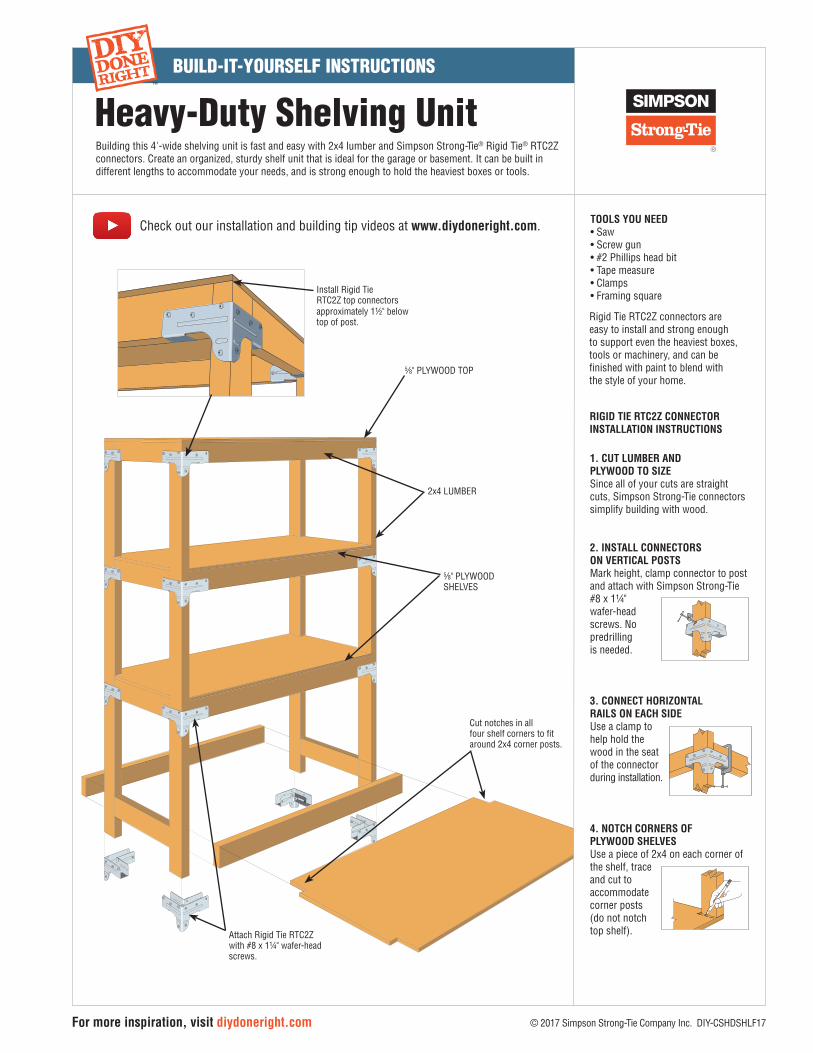
Building this 4'-wide shelving unit is fast and easy with 2x4 lumber and Simpson Strong-Tie® Rigid Tie® RTC2Z connectors. Create an organized, sturdy shelf unit that is ideal for the garage or basement. It can be built in different lengths to accommodate your needs, and is strong enough to hold the heaviest boxes or tools.
Heavy-Duty Shelving Unit
Install Rigid Tie RTC2Z top connectors approximately 1½" below top of post.
Cut notches in all four shelf corners to fit around 2x4 corner posts.
2x4 LUMBER
5⁄8" PLYWOOD TOP
Attach Rigid Tie RTC2Z with #8 x 1¼" wafer-head screws.
5⁄8" PLYWOOD SHELVES
1. CUT LUMBER AND PLYWOOD TO SIZESince all of your cuts are straight cuts, Simpson Strong-Tie connectors simplify building with wood.
2. INSTALL CONNECTORS ON VERTICAL POSTS Mark height, clamp connector to post and attach with Simpson Strong-Tie#8 x 1¼" wafer-headscrews. No predrilling is needed.
3. CONNECT HORIZONTAL RAILS ON EACH SIDE Use a clamp to help hold the wood in the seat of the connector during installation.
4. NOTCH CORNERS OF PLYWOOD SHELVESUse a piece of 2x4 on each corner of the shelf, trace and cut to accommodate corner posts(do not notch top shelf).
TOOLS YOU NEED• Saw • Screw gun• #2 Phillips head bit • Tape measure• Clamps• Framing square
Rigid Tie RTC2Z connectors are easy to install and strong enough to support even the heaviest boxes, tools or machinery, and can be finished with paint to blend with the style of your home.
RIGID TIE RTC2Z CONNECTOR INSTALLATION INSTRUCTIONS
Check out our installation and building tip videos at www.diydoneright.com.
© 2017 Simpson Strong-Tie Company Inc. DIY-CSHDSHLF17
BUILD-IT-YOURSELF INSTRUCTIONS
For more inspiration, visit diydoneright.com
TM
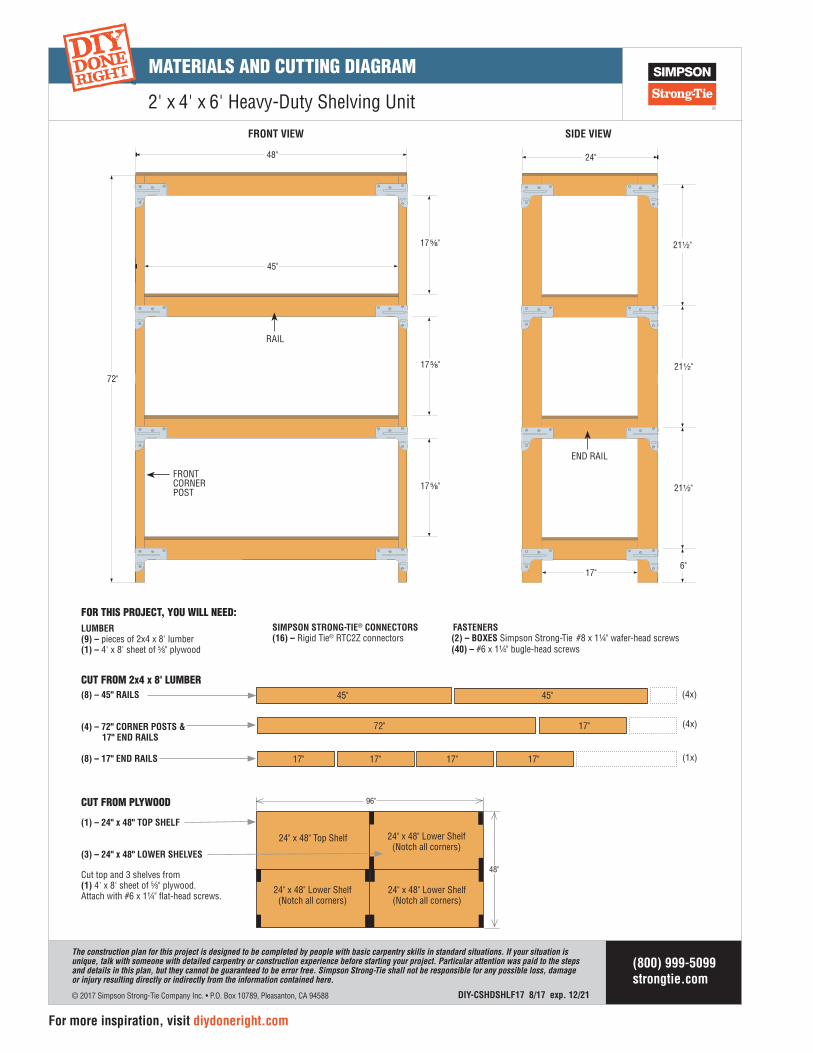
48"
45"
72"
17⅝"
17⅝"
17⅝"
24"
17"
21½"
21½"
21½"
6"
2' x 4' x 6' Heavy-Duty Shelving Unit
(4x)
(4x)
(1x)
24" x 48" Top Shelf
(8) – 45" RAILS
(4) – 72" CORNER POSTS & 17" END RAILS
(8) – 17" END RAILS
(1) – 24" x 48" TOP SHELF
(3) – 24" x 48" LOWER SHELVES
Cut top and 3 shelves from (1) 4' x 8' sheet of 5⁄8" plywood. Attach with #6 x 1¼" flat-head screws.
45" 45"
SIDE VIEWFRONT VIEW
72" 17"
24" x 48" Lower Shelf(Notch all corners)
24" x 48" Lower Shelf(Notch all corners)
24" x 48" Lower Shelf(Notch all corners)
SIMPSON STRONG-TIE® CONNECTORS(16) – Rigid Tie® RTC2Z connectors
FASTENERS(2) – BOXES Simpson Strong-Tie #8 x 1¼" wafer-head screws(40) – #6 x 1¼" bugle-head screws
LUMBER(9) – pieces of 2x4 x 8' lumber(1) – 4' x 8' sheet of 5⁄8" plywood
FRONT CORNER POST
RAIL
END RAIL
CUT FROM 2x4 x 8' LUMBER
CUT FROM PLYWOOD
17" 17" 17" 17"
96"
48"
FOR THIS PROJECT, YOU WILL NEED:
(800) 999-5099 strongtie.com
© 2017 Simpson Strong-Tie Company Inc. • P.O. Box 10789, Pleasanton, CA 94588 DIY-CSHDSHLF17 8/17 exp. 12/21
The construction plan for this project is designed to be completed by people with basic carpentry skills in standard situations. If your situation is unique, talk with someone with detailed carpentry or construction experience before starting your project. Particular attention was paid to the steps and details in this plan, but they cannot be guaranteed to be error free. Simpson Strong-Tie shall not be responsible for any possible loss, damage or injury resulting directly or indirectly from the information contained here.
MATERIALS AND CUTTING DIAGRAM TM
For more inspiration, visit diydoneright.com
© 2017 Simpson Strong-Tie Company Inc. DIY-CSLDTBL17
A FAST WAY TO CREATE A NEW WORK SPACE
5⁄8" PLYWOOD/OSB SHELVES
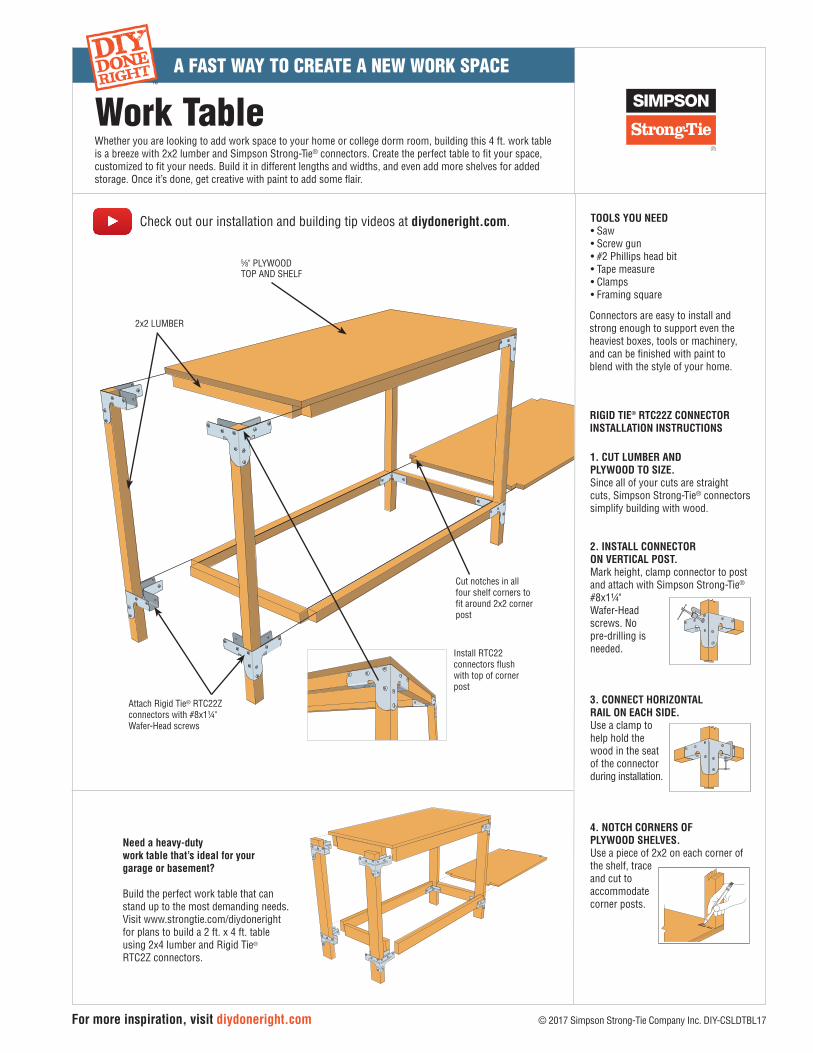
Whether you are looking to add work space to your home or college dorm room, building this 4 ft. work table is a breeze with 2x2 lumber and Simpson Strong-Tie® connectors. Create the perfect table to fit your space, customized to fit your needs. Build it in different lengths and widths, and even add more shelves for added storage. Once it’s done, get creative with paint to add some flair.
Work Table
Cut notches in all four shelf corners to fit around 2x2 corner post
2x2 LUMBER
For more inspiration, visit diydoneright.com
Need a heavy-duty work table that’s ideal for your garage or basement?
Build the perfect work table that can stand up to the most demanding needs. Visit www.strongtie.com/diydoneright for plans to build a 2 ft. x 4 ft. table using 2x4 lumber and Rigid Tie® RTC2Z connectors.
Install RTC22 connectors flush with top of corner post
Attach Rigid Tie® RTC22Z connectors with #8x1¼" Wafer-Head screws
5⁄8" PLYWOOD TOP AND SHELF
1. CUT LUMBER AND PLYWOOD TO SIZE.Since all of your cuts are straight cuts, Simpson Strong-Tie® connectors simplify building with wood.
2. INSTALL CONNECTOR ON VERTICAL POST. Mark height, clamp connector to post and attach with Simpson Strong-Tie®
#8x1¼" Wafer-Headscrews. No pre-drilling is needed.
3. CONNECT HORIZONTAL RAIL ON EACH SIDE. Use a clamp to help hold the wood in the seat of the connector during installation.
4. NOTCH CORNERS OF PLYWOOD SHELVES.Use a piece of 2x2 on each corner of the shelf, trace and cut to accommodate corner posts.
TOOLS YOU NEED• Saw • Screw gun• #2 Phillips head bit • Tape measure• Clamps• Framing square
Connectors are easy to install and strong enough to support even the heaviest boxes, tools or machinery, and can be finished with paint to blend with the style of your home.
RIGID TIE® RTC22Z CONNECTOR INSTALLATION INSTRUCTIONS
TM
Check out our installation and building tip videos at diydoneright.com.
(800) 999-5099 strongtie.com
© 2017 Simpson Strong-Tie Company Inc. • P.O. Box 10789, Pleasanton, CA 94588 DIY-CSLDTBL17 12/16 exp. 12/20
MATERIALS AND CUTTING DIAGRAM
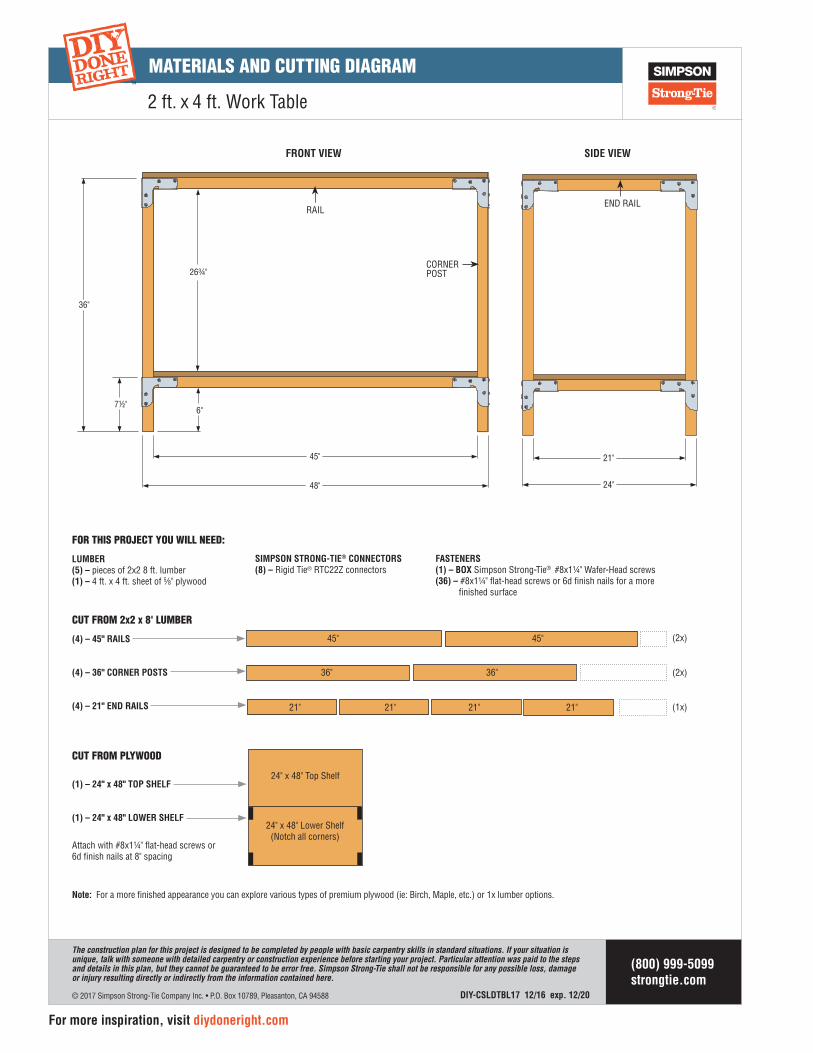
2 ft. x 4 ft. Work Table
24" x 48" Top Shelf
(4) – 45" RAILS
(4) – 36" CORNER POSTS
(4) – 21" END RAILS
(1) – 24" x 48" TOP SHELF
(1) – 24" x 48" LOWER SHELF
Attach with #8x1¼" flat-head screws or 6d finish nails at 8" spacing
45" 45"
36" 36"
24" x 48" Lower Shelf(Notch all corners)
SIMPSON STRONG-TIE® CONNECTORS(8) – Rigid Tie® RTC22Z connectors
FASTENERS(1) – BOX Simpson Strong-Tie® #8x1¼" Wafer-Head screws(36) – #8x1¼" flat-head screws or 6d finish nails for a more finished surface
LUMBER(5) – pieces of 2x2 8 ft. lumber(1) – 4 ft. x 4 ft. sheet of 5⁄8" plywood
SIDE VIEWFRONT VIEW
CUT FROM PLYWOOD
Note: For a more finished appearance you can explore various types of premium plywood (ie: Birch, Maple, etc.) or 1x lumber options.
48"
45"
7½"
36"
6"
26¾"
24"
21"
CORNER POST
RAILEND RAIL
CUT FROM 2x2 x 8' LUMBER
FOR THIS PROJECT YOU WILL NEED:
(2x)
(1x)
(2x)
TM
For more inspiration, visit diydoneright.com
The construction plan for this project is designed to be completed by people with basic carpentry skills in standard situations. If your situation is unique, talk with someone with detailed carpentry or construction experience before starting your project. Particular attention was paid to the steps and details in this plan, but they cannot be guaranteed to be error free. Simpson Strong-Tie shall not be responsible for any possible loss, damage or injury resulting directly or indirectly from the information contained here.
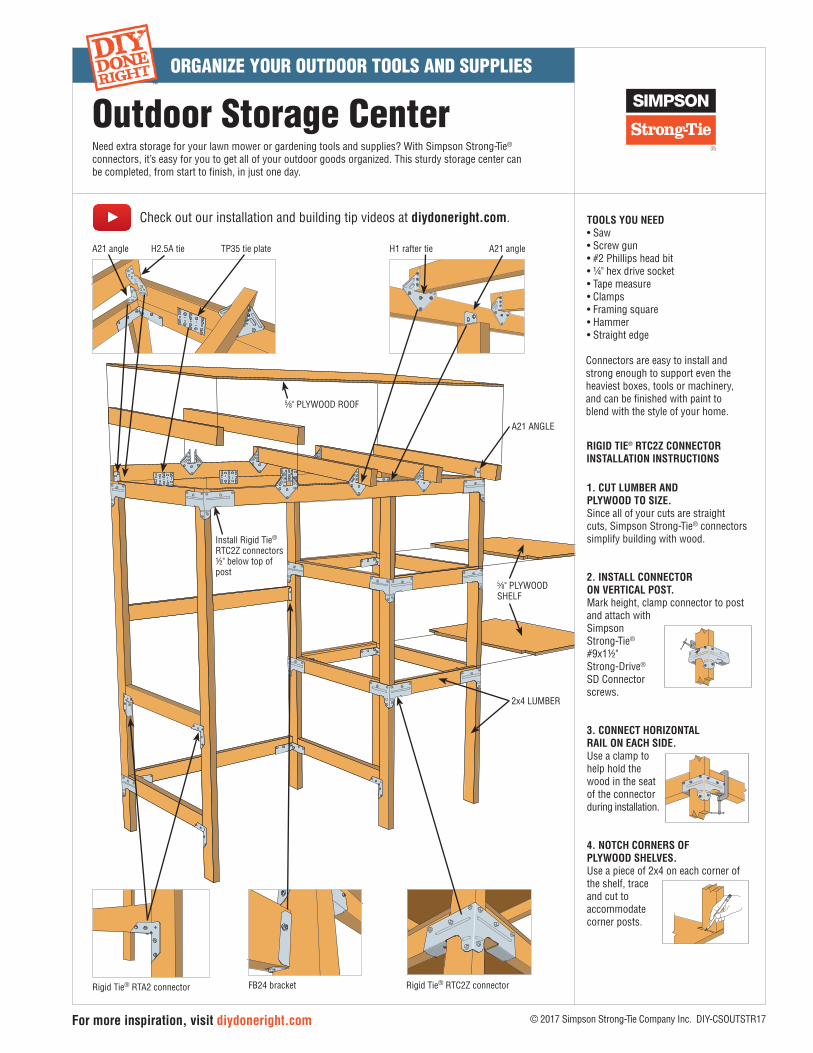
A21 Angle
© 2017 Simpson Strong-Tie Company Inc. DIY-CSOUTSTR17
TM
ORGANIZE YOUR OUTDOOR TOOLS AND SUPPLIES
TOOLS YOU NEED• Saw • Screw gun• #2 Phillips head bit • ¼" hex drive socket• Tape measure• Clamps• Framing square• Hammer• Straight edge
Need extra storage for your lawn mower or gardening tools and supplies? With Simpson Strong-Tie®
connectors, it’s easy for you to get all of your outdoor goods organized. This sturdy storage center can be completed, from start to finish, in just one day.
Outdoor Storage Center
Rigid Tie® RTC2Z connectorRigid Tie® RTA2 connector
A21 angle H1 rafter tieTP35 tie plate
FB24 bracket
For more inspiration, visit diydoneright.com
2x4 LUMBER
5⁄8" PLYWOOD ROOF
Install Rigid Tie® RTC2Z connectors ½" below top of post
A21 ANGLE
1. CUT LUMBER AND PLYWOOD TO SIZE.Since all of your cuts are straight cuts, Simpson Strong-Tie® connectors simplify building with wood.
2. INSTALL CONNECTOR ON VERTICAL POST. Mark height, clamp connector to post and attach with Simpson Strong-Tie®
#9x1½"Strong-Drive® SD Connectorscrews.
3. CONNECT HORIZONTAL RAIL ON EACH SIDE. Use a clamp to help hold the wood in the seat of the connector during installation.
4. NOTCH CORNERS OF PLYWOOD SHELVES.Use a piece of 2x4 on each corner of the shelf, trace and cut to accommodate corner posts.
Connectors are easy to install and strong enough to support even the heaviest boxes, tools or machinery, and can be finished with paint to blend with the style of your home.
RIGID TIE® RTC2Z CONNECTOR INSTALLATION INSTRUCTIONS
5⁄8" PLYWOOD SHELF
H2.5A tie A21 angle
Check out our installation and building tip videos at diydoneright.com.
(800) 999-5099 strongtie.com
© 2017 Simpson Strong-Tie Company Inc. • P.O. Box 10789, Pleasanton, CA 94588 DIY-CSOUTSTR17 12/16 exp. 12/20
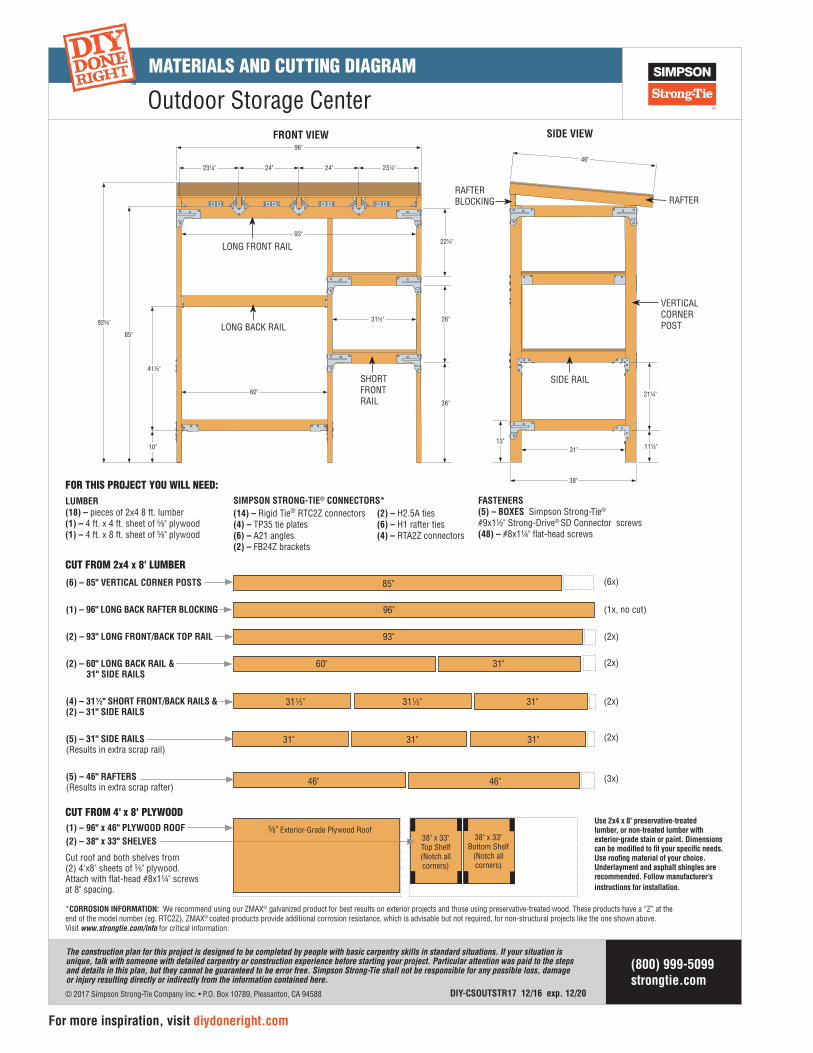
MATERIALS AND CUTTING DIAGRAM TM
Use 2x4 x 8' preservative-treated lumber, or non-treated lumber with exterior-grade stain or paint. Dimensions can be modified to fit your specific needs. Use roofing material of your choice. Underlayment and asphalt shingles are recommended. Follow manufacturer’s instructions for installation.
(6) – 85" VERTICAL CORNER POSTS
(1) – 96" LONG BACK RAFTER BLOCKING (2) – 93" LONG FRONT/BACK TOP RAIL (2) – 60" LONG BACK RAIL & 31" SIDE RAILS (4) – 31 1⁄2" SHORT FRONT/BACK RAILS & (2) – 31" SIDE RAILS (5) – 31" SIDE RAILS (Results in extra scrap rail)
(5) – 46" RAFTERS (Results in extra scrap rafter)
(1) – 96" x 46" PLYWOOD ROOF(2) – 38" x 33" SHELVES
38" x 33" Top Shelf(Notch all corners)
5⁄8" Exterior-Grade Plywood Roof
SIDE VIEWFRONT VIEW
46"
31"
38"
11½"
21¼"
13"
96"
85"
23¼" 24" 24" 23¼"
10"
41½"
36"
26"
60"
31½"
93"22½"
92 5⁄8"
Cut roof and both shelves from (2) 4'x8' sheets of 5⁄8" plywood. Attach with flat-head #8x1¼" screws at 8" spacing.
Outdoor Storage Center
SIMPSON STRONG-TIE® CONNECTORS*(14) – Rigid Tie® RTC2Z connectors (2) – H2.5A ties(4) – TP35 tie plates (6) – H1 rafter ties (6) – A21 angles (4) – RTA2Z connectors (2) – FB24Z brackets
FASTENERS(5) – BOXES Simpson Strong-Tie® #9x1½" Strong-Drive® SD Connector screws (48) – #8x1¼" flat-head screws
LUMBER(18) – pieces of 2x4 8 ft. lumber(1) – 4 ft. x 4 ft. sheet of 5⁄8" plywood(1) – 4 ft. x 8 ft. sheet of 5⁄8" plywood
38" x 33" Bottom Shelf
(Notch all corners)
60" 31"
85"
93"
31" 31" 31"
46" 46"
96"
LONG BACK RAIL
SHORT FRONT RAIL
RAFTER BLOCKING
LONG FRONT RAIL
SIDE RAIL
VERTICAL CORNER POST
RAFTER
CUT FROM 4' x 8' PLYWOOD
31 1⁄2" 31 1⁄2" 31"
FOR THIS PROJECT YOU WILL NEED:
CUT FROM 2x4 x 8' LUMBER(6x)
(3x)
(2x)
(1x, no cut)
(2x)
(2x)
(2x)
*CORROSION INFORMATION: We recommend using our ZMAX® galvanized product for best results on exterior projects and those using preservative-treated wood. These products have a “Z” at the end of the model number (eg. RTC2Z). ZMAX® coated products provide additional corrosion resistance, which is advisable but not required, for non-structural projects like the one shown above. Visit www.strongtie.com/info for critical information.
For more inspiration, visit diydoneright.com
The construction plan for this project is designed to be completed by people with basic carpentry skills in standard situations. If your situation is unique, talk with someone with detailed carpentry or construction experience before starting your project. Particular attention was paid to the steps and details in this plan, but they cannot be guaranteed to be error free. Simpson Strong-Tie shall not be responsible for any possible loss, damage or injury resulting directly or indirectly from the information contained here.
© 2017 Simpson Strong-Tie Company Inc. DIY-CSOCS17
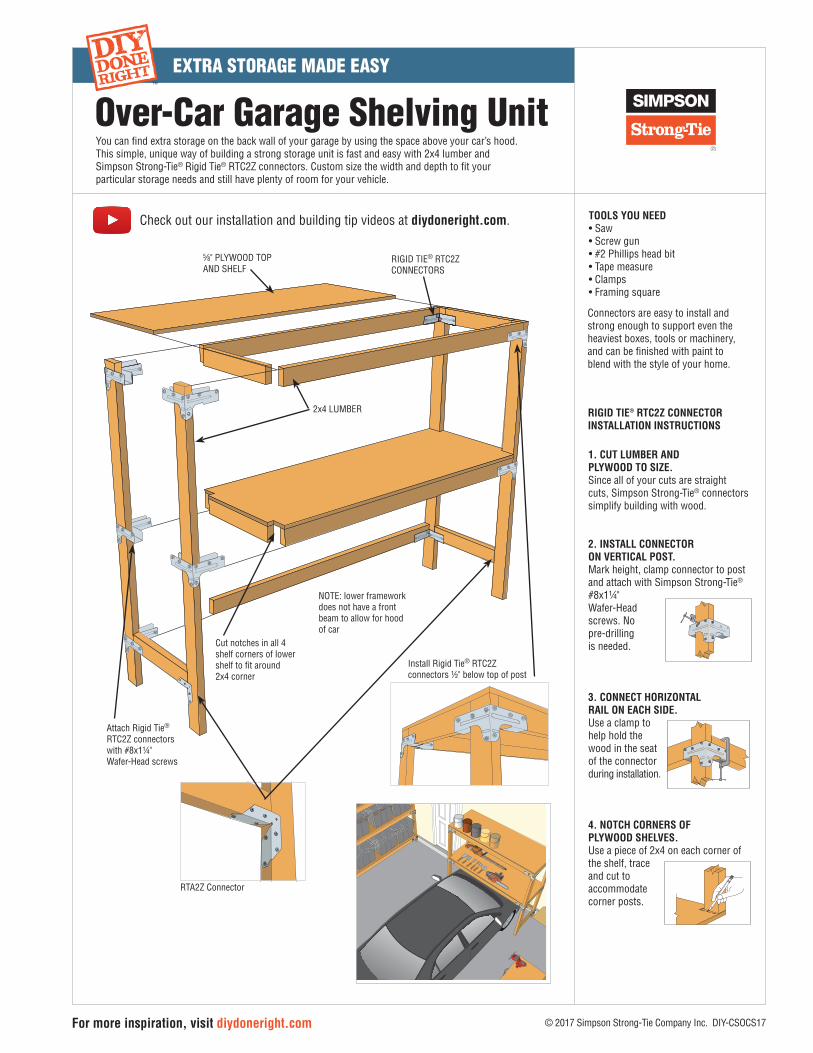
EXTRA STORAGE MADE EASY
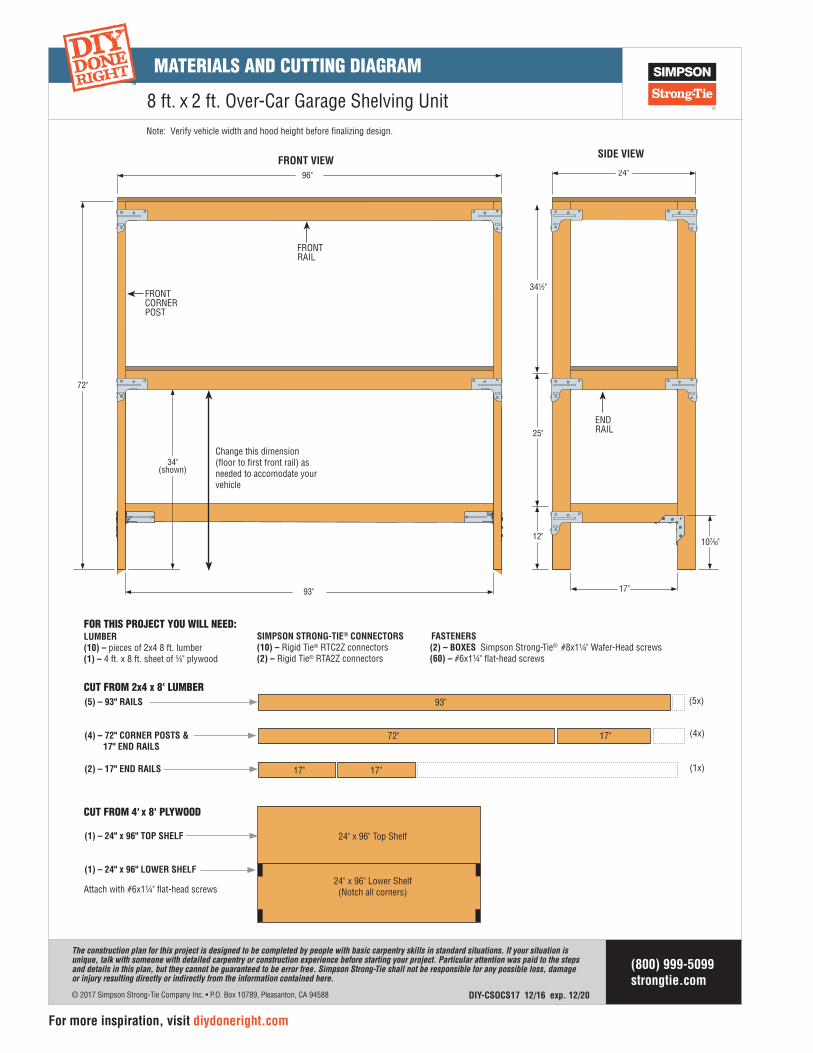
You can find extra storage on the back wall of your garage by using the space above your car’s hood. This simple, unique way of building a strong storage unit is fast and easy with 2x4 lumber and Simpson Strong-Tie® Rigid Tie® RTC2Z connectors. Custom size the width and depth to fit your particular storage needs and still have plenty of room for your vehicle.
Over-Car Garage Shelving Unit
Cut notches in all 4 shelf corners of lower shelf to fit around 2x4 corner
2x4 LUMBER
5⁄8" PLYWOOD TOP AND SHELF
NOTE: lower framework does not have a front beam to allow for hood of car
RIGID TIE® RTC2Z CONNECTORS
For more inspiration, visit diydoneright.com
Install Rigid Tie® RTC2Z connectors ½" below top of post
RTA2Z Connector
Attach Rigid Tie® RTC2Z connectors with #8x1¼" Wafer-Head screws
1. CUT LUMBER AND PLYWOOD TO SIZE.Since all of your cuts are straight cuts, Simpson Strong-Tie® connectors simplify building with wood.
2. INSTALL CONNECTOR ON VERTICAL POST. Mark height, clamp connector to post and attach with Simpson Strong-Tie®
#8x1¼" Wafer-Head screws. No pre-drilling is needed.
3. CONNECT HORIZONTAL RAIL ON EACH SIDE. Use a clamp to help hold the wood in the seat of the connector during installation.
4. NOTCH CORNERS OF PLYWOOD SHELVES.Use a piece of 2x4 on each corner of the shelf, trace and cut to accommodate corner posts.
TOOLS YOU NEED• Saw • Screw gun• #2 Phillips head bit • Tape measure• Clamps• Framing square
Connectors are easy to install and strong enough to support even the heaviest boxes, tools or machinery, and can be finished with paint to blend with the style of your home.
RIGID TIE® RTC2Z CONNECTOR INSTALLATION INSTRUCTIONS
TM
Check out our installation and building tip videos at diydoneright.com.
(800) 999-5099 strongtie.com
MATERIALS AND CUTTING DIAGRAM
24"
17"
12" 107⁄16"
341⁄2"
25"
34"
96"
93"
72"
(shown)
(5) – 93" RAILS
(4) – 72" CORNER POSTS & 17" END RAILS
(2) – 17" END RAILS
(1) – 24" x 96" TOP SHELF
(1) – 24" x 96" LOWER SHELF
Attach with #6x1¼" flat-head screws
72" 17"
Change this dimension (floor to first front rail) as needed to accomodate your vehicle
8 ft. x 2 ft. Over-Car Garage Shelving Unit
FRONT VIEWSIDE VIEW
SIMPSON STRONG-TIE® CONNECTORS(10) – Rigid Tie® RTC2Z connectors(2) – Rigid Tie® RTA2Z connectors
FASTENERS(2) – BOXES Simpson Strong-Tie® #8x1¼" Wafer-Head screws(60) – #6x1¼" flat-head screws
LUMBER(10) – pieces of 2x4 8 ft. lumber(1) – 4 ft. x 8 ft. sheet of 5⁄8" plywood
93"
FRONT CORNER POST
ENDRAIL
FRONTRAIL
Note: Verify vehicle width and hood height before finalizing design.
CUT FROM 4' x 8' PLYWOOD
CUT FROM 2x4 x 8' LUMBER
FOR THIS PROJECT YOU WILL NEED:
© 2017 Simpson Strong-Tie Company Inc. • P.O. Box 10789, Pleasanton, CA 94588 DIY-CSOCS17 12/16 exp. 12/20
(5x)
(4x)
(1x)
24" x 96" Top Shelf
24" x 96" Lower Shelf(Notch all corners)
17" 17"
For more inspiration, visit diydoneright.com
The construction plan for this project is designed to be completed by people with basic carpentry skills in standard situations. If your situation is unique, talk with someone with detailed carpentry or construction experience before starting your project. Particular attention was paid to the steps and details in this plan, but they cannot be guaranteed to be error free. Simpson Strong-Tie shall not be responsible for any possible loss, damage or injury resulting directly or indirectly from the information contained here.
TM
STACK LOGS NEAT AND CLEAN
© 2017 Simpson Strong-Tie Company Inc. DIY-CSLGHLDR17
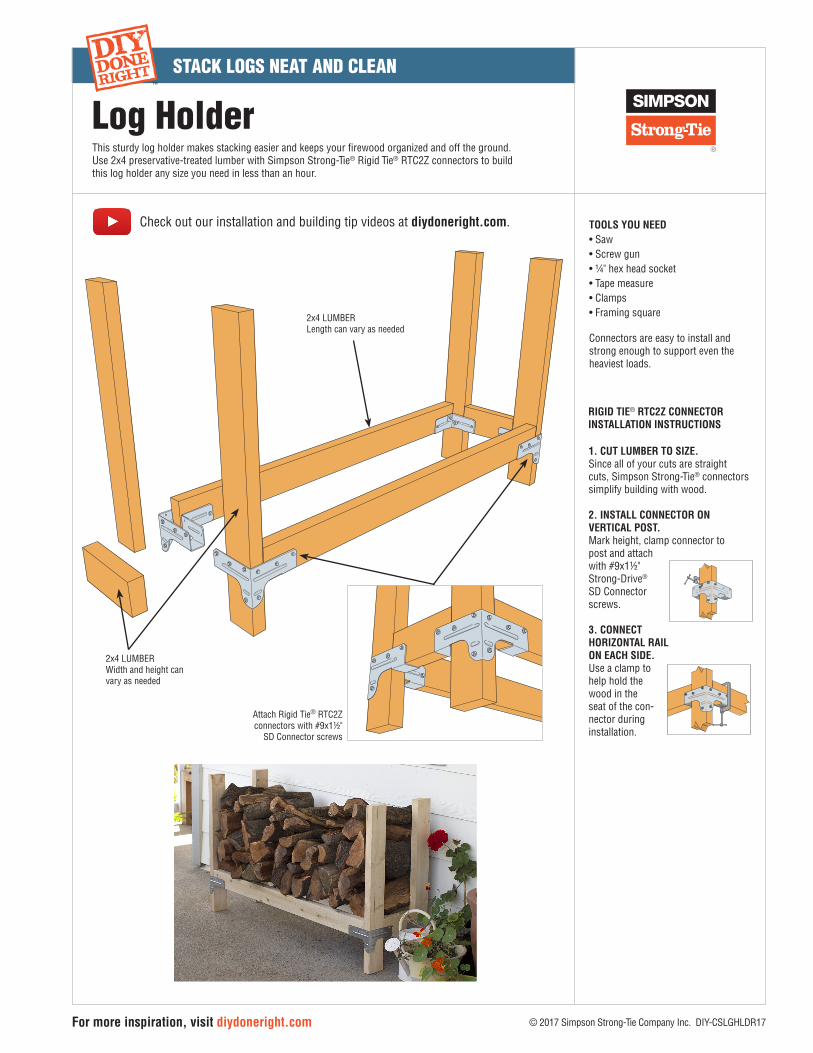
This sturdy log holder makes stacking easier and keeps your firewood organized and off the ground. Use 2x4 preservative-treated lumber with Simpson Strong-Tie® Rigid Tie® RTC2Z connectors to build this log holder any size you need in less than an hour.
Log Holder
2x4 LUMBERWidth and height can vary as needed
2x4 LUMBER Length can vary as needed
Attach Rigid Tie® RTC2Z connectors with #9x1½"
SD Connector screws
For more inspiration, visit diydoneright.com
TOOLS YOU NEED• Saw • Screw gun• ¼" hex head socket • Tape measure• Clamps• Framing square
Connectors are easy to install and strong enough to support even the heaviest loads.
1. CUT LUMBER TO SIZE.Since all of your cuts are straight cuts, Simpson Strong-Tie® connectors simplify building with wood.
2. INSTALL CONNECTOR ON VERTICAL POST. Mark height, clamp connector to post and attach with #9x1½"Strong-Drive®
SD Connector screws.
3. CONNECT HORIZONTAL RAIL ON EACH SIDE. Use a clamp to help hold the wood in the seat of the con-nector during installation.
RIGID TIE® RTC2Z CONNECTOR INSTALLATION INSTRUCTIONS
Check out our installation and building tip videos at diydoneright.com.
TM
MATERIALS AND CUTTING DIAGRAM
(800) 999-5099 strongtie.com
© 2017 Simpson Strong-Tie Company Inc. • P.O. Box 10789, Pleasanton, CA 94588 DIY-CSLGHLDR17 12/16 exp. 12/20
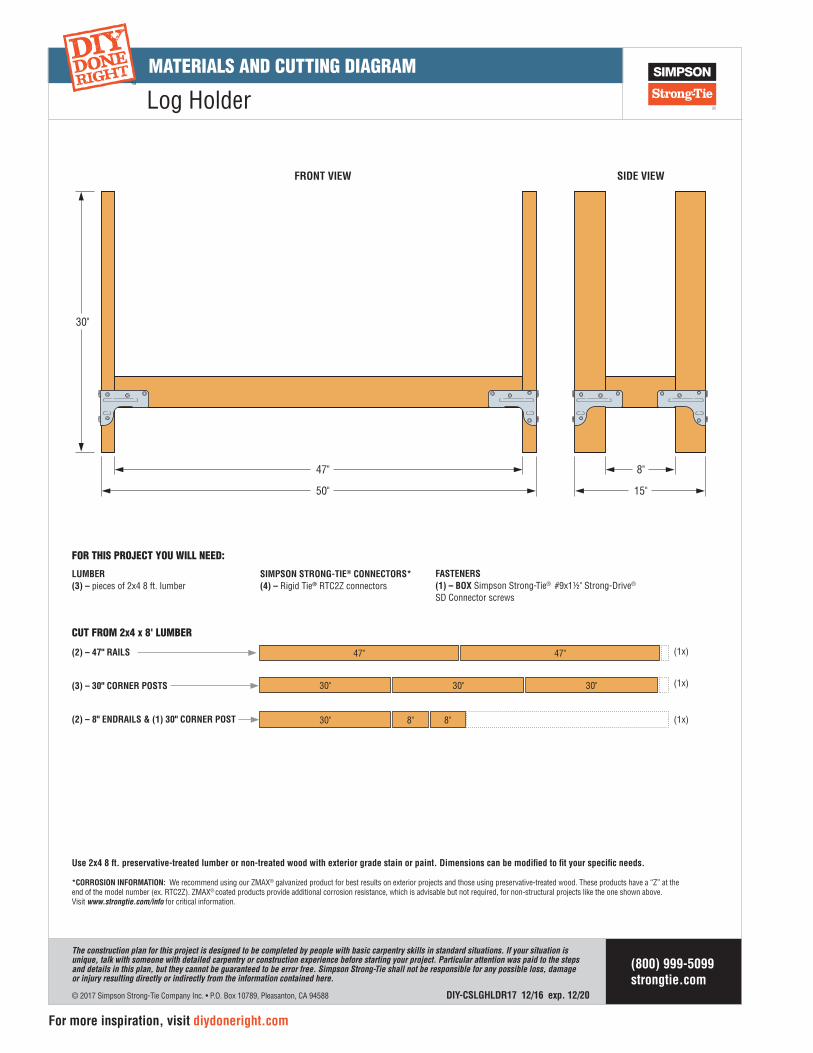
Log Holder
FRONT VIEW SIDE VIEW
50"
47"
15"
8"
30"
SIMPSON STRONG-TIE® CONNECTORS*(4) – Rigid Tie® RTC2Z connectors
FASTENERS(1) – BOX Simpson Strong-Tie® #9x1½" Strong-Drive®
SD Connector screws
LUMBER(3) – pieces of 2x4 8 ft. lumber
FOR THIS PROJECT YOU WILL NEED:
(2) – 47" RAILS
(3) – 30" CORNER POSTS
(2) – 8" ENDRAILS & (1) 30" CORNER POST
CUT FROM 2x4 x 8' LUMBER
8" 8"30"
30"
47" 47"
30" 30"
(1x)
(1x)
(1x)
Use 2x4 8 ft. preservative-treated lumber or non-treated wood with exterior grade stain or paint. Dimensions can be modified to fit your specific needs.
*CORROSION INFORMATION: We recommend using our ZMAX® galvanized product for best results on exterior projects and those using preservative-treated wood. These products have a “Z” at the end of the model number (ex. RTC2Z). ZMAX® coated products provide additional corrosion resistance, which is advisable but not required, for non-structural projects like the one shown above. Visit www.strongtie.com/info for critical information.
For more inspiration, visit diydoneright.com
The construction plan for this project is designed to be completed by people with basic carpentry skills in standard situations. If your situation is unique, talk with someone with detailed carpentry or construction experience before starting your project. Particular attention was paid to the steps and details in this plan, but they cannot be guaranteed to be error free. Simpson Strong-Tie shall not be responsible for any possible loss, damage or injury resulting directly or indirectly from the information contained here.
TM
© 2017 Simpson Strong-Tie Company Inc. DIY-CSPOTBCH17
CREATE A ONE-STOP SPOT FOR GARDENING
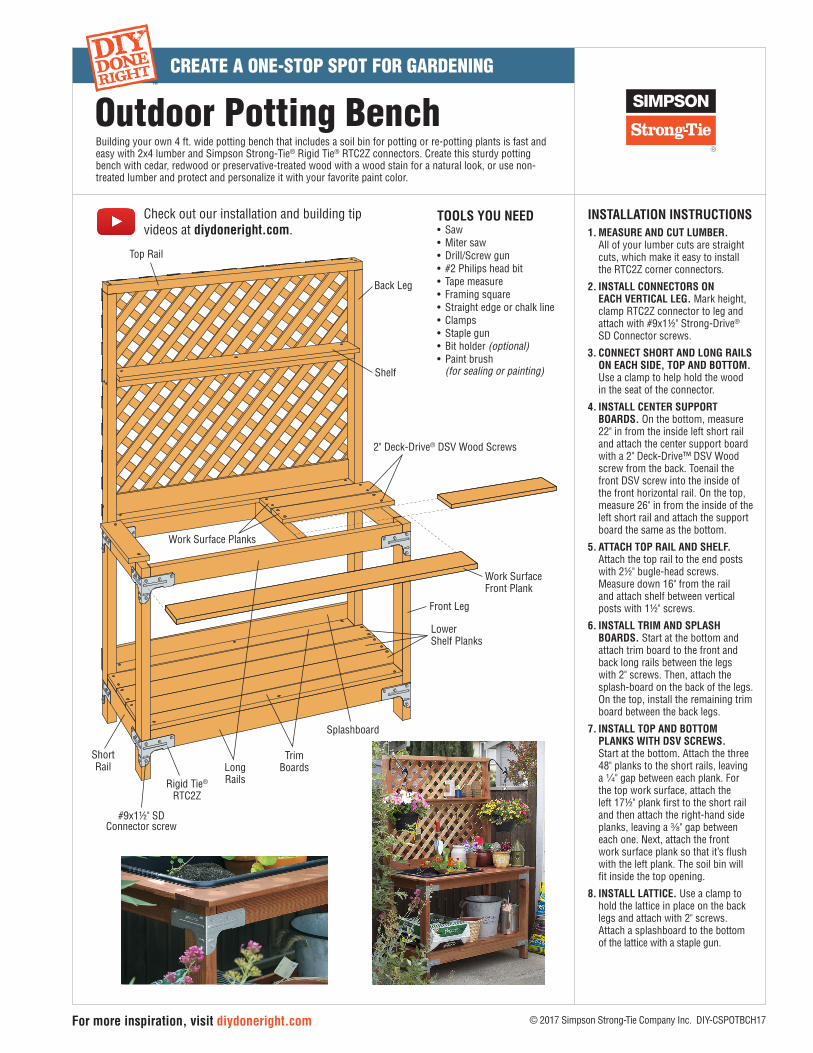
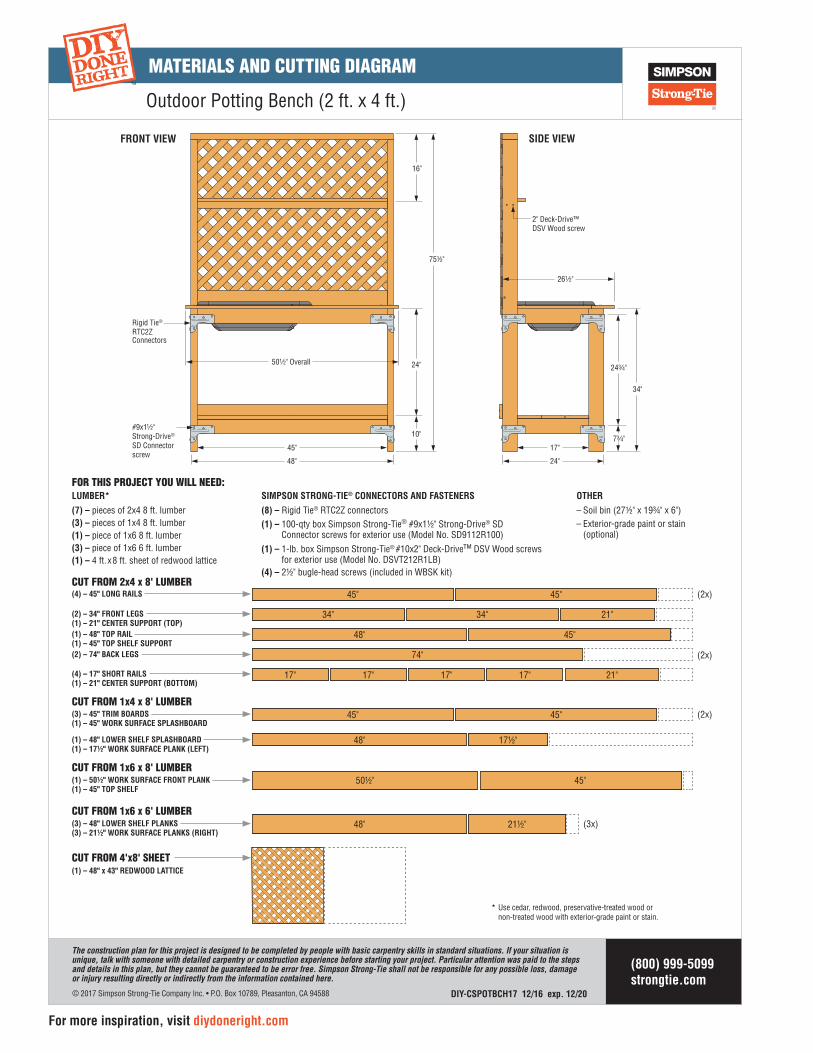
Building your own 4 ft. wide potting bench that includes a soil bin for potting or re-potting plants is fast and easy with 2x4 lumber and Simpson Strong-Tie® Rigid Tie® RTC2Z connectors. Create this sturdy potting bench with cedar, redwood or preservative-treated wood with a wood stain for a natural look, or use non-treated lumber and protect and personalize it with your favorite paint color.
Outdoor Potting Bench
For more inspiration, visit diydoneright.com
INSTALLATION INSTRUCTIONS1. MEASURE AND CUT LUMBER.
All of your lumber cuts are straight cuts, which make it easy to install the RTC2Z corner connectors.
2. INSTALL CONNECTORS ON EACH VERTICAL LEG. Mark height, clamp RTC2Z connector to leg and attach with #9x11/2" Strong-Drive® SD Connector screws.
3. CONNECT SHORT AND LONG RAILS ON EACH SIDE, TOP AND BOTTOM. Use a clamp to help hold the wood in the seat of the connector.
4. INSTALL CENTER SUPPORT BOARDS. On the bottom, measure 22" in from the inside left short rail and attach the center support board with a 2" Deck-Drive™ DSV Wood screw from the back. Toenail the front DSV screw into the inside of the front horizontal rail. On the top, measure 26" in from the inside of the left short rail and attach the support board the same as the bottom.
5. ATTACH TOP RAIL AND SHELF. Attach the top rail to the end posts with 21/2" bugle-head screws. Measure down 16" from the rail and attach shelf between vertical posts with 11/2" screws.
6. INSTALL TRIM AND SPLASH BOARDS. Start at the bottom and attach trim board to the front and back long rails between the legs with 2" screws. Then, attach the splash-board on the back of the legs. On the top, install the remaining trim board between the back legs.
7. INSTALL TOP AND BOTTOM PLANKS WITH DSV SCREWS. Start at the bottom. Attach the three 48" planks to the short rails, leaving a 1⁄4" gap between each plank. For the top work surface, attach the left 171/2" plank first to the short rail and then attach the right-hand side planks, leaving a 3⁄8" gap between each one. Next, attach the front work surface plank so that it’s flush with the left plank. The soil bin will fit inside the top opening.
8. INSTALL LATTICE. Use a clamp to hold the lattice in place on the back legs and attach with 2" screws. Attach a splashboard to the bottom of the lattice with a staple gun.
Back Leg
Shelf
Front Leg
Splashboard
Work Surface Front Plank
Work Surface Planks
2" Deck-Drive® DSV Wood Screws
Lower Shelf Planks
Top Rail
Long Rails
Trim Boards
Short Rail
Rigid Tie®
RTC2Z
#9x11/2" SDConnector screw
Check out our installation and building tip videos at diydoneright.com.
TOOLS YOU NEED• Saw• Miter saw• Drill/Screw gun• #2 Philips head bit• Tape measure• Framing square• Straight edge or chalk line• Clamps• Staple gun• Bit holder (optional)• Paint brush (for sealing or painting)
TM
(2x)
(2x)
(2x)
MATERIALS AND CUTTING DIAGRAM
Outdoor Potting Bench (2 ft. x 4 ft.)
LUMBER*
(7) – pieces of 2x4 8 ft. lumber(3) – pieces of 1x4 8 ft. lumber(1) – piece of 1x6 8 ft. lumber(3) – piece of 1x6 6 ft. lumber(1) – 4 ft. x 8 ft. sheet of redwood lattice
SIMPSON STRONG-TIE® CONNECTORS AND FASTENERS
(8) – Rigid Tie® RTC2Z connectors(1) – 100-qty box Simpson Strong-Tie® #9x11/2" Strong-Drive® SD
Connector screws for exterior use (Model No. SD9112R100) (1) – 1-lb. box Simpson Strong-Tie® #10x2" Deck-Drive™ DSV Wood screws
for exterior use (Model No. DSVT212R1LB)(4) – 21/2" bugle-head screws (included in WBSK kit)
OTHER
– Soil bin (271/2" x 193/4" x 6")– Exterior-grade paint or stain (optional)
FOR THIS PROJECT YOU WILL NEED:
For more inspiration, visit diydoneright.com
501⁄2" Overall
2" Deck-Drive™DSV Wood screw
Rigid Tie®
RTC2ZConnectors
#9x11⁄2" Strong-Drive® SD Connector screw
24"48"
261⁄2"
75½"
45" 17"
34"
243⁄4"
16"
10"
24"
73⁄4"
* Use cedar, redwood, preservative-treated wood or non-treated wood with exterior-grade paint or stain.
(3x)
45"
48"
48"
48" 211/2"
171/2"
45"501/2"
74"
34"
17" 17" 17" 17"
34"
21"
45"
45"
45"
21"
45"
(1) – 501/2" WORK SURFACE FRONT PLANK(1) – 45" TOP SHELF
(3) – 48" LOWER SHELF PLANKS(3) – 211/2" WORK SURFACE PLANKS (RIGHT)
(3) – 45" TRIM BOARDS(1) – 45" WORK SURFACE SPLASHBOARD
(1) – 48" LOWER SHELF SPLASHBOARD(1) – 171/2" WORK SURFACE PLANK (LEFT)
(4) – 45" LONG RAILS
(2) – 74" BACK LEGS
(2) – 34" FRONT LEGS(1) – 21" CENTER SUPPORT (TOP)(1) – 48" TOP RAIL(1) – 45" TOP SHELF SUPPORT
(4) – 17" SHORT RAILS(1) – 21" CENTER SUPPORT (BOTTOM)
CUT FROM 4'x8' SHEET(1) – 48" x 43" REDWOOD LATTICE
CUT FROM 2x4 x 8' LUMBER
CUT FROM 1x4 x 8' LUMBER
CUT FROM 1x6 x 8' LUMBER
CUT FROM 1x6 x 6' LUMBER
FRONT VIEW SIDE VIEW
TM
(800) 999-5099 strongtie.com
© 2017 Simpson Strong-Tie Company Inc. • P.O. Box 10789, Pleasanton, CA 94588 DIY-CSPOTBCH17 12/16 exp. 12/20
The construction plan for this project is designed to be completed by people with basic carpentry skills in standard situations. If your situation is unique, talk with someone with detailed carpentry or construction experience before starting your project. Particular attention was paid to the steps and details in this plan, but they cannot be guaranteed to be error free. Simpson Strong-Tie shall not be responsible for any possible loss, damage or injury resulting directly or indirectly from the information contained here.
© 2017 Simpson Strong-Tie Company Inc. DIY-CSCHICK17
Give Your Chickens Space and Comfort
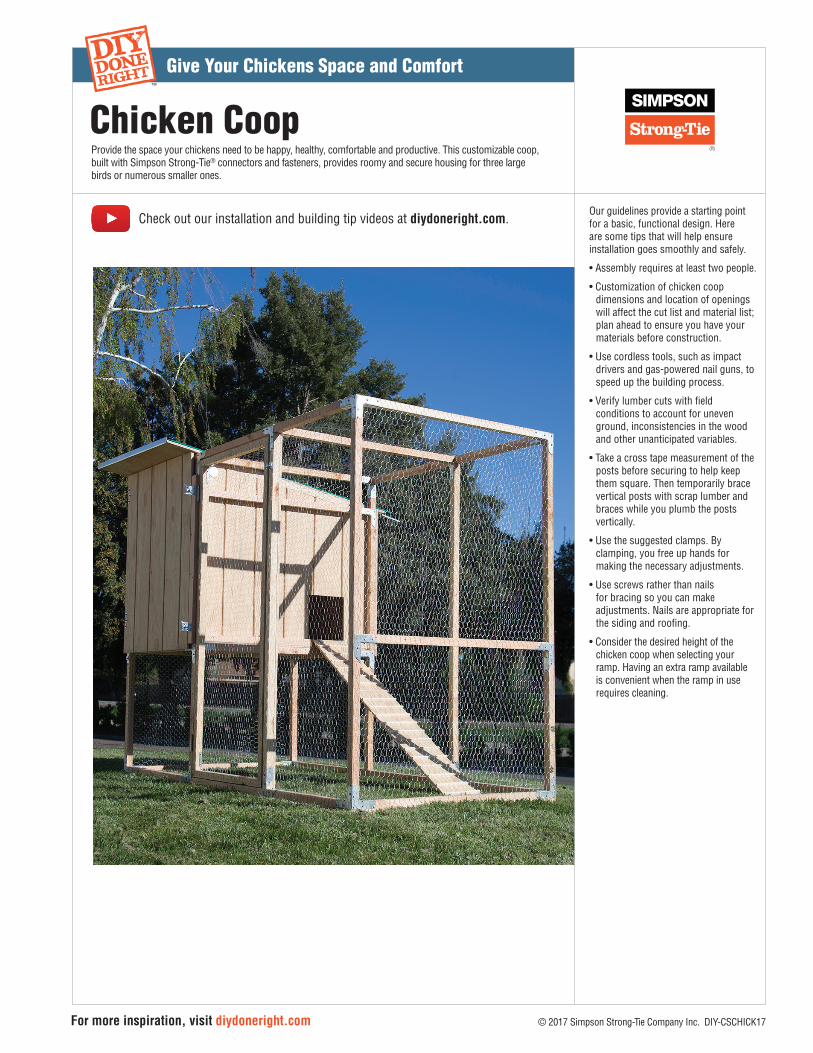
Provide the space your chickens need to be happy, healthy, comfortable and productive. This customizable coop, built with Simpson Strong-Tie® connectors and fasteners, provides roomy and secure housing for three large birds or numerous smaller ones.
Chicken Coop
For more inspiration, visit diydoneright.com
TM
Check out our installation and building tip videos at diydoneright.com.Our guidelines provide a starting point for a basic, functional design. Here are some tips that will help ensure installation goes smoothly and safely.
• Assembly requires at least two people.
• Customization of chicken coop dimensions and location of openings will affect the cut list and material list; plan ahead to ensure you have your materials before construction.
• Use cordless tools, such as impact drivers and gas-powered nail guns, to speed up the building process.
• Verify lumber cuts with field conditions to account for uneven ground, inconsistencies in the wood and other unanticipated variables.
• Take a cross tape measurement of the posts before securing to help keep them square. Then temporarily brace vertical posts with scrap lumber and braces while you plumb the posts vertically.
• Use the suggested clamps. By clamping, you free up hands for making the necessary adjustments.
• Use screws rather than nails for bracing so you can make adjustments. Nails are appropriate for the siding and roofing.
• Consider the desired height of the chicken coop when selecting your ramp. Having an extra ramp available is convenient when the ramp in use requires cleaning.
(Q)
(R)
(S)
(V)
(M)
(M)
(N)(N)
(O)
(O)
(L)
(P)
(U)
(T)
(L)
(P)
(P)
(P)
(P)
(P)
(F)
(I)
(I)
(I)(I)
(I)
(I)
(I)
(Z)
(F)
(A)
(A)
(B)(C)
(J)
(G)
(C)
(D)
(D)(B)
(H)
(H)
(E)
(K)
(K)
(J)
(E)
Give Your Chickens Space and Comfort
What You Will NeedTM
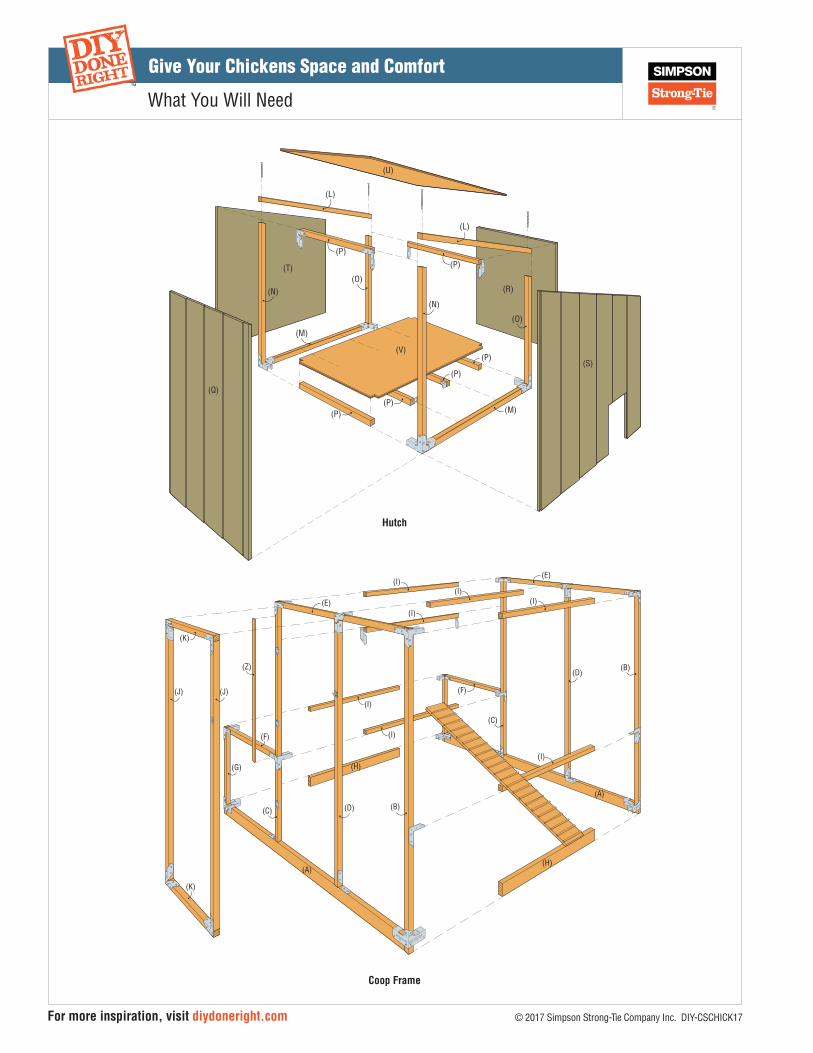
Hutch
Coop Frame
© 2017 Simpson Strong-Tie Company Inc. DIY-CSCHICK17For more inspiration, visit diydoneright.com
Give Your Chickens Space and Comfort
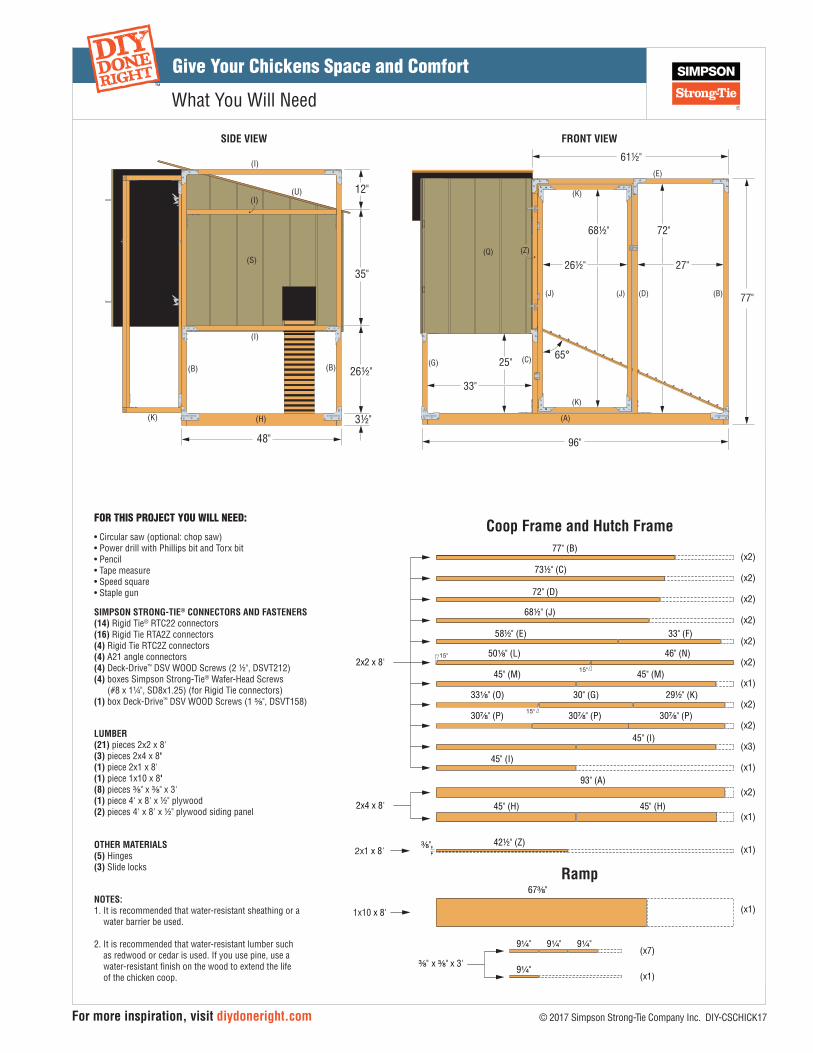
SIDE VIEW FRONT VIEW
What You Will Need
LUMBER (21) pieces 2x2 x 8'(3) pieces 2x4 x 8'(1) piece 2x1 x 8'(1) piece 1x10 x 8'(8) pieces 3/8" x 3/8" x 3'(1) piece 4' x 8' x ½" plywood(2) pieces 4' x 8' x ½" plywood siding panel
OTHER MATERIALS (5) Hinges (3) Slide locks
SIMPSON STRONG-TIE® CONNECTORS AND FASTENERS(14) Rigid Tie® RTC22 connectors(16) Rigid Tie RTA2Z connectors(4) Rigid Tie RTC2Z connectors(4) A21 angle connectors(4) Deck-Drive™ DSV WOOD Screws (2 ½", DSVT212)(4) boxes Simpson Strong-Tie® Wafer-Head Screws (#8 x 1¼", SD8x1.25) (for Rigid Tie connectors)(1) box Deck-Drive™ DSV WOOD Screws (1 ⅝", DSVT158)
FOR THIS PROJECT YOU WILL NEED:
TM
≠
≠
≠
≠ ≠
≠
≠
≠
≠
≠
≠≠
≠
≠
≠ ≠
≠
≠
≠
≠
≠
≠
≠
≠
(I)
(S)
(B) (B)
(H)
(I)
(K)
(K)
(J) (J)
(I)
(U) 12"
35"
26½"
48"
3½"
≠
≠
≠
≠
≠
≠
≠
≠
≠
≠
≠
≠
≠
≠
≠
≠
(Q)
(A)
96"
33"
25"65°
(B)(D)
(C)(G)
(J) (J)
(K)
(K)
(E)
61½"
27"26½"
68½"
77"
72"
(Z)
≠
≠
≠
≠
≠
≠
≠
≠
≠
≠
≠
≠
≠
≠≠
≠
≠≠≠
≠
≠
≠
≠≠
≠
≠
77" (B)(x2)
(x2)
(x2)
(x2)
(x2)
(x2)
(x1)
(x2)
(x2)
(x1)
(x1)
(x7)
(x1)
73½" (C)
72" (D)
68½" (J)
58½" (E) 33" (F)
30" (G)
30⅞" (P) 30⅞" (P)30⅞" (P)
33⅛" (O) 29½" (K)
93" (A)
67⅜"
9¼" 9¼" 9¼"
(x1)9¼"
(x2)45" (H) 45" (H)
(x1)
2x2 x 8'
2x4 x 8'
• RTC22
Model Quantity
• RTA2Z• RTC2Z
• A21
14164
4
⅜" x ⅜" x 3'
⅜"
50⅛" (L) 46" (N)
45" (M) 45" (M)
42½" (Z)
45" (I)
45" (I)(x3)
15°
15°
15°
Model Quantity• DSV212• SD8x1.25• Hinges• Silde Lock
4
53
4 (Box)
1x10 x 8'
2x1 x 8'
Ramp
Connectors
Coop Frame and Hutch Frame• Circular saw (optional: chop saw) • Power drill with Phillips bit and Torx bit• Pencil• Tape measure• Speed square• Staple gun
© 2017 Simpson Strong-Tie Company Inc. DIY-CSCHICK17For more inspiration, visit diydoneright.com
NOTES:1. It is recommended that water-resistant sheathing or a
water barrier be used.
2. It is recommended that water-resistant lumber such as redwood or cedar is used. If you use pine, use a water-resistant finish on the wood to extend the life of the chicken coop.
36⅛"
47⅞"
12"10"
36⅛"
47⅞"
(T)
15°
(S)
48⅜"
60"
37⅝"
33⅞"
1½"1½"
(V)(U)
48"
477∕8"
(Q)
36⅛"
33⅞" 34¼"
(R)
Plywood4' x 8' x ½"
Plywood siding panel4' x 8' x ½"
Plywood siding panel4' x 8' x ½"
(x1)
(x1)
(x1)
Give Your Chickens Space and Comfort
What You Will NeedTM
(800) 999-5099 strongtie.com
© 2017 Simpson Strong-Tie Company Inc. • P.O. Box 10789, Pleasanton, CA 94588 DIY-CSCHICK17 3/17 exp. 12/20
For more inspiration, visit diydoneright.com
The construction plan for this project is designed to be completed by people with basic carpentry skills in standard situations. If your situation is unique, talk with someone with detailed carpentry or construction experience before starting your project. Particular attention was paid to the steps and details in this plan, but they cannot be guaranteed to be error free. Simpson Strong-Tie shall not be responsible for any possible loss, damage or injury resulting directly or indirectly from the information contained here.
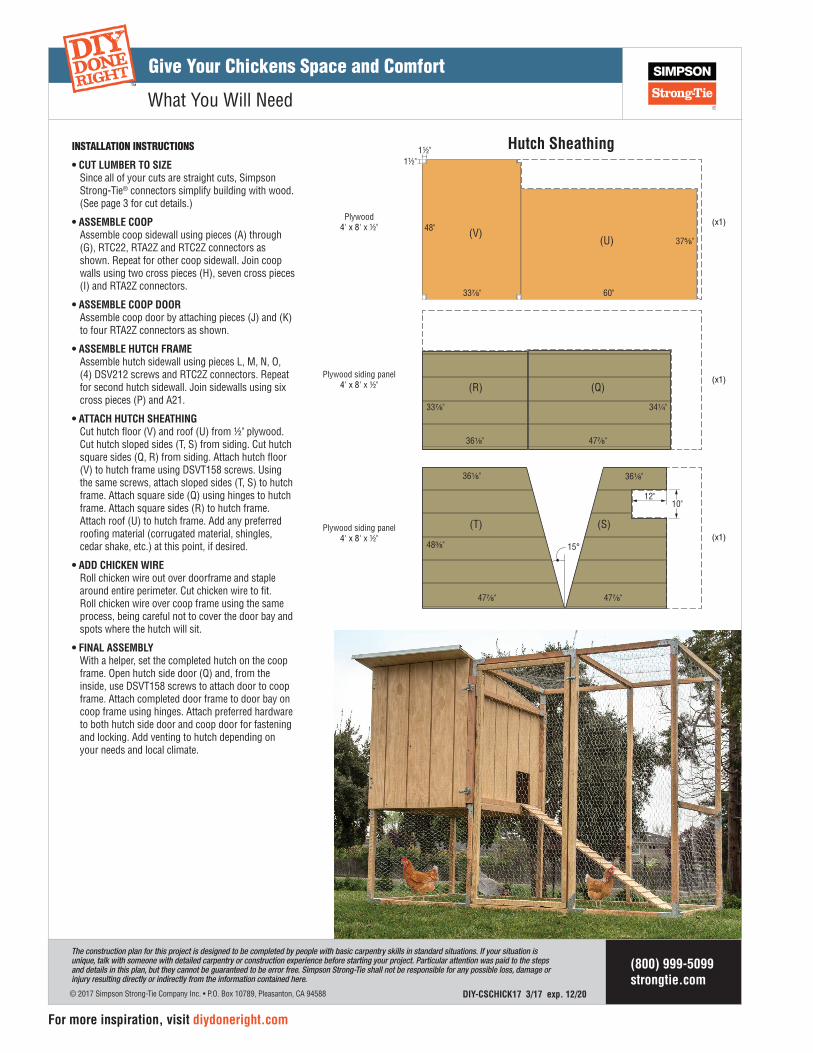
INSTALLATION INSTRUCTIONS
• CUT LUMBER TO SIZESince all of your cuts are straight cuts, Simpson Strong-Tie® connectors simplify building with wood. (See page 3 for cut details.)
• ASSEMBLE COOPAssemble coop sidewall using pieces (A) through (G), RTC22, RTA2Z and RTC2Z connectors as shown. Repeat for other coop sidewall. Join coop walls using two cross pieces (H), seven cross pieces (I) and RTA2Z connectors.
• ASSEMBLE COOP DOORAssemble coop door by attaching pieces (J) and (K) to four RTA2Z connectors as shown.
• ASSEMBLE HUTCH FRAMEAssemble hutch sidewall using pieces L, M, N, O, (4) DSV212 screws and RTC2Z connectors. Repeat for second hutch sidewall. Join sidewalls using six cross pieces (P) and A21.
• ATTACH HUTCH SHEATHINGCut hutch floor (V) and roof (U) from ½" plywood. Cut hutch sloped sides (T, S) from siding. Cut hutch square sides (Q, R) from siding. Attach hutch floor (V) to hutch frame using DSVT158 screws. Using the same screws, attach sloped sides (T, S) to hutch frame. Attach square side (Q) using hinges to hutch frame. Attach square sides (R) to hutch frame. Attach roof (U) to hutch frame. Add any preferred roofing material (corrugated material, shingles, cedar shake, etc.) at this point, if desired.
• ADD CHICKEN WIRERoll chicken wire out over doorframe and staple around entire perimeter. Cut chicken wire to fit. Roll chicken wire over coop frame using the same process, being careful not to cover the door bay and spots where the hutch will sit.
• FINAL ASSEMBLYWith a helper, set the completed hutch on the coop frame. Open hutch side door (Q) and, from the inside, use DSVT158 screws to attach door to coop frame. Attach completed door frame to door bay on coop frame using hinges. Attach preferred hardware to both hutch side door and coop door for fastening and locking. Add venting to hutch depending on your needs and local climate.
Hutch Sheathing
Related Documents