SHIPPING SOLUTIONS export documentation software export documentation software e x p o r t d o c u m e n t a t i o n s o f t w a r e USER GUIDE

Welcome message from author
This document is posted to help you gain knowledge. Please leave a comment to let me know what you think about it! Share it to your friends and learn new things together.
Transcript

SHIPPING SOLUTIONS
export documentat ion softwareexport documentat ion software
expor
t do
cum
enta
t ion software
USER GUIDE


1
Table of Contents
TABLE OF CONTENTS ........................................................................................................................ 1
ABOUT SHIPPING SOLUTIONS® ....................................................................................................... 5
Software Overview ................................................................................................................................... 6
INSTALLATION ................................................................................................................................... 7
System Requirements ............................................................................................................................... 7
Single-User Installation ............................................................................................................................ 7
Multi-User Installation .............................................................................................................................. 8
Running the Database on Your Company’s Existing SQL Server ........................................................... 8 Running the Database Using SQL Express on a Shared Network Computer ........................................... 9 Install Shipping Solutions Client Software and Connect to the SQL Server .......................................... 10 Configuring the Windows Firewall to Allow Connections to the SQL Database ................................... 11
CONFIGURING SHIPPING SOLUTIONS ........................................................................................ 22
Shipping Solutions Multi-User Version: Setting Up Logins and User Accounts ....................................... 23
Setting Up User Groups (Multi-User, Professional Only)......................................................................... 24
Adding Signatures and Logos ................................................................................................................. 26
Setting Up Profiles and Assigning Them to Users ................................................................................... 27
GETTING STARTED WITH SHIPPING SOLUTIONS .................................................................... 28
Main Menu ............................................................................................................................................. 28
Populating the Databases ........................................................................................................................ 29
Creating a Shipment ............................................................................................................................... 33
SHIPPING SOLUTIONS SOFTWARE IN DETAIL .......................................................................... 38
EZ Start Tab ........................................................................................................................................... 38
The EZ Start Toolbar .......................................................................................................................... 39 Shipment Number & Shipment Details ................................................................................................ 50 Contacts Screen .................................................................................................................................. 51 Product Detail Screen ......................................................................................................................... 54 Carriers and Ports Screen .................................................................................................................... 63 Invoices—Proforma/Commercial Screen ............................................................................................. 65 EEI – Electronic Export Information (AES) Screen ............................................................................. 68 Packing List Screen ............................................................................................................................ 71 Free Trade Agreements Screen ............................................................................................................ 74 Generic Certificate of Origin ............................................................................................................... 76 Electronic Certificate of Origin ........................................................................................................... 77 Canada Customs Invoice Screen.......................................................................................................... 80 Caricom Invoice Screen ...................................................................................................................... 82 Product Summary Screen .................................................................................................................... 84 Shipper’s Letter of Instruction Screen ................................................................................................. 85 Parcel Shipping Screen (Professional Only)......................................................................................... 87 Inland Bill of Lading Screen ............................................................................................................... 91 Ocean Bill of Lading/Dock Receipt Screen.......................................................................................... 93 Air Waybill Screen ............................................................................................................................. 95

2
Dangerous Goods IATA Screen (Professional Only) ........................................................................... 98 Dangerous Goods IMO Screen (Professional Only) ............................................................................ 102 Non-Dangerous Goods Screen (Professional Only) ............................................................................. 105 Bank Draft Screen ............................................................................................................................. 106 Security Endorsement Screen ............................................................................................................. 106 Shipment Log Screen (Professional Only) .......................................................................................... 107
Shipping Solutions Databases ................................................................................................................ 108
Contacts Database.............................................................................................................................. 109 Products Database.............................................................................................................................. 112 Phrases Database ............................................................................................................................... 120 Currencies Database (Professional Only) ............................................................................................ 121 Payment Terms Database ................................................................................................................... 123 Countries Database ............................................................................................................................ 123 Carriers and Ports Database ............................................................................................................... 124 Export Codes Database ...................................................................................................................... 125 License Types Database ..................................................................................................................... 126 Package Types Database .................................................................................................................... 126 Miscellaneous Lists Database ............................................................................................................. 126 Shipment Log Items Database (Professional Only) ............................................................................. 126
Utilities Tab .......................................................................................................................................... 127
Conversion Calculator ....................................................................................................................... 127 Generate Reports ............................................................................................................................... 128 Print Shipping Labels ......................................................................................................................... 129 Generate XML Data Files (Professional Only) ................................................................................... 129
Tools Tab .............................................................................................................................................. 130
Run Data Exchange Manager (Import Shipments) (Professional Only) ............................................... 130 Import Contacts and Products Databases ............................................................................................ 132 Export Contacts and Products Databases ............................................................................................ 135 Backup Database ............................................................................................................................... 136 Delete Shipments ............................................................................................................................... 137 Lock/Unlock Shipments (Professional Only) ...................................................................................... 138 Customize Documents ....................................................................................................................... 139 Customize Consolidated Documents (Professional Only) .................................................................... 139
Admin Tab ............................................................................................................................................ 140
Set Database Connection.................................................................................................................... 140 Setup Data Exchange Manager (Professional Only) ............................................................................ 141 Signatures & Logos ........................................................................................................................... 160 Profile Settings .................................................................................................................................. 162 User Groups (Professional Multi-User Version Only) ......................................................................... 164 Anyone who has been granted user rights to the Admin tab will be able to create new user groups or
modify existing user group settings at any time. ................................................................................. 165 User Accounts ................................................................................................................................... 166 Global Settings .................................................................................................................................. 167 Registration Number .......................................................................................................................... 167
TECHNICAL SUPPORT .................................................................................................................... 168
Contacting InterMart ............................................................................................................................. 168
Other Resources .................................................................................................................................... 168
Shipping Solutions Professional Customizations .................................................................................... 168

3
APPENDIX .......................................................................................................................................... 169
Summary of Export Documents ............................................................................................................. 169
Incoterms® 2020 .................................................................................................................................... 178
Export License Types and Codes ........................................................................................................... 180
Database File Structure .......................................................................................................................... 182
Contacts Databases ............................................................................................................................ 182 Products Database.............................................................................................................................. 183
Data Exchange Manager File Structure .................................................................................................. 185
International Trade Resources ................................................................................................................ 212

4

5
About Shipping Solutions®
Congratulations on your decision to use Shipping Solutions, America’s #1 selling export documentation and
compliance software. Shipping Solutions is used by thousands of exporters who save time and money every
time they prepare a new export shipment.
We are proud to offer three versions of Shipping Solutions: Classic, Professional and Enterprise. Shipping
Solutions Classic is a great tool for small companies to begin preparing their export documents faster, easier
and cheaper than they ever thought possible.
In addition to providing all the same features as the Classic version, Shipping Solutions Professional gives you more—more forms, more ways to share data and forms, and more ways to ensure that your exports
comply with export regulations.
Shipping Solutions Enterprise includes all the features and functionality of the Professional version along
with the ability to install the client software on an unlimited number of user’s computers.
This User Guide explains the installation and use of the Shipping Solutions Classic, Shipping Solutions
Professional, and Shipping Solutions Enterprise software.
The features described in this User Guide that are only found in the Shipping Solutions Professional and
Shipping Solutions Enterprise versions are clearly marked as Shipping Solutions Professional version only.
All screen shots are taken from Shipping Solutions Professional.
Shipping Solutions Professional

6
Software Overview
Whether you are an experienced exporter, an experienced computer user, or inexperienced at both, Shipping
Solutions is the easy way to enter your export orders and complete your standard export documents.
By utilizing the program’s extensive databases and the EZ Start screens, you can reduce the time it takes to
enter your export information by up to or more than 80 percent. And because the software allows you to
print standard export forms on plain paper from your inkjet or laser printer, it eliminates the need to
purchase and stock expensive pre-printed forms.
With Shipping Solutions, you simply enter your export information on the EZ Start screens, select the
documents you need to print, and in a matter of just a few minutes your paperwork is done and your
products are ready to ship.
To make the program even easier to use, Shipping Solutions allows you to key in or import your product
information, customer information, and all the intermediate consignees, forwarding agents and other
miscellaneous contacts you ever use into separate databases. For even more efficient use, you can import
orders into Shipping Solutions Professional from almost any accounting, order entry, or ERP system.
Current subscribers to the Shipping Solutions Professional Annual Maintenance Program (AMP) can also
check to see what documents they need to produce for exporting to specific countries, check the parties in
their transaction against the various government and United Nations restricted party lists, and check their
products against U.S. Export Regulations to determine if they need to apply for an export license.
Please Note: After completing your export documents, you must carefully review the printed form(s)
before use. Because Shipping Solutions does not restrict or limit the way you enter information into
each field, InterMart, Inc. cannot and does not in any way guarantee the accuracy of the completed
forms. InterMart strongly recommends that everyone involved in export documentation get thorough
and complete training from government or private training companies.

7
Installation
Shipping Solutions files are shipped in compressed format and automatically decompress during the
installation process. To install and run Shipping Solutions on a computer, run the installation program. Do
not just copy Shipping Solutions files into a directory on the hard disk.
System Requirements
Recommended Minimum Hardware:
• Processor 1 GHz
• RAM 1 GB
• Disk Space 3 GB
Supported Operating Systems:
• Windows 7 or higher.
Internet Security Options:
In addition, depending on your internet security settings, you may need to whitelist these URLs if you want
to use the corresponding services:
• http://www.shipsolutions.com – News flashes
• https://wizards.amberroad.com – Export Compliance Module (Professional version only)
• http://www.ibt-articles.com – Software registration (version 9.15 and earlier)
• https://ace.cbp.dhs.gov – ACE/AESDirect
• http://www.fedex.com – FedEx (Professional version only)
• http://www.apps.ups.com – UPS (Profesional version only)
• https://ssam.shippingsolutions.com – Export Compliance Module and software registration (version 9.16 and later)
Single-User Installation
The single-user version of Shipping Solutions includes a license to install the software on one computer.
Microsoft SQL Express is installed along with the Shipping Solutions program. When doing the installation,
it is best to be logged into the computer as the user who will be using the Shipping Solutions software.
Otherwise, the user many have trouble accessing the SQL Server database.
If you have the trial version of Shipping Solutions already installed on the computer, you will need to
uninstall the trial before continuing with the full single-user installation.
We will provide you with a link to download the software. The Professional single user download is called
sspro_9Xs_setup.exe, and the Classic single user version download is called sspro_8Xs_setup.exe, where
X stands for the version number. Once the file is downloaded, double-click to install. Once the installation is
complete, you will see a Shipping Solutions icon on your desktop.

8
Multi-User Installation
Shipping Solutions licenses are seat licenses. You need to purchase a license for each workstation that you
are installing Shipping Solutions on.
The exception is the Enterprise version of Shipping Solutions that allows for unlimited installation of the
client software with a database hosted on a Microsoft Azure cloud server managed by Shipping Solutions.
Enterprise customers will receive a personalized link to download the Shipping Solutions software.
Most companies, however, purchase the number of Shipping Solutions licenses that they need. Additional licenses can be purchased at any time by calling us at 888-890-7447.
The multi-user version of Shipping Solutions requires Microsoft SQL or SQL Express to run the database
file, which will store all your company’s export shipment data created in the software. The database must be
run somewhere where all users can access it. There are three options:
• Shipping Solutions can host the SQL database for you on a Microsoft Azure SQL Server in a cloud
environment. There is an additional fee for this hosting service except for Enterprise customers.
Contact us at 888-890-7447 to setup the cloud hosting of your database.
• If your company has an existing Microsoft SQL Server running version 2008 R2 or higher, you can
run the Shipping Solutions database on that server.
• You can install Microsoft SQL Server Express 2012 on a shared computer that all users can access.
Running the Database on Your Company’s Existing SQL Server
Click the Server link provided, which downloads an ISO file called SSPro_9X_Server CD.iso, where X
stands for the version number. Open the ISO file and then open the Database folder.
For SQL Server 2012 or higher, copy the ssdata_sql_01.mdf and ssdata_sql_10_log.ldf files to the desired
location on your server. Attach the database to your SQL Server and configure logins and users for the
newly attached database. If your company has Microsoft SQL Server Version 2008 R2, unzip the file in the
DB_Created_with_2008R2 folder and attach the mdf and ldf files to your SQL Server.
MS SQL Server offers two ways of implementing security. The first method uses Windows Integrated Security, which allows users in an already existing domain-controlled network to use the SQL Server
without a separate login. The users’ accounts or user groups can be simply assigned rights to the databases.
The second method uses SQL Server’s built in security that will require a separate login from the network or
other workstation login.
Creating SQL Server Logins
While we at Shipping Solutions do not provide support for implementing security on your company’s
existing SQL Server, the following instructions for creating SQL Server logins are provided as a courtesy for
our users:
1. Open SQL Server Management Studio. Expand the Security tree.
2. Right click on Logins and choose New Login.
3. In the Login name box enter the user name you want to create.
4. Click the SQL Server authentication button. Enter the password, and confirm the password.
5. Decide if you want to enforce the password policy by unchecking the boxes or leaving them
checked.

9
6. In the Default database dropdown choose ssdata_sql_01. Click OK.
7. Expand the Databases tree. Expand the ssdata_sql_01 tree. Expand the Security tree.
8. Right click on Users and choose New User.
9. Enter a user name. You may want to use the same user name you created in step 3.
10. Next to the Login Name box click the browse button and choose the user name created in step 3.
11. In both the Owned Schemas and Role Members boxes, click the check box next to
db_accessadmin, db_datareader, db_datawriter, and db_owner. Click OK.
Shipping Solutions Server Installation Menu
Running the Database Using SQL Express on a Shared Network
Computer
Click the Server link provided, which downloads an ISO file called SSPro_9X_Server CD.iso, where X
stands for the version number. Open the ISO file, and double click on Shipping_Solutions_Pro_9.exe. An
installation menu will pop up.
The menu includes two Install buttons. The first button installs Microsoft SQL Express 2012, and the second button copies the Shipping Solutions database to your computer and attaches it to SQL Express.
Click the first Install button. Agree to the license terms and click Install again. When the installation routine
completes, click Close, return to the Installation menu, and click the second Install button. Agree to the
license terms and click Install again. When the installation routine completes, click Close.
10
SQL Server Management Studio is installed with SQL Express. It can be opened by the user that installed
the SQL Express, but if needed, the sa password is set to ShippingSolutions01.
Install Shipping Solutions Client Software and Connect to the SQL
Server
Use the link provided to download the client software on each individual workstation. The file for Shipping
Solutions Professional is called sspro_9Xm_setup.exe, and the file for Shipping Solutions Classic is called
sspro_8Xm_setup.exe where X stands for the version number. Double-click and install the software.
Setting the Database Connection on the Shipping Solutions Multi-User Version
Open Shipping Solutions by double-clicking on the icon on your desktop. A message will pop up telling you
that you do not have a valid database connection. Click OK or Admin until the server connection box pops
up. Set the server connection string on each client:
1. In the server box, type the name of the SQL Server. If you installed SQL Express from the link we
provided, the name of the SQL Server will be the name of the computer where it was installed and
then \SQLEXPRESS.
2. If you are using SQL Server’s built in security (if you are using a Trusted Connection, skip this
step):
a. Uncheck the Trusted Connection box.
b. Type in the user name and password you created as described on page 8. You can also use
the default user name, sa, and the password, ShippingSolutions01.
3. Click Test Connection.
4. In the database box, choose ssdata_sql_01.
5. Click Test and Save.
The software will close. When you reopen the software, it should ask you to login. The default User Name is
“Admin”, and the default Password is “password”. This logs you into the software and is completely
separate from the SQL Server login.
The registration screen will pop up. You can register the software using the code provided, or you can click
Register Later. You have 30 days to register.

11
Configuring the Windows Firewall to Allow Connections to the SQL
Database
If you are having trouble connecting to the Shipping Solutions database, it could be that your user does not
have rights to the database, or it could be that the user cannot connect to the server.
If the error message says that the user does not have access to the database, grant the user the following
rights in SQL Server Management Studio: db_accessadmin, db_datareader, db_datawriter and db_owner.
If the error message says that the server cannot be found, it may help to configure the Windows Firewall to
allow for connections using Ports 1433 and 1434. The following steps outline how to open those ports on
computers running Windows 7 and higher.
Opening Ports
Rules that govern access to the computer’s resources need to be created. There are rules that control both
incoming and outgoing data, so you must create rules for both directions on the ports and programs where
access is needed. You will need to create both inbound and outbound rules for:
• The SQL Server;
• The SQL Browser;
• Port 1433; and
• Port 1434
Windows 7 Administrative Tools
Begin by setting the inbound and outbound rules for the SQL Server. Navigate to the Start->Control Panel
->Administrative Tools. Double click on Windows Firewall with Advanced Security. The window is
shown below.

12
Windows Firewall with Advanced Security Window
Begin by selecting Inbound Rules from the left column and clicking on New Rule from the right column.
This will open a New Inbound Rule Wizard window.
New Inbound Rule Wizard Window 1
Select Program and then click Next. This will open the next window in the Wizard.

13
New Inbound Rule Wizard Window 2
Select This program path and click the Browse button. This will open the navigation window pictured
below.
New Inbound Rule Wizard Window 3
In the Open window, navigate to the following:
C:\Program Files\Microsoft Sql Server\MSSQL10_50.SQLEXPRESS\MSSQL\Binn\. (If you have a Windows 7 64-bit computer your path may begin with C:\ProgramFiles (x86)\ instead of
C:\Program Files\.)
Click on sqlsrver (or sqlsevr.exe) and click Open. The navigation window will close, and you will return to
the New Inbound Rule Wizard Window 2 pictured above. Click on Next.

14
New Inbound Rule Wizard Window 4
Make sure Allow the connection is selected and click Next.
New Inbound Rule Wizard Window 5
Leave all the boxes checked and click Next.

15
New Inbound Rule Wizard Window 6
Enter SqlServer as the name. You may also enter an optional description. Click Finish, which will return
you to the Windows Firewall with Advanced Security window where your entry will appear at the top of
the main window.
New Outbound Rules Wizard
Now that you’ve created the inbound rule for the SQL Server, you need to create the outbound rule. From
the Windows Firewall with Advanced Security window, click Outbound Rules from the left and New
Rule from the right and repeat the steps you followed when creating the inbound rules:
1. On the Rule Type screen, select Program then click Next.
2. On the Program screen, select This program path and click the Browse button, which will open a
search window.
3. From the search window, navigate to the following: C:\Program Files\Microsoft Sql
Server\MSSQL10_50.SQLEXPRESS\MSSQL\Binn\. (If you have a Windows 7 64-bit computer
your path may begin with C:\ProgramFiles (x86)\ instead of C:\Program Files\.)
4. Click on sqlsrver (or sqlsevr.exe) and click Open. The navigation window will close. Click on
Next.

16
5. On the Action screen, make sure Allow the connection is selected and click Next.
6. On the Profile screen, leave all the boxes checked and click Next.
7. On the Name screen, enter SqlServer as the name. You may also enter an optional description.
Click Finish. This will return to the Windows Firewall with Advanced Security window where
your entry will appear at the top of the main screen.
Creating Inbound and Outbound Rules for the SQL Browser
Next, create inbound and outbound rules for the SQL Browser.
Click Inbound Rules from the left and New Rule from the right and repeat the process:
1. On the Rule Type screen, select Program then click Next.
2. On the Program screen, select This program path and click the Browse button, which will open a
search window.
3. From the search window, navigate to the following: C:\Program Files\Microsoft Sql
Server\90\Shared\. (If you have a Windows 7 64-bit computer your path may begin with
C:\ProgramFiles (x86)\ instead of C:\Program Files\.)
4. Click on sqlbrowser (or sqlbrowser.exe) and click Open. The navigation window will close.
Click on Next.
5. On the Action screen, make sure Allow the connection is selected and click Next.
6. On the Profile screen, leave all the boxes checked and click Next.
7. On the Name screen, enter SqlBrowser as the name. You may also enter an optional description.
Click Finish. Return to the Windows Firewall with Advanced Security screen where your entry
will appear at the top of the main screen.
Now click Outbound Rules from the left and New Rule from the right and repeat steps 1-7 listed above.

17
Creating Inbound and Outbound Rules for Port 1433
Next, create inbound and outbound rules for the ports of these programs.
Select Inbound Rules from the left column, then New Rule from the right column. The Rule Type window
will open.
New Inbound Port Wizard Window 1
Select Port and then click Next. This will open the next Protocol and Ports window in the Wizard.

18
New Inbound Port Wizard Window 2
Choose TCP. Enter 1433 in the Specific local ports field and then click Next. This will open the Action
window.
New Inbound Port Wizard Window 3
Make sure the Allow the connection option is chosen and then click Next.

19
New Inbound Port Wizard Window 4
Leave all the boxes checked and click Next.
New Inbound Port Wizard Window 5
Enter the name as Port1433Inbound, an optional description, and click Finish. Return to the Windows
Firewall with Advanced Security window where your entry will appear at the top of the main screen.

20
New Outbound Port Wizard
Now that you’ve created the inbound rule for Port 1433, you need to create the outbound rule. From the
Windows Firewall with Advanced Security window, click Outbound Rules from the left and New Rule
from the right and repeat the steps you followed when creating the inbound rules:
1. On the Rule Type screen, select Port then click Next.
2. On the Protocol and Ports screen, choose TCP. Enter 1433 in the Specific local ports box, then
click Next.
3. On the Action screen, make sure Allow the connection is selected and click Next.
4. On the Profile screen, leave all the boxes checked and click Next.
5. On the Name screen, enter the name as Port1433Outbound, an optional description, and click
Finish. This will return to the Windows Firewall with Advanced Security window where your
entry will appear at the top of the main screen.
The last set of inbound and outbound rules you’ll need to create are for Port 1434.
Click Inbound Rules from the left and New Rule from the right and repeat the process:
1. On the Rule Type screen, select Port then click Next.
2. On the Protocol and Ports screen, choose UDP. Enter 1434 in the Specific local ports box, then
click Next.
3. On the Action screen, make sure Allow the connection is selected and click Next.
4. On the Profile screen, leave all the boxes checked and click Next.
5. On the Name screen, enter the name as Port1434Inbound, an optional description, and click
Finish. Return to the Windows Firewall with Advanced Security window where your entry will
appear at the top of the main screen.
Finally, click Outbound Rules from the left and New Rule from the right and repeat the process:
1. On the Rule Type screen, select Port then click Next.
2. On the Protocol and Ports screen, choose UDP. Enter 1434 in the Specific local ports box, then
click Next.
3. On the Action screen, make sure Allow the connection is selected and click Next.
4. On the Profile screen, leave all the boxes checked and click Next.
5. On the Name screen, enter the name as Port1434Outbound, an optional description, and click
Finish.

21
To ensure that all eight inbound and outbound rules were created properly, go to the Windows Firewall
with Advanced Security window. Click on Inbound Rules. You should see the following rules listed:
A. Sqlserver
B. Sqlbrowser
C. Port1433Inbound
D. Port1434Inbound
Click on Outbound Rules and look for the corresponding outbound rules. If any of the rules are missing, go
back to the earlier procedures and add them. You may now close Windows Firewall with Advanced
Security.

22
Shipping Solutions Professional Main Menu
Configuring Shipping Solutions
When you start up the Shipping Solutions software, you will see the Main Menu tab with the version
number of the software, our customer service contact information, and a News Flashes box that includes a
link to the Shipping Solutions help desk, training videos, and the Annual Maintenance Program (AMP) login page. The tabs across the top of the screen take you to the EZ Start tab, where you can create your
shipments; the Databases tab, where you can store your contact and product information; and the Utilities,
Tools and Admin tabs.
The first time you click on one of these tabs, you will be asked to register the Shipping Solutions software.
Enter the product serial number provided as well as your contact information. You have 30 days to complete
the registration process.
If you installed the multi-user version, you may want to setup user accounts. Shipping Solutions
Professional allows you to assign different access rights to different users of the software. So, for example,
you can have some users who can enter and change data for each shipment record while other users can only
print out the forms. You can proceed to the next section of this User Guide for instructions on logging in and
setting up user accounts.
If you have installed the single-user version of Shipping Solutions, the software automatically assigns full
administrative rights to the program so the user can access all the functions available in Shipping Solutions.
You can skip the next couple sections of the User Guide and go directly to Adding Signatures and Logos
on page 25.

23
Shipping Solutions Professional Multi-User Version Login Screen
Shipping Solutions Multi-User Version: Setting Up
Logins and User Accounts
When you start up the multi-user version of Shipping Solutions for the first time, a login screen for Shipping
Solutions may appear. If not, click on Login at the bottom of the main screen. Start by logging in with the
default user name of Admin and the password of password. Click the Admin tab and then User Accounts.
You may want to change the password for the Admin user name.
You may now create user accounts for each of your users. By assigning different user accounts you can
grant different access rights to each user, and each user can have a different profile where their signature and
compliance login can be stored.
On the User Accounts screen, click Add New. Enter a user name, first name, last name, and password.
Choose the default profile and Admin group. You can come back later to make changes to the Group and
Profile, which are discussed in more detail in the next few sections of the User Guide. Click Save. Repeat
the process for each user.
If, however, you want all users to have the same access rights, use the same signatures and logos, use the
same compliance login, and use the same email for AES System responses, then all users can share the
Admin user account. If all users are using the Admin login you can skip the section on User Groups because
the Admin user is part of the Admin group, and this cannot be changed. Instead you can proceed to the Add
Signatures and Logos section on page 25.
You can modify these settings and create new user accounts at any time.

24
Set Up Access Rights for User Groups on the Admin Tab
Setting Up User Groups (Multi-User, Professional Only)
If you want to limit rights for certain users, you can set-up different user groups. Click the Admin tab and then User Groups. The Admin group is already set-up with full access rights. You cannot change the Admin
group. If you want all users to have full access to Shipping Solutions, you do not need to create any
additional groups.
If you want different user groups, however, click Add New. Enter a group name and check the boxes to
allow access to different parts of the software broken out into EZ Start Access Rights, which are primarily
the various functions available on the EZ Start Toolbar, and Tabs Access Rights, which allows access to
various screens that are part of each tab.
EZ Start Access Rights include:
• Create Shipments—This allows the user to create a new shipment on the EZ Start tab.
• Copy Shipment—This allows the user to copy a previous shipment record on the EZ Start tab.
• Submit AES—This gives the user access to the AES button at the top of the EZ Start tab. It
allows you to file your shipment information with the U.S. Census Bureau via AESDirect.
• Submit Compliance—This gives the user the ability to run compliance screenings from the EZ
Start tab if that user has registered for the Export Compliance Module and has received a user
name and password and your company has an active Annual Maintenance Program (AMP)
subscription. The Export Compliance Module includes Document Determination, Export License
Determination, and Restricted Party Screening.
• Consolidate Shipments—This gives the user the ability to combine multiple shipment records in
Shipping Solutions into a single set of export forms that can be previewed, printed and emailed as
well as submitting the data from this consolidated shipment to AES and to run compliance
screenings for this shipment.
• Delete Shipment—This allows the user to delete a shipment from the EZ Start tab.

25
• Change Shipment Options—This allows the user to click on the Change Shipment Options
button on the EZ Start tab and change the Shipment Number, Profile or Search Tag.
Tabs Access Rights include a Details button next to the name of each Shipping Solutions tab. When you
grant access to a specific tab by clicking on the check box for that tab you can further refine access rights by
clicking on the Details button and granting or denying access to each individual screen within that tab.
Those tabs include:
• EZ Start—This gives the user access to the various screens located in the EZ Start tab, which are
used to add, modify or delete data for each individual shipment record.
• Databases—This gives the user access to the Databases tab where they can add, change or delete
contact and product information.
• Utilities—This gives the user access to the Utilities tab where they can use the Conversion
Calculator, generate reports, print shipping labels, and generate XML data files for Canadian
Customs.
• Tools—This gives the user access to the Tools tab where they can run the Data Exchange
Manager, import and export contact and product databases, backup the database, delete blocks of
shipments, lock and unlock shipments, and customize the documents.
• Admin—This gives the user access to the Admin tab where they can set the SQL database
connection, setup the Data Exchange Manager, add signatures and logos, and create profiles, user
groups and user accounts.
Click Save. Repeat the process for as many user groups as you need. Then close the User Groups screen
and click on User Accounts. For each user account, choose the proper group from the Assign to Group
dropdown list.
Anyone who has been granted user rights to the Admin tab will be able to create new user groups or modify
existing user group settings at any time.
Adding Signatures and Logos to Shipping Solutions

26
Adding Signatures and Logos
Shipping Solutions gives you the option of adding a company logo and an individual’s signature to multiple
export documents (see the chart below), but first they must be loaded into the software. To load a signature
or logo into Shipping Solutions, click the Admin tab and then Signatures & Logos. Choose the appropriate
image type (Logo or Signature) and click Add. Enter a title for the image, an optional description, and then click on the button next to File Name to locate your image. The image can be a .bmp, .jpg, or .png file. The
size for the logo file is 200x50 pixels, and the size for the signature file is 180x25 pixels.
Document Signature Logo
Air Waybill (regular & data only) YES NO
Australia FTA Certificate of Origin YES NO
CAFTA-DR FTA Certificate of Origin YES NO
CARICOM Invoice YES NO
Certificate of Origin (Generic) YES NO
Chile FTA Certificate of Origin YES NO
Columbia TPA Certificate of Origin YES NO
Commercial Invoice (all versions) YES Exporter Logo
Dock Receipt (with Product Summary or Product Detail) NO Freight Forwarder Logo
Korea FTA Certificate of Origin YES NO
Inland Bill of Lading (with Product Summary or Product Detail) YES NO
NAFTA Certificate of Origin (all languages) YES NO
Ocean Bill of Lading (with Product Summary or Product Detail) NO Freight Forwarder Logo
Packing List YES Exporter Logo
Panama TPA Certificate of Origin YES NO
Peru TPA Certificate of Origin YES NO
Proforma Invoice (all versions) YES Exporter Logo
Shipper’s Letter of Instruction (in NCBFAA and SED formats) YES NO
Shipper’s Letter of Instruction (with Product Summary or Detail) YES Exporter Logo
Documents with Signatures and Logos Available
Please Note: The signatures that will appear on your export paperwork are scanned facsimiles of your
signature. They do not have the same legal standing as a real signature and should not be used as such.
Shipping Solutions provides this option for the convenience of our users. We strongly recommend that you
consult an attorney before deciding to use electronic versions of actual signatures.
Creating User Profiles

27
Setting Up Profiles and Assigning Them to Users
Profiles allow you to set logos, signatures and more for each user account that you create in Shipping
Solutions. The Default Profile is already set-up. If you want all users to use the same profile you can simply
modify the data fields described below for the Default Profile. However, if you want to assign different
profiles to different user accounts, click the Add new profile button, assign a Profile Name, and modify the
following fields:
• Compliance Login (Not available in Shipping Solutions Classic)—This is the user name and
password that allows you to run the Export Compliance Module through the Shipping Solutions
software (see page 47). You must have an active Annual Maintenance Program to use the Export
Compliance Module. To receive a user name and password submit a signed subscriber agreement,
which can be found on the Annual Maintenance Program website, and email it to
[email protected] or fax it to (651) 905-1827. You run the Export Compliance Module by
clicking on the Compliance button on the EZ Start screen. You can enter your user name and
password directly on that screen, but if you enter it here it will be saved and you won’t need to
reenter it again.
• ACE Login—Enter your user name and password for the ACE portal, so you won’t need to type it every time you file through AESDirect. Since ACE requires you to change your password every 90
days, you will need to update it here after changing it.
• AES/EEI Email—This is the email address to which the AES server will send email confirmation
of a successful AES filing along with the shipment’s ITN number. If you want the email sent to
multiple email addresses, you can enter them here separated by a comma.
• eCO Login—When you register for the electronic Certificate of Origin (eCO) service, the
American World Trade Chamber of Commerce (AWTCC) will send you an email with a link to
retrieve your portal User Name and Password. Enter that User Name. In addition, Shipping
Solutions will send you an email with your eCO API Key. Enter that key here. The password is not
used in the Shipping Solutions software. The password is used for accessing the AWTCC portal.
For more information on the eCO process, see page 76.
• Profile signature—Choose the signature you want to use with this profile from the drop-down list. The signatures you added earlier using the Signatures & Logos screen will appear in the drop-
down list. The signature will appear on the documents as shown in the chart on the previous page.
• Company Logo—Choose a logo from the drop-down list that you entered earlier using the
Signatures & Logos screen. This is the logo that will appear on the commercial and proforma
invoices, the packing list and the shipper’s letter of instruction.
• Freight Forwarder Logo—Choose a logo from the drop-down list that you entered earlier using
the Signatures & Logos screen. This is the logo that will appear on the ocean bill of lading and
dock receipt.
For the profiles to be used, you must go to the User Accounts screen and assign each user account the
appropriate profile. Each time that user creates a new shipment on the EZ Start tab, the profile assigned to
that user will be assigned to that shipment.
You can create new profiles any time you have a change; for example, a new company logo. Creating a new
profile rather than changing an existing profile will keep older shipments intact with their original profiles. If
a profile is no longer needed you can check the Inactive Profile box. This is preferable to deleting the
profile as it will then remain in effect on any shipments that used the now inactive profile.
Any shipment created by a user account will be given the profile assigned to that user. You can also change
the profile assigned to an individual shipment by going to the EZ Start screen, finding the shipment, and
clicking on Change Shipment Options.
28
Getting Started with Shipping Solutions
The Getting Started section of the Shipping Solutions User Guide is intended to provide you with a brief
overview of the most-used features found in the software. By reviewing this section of the User Guide, you
will learn the basics of using Shipping Solutions to reduce the time it takes to create and print out your
export documents. As you get familiar with the software, you should review the remaining sections of the
User Guide to learn more about the additional features and functionality of the program that has made it the
#1 selling export software.
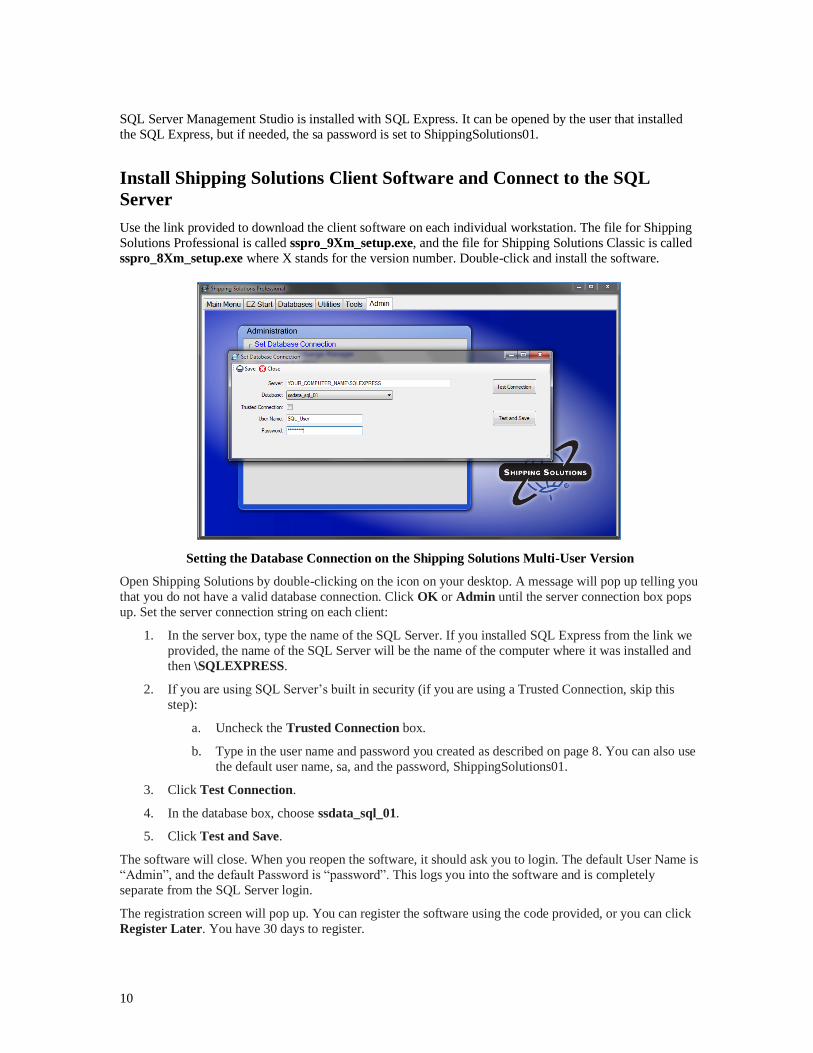
Shipping Solutions Professional Main Menu
Main Menu
When you start the Shipping Solutions software you will see the Main Menu, which is the starting point for
the software. From this screen, you will find the version number for your software in the box below the
Shipping Solutions logo; links to the Help Desk, Training Videos, and Annual Maintenance Program (AMP) login screen; and a News Flashes box that includes helpful links and news of interest to Shipping Solutions
users.
If you have the multi-user version of Shipping Solutions, there will be a Login button in the lower right
corner of the screen. Use the user name and password provided by your administrator to login. To exit the
program, click the red X in the upper right corner of the software.
The Main Menu also includes a series of tabs that will take you to various parts of the Shipping Solutions
software:
• The EZ Start tab is the most frequently used part of Shipping Solutions. This is where you will
enter the information you need to build a shipment; where you can preview, print and email your
export documents; where you can file your export information through the Automated Export

29
System (AES); and where Shipping Solutions Professional users can run the Export Compliance
Module to ensure that your shipment complies with current U.S. export regulations.
• The Databases tab allows you to store information about your company, your customers and your
products, so you don’t have to manually enter all that information every time you create a new
shipment.
• The Utilities tab includes a Conversion Calculator so you can quickly and easily convert
measurements between Imperial and metric. In addition, the tab allows you to generate reports from
your shipment history, print basic shipping labels, and, in the Shipping Solutions Professional
version, generate raw data files.
• The Tools tab includes utilities for importing data from an existing spreadsheet or database into the
various Shipping Solutions databases found on the Databases tab; export the data from the
Shipping Solutions databases into a text-delimited format; backup your existing shipment and
database information; delete selected shipments; and customize certain aspects of the export
documents. In addition, the Tools tab allows Shipping Solutions Professional users to run the Data
Exchange Manager to import shipment data from your company’s accounting, order-entry or ERP
system, and lock or unlock shipment records.
• The Admin tab provides a variety of functions depending on whether you are using the Shipping
Solutions Classic or Shipping Solutions Professional version and depending on whether you have
the single-user version or the multi-user version of the software. This tab includes setting up the
database connection with your SQL server; setting up the Data Exchange Manager for importing
orders from your accounting, order-entry or ERP system; storing signatures and logos that will print
on your export forms; setting up a profile for each user; setting up User Groups and User Accounts
that will allow you to control which users have access to certain features; and registering your
software with InterMart.
Populating the Databases
To get the maximum benefit from Shipping Solutions, the first time you use the program you should spend
some time entering information into its various databases. By doing so, you will eliminate the need to retype
common data every time you prepare a new shipment as well as reduce the likelihood of errors that can
delay shipments or require expensive changes.
To access any of the Shipping Solutions databases, click on the Databases tab at the top of the screen.
You can manually enter your contacts and products or import your contacts and products from a text file.
More detail on importing your contacts and products from a text file can be found on page 131.

30
Contacts Database Screen
Follow the steps below to manually add items to the Contacts Database:
1. Click the Databases tab and then click Contacts.
2. From the Select Contacts Type drop-down list, choose the type of contact you want to enter; for
example, Exporters.
3. Click the Add New Contact button and fill in the boxes with your contact’s information.
4. After you have entered that contact’s information, click Save. The contact will appear in the grid at
the bottom of the screen. If you have more contacts to enter, click Add New Contact and add the
next contact. You can change the contact type to enter a different type of contact.
Please Note: You can search for a contact in the Search Contacts box. Choose Starts With or
Contains in the Match drop-down list. Start typing the company name in the Search for
Company box. The grid will display any companies matching your search criteria.
5. To delete a contact, click on that contact in the grid and click Delete.
6. Closing the Contacts screen will return you to the Databases menu.

31
Products Database Screen
Follow the steps below to manually add items to the Products Database:
1. Make sure you are on the Databases tab and then click Products.
2. Click the Add New Product button and fill in the boxes with your product information. Note that
there is a second tab for the AES DDTC information, which is only required if a product ships
under a DDTC State Department license.
3. After you have entered the information for that product, click Save. The product will appear in the
grid at the bottom of the screen. If you have more products to enter, click Add New Product and
add the next product.
Please Note: You can search for a product in the Search Products box. Choose whether you want
to search on Product ID or Description. Then choose Starts With or Contains in the Match
drop-down list. Start typing the product ID or description in the Search for box. The grid will
display any products matching your search criteria.
4. To delete a product, click on that product in the grid and click Delete.
5. You must always click Save before closing the screen to save your changes.
6. Closing the Products screen will return you to the Databases menu.

32
List of Databases Available on the Database Tab
You can now proceed down the list of databases on the Databases tab entering any information you have:
• Click Phrases to enter any phrases you use often on your documents. Several common phrases are
pre-loaded. Click the Phrase Title in the grid to see the Phrase Text and modify it to meet your
company’s needs. Click Add to enter a new phrase. Enter a title for the phrase in the Phrase Title
box and enter the actual phrase in the Phrase Text box. Click Save.
• Click Currencies to enter currency exchange rates. These will be used if you choose an Invoice
Currency or an Alternate Currency other than U.S. dollars on the Invoices-
Proforma/Commercial screen available on the EZ Start tab. You can always, however, overwrite
these exchange rates on the EZ Start screen.
• Click Payment Terms to enter any additional payment terms used by your company. To add
another term, click Add, enter your new payment term, then click Save and Close.
• The Countries, Export Codes and License Types are preloaded databases, but you can add or
modify them if needed. To add an entry, click on the database, click Add, enter the new entry, then
click Save and Close.
• The Carriers and Ports database also comes preloaded with the four lists of carrier and port names
and codes provided by the U.S. Census Bureau for use with the Automated Export System (AES).
This list of codes does occasionally change, and you update one or more of the lists by clicking on the database name and then clicking on the Update AES Codes button. On the Download AES
Code Files window that opens, choose which lists you want to update and then click Run Selected
Updates. Like the other preloaded databases in Shipping Solutions, you can also manually add or
modify a specific list by clicking on the list name, clicking on Add, typing in the new entry, and
then clicking on Save and Close.
• The Package Types database allows you to store commonly used box sizes for use on the Packing
List.
33
• The Miscellaneous Lists database allows you to add additional items to certain drop-down menus
on various screens in Shipping Solutions such as the types of packing items on the Inland Bill of
Lading form.
• The Shipment Log Items screen allows you to add the individual tasks that are part of your export
process, often referred to as an Export Management System (EMS) plan, so you can document that they are being followed on every shipment. (See more information about the Shipment Log screen
on the EZ Start tab on page 106.) To ensure compliance with export regulations, the Bureau of
Industry and Security (BIS) strongly recommends that companies create a written EMS that clearly
outlines what steps your company needs to follow prior to every export shipment to ensure that you
haven’t violated current export regulations. To add or change a task click Add and type the task on
the highlighted line. Click Save and Close.
Creating a Shipment
Whether you are an experienced exporter or just getting started with exporting, Shipping Solutions makes
filling out your export documents fast and easy. Just enter your shipment information into the software, and
Shipping Solutions automatically completes the shipping documents, which you can then print out on plain
paper.
Shipping Solutions provides two ways to enter your shipment information into the software: (1) manually
enter the information into the program’s various EZ Start screens, or (2) use the program’s Data Exchange
Manager to import the information from your company’s accounting, order-entry or ERP system.
This Getting Started section of the User Guide will focus on option number one: entering your data into the
EZ Start screens. You’ll find more information about setting up and using the Data Exchange Manager
beginning on page 140.
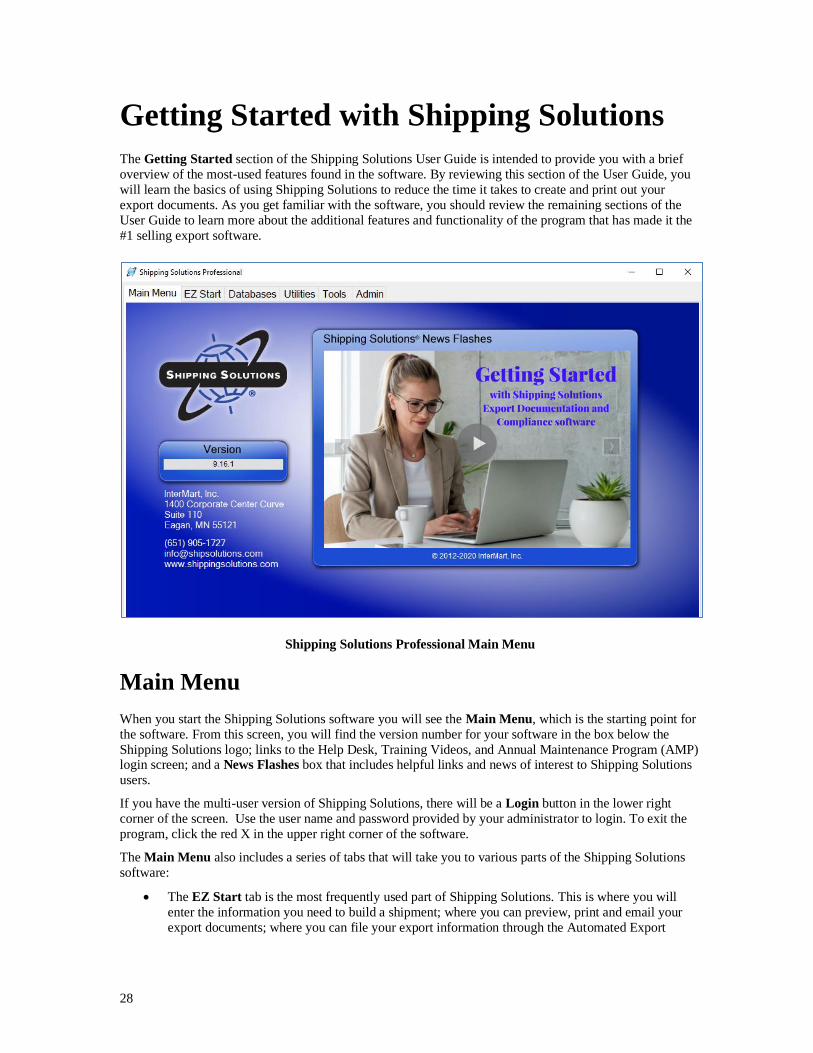
The EZ Start Tab in Shipping Solutions
34
To make the program easy to use, EZ Start is divided into several different screens each focusing on either
certain types of information (e.g. contacts and product detail) or on specific documents (e.g. commercial
invoice, NAFTA and packing list). By working your way down the list—skipping those screens or fields
you don’t need for a particular shipment—you have completed a set of export documents.
As a general rule, Shipping Solutions recommends that new users pay close attention to the first five screens: Contacts, Product Detail, Carriers and Ports, Invoices-Proforma/Commercial and EEI-
Electronic Export Information (AES). These screens include information that is required on most of the
forms. However, none of the fields are required by Shipping Solutions.
As you enter the appropriate information on each of the EZ Start screens, Shipping Solutions automatically
enters the information in the proper fields on the appropriate documents. So, for example, while your
exporter information appears on most of the export forms, you only need to enter the information once.
Please note: Shipping Solutions does not guarantee the accuracy of your export documents. You must
review each form carefully to ensure that it has been completed fully and accurately.
Follow these steps to create a basic shipment in EZ Start:
1. Click the EZ Start tab.
2. Click the New button to add a new shipment. A message should pop saying, “New Shipment has
been Created.”
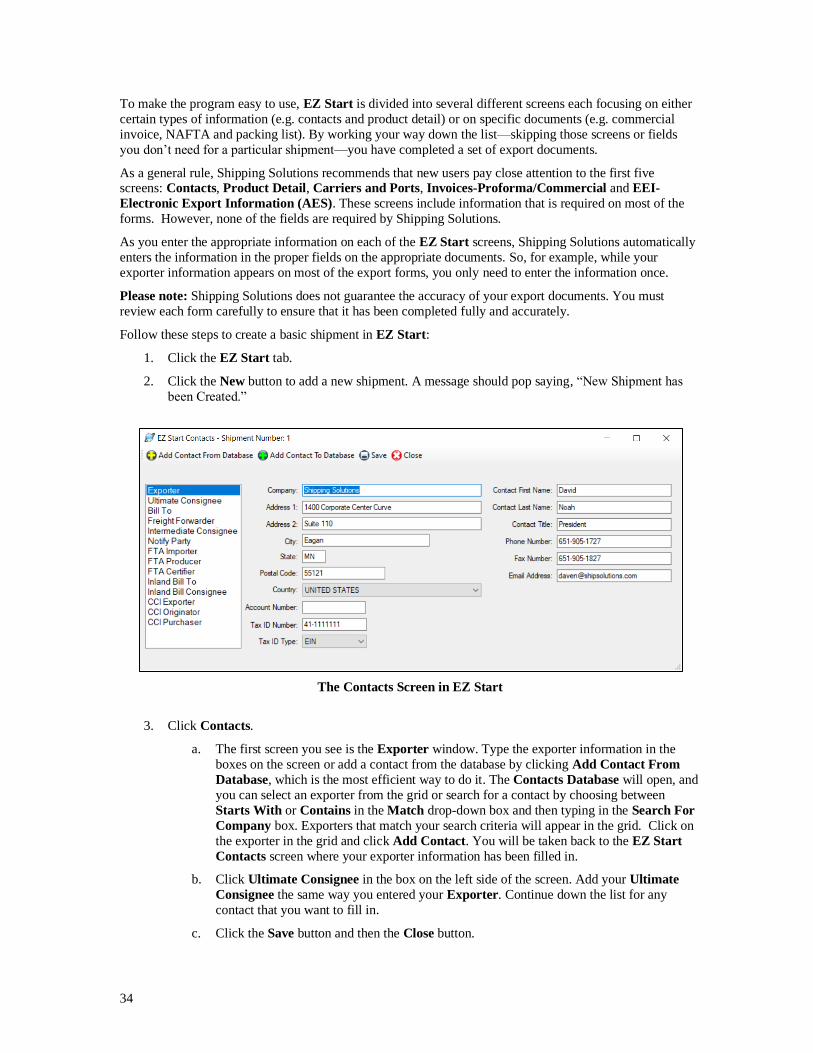
The Contacts Screen in EZ Start
3. Click Contacts.
a. The first screen you see is the Exporter window. Type the exporter information in the
boxes on the screen or add a contact from the database by clicking Add Contact From
Database, which is the most efficient way to do it. The Contacts Database will open, and
you can select an exporter from the grid or search for a contact by choosing between
Starts With or Contains in the Match drop-down box and then typing in the Search For
Company box. Exporters that match your search criteria will appear in the grid. Click on
the exporter in the grid and click Add Contact. You will be taken back to the EZ Start
Contacts screen where your exporter information has been filled in.
b. Click Ultimate Consignee in the box on the left side of the screen. Add your Ultimate
Consignee the same way you entered your Exporter. Continue down the list for any
contact that you want to fill in.
c. Click the Save button and then the Close button.

35
The Product Detail Screen in EZ Start
4. Click Product Detail.
a. To type your product information directly on this screen, click Add New Product and
then start typing. To choose a product from your product database, which is the most
efficient way to do it, click Add Products from Database.
b. If you click Add Products from Database, the Products Database will open where you can select a product from the grid or search for a product. To search choose ProductID or
Description in the Column drop-down box and either Start With or Contains in the
Match drop-down box. Then type what you are looking for in the Search For box.
Products that match your search criteria will appear in the grid.
c. Click on the product or products in the grid and click Add Selected Products to
Shipment. You will be taken back to the EZ Start Product Detail screen where your
products have been filled in. The counter in the upper left corner shows how many
products are in your shipment. You can navigate between the products by using the arrow
keys in the upper-left corner of the Product Detail window. Click the Add Products
from Database as many times as needed to add all the products in your shipment.
Please Note: To select more than one product at a time from the Product Database, hold
down the Ctrl button on your keyboard as you click on each item in the product grid.
d. Once you have all the products added, fill in quantities and any other missing information.
Note that there are separate tabs for vehicle information, DDTC information, and
dangerous goods information. Fill in only what is necessary for your paperwork. For
example, if you don’t need a Certificate of Origin, you do not need to fill in the Certificate
of Origin section of the screen.
e. Click the Save button and then the Close button.

36
The Carriers and Ports Screen in EZ Start
5. Click Carriers and Ports.
a. Enter the fields on this screen depending on which documents you need. If you plan to file
through AES, you will need to fill in all the fields. If you are not filing through AES, enter
the data you know.
b. Click Save and Close.
6. Now you can work your way down the list entering information only on the screens for the forms
you are going to use. For example, if you need a Commercial Invoice, go to the Invoices—
Proforma/Commercial screen next and fill in the information, but if you do not need a packing list
you can skip that screen. More detail on each screen is provided in the EZ Start section beginning
on page 38.
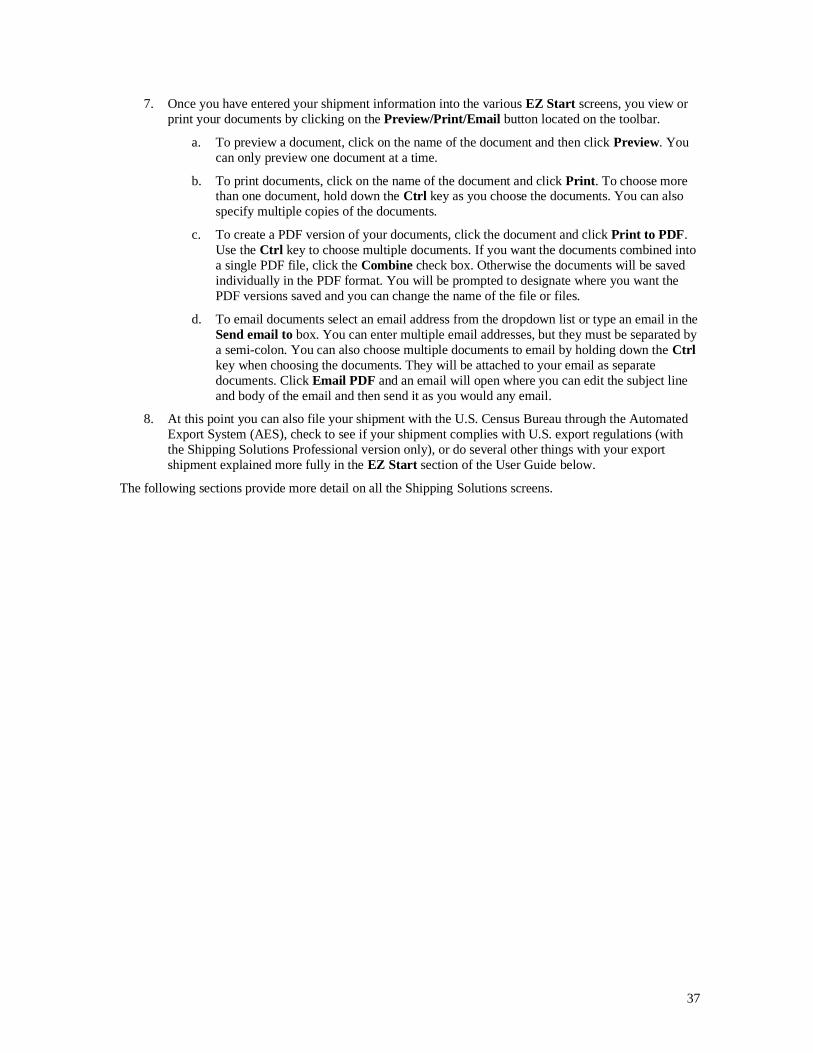
The Preview/Print/Email Menu in EZ Start
37
7. Once you have entered your shipment information into the various EZ Start screens, you view or
print your documents by clicking on the Preview/Print/Email button located on the toolbar.
a. To preview a document, click on the name of the document and then click Preview. You
can only preview one document at a time.
b. To print documents, click on the name of the document and click Print. To choose more than one document, hold down the Ctrl key as you choose the documents. You can also
specify multiple copies of the documents.
c. To create a PDF version of your documents, click the document and click Print to PDF.
Use the Ctrl key to choose multiple documents. If you want the documents combined into
a single PDF file, click the Combine check box. Otherwise the documents will be saved
individually in the PDF format. You will be prompted to designate where you want the
PDF versions saved and you can change the name of the file or files.
d. To email documents select an email address from the dropdown list or type an email in the
Send email to box. You can enter multiple email addresses, but they must be separated by
a semi-colon. You can also choose multiple documents to email by holding down the Ctrl
key when choosing the documents. They will be attached to your email as separate
documents. Click Email PDF and an email will open where you can edit the subject line
and body of the email and then send it as you would any email.
8. At this point you can also file your shipment with the U.S. Census Bureau through the Automated
Export System (AES), check to see if your shipment complies with U.S. export regulations (with
the Shipping Solutions Professional version only), or do several other things with your export
shipment explained more fully in the EZ Start section of the User Guide below.
The following sections provide more detail on all the Shipping Solutions screens.

38
Shipping Solutions Software in Detail
EZ Start Tab
Whether you are an experienced exporter or just getting started, Shipping Solutions makes filling out your
export documents fast and easy. From the Main Menu, click on the EZ Start tab, enter the information
about your shipment, and Shipping Solutions automatically completes the shipping documents.
To make the program easy to use, EZ Start is divided into several different screens each focusing on either
certain types of information (e.g. contacts and product detail) or on specific documents (e.g. commercial
invoice, NAFTA and packing list). By working your way down the list—skipping those screens or fields
you don’t need for a particular shipment—you have completed a set of export documents.
Generally, Shipping Solutions recommends that all users complete the first five screens: Contacts, Product
Detail, Carriers and Ports, Invoices-Proforma/Commercial and EEI-Electronic Export Information
(AES). These screens include information that is required on most of the forms. However, none of the fields
are required by Shipping Solutions.
As you enter the appropriate information on each of the EZ Start screens, Shipping Solutions automatically
enters the information in the proper fields on the appropriate documents. So, for example, while your
exporter information appears on most of the export forms, you only need to enter the information once.
Please note: Shipping Solutions does not guarantee the accuracy of your export documents. You must
review each form carefully to ensure that it has been completed fully and accurately.
The EZ Start Screen in Shipping Solutions Professional

39
The EZ Start Toolbar
Across the top of the EZ Start tab, are several toolbar buttons that automate various tasks within Shipping
Solutions:
• New—Click on this button to create a new shipment. Once you’ve clicked on this button a new
Shipment Number will appear and all the EZ Start screens will be empty, so you can enter new
data.
• Copy—This button is one of the best time-saving features for companies that make similar
shipments to the same consignees. To duplicate all the shipping information from a previous
shipment, go to that previous shipment by selecting it using the Find button. (See description
below.) Click on the Copy button and then click Copy Shipment. Uncheck the Copy Product
Detail box if you only want to copy the shipment header information. It is not a good business
practice to simply change a previous shipment rather than copying it because it is important to
maintain an electronic copy of your previous shipping information.
The Find Previous Shipment Button in EZ Start
• Find—This button allows you to search through all your previous shipments to find one specific
shipment. When you first click Find, the screen will display your 20 most recent shipments. Click
View All to see all your previous shipments from newest to oldest.
To narrow your search, select from the Column drop-down list the field you want to search, such
as the Invoice Number or Invoice Date. Next, choose whether you want to find a shipment that
contains, is equal to, or starts with what you are searching for. Third, enter what you are searching
for. Finally, click on the Search button, and Shipping Solutions will display the results in the
window. Click on the shipment you wish to open, and then click on the Select button. The
Shipment Number you selected will now appear on the EZ Start screen.
Alternately, you can click on any of the column headers in the grid to reorder your shipments in
alphanumeric order. Click once to reorder the information in the column in ascending order; click a

40
second time to reorder in descending order.
Your search results will remain in the Find Shipments window until you click Reset or close
Shipping Solutions.
The Preview/Print/Email Menu Button in EZ Start
• Preview/Print/Email—Click on this button to display all the documents available in Shipping
Solutions. (You’ll find a complete list of the documents available in Shipping Solutions and an
explanation of their purpose in the Appendix on page 168.) You have the option to preview, print,
print to PDF, or email the documents.
1. Preview—Select a document and then click Preview to see a preview of the document. The first time you preview a document after opening Shipping Solutions it will take a little longer
to open than expected, but the subsequent documents will open quickly. The icons at the top of
the Preview Report screen allow you to search, zoom or print the document right from the
preview screen.
2. Print—Select a document and the number of copies you want to print. Click Print. The
default printer will be filled in on the Print screen, but you have the option to change it to a
different printer. To print multiple documents at one time, hold down the Ctrl key while
selecting multiple documents. The documents will print to the default printer or to the printer
specified on the Tools-Customize Documents screen. You cannot specify the printer for
multiple reports on this screen.
3. Print to PDF—This option allows you to print documents to PDF in three different ways:
o To print a single document to PDF, select the document and click Print to PDF. A Save
As window will open allowing you to select the location where your PDF document will

41
be saved. By default, the PDF file will be saved as [shipment number]_[document name],
or 1_AirwayBill.pdf if you are trying to create a PDF file of the air waybill on the first
shipment. You do have the option of changing the name of the saved document in the
Save As window.
o To save multiple documents as individual PDF files, hold the Ctrl key down while selecting multiple documents and click Print to PDF. A Save As window will open
allowing you to select the location where your PDF documents will be saved. Each
document you selected will be saved as [shipment number]_[document name], but you can
change the name in the Save As window as each document is created. If you click the
Skip Prompts check box, you will only be asked for a location to save the last file
selected in the document list, and you can only change the name of that file. The rest of
the documents will be saved with their default names to the same location.
o To print multiple documents to a single PDF file, hold the Ctrl key down while selecting
documents and click the Combine check box. Click Print to PDF. The default name will
be [shipment number]_Reports.pdf, but you have the option to change the name. By
default, Shipping Solutions limits the number of documents you can combine in a single
PDF document to five. This is done so the average user won’t run out of computer memory. However, you can change the number of documents combined into a single PDF
on the Admin tab, Global Settings screen if you wish and your computer allows.
4. Email—To email a document, click on a document, enter an email address in the Send email
to box and click Email PDF. An email window will pop up where you can add a message
before clicking Send. To send the same document to multiple email addresses, separate the
addresses with semi-colons. You can also choose email addresses from the drop-down box.
All email addresses listed for this shipment’s contacts will be in the drop-down list. To email
multiple documents at one time, hold the Ctrl key down while selecting the documents.
Some of the documents are available in more than one format, such as in Spanish or French; as data
only so that you can print on pre-printed forms; or with or without their colored borders. If a
document name says “(with Product Detail)” it means that the product section of the document will be pulled from the EZ Start Product Detail screen. If a document name says “(with Product
Summary)” it means that the product section of the document will be pulled from the EZ Start
Product Summary screen.
If you only ever use certain export forms, you can click the Filter button located at the bottom of
the window. This will open a Document Filter window where you can uncheck any forms you
never use, and then click the Save and Close buttons. You will now only see the forms you selected
in the Preview/Print/Email window. Keep in mind that you can always click the List All button to
override the filter and see a list of all the export forms available in the software.

42
The AES Button in EZ Start
• AES—The AES button allows you to transmit your Electronic Export Information (EEI) to the
Automated Export System (AES). Generally, U.S. companies and individuals who export one or
more items valued at $2,500 or more to countries other than Canada or include products that require
an export license or export used vehicles are required by law to file.
Before you can file your EEI, you must get an Automated Commercial Environment (ACE) account. The ACE account application is on the U.S. Customs and Border Protection (CBP)
website. If you already have an ACE account, make sure your account has the Export Account
Type. To check this, talk to your company’s Trade Account Owner and, if needed, get the Exporter
role added to your account.
Instructions for Filing your EEI through Shipping Solutions
In Shipping Solutions, prepare your shipment as you normally do, and then click the AES button on
the toolbar of the EZ Start screen. A screen will pop up with the seven steps required to complete
your ACE filing. (See the image above.)
1. Review and correct any missing items listed on the right side of the screen. The missing
items are listed with the EZ Start screen where you need to enter them. Close the AES
screen and return to EZ Start to enter the missing information. You can do this as many
times as needed to complete your shipment information. When all fields have been
entered, the message All AES data is complete will appear on the right side of the screen.

43
The ACE Portal Login Screen
2. Log into the ACE Portal. You will notice two tabs at the top of the screen. You are
currently on the Shipment tab. Click the Login tab to get to the ACE login screen. Enter
your User Name and Password. (If you don’t have one, you need to register with ACE.)
You can store your user name and password on the Profile Settings screen located on the
Admin tab, so you don’t have to enter it every time.
The Accounts Tab on the ACE Portal

44
3. On the ACE Portal, click the Accounts tab. The tabs on the ACE screen are located below
the ACE Secure Data Portal heading. Choose Exporter in the Account Type drop-down
list and click Go. If you have more than one Account, choose one from the Account
Selector list.
4. Click the Shipment tab to return to the screen in Shipping Solutions showing the seven steps, and click the blue Create Filing button. A Filing tab will be created. After a few
seconds, you will see your data pop into the 4-step Export Filing screen.
The 4-Step Export Filing Screen on the ACE Portal
5. Review the data on the 4-step Export Filing screen. Then click the green Submit Filing
button.
6. If there is any data that does not meet AESDirect standards, you will get a Filing
Contains Errors screen. Small red boxes will appear next to each step in the filing
identifying the errors. Read the messages in red identifying what is wrong with the data,
fix the data, and click the Submit Filing button again. Continue fixing errors until your
shipment is accepted.

45
The AESDirect Filing Summary Screen on the ACE Portal
7. Click the Get ITN button at the top of the screen. When you do, Shipping Solutions will
copy it into the box labeled AES ITN Code or Exemption Statement on the EZ Start-
EEI-Electronic Export Information (AES) screen so that it will appear in the
appropriate spots on the appropriate forms. You will also need this number to access your
record if you need to make any changes to it later. The ITN number will be sent to the
email address used when registering with ACE. You can also enter a second email address on the EZ Start-EEI screen. If you want this email address to always receive the ITN
emails, you can store it on the Profile Settings screen on the Admin tab.
The AESDirect Shipment Manager
If you click Close on the 4-Step Export Filing screen you will find yourself on the AESDirect
Shipment Manager. There you will see a list of your filings from newest to oldest. The Shipment
Manager displays a green Accepted button if your filing was accepted and a red Rejected button if
your filing was rejected. If your filing was accepted, you will also see the ITN number. You can
copy and paste the ITN number from here to the Shipping Solutions EZ Start-EEI screen if you
didn’t do it earlier.
Any shipments that have not been accepted or rejected yet will be saved as Drafts. To continue
working on the shipment, click Edit under Shipment Actions. If you can’t see the Shipment
Actions, click the plus sign next to the Shipment Ref. #. The 4-step Export Filing screen will
open and you can enter any missing data and click the Submit Filing button. You can also click
directly on the Shipment Ref. # to open the 4-step Export Filing screen. However, the green
Submit Filing button is not available in this view.
If you are using Shipping Solutions to file your shipments, you will want to ignore the Create
Export Filing and Create from Template buttons. However, you may want to use the Amend
AES Filing button to locate a shipment that was already filed but needs to be amended. You can
also find shipments that were filed via the old AESDirect Legacy system using the Amend AES
Filing button.

46
AES Filing Tips
If you want to go to the AESDirect Shipment Manager without creating a filing, you can log into
the ACE Portal, click the Accounts tab, select the Exporter Account Type and click Go. You will
then see a task called Submit AESDirect Filings, which will take you to the AESDirect Shipment
Manager.
If you close the AES screen in Shipping Solutions, you will not necessarily be logged out of the
ACE Portal. Click the AES button and then the Login tab. If less than 30 minutes has passed, you
will probably still be logged in. To logout of the ACE Portal, click the Exit door just to the right of
the question mark at the top of the ACE Portal screen. There is no logout button on the AESDirect
Shipment Manager screen.
Definitions
Here are the definitions of some commonly used terms in the EEI filing process:
• 4-step Export Filing screen—This screen is within AESDirect, and it is the screen you
will be directed to after you have clicked the Create Filing button in Shipping Solutions.
Each of the four steps includes part of the data you uploaded. The four steps are Shipment, Parties, Commodities and Transportation. Review the data and then click the green
Submit Filing button to submit the data to AESDirect.
• Accounts Tab—This tab is in the ACE Portal. Once you are logged in, click this tab to
choose the Exporter Account Type and your Account (if your company has more than
one).
• ACE Portal—The ACE Secure Data Portal is run by U.S. Customs and Border Protection
(CBP). It has always been used for reporting on U.S. imports. In 2016 it was modified to
allow for reporting of Electronic Export Information (EEI). You must have a login to the
ACE Portal to file your EEI whether you are using Shipping Solutions or filing directly
from the ACE Portal website.
• AESDirect—AESDirect is still the system through which your EEI is filed. It is simply accessed through the ACE Portal now instead of through the AESDirect Legacy system.
You will not see any reference to AESDirect on the ACE Portal, however, until you login,
click the Accounts tab, select the Exporter Account Type, and click Go. You will then
see a task called Submit AESDirect Filings, which will take you to the AESDirect
Shipment Manager.
• AESDirect Legacy—This refers to the old system where EEI information has been filed
for years. This system was decommissioned on April 30, 2016.
• AESDirect Shipment Manager—This screen is accessed through the ACE Portal and
shows you all your shipments whether they have been accepted, rejected or are in draft
form. You can edit or delete drafts, and you can amend or cancel accepted shipments. You
can also print a summary of the EEI that you entered.
• Create Filing button—This button is located on the Shipment tab of the AES screen in
Shipping Solutions. Once all your shipment data is entered in Shipping Solutions, click
this button to upload it to AESDirect. You must be logged into the ACE Portal before
clicking this button.
• EEI—This stands for Electronic Export Information. It is the data that exporters are
required to file with the U.S. Census bureau for most exports valued at more than $2,500.
The method for filing your EEI is through AESDirect via the ACE Portal.
• Filing Tab—This tab is located on the AES screen within Shipping Solutions. It is the tab
you will be directed to after you have clicked the Create Filing button. The screen will
show the 4-step Export Filing screen in AESDirect.

47
• Login Tab—This tab is located on the AES screen within Shipping Solutions. It links to
the login page of the ACE Portal. You must login to the ACE Portal before clicking the
Create Filing button on the Shipment tab.
• Shipment Tab—This tab is located on the AES screen within Shipping Solutions. It
shows the seven steps for filing your EEI through the ACE Portal. It also provides a list of missing data so you can complete your shipment before uploading it to AESDirect. The
Create Filing button, which will upload your EEI to AESDirect, is located on this tab.
• Submit Filing button—This button is located on the 4-step Export Filing screen for a
shipment within AESDirect. Click this button to submit your EEI information to
AESDirect.
AES Resources
For questions about your ACE account, call the ACE Account Service Desk at (866) 530-4172,
option 1.
General questions about EEI filings can be directed to the U.S. Census Bureau’s Data Collection
Branch at (800) 549-0595, option 1.
Shipping Solutions Professional's Export Compliance Module
• Compliance (Not available in Shipping Solutions Classic)—Shipping Solutions Professional
allows Annual Maintenance Program (AMP) subscribers to ensure that their shipments comply
with current export regulations. Before taking advantage of these screening and compliance
features, you must request a user name and password by emailing [email protected].
You will receive an email back with your user name and password. All Shipping Solutions
users at your company can use the same user name and password.
After you have registered for the service, select the shipment you want to screen, click the
Compliance button and select one of the three screening options:

48
o Document Determination—All international shipments must include the appropriate
documentation to ensure Customs clearance at the port of export and the port of entry.
Shipping Solutions Professional determines which documents are needed for your
shipment to help you ensure that you are complying with export and import regulations.
Including appropriate documentation will help ensure your goods aren’t delayed at customs, your customers aren’t paying higher duty rates than necessary, and your
company is paid fully and in a timely manner. For this feature to produce accurate results,
make sure you have entered a country code for both the exporter and ultimate consignee
on the Contacts screen, a Product ID for each product entered on the Product Detail
screen, the Date of Export on the EEI – Electronic Export Information screen, and the
Mode of Transport on the Carriers and Ports screen.
o Export License Determination—The U.S. government restricts or bans the export of
certain goods to specific countries or entities to protect natural resources, control the
proliferation of arms and nuclear weapons, and to ensure national security and regional
stability. Shipping Solutions Professional allows you to screen your products based on
their Export Control Classification Number (ECCN) and country of ultimate destination to
help you determine if any licenses or license exceptions are needed to ship your goods. Screening your exports against the Export Administration Regulations (EAR) can protect
your company from fines, fees and even restrictions on exporting. For this feature to
produce accurate results, you must enter a Product ID and an ECCN code (if appropriate)
for each of your products on the Product Detail screen, a country code for both the
exporter and ultimate consignee on the Contacts screen, and the Date of Export on the
EEI – Electronic Export Information screen.
o Restricted Party Screening—Various government agencies maintain “bad guy” lists of
people and organizations to which it is illegal to export for one or more reasons. Shipping
Solutions Professional allows you to screen all the parties in your export transactions
against these lists and notifies you of any potential matches. Screening your exports
against these lists can protect your company from fines, fees and even restrictions on exporting. Shipping Solutions Professional will check all the names and addresses entered
on the Contacts screen for the selected shipment by accessing a secure server and
matching the appropriate fields in your current shipment against a consolidated list. In a
matter of seconds, you will see a display of all potential matches including the name and
address of the potential match, the Federal Register notice (if applicable) that added this
contact to one of the restricted party lists, the effective date and (if applicable) the
expiration date for this listing, and the list on which this match was found.
If you want to exclude any contact type from the compliance screening, go to
Admin=>Global Settings. Click Compliance Settings. Uncheck any contact types you
don’t want screened. For example, some companies uncheck Exporter because they don’t
want to repeatedly screen their own company. (You should consult with your company’s legal and/or compliance team to determine whether this is advisable.) The results will
indicate that the contact was not screened.
After you have chosen your screening option, click Run Compliance. A box will pop up
where you enter your user name and password. If you store your user name and password on
the Profile Settings screen on the Admin tab, they will fill in automatically and the box will
not pop up.
The first time you run a screening, a user agreement will pop up. Click the Accept button in
the upper-left corner to accept the agreement and proceed. You only need to do this one time,
and it will cover all compliance users at your company.
Once the results are returned you can click Audit Trail or Print Results. Clicking Audit Trail
will open a box showing all the screenings run for this shipment. The user account that ran the
screening is displayed. You can view or print the results.

49
Some companies choose to run a pre-screening against the Restricted Party Screening lists
when they first get an inquiry or order from a customer. Shipping Solutions’ online Restricted
Party Screening Wizard allows you to run Restricted Party Screenings from your web browser
and outside of the Shipping Solutions Professional software. These companies usually run a
final Restricted Party Screening within Shipping Solutions Professional before they ship their products to ensure that the lists, which could potentially be updated every day, haven’t
changed. Contact Shipping Solutions at (888) 890-7447 or [email protected] for more
details about the online Restricted Party Screening wizard..
The information for all three screening modules is monitored and updated within 24 hours of a
change, so you always have access to timely information.
Shipping Solutions Professional's Consolidation Utility
• Consolidate (Not available in Shipping Solutions Classic)—This feature allows you to
combine multiple shipping records stored in Shipping Solutions Professional into a single set
of documents. To start the consolidation process, you must first select the shipment record that
you want to act as the master record and view it on EZ Start. Shipping Solutions Professional will use the contact, invoice, EEI and other information from this master record for the new
consolidated shipment. You can select a master record by using the Find button described
above.
Once you have selected the master record, click the Consolidate button, which will open the
Consolidation Utility window. To add additional product line items from other shipment
records in Shipping Solutions Professional to the master shipment, click Select Shipments to
Consolidate, which will open a new window that will display the 10 most recent shipments
created in Shipping Solutions Professional. Click View All to see all your shipments from
newest to oldest (use the scroll bar to move through the list). To narrow your search, select
from the Field to Search drop-down list the field you want to search, such as the Invoice
Number or Invoice Date. Next, choose whether you want to find a shipment that contains or is equal to what you are searching for. Third, enter what you are searching for and click the
Search button. Shipping Solutions Professional will display the results in the window.
Click on the shipments you want to consolidate. To choose multiple shipments hold down the
Ctrl key while selecting the shipments. Click Add. The shipments will be moved to the lower
grid. If you want to remove a shipment from the consolidation, click Remove or, to start over,
click Remove All. Click Close.

50
Once you have consolidated your shipments, you can choose to perform one or more of the
following tasks:
o Preview/Print/Email Documents—Click here to preview, print or email documents
in the same way you would for a single shipment. See detailed instructions on page
40.
o Submit Data to AES—Click here to file the consolidated shipment in the same way
you would file a single shipment through AESDirect. See detailed instructions on
page 42.
o Run Compliance Checks—Click here to run a Restricted Party Screening, Document
Determination or Export License Determination screening on the consolidated
shipment in the same way you would a single shipment. See detailed instructions on
page 47.
o Create Packing List—Click here to load your packages and create a packing list in
the same way you would for a single shipment. See detailed instructions on page 70.
• Delete—This button deletes your current shipment from the program database. When you delete a
shipment, the entire shipment record will disappear as well as the Shipment Number. You will not
be able to use that Shipment Number again.
• Settings—This button allows you to control whether phrases selected from the Phrases Database
replace each other or combine multiple phrases together. By default, the software appends one
phrase to another, but you can change the setting to replace one phrase with another by unchecking
the Append Phrase box. All fields that allow you to select a phrase from the Phrases Database are
affected by this setting.
• Help—This button takes you to the Shipping Solutions website where you can view the latest
version of the User Guide, search through the Help Desk, or watch a video tutorial.
• Exit Application—This button will close the Shipping Solutions software.
Shipment Number & Shipment Details
On the right side of the EZ Start Screen, are boxes showing specific information about your shipment:
• Shipment Number

51
o The Shipment Number box shows the shipment
number along with a lock/unlock icon. If the
shipment is locked, the icon will be gold and appear
closed, and you will not be able to add or change any
information connected with this shipment record. If the shipment is unlocked the icon will be gray and
appear open. To lock or unlock a shipment, go to the
Tools tab and click Lock/Unlock Shipments (see
page 137).
o The Select Shipment button allows you to search
through your shipments and select one. It has the
same functionality as the Find button, described
above.
• Shipment Details
o The Change Shipment Options button allows you to
change the shipment number from the number
automatically assigned by the software whenever you create a new shipment to any number you would like.
You can also include letters in your shipment number.
Use the Search Tag field to enter a word or number
that will help you find this shipment when using the Find or Select Shipment buttons.
You can also change the Profile for this shipment. (For more information on profiles, see
page 161.) Click Update Shipment to save your changes or Cancel to delete the changes.
o Clicking on the Shipment Summary button will display the details about this shipment
without having to move through the various EZ Start screens. The summary information
includes: Shipment Number, Exporter, Ultimate Consignee, Invoice Number, Invoice
Date, Order Number, Status (locked or unlocked), Profile, and AES ITN/Exemption
Statement.
The Contacts Screen in EZ Start
Contacts Screen

52
Once you have clicked on the New or Copy button to create a shipment, you can proceed to the list of EZ
Start screens. The first screen is the Contacts screen, which is where you enter the names and addresses of
all the parties involved in your export shipment. You can enter the names and addresses of the parties into
the various fields on this screen, or you can select the contacts from the various Shipping Solutions
databases you have previously populated with your company and customer information (see page 108 for
more details).
The most commonly used types of contacts are always listed in the box on the left side of the screen. Other
contacts may be added from other EZ Start screens. For example, the consignee that appears on the Inland
Bill of Lading form is entered on the Bills of Lading—Inland Bill of Lading screen. However, you can
also choose to add other contacts from this screen by placing your cursor in the left-hand box of contacts and
clicking on the right mouse button. This will open a menu where you can click Add Contact and then
choose the type of contact you wish to add. You can also choose Delete Contact to delete any of these
additional contacts (but none of the first six contact types listed in the box).
The first screen you see is the Exporter window. Type the exporter information in the boxes on the screen
or add a contact from the database by clicking Add Contact from Database (preferred method). The
Contacts Database will open where you can select an exporter from the grid or search for a contact by
choosing between Starts With or Contains in the Match drop-down box and then typing the company you
are looking for in the Search For box. Exporters that match your search criteria will appear in the grid.
Adding Contacts to a Shipment from the Contacts Database
You can also sort the contacts by clicking on the column header in the grid. Clicking on the column header
once will sort all the contacts in ascending alpha/numeric order; clicking the column header a second time
will sort the contacts in descending order. You can sort the contact records by clicking on any of the column
headers. For example, clicking on the Postal Code column header will arrange all your contacts from the
smallest number value to the highest number value. Use the scroll bar on the right side of the grid if you
have more records than are visible in the grid.
Once you have found the correct exporter in the grid, simply double-click on the exporter in the grid or
highlight the correct exporter and then click Add Contact. You will be taken back to the EZ Start Contacts
screen where your exporter information has been filled in.

53
Click Ultimate Consignee in the box on the left side of the screen and add your Ultimate Consignee the
same way you entered your Exporter. Continue down the list for any contact that you want to fill in.
If you manually enter a new contact on this screen or make a change to an existing contact that you want
saved in the Contacts database, click Add Contact to Database. If the contact doesn’t currently exist in the
database, the software will ask you if you are sure you want to add it to the database. Click Yes.
If the contact already exists in the Contacts database, a grid will pop up with any matching contacts based on
company name. To add the contact again, click Add New Contact. To update an existing contact, choose
the contact to update in the grid, and click Update Selected Contact.
Once you are done adding contacts to your shipment, click the Save button and then the Close button.
Please Note: AES requires one additional piece of data for the Ultimate Consignee, which is not required
for any other contact: Ultimate Consignee Type. This mandatory AES field requires that you select from the
drop-down menu of choices: Direct Consumer, Government Entity, Other/Unknown, or Reseller.

54
The Product Detail Screen in EZ Start
Product Detail Screen
This screen allows you to enter your product information for each line item you are shipping. You can either
enter your information on this screen, or you can select products from the Product Database.
• Add New or Add From Database—Click on one of these two buttons to add the first product to
your shipment.
Use the Add New button if you want to type your product information directly on the EZ Start
screen. After you’ve entered your first product, click this button again to enter a second product.
Repeat this process until all your items have been entered.
If you have already entered your products into the Product Database, click on the Add From
Database button. Clicking this button will open the Products database where you can select a
product from the grid or search for a product. To search for a product to add to this shipment record, choose ProductID or Description in the Column drop-down box and either Starts With or
Contains in the Match drop-down box. Then type what you are looking for in the Search For box.
Products that match your search criteria will appear in the grid.
You can also sort the products by clicking on the column header in the grid. Clicking on the column
header once will sort all the products in ascending alphanumeric order; clicking the column header
a second time will sort the products in descending order. You can sort all the product records by
clicking on any of the column headers. For example, clicking on the Schedule B/HTS Code
column header will arrange all your products from the smallest number value to the highest number
value. Use the scroll bar on the right side of the grid if you have more records than are visible in the
grid.
Once you have found the correct product in the grid, simply double-click on the product in the grid or highlight the correct product and then click Add Selected Products to Shipment. You will be
taken back to the EZ Start Product Detail screen where your products have been filled in. The

55
counter in the upper left corner shows how many products are in your shipment. You can navigate
between the products by using the blue arrow keys. Click Add From Database as many times as
needed to add all the products in your shipment. To select more than one product at a time from the
Products database, hold down the Ctrl button on your keyboard as you click on each item in the
product grid.
• Add To Database—Click this button if you have manually entered a product or modified an
existing product on the EZ Start screen and now want to save that new or modified product to the
Product Database. First, it will ask if you want to save your changes, and you will need to click Yes
to proceed with adding the product to the database. If the product doesn’t exist yet in the Product
Database, the software will ask you if you are sure you want to add it to the database. Click Yes. If
the product already exists in the Product Database, a grid will pop up with any matching products
based on the Product ID. To add the product as is, click Add New Product. To update an existing
product, choose the product to update in the grid and click Update Selected Product.
• Delete—Click this button to delete the currently displayed line item for your shipment.
• Reorder Line Items—By default, Shipping Solutions will print the line items in your shipment in
the same order in which they were entered into the Product Detail screen with some exceptions for items that get combined together. This button allows you to rearrange the order in which the line
items will print on your invoices by clicking the item and entering a new line number for the item.
This feature will not rearrange the items on the non-invoice forms.
• Search Line Items—Click this button to display all the product line items you’ve entered for this
shipment in a grid box. Select one of the lines to display all its information on the screen. While the
blue arrow keys will also allow you to move through the line items in your shipment, this button
will make it easier if you have many line items.
• Save —You must click Save for the data you have entered to be saved. If you enter data into a field
but do not move off that field before saving, the data will not be saved.
• Close—Click Close to exit the Product Detail screen. You must click Save before closing to save
the data.
• Display Products On—Because you may not want all the product line items for this shipment to
appear on all the documents (you don’t want a product manufactured in China to appear on your
NAFTA Certificate, for example), Shipping Solutions provides check boxes for some of the
documents. Check the box if you want this product to appear on the following document and
uncheck the box if you don’t: Certificate of Origin, NAFTA/FTA Certificates, Invoices, SLI/Bills
of Lading, and Packing List.
If the Packing List check box is grayed out, it means this item has already been packed. Go to the
Packing List screen and unpack the item (see page 71). You will then be able to uncheck this box.
The AES check box determines if this product is included in the electronic filing to AESDirect. By
default, all the boxes are checked whenever you add a new line item.
• Product ID—Enter your company’s product number for this product.
• Product Description—Enter your company’s description of the product. You have the option to append the Country of Origin and/or the ECCN classification to the Product Description entered
here. By default, the Country of Origin will appear; the ECCN won’t. Go to the Tools tab,
Customize Documents screen to change these settings.
• Sales Quantity—Enter the number of pieces or units of the product you are shipping with this
order.
• Sales Unit of Measure—Enter the unit of measure for this product as it is calculated for invoicing
purposes. This unit of measure will appear on the commercial and proforma invoices.
• Unit Price—Enter the per piece or per unit price of the product. Shipping Solutions allows you to
enter a unit value with up to five decimal places.

56
• Extended Price—This is the total value for the line item, usually Quantity * Unit Price. Shipping
Solutions will automatically calculate this value for you, although you can overwrite the calculated
value with another value if you need to.
• Schedule B/HTS Code—Enter the Schedule B Commodity Classification Code or Harmonized
Tariff System (HTS) Code for the product. The first six digits of the code will appear on any document used internationally; all 10 digits appear on domestic documents and on your AES filing.
Shipping Solutions allows you to adjust the number of digits that appear on many of the forms by
going to the Tools tab and clicking on Customize Documents. That screen also gives you the
option not to display the Schedule B number on the invoices if you prefer.
• Gross Weight—Enter the total weight for this line item including packaging. Enter this weight in
pounds or kilograms, and the program will automatically convert it and fill in the other box.
• Net Weight—Enter the weight of the product without any immediate wrappings; e.g., the weight of
the contents of a tin can without the weight of the can. You can enter this weight in pounds or in
kilograms, and Shipping Solutions will automatically convert it and fill in the other box.
• Country of Origin—Shipping Solutions gives you the option of listing a product’s country of
origin on your invoices appended to the end of your Product Description. If you wish to take advantage of this option, enter the country of origin for this product in this field. (You can turn this
option on by going to the Tools tab and clicking on the Customize Documents screen. Click on the
Commercial Invoice, Proforma Invoice, Canada Customs Invoice, or CAFTA-DR form, and
then make sure the Add Country of Origin to Product Description box is checked.)
AES/EEI Section
The following fields are required when filing your Electronic Export Information (EEI) electronically
through the Automated Export System (AES) or if you are creating a Shipper’s Letter of Instruction in either
the NCBFAA format or the SED format so a third party (typically a freight forwarder) can file on your
behalf.
• Schedule B Description—Certain products may require that you use a different description on the
EEI/AES filing than on your invoices. This field gives you the opportunity to enter a second
product description that will appear only on the Shipper’s Letter of Instruction (in SED or
NCBFAA format) and be transmitted to AES. If you wish to use the same description for AES as
you do on the invoices, simply click on the Copy Product Description button, and Shipping
Solutions will copy the first description into this field.
• AES Quantity 1—Shipping Solutions will automatically copy the quantity that you entered into
the Sales Quantity field above into the AES Quantity 1 field. However, the correct unit of
measure for the Shipper’s Letter of Instruction (in SED or NCBFAA format) and AES is
determined by the Schedule B or Harmonized Tariff System code for your product. It may very
well be different than the unit of measure that you use on your invoices. Shipping Solutions allows
you to overwrite the quantity that it automatically copied into this field with a different quantity, if
necessary to match a different unit of measure.
• AES Unit of Measure 1—The correct unit of measure for the Shipper’s Letter of Instruction (in
SED or NCBFAA format) and AES is determined by the Schedule B or Harmonized Tariff System
code for your product. It may very well be different than the unit of measure that you use on your
invoices. Click on the drop-down menu to select one of the units of measure that is allowed by the U.S. Census Bureau to appear on the Shipper’s Letter of Instruction (in SED or NCBFAA format)
and transmitted to AES.
• AES Quantity 2—The U.S. Census Bureau requires exporters of certain, limited products to report
two quantities and two units of measure when filing their EEI electronically through AES. This
depends on the Schedule B or HTS code of the product. If this product requires two units of
measure, enter your second quantity here. Otherwise, leave this field blank.

57
• AES Unit of Measure 2—The U.S. Census Bureau requires exporters of certain, limited products
to report two quantities and two units of measure when filing their EEI electronically through AES.
This depends on the Schedule B or HTS code of the product. If this product requires two units of
measure, select the second unit of measure from the drop-down list. Otherwise, leave this field
blank.
• Origin—Indicate the type of export:
o Domestic—merchandise that is grown, produced or manufactured in the United States
(including imported merchandise that has been enhanced in value or changed from the
form in which it was imported by further manufacturing or processing in the United
States).
o Foreign—merchandise that has entered the United States and is being re-exported in the
same condition as when imported.
• FAS Value—U.S. export regulations require that the value of the products that you report on the
Shipper’s Letter of Instruction (in SED or NCBFAA format) or transmit to AES include not just
their Ex Works value (the value of the goods sitting in your warehouse), but also all additional
expenses that are incurred to transport your product to the port of export (such as freight and insurance). Use this field to enter those additional costs for each line item. These additional
expenses will be added to the line item totals for AES purposes but not the totals on any of the
invoices.
• Export Code—An export code is required when filing your EEI electronically through AES. Select
the proper code from the drop-down list. If you are not using AES, you can leave this field blank.
The most common code is “OS – All Other Exports.” You’ll find a complete description of all the
export codes in the Appendix (page 178).
• ECCN—Enter the Export Control Classification Number (ECCN), if necessary, for your product.
Please Note: EAR99 is not an ECCN number. Entering that code in this field may cause problems
if you try to file this shipment through AESDirect. If your product is EAR99, you can leave this
field blank. To have the ECCN append to the Product Description on the Proforma and Commercial
invoices, go to the Tools tab, Customize Documents screen.
• License No./Exemption—When you enter a license type, the license exemption will fill in here if
there is one. Otherwise, fill in your license number. You’ll find a complete list of export license
types and codes in the Appendix (see page 179).
• License Value— For shipments requiring an export license, report the value designated on the
export license that corresponds to the commodity being exported. This field was added as part of
the April 15, 2014, AES updates.
• License Type—Select the license type from the drop-down menu. The most common selection is
“C33 – No License Required.” You’ll find a complete list of export license types and codes in the
Appendix (see page 179).
Free Trade Agreements Section
The following fields appear on the USMCA Certificate of Origin (COO) as well as the Australia Free Trade
Agreement (FTA) COO, the CAFTA-DR COO, the Chile FTA COO, the Colombia Trade Promotion
Agreement (TPA) COO, the Korea FTA COO, the Panama TPA COO, and the Peru TPA Coo. You should
make sure you understand how to qualify your goods under each of the appropriate free trade agreements
before you ever provide an FTA Certificate of Origin to an importer.
You may skip the fields in this section if your shipment does not qualify—or you are not sure it qualifies—
for preferred tariff treatment under a U.S. free trade agreement.

58
FTA Certificate of Origin Form
Preference Criteria
Net Cost Producer Country of
Origin
Australia WO
POM PS
NC No
Yes No1 No2
US AU
CAFTA-DR
A B1 B2 C
If B2, then indicate: RVC ACU DM
FGM SG
Yes No1 No2
Not Required
Chile A B C
RVC BUILDUP RVC BUILDDOWN
No
Yes No – Article 4.13 (2a) No – Article 4.13 (2b)
US CL
Columbia
A B1 B2 C
RVC 1 RVC 2 RVC 3
No
Not Required US CO
Korea WO PSR PE
Not Required Not Required US KR
Panama 1 2 3
Not Required Not Required US PA
Peru A B C
Not Required Not Required US PE
USMCA
A B C
D1 D2 D3 E
Not Required
Yes No1 No2 No3
US CA MX JNT
Free Trade Agreement Fields
As you can see from this chart, each of the free trade agreements that the United States has entered with
other countries include different data elements to prove that your goods qualify under the rules of origin for
that agreement. The chart above lists those options for each of the specific FTA Certificates of Origin.
Each column in the chart is independent from the others for their respective agreements. For example, in the
USMCA COO row, using Preference Criteria “B” does not mean that you automatically enter “Yes” in the
Producer field, and “US” in the Country of Origin field. The one exception is for the CAFTA-DR COO. In
that case, you would only select one of the Net Cost field options if you selected “B2” as the Preference
Criteria for your product(s).

59
For a detailed explanation of each of the agreement’s rules of origin and what the abbreviations and citations
represent, visit the U.S. Trade Information’s website, www.export.gov/FTA/index.asp.
Bill of Lading Section
Shipping Solutions gives you two options for printing a Shipper’s Letter of Instructions, Inland Bill of
Lading, Ocean Bill of Lading and Dock Receipt. If you want the same product detail to appear on these
export forms as you do on the invoices, you’ll need to enter the data shown below. If you want a summary of
your products to appear on these export forms rather than a detailed listing of the products, you can leave the
fields in the Bill of Lading section blank. Instead, you will enter that information on the Product Summary
screen (see page 83).
The only exception is if you need a Canada Customs invoice or CARICOM invoice; in that case, you will
always need to enter the number and type of packages here.
• Number of Packages—Enter the number of packages in which this line item is packed. The
information will appear on the Canada Customs Invoice, CARICOM Invoice, and Inland Bill of
Lading.
• Type of Packages—Enter the type of package (e.g. box or pallet). The information will appear on
the CARICOM Invoice.
• Package Measurements—Enter the dimensions of the package(s) for this line item.
• Marks and Numbers—Enter any distinguishing information for your packages for this line item
such as a container and seal number.
• Hazardous Material—Check this box if this item qualifies as hazardous under Department of
Transportation regulations.
• Inland Bill of Lading Rate—Enter the rate that should appear on the Inland Bill of Lading for this
line item.
The AES Vehicle and DDTC Info Tab on the Product Detail Screen
AES Vehicle and DDTC Info Tab
Certain products shipping under a State Department license are required to include additional DDTC
information that can be found on the AES Vehicle and DDTC Info tab on the Product Detail screen. This

60
requirement doesn’t affect most exporters, who should simply skip this section. If it does apply to your
company, enter information into the following fields:
• Exemption Number—If required by the license type, select the exemption number from the drop-
down menu that is the specific citation from the International Traffic in Arms Regulations (ITAR)
(22 CFR 120-130) that exempts the shipment from the requirements for a license or other written
authorization from DDTC.
• Significant Military Equipment—Check this box if this line item appears on the United States
Munitions List (USML) for which special export controls are warranted because of their capacity
for substantial military utility or capability. See Section 120.7 of the ITAR (22 CFR, 120-130) for a
definition of SME and Section 121.1 for items designated as SME articles.
• USML Category Code—If required by the License Type, select from the drop-down menu the
USML category of the article being exported (22 CFR 121).
• Registration Number—If required by the license type, enter the number assigned by DDTC to
persons who are required to register per Part 122 of the ITAR (22 CFR, 120-130), that has an
authorization from DDTC (license or exemption) to export the article.
• Certified Party Indicator—Check this box if the U.S. exporter can certify that the exporter is an eligible party to participate in defense trade. See ITAR (22 CFR 120.1(c)). This certification is
required only when an exemption is claimed.
• Unit of Measure—If required by the license type, select the unit of measure for this line item from
the drop-down menu.
• Quantity—If required by the license type, enter the quantity for the line item being shipped. The
quantity is the total number of units that corresponds to the Unit of Measure field (see above).
Also, on the AES Vehicle and DDTC Info tab on the Product Detail screen is the information required if
you are shipping a used vehicle anywhere except to Puerto Rico:
• Vehicle ID Type—Select either VIN (Vehicle Identification Number) or Product ID from the pull-
down menu.
• Vehicle ID Number—Enter the VIN or ID number for the vehicle.
• Vehicle Title—Enter the unique title number issued by the state in which the vehicle title was
issued.
• Vehicle Title State—Enter the two-digit state code for the state in which the vehicle title was
issued.
Once you have filled in all the Product Detail fields, click the Save button and then the Close button.

61
The Dangerous Goods Tab on the Product Detail Screen
Dangerous Goods Tab
If your item is considered a dangerous good (DG) by either the International Air Transport Association
(IATA) or the International Maritime Organization (IMO), you will want to complete the appropriate fields
on this screen so that you can prepare the proper documentation for your shipment. The screen is divided
into IATA and IMO sections.
If you have already stored your DG information in the Products database, it will automatically populate on
this screen when you add the product to your shipment. If not, click Lookup DG to search for your item in
the IATA Database of Dangerous Goods. You can search the database by UN Number or Proper Shipping
Name. When you’ve located your item, highlight the row and click the Select button. The IATA Database
will provide the UN Number, Proper Shipping Name, Classification and Packing Group.
Since your shipment is either an air or ocean shipment, but not both, you do not need to complete both the IATA and IMO sections of this screen. However, if this is an ocean shipment you can click Copy to IMO to
get this information into the IMO section. The UN Number, Proper Shipping Name, Classification and
Packing Group are not always the same for IATA and IMO, so you may need to edit the IMO information.
Continue working in either the IATA or IMO section, whichever pertains to your shipment.
DISCLAIMER
Proper training is required under federal and/or state regulations to handle dangerous goods and/or
hazardous materials. All persons and entities must comply with all federal regulations, including but
not limited to the specific training requirements of 49 C.F.R. (172.000– 172.704).
InterMart provides this form and instructions to assist properly trained shippers. The materials
provided by Shipping Solutions in no way alter, satisfy or influence any federal or state requirements.
The information provided does not meet the training requirements as required in DOT 49 CFR.
The study and/or use of Shipping Solutions software does not qualify an individual to prepare,
package, transport or otherwise handle dangerous goods or hazardous materials.
The information contained in this document is subject to change or update due to changing
government regulations. The user of this document assumes responsibility for complying with all
applicable laws and regulations regarding the shipment of dangerous goods.
InterMart shall not be held responsible for any loss, injury and/or damage caused by errors,
omissions, misprints or misrepresentations of the contents of this software, forms or documentation or
for any unauthorized or inappropriate use.

62
IATA Section
Enter the Quantity. Since this could be different than the commercial invoice quantity, it is not copied from
the Invoices tab.
The Statement Builder Screen for Dangerous Goods
If you did not enter your packing information in the Product Database, you can type it directly in the Type
of Packing box, or you can click the Builder button. On the Statement Builder screen, choose your
Material and Container from the drop-down lists. Enter the amount in the containers in the Value box and
either L for liters or kg for kilograms from the Units drop-down list. Click the plus button to add the Value
and Units to your type of material and container in the Statement box. Use the degree button to add that
symbol to a flashpoint, if needed. You can also use this box, if needed, to describe an overpack. Click OK to
return to the DG tab.
If your DG item requires a technical name following the Proper Shipping Name, enter it in the Technical
Name box. Do not include the required parenthesis because Shipping Solutions will automatically add them.
The Include on IATA check box will default to checked. If for some reason you do not want to include this
item on your Dangerous Goods IATA document, uncheck the box.
IMO Section
Enter the Quantity. Since this could be different than the commercial invoice quantity, it is not copied from
the Invoices tab. If weights were pulled in from the Product Database, they will be multiplied by the
Quantity to get a total weight.
Type directly in the Kind of Packages box or click the Builder button as described in the IATA section.
Use the Additional Description box to enter any information that you want to follow the UN Number,
Proper Shipping Name, Classification and Packing Group. This information could include a flashpoint,
so a degree button is provided to add that symbol.
The Include on IMO check box will default to checked. If for some reason you do not want to include this
item on your Dangerous Goods IMO document, uncheck the box.
If your DG item requires a Technical Name, enter it in the box. Enter the name without parenthesis, which
will be added automatically to the document.
The Dangerous Goods IMO document shows Gross Weight/Volume and either Net Weight/Volume or
Cubic Meters, and you can enter the values here. Choose which values to display on the Tools tab,
Customize Documents, Dangerous Goods IMO screen. You can also change the Field Labels on that screen to indicate whether you are showing weight or volume.

63
The Carriers and Ports Screen in EZ Start
Carriers and Ports Screen
This screen allows you to specify your shipment’s method of transportation and the carriers and ports that
will be used to transport your goods. This information is used on various forms and for filing your EEI with
AES.
• Mode of Transport—Choose the method of transportation for your shipment from the drop-down list of choices supplied by U.S. Customs. For transshipments to Canada, the mode of transport
should be that of the border-crossing carrier, not that of the carrier that transports the goods to the
country of ultimate destination.
• Select Exporting Carrier—Depending on the method of transportation you chose above, either the
air (IATA) or ocean and land (SCAC) carriers will become available when you click the Select
Exporting Carrier button. To search for your carrier, choose either Code or Name in the Column
drop-down list, choose Starts With or Contains in the Match drop-down list, and type the
corresponding information for your carrier in the Search For box. Click on the correct carrier and
then click Select. The carrier name and code will be filled in on the Carriers and Ports screen. For
transshipments to Canada, the carrier code should be that of the border-crossing carrier, not that of
the carrier that transports the goods to the country of ultimate destination.
• Vessel Name—Enter the vessel name for ocean shipments or the carrier name for air, truck and rail
shipments. For air shipments, the Vessel Name should match the Exporting Carrier. If you have
selected Air as the Mode of Transport before selecting the Exporting Carrier, the exporting
carrier’s name will automatically be entered into the Vessel Name field. Enter Unknown for Auto;
Pedestrian; Road, Other; Mail; Passenger, Hand Carried or Fixed Transport.
• Select Inland Carrier—Click the button and select the carrier that will move your shipment to the
port of export. You can search for your carrier as described under Select Exporting Carrier.
• Select Port of Export—Click the button and select the port of export. For transshipments to
Canada, the port of export is the port where your shipment crosses the U.S./Canadian border, not
the port from which the goods are shipped to the country of ultimate destination.

64
• Loading Pier/Terminal—Enter the name of the pier or terminal on which your goods are loaded
on the export carrier’s vessel.
• Select Port of Unloading—Click the button and select the port in which your shipment will be
unloaded from the exporting carrier. This field is not required for AES filings when you are
shipping by air.
If you cannot locate a specific port, it may be because that port has a different name than you
expect. The U.S. Census Bureau has combined certain foreign ports into larger groupings called
“All Other Ports….” For example, “All Other Guyana Ports, Guyana.” You can search for a port
name in the Carriers and Ports database or you can ask your freight forwarder or carrier for the
official port name and code.
If you cannot find a specific carrier, ask your forwarder or carrier for the correct code and then add
it by going to the Databases tab, clicking on Carriers and Ports, the type of code you want to add
and then Add New.
The following list shows which export forms use what data from the Carriers and Ports screen:
• Canada Customs Invoice—Mode of Transport, Exporting Carrier, Loading Pier/Terminal
• CARICOM Invoice—Port of Export
• Commercial Invoice—Exporting Carrier, Loading Pier/Terminal
• Dock Receipt (all versions)—Vessel Name, Port of Export, Loading Pier/Terminal, Port of
Unloading
• Ocean Bill of Lading (all versions)—Vessel Name, Port of Export, Loading Pier/Terminal, Port of
Unloading
• Packing List—Exporting Carrier
• Proforma Invoice—Exporting Carrier, Loading Pier/Terminal
• Shipper’s Letter of Instruction (in SED format)—Mode of Transport, Exporting Carrier, Port of
Export, Loading Pier/Terminal, Port of Unloading
• Shipper’s Letter of Instruction (with Product Detail & Summary)—Mode of Transport
• EEI filing through AES—All fields on the Carriers and Ports screen including the codes.
Once you have filled in the necessary information on the Carriers and Ports screen, click the Save button
and then the Close button.

65
The Invoices Screen in EZ Start
Invoices—Proforma/Commercial Screen
This screen allows you to enter information about your shipment that will appear on the proforma and
commercial invoices.
• Proforma Invoice Date—Enter the date you want to appear on the proforma invoice.
• Proforma Invoice Number—Enter the number you want to assign to your proforma invoice for
this shipment.
• Proforma Phrase—Select the phrases you want to appear on your proforma invoice, most
commonly the U.S. Department of Commerce or U.S. Department of State anti-diversion clause.
Shipping Solutions includes a database for storing commonly used instructions and phrases that
your company uses, so you don’t have to retype these instructions on every shipment. Click on the
drop-down menu to see a list of phrases that have already been entered into the database. You can add additional phrases by going to the Databases tab and clicking on Phrases. This field allows
you to display up to approximately 600 characters.
• Special Instructions—Enter any special instructions you want to appear on the Proforma Invoice.
Shipping Solutions includes a database for storing commonly used instructions and phrases that
your company uses, so you don’t have to retype these instructions on every shipment. Click on the
drop-down menu to see a list of phrases that have already been entered into the database. You can

66
add additional phrases by going to the Databases tab and clicking on Phrases. This field allows
you to enter and display up to 25,000 characters.
• Commercial Invoice Date—Enter the date you want to appear on the commercial invoice. This
date is also used on the Canada Customs Invoice, the CARICOM invoice, and the various versions
of the Shipper’s Letter of Instruction. If you have already entered an invoice date on the Canada Customs Invoice screen, the CARICOM Invoice screen, or the Shipper’s Letter of Instruction
screen in EZ, the date will automatically appear on this screen too.
• Commercial Invoice Number—Enter the number you wish to assign to your commercial invoice
for this shipment.
• Commercial Phrase—Select the phrase you want to appear on your commercial invoice, most
commonly the U.S. Department of Commerce or U.S. Department of State anti-diversion clause.
Shipping Solutions includes a database for storing commonly used instructions and phrases that
your company uses, so you don’t have to retype these instructions on every shipment. Click on the
drop-down menu to see a list of phrases that have already been entered into the database. You can
add additional phrases by going to the Databases tab and clicking on Phrases. This field allows
you to display up to approximately 600 characters.
• Special Instructions—Enter any special instructions you wish to appear on the commercial invoice
and most of your other documents. Shipping Solutions includes a database for storing commonly
used instructions and phrases that your company uses, so you don’t have to retype these
instructions on every shipment. Click on the drop-down menu to see a list of phrases that have
already been entered into the database. You can add additional phrases by going to the Databases
tab and clicking on Phrases. The information you enter on this screen will not only appear on the
Commercial Invoice, it will also print on the Canada Customs Invoice, CAFTA-DR Certificate of
Origin, Certificate of Origin (Generic), Dock Receipt, Ocean Bill of Lading, Packing List and
Shipper’s Letter of Instruction (with Product Detail and Product Summary). This field allows you
to enter up to 25,000 characters.
• Order Number—Enter the customer’s order number or numbers for this shipment.
• PO Number—Enter the customer’s purchase order number.
• Terms—Click on the drop-down menu to choose one of the payment options. To add additional
payment terms, go to the Databases tab and click on Payment Terms.
• Incoterm Year—Choose a statement clarifying whether you are using the Incoterms revised in
2000, 2010 or 2020.
• Incoterm—Maintained by the International Chamber of Commerce (ICC), this codification of
terms is used in foreign trade contracts to define which parties incur the costs and at what specific
point the costs are incurred. Select the correct term from the drop-down menu. The drop-down
menu in this field includes the abbreviations for Incoterms® 2000, Incoterms® 2010, and the
Incoterms® 2020 rules. (For a complete listing of Incoterms 2020, see the Appendix on page 177.)
• Incoterm Location—Enter the geographic location at which the Incoterms rule takes place.
• Fees—The following six fields are intended to allow you to add any additional charges to the
invoices: Inland Freight Fees, Handling Fees, Consular Fees, Ocean/Air Fees, Insurance Fees,
and Other Fees. You can customize your commercial and proforma invoices, so they only display
the additional charges fields that you need. To change these options, go to the Tools tab, click
Customize Documents and choose either the Commercial Invoice or Proforma Invoice. Make sure
the boxes are checked next to only those values and fees fields you wish to display on that specific
invoice.
• Country of Ultimate Destination—Enter the name of the country in which the merchandise will
ultimately reside.

67
• Point or State of Origin—Enter the state in which the merchandise starts its journey to the port of
export, or the state of the commodity of the greatest value, or the state of consolidation.
• Show Intermediate Consignee as—Choose from the drop-down list what you want to display in
the Intermediate Consignee box on the proforma and commercial invoices: the intermediate
consignee or the bill to.
• Invoice Currency (This feature is not available in Shipping Solutions Classic.)—If you want your
invoices in U.S. dollars, do nothing with this field. If you would like your invoices to print in a
different currency, choose the currency here. The converted amounts, using the Currency
Exchange Rate, will appear on the proforma and commercial invoices. If the currency has a
symbol, the currency symbol will appear in the total price field for each line item, in the fee fields,
and in the invoice total price field. The associated three-character ISO currency code (e.g. USD for
U.S. dollars) will appear below the total price of the invoice.
• Currency Exchange Rate (This feature is not available in Shipping Solutions Classic.)—Once you
have chosen a different Invoice Currency and tabbed off the field, the Currency Exchange Rate
field will appear. If you have an exchange rate stored in the currency database for this currency,
then it will automatically fill in. Otherwise, you can enter the exchange rate directly on this screen. Shipping Solutions will multiply the exchange rate against the prices entered on the Product Detail
screen, which should be in U.S. dollars, to get the prices in the new currency. The converted prices
will appear on the proforma and commercial invoices. If the amounts on the Product Detail
screens are in U.S. dollars, however, Shipping Solutions will file your EEI information with AES in
U.S. dollars as is required by the U.S. Census Bureau.
• Alternate Currency (This feature is not available in Shipping Solutions Classic.)—Use this field
only if you want to display a second currency on your invoice as a total only. Select the currency
you wish to use from the drop-down menu. The converted total, using the Alternate Currency
Exchange Rate, will be shown at the bottom of the invoice below the primary currency total. If the
currency has a symbol, it will appear with the total. The associated three-character ISO currency
code (e.g. USD for U.S. dollars) will also appear.
• Alternate Currency Exchange Rate (This feature is not available in Shipping Solutions
Classic.)—Once you have chosen an Alternate Currency and tabbed off the field, the Alternate
Currency Exchange Rate field will appear. If you have an exchange rate stored in the currency
database for this currency, then it will automatically fill in. If not, you can enter the exchange rate
directly on this screen. Shipping Solutions will multiply the exchange rate against the total invoice
value and show this amount at the bottom of the commercial and proforma invoices. If the amounts
on the Product Detail screens are in U.S. dollars, however, Shipping Solutions will file your EEI
information with AES in U.S. dollars as is required by the U.S. Census Department.
• Signature—If you have assigned a signature to the profile used for this shipment, the signature file
will be filled in here. However, you can choose a different signature from the drop-down list or
choose No Signature for your commercial and proforma invoices.
Once you have filled in the invoice information, click Save and then Close. On the Preview/Print/Email screen you can print both the commercial invoice and the proforma invoice in either English or Spanish.

68
The EEI – Electronic Export Information for AES Screen in EZ Start
EEI – Electronic Export Information (AES) Screen
The information on this screen is used to complete a Shipper’s Letter of Instruction (in NCBFAA format or
in SED format) or to file your EEI information electronically through the Automated Export System (AES).
• Shipment Reference Number—Enter a unique reference number up to 17 characters for
identification purposes. This shipment reference number must be unique to your company and
cannot be re-used for future shipments.
• Date of Export—Enter the date the merchandise is scheduled to leave the U.S. for all methods of
transportation. If the actual date is not known, report the best estimate of departure. When you know
the actual date, log on to AESDirect and correct it. The date format should be MM/DD/YYYY.
• Foreign Trade Zone—Foreign Trade Zones are specially licensed commercial and industrial areas
near ports of entry where foreign and domestic goods may be brought in without being subject to
payment of Customs duties. Enter the one- to five-digit alphanumeric code assigned by the Foreign
Trade Zone Board.
• Inbond Type—This field is used for re-export of imported goods stored in a bonded warehouse.
Inbond shipments that involve a warehouse or foreign trade zone may be filed with AES for
informational purposes only.
• Import Entry Number—Enter the Import Entry Number when the export transaction is used as proof of export for import transactions, such as In-Bond, Temporary Import Bond or Drawbacks. If
an Inbond Type is specified, you must have an entry here.

69
• Filing Option—Select whether this AES filing is being done prior to export (Predeparture) or
after the export (Postdeparture). Because most exporters must file through AES prior to their
export, Shipping Solutions defaults to the Predeparture option.
• State of Origin—Select the state in which the merchandise starts its journey to the port of export.
If the shipment is composed of merchandise from more than one warehouse located in different states, provide the state with the commodity of the greatest value or the state where merchandise is
consolidated.
• Parties Are Related—Check this box if the parties in this shipment are related. A related-party
transaction is a transaction between a USPPI and a foreign consignee (e.g., parent company or
sister company) where there is at least 10% ownership of each by the same U.S. or foreign person
or business enterprise.
• Containerized—(For vessel shipments only.) Check this box for cargo originally booked as
containerized cargo and for cargo that has been placed in containers at the vessel operator’s option.
• Hazardous Materials—Check this box if this shipment is hazardous as defined by the Department
of Transportation.
• Routed Export Transaction—Check this box if this is a routed export transaction. A routed export transaction is one in which the foreign principal party in interest authorizes a U.S. forwarding or
other agent to export the merchandise out of the United States on its behalf.
• EEI Email Response—AES will send you an email with your ITN number confirming that your
EEI information was accepted by the Census Bureau. By default, this email will be sent to the
Systems Administrator that established your company’s ACE account when you registered. If you
want the confirmation email to be sent to someone in addition to the Systems Administrator, enter
that email address here. You can also store the email address in Shipping Solutions, so you don’t
have to enter it here for every shipment. To store an EEI Email Response address, go to the Admin
tab and clicking on Profile Settings. You can enter multiple email addresses by separating each
address with a comma.
• Country of Ultimate Destination—Enter the name of the country in which the merchandise will ultimately reside. If you have already entered this information on the Invoices screen, this field will
be filled in automatically.
• AES ITN Code or Exemption Statement—If you are filing your EEI information through the
Automated Export System (AES), you must be able to prove that you filed the information through
AES or that your shipment was exempt from the filing requirement. To do that, you must enter the
correct filing citation or exemption statement in this field.
This field will automatically print on the Shipper’s Letter of Instruction (with Product Detail and
Summary) and on the Air Waybill and Ocean Bill of Lading (with Product Detail and Summary). If
you will not be providing one or more of these forms to your freight forwarder or to the carrier, you
should add this statement to the Special Instructions field on the Commercial Invoice screen.
Even if you will be presenting the SLI or one of the waybills, you might want to include it on the
commercial invoice anyway.
After you have filed your EEI information through AES, you’ll receive an email with your Internal
Transaction Number (also known as ITN number) as proof that your AES filing was accepted by
the Census Bureau. The ITN number is a 15-digit code starting with the letter “X” plus the date the
EEI was filed and a six-digit number generated by Census.
You must enter the ITN number into this field after the citation AES. For example, a citation will
look like this: AES X20121014000001.
There are various exceptions that do not require filing your EEI information with AES. For
example, if the value of the goods is less than $2,500 and the goods don’t require an export license,
you should enter: NO EEI 30.37(a). Shipping Solutions has populated the most common exception
statements in the Phrases database, and they appear in the drop-down list for this field. If the one

70
you use regularly is missing, you can add it by going to the Databases tab, clicking on Phrases and
then the Add button. For a complete list of exceptions see part 30 of the Foreign Trade Regulations
found at www.census.gov.
SLI in NCBFAA Format Only Section
If you are using the Shipper’s Letter of Instruction in the format recommended by the National Customs
Broker and Freight Forwarder Association of America (NCBFAA) to provide your forwarder with the EEI
information for AES filing, fill in the following fields:
• DDTC Applicant Registration Number—For Department of State, DDTC licensed transactions,
enter your Directorate of Defense Trade Controls (DDTC) Registration Number (also referred to as
the Registration Code). DDTC Registration Numbers should always be exactly six characters.
• Freight Location Company—If different from the USPPI name, which is typically the exporter,
enter the company name where the cargo begins its journey to the port of export.
• $2500 or Less—Check this box if your shipment includes items that are valued at $2,500 or less
when grouped by Schedule B or HTS code that you are not including on the SLI and that do not
otherwise require AES filing.
• Authorize Forwarder—Check this box if you are authorizing the named freight forwarder to file
the EEI through AES on your behalf.
• Eligible Party Certification—If you are moving cargo against an ITAR exemption, you must
select Yes or No to certify that the exporter is an eligible party to participate in defense trade.
• Signature—If you have assigned a signature to the profile used for this shipment, the signature file will be filled in here. However, you can choose a different signature from the drop-down list or
choose No Signature for your Shipper’s Letter of Instruction (in NCBFAA format).
SLI in SED Format Only Section
Shipping Solutions includes a version of the Shipper’s Letter of Instruction based on the paper version of the old Shipper’s Export Declaration. This is no longer the format preferred by freight forwarders. (See the SLI
in NCBFAA format above.) However, if you wish to continue using the Shipper’s Letter of Instruction (in
SED format) to provide your forwarder with the information for AES filing, fill in the following fields:
• ECCN Code(s)—Re-enter your ECCN number, if applicable, in this field to fit into the limited
space allowed on the Shipper’s Letter of Instruction (in SED format).
• SED Export License Type—Re-enter a license type, if applicable, in this field to fit into the
limited space allowed on the Shipper’s Letter of Instruction (in SED format).
When you have entered all the necessary EEI information, click Save and then Close.

71
The Packing List Screen in EZ Start
Packing List Screen
The Shipping Solutions Packing List screen makes it easy to create a packing list based on each container or
other packaging unit. To create a packing list, click on the Add New Package button. Then, click the Load
Package button, and the Packing List Items screen will appear.
Loading a Container on the Packing List Screen

72
The Unpacked Items table shows a list of all the products in your shipment displaying the Quantity, Unit
of Measure, Product ID and Product Description. The first time you click Load Package all the products
you entered into the Product Detail screen will be listed in the Unpacked Items list (unless you excluded
specific products from the packing list on the Product Detail screen – see “Display Products On” on page
54). If you have a very long list of products, you can search for specific products using the Filter Items box.
There are several ways to load the packages:
• Click Add All to pack all your line items in one package.
• Click on a line item in the Unpacked Items list. Click Add Item to add the entire amount of that
item to this package.
• Click on a line item in the Unpacked Items list. Change the Quantity to Add/Remove to add a
subset of this line item to the current package and then click Add Item. For example, although you
may have entered a total of 10 widgets on the Product Detail screen, you may want only six
widgets in the current package. Adding six widgets to this current package will reduce the total
number of remaining widgets from 10 to four in the Unpacked Items window. You will enter those
remaining four items in a different package.
You will see your items move from the Unpacked Items list to the Packed Items list. If you need to make a change to the packed items, use Remove All to move all the items for this package back
to the Unpacked Items list. Use Remove Item along with the Quantity to Add/Remove to move
a subset of items from packed to unpacked. Click Close.
If you did not load all your line items in the first package, click Add New Package again to create
a second package. Click Load Package. You will see the remaining items to pack in the
Unpacked Items list. You will not see the items you packed in the first container. Load the second
package using the same process you used with the first package. Continue adding packages until all
your line items appear in the Packed Items list for one of the packages.
When you have finished selecting the products you wish to load in each package of your shipment, there
shouldn’t be any more products in the Unpacked Items window. If you leave any products in your
Unpacked Items list, you will have a discrepancy between your invoices and the packing list.
Please Note: Because the process of loading your packing list packages uses the items you previously entered on the Product Detail screen, any change in the quantity of items that you entered on that screen
could make your packing list inaccurate. If you increase the quantity of one or more of your items on the
Product Detail screen, you will need to return to the Packing List=>Load Package screen to add the
additional products to the packing list form.
If you try to lower the quantity of one or more of your items on the Product Detail screen, Shipping
Solutions will prevent you from doing so. You will first need to return to the Packing List=>Load Package
screen and unpack the item or items you wish to change from the packing list. Once you have made your
change(s) on the Product Detail screen, you’ll then repack the item on the Packing List screen.
Enter the dimensions and weights for each package. Move between the different packages using the blue
arrows in the upper left corner of the Packing List screen. The fields are defined below:
• Package Type—You can store commonly used package types in the Package Types database (see
page 125) and select them from the drop-down list.
• Dimensions—Enter the length, width and height of an individual package in inches. If you don’t
have this information available in inches, you may enter the dimensions in whatever measurement
you have and then click on the Convert button next to each of the dimension fields. The number
you entered will be displayed in the Value to Convert box and inches will be selected in the To
box. Choose the measurement of the number you entered (e.g. centimeters) and click Convert. The
amount you entered converted to inches will be displayed in the dimensions box.
• X Number of Packages this size—Enter the number of packages that are of the dimension listed
above.
73
• Total Cubic Feet and Meters—Shipping Solutions will automatically calculate the total cubic feet
and meters based on the dimensions and quantities entered above. You can display up to five
decimal places on the packing list. (You can control this option on the Tools=>Customize
Documents=>Packing List screen.)
• Gross and Net Weight—Enter the gross and net weights of this package in pounds or kilograms, and Shipping Solutions will automatically fill in the other box. You can display up to five decimal
places on the packing list. (You can control this option on the Tools=>Customize Documents=>
Packing List screen.) If you want the gross and net weight to be automatically calculated based on
your entries on the EZ Start=>Product Detail screen, go to the Admin=>Global Settings screen
and check the box labeled Calculate Packing List Weight.
Once you have loaded all your packages and entered the dimensions and weight of each, you have
the option of adding a signature and special instructions to your packing list:
• Signature—If you have assigned a signature to the profile used for this shipment, the signature file
will be filled in here. However, you can choose a different signature from the drop-down list or
choose No Signature for your packing list.
• Special Instructions—Choose any special instructions from the drop-down list or enter them directly in the box. You also have the option to display the Special Instructions that you entered in
the Commercial Invoice section of the Invoices – Proforma/Commercial screen. (You can
control this option on the Tools=>Customize Documents=>Packing List screen.) If you turn this
option on, the Packing List Special Instructions will appear on the Packing List form below the
Commercial Invoice Special Instructions.
Use the Delete Package button on the toolbar to delete a package from your shipment. Any items that were
loaded in that package will be returned to the Unpacked Items list.
If you need to make significant changes to your packing list, it may be easier to click the StartOver button
on the toolbar, which will unpack all your items and delete all your packages for this shipment record. You
can then begin the process of creating a new packing list from scratch.
When you have loaded all your packages and entered all the weight and dimension information click Save
and then Close. You can print the packing list on the Preview/Print/Email screen.

74
The Free Trade Agreements Screen in EZ Start
Free Trade Agreements Screen
Fill in the information on this screen if you need to complete an FTA Certificate of Origin.
• Importer—State the full legal name and address (including country) of the importer. If the
importer is not known, state “Unknown.” If multiple importers, state “Various.” To add click the
Importer button. You can type the name and address here or click Add Contact from Database.
The Select Database field defaults to the Miscellaneous database, but you can choose a contact
from any database by choosing the database from the Select Database drop-down list. To search
for a particular contact, choose Starts With or Contains from the Match drop-down list and start typing the contact’s company name in the Search for Company box. Click on the contact you
want and click Add Contact. Click Save and Close.
• Producer—State the full legal name and address (including country) of the producer. If more than
one producer’s goods are included on the certificate, manually attach a list of the additional
producers including the legal name, address and legal tax identification number, cross-referenced to
the products you are shipping. If you wish this information to be confidential, you may state
“Available to Customs Upon Request.” If the producer and the exporter are the same, enter
“Same.” If the producer is unknown, it is acceptable to enter “Unknown.” To add click the
Producer button. You can type the name and address here or click Add Contact from Database
and follow the process described under Importer.
• Certified By—Enter the contact information for the company that is completing and signing the NAFTA Certificate of Origin or FTA Certificate for this shipment or for these products. This form
can be produced and signed by either the producer or the exporter of the goods, if they are different
companies. To add click the Certified By button. You can type the name and address here or click
Add Contact from Database and follow the process described under Importer.
• FTA Date—Enter the date that should appear on the Certificate of Origin.
• Blanket Dates—Complete these fields if the Certificate of Origin covers multiple shipments of
identical goods exported for a specified period of up to one year. From Date is the date upon which
the Certificate becomes applicable to the goods covered by the blanket certificate (it may be prior

75
to the date of signing this Certificate). To Date is the date upon which the blanket period expires.
The importation of a good for which preferential treatment is claimed based on this Certificate must
occur between these dates. On the USMCA certificate, the invoice number will not appear on the
form if a blanket date is entered.
• USMCA Certified By—Choose Importer, Exporter or Producer depending on which party is certifying the goods. This information will appear on all versions of the USMCA Certificate of
Origin.
• Israeli Declaration By—Choose Exporter or Producer depending on which party is certifying
the goods. This information will appear on the Commercial Invoice for Israel.
• Signature—If you have assigned a signature to the profile used for this shipment, the signature file
will be filled in here. However, you can choose a different signature from the drop-down list or
choose No Signature for your FTA forms.
When you have filled in the information for your FTA certificate of origin, click Save and then Close.

76
The Certificate of Origin Screen in EZ Start
Generic Certificate of Origin
Fill in this screen if you need to prepare a generic Certificate of Origin. Because most of the information
that appears on this certificate of origin was entered on previous screens, you don’t need to enter much on
this screen.
• Phrases—You can select a verifying phrase (if necessary) from the Phrases Database drop-down
menu. A typical phrase reads: “The Chamber of Commerce of __________, a recognized Chamber
of Commerce under the laws of the State of _________________, has examined the manufacturer’s
invoice or shipper’s affidavit concerning the origin of the merchandise and, according to the best of
its knowledge and belief, finds that the products named originated in the United States of North
America.” To modify the phrase for your company, go to the Databases tab and click Phrases.
• Dated At—Enter the location where the company official will sign the certificate of origin.
• Day/Month/Year—Enter the date on which the company official will sign the certificate of origin.
When you have filled in all the generic certificate of origin fields, click Save and then Close. You can print
the generic certificate of origin on the Preview/Print/Email screen.

77
The Electronic Certificate of Origin Screen in EZ Start
Electronic Certificate of Origin
Shipping Solutions offers a fast and easy way for exporters to get a Certificate of Origin certified by the American World Trade Chamber of Commerce (AWTCC), whose seal is registered with customs authorities
worldwide. Rather than creating a paper certificate and taking it to a chamber to be certified, Shipping
Solutions allows you to use the information you already have entered in the software, upload it to the
chamber, and have a chamberized certificate delivered to you either electronically or by courier.
The first step is to register with AWTCC. To register go to www.shippingsolutions.com/certificate-of-origin.
Fill in the required information. After your registration has been processed, you will receive an email from
the AWTCC with your User Name and Password. This User Name and Password allows you to login into
the AWTCC’s portal at www.shippingsolutions.com/electronic-certificate-of-origin-login.
However, in order to avoid retyping your shipment information into the portal, you can use Shipping
Solutions to upload the information. In order to perform the upload, Shipping Solutions will send you an
API Key shortly after you receive your User Name and Password from the AWTCC. Enter your User Name
and API key on the Admin tab, Profile Settings screen in the eCO Login box. If you don’t receive the API
key, send an email to [email protected].
Create your shipment as you normally would and then click on the Electronic Certificate of Origin screen. In
the eCO Service Type box, choose Draft to submit the application to the portal in a draft state. Later you
will log into the portal using the User Name and Password provided by the AWTCC to finalize and submit
your application.

78
Most of the other information on the Electronic Certificate of Origin screen is pulled from other EZ Start
screens and cannot be modified on the Electronic Certificate of Origin screen. The boxes are filled as
follows:
• Consignor Reference—You have the option of using either the Order Number, PO Number, or
Commercial Invoice Number as a reference number for your Certificate of Origin. All of those
number are entered on the EZ Start=>Invoices screen.
• Exporter-Consignor—On the EZ Start=>Contacts screen, select Exporter in the white box and
fill in your company’s name and address.
• Ultimate Consignee—On the EZ Start=>Contacts screen, select Ultimate Consignee in the
white box and fill in your customer’s name and address.
• Country of Origin—On the EZ Start=>Product Detail screen, select the Country of Origin for
each of your line items. The countries of origin for all your line items will be combined into this
box.
• Transport Details—On the EZ Start=>Carriers and Ports screen, select the Mode of
Transport. This box is optional.
• Remarks—On the EZ Start=>Invoices screen, fill in the Commercial Invoice Special
Instructions.
• Items—This box includes items from the EZ Start=>Product Detail screen. You can control what
information is included by using the check boxes below the box. If you want your line items
separated by line breaks, check the Line Breaks box.
• Quantity—This box adds up the Gross Weight and Net Weight of all your line items. The
weights are entered on the EZ Start=>Product Detail screen.
• Comments for Chamber—Enter any information you want to communicate to AWTCC. This box
is not pulled from any other screen.
You must attach a PDF version of your Commercial Invoice that shows the countries of origin for each line
item. You can create the PDF on the EZ Start=>Preview/Print/Email screen. Then choose Commercial
Invoice in the Document Type box and click Attach Document. Navigate to where you saved the PDF of
your Commercial Invoice and click Open.
If you also want the chamber to certify your Commercial Invoice, check the certify box next to the document
once it is loaded. In addition, you can attach other documents for AWTCC to certify. Just choose the
Document Type and click Attach Document.
When everything is completed to your liking, click Submit eCO. The Submission Response box will
indicate whether your application was successfully submitted and take you to a login screen to log into the
AWTCC portal with the User Name and Password that was sent to you by the chamber.
When you login to the AWTCC portal, you are on the Active Applications screen. The application you
submitted should be at the top of the list (or click the Action Date heading to get the newest applications to
the top). Click Edit to review your application.
When the eCO application is ready, click Submit. A screen with two options will pop up:
• Chamber Printed—Click this option if you want to have AWTCC print your certificate, hand
stamp and sign it, and return it to you by over-night courier. Courier fees will be added to the
certification fee.
• Self Service/DIY—Click this option if you want to print the certificate yourself on a color printer.
The certificate will include a digitally imaged Chamber seal and signature printed on your
certificate over a security background.
Click the appropriate option. The first time you submit an eCO application you will be asked to enter your
credit card information. You can request that the credit card be saved for future submissions, but you will

79
have to enter the security code each time you submit an application. Your credit card will only be charged
when your eCO is approved.
Once the eCO is submitted, you will return to the Active Applications screen and see the message
“Application submitted and received for processing by American World Trade.” The status of the eCO
changes from Draft to At Chamber. If you view the eCO application, the status shows as Await Chamber
Approval.
After the chamber has reviewed your application, you will receive an email saying your eCO application has
been approved or rejected. If your application is rejected, the email will include details of what changes are
needed. Log back into the eCO portal, find your application on the dashboard, and click Edit to make
changes and resubmit your application.
If your application was approved, log back into the eCO portal to print your certificate. Find your approved
application on the dashboard and click Issue. A window will pop up with your approved eCO. Important:
You must print the eCO at that time because you cannot return to the pop-up window.
Once the eCO has been printed, it is no longer listed on the Active Applications screen. Click the Archive
button at the top of the screen to see your eCO. The status of approved certificates is Issued. Click View to
see the eCO application. You can print a Client Copy, but you are not able to print the official copy again.
You can also copy the application to be used for another similar eCO application.
For help with your application or using the portal, contact Shipping Solutions (888-890-7447 or
[email protected]). For questions about a specific eCO application, contact AWTCC (212-655-5458
or [email protected]).

80
The Canada Customs Invoice Screen in EZ Start
Canada Customs Invoice Screen
Fill in this screen if you need to prepare a Canada Customs Invoice.
• Purchaser (if other than Ultimate Consignee)—Enter the name and address of the purchaser of
your goods if it is different than the ultimate consignee. To add, click the Purchaser button. You can type the name and address here or click Add Contact from Database. The Select Database
field defaults to the Miscellaneous database, but you can choose a contact from any database by
choosing it from the Select Database drop-down list. To search for a particular contact, choose
Starts With or Contains from the Match drop-down list and start typing the contact’s company
name in the Search for Company box. Click on the contact you want and click Add Contact.
Click Save and Close.
• Exporter (if different than exporter on Contacts screen)—Enter the exporter’s name and
address if it is different than the exporter listed on the Contacts screen. To add, click the Exporter
button. You can type the name and address here or click Add Contact from Database and follow
the process described under Purchaser.
• Originator (if required)—When the invoice is completed on behalf of a company, the company’s name and address must be indicated. The name of the person completing the invoice may also be
indicated. To add click the Originator button. You can type the name and address here or click
Add Contact from Database and follow the process described under Purchaser.
• Date of Direct Shipment to Canada—Enter the date you want to appear on the Canada Customs
Invoice. This date is also used on the Commercial Invoice, Caricom Invoice, and the various
versions of the Shipper’s Letter of Instruction. If you have already entered an invoice date on the

81
Invoices screen, Caricom Invoice screen, or Shipper’s Letter of Instruction screen in EZ, the date
will automatically appear on this screen too.
• Other References—Enter any additional information that refers to this order (such as your
commercial invoice number or your customer’s PO number).
• Country of Transshipment—Enter the country through which the goods were shipped in transit to
Canada under customs control.
• Country of Origin of Goods—Enter the country of origin where the goods are grown, produced or
manufactured. Each manufactured article on the invoice must have been significantly transformed
in the country specified as the country of origin to its present form ready for export to Canada.
Certain operations such as packaging, splitting and sorting may not be considered sufficient
operations to confer origin.
• Additional Information for Transportation Field—Enter the place from which the goods began
their uninterrupted journey to Canada. If you entered a Mode of Transport and Exporting
Carrier on the Carriers and Ports screen, that information will also appear in this box on the
form.
• Condition/Terms of Sale—State whether the goods are shipped on a sale basis, consignment shipment, lease, etc. If on sale basis, specify the terms of sale, such as Net 30 Days. Indicate
whether the prices shown are FOB, CIF, etc. and details of discounts or any other special
arrangements.
• Currency—Indicate the currency in which the vendor’s demand for payment is made.
• If any of field 1 to 17…check this box—If any of the information in fields 1-17 on the Canada
Customs Invoice is included on an attached commercial invoice, check this box.
• Agency Ruling—If your products have received a special valuation ruling, enter it here. These
rulings generally reduce the Value For Duty rate applied.
• If fields 23 to 25…check this box—If you do not need to report additional charges for transporting
the goods to Canada, assembling the goods within Canada or for packing the goods, check this box.
• 23. Charges included—If you need to report any additional charges for transporting the goods to Canada, assembling the goods within Canada, or for packing the goods, enter the information in
these fields if they are already factored into the price of each line item.
• 24. Charges not included—If you need to report any additional charges for transporting the goods
to Canada, assembling the goods within Canada, or for packing the goods, enter the information in
these fields if they are not factored into the price of each line item.
• 25. Check if applicable—Check either box if it applies.
When you have filled in all the Canada customs invoice fields, click Save and then Close. You can print the
Canada Customs Invoice on the Preview/Print/Email screen.

82
The Caricom Invoice Screen in EZ Start
Caricom Invoice Screen
The Caribbean Community and Common Market (CARICOM) was created to promote a single market and economy within its member states. A CARICOM invoice must be completed when exporting to a member
country.
• Invoice Date— Enter the date you want to appear on the Caricom Invoice. This date is also used on
the Commercial Invoice, Canada Customs Invoice, and the various versions of the Shipper’s Letter
of Instruction. If you have already entered an invoice date on the Invoices screen, Canada Customs
Invoice screen, or Shipper’s Letter of Instruction screen in EZ, the date will automatically appear
on this screen too.
• CARICOM Certificate Number—Enter the invoice number.
• Other References—Enter references to other documents such as the proforma invoice number and
the confirmation of the order.
• Buyer—Enter the name of the Ultimate Consignee of the goods.
• Presenting Bank—Enter the name of the bank handling the transaction.
• Country of Origin—Enter the last country in which significant production or manufacture of the
goods took place. Minimal work on goods such as repacking, sorting or grading does not change
the country of origin.
• Terms and Conditions—Enter the terms of payment and delivery.
• Currency of Sale—Enter the currency used to display the value of the goods.
• Gross Weight (Lbs)—Enter the gross weight of the goods in pounds. Shipping Solutions will
automatically convert it to kilograms. If you don’t have the gross weight available in pounds, you
may enter the weight in whatever measurement you have and then click on the Convert button. The
number you entered will be displayed in the Value to Convert box and pounds will be selected in
the To box. Choose the measurement of the number you entered (e.g. kilograms) and click
Convert. The amount you entered converted to pounds will be displayed in the gross weight box.

83
• Cubic Meters—Enter the cubic measurement of the outer packages.
• Marks and Numbers—Enter the markings and numbers used on the packages.
• General Description of Goods—Enter a general description of the contents of the packages.
• Signature—If you have assigned a signature to the profile used for this shipment, the signature file
will be filled in here. However, you can choose a different signature from the drop-down list or
choose No Signature for your Caricom invoice.
When you have filled in all the Caricom invoice fields, click Save and then Close. You can print the
Caricom Invoice on the Preview/Print/Email screen.

84
The Product Summary Screen in EZ Start
Product Summary Screen
Because freight forwarders and carriers don’t need to know the line-item-by-line-item details of the products
you are shipping, this screen gives you the opportunity to enter a summary of your products. The summary information you enter on this screen will appear in the product sections of the Shipper’s Letter of
Instruction, Inland Bill of Lading, Ocean Bill of Lading, and Dock Receipt if you choose the option in the
Preview/Print/Email screen that says “(with Product Summary).” If you want to print the line item details
of your products on your documents, you do not need to complete this screen.
If you only want summary information on some of the forms, you can click the radio button to see which fields
are required for the form that you want, so you only fill in the information that’s needed.
• No. Pkgs—Enter the total number of packages in this shipment. This field is used on all four forms.
• HM—Mark with an “X” if this shipment includes Hazardous Materials. This field appears on the
inland bill of lading, the ocean bill of lading and the dock receipt.
• Description of Goods—Enter a general description of the products for each container/package.
This field appears on all four forms.
• Marks and Numbers—Enter any distinguishing information for your packages such as a container
and seal number. This field appears on all four forms.
• Weight—Enter the weight for each container/package. This field appears on all four forms.
• Measurements—Enter the dimensions of each container/package. This field appears on the ocean
bill of lading, dock receipt, and the shipper’s letter of instruction.
• Rate—Enter the rate that should appear on the inland bill of lading. The field appears only on the
inland bill of lading.
When you have filled in all the Product Summary fields, click Save and then Close.

85
The Shipper’s Letter of Instruction (SLI) Screen in EZ Start
Shipper’s Letter of Instruction Screen
Fill out the data on this screen to complete the Shipper’s Letter of Instruction (with Product Detail and
Product Summary) to present to your freight forwarder along with your other export documents. Please
review the instructions at the bottom of this section if you wish to produce a Shipper’s Letter of Instruction
(in SED format).
• Date— Enter the date you want to appear on the Shipper’s Letter of Instruction. This date is also
used on the Commercial Invoice, Canada Customs Invoice, and Caricom Invoice. If you have
already entered an invoice date on the Invoices screen, Canada Customs Invoice screen, or the
Caricom Invoice screen in EZ Start, the date will automatically appear on this screen too.
• Quote, Y/N and Adjustment fields for costs and fees—Enter any additional transportation fees
that your freight forwarder quoted you and if you wish to add these fees to the invoice.
• YES…check boxes—Check the first box if you want your freight forwarder to provide you with a
quotation for the costs of a variety of different services. If you would like your freight forwarder to
add these costs to the invoice, check the second box.
Please respond with these costs by—Choose how you want your freight forwarder to quote you
with these additional charges: phone, fax or email.
How Do You Want the Freight Billed—Select either prepaid or collect.
Shipping Details—Choose if you wish to have the freight forwarder consolidate your shipment
with other shipments to reduce freight costs or ship them directly to speed up the process.
Insurance—Check the Insurance Required? box if you would like the forwarder to insure your
shipment and enter the type of insurance in the Insurance Type field.
License Number/Symbol—If you are shipping a product that requires a special export license,
enter that information here. If not, enter NLR (No Licensed Required).

86
Forward Documents To—Enter the parties to receive a set of your shipping documents.
SLI Special Instructions—Enter any special instructions you would like to appear on the
Shipper’s Letter of Instruction (SLI). Shipping Solutions includes a database for storing commonly
used instructions and phrases that your company uses, so you don’t have to retype these
instructions on every shipment. Click on the drop-down menu to see a list of phrases you’ve
already entered into the database. You can add additional phrases by going to the Databases tab
and clicking on Phrases. This field will display up to approximately 750 characters.
These documents are attached…check boxes—Click on the box next to the export forms you are
providing your freight forwarder along with the SLI.
Signature – If you have assigned a signature to the profile used for this shipment, the signature file
will be filled in here. However, you can choose a different signature from the drop-down list or
choose No Signature for your SLI.
When you have filled in all the SLI fields, click Save and then Close. You can print the SLI with product
summary or product detail from the Preview/Print/Email screen.

87
Parcel Shipping Screen (Professional Only)
Shipping Solutions Professional allows you to transfer your shipment data to either the UPS WorldShip
software and/or the FedEx Ship Manager software so you can create shipping labels without having to
retype the information. Once you’ve submitted the data to UPS or FedEx, you can also track your shipments
from within the Shipping Solutions Professional software.
To use this feature, you first need to setup the connection between Shipping Solutions and the UPS
WorldShip and/or FedEx Ship Manager depending on which parcel shipping options you use. The Parcel
Shipping screen includes two tabs—one for UPS and one for FedEx. Click on the tab you wish to use for
this shipment.
The UPS Tab on the Parcel Shipping Screen in EZ Start
Setting Up the UPS Connection
Begin by copying the data map files included with the Shipping Solutions Professional software to the
appropriate folder located on the computer on which you are running UPS WorldShip. If you have installed
Shipping Solutions in the default installation location, navigate to
C:\ProgramData\InterMart\SSProfessional_9\miscdata\ship\UPS on the computer running Shipping
Solutions. Copy all four of the files located in this folder.
Now navigate to the UPS WorldShip folder C:\ProgramData\UPS\WSTD\ImpExp\Shipment on the
computer running the WorldShip software. Paste the four files you copied into this folder. If UPS WorldShip was installed on a server, even if you are accessing the program from your desktop computer, the
WorldShip folder will reside on that server.
Next, you must establish an ODBC connection between the Shipping Solutions database and UPS
WorldShip. On the computer hosting UPS WorldShip open the Control Panel. Depending on which version
of Windows you are using, you may be able to click on Administrative Tools; if not search for ODBC in
the search box located in the upper-right corner of this screen.
From here you’ll find an option called Data Sources (ODBC) or Set up Data Sources (ODBC). Double-
click on this option. If you are given a choice between a 32-bit and 64-bit version, choose the 32-bit version.
This will open an ODBC Data Source Administrator window. Click the System DNS tab, click Add,
choose SQL Server and click Finish. In the Name box type ShippingSolutionsRemote. You must use this
name for the connection to work. The Description is optional. You may want to use it to describe this as the
UPS connection. Type your SQL Server name in the Server box or choose it from the drop-down list.

88
If you don’t know the name of your SQL Server, you can find it in Shipping Solutions on the Admin tab=>
Set Database Connection screen. Now click Next. Choose either Windows authentication or SQL Server
authentication. Using SQL Server authentication will require a user name and password. On the Admin
tab=>Set Database Connection screen in Shipping Solutions, if you have the trusted connection box
checked you can probably use Windows authentication for this as well. Click Next. Change the default database, if needed. The default Shipping Solutions database is ssdata_sql_01. Click Next and Finish. Then
click Test Data Source. When the test completes successfully click OK until you have exited all the setup
screens.
Open UPS WorldShip. Click the Import-Export tab. Click Automatic Export and then Export After
Shipment Processing. Choose Multiple Maps. Click the check box next to the two Shipping Solutions
maps (SSPro Header Only Export and SSPro Header and Shipment Export) and then click the Export
button. This will allow UPS WorldShip to send the tracking number back to Shipping Solutions when you
process a shipment. The maps will not be visible until the ODBC connection is properly configured.
Sending Shipment Data to UPS WorldShip
You are now ready to start using the Parcel Shipping feature in Shipping Solutions, and you will not need to
complete the steps above again. The steps below need to be completed for each UPS shipment.
Prepare your shipment in Shipping Solutions as you normally would. To make it available to UPS
WorldShip, click on the EZ Start tab and click Parcel Shipping. Click the UPS tab. Click the check box
that says Make shipment available to UPS WorldShip. Select the UPS Service and Package Type.
Choose who to bill the transportation cost to. If it is someone other than the shipper, enter the UPS account
number. Enter a general Description of Goods. Save and Close the screen.
Open UPS WorldShip. Click the Import-Export tab and then Batch Import. Choose the proper profile. If
you have created a Packing List for this shipment in Shipping Solutions, choose the SSPro Header and
Shipment Import map. Otherwise, choose the SSPro Header Only Import map. UPS will then tell you
how many shipments are ready to import. Click Next and Save.
To see your imported shipments, click Home and then History. Expand the Imported Shipments and
shipper number trees. Click on the shipment you want to work on and click Edit/Reconcile. Fill in any
missing information. When you click Process Shipment, the tracking number will be sent back to the Parcel
Shipping screen in Shipping Solutions.
Please Note: If you are sending a multi-package shipment, WorldShip will only send the first tracking
number back to Shipping Solutions. You will need to manually copy and paste any additional tracking
numbers you want to keep in Shipping Solutions.
If UPS WorldShip says there are no records to import, go back to Shipping Solutions and make sure the
Make shipment available to UPS WorldShip box is checked. Also, make sure there is no tracking number
shown on the Parcel Shipping screen. Shipments with tracking numbers in Shipping Solutions will not be
visible to UPS WorldShip to avoid duplicate shipments.
Another reason UPS WorldShip may not be able to find your shipment is if you have chosen the wrong map.
If you have clicked the Add New Package button on the EZ Start-Packing List screen, you must use the
SSPro Header and Shipment Import map. If not, you must use the SSPro Header Only Import map.
ODBC Connection to Cloud Database
If you are using a cloud database hosted by Shipping Solutions, contact us for instructions for setting up the
ODBC connection.

89
The FedEx Tab on the Parcel Shipping Screen in EZ Start
Setting Up the FedEx Connection
Begin by copying the data profile files included with the Shipping Solutions Professional software to the
appropriate folder located on the computer on which you are running FedEx Ship Manager. If you have
installed Shipping Solutions in the default installation location, navigate to
C:\ProgramData\InterMart\SSProfessional_9\miscdata\ship\FedEx on the computer running Shipping
Solutions. Copy both files located in this folder.
Now navigate to the C:\ProgramData\FedEx\Integration\Profiles folder on the computer running the Ship
Manager software. Paste the two files you copied into this folder.
Next, you must establish an ODBC connection between the Shipping Solutions database and FedEx Ship
Manager. On the computer hosting Ship Manager open the Control Panel. Depending on which version of
Windows you are using, you may be able to click on Administrative Tools; if not search for ODBC in the
search box located in the upper-right corner of this screen.
From here you’ll find an option called Data Sources (ODBC) or Set up Data Sources (ODBC). Double-
click on this option. If you are given a choice between a 32-bit and 64-bit version, click on the 32-bit
version. This will open an ODBC Data Source Administrator window. Click the System DNS tab, click
Add, choose SQL Server and click Finish. In the Name box type SSExportRemote. You must use this
name for the connection to work. The Description is optional. You may want to use it to describe this as the
FedEx connection. Type your SQL Server name in the Server box or choose it from the drop-down list.
If you don’t know the name of your SQL Server, you can find it in Shipping Solutions on the Admin tab=>
Set Database Connection screen. Now click Next. Choose either Windows authentication or SQL Server
authentication. Using SQL Server authentication will require a user name and password. On the Admin tab
=>Set Database Connection screen in Shipping Solutions, if you have the trusted connection box checked you can probably use Windows authentication for this as well. Click Next. Change the default database, if
needed. The default Shipping Solutions database is ssdata_sql_01. Click Next and Finish. Then click Test
Data Source. When the test completes successfully click OK until you have exited all the setup screens.
Sending Shipment Data to FedEx Ship Manager
You are now ready to start using the Parcel Shipping feature in Shipping Solutions, and you will not need to
complete the steps above again. The steps below need to be completed for each FedEx shipment.
Prepare your shipment in Shipping Solutions as you normally would. To make it available to FedEx Ship
Manager, click on the EZ Start tab and click Parcel Shipping. Click the FedEx tab. Click the check box

90
that says Make shipment available to FedEx Ship Manager. Select the Service Type and Package Type.
These fields are optional. Make note of the Lookup Number. You will need to know this to pull the correct
shipment into FedEx Ship Manager. Save and Close the screen.
Open FedEx Ship Manager. Click Integration. Choose the proper profile. If you have created a Packing List
for this shipment in Shipping Solutions, choose SSProHeaderPackageImportExport. Otherwise, choose SSProHeaderOnlyImportExport. The program will now prompt you for the Lookup Value. (If the
Lookup Value box does not pop up, click Integration, choose None, and then click Integration again and
select the proper profile). Enter the number from the Parcel Shipping screen in Shipping Solutions. The
appropriate data will be pulled from Shipping Solutions into FedEx Ship Manager. Review your shipment
and complete any missing information. When you click Ship, the tracking number will be sent back to
Shipping Solutions and stored on the Parcel Shipping screen.
Please Note: If you are sending a multi-package shipment, Ship Manager will only send the first tracking
number back to Shipping Solutions. You will need to manually copy and paste any additional tracking
numbers you want to keep in Shipping Solutions.
If FedEx Ship Manager says it cannot find your lookup number, go back to Shipping Solutions and make
sure the Make shipment available to FedEx Ship Manager box is checked. Also, make sure there is no
tracking number shown on the Parcel Shipping screen. Shipments with tracking numbers in Shipping
Solutions will not be visible to FedEx Ship Manager to avoid duplicate shipments.
Another reason FedEx Ship Manager may not be able to find your shipment is if you have chosen the wrong
profile. If you have clicked the Add New Package button on the EZ Start-Packing List screen, you must use
the SSProHeaderPackageImportExport profile. If not, you must use the
SSProHeaderOnlyImportExport profile.
ODBC Connection to Cloud Database
If you are using a cloud database hosted by Shipping Solutions, contact us for instructions for setting up the
ODBC connection.

91
The Inland Bill of Lading Screen in EZ Start
Inland Bill of Lading Screen
Enter the information on this screen to complete an inland bill of lading for transporting your goods to a port
of export. Before you use this bill of lading format (or any bill of lading format), we recommend that you
negotiate a transportation contract with your motor carriers.
Inland Bill Number—Enter your inland bill of lading number.
Date—Enter the date the goods leave your facility.
Carrier Number—Enter the license number of the carrier.
Vehicle Number—Enter the number of the vehicle used to transport your goods to the port of
export.
Carrier—Enter the name of the firm transporting the goods to their port of export.
Shipper—Enter your company name.
COD Amount—If the carrier is to collect money from the consignee before the goods are to be
transferred to the consignee, enter the amount that needs to be collected here.
Remit COD To—Enter the name and address of the company that should receive the COD amount
collected.
COD Fee To Be Paid By—Select who, if anyone, should be paying the COD amount.
Received Qty and On—Enter the number and types of packages that will be picked up by the
carrier and how they are prepared for shipment. For example, you may have 50 boxes on 2 pallets.
Choose the types of packaging from the drop-down menu. You can add additional types of
packaging in the Miscellaneous Lists Database described on page 125.
Inland Bill Consignee—Select the Consignee for the first leg of your shipment. Since most companies use Shipping Solutions to complete their export documents, the consignee of an inland
bill of lading is usually the first delivery point where the international carrier receives the
merchandise to transport internationally. Enter the name and address of that company here. To add,
click the Inland Bill Consignee button. You can type the name and address here or click Add
Contact from Database. The Select Database field defaults to the Miscellaneous database, but

92
you can choose a contact from any database by choosing the database from the Select Database
drop-down list. To search for a particular contact, choose Starts With or Contains from the Match
drop-down list and start typing the contact’s company name in the Search for Company box.
Click on the contact you want and click Add Contact. Click Save and Close.
Inland Bill To—Enter the billing address here if different than the shipping address. To add click
the Inland Bill To button. You can type the name and address here or click Add Contact from
Database and follow the process described under Inland Bill Consignee.
Special Instructions—Enter any special instructions that need to appear on the inland bill of
lading. Shipping Solutions includes a database for storing commonly used instructions and phrases
that your company uses, so you don’t have to retype these instructions on every shipment. Click on
the drop-down menu to see a list of phrases you’ve already entered into the database. You can add
additional phrases by going to the Databases tab and clicking on Phrases. This field allows you to
display up to approximately 750 characters.
Include Anti-Diversion Statement—Check this box if the anti-diversion clause should appear on
the inland bill of lading. If you check this box, do not enter the anti-diversion clause in the Special
Instructions box or it will appear twice.
Freight Charges—Indicate the party responsible for the inland freight charges by selecting from
the drop-down list.
Agreed Upon Value Per lb.—Enter the maximum value per pound of your merchandise as
negotiated with your carrier.
Signature—If you have assigned a signature to the profile used for this shipment, the signature file
will be filled in here. However, you can choose a different signature from the drop-down list or
choose No Signature for your inland bill of lading.
When you have filled in all the inland bill of lading fields, click Save and then Close. You have two options
for printing the Inland Bill of Lading on the Preview/Print/Email screen. The first option, Inland Bill of
Lading (with Product Detail), pulls the product information from the EZ Start Product Detail screen with
line item-by-line item detail. The second printing option, Inland Bill of Lading (with Product Summary),
pulls the product information from the EZ Start Product Summary screen, which provides a summary of
your products.

93
The Ocean Bill of Lading/Dock Receipt Screen in EZ Start
Ocean Bill of Lading/Dock Receipt Screen
Complete the information on this screen to complete an ocean bill of lading and/or dock receipt.
Pre-Carriage By—Enter the name of the carrier who transported the goods to the port of export.
Pre-Carriage Place of Receipt—Enter the place where the pre-carrier received the goods.
Place of Receipt on Carrier—Enter the location where a consignment (shipment) is delivered to
the consignee; the place where the carrier's liability ends for the transport venture.
Booking Number—Enter the booking number assigned to your shipment.
Ocean B/L Number—Enter the ocean bill of lading number for your shipment.
Freight Charges—Enter any additional charges for this shipment that have either been prepaid or
must be collected.
Export References—Enter any reference numbers assigned to this shipment.
Domestic Routing/Export Instructions—Enter a description of how a shipment will be moved between consignor and consignee or between place of acceptance by the carrier and place of
delivery to the consignee.
Type of Move—Enter the method of transportation by which the merchandise is exported.
Forwarding Agent—Enter the contact information for the forwarding agent for this shipment. To
add, click the Forwarding Agent button. You can type the name and address here or click Add
Contact from Database. The Select Database field defaults to the Miscellaneous database, but
you can choose a contact from any database by choosing the database from the Select Database
drop-down list. To search for a particular contact, choose Starts With or Contains from the Match

94
drop-down list and start typing the contact’s company name in the Search for Company box.
Click on the contact you want and click Add Contact. Click Save and Close.
Ocean B/L Also Notify—Enter the contact information of any additional parties that should be
notified when the goods reach the port of destination. To add, click the Ocean B/L Also Notify
button. You can type the name and address here or click Add Contact from Database. The Select
Database field defaults to the Miscellaneous database, but you can choose a contact from any database by choosing the database from the Select Database drop-down list. To search for a
particular contact, choose Starts With or Contains from the Match drop-down list and start typing
the contact’s company name in the Search for Company box. Click on the contact you want and
click Add Contact. Click Save and Close.
Number of Original Bills—Indicate the number of original bills of lading you will be presenting
with the shipment.
Number of Pages and Attachments—Enter the number of pages that accompany the completed
ocean bill of lading. You may need to preview the form to see the total number of pages.
Signature (Agent)—If you are not going to sign the paper form, you can type in the name of the
signatory here.
Place—Enter the location where the ocean bill of lading is signed.
Date—Enter the date when the ocean bill of lading is signed.
Display Ultimate Consignee—This option lets you choose who appears as the ultimate consignee
on the Ocean Bill of Lading and the Master Ocean Bill of Lading. You can choose either the Ultimate Consignee or the Intermediate Consignee that you entered on the Contacts screen (see
page 51). By default, Shipping Solutions will use the Ultimate Consignee on the Ocean Bill of
Lading and the Intermediate Consignee on the Master Ocean Bill of Lading. The difference
between the two versions reflects the differences between how a standard and master ocean bill of
lading are typically used.
When you have filled in all the ocean bill of lading fields, click Save and then Close. There are several
options for printing the Ocean Bill of Lading and the Dock Receipt on the Preview/Print/Email screen. For
a description of all the export forms, you’ll find the Summary of Export Documents in the Appendix
beginning on page 168.

95
The Air Waybill Screen in EZ Start
Air Waybill Screen
Enter information on this screen to complete an air waybill.
• Shipper Account Number—Enter your company’s account number only if required by the carrier.
• Consignee Account Number—Enter the consignee’s (receiver’s) Precise Account Locator (PAL)
Number, if applicable.
• Agent Information—Enter the name, city, IATA code and account number for the carrier’s agent.
• Account Number (3 digit) —Enter the carrier’s three-digit account number.
• Issuing Carrier Information—Enter the number, name, and address of the air carrier.
• Air Waybill Number—Enter the waybill number for this shipment that was provided by the
carrier.
• Accounting Info—Enter the accounting information required by your carrier, if any.
• To (by First Carrier)—Enter the IATA three-letter code of the airport of destination or the first
transfer point of the goods.
• First Carrier—Enter either the full name or the IATA two-character code of the first carrier.

96
• To (by Second Carrier)—Enter the IATA three-letter code of the airport of destination or the
second transfer point.
• By (Second Carrier)—Enter the IATA two-character code of the second airline.
• To (by Third Carrier)—Enter the IATA three-letter code of the airport of destination or the third
transfer point.
• By (Third Carrier)—Enter the IATA two-character code of the third airline.
• Currency—Enter the ISO three-letter currency code of the currency applicable in the country of
departure (e.g. USD).
• Wgt/Val PP and Col—Enter an “X” in the “PP” box if the Weight/Valuation charges are wholly
prepaid; enter an “X” in the “Col” box if the charges are wholly collect.
• Other PP and Col—Enter an “X” in the “PP” box if the other charges (see below) are wholly
prepaid; enter an “X” in the “Col” box if the other charges are wholly collect.
• Declared Value for Carriage—Enter in the declared value for carriage. When no value is
declared, enter “NVD”.
• Declared Value for Customs—Enter the value of the shipment for customs purposes, which may
be “NCV,” or leave the box blank.
• Departure Airport— Enter the three-digit code for the airport of departure for the first carrier of
the goods.
• Destination Airport—Enter the airport of destination for the last carrier of the goods.
• Flight Date 1 and 2—Enter the requested date(s) of departure.
• Insurance Amount—If the issuing carrier offers insurance, enter the amount to be insured. If the
shipper doesn’t request any insurance, enter “XXX”.
• SCI—When a consignment is loaded or reloaded at an airport in a European Union country that is
to be unloaded or reloaded in an airport in another European Union country, enter the Customs
Origin Code.
• Handling—Enter only clear and concise information as required by the carrier.
• Pieces—Enter the number of pieces for the applicable rating entry.
• Gross Weight—Enter the gross weight of the pieces for the applicable rating entry.
• KG/LB—Enter “K” or “L” for the unit of weight used.
• Rate—Enter one of the following codes for the Rate Class:
o M—minimum charge
o N—normal rate
o Q—quantity rate
o B—basic charge (optional use)
o K—rate per kilogram (optional use)
o C—specific commodity rate
o R—class rate reduction
o S—class rate surcharge o U—unit load device basic charge or rate
o E—unit load device additional rate
o X—unit load device additional information
o Y—unit load device discount
o W—weight increase
• Commodity Item Number—Enter the appropriate IATA item description number.

97
• Chargeable Weight—Enter the chargeable weight calculated according to the applicable rating
rules.
• Rate/Charge—Enter the total charge or discount for each line entry.
• Total—Enter the total charge or discount for each line entry.
• Nature and Quantity of Goods—Enter the description of the goods.
• Prepaid and Collect Charges—Enter the prepaid and collect charges due the identified parties, if
any.
• Other Charges—Enter any other charges incurred at origin as either wholly prepaid or wholly
collect.
Signature—This is the signature of the shipper or its agent. If you have assigned a signature to the
profile used for this shipment, the signature file will be filled in here. However, you can choose a
different signature from the drop-down list or choose No Signature for your air waybill.
• Date Executed—Enter the date the air waybill was executed in the sequence of day, month and
year. Please Note: The month should be expressed alphabetically, either abbreviated or in full.
• Place Executed—Enter the name of the place (airport or city) where the air waybill was executed.
• Signature Agent—If the issuing carrier or its agent is not going to sign the air waybill, you can
type the name here.
When you have filled in all the air waybill fields, click Save and then Close. You have several options for
printing the Air Waybill on the Preview/Print/Email screen. For a description of all the export forms, you’ll
find the Summary of Export Documents in the Appendix beginning on page 168.

98
The IATA Dangerous Goods Screen in EZ Start
Dangerous Goods IATA Screen (Professional Only)
Complete the fields on this screen to enter information on the IATA Dangerous Goods form.
• Airport of Departure—Enter the full name of the airport or city of departure (if known). This field
is optional.
• Destination Airport—Enter the full name of the airport or city of destination (if known). This field
is optional.
• 24-Hour Phone—For shipments to, from or within the U.S., enter a phone number (including area
code and international access codes for numbers outside the U.S.) that is monitored at all times
while hazardous material is in transport, including storage incident to transport.
• Transport Type—Select whether your shipment will comply with limitations for Passenger and
Cargo Aircraft or the Limitations for Cargo Aircraft Only.
• Shipper Name/Title—Enter the name and title of the person signing the declaration.
• Place—Enter the place of signing the declaration.
• Date—Enter the date of signing the declaration.
• Check if Radioactive—Check this box if the shipment contains radioactive material. Radioactive
material must not be included on the same declaration form with other dangerous goods except dry
ice when used as a refrigerant.
• Additional Handling—Enter additional specific handling information or statement that may be
required. You can choose saved phrases from the drop-down list or type handling instructions
directly into the box.
Your dangerous goods items will be listed in the grid in the lower section of the screen and will include
products from the EZ Start-Product Detail screen along with any sub-products. Re-order the items by
clicking in the first column. Right click to edit or add an item, which will take you to the IATA Product
Detail screen.

99
The IATA Product Detail Screen for Adding or Editing Products
The IATA Product Detail screen first shows you information from the IATA Database of Dangerous
Goods including the packing instructions and maximum net quantity per package for limited quantities,
passenger and cargo planes, and cargo planes only. Special provisions from the IATA Database of
Dangerous Goods are also displayed.
If you have already stored your DG information in the Products database (see page 117), it will
automatically populate on this screen when you add the product to your shipment. If you are adding a new item, click Lookup DG to search for your item in the IATA Database of Dangerous Goods. You can search
the database by UN Number or Proper Shipping Name. The IATA Database will provide the UN Number,
Proper Shipping Name, Classification, and Packing Group.
Enter the Quantity. Since this could be different than the commercial invoice quantity, it is not copied from
the Invoices tab.
The IATA Statement Builder Screen
Type directly in the Type of Packing box or click the Builder button for help in entering your packing information. On the Statement Builder screen, choose your Material and Container from the drop-down
lists. Enter the amount in the containers in the Value box and either L for liters or kg for kilograms from the
Units drop-down list. Click the plus button to add the Value and Units to your type of material and
container in the Statement box. Use the degree button to add that symbol to a flashpoint, if needed. You can
also use this box, if needed, to describe an overpack. Click OK to return to the DG tab.

100
If your DG item requires a technical name following the Proper Shipping Name, enter it in the Technical
Name box. Do not include the required parenthesis because Shipping Solutions will automatically add them.
The Include on IATA check box will default to checked. If for some reason you do not want to include this
item on your Dangerous Goods IATA document, uncheck the box.
Some items require words in front of or following the Proper Shipping Name (PSN). For example, WASTE must precede your PSN if the DG item is being transported for disposal, and “stabilized” must
follow the PSN if the DG item must be stabilized for transport. There are many other possible prefixes and
suffixes (See the IATA Dangerous Goods regulations 8.1.3 for more details). Any words that you want to
precede or follow your PSN can be entered in the PSN Qualifying Prefix and PSN Qualifying Suffix box.
Packing Instructions can be taken from the information shown at the top of the screen. The Authorization
box should include any Special Provisions shown at the top of the screen and any other needed information.
Click Save and Close to return to the IATA screen. There are two ways to display your items on the IATA
documents. The first is in columns as shown in the grid on the IATA screen. The second is with double
slashes between the fields with no columns shown. To get an idea of how your items will look in the non-
columnar format, click the Format Computerized button. To return to the column view, click Format
Manual.
If you have unchecked the Include on IATA box for some of your items, you can display all items by checking the Show Excluded box. This may be helpful in locating items that have been entered but seem to
be missing.
The Dangerous Goods functions in Shipping Solutions were updated in version 9.12. For users who had a
previous version of Shipping Solutions and upgraded to 9.12, a Show Legacy button will be visible.
Clicking this button will return you to the method used for dangerous goods prior to version 9.12. We
encourage you to transition off the legacy screens as soon as possible as they will be phased out in a future
version of Shipping Solutions. Click Show New to return to the regular screen.
The IATA Dangerous Goods Form Options

101
There are multiple Dangerous Goods IATA forms listed on the EZ Start screen, Preview/Print/Email
button. The different versions display the data differently and vary what is printed. The product data on the
forms will print in columns unless you choose one of the IATA options that include “No Columns” in the
name. In that case, the product information will print with double slashes between the fields.
If you are printing the IATA form on a color printer, you can choose to print either the Dangerous Goods
IATA or Dangerous Goods IATA No Columns, and the entire document will print including the required
red border on the left- and right-side of the page. If you don’t have a color printer, you can print either the
columnar or non-columnar version of the form on paper that already has the red border (in which case
choose one of the options marked (No Red Border), or print the data on a pre-printed IATA form, in which
case choose one of the options marked (Data Only).
Users who upgraded to Shipping Solutions Professional version 9.12 will also see versions of the IATA
forms designated as Legacy. You should only use these versions of the IATA forms for shipments that were
created prior to upgrading to the version 9.12 software. These documents will be phased out in a future
version of Shipping Solutions.
DISCLAIMER
Proper training is required under federal and/or state regulations to handle dangerous goods and/or
hazardous materials. All persons and entities must comply with all federal regulations, including but
not limited to the specific training requirements of 49 C.F.R. (172.000– 172.704).
InterMart provides this form and instructions to assist properly trained shippers. The materials
provided by Shipping Solutions in no way alter, satisfy or influence any federal or state requirements.
The information provided does not meet the training requirements as required in DOT 49 CFR.
The study and/or use of Shipping Solutions software does not qualify an individual to prepare,
package, transport or otherwise handle dangerous goods or hazardous materials.
The information contained in this document is subject to change or update due to changing
government regulations. The user of this document assumes responsibility for complying with all
applicable laws and regulations regarding the shipment of dangerous goods.
InterMart shall not be held responsible for any loss, injury and/or damage caused by errors,
omissions, misprints or misrepresentations of the contents of this software, forms or documentation or
for any unauthorized or inappropriate use.

102
The IMO Dangerous Goods Screen in EZ Start
Dangerous Goods IMO Screen (Professional Only)
Complete this screen to enter information on the IMO Dangerous Goods form.
• Vessel/Flight# and Date—Enter the name of the vessel on which your shipment is loaded and the
date of departure.
• Port/Place of Handling—Enter the port in which your shipment was loaded on the vessel.
• Container ID Number—Enter the ID number for your container(s).
• Seal Number—Enter the seal number for your container(s).
• Container Size/Type—Enter the size and type of container(s).
• Tare Mass (Kg)—Enter the mass (or weight) of your empty container(s) including all fittings and
appliances used in the container.
• Total Gross Mass (Kg)—Enter the mass (or weight) of your container(s) packed with all your
products.
• Transportation Reference Number—Enter the waybill number for the shipment.
• Shipper Reference Number—Enter the shipper’s reference number.
• Forwarder Reference Number—Enter the freight forwarder’s reference number, if assigned.
• Carrier (by carrier)—Enter the carrier of the goods.
• Additional Handling—Enter any additional handling instructions for your shipment. You can
choose phrases from the Phrases Database by clicking on the drop-down list or type directly into
the box.

103
• 24-hr Phone—For shipments to, from or within the U.S., enter a phone number (including area
code and international access codes for numbers outside the U.S.) that is always monitored while
hazardous material is in transport, including storage incident to transport.
• PACKING—Enter the name of the company, person, status, place and date where your products
were packed.
• HAULER—Enter the name of the company, vehicle registration number, date and driver who
hauled the goods to the airport of departure.
• PREPARER—Enter the company, person and their status, place, and date where the IMO
Dangerous Goods form was prepared.
Your dangerous goods items will be listed in the grid in the middle section of the screen and will include
products from the EZ Start-Product Detail screen along with any sub-products. Re-order the items by
clicking in the first column. Right click to edit or add an item, which will take you to the IMO Product
Detail screen.
If you have already stored your DG information in the Products database (see page 117), it will
automatically populate on the IMO Product Detail screen when you add the product to your shipment. If
not, click Lookup DG to search for your item in the IATA Database of Dangerous Goods. You can search the database by UN Number or Proper Shipping Name. The IATA Database will provide the UN
Number, Proper Shipping Name, Classification and Packing Group. The list of dangerous goods is
slightly different for IMO than it is for IATA, so you may need to edit these for IMO shipments.
Enter the Quantity. Since this could be different than the commercial invoice quantity, it is not copied from
the Invoices tab.
Type directly in the Kind of Packages box or click the Builder button for help in entering your packing
information. On the Statement Builder screen, choose your Material and Container from the drop-down
lists. Enter the amount in the containers in the Value box and either L for liters or kg for kilograms from the
Units drop-down list. Click the plus button to add the Value and Units to your type of material and
container in the Statement box. Use the degree button to add that symbol to a flashpoint, if needed.
Use the Additional Description box to enter any information that you want to follow the UN Number,
Proper Shipping Name, Classification and Packing Group. This information could include a flashpoint,
so a degree button is provided to add that symbol.
If your DG item requires a technical name following the Proper Shipping Name, enter it in the Technical
Name box. Do not include the required parenthesis because Shipping Solutions will automatically add them.
The Include on IMO check box will default to checked. If for some reason you do not want to include this
item on your Dangerous Goods IMO document, uncheck the box.
The Dangerous Goods IMO document shows Gross Weight/Volume and either Net Weight/Volume or
Cubic Meters, and you can enter the values here. Click Save and Close to return to the IMO screen.
If you have unchecked the Include on IMO box for some of your items, you can display all items by
checking the Show Excluded box. This may be helpful in locating items that have been entered but seem to
be missing.
The Dangerous Goods functions in Shipping Solutions were updated in version 9.12. For users who had a previous version of Shipping Solutions and upgraded to 9.12, a Show Legacy button will be visible.
Clicking this button will return you to the method used for dangerous goods prior to version 9.12. We
encourage you to transition off the legacy screens as soon as possible as they will be phased out in a future
version of Shipping Solutions. Click Show New to return to the regular screen.
There are multiple Dangerous Goods IMO documents listed on the EZ Start screen, Preview/Print/Email
button. You can print the whole document (no designation) or you can print just the data on a preprinted
form (designated as Data Only). Users who upgraded to 9.12 will also see versions of the reports designated
as Legacy. These documents will be phased out in a future version of Shipping Solutions.

104
DISCLAIMER
Proper training is required under federal and/or state regulations to handle dangerous goods and/or
hazardous materials. All persons and entities must comply with all federal regulations, including but
not limited to the specific training requirements of 49 C.F.R. (172.000– 172.704).
InterMart provides this form and instructions to assist properly trained shippers. The materials
provided by Shipping Solutions in no way alter, satisfy or influence any federal or state requirements.
The information provided does not meet the training requirements as required in DOT 49 CFR.
The study and/or use of Shipping Solutions software does not qualify an individual to prepare,
package, transport or otherwise handle dangerous goods or hazardous materials.
The information contained in this document is subject to change or update due to changing
government regulations. The user of this document assumes responsibility for complying with all
applicable laws and regulations regarding the shipment of dangerous goods.
InterMart shall not be held responsible for any loss, injury and/or damage caused by errors,
omissions, misprints or misrepresentations of the contents of this software, forms or documentation or
for any unauthorized or inappropriate use.

105
The Non-Dangerous Goods Screen in EZ Start
Non-Dangerous Goods Screen (Professional Only)
Complete this screen to enter information on the Shipper’s Declaration of Goods Not Restricted.
• Airport of Departure—Enter the full name of the airport or city of departure (if known). This field
is optional.
• Airport of Destination—Enter the full name of the airport or city of destination (if known). This
field is optional.
• Shipper’s Name/Title—Enter the name and title of the person signing the declaration.
• Shipment Place—Enter the place where signing the declaration.
• Shipment Date—Enter the date when signing the declaration.
• Article and Description—List each non-dangerous product included in this shipment and all the
related information.
• Additional Handling Information—Enter additional specific handling information or statement
that may be required.
When you have filled in all the Non-Dangerous Goods fields, click Save and then Close. You have three
options for printing the document on the Preview/Print/Email screen. You can print the entire form, print
data only on a preprinted form you have purchased, or you can print the form excluding only the green
borders on paper you have purchased pre-printed with the green borders.

106
The Bank Draft Screen in EZ Start
Bank Draft Screen
Fill in this information to produce a bank draft with or without a transmittal letter.
Security Endorsement Screen
If you don’t regularly ship with certain airlines, they may request an FAA Security Endorsement form that
lists two forms of picture ID and includes a statement that the shipment does not contain unauthorized
explosives, destructive devices, or hazardous materials.

107
The Shipment Log Screen in EZ Start
Shipment Log Screen (Professional Only)
To ensure compliance with export regulations, the Bureau of Industry and Security (BIS) strongly
recommends that companies create a written Export Management and Compliance Program (EMCP) that
clearly outlines what steps your company needs to follow prior to every export shipment to ensure that you
haven’t violated current export regulations. While an EMCP isn’t mandatory, BIS officials say that creating and following such a plan can be an important mitigating factor that could reduce or eliminate penalties if
BIS finds that your company accidentally violated export rules and laws.
Penalties can run as high as $250,000 per civil export violation or twice the value of a transaction,
whichever is greater. (Criminal violations can result in a fine of up to $1 million, imprisonment for up to 20
years, or both.) This makes creating and following an EMCP a good investment.
The Shipment Log screen allows you to document that each step of your EMCP is being followed. The
information entered into this screen does not appear on any of the export forms, but it will automatically be
saved in the software and you can print out the shipment log for any shipment from the
Preview/Print/Email screen.
• Task—This is the list of tasks that your company has determined should be followed for every
export shipment. This list is preloaded with seven tasks outlined in the sample EMS provided by BIS. You can delete, modify or add new tasks to this list in the Shipment Log Items database. Go
to the Databases tab, click Shipment Log Items, then Add.
• Date Completed—As each task is completed, enter the date.
• Initial—Enter the initials of the person or persons completing each task.
• Notes—Enter any free-form notes you wish to save with this shipment record.
When you have filled in all the Shipment Log fields, click Save and then Close.

108
Shipping Solutions Databases
The Databases Tab in Shipping Solutions
To get the maximum benefit from Shipping Solutions, the first time you start the program you should spend
some time entering information into its various databases. By doing so, you will eliminate the need to retype
common data every time you prepare a new shipment as well as reduce the likelihood of errors that can
delay shipments or require expensive changes.
You can either enter information into the various databases one record at a time from within the various
database screens as described on the following pages, or you can import a group of records from an existing
spreadsheet or database by using the Import Contact and Product Databases features on the Tools tab
(see page 131).
To access any of the Shipping Solutions databases, click on the Databases tab at the top of the screen.

109
The Shipping Solutions Contacts Database
Contacts Database
To view or enter information into the various contact databases, click on Contacts from the list of the
Shipping Solutions databases. This will open a new window labeled Contacts Database. When you first
open the Contacts Database, the Exporter database will appear on screen. From here you can enter your
company information in the various fields. If you have more than one company location and/or multiple
divisions within your company, you can enter them all as separate records.
To select a different Contacts database, click on the drop-down menu next to the Select Contacts Type
label. From this drop-down menu, you can view and/or enter contact information into the Ultimate
Consignee, Intermediate Consignee, Freight Forwarders, Bill To, and Miscellaneous Contacts
databases in addition to the Exporters database.
When you begin preparing a new shipping record on the EZ Start tab, every contact record you entered into
the Contacts databases will be available from drop-down menus, so you don’t have to manually type this
information into the shipment record. Select the appropriate contacts for your shipments and Shipping
Solutions will automatically enter all the related information.
Add a New Contact
To manually enter a new contact into one of the Contacts databases, first make sure you select the correct
Contacts database from the Select Contacts Type drop-down menu. This will bring up the list of existing
contacts, if any, that are already in that database. Next, click on the Add New Contact button on the toolbar
at the top of the window. This will clear out all the data fields on the screen. You can then add information
into the fields listed below.

110
If you wish to copy an existing contact to a different contact type—for example, add an existing Ultimate
Consignee contact to the Bill To contact database—click on the Copy Contact button on the toolbar. You
can also use this button to duplicate a contact in the same database they already reside and then change some
of the information for that contact. For instance, you can copy a contact from a specific company and then
change that new contact record by changing the first and last names.
The following fields are part of each of the different Contacts databases:
• Company—Enter the company name.
• Address Fields—Enter the company’s address information.
• Tax ID Number—Enter the company’s identification number, usually the tax ID number.
• ID Type—Select the type of ID Number that you used: D-U-N-S for a number assigned by Dun &
Bradstreet, EIN for a U.S. tax identification number, or Foreign for a foreign country’s
identification number.
• Account Number—Enter the company’s account number if you have assigned it one.
• Contact First Name—Enter the first name of the contact for this company.
• Contact Last Name—Enter the last name of the contact for this company.
• Contact Title—Enter the title of the contact person entered above.
• Phone Number—Enter the company’s or the contact’s telephone number.
• Fax Number—Enter the company’s or the contact’s fax number.
• Email Address—Enter the contact’s email address.
• Contact Note—This field is provided strictly as a convenience. The information you enter in this
field will not appear on any forms.
The Foreign Trade Regulations also required one additional data field for the Ultimate Consignee for all
shipments filed through AES. The Ultimate Consignee Database also includes:
• Ultimate Consignee Type—Choose the type of consignee that best describes its business: Direct
Consumer, Government Entity, Other/Unknown, or Reseller.
Once you have entered all the information you wish to include for this new contact record, click on the Save
button on the toolbar. This will save all the information you entered, and it will add this new record to the
grid of existing contacts that appears at the bottom of the window.
Click on the Close button on the toolbar to exit the Contacts database.
Please Note: If you are adding multiple contacts into the Contacts database, you can import a list of contacts
from an existing spreadsheet or database using Shipping Solutions’ Import Contact and Product
Databases feature located on the Tools tab. (See page 131 for more detail.)
Search for a Contact
The Search Contacts section of the Contacts Database screen displays a grid of all the contacts already
entered into the database. You can search for an individual record in one of two ways:
1. You can type in the name of the company you are searching for by entering the company name into
the Search For Company field. By default, this search option will find all company names that
Starts With the information you entered. If you want to find the company name within the
Company field, click on the drop-down menu in the Match field and choose the Contains option.
Click on the appropriate company in the contacts grid to have the contact information appear in the
individual fields located in the top portion of the window. To clear a previous search, click on the
Clear Filter button.

111
2. You can sort the contacts already entered into the database by clicking on the column header in the
grid at the bottom of the page. Clicking on the column header once will sort all the contacts in
ascending alpha/numeric order; clicking the column header a second time will sort the contacts in
descending order. You can sort all the contact records by clicking on any of the column headers.
For example, clicking on the Postal Code column header will arrange all your contacts in this database from the smallest number value to the highest number value. Use the scroll bar on the
right side of the grid if you have more records than are visible in the grid.
Delete a Contact
To remove one or more contacts from a database, find the record you wish to delete by following the search
instructions listed above. Once you have found the correct contact, highlight that contact record by clicking
on it in the grid located at the bottom of the window. Once you click on a record it should be highlighted in
blue. You can select more than one contact record by holding down the Ctrl button on your keyboard and
clicking on every contact record you wish to delete.
Once you have highlighted one or more contacts, click on the Delete Contact button on the toolbar at the top of the window, which will delete the highlighted contact record(s). The deletion will not be permanent
until you click on the Save button on the toolbar.
Click on the Close button on the toolbar to exit the Contacts database.

112
The Shipping Solutions Products Database
Products Database
Whether your company exports a dozen different products or 12,000 different products, the Products
Database will save you an extraordinary amount of time rekeying the information on every shipment. Once
you have entered your product information in the Products Database, it will be available from a pull-down
menu on the EZ Start tab every time you prepare a new shipment.
The Products Database allows you to edit the information once it has been entered on the EZ Start tab.
Let’s say, for example, that you enter a standard price for a product in the Products Database. When you
prepare a new shipment, you select that product from the pull-down menu on the EZ Start tab and all the product information—including the price—automatically fills in on the screen. However, for this shipment,
the customer has negotiated a special lower price for this product. With Shipping Solutions, you can simply
edit the price on the EZ Start screen without affecting the price saved in the Products Database.
To view or enter information into the Products Database, click on Products from the list of the Shipping
Solutions databases. This will open a new window labeled Products Database. From here you can enter
your product information in the various fields. You can store each of your products as a separate record in
the database.
113
Add a New Product
To manually enter a new product into the Products Database, click on the Add New Product button on the
toolbar at the top of the window. This will clear out all the data fields on the screen. You can then add
information into the fields listed below.
The Product Database is divided into different sections related to the different export forms you can
produce in Shipping Solutions: Invoices, AES/EEI, and Certificate of Origin, although the data entered in
one section will usually print on other export documents as well.
In addition, the top of the Products Database window includes three tabs: Invoices/AES, AES DDTC
Info, and Dangerous Goods. All users will need to enter information on the first tab, Invoices/AES. If one
or more of your products falls under the jurisdiction of the State Department’s Directorate of Defense Trade Controls, which is primarily military items and weapons, you will need to click on and enter the information
on the AES DDTC Info tab. If you are shipping dangerous goods, you will need the Dangerous Goods tab.
The following fields are in the Invoices section of the Products Database:
• Product ID—Enter the part number, SKU number or other type of product number that your
company has assigned to this product, if any.
• Product Description—Enter your company’s description of the product as you wish it to appear
on the invoices.
• Sales Unit of Measure—Enter the unit of measure for this product as it is calculated for invoicing
purposes.
• Unit Price—Enter the price per piece or per unit for the product. Shipping Solutions allows you to
enter a unit value with up to five decimal places.
• Schedule B/HTS Code—Enter the Schedule B Commodity Classification or Harmonized Tariff
System (HTS) Code for your product. The first six digits of the code are the Harmonized System
(HS) code and will appear on any document used internationally; all 10 digits appear on domestic
documents such as the Shipper’s Letter of Instruction (in SED or NCBFAA format) as well for
filings through the Automated Export System (AES). All the codes should be checked and updated
at least annually. Please Note: Do not enter any periods with your product codes; Shipping
Solutions will insert those automatically.
• Gross Weight—The total weight for this product including packaging. You can enter this weight in
pounds or kilograms, and Shipping Solutions will automatically convert it and fill in the other box.
• Net Weight—Enter the weight of the product without any immediate wrappings; i.e., the weight of
the contents of a tin can without the weight of the can. You can enter this weight in pounds or
kilograms, and Shipping Solutions will automatically convert it and fill in the other box.
• Country of Origin—Select the country of origin from the drop-down menu for your product if you
wish it to appear on your commercial and proforma invoices as well as on the generic certificate of
origin. Otherwise, you can leave this field blank.
AES/EEI Section
The following fields are in the AES/EEI section of the Products Database. This information is required for
creating an SLI in SED or NCBFAA format and for filing your Electronic Export Information through the
Automated Export System (AES).
Typically, the export information for any shipment to a country other than Canada must be filed through
AES if the value of any line item (or group of line items with the same Schedule B or Harmonized Tariff
Code number) is more than $2,500, or if any item requires an export license. You may skip these fields if
your company isn’t required to file through AES:
Schedule B Description—Enter the description for the product as it appears in the HTS or
Schedule B Commodity Classification Code published by the U.S. Department of Census. This

114
description is what will be submitted to Census if you file electronically through AES or if you
print an SLI in SED or NCBFAA format. Please Note: AES allows a description with a maximum
of 45 characters. If you wish to use the same description as it appears in the Product Description
field in the invoices section of this window, simply click on the Copy Product Description button.
AES Unit of Measure 1—The unit of measure that is submitted to AES must match the unit of
measure that appears in the Schedule B or HTS codes and may be different than the unit of measure your company uses for invoice purposes. Shipping Solutions provides a drop-down menu with the
complete list of acceptable codes. Please Note: If you do not select the appropriate unit of measure
as indicated in the Schedule B or Harmonized Tariff codes, you will receive an error message when
you try to file through AES.
AES Unit of Measure 2—The U.S. Census Bureau requires exporters of certain, limited products
to report two quantities and two units of measure when filing through AES. If this product is one of
those products, enter your second unit of measure here. Otherwise, leave this field blank.
License Type—Select the license type from the drop-down menu or type it directly into this field.
If no license is required, select C33 - No Licensed Required (NLR).
ECCN—Enter the export control classification number, if necessary, for your product. You will
find a listing of all the ECCN numbers in the Commerce Control List in the Export Administration
Regulations (EAR). You will find the EAR online at the Bureau of Industry and Security’s website:
www.bis.doc.gov.
License No/Exemption—When you select a License Type in the field above, the appropriate
license exemption will automatically fill in here if there is one. Otherwise, fill in your license
number. See the Appendix on page 179 for a list of license types and their required codes.
License Value— For shipments requiring an export license, report the value designated on the
export license that corresponds to the commodity being exported.
Origin—Indicate the type of export:
(D) Domestic—Merchandise that is grown, produced, or manufactured in the United States
(including imported merchandise that has been enhanced in value or changed from the form in
which it was imported by further manufacture or processing in the United States).
(F) Foreign—Merchandise that has entered the United States and is being re-exported in the same
condition as when imported.
Hazardous Item—Check this box if this item qualifies as hazardous under Department of
Transportation regulations.
Free Trade Agreements Section
The following fields appear on the USMCA Certificate of Origin (COO) as well as the Australia Free Trade
agreement (FTA) COO, the CAFTA-DR COO, the Chile FTA COO, the Colombia Trade Promotion
Agreement (TPA) COO, the Korea FTA COO, the Panama TPA COO, and the Peru TPA COO. You should make sure you understand how to qualify your goods under each of the appropriate free trade agreements
before you ever provide Certificate of Origin to an importer.
You may skip the fields in this section if your shipment does not qualify—or you are not sure if it
qualifies—for preferred tariff treatment under a U.S. free trade agreement.

115
FTA Certificate of Origin Form
Preference Criteria Net Cost Producer
Country of Origin
Australia WO
POM PS
NC No
Yes No1 No2
US AU
CAFTA-DR
A B1 B2 C
If B2, then indicate: RVC ACU DM
FGM SG
Yes No1 No2
Not Required
Chile A B C
RVC BUILDUP RVC BUILDDOWN
No
Yes No – Article 4.13 (2a) No – Article 4.13 (2b)
US CL
Columbia
A B1 B2 C
RVC 1 RVC 2 RVC 3
No
Not Required US CO
Korea WO PSR PE
Not Required Not Required US KR
Panama 1 2 3
Not Required Not Required US PA
Peru A B C
Not Required Not Required US PE
USMCA
A B C
D1 D2 D3
Not Required
Yes No1 No2 No3
US CA MX JNT
Free Trade Agreement Fields
As you can see from this chart, each of the free trade agreements that the United States has entered with other countries include different data elements to prove that your goods qualify under the rules of origin for
that agreement. The chart above lists those options for each of the specific FTA Certificates of Origin.
Each column in the chart is independent from the others for their respective agreements. For example, in the
USMCA COO row, using Preference Criteria “B” does not mean that you automatically enter “Yes” in the
Producer field, and “US” in the Country of Origin field. The one exception is for the CAFTA-DR COO. In
that case, you would only select one of the Net Cost field options if you selected “B2” as the Preference
Criteria for your product(s).
For a detailed explanation of each of the agreement’s rules of origin and what the abbreviations and citations
represent, visit the U.S. Trade Information’s website, www.export.gov/FTA/index.asp.

116
Search Products Section
The Search Products section of the Products Database screen displays a grid of all the products already
entered into the database. You can search for an individual record in one of two ways:
1. First choose whether you wish to search for a product by its Product ID or Description in the
drop-down menu labeled Column. Next click on the Match drop-down menu to indicate whether
you wish to search for an item that Starts With or Contains the information you will be entering
into the Search For field. Finally, enter what you are looking for in the Search For field. As you
type in more information, the product grid below will start narrowing down the list of matching
products. Click on the appropriate item in the product grid to have the product information appear
in the individual fields located in the top portion of the window. To clear a previous search, click
on the Clear Filter button.
2. You can sort the products already entered into the database by clicking on the column header in the
grid at the bottom of the page. Clicking on the column header once will sort all the products in
ascending alpha/numeric order; clicking the column header a second time will sort the products in
descending order. You can sort all the product records by clicking on any of the column headers.
For example, clicking on the Schedule B/HTS Code column header will arrange all your products
from the smallest number value to the highest number value. Use the scroll bar on the right side of
the grid if you have more records than are visible in the grid. Click on the appropriate item in the
product grid to have the product information appear in the individual fields located in the top
portion of the window.
Update Country Names
If you had previously used Shipping Solutions Classic 6 or Shipping Solutions Professional 7 and converted
your old Product Database to Classic 8 or Professional 9, you may experience a problem getting a product’s
country of origin to appear on the Commercial Invoice, Proforma Invoice or Certificate of Origin. This is
because the Country of Origin might not have included both the full country name and the two-character
country code.
If you are experiencing this problem, you can update all the products in your Product Database by clicking
on the Update Country Names button on this screen. This is something you will only need to do once.
Delete a Product
To remove one or more products from the Products Database, find the record you wish to delete by
following the Search instructions listed above. Once you have found the correct product, highlight that
product record by clicking on it in the grid located at the bottom of the window. Once you click on a record
it should be highlighted in blue. You can select more than one product record by holding down the Ctrl
button on your keyboard and clicking on every contact record you wish to delete.
Once you have highlighted one or more products, click on the Delete Product button on the toolbar at the
top of the window, which will delete the highlighted contact record(s). The deletion will not be permanent
until you click on the Save button on the toolbar.
Click on the Close button on the toolbar to exit the Products Database.
Importing Products
If you are adding multiple products into the Products database, you can import a list of products from an
existing spreadsheet or database using Shipping Solutions’ Import Contact and Product Databases feature
located on the Tools tab. (See page 131 for more detail.)

117
The AES DDTC Info Tab on the Products Database Screen
AES DDTC Info Tab
The following fields located in the DDTC Info section of the AES DDTC Info tab are only required if your product requires a specific DDTC State Department license for export. This section doesn’t affect most
exporters, who should simply skip these fields:
• Exemption Number—If required by the license type, select the exemption number from the drop-
down menu that is the specific citation from the International Traffic in Arms Regulations (ITAR)
(22 CFR 120-130) that exempts the shipment from the requirements for a license or other written
authorization from DDTC.
• Registration Number—If required by the license type, the number assigned by DDTC to persons
who are required to register per Part 122 of the ITAR (22 CFR, 120-130), that has an authorization
from DDTC (license or exemption) to export the article.
• Quantity—If required by the license type, enter the quantity for the line item being shipped. The
quantity is the total number of units that corresponds to the Unit of Measure field (see above).
• Certified Party Indicator—Check this box if the U.S. exporter can certify that the exporter is an
eligible party to participate in defense trade. See ITAR (22 CFR 120.1(c)). This certification is
required only when an exemption is claimed.
• Significant Military Equip.—Check this box if this line item appears on the United States
Munitions List (USML) for which special export controls are warranted because of their capacity
for substantial military utility or capability. See Section 120.7 of the ITAR (22 CFR, 120-130) for a
definition of SME and Section 121.1 for items designated as SME articles.
• USML Category Code—If required by the License Type, select from the drop-down menu the
USML category of the article being exported (22 CFR 121).
• Unit of Measure—If required by the license type, select the unit of measure for this line item from
the drop-down menu.
Once you have entered all the information you wish to include for this new product record, click on the Save
button on the toolbar. This will save all the information you entered into the appropriate database and it will
add this new record to the grid of existing contacts that appears at the bottom of the window.

118
The Dangerous Goods Tab on the Product Database Screen
Dangerous Goods Tab
If your item is considered a dangerous good (DG) by either the International Air Transport Association (IATA) or the International Maritime Organization (IMO), you will want to complete these fields so that you
can prepare the proper documentation for your shipment. The screen is divided into IATA and IMO
sections.
IATA Section
Click the Lookup DG button to open the IATA Database of Dangerous Goods. You can search by UN
Number or Proper Shipping Name. Find the proper entry for your item and click Select. The UN Number,
Proper Shipping Name, Classification and Packing Group will fill in on the DG tab.
The Statement Builder Screen
Type directly in the Type of Packing box or click the Builder button for help in entering your packing
information. On the Statement Builder screen, choose your Material and Container from the drop-down

119
lists. Enter the amount in the containers in the Value box and either L for liters or kg for kilograms from the
Units drop-down list. Click the plus button to add the Value and Units to your type of material and
container in the Statement box. Use the degree button to add that symbol to a flashpoint, if needed. You can
also use this box, if needed, to describe an overpack. Click OK to return to the DG tab.
If your DG item requires a technical name following the Proper Shipping Name, enter it in the Technical
Name box. Do not include the required parenthesis because Shipping Solutions will automatically add them.
IMO Section
Although the list of Dangerous Goods for IMO is slightly different than IATA, a Copy to IMO button is
provided. You may need to edit the UN Number, Proper Shipping Name, Classification, and Packing
Group if it is different for IMO than for IATA.
Type directly in the Kind of Packages box or click the Builder button as described in the IATA section.
Use the Additional Description box to enter any information that you want to follow the UN Number,
Proper Shipping Name, Classification, and Packing Group. This information could include a flashpoint,
so a degree button is provided to add that symbol.
If your DG item requires a technical name following the Proper Shipping Name, enter it in the Technical
Name box. Do not include the required parenthesis because Shipping Solutions will automatically add them.
If you know the values, enter the Gross Weight/Volume, Net Weight/Volume, and Cubic Meters. You
will be able to display either Net Weight/Volume or Cubic Meters along with Gross Weight/Volume on
the DG documents.
Sub Products
If you have products that include DG items that are not listed separately on your commercial invoice, you
can list them as sub products. For example, a machine that includes a lithium battery will probably be listed
by the machine name on the Commercial Invoice, but the battery needs to be listed on the dangerous goods
document. To add a sub product to an item, first enter the sub product as a product on the Databases tab,
Products screen. Be sure to include a Product ID and the fields on the Dangerous Goods tab.
Then locate the main product in the Products database. On the Dangerous Goods tab, click the Manage
Sub Products button. A screen will come up that will allow you to search the Products database for the sub
product. Click Add and the item will be copied to the lower grid showing that it is a sub product to this
product. Repeat the process for as many sub products as needed. Click Close.
The Sub Products will appear in a grid at the bottom of the IATA and IMO sections. You must enter the
sub products separately for IATA and IMO.

120
The Shipping Solutions Phrases Database
Phrases Database
Certain export forms require that certain phrases appear on the documents. For example, most exports
(except those shipped under the jurisdiction of the U.S. Department of State) require that the Department of
Commerce (DOC) Anti-Diversion Clause appear on the invoices and waybills of a shipment. In other cases,
companies may have their own standard statements and phrases that must be added to their export forms.
Shipping Solutions’ Phrases Database allows you to store your common statements and phrases so that you
can access them from a drop-down menu on the EZ Start screens rather than retyping them on every form
every time you prepare a new set of export documents. Shipping Solutions preloads the Consolidated Destination Control Statement and a standard Chamber of Commerce statement used on a Certificate of
Origin to verify the origin of a company’s goods. In addition, Shipping Solutions preloads the four most
commonly used exemption statements indicating why a company is not required to file through AES for an
export shipment.
To add a new phrase to the Phrases Database, click on the Add button on the toolbar. Enter a Phrase Title
in the appropriate field. This is the title that will appear in the drop-down menu in the various EZ Start
screens, so you should make sure to give your new entry a recognizable title. Then enter the entire phrase in
the Phrase Text box. Click Save to save the new entry.
To remove any of the statements from the Phrases Database, highlight the one you want to remove and
then click on the Delete button on the toolbar.
Click on the Close button on the toolbar to exit the Phrases Database.

121
The Shipping Solutions Currencies Database
Currencies Database (Professional Only)
Shipping Solutions Professional gives you the flexibility to create commercial and proforma invoices using a
currency other than U.S. dollars and/or calculating the total value of both those invoices in two different
currencies. In either case, you can use currencies other than U.S. dollars on the two invoices while still filing
your Electronic Export Information (EEI) through the Automated Export System (AES) in U.S. dollars,
which is what is required by export regulations.
The Currencies Database includes a list of most currencies of the world along with the three-character ISO
code for each currency and a field for entering an exchange or conversion rate from U.S. dollars to that alternate currency. The exchange rate could be set in a sales contract or may be tied to a specific third-party
rate, such as the exchange rate as published in the Wall Street Journal on the first Friday of every month. In
either case it is up to you to update the exchange rate as necessary to stay accurate.
See the instructions for the Invoices—Proforma/Commercial screen in EZ Start beginning on page 66 for
more information about adding alternate or multiple currencies to those two export forms.

122
Modifying a Currency Exchange Rate
You can enter and save exchange rates here so they are available to use on the invoices.
1. Select the alternate currency you wish to use:
a. You can search for a currency by using the search tools included in the database. In the drop-
down menu labeled Column, choose whether you wish to search for a product by its Currency
Name or Country Code. Next click on the Match drop-down menu to indicate whether you
wish to search for an item that Starts With or Contains the information you will be entering
into the Search For field. Finally, enter what you are looking for in the Search For field. As
you type in more information, the product grid below will start narrowing down the list of
matching products. When you see the currency you wish to use, click on it so it is highlighted.
To clear a previous search, click on the Clear Filter button.
b. You can sort through the entire list of currencies in the database by clicking on a column
header in the grid. Clicking on the column header once will sort all the currencies in ascending
alpha/numeric order; clicking the column header a second time will sort the currencies in
descending order. Use the scroll bar on the right side of the grid to work your way up and
down the list. When you see the currency you wish to use, click on it.
2. Once you have selected a currency by highlighting it, enter the appropriate exchange rate in the
Conversion Rate field, and then click the Change Selected button. You will see the change
reflected in the currency grid.
3. If you wish to change the formatting used by the alternate currency, click on the Advanced button.
This will display a new column in the Currencies Database labeled Culture Code and add a new field at the bottom of the window also labeled Culture Code. If you wish to change the formatting
of this alternate currency, you can enter the correct culture code in this field and then click on the
Change Selected button again. If nothing appears in the culture code field, this currency will print
on the invoice without a currency symbol such as the dollar sign (“$”) and with two decimal place.
4. To test how the currency will appear on the commercial and proforma invoices, enter a numeric
value in the Value field and click on the Test button. You will see the converted amount with the
correct currency formatting and currency symbol in the Result field.
5. Make sure to click on the Save button on the toolbar to save your changes before exiting this
screen.
If the alternate currency you wish to use does not already appear in the Currencies Database, click on the
Add button in the toolbar and enter the correct information in the highlighted fields at the bottom of the grid.
Remember to click on the Save button on the toolbar before exiting this screen or your new currency
information will be lost.
Click on the Close button on the toolbar to exit the Currencies Database.

123
Payment Terms Database
The Invoices—Proforma/Commercial screen in EZ Start allows you to select the correct payment term
for a shipment from the Payment Terms Database. Shipping Solutions preloads three common payment
terms in the database.
Add—Click this button to add a new payment term to the database.
Delete—To remove an existing payment term from the database, highlight the term you wish to
remove in the grid and then click on the Delete button.
Save—Click this button to save any changes you made to the database.
Close—Click this button to exit the Payment Terms Database.
Countries Database
This database provides a list of countries and their two- and three-character codes to several different
country drop-down menus throughout the Shipping Solutions software. The two-digit codes are the official
codes provided by the U.S. Census Bureau for use with the Automated Export System (AES) and a variety
of export forms.
For the Commercial Invoice, Proforma Invoice, and Packing List, you can choose to display the two-digit,
three-digit, or full name of the country. To choose what you want to display on each of these forms, go to
the Tools tab, Customize Documents screen. Click on the form name to open the Customized Properties
screen. Choose the option you wish to use from the Display Country As drop-down menu.
The database allows you to change any of the records by highlighting the name and/or code you wish to change and then typing in the new information. In addition, the toolbar allows you to make other
modifications to the database if necessary:
Add—Click this button to add a new country name and code to the database.
Delete—To remove an existing country name from the database, highlight the country you wish to
remove in the grid and then click on the Delete button.
Save—Click this button to save any changes you made to the database.
Close—Click this button to exit the Countries Database.

124
The Carriers and Ports Database
Carriers and Ports Database
This database comes preloaded with the latest set of carrier and port codes provided by the U.S. Census Bureau for use with the Automated Export System (AES). These lists of carriers and ports and their
respective codes may be updated occasionally by the Census Bureau. You will be notified by the Bureau of
any changes by email if you have registered as an Account Administrator at your company for AES.
According to the Census Bureau:
We make every attempt to keep our SCAC/IATA code table current. However, you may be unable
to locate SCAC/IATA codes from time to time. If this should happen, please follow the procedures
listed below. Try to obtain the SCAC/IATA code from the carrier… If the carrier cannot provide a
SCAC/IATA code, you may use the following as a last resort.
• 99M—Unknown Mexican Trucker
• 99F—Unknown Foreign Air Carrier
• 99U—Unknown U.S. Air Carrier
• 99C—Unknown Canadian Air Carrier
• UNKN—Unknown Carrier: Ocean, Rail and Truck Modes of Transport Only
• 99O—Aircraft Moving Under Its Own Power (“Flyaway Aircraft”)
Changes to this database can be made manually or by running an update script that will retrieve the latest list
of carriers and ports and update them in your copy of the Shipping Solutions software.
Editing the Carriers and Ports Lists
To manually edit the list of carriers and ports and their respective names, click on the set of codes you wish
to modify. This will open a new window that includes all the names and codes for the list you selected. You
can change any of the records by highlighting the name and/or code you wish to change and then typing in
the new information. In addition, the toolbar allows you to make other modifications to the database if
necessary:
Add New—Click this button to add a new carrier or port name and code to the database.
Delete—To remove an existing carrier or port name from the database, highlight the name you
wish to remove in the grid and then click on the Delete button.
Save—Click this button to save any changes you made to the database.
Close—Click this button to exit any of the Carriers and Ports Databases.

125
Updating AES Codes on the Carriers and Ports Screen on the Databases Tab
Updating the Carriers and Ports Lists
To download and update the latest set of port names and codes provided by the Census Bureau, click on the Update AES Codes button, which will open a new window called Download AES Code Files. To update
all three sets of names and codes, click the Get All Updates box. Because the IATA and SCAC codes are no
longer provided by the Census Bureau, you can no longer download updates to these codes. You should get
any new codes you need from your freight forwarder or directly from the carrier.
To download and update a specific list or lists, click on the lists you wish to update in the Select AES Tables
to Update grid. The first two sets of codes are part of the Carriers and Ports Database; the Product Codes
selection updates the Export Codes Database and the License Types Database, as well as the drop-down
list of Units of Measure and DDTC Exemption Numbers that are part of the Product Database.
Click on the Run Selected Updates button to download and update the selected lists. A pop-up window will
appear when the update is complete. You can then click Close to exit out of the updates screens.
Export Codes Database
This database comes preloaded with the latest set of export codes provided by the U.S. Census Bureau for
use with the Automated Export System (AES). These export codes may be updated occasionally by the
Census Bureau. You will be notified by the Bureau of any changes by email if you have registered as an
Account Administrator at your company for AES.
Add—Click this button to add a new export code to the database.
Delete—To remove an existing export code from the database, highlight the name you wish to
remove in the grid and then click on the Delete button.
Save—Click this button to save any changes you made to the database.
Close—Click this button to exit the Export Codes Database.
You’ll find a complete list of all the export codes in the Appendix on page 178.

126
License Types Database
This database comes preloaded with the latest set of export license codes provided by the U.S. Census
Bureau for use with the Automated Export System (AES). These export license codes may be updated
occasionally by the Census Bureau. You will be notified by the Bureau of any changes by email if you have
registered as an Account Administrator at your company for AES.
Add—Click this button to add a new license type name and code to the database.
Delete—To remove an existing license type from the database, highlight the name you wish to
remove in the grid and then click on the Delete button.
Save—Click this button to save any changes you made to the database.
Close—Click this button to exit the License Types Database.
You’ll find a complete list of export license types in the Appendix on page 179.
Package Types Database
This database stores your commonly used package types so you can use them on the Packing List screen
without retyping the dimensions each time. Click Add and enter the Description you want to use for this
package type. Enter the Length, Width and Height in inches. Click Save.
Miscellaneous Lists Database
This database stores user definable drop-down menus used on miscellaneous screens in EZ Start. These
databases come preloaded with generic choices that the user may modify, delete or expand as necessary to
match their company’s export needs. The current set of lists include:
Inland Bill Received On—Provides options for the types of shipping container the goods are
packed on or in and is used on the Inland Bill of Lading (both versions).
Inland Bill Received Quantity—Provides options for how the goods included in a shipment are
accounted for and is used on the Inland Bill of Lading (both versions).
Shipment Log Items Database (Professional Only)
In order to ensure compliance with export regulations, the Bureau of Industry and Security (BIS) strongly
recommends that companies create a written Export Compliance Program (ECP) that clearly outlines what
steps your company needs to follow prior to every export shipment. The Shipment Log screen on EZ Start
(see page 106) allows you to document that each step of your ECP plan is being followed.
The Shipment Log Items Database comes preloaded with seven tasks outlined in the sample ECP provided
by BIS. You can add, modify or delete tasks stored in the Shipment Log Items database:
Add—Click this button to add a new task to the database.
Delete—To remove an existing task from the database, highlight the task you wish to remove in the
grid and then click on the Delete button.
Save—Click this button to save any changes you made to the database.
Close—Click this button to exit the Shipment Log Items Database.

127
Utilities Tab
The Utilities Tab in Shipping Solutions
Conversion Calculator
While many of the measurements used in the United States utilize imperial units, most of the rest of the
world relies on the metric system. The Conversion Calculator allows you to convert a variety of
measurements back and forth between the imperial and metric systems.
• Select Unit of Measure—Click on the drop-down list to select the type of measurement you want to
convert.
• Decimal Places—Click on the drop-down list to
choose how many decimal places to display in the
results. The calculator will round up to whatever
decimal place you choose.
• Highlight your choices in the list—Select the type
of measure for which you know the value under
From and the type of measure for which you want to
convert under To.
• Value to Convert—Enter the value you wish to
convert.
• Convert—Click this button to calculate the
conversion for the value you entered.
• Converted Value—The calculator will display the results of the conversion here.
• Close—Click this button to close the calculator.
Conversion Calculator

128
Creating Reports from Your Shipments in Shipping Solutions
Generate Reports
This utility allows you to run reports showing shipments by commercial invoice date, country, exporter
contact, freight forwarder, ultimate consignee or AES shipment reference number for a selected date range.
You can also run a report showing the screenings run in the Export Compliance Module for a selected date
range. Choose the report you want and enter the start and end date. The date range is based on commercial
invoice date. The Preview, Print, Print To PDF and Email PDF buttons work the same way as they do in
the Preview/Print/Email screen on EZ Start. (See page 40 for more detail.)
The Export to Excel section of the screen will output all relevant shipment information for the date range
selected to an Excel spreadsheet. It is not dependent on which report is chosen.
To start, click Manage Excel Reports. The initial report is named Default. Click the check boxes in the
Include column to include a particular field in your report. To create additional reports, click Add and give
the new report a name in the Excel Report Name box. Click on the name in the Custom Field name to
rename the field in your report. You can drag and drop rows to change the order in which they will appear in
your report. Click Save and Close.
To run the report, click the Export to Excel button. You will then be prompted to select a location on your
computer for the report.

129
Creating Shipping Labels from Shipping Solutions
Print Shipping Labels
With Shipping Solutions, you can print standard shipping labels on Avery 5164 labels to place on your
shipping packages. The From and To information on the labels automatically pulls from the Exporter and
Ultimate Consignee information entered on the EZ Start-Contacts screen. However, you can use the Ship
To Address drop-down list to change the To address to the Intermediate Consignee or Bill To record from
the EZ Start-Contacts screen.
Rather than wasting labels whenever you need to print less than a full sheet, click the radio button indicating
how many labels to skip. For example, if you want to print on a sheet of labels from which you’ve already used the top two labels, click the number 2 button, and printing will start with label number 3. You can also
indicate how many labels to print.
The Contact First Name, Last Name, and Phone Number entered on the EZ Start-Contacts screen will
print on the labels unless you uncheck the appropriate boxes. You can also show box numbers on the labels
by checking the appropriate box and indicating the starting box number (generally 1) and ending box
number.
You can Preview and Print the labels from this screen.
Generate XML Data Files (Professional Only)
Here you can create an eDoc for filing a Canada Customs Invoice. Click Generate eDoc File and a Save As
screen will open so you can indicate where to save the eDoc file. More eDoc file options will be added in
future releases of Shipping Solutions.

130
Tools Tab
The Tools Tab in Shipping Solutions
Run Data Exchange Manager (Import Shipments) (Professional Only)
Shipping Solutions Professional includes a Data Exchange Manager that allows you to import an entire
order or a set of orders from your accounting system into Shipping Solutions to be able to produce your documents, file electronically through the Automated Export System (AES), and fulfill your export
compliance responsibilities.
Before you can run the Data Exchange Manager (DXM), you must first set it up on the Admin Tab (see
page 140). Once you have set up the DXM, you have three different ways you can run it: (1) manually; (2)
from a script that calls the dxmRun.exe file, which will initiate the import process; or (3) as a Windows
Service that runs on a schedule and imports files whenever they exist in a pre-determined folder and use the
proper naming convention.
This screen on the Tools tab allows you to manually run the DXM to import an order into Shipping
Solutions Professional. For more information about options #2 and #3, see the instructions on page 141.

131
Manually Running the Data Exchange Manager to Import an Order
Selecting a Project to Import
When you click on the Run Data Exchange Manager (Import Shipments) screen on the Tools tab, a
Project window opens, which allows you to select which project you wish to run. A project will be created
when you configure the DXM following the instructions beginning on page 140. While most companies will
only create one project, some companies may create multiple projects if they wish to import orders from
more than one accounting, order-entry or ERP system.
When you select your project from the Project drop-down list, the Run Data Exchange Manager window
will tell you if there are either XML or delimited text files ready to process, or, if you select an ODBC project, a Lookup ID box will appear. Any other configuration settings you’ve chosen will also display. If
you have selected a folder-based project, a Process All Files check box will appear. Check the box to
process all the files without stopping.
If one or more files exist, click the Run button in the toolbar to import the order or orders. For ODBC
projects, enter the Lookup ID and click Run. The value you enter here is defined in the setup wizard found
on the Admin tab, Setup Data Exchange Manager for ODBC screen.
As the project runs, the bottom window will display the results of the import process and should end with
“Shipment ID’s Inserted [x]” where “x” is the Shipment Number inserted into your Shipping Solutions
database. To see more details of this particular import as well as previous imports you’ve run, click on the
View Log button on the toolbar.
To see your imported shipments, go to the EZ Start tab and click Select Shipment. The most recently
imported shipments will be listed at the top.
If there are no files to import into Shipping Solutions, the top window will indicate that your designated
folder is missing files to process.
Click Close to exit this window.

132
Import Contacts and Products Database Located on the Tools Tab
Import Contacts and Products Databases
A major benefit of using Shipping Solutions is to be able to store your customer and product information in
the software’s databases, so you don’t have to type the addresses and product detail over and over again. If
you have the information in another source, such as an ERP system or Excel spreadsheet, you can import the
information using this utility rather than typing the addresses and product detail by hand.
You will need to get your data into a text file that is delimited by tabs, commas or pipes. Do not use a
comma as your delimiter if your data also includes commas. This can be a problem when importing
addresses or product descriptions. After you have prepared your data, follow the steps on the screen to
import it into the Shipping Solutions database.
• What data do you want to import?—Choose either Contacts or Products.
• Which type of contact do you want to import?—This drop-down menu only appears if you chose
Contacts above. Choose which type of contact you want to import: exporter, ultimate consignee,
intermediate consignee, freight forwarder, bill to or miscellaneous.
• What type of delimiter does your file use?—You can choose pipe, comma or tab.
• Locate the file you want to import—Click Locate File and navigate to the location of your pipe,
comma or tab-delimited file.
• Check box…column names—Check this box if the first column in your text file includes column
names.

133
Mapping Data for Import into Shipping Solutions Databases
• Map Data—Clicking this button will open a window that displays all of the Shipping Solutions
field names, their lengths, and their system field names. In the User Fields column, use the drop-
down arrow to see the fields in your file and select which fields correspond to the Shipping
Solutions Fields. You do not have to map to all of the Shipping Solutions fields. Just map the fields that you have in your text files.
For a detailed list of all the data fields available in each of the databases, see the charts in the
Appendix beginning on page 181.
When you have finished mapping your data fields to the Shipping Solutions fields, click Save and
Exit. To restart the mapping process, click the Reset Mapping button. To cancel the mapping
process altogether, click the Cancel button.
• Data was exported from Shipping Solutions—If you used the Export Contact and Product
Databases feature to export your data (see page 134), and you didn’t change the column names,
you can check this box and skip the Map Data task. Be sure your file is saved as tab or pipe
delimited if you have commas in your data fields.

134
Previewing Data Before Import into Shipping Solutions Databases
• Preview and Import Data—Once you have mapped at least one field, this button will appear.
Click on the button to view a grid with the data you are about to import. There is a check box to
indicate whether you want to delete the existing items in the database. If you don’t check the box
the data will be appended to whatever is already in the database. Click Import Contacts.
• Reset Data Mapping—If you need to start over and want to clear all of your mapping, click this
button.
• Validate—Before you begin the setup process so you can import your contacts or products into the
Shipping Solutions databases, you can validate that the files you wish to import don’t include any formatting issues that will prevent them from importing correctly. Clicking this button opens a
Validate Text File window where you can select the file you wish to scan.
• Close—Click here to exit the Import Contacts and Products Databases window.

135
Exporting Data Out of the Shipping Solutions Databases
Export Contacts and Products Databases
To export the information you have entered into the various Shipping Solutions contacts and product
databases into a comma, tab or pipe-delimited text file, click the Export Contact and Product Databases
option on the Tools tab and follow these procedures:
• Select Data to Export—Choose either Contacts or Products.
• Select Contacts to Export—This drop-down menu only appears if you choose Contacts above.
Choose which type of contact you want to export.
• Select Delimiter—You can choose pipe, comma or tab. You don’t need to select a delimiter when
exporting to Excel. We recommend that you choose a pipe or tab delimiter since the comma
delimiter won’t work if you have commas in your data fields.
• Export to Excel—Click this button and a Save As window will open where you can indicate where
you want the data to be saved. The name defaults to the type of data being exported, but you can
change it here.
• Export to Text File—Click this button and a Save As window will open where you can indicate
where you want the data to be saved. The name defaults to the type of data being exported, but you
can change it here.
• Close—Click this button to exit the Export Contact and Product Databases window.

136
Backing Up the Shipping Solutions Database
Backup Database
Single-User Version
To create a backup of your Shipping Solutions database that is running on your computer, click Select the
Backup Location and navigate to where you want the backup to be saved. Click Backup Database to
create the backup. To restore a backup, follow the procedures below:
1. Navigate to C:\ProgramFiles(x86)\Intermart\SSProfessional_9\Applications\DBMaintenance and
double on DbRestore.exe.
2. The Database Restore Wizard will open.
3. Enter the name of your computer (or simply a period (“.”)) and then \SQLEXPRESS in the SQL
Server box. The period represents the name of your computer, and you can use a dot instead of
typing in a name.
4. Click Next.
5. Click the box to navigate to the location of your backup file and click Open. In most cases you can
click Next. In some cases, you will have to click the button next to SQL Server Authentication and
enter a user name and password.
6. To restore over an existing database, click the Existing Database radio button, and choose the
database you want to overwrite from the drop-down list. Proceed to step #8.
7. To restore with a new name, choose New Database and type in a new name for the database. Click
the box to navigate to the location where you want the database restored.
8. Click Next.
9. In Shipping Solutions, go to the Admin tab and click Set Database Connection. Chose the
restored database from the drop-down list and click Test and Save. You are now connected to the
restored database.
Multi-User Version
If you have the multi-user version of Shipping Solutions, you will need to discuss back-up procedures with
your database administrator. If the Shipping Solutions database (ssdata_sql_01) is housed on a company
SQL Server, backup procedures are probably already in place.

137
If the database is on a shared computer running the SQL Express that we provided to you, you can use SQL
Server Management Studio to back-up your database. On the computer running the database, click the Start
button in the lower left corner of the computer, choose All Programs or All Apps, Microsoft SQL Server
2008 R2, and SQL Server Management Studio. Click the plus sign next to Databases, right click
ssdata_sql_01, and choose Tasks and then Backup.
If you need to restore a backup, the process is the same except after choosing Tasks, choose Restore instead
of Backup.
The Delete Shipments Screen on the Tools Tab
Delete Shipments
Running this procedure will delete all shipments with a commercial invoice date equal to and before the date
selected. Make sure to back up your data prior to running this procedure. To run choose the date and click
Delete Shipments. This process cannot be reversed.

138
Lock or Unlock Shipments on the Utilities Tab
Lock/Unlock Shipments (Professional Only)
This screen allows you to lock or unlock a shipment. If a shipment is locked, users will only be able to
preview/print/email documents or copy the shipment. A gold padlock icon will appear next to the shipment
number to indicate that it is locked.
When you first open this screen, the last 20 shipments will be shown. Click View All to see all your
shipments in the grid. To search for certain shipments, choose the field you want to search on in the Column
drop-down list. Choose Contains, Equals or Starts With in the Match drop-down list and type what you are
searching for in the Search For box. Then click Search. Clicking Lock All will lock all the shipments in the
grid. Clicking Lock will lock only the highlighted shipment. Unlock and Unlock All work the same way.

139
The Customize Documents Screens on the Utilities Tab
Customize Documents
Click a particular form to see what is available to customize. On each form you can change the default
printer and margins by clicking the Print Options button. On some forms you can change the field titles by
clicking the Field Labels button. Some of the forms give you the option to change the document title, the
number of Schedule B digits, the date format, the number of unit price digits and more. Click Preview
Document to see your changes right away. You can also print documents for the current shipment from the
preview screen, but these customizations will also be in effect when printing from the Preview/Print/Email
button on EZ Start. The Reset to Defaults button will restore the form to its original settings. To save your
changes to any form, click Save and then Close.
Customize Consolidated Documents (Professional Only)
This works the same way as Customize Documents except you are customizing the consolidated versions
of the forms. These versions are printed via the Consolidate button on EZ Start (see page 49).

140
Admin Tab
The Admin Tab in Shipping Solutions
Set Database Connection
Here is where the connection is made to your Shipping Solutions database. By default, Shipping Solutions
creates a SQL Express database to store your shipment information.
The Set Database Connection Screen
If you have the single user version of Shipping Solutions, the installation will create and fill in your SQL
Server name, which is Your Computer Name\SQLEXPRESS. It will also connect you to and fill in the
Database name, which is ssdata_sql_01. The Trusted Connection box will be checked.

141
If you have the multi-user version of Shipping Solutions and your company has its own SQL server, you can
copy the database, ssdata_sql_01, to your SQL server and connect to it there. The process is explained on
page 9.
If you have the multi-user version of Shipping Solutions and you do not have or don’t want to use your
company’s existing SQL server, you can install SQLEXPRESS on a shared computer and then connect each
user to the database. The entire installation process is explained starting on page 10. Once the multi-user
version is correctly installed, the SQL Server name will be Name of Server Computer\SQLEXPRESS,
and the Database name will be ssdata_sql_01. If you are using Windows Integrated Security, the Trusted
Connection box will be checked. If you are using SQL Server security, the Trusted Connection box will
not be checked, and the User Name and Password that you created during the installation process will be
filled in.
Setup Data Exchange Manager (Professional Only)
Shipping Solutions Professional includes a Data Exchange Manager (DXM) that allows you to import orders
from your company’s accounting, order-entry or ERP system into Shipping Solutions Professional and produce your export documents, file your export information electronically through the Automated Export
System (AES), and fulfill your export compliance requirements.
There are three primary advantages of using the DXM:
1. Dramatically reduce the time it takes to complete your export documents. By importing one or
more orders into Shipping Solutions Professional, a company may import almost all of the data
required to complete the various export forms.
2. Eliminate redundant databases. Because you are importing an entire order or orders into Shipping
Solutions Professional, you are typically importing all the contact and product information from
your company’s system. This eliminates the need to import, store and update your contact and
product information in the Shipping Solutions databases. Since most accounting, order-entry and
ERP systems don’t allow you to store intermediate consignee and freight forwarder information,
you may still find it advantageous to use those databases in Shipping Solutions Professional.
3. Reduce data-entry errors. Because you are importing data from your company’s system, you don’t
need to retype important information. No retyping means no chance of new typos.
There are three primary ways the DXM can be used:
1. File-based processing requires that you configure your accounting, order-entry or ERP system to
generate a single XML file with a specific file name or matching header and detail delimited text
files with specific file names. This file or matching files will include one or more orders and can be
saved in a specific location that you specify. Whenever you then run the DXM either manually or
automatically, it will grab the order information and automatically insert it as a new shipment
record or shipment records in Shipping Solutions Professional. At this point you can review the
imported data, enter any missing data or change any data that needs to be changed, and then create
your export documents, file through AES, and run your export compliance screenings.
2. Folder-based processing allows you to identify a specific folder that the DXM will monitor and,
when the DXM is triggered, it will check the folder and import the order information from the
single XML file or the matching delimited text files. When you manually or automatically run the
DXM, it will grab the order information and insert it as a new shipment record or shipments records
in Shipping Solutions Professional.
3. An ODBC connection allows Shipping Solutions to directly communicate with your business
application such as your accounting, order-entry, or ERP system. This method is discussed in detail
starting on page 148.

142
Finally, there are three different ways you can run the DXM:
1. You can run the DXM by going to the Shipping Solutions Professional Tools tab and clicking on
the Run Data Exchange Manager (Import Shipments) screen. See the instructions for running
the DXM on page 129. This is the only method you can use with an ODBC connection.
2. You can run the DXM from a script that calls the dxmRun.exe file, which will initiate the import
process. This script could be used to generate the XML file or delimited text files from your
accounting or ERP system and then call dxmRun.exe at the end of that process, or it could be part
of some other process your company uses.
3. You can create a Windows Service that runs on a schedule and checks the folder you specified in
the folder-based processing described above so that whenever a file or files exist in the folder with
the proper naming convention, they will be imported into Shipping Solutions Professional.
Setting Up the DXM Starts by Creating or Editing a Project
Configuring the Data Exchange Manager
Before you can utilize the DXM, you must first configure it to work with your accounting, order-entry or
ERP system. Begin by going to the Admin tab in Shipping Solutions Professional and clicking on Setup
Data Exchange Manager. From here you can choose to create a new project by clicking on Create on the
program’s toolbar, or you can choose an existing project from the Select Project list. You can create as
many different projects as you need, so you can import data from multiple sources if you wish.
Create New Project Screen

143
If you choose to create a new project, the Create New DXM Project window will open. Enter a name for
this project without any spaces or punctuation, and click the Create button.
Regardless of whether you have decided to create a new project or use an existing project, select that project
from the Select Project list and click on the Edit button. This will open the Setup Data Exchange
Manager window for this project.
Setting Up the Data Exchange Manager
As mentioned above, you can choose to import data from your accounting or ERP system into the Shipping
Solutions Professional software using comma-, tab- or pipe-delimited text files, using an XML file, or using
an ODBC connection. In the File Type box, choose Text-Delimited, XML, or ODBC.
Next choose your Processing Type. Choose either File Based or Folder Based. When using an ODBC
connection, the only option is File Based. The File Based processing type requires that you generate an
XML file with a specific name or two delimited text files (a header and a detail file) with specific names.
The DXM allows you to process one file at a time (or one header/detail pair if you’re working with text-
delimited files) or all the files in one folder. To process one file, choose File Based. To process all files in a
folder, choose Folder Based.
Continue following the setup instructions below depending on which file type you have chosen. Skip ahead
to the section titled Use XML Files if you are using that option. Skip ahead to the section titled Use an
ODBC Connection on page 148 if you are using that option.

144
Use Text-Delimited Files
In order to import your orders into Shipping Solutions Professional using text delimited files, you need to
create two files from your accounting or ERP system: the header file and the detail file. The header file
contains all the information that applies to your entire shipment including exporter, consignee and shipping
information. The detail file includes information related to each separate line item of your order. Every order
can have multiple line items. The file layout shown in the Appendix on page 184 shows the fields available
to import and whether they are in the header or detail file. It also shows the acceptable format for each field.
Both the header and detail files must have a linking field that ensures that the line items for an order will
always stay tied to that order. The linking field must be the first column in both the header and detail file. If
you have field titles, the title of the linking field must be the same in both the header and detail file. Possible options for the linking field include the invoice number or the shipment number. The field used as the
linking field can also be used for another field. For example, if you use the invoice number as the linking
field, you can still also map it to the invoice number field in the header file.
If you are using folder-based processing, it’s very important you pay close attention to how the files are
named. Either the prefix or the suffix of the name must designate whether it is a header or detail file. The
rest of the file name must be identical for both file types; for example, NewOrder_Header.txt and
NewOrder_Detail.txt.
Once you have created the header and detail text files from your accounting or ERP system, you can test the
files to ensure they will work with the DXM by using the testing tools included with the software. See the
section titled DXM Testing Tools on page 157 for instructions on running the Text File Validator.
Once you have created your two text files and confirmed they will work with the DXM, complete the Setup
screen as described below:
1. File Type—Since this is a text-delimited project, click the Text Delimited button.
2. Processing Type—The DXM allows you to process one set of header and detail files or all the sets
of files in a certain folder. If you will only have one header and detail file to process at a time,
choose File Based. If you want all the properly named files in a specified folder to be processed,
choose Folder Based.
3. Add Fields from Product Database— If you want to supplement the data you are importing from
your accounting or ERP system, check this box. Click Setup to designate the fields you wish to
supplement. See Supplement Data from the Product Database on page 154 for more information.
4. Package—If you want to zip up the DXM files to be run on a different computer, click Package
and identify the location where you wish to save the zip file. This should be done after the setup is
complete and fully tested.
5. Select Delimiter—Select the type of delimiter that divides your data fields: comma, tab or pipe.
Tab or pipe delimiters are recommended especially if your data has commas, which will cause the
DXM to misread your data.
6. Check if First Record Contains Column Names—Check this box if you have column names in
your header and detail files. Column names are recommended to make the data mapping process
easier.
7. Header File (File Based only)—Click on the ellipsis button to display a search window that will
allow you to navigate through your computer to locate the header file of your shipment. Once you
have located it, click on the file and then click Open to select it.
8. Detail File (File Based only)—Click the ellipsis button to display a search window that will allow
you to navigate through your computer to locate the detail file of your shipment. Once you have
located it, click on the file and then click Open to select it.
9. Source Folder (Folder Based only)—Click the ellipsis button and locate the folder containing the
text files to be processed.

145
10. File Part (Folder Based only)—In order for the DXM to know which files contain header
information and which files contain detail information, you need to specify the file naming
convention you are using. Click either Prefix or Suffix depending on which part of the file name is
used and enter the prefix or suffix in the Header File Part box and Detail File Part box. For
example, if all header files begin “Header” enter “Header” in the Header File Part box.
11. Location of Files After Processing—Click the ellipsis button to display a search window that will
allow you to navigate through your computer to identify where you would like your text files to be
moved after the DXM runs. When moved the processed files will be renamed with the file format
YYYYMMDD_HHMMSSXX<filename> where XX is either AM or PM.
12. Copy Processed Files to Folder—When you are first setting up a DXM project, you may need to
run the import of the delimited text files more than once to ensure the mapping and other
configurations are correct. To make this process easier, you should leave this box unchecked so the
files you are using to test the import stay in the designated folder. Once your testing is complete,
and you are ready to move to the production phase, check this box so the processed files
automatically get moved to the folder identified in Step 11, listed above. For folder-based projects,
the box is always checked.
13. Logging in Debug Mode—Check this box if you are testing the import process and you want the DXM to write a more detailed log for the file import. The more detailed log may make it easier to
diagnose any problems you encounter during the setup process.
You must now map the fields in your text files to the fields in Shipping Solutions Professional. For a
detailed list of all the fields available for mapping, go to the Data Exchange Manager File Structure pages
located in the Appendix on page 184.
If you already have mapping in place and have changed the text files significantly or just want to start over
with your mapping, click Reset Mapping. This will wipe out all the mapping, so only click this button if
you are sure you want to start over. To begin or continue the mapping process click Mapping.

146
Mapping Data Fields Using the Data Exchange Manager
The Shipping Solutions fields are divided into six tables. Begin by highlighting Contacts in the Table to
Map drop-down list. The Shipping Solutions fields are listed in the left column.
Click on the drop-down list in the middle column. You should see your column headings from your header file. If you do not have column headings, the fields will appear as A0, A1, A2, etc. For each Shipping
Solutions field choose the corresponding field in your text file from the drop-down list. You do not need to
map every field; only map the fields for which you have data.
The right column can be used to enter a Default Value for a field. That default value will be used for every
shipment pulled in using this DXM project.
Once you have finished selecting the correct User Fields and entering any Default Values you want to use,
click Save. You must move off a mapped field before saving in order for that field to be saved. If you want
to exit the data mapping screen without saving your changes, click Cancel Mapping.
Next select the Header-Invoice table and repeat the process. Continue down the list of tables mapping all
the information you have in your header and detail text files and entering any default values. You do not
have to map all of the tables. Click View Mapping to view or print a list of the fields you have mapped.
Click View All Fields to see all fields available for mapping, and then click View Mapped Fields to see just
what you’ve mapped.
Click Close to close the Data Mapping screen.

147
Because you are using text-delimited files with the DXM, you can skip the next section and proceed to
Supplement Data from the Product Database section on page 154.
Configuring the DXM Using a Single XML File
Use XML Files
Working with the XML data format in the Data Exchange Manager greatly simplifies the process of moving
data from your accounting or ERP system into Shipping Solutions Professional. However, it does require
that the files conform to the schema provided with the software.
The schema can be found in the c:\Program Data\InterMart\SSProfessional_9\DXM\schemas folder. The
ssdataDXMschema_09.xsd schema provides XML structure validation and validation of elements to
correspond to the database’s expected data types, and in some cases, the fields’ allowed values. You can also
see the list of available fields and other information in the Data Exchange Manager file structure on page 184.
If you look at the schema, you will see that the following tables are required: tbl_doc_header,
tbl_document_contacts, and tbl_item_details. The other tables are optional. The tables must be in the order that they appear in the schema, but the elements within the tables can be in any order. None of the elements
are required.
The docsets element must define the schema location and namespace as shown below.
XML Header Info
<?xml version="1.0" encoding="utf-8"?>
<docsets xmlns:xsi="http://www.w3.org/2001/XMLSchema-instance"
xmlns="urn:SsproNamespace"
xsi:schemaLocation="urn:SsproNamespace ssdataDXMschema_09.xsd">
<docset>

148
Your Document XML as defined by the schema.
<docset>
</docsets>
Once you have created your XML file from your accounting or ERP System, you can test the file using the XML File Validator by clicking the Validate button (see page 157). Follow the steps below to complete the
setup screen:
1. File Type—Since this is an XML project, click XML.
2. Processing Types—The DXM allows you to process one XML file with a consistent name or all
files in a folder. If you want to process one file at a time, choose File Based. If you want to process
all files in a folder, choose Folder Based.
3. Add Fields from Product Database— If you want to supplement the data you are importing from
your accounting or ERP system, check this box. Click Setup to designate the fields you wish to
supplement. See Supplement Data from the Product Database below for more information.
4. Package—If you want to zip up the DXM files to be run on a different computer, click Package
and identify the location where you wish to save the zip file. This should be done after the setup is
complete and fully tested.
5. XML File (file-based only)—Click the ellipses button and navigate to the location of your XML file.
6. Source Folder (folder-based only)—Click the ellipses button and navigate to the location of the
folder containing your XML files.
7. Location of Files After Processing—Click the ellipsis button to display a search window that will
allow you to navigate through your computer to identify where you would like your text files to be
moved after the DXM runs. When moved the processed files will be renamed with the file format
YYYYMMDD_HHMMSSXX<filename> where XX is either AM or PM.
8. Copy Processed Files to Folder—When you are first setting up a DXM project, you may need to
run the import of the delimited text files more than once to ensure the mapping and other
configurations are correct. To make this process easier, you should leave this box unchecked so the
files you are using to test the import stay in the designated folder. Once your testing is complete, and you are ready to move to the production phase, check this box so the processed files
automatically get moved to the folder identified in Step 7, listed above. For folder-based projects,
the box is always checked.
9. Logging in Debug Mode—Check this box if you are testing the import process and you want the
DXM to write a more detailed log entry for the file import. The more detailed log entry may make
it easier to diagnose any problems you encounter during the setup process.

149
Setting Up the DXM Using an ODBC Connection
Use an ODBC Connection
Shipping Solutions Data Exchange Manager (DXM) includes a 64-bit ODBC connection option, which
allows Shipping Solutions to directly communicate with your business application such as your ERP, accounting or order-entry system. Your application must be ODBC-compliant (Open Database
Connectivity) and you must first establish an ODBC connection with your business application.
You should consult with your IT department before proceeding with setting up the ODBC connection. In
general, the steps to setup the ODBC connection are:
1. On the computer running the Shipping Solutions client, open the ODBC Data Source
Administrator window.
a. On a Windows 8 or 10 machine just click the Start button in the lower-left corner of your
computer and start typing ODBC.
b. On older operating systems, open the Control Panel and double-click the option called
Data Sources (ODBC) or Setup up Data Sources (ODBC).
c. If you are given a choice between 32-bit and 64-bit version, choose the 64-bit version.
2. On the ODBC Data Source Administrator window click the System DNS tab.
3. Click Add and choose the correct driver for your data source. You may have to download the
correct driver from your ERP system vendor. Click Finish.
4. Give your data source a name (a DSN), a description and choose the SQL Server to connect to.
5. Use the ODBC data source wizard to complete the connection.
Once you have created the ODBC connection with your accounting or ERP system, go to the Admin tab,
Setup Data Exchange Manager for ODBC screen. Review the Welcome screen and click Next. Complete
the steps on each of the tabs outlined below to configure the setup with Shipping Solutions Professional.

150
Profile Tab
Create a new profile or edit an existing profile. If you choose Edit an existing profile, a grid will pop up
showing your existing profiles. You can delete existing profiles or select one to edit and click Next. If you
choose to Create a new profile, a box will pop up where you can enter the name of your new profile.
The Data Source Tab in the Shipping Solutions ODBC Setup Screen
Data Source Tab
On this tab you identify the source of your shipment information. The databases that you can connect to via
ODBC are listed in the box. Select the data source name and click Next. If your data source is not listed,
contact your IT professional and review the general instructions above for setting up an ODBC connection.

151
The Look Up Tab in the Shipping Solutions ODBC Setup Screen
Look Up Tab
On this screen you identify the field you want to look up in order to import the correct shipment information. For example, you may want to pull in shipment records via an invoice number or order number. All of the
tables and views in your data source are listed in the DSN Look Up Table drop-down list. Select the table
or view where the field is located. Once you have chosen the table, the possible fields will appear in the
DSN Look Up Field drop-down list. Select the correct field. Click Next.
Selecting Contact Fields in the ODBC Destination Tab

152
Destination Fields Tab
Now you need to identify which fields in Shipping Solutions you will be populating with information from
your data source. The fields available in Shipping Solutions are divided into six groups. Click each group
and check the boxes next to the fields you want to populate with information from your data source. You can
also select fields that you want to populate with a default value.
The Contacts group includes names and addresses for all the parties in your shipment from your exporter
information to the name and address of the ultimate consignee to the NAFTA producer plus many more. The
Header-Invoice group includes much of the information needed for your commercial or proforma invoice
and your AESDirect filing such as the commercial invoice date, commercial invoice number, and the
exporting carrier. The Product Info group includes all the information about your line items such as product description, unit price and weight. You must choose at least one field in each of these three groups
(Contacts, Header-Invoice, and Product Info.)
The last three groups are used less frequently than the first three because your ERP system may not include
fields that are specific to exporting. The NAFTA/Free Trade/Canada Customs/CARICOM group
includes fields that appear on those documents, such as NAFTA blanket dates, the Condition of Sale that
appears on the Canada Customs Invoice and the Presenting Bank shown on the CARICOM invoice. The
Ocean BL/IATA/IMO/Inland BL group includes fields specific to the ocean and air waybill and the
dangerous goods documents. Finally, the Shipper’s Letter of Instruction group includes fields for that
document, such as various fees.
There is a Check All box on each group’s screen. However, please note that you will need to map every
field that is checked and each group contains many fields, so there is probably no circumstance where you
would want to use the Check All box.
When you have finished selecting the fields, click Next.
The Mapping Tab in the Shipping Solutions ODBC Setup Screen
Mapping Tab
Now you need to identify which field in your data source maps to each field you checked on the Destination
Fields tab. The groups you used on the Destination Fields tab will appear in the drop-down list. Select a
group. The fields you checked on the Destination Fields tab will appear in the first column.

153
The second column can be used to enter a default value for this field. For example, you may want to enter a
default value for your company name and address. The default value will remain the same for every
shipment.
However, most fields will use the third and fourth column only. All the tables and views in your data source
will appear in the drop-down list of the DSN Table/View Name column. Select the correct table or view for the first field. Field names from the table or view you selected will appear in the DSN Field Name column.
Select the correct field that corresponds to the Shipping Solutions Field Name.
Map each group that appears in the drop-down list. Then click Next.
The Mapping Tab in the Shipping Solutions ODBC Setup Screen
Relationships Tab
This tab is more complicated than the other tabs and requires a thorough knowledge of your data source,
meaning your accounting, order-entry or ERP system.
This screen builds the relationships between the tables. A relationship is built between two matching fields
where one field is in each table. For example, the matching field might be the order number, invoice number
or another field that is not even part of the shipment data. You will need a relationship between each table in
the data source that will act as a common thread to locate the information about a specific shipment
throughout the various tables.
To add a relationship, click the Select Tables button. Each of the tables you used on the Mapping tab will
appear in the list. If you need to build a relationship with a table that you did not use on the Mapping tab,
click the All button to see all tables in your data source. Select two tables. One table will appear as the
Primary Table and the other table will appear as the Secondary Table.
If you want to switch the two tables you can use the Flip Tables button. Flipping the tables may be necessary if you need to build a bridge between two tables that includes a third table not used in the
mapping. The fields in each table will appear in the boxes below the table names. Highlight a field in each
box and click Add Relationship. The relationship will show up in the grid below. Click Select Tables again
to add another relationship. You can use a table in more than one relationship, but you must have at least one
relationship for each table. Continue building relationships until all tables have been used. Then click Next.

154
The Mapping Tab in the Shipping Solutions ODBC Setup Screen
Summary Tab
This tab shows a summary of your ODBC configuration. Click the Back button to edit any settings. Click
the Finish button to save your settings and close the Setup Wizard.
Creating a New DXM Project Window
Create Your DXM Project
Once you have setup your ODBC connection and setup the ODBC configuration, you must create a Data
Exchange Manager (DXM) project. Go to the Admin tab, Setup Data Exchange Manager screen. Click
Create to create a new project, Edit to edit an existing project or Copy to copy an existing project.
In the File Type box choose ODBC. In the Profile box type the name of the profile you just setup. You can
also use the Add Fields from Product Database check box to supplement the data from your accounting or
ERP system with data stored in the Shipping Solutions Product Database. Continue to the next section for
more information.

155
While you are testing the DXM project, check the Logging in Debug Mode box. This will provide more
detailed logging in case of errors. Save and Close your project.
Supplement Data from the Shipping Solutions Products Database
Many accounting and ERP systems that companies use are biased towards domestic orders and therefore
may not include all the product information that may be required on your export forms. For example, the
Schedule B or Harmonized Tariff System (HTS) code may not be stored with the rest of your product
information.
If that is the case, Shipping Solutions Professional software users will need to manually add the missing data
for each product on every export shipment imported from your accounting system. Alternately, you can
automate the process of supplementing the missing data in one of two ways:
1. You can store the missing data in a table on your server and then reference that table of additional
data in the script your company writes to create either the delimited text files or the XML file
required for importing your orders into Shipping Solutions Professional using the DXM.
2. You can turn on the feature in the DXM that pulls missing data from the Shipping Solutions
Professional’s Products Database.
If you choose the second option for adding the missing data, you can import the product data into the
Products Database. Refer to page 131 for instructions on importing data into the Shipping Solutions database.
In order for this tool to work and add the selected data fields to any orders you import from your accounting
system, the DXM utilizes the Product ID field for each line item imported. The products you reference
during the import process must include a Product ID, and that Product ID must be unique for each item.
Once you are sure you have data in the Shipping Solutions Professional Products Database, click the Add
Fields from Product Database check box, and then click on the Setup button in the upper-right corner of
the Setup Data Exchange Manager window. It will open the Select Fields to Update window.
Select Data to Add to an Export Order Imported through the DXM
From this window, check on the box next to the data fields you want to be added from the Products Database
to your orders after importing from your accounting system. Once you have selected one or more fields,
click on the Save button to close the window and return to the main Setup window.
If you are selecting Preference Criteria, Producer Code, or Country of Origin (FTA), be sure to also check
the matching key field. For example, in addition to choosing “Preference Criteria,” you also need to select
156
“Preference Criteria Key” or this information won’t correctly appear on the EZ Start screen or the
appropriate export forms.
Running the DXM
Once you have the Data Exchange Manager configured to be able to import your order information from
your accounting, order-entry or ERP system, you have three choices for running the DXM: (1) from within
Shipping Solutions, (2) from a script, and (3) as a Windows Service. For ODBC projects, you only have the
option to run the DXM from within Shipping Solutions.
Run From Shipping Solutions
A user can run the DXM at any time by going to the Shipping Solutions Tools tab and clicking on Run
Data Exchange Manager (Import Shipments)—(see page 129). From this window, select a Project from
the drop-down list. Once you select a project, the top window will indicate if there are any files that match
the parameters set up in this particular project and are ready to process or if anything is missing. The bottom
box will show you the project parameters. If you have selected a folder-based project, a Process All Files
check box will appear. Check this box to process all the files without stopping.
For ODBC projects, a Lookup ID box will appear. Enter the value for the shipment you want to import.
The value is defined on the Admin tab’s Setup Data Exchange Manager for ODBC screen.
To process, click the Run button on the toolbar. The bottom box will then display the file as it is being
processed and should end with “Shipment ID’s Inserted [x]” where “x” is the Shipment Number inserted
into your Shipping Solutions database. If there are errors, you can click the View Log button on the toolbar
to see all the processing messages.
Run Using a Script
Another way to run the DXM is to call the dxmRun.exe file from a batch file or a script. This allows you to
import orders from your accounting system without any user intervention. For example, you can call the
dxmRun.exe file every time you generate a single XML file or a header and detail delimited text file in your
accounting or ERP system so there is no lag between the time the files are created and they appear in
Shipping Solutions Professional as a new shipment record.
To run the DXM, run the dxmRun.exe executable file either from a script or at the DOS command prompt.
When running the program, you will need to specify certain parameters depending on what kind of project
you are running:
• Text File-Based Project: Project name, User Name
• XML File-Based Project: Project name, User Name
• Text Folder-Based Project: Project name, Full path of header file, full path of detail file, User
Name
• XML Folder-Based Project: Project name, Full path of XML file, User Name
The User Name parameter is used to specify what Shipping Solutions User is assigned to the imported
shipments. The user name parameter is optional and the Admin User Name will be used if not specified.
The parameter must be specified as UserName=user. Use double quotes if the user name contains spaces, for
example, “UserName=user one”.
For folder-based projects the full path to the file to be processed needs to be passed in as parameters. If the
path contains spaces, it must be enclosed in double quotes so it is seen as a single parameter.
As an example, if you do not move any files from their default locations and you are running a project called
Project1, the DOS command would be as follows:
• File-based project:
C:\> C:\Program Files\InterMart\SSProfessional_9\Applications\DXM\dxmrun\dxmRun.exe
Project1

157
• File-based project with user specified:
C:\> C:\Program Files\InterMart\SSProfessional_9\Applications\DXM\dxmrun\dxmRun.exe
Project1 UserName=user
• Folder-based text-file project: C:\> C:\Program Files\InterMart\SSProfessional_9\Applications\DXM\dxmrun\dxmRun.exe
Project2 c:/DXMFiles/header.txt c:/DXMFiles/detail.txt
• Folder-based XML project with user specified:
C:\> C:\Program Files\InterMart\SSProfessional_9\Applications\DXM\dxmrun\dxmRun.exe
Project3 C:/DXM_XML_Files/shipment_1987.xml UserName=myuser
This command will read the setup files, locate the data files, and insert the shipment records into your
Shipping Solutions Professional database. It will also move the data files to the processed file location and
write to the sspro_dxm_logfile.txt log file in your project directory.
You may also add a line to a script file where you specify the DXM to run after your input has been created in your accounting or ERP system.
Run with the DXM Windows Service
Another way to run the DXM is by installing a Windows Service. The service will run continuously on your
computer checking a specified folder at specified time intervals for any files that are ready for processing.
Only folder-based projects can be run using the Windows Service.
To setup the Windows Service, use Windows Explorer to navigate to the following folder on your computer:
C:\ProgramFiles(x86)\InterMart\SSProfessional_9\Applications\DXMRunService. Double click on the
setup.exe file, which will open the DXMRunService Setup Wizard. Click Next. On the Start Parameters
window, enter your Project Name. This must exactly match the project name you have setup on the Setup
Data Exchange Manager screen located on the Shipping Solutions Admin tab. Now enter the Time Interval
in Minutes and the User Name.
The User Name should match one of the User Accounts created on the Shipping Solutions Admin tab.
Shipping Solutions will use all the details associated with the Profile associated with that User Name such as
the appropriate logo and signatures to place on the export forms for any incoming shipments. If you are
using the single-user version of Shipping Solutions Professional, which does not allow you to set up
multiple Users, enter “Admin” in this field or leave it blank. Click Next until the installation completes.
Click Close.
The service is now running and will process any files in the specified folder. It will read the setup files,
locate the data files, and insert the shipment records into your Shipping Solutions Professional database.
Once the import is finished, the Service will move the data files to the processed file location you already
identified and write to the sspro_dxm_logfile.txt log file in your project directory.
To confirm that the Service is running on your computer, open the Control Panel and search for Services. It
is under Administrative Tools. Click View Local Services and look for the DXM Run Service (Shipping
Solutions).
If you want to change the parameters of the Service, return to the Setup program. Uninstall the Service and
then reinstall with the new parameters.
You can review the Service log files in the C:\ProgramFiles\InterMart\DXMRunService\Logs folder. Your folder may be called ProgramFiles(X86). The newest log file is DXMRunService.log. The older logs are
numbered .1, .2, etc. with .1 being the next newest file.

158
Moving Your Project Files—XML or Text
If you want to run the DXM either from a script or as a Service on another machine, you will need to
package up your DXM project and move it. On the Admin tab, Setup Data Exchange Manager screen,
choose the Project you wish to move and then click the Edit button on the toolbar. From the Setup Data
Exchange Manager window, click on the Package button. This will create a zip file of all the necessary
DXM files in the location you specify. Copy and paste the zip file to the new location and then extract the
files. The text or XML files identified in the project must have an equivalent path on the computer you are
moving it to.
If you want to modify your project, you do not need to go back to Shipping Solutions. You can simply open the
dxmmapping.exe file located in the C:\ProgramFiles(x86)\InterMart\SSProfessional_9\Applications\DXM folder that was included with the zip file.
Moving Your Project Files—ODBC
Moving an ODBC project from one computer to another has to be done a little differently than the Text or
XML projects. Copy the entire DXM folder from one machine to another. The folder location is C:\ProgramData\InterMart\SSProfessional_9\DXM. This will copy both the project folder and the
necessary .dat files. You will also have to setup an ODBC connection from the source system.
DXM Testing Tools
The Data Exchange Manager includes tools that will review and validate whether or not the files you are
generating from your accounting or ERP system are setup correctly to work with the DXM. We have
included sample pipe-delimited files as well as an XML file that can be used for testing. You’ll find those
sample files in the c:\ProgramData\InterMart\SSProfessional_9\DXM\TestData folder.
Validating XML Files
XML File Validator
To validate your XML file, open the Setup Data Exchange Manager screen on the Shipping Solutions Admin tab, click on the Project you are working on, and click the Edit button on the toolbar. Now click on
the Validate button on the toolbar. Now click the Scan File button. The Validator will run your file against
the schema and list any errors it encounters in processing the file.

159
The XML Validator tends to be a bit pickier than the DXM, so it would be good practice to try running the
DXM before reviewing the exceptions generated by the XML File Validator. If you have more than one file
you wish to validate, you can click on the ellipsis next to the XML File field to search for and choose
another file.
Validating Text Files
Delimited Text File Validator
The Text File Validator will check your comma-, tab- or pipe-delimited text files generated from your
accounting or ERP system to determine if there are any illegal characters or extra line feeds that will cause
problems during the process of inserting the data in the Shipping Solutions Professional database.
To validate your delimited text files, open the Setup Data Exchange Manager screen on the Shipping
Solutions Admin tab, click on the Project you are working on, and click the Edit button on the toolbar.
Now click on the Validate button on the toolbar. Now click the Scan File button. The Validator will run
your file against the schema and list any errors it encounters in processing the file.
If you have more than one file you wish to validate, you can click on the ellipsis next to the Text File field
to search for and choose another file.
There is also a Validate button on the Mapping screen. This will scan the text-delimited files after they have
been converted to XML.

160
Add Signatures & Logos from the Admin Tab
Signatures & Logos
Shipping Solutions allows you to print your export forms with your company logo and/or an electronic
version of a signature included on the document. Before you can configure Shipping Solutions to do so, you
must store electronic versions of the signatures and logos in this database. For the signature, you can also
include a Contact Title and Contact Name that will appear on certain export forms. If you don’t enter a
Contact Title or Name with your signature, they will be filled in from the Contacts-Exporter record.
Once you’ve added signatures and logos to the database, you can associate them with Profile Settings (see
page 161), so that they will automatically appear on the export documents of your choosing. In addition, you
will have the ability on many of the EZ Start screens to add a signature to a document from a drop-down
list, which is pulled from the signatures added here.
Please Note: The signatures that will appear on your export paperwork are scanned facsimiles of your
signature. They do not have the same legal standing as a real signature and should not be used as such.
Shipping Solutions provides this option for the convenience of our users. We strongly recommend that you
consult an attorney before deciding to use electronic versions of actual signatures.
To add a signature or logo, click the radio button for either Logos or Signatures. Click Add and navigate to
your file. Documents accommodate 200x50 pixels for logos and 180x25 pixels for signatures. The accepted
file formats are *.bmp,*. jpg and *.png. The file name is filled in the Title box, but you can change it and
add a description. If the Width and Height of your image exceed the pixels allowed, you will need to edit your image outside of Shipping Solutions Professional and then reload it here, or your image will appear
distorted in the Preview box and on the documents.
For instructions on how to improve the look of your signature, contact our office at (651) 905-1727.

161
Signatures, Contact Title, Contact Name, and logos appear on the documents as shown below:
Document Signature Name Title Logo
Air Waybill (regular & data only) YES NO NO NO
Australia FTA Certificate of Origin YES NO NO NO
CAFTA-DR FTA Certificate of Origin YES NO NO NO
CARICOM Invoice YES NO NO NO
Certificate of Origin (Generic) YES YES YES NO
Chile TPA Certificate of Origin YES NO NO NO
Columbia FTA Certificate of Origin YES NO NO NO
Commercial Invoice (all versions) YES NO YES Exporter Logo
Dock Receipt (with Product Summary or
Product Detail) NO NO NO
Freight
Forwarder Logo
Korea FTA Certificate of Origin YES NO NO NO
Inland Bill of Lading (with Product
Summary or Product Detail) YES NO NO NO
NAFTA Certificate of Origin (all languages) YES NO NO NO
Ocean Bill of Lading (with Product
Summary or Product Detail) NO NO NO
Freight
Forwarder Logo
Packing List YES NO NO Exporter Logo
Panama TPA Certificate of Origin YES YES YES NO
Peru TPA Certificate of Origin YES YES YES NO
Proforma Invoice (all versions) YES NO YES Exporter Logo
Shipper’s Letter of Instruction (in NCBFAA
and SED formats) YES YES YES NO
Shipper’s Letter of Instruction (with Product
Summary or Detail) YES NO YES Exporter Logo

162
Setting Up User Profiles on the Admin Tab
Profile Settings
Profiles allow you to set logos, signatures and more for each user account that you create in Shipping
Solutions. The Default Profile is already set-up. If you want all users to use the same profile you can simply
modify the data fields described below for the Default Profile. However, if you want to assign different
profiles to different user accounts, click the Add new profile button, assign a Profile Name, and modify the
following fields:
• Compliance Login (Not available in Shipping Solutions Classic)—This is the user name and
password that allows you to run the Export Compliance Module through the Shipping Solutions software (see page 47). You must have an active Annual Maintenance Program to use the Export
Compliance Module. To receive a user name and password submit a signed subscriber agreement,
which can be found on the Annual Maintenance Program website, and email it to
[email protected] or fax it to (651) 905-1827. You run the Export Compliance Module by
clicking on the Compliance button on the EZ Start screen. You can enter your user name and
password directly on that screen, but if you enter it here it will be saved and you won’t need to
reenter it again.
• ACE Login—Enter your user name and password for the ACE portal, so you won’t need to type it
every time you file through AESDirect. Since ACE requires you to change your password every 90
days, you will need to update it here after changing it.
• AES/EEI Email—This is the email address to which the AES server will send email confirmation of a successful AES filing along with the shipment’s ITN number. If you want the email sent to
multiple email addresses, you can enter them here separated by a comma.
• eCO Login—When you register for the electronic Certificate of Origin (eCO) service, the
American World Trade Chamber of Commerce (AWTCC) will send you an email with a link to
retrieve your portal User Name and Password. Enter that User Name. In addition, Shipping
Solutions will send you an email with your eCO API Key. Enter that key here. The password is not
used in the Shipping Solutions software. The password is used for accessing the AWTCC portal.
For more information on the eCO process, see page 76.

163
• Profile signature—Choose the signature you want to use with this profile from the drop-down list.
The signatures you added earlier using the Signatures & Logos screen will appear in the drop-
down list. The signature will appear on the documents as shown in the chart on the previous page.
• Company Logo—Choose a logo from the drop-down list that you entered earlier using the
Signatures & Logos screen. This is the logo that will appear on the commercial and proforma
invoices, the packing list and the shipper’s letter of instruction.
• Freight Forwarder Logo—Choose a logo from the drop-down list that you entered earlier using
the Signatures & Logos screen. This is the logo that will appear on the ocean bill of lading and
dock receipt.
For the profiles to be used, you must go to the User Accounts screen and assign each user account the
appropriate profile. Each time that user creates a new shipment on the EZ Start tab, the profile assigned to
that user will be assigned to that shipment.
You can create new profiles any time you have a change; for example, a new company logo. Creating a new
profile rather than changing an existing profile will keep older shipments intact with their original profiles. If
a profile is no longer needed you can check the Inactive Profile box. This is preferable to deleting the
profile as it will then remain in effect on any shipments that used the now inactive profile.
Any shipment created by a user account will be given the profile assigned to that user. You can also change
the profile assigned to an individual shipment by going to the EZ Start screen, finding the shipment, and
clicking on Change Shipment Options.

164
Set Up Access Rights for User Groups on the Admin Tab
User Groups (Professional Multi-User Version Only)
User Groups allow you to assign specific capabilities to different groups of users. The Admin group comes preset in Shipping Solutions with full access rights; you cannot change this group. If you want all users to
have full access to Shipping Solutions you do not need to create any additional groups.
If you want different user groups, however, click Add New. Enter a group name and check the boxes to
allow access to different parts of the software broken out into EZ Start Access Rights, which are primarily
the various functions available on the EZ Start Toolbar, and Tabs Access Rights, which allows access to
various screens that are part of each tab.
EZ Start Access Rights include:
• Create Shipments—This allows the user to create a new shipment on the EZ Start tab.
• Copy Shipment—This allows the user to copy a previous shipment record on the EZ Start tab.
• Submit AES—This gives the user access to the AES button at the top of the EZ Start tab. It
allows you to file your shipment information with the U.S. Census Bureau via AESDirect.
• Submit Compliance—This gives the user the ability to run compliance screenings from the EZ
Start tab if that user has registered for the Export Compliance Module and has a user name and
password. The Export Compliance Module includes Document Determination, Export License
Determination and Restricted Party Screening.
• Consolidate Shipments—This gives the user the ability to combine multiple shipment records in
Shipping Solutions into a single set of export forms that can be previewed, printed and emailed as
well as submitting the data from this consolidated shipment to AES and to run compliance
screenings for this shipment.
• Delete Shipment—This allows the user to delete a shipment from the EZ Start tab.
• Change Shipment Options—This allows the user to click on the Change Shipment Options
button on the EZ Start tab and change the Shipment Number, Profile or Search Tag.

165
Tabs Access Rights includes a Details button next to the name of each Shipping Solutions tab. When you
grant access to a specific tab by clicking on the check box for that tab you can further refine access rights by
clicking on the Details button and granting or denying access to each individual screen within that tab.
Those tabs include:
• EZ Start—This gives the user access to the various screens located in the EZ Start tab, which are
used to add, modify or delete data for each individual shipment record.
• Databases—This gives the user access to the Databases tab where they can add, change or delete
contact and product information.
• Utilities—This gives the user access to the Utilities tab where they can use the Conversion
Calculator, generate reports, print shipping labels, and generate XML data files for Canadian
Customs.
• Tools—This gives the user access to the Tools tab where they can run the Data Exchange
Manager, import and export contact and product databases, backup the database, delete blocks of
shipments, lock and unlock shipments, and customize the documents.
• Admin—This gives the user access to the Admin tab where they can set the SQL database
connection, setup the Data Exchange Manager, add signatures and logos, and create profiles, user
groups and user accounts.
Click Save. Repeat the process for as many user groups as you need. Then close the User Groups screen
and click on User Accounts. For each user account, choose the proper group from the Assign to Group
dropdown list.
Anyone who has been granted user rights to the Admin tab will be able to create new user groups or modify
existing user group settings at any time.

166
Setting Up User Accounts on the Admin Tab
User Accounts
Here is where you can assign users to groups and set a user’s default profile.
• If you have the single user version of Shipping Solutions, your User Name will be Admin and the
Assign to Group box will say Admin. These cannot be changed. You can, however, change your
Default Profile. Any profiles you created under Profile Settings will be listed in the drop-down
list. Changing your default profile here will change the profile used for any new shipments, but the
profile will not change for any shipments that have already been created.
• If you have the multi-user version of Shipping Solutions you can add User Accounts for each of your Shipping Solutions users. Click Add New and enter a User Name. You can then assign the
users to any group you have setup on the User Groups screen. If you created other profiles under
Profile Settings you can change the user’s profile here.

167
Global Settings
There are several software features that can be turned on and off on this Global Settings screen. If you turn
on a feature, it will be turned on for all users.
• Maximum # of PDFs to Combine—This option controls how many PDF documents you can
combine on the Preview/Print/Email Documents screen on both the EZ Start and Consolidation
Utility. The default is that five documents can be combined into one PDF. However, if you have enough system resources, you may be able to combine more than five documents. You can change
the maximum number of forms to be combined here. If you encounter an error when increasing the
maximum number of documents to combine, reduce the number until the error resolves.
• Calculate Packing List Weight—If you check this box, Shipping Solutions will pull the Gross and
Net Weight you entered for each line item on the EZ Start-Product Details screen and enter them
on the Packing List screen. As you load each container on the Packing List screen, the weight for
all the items loaded will be calculated and entered for each package. If the amount is not correct
due to rounding or some other issue, you can always modify the number on the Packing List
screen. It will not change back to the calculated amount unless you unpack and repack the items
again.
• Increment Invoice Number—If this box is checked, Shipping Solutions will automatically fill in an Invoice Number on the EZ Start-Invoices screen starting with the number you enter in this
box. The Invoice Number will be automatically incremented and assigned when you click New or
Copy on the EZ Start screen toolbar. It will also work when running the Data Exchange Manager
(DXM) unless you map a different value to the Invoice Number field.
• Compliance Settings—The Restricted Party Screening feature in the Export Compliance Module
screens the following contacts that have been entered on the EZ Start tab, Contacts screen:
Exporter, Ultimate Consignee, Bill To, Intermediate Consignee, and Freight Forwarder. If you
don’t want to screen a contact, you can uncheck the box here. (You should consult with your
company’s legal and/or compliance team to determine whether this is advisable.) The results will
indicate that the contact was not screened.
Registration Number
Shipping Solutions requires you to register using the number provided on your CD-ROM case. It is
preferable to register via the pop-up screen when you first open Shipping Solutions, but if you don’t have
internet access, you can register by phone here.

168
Technical Support
Contacting InterMart
If you have any questions about or problems with the Shipping Solutions software, InterMart provides
several options for assistance:
Read the User Guide
The most comprehensive instructions for using the Shipping Solutions software is always contained in the User
Guide. You will find the most current version of the User Guide online at www.shippingsolutions.com/user-guide.
Call Us
InterMart customer service representatives are available during normal business days from 8:00 a.m. until
6:00 p.m. Central Time by calling (651) 905-1727. Current Annual Maintenance Program (AMP)
subscribers are provided a toll-free number to call for support.
Email Us
You can send your questions about Shipping Solutions to [email protected]. We will reply to your
email questions by the end of the next business day.
Use the Help Desk
Any questions that you might have about Shipping Solutions may have already been submitted, answered and
documented on the Shipping Solutions Help Desk at www.shipsolutions.com/services/helpdesk/helplist.asp. The Help Desk allows you to search for issues by category (e.g. printing, export forms, databases, etc.),
software version number, or description.
Watch a Video
InterMart has a video library that explains the various features included within the Shipping Solutions
software, which is available at www.shippingsolutions.com/video-tutorials, or visit our YouTube channel:
Shipping Solutions.
Other Resources
For more information about exporting, export regulations, and export documentation, see page 210 for a list
of International Trade Resources. These organizations and individuals provide a range of services related to
exporting but cannot answer questions about the Shipping Solutions software.
Shipping Solutions Professional Customizations
InterMart often gets requests from Shipping Solutions users who want to customize the program to meet their company’s specific needs. InterMart can and will customize the software at a rate of $225 per hour. If
you would like to receive a written quote for a customized version of Shipping Solutions Professional,
contact InterMart toll-free at (651) 905-1727.

169
Appendix
Summary of Export Documents Shipping Solutions export document and compliance software puts dozens of export documents at your
fingertips. The following summary includes:
• A description of each document available on the EZ Start-Preview/Print/Email screen.
• Charts explaining the differences if there is more than one version of the document.
• What version includes each document (C for Classic, P for Professional, E for Enterprise).
• The EZ Start screens where the data is entered to complete each document.
• Whether a document is also available in the Consolidation Utility of Professional and Enterprise.
You’ll find a more complete description of the various export documents in the white paper: The Beginner’s
Guide to Export Documents. You can download it for free at www.shippingsolutions.com/whitepaper-
beginners-guide-to-export-forms.
Air Waybill
An air waybill serves as a contract between the exporter and the air carrier or its agent to transport
merchandise as specified by the shipper. It serves as a receipt for the cargo and a contract stating where to
deliver the goods, freight charges to be paid, and who the goods are to be consigned to.
To complete the document, the contact names and addresses are entered on the EZ Start-Contacts screen.
The ITN number or AES exemption statement is entered on the EZ Start-EEI screen. The line items and all
other fields come from the EZ Start-Air Waybill screen.
Document Title Versions What Prints Notes
Air Waybill C, P, E Full Document
Air Waybill (Data Only) C, P, E
Data only for use
with pre-printed
form.
Air Waybill – Master P, E Full Document Shows Freight Forwarder as shipper and
Intermediate Consignee as consignee.
Air Waybill – Master
(Data Only) P, E
Data only for use
with pre-printed
form.
Shows Freight Forwarder as shipper and
Intermediate Consignee as consignee.

170
Australia FTA Certificate of Origin (C, P, E)
The Australia Free Trade Agreement (FTA) Certificate of Origin is used for shipments between the United
States and Australia that qualify for preferential duties and taxes under the free trade agreement.
To complete the document, the contact names and addresses can be entered on the EZ Start-Contacts
screen. The line items are pulled from the EZ Start-Product Detail screen, and the rest of the fields are
entered on the EZ Start-NAFTA/Other FTA screen.
This document is also available in the Consolidation Utility of Professional and Enterprise.
Bank Draft (C, P, E)
A bank draft is a negotiable instrument containing an unconditional order to pay a sum of money from the
drawer to the drawee. It must be signed by the drawer. A bank draft can also include a remittance letter
containing complete instructions for payment.
All the fields on the two bank draft documents are entered on the EZ Start-Bank Draft screen.
Document Title Notes
Bank Draft Includes remittance letter with complete instructions on how documents are to be
handled and payment made.
Bank Draft – Letter of
Credit Only includes information about the drawer and drawee.
CAFTA-DR Certificate of Origin (C, P, E)
The CAFTA-DR Certificate of Origin is used for shipments between the United States and the Central
American countries of El Salvador, Guatemala, Honduras, Nicaragua and Costa Rica as well as the
Dominican Republic if the goods qualify for preferential duties and taxes under the free trade agreement.
To complete the document, the contact names and addresses can be entered on the EZ Start-Contacts
screen. The line items are pulled from the EZ Start-Product Detail screen, remarks are entered on the EZ
Start-Invoices screen, and the rest of the fields are entered on the EZ Start-NAFTA/Other FTA screen.
This document is also available in the Consolidation Utility of Professional and Enterprise.
Canada Customs Invoice (C, P, E)
Commercial shipments to Canada, regardless of mode of transport, which are valued at over $2,500
(Canadian funds), are not classified under HTUSA Chapter 9810 (Importations of religious, educational,
scientific and other institutions), and are subject to duties and sales taxes, should be accompanied by a
Canada Customs Invoice. The invoice must contain all the information currently required by Canada
Customs Regulations and can be prepared either by the exporter or importer or their agents.
To complete the document, all the contacts names and addresses can be entered on the EZ Start-Contacts
screen. The line item information is entered on the EZ Start-Product Details screen. Transportation-related
information is entered on the EZ Start-Carriers and Ports screen, the PO number and any special
instructions are entered on the EZ Start-Invoices screen, and the rest of the information pulls from the EZ
Start-Canada Customs Invoice screen.
This document is also available in the Consolidation Utility of Professional and Enterprise.

171
CARICOM Invoice (C, P, E)
The CARICOM Invoice is used when exporting goods from the U.S. to one of the 15 Caribbean countries
that belong to the Caribbean Community & Common Market trade agreement. The CARICOM members
are: Antigua & Barbuda, Bahamas, Barbados, Belize, Dominica, Grenada, Guyana, Haiti, Jamaica,
Montserrat, Saint Lucia, St Kitts & Nevis, St Vincent & the Grenadines, Suriname, and Trinidad & Tobago.
To complete the document, all the contact names and addresses can be entered on the EZ Start-Contacts
screen. The line item information is entered on the EZ Start-Product Details screen, and transportation-
related information is entered on the EZ Start-Carriers and Ports screen. Invoice information and fees are
entered on the EZ Start-Invoices screen, and the rest of the information pulls from the EZ Start-Caricom
Invoice screen.
Certificate of Origin (Generic) (C, P, E)
A generic certificate of origin is used to certify to the importer where the goods were manufactured. Unlike
the NAFTA Certificate of Origin, which only pertains to the U.S., Canada and Mexico, or the CAFTA
Certificate of Origin, which only pertains to the U.S. and a group of Central American nations, the generic
certificate of origin can be used for any country you are exporting to. Virtually every country in the world
considers the origin of imported goods when determining what duty to assess.
To complete the document, enter the exporter and importer on the EZ Start-Contacts screen. The line items
come from the EZ Start-Product Details screen, any special instructions can be entered on the EZ Start-
Invoices screen, and the rest of the information is entered on the EZ Start-Generic Certificate of Origin
screen.
This document is also available in the Consolidation Utility of Professional and Enterprise.
Chile FTA Certificate of Origin (C, P, E)
The Chile FTA Certificate of Origin is used for shipments between the United States and Chile if the goods
qualify for preferential duties and taxes under the free trade agreement.
To complete the document, the contact names and addresses can be entered on the EZ Start-Contacts screen. The line items are pulled from the EZ Start-Product Detail screen, and the rest of the fields are
entered on the EZ Start-NAFTA/Other FTA screen.
This document is also available in the Consolidation Utility of Professional and Enterprise.
Colombia TPA Certificate of Origin (C, P, E)
The Colombia Trade Promotion Agreement (TPA) Certificate of Origin is used for shipments between the
United States and Colombia if the goods qualify for preferential duties and taxes under the free trade
agreement.
To complete the document, the contact names and addresses can be entered on the EZ Start-Contacts
screen. The line items are pulled from the EZ Start-Product Detail screen, remarks are entered on the EZ
Start-Invoices screen, and the rest of the fields are entered on the EZ Start-NAFTA/Other FTA screen.
This document is also available in the Consolidation Utility of Professional and Enterprise.
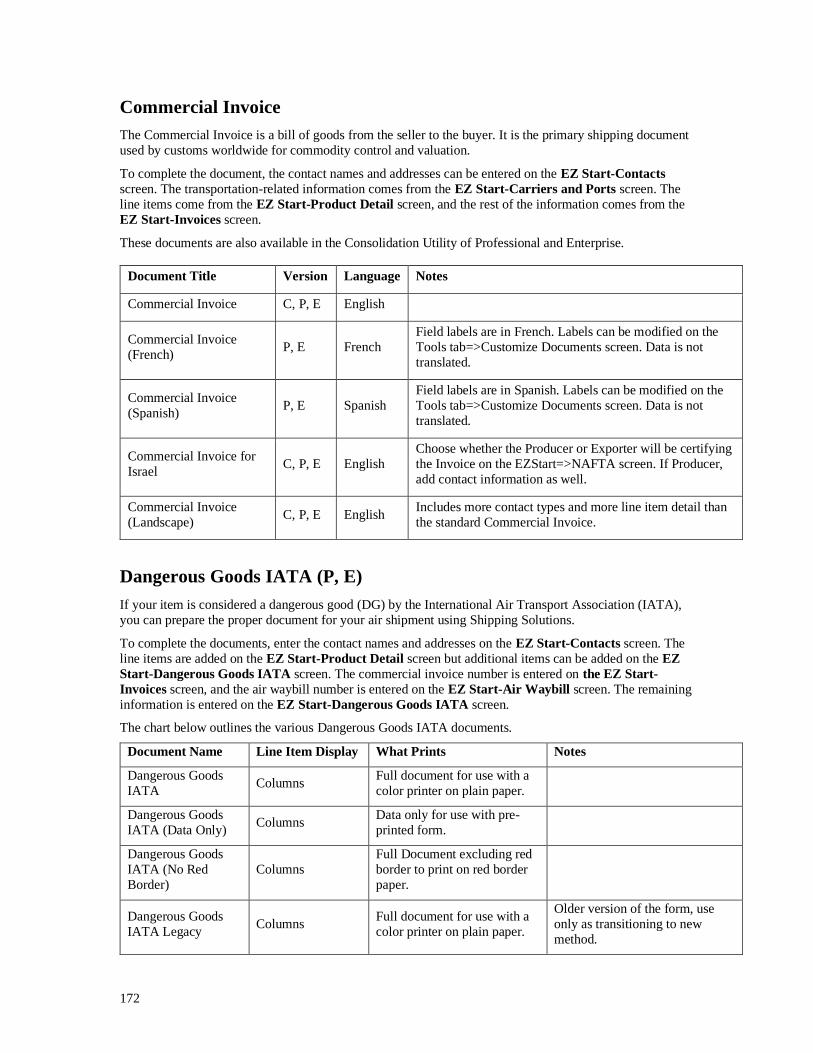
172
Commercial Invoice
The Commercial Invoice is a bill of goods from the seller to the buyer. It is the primary shipping document
used by customs worldwide for commodity control and valuation.
To complete the document, the contact names and addresses can be entered on the EZ Start-Contacts
screen. The transportation-related information comes from the EZ Start-Carriers and Ports screen. The
line items come from the EZ Start-Product Detail screen, and the rest of the information comes from the
EZ Start-Invoices screen.
These documents are also available in the Consolidation Utility of Professional and Enterprise.
Document Title Version Language Notes
Commercial Invoice C, P, E English
Commercial Invoice
(French) P, E French
Field labels are in French. Labels can be modified on the
Tools tab=>Customize Documents screen. Data is not
translated.
Commercial Invoice
(Spanish) P, E Spanish
Field labels are in Spanish. Labels can be modified on the
Tools tab=>Customize Documents screen. Data is not
translated.
Commercial Invoice for
Israel C, P, E English
Choose whether the Producer or Exporter will be certifying
the Invoice on the EZStart=>NAFTA screen. If Producer,
add contact information as well.
Commercial Invoice
(Landscape) C, P, E English
Includes more contact types and more line item detail than
the standard Commercial Invoice.
Dangerous Goods IATA (P, E)
If your item is considered a dangerous good (DG) by the International Air Transport Association (IATA),
you can prepare the proper document for your air shipment using Shipping Solutions.
To complete the documents, enter the contact names and addresses on the EZ Start-Contacts screen. The
line items are added on the EZ Start-Product Detail screen but additional items can be added on the EZ
Start-Dangerous Goods IATA screen. The commercial invoice number is entered on the EZ Start-
Invoices screen, and the air waybill number is entered on the EZ Start-Air Waybill screen. The remaining
information is entered on the EZ Start-Dangerous Goods IATA screen.
The chart below outlines the various Dangerous Goods IATA documents.
Document Name Line Item Display What Prints Notes
Dangerous Goods
IATA Columns
Full document for use with a
color printer on plain paper.
Dangerous Goods
IATA (Data Only) Columns
Data only for use with pre-
printed form.
Dangerous Goods
IATA (No Red
Border)
Columns
Full Document excluding red
border to print on red border
paper.
Dangerous Goods
IATA Legacy Columns
Full document for use with a
color printer on plain paper.
Older version of the form, use
only as transitioning to new
method.

173
Dangerous Goods
IATA Legacy (Data
Only)
Columns Data only for use with pre-
printed form.
Older version of the form, use
only as transitioning to new
method.
Dangerous Goods
IATA Legacy (No
Red Border)
Columns
Full document excluding red
border to print on red border
paper
Older version of the form, use
only as transitioning to new
method.
Dangerous Goods
IATA No Columns
No columns, data
divided by double-
slashes
Full document for use with a
color printer on plain paper.
Dangerous Goods
IATA No Columns
(Data Only)
No columns, data
divided by double-
slashes
Data only for use with pre-
printed form.
Dangerous Goods
IATA No Columns
(No Red Border)
No columns, data
divided by double-
slashes
Full document excluding red
border to print on red border
paper.
Dangerous Goods IMO (P, E)
If your item is considered a dangerous good (DG) by the International Maritime Organization (IMO) you
can prepare the proper document for your vessel or ground shipments using Shipping Solutions.
To complete the document, enter the contact names and addresses on the EZ Start-Contacts screen. The
line items are added on the EZ Start-Product Detail screen but additional items can be added on the EZ
Start-Dangerous Goods IMO screen. The remaining information is entered on the EZ Start-Dangerous
Goods IMO screen.
The chart below explains the various Dangerous Goods IMO documents.
Document Name Line Item Display What Prints Notes
Dangerous Goods
IMO Columns
Full document for use with a
color printer on plain paper.
Dangerous Goods
IMO (Data Only) Columns
Data only for use with pre-
printed form.
Dangerous Goods
IMO Legacy Columns
Full document for use with a
color printer on plain paper.
Older version of the form, use
only as transitioning to new
method.
Dangerous Goods
IMO Legacy (Data
Only)
Columns Data only for use with pre-
printed form.
Older version of the form, use
only as transitioning to new
method.
Dock Receipt (C, P, E)
The dock receipt acts as proof of delivery of the cargo to the carrier in good condition when an inland carrier
is used to move the goods to a port for export.
To complete the document, enter the contact information on the EZ Start-Contacts screen, any special
instructions on the EZ Start-Invoices screen, and the transportation-related information on the EZ Start-
Carriers and Ports screen. The source of the line items depends on which document you choose (see chart
below). The rest of the information is entered on the EZ Start-Ocean Bill of Lading screen.

174
Document Name Line Item Source Notes
Dock Receipt (with Product
Detail)
EZ Start-Product Detail
screen Also available in the Consolidation Utility (P, E only).
Dock Receipt (with Product
Summary)
EZ Start-Product
Summary screen
Inland Bill of Lading (C, P, E)
An inland bill of lading is a contract of carriage between the shipper and carrier that it is used within the
United States to move the goods to the port for export.
To complete the document, enter the contact information on the EZ Start-Contacts screen. The source of
the line items depends on which document you choose (see chart below). The rest of the information is
entered on the EZ Start-Inland Bill of Lading screen.
Document Name Line Item Source Notes
Inland Bill of Lading (with Product
Detail)
EZ Start-Product Detail
screen
Also available in the Consolidation Utility (P, E
only).
Inland Bill of Lading (with Product
Summary)
EZ Start-Product
Summary screen
Korea FTA Certificate of Origin (C, P, E)
The Korea Certificate of Origin is used for shipments between the United States and Korea if the goods
qualify for preferential duties and taxes under the free trade agreement.
To complete the document, the contact names and addresses can be entered on the EZ Start-Contacts
screen. The line items are pulled from the EZ Start-Product Detail screen, remarks are entered on the EZ
Start-Invoices screen, and the rest of the fields are entered on the EZ Start-NAFTA/Other FTA screen.
This document is also available in the Consolidation Utility of Professional and Enterprise.
Non-Dangerous Goods (P, E)
If an item could be suspected of being a dangerous good but actually does not meet the criteria of a dangerous good as defined by IATA or IMO, you may want to include a Non-Dangerous Good document to
relieve any suspicion.
To complete the document, the contact names and addresses can be entered on the EZ Start-Contacts
screen. Enter the air waybill number (if applicable) on the EZ Start-Air Waybill screen, and enter the order
number on the EZ Start-Invoices screen. All other fields are entered on the EZ Start-Non-Dangerous
Goods screen.
Document Title Line Item Display What Prints
Non-Dangerous Goods No columns, free-form
entry Full Document
Non-Dangerous Goods
(Data Only)
No columns, free-form
entry Data only for use with pre-printed form.
Non-Dangerous Goods
(No Green Border)
No columns, free-form
entry
Full document excluding green border to print on green
border paper.

175
Ocean Bill of Lading
An ocean bill of lading serves as a contract between the exporter and the ocean carrier or its agent to
transport merchandise as specified by the shipper. It serves as a receipt for the cargo and a contract stating
where to deliver the goods, freight charges to be paid, and who the goods are to be consigned to.
To complete the document, enter the contact information on the EZ Start-Contacts screen, any special
instructions are entered on the EZ Start-Invoices screen, and the transportation-related information on the
EZ Start-Carriers and Ports screen. The shipment reference number is pulled from the EZ Start-EEI
screen. The source of the line items depends on which document you choose (see chart below). The rest of
the information is entered on the EZ Start-Ocean Bill of Lading screen.
The chart below explains the various ocean bills of lading documents.
Document Name Version Line Item Source Notes
Ocean Bill of Lading – Master (with
Product Detail) P, E
EZ Start-Product
Detail
Shows Freight Forwarder as exporter and Intermediate Consignee as
consignee. Also available in the
Consolidation Utility.
Ocean Bill of Lading – Master (with
Product Summary) P, E
EZ Start-Product
Summary
Shows Freight Forwarder as exporter
and Intermediate Consignee as
consignee.
Ocean Bill of Lading – Rated (with
Product Detail) C, P, E
EZ Start-Product
Detail
Shows Freight Forwarder as forwarding
agent. Also available in the
Consolidation Utility (P, E only).
Ocean Bill of Lading – Rated (with
Product Summary) C, P, E
EZ Start-Product
Summary
Shows Freight Forwarder as forwarding
agent.
Ocean Bill of Lading – Unrated (with
Product Detail) P, E
EZ Start-Product
Detail
Does not show freight charges. Shows
Freight Forwarder as forwarding agent.
Also available in the Consolidation
Utility.
Ocean Bill of Lading – Unrated (with
Product Summary) P, E
EZ Start-Product
Summary
Does not show freight charges. Shows
Freight Forwarder as forwarding agent.
Packing List (C, P, E)
The packing list confirms the contents of the shipment by container and indicates weights, measurements
and piece count.
To complete the document, enter the contact information on the EZ Start-Contacts screen. The line items
are pulled from the EZ Start-Product Detail screen, and the invoice information (such as invoice date and
number, order number, special instructions, etc.) is pulled from the EZ Start-Invoices screen. Enter the
exporting carrier on the EZ Start-Carriers and Ports screen. The rest of the information is entered on the
EZ Start-Packing List screen.
On the EZ Start-Packing List screen, be sure to add as many packages as you need and to load them with
the correct line items. See the User Guide for instructions on creating the packing list.
This document is also available in the Consolidation Utility of Professional and Enterprise.

176
Panama TPA Certificate of Origin (C, P, E)
The Panama Certificate of Origin is used for shipments between the United States and Panama if the goods
qualify for preferential duties and taxes under the trade promotion agreement.
To complete the document, the contact names and addresses can be entered on the EZ Start-Contacts
screen. The line items are pulled from the EZ Start-Product Detail screen, and the rest of the fields are
entered on the EZ Start-NAFTA/Other FTA screen. You also have the option to display the Commercial
Invoices Special Instructions by checking the box on the Tools-Customize Documents screen for the
Panama TPA Certificate of Origin.
Peru TPA Certificate of Origin (C, P, E)
The Peru Certificate of Origin is used for shipments between the United States and Peru if the goods qualify
for preferential duties and taxes under the trade promotion agreement.
To complete the document, the contact names and addresses can be entered on the EZ Start-Contacts
screen. The line items are pulled from the EZ Start-Product Detail screen, and the rest of the fields are
entered on the EZ Start-NAFTA/Other FTA screen. You also have the option to display the Commercial
Invoices Special Instructions by checking the box on the Tools-Customize Documents screen for the Peru
TPA Certificate of Origin.
Proforma Invoice
The Proforma Invoice is a quotation outlining the possible sale. If the order results, the commercial invoice
will closely resemble the proforma invoice.
To complete the document, the contact names and addresses can be entered on the EZ Start-Contacts
screen. The transportation-related information comes from the EZ Start-Carriers and Ports screen. The
line items come from the EZ Start-Product Detail screen, and the rest of the information comes from the
EZ Start-Invoices screen.
These documents are also available in the Consolidation Utility of Professional and Enterprise.
Document Title Version Language Notes
Proforma Invoice C, P, E English
Proforma Invoice (French) P, E French
Field labels are in French. Labels can be
modified on the Tools tab, Customize
Documents screen. Data is not translated.
Proforma Invoice (Spanish) P, E Spanish
Field labels are in Spanish. Labels can be
modified on the Tools tab, Customize
Documents screen. Data is not translated.
Security Endorsement (C, P, E)
If you are not a known shipper with some airlines, they may request a Federal Aviation Administration
(FAA) Security Endorsement that requires two forms of ID. To complete the document, enter your
information on the EZ Start- Security Endorsement screen.

177
Shipment Log (P, E)
You can use the shipment log to make sure you are following your Export Management Compliance
Program (EMCP). Enter the steps of your EMCP on the Databases-Shipment Log Items screen. Then with
each shipment, log the date each step was completed along with the initials of the person doing the work.
When you print the document, it will show the completed steps along with the exporter and ultimate
consignee from the EZ Start-Contacts screen.
Shipper’s Letter of Instruction (C, P, E)
Shipping Solutions includes two types of Shipper’s Letters of Instruction (SLI). One type is used as a cover
letter to convey specific instructions from the exporter to the agent, usually an international freight
forwarder. The second type of SLI is used to provide to your freight forwarder all the information needed to
file your Electronic Export Information (EEI) with AESDirect.
To complete the cover letter version of the document, enter the contact names and addresses on the EZ
Start-Contacts screen. The source of the line items depends on which document you choose (see chart
below). The rest of the information comes from the EZ Start-Shipper’s Letter of Instruction screen.
To complete the AES filing version of the document, enter the contact names and addresses on the EZ
Start-Contacts screen. The transportation-related information comes from the EZ Start-Carriers and
Ports screen, and the line items come from the EZ Start-Product Detail screen. Enter the date and any special instructions on the EZ Start-Shipper’s Letter of Instruction screen. The USPPI Reference Number
will be pulled from either the EZ Start-Air Waybill screen or the EZ Start-Ocean Bill of Lading screen
depending on your mode of transport. The rest of the fields are completed on the EZ Start-EEI screen.
The chart below shows the four SLIs available in Shipping Solutions.
Document Title Type Line Item Source Notes
Shipper’s Letter of
Instruction (in
NCBFAA format)
AES Filing
EZ Start-Product
Detail with line
items combined by
Schedule B and D/F
Origin.
Recommended by the National Customs
Brokers & Forwarders Association. Also
available in the Consolidation Utility (P, E
only).
Shipper’s Letter of
Instruction (in SED
format)
AES Filing
EZ Start-Product
Detail with line
items combined by
Schedule B and D/F
Origin.
Based on the old Shipper’s Export Declaration,
this document is not as complete as the
NCBFAA format. Also available in the
Consolidation Utility (P, E only).
Shipper’s Letter of
Instruction (with
Product Detail)
Cover Letter EZ Start-Product
Detail
Also available in the Consolidation Utility (P,
E only).
Shipper’s Letter of
Instruction (with
Product Summary)
Cover Letter EZ Start-Product
Summary
USMCA Certification of Origin
The USMCA Certification of Origin is used for shipments between the United States and either Canada or
Mexico if the goods qualify for preferential duties and taxes under the free trade agreement.

178
To complete the document, the contact names and addresses can be entered on the EZ Start-Contacts
screen. The line items are pulled from the EZ Start-Product Detail screen, and the rest of the fields are
entered on the EZ Start-Free Trade Agreements screen.
These documents are also available in the Consolidation Utility of Professional and Enterprise.
Document Title Version Language Notes
USMCA C, P, E English
Most U.S. exporters will use this form. Labels
can be modified on the Tools tab, Customize
Documents screen.
USMCA- Canada (English) C, P, E English Labels can be modified on the Tools tab,
Customize Documents screen.
USMCA-Canada (French) C, P, E French
Field labels are in French. Labels can be
modified on the Tools tab, Customize
Documents screen. Data is not translated.
USMCA-Mexico C, P, E Spanish
Field labels are in Spanish. Labels can be
modified on the Tools tab, Customize
Documents screen. Data is not translated.
Incoterms® 2020 Maintained by the International Chamber of Commerce (ICC), this codification of terms is used in foreign
trade contracts to define which parties incur the costs and at what specific point the costs are incurred.
Terms for any mode of transportation:
• EXW—Ex-Works, named place.
• FCA—Free Carrier At, named place.
• CPT—Carriage Paid To, named place of destination.
• CIP—Carriage and Insurance Paid To, named place of destination.
• DAP—Delivered at Place, named place of destination.
• DPU—Delivered at Place Unloaded, named place of destination.
• DDP—Delivery Duty Paid, named place of destination.
Terms for sea and inland waterway transport:
• FAS—Free Alongside Ship, named ocean port of shipment.
• FOB—Free on Board vessel, named ocean port of shipment.
• CFR—Cost and Freight, named ocean port of destination.
• CIF—Cost, Insurance and Freight, named ocean port of destination.
You’ll find an Incoterms 2020 chart of responsibility at www.shippingsolutions.com/incoterms-chart-of-
responsibilities.

179
Export Information Codes
When filing your Electronic Export Information (EEI) with AES, you must select the proper export code.
The most common code is “OS—All other exports.” Here is a list and description of all the export codes as
they appear in the Foreign Trade Regulations (15 CFR 30):
• TP—Temporary exports of domestic merchandise
• IP—Shipments of merchandise imported under a Temporary Import Bond for further
manufacturing or processing
• IR—Shipments of merchandise imported under a Temporary Import Bond for repair
• CH—Shipments of goods donated for charity
• FS—Foreign Military Sales
• ZD—North American Free Trade Agreements (NAFTA) duty deferral shipments
• OS—All other exports
• HV—Shipments of personally owned vehicles
• HH—Household and personal effects
• TE—Temporary exports to be returned to the United States
• TL— Merchandise leased for less than a year
• IS— Shipments of merchandise imported under a Temporary Import Bond for return in the same
condition
• CR—Shipments moving under a carnet
• GP— U.S. Government shipments
• MS—Shipments consigned to the U.S. Armed Forces
• GS—Shipments to U.S. Government agencies for their use
• UG—Gift parcels under Bureau of Industry and Security License Exception GFT
• DD—Other exemptions:
o Currency
o Airline tickets o Bank notes
o Internal revenue stamps
o State liquor stamps
o Advertising literature
o Shipments of temporary imports by foreign entities for their use
• IW—International water shipments
• CI—Impelled shipments of goods donated for relief or charity
• FI—Impelled Foreign Military Sales Program
• OI—All other exports (impelled) (For Manifest Use Only by AES Carriers)

180
Export License Types and Codes
Certain products require an export license before they can be exported to certain countries. Here is a list of
license types organized by agency as they appear in the Foreign Trade Regulations (15 CFR 30):
Licensing Agency License Type License Description
License No. / Exemption
Department of Commerce, Bureau
of Industry & Security
C30 Licenses Issued by BIS Authorizing an Export, Re-export, or Other Regulated Activity (License value required)
License No.
C33 No License Required (NLR), Part 758 (All others, including Anti-Terrorism controls only)
NLR
C35 Limited Value Shipments, Part 740.3 LVS
C36 Shipments to B Countries, Part 740.4 GBS
C37 Civil End Users, Part 740.5 CIV
C38 Restrict Technology and Software, Part 740.6 TSR
C40 Temporary Imports, Exports, And Re-Exports, Part 740.9
TMP
C41 Servicing and Replacement of Parts and Equipment, Part 740.10
RPL
C42 Government and International Organizations, Part 740.11
GOV
C43 Gift Parcels and Humanitarian Donations, Part 740.12
GFT
C44 Technology and Software - Unrestricted Part 740.13
TSU
C45 Baggage, Part 740.14 BAG
C46 Aircraft and Vessels, Part 740.15 AVS
C50 Encryption Commodities and Software, Part 740.17
ENC
C51 License Exception Agricultural Commodities, Part 740.18
License No.
C53 Computers, Part 740.7 APP
C54 Short Supply Western Red Cedar, Part 754.4 SS-WRC
C57 Authorization for Validated End-User VEU
C58 Consumer Communication Devices CCD
C59 Strategic Trade Authorization STA
C60 Exports that fall under “600 series” ECCNs with a paragraph “.y.”
DY6
C62 Support for the Cuban People SCP
Nuclear Regulatory Commission
N01 Nuclear Regulatory Commission (NRC) Form 250/250A
License No.
N02 NRC General Export License CFR Citation
Number

181
Department of State, Directorate of Defense Trade Controls (DDTC)
SAG Agreements N/A
SAU Australia ITAR Exemptions Community Member No.
SCA Canadian ITAR Exemptions N/A
SGB United Kingdom ITAR Exemptions Community Member No.
S00 License Exemption Citation N/A
S05 DSP5, Permanent export of unclassified defense articles and services (License value required)
License No.
S61 DSP 61, Temporary import of unclassified articles (License value required)
License No.
S73 DSP73, Temporary export of unclassified articles (License value required)
License No.
S85 DSP85, Temporary or permanent import or export of classified articles (License value required)
License No.
S94 DSP 94, Foreign Military Sales (License value required)
Case ID
Department of Treasury, Office of
Foreign Assets Control (OFAC)
T10 OFAC Specific License Case ID
T11 OFAC General Export License
CFR Citation or Federal Register
Citation or General License
Number
T12 Kimberley Process Certificate Number (License value required)
KPC No.
Other License Types
OPA Other Partnership Agency License License No. or
OPA
Department of Energy, National Nuclear Security Administration
E01 Atomic Energy Act Authorization/Licenses AEA
Voluntary Self Disclosures
VDC Commerce Department Voluntary Self-Disclosure
N/A
VDS State Department Voluntary Disclosure N/A
VDO Other Partner Government Agency Voluntary Disclosure
N/A

182
Database File Structure Page 131 of this User Guide explains how you can import your list of contacts and products into the various
Shipping Solutions databases. The following charts include more specific details about the table structure—
including field names, types and size—for each of the databases.
For a definition of the type of information that should appear in each field, reference the specific information
about each of these databases located near the beginning of this User Guide.
Contacts Databases
This table structure applies to all contact databases including the Exporters, Ultimate Consignee,
Intermediate Consignee, Freight Forwarder, Bill To, and Miscellaneous databases.
Shipping Solutions Fields Field Length Column Names
Format
Contact Tax ID Number 50 contact_id_num
Contact Tax ID Type 50 contact_id_type E for EIN, T for Foreign, D for D-U-N-S
Contact Company 50 contact_name
Contact Address Line 1 50 contact_add_1
Contact Address Line 2 50 contact_add_2
Contact City 50 contact_city
Contact State 25 contact_state 2 digit state code
Contact Country 2 contact_country 2 digit country code
Contact Postal Code 50 contact_postal_code
Contact First Name 50 contact_name_first
Contact Last Name 50 contact_name_last
Contact Title 50 contact_title
Contact Phone 30 contact_phone_num
Contact Fax 30 contact_fax_num
Contact Email 50 contact_email
Contact Account No. 50 contact_acct_num
Ultimate Consignee Type (only for ultimate consignees)
1 contact_user2
D for Direct Consumer; G for Government Entity; O for Other/Unknown; R for Reseller
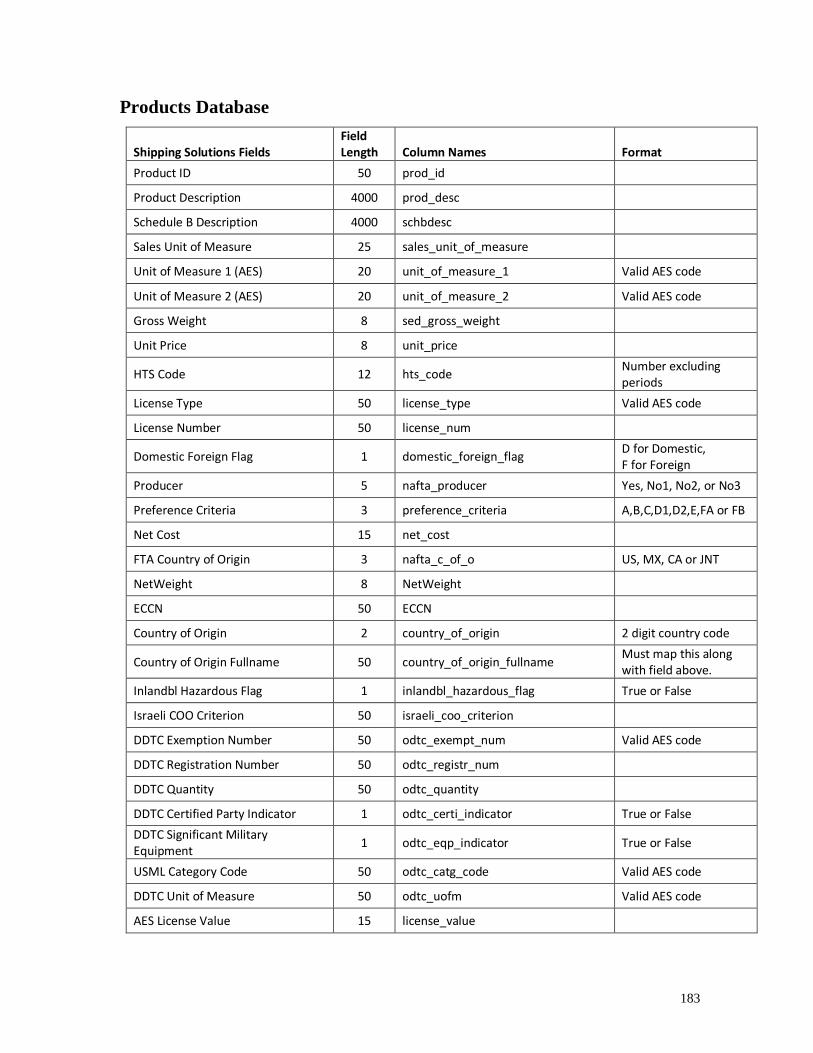
183
Products Database
Shipping Solutions Fields Field Length Column Names
Format
Product ID 50 prod_id
Product Description 4000 prod_desc
Schedule B Description 4000 schbdesc
Sales Unit of Measure 25 sales_unit_of_measure
Unit of Measure 1 (AES) 20 unit_of_measure_1 Valid AES code
Unit of Measure 2 (AES) 20 unit_of_measure_2 Valid AES code
Gross Weight 8 sed_gross_weight
Unit Price 8 unit_price
HTS Code 12 hts_code Number excluding periods
License Type 50 license_type Valid AES code
License Number 50 license_num
Domestic Foreign Flag 1 domestic_foreign_flag D for Domestic, F for Foreign
Producer 5 nafta_producer Yes, No1, No2, or No3
Preference Criteria 3 preference_criteria A,B,C,D1,D2,E,FA or FB
Net Cost 15 net_cost
FTA Country of Origin 3 nafta_c_of_o US, MX, CA or JNT
NetWeight 8 NetWeight
ECCN 50 ECCN
Country of Origin 2 country_of_origin 2 digit country code
Country of Origin Fullname 50 country_of_origin_fullname Must map this along with field above.
Inlandbl Hazardous Flag 1 inlandbl_hazardous_flag True or False
Israeli COO Criterion 50 israeli_coo_criterion
DDTC Exemption Number 50 odtc_exempt_num Valid AES code
DDTC Registration Number 50 odtc_registr_num
DDTC Quantity 50 odtc_quantity
DDTC Certified Party Indicator 1 odtc_certi_indicator True or False
DDTC Significant Military Equipment
1 odtc_eqp_indicator True or False
USML Category Code 50 odtc_catg_code Valid AES code
DDTC Unit of Measure 50 odtc_uofm Valid AES code
AES License Value 15 license_value

184
IATA UN Number 4 iata_un_number
IATA Proper Shipping Name 250 iata_psn
IATA Classification 50 iata_classification
IATA Packing Group 50 iata_packing_group
IATA Type of Packing 250 iata_qty_type_pkg
IATA Technical Name 250 iata_technical
IMO UN Number 4 imo_un_number
IMO Proper Shipping Name 250 imo_psn
IMO Classification 50 imo_classification
IMO Packing Group 50 imo_packing_group
IMO Kind of Packages 250 imo_qty_type_pkg
IMO Technical Name 250 imo_technical
IMO Additional Description 4000 imo_additional_desc
IMO Gross Weight/Volume 15 imo_gross_wt_vol
IMO Net Weight/Volume 15 imo_net_wt_vol
IMO Cubic Meters 15 imo_cubic_m

185
Data Exchange Manager File Structure
Instructions on page 140 of this User Guide explain how to set up Shipping Solutions Professional’s Data
Exchange Manager so you can link Shipping Solutions with your accounting, order entry or ERP system. As
part of that process, you must map the data fields from your accounting, ERP or order-entry system to the
fields in Shipping Solutions Professional.
Below is a detailed file layout of the Shipping Solutions fields available for mapping. The columns are
defined as follows:
1. The Text File column defines whether the field is in the header or detail text file.
2. The Mapping Table column defines in which mapping table the field is located.
3. The Shipping Solutions Professional Field column is the user friendly name of the field.
4. The System Field Name column is the system field name. You do not need to use this name if you
use the Setup Data Exchange Manager screen.
5. The Size column shows the length of the field.
6. The EZ Start Screen column indicates on which EZ Start screen the field appears.
7. The Format column shows the specific format of the field if there is one.
Text
File
Mapping
Table
Shipping
Solutions
Professional Field System Field Name Size
EZ Start
Screen Format
Header Contacts Exporter ID Type contact_id_type 50 Contacts E for EIN, T for Foreign, D for D-U-N-S
Header Contacts Exporter ID Number
contact_id_num 50 Contacts
Header Contacts Exporter Company contact_name 50 Contacts
Header Contacts Exporter Address 1 contact_add_1 50 Contacts
Header Contacts Exporter Address 2 contact_add_2 50 Contacts
Header Contacts Exporter City contact_city 50 Contacts
Header Contacts Exporter State contact_state 2 Contacts 2 digit state code
Header Contacts Exporter Country contact_country 2 Contacts 2 digit country code
Header Contacts Exporter Postal Code
contact_postal_code
50 Contacts
Header Contacts Exporter First Name
contact_name_first 50 Contacts
Header Contacts Exporter Last Name
contact_name_last 50 Contacts
Header Contacts Exporter Title contact_title 50 Contacts
Header Contacts Exporter Phone contact_phone_num
50 Contacts
Header Contacts Exporter Fax contact_fax_num 50 Contacts
Header Contacts Exporter Email contact_email 50 Contacts

186
Header Contacts Exporter Account Number
contact_acct_num 50 Contacts
Header Contacts Ultimate Consignee ID Type
contact_id_type 50 Contacts E for EIN, T for Foreign, D for D-U-N-S
Header Contacts Ultimate Consignee ID Number
contact_id_num 50 Contacts
Header Contacts Ultimate Consignee Company
contact_name 50 Contacts
Header Contacts Ultimate Consignee Address 1
contact_add_1 50 Contacts
Header Contacts Ultimate Consignee Address 2
contact_add_2 50 Contacts
Header Contacts Ultimate Consignee City
contact_city 50 Contacts
Header Contacts Ultimate Consignee State
contact_state 2 Contacts 2 digit state code
Header Contacts Ultimate Consignee Country
contact_country 2 Contacts 2 digit country code
Header Contacts Ultimate Consignee Postal Code
contact_postal_code
50 Contacts
Header Contacts Ultimate Consignee First Name
contact_name_first 50 Contacts
Header Contacts Ultimate Consignee Last Name
contact_name_last 50 Contacts
Header Contacts Ultimate Consignee Title
contact_title 50 Contacts
Header Contacts Ultimate Consignee Phone
contact_phone_num
50 Contacts
Header Contacts Ultimate Consignee Fax
contact_fax_num 50 Contacts
Header Contacts Ultimate Consignee Email
contact_email 50 Contacts
Header Contacts Ultimate Consignee Account Number
contact_acct_num 50 Contacts
Header Contacts Ultimate Consignee Type (AES)
contact_user2 1 Contacts
D for Direct Consumer; G for Government Entity; O for Other/Unknown; R for Reseller

187
Header Contacts Freight Forwarder ID Type
contact_id_type 50 Contacts E for EIN, T for Foreign, D for D-U-N-S
Header Contacts Freight Forwarder ID Number
contact_id_num 50 Contacts
Header Contacts Freight Forwarder Company
contact_name 50 Contacts
Header Contacts Freight Forwarder Address 1
contact_add_1 50 Contacts
Header Contacts Freight Forwarder Address 2
contact_add_2 50 Contacts
Header Contacts Freight Forwarder City
contact_city 50 Contacts
Header Contacts Freight Forwarder State
contact_state 2 Contacts 2 digit state code
Header Contacts Freight Forwarder Country
contact_country 2 Contacts 2 digit country code
Header Contacts Freight Forwarder Postal Code
contact_postal_code
50 Contacts
Header Contacts Freight Forwarder First Name
contact_name_first 50 Contacts
Header Contacts Freight Forwarder Last Name
contact_name_last 50 Contacts
Header Contacts Freight Forwarder Title
contact_title 50 Contacts
Header Contacts Freight Forwarder Phone
contact_phone_num
50 Contacts
Header Contacts Freight Forwarder Fax
contact_fax_num 50 Contacts
Header Contacts Freight Forwarder Email
contact_email 50 Contacts
Header Contacts Freight Forwarder Account Number
contact_acct_num 50 Contacts
Header Contacts Intermediate Consignee ID Type
contact_id_type 50 Contacts E for EIN, T for Foreign, D for D-U-N-S
Header Contacts Intermediate Consignee ID Number
contact_id_num 50 Contacts
Header Contacts Intermediate Consignee Company
contact_name 50 Contacts
Header Contacts Intermediate Consignee Address 1
contact_add_1 50 Contacts
Header Contacts Intermediate Consignee Address 2
contact_add_2 50 Contacts
Header Contacts Intermediate Consignee City
contact_city 50 Contacts
Header Contacts Intermediate Consignee State
contact_state 2 Contacts 2 digit state code

188
Header Contacts Intermediate Consignee Country
contact_country 2 Contacts 2 digit country code
Header Contacts Intermediate Consignee Postal Code
contact_postal_code
50 Contacts
Header Contacts Intermediate Consignee First Name
contact_name_first 50 Contacts
Header Contacts Intermediate Consignee Last Name
contact_name_last 50 Contacts
Header Contacts Intermediate Consignee Title
contact_title 50 Contacts
Header Contacts Intermediate Consignee Phone
contact_phone_num
50 Contacts
Header Contacts Intermediate Consignee Fax
contact_fax_num 50 Contacts
Header Contacts Intermediate Consignee Email
contact_email 50 Contacts
Header Contacts Intermediate Consignee Account Number
contact_acct_num 50 Contacts
Header Contacts BillTo ID Type contact_id_type 50 Contacts E for EIN, T for Foreign, D for D-U-N-S
Header Contacts BillTo ID Number contact_id_num 50 Contacts
Header Contacts BillTo Company contact_name 50 Contacts
Header Contacts BillTo Address 1 contact_add_1 50 Contacts
Header Contacts BillTo Address 2 contact_add_2 50 Contacts
Header Contacts BillTo City contact_city 50 Contacts
Header Contacts BillTo State contact_state 2 Contacts 2 digit state code
Header Contacts BillTo Country contact_country 2 Contacts 2 digit country code
Header Contacts BillTo Postal Code contact_postal_code
50 Contacts
Header Contacts BillTo First Name contact_name_first 50 Contacts
Header Contacts BillTo Last Name contact_name_last 50 Contacts
Header Contacts BillTo Title contact_title 50 Contacts
Header Contacts BillTo Phone contact_phone_num
50 Contacts
Header Contacts BillTo Fax contact_fax_num 50 Contacts
Header Contacts BillTo Email contact_email 50 Contacts
Header Contacts BillTo Account Number
contact_acct_num 50 Contacts

189
Header Contacts Notify Party ID Type
contact_id_type 50 Contacts E for EIN, T for Foreign, D for D-U-N-S
Header Contacts Notify Party ID Number
contact_id_num 50 Contacts
Header Contacts Notify Party Company
contact_name 50 Contacts
Header Contacts Notify Party Address 1
contact_add_1 50 Contacts
Header Contacts Notify Party Address 2
contact_add_2 50 Contacts
Header Contacts Notify Party City contact_city 50 Contacts
Header Contacts Notify Party State contact_state 2 Contacts 2 digit state code
Header Contacts Notify Party Country
contact_country 2 Contacts 2 digit country code
Header Contacts Notify Party Postal Code
contact_postal_code
50 Contacts
Header Contacts Notify Party First Name
contact_name_first 50 Contacts
Header Contacts Notify Party Last Name
contact_name_last 50 Contacts
Header Contacts Notify Party Title contact_title 50 Contacts
Header Contacts Notify Party Phone contact_phone_num
50 Contacts
Header Contacts Notify Party Fax contact_fax_num 50 Contacts
Header Contacts Notify Party Email contact_email 50 Contacts
Header Contacts Notify Party Account Number
contact_acct_num 50 Contacts
Header Contacts FTA Importer ID Type
contact_id_type 50 Contacts E for EIN, T for Foreign, D for D-U-N-S
Header Contacts FTA Importer ID Number
contact_id_num 50 Contacts
Header Contacts FTA Importer Company
contact_name 50 Contacts
Header Contacts FTA Importer Address Line 1
contact_add_1 50 Contacts
Header Contacts FTA Importer Address Line 2
contact_add_2 50 Contacts
Header Contacts FTA Importer City contact_city 50 Contacts
Header Contacts FTA Importer State contact_state 2 Contacts 2 digit state code
Header Contacts FTA Importer Country
contact_country 2 Contacts 2 digit country code
Header Contacts FTA Importer Postal Code
contact_postal_code
50 Contacts
Header Contacts FTA Importer Account Number
contact_acct_num 50 Contacts

190
Header Contacts FTA Importer Email Contact_email 50 Contacts
Header Contacts FTA Producer ID Type
contact_id_type 50 Contacts E for EIN, T for Foreign, D for D-U-N-S
Header Contacts FTA Producer ID Number
contact_id_num 50 Contacts
Header Contacts FTA Producer Company
contact_name 50 Contacts
Header Contacts FTA Producer Address Line 1
contact_add_1 50 Contacts
Header Contacts FTA Producer Address Line 2
contact_add_2 50 Contacts
Header Contacts FTA Producer City contact_city 50 Contacts
Header Contacts FTA Producer State contact_state 2 Contacts 2 digit state code
Header Contacts FTA Producer Country
contact_country 2 Contacts 2 digit country code
Header Contacts FTA Producer Postal Code
contact_postal_code
50 Contacts
Header Contacts FTA Producer Account Number
contact_acct_num 50 Contacts
Header Contacts FTA Producer Email Contact_email 50 Contacts
Header Contacts FTA Certify Company
contact_name 50 Contacts
Header Contacts FTA Certify First Name
contact_name_first 50 Contacts
Header Contacts FTA Certify Last Name
contact_name_last 50 Contacts
Header Contacts FTA Certify Title contact_title 50 Contacts
Header Contacts FTA Certify Phone contact_phone_num
50 Contacts
Header Contacts FTA Certify Fax contact_fax_num 50 Contacts
Header Contacts FTA Certify Email Contact_email 50 Contacts
Header Contacts CCI Purchaser ID Type
contact_id_type 50 Contacts E for EIN, T for Foreign, D for D-U-N-S
Header Contacts CCI Purchaser ID Number
contact_id_num 50 Contacts
Header Contacts CCI Purchaser Company
contact_name 50 Contacts
Header Contacts CCI Purchaser Address Line 1
contact_add_1 50 Contacts
Header Contacts CCI Purchaser Address Line 2
contact_add_2 50 Contacts
Header Contacts CCI Purchaser City contact_city 50 Contacts
Header Contacts CCI Purchaser State contact_state 2 Contacts 2 digit state code

191
Header Contacts CCI Purchaser Country
contact_country 2 Contacts 2 digit country code
Header Contacts CCI Purchaser Postal Code
contact_postal_code
50 Contacts
Header Contacts CCI Purchaser Account Number
contact_acct_num 50 Contacts
Header Contacts CCI Exporter ID Type
contact_id_type 50 Contacts E for EIN, T for Foreign, D for D-U-N-S
Header Contacts CCI Exporter ID Number
contact_id_num 50 Contacts
Header Contacts CCI Exporter Company
contact_name 50 Contacts
Header Contacts CCI Exporter Address Line 1
contact_add_1 50 Contacts
Header Contacts CCI Exporter Address Line 2
contact_add_2 50 Contacts
Header Contacts CCI Exporter City contact_city 50 Contacts
Header Contacts CCI Exporter State contact_state 2 Contacts 2 digit state code
Header Contacts CCI Exporter Country
contact_country 2 Contacts 2 digit country code
Header Contacts CCI Exporter Postal Code
contact_postal_code
50 Contacts
Header Contacts CCI Exporter Account Number
contact_acct_num 50 Contacts
Header Contacts CCI Originator ID Type
contact_id_type 50 Contacts E for EIN, T for Foreign, D for D-U-N-S
Header Contacts CCI Originator ID Number
contact_id_num 50 Contacts
Header Contacts CCI Originator Company
contact_name 50 Contacts
Header Contacts CCI Originator Address Line 1
contact_add_1 50 Contacts
Header Contacts CCI Originator Address Line 2
contact_add_2 50 Contacts
Header Contacts CCI Originator City contact_city 50 Contacts
Header Contacts CCI Originator State
contact_state 2 Contacts 2-digit state code
Header Contacts CCI Originator Country
contact_country 2 Contacts 2-digit country code
Header Contacts CCI Originator Postal Code
contact_postal_code
50 Contacts
Header Contacts CCI Originator Account Number
contact_acct_num 50 Contacts
Header Contacts IBL Consignee Company
contact_name 50 Contacts
Header Contacts IBL Consignee Address 1
contact_add_1 50 Contacts

192
Header Contacts IBL Consignee Address 2
contact_add_2 50 Contacts
Header Contacts IBL Consignee City contact_city 50 Contacts
Header Contacts IBL Consignee State
contact_state 2 Contacts
Header Contacts IBL Consignee Postal Code
contact_postal_code
20 Contacts
Header Contacts IBL Consignee First Name
contact_name_first 50 Contacts
Header Contacts IBL Consignee Last Name
contact_name_last 50 Contacts
Header Contacts IBL Bill To Company
contact_name 50 Contacts
Header Contacts IBL Bill To Address 1
contact_add_1 50 Contacts
Header Contacts IBL Bill To Address 2
contact_add_2 50 Contacts
Header Contacts IBL Bill To City contact_city 50 Contacts
Header Contacts IBL Bill To State contact_state 2 Contacts
Header Contacts IBL Bill To Postal Code
contact_postal_code
50 Contacts
Header Contacts IBL Bill To First Name
contact_name_first 50 Contacts
Header Contacts IBL Bill To Last Name
contact_name_last 50 Contacts
Header Contacts OBL Also Notify Company
contact_name 50 Contacts
Header Contacts OBL Also Notify Address 1
contact_add_1 50 Contacts
Header Contacts OBL Also Notify Address 2
contact_add_2 50 Contacts
Header Contacts OBL Also Notify City
contact_city 50 Contacts
Header Contacts OBL Also Notify State
contact_state 2 Contacts
Header Contacts OBL Also Notify Country
contact_country 2 Contacts
Header Contacts OBL Also Notify Postal Code
contact_postal_code
20 Contacts
Header Contacts OBL Also Notify First Name
contact_name_first 50 Contacts
Header Contacts OBL Also Notify Last Name
contact_name_last 50 Contacts
Header Contacts Forwarding Agent ID Type
contact_id_type 50 Contacts E for EIN, T for Foreign, D for D-U-N-S
Header Contacts Forwarding Agent ID Number
contact_id_num 50 Contacts
Header Contacts Forwarding Agent Company
contact_name 50 Contacts
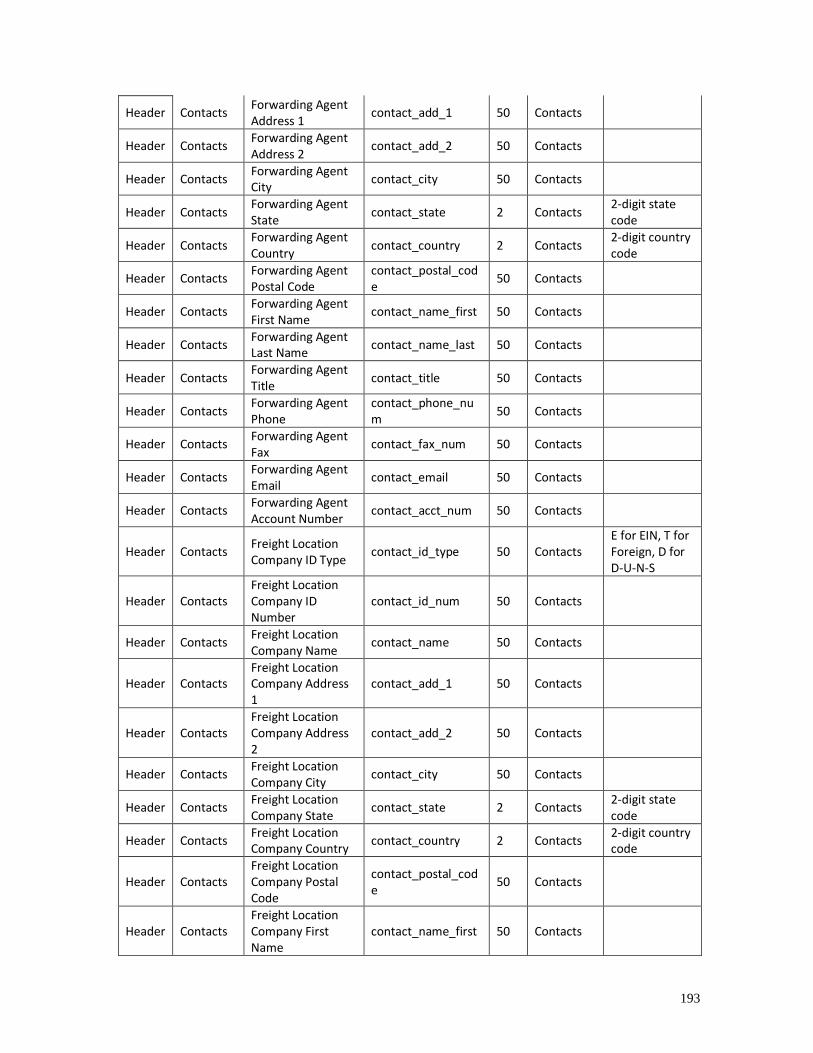
193
Header Contacts Forwarding Agent Address 1
contact_add_1 50 Contacts
Header Contacts Forwarding Agent Address 2
contact_add_2 50 Contacts
Header Contacts Forwarding Agent City
contact_city 50 Contacts
Header Contacts Forwarding Agent State
contact_state 2 Contacts 2-digit state code
Header Contacts Forwarding Agent Country
contact_country 2 Contacts 2-digit country code
Header Contacts Forwarding Agent Postal Code
contact_postal_code
50 Contacts
Header Contacts Forwarding Agent First Name
contact_name_first 50 Contacts
Header Contacts Forwarding Agent Last Name
contact_name_last 50 Contacts
Header Contacts Forwarding Agent Title
contact_title 50 Contacts
Header Contacts Forwarding Agent Phone
contact_phone_num
50 Contacts
Header Contacts Forwarding Agent Fax
contact_fax_num 50 Contacts
Header Contacts Forwarding Agent Email
contact_email 50 Contacts
Header Contacts Forwarding Agent Account Number
contact_acct_num 50 Contacts
Header Contacts Freight Location Company ID Type
contact_id_type 50 Contacts E for EIN, T for Foreign, D for D-U-N-S
Header Contacts Freight Location Company ID Number
contact_id_num 50 Contacts
Header Contacts Freight Location Company Name
contact_name 50 Contacts
Header Contacts Freight Location Company Address 1
contact_add_1 50 Contacts
Header Contacts Freight Location Company Address 2
contact_add_2 50 Contacts
Header Contacts Freight Location Company City
contact_city 50 Contacts
Header Contacts Freight Location Company State
contact_state 2 Contacts 2-digit state code
Header Contacts Freight Location Company Country
contact_country 2 Contacts 2-digit country code
Header Contacts Freight Location Company Postal Code
contact_postal_code
50 Contacts
Header Contacts Freight Location Company First Name
contact_name_first 50 Contacts

194
Header Contacts Freight Location Company Last Name
contact_name_last 50 Contacts
Header Contacts Freight Location Company Title
contact_title 50 Contacts
Header Contacts Freight Location Company Phone
contact_phone_num
50 Contacts
Header Contacts Freight Location Company Fax
contact_fax_num 50 Contacts
Header Contacts Freight Location Company Email
contact_email 50 Contacts
Header Contacts Freight Location Company Account Number
contact_acct_num 50 Contacts
Header Header-Invoice
Proforma Invoice Date
proforma_inv_date n/a Invoices MM/DD/YYYY
Header Header-Invoice
Proforma Invoice Number
proforma_inv_num 50 Invoices
Header Header-Invoice
Commercial Invoice Date
comm_inv_date n/a Invoices MM/DD/YYYY
Header Header-Invoice
Commercial Invoice Number
comm_inv_num 50 Invoices
Header Header-Invoice
Order Number order_num 50 Invoices
Header Header-Invoice
PO Number po_num 100 Invoices
Header Header-Invoice
Terms terms 50 Invoices Any entry in the Terms Database
Header Header-Invoice
Incoterm incoterm 3 Invoices 3-character Incoterm
Header Header-Invoice
Incoterm Location inco_location 50 Invoices
Header Header-Invoice
Incoterm Year incoterm_year 50 Invoices Exact phrase from EZ Start Invoices screen
Header Header-Invoice
Inland Freight Fees inland_freight_fees n/a Invoices decimal
Header Header-Invoice
Handling Fees handling_fees n/a Invoices decimal
Header Header-Invoice
Consular Fees consular_fees n/a Invoices decimal
Header Header-Invoice
Ocean / Air Fees ocean_air_fees n/a Invoices decimal
Header Header-Invoice
Insurance Fees insurance_fees n/a Invoices decimal
Header Header-Invoice
Other Fees other_fees n/a Invoices decimal
Header Header-Invoice
Country of Ultimate Destination
country_of_ultimate_destination
50 Invoices and EEI Information

195
Header Header-Invoice
Point or State of Origin
state_of_origin 50 Invoices
Header Header-Invoice
Exporting Carrier exporting_carrier 50 Carriers & Ports
Header Header-Invoice
Exporting Carrier Code
exporting_carrier_ code
10 Carriers & Ports
Header Header-Invoice
Vessel Name vessel_name 50 Carriers & Ports
Header Header-Invoice
Inland Carrier inland_carrier 50 Carriers & Ports
Header Header-Invoice
Inland Carrier Code inland_carrier_code 10 Carriers & Ports
Header Header-Invoice
Port of Export port_of_export 50 Carriers & Ports
Header Header-Invoice
Port of Export Code
port_of_export_code
10 Carriers & Ports
Header Header-Invoice
Loading Pier / Terminal
load_pier_terminal 50 Carriers & Ports
Header Header-Invoice
Port of Unloading port_of_unloading 50 Carriers & Ports
Header Header-Invoice
Port of Unloading Code
port_of_unloading_ code
10 Carriers & Ports
Header Header-Invoice
Shipment Reference Number
shipment_ref_num 30 EEI Information
Header Header-Invoice
Date of Export date_of_export n/a EEI Information
MM/DD/YYYY
Header Header-Invoice
Foreign Trade Zone inbond_code 50 EEI Information
Header Header-Invoice
Inbond Type Inbond_type 2 EEI Information
See chart at end of this table.
Header Header-Invoice
Import Entry Number
entry_number 50 EEI Information
Header Header-Invoice
Filing Option filing_option 1 EEI Information
2 or 4
Header Header-Invoice
State of Origin point_of_origin 2 EEI Information
2 digit state code
Header Header-Invoice
EEI Email Response aes_email_response 100 EEI Information
Header Header-Invoice
ECCN (SLI in SED Format)
eccn_consolidated 200 EEI Information
Header Header-Invoice
SED Export License Type
sed_paper_lic_type 50 EEI Information
Header Header-Invoice
Related Parties Flag
related_parties_flag n/a EEI Information
0 for No, 1 for Yes
Header Header-Invoice
Containerized Shipment Flag
containerized_flag n/a EEI Information
0 for No, 1 for Yes
Header Header-Invoice
Hazardous Shipment Flag
hazard_shipment_ flag
n/a EEI Information
0 for No, 1 for Yes
Header Header-Invoice
Routed Export Flag routed_export_flag n/a EEI Information
0 for No, 1 for Yes

196
Header Header-Invoice
Proforma Invoice Phrase
proforma_inv_phrase
2000
Invoices-Proforma/ Commercial
Header Header-Invoice
Proforma Invoice Special Instructions
proforma_inv_instruct
2000
Invoices-Proforma/ Commercial
Header Header-Invoice
Commercial Invoice Phrase
comm_inv_phrase 2000
Invoices-Proforma/ Commercial
Header Header-Invoice
Commercial Invoice Special Instructions
comm_inv_instruct 2000
Invoices-Proforma/ Commercial
Header Header-Invoice
Currency Exchange Rate
doc_currency_rate 50 Invoices-Proforma/ Commercial
Header Header-Invoice
Invoice Currency doc_currency 3 Invoices-Proforma/ Commercial
Must use valid 3-character code.
Header Header-Invoice
Mode of Transport Mode_of_transport 50 Carriers & Ports
See chart at end of this table.
Header Header-Invoice
Mode of Transport Code
mode_of_transport_ code
2 Carriers & Ports
See chart at end of this table.
Header Header-Invoice
Mode of Transport Type
mode_of_transport_ type
1 Carriers & Ports
See chart at end of this table.
Header Header-Invoice
Shipment Number user_reference_ number
50 All
Header Header-Invoice
Search Tag tags 50 Shipment Summary
Detail Product Info
Product ID prod_id 50
Prod Detail: Invoices Tab
Detail Product Info
Product Description
prod_desc No limit
Prod Detail: Invoices Tab
Detail Product Info
Quantity for Invoice
quantity n/a
Prod Detail: Invoices Tab
decimal
Detail Product Info
Quantity for Packing List
packing_qty n/a n/a decimal
Detail Product Info
Sales Unit of Measure
sales_unit_of_ measure
25
Prod Detail: Invoices Tab
Detail Product Info
Unit Price unit_price n/a
Prod Detail: Invoices Tab
decimal

197
Detail Product Info
Extended Price ext_price n/a
Prod Detail: Invoices Tab
decimal
Detail Product Info
Schedule B/HTS Code
hts_code 12
Prod Detail: Invoices Tab
Up to 10 digit code
Detail Product Info
Net Weight NetWeight n/a
Prod Detail: Invoices Tab
decimal
Detail Product Info
Country of Origin Code
country_of_origin 2
Prod Detail: Invoices Tab
2-digit country code
Detail Product Info
Country of Origin Long Name
country_of_origin_ fullname
50
Prod Detail: Invoices Tab
Must be mapped along with code.
Detail Product Info
Schedule B Description
schbDesc No limit
Prod Detail: Invoices Tab
Detail Product Info
Quantity 1 (AES) quantity_1 n/a
Prod Detail: Invoices Tab
decimal
Detail Product Info
Unit of Measure 1 (AES)
unit_of_measure_1 50
Prod Detail: Invoices Tab
Valid AES code
Detail Product Info
Quantity 2 (AES) quantity_2 n/a
Prod Detail: Invoices Tab
decimal
Detail Product Info
Unit of Measure 2 (AES)
unit_of_measure_2 50
Prod Detail: Invoices Tab
Valid AES code
Detail Product Info
Gross Weight sed_gross_weight n/a
Prod Detail: Invoices Tab
decimal
Detail Product Info
Domestic / Foreign Flag
domestic_foreign_ flag
1
Prod Detail: Invoices Tab
D for Domestic, F for Foreign
Detail Product Info
FAS Value (AES) sedFASVal n/a
Prod Detail: Invoices Tab
decimal

198
Detail Product Info
AES Export Code aes_export_code 10
Prod Detail: Invoices Tab
Valid AES code
Detail Product Info
ECCN ECCN 50
Prod Detail: Invoices Tab
Detail Product Info
License Number license_num 50
Prod Detail: Invoices Tab
Detail Product Info
License Value license_value 9
Prod Detail: Invoices Tab
integer
Detail Product Info
License Type license_type 50
Prod Detail: Invoices Tab
Valid AES code
Detail Product Info
Preference Criteria preference_criteria 3
Prod Detail: Invoices Tab
A, B, C, D1, D2, E, FA, FB, 1, 2 or 3
Detail Product Info
Net Cost (FTA) net_cost 15
Prod Detail: Invoices Tab
Detail Product Info
Producer Code (FTA)
nafta_producer 5
Prod Detail: Invoices Tab
Yes, No1, No2 or No3
Detail Product Info
Country of Origin (FTA)
nafta_c_of_o 3
Prod Detail: Invoices Tab
US, MX, CA, JNT, AU, CL, CO, KR, PA or PE
Detail Product Info
BL Number of Packages
bl_num_of_pkgs n/a
Prod Detail: Invoices Tab
decimal
Detail Product Info
BL Type of Packages
PackageType 50
Prod Detail: Invoices Tab
Detail Product Info
BL Package Measurements
dimensions 22
Prod Detail: Invoices Tab
Detail Product Info
BL Marks and Numbers
bl_marks_numbers 50
Prod Detail: Invoices Tab

199
Detail Product Info
BL Hazardous Material Flag
inlandbl_hazardous_flag
n/a
Prod Detail: Invoices Tab
0 for No, 1 for Yes
Detail Product Info
Inland BL Rate inlandbl_rate 50
Prod Detail: Invoices Tab
decimal
Detail Product Info
DDTC Exemption Number Code
odtc_exempt_num 25
Product Detail: Vehicle Tab
Valid AES code
Detail Product Info
DDTC Registration Number
odtc_registr_num 50
Product Detail: Vehicle Tab
Detail Product Info
DDTC Quantity odtc_quantity 10
Product Detail: Vehicle Tab
Detail Product Info
DDTC Equipment Indicator Flag
odtc_eqp_indicator n/a
Product Detail: Vehicle Tab
0 for No, 1 for Yes
Detail Product Info
DDTC Certification Indicator Flag
odtc_certi_indicator n/a
Product Detail: Vehicle Tab
0 for No, 1 for Yes
Detail Product Info
DDTC Category Code
odtc_catg_code 10
Product Detail: Vehicle Tab
Valid AES code
Detail Product Info
DDTC Unit of Measure Code
odtc_uofm 10
Product Detail: Vehicle Tab
Valid AES code
Detail Product Info
Vehicle Flag vehicle_flag n/a
Product Detail: Vehicle Tab
0 for No, 1 for Yes
Detail Product Info
Vehicle ID Type Code
vehicle_id_type 1
Product Detail: Vehicle Tab
V for Vin, P for Product ID
Detail Product Info
Vehicle ID Number vehicle_id 50
Product Detail: Vehicle Tab
Detail Product Info
Vehicle Title vehicle_title 50
Product Detail: Vehicle Tab

200
Detail Product Info
Vehicle Title State Code
vehicle_title_state 2
Product Detail: Vehicle Tab
2 digit state code
Detail Product Info
Include on AES include_on_sed n/a Product Details: Invoice Tab
0 for No 1 for Yes
Detail Product Info
Include on Certificate of Origin
include_on_ coforigin
n/a Product Details: Invoice Tab
0 for No 1 for Yes
Detail Product Info
Include on USMCA/FTA Certificates
include_on_nafta n/a Product Details: Invoice Tab
0 for No 1 for Yes
Detail Product Info
Include on Invoices include_on_invoices n/a Product Details: Invoice Tab
0 for No 1 for Yes
Detail Product Info
Include on SLI/ Bills of Lading
include_on_sli_bl n/a Product Details: Invoice Tab
0 for No 1 for Yes
Detail Product Info
Include on Packing List
include_on_packing_list
n/a Product Details: Invoice Tab
0 for No 1 for Yes
Detail Product Info
IATA UN Number iata_un_number 4 Product Details: DG Tab
Detail Product Info
IATA Proper Shipping Name
iata_psn 250 Product Details: DG Tab
Detail Product Info
IATA Classification iata_classification 50 Product Details: DG Tab
Detail Product Info
IATA Packing Group
iata_packing_group 50 Product Details: DG Tab
Detail Product Info
IATA Quantity iata_quantity n/a Product Details: DG Tab
integer
Detail Product Info
IATA Type of Packing
iata_qty_type_pkg 250 Product Details: DG Tab
Detail Product Info
IATA Technical Name
iata_technical 250 Product Details: DG Tab
Detail Product Info
IATA Qualifying Prefix
iata_qualifying_prefix
250 Product Details: DG Tab
Detail Product Info
IATA Qualifying Suffix
iata_qualifying_suffix
250 Product Details: DG Tab
Detail Product Info
IATA Packing Instructions
iata_pkg_instr 50 Product Details: DG Tab

201
Detail Product Info
IATA Authorization iata_authorization 50 Product Details: DG Tab
Detail Product Info
IMO UN Number imo_un_number 4 Product Details: DG Tab
Detail Product Info
IMO Proper Shipping Name
imo_psn 250 Product Details: DG Tab
Detail Product Info
IMO Classification imo_classification 50 Product Details: DG Tab
Detail Product Info
IMO Packing Group imo_packing_group 50 Product Details: DG Tab
Detail Product Info
IMO Quantity imo_quantity n/a Product Details: DG Tab
integer
Detail Product Info
IMO Kind of Packages
imo_qty_type_pkg 250 Product Details: DG Tab
Detail Product Info
IMO Technical Name
imo_technical 250 Product Details: DG Tab
Detail Product Info
IMO Additional Description
imo_additional_desc
4000
Product Details: DG Tab
Detail Product Info
IMO Gross Weight/Volume
imo_gross_wt_vol n/a Product Details: DG Tab
decimal
Detail Product Info
IMO Net Weight/Volume
imo_net_wt_vol n/a Product Details: DG Tab
decimal
Detail Product Info
IMO Cubic Meters imo_cubic_m n/a Product Details: DG Tab
decimal
Detail Product Info
IMO Include on IMO
Imo_dg_include n/a Product Details: DG Tab
0 for No 1 for Yes
Detail Product Info
IATA Include on IATA
Iata_dg_include n/a Product Details: DG Tab
0 for No 1 for Yes
Header Free Trade FTA Date nafta_date n/a Free Trade Agreement
MM/DD/YYYY
Header Free Trade Blanket From Date nafta_blanket_from_date
n/a Free Trade Agreement
MM/DD/YYYY
Header Free Trade Blanket End Date nafta_blanket_to_ date
n/a Free Trade Agreement
MM/DD/YYYY
Header Free Trade CCI Other Reference
cci_otherreferences 50 Canada Customs Invoice

202
Header Free Trade CCI Country of Transhipment
cci_countryoftrans 50 Canada Customs Invoice
Header Free Trade CCI Country of Origin
cci_origin 30 Canada Customs Invoice
Header Free Trade CCI Additional Transportation
cci_misc_info 150 Canada Customs Invoice
Header Free Trade CCI Condition of Sale
cci_conditionofsale 150 Canada Customs Invoice
Header Free Trade CCI Currency cci_currencyof settlement
50 Canada Customs Invoice
Header Free Trade CCI Box 18 Flag cci_18 n/a Canada Customs Invoice
0 for No, 1 for Yes
Header Free Trade CCI Agency Ruling cci_departmental ruling
50 Canada Customs Invoice
Header Free Trade CCI Box 22 Flag cci_22 n/a Canada Customs Invoice
0 for No, 1 for Yes
Header Free Trade CCI Box 23i Charges
cci_23i n/a Canada Customs Invoice
decimal
Header Free Trade CCI Box 23ii Charges
cci_23ii n/a Canada Customs Invoice
decimal
Header Free Trade CCI Box 23iii Charges
cci_23iii n/a Canada Customs Invoice
decimal
Header Free Trade CCI Box 24i Charges
cci_24i n/a Canada Customs Invoice
decimal
Header Free Trade CCI Box 24ii Charges
cci_24ii n/a Canada Customs Invoice
decimal
Header Free Trade CCI Box 24iii Charges
cci_24iii n/a Canada Customs Invoice
decimal
Header Free Trade CCI Box 25i Flag cci_25i n/a Canada Customs Invoice
0 for No, 1 for Yes
Header Free Trade CCI Box 25ii Flag cci_25ii n/a Canada Customs Invoice
0 for No, 1 for Yes
Header Free Trade Caricom Certificate Number
caricom_certificate_num
50 Caricom Invoice
Header Free Trade Caricom Other References
caricom_oth_refs 50 Caricom Invoice

203
Header Free Trade Caricom Buyer caricom_buyer 50 Caricom Invoice
Header Free Trade Caricom Presenting Bank
caricom_bank 35 Caricom Invoice
Header Free Trade Caricom Country of Origin
caricom_origin 35 Caricom Invoice
Header Free Trade Caricom Terms and Conditions
caricom_terms 50 Caricom Invoice
Header Free Trade Caricom Currency caricom_currency 50 Caricom Invoice
Header Free Trade Caricom Gross Weight
caricom_gross_wght
35 Caricom Invoice
Header Free Trade Caricom Cubic Meters
caricom_cubic_ meters
10 Caricom Invoice
Header Free Trade Caricom Marks and Numbers
caricom_marks_num
50 Caricom Invoice
Header Free Trade
Caricom Description of Goods
caricom_goods_desc
50 Caricom Invoice
Header OceanBL IBL Number ibl_number 50 Inland B/L
Header OceanBL IBL Date ibl_date n/a Inland B/L MM/DD/YYYY
Header OceanBL IBL Carrier Number ibl_carrier_number 50 Inland B/L
Header OceanBL IBL Vehicle Number
ibl_vehicle_number 50 Inland B/L
Header OceanBL IBL Carrier ibl_carrier 50 Inland B/L
Header OceanBL IBL Shipper ibl_shipper 50 Inland B/L
Header OceanBL IBL COD Amount ibl_cod_amt n/a Inland B/L decimal
Header OceanBL IBL Remit COD To ibl_remit_cod_to 50 Inland B/L
Header OceanBL IBL COD Paid By ibl_cod_paid_by 50 Inland B/L Shipper or Consignee
Header OceanBL IBL Quantity Received
ibl_recvd_qty 50 Inland B/L
Header OceanBL IBL Unit ibl_recvd_unit 50 Inland B/L Options in drop-down list
Header OceanBL IBL Container Received
ibl_recvd_container 50 Inland B/L
Header OceanBL IBL Container Unit ibl_recvd_container_unit
50 Inland B/L Options in drop-down list
Header OceanBL IBL Freight Charges Method
ibl_freight_chgs_pay_method
50 Inland B/L Prepaid, Collect or Third Party
Header OceanBL IBL Value per LB ibl_agreed_value n/a Inland B/L decimal
Header OceanBL IBL Display Anti-Diversion Clause
ibl_include_anti_div n/a Inland B/L 0 for No, 1 for Yes
Header OceanBL OBL Pre-Carriage By
obl_pre_carriage_by
30 Ocean B/L
Header OceanBL OBL Pre-Carriage Place of Receipt
obl_plc_of_recpt_ pre_carrier
30 Ocean B/L
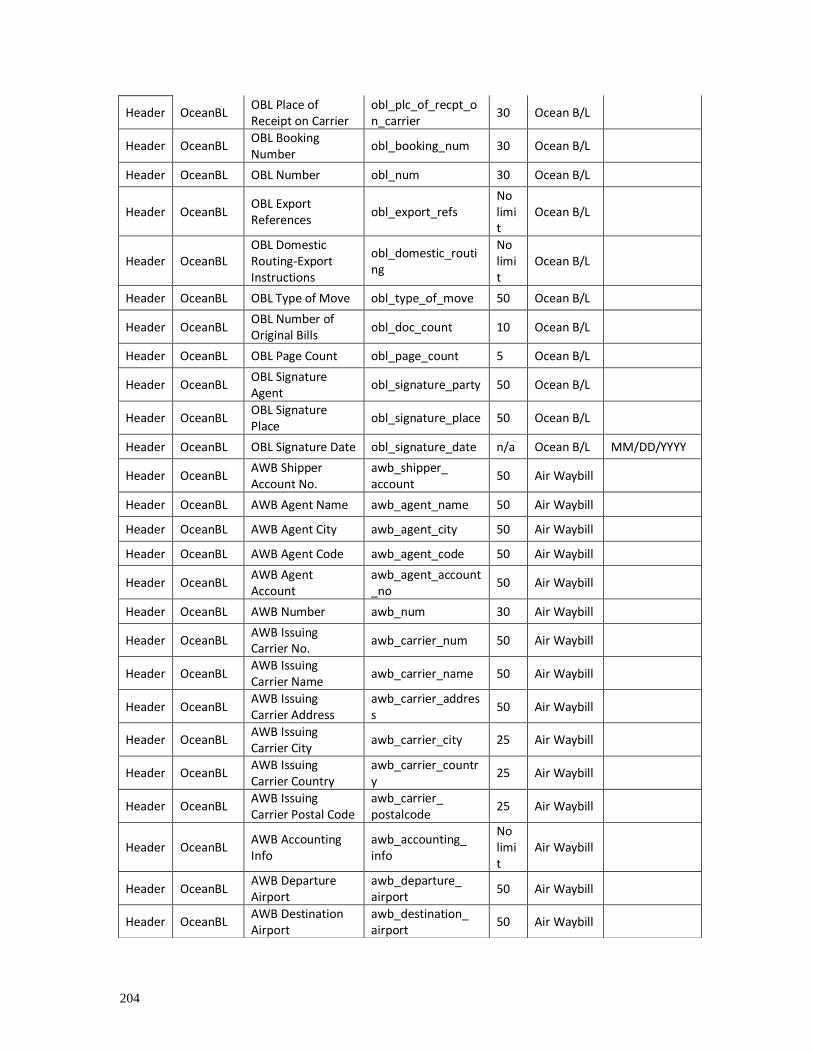
204
Header OceanBL OBL Place of Receipt on Carrier
obl_plc_of_recpt_on_carrier
30 Ocean B/L
Header OceanBL OBL Booking Number
obl_booking_num 30 Ocean B/L
Header OceanBL OBL Number obl_num 30 Ocean B/L
Header OceanBL OBL Export References
obl_export_refs No limit
Ocean B/L
Header OceanBL OBL Domestic Routing-Export Instructions
obl_domestic_routing
No limit
Ocean B/L
Header OceanBL OBL Type of Move obl_type_of_move 50 Ocean B/L
Header OceanBL OBL Number of Original Bills
obl_doc_count 10 Ocean B/L
Header OceanBL OBL Page Count obl_page_count 5 Ocean B/L
Header OceanBL OBL Signature Agent
obl_signature_party 50 Ocean B/L
Header OceanBL OBL Signature Place
obl_signature_place 50 Ocean B/L
Header OceanBL OBL Signature Date obl_signature_date n/a Ocean B/L MM/DD/YYYY
Header OceanBL AWB Shipper Account No.
awb_shipper_ account
50 Air Waybill
Header OceanBL AWB Agent Name awb_agent_name 50 Air Waybill
Header OceanBL AWB Agent City awb_agent_city 50 Air Waybill
Header OceanBL AWB Agent Code awb_agent_code 50 Air Waybill
Header OceanBL AWB Agent Account
awb_agent_account_no
50 Air Waybill
Header OceanBL AWB Number awb_num 30 Air Waybill
Header OceanBL AWB Issuing Carrier No.
awb_carrier_num 50 Air Waybill
Header OceanBL AWB Issuing Carrier Name
awb_carrier_name 50 Air Waybill
Header OceanBL AWB Issuing Carrier Address
awb_carrier_address
50 Air Waybill
Header OceanBL AWB Issuing Carrier City
awb_carrier_city 25 Air Waybill
Header OceanBL AWB Issuing Carrier Country
awb_carrier_country
25 Air Waybill
Header OceanBL AWB Issuing Carrier Postal Code
awb_carrier_ postalcode
25 Air Waybill
Header OceanBL AWB Accounting Info
awb_accounting_ info
No limit
Air Waybill
Header OceanBL AWB Departure Airport
awb_departure_ airport
50 Air Waybill
Header OceanBL AWB Destination Airport
awb_destination_ airport
50 Air Waybill

205
Header OceanBL AWB Flight Date 1 awb_flight_date_1 15 Air Waybill
Header OceanBL AWB Flight Date 2 awb_flight_date_2 15 Air Waybill
Header OceanBL AWB Declared Value Carriage
awb_declared_val_ carriage
20 Air Waybill
Header OceanBL AWB Declared Value Customs
awb_declared_val_ customs
20 Air Waybill
Header OceanBL AWB Insurance Amount
awb_insurance_ amount
20 Air Waybill
Header OceanBL AWB SCI awb_sci 50 Air Waybill
Header OceanBL AWB Handling awb_handling No limit
Air Waybill
Header OceanBL AWB Weight Charge Prepaid
awb_wght_chg_ prepaid
n/a Air Waybill decimal
Header OceanBL AWB Weight Charge Collect
awb_wght_chg_ collect
n/a Air Waybill decimal
Header OceanBL AWB Valuation Charge Prepaid
awb_val_chg_ prepaid
n/a Air Waybill decimal
Header OceanBL AWB Valuation Charge Collect
awb_val_chg_collect
n/a Air Waybill decimal
Header OceanBL AWB Tax Charge Prepaid
awb_tax_prepaid n/a Air Waybill decimal
Header OceanBL AWB Tax Charge Collect
awb_tax_collect n/a Air Waybill decimal
Header OceanBL AWB Charges Due Agent Prepaid
awb_due_agent_ prepaid
n/a Air Waybill decimal
Header OceanBL AWB Charges Due Agent Collect
awb_due_agent_ collect
n/a Air Waybill decimal
Header OceanBL AWB Charges Due Carrier Prepaid
awb_due_carrier_ prepaid
n/a Air Waybill decimal
Header OceanBL AWB Charges Due Carrier Collect
awb_due_carrier_ collect
n/a Air Waybill decimal
Header OceanBL AWB Total Prepaid awb_total_prepaid n/a Air Waybill decimal
Header OceanBL AWB Total Collect awb_total_collect n/a Air Waybill decimal
Header OceanBL AWB Other Charges
awb_other_charges No limit
Air Waybill
Header OceanBL AWB Date Executed
awb_executed 20 Air Waybill
Header OceanBL AWB Place Executed
awb_place 20 Air Waybill
Header OceanBL AWB Agent Signature
awb_signature_agent
20 Air Waybill
Header OceanBL IATA Airport of Departure
iata_airport_ departure
50
Dangerous Goods IATA and Non-Dangerous Goods

206
Header OceanBL IATA Destination Airport
iata_airport_ destination
50
Dangerous Goods IATA and Non-Dangerous Goods
Header OceanBL IATA Transport Type Code
iata_transport_type 1 Dangerous Goods IATA
P for Passenger, C for Cargo
Header OceanBL IATA Shipper Name-Title
shipper_name_title 50
Dangerous Goods IATA and Non-Dangerous Goods
Header OceanBL IATA Shipment Place
shipper_place 50
Dangerous Goods IATA and Non-Dangerous Goods
Header OceanBL IATA Shipment Date
shipper_date 50
Dangerous Goods IATA and Non-Dangerous Goods
MM/DD/YYYY
Header OceanBL IATA Radioactive Flag
iata_radioactive_flag
n/a Dangerous Goods IATA
0 for No, 1 for Yes
Header OceanBL IATA Additional Handling
addtnl_handling 250 Dangerous Goods IATA
Header OceanBL IMO Vessel-Flight-Date
imo_ship_ voyagenum
50 Dangerous Goods IMO
Header OceanBL IMO Port of Handling
imo_port_of_ handling
50 Dangerous Goods IMO
Header OceanBL IMO Container ID Number
imo_container_id 50 Dangerous Goods IMO
Header OceanBL IMO Seal Number imo_seal_num 50 Dangerous Goods IMO
Header OceanBL IMO Container Type-Size
imo_container_size 50 Dangerous Goods IMO
Header OceanBL IMO Tare Mass (kg) imo_tare 50 Dangerous Goods IMO
Header OceanBL IMO Gross Mass (kg)
imo_total_gross_ mass
50 Dangerous Goods IMO
Header OceanBL IMO Transportation Reference No.
imo_reference_num
30 Dangerous Goods IMO
Header OceanBL IMO Shipper Reference Number
imo_shipper_ref_ num
50 Dangerous Goods IMO

207
Header OceanBL IMO Forwarder Reference Number
imo_fwrdr_ref_num 50 Dangerous Goods IMO
Header OceanBL IMO Carrier imo_carrier_name 50 Dangerous Goods IMO
Header OceanBL IMO Packing Company
imo_packer_ company
50 Dangerous Goods IMO
Header OceanBL IMO Packing Name-Status
imo_packer_name_ status
50 Dangerous Goods IMO
Header OceanBL IMO Packing Place-Date
imo_packer_date 50 Dangerous Goods IMO
Header OceanBL IMO Hauler Name imo_hauler_name 50 Dangerous Goods IMO
Header OceanBL IMO Vehicle Reg Number
imo_hauler_vehicle_no
50 Dangerous Goods IMO
Header OceanBL IMO Hauler Driver-Date
imo_hauler_name_ date
50 Dangerous Goods IMO
Header OceanBL IMO Preparer Company
imo_preparing_ company
50 Dangerous Goods IMO
Header OceanBL IMO Preparer Name-Status
imo_preparing_name_status
50 Dangerous Goods IMO
Header OceanBL IMO Preparer Place-Date
imo_preparing_place_date
50 Dangerous Goods IMO
Header OceanBL Non-Dangerous Goods Description
articles_not_ restricted
No limit
Non-Dangerous Goods
Header OceanBL IATA 24-Hour Phone Number
24hr_phone 2000
Dangerous Goods IATA
Header SLI Inland Freight Fees Quote
sli_if_q n/a Shipper's Letter of Instruction
decimal
Header SLI OceanAir Fees Quote
sli_oa_q n/a Shipper's Letter of Instruction
decimal
Header SLI Handling Fees Quote
sli_hf_q n/a Shipper's Letter of Instruction
decimal
Header SLI Insurance Fees Quote
sli_ic_q n/a Shipper's Letter of Instruction
decimal
Header SLI Consular Fees Quote
sli_cf_q n/a Shipper's Letter of Instruction
decimal
Header SLI Additional Charges Quote
sli_ac_q n/a Shipper's Letter of Instruction
decimal
Header SLI Inland Freight Fees Adjustment
sli_if_a n/a Shipper's Letter of Instruction
decimal
Header SLI OceanAir Fees Adjustment
sli_oa_a n/a Shipper's Letter of Instruction
decimal

208
Header SLI Handling Fees Adjustment
sli_hf_a n/a Shipper's Letter of Instruction
decimal
Header SLI Insurance Fees Adjustment
sli_ic_a n/a Shipper's Letter of Instruction
decimal
Header SLI Consular Fees Adjustment
sli_cf_a n/a Shipper's Letter of Instruction
decimal
Header SLI Additional Charges Adjustment
sli_ac_a n/a Shipper's Letter of Instruction
decimal
Header SLI Adjust Inland Freight Flag
sli_if_yn n/a Shipper's Letter of Instruction
0 for No, 1 for Yes
Header SLI Adjust OceanAir Flag
sli_oa_yn n/a Shipper's Letter of Instruction
0 for No, 1 for Yes
Header SLI Adjust Handling Flag
sli_hf_yn n/a Shipper's Letter of Instruction
0 for No, 1 for Yes
Header SLI Adjust Insurance Flag
sli_ic_yn n/a Shipper's Letter of Instruction
0 for No, 1 for Yes
Header SLI Adjust Counsular Flag
sli_cf_yn n/a Shipper's Letter of Instruction
0 for No, 1 for Yes
Header SLI Adjust Additional Flag
sli_ac_yn n/a Shipper's Letter of Instruction
0 for No, 1 for Yes
Header SLI Quote on These Charges Flag
sli_quote n/a Shipper's Letter of Instruction
0 for No, 1 for Yes
Header SLI Adjust Invoice with Charges Flag
sli_adjust n/a Shipper's Letter of Instruction
0 for No, 1 for Yes
Header SLI Respond with Costs By Code
sli_respond_with_ costs
50 Shipper's Letter of Instruction
Phone, Fax or Email
Header SLI How to Bill Freight Code
sli_freight_prepaid 50 Shipper's Letter of Instruction
Collect or Prepaid
Header SLI Shipping Details Code
sli_shipping_cons_ direct
50 Shipper's Letter of Instruction
Consolidate or Direct
Header SLI Insurance Required Flag
sli_insurance_ required
n/a Shipper's Letter of Instruction
0 for No, 1 for Yes
Header SLI Type of Insurance sli_insurance_type No limit
Shipper's Letter of Instruction

209
Header SLI License Number-Symbol
sli_lic_num_symbol 25 Shipper's Letter of Instruction
Header SLI Forward Documents To
sli_fwd_docs_to 40 Shipper's Letter of Instruction
Header SLI Invoice Attached Flag
sli_doc_inv n/a Shipper's Letter of Instruction
0 for No, 1 for Yes
Header SLI NAFTA Attached Flag
sli_doc_nf n/a Shipper's Letter of Instruction
0 for No, 1 for Yes
Header SLI Inland Bill of Lading Attached Flag
sli_doc_ov n/a Shipper's Letter of Instruction
0 for No, 1 for Yes
Header SLI Packing List Attached Flag
sli_doc_pl n/a Shipper's Letter of Instruction
0 for No, 1 for Yes
Header SLI Certificate of Origin Attached Flag
sli_doc_co n/a Shipper's Letter of Instruction
0 for No, 1 for Yes
Header SLI Bank Draft Attached Flag
sli_doc_dr n/a Shipper's Letter of Instruction
0 for No, 1 for Yes
Header SLI Attachment Flag sli_doc_att n/a Shipper's Letter of Instruction
0 for No, 1 for Yes
Header SLI Other Attached Flag
sli_doc_Othr n/a Shipper’s Letter of Instruction
0 for No, 1 for Yes
Header SLI Cert of Origin Dated At
Sli_user_8 n/a Shipper’s Letter of Instruction
Header SLI Cert of Origin – Day
sli_user_3 n/a Shipper’s Letter of Instruction
Header SLI Cert of Origin – Month
sli_user_9 n/a Shipper’s Letter of Instruction
Header SLI Cert of Origin – Year
sli_user_10 n/a Shipper’s Letter of Instruction
Header SLI SLI Special Instructions
sli_spcl_instruct n/a Shipper’s Letter of Instruction
Header SLI Cert of Origin Special Instructions
sli_user_7 n/a Shipper’s Letter of Instruction

210
Inbond Type Codes for AESDirect
Codes Inbond Type
36 Warehouse withdrawal for IE
37 Warehouse withdrawal for T&E
67 Foreign Trade Zone withdrawal for IE
68 Foreign Trade Zone withdrawal for T&E
70 Not Sold Inbond

211
Acceptable Content for the Mode of Transport Fields
Mode of Transport Mode of Transport Code Mode of Transport Type
Air 40 A
Air, Containerized 41 A
Vessel 10 S
Vessel, Containerized 11 S
Barge 12 S
Rail 20 S
Rail, Containerized 21 S
Truck 30 S
Truck, Containerized 31 S
Auto 32 O
Pedestrian 33 O
Road, Other 34 O
Mail 50 O
Passenger, Hand Carried 60 O
Fixed Transport (Pipeline and Powerhouse) 70 O
In order for Mode of Transport data to be successfully imported into Shipping Solutions Professional, you
need to map all three of these data fields.
Code Contact Type
BB Inland Bill of Lading Bill To
BC Inland Bill of Lading Consignee
BT Bill To
CB Not used
CE Canada Customs Invoice Exporter
CO Canada Customs Invoice Originator
CP Canada Customs Invoice Purchaser
EX Exporter
FA Forwarding Agent
FF Freight Forwarder
FL Freight Location Company
IC Intermediate Consignee
NC FTA Certifier
NI FTA Importer
NP FTA Producer
NT Notify Party
OC Ocean Bill of Lading Also Notify
UC Ultimate Consignee
When running the DXM using an XML file, you will need to identify each contact type using these codes.
The EX contact type is required but can be blank.

212
International Trade Resources
If you have questions or concerns about the export process, we recommend you contact one or more of the
export resources listed below. These are not resources for questions or problems with the Shipping
Solutions software, although many of these people, companies and agencies have made valuable
contributions to Shipping Solutions:
• CARGOpak Corp., 800-266-0652, www.cargopak.com
• International Business Training, 800-641-0920, www.i-b-t.net
• The U.S. Bureau of Industry and Security advances U.S. national security, foreign policy, and
economic objectives by ensuring an effective export control and treaty compliance system and
promoting continued U.S. strategic technology leadership. www.bis.doc.gov/
• The U.S. Census Bureau’s Foreign Trade Division is the official source for U.S. export and import
statistics and responsible for issuing regulations governing the reporting of all export shipments
from the United States. If you're searching for import or export statistics, information on export
regulations, commodity classifications, or a host of other trade related topics, this is the place to get
the information you need. www.census.gov/foreign-trade/index.html
• The U.S. Commercial Service is the trade promotion arm of the U.S. Department of Commerce’s
International Trade Administration. U.S. Commercial Service trade professionals in more than 100
U.S. cities and in more than 75 countries help U.S. companies get started in exporting or increase
sales to new global markets. www.trade.gov/cs
• The U.S. International Trade Administration strengthens the competitiveness of U.S. industry, promotes trade and investment, and ensures fair trade through the rigorous enforcement of our trade
laws and agreements. It partners with other U.S. government agencies to help U.S. companies
export through www.export.gov.
Version 09.01.20
© 2020, InterMart, Inc., 1400 Corporate Center Curve, Suite 110, Eagan, MN 55121.
InterMart and Shipping Solutions are registered trademarks of InterMart, Inc. All Rights Reserved.
Related Documents