52 ArcUser January– March 2004 www.esri.com In addition to maps, charts, and graphs, ArcGIS provides two tools for generating reports that are available directly from the ArcMap interface. A generic reporting tool creates simple reports that can be added to a layout and can use group layers. The other choice, Crystal Reports, is an industry standard application that produces sophisticated, presentation-quality reports. With ArcGIS 8.3, users receive a full stand- alone copy of Crystal Reports 9 from Crystal Decisions. This article shows users how to take advantage of the Crystal Reports wizard that is integrated with ArcMap in ArcGIS ArcView, ArcEditor, and ArcInfo. The wizard minimizes the learning curve for new users by walking them through the report creation process and helps more experienced users generate reports quickly. For stand-alone reports, Crystal Reports supplies extensive sorting and grouping functionality and incorporates formulas and templates that speed report generation. However, if an appropriate template is not available for the desired report, the formatting options available solely from the wizard are limited. Because ArcGIS comes with a full copy of Crystal Reports, a good strategy is to rough the report out using the wizard from the ArcGIS interface and go directly into Crystal Reports to rene the report. Overview This introductory tutorial uses 2000 census data for the United States that comes from an ArcMap project supplied in the sample dataset. Through working through this exercise, the What You Will Need • ArcGIS 8.3 (ArcInfo, ArcEditor , or ArcView license) with Crystal Reports installed • Sample data downloaded from ArcUser Online T aking Advantage of Crystal Reports user can learn how to generate a basic report from ArcMap layers, enhance the formatting, and include additional information in Crystal Reports. Before launching Crystal Reports from the ArcMap interface, GIS users unfamiliar with Crystal Reports might benet from a brief, general introduction to Crystal Reports and some specic information on the functionality that is available through the wizard in ArcMap. See the accompanying article, “Introducing Crystal Reports.” Goals for the Tutorial Like a well-composed map, an effective report communicates specic information to a particular audience in an organized fashion. The rst step in creating an effective report is determining its purpose and audience. Both factors will inuence what data should be included and how it should be organized and displayed. Writing a single sentence description of the report will help identify the data sources and the information that the report should communicate. This tutorial will generate a report for managers of Trends, Inc., a ctional chain of retail stores. Trendsʼ best customers are young adults between the ages of 18 and 29. This report will contain census population data for the central region of the United States organized by state. Now that the purpose and audience for the report have been identied, the next step is to identify the elds that the data for this report will come from and to sketch out the placement of elds and heading the report will contain. Using pencil and paper for this step is sometimes useful, Area Function Items or Fields to Include Report Header (RH) Put the title and any information that will appear once at the beginning of the report here. Title: Young Adults in Central Region, Logo: trends.bmp, report date Page Header (PH) This section contains information that should appear at the top of each page. Column headings: Region, State, Total Population, Young Adult Population Details The bulk of the report goes here. Each eld in this section is printed once per record. Fields: SUB_REGION, STATE_NAME, POP2000, AGE_18_29 Report Footer (RF) Items that appear only once at the end of the report (e.g., grand totals, charts) go here. Graphics: crystalmap.map Page Footer (PF) Page numbers and other items that appear at the bottom of each page can be added here. Footer info: ESRI logo, copyright.txt T able 1: Design tab headers and elds especially when initially using Crystal Reports. A report worksheet call CRWorksheet in Adobe Acrobatʼs portable document format (PDF) was included with the sample dataset. If Acrobat Reader is not available, it can be downloaded at no charge from www.adobe.com/products/ acrobat/readstep2.html. The worksheet will help organize the report and identify what information is needed for the report. Setting Up the Project Visit the ArcUser Online Web site at www .esri.com/arcuser, and download the archive containing the sample dataset for this tutorial. Create a folder for the project called crystal. Unzip the archive into the crystal folder. See Table 1 for information on the items and elds that will be included in each section of the report. 1. Print a copy of CRWorksheet for use during the tutorial. Using the printed copy of the Crystal Reports Worksheet, write a one sentence summary of the purpose of the report as outlined in the previous section next to Reportʼs Purpose. 2. Under RH, write d own the name of the report and trends.bmp, the graphic that will be used in the report header. 3. Under PH, write the headings that will be used for the columns in the report as listed in Table 1. 4. Start ArcMap and open crystal.mxd. Right- click on the Central Region layer and choose Open Attribute Table. Examine the table data to determine which elds contain

Welcome message from author
This document is posted to help you gain knowledge. Please leave a comment to let me know what you think about it! Share it to your friends and learn new things together.
Transcript
8/3/2019 Taking Advantage of Crystal Report
http://slidepdf.com/reader/full/taking-advantage-of-crystal-report 1/5
52 ArcUser January–March 2004 www.esri.com
In addition to maps, charts, and graphs, ArcGIS
provides two tools for generating reports that are
available directly from the ArcMap interface. A
generic reporting tool creates simple reports that
can be added to a layout and can use group layers.
The other choice, Crystal Reports, is an industry
standard application that produces sophisticated,
presentation-quality reports.
With ArcGIS 8.3, users receive a full stand-
alone copy of Crystal Reports 9 from Crystal
Decisions. This article shows users how to take
advantage of the Crystal Reports wizard that is
integrated with ArcMap in ArcGIS ArcView,
ArcEditor, and ArcInfo. The wizard minimizes
the learning curve for new users by walking them
through the report creation process and helps
more experienced users generate reports quickly.
For stand-alone reports, Crystal Reports supplies
extensive sorting and grouping functionality and
incorporates formulas and templates that speed
report generation.
However, if an appropriate template is not
available for the desired report, the formatting
options available solely from the wizard are
limited. Because ArcGIS comes with a full copyof Crystal Reports, a good strategy is to rough
the report out using the wizard from the ArcGIS
interface and go directly into Crystal Reports to
rene the report.
OverviewThis introductory tutorial uses 2000 census
data for the United States that comes from an
ArcMap project supplied in the sample dataset.
Through working through this exercise, the
What You Will Need
• ArcGIS 8.3 (ArcInfo, ArcEditor, or ArcView license)with Crystal Reports installed
• Sample data downloaded from ArcUser Online
Taking Advantage
of Crystal Reportsuser can learn how to generate a basic report
from ArcMap layers, enhance the formatting,
and include additional information in Crystal
Reports. Before launching Crystal Reports from
the ArcMap interface, GIS users unfamiliar
with Crystal Reports might benet from a brief,
general introduction to Crystal Reports and some
specic information on the functionality that is
available through the wizard in ArcMap. See
the accompanying article, “Introducing Crystal
Reports.”
Goals for the TutorialLike a well-composed map, an effective report
communicates specic information to a particular
audience in an organized fashion. The rst step in
creating an effective report is determining its
purpose and audience. Both factors will inuence
what data should be included and how it should
be organized and displayed. Writing a single
sentence description of the report will help
identify the data sources and the information that
the report should communicate.
This tutorial will generate a report for
managers of Trends, Inc., a ctional chain of retail stores. Trendsʼ best customers are young
adults between the ages of 18 and 29. This report
will contain census population data for the central
region of the United States organized by state.
Now that the purpose and audience for the
report have been identied, the next step is to
identify the elds that the data for this report will
come from and to sketch out the placement of
elds and heading the report will contain. Using
pencil and paper for this step is sometimes useful,
Area Function Items or Fields to Include
Report Header(RH)
Put the title and any information that will appear once at thebeginning of the report here.
Title: Young Adults in Central Region, Logo: trends.bmp, reportdate
Page Header(PH)
This section contains information that should appear at thetop of each page.
Column headings: Region, State, Total Population, Young AdultPopulation
DetailsThe bulk of the report goes here. Each eld in this section isprinted once per record.
Fields: SUB_REGION, STATE_NAME, POP2000, AGE_18_29
Report Footer(RF)
Items that appear only once at the end of the report (e.g.,grand totals, charts) go here.
Graphics: crystalmap.map
Page Footer(PF)
Page numbers and other items that appear at the bottom of each page can be added here.
Footer info: ESRI logo, copyright.txt
Table 1: Design tab headers and elds
especially when initially using Crystal Reports.
A report worksheet call CRWorksheet in Adobe
Acrobatʼs portable document format (PDF) was
included with the sample dataset. If Acrobat
Reader is not available, it can be downloaded
at no charge from www.adobe.com/products/
acrobat/readstep2.html. The worksheet will help
organize the report and identify what information
is needed for the report.
Setting Up the ProjectVisit the ArcUser Online Web site at
www.esri.com/arcuser, and download the archive
containing the sample dataset for this tutorial.
Create a folder for the project called crystal. Unzip
the archive into the crystal folder. See Table 1 for
information on the items and elds that will be
included in each section of the report.
1. Print a copy of CRWorksheet for use during
the tutorial. Using the printed copy of the
Crystal Reports Worksheet, write a one
sentence summary of the purpose of the
report as outlined in the previous section
next to Reportʼs Purpose.2. Under RH, write down the name of the
report and trends.bmp, the graphic that will
be used in the report header.
3. Under PH, write the headings that will be
used for the columns in the report as listed
in Table 1.
4. Start ArcMap and open crystal.mxd. Right-
click on the Central Region layer and
choose Open Attribute Table. Examine the
table data to determine which elds contain
8/3/2019 Taking Advantage of Crystal Report
http://slidepdf.com/reader/full/taking-advantage-of-crystal-report 2/5
www.esri.com ArcUser January–March 2004
Hands O
Continued on page 54
Crystal Reports provides two ways of working with a report underconstruction: the Design tab and the Preview tab. The sameformatting options are available on both tabs, and changes in oneview will update the other. Toggling between the two allows usersto iteratively rene a report.
The Design tab lets the user work with a virtual report. Insteadof showing actual data, it uses representations of the data—framesthat show the size, shape, and placements of the elds that will
appear in the report. During the design process, elds are placed inone of ve sections or headers. Table 1 lists the ve main areas onthe Design tab, describes the function of each, and lists the items orelds from the sample data that will be placed in each area of thesample report.
If the report includes a group, summary, or subtotal, twoadditional sections are added—the Group Header and the GroupFooter. The Group Header holds the group name eld and appearsonly once at the beginning of the group. The Group Footer holdssummary data for a group and appears once at the end of a group.
The Preview tab lets the user view the report as it will appearwhen printed. When Preview is initially chosen, Crystal Reportsretrieves data from the data sources, performs any necessary
calculations, and displays the data in the report format. If changesare made to the underlying data or formulas, the Preview should berefreshed so Crystal Reports will use an updated version of the data.On the Preview tab, two views are available—the Standard Previewand the Group Tree View. The Standard Preview displays the datain the report. The Group Tree View supplies a high-level look at thereport that is useful for navigating and visualizing large reports.
Fields are the building blocks of a report. On the Design tab, the
object frame for a eld shows its location, the data type (i.e., XXXfor text elds, $55,555 for currency elds), eld width by numberof characters displayed, and the size and font currently selected.Actual data from the selected data sources is displayed as formattedin the report when it is viewed on the Preview tab. Adding relateddatabase elds, such as rst and last names, as text objects insteadof separate elds ensures that formatting is consistent and eliminateswhite space between the elds by trimming the elds.
Summary information associates information on the report’sauthor, title, keywords, comments, subject, and any template usedin the report. Subtotals, grand totals, and summaries are addedas summary data that may relate to the entire report or just agrouping.
Introducing Crystal Reports
the data required for the report based on the
headings in the previous step. Table 1 lists
those elds under Details.
5. This report does not use groups so skip
sections GH1 and GF1. These were
included so that the worksheet could be
used for organizing other reports.
6. Under RF, list crystalmap.bmp, the image
of the project map that was exported from
ArcGIS.
7. Under PF, list ESRI logo and copyright text.
Generating a Rough Version of the ReportWith the reportʼs data sources and format
sketched out on the worksheet, the Crystal
Reports wizard in ArcGIS can be used to quickly
generate a simple report, which will be further
enhanced using Crystal Reports.
1. In the main menu, choose Tools > Reports
> Crystal Reports to start the ESRI Crystal
Reports wizard. The wizard can be used to
view an existing report or create a template
in addition to generating a new report. Click
the radio button next to Create a Report
Using These Layers or Tables. The wizard
pane displays the available map layers.
2. Check the Central Region layer and click
next. A personal geodatabase is created for
the report.
3. In the next panel consult the worksheet to
identify the elds that will be used in the
report. Select each eld and use the > button
to move the eld to the Fields to Display
box on the right side of the pane. Click Nex
after all elds listed under Details have been
moved.
4. This information wonʼt be grouped, so click
Next.
8/3/2019 Taking Advantage of Crystal Report
http://slidepdf.com/reader/full/taking-advantage-of-crystal-report 3/5
54 ArcUser January–March 2004 www.esri.com
5. The next section allows records to be
suppressed based on a lter applied to the
data. A lter is an expression that applies a
condition to the data in a eld so specic
records are selected in much the same way
that features are selected by attribute in
ArcMap. The records for all states in theregion will be included so a lter is not
needed. Click Next.
6. In the next pane, type the report title from
the RH section of the worksheet next to
Title Report. Highlight Table for the report
style and click Next.
7. In the nal pane, click the radio button next
to Edit With Crystal Reports Designer and
click Finish. This will save the report using
the title typed in the last pane and start
Crystal Reports so further renements can
be made to the report that cannot be done in
the wizard.
Reviewing and Rening the ReportOther items such as page headings, logos, and
copyright text for the page footer will be added
using Crystal Reports 9. The report is initially
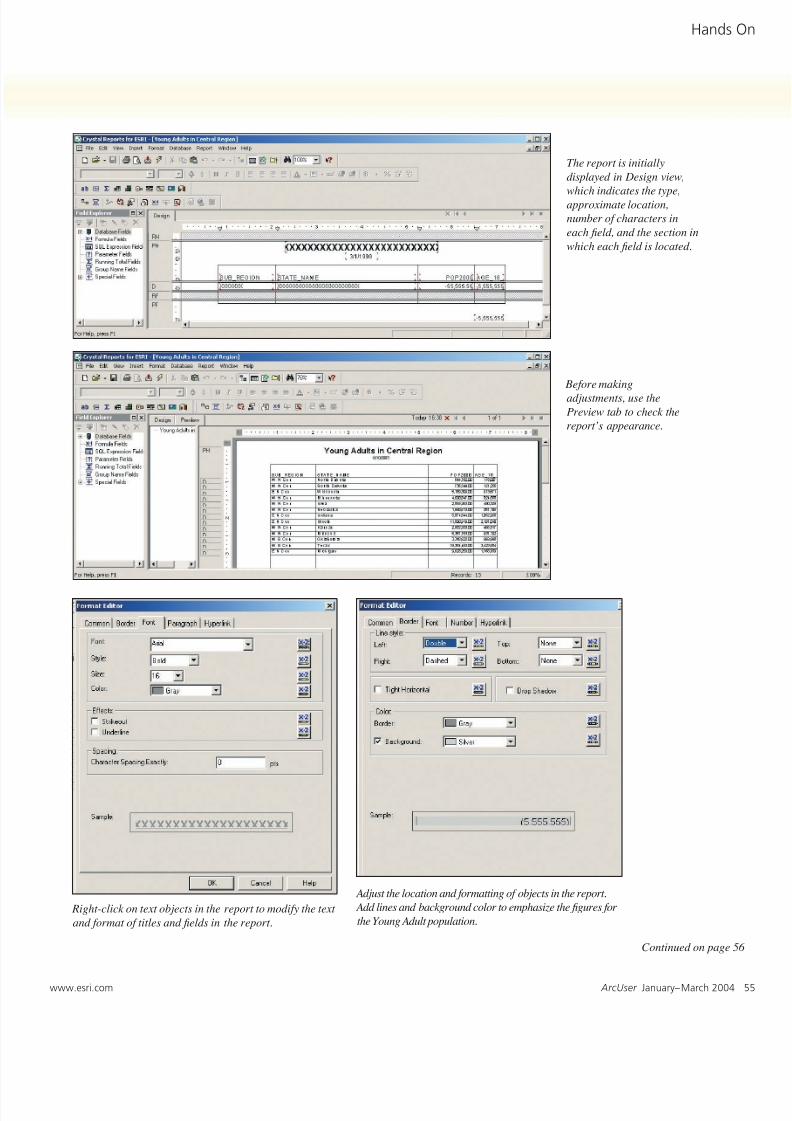
displayed in Design view, which indicates the
type, approximate location, number of characters
in each eld, and the section in which each eld
is located. Before making adjustments, use the
Preview tab to check the reportʼs appearance.
Report Header1. Choose File > Print Preview from the menu.
Crystal Reports accesses the actual data for
Taking Advantage of Crystal ReportsContinued from page 53
Use the Crystal Reports wizard in ArcGIS to
generate a rough version of a report that uses
data from an ArcMap document.
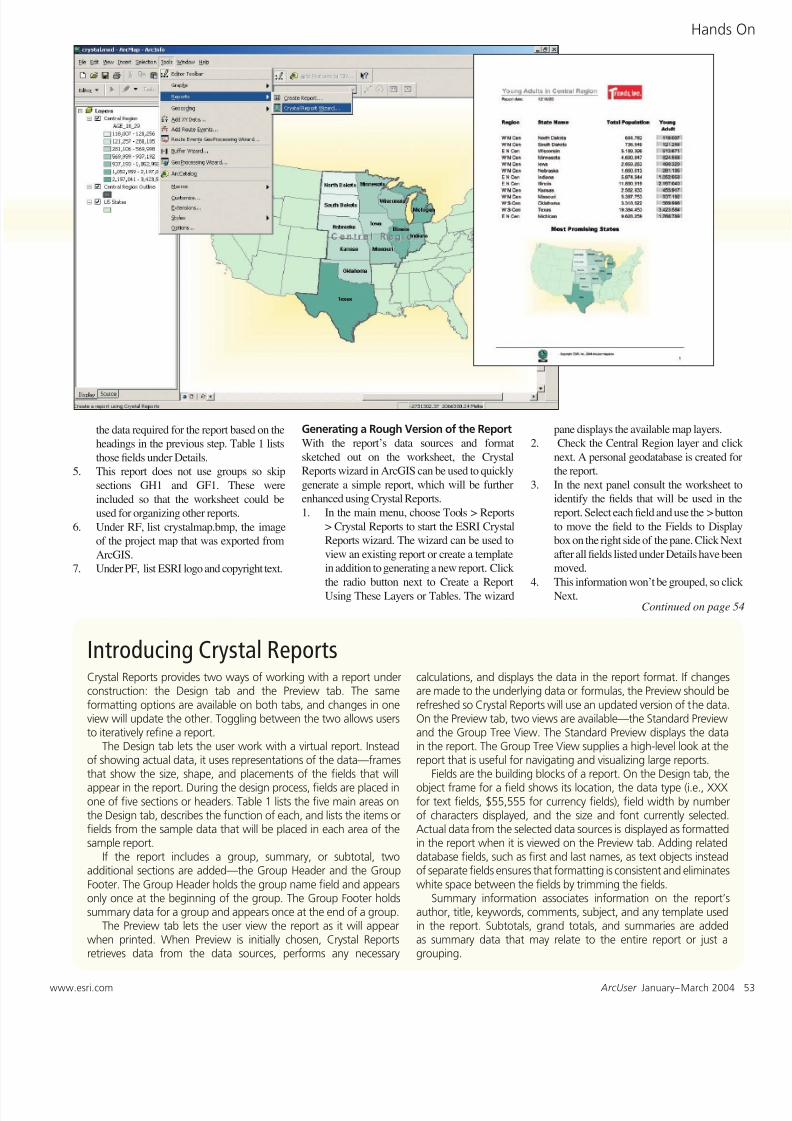
This tutorial uses data in an ArcMap document to generate a report using Crystal Reports.
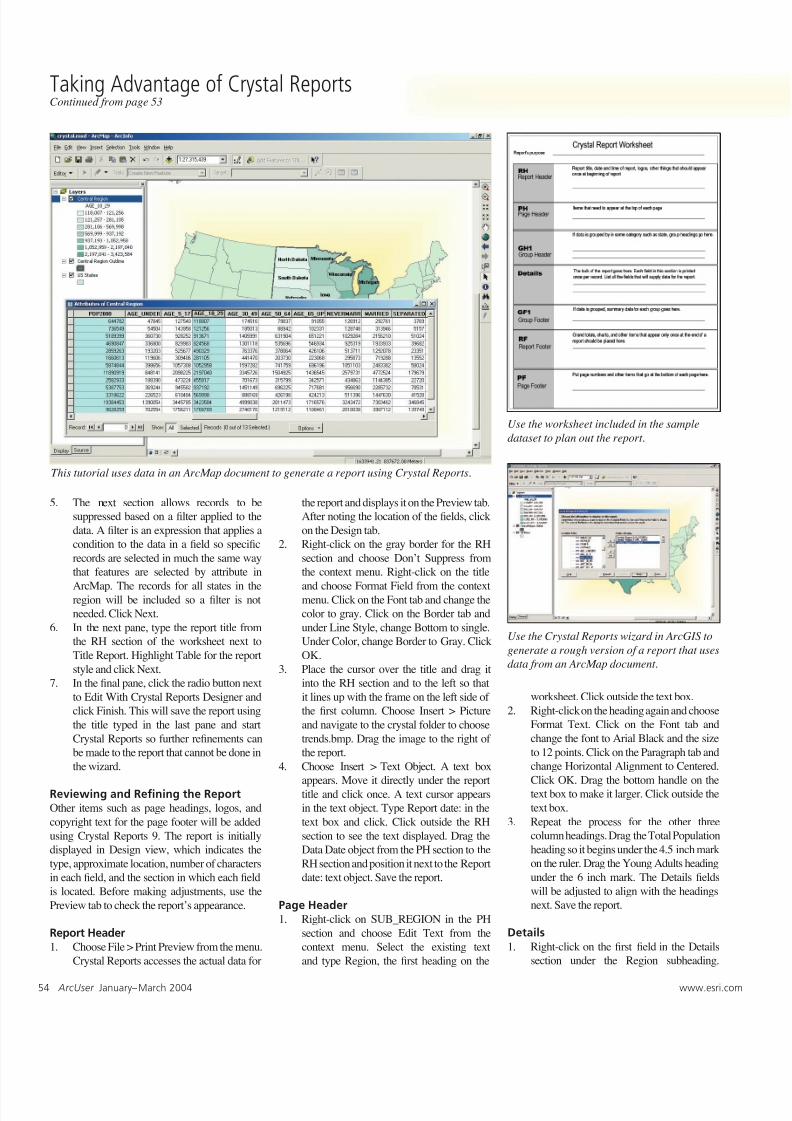
Use the worksheet included in the sample
dataset to plan out the report.
the report and displays it on the Preview tab.
After noting the location of the elds, click
on the Design tab.
2. Right-click on the gray border for the RH
section and choose Donʼt Suppress from
the context menu. Right-click on the title
and choose Format Field from the contextmenu. Click on the Font tab and change the
color to gray. Click on the Border tab and
under Line Style, change Bottom to single.
Under Color, change Border to Gray. Click
OK.
3. Place the cursor over the title and drag it
into the RH section and to the left so that
it lines up with the frame on the left side of
the rst column. Choose Insert > Picture
and navigate to the crystal folder to choose
trends.bmp. Drag the image to the right of
the report.
4. Choose Insert > Text Object. A text box
appears. Move it directly under the reporttitle and click once. A text cursor appears
in the text object. Type Report date: in the
text box and click. Click outside the RH
section to see the text displayed. Drag the
Data Date object from the PH section to the
RH section and position it next to the Report
date: text object. Save the report.
Page Header1. Right-click on SUB_REGION in the PH
section and choose Edit Text from the
context menu. Select the existing text
and type Region, the rst heading on the
worksheet. Click outside the text box.
2. Right-click on the heading again and choose
Format Text. Click on the Font tab and
change the font to Arial Black and the size
to 12 points. Click on the Paragraph tab and
change Horizontal Alignment to Centered.
Click OK. Drag the bottom handle on thetext box to make it larger. Click outside the
text box.
3. Repeat the process for the other three
column headings. Drag the Total Population
heading so it begins under the 4.5 inch mark
on the ruler. Drag the Young Adults heading
under the 6 inch mark. The Details elds
will be adjusted to align with the headings
next. Save the report.
Details1. Right-click on the rst eld in the Details
section under the Region subheading.
8/3/2019 Taking Advantage of Crystal Report
http://slidepdf.com/reader/full/taking-advantage-of-crystal-report 4/5
www.esri.com ArcUser January–March 2004
Hands O
The report is initially
displayed in Design view,
which indicates the type,approximate location,
number of characters in
each eld, and the section in
which each eld is located.
Before making
adjustments, use the
Preview tab to check the
reportʼs appearance.
Right-click on text objects in the report to modify the text
and format of titles and elds in the report.
Adjust the location and formatting of objects in the report.
Add lines and background color to emphasize the gures for
the Young Adult population.
Continued on page 56
8/3/2019 Taking Advantage of Crystal Report
http://slidepdf.com/reader/full/taking-advantage-of-crystal-report 5/5
56 ArcUser January–March 2004 www.esri.com
Hands On
Taking Advantage of Crystal ReportsContinued from page 55
Choose Format Field. Use the same
procedure used to format the PH section
text to change the font size to 12 points.
Click OK. Reformat the STATE_NAME
eld in the same fashion.
2. Select the POP2000 eld and drag it
under the Total Population heading. Use
the Format Field dialog box to change thefont size to 12. Click on the Number tab
and change the format to (1,123) to add a
comma and remove the zeroes. Click on the
Common tab and change the alignment to
Right. Click OK.
3. Select the AGE_18_29 eld and drag it
under the Young Adult heading. Use the
Format Field dialog box to change the
font size to 12. Click on the Number tab
and change the format to (1,123) to add a
comma and remove the zeroes. Click on the
Common tab and change the alignment to
Right. Click on the Border tab and change
the Line style to Double for Left, Dashedfor Right. Under Color, choose Gray for
Border. Check the box for Background:
and choose Silver for the background color.
Click OK. Drag out the object box to make
it large enough to display the reformatted
numbers.
4. Right-click on each of the vertical lines
that separate the columns, choose Format
Line, and check the Suppress box. Right-
click on the bounding box surrounding
all the Details elds, choose Format Box,
and check the Suppress box. If desired, use
the suppress option to eliminate the lines
between each eld. Save the report.
Report Footer1. Right-click on the gray border for the RF
section and choose Don t̓ Suppress from
the context menu. Click on the Design tab
and adjust the size of the report sections so
that there is a little space between the Details
section and the RF section and there is a
vertical four-inch space in the RH section.
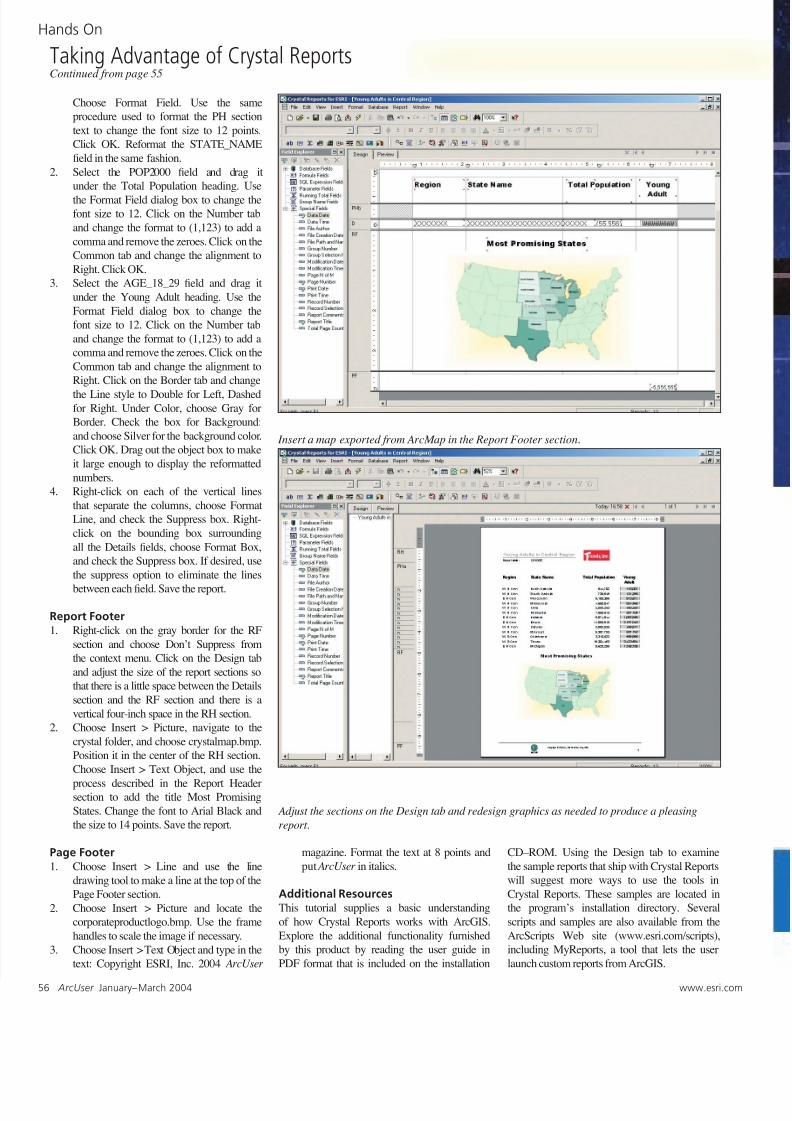
2. Choose Insert > Picture, navigate to the
crystal folder, and choose crystalmap.bmp.
Position it in the center of the RH section.
Choose Insert > Text Object, and use the
process described in the Report Headersection to add the title Most Promising
States. Change the font to Arial Black and
the size to 14 points. Save the report.
Page Footer1. Choose Insert > Line and use the line
drawing tool to make a line at the top of the
Page Footer section.
2. Choose Insert > Picture and locate the
corporateproductlogo.bmp. Use the frame
handles to scale the image if necessary.
3. Choose Insert > Text Object and type in the
text: Copyright ESRI, Inc. 2004 ArcUser
Adjust the sections on the Design tab and redesign graphics as needed to produce a pleasing
report.
Insert a map exported from ArcMap in the Report Footer section.
magazine. Format the text at 8 points and
put ArcUser in italics.
Additional ResourcesThis tutorial supplies a basic understanding
of how Crystal Reports works with ArcGIS.
Explore the additional functionality furnished
by this product by reading the user guide in
PDF format that is included on the installation
CD–ROM. Using the Design tab to examine
the sample reports that ship with Crystal Reports
will suggest more ways to use the tools in
Crystal Reports. These samples are located in
the programʼs installation directory. Several
scripts and samples are also available from the
ArcScripts Web site (www.esri.com/scripts),
including MyReports, a tool that lets the user
launch custom reports from ArcGIS.
Related Documents