Publications No. Issue Date INSTALLATION INSTRUCTIONS Accessory Application © 2020 American Honda Motor Co., Inc. – All Rights Reserved. AII14304-08 (2009) 1 of 17 08L91-TGS-1000-90 VERSION 1 TRAILER HARNESS P/N 08L91-TGS-100 2021 PASSPORT SEP 2020 PARTS LIST Control unit bracket Fuse box bracket Control unit harness Socket harness Control unit 2 Blade fuses, 20A (Contained in the subharness kit.) 30A Block fuse 2 Relays 3 Wire ties (May not be used) Wire tie with clip 2 Flange bolts, 6 x 16 mm 6 x 19 mm Shoulder bolt Ground bolt

Welcome message from author
This document is posted to help you gain knowledge. Please leave a comment to let me know what you think about it! Share it to your friends and learn new things together.
Transcript

Publications No.
Issue DateINSTALLATIONINSTRUCTIONS
Accessory Application
© 2020 American Honda Motor Co., Inc. – All Rights Reserved. AII14304-08 (2009) 1 of 1708L91-TGS-1000-90
VERSION 1TRAILER HARNESSP/N 08L91-TGS-100 2021 PASSPORT
SEP 2020
PARTS LISTControl unit bracket
Fuse box bracket
Control unit harness
Socket harness
Control unit
2 Blade fuses, 20A(Contained in the subharness kit.)
30A Block fuse
2 Relays
3 Wire ties(May not be used)
Wire tie with clip
2 Flange bolts, 6 x 16 mm
6 x 19 mm Shoulder bolt
Ground bolt

2 of 17 AII14304-08 (2009) © 2020 American Honda Motor Co., Inc. – All Rights Reserved.
2 Flange nuts
2 Aluminum tapes
Subharness kit
Accessory User’s Information Manual
TOOLS AND SUPPLIES REQUIRED
10 mm Open end wrenchRatchetPhillips screwdriver8 mm and 10 mm SocketsFileUtility knifeDiagonal cuttersIsopropyl alcoholShop towel5 mm Hex wrenchScissorsMasking tapeThe following tools are available through the Honda Tool and Equipment Program. On the iN, click on Service > Service Bay > Tool and Equipment Program, then enter the number under “Search.” Or, call 888-424-6857.• Trim Tool Set (T/N SOJATP2014)• Plastic Trim Tool (T/N SILTRIMTL10)
Illustration of the Trailer Harness on the Vehicle
INSTALLATION
NOTE:• If you are also installing the trailer hitch, install it after
you install the trailer hitch harness.• If you are also installing the backup sensor, rear
welcome lights, or hands-free access power tailgate, install them before you install the trailer hitch harness.
Customer Information: The information in this installation instruction is intended for use only by skilled technicians who have the proper tools, equipment, and training to correctly and safely add equipment to your vehicle. These procedures should not be attempted by “do-it-yourselfers.”
30A BLOCK FUSE
2 BLADE FUSES, 20A
SOCKET HARNESS
CONTROL UNIT
CONTROL UNIT HARNESS
2 RELAYS

© 2020 American Honda Motor Co., Inc. – All Rights Reserved. AII14304-08 (2009) 3 of 17
1. Open the tailgate.2. Disconnect the negative cable from the battery:
• Wrap a shop towel around the hood latch.
HOOD LATCH (Wrap with a shop towel.)
• Remove the front bulkhead cover.
• Remove the intake air tube.• Disconnect the negative cable from the battery.
FRONT BULKHEAD COVER
10 CLIPS
INTAKE AIR TUBE2 CLIPS

4 of 17 AII14304-08 (2009) © 2020 American Honda Motor Co., Inc. – All Rights Reserved.
3. Fold down the left and right rear seats, and move them forward.
4. Remove the cargo lid.
LEFT REAR SEAT
RIGHT REAR SEAT
Fold down.
Move forward.
Fold down.
Move forward.
CARGO LID
LEVER
2 CLIPS
5. Remove the tool box.
If the vehicle is equipped with accessory rear welcome lights, accessory backup sensors or accessory Hands-Free Access Power Tailgate, go to step 8; otherwise continue with step 6.
Without other accessories6. Remove the cover.
Turn.
TOOL BOX
2 KNOBS
LEFT REAR SIDE TRIM PANEL
COVER

© 2020 American Honda Motor Co., Inc. – All Rights Reserved. AII14304-08 (2009) 5 of 17
7. To remove the pocket, release retaining tabs 1, 2, and 3. Then, rock the pocket back and forth to release retaining tab 4. Go to step 15.
RETAINING TAB 1
RETAINING TAB 4
RETAINING TAB 3
RETAINING TAB 2
With accessory rear welcome lights, accessory backup sensors or accessory Hands-Free Access Power Tailgate8. Remove the left rear upper door sill trim.
9. Remove the rear trim panel.
2 CLIPS
LEFT REAR UPPER DOOR SILL TRIM
7 RETAINING TABS
4 RETAINING TABS
6 CLIPS
REAR TRIM PANEL

6 of 17 AII14304-08 (2009) © 2020 American Honda Motor Co., Inc. – All Rights Reserved.
10. Remove the two tie-down hooks.
LEFT REAR SIDE TRIM PANEL
2 TIE-DOWN HOOKS
2 COVERS2 SCREWS
4 RETAINING TABS
11. Using a plastic trim tool, pull the cover, and remove the cargo hook.
12. Apply masking tape to the left quarter pillar trim as shown.
LEFT REAR SIDE TRIM PANEL
COVER
BOLT
3 RETAINING TABS
COVER
SLOT
PLASTIC TRIM TOOL
CARGO HOOK
MASKING TAPE
LEFT QUARTER PILLAR TRIM
© 2020 American Honda Motor Co., Inc. – All Rights Reserved. AII14304-08 (2009) 7 of 17
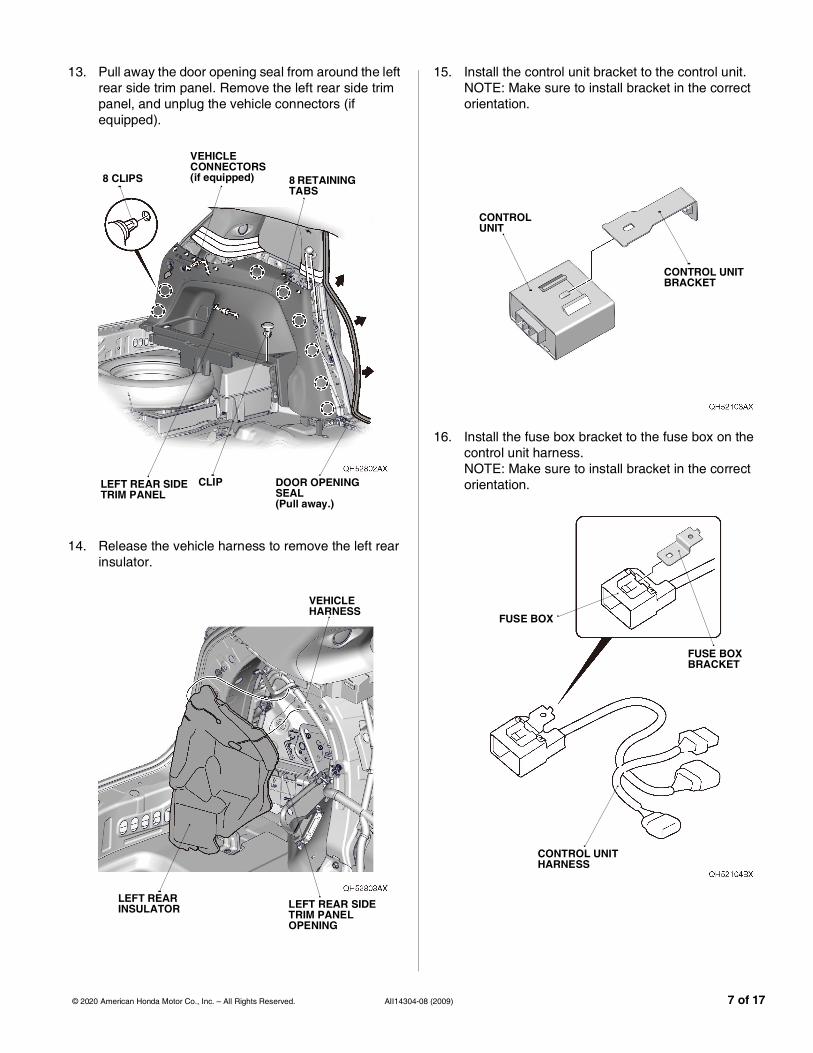
13. Pull away the door opening seal from around the left rear side trim panel. Remove the left rear side trim panel, and unplug the vehicle connectors (if equipped).
14. Release the vehicle harness to remove the left rear insulator.
8 RETAINING TABS
8 CLIPS
DOOR OPENING SEAL (Pull away.)
LEFT REAR SIDE TRIM PANEL
CLIP
VEHICLE CONNECTORS(if equipped)
LEFT REAR INSULATOR LEFT REAR SIDE
TRIM PANEL OPENING
VEHICLE HARNESS
15. Install the control unit bracket to the control unit.NOTE: Make sure to install bracket in the correct orientation.
16. Install the fuse box bracket to the fuse box on the control unit harness.NOTE: Make sure to install bracket in the correct orientation.
CONTROL UNIT
CONTROL UNIT BRACKET
FUSE BOX
FUSE BOX BRACKET
CONTROL UNIT HARNESS

8 of 17 AII14304-08 (2009) © 2020 American Honda Motor Co., Inc. – All Rights Reserved.
17. Install the control unit to the vehicle bracket with one 6 x 16 mm flange bolt.
If the vehicle is equipped with accessory rear welcome lights or accessory backup sensors, go to step 20; if the vehicle is equipped with accessory Hands-Free Access Power Tailgate, go to step 19; otherwise, continue with step 18.
LEFT REAR SIDE TRIM PANEL
CONTROL UNIT
VEHICLE BRACKET
6 x 16 mm FLANGE BOLT
Without other accessories18. Remove the tape to free the vehicle 14-pin
connector as shown. Go to step 21.
With accessory Hands-Free Access Power Tailgate19. Remove the tape to free the accessory hands-free
access harness 14-pin connector as shown. Go to step 21.
TAPE (Remove.)
LEFT REAR SIDE TRIM PANEL
VEHICLE 14-PIN CONNECTOR
TAPE (Remove.)
LEFT REAR SIDE TRIM PANEL OPENING
ACCESSORY HANDS-FREE ACCESS HARNESS 14-PIN CONNECTOR

© 2020 American Honda Motor Co., Inc. – All Rights Reserved. AII14304-08 (2009) 9 of 17
With accessory rear welcome lights or accessory backup sensors20. Remove the tape to free the accessory rear welcome
light harness 14-pin connector or accessory backup sensor harness 14-pin connector as shown.
TAPE (Remove.)
LEFT REAR SIDE TRIM PANEL OPENING
ACCESSORY REAR WELCOME LIGHT HARNESS 14-PIN CONNECTOR OR ACCESSORY BACKUP SENSOR HARNESS 14-PIN CONNECTOR
21. Route the control unit harness as shown.
22. Plug the control unit harness 12-pin connector into the control unit. Then, plug the vehicle 14-pin connector or other accessory harness 14-pin connector into the control unit harness 14-pin connector.
CONTROL UNIT
CONTROL UNIT HARNESS 12-PIN CONNECTOR
LEFT REAR SIDE TRIM PANEL
CONTROL UNIT HARNESS 14-PIN CONNECTOR
VEHICLE 14-PIN CONNECTOR OR OTHER ACCESSORY HARNESS 14-PIN CONNECTOR
CONTROL UNIT HARNESS

10 of 17 AII14304-08 (2009) © 2020 American Honda Motor Co., Inc. – All Rights Reserved.
23. If the vehicle is AWD model, secure the vehicle harness or other accessory harness to the vehicle harness with one wire tie. If the vehicle is 2WD model, secure the vehicle harness or other accessory harness to the vehicle bracket with one wire tie with clip as shown.
WIRE TIEAWD MODELS
WIRE TIE WITH CLIP
LEFT REAR SIDE TRIM PANEL
VEHICLE PANEL
VEHICLE BRACKET
2WD MODELS
VEHICLE HARNESS
VEHICLE HARNESS OR OTHER ACCESSORY HARNESS
VEHICLE HARNESS OR OTHER ACCESSORY HARNESS
24. Using isopropyl alcohol on a shop towel, thoroughly clean the vehicle panel where the aluminum tape will attach.
25. Using scissors, cut one piece of aluminum tape in half, and secure the 14-pin connectors to the vehicle panel with two pieces of aluminum tape as shown.
ALUMINUM TAPE(Cut in half.)
ALUMINUM TAPE
LEFT REAR SIDE TRIM PANEL
VEHICLE PANEL Clean with
isopropyl alcohol.
14-PIN CONNECTORS

© 2020 American Honda Motor Co., Inc. – All Rights Reserved. AII14304-08 (2009) 11 of 17
26. Remove the vehicle grommet from the vehicle panel.
If the vehicle is equipped with the trailer hitch, continue with step 27; otherwise, go to step 28.
VEHICLE PANEL
VEHICLE GROMMET
LEFT REAR SIDE TRIM PANEL
VEHICLE GROMMET(Do not reuse.)
TOP VIEW
27. Refer to the installation instructions of the trailer hitch, remove the trailer hitch.
28. Route the socket harness 8-pin connector and socket harness ground terminal through the vehicle panel hole, and install the socket harness grommet into the vehicle panel hole.NOTE:• Install the socket harness by holding the
grommet.• Make sure the grommet is seated properly.
VEHICLE PANEL HOLE
SOCKET HARNESS
SOCKET HARNESS GROMMET
SOCKET HARNESS 8-PIN CONNECTOR AND GROUND TERMINAL
SOCKET HARNESS GROMMET
VEHICLE PANEL
SECTION VIEW

12 of 17 AII14304-08 (2009) © 2020 American Honda Motor Co., Inc. – All Rights Reserved.
29. Using a utility knife, cut out the trailer hitch cover as shown. Remove any burrs.
TRAILER HITCH COVER
CUT LINE
FRONT VIEW
CUTTING AREA
TRAILER HITCH COVER Cut out.
REAR BUMPER
30. With the help of an assistant, bring the trailer hitch close to the vehicle, install the socket harness 7-pin socket to the trailer hitch with one 6 x 16 mm flange bolt, one 6 x 19 mm shoulder bolt, and two flange nuts.
31. Refer to the installation instructions of the trailer hitch, install the trailer hitch.
TRAILER HITCH
SOCKET HARNESS 7-PIN SOCKET
6 x 19 mm SHOULDER BOLT6 x 16 mm
FLANGE BOLT
2 FLANGE NUTS
SOCKET HARNESS 7-PIN SOCKET
TRAILER HITCH

© 2020 American Honda Motor Co., Inc. – All Rights Reserved. AII14304-08 (2009) 13 of 17
32. Secure the green tape on the socket harness to the trailer hitch with one wire tie.
33. Secure the socket harness to the rear bumper beam with one wire tie as shown.
TRAILER HITCH
SOCKET HARNESS
WIRE TIE
GREEN TAPE
WIRE TIEREAR BUMPER BEAM
SOCKET HARNESS
34. Install the two relays into the fuse box on the control unit harness.
LEFT REAR SIDE TRIM PANEL
2 RELAYSFUSE BOX
CONTROL UNIT HARNESS

14 of 17 AII14304-08 (2009) © 2020 American Honda Motor Co., Inc. – All Rights Reserved.
35. Secure the socket harness ground terminal and fuse box bracket to the vehicle bracket with one ground bolt.
LEFT REAR SIDE TRIM PANEL
FUSE BOX BRACKET
GROUND BOLT
VEHICLE BRACKET
SOCKET HARNESS GROUND TERMINAL
OPPOSITE SIDE VIEW
36. Using isopropyl alcohol on a shop towel, thoroughly clean the vehicle panel where the aluminum tape will attach.
37. Using scissors, cut one piece of aluminum tape in half, and secure the control unit harness to the vehicle panel with only one piece of aluminum tape.
ALUMINUM TAPE (Cut in half.)
VEHICLE PANEL Clean with isopropyl alcohol.
LEFT REAR SIDE TRIM PANEL
CONTROL UNIT HARNESS

© 2020 American Honda Motor Co., Inc. – All Rights Reserved. AII14304-08 (2009) 15 of 17
38. Plug the socket harness 8-pin connector into the control unit harness 8-pin connector.
39. Using isopropyl alcohol on a shop towel, thoroughly clean the vehicle panel where the aluminum tape will attach.
40. Secure the 8-pin connectors to the vehicle panel with one piece of aluminum tape cut in step 37.
SOCKET HARNESS 8-PIN CONNECTOR
CONTROL UNIT HARNESS 8-PIN CONNECTOR
Clean with isopropyl alcohol.
ALUMINUM TAPE(Cut in step 37.)
VEHICLE PANEL
LEFT REAR SIDE TRIM PANEL
8-PIN CONNECTORS
41. In the engine compartment, remove the cover from the sub fuse box.
42. Plug the two 20A blade fuses and the 30A block fuse into the sub fuse box.
3 RETAINING TABSCOVER
SUB FUSE BOX
SUB FUSE BOX
2 BLADE FUSES, 20A
30A BLOCK FUSE
FRONT VIEW
2 BLADE FUSES, 20A
30A BLOCK FUSE
SUB FUSE BOX

16 of 17 AII14304-08 (2009) © 2020 American Honda Motor Co., Inc. – All Rights Reserved.
43. Check that all wire harnesses are routed properly and all connectors are plugged in.
44. Install all removed parts except for the front bulkhead cover and the intake air tube.
45. Connect the negative cable to the battery.46. Install the front bulkhead cover and the intake air
tube.47. Press and hold the audio unit power button for 2
seconds to restore the audio and navi (if equipped) system functions.
48. Set the clock on vehicles without navigation.49. If necessary, restore the systems back to normal
operation as described in the service information.
Check the Operation of the Trailer Harness
50. Refer to the “TRAILER HARNESS TESTER”, and perform the “Trailer Harness Circuit Check”.

© 2020 American Honda Motor Co., Inc. – All Rights Reserved. AII14304-08 (2009) 17 of 17
How to Handle Subharness
This subharness is designed for use with the installation of an electric brake controller. Refer to the vehicle Owner’s Manual for the detailed information about handling this subharness.
Give a copy of this page to your customer.
SUBHARNESS
Related Documents