Slim Cooker Installation & Operating Instructions INSTALLATION & OPERATING INSTRUCTIONS STAINLESS STEEL GAS WOK COOKER S3012NG, S3012PG, 3012NG & 3012PG-B S7012NG, S7012PG ,7012NG & 7012PG-B FEATURES Electronic ignition system incorporating piezo-electric elements. S3012NG, S3012PG, S7012NG and S7012PG with flame failure safety device. Gas supply will be cut off automatically if the burner flame extinguished accidentally to prevent gas leakage. Wok burner suitable for all types of cooking from simmering to stir-frying. High-energy, high-efficiency burner reduces gas consumption. Large trivet for greater cooking flexibility. Easy to clean stainless steel top and control panel. IMPORTANT Read this instruction manual in its entirety carefully and retain for future reference. Familiarise yourself with the appliance before connecting the appliance to the gas cylinder THE APPLIANCE MUST BE ASSEMBLED IN COMPLIANCE WITH MANUFACTURER’S INSTRUCTIONS. SAI GLOBAL APPROVAL NO.: GSCS20074 Web: www.auscrown.com

Welcome message from author
This document is posted to help you gain knowledge. Please leave a comment to let me know what you think about it! Share it to your friends and learn new things together.
Transcript

Slim Cooker Installation & Operating Instructions
INSTALLATION & OPERATING INSTRUCTIONS
STAINLESS STEEL GAS WOK COOKER
S3012NG, S3012PG, 3012NG & 3012PG-B
S7012NG, S7012PG ,7012NG & 7012PG-B
FEATURES Electronic ignition system incorporating piezo-electric elements. S3012NG, S3012PG, S7012NG and S7012PG with flame failure safety device. Gas supply will be cut off
automatically if the burner flame extinguished accidentally to prevent gas leakage. Wok burner suitable for all types of cooking from simmering to stir-frying. High-energy, high-efficiency burner reduces gas consumption. Large trivet for greater cooking flexibility. Easy to clean stainless steel top and control panel. IMPORTANT Read this instruction manual in its entirety carefully and retain for future reference. Familiarise yourself with the appliance before connecting the appliance to the gas cylinder THE APPLIANCE MUST BE ASSEMBLED IN COMPLIANCE WITH MANUFACTURER’S
INSTRUCTIONS.
SAI GLOBAL APPROVAL NO.: GSCS20074
Web: www.auscrown.com

Slim Cooker Installation & Operating Instructions
WARNING
Important. Read these instructions carefully before use. Familiarise yourself with the appliance before connecting it to its gas supply. Keep these instructions for future reference.
It is the operator’s responsibility to check the appliance is properly assembled and maintained Do not lay the gas cylinder down – cylinder should be stored / used in the upright position Hazardous fire or explosion may result if instructions are ignored. Leak test all connections before use and after each cylinder refill Never check for leaks with a match or open flame Do not store or use petroleum products or other flammable vapours and liquids in the vicinity of this
appliance Use only in well ventilated areas, but not facing against any draught. WARNING! Carbon monoxide hazard – this appliance can produce carbon monoxide which
has no odour. Using the appliance in an enclosed space (for example, boats, caravan, tent, car, and mobile home) may cause death.
Do not move the appliance during operation Avoid twisting or kinking of the flexible gas hose Do not use cooker near any air opening(s) into buildings (i.e. windows, doorways, ventilation ducts
etc.) Leak test all connections before use and after each cylinder refill – refer “How to Check for Gas
Leaks” in this manual. NEVER check for leaks with a match or open flame. An LP cylinder not connected for use in this appliance shall not be stored near this appliance. Ensure the gas hose is not placed under the appliance or allowed to contact any hot surfaces of the
appliance This appliance must not be modified or changed in any way. Disconnect the gas cylinder from the wok cooker prior to storage. It is also recommended that the
gas cylinder be stored outdoors in a well-ventilated area. Do not use any other gas type except the one specified on the label/data plate. Use only the gas regulator specified in this instructions page or advised by your dealer. An inferior or
a damaged regulator could cause an incomplete combustion or other troubles with the burner. Do not leave the burner unattended when in use. Always turn off the burner and the main gas valve
after each use. Do not use the burner as a space heater under any circumstance. Do not cover or blow out the flames. This could cause gas leaking. Always keep flammable materials away from the burner. Make sure that you use cooking woks, pots or pans that sit firmly on the trivet. Do not use pots that
are too small / large for the burner size, as they could be unstable on the trivet. If abnormal combustion is observed when in use, turn off the main gas valve and examine the burner
(Refer to Trouble-Shooting Guide). Do not spray aerosols in the vicinity of the burner when in use. Children and adults should be alerted to the high temperatures of the cooker and its effect on
surrounding surfaces, clothing and skin Children or the elderly should be supervised when near this appliance Do not hang clothing or other flammable material on or near this appliance If the cooker fails to operate correctly, contact place of purchase or their authorised agent for advice
and service. Do not continue to use the appliance and do not attempt repair yourself. Make sure the gas inlet hose is clean and not blocked before connecting the gas. Always ensure that adequate fresh air is provided for ventilation. The cooker must only be operated on a level, firm non-combustible surface. This cooker shall not be used in a position where it could create a fire hazard and the minimum
clearances to combustible materials must be observed, as described below. A spider web can interfere with the flow of gas / air into the burner. The opening into the burner
directly in front of the gas valve should be checked regularly and cleared with a pipe cleaner or similar length device.
Do not attempt to repair the burner yourself.

Slim Cooker Installation & Operating Instructions
FOR YOUR SAFETY – WHAT TO DO IF YOU SMELL GAS Turn off gas supply at bottle immediately and extinguish all naked flames. Remove the appliance from any potential ignition sources and do not operate any electrical equipment near the
appliance (e.g.: light switches, power points, mobile phones, pagers, other appliances) Allow sufficient time for any accumulated propane gas to disperse Check for damage to seals and hoses and if no damage is visible, ensure fittings are adequately tight then
check for gas leaks using soapy water as detailed in this manual in a well ventilated area. Do not try to detect leaks using a flame
If odour / gas leak persists, turn off the gas supply at the gas cylinder and contact an authorized service agent. HOW TO CHECK FOR GAS LEAKS
To check for leaks, open the gas supply at the bottle with the appliance gas valves in the OFF position (DO NOT SWITCH APPLIANCE ON) and check for leakage by brushing a solution of soapy detergent and water onto the connection points at the bottle and the appliance. If bubbling is evident (it may take more than 30 seconds to appear) this indicates a gas leak is present. If disassembling, cleaning, reassembling and tightening the connection does not rectify the leak you should close the gas cylinder valve and consult the place of purchase for assistance.
Turn on the gas and check for gas leakage at all joints with soapy water or other approved methods.
PROCEDURES FOR GAS LEAKAGE The strong and distinctive odour of gas may make you aware of a gas leak. If you suspect a gas leak: Immediately turn off the gas supply at the gas bottle; Turn off all appliances and pilot lights; Do not allow gas to build up in the area. Do not use any naked flame or other ignition source (such as light switches, power points, mobile phones and
pagers); Do not operate any electrical equipment in the vicinity of a gas leak; Contact your licensed gas fitter to repair the leak and re-light the appliance.
NEVER attempt to repair the appliance yourself. IT MUST BE SERVICED AND REPAIRED BY A LICENSED PLUMBER OR GAS FITTER
PARTS INDEX
3012PG-B, 3012NG, S3012PG & 3012NG
7012PG-B, 7012NG, S7012PG & S7012NG
No: Part Name
1 Control Knob
2 Trivet
3 Tray
4 Gas Inlet
5 Inner Burner
6 Outer Burner
7 Leg
8 Body
9 Safety Device (S3012PG, S3012NG, S7012PG & S7012NG only)

Slim Cooker Installation & Operating Instructions
PREPARE TO ASSEMBLE THE APPLIANCE
Check for damage on the appliance. If damage occurs, please contact Austcrown or your dealer. Do not use a damaged appliance. WARNING! It is hazardous to use a damaged appliance. Positioning the Appliance Only use the appliance in well ventilated areas. The appliance must be sited with at least a 500 mm gap between both sides and the rear of the appliance and at least 1 m from the trivet of the appliance and any combustible or non-combustible materials above the appliance. When the burner is assembled abutting a side or rear wall, the wall must be of non-combustible material, e.g. ceramic tiles. If surrounding walls are constructed with a combustible material, contact your local Gas Authority for information on clearances required. The appliance must be secured to minimize movement and strain on the appliance connection. The appliance must be used on a level, stable, non-flammable surface when in use. If used on the ground in an area with long grass ensure that the grass is not long enough to enter under the appliance or at the sides as this could result in the grass catching fire. It is important that the ventilation openings of the appliance are not obstructed. The appliance should be protected from direct draughts and be positioned or protected against direct penetration by any trickling water (e.g. rain). Gas Type and Gas Pressure Do not use any other gas type except the one specified on the label/data plate. For LP Gas Model These models of appliances are only suitable for use with propane gas only and are set to operate under gas pressure of 2.75kPa. For Natural Gas Model These models of appliances are only suitable for use with natural gas only and are set to operate under gas pressure of 1.00kPa. The use of any equivalent Australia Approved hose/regulator assembly compliant with the above requirements
is acceptable. WARNING! It may hazardous to attempt to use other types of gas with this appliance. Gas Cylinder (For LP Gas Model only) Only cylinders which comply with AS2030.1 should be used. The appliance is suitable for use with gas cylinders of 3.9 kg to 15 kg gas capacity. The gas cylinder should not be dropped or handled roughly! If the stove is not in use, the cylinder must be disconnected. Replace the protective cap on the cylinder after disconnecting the cylinder from the stove. WARNING! It may hazardous to use damaged or dented gas cylinder. Cylinders must be stored outdoors in an upright position and out of the reach of children. The cylinder must never be stored under direct sunlight or where temperatures can reach over 50C. Do not store the cylinder near flames, pilot lights or other sources of ignition. DO NOT SMOKE around the cylinders. WARNING! It may hazardous to store gas cylinder in an enclosed place. Hose Use only gas hose complies with AS/NZS1869. The appliance required a ‘Class C’ Gas hose, with a ¼” BSPF threaded swivel nut with 60º inverted flare connected to the gas inlet of the appliance. The hose should be secured to the regulator and the appliance with spanner. Use the hose with the right threads, DO NOT use adaptors. WARNING! It may hazardous to use wrong type of hose. The life expectancy of the hose is estimated as 5 years. It is recommended that it the hose is changed every 5 years.

Slim Cooker Installation & Operating Instructions
The use of the wrong hose is unsafe; always check that you have the correct items before operating the stove. The hose used must conform to the relevant standard for the country of use. The length of the hose must not excess 1.5 metres (maximum). A worn or damaged hose must be replaced. Ensure that the hose is not obstructed, kinked, or in contact with any part of the stove other than at its connection. WARNING! It may hazardous to use a damaged hose. Regulator Use only an approved regulator. The appliance must be used with a LOW pressure regulator with output pressure of 2.75kPa for Propane Gas Model or 1.0kPa for Natural Gas Model. Use the regulator with the right threads. DO NOT use adaptors. The use of any equivalent certified hose/regulator assembly compliant with the above requirements is acceptable. WARNING! It may hazardous to use wrong type of regulator. Storage of Appliance Always wait for the appliance to cool down before attempting to transport or store. Storage of a stove for transport or indoors is only permissible if the cylinder is disconnected and removed from the appliance. When the appliance is not to be used for a period of time it should be stored in its original packaging and stored in a dry dust free environment.
ASSEMBLY INSTRUCTIONS
The manufacturer and their appointed agents decline any responsibility in the case of assembly not being in accordance with these instructions. You will require a Philips head screwdriver and adjustable wrench for assembly purposes and you should also refer to exploded view / parts list as necessary. CAUTIONS
The burner must be installed only by a licensed gas fitter/plumber. Do not install a damaged burner. Contact your service agent or the supplier. Check the gas type of the burner and make sure the burner is connected to the gas type specified on
the data plate. Before connection, ensure that there is no debris caught in the head of the gas cylinder, hose, burner
and burner ports. Please always ensure that adequate fresh air ventilation is provided. The burner must only be used on a level firm non-combustible surface. The use of an adjustable wrench is required.
CLEARANCES
This cooker must be placed so that a vertical clearance of at least 600mm is maintained between its burners and any combustible material. Where it is not practical, the underside of any combustible material with a vertical clearance of less than 600mm above a burner should be protected by mill-board at least 6mm thick which is covered with sheet metal not less than 0.4mm thick, or protected by an equivalent material extending at least 225mm beyond the sides of the cooker. In either case, the vertical clearance above the cooker burner should not be less than 450mm.
The minimum clearance from the cooker to rear or sides of combustible surfaces must be no less than 225mm.
When the cooker is installed abutting a side or rear wall, the wall must be of non-combustible material, e.g. ceramic tiles. If surrounding walls are constructed with a combustible material, contact your local Gas Authority for information on clearances required.
Combustible material Range hood
Slim Cooker Installation & Operating Instructions
LPG INSTALLATION 1. Remove all packing material and literature from the cooker. 2. Remove the plastic laminate film off the top surface of the cooker. 3. The hose assembly should not be assembled beneath the cooker, under direct sunlight and close to other
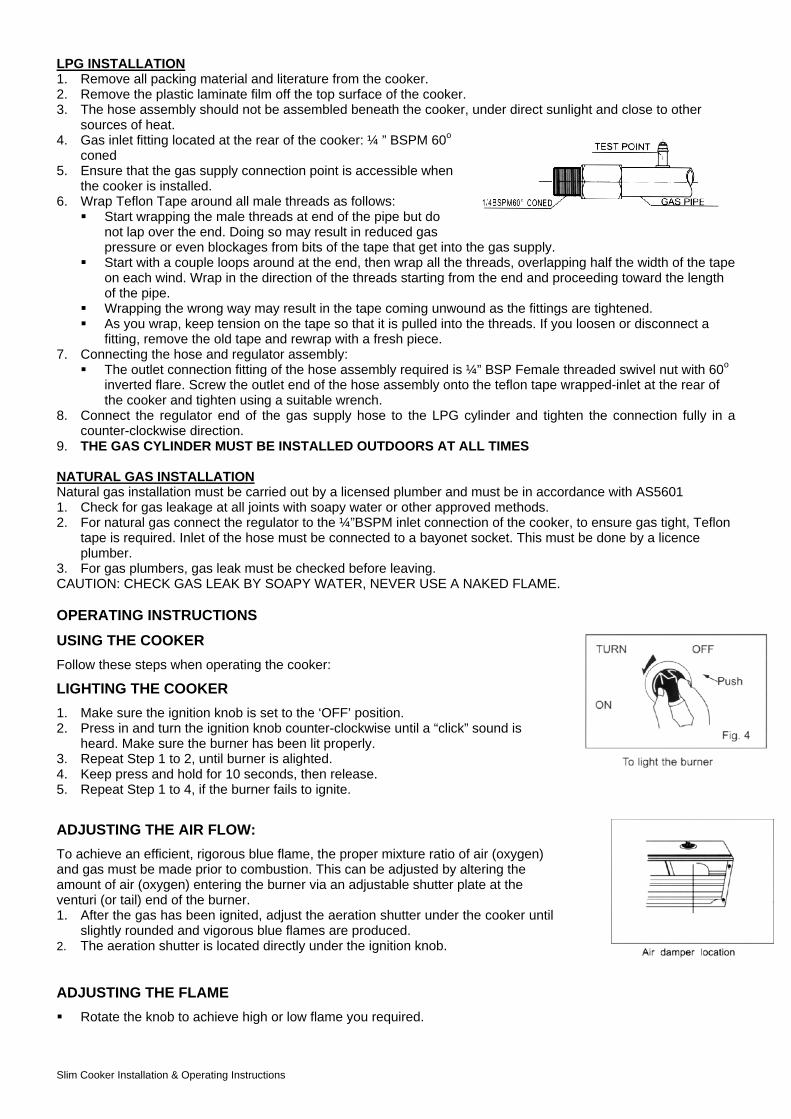
sources of heat. 4. Gas inlet fitting located at the rear of the cooker: ¼ ” BSPM 60o
coned 5. Ensure that the gas supply connection point is accessible when
the cooker is installed. 6. Wrap Teflon Tape around all male threads as follows:
Start wrapping the male threads at end of the pipe but do not lap over the end. Doing so may result in reduced gas pressure or even blockages from bits of the tape that get into the gas supply.
Start with a couple loops around at the end, then wrap all the threads, overlapping half the width of the tape on each wind. Wrap in the direction of the threads starting from the end and proceeding toward the length of the pipe.
Wrapping the wrong way may result in the tape coming unwound as the fittings are tightened. As you wrap, keep tension on the tape so that it is pulled into the threads. If you loosen or disconnect a
fitting, remove the old tape and rewrap with a fresh piece. 7. Connecting the hose and regulator assembly:
The outlet connection fitting of the hose assembly required is ¼” BSP Female threaded swivel nut with 60o
inverted flare. Screw the outlet end of the hose assembly onto the teflon tape wrapped-inlet at the rear of the cooker and tighten using a suitable wrench.
8. Connect the regulator end of the gas supply hose to the LPG cylinder and tighten the connection fully in a counter-clockwise direction.
9. THE GAS CYLINDER MUST BE INSTALLED OUTDOORS AT ALL TIMES NATURAL GAS INSTALLATION Natural gas installation must be carried out by a licensed plumber and must be in accordance with AS5601 1. Check for gas leakage at all joints with soapy water or other approved methods. 2. For natural gas connect the regulator to the ¼”BSPM inlet connection of the cooker, to ensure gas tight, Teflon
tape is required. Inlet of the hose must be connected to a bayonet socket. This must be done by a licence plumber.
3. For gas plumbers, gas leak must be checked before leaving. CAUTION: CHECK GAS LEAK BY SOAPY WATER, NEVER USE A NAKED FLAME. OPERATING INSTRUCTIONS
USING THE COOKER
Follow these steps when operating the cooker:
LIGHTING THE COOKER
1. Make sure the ignition knob is set to the ‘OFF’ position. 2. Press in and turn the ignition knob counter-clockwise until a “click” sound is
heard. Make sure the burner has been lit properly. 3. Repeat Step 1 to 2, until burner is alighted. 4. Keep press and hold for 10 seconds, then release. 5. Repeat Step 1 to 4, if the burner fails to ignite.
ADJUSTING THE AIR FLOW:
To achieve an efficient, rigorous blue flame, the proper mixture ratio of air (oxygen) and gas must be made prior to combustion. This can be adjusted by altering the amount of air (oxygen) entering the burner via an adjustable shutter plate at the venturi (or tail) end of the burner. 1. After the gas has been ignited, adjust the aeration shutter under the cooker until
slightly rounded and vigorous blue flames are produced. 2. The aeration shutter is located directly under the ignition knob.
ADJUSTING THE FLAME
Rotate the knob to achieve high or low flame you required.

Slim Cooker Installation & Operating Instructions
SHUTTING DOWN THE COOKER
1. Turn the LP cylinder gas valve fully clockwise to “OFF” position. When the appliance is not in use/stored, the gas must always be turned off at the cylinder to ensure there is no gas flow and that no gas is present in the regulator, hose and appliance.
2. Turn the ignition knob to the OFF position until a “click” sound is heard. Make sure there is no flow of gas through the burner.
RESTART COOKER AFTER FLAME FAILURE SAFETY DEVICE
ACTIVATED
If case the burner flame accidentally extinguished. The flame failure safety device will be set off and cut off the gas supply to the burner head to prevent gas leakage. To restart the cooker, please follow the procedures below 1. Turn off the cooker. 2. Wait for 5 minutes. 3. Re-ignite the cooker (See Section “LIGHTING THE COOKER”). CAUTION
Turning off the cooker

Slim Cooker Installation & Operating Instructions
MAINTENANCE
Allow the cooker to cool after use before performing any cleaning or maintenance work. Do not move the appliance or attempt any maintenance within 30 minutes of cooker being used.
Burner ports may be cleaned with either compressed air or pipe cleaner or similar device. Any spider’s web formed in the burner inlet (venturi) must be cleared with a pipe cleaner or similar length
device. Caution: Operation of the burner with a web in the inlet may result in leakage and/or ignition of gas at the burner inlet.
It is also recommended that the hose assembly and regulator inlet fitting seals be checked for damage, abrasion, cracking or displacement before each use. PVC hose assemblies may harden with age and should be replaced if this occurs. If a replacement part or assembly is required please contact place of purchase or an authorised agent for advice.
Periodic service should be performed at intervals not exceeding 6 months by an authorised service agent or more often if required
Keep the cooker clean regularly by wiping with a damp cloth. Before checking and maintaining the cooker, make sure the main gas valve is turned off. Make sure the burner head(s) is/are clean before using the cooker. Use a steel wire brush to clean the burner if
it is heavily clogged. If the burner is heavily clogged, do not use the unit. Contact your authorised plumber or gas fitter to carry for cleaning and maintenance. Do not attempt to remove the burner unit(s) yourself.
Check the gas pipes regularly for wear or leaks. If any wear or leaks are presents, please contact an authorised plumber / gasfitter for repair.
Do not touch the burner, trivet, tray etc. immediately after use or when in use. This could burn your hand. Clean the trivet and tray after each use. Always wipe off spills, do not leave spills to dry on the surface of the
trivet, tray or burner. Inspect the electrodes carefully after you have removed the tray receptacle and if soiled, clean with a dry cloth. ABNORMAL OPERATION
You should cease using the appliance and seek service from an authorised agent if any of the following are observed during operation of the appliance: Carbon build up on the appliance or pans, Excessive yellow tipping of the burner flame, Flames lifting off the burner ports or flashing back. Flame abnormality may be due to gas supply restriction or blockage of burner ports or venturi. Gas spillage may occur if the burner inlet is partially blocked by a spider’s web, the gas may ignite around the burner inlet. It is recommended that an authorised person/service agent perform all maintenance.
If the cooker fails to operate correctly, contact place of purchase or authorised agent for advice and service. DO NOT ATTEMPT REPAIRS YOURSELF. CONVERSION These cookers are not convertible; they must be used with the gas specified.

Slim Cooker Installation & Operating Instructions
SPECIFICATION TABLE
Product images
Model S7012NG S7012PG 7012NG 7012PG-B S3012NG S3012PG 3012NG 3012PG-B
Gas type Natural propane Natural propane Natural propane Natural propane
Outer Ring 12.00MJ/hr 9.10MJ/hr 12.00MJ/hr 9.10MJ/hr 12.00MJ/hr 9.10MJ/hr 12.00MJ/hr 9.10MJ/hr
Inner Ring 2.60MJ/hr 2.30MJ/hr 2.60MJ/hr 2.30MJ/hr 2.60MJ/hr 2.30MJ/hr 2.60MJ/hr 2.30MJ/hr Heat
Capacity Total 29.20MJ/hr 22.80MJ/hr 29.20MJ/hr 22.80MJ/hr 14.60MJ/hr 11.40MJ/hr 14.60MJ/hr 11.40MJ/hr
Outer Ring 0.27m3/hr 0.21Kg/hr 0.27m3/hr 0.21Kg/hr 0.27m3/hr 0.21Kg/hr 0.27m3/hr 0.21Kg/hr
Inner Ring 0.05m3/hr 0.04Kg/hr 0.05m3/hr 0.04Kg/hr 0.05m3/hr 0.04Kg/hr 0.05m3/hr 0.04Kg/hr Gas
Cnsmptn Total 0.64m3/hr 0.50Kg/hr 0.64m3/hr 0.50Kg/hr 0.32m3/hr 0.25Kg/hr 0.32m3/hr 0.25Kg/hr
Outer Ring 1.25mm 0.80mm 1.25mm 0.80mm 1.25mm 0.80mm 1.25mm 0.80mm
Inner Ring 0.60mm 0.40mm 0.60mm 0.40mm 0.60mm 0.40mm 0.60mm 0.40mm Injector
Size Pilot 0.65mm 0.45mm 0.65mm 0.45mm 0.65mm 0.45mm 0.65mm 0.45mm
Burner size 120mm 120mm 120mm 120mm 120mm 120mm 120mm 120mm
Gas pressure 1.0kpa 2.75kpa 1.0kpa 2.75kpa 1.0kpa 2.75kpa 1.0kpa 2.75kpa
Safety Device YES YES N/A N/A YES YES N/A N/A
Net weight 6.06kg 5.76kg 3.18kg 3.12kg 3.00kg
Dimensions W×D×H 690mm*380mm*109mm 280mm*380mm*109mm
Ignition system Auto Piezo Electric Ignition
Gas fitting 1/4" BSPM 60°conned
SAI Global Approval No. GSCS20074
Country of origin China
Austcrown Pty. Ltd and their appointed agents will not be liable in respect of any misuse, which is not in accordance with the instructions and precautions specified in this booklet. TROUBLESHOOTING
Problem Possible Cause Solution
No Ignition
Main Gas Valve is not turned on. Air trapped in the gas hose. Electronic ignition is wet or dirty. The safety valve is not open.
Turn off the gas valve once and then turn it on fully. Repeat the ignition process until all air in the hose is purged completely. Clean and wipe the electrode with a dry cloth. Push in the ignition knob and turn it anti-clockwise until a click sound is heard. Ensure the burner has been lit. Press the ignition knob for 3-4 seconds and release the knob.
Gas Leaking Failure of the gas valve. Contact your dealer for a service/repair.
DO NOT ATTEMPT TO REPAIR IT YOURSELF.
Incomplete Combustion
(Yellow Flame)
Aeration shutters are not properly adjusted. Burner is not properly assembled. Flame holes of the burner are clogged. Nozzle is clogged.
Follow procedures for Adjusting the Airflow Position the burner body properly. Clean the burner head and the burner cap. Contact your dealer for a service/repair. DO NOT ATTEMPT TO REPAIR IT YOURSELF.

Slim Cooker Installation & Operating Instructions
AUSTCROWN PTY LTD 18 / 634 Mitcham Road, VERMONT VIC 3133, AUSTRALIA Fax: +61 3 9873 5311
Email: [email protected] Web: www.auscrown.com SERVICE AGENTS For services and repairs, contact our service agent or any other authorised gas fitter and plumber. Progress Plumbing and Gas Maintenance 16 Raymond Street, BLACKBURN VIC 3130 Ph: 9878 5845 Mobile: 0418 379 252

AUSCROWN
www.auscrown.com
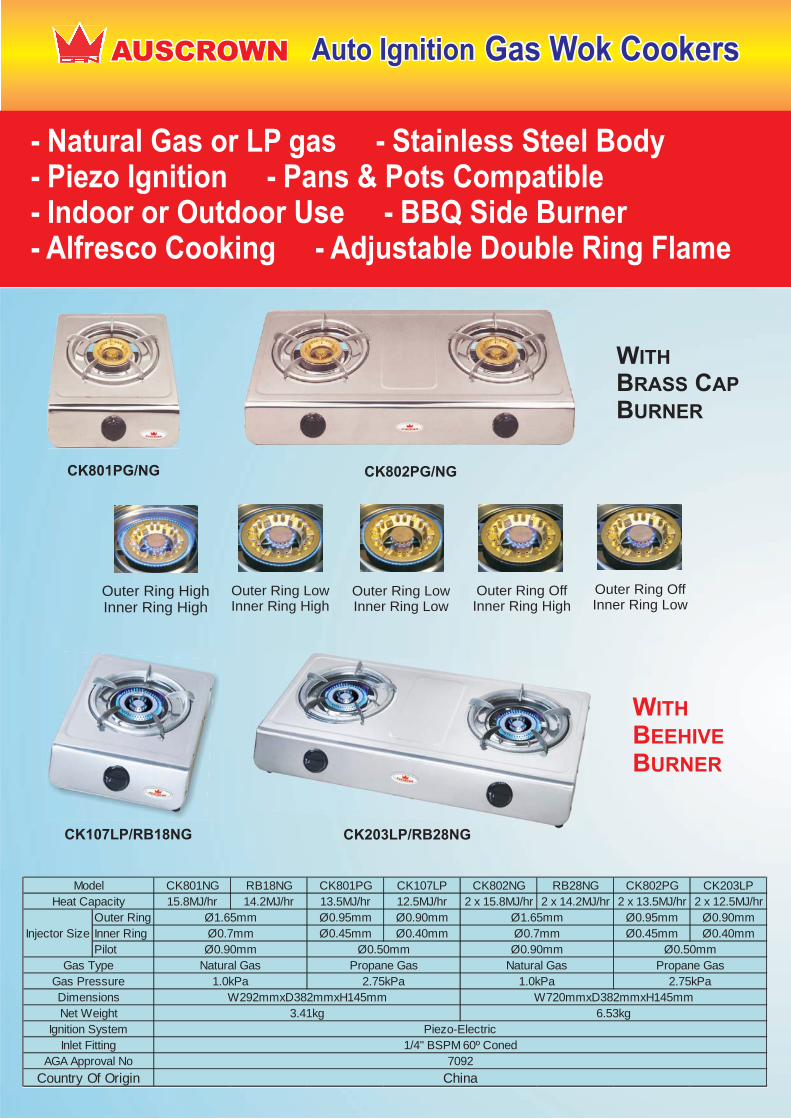
- Natural Gas or LP gas - Stainless Steel Body - Piezo Ignition - Pans & Pots Compatible - Indoor or Outdoor Use - BBQ Side Burner - Alfresco Cooking - Adjustable Double Ring Flame
AUSCROWN
WITH BEEHIVE BURNER
CK107LP/RB18NG CK203LP/RB28NG
CK801NG RB18NG CK801PG CK107LP CK802NG RB28NG CK802PG CK203LP
15.8MJ/hr 14.2MJ/hr 13.5MJ/hr 12.5MJ/hr 2 x 15.8MJ/hr 2 x 14.2MJ/hr 2 x 13.5MJ/hr 2 x 12.5MJ/hr
Outer Ring Ø0.95mm Ø0.90mm Ø0.95mm Ø0.90mm
Inner Ring Ø0.45mm Ø0.40mm Ø0.45mm Ø0.40mm
Pilot
2.75kPa 1.0kPa 2.75kPa
Ø0.90mm Ø0.50mm Ø0.90mm Ø0.50mm
Piezo-Electric
1/4" BSPM 60º Coned
7092
China
W292mmxD382mmxH145mm
3.41kg
W720mmxD382mmxH145mm
6.53kg
Dimensions
Natural Gas Propane Gas Propane Gas
1.0kPa
Ø1.65mm
Ø0.7mm
Natural Gas
Ø0.7mm
Ø1.65mm
Inlet Fitting
Country Of Origin
Model
Heat Capacity
AGA Approval No
Net Weight
Ignition System
Gas Type
Gas Pressure
Injector Size
CK801PG/NG CK802PG/NG
Outer Ring HighInner Ring High
Outer Ring LowInner Ring High
Outer Ring LowInner Ring Low
Outer Ring OffInner Ring High
Outer Ring OffInner Ring Low
WITH BRASS CAP BURNER
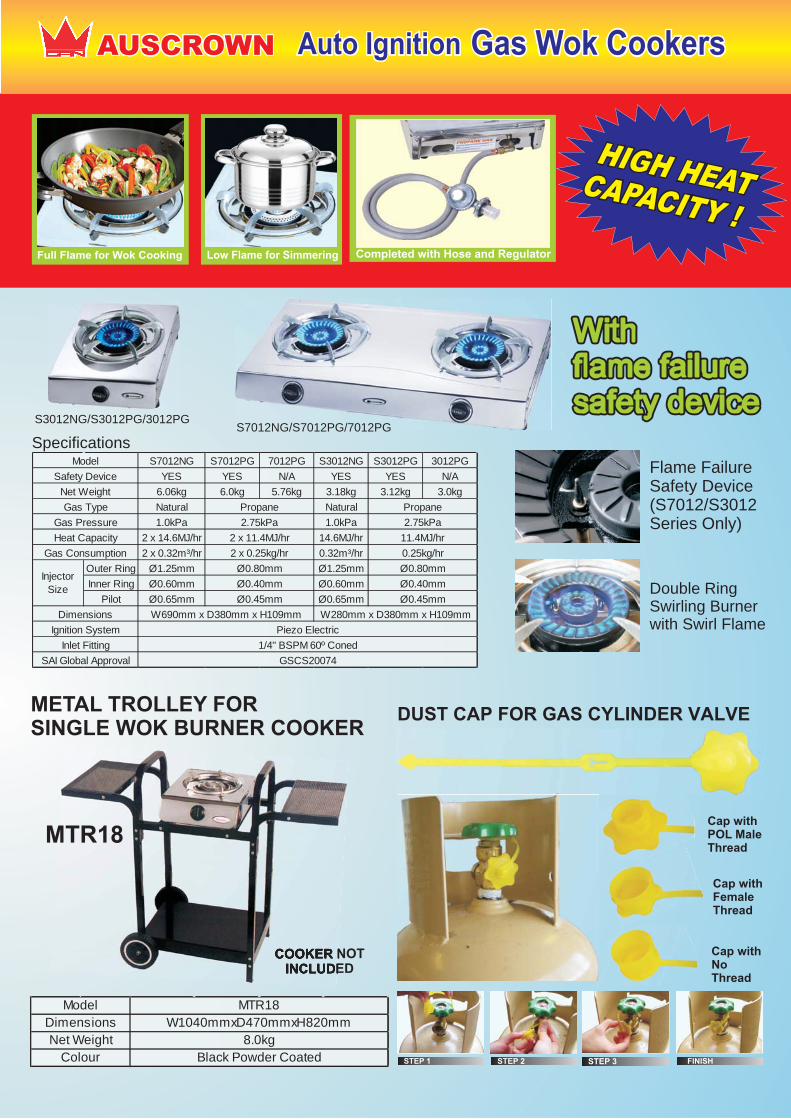
METAL TROLLEY FOR SINGLE WOK BURNER COOKER
DUST CAP FOR GAS CYLINDER VALVE
STEP 1 STEP 2 STEP 3 FINISH
Cap withPOL Male Thread
Cap withFemale Thread
Cap with No Thread
COOKER NOT INCLUDED
COOKER NOT INCLUDED
MTR18
S7012NG/S7012PG/7012PGS3012NG/S3012PG/3012PG
Flame Failure Safety Device(S7012/S3012 Series Only)
Double Ring Swirling Burnerwith Swirl Flame
SpecificationsS7012NG S7012PG 7012PG S3012NG S3012PG 3012PG
YES YES N/A YES YES N/A
6.06kg 6.0kg 5.76kg 3.18kg 3.12kg 3.0kg
Natural Natural
1.0kPa 1.0kPa
2 x 14.6MJ/hr 14.6MJ/hr
2 x 0.32m³/hr 0.32m³/hr
Outer Ring Ø1.25mm Ø1.25mm
Inner Ring Ø0.60mm Ø0.60mm
Pilot Ø0.65mm Ø0.65mm
Model
Gas Type
Heat Capacity
Gas Consumption
Injector
Size
Safety Device
Net Weight
Propane
2.75kPa
2 x 11.4MJ/hr
Propane
Dimensions W690mm x D380mm x H109mm W280mm x D380mm x H109mm
11.4MJ/hr
Gas Pressure
0.25kg/hr2 x 0.25kg/hr
Ø0.40mm
Ø0.45mm
Ignition System
2.75kPa
SAI Global Approval
Ø0.80mm
Ø0.40mm
Ø0.45mm
Ø0.80mm
GSCS20074
Piezo Electric
Inlet Fitting 1/4" BSPM 60º Coned
Model MTR18
Colour
Net Weight
Dimensions W1040mmxD470mmxH820mm
Black Powder Coated
8.0kg
Completed with Hose and Regulator
AUSCROWN

AUSCROWN Butane Gas HANDY RANGE
Features:Portable / Piezo Ignition / Indoor or Outdoor / Light Weight / Easy to Use / Compact
Model AD90 HR200
Injector Size Ø0.55mm Ø0.56mm
Dimensions W343mm x D256mm x H111mm W335mm x D290mm x H88mm
AGA Approval No 5240 6860
Gas Type
Gas Pressure
Heat Capacity
Gas Consumption
Net Weight
Ignition System
1.7kg
150g/hr
7.0MJ/hr
Piezo-Electric
Butane Gas
Cartridge PressurePacking: 4 units/pack
Grill plate lifter included.For convenient and safe handling.
Removable non-stick grill plate. Makes cookingand cleaning easy.
Enamelled pan.Collects excessive grease and reduces smoke
How it works
* Handy Range Not Included.
230GM BUTANE GAS CARTRIDGE
GP33 KOREAN BBQ GRILL PLATE
HR200AD90
Features:- 33cm diameter.- Removable non-stick grill plate.- Steam function.- Enameled pan.- Grill plate lifter included.
Steam action. Keeps food moist & succulent when cooking.

AUSCROWNBRUSHED STAINLESS STEELCANOPY RANGE HOODS
Features:Strong Suction / Brushed Stainless Steel Body / 3 Speed Control / Micromesh Filters /Optional Charcoal Filter / Ducted or Re-circulated Exhaust
CS900 900MM CS600 600MM
CI900G 900MM ISLAND TYPEWITH TEMPERED GLASSCI900 900MM ISLAND TYPE
C900GH 900MM CANOPY WITH TEMPERED GLASS
X: Heigh when duct cover fully extended.
Model C900GH CS900 CS600 CI900 CI900G
Dimensions
W900mm
D475mm
H579mm
X960mm
W900mm
D500mm
H582mm
X980mm
W600mm
D500mm
H580mm
X980mm
W895mm
D600mm
H637mm
X1204mm
W895mm
D600mm
H613mm
X1180mm
Net Weight 21kg 22kg 17kg 27kg 29kg
Lamp Power
Flow Rate
Load of Motor
Duct Size
C tick Approval
AS Approval
Power
No. of Motor
1000m³/hr
2 x 2W
150mm
4 x 2W
240V 60Hz
1
V06076/0
N2788
250W

PORTABLE FOR OUTDOOR USE WITH LP GAS BOTTLE
Rambo
Model HPA100LPB RH31LT HP200LPB
Dimensions W320mm x L520mm x H160mm W330mm x L490mm x H180mm W415mm x L690mm x H220mm
Net Weight 6.6kg 7.7kg 14.9kg
Injector SizeBurner :Ø0.90mm
Pilot: Ø0.45mm
Burner: Ø0.90mm
Pilot: Ø0.25mm
Outer Ring: Ø0.1.2mm
Inner Ring: Ø0.55mm
Pilot: Ø0.25mm
Ignition System Piezo Electric Manual with Pilot Manual with Pilot
Gas Pressure 61kPa
Heat Capacity 64MJ/hr
Gas Consumption 1.6kg/hr
Gas Type
Inlet Fitting 1/4" BSPM 60º Coned
Propane
55MJ/hr
100kPa
1.0kg/hr
COMPLETE WITH HOSE & REGULATOR
WITH AUTOMATIC IGNITIONLow Pressure
COMPLETE WITH HOSE & REGULATOR
RBC176LP RBC225LP
20MJ/hr 32MJ/hr
0.42kg/hr 0.64kg/hr
Inner Ring Ø0.65mm Ø0.90mm
Outer
Ring
Ø1.20mm Ø1.30mm
Pilot Ø0.60mm Ø0.6mm
W320mm x D520mm x H160mm W320mm x D480mm x H180mm
5.16kg 6.6kg
Inlet Fitting 1/4" BSPM 60º Coned
Country of Origin China
Approval No. IAPMO R&T OCEANA GMK10042
Net Weight
Dimensions
Injector
Size
Gas Consumption
Model
Gas Pressure
Heat Capacity
ULP gas
2.75kPa
Gas Type
Ignition System Piezo Electric
RH31LT with pilot HP200LPB 2 ring high with pilot HPA100LPB with auto ignitionFOR OVERSEAS MARKET ONLY FOR OVERSEAS MARKET ONLY
RH31LT & HP200LPB for overseas onlynot for Australia

AUSCROWNLOW PRESSURE CAST IRON RING BURNER
Features:High Heat Capacity / Portable / Ideal for Outdoor Cooking / Individual Ring Control
*Burners Not Included
FRAME FOR CAST IRON RING BURNER Features:Portable / Ideal for Stockpot Cooking
FF30 FOR C30LP
FF40 FOR C40LP
FF50 FOR C50LP
Rings can be operated individually
C20LP C30LP C40LP C50LP
Model C20LP C30LP C40LP C50LP
Number of Rings 1 2 3 4
Heat Capacity 12MJ/hr 20MJ/hr 30MJ/hr 59MJ/hr
Gas Consumption 0.26kg/hr 0.44kg/hr 0.65kg/hr 1.28kg/hr
Injector Size Ø1.0mm1st Ring: Ø0.7mm
2nd Ring: Ø1.1mm
1st Ring: Ø0.50mm
2nd Ring: Ø0.90mm
3rd Ring: Ø1.20mm
1st Ring: Ø0.50mm
2nd Ring: Ø0.80mm
3rd Ring: Ø1.05mm
4th Ring: Ø1.50mm
DimensionsW190mm
L370mm
H85mm
W185mm
L420mm
H85mm
W250mm
L470mm
H95mm
W360mm
L635mm
H110mmNet Weight 1.82kg 3.2kg 6.2kg 12.8kg
Gas Type
Gas Pressure
Ignition System
Inlet Fitting
AGA Approval No
Propane Gas
2.75kPa
Manual
1/4" BSPM 60º Coned
6429
Supplied with AGA approved
regulator & 1.2 meter hose
FF30 FF40 FF50
W378mm x D378mm x H175mm W430mm x D430mm x H175mm W530mm x D530mm x H175mm
5.6kg 6.6kg 8.8kg
Ø458mm Ø510mm Ø610mm
Ø378mm Ø430mm Ø530mm
Model
Dimensions
Net Weight
Minimum Pot Size
Maximum Pot Size
FF30 FF50
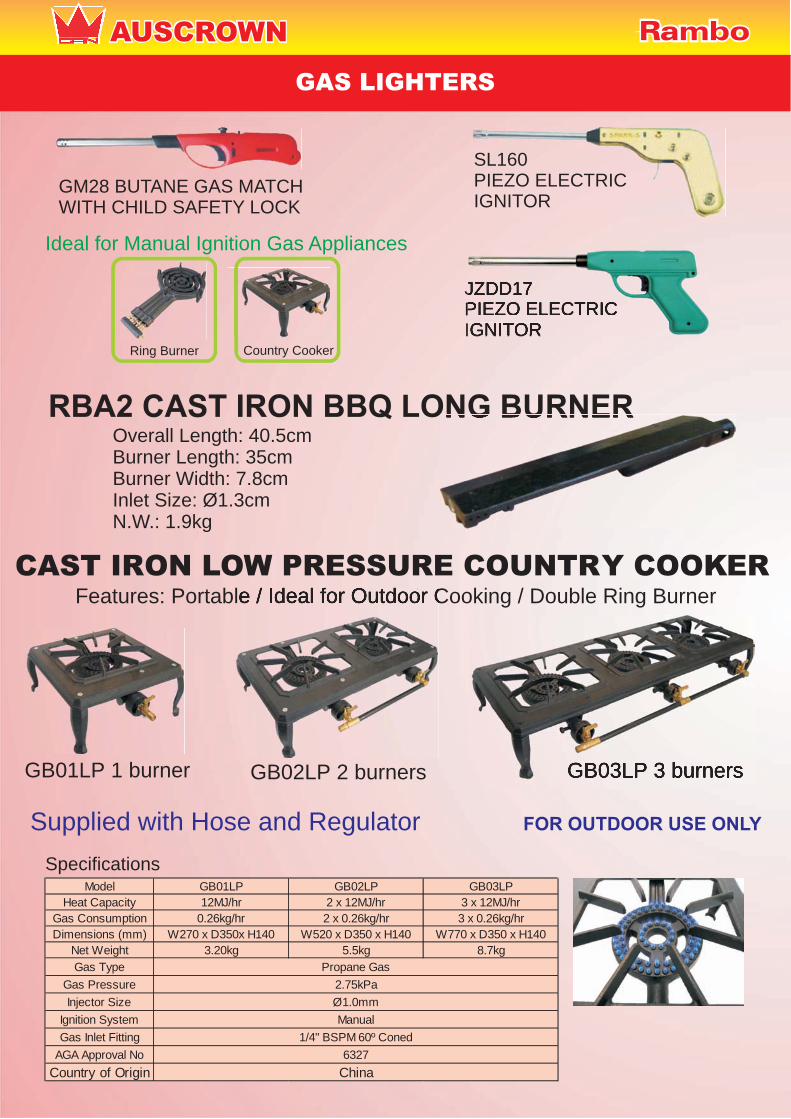
AUSCROWN
GAS LIGHTERS
SL160 PIEZO ELECTRIC IGNITOR
JZDD17 PIEZO ELECTRIC IGNITOR
RBA2 CAST IRON BBQ LONG BURNEROverall Length: 40.5cmBurner Length: 35cmBurner Width: 7.8cmInlet Size: Ø1.3cmN.W.: 1.9kg
GM28 BUTANE GAS MATCH WITH CHILD SAFETY LOCK
Ideal for Manual Ignition Gas Appliances
RBA2 CAST IRON BBQ LONG BURNER
Ring Burner Country Cooker
CAST IRON LOW PRESSURE COUNTRY COOKER
GB01LP 1 burner GB02LP 2 burners GB03LP 3 burners
FOR OUTDOOR USE ONLY
Features: Portable / Ideal for Outdoor Cooking / Double Ring Burner
Specifications
Supplied with Hose and Regulator
Features: Portable / Ideal for Outdoor Cooking / Double Ring Burner
GB03LP 3 burners
JZDD17 PIEZO ELECTRIC IGNITOR
Model GB01LP GB02LP GB03LP
Heat Capacity 12MJ/hr 2 x 12MJ/hr 3 x 12MJ/hr
Gas Consumption 0.26kg/hr 2 x 0.26kg/hr 3 x 0.26kg/hr
Dimensions (mm) W270 x D350x H140 W520 x D350 x H140 W770 x D350 x H140
Net Weight 3.20kg 5.5kg 8.7kg
Gas Type
Gas Pressure
Injector Size
Ignition System
Gas Inlet Fitting
AGA Approval No
Country of Origin
1/4" BSPM 60º Coned
Propane Gas
2.75kPa
6327
China
Ø1.0mm
Manual

AUSCROWN
28 Jet Flame 18 Jet Flame
Y018LPWF
LOW PRESSURE DUCKBILL STOCKPOT BURNERS
LP gas models supplied with hose and regulatorNatural gas models supplied with regulator
Heat/boil 100 to 200 litre pot
HIGH PRESSURE STOCKPOT BURNERSFOR OUTDOOR USE ONLYFOR OUTDOOR USE ONLYFOR OUTDOOR USE ONLYFOR OUTDOOR USE ONL
HP200LPWF double ring
HPA100LPWFsingle ring withauto ignition
HIGH PRESSURE STOCKPOT BURNERS
HPsingle ring withauto ignition
Y018LPWF Y018NGWF Y028LPWF Y028NGWFPropane Gas Natural Gas Propane Gas Natural Gas
2.75kPa 1.0kPa 2.75kPa 1.0kPa67MJ/hr 67MJ/hr 104MJ/hr 104MJ/hr
1.34kg/hr 1.76m³/hr 2.08kg/hr 2.74m³/hr
Duckbill jet Ø0.55mm Ø1.05mm Ø0.55mm Ø1.05mm
Pilot Ø0.40mm Ø0.80mm Ø0.40mm Ø0.80mm18 28
Manual with Pilot1/2" BSPF
China
44kg
W490 x D570 x H410
27kgMin: Ø440 Max: Ø490
GASMARK CERTIFICATE GMK10005
W610 x D690 x H490Min: Ø440 Max: Ø610Pot Size (mm)
Net WeightIgnition System
Inlet FittingApproval No
Country of Origin
Model
Gas TypeGas PressureHeat Capacity
Gas Consumption
Dimensions (mm)
Injector
SizeNo. of jets
Y018LPWF
with Flame Failure Safety Device
Flame Failure Safety Device
HP200LPWF for overseas only, not for Australia
Model HP200LPWF HPA100LPWF
Gas Pressure 61kPa 100kPa
Heat Capacity 64MJ/hr 49MJ/hr
Gas Consumption 1.6kg/hr 1.0kg/hr
Ignition System Manual Pilot Piezo Electric
Injector Size
Outer Ring: Ø1.20mm
Inner Ring: Ø0.55mm
Pilot: Ø0.25mm
Burner: Ø0.90mm
Pilot: Ø0.45mm
Dimensions (mm) W456 x D760 x H440 W456 x D600 x H440
Net Weight 33kg 29kg
Approval No For overseas only IAPMO GMK10051
Gas Type
Inlet Fitting
Pot Size
country of Origin
Min: Ø400mm Max: Ø610mm
Propane Gas
1/4" BSPM 60º coned
China
AUSCROWN
TYPE B / SECOND TIER APPROVAL FROM A LICENSED GAS INSPECTOR MUST BE OBTAINED PRIOR TO OPERATION
A30NG and A30LP
A30NG and A30LP
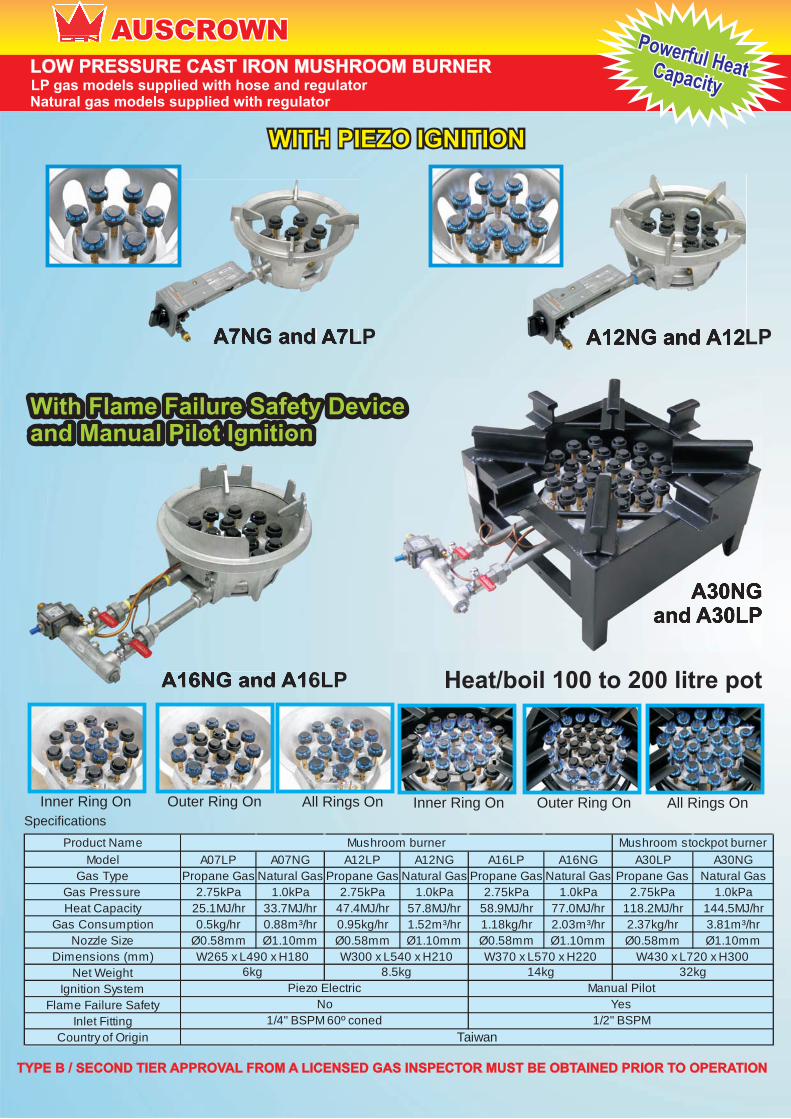
LOW PRESSURE CAST IRON MUSHROOM BURNER
A7NG and A7LP A12NG and A12LPA7NG and A7LP A12NG and A12LP
A16NG and A16LP
LP gas models supplied with hose and regulatorNatural gas models supplied with regulator
Heat/boil 100 to 200 litre pot
Product Name
Model A07LP A07NG A12LP A12NG A16LP A16NG A30LP A30NG
Gas Type Propane Gas Natural Gas Propane Gas Natural Gas Propane Gas Natural Gas Propane Gas Natural Gas
Gas Pressure 2.75kPa 1.0kPa 2.75kPa 1.0kPa 2.75kPa 1.0kPa 2.75kPa 1.0kPa
Heat Capacity 25.1MJ/hr 33.7MJ/hr 47.4MJ/hr 57.8MJ/hr 58.9MJ/hr 77.0MJ/hr 118.2MJ/hr 144.5MJ/hr
Gas Consumption 0.5kg/hr 0.88m³/hr 0.95kg/hr 1.52m³/hr 1.18kg/hr 2.03m³/hr 2.37kg/hr 3.81m³/hr
Nozzle Size Ø0.58mm Ø1.10mm Ø0.58mm Ø1.10mm Ø0.58mm Ø1.10mm Ø0.58mm Ø1.10mm
Dimensions (mm)
Net Weight
Ignition System
Flame Failure Safety
Inlet Fitting
Country of Origin Taiwan
1/4" BSPM 60º coned
Mushroom stockpot burnerMushroom burner
Manual Pilot
YesNo
W265 x L490 x H180 W300 x L540 x H210 W370 x L570 x H220
1/2" BSPM
Piezo Electric
W430 x L720 x H3006kg 8.5kg 14kg 32kg
All Rings OnOuter Ring OnInner Ring OnAll Rings OnOuter Ring OnInner Ring On
Specifications
With Flame Failure Safety Deviceand Manual Pilot Ignition
A16NG and A16LP

AUSCROWN Rambo
LOW PRESSURE DUAL RING BURNER
*Recommended size only. Size may be adjusted according to the user’s requirements
LOW PRESSURE GAS JET BURNER
Product Name
Gas Type Propane Natural Propane Natural Propane Natural Propane Natural
Gas Pressure 2.75kPa 1.00kPa 2.75kPa 1.00kPa 2.75kPa 1.00kPa 2.75kPa 1.00kPa
Gas Consumption 0.74kg/hr 0.97m3/hr 1.48kg/hr 1.95m3/hr 1.71kg/hr 2.24m3/hr 2,37kg/hr 3.11m3/hr
Injector Size Ø0.55mm Ø1.05mm Ø0.55mm Ø1.05mm Ø0.55mm Ø1.05mm Ø0.55mm Ø1.05mm
Heat Capacity
Dimensions
Net Weight
Inlet Fitting
37MJ/hr 74MJ/hr 85MJ/hr 118MJ/hr
Ø143mm x H60mm Ø204mm x H60mm Ø230mm x H60mm Ø260mm x H65mm
3/8" BSPF
1.1kg 2.4kg 2.7kg 3.9kg
1/2" BSPF 3/4" BSPF
32 jet Mongolian Burner10 jet Mongolian Burner 23 jet Mongolian Burner20 jet Mongolian Burner
Model/Product Name
Gas Type Propane Gas Natural Gas
Gas Pressure 2.75kPa 1.00kPa
Gas Consumption 1.4kg/hr 1.8m³/hr
Injector Size*Outer Ring: Ø1.90mm
Inner Ring: Ø1.30mm
Outer Ring: Ø3.10mm
Inner Ring: Ø2.10mm
Heat Capacity
Inlet Fitting
Dimensions
Net Weight
Approval
Country of Origin
70MJ/hr
China
CRN8 Dual Ring Burner
W250mm x D405mm x H80mm
7.1kg
Gas Fitter Applied
1/4" BSPM (Injectors)
Specifications
Specifications
Specifications
LOW PRESSURE DUCKBILL BURNER AND CHIMNEY BURNER
Product Name
Gas Type Propane Natural Propane Natural Propane Natural Propane Natural
Gas Pressure 2.75kPa 1.00kPa 2.75kPa 1.00kPa 2.75kPa 1.00kPa 2.75kPa 1.00kPa
Gas Consumption 1.34kg/hr 1.76m3/hr 2.09kg/hr 2.74m3/hr 1.34kg/hr 1.76m3/hr 1.97kg/hr 2.58m3/hr
Injector Size Ø0.55mm Ø1.05mm Ø0.55mm Ø1.05mm Ø0.55mm Ø1.05mm Ø0.55mm Ø1.05mm
Heat Capacity
Inlet Fitting
Dimensions
Net Weight 2.75kg 6kg 6.8kg
Ø192mm x H100mm Ø270mm x H105mm Ø300mm x H95mm Ø300mm x H185mm
3/4" BSPF 1/2" BSPF1/2" BSPF
7.4kg
28 jet duckbill burner 18 jet duckbill chimney burner24 jet Mongolian chimney burner
67MJ/hr67MJ/hr 98MJ/hr104MJ/hr
18 jet duckbill burner
1/2" BSPF
CRN8
10 jets
20 jets 23 jets32 jets
18 jets18 jets
24 Mongolian jets28 jets

COMMERCIAL GAS RICE COOKER
GRC600/800ARC30LT ARC60LT ARC90LT
Model ARC30LT ARC60LT ARC90LT GRC600LP GRC800LP GRC600NG GRC800NG
Cooking Capacity3 Litres
(12 cups*)
6 Litres
(24cups*)
9 Litres
(24-36cups)
6 - 11 Litres
(24 - 44cups*)
6 - 14 Litres
(24 - 56cups*)
6 - 11 Litres
(24 - 44cups*)
6 - 14 Litres
(24 - 56cups*)
Heat Capacity 9.0MJ/hr 21.5MJ/hr 28.5MJ/hr 32.5MJ/hr 36.5MJ/hr 31.8MJ/hr 36.5MJ/hr
Gas Consumption 0.18kg/hr 0.43kg/hr 0.57kg/hr 0.65kg/hr 0.73kg/hr 0.84m³/hr 0.96m³/hr
DimensionsØ390mm
H330mm
Ø470mm
H420mm
Ø540mm
H460mm
Ø590mm
H460mm
Ø590mm
H490mm
Ø590mm
H460mm
Ø590mm
H490mm
Net Weight 5.9kg 12.8kg 16.2kg 16.2kg 19.0kg 16.2kg 19.0kg
Flame Failure Safety Device
Gas Type
Gas Pressure
Inlet Fitting
Ignition System
Country of Origin
Natural Gas
1/4" BSPM 60º Coned
N/A
1.0kPa2.75kPa
Yes Yes
Piezo Electric
Taiwan
Propane Gas
AUSCROWN
Features:Large Cooking Capacity / Aluminium Cooking Bowl / Keep Warm Function / Available in Natural Gas and Propane Gas / Assembled with Hose and Regulator
ERC9L
Rice Net
COMMERCIAL ELECTRIC RICE COOKER
ERS5L
Model ERC9L ERC6L ERS5LCooking Capacity 9 Litres (36 x 250ml cup) 6 Litres (24 x 250ml cup) 1.8 - 5.4 Litres (30 x 180ml cup)
Voltage 220V AC 220V AC 230V ACFrequency 60 Hz 60 Hz 50 Hz
Power 3000W 3000W 1,460W (Keep warm: 180W)Canrton Box Dimensions (mm) 500 x 491 x 360 418 x 418 x 433
Net Weight 14.4kg 9.8kgGross Weight 17.3kg 10.6kgApproval No.
Country of Origin KoreaC tick Approval N2788
AS/NZSA SGS/100590Taiwan
FOR OVERSEAS MARKET ONLY

RamboAUSCROWN
LF103
7010-1C
7020R-1C 7068R
M12P14SM18P14S
LOW PRESSURE LP GAS REGULATORWITH HOSE
RHS005
TPA7010With Child Safe
Handwheel Tightener
MPR61LFTMPR100LFT
Model MPR61LFT MPR100LFT TPA7010 7010-1C 7020-1C 7020R-1C LF103 7068RNet weight 371gm 375gm 303gm 291gm 270gm 270gm 462gm 265gm
Flow Rate 2.8kg/hr 4.5kg/hr 3kg/hr 2.5kg/hr 0-4.5kg/hr 1.5kg/hr
Output Pressure 61kPa 100kPa 2.75kPa 2.75kPa 0-207kPa 2.75kPa
Outlet Fitting 3/8" 19PTF 3/8" 19PTF 3/8" 19PTF
Approval AGA UL/ALPGA Endrsd
Inlet Fitting 3/8"LH
Inlet Pressure
Country of Origin
2kg/hr
2.75kPa
1/4"BSPF1/4"BSPF
CGA510 POL with soft noseCGA510 POL w/soft nose
AGA UL Registed and ALPGA endorsed
China
250 to 1750kPa
Specifications
HM12/HM15/HM18
Product
name
Stainless steel braided
high pressure LP gas hose
Model HM12 HM15 HM18 RHS005
Length 1200mm 1500MM 1800MM 1800MM
Inlet Fitting 1/4" BSPM
Outlet Fitting 1/4" BSPF Swivel Nut
Max Working Pressure 2600kPa
Working Temperature
Country of Origin
7kPa
-20ºC to 65ºC
Low pressure
LP gas hose
3/8" BSPM
1/4" BSPF Swivel Nut
China
Model M12P14S M18P14S
Hose Length 1200mm 1800mm
Inlet Pressure
Output Pressure
Flow Rate
Inlet Fitting CGA-510 POL with Soft Bull Nose
Outlet Fitting
1,750KpA
2.75kPa
2kg/hr
1/4" BSPF Swivel Nut
LP GAS HOSE
TPA7010TPA7010TPWith Child Safe
LF103
7010-1C7020-1C7020-1C
7020R-1C 7068RMPR61LFT
MPR100LFT
M12P14SM18P14S
RHS005
GAS HOSE

AUSCROWN
LPG BLOW TORCH
Rambo
RB14355
UNITS CONVERSION INDEXPRESSURE1 kPa = 10 mbar
= 7.5 mmHg = 0.29 inHg = 101.97 mmH 02
= 4.01 inH 02
= 0.145 psi
HEAT CAPACITY1 MJ/hr = 948.45 BTU/hr
= 240.8 kcal/hr= 277.8 W
EXAMPLE: CONVERT MJ/HR TO BTU/HRCK107LP Heat Capacity = 12.5MJ/hr1MJ/hr = 948.45 BTU/hrConvertCK107LP Heat Capacity = 12.5 x 1MJ/hr
= 12.5 x 948.45BTU/hr = 11855.62 BTU/hr
RBFB01 RBFB02 RBFB03 RBFB04 RBFB05 RBFB06 FB2 FB1.5
Product nameModel RBFB01 RBFB02 RBFB03 RBFB04 RBFB05 RBFB06 FB2 FB1.5
Heat Capacity 200 98 58.8 29.4 19.6 14.7
Gas Consumption 4.1kg/hr 2.0kg/hr 1.2kg/hr 0.6kg/hr 0.4kg/hr 0.3kg/hr
Jet Size Ø1.55mm Ø1.00mm Ø0.60mm Ø0.55mm Ø0.35mm Ø0.25mm
Burner Diameter 42mm 32mm 29mm 25mm 19mm 18mm 51mm 38mmLength 108 91 87 84 70 67 113mm 103mm
Net Weight 0.21 0.12 0.11 0.09 0.08 0.07 0.23kg 0.16kgGas Type
Gas Pressure
Inlet Fitting
Recommended 400kPa
Internal M20x1 RH
Brass burner Stainless steel burner
LP Gas
RB80203
RB40101
RB25063
RBBTHRBBTH
Handle
Neck tubes
Flame burners
HandleHandle
Product name HandleModel RB14355 RB80203 RB40101 RB25063 RB-BTH
Length 350mm 200mm 100mm 65mm 215mm
Net Weight 0.16kg 0.12kg 0.08kg 0.07kg 0.31kg
Inlet Fitting External M20x1RH
Outlet Fitting External M14x1RH
Neck tube
Internal M14x1 RH
External M20x1 RH

FREE STANDING LPG TABLE COOKERS
LF402 AT402 SA810 SA820 SA920
2 x 24 MJ/hr 2 x 90 MJ/hr 90 MJ/hr
2 x 0.5kg/hr 2 x 1.8kg/hr 1.8kg/hr
Inner: 0.7mm Outer: 1.1mm
W435mm x D565mm x H 840mm
18kg 18kg 11.3kgNet Weight 17kg
1mmInner: 0.65mm Outer: 0.95mmNozzle Size
Inlet Fitting
Dimensions W815mm x D565mm x H820mm W815mm x D565mm x H840mm
Heat Capacity
Gas Consumption
Ignition System
2 x 14.6MJ/hr
2 x 0.3kg/hr
Piezo Electric
1/4" BSPM 60º Coned
Manual
Model
Gas Type
Gas Pressure
LP Gas
2.75kPa 100 kPa
Model AT-204 HQ204
Net Weight 14.6kg 23kg
Gas Type
Gas Pressure
Heat Capacity
Gas Consumption
Inlet Fitting
Dimensions
Country of Origin
LP gas
Thailand
2.75kPa
14.6 MJ/hr
0.29 kg/hr
1/4" BSPF 60º Coned
W815mm x D565mm x H820mm
WH550 5.5 LITRE LPG WATER HEATERFeatures:Endless Flow of Hot Water / Compact / High Heat Efficiency
AUSCROWN
Gas Type LP Gas
Gas Consumption: 0.79 kg/hr
Gas Pressure
2.8 kPa
Gas Fitting
Æ9.5 mm / ¼” BSPM 60º Coned
Heat Capacity
11 kW
Output Rate
5.5 L/min
Heat Efficiency
>85%
Exhaustion Method
Duct (Size Æ90 mm)
Ignition Method
Automatic Pulse Ignition
Power
DC: 3V
Water Pressure
0.025 – 1.0 Mpa
Water Inlet size
G1/2
Dimensions
(H)440mm x (L) 330mm x (W) 130mm
Gross/Net Weight
6.6kg / 6.0kg
Country of Origin: China
AT204 STAINLESS STEEL CABINET COOKER
HQ204 POWDER COATED CABINET COOKER
PRODUCTS FOR OVERSEAS ONLY NOT AVAILABLE IN AUSTRALIA
Low pressure High pressure
AT402LF402 SA820 SA920SA810
AT204

AUSCROWN
LP Gas Tiki Torch
AUSTCROWN PTY LTDUNIT 18 / 634 MITCHAM ROAD, VERMONT VIC 3133, AUSTRALIAPH: +61 3 9873 5811 EMAIL: [email protected]
Shop online: www.auscrown.com
BUTANE GAS BLOW TORCH
Product name Tiki TorchModel TK28
Heat Capacity 12.33MJ/hrGas Consumption 0.22 kg/hr
Injector Size 1 mm ÈDimensions 190mmÈ x 300mmHNet Weight 1.4 kg
Ignition System Manual
Gas Type LP gas
Gas Pressure 2.8 kPa
Inlet Fitting 1''-11PT
Country of Origin ChinaSide viewBottom view
Gas injector
Gas inlet Gas inlet with female screw thread
Screen
Product name Butane gas blow torch
Model KW707
Heat Capacity 1,325 Kcal/hr (1.54KW/hr)
Gas Consumption 125gm/hr
Jet Size 0.27mm Diameter
Burner Diameter 22.5mm
Dimensions (mm) 165 x 55 x 32
Net Weight 130gm
Gas Type AUSCROWN butane gas
Gas Pressure 2-3kg/cm2
Inlet FittingAUSCROWN
Butane gas canister nozzle type
Packing
1 unit/cardboard pack,
10 units/inner carton,
100 units/outer carton
Gross Weight1.6kg/inner carton,
16kg/outer carton
Inner carton dimensions 278 x 105 x 210 (mm)
Outer carton dimensions 550 x 295 x 445 (mm)
AUSCROWNButane Gas Cartridge
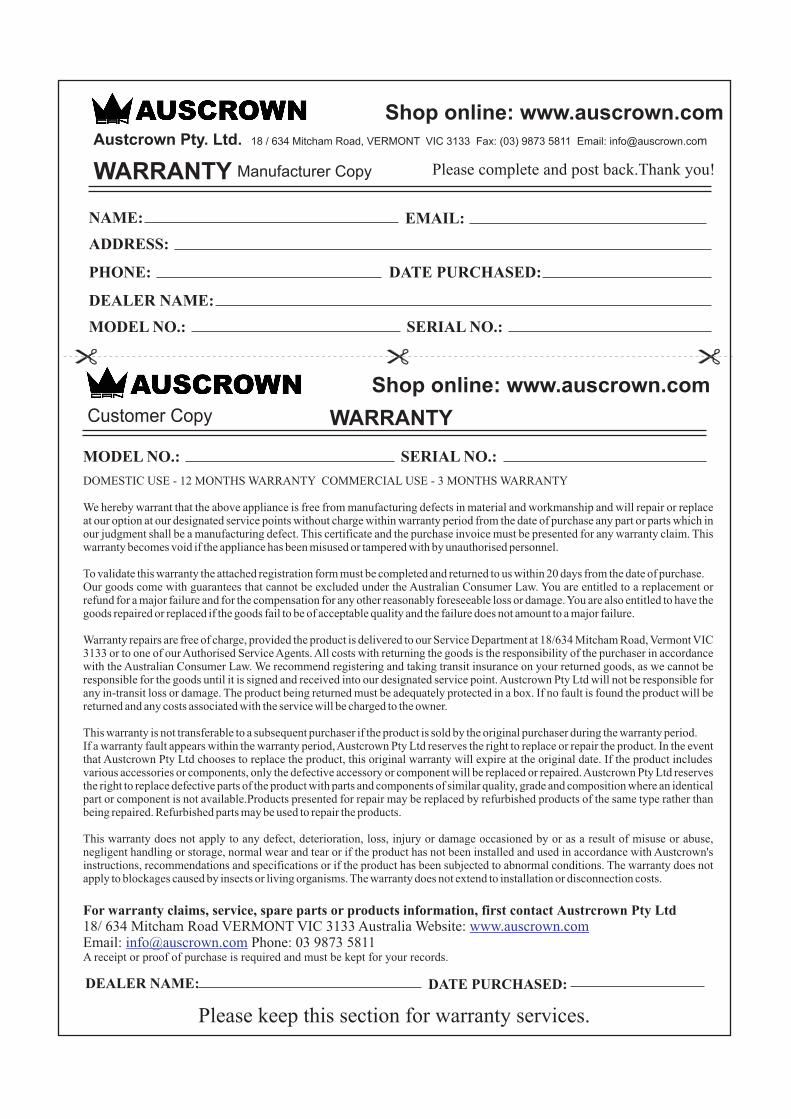
NAME:
ADDRESS:
PHONE: DATE PURCHASED:
DEALER NAME:
MODEL NO.: SERIAL NO.:
Please complete and post back.Thank you!WARRANTY Manufacturer Copy
MODEL NO.: SERIAL NO.:
DOMESTIC USE - 12 MONTHS WARRANTY COMMERCIAL USE - 3 MONTHS WARRANTY
We hereby warrant that the above appliance is free from manufacturing defects in material and workmanship and will repair or replace at our option at our designated service points without charge within warranty period from the date of purchase any part or parts which in our judgment shall be a manufacturing defect. This certificate and the purchase invoice must be presented for any warranty claim. This warranty becomes void if the appliance has been misused or tampered with by unauthorised personnel.
To validate this warranty the attached registration form must be completed and returned to us within 20 days from the date of purchase.Our goods come with guarantees that cannot be excluded under the Australian Consumer Law. You are entitled to a replacement or refund for a major failure and for the compensation for any other reasonably foreseeable loss or damage. You are also entitled to have the goods repaired or replaced if the goods fail to be of acceptable quality and the failure does not amount to a major failure.
Warranty repairs are free of charge, provided the product is delivered to our Service Department at 18/634 Mitcham Road, Vermont VIC 3133 or to one of our Authorised Service Agents. All costs with returning the goods is the responsibility of the purchaser in accordance with the Australian Consumer Law. We recommend registering and taking transit insurance on your returned goods, as we cannot be responsible for the goods until it is signed and received into our designated service point. Austcrown Pty Ltd will not be responsible for any in-transit loss or damage. The product being returned must be adequately protected in a box. If no fault is found the product will be returned and any costs associated with the service will be charged to the owner.
This warranty is not transferable to a subsequent purchaser if the product is sold by the original purchaser during the warranty period.If a warranty fault appears within the warranty period, Austcrown Pty Ltd reserves the right to replace or repair the product. In the event that Austcrown Pty Ltd chooses to replace the product, this original warranty will expire at the original date. If the product includes various accessories or components, only the defective accessory or component will be replaced or repaired. Austcrown Pty Ltd reserves the right to replace defective parts of the product with parts and components of similar quality, grade and composition where an identical part or component is not available.Products presented for repair may be replaced by refurbished products of the same type rather than being repaired. Refurbished parts may be used to repair the products.
This warranty does not apply to any defect, deterioration, loss, injury or damage occasioned by or as a result of misuse or abuse, negligent handling or storage, normal wear and tear or if the product has not been installed and used in accordance with Austcrown's instructions, recommendations and specifications or if the product has been subjected to abnormal conditions. The warranty does not apply to blockages caused by insects or living organisms. The warranty does not extend to installation or disconnection costs.
For warranty claims, service, spare parts or products information, first contact Austrcrown Pty Ltd18/ 634 Mitcham Road VERMONT VIC 3133 Australia Website: Email: Phone: 03 9873 5811A receipt or proof of purchase is required and must be kept for your records.
DEALER NAME: DATE PURCHASED:
Please keep this section for warranty services.
WARRANTYCustomer Copy
Austcrown Pty. Ltd. 18 / 634 Mitcham Road, VERMONT VIC 3133 Fax: (03) 9873 5811 Email: [email protected]
Shop online: www.auscrown.com
Shop online: www.auscrown.com
EMAIL:

Austcrown Pty Ltd.18 / 634 Mitcham RoadVERMONT VIC 3133AUSTRALIA
PLEASEAFFIXSTAMP
Austcrown Pty Ltd18 / 634 Mitcham RoadVERMONT VIC 3133 AUSTRALIAPh: (03) 9873 5811Fax: (03) 9873 5311Email: [email protected]
For services & enquiries, please contact:
Shop online: www.auscrown.com
Related Documents