1. Introducon. One of the coolest things I’ve had to do recently, is upload podcasts to iTunes. You would think it’s the easiest thing in the world, but the enre upload process has to be done VERY carefully, and includes formang your audio files,… and an XML document structure with special iTunes tags,… and file locaons,… and then, finally, acvated in a special secon of the iTunes Store. It’s much easier to upload your mp3 file and then just link people straight to it, but you’d miss out on the world of people who use iTunes and portable devices to view content. And, if you don’t use iTunes or other podcasng services, your audio files won’t really be ‘podcasts’ (you won’t be able to idenfy episodes, or manage them through podcasng soſtware). iTunes is not the only place for podcasts. Other opons include Zune, Juice, and Winamp. However, iTunes has its benefits. It is the largest podcast directory, and, only on iTunes can you make ‘enhanced’ podcasts, with audio AND a slideshow of images. I’ll be showing you how to make enhanced podcasts on another tutorial, but for now let’s focus on geng our podcasts up there. Basically, it takes 3 basic steps to get your podcasts on iTunes: 1. Save the audio files in your online server, typically formaed as mp3 2. Fill in the podcast details in an XML file that you’ll also save on your server 3. Log in to iTunes with your Apple ID and tell iTunes to connect to your podcast Aha! But there are many details hidden all over, that you can’t ignore, or your podcast will never go up! They’re mostly special iTunes tags that have to appear in the XML file. But it’s also about knowing how to test to see if your podcast will work, and how exactly to submit it to the iTunes Store, and knowing how long to expect to see it ‘live’. 2. Recording. In podcasng, the voice is almost always the most important element of the show. Strong, clear voice recordings can not only add credibility and professionalism to your podcast, but make them easier to edit and mix. Under- standing when and why to reduce noise will help your podcast to sound its best! Reducing noise in your record- ings is easiest done by recording in a quiet place to start with. Somemes your computer is noisy. Some CD and DVD drives can also be noisy if you leave a disc spinning in them, so check them. A second source of noise is your voice's reflecon off of hard surfaces like walls, hard floors, and the surface of your desk. You can experi- ment with carpet, curtains, or fabric coverings. Audio quality: Audio files get larger the longer you record. They don’t need to be of the highest quality, so, in order to reduce bandwidth, limit the quality to 64 kbps (at 44.1 kHz; don’t go lower than that; 48 kbps will start to sound poor). The recording could be mono, although stereo highlights depth of voice and music elements (if you have any). Podcasting to the World Sandro Alberti ([email protected]); September- 2009

Podcasting to the World
Mar 13, 2016
Overview of audio files and podcasting. Extensive focus on exactly how to publish your podcasts on the iTunes Store.
Welcome message from author
This document is posted to help you gain knowledge. Please leave a comment to let me know what you think about it! Share it to your friends and learn new things together.
Transcript

1. Introduction. One of the coolest things I’ve had to do recently, is upload podcasts to iTunes. You would think it’s the easiest thing in the world, but the entire upload process has to be done VERY carefully, and includes formatting your audio files,… and an XML document structure with special iTunes tags,… and file locations,… and then, finally, activated in a special section of the iTunes Store.
It’s much easier to upload your mp3 file and then just link people straight to it, but you’d miss out on the world of people who use iTunes and portable devices to view content. And, if you don’t use iTunes or other podcasting services, your audio files won’t really be ‘podcasts’ (you won’t be able to identify episodes, or manage them through podcasting software).
iTunes is not the only place for podcasts. Other options include Zune, Juice, and Winamp. However, iTunes has its benefits. It is the largest podcast directory, and, only on iTunes can you make ‘enhanced’ podcasts, with audio AND a slideshow of images. I’ll be showing you how to make enhanced podcasts on another tutorial, but for now let’s focus on getting our podcasts up there.
Basically, it takes 3 basic steps to get your podcasts on iTunes:1. Save the audio files in your online server, typically formatted as mp32. Fill in the podcast details in an XML file that you’ll also save on your server3. Log in to iTunes with your Apple ID and tell iTunes to connect to your podcast
Aha! But there are many details hidden all over, that you can’t ignore, or your podcast will never go up! They’re mostly special iTunes tags that have to appear in the XML file. But it’s also about knowing how to test to see if your podcast will work, and how exactly to submit it to the iTunes Store, and knowing how long to expect to see it ‘live’.
2. Recording. In podcasting, the voice is almost always the most important element of the show. Strong, clear voice recordings can not only add credibility and professionalism to your podcast, but make them easier to edit and mix. Under-standing when and why to reduce noise will help your podcast to sound its best! Reducing noise in your record-ings is easiest done by recording in a quiet place to start with. Sometimes your computer is noisy. Some CD and DVD drives can also be noisy if you leave a disc spinning in them, so check them. A second source of noise is your voice's reflection off of hard surfaces like walls, hard floors, and the surface of your desk. You can experi-ment with carpet, curtains, or fabric coverings.
Audio quality: Audio files get larger the longer you record. They don’t need to be of the highest quality, so, in order to reduce bandwidth, limit the quality to 64 kbps (at 44.1 kHz; don’t go lower than that; 48 kbps will start to sound poor). The recording could be mono, although stereo highlights depth of voice and music elements (if you have any).
Podcasting to the WorldSandro Alberti ([email protected]); September- 2009

3. The XML file. Now that you have a great audio file, you are ready to share it with the world as a podcast. What do you do next???
Also known as an RSS file (or ‘news feed’), the XML text document contains code enables specially designed software to tag and identify the audio files that will be used in a podcast. It is also what is used to locate and track new versions or episodes of a particular podcast and therefore keep the user up to date. This is the case whether you make a podcast for iTunes or for other distributors (all XML files use the same universal lines of code, but iTunes needs extra ‘itunes’ code as well).
Apple gives you detailed instructions on how to format the ideal XML file, but the information is a bit long, and too detailed. I learned the series of steps that can make your life much simpler.
First, let’s look at a sample XML file:
An XML file is just a text file with this special tag at the beginning, to identify it as XML:<?xml version="1.0" encoding="utf-8"?>
The other thing that makes an XML is that the whole content is placed inside nested tags. The tags are used to identify each section of content. So, for example, if your content was this paragraph:Hello, world. This is a type of flower:Rose
This content could be identified in different ways, but one logical ways would be that the first line is an ‘intro-duction’, and the second line (the word ‘rose’) is a ‘flower type’. And these descriptions would look like tags surrounding the content, like this:<introduction>Hello, world. This is a type of flower:</introduction><flower-type>Rose</flower-type>
So in an XML file for iTunes, Apple gives you a series of tags, and you just have to put your content inside of them. All this information is what fills in the final iTunes podcast window. For example, whatever you put inside the <title> tag will appear as the title in your final iTunes podcast window. XML files have been used this way by other podcast providers for a while, so iTunes uses the standard podcast XML structure, and adds some of its own, ‘private’ tags. That is why some tags are left the same (like <title>), but some have the word ‘itunes:’ as part of their name (like <itunes:author>).
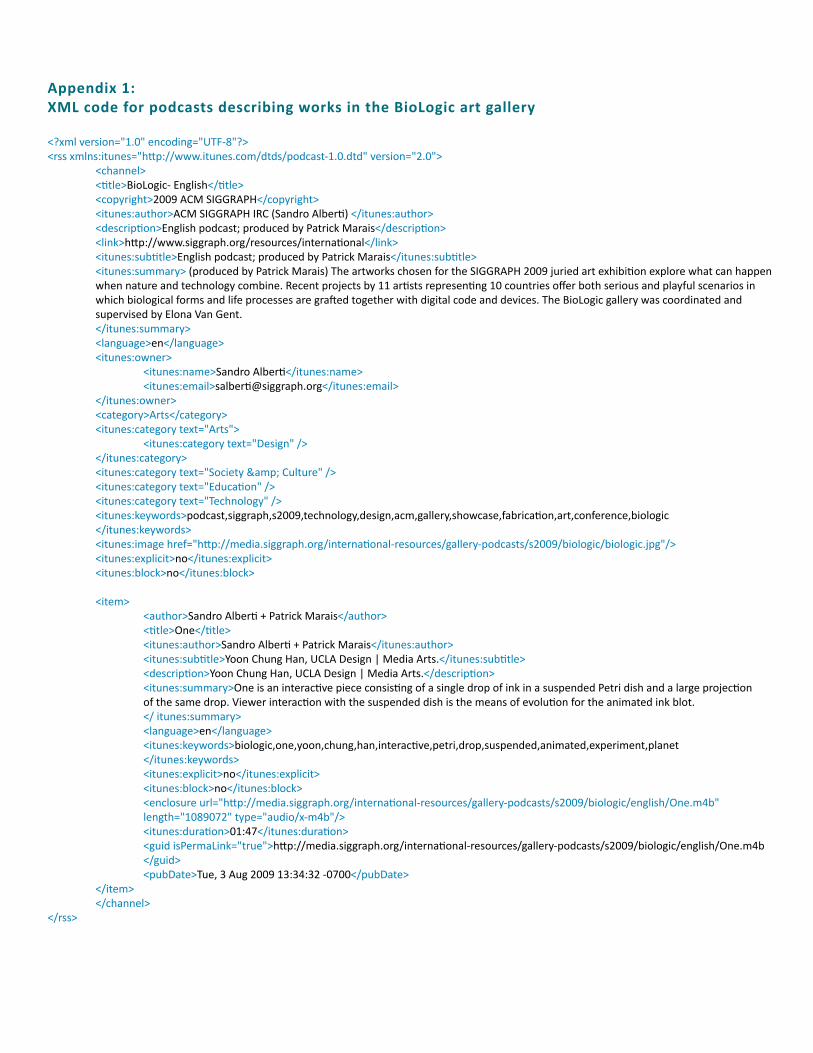
In the rest of this section, I will refer to Appendix 1 of this document, which a direct copy of the XML file I used for podcasts that describe works at an art gallery called BioLogic. I’ve simplified it to include only one of the 15 podcasts (‘items’) that I actually have on iTunes.
OK. Now let’s look at the beginning of actual, REAL code:<?xml version="1.0" encoding="UTF-8"?> <rss xmlns:itunes="http://www.itunes.com/dtds/podcast-1.0.dtd" version="2.0"> <channel> The rest of the code will go in here </channel> </rss>
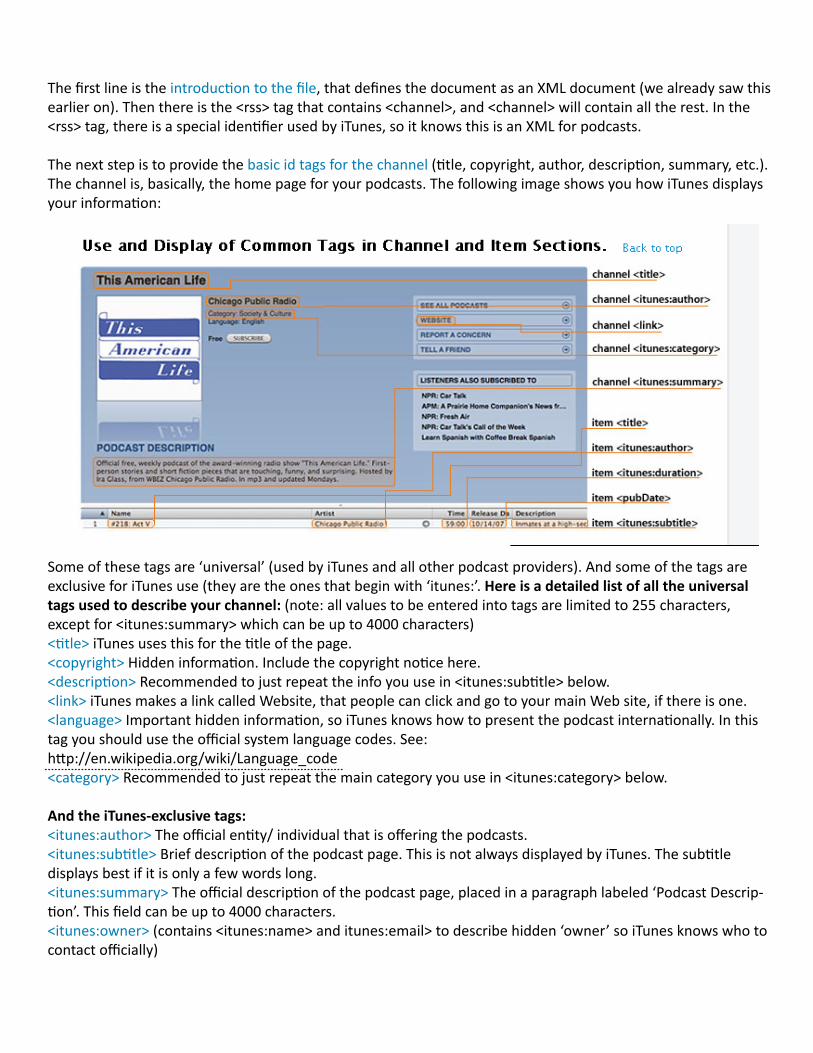
The first line is the introduction to the file, that defines the document as an XML document (we already saw this earlier on). Then there is the <rss> tag that contains <channel>, and <channel> will contain all the rest. In the <rss> tag, there is a special identifier used by iTunes, so it knows this is an XML for podcasts.
The next step is to provide the basic id tags for the channel (title, copyright, author, description, summary, etc.). The channel is, basically, the home page for your podcasts. The following image shows you how iTunes displays your information:
Some of these tags are ‘universal’ (used by iTunes and all other podcast providers). And some of the tags are exclusive for iTunes use (they are the ones that begin with ‘itunes:’. Here is a detailed list of all the universal tags used to describe your channel: (note: all values to be entered into tags are limited to 255 characters, except for <itunes:summary> which can be up to 4000 characters)<title> iTunes uses this for the title of the page.<copyright> Hidden information. Include the copyright notice here.<description> Recommended to just repeat the info you use in <itunes:subtitle> below.<link> iTunes makes a link called Website, that people can click and go to your main Web site, if there is one.<language> Important hidden information, so iTunes knows how to present the podcast internationally. In this tag you should use the official system language codes. See:http://en.wikipedia.org/wiki/Language_code<category> Recommended to just repeat the main category you use in <itunes:category> below.
And the iTunes-exclusive tags:<itunes:author> The official entity/ individual that is offering the podcasts.<itunes:subtitle> Brief description of the podcast page. This is not always displayed by iTunes. The subtitle displays best if it is only a few words long.<itunes:summary> The official description of the podcast page, placed in a paragraph labeled ‘Podcast Descrip-tion’. This field can be up to 4000 characters.<itunes:owner> (contains <itunes:name> and itunes:email> to describe hidden ‘owner’ so iTunes knows who to contact officially)

<itunes:category> iTunes uses this instead of the basic <category> tag. Categories are very important in iTunes (that is how all content is organized). You have to use official iTunes categories, such as ‘Design’ or ‘Society & Culture’ (where & is code for &; you sometimes have to use special code for characters like amper-sands or semicolons). You can list multiple categories, and you can also nest subcategories.<itunes:keywords> Hidden. Very useful for people to find your podcasts on searches. This accepts a maximum of 12 text keywords. Use commas to separate keywords. Minimize keyword usage. Almost nothing belongs in the keywords tag that isn’t better handled in the title or <itunes:summary> tag. The best use for keywords is to include common misspellings of your name or title, to ensure your podcast is still searchable despite a misspell-ing.<itunes:image> URL of the image that will appear in the header of the podcast channel. Images should be JPG and sized to 480-pixel squares.<itunes:explicit> Places a parental advisory graphic if ‘yes’. The three values for this tag are "yes", "no", and "clean".<itunes:block> Used to prevent an episode or podcast from appearing. Usually you just write ‘no’ here.<itunes:new-feed-url> Used when you change the URL of your podcast. This is explained later in this document, under ‘Changing your Feed URL’. Then, for each individual podcast file in your channel, you make an <item> tag, and you fill THAT with its own descriptive tags (the title, author, description, etc. of each audio file):<author> Recommended to just repeat the info you use in <itunes:author> below.<title> The title of each individual podcast (if the podcasts are episodes, this is where you label the episode number).<description> Recommended to just repeat the info you use in <itunes:summary> below.<language> Same as the channel <language> above. <guid> The globally unique identifier. Important so that all this validates correctly. It is the URL of the audio file.<enclosure> You need to include 3 pieces of information: url (the url of the audio file; same as guid above), length (the size of the file in bytes), and type (audio/mpeg).<pubDate> Includes date and time and time zone, like this: Tue, 3 Aug 2009 13:34:32 -0700
<itunes:author> This appears as the podcast ‘Artist’. If the tag is not present, iTunes uses the contents of the <author> tag above.<itunes:subtitle> The description of each podcast file. The subtitle displays best if it is only a few words long.<itunes:summary> Brief description of the podcast. Appears when the "circled i" in the Description column is clicked. This field can be up to 4000 characters.<itunes:keywords> Same as the channel <itunes:keywords> above. Could be honed for the specific podcast file.<itunes:explicit> Same as the channel <itunes:explicit> above. Can be defined for each podcast file.<itunes:block> Same as the channel <itunes:explicit> above, to block a particular podcast file.<itunes:duration> The length of the podcast, in hours:minutes:seconds. It appears visible to visitors, but is most important to keep track of all timing issues in the podcast, so be extra precise with this tag. The tag can be formatted HH:MM:SS, H:MM:SS, MM:SS, or M:SS (H = hours, M = minutes, S = seconds).
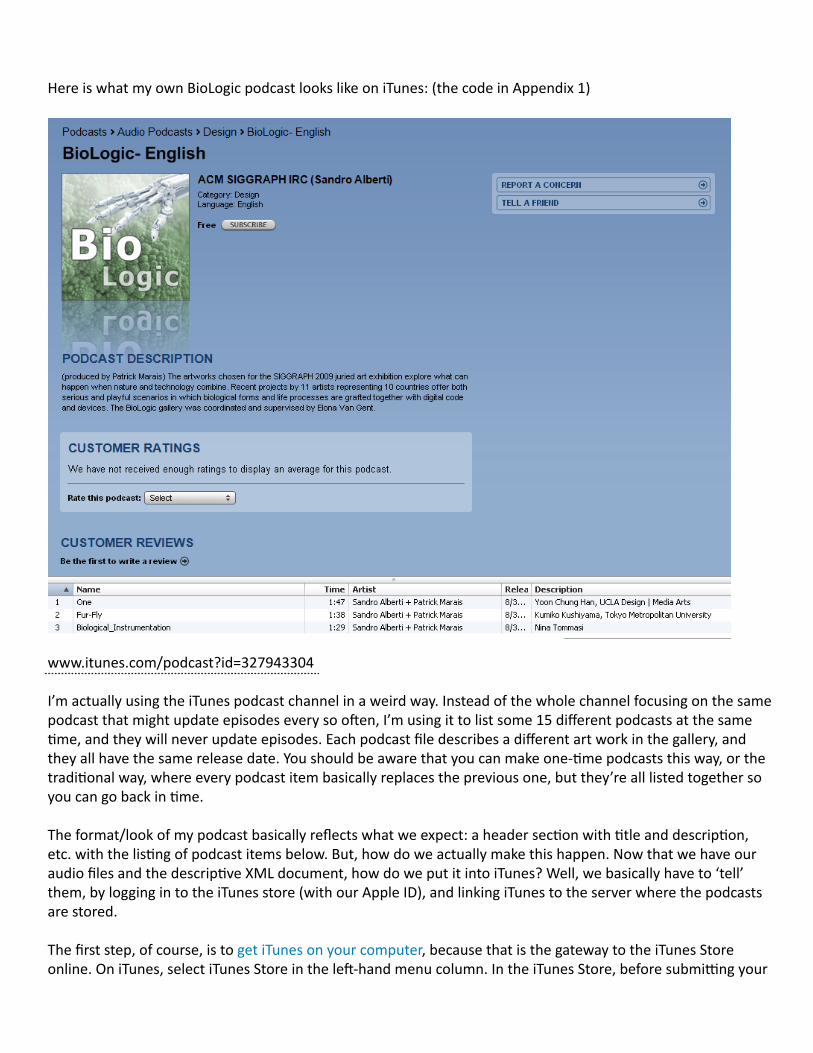
Here is what my own BioLogic podcast looks like on iTunes: (the code in Appendix 1)
www.itunes.com/podcast?id=327943304
I’m actually using the iTunes podcast channel in a weird way. Instead of the whole channel focusing on the same podcast that might update episodes every so often, I’m using it to list some 15 different podcasts at the same time, and they will never update episodes. Each podcast file describes a different art work in the gallery, and they all have the same release date. You should be aware that you can make one-time podcasts this way, or the traditional way, where every podcast item basically replaces the previous one, but they’re all listed together so you can go back in time.
The format/look of my podcast basically reflects what we expect: a header section with title and description, etc. with the listing of podcast items below. But, how do we actually make this happen. Now that we have our audio files and the descriptive XML document, how do we put it into iTunes? Well, we basically have to ‘tell’ them, by logging in to the iTunes store (with our Apple ID), and linking iTunes to the server where the podcasts are stored.
The first step, of course, is to get iTunes on your computer, because that is the gateway to the iTunes Store online. On iTunes, select iTunes Store in the left-hand menu column. In the iTunes Store, before submitting your
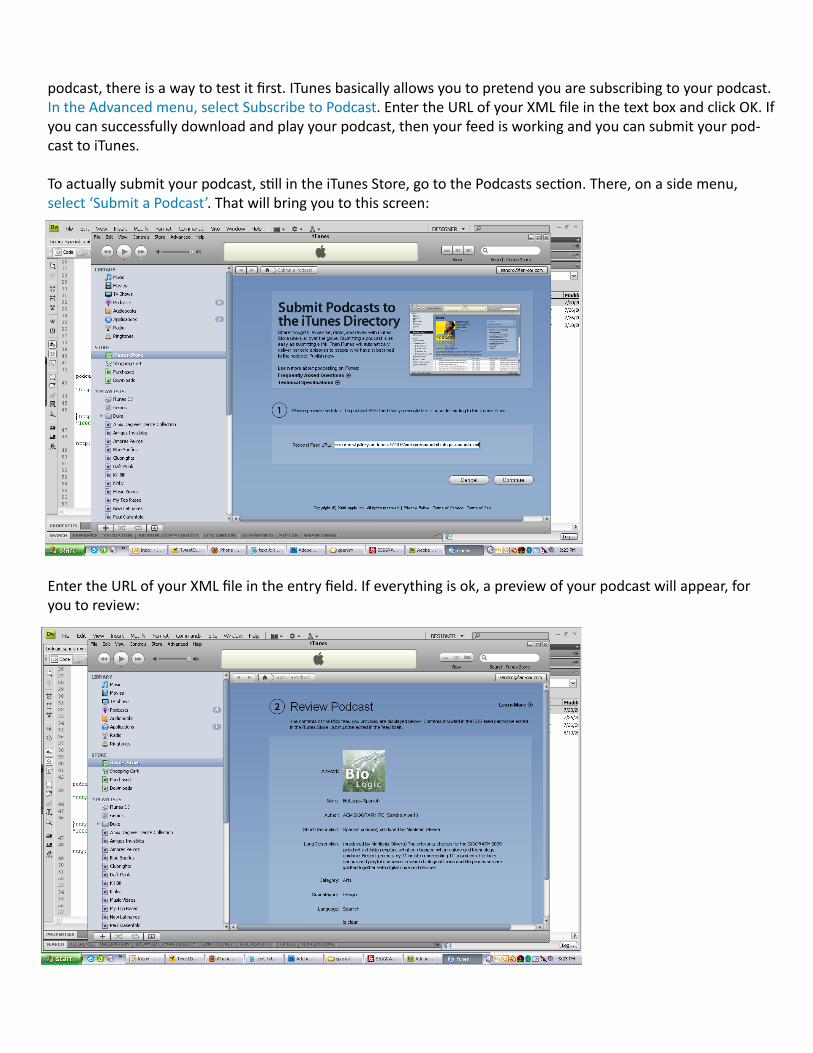
podcast, there is a way to test it first. ITunes basically allows you to pretend you are subscribing to your podcast. In the Advanced menu, select Subscribe to Podcast. Enter the URL of your XML file in the text box and click OK. If you can successfully download and play your podcast, then your feed is working and you can submit your pod-cast to iTunes.
To actually submit your podcast, still in the iTunes Store, go to the Podcasts section. There, on a side menu, select ‘Submit a Podcast’. That will bring you to this screen:
Enter the URL of your XML file in the entry field. If everything is ok, a preview of your podcast will appear, for you to review:

If you have not included <language>, <itunes:category>, and <itunes:explicit> tags in your feed, you will see a second screen prompting you for this information. If everything is OK, and you accept it, Apple is notoriously slow in making your initial podcast appear to the world. In your first podcasts, it might take over a week (upon submission, your podcast is placed in a queue for review by the iTunes staff). In the future, when you are updat-ing your podcasts, iTunes normally continues to update your podcasts automatically every 24 hours. There is also a way for your updates to be nearly immediate, if you ping the iTunes Store with your update, by opening a browser and typing this in the URL:https://phobos.apple.com/WebObjects/MZFinance.woa/wa/pingPodcast?id=FEEDID… where FEEDID is your iTunes podcast numeric ID. When you enter this into your browser, you’ll get a HTTP 200 code. That’s OK.
4. Removing or blocking your feed.If you are no longer creating a podcast and you want it removed from iTunes, you should:1. Log into iTunes.2. Find and select your podcast.3. Click on Report a Concern.4. Select "is mine and I want it removed from the Music Store" from the Choose a Reason menu.5. Explain why you want the podcast removed.If you only want to remove your feed temporarily, you can use the <iTunes:block> tag described earlier.
5. Changing your feed URL.Podcasters occasionally need to move their feed from one location to another. You should use the <itunes:new-feed-url> tag described earlier. The tag will cause the iTunes Store to be updated with the new feed URL, as well as all iTunes client versions that support podcasting.
In your server, you should also set your web server to return an HTTP 301 response and redirect when receiving a request for the old feed.
The <itunes:new-feed-url> tag will work for iTS and all versions of the iTunes client that support podcasting. The 301 redirect will work for most of your subscribers who do not use the iTunes client. Be sure to maintain the <itunes:new-feed-url> tag and the 301 redirect for at least two weeks to ensure that most subscribers have attempted to download your most recent episode and have thereby received the new URL.
6. Podcasting tools.Garageband: This is the most popular program for making podcasts these days, since it’s part of the Mac operat-ing system. It’s recording software for more than just podcasts, including a variety of musical tracks and sound effects. You can assign Lead and Backing audio tracks (louder and softer). It also offers tools to modulate your voice (eliminating background hissing and feedback). It also allows for enhanced podcasts, since it can import images and URLs, placing them in the audio timeline. In the podcast’s ‘Track Info’ you can directly enter Title, Artist, Parental Advisory, and Description. And, in ‘Export’, you can also enter the name of the playlist, album, and composer. To export the file for iTunes, you simply select Share > Send Song to iTunes. www.apple.com/ilife/garageband
Podcaster: This program is produced by Kudlian Software, and basically allows formatting of an existing audio file into a podcast (the way Garageband does for the Mac, but this software is for Windows too).www.kudlian.net/products/podcaster

Audacity: There are two reasons why Audacity is used by so many podcasters: it works, and it's free! It also has great cross-platform support, running on Windows, Macs, and Linux. Audacity is a simple program that can record live audio and comes with a basic set of effects that you can try out on your recordings.http://audacity.sourceforge.net
Podpress: If you use Wordpress for your blog or Web site, Podpress is the dream plugin for podcasting. It allows you to upload mp3 files and presents them in an auto-player in your site. It also helps you make XML files for iTunes easily (and even shows you a preview of the iTunes channel!).www.mightyseek.com/podpress
6. Other sources.Apple ‘Making a Podcast’:www.apple.com/itunes/podcasts/specs.html
HowStuffWorks ‘How Podcasting Works’: http://computer.howstuffworks.com/podcasting.htm
About.com ‘Podcasting’:http://podcasting.about.com
Appendix 1:XML code for podcasts describing works in the BioLogic art gallery
<?xml version="1.0" encoding="UTF-8"?><rss xmlns:itunes="http://www.itunes.com/dtds/podcast-1.0.dtd" version="2.0"> <channel> <title>BioLogic- English</title> <copyright>2009 ACM SIGGRAPH</copyright> <itunes:author>ACM SIGGRAPH IRC (Sandro Alberti) </itunes:author> <description>English podcast; produced by Patrick Marais</description> <link>http://www.siggraph.org/resources/international</link> <itunes:subtitle>English podcast; produced by Patrick Marais</itunes:subtitle> <itunes:summary> (produced by Patrick Marais) The artworks chosen for the SIGGRAPH 2009 juried art exhibition explore what can happen when nature and technology combine. Recent projects by 11 artists representing 10 countries offer both serious and playful scenarios in which biological forms and life processes are grafted together with digital code and devices. The BioLogic gallery was coordinated and supervised by Elona Van Gent. </itunes:summary> <language>en</language> <itunes:owner> <itunes:name>Sandro Alberti</itunes:name> <itunes:email>[email protected]</itunes:email> </itunes:owner> <category>Arts</category> <itunes:category text="Arts"> <itunes:category text="Design" /> </itunes:category> <itunes:category text="Society & Culture" /> <itunes:category text="Education" /> <itunes:category text="Technology" /> <itunes:keywords>podcast,siggraph,s2009,technology,design,acm,gallery,showcase,fabrication,art,conference,biologic </itunes:keywords> <itunes:image href="http://media.siggraph.org/international-resources/gallery-podcasts/s2009/biologic/biologic.jpg"/> <itunes:explicit>no</itunes:explicit> <itunes:block>no</itunes:block>
<item> <author>Sandro Alberti + Patrick Marais</author> <title>One</title> <itunes:author>Sandro Alberti + Patrick Marais</itunes:author> <itunes:subtitle>Yoon Chung Han, UCLA Design | Media Arts.</itunes:subtitle> <description>Yoon Chung Han, UCLA Design | Media Arts.</description> <itunes:summary>One is an interactive piece consisting of a single drop of ink in a suspended Petri dish and a large projection of the same drop. Viewer interaction with the suspended dish is the means of evolution for the animated ink blot. </ itunes:summary> <language>en</language> <itunes:keywords>biologic,one,yoon,chung,han,interactive,petri,drop,suspended,animated,experiment,planet </itunes:keywords> <itunes:explicit>no</itunes:explicit> <itunes:block>no</itunes:block> <enclosure url="http://media.siggraph.org/international-resources/gallery-podcasts/s2009/biologic/english/One.m4b" length="1089072" type="audio/x-m4b"/> <itunes:duration>01:47</itunes:duration> <guid isPermaLink="true">http://media.siggraph.org/international-resources/gallery-podcasts/s2009/biologic/english/One.m4b </guid> <pubDate>Tue, 3 Aug 2009 13:34:32 -0700</pubDate> </item> </channel></rss>
Related Documents