PeopleSoft Campus Solutions 9.2: Integration Interfaces April 2022

Welcome message from author
This document is posted to help you gain knowledge. Please leave a comment to let me know what you think about it! Share it to your friends and learn new things together.
Transcript

PeopleSoft Campus Solutions 9.2:Integration Interfaces
April 2022

PeopleSoft Campus Solutions 9.2: Integration InterfacesCopyright © 1988, 2022, Oracle and/or its affiliates.
This software and related documentation are provided under a license agreement containing restrictions on use anddisclosure and are protected by intellectual property laws. Except as expressly permitted in your license agreementor allowed by law, you may not use, copy, reproduce, translate, broadcast, modify, license, transmit, distribute,exhibit, perform, publish, or display any part, in any form, or by any means. Reverse engineering, disassembly, ordecompilation of this software, unless required by law for interoperability, is prohibited.
The information contained herein is subject to change without notice and is not warranted to be error-free. If youfind any errors, please report them to us in writing.
If this is software or related documentation that is delivered to the U.S. Government or anyone licensing it on behalfof the U.S. Government, then the following notice is applicable:
U.S. GOVERNMENT END USERS: Oracle programs (including any operating system, integrated software,any programs embedded, installed or activated on delivered hardware, and modifications of such programs) andOracle computer documentation or other Oracle data delivered to or accessed by U.S. Government end users are"commercial computer software" or “commercial computer software documentation” pursuant to the applicableFederal Acquisition Regulation and agency-specific supplemental regulations. As such, the use, reproduction,duplication, release, display, disclosure, modification, preparation of derivative works, and/or adaptation of i) Oracleprograms (including any operating system, integrated software, any programs embedded, installed or activatedon delivered hardware, and modifications of such programs), ii) Oracle computer documentation and/or iii) otherOracle data, is subject to the rights and limitations specified in the license contained in the applicable contract. Theterms governing the U.S. Government’s use of Oracle cloud services are defined by the applicable contract for suchservices. No other rights are granted to the U.S. Government.
This software or hardware is developed for general use in a variety of information management applications. It isnot developed or intended for use in any inherently dangerous applications, including applications that may create arisk of personal injury. If you use this software or hardware in dangerous applications, then you shall be responsibleto take all appropriate fail-safe, backup, redundancy, and other measures to ensure its safe use. Oracle Corporationand its affiliates disclaim any liability for any damages caused by use of this software or hardware in dangerousapplications.
Oracle and Java are registered trademarks of Oracle and/or its affiliates. Other names may be trademarks of theirrespective owners.
Intel and Intel Inside are trademarks or registered trademarks of Intel Corporation. All SPARC trademarks are usedunder license and are trademarks or registered trademarks of SPARC International, Inc. AMD, Epyc, and the AMDlogo are trademarks or registered trademarks of Advanced Micro Devices. UNIX is a registered trademark of TheOpen Group.
This software or hardware and documentation may provide access to or information about content, products, andservices from third parties. Oracle Corporation and its affiliates are not responsible for and expressly disclaim allwarranties of any kind with respect to third-party content, products, and services unless otherwise set forth in anapplicable agreement between you and Oracle. Oracle Corporation and its affiliates will not be responsible for anyloss, costs, or damages incurred due to your access to or use of third-party content, products, or services, except asset forth in an applicable agreement between you and Oracle.
Documentation Accessibility
For information about Oracle's commitment to accessibility, visit the Oracle Accessibility Program website athttps://docs.oracle.com/pls/topic/lookup?ctx=acc&id=docacc.
Access to Oracle Support
Oracle customers that have purchased support have access to electronic support through My Oracle Support. Forinformation, visit https://docs.oracle.com/pls/topic/lookup?ctx=acc&id=info or visit https://docs.oracle.com/pls/topic/lookup?ctx=acc&id=trs if you are hearing impaired.

Contents
Preface: Preface...........................................................................................................................................ixUnderstanding the PeopleSoft Online Help and PeopleBooks............................................................. ix
Hosted PeopleSoft Online Help...................................................................................................... ixLocally Installed Help..................................................................................................................... ixDownloadable PeopleBook PDF Files............................................................................................ixCommon Help Documentation........................................................................................................ixField and Control Definitions.......................................................................................................... xTypographical Conventions.............................................................................................................. xISO Country and Currency Codes................................................................................................... xRegion and Industry Identifiers...................................................................................................... xiTranslations and Embedded Help................................................................................................... xi
Using and Managing the PeopleSoft Online Help...............................................................................xiiPeopleSoft Enterprise Components Related Links.............................................................................. xiiContact Us.............................................................................................................................................xiiFollow Us..............................................................................................................................................xii
Chapter 1: Setting Up the Credit Card Interface.................................................................................. 13Understanding XML-Based Integration Using Integration Broker...................................................... 13Setting Up Credit Card Integration for Integration Broker..................................................................23
Configuring Integration for Integration Broker............................................................................. 24Setting Up Credit Card Interface Elements..........................................................................................25
Prerequisites for Setting Up Credit Card Interface Elements........................................................ 25Pages Used to Set Up Credit Card Interface Elements................................................................. 26Payment Processor Page.................................................................................................................26Card Type Page.............................................................................................................................. 30Test Credit Card Interface - Card Entry/Display Page.................................................................. 32Test Credit Card Interface - Transaction Page...............................................................................34
Chapter 2: Using PeopleSoft Directory Interface...................................................................................39Understanding PeopleSoft Directory Interface.....................................................................................39Understanding Implementing PeopleSoft Directory Interface............................................................. 40Overview of Using PeopleSoft Directory Interface............................................................................. 41
Setting Up in PeopleSoft Application Designer and PeopleSoft Integration Broker..................... 42Using the Directory Configurations Component........................................................................... 43
Common Elements Used in The Directory Interface...........................................................................43Defining and Configuring the Directory.............................................................................................. 44
Pages Used to Define and Configure the Directory...................................................................... 44Directory Setup Page......................................................................................................................44Cache Schema Page....................................................................................................................... 47Delete Directory Page.................................................................................................................... 48
(Optional) Setting Up Directory Authentication.................................................................................. 48Pages Used to Set Up Directory Authentication........................................................................... 48Authentication Page........................................................................................................................49Mandatory User Properties Page....................................................................................................50Optional User Properties Page....................................................................................................... 50
Setting Up Mappings............................................................................................................................ 51Pages Used to Set Up Mappings................................................................................................... 51Understanding Mapping................................................................................................................. 52
Copyright © 1988, 2022, Oracle and/or its affiliates. iii

Contents
Map Details Page........................................................................................................................... 52Modify Connect DN - Directory Interface Page........................................................................... 55DN Details Page.............................................................................................................................56DN Attribute Function - Directory Interface Page........................................................................ 58DN Defaults Page...........................................................................................................................60Attribute Details Page.................................................................................................................... 61Locating Delivered Messages........................................................................................................ 63
(Optional) Setting Up Entry Membership Rules..................................................................................63Pages Used to Set Up Entry Membership Rules........................................................................... 63Entry Definition Page.....................................................................................................................63Entry Membership Rules Page.......................................................................................................66
Loading Data into the Directory...........................................................................................................68Understanding Directory Load Behavior....................................................................................... 68Directory Load Page.......................................................................................................................69
Chapter 3: Reviewing Directory Data and Generating Reports...........................................................71Reviewing LDAP Directory Data.........................................................................................................71
Pages Used to Review LDAP Directory Data...............................................................................71Directory Audit Page......................................................................................................................71Directory Search Page....................................................................................................................72
Viewing PeopleSoft Directory Interface Reports................................................................................. 75Pages Used to View PeopleSoft Directory Interface Reports........................................................75Directory Audit Report Page......................................................................................................... 75Directory BI Status Report Page....................................................................................................76
Managing Transaction Audit History................................................................................................... 77Pages Used to Manage Transaction Audit History........................................................................77Transaction History Report Page................................................................................................... 78Transaction History Inquiry Page.................................................................................................. 79Purge Transaction History Page.....................................................................................................81
Chapter 4: Using the Error Handling Utility......................................................................................... 83Understanding the Error Handling Utility............................................................................................83
Error Management Process............................................................................................................ 83Setting Up and Maintaining Message Errors....................................................................................... 84
Creating Error-Correction Pages.................................................................................................... 85Data Maintenance Page..................................................................................................................86Workflow/Security Page.................................................................................................................88Setting Up Workflow Notification in PeopleSoft Application Designer....................................... 89Data Maintenance Page..................................................................................................................89
Correcting Message Errors................................................................................................................... 91Understanding the Workflow Notification Process........................................................................91Correcting Message Errors.............................................................................................................91
Chapter 5: Using the Publish Utility....................................................................................................... 93Understanding the Publish Utility........................................................................................................ 93Understanding Publishing Rules...........................................................................................................93
Pre-Processing and Post-Processing...............................................................................................94Data Sources................................................................................................................................... 94Message Chunking......................................................................................................................... 94Record Mapping............................................................................................................................. 96Output Format.................................................................................................................................96Publishing Data in Related Languages.......................................................................................... 97
Prerequisites for Using the Publish Utility...........................................................................................97Common Elements Used in The Publish Utility..................................................................................98
iv Copyright © 1988, 2022, Oracle and/or its affiliates.

Contents
Using Sequential and Parallel Processing............................................................................................ 99Understanding Using Sequential and Parallel Processing............................................................. 99Prerequisites for Using Parallel Processing................................................................................. 100Using Sequential Processing........................................................................................................ 100Using Parallel Processing.............................................................................................................100Changing Processing Modes........................................................................................................ 101
Assigning Full Table Publishing Rules.............................................................................................. 101Pages Used to Assign Full Table Publishing Rules.....................................................................101Full Table Publish Rules Page..................................................................................................... 101Record Mapping Page.................................................................................................................. 103Languages Page............................................................................................................................ 103
Assigning Batch Publishing Rules..................................................................................................... 104Batch Publish Rules Page............................................................................................................ 105Record Mapping Page.................................................................................................................. 105Batch Programs Page................................................................................................................... 106
Performing Pre-Processing and Post-Processing Tasks......................................................................107Setting General Pre-Processing and Post-Processing Options.....................................................108Coding Pre-Processing and Post-Processing Tasks......................................................................108
Setting Up Message Chunking........................................................................................................... 111Pages Used to Set Up Message Chunking...................................................................................111Understanding Message Chunking...............................................................................................111Identifying When to Use Chunking............................................................................................. 112Selecting Chunking Fields........................................................................................................... 112Creating Chunking Rules............................................................................................................. 114Chunking Rule Page.....................................................................................................................115BusUnit Mapping Page................................................................................................................ 116SetId Mapping Page..................................................................................................................... 116Eo Recgrp Page............................................................................................................................ 117Add Nodes to Chunk Rule Page..................................................................................................118Quick Map Page...........................................................................................................................119Map Business Unit Page.............................................................................................................. 120Map Set IDs Page........................................................................................................................ 121
Creating Custom Chunking Tables.....................................................................................................122Creating a Custom Chunking Table.............................................................................................122Creating a View for the Component Search Record................................................................... 122Creating Maintenance Pages........................................................................................................ 123Creating a Component..................................................................................................................124Creating Routing PeopleCode...................................................................................................... 124
Chapter 6: Using the Inbound Data Error Scan Utility......................................................................129Understanding the Inbound Data Error Scan Utility..........................................................................129Running the Inbound Data Error Scan Utility................................................................................... 129
Page Used to Run the Inbound Data Error Scan Utility..............................................................129Incoming Data Error Scan Page.................................................................................................. 129
Chapter 7: Using the Effective Date Publish Utility............................................................................ 131Understanding the Effective Date Publish Utility.............................................................................. 131Performing a Full Data Publish of Current Effective Data................................................................133
Pages Used to Perform a Full Data Publish of Current Effective Data....................................... 133Creating Effective-Dated Messages............................................................................................. 133Creating the Service Operation.................................................................................................... 134Defining the Node and Target Connector.................................................................................... 135Chunking Rule Page.....................................................................................................................135
Copyright © 1988, 2022, Oracle and/or its affiliates. v

Contents
Creating Publish Rule Definitions............................................................................................... 136Full Data Publish Page.................................................................................................................136Defining Routing.......................................................................................................................... 138
Publishing Incremental Messages of Current Effective Data.............................................................138Creating Service Operations for Publishing Incremental Messages of Current EffectiveData............................................................................................................................................... 139Creating Subscription Processes That Open the Generic Effective-Dated Delay Function......... 139
Publishing Effective-Dated Rows from the Delay Table................................................................... 139Page Used to Publish Effective-Dated Rows from the Delay Table............................................139Understanding Effective-Dated Row Publishing......................................................................... 140Effective Date Pub Page.............................................................................................................. 140
Publishing Effective-Dated Rows and Prior-Dated Rows from the Delay Table...............................141Page Used to Publish Effective-Dated Rows and Prior-Dated Rows from the Delay Table........ 142Understanding Publishing Effective-Dated Rows and Prior-Dated Rows from the DelayTable..............................................................................................................................................142Effective Date Prior Publish Page............................................................................................... 142
Chapter 8: Using the Flat File Utility....................................................................................................145Understanding the Flat File Utility.....................................................................................................145Processing Inbound Flat Files............................................................................................................ 145Initiating File Processing.................................................................................................................... 147
Pages Used to Initiate File Processing.........................................................................................147File Inbound Page........................................................................................................................ 147Inbound File Page........................................................................................................................ 150
Testing Inbound Flat File Processing................................................................................................. 152Chapter 9: Using the XML Schema Utility.......................................................................................... 155
Understanding the XML Schema Utility............................................................................................155Generating the XML Schema.............................................................................................................155
Page Used to Generate the XML Schema................................................................................... 155Generate XML Schema Page.......................................................................................................155Interpreting Sample Output..........................................................................................................157
Chapter 10: Understanding Enterprise Integration.............................................................................163Understanding PeopleSoft Business Interlinks...................................................................................163Understanding PeopleSoft Component Interfaces..............................................................................163Understanding File Layouts................................................................................................................163Understanding PeopleSoft Integration Broker....................................................................................163
Chapter 11: Understanding Integration Points.................................................................................... 165Overview of Integration Points.......................................................................................................... 165
Chapter 12: Activating Integration Points............................................................................................167Setting Up PeopleSoft Integration Points...........................................................................................167
Pages Used to Set Up PeopleSoft Integration Points.................................................................. 167Batch Publish Rules Page............................................................................................................ 167Add Nodes to Chunk Rule Page..................................................................................................169Assigning Business Units or SetIDs to a Chunking Rule............................................................169Specifying OnRoute PeopleCode.................................................................................................170
Setting Up Related Languages........................................................................................................... 170Understanding Related Language Tables.....................................................................................170Understanding Related Language Guidelines for Messaging......................................................171Interpreting Component Processor Behavior............................................................................... 172Publishing a Message from a Component................................................................................... 172Publishing a Message from Batch Programs............................................................................... 172Subscribing to Data in a PeopleSoft Multilingual Environment................................................. 172
vi Copyright © 1988, 2022, Oracle and/or its affiliates.

Contents
Subscribing to Data in a Non-Multilingual Environment............................................................173Examining Related-Language Messaging Scenarios..........................................................................174
Publishing a Non-Base Language Message to a Subscribing System with a Different BaseLanguage and No Prior Data....................................................................................................... 175Switching the Preferred Language to Japanese and Updating the Same Employee's Nameand Address.................................................................................................................................. 175
Chapter 13: Integration Point Naming Standards...............................................................................177Standard Action and Event Verbs.......................................................................................................177Standard Business Object Nouns........................................................................................................179
Chapter 14: PeopleSoft Design Patterns............................................................................................... 183List of Design Patterns....................................................................................................................... 183
Copyright © 1988, 2022, Oracle and/or its affiliates. vii

Contents
viii Copyright © 1988, 2022, Oracle and/or its affiliates.

Preface
Understanding the PeopleSoft Online Help and PeopleBooks
The PeopleSoft Online Help is a website that enables you to view all help content for PeopleSoftapplications and PeopleTools. The help provides standard navigation and full-text searching, as well ascontext-sensitive online help for PeopleSoft users.
Hosted PeopleSoft Online HelpYou can access the hosted PeopleSoft Online Help on the Oracle Help Center. The hosted PeopleSoftOnline Help is updated on a regular schedule, ensuring that you have access to the most currentdocumentation. This reduces the need to view separate documentation posts for application maintenanceon My Oracle Support. The hosted PeopleSoft Online Help is available in English only.
To configure the context-sensitive help for your PeopleSoft applications to use the Oracle Help Center,see Configuring Context-Sensitive Help Using the Hosted Online Help Website.
Locally Installed HelpIf you’re setting up an on-premise PeopleSoft environment, and your organization has firewall restrictionsthat prevent you from using the hosted PeopleSoft Online Help, you can install the online help locally.See Configuring Context-Sensitive Help Using a Locally Installed Online Help Website.
Downloadable PeopleBook PDF FilesYou can access downloadable PDF versions of the help content in the traditional PeopleBook format onthe Oracle Help Center. The content in the PeopleBook PDFs is the same as the content in the PeopleSoftOnline Help, but it has a different structure and it does not include the interactive navigation features thatare available in the online help.
Common Help DocumentationCommon help documentation contains information that applies to multiple applications. The two maintypes of common help are:
• Application Fundamentals
• Using PeopleSoft Applications
Most product families provide a set of application fundamentals help topics that discuss essentialinformation about the setup and design of your system. This information applies to many or allapplications in the PeopleSoft product family. Whether you are implementing a single application, somecombination of applications within the product family, or the entire product family, you should be familiarwith the contents of the appropriate application fundamentals help. They provide the starting points forfundamental implementation tasks.
Copyright © 1988, 2022, Oracle and/or its affiliates. ix

Preface
In addition, the PeopleTools: Applications User's Guide introduces you to the various elements of thePeopleSoft Pure Internet Architecture. It also explains how to use the navigational hierarchy, components,and pages to perform basic functions as you navigate through the system. While your application orimplementation may differ, the topics in this user’s guide provide general information about usingPeopleSoft applications.
Field and Control DefinitionsPeopleSoft documentation includes definitions for most fields and controls that appear on applicationpages. These definitions describe how to use a field or control, where populated values come from, theeffects of selecting certain values, and so on. If a field or control is not defined, then it either requiresno additional explanation or is documented in a common elements section earlier in the documentation.For example, the Date field rarely requires additional explanation and may not be defined in thedocumentation for some pages.
Typographical ConventionsThe following table describes the typographical conventions that are used in the online help.
Typographical Convention Description
Key+Key Indicates a key combination action. For example, a plus sign (+) between keys means that you must hold down the first keywhile you press the second key. For Alt+W, hold down the Altkey while you press the W key.
. . . (ellipses) Indicate that the preceding item or series can be repeated anynumber of times in PeopleCode syntax.
{ } (curly braces) Indicate a choice between two options in PeopleCode syntax. Options are separated by a pipe ( | ).
[ ] (square brackets) Indicate optional items in PeopleCode syntax.
& (ampersand) When placed before a parameter in PeopleCode syntax, an ampersand indicates that the parameter is an alreadyinstantiated object.
Ampersands also precede all PeopleCode variables.
⇒ This continuation character has been inserted at the end of aline of code that has been wrapped at the page margin. Thecode should be viewed or entered as a single, continuous lineof code without the continuation character.
ISO Country and Currency CodesPeopleSoft Online Help topics use International Organization for Standardization (ISO) country andcurrency codes to identify country-specific information and monetary amounts.
x Copyright © 1988, 2022, Oracle and/or its affiliates.

Preface
ISO country codes may appear as country identifiers, and ISO currency codes may appear as currencyidentifiers in your PeopleSoft documentation. Reference to an ISO country code in your documentationdoes not imply that your application includes every ISO country code. The following example is acountry-specific heading: "(FRA) Hiring an Employee."
The PeopleSoft Currency Code table (CURRENCY_CD_TBL) contains sample currency code data. TheCurrency Code table is based on ISO Standard 4217, "Codes for the representation of currencies," andalso relies on ISO country codes in the Country table (COUNTRY_TBL). The navigation to the pageswhere you maintain currency code and country information depends on which PeopleSoft applicationsyou are using. To access the pages for maintaining the Currency Code and Country tables, consult theonline help for your applications for more information.
Region and Industry IdentifiersInformation that applies only to a specific region or industry is preceded by a standard identifier inparentheses. This identifier typically appears at the beginning of a section heading, but it may also appearat the beginning of a note or other text.
Example of a region-specific heading: "(Latin America) Setting Up Depreciation"
Region Identifiers
Regions are identified by the region name. The following region identifiers may appear in the PeopleSoftOnline Help:
• Asia Pacific
• Europe
• Latin America
• North America
Industry Identifiers
Industries are identified by the industry name or by an abbreviation for that industry. The followingindustry identifiers may appear in the PeopleSoft Online Help:
• USF (U.S. Federal)
• E&G (Education and Government)
Translations and Embedded HelpPeopleSoft 9.2 software applications include translated embedded help. With the 9.2 release, PeopleSoftaligns with the other Oracle applications by focusing our translation efforts on embedded help. Weare not planning to translate our traditional online help and PeopleBooks documentation. Instead weoffer very direct translated help at crucial spots within our application through our embedded helpwidgets. Additionally, we have a one-to-one mapping of application and help translations, meaning thatthe software and embedded help translation footprint is identical—something we were never able toaccomplish in the past.
Copyright © 1988, 2022, Oracle and/or its affiliates. xi

Preface
Using and Managing the PeopleSoft Online Help
Select About This Help in the left navigation panel on any page in the PeopleSoft Online Help to seeinformation on the following topics:
• Using the PeopleSoft Online Help.
• Managing hosted Online Help.
• Managing locally installed PeopleSoft Online Help.
PeopleSoft Enterprise Components Related Links
PeopleSoft Information Portal
My Oracle Support
PeopleSoft Training from Oracle University
Contact Us
Send your suggestions to [email protected].
Please include the applications update image or PeopleTools release that you’re using.
Follow Us
Icon Link
YouTube
Twitter@PeopleSoft_Info.
PeopleSoft Blogs
xii Copyright © 1988, 2022, Oracle and/or its affiliates.
Chapter 1
Setting Up the Credit Card Interface
Understanding XML-Based Integration Using Integration Broker
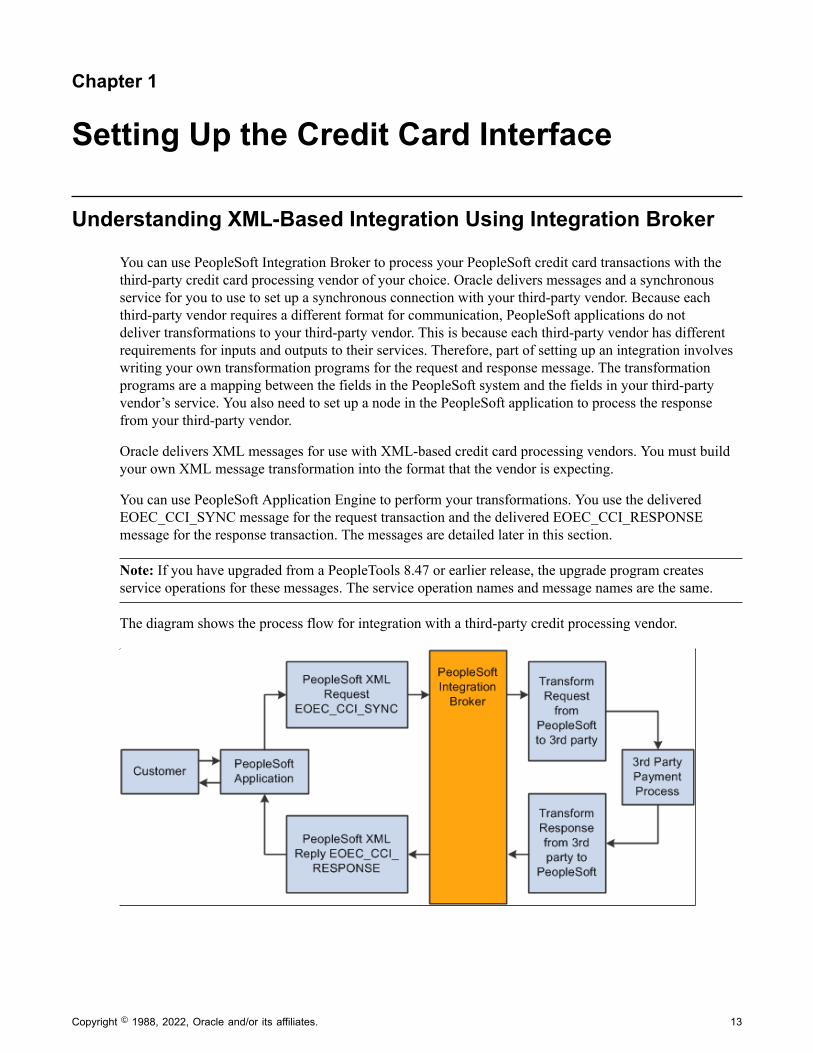
You can use PeopleSoft Integration Broker to process your PeopleSoft credit card transactions with thethird-party credit card processing vendor of your choice. Oracle delivers messages and a synchronousservice for you to use to set up a synchronous connection with your third-party vendor. Because eachthird-party vendor requires a different format for communication, PeopleSoft applications do notdeliver transformations to your third-party vendor. This is because each third-party vendor has differentrequirements for inputs and outputs to their services. Therefore, part of setting up an integration involveswriting your own transformation programs for the request and response message. The transformationprograms are a mapping between the fields in the PeopleSoft system and the fields in your third-partyvendor’s service. You also need to set up a node in the PeopleSoft application to process the responsefrom your third-party vendor.
Oracle delivers XML messages for use with XML-based credit card processing vendors. You must buildyour own XML message transformation into the format that the vendor is expecting.
You can use PeopleSoft Application Engine to perform your transformations. You use the deliveredEOEC_CCI_SYNC message for the request transaction and the delivered EOEC_CCI_RESPONSEmessage for the response transaction. The messages are detailed later in this section.
Note: If you have upgraded from a PeopleTools 8.47 or earlier release, the upgrade program createsservice operations for these messages. The service operation names and message names are the same.
The diagram shows the process flow for integration with a third-party credit processing vendor.
Copyright © 1988, 2022, Oracle and/or its affiliates. 13

Setting Up the Credit Card Interface Chapter 1
EOEC_CCI_Sync Message
The EOEC_CCI_SYNC message is a synchronous request that the credit card interface sends to thethird-party vendor. The request can be for an authorize, bill, authorize and bill, credit transaction, orauthorization reversal. The PeopleCode that supports this message is located in App Package EOEC_CCI.The following tables describe the request fields and how they are populated by the PeopleSoft system.
Level 0 Record: EOEC_CCI_XMLPAY:
Message field Alias Populated with
EOEC_CCI_UNIQUE_ID UNIQUEID Unique ID generated for eachtransaction.
Level 1 Record: EOEC_CCI_RQST:
Message field Alias Populated with
EOEC_CCI_MERCHANT VENDOR Populated from the merchant ID set upon the Credit Card Interface Installationpage.
EOEC_CCI_PARTNER PARTNER Hardcoded to “PeopleSoft”.
Level 2 Record: EOEC_CCI_TRANS:
Message field Alias Populated with
EOEC_CCI_TRANSID TRANSACTION_ID Either blank or contains the request IDof a previous transaction (such as a priorauthorization transaction).
EOEC_CCI_MERCH_REF TRANSACTION_CUSTREF Contains a reference to the transactionsuch as an order or invoice number.
EOEC_CCI_RQSTTOKEN N/A Either blank or contains the requesttoken of a previous transaction (such as aprior authorization transaction).
Level 3 Record: EOEC_CCI_TRNTYP:
14 Copyright © 1988, 2022, Oracle and/or its affiliates.

Chapter 1 Setting Up the Credit Card Interface
Message field Alias Populated with
EOEC_CCI_TRANSACT TRANSTYPE The service to be performed:
• 1=Authorize Only
• 2=Authorize & Bill
• 3=Bill Only
• 4=Credit
• 5=Authorize Reversal
Level 4 Record: EOEC_CCI_PAYDAT:
Message field Alias Populated with
EOEC_CCI_TRANSACT N/A N/A
Level 5 Record: EOEC_CCI_INV:
Message field Alias Populated with
EOEC_CCI_INV_NUM INVNUM Either blank or contains the requestID of a pervious transaction (suchas a prior authorization transaction). Oracle recommends that you useTRANSACTION_ID instead ofINVNUM in transformation programsbecause the field is only 20.
EOEC_DATE N/A
DESCR254 DESCRIPTION Hardcoded to “Description”.
EOEC_CCI_DISC_AMT DISCOUNTAMT N/A
EOEC_CCI_SHIP_AMT SHIPAMT N/A
EOEC_CCI_DUTY_AMT DUTYAMT N/A
EOEC_CCI_TAX_AMT TAXAMT N/A
Copyright © 1988, 2022, Oracle and/or its affiliates. 15

Setting Up the Credit Card Interface Chapter 1
Message field Alias Populated with
EOEC_CCI_TAX_INCL NATIONALTAXINCL N/A
EOEC_CCI_TOTAL_AMT TOTALAMT The total amount of the transaction.
EOEC_CCI_COMMENT COMMENT N/A
CURRENCY_CD N/A N/A
Level 6 Record: EOEC_CCI_BILLFM:
Message field Alias Populated with
EOEC_CCI_FULLNAME NAME N/A
EOEC_EMAIL_ADDR EMAIL N/A
PHONE N/A N/A
FAX N/A N/A
URL N/A N/A
Level 7 Record: EOEC_CCI_ADDR1:
Message field Alias Populated with
ADDRESS1 STREET N/A
ADDRESS2 N/A N/A
ADDRESS3 N/A N/A
ADDRESS4 N/A N/A
CITY N/A N/A
STATE N/A N/A
16 Copyright © 1988, 2022, Oracle and/or its affiliates.

Chapter 1 Setting Up the Credit Card Interface
Message field Alias Populated with
POSTAL ZIP N/A
COUNTRY N/A N/A
Level 6 Record: EOEC_CCI_BILLTO:
Message field Alias Populated with
EOEC_CCI_CUSTID CUSTOMERID N/A
EOEC_CCI_FULLNAME NAME N/A
EOEC_EMAIL_ADDR EMAIL Email address of the consumer.
PHONE N/A Telephone number of the consumer.
FAX N/A N/A
EOEC_CCI_CUSTCODE CUSTCODE N/A
EOEC_CCI_PO_NUM PONUM N/A
EOEC_CCI_TAXEXEMPT TAXEXEMPT N/A
Level 7 Record: EOEC_CCI_ADDR2:
Message field Alias Populated with
ADDRESS1 STREET Street address of the consumer.
ADDRESS2 N/A N/A
ADDRESS3 N/A N/A
ADDRESS4 N/A N/A
CITY N/A City address of the consumer.
Copyright © 1988, 2022, Oracle and/or its affiliates. 17

Setting Up the Credit Card Interface Chapter 1
Message field Alias Populated with
STATE N/A State address of the consumer.
POSTAL ZIP Postal address of the consumer.
COUNTRY N/A Country address of the consumer.
Level 6 Record: EOEC_CCI_SHIPFM:
Message field Alias Populated with
EOEC_CCI_FULLNAME NAME N/A
EOEC_EMAIL_ADDR EMAIL N/A
PHONE N/A N/A
FAX N/A N/A
Level 7 Record: EOEC_CCI_ADDR3:
Message field Alias Populated with
ADDRESS1 STREET N/A
ADDRESS2 N/A N/A
ADDRESS3 N/A N/A
ADDRESS4 N/A N/A
CITY N/A N/A
STATE N/A N/A
POSTAL ZIP N/A
COUNTRY N/A N/A
18 Copyright © 1988, 2022, Oracle and/or its affiliates.

Chapter 1 Setting Up the Credit Card Interface
Level 6 Record: EOEC_CCI_SHIPTO:
Message field Alias Populated with
EOEC_CCI_FULLNAME NAME N/A
EOEC_EMAIL_ADDR EMAIL N/A
PHONE N/A N/A
FAX N/A N/A
Level 7 Record: EOEC_CCI_ADDR4:
Message field Alias Populated with
ADDRESS1 STREET N/A
ADDRESS2 N/A N/A
ADDRESS3 N/A N/A
ADDRESS4 N/A N/A
CITY N/A N/A
STATE N/A N/A
POSTAL ZIP N/A
COUNTRY N/A N/A
Level 6 Record: EOEC_CCI_ITEM:
Message field Alias Populated with
EOEC_CCI_ITEM NUM ITEM_NUMBER N/A
EOEC_CCI_SKU SKU N/A
Copyright © 1988, 2022, Oracle and/or its affiliates. 19

Setting Up the Credit Card Interface Chapter 1
Message field Alias Populated with
EOEC_CCI_UPC UPC N/A
DESCR254 DESCRIPTION N/A
EOEC_CCI_QTY AMT TOTALAMT QUANTITY N/A
EOEC_CCI_UOM UNITOFMEASURE N/A
EOEC_CCI_UNITPRICE UNITPRICE N/A
EOEC__CCI_EXTAMT EXTAMT N/A
EOEC_CCI_DISC_AMT DISCOUNTAMT N/A
EOEC_CCI_TAX_AMT TAXAMT _ N/A
EOEC_CCI_TOTAL TOTALAMT N/A
Level 4 Record: EOEC_CCI_TENDER:
Message field Alias Populated with
EOEC_CCI_TRANSACT N/A N/A
Level 5 Record: EOEC_CCI_CARD:
Message field Alias Populated with
EOEC_CCI_TYPE CARDTYPE Two-character code for the type of cardused in the transaction.
• 01=Visa
• 02=MasterCard
• 03=Diners Club
• 04=American Express
• 05=Discover
20 Copyright © 1988, 2022, Oracle and/or its affiliates.

Chapter 1 Setting Up the Credit Card Interface
Message field Alias Populated with
EOEC_CCI_NUMBER CARDNUM Credit card number used in thetransaction.
EOEC_CCI_EXPYR EXPYR Expiration year of the card.
EOEC_CCI_EXPMO EXPMO Expiration month of the card.
EOEC_CCI_CVNUM CVNUM Card verification number.
EOEC_CCI_MAGDATA MAGDATA N/A
EOEC_CCI_FULLNAME NAMEONCARD First and last name of the consumer.
EOEC_CCI_FNAME FIRSTNAME First name of the consumer.
EOEC_CCI_LNAME LASTNAME Last name of the consumer.
Level 5 Record: EOEC_CCI_STATUS:
Message field Alias Populated with
EOEC_CCI_TRANS_REF PNREF N/A
Note: When writing your transformation program, use the alias name to reference the fields. When youview the “Request — Original” text of the message, the alias name is displayed.
EOEC_CCI_RESPONSE Message
The EOEC_CCI_RESPONSE message is a response to the request that the credit card interface receivesfrom the third-party vendor. Your transformation should populate the response message fields as shown inthe tables.
Level 0 Record: EOEC_CCI_XMLRSP:
Message field Alias Populate with
EOEC_CCI_UNIQUE_ID UNIQUEID N/A
Level 1 Record: EOEC_CCI_RSPNS:
Copyright © 1988, 2022, Oracle and/or its affiliates. 21
Setting Up the Credit Card Interface Chapter 1
Message field Alias Populate with
EOEC_CCI_MERCHANT VENDOR N/A
EOEC_CCI_PARTNER PARTNER N/A
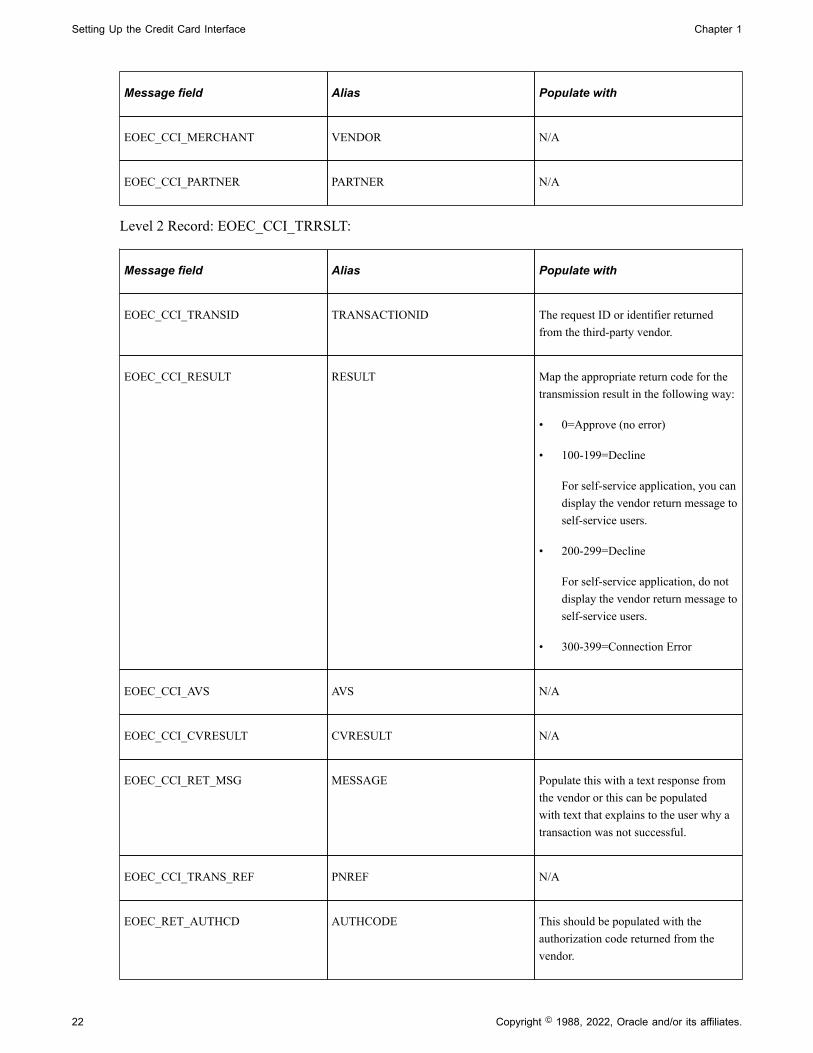
Level 2 Record: EOEC_CCI_TRRSLT:
Message field Alias Populate with
EOEC_CCI_TRANSID TRANSACTIONID The request ID or identifier returnedfrom the third-party vendor.
EOEC_CCI_RESULT RESULT Map the appropriate return code for thetransmission result in the following way:
• 0=Approve (no error)
• 100-199=Decline
For self-service application, you candisplay the vendor return message toself-service users.
• 200-299=Decline
For self-service application, do notdisplay the vendor return message toself-service users.
• 300-399=Connection Error
EOEC_CCI_AVS AVS N/A
EOEC_CCI_CVRESULT CVRESULT N/A
EOEC_CCI_RET_MSG MESSAGE Populate this with a text response fromthe vendor or this can be populatedwith text that explains to the user why atransaction was not successful.
EOEC_CCI_TRANS_REF PNREF N/A
EOEC_RET_AUTHCD AUTHCODE This should be populated with theauthorization code returned from thevendor.
22 Copyright © 1988, 2022, Oracle and/or its affiliates.

Chapter 1 Setting Up the Credit Card Interface
Message field Alias Populate with
EOEC_CCI_HOSTCODE HOSTCODE N/A
EOEC_CCI_HOST_URL HOSTURL N/A
EOEC_CCI_ORIGRSLT ORIGRESULT N/A
EOEC_RET_STATUS TRSTATUS N/A
EOEC_RET_STATUSMSG N/A N/A
EOEC_RET_AUTHDTTM N/A N/A
EOEC_CCI_RQSTTOKEN N/A N/A
Level 3 Record: EOEC_CCI_AVRSLT
Message field Alias Populate with
EOEC_MATCH_STREET STREETMATCH N/A
EOEC_MATCH_ZIP ZIPMATCH N/A
When writing the transformation program, use the alias name to reference the fields.
Note: The alias name is shown in the “Response — Original” message from within the ServiceOperations Monitor.
Agents can then process credit cards using their application-specific credit card transaction page to submitthe transaction to the vendor for authorization, billing, authorization and billing, or credit. You can choosewhich types of transactions to permit.
For more information, refer the product documentations for PeopleTools: Integration Broker
PeopleTools: Security Administration
PeopleTools: Portal Technology.
Setting Up Credit Card Integration for Integration Broker
This section discusses how to configure integration for Integration Broker.
Copyright © 1988, 2022, Oracle and/or its affiliates. 23

Setting Up the Credit Card Interface Chapter 1
Configuring Integration for Integration BrokerTo set up Integration Broker for credit card processing:
1. Define the Integration Broker Gateway if it's not already done.
2. Activate the delivered service (EOEC_CCI_SYNC) that is used for the credit card integration.
3. Set up an external node to use when using the XML-based interface to which the XML messagesshould be sent and to indicate where the processor is located.
Also specify the authentication option that you arranged with the credit card processor.
4. Set up routings.
Use the Routings tab in the Node component to add the EOEC_CCI_SYNC service to the node. Tosee the XML data before and after transformations, set the log detail to Header & Detail. This ishelpful when troubleshooting your new integration.
5. Test the integration.
You can use the test component described below.
If you receive error messages when using Integration Broker, see the Troubleshooting the IntegrationBroker Setup section below:
Troubleshooting the Integration Broker Setup
Several sources of information are available when the setup is not successful. These include but are notlimited to:
• Error messages stored on the message instance (view with the message monitor).
• IB gateway error log (http://<GatewayMachine>:<Port>/PSIGW/errorLog.html).
• IB gateway message log (http://<GatewayMachine>:<Port>/PSIGW/msgLog.html).
• Application server log for the active IB domain server on the database.
• Web server logs.
You can also do the following:
• Increase the log fence on the gateway properties file. This file is located in the following directory:PS_CFG_HOME\webserv\<web-server>\applications\peoplesfoft\PSIGW
If you set the log fence to five in the integration Gateway properties, you will receive more details inthe error and message logs.
• Check the Service Operations Monitor to view the XML messages before and after thetransformations (PeopleTools, Integration Broker, Monitor, Service Operations, SynchronousServices).
• Check the Header and Detail logs on the Synchronous Detail page (PeopleTools, Integration Broker,Service Operations Monitor, Monitor, Synchronous Details).
24 Copyright © 1988, 2022, Oracle and/or its affiliates.

Chapter 1 Setting Up the Credit Card Interface
Problems are usually due to incorrect transformations between the two systems. Use these logs toensure that your transformations are correct.
Your Response-Transformed message structure should look similar to this:
<?xml version="1.0"?><EOEC_CCI_RESPONSE xmlns:c="yourcompany.com"> <FieldTypes> <EOEC_CCI_XMLRSP class="R"/> <EOEC_CCI_TRRSLT class="R"> <RESULT type="NUMBER"/> </EOEC_CCI_TRRSLT> <EOEC_CCI_AVRSLT class="R"/> <EOEC_CCI_RSPNS class="R"/> <PSCAMA class="R"/> </FieldTypes> <MsgData> <Transaction> <EOEC_CCI_XMLRSP class="R"> <UNIQUEID/> <EOEC_CCI_RSPNS class="R"> <VENDOR/> <PARTNER/> <EOEC_CCI_TRRSLT class="R"> <TRANSACTIONID>177</TRANSACTIONID> <RESULT>0</RESULT> <AVS/> <CVRESULT/> <MESSAGE/> <AUTHCODE>123456</AUTHCODE> <HOSTCODE/> <HOSTURL/> <ORIGRESULT/> <TRSTATUS/> <EOEC_RET_STATUSMSG/> <EOEC_RET_AUTHDTTM/> <EOEC_CCI_AVRSLT class="R"> <STREETMATCH/> </EOEC_CCI_AVRSLT> </EOEC_CCI_TRRSLT> </EOEC_CCI_RSPNS> </EOEC_CCI_XMLRSP> </Transaction> </MsgData></EOEC_CCI_RESPONSE>
Setting Up Credit Card Interface Elements
This section discusses how to set up credit card interface elements.
Note: The information in this section is used for credit card integration using Integration Broker, or anymanual processing that you have set up for credit card processing suppliers.
Prerequisites for Setting Up Credit Card Interface ElementsBefore you can test a PeopleSoft credit card integration, you must set up a URL identifier on the URLMaintenance page (PeopleTools >Utilities >Administration >URLs).
Before you set up credit card processing options, establish your merchant account with a third-partysupplier.
Copyright © 1988, 2022, Oracle and/or its affiliates. 25

Setting Up the Credit Card Interface Chapter 1
Check the installation documentation for the product you are installing for specific details on setting upcredit card interfaces.
Pages Used to Set Up Credit Card Interface Elements
Page Name Definition Name Usage
Payment Processor Page EOEC_CCI_INSTAL Define connection parameters for creditcard processing calls to a third-partysupplier.
Before you set up credit card processingoptions, establish your merchant accountwith a third-party supplier.
Card Type Page EOEC_CCI_CARDTYPE Define the types of credit cards youaccept for credit card processing.
Test Credit Card Interface - Card Entry/Display Page
EOEC_CCI_TEST Enter test credit card information thatyou can submit to verify that your creditcard processing is functioning properly.
Test Credit Card Interface - TransactionPage
EOEC_CCI_TRANSACT Enter test credit card transactioninformation that you can submit toverify that your credit card processing isfunctioning properly.
Payment Processor PageUse the Payment Processor page (EOEC_CCI_INSTAL) to define connection parameters for credit cardprocessing calls to a third-party supplier.
Note: Before you set up credit card processing options, establish your merchant account with a third-partysupplier.
Note: Check the installation documentation for the product you are installing for specific details onsetting up credit card interfaces.
Navigation:
Enterprise Components > Component Configurations > Credit Card Interface >CC Interface-Payment Processor
26 Copyright © 1988, 2022, Oracle and/or its affiliates.

Chapter 1 Setting Up the Credit Card Interface
This example illustrates the fields and controls on the Payment Processor page. You can find definitionsfor the fields and controls later on this page.
Verify connection requirements with your third-party supplier.
Copyright © 1988, 2022, Oracle and/or its affiliates. 27

Setting Up the Credit Card Interface Chapter 1
Payment Processor Attributes
Field or Control Description
Payment Processor ID Enter the processor name. The Payment Processor ID shouldcorrespond to your merchant account ID with the third-partysupplier.
Data Location Select from Hosted or Local.
Credit Card Hist. Backup Days (credit card history backupdays)
If you create a process that archives history records, specifythe number of days that you retain credit card authorizationhistory records.
On-line Transmission Retries Enter a value from 0 through 9 to specify how many times thesystem should attempt to retransmit transactions in the event oftransmission failure.
Address Verification Flag Credit card transmissions can fail authorization if the addressthat you send doesn't exactly match the billing address for thecredit card. Select from:
Add Ver ON (address verification on): Transactions fail whenthe address that you send does not match the credit card billingaddress. This is the default value.
Add Vf OFF (address verification off): Transactions do notfail when the address that you send does not match the billingaddress on the credit card.
28 Copyright © 1988, 2022, Oracle and/or its affiliates.

Chapter 1 Setting Up the Credit Card Interface
Default Transaction Type
Field or Control Description
Credit Card Transaction Type Select the types of transactions that your agents are allowed tosubmit. Disallowed transaction types are not available on theapplication-specific credit card transaction page. Select from:
Authorization Reversal: Your supplier can cancel thetransaction after authorization and before payment is received. This makes the funds available if the transaction is cancelled.
Authorize Bill Subscription
Authorize Only: Your supplier verifies that the card is validfor the charge. For example, the customer has enough creditto pay for the order, the card is not stolen, and so forth. Thesupplier does not bill the credit card.
Authorize Subscription
Authorize and Bill: Your supplier performs both authorizationand billing during the same transaction. The supplier chargesthe customer’s credit card on receiving authorization.
Bill Only: Your supplier bills the card without first verifyingthat the card is valid for the charge. Select this option if youhave preauthorized the transaction and you want to submit thetransaction for billing only.
Create Account
Credit Only: Your supplier credits the customer’s credit card.
Delete Account
Error
Modify Account
Retrieve Subscription
Process Credits? Select to permit agents to submit credit transactions as wellas billing transactions. This option is available only when youselect Authorize and Bill or Credit Only in the Credit CardTransaction Type field.
Integration Attributes and Integration Location
The third-party supplier that you integrate with will provide you with information to connect with theirsystems. Enter that information to enable your PeopleSoft system to make the connection when yousubmit a transaction for processing.
Copyright © 1988, 2022, Oracle and/or its affiliates. 29

Setting Up the Credit Card Interface Chapter 1
Field or Control Description
Processor URL Enter the URL identifier that corresponds to theURL for the merchant integration point. You definethe URL identifier on the URL Maintenance page (PeopleTools >Utilities >Administration >URLs).
Type of Interface Select HTML Transaction or Integration Broker.
Integration Package and Integration Class Enter the Application Package and Application Class thatholds the integration iScript PeopleCode. This class mustextend EOEC_CCI:iScripts:iScriptBuilderBase.
Return Package and Return Class Enter the Application Package and Application Class thatholds the iScript PeopleCode for return processing. Thedefault class parses the URL return parameters and stores themin the Global Object.
Additional Attributes
The Additional Attributes grid contains a name/value pair attribute system for third-party supplierdefinitions and stores integration attributes that are not captured in the main section of the paymentprocessor information. For example, a third-party supplier may require each integrating system tostore and leverage a security script. Another possible use for the additional attributes section is to storeprovider-specific integration properties that you would like to customize for the PeopleSoft customer.
Card Type PageUse the Card Type page (EOEC_CCI_CARDTYPE) to define the types of credit cards you accept forcredit card processing.
Navigation:
Enterprise Components > Component Configurations > Credit Card Interface > Credit CardTypes
30 Copyright © 1988, 2022, Oracle and/or its affiliates.

Chapter 1 Setting Up the Credit Card Interface
This example illustrates the fields and controls on the Card Type page. You can find definitions for thefields and controls later on this page.
Use this page to define the types of credit cards that you accept for credit card processing.
Oracle delivers data for most popular credit card types. You can modify existing definitions and add newones.
Field or Control Description
Credit Card Type Enter a value for the credit card.
Credit Card Name Enter a credit card name such as Visa or MasterCard. Thename should match the credit card type so that you canidentify the card without memorizing the credit card typecodes.
Credit Card Number Length Enter the card's standard credit card number length. Beforetransmitting a request to your supplier, the system validates thelength of the credit card number against this number.
Credit Card Status Select Active if you accept this type of credit card. SelectInactive if you don’t accept this type of credit card. Inactivecredit card types do not appear on the application-specificcredit card transaction page or in the Test Credit Card Interfacecomponent.
The default value for this field is Inactive.
Credit Card Valid Prefixes Enter all valid prefixes for this type of credit card. Entermultiple prefixes in comma-separated format with no spacesin between. The system removes any characters other thannumbers and commas when you move to another field.
Before transmitting a request to your supplier, the systemvalidates that the credit card number starts with a valid prefix.
Copyright © 1988, 2022, Oracle and/or its affiliates. 31

Setting Up the Credit Card Interface Chapter 1
Field or Control Description
Use Check Digit Algorithm Select Y (yes) to use the modulus (MOD) 10 check digitalgorithm to validate credit card numbers before transmittingrequests to your supplier. The MOD 10 check digit algorithmverifies whether card numbers you enter into the system arelegitimate.
The default value for this field is N.
Credit Card Expiration Days Enter a four digit numerical expiration value.
Test Credit Card Interface - Card Entry/Display PageUse the Test Credit Card Interface - Card Entry/Display page (EOEC_CCI_TEST) to enter test credit cardinformation that you can submit to verify that your credit card processing is functioning properly.
Navigation:
Enterprise Components > Component Configurations > Credit Card Interface > Test Credit CardInterface > Card Entry/Display
This example illustrates the fields and controls on the Test Credit Card Interface - Card Entry/Displaypage. You can find definitions for the fields and controls later on this page.
Use this page to enter test credit card information that you can submit to verify that your credit cardprocessing is functioning properly.
The test that you can run on this page:
32 Copyright © 1988, 2022, Oracle and/or its affiliates.

Chapter 1 Setting Up the Credit Card Interface
• Verifies that the card number you enter meets the requirements defined in the Credit Card ValidPrefixes field for the associated card type on the Card Type page.
• If you have set the Use Check Digit Algorithm field value to Y, verifies that the card number is validbased on the MOD 10 check digit algorithm.
• Verifies that you have entered values in the Exp. Month, Expiration Year, First Name and LastName fields on this page.
You can use the following credit card sample data in your test transactions:
Credit Card Type Credit Card Number
American Express 378282246310005
Diners Club/Carte Blanche 38000000000006
Discover 6011111111111117
MasterCard 5555555555554444
Visa 4111111111111111
Field or Control Description
Card Type Select a card type to test. Available values are defined on theCredit Card Types page.
Credit Card Number Enter the credit card number to test.
Exp. Month (expiration month), Expiration Year, CardVerification Number, First Name and Last Name
Enter card information to test.
Card verification number is optional in running credit cardtests.
Toggle Display Click to switch between display-only and editable modes.
Test Click to begin the test.
Test Results The results of the test appear in this text box. If the cardnumber is valid, the message VALID CARD NUMBERappears. If the card number is not valid, an explanatorymessage appears; the card number is incorrect or the card isexpired, for example.
Copyright © 1988, 2022, Oracle and/or its affiliates. 33

Setting Up the Credit Card Interface Chapter 1
Test Credit Card Interface - Transaction PageUse the Test Credit Card Interface - Transaction page (EOEC_CCI_TRANSACT) to enter test creditcard transaction information that you can submit to verify that your credit card processing is functioningproperly.
Navigation:
Enterprise Components > Component Configurations > Credit Card Interface > Test Credit CardInterface > Transaction
This example illustrates the fields and controls on the Test Credit Card Interface - Transaction page. Youcan find definitions for the fields and controls later on this page.
Use this page to enter test credit card transaction information that you can submit to verify that your creditcard processing is functioning properly.
The test that you can run on this page verifies that your environment is set up correctly to process onlinecredit card transactions using XML Compliant integration.
Note: This does not test the environment that is set up for batch credit card transactions.
34 Copyright © 1988, 2022, Oracle and/or its affiliates.

Chapter 1 Setting Up the Credit Card Interface
Field or Control Description
Sequence and Request ID Display a combination of numbers that distinguishes thetransaction from other transactions. The combination ofnumbers are similar to a run control or job number.
Amount Enter a transaction amount and click the Look up button toselect a transaction currency.
Token The token is a response value that is returned from the CreditCard processing service. It is another validation that can bereferenced in regards to a specific transaction.
Trans. Type (transaction type) Choose a transaction type to test:
Auth/Bill (Authorization/Bill): Perform both authorization andbilling during the same transaction.
AuthRev (Authorization Reversal): Cancel the transaction afterauthorization and before payment is received.
Authorize: (default value) Verify that the card is valid for thecharge.
Bill: Bill the card without first verifying that the card is validfor the charge.
Credit: Credit the customer’s credit card.
Class ID Select TestTransaction (the default) or one of the followinginterface types that has been specified on the Credit CardInterface Installation page.
ProcessBrokerTransaction: Select if you want to test yourXML-based interface.
InterlinkTransaction: Select if you want to test your BusinessInterlink interface.
Process Click to process the test transaction.
Return Code Enter a return code to test whether proper error messages andresults are returned. Available codes and their descriptions arediscussed in the Return Codes section subsequently.
Test Results The results of the transaction test appear in this text box. Testresult interpretations are discussed in the following sections.
Return Codes
You can enter any of the following return codes and click Process to view the corresponding descriptionand error message in the Test Results area. These return codes and their corresponding error messagescan appear in multiple areas. For example, when you are using the Test Credit Card Interface component,
Copyright © 1988, 2022, Oracle and/or its affiliates. 35

Setting Up the Credit Card Interface Chapter 1
they appear on this test page. In an application, they appear as appropriate for that application's method ofinteracting with the credit card interface.
Return Code Description
-3 Error Opening Trace File
-4 Vendor Error − ICS_INIT failed
-5 Unsupported Service
-6 Credit card number is invalid
-7 Phone number is too long
-8 State field length is invalid
-9 Zip Code field is too long
-10 Amount must be greater than zero
-11 Vendor Error − ICS_SEND failed
-12 Decryption Failed
-15 Request ID is required
-16 Currency is required
-17 Phone is required
-18 Email ID is required
-19 Zip Code is required
-20 City is required
-21 Country code is required
-23 Address 1 is required
36 Copyright © 1988, 2022, Oracle and/or its affiliates.

Chapter 1 Setting Up the Credit Card Interface
Return Code Description
-99 Trace Run Only
Copyright © 1988, 2022, Oracle and/or its affiliates. 37

Setting Up the Credit Card Interface Chapter 1
38 Copyright © 1988, 2022, Oracle and/or its affiliates.

Chapter 2
Using PeopleSoft Directory Interface
Understanding PeopleSoft Directory Interface
PeopleSoft Directory Interface uses Lightweight Directory Access Protocol (LDAP) directory services toauthenticate users of PeopleSoft applications.
PeopleSoft Directory Interface provides additional mappings and integration points, such as messages,that enable PeopleSoft data and LDAP data to stay synchronized. Most directory data, such as user ID,name, and email address, is also maintained in your PeopleSoft database. When you use PeopleSoftDirectory Interface, you make selected PeopleSoft data available to the directory, and you maintain thedata in the PeopleSoft database.
When information changes in the PeopleSoft database, PeopleSoft Directory Interface captures thatupdated information and automatically updates the equivalent information in the directory server, or itwrites the updates to a file for you to apply at another time.
Understanding Data Mapping
PeopleSoft information is stored in tables according to a relational model. The information in your LDAPdirectory is stored in trees according to a hierarchical model. You use PeopleSoft Directory Interface tomap selected PeopleSoft data to corresponding data in the directory service. When PeopleSoft DirectoryInterface receives user data from the PeopleSoft database, it can map the data objects to the correspondingobjects in the directory.
For PeopleSoft Directory Interface to map PeopleSoft information to your directory, it needs informationabout the directory hierarchical structure, or directory information tree.
Entries are made up of a distinguished name (DN) and attribute and value pairs. The distinguished nameidentifies an entry’s position in the tree, and the attributes hold the data that make up the entry.
Available attributes for an object class entry are specified in the directory schema. You must load theschema into the Directory Interface before you can map PeopleSoft data to the directory.
PeopleSoft Directory Interface mapping tables map LDAP attributes to PeopleSoft messages. Eachmessage contains selected information about a PeopleSoft record and its fields.
Note: Refer to PeopleSoft application documentation for information about specific messages deliveredby PeopleSoft applications.
Understanding Data Synchronization
After you have loaded PeopleSoft data into your LDAP directory, you can synchronize the data. To dothis, use one of the following options:
• PeopleSoft Business Interlinks.
Copyright © 1988, 2022, Oracle and/or its affiliates. 39

Using PeopleSoft Directory Interface Chapter 2
PeopleSoft Business Interlinks updates the data in real time, so that your directory information isalways synchronized with PeopleSoft data.
• LDAP Data Interchange Format (LDIF) files.
You can load LDIF files as needed or defined by your system.
Note: The application server needs to be configured for receiving messages.
Delivered Business Interlinks
Oracle delivers the following business interlinks with PeopleSoft Directory Interface:
Term Definition
EO_DS_ADD Adds a new entry to the directory by creating a distinguishedname and its corresponding attributes.
EO_DS_BIND Authenticates the information exchanged between the databaseand the directory.
EO_DS_DEL Deletes an entry from the directory.
EO_DS_MODDN Renames a directory entry. Changes its distinguished nameby renaming the actual entry or changing its position in thedirectory entry.
EO_DS_MODIFY Changes the attributes of an entry.
EO_DS_SEARCH Searches for directory entries and their correspondingattributes.
Refer to Enterprise PeopleTools 8.46 PeopleBook: PeopleSoft Business Interlinks for more informationon business interlinks.
Understanding Implementing PeopleSoft Directory Interface
Consider these PeopleSoft Directory Interface implementation guidelines for best results:
40 Copyright © 1988, 2022, Oracle and/or its affiliates.

Chapter 2 Using PeopleSoft Directory Interface
Term Definition
LDAP Searches Some LDAP searches may generate LDAP referrals to otherservers participating in your directory. You must be ableto ping by hostname all servers in the directory from theapplication server. If any server is unreachable by hostnamefrom the application server, you can add a line for the serverto the hosts. Your directory information tree must have userentries at the leaf level. This is required when an entry needs tobe moved from one branch to another. The entry needs to be atthe leaf level so that the system can read user attributes, one ofwhich is the password file on the application server.
Entry Limit In the directory, configure the entry limit value to be largerthan the number of rows that you expect will be returned. Thedefault value is usually not sufficient.
Directory Tree Your directory information tree must have user entries at theleaf level. This is required when an entry needs to be movedfrom one branch to another. The entry needs to be at the leaflevel so that the system can read user attributes, one of whichis the password.
Microsoft Active Directory The following items apply to implementations that useMicrosoft Active Directory:
• The registry key HKLM\System\CurrentControlSet\Services\NTDS\Parameters\Schema Update Allowedmust be present and set to a nonzero DWORD on theActive Directory FSMO Role Owner.
• When creating structural object classes in MicrosoftActive Directory, you need to specify containment. PsftJobs can be children of the following classes ofobjects only: builtinDomain, organizationalUnit, anddomainDNS.
• You must add the server names in the Directory Setupcomponent as they appear on the DNSHostName attributeon the server entries under the CN=Sites entry.
Overview of Using PeopleSoft Directory Interface
This section briefly describes the steps needed to use PeopleSoft Directory Interface, including:
• Setting up in PeopleSoft Application Designer and PeopleSoft Integration Broker.
• Using the Directory Configurations component.
Copyright © 1988, 2022, Oracle and/or its affiliates. 41

Using PeopleSoft Directory Interface Chapter 2
Setting Up in PeopleSoft Application Designer and PeopleSoft IntegrationBroker
Perform the following steps in PeopleSoft Application Designer and PeopleSoft Integration Broker.
Setting Up in PeopleSoft Application Designer
Access PeopleSoft Application Designer.
• Create authentication and user profile maps as needed.
If you are going to authenticate users with the directory server, a PeopleSoft user profile is required—that is, a row in the PSOPRDEFN table where PeopleSoft user information is stored. In thiscontext, you cache LDAP user information inside your PeopleSoft system. Properties that youspecify in the Mandatory and Optional Properties pages of the Mappings component are the columnsin PSOPRDEFN that the system populates with values from your directory server. PeopleSoftapplications use this cache of user information, not your directory server. Whenever a transactionrequires user information, the application refers to the local PSOPRDEFN table instead of queryingthe directory server.
• Add Signon PeopleCode.
Directory authentication requires that Signon PeopleCode be enabled and configured with properpermissions. After a user signs onto the system and the Signon PeopleCode runs, the PeopleSoftsystem creates a row for the user in the user definition table by retrieving the LDAP informationand creating a local cache. Signon PeopleCode maintains this row automatically and any changesmade in the directory server are reproduced in the local cache. Using the Mappings component, set upmappings. To keep the data synchronized, you must map PeopleSoft data to the equivalent directoryobjects. PeopleSoft Directory Interface then associates the fields in the message with the attributes inthe directory and updates the selected directory attributes with the field data from the message.
• Activate the DSCHNL channel.
Open the message channel and select Run.
See PeopleTools: PeopleSoft Application Designer Developer's Guide
Setting Up in PeopleSoft Integration Broker
Access PeopleSoft Integration Broker.
• Activate a relevant node.
This node should be the default local node.
• Define a service operation.
Note that the service operations, and messages to include in the service operations, depend on theapplication. For example, in an human resources implementation, you might want to include messagessuch as Dept, Location, Person, and Job in a service operation, in addition to core messages such asDSMINPUT.
See PeopleTools: Integration Broker
42 Copyright © 1988, 2022, Oracle and/or its affiliates.

Chapter 2 Using PeopleSoft Directory Interface
Using the Directory Configurations ComponentAccess Directory Configurations component (PSDSSETUP) from the browser menu.
• Using the Directory Configurations component, configure the directory.
Enter appropriate connection information such as the server name (DNS or IP address) and thelistening port number, the user DN, and associated password.
• Using the Schema Management page, select names of object classes and attribute types and thencache the schema.
• To keep the data synchronized, you must map PeopleSoft data to the equivalent directory objects.
Set up mappings using the Mappings component. After this is completed, PeopleSoft DirectoryInterface associates the fields in the message to the attributes in the directory and updates the selecteddirectory attributes with the field data from the message.
• Using the Membership Rules component, create rules and memberships, if desired.
• Load data in the directory.
• Set directory search criteria.
Enter search parameters to query the directory and view the results.
Common Elements Used in The Directory Interface
Field or Control Description
Directory ID Unique identifier for the directory.
Description A brief description of the directory.
Directory Product Select the directory product from the drop-down list box.
Default Connect DN Displays the connect distinguished name associated with thedirectory ID that you selected. Use this ID to connect to thedirectory server.
Password Password to access the directory.
LDAP Server The name of the server where the directory resides.
Port The LDAP server port associated with the LDAP server thatyou select.
SSL Port The secure socket layer port.
Copyright © 1988, 2022, Oracle and/or its affiliates. 43

Using PeopleSoft Directory Interface Chapter 2
Defining and Configuring the Directory
Use the Directory Configurations component (PSDSSETUP) to define and configure the directoryconnection. This section discusses how to define and configure the directory.
Pages Used to Define and Configure the Directory
Page Name Definition Name Usage
Directory Setup Page DSDIRSETUP Enter values to configure the directory.
Additional Connect DN's Page DSSERVERID Add values for additional connect DNs.
Schema Management Page DSEXTINSTALL Manage schema, and apply PeopleSoftschema extensions.
Test Connectivity Page DSSRCHRSLT Test the directory connectivity.
Cache Schema Page DSSCHEMACACHE Cache the schema.
Delete Directory Page DSPURGEDIRID Delete the directory configuration.
Directory Setup PageThis section discusses how to:
• Set up the directory connection.
• Connect additional DN's.
• Manage the schema.
Directory Setup Page
Use the Directory Setup page (DSDIRSETUP) to enter values to configure the directory.
Navigation:
Enterprise Components > Directory Interface > Definitions > Directory Configurations >Directory Setup
44 Copyright © 1988, 2022, Oracle and/or its affiliates.

Chapter 2 Using PeopleSoft Directory Interface
This example illustrates the fields and controls on the Directory Setup page. You can find definitions forthe fields and controls later on this page.
Additional Connect DN's Page
Use the Additional Connect DN's page (DSSERVERID) to add values for additional connect DNs.
Navigation:
Enterprise Components > Directory Interface > Definitions > Directory Configurations >Additional Connect DN's
This example illustrates the fields and controls on the Additional Connect DN's page. You can finddefinitions for the fields and controls later on this page.
Use this page to add values for additional connect DNs. Add more connect DNs and passwords, if needed.
Schema Management Page
Use the Schema Management page (DSEXTINSTALL) to manage schema, and apply PeopleSoft schemaextensions.
Navigation:
Enterprise Components > Directory Interface > Definitions > Directory Configurations > SchemaManagement
Copyright © 1988, 2022, Oracle and/or its affiliates. 45

Using PeopleSoft Directory Interface Chapter 2
This example illustrates the fields and controls on the Schema Management page. You can find definitionsfor the fields and controls later on this page.
Use this page to manage schema, and apply PeopleSoft schema extensions.
Activate the check boxes of those object classes or attribute types that you want applied to the cacheschema.
Test Connectivity Page
Use the Test Connectivity page (DSSRCHRSLT) to test the directory connectivity.
Navigation:
Enterprise Components > Directory Interface > Definitions > Directory Configurations > TestConnectivity
46 Copyright © 1988, 2022, Oracle and/or its affiliates.

Chapter 2 Using PeopleSoft Directory Interface
This example illustrates the fields and controls on the Test Connectivity page. You can find definitions forthe fields and controls later on this page.
Use this page to test the directory connectivity.
When you access the Test Connectivity page, the connection test launches automatically. The resultsappear in the page. A successful test shows the message SUCCESS in green.
The preceding example shows the message FAILED in red, confirming that the connection test failed.
Verify that your directory server configuration details contain the correct values (correct server name,port, and so on).
Cache Schema PageUse the Cache Schema page (DSSCHEMACACHE) to cache the schema.
Navigation:
Enterprise Components > Directory Interface > Definitions > Schema Cache
This example illustrates the fields and controls on the Cache Schema page. You can find definitions forthe fields and controls later on this page.
Enter the directory ID and server name of the schema to be cached and click the Cache Schema Nowbutton.
Copyright © 1988, 2022, Oracle and/or its affiliates. 47

Using PeopleSoft Directory Interface Chapter 2
Delete Directory PageUse the Delete Directory page (DSPURGEDIRID) to delete the directory configuration.
Navigation:
Enterprise Components > Directory Interface > Definitions > Directory Deletions
This example illustrates the fields and controls on the Delete Directory page. You can find definitions forthe fields and controls later on this page.
Select the check boxes for the desired directory configuration deletions.
(Optional) Setting Up Directory Authentication
This section discusses how to use map authentication and view user properties.
For information about setting up authentication servers, user profile maps, and role membership rules,refer to the following documentation.
Pages Used to Set Up Directory Authentication
Page Name Definition Name Usage
Authentication Page DSSECMAPMAIN Create a mapping for the directory thatthe system relies on for authenticatingusers.
Mandatory User Properties Page DSUSRPRFLMANMAP Specify the attributes required for sign-in. You can have the system retrievethese mandatory values from thedirectory server, or you can enter defaultvalues.
48 Copyright © 1988, 2022, Oracle and/or its affiliates.

Chapter 2 Using PeopleSoft Directory Interface
Page Name Definition Name Usage
Optional User Properties Page DSUSRPRFLOPTMAP Specify optional user properties to storein and retrieve from the directory. Youcan specify general, permission list, andworkflow attributes. All these attributesappear in the User Profile component.
Authentication PageUse the Authentication page (DSSECMAPMAIN) to create a mapping for the directory that the systemrelies on for authenticating users.
Navigation:
Enterprise Components > Directory Interface > Mappings > Authentication
This example illustrates the fields and controls on the Authentication page. You can find definitions forthe fields and controls later on this page.
Use this page to create a mapping for the directory that the system relies on for authenticating users.
Field or Control Description
Anonymous Bind If directory data required for authentication and user profilemaintenance is visible to an anonymous connection, you canselect this check box.
Copyright © 1988, 2022, Oracle and/or its affiliates. 49

Using PeopleSoft Directory Interface Chapter 2
Field or Control Description
Use Secure Socket Layer Select if you are using SSL between the PeopleSoft systemand the directory server.
Mandatory User Properties PageUse the Mandatory User Properties page (DSUSRPRFLMANMAP) to specify the attributes required forsign-in.
You can have the system retrieve these mandatory values from the directory server, or you can enterdefault values.
Navigation:
Enterprise Components > Directory Interface > Mappings > User Profiles > Mandatory UserProperties
This example illustrates the fields and controls on the Mandatory User Properties page. You can finddefinitions for the fields and controls later on this page.
Select Authentication Map and set check boxes and field values as needed.
Optional User Properties PageUse the Optional User Properties page (DSUSRPRFLOPTMAP) to specify optional user properties tostore in and retrieve from the directory.
50 Copyright © 1988, 2022, Oracle and/or its affiliates.

Chapter 2 Using PeopleSoft Directory Interface
You can specify general, permission list, and workflow attributes. All these attributes appear in the UserProfile component.
Navigation:
Enterprise Components > Directory Interface > Mappings > User Profiles > Optional UserProperties
This example illustrates the fields and controls on the Optional User Properties page. You can finddefinitions for the fields and controls later on this page.
Use the Mandatory User Properties page or the Optional User Properties page to specify the attributesrequired for sign-in. You can have the system retrieve these mandatory values from the directory server,or you can enter default values.
The default shows the Attribute Name field available. If you select the Use Constant Value check box,the Constant Value field becomes available instead.
Setting Up Mappings
This section provides an overview of mapping and discusses how to set up mappings.
Pages Used to Set Up Mappings
Page Name Definition Name Usage
Map Details Page EO_DSMAP Set up a mapping and enter the datarelationship details between PeopleSoftdata and directory data.
Modify Connect DN - DirectoryInterface Page
EO_DSUSERDN Modify the Connect DN.
DN Details Page EO_DSDN Set up the relationship between thedata contained in the message that youselected on the Message Details page andthe directory entry’s distinguished name.
DN Attribute Function - DirectoryInterface Page
EO_DSDN_XLAT Translate or perform functions withdatabase values.
Copyright © 1988, 2022, Oracle and/or its affiliates. 51

Using PeopleSoft Directory Interface Chapter 2
Page Name Definition Name Usage
DN Defaults Page EODS_DN_DEFAULTS Define a constant value or PeopleCodefunction that returns values that supplythe blank values on the DirectoryInformation Tree.
Attribute Details Page EO_DSATTRIB Set up the relationship between the datain the message that you selected on theMessage Details page and the directoryobject class attributes.
Understanding MappingYou map PeopleSoft data to the equivalent directory objects to keep the data synchronized. PeopleSoftDirectory Interface receives PeopleSoft data from messages contained within service operation that youpublish whenever a business event associated with the messages identified in the Directory Mappingcomponent. Each message contains information about records and the most recent data for the recordfields. Using the mapping information that you set up, PeopleSoft Directory Interface associates the fieldsin the message with the attributes in the directory and then updates the selected directory attributes withthe field data from the message. Additionally, you can define a constant value or a PeopleCode functionthat returns a value to supply data used in building temporary Directory Information Trees when not alldata exists for an entry.
Map Details PageUse the Map Details page (EO_DSMAP) to set up a mapping and enter the data relationship detailsbetween PeopleSoft data and directory data.
Navigation:
Enterprise Components > Directory Interface > Mappings > Directory maps > Map Details
52 Copyright © 1988, 2022, Oracle and/or its affiliates.

Chapter 2 Using PeopleSoft Directory Interface
This example illustrates the fields and controls on the Map Details page. You can find definitions for thefields and controls later on this page.
Use this page to set up mapping and enter the data relationship details between PeopleSoft data anddirectory data.
Field or Control Description
Status Select the appropriate status from the following values.
• Active: The map is active and ready to be used.
• Inactive: The map is not ready to be used.
• Remote: The map is not used at this time, and may appearto be unavailable.
Copyright © 1988, 2022, Oracle and/or its affiliates. 53

Using PeopleSoft Directory Interface Chapter 2
Message Information
Field or Control Description
Message Name Select the message to associate with this mapping. Themessage contains the PeopleSoft records and fields that havethe data that you want to associate with the attributes thatmake up the directory entry that you select in the DirectoryConnect Information group box. For example, if you selectthe output − DEPTID object class, select the department (DSDEPT_SYNC) message because it contains the fieldsrelevant to the department object class.
Function Enter the name of the PeopleCode function that you want torun using this message as an input parameter. The function canuse any of the fields contained in the message to produce anoutput value for one or more of the fields that you map. Thisenables you to use a field in a function without mapping to itdirectly. For example, if you want the employee ID value sentto the directory to be a value combining the employee ID andthe salary code, enter a function that produces that value. Youthen need to map only to the EmplID field to insert the derivedemployee ID in the directory.
Directory Connect Information
Field or Control Description
SeqNum (directory sequence number) Indicate the order in which the server should be used whenthe system processes this mapping. If the first server isunavailable, the system attempts to access the other serversin sequence until it finds an available one. If you are usingmultiple servers, this enables you to distribute the load acrossservers.
Directory Search Base Enter a directory search base. The search base is the entry inthe directory information tree from which the system beginsa search relating to this mapping. For example, if on theAttribute Details page you select to have a field value updatedindirectly, PeopleSoft Directory Interface searches for andupdates all instances of that field in entries from that point inthe information tree down.
Modify Connect DN Click to access the Modify Connect DN - Directory Interfacepage to modify the connect DN.
54 Copyright © 1988, 2022, Oracle and/or its affiliates.

Chapter 2 Using PeopleSoft Directory Interface
Field or Control Description
Output Type Select the method that the system should use to send themapped data to the directory data. Select I to send data to thedirectory directly through a business interlink. Select F to senddata to an LDAP Data Interchange Format (LDIF) file to bemanually updated in the directory.
Use the same output type for all your mappings to keep dataconsistent in the directory.
Retain Original Directory Data When you move data in your directory using the PeopleSoftDirectory Interface, the Directory Interface copies the data tothe new location and then deletes the old version. Select thischeck box to preserve the original data. You can select thischeck box at a later date provided that you do it before the datamove.
Note: Select this check box if your directory contains binarydata. Move the binary data with your directory administrativetool.
Map Object Class
Field or Control Description
Directory Object Class Select one or more directory object classes. The object classesthat you select determine the attributes that you can map toPeopleSoft data.
Modify Connect DN - Directory Interface PageUse the Modify Connect DN - Directory Interface page (EO_DSUSERDN) to modify the Connect DN.
Navigation:
Click the Modify Connect DN button on the Map Details page.
Copyright © 1988, 2022, Oracle and/or its affiliates. 55

Using PeopleSoft Directory Interface Chapter 2
This example illustrates the fields and controls on the Modify Connect DN - Directory Interface page.You can find definitions for the fields and controls later on this page.
Use this page to modify the connect DN.
Field or Control Description
Use Default (Admin) DN? (Y/N) (use default [administrative]distinguished name)
Select to use the default connect distinguished name value thatyou set up in PeopleTools.
User DN (user distinguished name) Displays the alternative IDs that you can use to connect to thespecified directory ID. You can use a user ID (and password)other then the default one listed on the Directory Setup pagein PeopleTools. Because the default user ID is most likely anadministrative ID, you can set up a more secure user ID for thescope of the mapping.
DN Details PageUse the DN Details page (EO_DSDN) to set up the relationship between the data contained in themessage that you selected on the Message Details page and the directory entry’s distinguished name.
Navigation:
Enterprise Components > Directory Interface > Mappings > Directory maps > DN Details
This example illustrates the fields and controls on the DN Details page. You can find definitions for thefields and controls later on this page.
56 Copyright © 1988, 2022, Oracle and/or its affiliates.

Chapter 2 Using PeopleSoft Directory Interface
Use this page to define a constant value or PeopleCode function that returns values that populate the blankvalues on the Directory Information Tree.
Associate the data contained in the message that you selected on the Map Details page with the entry'sdistinguished name.
DN Details
Field or Control Description
Attr Seq No (attribute sequence number) The system assigns an attribute sequence number to theattributes. Some directory attribute values consist of multiplevalues. The attribute sequence number distinguishes betweenthe different attribute values and indicates to PeopleSoftDirectory Interface the order in which the PeopleSoft valuesand constant values should be assigned to the attribute.
Attribute Select the directory attributes associated with the mapping’sdistinguished name. For example, for the Department entry,map the o − Corporation first, the l − location second, and thenthe ou − Department attribute.
Seq (sequence) Enter the sequence number of the directory attribute. Thedirectory builds the entry’s distinguished name using theattributes in sequential order.
Use Constant and Constant Value Select to use the constant value that you enter in the ConstantValue field to supply this attribute instead of a PeopleSoft fieldvalue.
Record and Field Name Select the name of the record that contains the PeopleSoft fieldand the PeopleSoft field containing the value to assign to thisattribute.
Click to access the DN Attribute Function - Directory Interfacepage and translate database values or instruct the system toperform functions with database values.
Note: Use this page when constructing distinguished namesacross active directory multiple domains.
Example Entry
An entry’s distinguished name is built by applying the attributes in a sequential order. The order for thedepartment entry example would be constructed using the data in the following table:
Copyright © 1988, 2022, Oracle and/or its affiliates. 57

Using PeopleSoft Directory Interface Chapter 2
SequenceNumber
DirectoryAttribute
AttributeSequenceNumber
Use ConstantValue
Record (Table) Name
Field Name ConstantValue
1 o 1 Yes Corp
2 l 1 No DEPT_TBL LOCATION NA
3 ou 1 No DEPT_TBL DEPTID NA
DN Attribute Function - Directory Interface PageUse the DN Attribute Function - Directory Interface page (EO_DSDN_XLAT) to translate or performfunctions with database values.
Navigation:
Click the Command Btn icon for the attribute on the DN Details page.
This example illustrates the fields and controls on the DN Attribute Function - Directory Interface page.You can find definitions for the fields and controls later on this page.
Use this page to set up the relationship between the data in the message that you selected on the MessageDetails page and the directory object class attributes.
Field or Control Description
Translate Value Select to replace the database value with the DistinguishedName field value for the selected attribute.
58 Copyright © 1988, 2022, Oracle and/or its affiliates.
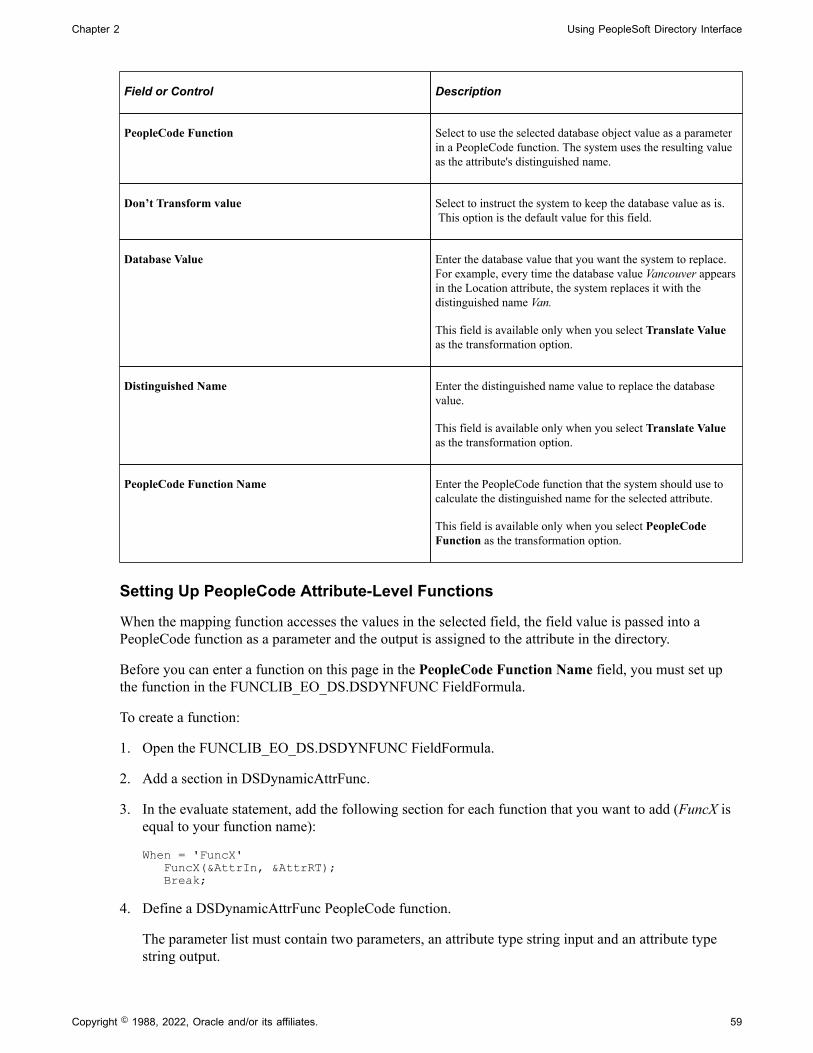
Chapter 2 Using PeopleSoft Directory Interface
Field or Control Description
PeopleCode Function Select to use the selected database object value as a parameterin a PeopleCode function. The system uses the resulting valueas the attribute's distinguished name.
Don’t Transform value Select to instruct the system to keep the database value as is. This option is the default value for this field.
Database Value Enter the database value that you want the system to replace.For example, every time the database value Vancouver appearsin the Location attribute, the system replaces it with thedistinguished name Van.
This field is available only when you select Translate Valueas the transformation option.
Distinguished Name Enter the distinguished name value to replace the databasevalue.
This field is available only when you select Translate Valueas the transformation option.
PeopleCode Function Name Enter the PeopleCode function that the system should use tocalculate the distinguished name for the selected attribute.
This field is available only when you select PeopleCodeFunction as the transformation option.
Setting Up PeopleCode Attribute-Level Functions
When the mapping function accesses the values in the selected field, the field value is passed into aPeopleCode function as a parameter and the output is assigned to the attribute in the directory.
Before you can enter a function on this page in the PeopleCode Function Name field, you must set upthe function in the FUNCLIB_EO_DS.DSDYNFUNC FieldFormula.
To create a function:
1. Open the FUNCLIB_EO_DS.DSDYNFUNC FieldFormula.
2. Add a section in DSDynamicAttrFunc.
3. In the evaluate statement, add the following section for each function that you want to add (FuncX isequal to your function name):
When = 'FuncX' FuncX(&AttrIn, &AttrRT); Break;
4. Define a DSDynamicAttrFunc PeopleCode function.
The parameter list must contain two parameters, an attribute type string input and an attribute typestring output.
Copyright © 1988, 2022, Oracle and/or its affiliates. 59

Using PeopleSoft Directory Interface Chapter 2
PeopleCode Function Example
The following example displays the setup for functions FuncX, FuncY, and FuncZ.
This example illustrates the fields and controls on the Setup functions on theFUNCLIB_EO_DS.DSDYNFUNC FieldFormula. You can find definitions for the fields and controlslater on this page.
DN Defaults PageUse the DN Defaults page (EODS_DN_DEFAULTS) to define a constant value or PeopleCode functionthat returns values that supply the blank values on the Directory Information Tree.
Navigation:
Enterprise Components > Directory Interface > Mappings > Directory maps > DN Defaults
This example illustrates the fields and controls on the DN Defaults page. You can find definitions for thefields and controls later on this page.
60 Copyright © 1988, 2022, Oracle and/or its affiliates.

Chapter 2 Using PeopleSoft Directory Interface
Use this page to define a constant value or PeopleCode function that returns values that populate the blankvalues on the Directory Information Tree.
This page enables you to define defaults for any Record.Field value that is left blank in the data rowsetof the message that is used to populate the map. For example, you can enter defaults to enter the blanksleft by the lack of Department/Location data for the Persons of Interest constructed by the PeopleSoftDirectory Interface.
In the preceding sample page, the value for JOB.DEPTID is by default a method calledHCDI_SERVICES:HCDIUtilities.DeptID. This method returns a DeptID constant.
Note: The syntax for the method needs to be fully qualified using the following format:Package_Name:App_Class_Name.Method_Name.
Field or Control Description
Seq (sequence number) Displays the sequence number for this attribute.
Record (Table) Name Select the record name for the value. This field is required.
Field Name Select the field name for the value. This field is required.
DN Attribute The name of the distinguished name attribute.
Object Method Enter the object method you are using to supply the value, ifapplicable. Leave this field blank if you are using a constant orparameter to supply the value.
Constant/Parameter Enter the values for the constant or the parameter, ifapplicable. Leave this field blank if you are using an objectmethod to supply the value.
Force Select to overwrite the Record.Field values at runtime, even ifthe values exist.
Attribute Details PageUse the Attribute Details page (EO_DSATTRIB) to set up the relationship between the data in themessage that you selected on the Message Details page and the directory object class attributes.
Navigation:
Enterprise Components > Directory Interface > Mappings > Directory maps > Attribute Details
Copyright © 1988, 2022, Oracle and/or its affiliates. 61

Using PeopleSoft Directory Interface Chapter 2
This example illustrates the fields and controls on the Attribute Details page. You can find definitions forthe fields and controls later on this page.
Use this page to set up the relationship between the data in the message that you selected on the MessageDetails page and the directory object class attributes.
On this page, associate the fields contained in the message that you selected on the Map Details pagewith the attributes that provide more detail about an entry. Some attributes are mandatory (an objectclass’s mandatory attributes are defined in the directory schema) and must be mapped to either a constantvalue or record or field. For the department example, you would map PeopleSoft records and fields to themandatory attributes (such as DeptID), and you could add additional attributes that would give you moreinformation about the object class, such as description.
Note: The system does not update related-display field values unless the source field is also mapped.If the source field is not mapped, the audit process still indicates and enables you to update anydiscrepancies. For example, when you map to an employee’s job code, the directory entry also includesthe job code description. If you change the job code description on the Job Code component, the systemupdates the related-display description field on the employee’s Job Data page, but it does not update to thedirectory, because it is not included in the mapping.
Warning! The fields that you map to mandatory attributes must contain data or the mapping will fail. Youcan guarantee that data will be in the fields by mapping mandatory attributes to required fields.
Field or Control Description
Attr Seq No (attribute sequence number) Displays the attribute sequence number assigned to thisattribute.
Attribute In the Mandatory scroll area, the system displays themandatory attributes for this object class.
In the Optional scroll area, select optional attributes.
62 Copyright © 1988, 2022, Oracle and/or its affiliates.

Chapter 2 Using PeopleSoft Directory Interface
Field or Control Description
Seq (sequence number) Enter a sequence number for this attribute. Some directoryattribute values are made up of multiple values. The attributesequence number distinguishes between the different attributevalues and indicates to PeopleSoft Directory Interface theorder in which the PeopleSoft values and constant valuesshould be assigned to the attribute.
Ind Upd (indirect update) Select if the field that you selected is used as an attributein the directory outside of this mapping and you want it tobe updated when this field is updated. The system updatesattributes only in entries at lower levels on the directoryinformation tree than this entry.
Locating Delivered MessagesYour PeopleSoft application that supports the PeopleSoft Directory Interface delivers a set of messages tobe used to share information with your directory service.
Note: If you have upgraded from a PeopleTools 8.47 or earlier release, the upgrade program createsservice operations for these messages. The service operation names and message names are the same.
For information about this delivered data and how it works in conjunction with the PeopleSoft DirectoryInterface, see your PeopleSoft application documentation.
(Optional) Setting Up Entry Membership Rules
This section discusses how to create entry definitions and specify entry membership rules.
Entry membership rules enable you to modify a directory entry, such as a group, based on criteria storedin the PeopleSoft database. This feature provides a method to match any type of directory entry to rulesthat are meaningful in PeopleSoft applications. You can use membership rules to create any type oflogical grouping in the directory. The groupings are not restricted to security purposes.
Pages Used to Set Up Entry Membership Rules
Page Name Definition Name Usage
Entry Definition Page EO_DSCONTAINERDEFN Create a directory entry definition.
Entry Membership Rules Page EO_DSSECRULES Establish entry membership rules.
Entry Definition PageUse the Entry Definition page (EO_DSCONTAINERDEFN) to create a directory entry definition.
Copyright © 1988, 2022, Oracle and/or its affiliates. 63

Using PeopleSoft Directory Interface Chapter 2
Navigation:
Enterprise Components > Directory Interface > Membership Rules > Entry Rules > EntryDefinition
This example illustrates the fields and controls on the Entry Definition page. You can find definitions forthe fields and controls later on this page.
Use this page to create a directory entry definition.
Field or Control Description
Entry Name Displays the entry name that you entered on the search page. The system uses this value for the entry name throughout theapplication, so it must be the name of an existing entry in theexternal directory. The PeopleSoft system assumes that thename is unique in the directory.
Active Flag Select to activate rules. Rules that are not active do not run.
64 Copyright © 1988, 2022, Oracle and/or its affiliates.

Chapter 2 Using PeopleSoft Directory Interface
Directory Search Parameters
Field or Control Description
Search Base Enter the distinguished name of the base under which thisentry will be located in the directory. The application performsan LDAP search to retrieve the distinguished name of the entryusing this field as the base.
Search Scope Select from:
Base: The query searches only the value in the Search Basefield.
One: The query searches only the entries one level down fromthe value in the Search Base field.
Sub: The query searches the value in the Search Base fieldand all entries beneath it.
Build Filter
Field or Control Description
( ) Select the check boxes below the parentheses to groupexpressions. You can group more than one line together usingthe check box on the left for the first line and the check box onthe right for the last line.
Attribute Enter the name of the attribute that will store the members ofthe entry in the external directory. It is typically set to member, but the attribute name could be anything that you choose.
Operation Assign an operator to your rule such as <, <=, <>, =, >, or>=.
Value Assign a value to the attribute in your rule.
And/Or To add another line to your rule, select AND or OR dependingon your rule logic. Select END to signify the end of the search. Select NONE if you are not using this kind of filter.
Refresh After you make changes using the Build Filter options, clickthis button to update the Search Filter edit box to reflect thechanges.
Copyright © 1988, 2022, Oracle and/or its affiliates. 65

Using PeopleSoft Directory Interface Chapter 2
Field or Control Description
Clear LDAP Filter Click to delete all values from the Search Filter edit box andthe Build Filter selections.
Search Filter Displays the filter that the system applies to the search for thedistinguished name of the defined entry. This field typicallydisplays the directory object class of the entry in the form“objectclass = GroupOfUniqueNames”, for example. Thisindicates what type of entry to search. To retrieve the correctentry distinguished names, the system adds the name of theentry to the search filter at runtime. The name retrieved bythe LDAP search using this filter is tied to the rules definedin the Entry Membership Rules page. When these rules run, the employee that the system is currently processing is eitheradded to or deleted from the distinguished name retrieved bythe search.
Search Attributes
Field or Control Description
Directory Attribute Select the attribute of the entry being defined that will containall the members of this entry. This attribute must be valid forthe current entry in the directory. The employees that satisfythe entry membership rules of this entry are added under thisentry as a new value of this attribute. Because of this, as manyattribute values may exist as employees satisfying the entrymembership rules. If this field is left blank, the applicationuses member as a default attribute name.
Trigger Message Names
Field or Control Description
Map Names Select the names of the maps to associate with the entrydefinition. Besides being a security feature, this also improvesperformance at runtime, because only applicable rules areevaluated.
Note: Run the directory audit if an entry rule has changed or if you want to initialize the directory entries.
Entry Membership Rules PageUse the Entry Membership Rules page (EO_DSSECRULES) to establish entry membership rules.
66 Copyright © 1988, 2022, Oracle and/or its affiliates.

Chapter 2 Using PeopleSoft Directory Interface
Navigation:
Enterprise Components > Directory Interface > Membership Rules > Entry Rules > EntryMembership Rules
This example illustrates the fields and controls on the Entry Membership Rules page. You can finddefinitions for the fields and controls later on this page.
Use this page to establish entry membership rules.
Entry Membership Rules
Field or Control Description
Sequence Displays the sequence of a rule within a rule set. The sequencebecomes significant when you enter more than one rule.
NOT Select to negate the rule that you enter. This is similar to usingthe symbol ! to reverse the truth value of an operand.
( ) Select the check boxes to add parentheses around your rule. You can group more than one line together using the checkbox on the left for the first line and the check box on the rightfor the last line.
Record and Field Name Enter the name of the PeopleSoft record and field containingthe information to be tested.
Operation Enter the appropriate operator, such as: < , <= , <> , = , > , or>=.
Copyright © 1988, 2022, Oracle and/or its affiliates. 67

Using PeopleSoft Directory Interface Chapter 2
Field or Control Description
Value Enter the value on which the employee’s data needs to betested. This can be any value of the same type as the field usedin the rule, such as String, number, date, and so on.
AND/OR To add another line to your rule, select AND or OR dependingon your rule logic. Select END to signify the end of the search. Select NONE if you are not using this kind of filter.
The entry rules are logical expressions that can be either true or false. They are composed of filters ondatabase objects associated by logical operators. Rules have the following form:
[NOT] [ ( ] Record . Field operatorConstant [ ) ] [AND/OR]
The symbols between square brackets are optional. The operator can be <, <=, <>, =, >, or >=. A rule setis composed of single rules joined by AND or OR Boolean operators if necessary. The following exampleshows a series of single rules joined to make one compound rule.
( JOB.LOCATION = ‘KC004’ AND [1]JOB.COMPRATE > 15000 ) OR [2]NOT JOB.DEPTID = ‘GBIY004’[3]
Note: No limits are imposed on the number of rules used within a rule set.
Loading Data into the Directory
This section provides an overview of how to load the directory and discusses how to load the directorywith PeopleSoft data.
Understanding Directory Load BehaviorUse the Directory Load process when no existing data is in the directory. The process overwrites any datain the directory.
If you have data in your directory, use the Directory Audit process instead of the Directory Load process.The audit process compares the PeopleSoft data to your existing directory data and enables you to reviewand resolve any possible conflicts.
Note: For PeopleSoft Human Capital Management (HCM) customers only, an alternative process namedDSMAPINPUT FullSync is available that you can use in place of the Directory Load process. This newprocess does not replace the Directory Load process; it is provided as an alternative to load the data ifperformance becomes an issue.
See PeopleSoft HCM: Application Fundamentals
68 Copyright © 1988, 2022, Oracle and/or its affiliates.

Chapter 2 Using PeopleSoft Directory Interface
Directory Load PageUse the Directory Load page (EO_RUNCTL_DS_LOAD) to load directories with PeopleSoft data.
Navigation:
Enterprise Components > Directory Interface > Load Directory
This example illustrates the fields and controls on the Directory Load page. You can find definitions forthe fields and controls later on this page.
Use this page to run the Directory Load process.
Field or Control Description
LDIF File Select to have the process send the data to an LDIF file for youto load in the directory.
Direct Update Select to have the process directly update the directory.
Run Click to run the process using PeopleSoft Process Scheduler.
Copyright © 1988, 2022, Oracle and/or its affiliates. 69

Using PeopleSoft Directory Interface Chapter 2
70 Copyright © 1988, 2022, Oracle and/or its affiliates.

Chapter 3
Reviewing Directory Data and GeneratingReports
Reviewing LDAP Directory Data
This section discusses how to run a directory audit and a directory search.
Pages Used to Review LDAP Directory Data
Page Name Definition Name Usage
Directory Audit Page EO_RUNCTL_DS_AUDIT Run the Directory Audit process.
Directory Search Page EO_DSSRCHDIRECTORY Define search parameters to query thedirectory. The page saves the searchparameters for future use.
Directory Audit PageUse the Directory Audit page (EO_RUNCTL_DS_AUDIT) to run the Directory Audit process.
Navigation:
Enterprise Components > Directory Interface > Run Directory Audit
This example illustrates the fields and controls on the Directory Audit page. You can find definitions forthe fields and controls later on this page.
Use this page to run the process to ensure that your directory database has the same data as yourPeopleSoft database.
The Directory Audit process compares the data in the directory to the data in the PeopleSoft databaseidentified in the selected map and creates an LDAP Data Interchange Format (LDIF) file containing any
Copyright © 1988, 2022, Oracle and/or its affiliates. 71

Reviewing Directory Data and Generating Reports Chapter 3
discrepancies using the PeopleSoft system as the authority. You can then use the LDIF file to update thedirectory.
Note: For PeopleSoft HCM customers only, an alternative process named DSMAPINPUT FullSync Auditis available that you can use in place of the Directory Audit process. This new process does not replacethe Directory Audit process; it is provided as an alternative to audit the data if performance becomes anissue.
See PeopleSoft HCM: Application Fundamentals
Field or Control Description
Map Name Select the name of the map that the audit should be runagainst.
Directory Search PageUse the Directory Search page (EO_DSSRCHDIRECTORY) to define search parameters to query thedirectory.
The page saves the search parameters for future use.
Navigation:
Enterprise Components > Directory Interface > Search Directory
72 Copyright © 1988, 2022, Oracle and/or its affiliates.

Chapter 3 Reviewing Directory Data and Generating Reports
This example illustrates the fields and controls on the Directory Search page. You can find definitions forthe fields and controls later on this page.
Use this page to define search parameters to query the directory and view the results. Search results aredisplayed on the Search Results page as they appear in the directory.
Field or Control Description
Search Name Enter the search name. The system saves the search parametersthat you enter on this page and stores them under this name forfuture use.
Directory Search Parameters
Field or Control Description
Search Base Select the directory entry that is the search base for this search.The search base is the entry in the directory information tree atwhich the search begins querying.
Copyright © 1988, 2022, Oracle and/or its affiliates. 73

Reviewing Directory Data and Generating Reports Chapter 3
Field or Control Description
Search Scope Select from:
Base: The query searches only the value in the Search Basefield.
One: The query searches only the entries one level down fromthe value in the Search Base field.
Sub: The query searches the value in the Search Base fieldand all entries beneath it.
Build Filter
Use the fields in the Build Filter group box to create an attribute-specific filter. For example, if you wantdata on a single person, enter the attribute name Person, the operation =, and the person’s name in theValue field. You can construct multiple filters.
Field or Control Description
( ) Use parentheses to separate filter statements.
Attribute Name Enter the name of the attribute data to which you want to filter.
Operation Select an operator to determine how to filter the data.
Value Select a value to compare against when filtering.
And/Or Select from:
• And: A search must meet the criteria of multiplestatements.
• END: This value marks the end of a query. This valueapplies parentheses appropriately.
• NoOp: No operator is used.
• OR: A search must meet the criteria of one of multiplestatements.
74 Copyright © 1988, 2022, Oracle and/or its affiliates.

Chapter 3 Reviewing Directory Data and Generating Reports
Field or Control Description
Search Filter You can narrow the search (for example, instruct the systemto search for all attributes but one) by entering a search filter. Enter the search filter using standard LDAP protocol.
You can specify one or more attributes to search for. To searchall attributes, enter an asterisk ( * ).
For more information about the LDAP protocol, see yourdirectory documentation.
Search Attributes
Field or Control Description
Directory Attribute Select the attributes to search for.
Leave this field blank to search all attributes.
Viewing PeopleSoft Directory Interface Reports
This section discusses how to view the directory audit report and the business interlink status report.
Pages Used to View PeopleSoft Directory Interface Reports
Page Name Definition Name Usage
Directory Audit Report Page EO_RUNCTL_DS_AUDIT Generate the Directory Audit report.
Directory BI Status Report Page EO_RUN_DS_BI_RPT Generate the Directory BI Status report.
Directory Audit Report PageUse the Directory Audit Report page (EO_RUNCTL_DS_AUDIT) to generate the Directory Audit report.
Navigation:
Enterprise Components > Directory Interface > Audit Report
Copyright © 1988, 2022, Oracle and/or its affiliates. 75

Reviewing Directory Data and Generating Reports Chapter 3
This example illustrates the fields and controls on the Directory Audit Report page. You can finddefinitions for the fields and controls later on this page.
Use this page to generate the Directory Audit report.
The Directory Audit SQR report (EO_DS001) locates and reports discrepancies between the PeopleSoftdatabase and your directory. Before you can generate the Directory Audit report, run the Directory Auditprocess. The Directory Audit process populates a comparison record containing the data that differsbetween the PeopleSoft database and the directory and creates an LDIF file with this data that can be usedto update the directory. The Directory Audit report is based on this record, so you can verify what will beupdated in the directory if you apply the LDIF file.
The report generates the following error messages:
• The distinguished name is not found in the directory.
• The distinguished name is not found in PeopleSoft.
• The attribute is in PeopleSoft but not in the directory.
• The attribute is in the directory but not in PeopleSoft.
• The value is in PeopleSoft but not in the directory.
• The value is in the directory but not in PeopleSoft.
Directory BI Status Report PageUse the Directory BI Status Report page (EO_RUN_DS_BI_RPT) to generate the Directory BI Statusreport.
Navigation:
Enterprise Components > Directory Interface > Bus Interlink Status Report
76 Copyright © 1988, 2022, Oracle and/or its affiliates.

Chapter 3 Reviewing Directory Data and Generating Reports
This example illustrates the fields and controls on the Directory BI Status Report page. You can finddefinitions for the fields and controls later on this page.
Use this page to generate the BI Status report.
If you selected an output type of Business Interlinks when setting up maps to associate PeopleSoft fieldswith directory attributes, the system uses PeopleSoft Business Interlinks to modify the directory. If errorsoccur as a result of the interlinks, the system writes the errors to an error record. The Business InterlinkStatus SQR report (EO_DS002) retrieves and presents the data contained in this error record.
Field or Control Description
Delete History Error Rows for MAP Select to delete historical error rows for this map afterreporting them. The PS_EO_BILOAD_ERR record retainserror data for this map until you run the report with this checkbox selected.
Run Click Run to generate the report using PeopleSoft ProcessScheduler.
For more information, refer the product documentation for PeopleTools: Process Scheduler.
Managing Transaction Audit History
This section discusses how to manage transaction audit history.
Pages Used to Manage Transaction Audit History
Page Name Definition Name Usage
Transaction History Report Page EODS_RUN_AUDIT Generate a transaction history report.
Transaction History Inquiry Page EODS_AUDIT_HIS_IN Search for a transaction history.
Purge Transaction History Page EODS_RUN_ADT_PURGE Purge audit history data.
Copyright © 1988, 2022, Oracle and/or its affiliates. 77

Reviewing Directory Data and Generating Reports Chapter 3
Transaction History Report PageUse the Transaction History Report page (EODS_RUN_AUDIT) to generate a transaction history report.
Navigation:
Enterprise Components > Directory Interface > Audit History > Run Report
This example illustrates the fields and controls on the Transaction History Report page. You can finddefinitions for the fields and controls later on this page.
Use this page to generate a Transaction History report.
Field or Control Description
Map Name Select a directory entry map name.
User ID Select the user ID.
Status Select the status of the transaction. Valid values are Successfuland No Success.
Output Type Select the type of output. Valid values are File Format andBusiness Interlink.
Transaction Type Select a type of transaction. Valid values are Add, Delete, andUpdate.
78 Copyright © 1988, 2022, Oracle and/or its affiliates.

Chapter 3 Reviewing Directory Data and Generating Reports
Field or Control Description
Directory Attribute Select the attribute of the entry being defined that will containall the members of this entry. This attribute must be valid forthe current entry in the directory.
The employees who satisfy the entry membership rules ofthis entry are added under this entry as a new value of thisattribute. Because of this, as many attribute values will exist asemployees satisfying the entry membership rules. If this fieldis left blank, the application uses member as a default attributename.
The following example shows the Process Scheduler Request page with Transaction Audit HistoryReport in the process list. The system supports the creation of this report using Crystal Reports or OracleBusiness Intelligent Publisher (BI Publisher or BIP).
This example illustrates the fields and controls on the Process Scheduler Request page showing theTransaction Audit History Report in the process list. You can find definitions for the fields and controlslater on this page.
Transaction History Inquiry PageUse the Transaction History Inquiry page (EODS_AUDIT_HIS_IN) to search for a transaction history.
Navigation:
Enterprise Components > Directory Interface > Audit History > Transaction Inquiry
Copyright © 1988, 2022, Oracle and/or its affiliates. 79

Reviewing Directory Data and Generating Reports Chapter 3
This example illustrates the fields and controls on the Transaction History Inquiry page. You can finddefinitions for the fields and controls later on this page.
Use this page to run a query that appears in the browser rather than creating a report that runs usingProcess Scheduler.
Field or Control Description
Map Name Select a Directory Entry Map name.
User ID Select the user ID.
Status Select the status of the transaction. Valid values are Successfuland No Success.
Output Type Select the type of output. Valid values are File Format andBusiness Interlink.
Transaction Type Select a type of transaction. Valid values are Add, Delete, andUpdate.
80 Copyright © 1988, 2022, Oracle and/or its affiliates.
Chapter 3 Reviewing Directory Data and Generating Reports
Field or Control Description
Directory Attribute Select the attribute of the entry being defined that will containall the members of this entry. This attribute must be valid forthe current entry in the directory.
The employees who satisfy the entry membership rules ofthis entry are added under this entry as a new value of thisattribute. Because of this, as many attribute values exist asemployees satisfying the entry membership rules. If this fieldis left blank, the application uses member as a default attributename.
Transaction Information Tab
The Transaction Information tab displays information about the transaction including the map name, thestatus, output type, and transaction type.
Attributes Tab
The Attributes tab displays information about the transaction including what directory audit action wasperformed, the type of directory attribute, and the attribute value.
DN Details Tab
The DN Details tab displays the distinguished name of the transaction.
Purge Transaction History PageUse the Purge Transaction History page (EODS_RUN_ADT_PURGE) to purge audit history data.
Navigation:
Enterprise Components > Directory Interface > Audit History > Purge Transactions
This example illustrates the fields and controls on the Purge Transaction History page. You can finddefinitions for the fields and controls later on this page.
The following shows the Process Scheduler Request page with Purge Audit History in the process list:
Copyright © 1988, 2022, Oracle and/or its affiliates. 81

Reviewing Directory Data and Generating Reports Chapter 3
This example illustrates the fields and controls on the Process Scheduler Request page showing PurgeAudit History in the process list. You can find definitions for the fields and controls later on this page.
Use the Purge Transaction History page to purge audit history data based on the date range that you enterin the run control page.
82 Copyright © 1988, 2022, Oracle and/or its affiliates.

Chapter 4
Using the Error Handling Utility
Understanding the Error Handling Utility
The Error Handling utility is a PeopleTools application that you use to view and correct messages that arereceived by the subscriber. You can also use this utility to correct data that is stored in staging tables.
Warning! Effective with the PeopleTools 8.48 release, the Integration Broker Service Operations Monitorsupersedes the Error Handling utility.
For more details, see product documentation for PeopleTools: Integration Broker Service OperationsMonitor.
Error Management ProcessPeopleSoft applications that receive flat file data from other systems through batch processes have built-in facilities to validate and correct data prior to updating the main application tables. Likewise, beforeupdating core PeopleSoft application tables, the subscription process detects data errors in the messagesthat it receives. These error messages are stored in either message queues or staging tables.
In some cases, however, errors can’t be sent back to the third party for correction (such as when data isin a flat file). In these cases, you must provide error processing on incoming data so that messages thatcontain information about business objects, such as items and vendors, can be corrected and reprocessedin the PeopleSoft system.
In many integration point implementations, especially those that involve huge transactions and complexdata validations, subscription codes are written to run simple incoming data validations. Upon asuccessful outcome, the system performs these steps:
1. Writes incoming data to staging tables.
2. Runs more stringent data validation processes, usually in batch processes.
As a result of the first subscription process, entries are written to a special staging table (EO_EIP_CTL).The EO_EIP_CTL table is keyed by a single key, EIP_CTL_ID, and has messaging keys. TheEO_EIP_CTL table maintains links between the source message and the staged data and ensures that thedata maintenance program can identify the staging tables.
To find the particular message that you want to view:
1. Select a message by using standard selection criteria, including data maintenance programs, businessunit or setID, data status, and staging table or message queue.
2. Click a detail button to access the application page related to the edited message.
3. Make your edits.
Copyright © 1988, 2022, Oracle and/or its affiliates. 83

Using the Error Handling Utility Chapter 4
4. Save the message.
Note: Messages that are selected from a staging table are saved to the staging table. Before they're savedpermanently (to the application table), the corrected messages that were selected from the messagequeue are assigned a status of Changed and saved to the same queue. The messages then undergo thesubscription process data validation again, after which they're saved to an application table.
A data maintenance program corrects errors in data that enters the PeopleSoft system.
Note: Subscription error management does not apply to real-time data that enters the PeopleSoft systemthrough PeopleSoft Business Interlinks.
Error management consists of the following sequential activities:
1. The PeopleSoft system receives XML messages from a third-party source.
2. Subscription processes validate the data and send the data to:
• PeopleSoft application tables (if no errors were found).
• Message queue (if errors were found).
• PeopleSoft staging tables (if subscription logic requires).
3. The Error Handling utility interacts with:
• Message queue.
• Staging tables.
4. The user interacts with:
• The Error Handling page (to select a message for review or correction).
• Application pages (for editing data errors).
5. The PeopleSoft system updates:
• Message queue (if the original message was selected from the queue).
• Staging tables (if the original data was extracted for staging tables).
Setting Up and Maintaining Message Errors
This section discusses how to:
• Create error-correction pages.
• Set up the error handling utility.
84 Copyright © 1988, 2022, Oracle and/or its affiliates.

Chapter 4 Using the Error Handling Utility
• Set up row security.
• Set up workflow notification in PeopleSoft Application Designer.
• Test the error handling utility.
Warning! Effective with the PeopleTools 8.48 release, the Integration Broker Service Operations Monitorsupersedes the Error Handling utility.
Creating Error-Correction PagesUse PeopleSoft Application Designer to create error-correction pages and components.
Note: The Header Details page and the Error Details page are applicable only if data resides in themessaging queues. Use one Header Details page and one Error Details page for each field.
When creating error-correction pages, follow these guidelines:
• Use EO_EIP_CTL as the main header table if you use staging tables.
Developers can use unique EIP_CTL_ID generator functions (Generate_EIP_CTL_ID andIncrement_EIP_CTL_ID) available in the FUNCLIB_EOEIP.EIP_CTL_ID FieldFormula event.
• Use the generate EIP_CTL_ID function to generate a unique key value for EIP_CTL_ID, based on thesubscription process instance.
The EIP_CTL_ID function is the sole key in the EO_EIP_CTL header table.
• Hook to EO_EIP_CTL to use the Error Handling utility for staging-table-based error handling.
See Data Maintenance Page.
• Modify the record PeopleCode in the derived work record EO_EIP_CTL_WRK.
The derived work record called EO_EIP_CTL_WRK contains most of the processing logic for theutility. Although most of the codes are generic, you must write application-specific codes for thereturn button field (EIP_RETURN_BTN).
• Add codes to return the user to the main Error Handling page.
Use the EO_EIP_CTL_WRK derived record in your component and write component PeopleCode forthe record to handle any unique requirements.
Note: This unique code belongs only to your component and cannot be shared.
FUNCLIB_XXEIP Codes
Functions are created and stored in product-specific FUNCLIB_XXEIP records, with XX representing theproduct. Application developers can look up these function libraries for possible use as templates.
Common integration-related functions are placed in the FUNCLIB_EOEIP record.
Copyright © 1988, 2022, Oracle and/or its affiliates. 85

Using the Error Handling Utility Chapter 4
EIP_DETAIL_BTN FieldFormula
Function Copy_Detail_Errors (&WRK_FIELD, &J, &WRK_ROWSET) copies edit errors to a genericerror subpage.
Function BuildQueueRowset (&WRK_ROWSET1 As Rowset, &WRK_ROWSET2 As Rowset,&MSG_ROWSET As Rowset, &SCROLL, &RECORD_FROM, &RECORD_TO) generically builds thequeue-based transfer page. This function is useful for single record messages.
FUNCLIB_EOEIP.EIP_CTL_ID FieldFormula
You need an EIP_CTL_ID every time that you process a message to maintain error handling. UseFunction Generate_EIP_CTL_ID and Increment_EIP_CTL_ID to create EIP_CTL_IDs based on a newsubscription process instance. For the Generate_EIP_CTL_ID function, invoke method 4 from the list ofprocess instances.
Note: Although in some cases a random number generator is used for creating a new EIP_CTL_IDby calling Generate_EIP_CTL_ID(1), you should use the subscription process instance if possible.Generate_EIP_CTL_ID(4) uses the identifier number of the message subscription process. Rememberto activate this on the message subscription properties by selecting the Generate Subscription ProcessInstance check box.
Warning! The Generate_EIP_CTL_ID and Increment_EIP_CTL_ID functions call other functions inFUNCLIB_ININTFC (an FDM record). You must re-create these additional functions whenever you useGenerate_EIP_CTL_ID and Increment_EIP_CTL_ID within applications.
Data Maintenance PageUse the Data Maintenance page (EO_EIP_CTL_SETUP1) to set up the Error Handling utility and correctmessage errors.
Navigation:
Enterprise Components > Integration Definitions > Data Maintenance Utility
86 Copyright © 1988, 2022, Oracle and/or its affiliates.

Chapter 4 Using the Error Handling Utility
This example illustrates the fields and controls on the Data Maintenance page. You can find definitionsfor the fields and controls later on this page.
Use this page to set up the Error Handling utility and correct message errors.
Field or Control Description
Queue Based and Stage Table PeopleTools messages are queue-based; bulk data orapplication data is usually staged.
Business Unit and SetID Select a business unit or setID on which to base the data.
Component Name Select the name of the component for accessing the ErrorHandling/Data Maintenance page (EO_EIP_CTL_MAINT). This is the component that the user opens for error-correction activities. You should select EIP_DTA_CTL. Thiscomponent uses the same fonts and images for all incomingdata maintenance or error-correction activities within thePeopleSoft system for non-real-time integration.
Prompt Table Follow the navigation path to use the Error Handling utility, and select a prompt table for the data maintenance program (EIP_PROGRAM). The PeopleSoft system includes acommon error handling menu structure that points to the maincomponent EIP_DTA_CTL. Based on user privileges, theError Handling utility prompts from a selected list of datamaintenance programs.
Copyright © 1988, 2022, Oracle and/or its affiliates. 87

Using the Error Handling Utility Chapter 4
Field or Control Description
Panel Transfer Code Select Next Panel to receive a transfer panel name prompt, which gives you a selection of pages that are part of the maindata maintenance component that you selected in the MainData Maint Panel Group field. Select one page.
Selecting either Transfer or Modal opens additional fields.
Role Name Select a name to set up workflow notification and to notify allrole users listed.
User ID Select to notify only specific role users.
Flag1, Flag2, Flag3, Flag4 and Flag5 Users often do not see these check boxes. Applicationdevelopers use them for extra coding flexibility. Developersmust create documentation for these check boxes to use them.
Workflow/Security PageUse the Workflow/Security page (EO_EIP_CTL_SETUP2) to set up row security.
Navigation:
Enterprise Components > Integration Definitions > Data Maintenance Utility > Workflow/Security
This example illustrates the fields and controls on the Workflow/Security page. You can find definitionsfor the fields and controls later on this page.
Use this page to set up row security.
88 Copyright © 1988, 2022, Oracle and/or its affiliates.

Chapter 4 Using the Error Handling Utility
Field or Control Description
Row Security Permission List Assign a row security class to the transaction type that you aresetting up.
Note: The value that you select determines which user can seethe given transaction type. You can enter multiple row securityclasses.
Setting Up Workflow Notification in PeopleSoft Application DesignerYou can set up an EO_WF_ERR Application Engine process to scan the EO_EIP_CTL table periodicallyto look for rows with ERROR status. When the system finds errors, it generates workflow notificationsand routes them to the role users that you designated in the User ID field on the Data Maint Setup1 page.Clicking the worklist item in the workflow notification transfers the user to the Error Handling/DataMaint (error handling/data maintenance) page.
To set up workflow notification:
1. Open an instance of PeopleSoft Application Designer.
2. Select File, Open.
3. Select Business Process from the Definition drop-down menu.
4. Open business process EC_MANAGE_ERRORS.
5. Right-click the MANAGE ERRORS icon and select View Definition.
6. Double-click the Correct Errors icon to open the Step Definition dialog box.
7. Click the Attributes button to open the Step Attributes dialog box.
8. Complete the required navigation information to the error correction page in the Step Attributesdialog box and click OK.
Data Maintenance PageUse the Data Maintenance page (EO_EIP_CTL_MAINT) to test the error handling utility.
Test subscription processes must error out. Create a message subcontract with Error status, or create astage-based incoming transaction with a status value of 1 (Error).
Navigation:
Enterprise Components > Integration Definitions > Review Centralized Error
Copyright © 1988, 2022, Oracle and/or its affiliates. 89
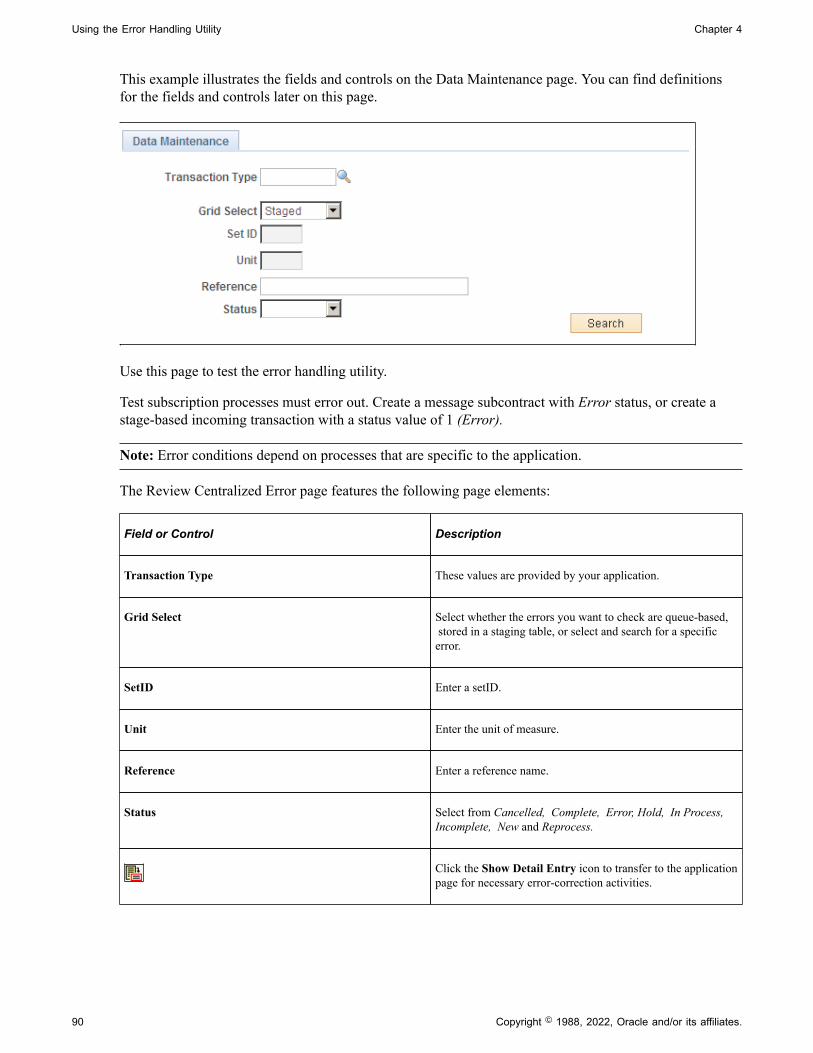
Using the Error Handling Utility Chapter 4
This example illustrates the fields and controls on the Data Maintenance page. You can find definitionsfor the fields and controls later on this page.
Use this page to test the error handling utility.
Test subscription processes must error out. Create a message subcontract with Error status, or create astage-based incoming transaction with a status value of 1 (Error).
Note: Error conditions depend on processes that are specific to the application.
The Review Centralized Error page features the following page elements:
Field or Control Description
Transaction Type These values are provided by your application.
Grid Select Select whether the errors you want to check are queue-based, stored in a staging table, or select and search for a specificerror.
SetID Enter a setID.
Unit Enter the unit of measure.
Reference Enter a reference name.
Status Select from Cancelled, Complete, Error, Hold, In Process, Incomplete, New and Reprocess.
Click the Show Detail Entry icon to transfer to the applicationpage for necessary error-correction activities.
90 Copyright © 1988, 2022, Oracle and/or its affiliates.

Chapter 4 Using the Error Handling Utility
Correcting Message Errors
This section provides an overview of the Workflow Notification process and discusses how to correctmessage errors.
Warning! Effective with the PeopleTools 8.48 release, the Integration Broker Service Operations Monitorsupersedes the Error Handling utility.
Understanding the Workflow Notification ProcessWorkflow error notification involves the following steps:
1. A process-scheduled Application Engine program scans data errors in the staging tables (or in theSubscription Contract Message queues) at a given interval.
Note: You can also run a separate Workflow Notification Application Engine program for messagingqueues.
2. When the Application Engine program finds errors in the actual message queue or the stagingsummary table, it opens respective component interfaces that invoke the designated temporarycomponents for inserting error data into the underlying temp tables.
3. Saving the temporary page (through component interface calls) triggers workflow PeopleCode to sendworklist notifications to designated users, depending on the role name or user ID that you selected onthe Data Maint Setup1 page.
Note: The Application Engine program traps only the first error for each field, but it can trap multipleerrors for each record.
Correcting Message ErrorsTo correct message errors:
1. Access the Data Maint Setup1 page to open the worklist.
2. Open the worklist.
You are transferred to the Data Maintenance page (EO_EIP_CTL_MAINT) to correct the errors.
3. Find the error rows by using a combination of search criteria, such as transaction type, business unitor setID, and error status.
4. Click the Search icon.
5. Click the Show Detail Entry icon (to the left of each row) to select a specific transaction thatrepresents a single message or a single row of header-level record from the staging table.
6. Correct the data.
Copyright © 1988, 2022, Oracle and/or its affiliates. 91

Using the Error Handling Utility Chapter 4
7. Click the Return button to return to the Error Handling Summary page (EO_EIP_CTL_MAINT) andcontinue the session with other transactions.
Note: In this scenario, the corrected data does not update core PeopleSoft tables. Instead, it updates themessage queue or staging tables.
92 Copyright © 1988, 2022, Oracle and/or its affiliates.

Chapter 5
Using the Publish Utility
Understanding the Publish Utility
The Publish utility automates the process of copying the contents of an entire table into a remote databaseor legacy system.
Use the utility to synchronize data from an existing system when a new PeopleSoft system is installed.
The Publish utility is built upon the PeopleSoft Integration Broker services-oriented architecture andpublishes service operations to target systems. The service operations published contain messages thatstore the table data.
Use the Publish utility to perform full table publish or batch publish processing. These process are definedas:
Term Definition
Full table publish The full publish process seeds, or initially populates orrepopulates, a copy of an entire table into a remote database orlegacy system. The entire contents of the table are published toall systems that require a copy of the table.
Batch publish This term describes jobs or processes that run independentlyof their initiating process. A batch process can also run atone or more predetermined times in the future from theinitiating request. A batch process is appropriate for publishingincremental changes to data in a batch environment or forprocessing large volumes.
To use the utility you use the PeopleSoft Pure Internet Architecture to create publishing rules andthen assign them to service operation messages to control how the utility manages the messages it ispublishing.
Understanding Publishing Rules
You control the size and number of, and the frequency at which data full table or batch data is publishedby creating and using a series of data publishing rules.
The PeopleSoft Pure Internet Architecture component that you use to create publishing rules dependson the type of processing that you want to perform. For full table publish processing, use the Full TablePublish Rules component (EOIU_SOPUBFULL) to create publishing rules; for batch publish processes,use the Batch Process Rules component (EO_MSGPUBBATCH).
Copyright © 1988, 2022, Oracle and/or its affiliates. 93

Using the Publish Utility Chapter 5
The pages in the Full Table Publish Rules and Batch Process Rules components are very similar. You usethese components to specify:
• Pre-processing and post-processing tasks.
• The source of the data.
• Whether to chunk the message.
• Record mapping.
• Output format.
• Related languages in which to publish the data. (Full table publishing rules only)
Pre-Processing and Post-ProcessingOften, performing pre-processing and post-processing tasks on the subscribing system before or afterit processes a service operation message is desirable. Pre-processing tasks can include actions such asdeleting existing data. Post-processing actions can include data clean-up.
Performing pre-processing and post-processing tasks is optional. However, if you choose to performthem, you must enable the Message Header or Message Trailer options on the Full Table Publish Rules orBatch Publish Rules page, as well as code the processing logic on the service operation handler.
You can perform pre-processing and post-processing tasks on service operations that are processedsequentially or in parallel.
Note: Using pre-processing and post-processing tasks in conjunction with the parallel processing featureof the Publish Utility is currently available in the HCM application only. To use pre- and post-processingtasks in conjunction with parallel processing you must apply one of the following resolutions to boththe publishing and subscribing systems: HCM 9.0 systems – Resolution 827074; HCM 9.1 systems –Resolution 827350.
Using pre-processing and post-processing logic is discussed in greater detail elsewhere in thisdocumentation.
See Performing Pre-Processing and Post-Processing Tasks.
Data SourcesThe data to publish using the Publish utility can be from the following sources:
• A staging table.
• A temporary table.
• A view.
Message ChunkingThis section discusses message chunking as it pertains to specifying chunking options in publishing rules.Setting up message chunking is discussed elsewhere in this documentation.
94 Copyright © 1988, 2022, Oracle and/or its affiliates.

Chapter 5 Using the Publish Utility
See Setting Up Message Chunking.
Chunking
Chunking refers to the automatic breaking of a message into several smaller messages based on values infields in the level zero record.
You can perform chunking based on setID, business unit, or record group.
Chunking on business unit means that all transactions within the message are for the same business unitvalue.
The system chunks message data based on the MaxMessageSize parameter.
The MaxMessageSize (maximum message size) field in the PeopleSoft Option (PSOPTIONS) tablelimits the size of the message. Before processing each level zero record, the Full Table Publish utilitycompares the size of the message against the value in the MaxMessageSize field. When the messagesize exceeds the value in the MaxMessageSize field, the service operation publishes, and a new serviceoperation starts.
You can also specify message chunking in the publish rules for the service operation, which enables themessage to publish when the value of a chunk field changes.
Chunking Field
Chunking fields are key fields in the level zero record that are used to break the message into parts.
Chunking Table
A chunking table is a derived or Structured Query Language (SQL) table that contains the fields by whichthe message is chunked. SQL chunk tables define the valid values of the chunking fields and the nodes towhich the message is published.
Oracle provides three standard chunking tables: EO_BUSUNIT_EOC for business unit values,EO_SETID_EOC for setID values and EO_RECGRP_EOC for record groups values. Oracle provideschunking tables for business unit, setID and record group that are maintained by a series of components(such as components that are created for maintaining the business unit chunking table).
Alternate Chunking Table
An alternate chunking table is a secondary chunk table. It provides a separate view of an existing chunktable, but with one or more field names customized. It enables you to reuse an existing chunk table. Forexample, if the record EO_BUSUNT_EOC has BUSINESS_UNIT as the chunking field, you can create aview of this table that has BUSINESS_UNIT_IN as the chunking field.
When the field being chunked doesn't use the normal field names for business unit and setID, the alternatechunk table enables you to use the existing chunk tables and maintenance pages for business unit andsetID. The alternate chunk table enables the user to use the existing chunk tables and maintenance pagesfor business unit and setID when the field being chunked doesn't use the normal field names for businessunit and setID, for example, BUSINESS_UNIT_IN. Use the _EOV suffix for alternate chunk tables.
Copyright © 1988, 2022, Oracle and/or its affiliates. 95

Using the Publish Utility Chapter 5
Chunking Rule
A chunking rule points to the chunking table. Multiple chunking rules can point to the same chunkingtable.
Record MappingYou should use the record mapping feature in a publish rule because:
• The published data comes from staging tables or temporary tables.
Using staging tables is the only way to publish rows that have been deleted from application mastertables.
• The published data needs an order sequence that differs from that of the records in the message.
• You must create a view that selects only current effective-dated rows in situations in which theapplication table is effective-dated and the subscribing database cannot process future-datedtransactions.
Output FormatYou can choose the output of the Full Table Publish utility to be in the following formats:
• Message (default value).
• Flat file.
• Flat file with control record.
You can create multiple publish rules with different output formats for the same service operation.
Flat File Output
You select the flat file option when you set up publish rule definitions for the service operation. If a filelayout object exists with the same name as the message object, you can modify the output format field onthe Publish Rule Definition page.
If you select flat file output, the header and trailer messages aren’t created, and a single output flat file iscreated even if you already specified the chunking rule.
The file layout definition must have a record structure identical to that of the message; if theAUDIT_ACTN field does not exist in the record, you must add it to the file layout record definition.
The option becomes modifiable if a file layout object exists with the same name as the messagedefinition.
The directory location of the flat file is determined by the value in the OUTPUT parameter in PeopleSoftConfiguration Manager.
The flat file name is messageName_SequenceNumber.out, where messageName is the message name andSequenceNumber is the next available sequential number for files with that message name.
96 Copyright © 1988, 2022, Oracle and/or its affiliates.

Chapter 5 Using the Publish Utility
Publishing Data in Related LanguagesThe Publish utility provides the option to publish data in related languages.
If you choose to use the related language feature, the system creates the following related languagemessages:
• One message in the base language of the publishing system.
• One message for each language in the related language tables for the base tables.
The subscribing system receives the messages in the order in which they are published. For example, ifthe base language is English, with French and then German as related language tables, the Publish utilitycreates the messages in this order:
1. (Optional) Header message.
2. English message 1.
3. French message 1.
4. German message 1.
5. English message 2.
6. French message 2.
7. German message 2.
8. (Optional) Trailer message.
Prerequisites for Using the Publish Utility
The Publish Utility uses the PeopleSoft Integration Broker services-oriented architecture and to publishservice operations to target systems. As such, to use the utility you must have:
• An understanding of PeopleSoft Integration Broker.
• PeopleSoft Integration Broker configured for your integration requirements.
• Service operations, including messages, handler, and routing definitions, setup on sending andreceiving systems.
• Using pre-processing and post-processing tasks in conjunction with the parallel processing featureof the Publish Utility is currently available in the HCM application only. You must apply one of thefollowing resolutions to both publishing and subscribing systems:
• HCM 9.0 systems: Resolution 827074.
• HCM 9.1 systems: Resolution 827350.
Copyright © 1988, 2022, Oracle and/or its affiliates. 97

Using the Publish Utility Chapter 5
Common Elements Used in The Publish Utility
Field or Control Description
Alternate Chunk Table (Optional.) Enter the name of an alternate chunk table.
This field in disabled until you enter a value in the ChunkRule ID field.
Service Operation Click the link to view the service operation definitionassociated with the publish rule.
Chunking Rule ID Associate a chunking method with the publish rule, if needed.
Message Options The valid options are:
• Create Message Header
Select the check box to have the system create a messageheader when the publish rule is invoked. Clear the checkbox if you do not want a message header created when thepublish rule is invoked.
By default, the Create Message Header check box isselected.
• Create Message Trailer
Select the check box to have the system create a messagetrailer when the publish rule is invoked. Deselected thecheck box if you do not want a message trailer createdwhen the publish rule is invoke.
By default, the Create Message Trailer check box isselected.
Publish Rule ID Enter the name of the publish rule to create and assign to themessage.
(Publish Rule ID) Description Enter a description for the publish rule.
Message.Version Displays the message and message version associated with theservice operation assigned to the publish rule.
98 Copyright © 1988, 2022, Oracle and/or its affiliates.
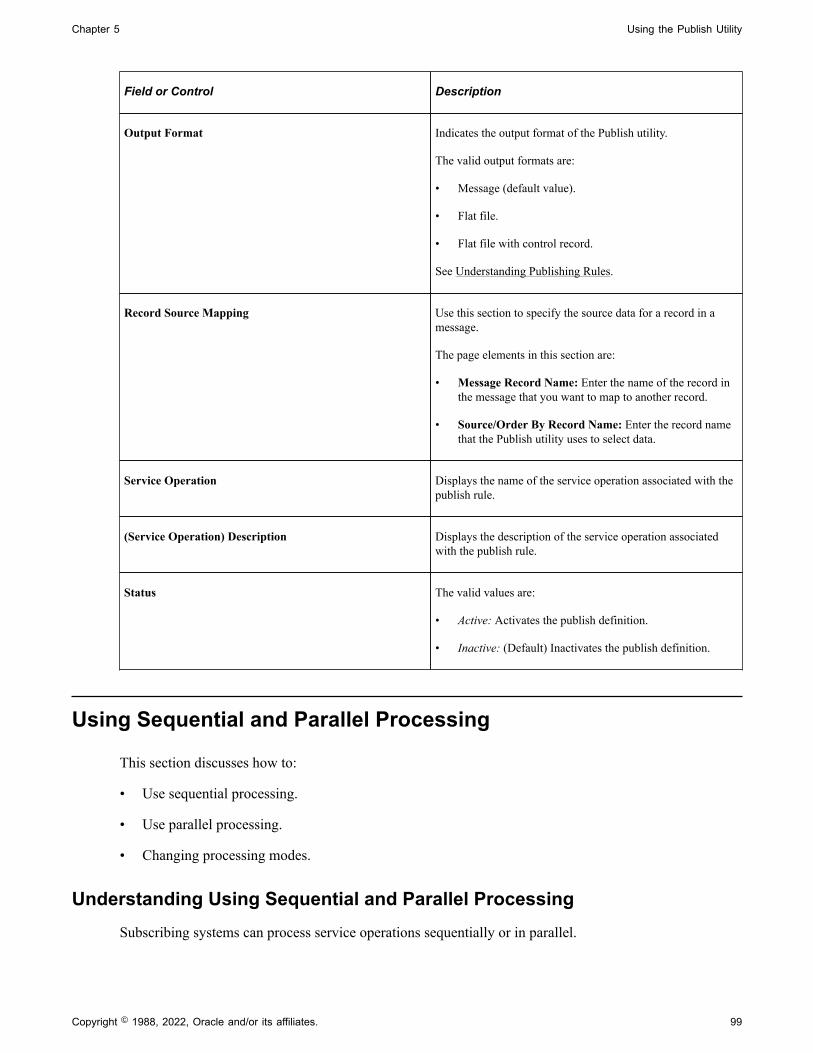
Chapter 5 Using the Publish Utility
Field or Control Description
Output Format Indicates the output format of the Publish utility.
The valid output formats are:
• Message (default value).
• Flat file.
• Flat file with control record.
See Understanding Publishing Rules.
Record Source Mapping Use this section to specify the source data for a record in amessage.
The page elements in this section are:
• Message Record Name: Enter the name of the record inthe message that you want to map to another record.
• Source/Order By Record Name: Enter the record namethat the Publish utility uses to select data.
Service Operation Displays the name of the service operation associated with thepublish rule.
(Service Operation) Description Displays the description of the service operation associatedwith the publish rule.
Status The valid values are:
• Active: Activates the publish definition.
• Inactive: (Default) Inactivates the publish definition.
Using Sequential and Parallel Processing
This section discusses how to:
• Use sequential processing.
• Use parallel processing.
• Changing processing modes.
Understanding Using Sequential and Parallel ProcessingSubscribing systems can process service operations sequentially or in parallel.
Copyright © 1988, 2022, Oracle and/or its affiliates. 99

Using the Publish Utility Chapter 5
In sequential processing, the subscribing system processes messages defined in inbound serviceoperations in the order received.
In parallel processing, the subscribing system processes messages defined in service operations inparallel, in no specific sequence.
You can use sequential or parallel processing when using either full table publishing or batch publishing.
You configure sequential or parallel processing at the queue level on the subscribing system.
Prerequisites for Using Parallel ProcessingNote the following prerequisites for using pre-processing and post-processing tasks in conjunction withthe parallel processing feature of the utility:
• The pre-processing and post-processing task functionality of the parallel processing feature of thePublish Utility is currently available in the HCM application only.
• To use pre-processing and post-processing tasks in conjunction with parallel processing you mustapply the following resolutions to both the publishing and subscribing systems:
• HCM 9.0 systems: Resolution 827074.
• HCM 9.1 systems: Resolution 827350.
Using Sequential ProcessingTo implement sequential processing, on the subscribing system associate the message on the inboundservice operation with an ordered queue.
See PeopleTools: PeopleSoft Integration Broker, “Managing Service Operations,” Defining ServiceOperation Version Information, “Specifying Messages for Service Operations”
Using Parallel ProcessingTo implement parallel processing, on the subscribing system associate the message on the inbound serviceoperation with an unordered queue. If the message is currently assigned to an ordered queue, assign it to aunordered queue.
In order to realize any performance gain from parallel processing, multiple subscription handlers must beset up for the subscription node to process messages on the unordered queue.
Only Messages that utilize functions inside the PeopleCode function library FUNCLIB_EOEIP for theirpre-processing, post-processing and subscription handler logic will have the order of processing logicenforced when using the parallel processing mode.
See PeopleTools: PeopleSoft Integration Broker, “Managing Service Operations,” Defining ServiceOperation Version Information, “Specifying Messages for Service Operations”
See PeopleTools: PeopleSoft Integration Broker, “Managing Service Operation Queues,” Adding QueueDefinitions
100 Copyright © 1988, 2022, Oracle and/or its affiliates.

Chapter 5 Using the Publish Utility
Changing Processing ModesIf your business requirements change, you can change the processing mode from sequential processingto parallel processing or vice versa, by moving the message associated with the service operation to theappropriate queue type.
If you have coded pre-processing or post-processing tasks, you must move the code for those tasks in theservice operation message. More information is provided elsewhere in this documentation.
See Performing Pre-Processing and Post-Processing Tasks.
Assigning Full Table Publishing Rules
All PeopleSoft applications use common, centralized tables and pages to define how to publish full tablemessages. The Publish utility uses publishing rules to process the data.
This section discusses how to assign full table publishing rules.
Note: You can create multiple publish rules for the same message. The Full Table Publish utility treatseach publish rule as a separate publishing cycle.
Pages Used to Assign Full Table Publishing Rules
Page Name Definition Name Usage
Full Table Publish Rules Page EOIU_SOPUBFULL Associate a rule with a message andcharacterize the rule.
Record Mapping Page EOIU_SORECMAP Map a message record to another record.
Languages Page EOIU_SOLANGUAGE Specify languages in which to publish amessage.
Full Table Publish Rules PageUse the Full Table Publish Rules page (EOIU_SOPUBFULL) to associate a rule with a message andcharacterize the rule.
Navigation:
Enterprise Components > Integration Definitions > Full Data Publish Rules
Copyright © 1988, 2022, Oracle and/or its affiliates. 101

Using the Publish Utility Chapter 5
This example illustrates the fields and controls on the Full Table Publish Rules page. You can finddefinitions for the fields and controls later on this page.
Use this page to associate a rule to a message and characterize the rule.
Field or Control Description
Message Options The valid values are:
• Create Message Header. Use to initiate pre-processingtasks on the subscribing system.
• Create Message Trailer. Use to initiate post-processingtasks on the subscribing system.
By default, both options are enabled.
Ensure that the subscribing process does not need the headeror trailer process before you deselect these check boxes for aBatch Publish message.
When sending messages sequentially, header messages triggerspecial logic (in a PeopleCode program) on the PeopleSoftfull message subscription that deletes the existing applicationrecords. Also, some applications use the trailer message toindicate that all data messages have been received and toinitiate the validation process. The documentation for theindividual message should note whether headers and trailersare supported.
Create Delay Records This check box appears only if the message name ends withFULLSYNC_EFF (such as MESSAGENAME_FULLSYNC_EFF). Select this check box to write all future-dated rows tothe delay table. Also select this check box in conjunction withrecord mapping views that publish only the current effective-dated rows.
102 Copyright © 1988, 2022, Oracle and/or its affiliates.

Chapter 5 Using the Publish Utility
Record Mapping PageUse the Record Mapping page (EOIU_SORECMAP) to map a message record to another record.
Navigation:
Enterprise Components > Integration Definitions > Full Data Publish Rules > Record Mapping
This example illustrates the fields and controls on the Record Mapping page. You can find definitions forthe fields and controls later on this page.
Use this page to map a message record to another record.
Regardless of which source table you use (staging table, temporary table, or a view), ensure that thesource table field names are identical to the field names in the target message record. Key fields must alsoadhere to the parent and child relationship. (Keys of a parent record must exist in the child record, in thesame sequence.) The Publish utility uses the Source/Order By Record Name field to select rows forpublishing. You use key matching to find all child rows of a parent.
The chunk field should be the primary key field in all Source/Order By records. If the chunk field is not akey field of the level zero record, join the chunk field to all records in which the chunk field does not existby using views in PeopleSoft Application Designer.
Enter only those message records with a different source or ordering record. If the message record nameand the source or ordering record name are identical, do not insert a row for that record on the RecordMapping page.
Languages PageUse the Languages page (EOIU_SOLANGUAGE) to specify languages in which to publish a message.
Navigation:
Enterprise Components > Integration Definitions > Full Data Publish Rules > Languages
Copyright © 1988, 2022, Oracle and/or its affiliates. 103

Using the Publish Utility Chapter 5
This example illustrates the fields and controls on the Languages page. You can find definitions for thefields and controls later on this page.
Use this page to specify languages in which to publish a message.
Field or Control Description
Publish All Related Languages Select to indicate whether to publish the message in all of therelated languages. If this option is selected, the scroll area thatyou use to enter individual related languages is unavailable. This check box is deselected by default.
Publish Base Language Select to publish the message in the base language. This checkbox is selected by default.
Language Code Select the related language in which to publish the message.
Assigning Batch Publishing Rules
All applications can use common, centralized tables and pages to define how to publish incrementalmessages from an application program. The Publish utility uses batch publish rules to process the datafrom the application program.
This section discusses how to:
• Associate a rule with a message and characterize the rule.
• Map a batch publishing message record to another record.
• Assign an application program to a publishing rule.
104 Copyright © 1988, 2022, Oracle and/or its affiliates.

Chapter 5 Using the Publish Utility
Note: You can link application programs to multiple publishing rules for the same message or differentmessages. The Publish utility treats each publishing rule as a separate publishing cycle.
Batch Publish Rules PageUse the Batch Publish Rules page (EOIU_SOPUBATCH) to associate a rule with a message andcharacterize the rule.
Navigation:
Enterprise Components > Integration Definitions > Batch Publish Rules
This example illustrates the fields and controls on the Batch Publish Rules page. You can find definitionsfor the fields and controls later on this page.
Use this page to associate a rule to a message and characterize the rule.
The page elements and controls that you use on the Batch Publish Rules page are described elsewhere inthis documentation.
See Common Elements Used in The Publish Utility.
Record Mapping PageUse the Record Mapping page (EOIU_SORECMAP) to map a message record to another record.
Navigation:
Enterprise Components > Integration Definitions > Batch Publish Rules > Record Mapping
Copyright © 1988, 2022, Oracle and/or its affiliates. 105

Using the Publish Utility Chapter 5
This example illustrates the fields and controls on the Record Mapping page. You can find definitions forthe fields and controls later on this page.
Use this page to map a message record to another record.
Note: When running a batch publish rule, the Publish utility runs cleanup logic, which either updatesfields or deletes rows in the source tables. If the source table is a view that contains a join, then the optionto delete published rows fails.
Field or Control Description
Message Record Name Enter the name of the record in the message that you want tomap to another record.
Source/Order By Record Name Enter the record name that the Publish utility uses to selectdata.
This page specifies the source data for a record in a message. It works in the same manner andaccomplishes the same purpose as the Record Mapping page for a full table publish.
Batch Programs PageUse the Batch Programs page (EOIU_SOBATPGM) to assign an application program(PROCESS_NAME) to the publish rule.
Navigation:
Enterprise Components > Integration Definitions > Batch Publish Rules > Batch Programs
106 Copyright © 1988, 2022, Oracle and/or its affiliates.

Chapter 5 Using the Publish Utility
This example illustrates the fields and controls on the Batch Programs page. You can find definitions forthe fields and controls later on this page.
Use this page to assign an application program (PROCESS_NAME) to the publish rule.
Field or Control Description
Process Name Enter the name of the COBOL, Structured Query Report (SQR), or Application Engine program that is marking therecords to be published.
The Publish utility initially receives the process name fromthe batch parameter record that is created by the applicationprogram. The program then retrieves and processes eachpublish rule for the application process name. The processname can be any 12-character string, as long as it matcheswhat the application program inserts into the batch parameterrecord.
If you select a flat file format, the Publish utility does notcreate a header or trailer message, and the utility ignores anychunking rules. Instead, the utility creates a single flat file.
Performing Pre-Processing and Post-Processing Tasks
This section discusses how to:
• Set general pre-processing and post-processing options.
• Code pre-processing and post-processing tasks.
Copyright © 1988, 2022, Oracle and/or its affiliates. 107

Using the Publish Utility Chapter 5
Setting General Pre-Processing and Post-Processing OptionsTo perform pre-processing and post-processing tasks, you must select the appropriate Message Header orMessage Trailer option on the Full Table Publish Rules page or on the Batch Publish Rules page.
To set general pre-processing and post-processing options:
1. Access the Full Table Publish Rules page or the Batch Publish Rules page.
• To access the Full Table Publish Rules pages, select Enterprise Components > IntegrationDefinitions > Full Table Publish Rules.
• To access the Batch Publish Rules pages, select Enterprise Components > IntegrationDefinitions > Batch Publish Rules.
2. In the Message Options section, select the appropriate options:
Field or Control Description
Message Header Select this option to perform pre-processing tasks on aservice operation message.
Message Trailer Select this option to perform post-processing tasks on aservice operation message.
3. Click the Save button.
Coding Pre-Processing and Post-Processing TasksThe type of processing that you are performing determines the location in the message where you insertthe pre-processing and post-processing logic.
Using PeopleSoft-Delivered Functions for Pre-Processing and Post-Processing
Consider using the following PeopleSoft-delivered functions in pre-processing logic:
Field or Control Description
Delete_Existing_Data Function The Delete_Existing_Data function loops through the defaultmessage definition records and deletes all the rows from eachrecord. It also deletes all the rows from the related languagerecord.
108 Copyright © 1988, 2022, Oracle and/or its affiliates.

Chapter 5 Using the Publish Utility
Field or Control Description
Subscribe_FullReplication Function The Subscribe_FullReplication function is called fromsubscription processes that do full replication. This functionchecks the first instance of PSCAMA.BATREPFIRSTMSGand if this flag is set to yes, it invokes delete processing thatdeletes all the data from every record in the message as well asrelated language records. It then invokes the same Proc_Sub_Rowset processing that incremental replication processinguses. It loops through the message hierarchy and inserts thedata into the appropriate tables based on PSCAMA.AUDIT_ACTION and the message definition records.
Coding Pre-Processing and Post-Processing Tasks
The type of processing that you are performing, sequential or parallel, determines the location in themessage where you insert pre-processing and post-processing logic.
The following code example shows sample pre-processing and post-processing code. Section numbershave been entered as remarks to show the location to insert code based on the processing that you areperforming.
Processing Task Section
Parallel Pre-processing Section 1
Sequential Pre-processing Section 2
Sequential Post-processing Section 3
Parallel Post-processing Section 4
Important! If you change processing modes from sequential processing to parallel processing or viceversa, you must move any pre-processing and post-processing code to the appropriate section in themessage, as described in the table.
If &ParallelFS Then ... If &Pre_Process_Flg = "Y" Then
rem ****** Begin Pre-Processing Logic for parallel-enabled FullSync *****; Delete_Existing_Data(&MSG);
/************************************************************************/ /* */ /* Section 1 */ /* */ /************************************************************************/
Copyright © 1988, 2022, Oracle and/or its affiliates. 109

Using the Publish Utility Chapter 5
rem ****** End Pre-Processing Logic for parallel-enabled FullSync ******;
End-If;
End-If;
&MSG_ROWSET = &MSG.GetRowset();&MSG_LANG_CD = &MSG_ROWSET(1).PSCAMA.LANGUAGE_CD.Value;&MSG_BASE_LANG_CD = &MSG_ROWSET(1).PSCAMA.BASE_LANGUAGE_CD.Value;&FULL_INCR = "FULL";
Evaluate &MSG_ROWSET(1).PSCAMA.MSG_SEQ_FLG.ValueWhen "H" If Not &ParallelFS Then
rem ****** Begin Pre-Processing Logic for nonparallel-enabled FullSync ******; Delete_Existing_Data(&MSG);
/*************************************************************************/ /* */ /* Section 2 */ /* */ /*************************************************************************/
rem ****** End Pre-Processing Logic for nonparallel-enabled FullSync ******;
End-If; Break;When "T" If Not &ParallelFS Then
/*************************************************************************/ /* */ /* Section 3 */ /* */ /*************************************************************************/
rem ** Insert Post-Processing Logic Here for nonparallel-enabled FullSync **;
End-If; Break;When-Other Proc_Sub_Rowset(&MSG_ROWSET); rem ****** put additional process like editing here ********;
If &ParallelFS Then ...
If &Post_Process_Flg = "Y" Then
/*************************************************************************/ /* */ /* Section 4 */ /* */ /*************************************************************************/
rem *** Insert Post-Processing Logic Here for parallel-enabled FullSync ***;
End-If; ... Break;
End-Evaluate;
110 Copyright © 1988, 2022, Oracle and/or its affiliates.

Chapter 5 Using the Publish Utility
Setting Up Message Chunking
This section provides an overview of message chunking.
Pages Used to Set Up Message Chunking
Page Name Definition Name Usage
Chunking Rule Page EO_CHUNKRULE Define a chunking rule description.
BusUnit Mapping Page EO_CHUNKBU Maintain chunking data for businessunits.
SetId Mapping Page EO_CHUNKSETID Maintain chunking data for setIDs.
Eo Recgrp Page EO_RECGRP Maintain chunking data for recordgroups.
Add Nodes to Chunk Rule Page EO_ADNODECHUNK_PNL Add nodes to existing chunking rules.
Quick Map Page EO_ADDSIDNODE_PNL Assign business units to a chunking rule.
Map Business Unit Page EO_ADDNODEBU_PNL Assign chunking rules to a business unit.
Map Set IDs Page EO_ADDNODESID_PNL Assign chunking rules to a setID.
Understanding Message ChunkingIf you publish to multiple nodes, you might want the messages to be routed based on a specific field.Chunking rules direct the message. You can use the same chunking fields for breaking a large messageinto smaller messages, as well as for associating messages with a node (based on those same fields). Youset up this kind of relationship between nodes and the fields used to break the message apart (break fields)by using chunking message pages.
You can, depending on some XML content-based logic, use message chunking to route and deliver groupsof transactions to different third-party nodes.
For example, consider purchase orders. If you run the full batch publish, each third-party node receivesan XML message containing all purchase orders that are dispatched, regardless of whether any purchaseorders are intended for that particular customer. With chunking, however, you can set up a chunking ruleto chunk a message by customer ID. This creates an XML message for each customer that contains onlypurchase orders intended for that particular customer.
Copyright © 1988, 2022, Oracle and/or its affiliates. 111

Using the Publish Utility Chapter 5
Note: Do not confuse message chunking with queue partitioning. You use queue partitioning to partitiona queue by a level zero key field. If a field exists on level zero of the record in the message by which youcan uniquely distinguish and group transactions to be processed in parallel, partitioning the message bythis field increases performance. Without partitioning, a PeopleSoft subscribing system must processeach incoming service operation and its associated message in the order in which the service operation isreceived according to the Publication ID (PUBID) field.
Identifying When to Use ChunkingUse chunking when:
• The message data is large, and the subscriber is consistently interested only in part of the data.
• Subscribers can more efficiently process the message data by chunking messages.
• You have trading-partner-specific content and legally do not want data to be shared among vendors.
You can chunk messages by:
• Locations and inventory shipments by business unit.
• Customers by setID.
• Employees by department or company.
• Sales order acknowledgements by setID and customer ID.
• Purchase orders and purchase order changes by setID and vendor ID.
Selecting Chunking FieldsTo maximize performance and prevent application developers from maintaining complicated views of thedata, create staging or temporary tables that contain the chunking fields as the highest order key fields.
Chunking fields can affect performance and alter the options that are available to the Publish utility. ThePublish utility creates SQL for each table that is defined in the message object. Tables that are defined inthe message can be mapped to an alternative source table or viewed on the Record Mapping page underthe Publish Rule Definition page.
The source table (or view) serves two purposes:
• It enables the data that must be published to come from a source other than the table that is defined inthe message.
• It enables the data to be ordered so that the Publish utility can process rows in the correct sequence.
Because the SQL is run only once and includes a subquery against the values in the chunking table, youmust define all chunking fields in every table that is used to retrieve data for the message. The SQL order-by clause is set according to the key fields that are defined in the table. The result is that chunking fieldsmust be defined as key fields for the Publish utility to work.
112 Copyright © 1988, 2022, Oracle and/or its affiliates.

Chapter 5 Using the Publish Utility
Example of Generated SQL for Chunking
This is an example of SQL that is generated for chunking:
Select * from PS_INV_ITEMS Awhere EXISTS (Select 'Y' from PS_EO_SETID_EOC Bwhere B.CHUNK_RULE_ID = 'SETID'and B.EFFDT = '20000201'and A.SETID = B.SETID)order by A.SETID, INV_ITEM_ID, EFFDT
The field that you select to chunk on determines the view table that you must create:
Chunking Field Attribute Corresponding View Table
Chunking field is a key field in level zero table. By rule, the chunking fields are also key fields in the childtables. The key fields of a parent table must be key fields inthe child table and in the same order. If the chunking fields arenot the highest order key fields, create a view that consists ofall fields in the source table, with the chunking fields as thehighest order key fields, followed by the remaining key fieldsfrom the source table. Then map this view table to the sourcetable on the Record Mapping page under the Publish RuleDefinition page.
Chunking field is not a key field. Create a view of the source data that consists of all fields in thesource table, with the chunking fields as the highest order keyfields, followed by the rest of the key fields from the sourcetable. Then map this view table to the source table on theRecord Mapping page under the Publish Rule Definition page.
Chunking field is not in a source table. Create a view table that joins the source table to an existingtable that contains the chunking fields. This view must consistof all fields in the source table and the chunking fields fromthe joined table. The chunking fields are the highest orderkey fields, followed by the rest of the key fields from thesource table. Then map the view table to the source table onthe Record Mapping page under the Publish Rule Definitionpage.
Example
The following sample SQL code creates a view table that joins the PS_OMEC_CP_OPT_DETsource table to an existing PS_OMEC_HDR_OUT table that contains the chunking fields. TheB.SETID_CUSTOMER and the B.CUST_ID chunking fields are the highest order key fields fromthe joined table (PS_OMEC_HDR_OUT), followed by the rest of the key fields from the source table(PS_OMEC_CP_OPT_DET).
SELECT B.SETID_CUSTOMER, B.CUST_ID, A.BUSINESS_UNIT, A.ORDER_NO, A.ORDER_INT_LINE_NO
Copyright © 1988, 2022, Oracle and/or its affiliates. 113

Using the Publish Utility Chapter 5
, A.CP_MODE, A.CP_COMP_SEQ, A.OPTION_NAME, A.OPTION_VALUE, A.OPTION_DESC, A.VAR_TYPE, A.VAR_LENGTH, A.VAR_DECIMAL, A.PROCESS_INSTANCE, A.AUDIT_ACTN, A.IN_PROCESS_FLGFROM PS_OMEC_CP_OPT_DET A, PS_OMEC_HDR_OUT BWHERE A.BUSINESS_UNIT = B.BUSINESS_UNITAND A.ORDER_NO = B.ORDER_NO
Creating Chunking RulesThe chunking rule consists of four tables:
Level Table Description
Level 0 EO_CHUNKRULE A system table delivered with live data.
Level 1 EO_CHUNKEFFDT A system table delivered with live data. When a chunking rule is saved, a rowis added to this table with the effectivedate (EFFDT) field automaticallypopulated from the current date and theeffective status set to Active.
Level 2 EO_CHUNKNODE This is not a system table and isdelivered empty.
Level 3 NAME_EOC A user-defined chunking table.
Note: All user-defined chunking table names must end in _EOC.
Oracle provides three standard tables: EO_BUSUNIT_EOC for business unit values, EO_SETID_EOCfor setID values, and EO_RECGRP_EOC for record group values. The different types of user-definedchunking tables are:
Table Type Description
Derived Table Contains only the chunking fields. This table can be used bythe Publish utility to chunk the message whenever the value ofthe chunking field changes. In derived tables, no relationshipexists between the value of the chunking fields and messagenode names that are used to route the message. OnRoutePeopleCode needs hard-coded routing logic or additionaltables to route the message to the appropriate nodes.
114 Copyright © 1988, 2022, Oracle and/or its affiliates.

Chapter 5 Using the Publish Utility
Table Type Description
SQL Tables Contains the following fields:
• CHUNK_RULE_ID
• EFFDT
• MSGNODENAME
• Chunking fields
This table limits the published data to the values of thechunking fields in the chunking table and contains the messagenode name that is used to route the message.
Alternate Chunking Tables Enables reuse of existing chunking tables. This table must endin _EOV.
Chunking Rule PageUse the Chunking Rule page (EO_CHUNKRULE) to define a chunking rule description.
Navigation:
Enterprise Components > Integration Definitions > Map Chunking Rules > Define ChunkingRules
This example illustrates the fields and controls on the Chunking Rule page. You can find definitions forthe fields and controls later on this page.
Use this page to define a chunking rule description.
Chunk fields are the chunking fields that are defined in the Chunk Table field.
The chunking fields appear in this scroll area to verify that the correct chunking table was entered. Oracleprovides chunking rules for business unit and setID for all application databases. Adding a new chunkingrule inserts a row into the EO_CHUNKEFFDT table, with a default effective date (EFFDT) of the currentdate.
Copyright © 1988, 2022, Oracle and/or its affiliates. 115

Using the Publish Utility Chapter 5
BusUnit Mapping PageUse the BusUnit Mapping (business unit mapping) page (EO_CHUNKBU) to maintain chunking data forbusiness units.
Navigation:
Enterprise Components > Integration Definitions > Map Chunking Rules >Chunk By BusinessUnit
This example illustrates the fields and controls on the BusUnit Mapping page. You can find definitions forthe fields and controls later on this page.
Use this page to maintain chunking data for business units.
All four levels of the chunking rule tables appear.
Oracle provides chunking tables for business unit, setID and record group that are maintained by a seriesof components (such as components that are created for maintaining the business unit chunking table).
You can use each component to update the underlying relationship between the business unit and thesubscribing nodes. You can maintain the data either by business unit or by node, individually or as agroup, to reduce the amount of entry work.
SetId Mapping PageUse the SetId Mapping page (EO_CHUNKSETID) to maintain chunking data for setIDs.
Navigation:
Enterprise Components > Integration Definitions > Map Chunking Rules > Chunk By SetID
116 Copyright © 1988, 2022, Oracle and/or its affiliates.

Chapter 5 Using the Publish Utility
This example illustrates the fields and controls on the SetId Mapping page. You can find definitions forthe fields and controls later on this page.
Use this page to maintain chunking data for setIDs.
All four levels of the chunking rule tables appear.
Oracle provides chunking tables for business unit, setID and record group that are maintained by a seriesof components (such as components that are created for maintaining the business unit chunking table).
You can use each component to update the underlying relationship between the business unit and thesubscribing nodes. You can maintain the data either by business unit or by node, individually or in agroup, to reduce the amount of entry work.
Eo Recgrp PageUse the Eo Recgrp (Enterprise Component Record Group) page (EO_RECGRP) to maintain chunkingdata for record groups.
Navigation:
Enterprise Components > Integration Definitions > Map Chunking Rules >Chunk By RecordGroup
Copyright © 1988, 2022, Oracle and/or its affiliates. 117

Using the Publish Utility Chapter 5
This example illustrates the fields and controls on the Eo Recgrp page. You can find definitions for thefields and controls later on this page.
Use this page to maintain chunking data for record groups.
All four levels of the chunking rule tables appear.
Oracle provides chunking tables for business unit, setID and record group that are maintained by a seriesof components (such as components that are created for maintaining the business unit chunking table).
You can use each component to update the underlying relationship between the business unit and thesubscribing nodes. You can maintain the data either by business unit or by node, individually or in agroup, to reduce the amount of entry work.
Add Nodes to Chunk Rule PageUse the Add Nodes to Chunk Rule page (EO_ADNODECHUNK_PNL) to add nodes to existingchunking rules.
Navigation:
Enterprise Components > Integration Definitions > Map Chunking Rules >Node to Chunk Rule
118 Copyright © 1988, 2022, Oracle and/or its affiliates.

Chapter 5 Using the Publish Utility
This example illustrates the fields and controls on the Add Nodes to Chunk Rule page. You can finddefinitions for the fields and controls later on this page.
Use this page to add nodes to existing chunking rules.
To add nodes to an existing chunking rule:
1. Select the check box in the Add column of the nodes that you defined earlier.
2. Click the Save button to display the Add Chunk Values column.
When you select a node and then click Save, the ADD button in the Add Chunk Values columnappears.
3. Click the Add button in the Add Chunk Values column for the nodes that you want to add.
The Quick Map page appears.
Quick Map PageUse the Quick Map page (EO_ADDSIDNODE_PNL) to assign business units to a chunking rule.
Navigation:
Click the Add button on the Add Notes to Chunk Rule page. This button is available after you have addednodes to the chunking rule.
Copyright © 1988, 2022, Oracle and/or its affiliates. 119

Using the Publish Utility Chapter 5
This example illustrates the fields and controls on the Quick Map page. You can find definitions for thefields and controls later on this page.
Use this page to a Assign business units to a chunking rule.
If you previously accessed business unit chunking rules, you can add business units to a chunking rule. Ifyou previously accessed setIDs, you can add setIDs to a chunking rule.
Note: You cannot access the Quick Map page without first using either the BusUnit Mapping page or theSetId Mapping page to add an effective-dated node to the chunking rule ID.
Field or Control Description
Select All and Deselect All Click to add or remove all business units that are assigned tothe node. Add check boxes are selected for business units thatare assigned to the node.
Map Business Unit PageUse the Map Business Unit page (EO_ADDNODEBU_PNL) to assign chunking rules to a business unit.
Navigation:
Enterprise Components > Integration Definitions > Map Chunking Rules >Chunk Rule/Node toBU
120 Copyright © 1988, 2022, Oracle and/or its affiliates.

Chapter 5 Using the Publish Utility
This example illustrates the fields and controls on the Map Business Unit page. You can find definitionsfor the fields and controls later on this page.
Use this page to assign chunking rules to a business unit.
Field or Control Description
Select All and Deselect All Click to add or remove all nodes that are assigned to thebusiness unit. Add check boxes are selected for nodes that areassigned to the business units.
Map Set IDs PageUse the Map Set IDs page (EO_ADDNODESID_PNL) to assign chunking rules to a setID.
Navigation:
Enterprise Components > Integration Definitions > Map Chunking Rules >Chunk Rule/Node toSetID
This example illustrates the fields and controls on the Map Set IDs page. You can find definitions for thefields and controls later on this page.
Use this page to assign chunking rules to a setID.
Field or Control Description
Select All and Deselect All Click to add or remove all message nodes that are assigned tothe setID. Add check boxes are selected for message nodesthat are assigned to the setIDs.
Copyright © 1988, 2022, Oracle and/or its affiliates. 121

Using the Publish Utility Chapter 5
Creating Custom Chunking Tables
This section discusses how to:
• Create a custom chunking table.
• Create a view for the component search record.
• Create maintenance pages.
• Create a component.
• Create routing PeopleCode.
Creating a Custom Chunking TableTo create a custom chunking table:
1. Select File, Open in PeopleSoft Application Designer.
2. Select Record in the Definition drop-down menu.
3. Open the EO_BUSUNT_EOC record.
4. Save the record as YOUR_TABLE_EOC.
5. Remove the BUSINESS_UNIT field.
6. Insert the custom chunking fields at the bottom of the record.
7. Select File, Save.
8. Build the SQL table.
Creating a View for the Component Search RecordTo create a view for the component search record:
1. Select File, Open in PeopleSoft Application Designer.
2. Select Record in the Definition drop-down menu.
3. Open the EO_CHUNKBU_VW record.
4. Save the record as YOUR_TABLE_VW.
5. Select the Record Type tab.
6. Open the SQL editor.
7. Modify the Where clause.
Change WHERE RECNAME_CHUNK=EO_BUSUNT_EOC to WHERERECNAME_CHUNK=YOUR_TABLE_EOC.
122 Copyright © 1988, 2022, Oracle and/or its affiliates.

Chapter 5 Using the Publish Utility
8. Select File, Save.
9. Build the SQL view.
Creating Maintenance PagesYou can also create maintenance pages.
This example illustrates the fields and controls on the Grid Properties dialog box. You can find definitionsfor the fields and controls later on this page.
To create maintenance pages:
1. Select File, Open in PeopleSoft Application Designer.
2. Select Page in the Definition drop-down menu.
3. Open the EO_CHUNKBU page.
4. Save the page as YOUR_PAGE.
5. Select the Order tab.
6. In the Type column, double-click Grid to open the Grid Properties dialog box.
7. Change the value in the Main Record and Page Field Name fields to YOUR_TABLE_EOC.
8. Click OK.
Copyright © 1988, 2022, Oracle and/or its affiliates. 123

Using the Publish Utility Chapter 5
9. Delete the business unit and description columns.
10. Add chunking fields from YOUR_TABLE_EOC.
11. Select File, Save.
Creating a ComponentTo create a component:
1. Select File, New in PeopleSoft Application Designer.
2. Select Component in the New Definition box.
3. Select Insert, Page Into Component.
4. Enter YOUR_PAGE.
5. Click Close.
6. Select File, Definition Properties
7. Select the Use tab to edit component properties:
a. In the Search record field, enter YOUR_TABLE_VW.
b. Select the Update/Display, Update/Display All, and Correction check boxes.
8. Click OK.
9. Select File, Save As, and save the page group as YOUR_COMPONENT.
10. Add YOUR_PAGE_GROUP to YOUR_MENU that is used by your application.
Creating Routing PeopleCodeOnRouteSend (and OnRouteReceive) are PeopleCode methods that are tied to the message for routing,based on the message contents. If you want the contents of the message (such as a message chunking fieldvalue) to determine the subscribing nodes that should receive the message, OnRouteReceive PeopleCodemust contain the logic to examine the message and return a list of subscribing nodes.
The OnRouteSend and OnRouteReceive methods are contained in the IRouter application class. TheIRouter application class is located in PeopleSoft Application Designer in the Integration subpackage ofthe PS_PT application package.
PeopleCode functions provided by common components, GetNodes and RtnNodes, work with anymessage and chunking rule. For a given message, these nodes select the chunking rule for the publish rulethat is assigned to the message.
The functions:
• Build SQL based on the chunking fields as defined in the chunking table.
• Extract chunking field values from the message.
124 Copyright © 1988, 2022, Oracle and/or its affiliates.

Chapter 5 Using the Publish Utility
• Run the associated SQL.
• Compare the array of nodes returned to the application server against the list of nodes for the messagechannel.
• Create a publish contract for nodes in both arrays.
You can override the publish rule from the message, specifying an optional parameter when callingthe functions.
• Return an array of nodes that is based on the nodes that are assigned to the message channel if thepublish rule is invalid or does not contain a chunking rule.
Returning an array of nodes enables the functions to work regardless of whether chunking is set up forthe publish rule.
To route any message that uses chunking, use generic PeopleCode functions.
These functions are called from routing PeopleCode:
Field or Control Description
GetNodes Returns an array of nodes to the application server.
Use this function for integrations on PeopleTools 8.47 andearlier releases.
RtnNodes Returns an array of nodes to the calling PeopleCode.
Use this function for integrations on PeopleTools 8.47 andearlier releases.
RtnMsgNodes Returns an array of nodes of datatype Any to the callingPeopleCode.
Use this function for integrations on PeopleTools 8.48 andhigher releases.
These functions are internal functions:
Field or Control Description
FndNodes Builds an array of nodes for the message.
GetPubRule Selects the chunking rule for the publish rule.
GetChunkInfo Selects the chunk table for the chunking rule.
BuildSQL Builds SQL to select nodes from the chunking table forspecific chunking field values from the message.
Copyright © 1988, 2022, Oracle and/or its affiliates. 125

Using the Publish Utility Chapter 5
Field or Control Description
GetValue Gets the chunking field values from the message.
HasNodes Determines whether a chunking field is mapped to any nodesfor a particular chunking rule.
The following code example shows the logic that you can add to SavePostChange PeopleCode for theCustomer_General component to verify that the setID can publish the message by calling the HasNodes()function:
Declare Function HasNodes PeopleCode FUNCLIB_EOEIP.PUBLISH_ROUTE_PCFieldFormula;Local Message &MSG;Local Rowset &RS0;Local string &PublishRule;&MSG = CreateMessage(MESSAGE.CUSTOMER_MSG);/* Check if message is active */If &MSG.IsActive Then &RS0 = GetLevel0(); &PublishRule = "CUSTOMER_SYNC"; /* Call function passing publish rule and rowset, which returns true if this setID can publish the message */ If (HasNodes(&PublishRule, &RSO)) Then &RS0 = GetLevel0(); &MSG.CopyRowsetDelta(&RS0); &MSG.Publish(); End-If;End-If;
The following code example shows the logic that you can add to service operation APC handlerPeopleCode to chunk the message by nodes as defined in the chunking rules by calling the RtnMsgNodesfunction:
import PS_PT:Integration:IRouter;
class ChunkSetidByNode implements PS_PT:Integration:IRouter method RoutingHandler(); property array of any destinationNodes; method OnRouteSend(&_MSG As Message) Returns integer; method OnError(&_MSG As Message);end-class;
Declare Function RtnMsgNodes PeopleCode FUNCLIB_EOEIP.PUBLISH_ROUTE_PCFieldFormula;
/* constructor */method RoutingHandlerend-method;
method OnRouteSend /+ &_MSG as Message +/ /+ Returns Integer +/ /+ Extends/implements PS_PT:Integration:IRouter.OnRouteSend +/ /* Variable Declaration */ Local string &PublishRule;
%This.destinationNodes = RtnMsgNodes(&PublishRule, &_MSG);
If %This.destinationNodes.Len > 0 Then Return (%IntBroker_ROUTE_SOME); Else Return (%IntBroker_ROUTE_ALL);
126 Copyright © 1988, 2022, Oracle and/or its affiliates.

Chapter 5 Using the Publish Utility
End-If;
end-method;
/** If an error occurs the OnError method if implemented will be automatically invo⇒
ked. The type of exception can be viewed by using the Message object to retrieve th⇒
e Exception object (&Message.IBException) * @param MSG Message object containing the operation instance where the error o⇒
ccured while being routed */method OnError /+ &_MSG as Message +/ /+ Extends/implements PS_PT:Integration:IRouter.OnError +/end-method;
Copyright © 1988, 2022, Oracle and/or its affiliates. 127

Using the Publish Utility Chapter 5
128 Copyright © 1988, 2022, Oracle and/or its affiliates.

Chapter 6
Using the Inbound Data Error Scan Utility
Understanding the Inbound Data Error Scan Utility
The Inbound Data Error Scan utility launches the PeopleSoft Application Engine program EO_WF_ERRthat scans the PSAPMSGSUBCON and EO_EIP_CTL tables for data errors on inbound asynchronousintegrations and notifies respective users if errors are encountered.
Related LinksUnderstanding the Error Handling Utility
Running the Inbound Data Error Scan Utility
This section discusses how to launch the Inbound Data Error Scan utility.
Page Used to Run the Inbound Data Error Scan Utility
Page Name Definition Name Usage
Incoming Data Error Scan Page EO_ERR_RUNCNTL Start the EO_WF_ERR applicationengine program.
Incoming Data Error Scan PageUse the Incoming Data Error Scan page (EO_ERR_RUNCNTL) to start the EO_WF_ERR applicationengine program.
Navigation:
Enterprise Components > Integration Definitions > Initiate Processes > Inbound Data Error Scan
Copyright © 1988, 2022, Oracle and/or its affiliates. 129

Using the Inbound Data Error Scan Utility Chapter 6
This example illustrates the fields and controls on the Incoming Data Error Scan page. You can finddefinitions for the fields and controls later on this page.
Field or Control Description
Request ID Enter the request ID of the integration on which to scan forerrors.
Run Click to launch the EO_WF_ERR application engine program.
130 Copyright © 1988, 2022, Oracle and/or its affiliates.
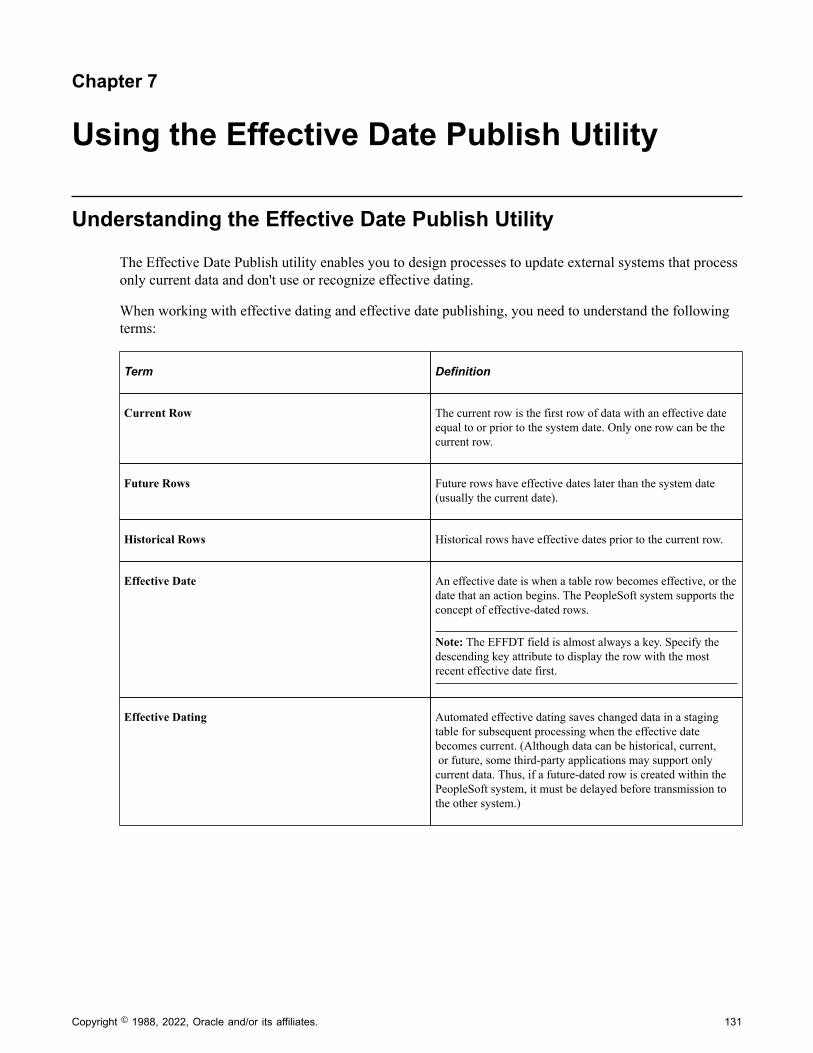
Chapter 7
Using the Effective Date Publish Utility
Understanding the Effective Date Publish Utility
The Effective Date Publish utility enables you to design processes to update external systems that processonly current data and don't use or recognize effective dating.
When working with effective dating and effective date publishing, you need to understand the followingterms:
Term Definition
Current Row The current row is the first row of data with an effective dateequal to or prior to the system date. Only one row can be thecurrent row.
Future Rows Future rows have effective dates later than the system date (usually the current date).
Historical Rows Historical rows have effective dates prior to the current row.
Effective Date An effective date is when a table row becomes effective, or thedate that an action begins. The PeopleSoft system supports theconcept of effective-dated rows.
Note: The EFFDT field is almost always a key. Specify thedescending key attribute to display the row with the mostrecent effective date first.
Effective Dating Automated effective dating saves changed data in a stagingtable for subsequent processing when the effective datebecomes current. (Although data can be historical, current, or future, some third-party applications may support onlycurrent data. Thus, if a future-dated row is created within thePeopleSoft system, it must be delayed before transmission tothe other system.)
Copyright © 1988, 2022, Oracle and/or its affiliates. 131

Using the Effective Date Publish Utility Chapter 7
Term Definition
Effective Sequence An effective sequence serves two purposes:
• If EFFSEQ is a required field, it enables the entry of morethan one row with the same effective date when pairedwith EFFDT. The system assigns a unique sequencenumber to each row that has the same effective date. Italso enables the first EFFSEQ to be zero.
• If EFFSEQ is not a required field, it is not paired withEFFDT, has no special function, and can be used as asimple sequencing field.
Effective Status Effective status enables the system to select the appropriateeffective-dated rows, when combined with the effective datefield.
Full Data Publish The full data publish process seeds, or initially populates orrepopulates, a copy of an entire table onto a remote databaseor legacy system. The entire contents of the table are publishedto all systems that require a copy of the table. Generally, fulldata replication occurs with setup tables (relatively static, low-volume tables that are keyed by setID) and occurs in anasynchronous manner.
When a full copy of the table exists on the external system, anincremental update provides a mechanism to keep the copy up-to-date with changes made on the master.
Incremental Publish The incremental publish process sends a message that containsonly the rows where the data has been modified, plus thecorresponding anchoring parent and grandparent rows. When aparticular transactional event occurs, an incremental update ofthe transaction data is sent to other systems to notify them ofthe changes.
Nodes Each node represents a publishing or subscribing systemof a service operation. For example, the PeopleSoft HumanResources and PeopleSoft Financials databases are eachdefined as a node, even if they are both on the same server.
Service Operation Queues Service operation queues group messages and the nodes towhich they are published, so that messages are publishedsequentially. Each message must belong to only one queue. Queues control the ordering of messages and define timeoutparameters and error thresholds. Assign nodes to a queue whenyou define the message in the service operation.
Message Chunking Chunking automatically breaks a message into several smallermessages based on the values in one or more of the fields inthe level zero record. When publishing the entire contents ofa table, you can use message chunking to publish only certainsets of data if, for example, a particular subscriber is interestedin only a portion of the table.
132 Copyright © 1988, 2022, Oracle and/or its affiliates.

Chapter 7 Using the Effective Date Publish Utility
Term Definition
Request ID Use the request ID to specify multiple requirements within thesame run control.
Run Control You use run controls to produce full messages for objectsat the same time. Run controls also associate publish ruledefinitions with the scheduled full publish process run. For example, you can set up a run control to publish bothcustomer full messages and sales order full messages on adaily schedule.
Performing a Full Data Publish of Current Effective Data
This section discusses how to perform a full data publish of current effective data.
For full data messages that are intended for vendors who do not handle effective dating, use the EffectiveDate Publish utility and a current full message to publish only those rows that are currently active. Anyfuture-dated rows are written to the delay table.
This section discusses the process involved in a full data publish of current effective data. It uses theCUSTOMER_FULLSYNC_EFF service operation as an example, but the methods and procedures thatare described here apply to creating any effective-dated service operation that contains effective-datedmessages.
Pages Used to Perform a Full Data Publish of Current Effective Data
Page Name Definition Name Usage
Chunking Rule Page EO_CHUNKRULE Define the chunking rule description.
Full Data Publish Page EO_FULLDATAPUB Create the run control for the Full DataPublish utility.
The run control associates publish ruledefinitions with the scheduled FullPublish process run. For example, youcan set up a run control to publish bothcustomer and sales order full messages atthe end of each day.
Creating Effective-Dated MessagesThe structure of the current full message must be a clone of the original FullSync message structure.However, you must map effective-dated records to a record view that selects only those rows that containcurrent data.
Copyright © 1988, 2022, Oracle and/or its affiliates. 133

Using the Effective Date Publish Utility Chapter 7
This example uses the message CUSTOMER_FULLSYNC. The current full message for customer data,CUSTOMER_FULLSYNC, uses the following views that are created as ordering view records.
Level Target Records Ordering View Records
Level 0 CUSTOMER CUSTOMER
Level 1 CUST_ADDR_CNTCTC CUST_ADDR_CNTCTC
Level 1 CUST_ADDR_SEQ CUST_ADDR_SEQ
Level 2 CUST_ADDRESS (effective-dated) CUST_ADDR_EF2VW (currenteffective-dated view)
Level 1 CUST_CNTCT_SEQ CUST_CNTCT_SEQ
Level 2 CUST_CONTACT (effective-dated) CUST_CNCT_EF2VW (currenteffective-dated view)
Level 3 CUST_CNTCT_CARD (effective-dated) CUST_CARD_EF_VW (currenteffective-dated view)
Level 3 CUST_CNTCT_DOC (effective-dated) CUST_DOC_EF_VW (current effective-dated view)
Level 3 CUST_CNTCT_PHN (effective-dated) CUST_PHN_EF_VW (current effective-dated view)
Level 3 CUST_CNTCT_TYPE (effective-dated) CUST_TYPE_EF_VW (currenteffective-dated view)
Creating the Service OperationTo complete a full data publish of effective dated data, you must create a service operation.
Note: The name of the service operation must end with _EFF suffix to be effective dated.
When you create a service operation:
• Specify the effective dated messages to publish.
• Specify a service operation queue for each message.
• Specify the directionality or routing of the integration.
• Define an OnRouteSend service operation handler, which contains the processing logic.
134 Copyright © 1988, 2022, Oracle and/or its affiliates.

Chapter 7 Using the Effective Date Publish Utility
Defining the Node and Target ConnectorCreate a full message definition that contains the necessary records in the publishing system. You can alsoset up message routing by using OnRouteTo PeopleCode.
Note: Remember to insert the message version first, otherwise you can’t add the tables that compose themessage.
Begin by setting up the node and the transaction and connector details by using the Integration Profilesetup function of PeopleSoft Integration Broker. To set up the node:
1. Create a node.
See PeopleTools: PeopleSoft Integration Broker Administration, “Adding and Configuring Nodes”
2. Set up the connector.
The default target is PSHTTP, but you can instead provide the HTTP address for another target.
See PeopleTools: PeopleSoft Integration Broker Administration, “Managing Integration Gateways”
Chunking Rule PageUse the Chunking Rule page (EO_CHUNKRULE) to define the chunking rule description.
Navigation:
Enterprise Components > Integration Definitions > Map Chunking Rules > Define ChunkingRules
This example illustrates the fields and controls on the Chunking Rule page. You can find definitions forthe fields and controls later on this page.
In message chunking, all data within the message contains the same break field. For example, if the breakfield is business unit, all transactions in the message are for the same business unit.
To ensure that the message publishes when you use chunking rules:
1. Add subscribing nodes to the chunking node table.
Copyright © 1988, 2022, Oracle and/or its affiliates. 135

Using the Effective Date Publish Utility Chapter 7
2. In PeopleSoft Application Designer, add OnRouteSend PeopleCode to return a list of subscribingnodes.
Creating Publish Rule DefinitionsFor creating the current full message, the publish rule defines these options:
• Message header and trailer creation.
• Chunking rules.
• Ordering views.
Create publish rule definitions for each current full message definition. Observe these guidelines:
• Specify only target records that are effective-dated.
• Select only the current effective row to list the ordering view record that should be used as an overridewhen the message is published.
• The Effective Date Publish utility makes a logic pass through the data for each publish rule definition.
You can use this logic to order and chunk the data differently for each subscriber.
Note: When chunking a message, you must provide an ordering view for each record that includes thechunking fields. The fields in this view must appear in the same order as the primary keys, followedby any other keys that are needed for that record. If you override the normal key structure of themessage records, you must provide the ordering views for each record to guarantee that the message isreconstructed with the correct chunking, parent, or child key relationships.
Full Data Publish PageUse the Full Data Publish page (EO_FULLDATAPUB) to create the run control for the Full Data Publishutility.
The run control associates publish rule definitions with the scheduled Full Publish process run. Forexample, you can set up a run control to publish both customer and sales order full messages at the end ofeach day.
Navigation:
Enterprise Components > Integration Definitions > Initiate Processes > Full Data Publish
136 Copyright © 1988, 2022, Oracle and/or its affiliates.

Chapter 7 Using the Effective Date Publish Utility
This example illustrates the fields and controls on the Full Data Publish page. You can find definitions forthe fields and controls later on this page.
Use this page to create the run control for the Full Data Publish utility.
Field or Control Description
Request ID Enter request IDs to group the Description, Process Frequency, and Message Name parameters under one unique processrequest. A single run control ID can encompass multiplerequest IDs.
Parameters Select the name of the message to publish.
The PeopleSoft system adds a run control for the currently effective FullSync message that is chunked bythe setID CUSTOMER_FULLSYNC_EFF_SETID.
Note: If you insert a new row, the same run control component can publish more than one message,so you can produce both the full message and the current effective-dated full message from the samePeopleSoft Process Scheduler run.
Note: You must set up the run control parameters to start the Full Data Publish program.
Performing Full Table Replication
Access the Full Data Publish page (Enterprise Components > Integration Definitions > InitiateProcesses > Full Data Publish).
Click the Run button on the Full Data Publish (EO_FULLDATAPUB) page to access and select the FullTable Data Publish check box and perform a full table replication.
Copyright © 1988, 2022, Oracle and/or its affiliates. 137

Using the Effective Date Publish Utility Chapter 7
This example illustrates the fields and controls on the Process Scheduler Request page showing the FullTable Data Publish option. You can find definitions for the fields and controls later on this page.
Defining RoutingTo define the message routing, you must create an OnRouteSend service operation handler and define thehandler in the service operation.
Note: Perform this step only if you're chunking a message.
Example
You want to route the customer message to the nodes that are defined in the SetID/Nodes page within thePublish Setup component. Add the following PeopleCode to the OnRouteSend handler for the serviceoperation:
Declare Function GETSETIDNODES PeopleCode FUNCLIB_EOEIP.PUBLISH_ROUTE_PC Field Formula;Local Message &MSG;/* Call Function that looks at Setid of first transaction in the message and returns a list of subscribing nodes to route the message */&MSG = GetMessage();GETSETIDNODES(&MSG, %Date);
Publishing Incremental Messages of Current Effective Data
This section discusses how to:
• Create service operations for publishing incremental messages of current effective data.
• Create subscription processes that open the generic effective-dated delay function.
For incremental messages, use subscription PeopleCode to copy current effective rows to a currentincremental message for immediate publication, to strip out historic data, and to store future effectiverows in a delay table. A regularly scheduled Application Engine program uses the delay table data as atrigger to publish future data when that data becomes effective.
138 Copyright © 1988, 2022, Oracle and/or its affiliates.

Chapter 7 Using the Effective Date Publish Utility
Creating Service Operations for Publishing Incremental Messages ofCurrent Effective Data
You must create a service operation and associate an incremental message definition with it.
Note: The name of the service operation must end with the suffix _EFF to be effective dated.
The incremental message definition must contain the necessary records in the publishing system. Specifythe message version first, otherwise you can’t add the tables that compose the message. When the systemrequests a message channel, enter the queue definition that you previously selected.
Creating Subscription Processes That Open the Generic Effective-DatedDelay Function
The PeopleSoft system includes a function called PROCESS_EFFDT_MSG. This function reads throughan incremental message and processes the past, current, future, or non-effective-dated information.PROCESS_EFFDT_MSG resides within the record FUNCLIB_EOEIP, in the EFFDT_MSG_PC field.
To create a subscription process that opens the generic effective-dated Delay function:
1. Open the Process_Effdt_Msg generic function stored in record FUNCLIB_EOEIP.
2. Pass it the name of the current effective-dated incremental message.
3. Indicate whether only rows with Active effective status should be selected as the current effective-dated rows.
If the &ACTIVE_EFFSTATUS parameter passed in is set to False, the current effective-dated row(whether active or inactive) is selected.
4. Pass the parameter set to True if only active effective-dated rows should be sent to the other system.
Note: The standard setting for the &ACTIVE_EFFSTATUS parameter is False.
Publishing Effective-Dated Rows from the Delay Table
This section provides an overview of effective-dated row publishing from the delay table and discusseshow to run the Effective Date Publish utility.
Page Used to Publish Effective-Dated Rows from the Delay Table
Page Name Definition Name Usage
Effective Date Pub Page EO_EFFDATAPUB Run the Effective Date Publish utility.
Copyright © 1988, 2022, Oracle and/or its affiliates. 139

Using the Effective Date Publish Utility Chapter 7
Understanding Effective-Dated Row PublishingPublishing effective-dated rows from a delay table requires:
• A future-dated entry in the delay table.
• The process request page.
• An Application Engine utility program that publishes future-dated information when it becomescurrent.
The Application Engine Effective Date Publish utility publishes effective-dated rows from a delay tableby:
1. Retrieving from the delay table any entries that are effective within a date range.
2. Using the key strings from the delay table and record information for the current message to read theoriginal application tables and retrieve the most current effective rows.
3. Publishing those rows to the current incremental message.
The third-party application subscribes to the current incremental messages.
The PeopleSoft system allows for an end date range on the Effective Date Publish utility if the utility wasnot run for one day. The end date range enables the program to run on the next date.
You can run the Effective Date Publish utility multiple times during the day, and it deletes the informationfrom the delay queue when the future effective date data becomes current and the message for that datahas been published. The Effective Date Publish utility retrieves only the latest delay table informationsince the prior run.
If the Effective Date Publish utility is invoked after not running for a period of time, it retrieves only thecurrent row and publishes that as the active record. The presumption is that the subscribers want only themost current database information that is published.
Effective Date Pub PageUse the Effective Date Pub page (EO_EFFDATAPUB) to run the Effective Date Publish utility.
Navigation:
Enterprise Components > Integration Definitions > Initiate Processes > Effective Date Publish
140 Copyright © 1988, 2022, Oracle and/or its affiliates.

Chapter 7 Using the Effective Date Publish Utility
This example illustrates the fields and controls on the Effective Date Pub page. You can find definitionsfor the fields and controls later on this page.
Field or Control Description
Message Name Select the current incremental message to publish.
End Date Select the latest effective date to process from the delay table.
Run Click to run this request.
The Application Engine program uses the trigger records inthe delay table and the end date parameter from the run controlcomponent to publish a current effective incremental messagethat contains all future-dated rows that are effective. Thisensures that third-party systems that cannot manage future-dated records always receive currently active data on thatdata's effective date, even if that information was previouslyupdated on the PeopleSoft system.
Publishing Effective-Dated Rows and Prior-Dated Rows from theDelay Table
This section provides an overview of publishing effective-dated rows and prior-dated rows from theDelay table, and discusses how to run the Effective Date and Prior Publish utility.
Copyright © 1988, 2022, Oracle and/or its affiliates. 141

Using the Effective Date Publish Utility Chapter 7
Page Used to Publish Effective-Dated Rows and Prior-Dated Rows from theDelay Table
Page Name Definition Name Usage
Effective Date Prior Publish Page EO_EFFPRIORPUB Run the Effective Date and Prior Publishutility.
Understanding Publishing Effective-Dated Rows and Prior-Dated Rowsfrom the Delay Table
Publishing effective-dated rows and prior-dated rows from the delay table is similar to publishingeffective-dated rows. The difference is that in addition to publishing messages with a specified effectivedate or date range, the system also publishes all prior-dated rows with non-key changes.
Related LinksUnderstanding Effective-Dated Row Publishing
Effective Date Prior Publish PageUse the Effective Date Prior Publish page (EO_EFFPRIORPUB) to run the Effective Date and PriorPublish utility.
Navigation:
Enterprise Components > Integration Definitions > Initiate Processes > Effective Date PriorPublish
This example illustrates the fields and controls on the Effective Date Prior Publish page. You can finddefinitions for the fields and controls later on this page.
142 Copyright © 1988, 2022, Oracle and/or its affiliates.

Chapter 7 Using the Effective Date Publish Utility
Field or Control Description
Message Name Select the current incremental message to publish.
End Date Select the highest effective date to process from the delaytable.
Run Click to run this request.
Copyright © 1988, 2022, Oracle and/or its affiliates. 143

Using the Effective Date Publish Utility Chapter 7
144 Copyright © 1988, 2022, Oracle and/or its affiliates.

Chapter 8
Using the Flat File Utility
Understanding the Flat File Utility
When external systems send flat files to you for inbound transactions, you must develop complementaryprocesses to translate incoming files into messages or translate outbound messages into files.
This is the flow for inbound file processing when you use the Flat File utility:
1. The utility receives a flat file in the form of a file layout object from an external system.
The flat file consists of one of the following items:
• The relevant data.
• An index file that contains pointers to the data.
Each index file lists the names of a set of data files to be processed. These files contain theapplication data, which is in one of the following formats: fixed record, Comma Separated Values(CSV), or XML.
2. The utility reads the file that is submitted for processing:
• If the file is an index file, the Flat File utility loads the list of data files that are associated witheach index file to be processed into a parameter table.
• If it is a single data file, the utility inserts the single data file into a parameter table.
Note: If additional fields in the file layout are not in the message definition, the additional fieldsare ignored during the copying of the flat file data to the message and are not included in themessage.
3. The utility loops through the list of data files to be processed and reads each data file.
4. The utility copies the row sets of the data files into the message.
5. The utility publishes the message.
6. The subscribing systems receive the message and initiate normal inbound data processing.
Processing Inbound Flat Files
You use the file layout definition to read and write from flat files.
To process inbound flat files:
Copyright © 1988, 2022, Oracle and/or its affiliates. 145

Using the Flat File Utility Chapter 8
1. Determine the necessary format of the inbound data.
If an industry standard exists, use it for your file definition.
If no industry standard exists, create a file layout object that mirrors your message object.
2. Identify the inbound process and its standard message.
3. Analyze the vendor’s file structure and compare it to the standard message.
Answer these questions:
• Can you use an existing message, or do you need to create a new one?
• Can the customer conform to an existing integration point, or do you need to create one (alongwith corresponding subscription PeopleCode)?
4. Create the message definition.
5. Create a file layout definition with the same structure as the message definition to support the vendorfile format.
The hierarchical structure of the data in the File Layout Definition must match that of the messagedefinition. For example, suppose a message has three levels: level zero, containing record A, levelone, containing records B and C, and level two, containing record D.
All file layouts that are associated with this message must also have record A in level zero, record Band C in level one, and record D in level two.
Note: The file layout does not need to contain the exact same fields as the message definition.
For every record in your file layout, add a new file field, AUDIT_ACTN, as the first field in therecord (except when the field already exists in the application table).
You can associate more than one file layout with a single message. For example, vendor A may have adifferent number of fields than vendor B, so you may have two file layouts: one for A and one for B.
Specify the file ID uniquely to include a row in a file, which is necessary in mapping the data to itsproper record. Include start and end points when dealing with more than one record in a file layout.
Note: Each record in the file layout has a file record ID attribute. Do not confuse this with the filelayout ID. The file layout ID determines whether a new layout is encountered for multiple file layoutprocessing.
When you subscribe to the message and normal inbound data processing begins, you can invoke theSetDefault PeopleCode function to set the default values for fields that were not present in the inputfile.
6. Update or create the inbound file rule pages.
7. Create subscription PeopleCode in PeopleSoft Application Designer to process the message.
146 Copyright © 1988, 2022, Oracle and/or its affiliates.

Chapter 8 Using the Flat File Utility
Have the standard inbound process subscribe to and process the message normally. The standardmessage definition should have a subscription process that initiates the normal inbound processing forthe object to which you hook your application logic to process the file data.
8. Test the inbound flat file processing.
Note: You can process multiple inbound flat files at one time. Specifying an inbound index file as partof the Flat File utility parameters causes the system to read all input files within the index file and touse the associated file layout object and message to convert the data. Similarly, specify a wildcard inthe filename in the inbound file rule component, but make sure that all files that meet the wildcardcriteria correspond to the file layout and message mapping that are defined.
Initiating File Processing
This section discusses how to set up and initiate inbound flat file processing.
Pages Used to Initiate File Processing
Page Name Definition Name Usage
File Inbound Page EO_FILE_INBOUND Set up inbound flat file processing.
Inbound File Page EO_FILETOMSG Initiate inbound flat file processing. This file-to-message processing functionreads the file rowset and publishes it as amessage.
File Inbound PageUse the File Inbound page (EO_FILE_INBOUND) to set up inbound flat file processing.
Navigation:
Enterprise Components > Integration Definitions > Inbound File Rule
Copyright © 1988, 2022, Oracle and/or its affiliates. 147

Using the Flat File Utility Chapter 8
This example illustrates the fields and controls on the File Inbound page. You can find definitions for thefields and controls later on this page.
Referencing Application Engine Program
The file inbound setup allows you to reference an AE program and section that gets called as soon as thedata processing of the specified inbound file is completed. This functionality comes in handy if you wishto invoke customized actions after the flat file utility finishes processing data--simply build the customAE program and specify it on this page for the corresponding file rule.
Below is a sample code for an AE program that removes entries of data files that have been processedfrom index files. Steps of this program are executed only if the input file is flagged as an Index file.
/* Open the index file in Read-only mode *//* Initialize a string array and save all unprocessed file names from the Index fil⇒
e *//* Open the Index in Write mode, thereby clearing contents from previous iteration,⇒
and write the contents of the array to the file *//* When the last data file has been processed, write ‘All Done’ to the Index file *⇒
/
Local string &Index_FileName, &LineString;Local File &Index_File;Local array of string &Inbound_Files;Local number &I;Local boolean &Found;If EO_FILEPUB_AET.INDEX_FILE_FLG = "Y" Then /* Get index filename from the Inbound File Publish Rule */ SQLExec("Select FILE_INBOUND from PS_EO_FLOINDEFN WHERE FILE_ID = :1", EO_ FIL⇒
EPUB_AET.FILE_ID, &Index_FileName);
/* Open Index file as Read-only */ &Index_File = GetFile(&Index_FileName, "R", %FilePath_Absolute);
/* Initialise string array */ &Inbound_Files = CreateArrayRept("", 0);
148 Copyright © 1988, 2022, Oracle and/or its affiliates.

Chapter 8 Using the Flat File Utility
/* Save unprocessed filenames to array */ While &Index_File.ReadLine(&LineString); If &LineString <> EO_FILEPUB_AET.FILE_INBOUND Then &Inbound_Files.Push(&LineString); End-If; End-While; &Index_File.Close();
/* Open index file in Write mode */ &Index_File = GetFile(&Index_FileName, "W", %FilePath_Absolute);
/* Write unprocessed filenames to index file */ &I = 0; While &Inbound_Files.Next(&I) &Found = True; &Index_File.WriteLine(&Inbound_Files [&I]); End-While;
/* If all files processed, print Done */ If Not &Found Then &Index_File.WriteLine("All Done!"); End-If;
&Index_File.Close();
End-If;
Field or Control Description
File Identifier Displays the inbound file that you are associating with the rule.
Inbound File Enter the index file name or the data file name. Specify the fullpath information. The PeopleCode program uses the %filepath_absolute variable when opening the file.
Index Flag Select to distinguish between the index and the data file.
Status Select whether this inbound file rule is Active or Inactive. Thedefault value is Inactive.
File Layout ID Select a layout to associate with the file.
LUWSize (logical unit of work size) To limit the message size, enter the number of level zero rowsthat are in each message. The output message is normallydetermined by the MaxMessageSize system parameter.
Program and Section Enter the name of a PeopleSoft Application Engine (AE)program and section to invoke when the utility finishesprocessing data.
Copyright © 1988, 2022, Oracle and/or its affiliates. 149

Using the Flat File Utility Chapter 8
Field or Control Description
Create Message Header Select to create a header message. Use the header message asa trigger in the subscription process to initialize tables beforethey receive the data messages. This option is selected bydefault.
Create Message Trailer Select to create a trailer message. Use the trailer message asa trigger in the subscription process to indicate that all thedata messages have been received. This option is selected bydefault.
File Layout
Field or Control Description
Definition Name and Message Name If the File Layout ID field is blank, this field should containonly one entry.
If the File Layout ID field is not blank, this scroll area mustcontain an entry for each file layout definition name that isspecified in the inbound file.
Note: Use the wildcards * and ? for the file name but not for the directory path. The file layout andmessage mapping must be valid for all files that meet the wildcard criteria.
Inbound File PageUse the Inbound File page (EO_FILETOMSG) to initiate inbound flat file processing.
This file-to-message processing function reads the file rowset and publishes it as a message.
Navigation:
Enterprise Components > Integration Definitions > Initiate Processes > Inbound File Publish
150 Copyright © 1988, 2022, Oracle and/or its affiliates.

Chapter 8 Using the Flat File Utility
This example illustrates the fields and controls on the Inbound File page. You can find definitions for thefields and controls later on this page.
Use this page to initiate inbound flat file processing. This file-to-message processing function reads thefile rowset and publishes it as a message.
Parameters
Field or Control Description
File Identifier Select or enter the name of the file identifier that you set up inthe File Inbound page. The file identifier is tied to the publishrules.
Run Click to run this request.
Publishing a New Message
The Inbound File page runs an Application Engine process that initiates the file-to-message processing.The file-to-message processing function reads the file rowset and publishes it as a message.
If an index file exists when the inbound conversion process runs, the Application Engine program loadsthe list of files to be converted into a parameter table and completes a commit. The Application Engineprogram uses the list of files within the parameter table to restart the processing if a particular flat filefails. If a single data file is provided, then the rowset processing immediately begins.
The file publish process goes through each of the rowsets of the file layout and copies them into themessage row sets.
Copyright © 1988, 2022, Oracle and/or its affiliates. 151

Using the Flat File Utility Chapter 8
If the audit action (AUDIT_ACTN) exists in the file, it is copied to the PSCAMA record. If the auditaction does not exist in the file, the publishing process uses the default value that is specified in the filelayout field property.
The Flat File utility publishes a new message when one of the following situations occurs:
• Maximum message size is exceeded.
• Logical unit of work publish size is reached.
• A new file layout is detected.
• End of file is reached.
The Application Engine program completes a commit every time a message is published from a file. Afterconversion, the flat file remains in the parameter table with a status of Processed.
Note: The file layout should exactly match the message layout (excluding the PSCAMA record) andshould use the same character set as that used by the file: either American National Standards Institute orUnicode.
Testing Inbound Flat File Processing
To test inbound files:
1. Create a sample flat file, or ask the third-party vendor for a sample flat file.
2. Launch the Flat File utility.
a. Through the browser, sign in to PeopleSoft Internet Architecture.
b. Select Enterprise Components, Management, Inbound File Rule.
3. Run the Application Engine program to convert the sample flat file to a message by running MessageMonitor.
Use Message Monitor to ensure that the inbound file processing created a publish message thatcontains the sample flat file data.
a. Verify that the standard inbound subscription process received the message and processed it intothe application tables.
b. Determine whether the values become the inherited values (if you used the inherited value featurein file layout).
c. Validate that the production or staging tables loaded with the correct field values.
For production tables, look in the PeopleSoft application pages.
For staging tables, use either the PeopleSoft application pages or run a query by using PeopleSoftQuery.
152 Copyright © 1988, 2022, Oracle and/or its affiliates.

Chapter 8 Using the Flat File Utility
d. Ensure that the date formats conform.
Copyright © 1988, 2022, Oracle and/or its affiliates. 153

Using the Flat File Utility Chapter 8
154 Copyright © 1988, 2022, Oracle and/or its affiliates.

Chapter 9
Using the XML Schema Utility
Understanding the XML Schema Utility
PeopleSoft Open Integration Framework enables near real-time messaging and transactions by usinga format that is based on XML to convey information between diverse applications in a standard way.To take advantage of this standardization, you must obtain clear XML definitions (schemas) for eachapplication message, component interface, or business interlink.
The XML Schema utility provides the following features:
• Output options for the XML Schema utility, document type definition (DTD), or BizTalk definitionfor all application messages.
• The ability to create an XML definition for a single object, for all of the objects, or for all of theobjects by a specific owner.
• A single flat file for each XML definition that is written to your system's %TEMP directory (whenyou use the Microsoft Windows client) or the server's common access file directory (when you usePeopleSoft Internet Architecture).
• An application foundation for future standards of XML definitions.
Generating the XML Schema
This section discusses how to generate the XML Schema.
Page Used to Generate the XML Schema
Page Name Definition Name Usage
Generate XML Schema Page EO_GEN_XML_DATA Generate DTDs, XML schemas, andBizTalk definitions.
Generate XML Schema PageUse the Generate XML Schema page (EO_GEN_XML_DATA) to generate DTDs, XML schemas, andBizTalk definitions.
Navigation:
Enterprise Components > Integration Definitions > Review XML Schema
Copyright © 1988, 2022, Oracle and/or its affiliates. 155

Using the XML Schema Utility Chapter 9
This example illustrates the fields and controls on the Generate XML Schema page. You can finddefinitions for the fields and controls later on this page.
Field or Control Description
App Msg Selection Criteria (application message selectioncriteria)
Select application selection message criteria. Values are AllMsg (all messages), Channel, Owner ID and Single Msg (single message). Depending on the selection criteria, you canenter the selection value (if already known) or search for thevalue.
Generate DTD Spec Select for DTD spec output format.
Generate XML Schema Select for XML schema output format.
Generate Biztalk Definition Select for BizTalk definition output format.
Generate Click to generate the selected output formats.
The utility queries the relevant PeopleTools tables to generate the selected types of XML schemas andwrites the results to the server’s file directory or your system’s Temp directory, depending on the clientthat you use.
To produce an XML schema, DTD, or BizTalk definition:
1. Define the selection criteria for application messages, component interfaces, and business interlinks.
2. Select XML schemas, DTDs, or BizTalk definitions for application message, component interface,and business interlink objects.
PeopleCode sends a query to the PeopleTools tables to create the selected types of XML definitions.
The XML Schema utility then writes the definitions to the file directory as specified by thePS_SERVDIR environment variable when you are using PeopleSoft Internet Architecture or the%TEMP directory of your system when you are using the Microsoft Windows client.
156 Copyright © 1988, 2022, Oracle and/or its affiliates.

Chapter 9 Using the XML Schema Utility
Interpreting Sample OutputThe following code shows three samples of output for the same application message (in this case,MARKET_RATE_TYPE_FULLSYNC) in BizTalk, DTD, and XML schema formats.
Example: BizTalk
The following code shows MARKET_RATE_TYPE_FULLSYNC in BizTalk format:
<BizTalk xmlns="urn:schemas-biztalk-org:BizTalk/biztalk-0.81.xml"><Body><xsd:schema xmlns:xsd="http://www.w3.org/2000/10/XMLSchema"><xsd:element name="MARKET_RATE_TYPE_FULLSYNC" type="MARKET_RATE_TYPE_FULLSYNCType"/>
<xsd:complexType name="MARKET_RATE_TYPE_FULLSYNCType"><xsd:sequence> <xsd:element name="FieldTypes" type="FieldTypesType"/> <xsd:element name="MsgData" type="MsgDataType"/></xsd:sequence></xsd:complexType>
<xsd:complexType name="FieldTypesType"><xsd:sequence> <xsd:element name="RT_TYPE_TBL" type="FieldTypesRT_TYPE_TBLType"/> <xsd:element name="PSCAMA" type="PSCAMA"/></xsd:sequence></xsd:complexType>
<xsd:complexType name="FieldTypesRT_TYPE_TBLType"><xsd:sequence> <xsd:element name="RT_TYPE" type="FieldTypesFieldType"/> <xsd:element name="DESCR" type="FieldTypesFieldType"/> <xsd:element name="DESCRSHORT" type="FieldTypesFieldType"/></xsd:sequence> <xsd:attribute name="class" type="xsd:string" use="required" value="R"/></xsd:complexType>
<xsd:complexType name="PSCAMA"> <xsd:sequence> <xsd:element name="LANGUAGE_CD" type="LANGUAGE_CDType" minOccurs="0" maxOccurs "1"/> <xsd:element name="AUDIT_ACTN" type="AUDIT_ACTNType"/> <xsd:element name="BASE_LANGUAGE_CD" type="BASE_LANGUAGE_CDType" minOccurs="0"maxOccurs="1"/> <xsd:element name="MSG_SEQ_FLG" type="MSG_SEQ_FLGType" minOccurs="0" maxOccurs= "1"/> <xsd:element name="PROCESS_INSTANCE" type="PROCESS_INSTANCEType" minOccurs="0" maxOccurs="1"/> <xsd:element name="PUBLISH_RULE_ID" type="PUBLISH_RULE_IDType" minOccurs="0" maxOccurs="1"/> <xsd:element name="MSGNODENAME" type="MSGNODENAMEType" minOccurs="0" maxOccurs= "1"/> </xsd:sequence> <xsd:attribute name="class" type="xsd:string" use="required" value="R"/></xsd:complexType>
<xsd:complexType name="LANGUAGE_CDType" > <xsd:attribute name="type" type="fieldtypes" use="optional"/></xsd:complexType>
<xsd:complexType name="AUDIT_ACTNType" > <xsd:attribute name="type" type="fieldtypes" use="optional"/></xsd:complexType>
<xsd:complexType name="BASE_LANGUAGE_CDType" > <xsd:attribute name="type" type="fieldtypes" use="optional"/></xsd:complexType>
Copyright © 1988, 2022, Oracle and/or its affiliates. 157

Using the XML Schema Utility Chapter 9
<xsd:complexType name="MSG_SEQ_FLGType"> <xsd:attribute name="type" type="fieldtypes" use="optional"/></xsd:complexType>
<xsd:complexType name="PROCESS_INSTANCEType"> <xsd:attribute name="type" type="fieldtypes" use="optional"/></xsd:complexType>
<xsd:complexType name="PUBLISH_RULE_IDType"> <xsd:attribute name="type" type="fieldtypes" use="optional"/></xsd:complexType>
<xsd:complexType name="MSGNODENAMEType"> <xsd:attribute name="type" type="fieldtypes" use="optional"/></xsd:complexType>
<xsd:complexType name="MsgDataType"> <xsd:sequence> <xsd:element name="Transaction"> <xsd:complexType> <xsd:sequence> <xsd:element name="RT_TYPE_TBL" type="MsgDataRT_TYPE_TBLType"/> <xsd:element name="PSCAMA" type="PSCAMA"/> </xsd:sequence> </xsd:complexType> </xsd:element> </xsd:sequence></xsd:complexType>
<xsd:complexType name="MsgDataRT_TYPE_TBLType"><xsd:sequence> <xsd:element name="RT_TYPE"><xsd:simpleType><xsd:restriction base="xsd:string" > <xsd:pattern value="[A-Z]{1-5}" /></xsd:restriction></xsd:simpleType></xsd:element> <xsd:element name="DESCR"><xsd:simpleType><xsd:restriction base="xsd:string"> <xsd:pattern value=".{1-30}" /></xsd:restriction></xsd:simpleType></xsd:element> <xsd:element name="DESCRSHORT"><xsd:simpleType><xsd:restriction base="xsd:string"> <xsd:pattern value=".{1-10}" /></xsd:restriction></xsd:simpleType></xsd:element></xsd:sequence> <xsd:attribute name="class" type="xsd:string" use="required" value="R"/></xsd:complexType>
<xsd:complexType name="FieldTypesFieldType"> <xsd:attribute name="type" type="fieldtypes"/></xsd:complexType>
<xsd:simpleType name="fieldtypes"><xsd:restriction base="xsd:string"> <xsd:enumeration value="CHAR"/> <xsd:enumeration value="NUMBER"/> <xsd:enumeration value="DATE"/> <xsd:enumeration value="DATETIME"/> <xsd:enumeration value="TIME"/></xsd:restriction></xsd:simpleType>
158 Copyright © 1988, 2022, Oracle and/or its affiliates.

Chapter 9 Using the XML Schema Utility
</xsd:schema></Body></BizTalk>
Example: DTD
The following code shows MARKET_RATE_TYPE_FULLSYNC in DTD format:
<!ELEMENT MARKET_RATE_TYPE_FULLSYNC (FieldTypes, MsgData)>
<!ENTITY % recordtypes "class (R | SR) #REQUIRED" > <!ENTITY % fieldtypes "type (CHAR | NUMBER | DATE | TIME | DATETIME) #IMPLIED" >
<!ELEMENT FieldTypes (RT_TYPE_TBL, PSCAMA)>
<!ELEMENT PSCAMA (LANGUAGE_CD?, AUDIT_ACTN, BASE_LANGUAGE_CD?, MSG_SEQ_FLG?,
PROCESS_INSTANCE?, PUBLISH_RULE_ID?, MSGNODENAME?)> <!ATTLIST PSCAMA class (R | SR) #REQUIRED> <!ELEMENT LANGUAGE_CD (#PCDATA)> <!ATTLIST LANGUAGE_CD type (CHAR | NUMBER | DATE | TIME | DATETIME) #IMPLIED> <!ELEMENT AUDIT_ACTN (#PCDATA)> <!ATTLIST AUDIT_ACTN type (CHAR | NUMBER | DATE | TIME | DATETIME) #IMPLIED> <!ELEMENT BASE_LANGUAGE_CD (#PCDATA)> <!ATTLIST BASE_LANGUAGE_CD type (CHAR | NUMBER | DATE | TIME | DATETIME) #IMPLIED> <!ELEMENT MSG_SEQ_FLG (#PCDATA)> <!ATTLIST MSG_SEQ_FLG type (CHAR | NUMBER | DATE | TIME | DATETIME) #IMPLIED> <!ELEMENT PROCESS_INSTANCE (#PCDATA)> <!ATTLIST PROCESS_INSTANCE type (CHAR | NUMBER | DATE | TIME | DATETIME) #IMPLIED> <!ELEMENT PUBLISH_RULE_ID (#PCDATA)> <!ATTLIST PUBLISH_RULE_ID type (CHAR | NUMBER | DATE | TIME | DATETIME) #IMPLIED> <!ELEMENT MSGNODENAME (#PCDATA)> <!ATTLIST MSGNODENAME type (CHAR | NUMBER | DATE | TIME | DATETIME) #IMPLIED><!ELEMENT RT_TYPE_TBL (RT_TYPE, DESCR, DESCRSHORT)> <!ATTLIST RT_TYPE_TBL class (R | SR) #REQUIRED>
<!ELEMENT RT_TYPE (#PCDATA)> <!ATTLIST RT_TYPE type (CHAR | NUMBER | DATE | TIME | DATETIME) #IMPLIED> <!ELEMENT DESCR (#PCDATA)> <!ATTLIST DESCR type (CHAR | NUMBER | DATE | TIME | DATETIME) #IMPLIED> <!ELEMENT DESCRSHORT (#PCDATA)> <!ATTLIST DESCRSHORT type (CHAR | NUMBER | DATE | TIME | DATETIME) #IMPLIED>
<!ELEMENT MsgData (Transaction)><!ELEMENT Transaction (RT_TYPE_TBL, PSCAMA)>
Example: XML Schema
The following code shows MARKET_RATE_TYPE_FULLSYNC in XML schema format:
<xsd:schema xmlns:xsd="http://www.w3.org/2000/10/XMLSchema">
<xsd:element name="MARKET_RATE_TYPE_FULLSYNC" type="MARKET_RATE_TYPE_FULLSYNCType"/>
<xsd:complexType name="MARKET_RATE_TYPE_FULLSYNCType"><xsd:sequence> <xsd:element name="FieldTypes" type="FieldTypesType"/> <xsd:element name="MsgData" type="MsgDataType"/></xsd:sequence></xsd:complexType>
<xsd:complexType name="FieldTypesType"><xsd:sequence>
Copyright © 1988, 2022, Oracle and/or its affiliates. 159

Using the XML Schema Utility Chapter 9
<xsd:element name="RT_TYPE_TBL" type="FieldTypesRT_TYPE_TBLType"/> <xsd:element name="PSCAMA" type="PSCAMA"/></xsd:sequence></xsd:complexType>
<xsd:complexType name="FieldTypesRT_TYPE_TBLType"><xsd:sequence> <xsd:element name="RT_TYPE" type="FieldTypesFieldType"/> <xsd:element name="DESCR" type="FieldTypesFieldType"/> <xsd:element name="DESCRSHORT" type="FieldTypesFieldType"/></xsd:sequence> <xsd:attribute name="class" type="xsd:string" use="required" value="R"/></xsd:complexType>
<xsd:complexType name="PSCAMA"> <xsd:sequence> <xsd:element name="LANGUAGE_CD" type="LANGUAGE_CDType" minOccurs="0" maxOccurs= "1"/> <xsd:element name="AUDIT_ACTN" type="AUDIT_ACTNType"/> <xsd:element name="BASE_LANGUAGE_CD" type="BASE_LANGUAGE_CDType" minOccurs="0" maxOccurs="1"/> <xsd:element name="MSG_SEQ_FLG" type="MSG_SEQ_FLGType" minOccurs="0" maxOccurs= "1"/> <xsd:element name="PROCESS_INSTANCE" type="PROCESS_INSTANCEType" minOccurs="0" maxOccurs="1"/> <xsd:element name="PUBLISH_RULE_ID" type="PUBLISH_RULE_IDType" minOccurs="0" maxOccurs="1"/> <xsd:element name="MSGNODENAME" type="MSGNODENAMEType" minOccurs="0" maxOccurs= "1"/> </xsd:sequence> <xsd:attribute name="class" type="xsd:string" use="required" value="R"/></xsd:complexType>
<xsd:complexType name="LANGUAGE_CDType" > <xsd:attribute name="type" type="fieldtypes" use="optional"/></xsd:complexType>
<xsd:complexType name="AUDIT_ACTNType" > <xsd:attribute name="type" type="fieldtypes" use="optional"/></xsd:complexType>
<xsd:complexType name="BASE_LANGUAGE_CDType" > <xsd:attribute name="type" type="fieldtypes" use="optional"/></xsd:complexType>
<xsd:complexType name="MSG_SEQ_FLGType"> <xsd:attribute name="type" type="fieldtypes" use="optional"/></xsd:complexType>
<xsd:complexType name="PROCESS_INSTANCEType"> <xsd:attribute name="type" type="fieldtypes" use="optional"/></xsd:complexType>
<xsd:complexType name="PUBLISH_RULE_IDType"> <xsd:attribute name="type" type="fieldtypes" use="optional"/></xsd:complexType>
<xsd:complexType name="MSGNODENAMEType"> <xsd:attribute name="type" type="fieldtypes" use="optional"/></xsd:complexType>
<xsd:complexType name="MsgDataType"> <xsd:sequence> <xsd:element name="Transaction"> <xsd:complexType> <xsd:sequence> <xsd:element name="RT_TYPE_TBL" type="MsgDataRT_TYPE_TBLType"/> <xsd:element name="PSCAMA" type="PSCAMA"/> </xsd:sequence> </xsd:complexType>
160 Copyright © 1988, 2022, Oracle and/or its affiliates.

Chapter 9 Using the XML Schema Utility
</xsd:element> </xsd:sequence></xsd:complexType>
<xsd:complexType name="MsgDataRT_TYPE_TBLType"><xsd:sequence> <xsd:element name="RT_TYPE"><xsd:simpleType><xsd:restriction base="xsd:string" > <xsd:pattern value="[A-Z]{1-5}" /></xsd:restriction></xsd:simpleType></xsd:element> <xsd:element name="DESCR"><xsd:simpleType><xsd:restriction base="xsd:string"> <xsd:pattern value=".{1-30}" /></xsd:restriction></xsd:simpleType></xsd:element> <xsd:element name="DESCRSHORT"><xsd:simpleType><xsd:restriction base="xsd:string"> <xsd:pattern value=".{1-10}" /></xsd:restriction></xsd:simpleType></xsd:element></xsd:sequence> <xsd:attribute name="class" type="xsd:string" use="required" value="R"/></xsd:complexType>
<xsd:complexType name="FieldTypesFieldType"> <xsd:attribute name="type" type="fieldtypes"/></xsd:complexType>
<xsd:simpleType name="fieldtypes"><xsd:restriction base="xsd:string"> <xsd:enumeration value="CHAR"/> <xsd:enumeration value="NUMBER"/> <xsd:enumeration value="DATE"/> <xsd:enumeration value="DATETIME"/> <xsd:enumeration value="TIME"/></xsd:restriction></xsd:simpleType>
</xsd:schema>
Copyright © 1988, 2022, Oracle and/or its affiliates. 161

Using the XML Schema Utility Chapter 9
162 Copyright © 1988, 2022, Oracle and/or its affiliates.

Chapter 10
Understanding Enterprise Integration
Understanding PeopleSoft Business Interlinks
PeopleSoft Business Interlinks enables you to perform component-based, real-time integration fromPeopleSoft applications to external systems. PeopleSoft Business Interlinks creates synchronoustransactions that enable PeopleSoft applications to pass data to and receive data from the external systemin real time. You can use PeopleSoft Business Interlinks to integrate PeopleSoft with third-party systems,with another PeopleSoft application, or with systems on the internet.
Understanding PeopleSoft Component Interfaces
A component interface is a set of application programming interfaces (APIs) that you can use to accessand modify PeopleSoft database information using a program instead of the PeopleSoft client. PeopleSoftComponent Interfaces exposes a PeopleSoft component (a set of pages grouped for a business purpose)for synchronous access from another application (PeopleCode, Java, C/C++, or Component ObjectModel [COM]). A PeopleCode program or an external program (Java, C/C++, or COM) can view, enter,manipulate, and access PeopleSoft component data, business logic, and functionality.
Understanding File Layouts
A file layout is a definition (or mapping) of a file to be processed. It identifies where fields are located infile data. Once you create a file layout, you can write PeopleCode programs that ultimately use the filelayout, either to read data from or write data to a file.
In addition to manipulating transaction data, you can use file layouts and flat files to move data betweenyour PeopleSoft database and external systems (data interchange).
Understanding PeopleSoft Integration Broker
PeopleSoft Integration Broker is a messaging system that enables you to synchronize data in oneapplication or system with another.
PeopleSoft Integration Broker facilitates synchronous and asynchronous messaging among internalsystems and trading partners, while managing message structure, message format, and transportdisparities.
PeopleSoft Integration Broker comprises two high-level subsystems: the integration engine and theintegration gateway. The integration engine runs on the PeopleSoft application server. It is tied closely toPeopleSoft applications and produces or consumes messages for these applications.
Copyright © 1988, 2022, Oracle and/or its affiliates. 163

Understanding Enterprise Integration Chapter 10
The integration gateway manages the receipt and delivery of messages passed among systems throughPeopleSoft Integration Broker. It provides support for the leading TCP/IP protocols used in themarketplace today, and more importantly, provides extensible interfaces for the development of newconnectors for communication with legacy and internet-based systems.
164 Copyright © 1988, 2022, Oracle and/or its affiliates.

Chapter 11
Understanding Integration Points
Overview of Integration Points
Provided by a PeopleSoft application, an integration point is an interface that is used to communicatewith other PeopleSoft or external applications. An integration point provides integration details forPeopleSoft applications, including which technologies are involved, technology details, information forusing PeopleSoft Integration Broker for messaging, and how different integration points are related.
The integration point consists of data rules for the applications that it supports. The integration points thatare delivered with PeopleSoft applications provide generic functionality so that they can be adapted foruse with as many programs as possible.
You can implement an integration point can be implemented by using different technologies available inPeopleTools, such as messaging, component interfaces, business interlinks, XML links, and electronicdata interchange (EDI).
Integration points can be associated with or used by application groups. An application group is a logicalgrouping of applications that use an integration point in the same business manner.
Other than this grouping facility, an application group and an application mean the same thing. In therest of the documentation, the words application group and application are used interchangeably unlessclearly specified.
Every integration point is owned by at least one application, but can be used in multiple applications.Therefore, if an application sends an integration point, and another application can receive the sameintegration point, the two systems should be interoperable, assuming the data structure and the rules of theintegration point are implemented the same in both places.
However, sometimes two applications might use the same integration point but implement it in differentways. For example, one application that uses the Customer integration point may need to transformthe data before it can be sent to an external system, which has another data structure for its customerinformation.
An integration point can be a part of multiple application groups. For example, the Department Tableintegration point may be used by a number of application groups, including PeopleSoft HumanResources, Customer Relationship Management (CRM), and General Ledger.
For more information, refer to the Interactive Services Repository on the My Oracle Support website.
Copyright © 1988, 2022, Oracle and/or its affiliates. 165

Understanding Integration Points Chapter 11
166 Copyright © 1988, 2022, Oracle and/or its affiliates.
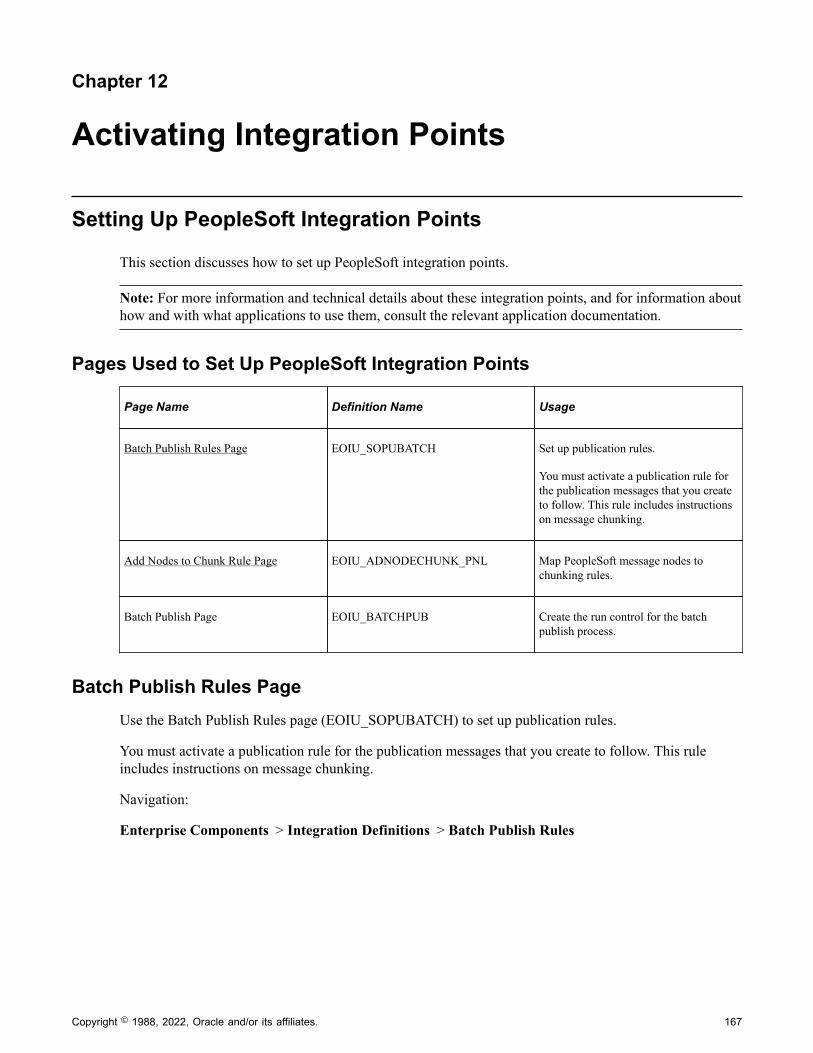
Chapter 12
Activating Integration Points
Setting Up PeopleSoft Integration Points
This section discusses how to set up PeopleSoft integration points.
Note: For more information and technical details about these integration points, and for information abouthow and with what applications to use them, consult the relevant application documentation.
Pages Used to Set Up PeopleSoft Integration Points
Page Name Definition Name Usage
Batch Publish Rules Page EOIU_SOPUBATCH Set up publication rules.
You must activate a publication rule forthe publication messages that you createto follow. This rule includes instructionson message chunking.
Add Nodes to Chunk Rule Page EOIU_ADNODECHUNK_PNL Map PeopleSoft message nodes tochunking rules.
Batch Publish Page EOIU_BATCHPUB Create the run control for the batchpublish process.
Batch Publish Rules PageUse the Batch Publish Rules page (EOIU_SOPUBATCH) to set up publication rules.
You must activate a publication rule for the publication messages that you create to follow. This ruleincludes instructions on message chunking.
Navigation:
Enterprise Components > Integration Definitions > Batch Publish Rules
Copyright © 1988, 2022, Oracle and/or its affiliates. 167

Activating Integration Points Chapter 12
This example illustrates the fields and controls on the Batch Publish Rules page. You can find definitionsfor the fields and controls later on this page.
If the data that you’re transmitting does not fit in a single message, or if you want to send different partsof the message to different target systems, set up the rules to chunk the message and associate it with thepublish rule. The business unit and setID chunking rules are standard in PeopleSoft applications, but youcan configure chunking rules.
Field or Control Description
Publish Rule ID Select the name of the message for which you’re setting uprules.
Status Select Active to activate this publish rule definition for thismessage. Select Inactive to prevent this rule from applying tothis message.
Chunking Rule ID and Alternate Chunk Table Enter the unique chunking rule name that is set up when youcreated the chunking rule. The message that you publish isrouted based on this field. If necessary, enter an additionalfield in the Alternate Chunk Rule ID field by which to chunkthe message.
Message Options
Many PeopleSoft systems rely on a message header and message trailer to trigger subscriptionPeopleCode to discard old table data and insert the new incoming data. As a general rule, all FullSyncmessages should use a header and trailer. Sync messages don’t need headers and trailers.
168 Copyright © 1988, 2022, Oracle and/or its affiliates.

Chapter 12 Activating Integration Points
Output Format
The Application Engine program used to chunk messages can create either an XML message that flowsthrough messaging architecture or a flat file that is generated in PeopleSoft Process Scheduler and notpublished elsewhere. Always select Message as the format when you send data to PeopleSoft systems.
Add Nodes to Chunk Rule PageUse the Add Nodes to Chunk Rule page (EOIU_ADNODECHUNK_PNL) to map PeopleSoft messagenodes to chunking rules.
Navigation:
Enterprise Components > Integration Definitions > Map Chunking Rules >Node to Chunk Rule
This example illustrates the fields and controls on the Add Nodes to Chunk Rule page. You can finddefinitions for the fields and controls later on this page.
To map nodes to a chunk rule:
1. In the Add column, select the check box next to the nodes that you defined earlier.
After you select a node, use the Add button in the Add Chunk Values column to open the Quick Mappage for the message you defined earlier.
2. Click Save.
Assigning Business Units or SetIDs to a Chunking RuleSee Assigning Business Units or SetIDs to a Chunking Rule.
Copyright © 1988, 2022, Oracle and/or its affiliates. 169

Activating Integration Points Chapter 12
Specifying OnRoute PeopleCodeCreate a service operation handler to route the message chunk to the correct subscriber node.
To do so, extend the IRouter application class and use the OnRouteSend method. Then in the appropriateservice operation, define a handler and specify the application class.
Setting Up Related Languages
This section provides overviews of related language tables and related language guidelines for PeopleSoftmessaging and discusses how to:
• Interpret component processor behavior.
• Publish a message from a component.
• Publish a message from batch programs.
• Subscribe to data in a PeopleSoft multilingual environment.
• Subscribe to data in a non-multilingual environment.
Understanding Related Language TablesYou can use several possible scenarios to familiarize yourself with related languages when setting uprelated languages for a message.
A department table, for example, must publish information in German as well as English. In the followingexample, the base application tables and related-language tables have a parent-child relationship. Therelated-language table has the same name as the parent table, but is suffixed with _LANG, in accordancewith PeopleSoft naming conventions.
This example illustrates the fields and controls on the Related-language record definitions. You can finddefinitions for the fields and controls later on this page.
170 Copyright © 1988, 2022, Oracle and/or its affiliates.

Chapter 12 Activating Integration Points
Consider the following points:
• The parent table, DEPT_TBL, has the related-language child table, DEPT_TBL_LANG.
• The child table has the same fields as the parent table, plus an additional field of LANGUAGE_CD.
• The attributes of the child table are all of the translatable textual fields of the parent record.
Understanding Related Language Guidelines for MessagingWhen publishing a full message, generate messages that contain the contents of an entire table by firstgenerating a message in the base language of the system that contains the full table contents. Thengenerate messages for each of the related languages that are supported by the publishing system. Eachmessage should contain the full message structure for that message object (levels 0, 1, 2, and so on). Thelanguage-specific messages should contain the translatable field values for that language and include thebase language fields that are not translatable.
When subscribing to a full message, specify the language code only at level 0 of the message. Thiscaptures and sets the user’s preferred language to level 0 of the PeopleSoft Common Application MessageAttributes (PSCAMA) message header. All data within the message must be in the same language. Followthese steps:
1. Delete the base language tables and related-language tables.
2. Replace these tables with data from the messages as appropriate.
3. Place only those related-language field values that are supported by the subscribing system into therelated-language tables.
4. Add the related-language table entry only if the base language table entry already exists.
When publishing an incremental message, the PeopleSoft system generates base messages in the user'spreferred language by using the language code of the user ID. Putting the user’s preferred language codein the message header PSCAMA record defines the message language for the subscribing system.
When subscribing to an incremental message using PeopleSoft Component Interfaces, use a simplePeopleCode program that performs a SetLanguage (messagelanguage) call to a component interface withthe message definition. This enables the subscribing system to process the data in the appropriate relatedor base language for that system.
When subscribing to an incremental message using PeopleCode only, the PeopleCode programmust simulate what the component processor does. The PeopleSoft system provides a genericSubscribe_IncrReplication PeopleCode function that provides basic language-related ability forincremental message subscriptions.
Note: All PeopleSoft subscription processes that are associated with textual information work as if thecontent is related-language enabled; thus the processes provide support for customer related-languageextensions and future PeopleSoft enhancements.For PeopleSoft-to-PeopleSoft system integration, you do not need to specify the language-sensitive dataon either system.
All of the PeopleCode functions that are needed for related language processing of incremental and fullmessages are in the FUNCLIB_EOEIP record. The record contains two functions:
Copyright © 1988, 2022, Oracle and/or its affiliates. 171

Activating Integration Points Chapter 12
• Subscribe_IncrReplication has related-language processing for an incremental message subscriptionprocess.
• Subscribe_FullReplication has related-language processing for a batch subscribe process.
Interpreting Component Processor BehaviorWhen you open a component, the component processor:
1. Compares the user's preferred language against the base language for the database.
2. Uses the record information from the base application table (DEPARTMENT_TBL).
If a record in the base application table exists for the user's preferred language, the fields on therelated-language table (DEPARTMENT_LANG) overlay the record information. For example, aGerman user sees German descriptions even if the base language for the database is English.
When you change the user's preferred language and save the component:
1. The component processor writes all the data for related-language fields back to the related-languagetable.
2. The component processor writes the rest of the data back to the base application table.
3. The German user’s entries for the DESCR and DESCRSHORT fields are saved back to theDEPARTMENT_LANG table with its key values and the LANGUAGE_CD field in German.
4. The data that was entered by the German user in the key fields, as well as MANAGER_NAME andACCOUNTING_OWNER fields, are saved on the parent record DEPARTMENT_TBL.
Publishing a Message from a ComponentThe PeopleSoft system employs the user's preferred language to determine the language of a message thatis published from a component. The default for LANGUAGE_CD is set to the preferred language code(OPERATOR.LANGUAGE_CD). The standard for incremental changes is to publish only the data thathas changed, in the language to which it was changed. Changing the preferred language to translate datagenerates new messages appropriately.
Publishing a Message from Batch ProgramsApplication Engine and Structured Query Report incremental message programs should use the baselanguage of the system. These programs perform their accesses and updates on the base tables only, evenif related-language tables are supported for those business objects. Related-language tables are featured inbatch program processing only in generating warnings or errors that use the message catalog.
When a batch application program runs, the processing is done in the base language of the system, andmessages are generated in only the base language.
Subscribing to Data in a PeopleSoft Multilingual EnvironmentThe subscription process sets the language for processing the message to the language needed by thesubscriber system. For example, if the base language of the subscribing system is French, and the
172 Copyright © 1988, 2022, Oracle and/or its affiliates.

Chapter 12 Activating Integration Points
PeopleSoft system is sending German data, the subscription process must store the German data in arelated-language table and the nontranslatable data in the French base application tables. Neither system'sbase language matters; only the base language of the subscribing system and the actual message languageare used.
Subscribing to Data in a Non-Multilingual EnvironmentWhen handling subscribing systems that do not support multiple languages, you can subscribe to data inthese ways:
• Setting message publish routing PeopleCode.
• Sending service operations to all appropriate nodes.
• Permitting the subscription to process itself.
• Subscribing to data that is specific to an external system.
Setting Message Publish Routing PeopleCode
Set message publish routing PeopleCode to send only messages in a particular language code to asubscribing node.
The subscribing node does not need to check the language in which the message was generated; anymessage that it receives in its language is automatically used to update the subscribing system’s database.To implement this option:
• Determine the languages in which messages are published.
• Determine the message language that a subscribing node receives.
• Add PeopleCode routing logic on the publish side to check the language code of the first occurrencein the message record and return a list of subscribing nodes that should receive the message for thatlanguage.
The publish routing PeopleCode guarantees that the message is sent to the correct subscribing nodes byusing the message language code.
Sending Service Operations to All Appropriate Nodes
Send service operations to all appropriate nodes regardless of the language and have the subscriptionrouting PeopleCode filter out messages in different languages.
PeopleCode on the subscription routing checks the language code of the first occurrence in the messageand controls whether the node should receive the message. To implement this option:
• Ensure that service operations in all languages are sent to all appropriate nodes.
• Add the PeopleCode to compare the message language against a hard-coded language value for thesubscribing system.
The advantage of putting the logic within the subscription routing PeopleCode is that every message ischecked for a language value match.
Copyright © 1988, 2022, Oracle and/or its affiliates. 173

Activating Integration Points Chapter 12
Permitting the Subscription to Process Itself
You can permit the subscription process itself, rather than the routing PeopleCode for the serviceoperation and queue, to determine whether the message should be processed for the subscribing system.
The subscription process checks the language code of the PSCAMA record for the first instance of themessage against a hard-coded value for the subscribing system. If the language code does not match, themessage is ignored. If the message language code does match, it’s considered a base language message,and it replaces all data on the subscribing system according to the audit action flags on the messagerecords.
Note: To prevent data integrity issues, generic subscription processes should not filter messages based onlanguage code.
Subscribing to Data That Is Specific to an External System
Subscribe to data that is specific to an external system for language code, business unit, or setIDrequirements that are specific to an external system.
Use the chunking rule and the routing control tables that Oracle supplies to select a portion of the data andsend it to a specific node.
Use the PeopleSoft-supplied Publish Header (PublishHdr) component to enter the partitioning views andfields for a message. This chunks the message so that all contents within a single message contain thesame partitioning value (such as business unit, setID, or application-specific fields).
Set up the routing control for the message so that the message is sent only to the appropriate nodes. ThePeopleSoft system supplies a business unit routing control (BU Routing Control) component and a setIDrouting control component that enable applications to specify for each message which nodes shouldreceive the partitioned message data.
After you set up the chunking rule and routing rules, both the full data publish and batch publishprograms partition the data according to the appropriate value and route it accordingly. You can nowpublish and subscribe to the message.
Examining Related-Language Messaging Scenarios
Actual related-language messaging scenarios include publishing a non-base language message andswitching a preferred language.
This section discusses how to:
• Publish a non-base language message to a PeopleSoft subscribing system with a different baselanguage and no prior data.
• Switch the preferred language to Japanese and update the same employee's name and address.
174 Copyright © 1988, 2022, Oracle and/or its affiliates.

Chapter 12 Activating Integration Points
Publishing a Non-Base Language Message to a Subscribing System with aDifferent Base Language and No Prior Data
In the following example, the publishing system base language is English, the subscriber base language isJapanese, and the user’s preferred language is German.
This is the process for publishing:
1. An online user adds a new level 0 key on a page.
The data is stored in both the base language table (English) and the related-language table (German).
2. The system publishes a message in the user’s preferred language (German).
3. The data is inserted into the subscribing system.
The data is inserted into both the base language table and related-language table (German) because itis added for the first time; data cannot reside in a related-language table without corresponding databeing in the base table.
Switching the Preferred Language to Japanese and Updating the SameEmployee's Name and Address
This is the process for switching a preferred language:
1. A user switches the preferred language from English to Japanese.
The user updates the same record as in the previous scenario. Data that is not language-sensitive isupdated in the base table (English). Language-sensitive data is inserted into the related-language table(Japanese).
2. A system publishes a message in the user’s preferred language (Japanese).
3. Data is inserted into the subscribing system.
All data goes to the base table (Japanese), because the message was sent in the same language as thesubscribing system’s base language.
Copyright © 1988, 2022, Oracle and/or its affiliates. 175

Activating Integration Points Chapter 12
176 Copyright © 1988, 2022, Oracle and/or its affiliates.

Chapter 13
Integration Point Naming Standards
Standard Action and Event Verbs
The following standard verbs are used in the names and descriptions of integration points:
Verb Description
Acknowledge Indicates receipt of a processing request. Also conveys theresult of the original request. (For example, your applicationacknowledges a purchase order (PO) when a PO hasbeen issued and the corresponding business applicationacknowledges the receipt of the PO and responds with anacceptance or counter offer.)
Add Use when a complete entity has already been constructedand needs to be communicated for the first time to anotherbusiness application, and when business implications gobeyond what a Sync message would convey. Transactionalmessages may use Add; setup data should use Sync.
Adjust Clarifies a specific process (for example, adjustment ofinventory quantity on hand when neither Add, Change, orDelete conveys the full meaning).
Allocate Clarifies a specific process (for example, allocating costs todifferent business applications when neither Add, Change, orDelete conveys the full meaning).
Approve Use when an entity passes an approval process and is ready forthe next business process step.
Cancel Use when business implications go beyond a simple change ordelete (for example, canceling a purchase order).
Change Use when an entity is changed based on a business eventand the change needs to be communicated to anotherbusiness application. Encompasses business implicationsbeyond what a Sync message would convey (for example, SalesOrderChange). Transactional messages can use Change;setup data should use Sync.
Copyright © 1988, 2022, Oracle and/or its affiliates. 177

Integration Point Naming Standards Chapter 13
Verb Description
Confirm Responds to a request from the receiving application toconfirm. This function conveys the result of the originalrequest (for example, when an inventory issue must beconfirmed in an application based on an event in a warehousemanagement business application).
Create Use when the processing must initiate the building of thedocument rather than moving the document from one systemto another.
Find Requests a list of items from a business application. Theresponse to this request is List. Equivalent to a search dialogbox in which you pass the search criteria over as the message.
FullSync Replicates a complete entity, including all record instances, between business applications to initially seed the receivingapplication with that data. Use with all full messagedefinitions.
Get Requests a specific data entity from a business application. The response to this request is Show. Differs from Find in thatthe specific entity’s key values are known and its details arebeing requested, whereas Find checks for existence and returnsa list of values that match the Find criteria.
Issue Clarifies a specific process (for example, issue material frominventory in cases in which neither Add, Change, or Deleteconveys the full meaning).
List Use when sending a list of multiple data entities in a summaryformat. The List verb can be used to respond to a Find orGet request, or in a publish scenario, to push information toother applications based on a business event. The results of aList can be used as is, or they can be used to select a specificinstance of a document or entity to issue a detail Get request.
Load Initiates the addition of a data entity to another businessapplication where maintenance of the document passes to thereceiving application permanently. When the request is passed, the sending application no longer has direct control over thedocument or entity.
Post Clarifies a specific process (for example, a posted journalentry, in cases in which neither Add, Change, or Deleteconveys the full meaning).
Receive Clarifies a specific process (for example, when you receiveinventory against a PO, in cases in which Change is notdetailed enough for the business context).
178 Copyright © 1988, 2022, Oracle and/or its affiliates.

Chapter 13 Integration Point Naming Standards
Verb Description
Request Requests specific data from a business application. Therequested data should be passed back as a separate message.
Show Sends information about a specific instance of a businessentity. Can also be used to respond to a Get request, or ina publish scenario in which it pushes information to otherapplications based on a business event.
Sync Communicates the need to update master files betweenbusiness applications. Facilitates application integrity and easeof data entry for the business user by enabling a single pointof input. Should contain only incremental messages of Add, Change, and Delete actions to the entity. Normally used forpassing setup messages between applications.
Transfer Clarifies a specific process (for example, in the event of atransfer of material from one inventory location to another, incases in which neither Add, Change, or Delete conveys the fullmeaning).
Update Clarifies a specific process (for example, in the event ofan update of inspection information from one businessapplication to another, in cases in which neither Add, Change, or Delete conveys the full meaning). The event is not addinga document or changing fields, but communicating theoccurrence of an event as well as the corresponding data thataccompanies the event. Transactional data may use Update;setup data should use Sync.
Standard Business Object Nouns
Business objects appear in uppercase with underscores between key words.
The following table lists examples of business object names only; it is not intended to list or setconventions.
Account_Chartfield Deal Names_Prefix_Suffix Project_Category
Action_Reason Department Nations_Duevo Project_Status
APE_Industry Dept_Budget Occupation_Illness Project_Team
Applicant Detail_Calendar Par_Location Project_Type_Cat_ Link
Bank DirectDeposit Par_Location_Count Purchase_Order
Copyright © 1988, 2022, Oracle and/or its affiliates. 179

Integration Point Naming Standards Chapter 13
Account_Chartfield Deal Names_Prefix_Suffix Project_Category
BOM Earnings Payroll Rating_Model
Budget Expense Payroll_Paysheet Regulatory_Region
Bus_Unit_FS Expense_Advance Pension_Fund Resource_Category
Bus_Unit_GL Expense_Report Person_ Accomplishment Resource_SubCategory
Bus_Unit_HR Expense_Sheet Person_Competency Resource_Type
Bus_Unit_PC Fund Person_Contract_ Belgium Review_Scale
Bus_Unit_PF Grant Person_Credit_Card Salary
Carrier Image Person_Disability Salary_Matrix
Company Industry_Inspection Person_Diversity Salary_Plan
Company_Credit_ Card InterUnit Person_Education Salary_Structure
Company_Property Inventory Person_Names SalesOrder
Competency Item Person_Property Schedule
Consumer Item_BusUnit Person_PriorWork State
Consumer_Usage Item_Rev Person_Visa_Citizen State_Name
Contract Item_Vendor Position Statute
ContractBelgium Job_Code Product_Chartfield Statute_Belgium
Country Journal Product_Item Vendor
Customer Labor_Category Product_Group Visa_Permit
Credit_Card Labor_Relations Product_Price Voucher
Credit_Card_ Merchant Location Product_UOM Union
180 Copyright © 1988, 2022, Oracle and/or its affiliates.

Chapter 13 Integration Point Naming Standards
Account_Chartfield Deal Names_Prefix_Suffix Project_Category
Currency Market_Price Project UOM
Customer Market_Rate Project_Activity Workforce
Copyright © 1988, 2022, Oracle and/or its affiliates. 181

Integration Point Naming Standards Chapter 13
182 Copyright © 1988, 2022, Oracle and/or its affiliates.

Chapter 14
PeopleSoft Design Patterns
List of Design Patterns
The following table presents brief descriptions of the delivered design patterns:
Design Pattern Name Description
AE Row By Row Publish (application engine row by rowpublish)
In this design pattern, the transaction or setup data that youwant to send out of the PeopleSoft system is updated by useof an Application Engine program that performs procedural (row-by-row) processing; you want to publish these changes. Generally, messages are used with this design pattern.
Batch Publish Use this design pattern to publish messages from a batchapplication. The batch application can be a COBOL orStructured Query Report program that takes either aprocedural or set-based approach, or it can be an ApplicationEngine set-based program.
Batch Subscribe This design pattern enables you to perform edits againstmessages in sets. This can be a useful technique for highvolume data, including millions of inbound rows. Thisdesign pattern is useful when you know that a single messagedefinition may contain multiple instances of a transaction, orwhen you must reuse an existing batch program.
CI Subscribe (component interface subscribe) This design pattern uses a component interface to editincoming message data. This enables you to reuse existingbusiness rules when processing data.
Component Publish In this design pattern, the transaction or setup data that youwant to send out of PeopleSoft is being updated by using aPeopleSoft component. In this case, the data is already in thecomponent buffer, and the Publish PeopleCode function isused to publish a message.
EDI In This design pattern is for inbound EDI documents.
You should use EDI only for existing EDI manager inboundtransactions that must be supplied to an EDI partner, and youwant to allow subscription to an XML message, or when youneed to comply with other industry standards, such as SWIFT,BAI, or HL7, that have an existing EDI manager inbound map, and you want to convert to subscribing to an XML message.
Copyright © 1988, 2022, Oracle and/or its affiliates. 183

PeopleSoft Design Patterns Chapter 14
Design Pattern Name Description
EDI Out This design pattern is for outbound EDI documents.
You should use EDI only for existing EDI manager inboundtransactions that must be supplied to an EDI partner and youwant to allow subscription to an XML message, or you needto comply with other industry standards, such as SWIFT, BAI, or HL7, that have an existing EDI manager inbound map, andyou want to convert to publishing to an XML message.
Full Table Publish Use this design pattern to populate an entire copy of a tableonto a remote database or legacy system. Generally, full datareplication occurs with setup tables, or relatively static, low-volume tables that are keyed by setID. When a copy of a tableexists on the remote system, incremental updates can be used.
Full Table Subscribe Use this design pattern to subscribe to messages that containan entire copy of a table that is published from a remotedatabase or legacy system. Generally, full data replicationoccurs with setup tables, or relatively static, low-volume tablesthat are keyed by setID. When a copy of a table exists on theremote system, incremental updates can be used.
No Pattern No design pattern is specified.
PeopleCode Subscribe Use this design pattern to subscribe to messages by using aPeopleCode program when additional processing is required. Use PeopleCode subscription when simple edits or no editsagainst the inbound data are needed before you insert the datainto the application tables or staging tables.
Sync Reply In this design pattern, another system initiates a requestfor information from the PeopleSoft system and waits forinformation to be returned. This information must be providedby the PeopleSoft system in a real-time synchronous mode andin a conversational style of interface before the other systemcan continue processing. Generally, business interlinks areused to satisfy this type of request.
Sync Request Use this design pattern when a PeopleSoft application mustcall a third-party vendor’s application to request information.This information must be provided in a real-time, synchronousmode. Generally, business interlinks are used to satisfy thistype of request.
XML Reply In this design pattern, another system initiates a request forinformation from the PeopleSoft system. This informationmust be provided by the PeopleSoft system in a real-timesynchronous mode and in a conversational style of interfacebefore the other system can continue processing. Generally, XMLDocs are used to satisfy this type of request.
184 Copyright © 1988, 2022, Oracle and/or its affiliates.

Chapter 14 PeopleSoft Design Patterns
Design Pattern Name Description
XML Request Use this design pattern when a PeopleSoft application mustcall a third party vendor’s application to request information.This information must be provided in a real-time, synchronousmode. Generally, XMLDocs are used to satisfy this type ofrequest.
Copyright © 1988, 2022, Oracle and/or its affiliates. 185

PeopleSoft Design Patterns Chapter 14
186 Copyright © 1988, 2022, Oracle and/or its affiliates.
Related Documents