PeopleSoft CRM 9.2: Call Center Applications June 2020

Welcome message from author
This document is posted to help you gain knowledge. Please leave a comment to let me know what you think about it! Share it to your friends and learn new things together.
Transcript

PeopleSoft CRM 9.2: Call CenterApplications
June 2020

PeopleSoft CRM 9.2: Call Center ApplicationsCopyright © 1988, 2020, Oracle and/or its affiliates.
This software and related documentation are provided under a license agreement containing restrictions on use anddisclosure and are protected by intellectual property laws. Except as expressly permitted in your license agreementor allowed by law, you may not use, copy, reproduce, translate, broadcast, modify, license, transmit, distribute,exhibit, perform, publish, or display any part, in any form, or by any means. Reverse engineering, disassembly, ordecompilation of this software, unless required by law for interoperability, is prohibited.
The information contained herein is subject to change without notice and is not warranted to be error-free. If youfind any errors, please report them to us in writing.
If this is software or related documentation that is delivered to the U.S. Government or anyone licensing it on behalfof the U.S. Government, then the following notice is applicable:
U.S. GOVERNMENT END USERS: Oracle programs (including any operating system, integrated software,any programs embedded, installed or activated on delivered hardware, and modifications of such programs) andOracle computer documentation or other Oracle data delivered to or accessed by U.S. Government end users are"commercial computer software" or “commercial computer software documentation” pursuant to the applicableFederal Acquisition Regulation and agency-specific supplemental regulations. As such, the use, reproduction,duplication, release, display, disclosure, modification, preparation of derivative works, and/or adaptation of i) Oracleprograms (including any operating system, integrated software, any programs embedded, installed or activatedon delivered hardware, and modifications of such programs), ii) Oracle computer documentation and/or iii) otherOracle data, is subject to the rights and limitations specified in the license contained in the applicable contract. Theterms governing the U.S. Government’s use of Oracle cloud services are defined by the applicable contract for suchservices. No other rights are granted to the U.S. Government.
This software or hardware is developed for general use in a variety of information management applications. It isnot developed or intended for use in any inherently dangerous applications, including applications that may create arisk of personal injury. If you use this software or hardware in dangerous applications, then you shall be responsibleto take all appropriate fail-safe, backup, redundancy, and other measures to ensure its safe use. Oracle Corporationand its affiliates disclaim any liability for any damages caused by use of this software or hardware in dangerousapplications.
Oracle and Java are registered trademarks of Oracle and/or its affiliates. Other names may be trademarks of theirrespective owners.
Intel and Intel Inside are trademarks or registered trademarks of Intel Corporation. All SPARC trademarks are usedunder license and are trademarks or registered trademarks of SPARC International, Inc. AMD, Epyc, and the AMDlogo are trademarks or registered trademarks of Advanced Micro Devices. UNIX is a registered trademark of TheOpen Group.
This software or hardware and documentation may provide access to or information about content, products, andservices from third parties. Oracle Corporation and its affiliates are not responsible for and expressly disclaim allwarranties of any kind with respect to third-party content, products, and services unless otherwise set forth in anapplicable agreement between you and Oracle. Oracle Corporation and its affiliates will not be responsible for anyloss, costs, or damages incurred due to your access to or use of third-party content, products, or services, except asset forth in an applicable agreement between you and Oracle.
The business names used in this documentation are fictitious, and are not intended to identify any real companiescurrently or previously in existence.
Documentation Accessibility
For information about Oracle's commitment to accessibility, visit the Oracle Accessibility Program website at http://www.oracle.com/pls/topic/lookup?ctx=acc&id=docacc.
Access to Oracle Support
Oracle customers that have purchased support have access to electronic support through My Oracle Support. Forinformation, visit http://www.oracle.com/pls/topic/lookup?ctx=acc&id=info or visit http://www.oracle.com/pls/topic/lookup?ctx=acc&id=trs if you are hearing impaired.

Contents
Preface: Preface........................................................................................................................................xviiUnderstanding the PeopleSoft Online Help and PeopleBooks.......................................................... xvii
Hosted PeopleSoft Online Help...................................................................................................xviiLocally Installed Help..................................................................................................................xviiDownloadable PeopleBook PDF Files.........................................................................................xviiCommon Help Documentation.................................................................................................... xviiField and Control Definitions..................................................................................................... xviiiTypographical Conventions.........................................................................................................xviiiISO Country and Currency Codes..............................................................................................xviiiRegion and Industry Identifiers.................................................................................................... xixTranslations and Embedded Help................................................................................................. xix
Using and Managing the PeopleSoft Online Help............................................................................... xxPeopleSoft CRM Related Links........................................................................................................... xxContact Us.............................................................................................................................................xxFollow Us..............................................................................................................................................xx
Chapter 1: Getting Started with PeopleSoft CRM Call Center Applications..................................... 23PeopleSoft CRM Call Center Applications Overview......................................................................... 23PeopleSoft CRM Call Center Business Processes............................................................................... 24PeopleSoft CRM Call Center Integrations........................................................................................... 26PeopleSoft Call Center Applications Implementation..........................................................................28
Chapter 2: Defining Call Center Business Units and Display Template Options............................... 29Understanding Call Center Business Units.......................................................................................... 29Understanding Display Templates........................................................................................................ 29
Appearance and Behavior Control.................................................................................................29Display Template Families.............................................................................................................30AAF Policies and Display Templates............................................................................................ 31Defaulting Logic.............................................................................................................................32
Understanding Assignment Options..................................................................................................... 36Provider Group Assignment...........................................................................................................36Person Assignment......................................................................................................................... 37
Defining Call Center Business Units................................................................................................... 39Pages Used to Define Call Center Business Units........................................................................ 39Prerequisites.................................................................................................................................... 39Call Center BU Page......................................................................................................................39Business Unit - Options Page........................................................................................................ 42Match Usage Page..........................................................................................................................47Business Unit - Display Templates Page.......................................................................................48Case Defaults Page.........................................................................................................................48
Defining Display Template General Options for PeopleSoft Call Center............................................52Page Used to Enable Pages and General Options for PeopleSoft Call Center.............................. 52Display Template Page...................................................................................................................53
Managing Policies Using Case Display Template Actions.................................................................. 56Page Used to Manage Policies Using Case Display Template Actions.........................................56Manage Policies by Case Display Template Action Page............................................................. 56
Chapter 3: Setting Up Call Center Prompt Tables................................................................................ 59Understanding Call Center Prompt Tables........................................................................................... 59
Copyright © 1988, 2020, Oracle and/or its affiliates. iii

Contents
Call Center Prompt Tables............................................................................................................. 59Delivered Values in Call Center Prompt Tables............................................................................ 61
Common Elements Used to Set Up Call Center Prompt Tables.......................................................... 62Setting Up Basic Prompt Tables for Cases.......................................................................................... 63
Pages Used to Set Up Prompt Tables for All Cases......................................................................63Prerequisites.................................................................................................................................... 64Case Status Page............................................................................................................................ 65Case Type Page.............................................................................................................................. 66Priority Page................................................................................................................................... 67Urgency Page..................................................................................................................................67Severity Page.................................................................................................................................. 68Impact Page.................................................................................................................................... 68Source Page.................................................................................................................................... 69Problem Type Page.........................................................................................................................70Category Page.................................................................................................................................71Category Competencies Page.........................................................................................................72Type Page....................................................................................................................................... 73Type Competencies Page................................................................................................................74Detail Page......................................................................................................................................75Detail Competencies Page..............................................................................................................76Combine Category/Type/Detail Page............................................................................................. 77Combine Category/Type/Detail: Competencies Page.................................................................... 80Quick Code Page............................................................................................................................81
Setting Up Problem Codes for Material Returns................................................................................. 88Page Used to Set Up Problem Codes............................................................................................ 89Problem Codes Page...................................................................................................................... 89
Setting Up Reason Codes..................................................................................................................... 89Page Used to Set Up Reason Codes..............................................................................................90Reason Code Page..........................................................................................................................90
Setting Up Case Relationship Types and Labels..................................................................................90Page Used to Set Up Case Relationship Types and Labels...........................................................90Case Relationship Type Page.........................................................................................................91
Setting up Case Matching Criteria....................................................................................................... 92Pages Used to Define Matching Criteria....................................................................................... 93Match Detail Page.......................................................................................................................... 93Match Usage Page..........................................................................................................................95
Chapter 4: Setting Up RMA Processing................................................................................................. 97Understanding RMA in PeopleSoft Support........................................................................................ 97Activating the Required Service Operations........................................................................................ 97Defining Items.......................................................................................................................................98Defining Defaults and Procurement Options for Requisition Processing............................................ 98Defining Valid Requisition Requester IDs........................................................................................... 99Setting Up Links to PeopleSoft Purchasing and PeopleSoft Inventory............................................... 99Synchronizing Problem Codes and Reason Codes...............................................................................99Viewing RMA Statuses.......................................................................................................................100Processing Return-and-Replace RMAs in PeopleSoft Supply Chain Management........................... 100
Chapter 5: Setting Up Links and Related Actions...............................................................................101Understanding Link Setup.................................................................................................................. 101
Basic Link Setup.......................................................................................................................... 101Link Presentation on the Case Page............................................................................................ 102Link Groups Delivered by the PeopleSoft System...................................................................... 102
iv Copyright © 1988, 2020, Oracle and/or its affiliates.

Contents
Link Categories Delivered by the PeopleSoft..............................................................................103Link Definitions Delivered by the PeopleSoft System (Content References)............................. 105Link Definitions for PeopleSoft CRM.........................................................................................134
Setting Up Content References...........................................................................................................136Pages Used to Set Up Content References..................................................................................136Setting Up Content References.................................................................................................... 136Setting Up Security for Content References................................................................................136
Viewing and Modifying Link Definitions.......................................................................................... 136Pages Used to View and Modify Link Definitions......................................................................137Link Category Definition Page.................................................................................................... 137Link Definition Page.................................................................................................................... 137Link Group Page.......................................................................................................................... 141
Chapter 6: Setting Up PeopleSoft Change Management.................................................................... 145Understanding PeopleSoft Change Management Setup..................................................................... 145
Change Management Usages....................................................................................................... 145Change Request Prompt Tables................................................................................................... 145Phase Templates........................................................................................................................... 146Transitions and Active Analytics Framework..............................................................................146Task Type Role Map and the Assignment Engine.......................................................................147Security Considerations for Accessing Change Management Tasks........................................... 147
Setting Up Prompt Tables for Change Requests................................................................................ 147Pages Used to Set Up Prompt Tables for Change Requests........................................................147Business Reason Page.................................................................................................................. 148Category Page...............................................................................................................................149Component Audit Page................................................................................................................ 149Impact Page.................................................................................................................................. 150Note Type Page............................................................................................................................ 151Phase Page.................................................................................................................................... 152Priority Page................................................................................................................................. 153Relationship Types Page.............................................................................................................. 154Resolution Page............................................................................................................................ 155Request Type Page....................................................................................................................... 155Status Page....................................................................................................................................156Status Transition Page.................................................................................................................. 157Sub Type Page..............................................................................................................................158
Setting Up Change Management Business Units...............................................................................159Page Used to Set Up Change Management Business Units........................................................ 159Define Change Management Page...............................................................................................160
Setting Up Change Management Defaults......................................................................................... 161Page Used to Set Up Change Management Defaults.................................................................. 161Defaults Page................................................................................................................................161
Setting Up Template Duration Levels................................................................................................ 162Page Used to Set Up Template Duration Levels......................................................................... 162Template Duration Level Page.....................................................................................................162
Setting Up Phase Templates............................................................................................................... 163Pages Used to Create a Phase Template......................................................................................163Phase Page.................................................................................................................................... 164Task Group Template Page.......................................................................................................... 165Phase Template Page....................................................................................................................166Phase Template Use Page............................................................................................................ 167
Setting Up the Task Type Role Map..................................................................................................168
Copyright © 1988, 2020, Oracle and/or its affiliates. v

Contents
Page Used to Set Up the Task Type Role Map........................................................................... 168Task Type Role Map Page........................................................................................................... 168
Chapter 7: Setting Up PeopleSoft Quality Management.....................................................................171Understanding PeopleSoft Quality Management Business Units.......................................................171Defining PeopleSoft Quality Management Business Units................................................................171
Page Used to Define PeopleSoft Quality Management Business Units...................................... 171Quality Definition Page................................................................................................................171
Setting Up User Codes....................................................................................................................... 172Pages Used to Set Up User Codes...............................................................................................173Defect Symptoms Page................................................................................................................ 173Defect Causes Page...................................................................................................................... 174Defect Status Page........................................................................................................................175Defect Status State Page.............................................................................................................. 176Defect Status State Reason Page................................................................................................. 177Status Combinations Page............................................................................................................178Defect Relationship Types Page...................................................................................................179
Setting Up Products............................................................................................................................ 180Pages Used to Set Up Products................................................................................................... 180Understanding Products and Components................................................................................... 180Component Types Page................................................................................................................181Component Definition Page......................................................................................................... 182Component Definitions - Relationships Page.............................................................................. 183Version Page................................................................................................................................. 184Environments Page....................................................................................................................... 186
Chapter 8: Defining EIP Options for Integration to PeopleSoft or Oracle E-Business HCM......... 189Understanding the Integration Between PeopleSoft CRM and PeopleSoft or E-Business HCM....... 189
Initial Data Load for Integration with E-Business HCM.............................................................189EIP Message Process....................................................................................................................189Request Message.......................................................................................................................... 190Response Message........................................................................................................................191Inactive Worker Data....................................................................................................................191
Loading Initial Data from E-Business HCM......................................................................................191Pages Used to Load Initial Data from E-Business HCM............................................................ 191EBS HR HelpDesk Data Load Page............................................................................................191
Defining EIP Options......................................................................................................................... 192Define HCM Sections Page......................................................................................................... 192Worker Statuses to EIP Page....................................................................................................... 193
Viewing HR-Related Payroll Information on the 360-Degree View Page......................................... 194Page Used to View HR-Related Payroll Information on the 360-Degree View Page..................195Viewing the HR HelpDesk Worker 360-Degree View Page....................................................... 195Viewing Job and Position Summary............................................................................................195Viewing Pay Summary.................................................................................................................199Viewing Payment Total................................................................................................................ 201Viewing Absences........................................................................................................................ 203Viewing Benefits.......................................................................................................................... 205Viewing New Action Links and Security Roles..........................................................................207Viewing HR-Related Payroll Information on the 360-Degree View Page for US Federal.......... 208
Chapter 9: Defining Options for Integration to PeopleSoft Campus Solutions................................ 213Understanding the Integration Between PeopleSoft CRM and PeopleSoft Campus Solutions.......... 213
EIP Message Process....................................................................................................................213Request Message.......................................................................................................................... 213
vi Copyright © 1988, 2020, Oracle and/or its affiliates.

Contents
Response Message........................................................................................................................214Viewing Campus Solutions-Related Information on the 360-Degree View Page.............................. 214
Page Used to View Campus Solutions-Related Information on the 360-Degree View Page....... 214Constituent 360-Degree View Page............................................................................................. 215Viewing Checklists, Communications, and Comments............................................................... 218Viewing Recruiting Information.................................................................................................. 221Viewing Admissions Information................................................................................................ 222Viewing Transfer Credits Information......................................................................................... 224Viewing Academics Information..................................................................................................225Viewing Financial Information.................................................................................................... 226Viewing Financial Aid Information............................................................................................. 227Viewing Transcript Request Information..................................................................................... 228Viewing Contributor Relations Information................................................................................ 229Viewing Affiliations Information................................................................................................. 230
Chapter 10: Setting Up Full Sync Integration with PeopleSoft HCM............................................... 231Understanding Full Sync Integration with PeopleSoft HCM.............................................................231
Setting Up Full Sync Integration with PeopleSoft HCM............................................................ 231Chapter 11: Managing Cases..................................................................................................................233
Understanding the Configurable Case................................................................................................ 233Understanding Case Access................................................................................................................233
Case Creation................................................................................................................................233Case Retrieval...............................................................................................................................235Saved Searches............................................................................................................................. 235
Understanding Case Management...................................................................................................... 236Case Page Activities.....................................................................................................................236Quick Codes................................................................................................................................. 241Case Information Security............................................................................................................242Case Assignments.........................................................................................................................243Case Visibility...............................................................................................................................245Case Closure................................................................................................................................. 245Case Toolbar Functions................................................................................................................247Toolbar Functions......................................................................................................................... 251Background Processing................................................................................................................ 253
Managing Basic Case Information..................................................................................................... 255Pages Used to Manage Basic Case Information..........................................................................255Case Page......................................................................................................................................256Escalating Cases........................................................................................................................... 273Match Results Page...................................................................................................................... 273Outbound Notification Page.........................................................................................................274Installed Product Viewable Hierarchy Page.................................................................................275Entitlement Match Page............................................................................................................... 275Entitlement Details Page.............................................................................................................. 275Provider Group Summary Page................................................................................................... 276Candidate Summary Page............................................................................................................ 276
Validating Errors Reported by Callers................................................................................................276Page Used to Validate Errors....................................................................................................... 276Error Message Validation............................................................................................................. 277Error Validation Page................................................................................................................... 277
Integrating with Third-Party Asset Management Applications..........................................................278Understanding Employee Relations Case Management.....................................................................279Setting Up ER Case Access............................................................................................................... 279
Copyright © 1988, 2020, Oracle and/or its affiliates. vii

Contents
Pages Used to Set Up ER Case Access.......................................................................................279Configure Case Access Page........................................................................................................280
Creating ER Cases.............................................................................................................................. 281Pages Used to Create ER Cases.................................................................................................. 281Create ER Case Tile.....................................................................................................................281Employee Relations Case Page....................................................................................................282
Using the PeopleSoft Fluid Interface to View and Manage ER Cases...............................................285Pages Used to View and Manage ER Cases................................................................................285My ER Cases Tile........................................................................................................................ 285My ER Cases Page.......................................................................................................................286Search ER Cases Tile...................................................................................................................287Employee Relations Case Search Page........................................................................................288
Using the PeopleSoft Fluid User Interface to View and Manage HR HelpDesk Cases..................... 289Pages Used to View and Manage HR HelpDesk Cases in the PeopleSoft Fluid UserInterface........................................................................................................................................ 289My HRHD Cases Tile.................................................................................................................. 289My HRHD Cases Page................................................................................................................ 290
Setting Up of the Info Tiles for the Fluid Agent Triage Dashboard as an Administrator...................291Pages Used to Set Up the Info Tiles for the Fluid Agent Triage Dashboard as anAdministrator................................................................................................................................ 291Configure Search Definitions Page..............................................................................................291Configure Search Page................................................................................................................. 292
Using the Fluid Agent Triage Dashboard to View and Manage HR HelpDesk Cases....................... 295Pages Used to View and Manage HR HelpDesk Cases Using the Fluid Agent TriageDashboard..................................................................................................................................... 295Agent Triage Dashboard Tile.......................................................................................................295Agent Triage Dashboard Page..................................................................................................... 296Personalize Search Definitions Page............................................................................................298Configure Search Page................................................................................................................. 299
Chapter 12: Creating Cases Automatically For HCM Updates......................................................... 301Understanding Automatic Case Creation For HCM Updates............................................................ 301
Creating Case for HCM Self-Service Transaction Updates.........................................................301Active Analytics Framework (AAF) Setup for Automatic Case Creation...................................301Quick Codes and EIP Information for Automatic Case Creation................................................302Create Case EIP............................................................................................................................303
Setting Up Automatic Case Creation................................................................................................. 304Configuring the Default HCM Source Value...............................................................................304Setting Up Integration Broker......................................................................................................305Publishing quick codes from CRM to HCM............................................................................... 306Troubleshooting Integration Issues.............................................................................................. 312
Chapter 13: Processing Cases.................................................................................................................315Understanding Processing a Case.......................................................................................................315Understanding Solutions..................................................................................................................... 315Viewing the Case Summary Page...................................................................................................... 315
Page Used to View the Case Summary Page.............................................................................. 316Summary Page..............................................................................................................................316
Adding Notes and Attachments..........................................................................................................318Page Used to Add Notes and Attachments..................................................................................318Understanding Notes and Attachments........................................................................................318Notes Page.................................................................................................................................... 320
Adding Tasks to a Case......................................................................................................................323
viii Copyright © 1988, 2020, Oracle and/or its affiliates.

Contents
Page Used to Add Tasks to a Case..............................................................................................324Tasks Page.................................................................................................................................... 324
Reviewing Case History..................................................................................................................... 325Pages Used to Review Case History........................................................................................... 325Understanding Case History.........................................................................................................325Case History - Events Page......................................................................................................... 328Case History - Interactions Page..................................................................................................329Case History - Assignments Page................................................................................................330Case History - Audit Trail Page.................................................................................................. 331
Managing Related Cases.....................................................................................................................332Pages Used to Manage Case Relationships................................................................................. 332Understanding Related Cases.......................................................................................................332Related Cases Page.......................................................................................................................337Relate Existing Case - Relationship Page....................................................................................338Create a New Case - Relationship Page...................................................................................... 339
Managing Related Actions..................................................................................................................341Pages Used to Relate a Case to Other PeopleSoft CRM Objects................................................342Understanding Related Actions....................................................................................................342Related Actions Page................................................................................................................... 346Use Business Project Page........................................................................................................... 348Send Case Survey Page................................................................................................................348Branch Script Page.......................................................................................................................349Defects and Enhancements Page..................................................................................................350Quality Management - Defect Page.............................................................................................351Create Sales Lead Page................................................................................................................353Create Order Page........................................................................................................................ 354Return Material Authorization Page............................................................................................ 355Create Service Order Page........................................................................................................... 356Change Requests Page................................................................................................................. 357Change Request Page................................................................................................................... 359
Identifying Interested Parties.............................................................................................................. 360Page Used to Identify Interested Parties......................................................................................360Interested Parties Page................................................................................................................. 360
Recording Billing Information............................................................................................................362Page Used to Record Billing Information................................................................................... 362Billing Page.................................................................................................................................. 362
Entering Attribute Information........................................................................................................... 365Page Used to Enter Attribute Information................................................................................... 365Attributes Page............................................................................................................................. 366
Selecting, Printing, and Emailing Case Information.......................................................................... 366Pages Used to Select, Print, and Email Case Information...........................................................366Understanding the Print Case Functionality................................................................................ 367Case - Display Options Page....................................................................................................... 367Print Case Page............................................................................................................................ 368
Chapter 14: Tracking Time Spent on Cases......................................................................................... 371Understanding Time Logs...................................................................................................................371Managing Time................................................................................................................................... 371
Page Used to Manage Time.........................................................................................................372Manage Time Page.......................................................................................................................372
Chapter 15: Managing Credit Card Payments.................................................................................... 375Understanding Credit Card Processing...............................................................................................375
Copyright © 1988, 2020, Oracle and/or its affiliates. ix

Contents
Processing Options....................................................................................................................... 375Credit Card Transactions..............................................................................................................375Transaction Process Flow.............................................................................................................376
Processing Credit Cards and Reviewing Transactions....................................................................... 377Pages Used to Process Credit Cards and Review Transactions...................................................377Credit Card Information Page...................................................................................................... 377Review Electronic Card History Page......................................................................................... 382View Contact Address Detail Page..............................................................................................383
Chapter 16: Managing Material Returns..............................................................................................385Understanding Material Return Processing........................................................................................ 385
RMA Process Flows.....................................................................................................................385RMA Notifications....................................................................................................................... 391
Setting Up Material Return Processing.............................................................................................. 392Creating RMA Transactions............................................................................................................... 393
Pages Used to Create RMA Transactions....................................................................................394Return Material Authorization Page............................................................................................ 394Returns - Installed Product Hierarchy Page.................................................................................398Return Material Authorization - Notes Page............................................................................... 399
Chapter 17: Managing Assets.................................................................................................................401Understanding Asset Management..................................................................................................... 401
Asset Management Functionality.................................................................................................401Asset Related Actions.................................................................................................................. 401Link Definition Setup...................................................................................................................402
Prerequisites for Managing Assets..................................................................................................... 403Common Elements Used to Manage Assets...................................................................................... 403Managing Assets from the Case Page in PeopleSoft HelpDesk........................................................ 403
Accessing the Asset Administration Application........................................................................ 403Accessing the Asset Summary.....................................................................................................404Accessing the Asset Administrator.............................................................................................. 405Accessing Remote Control...........................................................................................................405Accessing Software Delivery....................................................................................................... 405
Adding and Reconciling Installed Assets...........................................................................................405Pages Used to Add and Reconcile Installed Assets.....................................................................405Understanding Installed Assets.................................................................................................... 406Installed Assets Page....................................................................................................................406Asset Reconciliation Page............................................................................................................408
Chapter 18: Understanding Asset Lifecycle Management (ALM) for CRM HelpDesk................... 409CRM Asset Lifecycle Management Business Processes....................................................................409Asset Management Functionality....................................................................................................... 409Integration Architecture and Data Flow.............................................................................................410Understanding Installed Assets...........................................................................................................410
Identifying a Financials Asset in CRM....................................................................................... 411Updating CRM Asset Data With New Asset Information from Financials................................. 413
Chapter 19: Creating Work Orders from Cases.................................................................................. 419Understanding Work Order Requests................................................................................................. 419
Work Order Functionality............................................................................................................ 419Integration points with PeopleSoft Financials............................................................................. 420Work Order Descriptions and Status Changes.............................................................................420Relationships Between Work Orders and Cases..........................................................................421Work Orders and the 360-Degree View.......................................................................................421Installed Product History..............................................................................................................422
x Copyright © 1988, 2020, Oracle and/or its affiliates.

Contents
Creating Work Orders.........................................................................................................................422Page Used to Create Work Orders...............................................................................................422Create Work Order Page.............................................................................................................. 422
Viewing Work Orders......................................................................................................................... 424Pages Used to View Work Orders............................................................................................... 424Case - Summary Page.................................................................................................................. 424
Replying to Work Order Information Requests................................................................................. 427Page Used to Reply to Work Order Information Requests..........................................................427Understanding Information Requests...........................................................................................427Reply To Work Order Information Request Page........................................................................428
Chapter 20: Working with Services Operational Dashboards............................................................429Understanding Services Operational Dashboards...............................................................................429
Manager Dashboard......................................................................................................................429Agent Dashboard.......................................................................................................................... 430Understanding Pagelets with Bar Charts..................................................................................... 430Understanding Pagelets with Grids..............................................................................................431
Setting Up Services Operational Dashboards.....................................................................................432Working with Services Operational Dashboards................................................................................433
Pages Used to Work with Services Operational Dashboards.......................................................433Common Elements Used In This Section....................................................................................433Working with the Manager Dashboard........................................................................................ 434Working with the Agent Dashboard............................................................................................ 441
Chapter 21: Using Change Management.............................................................................................. 447Understanding Change Request Access............................................................................................. 447Understanding Change Request Management....................................................................................447
Main Change Request Page......................................................................................................... 448Notes Page.................................................................................................................................... 449Tasks Page.................................................................................................................................... 449History Page................................................................................................................................. 450Related Changes Page.................................................................................................................. 450Related Actions Page................................................................................................................... 451Interested Parties Page................................................................................................................. 451
Accessing Change Requests............................................................................................................... 451Page Used to Access Change Requests....................................................................................... 451Change Requests Search Page..................................................................................................... 451
Managing Basic Change Request Information...................................................................................453Pages Used to Manage Basic Change Request Information........................................................453Change Request Page................................................................................................................... 453Collect Attributes for Change Request Page............................................................................... 456Add Change Request Page...........................................................................................................457Manage Change Requests Page................................................................................................... 458
Managing Notes.................................................................................................................................. 459Pages Used to Manage Notes...................................................................................................... 459Change Request - Notes Page......................................................................................................459View Note Page............................................................................................................................460
Managing Tasks.................................................................................................................................. 461Page Used to Manage Tasks........................................................................................................ 461Change Request - Tasks Page...................................................................................................... 461
Reviewing Change Request History...................................................................................................462Pages Used to Review Change Request History......................................................................... 462Understanding Change Request History...................................................................................... 463
Copyright © 1988, 2020, Oracle and/or its affiliates. xi

Contents
Prerequisite....................................................................................................................................463Change Request History - Events Page....................................................................................... 464Change Request History - Audit Page.........................................................................................464
Managing Related Changes................................................................................................................ 465Page Used to Manage Related Changes...................................................................................... 465Change Request - Related Changes Page.................................................................................... 466
Managing Related Actions..................................................................................................................466Page Used to Manage Related Actions........................................................................................466Change Request - Related Actions Page..................................................................................... 467
Managing Interested Parties................................................................................................................467Pages Used to Manage Interested Parties.................................................................................... 467Change Request - Interested Parties Page................................................................................... 468
Chapter 22: Managing Defects and Fixes............................................................................................. 469Understanding Defect and Fix Tracking............................................................................................ 469Entering Defects..................................................................................................................................469
Pages Used to Enter Defects........................................................................................................470Quality Management - Defect Page.............................................................................................470Quality Management - Notes Page.............................................................................................. 474Quality Management - Fixes Page...............................................................................................475Quality Management - Solutions Page........................................................................................ 476Quality Management - Products Affected Page...........................................................................477Quality Management - Interested Parties Page............................................................................478Quality Management - Related Actions Page..............................................................................478Quality Management - Related Defects Page.............................................................................. 479Relate Existing Defect - Relationship Page.................................................................................480Quality Management - Tested Environments Page......................................................................481Quality Management - Workflow History Page.......................................................................... 482
Recording Fixes and Linking Them to Defects................................................................................. 483Pages Used to Record Fixes and Link Them to Defects............................................................. 483Quality Management - Fix Page.................................................................................................. 483Quality Management - Defects Page........................................................................................... 485Quality Management - Notes Page.............................................................................................. 486
Chapter 23: Configuring Self-Service Applications............................................................................. 487Understanding PeopleSoft Call Center's Self-Service Application Configuration............................. 487
Self-Service Application Configuration....................................................................................... 487Contact Me Notifications............................................................................................................. 488Live Chat...................................................................................................................................... 488Association of Solutions with Case Closure Reasons................................................................. 488Search Descriptions for Predefined Searches.............................................................................. 489Troubleshooting Guide and FAQ Configuration..........................................................................491
Configuring Contact Me Regarding This Problem Notifications.......................................................492Associating Solutions with Reasons for Closing Cases..................................................................... 493
Page Used to Associate Solutions with Reasons for Closing Cases............................................493Reason and Solution Link Page...................................................................................................493
Updating Search Descriptions............................................................................................................ 494Page Used to Update Search Descriptions...................................................................................494Predefined Search Attributes Page...............................................................................................494
Configuring Troubleshooting Guide...................................................................................................495Pages Used to Configure Troubleshooting Guides...................................................................... 495Troubleshooting Guide Page........................................................................................................ 495Solution - Libraries Page............................................................................................................. 496
xii Copyright © 1988, 2020, Oracle and/or its affiliates.

Contents
Chapter 24: Working with Self-Service Application Transactions.....................................................497Understanding Self-Service Transactions........................................................................................... 497
Self-Service Transactions............................................................................................................. 497Configurable Functionality...........................................................................................................498Self-Service Data Access............................................................................................................. 499Case Visibility...............................................................................................................................500Confirmation Pages...................................................................................................................... 501
Understanding the Self-Service Home Page Content and Layout......................................................502Accessing Self-Service Transactions In PeopleSoft CRM and HCM................................................ 503
Understanding Self-Service Case Search and Display Template Families.................................. 503Case Creation and Display Template Families............................................................................ 504Case Management and Display Template Families..................................................................... 504Pages Used to Access Self-Service Transactions........................................................................ 505Customer Service Center Home Page..........................................................................................505IT Service Center Home Page..................................................................................................... 506HR Service Center Home Page....................................................................................................507HCM Employee Self Service Home Page................................................................................... 507HCM Manager Self-Service Home Page.....................................................................................508Campus Service Center Home Page............................................................................................ 509Student Center Home Page.......................................................................................................... 510Faculty Center Home Page.......................................................................................................... 511Customer Selection Page..............................................................................................................512
Defining the Self-Service Home Page Content and Layout...............................................................513Pages Used to Set Up the Self-Service Home Page.................................................................... 514Home Page - General Page..........................................................................................................514Home Page - Top Solutions Page................................................................................................ 515Home Page - Fluid Preferences Page.......................................................................................... 517Home Page - Search Pagelet Page...............................................................................................518Home Page - FAQ Page...............................................................................................................520Home Page - Known Issues Page................................................................................................521Home Page - Shortcuts Page....................................................................................................... 522Home Page - Quick Links Page.................................................................................................. 523Home Page - Chat Schedule Page............................................................................................... 524Personalize Content: <Service Center Name> Page....................................................................526Personalize Layout: <Service Center Name> Page..................................................................... 526
Viewing the Self-Service Pagelets......................................................................................................527Pages Used to View Additional Self-Service Home Page Content............................................. 528Search Here for Answers Pagelet................................................................................................ 528Search Page...................................................................................................................................529Top Solutions Pagelet...................................................................................................................531Solution Details Page................................................................................................................... 532FAQ Pagelet..................................................................................................................................532Frequently Asked Question Page.................................................................................................533Known Issues Pagelet...................................................................................................................535Known Issues Page...................................................................................................................... 535My Recent Cases Pagelet.............................................................................................................536Discussion Forums Pagelet.......................................................................................................... 537Shortcuts Pagelet.......................................................................................................................... 538Quick Links Pagelet..................................................................................................................... 541
Creating Cases.....................................................................................................................................542Pages Used to Add a Case...........................................................................................................542
Copyright © 1988, 2020, Oracle and/or its affiliates. xiii

Contents
Create Case Page..........................................................................................................................542Direct Report Page or Look Up Employee Page.........................................................................548Edit Contact Information Page.....................................................................................................549
Managing Existing Self-Service Application Cases...........................................................................550Pages Used to Manage Cases...................................................................................................... 550Find Cases Page........................................................................................................................... 551Case <ID> - Case Information Page............................................................................................552Case <ID> - Notes and Attachments Page.................................................................................. 553Add Note and Attachment Page.................................................................................................. 553Case <ID> - Interested Parties.....................................................................................................554Reason for Closing the Case Page...............................................................................................555Reason for Reopening the Case Page..........................................................................................556Manage Case - Edit Contact Information Page........................................................................... 557
Searching for Solutions.......................................................................................................................558Pages Used to Search for Solutions.............................................................................................558Search or Solution Search Page...................................................................................................559Case <ID> - Solutions Considered Page..................................................................................... 560Solution Details or Solution Considered Details Page................................................................ 560
Accessing FAQs.................................................................................................................................. 561Pages Used to Access FAQs........................................................................................................ 561Frequently Asked Questions Page............................................................................................... 561
Selecting and Running Troubleshooting Guides................................................................................ 562Pages Used to Select and Run Troubleshooting Guides..............................................................562Troubleshooting Guide Page........................................................................................................ 563Execute Script Page......................................................................................................................564
Chapter 25: Using the Fluid Interface to View and Manage HRHD Self Service ApplicationTransactions..............................................................................................................................................565
Understanding Employee Self Service Home Page........................................................................... 565Employee Self Service Home Page............................................................................................. 565
HR Service Center Dashboard............................................................................................................567Employee Self Service Home Page............................................................................................. 568
Using the PeopleSoft Fluid Interface to Search Answers.................................................................. 570Pages Used to Search Answers Using the PeopleSoft Fluid User Interface................................ 570Search for Answers Tile...............................................................................................................571Search Results Page..................................................................................................................... 572Solution Details Page................................................................................................................... 575
Using the PeopleSoft Fluid Interface to View FAQ...........................................................................577Pages Used to View FAQ............................................................................................................ 577FAQ Tile....................................................................................................................................... 577Frequently Asked Questions Page............................................................................................... 578
Using the PeopleSoft Fluid Interface to Create Case.........................................................................582Pages Used to Create Case.......................................................................................................... 583Create Case Tile........................................................................................................................... 583Create Case Wizard...................................................................................................................... 584Create Case — Enter Details Page.............................................................................................. 586Create Case — Review and Submit Page................................................................................... 590
Enabling Suggested Solutions for HRHD Fluid Self Service Cases..................................................592Viewing Suggested Solutions.......................................................................................................592
Using the PeopleSoft Fluid Interface to View Top Solutions............................................................ 593Pages Used to View Top Solutions..............................................................................................593Top Solutions Tile........................................................................................................................ 594
xiv Copyright © 1988, 2020, Oracle and/or its affiliates.

Contents
Top Solutions Page.......................................................................................................................594Solution Details Page................................................................................................................... 596
Using the PeopleSoft Fluid Interface to View Cases......................................................................... 599Pages Used to View Cases...........................................................................................................599My Cases Tile...............................................................................................................................600My Cases Page............................................................................................................................. 600Case Details Page.........................................................................................................................602
Using PeopleSoft Fluid User Interface to View Known Issues......................................................... 613Pages Used to View Known Issues............................................................................................. 613Known Issues Tile........................................................................................................................ 613Known Issues Page...................................................................................................................... 614Known Issues: Case Details Page................................................................................................615
Using the PeopleSoft Fluid User Interface to View HR Shortcuts.................................................... 617Pages Used to View HR Shortcuts.............................................................................................. 618HR Shortcuts Tile.........................................................................................................................618HR Shortcuts Page....................................................................................................................... 618
Using the PeopleSoft Fluid User Interface to Browse for Solutions By Topic.................................. 621Pages Used to Browse for Solutions By Topic in the PeopleSoft Fluid User Interface............... 621Browse By Topic Tile.................................................................................................................. 622Search Results Page..................................................................................................................... 622
Understanding HR HelpDesk Self Service and HCM Integration..................................................... 623Setting up PeopleSoft HR HelpDesk Self Service Integration in CRM.............................................623
Pages Used for Setting up HR HelpDesk Self Service Integration in CRM................................624Action Configuration Page...........................................................................................................624Context Map Definition Page...................................................................................................... 625HR HelpDesk Context Parameters Page: Solutions tab...............................................................626HR HelpDesk Context Parameters Page: Case tab......................................................................628HR HelpDesk Context Parameters Page: Preferences tab........................................................... 628Enabling Related Content Tiles for HCM Self Service Transactions.......................................... 629
Understanding Chat Feature on Fluid HR Helpdesk Components.....................................................632Setting up Chat Options on Fluid Pages............................................................................................ 632
Pages Used to Set up Chat Options on Fluid Pages....................................................................632Chat Enabled Fluid Page Setup................................................................................................... 632Agent Popup Page Definition Page............................................................................................. 633Steps to Assign Related Content Service on Fluid Components................................................. 635
Chapter 26: Integrating a Case with Third-Party Systems................................................................ 639Understanding the Case EIP...............................................................................................................639Defining Case EIP Functionality........................................................................................................639
Assumptions About the Case EIP................................................................................................639Case EIP Functionality.................................................................................................................640Delivered EIPs..............................................................................................................................641Technical Process Flows.............................................................................................................. 642Error Handling..............................................................................................................................648
Implementing Case EIP...................................................................................................................... 648Code Processing for Case EIP..................................................................................................... 648Setup Configuration......................................................................................................................649
Chapter 27: PeopleSoft Call Center Interactive Reports.................................................................... 653Understanding Interactive Reports..................................................................................................... 653Common Elements Used for Interactive Reports...............................................................................653Launching and Viewing Interactive Reports...................................................................................... 654
Pages Used to Launch and View Interactive Reports..................................................................654
Copyright © 1988, 2020, Oracle and/or its affiliates. xv

Contents
Service Operations Analysis Page............................................................................................... 655Support Service Level Management Analysis Page.................................................................... 655Help Desk Service Level Management Analysis Page................................................................656Change Metrics Update Page.......................................................................................................657Forward Schedule Page................................................................................................................658
Chapter 28: Integrating Oracle's Enterprise Manager with PeopleSoft CRM HelpDesk................661Understanding Oracle’s EM System Integration with PeopleSoft CRM............................................661
How it works................................................................................................................................ 661Integration flow process............................................................................................................... 661Connector Descriptor....................................................................................................................662Trouble Ticket Template.............................................................................................................. 662Sample Case Created from EM................................................................................................... 665
Setting up Options in PeopleSoft CRM............................................................................................. 667New Source for Enterprise Manager........................................................................................... 668New Severity Codes for Enterprise Manager.............................................................................. 668New Enterprise Manager Link Definition................................................................................... 669New Enterprise Manager AAF Action Type............................................................................... 670New Policy to Create an Enterprise Manager Related Action.................................................... 671Related Action Changes on the Case page..................................................................................672
Deploying and Configuring the PeopleSoft Connector to the EM Console.......................................673Copying the JAR File.................................................................................................................. 673Deploying and Registering the Connector...................................................................................673Configuring the Connector...........................................................................................................674
Chapter 29: Delivered Active Analytics Framework System Data for Call CenterApplications.............................................................................................................................................. 679
Delivered Terms.................................................................................................................................. 679Chapter 30: PeopleSoft CRM Call Center Reports............................................................................. 683
PeopleSoft CRM Call Center Reports: A to Z...................................................................................683PeopleSoft HelpDesk Reports...................................................................................................... 683PeopleSoft Support Reports......................................................................................................... 685Solution Reports........................................................................................................................... 687
xvi Copyright © 1988, 2020, Oracle and/or its affiliates.

Preface
Understanding the PeopleSoft Online Help and PeopleBooks
The PeopleSoft Online Help is a website that enables you to view all help content for PeopleSoftapplications and PeopleTools. The help provides standard navigation and full-text searching, as well ascontext-sensitive online help for PeopleSoft users.
Hosted PeopleSoft Online HelpYou can access the hosted PeopleSoft Online Help on the Oracle Help Center. The hosted PeopleSoftOnline Help is updated on a regular schedule, ensuring that you have access to the most currentdocumentation. This reduces the need to view separate documentation posts for application maintenanceon My Oracle Support. The hosted PeopleSoft Online Help is available in English only.
To configure the context-sensitive help for your PeopleSoft applications to use the Oracle Help Center,see Configuring Context-Sensitive Help Using the Hosted Online Help Website.
Locally Installed HelpIf you’re setting up an on-premise PeopleSoft environment, and your organization has firewall restrictionsthat prevent you from using the hosted PeopleSoft Online Help, you can install the online help locally.See Configuring Context-Sensitive Help Using a Locally Installed Online Help Website.
Downloadable PeopleBook PDF FilesYou can access downloadable PDF versions of the help content in the traditional PeopleBook format onthe Oracle Help Center. The content in the PeopleBook PDFs is the same as the content in the PeopleSoftOnline Help, but it has a different structure and it does not include the interactive navigation features thatare available in the online help.
Common Help DocumentationCommon help documentation contains information that applies to multiple applications. The two maintypes of common help are:
• Application Fundamentals
• Using PeopleSoft Applications
Most product families provide a set of application fundamentals help topics that discuss essentialinformation about the setup and design of your system. This information applies to many or allapplications in the PeopleSoft product family. Whether you are implementing a single application, somecombination of applications within the product family, or the entire product family, you should be familiarwith the contents of the appropriate application fundamentals help. They provide the starting points forfundamental implementation tasks.
Copyright © 1988, 2020, Oracle and/or its affiliates. xvii

Preface
In addition, the PeopleTools: Applications User's Guide introduces you to the various elements of thePeopleSoft Pure Internet Architecture. It also explains how to use the navigational hierarchy, components,and pages to perform basic functions as you navigate through the system. While your application orimplementation may differ, the topics in this user’s guide provide general information about usingPeopleSoft applications.
Field and Control DefinitionsPeopleSoft documentation includes definitions for most fields and controls that appear on applicationpages. These definitions describe how to use a field or control, where populated values come from, theeffects of selecting certain values, and so on. If a field or control is not defined, then it either requiresno additional explanation or is documented in a common elements section earlier in the documentation.For example, the Date field rarely requires additional explanation and may not be defined in thedocumentation for some pages.
Typographical ConventionsThe following table describes the typographical conventions that are used in the online help.
Typographical Convention Description
Key+Key Indicates a key combination action. For example, a plus sign (+) between keys means that you must hold down the first keywhile you press the second key. For Alt+W, hold down the Altkey while you press the W key.
. . . (ellipses) Indicate that the preceding item or series can be repeated anynumber of times in PeopleCode syntax.
{ } (curly braces) Indicate a choice between two options in PeopleCode syntax. Options are separated by a pipe ( | ).
[ ] (square brackets) Indicate optional items in PeopleCode syntax.
& (ampersand) When placed before a parameter in PeopleCode syntax, an ampersand indicates that the parameter is an alreadyinstantiated object.
Ampersands also precede all PeopleCode variables.
⇒ This continuation character has been inserted at the end of aline of code that has been wrapped at the page margin. Thecode should be viewed or entered as a single, continuous lineof code without the continuation character.
ISO Country and Currency CodesPeopleSoft Online Help topics use International Organization for Standardization (ISO) country andcurrency codes to identify country-specific information and monetary amounts.
ISO country codes may appear as country identifiers, and ISO currency codes may appear as currencyidentifiers in your PeopleSoft documentation. Reference to an ISO country code in your documentation
xviii Copyright © 1988, 2020, Oracle and/or its affiliates.

Preface
does not imply that your application includes every ISO country code. The following example is acountry-specific heading: "(FRA) Hiring an Employee."
The PeopleSoft Currency Code table (CURRENCY_CD_TBL) contains sample currency code data. TheCurrency Code table is based on ISO Standard 4217, "Codes for the representation of currencies," andalso relies on ISO country codes in the Country table (COUNTRY_TBL). The navigation to the pageswhere you maintain currency code and country information depends on which PeopleSoft applicationsyou are using. To access the pages for maintaining the Currency Code and Country tables, consult theonline help for your applications for more information.
Region and Industry IdentifiersInformation that applies only to a specific region or industry is preceded by a standard identifier inparentheses. This identifier typically appears at the beginning of a section heading, but it may also appearat the beginning of a note or other text.
Example of a region-specific heading: "(Latin America) Setting Up Depreciation"
Region IdentifiersRegions are identified by the region name. The following region identifiers may appear in the PeopleSoftOnline Help:
• Asia Pacific
• Europe
• Latin America
• North America
Industry IdentifiersIndustries are identified by the industry name or by an abbreviation for that industry. The followingindustry identifiers may appear in the PeopleSoft Online Help:
• USF (U.S. Federal)
• E&G (Education and Government)
Translations and Embedded HelpPeopleSoft 9.2 software applications include translated embedded help. With the 9.2 release, PeopleSoftaligns with the other Oracle applications by focusing our translation efforts on embedded help. Weare not planning to translate our traditional online help and PeopleBooks documentation. Instead weoffer very direct translated help at crucial spots within our application through our embedded helpwidgets. Additionally, we have a one-to-one mapping of application and help translations, meaning thatthe software and embedded help translation footprint is identical—something we were never able toaccomplish in the past.
Copyright © 1988, 2020, Oracle and/or its affiliates. xix

Preface
Using and Managing the PeopleSoft Online Help
Select About This Help in the left navigation panel on any page in the PeopleSoft Online Help to seeinformation on the following topics:
• Using the PeopleSoft Online Help
• Managing Hosted online help
• Managing locally installed PeopleSoft Online Help
PeopleSoft CRM Related Links
Oracle Help Center
PeopleSoft Online Help Home
PeopleSoft Information Portal
My Oracle Support
PeopleSoft Training from Oracle University
PeopleSoft Video Feature Overviews on YouTube
PeopleSoft Business Process Maps (Microsoft Visio format)
PeopleSoft Spotlight Series
Contact Us
Send your suggestions to [email protected]. Please include the applications update image orPeopleTools release that you’re using.
Follow Us
Facebook.
YouTube
Twitter@PeopleSoft_Info.
xx Copyright © 1988, 2020, Oracle and/or its affiliates.

Preface
PeopleSoft Blogs
Copyright © 1988, 2020, Oracle and/or its affiliates. xxi


Chapter 1
Getting Started with PeopleSoft CRM CallCenter Applications
PeopleSoft CRM Call Center Applications Overview
PeopleSoft CRM call center applications provide a collaborative framework for streamlining employeehelp desk and customer support operations. Through a standard web browser, agents can accessworkforce, customer, and enterprise information. When employees or customers use the PeopleSoftemployee or customer portal with PeopleSoft CRM self-services applications, they can access informationthat can help them solve their problems online without intervention from an agent.
PeopleSoft CRM offers six distinct applications to provide complete support management for yourinternal and external customers:
• PeopleSoft Support enables you to manage your customer support operations.
• PeopleSoft HelpDesk enables you to manage your workforce support operations.
• PeopleSoft HelpDesk for Human Resources enables you to manage employee human resourcesinquiries and issues.
• PeopleSoft Service Center for Higher Education enables you to manage constituent and staff inquiriesand issues.
• PeopleSoft Quality Management enables you to manage information related to product defects,enhancement requests, and resolutions (fixes).
• PeopleSoft Change Management enables you to effectively manage change requests.
Note: For PeopleSoft Support, HelpDesk and HelpDesk for Human Resources, there are two types ofself-service applications: one for employees (HelpDesk) and one for customers (Support).
These applications provide complete solutions for tracking and resolving problems and change requests.Together, they provide end-to-end management of all customer and workforce support issues. Because theapplications use the same technology foundation, an organization that uses more than one can leverageinformation technology resources and implementation processes across applications.
Each application provides functionality tailored to its unique audience. Cases are tracked based on datathat is appropriate to the specific application. HelpDesk cases are tracked by employee, department,and other data relevant to internal cases. Support cases are tracked by customer, contact, and other datarelevant to external customers. Analyst Service Center (Service Center for Higher Education) cases aretracked by customer contact, consumer (constituent), employee, and other data relevant to an educationalinstitution.
Copyright © 1988, 2020, Oracle and/or its affiliates. 23

Getting Started with PeopleSoft CRM Call Center Applications Chapter 1
PeopleSoft CRM Call Center Business Processes
This topic discusses the business processes that you can perform using PeopleSoft CRM call centerapplications. We discuss these business processes in greater detail in the business process topics in thisdocumentation. You'll find greater detail for each in the corresponding business process topics.
Business Processes for Call Center ApplicationsThese business processes apply to PeopleSoft Support, Service Center for Higher Education, HelpDeskand HelpDesk for Human resources. They enable you to:
• Create and manage cases, including those originating in a third-party system.
• Configure the Case page to display the information, fields, and layout specific to your support andinformation-gathering requirements.
• Use a skills-based assignment engine to assign cases to the agents and provider groups that are mostqualified to handle the cases.
• Create and manage solution libraries, search the solution library using text searches, and search forand view defects and enhancements.
• Track both successful and unsuccessful attempts to resolve cases.
• Embed analytics to suggest next actions and provide related dialogs based on the information andresponses entered for a case.
• Deploy self-service transactions that callers can use to search for solutions and to report, review, andupdate their own cases.
• Relate cases to each other.
• Enable chat for self-service customers.
• Manage work using structured task lists known as business projects.
• Add and track tasks.
• Use troubleshooting scripts, customer satisfaction scripts, and surveys to gather information fromcallers.
• Assign system access to users by role using authentication tokens.
• Invoice customers for services rendered, regardless of whether a service agreement is in place (usedonly for PeopleSoft Support).
• Associate service-level agreements with cases to gain insight into performance against targetedservice levels and related agreements.
• Use reports and charts to analyze and manage overall call center operations.
PeopleSoft Support Business ProcessesPeopleSoft Support enables you to:
24 Copyright © 1988, 2020, Oracle and/or its affiliates.

Chapter 1 Getting Started with PeopleSoft CRM Call Center Applications
• Access the actionable customer 360-Degree View page to see an enterprise view of any customer.
• Manage material returns.
• Generate new service orders from a case.
• Invoice customers for services rendered, regardless of whether a service agreement is in place.
• Run lead qualification (upsell and cross-sell) scripts and generate new sales leads and orders from acase.
• Relate cases to defects using PeopleSoft Quality Management.
• Associate a task list to a case.
• Use interactive reports and charts to analyze and manage overall call center operations.
PeopleSoft HelpDesk Business ProcessesPeopleSoft HelpDesk enables you to:
• Access the HelpDesk 360-Degree View page to see PeopleSoft CRM-related data for any worker.
• Relate cases to defects in the PeopleSoft Quality Management.
• Manage assets, including asset discovery and remote control tasks, with PeopleSoft HelpDesk or withthird-party IT asset management applications.
• Initiate and track change requests for a worker.
• Use reports and charts to analyze and manage help desk operations.
PeopleSoft HelpDesk for Human Resources Business ProcessesPeopleSoft HelpDesk for Human Resources enables you to:
• Access the HelpDesk for Human Resources 360-Degree View page to see a summary of relevanthuman resources (HR) and CRM data for any worker.
• Give agents single-click access from a case to specific transactions in the HR system.
• Use reports and charts to analyze and manage help desk operations.
Service Center for Higher EducationPeopleSoft Service Center for Higher Education enables you to:
• Create cases relevant to IT or support (non-IT) issues, or to create blended cases (using pre-defineddisplay templates).
• Access the Constituent 360-Degree View page to see PeopleSoft CRM-related data for any constituentor worker.
• Use Action Links to quickly access relevant pages in PeopleSoft Campus Solutions.
Copyright © 1988, 2020, Oracle and/or its affiliates. 25

Getting Started with PeopleSoft CRM Call Center Applications Chapter 1
PeopleSoft Quality ManagementPeopleSoft Quality Management enables you to:
• Track reported defects and enhancement requests and keep a record of how they are resolved.
• Record defect and fix information with user-defined codes and comprehensive product descriptions.
• Move the defect through the resolution process by automating worklist assignments and notificationsusing workflow functionality.
• Identify and access the correct records using the search tool.
PeopleSoft Change ManagementPeopleSoft Change Management enables you to:
• Manage basic change request information.
• Link cases and defects to a change.
• Link similar change requests in either a parent to child relationship or an equal relationship.
• Link impacted product groups, products, and assets to a change request.
• Manage the phases and tasks that are associated with a change request.
PeopleSoft CRM Call Center Integrations
The PeopleSoft CRM call center applications integrate with other PeopleSoft CRM applications andwith external systems. We discuss integration considerations in the implementation topics in thisdocumentation. Supplemental information about third-party application integrations is located on MyOracle Support.
Integration with Other PeopleSoft CRM ApplicationsThe PeopleSoft CRM call center applications are part of the PeopleSoft CRM product suite. Because thecall center applications reside in the same database as the other PeopleSoft CRM applications, data canmove smoothly from application to application without the need for integration-specific configuration.
For example, if you license both PeopleSoft Support and Integrated FieldService, you automatically havethe ability to create service orders from within your support cases.
The use of component interfaces for this type of cross-component flow ensures the triggering of all datavalidation and other PeopleCode processes.
Call center applications integrate with these PeopleSoft applications:
• Integrated FieldService.
• Sales.
• Order Capture.
• Contracts.
26 Copyright © 1988, 2020, Oracle and/or its affiliates.

Chapter 1 Getting Started with PeopleSoft CRM Call Center Applications
• Asset Management.
• Services Procurement (work order integration).
• Online Marketing (surveys).
Integration with External SystemsCustomer, worker, product, and Analytic Calculation Engine (ACE) integrations are common to multiplePeopleSoft CRM applications. The call center applications support the following additional integrationpoints:
• Integration with PeopleSoft Supply Chain Management or similar systems enables you to generatereturn material authorizations (RMAs) in PeopleSoft Support for customers returning stock forreplacement or repair or for orders that were shipped in error.
• The Credit Card enterprise integration point (EIP) enables you to integrate with third-party credit cardauthorization and payment vendors in PeopleSoft Support.
• Real-time EIPs for HelpDesk for Human Resources enable you to view relevant HR data (fromPeopleSoft Human Capital Management or Oracle E-Business HCM) while using the security that isalready established in the human resources system to control access to the data.
To protect sensitive data, the information is not stored in the PeopleSoft CRM system.
• Real-time EIPs for Service Center for Higher Education enable you to view constituent data fromPeopleSoft Campus Solutions.
• The Worker EIP synchronizes worker information with other systems.
When you implement the Worker EIP, the system publishes application messages when users addor modify worker records in PeopleSoft CRM. You can also set up PeopleSoft CRM to subscribeto Worker EIP application messages that are published when users modify these records in othersystems. The Worker EIP gives PeopleSoft CRM the ability to accept and create future-dated workersthat were created in other systems and subscribed to by PeopleSoft CRM.
• Through the Case EIP, third-party IT asset management applications can launch IT asset discoveryand desktop remote control from PeopleSoft HelpDesk.
Note: You can launch IT asset discovery and desktop remote control without the case EIP. Using theIT Asset Management Integration with your third-party discovery and remote control software, anagent can perform administrative and diagnostic functions from the Case page.
• The Systems Management integration framework provides a mechanism for integrating third-partynetwork management applications.
• Integration with PeopleSoft Contracts or any third-party billing application enables the invoicing ofagreement-based service orders as they are generated during a support call.
• Integrations with PeopleSoft Service Procurement and Maintenance Management enable users tocreate work orders in PeopleSoft Financials.
Related Links"EIPs in PeopleSoft CRM" (PeopleSoft CRM 9.2: Business Object Management)
Copyright © 1988, 2020, Oracle and/or its affiliates. 27

Getting Started with PeopleSoft CRM Call Center Applications Chapter 1
"Business Object Relationship Modelling" (PeopleSoft CRM 9.2: Business Object Management)
PeopleSoft Call Center Applications Implementation
PeopleSoft Setup Manager enables you to generate a list of setup tasks for your organization based onthe features that you are implementing. The setup tasks include the components that you must set up,listed in the order in which you must enter data into the component tables, and links to the correspondingdocumentation.
PeopleSoft call center applications also provide component interfaces to help you load data from yourexisting system into Call Center tables. Use the Excel to Component Interface utility with the componentinterfaces to populate the tables.
This table lists some of the components that have component interfaces:
Component Component Interface References
RC_CASE_TYPE RC_CASE_TYPE_CI See Setting Up Basic Prompt Tables forCases.
RC_PRIORITY RC_PRIORITY_CI See Setting Up Basic Prompt Tables forCases.
RC_PROBTYPE RC_PROBTYPE_CI See Setting Up Basic Prompt Tables forCases.
RC_SEVERITY RC_SEVERITY_CI See Setting Up Basic Prompt Tables forCases.
RC_STATUS RC_STATUS _CI See Setting Up Basic Prompt Tables forCases.
RC_QUICK_CODE RC_QUICK_CODE _CI See Setting Up Basic Prompt Tables forCases.
RBT_TGUIDE_SETUP RBT_TGUIDE_SETUP_SCI See Configuring Troubleshooting Guide.
RC_SOLN_LIB_SETUP RC_SOLN_LIB_SETUP_SCI See Configuring Troubleshooting Guide.
RC_CTD_DEFINE RC_CTD_DEFINE _CI See Setting Up Basic Prompt Tables forCases.
RC_CTD_COMBINE RC_CTD_COMBINE_CI See Setting Up Basic Prompt Tables forCases.
Other Sources of InformationIn the planning phase of your implementation, take advantage of all PeopleSoft sources of information,including the installation guides, table-loading sequences, data models, and business process maps.A complete list of these resources appears in the Application Fundamentals documentation withinformation about where to find the most current version of each.
See the product documentation for PeopleTools: Setup Manager and PeopleTools: Component Interfaces.
28 Copyright © 1988, 2020, Oracle and/or its affiliates.

Chapter 2
Defining Call Center Business Units andDisplay Template Options
Understanding Call Center Business Units
A call center business unit represents an operational entity, an individual call center within yourorganization. You must associate all call center cases with a business unit. All call center reporting andanalysis is based on business units. You can configure different business units for different businessprocesses.
You can use one business unit for all cases, or you can separate operations based on whatever criteriamakes the most sense. For example, you could create business units for different product lines or regions.
Before creating multiple call center business units, be sure that you understand the concept of tablesetcontrols, the mechanism that is used to determine valid values for certain fields on the Case page andother transactional pages.
See "Understanding TableSet Controls in PeopleSoft CRM" (PeopleSoft CRM 9.2: ApplicationFundamentals ).
Understanding Display Templates
This topic discusses:
• Appearance and behavior control.
• Display template families.
• Active Analytics Framework (AAF) policies and display templates.
• Defaulting logic.
• Delivered display templates for call center applications.
Appearance and Behavior ControlDisplay templates enable you to control the appearance and behavior of the Case component (RC_CASE)for a variety of specific business needs. You can associate the Case component with multiple displaytemplates, each of which provides a different presentation of the component tailored for your specificneeds.
The PeopleSoft CRM Call Center application delivers the Case component with multiple templates. Youcan, however, create new display templates or modify existing ones. You can also automatically change
Copyright © 1988, 2020, Oracle and/or its affiliates. 29

Defining Call Center Business Units and Display Template Options Chapter 2
display templates on the pages within the Case component based on certain case criteria using AAFpolicies. Additionally, agents can manually change their views of cases using different display templates.
For example, suppose that you are using the three delivered display templates for the Case componentin your call center operation: Customer Support Center, Internal IT HelpDesk, and Internal HumanResources HelpDesk. You can configure how the component looks and behaves in each operation basedupon your business requirements.
You may also want to disable the Related Cases page for the two help desk display templates, change theCustomer Information section label to Employee Information for the help desk display templates, disablethe Dispute Information section in display templates that are not pertinent to the communications industry,and so on.
Use display templates to control:
• Visibility of pages. (You cannot change the order of the pages.)
• Visibility of page sections. (You cannot change the order of the sections.)
• Visibility and security of page fields.
• Functionality and setup options that are initiated by display templates.
• Default pages that appear when users access the component in the add or update mode.
• Most labels on fields, sections, and tabs within sections.
Note: From the Display Template Details component, you can change labels for a section, field, orembedded tabs without first creating a message catalog definition. The system automatically createsthe message or label behind the scenes.
See "Configuring Display Templates for Components" (PeopleSoft CRM 9.2: Automation andConfiguration Tools).
Display Template FamiliesYou can categorize display templates into families. Once an agent opens a case, however, the agent cannotchange the display template family. Depending on how you configure your system, an agent can usedifferent display templates to view information for the same case.
Use the Display Template Family component (RDT_TMPL_FAMILY) to specify which display templatesand components are assigned to the display template family.
The PeopleSoft system delivers a number of display template families for its call center applications.You cannot, however, add new display template families. You can add and create new display templatesand assign them to an existing display template family. You can also change the description of a displaytemplate family.
To clone an existing display template and assign it to a display template family, use the Display TemplateSave As page.
Related Links"Understanding Display Templates" (PeopleSoft CRM 9.2: Automation and Configuration Tools)
30 Copyright © 1988, 2020, Oracle and/or its affiliates.

Chapter 2 Defining Call Center Business Units and Display Template Options
AAF Policies and Display TemplatesTo render case information using a specific display template based on predetermined AAF policyconditions, you can create new AAF policies using the Case Display Template action.
You can associate these trigger points with the Case Display Template action for agent-facing Casecomponents:
• After a HelpDesk Case is Saved.
• After a Support Case is Saved.
• When a Business Unit is Selected for HelpDesk Case.
• When a Business Unit is Selected for Support Case.
• When a Case Type is Selected for HelpDesk Case.
• When a Case Type is Selected for Support Case.
• When a Category is Selected for HelpDesk Case.
• When a Category is Selected for Support Case.
• When a HelpDesk Case is Presented.
• When a New Self-Service HelpDesk Case is Presented.
• When a New Self-Service Support Case is Presented.
• When a Product Group is Selected for HelpDesk Case.
• When a Product Group is Selected for Support Case.
• When a Product is selected for a HelpDesk Case.
• When a Product is Selected for Support Case.
• When a Support Case is Presented.
• When an Existing Self-Service HelpDesk Case is Presented.
• When an Existing Self-Service Support Case is Presented.
You can associate these trigger points with the Case Display Template action for both self-service Casecomponents:
• When a New Self-Service Support Case Business Unit is Selected.
• When a New Self-Service HelpDesk Case Business Unit is Selected.
Additionally, you can use the Manage Policies by Case Display Template Action search page to locate allthe policies that use the Case Display Template action.
Related Links"Understanding AAF" (PeopleSoft CRM 9.2: Automation and Configuration Tools)
Copyright © 1988, 2020, Oracle and/or its affiliates. 31

Defining Call Center Business Units and Display Template Options Chapter 2
Defaulting LogicThe system uses defaulting logic to determine which display templates and display template families touse when an agent opens a new case. This topic discusses these three types of defaulting logic:
• Display template family.
• Business unit.
• Display template ID.
Display Template Family Defaulting LogicThe display template family defaulting logic uses content references (CREFs) to determine which displaytemplate family to use when an agent opens a new case. The system typically gets the display templatefamily directly from the CREF that is associated with the link in the left-hand navigation.
This logic is only used to add a new case. When updating an existing case, the system retrieves thedisplay template family information from the existing Case record.
If the display template family is not available in the CREF, the system looks for the display template ID inthe CREF. If it is not there, the system displays an error message.
If the display template ID is in the CREF, the system gets the display template family from the displaytemplate ID. To locate this information, the system looks at the display template family setup pages forthe display template family that is associated with the component.
Note: You cannot change the display template families that are associated with the CREF. You can,however, add as many display templates as you need to the display template family.
32 Copyright © 1988, 2020, Oracle and/or its affiliates.

Chapter 2 Defining Call Center Business Units and Display Template Options
Image: Display template family defaulting logic
This flowchart shows how the system uses content references to locate the correct display template familywhen it creates a new case.
Business Unit Defaulting LogicIf you set up the User Preferences - Call Center page with display template, component, and business unitinformation, the system gets the business unit from the User Preferences page.
If the default business unit is not valid, the system uses the first business unit and display template ID inthe list on the Case page for the Business Unit field. If an agent changes the business unit that the user hasaccess to while on the Case page, the system looks at the Display Template page within the Call CenterBusiness Unit Definition component to display the correct display template family.
Copyright © 1988, 2020, Oracle and/or its affiliates. 33
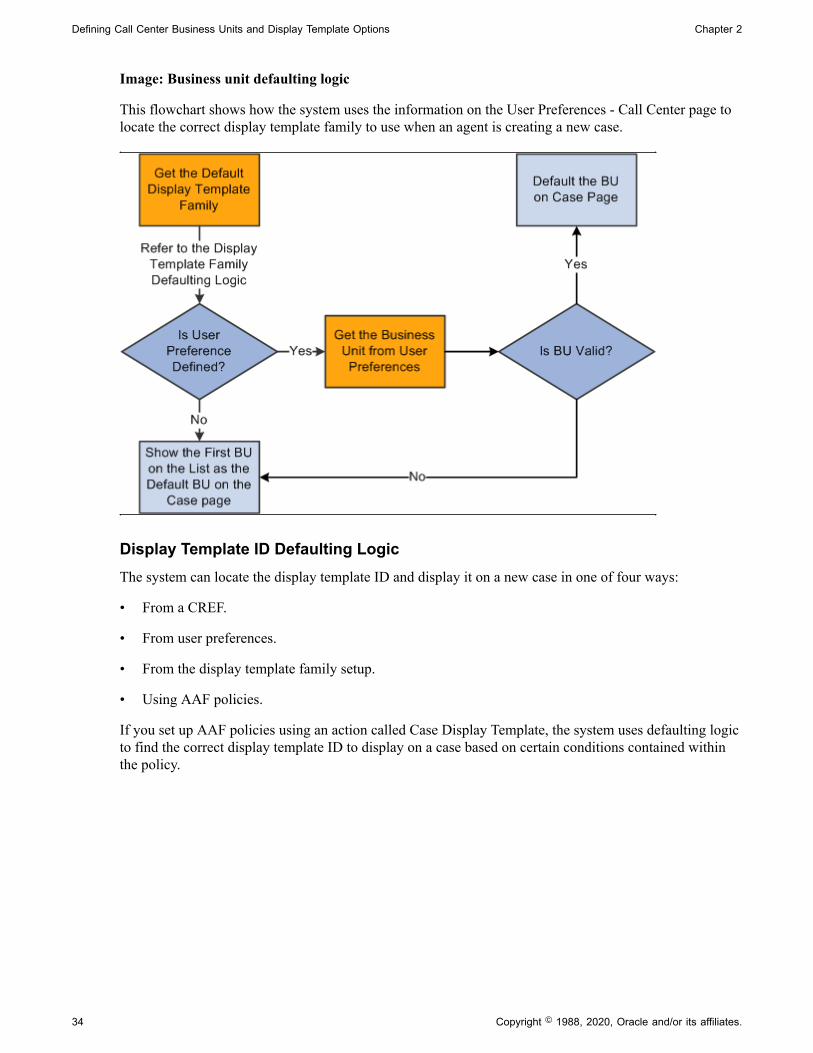
Defining Call Center Business Units and Display Template Options Chapter 2
Image: Business unit defaulting logic
This flowchart shows how the system uses the information on the User Preferences - Call Center page tolocate the correct display template family to use when an agent is creating a new case.
Display Template ID Defaulting LogicThe system can locate the display template ID and display it on a new case in one of four ways:
• From a CREF.
• From user preferences.
• From the display template family setup.
• Using AAF policies.
If you set up AAF policies using an action called Case Display Template, the system uses defaulting logicto find the correct display template ID to display on a case based on certain conditions contained withinthe policy.
34 Copyright © 1988, 2020, Oracle and/or its affiliates.

Chapter 2 Defining Call Center Business Units and Display Template Options
Image: Display template ID defaulting logic
This flowchart shows the defaulting logic that the system uses.
Note: When implementing the integration of HelpDesk to PeopleSoft or E-Business HCM, it is importantthat users have the appropriate display template ID specified in their user preferences. As delivered,the CREF's for Add Case and Search Case point to a display template family, so the user preference ischecked to determine the correct display template ID to use for a case.As delivered, the correct display template ID to list in user preferences to open a PeopleSoft HRHelpDesk Case from the left hand navigation is CRM_HHD. The delivered display template ID to bespecified to open an E-Business HR HelpDesk Case from the left hand navigation is CRM_HHD_EBS.
Copyright © 1988, 2020, Oracle and/or its affiliates. 35

Defining Call Center Business Units and Display Template Options Chapter 2
Important! PeopleSoft CRM delivers system data for each component that supports display templates.Stored in the Display Template System Data component, the system data dictates which parts of thecomponent that functional users are able to control using the predefined display templates (displaytemplates are defined in the Display Template Definition component). Access to these two componentsis restricted to IT administrators only. You can change this information if you need to. PeopleSoftconsidered these types of changes a configuration rather than a customization. You cannot, howevercreate new families, just new templates within the delivered families.
Understanding Assignment Options
The Options page has two sections: Agent and Self-service. Each section has options for provider groupassignment and for agent assignment.
Note: In addition to the options, you can automatically assign self-service cases to a provider group(but not to an agent) by specifying a default provider group on the Case Defaults page. However, auto-assignment settings on this page take precedence: the system will first attempt to assign cases based onthe settings on the Business Unit - Options page. Only if that attempt fails does the system assign the caseto the default Assign To provider group that is specified on the Case Defaults page.
This topic discusses:
• Provider group assignment.
• Person assignment.
See "Understanding Provider Groups and Group Members" (PeopleSoft CRM 9.2: ApplicationFundamentals ).
Provider Group AssignmentThe following definitions describe options for automatically assigning new cases to provider groups.These settings apply only when the Provider Group field or the Assigned To field is blank in a newlysubmitted case—the system does not override an existing value in the Provider Group field. For example,if you use a Quick Code to assign a provider group, the system does not attempt to assign a providergroup when you save.
None Select None if you do not want any automatic assignment tooccur; assignments must be made manually.
Note: Delivered AAF policies for cases send notifications to theagent or provider group that is assigned to a newly created case. If you allow unassigned cases to be saved, you should define amechanism for routing and handling these cases.
Any Select Any or Available to invoke the assignment engine whenthe case is saved.
If you select Any, the assignment engine finds the worker orprovider group with the highest overall fit score.
36 Copyright © 1988, 2020, Oracle and/or its affiliates.

Chapter 2 Defining Call Center Business Units and Display Template Options
Note: If a user manually assigns an agent to the case and theagent is in exactly one provider group, the system automaticallyassigns the agent's provider group to the case when it is saved. Ifthe agent is in more than one provider group, the system leavesthe Provider Group field blank on the Case page when the caseis saved. You could, however, have a provider group that isavailable and none of the workers are available.
Available Select Any or Available to invoke the assignment engine whenthe case is saved.
If you select Available, the assignment engine looks only atprovider groups that are currently available according to theschedules you create.
Default Select Default to assign a case to its creator. This value does notinvoke the assignment engine.
If you select Default, the system will address whether an agentis on the case. If an agent is on the case and that agent is in onlyone provider group, the system assigns that provider group asthe Default provider group. Otherwise, the system leaves theProvider Group field blank.
Selecting Default forces the system to find the group for theagent that has already been selected. If the agent is a memberof more than one group, the system leaves the Provider Groupblank.
Note: This option is available only for cases created by agents, not for cases created by self-service application users. However, you can set up a self-service provider group on the CaseDefaults page using the Assigned to Provider Group field forself-service call center components.
Person AssignmentThe following definitions describe options for automatically assigning new cases to individual agents.These settings apply only when the Assigned To field is blank in a newly submitted case; the system doesnot override an existing value in the Assigned To field. For example, if you use a Quick Code to assign anagent, then the system does not attempt to assign a different agent when you save the case.
Note: The system always assigns a provider group first, and then an agent.
None Indicates that the system does not assign new cases to agents.
Copyright © 1988, 2020, Oracle and/or its affiliates. 37

Defining Call Center Business Units and Display Template Options Chapter 2
Note: Be aware that delivered AAF policies for cases sendnotifications to the agent or provider group that is assigned toa newly created case. If you allow agents to save unassignedcases, you should define a mechanism for routing and handlingthose cases.
Any Select to have the assignment engine assign the case tothe person with the highest fit score (if a provider groupwas previously entered, either manually or through auto-assignment). If the system did not assign a provider group, thenit does not assign an agent either.
Available Select to have the assignment engine check worker schedulesand assign cases only to agents who are available at the time thecase is assigned.
Note: The Any and Available options use the assignment engine. For the assignment engine to assign an agent, a provider groupmust already be assigned.
Default Select to have the system assign the case to the agent whocreated the case.
This setting only applies if the case is new. If you update anexisting case and clear the Assigned To field, the system leavesit blank. This functionality is true for the other assignmentoptions as well. If you want to run the assignment engine afterthe initial creation of the case, you need to use the Suggest aProvider Group and Suggest an Agent buttons next to the fields.
The system handles case assignments according to these rules:
• If a provider group is specified, either manually or throughauto-assignment, the system does not assign the case to anagent.
• If no provider group is specified, the system assigns the caseto the agent who created the case.
• If the provider group auto-assignment option is also Default, then the system assigns the case to the agent's providergroup (assuming that one can be uniquely identified).
Note: This option is for cases created by agents. For casescreated through a self-service application, you can set up adefault provider group on the Case Defaults page that you canuse for self-service. The system will assign a provider group, but it will not assign an agent.
See "Understanding Assignment Searches" (PeopleSoft CRM9.2: Application Fundamentals ).
38 Copyright © 1988, 2020, Oracle and/or its affiliates.

Chapter 2 Defining Call Center Business Units and Display Template Options
Defining Call Center Business Units
To define call center business units, use the Call Center Definition (RC_BUS_UNIT) component.
This topic lists prerequisites and discusses how to define call center business units.
Pages Used to Define Call Center Business UnitsPage Name Definition Name Usage
Call Center BU Page BUS_UNIT_RC1 Create call center business units andestablish default business units to usewhen integrating with other PeopleSoftapplications.
Business Unit - Options Page BUS_UNIT_RC2 Define business rules for a call centerbusiness unit.
Match Usage Page RC_MATCH_SUMMARY View the case matching criteria definedfor this business unit and associatedSetID.
Business Unit - Display Templates Page BUS_UNIT_RC_RDT Associate display template families anddisplay templates with the business unit.
Case Defaults Page BUS_UNIT_RC_DEF Set up defaults for all call centerapplications.
Related Links"Understanding Business Units in PeopleSoft CRM" (PeopleSoft CRM 9.2: Application Fundamentals )"Understanding TableSet Controls in PeopleSoft CRM" (PeopleSoft CRM 9.2: ApplicationFundamentals )
PrerequisitesBefore you can associate a call center business unit with a default business unit in PeopleSoftFieldService, Inventory, Quality Management, or Sales, you must first create business units for thespecific application.
You may also want to do some other setup tasks, such as creating case statuses, provider groups, category/type/details, and so on.
Call Center BU PageUse the Call Center BU page (BUS_UNIT_RC1) to create call center business units and establish defaultbusiness units to use when integrating with other PeopleSoft applications.
Navigation
Set Up CRM > Business Unit Related > Call Center Definition > Call Center BU
Copyright © 1988, 2020, Oracle and/or its affiliates. 39

Defining Call Center Business Units and Display Template Options Chapter 2
Image: Call Center BU page
This example illustrates the fields and controls on the Call Center BU page.
The preceding page is shown in the Add a New Business Unit mode. In Add mode, the system hides theother pages in the component and many fields are not available for entry.
Business Unit Displays the business unit identifier you entered when you firstaccessed the page. To maximize system performance, alwaysuse exactly five characters.
Business Unit Description Description Enter the description that you want to appear on the Case page
and other places where the business unit appears.
Default SetID The Default SetID field appears only when you open the CallCenter BU page in Add mode. Once you create the businessunit, the system sets up default tableset control information, andyou must use the TableSet Control page to change the default.
Enter or select the default setID for the business unit. Whenyou create a business unit, the system copies the setID for each
40 Copyright © 1988, 2020, Oracle and/or its affiliates.

Chapter 2 Defining Call Center Business Units and Display Template Options
record group from the tableset control of the setID you haveentered. In the tableset control record, each of the deliveredrecord groups is associated with the setID that you enter here ora setID that is being shared (SHARE) with other setIDs.
Note: The system will always create a setID that is equal to thebusiness unit that you create. Every business unit is also a setID.
Status Indicates the call center status. Values are: Open (active) orClosed (inactive). The system does not process transactions forclosed business units.
Note: You cannot create a new case for a closed business unit, but you can continue working a case that has already beencreated with a business unit that was closed after the case wasopened.
Create BU (create business unit) This button appears only when you open the Call Center BUpage in Add a New Business Unit mode.
Click to establish the tableset controls for the call centerbusiness unit based on the default setID that you specify.
Other pages in the component and many of the fields on thispage are unavailable until you click the Create BU button tocreate the business unit.
The following fields are not available until you click the Create BU button. Use these fields to specifydefault business units to use when creating certain types of objects from the Related Actions section onthe Case page, the Related Actions section on the Case Summary page, or from the Related Actions pagewithin the Case component.
These fields are relevant only if you integrate with the specified product. Agents can override the defaultsthat are established here.
Self-Service Description Enter a description for self-service application users. Thisdescription should be meaningful to users who are unfamiliarwith the organization of your call center business unit.
Service Order Unit Enter the default FieldService business unit to use when creatingservice orders from call center cases. When you establishtableset sharing, ensure that the field service business unit andthe call center business unit prompt against the same set ofcustomers.
RMA Unit (return materialauthorization unit)RMA Unit
Enter the default RMA business unit to use when creating areturn material authorization from a case.
Sales Unit Sales Unit field Enter the default Sales business unit to use when creating a saleslead from the Related Actions page in a call center case. Whenyou establish tableset sharing, make sure that the sales businessunit and the call center business unit prompt against the same setof customers.
Copyright © 1988, 2020, Oracle and/or its affiliates. 41

Defining Call Center Business Units and Display Template Options Chapter 2
Quality Unit Enter the default Quality Management business unit to use whencreating or relating a defect to a case. You can create a newdefect or relate an existing defect. In either case, the systemdisplays the business unit that you enter here on the page.
Order Capture Unit Enter the default Order Capture business unit to use whenentering an order related to a case.
Note: If you use a lead qualification script to transfer to OrderCapture from either the Support or HelpDesk case component, the business unit must be valid for your Order Captureapplication or you must select a default order capture businessunit on this setup page.
Online Marketing Unit Select the online marketing business unit that you want thesystem to use by default in the Dialog Business Unit fieldwhen a user selects the Case Survey related action to launch acustomer survey from the Case page.
Business Unit - Options PageUse the Business Unit - Options page (BUS_UNIT_RC2) to define business rules for a call centerbusiness unit.
Navigation
Set Up CRM > Business Unit Related > Call Center Definition > Options
Image: Business Unit - Options page (1 of 3)
This example illustrates the fields and controls on the Business Unit - Options page (1 of 3).
42 Copyright © 1988, 2020, Oracle and/or its affiliates.

Chapter 2 Defining Call Center Business Units and Display Template Options
Image: Business Unit - Options page (2 of 3)
This example illustrates the fields and controls on the Business Unit - Options page (2 of 3).
Image: Business Unit - Options page (3 of 3)
This example illustrates the fields and controls on the Business Unit - Options page (3 of 3).
The fields on this page are not available for entry until you create the business unit by clicking the CreateBU button on the Call Center BU page.
Agent Assign Person Select the option that you want the system to use to
automatically assign new cases to individual agents.
See Person Assignment.
Assign Provider Group Select the option that you want the system to use toautomatically assign provider groups to new cases.
See Person Assignment.
Call Center Manager Select your default call center manager. You can use theselection here to route workflow using AAF notifications.
See "Understanding PeopleSoft CRM Workflow" (PeopleSoftCRM 9.2: Automation and Configuration Tools).
Max # of Notes in Web Service If you tend to have many notes in your cases, enter a numberthat limits the volume of notes that you want included in a webservice. If you leave this field blank, the system includes allnotes.
Copyright © 1988, 2020, Oracle and/or its affiliates. 43

Defining Call Center Business Units and Display Template Options Chapter 2
ER Case Manager Select your default ER case manager for the selected businessunit. ER Case Manager will be able to access all the ER Casesfor the particular BU irrespective of the individual assignment.
See Understanding Employee Relations Case Management.
Product Prompt Select how you want the product prompt to work. The optionsare:
• All
You can select a product from the master products table.
• Installed
You can select from a list of products that are installed at aspecific site.
See "Defining Products" (PeopleSoft CRM 9.2: Product andItem Management).
Allow Multiple Resolutions Select if you want to allow an agent to select more than onesolution to be marked as Successful.
Autoexecute Solution Search Select if you want the PeopleSoft search to automaticallyexecute when the Search page is accessed.
Canceled to Open Case Status Select to allow agents to reopen cases that are in a canceledstatus.
Closed to Open Case Status Select to allow agents to reopen cases that are closed.
Bill for Cases Select if you are using the billing functionality for support cases. Select the Details link to enter price by currency and rate typeinformation.
Note: This field appears only if you selected the Send BillingTransactions to Contracts and Calculate Price on Case checkboxes on the Installation Options - Billing and Pricing Optionspage.
Percent of SLA for Red (percent ofservice level agreement for red)
Enter a number to indicate the percentage of SLA (ServiceLevel Agreement) restore time that needs to pass before thesystem turns the case to red. For example, enter 90 (enter awhole number, not a decimal amount) if you want a case to turnred when it has reached 90 percent of the SLA restore time. Inaddition, this calculation takes into account the time the case ison hold.
Percent of SLA for Yellow percent ofService Level Agreement for yellow)
Enter a number to indicate the percentage of SLA restore timethat needs to pass before the system turns the case to yellow. The number you enter in this field must be lower than the rednumber or you will receive an error message. As such, a case
44 Copyright © 1988, 2020, Oracle and/or its affiliates.

Chapter 2 Defining Call Center Business Units and Display Template Options
should turn yellow before it turns red. These fields will acceptnumbers between 1 and 999. Do not enter decimal amounts.
Close with Business Project Select to allow agents to close cases with business projects thatare at the In Process status.
Close with Service Order Select to allow agents to close cases that have an open serviceorder.
Case ID Before Save Select to generate a case ID when the agent first opens the case.
Change Adhoc Solution Status to"Submitted for Review"
Select to automatically update the status of an ad hoc solution toSubmitted for Review when a solution resolves a case.
Solve Case from OutboundNotification
Select to allow cases of this business unit to be resolvable whenoutbound notifications are sent.
This option is selected by default. When selected, the Send andSolve toolbar button appears on the Outbound Notification pageif the initiating transaction is case. You can click this button forthe system to perform these tasks:
• Deliver the drafted notification to recipients.
• Solve the associated case by attaching a predefined cannedsolution (the specified email resolution solution ID) to thecase and setting the case status to the resolved case status asspecified on the Case Defaults page.
See "Sending Manual Notifications From CRM Transactions"(PeopleSoft CRM 9.2: Automation and Configuration Tools).
Email Resolution Solution ID Select to specify a solution that attaches to cases when usersclick the Send and Solve button on the Outbound Notificationpage. Solutions meeting these criteria are available for selection:
• Solutions are of type Canned Solution.
• Solutions are active.
• Solutions belong to the setID that is associated with the callcenter business unit.
When the system resolves a case from an outbound notification, it attaches a solution to the case with a solution status ofSuccessful Resolution and then sets the status of the case to thepredefined resolved case status. As a result, the system alsoincreases the usage count of the canned solution by one as well.
Note: If you access the Outbound Notification page by clickingthe Email button to email a solution and click the Send andSolve button, the selected solution is then used to attach to therelated case as the successful resolution. The canned solutiondoes not apply when a solution is already selected.
Copyright © 1988, 2020, Oracle and/or its affiliates. 45

Defining Call Center Business Units and Display Template Options Chapter 2
This option is selected automatically if the Solve Case fromOutbound Notification option is selected. Make sure to specifyan email resolution solution; otherwise, an error messageappears if you click the Send and Solve button but no cannedsolution is available to attach and resolve the case. In this case,the system sends the notification but it does not resolve the case.
Enable Match Case Select this to enable case matching for this Business Unit. Casematching enables you to instruct the system to find cases thatare similar to the case you are presently viewing. This providesa quick way to check if the issue from the current case you areviewing has already been reported in or is related to anothercase.
Note: The rules for defining case matches are defined on theMatch Detail page, and can be viewed using the Match Usagelink on the Options page for Call Center Business Unit defaults.
Match Usage Click this link to view the match usage criteria that have beendefined for this business unit and associated SetID on the MatchDetail page.
Reason Interested Specify the reason to be associated with the entry for interestedparty on a case when the Add Interested Party action is takenfrom the 360-Degree View global cases node.
Favorite Solutions for Agents Select this to allow agents to mark solutions as favorite.
Self-Service Options Assign Person Select the option that you want the system to use to
automatically assign self-service cases to individual agents.
See Person Assignment.
Assign Provider Group Select the option that you want the system to use toautomatically assign provider groups to new cases.
See "Understanding Provider Groups and Group Members"(PeopleSoft CRM 9.2: Application Fundamentals ).
Solution Newly Created Period Specify how long (in days) the new icon should appear forsolutions.
Allow Case to be Closed Select to allow self-service application users to close cases.
Allow Case to be Reopened Select to allow self-service application users to reopen cases thatare closed.
Grace Period (Days) Enter the number of days after a case has been closed duringwhich self-service application users are permitted to reopenthe case. This option is only allowed if you select the previous
46 Copyright © 1988, 2020, Oracle and/or its affiliates.

Chapter 2 Defining Call Center Business Units and Display Template Options
option—allowing a case to be reopened. If you allow cases to bereopened, the grace period will default to 7 days.
Reason Interested Specify the reason to be associated with the entry for interestedparty on a case when the Add Interested Party action is takenfrom the 360-Degree View global cases node.
Suggested Solutions Count Select to specify suggested solutions count while creatinga case. You can specify the solution count based on days orsolutions created across dates.
Related Links"Understanding TableSet Controls in PeopleSoft CRM" (PeopleSoft CRM 9.2: ApplicationFundamentals )
Match Usage PageUse the Match Usage page (RC_MATCH_SUMMARY) to view the case matching criteria defined forthis business unit and associated SetID.
Navigation
Click the Match Usage link on the Business unit - Options page.
Image: Match Usage page
This example illustrates the fields and controls on the Match Usage page.
Use this page to view the case match options defined for the business unit and any applicable providergroups.
These options are defined on the Match Detail and Match Usage pages. The system uses these options tofind cases that are similar to one another, thus enabling the user to identify potentially duplicate cases.
Note: If there is no Match Definition associated with this business unit (as defined in the MatchDefinition itself), then the two grids on this page will display "No match definition is found for BusinessUnit" and "No match definition is found for Provider Group."
See Understanding Call Center Prompt Tables.
Copyright © 1988, 2020, Oracle and/or its affiliates. 47

Defining Call Center Business Units and Display Template Options Chapter 2
Business Unit - Display Templates PageUse the Business Unit - Display Templates page (BUS_UNIT_RC_RDT) to associate display templatefamilies and display templates with the business unit.
Navigation
Set Up CRM > Business Unit Related > Call Center Definition > Display Templates
Image: Display Templates page
This example illustrates the fields and controls on the Display Templates page.
Use this page to enable the business unit for the display template family. For example if the US200business unit needs to be enabled for support cases, then you are required to establish the link betweenUS200 and the RC_SUPPORT family on this page.
When you select the display template ID, the system displays only the display template IDs that areassociated with the display template family you selected.
If an agent changes the business unit while on the Case page, the system looks at this page to display thecorrect display template family and ID.
Case Defaults PageUse the Case Defaults page (BUS_UNIT_RC_DEF) to set up defaults for all call center applications.
Navigation
Set Up CRM > Business Unit Related > Call Center Definition > Case Defaults
48 Copyright © 1988, 2020, Oracle and/or its affiliates.

Chapter 2 Defining Call Center Business Units and Display Template Options
Image: Case Defaults page (1 of 2)
This example illustrates the fields and controls on the Case Defaults page (1 of 2).
Image: Case Defaults page (2 of 2)
This example illustrates the fields and controls on the Case Defaults page (2 of 2).
The fields on this page are not available for entry until you create the business unit by clicking the CreateBU button on the Call Center BU page.
Case Defaults Template Family Select the display template family that you want to use for
this business unit. The system shows all the existing displaytemplate families that are defined in the system.
Copyright © 1988, 2020, Oracle and/or its affiliates. 49

Defining Call Center Business Units and Display Template Options Chapter 2
Call Center Component Select the component that you want to associate with the displaytemplate family that is displayed in the previous field. Thesystem displays the components that are defined for the selecteddisplay template family.
You can set up different defaults for different components onthe same template, and you can set up different default valuesfor different templates that use the same business unit. Whenyou select a component, the system may display a differentset of fields, as not all default fields apply to each call centercomponent.
All Call Centers New Case Status Select the status that you want the system to use when an agent
opens a new case.
Note: Although most defaults are optional, the New Case Statusdefault is required for the component that is used to report newself-service cases. Without a default value, the system cannotsave the case. Also, because Case Status is a required field for acase, an agent reporting a case through a self-service applicationcannot set the case status.
Resolved Case Status Select the value that you want the system to use when an agentidentifies a successful solution and resolves the case.
Both agents and self-service application users can resolvecases. Agents resolve cases by setting a solution status toSuccessful Resolution. Self-service application users resolvecases by answering Yes when asked whether a particular solutionresolved their problem. The default can be different for a self-service user than it is for an agent.
Reopened Case Status If you selected the Allow Case to be Reopened check box on theBusiness Unit - Options page, select the status that you want thesystem to use when the self-service application user reopens acase. If you do not enter a status here, then, when an agent orself-service user reopens a case, the status will not change. Theresult could be cases closing without a successful resolution—acondition that the system does not normally allow.
Duplicate Case Status If you relate one case to another, and the associated relationshiptype definition has the Set status of child case using duplicatecase status from the Business Unit Defaults check box selected, then the child case status will be automatically set to the valuespecified in this field.
50 Copyright © 1988, 2020, Oracle and/or its affiliates.
Chapter 2 Defining Call Center Business Units and Display Template Options
Note: If this field has no value, then the child case status willnot be updated when it is related to another case, even if theassociated relationship type definition has the Set status of childcase using duplicate case status from the Business Unit Defaultsoption checked.
Case Type Select the default case type for a new case.
Case Subtype Select the default case subtype for a new case.
Case Priority Select the default case priority for a new case.
Case Impact Select the default case impact for a new case.
Urgency Select the default case urgency for a new case.
Case Severity Select the default case severity for a new case.
Source Select the default source for the case. This field enables you totell which cases were entered by way of self-service applicationsor by agents.
Source Web Service Select the default source for a case that is created through a webservice.
Source ERMS Select the default source for a case that is created through thePeopleSoft CRM ERMS system.
See "Understanding ERMS Setup" (PeopleSoft CRM 9.2:Multichannel Applications).
Source HCM Select the default source value to populate for cases that areautomatically created when personal or job data updates haveoccurred in the integrated HCM system. Use this field when theautomatic case creation feature is enabled.
Product Group Select the default product group for a new case. When an agentor user selects a Product Group on a case, the system filters thevalues for the product and installed product to only display theproducts and installed products contained within the specifiedproduct group.
Category/Type/Details (CTD) Defaults Category Select the default case category for a new case.
Specialty Type Select the default case specialty type for a new case.
Detail Select the default case detail for a new case.
Defaults for Self-ServiceThese fields, which were described previously, may also appear in this section: Source, Case Type, CaseSubtype, Case Priority, Case Severity and Product Group.
Copyright © 1988, 2020, Oracle and/or its affiliates. 51

Defining Call Center Business Units and Display Template Options Chapter 2
Assign to Provider Group Select the provider group that you want the system to use whena user opens a case for the self-service business unit.
Note Type Select the note type that you want the system to use when a useropens a case for the self-service business unit.
New Case Status Select the case status that you want the system to use when auser opens a new case for the self-service business unit.
Resolved Case Status Select the status that you want the system to use when a useridentifies a successful solution a case for the self-servicebusiness unit.
Closed Case Status Select the status that you want the system to use when a usercloses a case for the self-service business unit.
Reopened Case Status Select the status that you want the system to use when a userreopens a case for the self-service business unit. If you do notenter a status here, then the status will not change when the self-service user reopens a case. The result could be cases beingclosed without a successful resolution—a condition that thesystem does not normally allow.
Contact Me Provider Group Select the provider group that you want the system to use whena user clicks the Contact Me button on a case for the self-servicebusiness unit.
Related LinksUnderstanding Call Center Prompt Tables
Defining Display Template General Options for PeopleSoft CallCenter
This topic discusses how to enable pages and general options for PeopleSoft Call Center applications.
Note: For detailed information on using display templates and configuring pages to display specific fieldsand sections, refer to the documentation mentioned in the next topic.
Page Used to Enable Pages and General Options for PeopleSoft Call CenterPage Name Definition Name Usage
Display Template Page RDT_TMPL_PAGE Use this page as an entry point to controlthe appearance and behavior of thespecified component.
Related Links"Understanding Display Templates" (PeopleSoft CRM 9.2: Automation and Configuration Tools)
52 Copyright © 1988, 2020, Oracle and/or its affiliates.

Chapter 2 Defining Call Center Business Units and Display Template Options
Display Template PageUse the Display Template page (RDT_TMPL_PAGE) to use this page as an entry point to control theappearance and behavior of the specified component.
Navigation
Set Up CRM >Common Definitions >Component Configuration >Display Templates >DisplayTemplate Details
Image: Display Template page (1 of 2)
This example illustrates the fields and controls on the Display Template page (1 of 2).
Copyright © 1988, 2020, Oracle and/or its affiliates. 53

Defining Call Center Business Units and Display Template Options Chapter 2
Image: Display Template page (2 of 2)
This example illustrates the fields and controls on the Display Template page (2 of 2).
Select a display template from the list and use it to configure the corresponding component.
Note: You can review a list of system-delivered display templates in the Display Template Detailscomponent.
PagesThis grid lists the pages that are configurable for the component.
Page Click to access the Display Template - Page Definition pageto configure the sections and fields of the selected page. Thenames of pages that are not enabled appear in plain text.
Add Mode Default Select to show the corresponding page by default when youcreate a transaction for the component. Selecting this check boxis optional and you can select only one page as the default. Ifyou don't identify a default page, the system displays the pagethat is specified for the component in Application Designer.
If users access the component and they don't have permission toaccess the default page, the system displays the first page in thecomponent that the user has permission to access.
54 Copyright © 1988, 2020, Oracle and/or its affiliates.

Chapter 2 Defining Call Center Business Units and Display Template Options
Update Mode Default Select to show the corresponding page by default when youopen an existing transaction for the component. Selecting thischeck box is optional. You can select only one page as thedefault. The display logic that is used for the add mode appliesto the update mode as well.
General OptionsThis section of the page presents the features and functionality that are enabled in the component systemdata definition. The list varies depending on the number of feature options that are enabled for a givencomponent.
Typically, you select a value for each listed option. This grid does not appear if IT administrators have notenabled any general options in the component's system data to be configured through display templates.
Note: You should not need to modify any of the general options on your display template. Displaytemplates come pre-configured with all the appropriate general options selected.
Licensed Product Code Select the licensed product that this display template applies to.
Licensed Product Definition Enter a description of the licensed product identified in theprevious field.
360 Degree Version Select the type of 360-Degree View that you want to use for thistemplate. Options are Customer, Constituent, HRHD Worker, and Worker.
See "Understanding 360-Degree View Setup" (PeopleSoft CRM9.2: Application Fundamentals ).
Application Set Extension This option contains functions to handle additional businesslogic to be performed when the user clicks selected tabs, links, and other items on the page. Do not change this value unlessyou are familiar with this application class extension.
Search Definition Name Select the Solution Advisor Search Definition Name that youwant to use for this template.
BO Search Adapter Name (businessobject search adapter name)
Select the adapter to use for this template on this component. The adapter specifies the BO search definitions and quickcreate definitions that are enabled for a particular componentor transaction. The adapter also defines the fields that appear inbasic search mode, the search criteria to invoke for these fields, and the sub-pages of the component upon which these fieldsappear.
See "Understanding BO Search and Quick Create Setup"(PeopleSoft CRM 9.2: Business Object Management).
Email Template for Case Notes Select the default correspondence template that you want to useto email case notes to customers or employees.
Copyright © 1988, 2020, Oracle and/or its affiliates. 55

Defining Call Center Business Units and Display Template Options Chapter 2
See "Understanding Correspondence Generation" (PeopleSoftCRM 9.2: Automation and Configuration Tools).
Email Template for Solutions Select the default correspondence template that you want to useto email solutions to customers or employees.
See "Understanding Correspondence Generation" (PeopleSoftCRM 9.2: Automation and Configuration Tools).
Portal Name Select the portal that you want the system to use for transferringinformation when you are using a content reference.
See Understanding Link Setup.
Portal Object Name Select the content reference that you want the system to use fortransfers.
See Understanding Link Setup.
Action Group ID Select the action link group that you want the system to use forthis template. This group is the superset of all action links that auser will be able to use for this template.
See Understanding Link Setup.
Task Template Select the application usage to filter which task templates areavailable on the case for that display template.
Toolbar Select which toolbar should appear on the case for that displaytemplate.
Managing Policies Using Case Display Template Actions
This topic discusses how to manage policies using case display template actions.
Page Used to Manage Policies Using Case Display Template ActionsPage Name Definition Name Usage
Manage Policies by Case DisplayTemplate Action Page
RC_RDT_PLCY_SRCH View AAF policies that are using theCase Display Template action.
Manage Policies by Case Display Template Action PageUse the Manage Policies by Case Display Template Action page (RC_RDT_PLCY_SRCH) to view AAFpolicies that are using the Case Display Template action.
Navigation
Set Up CRM > Common Definitions > Component Configuration > Display Templates > Case DisplayTemplate Policies
56 Copyright © 1988, 2020, Oracle and/or its affiliates.

Chapter 2 Defining Call Center Business Units and Display Template Options
Image: Manage Policies by Case Display Template Action page
This example illustrates the fields and controls on the Manage Policies by Case Display Template Actionpage.
To locate policies that are related to certain setIDs, trigger points, contexts, display template families, ordisplay template IDs, select or enter information in the appropriate fields shown in the Search section, andthen click Search.
Copyright © 1988, 2020, Oracle and/or its affiliates. 57

Defining Call Center Business Units and Display Template Options Chapter 2
58 Copyright © 1988, 2020, Oracle and/or its affiliates.

Chapter 3
Setting Up Call Center Prompt Tables
Understanding Call Center Prompt Tables
This topic discusses:
• Call center prompt tables.
• Delivered values in call center prompt tables.
Call Center Prompt TablesThis topic explains the different types of prompt tables that you must set up for all core call centerapplication prompt tables.
Prompt Tables for All CasesTo get your PeopleSoft CRM call center application up and running, define values for these fields:
• Case Status (required)
• Case Type
• Impact
• Priority
• Urgency
• Severity
• Source
• Category, Specialty Type, and Details
• Problem Type
• Quick Code
Each quick code may be associated with values from one to up to over twenty different case fields. Valuesreferenced by a currently active quick code cannot be deleted. When an agent enters a quick code on theCase page, the system automatically enters all of the related data. It does not save the quick code to thecase.
Problem types are defined by the product for which a case is being created. Use problem types toassociate products with the competencies that one needs to resolve a problem. Because Problem Type isa child of Product, the Problem Type field on the Case page derives its values from Product. The Productmust be set up before Problem Type. Competencies for Problem Type are not restricted, however.
Copyright © 1988, 2020, Oracle and/or its affiliates. 59
Setting Up Call Center Prompt Tables Chapter 3
See "Understanding Products in PeopleSoft CRM" (PeopleSoft CRM 9.2: Product and ItemManagement).
Problem Codes for PeopleSoft Support Material ReturnsThis section is specific to PeopleSoft Support.
Problem codes identify why a customer is returning stock on return material authorizations (RMAs)created in PeopleSoft Support. If your PeopleSoft Support system is integrated with PeopleSoft Inventory,the problem codes that you select on RMAs must match reason codes defined in PeopleSoft Inventory. Inaddition, the matching reason codes in PeopleSoft Inventory must be defined with a reason type of ReturnMaterial Authorization. When the RMA is staged in PeopleSoft Inventory, the problem code is used asthe reason code. If the reason code on the RMA form does not exist in PeopleSoft Inventory, the systemlogs an error when the RMA EIP (return material authorization enterprise integration point) applicationmessage is processed.
See Setting Up Problem Codes for Material Returns.
Reason CodesEnter reason codes to define reasons for various actions. Reason types are associated with a reason codeand include:
• Reasons why a person has been associated with a case as an interested party.
• Reasons why a self-service user is closing a case.
• Reasons why a self-service user is reopening a case.
• Reasons for billing adjustments. (Used with billing contract integration.)
See Setting Up Reason Codes.
Case Relationship TypesCases can be related to each other for many reasons. Here are some examples:
• A global case affects many people, but one resolution solves the problem for everybody.
Suppose that your website is down because of a problem with the web server. Many people arereporting the same problem. You only need to fix the problem once to resolve everyone's problem.Create a global case for the problematic web server and child cases (sometimes called tickets) whereeach person is reporting the problem. Maintain a parent-child relationship between the global case andall of the tickets. Based on this relationship, you can close all of the child tickets once the global caseis closed.
See Setting Up Case Relationship Types and Labels.
• A common case affects many people, but each affected person requires a separate resolution.
Suppose that a software bug is causing problems. Again, many people are reporting the problem, butthis time each individual must apply a software patch. Create a common case to track the problem andcreate child cases for each individual reporting the problem. Based on this relationship, you can trackthe effect of the problem across your organization. This common-case parent-child relationship differs
60 Copyright © 1988, 2020, Oracle and/or its affiliates.

Chapter 3 Setting Up Call Center Prompt Tables
from the web server global case because you do not want to close the child cases when the commoncase is closed.
• A similar case helps an agent to resolve another case.
Suppose that two people have reported problems with their desktop computers. The problems soundsimilar, and each assigned agent wants to monitor activity on the other case. Similar cases arefunctionally related, but they do not have a hierarchical relationship.
Other kinds of cases include cause-and-effect and case relationships that can occur in your businessoperating environment.
Establish valid case relationship types on the Case Relationship Type page. Each relationship is markedas hierarchical or equivalent (non-hierarchical). Each case in a relationship has a relationship label. If therelationship is hierarchical, separate labels exist for the parent case and the child case. If the relationshipis equivalent, only one valid label exists.
If the case is not a hierarchical relationship, the Relationship field controls how the relationship isdescribed on the Related Cases page. If you look at either one of the related cases, the Relationship fielddisplays the equivalent label.
Related LinksUnderstanding Case ManagementUnderstanding Processing a CaseUnderstanding Material Return ProcessingUnderstanding Change Request ManagementUnderstanding Self-Service Transactions"Integrating with PeopleSoft Financial Management Services" (PeopleSoft CRM 9.2: IntegratedFieldService)"Integrating with PeopleSoft Human Capital Management" (PeopleSoft CRM 9.2: IntegratedFieldService)"Integrating with PeopleSoft SCM" (PeopleSoft CRM 9.2: Integrated FieldService)
Delivered Values in Call Center Prompt TablesThis topic discusses delivered relationship types. All of these values are associated with the SHAREsetID.
These values are used in Active Analytics Framework (AAF) policies. For example, the PeopleSoftsystem delivers AAF policies to cascade case statuses and to send notifications to owners of related caseswhen a case status changes. If you use the delivered policies, you must use the delivered values or changethe event processing rules to reference new values.
Relationship TypesThis table lists the delivered relationship types:
Type Hierarchical Short Name Labels
COMMO Yes Common Parent, Child
Copyright © 1988, 2020, Oracle and/or its affiliates. 61

Setting Up Call Center Prompt Tables Chapter 3
Type Hierarchical Short Name Labels
DUP Yes Duplicate Original, Duplicate
EQUAL No Equivalent (none)
GLOBE Yes Global Parent, Child
Related Links"Understanding AAF" (PeopleSoft CRM 9.2: Automation and Configuration Tools)
Common Elements Used to Set Up Call Center Prompt Tables
SetID Except for quick codes, which are associated with businessunits, all of the prompt tables described in this documentationare associated with setIDs. This association enables you to setup different sets of values for different call center business units.
If you're setting up one set of values for all of your call centers, use the same setID for all of the values.
If you're setting up different sets of values for different callcenters, enter the appropriate setID for each value.
Self-Service Select this check box to inform the system as to which valuesor fields self-service application users can select when creatingnew cases.
Select this check box to allow self-service application users toselect priorities of Low and Standard, but not High.
This check box does not affect the self-service application users'ability to see the value when viewing an existing case; it onlyaffects their ability to select the value when creating a new case.
This check box is relevant only for fields that self-serviceapplication users can edit.
Short Name Enter a short name that describes the value to users of the Casepage.
Note: Although you can enter up to 20 characters, names longerthan 15 characters might be truncated in the drop-down listboxes on the Case page.
Self-Service Description Enter a description regardless of whether the Self-Servicecheck box is selected. This entry describes the value to self-service application users. Even if users cannot select a value (the
62 Copyright © 1988, 2020, Oracle and/or its affiliates.

Chapter 3 Setting Up Call Center Prompt Tables
behavior controlled by the check box), they still may be able toview it.
If you don't enter a description, the system copies the shortdescription to this field when you save the page.
If the value appears on any of the self-service pages, theself-service description appears instead of the regular shortdescription.
Long Description Enter a long name, up to 50 characters, that describes the value.
Effective Date Enter the effective date of the value.
Most prompt table values are not effective-dated; only quickcodes and reason codes have effective dates.
Status Select a status to determine whether an effective-dated item (a quick code or a reason code) is active or inactive as of theassociated effective date.
Setting Up Basic Prompt Tables for Cases
To set up basic prompt tables for cases, use the Quick Code (RC_QUICK_CODE), Source(RC_SOURCE), Severity (RC_SEVERITY), Priority (RC_PRIORITY), Case Type (RC_CASE_TYPE),Case Status (RC_STATUS), Category/Type/Detail (RC_CTD_DEFINE), Combine Category/Type/Detail(RC_CTD_COMBINE) and Impact (RC_IMPACT) components.
This topic lists prerequisites and discusses how to set up basic prompt tables for cases.
Pages Used to Set Up Prompt Tables for All CasesPage Name Definition Name Usage
Case Status Page RC_STATUS Set up case status values.
Case Type Page RC_CASETYPE Set up case type values.
Priority Page RC_PRIORITY Set up case priority values.
Urgency Page RC_URGENCY Set up case urgency values.
Severity Page RC_SEVERITY Set up case severity values.
Impact Page RC_IMPACT Set up impact values.
Source Page RC_SOURCE Set up valid methods people can use toreport cases. You can track cases that arecreated through self-service or cases thatare initially created by your computerand telephony integration system.
Copyright © 1988, 2020, Oracle and/or its affiliates. 63

Setting Up Call Center Prompt Tables Chapter 3
Page Name Definition Name Usage
Problem Type Page RC_PROBTYPE Set up problem types. Associate problemtypes to products and the competenciesthat one would need to resolve theparticular problem.
Category Page RC_CTD_CATEGORY Set up case category values.
Category Competencies Page RC_CTD_CAT_COMP Set up case category competency values.
Type Page RC_CTD_TYPE Set up case specialty types.
Type Competencies Page RC_CTD_TYPE_COMP Set up case specialty type competencies.
Detail Page RC_CTD_DETAIL Set up case details.
Detail Competencies Page RC_CTD_DETAIL_COMP Set up case detail competencies.
Combine Category/Type/Detail Page RC_CTD_COMBINE Set up valid combinations of category, specialty type, and detail.
Combine Category/Type/Detail:Competencies Page
RC_CTD_COMP View and edit competencies linked tothe category, specialty type and detailassociated with row of the grid fromwhich the user clicked the Competenciesbutton.
Quick Code Page RC_QUICK_CODE Set up quick code shortcuts that an agentcan use to enter data automatically intovarious fields on the Case page.
PrerequisitesBefore you set up the prompt tables for your call center application, consider the following:
• Before you set up quick codes, set up all of the values to be referenced by the quick code.
Quick codes may reference most of the other setup values discussed in this section.
• You must set up your products before you can set up problem types.
• If you want to use competencies in case assignment, establish competencies before you set up theCategory, Specialty Type, Detail, and Problem Types pages.
Related Links"Understanding Solutions" (PeopleSoft CRM 9.2: Services Foundation)"Understanding Workers in CRM" (PeopleSoft CRM 9.2: Business Object Management)"Understanding Provider Groups and Group Members" (PeopleSoft CRM 9.2: ApplicationFundamentals )"Setting Up Competency Information in PeopleSoft CRM" (PeopleSoft CRM 9.2: ApplicationFundamentals )
64 Copyright © 1988, 2020, Oracle and/or its affiliates.

Chapter 3 Setting Up Call Center Prompt Tables
Case Status PageUse the Case Status page (RC_STATUS) to set up case status values.
Navigation
Set Up CRM > Product Related > Call Center > Case Status > Case Status
Image: Case Status page
This example illustrates the fields and controls on the Case Status page.
Category Select a case category value for each case status. This valuedrives many of your call center metrics. Because the actualstatus values vary by implementation, certain system processingis based on the category field rather than the actual case status. All statuses fall into one of these categories:
Open: Case needs to be resolved.
Closed: Case is resolved and no further work is necessary.
Canceled: Case is not resolved, but there is no longer any needto resolve the case.
On-Hold: Case is on-hold, and the case needs to be resolved.
Billable Select if you bill for support and integrate your CRM data witha PeopleSoft or third-party billing system.
Related LinksDelivered Values in Call Center Prompt Tables
Copyright © 1988, 2020, Oracle and/or its affiliates. 65

Setting Up Call Center Prompt Tables Chapter 3
Case Closure
Case Type PageUse the Case Type page (RC_CASETYPE) to set up case type values.
Navigation
Set Up CRM > Product Related > Call Center > Case Type > Case Type
Image: Case Type page
This example illustrates the fields and controls on the Case Type page.
Enter descriptions for the Case Type, Self-Service Description, Long Description, and Short Namefields. Select the Self-Service check box if the case type will be used in the self-service application.
VAT Defaults Click this link to access the VAT Defaults Setup page. This isa common page that is used to set up value-added tax (VAT)defaults for all PeopleSoft applications that process VATtransactions. Use this page to define VAT defaults for servicegroups according to VAT registration country and state. Thesystem displays VAT defaults and Service VAT Treatmentdefaults only when the integration to PeopleSoft TransactionBilling Processor is installed.
Service VAT Treatment Defaults Click this link to access the Service VAT Treatment DriversSetup page. This common page is used to set up VAT servicestreatment for all PeopleSoft applications that process VATtransactions. If you are required to implement special handlingfor services, you can specify VAT service treatment defaults forservice groups on this page for a supplier's (seller's) locationcountry and state.
66 Copyright © 1988, 2020, Oracle and/or its affiliates.

Chapter 3 Setting Up Call Center Prompt Tables
Case Subtypes Use the fields in this section to enter descriptions of the casesubtype that you want to associate with the case type that isdescribed in the Case Type field.
See the product documentation for PeopleSoft FSCM: Global Options and Reports.
Priority PageUse the Priority page (RC_PRIORITY) to set up case priority values.
Navigation
Set Up CRM > Product Related > Call Center > Priority > Priority
Image: Priority page
This example illustrates the fields and controls on the Priority page.
Category Select the category that you want the system to associate withthe entry in the Priority field. All priority values are associatedwith a priority category. Values include High, Medium, andLow. The association between a priority and a priority categoryenables the display of the High Priority Problem Reports chartto help identify high-priority cases.
Self-Service Description Enter the descriptions of the priorities as you want them toappear on the self-service page of your call center application.
Use the priority values to indicate how quickly a problem or case must be fixed.
Urgency PageUse the Urgency page (RC_URGENCY) to set up case urgency values.
Navigation
Set Up CRM > Product Related > Call Center > Urgency > Urgency
Copyright © 1988, 2020, Oracle and/or its affiliates. 67

Setting Up Call Center Prompt Tables Chapter 3
Image: Urgency page
This example illustrates the fields and controls on the Urgency page.
Self-Service Description Enter the descriptions of the urgency values as you want them toappear on the self-service page of your call center application.
Use the urgency values to indicate the business impact of the case or issue.
Severity PageUse the Severity page (RC_SEVERITY) to set up case severity values.
Navigation
Set Up CRM > Product Related > Call Center > Severity > Severity
Image: Severity page
This example illustrates the fields and controls on the Severity page.
Select the Self-Service check box if you want the value for the severity to appear on the self-service pageof your call center application. Use the Self-Service Description field to enter a description of the severitythat self-service users will understand.
Impact PageUse the Impact page (RC_IMPACT) to set up impact values.
68 Copyright © 1988, 2020, Oracle and/or its affiliates.

Chapter 3 Setting Up Call Center Prompt Tables
Navigation
Set Up CRM > Product Related > Call Center > Impact > Impact
Image: Impact page
This example illustrates the fields and controls on the Impact page.
To enter a new impact, click the Add a new row button. Enter a code to represent the effect in the Impactfield. Then enter descriptions of the effect in the Short Name, Self-Service Description, and LongDescription fields.
Source PageUse the Source page (RC_SOURCE) to set up valid methods people can use to report cases.
You can track cases that are created through self-service or cases that are initially created by yourcomputer and telephony integration system.
Navigation
Set Up CRM > Product Related > Call Center > Source > Source
Copyright © 1988, 2020, Oracle and/or its affiliates. 69

Setting Up Call Center Prompt Tables Chapter 3
Image: Source page
This example illustrates the fields and controls on the Source page.
Enter descriptions for the various sources that you use to collect information for your call centerapplications.
Problem Type PageUse the Problem Type page (RC_PROBTYPE) to set up problem types.
Associate problem types to products and the competencies that one would need to resolve the particularproblem.
Navigation
Set Up CRM > Product Related > Call Center > Problem Type > Problem Type
70 Copyright © 1988, 2020, Oracle and/or its affiliates.

Chapter 3 Setting Up Call Center Prompt Tables
Image: Problem Type page
This example illustrates the fields and controls on the Problem Type page.
Problem Type Problem Type Enter an abbreviation to represent the problem type.
Abbreviations can be no longer than five characters.
Problem Type Competency Information Description Select the competency needed to resolve the problem.
Minimum Level Select the minimum skill level that a person would need toresolve the problem for the selected competency.
Weight Select the level of importance that you want to assign to thecompetency. The system uses this weighting factor during theassignment process to locate the best person available to resolvethe problem.
Category PageUse the Category page (RC_CTD_CATEGORY) to set up case category values.
Navigation
Set Up CRM > Product Related > Call Center > Category/Type/Detail > Category
Copyright © 1988, 2020, Oracle and/or its affiliates. 71

Setting Up Call Center Prompt Tables Chapter 3
Image: Category page
This example illustrates the fields and controls on the Category page.
To enter a new category, click the Add a new row button. Enter a code in the Category field, then enterdescriptions in the Short Name, Self-Service Description, and Long Description fields.
Select the Self-Service check box if the category will be used in the self-service application. Note thatif Self-Service is not installed, the Self-Service check box and Self-Service Description, field will behidden.
Category Competencies PageUse the Category Competencies page (RC_CTD_CAT_COMP) to set up case category competencyvalues.
Navigation
Set Up CRM > Product Related > Call Center > Category/Type/Detail > Category Competencies
72 Copyright © 1988, 2020, Oracle and/or its affiliates.

Chapter 3 Setting Up Call Center Prompt Tables
Image: Category Competencies page
This example illustrates the fields and controls on the Category Competencies page.
Category Competency Information Description Select the competency needed to resolve problems for the
displayed category.
Minimum Level Select the minimum skill level that a person would need toresolve the problem for the selected competency.
Weight Select the level of importance that you want to assign to thecompetency. The system uses this weighting factor during thecase assignment process to locate the best person available toresolve the problem.
Type PageUse the Type page (RC_CTD_TYPE) to set up case specialty types.
Navigation
Set Up CRM > Product Related > Call Center > Category/Type/Detail > Type.
Note: Though this page is simply entitled Type, be aware that it refers to Specialty Type (do not confuse itwith the Case Type page).
Copyright © 1988, 2020, Oracle and/or its affiliates. 73

Setting Up Call Center Prompt Tables Chapter 3
Image: Type page
This example illustrates the fields and controls on the Type page.
To enter a new specialty type, click the Add a new row button. Enter a code in the Specialty Type field,then enter descriptions in the Short Name, Self-Service Description, and Long Description fields.
Select the Self-Service check box if the specialty type will be used in the self-service application. Notethat if Self-Service is not installed, the Self-Service check box and Self-Service Description, field will behidden.
Type Competencies PageUse the Type Competencies page (RC_CTD_TYPE_COMP) to set up case specialty type competencies.
Navigation
Set Up CRM > Product Related > Call Center > Category/Type/Detail > Type Competencies.
74 Copyright © 1988, 2020, Oracle and/or its affiliates.

Chapter 3 Setting Up Call Center Prompt Tables
Image: Type Competencies page
This example illustrates the fields and controls on the Type Competencies page.
Specialty Type Competency Information Description Select the competency needed to resolve problems for the
displayed specialty type.
Minimum Level Select the minimum skill level that a person would need toresolve the problem for the selected competency.
Weight Select the level of importance that you want to assign to thecompetency. The system uses this weighting factor during thecase assignment process to locate the best person available toresolve the problem.
Detail PageUse the Detail page (RC_CTD_DETAIL) to set up case details.
Navigation
Set Up CRM > Product Related > Call Center > Category/Type/Detail > Detail.
Copyright © 1988, 2020, Oracle and/or its affiliates. 75

Setting Up Call Center Prompt Tables Chapter 3
Image: Detail page
This example illustrates the fields and controls on the Detail page.
To enter a new detail, click the Add a new row button. Enter a code in the Detail field, then enterdescriptions in the Short Name, Self-Service Description, and Long Description fields.
Select the Self-Service check box if the detail will be used in the self-service application. Note thatif Self-Service is not installed, the Self-Service check box and Self-Service Description, field will behidden.
Detail Competencies PageUse the Detail Competencies page (RC_CTD_DETAIL_COMP) to set up case detail competencies.
Navigation
Set Up CRM > Product Related > Call Center > Category/Type/Detail > Detail Competencies.
76 Copyright © 1988, 2020, Oracle and/or its affiliates.

Chapter 3 Setting Up Call Center Prompt Tables
Image: Detail Competencies page
This example illustrates the fields and controls on the Detail Competencies page.
Detail Competency Information Description Select the competency needed to resolve problems for the
displayed detail.
Minimum Level Select the minimum skill level that a person would need toresolve the problem for the selected competency.
Weight Select the level of importance that you want to assign to thecompetency. The system uses this weighting factor during thecase assignment process to locate the best person available toresolve the problem.
Combine Category/Type/Detail PageUse the Combine Category/Type/Detail page (RC_CTD_COMBINE) to set up valid combinations ofcategory, specialty type, and detail.
Navigation
Set Up CRM > Product Related > Call Center > Combine Category/Type/Detail > Combine Category/Type/Detail.
Copyright © 1988, 2020, Oracle and/or its affiliates. 77

Setting Up Call Center Prompt Tables Chapter 3
Image: Combine Category/Type/Detail page
This example illustrates the fields and controls on the Combine Category/Type/Detail page.
Use this page to link specialty types and details to each desired category. When a user selects a categoryvalue on the case page, only the specialty type entries linked to that category will be available on the casepage specialty type drop-down. Similarly, when a user selects a category and specialty type on the casepage, only the details linked to those two fields will be displayed in the detail drop-down.
To search for existing combinations, enter your search criteria and click the Search button.
To enter a new combination, click the Add a new row button (the grid row button with a plus sign) withinthe Category/Type/Detail Result grid.
Search Use Saved Search Select a set of saved search criteria that you wish to execute.
Save Search Criteria Click this link to name and save a set of search criteria for futureuse.
Delete Saved Search Click this link to delete an existing saved set of search criteria.
Category/Type/Detail Result Category Description Select the category for which you wish to define valid specialty
types and details
78 Copyright © 1988, 2020, Oracle and/or its affiliates.

Chapter 3 Setting Up Call Center Prompt Tables
Specialty Type Select a specialty type that you wish to make available for thespecified category value.
Detail Select a detail that you wish to make available for the specifiedcategory and specialty type values.
Start Date Enter the start date on which the specified category, specialtytype and detail value combination will become valid.
End Date The date after which the specified category, specialty type anddetail value combination will no longer be valid. Cases createdafter this date will no longer be able to use this combination. Users do not enter end dates directly into the grid: end dates aredisplayed after a user selects one or more rows and clicks theInactivate button.
Status Shows the status of a particular combination defined on a rowin the grid. Users do not enter values for this field: the statusvalue displayed is based on the start and end dates in effect forthat row. Rows with a start date greater than the current dateare considered to be in Pending status, indicating that thesecombinations are not yet available on cases. Rows with an enddate less than the current date are considered to be in Inactivestatus, and are not available to new cases. Rows whose start dateprecedes the current date and whose end date is either blank orgreater than the current date are considered Active.
(Competencies)Click this button to view the competencies for the category, specialty type and detail listed on the row.
Note: This button is only visible if there competencies exist forat least one of the category, specialty type or detail definitionslisted in the search results.
Clone Click this button to clone the selected row(s) from the grid. Youwill be prompted to select which field(s) you do not wish tohave cloned from the specified source row(s), since you mustspecify at least one value on the new row that is different fromthe source row.
For example, users who wish to define multiple valid detailentries for a given category and specialty type may find itconvenient to clone an existing row for that category andspecialty type and simply add the desired detail value.
Update Start Date Users may select multiple rows in the grid and update the validstart date for those rows by clicking this button and specifyingthe new desired start date.
Inactivate Click this button to inactivate the selected row(s) from the grid. All selected rows will be given an end date equal to the currentdate, and the corresponding category, specialty type and detailcombinations will no longer be available on cases opened afterthat date.
Copyright © 1988, 2020, Oracle and/or its affiliates. 79

Setting Up Call Center Prompt Tables Chapter 3
Note that a combination cannot be inactivated if it is currentlyused by an open case, a case default, a quick code or an AAFpolicy action.
Reactivate Click this button to reactivate the selected row(s) from the grid. All selected rows will be given a blank end date and a start dateequal to the current date.
Delete Use this button to delete the selected row(s) from the grid. Acombination may not be deleted if it is currently used in an opencase, a quick code, a business unit default, or an AAF policyaction.
Combine Category/Type/Detail: Competencies PageUse the Combine Category/Type/Detail: Competencies page (RC_CTD_COMP) to view and editcompetencies linked to the category, specialty type and detail associated with row of the grid from whichthe user clicked the Competencies button.
Navigation
Set Up CRM >Product Related >Call Center >Combine Category/Type/Detail >Combine Category/Type/Detail. Click the Competencies button for the desired Category/Type/Detail Result grid row.
80 Copyright © 1988, 2020, Oracle and/or its affiliates.

Chapter 3 Setting Up Call Center Prompt Tables
Image: Combine Category/Type/Detail: Competencies page
This example illustrates the fields and controls on the Combine Category/Type/Detail: Competenciespage.
Use this page to view or edit the competencies for the selected combination of category, specialty type,and detail.
You may add or delete competencies associated to any entry shown on this page.
Note: Be aware that any changes made to the competency values for the category shown on this pagewill apply to all instances of that category, not just to the category, specialty type, and detail combinationshown on the page. The same applies to any changes made to competency values made on this page forspecialty types or details. Changes made on this page will apply in the same manner as changes made tothe competency pages on the Category/Type/Detail component.
Quick Code PageUse the Quick Code page (RC_QUICK_CODE) to set up quick code shortcuts that an agent can use toenter data automatically into various fields on the Case page.
Navigation
Set Up CRM > Product Related > Call Center > Quick Code > Quick Code
Copyright © 1988, 2020, Oracle and/or its affiliates. 81

Setting Up Call Center Prompt Tables Chapter 3
Note: You can use quick code to have the system suggest an action and to populate other fields on theCase page.
Image: Quick Code page (1 of 3)
This example illustrates the fields and controls on the Quick Code page (1 of 3).
82 Copyright © 1988, 2020, Oracle and/or its affiliates.

Chapter 3 Setting Up Call Center Prompt Tables
Image: Quick Code page (2 of 3)
This example illustrates the fields and controls on the Quick Code page (2 of 3).
Copyright © 1988, 2020, Oracle and/or its affiliates. 83

Setting Up Call Center Prompt Tables Chapter 3
Image: Quick Code page (3 of 3)
This example illustrates the fields and controls on the Quick Code page (3 of 3).
Quick Code This page displays a unique code that agents can use to populatemultiple fields on the Case page automatically.
Business Unit Displays the business unit of the call center that uses this quickcode.
Quick Code Description Description Enter a short text description of the code. This description can
be no longer than 20 characters.
Usage Count Displays the number of times this quick code has been used topopulate default values in cases.
When you select a quick code to use in a case, at save time, thesystem increases the quick code usage count by 1 and updatesthe code’s last used date to the current date. The same updateapplies when a case using this quick code is saved throughcomponent interface.
The usage count provides the information needed to determineif a quick code is being utilized. You can then decide if youwant to make modifications to increase usability or inactivate itaccordingly.
84 Copyright © 1988, 2020, Oracle and/or its affiliates.

Chapter 3 Setting Up Call Center Prompt Tables
Note: If the quick code definition is updated using the CorrectHistory mode, the usage count and last used values are not reset;however, if you add a new effective-dated row to the quick codedefinition, the system resets the usage count and the last useddate of the new row to zero and null respectively.
Last Used Displays the date this quick code was last used. When you selecta quick code to use in a case, at save time, this field is updatedto the current date.
OverwriteSelect the Overwrite check box if you want the system to overwrite the value for the same field on Casepage when an agent selects the quick code for a case.
This table illustrates the use of the Overwrite check box using the Case Status field:
Value on Case Page Quick Code Value Overwrite CheckBox
After Quick Code isSelected
Explanation
Blank Open - Engineering Selected Open - Engineering Quick code overwritesblank field.
Blank Open - Engineering Cleared Open - Engineering Quick code overwritesblank field even thoughOverwrite check boxhas not been selected.
Open - New Open - Engineering Selected Open - Engineering Quick code overwritesexisting value in fieldas Overwrite check boxis selected.
Open - New Open - Engineering Cleared Open - New Quick code does notoverwrite existing valuein field as Overwritecheck box has not beenselected.
Open - New Blank Selected Blank Quick code usesblank field values tooverwrite existing valuein field as Overwritecheck box is selected.
Open - New Blank Cleared Open - New Quick code does notoverwrite existing valuein field as Overwritecheck box has not beenselected.
Copyright © 1988, 2020, Oracle and/or its affiliates. 85

Setting Up Call Center Prompt Tables Chapter 3
The Suggested Action fields have only one Overwrite check box for the three fields. Also, you cannot usethe Overwrite check box for the Notes and Interested Parties grids.
Problem InformationWhen an agent enters a quick code, the system assigns the information in these fields to a case.
Problem Summary Enter the summary associated with this quick code.
Description Enter the description associated with this quick code.
Case InformationWhen an agent enters a quick code, the system assigns the information in these fields to a case.
Case Type Select the case type associated with this quick code.
Case Subtype Select the case subtype associated with this quick code.
Case Status Select the case status associated with this quick code.
Provider Group Select the provider group associated with this quick code.
Assigned To Select the agent to whom the case is to be assigned. If you'vespecified a provider group, you can select agents who are part ofthat group only.
Product ID Select the product ID associated with this quick code.
Problem Type Select the problem type associated with chosen Product ID ofthis quick code
Category Select the category associated with this quick code.
Specialty Type Select the specialty type associated with this quick code.
Detail Select the detail associated with this quick code.
Case Priority Select the priority to be assigned to a case.
Case Impact Select the impact to be assigned to a case.
Source Select the source to be assigned to a case.
Urgency Select the urgency to be assigned to a case.
Case Severity Select the severity to be assigned to a case.
Error Code Select the error code to be assigned to a case.
Error Message Select the error message to be assigned to a case.
Suggested ActionsWhen an agent enters a quick code, the system assigns an action to the case.
86 Copyright © 1988, 2020, Oracle and/or its affiliates.

Chapter 3 Setting Up Call Center Prompt Tables
Link Category Select the link category to be associated with a case.
Version Select the link category's version to be assigned to a case.
Link Name Select the link name to be associated with a case.
Solution Keyword or Phrase Enter the keywords to be associated with a case. These
keywords appear in the Search subtab on the Solutions page ofthe Case component, thus driving the search for solutions for thecase.
Solution Click to select a solution to be associated with this quick code. When this quick code is selected for a case, the chosen solutionappears on the Attempted Solutions section on the Solutionspage of the case.
Only solutions that meet all these conditions are available forselection:
• Solutions in the same setID as the quick code
• Solutions that are active based on their start and end datesand the effective date of the quick code.
Note: When you select a solution for a quick code, you mustalso select a status for the solution. An error message appears ifonly one of these field has a value but not both.
Solution Summary Displays the summary text of the selected solution.
Solution Status Select the initial status for the solution to appear on the Solutionpage of the Case component. Values are:
Failed Resolution
In Consideration
Successful Resolution
Waiting on Customer
Withdrawn
Note: When you select a solution status, you must also select asolution to which the status applies. An error message appears ifonly one of these field has a value but not both.
See "Case - Solution Page, Service Order - Solution Page or Quality Management - Solutions Page"(PeopleSoft CRM 9.2: Services Foundation).
Copyright © 1988, 2020, Oracle and/or its affiliates. 87

Setting Up Call Center Prompt Tables Chapter 3
Display TemplateIf you associate a display template to a quick code, selecting that quick code on a case will cause the casecomponent to be shown using the associated display template ID.
Note: Cases retain the display template ID with which they were originally created. Therefore subsequentviews of the case will be shown using the original display template for that case, not the display templateassociated with the quick code. However, a user could also create an AAF policy to change the displaytemplate used to view a case based on certain conditions, such as if a particular field has a certain value.
Display Template Family Select the display template family to be associated with thequick code.
Display Template ID Select the display template ID to be associated with the quickcode. When the quick code is selected on a case, the case willbe re-displayed using the quick code's display template ID (aslong as the display template family of the case and the displaytemplate family of the quick code match).
NotesWhen an agent enters a quick code, the system assigns the information in these fields to a case.
Summary Enter the notes summary to be associated to the case.
Description Enter the notes description to be associated to the case.
See "Understanding Notes and Attachments" (PeopleSoft CRM 9.2: Application Fundamentals ).
Interested PartiesWhen an agent enters a quick code, the system assigns the information in these fields to a case.
Interested Parties Select the interested parties to be associated with a case.
Reason Code Select the reason the interested party should be listed as aninterested party on the case.
Setting Up Problem Codes for Material Returns
This topic discusses how to set up problem codes for material returns.
Note: This topic is relevant to PeopleSoft Support only. It is not applicable to the PeopleSoft HelpDesk,Quality Management, or Change Management applications.
88 Copyright © 1988, 2020, Oracle and/or its affiliates.

Chapter 3 Setting Up Call Center Prompt Tables
Page Used to Set Up Problem CodesPage Name Definition Name Usage
Problem Codes Page RF_PROBLEM_CD Set up the problem codes used to identifyreasons for material returns on the RMAform.
Related LinksUnderstanding Material Return Processing
Problem Codes PageUse the Problem Codes page (RF_PROBLEM_CD) to set up the problem codes used to identify reasonsfor material returns on the RMA form.
Navigation
Set Up CRM > Common Definitions > Codes and Auto Numbering > Problem Codes > Problem Codes
Image: Problem Codes page
This example illustrates the fields and controls on the Problem Codes page.
If you integrate with PeopleSoft Inventory, the problem codes established on this page are used withRMAs and must match the reason codes that are established on the Reason Code page in PeopleSoftInventory. In addition, the matching reason codes in PeopleSoft Inventory must be defined with a reasontype of Return Material Authorization.
See PeopleSoft FSCM: Application Fundamentals
Setting Up Reason Codes
This topic discusses how to set up reason codes.
Copyright © 1988, 2020, Oracle and/or its affiliates. 89

Setting Up Call Center Prompt Tables Chapter 3
Page Used to Set Up Reason CodesPage Name Definition Name Usage
Reason Code Page RB_REASON_CD Create reason codes for various actions.
Reason Code PageTo set up reason codes, use the Reason Code (RB_REASON_CD) component.
Use the Reason Code page (RB_REASON_CD) to create reason codes for various actions.
Navigation
Set Up CRM > Common Definitions > Codes and Auto Numbering > Reason Codes > Reason Code
Image: Reason Code page
This example illustrates the fields and controls on the Reason Code page.
Use the Effective Date and Status fields to make the reason code available to users. Select the ReasonType that you want the system to associate with the reason code that appears on the page. Enter moredetailed descriptions for both agents and self-services users (if needed).
Setting Up Case Relationship Types and Labels
This topic discusses how to set up case relationship types and labels.
Page Used to Set Up Case Relationship Types and LabelsPage Name Definition Name Usage
Case Relationship Type Page RC_RELATION_TYPE Set up types of case relationships anddefine the relationship labels that willappear on the Related Cases page.
90 Copyright © 1988, 2020, Oracle and/or its affiliates.

Chapter 3 Setting Up Call Center Prompt Tables
Case Relationship Type PageTo set up case relationship types and labels, use the Case Relationship Type (RC_RELATION_TYPE)component.
Use the Case Relationship Type page (RC_RELATION_TYPE) to set up types of case relationships anddefine the relationship labels that will appear on the Related Cases page.
Navigation
Set Up CRM > Product Related > Call Center > Case Relationship Type > Case Relationship Type
Image: Case Relationship Type page
This example illustrates the fields and controls on the Case Relationship Type page.
Relationship Hierarchical Select this check box if the relationship is hierarchical (a parent-
child relationship). Clear this check box if the relationship isnot hierarchical. Non-hierarchical relationships are also calledequivalent relationships.
Parent Label and Child Label If this is a hierarchical relationship, these fields control how therelationship is described on the Related Cases page. If you lookat the child case, the Relationship field displays the child label;if you look at the parent case, the Relationship field displays theparent label.
Copyright © 1988, 2020, Oracle and/or its affiliates. 91

Setting Up Call Center Prompt Tables Chapter 3
You can enter information into these fields only if you select theHierarchical check box.
Equivalent Label If this is not a hierarchical relationship, this field controls howthe relationship is described on the Related Cases page. If youlook at either one of the related cases, the Relationship fielddisplays the equivalent label.
You can enter information into this field only if you clear theHierarchical check box.
BehaviorThis page area will only be visible if the Hierarchical check box has been selected in the Relationshippage area.
Set Parent as Global Case When a case relationship is created, if the correspondingrelationship type has this check box selected, then the GlobalCase check box will be automatically selected and updated onthe parent case of the new relationship.
Set status of child case usingDuplicate Case Status from theBusiness Unit Defaults
When a case relationship is created, if the relationship typehas this check box selected, then the child case status will beautomatically set to the Duplicate Case Status value specified inthe Call Center Business Unit Defaults page.
Note: If this check box is selected but no Duplicate Case Statusvalue has been specified on the Call Center Business UnitDefaults page, no automatic status update will be made on thechild case.
ExampleConsider a Global relationship type with a parent label of Global Case and a child label of Ticket:
• On the Related Cases page for the child case, the parent case appears in the Existing Related Casesgrid.
In that grid, the Type field value is Global and the Relationship field value is Ticket.
• On the Related Cases page for the parent case, the child case appears in the Existing Related Casesgrid.
In that grid, the Type field value is still Global, but the Relationship field value is Global Case.
Setting up Case Matching Criteria
To set up case matching criteria, use the Case Match Definition (RC_CASE_MATCH) component.
92 Copyright © 1988, 2020, Oracle and/or its affiliates.

Chapter 3 Setting Up Call Center Prompt Tables
Pages Used to Define Matching CriteriaPage Name Definition Name Usage
Match Detail Page RC_MATCH_DETAIL Specify the criteria to be used to match acase with other existing cases.
Match Usage Page RC_MATCH_USAGE Specify the business units and providergroups to which the match criteria shouldapply.
Match Detail PageUse the Match Detail page (RC_MATCH_DETAIL) to specify the criteria to be used to match a case withother existing cases.
Navigation
Set Up CRM > Product Related > Call Center > Case Match Definition > Match Detail
Image: Match Detail page (1 of 2)
This example illustrates the fields and controls on the Match Detail page (1 of 2).
Copyright © 1988, 2020, Oracle and/or its affiliates. 93

Setting Up Call Center Prompt Tables Chapter 3
Image: Match Detail page (2 of 2)
This example illustrates the fields and controls on the Match Detail page (2 of 2).
Case Filter Criteria Global Case Select this to restrict the match to include only cases whose
Global Case check box has been selected.
Includes Case Search In Past Period(Months)
Specify the number of months from case creation date tocurrent date that should be considered when matching cases. Amaximum value of 99 is allowed.
Case Match Status grid Indicate the SetID and case status to be used when the systemlooks for matching cases.
Case Match CriteriaSelect the check boxes for all criteria that should apply when the system looks for matching cases.
Incident LocationSelect the check boxes for all criteria that should apply when the system looks for matching cases.
Keyword Search Minimum Score (%) The minimum score returned from the PeopleSoft Search to
qualify a case as a match.
Enable Keyword Search Select to enable keyword search on case match. If this checkbox is selected, the system will search the case Summary andCase Detail field values from other cases to match the words inthe Summary field of the case from which the search has beeninitiated.
94 Copyright © 1988, 2020, Oracle and/or its affiliates.

Chapter 3 Setting Up Call Center Prompt Tables
Note: If this check box is selected, only cases that exceed orequal the minimum score are considered. These results mustalso meet all the other case match criteria specified on this page.
Match Usage PageUse the Match Usage page (RC_MATCH_USAGE) to specify the business units and provider groups towhich the match criteria should apply.
Navigation
Set Up CRM > Product Related > Call Center > Case Match Definition > Match Usage
Image: Match Usage page
This example illustrates the fields and controls on the Match Usage page.
Business Unit Match Coverage Business Unit Specify the business unit for which this set of matching criteria
(defined on the Match Definition page) should apply.
Relationship Type Select the relationship type that should be made available for theselected business unit when presenting case matches.
Provider Group Match Coverage Provider Group SetID Specify the SetID of the associated provider group for which
this set of matching criteria (defined on the Match Definitionpage) should apply.
Provider Group Name Specify the provider group for which this set of matchingcriteria (defined on the Match Definition page) should apply.
Relationship Type Select the relationship type that should be made available for theselected provider group when presenting case matches.
Copyright © 1988, 2020, Oracle and/or its affiliates. 95

Setting Up Call Center Prompt Tables Chapter 3
See Setting Up Case Relationship Types and Labels.
When searching for case matches, if there is no provider group on the current case, the system will use thematch criteria defined for the case business unit. If the current case has a provider group, then the systemwill use the match criteria defined for that provider group.
If the current case has a provider group but there is no match criteria defined for that provider group, thenthe system will use the match criteria defined for the business unit for that case.
Note: There is no limit to how many match definitions you can define for a business unit or providergroup. However, the more match definitions you define, the more processing it will take to return yourmatch results. For that reason, we recommend you minimize the number of match definitions you use.
96 Copyright © 1988, 2020, Oracle and/or its affiliates.

Chapter 4
Setting Up RMA Processing
Understanding RMA in PeopleSoft Support
RMA functions and real-time item balance and availability checks in PeopleSoft Support requireintegration with inventory and purchasing systems. This documentation discusses implementationrequirements and recommendations to consider when integrating PeopleSoft Support with PeopleSoftInventory and PeopleSoft Purchasing in the PeopleSoft Supply Chain Management (SCM) product line.
Note: RMA functionality is relevant to PeopleSoft Support only. PeopleSoft HelpDesk applications,PeopleSoft Change Management, and PeopleSoft Quality do not incorporate RMA functionality.
Note: You must implement the Business Unit EIP to make business units defined in PeopleSoft SCMavailable for selection on pages in PeopleSoft Support.
Activating the Required Service Operations
The implementation of RMA functionality in PeopleSoft Support requires activation of the followingservice operations:
• Business Unit.
• Item Master.
• Customer.
• Product.
• Return Material Authorization.
• Purchase Order Requisition.
• Item Balance.
As delivered, PeopleSoft service operation queues are inactive. In the PeopleSoft CRM and PeopleSoftSupply Chain Management (SCM) systems, you must activate the required service operation, set theassociated service operation queues to run mode, define the publication or subscription routing rules, andconfigure an existing message node or define a new one.
See the product documentation for PeopleTools: Integration Broker and PeopleTools: Integration BrokerAdministration.
Copyright © 1988, 2020, Oracle and/or its affiliates. 97

Setting Up RMA Processing Chapter 4
Defining Items
Item information in PeopleSoft CRM must be synchronized with item information in PeopleSoft SCM.Although PeopleSoft CRM pages enable you to enter item information manually in PeopleSoft CRM, usethe Item Master service operation to populate item tables in PeopleSoft CRM with the master item data inPeopleSoft SCM.
Once you activate the Item Master service operation, however, you can use the pages of the ItemDefinition component in PeopleSoft CRM to view item information only. You cannot add or update itemdefinitions in PeopleSoft CRM.
As delivered, PeopleSoft service operations are inactive. In both your PeopleSoft CRM and PeopleSoftSCM systems, you must activate the required service operations of the Item Master, set the associatedservice operation queues to run mode, define the routing rules, and configure an existing message node ordefine a new message node.
PeopleSoft CRM stores only a subset of the item attributes defined in PeopleSoft SCM—only the itemattributes that are used in PeopleSoft CRM are synchronized. To view the complete item definition, usethe item definition components in PeopleSoft SCM.
Item definitions in PeopleSoft CRM are stored at the setID level only. Therefore, it is possible for aparticular item to have a status of Active at the setID level but a status of Inactive in any of the businessunits in which the item is defined.
Related Links"Understanding Item Definition in PeopleSoft CRM" (PeopleSoft CRM 9.2: Product and ItemManagement)
Defining Defaults and Procurement Options for RequisitionProcessing
Call center business units in PeopleSoft CRM that can create RMAs must be defined as valid sources ofrequisitions in PeopleSoft SCM. Using the Requisition Loader Defaults component in PeopleSoft SCM,you define each call center business unit as a loader business unit and establish processing defaults forrequisitions staged by the call center business unit, including the purchasing business unit in PeopleSoftPurchasing that processes the requisitions.
See PeopleSoft FSCM: Purchasing
When defining procurement options in PeopleSoft SCM, you can associate the call center business unitwith an appropriate distribution network on the Ship To Locations page. You can configure sourcingprocesses in PeopleSoft Purchasing to check available quantity first in the distribution network beforecreating a purchase order with an external vendor.
If quantity exists in one of the Inventory business units in the defined distribution network, a materialstock request is created to fulfill the requisition. Do not include in distribution networks any Inventorybusiness units representing field service trucks.
See PeopleSoft FSCM: Inventory
98 Copyright © 1988, 2020, Oracle and/or its affiliates.

Chapter 4 Setting Up RMA Processing
Note: You must implement the Business Unit service operation to make business units defined inPeopleSoft Support available for selection on pages in PeopleSoft SCM.
See the product documentation for PeopleSoft FSCM: Application Fundamentals.
Defining Valid Requisition Requester IDs
Every requisition generated in PeopleSoft CRM includes a requester ID, representing the person or entitythat initiates a requisition request. For requisitions initiated from the RMA Form component (RF_RMA),the system populates the Requester field with the default requester ID defined on the User Preferences -Overall Preferences page.
You can select an alternate requester ID as necessary; however, you must define the requester ID onrequisitions staged in PeopleSoft Purchasing as a valid requester ID in PeopleSoft SCM. You establishrequesters on the Requester Setup page in PeopleSoft SCM.
You can set up requester IDs that are associated with multiple user IDs. In this case, a requester IDrepresents a specific group or region. Setting up requester IDs in this manner enables you to monitorrequisitions staged by the associated group or region rather than by a specific person in the RequisitionWorkbench component (REQ_WORKBENCH) in PeopleSoft Purchasing.
Note: For requisitions initiated for advanced return RMAs in PeopleSoft Support, the system sets therequisition ID equal to the RMA ID. RMA IDs are limited to 10 digits.
See the product documentation for PeopleSoft FSCM: Application Fundamentals and PeopleSoft FSCM:Purchasing.
Setting Up Links to PeopleSoft Purchasing and PeopleSoftInventory
PeopleSoft uses content references that point to the ERP node on the Employee portal. Assuming the ERPnode is available, no setup is required to access the Requisition Workbench component in PeopleSoftPurchasing and the Item/Product Availability Inquiry component (ATP_AVAIL_INV) in PeopleSoftInventory when using the RMA Form component within the portal in the FDM database.
See the product documentation for PeopleTools: Integration Broker and PeopleTools: Integration BrokerAdministration.
Synchronizing Problem Codes and Reason Codes
When creating an RMA in PeopleSoft Support, you must specify a problem code. You set up problemcodes for RMAs on the Problem Codes page under Set Up CRM > Common Definitions > Codes andAuto Numbering. If you are integrating with PeopleSoft Inventory, the problem codes for RMAs inPeopleSoft Support must match the reason codes established on the Reason Code page in PeopleSoftInventory.
Copyright © 1988, 2020, Oracle and/or its affiliates. 99

Setting Up RMA Processing Chapter 4
In addition, you must define the matching reason codes in PeopleSoft Inventory with a reason type ofReturn Material Authorization. When you create the RMA form in PeopleSoft Inventory, the problemcode is used as the reason code. If the reason code on the RMA form does not exist in PeopleSoftInventory, the system logs an error when the Returned Material Authorization EIP application message isprocessed.
See the product documentation for PeopleSoft FSCM: Application Fundamentals.
Related LinksUnderstanding Call Center Prompt Tables
Viewing RMA Statuses
The RMA status field is included on the RMA record in PeopleSoft Support. However, the RMA statusfield does not appear on the pages in the RMA Form component because the RMA status in PeopleSoftSupport is not updated by PeopleSoft Inventory.
If your implementation includes PeopleSoft Inventory and you have logged on to the portal using thesingle sign-on feature, click View Status in the RMA Form component in PeopleSoft Support to accessPeopleSoft Inventory's RMA Form page. On the RMA Form page in PeopleSoft Inventory, you can checkthe status of the RMA. The View Status link is disabled in Add mode.
Processing Return-and-Replace RMAs in PeopleSoft SupplyChain Management
Orders for return-and-replace RMAs are not created until the returned material has been physicallyreceived at the specified return-to-inventory business unit. When a person records receipt of materialon a return-and-replace RMA in PeopleSoft Inventory, the system displays a message indicating that areplacement order is required.
Depending on your business process rules, the person enters a material stock request in PeopleSoftInventory or a requisition in PeopleSoft Purchasing to replace the customer's returned material.
The person receiving the returned material uses the information on the RMA, such as the customer'saddress and information about the item and quantity returned, to create the replacement order. To facilitatetracking, the replacement order in PeopleSoft Inventory or PeopleSoft Purchasing, you should create thereplacement requisitions or material stock requests using the same ID as the RMA.
See the product documentation for PeopleSoft FSCM: Inventory.
100 Copyright © 1988, 2020, Oracle and/or its affiliates.

Chapter 5
Setting Up Links and Related Actions
Understanding Link Setup
This topic discusses:
• Basic link setup.
• Link presentation on the Case page.
• Link groups delivered by the PeopleSoft system.
• Link categories delivered by the PeopleSoft system.
• Link definitions delivered by the PeopleSoft System (content references).
• Link definitions for PeopleSoft Customer Relationship Management (CRM).
Basic Link SetupThe PeopleSoft system uses links to provide users with the ability to link to other PeopleSoft pages fromthe Case page. You can also provide users with the ability to relate actions to cases.
The PeopleSoft system provides a standard method to link to PeopleSoft pages from the Case page inPeopleSoft Support, HelpDesk, and HelpDesk for Human Resources. To enable you to add and removelinks with little or no configuration, the PeopleSoft system provides system-delivered data for contentreferences, link categories, link definitions, and link groups.
To link to an action from the Case page, you must have a valid:
1. Link group.
Define the appropriate link group to the display template. A link group definition is a grid that iscomprised of rows of link categories and associated link names.
2. Link category.
A category can have multiple versions, each associated with a different target system (for example,PeopleSoft HCM 9.0, PeopleSoft HCM 8.9, and so on). However, Oracle recommends that only oneversion of each link category is activated at any time.
3. Link definitions.
Associate a link name to a link category. For each link definition, you must identify the values thatwill be transferred to the key fields of the target page.
Copyright © 1988, 2020, Oracle and/or its affiliates. 101

Setting Up Links and Related Actions Chapter 5
Link Setup for PeopleSoft HelpDesk for Human Resources UsersFor users of PeopleSoft HelpDesk for Human Resources, this linking method enables you to runPeopleSoft HCM on multiple databases using multiple PeopleSoft HCM versions. It also enables you tolink to an Oracle E-Business HCM database. For security considerations when linking from a PeopleSoftHelpDesk for Human Resources case to PeopleSoft or E-Business HCM, you must also:
• Set up a node for each database server.
Note: For this setup to work, the system needs to know the name of the database and the applicationserver for that database. You must set up the Content URL Text for the PeopleSoft or E-BusinessHCM node per your environment.
• Set up user IDs for both PeopleSoft or E-Business HCM and PeopleSoft CRM.
• Set up single signon.
See PeopleTools: Portal Technology
• Set up portal content references and security for each target page in PeopleSoft or E-Business HCM.
Note: The availability of a link is security-defined for the content reference. You must set up securitythat matches the security for the target page. If a mismatch occurs, users receive an error messagewhen they attempt to access the page.
Link Presentation on the Case PageAfter links are set up, the link categories appear in the Actions group box on the Case page. A user canview a subset of links based on the security established for the content reference in the link definition. Ifthe user does not have access to any link definitions within a category, the category does not appear. Thissecurity is different from the security established for the target page in PeopleSoft HCM. The group boxcan accommodate multiple link categories.
The group box displays:
• The link category name.
• A drop-down list box per link category for the user to specify a specific link within the category.
• A Go button.
After you select a specific link name and click the Go button, the system opens a new browser windowwith the target page.
Note: If the parameters are not sufficient to get access to the target page, the target's search page appears.
Link Groups Delivered by the PeopleSoft SystemThis table lists the link groups delivered by the PeopleSoft system:
Link Group ID Description
GOV Government
102 Copyright © 1988, 2020, Oracle and/or its affiliates.

Chapter 5 Setting Up Links and Related Actions
Link Group ID Description
HDREL HelpDesk Related Actions
HE Higher Education Actions
HEIT Higher Education IT Actions
HESPT Higher Education Support
HITEC Hi-Technology
HREBS HR HelpDesk EBS
HRMS HR HelpDesk
SPRT Support Related Actions
Link Categories Delivered by the PeopleSoftThis table lists the link categories delivered by the PeopleSoft system:
Link Category Link Version Action Flag Long Description Description
ACAD 9.1 Active Academics Academic
ADM 9.1 Active Admissions Admission
BENEF 8.O SP1 Inactive Benefits Benefits
BENEF 8.3 Inactive Benefits Benefits
BENEF 8.8 Inactive Benefits Benefits
BENEF 8.9 Inactive Benefits Benefits
BENEF 9.0 Inactive Benefits Benefits
BENEF 9.1 Active Benefits Benefits
CR 9.1 Active Contributor Relations Contributor Relation
CS 9.1 Active Campus Community Campus Community
EBABS 12.1 Active Absences Absences
EBASN 12.1 Active Assignment Assignment
EBCMP 12.1 Active Manage Benefits Manage Benefits
EBHR 12.1 Active Personal Personal
EBMWK 12.1 Active Maintain Worker Maintain Worker
Copyright © 1988, 2020, Oracle and/or its affiliates. 103

Setting Up Links and Related Actions Chapter 5
Link Category Link Version Action Flag Long Description Description
EBPAY 12.1 Active Manage Payroll Manage Payroll
EBPUK 12.1 Active Tax and Statutory Tax and Statutory
FIN 9.1 Active Financials Financial
HRMS 8.O SP1 Inactive HRMS Human Resources
HRMS 8.3 Inactive HRMS Human Resources
HRMS 8.8 Inactive HRMS Human Resources
HRMS 8.9 Inactive HRMS Human Resources
HRMS 9.0 Inactive HRMS Human Resources
HRMS 9.1 Active HRMS Human Resources
PAYR 8.0 SP1 Inactive Payroll Payroll
PAYR 8.3 Inactive Payroll Payroll
PAYR 8.8 Inactive Payroll Payroll
PAYR 8.9 Inactive Payroll Payroll
PAYR 9.0 Inactive Payroll Payroll
PAYR 9.1 Active Payroll Payroll
RELA Other Active Related Actions Related Actions
SACT Other Active Suggested Actions Suggested Actions
STOCK 8.O SP1 Inactive Stock Stock
STOCK 8.3 Inactive Stock Stock
STOCK 8.8 Inactive Stock Stock
STOCK 8.9 Inactive Stock Stock
STOCK 9.0 Inactive Stock Stock
STOCK 9.1 Active Stock Stock
TRNG 8.O SP1 Inactive Training Training
TRNG 8.3 Inactive Training Training
TRNG 8.8 Inactive Training Training
TRNG 8.9 Inactive Training Training
104 Copyright © 1988, 2020, Oracle and/or its affiliates.

Chapter 5 Setting Up Links and Related Actions
Link Category Link Version Action Flag Long Description Description
TRNG 9.0 Inactive Training Training
TRNG 9.1 Active Training Training
Link Definitions Delivered by the PeopleSoft System (Content References)This topic lists the link definitions that are delivered by the PeopleSoft system.
Note: If you licensed PeopleSoft Benefits Administration, you can access both PeopleSoft BenefitsAdministration links and Manage Base Benefits links. If you licensed Manage Base Benefits only, youwill not have access to PeopleSoft Benefits Administration links. Manage Base Benefits links includeall PeopleSoft Benefits Administration links except Election Entry and Create Event. If you have notlicensed PeopleSoft Benefits Administration, you should delete all of the delivered PeopleSoft BenefitsAdministration links except Election Entry and Create Event from the Link Definition page.
Link Definitions for PeopleSoft HCM 9.1This table lists the link definitions delivered by the PeopleSoft system for PeopleSoft HCM, version 9.1:
Note: This data is delivered with the Active Flag set to Active.
Category Link Name Short Name ContentReference
Page Name Search Key
BENEF BENE Election Entry HC_BAS_ELECTION_ENTRY_GBL
BAS_ELECT_EVENT
EMPLID
BENEF BENS Benefits Summary HC_BENEFITS_SUMMARY_GBL9
BN_ENRL_SUMMARY
EMPLID
BENEF CARAL Car Allocation HC_CAR_ALLOCATION_GBL
CAR_ALLOCATION
EMPLID
BENEF CARPL Car Benefit HC_CAR_PLAN_GBL
CAR_PLAN EMPLID
BENEF DEBEN Dependent/Beneficiaries
HC_DEPEND_BENEF_GBL1
DEPEND_BENEF1
EMPLID
BENEF DISP Disability Plans HC_DISABILITY_BENEFIT_GBL
DISABILITY_BENEFIT
EMPLID
BENEF EVENT Create Event HC_BAS_ON_DEM_EM_PG_GBL
BAS_ON_DEM_EM
EMPLID
Copyright © 1988, 2020, Oracle and/or its affiliates. 105

Setting Up Links and Related Actions Chapter 5
Category Link Name Short Name ContentReference
Page Name Search Key
BENEF FSAUS FSA Plans (USA) HC_FSA_BENEFITS_GBL
FSA_BENEFITS EMPLID
BENEF HLTH Health Plans HC_HEALTH_BENEFITS_GBL4
HEALTH_BENEFITS1
EMPLID
BENEF L/ADD Life/ADD Plans HC_LIFE_ADD_BENEF_GBL
LIFE_ADD_BENEF1
EMPLID
BENEF LEAP Leave Plans (USA) HC_LEAVE_PLANS_GBL
LEAVE_PLANS EMPLID
BENEF LEAPC Leave Plans (CAN) HC_LEAVE_PLANSA_GBL
LEAVE_PLANS EMPLID
BENEF PENUS Pension Plan (USA)
HC_US_PENSION_PLANS_GBL
PENSION_PLAN1 EMPLID
BENEF PPCAN Pension Plan (CAN)
HC_PENSION_PLAN_GBL5
PENSION_PLAN1 EMPLID
BENEF RETP Retirement Plans HC_RTRMNT_PLANS_GBL
RTRMNT_PLANS EMPLID
BENEF SAVP Savings Plans HC_SAVINGS_PLANS_GBL
SAVINGS_PLANS1
EMPLID
BENEF VACP Vacation Plans HC_VACATION_BENEFIT_GBL
VACATION_BENEFIT
EMPLID
HRMS CNTRC Update Contracts HC_CONTRACT_DATA_GBL1
CONTRACT1 EMPLID
HRMS EMERC EmergencyContacts
HC_EMERGENCY_CONTACT_GBL4
EMERGENCY_CONTACT
EMPLID
HRMS JOBD Job DataInformation
HC_JOB_DATA_GBL
JOB_DATA1 EMPLID
HRMS JOBS Job Summary HC_JOB_SUMM_GBL7
WF_JOB_SUMMARY
EMPLID
HRMS PERSD Personal Data HC_PERSONAL_DATA_GBL7
PERSONAL_DATA2
EMPLID
106 Copyright © 1988, 2020, Oracle and/or its affiliates.

Chapter 5 Setting Up Links and Related Actions
Category Link Name Short Name ContentReference
Page Name Search Key
PAYR ABSGB Absence Event -GBR
HC_GPGB_ABS_EVENT_GBL
GPGB_ABS_EVENT_1
EMPLID
PAYR ABSGP Absence Event HC_GP_ABS_EVENT_GBL
GP_ABS_EVENT EMPLID
PAYR BKACT Bank Accounts HC_PYE_BANKACCT_GBL7
PYE_BANKACCT EMPLID
PAYR DIRDC Direct Deposit -CAN
HC_DIRECT_DEPOSIT_CAN_CAN
DIRECT_DEPOSIT_CAN
EMPLID
PAYR DIRDF Direct Deposit -USF
HC_DIRECT_DEPOSIT_USA3
DIRECT_DEPOSIT
EMPLID
PAYR DIRDU Direct Deposit -US
HC_DIRECT_DEPOSIT_USA5
DIRECT_DEPOSIT
EMPLID
PAYR GARFR Garnishments -FRA
HC_GPFR_GAR_DAT_GBL
GPFR_GAR_DAT EMPLID
PAYR GEND General Deduct -US
HC_GENL_DED_DATA_USA8
GENL_DED_DATA
EMPLID
PAYR GENDC General Deduct -CAN
HC_GENL_DED_DATA_CAN
GENL_DED_DATA
EMPLID
PAYR GENDU General Deduct -USF
HC_GENL_DED_DATA_USF
GENL_DED_DATA
EMPLID
PAYR LNMGB Maintain Loans –GBR
HC_GPGB_EE_LOANS_GBL
GPGB_EE_LOAN_DT
EMPLID
PAYR LNRGB Review Loans –GBR
HC_GPGB_EE_LOAN_RV_GBL
GPGB_EE_LOAN_RV
EMPLID
PAYR LONFR Request Loans -FRA
HC_GPFR_LOANS_GBL
GPFR_LOANS EMPLID
PAYR NTPAY Net Pay Elections HC_GP_NET_DIST_GBL
GP_NET_DIST EMPLID
PAYR PAYFR Payslip - FRA HC_GPFR_ONPAY_GBL
GPFR_ONPAY_SUM
EMPLID
Copyright © 1988, 2020, Oracle and/or its affiliates. 107

Setting Up Links and Related Actions Chapter 5
Category Link Name Short Name ContentReference
Page Name Search Key
PAYR PAYGB Payslip - GBR HC_GPGB_PSLIP_PU_PNLG_GBL
GPGB_PSLIP_PU EMPLID
PAYR PAYSC Paysheet - CAN HC_PAY_SHEET_ADD_CAN
PAY_SHEET_LINE_S
EMPLID
PAYR PAYSF Paysheet - USF HC_PAY_SHEET_ADD_USA9
PAY_SHEET_LINE_S
EMPLID
PAYR PAYSU Paysheet - US HC_PAY_SHEET_ADD_USA8
PAY_SHEET_LINE_S
EMPLID
PAYR PCHK Paycheck - US HC_PAY_CHECK_USA5
PAY_CHECK_E EMPLID
PAYR PCHKC Paycheck - CAN HC_PAY_CHECK_CAN2
PAY_CHECK_E EMPLID
PAYR PCHKU Paycheck - USF HC_PAY_CHECK_USF4
PAY_CHECK_E EMPLID
PAYR SAVB Savings Bond - US HC_SAVINGS_BOND_LOG_USA
SAVINGS_BOND_LOG
EMPLID
PAYR TAXCA Tax Data - CAN HC_TAX_DATA_CAN_CAN
TAX_DATA_CAN1
EMPLID
PAYR TAXSF Tax Data - USF HC_TAX_DATA_USA2
TAX_DATA1 EMPLID
PAYR TAXUS Tax Data - US HC_TAX_DATA_USA6
TAX_DATA1 EMPLID
STOCK STKEX Stock Exercise HC_ST_EXER_SRCH_GBL
ST_EXER_SRCH1 EMPLID
STOCK STOCA Stock Activity HC_ST_RUNCTL_STOK002_GBL9
ST_RUNCTL_STOK002
EMPLID
TRNG CENRL Course Enrollment HC_TRN_STUDNT_CRS_DT2_GBL
COURSE_STUDNT_ENRL
EMPLID
TRNG TRNSU Training Summary HC_TRN_STUDNT_CRS_SU3_GBL
TRN_STUDNT_CRS_SUM
EMPLID
108 Copyright © 1988, 2020, Oracle and/or its affiliates.

Chapter 5 Setting Up Links and Related Actions
Link Definitions for PeopleSoft HCM 9.0This table lists the link definitions delivered by the PeopleSoft system for PeopleSoft HCM, version 9.0:
Note: This data is delivered with the Active Flag set to Inactive.
Category Link Name Short Name ContentReference
Page Name Search Key
BENEF BENE Election Entry HC_BAS_ELECTION_ENTRY_GBL
BAS_ELECT_EVENT
EMPLID
BENEF BENS Benefits Summary HC_BENEFITS_SUMMARY_GBL9
BENEFITS_SUMMARY1
EMPLID
BENEF CARAL Car Allocation HC_CAR_ALLOCATION_GBL
CAR_ALLOCATION
EMPLID
BENEF CARPL Car Benefit HC_CAR_PLAN_GBL
CAR_PLAN EMPLID
BENEF DEBEN Dependent/Beneficiaries
HC_DEPEND_BENEF_GBL1
DEPEND_BENEF1
EMPLID
BENEF DISP Disability Plans HC_DISABILITY_BENEFIT_GBL
DISABILITY_BENEFIT
EMPLID
BENEF EVENT Create Event HC_BAS_ON_DEM_EM_PG_GBL
BAS_ON_DEM_EM
EMPLID
BENEF FSAUS FSA Plans (USA) HC_FSA_BENEFITS_GBL
FSA_BENEFITS EMPLID
BENEF HLTH Health Plans HC_HEALTH_BENEFITS_GBL4
HEALTH_BENEFITS1
EMPLID
BENEF L/ADD Life/ADD Plans HC_LIFE_ADD_BENEF_GBL
LIFE_ADD_BENEF1
EMPLID
BENEF LEAP Leave Plans (USA) HC_LEAVE_PLANS_GBL
LEAVE_PLANS EMPLID
BENEF LEAPC Leave Plans (CAN) HC_LEAVE_PLANSA_GBL
LEAVE_PLANS EMPLID
BENEF PENUS Pension Plan (USA)
HC_US_PENSION_PLANS_GBL
PENSION_PLAN1 EMPLID
Copyright © 1988, 2020, Oracle and/or its affiliates. 109

Setting Up Links and Related Actions Chapter 5
Category Link Name Short Name ContentReference
Page Name Search Key
BENEF PPCAN Pension Plan (CAN)
HC_PENSION_PLAN_GBL5
PENSION_PLAN1 EMPLID
BENEF RETP Retirement Plans HC_RTRMNT_PLANS_GBL
RTRMNT_PLANS EMPLID
BENEF SAVP Savings Plans HC_SAVINGS_PLANS_GBL
SAVINGS_PLANS1
EMPLID
BENEF VACP Vacation Plans HC_VACATION_BENEFIT_GBL
VACATION_BENEFIT
EMPLID
HRMS CNTRC Update Contracts HC_CONTRACT_DATA_GBL1
CONTRACT1 EMPLID
HRMS EMERC EmergencyContacts
HC_EMERGENCY_CONTACT_GBL4
EMERGENCY_CONTACT
EMPLID
HRMS JOBD Job DataInformation
HC_JOB_DATA_GBL
JOB_DATA1 EMPLID
HRMS JOBS Job Summary HC_JOB_SUMMARY_GBL7
JOB_SUMMARY EMPLID
HRMS PERSD Personal Data HC_PERSONAL_DATA_GBL7
PERSONAL_DATA2
EMPLID
PAYR ABSGB Absence Event -GBR
HC_GPGB_ABS_EVENT_GBL
GPGB_ABS_EVENT_1
EMPLID
PAYR ABSGP Absence Event HC_GP_ABS_EVENT_GBL
GP_ABS_EVENT EMPLID
PAYR BKACT Bank Accounts HC_PYE_BANKACCT_GBL7
PYE_BANKACCT EMPLID
PAYR DIRDC Direct Deposit -CAN
HC_DIRECT_DEPOSIT_CAN_CAN
DIRECT_DEPOSIT_CAN
EMPLID
PAYR DIRDF Direct Deposit -USF
HC_DIRECT_DEPOSIT_USA3
DIRECT_DEPOSIT
EMPLID
PAYR DIRDU Direct Deposit -US
HC_DIRECT_DEPOSIT_USA5
DIRECT_DEPOSIT
EMPLID
110 Copyright © 1988, 2020, Oracle and/or its affiliates.

Chapter 5 Setting Up Links and Related Actions
Category Link Name Short Name ContentReference
Page Name Search Key
PAYR GARFR Garnishments -FRA
HC_GPFR_GAR_DAT_GBL
GPFR_GAR_DAT EMPLID
PAYR GEND General Deduct -US
HC_GENL_DED_DATA_USA8
GENL_DED_DATA
EMPLID
PAYR GENDC General Deduct -CAN
HC_GENL_DED_DATA_CAN
GENL_DED_DATA
EMPLID
PAYR GENDU General Deduct -USF
HC_GENL_DED_DATA_USF
GENL_DED_DATA
EMPLID
PAYR LNMGB Maintain Loans –GBR
HC_GPGB_EE_LOANS_GBL
GPGB_EE_LOAN_DT
EMPLID
PAYR LNRGB Review Loans –GBR
HC_GPGB_EE_LOAN_RV_GBL
GPGB_EE_LOAN_RV
EMPLID
PAYR LONFR Request Loans -FRA
HC_GPFR_LOANS_GBL
GPFR_LOANS EMPLID
PAYR NTPAY Net Pay Elections HC_GP_NET_DIST_GBL
GP_NET_DIST EMPLID
PAYR PAYFR Payslip - FRA HC_GPFR_ONPAY_GBL
GPFR_ONPAY_SUM
EMPLID
PAYR PAYGB Payslip - GBR HC_GPGB_PSLIP_PU_PNLG_GBL
GPGB_PSLIP_PU EMPLID
PAYR PAYSC Paysheet - CAN HC_PAY_SHEET_ADD_CAN
PAY_SHEET_LINE_S
EMPLID
PAYR PAYSF Paysheet - USF HC_PAY_SHEET_ADD_USA9
PAY_SHEET_LINE_S
EMPLID
PAYR PAYSU Paysheet - US HC_PAY_SHEET_ADD_USA8
PAY_SHEET_LINE_S
EMPLID
PAYR PCHK Paycheck - US HC_PAY_CHECK_USA5
PAY_CHECK_E EMPLID
PAYR PCHKC Paycheck - CAN HC_PAY_CHECK_CAN2
PAY_CHECK_E EMPLID
PAYR PCHKU Paycheck - USF HC_PAY_CHECK_USF4
PAY_CHECK_E EMPLID
Copyright © 1988, 2020, Oracle and/or its affiliates. 111

Setting Up Links and Related Actions Chapter 5
Category Link Name Short Name ContentReference
Page Name Search Key
PAYR SAVB Savings Bond - US HC_SAVINGS_BOND_LOG_USA
SAVINGS_BOND_LOG
EMPLID
PAYR TAXCA Tax Data - CAN HC_TAX_DATA_CAN_CAN
TAX_DATA_CAN1
EMPLID
PAYR TAXSF Tax Data - USF HC_TAX_DATA_USA2
TAX_DATA1 EMPLID
PAYR TAXUS Tax Data - US HC_TAX_DATA_USA6
TAX_DATA1 EMPLID
STOCK STKEX Stock Exercise HC_ST_EXER_SRCH_GBL
ST_EXER_SRCH1 EMPLID
STOCK STOCA Stock Activity HC_ST_RUNCTL_STOK002_GBL9
ST_RUNCTL_STOK002
EMPLID
TRNG CENRL Course Enrollment HC_TRN_STUDNT_CRS_DT2_GBL
COURSE_STUDNT_ENRL
EMPLID
TRNG TRNSU Training Summary HC_TRN_STUDNT_CRS_SU3_GBL
TRN_STUDNT_CRS_SUM
EMPLID
Link Definitions for PeopleSoft HCM 8.9This table lists the link definitions delivered by the PeopleSoft system for PeopleSoft HCM, version 8.9:
Note: This data is delivered with the Active Flag set to Inactive.
Category Link Name Short Name ContentReference
Page Name Search Key
BENEF BENE Election Entry HC_BAS_ELECTION_ENTRY_GBL
BAS_ELECT_EVENT
EMPLID
BENEF BENS Benefits Summary HC_BENEFITS_SUMMARY_GBL9
BENEFITS_SUMMARY1
EMPLID
BENEF CARAL Car Allocation HC_CAR_ALLOCATION_GBL
CAR_ALLOCATION
EMPLID
112 Copyright © 1988, 2020, Oracle and/or its affiliates.

Chapter 5 Setting Up Links and Related Actions
Category Link Name Short Name ContentReference
Page Name Search Key
BENEF CARPL Car Benefit HC_CAR_PLAN_GBL
CAR_PLAN EMPLID
BENEF DEBEN Dependent/Beneficiaries
HC_DEPEND_BENEF_GBL1
DEPEND_BENEF1
EMPLID
BENEF DISP Disability Plans HC_DISABILITY_BENEFIT_GBL
DISABILITY_BENEFIT
EMPLID
BENEF EVENT Create Event HC_BAS_ON_DEM_EM_PG_GBL
BAS_ON_DEM_EM
EMPLID
BENEF FSACA FSA Plans (CAN) HC_FSA_BENEFITS_CAN_GBL
FSA_BENEFITS EMPLID
BENEF FSAUS FSA Plans (USA) HC_FSA_BENEFITS_GBL
FSA_BENEFITS EMPLID
BENEF HLTH Health Plans HC_HEALTH_BENEFITS_GBL4
HEALTH_BENEFITS1
EMPLID
BENEF L/ADD Life/ADD Plans HC_LIFE_ADD_BENEF_GBL
LIFE_ADD_BENEF1
EMPLID
BENEF LEAP Leave Plans (USA) HC_LEAVE_PLANS_GBL
LEAVE_PLANS EMPLID
BENEF LEAPC Leave Plans (CAN) HC_LEAVE_PLANSA_GBL
LEAVE_PLANS EMPLID
BENEF PENUS Pension Plan (USA)
HC_US_PENSION_PLANS_GBL
PENSION_PLAN1 EMPLID
BENEF PPCAN Pension Plan (CAN)
HC_PENSION_PLAN_GBL5
PENSION_PLAN1 EMPLID
BENEF RETP Retirement Plans HC_RTRMNT_PLANS_GBL
RTRMNT_PLANS EMPLID
BENEF SAVP Savings Plans HC_SAVINGS_PLANS_GBL
SAVINGS_PLANS1
EMPLID
BENEF VACP Vacation Plans HC_VACATION_BENEFIT_GBL
VACATION_BENEFIT
EMPLID
Copyright © 1988, 2020, Oracle and/or its affiliates. 113

Setting Up Links and Related Actions Chapter 5
Category Link Name Short Name ContentReference
Page Name Search Key
HRMS CNTRC Update Contracts HC_CONTRACT_DATA_GBL1
CONTRACT1 EMPLID
HRMS EMERC EmergencyContacts
HC_EMERGENCY_CONTACT_GBL4
EMERGENCY_CONTACT
EMPLID
HRMS JOBD Job DataInformation
HC_JOB_DATA_GBL
JOB_DATA1 EMPLID
HRMS JOBS Job Summary HC_JOB_SUMMARY_GBL7
JOB_SUMMARY EMPLID
HRMS PERSD Personal Data HC_PERSONAL_DATA_GBL7
PERSONAL_DATA2
EMPLID
PAYR ABSGB Absence Event -GBR
HC_GPGB_ABS_EVENT_GBL
GPGB_ABS_EVENT_1
EMPLID
PAYR ABSGP Absence Event HC_GP_ABS_EVENT_GBL
GP_ABS_EVENT EMPLID
PAYR BKACT Bank Accounts HC_PYE_BANKACCT_GBL7
PYE_BANKACCT EMPLID
PAYR DIRDC Direct Deposit -CAN
HC_DIRECT_DEPOSIT_CAN_CAN
DIRECT_DEPOSIT_CAN
EMPLID
PAYR DIRDF Direct Deposit -USF
HC_DIRECT_DEPOSIT_USA3
DIRECT_DEPOSIT
EMPLID
PAYR DIRDU Direct Deposit -US
HC_DIRECT_DEPOSIT_USA5
DIRECT_DEPOSIT
EMPLID
PAYR GARFR Garnishments -FRA
HC_GPFR_GAR_DAT_GBL
GPFR_GAR_DAT EMPLID
PAYR GEND General Deduct -US
HC_GENL_DED_DATA_USA8
GENL_DED_DATA
EMPLID
PAYR GENDC General Deduct -CAN
HC_GENL_DED_DATA_CAN
GENL_DED_DATA
EMPLID
PAYR GENDU General Deduct -USF
HC_GENL_DED_DATA_USF
GENL_DED_DATA
EMPLID
114 Copyright © 1988, 2020, Oracle and/or its affiliates.

Chapter 5 Setting Up Links and Related Actions
Category Link Name Short Name ContentReference
Page Name Search Key
PAYR LNMGB Maintain Loans –GBR
HC_GPGB_EE_LOANS_GBL
GPGB_EE_LOAN_DT
EMPLID
PAYR LNRGB Review Loans –GBR
HC_GPGB_EE_LOAN_RV_GBL
GPGB_EE_LOAN_RV
EMPLID
PAYR LONFR Request Loans -FRA
HC_GPFR_LOANS_GBL
GPFR_LOANS EMPLID
PAYR NTPAY Net Pay Elections HC_GP_NET_DIST_GBL
GP_NET_DIST EMPLID
PAYR PAYFR Payslip - FRA HC_GPFR_ONPAY_GBL
GPFR_ONPAY_SUM
EMPLID
PAYR PAYGB Payslip - GBR HC_GPGB_PSLIP_PU_PNLG_GBL
GPGB_PSLIP_PU EMPLID
PAYR PAYSC Paysheet - CAN HC_PAY_SHEET_ADD_CAN
PAY_SHEET_LINE_S
EMPLID
PAYR PAYSF Paysheet - USF HC_PAY_SHEET_ADD_USA9
PAY_SHEET_LINE_S
EMPLID
PAYR PAYSU Paysheet - US HC_PAY_SHEET_ADD_USA8
PAY_SHEET_LINE_S
EMPLID
PAYR PCHK Paycheck - US HC_PAY_CHECK_USA5
PAY_CHECK_E EMPLID
PAYR PCHKC Paycheck - CAN HC_PAY_CHECK_CAN2
PAY_CHECK_E EMPLID
PAYR PCHKU Paycheck - USF HC_PAY_CHECK_USF4
PAY_CHECK_E EMPLID
PAYR SAVB Savings Bond - US HC_SAVINGS_BOND_LOG_USA
SAVINGS_BOND_LOG
EMPLID
PAYR TAXCA Tax Data - CAN HC_TAX_DATA_CAN_CAN
TAX_DATA_CAN1
EMPLID
PAYR TAXSF Tax Data - USF HC_TAX_DATA_USA2
TAX_DATA1 EMPLID
PAYR TAXUS Tax Data - US HC_TAX_DATA_USA6
TAX_DATA1 EMPLID
Copyright © 1988, 2020, Oracle and/or its affiliates. 115

Setting Up Links and Related Actions Chapter 5
Category Link Name Short Name ContentReference
Page Name Search Key
STOCK STKEX Stock Exercise HC_ST_EXER_SRCH_GBL
ST_EXER_SRCH1 EMPLID
STOCK STOCA Stock Activity HC_ST_RUNCTL_STOK002_GBL9
ST_RUNCTL_STOK002
EMPLID
TRNG CENRL Course Enrollment HC_TRN_STUDNT_CRS_DT2_GBL
COURSE_STUDNT_ENRL
EMPLID
TRNG TRNSU Training Summary HC_TRN_STUDNT_CRS_SU3_GBL
TRN_STUDNT_CRS_SUM
EMPLID
Link Definitions for PeopleSoft HCM 8.8This table lists the link definitions delivered by the PeopleSoft system for PeopleSoft HCM, version 8.8:
Note: This data is delivered with the Active Flag set to Inactive.
Category Link Name Short Name ContentReference
Page Name Search Key
BENEF BENE Election Entry HC_BAS_ELECTION_ENTRY_GBL
BAS_ELECT_EVENT
EMPLID
BENEF BENS Benefits Summary HC_BENEFITS_SUMMARY_GBL9
BENEFITS_SUMMARY1
EMPLID
BENEF DEBEN Dependent/Beneficiaries
HC_DEPEND_BENEF_GBL1
DEPEND_BENEF1
EMPLID
BENEF DISP Disability Plans HC_DISABILITY_BENEFIT_GBL
DISABILITY_BENEFIT
EMPLID
BENEF EVENT Create Event HC_BAS_ON_DEM_EM_PG_GBL
BAS_ON_DEM_EM
EMPLID
BENEF FSACA FSA Plans (CAN) HC_FSA_BENEFITS_CAN_GBL
FSA_BENEFITS EMPLID
BENEF FSAUS FSA Plans (USA) HC_FSA_BENEFITS_GBL
FSA_BENEFITS EMPLID
116 Copyright © 1988, 2020, Oracle and/or its affiliates.

Chapter 5 Setting Up Links and Related Actions
Category Link Name Short Name ContentReference
Page Name Search Key
BENEF HLTH Health Plans HC_HEALTH_BENEFITS_GBL4
HEALTH_BENEFITS1
EMPLID
BENEF L/ADD Life/ADD Plans HC_LIFE_ADD_BENEF_GBL
LIFE_ADD_BENEF1
EMPLID
BENEF LEAP Leave Plans (USA) HC_LEAVE_PLANS_GBL
LEAVE_PLANS EMPLID
BENEF LEAPC Leave Plans (CAN) HC_LEAVE_PLANSA_GBL
LEAVE_PLANS EMPLID
BENEF PENUS Pension Plan (USA)
HC_US_PENSION_PLANS_GBL
PENSION_PLAN1 EMPLID
BENEF PPCAN Pension Plan (CAN)
HC_PENSION_PLAN_GBL5
PENSION_PLAN1 EMPLID
BENEF RETP Retirement Plans HC_RTRMNT_PLANS_GBL
RTRMNT_PLANS EMPLID
BENEF SAVP Savings Plans HC_SAVINGS_PLANS_GBL
SAVINGS_PLANS1
EMPLID
BENEF VACP Vacation Plans HC_VACATION_BENEFIT_GBL
VACATION_BENEFIT
EMPLID
HRMS EMERC EmergencyContacts
HC_EMERGENCY_CONTACT_GBL4
EMERGENCY_CONTACT
EMPLID
HRMS JOBD Job DataInformation
HC_JOB_DATA_GBL
JOB_DATA1 EMPLID
HRMS JOBS Job Summary HC_JOB_SUMMARY_GBL7
JOB_SUMMARY EMPLID
HRMS PERSD Personal Data HC_PERSONAL_DATA_GBL7
PERSONAL_DATA1
EMPLID
PAYR DIRDC Direct Deposit -CAN
HC_DIRECT_DEPOSIT_CAN_CAN
DIRECT_DEPOSIT_CAN
EMPLID
PAYR DIRDF Direct Deposit -USF
HC_DIRECT_DEPOSIT_USA3
DIRECT_DEPOSIT
EMPLID
Copyright © 1988, 2020, Oracle and/or its affiliates. 117

Setting Up Links and Related Actions Chapter 5
Category Link Name Short Name ContentReference
Page Name Search Key
PAYR DIRDU Direct Deposit -US
HC_DIRECT_DEPOSIT_USA5
DIRECT_DEPOSIT
EMPLID
PAYR GEND General Deduct -US
HC_GENL_DED_DATA_USA8
GENL_DED_DATA
EMPLID
PAYR GENDC General Deduct -CAN
HC_GENL_DED_DATA_CAN
GENL_DED_DATA
EMPLID
PAYR GENDU General Deduct -USF
HC_GENL_DED_DATA_USF
GENL_DED_DATA
EMPLID
PAYR PAYSC Paysheet - CAN HC_PAY_SHEET_ADD_CAN
PAY_SHEET_LINE_S
EMPLID
PAYR PAYSF Paysheet - USF HC_PAY_SHEET_ADD_USA9
PAY_SHEET_LINE_S
EMPLID
PAYR PAYSU Paysheet - US HC_PAY_SHEET_ADD_USA8
PAY_SHEET_LINE_S
EMPLID
PAYR PCHK Paycheck - US HC_PAY_CHECK_USA5
PAY_CHECK_E EMPLID
PAYR PCHKC Paycheck - CAN HC_PAY_CHECK_CAN2
PAY_CHECK_E EMPLID
PAYR PCHKU Paycheck - USF HC_PAY_CHECK_USF4
PAY_CHECK_E EMPLID
PAYR SAVB Savings Bond - US HC_SAVINGS_BOND_LOG_USA
SAVINGS_BOND_LOG
EMPLID
PAYR TAXCA Tax Data - CAN HC_TAX_DATA_CAN_CAN
TAX_DATA_CAN1
EMPLID
PAYR TAXSF Tax Data - USF HC_TAX_DATA_USA2
TAX_DATA1 EMPLID
PAYR TAXUS Tax Data - US HC_TAX_DATA_USA6
TAX_DATA1 EMPLID
STOCK STKEX Stock Exercise HC_ST_EXER_SRCH_GBL
ST_EXER_SRCH1 EMPLID
STOCK STOCA Stock Activity HC_ST_RUNCTL_STOK002_GBL9
ST_RUNCTL_STOK002
EMPLID
118 Copyright © 1988, 2020, Oracle and/or its affiliates.

Chapter 5 Setting Up Links and Related Actions
Category Link Name Short Name ContentReference
Page Name Search Key
TRNG CENRL Course Enrollment HC_TRN_STUDNT_CRS_DT2_GBL
COURSE_STUDNT_ENRL
EMPLID
TRNG TRNSU Training Summary HC_TRN_STUDNT_CRS_SU3_GBL
TRN_STUDNT_CRS_SUM
EMPLID
Link Definitions for PeopleSoft HCM 8.3This table lists the link definitions delivered by the PeopleSoft system for PeopleSoft HCM, version 8.3:
Note: This data is delivered with the Active Flag set to Inactive.
Category Link Name Short Name ContentReference
Page Name Search Key
BENEF BENE Election Entry HC_BAS_ELECTION_ENTRY_GBL
BAS_ELECT_EVENT 1
EMPLID
BENEF BENS Benefits Summary HC_BENEFITS_SUMMARY_GBL9
BENEFITS_SUMMARY1
EMPLID
BENEF DEBEN Dependent/Beneficiaries
HC_DEPEND_BENEF_GBL1
DEPEND_BENEF1
EMPLID
BENEF DISP Disability Plans HC_DISABILITY_BENEFIT_GBL
DISABILITY_BENEFIT
EMPLID
BENEF EVENT Create Event HC_BAS_ON_DEM_EM_PG_GBL
BAS_ON_DEM_EM
EMPLID
BENEF FSACA FSA Plans (CAN) HC_FSA_BENEFITS_CAN_GBL
FSA_BENEFITS EMPLID
BENEF FSAUS FSA Plans (USA) HC_FSA_BENEFITS_GBL
FSA_BENEFITS EMPLID
BENEF HLTH Health Plans HC_HEALTH_BENEFITS_GBL4
HEALTH_BENEFITS1
EMPLID
BENEF L/ADD Life/ADD Plans HC_LIFE_ADD_BENEF_GBL
LIFE_ADD_BENEF1
EMPLID
Copyright © 1988, 2020, Oracle and/or its affiliates. 119

Setting Up Links and Related Actions Chapter 5
Category Link Name Short Name ContentReference
Page Name Search Key
BENEF LEAP Leave Plans (USA) HC_LEAVE_PLANS_GBL
LEAVE_PLANS EMPLID
BENEF LEAPC Leave Plans (CAN) HC_LEAVE_PLANSA_GBL
LEAVE_PLANS EMPLID
BENEF PENUS Pension Plan (USA)
HC_US_PENSION_PLANS_GBL
PENSION_PLAN1 EMPLID
BENEF PPCAN Pension Plan (CAN)
HC_PENSION_PLAN_GBL5
PENSION_PLAN1 EMPLID
BENEF RETP Retirement Plans HC_RTRMNT_PLANS_GBL
RTRMNT_PLANS EMPLID
BENEF SAVP Savings Plans HC_SAVINGS_PLANS_GBL
SAVINGS_PLANS1
EMPLID
BENEF VACP Vacation Plans HC_VACATION_BENEFIT_GBL
VACATION_BENEFIT
EMPLID
HRMS EMERC EmergencyContacts
HC_EMERGENCY_CONTACT_GBL4
EMERGENCY_CONTACT
EMPLID
HRMS JOBD Job DataInformation
HC_JOB_DATA_GBL
JOB_DATA1 EMPLID
HRMS JOBS Job Summary HC_JOB_SUMMARY_GBL7
JOB_SUMMARY EMPLID
HRMS PERSD Personal Data HC_PERSONAL_DATA_GBL7
PERSONAL_DATA1
EMPLID
PAYR DIRDC Direct Deposit -CAN
HC_DIRECT_DEPOSIT_CAN_CAN
DIRECT_DEPOSIT_CAN
EMPLID
PAYR DIRDF Direct Deposit -USF
HC_DIRECT_DEPOSIT_USA3
DIRECT_DEPOSIT
EMPLID
PAYR DIRDU Direct Deposit -US
HC_DIRECT_DEPOSIT_USA5
DIRECT_DEPOSIT
EMPLID
PAYR GEND General Deduct -US
HC_GENL_DED_DATA_USA8
GENL_DED_DATA
EMPLID
120 Copyright © 1988, 2020, Oracle and/or its affiliates.

Chapter 5 Setting Up Links and Related Actions
Category Link Name Short Name ContentReference
Page Name Search Key
PAYR GENDC General Deduct -CAN
HC_GENL_DED_DATA_CAN
GENL_DED_DATA
EMPLID
PAYR GENDU General Deduct -USF
HC_GENL_DED_DATA_USF
GENL_DED_DATA
EMPLID
PAYR PAYSC Paysheet - CAN HC_PAY_SHEET_ADD_CAN
PAY_SHEET_ADD_S
EMPLID
PAYR PAYSF Paysheet - USF HC_PAY_SHEET_ADD_USA9
PAY_SHEET_ADD_S
EMPLID
PAYR PAYSU Paysheet - US HC_PAY_SHEET_ADD_USA8
PAY_SHEET_ADD_S
EMPLID
PAYR PCHK Paycheck - US HC_PAY_CHECK_USA5
PAY_CHECK_E EMPLID
PAYR PCHKC Paycheck - CAN HC_PAY_CHECK_CAN2
PAY_CHECK_E EMPLID
PAYR PCHKU Paycheck - USF HC_PAY_CHECK_USF4
PAY_CHECK_E EMPLID
PAYR SAVB Savings Bond - US HC_SAVINGS_BOND_LOG_USA
SAVINGS_BOND_LOG
EMPLID
PAYR TAXCA Tax Data - CAN HC_TAX_DATA_CAN_CAN
TAX_DATA_CAN1
EMPLID
PAYR TAXSF Tax Data - USF HC_TAX_DATA_USA2
TAX_DATA1 EMPLID
PAYR TAXUS Tax Data - US HC_TAX_DATA_USA6
TAX_DATA1 EMPLID
STOCK STKEX Stock Exercise HC_ST_EXER_SRCH_GBL
ST_EXER_SRCH1 EMPLID
STOCK STOCA Stock Activity HC_ST_RUNCTL_STOK002_GBL9
ST_RUNCTL_STOK002
EMPLID
TRNG CENRL Course Enrollment HC_TRN_STUDNT_CRS_DT2_GBL
COURSE_STUDNT_ENRL
EMPLID
Copyright © 1988, 2020, Oracle and/or its affiliates. 121

Setting Up Links and Related Actions Chapter 5
Category Link Name Short Name ContentReference
Page Name Search Key
TRNG TRNSU Training Summary HC_TRN_STUDNT_CRS_SU3_GBL
TRN_STUDNT_CRS_SUM
EMPLID
Link Definitions for PeopleSoft HCM 8.0 SP1This table lists the link definitions delivered by the PeopleSoft system for PeopleSoft HCM, version 8.0SP1:
Note: This data is delivered with the Active Flag set to Inactive.
Category Link Name Short Name ContentReference
Page Name Search Key
BENEF BENE Election Entry HC_BAS_ELECTION_ENTRY_GBL
BAS_ELECT_EVENT
EMPLID
BENEF BENS Benefits Summary HC_BENEFITS_SUMMARY_GBL9
BENEFITS_SUMMARY1
EMPLID
BENEF DEBEN Dependent/Beneficiaries
HC_DEPEND_BENEF_GBL1
DEPEND_BENEF1
EMPLID
BENEF DISP Disability Plans HC_DISABILITY_BENEFIT_GBL
DISABILITY_BENEFIT
EMPLID
BENEF EVENT Create Event HC_BAS_ON_DEM_EM_PG_GBL
BAS_ON_DEM_EM
EMPLID
BENEF FSACA FSA Plans (CAN) HC_FSA_BENEFITS_CAN_GBL
FSA_BENEFITS EMPLID
BENEF FSAUS FSA Plans (USA) HC_FSA_BENEFITS_GBL
FSA_BENEFITS EMPLID
BENEF HLTH Health Plans HC_HEALTH_BENEFITS_GBL4
HEALTH_BENEFITS1
EMPLID
BENEF L/ADD Life/ADD Plans HC_LIFE_ADD_BENEF_GBL
LIFE_ADD_BENEF1
EMPLID
BENEF LEAP Leave Plans (USA) HC_LEAVE_PLANS_GBL
LEAVE_PLANS EMPLID
122 Copyright © 1988, 2020, Oracle and/or its affiliates.

Chapter 5 Setting Up Links and Related Actions
Category Link Name Short Name ContentReference
Page Name Search Key
BENEF LEAPC Leave Plans (CAN) HC_LEAVE_PLANSA_GBL
LEAVE_PLANS EMPLID
BENEF PENUS Pension Plan (USA)
HC_US_PENSION_PLANS_GBL
US_PLAN_1 EMPLID
BENEF PPCAN Pension Plan (CAN)
HC_PENSION_PLAN_GBL5
PENSION_PLAN1 EMPLID
BENEF RETP Retirement Plans HC_RTRMNT_PLANS_GBL
RTRMNT_PLANS EMPLID
BENEF SAVP Savings Plans HC_SAVINGS_PLANS_GBL
SAVINGS_PLANS1
EMPLID
BENEF VACP Vacation Plans HC_VACATION_BENEFIT_GBL
VACATION_BENEFIT
EMPLID
HRMS EMERC EmergencyContacts
HC_EMERGENCY_CONTACT_GBL4
EMERGENCY_CONTACT
EMPLID
HRMS JOBD Job DataInformation
HC_JOB_DATA_GBL
JOB_DATA1 EMPLID
HRMS JOBS Job Summary HC_JOB_SUMMARY_GBL7
JOB_SUMMARY EMPLID
HRMS PERSD Personal Data HC_PERSONAL_DATA_GBL7
PERSONAL_DATA1
EMPLID
PAYR DIRDC Direct Deposit -CAN
HC_DIRECT_DEPOSIT_CAN_CAN
DIRECT_DEPOSIT_CAN
EMPLID
PAYR DIRDF Direct Deposit -USF
HC_DIRECT_DEPOSIT_USA3
DIRECT_DEPOSIT
EMPLID
PAYR DIRDU Direct Deposit -US
HC_DIRECT_DEPOSIT_USA5
DIRECT_DEPOSIT
EMPLID
PAYR GEND General Deduct -US
HC_GENL_DED_DATA_USA8
GENL_DED_DATA
EMPLID
PAYR GENDC General Deduct -CAN
HC_GENL_DED_DATA_CAN
GENL_DED_DATA
EMPLID
Copyright © 1988, 2020, Oracle and/or its affiliates. 123

Setting Up Links and Related Actions Chapter 5
Category Link Name Short Name ContentReference
Page Name Search Key
PAYR GENDU General Deduct -USF
HC_GENL_DED_DATA_USF
GVT_GENL_DED_DATA
EMPLID
PAYR PAYSC Paysheet - CAN HC_PAY_SHEET_ADD_CAN
PAY_SHEET_ADD_S
EMPLID
PAYR PAYSF Paysheet - USF HC_PAY_SHEET_ADD_USA9
PAY_SHEET_ADD_S
EMPLID
PAYR PAYSU Paysheet - US HC_PAY_SHEET_ADD_USA8
PAY_SHEET_ADD_S
EMPLID
PAYR PCHK Paycheck - US HC_PAY_CHECK_USA5
PAY_CHECK_E EMPLID
PAYR PCHKC Paycheck - CAN HC_PAY_CHECK_CAN2
PAY_CHECK_E EMPLID
PAYR PCHKU Paycheck - USF HC_PAY_CHECK_USF4
PAY_CHECK_E EMPLID
PAYR SAVB Savings Bond - US HC_SAVINGS_BOND_LOG_USA
SAVINGS_BOND_LOG
EMPLID
PAYR TAXCA Tax Data - CAN HC_TAX_DATA_CAN_CAN
TAX_DATA_CAN1
EMPLID
PAYR TAXSF Tax Data - USF HC_TAX_DATA_USA2
TAX_DATA1 EMPLID
PAYR TAXUS Tax Data - US HC_TAX_DATA_USA6
TAX_DATA1 EMPLID
STOCK STKEX Stock Exercise HC_ST_EXER_SRCH_GBL
ST_EXER_SRCH1 EMPLID
STOCK STOCA Stock Activity HC_ST_RUNCTL_STOK002_GBL9
ST_RUNCTL_STOK002
EMPLID
TRNG CENRL Course Enrollment HC_TRN_STUDNT_CRS_DT2_GBL
COURSE_STUDNT_ENRL
EMPLID
TRNG TRNSU Training Summary HC_TRN_STUDNT_CRS_SU3_GBL
TRN_STUDNT_CRS_SUM
EMPLID
124 Copyright © 1988, 2020, Oracle and/or its affiliates.

Chapter 5 Setting Up Links and Related Actions
Link Definitions for Campus SolutionsThis table lists the link definitions delivered by PeopleSoft CRM
Note: This data is delivered with the Active Flag set to Active.
Category Link Name Short Name ContentReference
Page Name Search Key
ACAD ACD01 AcademicRequirements
HC_RQ_SUMMARY_ACAD_GBL
EMPID
ACAD ACD02 AcademicsSummary
HC_ACAD_SUMMARY_GBL
SCC_SUM_ACADEMICS
EMPID
ACAD ACD03 EnrollmentSummary
HC_STDNT_ENRL_INQ_GBL
EMPID
ACAD ACD04 Quick EnrollClasses
HC_QUICK_ENROLL_GBL
EMPID
ACAD ACD05 Search Classess HC_CLASS_SEARCH_GBL4
EMPID
ACAD ACD06 Search CourseCatalog
HC_SSS_BROWSE_CATLG_GBL3
EMPID
ACAD ACD07 Exam Schedule HC_EXAM_SCHEDULE_GBL
SSR_SSENRL_TERM
EMPID
ACAD ACD08 Student Grades HC_STDNT_GRADE_INQ_GBL
EMPID
ACAD ACD09 Request Transcript HC_TSCRPT_RQST_GBL
EMPID
ACAD ACD10 RequestAdvisement Report
HC_SAA_RPT_RQST
EMPID
ACAD ACD11 Transfer CourseCredit
HC_TRNS_CRSE_MNL_GBL
EMPID
ACAD ACD12 Transfer TestCredits
HC_TRNS_TEST_MNL_GBL
EMPID
ACAD ACD013 Transfer OtherCredits
HC_TRNS_OTHR_GBL
EMPID
Copyright © 1988, 2020, Oracle and/or its affiliates. 125

Setting Up Links and Related Actions Chapter 5
Category Link Name Short Name ContentReference
Page Name Search Key
ADM ADM10 AdmissionApplications
HC_ADM_APPL_MAINTNCE_GBL1
EMPID
ADM ADM20 Test Results HC_ACAD_TST_RSLT_PERS_GBL
EMPID
ADM ADM30 External Education HC_ACAD_HISTORY_PERS_GBL
EMPID
CR CR10 Contributor Profile HC_AV_PRSN_BIO_DEMO_GBL
EMPID
CR CR20 RelationshipSummary
HC_AV_CNST_RELATION_GBL
EMPID
CR CR30 Giving History HC_AV_P_GPROFILE_GBL
EMPID
CS CS10 Student ServicesCenter
HC_SCC_STDCTR_ADMIN
SSS_STUDENT_CENTER
EMPID
CS CS100 CommentSummary
HC_OPR_3C_SUM_PERS_GBL3
EMPID
CS CS20 ConstituentAddresses
HC_ADDRESS_MAINT_GBL2
EMPID
CS CS30 ConstituentElectronic Address
HC_E_MAIL_ADDR_PERS_GBL
EMPID
CS CS40 Constituent Phones HC_PHONE_PERS_GBL
EMPID
CS CS50 Emergency Contact HC_EMERG_NTC_SA_PERS_GBL
EMPID
CS CS60 Manage ServiceIndicators
HC_SCC_SI_SUMRY_PERS
EMPID
CS CS70 Affiliations HC_SCC_AFL_ADDUPD_GBL
EMPID
126 Copyright © 1988, 2020, Oracle and/or its affiliates.

Chapter 5 Setting Up Links and Related Actions
Category Link Name Short Name ContentReference
Page Name Search Key
CS CS80 Checklist Summary HC_CHKLST_SUMM_PERS_GBL5
EMPID
CS CS90 CommunicationSummary
HC_COMM_SUMMARY_PERS_GBL4
EMPID
FIN FIN10 Financial AidStatus
HC_SS_FA_AU_STATUS_GBL
EMPID
FIN FIN20 View Term AwardSummary
HC_STDNT_AWRD_INQUIRY_GBL
EMPID
FIN FIN30 View AnticipatedAid by Term
HC_ANTICIPTD_AID_SUMM_GBL
EMPID
FIN FIN40 Account Summary HC_ACCOUNT_VW_GBL4
EMPID
FIN FIN50 Payment Plan HC_PAYMENT_PLAN_GBL
EMPID
FIN FIN60 Tuition Calculation HC_TUITION_CALC_GBL
EMPID
FIN FIN70 Pay Tuition Fee HC_GRP_QUICK_POST_GBL
EMPID
FIN FIN80 Miscellaneous Fees HC_OPT_FEE_STDNT_GBL
EMPID
Link Definitions for Oracle E-Business HCMThis table lists the link definitions delivered by PeopleSoft CRM
Note: This data is delivered with the Active Flag set to Active.
Category Link Name Short Name Content Reference Search Key
EBABS ABENT Absences Entry CR_RC_HRHD_EBS_ABENT
P_PERSON_ID
P_BGID
Copyright © 1988, 2020, Oracle and/or its affiliates. 127

Setting Up Links and Related Actions Chapter 5
Category Link Name Short Name Content Reference Search Key
EBABS ABMNG Absence Management CR_RC_HRHD_EBS_ABSMAN
P_PERSON_ID
P_BGID
EBABS ACCRV View Accruals CR_RC_HRHD_EBS_ACCRUALS
P_PERSON_ID
P_BGID
EBASN ASNEX Assignment ExtraInformation
CR_RC_HRHD_EBS_ASSIGNX
P_PERSON_ID
P_BGID
EBASN ASNRT Assignment Rate CR_RC_HRHD_EBS_ASSIGNR
P_PERSON_ID
P_BGID
EBASN ASSGN Assignment CR_RC_HRHD_EBS_ASSIGNMENT
P_PERSON_ID
P_BGID
EBASN COST Change Cost Center CR_RC_HRHD_EBS_CHGCOST
P_PERSON_ID
P_BGID
EBASN HOURS Change Hours CR_RC_HRHD_EBS_CHGHRS
P_PERSON_ID
P_BGID
EBASN HRVW HE Views CR_RC_HRHD_EBS_HRVIEWS
P_PERSON_ID
P_BGID
EBASN JOB Change Job CR_RC_HRHD_EBS_CHGJOB
P_PERSON_ID
P_BGID
EBASN PREF Work Preferences CR_RC_HRHD_EBS_WORKPREF
P_PERSON_ID
P_BGID
EBASN RELIN Release Information CR_RC_HRHD_EBS_RELEASE
P_PERSON_ID
P_BGID
EBASN STAT Worker Status Change CR_RC_HRHD_EBS_WORKSTAT
P_PERSON_ID
P_BGID
EBASN TENUR Tenure Status CR_RC_HRHD_EBS_TENURE
P_PERSON_ID
P_BGID
128 Copyright © 1988, 2020, Oracle and/or its affiliates.

Chapter 5 Setting Up Links and Related Actions
Category Link Name Short Name Content Reference Search Key
EBCMP BNBAL Person BenefitsBalances
CR_RC_HRHD_EBS_PERBENBAL
P_PERSON_ID
P_BGID
EBCMP BSASN Person BenefitAssignment
CR_RC_HRHD_EBS_PERBENASSIGN
P_PERSON_ID
P_BGID
EBCMP COBRA COBRA QualifiedBeneficiaries
CR_RC_HRHD_EBS_COBRABEN
P_PERSON_ID
P_BGID
EBCMP COURT Court Order Form CR_RC_HRHD_EBS_COURT
P_PERSON_ID
P_BGID
EBCMP DEPBN Dependent/Beneficiary CR_RC_HRHD_EBS_DEPBEN
P_PERSON_ID
P_BGID
EBCMP ENACT Person EnrollmentAction Items
CR_RC_HRHD_EBS_ENRLACTION
P_PERSON_ID
P_BGID
EBCMP ENCRT EnrollmentCertifications
CR_RC_HRHD_EBS_ENRLCERT
P_PERSON_ID
P_BGID
EBCMP ENROL View EnrollmentResults
CR_RC_HRHD_EBS_ENRLRESULTS
P_PERSON_ID
P_BGID
EBCMP FLEX Flex ProgramEnrollment
CR_RC_HRHD_EBS_FLEX
P_PERSON_ID
P_BGID
EBCMP LIFE Process Life Events CR_RC_HRHD_EBS_LIFEEVENTS
P_PERSON_ID
P_BGID
EBCMP NONFL Non Flex ProgramEnrollment
CR_RC_HRHD_EBS_NONFLEX
P_PERSON_ID
P_BGID
EBCMP OVRRD Override PlanEnrollment
CR_RC_HRHD_EBS_ENRLOVER
P_PERSON_ID
P_BGID
EBCMP PERCM PersonCommunications
CR_RC_HRHD_EBS_PERCOM
P_PERSON_ID
P_BGID
Copyright © 1988, 2020, Oracle and/or its affiliates. 129

Setting Up Links and Related Actions Chapter 5
Category Link Name Short Name Content Reference Search Key
EBCMP PLENR Miscellaneous PlanEnrollment
CR_RC_HRHD_EBS_MISC
P_PERSON_ID
P_BGID
EBCMP PRIMC Primary Care Provider CR_RC_HRHD_EBS_PRIMCARE
P_PERSON_ID
P_BGID
EBCMP PRTIN View ParticipantInformation
CR_RC_HRHD_EBS_VPARTINFO
P_PERSON_ID
P_BGID
EBCMP PRTOV Participation Override CR_RC_HRHD_EBS_PARTOVR
P_PERSON_ID
P_BGID
EBCMP RECPY Record ContinuingPayments
CR_RC_HRHD_EBS_CONTBEN
P_PERSON_ID
P_BGID
EBCMP REIMB ReimbursementRequests
CR_RC_HRHD_EBS_REIMBURSE
P_PERSON_ID
P_BGID
EBCMP SAVEN Savings PlanEnrollment
CR_RC_HRHD_EBS_SAVEPLAN
P_PERSON_ID
P_BGID
EBCMP WHAT What-if Eligibility CR_RC_HRHD_EBS_WHATIF
P_PERSON_ID
P_BGID
EBHR ADDR Address CR_RC_HRHD_EBS_ADDRESS
P_PERSON_ID
P_BGID
EBHR APPL Application CR_RC_HRHD_EBS_APPLICATION
P_PERSON_ID
P_BGID
EBHR CNTCT Contact CR_RC_HRHD_EBS_CONTACT
P_PERSON_ID
P_BGID
EBHR COMDL CommunicationDelivery Method
CR_RC_HRHD_EBS_COMMDEL
P_PERSON_ID
P_BGID
EBHR EDUCA Education andQualification
CR_RC_HRHD_EBS_EDUCATE
P_PERSON_ID
P_BGID
130 Copyright © 1988, 2020, Oracle and/or its affiliates.

Chapter 5 Setting Up Links and Related Actions
Category Link Name Short Name Content Reference Search Key
EBHR EXINF Extra Information Type CR_RC_HRHD_EBS_XINFO
P_PERSON_ID
P_BGID
EBHR INFO Personal Information CR_RC_HRHD_EBS_PERINFO
P_PERSON_ID
P_BGID
EBHR MEDIC Medical Assessments CR_RC_HRHD_EBS_MEDICALASSESS
P_PERSON_ID
P_BGID
EBHR OTHQL Other Qualification CR_RC_HRHD_EBS_OTHERQUAL
P_PERSON_ID
P_BGID
EBHR PERDT Enter Person Details CR_RC_HRHD_EBS_PERDETAILS
P_PERSON_ID
P_BGID
EBHR PERX Person ExtraInformation
CR_RC_HRHD_EBS_PERSONX
P_PERSON_ID
P_BGID
EBHR PHONE Phone CR_RC_HRHD_EBS_PHONE
P_PERSON_ID
P_BGID
EBHR PICT Picture CR_RC_HRHD_EBS_PICTURE
P_PERSON_ID
P_BGID
EBHR PRVEM Previous Employment CR_RC_HRHD_EBS_PREVEMPL
P_PERSON_ID
P_BGID
EBHR QUALF Qualification CR_RC_HRHD_EBS_QUAL
P_PERSON_ID
P_BGID
EBHR RANK Academic Rank CR_RC_HRHD_EBS_RANK
P_PERSON_ID
P_BGID
EBHR RECOR Document of Records CR_RC_HRHD_EBS_DOCREC
P_PERSON_ID
P_BGID
EBHR SCHOL School/CollegeAttended
CR_RC_HRHD_EBS_SCHOOL
P_PERSON_ID
P_BGID
Copyright © 1988, 2020, Oracle and/or its affiliates. 131

Setting Up Links and Related Actions Chapter 5
Category Link Name Short Name Content Reference Search Key
EBHR SPECI Special Information CR_RC_HRHD_EBS_SPECIALINFO
P_PERSON_ID
P_BGID
EBHR SPINF Special InformationTypes
CR_RC_HRHD_EBS_SINFO
P_PERSON_ID
P_BGID
EBMWK MNTCW Maintaining ContingentWorker
CR_RC_HRHD_EBS_TMPLCW
P_PERSON_ID
P_BGID
EBMWK MNTEM Maintaining Employee CR_RC_HRHD_EBS_TMPLEMPL
P_PERSON_ID
P_BGID
EBMWK MNTVI Maintaining Visa CR_RC_HRHD_EBS_TMPLVISA
P_PERSON_ID
P_BGID
EBPAY ASSGN Assignment ProcessResults
CR_RC_HRHD_EBS_ASSIGNRES
P_PERSON_ID
P_BGID
EBPAY CMPT Total Compensation CR_RC_HRHD_EBS_TOTALCOMP
P_PERSON_ID
P_BGID
EBPAY EARN Statement of Earnings CR_RC_HRHD_EBS_EARNINGS
P_PERSON_ID
P_BGID
EBPAY EHIST View Entry History CR_RC_HRHD_EBS_ENTRYHIST
P_PERSON_ID
P_BGID
EBPAY ELEM Element Entries RC_HRHD_EBS_ELEMENT
P_PERSON_ID
P_BGID
P_FUNCNAME
EBPAY EMVBL View EmployeeBalances
CR_RC_HRHD_EBS_EMPLBALANCE
P_PERSON_ID
P_BGID
EBPAY EXPAY External/ManualPayments
CR_RC_HRHD_EBS_MANPAY
P_PERSON_ID
P_BGID
132 Copyright © 1988, 2020, Oracle and/or its affiliates.

Chapter 5 Setting Up Links and Related Actions
Category Link Name Short Name Content Reference Search Key
EBPAY PAYMN Manage PayrollPayments
CR_RC_HRHD_EBS_PAYPAY
P_PERSON_ID
P_BGID
EBPAY PAYSL Pay Slip CR_RC_HRHD_EBS_PAYSLIP
P_PERSON_ID
P_BGID
EBPAY PRSPY Personal Pay Methods CR_RC_HRHD_EBS_PAYMETH
P_PERSON_ID
P_BGID
EBPAY SALHS Salary History CR_RC_HRHD_EBS_SALHIST
P_PERSON_ID
P_BGID
EBPAY TXBAL View Tax Balances CR_RC_HRHD_EBS_TAXBALANCE
P_PERSON_ID
P_BGID
EBPUK MILE Mileage Claim CR_RC_HRHD_EBS_CLAIM
P_PERSON_ID
P_BGID
EBPUK P45 P45 Form CR_RC_HRHD_EBS_P45
P_PERSON_ID
P_BGID
EBPUK PAY11 P11D CR_RC_HRHD_EBS_P11D
P_PERSON_ID
P_BGID
EBPUK PRVEH Private Vehicle Entry CR_RC_HRHD_EBS_PVEHICLE
P_PERSON_ID
P_BGID
EBPUK SSP SSP/SMP/Paternity/Adoption
CR_RC_HRHD_EBS_SSP
P_PERSON_ID
P_BGID
EBPUK TAX Tax Information CR_RC_HRHD_EBS_FEDTAX
P_PERSON_ID
P_BGID
EBPUK TAXBL Tax Balances CR_RC_HRHD_EBS_ADJUSTTAX
P_PERSON_ID
P_BGID
EBPUK TXINF UK Tax Information CR_RC_HRHD_EBS_UKTAX
P_PERSON_ID
P_BGID
Copyright © 1988, 2020, Oracle and/or its affiliates. 133

Setting Up Links and Related Actions Chapter 5
Category Link Name Short Name Content Reference Search Key
EBPUK TXSUM Tax Balance Summary CR_RC_HRHD_EBS_TAXBALSUM
P_PERSON_ID
P_BGID
EBPUK W2 Employee W-2 CR_RC_HRHD_EBS_W2
P_PERSON_ID
P_BGID
EBPUK W4 W-4 CR_RC_HRHD_EBS_W4
P_PERSON_ID
P_BGID
Link Definitions for PeopleSoft CRMThis table lists the link definitions delivered by PeopleSoft CRM.
Note: This data is delivered with the Active Flag set to Active.
Category Link Name ShortName
PortalCREF
ContentReference
ClassPath
Class ID SearchKey
Method
RELA ASSET AssetSummary
Employee CR_RC_ASSET_
SUMMARY
cfResource
Identifier
RELA BPDEF DefectWorkflow
Employee RC_LINK:APPS_RC
PCode RC_BUS_PROCESS_ID
Execute
Business
Project
RELA BPRJ BusinessProject
Employee RC_LINK:APPS_RC
PCode Execute
GenBusiness
Project
RELA BSCR BranchScript
Employee RC_LINK:APPS_RC
PCode Execute
Gen-Script
RELA CREQ ChangeRequest -Create New
Employee RC_LINK:APPS_RC
PCode Create
Change
Request
RELA EM EnterpriseManager
134 Copyright © 1988, 2020, Oracle and/or its affiliates.

Chapter 5 Setting Up Links and Related Actions
Category Link Name ShortName
PortalCREF
ContentReference
ClassPath
Class ID SearchKey
Method
RELA FRAUD Case FraudWorkflow
RC_LINK:APPS_RC
PCode BP_ID Execute
Business
Project
RELA LEAD Sales Lead Employee RC_LINK:APPS_RC
PCode CreateLead
RELA NDEF Defect -Create New
Employee RC_LINK:APPS_RC
PCode CreateDefect
RELA OFFR OfferHistory
RELA ORDER Sales Order Employee RC_LINK:APPS_RC
PCode Create
Sales-Order
RELA RCREQ
Note:Appliesonly toHelpDesk, not HRHelpDesk
ChangeRequest -Relate
Employee RC_LINK:APPS_RC
PCode Relate
Change
Request
RELA RDEF Defect- RelateExisting
Employee RC_LINK:APPS_RC
PCode RelateDefect
RELA REMOT RemoteControl
Employee CR_RC_REMOTE_CONTROL
cfResource
Identifier
RELA RMA CreateRMA
Employee RC_LINK:APPS_RC
PCode CreateRMA
RELA SO ServiceOrder
Employee RC_LINK:APPS_RC
PCode CreateSO
RELA SWDEL SoftwareDelivery
Employee CR_RC_SOFTWARE_DELIVERY
RELA WEBAD AssetAdministrator
Employee CR_RC_ASSET_ADMIN
cfResource
Identifier
Copyright © 1988, 2020, Oracle and/or its affiliates. 135

Setting Up Links and Related Actions Chapter 5
Category Link Name ShortName
PortalCREF
ContentReference
ClassPath
Class ID SearchKey
Method
RELA WO Work Order- CreateNew
Employee RC_LINK:APPS_RC
PCode CreateWO
RELA SRVY Case Survey RC_LINK:APPS_RC
PCode SendSurvey
Setting Up Content References
This topic discusses how to set up content references.
Pages Used to Set Up Content ReferencesPage Name Definition Name Usage
Content Ref Administration Page PORTAL_CREF_ADM Set up content references.
Content Reference Security Page PORTAL_CREF_SEC Set up security for content references.
Setting Up Content ReferencesThe PeopleSoft system delivers the content references for PeopleSoft Support, HelpDesk, and HelpDeskfor Human Resources. To link to non-PeopleSoft locations, you must register the links as contentreferences for the employee portal.
Based on the security provided in the portal, individual agents will see the links for the content to whichthey have access.
See the product documentation for PeopleTools: Portal Technology.
Setting Up Security for Content ReferencesThe availability of a link is based on the security that you define for the content reference. You must setup security that matches the security for the target page. If a mismatch occurs, a user receives an errormessage when they try to access the page.
Viewing and Modifying Link Definitions
To view and modify link definitions, use the Link Definition (RC_LINK), Link Category(RC_LINK_CAT), and Link Group (RC_LINK_GROUP) components.
This topic discusses how to view and modify link definitions.
136 Copyright © 1988, 2020, Oracle and/or its affiliates.

Chapter 5 Setting Up Links and Related Actions
Pages Used to View and Modify Link DefinitionsPage Name Definition Name Usage
Link Category Definition Page RC_LINK_CAT_PNL View and modify the categories intowhich link definitions are organized.
Link Definition Page RC_LINK_PNL View and modify link definitions.
Link Group Page RC_LINK_GROUP View and modify the link groups intowhich link categories are organized.
Link Category Definition PageUse the Link Category Definition page (RC_LINK_CAT_PNL) to view and modify the categories intowhich link definitions are organized.
Navigation
Set Up CRM > Product Related > Call Center > Link Category > Link Category
Image: Link Category Definition page
This example illustrates the fields and controls on the Link Category Definition page.
Order Enter a number to indicate the order in which you want the itemto appear on the Case page
Short Name and Long Description Enter descriptions to identify the link category you are adding ormodifying.
Active Flag Select either Active or Inactive.
Modify System Data Click to modify the system data and select or enter informationinto the Active Flag, Order, Short Name, and Long Descriptionfields. The following message appears: This object wasdelivered by PeopleSoft but updated by the customer.
Link Definition PageUse the Link Definition page (RC_LINK_PNL) to view and modify link definitions.
Copyright © 1988, 2020, Oracle and/or its affiliates. 137

Setting Up Links and Related Actions Chapter 5
Navigation
Set Up CRM > Product Related > Call Center > Link Definition > Link Definition
Image: Link Definition page (1 of 2)
This example illustrates the fields and controls on the Link Definition page (1 of 2).
Image: Link Definition page (2 of 2)
This example illustrates the fields and controls on the Link Definition page (2 of 2).
Link Details Link Name Enter a name for this link.
Short Name Enter a short name for this link definition. The text you enter inthis field appears on the Link Group page in the drop-down listbox for the Link Category field.
138 Copyright © 1988, 2020, Oracle and/or its affiliates.

Chapter 5 Setting Up Links and Related Actions
Self-Service The text you enter in this field appears on the self-serviceapplication page.
Long Description Enter a long description. Use this field to describe a particularlink definition in more detail.
Status Select either Active or Inactive.
The system includes only the active link definitions in the LinkCategory drop-down list box on the Case page.
Default Select this check box if you want the link to become the defaultfor the category when it appears on the Case page.
Note: Because users may not have access to all links, you canset multiple defaults.
Solvable Select this check box if you want the agent to close a case byperforming an action.
Closing a case by performing an action is a manual process. If the agent performs an action that resolves the case, then theagent must change the case status to Closed and save the Casepage.
Note: All actions are delivered as non-solvable when you firstinstall the application.
Open in New Window Select this check box if you want a new browser session toappear when the agent selects the action and clicks the Gobutton on the Case page.
Note: This option is applicable for those link definitions that arePortal CREFs.
Self-Service Select this check box to have this action available on theManage Case page in your self-service applications.
SetID Enabled Select this check box to make the setID column visible in theSearch Keys grid on the Link Definition page. This settingforces you to enter a setID value in the field.
At runtime, the system compares the setID derived from thecase business unit with the setID of the link definition. If thesetIDs don't match, then the system does not display the linkdefinition in the Related Actions drop-down list box.
This setting is done to avoid displaying a message to the userthat the selected actions cannot be performed because the setIDsdon't match.
Usage Displays the usage count. The value in this field incrementseach time the system adds the link to the Related Action
Copyright © 1988, 2020, Oracle and/or its affiliates. 139

Setting Up Links and Related Actions Chapter 5
Summary sections with the Case component. To find out whichlinks are used most often, you can write reports using this field.
Transfer Details Portal CREF Select this option to create a portal content reference.
Portal Name Select the object name that you want to associate with the link.
Content The actual content reference.
Action Select the page mode that appears when the page is accessed. Values are Add, Correction, Update/Display or Update/DisplayAll.
PeopleCode Select this option if the PeopleCode method needs to be invokedwhen the action is performed.
Class ID Specify the name of the application class.
Class Path Specify the class path of the application package.
Method Name Specify the method name.
Field Name This field identifies the search keys that the system uses toaccess the linked component. Search keys can be mentioned byassociating terms that are used in AAF policies. These terms areresolved when an action is performed from the Case page.
For example, EMPLID (employee ID) is the search key usedfor most PeopleSoft HCM transactions and is associated asTerm to the link definition. Term can also be configurable. Users can click the Lookup button to provide the value for theconfigurable term. For example, see the Defect Workflow LinkDefinition in the Related Actions Link category.
Note: To bypass the Send Case Survey page when an agentselects the Case Survey link, modify the system data and use theSearch Keys group box to select the last three terms that appearunder Call Center, Link Definition after you select the AddTerm button. These terms include: Select a Dialog Business Unit<BUSINESS_UNIT>, Select a Dialog ID <DIALOG_ID>, andSelect an External Event Trigger <EXT_EVENT_TRIGGER>.
Term Name This value is not editable if the selected term is not configurable. If the selected term is configurable, then this field appears as alink.
See "Understanding AAF" (PeopleSoft CRM 9.2: Automationand Configuration Tools).
140 Copyright © 1988, 2020, Oracle and/or its affiliates.

Chapter 5 Setting Up Links and Related Actions
DrillDown DetailsThis section captures the details about the component and page to transfer control to when the user clicksone of the rows in the Related Actions Summary on the Case Summary page.
Navigation Select the transaction ID of the page to which you want thesystem to navigate.
Market Select the object name that you want to associate with the link.
Related Object Status DetailsThis section captures the PeopleCode method that the system will invoke to get the status of the actionthat is performed. This status is displayed in the Related Actions Summary grid on the Case Summarypage.
PeopleCode Select this option to invoke PeopleCode to capture the status ofthe action.
Class ID Enter the name of the application class.
Class Path Enter the class path of the application package.
Method Name Enter the method name.
Static Value Select this option if the static status value needs to appear for anaction.
Static Status Select the static status value that will appear for this linkdefinition.
Link Group PageUse the Link Group page (RC_LINK_GROUP) to view and modify the link groups into which linkcategories are organized.
Navigation
Set Up CRM > Product Related > Call Center > Link Group > Link Group
Copyright © 1988, 2020, Oracle and/or its affiliates. 141

Setting Up Links and Related Actions Chapter 5
Image: Link Group page
This example illustrates the fields and controls on the Link Group page.
Link Selection - Links Description Enter a description of the link group that you want to create.
Link Category Select a link category that contains the desired link definitionthat you want in this link group. Only active link categories areavailable for selection.
Version Select a version. A category can have multiple versions, each associated with a different target system (for example, PeopleSoft HCM 8.9, PeopleSoft HCM 8.8, and so on).
Note: Active versions appear in this drop-down list box forselection. However, Oracle recommends that only one versionof each link category is activated at any time.
Link Name Select a link name. Only those link definitions that are definedwithin the selected link category appear in the drop-down listbox.
Note: To add a new link group, click the Add button at the end of the row.
142 Copyright © 1988, 2020, Oracle and/or its affiliates.
Chapter 5 Setting Up Links and Related Actions
Link Selection - System Data System Data If the link group was delivered by the PeopleSoft system, the
system displays a button that you can click to revise the linkassociated with the button. The system displays the message:This object was delivered by PeopleSoft but updated by thecustomer. It also enters the date it was modified. You can thenclick the Links tab and make changes to the link category.
Message Description Displays a message indicating who modified or is maintainingthe link group.
Date Modified Displays the date the link group was modified.
Modified By Displays the name of the person who modified the link group.
Related LinksDefining Display Template General Options for PeopleSoft Call Center
Copyright © 1988, 2020, Oracle and/or its affiliates. 143

Setting Up Links and Related Actions Chapter 5
144 Copyright © 1988, 2020, Oracle and/or its affiliates.

Chapter 6
Setting Up PeopleSoft Change Management
Understanding PeopleSoft Change Management Setup
This topic discusses:
• Change Management usages.
• Change request prompt tables.
• Phase templates.
• Transitions and Active Analytics Framework (AAF).
• Task type role map and the assignment engine.
• Security considerations for accessing Change Management tasks.
Change Management UsagesPeopleSoft Change Management is used to codify and manage an organization's internal businessprocesses. For example, a help desk might use PeopleSoft Change Management for commonly performedprocesses, such as upgrading a user's computer or scheduling an employee's office relocation.
Requests for changes are recorded on the Change Request page. This page also manages the changeprocess status, type, and priority, as well as key dates, impacted assets, and products.
See Understanding Change Request Management.
Change Request Prompt TablesPeopleSoft Change Management prompt tables refer to a group of relatively simple setup tables that holdthe values for various drop-down list box fields on the Change Request page.
Here is a list of the prompt tables that you should set up to use PeopleSoft Change Management:
• Business Reason
• Category
• Component Audit
• Impact
• Note Type
• Phase
Copyright © 1988, 2020, Oracle and/or its affiliates. 145

Setting Up PeopleSoft Change Management Chapter 6
• Phase Template
• Phase Template Use
• Priority
• Relationship Type
• Resolution
• Request Type
• Status
• Status Transition
• Sub Type
• Task Type Role Map
Phase TemplatesEach step in the change process consists of a phase. A phase comprises a task or a series of tasks. Tasksdescribe the work to be performed and the amount of time that the task normally takes.
At runtime, on the Change Request page, users can manually build phases in the Phase Summary grid.Alternatively, users can load phases automatically using phase templates. This alternative enables thephase model to be automatically populated to the Phase Summary grid when you select the appropriatetemplate from the Template field.
PeopleSoft offers functionality that enables this grid to be populated automatically based on the requesttype, subtype, and priority that a user selects on the Change Request page. Phase templates created viathis setup with matching request type, subtype, and priority criteria are linked to the phase template whenit is built. You can autoload phase templates by clicking the Load button.
If you click the Load button and no template exists that matches the current type, subtype, and priority,the system displays the Phase Template Load page. You can then select a template to load.
Transitions and Active Analytics FrameworkMuch of the automatic functionality for controlling the process flow of a change request is accomplishedusing the AAF functionality. This method provides the most flexibility for a configurable process flow ofchange requests.
The AAF setup is configurable and implemented within both the Change Management and TaskManagement applications. This enables users to build rules as to who to notify (what roles), when tonotify them (when a status or phase changes occur), and in what format (email or worklist). It also enablesusers to build rules that notify all impacted parties when a change is set to be implemented.
See "Understanding AAF" (PeopleSoft CRM 9.2: Automation and Configuration Tools).
146 Copyright © 1988, 2020, Oracle and/or its affiliates.

Chapter 6 Setting Up PeopleSoft Change Management
Task Type Role Map and the Assignment EngineIf you want the PeopleSoft Change Management application to know which roles are appropriate for atask, you must map the task type to the role. One-to-one mapping between task type and role is sufficientfor PeopleSoft Change Management. You can accomplish this mapping using the Task Type Role Mappage. Select Set Up CRM > Product Related > Change Management to access the page.
Security Considerations for Accessing Change Management TasksWhen using Change Management, tasks may be assigned to different users, and normally users may onlyedit tasks that have been assigned to them. However, it is possible to use PeopleSoft CRM applicationlevel security to allow certain users to change the owner of a task or to update tasks that are assigned toother users.
You can do this by using the Membership List page. Select Set Up CRM > Security > CRM ApplicationSecurity > Search Membership List using Task Manager as the value for the Name field. Click the EditMember link on the page to add or delete roles from the membership list. These roles refer to PeopleToolssecurity roles: any users that have one of the associated roles that you list for the "Task Manager"Membership List will be allowed to update tasks which are assigned to other users.
See "Application Security" (PeopleSoft CRM 9.2: Application Fundamentals ).
See "Defining Application Security" (PeopleSoft CRM 9.2: Application Fundamentals ).
Setting Up Prompt Tables for Change Requests
To set up prompt tables for change requests, use the Sub Type (RG_UD_REQ_SUB_TYPE), Status(RG_UD_REQ_STATUS), Request Type (RG_UD_REQ_TYPE), Resolution (RG_UD_REQ_RESO),Priority (RG_UD_REQ_PRTY), Phase (RG_UD_REQ_STATE), Impact (RG_UD_REQ_IMPACT),Category (RG_UD_REQ_CATGY), Business Reason (RG_UD_REQ_BUSR), ComponentAudit (RG_UD_COMP_AUDIT), Note Type (RG_UD_REQ_NOTT), Relationship Type(RG_UD_REL_TYPE), Status Transition (RG_UD_PHS_TRANS) components.
This topic discusses how to set up prompt tables for change requests.
Pages Used to Set Up Prompt Tables for Change RequestsPage Name Definition Name Usage
Business Reason Page RG_UD_REQ_BUSR Set up change request business reasons.
Category Page RG_UD_REQ_CATGY Set up change request categories.
Component Audit Page RG_UD_REQ_AUDIT Select the record or table name for whichyou want the system to generate andmaintain audit records.
Impact Page RG_UD_REQ_IMPACT Set up change request impact values.
Note Type Page RG_UD_REQ_NOTT Set up note types.
Copyright © 1988, 2020, Oracle and/or its affiliates. 147

Setting Up PeopleSoft Change Management Chapter 6
Page Name Definition Name Usage
Phase Page RG_UD_REQ_STATE Set up change request phases.
Priority Page RG_UD_REQ_PRTY Set up change request priorities.
Relationship Types Page RG_UD_REL_TYPE Set up descriptions of relationshipsthat you want to appear on the RelateExisting Change Request page forchange management cases that have acorrelation in some way.
Resolution Page RG_UD_REQ_RESO Set up change request resolutions.
Request Type Page RG_UD_REQ_TYPE Set up change request types.
Status Page RG_UD_REQ_STATUS Set up change request statuses.
Status Transition Page RG_UD_PHS_TRANS Set up notifications when a change instatus occurs.
Sub Type Page RG_UD_REQ_SUB_TYPE Set up change request subtypes.
Business Reason PageUse the Business Reason page (RG_UD_REQ_BUSR) to set up change request business reasons.
Navigation
Set Up CRM > Product Related > Change Management > Business Reason > Business Reason
Image: Business Reason page
This example illustrates the fields and controls on the Business Reason page.
Enter an abbreviation for the reason and the description that you want to appear on the Change Requestpage in the Business Reason drop-down list box. The Business Reason field appears in the ChangeRequest section on the main Change Request page.
148 Copyright © 1988, 2020, Oracle and/or its affiliates.

Chapter 6 Setting Up PeopleSoft Change Management
Category PageUse the Category page (RG_UD_REQ_CATGY) to set up change request categories.
Navigation
Set Up CRM > Product Related > Change Management > Category > Category
Image: Category page
This example illustrates the fields and controls on the Category page.
Enter an abbreviation for the category and the description that you want to appear on the Change Requestpage in the Category drop-down list box. The Category field appears in the Change Control section on themain Change Request page.
Component Audit PageUse the Component Audit page (RG_UD_REQ_AUDIT) to select the record or table name for which youwant the system to generate and maintain audit records.
Navigation
Set Up CRM > Product Related > Change Management > Component Audit > Component Audit
Copyright © 1988, 2020, Oracle and/or its affiliates. 149

Setting Up PeopleSoft Change Management Chapter 6
Image: Component Audit page
This example illustrates the fields and controls on the Component Audit page.
Select the record or table name that you want the system to audit. Then select the Change check box nextto the actions for which you want the system to generate and maintain audit records. PeopleSoft CRMdelivers this page with the Change check box selected for all the records and table names that are listed.
If you select the Add check box, and a row is added to the table, then the system generates an audit recordand it is included in the audit report. The same is true for the Change and Delete check boxes.
Selecting the Change check box causes the system to generate audit records for everything except adds.Selecting the Delete check box would only generate audits for actions that were deleted.
Note: Selecting both the Delete and Change check boxes would be redundant and is not recommended.
Impact PageUse the Impact page (RG_UD_REQ_IMPACT) to set up change request impact values.
Navigation
Set Up CRM > Product Related > Change Management > Impact > Impact
150 Copyright © 1988, 2020, Oracle and/or its affiliates.

Chapter 6 Setting Up PeopleSoft Change Management
Image: Impact page
This example illustrates the fields and controls on the Impact page.
Enter an abbreviation for the impact and the description that you want to appear on the Change Requestpage in the Impact drop-down list box. The Impact field appears in the Change Control section on themain Change Request page.
Note Type PageUse the Note Type page (RG_UD_REQ_NOTT) to set up note types.
Navigation
Set Up CRM > Product Related > Change Management > Note Type > Note Type
Copyright © 1988, 2020, Oracle and/or its affiliates. 151

Setting Up PeopleSoft Change Management Chapter 6
Image: Note Type page
This example illustrates the fields and controls on the Note Type page.
Enter an abbreviation for the note type and the description that you want to appear in the Type drop-downlist box on the Change Request - Notes page.
Phase PageUse the Phase page (RG_UD_REQ_STATE) to set up change request phases.
Navigation
Set Up CRM > Product Related > Change Management > Phase > Phase
152 Copyright © 1988, 2020, Oracle and/or its affiliates.

Chapter 6 Setting Up PeopleSoft Change Management
Image: Phase page
This example illustrates the fields and controls on the Phase page.
Enter an abbreviation for the phase and the description that you want to appear on the Change Requestpage in the Phase drop-down list box. The Phase field appears in the Phase Summary section on the mainChange Request page.
Priority PageUse the Priority page (RG_UD_REQ_PRTY) to set up change request priorities.
Navigation
Set Up CRM > Product Related > Change Management > Priority > Priority
Copyright © 1988, 2020, Oracle and/or its affiliates. 153

Setting Up PeopleSoft Change Management Chapter 6
Image: Priority page
This example illustrates the fields and controls on the Priority page.
Enter an abbreviation for the priority and the description that you want to appear on the Change Requestpage in the Priority drop-down list box. The Priority field appears in the Change Request section on themain Change Request page.
Relationship Types PageUse the Relationship Types page (RG_UD_REL_TYPE) to set up descriptions of relationships that youwant to appear on the Relate Existing Change Request page for change management cases that have acorrelation in some way.
Navigation
Set Up CRM > Product Related > Change Management > Relationship Type > Relationship Types
Image: Relationship Types page
This example illustrates the fields and controls on the Relationship Types page.
Enter an abbreviation for the relationship type and the description that you want to appear in theRelationship Type drop-down list box on the Relate Existing Change Request page.
154 Copyright © 1988, 2020, Oracle and/or its affiliates.

Chapter 6 Setting Up PeopleSoft Change Management
Select the Hierarchical check box to identify the relationship type as being either the parent or the child tothe other relationship type (not an equal relationship type).
When you are recording a related change request, the system prompts you for a relationship type. Whenyou select the 1st relationship type and the hierarchical check box is selected, then the hierarchical checkbox must be selected for the 2nd relationship type. The system also enforces the converse.
You access this page by clicking the Add Related Change button on the Change Request - RelatedChanges page.
Resolution PageUse the Resolution page (RG_UD_REQ_RESO) to set up change request resolutions.
Navigation
Set Up CRM > Product Related > Change Management > Resolution > Resolution
Image: Resolution page
This example illustrates the fields and controls on the Resolution page.
Enter an abbreviation for the resolution and the description that you want to appear on the ChangeRequest page in the Resolution drop-down list box. The Resolution field appears in the Change Controlsection on the main Change Request page.
Request Type PageUse the Request Type page (RG_UD_REQ_TYPE) to set up change request types.
Navigation
Set Up CRM > Product Related > Change Management > Request Type > Request Type
Copyright © 1988, 2020, Oracle and/or its affiliates. 155

Setting Up PeopleSoft Change Management Chapter 6
Image: Request Type page
This example illustrates the fields and controls on the Request Type page.
Enter an abbreviation for the request type and the description that you want to appear on the ChangeRequest page in the Request Type drop-down list box. The Request Type field appears in the ChangeRequest section on the main Change Request page.
Status PageUse the Status page (RG_UD_REQ_STATUS) to set up change request statuses.
Navigation
Set Up CRM > Product Related > Change Management > Status > Status
156 Copyright © 1988, 2020, Oracle and/or its affiliates.

Chapter 6 Setting Up PeopleSoft Change Management
Image: Status page
This example illustrates the fields and controls on the Status page.
Enter an abbreviation for the status and the description that you want to appear on the Change Requestpage in the Status drop-down list box. The Status field appears in the Change Request section on the mainChange Request page.
Select a value from the Category drop-down list box to indicate the status category of each status youdefine. The Change Request Audit History will display the Closed Date and Time and the User ID andname when the status of the Change Request has been changed to a status whose category value is Closedor Canceled.
Status Transition PageUse the Status Transition page (RG_UD_PHS_TRANS) to set up notifications when a change in statusoccurs.
Navigation
Set Up CRM > Product Related > Change Management > Status Transition > Status Transition
Copyright © 1988, 2020, Oracle and/or its affiliates. 157

Setting Up PeopleSoft Change Management Chapter 6
Image: Status Transition page
This example illustrates the fields and controls on the Status Transition page.
Use this page to build rules to automatically change the status of a change request when certain conditionsare met or initiate other events when certain conditions are true.
Select a value from the Status From drop-down list box to indicate the initial status of the change request.Select a value from the Status To drop-down list box that you want the system to use when a certaincondition is met or initiate a certain action when a user changes the status.
Click the Edit Condition link to select the terms that you want the system to use to change the status of thechange request or alter the fields on the change request.
When you click the Select Term link on the Edit Condition page, use only the terms that appear under theChange Request folder.
Note: When the transition condition is true, the system triggers AAF actions. For example, when thestatus of the change request changes from New to Approved and the Priority is Emergency, then thistransition condition will be true and AAF will initiate an action when the change request is saved. Thesystem checks all status transitions at save time to determine if they are true and sets off any AAF actionsthat are associated with the new condition.
Related Links"Understanding AAF" (PeopleSoft CRM 9.2: Automation and Configuration Tools)
Sub Type PageUse the Sub Type page (RG_UD_REQ_SUB_TYPE) to set up change request subtypes.
158 Copyright © 1988, 2020, Oracle and/or its affiliates.

Chapter 6 Setting Up PeopleSoft Change Management
Navigation
Set Up CRM > Product Related > Change Management > Sub Type > Sub Type
Image: Sub Type page
This example illustrates the fields and controls on the Sub Type page.
Request Type Select a request type.
Sub Type Enter a subtype.
Description Enter a description for the subtype that you want to appear onthe Change Request page in the Sub Type drop-down list box. The Sub Type field appears in the Change Request section onthe main Change Request page.
Setting Up Change Management Business Units
To set up Change Management business units, use the Change Management Definition(RG_BUSINESS_UNIT) component.
This topic discusses how to set up Change Management business units.
Page Used to Set Up Change Management Business UnitsPage Name Definition Name Usage
Define Change Management Page BUS_UNIT_TBL_RG Define business rules for a call centerbusiness unit.
Copyright © 1988, 2020, Oracle and/or its affiliates. 159

Setting Up PeopleSoft Change Management Chapter 6
Define Change Management PageUse the Define Change Management page (BUS_UNIT_TBL_RG) to define business rules for a callcenter business unit.
Navigation
Set Up CRM > Business Unit Related > Change Management Definition
Image: Define Change Management page
This example illustrates the fields and controls on the Define Change Management page.
Business Unit Enter a business unit identifier. To maximize systemperformance, always use exactly five characters.
Short Description Enter the description that will appear on the Case page and otherplaces where the business unit appears.
Call Center Business Unit Select the default call center business unit to use when selectinga case to relate to a change request.
Quality Business Unit Select the default PeopleSoft Quality Management business unitto use when selecting a case to relate to a change request.
Phase Template Duration Select either Phase Level or Task Level. Both phases and taskscan have durations. Your selection in this field tells the phasetemplate load process whether to use the phase durations or taskdurations when loading phases and tasks for a change request. This functionality provides a way to define templates to havethe flexibility for either phase or task duration calculations.
If you do not select a template duration, the system defaults thevalue in this field to Phase Level.
160 Copyright © 1988, 2020, Oracle and/or its affiliates.

Chapter 6 Setting Up PeopleSoft Change Management
Note: If you define duration at the task level, the systementers both a start date and an end date using that task durationcalculated for the change request. This provides flexibilityto define templates that have both parallel and dependant (sequential) tasks on a change request when doing a templateload. You can still, however, manually add phases and taskswhere tasks can be parallel or dependent.
Setting Up Change Management Defaults
This topic discusses how to set up Change Management defaults.
Page Used to Set Up Change Management DefaultsPage Name Definition Name Usage
Defaults Page BUS_UNIT_RG_DEF Set up Change Management defaults.
Defaults PageUse the Defaults page (BUS_UNIT_RG_DEF) to set up Change Management defaults.
Navigation
Set Up CRM > Business Unit Related > Change Management Definition > Defaults
Image: Defaults page
This example illustrates the fields and controls on the Defaults page.
Copyright © 1988, 2020, Oracle and/or its affiliates. 161

Setting Up PeopleSoft Change Management Chapter 6
Request Type Select the default request type for a new change request.
Sub Type Select the default subtype for a new change request.
Status Select the default status for a new change request.
Business Reason Select the default business reason for a new change request
Priority Select the default priority for a new change request.
Category Select the default category for a new change request.
Impact Select the default case type for a new change request.
Template ID Select the default template ID for a new change request.
Setting Up Template Duration Levels
This topic discusses how to set up template duration levels.
Page Used to Set Up Template Duration LevelsPage Name Definition Name Usage
Template Duration Level Page BUS_UNIT_DURLVL_RG Instruct the system on which tasks orphases to display on the Change Requestpage.
Template Duration Level PageUse the Template Duration Level page (BUS_UNIT_DURLVL_RG) to instruct the system on which tasksor phases to display on the Change Request page.
Navigation
Set Up CRM > Business Unit Related > Change Management Definition > Template Duration Level
162 Copyright © 1988, 2020, Oracle and/or its affiliates.

Chapter 6 Setting Up PeopleSoft Change Management
Image: Template Duration Level page
This example illustrates the fields and controls on the Template Duration Level page.
Use the View field to review phases and tasks that have been set up in advance. You can use this field tofilter tasks and phases with and without durations. You can also use this field to view either all tasks or allphases that are available for selection on the Change Request page. This page is informational only.
To access the Task Group Template page for a particular task, click the Task Group Template link. Toaccess the Phase Template page for a particular phase, click the Phase Template link. These links appearbased on the value you select in the View field.
Once you access the Task Group Template page or the Phase Template page, you can change the tasks orphases that appear. The changes appear when you return to the Template Duration Level page.
Setting Up Phase Templates
To set up phase templates, use the Phase Template Use (RG_UD_PHS_MODEL) and Phase Template(RG_UD_MODEL) components.
This topic discusses how to create phase templates.
Pages Used to Create a Phase TemplatePage Name Definition Name Usage
Phase Page RG_UD_REQ_STATE Create phases. These phases appear inthe Phase drop-down list box on thePhase Template page.
Copyright © 1988, 2020, Oracle and/or its affiliates. 163

Setting Up PeopleSoft Change Management Chapter 6
Page Name Definition Name Usage
Task Group Template Page RB_TSK_GRP_TPL Define task group templates. Youassociate a task group template to aphase on the Phase Template page.
Phase Template Page RG_UD_PHS_MODEL Create the phase template. Identifythe phases and the phases' task grouptemplates that you want to associate withthe phase template.
Phase Template Use Page RG_UD_PHS_MODL_USE Instruct the system on which phasetemplates to display when entering achange request for a specific businessunit.
Phase PageUse the Phase page (RG_UD_REQ_STATE) to create phases.
These phases appear in the Phase drop-down list box on the Phase Template page.
Navigation
Set Up CRM > Product Related > Change Management > Phase
Image: Phase page
This example illustrates the fields and controls on the Phase page.
164 Copyright © 1988, 2020, Oracle and/or its affiliates.

Chapter 6 Setting Up PeopleSoft Change Management
PhaseThese phases appear in the Phase drop-down list box in the Phase Summary section on the ChangeRequest page.
Add New Phase Click to add a new phase to this setID.
Click the Datetime Added icon to view when the phase was lastadded or modified by a user.
Task Group Template PageUse the Task Group Template page (RB_TSK_GRP_TPL) to define task group templates.
You associate a task group template to a phase on the Phase Template page.
Navigation
Set Up CRM > Common Definition > Task Management > Task Group Template > Task GroupTemplate
Image: Task Group Template page
This example illustrates the fields and controls on the Task Group Template page.
Specify the task type, priority, description, task owner, assigned to, and location of each task that is part ofthe task group. Select the Duration tab to enter task level duration information, including days, hours, andstart use codes.
Start Use Code Select from these values:
Current Phase Start: Task start date is equal to the current phasestart date.
Next in Sequence: Task start date is equal to the prior task’s enddate.
Prior Phase Start: Task start date is equal to the previous phasestart date.
Copyright © 1988, 2020, Oracle and/or its affiliates. 165

Setting Up PeopleSoft Change Management Chapter 6
Prior Task Start: Task start date is equal to the prior task startdate.
Phase Template PageUse the Phase Template page (RG_UD_PHS_MODEL) to create the phase template.
Identify the phases and the phases' task group templates that you want to associate with the phasetemplate.
Navigation
Set Up CRM > Product Related > Change Management > Phase Template > Phase Template
Image: Phase Template page
This example illustrates the fields and controls on the Phase Template page.
Template ID Enter an abbreviation for the phase template that you arecreating.
Description and Long Description Enter text to describe the phase template that you are adding tothe system.
Phase Select a phase to associate with this phase template. To setup phases, select Set Up CRM > Product Related > ChangeManagement > Phase.
Status Select a status. This status will be associated with the task orseries of tasks that are tied to this phase.
Days and Hours Enter the number of days and hours that the phase should take.
166 Copyright © 1988, 2020, Oracle and/or its affiliates.

Chapter 6 Setting Up PeopleSoft Change Management
Task Group Template ID Select the task group template that you want to associate withthis particular phase of the template.
Phase Template Use PageUse the Phase Template Use page (RG_UD_PHS_MODL_USE) to instruct the system on which phasetemplates to display when entering a change request for a specific business unit.
Navigation
Set Up CRM > Product Related > Change Management > Phase Template Use > Phase Template Use
Image: Phase Template Use page
This example illustrates the fields and controls on the Phase Template Use page.
The Phase Template Use page enables you to vary templates of the same type based on how critical thechange request is to the organization. For example, while certain documentation and approval levels maybe required for a medium priority change request, some organizations may choose to skip some tasks orapprovals for an emergency change request.
When a template is automatically populated into a change request, the assignment engine is invokedfor each task, and the system recommends resources for each generated task. The change managercan manually update task assignments from either the Tasks page on the change request or from TaskManagement. Alternatively, the change manager can manually build phases and tasks when the changerequest is approved.
Template Use ID Enter the name of the template that you set up on the TaskGroup Template page (select Set Up CRM > CommonDefinitions > Task Management > Task Group Template).
Start Date and End Date Use the start and end dates to activate or inactivate a givenphase template use row.
For example, if you wanted to create another row that loadeda different template ID based on the same type, sub type, andpriority, you could give the MODEL3A row an end date andthen insert a new row with the same type, sub type, and prioritybut with a new template ID.
Copyright © 1988, 2020, Oracle and/or its affiliates. 167

Setting Up PeopleSoft Change Management Chapter 6
Request Type Select the type of change request that you want the system tolook for on the Change Request page.
Sub Type Select the subtype that you want the system to look for on theChange Request page.
Priority Select the priority that you want the system to look for on theChange Request page.
Template ID Select the template ID that you want the system to use on thechange request.
Setting Up the Task Type Role Map
To set up the Task Type Role map, use the Task Type Role Map (RG_UD_TSK_ROLE_GBL)component.
This topic discusses how to set up the Task Type Role map.
Page Used to Set Up the Task Type Role MapPage Name Definition Name Usage
Task Type Role Map Page RG_UD_TSK_ROLE Create one-to-one mapping between tasktypes and roles in Change Management.
Task Type Role Map PageUse the Task Type Role Map page (RG_UD_TSK_ROLE) to create one-to-one mapping between tasktypes and roles in Change Management.
Navigation
Set Up CRM > Product Related > Change Management > Task Type Role Map
168 Copyright © 1988, 2020, Oracle and/or its affiliates.

Chapter 6 Setting Up PeopleSoft Change Management
Image: Task Type Role Map page
This example illustrates the fields and controls on the Task Type Role Map page.
Task Type Role Map Task Type Select a task type.
Task types are set up in Task Management under Set UpCRM > Common Definitions > Task Management > TaskType. They enable users to categorize tasks.
Role Select a management role.
Roles, which are implemented using PeopleTools security, provide the assignment engine with the ability to select andassign all or one member of a provider group that has its rolemapped to a task type for tasks that are associated with a changerequest.
Note: Only security roles are listed: role queries are notpermitted here.
Assign All Members of Group Select if you want all members of a provider group to beassociated with a particular task type.
Add New Task Type Role Map Click this button to add a new row to the Task Type Role Mapsection.
Copyright © 1988, 2020, Oracle and/or its affiliates. 169

Setting Up PeopleSoft Change Management Chapter 6
170 Copyright © 1988, 2020, Oracle and/or its affiliates.

Chapter 7
Setting Up PeopleSoft Quality Management
Understanding PeopleSoft Quality Management Business Units
PeopleSoft Quality Management business units enable you to organize defects and fixes to correspondwith distinct operational entities within your business. Segmenting your operation by business unitsfacilitates filtering and reporting functionality. Each quality management business unit is also linked to aChange Management business unit and a Call Center business unit.
Defining PeopleSoft Quality Management Business Units
To define PeopleSoft Quality Management business units, use the Quality Definition(RQ_BUS_UNIT_TBL) component.
This topic discusses how to define PeopleSoft Quality Management business units.
Page Used to Define PeopleSoft Quality Management Business UnitsPage Name Definition Name Usage
Quality Definition Page RQ_BUS_UNIT_TBL Define PeopleSoft Quality Managementbusiness units.
Quality Definition PageUse the Quality Definition page (RQ_BUS_UNIT_TBL) to define PeopleSoft Quality Managementbusiness units.
Navigation
Set Up CRM > Business Unit Related > Quality Definition
Copyright © 1988, 2020, Oracle and/or its affiliates. 171
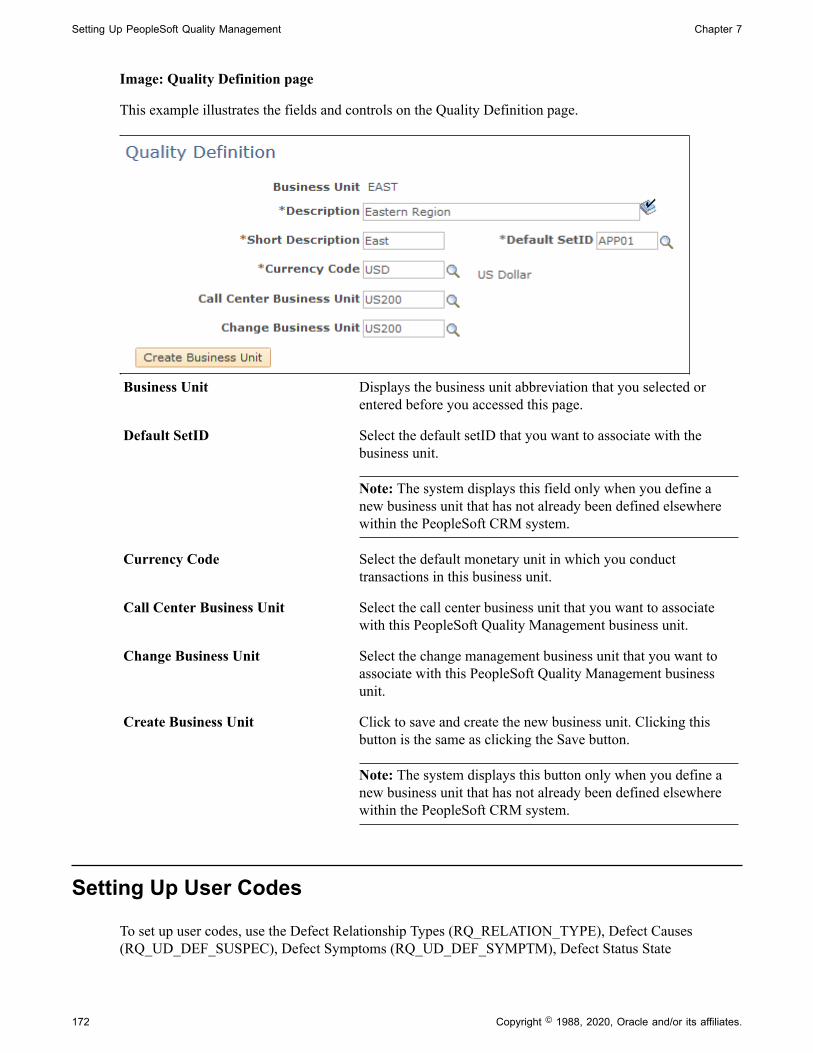
Setting Up PeopleSoft Quality Management Chapter 7
Image: Quality Definition page
This example illustrates the fields and controls on the Quality Definition page.
Business Unit Displays the business unit abbreviation that you selected orentered before you accessed this page.
Default SetID Select the default setID that you want to associate with thebusiness unit.
Note: The system displays this field only when you define anew business unit that has not already been defined elsewherewithin the PeopleSoft CRM system.
Currency Code Select the default monetary unit in which you conducttransactions in this business unit.
Call Center Business Unit Select the call center business unit that you want to associatewith this PeopleSoft Quality Management business unit.
Change Business Unit Select the change management business unit that you want toassociate with this PeopleSoft Quality Management businessunit.
Create Business Unit Click to save and create the new business unit. Clicking thisbutton is the same as clicking the Save button.
Note: The system displays this button only when you define anew business unit that has not already been defined elsewherewithin the PeopleSoft CRM system.
Setting Up User Codes
To set up user codes, use the Defect Relationship Types (RQ_RELATION_TYPE), Defect Causes(RQ_UD_DEF_SUSPEC), Defect Symptoms (RQ_UD_DEF_SYMPTM), Defect Status State
172 Copyright © 1988, 2020, Oracle and/or its affiliates.

Chapter 7 Setting Up PeopleSoft Quality Management
(RQ_UD_ST_REASON), Defect Status State Reason (RQ_UD_ST_ST_RSN), Defect Status(RQ_UD_ST_STATUS), and Status Combinations (RQ_UD_STAT_COMBO) components.
This topic discusses how to set up user codes.
Pages Used to Set Up User CodesPage Name Definition Name Usage
Defect Symptoms Page RQ_UD_DEF_SYMPTM Define defect symptom codes toprovide consistent problem symptomdescriptions and to facilitate data entry.
Defect Causes Page RQ_UD_DEF_SUSPEC Define defect cause codes to provideconsistent potential problem causedescriptions and to facilitate data entry.
Defect Status Page RQ_UD_ST_STATUS Define defect status codes.
Defect Status State Page RQ_UD_ST_REASON Define status states to describe defectstatus more specifically.
Defect Status State Reason Page RQ_UD_ST_ST_RSN Define status-state reason codes toexplain why a defect is in a particularstatus state.
Status Combinations Page RQ_UD_STAT_COMBO Define status-state combinations tocontrol permissible transitions.
Defect Relationship Types Page RQ_RELATION_TYPE Define defect relationship types todescribe dependencies and relationshipsamong defects.
Defect Symptoms PageUse the Defect Symptoms page (RQ_UD_DEF_SYMPTM) to define defect symptom codes to provideconsistent problem symptom descriptions and to facilitate data entry.
Navigation
Set Up CRM > Product Related > Quality Management > Defect Symptoms > Defect Symptoms
Copyright © 1988, 2020, Oracle and/or its affiliates. 173

Setting Up PeopleSoft Quality Management Chapter 7
Image: Defect Symptoms page
This example illustrates the fields and controls on the Defect Symptoms page.
Note: The system provides sample field values. You can configure these codes to match product offeringsor meet business objectives.
Defect symptom codes describe common symptoms that your customers might experience. For example,when a faulty motherboard causes a computer to crash, the symptom is the crash.
Symptom and Description Enter a unique code and description that represent the defectsymptom.
Defect Causes PageUse the Defect Causes page (RQ_UD_DEF_SUSPEC) to define defect cause codes to provide consistentpotential problem cause descriptions and to facilitate data entry.
Navigation
Set Up CRM > Product Related > Quality Management > Defect Causes > Defect Causes
174 Copyright © 1988, 2020, Oracle and/or its affiliates.

Chapter 7 Setting Up PeopleSoft Quality Management
Image: Defect Causes page
This example illustrates the fields and controls on the Defect Causes page.
Defect cause codes describe the actual cause of a problem. For example, when a loud squealing noisecomes from the bottom of a refrigerator, the actual cause is a bad compressor bearing.
Suspected Cause and Description Enter a unique code and description that represent the suspectedcause of the defect.
Defect Status PageUse the Defect Status page (RQ_UD_ST_STATUS) to define defect status codes.
Navigation
Set Up CRM > Product Related > Quality Management > Defect Status > Defect Status
Image: Defect Status page
This example illustrates the fields and controls on the Defect Status page.
Copyright © 1988, 2020, Oracle and/or its affiliates. 175

Setting Up PeopleSoft Quality Management Chapter 7
Defect status codes describe the defect's most fundamental status in the problem resolution (fix) cycle.The values OPEN and CLOS (closed) are delivered with the system. Add additional values as required;however, the delivered values should be adequate for most needs.
Status Code and Description Enter a unique four-character code and description that representthe defect status.
Defect Status State PageUse the Defect Status State page (RQ_UD_ST_REASON) to define status states to describe defect statusmore specifically.
Navigation
Set Up CRM > Product Related > Quality Management > Defect Status State > Defect Status State
Image: Defect Status State page
This example illustrates the fields and controls on the Defect Status State page.
Status states define the defect's status in the resolution process more specifically than status codes. Forexample, when you close an enhancement request, you may do so because you have completed theprocess or because you decided not to enhance the product as requested. Each status state is linked to avalid status and is available on the Defect page when the corresponding status is chosen.
Status Code Select the description of the defect's status in the resolutionprocess. Delivered status options are: Closed and Open.Definestatus codes on the Defect Status page.
State and Description Enter a unique code of up to four characters and a description torepresent the status state.
176 Copyright © 1988, 2020, Oracle and/or its affiliates.

Chapter 7 Setting Up PeopleSoft Quality Management
Defect Status State Reason PageUse the Defect Status State Reason page (RQ_UD_ST_ST_RSN) to define status-state reason codes toexplain why a defect is in a particular status state.
Navigation
Set Up CRM > Product Related > Quality Management > Defect Status State Reason > Defect StatusState Reason
Image: Defect Status State Reason page
This example illustrates the fields and controls on the Defect Status State Reason page.
Use the Reason field to describe why a defect resolution has a particular status and state. One status-statecombination might have several reasons. For example, a defect may be set with a status state of Closed- Do Not Fix because the product is no longer supported or because you have determined that the defectcomplaint should really be an enhancement request. Each status-state reason is linked to a status and statecombination and is available on the Defect page when a user chooses the corresponding status and state.
Status Select the description of the defect's status in the resolutionprocess. Delivered status options are: Closed and Open. Definestatus codes on the Defect Status page.
State Select the state that you want to associate with the defect status. States define the defect's status in the resolution process morespecifically than status codes. Select either Deferred, Do NotFix, Fixed, or Withdrawn.
Copyright © 1988, 2020, Oracle and/or its affiliates. 177

Setting Up PeopleSoft Quality Management Chapter 7
Reason and Description Enter a code of up to three characters and a description tofurther explain the reason for the status-state combination.
Status Combinations PageUse the Status Combinations page (RQ_UD_STAT_COMBO) to define status-state combinations tocontrol permissible transitions.
Navigation
Set Up CRM > Product Related > Quality Management > Status Combinations > Status Combinations
Image: Status Combinations page
This example illustrates the fields and controls on the Status Combinations page.
As a defect or enhancement request moves thorough the resolution process, you want to change the status-state combination to reflect its progress. However, certain changes do not make sense. For example, ifan enhancement request's status is Open - Deferred, you should not change it to Closed - Fixed withoutpassing through the verify, fix, and test stages.
Use this page to control which transitions are permissible. Define combinations for all possibletransitions, including reverse transitions. For example, if a software fix fails in testing, it must be returnedto the developer. In this case, you need a valid status combination that allows the change to go from Open- Fixed back to Open - To Test in development.
178 Copyright © 1988, 2020, Oracle and/or its affiliates.

Chapter 7 Setting Up PeopleSoft Quality Management
Status Code From Select the description of the beginning status code from thecodes that you defined on the Defect Status page.
State Code From Select the description of the beginning state code from the codesthat you defined on the Defect Status State page.
Status Code To Select the description of the new (after the combination change)status code from the codes that you defined on the Defect Statuspage.
State Code To Select the description of the new state code after the changefrom the codes that you defined on the Defect Status State page.
Defect Relationship Types PageUse the Defect Relationship Types page (RQ_RELATION_TYPE) to define defect relationship types todescribe dependencies and relationships among defects.
Navigation
Set Up CRM > Product Related > Quality Management > Defect Relationship Types > DefectRelationship Types
Image: Defect Relationship Types page
This example illustrates the fields and controls on the Defect Relationship Types page.
Sometimes, two or more defect cases are related to one another, or the solution to a defect may bedependent on the solution to a previous defect. Defect relationship types describe these dependencies. Alldefect relationships fall into the general categories of hierarchical or equivalent.
An equivalent relationship is two or more defects having the same cause. One fix resolves multiplecases. A hierarchical relationship is an instance when one case cannot be resolved without first resolvinganother.
Relationship Type Enter a unique code up to five characters to represent therelationship type.
Copyright © 1988, 2020, Oracle and/or its affiliates. 179

Setting Up PeopleSoft Quality Management Chapter 7
Parent Label and Child Label If you are defining a hierarchical relationship, enter a label valuefor both the parent and the child defects. These labels are usedon the Related Defects page to describe the relationship.
Equivalent Label If you are defining an equivalent relationship, enter a label valueto appear on all related cases.
Hierarchical Clear this check box to define an equivalent relationship type.
Setting Up Products
To set up products, use the Component Definitions (RQ_COMP_DEFN), Component Versions(RQ_PROD_VERS), and Component Types (RQ_UD_COMP_TYPE) components.
This topic provides an overview of products and components and discusses how to set up products.
Pages Used to Set Up ProductsPage Name Definition Name Usage
Component Types Page RQ_UD_COMP_TYPE Define general component types.
Component Definition Page RQ_COMP_DEFN Define product components.
Component Definitions - RelationshipsPage
RQ_COMP_PAR_LNK Define parent-child relationshipsbetween product components.
Version Page RQ_PROD_VERS Define distinct component versions.
Environments Page RQ_PROD_VERS_ENV Define version environment details.
Understanding Products and ComponentsGenerally, every product consists of components, each of which may also consist of subcomponents. Youuse the Component Type page to break down products into component and subcomponent levels.
You can then combine components and subcomponents in a hierarchical relationship on the ComponentDefinitions page. As changes are made in the combination of components and subcomponents, a differentcomponent definition of the product is created and distinguished from all others by a unique versiondefinition. When you select a specific product version while creating a defect record, you can drill downto the correct components and subcomponents that you used to build that particular version.
For example, here is a simple breakdown of a laptop computer's components:
180 Copyright © 1988, 2020, Oracle and/or its affiliates.

Chapter 7 Setting Up PeopleSoft Quality Management
Image: Example of laptop component hierarchy
This example illustrates the fields and controls on the Example of laptop component hierarchy.
At the least, a laptop computer is made up of a bottom casing and a top casing. One of the bottom casing'ssubcomponents is the keyboard, which is made up of several individual keys. The top casing has a liquidcrystal display (LCD) screen as one of the subcomponents. As you can see, this breakdown could go onfor many levels.
Suppose that you manufacture laptops, and you want to offer an improved LCD screen. The laptops thatinclude the improved screen are a new version. As you create the version's component definition, theonly change is the LCD screen, but that change means that the hierarchy of components is different. Byattaching the new component definition to a new and unique component version, you are assured that thecorrect LCD screen is available as you drill down on the product components.
Note: Product definitions can become quite complex. Consult with product experts to obtain theinformation needed to complete the following pages.
Component Types PageUse the Component Types page (RQ_UD_COMP_TYPE) to define general component types.
Navigation
Set Up CRM > Product Related > Quality Management > Component Types > Component Types
Copyright © 1988, 2020, Oracle and/or its affiliates. 181

Setting Up PeopleSoft Quality Management Chapter 7
Image: Component Types page
This example illustrates the fields and controls on the Component Types page.
The component type is the most basic definition of a component. This general description can be usedin multiple component definitions. For example, you might define a component type that represents allkeyboards, or you might narrow the definition to only keyboards for laptops.
Component Type Enter a unique code that represents the component specificallydefined by the combination of the type and productiondescriptions. This field is limited to four characters.
Type Description Briefly describe the component. This description appears inthe component hierarchy display and on the main Defect page. You can also use it to describe the same component in multiplecomponent definitions.
For example, all laptop computers have a keyboard. Thekeyboards for each laptop model may differ, but they all havea keyboard of some type. The type description keyboard is ageneral description of the component that is used for all models.
Production Description Briefly describe the product to which the component belongs. This field is informational and provides a means of furtherdistinguishing a type description by associating it with aparticular product or by adding further defining characteristics. For example, you can distinguish between a laptop keyboardand a desktop keyboard by changing the production description.
Component Definition PageUse the Component Definition page (RQ_COMP_DEFN) to define product components.
182 Copyright © 1988, 2020, Oracle and/or its affiliates.

Chapter 7 Setting Up PeopleSoft Quality Management
Navigation
Set Up CRM > Product Related > Quality Management > Component Definitions > ComponentDefinition
Image: Component Definition page
This example illustrates the fields and controls on the Component Definition page.
The component definition is a more specific description of a particular component. For example, youmight have a laptop keyboard with gray keys and another with black keys. The component definitionenables you to distinguish between the two keyboards.
The component definitions also show the level at which subcomponents are linked to other components ina child-to-parent relationship, creating a hierarchy that culminates in the product component definition.
Name Enter the component name. This name is informational only andcan be the same as the component ID or type description.
Component Hierarchy Click this link to view the hierarchy of components.
Type Select the type of component that you described in the Namefield.
Class Select a component class description. Values are: Doc (documentation), HW (hardware), Service, Test, Third PartyDoc (third-party documentation), Third Party HW (third-partyhardware), Third Party SW (third-party software), and ThirdParty Service.
Component Definitions - Relationships PageUse the Component Definitions - Relationships page (RQ_COMP_PAR_LNK) to define parent-childrelationships between product components.
Navigation
Set Up CRM > Product Related > Quality Management > Component Definitions > Relationships
Copyright © 1988, 2020, Oracle and/or its affiliates. 183

Setting Up PeopleSoft Quality Management Chapter 7
Image: Relationships page
This example illustrates the fields and controls on the Relationships page.
Component relationships define the component hierarchy. In the example of the laptop computer, thebottom casing includes the keyboard assembly, which is made up of individual keys. Thus, the bottomcasing is the parent to the keyboard assembly, which, in turn, is the parent to the keys.
Parent ID Select the parent component to which the defined component isrelated.
Name and Type Displays the name and type of the selected parent component.
Child ID Select the child component to which the defined component isrelated.
Name and Type Displays the name and type of the selected parent component.
Note: To link components, both the component being linked and the component to which you are linkingmust have valid component definitions. If the component to which you are linking does not have adefinition, you can create the definition by clicking the Component Definitions button.
To view the component relationship, return to the Component Definition page. Click the ComponentHierarchy link to access the Component Hierarchy page. Click the Refresh button to display newly addedcomponents.
Version PageUse the Version page (RQ_PROD_VERS) to define distinct component versions.
Navigation
Set Up CRM > Product Related > Quality Management > Component Versions > Version
184 Copyright © 1988, 2020, Oracle and/or its affiliates.

Chapter 7 Setting Up PeopleSoft Quality Management
Image: Version page
This example illustrates the fields and controls on the Version page.
Products consist of components. When one or more of these components changes, you refer to thechanged product as a new version. PeopleSoft Quality Management enables you to uniquely identifydifferent product versions by defining different component versions. Each version represents a uniqueproduct component definition.
Note: When creating a new value, the Production ID is in a free form text field. The Production ID is thelink between the product and the version.
Main Information Version Enter a word or phrase to describe the version build.
Product Select the product that is associated with the component.
Phase Introduced Select the product development phase in which this componentversion was introduced. Values are: Alpha, Analysis/Design, Beta, Concept, Implementation, Maintenance, Production, Requirements, and Retirement.
Complexity Select the level of complexity that best represents what it wouldtake to fix a defect in the component.
Production Date and IntroducedDate
Enter the dates the product was first produced and introduced tothe market.
Copyright © 1988, 2020, Oracle and/or its affiliates. 185

Setting Up PeopleSoft Quality Management Chapter 7
Lines Added, Lines Changed, and Lines Deleted
Enter the lines of code that were added, changed, or deleted inthis version. These fields apply to software code.
Predecessor ID and Successor ID Enter a predecessor and successor version, if applicable.
Responsible PartiesGenerally, responsible parties are the team members charged with maintaining a product's quality andcomponents. Responsible-party information entered here automatically transfers to the Defect page whenthe version is selected on that page.
Name Select the names of responsible parties.
Type Select the responsible party's role.
Environments PageUse the Environments page (RQ_PROD_VERS_ENV) to define version environment details.
Navigation
Set Up CRM > Product Related > Quality Management > Component Versions > Environments
Image: Environments page
This example illustrates the fields and controls on the Environments page.
Component version environments relate only to software products and describe technical details needed toidentify problems and fixes. Environment information entered here automatically transfers to the Defectpage when the corresponding version is selected. This page is needed for software products only.
Label Describe the component version environment.
Support Type Select whether the software version has service support.
186 Copyright © 1988, 2020, Oracle and/or its affiliates.

Chapter 7 Setting Up PeopleSoft Quality Management
OS (operating system) and OSVersion (operating system version)
Select the software operating system and version.
Environment, Platform, andNetwork
Select the database management system environment (forexample, Microsoft SQL Server or Oracle), hardware platform, and network protocol within which the software operates.
UI (user interface) Select the user interface that the software uses.
Copyright © 1988, 2020, Oracle and/or its affiliates. 187

Setting Up PeopleSoft Quality Management Chapter 7
188 Copyright © 1988, 2020, Oracle and/or its affiliates.

Chapter 8
Defining EIP Options for Integration toPeopleSoft or Oracle E-Business HCM
Understanding the Integration Between PeopleSoft CRM andPeopleSoft or E-Business HCM
This topic discusses:
• Initial Data Load for integration with E-Business HCM.
• EIP message process.
• Request message.
• Response message.
• Inactive worker data.
Initial Data Load for Integration with E-Business HCMPart of the initial setup for CRM HelpDesk for Human Resources involves synchronizing certain databetween the CRM and HCM systems. When integrating with E-Business HCM, data for department, jobcode, location, person, and workforce must be loaded from the E-Business system into flat files. This datais then loaded into the CRM system using batch processes to read each of the flat files.
EIP Message ProcessAll search information is stored in the PeopleSoft CRM database. When an agent accesses the 360-DegreeView page for a specific employee, a secured synchronous request is sent to PeopleSoft or E-BusinessHCM, depending on which system is the source of employee information.
When PeopleSoft or E-Business HCM validates the request, a response is sent to PeopleSoft CRM, andthe information is used to display the 360-degree view of the employee. The EIP message is implementedby a runtime synchronous request and response message. The structure of the request and responsemessage differs depending on which HCM is being accessed.
Each time an agent accesses an employee record from the 360-Degree View search page, the systemtriggers a runtime EIP. For security reasons, the information is not saved to the PeopleSoft CRM database.
See "Understanding the 360-Degree View" (PeopleSoft CRM 9.2: Application Fundamentals ).
Copyright © 1988, 2020, Oracle and/or its affiliates. 189

Defining EIP Options for Integration to PeopleSoft or Oracle E-Business HCM Chapter 8
Request MessageThe system sends a secured synchronous request message from PeopleSoft CRM to the PeopleSoft or E-Business HCM. The system validates the requestor's information before processing the request.
When integrating to PeopleSoft HCM, the request message contains this information:
• Authentication cookie.
A PeopleSoft-provided authentication token for the purpose of single sign on. PeopleSoft CRMtransfers this cookie to PeopleSoft HCM so that it can get a valid user. The system then uses thecookie to validate security access in PeopleSoft HCM before it provides service.
• EmplID (employee ID) from the 360-Degree View search page.
• As of date.
The date that is passed for effective-dated components in PeopleSoft HCM. The default value is%date (today's date). The system can use this date to query information from past dates.
• Language.
The language that the agent uses to log on to the application. The default value is (%language).PeopleSoft HCM retrieves information based on the language code in the request forinternationalization support.
When integrating to E-Business HCM, the request message contains this information:
The request message header contains these fields:
• Responsibility Name.
The value for this is defined on the Call Center page of the User Preferences.
• Responsibility Application Name.
The value for this is defined on the Call Center page of the User Preferences.
• Security Group.
The value for this is defined on the Call Center page of the User Preferences.
• Language.
• Organization ID.
The value for this is defined on the Call Center page of the User Preferences.
The request message input parameters section includes these fields:
• EBS Person ID.
Note: The EBS Person ID is not the same as the PeopleSoft Person ID.
• Effective Date.
190 Copyright © 1988, 2020, Oracle and/or its affiliates.

Chapter 8 Defining EIP Options for Integration to PeopleSoft or Oracle E-Business HCM
The PeopleSoft system delivers these sections as options on the Define HCM Sections page. You canselect or clear these options in the installation setup for your organization as a whole:
• Absence
• Benefits
• Direct Reports
• Job and Position Summary
• Pay Summary
Response MessageThe synchronous response from PeopleSoft or E-Business HCM contains a response to the informationprovided in the request. When integrating with PeopleSoft HCM, the system displays all error messagesprovided by PeopleSoft HCM (including the denial of access).
Note: You must establish the same user IDs for both PeopleSoft CRM and PeopleSoft or E-BusinessHCM as well as grant security access to the information and enable single sign on in PeopleSoft orE-Business HCM. Depending on the setup in PeopleSoft or E-Business HCM, a user ID may nothave access to all of the information. In that case, the response returned from the Human ResourceManagement system will contain an error message, such as Secured, for certain information.
Inactive Worker DataYou can configure the system to bring inactive worker statuses into PeopleSoft CRM. The HR HelpDeskWorker 360–Degree View enables you to search for inactive workers. In addition to Active status,PeopleSoft HCM has 11 worker statuses that you can select from on the Worker Statuses to EIP setuppage. Options include Deceased, Retired, and Leave of Absence.
Note: When integrating with E-Business HCM, all workers, regardless of status, are retrieved.
Loading Initial Data from E-Business HCM
This topic discusses how to load initial data from E-Business HCM into the CRM system.
Pages Used to Load Initial Data from E-Business HCMPage Name Definition Name Usage
EBS HR HelpDesk Data Load Page RC_EBS_UPLOAD Load initial data from E-Business HCMflat files.
EBS HR HelpDesk Data Load PageUse the EBS HR HelpDesk Data Load page (RC_EBS_UPLOAD) to load initial data from E-BusinessHCM flat files.
Copyright © 1988, 2020, Oracle and/or its affiliates. 191

Defining EIP Options for Integration to PeopleSoft or Oracle E-Business HCM Chapter 8
Navigation
Set Up CRM > Install > EBS Data Upload > EBS Data Upload
Image: EBS HR HelpDesk Data Load page
This example illustrates the fields and controls on the EBS HR HelpDesk Data Load page.
Data to upload Select the type of data to be loaded from flat file to PeopleSoftCRM system.
File Name Specify the name of the flat file containing data from the E-Business HCM that is to be loaded into the PeopleSoft CRMsystem.
Run Click this button to initiate the batch process that will load thedata from the specified file.
Use this page to load data for department, job code, location, person, and workforce from the E-BusinessHR system. Each of the specified types of data must be loaded sequentially into the PeopleSoft CRMsystem. Note that the data to be loaded for each batch process must be specified in a flat file.
Note: For more information on the E-Business HCM initial data load process, consult your PeopleSoftCRM Installation Guide.
Defining EIP Options
This topic discusses how to define EIP options.
Define HCM Sections PageUse the Define HCM Sections page (RB_TD_HCM_CNTRYSEC) to activate and deactivate thesubscription options by country, that you want the system to display on the 360-Degree View page forPeopleSoft HelpDesk for Human Resources.
Navigation
Set Up CRM > Common Definitions > 360-Degree View > Define HCM Sections > Define HCMSections
192 Copyright © 1988, 2020, Oracle and/or its affiliates.

Chapter 8 Defining EIP Options for Integration to PeopleSoft or Oracle E-Business HCM
Image: Define HCM Sections page
This example illustrates the fields and controls on the Define HCM Sections page.
Select the check boxes associated with the sections that you want the system to display on the 360-Degree View page for PeopleSoft HelpDesk for Human Resources. You can define HCM sections foreach country where you process payroll.
Note: GP stands for Global Payroll; NA stands for North American Payroll.
Related Links"Understanding 360-Degree View Setup" (PeopleSoft CRM 9.2: Application Fundamentals )
Worker Statuses to EIP PageUse the Worker Statuses to EIP page (RB_WRKR_EIP_OPN) to make inactive worker statuses availablein PeopleSoft CRM.
Navigation
Set Up CRM > Common Definitions > Integration Rules > Integration Defaults > Worker Statuses >Worker Statuses
Copyright © 1988, 2020, Oracle and/or its affiliates. 193

Defining EIP Options for Integration to PeopleSoft or Oracle E-Business HCM Chapter 8
Image: Worker Statuses to EIP page
This example illustrates the fields and controls on the Worker Statuses to EIP page.
While integrating with PeopleSoft HCM, use this settings to define which workers status to be broughtinto CRM system. Select all of the check boxes associated with the worker statuses that you want to makeavailable in PeopleSoft HelpDesk for Human Resources.
The system creates workers with the statuses that you selected. This information is available to agents onboth the PeopleSoft HelpDesk for Human Resources Case search page and the PeopleSoft HelpDesk forHuman Resources 360-Degree View page.
Viewing HR-Related Payroll Information on the 360-Degree ViewPage
This topic discusses how to view HR-related payroll information on the 360-Degree View page.
194 Copyright © 1988, 2020, Oracle and/or its affiliates.

Chapter 8 Defining EIP Options for Integration to PeopleSoft or Oracle E-Business HCM
Page Used to View HR-Related Payroll Information on the 360-Degree ViewPage
Page Name Definition Name Usage
360-Degree View Page RB_TD_AGENT_VIEW View HR data for workers (employees)that comes over to the CRM from thePeopleSoft or E-Business HCM.
Viewing the HR HelpDesk Worker 360-Degree View PageFrom the 360-Degree View page in PeopleSoft HelpDesk for Human Resources you can view fields andcountry-specific information for the Job and Position Summary, Pay Summary, and Benefits sections.
The PeopleSoft system also provides the ability to show the final paycheck for a terminated or retiredemployee on the 360–Degree View page.
Using Active Analytics Framework (AAF), functional users can create policies that identify and markHelpDesk for Human Resources cases as secured when users save cases and the terms of the conditionare met. To accomplish this, the system displays a Secured Case check box next to the Resolved by FirstContact check box on the Configure Call Center Case Update Action policy page.
The 360-Degree View page also enables agents to distinguish between a person’s paycheck and benefitsas they relate to the person’s assignments and relationship to the company. To enable help desk agentsusing the HelpDesk for Human Resources application to view IT help desk cases that are associated toassets for a given worker, the system displays a Help Desk Cases node on the HR HelpDesk Worker 360-Degree View page.
Fields in the Authorized Cases section on the 360-Degree View page are laid out to better reflect theimportance of the fields to an agent. The system provides users with the ability to access a worker’shistorical, current, and future job record on the Worker component.
So that agents can only access the information that they have permission to view, PeopleSoft extendedthe 360 EIP to include row-level security. Rather than maintaining a second layer of security in the CRMsetup pages, you only have to set up this security once. Using the Configure Roles page, you have theability to make HR sections and subsections configurable in the HR HelpDesk Worker 360-Degree Viewpage.
Related Links"Understanding AAF" (PeopleSoft CRM 9.2: Automation and Configuration Tools)"Understanding 360-Degree View Setup" (PeopleSoft CRM 9.2: Application Fundamentals )
Viewing Job and Position SummaryThe Job and Position Summary section provides agents with a summary of the caller’s job data to answercommon questions about an employee’s job title, location, or status.
This table describes some of the common fields that are shown in the Job and Position Summary section:
Copyright © 1988, 2020, Oracle and/or its affiliates. 195

Defining EIP Options for Integration to PeopleSoft or Oracle E-Business HCM Chapter 8
Common Fields Description
As Of Date Enables agents to see data for different dates. After a search, when the EIP is instantiated for the first time, the systempasses the current date to the As Of Date field. All the datathat appears is based on the current date. If the agent wants tosee past-dated data, he or she can change the As Of Date fieldand click Go. This action re-instantiates the EIP.
Show Job Details for The values in this drop-down list box come from the HD_360_XREF_WK record, which is included in the HD_360_RESPONSE_SYNC message. All the unique job codes fromthe response message are added to the Show Job Details forfield. When more then one job code is available for the person, the system adds the View All value to the drop-down listbox. Selecting the View All value displays all the data for theperson in the Job and Position Summary, Pay Summary, andBenefits sections. The system hides the field if the person hasonly one job. Job and Position Summary, Pay Summary andBenefits are filtered when the agent selects any job code. Allthe records that take part in the filtering are tagged with the jobcode.
This field only appears when integrating with PeopleSoftHCM.
Work Period The time period during which the standard hours must becompleted.
This field only appears when integrating with PeopleSoftHCM.
Company A high-level entity to which all departments roll up.
This field appears here only when integrating with PeopleSoftHCM.
Establishment Organizational entities that define physical locations andspecific attributes associated with the establishment.
This field only appears when integrating with PeopleSoftHCM.
Labor Agreement A field that is defined by customers and identify a specificlabor contract.
This field only appears when integrating with PeopleSoftHCM.
Employee Category A class of employees as defined in the labor agreement.
Person Type A blend of the Person Organization (PER_ORG) and Person ofInterest Type (POI_TYPE) fields in PeopleSoft HCM. The Joband Position Summary section on the 360-Degree View pagesubscribes to the Person Organization and Person of InterestType fields in the HelpDesk 360 Response Sync Message.
If appropriate, the system automatically hides fields that are not used outside of North America. Someavailable fields are commonly used only in France, such as Paid Hours and Paid Work Period.
196 Copyright © 1988, 2020, Oracle and/or its affiliates.

Chapter 8 Defining EIP Options for Integration to PeopleSoft or Oracle E-Business HCM
Here is an example of the Job and Position Summary (France) section from the Human ResourcesHelpDesk (HRHD) Worker 360-Degree View page (when integrating to PeopleSoft HCM).
Image: Job and Position Summary section (France) - HRHD Worker 360-Degree View page(PeopleSoft HCM)
This example illustrates the fields and controls on the Job and Position Summary section (France) -HRHD Worker 360-Degree View page (PeopleSoft HCM).
The Person Type field (Organizational Relationship) enables agents to distinguish among a contingentworker, employee, or person of interest (POI) in the Job and Position Summary section for each of aworker's jobs in the scroll area.
Here is an example of the Job and Position Summary (United Kingdom) section from the HumanResources HelpDesk (HRHD) Worker 360-Degree View page (when integrating to PeopleSoft HCM).
Image: Job and Position Summary section (U.K.) - HRHD Worker 360-Degree View page(PeopleSoft HCM)
This example illustrates the fields and controls on the Job and Position Summary section (U.K.) - HRHDWorker 360-Degree View page (PeopleSoft HCM).
Here is an example of the Job and Position Summary section from the Human Resources HelpDesk(HRHD) Worker 360-Degree View page (when integrating to Oracle E-Business HCM).
Copyright © 1988, 2020, Oracle and/or its affiliates. 197

Defining EIP Options for Integration to PeopleSoft or Oracle E-Business HCM Chapter 8
Image: Job and Position Summary section - HRHD Worker 360-Degree View page (E-BusinessHCM)
This example illustrates the fields and controls on the Job and Position Summary section - HRHD Worker360-Degree View page (E-Business HCM).
This table describes the fields used in the Job and Position Summary section:
Fields in the Job and Position Summary Section Description
Common fields available when integrating to either PeopleSoftor E-Business HCM
The system displays these fields for all workers:
Job Code
Job Description
Date of Hire
Person Type
Employee Status
Employment Status Date
Position
Location
Supervisor ID
Supervisor Name
Standard Hours
Work Period
Employee Category
Payroll System
198 Copyright © 1988, 2020, Oracle and/or its affiliates.

Chapter 8 Defining EIP Options for Integration to PeopleSoft or Oracle E-Business HCM
Fields in the Job and Position Summary Section Description
Common fields available when integrating to PeopleSoft HCM The system displays these fields for all workers:
Business Unit
Company
Establishment
Department
Regular/Temporary
Full/Part Time
Labor Agreement
Common fields available when integrating to E-BusinessHCM
The system displays these fields for all workers:
Employment Category
Organization
Collective Agreement
U.S. fields available when integrating to PeopleSoft HCM These fields appear if the worker’s regulatory region is USA:
FLSA Status
FICA Status - Employee
Note: The system hides the FLSA Status and FICA Status-Employee fields when the employee is Canadian.
France fields available when integrating to PeopleSoft HCM These fields appear if the regulatory region is FRA:
Paid Hours
Paid Work Period
Viewing Pay SummaryThe Pay Summary section provides an agent with a summary of an employee's last confirmed paycheck.The help desk agent uses the Pay Summary section to answer common questions about the caller’s netpay, taxes, and withholding amounts.
When integrating with PeopleSoft HCM, the system displays the Withholding Option section only forNorth American Payroll (U.S. and Canada) customers. This section includes the number of withholdingallowances, special state tax information, additional percentages withheld, and additional amountswithheld at both the state and provincial and the federal levels.
To enhance PeopleSoft Global Payroll, new common fields as well as new fields for country extensions(U.K. and France) were added. PeopleSoft HCM determines which global fields are sent in the 360Response message.
Here is an example of the Pay Summary (France) section from the Human Resources HelpDesk (HRHD)Worker 360-Degree View page (when integrating to PeopleSoft HCM).
Copyright © 1988, 2020, Oracle and/or its affiliates. 199

Defining EIP Options for Integration to PeopleSoft or Oracle E-Business HCM Chapter 8
Image: Pay Summary section (France) - HRHD Worker 360-Degree View page (PeopleSoft HCM)
This example illustrates the fields and controls on the Pay Summary section (France) - HRHD Worker360-Degree View page (PeopleSoft HCM).
Here is an example of the Pay Summary (U.K.) section from the Human Resources HelpDesk (HRHD)Worker 360-Degree View page (when integrating to PeopleSoft HCM).
Image: Pay Summary section (U.K.) - HRHD Worker 360-Degree View page (PeopleSoft HCM)
This example illustrates the fields and controls on the Pay Summary section (U.K.) - HRHD Worker 360-Degree View page (PeopleSoft HCM).
Here is an example of the Pay Summary section from the Human Resources HelpDesk (HRHD) Worker360-Degree View page (when integrating to E-Business HCM).
Image: Pay Summary section - HRHD Worker 360-Degree View page (E-Business HCM)
This example illustrates the fields and controls on the Pay Summary section - HRHD Worker 360-DegreeView page (E-Business HCM).
This table describes the fields that represent common fields versus country-specific fields in the PaySummary section:
200 Copyright © 1988, 2020, Oracle and/or its affiliates.

Chapter 8 Defining EIP Options for Integration to PeopleSoft or Oracle E-Business HCM
Fields in the Pay Summary Section Description
Common fields when integrating to E-Business HCM or forintegrating to PeopleSoft HCM Payroll North America andGlobal Payroll
These fields appear for all:
Company
Address *
Paygroup
Job Title
Currency Code
Note: * Even though Address is not a field commonly used byGlobal Payroll, it is included to make the common fields lineup. It is coded to Not Applicable for Global Payroll.
Fields shown when integrating to E-Business HCM or whenintegrating to PeopleSoft HCM Payroll North America.
For PeopleSoft HCM, these fields appear only when theemployee’s Pay System Flag is PNA:
Period End *
Tax Location
Federal Marital Status
Pay Frequency
Note: * This field must appear for Global Payroll to align withthe Period Begin Date field.
Global Payroll-only fields These fields appear when the employee’s Pay System Flag isGP:
Period Begin
Period End
Calculation Begin
Calculation End
Run Type
Note: Calculation begin and end dates represent the first dayand the last day of the period for which this payment wascalculated. Run Type represents the type of payment (forexample, regular pay, bonus, and so on).
Viewing Payment TotalThe system also displays the Payment Total section as a subsection of the Pay Summary when theemployee’s pay summary flag equals Payroll North America (PNA) or Global Payroll (GP). For GlobalPayroll, the group box label is called Payment Total since paycheck is not a commonly used term inEurope.
Copyright © 1988, 2020, Oracle and/or its affiliates. 201
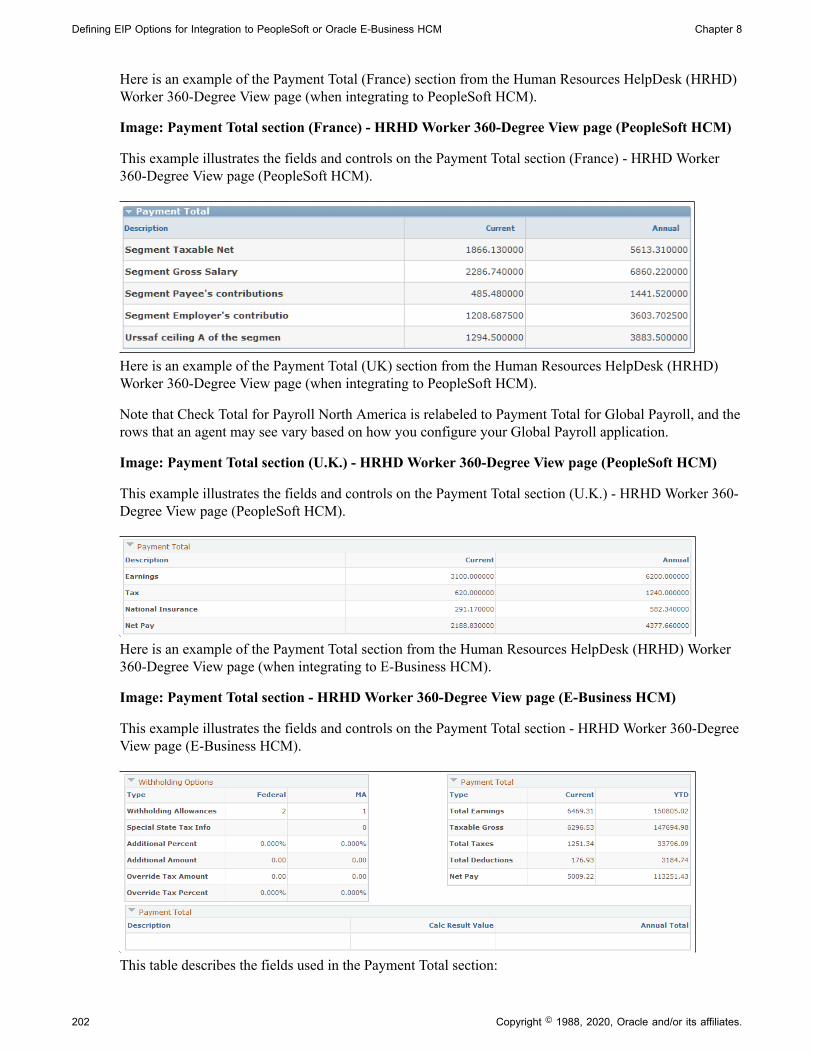
Defining EIP Options for Integration to PeopleSoft or Oracle E-Business HCM Chapter 8
Here is an example of the Payment Total (France) section from the Human Resources HelpDesk (HRHD)Worker 360-Degree View page (when integrating to PeopleSoft HCM).
Image: Payment Total section (France) - HRHD Worker 360-Degree View page (PeopleSoft HCM)
This example illustrates the fields and controls on the Payment Total section (France) - HRHD Worker360-Degree View page (PeopleSoft HCM).
Here is an example of the Payment Total (UK) section from the Human Resources HelpDesk (HRHD)Worker 360-Degree View page (when integrating to PeopleSoft HCM).
Note that Check Total for Payroll North America is relabeled to Payment Total for Global Payroll, and therows that an agent may see vary based on how you configure your Global Payroll application.
Image: Payment Total section (U.K.) - HRHD Worker 360-Degree View page (PeopleSoft HCM)
This example illustrates the fields and controls on the Payment Total section (U.K.) - HRHD Worker 360-Degree View page (PeopleSoft HCM).
Here is an example of the Payment Total section from the Human Resources HelpDesk (HRHD) Worker360-Degree View page (when integrating to E-Business HCM).
Image: Payment Total section - HRHD Worker 360-Degree View page (E-Business HCM)
This example illustrates the fields and controls on the Payment Total section - HRHD Worker 360-DegreeView page (E-Business HCM).
This table describes the fields used in the Payment Total section:
202 Copyright © 1988, 2020, Oracle and/or its affiliates.

Chapter 8 Defining EIP Options for Integration to PeopleSoft or Oracle E-Business HCM
Fields in the Payment Total Section Description
Description (PeopleSoft HCM) or Type (E-Business HCM)column.
For PeopleSoft HCM, this data appears under theDescriptioncolumn only when the employee’s Pay SystemFlag is PNA:
Total Earnings
Taxable Gross
Total Taxes
Total Deductions
Net Pay
*********
For PeopleSoft HCM, depending on the country, this dataappears under the Description column only when theemployee’s Pay System Flag is GP:
Segment Taxable Net (France)
Yearly Gross Salary (France)
National Insurance (France)
Segment Payee's contribution (France)
Segment Employer's contribution (France)
Urssaf ceiling A of the segment (France)
Earnings (UK)
Tax (UK)
National Insurance (UK)
Net Pay (UK)
Current column. Displays the current amount for the field on the correspondingline under the Description or Type column in the grid.
Annual (PeopleSoft HCM) or YTD (E-Business HCM)column
Displays the annual amount for the field on the correspondingline under the Description or Type column in the grid.
Viewing AbsencesWith the introduction of Global Payroll to the 360-Degree View, it is common for employees to call thehelp desk with questions about absence accruals and balances. European countries track more absencetypes than the U.S. typically tracks.
Furthermore, customers need the ability to tailor the absence section to meet their individual country'sneeds. PeopleSoft HCM offers absence management as a separate product; therefore, the Absence sectionis a separate section in the 360-Degree View page, and it has no ties to the Pay Summary section.
Copyright © 1988, 2020, Oracle and/or its affiliates. 203

Defining EIP Options for Integration to PeopleSoft or Oracle E-Business HCM Chapter 8
Here is an example of the Absence (U.K.) section from the Human Resources HelpDesk (HRHD) Worker360-Degree View page (when integrating to PeopleSoft HCM).
Image: Absence section (U.K.) - HRHD Worker 360-Degree View page (PeopleSoft HCM)
This example illustrates the fields and controls on the Absence section (U.K.) - HRHD Worker 360-Degree View page (PeopleSoft HCM).
Here is an example of the Absence (France) section from the Human Resources HelpDesk (HRHD)Worker 360-Degree View page (when integrating to PeopleSoft HCM).
Image: Absence section (France) - HRHD Worker 360-Degree View page (PeopleSoft HCM)
This example illustrates the fields and controls on the Absence section (France) - HRHD Worker 360-Degree View page (PeopleSoft HCM).
Here is an example of the Absence section from the Human Resources HelpDesk (HRHD) Worker 360-Degree View page (when integrating to E-Business HCM).
Image: Absence section - HRHD Worker 360-Degree View page (E-Business HCM)
This example illustrates the fields and controls on the Absence section - HRHD Worker 360-Degree Viewpage (E-Business HCM).
Requirements for AbsenceUsing the 360–Degree View configuration, you can enable or disable the Absence section on the 360–Degree View page. When integrating to PeopleSoft HCM, the 360–Degree View page can display theAbsence section with or without payroll data for both Payroll North America and Global Payroll.
The absence configuration defined in PeopleSoft HCM determines how columns are labeled in theAbsence grid. You can, however, configure the section name as the terminology varies from country tocountry (for example, Absence, Leave, and so on).
The 360-Degree View page subscribes to and displays the following fields:
204 Copyright © 1988, 2020, Oracle and/or its affiliates.

Chapter 8 Defining EIP Options for Integration to PeopleSoft or Oracle E-Business HCM
Field Description
Description The description of the absence type (for example, PTO, sick, vacation, and so on).
Entitlement Balance The grand total, positive or negative, accrued by the workerfor the absence type.
As of Date The date as of which the entitlement balance was lastcalculated.
Viewing BenefitsThe Benefits Information section provides the help desk agent with a summary of the caller’s benefitsto help them answer common questions about health plans, level of coverage, contributions to a savingsplan, and coverage for dependents and beneficiaries.
Here is an example of the Benefits section from the Human Resources HelpDesk (HRHD) Worker 360-Degree View page (when integrating to PeopleSoft HCM).
Image: Benefits section - HRHD Worker 360-Degree View page (PeopleSoft HCM)
This example illustrates the fields and controls on the Benefits section - HRHD Worker 360-Degree Viewpage (PeopleSoft HCM).
Here is an example of the Benefits section from the Human Resources HelpDesk (HRHD) Worker 360-Degree View page (when integrating to E-Business HCM).
Copyright © 1988, 2020, Oracle and/or its affiliates. 205

Defining EIP Options for Integration to PeopleSoft or Oracle E-Business HCM Chapter 8
Image: Benefits section - HRHD Worker 360-Degree View page (E-Business HCM)
This example illustrates the fields and controls on the Benefits section - HRHD Worker 360-Degree Viewpage (E-Business HCM).
The Benefits grid contains information regarding the individual's coverage. The Dependents/Beneficiariesgrid contains information regarding the coverage for the individual's dependents and beneficiaries.
This information comes from E-Business HCM or from the PeopleSoft HCM Base Benefits module.When using PeopleSoft HCM, data is available to support the U.K. and France. The U.K. currently usesthe Base Benefits module to manage benefit enrollment for employees.
Direct ReportsHere is an example of the Direct Reports section from the Human Resources HelpDesk (HRHD) Worker360-Degree View page (when integrating to E-Business HCM).
Image: Direct Reports sections - HRHD Worker 360-Degree View page (E-Business HCM)
This example illustrates the fields and controls on the Direct Reports sections - HRHD Worker 360-Degree View page (E-Business HCM).
United Kingdom RequirementsFor UK customers, the system displays Company Car in the Benefits sections. The system displays theattributes of the car, such as make and model, if the attributes are included in the 360 Sync Responsemessage.
206 Copyright © 1988, 2020, Oracle and/or its affiliates.

Chapter 8 Defining EIP Options for Integration to PeopleSoft or Oracle E-Business HCM
Here is an example of the Benefits and Direct Reports (U.K.) section from the Human ResourcesHelpDesk (HRHD) Worker 360-Degree View page (when integrating to PeopleSoft HCM).
Image: Benefits Information and Direct Reports sections (United Kingdom) - HRHD Worker 360-Degree View page (PeopleSoft HCM)
This example illustrates the fields and controls on the Benefits Information and Direct Reports sections(United Kingdom) - HRHD Worker 360-Degree View page (PeopleSoft HCM).
Requirements for FranceSince France does not use Base Benefits to manage employee benefits enrollments, the system does notdisplay information in the Benefits Information section. Instead, it displays this message: No BenefitsInformation exists for this person.
Here is an example of the Benefits and Direct Reports (France.) section from the Human ResourcesHelpDesk (HRHD) Worker 360-Degree View page (when integrating to PeopleSoft HCM).
Image: Benefits Information and Direct Reports sections (France) - HRHD Worker 360-DegreeView page (PeopleSoft HCM)
This example illustrates the fields and controls on the Benefits Information and Direct Reports sections(France) - HRHD Worker 360-Degree View page (PeopleSoft HCM).
Viewing New Action Links and Security RolesAgents use action links when the information on the Worker 360-Degree View page is insufficient toanswer the caller’s questions. The agent can create a case for the caller and transfer to the pages inPeopleSoft or E-Business HCM directly from the case to find additional HR-related information.
With the introduction of Global Payroll, PeopleSoft CRM added new action links to the interface withPeopleSoft HCM versions 8.9 and above. This table lists the action links associated with PeopleSoftGlobal Payroll information:
Action Link Category Link
Benefits Car Allocation
Car Plan
Copyright © 1988, 2020, Oracle and/or its affiliates. 207

Defining EIP Options for Integration to PeopleSoft or Oracle E-Business HCM Chapter 8
Action Link Category Link
Human Resources Update Contract
Global Payroll - France Payslip — FRA
Request Loans — FRA
Garnishments —FRA
Global Payroll - UK Payslip — GBR
Review Loans — GBR
Maintain Loans — GBR
Absence Event — GBR
Global Payroll - Core Bank Account
Net Pay Elections
Absence Event
The system displays the action links on the Case page based on the agent’s security access. If the agentdoesn’t have access, the system does not display the link in the action category drop-down list box.
Viewing HR-Related Payroll Information on the 360-Degree View Page forUS Federal
PeopleSoft HCM may be set up and used by US Federal employees. These organizations capture and usedata elements which are different from private organizations who have implemented PeopleSoft HCM.
This topic discuss about the fields and sections that are newly introduced in 360–Degree View page, forproviding effective service delivery to the Federal employees. For details on common fields and sectionsavailable in 360–Degree View page, see Viewing HR-Related Payroll Information on the 360-DegreeView Page
Note: The system delivers new role and permission list that enables to provide a different HRHD 360-Degree View to the Agents who have access to US Federal data. The permission list will be similar to‘HRHD 360-degree View’, but specifically used only for the ‘HRHD 360 Degree View for USF’ role. Formore details, see "Configuring the 360-Degree View Search Page" (PeopleSoft CRM 9.2: ApplicationFundamentals )Use the Define HCM Sections page to enable or disable the sections specific to US Federal on the HRHD360-Degree View page. For details, see Define HCM Sections Page
The job records for federal employees are displayed in HRHD 360 degree based on GVT WIP status.System should display the job records only if the WIP status is set to either Complete or Corrected orIRR Reported. For more details, see Understanding Delivered Sample WIP System Parameters section inHCM Online Help.
208 Copyright © 1988, 2020, Oracle and/or its affiliates.

Chapter 8 Defining EIP Options for Integration to PeopleSoft or Oracle E-Business HCM
Viewing US Federal EmploymentThe US Federal Employment section displays DOS Tenure and Service computation dates for the USFederal employee.
Note: This section is enabled only for US Federal employees.
Image: US Federal Employment section — HRHD 360–Degree View Page
This example illustrates the fields and controls on the US Federal Employment section - HRHD 360-Degree View page.
This table describes the fields available in the US Federal Employment section.
Fields in the US Federal Employment Section Description
SCD Tenure Displays the type of employment for the US Federal employeesuch as Permanent, Indefinite, and the like.
SCD Leave Date, SCD Retire Date, SCD TSP Displays the dates related to the service of the US Federalemployee.
Viewing US Federal Job and Position SummaryThe Job and Position Summary section provides US Federal employees with a summary of the caller’sjob data to answer common questions about an employee’s job title, location, or status.
Image: Job and Position Summary Section — HRHD 360–Degree View Page
This example illustrates the fields and controls on the Job and Position Summary section - HRHD 360-Degree View page. The highlighted fields are applicable only for US Federal employees.
This table describes the fields applicable only for US Federal employees in the Job and Position Summarysection.
Copyright © 1988, 2020, Oracle and/or its affiliates. 209

Defining EIP Options for Integration to PeopleSoft or Oracle E-Business HCM Chapter 8
Fields in the Job and Position Summary Section Description
FLSA Status FLSA status determines whether the employee is eligible forbeing paid for overtime.
Type of Appointment Displays the type of appointment for US Federal employee.
For details on the rest of fields available in the Job and Position Summary section, see Viewing Job andPosition Summary
Viewing US Federal CompensationThe US Federal Compensation section provides a summary of payplan series, grade and step for the USFederal employee
Image: US Federal Compensation — HRHD 360–Degree View Page
This example illustrates the fields and controls on the US Federal Compensation section - HRHD 360-Degree View page.
Note: This section is enabled only for US Federal employees.
This table describes the fields available in the US Federal Compensation section.
Fields in the US Federal Compensation Section Description
Pay Plan, Pay Plan Table, Pay Plan Grade and Step Displays the pay plan, pay plan grade, series and step for theUS Federal employee.
Viewing US Federal Benefits InformationThis section provides an overall view of the benefit plan, retirement data associated with the employee.
210 Copyright © 1988, 2020, Oracle and/or its affiliates.

Chapter 8 Defining EIP Options for Integration to PeopleSoft or Oracle E-Business HCM
Image: Benefits Information section — HRHD 360–Degree View Page
This example illustrates the fields and controls on the Benefits Information section - HRHD 360-DegreeView page. The highlighted fields are applicable only for US Federal employees.
This table describes the fields applicable only for US Federal employees in the Benefits Informationsection.
Fields in the Benefits Information Section Description
Benefit Program Benefit plan associated with the US Federal employee
Retirement Plan Retirement plan for the US Federal employee.
For details on the rest of the fields available in the Benefits Information section, see Viewing Benefits
Copyright © 1988, 2020, Oracle and/or its affiliates. 211

Defining EIP Options for Integration to PeopleSoft or Oracle E-Business HCM Chapter 8
212 Copyright © 1988, 2020, Oracle and/or its affiliates.

Chapter 9
Defining Options for Integration toPeopleSoft Campus Solutions
Understanding the Integration Between PeopleSoft CRM andPeopleSoft Campus Solutions
This topic discusses:
• EIP message process.
• Request message.
• Response message.
EIP Message ProcessAll search information is stored in the PeopleSoft CRM database. When an agent accesses the 360-DegreeView page for a specific constituent, a secured synchronous request is sent to PeopleSoft CS.
When PeopleSoft CS validates the request, a response is sent to PeopleSoft CRM, and the informationis used to display the 360-degree view of the employee. The EIP message is implemented by theSCC_CONSTITUENT Integration Broker service and its associated synchronous service operation andrequest and response messages.
See "Understanding 360-Degree View Setup" (PeopleSoft CRM 9.2: Application Fundamentals ).
Request MessageThe system sends a secured sync request message from PeopleSoft CRM to PeopleSoft CS. The systemvalidates the requestor's information before processing the request.
The request message contains this information:
• EmplID (employee ID) from the 360-Degree View search page.
• Checklist, Communications, and Comments (3C) option (to indicate if data for this section is beingrequested).
• Admissions option (to indicate if data for this section is being requested).
• Transfer Credits option (to indicate if data for this section is being requested).
• Academics option (to indicate if data for this section is being requested).
• Finances option (to indicate if data for this section is being requested).
Copyright © 1988, 2020, Oracle and/or its affiliates. 213

Defining Options for Integration to PeopleSoft Campus Solutions Chapter 9
• Financial Aid option (to indicate if data for this section is being requested).
• Transcript option (to indicate if data for this section is being requested).
• Contributor Relations option (to indicate if data for this section is being requested).
• Affiliations option (to indicate if data for this section is being requested).
• Language Code.
The language that the agent uses to log on to the application. The default value is (%language).PeopleSoft Campus Solutions retrieves information based on the language code in the request forinternationalization support.
Response MessageThe sync response from PeopleSoft CS contains a response to the information provided in the request.
The response contains multiple rowsets that provide data for the summary (profile) section of the 360-degree view page and for all of the requested sections that are specific to the 360-Degree View for HigherEducation (Checklist, Communications, and Comments; Admissions; Transfer Credits; Academics;Finances; Financial Aid; Transcript; Contributor Relations; and Affiliations).
Note: You must establish the same user IDs for both PeopleSoft CRM and PeopleSoft CS as well as grantsecurity access to the information and enable single sign on in PeopleSoft CS. Depending on the setup inPeopleSoft CS, a user ID may not have access to all of the information.When all data for a particular 360-degree view section originates from the same component in PeopleSoftCS and the user does not have security access to the component, the word Secured is displayed instead ofshowing the details for that section. However, if data for the section originates from different componentsand the user has access to some but not all of those components, all details in the section are displayed butthe fields for which the user has no security will appear blank
Viewing Campus Solutions-Related Information on the 360-DegreeView Page
This topic discusses how to view campus solutions-related information on the 360-Degree View page.
Page Used to View Campus Solutions-Related Information on the 360-Degree View Page
Page Name Definition Name Usage
Constituent 360-Degree View Page RB_TD_AGENT_VIEW View academic-related data fora constituent that comes over toPeopleSoft CRM from PeopleSoftCampus Solutions.
214 Copyright © 1988, 2020, Oracle and/or its affiliates.

Chapter 9 Defining Options for Integration to PeopleSoft Campus Solutions
Constituent 360-Degree View PageUse the Constituent 360-Degree View page (RB_TD_AGENT_VIEW) to view academic-related data fora constituent that comes over to PeopleSoft CRM from PeopleSoft Campus Solutions.
Navigation
Constituent 360-Degree View
Image: Constituent 360-Degree View page (1 of 7)
This example illustrates the fields and controls on the Constituent 360-Degree View page (1 of 7).
Image: Constituent 360-Degree View page (2 of 7)
This example illustrates the fields and controls on the Constituent 360-Degree View page (2 of 7).
Copyright © 1988, 2020, Oracle and/or its affiliates. 215

Defining Options for Integration to PeopleSoft Campus Solutions Chapter 9
Image: Constituent 360-Degree View page (3 of 7)
This example illustrates the fields and controls on the Constituent 360-Degree View page (3 of 7).
Image: Constituent 360-Degree View page (4 of 7)
This example illustrates the fields and controls on the Constituent 360-Degree View page (4 of 7).
216 Copyright © 1988, 2020, Oracle and/or its affiliates.

Chapter 9 Defining Options for Integration to PeopleSoft Campus Solutions
Image: Constituent 360-Degree View page (5 of 7)
This example illustrates the fields and controls on the Constituent 360-Degree View page (5 of 7).
Image: Constituent 360-Degree View page (6 of 7)
This example illustrates the fields and controls on the Constituent 360-Degree View page (6 of 7).
Copyright © 1988, 2020, Oracle and/or its affiliates. 217

Defining Options for Integration to PeopleSoft Campus Solutions Chapter 9
Image: Constituent 360-Degree View page (7 of 7)
This example illustrates the fields and controls on the Constituent 360-Degree View page (7 of 7).
From the 360-Degree View page in PeopleSoft Service Center for Higher Education you can view fieldsfor the sections on Checklist, Communications, and Comments; Recruiting; Admissions; Transfer Credits;Academics; Finances; Financial Aid; Transcript; Contributor Relations; and Affiliations.
So that agents can only access the information that they have permission to view, the 360 EIP includesrow-level security. Rather than maintaining a second layer of security in the CRM setup pages, you onlyhave to set up this security once. Using the Configure Roles page, you have the ability to configure whichCampus Solutions sections are available for a user with that role who accesses the Constituent 360-Degree View page.
Related Links"Understanding AAF" (PeopleSoft CRM 9.2: Automation and Configuration Tools)"Configuring the 360-Degree View Search Page" (PeopleSoft CRM 9.2: Application Fundamentals )
Viewing Checklists, Communications, and CommentsThis section includes data from the checklists, communications, and comments associated with theconstituent to help provide agents with helpful information as they work on that person’s request or issue.
Checklists, communications, and comments provide a way to track and analyze correspondence, lists ofrequirements, and notes about constituents.
• Checklists are used to assign lists of requirements to individuals, organizations, events, or groups ofindividuals and to monitor constituent’s progress toward completing those requirements.
• Communications enable users to track and analyze all of the institution’s contacts with students,staff, constituents, and organizations inside and outside the institution. Note that the Constituent 360-Degree View only displays communications to and from constituents.
• Comments enable users to track remarks, explanations, or clarifications about individuals andorganizations. Note that the Constituent 360-Degree View only displays comments regardingconstituents.
Here is an example of the Checklist, Communications, and Comments section from the Service Center forHigher Education Constituent 360-Degree View page.
218 Copyright © 1988, 2020, Oracle and/or its affiliates.

Chapter 9 Defining Options for Integration to PeopleSoft Campus Solutions
Image: Checklist, Communications, and Comments section of 360-Degree View for HigherEducation page
This example illustrates the fields and controls on the Checklist, Communications, and Comments sectionof 360-Degree View for Higher Education page.
Checklists
Field Description
Function The code for the functional area with which the constituent isassociated, for example Admissions.
Institution Institution that applies to the specific Checklist.
Checklist Type Type that best describes the checklist
Checklist The code that describes the checklist assigned to an individual, organization, or event.
Item Items available for specific checklists.
Copyright © 1988, 2020, Oracle and/or its affiliates. 219

Defining Options for Integration to PeopleSoft Campus Solutions Chapter 9
Field Description
Status The Checklist Status.
Due Date The date by which the checklist must be completed for theconstituent.
DateTime Date and time when checklist was created.
Communications
Field Description
Function The code for the functional area with which the constituent isassociated.
Institution Institution associated with this communication.
Category The category of communication context to indicate why acommunication was sent or received
Method Indicates the form of a communication (for example, letter, email, or phone call).
Direction The direction of a communication, such as in person, incomingcommunication, or outgoing communication.
Letter The letter code for a communication. The code specifies thevariable data associated with this communication.
Status The communication status. Valid values are Completed or NotCompleted.
Date Completed Date when the communication was completed.
Communication Date Date the communication was created.
Comments
Field Description
Function The code for the functional area with which this constituent isassociated.
Institution Institution associated with this comment.
Category The business need with which this comment is associated.
Comment ID ID of the person entering the comment
220 Copyright © 1988, 2020, Oracle and/or its affiliates.

Chapter 9 Defining Options for Integration to PeopleSoft Campus Solutions
Field Description
Name The name of the person entering the comment.
DateTime Date and time when the comment was created.
Viewing Recruiting InformationThis section provides a summary of a suspect’s or prospect’s academic interest.
The information in this section is stored in and retrieved from the PeopleSoft CRM system: it is not partof the EIP message to PeopleSoft Campus Solutions.
When there is no program information for a given institution and career, academic information isretrieved for data where the recruiting status is Suspect, Prospect, or Applicant.
When there is program information for a given institution and career, academic information is displayedfor any program where the constituent's lifecycle status is Suspect, Prospect, or Applicant.
Image: Recruiting section of 360-Degree View for Higher Education page
This example illustrates the fields and controls on the Recruiting section of 360-Degree View for HigherEducation page.
Field Description
Institution Institution that is recruiting the potential suspect or prospect.
Career Prospective academic career in which a suspect or prospect hasan interest, such as Undergraduate, Graduate, or ContinuingEducation.
Admit Type Admit type for this suspect or prospect, such as First-Year,Second-Year, or Transfer.
Admit Term The admit term in which the suspect or prospect is expected toenroll.
Recruiting Status Indicates the level of interest, at the academic career level, thatthe prospective student has in the institution.
Copyright © 1988, 2020, Oracle and/or its affiliates. 221

Defining Options for Integration to PeopleSoft Campus Solutions Chapter 9
Field Description
Source Date Career source date for which the program status record wasadded. The source date is the date that the data was loaded
Last School Attended Suspect or prospect’s last school attended.
Graduation Date Graduation date from the last school the suspect or prospectattended. This may be a future date.
School Type School type (for last school attended) of the suspect orprospect.
Campus Suspect or prospect’s prospective campus if applying to theinstitution. The campus is associated with the program and isoften where the student will attend classes.
Program Suspect or prospect’s prospective interest in an academicprogram such as Graduate of Fine Arts Program.
Lifecycle Status The individual’s Lifecycle Status indicates the perceived levelof interest, at the academic program level, that a potentialstudent has in the institution. For example, a person whoattended an on-campus event may be considered a suspect (someone who you suspect is interested in the institution). Aperson who requests a catalog may be considered a prospect (someone who has indicated interested in the institution).
Status Date Date for which the program status was added.
Plan Academic plan for which a suspect or prospect has indicated apotential interest.
Sub-Plan Suspect or prospect's potential interest in a specific academicSub-Plan. Sub-Plans are areas of further specialization withinan academic plan.
Viewing Admissions InformationThis section displays a constituent's admissions information. The data originates from the Admissionspage of the Student Service Center and the Application Data component in Campus Solutions.
If the constituent is applying for multiple sub-plans within one plan (such as multiple specialties orconcentrations), the grid displays a row for each sub-plan.
222 Copyright © 1988, 2020, Oracle and/or its affiliates.
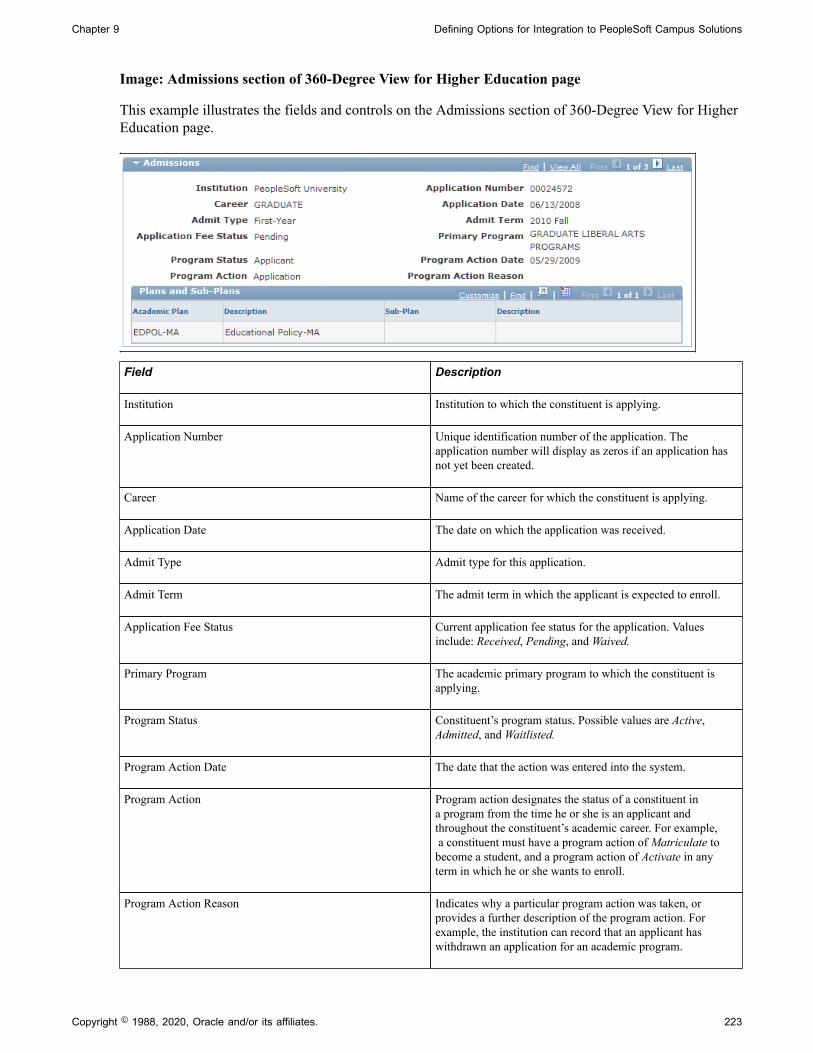
Chapter 9 Defining Options for Integration to PeopleSoft Campus Solutions
Image: Admissions section of 360-Degree View for Higher Education page
This example illustrates the fields and controls on the Admissions section of 360-Degree View for HigherEducation page.
Field Description
Institution Institution to which the constituent is applying.
Application Number Unique identification number of the application. Theapplication number will display as zeros if an application hasnot yet been created.
Career Name of the career for which the constituent is applying.
Application Date The date on which the application was received.
Admit Type Admit type for this application.
Admit Term The admit term in which the applicant is expected to enroll.
Application Fee Status Current application fee status for the application. Valuesinclude: Received, Pending, and Waived.
Primary Program The academic primary program to which the constituent isapplying.
Program Status Constituent’s program status. Possible values are Active,Admitted, and Waitlisted.
Program Action Date The date that the action was entered into the system.
Program Action Program action designates the status of a constituent ina program from the time he or she is an applicant andthroughout the constituent’s academic career. For example, a constituent must have a program action of Matriculate tobecome a student, and a program action of Activate in anyterm in which he or she wants to enroll.
Program Action Reason Indicates why a particular program action was taken, orprovides a further description of the program action. Forexample, the institution can record that an applicant haswithdrawn an application for an academic program.
Copyright © 1988, 2020, Oracle and/or its affiliates. 223

Defining Options for Integration to PeopleSoft Campus Solutions Chapter 9
Field Description
Plan Academic plan for which a suspect or prospect has indicated apotential interest.
Sub-Plan Suspect or prospect's potential interest in a specific academicSub-Plan. Sub-Plans are areas of further specialization withinan academic plan.
Viewing Transfer Credits InformationThe Transfer Credits section enables agents to view high level transfer credit information for students.
Image: Transfer Credits section of 360-Degree View for Higher Education page
This example illustrates the fields and controls on the Transfer Credits section of 360-Degree View forHigher Education page.
Field Description
Credit Type Identifies the type of credit information being displayed. Validvalues are: Course Credit, Test Credit, and Other Credit.
Credit Source Identifies the source of the credit. For Course Credit this isthe institution in which the constituent earned credits that arebeing transferred. For Test Credit and Other Credits this fieldis blank.
Institution Academic institution for which the specified individual’stransfer credit was processed.
Career Academic career for which you want to retrieve the specifiedindividual’s transfer credit summaries.
Program Academic program for which you want to retrieve thespecified individual’s transfer credit summaries.
Articulation Term Term for which the target institution processes theconstituent’s transfer credit.
Model Status The status of the transfer credit model. Valid values are:Submitted, Completed, or Posted.
Units Transferred The units of the internal equivalent course. Only those unitsthat have been posted will be displayed.
224 Copyright © 1988, 2020, Oracle and/or its affiliates.

Chapter 9 Defining Options for Integration to PeopleSoft Campus Solutions
Viewing Academics InformationThe Academics section provides academic advisors and other users with an overview of a student’sacademic information.
The system uses the current term, closest future term, or most recent past term (in that order) to determinewhich term to display as the most recent term. The specific logic used for this process is:
• Choose the term with the smallest term code in which the Term Begin Date is less than or equal totoday’s date and the Term End Date is greater than or equal to today’s date.
• If none of the student’s terms satisfy the above criteria, choose the student’s term with the smallestterm code in which the Term Begin Date is greater than today’s date.
• If none of the student’s terms satisfy the above criteria, choose the student’s term with the highestterm code in which the Term End Date is less than today’s date.
The data is sorted alphabetically by Institution, Career, and Program.
Image: Academics section of 360-Degree View for Higher Education page
This example illustrates the fields and controls on the Academics section of 360-Degree View for HigherEducation page.
Field Description
Institution Name of institution in which student is enrolled.
Career Academic career for the constituent.
Program The academic program in which the student is enrolled.
Program Status Student’s program status.
Admit Term The admit term in which the student is enrolled.
Campus The campus is associated with the program and is often wherethe student is attending classes.
Copyright © 1988, 2020, Oracle and/or its affiliates. 225

Defining Options for Integration to PeopleSoft Campus Solutions Chapter 9
Field Description
Cumulative Units Includes all passed units including both enrollment andtransfer credit.
Expected Grad Term Term and year in which the student is expected to graduate.
Plan Academic plan within the academic program.
Sub-Plan Area of further specialization within an academic plan.
Term Most recent term for which a constituent has enrolled or hascompleted.
Primary Program The constituent’s primary academic program for the specifiedcareer and term combination.
Academic Load The student's academic load for the specified career and termcombination.
Approved Load The academic load for which the student is enrolled, andwhich is approved by the institution for the term.
Term Units Student's consolidated units for the most recent term.
Academic Standing Academic status of the constituent.
Viewing Financial InformationThe Finances section displays pertinent information regarding the students’ account.
Image: Finances section of 360-Degree View for Higher Education page
This example illustrates the fields and controls on the Finances section of 360-Degree View for HigherEducation page.
Field Description
Business Unit A business unit can have its own set of business rules thatenable campuses to operate independently from each otherfinancially. You must set up at least one business unit.
Amount Due Now Includes any charges incurred through the current date plus thenumber of days specified for the days in future for the due nowfield on the Institution Set page associated with the businessunit.
226 Copyright © 1988, 2020, Oracle and/or its affiliates.

Chapter 9 Defining Options for Integration to PeopleSoft Campus Solutions
Field Description
Deposit Due Deposits incurred to date.
Overall Due Represents past due, current due, and any future due chargesfor the business unit.
Anticipated Aid Student’s pending or anticipated aid that has not been posted totheir account. Values are Yes or No.
Payment Plans Indicates whether a student is currently on a payment plan.
Last Bill Date The last date a bill was generated for the student.
Last Refund Date The last date a refund was generated for the student.
Last 1098 T Year Year for which the Last 1098 T was generated for the student.
1098 T Status Captures the status of the student’s 1098-T. Values are:Transmitted, Printed, and Awaiting Consent.
Viewing Financial Aid InformationThe Financial Aid section provides users with the ability to see whether financial aid has been offered,accepted, or disbursed, as well as the date and status of the last financial aid notification letter sent.
Image: Financial Aid section of 360-Degree View for Higher Education page
This example illustrates the fields and controls on the Financial Aid section of 360-Degree View forHigher Education page.
Field Description
Institution Name of institution for which the constituent is applying forfinancial aid.
Aid Year The financial aid year.
Aid Application Date The date the student turned in an application or the date thatidentified the student as a possible recipient for financial aid.
Aid Processing Status Indicates the processing status for a student financial aidpackage.
Copyright © 1988, 2020, Oracle and/or its affiliates. 227

Defining Options for Integration to PeopleSoft Campus Solutions Chapter 9
Field Description
SAP Status (Satisfactory Academic Progress Status) Indicates whether the student is meeting satisfactory academicprogress (SAP). This is used to determine whether to awardfederal aid to the student. The SAP global disbursement rulesuse this field to determine whether to authorize disbursementof the student’s award. Also, Common Line DisbursementHold and Release processing uses this field to determinewhether a hold should be placed on the student’s CommonLine loan.
Aid Offered Indicates if aid has been offered based on the total of alldisbursements for all awards that fall in the same aid year.
Valid values are Yes (aid has been awarded) or No (no aidawarded).
Aid Accepted Indicates if the student has accepted any offered aid. The validvalues are No, Partial, or All.
Disbursed Aid Indicates whether aid has been disbursed to the student'sfinancial account. Valid values are No, Partial, or All.
Last FAN Date Indicates the date and time the Financial Aid Notification (FAN) letter was created.
FAN Status Indicates whether the FAN letter has been printed, is awaitingprinting, is being revised or has an error.
Viewing Transcript Request InformationThis section provides users with an overview of a student’s transcript requests.
Image: Transcript Request section of 360-Degree View for Higher Education page
This example illustrates the fields and controls on the Transcript Request section of 360-Degree View forHigher Education page.
Field Description
Institution Name of institution in which student is requesting a transcript.
Request Date Date student requested the transcript.
Transcript Type Transcript student is requesting such as Official or Unofficialtranscript.
Request Status The transcript status.
228 Copyright © 1988, 2020, Oracle and/or its affiliates.

Chapter 9 Defining Options for Integration to PeopleSoft Campus Solutions
Field Description
Request Reason Reason for the transcript request. The reason appears on thetranscript if the transcript type is set to display request reasoninformation.
Viewing Contributor Relations InformationThis section displays a record of lifetime gifts and pledges made by a constituent and by other individualswith whom the constituent has a personal or organizational relationship.
Image: Contributor Relations section of 360-Degree View for Higher Education page
This example illustrates the fields and controls on the Contributor Relations section of 360-Degree Viewfor Higher Education page.
Field Description
Institution Name of institution with which the constituent or relative has ahistory of giving money.
Lifetime Commitment $ Displays the total amount of money ever donated or pledgedby the donor.
Lifetime Open Pledge $ Displays the total amount of money promised but not yetdonated by the donor.
Lifetime Gift/Payments $ Displays the total amount of money ever given by the donor. This amount only includes money actually received, andexcludes outstanding pledges.
Lifetime Hard Credits $ Displays the total amount of hard credit given to the donor forrecognition purposes.
Total YTD Giving $ Displays the total amount in gifts and pledge payments thedonor made to the allocation account during this fiscal year.
Total Years Giving Displays the total number of years in which the donor hasgiven to the institution. Only hard credit recognition is used tocalculate this field.
Copyright © 1988, 2020, Oracle and/or its affiliates. 229

Defining Options for Integration to PeopleSoft Campus Solutions Chapter 9
Field Description
Consecutive Years Giving Displays the total number of consecutive years in which thedonor has given to your institution. The value in this fieldresets to zero if more than one year has passed since thedonor's most recent gift.
Relationships
Field Description
Name Displays the name of the donor.
Relationship Displays the donor’s relationship to the constituent. Onlyactive relationships are displayed.
Lifetime Gift/Payments $ Displays the total amount of money ever donated by the donorwho has a relationship with the constituent. This amount onlyincludes money actually received, and excludes outstandingpledges.
Currency Currency of the Lifetime Commitments, Lifetime OpenPledge, and Lifetime Gifts/Payments.
Viewing Affiliations InformationThis section provides a history of the constituent’s active and inactive relationship with the institution.
Image: Affiliations section of 360-Degree View for Higher Education page
This example illustrates the fields and controls on the Affiliations section of 360-Degree View for HigherEducation page.
Field Description
Affiliations Indicates the constituent’s relationship to the institution.
Start Date, End Date Start and end dates of the affiliation.
Affiliation Status Indicates the current state of the affiliation. Valid values areActive or Inactive.
230 Copyright © 1988, 2020, Oracle and/or its affiliates.

Chapter 10
Setting Up Full Sync Integration withPeopleSoft HCM
Understanding Full Sync Integration with PeopleSoft HCM
This topic provides an overview of the CRM full sync integration process with PeopleSoft HCM.
CRM uses full sync integration points during system implementation to import all data for a given setof HCM table(s). After all full syncs are processed, incremental sync integration points are activated toensure that additions, modifications, and deletions of data in PeopleSoft HCM are imported into CRM.The CRM Full Sync Integration Guided Process enables you to improve and simplify the processing offull sync integration points between PeopleSoft HCM and CRM.
Setting Up Full Sync Integration with PeopleSoft HCMCRM uses full sync integration points during system implementation to import all data for a given setof HCM table(s). After all full syncs are processed, incremental sync integration points are activated toensure that additions, modifications, and deletions of data in PeopleSoft HCM are imported into CRM.To manage integration between PeopleSoft HCM and CRM, Integration Broker technology is utilized toconfigure, activate, and monitor integration that synchronizes a given set of HCM table(s). In addition tothis technology, Enterprise Components integration definitions and processes are utilized to configure fullsync data rules and initiate the full sync integration points. When you run a full or incremental integrationpoint, the imported data is loaded directly into the CRM table(s). Because of data dependencies, someintegration points must be run in a specific order. The CRM Full Sync Integration Guided Process enablesyou to improve and simplify the processing of full sync integration points between PeopleSoft HCM andCRM. The process enables you to initiate and monitor full sync integration points between HCM andCRM while the guided process is hosted on PeopleSoft HCM.
For more information on how to set up and implement the full sync integration, see the red paperavailable at: https://support.oracle.com/epmos/faces/DocumentDisplay?id=1942360.1
Copyright © 1988, 2020, Oracle and/or its affiliates. 231

Setting Up Full Sync Integration with PeopleSoft HCM Chapter 10
232 Copyright © 1988, 2020, Oracle and/or its affiliates.

Chapter 11
Managing Cases
Understanding the Configurable Case
In PeopleSoft CRM one Case component supports all PeopleSoft CRM Support, HelpDesk, HelpDesk forHuman Resources, and Service Center for Higher Education applications, as well as the related industrysolutions.
The system stores the display template family code within the Case component. The display templatefamily code identifies the type of the Case and may provide several display template IDs that a user canchoose from.
Display template IDs control the appearance and behavior of the Case component and its pages to supportthe varied business needs of call centers. An implementer can choose to show or hide pages, sections, andfields. An implementer can also control field labels.
Understanding Case Access
This topic discusses:
• Case creation.
• Case retrieval.
• Saved searches.
Related Links"Understanding 360-Degree View Setup" (PeopleSoft CRM 9.2: Application Fundamentals )Managing Related CasesDefining Call Center Business Units
Case CreationYou can create new cases in several ways:
• Navigate to your PeopleSoft call center application (Support, HelpDesk, HR HelpDesk, or AnalystService Center) and select Add Case.
When users want to add new cases, they are taken directly to the Case component in Add mode.Users can search for customers or employees directly on the Case page, thus increasing efficiency andusability. Users can also enter information about the case before identifying the customer.
As delivered, the Analyst Service Center provides creation and retrieval of three different typesof case (each based on a separate Display Template ID). These cases are tailored for Information
Copyright © 1988, 2020, Oracle and/or its affiliates. 233
Managing Cases Chapter 11
Technology (IT)-related cases, non-IT (support) cases, and blended cases (which may be used to trackeither IT or non-IT cases).
Note: You can also use the Support Center, Help Desk Center, or HR Help Desk Center links from theHome page to navigate through the applications and add new cases.
• Use Quick Create functionality.
Use the Quick Create function to create new customers, consumers, contacts, workers, and POIsquickly.
• Use a computer telephony integration (CTI) system to identify a caller.
The CTI system enters caller information on the 360-Degree View page. From there, you can accessthe Case page to create a new case. The system populates customer or contact information on thispage from the 360-Degree View page.
Note: An agent may also use the 360-Degree View page without CTI to gather information about thecustomer before entering a new case.
• Clone an existing case by clicking the Clone Case button on the case toolbar.
Use this method when the new case is substantially similar to another case.
• Create a new case from the Related Cases page of an existing case.
Use this method when the new case is related to an existing case. This method enables you toestablish the relationship between the cases at the same time that you create the new case.
Using this method, you can select the type of information to copy to the new case. If you do not copycaller information, you can identify the caller using the appropriate fields on the new Case page.
• If an implementer enables the Agent - My Cases pagelet, agents can create cases without leaving theirpersonal case access portal.
• In the email workspace, agents can make use of email handling options to create and associate a caseto an email to support the completion of the correspondence.
• If an implementer enables the configuration option for a group worklist to create cases for newinbound email, the system creates a case for each incoming unstructured email that ERMS receivesand routes to that group worklist.
See "Group Worklist Page" (PeopleSoft CRM 9.2: Automation and Configuration Tools).
• If enabled at the HCM installation level, the CRM system automatically creates HR HelpDeskcases when the job-related or personal data is updated in the HCM system it integrates with. SeeUnderstanding Automatic Case Creation For HCM Updates
Note: To generate a case ID before a case is saved, implementers and administrators can select the CaseID Before Save check box on the Call Center Definition - Options page. This feature is useful if you wantto provide customers with a case ID before the agent enters all the problem information. Note that if theagent provides the customer with a case ID for their reference and the agent tries to save a case and is notable to, the customer has a case ID that is not recorded in the system.
234 Copyright © 1988, 2020, Oracle and/or its affiliates.

Chapter 11 Managing Cases
Default Contact InformationWhen you create a new case, the system enters default contact information for the caller.
For PeopleSoft Support, when a user selects both the customer and contact, the contact information isobtained from the contact's preferred primary phone and email information.
For PeopleSoft HelpDesk and HelpDesk for Human Resources, a user selects an employee rather than acustomer and contact. They can also enter an alternative contact in addition to an employee. In this case,the contact information comes from the alternative contact instead of the employee.
For PeopleSoft Service Center for Higher Education, user may select an individual consumer (a categorywhich includes individual students), a company and contact, or an employee (staff or faculty member).
Case RetrievalAccess an existing case directly from your My Cases pagelet or use the Case Search page. You canperform a search based on case information (such as the case number) or caller information.
If you know the case number, you do not have to identify the business unit before searching. If you aresearching based on other criteria, enter a business unit before performing the search.
Note: The number and type of information fields on the Case Search page that are used to search for casesis determined in the Configurable Search Definition, which is associated to the Display Template.
See "Understanding Display Templates" (PeopleSoft CRM 9.2: Automation and Configuration Tools),"Understanding the Configurable Search" (PeopleSoft CRM 9.2: Automation and Configuration Tools).
If you use CTI to access the Case page, the system normally bypasses the Case Search page because theCTI system provides the data that would otherwise be found through the search mechanism. However,if a caller provides an invalid case number, the system cannot go directly to the Case page. Instead, itdisplays the Case Search page and enters the data that is provided by CTI into the search fields. Becausethe appearance of the Case Search page indicates that the case number is invalid, you must delete theinvalid case number before performing a search.
Note: When a case is secure, only agents in the assigned provider group are authorized to open the case.If you use CTI or the 360-Degree View page to access the Case page and the system tries to send the caseto an agent who is not authorized, the agent receives a message stating that he or she is not authorized toopen the case. To avoid this situation, consider the secure case scenario when you configure your routingrules.
Related LinksUnderstanding Call Center Business Units"Understanding CTI" (PeopleSoft CRM 9.2: Multichannel Applications)"Using PeopleSoft Support Pagelets" (PeopleSoft CRM 9.2: Portal Pack)
Saved SearchesSaved searches enable you to reuse case search criteria. The system saves searches under your user ID bymaintaining separate lists of saved searches for each user.
Copyright © 1988, 2020, Oracle and/or its affiliates. 235

Managing Cases Chapter 11
The behavior of the saved search depends on how the search page was set up on the Configurable SearchSetup page. The system administrator can choose to populate the results grid automatically with the mostrecently used search criteria or with the user's default saved search. If the administrator selects the checkbox that enables users to choose how the results grid is initialized, then users have the option to:
• Save search criteria.
• Personalize available search fields.
• Decide how the results grid is initialized.
Related Links"BO Searches on Configurable Search Pages" (PeopleSoft CRM 9.2: Automation and ConfigurationTools)
Understanding Case Management
This topic discusses:
• Case page activities.
• Quick codes.
• Case information security.
• Case assignments.
• Case visibility
• Case closure.
• Case toolbar functions.
• Toolbar functions.
• Background processing.
Note: This chapter discusses Case page activities. Subsequent chapters discuss additional case processingthat take place on other pages in the Case component.
Case Page ActivitiesDepending on the display template, the Case page can be divided into the following sections:
Note: Sections marked with an asterisk (*) are delivered enabled when you first install the application.The display template controls the visibility of the other sections.
• Customer information section. *
This section is titled Employee Information for PeopleSoft HelpDesk applications.
236 Copyright © 1988, 2020, Oracle and/or its affiliates.

Chapter 11 Managing Cases
• Academic Information section (associated only with PeopleSoft Service Center for HigherEducation).
• Problem section. *
• Case Information section. *
• Actions section. *
• Add a note section.
• Incident address section.
See Understanding Processing a Case.
See "Configuring Display Templates for Components" (PeopleSoft CRM 9.2: Automation andConfiguration Tools).
Customer Information SectionIn PeopleSoft Support, the case's Customer Information section contains customer fields. The samesection for a PeopleSoft HelpDesk or HelpDesk for Human Resources case contains employee fields.
In Service Center for Higher Education, you can search for a company (and company contact), consumer,or worker. Note that students (constituents) have the role of consumer within the Service Center forHigher Education application, while staff and faculty have the role of worker. An individual with therole of company contact who also has the role of consumer or worker will show up multiple times in thesearch results (both as an individual and as a representative of the company). However, individuals whoare not company contacts will show up only once in the search results, even if they have both the role ofconsumer and worker.
Consider the following when using the Customer Information section:
• If you are searching for a company, you can enter a partial value in the Company field and click theSearch button.
The system returns a list of companies that begin with the value you entered in the Company field.If only one company matches your search, the system displays a page with all of the contacts forthat particular company. When creating a case for a company, you must identify a contact person. Acontact person is optional if you are creating a case for a consumer.
• If you are searching for a consumer, you can enter a partial value in either the First Name or LastName field and click the Search button.
Do not enter anything in the Company field.
• If you want to edit a contact's contact method for the case, click the Edit link to launch the EditContact Information page.
This page lists the contact information for the selected contact. The system lists only addressinformation for HelpDesk for Human Resources cases.
• Business Object Search functionality controls the appearance of customer search fields and some ofthe other fields.
Copyright © 1988, 2020, Oracle and/or its affiliates. 237

Managing Cases Chapter 11
Note: For PeopleSoft HelpDesk applications, the appearance of certain fields is controlled by thesecure worker role.
See "Understanding BO Search and Quick Create Setup" (PeopleSoft CRM 9.2: Business ObjectManagement).
• If a case is created automatically by the system for an inbound email message (a feature that can beenabled in any group worklist definition with the installation of ERMS), the email sender (identifiedby the email address) is populated as the customer contact of the case.
If the email address does not match any of the customer record in the CRM system, one of these twothings happens based on the setup of the mailbox to which the inbound email is routed—either a newcustomer (a Person record) is created using the email address and becomes the contact of the case, orthe Anonymous User person record is used as the customer (consumer) of the case. On the other hand,if multiple matches are found for the email address, the Select Sender link appears in the CustomerInformation section, indicating that the call center agent needs to choose an email sender as the casecustomer.
A case customer must be identified before a case can be saved, unless the Anonymous Caller option isselected on the case.
See "Group Worklist Page" (PeopleSoft CRM 9.2: Automation and Configuration Tools).
The Customer Information Section is grouped using an expandable group box layout. Use the displaytemplate to control how the fields appear in each section.
Note: If you select an incorrect company, you can search again to select the appropriate company. ForPeopleSoft HelpDesk customers, one person can enter a case on behalf of another person. You can selectthe employee associated with the case, select an alternative contact, and then click the Edit button to entercontact details for the case.
See "Configuring Display Templates for Components" (PeopleSoft CRM 9.2: Automation andConfiguration Tools).
Academic Information SectionThis section is enabled for cases in Service Center for Higher Education. It displays a summary of theacademic information (such as institution, program and plan) that is associated with the constituent. Thefields in this section are not editable (any required updates to the information should be processed in thePeopleSoft Campus Solutions application).
Because individuals may be linked to more than one institution, program, plan, or sub-plan, theinformation in this section is presented in a scroll area, so that multiple sets of information may beviewed.
Problem Information SectionThis section discusses two fields: Summary and Description.
The Summary field is required. The system can be configured so that values for the Summary andDescription fields can be entered by default on the Case page when the user selects a quick code. If aproblem summary is already entered on an existing case, a quick code will not overwrite the Summaryand Description fields unless the overwrite check box is selected for either the Summary or Description
238 Copyright © 1988, 2020, Oracle and/or its affiliates.

Chapter 11 Managing Cases
fields in the quick code. In this case, you can overwrite the values for the Summary and Description fieldseven if these fields are already populated.
Note: Call center agents can also use text trays and quick keys to automatically fill static and dynamicdata into the Description field.
See "Understanding the Text Tray" (PeopleSoft CRM 9.2: Automation and Configuration Tools).
Case Information SectionThe fields in the Case Information section are grouped using the configurable Embedded Tabs sectionlayout. By default, the system displays the Main and More tabs. Use the display template to determine thenumber of tabs, their labels, and the fields that you want to appear.
This section discusses how to:
• Secure a case.
• Enable the creation of a case with an anonymous caller.
• Enable the creation of a case that specifies a site as the customer rather than a person or company.
This capability is useful for service calls that must be specified by location rather than by a contactname or billing entity.
• Display the business unit associated with the case.
• Select a quick code.
You can configure a quick code to populate other fields.
• Categorize a case.
The Category, Specialty Type, and Detail fields can affect the way in which the system assignsprovider groups and agents to the case.
• Assign a case.
You can assign a case in many ways. You can configure the system to automatically suggest aprovider group and agent.
• Associate and describe a product for which support is extended.
You can record its placement within a product hierarchy, serial number, where it was purchased, andwhether it is installed.
• Record asset information.
You can track company equipment with identification numbers and track whether the equipment isinstalled.
• Track the reported problem.
You can prioritize and categorize problems by type and severity, create and assign error codes andmessages to attach to the problem, and record the response and outcome.
• Perform an entitlement search.
Copyright © 1988, 2020, Oracle and/or its affiliates. 239

Managing Cases Chapter 11
PeopleSoft call center applications enable you to set up agreements and warranties that govern andtrack a customer's or an employee's entitlement to support. To control the way the system searches foragreements, you can use the configuration options available on the Agreement Search Configurationpage. You can also use the Active Analytics Framework (AAF) to set up automatic agreementsearches.
See "Understanding Agreements and Warranties" (PeopleSoft CRM 9.2: Application Fundamentals ).
• Authorize a credit card.
• Review response times.
You can view the service-level agreement information about expected and actual response and restoretimes. A customer's entitled response and restore time takes a business's hours of operation intoconsideration. The system uses the same logic for holiday schedules. If an agreement is entitled withregular hours of operation but the business is closed on public holidays, the entitlement takes theholiday schedule into account. On the Service Level page, you can use the Holiday Schedule field toselect the holiday schedule that you want associated with the service level. The system provides theholiday schedule by default to the agreement line when the service level is specified.
• Review survey scores.
If you have permission to view the Survey Score field, you can review the scores generated by thesurveys that were sent to customers by email. You can also review the actual survey by clicking alink on the Related Actions page in the Case component after the customer has filled out the survey.This field, however, does not appear on the page unless you enable it on the Display Template - PageDefinition page. You must also sign in as a user with permission to view this field; otherwise, it doesnot appear on the page. You can set up your system so that an agent can send a survey manually toa customer's email address, or you can use AAF to automatically send surveys to customers whenagents close cases. To run and view reports that show survey scores for particular agents or types ofcases, refer to the documentation for your PeopleSoft CRM Online Marketing application.
Actions SectionThe link categories that you or your implementation team set up during installation appear in the Actionssection on the main Case and Summary pages. You can link to pages such as those in the HR database(used in HelpDesk for Human Resources) or the PeopleSoft Campus Solutions application (used inPeopleSoft Service Center for Higher Education), or you can link to related actions, business projects,change requests, and so on.
Using AAF policies or by selecting a quick code, you can configure your system to automatically suggestan action. You also can manually select an action from the Actions section.
Only those link categories and definitions that are associated to a link group—which is associated to adisplay template—appear in the Actions section.
See Link Group Page.
Add a Note SectionThe Add a Note section, which is delivered as hidden, provides a note field on the main Case page. Eachtime users open a particular case, they can only add one note on the Case page. Once a note has beenadded on the Case page, it may be edited there, if desired, until the user exits the case. However, to add
240 Copyright © 1988, 2020, Oracle and/or its affiliates.

Chapter 11 Managing Cases
additional notes without exiting and re-opening the case, the user must use the Notes page. On the Notespage, agents can always add new notes, as well as view and edit existing notes.
Note: To create a note using text tray functionality, you need to be on the Notes page.
See Adding Notes and Attachments.
Incident Address SectionThis section is delivered hidden. If you want to make the Incident Address section visible, modify thedisplay template to enable this section.
In the Incident Address group box, you record information about the location of the incident.
In this group box, you can:
• Enter either a street address or the intersection for the incident.
• Describe additional information about the location using free-form text.
Related LinksBasic Link Setup
Quick CodesYou can use quick codes to populate these fields on the Case page:
• Note (Summary and Description)
• Problem (Summary and Description)
• Case Status
• Case Priority
• Case Impact
• Urgency
• Case Severity
• Provider Group
• Assigned To
• Case Type
• Case Subtype
• Category
• Specialty Type
• Detail
Copyright © 1988, 2020, Oracle and/or its affiliates. 241

Managing Cases Chapter 11
• Error Code
• Error Message
• Interested Parties
• Product ID
• Product Group
• Suggested Action (Link Category, Version, Link Name)
• Solution and solution status
• Name Change
• Location Change
• Early Retirement
Case Information SecurityYou can control the visibility of the Secured check box by using a display template. When an agentdetermines that a case is sensitive, he or she can select the Secured check box in the Case Informationsection of the template to specify that the case should be viewed only by individuals associated with theprovider group on the case.
When a case is marked secured, the agent must specify a provider group before saving the case. Oncethe agent secures the case, it is associated with the provider group. Only agents belonging to the providergroup can access the case. If the agent who created the case is not a member of the provider group, theagent cannot access the secured case.
Note: Security is implemented on specific pages throughout the system. If your organization modifiesthe system to show case summary information on additional pages, you must secure the informationappropriately.
The word Secured is substituted for the case summary on the following pages:
• Case Search.
Secured appears in the Problem Summary field of the search results grid both when accessing a caseand when searching for a case to relate to another case.
Note: The other fields in the search results grid display actual case data; therefore, agents can viewthe case status or the assigned agent without accessing the case. This limited visibility enables evennon-authorized agents to provide limited support when callers inquire about a secure case. The link toaccess the case, however, is disabled for unauthorized users.
• 360-Degree View for authorized and unauthorized cases.
The 360-Degree View page for PeopleSoft HelpDesk for Human Resources and the Constituent 360-Degree View page for Service Center for Higher Education each have two case nodes, one for casesthat cannot be accessed (unauthorized) and one for those that can (authorized).
242 Copyright © 1988, 2020, Oracle and/or its affiliates.

Chapter 11 Managing Cases
Secured appears if the Case node in the action tree is configured to show the case summary. You canalso configure the unauthorized node to show the summary of the secured case. The 360-Degree Viewpage for PeopleSoft HelpDesk for Human Resources and for Service Center for Higher Education isdelivered showing only the case status and count. For 360-Degree Views that are not related to thesetwo applications, secure cases are not hidden or disabled on these pages or sections.
• Related Cases.
• Solution - Related Actions.
• Solution pages.
Secured appears in the search results grid.
• Worklist.
Secured appears if the agent is not in the provider group.
• Email notifications (automated and manual).
The PeopleSoft system does not prohibit users from emailing case information to other users whodon't have access to the case (for example, through the Outbound Notification page). The summarydoes not change for email notifications about secured cases.
Note: When an agent prompts for cases, the system displays only those cases that the agent is authorizedto access. To access a secured case, the agent must be a member of the provider group associated with thecase.
Configuration Issues for Secured CasesTo avoid sending out information about secured cases when you are setting up AAF policies, businessprojects, workflow actions, and email templates, use the Secured Case field (SECURE_CASE_FLG) onthe Case page (RC_CASE) to define record field conditions.
For example, suppose you want to suppress secured cases from being viewed by unauthorized users. Youcan define an event to perform a check for a value equal to N on the SECURE_CASE_FLG field beforedisplaying or distributing case information.
Note: Secured case functionality can be used by any call center application. However, this functionality isdelivered only for PeopleSoft HelpDesk for Human Resources. The secure case flag is part of a conditionto make sure you don't send out secure information. AAF policies do not automatically treat secured casesas special.
Case AssignmentsYou can assign a case to any worker except future-dated workers. The worker to whom a case is assignedis the case owner, even if other agents or specialists are helping the assignee.
You can also assign cases to provider groups rather than to individual agents. Provider groups are pools ofagents with something in common, like agents who support a certain product or work at a particular callcenter.
You can assign cases by:
Copyright © 1988, 2020, Oracle and/or its affiliates. 243

Managing Cases Chapter 11
• Entering the provider group or agent name manually.
• Invoking the assignment engine, which suggests an assignee.
The assignment engine attempts to match the person or provider group with all of the competenciesassociated with the case category, type, or detail, whichever level is appropriate for the case.
Additionally, because you can associate competencies with problem types, the assignment engineattempts to match the person or provider group with the competencies listed for the problem.
You can set up the assignment engine to assign cases to provider groups according to thecompetencies associated with problem types and then to assign cases to agents according to thecompetencies associated with category, type, and detail.
See "Understanding Assignment Searches" (PeopleSoft CRM 9.2: Application Fundamentals ).
Note: Based on how you configure the system, the assignment engine will also uses product,customer, region, and location information.
• Entering a quick code.
You can enter a quick code that is associated with a default assignee (either a provider group or anagent).
• Having the system assign the case at save time.
Auto-assignment options that are configured in the Call Center Business Unit component occuronly if you have not already assigned the case. If you use AAF policies to assign the case, the eventdefinitions determine the conditions under which the assignment occurs.
Assignment NotificationsThe PeopleSoft system delivers call center workflow to send notifications when a case is assigned orreassigned.
If you assign cases to provider groups (without specifying an agent within the group), you can use AAFpolicies to send an assignment notification to the provider group's worklist. Usually, the worklist monitorassigns the worklist item, the case, or both to an individual. The PeopleSoft system is not delivered withthis workflow turned on, however. To use this functionality, you must reset the end date in the AAFpolicy.
Related LinksDefining Call Center Business Units"Understanding Provider Groups and Group Members" (PeopleSoft CRM 9.2: ApplicationFundamentals )"Understanding Assignment Searches" (PeopleSoft CRM 9.2: Application Fundamentals )"Understanding AAF" (PeopleSoft CRM 9.2: Automation and Configuration Tools)
244 Copyright © 1988, 2020, Oracle and/or its affiliates.

Chapter 11 Managing Cases
Case VisibilityTo prevent employees from viewing sensitive case information (for example, grievances) through theHelpDesk self-service applications, the PeopleSoft system includes a value called Internal, exclude CaseContact in the Visibility drop-down list box on the main Case page.
When a user selects Internal, exclude Case Contact, the employee who is the subject of the case is unableto view the case through the HelpDesk self-service application.
The person who reported the case (Reported By) can view it in the self-service application if the case isnot secured. When a case is secured, the Reported By person will no longer be able to view the case in theself-service application.
When an agent selects the Internal, exclude Case Contact visibility value and clicks the Notificationbutton, the system displays a warning message to the agent that the employee does not have visibility tothis case. In this situation, you would not want to send a notification to the employee.
The system does not display the employee name and email address in the Recipients grid on the OutboundNotification page.
The Case Contact role query has been modified so that it won’t return the case contact when the agentselects the Internal, exclude Case Contact visibility value. This modification prevents the agent fromsending a notification to the employee in question.
To update a secured case when the visibility is Internal, exclude Case Contact, the PeopleSoft system hasa new policy called Case Visibility Changed.
When a case is secured, an agent that does not belong to the provider group can’t open the case. Thissafeguard prevents the agent from opening the case from the 360-Degree View page and discussing itwith the employee in question.
Note: This feature is only applicable to PeopleSoft HelpDesk and HelpDesk for Human Resources.
Case ClosureThe Case Status field on the Case page shows where the case is in its life cycle. You close a case byselecting the appropriate status in the Case Status field.
Case status values vary by implementation, but all case statuses fall into one of these categories:
• Open
• Closed
• On Hold
• Canceled
These processing rules are based on the case status categories:
• Your business unit settings determine whether you can reopen canceled or closed cases.
You can also set up the Call Center Definition - Case Defaults page to change the status automaticallywhen an agent obtains a successful resolution.
Copyright © 1988, 2020, Oracle and/or its affiliates. 245

Managing Cases Chapter 11
See Understanding Call Center Business UnitsUnderstanding Display Templates.
• When you close a case, the current date and time are entered in the Closed Date field; if you reopenthe case, the Closed Date field is cleared.
• If a case is associated with a solvable action, you can close the case by selecting the action.
• You cannot close a case until it has either a resolution associated with it or a solvable actionassociated with it.
You can set up your system to prevent the closing of cases unless there is a business project associatedwith the case. To do this, however, the business project related action must be marked as solvable onthe Link Definition page. If the business project is marked as solvable and it is associated with thecase, the business project doesn't need to be closed before you can close the case.
• You can set up the system at the business unit level to allow cases to be resolved after sendingoutbound notifications from them.
When this option is selected, the Send and Solve toolbar button appears on the Outbound Notificationpage. When the user finishes composing the message and clicks the button, the system sends thenotification out to recipients and solves the associated case transaction by setting its status to thepredefined resolved case status (for example, Closed - Resolved).
If the outbound notification requires approval from a supervisor, the system resolves the associatedcase upon receipt of the approval from the supervisor.
See Business Unit - Options Page.
When cascading statuses through related cases, these rules also apply:
• Changing the parent case's status changes the status of all child cases unless:
• The child case is associated with an open case.
• The child case is in a closed or canceled status that is not the same as the parent's original status.
• You can close a case using more than one resolution.
• Closing a parent case cascades the successful solution to the child cases that are associated with theparent case.
• Reopening a parent case changes the successful solutions in the child cases to failed solutions.
• When a case is closed, it becomes read-only except for the Case Notes and Resolution Status fields.
This flexibility accommodates instances for which multiple resolutions can close a case for thatbusiness unit.
Note: A solvable action will not cascade to the other cases, but a successful resolution will.
Related LinksUnderstanding Call Center Business UnitsUnderstanding Display Templates
246 Copyright © 1988, 2020, Oracle and/or its affiliates.

Chapter 11 Managing Cases
"Understanding Case, Service Order, and Defect Resolution" (PeopleSoft CRM 9.2: Services Foundation)"Understanding Entitlement Searches" (PeopleSoft CRM 9.2: Application Fundamentals )
Case Toolbar FunctionsThe toolbar at the top of all of the pages in the Case component provides access to several commonactivities. The toolbar is configurable; these activities are available only if the toolbar is active.
See "Understanding the Configurable Toolbar" (PeopleSoft CRM 9.2: Automation and ConfigurationTools).
The PeopleSoft system delivers configurable toolbar definitions, one for each application.
Common Call Center Toolbar ButtonsThe configurable toolbar in all call center applications contains these buttons:
• Spell Check
• 360-Degree View
• 360-Degree Search
• Text Tray
• Notification
• Time Entry
• Search
• Next
• Add
• Update
• Clone Case
• Correspondence
Additional Toolbar Buttons for PeopleSoft SupportIn addition to the common buttons, the toolbar for PeopleSoft Support contains these buttons:
• Upsell
• Order
• Map Dashboard
• CTI Dialout
Copyright © 1988, 2020, Oracle and/or its affiliates. 247

Managing Cases Chapter 11
If customers implement their own CTI switch, they need to implement a new Javascript functionthat is specific to the CTI switch. PeopleSoft CRM delivers a Javascript function that works with thedelivered CTI definitions, so when an agent clicks the button, an outbound call is made for the phonenumber listed on the case. If customers have a specific CTI switch implementation, they must add anew Javascript function for the implementation (the Javascript function file should be located in the<PS_HOME>/cs/ps/pCti directory) and register it in the CTI component of the CRM system.
See "Setting Up CTI System Definitions" (PeopleSoft CRM 9.2: Multichannel Applications).
• Get Offer/Promotions
Note: You must use PeopleSoft's AAF functionality to activate the Get Offer/Promotions button; thisfunctionality is not delivered. When AAF policy conditions are met, the existing Upsell Configuration onCase action displays the Get Offers icon on the Case toolbar. This action is modifiable to present the GetOffers/Promotions button based on rules that are evaluated by the existence of a third-party optimizationengine. Agents can also initiate branch scripts associated with the offer for scripted selling.
See "Understanding AAF" (PeopleSoft CRM 9.2: Automation and Configuration Tools).
See Understanding Link Setup.
Additional Toolbar Buttons for PeopleSoft HelpDeskIn addition to the common buttons, the toolbar for PeopleSoft HelpDesk contains these buttons:
• Asset Discovery
Provided that system and data integration has been accomplished, this button launches an assetmanagement application, which passes the desired asset information to the application for reporting.
You can also launch asset discoveries from the:
• 360-degree view of an employee.
• Case toolbar.
• Remote Control
The Remote Control button launches a third-party remote control process that enables an IT agent to:
• Remotely query for data from an installed product or asset.
• Run a process to remotely take control of an employee’s computer to resolve a problem.
See Integrating with Third-Party Asset Management Applications.
Additional Toolbar Buttons for PeopleSoft Service Center for Higher EducationIn addition to the common buttons, the toolbar for PeopleSoft Service Center for Higher Education maycontain these buttons (depending on whether the user has accessed an IT, non-IT, or blended case):
• Upsell Opportunity Alert
• Order
248 Copyright © 1988, 2020, Oracle and/or its affiliates.

Chapter 11 Managing Cases
• Map Dashboard
• CTI Dialout
If customers implement their own CTI switch, they need to implement a new Javascript functionthat is specific to the CTI switch. PeopleSoft CRM delivers a Javascript function that works with thedelivered CTI definitions, so when an agent clicks the button, an outbound call is made for the phonenumber listed on the case. If customers have a specific CTI switch implementation, they must add anew Javascript function for the implementation (the Javascript function file should be located in the<PS_HOME>/cs/ps/pCti directory) and register it in the CTI component of the CRM system.
See "Setting Up CTI System Definitions" (PeopleSoft CRM 9.2: Multichannel Applications).
• Asset Summary
• Remote Control
The Remote Control button launches a third-party remote control process that enables an IT agent to:
• Remotely query for data from an installed product or asset.
• Run a process to remotely take control of an employee’s computer to resolve a problem.
NotificationsThe Notification toolbar button provides convenient access to case-related communication and worklisttasks. Clicking this button:
• Launches the Outbound Notification page for users to compose and send email and worklistnotifications.
• Launches the email workspace for users to respond to existing email messages that are associated withthe case. Email workspace can be used for sending new adhoc emails based on system setup.
This function is available with the installation of Multichannel Communications.
Time TrackingWhen you create a new case, the system creates a time record for the case. For the system to do this, youmust first set up autonumbering for time records.
Important! Because the system creates a time record for every case, you must set up autonumbering fortime records even if you don't track the time that you spend working on cases.
To track the time that you spend working on a case, click the Track Time button in the case toolbar toaccess the Manage Time page.
Use the Manage Time page to record the start and end times for each block of time that you work on thecase. Unless the case is resolved during the first call, separate time records will exist for the differentblocks of time spent working on the case. Every person who works on a case needs to record timeseparately.
The time entry record is created the first time that the case is saved in the agent-facing component. Forcases created elsewhere (for example, cases created in self-service, through cloning, or through relatedcase functionality), the system does not create the time record until the case is accessed and saved in the
Copyright © 1988, 2020, Oracle and/or its affiliates. 249

Managing Cases Chapter 11
agent-facing component. If a user clicks the Track Time button for a case that does not yet have a timerecord, the system prompts the user to save the case first.
When you add a new row to the time record, the system enters the name of the currently assigned agentto that row. If your name does not appear as the currently assigned agent, change this value to your ownname.
The system enters the current date and time as the start time. These default values are helpful for agentswho create the time record when they start working on a case and then return to the time record later toenter the end time. If you create the record at the end of a block of time when you've worked on the case,you must override the default start time.
Note: If an existing case has time recorded, and an agent subsequently changes the Business Unit on thecase, the existing time entries will be updated to the new Business Unit.
Upsell OpportunitiesThis functionality is available only in PeopleSoft Support and PeopleSoft Service Center for HigherEducation.
If a caller reports a problem with an old or superseded product, you might want to recommend that thecaller upgrade to a newer product. A flashing button, which appears on the toolbar on the Case page,alerts agents to a potential upsell opportunity.
The flashing button is triggered based on conditions set up in an AAF policy. For example, you cantrigger the upsell toolbar button to flash when a customer is identified or when a product is selected andthe case has a specified priority.
The Branch Script tool is used to recommend a product to upsell. Branch scripts are associated withspecific products. Clicking the button launches a branch script and adds it to the list of related actions forthe case.
Note: You can also control how the toolbar buttons behave using AAF policies.
See "Action Configuration Page" (PeopleSoft CRM 9.2: Automation and Configuration Tools).
See "Understanding AAF" (PeopleSoft CRM 9.2: Automation and Configuration Tools).
From the Actions section on the Case page or from the Related Actions page, you can transfer directlyto the Order Capture page. Whenever possible, the system maps branch script answers to correspondingfields on the Order Capture page. This mapping is accomplished using variables associated with thebranch script. For example, the system maps the Product field (if it appears) to the Order Capture page.
Text TraysCall center agents can use text trays and quick keys to auto-fill static and dynamic data, reply to emails,create text for ad hoc notifications or emails, or create notes about a case.
You can use both public and personal quick keys in text tray-enabled text fields within transaction pages.You can also create and maintain your own set of personal quick keys.
Administrators and implementers can manage and create public quick keys. They can create two types ofquick keys:
250 Copyright © 1988, 2020, Oracle and/or its affiliates.

Chapter 11 Managing Cases
• Dynamic quick keys are comprised of static text and a dynamic token, which pulls the value from thedatabase.
• Static quick key always resolve to straight text.
You can create quick key categories and edit existing and delivered categories, edit existing quick keys,group quick keys into categories, and determine the key sequence for hot keys.
You can use the Quick Code functionality to auto-populate these fields in PeopleSoft Support, HelpDesk,and HelpDesk for Human Resources:
• Problem - Description field on the Case page.
• Details field on the Notes page.
For example, you can have a quick code that automatically fills out the case and inserts text into theProblem - Description field. Included in this text could be the #123 quick key code, which would resolveto text through the Text Tray functionality.
See Quick Code Page.
See "Understanding the Text Tray" (PeopleSoft CRM 9.2: Automation and Configuration Tools).
Toolbar FunctionsAccess the Case page in PeopleSoft Support, HelpDesk, HelpDesk for Human Resources, or ServiceCenter for Higher Education. The toolbar at the top of the Case page and all pages in the Case componentinclude a row with buttons and a time zone control.
The toolbar configuration controls which buttons appear. As delivered, the button row in the toolbardisplays some or all page elements. Page elements that are common across all applications aredocumented in Automation and Configuration Tools.
See "Understanding the Configurable Toolbar" (PeopleSoft CRM 9.2: Automation and ConfigurationTools).
Click the Print button to launch a separate browser window thatyou can use to print case information and change print options.
Click the Time Entry button to access the Manage Time page, where you can track the time that you spent working on thecase. You are prompted to save the case before you access theManage Time page. This button appears only after an agentsaves the case for the first time.
Click the Text Tray button to launch the Text Tray page, whereyou can select a quick key that will automatically enter pre-written text into the Description field on the Case page and theDetail field on the Notes page in the Case component.
Click the Update button to access the Case Search page in Findan Existing Case mode.
Copyright © 1988, 2020, Oracle and/or its affiliates. 251

Managing Cases Chapter 11
Note: The Configurable Search Setup pages determine whatresult set (if any) appears when you click the Update Casebutton.
See "Configuring Searches" (PeopleSoft CRM 9.2: Automationand Configuration Tools).
Click the Clone Case button to create a new case with the samecaller information and problem information as the existingcase. The system creates the new case and displays a messageproviding the new case number. After you click OK in themessage dialog box, the system displays the new case in a newbrowser window.
Agreements, warranties, solutions, notes and attachments, casehistory, related cases, related actions, and interested parties arenot copied to the new case, and the Resolved by First Contactcheck box is always clear in the new case.
Click the Order Capture button to access the Entry Form pagein the Order Capture component. The system automaticallypopulates the customer and product data on the Entry Formpage.
Click the Upsell button to run the upsell script. This buttonappears only if an upsell script is associated with the productand if other business unit-specific upsell criteria are met. Thisicon changes to a coin based on the base currency.
The upsell functionality is specific to PeopleSoft Support.
Click the Asset Summary button to launch an asset managementapplication, which passes the desired asset information to theapplication for reporting.
Click the Remote Control button to launch a remote controlprocess that enables an IT agent to remotely query for data froman installed product or asset or to run a process to remotely takecontrol of an employee’s computer.
Click the CTI Dialout button to launch the Outbound Call pageto enable a user to direct the CTI console to dial a telephonenumber displayed on that page. Outbound calling works onlywhen the CTI console is enabled and the user has registeredwith the CTI vendor.
Click the View Worklist button to launch the My Worklist page. The agent uses the Worklist page to efficiently manage personalwork tasks and responsibilities.
Note: You must set up this button on the Toolbar Definitionspages during setup.
252 Copyright © 1988, 2020, Oracle and/or its affiliates.

Chapter 11 Managing Cases
See "Understanding the Configurable Toolbar" (PeopleSoftCRM 9.2: Automation and Configuration Tools).
History Select a value and click the green arrow to return to the selectedpage. This field appears if you access the Case page through apage other than the Case Search page.
Current user time Displays the time that you opened the component. This field isinformational only; it is not saved with the case.
Time zone Select the time zone in which to display the times on the page. Values are:
My Time Zone: The current user's local time zone.
Customer (PeopleSoft Support only): The time zone that isassociated with the caller.
Employee (PeopleSoft HelpDesk and HelpDesk for HumanResources only): The time zone that is associated with the caller.
Assigned: The time zone of the agent who is currently assignedto the case.
Previously Assigned: The time zone of the agent who waspreviously assigned to the case.
Related LinksReviewing Case History"Understanding Manual Notifications" (PeopleSoft CRM 9.2: Automation and Configuration Tools)"Understanding the Configurable Toolbar" (PeopleSoft CRM 9.2: Automation and Configuration Tools)
Background ProcessingThis section discusses case processing that is transparent to the end user.
Active Analytics Framework (AAF)PeopleSoft AAF is a suite of tools comprising a closed-loop decision-making system where you canaddress specific business issues. Applications can respond when certain conditions are met and certainactions are recommended.
Actions include giving a priority service or a better discount for high-value customers, identifyingfraudulent transactions, and displaying alerts and warning messages.
At runtime, applications send requests to the AAF decision engine to evaluate all of the policiespertaining to a trigger point. For policies whose conditions are evaluated as true, the system invokes theirassociated actions.
Your organization can set up AAF policies to trigger various actions under specified conditions. The AAFdecision engine can perform several actions that are transparent to the person who triggers the action.
AAF policies can:
Copyright © 1988, 2020, Oracle and/or its affiliates. 253

Managing Cases Chapter 11
• Send general-purpose notifications.
• Send notifications related to entitlements.
Agreement lines provide customers with specific entitlements such as guaranteed response times andrecovery times. Each entitlement can be associated with a workflow rule that sends a notification at apredetermined time. Typically, the notification informs you of an impending deadline.
• Track consumption of prepaid cases under an agreement line that covers a specific number of prepaidcases (PeopleSoft Support only).
• Cascade the case status and resolution information to child cases.
• Send notifications to agents and managers when a case is escalated.
When a user clicks the Escalate Case button on the Case page, the system displays a message. If theuser clicks OK, the system saves the case and sets off one of these trigger points in AAF: When aSupport Case is Escalated or When a Help Desk Case is Escalated.
The AAF decision engine also triggers these actions, whose effects are visible in the case where they aretriggered:
• Suggest an action.
• Display alert messages as well as cross-sell and upsell notifications.
• Recommend a solution or a product in an upsell or cross-sell situation.
• Log entries in the Events tab of the Case History page.
• Log entries in the Events tab of the Product History page of an installed product, service, or asset.
• Log entries in the Events tab of the Change Request History page.
• Instantiate a business project.
• Update information on a Case page.
• Display a new page from a link (not available for self-service cases.)
• Display the Upsell button in the toolbar.
• Set the display template ID.
See "Understanding AAF" (PeopleSoft CRM 9.2: Automation and Configuration Tools).
InteractionsInteractions are records of communication between you and your customers. Interactions can be relatedto transactional objects such as cases, service orders, and so on. Related transactions are consideredsubinteractions.
You don't need to set up workflow to capture interactions. The system captures them automatically basedon certain actions that you perform.
The system records inbound interactions for a case when:
254 Copyright © 1988, 2020, Oracle and/or its affiliates.

Chapter 11 Managing Cases
• You create or access a case from the 360-Degree View page.
• You create or access a case through the CTI system.
• A customer or employee uses self-service pages to access, update, or add a case.
The system records outbound interactions for a case when:
• You create correspondence for a case.
Note: When an agent sends an email from a case to an employee, the system creates an interactiononly if the employee is the customer, contact, or alternate contact for the case.
• You create notifications for a case.
Related Links"Understanding AAF" (PeopleSoft CRM 9.2: Automation and Configuration Tools)
Managing Basic Case Information
This topic discusses how to manage basic case information.
Note: The information that is available on the Case page is conditional and is based on the template thatyou or your implementation team have assigned to the business unit.
Pages Used to Manage Basic Case InformationPage Name Definition Name Usage
Case Page RC_CASE Add and manage PeopleSoft Support, HelpDesk, HelpDesk for HumanResources, and Service Center forHigher Education cases.
You can also access the Case pagein PeopleSoft Support, HelpDesk, HelpDesk for Human Resources, andService Center for Higher Educationfrom the 360-Degree View page byselecting Add Case from the Actionsdrop-down list box.
Match Results Page RC_MATCH_RSLT_SEC View a list of matching cases basedon the Case Match Definition. Whereappropriate, select a related case fromthe match results set. When selected, thecase will appear in the Related Casesgrid.
Copyright © 1988, 2020, Oracle and/or its affiliates. 255

Managing Cases Chapter 11
Page Name Definition Name Usage
Outbound Notification Page RB_EM_OB_NOTIFY Send a manual notification.
If you have purchased PeopleSoftERMS, you can use the Notificationbutton on the toolbar to compose newemail messages using the OutboundNotification component or respond toexisting email using Email Workspace.
The system automatically populates thecontact and interested parties of the casein the recipient list on the OutboundNotification page.
Installed Product Viewable HierarchyPage
RF_INSTPROD_VH_SEC View the installed products that meetthe criteria available on the Case page. For the installed products that thesystem returns, the page displays parent, child, and sibling relationships to otherinstalled products.
Entitlement Match Page RF_ENTL_LIST_SEC Select from a list of warranties oragreement lines that may cover the case.
Entitlement Details Page RF_VIEW_ENTL_SEC View the entitlements associated with acase. This link is available after an agentselects an agreement line or a warranty.
Provider Group Summary Page RF_ASSIGN_PG_SEC Select a provider group from the searchresult that can be assigned to the case. Groups are ranked by their fit score, an evaluation of how well each groupmatched the case criteria.
Candidate Summary Page RF_ASSIGN_LIST_SEC Select a worker from the search resultthat can be assigned to the case. Candidates are ranked by their fit score,an evaluation of how well each candidatematched the case criteria.
Case PageUse the Case page (RC_CASE) to add and manage PeopleSoft Support, HelpDesk, HelpDesk for HumanResources, and Service Center for Higher Education cases.
You can also access the Case page in PeopleSoft Support, HelpDesk, HelpDesk for Human Resources,and Service Center for Higher Education from the 360-Degree View page by selecting Add Case from theActions drop-down list box.
256 Copyright © 1988, 2020, Oracle and/or its affiliates.

Chapter 11 Managing Cases
Navigation
• Support > Add Case > Case
• Support > Search Cases > Case
• HelpDesk > Add Case > Case
• HelpDesk > Search Cases > Case
• HR HelpDesk > Add Case > Case
• HR HelpDesk > Search Cases > Case
• Analyst Service Center > Add Case > Case
• Analyst Service Center > Search Cases > Case
Image: Case Page
This example illustrates the fields and controls on the Case Page.
Copyright © 1988, 2020, Oracle and/or its affiliates. 257

Managing Cases Chapter 11
Customer InformationIn PeopleSoft Support cases, this group box displays information about the customer who reported theproblem. In HelpDesk and HelpDesk for Human Resources cases, this group box displays employeeinformation. In Service Center for Higher Education, this group box displays a combination of these typesof information, since such a case can be created for a company contact, consumer, or employee.
Select the Show Details link to see more information about the customer.
Note: The visibility of fields in this section depends on the Business Object Search setup, the displaytemplate that is used, and how you modify the display template.
These fields are used by PeopleSoft Support:
Customer Displays the customer (company or consumer) who reported thecase.
Contact Displays the contact person for this case. If the customer isa company, this is a person acting on the company's behalf. If the customer is a consumer, this is someone acting on theconsumer's behalf.
Note: The contact must have a currently active relationship withthe company to be valid.
If a consumer does not have a contact, this field is blank onthe Case page. However, the search results grid on the CaseSearch page shows the consumer name in both the customer andcontact columns.
Contact Method and Edit Click Edit to enter the preferred method for contacting thecaller.
Reported By Select the person who is reporting the problem.
Site Displays the customer site that is associated with the case. Initially, the system uses the contact's site (for this customer)as the default value. If this site doesn't exist or isn't unique, thesystem uses the customer's site (if unique) as the default value. The site is validated against the SIN and the Installed Productfields for the case. If you select a SIN or a product, the systementers the site that is associated with that SIN or product. If youselect a site for which the current SIN or product is invalid, thesystem clears the SIN or product information.
SIN (site identification number) Displays the site identification number (SIN), which isgenerated for each valid site on an agreement line when theagreement line is created. The SIN identifies the agreementline, the site, and the customer, but not the contact. If you entera SIN, you cannot also enter a PIN (personal identificationnumber).
258 Copyright © 1988, 2020, Oracle and/or its affiliates.

Chapter 11 Managing Cases
When you select a SIN, the system enters the associated site inthe Site field. If the product is not valid for the SIN, the systemclears the Product field.
PIN (personal identification number) Enter a PIN to identify a customer, a representative, and anagreement.
Region Displays the region that is associated with the default address.
Customer Reference Enter the reference number provided by the customer, ifavailable. This number is used for the customer's internaltracking purposes.
Employee InformationAccess the Employee Information section on the Case page in PeopleSoft HelpDesk for HumanResources.
In PeopleSoft HelpDesk cases, the Employee Information group box displays information about theemployee who reported the problem.
If you enter information in this section to look up an employee for the case but the system cannot identifyan exact match, a search page appears and you can select to create either worker or POI using the quickcreate function. If the search yields multiple matches, you can pick one from the search results or create anew one if deemed necessary.
Note: The visibility of the fields in this section is dependent on the display template that is used andhow you modify the display template. If an agent has access to view secured data, the system displaysinformation for the Contact Method, Edit, Phone, Email, Address, Status, and Gender fields. Securedworker information is home phone number, home email address, and home address. If the agent does nothave access to view secured data, the system hides the data for these fields and the agent can only viewdata that is not secured.
These fields are used by PeopleSoft HelpDesk and HelpDesk for Human Resources:
Employee Displays the worker who is experiencing the problem.
Click the name of the person to go to the Worker page, whereyou can change or add address, phone, and email details for thecontact.
Note: When you search for an employee, you can use theEmployee ID, First Name, and Last Name as search fields. The Employee ID field uses the equals (=) operator. The othertwo fields use the Begins With operator. The operators are notdisplayed, so they aren't obvious to the user. You can, however, configure and change the default operator.
See "Adding and Modifying BO Search and Quick CreateDefinitions" (PeopleSoft CRM 9.2: Business ObjectManagement).
Copyright © 1988, 2020, Oracle and/or its affiliates. 259

Managing Cases Chapter 11
National ID Displays the ID number by which a person is identifiednationally. In the U.S., it is the social security number. This fieldappears in PeopleSoft HelpDesk for Human Resources casesonly.
Alternate Contact Select an alternate contact for a case; for example, an officemanager who handles calls for other employees.
Contact Method and Edit Click Edit to enter the preferred method for contacting thecaller.
Reported By Select the person who is reporting the problem.
In cases that are crated for Higher Education, any individualmay be selected for the Reported By field.
In HelpDesk applications, existing agent-facing cases displaythe manager or employee who reported the problem and theemployee name for whom the case was opened in the Employeefield.
In the case of the HR for HelpDesk application, you canalso select POIs to report cases on behalf of employees. Forexample, a wife can log a case to ask about her husband’sbenefits plan coverage. If the search doesn’t return the desiredreported by person, you can create a new worker or POI on thesearch page using the quick create functionality.
Department, Location, Address, and Employee Status
Displays information about the worker who is experiencing theproblem.
Note: In the HelpDesk for Human Resources application, theDepartment and Location fields are display-only. You cannotchange the values that the system displays in these fields. In theHelpDesk application, which is customized for IT departments, you can edit the values in the Department and Location fields. The system provides values for the Department and Locationfields by default based on the worker information, providedthe setID specified for these fields in the worker componentmatches the setID specified for the appropriate record group forthe Case business unit.
Gender Displays the person's gender, if known. This field appears inPeopleSoft HelpDesk for Human Resources cases only.
Contact MethodClick the Edit link to edit a person's preferred method of contact. A secondary page appears.
Contact Type Select the address, email, or phone number that you want to useon the Case page.
To enter additional contact information that is not in the system, use the drop-down list box.
260 Copyright © 1988, 2020, Oracle and/or its affiliates.

Chapter 11 Managing Cases
For example, suppose that you need to contact the caller at ahotel phone number. You can enter the phone number here andavoid adding the hotel phone number to the caller's permanentrecord.
Contact Details Enter contact information for the contact.
Type Displays the contact type for existing contact methodsassociated with this person. If adding a temporary new contactmethod, the field value defaults to For This Case Only.
Note that any emails initiated from a case by AAF will use the contact method associated with therecipient's role, regardless of whether the case has an email contact method with the type For This CaseOnly.
Academic Information SectionAccess the Academic Information section on the Case page in PeopleSoft Service Center for HigherEducation.
After identifying a constituent for a case in PeopleSoft Service Center for Higher Education, an agent willbe able to view a display-only summary of the constituent's academic information.
Institution The academic institution associated with constituent.
Career The academic career of the constituent.
Lifecycle Status The program status ( not including recruiting status) of theconstituent. If the constituent is only a suspect or prospect, thisfield and the other fields below it will be blank.
Start Date The start date for the specified combination of institution, career, program, and plan.
Program The academic program associated with the constituent.
Plan The plan within the specified program with which theconstituent is associated.
Sub Plan The sub plan within the specified program and plan with whichthe constituent is associated.
Main Global Case Select this check box to identify the case as a Global Case.
Quick Code Select a quick code. Depending on your business rules, thequick code you select automatically populates other fields orsuggests an action. If the quick code is associated with a displaytemplate ID, selecting that quick code will cause the casecomponent to be shown using the associated display templateID.
Copyright © 1988, 2020, Oracle and/or its affiliates. 261

Managing Cases Chapter 11
Note: Cases retain the display template ID with which theywere originally created. Therefore subsequent views of the casewill be shown using the original display template for that case, not the display template associated with the quick code.
Case Type Select the case type that best describes the part of yourorganization that is responsible for the problem. For example, a case can be a documentation issue, a service request, or apossible product defect.
Case Subtype Select the case subtype that best describes the kind of case typeselected.
Case Status Select the overall status of the case. Use the different statuses totrack the progression of the case. You define specific statuses foryour organization.
Provider Group Select the provider group to which you want to assign the case. For new cases, the default provider group (if any) depends onyour business unit configuration.
When a Product Group is specified on a case, the system filtersthe values for product and installed product to only display theproducts and installed products contained within the specifiedproduct group.
See Understanding Call Center Business UnitsandUnderstanding Display Templates.
Click the Suggest a Provider Group button to generate a list ofsuggested provider groups on the Provider Group Summarypage. Select one of the suggested provider groups.
Assigned To Select an agent who belongs to the selected provider group. Fornew cases, the default assignee depends on your business unitconfiguration.
You cannot select an agent without first selecting a providergroup. The only time that a case is assigned to an agent and nota provider group is when the default assignee is the agent whocreated the case.
See "Understanding Assignment Searches" (PeopleSoft CRM9.2: Application Fundamentals ).
Click the Suggest an Agent button to generate a ranked list ofqualified, available agents on the Candidate List page, whereyou can select one of the suggested agents.
You must select a provider group before you can generate acandidate list.
Product Group Select the product group that requires support.
262 Copyright © 1988, 2020, Oracle and/or its affiliates.

Chapter 11 Managing Cases
This field is enabled when you first install your PeopleSoftSupport application. It is applicable for all the verticals exceptHelpDesk for Human Resources and Government.
Product Select the product that requires support.
Note: The system displays a list of products based on the optionthat you selected for the Product Prompt field on the BusinessUnit - Options page. If you selected All, you can select a productfrom the master products table. If you selected FSI and you haveFSI installed, you can select an FSI-related product from themaster FSI products table. If you selected Installed, you canselect from a list of products that are installed at a specific site.
When you select an installed product, the system enters theassociated site in the Site field, and, if the current SIN is notvalid for the product, clears the SIN field.
To define a new installed product for this customer, click theTransfer button to access the Installed Products component.
Description Enter a complete description of the problem that the caller isreporting. If you do not enter a description, the system copiesthe value of the Summary field into this field.
Problem Type Select an aspect of the product for which a call center agentmight be qualified to resolve the problem. This field is relatedto the Product field. You must first select a product before thesystem displays problem type values that you can select.
If the Product field is blank, no values are available. If you usethe system's auto-assignment feature, the assignment engineemploys the competencies associated with the problem typeto help identify the agents who are most qualified to solve theproblem.
Serial Number Enter the serial number of the product that requires supportor servicing. If you have selected a product, the system entersthe serial number for that product. If you have not selected aproduct, selecting a serial number enters both the product andthe serial number.
If you enter a serial number directly into the Serial Number fieldwhen you first access the Case page for PeopleSoft Support andHelpDesk, the system automatically populates the Customer, Contact, Site, and Product fields on the Case page.
Asset Tag Click to display the Search Installed Assets page, where you canlook for installed assets by employee, department, and location.
To display this field on the Case page, access the DisplayTemplate page to select the check box for the Asset Tag field.
Copyright © 1988, 2020, Oracle and/or its affiliates. 263

Managing Cases Chapter 11
Installed If the product that you select is registered to the employee, consumer, or customer on the Installed Products page, itdisplays here (PeopleSoft Support and HelpDesk only).
Select Agreement or Warranty Click to search for warranties and agreement lines that mightcover the case. This link is available only for open cases that arenot already associated with existing agreements or warranties.
Warranties are associated with installed products and are, therefore, found only in the PeopleSoft Support applicationand only if you've specified an installed product with a validwarranty.
If the entitlement search returns more than one match, thesystem displays the results on the Entitlement Match page. From there, you can select a warranty or agreement line, viewwarranty or agreement line details, and associate a warranty oragreement line with the case.
The system returns agreement lines as search results inentitlement searches for either a product or an installed product. The search attempts to locate either a product or an installedproduct on the agreement line that matches the product orinstalled product on the case.
A warranty is returned in an entitlement search only if aninstalled product is supplied. If the entitlement search finds onlyone valid warranty or agreement line, the system bypasses theEntitlement Match page and displays the warranty or agreementline that was found on the case.
Once you have selected an agreement line or warranty andsaved the case, the system replaces this link with a link to accessentitlement details of the selected agreement line or warranty, and a link to clear the current selection on the Case page. Inaddition, values of these fields are no longer available for edits:
• (PeopleSoft Support) Customer, Contact, Business Unit, PIN, SIN, Site, Product Group, Product, Problem Type, andSerial Number.
• (PeopleSoft IT HelpDesk) Employee, Business Unit, Product Group, Product, and Asset Tag.
• (PeopleSoft HR HelpDesk) Employee and Business Unit.
• (PeopleSoft Higher Education) Customer, Product Group, Product, and Business Unit.
264 Copyright © 1988, 2020, Oracle and/or its affiliates.

Chapter 11 Managing Cases
Note: Once the page is saved, you can't modify an agreementline without special administrative-level permission. If youmodify the entitlements of an agreement after the agreementis already selected on the case, the new entitlements don't takeeffect. The PeopleSoft system provides an Application Engineprogram (RF_AGR_LEAD) to verify the entitlements that arealready scheduled at the time the agreement is selected. SelectCustomer Contracts CRM > Agreements > Lead Generation >Sales Lead Generation for Agreement Renewal.
Credit Authorization This link initiates a search of the customer's billing records fora flag indicating whether to accept the customer's payment bycredit card.
Priority Select the priority that classifies the case according to its effecton the caller's ability to continue operations. A problem thatstops mission-critical activities has a higher priority than aproblem that has a workaround or that inconveniences someone.
Urgency Select the urgency of the case. As delivered, this field is visibleon HelpDesk (but not Support) cases, though this may bechanged by your system administrator.
Severity Select the severity of the case according to its reproducibility.
View Product Hierarchy Click the View Product Hierarchy button to view the installedproduct records that meet the caller and product criteria alreadyentered on the Case page. The system displays the parent, child, and sibling relationships for the selected installed productrecords on the Installed Product Viewable Hierarchy page.
In PeopleSoft Support cases, the search is based on thecustomer, site, product, and serial number that have beenentered.
In PeopleSoft HelpDesk cases, the search is based on theworker, department, product, and asset tag that have beenentered.
More View Mode Use this field to manually change the display template that
controls the appearance of the information that appears on thepage.
Note: This field is delivered as hidden. If you want it to appearon the page, you must select it on the Display Template - PageDefinition page.
When you change a display template (using AAF or manually)the system re-renders the entire page, including the toolbar, related actions, and various group boxes that appear on thepages within the Case component.
Copyright © 1988, 2020, Oracle and/or its affiliates. 265

Managing Cases Chapter 11
The View Mode field displays all the display templates forthe component, display template family, and selected businessunit. The system obtains the list of display templates from theCall Center Definition - Display Templates page. When anagent changes the business unit on the Case page, the systemrepopulates the display template values that appear in the drop-down list box for the View Mode field.
Warning! The display template that an agent selects using theView Mode field is temporary. This information is not stored inthe Case record. Therefore, if an agent selects a display templatethat is not the default display template and then saves the caseand comes back to it, the system displays the Case page with thedefault display template, not the one that the agent last used toview the case.
Business Unit Displays the business unit that is associated with the case. Business units also control prompting for many other fieldsin the case. The system displays values that are valid forthe business unit only. When you change the business unit, the values in this field are those for which the appropriatevertical (PeopleSoft Support or HelpDesk) is established. Thesystem confirms that these conditions are met before the case istransferred to the business unit that you select:
• The case has no related actions or related cases.
• The current and new business units reference the samesetup data (that is, they use the same setID) for theserecord groups: FS_18 (items), RB_01 (customers), RF_07 (agreements and warranties), and RC_02 through RC_09 (case attributes and AAF).
Visibility Select the visibility of the case. The options are Internal, External,and Internal, exclude Case Contact.
Select the Internal, exclude Case Contact option to prevent self-service users from viewing the case through the self-serviceapplication.
Resolved by First Contact Select to indicate that the agent resolved the case on the firstcontact with the customer or employee.
Source Select the communication channel used by the person whooriginally reported the problem. For example, a person canreport a case by telephone, email, or a self-service web page. A case can also be created as a result of a personal data recordchange in the HCM system.
Impact Select from the drop-down list box a value that describes theeffect that the problem has on the business processes of theorganization.
266 Copyright © 1988, 2020, Oracle and/or its affiliates.

Chapter 11 Managing Cases
Asset Tag Select the asset tag of the installed product that requires supportin PeopleSoft HelpDesk. If you entered a product, values arelimited to asset tags for the specified product. If you have notentered a product, selecting an asset tag enters both the productand the asset tag.
Installed Displays Yes or No in PeopleSoft Support and HelpDesk if theproduct that you select is registered to the employee, consumer, or customer on the Installed Products page.
Summary Enter a summary of the problem that the caller is reporting. Thisfield is required. If you do not enter a value, the system uses thefirst 80 characters of the Description field as the summary. Thisshortcut helps you avoid retyping the same text into two fields.
Category, Specialty Type, andDetails
Select category, specialty type, and details for the case. Theseare hierarchical fields. The category value that you enter limitsthe specialty type values, and the specialty type value that youenter limits the details values.
Note: These fields can be set up to drive the case assignmentprocess.
See "Understanding the Configurable Toolbar" (PeopleSoftCRM 9.2: Automation and Configuration Tools).
See Combine Category/Type/Detail Page.
Additional Fields in the Case Information SectionUse the display template to control the visibility of these fields. You can choose whether these fieldsappear on the Main tab or the More tab.
Note: The system updates the response met and restore met dates and times for all cases, even if the casedoes not have an associated agreement with an entitlement.
See "Configuring Display Templates for Components" (PeopleSoft CRM 9.2: Automation andConfiguration Tools).
Secured Case Select to indicate to the system that the case should only beviewed by individuals associated with the provider group on thecase.
When you mark a case as secured, you must enter a providergroup before you can save the case. Once you secure the case, itis associated with the provider group.
Only agents belonging to the provider group can access thecase. If the agent who created the case is not a member of theprovider group, that agent will not have access to the securedcase.
Copyright © 1988, 2020, Oracle and/or its affiliates. 267

Managing Cases Chapter 11
Anonymous Caller Select if the caller wants to remain anonymous. No personalinformation is recorded, and no personal information is requiredto save the case.
If the caller wants to register, clear the Anonymous check boxand search for existing customers or use the Quick Createfunction to create a new customer.
Note: The Anonymous Caller option requires that ananonymous customer or worker is already set up using theinstallation options.
See "Creating Business Objects by Using the Quick CreateComponent" (PeopleSoft CRM 9.2: Business ObjectManagement).
Site without Customer Select to enable cases to be created for specific sites withouta customer. This check box is displayed after the CustomerInformation is selected. If you plan to use this option, firstset up an anonymous customer, since the system assigns theanonymous customer when this option is selected.
Remote Case/Issue ID The unique keys of the case in the third-party systemfrom which the case was passed to PeopleSoft Call Centerapplications. This option is used to map the case created inCRM to its counterpart stored in a third-party system.
Purchased From Enter the name of the vendor from whom the customer acquiredthe product or service that is referenced in the case.
Target Close Date Enter the desired date of resolution for the problem.
Error Code and Error Message Error codes are relevant for business units that support productsthat can display error messages, products such as softwareor electronics. If you enable error code processing, users canaccess a list of frequently used solutions based on the error codeor error message entered for the case. Enter any error code anderror message that the caller reports.
To fill in the message associated with the error code, click theValidate button. If the error code has not been used before, thesystem displays the Error Validation page. You can then use thispage to search for or create new error codes and messages.
By entering error information, you enable the Frequently UsedSolutions page to list frequently used solutions according to theerror. The system does not restrict you from prompting againstknown errors.
Response Met Displays the date and time that the problem was fixed or theservice was restored.
Restore Met Displays the date and time the agent or service person restoredservice or fixed the problem with the product.
268 Copyright © 1988, 2020, Oracle and/or its affiliates.

Chapter 11 Managing Cases
Entitled Response Displays the date and time that the customer or employee isentitled to a response after they call in a problem.
Actual Response Displays the date and time that the agent or service personactually responded to the caller's problem.
Entitled Restore Displays the date and time that the caller is entitled to have theirproblem or service restored.
Red Restore and Yellow Restore Displays the date and time that the problem or service willturn red or yellow if it is not restored. These fields are used inconjunction with agreements.
To use these fields, you must enter a percent in the Percentof SLA for Red and Percent of SLA for Yellow fields on theBusiness Unit-Options page.
Actual Restore Displays the date and time that the service or problem wasactually fixed or restored.
Survey Score Displays the score generated by the survey that was sent to thecustomer. This field does not appear on the page unless youenable it using the Display Template - Page Definition page. You must also sign in as a user that has permission to view thisfield; otherwise it does not appear on the page.
The Survey Score field uses the RC_VIEW_SURVEY _SCOREfunctional option code, the RC_VIEW_SURVEY _SCORE _GROUP functional option group code, and the Case SurveyScore application security profile to enforce security. ThePeopleSoft system delivers the functional option code for theSurvey Score field on the Display Template - Page Definitionpage. It also delivers the Case Survey Score membership list,which is where you can control what roles or users are permittedto view the Survey Score once it is enabled on the DisplayTemplate - Page Definition page. For this membership list, thePeopleSoft system delivers the Call Center Manager and HelpDesk Manager roles.
Copyright © 1988, 2020, Oracle and/or its affiliates. 269

Managing Cases Chapter 11
Note: The Survey email is sent to Customer's primary emailaddress. If the customer is a consumer, then the survey email issent to the consumer's primary email address. If the customer isa company, then the survey email is sent to the contact's primaryemail address.On the Case page, an agent can edit the Contact Method fieldto enter an email with the For This Case Only type, which canbe different from the customer's primary email. In that scenario,the survey email is still sent to customer's primary email addressand not to the email address with the For This Case Only type.Using AAF policies, you can instruct the system to send out asurvey when a case is in the Closed - Resolved status. In thistype of policy setup, administrators can specify who to notifyif an error occurs while sending out a survey. The two optionsare: Notify a Role and Notify a User. If the notify role option isselected and an error occurs, then all users having the specifiedrole receive an email notification. If the user option is selected, then only that user will receive the email about the error.
See "Understanding PeopleSoft CRM Security" (PeopleSoftCRM 9.2: Application Fundamentals ).
Escalation Date Time and EscalationCount
These fields display the date and time an escalation was initiatedand the number of times the case was escalated. These fields arehidden when you first install your call center applications.
See "Configuring Display Templates for Components" (PeopleSoft CRM 9.2: Automation andConfiguration Tools).
See Understanding Assignment Options.
Enter information about the case in the following fields:
ActionsAccess the Actions section on the Case page.
The Action Link Groups that you or your implementation team set up during installation appear in theRelated Actions group box on the Case page. You can set up links in the Related Actions drop-down listbox to create service orders and defects and to look for offers and promotions.
When the system loads the items in the Related Actions drop-down list box, it checks to see if the linkdefinition is setID enabled. If it is, then the setID of the link definition is matched with the setID of thecase, which is obtained from Case business unit. If the two setIDs do not match, then the system does notpopulate that link definition in the drop-down list box. When the Case page is loaded and the user changesthe business unit, the system reloads the items in the Actions drop-down list box.
In PeopleSoft HelpDesk for Human Resources, you can link to pages in the PeopleSoft or E-BusinessHCM database (depending on which one your system is integrated with).
In PeopleSoft Service Center for Higher Education, you can link to pages in the PeopleSoft CampusSolutions application.
270 Copyright © 1988, 2020, Oracle and/or its affiliates.

Chapter 11 Managing Cases
PeopleSoft Support, HelpDesk, and Service Center for Higher Education applications offer the capabilityto link to predefined actions from the Case page. You can execute actions on the Actions section of theCase Page, the Summary page, or the Related Actions page.
Note that in Service Center for Higher Education, some listed actions may not be applicable for all roles(constituent, company contact, or worker). If an action is attempted for someone who does not have arole that permits that action, an error message will be displayed to inform the user that the action is notavailable.
See Managing Related Actions.
The PeopleSoft system delivers these predefined actions:
• Asset Administrator
• Asset Summary
• Branch Script
• Business Project
• Case Survey
• Change Request - Create New
• Change Request - Relate
• Create RMA
• Defect - Create New
• Defect - Relate Existing
• Offer History
• Sales Lead
• Sales Order
• Service Order
• Remote Control
• Software Delivery
• Work Order - Create New
Note: To create a related action to the Offer Presentation page in PeopleSoft Order Capture, you must setup the link using the Link Group pages. To display the Get Offers or Promotions icon, you must set it upusing an AAF policy.
See Understanding Link Setup.
See "Understanding AAF" (PeopleSoft CRM 9.2: Automation and Configuration Tools).
Copyright © 1988, 2020, Oracle and/or its affiliates. 271

Managing Cases Chapter 11
Suggest ActionThe system automatically displays a suggested action that the agent can perform. This suggestion isdriven by policies that you set up in AAF.
See "Configure Call Center Suggested Action Page" (PeopleSoft CRM 9.2: Automation andConfiguration Tools).
LinksThe system displays a category name (for example, Human Resources, Benefits, Related Actions) forspecific links in a category and a Go button.
Depending on the security established for the links that are set up as content references (CREFs), an agentcan view all links or a subset of the links. Note that only permission list security definitions from thecontent reference will be used for determining link visibility. If the user does not have access to any linksin a category, the category does not appear.
Go Click this button after selecting a link in a category to access thecorresponding component (specified as a link).
When you click Go, the system:
• Opens a new browser window with the target page (optional).
• Enters the link's long description in the Related Actionssection.
Note: The PeopleSoft system includes links to Base Benefitsand Benefits Administration enrollment functionality inPeopleSoft Capital Management (PeopleSoft HCM). Enrollmentin medical and FSA (flexible spending accounts) plans under theCOBRA (Consolidated Omnibus Budget Reconciliation Act)provisions is carried out in a different manner within PeopleSoftHCM. To access the enrollment pages for medical and FSAplans under COBRA, log on directly to your PeopleSoft HCMsystem.
See PeopleSoft HCM: Application Fundamentals.
See PeopleSoft HCM: Benefits Administration.
Related LinksCase CreationUnderstanding Call Center Prompt TablesValidating Errors Reported by Callers"Understanding Installed Products" (PeopleSoft CRM 9.2: Product and Item Management)"Understanding Business Project Tracking" (PeopleSoft CRM 9.2: Automation and Configuration Tools)Understanding Link SetupSetting Up Content References
272 Copyright © 1988, 2020, Oracle and/or its affiliates.

Chapter 11 Managing Cases
Escalating CasesAccess the Case page.
Use the Escalate Case button to send notifications to agents and managers. If you have associated an AAFtrigger point with the button, the system displays a message when a user clicks the Escalate Case button.
Note: The PeopleSoft system does not deliver the Escalate Case button with any associated trigger points.You must use the functionality within AAF to activate this button before you implement your PeopleSoftcall center applications.
When the user clicks OK, the system increments the escalation count, saves the escalation date and time,saves the case, and sets off one of these trigger points in AAF:
• When a Support Case is Escalated
• When a Help Desk Case is Escalated
See "Understanding AAF" (PeopleSoft CRM 9.2: Automation and Configuration Tools).
Match Results PageUse the Match Results page (RC_MATCH_RSLT_SEC) to view a list of matching cases based on theCase Match Definition.
Where appropriate, select a related case from the match results set. When selected, the case will appear inthe Related Cases grid.
Navigation
Click the Match Cases button on the Case, Solution, Summary, Notes, Tasks, Case History, RelatedActions, Related Cases, or Interested Parties page.
Image: Match Results page
This example illustrates the fields and controls on the Match Results page.
The Match Cases page enables you to see any existing cases that match the current case. This lets you seeif the current issue has already been recorded in another case. Any cases that match the current case willbe displayed.
Copyright © 1988, 2020, Oracle and/or its affiliates. 273

Managing Cases Chapter 11
Score Displays a rating between 1 and 100 that represents how closelythe entry matches the search criteria. This field is only displayedif keyword searching is enabled.
Note: Keyword searching is enabled or disabled on the MatchDetail page.
Relationship Type Describes the type of relationship that will apply if youassociate the case from this grid row with the current case.
Case ID Identifies cases which match the current case.
Note: Case matching criteria are defined on the Match Detailpage.
OK button Click this button to associate the current case with the case onthe selected grid row. The two cases will be associated with therelationship indicated on the selected grid row.
Note that the system will also automatically make the followingupdates:
• If the relationship type for the selected case has the SetParent as Global Case check box selected, the system willautomatically select and update the Global Case check boxfor that case.
• If the relationship type for the selected case has the SetStatus of Child Using Duplicate Case Status check boxselected, the system will automatically update the statusof the current case to the Duplicate Case Status defined onBusiness Unit Case Default page.
Note: If no existing cases meet the match criteria, the Match Results page will be displayed with amessage indicating that no matches were found.If case matching is not enabled for the business unit of the current case, the Match Results page will bedisplayed with a message indicating that no match criteria have been defined for this business unit.
See Understanding Call Center Prompt Tables.
See Defining Call Center Business Units.
Outbound Notification PageUse the Outbound Notification page (RB_EM_OB_NOTIFY) to send a manual notification.
If you have purchased PeopleSoft ERMS, you can use the Notification button on the toolbar to composenew email messages using the Outbound Notification component or respond to existing email using EmailWorkspace.
The system automatically populates the contact and interested parties of the case in the recipient list onthe Outbound Notification page.
274 Copyright © 1988, 2020, Oracle and/or its affiliates.

Chapter 11 Managing Cases
Navigation
Click the Notification button or Set Reminder button on the Case page or any page with the case toolbar.
The Outbound Notification page behaves slightly different if the Set Reminder toolbar button is clicked toaccess the page as opposed to the Notification button:
• The Send and Send and Solve Case toolbar buttons are unavailable.
• The system makes the sender of the notification the TO recipient of the notification.
See "Sending Manual Notifications From CRM Transactions" (PeopleSoft CRM 9.2: Automation andConfiguration Tools).
Installed Product Viewable Hierarchy PageUse the Installed Product Viewable Hierarchy page (RF_INSTPROD_VH_SEC) to view the installedproducts that meet the criteria available on the Case page.
For the installed products that the system returns, the page displays parent, child, and sibling relationshipsto other installed products.
Navigation
Click the View Product Hierarchy button on the Information section of the Case page.
For more information about viewing the installed product hierarchy, see "Understanding InstalledProducts" (PeopleSoft CRM 9.2: Product and Item Management).
Entitlement Match PageUse the Entitlement Match page (RF_ENTL_LIST_SEC) to select from a list of warranties or agreementlines that may cover the case.
Navigation
Click the Select Agreement or Warranty link on the Case page selecting an agreement or warrantyagreement or warranty link
For more information about using entitlement matches, see "Understanding Entitlement Searches"(PeopleSoft CRM 9.2: Application Fundamentals ).
Entitlement Details PageUse the Entitlement Details page (RF_VIEW_ENTL_SEC) to view the entitlements associated with acase.
This link is available after an agent selects an agreement line or a warranty.
Navigation
Click the available warranty or agreement line link on the Case page.
Copyright © 1988, 2020, Oracle and/or its affiliates. 275

Managing Cases Chapter 11
For more information about using entitlement defaults, see "Understanding Agreements and Warranties"(PeopleSoft CRM 9.2: Application Fundamentals ).
Provider Group Summary PageUse the Provider Group Summary page (RF_ASSIGN_PG_SEC) to select a provider group from thesearch result that can be assigned to the case.
Groups are ranked by their fit score, an evaluation of how well each group matched the case criteria.
Navigation
Click the Suggest a Provider Group button on the Case page.
For more information about selecting provide groups, see "Understanding Assignment Searches"(PeopleSoft CRM 9.2: Application Fundamentals ).
Candidate Summary PageUse the Candidate Summary page (RF_ASSIGN_LIST_SEC) to select a worker from the search resultthat can be assigned to the case.
Candidates are ranked by their fit score, an evaluation of how well each candidate matched the casecriteria.
Navigation
Click the Suggest an Agent button on the Case page.
For more information about selecting workers, see "Understanding Workers in CRM" (PeopleSoft CRM9.2: Business Object Management).
Validating Errors Reported by Callers
This topic provides an overview of error message validation and discusses how to validate an error.
The Validate button is delivered hidden. If you want to validate errors reported by callers, modify thedisplay template to enable the links.
Page Used to Validate ErrorsPage Name Definition Name Usage
Error Validation Page RC_CASE_ERROR Search for existing errors or create newerrors. Use this page when an error ona case does not have an unambiguousmatch in the error table. The error codeelements are visible only if you haveenabled the error code tracking forthe business unit with which you areworking.
276 Copyright © 1988, 2020, Oracle and/or its affiliates.

Chapter 11 Managing Cases
Error Message ValidationWhen you support products such as software or electronics that provide users with diagnostic errormessages, looking up frequently used solutions using the error message is an efficient way to resolvecases.
You record error information on the Case page. The system does not force you to select from known errormessages. Instead, you can enter whatever error information the caller provides. The appearance of thisbutton is activated in the Display Template Details page. If it is activated in the display template, thebutton appears on the page. If it isn't activated in the display template, then the system does not display it.
When you enter an error code, the system goes through the following process to ensure that acorresponding entry appears in the Error table (ERROR_MESS_TBL):
1. The system checks whether the data that you entered is an unambiguous match for a single knownerror.
If a match is found, the system associates the case with the known error.
An unambiguous match is not necessarily an exact match. For example, if the case does not specifythe error code but it has a message that is an exact match for a known message, then the systemconsiders the match an unambiguous match. However, an error code alone is never sufficient for anunambiguous match because different products might use the same code for different purposes.
2. If no unambiguous match is established, you can click the Validate button to access the ErrorValidation page.
From this page, you can:
• Search for similar errors.
If you find and select an error, the system associates the case with that error. The search is akeyword search, so it does not require an exact match—a close match suffices. This searchhelps you find the error even if you don't type the full text of the error message or if you havetypographical errors in your data.
• Create a new error record using the error code and error message that you entered on the Casepage.
This process facilitates the process of adding error records to the database. Error records areestablished as the errors are reported, and you can avoid the initial work of creating records for allpossible errors.
Error Validation PageUse the Error Validation page (RC_CASE_ERROR) to search for existing errors or create new errors.
Use this page when an error on a case does not have an unambiguous match in the error table. The errorcode elements are visible only if you have enabled the error code tracking for the business unit withwhich you are working.
Navigation
Click the Validate button within the Case Information group box on the Case page.
Copyright © 1988, 2020, Oracle and/or its affiliates. 277

Managing Cases Chapter 11
Image: Error Validation page
This example illustrates the fields and controls on the Error Validation page.
Error Code and Error Message Displays the error code and error message that are prepopulatedusing the data from the Case page.
Search Click to search for existing errors.
Create New Error Click to create a new error record using the error code andmessage on the Error Validation page. If you changed theinformation on this page, the system updates the error code andmessage on the Case page to reflect the change.
When you create a new error, the system associates theunderlying case with the system-generated ID that is assignedto the error. The presence of an error ID on the case recordindicates that the error has been validated.
Return to Case Click to leave the page without validating the error. As long asthe error remains unvalidated, the Validate button on the Casepage remains available.
Integrating with Third-Party Asset Management Applications
PeopleSoft HelpDesk gives IT support personnel the ability to pass case information to a third-partyasset management application in the performance of asset management tasks. Assets can be any network-connected device, such as a computer, peripheral, or router.
PeopleSoft HelpDesk provides the framework to launch the third-party application from the case toolbarand from the Related Actions sections. PeopleSoft HelpDesk has two toolbar buttons—one for AssetDiscovery and one for Remote Control. These buttons launch a third-party asset management applicationand pass information specific to the case to the third-party applications. The information from the case is
278 Copyright © 1988, 2020, Oracle and/or its affiliates.

Chapter 11 Managing Cases
passed in the URL. Case information that is passed is typically a person or asset ID, such as employee IDnumber or the asset tag.
The system captures the date and time when an agent launches the asset management application on theRelated Actions page.
To set up case information transfer:
• Set up the link in the Link Definition page.
• Modify the content reference and point it at the Asset Management application installed at your site.
Understanding Employee Relations Case Management
Employee Relations refers to an organization’s effort to maintain good employee relationship atworkplace. PeopleSoft Employee Relations Case Management feature focuses on managing sensitivetopics such as Accommodation Requests, Employee Health and safety, Conflict Resolution, Ethics &Conduct, among others. These issues are typically confidential in nature for both employees and theOrganization in terms of accountability to Employee Privacy and their legal rights at the workplace.
PeopleSoft Employee Relations Case Management feature facilitates to:
• Adding multiple case assignees, both as Provider Group or Individual type
• Setting up Case access to assignees by roles
• Associating Case Access for each Assignee on a given Case ("who" can "see" what and "do" what ona given case)
• ER case creation for an anonymous reporter.
• Relating multiple ER Cases.
• Authorized agent to add notes/attachments.
Setting Up ER Case Access
This topic discusses how to configure case access definition based on roles.
Pages Used to Set Up ER Case AccessPage Name Definition Name Usage
Configure Case Access Page RC_ER_ROLE_MAP To set up a new mapping betweendisplay templates defined under ERfamily and ER user roles.
Copyright © 1988, 2020, Oracle and/or its affiliates. 279

Managing Cases Chapter 11
Configure Case Access PageUse Configure Case Access page (RC_ER_ROLE_MAP) to set up mapping between display templatesdefined under ER family and ER user role. This mapping definition is used to filter the templates on ERCase page based on the role of selected assignee.
Navigation
Setup CRM > Product Related > Call Center >Configure Case Access
Image: Configure Case Access Page
This example illustrates the fields and controls on the Configure Case Access Page.
Role Name The role created for ER. The defined ER roles are:
• ER HelpDesk Agent: Users with this role have Read/Writepermission to access ER Case component. ER HelpDeskAgent will have read-write access to a case by default basedon its role. However, such access can be overridden on acase by associating a different case access template to him.
• ER HelpDesk Administrator: Users with this role has gotRead/Write permission to access all ER Case components.
• ER HelpDesk Manager: Users with this role has got Read/Write permission to access all ER Case components.
• ER Case Panelist: Users with this role have Read/Writepermission to access Case Notes page, whereas read-onlyaccess to any other RC_CASE component pages. The ERCase Panelist should have access to My Assigned Cases tileonly.
Primary Select to set the default Case Access, incase multiple displaytemplates are added to the role.
When someone is added as case assignee, then by default theprimary case access template is associated to that person whichdefines the type of access he will have on that case. However,
280 Copyright © 1988, 2020, Oracle and/or its affiliates.

Chapter 11 Managing Cases
same can be overridden with another non-primary case accesstemplate that his underlying role has been mapped to.
Display Template ID Select the access template for the ER case.
An administrator can add as many display templates withdifferent configurations which they feel the users with suchroles should be restricted with.
Case Access Enter the access information based on the Case Accesstemplates. This will be displayed in Case Access field in “CaseAssignment and Access“.
Creating ER Cases
You can create ER cases that should only be viewed by members associated with the provider group onthe case. Based on the granted case access, agents or provider group members can access the case withinthe specified time period.
Pages Used to Create ER CasesPage Name Definition Name Usage
Create ER Case Tile CR_RC_ERHD_CREATE
(cref for the tile)
Used to access Employee Relations Casepage in Add mode.
Employee Relations Case Page RC_CASE Used to create a new ER case.
Create ER Case TileUse the Create ER Case tile to access Employee Relations Case page.
Navigation
Select Fluid Home under the main menu. On the page that appears, select HR Service Agent. The CreateCase ER tile is available on the HR Service Agent landing page.
Copyright © 1988, 2020, Oracle and/or its affiliates. 281

Managing Cases Chapter 11
Image: Create ER Case Tile
Create ER Case tile
Click the Create ER Case tile to access Employee Relations Case page.
Employee Relations Case PageUse the Employee Relations Case page (RC_CASE) to add and manage ER cases.
Navigation
Click the Create ER Case tile on the HR Service Agent home page.
282 Copyright © 1988, 2020, Oracle and/or its affiliates.

Chapter 11 Managing Cases
Image: Employee Relations Case Page
This example illustrates the fields and controls on the Employee Relations Case page.
Employee InformationThe Employee Information section displays information about the employee for whom the case is created.
Note: The visibility of fields in this section depends the display template that is used.
Employee ID Employee ID of the employee for whom the case is created.
First Name First name of the employee.
Last Name Last name of the employee.
Problem InformationYou can enter the problem summary and description in this section.
The Summary field is required. The system can be configured so that values for the Summary andDescription fields are automatically displayed on the Employee Relations Case page when the user selects
Copyright © 1988, 2020, Oracle and/or its affiliates. 283

Managing Cases Chapter 11
a quick code. If a problem summary is already entered on an existing case, a quick code will not overwritethe Summary and Description fields unless the overwrite check box is selected for either the Summaryor Description fields in the quick code. In this case, you can overwrite the values for the Summary andDescription fields even if these fields are already populated.
Case InformationThe Case Information section is used to enter ER Case specific information. For more details, see CasePage Activities.
Note: For ER cases, the case visibility is ‘Internal’.
Case Assignment and AccessUse the Case Assignment and Access section to add single or multiple case assignee to work on the ERcase. Case assignees can be provider group and its member, or it can be individual case assignee havingaccess to ER cases.
Primary Select the check-box to add Primary Point of contact to theCase.
Assignment Type Select the required assignment type. You can assign thecase to Provider Group(s) and/or an Individual(s) havingappropriate role based access to Case. In case of Groupassignment, all members of the assigned Provider Group (s)will have authorized access to the Case whereas for Individualassignment, it’s limited to only the individual assignee to theCase. Individual access will have precedence over GroupAccess for an assignee.
Provider Group Select the required provider group. This field is enabled onlywhen Group is selected in the Assignment Type field.
Assigned To Select an assignee to work on the ER case. For groupassignment this field can be used to identify a point of contactfor the bug in the group.
Start Date and End Date You can select the period for which each case assignee hasauthorized access to the ER Case. The time period can be asubset of the entire Case life cycle. Start Date gets defaultedwith the date on which Case assignee gets added, whereas EndDate is optional to select. Selecting End Date marks the end torespective Case Assignee’s access to the Case.
Note: Primary assignee can’t be end dated.
Case Access Each Case Assignee’s access is restricted by a Case AccessTemplate which can be configured by means of Configure CaseAccess page. Each Case Access Template is pre-configured tohave certain sections/pages/fields as visible/hidden and settingsto render them. Different access privileges are determined basedon the case access definition mapped against each case assignee.
284 Copyright © 1988, 2020, Oracle and/or its affiliates.

Chapter 11 Managing Cases
If the assignment type is individual, then the Case Access willbe populated based on the assignee role defined in case accessdefinition. If the assignment type is group then the configurecase access prompt will be populated with all case accessdefined under configure case access setup for that particulardisplay template family.
Comment Click the icon to enter additional remarks about ER caseassignment.
Add New Assignee Click this button to add another assignee to the ER case.
Audit HistoryThis section displays information about the agents who created and modified the ER Case details.
Using the PeopleSoft Fluid Interface to View and Manage ERCases
This section discusses how to manage and view ER Cases.
Pages Used to View and Manage ER CasesPage Name Definition Name Usage
My ER Cases Tile CR_RC_ASG_CASE_ER_FL_GBL Use My ER Cases tile to access My ERCases page.
My ER Cases Page RC_ASG_CASE_ER_FL Use My ER Cases page to view a listof secured cases that are currentlyassociated with the logged in agent.
Search ER Cases Tile CR_RC_ERHD_SEARCH Use Search ER Cases tile to accessEmployee Relations Case Search Page.
Employee Relations Case Search Page RC_CASE_SEARCH Use Employee Relations Case SearchPage to search or add a case assignee.
My ER Cases TileUse My ER Cases tile to access My ER Cases page.
Navigation
Select Fluid Home under the main menu. On the page that appears, select HR Service Agent. The My ERCases tile is available on the HR Service Agent landing page.
Copyright © 1988, 2020, Oracle and/or its affiliates. 285

Managing Cases Chapter 11
Image: My ER Cases Tile
My ER Cases tile
The tile shows the total number of recently updated and open cases.
My ER Cases PageUse My ER Cases page to access a list of ER cases assigned to logged in agent.
Navigation
Click the My ER Cases tile available on the HR Service Agent home page.
Image: My ER Cases Page
This example illustrates the fields and controls on the My ER Cases page.
View Filter the cases that appear in the Employee Relations Cases list. Values are:
• All my cases modified in last 7 days
• All my open cases
• All open cases as primary assignee
• All open cases with my Provider Group as Primary
Note: Latest updated case is displayed at the top of the page. You can also search for a case based on Case ID.
286 Copyright © 1988, 2020, Oracle and/or its affiliates.

Chapter 11 Managing Cases
Case ID Displays the unique ID of the case assigned to the agent.
Employee Name of the employee for whom the case is created.
Summary Brief case description.
Case Priority Priority assigned to the case.
Case Status Status of the case. Different case statuses are:
• Open – New
• Closed – Cancelled
• Cancelled – Duplicate
• Closed – Duplicate
• Closed – Resolved
• On Hold
• Open – Pending HR
• Open – Reopened
• Open – Research
• Open – WC Claim
• Open - Case Escalated
• Open – Chg Request
• Open – Pend Employee
Provider Group The provider group to which the ER case was assigned. Thisfield is left blank if case is assigned to an individual assignee.
Assigned To The agent to whom the ER case was assigned.
Note: If the case is assigned to multiple group or individual, then the Primary assignee is displayed.
Last Modified The date and time on which the ER case was lastly modified.
Create Case button Click this button to create a new ER case.
If you want to view the details of an ER case, click on the corresponding row. The Employee RelationsCase page for the selected case is displayed. You can modify the ER case details as per requirement.
Search ER Cases TileUse Search ER Cases tile to access Employee Relations Case Search page.
Copyright © 1988, 2020, Oracle and/or its affiliates. 287

Managing Cases Chapter 11
Navigation
Select Fluid Home under the main menu. On the page that appears, select HR Service Manager. TheSearch ER Case tile is available on the HR Service Agent landing page.
Image: Search ER Case Tile
Search ER Case tile
Employee Relations Case Search PageUse Employee Relations Case Search Page (RC_CASE_SEARCH_UPD) to search for existing cases oradd a new case assignee to work on the case, if required.
Navigation
Click the Search ER Case tile available on the HR Service Agent home page.
Image: Employee Relations Case Search Page
This example illustrates the fields and controls on the Employee Relations Case Search page.
288 Copyright © 1988, 2020, Oracle and/or its affiliates.

Chapter 11 Managing Cases
Add Case Click this button to add new ER cases.
You can also search for existing cases.
Using the PeopleSoft Fluid User Interface to View and Manage HRHelpDesk Cases
This topic discusses how agents use the PeopleSoft Fluid User Interface to view and manage HRHelpDesk cases.
Pages Used to View and Manage HR HelpDesk Cases in the PeopleSoftFluid User Interface
Page Name Definition Name Usage
My HRHD Cases Tile CR_RC_ASG_CASE_HHD_FL_GBL Access the My HRHD Cases page.
My HRHD Cases Page RC_ASG_CASE_HHD_FL View and manage your HRHD cases.
My HRHD Cases TileUse the My HRHD Cases tile (CR_RC_ASG_CASE_HHD_FL_GBL) to access the My HRHD Casespage. The tile shows the number of Recently Updated and Open cases.
Note: The Agent Triage Dashboard tile provides Agents access to an enhanced Agent Dashboard with theability to group/triage HRHD cases thereby allowing them to easily manage cases.
Navigation
You can add the My HRHD Cases tile, through personalization, to any system-delivered Agent homepageor a homepage that you create.
Image: My HRHD Cases tile
This example illustrates the fields and controls on the My HRHD Cases tile.
Copyright © 1988, 2020, Oracle and/or its affiliates. 289

Managing Cases Chapter 11
My HRHD Cases PageUse the My HRHD Cases page (RC_ASG_CASE_HHD_FL) to view and manage your HRHD cases.
Navigation
Click the My HRHD Cases tile on an Agent homepage.
Image: My HRHD Cases page
This example illustrates the fields and controls on the My HRHD Cases page. You can find definitions forthe fields and controls later on this page.
View Filter the cases that appear in the HR HelpDesk Cases list. Available values are:
• All my cases modified in last 30 days
• All my cases modified in last 7 days
• All my open cases
• Unassigned cases in my provider group
Note: The last updated case is always displayed at the top of thepage.
Enter Case ID to Search for a Case Enter a Case ID to navigate directly to the case page.
Case ID Displays the unique ID of the case.
Employee Name of the employee for whom the case is created.
Summary Displays a brief case description.
290 Copyright © 1988, 2020, Oracle and/or its affiliates.

Chapter 11 Managing Cases
Priority Displays the priority assigned to the case.
Case Status Displays the status of the case.
Provider Group The provider group to which the HRHD case is assigned. Thisfield is left blank if the case is assigned to an individual.
Assigned To The agent to whom the HRHD case is assigned.
Note: If the case is assigned to multiple group or individual, then the Primary assignee is displayed.
Last Modified The date and time when the HRHD case was last modified.
Create Case button Click this button to create a new case.
Setting Up of the Info Tiles for the Fluid Agent Triage Dashboardas an Administrator
This topic discusses how administrators set up the Info Tiles for the Fluid Agent Triage Dashboard.
Pages Used to Set Up the Info Tiles for the Fluid Agent Triage Dashboardas an Administrator
Page Name Definition Name Usage
Configure Search Definitions Page RC_ADMFLTR_PREF_FL Set search definitions to appear as InfoTiles on the Agent Triage Dashboard.
Configure Search Page RC_AGT_TRIAGE_FL Configure the search fields for the searchdefinitions.
Configure Search Definitions PageAdministrators use the Configure Search Definitions page (RC_ADMFLTR_PREF_FL) to set searchdefinitions to appear as Info Tiles on the Agent Triage Dashboard.
Navigation
Set Up CRM >Product Related >Call Center >Configure Search Definitions
Copyright © 1988, 2020, Oracle and/or its affiliates. 291

Managing Cases Chapter 11
Image: Configure Search Definitions page
This example illustrates the fields and controls on the Configure Search Definitions page.
Click the button to add a new search definition.
Share with Agent Administrators can swipe the slider to Yes to share their searchdefinitions with Agents.
Configure Click the Configure button to edit the search definition.
Search Definition Settings: AllowAgents to Create Search Definition
Administrators can swipe the slider to Yes to allow Agents tocreate their own search definitions.
Save Click the Save button to save your settings.
Configure Search PageAdministrators use the Configure Search page (RC_AGT_TRIAGE_FL) to configure the search fields forthe search definitions.
Note: The search fields appearing on the Configure Search page are controlled by the ConfigurableSearch Setup. For details, see the Configurable Search Setup section below.
292 Copyright © 1988, 2020, Oracle and/or its affiliates.

Chapter 11 Managing Cases
Navigation
On the Configure Search Definitions page, click the Plus (+) button or the Configure button to access theConfigure Search page.
Image: Configure Search page
This example illustrates the fields and controls on the Configure Search page.
Delete Use the Delete button to delete an existing search definition.
Copyright © 1988, 2020, Oracle and/or its affiliates. 293

Managing Cases Chapter 11
Note: The Delete button appears on this page only whenaccessed via the Configure button.
Configurable Search SetupThe Configurable Search Setup controls the search fields appearing on the Configure Search page.
Navigation
Set Up CRM >Common Definitions >Component Configuration >Configurable Search Setup
Image: Configurable Search Setup
This example illustrates the fields and controls on the Configurable Search Setup.
Related Links"Configuring Searches" (PeopleSoft CRM 9.2: Automation and Configuration Tools)
294 Copyright © 1988, 2020, Oracle and/or its affiliates.

Chapter 11 Managing Cases
Using the Fluid Agent Triage Dashboard to View and Manage HRHelpDesk Cases
This topic discusses how agents use the Fluid Agent Triage Dashboard to view and manage HR HelpDeskcases.
Understanding the Fluid Agent Triage DashboardThe Fluid Agent Triage Dashboard helps HR HelpDesk agents to:
• Create Search definitions to be displayed as Info Tiles on their dashboards.
• Group or triage cases into various categories to effectively manage all cases.
• Search for cases using Case IDs.
• Create new cases.
• Activate or inactivate the search definitions on their dashboard.
Pages Used to View and Manage HR HelpDesk Cases Using the Fluid AgentTriage Dashboard
Page Name Definition Name Usage
Agent Triage Dashboard Tile CR_RC_AGT_TRIAGE_GBL_FL Access the Agent Triage Dashboardpage.
Agent Triage Dashboard Page RC_AGT_DASHBRD_FL View and manage/triage the HRHelpDesk cases.
Personalize Search Definitions Page RC_AGTFLTR_PREF_FL Agents use this page to configure thesearch definitions and the order ofdisplay of the Info Tiles on the AgentTriage Dashboard.
Configure Search Page RC_AGT_TRIAGE_FL Agents use this page to set their ownsearch definitions to appear as Info Tileson the Agent Triage Dashboard.
Agent Triage Dashboard TileUse the Agent Triage Dashboard tile (CR_RC_AGT_TRIAGE_GBL_FL) to access the Agent TriageDashboard.
Note: The Agent Triage Dashboard tile is a dynamic tile created using the Tile Wizard. You can find thesetup details in PeopleTools >Portal >Tile Wizard, under the Tile Name: AGENT_TRIAGE_DASH.For more information, refer the topic Using Tile Wizard on PeopleTools: Portal Technology.
Copyright © 1988, 2020, Oracle and/or its affiliates. 295

Managing Cases Chapter 11
Navigation
You can add the My Agent Triage Dashboard tile, through personalization, to any system-delivered Agenthomepage or a homepage that you create.
Image: My Agent Triage Dashboard tile
This example illustrates the fields and controls on the My Agent Triage Dashboard tile.
The Agent Triage Dashboard tile displays the number of cases for the top two search definitions, in theorder of display as set in the Personalize Search Definitions Page.
Agent Triage Dashboard PageUse the Agent Triage Dashboard page (RC_AGT_DASHBRD_FL) to view and manage/triage the HRHelpDesk cases.
Navigation
Click the My Agent Triage Dashboard tile on an Agent homepage.
Image: Agent Triage Dashboard page
This example illustrates the fields and controls on the Agent Triage Dashboard page. You can finddefinitions for the fields and controls later on this page.
Case Search Enter a Case ID to navigate directly to the case page.
296 Copyright © 1988, 2020, Oracle and/or its affiliates.

Chapter 11 Managing Cases
Click the Refresh button to refresh the page.
Configuration Update buttonClick to access the Personalize Search Definitions page, whereas an Agent you can set search definitions to appear as InfoTiles on the Agent Triage Dashboard.
Create Case Click this button to create a new case.
Info Tiles Info Tiles are Search Categories created either by an Agent orthe Administrator. A maximum of eight Info Tiles are displayedat the top of an Agent Triage Dashboard. The order in whichthese appear can be set in the Personalize Search Definitionspage.
Case ID Displays the unique ID of the case.
Employee Name of the employee for whom the case is created.
Problem Summary Displays a brief case description.
Priority Displays the priority assigned to the case.
Case Status Displays the status of the case.
Provider Group The provider group to which the HRHD case is assigned. Thisfield is left blank if the case is assigned to an individual.
Last Modified The date and time when the HRHD case was last modified.
Quick Update Click this button to Quick Update page where you can updatethe case information as well as add a note.
Copyright © 1988, 2020, Oracle and/or its affiliates. 297

Managing Cases Chapter 11
Image: Quick Update page
This example illustrates the fields and controls on the Quick Update page.
Chevron buttonClick the Chevron button on a case row to navigate directly tothat case.
Personalize Search Definitions PageAgents use the Personalize Search Definitions page (RC_AGTFLTR_PREF_FL) to configure the searchdefinitions and the order of display of the Info Tiles on the Agent Triage Dashboard.
Navigation
Click the Agent Triage Dashboard tile on an Agent homepage. On the Agent Triage Dashboard page,click the Configuration Update button to open the Personalize Search Definitions page.
298 Copyright © 1988, 2020, Oracle and/or its affiliates.

Chapter 11 Managing Cases
Image: Personalize Search Definitions page
This example illustrates the fields and controls on the Personalize Search Definitions page.
Configure Search PageAgents use the Configure Search page (RC_AGT_TRIAGE_FL) to set their own search definitions toappear as Info Tiles on the Agent Triage Dashboard.
Navigation
Click the Agent Triage Dashboard tile on an Agent homepage. On the Agent Triage Dashboard page,click the Configuration Update button to open the Personalize Search Definitions page and then click theConfigure button or Plus button.
Copyright © 1988, 2020, Oracle and/or its affiliates. 299

Managing Cases Chapter 11
Image: Configure Search page
This example illustrates the fields and controls on the Configure Search page.
Delete button Use the Delete button to delete the search definition.
300 Copyright © 1988, 2020, Oracle and/or its affiliates.

Chapter 12
Creating Cases Automatically For HCMUpdates
Understanding Automatic Case Creation For HCM Updates
This topic discusses the following:
• Case creation for HCM self-service transaction updates.
• Active Analytics Framework setup for automatic case creation.
• Quick codes and EIP information.
• Create Case EIP.
Creating Case for HCM Self-Service Transaction UpdatesPeopleSoft CRM HelpDesk for Human Resources provides the ability to automatically create cases forpersonal and job data updates that are made through transactions in HCM.
For example, an employee signs into the self-service application and submits a name change requestafter getting married. Submission of this request triggers the system to evaluate if the update warrantsthe creation of an HR HelpDesk case and if the answer is yes, a message is sent to the integrated CRMsystem, and subsequently, CRM system creates a HR HelpDesk case for the name change. The case thengets assigned, worked on and resolved, based on how the existing case management process is defined.
Note: Automatic case creation is not applicable for updates made for Persons of interest (POIs). That is,when you submit a name change or job relocation request through self-service transactions for a POI, itwill not automatically create an HR HelpDesk case.
Active Analytics Framework (AAF) Setup for Automatic Case CreationThe automatic case creation feature leverages AAF setup components to build policies that specify theconditions (the types of HCM data updates) for which the system needs to create HR HelpDesk casesautomatically. The system delivers trigger points, policies, actions, and other setup components for use inthis feature.
When an employee updates their personal data or job data in HCM at runtime, AAF invokes thecorresponding trigger point and evaluates the policy that is associated with the trigger point. If allconditions of the policy are evaluated to true based on the runtime scenario, it executes the Create Caseaction of the policy.
The Create Case action publishes information that is needed to create the case from HCM to CRMthrough an Enterprise Integration Point (EIP). When CRM receives the message, it takes the information
Copyright © 1988, 2020, Oracle and/or its affiliates. 301

Creating Cases Automatically For HCM Updates Chapter 12
from the message and uses the agent-facing RC_CASE_CI component interface to create the HRHelpDesk case for the data update in HCM.
Note: PeopleSoft delivers the Active Analytics Framework, trigger points and policies as disabled; makesure you enable them to use the AAF setup.
AAF Component Delivered Value
Trigger Point The following trigger points invoked from the componentPostSaveChange event:
• After the Person Data is Updated.
• After the Job Data is Updated.
Policy Following policies available for the SHARE setID.
• Name is Changed:
Condition: If first or last name is changed, and regulatoryregion is USA.
• HRHD: Job Location is changed
Condition: If location is changed, and the business unit isGlobal Business Institute BU, and HR status is Active.
• HRHD: Early Retirement Requested
Condition: If action is Retirement, and reason is EarlyRetirement, and HR status is Active.
Note: The policies mentioned here are examples of thesystem-delivered policies. You can modify the existingpolicies, or create new ones as per your requirements.
Action Create Case in CRM
This action sends the information collected on the actionconfiguration page in AAF to CRM in the form of EIPmessages. See Create Case EIP.
Term Several terms are available in the following subject areas:
• Job data
• Person data
Note: You can create new terms as per your requirements.
Quick Codes and EIP Information for Automatic Case CreationTo build an AAF policy in HCM, the administrators need to refer to the CRM quick codes. To ensure thatthe quick codes are present in HCM, we need to publish the quick codes from CRM and this is done usingEIPs. The EIP publishes the following quick code field values:
• Business Unit
302 Copyright © 1988, 2020, Oracle and/or its affiliates.

Chapter 12 Creating Cases Automatically For HCM Updates
• Quick Code
• Effective Date
• Status as of Effective Date
• Description (quick code)
• Summary
• Case Status
• Overwrite
• Problem Description
For publishing quick codes from CRM to HCM as part of automatic case creation, CRM uses twoasynchronous one-way EIPs:
• HD_QUICK_CODE_FULLSYNC: You need to invoke the publish process in the Full Data Publishutility of Enterprise Components for initial full synchronization.
• HD_QUICK_CODE_SYNC: Publishes the incremental synchronization when a quick code is addedor modified.
Ideally, during the initial setup, you need to use the full synchronizationEIP(HD_QUICK_CODE_FULLSYNC) to export all CRM quick codes to the HCM system. Once youexport all quick codes, turn off this EIP. Later on, whenever you want to export the newly created ormodified quick codes, use the incremental synchronization EIP(HD_QUICK_CODE_SYN). If you thinkthe codes are corrupted in HCM, you need to run the quick code full synchronization, as the EIP removesall existing quick codes from HCM and reloads it from CRM.
Note: Subsequent quick code changes while you synchronize to HCM do not get reflected in the existingAAF polices in HCM. However, while processing the Create Case EIP messages in CRM, the system willalways use the latest version of quick codes.
For more information on how to publish the quick codes from CRM to HCM, see Publishing quick codesfrom CRM to HCM
Create Case EIPWhen the Create Case action is invoked in AAF, it publishes a one-way, asynchronous EIP(HD_HRHD_CASE) message from HCM to CRM. The message contains information that CRM uses tocreate HR HelpDesk cases and pre-populate them with default values using the agent facing componentinterface (RC_CASE_CI).
The case-related information includes:
• Employee ID (for whom the case is created)
• Employee Referral ID (by whom the case is created)
• Business Unit
• Quick Code
Copyright © 1988, 2020, Oracle and/or its affiliates. 303

Creating Cases Automatically For HCM Updates Chapter 12
• Problem Description
For each Create Case EIP message it receives, CRM uses the business unit and the quick code from themessage to derive the rest of the default values that need to be populated to a case.
Case Problem DescriptionThe CRM system obtains default values for case problem description from two sources: the quick codedefinition and the EIP message (which originates from the AAF action). It then evaluates the followingconditions and decide which one to use for a case:
• If the Overwrite option of the (problem) Description field is enabled in the associated quick codedefinition, system uses the quick code problem description. If the Overwrite option is disabled, theproblem description from the EIP message is used instead.
• If problem descriptions from both sources (quick code and EIP message) are unavailable, the problemsummary text from the quick code definition is used as the problem description of the case.
• If problem summary is unavailable from the quick code definition, the first 80 characters of theproblem description is used as the problem summary of the case.
Case VisibilityBy default, the visibility of cases created for HCM data update is set to Internal.
Case SourceThe CRM system populates the Source HCM field value as the default source of cases created for theHCM data update.
Setting Up Automatic Case Creation
We deliver the CRM system with the automatic case creation facility disabled. To enable the automaticcreation of cases in CRM when a person updates his or her personal or job data in HCM, follow the stepsbelow:
1. Configure the default HCM source value that you should populate in the cases.
2. Set up the Integration Broker to execute the Create Case and Quick Code EIPs.
3. Publish the quick codes from CRM to HCM using EIPs for an initial full synchronization.
4. Enable the Enable Runtime option on the Install Options page of the AAF setup in the HCM system.
5. Configure AAF policies that decide when you need to initiate automatic case creation.
Configuring the Default HCM Source ValueUse the Case Defaults page to configure a default case source for the business unit for which you want toenable the automatic case creation.
304 Copyright © 1988, 2020, Oracle and/or its affiliates.

Chapter 12 Creating Cases Automatically For HCM Updates
For example, if you are enabling automatic case creation for the business unit HRHDU, edit the record forHRHDU business unit to set the value of Source HCM field to HCM HR HelpDesk
Navigation
Set up CRM >Business Unit Related >Call Center Definition >Case Defaults
Image: Case Defaults page
This example illustrates the fields and controls on the Case Defaults page. You can find definitions for thefields and controls later on this page.
Setting Up Integration BrokerFollow the steps below to set up the Integration Broker for automatic case creation:
1. Edit the CASE_EIP queue to set the Queue Status to Run in both HCM and CRM systems.
2. Check if the Domain Status is set to Active in HCM and CRM systems.
3. In HCM, check the following settings against the remote node PS CRM - Local Node:
• If PSFT_CR is not the PS CRM local node in the system, rename the PSFT_CR node to match thename of the existing CRM local node.
Copyright © 1988, 2020, Oracle and/or its affiliates. 305

Creating Cases Automatically For HCM Updates Chapter 12
• In the Authentication Option field, select Password. Also ensure that the node password is thesame as the one used in the local node. E.g.: PSOFT.
• In the Default User ID field, select the HRHD Administrator role.
4. In HCM, check the following settings against the local node in the system:
• In the Authentication Option field, select Password.
• Make sure that the node password is the same as the one used in the remote node. E.g.: PSOFT.
5. In HCM, add the remote node (the CRM node) to the LOCAL gateway and make sure that you areable to ping the node successfully. Repeat this step in CRM to add the remote node (the HCM node)to the LOCAL gateway, and ping the node.
6. In CRM, check the following settings against the remote node PS HRMS - Local Node:
• If PSFT_HR is not the PS HRMS local node in the system, rename the PSFT_HR node to matchthe name of the existing HCM local node.
• In the Authentication Option field, select Password. Also ensure that the node password is thesame as the one used in the local node. E.g.: PSOFT.
• In the Default User ID field, select the HRHD Self Service role.
7. In CRM, check the following settings against the local node in the system:
• In the Authentication Optionfield, select Password.
• Make sure that the node password is the same as the one used in the remote node. E.g.: PSOFT.
Note: To read more about the Integration Broker setup, see the product documentation for PeopleTools:Integration Broker andPeopleTools: Integration Broker Administration.
Publishing quick codes from CRM to HCMTo publish quick codes from CRM to HCM for automatic case creation, system uses two asynchronousone-way EIPs:
• HD_QUICK_CODE_FULLSYNC: You need to Invoke the publish process in the Full Data Publishutility of Enterprise Components for initial full synchronization.
• HD_QUICK_CODE_SYNC: The incremental synchronization is published automatically when aQuick Code is added or modified.
Ideally, during the initial setup, you need to use the full synchronizationEIP(HD_QUICK_CODE_FULLSYNC) to export all CRM quick codes to the HCM system. Once youexport all quick codes, turn off this EIP. Later on, whenever you want to export the newly created ormodified quick codes, use the incremental synchronization EIP(HD_QUICK_CODE_SYN). If you thinkthe codes are corrupted in HCM, you need to run the quick code full synchronization, as the EIP removesall existing quick codes from HCM and reloads it from CRM.
306 Copyright © 1988, 2020, Oracle and/or its affiliates.

Chapter 12 Creating Cases Automatically For HCM Updates
Initial Full SynchronizationFollow the procedure below to publish the quick codes from CRM to HCM:
1. Log on to CRM as an administrator user.
2. Access the Full Data Publish Rules page and edit the full data publish rule configured for theHD_QUICK_CODE_FULLSYNC service operation and make the changes listed below:
• Enter HD_QUICK_CODE_FULLSYNC in the Publish Rule ID and Description fields.
• Select Active in the Status field.
• Clear the Create Message Reader and Create Message Trailer check boxes.
Navigation: Enterprise Components, Integration Definitions, Full Data Publish Rules
Image: Full Data Publish Rules page
This example illustrates the Full data publish rules configuration for automatic case creation.
3. Click the Languages tab of the Full Data Publish Rules page and select the following check boxes:
• Publish All Related Languages
• Publish Base Language
Copyright © 1988, 2020, Oracle and/or its affiliates. 307

Creating Cases Automatically For HCM Updates Chapter 12
Image: Full Data Publish Rules - Languages page
This example illustrates the Full data publish rules - Languages configuration for automatic casecreation.
4. Access the Full Data Publish page and add a new run control for theHD_QUICK_CODE_FULLSYNC service operation.
• Enter an identifier in the Request ID field.
• Select Once in the Process Frequency check box.
• Search and select HD_QUICK_CODE_FULLSYNC in the Service Operation field.
Navigation: Enterprise Components, Integration Definitions, Initiate Processes, Full Data Publish
308 Copyright © 1988, 2020, Oracle and/or its affiliates.

Chapter 12 Creating Cases Automatically For HCM Updates
Image: Full Data Publish page
This example illustrates the Full Data Publish page.
5. Click the Run button and check the Process Monitor to see if the Full Data Publish process(EOP_PUBLISHT) is completed successfully.
Subsequent Incremental SynchronizationFollow the steps below to publish the newly added quick codes to HCM:
1. Log on to CRM as an administrator user.
2. Access the Quick Code page and search for a quick code with HRHDU in the Business Unit field.
Navigation: Set UP CRM, Product Related, Call Center, Quick Code
3. Update one of the existing quick code, or create a new quick code and save the changes.
Verify the New Quick Codes1. Log on to HCM as an HRHD Administrator user.
2. Open the AAF policy for the automatic case creation in design mode.
Navigation: Enterprise Components, Active Analytics Framework, Policies, Manage Policies.
3. Click the Edit Actions button in the Actions section. This opens up the Edit Actions page.
Copyright © 1988, 2020, Oracle and/or its affiliates. 309

Creating Cases Automatically For HCM Updates Chapter 12
Image: Build a Policy - Edit Actions page
This example illustrates configuring the actions on the Edit Actions page.
4. On the Edit Actions page, click the Configure button in the Actions section. This opens the CreateCase Configuration page.
310 Copyright © 1988, 2020, Oracle and/or its affiliates.

Chapter 12 Creating Cases Automatically For HCM Updates
Image: Create Case Configuration page
This example illustrates the Create Case Configuration page. You can search and select quick codeson this page.
5. Select HRHDU in the Case Business Unit field and search for quick codes in the Quick Code field.Verify whether all configured quick codes in CRM are listed.
Verifying the Configuration for Automatic Case CreationTo verify the automatic case creation setup, follow the steps below:
1. Log on to the HCM system as an HRHD Administrator user.
2. Access the Build a Policy page and activate the AAF setup for the feature. This involves checking ifthe policies and the triggers are enabled. You should also turn ON the AAF setting Enable Runtime toenable case creation.
3. Open the policy in Edit mode and modify either the case business unit or the quick code used forcreating cases and save the changes. Make sure that the policy is activated.
Copyright © 1988, 2020, Oracle and/or its affiliates. 311

Creating Cases Automatically For HCM Updates Chapter 12
4. Access the Workflow Configurations page and make sure that the Allow DB Update option is selectedfor the required self service transactions, for example, Name Change.
5. At runtime, access the Name Change self service transaction and change a person’s last name inHCM. Submit the request. This event triggers the AAF policy created for name change.
6. The system publishes the case related information to CRM and creates an HR HelpDesk case throughthe Create Case EIP (HD_HRHD_CASE). Verify that the new case is created for the right employee(for whom the HR data was updated) and displays the correct default values (as selected in the policyaction).
Troubleshooting Integration IssuesA list of common issues seen during automatic case creation, and their possible resolutions are listedbelow:
Issue Solution
Unable to view transaction details; links on the IntegrationBroker Monitor are disabled.
To view transaction details on the monitor, the logged on userneeds to be associated with a role that has the HRHD EIPservice permission. E.g.: HRHD Administrator.
The transaction status of the service operation stays at Newand would not update.
Make sure that the domain status is set to Active and thechannel status for HRHD EIP services is set to RUN.
Unable to ping the remote node successfully and receives thiserror: “Asynchronous Message Handler: Access denied. Targetand source message node passwords do not match.”
Use the same password for both local and remote nodes inCRM and HCM. E.g.: PSOFT
Receives the following error while publishing EIP message:“PublicationContractManager::ProcessError/RetryResponse(): 'PSFT Authentication token failed for Node <local nodename>. (158,454)'”.
Use Password as the authentication option for local andremote nodes in both systems.
Receives error regarding Integration Broker Authentication:No node Authentication Option set for node <remove nodename> on Target system.
Make sure that he remote node name on the local system is thesame as the local node name on the remote system.
Receives error “PublicationContractManager:ProcessError/RetryResponse(): 'User XXX not authorized to invoke ServiceOperation HD_XXXXXXX. (158,536)'”.
Make sure user XXX has the HRHD Administrator role in thetarget system.
No transaction was created in the Integration Broker Monitorafter the EIP message for quick codes was supposed to bepublished.
Make sure that when the quick code sync process is set to runon the Full Data Publish page, the process frequency is set toOnce.
Troubleshooting Quick Codes IssuesIf the newly created quick codes are not displayed as expected in HCM, follow the steps below to see ifthe issue is EIP-related:
1. Log on to CRM and check the Process Monitor component of Process Scheduler to see if the processEOP_PUBLISHT is running successfully. Navigation: PeopleTools, Process Scheduler, ProcessMonitor.
312 Copyright © 1988, 2020, Oracle and/or its affiliates.

Chapter 12 Creating Cases Automatically For HCM Updates
2. Access the Monitor Overview page and check if the Integration Broker request result for full sync(HD_QUICK_CODE_FULLSYNC) or incremental sync (HD_QUICK_CODE_SYNC) is Done.Navigation: PeopleTools, Integration Broker, Service Operations Monitor, Monitoring, AsynchronousServices.
3. Access the Operation Instances page to check if theTransaction Status of the service operation(HD_QUICK_CODE_FULLSYNC or HD_QUICK_CODE_SYNC) is Done.
4. If the process results in an error, click the Error link to get the error details
Note: If the above steps were completed without errors, it means that there are no issues with IntegrationBroker connectivity from the CRM side. You need to repeat the same steps in HCM also. Log on to HCMas an HRHD Administrator user and check for any Integration Broker issues on the HCM side.
Copyright © 1988, 2020, Oracle and/or its affiliates. 313

Creating Cases Automatically For HCM Updates Chapter 12
314 Copyright © 1988, 2020, Oracle and/or its affiliates.

Chapter 13
Processing Cases
Understanding Processing a Case
You perform some case management activities in the Case component on pages other than the Case page.
Pages that are present in PeopleSoft Support, PeopleSoft Analyst Service Center, PeopleSoft HelpDesk,and PeopleSoft HelpDesk for Human Resources are illustrated only once. Pages that show customerand contact fields are from PeopleSoft Support. Pages that show employee fields are from PeopleSoftHelpDesk cases.
Understanding Solutions
PeopleSoft ERMS, FieldService, Quality Management, and call center applications enable you totrack both the final solution—the one that resolved the caller's problem—and other solutions that wereconsidered. By tracking all solution usage, you capture valuable information about the effectiveness ofyour solution set.
You can search for solutions by clicking the Find Solutions button at the bottom of any page in the Casecomponent, or you can access the Solutions page directly.
See "Finding and Attempting Solutions" (PeopleSoft CRM 9.2: Services Foundation).
Viewing the Case Summary Page
The Case Summary page enables users to see all the case information and case activity on a single page.
Modify the display template to control what information and sections you want to be visible on this page.The Case Summary page can consist of these sections:
• Problem
• Case Information
• Notes Summary
• Tasks
• Attempted Solutions
• Related Actions
• Related Cases
Copyright © 1988, 2020, Oracle and/or its affiliates. 315

Processing Cases Chapter 13
• Interested Parties
• Event History
• Billing Information
Note: The PeopleSoft system does not deliver all sections of the Case component as active. You must usethe pages within the Display Template component to activate the pages, sections, and fields within theCase component that you want to use to implement your system.
See "Configuring Display Templates for Components" (PeopleSoft CRM 9.2: Automation andConfiguration Tools).
Page Used to View the Case Summary PagePage Name Definition Name Usage
Summary Page RC_CASE_SUMMARY View all the case information on a singlepage.
Summary PageUse the Summary page (RC_CASE_SUMMARY) to view all the case information on a single page.
Navigation
• Support > Search Cases > Case > Summary
• HelpDesk > Search Cases > Case > Summary
• HR HelpDesk > Search Cases > Case > Summary
• Analyst Service Center > Search Cases > Case > Summary
316 Copyright © 1988, 2020, Oracle and/or its affiliates.
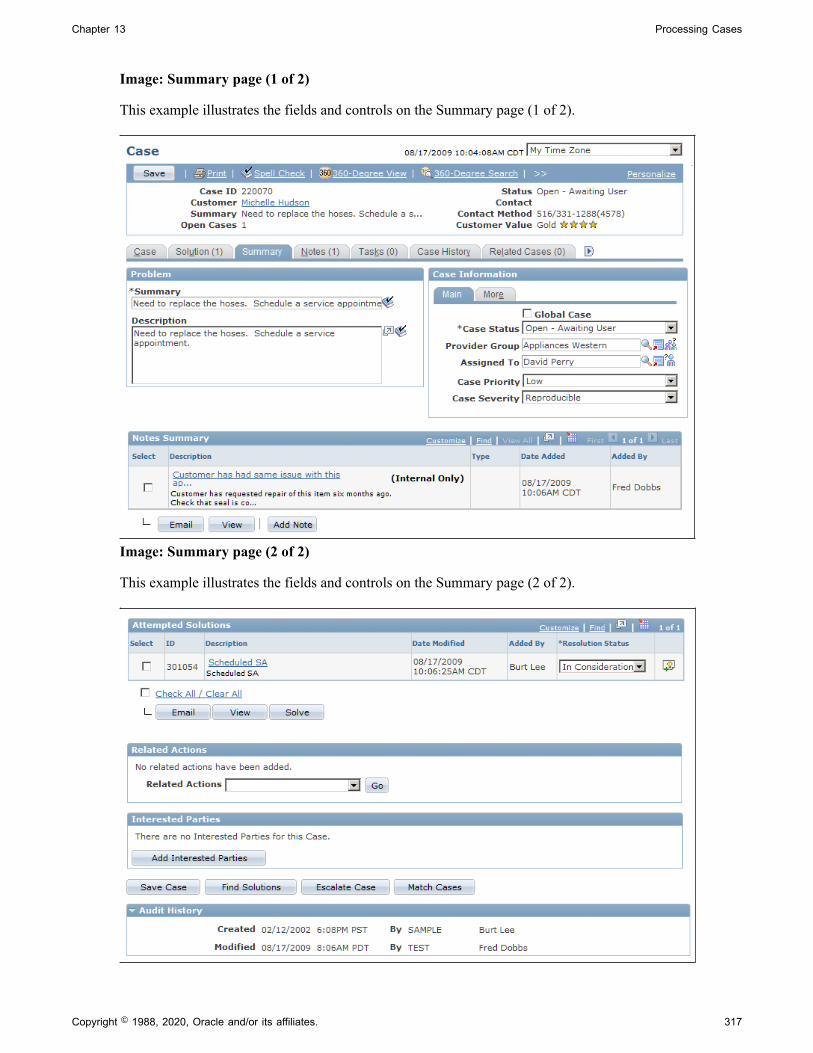
Chapter 13 Processing Cases
Image: Summary page (1 of 2)
This example illustrates the fields and controls on the Summary page (1 of 2).
Image: Summary page (2 of 2)
This example illustrates the fields and controls on the Summary page (2 of 2).
Copyright © 1988, 2020, Oracle and/or its affiliates. 317

Processing Cases Chapter 13
Use the Summary page to view and manage case information from a single page.
Note: The number to the right of the tabs that appear at the top of the page indicates the number of itemsthat appear on that page. For example, if the system displays the number 2 in parentheses on the Notestab, then two notes are associated with the case.
Adding Notes and Attachments
This topic provides an overview of notes and attachments and discusses how to add notes and attachmentsto a case.
Page Used to Add Notes and AttachmentsPage Name Definition Name Usage
Notes Page RC_CASE_NOTE Track notes and attachments that arerelated to cases.
Understanding Notes and AttachmentsRecording notes and attaching files to those notes is often essential to a user's work. Notes are the primarymethod that is used to track case research and communications. If you exchange files with the caller, youneed to associate those files with the case.
PeopleSoft CRM provides a standard interface for working with notes and attachments across all thecomponents that require this functionality. On the Case page, you can use text trays and quick keys toauto-fill static and dynamic data to create notes about a case. The Notes page is enabled when delivered.
Note: Once a case is closed, you can add a note on the Notes page by clicking the Add Note button or onthe Summary page by clicking the Add Note or Attachment button. You cannot enter a note on the Casepage in the Add a Note section.
Adding Case Notes for Inbound and Outbound EmailIf the ERMS application is licensed and installed, you can set up the system to automatically add notesto cases when inbound email are received and outbound email are sent for them. When the Add everynotification as Note to the Associated Case option is selected, the system adds a note to the case for eachemail it receives and delivers using the information from the email, as described in this table:
Case Note Field Name Field Value
Subject <Email subject>
Details <Email body>
Visibility All
318 Copyright © 1988, 2020, Oracle and/or its affiliates.

Chapter 13 Processing Cases
Case Note Field Name Field Value
Note Origin Inbound, Outbound, Outbound AAF, Outbound Solution, orOutbound Notes
Note Type Notification
Date Added <Date and time of when the note was created>
Added By • For inbound email: <PeopleSoft user who started theERMS processes>
• For outbound email sent by an agent: <agent who sent theemail>
• For outbound email sent by an AAF policy: <agent whotriggered the policy on the case>
Customer For inbound email: <customer who sent the email>
For outbound email: <blank>
Contact • For inbound email: <customer contact who sent theemail>
• For outbound email: <blank>
Employee • Note for inbound email: <employee who sent the email>
• Note for outbound email: <blank>
Here are a list of scenarios where the system adds a case note when an email is received or sent from acase:
• When an agent creates a case from an inbound email on the Recent Activities tab of the emailworkspace.
A case note for the inbound email is added to the new case.
• When a case is created automatically from an inbound email (based on a setup option).
A case note for the inbound email is added to the new case.
• When an agent associates an existing case to an inbound email from the email workspace.
A case note for the inbound email is added to the existing case.
• When an agent sends an email response for an inbound email on the email workspace and the inboundemail is associated with a case.
A case note for the outbound email response is added to the case.
• When an agent sends an email response for an inbound email from a case.
Copyright © 1988, 2020, Oracle and/or its affiliates. 319

Processing Cases Chapter 13
A case note for the outbound email is added to the case.
• When an agent sends an outbound email (not a response) from a case.
A case note for the outbound email is added to the case.
• When a customer sends an email response (inbound email) for an agent's outbound email that isassociated with a case.
A case note for the inbound email is added to the case.
• When an agent sends one or more solutions by email from a case.
A case note for the outbound email is added to the case.
• When an agent sends one or more notes by email from a case.
A case note for the outbound email is added to the case.
• When an AAF policy sends an outbound email from a case based on a triggering event.
A case note for the outbound email is added to the case.
• When an agent sends a reminder using the Set Reminder feature from a case.
A case note for the outbound reminder is added to the case.
See "System Installations Page" (PeopleSoft CRM 9.2: Multichannel Applications).
Notes PageUse the Notes page (RC_CASE_NOTE) to track notes and attachments that are related to cases.
Navigation
• Support > Search Cases > Case > Notes
• HelpDesk > Search Cases > Case > Notes
• HR HelpDesk > Search Cases > Case > Notes
• Analyst Service Center > Search Cases > Case > Notes
320 Copyright © 1988, 2020, Oracle and/or its affiliates.

Chapter 13 Processing Cases
Image: Notes page (1 of 2)
This example illustrates the fields and controls on the Notes page (1 of 2).
Image: Notes page (2 of 2)
This example illustrates the fields and controls on the Notes page (2 of 2).
The Notes Summary region of the page includes the following fields:
Copyright © 1988, 2020, Oracle and/or its affiliates. 321

Processing Cases Chapter 13
Filter by Note Type Select a note type for the system to display notes by the selectednote type in the Notes Summary section. Values are:
All (default value)
Comment
Customer Call
Notification
Research
Subject and Details Click the subject link to view and edit details of the note in theNote Details section that appears subsequently on the samepage.
These values are not available for edit if the case note is createdautomatically after sending or receiving a notification.
A paperclip icon after the subject indicates that the note has oneor more attachments.
Email Click this button to send an email based on the selected note(s). Any attachments for the note will be available to include withthe email. After a notification is sent, the Case Summary page isdisplayed. Users can view the notification history in the NotesSummary section of the Case Summary page.
See "Understanding Manual Notifications" (PeopleSoft CRM9.2: Automation and Configuration Tools).
View Click this button to view details of the selected note(s) displayedas a separate page.
Add Note Click this button to add a note to the case.
The Note Details region of the page includes the following fields:
Subject Enter a summary description of the note.
Details Enter the main information for the note.
Visibility Select Internal to limit visibility of the note to internal workers:self-service users will not see this type of note. Select All toallow both internal workers and self-service users access to thenote.
Note Type See "Setting Up Note Types" (PeopleSoft CRM 9.2: ApplicationFundamentals ).
Origin Displays the origin of the case note.
• If the note is added manually by an agent, by quick code, orby and AAF policy, the value is Internal.
322 Copyright © 1988, 2020, Oracle and/or its affiliates.

Chapter 13 Processing Cases
• If the note is added for a self service case, the value is SelfService.
• If the note is added for an inbound or outbound email, thevalue can be Inbound, Outbound, Outbound AAF, OutboundSolution, or Outbound Notes.
To/From Displays the sender or recipient email address for case notesof type Notification. If there are multiple recipients for anoutbound email, the first 70 characters of all recipient emailaddresses will be displayed here.
This information is only applicable to notification-specific casenotes.
View Email Click to view the email message that is associated with this casenote.
This link appears if the case note is created for an inbound oroutbound email that is received or sent for the associated case.
Visibility Select whether the note is visible to self-service users. Select Allto show this note to both call center personnel and self-serviceusers; select Internal (default value) to hide this note from self-service users.
Contact Information (optional) Enter the customer contact or employee for whom thenote is created.
Add an Attachment Click this button to attach a file to the note. You will be ableto add a description of any attachment that you add. You willalso be able to control the visibility of the attachment to hide ordisplay it to self-service users similar to the way that visibilitycan be controlled for the note.
Agents can use text trays and quick keys to auto-fill static and dynamic data and create notes about a case.
Note: Static data is text that is part of text tray entry, such as “Customer resolved problem on their own.”Dynamic data includes tokens that the system dynamically resolves when the entry is used. For example,if you want to include the agent's name in a note, you could create a text tray entry such as “Contact{agent name}.” In this example, the text in brackets is the token, and the system substitutes the agent'sname when the full text is applied.
Related Links"Understanding Notes and Attachments" (PeopleSoft CRM 9.2: Application Fundamentals )
Adding Tasks to a Case
The Tasks page provides call center agents with the ability to assign tasks to themselves or to otheragents. Agents can add and update task information either on the Task page or on the Task section on the
Copyright © 1988, 2020, Oracle and/or its affiliates. 323

Processing Cases Chapter 13
Case Summary page. They can also add a task or drill down to the Task Details page to create or updatetask details. Users can also create a task when the case is closed.
Page Used to Add Tasks to a CasePage Name Definition Name Usage
Tasks Page RC_CASE_TSK Add tasks to a case.
Related Links"Understanding AAF" (PeopleSoft CRM 9.2: Automation and Configuration Tools)"Task Group Template Page" (PeopleSoft CRM 9.2: Application Fundamentals )
Tasks PageUse the Tasks page (RC_CASE_TSK) to add tasks to a case.
Navigation
• Support > Search Cases > Case > Tasks
• HelpDesk > Search Cases > Case > Tasks
• HR HelpDesk > Search Cases > Case > Tasks
• Analyst Service Center > Search Cases > Case > Tasks
Image: Tasks page
This example illustrates the fields and controls on the Tasks page.
324 Copyright © 1988, 2020, Oracle and/or its affiliates.

Chapter 13 Processing Cases
Type Displays various icons to indicate the type of task that appears. For example, if the task type is To Do, the system displays agreen box with a check mark.
Subject Click this link to go to the Task Details page, where you canupdate task information, add notes, and reassign workers.
Add Task Click this button to go to the Task Details page to add new tasksto the case and assign workers to the task. Users can also clickthis button to create a task after the case has been closed.
See "Understanding Task Management" (PeopleSoft CRM 9.2:Application Fundamentals ).
Task Group Select a group of tasks to be applied to the case.
Add Task Group Apply the group of tasks specified in the Task Group field. Allthe individual tasks from the specified task group template willbe added to the case.
Note: The only task templates which will appear in this fieldare those which have a status of Active and which belongto the application usage selected for task templates on thecorresponding Display Template ID.
Reviewing Case History
This topic provides an overview of case history and discusses how to review case history.
Pages Used to Review Case HistoryPage Name Definition Name Usage
Case History - Events Page RC_ACTION_HIST View a summary of important events inthe life cycle of a case.
Case History - Interactions Page RC_ACTION_HIST View information about interactionsrelated to the case.
Case History - Assignments Page RC_ACTION_HIST View information about caseassignments.
Case History - Audit Trail Page RC_ACTION_HIST View detailed information about changesto specific fields in the case.
Understanding Case HistoryThe Case History page has these four subtabs:
• Event History page
Copyright © 1988, 2020, Oracle and/or its affiliates. 325

Processing Cases Chapter 13
Event history provides a summary of the major events in the life cycle of a case.
• Interactions page
Case interactions are the sum of the events that take place when a customer or worker contacts theorganization.
• Assignments page
This subtab lists all the provider group and agent assignments associated with the case. It also lists theamount of time and percentage of service level consumed by each assignment.
• Audit History page
Case auditing complements event history processing by providing an automated mechanism forkeeping a detailed change history without cluttering the Event History page. Events are configurable.
There is some overlap in the data that these pages capture.
See "Case History Configuration Page" (PeopleSoft CRM 9.2: Automation and Configuration Tools).
Event History PageThis page displays information about major events in the life of the case, including a description of theevent and details of any field changes that are associated with the event.
AAF policies determines the events that are logged. In addition, each item references the policy namecontaining the case history action that logged the item. Policies are not active until you set them up.
The Interactions Page and the Audit History pages display information that also appears in the casehistory table. So, whenever there is an interaction, the system displays it on the Interactions page and inthe case history table. The same is true for the Audit History page. Whenever a change is picked up by theAudit history page, the system displays it in the case history table.
See "Case History Configuration Page" (PeopleSoft CRM 9.2: Automation and Configuration Tools).
Interactions PageThis page displays the events that occurred when a customer contacted the organization. An interaction iscreated every time a case is opened or accessed through computer telephony integration (CTI), from the360-degree view, or in self-service.
The system also creates an interaction when agents send notifications, email, and correspondence. Thesystem logs interactions automatically; so they cannot be turned on and off. An interaction may containmultiple subinteractions.
Assignments PageThis page provides a summary of all the provider group and agent assignments that have been associatedto the case. The total elapsed time for each such assignment is displayed so that it is easy to see whohas been working on the case and how long they have been working. If the case is associated with anagreement service level and restore time, the percentage of consumed restore time is displayed for eachassignment, as well as for the case as a whole.
The percent of service level agreement restore time consumed is calculated as follows:
326 Copyright © 1988, 2020, Oracle and/or its affiliates.

Chapter 13 Processing Cases
1. Count the total elapsed minutes from when the assignment was made to when it was changed or towhen the case was completed
(For the current assignment of an active case, count the minutes from making the assignment toclicking on the Assignments page subtab.)
2. Subtract any minutes for which the customer was not entitled to service.
This is based on the service level and holiday schedule associated with the customer's agreement, aswell as any time during which the case may have been on hold.
3. Divide the result by the total entitled restore time (in minutes) and multiply this by 100.
Consider the following example, in which a case was initially created and assigned to the provider groupAppliances Western, and then one hour later was assigned to the agent Mason Orellana.
Image: Assignments Grid
This is an example in which a case was initially created and assigned to a provider group and thenreassigned to an agent.
In this example, the agreement restore time associated to the case is 1500 minutes (25 hours). The percentservice level agreement (SLA) restore time consumed for the initial assignment is calculated as follows:
% SLA Consumed = [ (Date reassigned) – (Date assigned) – (Non-covered minutes per SLA) ] / (Restoretime) * 100
% SLA Consumed = [1:45 AM – 12:45 AM – 0] / 1500 * 100 = 4
%SLA Consumed = [60 elapsed minutes – 0 non-covered minutes] / 1500 restore minutes * 100 = 4percent
If the service level for the case agreement specified that the customer had no coverage from 1:00am to6:00am, then the percent SLA consumed would be different, since 45 minutes of the elapsed time wouldnot be covered by the service agreement. This would be calculated as follows:
% SLA Consumed = [ (Date reassigned) – (Date assigned) – (Non-covered minutes per SLA) ] / (Restoretime) * 100
% SLA Consumed = [1:45 AM – 12:45 AM – 45] / 1500 * 100 = 1
% SLA Consumed = [60 elapsed minutes – 45 non-covered minutes] / 1500 restore minutes * 100 = 1percent
Note: If an agreement is changed on a case that already had an agreement, the percent SLA consumedwill be reset to zero for all assignments unless the case is already late. In the event that the case hasalready missed the SLA and the agreement is changed, the % SLA Consumed values will remainunchanged.
Copyright © 1988, 2020, Oracle and/or its affiliates. 327

Processing Cases Chapter 13
Audit History PageThis page displays record-level changes to case data. Your organization chooses which fields in the recordto audit and the types of changes to capture (adding, updating, displaying, or deleting). While the systemcan capture before and after values, no conditional logic exists to evaluate the before and after valuesof the fields. The system captures all audited actions regardless of the field value. Auditing is delivereddisabled.
Related Links"Understanding Audit Information" (PeopleSoft CRM 9.2: Application Fundamentals )"Understanding AAF" (PeopleSoft CRM 9.2: Automation and Configuration Tools)"Understanding Interactions" (PeopleSoft CRM 9.2: Application Fundamentals )
Case History - Events PageUse the Case History - Events page (RC_ACTION_HIST) to view a summary of important events in thelife cycle of a case.
Navigation
• Support > Search Cases > Case > Case History
• HelpDesk > Search Cases > Case > Case History
• HR HelpDesk > Search Cases > Case > Case History
• Analyst Service Center > Search Cases > Case > Case History
Image: Case History - Events page
This example illustrates the fields and controls on the Case History - Events page.
328 Copyright © 1988, 2020, Oracle and/or its affiliates.

Chapter 13 Processing Cases
Note: To populate the Event History grid for adhoc email notifications that are sent from the case, useAAF to create policies. When you create the policy, use the term Adhoc Email Subject.
Date The date that the action occurred.
Policy Name The system populates this field with the description of the actionfrom the Event Definition page.
Details Details about the action that was taken. For example, if a case isescalated or the assignment of a case changes.
Visibility The system displays either All or Internal to indicate who canview the details of the event.
Changed By The name of the agent who initiated the event.
Case History - Interactions PageUse the Case History - Interactions page (RC_ACTION_HIST) to view information about interactionsrelated to the case.
Navigation
Click the Interactions tab on the Case History page.
Image: Case History - Interactions page
This example illustrates the fields and controls on the Case History - Interactions page.
Date/Time Created The date and time the agent created the interaction.
Type The type of interaction, either Inbound or Outbound.
Channel The method used to initiate the interaction.
Copyright © 1988, 2020, Oracle and/or its affiliates. 329
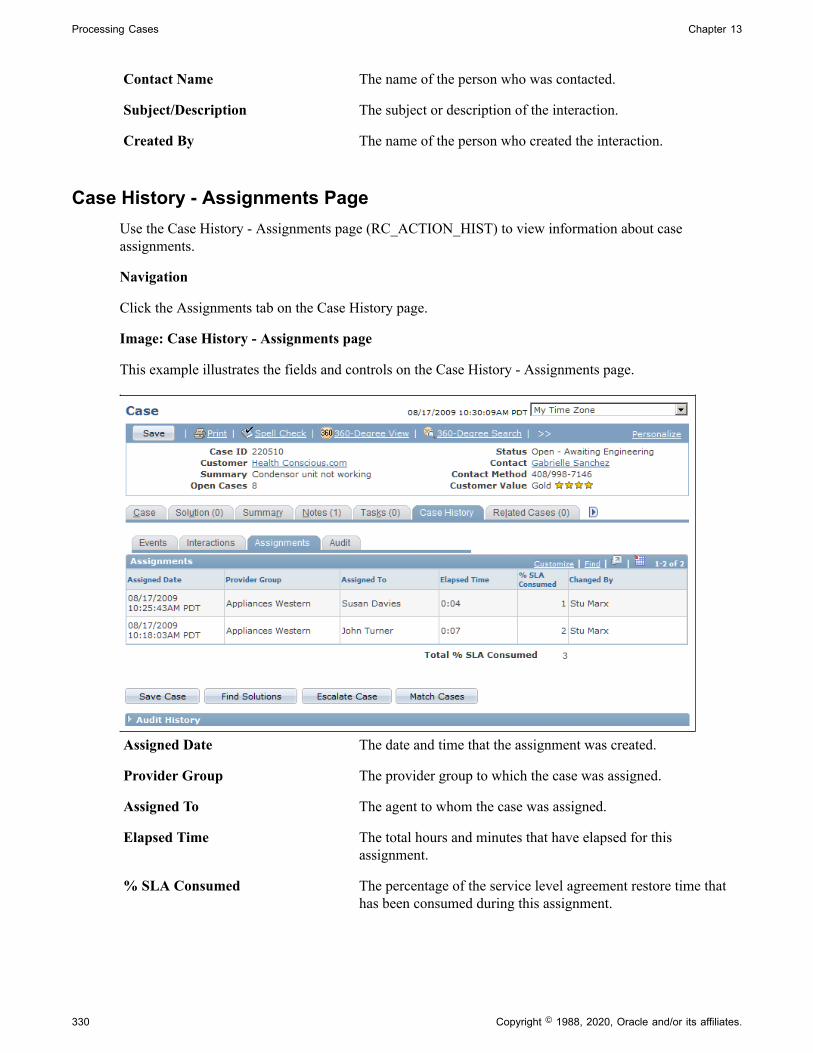
Processing Cases Chapter 13
Contact Name The name of the person who was contacted.
Subject/Description The subject or description of the interaction.
Created By The name of the person who created the interaction.
Case History - Assignments PageUse the Case History - Assignments page (RC_ACTION_HIST) to view information about caseassignments.
Navigation
Click the Assignments tab on the Case History page.
Image: Case History - Assignments page
This example illustrates the fields and controls on the Case History - Assignments page.
Assigned Date The date and time that the assignment was created.
Provider Group The provider group to which the case was assigned.
Assigned To The agent to whom the case was assigned.
Elapsed Time The total hours and minutes that have elapsed for thisassignment.
% SLA Consumed The percentage of the service level agreement restore time thathas been consumed during this assignment.
330 Copyright © 1988, 2020, Oracle and/or its affiliates.
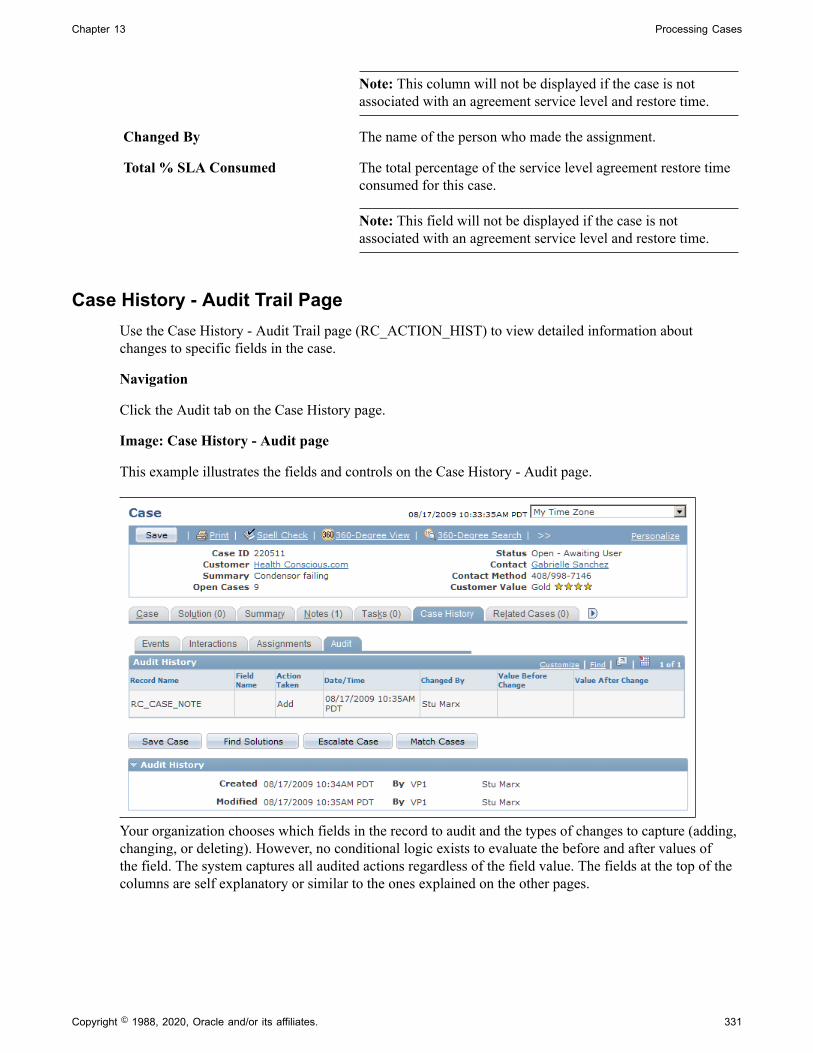
Chapter 13 Processing Cases
Note: This column will not be displayed if the case is notassociated with an agreement service level and restore time.
Changed By The name of the person who made the assignment.
Total % SLA Consumed The total percentage of the service level agreement restore timeconsumed for this case.
Note: This field will not be displayed if the case is notassociated with an agreement service level and restore time.
Case History - Audit Trail PageUse the Case History - Audit Trail page (RC_ACTION_HIST) to view detailed information aboutchanges to specific fields in the case.
Navigation
Click the Audit tab on the Case History page.
Image: Case History - Audit page
This example illustrates the fields and controls on the Case History - Audit page.
Your organization chooses which fields in the record to audit and the types of changes to capture (adding,changing, or deleting). However, no conditional logic exists to evaluate the before and after values ofthe field. The system captures all audited actions regardless of the field value. The fields at the top of thecolumns are self explanatory or similar to the ones explained on the other pages.
Copyright © 1988, 2020, Oracle and/or its affiliates. 331

Processing Cases Chapter 13
Managing Related Cases
This topic provides an overview of related cases and discusses how to manage related cases.
Pages Used to Manage Case RelationshipsPage Name Definition Name Usage
Related Cases Page RC_RELATIONSHIP Manage case relationships, relatecases to each other based on caserelationship types that your organizationhas established, and view and deleteexisting case relationships.
Your organization must define caserelationship types and workflow rules forcascading statuses through related cases.
Search Cases Page RC_CASE_SEARCH_SEC. Select a case to relate to the current case.
Relate Existing Case - Relationship Page RC_REL_TYPE_SEC Specify the relationship details whenrelating a case to an existing case.
Create a New Case - Relationship Page RC_REL_COPY Specify the relationship details whenyou create a new related case. You canalso specify which information from theoriginating case to copy into the case thatyou are creating.
Understanding Related CasesUsers can relate cases to each other for numerous reasons. Your organization establishes valid caserelationship types on the Case Relationship Type page. Each relationship is marked as hierarchical orequivalent (non-hierarchical). Each case in a relationship has a relationship label. If the relationship ishierarchical, the parent case and the child case have separate labels. If the relationship is equivalent, onlyone valid label exists.
When defining hierarchical relationship types, you can select the Set Parent As Global Case optionto make the system automatically designate the parent case as a global case as soon as you establish arelationship between that case and a child case.
See Setting Up Case Relationship Types and Labels.
You can easily search for similar cases from the Case page (using the Match Cases button) or from the360-Degree View page in order to identify cases that should be related to each other.
The Case Relationships page displays a list of all cases that are related to the current case. Relationshipsare always reciprocal. If case A is related to case B, then the Related Cases page for both cases reflectsthe relationship. However, child cases of a common parent do not appear on each other's Related Casespage. Use the Related Cases page of the parent case to see all case relationships at a glance.
Similarly, two cases that are equivalent to a third case do not appear on each other's Related Cases page.That is, the fact that case A is equivalent to both case B and case C does not establish a relationship
332 Copyright © 1988, 2020, Oracle and/or its affiliates.
Chapter 13 Processing Cases
between case B and case C. To see all equivalent cases in one place, you must make the equivalent casesinto children of a common parent.
You can easily choose to make the system cancel any duplicate cases that you identify by associatingthem with the appropriate original case using a relationship type that has been set to use the optionentitled Set status of child case using duplicate case status from the Call Center Business Unit Defaults.
See Setting Up Case Relationship Types and Labels.
Your organization can also use the AAF Case Relationship action to cascade case statuses. You can writea policy to use this action to cascade statuses from a parent case to all of its child cases.
For example, this is useful if your organization establishes a global relationship type for trackingproblems where a single solution (such as rebooting a server) fixes a problem for multiple people. Inthis situation it may make sense to automatically close all child cases when the parent case is closed.When the status cascades to children, any status-related workflow for the child case is triggered, includingcascading statuses to the child case's children.
Note: The Case Relationship policy is delivered inactive in the Case Status Changed policy.
Methods for relating cases are:
• Relate the current case to another existing case.
For example, you receive four calls reporting problems about your web server before you recognizethat this is a global problem. The four cases that you've already created need to be related to eachother. When you relate the cases, you can choose one as the parent case and make the other three intochildren or you can make all four of the original cases into children of a new parent case.
• Create a new case and relate it to the current case.
For example, you've established a global case for your web server problem. Someone calls to reportthe problem. From the existing global case, you can create a new child case and copy the probleminformation into the new case.
Note: You can also modify the display template to enable the user to relate a case to a new or an existingcase on the Case Summary page.
Copyright © 1988, 2020, Oracle and/or its affiliates. 333

Processing Cases Chapter 13
Image: Methods for relating cases process flows
This diagram illustrates the methods for relating cases, depending on whether the case in question is newor existing.
Identifying Potentially Related CasesWhile reviewing or creating a case you can click the Match Cases button on any page of the casecomponent to search for similar cases using predefined match criteria. Once similar cases are found,you can quickly relate the case to one of the similar cases, such as designating it as the related child of aglobal case or as a duplicate case that is to be cancelled.
See Managing Basic Case Information.
You can also view potentially related cases for a particular customer or employee by looking at the 360-Degree View. As delivered, the relevant 360-Degree views will contain a folder for global cases with thefollowing nodes:
• Related: The Related node displays the global cases for which a related case is already created for thecustomer or employee. If the global case is for the customer or employee whose 360-Degree View isbeing displayed, the case will show in the related node
• Not Related. The Not Related node displays cases that are not yet related to the customer or employeebut which might impact them. It lists existing global cases whose products are the same as those forthe installed products of the customer or employee. It also lists global cases that are not associatedwith any product.
• View All. The View All node lists all the global cases from the Related and Not Related nodes.
Selecting any of the nodes from the Global Cases folder will populate the related dynamic grid withinformation about those cases. Use this grid to see information from the list of global cases or transfer to aglobal case by clicking on its Case ID link.
334 Copyright © 1988, 2020, Oracle and/or its affiliates.

Chapter 13 Processing Cases
Note: When the link of a secure global case is selected, you will not be able to access the case unless youare in the provider group assigned to that case. Similarly, for secured cases, the Summary, Product, CaseType, and Incident Location fields will display the word Secured instead of the relevant data.
When viewing the Not Related or View All dynamic grids, you can perform a related action on a globalcase by selecting its row on the grid and choosing the desired action from the Related Actions list. Asdelivered, the following two actions will be available.
• Add Child Case: The Add Child Case action automatically creates a child case and links it to theselected global case. The new case will contain the customer or employee details associated with thecurrent 360-Degree View, and the Problem and Resolution of the global case will be copied over tothe new case. If the 360-Degree View has been opened for a company without a contact and the AddChild Case action is selected, you will be prompted to search and select the company contact.
• Add Interested Party: The Add Interested Party action will add the contact of the customer as aninterested party to the global case, and will apply the reason specified from the Reason Interestedfield on the Options page of the Business Unit Call Center Definition setup component. If the 360-Degree View has been opened for a company without a contact and the Add Interested Party action isselected, you will be prompted to search and select the company contact.
The Global Cases folder and related dynamic grid on the 360-Degree View is shown here.
Image: 360-Degree View page with Global Cases folder expanded
This example illustrates the fields and controls on the 360-Degree View page with Global Cases folderexpanded.
Copyright © 1988, 2020, Oracle and/or its affiliates. 335

Processing Cases Chapter 13
Relating a Case to an Existing CaseTo relate a case to an existing case:
1. On the Related Cases page, click the Relate an Existing Case button.
The Search Cases page appears.
2. Use the Search Cases page to identify the case that you want to associate with the current case.
Enter search criteria to help you find the case and click the Search button. The system returns a list ofcases that match your criteria. To select a case, click that case in the results list. The Relate ExistingCase - Relationship page appears.
If your search criteria uniquely identifies a case, the system bypasses the list of search results anddisplays the Relate Existing Case - Relationship page.
3. Use the Relate Existing Case - Relationship page to specify the relationship details.
Specify a relationship type and choose relationship labels for each of the cases. Valid relationshiptypes are defined by your organization and are based on the business unit of the case.
4. Click OK.
The system establishes the relationship and saves the case. The new case relationship appears on theRelated Cases page.
Another way to relate an existing case to another is to click the Match Cases button on any page of theCase component, and select the desired case to relate to the current one from among the displayed results.
See Managing Basic Case Information.
Creating and Relating a New CaseTo create a new case related to the current case:
1. On the Related Cases page, click the Create and Relate a New Case button.
The Create a New Case - Relationship page appears.
2. Use the Create a New Case - Relationship page to specify the relationship details.
Specify a relationship type and choose relationship labels for each case. Your organization definesvalid relationship types based on the business unit of the case.
3. Select the information to copy from the original case to the new case.
You can copy the customer or employee information, problem information, and resolutioninformation.
4. Click OK.
Customer or employee information is required for all cases. Therefore, if you choose to not copycaller information, the Create a New Case - Relations page appears so that you can identify thecompany-contact or the consumer-employee contact for whom you are creating and relating a case.
Note: Contact information is optional if you are creating a case for a consumer.
336 Copyright © 1988, 2020, Oracle and/or its affiliates.

Chapter 13 Processing Cases
If you choose to copy the caller information, the system immediately creates the new case and returnsyou to the Related Cases page. The newly established case relationship appears in the ExistingRelated Cases grid. Select the case link in the Related Cases grid to transfer to the new case.
Related LinksSetting Up Case Relationship Types and Labels
Related Cases PageUse the Related Cases page (RC_RELATIONSHIP) to manage case relationships, relate cases to eachother based on case relationship types that your organization has established, and view and delete existingcase relationships.
Your organization must define case relationship types and workflow rules for cascading statuses throughrelated cases.
Navigation
• Support > Search Cases > Case > Related Cases
• HelpDesk > Search Cases > Case > Related Cases
• HR HelpDesk > Search Cases > Case > Related Cases
• Analyst Service Center > Search Cases > Case > Related Cases
Image: Related Cases page
This example illustrates the fields and controls on the Related Cases page.
The Related Cases grid lists all existing case relationships.
Relationship Describes how the current case relates to the related case.
If the relationship is hierarchical, the parent case and the childcase can have different values in this field. For example, one
Copyright © 1988, 2020, Oracle and/or its affiliates. 337

Processing Cases Chapter 13
value might be Global Case and the other value might be Ticket. If the relationship is equivalent, only one label is valid.
Type The relationship type.
This value is the same for both cases in the relationship. Forexample, if your organization established a relationship typecalled Global, then both the parent and child record have Globalin the Type column.
Case The case number of the related case. Click the case number linkto display the related case.
Customer and Name For a PeopleSoft Support case, these fields identify the customerand contact who are associated with the related case.
Employee and EmplID (employeeID)
For a PeopleSoft HelpDesk case, these fields identify theemployee who is associated with the related case.
Status The status of the related case. The system gets this informationfrom the Case Status field for the case.
Date Added The date and time that the relationship was established.
Delete Click to delete the case relationship. Clicking this button doesnot delete either case, only the relationship.
Creating New Case Relationships Relate an Existing Case Click to display the Relate Existing Case - Search page, where
you identify an existing case to relate to the current case. Afteryou identify the case, the system displays the Relate ExistingCase - Relationship page, where you establish the relationshipbetween the cases.
Create and Relate a New Case Click to display the Create a New Case - Relationship page, where you can choose the information to be copied to the newcase and establish the relationship between the cases.
Relate Existing Case - Relationship PageUse the Relate Existing Case - Relationship page (RC_REL_TYPE_SEC) to specify the relationshipdetails when relating a case to an existing case.
Navigation
Select the case on the Relate Existing Case - Search page.
338 Copyright © 1988, 2020, Oracle and/or its affiliates.

Chapter 13 Processing Cases
Image: Relate Existing Case - Relationship page
This example illustrates the fields and controls on the Relate Existing Case - Relationship page.
Relationship Type Specify a relationship type. Relationship types can be eitherhierarchical (parent-child) or nonhierarchical. Your organizationdefines values that are based on the business unit of the case.
Case (current case number) and Case(related case number)
Select relationship labels for the current case and the case thatyou're relating to it.
If the relationship is hierarchical, one valid label exists for theparent case and one valid label exists for the child case. Matchthe cases to the appropriate labels to establish the desired parent-child relationship.
If the relationship is not hierarchical, only one valid label exists. Select that label for both cases.
Related LinksCase Relationship Type Page
Create a New Case - Relationship PageUse the Create a New Case - Relationship page (RC_REL_COPY) to specify the relationship detailswhen you create a new related case.
You can also specify which information from the originating case to copy into the case that you arecreating.
Navigation
Click the Create and Relate a New Case button on the Related Cases page.
Copyright © 1988, 2020, Oracle and/or its affiliates. 339

Processing Cases Chapter 13
Image: Create a New Case - Relationship page
This example illustrates the fields and controls on the Create a New Case - Relationship page.
Characteristics Relationship Type Specify a relationship type. Relationship types can be either
hierarchical (parent-child) or nonhierarchical. Values are definedby your organization and are based on the business unit of thecase.
Case (current case number) and NewCase
Select relationship labels for both the current case and the newcase that you're creating.
If the relationship is hierarchical, one valid label exists for theparent case and one valid label exists for the child case. Matchthe cases to the appropriate labels to establish the desired parent-child relationship.
If the relationship is not hierarchical, only one valid label exists. Select that label for both cases.
InformationThe system always copies the business unit to the new case. You choose which other information to copyto the new case.
Customer In PeopleSoft Support, select this check box to copy the callerfrom the originating case to the new case. The system copies thecustomer, contact, site, PIN (person identification number), SIN (site identification number), contact method, and contact details.
Employee For PeopleSoft HelpDesk applications, select this check box tocopy the caller from the originating case to the new case. Thesystem copies the employee number, employee name, phonetype, email address type, contact method, contact details, andalternate contact.
340 Copyright © 1988, 2020, Oracle and/or its affiliates.

Chapter 13 Processing Cases
Problem Select to copy problem information from the originating caseto the new case. The system copies the problem summary, description, case status, case type, source, priority, severity, impact, error code, error message, resolved on first contact, closed date and time, provider group, assignee, product, problem type, serial number, asset tag, and category, type, anddetail information.
If you do not copy problem information, the summary for thenewly created case identifies the originating case.
Note: If you don't copy caller information to the new case, thenthe product, serial number, and asset tag that are copied mightnot be valid for the caller that you identify. In this situation, modify the values before saving the case.
Resolution Select this check box to copy resolution information fromthe originating case to the new case. The system copies allattempted resolutions and their statuses, but not the resolutionnotes.
OK Click this button to create the new case, establish therelationship between the two cases, and return to the RelatedCases page. If you are not copying caller information, thesystem prompts you to identify the caller for the new casebefore the case is created.
Cancel Click this button to return to the Related Cases page withoutestablishing the relationship.
Related LinksUnderstanding Case ManagementSetting Up Case Relationship Types and Labels
Managing Related Actions
This topic discusses how to manage related actions.
Copyright © 1988, 2020, Oracle and/or its affiliates. 341

Processing Cases Chapter 13
Pages Used to Relate a Case to Other PeopleSoft CRM ObjectsPage Name Definition Name Usage
Related Actions Page RC_ASSOCIATION Relate a case to other PeopleSoft CRMobjects. In PeopleSoft HelpDesk forHuman Resources, there are other actionlinks to pages in the HR database. InPeopleSoft Service Center for HigherEducation, there are action links to pagesin the PeopleSoft Campus Solutionsapplication.
Use Business Project Page RC_LINK_GENBP_SEC Associate business projects with a case.
Send Case Survey Page RC_LINK_SEND_SRVY Send case surveys to existing customers.
Branch Script Page RC_LINK_SCRIPT_SEC Select a branch script to relate to a case.
Defects and Enhancements Page RC_CASE_DEFECT_SEC Search for and identify a defect to relateto the case.
Quality Management - Defect Page RQ_DEFECT_MAIN Add a new defect and relate it to thecase.
Create Sales Lead Page RC_LINK_LEAD_SEC Create a sales lead and relate it to thecurrent case.
Create Order Page RC_LINK_RO_SEC Create an order and relate it to thecurrent case.
Return Material Authorization Page RC_RMA_HDR Create an RMA and relate it to thecurrent case.
Create Service Order Page RC_LINK_RO_SEC Create a service order and relate it to thecurrent case.
Change Requests Page RC_CASE_CHANGE_SEC Search for and identify a change requestto relate to the case.
Change Request Page RG_CHANGE_REQUEST Create change requests.
Understanding Related ActionsIn PeopleSoft CRM, you can:
• Manually create a related action on a case.
• Configure the system so that selecting a quick code suggests an action.
• Configure the system so that PeopleSoft's AAF system suggests an action.
342 Copyright © 1988, 2020, Oracle and/or its affiliates.

Chapter 13 Processing Cases
Related Actions for PeopleSoft Support, HelpDesk, and Service Center for HigherEducation CasesThis table lists and describes delivered actions you can associate with PeopleSoft Support, PeopleSoftHelpDesk, and Service Center for Higher Education cases:
Important! Some of the listed actions are role-specific (for example, worker, company contact, orconsumer). If an action is attempted for someone whose role does not permit that action, or if thatsomeone is associated with more than one role and the system is unable to determine for which rolethat action should be created, an error message will be displayed to inform the user that the action is notavailable.
Note: In PeopleSoft HelpDesk for Human Resources, there are other action links to pages in the HRdatabase instead of the related actions listed below. In PeopleSoft Service Center for Higher Education,there are action links to pages in the PeopleSoft Campus Solutions application.
Link Description Applicable To Role-Specific?
Asset Administrator Launches an assetmanagement application froma case to gather informationabout network devices.
HelpDesk, and HigherEducation cases
Worker
Asset Summary Launches an assetmanagement application,which passes the desired assetinformation to the applicationfor reporting.
HelpDesk, and HigherEducation cases
Worker
Branch Script Launches a specified branchscript.
Support and Higher Educationcases
Consumer or CompanyContact
Business Project Launches the Use BusinessProject page, which lets theuser select a business projectthat they want to associatewith the case.
You can set up additional linkdefinitions to launch a specificbusiness project.
Support, HelpDesk, andHigher Education cases
No
Copyright © 1988, 2020, Oracle and/or its affiliates. 343

Processing Cases Chapter 13
Link Description Applicable To Role-Specific?
Case Survey Launches the Send CaseSurvey page, where an agentcan enter a business unit, dialog name, and action tosend a survey to the customer.
Important! You can also setup this link to automaticallylaunch a survey and bypassthe Send Case Survey page. In addition, the PeopleSoftsystem delivers the roles ofCall Center Manager andHelp Desk Manager to thispermission list to be usedfor the new survey reports. Users who are not authorizedto view the reports will notbe able to see the links in theRelated Actions field.
Support and Higher Educationcases
No
Change Request - Create New Creates a new change request. HelpDesk, and HigherEducation cases
Worker
Change Request - RelateExisting
Relates an existing changerequest to the case.
For example, you may want touse Change Request - RelateExisting when a caller hasa problem with their emailsystem. The agent knowsthat this has been a reportedproblem in the past and findsa related change request. Through Related Actions, theagent associates this new caseto the existing change request.
HelpDesk, and HigherEducation cases
Worker
Create RMA An RMA authorizes acustomer to return defectiveor unwanted materials.
Support and Higher Educationcases
You can manage RMAs onlyif PeopleSoft Support isintegrated with PeopleSoftInventory.
Consumer or CompanyContact
Defect - Create New Create defects to identifyproblems with your products.
Support, HelpDesk, andHigher Education cases
No
344 Copyright © 1988, 2020, Oracle and/or its affiliates.

Chapter 13 Processing Cases
Link Description Applicable To Role-Specific?
Defect - Relate Existing Associate existing defectswith cases.
Support, HelpDesk, andHigher Education cases
No
Remote Control Launches the assetmanagement applicationfrom a case to performtroubleshooting on a remotedevice, such as an employee'slaptop.
HelpDesk, and HigherEducation cases
Worker
Sales Lead Sales leads populate the salespipeline.
Support and Higher Educationcases
You can create sales leadsonly if you have implementedPeopleSoft Sales.
Consumer or CompanyContact
Sales Order A sales order records arequest for a product that isprovided by your company'ssales, marketing, or fieldservices organization.
Support and Higher Educationcases
You can create sales ordersonly if you've implementedPeopleSoft Order Capture.
Consumer or CompanyContact
Service Order A service order records arequest for a service that isprovided by your company'sfield services organization.
Support and Higher Educationcases
You can create service ordersonly if you've implementedPeopleSoft FieldService.
Consumer or CompanyContact
Software Delivery Launches your third-party Software Deliveryapplication, which can beused to install software onvarious identified assets.
HelpDesk, and HigherEducation cases
Worker
Work Order - Create New Launches the Create WorkOrder page, where an agentwho is working on a helpdesk case can create a workorder from the case to assign atechnician to troubleshoot andsolve the problem.
HelpDesk, and HigherEducation cases
Worker
See Link Group Page.
See "Understanding Display Templates" (PeopleSoft CRM 9.2: Automation and Configuration Tools).
Copyright © 1988, 2020, Oracle and/or its affiliates. 345

Processing Cases Chapter 13
Service Order and Material Return ComparisonWhen customers report problems with broken or defective parts or materials, you can do one of thefollowing:
• If the customer is entitled to on-site service, create a service order so that your organization can send afield service technician to the customer's site to repair the part.
• If the customer is not entitled to on-site service, create a return material authorization (RMA) so thatthe customer can return the merchandise.
Related Actions PageUse the Related Actions page (RC_ASSOCIATION) to relate a case to other PeopleSoft CRM objects.
In PeopleSoft HelpDesk for Human Resources, there are other action links to pages in the HR database. InPeopleSoft Service Center for Higher Education, there are action links to pages in the PeopleSoft CampusSolutions application.
Navigation
• Support > Search Cases > Case
Scroll down to the Actions section.
• HelpDesk > Search Cases > Case
Scroll down to the Actions section.
• HR HelpDesk > Search Cases > Case
Scroll down to the Actions section.
• Analyst Service Center > Search Cases > Case
Scroll down to the Actions section.
346 Copyright © 1988, 2020, Oracle and/or its affiliates.

Chapter 13 Processing Cases
Image: Related Actions page
This example illustrates the fields and controls on the Related Actions page.
Related Actions SummaryThis grid lists all existing relationships between the current case and other PeopleSoft CRM objects.
Type The types of related objects include: Customer SatisfactionScript, Lead Qualification Script, Troubleshooting Guide, Business Project, Sales Lead, Sales Order, RMA, QualityDefect, or Service Order.
Summary A description of the object, derived from the description field onthe page where the object is maintained.
Status Indicates the status of the related object that is associated withthe case.
Date Created The date that the object was created and associated with thecase.
Related Actions Select the type of action that you want to create and relate to thecase.
Note: Based on the products that you have installed you maywant to change the list of objects that appear in the drop-downlist box. For example, if you don't have PeopleSoft FieldServiceinstalled, you wouldn't want Service Order to appear.
See "Industry-Specific Translates Page" (PeopleSoft CRM 9.2:Automation and Configuration Tools).
Go After you select an action, click Go to access the page whereyou enter information specific to the type of object that you'recreating.
Copyright © 1988, 2020, Oracle and/or its affiliates. 347
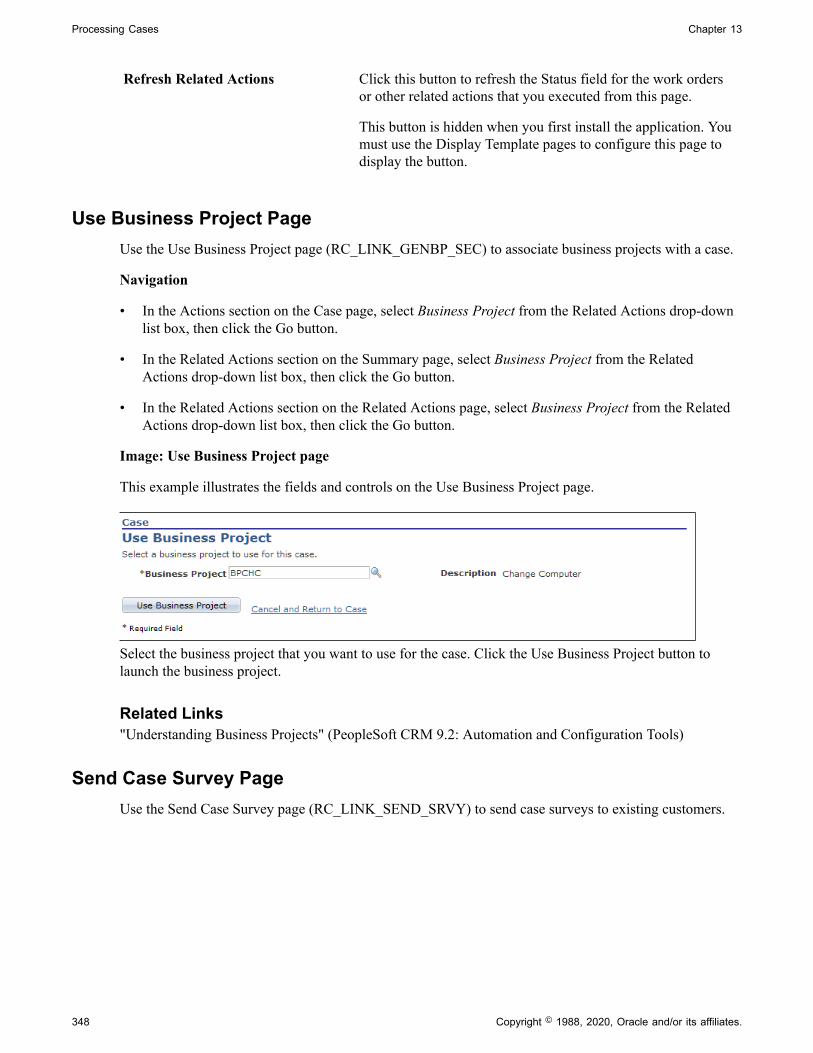
Processing Cases Chapter 13
Refresh Related Actions Click this button to refresh the Status field for the work ordersor other related actions that you executed from this page.
This button is hidden when you first install the application. Youmust use the Display Template pages to configure this page todisplay the button.
Use Business Project PageUse the Use Business Project page (RC_LINK_GENBP_SEC) to associate business projects with a case.
Navigation
• In the Actions section on the Case page, select Business Project from the Related Actions drop-downlist box, then click the Go button.
• In the Related Actions section on the Summary page, select Business Project from the RelatedActions drop-down list box, then click the Go button.
• In the Related Actions section on the Related Actions page, select Business Project from the RelatedActions drop-down list box, then click the Go button.
Image: Use Business Project page
This example illustrates the fields and controls on the Use Business Project page.
Select the business project that you want to use for the case. Click the Use Business Project button tolaunch the business project.
Related Links"Understanding Business Projects" (PeopleSoft CRM 9.2: Automation and Configuration Tools)
Send Case Survey PageUse the Send Case Survey page (RC_LINK_SEND_SRVY) to send case surveys to existing customers.
348 Copyright © 1988, 2020, Oracle and/or its affiliates.

Chapter 13 Processing Cases
Navigation
• In the Actions section on the Case page, select Case Survey from the Related Actions drop-down listbox, then click the Go button.
• In the Related Actions section on the Summary page, select Case Survey from the Related Actionsdrop-down list box, then click the Go button.
• In the Related Actions section on the Related Actions page, select Case Survey from the RelatedActions drop-down list box, then click the Go button.
Image: Send Case Survey page
This example illustrates the fields and controls on the Send Case Survey page.
Select the business unit, dialog name, and action that you want to use to send a survey to the customerassociated with the case; click OK.
Note: You can also set up this link to automatically launch a survey and bypass the Send Case Surveypage. To do this, you must modify the system data and use the Search Keys group box on the LinkDefinition page to select the last three terms that appear under Call Center, Link Definition after youselect the Add Term button. There terms are: Select a Dialog Business Unit <BUSINESS_UNIT>, Selecta Dialog ID <DIALOG_ID>, and Select an External Event Trigger <EXT_EVENT_TRIGGER>.
Related LinksUnderstanding Link Setup"Understanding Surveys" (PeopleSoft CRM for Online Marketing 9.2)
Branch Script PageUse the Use Branch Script page (RC_LINK_SCRIPT_SEC) to select a branch script to relate to a case.
Copyright © 1988, 2020, Oracle and/or its affiliates. 349

Processing Cases Chapter 13
Navigation
• In the Actions section on the Case page, select Branch Script from the Related Actions drop-down listbox, then click the Go button.
• In the Related Actions section on the Summary page, select Branch Script from the Related Actionsdrop-down list box, then click the Go button.
• In the Related Actions section on the Related Actions page, select Branch Script from the RelatedActions drop-down list box, then click the Go button.
Image: Use Branch Script page
This example illustrates the fields and controls on the Use Branch Script page.
Note: You can relate a different branch script multiple times to a single case. You can also relate the samebranch script to a single case multiple times.
Branch Script Select the desired script from the predefined scripts available inthe list.
Use Branch Script Click to launch the script on the Execute Script page. Onceyou launch the script, the relationship between the case and thescript is established.
Related Links"Understanding Scripts" (PeopleSoft CRM 9.2: Automation and Configuration Tools)
Defects and Enhancements PageUse the Defects and Enhancements page (RC_CASE_DEFECT_SEC) to search for and identify a defectto relate to the case.
350 Copyright © 1988, 2020, Oracle and/or its affiliates.

Chapter 13 Processing Cases
Navigation
• In the Actions section on the Case page, select Defect - Relate Existing from the Related Actionsdrop-down list box, then click the Go button.
• In the Related Actions section on the Summary page, select Defect - Relate Existing from the RelatedActions drop-down list box, then click the Go button.
• In the Related Actions section on the Related Actions page, select Defect - Relate Existing from theRelated Actions drop-down list box, then click the Go button.
Image: Defects and Enhancements page
This example illustrates the fields and controls on the Defects and Enhancements page.
On this page, you can sort and filter to narrow down your list of defects, or you can search for otherdefects.
Business Unit Select the business unit for the defect that you want to relate tothe case. The default comes from the Business Unit (Quality)field in the Call Center BU page.
Defect ID Select the defect that you want to relate to the current case.
Related LinksDefining Call Center Business Units"Understanding AAF" (PeopleSoft CRM 9.2: Automation and Configuration Tools)
Quality Management - Defect PageUse the Quality Management - Defect page (RQ_DEFECT_MAIN) to add a new defect and relate it tothe case.
Copyright © 1988, 2020, Oracle and/or its affiliates. 351

Processing Cases Chapter 13
Navigation
• In the Actions section on the Case page, select Defect - Create New from the Related Actions drop-down list box, then click the Go button.
• In the Related Actions section on the Summary page, select Defect - Create New from the RelatedActions drop-down list box, then click the Go button.
• In the Related Actions section on the Related Actions page, select Defect - Create New from theRelated Actions drop-down list box, then click the Go button.
Image: Quality Management - Defect page (1 of 2)
This example illustrates the fields and controls on the Quality Management - Defect page (1 of 2).
352 Copyright © 1988, 2020, Oracle and/or its affiliates.

Chapter 13 Processing Cases
Image: Quality Management - Defect page (2 of 2)
This example illustrates the fields and controls on the Quality Management - Defect page (2 of 2).
For instructions about using the Quality Management - Defect page:
See Understanding Defect and Fix Tracking.
Create Sales Lead PageUse the Create Sales Lead page (RC_LINK_LEAD_SEC) to create a sales lead and relate it to the currentcase.
Navigation
• In the Actions section on the Case page, select Sales Lead from the Related Actions drop-down listbox, then click the Go button.
• In the Related Actions section on the Summary page, select Sales Lead from the Related Actionsdrop-down list box, then click the Go button.
• In the Related Actions section on the Related Actions page, select Sales Lead from the RelatedActions drop-down list box, then click the Go button.
Copyright © 1988, 2020, Oracle and/or its affiliates. 353

Processing Cases Chapter 13
Image: Create Sales Lead page
This example illustrates the fields and controls on the Create Sales Lead page.
Note: Only PeopleSoft Support or Service Center for Higher Education users can create sales leads. Thisfunctionality is not available in PeopleSoft HelpDesk applications.
Business Unit Select a sales business unit for the lead that you're creating. Thedefault comes from the Sales Unit field on the Call Center BUpage.
Description Enter a description for the new lead.
Create Sales Lead Click to create the lead.
Related Links"Creating a Sales Lead" (PeopleSoft CRM 9.2: Sales)"Creating a Sales Opportunity" (PeopleSoft CRM 9.2: Sales)
Create Order PageUse the Create Order page (RC_LINK_RO_SEC) to create an order and relate it to the current case.
Navigation
• In the Actions section on the Case page, select Sales Order from the Related Actions drop-down listbox, then click the Go button.
• In the Related Actions section on the Summary page, select Sales Order from the Related Actionsdrop-down list box, then click the Go button.
• In the Related Actions section on the Related Actions page, select Sales Order from the RelatedActions drop-down list box, then click the Go button.
354 Copyright © 1988, 2020, Oracle and/or its affiliates.

Chapter 13 Processing Cases
Image: Create Order page
This example illustrates the fields and controls on the Create Order page.
Note: Only PeopleSoft Support or Service Center for Higher Education users can create orders. Thisfunctionality is not available in PeopleSoft HelpDesk applications.
Business Unit Select an order business unit for the order that you're creating. Business units are limited to those using the same customersetID as the case.
Description Enter a description for the new order.
Create Order Click to create the order.
Related Links"Understanding Order Capture" (PeopleSoft CRM 9.2: Order Capture Applications)
Return Material Authorization PageUse the Return Material Authorization page (RC_RMA_HDR) to create an RMA and relate it to thecurrent case.
Navigation
• In the Actions section on the Case page, select Create RMA from the Related Actions drop-down listbox, then click the Go button.
• In the Related Actions section on the Summary page, select Create RMA from the Related Actionsdrop-down list box, then click the Go button.
• In the Related Actions section on the Related Actions page, select Create RMA from the RelatedActions drop-down list box, then click the Go button.
Copyright © 1988, 2020, Oracle and/or its affiliates. 355

Processing Cases Chapter 13
Image: Return Material Authorization page
This example illustrates the fields and controls on the Return Material Authorization page.
Note: Only PeopleSoft Support users or Service Center for Higher Education can create RMAs. Thisfunctionality is not available in PeopleSoft HelpDesk applications.
Related LinksUnderstanding Material Return Processing
Create Service Order PageUse the Create Service Order page (RC_LINK_RO_SEC) to create a service order and relate it to thecurrent case.
Navigation
• In the Actions section on the Case page, select Service Order from the Related Actions drop-down listbox, then click the Go button.
• In the Related Actions section on the Summary page, select Service Order from the Related Actionsdrop-down list box, then click the Go button.
• In the Related Actions section on the Related Actions page, select Service Order from the RelatedActions drop-down list box, then click the Go button.
356 Copyright © 1988, 2020, Oracle and/or its affiliates.

Chapter 13 Processing Cases
Image: Create Service Order page
This example illustrates the fields and controls on the Create Service Order page.
Note: Only PeopleSoft Support or Service Center for Higher Education users can create service orders;this functionality is not available in PeopleSoft HelpDesk applications.
Business Unit Select a business unit for the service order that you're creating. The default comes from the Service Order Unit field in the CallCenter BU page.
Service ID Select the service that is to be performed.
Create Service Order Click to create the service order.
Related Links"Understanding Service Orders" (PeopleSoft CRM 9.2: Integrated FieldService)
Change Requests PageUse the Change Requests page (RC_CASE_CHANGE_SEC) to search for and identify a change requestto relate to the case.
Navigation
• In the Actions section on the Case page, select Change Request - Relate from the Related Actionsdrop-down list box, then click the Go button.
• In the Related Actions section on the Summary page, select Change Request - Relate from the RelatedActions drop-down list box, then click the Go button.
• In the Related Actions section on the Related Actions page, select Change Request - Relate from theRelated Actions drop-down list box, then click the Go button.
Copyright © 1988, 2020, Oracle and/or its affiliates. 357

Processing Cases Chapter 13
Image: Change Requests search page (1 of 2)
This example illustrates the fields and controls on the Change Requests search page (1 of 2).
Image: Change Requests search page (2 of 2)
This example illustrates the fields and controls on the Change Requests search page (2 of 2).
Note: Only PeopleSoft HelpDesk or Service Center for Higher Education users can relate changerequests; this functionality is not available in PeopleSoft Support applications.
To relate an existing change request to a case, click one of the change requests that appears in the SearchResults grid. The Change Request appears in the Related Actions Summary grid on the Case - Summarypage and the Case - Related Actions page.
To add a new change request, click the Add Change Request button at the bottom of the page.
358 Copyright © 1988, 2020, Oracle and/or its affiliates.

Chapter 13 Processing Cases
Change Request PageUse the Change Request page (RG_CHANGE_REQUEST) to create change requests.
Navigation
• In the Actions section on the Case page, select Change Request - Create New from the RelatedActions drop-down list box, then click the Go button.
• In the Related Actions section on the Summary page, select Change Request - Create New from theRelated Actions drop-down list box, then click the Go button.
• In the Related Actions section on the Related Actions page, select Change Request - Create New fromthe Related Actions drop-down list box, then click the Go button.
Image: Change Request page (1 of 2)
This example illustrates the fields and controls on the Change Request page (1 of 2).
Copyright © 1988, 2020, Oracle and/or its affiliates. 359

Processing Cases Chapter 13
Image: Change Request page (2 of 2)
This example illustrates the fields and controls on the Change Request page (2 of 2).
Note: Only PeopleSoft HelpDesk or Service Center for Higher Education users can create changerequests. This functionality is not available for PeopleSoft Support users.
For instructions about using the pages in this component:
See Understanding Change Request Management.
Identifying Interested Parties
The main people associated with a case are those who have the problem (customer contacts, consumersand their contact, employees and their alternate contacts) and the agent to whom the case is assigned.
Additionally, there may be many other people interested in the case and its progress, such as agents whoare working on the case or a similar case, a customer's account manager and sales representative, and soon.
By adding people to the list of interested parties for the case, you facilitate communication with thesepeople. When you send a notification from the case, the Outbound Notification page includes a check boxthat you can select to send the notification to the interested parties in addition to any other addressees.
Page Used to Identify Interested PartiesPage Name Definition Name Usage
Interested Parties Page RC_INTEREST_PARTY List the names of people who might wantto receive information about this case.
Interested Parties PageUse the Interested Parties page (RC_INTEREST_PARTY) to list the names of people who might want toreceive information about this case.
360 Copyright © 1988, 2020, Oracle and/or its affiliates.

Chapter 13 Processing Cases
Navigation
• Support > Search Cases > Case
Click the Add Interested Parties button on the Summary page
• HelpDesk > Search Cases > Case
Select the Add Interested Parties button on the Summary page.
• HR HelpDesk > Search Cases > Case
Select the Add Interested Parties button on the Summary page.
• Analyst Service Center > Search Cases > Case
Select the Add Interested Parties button on the Summary page.
Image: Interested Parties page
This example illustrates the fields and controls on the Interested Parties page.
Name To be an interested party, a person must have a person record inthe PeopleSoft CRM database.
For the system to send notifications to the person, the personmust have a user ID (for worklist notifications) or an emailaddress (for email notifications).
Reason The reason that the person is included as an interested party. Your organization defines values based on the business unit ofthe case. The reason codes shown here are those defined withthe reason type Reason Interested.
Date Added The date and time that the person was added as an interestedparty.
Copyright © 1988, 2020, Oracle and/or its affiliates. 361

Processing Cases Chapter 13
Recording Billing Information
The PeopleSoft system enables the PeopleSoft Support and vertical applications that are using PeopleSoftSupport to bill for their services. Cases with an agreement can be billed through contracts. Cases witha warranty, or no agreement, are called on demand and sent to the contract interface table, and then tobilling. The PeopleSoft Contracts system takes care of the billing and accounting rules.
The Billing page is delivered hidden. If you want to bill for cases, modify the template to enable the pageand perform the setup for billing.
Note: This functionality is not available to PeopleSoft HelpDesk, HelpDesk for Human Resources, orAnalyst Service Center. You can control access to the billing page using regular role based security. Onlythe manager role has access; agents do not have access
See "Understanding PeopleSoft CRM Integration with the Transaction Billing Processor" (PeopleSoftCRM 9.2: Services Foundation).
Page Used to Record Billing InformationPage Name Definition Name Usage
Billing Page RC_CASE_BI Manage billing information for a case.
Billing PageUse the Billing page (RC_CASE_BI) to manage billing information for a case.
Navigation
Support > Search Cases > Case > Billing
362 Copyright © 1988, 2020, Oracle and/or its affiliates.

Chapter 13 Processing Cases
Image: Billing page
This example illustrates the fields and controls on the Billing page.
This page serves multiple purposes. It enables a user with a manager role to view billing information,purchase order numbers, and authorize credit card information for the service that is performed at thecustomer site. It also enables users to view subtotals for fees by case or by time, apply adjustments totransaction fees, recalculate totals, and view the billable amount in the customer's currency.
Billing InformationThe system populates this group box with information from the bill to customer on the case.
Bill to Customer Select the customer that should be billed for the case.
Bill To Contact Select the contact that should be billed for the case.
Bill To Address Select the customer address to which the bill should be sent.
Bill Currency Select the currency that the customer is using for the transaction.
The currency name appears to the right of the field. When theinformation is sent to PeopleSoft Contracts, the system printsthe name of the currency on the invoice.
Payment Information Purchase Order Enter the customer-provided purchase order number.
Copyright © 1988, 2020, Oracle and/or its affiliates. 363

Processing Cases Chapter 13
Note: This field does not have any integration to PeopleSoftSupply Chain Management (PeopleSoft SCM) and is notrequired. If you enter a purchase order number in this field, the system posts it to PeopleSoft Contracts. When PeopleSoftContracts sends the information to PeopleSoft Billing forinvoice generation, the system prints the purchase order numberon the invoice.
Invoice Select if the customer intends to pay for the service by invoice.
Payment Terms If you selected the Invoice option, use this field to select thebilling cycle for the invoice (for example, NET30 - Due in 30days). The payment terms appear on the invoice that is sent tothe customer.
Credit Card Select if the customer intends to pay for the service by creditcard.
Credit Card Information Click to access the Credit Card Details page, where you entercredit card authorization information, such as the card type, cardnumber, expiration month, and year. The system displays theauthorization status, date, and code on the Transactions Resultspage after you click the Submit Transaction button on the CreditCard Details page.
Note: You can integrate credit card information withCybersource, a third-party taxware vendor.
Tax Parameters Click to access the Tax Parameters page, where you indicatewhether the customer is exempt from taxes. If the customer istax exempt, enter the exemption certificate number and tax codethat the customer supplies to you.
The system uses a default tax code based on the customer'saddress, but you can override it by choosing another value.
Billing DetailsA case can be billed by case (flat fee) or time. Billing applies to either on demand cases or agreementcases. When a case is created with an agreement, and pricing is enabled from the installation optionscomponent, the case is billed based on the transaction fee defined in that agreement line.
The transaction fee can be either a flat fee or time based. When a case is created without an agreement,the on-demand case fee is applied. Based on business unit setup (whether the on-demand case is billed bytime or by case), it retrieves pricing information from the pricing setup for either case-based or time-basedbilling.
When a case is billed by case, only a flat fee is applied. When a case is billed by time, it is billed basedon the total billable hours worked on that case, multiplied by the hourly rate. Once the case is billed, youcannot enter any more billable hours.
Managers can use this section to adjust the fees by increasing or decreasing a fee by a percent or by anamount.
364 Copyright © 1988, 2020, Oracle and/or its affiliates.

Chapter 13 Processing Cases
The system then calculates the sum of all lines, including those that have changed, and provides therecalculated amount in the Total Amount field.
+/− Select the plus sign (+) to indicate a positive adjustment to theprice or the minus sign (−) to indicate a negative adjustment tothe price.
Adjustment Enter either a currency amount or a percentage value.
Type Select Percent or Amount.
Reason Select the reason for the adjustment. These values are user-definable on the Reason Code setup page. The PeopleSoftsystem delivers this feature without any valid values.
Other If the predefined values for the Reason field do not describethe reason for the adjustment, click this link to access the OtherReason page, where you can enter a unique description of thereason.
Recalculate Totals Click this button any time there is a change to the BillingDetails grid that affects the price or the currency code. Thesystem recalculates the total cost of the fees.
Clear Adjustments Click this button to clear the adjustments that were made andreturn to the original total amounts.
Entering Attribute Information
Attributes enable you to extend the information stored for a case without modifying that case's basetable. This capability is valuable when you want to capture additional information about a case that is notavailable.
For example, you might need to capture the color and size attributes for certain types of products but notfor all products. Because these attributes are relevant only for some products, you do not want to addthem as fields to the base table itself.
Page Used to Enter Attribute InformationPage Name Definition Name Usage
Attributes Page RC_ATTR_CASE Add user-defined information to thecase.
Related Links"Understanding Attributes" (PeopleSoft CRM 9.2: Automation and Configuration Tools)
Copyright © 1988, 2020, Oracle and/or its affiliates. 365

Processing Cases Chapter 13
Attributes PageUse the Attributes page (RC_ATTR_CASE) to add user-defined information to the case.
Navigation
• Support > Search Cases > Case > Attributes
• HelpDesk > Search Cases > Case > Attributes
• HR HelpDesk > Search Cases > Case > Attributes
• Analyst Service Center > Search Cases > Case > Attributes
Image: Attributes page
This example illustrates the fields and controls on the Attributes page.
Select or enter the information that you want to add to the case.
See "Understanding Attributes" (PeopleSoft CRM 9.2: Automation and Configuration Tools).
Selecting, Printing, and Emailing Case Information
This topic provides an overview of print case functionality and discusses how to select, print, and emailcase information.
Pages Used to Select, Print, and Email Case InformationPage Name Definition Name Usage
Case - Display Options Page RC_PRINT_OPTIONS Change print options.
366 Copyright © 1988, 2020, Oracle and/or its affiliates.
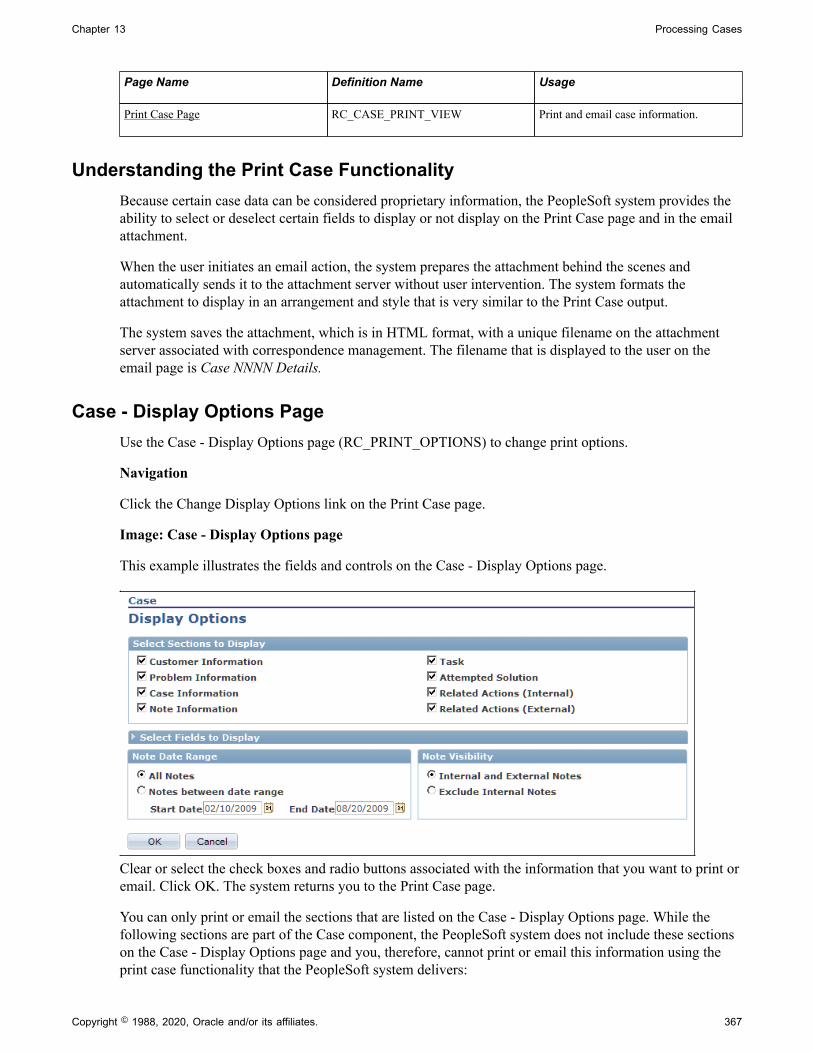
Chapter 13 Processing Cases
Page Name Definition Name Usage
Print Case Page RC_CASE_PRINT_VIEW Print and email case information.
Understanding the Print Case FunctionalityBecause certain case data can be considered proprietary information, the PeopleSoft system provides theability to select or deselect certain fields to display or not display on the Print Case page and in the emailattachment.
When the user initiates an email action, the system prepares the attachment behind the scenes andautomatically sends it to the attachment server without user intervention. The system formats theattachment to display in an arrangement and style that is very similar to the Print Case output.
The system saves the attachment, which is in HTML format, with a unique filename on the attachmentserver associated with correspondence management. The filename that is displayed to the user on theemail page is Case NNNN Details.
Case - Display Options PageUse the Case - Display Options page (RC_PRINT_OPTIONS) to change print options.
Navigation
Click the Change Display Options link on the Print Case page.
Image: Case - Display Options page
This example illustrates the fields and controls on the Case - Display Options page.
Clear or select the check boxes and radio buttons associated with the information that you want to print oremail. Click OK. The system returns you to the Print Case page.
You can only print or email the sections that are listed on the Case - Display Options page. While thefollowing sections are part of the Case component, the PeopleSoft system does not include these sectionson the Case - Display Options page and you, therefore, cannot print or email this information using theprint case functionality that the PeopleSoft system delivers:
Copyright © 1988, 2020, Oracle and/or its affiliates. 367

Processing Cases Chapter 13
• Related Cases
• Interested Parties
• Attributes
• Case History
• Billing
Print Case PageUse the Print Case page (RC_CASE_PRINT_VIEW) to print and email case information.
Navigation
Click the Print button from the case toolbar.
368 Copyright © 1988, 2020, Oracle and/or its affiliates.

Chapter 13 Processing Cases
Image: Print Case page (1 of 2)
This example illustrates the fields and controls on the Print Case page (1 of 2).
Copyright © 1988, 2020, Oracle and/or its affiliates. 369

Processing Cases Chapter 13
Image: Print Case page (2 of 2)
This example illustrates the fields and controls on the Print Case page (2 of 2).
To print case information, click File > Print > Print from the toolbar on your browser page.
To email case information, click the Email button at either the top or the bottom of the page. The systemdisplays the Outbound Notification page. Any attachments associated with the case will be available onthe Outbound Notification page for inclusion with the email.
See "Sending Manual Notifications From CRM Transactions" (PeopleSoft CRM 9.2: Automation andConfiguration Tools).
370 Copyright © 1988, 2020, Oracle and/or its affiliates.

Chapter 14
Tracking Time Spent on Cases
Understanding Time Logs
In PeopleSoft CRM, a time log is automatically generated for every case created in the system. A casetime log is prepopulated with the case's assigned agent name and its start date and time.
Time logs are stored in the PeopleSoft database for informational purposes. The time log is referenced inagreement pricing for cases where there is a prepaid agreement for a specified number of hours: the timelog is used to decrement the number of remaining hours in the prepaid agreement.
You can design your own reports and processes to leverage the time data captured for each case.PeopleSoft Support and HelpDesk deliver a report that shows the average time that each support or helpdesk agent spent to close a case.
Note: If you log time for a task that spans multiple days, it is highly recommended that you enter timereports for each work day (that is, start and end dates are identical), which enables the system to recordthe exact number of work hours per work day for reporting.For example, you want to log time for a service activity that you just finished and it lasted three days,from 4 p.m. on June 6 through 10 a.m. on June 8. If you enter the entire period of time in one time-logentry, the system includes the nonwork hours during this time period when it calculates the total numberof hours you spent on this task.In this scenario, June 7 becomes a 24-hour work day even though you actually worked eight hours on thatday. To make sure the system captures work hours accurately, log time for each work day that you spendon the task by adding rows to the task's time log.
Related LinksPeopleSoft CRM Call Center Reports: A to Z
Managing Time
This topic discusses how to log time that is spent working on cases.
Copyright © 1988, 2020, Oracle and/or its affiliates. 371

Tracking Time Spent on Cases Chapter 14
Page Used to Manage TimePage Name Definition Name Usage
Manage Time Page RF_TIME Log the actual period of time spent tocomplete a case.
Time entry links can appear under theSupport or HelpDesk folder, dependingon who is logged in. For example, ahelp desk agent will see Time underHelpDesk folder.
Manage Time PageUse the Manage Time page (RF_TIME) to log the actual period of time spent to complete a case.
Time entry links can appear under the Support or HelpDesk folder, depending on who is logged in. Forexample, a help desk agent will see Time under HelpDesk folder.
Navigation
• Support > Time > Manage Time > Manage Time
• HelpDesk > Time > Manage Time > Manage Time
• Click the Time Entry button on the toolbar of the Case component of PeopleSoft Support, HelpDeskor HelpDesk for Human Resources.
Image: Manage Time page
This example illustrates the fields and controls on the Manage Time page.
Each case is associated with only one system generated time log (each with a unique time report ID).While you cannot manually create time logs, you can, however, add rows within an existing time log. It isuseful if a task spans multiple days and you want to report work time on a daily basis.
Agent Select the worker who spent the time performing the work onthe case. For a case time log, the system populates this fieldwith the name of the agent assigned to the case (if available).
372 Copyright © 1988, 2020, Oracle and/or its affiliates.

Chapter 14 Tracking Time Spent on Cases
Start Date and Start Time Enter the date and time that the work began on the case. Thesystem uses the information in the end date and time fields tocalculation duration on the Summary page
End Date and End Time Enter the date and time that the work ended on the case.
Duration Displays the amount of time the agent entered for that specificrow.
Add Time Click to add a new row that you can use to enter additional time.
Return to Case Click to return to the associated case
CommentsEnter any comments related to the time that you entered.
Related LinksUnderstanding Case Management"Understanding the Configurable Toolbar" (PeopleSoft CRM 9.2: Automation and Configuration Tools)
Copyright © 1988, 2020, Oracle and/or its affiliates. 373

Tracking Time Spent on Cases Chapter 14
374 Copyright © 1988, 2020, Oracle and/or its affiliates.

Chapter 15
Managing Credit Card Payments
Understanding Credit Card Processing
If your organization accepts credit cards in payment for support, you can use the Authorize Credit Cardpage to manage this process. This page is not available when the case is associated with an agreementwhere this form of payment (pay for service) is inapplicable.
See Integration Interfaces
This topic discusses:
• Processing options.
• Credit card transactions.
• Transaction process flow.
Note: Credit card processing is relevant to PeopleSoft Support only; PeopleSoft HelpDesk, HelpDesk forHuman Resources, and Service Center for Higher Education do not incorporate credit card functionality.
Processing OptionsCredit card processing depends on whether you use a third-party credit card authorization and paymentvendor.
If you entered a merchant ID on the setup page, these conditions occur:
• The Authorize Credit Card page contains a Submit button that agents use to submit transactions.
• The Authorize Credit Card page requires you to enter information that your third-party credit cardauthorization and payment vendor requires.
If you did not enter the merchant ID, there are no required fields on the Authorize Credit Card page.This page does not have a Submit button. Instead, the page captures information for use with yourorganization's own solution for processing credit card payments.
Credit Card TransactionsPeopleSoft Support facilitates credit card processing through integration with third-party credit cardauthorization and payment vendors.
Depending on how your organization has configured your credit card processing, some or all of thesetransaction options are available:
Copyright © 1988, 2020, Oracle and/or its affiliates. 375

Managing Credit Card Payments Chapter 15
Transaction Option Processing
Authorize Only Verifies that the card is valid for the charge (the customer hasenough credit to pay for the order, the card is not stolen, and soon). The vendor does not bill the credit card.
Bill Only Bills the card without first verifying that the card is valid forthe charge. Select this option if you have preauthorized thetransaction and you want to submit the transaction for billingonly.
Authorize and Bill Performs both authorization and billing. The vendor chargesthe customer's credit card upon receiving authorization.
Credit Only Credits the customer's credit card.
Transaction Process FlowThe system performs all credit card validation before submitting data to the vendor, which preventsunnecessary transaction charges.
Image: Credit card transaction process flow
This diagram illustrates the credit card transaction process flow.
When the system validates a credit card number, it validates that:
376 Copyright © 1988, 2020, Oracle and/or its affiliates.

Chapter 15 Managing Credit Card Payments
• The credit card number is the correct length.
• The credit card number starts with a valid prefix.
• The credit card number is valid (if the Credit Card Setup page specifies the use of a check digitalgorithm).
The system saves the authorization information along with the other transaction information in the creditcard history once you manually save the case. This ensures that you have records of any real-time billingor credit transactions.
Processing Credit Cards and Reviewing Transactions
This topic discusses how to process credit cards and review transactions.
Pages Used to Process Credit Cards and Review TransactionsPage Name Definition Name Usage
Credit Card Information Page RC_CASE_CARD_SEC Submit a customer's credit cardinformation for authorization.
Credit Card Information - TransactionResults Page
RC_CASE_CARD_SEC Review transaction results.
Review Electronic Card History Page RB_CARD_HISTORY Review credit card transactions that havebeen submitted for authorization.
Review Electronic Card History Page RB_CARD_ADDR Review the address information thatwas used to process the credit cardtransaction.
Credit Card Information PageUse the Credit Card Information page (RC_CASE_CARD_SEC) to submit a customer's credit cardinformation for authorization.
Navigation
Support > Add Case > Case
Click the Credit Card Information link on the Billing page. Or click Credit Authorization link from Casepage [if enabled on display template]
Copyright © 1988, 2020, Oracle and/or its affiliates. 377

Managing Credit Card Payments Chapter 15
Image: Credit Card Information page
This example illustrates the fields and controls on the Credit Card Information page.
This page is also used in the Service Order and Agreement components for credit card authorizationpurposes.
Note: For security purposes, the credit card number and the verification number are encrypted andstored in the database. After save, only the last 4 digits of the credit card number is shown. As for theverification number, it is masked with XXX, and will be removed permanently from the database after thecredit card authorization process completes.
Credit Card InformationThis group box displays fields that are generally required by third-party credit card software vendors. Allfields are required.
Credit Card on File and Credit Card Select this option if the customer or consumer has a credit cardon file. Then select the card that you want to use from the CreditCard drop-down list box.
Phone Enter the customer's phone number.
Email Address Enter the customer's email address.
New Credit Card Select this option if the customer is using a new credit card.
Save on File Select the check box if you want to save the person's credit cardinformation.
First Name, Last Name and Nameon Card
Enter this information for the credit card holder. The defaultname is the name of the consumer or contact who is associatedwith the case. Change the value if this is not the name on thecredit card.
378 Copyright © 1988, 2020, Oracle and/or its affiliates.

Chapter 15 Managing Credit Card Payments
Credit card information stored in a person's record (for example, information entered in the Consumer or Contact component)does not appear by default on this page.
If, after submitting a credit card charge, you return to thispage to authorize additional charges, the information thatyou previously entered is saved, but the credit card number ismasked so that you see only the last four digits. The informationis preserved for the current case only. If the same person paysfor another case, you must reenter all of the information.
Card Type Select a credit card type. Values are based on the credit cardsthat are designated Active on the Credit Card Setup page andmay include AMEX, Diners Club/Carte Blanche, Discover, MasterCard, and Visa.
Card Number Enter the number of the credit card that is to be charged for thetransaction.
Expires Select the credit card expiration date (2-digit month and 4-digityear).
Note: The Expires field (CR_CARD_EXPYR) containstranslate values for valid expiration years. You must periodicallyreview and update this field with valid expiration year values. PeopleSoft CRM delivers values that range from 2001 to 2014.
Verification Number Enter the verification code of the credit card.
This field becomes required if the Credit Card VerificationNumber Required option is selected on the General Optionspage.
After the credit card transaction is submitted and theauthorization process is completed (passed or failed), theverification number will be deleted permanently from thesystem in compliance with the Payment Card Industry (PCI)Security Standards Council recommendations on sensitive datastorage.
Email Address and Phone Displays the customer's primary email address and telephonenumber by default.
Address Displays the primary address that the system has on file for theperson for whom you are executing a credit card transaction. Other addresses that are associated with that person are alsoavailable for selection.
Confirm that the address is the billing address for the creditcard, because address verification is part of the authorizationprocess. The address format is based on the country that youenter.
Copyright © 1988, 2020, Oracle and/or its affiliates. 379

Managing Credit Card Payments Chapter 15
Click the Enter New Address link if you want to add a newaddress to be used in the transaction. Click the Edit link if youwant to update the currently selected address.
Transaction DetailsThe options that are available depend on how your organization has configured credit card processing.
Amount Enter the amount that is to be authorized.
Currency Code Select the currency in which the credit card transaction shouldbe calculated.
Transaction Type Select one of these values:
Authorize Only: Select to submit the transaction forauthorization only. The vendor verifies that the card is valid forthe charge and does not bill the credit card.
Authorize and Bill: Select to submit the transaction forauthorization and billing. The vendor performs bothauthorization, and if the charge is authorized, the vendor chargesthe customer's credit card.
Bill Only: Select if you have preauthorized the transaction andyou want to submit the transaction for billing only. The vendorbills the card without verifying that the card is valid for thecharge.
Credit Only: Select to submit a credit transaction. The vendorcredits the customer's credit card.
Submit Transaction Click to validate all of the data on the page. If the system findsmissing or invalid data, the system displays an error messageexplaining the problem. You must correct all of the errors beforethe approval process can be initiated.
If all validation criteria are met, clicking this button calls thebusiness interlink. The vendor then performs the authorization, billing, and credit processing that you requested.
Warning! When you submit an authorize and bill, bill only, or credit only transaction, the system saves the transactioninformation after the vendor returns the information. When yousubmit an authorize only transaction, you must save your workmanually by saving the Case page. If you fail to save, the caseresults in an incomplete credit card transaction and you willhave no record of the completed transaction in your system.
Credit Card Information - Transaction ResultsAccess the Credit Card Information - Transaction Results page (click the Submit Transaction button onthe Credit Card Information page).
380 Copyright © 1988, 2020, Oracle and/or its affiliates.
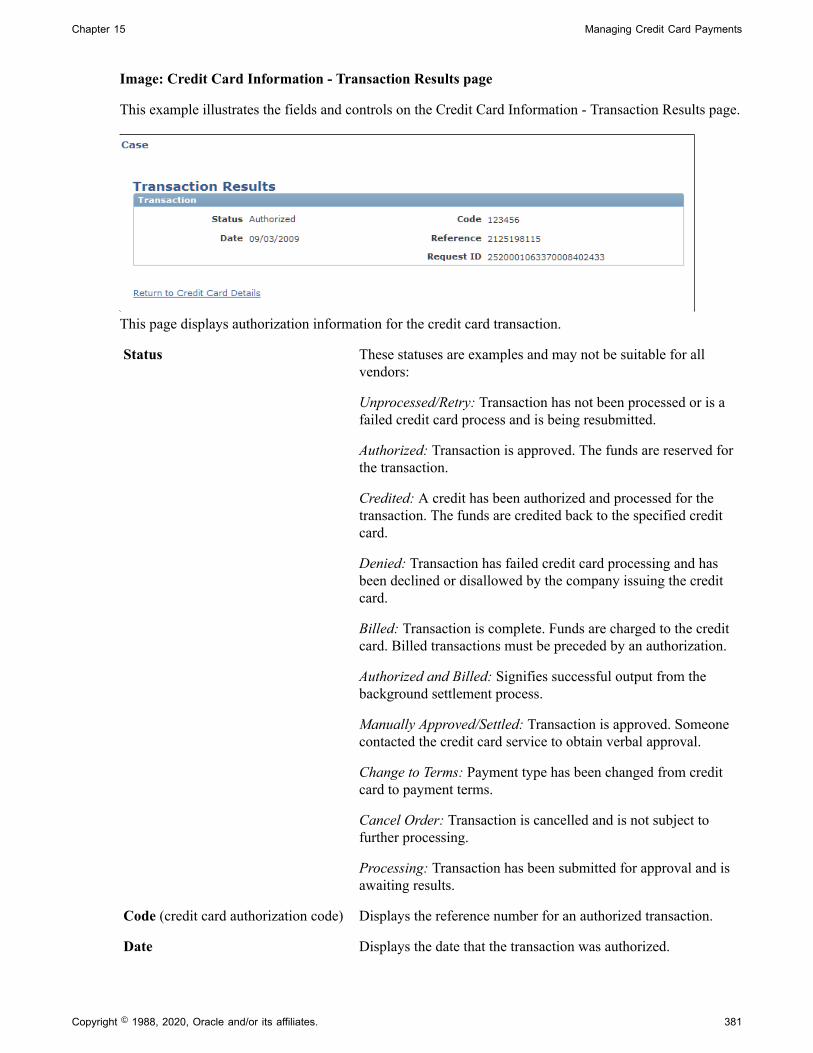
Chapter 15 Managing Credit Card Payments
Image: Credit Card Information - Transaction Results page
This example illustrates the fields and controls on the Credit Card Information - Transaction Results page.
This page displays authorization information for the credit card transaction.
Status These statuses are examples and may not be suitable for allvendors:
Unprocessed/Retry: Transaction has not been processed or is afailed credit card process and is being resubmitted.
Authorized: Transaction is approved. The funds are reserved forthe transaction.
Credited: A credit has been authorized and processed for thetransaction. The funds are credited back to the specified creditcard.
Denied: Transaction has failed credit card processing and hasbeen declined or disallowed by the company issuing the creditcard.
Billed: Transaction is complete. Funds are charged to the creditcard. Billed transactions must be preceded by an authorization.
Authorized and Billed: Signifies successful output from thebackground settlement process.
Manually Approved/Settled: Transaction is approved. Someonecontacted the credit card service to obtain verbal approval.
Change to Terms: Payment type has been changed from creditcard to payment terms.
Cancel Order: Transaction is cancelled and is not subject tofurther processing.
Processing: Transaction has been submitted for approval and isawaiting results.
Code (credit card authorization code) Displays the reference number for an authorized transaction.
Date Displays the date that the transaction was authorized.
Copyright © 1988, 2020, Oracle and/or its affiliates. 381

Managing Credit Card Payments Chapter 15
Reference Displays a message regarding the authorization. For example, ifa link is not working, you might see Interlink Error.
Return to Credit Card Details Click to return to the Credit Card Information page.
If you return to the case without submitting the transaction, the information still appears on the Credit Card Informationpage and is saved to the credit card history when you save thecase, even though the transaction results fields are blank. Toprevent this from happening, you can either clear all data fromthe Authorize Credit Card page before returning to the case orclose the case without saving.
Related LinksRecording Billing Information"Understanding Credit Card Encryption" (PeopleSoft CRM 9.2: Application Fundamentals )
Review Electronic Card History PageUse the Review Electronic Card History page (RB_CARD_HISTORY) to review credit card transactionsthat have been submitted for authorization.
Navigation
Review Electronic Card History > Electronic Card History
Image: Review Electronic Card History page (1 of 2)
This example illustrates the fields and controls on the Review Electronic Card History page (1 of 2).
382 Copyright © 1988, 2020, Oracle and/or its affiliates.

Chapter 15 Managing Credit Card Payments
Image: Review Electronic Card History page (2 of 2)
This example illustrates the fields and controls on the Review Electronic Card History page (2 of 2).
Many fields on this page are the same as for the Authorize Credit Card page. Only definitions for fieldsthat do not correspond to similarly named fields on the Authorize Credit Card page are described here.
Card Information Card Owner ID Displays the name of the application through which the credit
card transaction was processed. PeopleSoft CRM groups creditcard transactions by the application from which they originated. Use the Show previous row and Show next row buttons toscroll through the transactions for a specific PeopleSoft CRMapplication.
Card History Sequence Number If multiple credit card transactions are associated with a case,
the sequence number differentiates the transactions.
Verification Number Sent Indicates if a credit card verification number was sent for thiscredit card transaction. The number is not displayed on thispage.
Return Message Status, Message 1, Message 2, and Message 3
Displays information regarding your authorization, billing, orcredit request.
Address Verification Service Displays address verification results. An example is ExactAddress Match.
Contact Address Click to access the Address Secondary page, where you canreview the address information used to process the credit cardtransaction.
View Contact Address Detail PageUse the View Contact Address Detail page (RB_CARD_ADDR) to review the address information thatwas used to process the credit card transaction.
Copyright © 1988, 2020, Oracle and/or its affiliates. 383

Managing Credit Card Payments Chapter 15
Navigation
Click the Contact Address link on the Review Electronic Card History page.
Image: View Contact Address Detail page
This example illustrates the fields and controls on the View Contact Address Detail page.
Use this page to review the address information used to process the credit card transaction. Click Returnto go back to the Review Electronic Card History page.
384 Copyright © 1988, 2020, Oracle and/or its affiliates.

Chapter 16
Managing Material Returns
Understanding Material Return Processing
If you integrate PeopleSoft Support with PeopleSoft Inventory and PeopleSoft Purchasing or a third-partyinventory and purchasing system, call center agents can generate RMAs for customers returning stock forreplacement, repair, or stock that was shipped in error.
This topic discusses:
• RMA process flows.
• RMA notifications.
We discuss this information in the documentation for understanding requisitions and understandingpurchase orders.
See PeopleSoft FSCM: Purchasing
Note: This chapter is relevant to PeopleSoft Support only; PeopleSoft HelpDesk applications do notincorporate RMA functionality.
RMA Process FlowsAgents using PeopleSoft Support can create four types of RMAs:
• Advanced exchange
• Return-and-replace
• Repair-and-return
• Return-to-stock
Basic RMA ProcessingRegardless of RMA type, some processing steps are shared by all RMAs that are created in PeopleSoftSupport:
1. A customer calls the agent and requests an RMA.
2. The agent opens a new or existing case for the customer and creates an RMA in PeopleSoft Support.
3. When the agent saves the RMA, the system uses the Return Material Authorization EIP (referred to asRMA Form EIP in the diagram) to stage the RMA for processing in the inventory business unit thathas been defined on the RMA as the location to send the returned material.
4. The customer physically returns the material to the inventory business unit.
Copyright © 1988, 2020, Oracle and/or its affiliates. 385

Managing Material Returns Chapter 16
5. In PeopleSoft Inventory, or your third-party inventory system, receipt of the returned material isrecorded and the RMA is closed in the inventory system.
Your inventory system handles the receipt status management for RMAs.
Image: Basic RMA processing flow
This diagram illustrates the basic RMA processing flow from PeopleSoft Support through PeopleSoftInventory or a third-party inventory system.
We discuss this information in more detail in the Financials/Supply Chain Management documentationfor defining general options.
See PeopleSoft FSCM: Application Fundamentals
Advanced Exchange RMAsWith the advanced exchange RMA type, you can create a replacement order for the customer at the timethat you create the RMA. Specify the replacement item or items on the RMA line.
The replacement order can include any of the active items in your system. When you save the RMA form,the system stages the RMA in your inventory system using the Return Material Authorization EIP andcreates a requisition request for the replacement order in your purchasing system using the PurchaseOrder Requisition EIP (referred to as PO Requisition EIP in the diagram).
The system obtains the ship to address for the customer's replacement order from the RMA form.
We discuss this information in more detail in the documentation for enterprise integration points,understanding the EIP catalog.
See PeopleTools: Integration Broker Service Operations Monitor and PeopleTools: Integration BrokerTesting Utilities and Tools.
386 Copyright © 1988, 2020, Oracle and/or its affiliates.

Chapter 16 Managing Material Returns
Image: Advanced exchange RMA processing flowAdvanced exchange RMA processingflowRMAsprocessing flow for advanced exchange RMA
This diagram illustrates the advanced exchange RMA processing flow.
The Purchase Order Requisition EIP enables you to requisition a replacement for the customer at the timethat the advanced exchange RMA is created.
Note: PeopleSoft Purchasing, or your third-party purchasing system, handles the processing of therequisitions that are staged by the Purchase Order Requisition EIP. In your purchasing system, you mustset processing defaults for the staged requisitions and perform any required actions to complete theordering process.
Return-and-Replace RMAsUnlike the advanced exchange RMA, orders for return-and-replace RMAs are not created until thereturned material has been physically received in the location specified as the return-to business unit.Follow these steps to process a return-and-replace RMA:
Copyright © 1988, 2020, Oracle and/or its affiliates. 387

Managing Material Returns Chapter 16
1. When a person records receipt of material on a return-and-replace RMA in your inventory system, theinventory system displays a message indicating that a replacement order is required.
2. Depending on your business process rules, the person manually enters a material stock request inyour inventory system or a requisition in your purchasing system to replace the customer's returnedmaterial.
3. The person receiving the returned material uses the information on the RMA, such as the customer'saddress, information about the item, and quantity returned, to create the replacement order.
4. To facilitate tracking of the replacement order in your inventory or purchasing systems, the same IDas the RMA should be used when the person manually creates replacement requisitions or materialstock requests.
388 Copyright © 1988, 2020, Oracle and/or its affiliates.

Chapter 16 Managing Material Returns
Image: Return-and-replace RMA processing flowReturn-and-replace RMA processing flow processflowsReturn-and-replace RMA
This diagram illustrates the return-and-replace RMA processing flow.
For return-and-replace RMAs, replacement orders are manually created in your inventory or purchasingsystems after the returned material has been physically received from the customer.
Repair-and-Return RMAsYou create repair-and-return RMAs when a customer sends an item back to you for repair. As delivered,PeopleSoft CRM does not offer repair depot functions. However, if your business includes repair services,
Copyright © 1988, 2020, Oracle and/or its affiliates. 389

Managing Material Returns Chapter 16
you can use the repair-and-return RMA option in conjunction with your business process rules. Therepair-and-return RMA processing is similar to return-and-replace RMA processing:
1. A person creates an RMA for a customer in the specified return-to business unit in your inventorysystem.
2. A staff member, in the facility where the item needing repairs is sent, records the receipt of the RMAin your inventory system.
3. The staff member creates a work order for the repairs, according to your business rules, and deliversthe item to the appropriate staff for repair work.
4. The work order should include the ship to address for the customer who appears on the RMA formand the RMA number (to facilitate RMA tracking across your enterprise).
5. The material is shipped back to the customer using the address information from the RMA when therepair work is complete.
Image: Repair-and-return RMA processing flowrepair-and-return RMA processing flow processflowsRepair-and-return RMA
This diagram illustrates the repair-and-return RMA processing flow.
For repair-and-return RMAs, repair work orders are manually created per your business rules when thereturned material is physically received from the customer.
Return-to-Stock RMAsYou create a return-to-stock RMA for a customer who is returning material with no need for areplacement. Typically, the customer has received the wrong shipment or been shipped too much quantity.The process flow for a return-to-stock RMA is identical to the basic RMA processing flow.
We discuss this information in more detail in the documentation for receiving and putting away stock andtransferring stock between business units.
See PeopleSoft FSCM: Inventory
Note: You can create RMAs for customers who return stock for orders that they placed but then changedtheir minds about the order at the time of receipt. For billing purposes, use the RMA processes of yourorder management system to handle these cases.
390 Copyright © 1988, 2020, Oracle and/or its affiliates.
Chapter 16 Managing Material Returns
RMA NotificationsAs delivered, PeopleSoft Support offers the RMA receipt notification workflow. You can use thisworkflow to notify the receiving manager and receiving agent when an RMA shipment is expected from acustomer. Once the workflow is set up, the system sends your receiving managers and receiving agents anotification each time that a new RMA is saved in PeopleSoft Support.
RMA Receipt Workflow Notifications SetupTo enable RMA notifications, you must define people in your system with receiving manager andreceiving agent roles and establish their routing preferences and email addresses.
To set up RMA notification workflow:
1. Assign the receiving manager and receiving agent roles to the appropriate employees in your system.
When an RMA is created, the receiving managers and receiving agents receive notification that areceipt for returned material is expected. You associate the receiving manager or receiving agent roleto a person in your system on the Roles page under User Profiles.
We discuss this procedure in the documentation for setting up user profiles.
2. Define notification routing preferences for the people assigned the receiving manager and receivingagent roles.
When an RMA is created, the notification is published as a worklist entry, an email, or both,depending on the routing preferences defined for the group member on the Workflow page accessiblethrough User Profiles. On that page, indicate whether the person is a worklist user, an email user, orboth.
Note: Note that if you select both the Worklist User and Email User check boxes for the person, twonotices—an email and a worklist entry—are published each time the workflow process is triggeredfor an RMA that is created. Define an email address for each person with an email notificationpreference.
3. Define valid email addresses for the people who receive email notifications.
For each person with an email routing preference for RMA notifications, define a primary emailaddress in the Worker component.
Note: Person IDs defined for the worker are associated with user IDs on the User Profile page underWorkforce > Search Worker or the User Profile component under PeopleTools > Security > UserProfiles. For workflow notifications to work as designed, link each person in your system to one userID only.
4. (Optional) Associate worklist groups with the people who are assigned receiving manager andreceiving agent roles.
When an RMA is created, a worklist entry can be created for the worklist group that is established forthe people who are assigned receiving manager and receiving agent roles in your system. A worklistgroup must first be defined on the Group Worklist Setup page.
See the product documentation for PeopleTools: System and Server Administration.
Copyright © 1988, 2020, Oracle and/or its affiliates. 391

Managing Material Returns Chapter 16
Related Links"Group Worklist Page" (PeopleSoft CRM 9.2: Automation and Configuration Tools)
Setting Up Material Return Processing
Successful implementation of the RMA creation functionality depends on several setup steps:
1. Define inventory business units.
Define business units in your inventory system that represent the warehouses that are to receivereturned material. Activate the Business Unit EIP to insert the business units that are defined in yourinventory system in the BUSINESS_UNIT_FS table in the PeopleSoft CRM system automatically.This enables you to select the appropriate inventory business unit on the RMA Form.
We discuss this procedure in more detail in the documentation for transferring stock between businessunits.
See PeopleSoft FSCM: Inventory.
2. Synchronize item, product, and customer masters between PeopleSoft CRM and your purchasing andinventory systems.
Activate the Item Master EIP, the Product EIP, and the Customer EIP to populate your PeopleSoftCRM tables with the master data in your inventory and purchasing systems. Alternatively, you canmanually enter item, product, and customer information in both PeopleSoft CRM and your inventorysystem.
3. Define requisition processing defaults in your purchasing system.
Call center business units in PeopleSoft CRM that can create RMAs must be defined as a valid sourceof requisitions in your purchasing system. If you are integrating with PeopleSoft Purchasing, use theRequisition Loader Defaults component in PeopleSoft Supply Chain Management to define each callcenter business unit as a Loader BU. Using the same component, establish processing defaults forrequisitions that are staged by the call center business unit, including the purchasing business unit inPeopleSoft Purchasing that is used to process the requisitions.
When you define procurement options in PeopleSoft Supply Chain Management, you can associatethe call center business unit with an appropriate distribution network on the Ship To Locations page.You can configure sourcing processes in PeopleSoft Purchasing to verify the available quantity in thedistribution network before creating a purchase order with an external vendor. If the quantity exists inone of the inventory business units in the defined distribution network, the system creates a materialstock request to fulfill the requisition.
See PeopleSoft FSCM: Application Fundamentals.
4. Define requesters in PeopleSoft CRM and your purchasing system.
The requester ID represents a person or an entity that initiates a requisition request. For advancedexchange RMA lines, the system populates the Requester field with the default requester ID thatis defined on the User Preferences - Overall Preferences page. You can modify the requester ID asnecessary. However, if you integrate with PeopleSoft Purchasing, the requester ID that you select
392 Copyright © 1988, 2020, Oracle and/or its affiliates.

Chapter 16 Managing Material Returns
for the RMA line created in PeopleSoft Support must be a valid user ID and requisition requester inPeopleSoft Purchasing.
5. Activate the associated service operation queues.
In your PeopleSoft Support and Inventory systems, activate the Return Material Authorization serviceoperation. For advanced exchange RMAs, activate the Purchase Order Requisition service operationin PeopleSoft Support and in your purchasing system.
6. Define problem codes in PeopleSoft CRM and reason codes in PeopleSoft Inventory.
When you create an RMA in PeopleSoft Support, you must specify a problem code. You set upproblem codes for RMAs on the Problem Codes page under Set Up CRM > Common Definitions >Codes and Auto Numbering > Problem Codes. If you are integrating with PeopleSoft Inventory, theproblem codes that you select for RMAs in PeopleSoft Support must match the reason codes that areestablished on the Reason Code page in PeopleSoft Inventory. Also, the matching reason codes inPeopleSoft Inventory must be defined with a reason type of Return Material Authorization. Whenthe RMA form is created in PeopleSoft Inventory, the problem code is used as the reason code. If thereason code on the RMA form does not exist in PeopleSoft Inventory, the system logs an error whenthe RMA service operation is processed.
7. Create a case for a customer.
Create a case using the Case component in PeopleSoft Support. RMAs must be associated with a casein your system. You cannot create an RMA without first creating a case.
Related LinksUnderstanding Call Center Business UnitsUnderstanding Display TemplatesUnderstanding Case Management"Integrating with PeopleSoft Financial Management Services" (PeopleSoft CRM 9.2: IntegratedFieldService)"Understanding Item Definition in PeopleSoft CRM" (PeopleSoft CRM 9.2: Product and ItemManagement)"Understanding Products in PeopleSoft CRM" (PeopleSoft CRM 9.2: Product and Item Management)"Business Object Relationship Modelling" (PeopleSoft CRM 9.2: Business Object Management)
Creating RMA Transactions
This topic discusses how to create RMA transactions.
If PeopleSoft Support is integrated with PeopleSoft Inventory and PeopleSoft Purchasing or a third-partyinventory and purchasing system, you can create RMAs for customer returns using the pages in the RMAForm component or the Related Actions page in cases. You must save a case to save an RMA. Typically,an RMA is created from a case.
Copyright © 1988, 2020, Oracle and/or its affiliates. 393

Managing Material Returns Chapter 16
Pages Used to Create RMA TransactionsPage Name Definition Name Usage
Return Material Authorization Page RF_RMA_HDR Create and view RMA transactions.
Returns - Installed Product HierarchyPage
RF_INSTPROD_VH_SEC View the installed product hierarchy forthe specified customer.
Return Material Authorization - NotesPage
RF_RMA_NOTE Record comments and attach files thatare related to an RMA.
Related LinksManaging Related Actions"Understanding Installed Products" (PeopleSoft CRM 9.2: Product and Item Management)
Return Material Authorization PageUse the Return Material Authorization page (RF_RMA_HDR) to create and view RMA transactions.
Navigation
Support > Returns
Support > Add Case
Select Create RMA from the Related Action drop-down list box and click the Go button.
394 Copyright © 1988, 2020, Oracle and/or its affiliates.

Chapter 16 Managing Material Returns
Image: Return Material Authorization page
This example illustrates the fields and controls on the Return Material Authorization page.
If your implementation includes PeopleSoft Inventory, and you logged in to the portal using the singlesign-on feature, you can click the View Status link to access the RMA Form page in PeopleSoft Inventory.The View Status link is disabled in Add mode. Similarly, the Requisition Workbench link appears if yourimplementation includes PeopleSoft Purchasing, and you logged in to the portal using the single sign-onfeature. This link is active only in Update/Display mode when at least one RMA line has the RMA typeAdvanced Exchange. The Requisition Workbench link is disabled in Add mode.
RMA Number Displays Next until you click Save. Then the system issues theRMA a number.
Case ID The unique identifier of a case.
Customer Displays the name of the customer who is returning the material. The customer name is populated from the case and cannotbe changed. Customer records are established in your systemusing the Add Company or Search Company components underCustomers CRM.
Note: Before you create and save an RMA, a case must becreated and a ship-to role must be defined for the customerdefined on that case.
Contact The system populates this field with the contact name that wasentered on the case, if available, or with the name of the primarycontact who is associated with the customer. You can modifythis value.
Copyright © 1988, 2020, Oracle and/or its affiliates. 395

Managing Material Returns Chapter 16
Note: A contact is required if the specified customer is acompany, but optional if the customer is a consumer.
Unit Displays the business unit that is associated with the RMA.
Contact InformationThis section displays information about the customer who is returning the material:
Case ID The unique identifier of a case. When you create a new RMA, you must specify an existing case ID before you save the RMA. You cannot change the Case ID on an existing RMA.
Phone Select the phone number that is associated with the contact orcustomer.
Contact Enter the name of the person who requested the RMA on behalfof the customer. The system populates this field with the contactname that was entered on the case, if available, or with the nameof the primary contact who is associated with the customer. Youcan modify this value.
Note: A contact is required if the specified customer is acompany, but optional if the customer is a consumer.
Email From the Email drop-down list box, select an email address thatis associated with the customer, contact, or site.
Return Product InformationThis section provides default information for each RMA line that you add. You can modify theinformation that is defined using these fields for each RMA line.
If you choose Return to Stock for the RMA Line Type field, at the top of the page or click the Add ReturnProduct button, the system displays information about the product being returned to stock. If you do this,enter the appropriate information in these fields.
Delete Click this button to delete the row of data that is displayed.
Return To IBU (return to inventorybusiness unit) Return To IBU
Select the inventory business unit where the customer ships thereturned material. In PeopleSoft Support, a default value forthis field is specified for the call center business unit on the CallCenter BU page. If PeopleSoft Inventory is installed, this is aPeopleSoft Inventory business unit.
RMA Line Type Displays the type of processing that is used for the returnedmaterial. Values are:
Advanced Exchange: Immediately creates a replacement orderfor the item that the customer is returning. The replacementorder can be for the same item or for a different item. You canspecify the replacement in the Replacement Item(s) grid. The
396 Copyright © 1988, 2020, Oracle and/or its affiliates.

Chapter 16 Managing Material Returns
system populates the replacement item and requested quantityusing the values defined for the return item and returnedquantity.
Repair and Return: The customer is returning an item for repair.
Return and Replace: The item that the customer is returningmust be received before a replacement order can be created.
Return to Stock: The customer is returning material that wasoriginally requested on a case that was not needed.
Site Displays the identification of the customer site from whichmaterial is being returned.
Serial ID Displays the serial number or ship-serial number of the item thatthe customer is returning. If the item is serial-controlled, a serialnumber is required for the RMA. If necessary, a different serialnumber can be entered at the time of receipt. Ship-serial IDs areoptional for ship-serial-controlled items.
Note: If you enter a value for an item that is not serial controlledor ship-serial controlled in your system, the value is removedwhen you save the information.
Product ID and Product Name Displays the identification information for the product that thecustomer is returning.
Note: If more than one installed product record for an itemID, serial number, or product is found, the system displays theInstalled Product List page, where you can select the applicableinstalled product record.
Item ID and Item Name Displays the identification of the item that the customer isreturning.
Qty Returned (quantity returned) Displays the amount of the item that the customer is returning. For serial-controlled items, this quantity must be 1.
Requester Displays the ID of the person or entity that is associated withthe requisition request. The system populates this value withthe default requester ID that is defined on the User Preferences- Overall Preferences page. You can modify the requester ID, as necessary. If you have implemented PeopleSoft Purchasing, you can use the requester ID to view the status of all therequisitions that have been entered by a specific person usingthe Requisition Workbench.
We discuss this procedure in the documentation for reviewingrequisition information.
See the product documentation for PeopleSoft FSCM:Purchasing.
Copyright © 1988, 2020, Oracle and/or its affiliates. 397

Managing Material Returns Chapter 16
Important! If you integrate with PeopleSoft Purchasing, therequester ID must be a valid user ID and requisition requesterin PeopleSoft Purchasing. Requesters are established on theRequester Setup page in PeopleSoft Supply Chain Managementunder Structure Procurement Options.
Comments Enter notes about the RMA (optional).
Return Date Displays the date that the returned item is expected to bereceived at the inventory business unit defined as the Return ToIBU. When you add a new RMA, you can specify an estimatedreturn date for informational purposes only. The current date isthe default value for this field.
Problem Code Select the entry that best describes the problem you are havingwith the product.
See Setting Up Problem Codes for Material Returns.
Address Displays the ship-to address that is specified for the customer orcustomer site. The system populates primary ship to address thatis defined for the site, if entered, or the primary ship-to addressthat is defined for the customer.
Displays the address associated with one of the ship-toaddresses specified for the customer or customer site. Whenentering a new RMA, click the Override Address link to modifythe address on the RMA Header Return From Address page. When viewing an existing RMA, click the Display Address linkto view the address information.
Lot ID Displays the lot number of the item that the customer isreturning. Lot IDs are optional for lot-controlled items.
Note: If a value is entered for an item that is not lot-controlledin your system, the value is removed when you save theinformation.
UOM (unit of measure) Displays the unit by which the replacement item is measured. Inmost cases this will be EA for each.
Returns - Installed Product Hierarchy PageUse the Returns - Installed Product Hierarchy page (RF_INSTPROD_VH_SEC) to view the installedproduct hierarchy for the specified customer.
Navigation
Click the View Inst Product Hierarchy View Inst Product Hierarchy button on the Return MaterialAuthorization page.
398 Copyright © 1988, 2020, Oracle and/or its affiliates.

Chapter 16 Managing Material Returns
Image: Returns - Installed Product Hierarchy page
This example illustrates the fields and controls on the Returns - Installed Product Hierarchy page.
See "Viewing Installed Product Hierarchies" (PeopleSoft CRM 9.2: Product and Item Management).
Return Material Authorization - Notes PageUse the Return Material Authorization - Notes page (RF_RMA_NOTE) to record comments and attachfiles that are related to an RMA.
Navigation
Select the Notes page on the Return Material Authorization component.
Copyright © 1988, 2020, Oracle and/or its affiliates. 399

Managing Material Returns Chapter 16
Image: Return Material Authorization - Notes page
This example illustrates the fields and controls on the Return Material Authorization - Notes page.
See "Understanding Notes and Attachments" (PeopleSoft CRM 9.2: Application Fundamentals ).
400 Copyright © 1988, 2020, Oracle and/or its affiliates.

Chapter 17
Managing Assets
Understanding Asset Management
This topic discusses:
• Asset management functionality.
• Asset related actions.
• Link definition setup.
Note: Asset management is relevant only to PeopleSoft HelpDesk; PeopleSoft Support and HelpDesk forHuman Resources do not incorporate asset management functionality into their applications.
Asset Management FunctionalityAsset management provides organizations with the ability to gather information about the hardware andsoftware that is used over their network. The system can also detect the location of personal computers onthe network.
Asset management offers these benefits:
• Provides foundation data for effective troubleshooting.
• Facilitates planning for upgrades.
• Helps control the total cost of ownership.
• Helps to accurately determine how much has been invested on a client system.
• Increases company control and security.
Note: PeopleSoft Helpdesk does not currently provide any mechanisms to detect hardware and softwareassets from within the PeopleSoft CRM applications. You must integrate with a third-party application forasset discovery or remote control of technology assets.
Asset Related ActionsAfter you set up an integration with a third-party asset management system, agents can perform thesefunctions from the Case page or Case toolbar in PeopleSoft HelpDesk:
• Asset Administrator
Execute web administrator actions.
• Asset Summary
Copyright © 1988, 2020, Oracle and/or its affiliates. 401

Managing Assets Chapter 17
Run an ad hoc asset discovery process to verify configuration details of a specific asset.
• Remote Control
Execute a remote control process so a help desk agent can remotely take control of an employee’sdesktop to resolve a problem.
• Software Delivery
Perform software delivery related actions
Link Definition SetupThe PeopleSoft system delivers four link definitions that appear on the Case page in the Related Actiondrop-down list box:
• Asset Administrator
• Asset Summary
• Remote Control
• Software Delivery
Portal Crefs (content references) are set up on the Content Ref Administration page in PeopleSoftPeopleTools (select PeopleTools > Portal > Structure and Content > Hidden Crefs. Then click AssetAdministrator, Asset Summary, Remote Control, or Software Delivery.
Link definitions are set up in PeopleSoft CRM on the Link Definition page (select Set Up CRM >Product Related > Call Center > Link Definition). Click the RELA (related actions) category.
On the Link Definition page, the Field Name in the Search Keys grid is set to cfResourceIdentifier.
Additionally, the PeopleSoft system selected the Solvable check boxes for all four link definitions.However, the Self-Service check boxes are not selected for any of the link definitions. The term SerialNumber is associated with three link definitions (Asset Summary, Asset Administrator, and RemoteControl).
At runtime, the system resolves the Serial Number term and adds it to the URL string. For example, theAsset Summary related action generates this URL: http://209.17.27.128/<path to thirdparty asset system>&cfResourceIdentifier=2UB234345
Note: You may need to update the Portal CREF information to point to the correct URL based on yourenvironment.
See the product documentation for PeopleTools: Portal Technology.
Related LinksUnderstanding Link Setup
402 Copyright © 1988, 2020, Oracle and/or its affiliates.

Chapter 17 Managing Assets
Prerequisites for Managing Assets
Before you can access your asset management application from PeopleSoft HelpDesk, you must:
• Install a third-party asset management application.
• Install the third-party software on the computers that need to be discovered.
• Install the third-party remote control software on the computers that need to be remotely controlled.
Note: Refer to your third-party vendor's documentation or ask your consultant for advice on setting up anintegration with PeopleSoft CRM.
Common Elements Used to Manage Assets
This topic discusses common elements used to manage assets.
TermsThese terms are used throughout this documentation:
Asset Any technology device, such as a computer, peripheral, orrouter.
Remote Control The ability to remotely take control of a computer system.
ITAM Information Technology Asset Management.
Managing Assets from the Case Page in PeopleSoft HelpDesk
This topic discusses how to:
• Access the Asset Administration application.
• Access the Asset Summary process.
• Access the Asset administrator.
• Access the Remote Control action.
• Access the Software Delivery application.
Accessing the Asset Administration ApplicationOnce an agent has opened a case for an employee, he or she can use the Related Actions drop-downlist box on either the Case page, the Summary page, or the Related Actions page to access the assetmanagement pages in your third-party asset management system.
Copyright © 1988, 2020, Oracle and/or its affiliates. 403

Managing Assets Chapter 17
Note: PeopleSoft CRM may not integrate with all third-party asset management systems, and PeopleSoftcannot guarantee that it will work with your particular third-party applications. PeopleSoft systemssupport frameworks for which you can open a URL and pass in parameters via the URL. Please ask yourconsultant for advice on setting up an integration from your third-party asset management system toPeopleSoft CRM.
Image: Access to Asset Administration from the PeopleSoft HelpDesk component pages
This graphic illustrates how an agent can access the third-party asset management system from thePeopleSoft HelpDesk application.
Accessing the Asset SummaryFrom the Case page in PeopleSoft HelpDesk, agents can run an Asset Summary process to verifyconfiguration details of a specific asset. Using a third-party asset discovery application, this feature alsoassists help desk agents in performing asset discovery.
The Asset Discovery process gives help desk agents the ability to get the baseline information about theuser’s asset, which helps agents resolve issues.
To identify an asset on the network:
1. The agent navigates to the help desk case.
2. The agent fills in the required information as well as the asset tag information, saves the case, andthen selects Asset Summary from the Related Actions drop-down list box or the toolbar.
3. The agent then clicks Go to perform the action.
PeopleSoft CRM passes the serial number information to the third-party application in the URL. If theagent performs the Asset Summary action and the Serial Number field is not populated, the systemdisplays an error message. Once the system performs the Asset Summary action, the system creates arecord in the Related Actions grid. The system displays the word Performed in the Status field in the
404 Copyright © 1988, 2020, Oracle and/or its affiliates.

Chapter 17 Managing Assets
Related Action Summary grid on both the Summary page and the Related Actions page in the Casecomponent.
The asset information retrieved is not transferred back to PeopleSoft CRM. Once an agent has accessto the third-party application, they can locate the hardware configuration, installed software, specificnetwork information, and the services that are running on the user's desktop.
Accessing the Asset AdministratorFrom the Case page in PeopleSoft HelpDesk, agents can select Asset Administrator from the RelatedActions drop-down list box and then click Go to transfer to the third-party asset administrationapplication.
Accessing Remote ControlFrom the Case page in PeopleSoft HelpDesk, agents can take control of a user's machine to troubleshootproblems by initiating the Remote Control process. Using this feature, help desk agents can effectivelyresolve an employee issue involving their computer equipment.
Once an agent performs the Remote Control action, the system creates a record in the Related ActionSummary grid. The control is then transferred to the asset management application, where an agent canremotely control a user's desktop using the remote control features provided by your third-party vendor.
Generally, remote control software lets the local computer take full operational control of a remotecomputer, including the ability to launch applications or change system settings.
Accessing Software DeliveryFrom the Case page in PeopleSoft HelpDesk, agents can select Software Delivery from the RelatedActions drop-down list box and click Go. This action launches your third-party software deliveryapplication, which is used to install software on various identified assets.
The software delivery application enables agents to efficiently deliver software to desktops, laptops, andservers through intelligent network devices.
Once the agent performs the action, the system creates a record in the Related Action Summary grid onboth the Summary page and the Related Actions page in the Case component.
Adding and Reconciling Installed Assets
This topic provides an overview of installed assets and discusses adding installed assets for PeopleSoftHelpDesk.
Pages Used to Add and Reconcile Installed AssetsPage Name Definition Name Usage
Installed Assets Page RF_INST_PRODUCT Create installed assets in the PeopleSoftCRM database.
Copyright © 1988, 2020, Oracle and/or its affiliates. 405

Managing Assets Chapter 17
Page Name Definition Name Usage
Asset Reconciliation Page RF_ASSET_RECON Display all possible entries fromPeopleSoft CRM that were matched toentries in PeopleSoft Financials. Userscan update the data that was entered inPeopleSoft CRM with data that existedin PeopleSoft Financials for the sameasset.
Understanding Installed AssetsThe Installed Assets feature enables IT asset information to be shared between the Asset RepositoryModule (ARM ) in PeopleSoft Financials and installed products in PeopleSoft CRM. For a PeopleSoftCRM implementation, ARM is considered the master data source for asset information.
PeopleSoft HelpDesk requires a configuration option at the setID level, which determines whetherintegration to the ARM is used. This option appears under the navigation Set Up CRM > ProductRelated > Installed Product > Configuration.
The Integration Options group box and the Enable Asset Integration with PeopleSoft Financials fieldappear on this page. If you select the check box for this field, the synchronization between the twodatabases is in effect.
IT asset information from PeopleSoft Financials is published to PeopleSoft CRM as an initial fulldata synchronization. Subsequent changes made to IT asset data in the ARM triggers an incrementalsynchronization that is published to update installed product information.
Likewise, any changes made to installed products asset data in PeopleSoft CRM triggers an incrementalsynchronization that is published to update the PeopleSoft Financials asset information.
The system evaluates data coming from PeopleSoft Financials to PeopleSoft CRM to see if acorresponding installed asset entry already exists, or whether it represents a totally new asset. In thelater example, a new entry is created in PeopleSoft CRM. If a possible, but not definite, match exists,the system sends the result to a reconciliation table for analysis by an agent. The agent decides to eitherupdate an existing PeopleSoft CRM entry or create a new entry.
Note: The system checks the mapping table first to determine the product ID since a default product IDshould always exist in the mapping table (even when no matches exist on the asset subtype, manufacturer,and model data). If no mapping table entry is found, the system derives the product ID from the itemID. The item ID would be used only in cases when no mapping table exists for the setID. Not having amapping table for the setID, however, would constitute an erroneous data setup.
Related Links"Understanding Hardware Asset Information Mapping and Reconciliation" (PeopleSoft CRM 9.2:Product and Item Management)
Installed Assets PageUse the Installed Assets page (RF_INST_PRODUCT) to create installed assets in the PeopleSoft CRMdatabase.
406 Copyright © 1988, 2020, Oracle and/or its affiliates.

Chapter 17 Managing Assets
Navigation
HelpDesk >Installed Assets >Installed Assets
Image: Installed Assets page (1 of 2)
This example illustrates the fields and controls on the Installed Assets page (1 of 2).
Image: Installed Assets page (2 of 2)
This example illustrates the fields and controls on the Installed Assets page (2 of 2).
For instructions about using the Installed Assets page, refer to the section below.
Related Links"Managing Installed Products" (PeopleSoft CRM 9.2: Product and Item Management)
Copyright © 1988, 2020, Oracle and/or its affiliates. 407

Managing Assets Chapter 17
Asset Reconciliation PageUse the Asset Reconciliation page (RF_ASSET_RECON) to display all possible entries from PeopleSoftCRM that were matched to entries in PeopleSoft Financials.
Users can update the data that was entered in PeopleSoft CRM with data that existed in PeopleSoftFinancials for the same asset.
Navigation
HelpDesk > Asset Reconciliation >Asset Reconciliation
Image: Asset Reconciliation page
This example illustrates the fields and controls on the Asset Reconciliation page.
For instructions about using the Asset Reconciliation page, refer to the section below.
Related Links"Mapping and Reconciling Asset Information" (PeopleSoft CRM 9.2: Product and Item Management)
408 Copyright © 1988, 2020, Oracle and/or its affiliates.

Chapter 18
Understanding Asset Lifecycle Management(ALM) for CRM HelpDesk
CRM Asset Lifecycle Management Business Processes
Asset Lifecycle Management (ALM) expands agent and administrator asset management businesscapabilities through integration with PeopleSoft Financials and third-party asset discovery and controlsystems.
Using ALM, asset data administrators can:
• Increase control and security of asset data.
• Plan system upgrades more easily.
• More effectively manage the system's total cost of ownership.
Using ALM and your third-party system, help desk agents use case page actions to:
• Run an ad hoc asset discovery process to verify configuration details of a specific installed asset.
Accessed using the Asset summary action.
• Remotely control an employee’s desktop to resolve a problem.
Accessed using the Remote control action.
• Browse inventory, manage product ads and packaging, and create and manage queries andnotifications.
Accessed using the Asset administrator action.
• Distribute software to the enterprise.
Accessed using the Software delivery action.
Asset Management Functionality
Asset management provides organizations with the ability to gather information about the hardware andsoftware that is used over their network. The system can also detect the location of personal computers onthe network.
Asset management offers these benefits:
• Provides foundation data for effective troubleshooting.
Copyright © 1988, 2020, Oracle and/or its affiliates. 409

Understanding Asset Lifecycle Management (ALM) for CRM HelpDesk Chapter 18
• Facilitates planning for upgrades.
• Helps keep the total cost of ownership under control.
• Helps to accurately determine how much has been invested in a client system.
• Increases company control and security.
Note: PeopleSoft HelpDesk does not currently provide any mechanisms to detect hardware and softwareassets from within its CRM applications. You must integrate with a third-party application for assetdiscovery or remote control of technology assets.
Related Links"Understanding Installed Products" (PeopleSoft CRM 9.2: Product and Item Management)
Integration Architecture and Data Flow
Asset Lifecycle Management is based upon the sharing of information technology (IT) asset informationbetween the Asset Repository Module (ARM ) in PeopleSoft Financials and installed products inPeopleSoft CRM. For a PeopleSoft CRM implementation, the ARM is considered the master data sourcefor asset information.
IT asset information from PeopleSoft Financials is published to PeopleSoft CRM as an initial fulldata synchronization. Subsequent changes made to IT asset data in the ARM triggers an incrementalsynchronization that is published to update installed product information.
Likewise, any changes made to installed product asset data in PeopleSoft CRM triggers an incrementalsynchronization that is published to update the PeopleSoft Financials asset information.
The system evaluates data coming from PeopleSoft Financials to PeopleSoft CRM to determine whethera corresponding installed asset entry already exists, or whether it represents a new asset. If there is adefinitive match, the CRM installed asset entry is automatically updated with the information fromthe corresponding Financials entry. If there is a possible, but not definite match, the result is sent to areconciliation table for analysis by an agent, where he or she makes the decision to either update anexisting PeopleSoft CRM entry or create a new entry. If the data represents a new asset, a new entry iscreated in PeopleSoft CRM.
All Financials entries of Asset_Type 010 (IT-Hardware) are added to the CRM installed asset table whenthe full sync is performed (COPY_IT_ASSET). Subsequent additions and updates to the Financials assetrepository data for Asset_Type 010 entries are thereafter sent to CRM for incremental synchronization.
Understanding Installed Assets
This topic discusses system management of new and updated data in the integrated system.
410 Copyright © 1988, 2020, Oracle and/or its affiliates.

Chapter 18 Understanding Asset Lifecycle Management (ALM) for CRM HelpDesk
Identifying a Financials Asset in CRMThe CRM Installed Product table requires a Product ID for every Installed Asset. This enables users tosee the kind of asset that is being referred to in the system. Since neither Product ID nor Inventory ItemID are required for entries in the Financials Asset table, it is important that CRM installed product tableentries are assigned a Product ID.
The CRM system assigns Product IDs according to the Product Mapping table.
Note: PeopleSoft Financials assets do not store product data, but product ID is a required attribute forCRM installed assets. Therefore, a mapping table specifies the Product ID that CRM should use to createa new entry from Financials asset data. The administrator can add entries to the mapping table to linkspecific combinations of asset subtype, manufacturer, and model values from Financials with a particularCRM Product ID. Additionally, a default entry is required in the CRM mapping table (designated by justa Product ID value with no subtype, manufacturer, or model values). The CRM system uses the defaultto create installed asset entries if the mapping table contains no match on more specific combinations ofsubtype, manufacturer, and model values.The system checks the mapping table first to determine the product ID since there should always be adefault product ID for use in the mapping table (even when there are no matches on the asset subtype,manufacturer and model data). If no mapping table entry is found, the system derives the product ID fromthe item ID. Thus, the item ID is used only in cases where no mapping table exists for the setID. Nothaving a mapping table for the setID, however, would constitute an erroneous data setup.
Assignments by Matching Attribute ValuesIdeally, each combination of Financials Asset_Subtype, Manufacturer, and Model corresponds to aCRM product, and each will map to an asset that can conceivably be returned by the Financials system(including the discovery process run on the Financials system). This enables a meaningful CRM productto be associated with each type of Financials asset.
Copyright © 1988, 2020, Oracle and/or its affiliates. 411

Understanding Asset Lifecycle Management (ALM) for CRM HelpDesk Chapter 18
Image: Assigning Product IDs in CRM
This graphic illustrates how a Product ID is determined for a new asset in the CRM system.
When receiving information on a new asset from the Financials system, the CRM system checks theFinancials Asset table for a match on non-null values for the Asset_Subtype, Manufacturer, and Modelfields. If there is a match, the CRM system uses the corresponding Product from the mapping table tocreate the new installed asset on the CRM system. If there is no match for the three fields, a match will beattempted on Asset_Subtype and Manufacturer. If a match is found here, the corresponding Product_IDwill be used. If no match is found on these two fields, a match will be attempted only on Asset_Subtype.If no match is found on this field, a match will be attempted just on blank values for Asset_Subtype,Manufacturer, and Model (this type of row will correspond to a “default” Product_ID).
412 Copyright © 1988, 2020, Oracle and/or its affiliates.

Chapter 18 Understanding Asset Lifecycle Management (ALM) for CRM HelpDesk
Note: A SaveEdit error on the mapping page requires a value for Manufacturer if a value for Model ispresent on that row. In addition, this SaveEdit error requires that the user enter a single “default” valuespecifying a Product that should be used when no other match applies. This helps ensure that CRMProducts can be identified and used for any asset entry that comes from Financials.
As already mentioned, the user ideally would set up data so that the assets sent from Financials (Assettype of IT-Hardware) have values for Asset Subtype, Manufacturer, and Model, and ensure that eachof these combinations is mapped to a distinct Product on the mapping page. This would involve settingup the appropriate Asset Subtypes and Profiles on the Financials side, and the appropriate Products andproduct mapping setup page on the CRM side. Providing a “default” Product ID as described aboveensures that a Product ID can always be found for use in the CRM Installed product table. This is requiredsince the CRM Installed Product table requires a Product ID value for each of its entries.
Important! Before adding data to the Product Mapping page, the user must run theManufacturer_Fullsync and Copy_AM_Subtype full synchronizations. Synchronizations are discussedfurther in Chapter 2, Setting Up Integration and Data Transfer, “Setting Up the Mapping Table.”
Updating CRM Asset Data With New Asset Information from FinancialsWhen asset data is sent from Financials to CRM, the CRM installed asset table is updated with thecorresponding asset data. The identification logic involves filtering data attributes to find matchesbetween Financials and CRM. The logic must account for definite positive matches, assumed positivematches, and ambiguous match results.
Positive MatchesThis table depicts the conditions that result in the three possible update outcomes when the CRM systemidentifies a match of one or more of the four asset table values in the Financials asset data:
Required MatchConditions
CRM UpdateOutcomes
Serial ID Business Unit Asset ID Installed Product ID
Match* Match* The CRM data for thatrow is updated withall the values fromFinancials. This mayoccur when data for anasset has previouslybeen received fromFinancials by CRMand a change issubsequently savedand published byFinancials.
Copyright © 1988, 2020, Oracle and/or its affiliates. 413

Understanding Asset Lifecycle Management (ALM) for CRM HelpDesk Chapter 18
Required MatchConditions
CRM UpdateOutcomes
Serial ID Business Unit Asset ID Installed Product ID
Match The CRM data for thatrow is updated withall the values fromFinancials. This mayoccur when data foran asset was createdby CRM and sent overto Financials and achange is subsequentlysaved and published byFinancials.
The correspondingCRM entry wouldhave the same InstalledProduct ID but wouldnot yet have valuesfor Business Unit andAsset ID.
414 Copyright © 1988, 2020, Oracle and/or its affiliates.

Chapter 18 Understanding Asset Lifecycle Management (ALM) for CRM HelpDesk
Required MatchConditions
CRM UpdateOutcomes
Serial ID Business Unit Asset ID Installed Product ID
yes No match* No match* The CRM data for thatrow is updated withall the values fromFinancials. This mayoccur if data for thesame asset has beenentered independentlyin both Financials andCRM prior to initialsynchronization.
If data for the sameasset has been enteredin Financials and CRMin a prior release, the Financials entrywill initially not havethe key fields for thecorresponding CRMentry and the CRMentry will initially nothave the key fieldsfor the correspondingFinancials entry.However, if both entriesrefer to the same SerialID, it can be assumedthat they refer to thesame actual asset.
* Both conditions must be true.
Assumed Positive MatchesMatch conditions vary depending on the asset:
• Asset Tag
If there is a match between Financials and CRM based on identical non-null values for asset tag andproduct, and if there is a blank value for Business Unit, Asset ID, and Serial ID on the CRM side, theCRM data for that row will be updated with all the values from Financials. This applies in situationswhere data for the same assets already existing in Financials and CRM (but in which CRM may onlyhave a value for Asset_Tag, rather than Serial ID), and an update from Financials needs to be matchedagainst the corresponding CRM entry.
• Employee and Product
Copyright © 1988, 2020, Oracle and/or its affiliates. 415

Understanding Asset Lifecycle Management (ALM) for CRM HelpDesk Chapter 18
If there is a single matching row between Financials and CRM based on identical non-null values foremployee ID and product ID, and there is a blank value for Business Unit, Asset ID and Serial ID onthe CRM side, the CRM data for that row will be updated with all the values from Financials. Thisapplies in situations where data for the same actual assets already exists in Financials and CRM, andan update from Financials needs to be matched against the corresponding CRM entry. If there is singleentry in CRM that matches the assigned employee and Product, it is assumed to refer to the sameactual asset, and the CRM entry will be updated.
• Department and Product
If there is a single matching row between Financials and CRM based on identical non-null values forDepartment ID and Product ID and there is a blank value for SeriaI ID on the CRM side, the CRMdata for that row will be updated with all the values from Financials. This applies to situations wheredata for the same actual assets already exists in Financials and CRM (but in which CRM may onlyhave a value for Asset_Tag, rather than Serial ID), and an update from Financials needs to be matchedagainst the corresponding CRM entry. If there is a single entry in CRM that matches the assigneddepartment and Product, it is assumed to refer to the same actual asset, and the CRM entry will beupdated.
Ambiguous MatchesWhen it is not possible to unequivocally determine that the asset is definitely the same or definitelydifferent on both systems, the data for that row is sent to a reconciliation table that the administrator canaccess in the CRM application. The reconciliation table lists the assets, with their attribute data, thatrequire reconciliation with CRM entries. The administrator can open each entry to view the possiblematches with existing CRM installed assets based on the matches on Product_ID and one or more of thefollowing: Emplid, Deptid, or Location.
The administrator can:
• Confirm that the CRM entry refers to the same asset represented by the data from Financials andupdate the CRM data with all the values from the Financials system.
• Specify that the Financials data does not refer to any asset on the CRM side and create a new CRMinstalled asset.
The asset manager reconciles ambiguous matches on the Asset Reconciliation page, shown in this figure.
416 Copyright © 1988, 2020, Oracle and/or its affiliates.

Chapter 18 Understanding Asset Lifecycle Management (ALM) for CRM HelpDesk
Image: Asset Reconciliation example
This example illustrates the fields and controls on the Asset Reconciliation example.
In this example, a Financials entry for a Compass Notebook computer with Serial ID A43-22342belonging to Carmichael Espinosa (Emplid KU0015) was received. However, the search results show twoexisting CRM installed assets for the same person and product. Since the CRM entries have no Serial_IDvalue, it is not possible to automatically determine if either asset is the same actual asset as the Financialsentry; the match results are ambiguous.
The asset manager must now conduct research on the two CRM entries to determine whether either ofthem does indeed represent the same asset as the new entry from Financials (serial id A43-22342). Ifresearch indicates that the actual asset represented by the first CRM entry (Asset Tag GBI02–IT2037) hasa serial ID of A43-22342, then it is in reality the same asset as the entry from Financials. To reconcile thedata, the manager selects the first CRM asset in the table and clicks the Merge Selected Installed Assetbutton, thus merging the data from the new Financials entry with that CRM installed asset entry.
On the other hand, if neither serial ID of the two CRM entries corresponds to the Financials entry, thenthe entry represents a different physical asset. The manager reconciles the new data by clicking the CreateNew Installed Asset button to create a new CRM Installed Asset entry from the data of the Financialsentry, giving Carmichael Espinosa a total of three Compass Notebook installed asset entries.
With ambiguous matches, often data for the same actual assets exists in Financials and CRM (but inwhich CRM may only have a value for Asset_Tag, rather than Serial_ID) because the lack of matchingunique identifiers and/or the presence of multiple potential matches prevents a positive match.
Note: The status value of a Financials asset does not map directly to the status of the corresponding CRMinstalled asset. The Financials system will only update the CRM Installed asset entry to "Installed" or"Uninstalled", depending on what transaction is being executed in Financials.For example, whenever a user updates an asset in the Basic Add page in Financials, the status of the newor existing CRM installed asset is updated to "Installed" (stored in the system as "INS") regardless ofthe actual status value of the asset in Financials. Whenever a user disposes of an asset in the Financialssystem, the status of the corresponding CRM installed asset is set to "uninstalled" (stored in the system as"UNI").
Copyright © 1988, 2020, Oracle and/or its affiliates. 417

Understanding Asset Lifecycle Management (ALM) for CRM HelpDesk Chapter 18
418 Copyright © 1988, 2020, Oracle and/or its affiliates.

Chapter 19
Creating Work Orders from Cases
Understanding Work Order Requests
This topic discusses:
• Work order functionality.
• Integration points with PeopleSoft Financials.
• Work order descriptions and status changes.
• Relationships between work orders and cases.
• Work orders and the 360-degree view.
• Installed product history.
Note: Work order requests pertain to PeopleSoft HelpDesk only; PeopleSoft Support and PeopleSoftHelpDesk for Human Resources do not incorporate work order functionality.
Work Order FunctionalityIf an agent is working on a help desk case that he or she cannot resolve, the agent can create a work orderfrom the case to assign a technician to troubleshoot and solve the problem.
The agent creates a work order when the solution search results recommend the creation of a work orderor the agent determines that he cannot resolve the case in a reasonable amount of time.
To create a work order from a case, an agent must select Worker Order - New from the Actions field oneither the Case page, the Case - Summary page, or the Case - Related Actions page, and then click the Gobutton. This action takes the user to the Create Work Order page. When the agent provides the requiredinformation on the Create Work Order page and clicks the Create Work Order button, the Add WorkOrder Transaction message is triggered.
Once an agent creates a work order, a help desk agent can:
• Access the work order in PeopleSoft Maintenance Management from the Related Actions section onthe Case - Summary page or the Case - Related Actions page.
• Receive workflow events in his or her worklist when there is a status change or description change onthe work order.
If an Active Analytics Framework (AAF) status change or description change policy is activated, bothemail and worklist notifications are sent.
• Relate existing work orders to cases.
Copyright © 1988, 2020, Oracle and/or its affiliates. 419

Creating Work Orders from Cases Chapter 19
Integration points with PeopleSoft FinancialsThe integration between IT HelpDesk in PeopleSoft CRM and Maintenance Management in PeopleSoftFinancials is accomplished with application messaging using the PeopleTools Integration Broker.
The following messages are used for this integration:
Main MessagesThese are the main messages that the system uses to transfer information:
• Add/Update Work Order Transaction (SYNC_WORK_ORDER_REQ)
• Add/Update Transaction Acknowledgement (SYNC_WORK_ORDER_RSP)
• Key Event Change Notification (SYNC_WM_WO_KEY_EVENT)
Setup MessagesThese are the setup messages that the system uses to transfer information:
• Problem Code Tree (COPY_PROBLEM_TREE)
• Problem Location (COPY_SHOP_LOC)
• Work Order Status COPY_WO_STATUS)
• Work Order Priority (COPY_WM_PRIORITY)
Work Order Descriptions and Status ChangesWhen the work order description or status on the Work Order page changes, the system sends the KeyEvent Change Notification message to PeopleSoft HelpDesk.
To trigger changes to a case when its associated work order's status or description changes requires thatyou use AAF to create a case change policy triggered by work order status and description changes.
Use these terms to build a new policy within the Case Update Action Type:
• Work Order ID
• Work Order Summary
• Work Order Description (Task Notes)
• Work Order Status
For example, a policy can specify that when the work order status changes from Open to Closed, thesystem updates the case status to Closed and notifies the requester or sends the customer a satisfactionsurvey.
The Key Event Message is not, however, enabled by activating AAF policies. You must also subscribeto the Key Event message. When a user changes the status or description on a work order, the systemtriggers the AAF description and status changes and then publishes the Key Event message.
To create policies for work order changes:
420 Copyright © 1988, 2020, Oracle and/or its affiliates.

Chapter 19 Creating Work Orders from Cases
1. Navigate to Enterprise Components > Active Analytics Framework > Policies > Manage Policies.
2. Access either the Work Order Status Change or Work Order Description Change policy.
3. Click the Activate button.
These policies represent a message display process that runs when the event type in the Key EventChange Notification message is set to a work order status change or a work order description change.
Once the message is activated, the agent can click the URL in the worklist or email notification to launchthe Case Summary page for the case that is associated with the work order.
See Active Analytics Framework.
See "Understanding CRM Action Types" (PeopleSoft CRM 9.2: Automation and Configuration Tools).
Relationships Between Work Orders and CasesCases can be related to one another to create cross-referencing in a help desk knowledge base. For thesame reason, correlating similar work orders is often advantageous. However, the system does not allowa work order to be related to another work order. Instead, work orders are related to each other througha case. For example, when two cases pertain to the same problem and one case has a related work order,instead of creating another work order on the second case, relate the second case to the first case bysearching on the work order ID or the description.
An agent can create as many work orders per case as necessary. Conversely, an agent can create multiplecases for the same problem and work order. In this situation, the work orders can be related to each otherthrough a global case that represents the other cases with the common work order. The work order theagent can relate the cases to is then associated with the common work order.
All workflow is then driven off the global case. For example, when the status of the common work orderchanges, email notifications are sent to agents assigned to the related cases.
When an agent creates a help desk case for an employee and determines that a work order is needed, theagent can also determine if the issue is global (for example, a network or common area printer is down).The agent can check for the existence of a global case with a related work order. AAF policies, however,do not send workflow to all related cases.
Work Orders and the 360-Degree ViewIf a work order is associated with a case, agents can view the work orders on the Worker 360-DegreeView page. Work orders appear as a node on a tree. For each work order status, the system displays a linkand the number of work orders at that status.
When an agent clicks one of the links, the system displays all work orders with that status in a dynamicgrid in the right-hand column of the page. This display includes all work orders with a specific status thatare associated to cases that have been reported by the employee.
The dynamic grid contains 4 columns:
• Work Order ID
• Work Order Description
Copyright © 1988, 2020, Oracle and/or its affiliates. 421

Creating Work Orders from Cases Chapter 19
• Work Order Status
• Case ID
Help desk agents can access the work order in PeopleSoft Financials by clicking the work order IDfrom the 360-Degree View page in PeopleSoft CRM. The agent does not have to log in to PeopleSoftFinancials to access the work order because the system uses single signon technology for access to bothdatabases. The work order tree node only appears on the Worker 360-Degree View page.
Installed Product HistoryAfter an agent creates a work order, the Work Order ID field appears in the Associated Cases grid on theInstalled Product History page. If a case has more than one work order associated with it, the case ID isrepeated on additional rows; however, the work order ID is unique. The system turns the work order IDinto a link, which enables the agent to access the work order in PeopleSoft Financials through a singlesign on.
Creating Work Orders
This topic discusses how to create work orders in PeopleSoft CRM.
Page Used to Create Work OrdersPage Name Definition Name Usage
Create Work Order Page RC_LINK_WO_SEC Create a work order in PeopleSoftFinancials.
You can also create a new work orderfrom the Case - Summary page and theCase - Related Actions page using thesame method described previously.
Create Work Order PageUse the Create Work Order page (RC_LINK_WO_SEC) to create a work order in PeopleSoft Financials.
You can also create a new work order from the Case - Summary page and the Case - Related Actions pageusing the same method described previously.
Navigation
HelpDesk > Add Case > Case
Select Work Order - New from the Related Actions drop-down list box and then click Go.
HelpDesk > Search Cases > Case
Select Work Order - New from the Related Actions drop-down list box and then click Go.
422 Copyright © 1988, 2020, Oracle and/or its affiliates.

Chapter 19 Creating Work Orders from Cases
Image: Create Work Order page
This example illustrates the fields and controls on the Create Work Order page.
The system takes information from the Case page and displays it on the Create Work Order page for thesefields: Employee Name, Asset Tag, Product Description, Summary, and Description.
Note: If necessary, an agent can change or add additional text to the Summary and Description fields.
Problem Select the problem that best describes the caller's issue.
The system may or may not display additional problem fieldsbased on the parent-child relationships that exist between theproblem codes.
The problem code fields guide an agent’s choices for identifyingor classifying the problem. Each level in the problem selectionprovides a more detailed explanation as to the type of problembeing reported against the installed asset. Based on the selection, the system may display additional fields, such as Computer, ITAM (Information Technology Asset Management) andHardware.
The problem code you select also drives the available values forshop location, as would be the case if shops are categorized bythe problem they service. This data comes from the FinancialsWork Management application.
Copyright © 1988, 2020, Oracle and/or its affiliates. 423

Creating Work Orders from Cases Chapter 19
The problem code that you select here drives the values that thesystem uses to create the work order in PeopleSoft MaintenanceManagement.
Service Location Select the location where the item will be serviced. The systempulls information in the service location drop-down list boxfrom the Work Management Shop Location table (PS_WM_SHOP_LOC2_VW).
The service location is the location where the installed assetis sent for repair. This location can also be the where thetechnician is located.
Work Order Priority Select a value that matches the priority that you think should begiven to the problem you are having.
This field is used as an override. If it is not populated, thesystem populates the Priority field from the work order problemcode.
Viewing Work Orders
This topic discusses how to view work orders in PeopleSoft CRM.
Pages Used to View Work OrdersPage Name Definition Name Usage
Case - Summary Page RC_CASE_SUMMARY View work orders.
Case - Related Actions Page RC_ASSOCIATION View work orders.
Installed Assets - History Page RF_INST_PROD_HIST View work orders that are related tocases.
Case - Summary PageUse the Case - Summary page (RC_CASE_SUMMARY) to view work orders.
Navigation
HelpDesk > Search Cases > Summary
424 Copyright © 1988, 2020, Oracle and/or its affiliates.

Chapter 19 Creating Work Orders from Cases
Image: Case - Summary page: Related Action Summary section
This example illustrates the fields and controls on the Case - Summary page: Related Action Summarysection.
Image: Case - Related Actions page
This example illustrates the fields and controls on the Case - Related Actions page.
Copyright © 1988, 2020, Oracle and/or its affiliates. 425

Creating Work Orders from Cases Chapter 19
Image: Installed Assets: History page - Related Transactions
This example illustrates the fields and controls on the Installed Assets: History page - RelatedTransactions.
Before PeopleSoft CRM receives the Add/Update Transaction Acknowledgement message fromPeopleSoft Financials, the system populates these fields in the Related Action Summary grid:
• Type
The system populates this field with the words Work Order.
• Summary
The system populates this field with the word New, indicating that the work order is in the process ofbeing created.
• Status
The system does not populate this field until the work order is actually created in PeopleSoftMaintenance Management.
• Date Created
Date the agent initiated the creation of the work order (not the date the work order was actuallycreated in PeopleSoft Maintenance Management).
• Added By
The system populates this field with the login name of the agent who created the work order.
Note: If another help desk case is related to an existing work order, the Added By field displays the nameof the agent who created the work order, not the name of the person who linked the existing work order tothe case.
Once PeopleSoft CRM receives the Add/Update Transaction Acknowledgement message, the systemupdates the Related Action Summary grid for the work order row. Updating consists of displaying the
426 Copyright © 1988, 2020, Oracle and/or its affiliates.

Chapter 19 Creating Work Orders from Cases
work order ID and description in the Summary field and turning the text into a link that agents can use toview the work order in PeopleSoft Maintenance Management. Additionally, the system resets the Statusfield to the Work Order header status and sets the Date Created field to the date and time that the workorder was created in PeopleSoft Maintenance Management.
When a work order cannot be created in PeopleSoft Financials, it sends an error message to the CRMdatabase. To view the message, click the Error Details link on the Case - Related Action Summary page.
Replying to Work Order Information Requests
This topic provides an overview of information requests and discusses how to reply to informationrequests for work orders in PeopleSoft CRM.
Page Used to Reply to Work Order Information RequestsPage Name Definition Name Usage
Reply To Work Order InformationRequest Page
WM_WO_NOTE_REPLY Provide more information to thetechnician who is working on a fix orservicing your customer's problem.
Understanding Information RequestsTo request information on the work order for a specific task, a technician must create a task note inPeopleSoft Maintenance Management by selecting the Needs Reply check box and then entering text inthe Note field requesting additional information.
When the technician clicks the Send To Requester button, PeopleSoft Maintenance Management sends arequest for information by email to the agent handling the case and sets an indicator on the Work Order,Tasks Notes, and Notes pages in PeopleSoft Maintenance Management to capture the request for moreinformation. This indicator is also used to capture request-for-information replies from PeopleSoft CRM.The contents of the email notification are determined by PeopleSoft Maintenance Management.
To respond to the request, the agent using the CRM application clicks the URL in the email. The URL hasthe work order ID embedded in it. When an agent clicks the link, the system displays the Reply To WorkOrder Information Request page in PeopleSoft Maintenance Management. The agent completes the replyand saves it.
After the agent saves the Reply to Work Order Information Request, PeopleSoft MaintenanceManagement creates a new work order task note to capture the reply, updates the reply indicator on allpages, and sends an email notification to the technician indicating that a reply has been received.
PeopleSoft HelpDesk ignores the Key Event Change Notification message when it contains a requestfor more information and a reply to a request for more information, as the work order task notes are notstored on the Case Notes page in PeopleSoft CRM.
For information purposes only, the Key Event Change Notification message sends the note, case ID, andwork order ID to PeopleSoft HelpDesk. In the event that the case is reassigned to another agent, the AddWork Order Transaction message sends contact information to PeopleSoft Maintenance Management.Therefore, PeopleSoft Maintenance Management should always have the most current assigned-to person
Copyright © 1988, 2020, Oracle and/or its affiliates. 427

Creating Work Orders from Cases Chapter 19
for a given case. To complete the process, the technician reviews the note and selects the Reviewed checkbox. PeopleSoft Maintenance Management updates the reply indicator on the Work Order, Tasks Notes,and Notes pages.
Reply To Work Order Information Request PageUse the Reply To Work Order Information Request page (WM_WO_NOTE_REPLY) to provide moreinformation to the technician who is working on a fix or servicing your customer's problem.
Navigation
Click the URL in the request for information email that is sent from PeopleSoft MaintenanceManagement.
Image: Reply To Work Order Information Request page
This example illustrates the fields and controls on the Reply To Work Order Information Request page.
Enter the information that the technician requested in the Note field in the Reply Message section of thepage. Click Save when you are finished. The system creates a new work order task note to capture thereply, updates the reply indicator on all pages, sends an email notification to the technician indicating thata reply has been received, and sends a Key Event Change Notification message with the response text toPeopleSoft HelpDesk.
428 Copyright © 1988, 2020, Oracle and/or its affiliates.

Chapter 20
Working with Services OperationalDashboards
Understanding Services Operational Dashboards
Services operational dashboards are collections of pagelets that are built to provide real-time actionableinformation for call center managers and agents, which help to increase agent efficiency, offer insight oncustomer needs and provide call center staff the tools needed to better serve the customer base. PeopleSoftCRM delivers two role-specific dashboards for call centers:
• Manager Dashboard
• Agent Dashboard
Each dashboard consists of pagelets that display call center data relevant to users of that role. Withinpagelets, managers and agents can interact with data that is presented in charts and grids by drilling intobars and clicking links, which give them additional information about cases and solutions, as well asbetter insight on customers that require immediate actions.
Delivered pagelets are WSRP (web services for remote portlets) compliant so they can be used in anyWSRP-compliant portal (for example, Applications Portal) or any other compliant external portal. Theycan be rearranged freely on dashboards by dragging and dropping by their titles to the desired areas,or by clicking the Layout link on the PIA homepage to personalize the dashboard's layout. In additionto the Manager and Agent Dashboards, these pagelets can also appear on the PIA homepage throughconfiguration on the Personalize Content page (PORTAL_HPCOMP).
See PeopleTools: Applications User's Guide, Setting User Preferences, Personalizing Layout.
Manager DashboardThe Manager Dashboard displays operational data for cases that are assigned to provider groups and theseprovider groups are associated with the manager that is selected in pagelet personalization pages of thelogged on user. The manager-provider group relationship is established on the Provider Groups page.
The Manager Dashboard includes these pagelets out of the box:
• Cases at Risk of Exceeding SLA (service level agreement)
• Manager Case Backlog
• Case Arrivals versus Closures
• Top Solutions by Product
• Top Solutions by Library
Copyright © 1988, 2020, Oracle and/or its affiliates. 429
Working with Services Operational Dashboards Chapter 20
• Top Solutions by Category
PeopleSoft CRM Manager Dashboard
See Working with the Manager Dashboard for more information on dashboard pagelets.
Agent DashboardThe Agent Dashboard displays information of all open cases that are assigned to the logged on agent. Itincludes these pagelets out of the box:
• My Case Backlog
• My Open Case SLA Status
• Agent - My Cases
• Top Solutions by Product
• Top Solutions by Library
• Top Solutions by Category
PeopleSoft CRM Agent Dashboard
See Working with the Agent Dashboard for more information on dashboard pagelets.
Understanding Pagelets with Bar ChartsSeveral delivered pagelets represent case information in the form of stacked bar charts. These charts areinteractive. When you put your mouse over a bar, hover text appears, showing the number of cases withthe status or priority that the bar represents. When you click a bar, a modal secondary page is displayed:
430 Copyright © 1988, 2020, Oracle and/or its affiliates.

Chapter 20 Working with Services Operational Dashboards
Image: Modal secondary page appears with a list of cases after clicking a bar on a stacked barchart
This example illustrates the fields and controls on the Modal secondary page appears with a list of casesafter clicking a bar on a stacked bar chart.
The page lists the summary information of the cases that the bar represents. Clicking a case ID linktransfers you to the Case component on a new browser window where you can update the case.
Understanding Pagelets with GridsSolutions-specific pagelets are built in the form of grids. Each grid displays the top ten solutions withthe highest solved counts and usage counts. It shows basic information such as solution summary, usagecounts and the number of times they are used to solve cases. For each solution-specific pagelet, you canchange the criterion (product, solution library, and category) by which the solution information is filtered.You can also click a solution ID link to transfer to a modal secondary page and view the solution in moredetail:
Copyright © 1988, 2020, Oracle and/or its affiliates. 431

Working with Services Operational Dashboards Chapter 20
Image: Modal secondary page appears with solution detail after clicking a solution ID link
This example illustrates the fields and controls on the Modal secondary page appears with solution detailafter clicking a solution ID link.
Important! Make sure to run the Update Solution Usage Counts process that updates solution usage andsolved count, so that solutions can be ranked and displayed properly on pagelets.
Setting Up Services Operational Dashboards
Perform these steps to set up services operational dashboards:
• Specify default values for use in dashboard pagelets on the Call Center page of the User Preferencescomponent for dashboard users.
See "Call Center Page" (PeopleSoft CRM 9.2: Application Fundamentals ).
• Specify a manager for each provider group on the Provider Groups page for bar charts on ManagerDashboard to show information properly based on the manager selected in personalization settings.
See "Defining Provider Groups" (PeopleSoft CRM 9.2: Application Fundamentals ).
• Make sure that the Percent of SLA for Red and Percent of SLA for Yellow options are enabled on theBusiness Unit - Options page for SLA pagelets to display information properly.
See Business Unit - Options Page.
• Run the Update Solution Usage Counts AE process to update solution usage counts as well as solutionusage counts by categories, types and details.
See "Update Solution Usage Counts Page" (PeopleSoft CRM 9.2: Services Foundation).
432 Copyright © 1988, 2020, Oracle and/or its affiliates.

Chapter 20 Working with Services Operational Dashboards
Working with Services Operational Dashboards
This topic discusses how to work with Services Operational Dashboards.
Pages Used to Work with Services Operational DashboardsPage Name Definition Name Usage
Services Manager Dashboard Page
HelpDesk Manager Dashboard Page
HR HelpDesk Manager Dashboard Page
Service Center Manager Dashboard Page
(not applicable) Access the Manager Dashboard to viewinformation and take actions regardingcases that are assigned to providergroups of the manager selected in thelogged on user's personalization settings.
Services Agent Dashboard Page
HelpDesk Agent Dashboard Page
HR HelpDesk Agent Dashboard Page
Service Center Agent Dashboard Page
(not applicable) Access the Agent Dashboard to viewinformation and take actions regardingcases that are owned by agents.
Common Elements Used In This Section
(Refresh)Click to refresh data display on the corresponding pagelet. Or, press the F5 key or the refresh button of the web browser torefresh all pagelets in the entire dashboard.
Note: Refresh the dashboards for the latest operational data tobe displayed.
(Personalize)Click to personalize settings of the corresponding pagelet. Thesame options are also available on the User Preferences - CallCenter page. When you make changes here, the changes arereflected in the pagelet display as well as the User Preferencescomponent.
The system delivers these pages to personalize individualdashboard pagelets:
Important! Oracle highly recommends that you specify yourpersonalization options and values for all pagelets so they candisplay information that pertains to your job area.
• Personalize Case Arrivals versus Closures (RC_ARRIVAL_PRS)
• Personalize Cases at Risk of Exceeding SLA (RC_SLARISK_PRS)
Copyright © 1988, 2020, Oracle and/or its affiliates. 433

Working with Services Operational Dashboards Chapter 20
• Personalize Manager Case Backlog (RC_BACKLOG_MGR_PRS)
• Personalize Agent Case Backlog (RC_BACKLOG_AGT_PRS)
• Personalize My Open Case SLA Status (RC_MYSLA_PRS)
• Personalize Top Solutions By Category (RC_SOLCAT_PRS)
The system prepopulates the fields with the correspondingvalues that are defined on the User Preferences - Call Centerpage for the logged on user.
• Personalize Top Solutions By Product (RC_SOLBYPROD_PRS)
The system prepopulates the fields with the correspondingvalues that are defined on the User Preferences - Call Centerpage for the logged on user.
• Personalize Top Solutions By Library (RC_SOLLIB_PRS)
The system prepopulates the fields with the correspondingvalues that are defined on the User Preferences - Call Centerpage for the logged on user.
See "Call Center Page" (PeopleSoft CRM 9.2: ApplicationFundamentals ).
(Minimize) and (Expand)Click to toggle between collapsing and expanding thecorresponding pagelet.
(Remove)Click to remove the corresponding pagelet from the dashboard.
Use the Content link on the PIA home page to add back deletedpagelets.
View By Select how the case information should be filtered and displayedon pagelets with bar charts, by status, priority, or predefinedtime frame.
ID Click the solution ID link to view the solution detail in a modalsecondary page.
Working with the Manager DashboardAccess the Services Manager Dashboard page (Services Manager Dashboard).
Cases at Risk of Exceeding SLA Pagelet (RC_SLAEXCEED_PLT)This pagelet displays the number of cases, which are assigned to provider groups of the manager selectedin the logged on user's personalization settings, that are at risk of missing or already missing their
434 Copyright © 1988, 2020, Oracle and/or its affiliates.

Chapter 20 Working with Services Operational Dashboards
SLAs. In the CRM system, a case is considered at risk of exceeding its SLA when its yellow date andtime is about to pass or have passed, or exceeding its SLA when its red date and time is about to passor have passed. A yellow or a red date and time refers to the restore time of a case that is running therisk of failing to meet its SLA. The restore time of a case is calculated based on the entitlements of theagreement that the case associates with. The calculation takes into account the service level selected onthe agreement and the holiday schedule. When you save a case with an agreement selected, the restoretime is computed and populated on the More tab of the Case page. As an administrator, you can configurethe system to alert agents and managers of cases that are at risk of not meeting SLAs. Enable the Percentof SLA for Red and Percent of SLA for Yellow options on the Business Unit - Options page and enter thepercentages of case restore time that has elapsed for the system to turn an unresolved case to red (exceedsSLA) and yellow (at risk of exceeding SLA) statuses. For example, the restore time of a newly saved caseis set to 10 hours from now. If the SLA for red and SLA for yellow are set at 90 and 50 percents of thecase restore time, the system turns the unresolved case to the yellow state in five hours and the red statein nine hours. As delivered, the restore dates and times for the red state and yellow state are enabled fordisplay on Support cases.
Managers can use information provided in this pagelet to identify provider groups and agents who arestruggling to meet customer SLA commitments. They see how these cases are allocated among providergroups by status and priority. With this data, they can take actions, such as reassigning cases, to balancethe workload of each of their provider groups.
Copyright © 1988, 2020, Oracle and/or its affiliates. 435

Working with Services Operational Dashboards Chapter 20
Image: Cases at Risk of Exceeding SLA pagelet in Manager Dashboard
This example illustrates the fields and controls on the Cases at Risk of Exceeding SLA pagelet inManager Dashboard.
Note: Case priority is not a required field in cases; for cases that do not have this value specified, they arerepresented in bar chart pagelets using the No Priority legend.
Manager Case Backlog Pagelet (RC_BACKLOG_MGR_PLT)This pagelet displays the number of open cases that are assigned to provider groups of the logged onmanager, by priority or status.
436 Copyright © 1988, 2020, Oracle and/or its affiliates.

Chapter 20 Working with Services Operational Dashboards
Image: Manager Case Backlog pagelet in Manager Dashboard
This example illustrates the fields and controls on the Manager Case Backlog pagelet in ManagerDashboard.
Case Arrivals Versus Closures Pagelet (RC_ARRIVAL_PLT)This pagelet displays the numbers of new cases and closed cases that are assigned to provider groupsof the manager selected in the logged on user's personalization settings. Managers can choose the timerange for which the information is presented: for the past day, the past seven days, or the past 30 days.The pagelet provides a side-by-side comparison of the numbers, giving managers an idea of how eachprovider group is doing in terms of workload and availability.
The data on case arrivals and case closures, as shown on this pagelet, is based on the case created date andcase closed date (viewable in the Audit History section of cases).
Copyright © 1988, 2020, Oracle and/or its affiliates. 437

Working with Services Operational Dashboards Chapter 20
Image: Case Arrivals versus Closures pagelet in Manager Dashboard
This example illustrates the fields and controls on the Case Arrivals versus Closures pagelet in ManagerDashboard.
Top Solutions by Product Pagelet (RC_SOLPROD_PLT)This pagelet lists the top ten most frequently used solutions to resolve cases created for the specifiedproduct. Solutions with the highest solved counts appear first, followed by those with the highest usagecounts, and the most recently used.
Only active, non-adhoc type solutions are eligible for display on this pagelet.
Solutions are associated with products on the Related Actions page on the Solution component.
438 Copyright © 1988, 2020, Oracle and/or its affiliates.

Chapter 20 Working with Services Operational Dashboards
Image: Top Solutions by Product pagelet in Manager and Agent Dashboards
This example illustrates the fields and controls on the Top Solutions by Product pagelet in Manager andAgent Dashboards.
Note: As delivered, the Top Solutions by Product pagelet is not displayed on HR HelpDesk dashboardpages as product groups and products are not enabled in display templates for use in HR HelpDesk cases.However, if you have these fields enabled for HRHD cases, you can make this pagelet available on bothdashboards to view top solutions that are filtered by products.
Product Select the name of the product by which the solution list isfiltered. The system populates the default value of this fieldthat is specified on the Call Center page of the User Preferencescomponent.
Copyright © 1988, 2020, Oracle and/or its affiliates. 439

Working with Services Operational Dashboards Chapter 20
See "Call Center Page" (PeopleSoft CRM 9.2: ApplicationFundamentals ).
Top Solutions by Library Pagelet (RC_SOLLIB_PLT)This pagelet lists, for the specified library, the top ten most frequently used solutions to resolve cases.Solutions with the highest solved counts appear first, followed by those with the highest usage counts, andthe most recently used.
Only active, non-adhoc type solutions are eligible for display on this pagelet.
Image: Top Solutions by Library pagelet in Manager and Agent Dashboards
This example illustrates the fields and controls on the Top Solutions by Library pagelet in Manager andAgent Dashboards.
Top Solutions by Category Pagelet (RC_SOLCAT_PLT)This pagelet lists, for the specified case category, the top ten most frequently used solutions to resolvecases. Solutions with the highest solved counts appear first, followed by those with the highest usagecounts, and the most recently used.
Only active, non-adhoc type solutions are eligible for display on this pagelet.
Solutions are associated with case categories on the Related Actions page on the Solution component.
440 Copyright © 1988, 2020, Oracle and/or its affiliates.

Chapter 20 Working with Services Operational Dashboards
Image: Top Solutions by Category pagelet in Manager and Agent Dashboards
This example illustrates the fields and controls on the Top Solutions by Category pagelet in Manager andAgent Dashboards.
Related LinksBusiness Unit - Options Page"Solution - Related Actions Page" (PeopleSoft CRM 9.2: Services Foundation)
Working with the Agent DashboardAccess the Services Agent Dashboard page (Services Agent Dashboard).
My Open Case SLA Status Pagelet (RC_MYSLA_PLT)This pagelet displays, for the logged on agent, all of his or her open cases that are at risk of missing oralready missing their SLAs. Agents can use information provided in this pagelet to identify cases thatneed immediate attention. Data on this pagelet can be viewed by case status or priority.
Refer to the Cases at Risk of Exceeding SLA Pagelet section for more information on how the systemdetermines cases that are at risk of exceeding or already exceeding SLAs.
Copyright © 1988, 2020, Oracle and/or its affiliates. 441

Working with Services Operational Dashboards Chapter 20
Image: My Open Case SLA Status pagelet in Agent Dashboard
This example illustrates the fields and controls on the My Open Case SLA Status pagelet in AgentDashboard.
My Case Backlog Pagelet (RC_BACKLOG_AGT_PLT)This pagelet displays the number of open cases that are assigned to the logged on agent. Data on thispagelet can be viewed by case status or priority.
442 Copyright © 1988, 2020, Oracle and/or its affiliates.

Chapter 20 Working with Services Operational Dashboards
Image: My Case Backlog pagelet in Agent Dashboard
This example illustrates the fields and controls on the My Case Backlog pagelet in Agent Dashboard.
Note: Case priority is not a required field in cases; for cases that do not have this value specified, they arerepresented in bar chart pagelets using the No Priority legend.
Agent - My Cases Pagelet (RC_AGT_CASES_PGT_W)Similar to the My Case Backlog pagelet, this pagelet displays open cases that are currently assigned to thelogged on agent. In this pagelet, case information is presented in a grid, allowing agents to sort cases bycolumn headings and prioritize their cases based on, for example, customer, case summary, case creationdate, priority, status, or entitled restore date and time. Click a case ID link to open and edit the case in abrowser window or tab.
Delivered views are available in this pagelet for agents to filter cases that they are interested in:
• All of my cases that were modified in the past 30 days.
Copyright © 1988, 2020, Oracle and/or its affiliates. 443

Working with Services Operational Dashboards Chapter 20
• All of my cases that were modified in the past 7 days.
• All of my open cases.
• All unassigned cases in my provider group.
Through this view, agents can review and cherry-pick unassigned cases to work on based on theirskills and availability.
In addition, agents can add new cases (created using case default values that are specified for agent'sbusiness unit) and search existing cases (associated with agent's business unit) from this pagelet.
Image: Agent - My Cases pagelet in Agent Dashboard
This example illustrates the fields and controls on the Agent - My Cases pagelet in Agent Dashboard.
Top Solutions by Product PageletThis pagelet lists the top ten solutions that are most frequently used to resolve cases created for thespecified product.
See Working with the Manager Dashboard
444 Copyright © 1988, 2020, Oracle and/or its affiliates.

Chapter 20 Working with Services Operational Dashboards
Top Solutions by Library PageletThis pagelet lists, for the specified library, the top ten solutions that are most frequently used to resolvecases.
See Working with the Manager Dashboard
Top Solutions by Category PageletThis pagelet lists, for the specified case category, the top ten solutions that are most frequently used toresolve cases.
See Working with the Manager Dashboard
Copyright © 1988, 2020, Oracle and/or its affiliates. 445

Working with Services Operational Dashboards Chapter 20
446 Copyright © 1988, 2020, Oracle and/or its affiliates.
Chapter 21
Using Change Management
Understanding Change Request Access
This topic discusses the five ways to access change requests:
• Through the HelpDesk menu.
Navigate to HelpDesk > Add Change Request or HelpDesk > Search Change Requests.
Note: If you want to create a new change request, the system displays a blank Change Request page.If you want to search for existing change requests, the system displays the configured search page forChange Management.
• From the HelpDesk Case page.
From the HelpDesk Case page, the Actions section enables the user to directly create a new changerequest. Creating the request for change from the case creates a direct link between the change requestand the case. You can view the change request from the case and the case from the change request.
• From the Quality Management - Defect page.
Using the Related Actions functionality, you can create a new change request directly from the defect.Also, you can identify and link an existing change request to the defect. Linking causes the changerequest to be viewed from the defect, and the defect to be viewed from the change request.
• From the Worker 360-Degree View page.
This page provides the ability to both add a new change request from the employee view, and to viewany requests already added by that employee.
• From Employee Self Service.
You can add a change request by navigating to Employee Self Service > HelpDesk > Add ChangeRequest.
Understanding Change Request Management
This topic discusses:
• Main Change Request page.
• Notes page.
• Tasks page.
Copyright © 1988, 2020, Oracle and/or its affiliates. 447

Using Change Management Chapter 21
• History page.
• Related Changes page.
• Related Actions page.
• Interested Parties page.
Main Change Request PageYou can access the main Change Request page by using any of the five available methods. After the pageappears, you can see the six distinct sections on the Change Request page:
• Requestor Information section.
The user must enter a change request requester. The agent can select a person from any availableemployee record. The system provides the default values for the requester's department, location,manager’s name, and manager’s telephone fields from the employee record that was selected.
• Change Request section.
In this section, you record information about the nature of the change request. The Summary, Business Unit, Request Type, Status, and Priority fields are required to save the change request. Theother fields are informational only. You configure values for these fields. You set up these values bynavigating to Set Up CRM > Product Related > Change Management.
See Understanding Change Request Management.
• Product Information section.
This section enables you to link a particular product to a change request.
Users can link affected product groups or installed products to the change request using the Lookupbutton. They can refine the affected product further by linking the specific asset tag of the itemaffected. The View Affected Parties link appears when the selected installed product has specificemployees linked to it. Clicking this button results in the appearance of all of the linked employees.
• Change Control section.
This section is used to record more specific information about the change request. The Impact, Category, Release #, Resolution, and Requested By Date fields are informational only.
The start dates and start and end times are not only informational; the system uses these fields tocalculate duration. The 24/7 check box enables work to be scheduled beyond a normal Monday toFriday, 9 to 5 work week.
The system uses the values entered in the Schedule subsection as a guide for the phase and for the taskstart and end dates. All phase and task dates, whether built manually in the Phase Summary sectionon the main Change Request page or populated automatically from the Phase Model setup option, arenot allowed to start before the start date indicated in the Schedule subsection in the Change Controlsection. The system provides the value in the End Date field by default. It is the last date on the lasttask when the phase model or task model was either built or automatically loaded.
• Phase Summary section.
448 Copyright © 1988, 2020, Oracle and/or its affiliates.

Chapter 21 Using Change Management
Use this section to manage the phases and tasks that are associated to a change request. Only phasesare displayed in this grid. You can view associated tasks and phases on the Tasks page. Each phase inthe Phase Summary section consists of a task or set of tasks that need to be completed in order for achange to be successful. Any required approvals should be presented in the form of an approval task.
See Tasks Page.
You can build phases manually in this grid. Alternatively, you can have the system automaticallypopulate phases and tasks by selecting a template and clicking the Load button.
See Setting Up Phase Templates.
You can load any template by choosing the appropriate template name and clicking the Load button.
If users click the Load button without first selecting a phase template, all phase templates whose type,subtype, or priority fields match the type, subtype, and priority fields of the change request appear.Users then select the desired phase template, thus populating the phases in the Phase Summary gridand tasks on the Task page. You can manually build phases by clicking the Add Phase button.
• Audit History section.
This section tracks the dates and times that the change request was created and modified.
Note: The Change Control, Phase Summary, and Audit History sections are collapsed by default whenyou access the Change Request page.
See Accessing Change Requests.
Notes PageNotes pages follow the standard Notes and Attachments format that is used throughout the PeopleSoftCRM application suite. During the course of a change cycle, specific types of documentation may berequired, such as backout plans, design documents, or a cost benefit analysis.
To identify these common documents within a specific note, PeopleSoft Change Management provides aNote Type field. Before adding an attachment to the note, you can identify the note type from the drop-down list box. The user configures the values in this field.
Related Links"Understanding Notes and Attachments" (PeopleSoft CRM 9.2: Application Fundamentals )
Tasks PageThe Tasks page displays all tasks, process flow steps, and decision points that are associated witha Change Request. PeopleSoft Change Management carries the task ID link to point to the TaskManagement application for the actual definition of the task.
Task Management tracks each task associated with a change request. Change Management uses TaskManagement functions for task groups to further define and control the process flow of a change request.
Tasks can be added, deleted, and edited from this page. They can be added automatically using the phasemodel or added manually.
Copyright © 1988, 2020, Oracle and/or its affiliates. 449

Using Change Management Chapter 21
Note: When an owner is added or changed on a change request, and at least one task is in the status ofIn Progress, the system displays a message asking if the change request owner should be applied to anyuncompleted tasks. If the user clicks No, the system does not apply the owner on the change request toany tasks when the change request is saved. If the user clicks Yes, the system applies the owner on thechange request to all uncompleted tasks that are not canceled when the change request is saved. If thereare no tasks with the status of In Progress, then the system applies the owner change to all tasks on thechange request, and the user does not receive a message. The system automatically makes the change.
Related Links"Managing Tasks" (PeopleSoft CRM 9.2: Automation and Configuration Tools)
History PageAAF events control the process flow of a change request. Whenever an event is processed on a changerequest, it is audited and then appears on the History Events page.
Whenever a change is processed on a change request, it is audited and then appears on the History Auditpage. The records to be audited are configurable when you set up your PeopleSoft CRM applications.History interactions appear when email is used to notify an assigned worker of a task action or statuschange.
Related Changes PageThe Related Changes page provides the ability to link similar change requests in either a parent/child oran equal relationship.
A status change is referred to as cascading when a status change on one change request causes the samestatus change on one or more change requests automatically. Cascading changes occur when a usermanually changes the status or when an AAF rule executes unattended.
Several conditions must exist for cascading status changes to occur. First, the change request whose statusis being changed must be related to another change request. Two characteristics define each relationship:
• Type
• Hierarchical indication
When the type is Global and the hierarchy indicator is a parent of the change request whose status ischanging, then a cascading status occurs. If the status change is to a final type status (such as Closed,Completed, or Rejected) then the system displays a related change request with the two characteristics.These changes apply to online manual status changes.
For AAF rule execution status changes, the status is cascaded automatically when the Changed To statusis marked as a cascading type status (see Status setup for this indicator).
Note: PeopleSoft Change Management does not deliver a definition or AAF rule for rule execution statuschanges. You can, however create your own rules using the PeopleSoft AAF functionality.
See "Understanding AAF" (PeopleSoft CRM 9.2: Automation and Configuration Tools).
450 Copyright © 1988, 2020, Oracle and/or its affiliates.

Chapter 21 Using Change Management
Related Actions PagePeopleSoft Change Management also provides the ability to link cases and defects to a change. If achange request was initiated by defect identification or from a help desk case, you can link those defectsand cases directly to the change request.
Linking a defect or case to a change request enables the user to drill down into these other objects directlyfrom PeopleSoft Change Management. It also causes the change to be linked to the defect or case, andprovides the ability to drill down into the Change Request from either PeopleSoft HelpDesk or PeopleSoftQuality Management.
Conversely, you can create and link change requests to defects from PeopleSoft Quality Management andto cases from PeopleSoft HelpDesk. Linking from either of these two applications also creates the linkagein PeopleSoft Change Management.
Linking cases and defects also causes status updates to be forwarded to the help desk agent or the qualityanalyst. You can determine and configure the type and frequency of the updates using AAF policies.
You will not be able to create either a case or a defect from PeopleSoft Change Management. Similarly,no cascading status functionality exists among cases, defects, and change requests.
Interested Parties PageInterested parties, such as individuals who are not part of the change process by way of an assignedtask or role, can receive notifications and updates about the change status through their inclusion on theInterested Parties page.
Users can designate interested parties to receive updates for only specific phases or for all phases.
Interested parties are limited to employees. You can determine and configure the type and frequency ofthe updates using AAF policies.
Accessing Change Requests
This topic discusses how to add new change requests and access existing change requests.
Page Used to Access Change RequestsPage Name Definition Name Usage
Change Requests Search Page RG_CHANGE_SRCH Access existing search requests.
Change Requests Search PageUse the Change Requests search page (RG_CHANGE_SRCH) to access existing search requests.
Copyright © 1988, 2020, Oracle and/or its affiliates. 451

Using Change Management Chapter 21
Navigation
• HelpDesk > Search Change Requests
• Employee Self-Service > HelpDesk > Manage A Change Request
• Worker 360 - Degree View > Change Requests > Search Requests
Image: Change Requests search page (1 of 2)
This example illustrates the fields and controls on the Change Requests search page (1 of 2).
Image: Change Requests search page (2 of 2)
This example illustrates the fields and controls on the Change Requests search page (2 of 2).
If the field that you are looking for to search by does not appear on the basic search page, use theadvanced search page or click the Personalize Search link and select any unchecked search fields that youwish to use.
The system displays the Personalize Search Settings page if the system administrator has made this pageavailable to you. You can use this page to select additional fields to appear on the search page.
452 Copyright © 1988, 2020, Oracle and/or its affiliates.

Chapter 21 Using Change Management
If you still do not see the field that you are looking for, contact your system administrator. Rememberthat you can enter part of the whole value in most fields, depending on what operators are set for a givensearch field. Most of these values are also user defined. They are based on the needs of your organization.
Related Links"Change Management Page" (PeopleSoft CRM 9.2: Application Fundamentals )"Understanding the Configurable Search" (PeopleSoft CRM 9.2: Automation and Configuration Tools)"Personalizing the Search Page" (PeopleSoft CRM 9.2: Automation and Configuration Tools)"Performing Searches" (PeopleSoft CRM 9.2: Automation and Configuration Tools)
Managing Basic Change Request Information
This topic discusses how to manage basic change request information.
Pages Used to Manage Basic Change Request InformationPage Name Definition Name Usage
Change Request Page RG_CHANGE_REQUEST Add new change requests.
Collect Attributes for Change RequestPage
RG_ATTR_PROD_SEC Add or edit attributes to be associatedfor each installed product on a changerequest.
Add Change Request Page RG_CHANGE_REQ_SS Add new change requests in HelpDeskSelf-Service.
Manage Change Requests Page RG_CHANGE_SS_SRCH Search for and access change requests inHelpDesk Self-Service.
Change Request PageUse the Change Request page (RG_CHANGE_REQUEST) to add new change requests.
Navigation
• HelpDesk > Add Change Request
• HelpDesk > Add Case
Select Change Request from the Related Actions drop-down list box in the Actions section.
Copyright © 1988, 2020, Oracle and/or its affiliates. 453

Using Change Management Chapter 21
Image: Change Request page (1 of 2)
This example illustrates the fields and controls on the Change Request page (1 of 2).
Image: Change Request page (2 of 2)
This example illustrates the fields and controls on the Change Request page (2 of 2).
Use the fields on this page to define the nature of the change you are proposing.
Use the Change Request section to record basic information associated to a change request, such as asummary, type, reason and priority.
454 Copyright © 1988, 2020, Oracle and/or its affiliates.

Chapter 21 Using Change Management
Description Manually enter a description of the change request, or enter avalue by selecting a Text Tray value.
Status Enter the status of the change request. Once a change request isassociated with a status whose category is Closed or Canceled,the Audit History section of the page is updated with the dateand time of that status change, as well as the userID and nameof the person who made that change.
Duration If the change request necessitates a service outage, specify thelength of time for that outage in this field.
Units Select the unit of time that applies to the number entered in theDuration field.
Use the Product Information section to manage the products and installed products that are associated to achange request.
Product Group Select the desired product group.
Product Select the desired product. This is a required field.
The choices available for product are limited to the appropriatesetID, which is derived from the business unit of the changerequest. If a product group has already been specified, theavailable options for selecting a product are further limited tothose within that product group.
The installed product entry (Asset Tag value) will be defaultedonto the page if one and only one installed product exists for thespecified product for the person listed as the Change Requestor.
If you select a product and there are installed product entriesassociated with the product for multiple people, the systemdisplays a link on far right side of the grid entitled AffectedParties to provide you with a way to display who has thatproduct installed. This tells you who may be affected by thechange request.
Asset Tag Enter the desired asset tag number. You may prompt for validinstalled product (asset) entries by using the lookup (magnifyingglass) icon to the right of this field.
Click the Collect Attributes icon to display the CollectAttributes for Change Request page. The actual format andnumber of attributes will depend on what attributes (and theirassociated conditions) have been configured for a changerequest.
The disabled Collect Attributes icon is displayed if attributes arenot enabled for change requests for that installed product. Noattribute collection is possible for that row in the grid.
Copyright © 1988, 2020, Oracle and/or its affiliates. 455

Using Change Management Chapter 21
From Owner (located on theOwnership tab of the ProductInformation grid)
This field will display the current owner of the selected installedproduct.
To Owner (located on the Ownershiptab of the Product Information grid)
Select the person to whom ownership of the installed productshould be transferred. This value will default to the changerequest Requester unless the current owner identified for theinstalled product is already the Requester.
When a change request is saved with a Status set to a Categoryof Closed, the corresponding installed product entry will beupdated with this person's name as the new owner.
Use the Change Control section to record important data associated to a change request, such as theimpact, category and change requestor.
Requested By Date Enter the requested completion date for the change request.
Use the Phase Summary section to manage the phases and tasks that are associated to a change request.Only phases appear in this grid. You can also view tasks and the phases that are associated to them fromthe Tasks page.
Each phase in the Phase Summary section consists of a task or set of tasks that needs to be completed fora change to be successful. Any required approvals should also be presented in the form of an approvaltask.
Note: The Text Tray option available on the change request Toolbar enables the user to quickly populatetext tray entries into the Description on the main Change Request page.
See Understanding Change Request Management.
Collect Attributes for Change Request PageUse the Collect Attributes for Change Request page (RG_ATTR_PROD_SEC) to add or edit attributes tobe associated for each installed product on a change request.
Navigation
HelpDesk >Add Change Request
Click the Collect Attributes icon on the Manage Product grid of the main Change Request page.
456 Copyright © 1988, 2020, Oracle and/or its affiliates.

Chapter 21 Using Change Management
Image: Change Request: Collect Attributes for Change Request page
This example illustrates the fields and controls on the Change Request: Collect Attributes for ChangeRequest page.
Enter the desired attribute values for each installed product (asset) entry listed on the Change Requestpage. When a change request is saved with a Status set to a Category of Closed, any non-blank attributevalues from the change request will be copied to the identically named attributes of the correspondinginstalled product entry.
Attributes are user-defined and are associated independently to each permitted component. Only attributesthat are associated to both the Change Request and Installed Product components (with similar conditions,if any) will be considered when updating the installed product attributes upon saving a closed changerequest.
See "Understanding Attributes" (PeopleSoft CRM 9.2: Automation and Configuration Tools).
Add Change Request PageUse the Add Change Request page (RG_CHANGE_REQ_SS) to add new change requests in HelpDeskSelf-Service.
Navigation
Employee Self-Service >HelpDesk >Add Change Request
Copyright © 1988, 2020, Oracle and/or its affiliates. 457

Using Change Management Chapter 21
Image: Add Change Request page
This example illustrates the fields and controls on the Add Change Request page.
Use the fields on this page to define the nature of the change you are proposing. Many of the fields in theChange Request section are dependent on each other in that the values change based on your previousselection. Click Submit when you are finished.
Manage Change Requests PageUse the Manage Change Requests page (RG_CHANGE_SS_SRCH) to search for and access changerequests in HelpDesk Self-Service.
Navigation
Employee Self-Service >HelpDesk >Manage A Change Request
458 Copyright © 1988, 2020, Oracle and/or its affiliates.

Chapter 21 Using Change Management
Image: Manage Change Requests page
This example illustrates the fields and controls on the Manage Change Requests page.
Select one of the predefined searches from the Predefined Search drop-down list box. Click Search. Thesystem displays the change requests that match the search criteria you selected. Click the link under theChange Request column to access the change request you submitted.
Managing Notes
This topic discusses how to manage notes.
Pages Used to Manage NotesPage Name Definition Name Usage
Change Request - Notes Page RG_CHANGE_NOTE Add notes and attachments to changerequests.
View Note Page RB_VIEW_NOTE_SEC View the content of notes andattachments related to the changerequest.
Change Request - Notes PageUse the Change Request - Notes page (RG_CHANGE_NOTE) to add notes and attachments to changerequests.
Copyright © 1988, 2020, Oracle and/or its affiliates. 459

Using Change Management Chapter 21
Navigation
• HelpDesk > Add Change Request
Click the Notes tab.
• HelpDesk > Add Case
Select Change Request from the Related Actions drop-down list box in the Actions section, and thenselect the Notes page.
Image: Change Request: Notes page
This example illustrates the fields and controls on the Change Request: Notes page.
When adding a new note to the change request, the note Description field may be populated using a TextTray entry.
Notes functionality is similar across all PeopleSoft CRM applications.
Related Links"Understanding Notes and Attachments" (PeopleSoft CRM 9.2: Application Fundamentals )
View Note PageUse the View Note page (RB_VIEW_NOTE_SEC) to view the content of notes and attachments relatedto the change request.
Navigation
Select the notes you want to view and then click the View button on the Change Request - Notes page.
460 Copyright © 1988, 2020, Oracle and/or its affiliates.

Chapter 21 Using Change Management
Image: View Note page
This example illustrates the fields and controls on the View Note page.
Note: Use this page to view notes and attachments related to the change request. Click Return to go backto the Notes page.
Managing Tasks
This topic discusses how to manage tasks.
Page Used to Manage TasksPage Name Definition Name Usage
Change Request - Tasks Page RG_CHG_TASKS Manage tasks in PeopleSoft ChangeManagement.
Change Request - Tasks PageUse the Change Request - Tasks page (RG_CHG_TASKS) to manage tasks in PeopleSoft ChangeManagement.
Navigation
• HelpDesk > Add Change Request
Click the Tasks tab.
• HelpDesk > Add Case
Select Change Request from the Related Actions drop-down list box in the Actions section, and thenselect the Tasks tab.
Copyright © 1988, 2020, Oracle and/or its affiliates. 461

Using Change Management Chapter 21
Image: Change Request: Tasks page
This example illustrates the fields and controls on the Change Request: Tasks page.
Adding tasks in PeopleSoft Change Management is similar to the process that is used in PeopleSoftSupport and HelpDesk. For instructions on using the Tasks page, see Adding Tasks to a Case and"Managing Tasks" (PeopleSoft CRM 9.2: Automation and Configuration Tools).
Reviewing Change Request History
This topic discusses how to review change request history.
Pages Used to Review Change Request HistoryPage Name Definition Name Usage
Change Request History - Events Page RG_CHG_HISTORY View a summary of important events inthe life cycle of a change request.
Change Request History - Audit Page RG_CHG_HISTORY View detailed information about changesto specific fields in the change request.
462 Copyright © 1988, 2020, Oracle and/or its affiliates.

Chapter 21 Using Change Management
Understanding Change Request HistoryThe Change Request History page includes an Events subpage and an Audit subpage:
• Change request history provides a summary of the major events in the life cycle of a change request.
• Change request auditing complements change request history processing by providing an automatedmechanism for keeping a detailed change history without cluttering the Change Request History page.
Some overlap is acceptable in the data that these pages capture.
Change Request History PageThis page displays information about major events in the life of the change request, including adescription of the event and details of any field changes that are associated with the event. The followingmechanisms insert data into the change request history table:
• Change Request History AAF policy.
At save time, the system evaluates record- and field-level conditions that you define. When thecondition is true, the system adds a row of change request history data.
• Workflow AAF policy (including service-level workflow).
The system triggers a workflow action under conditions that you define. The event processingdefinition includes a check box that you select if you want to create change request history when theworkflow is triggered.
• Manual notifications.
The system adds change request history whenever a user sends a manual notification from the changerequest.
See "Understanding Manual Notifications" (PeopleSoft CRM 9.2: Automation and ConfigurationTools).
Audit History PageThis page displays record-level changes to change request data. Your organization chooses which fieldsin the record to audit and the types of changes to capture (adding, updating, displaying, or deleting).However, there is no conditional logic to evaluate the before and after values of the field. The systemcaptures all audited actions regardless of the field value.
Related Links"Understanding Audit Information" (PeopleSoft CRM 9.2: Application Fundamentals )"Understanding AAF" (PeopleSoft CRM 9.2: Automation and Configuration Tools)"Understanding Interactions" (PeopleSoft CRM 9.2: Application Fundamentals )
PrerequisiteYour organization must define event sets that tell the system which events to capture on the ChangeRequest - History page.
Copyright © 1988, 2020, Oracle and/or its affiliates. 463

Using Change Management Chapter 21
Related Links"Understanding Audit Information" (PeopleSoft CRM 9.2: Application Fundamentals )"Case History Configuration Page" (PeopleSoft CRM 9.2: Automation and Configuration Tools)
Change Request History - Events PageUse the Change Request History - Events page (RG_CHG_HISTORY) to view a summary of importantevents in the life cycle of a change request.
Navigation
• HelpDesk > Add Change Request
Select the Show more tabs button and then click the History page.
• HelpDesk > Add Case
Select Change Request from the Related Actions drop-down list box in the Actions section. Select theShow more tabs button. Select the History page.
Image: Change Request History - Events page
This example illustrates the fields and controls on the Change Request History - Events page.
Audit Click to display the Audit History page.
Events Describes the event.
These fields are either populated through AAF processing orwhenever a user sends a manual notification from the changerequest.
Change Request History - Audit PageUse the Change Request History - Audit page (RG_CHG_HISTORY) to view detailed information aboutchanges to specific fields in the change request.
464 Copyright © 1988, 2020, Oracle and/or its affiliates.

Chapter 21 Using Change Management
Navigation
Click the Audit link on the Change Request History page.
Image: Change Request History - Audit page
This example illustrates the fields and controls on the Change Request History - Audit page.
Your organization chooses which fields in the record to audit and the types of changes to capture (adding,updating, displaying, or deleting).
Managing Related Changes
This topic discusses how to manage related changes.
Page Used to Manage Related ChangesPage Name Definition Name Usage
Change Request - Related Changes Page RG_REL_CHANGES Relate your change request to anotherchange request.
Copyright © 1988, 2020, Oracle and/or its affiliates. 465

Using Change Management Chapter 21
Change Request - Related Changes PageUse the Change Request - Related Changes page (RG_REL_CHANGES) to relate your change request toanother change request.
Navigation
• HelpDesk >Add Change Request
Click the Related Changes tab.
• HelpDesk > Add Case
Select Change Request from the Related Actions drop-down list box in the Actions section, and thenselect the Related Changes page.
Image: Change Request: Related Changes page
This example illustrates the fields and controls on the Change Request: Related Changes page.
Managing related changes in PeopleSoft Change Management is similar to the process that is used tomanage related cases, which is described the documentation for PeopleSoft Support and HelpDesk.
Related LinksManaging Related Cases
Managing Related Actions
This topic discusses how to manage related actions.
Page Used to Manage Related ActionsPage Name Definition Name Usage
Change Request - Related Actions Page RG_REL_OBJECTS Relate actions to the change request.
466 Copyright © 1988, 2020, Oracle and/or its affiliates.

Chapter 21 Using Change Management
Change Request - Related Actions PageUse the Change Request - Related Actions page (RG_REL_OBJECTS) to relate actions to the changerequest.
Navigation
• HelpDesk, Add Change Request
Click the Related Actions tab.
• HelpDesk > Add Case
Select Change Request from the Related Actions drop-down list box in the Actions section, and thenselect the Related Actions page.
Image: Change Request - Related Actions page
This example illustrates the fields and controls on the Change Request - Related Actions page.
Managing related actions in PeopleSoft Change Management is similar to the process that is used tomanage related actions in PeopleSoft Support and HelpDesk.
Related LinksManaging Related Actions
Managing Interested Parties
This topic discusses how to manage interested parties for a change request.
Pages Used to Manage Interested PartiesPage Name Definition Name Usage
Change Request - Interested Parties Page RG_CHG_INT_PARTY Manage interested parties in a changerequest.
Copyright © 1988, 2020, Oracle and/or its affiliates. 467
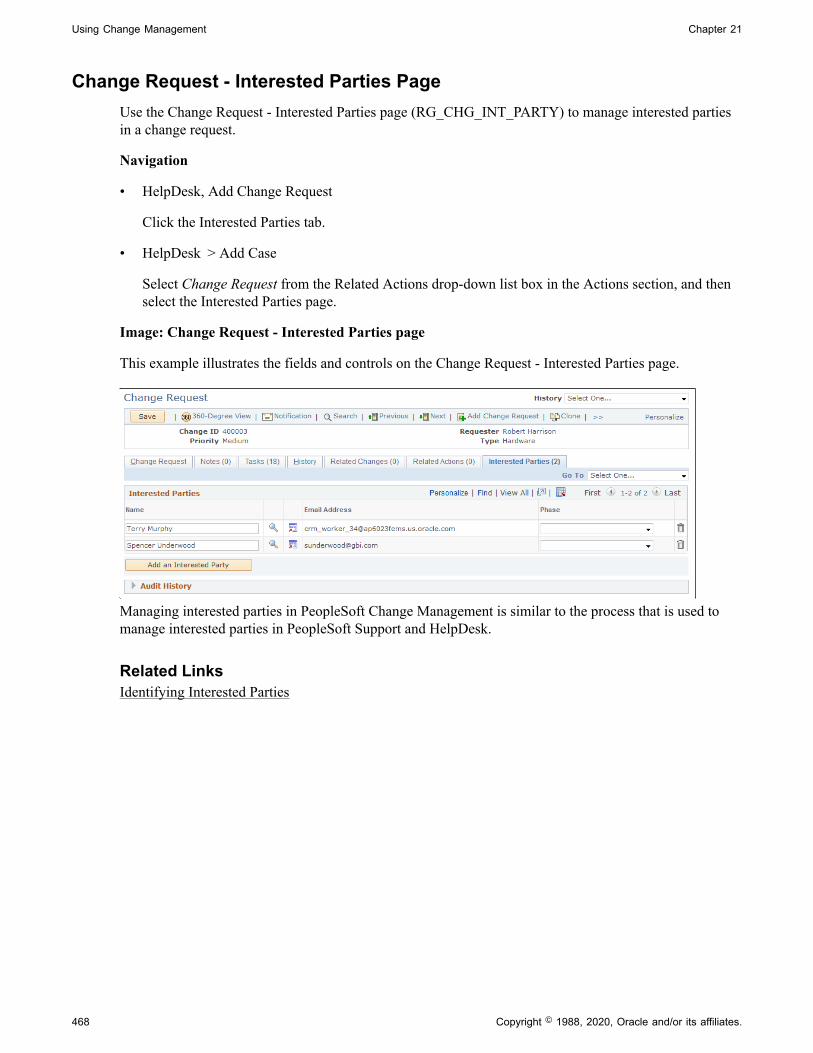
Using Change Management Chapter 21
Change Request - Interested Parties PageUse the Change Request - Interested Parties page (RG_CHG_INT_PARTY) to manage interested partiesin a change request.
Navigation
• HelpDesk, Add Change Request
Click the Interested Parties tab.
• HelpDesk > Add Case
Select Change Request from the Related Actions drop-down list box in the Actions section, and thenselect the Interested Parties page.
Image: Change Request - Interested Parties page
This example illustrates the fields and controls on the Change Request - Interested Parties page.
Managing interested parties in PeopleSoft Change Management is similar to the process that is used tomanage interested parties in PeopleSoft Support and HelpDesk.
Related LinksIdentifying Interested Parties
468 Copyright © 1988, 2020, Oracle and/or its affiliates.

Chapter 22
Managing Defects and Fixes
Understanding Defect and Fix Tracking
Flaws and functional shortcomings can occur in all products. Within PeopleSoft Quality Management,both product flaws and proposed enhancements are defects, and resolutions to both are fixes.
Use PeopleSoft Quality Management to track reported defects and enhancement requests and to recordhow requests are resolved. Automated worklist assignments and notifications move the defect throughthe resolution process. Managers, engineers, call center operators, and others can use the search tool toquickly identify and access records.
Use PeopleSoft Quality Management to:
• Identify defects associated with particular products or components.
• Monitor the progress of defects as they move forward to resolution.
• Advise support personnel and customers about fixes that have not yet been applied.
• Identify component problems affecting multiple products or versions.
• Log product enhancement requests made by customers and quality assurance engineers.
• Monitor requirements for quality certification processes such as ISO 9000.
• Measure product quality, identify defect trends, and assess customer satisfaction.
You can maintain a record of fixes to facilitate quick resolutions to similar defects and related cases. Usethe record of fixes to:
• Reduce the possibility of fixing the same problem twice.
• Provide links to other defect records and quickly identify similar problems.
• Provide a detailed history of when a defect was fixed, the effort involved, and the versions affected.
Entering Defects
This topic discusses how to enter defects.
Copyright © 1988, 2020, Oracle and/or its affiliates. 469

Managing Defects and Fixes Chapter 22
Pages Used to Enter DefectsPage Name Definition Name Usage
Quality Management - Defect Page RQ_DEFECT_MAIN Enter detailed information about thedefect, product, responsible parties, interested parties, environment, anddefect resolution.
Quality Management - Notes Page RQ_DEFECT_NOTE Add notes and attachments to a defect, forward notes to other parties on an adhoc basis, and generate ad hoc emailmessages.
Quality Management - Fixes Page RQ_DEFECT_FIX_LNKS Link new or existing fixes to a defect.
Quality Management - Solutions Page RQ_DEFECT_SOL_LNK2 Search for solutions to the defect orproblem.
Quality Management - Products AffectedPage
RQ_DEFECT_AFFD_PRD Identify and enter information aboutadditional products that are affectedby the defect. You can list multipleproducts.
Quality Management - Interested PartiesPage
RQ_DEFECT_INTR Identify people who want to be notifiedregarding defect resolution progress.
Quality Management - Related ActionsPage
RQ_DEF_CASE_LNK Link the defect to related support or helpdesk cases.
Quality Management - Related DefectsPage
RQ_DEF_RELATIONS View information about related defects, associate defects that can be resolvedby the same fix, and identify defectsthat must be resolved in a particularsequence.
Relate Existing Defect - RelationshipPage
RQ_REL_TYPE_SEC Specify how defects are related to oneanother.
Quality Management - TestedEnvironments Page
RQ_DEFECT_TEST_ENV Identify and enter information about theenvironments in which the defect will betested.
Quality Management - Workflow HistoryPage
RQ_WL_ACTN_HISTORY View workflow status and priorityhistory resulting from worklistnotifications.
Quality Management - Defect PageUse the Quality Management - Defect page (RQ_DEFECT_MAIN) to enter detailed information aboutthe defect, product, responsible parties, interested parties, environment, and defect resolution.
Navigation
Quality Management > Add Defect > Defect
Quality Management > Search Defects > Defect
470 Copyright © 1988, 2020, Oracle and/or its affiliates.

Chapter 22 Managing Defects and Fixes
Image: Quality Management - Defect page (1 of 2)
This example illustrates the fields and controls on the Quality Management - Defect page (1 of 2).
Image: Quality Management - Defect page (2 of 2)
This example illustrates the fields and controls on the Quality Management - Defect page (2 of 2).
The Quality Management - Defect page contains information relevant to problem reporting andresolution. As the defect moves through to the resolution process, you can track its status on this page.
Copyright © 1988, 2020, Oracle and/or its affiliates. 471

Managing Defects and Fixes Chapter 22
Defect Information Date Reported Enter the date on which the defect or enhancement request is
reported.
Reported By Select the name of the person reporting the defect orenhancement request. The name of the user who opened thedefect issue appears by default.
Type Select a type. Values are:
Defect: Relates to a problem or malfunction. The standardresponse to a defect is a fix.
Enhancement: Relates to a request for new functionality. Thestandard response to this request is an enhancement.
Subject Enter details about the defect being reported.
Status Select the status of the defect or enhancement request. PeopleSoft delivers Open and Closed. You can define otheroptions during setup.
State Select a state that more fully describes your status selection. Thesystem delivers several options. You can change these optionsor define others during setup. Available states are dynamicdepending on the selected status.
Reason Select a reason that further describes the status and stateselections. Available reasons are dynamic depending on theselected status and state.
Priority Select a priority for the defect. PeopleSoft delivers High, Low, and Medium with the system.
Severity Select the severity of the defect. PeopleSoft delivers High, Low, and Medium with the system.
Duplicate of If similar defect or enhancement requests already exist, selectthe principal defect here to designate the current defect as aduplicate of the principal defect.
For example, if, after creating a new defect record, you find thata defect has already been reported but not described in quitethe same way, specify the current record as a duplicate of theprevious record and change the status of the current record toclosed.
Product Information Product Select the product to which the defect or enhancement request
relates.
472 Copyright © 1988, 2020, Oracle and/or its affiliates.

Chapter 22 Managing Defects and Fixes
Note: Only products with a valid version definition, establishedin PeopleSoft Quality Management setup, appear in the search. If a product does not appear, a version for that product must beestablished in setup.
Production ID Select the appropriate production ID for your product selection. Only IDs linked to the selected product appear through thissearch. When you select a valid production ID, the systemautomatically fills in the version in the Version field.
Version Once a user selects a production ID, the system automaticallydisplays the version label.
Component ID Click the Component Hierarchy button to access the ComponentDescriptions page and select the appropriate component.
Symptom Select a symptom that may have alerted you to the defect. Define symptoms in PeopleSoft Quality Management setup.
Product Impact Describe the impact of the defect on your component. Valuesare: Affected - Use Workaround, Degraded, Unaffected, andUnusable.
Phase Select the production phase in which the product failure orenhancement request occurred. Values are: Alpha, Analysis/Design, Beta, Concept, Implementation, Maintenance, Production, Requirements, and Retirement.
Suspect. Cause (suspected cause) Select a suspected cause of the defect. Define suspected causesin PeopleSoft Quality Management setup.
Repeatability Select the regularity with which the failure can be reproduced. Values are: Intermittent, One time occurrence, Recurring, andReproducible.
Responsible PartiesResponsible parties are those who take the lead for one or more steps in the defect resolution process andare linked to the product version definition during version setup. These values are automatically populatedwhen a user selects the product version. You can add or delete responsible parties as needed.
You can use information about responsible parties to control search functions and role-related workflow.To modify workflow processing use AAF policies.
Currently assigned to this defect Select this option to indicate who is responsible for the defect'sprogress at any point. For example, if the current state of thedefect resolution is To Test, the person assigned would be thequality analyst. When defined, the system sends workflowmessages as the status is changed and saved.
Copyright © 1988, 2020, Oracle and/or its affiliates. 473

Managing Defects and Fixes Chapter 22
Note: Selecting an assignment is a manual process. You canselect only one name as the responsible party at any point. Asthe defect-resolution process progresses, the responsible partychanges.
Add a Responsible Party Click to add a new row to the Responsible Parties grid.
EnvironmentThis section is used primarily for software problems.
OS (operating system) Select the operating system of the environment in which theproduct failed if it is not automatically populated, or to modifyoperating system information.
Label Enter the environment information that is linked to the versionduring version setup.
Note: If there are multiple environment sets linked to a version, the Select an Environment button appears. Also, if only oneenvironment exists that is linked to the versions, the systemautomatically inserts values into the fields on the page.
Platform Select the type of computer on which the defect was found. Dothis only if the system does not automatically populate this fieldor if you want to modify platform information.
OS Version (operating systemversion)
Enter the version of the environment in which the product failedif it is not automatically populated, or to modify operatingsystem information.
UI (user interface) Select the type of user interface through which the defectwas found. Do this only if the system does not automaticallypopulate this field or if you want to modify user interfaceinformation.
Environment Select the database management environment in whichthe defect was found. Do this only if the system does notautomatically populate this field or if you want to modifyenvironment information.
Network Select the type of network on which the defect was found. Dothis only if the system does not automatically populate this fieldor if you want to modify network information.
Quality Management - Notes PageUse the Quality Management - Notes page (RQ_DEFECT_NOTE) to add notes and attachments to adefect, forward notes to other parties on an ad hoc basis, and generate ad hoc email messages.
474 Copyright © 1988, 2020, Oracle and/or its affiliates.

Chapter 22 Managing Defects and Fixes
Navigation
Quality Management > Add Defect > Notes
Quality Management > Search Defects > Notes
Image: Quality Management - Notes page
This example illustrates the fields and controls on the Quality Management - Notes page.
The process of adding notes and attachments is similar across all PeopleSoft applications.
For instructions on adding notes and attachments, see "Understanding Notes and Attachments"(PeopleSoft CRM 9.2: Application Fundamentals ).
Quality Management - Fixes PageUse the Quality Management - Fixes page (RQ_DEFECT_FIX_LNKS) to link new or existing fixes to adefect.
Navigation
Quality Management > Add Defect > Fixes
Quality Management > Search Defects > Fixes
Image: Quality Management - Fixes page
This example illustrates the fields and controls on the Quality Management - Fixes page.
As fixes are implemented to resolve the defect, use the Quality Management - Fixes page to both createa fix and link the defect to the fix. This provides an immediate link to all fixes that resolve the defect infull or in part. Alternately, link the defect to the fix using the Quality Management - Defects page in the
Copyright © 1988, 2020, Oracle and/or its affiliates. 475

Managing Defects and Fixes Chapter 22
Fix component. Having fix information linked to a defect record enables call center operators to refercustomers to available fixes that might not have been installed.
PeopleSoft Search is used to perform search on fixes. Refer to "Understanding PeopleSoft SearchFramework Definitions for CRM" (PeopleSoft CRM 9.2: Automation and Configuration Tools) and"Understanding PeopleSoft Search Framework Definitions for CRM" (PeopleSoft CRM 9.2: Automationand Configuration Tools) topics for more information on using PeopleSoft Search in CRM.
Subject Displays the subject description associated with the fixes linkedto this defect. The system populates this field with the subjectinformation that you entered on the Quality Management - Fixpage in the Fix component.
Quality Management - Solutions PageUse the Quality Management - Solutions page (RQ_DEFECT_SOL_LNK2) to search for solutions to thedefect or problem.
Navigation
Quality Management > Add Defect > Solutions
Quality Management > Search Defects > Solutions
Image: Quality Management - Solutions page
This example illustrates the fields and controls on the Quality Management - Solutions page.
PeopleSoft CRM call center, field service and quality management applications enable you to track boththe final solution—the one that resolved the caller's problem—and other solutions that were considered.
476 Copyright © 1988, 2020, Oracle and/or its affiliates.

Chapter 22 Managing Defects and Fixes
By tracking all solution usage, you capture valuable information about the effectiveness of your solutionset.
See "Understanding Solutions" (PeopleSoft CRM 9.2: Services Foundation).
Quality Management - Products Affected PageUse the Quality Management - Products Affected page (RQ_DEFECT_AFFD_PRD) to identify and enterinformation about additional products that are affected by the defect.
You can list multiple products.
Navigation
Quality Management > Add Defect > Products Affected
Quality Management > Search Defects > Products Affected
Image: Quality Management - Products Affected page
This example illustrates the fields and controls on the Quality Management - Products Affected page.
Complete this page if this defect or enhancement affects other products or components. For example, ifyou have a product that more than one appliance uses, use this page to list all appliances that contain theproduct.
Product Select the product in which the defect is found.
Product ID Once you select a product, the system displays the product ID.
Production ID Select the appropriate production ID for your product selection. Only IDs linked to the selected product appear through thissearch.
Version Once you select a production ID, the system displays the versionlabel.
Component ID Select the appropriate component for this product and version.
Name Select the name of the person who found the defect.
Copyright © 1988, 2020, Oracle and/or its affiliates. 477

Managing Defects and Fixes Chapter 22
Test Status Select the test status. Values are: Failed, Not Tested, andPassed.
Details Describe the impact of the defect on the component.
Quality Management - Interested Parties PageUse the Quality Management - Interested Parties page (RQ_DEFECT_INTR) to identify people who wantto be notified regarding defect resolution progress.
Navigation
Quality Management > Add Defect > Interested Parties
Quality Management > Search Defects > Interested Parties
Image: Quality Management - Interested Parties page
This example illustrates the fields and controls on the Quality Management - Interested Parties page.
Interested parties want to be notified regarding the defect resolution progress, but are not designatedas responsible parties. Interested parties can be either employees or non-employees—for example,customers. As with responsible parties, information pertaining to interested parties controls role-relatedworkflow.
Quality Management - Related Actions PageUse the Quality Management - Related Actions page (RQ_DEF_CASE_LNK) to link the defect to relatedsupport or help desk cases.
Navigation
Quality Management > Add Defect > Related Actions
Quality Management > Search Defects > Related Actions
478 Copyright © 1988, 2020, Oracle and/or its affiliates.

Chapter 22 Managing Defects and Fixes
Image: Quality Management - Related Actions page
This example illustrates the fields and controls on the Quality Management - Related Actions page.
Linking a defect to related cases enables call center agents to track a defect throughout the resolutionprocess and to track cases that can be resolved by the same fix. This also enables quality assuranceanalysts to gain additional information about a case.
Type Displays the type of related action.
ID Displays the ID of the related action.
Summary Displays the details of the action.
Date and Time Added Displays the date and time when the action and the defect werelinked.
Added By Displays the name of the person who linked the action to thedefect.
Type Select the type of action to relate. Values include Case, ChangeRequest, and Create Change Request. Selecting Create ChangeRequest and clicking the Add Related Action button takes youto the Change Request page.
Quality Management - Related Defects PageUse the Quality Management - Related Defects page (RQ_DEF_RELATIONS) to view information aboutrelated defects, associate defects that can be resolved by the same fix, and identify defects that must beresolved in a particular sequence.
Navigation
Quality Management > Add Defect > Related Defects
Quality Management > Search Defects > Related Defects
Copyright © 1988, 2020, Oracle and/or its affiliates. 479

Managing Defects and Fixes Chapter 22
Image: Quality Management - Related Defects page
This example illustrates the fields and controls on the Quality Management - Related Defects page.
Use the Quality Management - Related Defects page to view other defects that have been linked to thesubject defect. Also, link new defects by clicking the Relate a Defect button.
Relate a Defect Click to access the Relate Existing Defect page and link anexisting defect record to the new defect.
Relate Existing Defect - Relationship PageUse the Relate Existing Defect - Relationship page (RQ_REL_TYPE_SEC) to specify how defects arerelated to one another.
Navigation
Quality Management > Add Defect > Related Defects. Click the Relate Existing Defect button.
Quality Management > Search Defects Click the Relate Existing Defect button.
Image: Relate Existing Defect page
This example illustrates the fields and controls on the Relate Existing Defect page.
Linking related defects shows how a defect affects or is affected by other defects. For example, the harddrives on the new computer model that you are building can't be accessed. The floppy drives on the newmodel can't be accessed either. As the engineers study the problems, they find that the controller moduleon the motherboard is designed incorrectly and is responsible for the drive problems. The engineers entera third defect record and link the two drive defect records as children to the motherboard defect.
480 Copyright © 1988, 2020, Oracle and/or its affiliates.

Chapter 22 Managing Defects and Fixes
Relationship Type Select the appropriate relationship type to describe therelationship between the defects. You define relationship typesin setup. PeopleSoft provides sample values. You can changethem or add new values to fit your needs. Also, select the labelsthat describe the role of each defect in the relationship.
For example, use a relationship type of Common to indicatethat a defect in one component causes a defect in anothercomponent. In this example, the defect in the first componentthat causes the problem in the second component is the Parent, while the second defect is the Child. If problems in two or morecomponents are caused by the same defect but there is not aparent and child relationship, the relationship type is Equivalentand all linked defects are Equal.
Note: All relationship-type labels that are established under aparticular setID appear. However, you can select and save labelsappropriate to the specified relationship type only.
Quality Management - Tested Environments PageUse the Quality Management - Tested Environments page (RQ_DEFECT_TEST_ENV) to identify andenter information about the environments in which the defect will be tested.
Navigation
Quality Management > Add Defect > Tested Environments
Quality Management > Search Defects > Tested Environments
Image: Quality Management - Tested Environments page
This example illustrates the fields and controls on the Quality Management - Tested Environments page.
Copyright © 1988, 2020, Oracle and/or its affiliates. 481

Managing Defects and Fixes Chapter 22
For software defects, it is important to know which environments the defects occurred in. Enter detailsabout as many environment combinations as needed.
Environment Label Enter a name to identify the tested database management systemenvironment.
Type Select an environment type, which relates to reproductionstatus. Values are: Not Reproduced, Partially Reproduced, andReproduced.
OS (operating system) and OS Version(operating system version)
Select or enter the operating system and version of the testenvironment.
Environment Select the database management system environment in whichthe test component resides.
Platform Select the computer processor type.
Network Select the type of network on which users utilize the product.
UI (user interface) Select the type of user interface through which users access thecomponent.
Name Select the person who conducted the testing in the statedenvironment.
Description Describe the testing environment or the tests that wereconducted.
Quality Management - Workflow History PageUse the Quality Management - Workflow History page (RQ_WL_ACTN_HISTORY) to view workflowstatus and priority history resulting from worklist notifications.
Navigation
Quality Management > Add Defect > Workflow History
Quality Management > Search Defects > Workflow History
Image: Quality Management - Workflow History page
This example illustrates the fields and controls on the Quality Management - Workflow History page.
482 Copyright © 1988, 2020, Oracle and/or its affiliates.

Chapter 22 Managing Defects and Fixes
The Worklist Routing History grid displays a record of all workflow related to defect record statuschanges.
Date/Time Displays the date and time when a worklist notification wassaved.
From User and To User Displays the users who triggered and received the worklistnotification.
Priority, Status, and State Displays the priority code, status, and status state of the defectwhen the worklist notification was saved.
Refresh Grid Click to reflect recent changes to workflow history.
Recording Fixes and Linking Them to Defects
This topic discusses how to record fixes and link them to defects.
Pages Used to Record Fixes and Link Them to DefectsPage Name Definition Name Usage
Quality Management - Fix Page RQ_FIX_MAIN Enter and update detailed informationabout a fix.
Quality Management - Defects Page RQ_FIX_DEFECT_LNKS Link defects with fixes. You can linkmultiple defects to a single fix.
Quality Management - Notes Page RQ_FIX_NOTE Add notes and attachments to a fix, forward notes to other parties on an adhoc basis, and generate ad hoc emailmessages.
Quality Management - Fix PageUse the Quality Management - Fix page (RQ_FIX_MAIN) to enter and update detailed information abouta fix.
Navigation
Quality Management > Add Fix > Fix
Quality Management > Search Fixes > Fix
Copyright © 1988, 2020, Oracle and/or its affiliates. 483

Managing Defects and Fixes Chapter 22
Image: Quality Management - Fix page
This example illustrates the fields and controls on the Quality Management - Fix page.
Subject Enter a brief description of the fix.
Completed By Select the person who completed the fix.
Test Status Select the testing status of the fix. Values are: Failed, InProgress, Partially Passed, Passed, and Pending.
Fix Time (Hrs. Mins) (fix time [hoursand minutes])
Enter the approximate time required to complete the fix.
Complexity Select the level of fix complexity. Values are: Easy, Medium, Trivial, and Very Complex.
Confidence Select the level of confidence in the fix. Values are: High, Low, and Medium.
Product Select the product to which the fix applies.
Verified By Select the name of the person who verified that the fix wassuccessful.
Production ID Select the appropriate production ID for your product selection. Only IDs linked to the selected product appear through thissearch.
484 Copyright © 1988, 2020, Oracle and/or its affiliates.

Chapter 22 Managing Defects and Fixes
Version Once you select a production ID, the system automaticallydisplays the version label.
Component ID Select the component for which the fix applies.
Verified On Select the date of the verification.
First Found In Select the product version in which the defect was first reported.
Fixed In Select the product version in which the fix was first successfullyapplied.
Verified In Select the product version in which the fix was first successfullytested.
Note: Several of the fields on this page enable you to distinguish between product versions. For example,a flaw in a piece of software code might be introduced into a program in one version (the ProductionID field) but not discovered until a later version (the First Found In field). That same flaw might not befixed until an even later version (the Fixed In field) is issued. By noting the program version in which theproblem was introduced, you know to provide the fix to customers who are still using earlier versions.
Quality Management - Defects PageUse the Quality Management - Defects page (RQ_FIX_DEFECT_LNKS) to link defects with fixes.
You can link multiple defects to a single fix.
Navigation
Quality Management > Add Fix > Defects
Quality Management > Search Fixes > Defects
Image: Quality Management - Defects page
This example illustrates the fields and controls on the Quality Management - Defects page.
As fixes are implemented, use the Defects page to link the fix to one or more defects. This provides animmediate link to all reported defects resolved in full or in part by the fix. Alternately, you can link the fixto the defect using the Fixes page in the Defects component.
PeopleSoft Search is used to perform search on defects. Refer to "Understanding PeopleSoft SearchFramework Definitions for CRM" (PeopleSoft CRM 9.2: Automation and Configuration Tools) and
Copyright © 1988, 2020, Oracle and/or its affiliates. 485

Managing Defects and Fixes Chapter 22
"Understanding PeopleSoft Search Framework Definitions for CRM" (PeopleSoft CRM 9.2: Automationand Configuration Tools) topics for more information on using PeopleSoft Search in CRM.
Subject Displays the subject of the selected defect.
Add a Link to Defect Click to add a new row to the Defects Linked To This Fix grid.
Quality Management - Notes PageUse the Quality Management - Notes page (RQ_FIX_NOTE) to add notes and attachments to a fix,forward notes to other parties on an ad hoc basis, and generate ad hoc email messages.
Navigation
Quality Management > Add Fix > Notes
Quality Management > Search Fixes > Notes
The process of adding notes and attachments is similar across all PeopleSoft applications.
For instructions on adding notes and attachments, see "Understanding Notes and Attachments"(PeopleSoft CRM 9.2: Application Fundamentals ).
486 Copyright © 1988, 2020, Oracle and/or its affiliates.

Chapter 23
Configuring Self-Service Applications
Understanding PeopleSoft Call Center's Self-Service ApplicationConfiguration
This topic discusses:
• Self-service application configuration.
• Contact Me notifications.
• Live chat.
• Association of solutions with case closure reasons.
• Search descriptions for predefined searches.
• Troubleshooting guide and FAQ configuration.
Self-Service Application ConfigurationCentral to the self-service configurability options are display templates. When associated with the Casecomponent, display templates control the appearance and behavior of self-service components and theirpages. Implementers can show or hide pages, sections and fields, as well as adjust field labels.
Note: If you create a new display template for self-service transactions, you must define the new templatefor all the self-service components.
See Setting Up Basic Prompt Tables for Cases.
See "Configuring Display Templates for Components" (PeopleSoft CRM 9.2: Automation andConfiguration Tools).
See Understanding Call Center Business UnitsUnderstanding Display Templates.
RC_SUPPORT Display TemplateThe RC_SUPPORT, CRM_COM, CRM_ENG, CRM_FIN, CRM_INS and CRM_GOV display templatecontrols these PeopleSoft Support self-service application components:
• RC_CASE_SW_SS (Support - Manage Case)
• RC_CASE_SW_SS_RPT ( Support - Create Case)
• RC_CASE_SW_SS_SRCH (Support - Search Cases)
• RC_SOLNSRCH_SW_SS ( Support - Search Solutions)
Copyright © 1988, 2020, Oracle and/or its affiliates. 487

Configuring Self-Service Applications Chapter 23
• RC_SS_SW (Self Service Support Desk)
RC_HELPDESK, CRM_HHD, and CRM_HE Display TemplatesThe RC_HELPDESK (PeopleSoft HelpDesk), CRM_HHD (PeopleSoft HelpDesk for Human Resources),and CRM_HE (PeopleSoft Service Center for Higher Education) display templates controls the followingHelpDesk self-service application components:
• RC_CASE_HD_SS ( HelpDesk - Manage Case)
• RC_CASE_HD_SS_RPT ( HelpDesk - Create Case)
• RC_CASE_HD_SS_SRCH (HelpDesk - Search Cases)
• RC_SOLNSRCH_HD_SS ( HelpDesk - Search Solutions)
• RC_SS_HD (Self Service HelpDesk Desk)
Contact Me NotificationsIf you include the Contact Me Regarding This Problem button on the self-service application pages,ensure that clicking this button sends the appropriate notifications. PeopleSoft delivers AAF objects(trigger points, action types, and terms) to support this process.
The delivered AAF objects send notifications to the assignee (agent, provider group, or call centermanager). Separate email and worklist notifications enable the system to send notifications using therecipient's preferred notification method.
Related Links"Understanding Business Units in PeopleSoft CRM" (PeopleSoft CRM 9.2: Application Fundamentals )
Live ChatAll self-service pages are enabled for chat. This immediate access to a live agent, if needed, encouragesself-service adoption and enables organizations to eliminate potential customer frustration orabandonment by delivering real-time service.
See "Understanding Chat" (PeopleSoft CRM 9.2: Multichannel Applications).
Association of Solutions with Case Closure ReasonsDepending on system configuration, closed cases are generally associated with a successful solution. Youdefine whether a self-service application user can close or reopen self-service application cases on theBusiness Unit - Options page.
When a self-service application user clicks the Close Case button to close a case, the Close Case pageprompts the user for a reason. The system derives the successful solution from the reason that the self-service application user enters. Reason codes are tied to solutions which are then used to resolve the case.
There are two types of case closure reasons:
• A predefined reason (as established on the Reason Code page).
488 Copyright © 1988, 2020, Oracle and/or its affiliates.
Chapter 23 Configuring Self-Service Applications
• A free-form text reason.
Note: Use the Reason and Solution Link page to associate solutions with each of the predefined reasons.If the user selects a reason that does not have an associated solution, the system creates and uses a newsolution type: Canned. The reason code description becomes the solution summary. If the user entersa free-form text reason, the system creates and uses a new solution type: Adhoc. The text that the userenters becomes the solution summary. Users can enter multiple solutions to solve cases.
Related LinksUnderstanding Processing a CaseAssociating Solutions with Reasons for Closing CasesUnderstanding Call Center Prompt Tables"Understanding Solution Management Setup" (PeopleSoft CRM 9.2: Services Foundation)"Understanding Solutions" (PeopleSoft CRM 9.2: Services Foundation)Understanding Call Center Business UnitsUnderstanding Display Templates
Search Descriptions for Predefined SearchesSelf-service application users have access to predefined searches that locate cases that are associated withthe user.
Case AccessibilitySelf-service application cases can be accessed by:
• Company representatives (contacts).
In PeopleSoft Support cases are created mainly for companies. This is anyone who acts as a contactfor the company, regardless of whether that person is associated with the case in question. You canalso allow the creation of cases for consumers. When cases are created for consumers, the contact canbe a consumer or another person.
Note that in PeopleSoft Service Center for Higher Education, cases can be created by constituents(who have the role of individual consumers).
• Employees.
In PeopleSoft HelpDesk and PeopleSoft HelpDesk for Human Resources cases are typically createdby employees. In PeopleSoft HelpDesk there can be an alternate contact. Employees acting on theirown behalf are not considered alternate contacts.
In PeopleSoft Service Center for Higher Education, cases can be created by employees: this istypically done by staff or faculty who need to create a case.
• Managers
In PeopleSoft HelpDesk for Human Resources managers can report cases on behalf of the peoplereporting directly to them. This functionality requires an interface to a human resource managementsystem. In PeopleSoft HelpDesk managers can report a case on behalf of another worker, provided theworker has been properly entered into the PeopleSoft CRM system.
Copyright © 1988, 2020, Oracle and/or its affiliates. 489

Configuring Self-Service Applications Chapter 23
A person who is a contact for more than one customer (for example, a consultant who works with severalof your customers) uses the Customer Selection pagelet in the PeopleSoft Customer Portal to indicatewhich company's information to access.
Case SearchingSelf-service application users can search for existing cases in two ways:
• Basic search.
The user selects a search from a list of predefined searches.
• Advanced search.
The user can enter search words, including field-specific search criteria.
There are two categories of predefined searches (searches in both categories search across business units).
• All cases: This search locates all of the cases that the user can access:
• In PeopleSoft Support, company contacts can view all of the company's cases, including cases forwhich they are not the contact.
• In PeopleSoft Support, consumers can view all of the cases that are reported on their behalf(regardless of the contact) and all of the cases for which they are contacts (regardless of thecustomer).
• In PeopleSoft HelpDesk, employees can view all of the cases that were reported on their behalf(regardless of the contact) and all of the cases for which they are alternate contacts, even if thecase was reported for someone else. The delivered name for this search is all my cases.
• In PeopleSoft Service Center for Higher Education, consumers, company contacts and employeeswill be able to view their cases and any cases for which they are a contact.
• Cases for which I am the contact: This search locates cases where the self-service application user isthe contact, regardless of the person or company for whom the case was created.
• In PeopleSoft Support, a person representing a company can view cases for the company that isbeing represented. They do, however, have to be the contact for the case to be able to view thecase.
• In PeopleSoft Support, consumers can view cases for which they are the contact. Unless anotherperson is identified as the case contact, consumers are considered their own contacts.
• In PeopleSoft HelpDesk, employees can view cases for which they are the alternate contact. Thissearch does not retrieve cases for which the user is the employee and there is no alternate contact,even though the absence of an alternate employee implies that the employee is the case contact.
These predefined searches are based on the All cases and Cases for which I am the contact. search types:
• All cases that I am contact for.
• All my cases.
• All my open cases.
490 Copyright © 1988, 2020, Oracle and/or its affiliates.

Chapter 23 Configuring Self-Service Applications
• Cases that I am contact for, last 30 days.
• Cases that I am contact for, last 7 days.
• Cases that I reported for others.
• My cases reported in the last 30 days.
• My cases reported in the last 7 days.
• Open cases that I am contact for.
• Open cases that I reported for others.
When you configure descriptions for the searches, you can set up different descriptions for each deliveredrole type: contact, consumer, broker, and employee.
Note: If you add additional role types that apply to self-service application users, you must set upcorresponding predefined searches. The system does not do this for you.
Related Links"Defining Role Types and Role Categories" (PeopleSoft CRM 9.2: Business Object Management)
Troubleshooting Guide and FAQ ConfigurationPeopleSoft Support and HelpDesk self-service application users have direct access to solutions andtroubleshooting guides.
Note: Troubleshooting guides and FAQs are used in PeopleSoft Support, PeopleSoft HelpDesk, andPeopleSoft HelpDesk for Human Resources.
Troubleshooting GuidesTo make a troubleshooting guide script available to self-service application users, associate it with asolution library. You can associate solution libraries with one script only, so you must create a library foreach script. When self-service application users select a script, they see the library name, not the scriptname.
Frequently Asked Questions (FAQs)The Frequently Asked Questions self-service page gives PeopleSoft Support self-service customers accessto solutions whose corresponding library has the External FAQ check box selected.
Related LinksAccessing FAQs"Defining Role Types and Role Categories" (PeopleSoft CRM 9.2: Business Object Management)Selecting and Running Troubleshooting Guides"Understanding Solution Management Setup" (PeopleSoft CRM 9.2: Services Foundation)"Understanding Solutions" (PeopleSoft CRM 9.2: Services Foundation)
Copyright © 1988, 2020, Oracle and/or its affiliates. 491

Configuring Self-Service Applications Chapter 23
Configuring Contact Me Regarding This Problem Notifications
This topic discusses how to configure notifications that are triggered after users click the Contact MeRegarding This Problem button on self-service application pages.
Note: The Contact Me Regarding This Problem button is specific to call center self-service applicationpages; it is different from the Contact Us page that customers use to submit general-purpose questions andfeedback to your organization.
To configure notifications for the Contact Me Regarding This Problem button:
1. Create a new email template (if you do not want to use the delivered email template for your emailnotifications).
2. Set up an AAF policy to configure the use of the Contact Me Regarding This Problem button.
Use these AAF delivered data elements:
Data Element Name
Trigger Point After a New Self-Service HelpDesk Case is Saved
After a New Self-Service Support Case is Saved
Policy Name Employee Has Requested Contact - Agent Assigned
Employee Has Requested Contact - Provider GroupAssigned
Employee Has Requested Contact - No Provider Group orAgent Assigned
Self Service Case Created - Assigned to Agent
Self Service Case Created - Assigned To Provider Group
Note: These are the policies that PeopleSoft delivers. Youcan create new policies as you need them.
Action Type Notifications & Workflow
Action Name Worklist Notification to Assigned To
Send Worklist Notification
Related Links"Understanding AAF" (PeopleSoft CRM 9.2: Automation and Configuration Tools)"Sending Contact Us Messages" (PeopleSoft CRM 9.2: Application Fundamentals )
492 Copyright © 1988, 2020, Oracle and/or its affiliates.

Chapter 23 Configuring Self-Service Applications
Associating Solutions with Reasons for Closing Cases
This topic discusses how to associate solutions with reasons for closing cases.
Page Used to Associate Solutions with Reasons for Closing CasesPage Name Definition Name Usage
Reason and Solution Link Page RC_REASON_SOLN Identify the solutions that users canselect from to close cases through self-service applications.
Reason and Solution Link PageUse the Reason and Solution Link page (RC_REASON_SOLN) to identify the solutions that users canselect from to close cases through self-service applications.
Navigation
Set Up CRM > Product Related > Call Center > Self-Service Configuration > Reason and Solution Link
Image: Reason and Solution Link page
This example illustrates the fields and controls on the Reason and Solution Link page.
Reason Code Displays all the reasons of the type Reason Closed that you haveset up for this setID. These are the reasons that a self-serviceapplication user can select from when closing a case.
Solution ID Select the solution that represents the reason a user may closea case. When a self-service application user closes a case andselects a reason, the associated solution is added to the case as aresolution with this status: Successful Resolution.
If a reason does not have an associated solution, then the firsttime that a self-service application user closes a case with thatreason, the system creates a Canned solution and associates it
Copyright © 1988, 2020, Oracle and/or its affiliates. 493

Configuring Self-Service Applications Chapter 23
with that reason. The next time that reason is used, the solutionthat was previously created is used.
Updating Search Descriptions
To update search descriptions, use the Predefined Search Attributes (RG_DEFINED_SRCH) component.
This topic discusses how to update predefined search descriptions.
Page Used to Update Search DescriptionsPage Name Definition Name Usage
Predefined Search Attributes Page RC_DEFINED_SRCH Update predefined search descriptions.
Predefined Search Attributes PageUse the Predefined Search Attributes page (RC_DEFINED_SRCH) to update predefined searchdescriptions.
Navigation
Set Up CRM > Product Related > Call Center > Self-Service Configuration > Predefined SearchAttributes
Image: Predefined Search Attributes page
This example illustrates the fields and controls on the Predefined Search Attributes page.
For each search code and customer role type combination, review the search description and modify it asneeded. You can also enable a search code or disable it by either clearing or selecting the associated checkbox. Select one of the search codes as the default, if desired.
494 Copyright © 1988, 2020, Oracle and/or its affiliates.

Chapter 23 Configuring Self-Service Applications
Configuring Troubleshooting Guide
To configure troubleshooting guides, use the Troubleshooting Guide (RBT_TGUIDE_SETUP) andSolution Library Setup (RC_SOLN_LIB_SETUP) components.
This topic discusses how to configure troubleshooting guides.
Pages Used to Configure Troubleshooting GuidesPage Name Definition Name Usage
Troubleshooting Guide Page RBT_TGUIDE_SETUP Identify troubleshooting guide scriptsthat customers can access through self-service applications.
Solution - Libraries Page RC_SOLN_LIBRARY Create solution libraries.
Troubleshooting Guide PageUse the Troubleshooting Guide page (RBT_TGUIDE_SETUP) to identify troubleshooting guide scriptsthat customers can access through self-service applications.
Navigation
Set Up CRM > Product Related > Call Center > Self-Service Configuration > Troubleshooting GuideSetup > Troubleshooting Guide
Image: Troubleshooting Guide page
This example illustrates the fields and controls on the Troubleshooting Guide page.
Script ID Select the script to run when the self-service application userselects the solution library.
Because each library is associated with a single script, you mustcreate additional libraries for each script that you want to make
Copyright © 1988, 2020, Oracle and/or its affiliates. 495

Configuring Self-Service Applications Chapter 23
available to self-service application users on the Customer Care- Troubleshooting Guide page.
Solution - Libraries PageUse the Solution - Libraries page (RC_SOLN_LIBRARY) to create solution libraries.
Navigation
Solutions > Search Solutions > Libraries
Image: Solution - Libraries page
This example illustrates the fields and controls on the Solution - Libraries page.
Select the External FAQ check box to make the solution available to self-service users as a FrequentlyAsked Question.
Solution libraries are set up in a similar manner across many PeopleSoft CRM applications.
Related Links"Solution Library Page" (PeopleSoft CRM 9.2: Services Foundation)
496 Copyright © 1988, 2020, Oracle and/or its affiliates.

Chapter 24
Working with Self-Service ApplicationTransactions
Understanding Self-Service Transactions
PeopleSoft CRM call center applications enable you to deploy self-service transactions that callers canuse to enter and view their own cases. These transactions provide limited access to case information andemploy a simple interface that is suited to the casual, untrained user.
This topic discusses:
• Self-service transactions.
• Configurable functionality.
• Self-service data access.
• Case visibility.
• Confirmation pages.
Related Links"Understanding Customer Self-Service" (PeopleSoft CRM 9.2: Application Fundamentals )
Self-Service TransactionsThe following transactions are available to PeopleSoft Support, PeopleSoft HelpDesk, PeopleSoftHelpDesk for Human Resources, and PeopleSoft HelpDesk for Higher Education self-service users:
• Search for solutions outside the context of a case.
• Create a new case (Create Case).
• Manage cases.
Search for, review, and update existing cases.
• Use FAQs.
Access solutions that belong to the solution library with a specific FAQ configuration.
• Use troubleshooting guides.
Access and run troubleshooting guide scripts that have been associated with solution libraries.
Copyright © 1988, 2020, Oracle and/or its affiliates. 497

Working with Self-Service Application Transactions Chapter 24
Note: For information on using employee self service to add and manage change requests, refer to thedocumentation on Using Change Management.
Related LinksManaging Basic Change Request Information
Configurable FunctionalityWithin the transactions that are used to create and manage cases, certain functionality depends on thesystem configuration.
Business Unit ConfigurationThe availability of the following functionality depends on the settings on the Business Unit - Optionspage:
• Close a case.
The Close this case link is available for cases that have not been resolved and have no correspondingresolution with the status Successful Resolution. The button's availability depends not on the casestatus, but on the resolution status.
When a self-service user clicks this button and provides a reason for closing the case, the systemadds a successful resolution to the case and updates the status based on the closed case status that youselect on the Case Defaults page. (If you do not enter a closed case status or if you enter a status witha type other than Closed, then the case is not closed. It is resolved, however.)
• Reopen a case.
The Re-open this case link is available for cases that have been resolved—that is, there is a resolutionwith the status Successful Resolution. The button's availability depends not on the case status, but onthe resolution status.
When a self-service user clicks the Re-open this case button and provides a reason for reopening thecase, the system changes the status of the successful resolution to Resolution Failed and updates thestatus based on the reopened case status that you select on the Case Defaults page. (If you do not entera reopened case status, the status does not change.)
If your organization has not set a reopened case status, the status doesn't change. This could resultin cases having a closed status without having a successful resolution—a condition that the systemnormally does not allow.
Users can reopen cases only during the grace period that is established by your organization. Thegrace period lasts for a specified number of days after a user has resolved the case.
Active Analytics Framework (AAF) NotificationsThe AAF decision engine handles notifications related to activity that is in the self-service pages.PeopleSoft delivers AAF action types that:
• Send a notification when a new case is submitted.
498 Copyright © 1988, 2020, Oracle and/or its affiliates.

Chapter 24 Working with Self-Service Application Transactions
• Send a notification when a user clicks the Contact Me regarding this case button.
The system sends both notifications to the agent, call center manager, or provider group who is assignedto the new case.
Note: All AAF policies are delivered inactive. Users must activate the AAF objects that they wish to use.
Self-Service WorkflowPeopleSoft has built these action types and workflow actions into its self-service applications forPeopleSoft HelpDesk, HR HelpDesk, Support, and Service Center for Higher Education:
• When a self-service user saves any change to the case, the system sends an email notification to theperson to whom a case is assigned.
• When a self-service user creates a new case, the system sends a worklist notification to the defaultself-service provider group that is associated with the business unit.
• When a user clicks the Contact Me Regarding This Problem button for a case that is assigned to anagent:
• The system sends an email to the assigned agent of the case if their notification preference isemail or both.
• The system sends the case to the assigned case agent's list if their notification preference isworklist or both.
• When a user clicks the Contact Me Regarding This Problem button for a case that is assigned to aprovider group (but not to an agent), the system sends a worklist entry to the provider group members.
• When a user clicks the Contact Me Regarding This Problem button for a case that is unassigned, thesystem sends a worklist entry to members of the Contact Me provider group (established on the CaseDefaults page).
Field Value ConfigurationWhen you set up prompt tables for certain case fields, you can enter self-service versions of the fieldvalues.
Related LinksUnderstanding Self-Service TransactionsUnderstanding Call Center Business UnitsUnderstanding Display TemplatesUnderstanding Call Center Prompt Tables"Understanding AAF" (PeopleSoft CRM 9.2: Automation and Configuration Tools)
Self-Service Data AccessThe fields and data that appear in the self-service transactions vary depending on the configuration and onthe data itself.
Copyright © 1988, 2020, Oracle and/or its affiliates. 499

Working with Self-Service Application Transactions Chapter 24
Field VisibilityImplementers can control the visibility of fields and the appearance of field labels by modifying thedisplay template.
See Understanding Self-Service Transactions.
Row-Level VisibilityIndividual case notes and case history items have a visibility attribute that controls self-service access tothe data. The Case Notes and Case History grids on the Manage Case page show only rows of data withAll visibility. Notes, attachments, and history items with internal visibility do not appear.
Access to solutions is more complex, depending on two factors:
• Solution visibility
When accessing solutions using Solution Advisor or the Frequently Asked Questions page, onlysolutions with All visibility are visible.
• Resolution status
When viewing a case, self-service users can see associated solutions that have a status other thanWithdrawn. Solutions that are associated with a case appear regardless of the solution's visibilitysetting.
• Case visibility
When searching cases in Case Search, only the cases with All visibility are visible.
Values That Are Available for SelectionWhen creating a case, self-service users have access to all fields that are available for entry. For someprompt fields (case type, priority, severity, category, specialty type, and detail), self-service users mightnot have access to all of the values that are valid for agents. This restriction is based on how the value wasdefined on its setup page. Only values that are tagged for self-service use are available. Furthermore, thefield labels for self-service users may differ from those seen by agents (depending on prompt table setup).
Related LinksUnderstanding Self-Service TransactionsUnderstanding Call Center Prompt Tables"Understanding Notes and Attachments" (PeopleSoft CRM 9.2: Application Fundamentals )"Understanding AAF" (PeopleSoft CRM 9.2: Automation and Configuration Tools)
Case VisibilityTo prevent employees from viewing sensitive case information (for example, grievances) through theHelpDesk self-service applications, PeopleSoft has added a value called Internal, exclude Case Contactto the Visibility drop-down menu list on the agent-facing Case page. When an agent selects Internal,exclude Case Contact, the employee who is the subject of the case is unable to view the case through theHelpDesk self-service application.
500 Copyright © 1988, 2020, Oracle and/or its affiliates.

Chapter 24 Working with Self-Service Application Transactions
The person who reported the case (Reported By) can view it in the self service application if the case isnot secured. When a case is secured, the Reported By person will no longer have visibility to the case inthe self-service application.
Note: This feature is only applicable to CRM HelpDesk, HelpDesk for Human Resources, and ServiceCenter for Higher Education.
Related LinksCase Visibility
Confirmation PagesWhen self-service users perform certain actions, the system provides a confirmation to assure the user thatthe transaction was successful.
The confirmation pages have different forms depending on the application.
• PeopleSoft Support displays confirmation text at the top of the page where the user performs theaction. The confirmation message is highlighted with a yellow background.
• PeopleSoft HelpDesk and PeopleSoft Service Center for Higher Education use a separateconfirmation page, where the user must click a button or link before continuing.
Note: You can control the appearance of configuration pages by modifying display templates.
See "Configuring Display Templates for Components" (PeopleSoft CRM 9.2: Automation andConfiguration Tools).
The following actions trigger confirmation messages:
User Action PeopleSoft HelpDesk ConfirmationPage
Description
Submit a new case without searching forsolutions (click the Submit button, notthe Submit and Search Solutions button).
Submit Confirmation page (RC_CASE_HD_SS_CONF)
Confirms that the user submitted thecase. Gives the user the new casenumber.
Close a case. Submit Confirmation page (RC_CASE_HD_SS_CLOS)
Confirms that the case is successfullyclosed.
Reopen a case. Submit Confirmation page (RC_CASE_HD_SS_SUBT)
Confirms that the case is successfullyreopened.
Answer Yes when asked whether asolution resolved the user's problem (when viewing a solution in the contextof a case).
Close Case page (RC_CASE_HD_SS_CLOS)
Confirms that the solution is successfuland the case is closed.
Copyright © 1988, 2020, Oracle and/or its affiliates. 501

Working with Self-Service Application Transactions Chapter 24
Understanding the Self-Service Home Page Content and Layout
The self-service home page is a central place where all self-service actions such as finding information,creating cases, and chatting with an agent can be initiated and shortcuts to HR transactions are available.Users can access information or resources they need in order to get their issues resolved. PeopleSoft CRMdelivers four versions of home pages:
• HR Service Center: HR Help Desk for employees to manage HR questions and inquires.
• IT Service Center: IT Help Desk for employees to manage IT questions and inquires.
• Customer Service Center: Support for customers.
• Campus Service Center: Higher Education for students and faculty.
Various controls and information are displayed on the home page in the form of pagelets. The home pageshave different combinations of the following pagelets:
• Welcome Banner
• Quick Links
• Search Here for Answers
• Top Solutions
• FAQ
• Known Issues
• Discussion Forums
• My Recent Cases
• Shortcuts
The Welcome Banner and Search Here for Answers pagelet are fixed in their positions. The self-serviceuser can move other pagelets around by dragging and dropping them to a new position. The followingtable lists the different pagelets and their description, properties, and the home page they appear in.
Pagelet Home Page in Which the PageletAppears
Description
Welcome Banner All Greets the logged in self-service user.
Quick Links All Displays links for users to navigate toother components such as Create Case, Manage Cases, Chat, and Email.
Search All Allows the user to search for contentusing the keyword search or browsingthrough content.
Top Solutions All Displays a pre-defined list of topsolutions.
502 Copyright © 1988, 2020, Oracle and/or its affiliates.

Chapter 24 Working with Self-Service Application Transactions
Pagelet Home Page in Which the PageletAppears
Description
FAQ Customer Service Center, HR ServiceCenter, and IT Service Center
Displays a pre-defined list of FrequentlyAsked Questions.
Known Issues All Displays a pre-defined list of GlobalCases.
Discussion Forums Campus Service Center Displays a list of discussion forums fromEnterprise Portal.
My Recent Cases All Displays a list of recent cases for thelogged in user.
Shortcuts HR Service Center and Campus ServiceCenter
Displays a list of shortcuts to HCM, EBS, or Campus Solutions that havebeen defined by the Administrator.
All pagelets except the Welcome Banner has icons in the top-right corner. The following table describesthe icons on the pagelets.
Icons Description
Refreshes the contents of the pagelet
Displays options to minimize or expand and remove pagelet.
Accessing Self-Service Transactions In PeopleSoft CRM and HCM
This topic provides overviews on self-service case search, case creation, and case management as theyrelate to display template families, and discusses how to access self-service transactions.
Understanding Self-Service Case Search and Display Template FamiliesThe system passes the display template family from the content reference (CREF). This enables thesystem to search for cases across the display template family for cases using the self-service search casecomponent (RC_CASE_SW_SS_SRCH or RC_CASE_HD_SS_SRCH).
CREF Name Vertical Display Template Family
CR_RC_CASE_SW_SS_SRCH_GBL Support RC_SUPPORT
CR_RC_CASE_HD_SS_SRCH IT Help Desk RC_HELPDESK
CR_RC_CASE_HD_SS_SRCH_HHD HR Help Desk CRM_HHD
CR_RC_CASE_HD_SS_SRCH_HE Service Center for Higher Education CRM_HE
Copyright © 1988, 2020, Oracle and/or its affiliates. 503

Working with Self-Service Application Transactions Chapter 24
The searching logic uses the display template family instead of the display template ID to filter the casesthat are shown in the results grid. Based on the defaulting logic described in previous topics on displaytemplate families, the system defaults the display template family, business unit, and display template IDin the self-service search results grid which is displayed when the user searches for a case using the FindCases link on the Quick Links pagelet. You cannot, however, define AAF actions for this component. Forthe Create Case and Manage Case components you can, however, use AAF to render the Case page with aselected display template.
Case Creation and Display Template FamiliesThe system passes the display template family from the content reference (CREF) to create cases for thecreate case component (RC_CASE_SS).
The system renders the Create Case pages for the different verticals based on the defaulting logicdescribed in previous topics, which relies on system defaults for the display template family, business unitand display template ID.
PeopleSoft delivers four AAF trigger points that you can use to render the Create Case page usingdifferent display template IDs:
• When a New IT Service Center Case is presented.
• When a New HR Service Center Case is presented
• When a New IT Service Center Case Business Unit is changed.
• When a New IT Service Center Case Business Unit is changed.
Based on the AAF policies that you create, the system derives the display template ID when the Case PostBuild Event executes. This is used to render the Create Case page. With this design, the system does notstore the display template ID in the case record. Instead, the system stores the display template familycode in the case record.
Case Management and Display Template FamiliesThe system passes the display template Family from the CRMCRefTransfer application programminginterface (API) to display the Manage Case page (RC_CASE_SW_SS).
The system renders the Manage Case pages for the different verticals based on the defaulting logicdescribed in previous topics, which relies on system defaults for the display template family, business unitand display template ID.
PeopleSoft delivers two AAF trigger points for this component that you can use to render the Case <ID>page using different display template IDs:
• When a IT Service Center Manage Case is presented.
• When a HR Service Center Desk Manage Case is presented.
After the system creates a case, you cannot change the display template family code.
504 Copyright © 1988, 2020, Oracle and/or its affiliates.

Chapter 24 Working with Self-Service Application Transactions
Pages Used to Access Self-Service TransactionsPage Name Definition Name Usage
Customer Service Center Home Page (not applicable) Select a PeopleSoft (Support) self-service application transaction.
IT Service Center Home Page (not applicable) Select a PeopleSoft Help Desk self-service application transaction.
HR Service Center Home Page (not applicable) Select a PeopleSoft HR Help Desk self-service application transaction.
HCM Employee Self Service Home Page (not applicable) Select an employee self-serviceapplication transaction in PeopleSoftHCM.
HCM Manager Self-Service Home Page (not applicable) Select a manager self-service applicationtransaction in PeopleSoft HCM.
Campus Service Center Home Page (not applicable) Select a PeopleSoft Service Centerfor Higher Education self-serviceapplication transaction.
Student Center Home Page (not applicable) Select a self-service applicationtransaction in PeopleSoft Student Center (Campus Service Center).
Faculty Center Home Page (not applicable) Select a self-service applicationtransaction in PeopleSoft Faculty Center (Campus Service Center).
Customer Selection Page CUST_SELECT Select a customer to represent inPeopleSoft Customer Service Centeror Campus Service Center self-serviceapplication transactions.
Customer Service Center Home PageUse the Customer Service Center home page to select a PeopleSoft Support self-service applicationtransaction.
• Customer Service Center
• Customer Care >Customer Service Center
Copyright © 1988, 2020, Oracle and/or its affiliates. 505

Working with Self-Service Application Transactions Chapter 24
Image: Customer Service Center home page
This example illustrates the fields and controls on the Customer Service Center home page.
IT Service Center Home PageNavigation
Use the IT Service Center home page to select a PeopleSoft Help Desk self-service applicationtransaction.
• IT Service Center
• Employee Self Service >Help Desk >IT Service Center
Image: IT Service Center home page
This example illustrates the fields and controls on the IT Service Center home page.
506 Copyright © 1988, 2020, Oracle and/or its affiliates.

Chapter 24 Working with Self-Service Application Transactions
HR Service Center Home PageNavigation
Use the HR Service Center home page to select a PeopleSoft HR Help Desk self-service applicationtransaction.
• HR Service Center
• Employee Self Service >HR Help Desk >HR Service Center
Image: HR Service Center home page
This example illustrates the fields and controls on the HR Service Center home page.
HCM Employee Self Service Home PageUse the HCM Employee Self Service Home Page to select an employee self-service applicationtransaction in PeopleSoft HCM.
Navigation
• Click the HCM Manager Self-Service link in the Quick Links section on the HR Service Center homepage.
• Employee Self Service >HR Help Desk >HCM Manager Self-Service
Copyright © 1988, 2020, Oracle and/or its affiliates. 507

Working with Self-Service Application Transactions Chapter 24
Image: HCM Employee Self-Service home page (PeopleSoft HCM)
This example illustrates the fields and controls on the HCM Employee Self-Service Home page(PeopleSoft HCM).
HCM Manager Self-Service Home PageUse the HCM Manager Self-Service home page to select a manager self-service application transaction inPeopleSoft HCM.
Navigation
• Click the HCM Employee Self-Service link in the Quick Links section on the HR Service Centerhome page.
• Employee Self Service >HR Help Desk >HCM Employee Self-Service
508 Copyright © 1988, 2020, Oracle and/or its affiliates.

Chapter 24 Working with Self-Service Application Transactions
Image: Manager Self-Service home page(PeopleSoft HCM)
This example illustrates the fields and controls on the Manager Self-Service home page (PeopleSoftHCM).
Click the links on these pages to access self-service transactions in PeopleSoft HCM.
Note: PeopleSoft delivers URL identifiers for both the Manager Self-Service page and the EmployeeSelf-Service page in PeopleSoft HCM. To provide access to these pages from PeopleSoft CRMyou must update the URLs with the correct server names for your PeopleSoft HCM application.Go to PeopleTools > Utilities > Administration > URLs > URL Maintenance. Then select theRC_HD_HRHOME URL identifier and enter the correct URL for the page. Repeat the same process forthe RC_HD_HRHOME_MGR URL identifier.
See PeopleTools: System and Server Administration.
Campus Service Center Home PageUse the Campus Service Center home page to select a PeopleSoft Service Center for Higher Educationself-service application transaction.
Navigation
• Campus Service Center
• Service Center > Campus Service Center
Copyright © 1988, 2020, Oracle and/or its affiliates. 509

Working with Self-Service Application Transactions Chapter 24
Image: Campus Service Center home page
This example illustrates the fields and controls on the Campus Service Center home page.
Student Center Home PageNavigation
• Click the Student Center link in the Campus Shortcuts section on the Campus Service Center homepage.
• Service Center > Student Center
Image: Student Center page (1 of 2) [PeopleSoft Campus Solutions]
This example illustrates the fields and controls on the Student Center page (1 of 2) [PeopleSoft CampusSolutions].
510 Copyright © 1988, 2020, Oracle and/or its affiliates.

Chapter 24 Working with Self-Service Application Transactions
Image: Student Center page (2 of 2) [PeopleSoft Campus Solutions]
This example illustrates the fields and controls on the Student Center page (2 of 2) [PeopleSoft CampusSolutions].
Click the links on this page to access self-service transactions in PeopleSoft Campus Solutions.
Faculty Center Home PageNavigation
Click the Faculty Center link in the Campus Shortcuts section on the Campus Service Center home page.
Copyright © 1988, 2020, Oracle and/or its affiliates. 511

Working with Self-Service Application Transactions Chapter 24
Image: Faculty Center home page (PeopleSoft Campus Solutions)
This example illustrates the fields and controls on the Faculty Center home page (PeopleSoft CampusSolutions).
Customer Selection PageUse the Customer Selection page (CUST_SELECT) to select a customer to represent in PeopleSoftCustomer Service Center and Campus Service Center self-service application transactions.
Navigation
Service Center >Customer Selection
512 Copyright © 1988, 2020, Oracle and/or its affiliates.

Chapter 24 Working with Self-Service Application Transactions
Image: Customer Selection page
This example illustrates the fields and controls on the Customer Selection page.
Use this page if you have more than one role in Customer Service Center or Campus Service Center.Click the Select button to choose the role that you wish to be used when accessing a Service Center forHigher Education self-service case.
If you have multiple roles and you do not access this page to select the desired role to be used forCustomer Service Center or Campus Service Center self-service cases, the system will default your roleby using the first role found for you in this hierarchy:
• Worker.
• Consumer (Constituent).
• Company Contact.
Defining the Self-Service Home Page Content and Layout
This topic discusses how to define the self-service home page content and layout.
As an Administrator, you can perform the following for each pagelet:
• Position of each pagelet
• Whether the pagelet will be fixed or can be moved around by the end-user
• Whether the end-user can remove the pagelet
• Refresh and Page Setup icons
• Pagelet title
Copyright © 1988, 2020, Oracle and/or its affiliates. 513

Working with Self-Service Application Transactions Chapter 24
Pages Used to Set Up the Self-Service Home PagePage Name Definition Name Usage
Home Page - General Page RC_SS_GENERAL Enter an email address to which emailsfrom the home page will be sent.
Home Page - Top Solutions Page RC_SS_SOLUTION Search for solutions using search criteriaand select solutions to be displayed inthe Top Solutions pagelet on the SupportSelf Service home page across differentbusiness units.
Home Page - Fluid Preferences Page RC_SS_TL_SETUP Set up the Browse By Topic tile and theorder in which the links appear on theBrowse By topic tile. Only the first 11links are displayed on the tile.
Home Page - Search Pagelet Page RC_SS_FACET Set up the Search Here for Answerspagelet on the home page by selectingthe facets and values under each facet tobe displayed.
Home Page - FAQ Page RC_SS_FAQ Select the top Frequently AskedQuestions to be displayed in the FAQpagelet on the home page acrossdifferent Set Ids and Solution Libraries.
Home Page - Known Issues Page RC_SS_ISSUES Select the Global Cases to be displayedto a self-service user.
Home Page - Shortcuts Page RC_SS_LINKS Set up HCM or Campus Solutionsshortcut links to be displayed on theHome page.
Home Page - Quick Links Page RC_SS_QUICK_LINKS Set up the quick links to be displayed inthe Quick Links pagelet.
Home Page - Chat Schedule Page RC_SS_AGT_SCHEDULE Set up Chat Schedule based on agentavailability.
Personalize Content: <Service CenterName> Page
PORTAL_HPCOMP Personalize the name of the home page,Welcome message, and select pagelets tobe displayed.
Personalize Layout: <Service CenterName> Page
PORTAL_HPLAYOUT Personalize the appearance and layout ofthe home page and delete pagelets.
Home Page - General PageUse the Home Page - General page (RC_SS_GENERAL) to enter an email address to which emails fromthe home page will be sent.
Navigation
Set Up CRM >Product Related >Call Center >Self-Service Configuration >Home Page >General
514 Copyright © 1988, 2020, Oracle and/or its affiliates.

Chapter 24 Working with Self-Service Application Transactions
Image: Home Page - General page
This example illustrates the fields and controls on the Home Page - General page.
Email Address Enter an email address in this field. The email address can be anERMS mailbox or any other email address.
Home Page - Top Solutions PageUse the Home Page - Top Solutions page (RC_SS_SOLUTION) to search for solutions using searchcriteria and select solutions to be displayed in the Top Solutions pagelet on the Support Self Service homepage across different business units.
Navigation
Set Up CRM >Product Related >Call Center >Self-Service Configuration >Home Page >Top Solutions
Image: Home Page - Top Solutions page (1 of 2)
This example illustrates the fields and controls on the Home Page - Top Solutions page (1 of 2).
Copyright © 1988, 2020, Oracle and/or its affiliates. 515

Working with Self-Service Application Transactions Chapter 24
Image: Home Page - Top Solutions page (2 of 2)
This example illustrates the fields and controls on the Home Page - Top Solutions page (2 of 2).
Solution to Display on Top Solutions Pagelet SectionSolution Summary Click the Solution Summary link to drill into solution and open
the solution details in a separate window.
Click the Delete row icon to remove a solution so that it is notdisplayed on the Top Solutions pagelet on the home page.
Order Specify the order in which the solutions will be displayed in theTop Solutions pagelet and click the Save button.
Search SectionSearch for solutions using one or more of the following search criteria:
• Use Saved Search
• SetID
• Solution Library
• Solution Summary
• Usage Count
• Solved Count
• Self Service Usage Count
• Self Service Solved Count
• Self Service Unsolved Count
• Last Usage
516 Copyright © 1988, 2020, Oracle and/or its affiliates.

Chapter 24 Working with Self-Service Application Transactions
Search Results SectionThis section displays solutions based on the search criteria and are filtered by solutions that are notmarked as FAQ with Type = Standard, Status = Active, Visibility = All and solutions that are not expired.Only solutions that are not already added to the Top Solutions pagelet are displayed in the search results.
Add to Top Solution Select one or multiple solutions in the Search results and clickthe Add to Top Solutions button.
Note: It is recommended to keep this list to less than 15solutions since these represent the top solutions and all topsolutions will be displayed in this pagelet.
Solution Summary Click a Solution Summary link to view the solution details in aseparate window.
Home Page - Fluid Preferences PageUse the Home Page - Fluid Preferences page (RC_SS_TL_SETUP) to set up Browse By Topic tile andthe order in which the links appear on the Browse By topic tile. Only the first 11 links are displayed onthe tile.
Navigation
Set Up CRM >Product Related >Call Center >Self-Service Configuration >Home Page >FluidPreferences
Copyright © 1988, 2020, Oracle and/or its affiliates. 517

Working with Self-Service Application Transactions Chapter 24
Image: Home Page - Fluid Preferences page
This example illustrates the fields and controls on the Home Page - Fluid Preferences page. You can finddefinitions for the fields and controls later on this page.
Topic check box Select the check box to enable the Topics grid below.
Topics grid Select the Solution Libraries to be displayed on the Browseby Topic tile. Specify the order in which the solutions will bedisplayed on the Browse by Topic tile. The SetID drop-downlist displays the set ids that correspond to the Business Unit forthe display template family of the home page. The Topic lookupdisplays all Solution Libraries for the selected Set ID.
Add Topic button Use this button to add a topic.
Home Page - Search Pagelet PageUse the Home Page - Search Pagelet page (RC_SS_FACET) to set up the Search Here for Answerspagelet on the home page by selecting the facets and values under each facet to be displayed.
Navigation
Set Up CRM >Product Related >Call Center >Self-Service Configuration >Home Page >SearchPagelet
518 Copyright © 1988, 2020, Oracle and/or its affiliates.

Chapter 24 Working with Self-Service Application Transactions
Image: Home Page - Search Pagelet page
This example illustrates the fields and controls on the Home Page - Search Pagelet page.
Facets on Search Pagelet Select the facets to be displayed on the Search Here for Answerspagelet.
Content Type Select the content types to be displayed on the Search Here forAnswers pagelet. The different content types include Solutions, Frequently Asked Questions, and Known Issues.
Categories Select the categories to be displayed under the Category facet onthe Search Here for Answers pagelet. The SetID drop-down listdisplays the set ids that correspond to the Business Unit for thedisplay template family of the home page. The Category lookupdisplays all categories that have an active combination underCombine Category Type Detail component for the selected SetId.
Topics Select the Solution Libraries to be displayed under the Topicfacet on the Search Here for Answers pagelet. The SetID drop-down list displays the set ids that correspond to the Business
Copyright © 1988, 2020, Oracle and/or its affiliates. 519

Working with Self-Service Application Transactions Chapter 24
Unit for the display template family of the home page. The topiclookup displays all Solution Libraries for the selected Set ID.
Product Groups Select the Product Groups to be displayed on the Search Herefor Answers pagelet. The SetID drop-down list displays the setids that correspond to the Business Unit for the display templatefamily of the home page. The Product Group lookup displaysthe product groups for the selected Set ID.
Home Page - FAQ PageUse the Home Page - FAQ page (RC_SS_FAQ) to select the Top Frequently Asked Questions to bedisplayed in the FAQ pagelet on the home page across different Set Ids and Solution Libraries.
Navigation
Set Up CRM >Product Related >Call Center >Self-Service Configuration >Home Page >FAQ
Image: Home Page - FAQ page (1 of 2)
This example illustrates the fields and controls on the Home Page - FAQ page (1 of 2).
520 Copyright © 1988, 2020, Oracle and/or its affiliates.

Chapter 24 Working with Self-Service Application Transactions
Image: Home Page - FAQ page (2 of 2)
This example illustrates the fields and controls on the Home Page - FAQ page (2 of 2).
The page displays the list of FAQ that have been selected to display on the Top FAQ pagelet. The fieldsand controls in the Home Page - FAQ page are similar to the fields and controls in the Home Page - TopSolutions page. See the Home Page - Top Solutions Page topic for more information.
Home Page - Known Issues PageUse the Home Page - Known Issues page (RC_SS_ISSUES) to select the Global Cases to be displayed toa self-service user.
Navigation
Set Up CRM >Product Related >Call Center >Self-Service Configuration >Home Page >Known Issues
Copyright © 1988, 2020, Oracle and/or its affiliates. 521
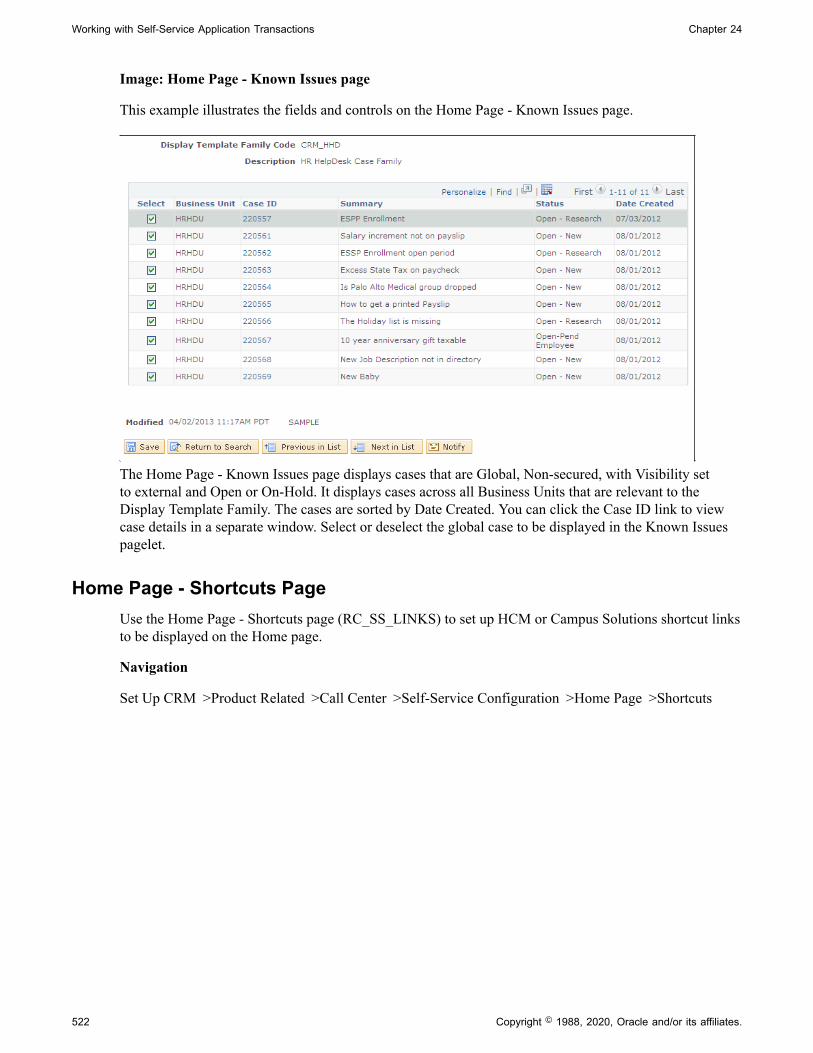
Working with Self-Service Application Transactions Chapter 24
Image: Home Page - Known Issues page
This example illustrates the fields and controls on the Home Page - Known Issues page.
The Home Page - Known Issues page displays cases that are Global, Non-secured, with Visibility setto external and Open or On-Hold. It displays cases across all Business Units that are relevant to theDisplay Template Family. The cases are sorted by Date Created. You can click the Case ID link to viewcase details in a separate window. Select or deselect the global case to be displayed in the Known Issuespagelet.
Home Page - Shortcuts PageUse the Home Page - Shortcuts page (RC_SS_LINKS) to set up HCM or Campus Solutions shortcut linksto be displayed on the Home page.
Navigation
Set Up CRM >Product Related >Call Center >Self-Service Configuration >Home Page >Shortcuts
522 Copyright © 1988, 2020, Oracle and/or its affiliates.

Chapter 24 Working with Self-Service Application Transactions
Image: Home Page - Shortcuts page
This example illustrates the fields and controls on the Home Page - Shortcuts page.
The Administrator can use the Home Page - Shortcuts page to set up the shortcut links to be displayedin the Shortcuts pagelet. These Shortcuts are integration points to HCM, EBS or Campus Solutions.The Administrator can set up any number of links to the commonly used components in HCM, EBS, orCampus Solutions.
The Shortcuts are defined using Link Groups, Link Categories and Link Definitions, which is existingfunctionality. The administrator can add the Link Definitions to the Shortcuts pagelet. Link Definitionsthat have been marked as Self Service will be available to be added to the Shortcuts pagelet.
Note: The Administrator can use the Link Group component (RC_LINK_GROUP) [Set UpCRM >Product Related >Call Center >Link Group] to set up a Link Group containing the required LinkCategories and corresponding Links to be displayed on the Shortcuts pagelet.
The Administrator can select the Display in Pagelet check box to select the links to be displayed in theHome Page - Shortcuts page. The Administrator can also specify the Link Order and Category Order forthe pagelet.
Home Page - Quick Links PageUse the Home Page - Quick Links page (RC_SS_QUICK_LINKS) to set up the quick links to bedisplayed in the Quick Links pagelet.
Copyright © 1988, 2020, Oracle and/or its affiliates. 523

Working with Self-Service Application Transactions Chapter 24
Navigation
Set Up CRM >Product Related >Call Center >Self-Service Configuration >Home Page >Quick Links
Image: Home Page - Quick Links page
This example illustrates the fields and controls on the Home Page - Quick Links page.
The Home Page - Quick Links page allows the Administrator to select Quick Links to be displayed to aself-service user and specify their order of appearance in the pagelet. Quick Links are provided to quicklynavigate to some of the most used self-service pages in the application. The Administrator can add theLink Definitions to the Quick Links pagelet. Link Definitions that have been marked as Self Servicewill be available to be added to the Quick Links pagelet. Administrators can set up the quick links to bedisplayed in the Quick Links pagelet.
Note: The Quick Links are defined using Link Category Definition page, Link Definition page, and LinkGroup page.
There are two types of Create Case pages. The Administrators can enable one of the Create Case pages toappear in the home page as business requirements.
Home Page - Chat Schedule PageUse the Home Page - Chat Schedule page (RC_SS_AGT_SCHEDULE) to set up Chat Schedule.
Navigation
Set Up CRM >Product Related >Call Center >Self-Service Configuration >Home Page >Chat Schedule
524 Copyright © 1988, 2020, Oracle and/or its affiliates.

Chapter 24 Working with Self-Service Application Transactions
Image: Home Page - Chat Schedule page
This example illustrates the fields and controls on the Home Page - Chat Schedule page.
The Administrator defines the Hour of Operations for each day of the week during which the Chatagents will be available using the Home Page - Chat Schedule page. The Chat Schedule works based onthe Display Template family defined. This helps to maintain different chat schedules for Support andHelpdesk call centers. The Time Zone and Hours of Operations are defaulted from the Calendar Options(Main Menu >Setup CRM >Install >Installation Options). The Administrator can select a differentTime Zone, if needed. The Chat with Agent link is displayed on the Quick Links pagelet when a self-service user logs in during these hours. The Holiday Schedule page (HOLIDAY_SCHED_TBL) [Set UpCRM >Common Definitions >Calendars and Schedules >Holiday Schedule] specifies the days duringwhich the Chat will not be available for the user.
An Administrator can configure a Live Chat with Agent section to appear on various pages using theChat Enabled Page Setup page (RB_CHAT_ADMIN) [Setup CRM >Product Related >MultichannelDefinitions >Chat >Chat Page Setup]. The Chat Schedule set in the Home Page - Chat Schedule pageaffects this functionality as well. If the Chat with Agent functionality is enabled for a page (e.g. ContactUs page), then during runtime, the Live Chat with Agent section or Chat with Agent button is displayedonly when a self-service user logs in during the Hour of Operations set through the Chat Schedule setup.Otherwise, Live Chat with Agent section or Chat with Agent button is not displayed.
When the chat functionality is configured, the following pages have the Chat with Agent button:
• Troubleshooting Guide page
• FAQ page
• Create Case pages
• Open/Display Case pages
• Search page
• Solution Details page
Copyright © 1988, 2020, Oracle and/or its affiliates. 525

Working with Self-Service Application Transactions Chapter 24
• Known Issues page
• Change Request page
• Internal Contact page
• Customer Selection page
Personalize Content: <Service Center Name> PageUse the Personalize Content: <Service Center Name> page (PORTAL_HPCOMP) to personalize thename of the home page, Welcome message, and select pagelets to be displayed.
Navigation
Click the Personalize Content link on the top-right corner of the Self-Service Service Center Home page.
Image: Personalize Content: <Service Center Name> page
This example illustrates the fields and controls on the Personalize Content: <Service Center Name> page.
Personalize Layout: <Service Center Name> PageUse the Personalize Layout: <Service Center Name> page (PORTAL_HPLAYOUT) to personalize thename of the home page, Welcome message, and select pagelets to be displayed.
526 Copyright © 1988, 2020, Oracle and/or its affiliates.

Chapter 24 Working with Self-Service Application Transactions
Navigation
Click the Personalize Layout link on the top-right corner of the Self-Service Service Center Home page.
Image: Personalize Layout: <Service Center Name> page
This example illustrates the fields and controls on the Personalize Layout: <Service Center Name> page.
Viewing the Self-Service Pagelets
You can personalize the appearance of the pagelets in the self-service home page. You can define theposition of the pagelets and select the pagelets that need to be displayed on the home page. This topicillustrates how to personalize the pagelets and also describes the features in the pagelets.
A guest user has limited access to the Support self-service home page. A guest user is applicable only toSupport and Higher Education verticals. The guest user can view the following pagelets:
• Search
• Top Solutions
• FAQ
• Discussion Forums
• Quick Links
This topic discusses how to view additional self-service home page content.
Copyright © 1988, 2020, Oracle and/or its affiliates. 527

Working with Self-Service Application Transactions Chapter 24
Pages Used to View Additional Self-Service Home Page ContentPage Name Definition Name Usage
Search Here for Answers Pagelet (not applicable) Search by keyword and browse throughcontent.
Search Page RC_SS_SOLNSRCH View content related to the searchkeyword or category.
Top Solutions Pagelet (not applicable) View a list of top solutions selected bythe Administrator, if any.
Solution Details Page RC_SS_SOLNDTLS View the summary, symptoms, anddetails of the solution.
FAQ Pagelet (not applicable) View a list of the top FAQ selected bythe Administrator.
Frequently Asked Question Page RC_FAQ_DETAILS_SS View the details of an FAQ.
Known Issues Pagelet (not applicable) View global cases. Global cases are casesthat impact multiple users and have beenmarked as Global.
Known Issues Page RC_KNOWN_ISSUES_SS View a list of all known issues.
My Recent Cases Pagelet (not applicable) View the most recent cases created forthe self service user across all BusinessUnits.
Discussion Forums Pagelet (not applicable) View and participate in discussions.
Shortcuts Pagelet (not applicable) View links to commonly usedcomponents in HCM, EBS, or CampusSolutions. A sample set is availablefor each pillar. The Administrator canconfigure their own set of shortcuts. Shortcuts are applicable only to HRService Center and Campus ServiceCenter Home Pages. The Shortcutspagelet is called the HR Shortcutspagelet in the HR Service Center andcalled Campus Shortcuts for CampusService Center.
Quick Links Pagelet (not applicable) View a list of quick links to accessvarious features.
Search Here for Answers PageletUse the Search Here for Answers pagelet to search by keyword and browse through content.
528 Copyright © 1988, 2020, Oracle and/or its affiliates.

Chapter 24 Working with Self-Service Application Transactions
Image: Search Here for Answers pagelet
This example illustrates the fields and controls on the Search Here for Answers pagelet.
Type a keyword in the search field and click the Search icon. Search results are displayed in the Search page. You canfurther drill down the search results by using one or more facetsdisplayed in the Filter by section displayed to the left of theSearch Results.
Facets Facets categorize available content. You can use the links listedin a facet to browse through content, for e.g. Solutions linkunder the Browse by Content Type facet. Facets appear based onavailability of the content type in the search results.
Search PageUse the Search page (RC_SS_SOLNSRCH) to view content related to the search keyword or category.
Navigation
• Specify a keyword or leave the search field blank and click the Search icon in the Search Here forAnswers pagelet.
• Click a link under a facet in the Search Here for Answers pagelet.
Copyright © 1988, 2020, Oracle and/or its affiliates. 529

Working with Self-Service Application Transactions Chapter 24
Image: Search page
This example illustrates the fields and controls on the Search page.
When you perform a keyword search or browse by facets the results are displayed in a new page. Theresults display Solutions, FAQ, Known Issues, and Troubleshooting Guides. You can click the relevantlink to view the Solution, FAQ, or Known Issue details. The content type is displayed in the last line.Only content specific to the Display Template Family’s Business Units is displayed in the search results.If the user has BU security set up, only content relevant to the Business Units that the user can access willbe displayed in the search results.
For keyword based search, the search results are sorted by score in descending order. The least score forwhich the results are displayed is defined by the administrator.
This is determined by the number of days a solution isconsidered to be new as defined in the Call Center setup forBusiness Unit.
This icon is displayed for any solution that an Administratorhas marked as a top solution to be shown in the Top Solutionspagelet on the Home Page.
A solution is considered to be failed if the user clicks on the Nobutton on the solution for the question “Did this resolve yourissue?” If the user performs a new search in the same session (before logging off and logging back in) and it brings up asolution that the user had marked as failed resolution in thatsession, this icon will still be displayed.
A solution is considered to be successful if the user clicks onthe Yes button on the solution for the question “Did this resolveyour issue?” If the user performs a new search in the samesession (before logging off and logging back in) and it brings up
530 Copyright © 1988, 2020, Oracle and/or its affiliates.

Chapter 24 Working with Self-Service Application Transactions
a solution that the user had marked as a successful resolution inthat session, this icon will still be displayed.
A search result is considered to be viewed if the user drills intoa search result. If the user performs a new search in the samesession (before logging off and logging back in) and it bringsup content that the user had already viewed, this icon will stillbe displayed. The existing icon for any search result will bechanged to Viewed once the result is viewed. The icon for afailed solution will not be changed to Viewed if the user viewsthe solution again.
No icon A solution that is not new or top or failed or viewed is displayedwithout any icon. FAQ and Known Issues that are not viewedis displayed without any icon. However, if the user views thefailed solution again and submits feedback that the solutionworked, the icon will be changed to Successful.
Bread crumbs with the search criteria are displayed above thesearch results. You can click the Remove Filter icon to the rightof a filter displayed in the bread crumb to remove the filter.
Clear All Filters Click this link to clear all applied filters from the search results.
Search You can type a new keyword in the Search field and click theSearch button to perform a new search. All applied filters areremoved.
<Self-Service> Service Center Click this link to go back to the home page.
Create Case If you do not find an appropriate solution, you can click theCreate Case link to log a case.
Facets Use the facets on the left to drill down further into the results.
Advanced Search Click this link to search for solutions using additional criteria.
Top Solutions PageletUse the Top Solutions pagelet to view a list of top solutions selected by the Administrator, if any.
Copyright © 1988, 2020, Oracle and/or its affiliates. 531

Working with Self-Service Application Transactions Chapter 24
Image: Top Solutions pagelet
This example illustrates the fields and controls on the Top Solutions pagelet.
You can click a Solution link to view the Solution Details page.
Solution Details PageUse the Solution Details page (RC_SS_SOLNDTLS) to view the summary, symptoms, and details of thesolution.
Image: Solution Details page
This example illustrates the fields and controls on the Solution Details page.
Email Solution This button enables the user to email the solution.
Yes No Use these buttons to indicate if the solution resolved your issue.
FAQ PageletUse the FAQ pagelet to view a list of the top FAQ selected by the Administrator.
532 Copyright © 1988, 2020, Oracle and/or its affiliates.

Chapter 24 Working with Self-Service Application Transactions
Image: FAQ pagelet
This example illustrates the fields and controls on the FAQ pagelet.
FAQ Click an FAQ link to view the details of the FAQ in theFrequently Asked Question page. The FAQ details for theselected FAQ are highlighted in the Frequently Asked Questionpage.
View All You can click the View All link to view all FAQ in theFrequently Asked Question page.
You can click an FAQ link to view the description of the FAQ.
Frequently Asked Question PageUse the Frequently Asked Question page (RC_FAQ_DETAILS_SS) to view the details of an FAQ.
Copyright © 1988, 2020, Oracle and/or its affiliates. 533

Working with Self-Service Application Transactions Chapter 24
Image: Frequently Asked Question page (1 of 2)
This example illustrates the controls on the Frequently Asked Question page (1 of 2).
Image: Frequently Asked Question page (1 of 2) with the FAQ highlighted
This example illustrates the fields and controls on the Frequently Asked Question page (2 of 2).
Frequently Asked Questions is a single scrollable page that contains a list of all FAQs on the top withinthe individual topics (or solutions libraries). This list displays only the questions. The bottom portion of
534 Copyright © 1988, 2020, Oracle and/or its affiliates.

Chapter 24 Working with Self-Service Application Transactions
the page displays all FAQs with the questions and answers. When the user clicks on any FAQ in the liston top of the page, the page scrolls to the section that the FAQ belongs to. The selected FAQ is positionedon top of the page.
The users can alternately click the FAQ link in Quick Links pagelet to get to the FAQ and can click the<Home Page> Service Center link to go back to the home page.
Known Issues PageletUse the Known Issues pagelet to view global cases. Global cases are cases that impact multiple users andhave been marked as Global.
Image: Known Issues pagelet
This example illustrates the fields and controls on the Known Issues pagelet.
Known Issue The Known Issues pagelet displays 5 most recent cases thathave been made accessible to self service users. Click a knownissue link to view the Case <ID> page.
View All Click the View All link to view a list of all known issues in theKnown Issues page.
Known Issues PageUse the Known Issues page (RC_KNOWN_ISSUES_SS) to view a list of all known issues.
Navigation
Click the View All link on the Known Issues pagelet.
Copyright © 1988, 2020, Oracle and/or its affiliates. 535

Working with Self-Service Application Transactions Chapter 24
Image: Known Issues page
This example illustrates the fields and controls on the Known Issues page.
Notify Me Select the check box for a case to receive notifications about thecase progress.
My Recent Cases PageletUse the Recent Cases pagelet to view the most recent cases created for the self service user across allBusiness Units.
536 Copyright © 1988, 2020, Oracle and/or its affiliates.

Chapter 24 Working with Self-Service Application Transactions
Image: My Recent Cases pagelet
This example illustrates the fields and controls on the My Recent Cases pagelet.
The My Recent Cases pagelet displays a maximum of 5 cases and displays the Case ID, Case Summary,and Case Status for each case. The pagelet displays the cases created by the logged in user, an agent, orcases created by another user on behalf of the logged in user.
Link Case Click the Link Case link to view case details in the Case <ID>page.
Find Cases Click the Find Cases link to view the Find Cases page. See the<placeholder> topic for more information about the Find Casespage. The Find Cases page allows you to perform a search basedon predefined search criteria.
Discussion Forums PageletUse the Discussion Forums pagelet to view and participate in discussions.
Users can be a member of one or more communities in the Enterprise Portal. The discussion forumspagelet displays the most recent discussion across all communities that the user belongs to.
Note: PeopleSoft CRM does not deliver a pagelet definition for Discussion Forum. See PeopleSoft HCM9.1: Viewing Discussion Forum Pagelets within Your Application [ID 1480882.1] in the My OracleSupport website for more information on implementing the Discussion Forum pagelet.
Copyright © 1988, 2020, Oracle and/or its affiliates. 537

Working with Self-Service Application Transactions Chapter 24
Shortcuts PageletUse the Shortcuts pagelet to view links to commonly used components in HCM, EBS, or CampusSolutions. A sample set is available for each pillar. The Administrator can configure their own set ofshortcuts. Shortcuts are applicable only to HR Service Center and Campus Service Center Home Pages.The Shortcuts pagelet is called the HR Shortcuts pagelet in the HR Service Center and called CampusShortcuts for Campus Service Center.
Image: HR Service Center - HR Shortcuts pagelet
This example illustrates the fields and controls on the HR Service Center - HR Shortcuts pagelet.
The following table lists the category, action, and navigation path of links on the HR Service Center - HRShortcuts pagelet in PeopleSoft HCM 9.2, 9.1, and 9.0.
All shortcuts in the table have been delivered for 9.2. However, only the shortcuts marked Y are displayedin the delivered HR Shortcuts pagelet. For example, the Manager Dashboard link is displayed only if thelogged-on user is a manager.
Category Action Navigation HCM 9.2 HCM 9.1 HCM 9.0
PersonalInformation
PersonalInformation
SelfService >Personal
Y Y Y
PersonalInformation
Summary
538 Copyright © 1988, 2020, Oracle and/or its affiliates.

Chapter 24 Working with Self-Service Application Transactions
Category Action Navigation HCM 9.2 HCM 9.1 HCM 9.0
Job Related CompanyDirectory
CompanyDirectory
Y
Job Related ManagerDashboard
ManagerDashboard
Y
Job Related Absence Request SelfService >TimeReporting >ReportTime >AbsenceRequest
Y Y Y
Job Related PerformanceDocuments
SelfService >PerformanceManagement >MyPerformanceManagement >CurrentDocuments
Y Y Y
Job Related Learning Home (New in 9.2) Y
Job Related Timesheet SelfService >TimeReporting
>ReportTime >Timesheet
Y Y Y
Job Related My Career Profile SelfService >CareerPlanning >MyProfile
Y Y
Compensation View Paycheck Self Service>Payroll and
Compensation >ViewPaycheck
Y Y Y
Compensation CompensationHistory
SelfService >PayrollandCompensation >CompensationHistory
Y Y Y
Compensation Stock OptionsSummary
SelfService >StockActivity >StockOption Summary
Y Y Y
Benefits Benefits Summary SelfService >Benefits >BenefitsSummary
Y Y Y
Benefits Dependents/BeneficiaryInformation
SelfService >Benefits >Dependents/Beneficiary Info
Y Y Y
Copyright © 1988, 2020, Oracle and/or its affiliates. 539

Working with Self-Service Application Transactions Chapter 24
The following shortcuts are delivered with the EBS integration for the pagelet HR Shortcuts on the HRHelpdesk home page:
• Person Details
• Payslip
• Total Compensation
• Absence Management
• Benefits Summary
Campus Solutions shortcuts have been delivered only for the CS 9.0 release. The following shortcuts aredelivered for in the pagelet Campus Shortcuts on the Higher Education dashboard:
For Student:
• Student Center (Self Service >Student Center)
• Personal Data Summary (Self Service >Campus Personal Information >Personal Data Summary)
• Request Admissions Information (Self Service >Student Admission >Request Information)
• Community Directory (Self Service >Community Directory Search)
For Faculty:
• Personal Information (Self Service > Campus Personal Information > Personal Data Summary)
• Faculty Center (Self Service > My Schedule)
If a user has both roles – student and worker – then all the above shortcuts are displayed for that user.
Image: Campus Service Center - Campus Shortcuts pagelet
This example illustrates the fields and controls on the Campus Service Center - Campus Shortcutspagelet.
540 Copyright © 1988, 2020, Oracle and/or its affiliates.

Chapter 24 Working with Self-Service Application Transactions
Quick Links PageletUse the Quick Links pagelet to view a list of quick links to access various features.
Image: Quick Links pagelet
This example illustrates the fields and controls on the Quick Links pagelet.
The Quick Links pagelet lists the quick links to access the features that are listed in the table below. Thetable also indicates the Service Center to which the feature is applicable.
The following table lists the Quick Links and their availability in the different home pages.
Feature HR Service Center IT Service Center Customer ServiceCenter
Campus ServiceCenter
Troubleshooting Guide Yes Yes Yes Yes
FAQ Yes Yes Yes Yes
Find Cases Yes Yes Yes Yes
Create Case Yes Yes Yes Yes
Email Agent Yes Yes Yes Yes
Chat with Agent Yes Yes Yes Yes
Add Change Request Yes
Manage ChangeRequest
Yes
Internal Contact Yes Yes
Customer Selection Yes
Copyright © 1988, 2020, Oracle and/or its affiliates. 541

Working with Self-Service Application Transactions Chapter 24
Feature HR Service Center IT Service Center Customer ServiceCenter
Campus ServiceCenter
HCM Employee Self-Service
Yes
HCM Manager Self-Service
Yes
Creating Cases
The Case Creation process is a simplified user interface through which a self service user can create acase. Instead of showing all case fields on a single page, an administrator can configure multiple stepsfor the case creation process. The administrator can specify the fields that will be displayed on each pageand a description of each step. Display Template is used to set this up. This topic discusses how to createcases.
Pages Used to Add a CasePage Name Definition Name Usage
Create Case Page RC_CASE_SS_RPT1
RC_CASE_SS_RPT2
RC_CASE_SS_RPT3
Describe and submit a new problem.
Direct Report Page or Look UpEmployee Page
RC_CASE_HD_SS_DIRR Look up and select an employee forwhom you are adding a case.
The Add Case for Direct Report link isonly available for PeopleSoft HR ServiceCenter and the Add Case for SomeoneElse link is only available for PeopleSoftIT Service Center.
Edit Contact Information Page RC_CASE_HD_SS_CNTC Update contact information for theemployee that is the contact on the case.
Create Case PageUse the Create Case page (RC_CASE_SS_RPT1, RC_CASE_SS_RPT2, or RC_CASE_SS_RPT3) todescribe and submit a new problem.
542 Copyright © 1988, 2020, Oracle and/or its affiliates.

Chapter 24 Working with Self-Service Application Transactions
Navigation
• Customer Care >Create Case
• On the HR Service Center Home Page, click the Create Case link on the Quick Links pagelet.
• Employee Self Service >HR Help Desk >Create Case
• On the IT Service Center Home Page, click the Create Case link on the Quick Links pagelet.
• Employee Self Service > Help Desk > Create Case
• On the Campus Service Center Home Page, click the Create Case link on the Quick Links pagelet.
• Service Center > Create Case
Image: HR Service Center - Create Case page (1 of 3)
This example illustrates the fields and controls on the HR Service Center - Create Case page (1 of 3).
Copyright © 1988, 2020, Oracle and/or its affiliates. 543

Working with Self-Service Application Transactions Chapter 24
Image: HR Service Center - Create Case page (2 of 3)
This example illustrates the fields and controls on the HR Service Center - Create Case page (2 of 3) ofthe three step case creation process.
Image: HR Service Center - Create Case page (3 of 3)
This example illustrates the fields and controls on the HR Service Center - Create Case page (3 of 3) ofthe three step case creation process.
Create Case For This read-only field displays the name of the customer. It can bethe name of the company where the self-service application userworks.
544 Copyright © 1988, 2020, Oracle and/or its affiliates.

Chapter 24 Working with Self-Service Application Transactions
Add Case for Direct Report Click this link if you want to report a case on behalf of one ofthe people reporting directly to you. The system displays a listof your direct reports. To return to this page, select the employeefor whom you want to report a case.
Note: The system displays this field for HR Service Centercases only. PeopleSoft delivers this field as enabled witha security option that allows managers with roles that areassociated with the Choose Direct Report (RC_CHOOSE_DIRECT_REPORT) functional option to enter cases on behalfof their direct reports. You can use the CRM_HHD displaytemplate for the RC_CASE_HD_SS_RPT case component todisable this field or change the security option.
Add Case for Someone Else Click this link if you want to report a case on behalf of someoneelse. The system displays a list of workers that are alreadyentered into PeopleSoft CRM. To return to this page, select theworker for whom you want to report a case.
Note: The system displays this field for HelpDesk cases only. PeopleSoft delivers this field as enabled with a security optionthat allows managers with roles that are associated with theOn Behalf Of (RC_ON_BEHALF_OF) functional option toenter cases on behalf of other workers. You can use the RC_HELPDESK display template for the RC_CASE_HD_SS_RPT case component to disable this field or change the securityoption.
Contact Details This read-only field displays the contact's primary contactmethod.
Edit Contact Details Click this link to change the contact person specified in theCustomer field or the Employee field.
Attach a File Click this button to attach a file to the case.
Summary, Details, Case Type, Category, Specialty Type, Detail, Priority, and Severity
Select or enter information in these fields to describe the type ofproblem you are having.
Save My Case When the user clicks the Save My Case button, depending onDisplay Template Details setup, the user is presented with aSubmit Confirmation page with the case ID. The user can clickthe OK button to confirm the submission and view the Case<ID> - Case Information page or the Case ID - Solutions Searchpage depending on the page set by the Administrator.
Copyright © 1988, 2020, Oracle and/or its affiliates. 545

Working with Self-Service Application Transactions Chapter 24
Image: IT Service Center - Create Case page
This example illustrates the fields and controls on the IT Service Center - Create Case page (single stepcase creation process).
The visibility of page elements depends on how you configure the display template for this component.Also, some fields can be assigned default values based on business unit settings. The system entersdefault values even if the fields are hidden.
The Add Case page appears as a single step, two step, or three step process based on how it has been setup by the Administrator in the Display Template for the RC_CASE_SS component.
The display template for Self Service Case allows the administrator to:
546 Copyright © 1988, 2020, Oracle and/or its affiliates.

Chapter 24 Working with Self-Service Application Transactions
• Indicate the number of steps in the case creation process.
• Select the fields to be displayed in each step.
• Enter the label for each step.
See "Configuring Display Templates for Components" (PeopleSoft CRM 9.2: Automation andConfiguration Tools).
See Understanding Call Center Business UnitsUnderstanding Display Templates.
Employee This read-only field displays the name of the employee whoentered the case.
Contact Details This read-only field displays the contact's primary contactmethod.
Edit Contact Details Click this link to change the contact person specified in theCustomer field or the Employee field.
Business Unit This field may have a different label, depending on how youconfigure self-service. This is a required field for cases. If youdo not show business units on the self-service pages, the usermust have a default self-service business unit established on theUser Preferences - Call Center page.
Note: If the user creates a case using a Business Unit that isdifferent from the default self-service business unit establishedon the User Preferences - Call Center page, the system willupdate the user's default self-service business unit value with thenewly selected value.
Case Type Select the type of case you are adding.
Product Group Select the product group associated with the case you areadding.
The system filters the values for product and installed productto only display the products and installed products containedwithin the specified product group.
Product Select the product associated with the case you are adding.
PeopleSoft Support and PeopleSoft HelpDesk derive the list ofproducts differently:
• In PeopleSoft Support, the field prompts against the productdescriptions for the user's installed products. A productdescription appears only once, even if a user has more thanone installed version of a particular product.
• In PeopleSoft HelpDesk and Service Center for HigherEducation applications, the field prompts against all productdescriptions.
Copyright © 1988, 2020, Oracle and/or its affiliates. 547

Working with Self-Service Application Transactions Chapter 24
View Product Hierarchy Click this link to go to the Installed Product Hierarchy pagewhere you can search for installed products by product ID, product name, site name, and installed status.
Problem Type Select the problem type associated with the case you are adding.
Problem types are defined by product. This gives you anadditional level of categorization for the problem. Becauseproblem type is a child of Product, the Problem Type field onthe Case page derives its values from product. If the ProblemType field is visible, be sure that the descriptions of yourproduct competencies make sense to a self-service user who isselecting a problem type. Valid problem types depend on theproduct that the user selects.
Serial Number and Asset Tag The serial number appears in PeopleSoft Support andPeopleSoft Service Center for Higher Education. The assettag appears in PeopleSoft IT Service Center and PeopleSoftCampus Service Center. Both fields prompt against the user'sinstalled products. Valid values are limited based on the productthat the user selects. Blank values might appear if the user hasinstalled products that do not have serial numbers or asset tags.
Category, Specialty Type, Detail, Priority, Urgency, Severity, Summary, and Details
Select or enter information in these fields to describe the type ofproblem you are having.
Direct Report Page or Look Up Employee PageUse the Direct Report page or Look Up Employee page (RC_CASE_HD_SS_DIRR) to look up and selectan employee for whom you are adding a case.
The Add Case for Direct Report link is only available for PeopleSoft HR Service Center and the AddCase for Someone Else link is only available for PeopleSoft IT Service Center..
Navigation
• Click the Add Case for Direct Report link on the Create Case page.
• Click the Add Case for Someone Else link on the Create Case page.
548 Copyright © 1988, 2020, Oracle and/or its affiliates.

Chapter 24 Working with Self-Service Application Transactions
Image: Direct Report page
This example illustrates the fields and controls on the Direct Report page.
In the Lookup Employee page, enter your search criteria in the fields at the top of the page and then clickLook Up. Click the name of the employee for whom you are reporting a case. The system returns to theCreate Case page.
In the Direct Report page, select the Name link for the person you want to create the case for. The nameappears in the Create Case for field in the Create Case page.
Note: This page is part of the HelpDesk for Human Resources reported-by feature. The system displaysthis page, when you click the Add Case for Direct Report or Add Case for Someone Else link. PeopleSoftenables this link for HelpDesk for Human Resources customers when you first install the application.This field is used to report cases for your direct reports. If you have properly set up the integrationbetween HCM and CRM, then the system retrieves the direct report details directly from the PeopleSoftHCM database.
Edit Contact Information PageUse the Edit Contact Information page (RC_CASE_HD_SS_CNTC) to update contact information for theemployee that is the contact on the case.
Navigation
Click the Edit Contact Details link on the Create Case page.
Copyright © 1988, 2020, Oracle and/or its affiliates. 549

Working with Self-Service Application Transactions Chapter 24
Image: Edit Contact Information page
This example illustrates the fields and controls on the Edit Contact Information page.
Use the fields in the New Contact Information section to change contact information for the case onwhich you are currently working. To add another contact click the Select Contact link. To erase thecontact that is displayed, click the Clear Contact link. Click Save when you are finished. The systemreturns you to the Create Case page.
Managing Existing Self-Service Application Cases
This topic discusses how to manage existing self-service application cases.
Note: You can display a group box for billing information by selecting this option on the displaytemplate. This section is delivered hidden.
Pages Used to Manage CasesPage Name Definition Name Usage
Find Cases Page RC_CASE_SW_SS_SRCH
RC_CASE_HD_SS_SRCH
Search for cases to view more details.
Case <ID> - Case Information Page RC_CASE_SW_SS
RC_CASE_HD_SS
View case information.
This page is also the starting point forseveral other processes: adding notes,changing contact information, requestingthat an agent contact the user, searchingfor new solutions, and viewing solutionsthat are already under consideration forthis case.
550 Copyright © 1988, 2020, Oracle and/or its affiliates.

Chapter 24 Working with Self-Service Application Transactions
Page Name Definition Name Usage
Case <ID> - Notes and AttachmentsPage
RC_CASE_SW_SS_NDTL
RC_CASE_HD_SS_NDTL
View case notes and attachments.
Add Note and Attachment Page RC_CASE_SW_SS_NADD
RC_CASE_HD_SS_NADD
Enter a new case note and attachment.
You must save the case to save the note.
Case <ID> - Interested Parties RC_CASE_SW_SS_INT
RC_CASE_HD_SS_INT
View interested parties added by the useror by an agent. The tab also displays thecount of the number of interested partieson the case.
Reason for Closing the Case Page RC_CASE_SW_SS_CLSE
RC_CASE_HD_SS_CLSE
Select or enter the reason for closing anopen case.
Reason for Reopening the Case Page RC_CASE_SW_SS_ROPN
RC_CASE_HD_SS_ROPN
Select or enter the reason for reopening aclosed case.
Reopening a case causes all successfulresolutions to be marked as failedsolutions.
Manage Case - Edit Contact InformationPage
RC_CASE_SW_SS_CONT
RC_CASE_SW_SS_CNTC
RC_CASE_HD_SS_CNTC
RC_CASE_HE_SS_CSMR
Change the contact information for acase.
Find Cases PageUse the Find Cases page (RC_CASE_SW_SS_SRCH or RC_CASE_HD_SS_SRCH) to search for casesto view in more detail.
Navigation
• On the HR Service Center, IT Service Center, Customer Service Center, or Campus Service Centerhome page, click the Find Cases link on the Quick Links or My Recent Cases pagelet.
• Employee Self Service > Help Desk > Find Cases
• Employee Self Service > HR Help Desk > Find Cases
• Customer Care > Find Cases
• Service Center > Find Cases
Copyright © 1988, 2020, Oracle and/or its affiliates. 551

Working with Self-Service Application Transactions Chapter 24
Image: Find Cases page
This example illustrates the fields and controls on the Find Cases page.
Related LinksUpdating Search Descriptions
Case <ID> - Case Information PageUse the Case <ID> - Case Information page (RC_CASE_SW_SS or RC_CASE_HD_SS) to view caseinformation.
This page is also the starting point for several other processes: adding notes, changing contactinformation, requesting that an agent contact the user, searching for new solutions, and viewing solutionsthat are already under consideration for this case.
Navigation
• On the HR Service Center, IT Service Center, Customer Service Center, or Campus Service Centerhome page, click a Link Case link on the My Recent Cases pagelet.
• Select a case from the list of search results on the Find Cases page.
552 Copyright © 1988, 2020, Oracle and/or its affiliates.

Chapter 24 Working with Self-Service Application Transactions
Image: Case <ID> - Case Information page
This example illustrates the fields and controls on the Case <ID> - Case Information page.
Case <ID> - Notes and Attachments PageUse the Case <ID> - Notes and Attachments page (RC_CASE_SW_SS_NDTL orRC_CASE_HD_SS_NDTL) to view case notes and attachments.
Navigation
On the Case <ID> page, click the Notes and Attachments tab.
Image: Case <ID> - Notes and Attachments page
This example illustrates the fields and controls on the Case <ID> - Notes and Attachments page.
Add Note and Attachment PageUse the Add Note and Attachment page (RC_CASE_SW_SS_NADD or RC_CASE_HD_SS_NADD) toenter a new case note and attachment.
You must save the case to save the note.
Copyright © 1988, 2020, Oracle and/or its affiliates. 553

Working with Self-Service Application Transactions Chapter 24
Navigation
On the Case <ID> - Notes and Attachments page, click the Add Note or Attachment button.
Image: Add Note and Attachment page
This example illustrates the fields and controls on the Add Note and Attachment page.
Use the fields on this page to add notes and attachments. Click the Add Attachment button to add filesfrom your computer to the case. Click Save when you are finished.
Related Links"Adding Attachments to Notes" (PeopleSoft CRM 9.2: Application Fundamentals )
Case <ID> - Interested PartiesUse the Case <ID> - Interested Parties page (RC_CASE_SW_SS_INT and RC_CASE_HD_SS_INT) toview interested parties added by the user or by an agent. The tab also displays the count of the number ofinterested parties on the case.
Navigation
On the Case <ID> page, click the Interested Parties tab.
554 Copyright © 1988, 2020, Oracle and/or its affiliates.

Chapter 24 Working with Self-Service Application Transactions
Image: Case <ID> - Interested Parties page
This example illustrates the fields and controls on the Case <ID> - Interested Parties page.
For HR Help Desk, the Case <ID> - Interested Parties page is hidden and can be displayed for self-serviceusers by the Administrator.
Add Interested Party Click the Add Interested Party button to display the AddInterested Party page. Select a Name and Reason Code, andclick the Save button to add an interested party to the case.
Reason for Closing the Case PageUse the Reason for Closing the Case page (RC_CASE_SW_SS_CLSE or RC_CASE_HD_SS_CLSE) toselect or enter the reason for closing an open case.
Navigation
On the Case <ID> page, click the Close this Case button. This button is available only if the business unitrules permit self-service users to close cases.
Image: Reason for Closing the Case page
This example illustrates the fields and controls on the Reason for Closing the Case page.
Predefined Reasons and Reason Select the Predefined Reasons option and then select one of thepredefined reasons from the Reason drop-down list box.
Copyright © 1988, 2020, Oracle and/or its affiliates. 555

Working with Self-Service Application Transactions Chapter 24
Other Reason and Details Select this option and enter the reason in the Details field if youwant to enter a free-form text reason.
Save When the user clicks this button, the system changes the casestatus to the value that is specified in the Closed Case Statusfield on the Case Defaults page.
See Case Defaults Page.
If a user selects a predefined reason from the Reason field, thesystem resolves the case by using the solution that is identifiedon the Reason and Solution Link page.
If no solution is linked to the selected reason code, the systemcreates one (using the solution type Canned) and updates theReason and Solution Link page accordingly.
If a user entered a reason in the Details field, the system uses thetext to create a new solution of type Adhoc. The solution thenresolves the case using the newly created solution.
Related LinksAssociating Solutions with Reasons for Closing CasesSetting Up Reason CodesCase Defaults Page
Reason for Reopening the Case PageUse the Reason for Reopening the Case page (RC_CASE_SW_SS_ROPN or RC_CASE_HD_SS_ROPN)to select or enter the reason for reopening a closed case.
Reopening a case causes all successful resolutions to be marked as failed solutions.
Navigation
On the Case <ID> page, click the Reopen this Case button. This button is available only if the businessunit rules permit self-service users to close cases.
556 Copyright © 1988, 2020, Oracle and/or its affiliates.

Chapter 24 Working with Self-Service Application Transactions
Image: Reason for Reopening the Case page
This example illustrates the fields and controls on the Reason for Reopening the Case page.
Predefined Reasonsand Reason Select the Predefined Reasons option and then select one of thepredefined reasons from the Reason drop-down list box. Theavailable reasons include: Problem Re-occurred, and SolutionFailed.
Other Reason and Details Select this option and enter the reason in the Details field if youwant to enter a free-form text reason.
Save When the user clicks this button, the system changes the casestatus to the value that is specified in the Reopened Case Statusfield on the Case Defaults page. The reason (either predefined orfree-form text) becomes a resolution note.
Related LinksAssociating Solutions with Reasons for Closing CasesSetting Up Reason CodesCase Defaults Page
Manage Case - Edit Contact Information PageUse the Manage Case - Edit Contact Information page (RC_CASE_SW_SS_CONT,RC_CASE_SW_SS_CNTC, RC_CASE_HD_SS_CNTC, or RC_CASE_HE_SS_CSMR) to change thecontact information for a case.
Navigation
Click the Edit Contact Details Change Contact Information button link on the Create Case page or theCase <ID> page.
Copyright © 1988, 2020, Oracle and/or its affiliates. 557

Working with Self-Service Application Transactions Chapter 24
Image: Manage Case - Edit Contact Information
This example illustrates the fields and controls on the Manage Case - Edit Contact Information.
The appearance of this page varies slightly depending on whether the user is a company contact person(PeopleSoft Support), a consumer (PeopleSoft Support), or a worker (PeopleSoft HelpDesk).
You can change contact information when you are creating a new case or viewing an existing case.
On the Create Case page, the Change Contact Information button is available only until the case issubmitted. After submitting the case, use the Manage Case - Edit Contact Information page to change thecontact information.
Searching for Solutions
This topic discusses how to search for solutions.
Pages Used to Search for SolutionsPage Name Definition Name Usage
Search or Solution Search Page RC_SS_SOLNSRCH
RC_CASE_HD_SS_SOLN
Perform a basic solution search.
Case <ID> - Solutions Considered Page RC_CASE_SW_SS_SOLC
RC_CASE_HD_SS_SOLC
View solutions viewed by the self serviceuser or solutions recommended for thecase by an agent.
Solution Details or Solution ConsideredDetails Page
RC_SS_SOLNDTLS
RC_CASE_SS_RSL_2ND
View a solution and indicate whether thesolution solved a problem.
558 Copyright © 1988, 2020, Oracle and/or its affiliates.

Chapter 24 Working with Self-Service Application Transactions
Search or Solution Search PageUse the Search (RC_SS_SOLNSRCH) or Solutions Search page (RC_CASE_HD_SS_SOLN) to performa basic solution search.
Navigation
• On the HR Service Center, IT Service Center, Customer Service Center, or Campus Service Centerhome page, click the Search icon on the Search Here for Answers pagelet.
• Click the Solutions Search tab in the Case <ID> page.
• Employee Self Service > Help Desk > Search Solutions
• Employee Self Service > HR Help Desk > Search Solutions
• Customer Care > Search Solutions
• Service Center >Search Solutions
Image: Search page
This example illustrates the fields and controls on the Search page.
Image: Case <ID> - Solutions Search page
This example illustrates the fields and controls on the Case <ID> - Solutions Search page.
Search Text Solution Advisor uses PeopleSoft Search to perform keywordsearch. It takes the keywords entered in this field and searchthem against the index file that's generated for solutions.
Advanced Search Click this link to access the Search Solution page for advancedsearches, which accepts field-specific search criteria.
Search Click this button to perform a search. The search results appearat the bottom of the page.
Create Case This link appears when you are searching for solutions outsidethe context of a case.
Copyright © 1988, 2020, Oracle and/or its affiliates. 559

Working with Self-Service Application Transactions Chapter 24
<Self-Service Home Page> ServiceCenter
This link appears when you are searching for solutions withinthe context of a case.
Case <ID> - Solutions Considered PageUse the Case <ID> - Solutions Considered page (RC_CASE_SW_SS_SOLC orRC_CASE_HD_SS_SOLC) to view solutions viewed by the self service user or solutions recommendedfor the case by an agent.
Navigation
Click the Solutions Considered tab on the Case <ID> page.
Image: Case <ID> - Solutions Considered page
This example illustrates the fields and controls on the Case <ID> - Solutions Considered page.
To search for frequently used solutions, first select a product by clicking the Choose a Product link.
Note: Self-service users can only search on active solutions. Solutions that are categorized as eithercanned or adhoc do not appear in searches on the Case <ID> - Solutions Considered page for both agentsand self-service users.
Solution Details or Solution Considered Details PageUse the Solution Details page (RC_SS_SOLNDTLS) or the Solution Considered Details page(RC_CASE_SS_RSL_2ND) to view a solution and indicate whether the solution solved a problem.
Navigation
• On the HR Service Center, IT Service Center, Customer Service Center, or Campus Service Centerhome page, click a Solution link on the Top Solutions pagelet.
• Click a Solution Summary link in the Case <ID> - Solutions Considered tab.
560 Copyright © 1988, 2020, Oracle and/or its affiliates.

Chapter 24 Working with Self-Service Application Transactions
Image: Solution Details page
This example illustrates the fields and controls on the Solution Details page.
Use this page to review the details of a solution and indicate if the solution solved your problem.
If a solution has related solutions, then the system lists the related solutions under Attachments onthe Solution Summary Page. By Clicking the Related Solution the user can view the Related SolutionSummary.
Accessing FAQs
This topic discusses how to access FAQs.
Pages Used to Access FAQsPage Name Definition Name Usage
Frequently Asked Questions Page RC_FAQ_DETAILS_SS View a list of frequently asked questionsand the corresponding details.
Frequently Asked Questions PageUse the Frequently Asked Questions page (RBT_FAQ_SOL_SS) to view a list of frequently askedquestions and the corresponding details.
Copyright © 1988, 2020, Oracle and/or its affiliates. 561

Working with Self-Service Application Transactions Chapter 24
Navigation
• On the HR Service Center, IT Service Center, Customer Service Center, or Campus Service Centerhome page, click an FAQ or the View All link on the FAQ pagelet.
• Employee Self Service > Help Desk > FAQ
• Employee Self Service > HR Help Desk > FAQ
• Customer Care > FAQ
• Service Center >FAQ
Image: Frequently Asked Question page
This example illustrates the fields and controls on the Frequently Asked Question page.
Selecting and Running Troubleshooting Guides
This topic discusses how to select and run troubleshooting guides.
Pages Used to Select and Run Troubleshooting GuidesPage Name Definition Name Usage
Troubleshooting Guide Page RBT_TGUIDE_SS Select a troubleshooting guide.
Execute Script Page RC_BS_SELF_CONFIG Run a troubleshooting guide script.
562 Copyright © 1988, 2020, Oracle and/or its affiliates.

Chapter 24 Working with Self-Service Application Transactions
Troubleshooting Guide PageUse the Troubleshooting Guide page (RBT_TGUIDE_SS) to select a troubleshooting guide.
Navigation
• On the HR Service Center, IT Service Center, Customer Service Center, or Campus Service Centerhome page, click the Troubleshooting Guide link on the Quick Links pagelet.
• Employee Self Service > Help Desk > Troubleshooting Guide
• Employee Self Service > HR Help Desk > Troubleshooting Guide
• Customer Care > Troubleshooting Guide
• Service Center >Troubleshooting Guide
Image: Troubleshooting Guide page
This example illustrates the fields and controls on the Troubleshooting Guide page.
Business Unit This field may have a different label, depending on how youconfigure self-service. If you do not show a business unit onthe self-service pages, the user must have a default self-servicebusiness unit established on the User Preferences - Call Centerpage.
Guide Select from a list of solution libraries that you set up in theTroubleshooting Guide setup page. Each library is associatedwith a single script.
Script Name Select the script name populated for the solution library.
Launch Click to display the Execute Script page and run the script thatis associated with the selected library.
Copyright © 1988, 2020, Oracle and/or its affiliates. 563

Working with Self-Service Application Transactions Chapter 24
Execute Script PageUse the Execute Script page (RC_BS_SELF_CONFIG) to run a troubleshooting guide script.
Navigation
On the Troubleshooting Guide page, select a solution library and script name, and click the Launchbutton.
Image: Execute Script page
This example illustrates the fields and controls on the Execute Script page.
See "Running Scripts on Self-Service Pages" (PeopleSoft CRM 9.2: Automation and ConfigurationTools).
564 Copyright © 1988, 2020, Oracle and/or its affiliates.

Chapter 25
Using the Fluid Interface to View andManage HRHD Self Service ApplicationTransactions
Understanding Employee Self Service Home Page
This topic describes the delivered home page for Employee Self-Service.
Page Name Definition Name Usage
Employee Self Service Home Page CR_RC_IT_EMP_SELF_SERVICE Access a variety of employee self-service application transactions.
Employee Self Service Home PageUse the Employee Self-Service home page to access a variety of employee self-service transactions. Thecref for this home page is CR_RC_IT_EMP_SELF_SERVICE.
Navigation
In fluid mode, the fluid home appears when you first sign in. The default home page title appears at thetop of the home page. If the Employee Self-Service home page is not your default home page, click thetitle of the default home page and select Employee Self-Service from the list that appears.
Copyright © 1988, 2020, Oracle and/or its affiliates. 565

Using the Fluid Interface to View and Manage HRHD Self Service Application Transactions Chapter 25
Image: (Tablet) Employee Self Service Home Page
This example illustrates the Employee Self-Service home page for the tablet.
566 Copyright © 1988, 2020, Oracle and/or its affiliates.

Chapter 25 Using the Fluid Interface to View and Manage HRHD Self Service Application Transactions
Image: (Smartphone) Employee Self-Service Home Page
This example illustrates the Employee Self-Service home page for the smartphone.
For details on action buttons, which appear on the page banner when viewed with a smartphone ortablet, see "Understanding Banners in PeopleSoft Fluid User Interface" (PeopleSoft 9.2: EnterpriseComponents).
HR Service Center Dashboard
The HR Service Center dashboard displays various tiles that facilitate the employee to view relevantinformation and to take necessary actions such as searching for answers, creating a case, viewing casesthey created, and the like.
Copyright © 1988, 2020, Oracle and/or its affiliates. 567

Using the Fluid Interface to View and Manage HRHD Self Service Application Transactions Chapter 25
Navigation
Click the HR Service Center tile on the Employee Self Service home page to access the HR ServiceCenter dashboard.
Employee Self Service Home PageUse the Employee Self-Service home page to access a variety of employee self-service transactions. Thecref for this home page is CR_RC_IT_EMP_SELF_SERVICE.
Navigation
In fluid mode, the fluid home appears when you first sign in. The default home page title appears at thetop of the home page. If the Employee Self-Service home page is not your default home page, click thetitle of the default home page and select Employee Self-Service from the list that appears.
Image: (Tablet) HR Service Center Dashboard
This example illustrates the HR Service Center dashboard for the tablet.
568 Copyright © 1988, 2020, Oracle and/or its affiliates.

Chapter 25 Using the Fluid Interface to View and Manage HRHD Self Service Application Transactions
Image: (Smartphone) HR Service Center Dashboard
This example illustrates the HR Service Center dashboard for the smart phone.
Note: The behavior and appearance of tiles displayed in the HR Service Center dashboard can be changedas per requirements.
PeopleSoft CRM Tiles on the HR Service Center DashboardThe following table describes the tiles on the delivered HR Service Center dashboard.
Use the links in the table to access complete documentation for each transaction.
Copyright © 1988, 2020, Oracle and/or its affiliates. 569

Using the Fluid Interface to View and Manage HRHD Self Service Application Transactions Chapter 25
Tile Name Definition Name Usage
Search for Answers Tile CR_RC_SS_SRCH_FL_GBL Allows user to search for cases and findcorresponding solutions and also enablesusers to access Top Solutions or KnownIssues pages.
FAQ Tile CR_RC_SS_FAQ_FL_GBL Access Frequently Asked Questionspage, where you can view a list of topfrequently asked questions selected bythe administrator based on categories.
Create Case Tile CR_RC_SS_CCASE_FL_GBL Access Create Case wizard, where youcan describe and submit a new problemusing a step by step guided process.
My Cases Tile CR_RC_CASE_SS_SRCH_FL_GBL Access My Cases page, where you canview a list of cases related to the user.
Top Solutions Tile CR_RC_SS_TOPSOLN_FL_GBL Access Top Solutions page, whereyou can view the list of top solutionsconfigured by the administrator.
Known Issues Tile CR_RC_SS_ISSUES_FL_GBL Access Known Issues page to view a listof all known issues.
HR Shortcuts Tile CR_RC_SS_HR_SHORTS_FL_GBL Access the HR Shortcuts page to viewlinks to commonly used components inHCM.
Browse By Topic Tile CR_RC_SS_BROWSE_TL_FL_GBL Allow users to browse for solutionsby specific topics. The tile displays amaximum of 11 topics which the userscan set up, to facilitate their search forrelevant solutions.
Using the PeopleSoft Fluid Interface to Search Answers
This topic discusses how employees use the PeopleSoft Fluid User Interface to search for answers.
Pages Used to Search Answers Using the PeopleSoft Fluid User InterfacePage Name Definition Name Usage
Search Results Page RC_SS_SRCH_ANS_FL Use the Search Results page to viewcontent related to the search keyword inspecific category.
570 Copyright © 1988, 2020, Oracle and/or its affiliates.

Chapter 25 Using the Fluid Interface to View and Manage HRHD Self Service Application Transactions
Page Name Definition Name Usage
Solution Details Page RC_SS_SOLN_DTL_FL Use the Solution Details page to viewthe details of the solution and number ofpeople who found the solution as helpful.
Search for Answers TileUse the Search for Answers tile to access top solutions, known issues, or troubleshooting guides based onrequirement.
This tile has two sections. The first section enables the employees to search for answers, while the secondsection enables to access top solutions or known issues . By default, the second section displays topsolutions configured by the administrator.
An administrator can decide which section they want the organization to view when the employees log into HR Service Center dashboard. This is based on a URL field parameter setting in the Fluid Attributestab of Search for Answers - Content Ref Administration page. If known issues need to be displayed, setAdditional Parameters field value as DISP_TMPL_FAM_CD=CRM_HHD&TYPE=KNOWN_ISSUES.If top solutions need to be displayed, set Additional Parameters field value asDISP_TMPL_FAM_CD=CRM_HHD&TYPE=TOPSOLUTIONS. (Navigation: PeopleTools, Portal,Structure and Content, Fluid Structure and Content, Fluid Pages, HR HelpDesk Self Service, Search forAnswers, Edit, Fluid Attributes).
Note: The Known Issues section displays 6 most recent cases that have been made accessible to self-service users.
Navigation
Click the HR Service Center tile available in the Employee Self Service home page. The Search forAnswers tile is available on the HR Service Center dashboard.
Copyright © 1988, 2020, Oracle and/or its affiliates. 571

Using the Fluid Interface to View and Manage HRHD Self Service Application Transactions Chapter 25
Image: (Tablet) Search for Answers Tile
This example illustrates the Search for Answers tile for the tablet.
Image: (Smartphone) Search for Answers Tile
This example illustrates the Search for Answers tile for the smartphone.
Click on the Search icon, after entering the keywords in Searchfield. Search results are displayed in the Search Results page.
View All Click this link to open the corresponding page listing all topsolutions or known issues based on configuration.
Search Results PageUse the Search Results page to view content related to the search keyword in specific category.
572 Copyright © 1988, 2020, Oracle and/or its affiliates.

Chapter 25 Using the Fluid Interface to View and Manage HRHD Self Service Application Transactions
Navigation
Specify a keyword or leave the search field blank and click the Search icon in the Search For Answerstile.
Image: (Tablet) Search Results Page
This example illustrates the Search Results page for the tablet.
Copyright © 1988, 2020, Oracle and/or its affiliates. 573
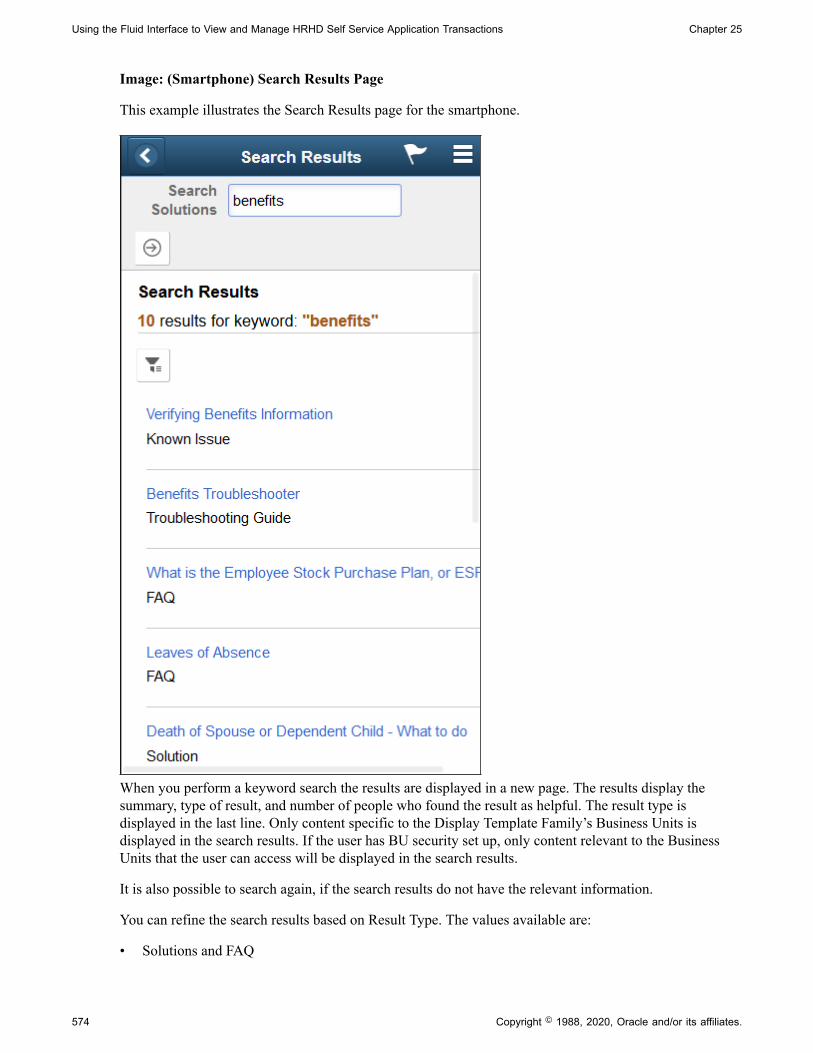
Using the Fluid Interface to View and Manage HRHD Self Service Application Transactions Chapter 25
Image: (Smartphone) Search Results Page
This example illustrates the Search Results page for the smartphone.
When you perform a keyword search the results are displayed in a new page. The results display thesummary, type of result, and number of people who found the result as helpful. The result type isdisplayed in the last line. Only content specific to the Display Template Family’s Business Units isdisplayed in the search results. If the user has BU security set up, only content relevant to the BusinessUnits that the user can access will be displayed in the search results.
It is also possible to search again, if the search results do not have the relevant information.
You can refine the search results based on Result Type. The values available are:
• Solutions and FAQ
574 Copyright © 1988, 2020, Oracle and/or its affiliates.

Chapter 25 Using the Fluid Interface to View and Manage HRHD Self Service Application Transactions
• Known Issues
• Troubleshooting Guides
You can drill down further into the search results based on sub filters. Sub filter options are displayedbased on the selected Result Type.
Solution Details PageUse the Solution Details page to view the details of the solution and number of people who found thesolution as helpful.
Navigation
Click a solution link in Search Results page to view the corresponding Solution Details page.
Image: Solution Details Page
This example illustrates the fields and controls on the Solution Details page.
Note: The look and feel of Solution Details page varies based on result types selected.
Yes and No radio buttons Use these radio buttons to indicate whether the solutionis helpful or not. The selection made by the employee forwhether the solution was helpful or not, will be retained forthe employee's logged in session. Based on self-service helpfulcount, the administrator gets the feedback on the effectivenessof the solution and depending on this, the administrator candecide which solution can be marked as the top solution.
If you select No, you are redirected to Solution Feedback modalwindow. For details, see Solution Feedback Modal Window.
Copyright © 1988, 2020, Oracle and/or its affiliates. 575

Using the Fluid Interface to View and Manage HRHD Self Service Application Transactions Chapter 25
Email Solution This button enables the user to e-mail the solution to themselvesor another person(s).
Add Feedback This button enables the user to provide feedback while viewinga top solution.
Solution Feedback Modal WindowUse the Solution Feedback modal window to provide a feedback.
Navigation
Click Add Feedback button on the Solution Details page.
Image: Solution Feedback Modal Window
This example illustrates the Solution Feedback modal window.
Type Select the feedback type. You can configure the requiredfeed back types in the Feedback Type page. For details, see "Feedback Type Page" (PeopleSoft CRM 9.2: ServicesFoundation)
Description Meaningful description of the feedback.
Note: ‘Type’ and ‘Description’ are mandatory fields.
576 Copyright © 1988, 2020, Oracle and/or its affiliates.

Chapter 25 Using the Fluid Interface to View and Manage HRHD Self Service Application Transactions
Using the PeopleSoft Fluid Interface to View FAQ
Employees use the Frequently Asked Questions (FAQ) tile to access the Frequently Asked Questionspage.
Note: If no FAQ is configured by the administrator or if no FAQ is applicable for the logged in user, theFAQ tile is displayed as 1X1 tile.
Pages Used to View FAQPage Name Definition Name Usage
FAQ Tile CR_RC_SS_FAQ_FL_GBL Use the Frequently Asked Questions (FAQ) tile to access the FrequentlyAsked Questions page.
Frequently Asked Questions Page RC_SS_FAQ_FL Use the Frequently Asked Questionspage to view a list of FAQ configured bythe administrator.
FAQ TileEmployees use the Frequently Asked Questions (FAQ) tile to access the Frequently Asked Questionspage.
Note: If no FAQ is configured by the administrator or if no FAQ is applicable for the logged in user, theFAQ tile is displayed as 1X1 tile.
Navigation
Click the HR Service Center tile available in the Employee Self Service home page. The FrequentlyAsked Questions tile is available on the HR Service Center dashboard.
Copyright © 1988, 2020, Oracle and/or its affiliates. 577

Using the Fluid Interface to View and Manage HRHD Self Service Application Transactions Chapter 25
Image: (Tablet) FAQ Tile
This example illustrates the FAQ tile for the tablet.
Image: (Smartphone) FAQ tile
This example illustrates FAQ tile for the smartphone.
This tile displays a list of questions that are frequently asked by the employees. You can also view all theFAQs by clicking View All.
Frequently Asked Questions PageUse the Frequently Asked Questions page to view a list of FAQ configured by the administrator.
Frequently Asked Questions is a single scrollable page that contains two portions; questions within thetopics and “questions and answers”. When the user clicks on any question in the list on top of the page,the page scrolls to the section that the FAQ belongs to.
Note: User can view only the solutions from authorized solution libraries. For more details on definingsolution library security, see Solution Library Security section in Finding and Attempting Solutions.
578 Copyright © 1988, 2020, Oracle and/or its affiliates.

Chapter 25 Using the Fluid Interface to View and Manage HRHD Self Service Application Transactions
Navigation
• Click View All link available in the FAQ tile to access the Frequently Asked Questions page.
• Click a particular FAQ link displayed in the FAQ tile to access the corresponding answer.
Image: (Tablet) Frequently Asked Questions Page (1 of 2)
This example illustrates the Frequently Asked Questions page for the tablet (1 of 2).
Copyright © 1988, 2020, Oracle and/or its affiliates. 579

Using the Fluid Interface to View and Manage HRHD Self Service Application Transactions Chapter 25
Image: (Tablet) Frequently Asked Questions Page (2 of 2)
This example illustrates the Frequently Asked Questions page for the tablet (2 of 2).
580 Copyright © 1988, 2020, Oracle and/or its affiliates.

Chapter 25 Using the Fluid Interface to View and Manage HRHD Self Service Application Transactions
Image: (Smartphone) Frequently Asked Questions Page (1 of 2)
This example illustrates the Frequently Asked Questions page for the smartphone (1 of 2).
Copyright © 1988, 2020, Oracle and/or its affiliates. 581

Using the Fluid Interface to View and Manage HRHD Self Service Application Transactions Chapter 25
Image: (Smartphone) Frequently Asked Questions Page (2 of 2)
This example illustrates the Frequently Asked Questions page for the smartphone (2 of 2).
For example, if you want to view a list of FAQ corresponding to Benefits California, select BenefitsCalifornia in the FAQs by Topic field. In this case, only the questions corresponding to BenefitsCalifornia are displayed in the Frequently Asked Questions page.
Using the PeopleSoft Fluid Interface to Create Case
Employees use the Create Case tile to access the Create Case wizard.
582 Copyright © 1988, 2020, Oracle and/or its affiliates.

Chapter 25 Using the Fluid Interface to View and Manage HRHD Self Service Application Transactions
Pages Used to Create CasePage Name Definition Name Usage
Create Case Tile CR_RC_SS_CCASE_FL_GBL Use Create Case tile to access CreateCase wizard, where you can describe andsubmit a new problem using a step bystep guided process.
Create Case Wizard RC_SS_HHD_STEP1_FL Use Create Case page to select or entercategory, type, and details of the case.
Create Case — Enter Details Page RC_SS_HHD_STEP2_FL Use Enter Details page to specify thecase details and attaching file(s) to thecorresponding case.
Create Case — Review and Submit Page RC_SS_HHD_SUBMT_FL Use Review and Submit page to reviewand submit the case.
Create Case TileEmployees use the Create Case tile to access the Create Case wizard..
Navigation
Click the HR Service Center tile available in the Employee Self Service home page. The Create Case tileis available on the HR Service Center dashboard.
Image: (Tablet) Create Case Tile
This example illustrates the Create Case tile for the tablet.
Copyright © 1988, 2020, Oracle and/or its affiliates. 583

Using the Fluid Interface to View and Manage HRHD Self Service Application Transactions Chapter 25
Image: (Smartphone) Create Case Tile
This example illustrates the Create Case tile for the smartphone.
Create Case WizardUse the Create Case wizard to describe and submit a new problem using a step by step guided process.
The Case Creation process is a guided process through which a self-service user can create a case. Insteadof showing all case fields on a single page, an administrator can configure multiple steps for the casecreation process. The administrator can specify the fields that will be displayed on each page and adescription of each step. Display Template is used for setting this up.
The visibility of page elements depends on how you configure the display template for this component.Also, some fields can be assigned default values based on business unit settings. The system entersdefault values even if the fields are hidden
The Create Case wizard can be a single step, two step, three step, or four step process based on how it hasbeen set up by the Administrator in the Display Template (CRM_HHD_CCASE_FL).
The display template for Self Service Case allows the administrator to:
• Control individual step description in the case creation process.
• Select the fields to be displayed in each step.
• Enter the label for each step.
For details on display template setup, see "Pages Used to Configure Display Templates for Components"(PeopleSoft CRM 9.2: Automation and Configuration Tools) and Appearance and Behavior Control
When a case is created or updated, push notifications are triggered. For more details on push notifications,refer Understanding the Push Notification Framework in PeopleTools: Fluid User Interface Developer’sGuide.
By default, the Create Case Guided Process involves the following three steps:
1. Select Category
2. Enter Details
3. Review and Submit
This topic will take you through the pages involved in these steps.
584 Copyright © 1988, 2020, Oracle and/or its affiliates.

Chapter 25 Using the Fluid Interface to View and Manage HRHD Self Service Application Transactions
Navigation
Click the Create Case tile to access the Create Case wizard. Select Category page is displayed, by default.
Image: (Tablet) Create Case — Select Category Page
This example illustrates the fields and controls on the Select Category page for the tablet.
Copyright © 1988, 2020, Oracle and/or its affiliates. 585

Using the Fluid Interface to View and Manage HRHD Self Service Application Transactions Chapter 25
Image: (Smartphone) Create Case – Select Category Page
This example illustrates the fields and controls on the Select Category page for the smartphone.
Category, Type, and Details Select or enter information in these fields to describe the type ofproblem you are having.
Create Case — Enter Details PageUse Enter Details page to specify the case details and attaching file(s) to the corresponding case.
586 Copyright © 1988, 2020, Oracle and/or its affiliates.

Chapter 25 Using the Fluid Interface to View and Manage HRHD Self Service Application Transactions
Navigation
Click step 2 or Enter Details, at the top of the page to navigate to the Enter Details page in the guidedprocess.
Image: (Tablet) Create Case — Enter Details Page for Employee
This example illustrates the fields and controls on the Create Case — Enter Details page for the tablet.
Copyright © 1988, 2020, Oracle and/or its affiliates. 587

Using the Fluid Interface to View and Manage HRHD Self Service Application Transactions Chapter 25
Image: Create Case — Enter Details Page for Manager
If the logged in user is a manager, the Enter Details page is displayed as shown:
588 Copyright © 1988, 2020, Oracle and/or its affiliates.

Chapter 25 Using the Fluid Interface to View and Manage HRHD Self Service Application Transactions
Image: (Smartphone) Enter Details Page
This example illustrates the fields and controls on the Enter Details page for the smartphone.
Case Summary, Description, andPriority
Select or enter information in these fields to describe the type ofproblem you are having.
Add Attachment Click this button to attach a file to the case.
Create Case For This field displays the name of the employee.
Contact Details This read-only field displays the contact's primary contactmethod.
Copyright © 1988, 2020, Oracle and/or its affiliates. 589

Using the Fluid Interface to View and Manage HRHD Self Service Application Transactions Chapter 25
Click this button in the Create Case For field to report a case onbehalf of one of the people reporting directly to you. The systemdisplays a list of your direct reports.
Click this button in the Case Contact field to change the contactperson specified in the Customer field or the Employee field.
Create Case — Review and Submit PageUse Review and Submit page to review and submit the case.
Navigation
Click step 3, Review and Submit, at the top of the page to navigate to the Review and Submit page in theguided process.
Image: (Tablet ) Create Case — Review and Submit Page
This example illustrates the fields and controls on the Review and Submit page for the tablet.
590 Copyright © 1988, 2020, Oracle and/or its affiliates.

Chapter 25 Using the Fluid Interface to View and Manage HRHD Self Service Application Transactions
Image: (Smartphone) Create Case — Review and Submit Page
This example illustrates the fields and controls on the Review and Submit page for the tablet.
Click Submit button to submit the case. When the user clicks the Submit button, the user is presented witha Case Submitted page with the case number as shown.
Copyright © 1988, 2020, Oracle and/or its affiliates. 591

Using the Fluid Interface to View and Manage HRHD Self Service Application Transactions Chapter 25
Image: Case Submitted Page
This example illustrates the Case Submitted page with the case number.
The user can click HR Support Center button to go back to the HR Service Center landing page.
Click MY Cases button to view the list of cases created by the user.
Enabling Suggested Solutions for HRHD Fluid Self Service Cases
PeopleSoft Suggested Solutions feature enables users to view helpful solutions while creating a case. Youcan search solutions based on Case Category, Type, and Details (CTD).
To enable suggested solutions feature:
• Suggested Solutions Count check-box available in Call Centre Definition Page (Self- Service section)should always be checked and select an appropriate value. For details, see Defining Call CenterBusiness Units.
• Suggested Solutions check-box in Business Unit — Options page should be checked. For details, seeDefining Call Center Business Units
Viewing Suggested SolutionsTo view suggested solutions,
1. Login as an employee, click HR Service Center tile available on the Employee Self Service homepage.
2. Click Create Case tile.
3. Select case category, type, and detail as per requirements. Suggested solutions for the selected CTDare displayed in the Suggested Solutions section based on the availability or setup.
592 Copyright © 1988, 2020, Oracle and/or its affiliates.

Chapter 25 Using the Fluid Interface to View and Manage HRHD Self Service Application Transactions
Image: Create Case Wizard – Select Category Page
Create Case Wizard – Select Category page
You can drill down to solution details and can mark solution as helpful or not. After creating thecase, viewed solutions are tagged to the case with appropriate status such as In consideration, FailedResolution, and Viewed. Based on the solution status an agent can able to figure out whether the solutionis useful for the employee or not.
It is also possible for the agent to set up solutions with appropriate CTD by means of Call Center BusinessUnit page. For details on fields and explanations of this page, see Defining Call Center Business Units.
Note: You can also search for Solutions by means of Search Solutions tile.
The number of solutions displayed is based on a suggested solution count which can be specified inBusiness Unit – Options page. For details, see Defining Call Center Business Units
Using the PeopleSoft Fluid Interface to View Top Solutions
Employees use the Top Solutions tile to access the Top Solutions page.
Note: By default, the Top Solutions tile is not available in the HR Service Center dashboard. This tile canbe enabled as per requirement. For details on enabling the tiles on home pages, refer Setting the Pageletsor Tiles That Appear on Home Pages section in PeopleTools: Portal Technology.
Pages Used to View Top SolutionsPage Name Definition Name Usage
Top Solutions Tile CR_RC_SS_TOPSOLN_FL_GBL Use the Top Solutions tile to access TopSolutions page.
Top Solutions Page RC_SS_TOPSOLN_FL Use the Top Solutions page to viewa list of solutions configured by theadministrator, if any.
Solution Details Page RC_SS_SOLN_DTL_FL Use the Solution Details page to viewthe details of the solution and number ofpeople who found the solution as helpful.
Copyright © 1988, 2020, Oracle and/or its affiliates. 593

Using the Fluid Interface to View and Manage HRHD Self Service Application Transactions Chapter 25
Top Solutions TileEmployees use the Top Solutions tile to access the Top Solutions page.
Navigation
Click the HR Service Center tile on the Employee Self Service landing page to access HR Service Centerdashboard. The Top Solutions tile is displayed on the HR Service Center dashboard.
Image: (Tablet) Top Solutions Tile
This example illustrates the Top Solutions tile for the tablet.
Image: (Smartphone) Top Solutions Tile
This example illustrates the Top Solutions tile for the smart phone.
The tile shows the total number of top solutions selected by the administrator.
Top Solutions PageUse the Top Solutions page to view a list of solutions configured by the administrator, if any. User canview only the solutions from authorized solution libraries. For more details on defining solution librarysecurity, see "Finding and Attempting Solutions" (PeopleSoft CRM 9.2: Services Foundation).
Navigation
• Click the Top Solutions tile to access the Top Solutions page.
• Top Solutions page can also be accessed as part of Search for Answers.
594 Copyright © 1988, 2020, Oracle and/or its affiliates.

Chapter 25 Using the Fluid Interface to View and Manage HRHD Self Service Application Transactions
Image: (Tablet) Top Solutions Page
This example illustrates the Top Solutions page for the tablet.
Copyright © 1988, 2020, Oracle and/or its affiliates. 595
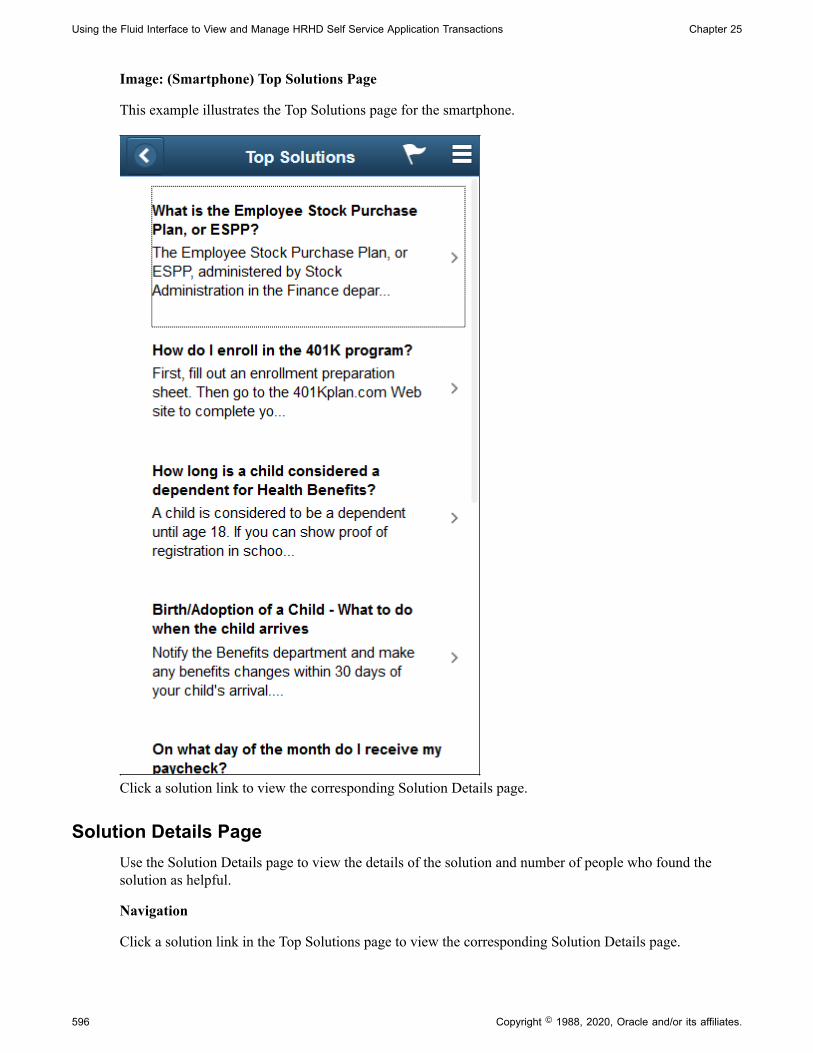
Using the Fluid Interface to View and Manage HRHD Self Service Application Transactions Chapter 25
Image: (Smartphone) Top Solutions Page
This example illustrates the Top Solutions page for the smartphone.
Click a solution link to view the corresponding Solution Details page.
Solution Details PageUse the Solution Details page to view the details of the solution and number of people who found thesolution as helpful.
Navigation
Click a solution link in the Top Solutions page to view the corresponding Solution Details page.
596 Copyright © 1988, 2020, Oracle and/or its affiliates.

Chapter 25 Using the Fluid Interface to View and Manage HRHD Self Service Application Transactions
Image: (Tablet) Solution Details Page
This example illustrates the Solution Details page for the tablet.
Attachments If there is any file attached in the solution, then it gets displayedin the Attachments section.
Yes and No radio buttons Use these radio buttons to indicate whether the solutionis helpful or not. The selection made by the employee forwhether the solution was helpful or not, will be retained forthe employee's logged in session. Based on self-service helpfulcount, the administrator gets the feedback on the effectivenessof the solution and depending on this, the administrator candecide which solution can be marked as the top solution.
Email Solution This button enables the user to e-mail the solution to themselvesor another person(s).
Add Feedback This button enables the user to provide feedback while viewinga top solution.
Copyright © 1988, 2020, Oracle and/or its affiliates. 597

Using the Fluid Interface to View and Manage HRHD Self Service Application Transactions Chapter 25
Image: Email Solution modal window
This example illustrates the Email Solution modal window.
Solution Feedback Modal WindowUse the Solution Feedback modal window to provide a feedback.
Navigation
Click Add Feedback button on the Solution Details page.
598 Copyright © 1988, 2020, Oracle and/or its affiliates.

Chapter 25 Using the Fluid Interface to View and Manage HRHD Self Service Application Transactions
Image: Solution Feedback Modal Window
This example illustrates the Solution Feedback modal window.
Type Select the feedback type. You can configure the requiredfeed back types in the Feedback Type page. For details, see "Feedback Type Page" (PeopleSoft CRM 9.2: ServicesFoundation)
Description Meaningful description of the feedback.
Note: ‘Type’ and ‘Description’ are mandatory fields.
Using the PeopleSoft Fluid Interface to View Cases
Employees use the My Cases tile to access the My Cases page.
Pages Used to View CasesPage Name Definition Name Usage
My Cases Tile CR_RC_CASE_SS_SRCH_FL_GBL Use My Cases tile to access My Casespage.
My Cases Page RC_CASE_SS_SRCH_FL Use My Cases page to view a list ofcases that are currently associated withthe logged in employee
Copyright © 1988, 2020, Oracle and/or its affiliates. 599

Using the Fluid Interface to View and Manage HRHD Self Service Application Transactions Chapter 25
My Cases TileUse the My Cases tile to access the My Cases page..
Navigation
Click the HR Service Center tile available in the Employee Self Service home page. The My Cases tile isavailable on the HR Service Center dashboard.
Image: (Tablet) My Cases Tile
This example illustrates the My Cases tile for the tablet.
Image: (Smartphone) My Cases Tile
This example illustrates the My Cases tile for the smartphone.
The tile displays number of open cases.
My Cases PageSelect the reason for adding the interested party, and click the Save button to add an interested party to thecase.
The predefined searches available are:
• All known issues that I am interested in
• All cases that I am the contact for
• All my cases
• All my cases related to Program/Service
• All my open cases
600 Copyright © 1988, 2020, Oracle and/or its affiliates.

Chapter 25 Using the Fluid Interface to View and Manage HRHD Self Service Application Transactions
• Cases that I reported for others
• Open known issues that I am interested in
• Open cases that I am the contact for
• Open cases that I reported for others
Navigation
• Click the My Cases tile available on the HR Service Center dashboard.
• Click the My Cases button available on the Case Submitted page.
Note: My open cases is the default view when the employee clicks on the My Cases tile and is taken tothe corresponding page.
Image: (Tablet) My Cases Page
This example illustrates the fields and controls on the My Cases page for the tablet.
Copyright © 1988, 2020, Oracle and/or its affiliates. 601

Using the Fluid Interface to View and Manage HRHD Self Service Application Transactions Chapter 25
Image: Smartphone) My Cases Page
This example illustrates the fields and controls on the My Cases page for the smartphone.
Clicking the case summary transfers the user to view the case details and make updates, such as addingnotes and attachments, reopen the case or close the case if the user no longer requires help.
Case Details PageUse the Case Details page displays the case details such as case category, status, summary, description,and priority. This page is also the starting point for several other processes: adding notes, changingcontact information, requesting that an agent contact the user, reopening a case, and viewing solutions thatare already under consideration for this case. An administrator can decide which all processes need to bedelivered based on the Display Template (CRM_HHD_MCASE_FL) set up.
602 Copyright © 1988, 2020, Oracle and/or its affiliates.

Chapter 25 Using the Fluid Interface to View and Manage HRHD Self Service Application Transactions
Navigation
• On the HR Service Center home page, click a case in the My Cases page.
• Select a case from the list of search results on the My Cases page.
Image: (Tablet) Case Details Page
This example illustrates the fields and controls on the Case Details page for the tablet.
Notify Agent Click this button to send appropriate notification to agents. PeopleSoft delivers AAF objects (trigger points, action types, and terms) to support this process. The delivered AAF objectssend notifications to the assignee (agent, provider group, orcall center manager). Separate email and work list notificationsenable the system to send notifications using the recipient'spreferred notification method. By default, this button is hiddenby means of display template.
Close Case Click the Close Case button to close a case at any time. Thisbutton is available only if the business unit rules permit self-service users to close cases.
On clicking this button, user is presented with a Close Casemodal window (RC_SS_CLOSECASE_FL)
Copyright © 1988, 2020, Oracle and/or its affiliates. 603

Using the Fluid Interface to View and Manage HRHD Self Service Application Transactions Chapter 25
Image: Close Case Modal Window
This example illustrates the fields and controls on the Close Case modal window.
Reason for closing this case Select one of the predefined reasons for closing the case fromthe drop-down list box.
The available reasons include the following:
• Case Cancelled
• Case Resolved
• Duplicate Case
• Other
If the user wants to enter a free-form text reason, select ‘Other’, and enter the reason in the Details field.
Submit Click this button to close the case. When the user clicks thisbutton, the system changes the case status to the value that isspecified in the Closed Case Status field on the Case Detailspage.
If a user selects any value other than ‘Other’, the systemresolves the case by using the solution that is identified on theReason and Solution Link page. If no solution is linked to theselected reason code, the system creates one (using the solutiontype Canned) and updates the Reason and Solution Link pageaccordingly.
If a user entered a reason in the Details field, the system uses thetext to create a new solution of type Adhoc. The solution thenresolves the case using the newly created solution.
604 Copyright © 1988, 2020, Oracle and/or its affiliates.

Chapter 25 Using the Fluid Interface to View and Manage HRHD Self Service Application Transactions
When the case gets closed, the solution associated with thereason selected by the employee is saved as the solution thatresolved the case. For more details on this, see Association ofSolutions with Case Closure Reasons.
Reopen Case Click the Reopen Case button to reopen cases that are closed.User is allowed to reopen a case based on configuration settings. If user is not allowed to reopen case, then the Reopen Casebutton is not displayed in the Case Details page.
On clicking this button, user is presented with a Reopen Casemodal window (RC_SS_REOPEN_SCF).
Image: Reopen Case Modal Window
This example illustrates the fields and controls on the Reopen Case modal window.
Reason for reopening the case Select one of the predefined reasons for reopening the casefrom the drop-down list box. The available reasons include thefollowing:
• Problem Re-occurred
• Resolution Failed
• Other
If the user wants to enter a free-form text reason, select ‘Other’, and enter the reason in the Details field.
Submit Click this button to reopen the case. When the user clicks thisbutton, the system changes the case status to the value that isspecified in the Reopen Case Status field on the Case Detailspage.
Copyright © 1988, 2020, Oracle and/or its affiliates. 605

Using the Fluid Interface to View and Manage HRHD Self Service Application Transactions Chapter 25
Case Details Page: Notes and Solutions TabUse Case Details page: Notes and Solutions tab (RC_SS_UPDATES_FL) to view the most recent Notesand Solutions added to the case by the agent or employee (or an eligible case contact). User can view thesolution summary, description, and status. User can add a Note or select a view that shows only notes,solutions or both. It is also possible to attach one or more files to the note.
Navigation
On the Case Details page, click the Notes and Solutions tab.
Image: (Tablet) Case Details Page: Notes and Solutions tab
This example illustrates the fields and controls on the Case Details Page: Notes and Solutions tab for thetablet.
606 Copyright © 1988, 2020, Oracle and/or its affiliates.

Chapter 25 Using the Fluid Interface to View and Manage HRHD Self Service Application Transactions
Image: (Smartphone) Case Details Page: Notes and Solutions
This example illustrates the fields and controls on the Case Details Page: Notes and Solutions for thesmartphone.
Note: For smartphones, Notes and Solutions, Details, and Contact details are available by selecting thecorresponding value from the View field.
Click the solution summary to view the details corresponding to that solution. User is also provided withan option to email the solution to themselves or others; and can view how many people find this solutionas helpful.
Add Note Click the Add Note button to add a new case note andattachment.
On clicking this button, user is presented with a modal window (RC_SS_NOTE_ADD_SCF).
Copyright © 1988, 2020, Oracle and/or its affiliates. 607

Using the Fluid Interface to View and Manage HRHD Self Service Application Transactions Chapter 25
Image: Add Note Modal Window
This example illustrates the fields and controls on the Add Note modal window.
Add Attachments Click this button to select a file to add as an attachment to thenote.
Case Details Page: Details TabUse Case Details page: Details tab (RC_SS_DETAILS_FL) to view the case details such as category,status, summary, and the like.
Navigation
On the Case Details page, click the Details tab.
608 Copyright © 1988, 2020, Oracle and/or its affiliates.

Chapter 25 Using the Fluid Interface to View and Manage HRHD Self Service Application Transactions
Image: (Tablet) Case Details Page: Details tab
This example illustrates the fields and controls on the Case Details page: Details tab for the tablet.
Copyright © 1988, 2020, Oracle and/or its affiliates. 609

Using the Fluid Interface to View and Manage HRHD Self Service Application Transactions Chapter 25
Image: (Smartphone) Case Details Page: Details
This example illustrates the fields and controls on the Case Details page: Details for the smartphone.
Case Details Page: Contact tabUse the Case Details Page: Contact tab (RC_SS_CONTACT_FL) to view the contact person for theparticular case and allows the employee to edit the case contact. User can add or remove interested partiesto their case. The tab also displays the interested parties added by the user or agent.
Navigation
On the Case Details page, click the Contact tab.
610 Copyright © 1988, 2020, Oracle and/or its affiliates.
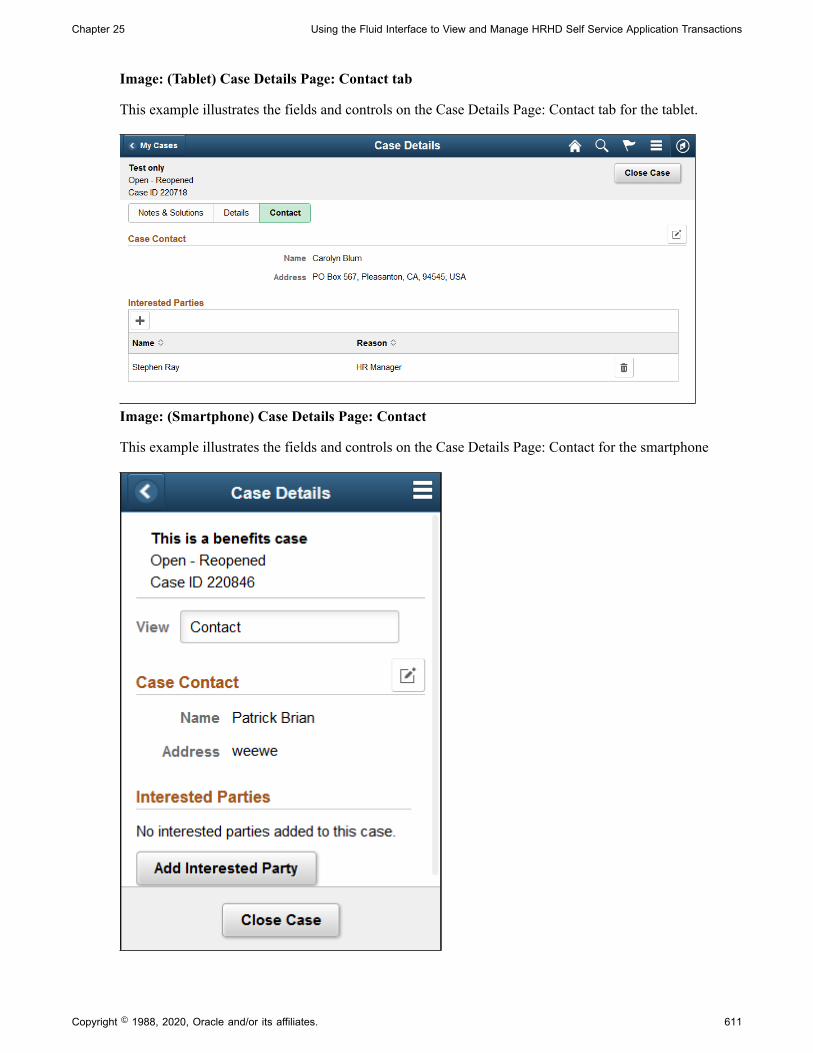
Chapter 25 Using the Fluid Interface to View and Manage HRHD Self Service Application Transactions
Image: (Tablet) Case Details Page: Contact tab
This example illustrates the fields and controls on the Case Details Page: Contact tab for the tablet.
Image: (Smartphone) Case Details Page: Contact
This example illustrates the fields and controls on the Case Details Page: Contact for the smartphone
Copyright © 1988, 2020, Oracle and/or its affiliates. 611

Using the Fluid Interface to View and Manage HRHD Self Service Application Transactions Chapter 25
Click this button to go to the Edit Case Contact modal window (RC_SS_HD_CNTC_SCF), wherein user can change thecontact details such as phone number, email, or addressspecified for a case. You can also select another employee ascase contact and modify their contact details.
Image: Edit Case Contact Modal Window
This example illustrates the fields and controls on the Edit Case Contact modal window.
You can change contact information when you are creating a new case or viewing an existing case.
On the Create Case page, the Change Contact link is available only until the case is submitted. Aftersubmitting the case, use the Edit Case Details Page to change the contact information.
Click the Add Interested Party button to select the employee and go to the Add Interested Party modalwindow (RC_SS_INTPARTY_SCF).
Image: Add Interested Party Modal Window
This example illustrates the fields and controls on the Edit Case Contact modal window.
Select the reason for adding the interested party, and click the Save button to add an interested party to thecase.
612 Copyright © 1988, 2020, Oracle and/or its affiliates.

Chapter 25 Using the Fluid Interface to View and Manage HRHD Self Service Application Transactions
Using PeopleSoft Fluid User Interface to View Known Issues
Employees use the Known Issues tile to access the Known Issues page.
Pages Used to View Known IssuesPage Name Definition Name Usage
Known Issues Tile CR_RC_SS_ISSUES_FL_GBL Use Known Issues tile to access KnownIssues page to view a list of all knownissues.
Known Issues Page RC_SS_ISSUES_FL Use the Known Issues page to viewa list of all global cases set by theadministrator.
Known Issues TileUse the Known Issues tile to access Known Issues page.
Navigation
• Click the HR Service Center tile available in the Employee Self Service home page. The KnownIssues tile is available on the HR Service Center dashboard.
• Known Issues can also be accessed as part of Search for Answers.
Image: (Tablet) Known Issues Tile
This example illustrates the Known Issues tile for the tablet.
Copyright © 1988, 2020, Oracle and/or its affiliates. 613

Using the Fluid Interface to View and Manage HRHD Self Service Application Transactions Chapter 25
Image: (Smartphone) Known issues Tile
This example illustrates the Known Issues tile for the smartphone.
Known Issues PageUse the Known Issues page to view a list of all global cases set by the administrator. Global cases arecases that impact multiple users and have been marked as Global. The look and feel of this page areconfigured by the administrator using display template (CRM_HHD_KNWN_ISUES_FL).
Navigation
Click the Known Issues tile to access the Known Issues page.
Image: (Tablet) Known Issues Page
This example illustrates the fields and controls on the Known Issues page for the tablet.
614 Copyright © 1988, 2020, Oracle and/or its affiliates.

Chapter 25 Using the Fluid Interface to View and Manage HRHD Self Service Application Transactions
Image: (Smartphone) Known Issues Page
This example illustrates the fields and controls on the Known Issues page for the smartphone.
Follow and Unfollow buttons Use these buttons for a case to receive notifications about thecase progress, without going into details.
Known Issues: Case Details PageUser can view the details of a case such as latest notes and attachments linked to the known issue andother details such as summary, priority, agent to which the case is assigned, and the like.
Copyright © 1988, 2020, Oracle and/or its affiliates. 615

Using the Fluid Interface to View and Manage HRHD Self Service Application Transactions Chapter 25
Navigation
Click a known issue link to access Known Issues: Case Details page.
Image: (Tablet) Known Issues: Case Details Page
This example illustrates the fields and controls on the Known Issues page for the smartphone.
Note: Contact tab is not available for an employee while viewing case details for known issues. Also, bydefault, Add Note button is disabled for known issues and can be enabled by means of Display Template.
616 Copyright © 1988, 2020, Oracle and/or its affiliates.

Chapter 25 Using the Fluid Interface to View and Manage HRHD Self Service Application Transactions
Image: (Smartphone) Known Issues: Case Details Page
This example illustrates the fields and controls on the Known Issues page for the smartphone.
Follow and Unfollow buttons Use these buttons for a case to receive notifications about thecase progress.
Using the PeopleSoft Fluid User Interface to View HR Shortcuts
Employees use the HR Shortcuts tile to access the HR Shortcuts page.
Copyright © 1988, 2020, Oracle and/or its affiliates. 617

Using the Fluid Interface to View and Manage HRHD Self Service Application Transactions Chapter 25
Pages Used to View HR ShortcutsPage Name Definition Name Usage
HR Shortcuts Tile CR_RC_SS_HR_SHORTS_FL_GBL Use the HR Shortcuts tile to accessthe HR Shortcuts page to view links tocommonly used components in HCM.
HR Shortcuts Page PT_AGSTARTPAGE_NUI Use the HR Shortcuts page to view linksto commonly used components in HCM.
HR Shortcuts Tileuse the HR Shortcuts tile to access the HR Shortcuts page.
Navigation
Click the HR Service Center tile available in the Employee Self Service home page. The HR Shortcutstile is available on the HR Service Center dashboard.
Image: (Tablet) HR Shortcuts Tile
use the HR Shortcuts tile to access the HR Shortcuts page.
Image: (Smartphone) HR Shortcuts Tile
This example illustrates the HR Shortcuts tile for the smartphone.
HR Shortcuts PageUse the HR Shortcuts page to view links to commonly used components in HCM. For details on this,refer PeopleSoft HCM.
618 Copyright © 1988, 2020, Oracle and/or its affiliates.

Chapter 25 Using the Fluid Interface to View and Manage HRHD Self Service Application Transactions
Navigation
Click the HR Shortcuts tile to access the HR Shortcuts page.
Image: (Tablet) HR Shortcuts Page
This example illustrates the fields and controls on the HR Shortcuts page for the tablet.
Copyright © 1988, 2020, Oracle and/or its affiliates. 619

Using the Fluid Interface to View and Manage HRHD Self Service Application Transactions Chapter 25
Image: (Smartphone) HR Shortcuts Page
This example illustrates the HR Shortcuts page for the smartphone.
The following table lists the category, action, and corresponding description of links on the HR Shortcutspage.
Category Action Description
Personal Information Personal Information Used to view and update an employee’spersonal information.
620 Copyright © 1988, 2020, Oracle and/or its affiliates.

Chapter 25 Using the Fluid Interface to View and Manage HRHD Self Service Application Transactions
Category Action Description
Job Related Company Directory Used to access employees companydirectory and matrix teams that youviewed in the classic Org Chart Viewerfeature.
Job Related Absence Request Used to select the absence request toapprove or deny.
Job Related Performance Documents Used to access employee’s performanceinformation.
Job Related Timesheet Used to approve or deny an employee'sreported time. The format of thetimesheet depends on whether theemployee is an elapsed or punch timereporter.
Job Related Talent Profile Used to view and edit employee’s talentprofiles and create new profiles.
Compensation View Paycheck Used to view details of the employee’spaycheck.
Compensation Compensation History Used to review or verify an employee'scompensation history.
Benefits Benefits Summary Used to view summary informationabout current benefits of the employee.
Using the PeopleSoft Fluid User Interface to Browse for SolutionsBy Topic
This topic discusses how employees use the PeopleSoft Fluid User Interface to browse for solutions bytopic.
Pages Used to Browse for Solutions By Topic in the PeopleSoft Fluid UserInterface
Page Name Definition Name Usage
Browse By Topic Tile CR_RC_SS_BROWSE_TL_FL_GBL Allow employees to quickly browse forsolutions by topics which are displayedas links on the tile. The tile displays amaximum of 11 topics which the userscan set up, to facilitate their search forrelevant solutions.
Search Results Page RC_SS_SRCH_ANS_FL View the content corresponding to thetopic link selected on the Browse ByTopic tile.
Copyright © 1988, 2020, Oracle and/or its affiliates. 621

Using the Fluid Interface to View and Manage HRHD Self Service Application Transactions Chapter 25
Browse By Topic TileEmployees use the Browse By Topic tile (CR_RC_SS_BROWSE_TL_FL_GBL) to quickly browse forsolutions by topics which are displayed as links on the tile. The tile displays a maximum of 11 topicswhich the users can set up, to facilitate their search for relevant solutions.
For more information on how to set up the topic links on the Browse By topic tile, refer Home Page -Fluid Preferences Page.
Navigation
By default, the Browse By Topic tile is not available in the HR Service Center dashboard. You can add theBrowse By Topic tile, through personalization, to any system-delivered homepage or a homepage that youcreate.
Image: Browse By Topic Tile
This example illustrates the fields and controls on the Browse By Topic tile.
Related LinksDefining the Self-Service Home Page Content and Layout
Search Results PageUse the Search Results page (RC_SS_SRCH_ANS_FL) to view the content corresponding to the topiclink selected on the Browse By Topic tile.
622 Copyright © 1988, 2020, Oracle and/or its affiliates.

Chapter 25 Using the Fluid Interface to View and Manage HRHD Self Service Application Transactions
Navigation
Click a topic link on the Browse By Topic tile to view the Search Results page.
Image: Search Results page
This example illustrates the fields and controls on the Search Results page.
Understanding HR HelpDesk Self Service and HCM Integration
This feature provides the ability to integrate and configure contextual HR HelpDesk specific content onPeopleSoft Fluid HCM Self-service pages. As part of integration, administrators need to setup integrationbetween HCM and CRM nodes and enable “Find Help” Related Content service on certain HCM fluidpages as per business needs. Wherever enabled, each of those related content services can be furtherconfigured using newly delivered setup pages in CRM to define context based setup configurations. Inrun time, Employees can click on Find help related content tile on a HCM transaction page, and search aswell as view solutions which are contextually recommended and report HR helpdesk cases in CRM.
This topic discusses:
• HR HelpDesk Self Service Integration Setup in CRM
• Enabling Related Content Tiles for HCM Self Service Transactions
Setting up PeopleSoft HR HelpDesk Self Service Integration inCRM
This section discusses the set up pages in CRM, for HR HelpDesk self-service integration with HCM.
Copyright © 1988, 2020, Oracle and/or its affiliates. 623

Using the Fluid Interface to View and Manage HRHD Self Service Application Transactions Chapter 25
Pages Used for Setting up HR HelpDesk Self Service Integration in CRMPage Name Definition Name Usage
Action Configuration Page RC_CTXT_CONFIGACTN To define actions that can beperformed in a context like SolutionRecommendation, Case Creation etc.
Context Map Definition Page RC_CNTXT_ACTN_MAP To define actions applicable for acontext. These actions are referred fromAction Configuration Page.
HR HelpDesk Context Parameters Page:Solutions tab
RC_CNTXT_MAP_SOL To configure the context related HRHelpDesk parameters in CRM side.
HR HelpDesk administrator can setuppreferences for solution parameters thatare used for solution recommendations.
HR HelpDesk Context Parameters Page:Case tab
RC_CNTXT_CASE To define case parameters.
HR HelpDesk Context Parameters Page:Preferences tab
RC_CNTXT_SOL_PREF To setup preferences for case parameters.
Action Configuration PageUse the Action Configuration page (RC_CTXT_CONFIGACTN) to define actions that can be performedin a context..
HR HelpDesk Administrator should be able to configure actions for Solution recommendation, Casecreation by associating appropriate Application Package. These packages will be used to implement thelogic/execution for solution recommendations, Case creation, chat based on user Profile and HCM contextin CRM.
Navigation
Setup CRM > Product Related >Call Center >Self-Service Configuration >HCM Self-ServiceIntegration >Define Action
624 Copyright © 1988, 2020, Oracle and/or its affiliates.

Chapter 25 Using the Fluid Interface to View and Manage HRHD Self Service Application Transactions
Image: Action Configuration Page
This example illustrates the fields and controls on the Action Configuration page.
Package, Path, and Class The implementation logic for execution of SolutionRecommendations, Case Creation, based on user Profile andHCM context in CRM. The administrator can override thislogic by associating appropriate application packages, based onrequirements. The application packages are associated with eachAction Code on CRM which will be delivered as system data.
Context Map Definition PageUse the Context Map Definition page (RC_CNTXT_ACTN_MAP) to define actions applicable for acontext. These actions are referred from Action Configuration page.
Navigation
Setup CRM > Product Related >Call Centre >Self-Service Configuration >HCM Self-ServiceIntegration >Configure Context
Copyright © 1988, 2020, Oracle and/or its affiliates. 625

Using the Fluid Interface to View and Manage HRHD Self Service Application Transactions Chapter 25
Image: Context Map Definition Page
This example illustrates the fields and controls on the Context Map Definition page.
Administrator can set up the solutions that need to be returned contextually for the corresponding HCMtransaction. It is also possible to add solutions as Featured Solutions.
Set ID and Library ID Select an appropriate Set ID and Library ID to which you wishto associate the solution.
Order Sequence in which featured solutions appeared on the Find Helppage.
HR HelpDesk Context Parameters Page: Solutions tabUse the HR HelpDesk Context Parameters Page (RC_CNTXT_MAP_SOL) to configure the contextrelated HR HelpDesk parameters in CRM side.
HR HelpDesk administrator can setup preferences for solution parameters that are used for solutionrecommendations.
Navigation
Setup CRM > Product Related >Call Centre >Self-Service Configuration >HCM Self-ServiceIntegration >Configure Context
626 Copyright © 1988, 2020, Oracle and/or its affiliates.

Chapter 25 Using the Fluid Interface to View and Manage HRHD Self Service Application Transactions
Image: HR HelpDesk Context Parameters Page : Solutions tab (1 of 2)
This example Illustrates the fields and controls on the HR HelpDesk Context Parameters Page : Solutionstab (1 of 2).
Image: HR HelpDesk Context Parameters Page : Solutions tab (2 of 2)
This example illustrates the fields and controls on the HR HelpDesk Context Parameters Page : Solutionstab.
Administrator can set up the solutions that need to be returned contextually for the corresponding HCMtransaction. It is also possible to add solutions as Featured Solutions.
Set ID and Library ID Select an appropriate Set ID and Library ID to which you wishto associate the solution.
Order Sequence in which featured solutions appeared on the Find Helppage.
Copyright © 1988, 2020, Oracle and/or its affiliates. 627

Using the Fluid Interface to View and Manage HRHD Self Service Application Transactions Chapter 25
HR HelpDesk Context Parameters Page: Case tabUse HR HelpDesk Context Parameters Page: Case tab (RC_CNTXT_CASE) to define Case parameters.HR HelpDesk administrator can define map of Case BUs with a set of Quick Codes or Category/Type/Details in CRM which will be used to populate case defaults, when an employee begins to create a casefrom HCM.
Navigation
Setup CRM > Product Related >Call Centre >Self-Service Configuration >HCM Self-ServiceIntegration >Configure Context >Case tab
Image: HR HelpDesk Context Parameters Page: Case tab
This example illustrates the fields and controls on the HR HelpDesk Context Parameters Page: Case tab.
Business Unit Select an appropriate case business unit.
Quick Code Select an appropriate quick code to define map of Case businessunits.
Note: It is permissible to define case parameters by either Quick Code (if it has CTD details) or CTDvalues directly in case there are no respective Quick Codes.
HR HelpDesk Context Parameters Page: Preferences tabUse Configure Context Page: Preferences tab (RC_CNTXT_SOL_PREF) to setup preferences for caseparameters.
Navigation
Setup CRM > Product Related >Call Centre >Self-Service Configuration >HCM Self-ServiceIntegration >Configure Context >Preferences tab
628 Copyright © 1988, 2020, Oracle and/or its affiliates.

Chapter 25 Using the Fluid Interface to View and Manage HRHD Self Service Application Transactions
Image: HR HelpDesk Context Parameters Page: Preferences tab (1 of 2)
This example illustrates the fields and controls on the HR HelpDesk Context Parameters Page:Preferences tab.
Image: HR HelpDesk Context Parameters Page: Preferences tab (2 of 2)
This example illustrates the fields and controls on the HR HelpDesk Context Parameters Page:Preferences tab.
Include Knowledge Content Select the content(s) that need to be displayed in Find Helppage.
Maximum count of solutions Specify the count of maximum solutions that need to be in FindHelp page.
Order By Select the filter criteria based on which solutions are displayedin Find Help page. You can filter the solutions based on lastupdated date, solved count, or usage count.
Enabling Related Content Tiles for HCM Self Service TransactionsTo enable related content tiles on any HCM self-service transaction, perform the following:
1. Navigate to Human Resources > PeopleTools >Portal >Related Content Service >Manage RelatedContent Service.
Copyright © 1988, 2020, Oracle and/or its affiliates. 629

Using the Fluid Interface to View and Manage HRHD Self Service Application Transactions Chapter 25
2. Select the required content reference.
3. Add the two related content services as per requirement: HR_RC_FIND_HELP andHR_RC_MYCASE.
4. Click on Configure button.
5. Specify the CRM Context ID and Action Code in the Mapping Data field. Action Code is optional forMy Cases.
6. Specify the Service Filter parameters as below:
Package: PS_RC_CRM_RELC_FILTER
Path: :
Class ID: CRMRelatedContent
7. Select Security Options and Click Ok.
8. Save the details configured in Assign Related Actions page.
After configuring related content tiles on a HCM transaction, the page is displayed as shown (Payslipspage is illustrated in this scenario)
Image: Payslips Page
This example illustrates the Payslips page.
The Find Help tile displays the count of recommended solutions or known issues.
Click on the Zoom icon, displays a modal window as shown:
630 Copyright © 1988, 2020, Oracle and/or its affiliates.

Chapter 25 Using the Fluid Interface to View and Manage HRHD Self Service Application Transactions
Image: Find Help Page (1 of 2)
This example illustrates the Find Help page.
Image: Find Help page (2 of 2)
This example illustrates the Find Help page.
You can view featured solutions first followed by known issues. If you want to create a case, click onCreate Case link.
Click on the Search icon, after entering the required keywords in Search for Answers field. Search resultsare displayed in the Search Results page.
The My Cases tile displays the count of case(s) along with the case status, created specific to the HCMtransaction for the logged in user.
Click on the Zoom icon, to view the My Cases page. For details, see Using the PeopleSoft Fluid Interfaceto View Cases
Note: User roles assigned with the permission list HCCPCRMSSFL can only view the Find Help and MyCases related content tile.
Copyright © 1988, 2020, Oracle and/or its affiliates. 631

Using the Fluid Interface to View and Manage HRHD Self Service Application Transactions Chapter 25
Understanding Chat Feature on Fluid HR Helpdesk Components
The Classic HR HelpDesk provides employees with the option to initiate chat with available agents toget their HR requests/queries answered. This option also available for Fluid Self-service pages in HRHelpdesk. For details on the chat feature available on the classic pages, see "Setting Up Chat Options"(PeopleSoft CRM 9.2: Multichannel Applications)
This topic discusses:
• Configurations to enable chat on fluid pages
• Steps to assign related content service on fluid components
Setting up Chat Options on Fluid Pages
PeopleSoft CRM facilitates to enable chat with agent as a related content service on Fluid Employee Self-service pages. This feature is available from People Tools version 8.55 and above and CRM 9.2.
Pages Used to Set up Chat Options on Fluid PagesPage Name Definition Name Usage
Chat Enabled Fluid Page Setup RB_CHAT_ENABL_F To specify the chat profile and agentpop-up page for each fluid self-servicecomponent to support the chat feature.
Agent Popup Page Definition Page RB_CHAT_FL_POPUP To define the mapping between fluidself-service components and full-functional page setup.
Chat Enabled Fluid Page SetupUse the Chat Enabled Fluid Page Setup (RB_CHAT_ENABL_F) to specify the chat profile and agentpop-up page for each self-service component to support the chat feature.
Navigation
Set Up CRM >Product Related > Multichannel Definitions >Chat >Fluid Setup >Chat Page Setup -Fluid
632 Copyright © 1988, 2020, Oracle and/or its affiliates.

Chapter 25 Using the Fluid Interface to View and Manage HRHD Self Service Application Transactions
Image: Chat Enabled Fluid Page setup
This example illustrates the fields and controls on the Chat Enabled Fluid Page setup.
Enable Chat Automation Select to activate the corresponding fluid component for users tostart live chat.
Component Name Select the fluid component for which the chat feature has to beenabled.
Chat Profile Name Select a chat profile to apply to the fluid component.
Chat Profile Click the Chat Profile link to view and edit the associated chatprofile setup.
Agent Popup Page ID Select a CRM full-functional page from the drop-down list box. When users initiate chat sessions from a Fluid self-service page, the associated CRM page is displayed in the agent chat window.
Agent Popup Click the Agent Popup link to view the selected agent popuppage on the Agent Popup Fluid Page Definition.
Agent Popup Page Definition PageUse the Agent Popup Page Definition page to define the mapping between self-service components andfull-functional page setup.
You can associate an agent pop-up page (a full-functional page) with multiple self-service componentson the Agent Popup Page Definition page, the system uses the one mapping that's specified on the ChatEnabled Page Setup page at runtime.
Navigation
Set Up CRM >Product Related > Multichannel Definitions >Chat >Fluid Setup >Agent Popup -Fluid
Copyright © 1988, 2020, Oracle and/or its affiliates. 633

Using the Fluid Interface to View and Manage HRHD Self Service Application Transactions Chapter 25
Image: Agent Popup Fluid Page Definition
This example illustrates the fields and controls on the Agent Popup Fluid Page Definition.
Page ID Displays the name that uniquely identifies the full-functionalpage.
Page Name Displays the name that uniquely identifies the full-functionalpage. Some pages share the same page and component names (for example, support case, helpdesk case, and helpdesk casefor human resources pages), the system uses the page ID todistinguish them.
Component Displays the name of the self-service component.
Template ID Displays the display template ID used by the full-functionalpage, if applicable.
App Package Displays the system delivered application package name thatcontains the application classes and methods used to definethe mapping between fluid self-service components and full-functional pages.
634 Copyright © 1988, 2020, Oracle and/or its affiliates.

Chapter 25 Using the Fluid Interface to View and Manage HRHD Self Service Application Transactions
App Class Displays the specific application class that contains allmethods used to define the mapping between fluid self-servicecomponents and the full-functional page.
App Method Displays the PeopleCode application class method name thatis used to populate all application keys needed to open the full-functional page.
Select the Agent pop up page ID and add the list of fluid components, which uses the corresponding pageid.
Steps to Assign Related Content Service on Fluid ComponentsTo assign Chat with Agent Related Content Service on fluid components, perform the following:
1. Navigate to People Tools >Portal >Related content Service > Manage Related Content Service
2. Click on Assign Related Content Service.
3. Select the content reference of the component on which the “Chat with Agent” has to be enabled.
Image: Select a Content Reference Page
This example illustrates the fields and controls on the Select a Content Reference page.
4. Under Component Level Related Content, add Service and choose the service ID asRC_CHATREQUEST.
Copyright © 1988, 2020, Oracle and/or its affiliates. 635

Using the Fluid Interface to View and Manage HRHD Self Service Application Transactions Chapter 25
Image: Assign Related Content Page
This example illustrates the fields and controls on the Assign Related Content page.
5. Click on Configure button and set the parameters as shown:
Image: Configure Service Page
This example illustrates the fields and controls on the Configure Service page.
Note: The parameters 1 and 2 has to be left blank for all the Self Service components except ManageCase and Solution Details.
For Manage Case, values for Parameter 1 and Parameter 2 has to be set as below.
636 Copyright © 1988, 2020, Oracle and/or its affiliates.

Chapter 25 Using the Fluid Interface to View and Manage HRHD Self Service Application Transactions
Image: Map parameters Page for Manage Case
This example illustrates the fields and controls on the Map parameters page.
For Solution Details, values for Parameter 1 and Parameter 2 has to be set as below.
Image: Map parameters Page for Solution Details
This example illustrates the fields and controls on the Map parameters page.
Chat Schedule of AgentsChat Related Content tile will be visible based on the Agent Schedule specified in Home Page – ChatSchedule page. For details, see Home Page - Chat Schedule Page
When the chat functionality is configured, the following fluid pages have the Chat with Agent tile:
• Search for Answers
• Solution Details
• Top Solutions Page
• FAQ
• Known Issues
• Manage Cases
• Create Case
Copyright © 1988, 2020, Oracle and/or its affiliates. 637

Using the Fluid Interface to View and Manage HRHD Self Service Application Transactions Chapter 25
• My Cases
638 Copyright © 1988, 2020, Oracle and/or its affiliates.

Chapter 26
Integrating a Case with Third-Party Systems
Understanding the Case EIP
The Case EIP integrates the PeopleSoft CRM case with third-party systems. The Case EIP is developedgenerically for PeopleSoft Support, HelpDesk, HelpDesk for Human Resources, Service Center forHigher Education, and all PeopleSoft CRM verticals. The Case EIP enables you to:
• Create a case from a third-party system.
• Update a case from a third-party system.
• Request case information from a third-party system.
This is a guide for technical users, installers, system administrators, and programmers who implement,maintain, or develop Case EIP.
Defining Case EIP Functionality
This topic discusses:
• Assumptions about the case EIP.
• Case EIP functionality.
• Delivered EIPs.
• Technical process flows.
• Error handling.
Assumptions About the Case EIPWhen considering the Case EIP, you must be aware of the following:
• To create a support case, these customer information fields must be provided: Customer BO ID,Customer Role Type ID, Display Template Family CodeID, and Contact BO ID.
Note: The Display Template Family Code is required for creating a case, not for updating it. If adefault Display Template Family Code is specified in the user default setup, the third-party vendordoes not have to provide it; case creation will occur. If no business unit or display template isprovided in the incoming request message and if the user does not have defaults defined, the systemsends an error message back to the third-party vendor.
Copyright © 1988, 2020, Oracle and/or its affiliates. 639

Integrating a Case with Third-Party Systems Chapter 26
• The third-party system needs to send the appropriate business unit, vertical, and market values in therequest, unless these values can be provided by default from user reference.
• The Case EIP is developed using PeopleTools Integration Broker technology.
• The Case EIP does not use bulk loading.
The Case EIP feature is intended to automatically create and update cases from third-party systems; itis not for data-conversion purposes.
• The Case EIP and related case component interfaces are meant for the agent-facing case, not for self-service.
• When creating a note for a case using the Case EIP, the system leaves the customer, contact, andemployee information blank.
The Case EIP cannot create a note for a different customer, contact, or employee.
• A case may use attributes.
An attribute can be of any data type (string, number, date, and so on). The system stores different datatypes in the matching data type field in the request message. It is the responsibility of the third-partysystem to provide the correct data format for attributes when creating attributes for a case.
• The case component can be configured to enable or disable functionality and to hide or unhide fieldson the Case page.
The case component is rendered based on the display template. When customers send a request tocreate a case, it is assumed that they will not send information that has been disabled or hidden. TheCase EIP will not do additional validation that is based on configuration settings.
See "Understanding Display Templates" (PeopleSoft CRM 9.2: Automation and Configuration Tools).
Case EIP FunctionalityThe Case EIP provides a bi-directional EIP in PeopleSoft CRM for PeopleSoft Support, HelpDesk,HelpDesk for Human Resources, Service Center for Higher Education, and all PeopleSoft CRM verticals.It provides a transactional framework that enables your call center to send and receive case information toand from any third-party applications.
640 Copyright © 1988, 2020, Oracle and/or its affiliates.

Chapter 26 Integrating a Case with Third-Party Systems
Image: Case EIP process flow
This diagram illustrates the Case EIP process flow.
Delivered EIPsThe following EIPs, as shown in the previous diagram, are provided:
• EIP #1 - Case Synchronous EIP.
• EIP #2 - Case Asynchronous EIP.
• EIP #3 - Request Case Information EIP (Synchronous).
Note: If the request contains a case ID, a new case is not created. The existing PeopleSoft CRM case isupdated with the pertinent information supplied in the request. If the case ID passed in is invalid, no caseis updated and an error message is sent back.
Warning! When you create a case, make sure the value of the CASE_ID field in the request message isempty or 0. When you update a case, make sure the CASE_ID value is a valid value that exists in theCRM RC_CASE table.
Case Synchronous EIPThe third-party application sends a request to CRM to create or update a case and waits for the response.Once the system processes the case in CRM, confirmation information is sent back to the third-partyapplication.
This EIP has one web service (RC_CASE_REQUEST_SYNC), which contains one service operation(RC_CASE_REQUEST_SYNC) with two messages:
• RC_CASE_REQUEST_SYNC - Inbound synchronous request message.
Copyright © 1988, 2020, Oracle and/or its affiliates. 641

Integrating a Case with Third-Party Systems Chapter 26
• RC_CASE_RESPONSE_SYNC - Outbound synchronous response message.
The processing details are as follows: when a request message is received, the on request event callsan appropriate case component interface (CI) to process information from the request message andsaves the information into the Case component. The system sends a response message back to the third-party system with confirmation information. The response message may contain information that CRMpopulates, such as case ID, assigned provider group, and agent.
Since the third-party system is waiting for the response from CRM, the system processes only one caseper message.
Case Asynchronous EIPThe third-party system sends a request to create or update a case, and it is not waiting for the response.Once the case is created or updated, CRM publishes confirmation information back to the third-party.
This EIP has two web services:
• RC_CASE_REQUEST_ASYNC, which contains one service operation(RC_CASE_REQUEST_ASYNC) with the message RC_CASE_REQUEST_ASYNC (inboundasynchronous message).
• RC_CASE_RESPONSE_ASYNC - which contains one service operation(RC_CASE_RESPONSE_ASYNC) with the message RC_CASE_RESPONSE_ASYNC (outboundasynchronous message).
The processing details are as follows: when CRM receives the request, it calls the appropriate case CI tocreate or update a case and then publishes case information back to the third party.
Since the third-party system is not waiting for the response from CRM, the request message may includeinformation from multiple cases in one message. CRM processes them one by one. The system issues acommit at the end of each successful case.
Request Case Information EIP (Synchronous)The third-party system sends a request to CRM to find case information. The request may containmultiple cases. CRM processes the request and sends the information for the case or cases back to thethird-party system.
This EIP has one web service (RC_CASE_INQUIRY_REQ_SYNC), which contains one serviceoperation (RC_CASE_INQUIRY_REQ_SYNC) with two messages:
• RC_CASE_INQUIRY_REQ_SYNC - Inbound synchronous request message.
• RC_CASE_INQUIRY_RESP_SYNC - Outbound synchronous response message.
The processing details are as follows: the request message may have one or more Case IDs, the on requestevent is triggered, and the CRM system processes the rowset of the message to populate case information,one by one. The system uses a direct SQL query instead of a CI.
Technical Process FlowsThe logic of EIP #1 (Case Synchronous EIP) and #2 (Case Asynchronous EIP) are the same except for theway in which they are initiated.
642 Copyright © 1988, 2020, Oracle and/or its affiliates.

Chapter 26 Integrating a Case with Third-Party Systems
EIP #1 is triggered from an OnRequest event. The system generates a sync response message and returnsit to the third-party system.
EIP #2 is triggered from an OnNotify event. The system publishes a response message for the third-partyapplication.
EIP #1 and #2 share the same PeopleCode function, ProcessCaseEIP is defined in theFUNCLIB_RC_EIP.CASE_EIP field formula.
Copyright © 1988, 2020, Oracle and/or its affiliates. 643

Integrating a Case with Third-Party Systems Chapter 26
Image: Process flow for EIP #1 and EIP #2Process Flow Diagram for EIP #1 and EIP #2processflowsEIP #1 and EIP #2
The following diagram illustrates the technical process flow for both EIP #1 and EIP #2.
This list indicates where you are in the process flow diagram:
1. The third-party sends an XML request to CRM by way of the integration gateway by using a webservice.
3. If integration broker (IB) does not recognize the format, the message is trapped in integration broker.
The process fails (this is standard integration broker functionality).
644 Copyright © 1988, 2020, Oracle and/or its affiliates.

Chapter 26 Integrating a Case with Third-Party Systems
See PeopleTools: Integration Broker Service Operations Monitor
See PeopleTools: Integration Broker Testing Utilities and Tools
4. OPRID, which is required, is used to validate whether the user has access to the requested case.
Once the user passes security checking, the system creates a case or updates it through integration broker.The integration broker user ID is used to create or update a case. This is the user ID that is used to startthe application server.
5. If the user passes the security check, the system obtains a session for component interface processing.
6. When creating a case, BUSINESS_UNIT is required.
The system automatically assigns the next new CASE_ID. If BUSINESS_UNIT is not supplied whencreating a case, CRM uses the default business unit from user preferences. When updating a case, onlyCASE_ID is required since it is a unique identifier.
7. Based on the Case ID value, the system decides whether to insert or update a case.
When no Case ID is provided, CRM creates a case by calling the create() method of CI. When the CaseID is provided, CRM checks whether the Case ID exists in CRM. If it exists, the case is updated bycalling the get() method; otherwise, the system does not do any case processing. The system generates aresponse message with CASE_EIP_STATUS = 1 (failed) and CASE_EIP_ERROR_MSG - Update failed.Case 123 does not exist in CRM. PeopleCode function IsCaseExist in FUNCLIB_RC_EIP. The CASE_IDFieldFormula checks if the case exists.
8. If the create() or get() method fails, the system generates an error message in RC_CASE_EIP_ERR forthe response message.
The system cancels the CI to reset the instance (process 11), and sends the response message with theerror message back to the third-party (process 12).
9. Once the create() or get() method passes successfully, CRM sets the CI properties as supplied in therequest message.
When the third-party application sends a request to create a support case or a Higher Education case for acompany contact or consumer, CRM requires customer and contact information.
For customer information, the third-party application can either provide CUST_ID or BO_ID_CUST.
If BO_ID_CUST is provided, CRM uses it directly to create a case.
Conversely, if only CUST_ID is provided, CRM uses the RD_COMPANY table to derive BO_ID_CUSTin order to create a case.
The function to get BO_ID_CUST is based on CUST_ID is the PeopleCode Function GetCustBObyID inFUNCLIB_RC_EIP.CASE_ID FieldFormula.
For contact information, the third-party application can either provide the PERSON_ID orBO_ID_CONTACT.
When BO_ID_CONTACT is provided, CRM uses it directly; otherwise, contact PERSON_ID is used toderive BO_ID_CONTACT from the RD_PERSON table.
Copyright © 1988, 2020, Oracle and/or its affiliates. 645

Integrating a Case with Third-Party Systems Chapter 26
The function to get BO_ID_CONTACT is based on PERSON_ID, the PeopleCode FunctionGetPersonBObyID in FUNCLIB_RC_EIP.CASE_ID FieldFormula.
Considerations for HelpDesk or HelpDesk for Human Resources Cases, or forService Center for Higher Education Case for WorkerThe third-party application must provide employee information when it sends a request to create a helpdesk case. To create a case, the third-party application must also supply the EMPLID, as CRM uses it toderive appropriate BO_ID_CUST with ROLE_TYPE_ID_CUST.
BO_ID_CUST and ROLE_TYPE_ID_CUST need to be populated internally for a case.
Note: Tip: When creating a support case for a customer, make sure BO_ID_CUST (orCUST_ID), ROLE_TYPE_ID_CUST, BO_ID_CONTACT (or CONTACT_PERSON_ID),ROLE_TYPE_ID_CNTCT is provided. When creating a HelpDesk case for an employee, make surethe EMPLID is provided. The POI (person of interest) is supported for PeopleSoft HelpDesk for HumanResources cases only. Third-party vendors must pass a valid worker for creating an IT help desk case,and a valid worker or POI for creating a HelpDesk for Human Resources case. Higher Education casessupport company contact, consumer, and worker. When creating a Higher Education case, provide eithercustomer or employee information based on what type of case you want to create.
15. If the setting of a CI property for a field fails, the system traps an error message in the &PSMessageobject with information on which field caused the error.
646 Copyright © 1988, 2020, Oracle and/or its affiliates.

Chapter 26 Integrating a Case with Third-Party Systems
Image: Process flow for EIP #3Process Flow Diagram for EIP #3 process flowsEIP #3
The following diagram illustrates the technical process flow for EIP #3.
1. The third-party application sends an XML request to CRM by way of the integration gateway.
2. If the integration broker (IB) does not recognize the format, the request is trapped in integration broker.
The case process fails.
3. When a message is passed in from integration broker, the PeopleCode process begins.
The system checks if the case ID exists in PeopleSoft CRM. If the case does not exist in PeopleSoft CRM,the system sends back a response message with an error message (process 5).
4. If the case exists in CRM, PeopleSoft CRM checks if the user has access to the case component basedon the market and vertical, and the system gathers market and vertical information.
If a user does not have access, a response message is sent back immediately with the access denied errormessage (process 5).
The function to check access permission is:
Copyright © 1988, 2020, Oracle and/or its affiliates. 647

Integrating a Case with Third-Party Systems Chapter 26
IsUserAuthorized in FUNCLIB_RC_EIP.CASE_ID FieldFormula.
5. Once the user passes the security check, the system executes a direct SQL query to get all case relatedinformation and send it back to the third party (process 8).
Error HandlingWhen a required field contains an invalid value in a request message, or the save event fails, the processfails. The system copies the request message over to response message, and the response message is sentback to the third party with an error message.
When a non-required field contains an invalid value, the system ignores that field and case processingcontinues. The system sends back a warning message.
Here are some tips:
• Always check fields CASE_EIP_STATUS and CASE_EIP_GEN_MSG first in the response message.
When the status is 0 or 2, the response message contains case information that is stored in thePeopleSoft CRM system. When the status is 1 (that is, when the case has failed), nothing is saved inPeopleSoft CRM, and the response message contains a copy of the request information, not the caseinformation stored in CRM. This functionality aids in error handling.
• When CASE_EIP_STATUS fails or a warning is issued, the system logs a detailed error or warningmessage in the rowset RC_CASE_EIP_ERR of the response message.
Implementing Case EIP
This topic discusses:
• Code processing for Case EIP.
• Setup configuration.
• Case EIP setup.
Code Processing for Case EIPFor Case EIP #1 (Case Synchronous Message), the entry point is in the service operationRC_CASE_REQUEST_SYNC OnRequest handler. It calls ProcessCaseEIP function inFUNCLIB_RC_EIP.CASE_EIP FieldFormula.
For Case EIP #2 (Case Asynchronous Message), the entry point is in service operationRC_CASE_REQUEST_ASYNC, onNotify handler. It calls the same ProcessCaseEIP function as EIP #1.
For Case EIP #3 (Request Case Synchronous Message), the entry point is in service operationRC_CASE_INQUIRY_REQ_SYNC OnRequest handler. It calls ProcessCaseInquiry function inFUNCLIB_RC_EIP.CASE_EIP FieldFormula.
648 Copyright © 1988, 2020, Oracle and/or its affiliates.

Chapter 26 Integrating a Case with Third-Party Systems
Setup ConfigurationThe two setup options for case EIP are:
• Number of notes for a case.
• Default value for Source EIP.
Number of Notes for a CaseThe Max # of Notes in Web Service field indicates the maximum number of notes to return in therequest EIP. The case component can contain an unlimited number of notes. This setup affects Case EIPperformance when trying to process hundreds or thousands of notes for a case. Based on your businessrequirements, you can set the upper limit number for Case EIP.
Note: This setting is only applied to response messages. Request messages process all notes that a thirdparty sends.
For instance, the customer sets the default number of notes for the response message at five. When therequest message contains more then five notes, the system processes all the notes that are saved into thecase. When a case contains more than five notes and a third party is requiring case information, then thesystem returns only the five most recent notes in the response message.
This page shows the Max # of Notes in Web Service field on the Call Center Definition - Options page:
Image: Call Center Definition - Options page
This example illustrates the fields and controls on the Call Center Definition - Options page.
Default Value for Source Web ServiceA customer can define the source value to use when creating a case using the Case EIP. It can be adifferent source value from the cases that are created online.
This example shows the Case Defaults page:
Copyright © 1988, 2020, Oracle and/or its affiliates. 649

Integrating a Case with Third-Party Systems Chapter 26
Image: Case Defaults page
This example illustrates the fields and controls on the Case Defaults page.
Note: The source EIP web service options are driven by business unit.
Case EIP SetupActivate these service operations along with their handlers and routings:
• RC_CASE_REQUEST_SYNC
• RC_CASE_REQUEST_ASYNC
• RC_CASE_RESPONSE_ASYNC
• RC_CASE_INQUIRY_REQ_SYNC
As delivered, PeopleSoft service operations are inactive. In both your PeopleSoft CRM and your third-party application, you must:
• Activate the required application service operations.
• Activate the service operation handler and routing.
650 Copyright © 1988, 2020, Oracle and/or its affiliates.

Chapter 26 Integrating a Case with Third-Party Systems
• Set the associated message queue to run mode for asynchronous service operations.
See the product documentation for PeopleTools: Integration Broker Service Operations Monitor andPeopleTools: Integration Broker Testing Utilities and Tools.
Copyright © 1988, 2020, Oracle and/or its affiliates. 651

Integrating a Case with Third-Party Systems Chapter 26
652 Copyright © 1988, 2020, Oracle and/or its affiliates.

Chapter 27
PeopleSoft Call Center Interactive Reports
Understanding Interactive Reports
PeopleSoft call center interactive reports are implementations of PeopleTools Analytic Calculation Engine(ACE). Interactive reports are dynamic and they provide analytic information to users. You can move dataelements around on a report and view it using different dimensions. The ability to view reports at differentangles, gives you visibility into the health of your call center, including the ability to:
• Detect trends that can be utilized for proactive problem management.
• Evaluate team and agent performance metrics.
• Anticipate training and staffing requirements.
You can save interactive reports, export them to Microsoft Excel, or print them as hard copies. Whileinteractive reports are interactive, the communication between them and the CRM database is one-way,which means the changes you make on the reports do not affect the data in the database. From interactivereports, you are not allowed to transfer to any CRM components and access data. User roles controlaccess to interactive reports.
Note: You must have Internet Explorer 5.1 or higher to access these reports.
Launching and Working with Interactive ReportsInteractive reports use action types and workflow to capture response and restore times. If the action typesdefined for the response are not met, an Application Engine process updates the case with response andrestore exceptions.
When you launch an interactive report, the system displays a view of the data that the system hascaptured. These views are built using PeopleTools Analytic Calculation Engine (ACE) technology.
Common Elements Used for Interactive Reports
Run Control ID Select from the list of run control IDs. These IDs identify a setof saved report parameters from previous launches and enableyou to save time and reduce mistakes. Use the Add New RunControl tab to generate reports when you don't have a run withthe desired business unit, customer, or date range.
Business Unit Select the business unit for which you want to launch theinteractive report. This is a required field.
Copyright © 1988, 2020, Oracle and/or its affiliates. 653

PeopleSoft Call Center Interactive Reports Chapter 27
All Customers Select to launch the interactive report for all customers withinthe selected business unit.
Select Customer and Customer Select to launch the interactive report for an individual customerand then select a customer from the Customer field.
Start Date Select the first date from which you want to view data for theinteractive report. This is a required field.
End Date Select the last date from which you want to view data for theinteractive report. This is a required field.
Launch Interactive Report Click to launch the Interactive Report. The system opens aseparate window to display the data.
Launching and Viewing Interactive Reports
This topic discusses how to launch and view interactive reports.
Pages Used to Launch and View Interactive ReportsPage Name Definition Name Usage
Service Operations Analysis Page RC_SUP_MUPD Launch the PeopleSoft Support ServiceOperations Analysis report.
Support Service Level ManagementAnalysis Page
RC_SUP_SUPD Launch the PeopleSoft Support ServiceLevel Management Analysis report.
Help Desk Service Level ManagementAnalysis Page
RC_HD_SUPD Launch the PeopleSoft Help DeskService Level Management Analysisreport.
Change Metrics Update Page RG_CHG_METRIX_UPD Launch the PeopleSoft HelpDeskChange Metrics report.
Forward Schedule Page RG_FWD_SCHED_UPD Launch the PeopleSoft HelpDeskForward Schedule report.
This report captures change requeststhat are in the statuses of Approved andExecuting. The reports should also havestart and end dates populated on therequests. You must set the run controldates to encompass the start dates of thechange requests in the above statuses. Inother words, if you want to know howmany requests are approved or executingand scheduled for the month of May, enter run control start dates of 5/1/2006and 5/31/2006.
654 Copyright © 1988, 2020, Oracle and/or its affiliates.

Chapter 27 PeopleSoft Call Center Interactive Reports
Related Links"Understanding Interactive Reports" (PeopleSoft CRM 9.2: Application Fundamentals )
Service Operations Analysis PageUse the Service Operations Analysis page (RC_SUP_MUPD) to launch the PeopleSoft Support ServiceOperations Analysis report.
Navigation
Support > Interactive Reports > Service Operation Analysis
Image: Service Operations Analysis launch page
This example illustrates the fields and controls on the Service Operations Analysis launch page.
Use this report to track the number of cases opened, cases closed, cancelled cases, and service orders
Support Service Level Management Analysis PageUse the Support Service Level Management Analysis page (RC_SUP_SUPD) to launch the PeopleSoftSupport Service Level Management Analysis report.
Navigation
Support > Interactive Reports > Service Level Management
Copyright © 1988, 2020, Oracle and/or its affiliates. 655

PeopleSoft Call Center Interactive Reports Chapter 27
Image: Support Service Level Management Analysis launch page
This example illustrates the fields and controls on the Support Service Level Management Analysislaunch page.
Use this report to track the total number of cases in which the support agent or agents responded on time,responded late, restored service on time, restored service late, or suspended cases.
Help Desk Service Level Management Analysis PageUse the Help Desk Service Level Management Analysis page (RC_HD_SUPD) to launch the PeopleSoftHelp Desk Service Level Management Analysis report.
Navigation
HelpDesk > Interactive Reports > Service Level Management
656 Copyright © 1988, 2020, Oracle and/or its affiliates.

Chapter 27 PeopleSoft Call Center Interactive Reports
Image: Help Desk Service Level Management Analysis launch page
This example illustrates the fields and controls on the Help Desk Service Level Management Analysislaunch page.
Use this report to track the total number of cases in which the help desk agent or agents responded ontime, responded late, restored service on time, restored service late, or suspended cases.
Change Metrics Update PageUse the Change Metrics Update page (RG_CHG_METRIX_UPD) to launch the PeopleSoft HelpDeskChange Metrics report.
Navigation
HelpDesk > Interactive Reports > Change Request Metrics
Copyright © 1988, 2020, Oracle and/or its affiliates. 657

PeopleSoft Call Center Interactive Reports Chapter 27
Image: Change Metrics Update launch page
This example illustrates the fields and controls on the Change Metrics Update launch page.
Use this report to track the number of requests opened.
Forward Schedule PageUse the Forward Schedule page (RG_FWD_SCHED_UPD) to launch the PeopleSoft HelpDesk ForwardSchedule report.
This report captures change requests that are in the statuses of Approved and Executing. The reportsshould also have start and end dates populated on the requests. You must set the run control dates toencompass the start dates of the change requests in the above statuses. In other words, if you want toknow how many requests are approved or executing and scheduled for the month of May, enter runcontrol start dates of 5/1/2006 and 5/31/2006.
Navigation
HelpDesk > Interactive Reports > Forward Schedule of Changes
658 Copyright © 1988, 2020, Oracle and/or its affiliates.

Chapter 27 PeopleSoft Call Center Interactive Reports
Image: Forward Schedule Update launch page
This example illustrates the fields and controls on the Forward Schedule Update launch page.
Use this report to view a forward schedule of changes.
The analytic grid will list all change requests having the start and end date within the requested FromDate and To Date. The full list of fields in the report is as follows:
• Business Unit
• Change ID
• Status
• Phase
• Request Type
• Change Summary
• Priority
• Category
• Impact
• Start Date and Time
Copyright © 1988, 2020, Oracle and/or its affiliates. 659

PeopleSoft Call Center Interactive Reports Chapter 27
• End Date and Time
• Production Release Date
• Outage Required
• Requester
• Interested Parties
• Owner
660 Copyright © 1988, 2020, Oracle and/or its affiliates.

Chapter 28
Integrating Oracle's Enterprise Managerwith PeopleSoft CRM HelpDesk
Understanding Oracle’s EM System Integration with PeopleSoftCRM
This topic discusses:
• How it works.
• Integration flow process.
• Connector descriptor.
• Trouble ticket template.
• Sample case created from EM.
How it worksEnterprise Manager (EM) is Oracle’s integrated solution for administering and monitoring software andsystems. It provides Application Performance Management, distributed database and application serveradministration, and automated tuning of Oracle environments.
Oracle’s EM utilizes a notification system that enables users to set up event rules which generatenotifications (for example you may want the system to issue an alert when disk space is 99% full). Whensuch an event occurs, the system can create a case within Oracle’s PeopleSoft HelpDesk application,which can assign a worker to take action to resolve the case.
Through the notification system, PeopleSoft Case Connector (trouble ticketing system connector)integrates with Oracle’s Enterprise Manager. When the system triggers a rule, the connector is notifiedand a case is created or updated based on a trouble ticket template. The system then sends a responsemessage with the case ID (ticket ID) back to Enterprise Manager.
Once the case is created, a help desk user can drill into the details on the EM Alert page from the case. Inaddition, an EM user can drill back to the case from the EM Detail page.
Integration flow processWhen a defined rule in EM is triggered, the connector is notified to create or update a case. The case ID isthen sent back to the EM system.
Copyright © 1988, 2020, Oracle and/or its affiliates. 661

Integrating Oracle's Enterprise Manager with PeopleSoft CRM HelpDesk Chapter 28
Image: Integration Flow
This illustration shows the integration between PeopleSoft’s CRM HelpDesk application and Oracle’s EMsystem.
Connector DescriptorThe connector descriptor describes how the EM system communicates with the CRM case troubleticketing system. The connector descriptor is an XML based file that defines the PeopleSoft web serviceend point for service operations and the authentication schema. It also cross-references a URL to link analert back to a case. Once the connector is deployed, the user can configure it on the connector console.
Authentication is completed while mapping data from web services security (WS-security or wsse) onthe case to the TicketingConnector authentication. TicketingService methods, such as createTicket orupdateTicket, are used in EM to create or update a ticket
The BaseURL in the connector descriptor is the base URL for the EM console. The ExternalURL is theURL pointing to CRM case.
Note: WS-Security is a building block that is used in conjunction with other web services andapplication-specific protocols to accommodate a wide variety of security models and encryptiontechnologies. WS-Security describes enhancements to SOAP (Simple Object Access Protocol) messagingto provide quality of protection through message integrity, message confidentiality, and single messageauthentication. These mechanisms are used to accommodate a wide variety of security models andencryption technologies. For this release, EM supports UserNameToken security on SOAP headers.
Trouble Ticket TemplateThe Trouble Ticket template is an XSLT file that transforms a message from the EM model format to theCRM model format. It is based on the XML schemas of the EM Alert and the Trouble Ticketing system.
The templates are used to construct tickets in the context of an EM alert. When a PeopleSoft Connector isnotified, the EM alert information is transformed into a trouble-ticketing message that is used to create orupdate a case in the trouble ticketing system.
662 Copyright © 1988, 2020, Oracle and/or its affiliates.

Chapter 28 Integrating Oracle's Enterprise Manager with PeopleSoft CRM HelpDesk
PeopleSoft delivers several default trouble ticket templates. You can easily modify them to fit your needs.The delivered XSL files include
• PSFTSampleTicketTemplate.xsl; default ticket template used to create or update a case.
• PSFTSampleTicketTemplate_AutoClose.xsl: used to create a new case if none already existed, or toadd a note and auto close an existing case after it has been updated.
• createTicketResponse.xsl: used to transform the response from CRM to EM when the CreateCase orUpdateCase method is invoked. It returns the Case ID from CRM help desk as a Ticket ID to EM.
The system will create a new case or update an existing case depending on whether the ticket ID isprovided in the EM alert message. If no case ID is provided from EM, the system creates a new case;otherwise, the system updates the case with the given case ID.
When creating a new case, the system adds an anonymous help desk case. The delivered default templatespecifies that the case will be created using the IT Help Desk business unit (ITHDK), but this can easilybe modified in the template to use any desired business unit.
The system stores the EM alert summary information in the Case Summary field, and adds otherinformation such as target type, metric, and key information in the Case Description field. Based on thebusiness unit setup, the system can also auto-trigger the assignment engine in PeopleSoft CRM uponsaving the case so that the case is assigned to the appropriate provider group and agent.
When updating an existing case, the system updates the severity on the HelpDesk case and adds the newEM information into a case note.
The following table lists the HelpDesk case fields which are given values in the delivered sampletemplate when creating a new case.
Note: It is important to remember that these are sample templates provided only as examples, andthat you may need to modify them to fit your requirements. Specifically, please note that some valuesspecified here refer to sample data, not system data, and therefore are values that you would need to addto or modify in your production system.
CRM HelpDesk Case Field Value
Case class R
DisplayTemplateFamilyCode RC_HELPDESK
Market GBL
Vertical HD
BusinessUnit ITHDK
AnonymousCaller Y
CaseType PROBL
Category NETWO
SpecialtyType ACCES
Copyright © 1988, 2020, Oracle and/or its affiliates. 663

Integrating Oracle's Enterprise Manager with PeopleSoft CRM HelpDesk Chapter 28
CRM HelpDesk Case Field Value
CaseSummary <value of EM Message>
CaseDescription Based on these values from EM:
• EMUser
• ConnectorId
• Target Type
• MetricColumn
• MetricName
• KeyColumn
• KeyValues
• Severity
• CollectionTime
• EventPageURL
Severity <value of EM SeverityCode>
[note: requires CRM setup for Severity value]
Source EM
[note: requires CRM setup for Source value]
When updating a case, the delivered sample template creates a note for the case using the following fieldvalues from the EM system:
• EMUser
• ConnectorId
• Target Type
• MetricColumn
• MetricName
• KeyColumn
• KeyValues
• Severity
• CollectionTime
• EventPageURL
In the delivered sample template, we also provide entries marked as comments, which list many fieldswithout an assigned value. This lets you know which fields are available for use when creating or
664 Copyright © 1988, 2020, Oracle and/or its affiliates.

Chapter 28 Integrating Oracle's Enterprise Manager with PeopleSoft CRM HelpDesk
updating a case. You can simply un-comment the lines for the fields that you want to use and enter theappropriate values.
View the Case web service definition for more technical information on the available Case fields. Youcan view the elements and fields that are included in each Case operation message through PeopleTools.Cases are created using the CreateCase service operation, and are updated using the UpdateCase serviceoperation under the web service RC_CASE. Note that these service operations need to be activated as partof the integration setup.
To view a list of field names and aliases for a particular service operation:
1. Select PeopleTools, Integration Broker, Integration Setup, Service Operation.
2. Enter RC_CASE in the Service Operation field and click Search.
The system lists all the service operations that are related to Case.
3. Select the service operation you want to view.
4. Click the View Message link in the Message Information area of the page for each message which youwant to view .
The system opens the Message Definition page in a new browser.
5. Click the Message Name link under the Parts grid of the Message Definition page.
6. Click the plus sign next to the table name at the bottom of the page to view the fields and aliasesassociated with the message.
Sample Case Created from EMThis is an example of case created from EM:
Copyright © 1988, 2020, Oracle and/or its affiliates. 665

Integrating Oracle's Enterprise Manager with PeopleSoft CRM HelpDesk Chapter 28
Image: Case page (1 of 2)
This example illustrates the fields and controls on the Case page (1 of 2).
Image: Case page (2 of 2)
This example illustrates the fields and controls on the Case page (2 of 2).
666 Copyright © 1988, 2020, Oracle and/or its affiliates.

Chapter 28 Integrating Oracle's Enterprise Manager with PeopleSoft CRM HelpDesk
Note that certain values shown in this example (including those for department, location, status, andpriority) are derived directly from CRM defaults or configuration rather than from the template or EMdata.
Note: When updating cases, the system doesn’t override the Case Summary and Description fields. TheEM alert summary and other additional information is added, however, as a note for the case.
Setting up Options in PeopleSoft CRM
This topic discusses the following changes made within the PeopleSoft CRM system to enable theintegration with Enterprise Manager:
• New source code.
• New severity codes.
• New Enterprise Manager link definition.
• New Enterprise Manager Active Analytics Framework (AAF) action type.
• New policy to create an Enterprise Manager related action.
• Related action changes on the Case page.
Note: Please refer to the appropriate sections in the documentation for additional information on using theSource page, Severity page, Case page, AAF, related actions, link definitions, and web services.
See Understanding Call Center Prompt Tables.
See Understanding Link Setup.
See Understanding Processing a Case.
See "Understanding AAF" (PeopleSoft CRM 9.2: Automation and Configuration Tools).
As you read the rest of this topic keep in mind the following action items that must be completed in orderto set up the integration:
• Create a new source code EM.
• Create new severity codes 15, 20, and 25.
• Activate Create Enterprise Manager Related Action policy.
Also note that to enable the integration you must activate the Case web services operations under theRC_CASE web service.
See PeopleTools: Integration Broker Service Operations Monitor
See PeopleTools: Integration Broker Testing Utilities and Tools
Note: In addition to these setup items within the PeopleSoft CRM system, remember that you must alsodeploy and configure the PeopleSoft connector, as described in a later topic in this document.
Copyright © 1988, 2020, Oracle and/or its affiliates. 667

Integrating Oracle's Enterprise Manager with PeopleSoft CRM HelpDesk Chapter 28
New Source for Enterprise ManagerPeopleSoft sample data includes a new row in the Source table (PS_RC_SOURCE_TBL) for the IT HelpDesk (ITHD1) setID to identify Enterprise Manager as a source for creating cases. The data containedin the Source field is EM, and the data contained in the Short Name and Long Description fields isEnterprise Mgr and Enterprise Manager, respectively.
Oracle delivers this information as sample data. You must add corresponding entries for any desiredsetID’s in your production system
Access the Source page (Set Up CRM, Product Related, Call Center, Source.)
Image: Source page
This example illustrates the fields and controls on the Source page.
Add an entry in the desired setID for the new source code EM. Note that this code must match the valuefor Source field on the trouble ticket template.
New Severity Codes for Enterprise ManagerOracle’s PeopleSoft CRM application provides these severity codes as sample data for the IT HelpDesk(ITHD1) setID. Although EM uses many more severity codes, only these codes are used for integrationpurposes:
• 25 - Critical
• 20 - Warning
• 15 - Clear
668 Copyright © 1988, 2020, Oracle and/or its affiliates.

Chapter 28 Integrating Oracle's Enterprise Manager with PeopleSoft CRM HelpDesk
Oracle delivers this information as sample data. You must add corresponding entries for any desiredsetID’s in your production system.
Access the Severity page (Set Up CRM, Product Related, Call Center, Severity.)
Image: Severity page
This example illustrates the fields and controls on the Severity page.
Add entries in the desired setID for the three new severity codes (15 = Clear, 20 = Warning, and 25 =Critical).
New Enterprise Manager Link DefinitionOracle’s PeopleSoft CRM application includes a new link definition called Enterprise Manager underthe Link Category RELA. This link definition is set up as Solvable. It will not be part of any link group;therefore, a user will not be able to perform this related action manually. It is a hidden option that canonly be performed automatically by the system.
Access the Link Definition page (Set Up CRM, Product Related, Call Center, Link Definition).
Copyright © 1988, 2020, Oracle and/or its affiliates. 669

Integrating Oracle's Enterprise Manager with PeopleSoft CRM HelpDesk Chapter 28
Image: Link Definition page (1 of 2)
This example illustrates the fields and controls on the Link Definition page (1 of 2).
Image: Link Definition page (2 of 2)
This example illustrates the fields and controls on the Link Definition page (2 of 2).
New Enterprise Manager AAF Action TypeTo create a related action for the Enterprise Manager link definition on the Case page, Oracle’s PeopleSoftCRM application delivers the new action type Case Enterprise Manager.
This action type can only be triggered from a component interface. You cannot trigger it from PeopleSoftpages. The Case Enterprise Manager action type will not have any design time configuration. It isdelivered as system data.
Access the Action Type page (Enterprise Components, Active Analytics Framework, Action Framework,Register Action Type).
670 Copyright © 1988, 2020, Oracle and/or its affiliates.

Chapter 28 Integrating Oracle's Enterprise Manager with PeopleSoft CRM HelpDesk
Image: Register Action Type page
This example illustrates the fields and controls on the Register Action Type page.
This action type is associated with the After a Helpdesk Case is Saved trigger point.
New Policy to Create an Enterprise Manager Related ActionOracle’s PeopleSoft CRM application includes a new policy called Create Enterprise Manager RelatedAction for the SHARE setID. This policy is associated with the After a HelpDesk Case is Saved triggerpoint. It is delivered with a status of In Design. You must update the status to Active if you wish to enableit for the EM integration.
The policy condition uses Enterprise Manager as its source. The policy action uses the EnterpriseManager AAF Action described earlier in this documentation.
Copyright © 1988, 2020, Oracle and/or its affiliates. 671

Integrating Oracle's Enterprise Manager with PeopleSoft CRM HelpDesk Chapter 28
Access the Build a Policy page (Enterprise Components, Active Analytics Framework, Policies, ManagePolicies).
Image: Build a Policy page
This example illustrates the fields and controls on the Build a Policy page.
If you use a setID other than SHARE, copy this policy using the desired setID. Remember to activate thepolicy as part of the setup for the integration.
Related Action Changes on the Case pageThe system creates a related action on the case page when a new case is created from Enterprise Manager.The related action summary contains a link that enables the user to transfer to the EM Console.
When a case is updated from Enterprise Manager, the system adds a new note to the case, but does notcreate a related action.
Access the Related Actions page (Support, Search Cases, Related Actions).
672 Copyright © 1988, 2020, Oracle and/or its affiliates.

Chapter 28 Integrating Oracle's Enterprise Manager with PeopleSoft CRM HelpDesk
Image: Related Actions page
This example illustrates the fields and controls on the Related Actions page.
To go to the EM Console Metrics Detail page, click the link under the Summary field in the RelatedAction Summary section.
Deploying and Configuring the PeopleSoft Connector to the EMConsole
To enable the integration, several files need to be copied to the EM Server, and the Peoplesoft connectormust be deployed, registered, and configured. This topic discusses:
• Copying the JAR file.
• Deploying and registering the connector.
• Configuring the connector.
Copying the JAR FilePeopleSoft delivers a JAR file (PSFTConnector.jar) that includes the EM Event Model XML, thePeoplesoft Connector Descriptor XML, and the sample template XSLT files mentioned in thisdocumentation for the Peoplesoft connector. Copy the JAR file to EM server oracle home.
Deploying and Registering the ConnectorSeveral Enterprise Manager Command-Line Utility (emctl) commands are used to deploy and register theconnector.
Note that the deploying command line shown in this section is applicable for EM 10gR3 and 10gR4. Ifyou are using different version of EM, the command line may be a little different.
To extract the JAR file into $ORACLE_HOME/sysman/connector/<connector_name_wo_space>directory run this command
emctl extract_jar connector <jar_file_name> <connector name> <oracle home>
Note: The connector name is the name specified in the connector descriptor XML file. The commandreplaces the spaces in the connector name with underscores (_) in connector_name_wo_space. Forinstance, a connector called Peoplesoft Connector will have a directory of Peoplesoft_Connector underthe directory of the Oracle home connector. If the Peoplesoft_Connector directory already exists, theextract_jar command will extract files to this directory; otherwise, it will create a new directory calledPeoplesoft_Connector and copy files to it.
Copyright © 1988, 2020, Oracle and/or its affiliates. 673

Integrating Oracle's Enterprise Manager with PeopleSoft CRM HelpDesk Chapter 28
Register the connector using this command (use the user name sysman):
emctl register_connector connector <PSFTConnectorDescriptor.xml> <serverName> <por⇒t> <databaseSid> <username> <password> <oracle home>
Oracle delivers two templates: The PeopleSoft Sample Template is used to create or update a case. ThePeopleSoft Auto-Close Template automatically closes out an open case with a solvable EM action.
Register the shipped ticket templates using this command:
emctl register_ticket_template connector <PSFTSampleTicketTemplate.xsl> <serverName⇒> <port> <databaseSid> <username> <password> <connectorTypeName> <connectorName> <t⇒emplateName> <templateDescription>
The <connectorTypeName> and <connectorName> use the same value: Peoplesoft Connector.The <templateName> and <templateDescription> are quoted strings, which can have spacesin them. The template name and description are displayed on the EM console.
Note: Because the EM connector can only support one active connector, make sure to delete theconnector from the console first. After you re-deploy a connector, you need to re-register the templatesagain even if they have not changed, as the templates are disconnected at the time the connector isdeleted.
Configuring the ConnectorOnce the connector is successfully deployed, you can log in to the EM console to configure the connector.On the configuration page, you can set up:
• WS end points: Specify WebService End Points for createTicket, updateTicket and getTicket webservice operations.
• WS credentials: User ID and password to log in to the PeopleSoft CRM system for adding or updatinga case.
• Web console settings: A URL that can transfer to the CRM case from the EM system. This is used onthe EM metric detail page to drill into the case.
• Grace period: A time value that is compared against the data when an alert is cleared to the timewhen it has transitioned out of clear. If this span of time is greater than the grace period, a new ticketis created for the alert, otherwise, the ticket is reopened. The idea is not to create the case for the samealert within a defined time period.
674 Copyright © 1988, 2020, Oracle and/or its affiliates.

Chapter 28 Integrating Oracle's Enterprise Manager with PeopleSoft CRM HelpDesk
Image: Oracle Enterprise Manager page
This example illustrates the fields and controls on the Oracle Enterprise Manager page.
Select Peoplesoft Connector from the Oracle Enterprise Manager page and then click the Configurebutton to access the following page. Use the Configure Management Connector page to enter URLs forthe WebService End Points. You can also add a user name and password and enter web console settings(machine and port and database name).
Image: Configure Management Connector: Peoplesoft Connector (General Tab)
This example illustrates the fields and controls on the Configure Management Connector: PeoplesoftConnector (General Tab).
The Ticket Template page lists all registered templates for the connector.
Copyright © 1988, 2020, Oracle and/or its affiliates. 675

Integrating Oracle's Enterprise Manager with PeopleSoft CRM HelpDesk Chapter 28
Image: Configure Management Connector: Peoplesoft Connector (Ticket Template Tab)
This example illustrates the fields and controls on the Configure Management Connector: PeoplesoftConnector (Ticket Template Tab).
Set up your desired rules to use the registered template to create a case in the HelpDesk system.
Image: Notification Rules: View Notification Rule page
This example illustrates the fields and controls on the Notification Rules: View Notification Rule page.
Once a case is created or updated, the user can drill into case from the EM Metric Detail page
676 Copyright © 1988, 2020, Oracle and/or its affiliates.

Chapter 28 Integrating Oracle's Enterprise Manager with PeopleSoft CRM HelpDesk
Image: Alert History page
This example illustrates the fields and controls on the Alert History page.
Please refer to Enterprise Manager documentation for additional information on using the EM Consoleand the Alert History page.
Copyright © 1988, 2020, Oracle and/or its affiliates. 677

Integrating Oracle's Enterprise Manager with PeopleSoft CRM HelpDesk Chapter 28
678 Copyright © 1988, 2020, Oracle and/or its affiliates.
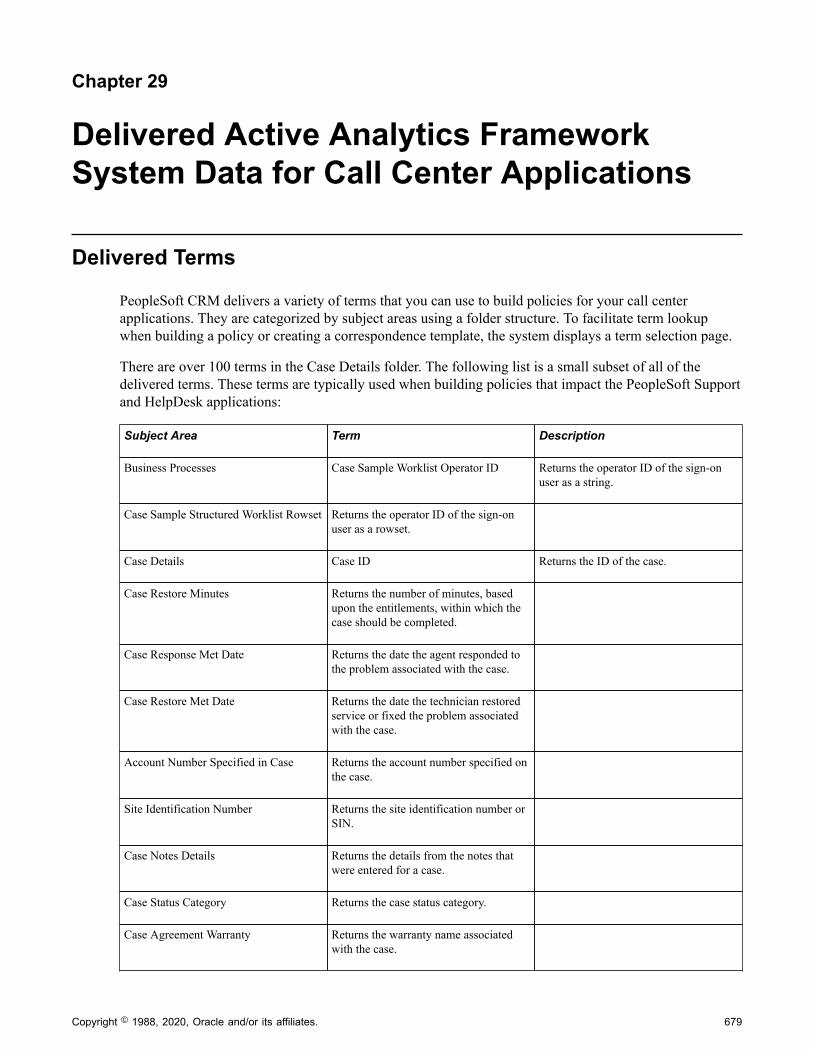
Chapter 29
Delivered Active Analytics FrameworkSystem Data for Call Center Applications
Delivered Terms
PeopleSoft CRM delivers a variety of terms that you can use to build policies for your call centerapplications. They are categorized by subject areas using a folder structure. To facilitate term lookupwhen building a policy or creating a correspondence template, the system displays a term selection page.
There are over 100 terms in the Case Details folder. The following list is a small subset of all of thedelivered terms. These terms are typically used when building policies that impact the PeopleSoft Supportand HelpDesk applications:
Subject Area Term Description
Business Processes Case Sample Worklist Operator ID Returns the operator ID of the sign-onuser as a string.
Case Sample Structured Worklist Rowset Returns the operator ID of the sign-onuser as a rowset.
Case Details Case ID Returns the ID of the case.
Case Restore Minutes Returns the number of minutes, basedupon the entitlements, within which thecase should be completed.
Case Response Met Date Returns the date the agent responded tothe problem associated with the case.
Case Restore Met Date Returns the date the technician restoredservice or fixed the problem associatedwith the case.
Account Number Specified in Case Returns the account number specified onthe case.
Site Identification Number Returns the site identification number orSIN.
Case Notes Details Returns the details from the notes thatwere entered for a case.
Case Status Category Returns the case status category.
Case Agreement Warranty Returns the warranty name associatedwith the case.
Copyright © 1988, 2020, Oracle and/or its affiliates. 679

Delivered Active Analytics Framework System Data for Call Center Applications Chapter 29
Subject Area Term Description
Case Agreement Line Retrieves the case agreement line for aspecific case.
Asset Tag Returns the asset number of the installedproduct.
Serial ID Returns the serial ID of the product thatis entered on the case.
Person PIN Returns the personal identificationnumber or PIN of the employeeassociated with the case.
BO_ID of Case Reported By Returns the business object ID of thecontact person who reported the case.
BO_ID of the Customer Reporting theCase
Returns the business object ID of thecustomer reporting the case.
Role Type ID of the Customer Reportingthe Case
Returns the role type ID of the customerreporting the case.
Role Type ID of the Contact Reportingthe Case
Returns the role type ID of the contactreporting the case.
BO_ID of the Site Reporting the Case Returns the business object ID of the sitereported on the case.
BO_ID of the Contact Reporting theCase
Returns the business object ID of thecontact reporting the case.
Work Order Description Change Returns the description of the workorder.
Link Definition Select a Solution <SOLUTION_ID> Allows users to select a solution.
Select a Business Project<BP_ID> Allows users to select a business project.
Select a Branch Script <SCRIPT_ID> Allows users to select a branch script.
Select a Dialog Business Unit<BUSINESS_UNIT>
Allows users to select a business unitunder which their dialogs would reside.
Select a Dialog ID <DIALOG_ID> Allows users to select a dialog ID.
Select an External Event Trigger <EXT_EVENT_TRIGGER>
Allows users to select an external event.
Notification Delay <Percentage> Restore Minutes Used to specify the percentage of entitledrestore time when a notification can besent.
<Percentage> Response Minutes Used to specify the percentage of entitledresponse time when a notification can besent.
680 Copyright © 1988, 2020, Oracle and/or its affiliates.

Chapter 29 Delivered Active Analytics Framework System Data for Call Center Applications
Subject Area Term Description
Case Metrics Number of Priority <PRIORITY> Cases Returns the number of priority cases.
RMA Details RMA Business Unit Returns the RMA Business Unit.
RMA ID Returns the RMA ID
Copyright © 1988, 2020, Oracle and/or its affiliates. 681

Delivered Active Analytics Framework System Data for Call Center Applications Chapter 29
682 Copyright © 1988, 2020, Oracle and/or its affiliates.

Chapter 30
PeopleSoft CRM Call Center Reports
PeopleSoft CRM Call Center Reports: A to Z
The tables in this topic list the PeopleSoft Support and PeopleSoft HelpDesk reports, sorted by report ID.
For more information about running these reports, refer to:
• The corresponding topic in this product documentation.
• PeopleTools: Process Scheduler
• PeopleTools: BI Publisher for PeopleSoft.
• PeopleTools: SQR Language Reference for PeopleSoft
For samples of these reports, see the Report Samples that are published with this online documentation.
This topic discusses:
• PeopleSoft HelpDesk case reports.
Except for report RCC2009, all HelpDesk-specific report IDs start with RCC1
• PeopleSoft Support case reports.
All Support-specific report IDs start with RCC2.
• Solution reports (shared by both applications).
Solution report IDs start with RCC2.
Note: For most reports the query name and report name are the same. If the query name is different, itappears in the Report ID and Report Name column. Unless otherwise noted, the from date and throughdate for the cases included in a report refer to the case creation date.
PeopleSoft HelpDesk ReportsReport ID and ReportName
Description Navigation Run Control Page
RCC1002
HelpDesk Cases By Agent
This report categorizes casesaccording to the agents towhom the case is assigned. For each case, the reportshows the case ID, status, priority, contact name, datecreated, and subject.
HelpDesk > Reports > CaseBy Agent > HelpDesk CaseBy Agent
RUN_RCC1002
Copyright © 1988, 2020, Oracle and/or its affiliates. 683

PeopleSoft CRM Call Center Reports Chapter 30
Report ID and ReportName
Description Navigation Run Control Page
RCC1003
HelpDesk Cases ByDepartment
This report lists thedepartments that havereported cases. For eachdepartment, the report showsthe number of cases reported.
HelpDesk > Reports > CaseBy Department > HelpDeskCase By Department
RUN_RCC1003
RCC1004
HelpDesk Case By Priority (RC_CASES_BY_PRIORITY)
This report provides a listof cases ordered by priorityand gives the total number ofcases for each priority. Foreach case, the report showsthe priority, case ID, status, department, reported by, datecreated, and assigned to agent.
HelpDesk > Reports > CaseBy Priority > HelpDesk CaseBy Priority
RUN_RCC1004
RCC1005
HelpDesk Cases By Type
This report provides a listof cases categorized andsubtotaled by case type. Foreach case, the report showsthe case ID, priority, status, caller name, date created, andassigned to.
HelpDesk > Reports > CaseBy Type > HelpDesk CaseBy Type
RUN_RCC1005
RCC1006
HelpDesk Cases By Status
This report lists case statusesand gives the number of caseswith each status.
HelpDesk > Reports > CaseBy Status > HelpDesk CaseBy Status
RUN_RCC1006
RCC1007
HelpDesk Case ByCategory/Type/Detail (HDBYCATETYDET)
This report groups cases bycategory and provides thetotal number of cases for eachcategory. For each case, thereport shows the case ID,category, type, detail, creationdate, caller name, status, andsummary.
HelpDesk > Reports > CaseBy Category/Type/Detail >HelpDesk Case By Category/Type/Detail
RUN_RCC1007
RCC1008
HelpDesk Case Information
This report provides detailedinformation for cases, including most of the datashown in the case component.
HelpDesk > Reports > CaseInformation > HelpDeskCase Information
RUN_RCC1008
RCC1009
HelpDesk Cases Status ByAgent
This report lists agents towhom cases have beenassigned. For each agent, thereport shows the agent's IDand name and the number ofopen cases for that agent intotal and broken out by casestatus.
HelpDesk > Reports > CaseStatus By Agent > HelpDeskCase Status By Agent
RUN_RCC1009
684 Copyright © 1988, 2020, Oracle and/or its affiliates.

Chapter 30 PeopleSoft CRM Call Center Reports
Report ID and ReportName
Description Navigation Run Control Page
RCC1010
HelpDesk Time ToClose By Agent (RC_CLOSEBYAGENT)
This report lists agents whohave been assigned cases. Foreach agent, the report showsthe agent's ID and name, a listof the agent's closed cases, thetotal number of cases closed, and the average number ofdays to close. The case showsthe case ID, priority, dateopened, date closed, and daysto close.
HelpDesk > Reports >Time To Close By Agent >HelpDesk Time To Close ByAgent
RUN_RCC1010
RCC1011
HelpDesk Cases ByEmployee
This report lists employeeswho have reported cases. Foreach employee, the reportshows the number of casesopened.
HelpDesk > Reports > CaseBy Employee > HelpDeskCase By Employee
RUN_RCC1011
RCC1012
HelpDesk Cases by BusinessProject
This report lists businessprojects that have been usedin cases. For each businessproject, the report shows thenumber of cases where thebusiness project was used.
HelpDesk > Reports >Case By Business Projects >HelpDesk Case By BusinessProjects
RUN_RCC1012
RCC2009
HelpDesk Employees WithCase
This report lists employeeswho opened cases during thespecified time period. Foreach employee, the reportprovides a name, location,department, telephone numberwith extension, and emailaddress. No case informationappears on this report.
HelpDesk > Reports >Employees with Case >HelpDesk Employees WithCase
RUN_RCC2009
PeopleSoft Support ReportsReport ID and ReportName
Description Navigation Run Control Page
RCC2000
Agreement Type Statistics (RCC_3007)
This report provides statisticsfor agreements used during aspecified date range, includingthe number of cases opened, the number of cases closedand the average time to closein days and in hours.
Support > Reports >Agreement Statistics >Agreement Statistics
RUN_RCC2000
RCC2001
Case Information
This report provides detailedinformation for cases, including most of the datashown in the case component.
Support > Reports > SupportCase Information > CaseInformation
RUN_RCC2001
Copyright © 1988, 2020, Oracle and/or its affiliates. 685

PeopleSoft CRM Call Center Reports Chapter 30
Report ID and ReportName
Description Navigation Run Control Page
RCC2002
Case by Age
This report categorizes casesby creation date and then bycustomer. For each case, thereport shows the case ID, priority, status, case type, contact name, assigned toagent, and subject.
Support > Reports > CasesBy Age > Cases By Age
RUN_RCC2002
RCC2003
Cases by Agent (RC_CASESBYAGENT)
This report lists agents towhom cases have beenassigned. For each agent, the report shows the agent'sname and the number of casesassigned to the agent, openedby the agent, and closed bythe agent. The report alsoprovides the average time toclose (in days and hours) forcases that the agent closed.
Support > Reports > CasesBy Agent > Cases By Agent
RUN_RCC2003
RCC2004
Cases by Customer
This report categorizes casesby customer. For each case, the report shows the case ID, priority, status, product ID, case type, contact name, datecreated, assigned to agent, andsubject.
Support > Reports > CasesBy Customer > Cases ByCustomer
RUN_RCC2004
RCC2005
Cases by Priority
This report categorizes casesby priority and status, thenby customer. For each case, the report shows the case ID, case type, date created, andsubject.
Support > Reports > CasesBy Priority > Cases byPriority
RUN_RCC2005
RCC2006
Cases by Product
This report categorizes casesby product. For each case, the report shows the productID, case ID, priority, status, case type, contact name, datecreated, assigned to agent, andsubject.
Support > Reports > CasesBy Product > Cases byProduct
RUN_RCC2006
RCC2007
Cases by Type
This report categorizes casesby case type. For each case, the report shows the caseID, priority, status, contactname, date created, assignedto agent, and subject.
Support > Reports > Casesby Type > Cases By Type
RUN_RCC2007
686 Copyright © 1988, 2020, Oracle and/or its affiliates.

Chapter 30 PeopleSoft CRM Call Center Reports
Report ID and ReportName
Description Navigation Run Control Page
RCC2008
Cases Reopened
This report lists cases thathave been reopened. For eachcase, the report shows thecase ID, the date the case wasreopened, and the user whoreopened the case.
Note: This report requires thatthe Case Re-Opened policybe activated in the PredictiveAnalytics Frameworkdefinition.
Support > Reports > CasesReopened > Cases Reopened
RUN_RCC2008
RCC2013
Support Agreement Usage
This report lists agreementsthat have been associatedwith cases. Agreements arecategorized by customer. Foreach agreement, the reportshows the agreement code, the start date, the end date, and the number of casesthat are associated with thatagreement.
Support > Reports > SupportAgreement Dates > SupportAgreement Dates
RUN_RCC2013
Related Links"Understanding AAF" (PeopleSoft CRM 9.2: Automation and Configuration Tools)
Solution ReportsReport ID and ReportName
Description Navigation Run Control Page
RCC2012
Solutions Usage
This report lists solutions thatwere used in cases createdduring the specified daterange. For each solution, thereport shows the solutionusage count, solved count, andsuccess rate.
Solutions > Reports >Solutions Usage > SolutionsUsage
RUN_RCC2012
RCC2014
Top Ten Solutions by Product
For each included product, this report lists the tensolutions that most oftenresolved cases that werecreated during the specifieddate range. For each solution, the report shows the numberof cases solved for thatproduct.
Solutions > Reports > TopTen Solutions by Product >Top Ten Solutions by Product
RUN_RCC2014
Copyright © 1988, 2020, Oracle and/or its affiliates. 687

PeopleSoft CRM Call Center Reports Chapter 30
688 Copyright © 1988, 2020, Oracle and/or its affiliates.
Related Documents