PEOPLESOFT FINANCIALS 9.2 User Guide: Navigating the new Fluid User Interface Last updated: November 2020

Welcome message from author
This document is posted to help you gain knowledge. Please leave a comment to let me know what you think about it! Share it to your friends and learn new things together.
Transcript

PEOPLESOFT FINANCIALS 9.2
User Guide: Navigating the new Fluid User Interface
Last updated: November 2020

Contents Overview .................................................................................................................................................. 2
New terminology ...................................................................................................................................... 3
What is Fluid? ....................................................................................................................................... 3
Homepage ............................................................................................................................................ 3
Component ........................................................................................................................................... 4
Tiles ..................................................................................................................................................... 4
Navigation tiles ................................................................................................................................. 4
Collection tiles ................................................................................................................................... 4
Important notes regarding collection tiles .......................................................................................... 4
Navigating the Fluid homepage ................................................................................................................ 5
Breadcrumbs ........................................................................................................................................ 5
Banner.................................................................................................................................................. 5
Back button ....................................................................................................................................... 5
Page title ........................................................................................................................................... 5
Icons (banner actions) ...................................................................................................................... 5
Personalizing the homepage .................................................................................................................... 8
Create a homepage .............................................................................................................................. 8
Remove a homepage ........................................................................................................................... 9
Add navigation tile to a homepage ........................................................................................................ 9
Remove navigation tile from a homepage ........................................................................................... 10
Arrange tiles on a homepage .............................................................................................................. 10
Move a tile from one homepage to another ........................................................................................ 11
Navigating the NavBar ........................................................................................................................... 12
Personalize NavBar (gear tile) ............................................................................................................ 12
Remove a tile from the NavBar ....................................................................................................... 12
Recent Places .................................................................................................................................... 13
My Favorites ....................................................................................................................................... 14
Navigator ............................................................................................................................................ 15
Expenses ........................................................................................................................................... 16
My Preferences .................................................................................................................................. 17
Classic Home ..................................................................................................................................... 17
Personalizing data grids ......................................................................................................................... 18
Hide fields .......................................................................................................................................... 18
Reorder fields ..................................................................................................................................... 18
Show All Columns icon ....................................................................................................................... 19
Change your password .......................................................................................................................... 20
Forgot your password – How to setup .................................................................................................... 22
Forgot your password - Reset ................................................................................................................ 25

Overview This guide is intended to:
• Define terminology related to the new user interface screens. • Address new look and feel of the PeopleSoft Financials upgrade. • Go over some of the new features. • Provide steps on how to navigate and customize user experience.
New PeopleSoft Financials link: https://financials.ok.gov/

New terminology With new performance improvements comes new terminology. The definitions below are provided to aid the user in understanding the Fluid enhancements made to the system. While the definitions are termed here, the functionality of each will be discussed in other sections of this guide.
What is Fluid? PeopleSoft Fluid User Interface (Fluid UI) is a modern, responsive user interface that provides the flexibility to work seamlessly from desktops, tablets and phones. Fluid navigation uses homepages and tiles as the starting point for navigation to both the new Fluid UI and the Classic Home view. The new Fluid UI does not change how the user currently performs functions in the system. This mainly changes the look and feel of the screens and how you navigate the homepage and the Fluid styling of the interface. Fluid navigation focuses on:
• Providing users with multiple paths to access functionality. • Allowing users to choose the path that is most effective for them. • Using related actions to make navigation work across all paths.
Homepage Homepages are the starting point for navigation in Fluid when the user logs into PeopleSoft. A user can have several homepages but only one default homepage. The user can customize each homepage to accommodate their personal interaction with the system.
Homepage showing new Fluid UI with custom navigation tiles and NavBar displayed.
Homepage in PeopleSoft 9.2 PUM5, prior to upgrade.

Component A component is another term for module. Some examples of components in PeopleSoft are Accounts Payable, Purchasing, General Ledger and Accounts Receivable.
Tiles On the homepage there are several square icons titled with various component names. In the Fluid UI, these are referred to as tiles. They can more easily be defined as shortcuts to component pages or tasks. They are interactive and customizable.
Navigation tiles These tiles (shortcuts) will take the user to a specific task. For example, creating a Regular Deposit.
Collection tiles These tiles (shortcuts) will take the user to a grouping of tasks related to a specific component.
Important notes regarding collection tiles
• Just because the user can see these tiles upon login does not mean they have security access to functions within these tiles. The user will receive this error message if they do not have access:
• These tiles can be deleted by following the steps under Remove navigation tile from homepage.
• The left panel navigation, available through the collection tiles, only provides access to standard delivered pages. None of our customized pages, functions, processes or reports will be accessible via this navigation at this time.
Therefore, we strongly urge users to utilize one of the following options to navigate the system:
• NavBar > Navigator. • Create custom navigation tiles that take the user directly to the functions they
are not able to access through the collection tiles. • Classic Menu.

Navigating the Fluid homepage
Breadcrumbs
At this time, the breadcrumb functionality will not be available after the upgrade. However, there are several new features and customizable options within the new Fluid UI.
View of breadcrumbs in PeopleSoft 9.2 PUM5.
Banner The ribbon at the top of the screen is referred to as the banner, which contains the main elements a user will utilize to navigate the system.
Back button On every page in the Fluid UI, a back button should appear on the left side of the banner. The button allows users to return to the previous page. If the transaction is editable and edits have been made without saving, the save alert will display when the back button is selected.
Note: Do not use the back button on your browser, as you may not get a save alert and may cause issues with your data.
Save alert.
Page title Refers to the current page the user is on.
Icons (banner actions) There are five icons located in the top right corner of the banner: Home, Search, Notifications, Actions List and NavBar.
Banner icons
Home Takes the user back to the Fluid homepage, no matter where they are in the system.

Search This allows the user to search the entire system for keywords related to a function or task they are looking for.
Search
The system displays the search results in a two-panel window. If the user needs to modify the search, expand the arrow next to New Search and the search window will display without the user navigating back to the prior page.
Search result window
Notifications The Notifications icon will display a badge with a number count on the flag icon in the banner to notify the user of any new actions or alerts. These notifications include links that allow users to navigate directly to an item that needs attention. Currently, Notifications are configured for Requisitions and Voucher Approvals.
Note: Notifications will be implemented shortly after go-live.
Actions List These actions are different from the actions within the Notifications menu. This icon allows users to perform certain actions while on the homepage and different actions when on a page within the system.
• From the homepage, the user can perform the following actions:
Actions List from homepage.
• From any other page, the user can perform the following actions:
Actions List from a component page.
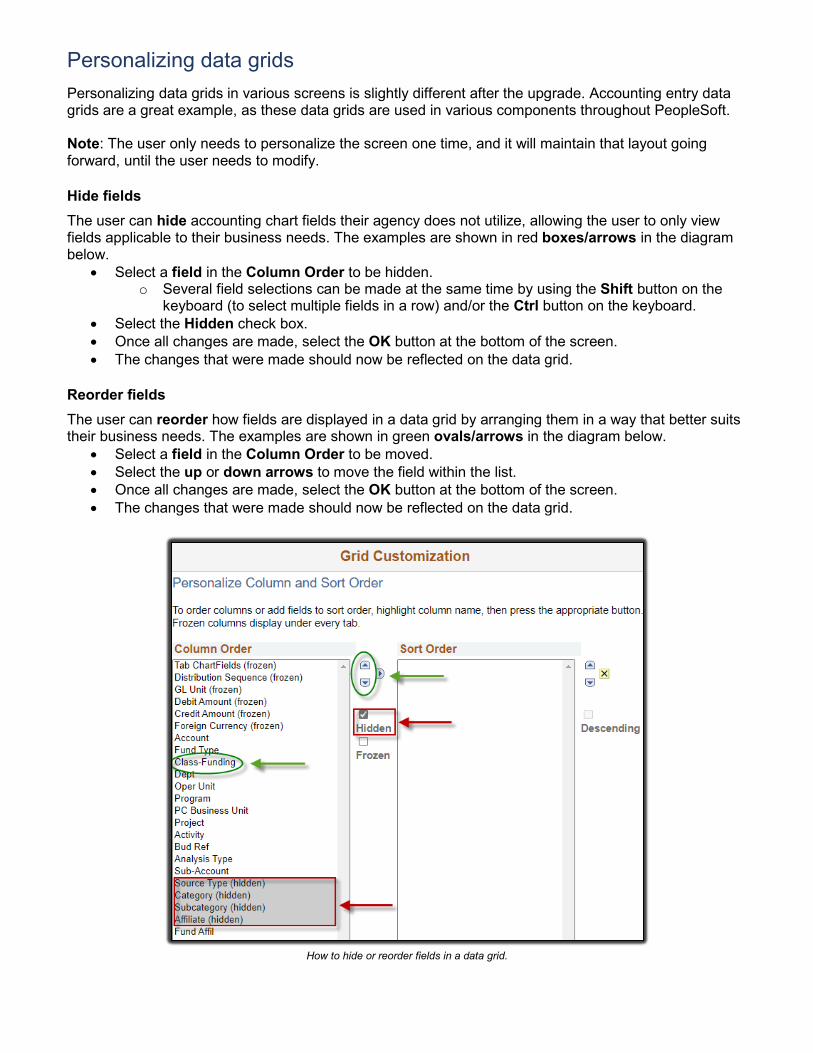
NavBar The NavBar is the alternative to the Main Menu in PeopleSoft 9.2 PUM5.

Personalizing the homepage Personalization options allow users to configure navigation based on their personal preferences and usage of the system. Users can personalize their user interface in multiple ways.
Create a homepage When the user logs in, the default homepage is titled My Homepage. A user can create additional homepages to help them organize their tasks on separate pages. They would navigate between the different homepages by selecting My Homepage and then the desired page from the drop-down menu.
Actions List from a component page.
For example, if a user performs most of their tasks in the Accounts Payable component and is responsible for running a variety of reports from different components, the user could have two homepages: 1) Accounts Payable and 2) Reports. They could then create tiles (shortcuts) for each task on the respective homepage for easier navigation through the system.
• Navigate to the current homepage by selecting the Home icon. • Select the Actions List icon. • Select Personalize Homepage from the menu. • Select Add Homepage button from the upper left corner of the screen. • In the Add New Homepage field, enter the desired name of the new homepage. In this example,
we are creating a Reports homepage. • Select the Add button. • Select the Save button in the upper right corner of the screen. • User will now see a new blank homepage titled Reports.
Add (new) Homepage setup screen.
To add new tiles to the Reports homepage, users can follow the steps under Add navigation tile to homepage. In this example, we have navigated to several different reports in the system and added them to the new Reports homepage.

Example of a new Reports homepage, with eight new tiles (shortcuts) added.
Remove a homepage • Navigate to the current homepage by selecting the Home icon. • Select the Actions List icon. • Select Personalize Homepage from the menu. • Select My Homepage in the left menu. A red X should appear next to the rest of the homepages.
o Note: You will need to select a homepage, other than the one you are trying to delete, before the red X will appear.
• Select the red X next to the homepage you want to delete. • Select the Save button. • User should no longer see the homepage in the list.
Menu to remove a homepage.
Add navigation tile to a homepage • In this example, we add the Query Viewer navigation tile. • Navigate to: NavBar > Navigator > Reporting Tools > Query > Query Viewer. • Select the Actions List icon. • Select Add To Homepage.
Add a tile to a homepage from a page.

• In the Tile Label field, enter the name to be displayed under the tile. • Under Choose from available homepages, select the homepage on which the tile should
appear.
Add (tile) To Homepage setup screen.
• A confirmation message will display. Select OK. • Select the Home icon to return to the homepage. • A navigation tile for Query Viewer should now be displayed on the Reports homepage.
Remove navigation tile from a homepage To remove a navigation or collection tile from a homepage, perform the steps below. In this example, we remove the Query Viewer navigation tile.
• Navigate to the homepage by selecting the Home icon. • Select the Actions List icon from the upper right corner of the screen. • Select Personalize Homepage. • Find the tile to be removed and select the red X button in the upper right corner of the tile. • Select the Save button in the upper right corner of the screen to save changes to the homepage.
Menu to remove tile from homepage.
Arrange tiles on a homepage If the user wants to rearrange tiles on the homepage, perform the steps below.
• Navigate to the homepage by selecting the Home icon. • Select the Actions List icon from the upper right corner of the screen. • Select Personalize Homepage. • Locate the tile to be moved. • You can alter the sequence in which the tiles appear on the homepage using drag and drop.
Select and hold the tile icon and drag it to the desired position, then release. The dotted yellow line indicates the tile you are dragging, and the solid yellow line indicates the location where you are dropping the tile.

Move a tile from one homepage to another • Navigate to the homepage by selecting the Home icon. • Select the Actions List icon from the upper right corner of the screen. • Select Personalize Homepage. • Locate the tile to be moved or copied. • Select the small square box with a pencil at the bottom right corner of the tile.
Move To or Copy To action button on tile.
• Select either Move To or Copy To.
Move To or Copy To selection menu.
• Select the homepage to which the tile is being moved.
Selecting homepage tile to Copy To.
• Select the Save button.
Select the homepage from where the tile was moved or copied in the banner drop-down menu to verify.
Select the homepage section from the banner to navigate to a different homepage.

Navigating the NavBar
Personalize NavBar (gear tile) This icon provides limited customization as to what tiles are displayed on the NavBar. Users can add, remove and reorder tiles like they can on the homepage.
Personalize NavBar from the gear tile.
Remove a tile from the NavBar
• Navigate to the homepage by selecting the Home icon. • Select the NavBar icon from the upper right corner of the screen. • Select Personalize NavBar icon. • Select the red X next to the tile to be removed. • Select Done.

Removing a tile from the NavBar.
You can alter the sequence in which the tiles appear in the pane using drag and drop. Select, hold and drag the tile icon to the desired position, then release. The dotted yellow line indicates the tile you are dragging, and the solid yellow line indicates the location where you are dropping the tile.
Select and drag tile to alter the sequence tiles are displayed in the NavBar.
Note: While adding tiles to the NavBar is available, users are encouraged to use the My Favorites option or add a navigation tile to their homepage, rather than adding tiles to the NavBar.
Recent Places This tile stores a list of the five most recent pages the user has viewed in the system. Users can select any of their Recent Places to navigate to them.

Recent Places menu
My Favorites This tile stores a list of pages the user marked as My Favorites. This functionality operates like the previous version of PeopleSoft and will contain any previously saved favorites. The pages displayed in this list are customizable and can be edited by the user.
Note: Favorites cannot be added from the Edit Favorites navigation; you can only edit and view them.
My Favorites menu.
To add a page in the My Favorites menu:
• Navigate to the task being performed. In this example, we navigate to Query Viewer. o NavBar > Navigator > Reporting Tools > Query > Query Viewer.
• Select the Actions List icon. • Select Add to Favorites. • Enter the name to be displayed in the My Favorites menu. • Select Add, then select OK.

To delete a page in the My Favorites menu:
• Select Edit Favorites. • Select the box(es) next to each component to be deleted. • Select the Delete Selected button at the top of the menu. • Select Yes on the confirmation message displayed on the screen. • Select the Save button.
To rearrange the order in which the pages are displayed in the My Favorites menu:
• Select Edit Favorites. • Enter sequential numbers in the fields under the Sequence number column, in the order the user
wants them to display. • Select the Save button.
Edit Favorites menu.
Navigator This tile provides access to all components to which the user has security access and is not customizable by the user. This mirrors the Main Menu functionality within the Classic Menu; however, it does not display the cascading menus like the Classic Menu does. If the user prefers the Classic Menu, they can follow the steps under Classic Home.
As menu items are selected, they move to the top of the NavBar list (as seen in the image below on the right). There are two buttons next to the last menu item selected. The back button to the left of the menu item name returns the user to the previous menu. The up button to the far right returns the user to the main Navigator menu.

Navigator menu expanded. Return one level and return to main menu button.
Expenses This tile will not work for every user. If you receive the error messages, this is not a bug. It just means your agency is not using this feature at this time, or the user doesn’t have security access to this module. If the Expenses icon is not functioning properly and is displaying the messages below, follow the steps to Remove a tile from the NavBar. Note: Please do not contact the OMES Service Desk related to these messages. When selecting the tile, several error messages are displayed.
• Select OK on the first two messages displayed.
Error message 1.
Error message 2.
• Select Back on the last message.

Error message 3.
My Preferences This tile contains customizable settings the user can turn on/off based on their preferences and interactions with the system (e.g., Autocomplete, Tab over Calendar button, Tab over Lookup button, Tab over Page Links, etc.). The selections made here will apply to all pages to which the user has access within the system.
• Select the arrow next to Navigation Personalizations to expand the menu.
Customizing My Preferences.
• Review the list of options and make changes by selecting the Yes/No slider switch buttons. • After all changes have been made, select the Save button in the upper right corner.
Slider switch options available under Navigation Personalizations menu.
Classic Home This tile navigates to the Classic Menu view, like the previous versions of PeopleSoft Financials. When you navigate to this page for the first time, the Classic Menu may be minimized on the screen. If this is the case, select the gear button with the down arrow on the bar that displays the words “Menu – Classic.” Then select Expand.
Expand the Classic Menu.
Personalizing data grids Personalizing data grids in various screens is slightly different after the upgrade. Accounting entry data grids are a great example, as these data grids are used in various components throughout PeopleSoft. Note: The user only needs to personalize the screen one time, and it will maintain that layout going forward, until the user needs to modify.
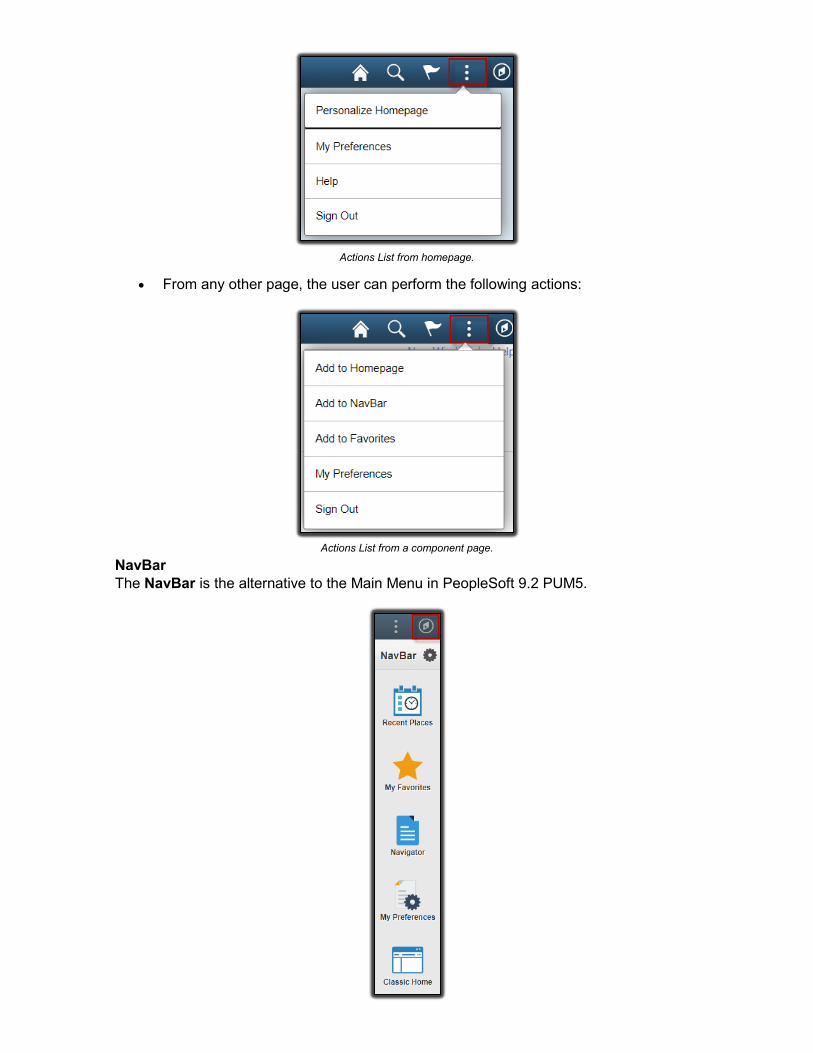
Hide fields The user can hide accounting chart fields their agency does not utilize, allowing the user to only view fields applicable to their business needs. The examples are shown in red boxes/arrows in the diagram below.
• Select a field in the Column Order to be hidden. o Several field selections can be made at the same time by using the Shift button on the
keyboard (to select multiple fields in a row) and/or the Ctrl button on the keyboard. • Select the Hidden check box. • Once all changes are made, select the OK button at the bottom of the screen. • The changes that were made should now be reflected on the data grid.
Reorder fields The user can reorder how fields are displayed in a data grid by arranging them in a way that better suits their business needs. The examples are shown in green ovals/arrows in the diagram below.
• Select a field in the Column Order to be moved. • Select the up or down arrows to move the field within the list. • Once all changes are made, select the OK button at the bottom of the screen. • The changes that were made should now be reflected on the data grid.
How to hide or reorder fields in a data grid.
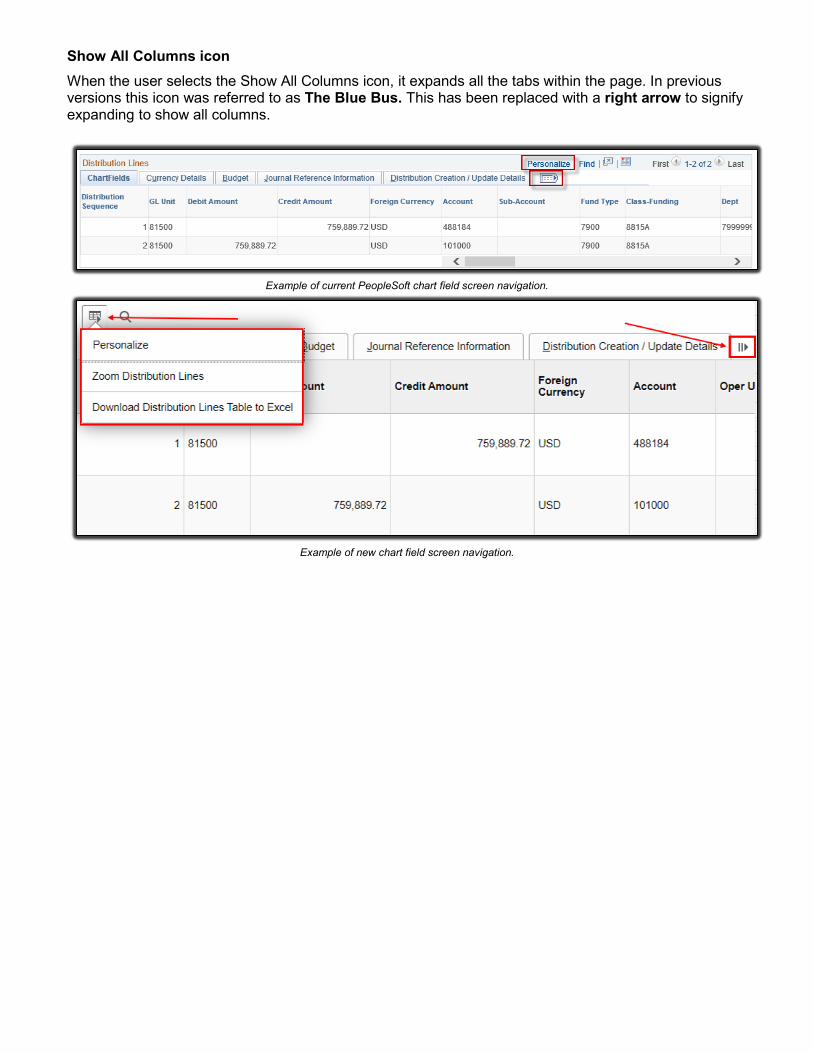
Show All Columns icon When the user selects the Show All Columns icon, it expands all the tabs within the page. In previous versions this icon was referred to as The Blue Bus. This has been replaced with a right arrow to signify expanding to show all columns.
Example of current PeopleSoft chart field screen navigation.
Example of new chart field screen navigation.

Change your password • Log in to PeopleSoft at https://financials.ok.gov. • Enter your User ID and Password. • Select Sign In.
• Select the NavBar icon in the upper right corner of the homepage.
• Select Navigator. This action displays a list of menu items. • Scroll down towards the bottom of the list and select Change My Password.

• Enter the Current Password. • Enter the New Password. • Confirm new password. • Select Change Password.
• If the criteria above are entered successfully, the user should receive a confirmation message. • If the criteria above are not met or entered successfully, the user will receive a message to modify
the information entered.

Forgot your password – How to set up • In order to use the Forgot your password feature from the login screen, the user must configure
a few settings before it will work. • Log in to PeopleSoft at https://financials.ok.gov. • Enter your current User ID and Password. • Select Sign In.
• Select the NavBar icon in the upper right corner of the homepage.
• Select Navigator. This action displays a list of menu items. • Scroll down the list and select My System Profile.
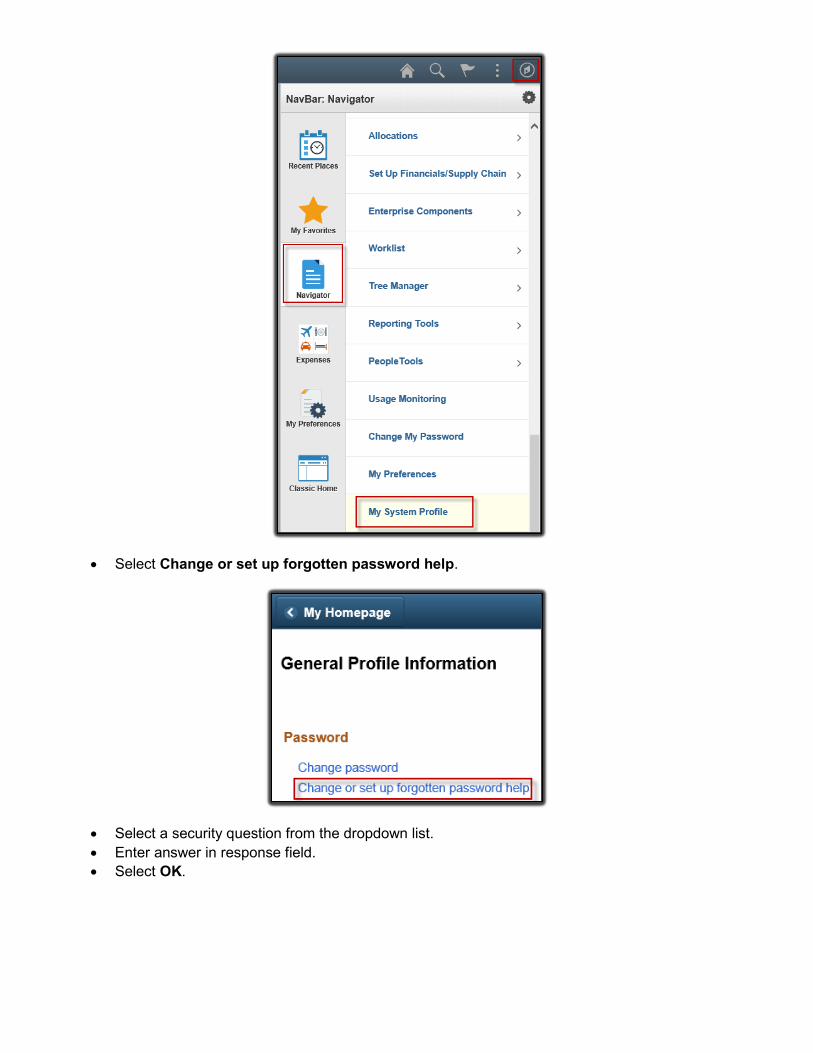
• Select Change or set up forgotten password help.
• Select a security question from the dropdown list. • Enter answer in response field. • Select OK.

• Scroll down the page until you see the Email section. • Make sure the box is checked under Primary Email Account. • Select Business for Email Type. • Enter the users Email address. • Select Save.

Forgot your password - Reset • Note: If the user has locked themselves out by entering the wrong password three or more times,
you will not be able to use this feature. The user will need to contact the OMES Service Desk at 405-521-2444.
• From login screen, select Forgot your password?
• Enter User ID. • Select Continue.
• Enter answer in Response field. • Select Email New Password. • Check email account for new temporary password. The email will be from SOKLFPRD-

• Return to the login screen. • Enter your User ID. • Enter new temporary Password sent via email. • Select Sign In.
• Select Click here to change your password.
• Enter temporary password sent via email in Current Password field. • Enter New Password. • Enter Confirm New Password.

• Select Change Password.
• If the user has successfully changed the password, this message will display. • Select OK.
• If the new password has been previously used, this message will display. • Select OK. • Repeat steps above for selecting a new password.
• User will need to enter a different password until they have successfully entered a password that has not been previously used.
Related Documents