Welcome message from author
This document is posted to help you gain knowledge. Please leave a comment to let me know what you think about it! Share it to your friends and learn new things together.
Transcript
CONTENTS
CHAPTER 1: INTRODUCTION TO ANDROID, MOBILE DEVICES, AND THE MARKETPLACE 1
Product Comparison 2
The .NET Framework 2
Mono 3
Mono for Android 4
Mono for Android Components 5
Development Tools 6
Mobile Development 6
Getting Around Support Issues 7
Design Issues 7
Android 8
History of Android 8
Writing Web-Based Applications for Android 9
Writing Native Applications for Android 9
Android Development Issues 9
Android SDK Tools 10
Android Development Costs 11
Cross-Platform Alternatives 12
Other Cross-Platform Tools 12
Considerations for Selecting a Cross-Platform Tool 12
How Does the Tool Allow You to Author Your Application? 13
What Device Features Does the Tool Support? 13
What Platforms Does the Tool Support? 14
What Skill Sets Does the Tool Require? 14
What Tools Exist to Support Development? 14
How Active Are the Development Community and Support Channels? 14
What Are the Successful Application Deployments for This Tool? 14
Summary 15
ftoc.indd xiftoc.indd xi 22/02/13 4:43 PM22/02/13 4:43 PM
xii
CONTENTS
CHAPTER 2: INTRODUCTION TO MONO FOR ANDROID 17
Before You Begin Developing 17
What Is Mono? 17
Mono Implementation Goals 18
Mono Standards 18
What Is Mono for Android? 18
Why Do I Need Mono for Android? 18
Familiar Development Environment 19
Familiar API and Library Structure 19
What Are the Trade-Off s of Working with Mono for Android? 21
Waiting for Improvements 21
Taking a Potential Performance Hit 21
Memory Management 21
What Do I Need for the Mono for Android Development Environment? 22
Java SDK 22
Android SDK 22
Visual Studio 24
Visual Studio Development with Mono for Android 25
General Setup 25
Building Hello Android 26
Logging 28
Debugging 30
Testing 30
Deploying 31
Mono for Android Development with MonoDevelop 31
General Setup 31
Building Hello Android 32
Logging 34
Debugging 34
Testing 34
Deploying 35
Summary 35
CHAPTER 3: UNDERSTANDING ANDROID/MONO FOR ANDROID APPLICATIONS 37
What Is an Android Application? 38
The Building Blocks of an Android Application 39
Activities 39
Services 44
Content Providers 44
ftoc.indd xiiftoc.indd xii 22/02/13 4:43 PM22/02/13 4:43 PM
xiii
CONTENTS
Broadcast Receivers 47
Communicating between Components: Android Intents 49
Binding the Components: The Android Manifest 50
Android Manifest Basics 51
Editing the Manifest for Mono for Android via Visual Studio 54
Summary 56
CHAPTER 4: PLANNING AND BUILDING YOUR APPLICATION’S USER INTERFACE 59
Guidelines for a Successful Mobile UI 59
Building an Android UI 60
Views 60
Design Surface 61
Choosing a Control Layout 61
AbsoluteLayout 62
FrameLayout 63
LinearLayout 63
RelativeLayout 65
TableLayout 67
Optimizing Layouts 68
Designing Your User Interface Controls 69
TextView 70
EditText 70
AutoCompleteTextView 71
Spinner 71
Button 73
Check Box 73
Radio Buttons and Groups 73
Clocks 76
Pickers 77
Images 79
ImageView 80
ImageButton 80
Gallery 80
Virtual Keyboards 84
Selecting Your Virtual Keyboard 86
Removing the Keyboard 86
Controlling Your Menus 87
Introducing the Menu System 87
Menus 87
Submenus 90
ftoc.indd xiiiftoc.indd xiii 22/02/13 4:43 PM22/02/13 4:43 PM
xiv
CONTENTS
Context Menus 90
Defi ning Menus as a Resource 92
Menus 93
Context Menus 94
Resolution-Independent UI 95
Supporting Various Screen Resources 95
Supporting Screen Sizes 95
Supporting Pixel Densities 96
Using Android Market Support 97
Multiple Screen Resolution Best Practices 97
Constructing a User Interface: A Phone and Tablet Example 98
Summary 104
ftoc.indd xivftoc.indd xiv 22/02/13 4:43 PM22/02/13 4:43 PM
1Introduction to Android, Mobile Devices, and the Marketplace
WHAT’S IN THIS CHAPTER?
A short history of Mono and its relationship to the .NET Framework
How Mono for Android opens the Android platform to .NET
developers
Why Mono for Android is so attractive to developers
The history of Android and its mind share
Exploring cross-platform alternatives
The past several years have seen an amazing growth in the use of smartphones. USA Today recently reported on how smartphones have become an indispensable part of people’s lives. With growth and popularity comes competition, and, unlike desktop computers, no single vendor or platform dominates the mobile device marketplace; devices based on Symbian, Research in Motion (Blackberry), Windows Mobile, Android, and other platforms are available. In addition, devices may run the same operating system and be presented to the user in separate form factors. This fracture in the marketplace is problematic for developers: How can they take a development framework or tool that they already know and use that knowl-edge in a device that has a large and growing market share?
This chapter looks at how the largest segment of developers (.NET/C# developers) can target the smartphone that has the highest mind share (Android). It also looks at how the smartphone is growing faster in market share than any other device.
c01.indd 1c01.indd 1 22/02/13 4:24 PM22/02/13 4:24 PM
2 ❘ CHAPTER 1 INTRODUCTION TO ANDROID, MOBILE DEVICES, AND THE MARKETPLACE
PRODUCT COMPARISON
This section takes a quick look at the .NET Framework, Mono, and Mono for Android. These products have allowed the largest segment of developers to target the Android family of mobile devices — the fastest-growing mobile platform currently on the market.
The .NET Framework
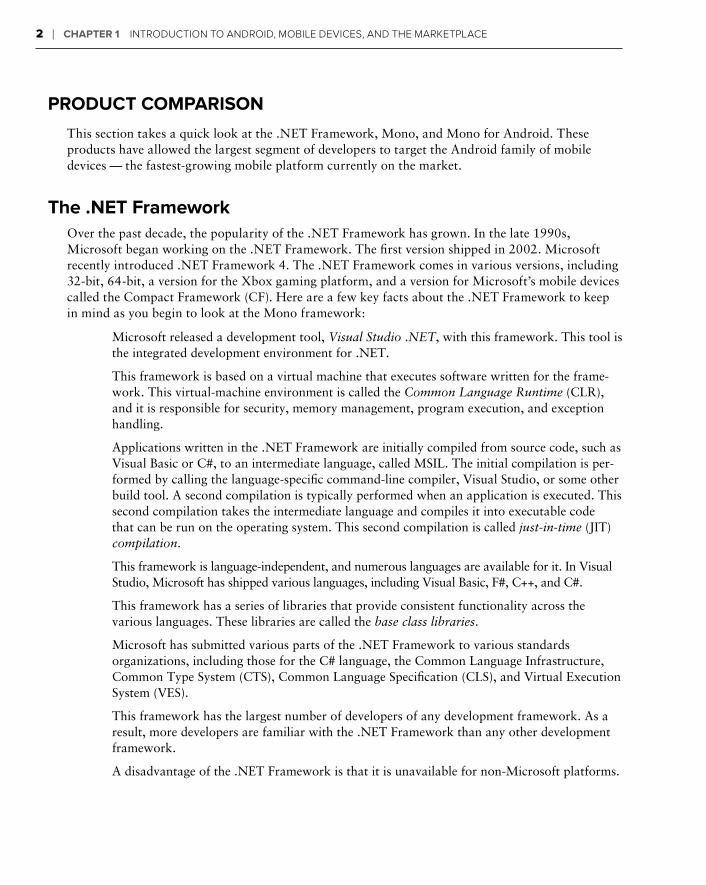
Over the past decade, the popularity of the .NET Framework has grown. In the late 1990s, Microsoft began working on the .NET Framework. The fi rst version shipped in 2002. Microsoft recently introduced .NET Framework 4. The .NET Framework comes in various versions, including 32-bit, 64-bit, a version for the Xbox gaming platform, and a version for Microsoft’s mobile devices called the Compact Framework (CF). Here are a few key facts about the .NET Framework to keep in mind as you begin to look at the Mono framework:
Microsoft released a development tool, Visual Studio .NET, with this framework. This tool is the integrated development environment for .NET.
This framework is based on a virtual machine that executes software written for the frame-work. This virtual-machine environment is called the Common Language Runtime (CLR), and it is responsible for security, memory management, program execution, and exception handling.
Applications written in the .NET Framework are initially compiled from source code, such as Visual Basic or C#, to an intermediate language, called MSIL. The initial compilation is per-formed by calling the language-specifi c command-line compiler, Visual Studio, or some other build tool. A second compilation is typically performed when an application is executed. This second compilation takes the intermediate language and compiles it into executable code that can be run on the operating system. This second compilation is called just-in-time (JIT) compilation.
This framework is language-independent, and numerous languages are available for it. In Visual Studio, Microsoft has shipped various languages, including Visual Basic, F#, C++, and C#.
This framework has a series of libraries that provide consistent functionality across the various languages. These libraries are called the base class libraries.
Microsoft has submitted various parts of the .NET Framework to various standards organizations, including those for the C# language, the Common Language Infrastructure, Common Type System (CTS), Common Language Specifi cation (CLS), and Virtual Execution System (VES).
This framework has the largest number of developers of any development framework. As a result, more developers are familiar with the .NET Framework than any other development framework.
A disadvantage of the .NET Framework is that it is unavailable for non-Microsoft platforms.
c01.indd 2c01.indd 2 22/02/13 4:24 PM22/02/13 4:24 PM
Product Comparison ❘ 3
The signifi cance of all this is that Microsoft has created a standards-based environment for the .NET Framework. Though most developers working on the Microsoft platform are not worried about the standards compliance of the .NET Framework, the signifi cance of this aspect of the .NET Framework cannot be understated. By defi ning these standards and submitting these standards to compliance committees, Microsoft has created a group of developers that can integrate at fairly low levels into the .NET Framework. In this environment, Miguel de Icaza had a vision and stepped up to create the Mono framework discussed next.
Mono
Mono is an open source project that provides a C# compiler and CLR on non-Windows operating systems. Mono is currently licensed under GPL version 2, LGPL version 2, the MIT, and dual licenses. Mono runs on Mac, Linux, BSD, and other operating systems. Along with the C# compiler, additional languages run on Mono, including F#, Java, Scala, Basic, and others.
Mono, the brainchild of Miguel de Icaza, was offi cially announced in 2001. Version 1.0 shipped in 2004, and currently Mono is at version 2.10, though it is continually being upgraded and will most likely be at a later version by the time you read this. Currently, Mono has parity with many of the features in .NET 4. Mono continues to be directly led by de Icaza. Recently, the steward-ship of Mono has passed to Xamarin. Xamarin leads the direction of Mono. Mono started as an open source implementation of a C# compiler. It grew from this initial design into the current open source implementation of .NET. It is now Xamarin’s responsibility to nurture Mono. Xamarin is responsible for the development of Mono for Android, MonoTouch, and the software that makes these products work for the developer. Given that Xamarin is laser-focused on Mono in the mobile area, I think these products are in good hands.
As much as there is a desire to match the .NET Framework’s features, this is not possible because Microsoft has more resources and a head start on the development of those features. At the same time, the Mono project has parity with a large number of .NET Framework features. The best that Xamarin will most likely accomplish is to be shortly behind the .NET Framework for most of the APIs that are possible.
Along with Mono is the open source IDE called MonoDevelop, which started as a port of the SharpDevelop IDE. MonoDevelop began as a project to allow for Mono development on Linux, but with the release of MonoDevelop 2.2, the ability to develop with Mono expanded to the Mac, Windows, and several other non-Linux UNIX platforms.
Although the .NET Framework is very popular, two issues make it unsuitable for running on Android:
At some level Google and Microsoft are competitors and are probably not too excited to work together. Microsoft has had Windows Mobile devices for years, which compete directly with Google’s Android operating system.
The .NET Framework fundamentally is a major competitor for the Java Virtual Machine that is at the heart of an Android device. This Java VM is called Dalvik. The .NET Framework and Java have been competitors since the initial announcements of the .NET Framework.
c01.indd 3c01.indd 3 22/02/13 4:24 PM22/02/13 4:24 PM
4 ❘ CHAPTER 1 INTRODUCTION TO ANDROID, MOBILE DEVICES, AND THE MARKETPLACE
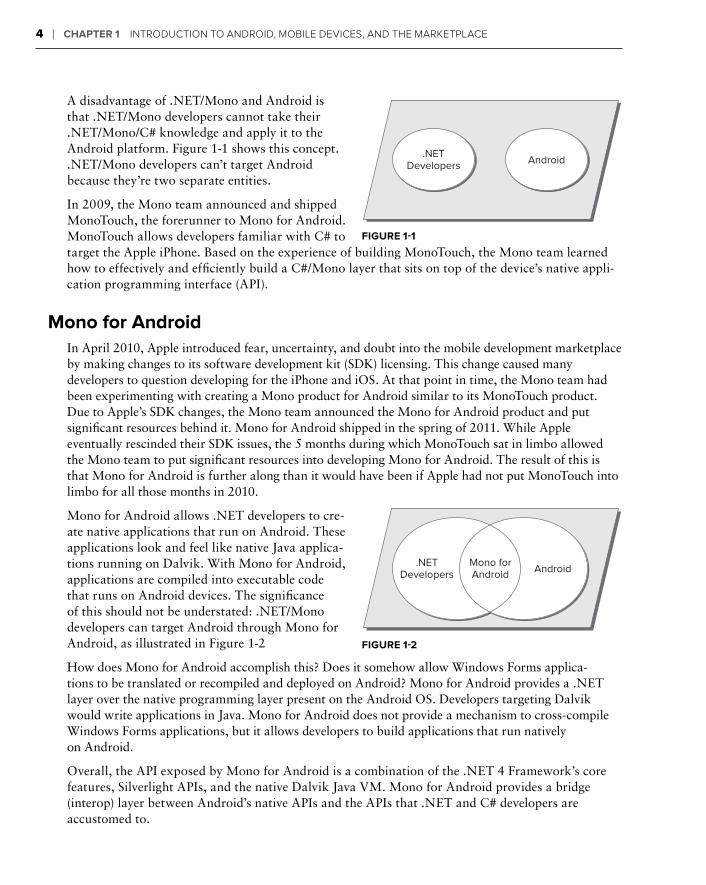
A disadvantage of .NET/Mono and Android is that .NET/Mono developers cannot take their .NET/Mono/C# knowledge and apply it to the Android platform. Figure 1-1 shows this concept..NET/Mono developers can’t target Android because they’re two separate entities.
In 2009, the Mono team announced and shipped MonoTouch, the forerunner to Mono for Android. MonoTouch allows developers familiar with C# to target the Apple iPhone. Based on the experience of building MonoTouch, the Mono team learned how to effectively and effi ciently build a C#/Mono layer that sits on top of the device’s native appli-cation programming interface (API).
Mono for Android
In April 2010, Apple introduced fear, uncertainty, and doubt into the mobile development marketplace by making changes to its software development kit (SDK) licensing. This change caused many developers to question developing for the iPhone and iOS. At that point in time, the Mono team had been experimenting with creating a Mono product for Android similar to its MonoTouch product. Due to Apple’s SDK changes, the Mono team announced the Mono for Android product and put signifi cant resources behind it. Mono for Android shipped in the spring of 2011. While Apple eventually rescinded their SDK issues, the 5 months during which MonoTouch sat in limbo allowed the Mono team to put signifi cant resources into developing Mono for Android. The result of this is that Mono for Android is further along than it would have been if Apple had not put MonoTouch into limbo for all those months in 2010.
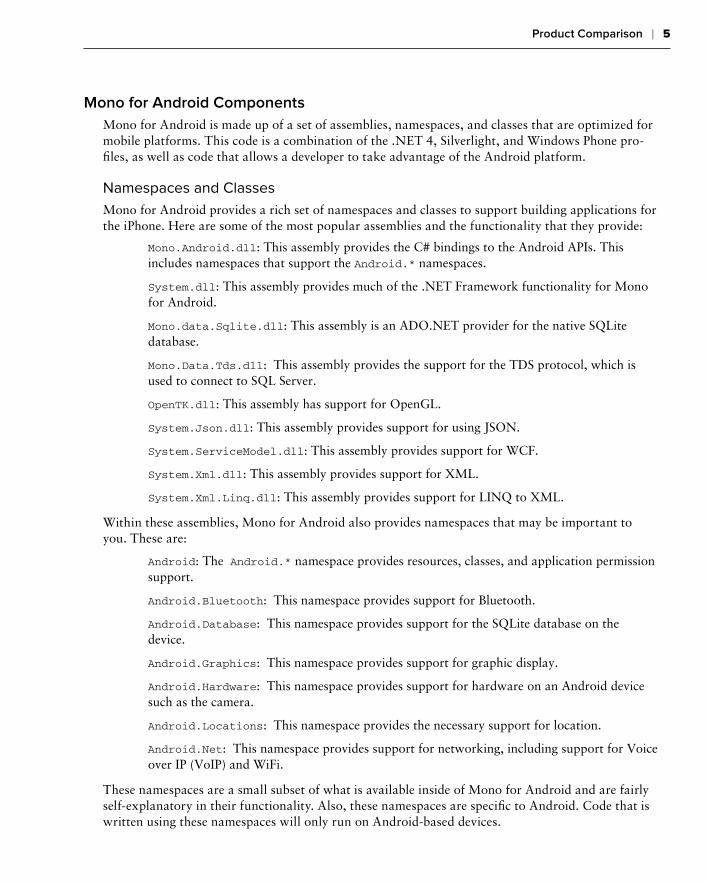
Mono for Android allows .NET developers to cre-ate native applications that run on Android. These applications look and feel like native Java applica-tions running on Dalvik. With Mono for Android, applications are compiled into executable code that runs on Android devices. The signifi cance of this should not be understated: .NET/Mono developers can target Android through Mono for Android, as illustrated in Figure 1-2
How does Mono for Android accomplish this? Does it somehow allow Windows Forms applica-tions to be translated or recompiled and deployed on Android? Mono for Android provides a .NET layer over the native programming layer present on the Android OS. Developers targeting Dalvik would write applications in Java. Mono for Android does not provide a mechanism to cross-compile Windows Forms applications, but it allows developers to build applications that run natively on Android.
Overall, the API exposed by Mono for Android is a combination of the .NET 4 Framework’s core features, Silverlight APIs, and the native Dalvik Java VM. Mono for Android provides a bridge (interop) layer between Android’s native APIs and the APIs that .NET and C# developers are accustomed to.
.NETDevelopers Android
FIGURE 1-1
.NETDevelopers
Mono forAndroid Android
FIGURE 1-2
c01.indd 4c01.indd 4 22/02/13 4:24 PM22/02/13 4:24 PM
Product Comparison ❘ 5
Mono for Android Components
Mono for Android is made up of a set of assemblies, namespaces, and classes that are optimized for mobile platforms. This code is a combination of the .NET 4, Silverlight, and Windows Phone pro-fi les, as well as code that allows a developer to take advantage of the Android platform.
Namespaces and Classes
Mono for Android provides a rich set of namespaces and classes to support building applications for the iPhone. Here are some of the most popular assemblies and the functionality that they provide:
Mono.Android.dll: This assembly provides the C# bindings to the Android APIs. This includes namespaces that support the Android.* namespaces.
System.dll: This assembly provides much of the .NET Framework functionality for Mono for Android.
Mono.data.Sqlite.dll: This assembly is an ADO.NET provider for the native SQLite database.
Mono.Data.Tds.dll: This assembly provides the support for the TDS protocol, which is used to connect to SQL Server.
OpenTK.dll: This assembly has support for OpenGL.
System.Json.dll: This assembly provides support for using JSON.
System.ServiceModel.dll: This assembly provides support for WCF.
System.Xml.dll: This assembly provides support for XML.
System.Xml.Linq.dll: This assembly provides support for LINQ to XML.
Within these assemblies, Mono for Android also provides namespaces that may be important to you. These are:
Android: The Android.* namespace provides resources, classes, and application permission support.
Android.Bluetooth: This namespace provides support for Bluetooth.
Android.Database: This namespace provides support for the SQLite database on the device.
Android.Graphics: This namespace provides support for graphic display.
Android.Hardware: This namespace provides support for hardware on an Android device such as the camera.
Android.Locations: This namespace provides the necessary support for location.
Android.Net: This namespace provides support for networking, including support for Voice over IP (VoIP) and WiFi.
These namespaces are a small subset of what is available inside of Mono for Android and are fairly self-explanatory in their functionality. Also, these namespaces are specifi c to Android. Code that is written using these namespaces will only run on Android-based devices.
c01.indd 5c01.indd 5 22/02/13 4:24 PM22/02/13 4:24 PM
6 ❘ CHAPTER 1 INTRODUCTION TO ANDROID, MOBILE DEVICES, AND THE MARKETPLACE
Development Tools
No matter what type of project you are building, development tools are an integral part of creating an application. Long gone are the days of a bunch of fi les, a character-based editor, command-line output for debugging, and a make fi le as the only way to build an application.
Developers who work in the .NET Framework are familiar with Visual Studio. Visual Studio is Microsoft’s development tool. It includes support for solutions, projects, a visual design surface, databases, and numerous other features.
Similarly, Mono has its own development tool; MonoDevelop is a free IDE used for developing with Mono and is an early branch of the SharpDevelop IDE. Originally, MonoDevelop ran only on Linux, but with version 2.2, MonoDevelop began running on the Mac and Windows. MonoDevelop lets you create and manage numerous projects as well as debug and deploy to the simulator and devices for testing.
Thankfully, the Mono team has produced Mono for Android, which will work across Visual Studio and MonoDevelop, as well as a plug-in for operating systems other than Windows. This facilitates writ-ing code with Mono for Android across Visual Studio, MonoDevelop on the Mac, and MonoDevelop on Windows. Developers are free to use whichever of these development IDEs they prefer. At this point in time, I have personally found that Windows and the Mac each have their own advantages, including:
Debugging on Windows is where most developers starting with Mono for Android will prob-ably start.
Debugging on the Mac seems to work very well in the Android emulator.
MOBILE DEVELOPMENT
Developers need to keep a few key ideas in mind when building applications on Android with Mono for Android:
The Android simulator is good for initial testing; however, it is not necessarily accurate for all testing. Just because something works in the simulator doesn’t mean it will run on all Android devices in the same way. Final testing should be completed on different versions of Android devices.
As of the Android SDK available for the writing of this book, testing on a device is typically more accurate for advanced features. For basic development, the emulator is easier to work with. Thanks to snapshots, it’s typically quicker to work with as well.
.NET executables are fairly small because they can use a shared copy of the framework. Mono for Android can have applications deployed two different ways. The most com-mon way is to have the application and Mono for Android bound together. A second way is for the applications to share the Mono framework. This makes application executables small, but it also means that a copy of the Mono framework for Mono for Android must be installed on the device.
c01.indd 6c01.indd 6 22/02/13 4:24 PM22/02/13 4:24 PM
Mobile Development ❘ 7
At the time of this writing, it is suggested that the application be bound with the Mono for Android runtime. This is currently what is done when a “Release” build of the application is done.
It is important to be a good citizen on a device. Developers will need to continually think about how to implement features that are good citizens.
Getting Around Support Issues
Although Mono for Android is a commercially licensed product, it is still under continual devel-opment, so it might not support a specifi c namespace or assembly. You have two options in this situation:
1. Wait on the implementation of that assembly from the Mono for Android product.
2. Pull the necessary code or reference the necessary assembly in your project. This is fairly common if the application needs to use code within the System.Web.* namespaces. For example, imagine an application that needs to call a REST-based web service and needs to encode data before it is sent. System.Web.HttpUtility.HtmlEncode() should be called. Unfortunately, the System.Web namespace is not part of Mono for Android by default. You must add this namespace by referencing the System.Web assembly in your application.
Design Issues
In addition to the technical issues of building an application for Android, here are some design issues developers should be aware of:
Don’t design an application for a desktop environment and think that it can be scaled down to Android or any mobile device. Android does not have the display, hardware, or storage of a desktop computer. Android and mobile device applications are good for simple, limited-purpose functions, but they should not be expected to do everything that a desktop application does.
The Android simulator is a fi ne tool, but don’t limit your testing to it. A simulator is just that. A keyboard and mouse are associated with the Android simulator since it is primarily running on the desktop. Also, understand that the simulator is ultimately using the CPUs of the development system. While the CPU of a device is fi ne for the device, it really isn’t com-parable in terms of performance with a desktop. The desktop has a high click speed, more memory, and typically has higher speed and higher quality Internet bandwidth. To really test a complicated design, you must test the application from Android on a mobile device while running on a mobile network.
When testing on a device, though WiFi is a mobile network, the WiFi in your offi ce or home is typically of a higher quality than a mobile provider’s network. Typically, WiFi will have lower latency and higher bandwidth than a 3G (or worse) connection. Applications must be tested in a mobile scenario. Get a coworker to drive you around to test an application.
c01.indd 7c01.indd 7 22/02/13 4:25 PM22/02/13 4:25 PM
8 ❘ CHAPTER 1 INTRODUCTION TO ANDROID, MOBILE DEVICES, AND THE MARKETPLACE
ANDROID
There’s no doubt that Android devices took off in the fi rst half of 2010. Although the Android phone was not the fi rst graphical phone, it was the fi rst product that provided its software free to phone device manufacturers, made it easy to use, and provided an easy-to-use marketplace to purchase applications.
History of Android
In July 2005 Google purchased a small company called Android, Inc., which was involved in mobile software. With this purchase, Google began heading in the direction of mobile devices. Rumors regarding Google’s entry into mobile devices began to ramp up in December 2006. In the fall of 2007, the Open Handset Alliance (OHA) was formed, with the goal of creating a set of standards for mobile devices. The alliance has at its core a mobile device architecture based on the Linux Kernel version 2.6 (and later), along with an SDK that can be used to build native Android applica-tions. In the fall of 2008, the fi rst Android phone shipped.
The initial shipment of Android was not well received in the marketplace. It was criticized signifi cantly by the media and by the fi rst users of the platform. However, Android had several big advantages over competing platforms that were not evident at the time. Android is an open platform. As such, manu-facturers are competing against other mobile device manufacturers as well as against other members of the Open Handset Alliance. This means the pace of innovation at the hardware level is signifi cant, and the Android platform shows it compared to other platforms. Android devices are not limited to one manufacturer or one telecommunications carrier either. As such, telecommunications carri-ers must compete with each other. These two factors and others have led to a signifi cant amount of innovation and advancement in the Android and mobile device marketplaces.
After some initial teething pains, the Android SDK has grown up. (You can fi nd a discussion of the tools available in the Android SDK — and pertinent to Mono for Android developers — later in this chapter.) After numerous beta releases in 2007 and 2008, the 1.0 release of the SDK occurred in September 2008. Since that time, many additional SDK versions have shipped.
In the fall of 2009, OHA introduced the Android 2.0 (Eclair) operating system. This was a watershed event for Android. Along with the shipment of Android 2.0, Motorola released the Droid phone, and Verizon began signifi cantly marketing the product. From that point Android has quickly grown in the marketplace.
In 2010, OHA shipped Android 2.1. In addition, HTC, Motorola, and others produced a family of high-end devices. The shipment of these items further accelerated Android’s growth and mind share. At the same time, a number of manufacturers introduced tablet devices based on Android.
In early 2011, devices based on Android 3.0 (a.k.a. Honeycomb) shipped. This version of Android is optimized for the tablet environment. Unfortunately, this version of Android has not been well received in the marketplace.
In late 2011, Google announced and shipped Android 4.0 (a.k.a. Ice Cream Sandwich). Ice Cream Sandwich is the version of Android that unifi es the programming APIs for Android phones and tablets.
Growth has been a hallmark of the Android platform. Since its fi rst availability in 2008, Android shipments have grown signifi cantly. Gartner Group is predicting that Android will see tremendous growth at least through 2015. Considering that Android had so few devices in the marketplace in 2008, this growth is mind-boggling.
c01.indd 8c01.indd 8 22/02/13 4:25 PM22/02/13 4:25 PM
Android ❘ 9
Writing Web-Based Applications for Android
Writing a web-based application for Android is fairly simple. The WebKit web browser is a great tool; it does an excellent job of scaling web-based applications to run on an Android-sized screen. It also does well at running applications that are highly dependent on JavaScript. Upgrading an Android web-based application is also a simple matter of deploying a new version of the application to a web server. Many applications have taken this approach. And although HTML5 has a number of great features, a web-based environment has some inherent limitations.
Unfortunately, web applications are not suitable for all applications. Applications that require some background processing and access to local resources must work when a network connection is unavailable, and some other application types don’t work well in this model.
So, the question becomes how you write a native application that fi ts into Android.
Writing Native Applications for Android
These native applications are a great improvement over web-based applications, which are limited in what they can do on a device. Fundamentally, web-based applications have to be loaded over the web and cannot access all device features. Native applications tend to have more support for device features such as the accelerometer, fi le system, camera, cross-domain web services, and other fea-tures that are not available in HTML and JavaScript. In addition, native applications do not depend on the wireless network to be loaded, whereas a web application is dependent on the wireless net-work for nearly everything.
Android Development Issues
Developers must consider several issues when running applications on the device:
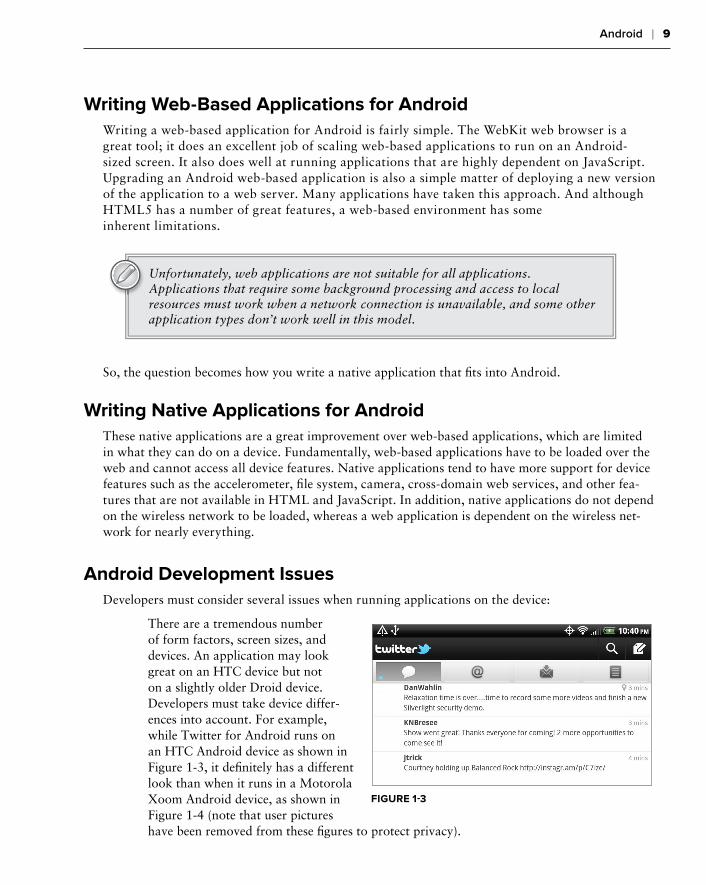
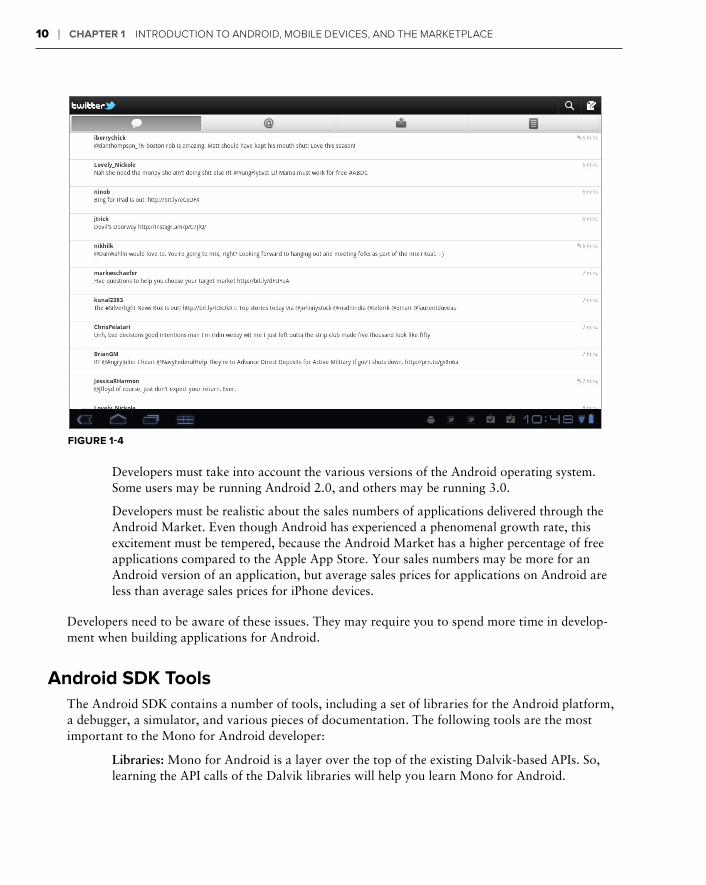
There are a tremendous number of form factors, screen sizes, and devices. An application may look great on an HTC device but not on a slightly older Droid device. Developers must take device differ-ences into account. For example, while Twitter for Android runs on an HTC Android device as shown in Figure 1-3, it defi nitely has a different look than when it runs in a Motorola Xoom Android device, as shown in Figure 1-4 (note that user pictures have been removed from these fi gures to protect privacy).
FIGURE 1-3
c01.indd 9c01.indd 9 22/02/13 4:25 PM22/02/13 4:25 PM
10 ❘ CHAPTER 1 INTRODUCTION TO ANDROID, MOBILE DEVICES, AND THE MARKETPLACE
FIGURE 1-4
Developers must take into account the various versions of the Android operating system. Some users may be running Android 2.0, and others may be running 3.0.
Developers must be realistic about the sales numbers of applications delivered through the Android Market. Even though Android has experienced a phenomenal growth rate, this excitement must be tempered, because the Android Market has a higher percentage of free applications compared to the Apple App Store. Your sales numbers may be more for an Android version of an application, but average sales prices for applications on Android are less than average sales prices for iPhone devices.
Developers need to be aware of these issues. They may require you to spend more time in develop-ment when building applications for Android.
Android SDK Tools
The Android SDK contains a number of tools, including a set of libraries for the Android platform, a debugger, a simulator, and various pieces of documentation. The following tools are the most important to the Mono for Android developer:
Libraries: Mono for Android is a layer over the top of the existing Dalvik-based APIs. So, learning the API calls of the Dalvik libraries will help you learn Mono for Android.
c01.indd 10c01.indd 10 22/02/13 4:25 PM22/02/13 4:25 PM
Android ❘ 11
Simulator: The simulator is the fi rst tool that developers use to test their applications. It allows them to create various simulated versions of Android, screen resolutions, memory, and other hardware factors.
One thing that developers will fi nd missing, at least in the initial versions of Mono for Android, is a design surface. When the Mono team shipped MonoTouch, it used the Interface Builder SDK tool. Unfortunately, the Android SDK has no design surface. Further, due to time constraints, the initial shipments of Mono for Android also don’t include a design surface.
Fortunately, all is not lost for developers. There are currently two ways to create a user interface for Mono for Android:
1. Edit the user interface XML by hand. Obviously, this method is error-prone.
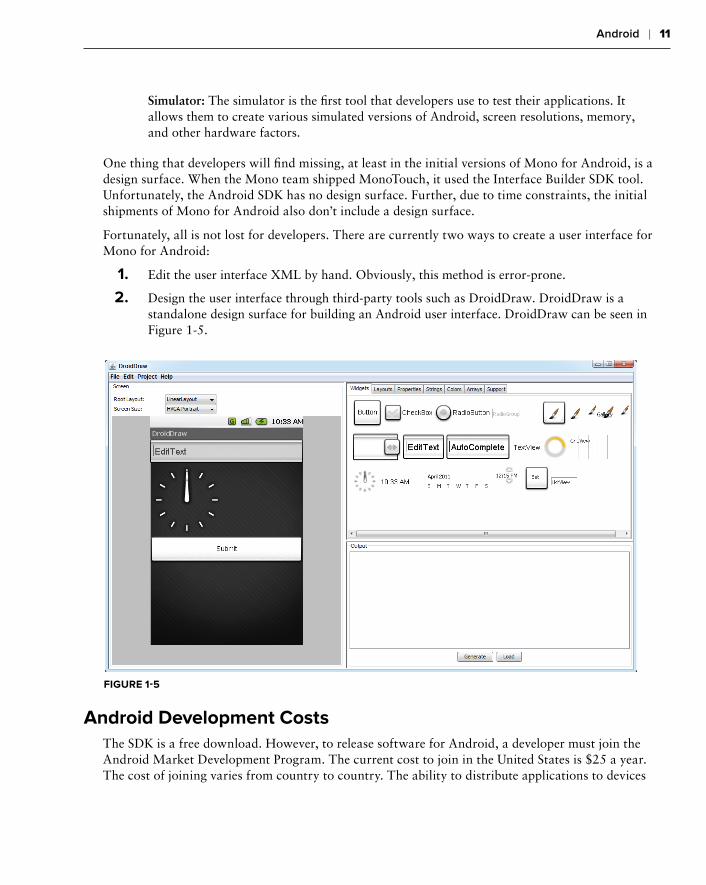
2. Design the user interface through third-party tools such as DroidDraw. DroidDraw is a standalone design surface for building an Android user interface. DroidDraw can be seen in Figure 1-5.
FIGURE 1-5
Android Development Costs
The SDK is a free download. However, to release software for Android, a developer must join the Android Market Development Program. The current cost to join in the United States is $25 a year. The cost of joining varies from country to country. The ability to distribute applications to devices
c01.indd 11c01.indd 11 22/02/13 4:25 PM22/02/13 4:25 PM
12 ❘ CHAPTER 1 INTRODUCTION TO ANDROID, MOBILE DEVICES, AND THE MARKETPLACE
depends on having the necessary development certifi cates. These are available through the Android Developer site after you join the Android Development Program. Certifi cates are discussed more in Chapter 16.
CROSS-PLATFORM ALTERNATIVES
The choice of using a cross-platform development tool, such as Mono for Android or MonoTouch, is not one to be made lightly. Even though Mono for Android offers a superior combination of native development and integration with the .NET stack and leverages the power of Visual Studio, it is important to not only be aware of the differences between native and non-native development tools, but also understand the differences between the various cross-platform options.
Other Cross-Platform Tools
In addition to Mono for Android, there are several other options out there that can be used to develop mobile applications that can target Android as well as other platforms. Here are a few examples of other cross-platform mobile development tools:
PhoneGap is a cross-platform mobile development tool that focuses on using standards-based web technologies, including HTML5, jQuery Mobile, and so on. Like Mono for Android, PhoneGap uses a common technology to allow developers to not only write applications for their target mobile devices but also to directly access some of the native features of the device, such as the compass, the camera, or the fi le system.
Appcelerator Titanium is another cross-platform tool that allows a developer to write appli-cations using HTML, JavaScript, and their own library of APIs that grant access to several of the mobile device’s features. Much like Mono for Android, Titanium can be compiled into the native language, meaning that you can present the same kind of experience that other native applications may offer.
RhoMobile Rhodes is a Ruby-based framework that allows you to build cross-platform applications. This tool allows you to compile into native applications that can access many of the device’s features.
These tools are among the most popular of the many other cross-platform tools in the market today. Because needing to target multiple mobile platforms with as little effort as possible is a common problem, you have many different solutions to consider.
Considerations for Selecting a Cross-Platform Tool
When selecting a cross-platform tool, you have to consider many different things. In some cases, some options may provide too simple a solution and maintenance/features could quickly become unwieldy or even impossible. Other tools could offer many, many native features, but in the process, introduce additional complexity beyond what a native approach might have offered. Because of this, making the right tool selection is critical. The following sections discuss a few things developers should ask themselves about the tool before making their selection.
c01.indd 12c01.indd 12 22/02/13 4:25 PM22/02/13 4:25 PM
Cross-Platform Alternatives ❘ 13
How Does the Tool Allow You to Author Your Application?
As far as cross-platform tools go, they tend to take one of two approaches to allow developers to write their applications. The fi rst approach is to utilize a mobile device’s natural support for web browsing, whereas the second approach is to develop the means to translate or compile a common language, such as C# or JavaScript, into the native language, such as Java for Android/Dalvik or Objective-C for iOS.
Utilizing a mobile device’s natural affi nity with web browsing allows developers to work primarily with HTML and JavaScript, which makes development approachable for a very large subset of potential mobile developers. In addition, there are a plethora of development tools and environments that make the development process fl uid and painless. A great example of this approach would be PhoneGap.
Unfortunately, this approach tends to have a couple of fl aws. For starters, this approach results in a web application with native features rather than a full, native application. Although web applications have come a very long way in the past few years, they are quite different than native applications and have their own special foibles. In addition, users tend to appreciate the experience of a native appli-cation over that of a web application. The second fl aw with this approach is that support of native features can be limited and, in some cases, impossible. Generally, access to native features is achieved through a custom JavaScript API.
The second approach, translating or compiling from a common language to the native language, allows the users to harness the native speed and features of the application while also writing in another, more accessible language. The large benefi t to this approach is that you end up with the look and feel of a native application as well as native performance speeds. Mono for Android is a great example of this approach.
The fl aws of this approach are that these solutions tend to require a slightly more advanced skill set. Whereas the web browser–based approach usually requires a basic understanding of HTML and browser page request life cycles, the compiled approach requires an understanding of the underly-ing architecture and design paradigms of the mobile platform. For instance, a Mono for Android developer needs to have at least a basic understanding of Android before they can begin writing an application. Finally, some of the cross-platform tools may require some platform-specifi c code to fully compliment the solution — particularly when it comes to handling UI logic.
What Device Features Does the Tool Support?
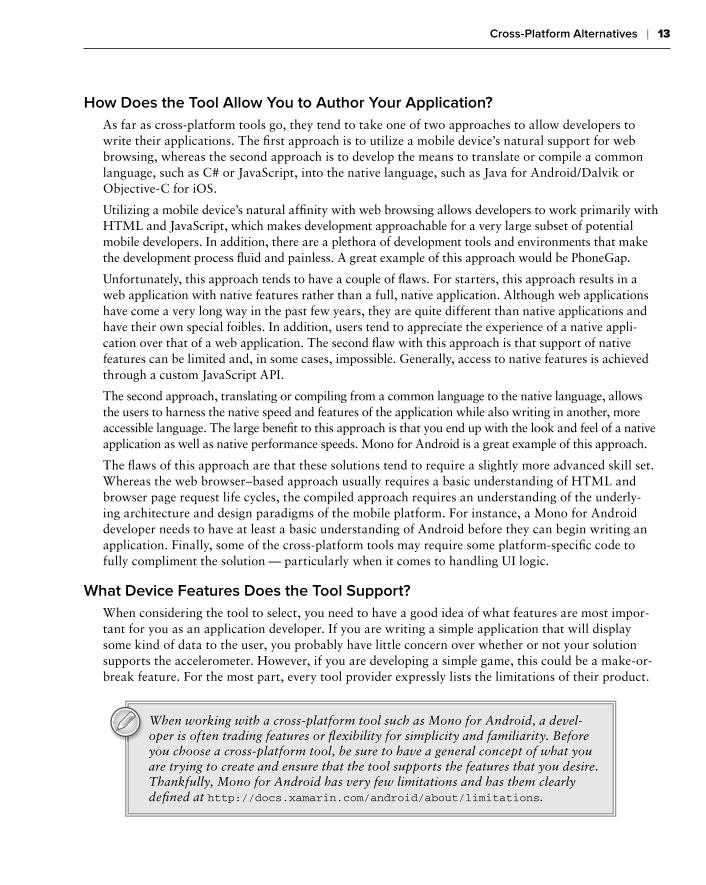
When considering the tool to select, you need to have a good idea of what features are most impor-tant for you as an application developer. If you are writing a simple application that will display some kind of data to the user, you probably have little concern over whether or not your solution supports the accelerometer. However, if you are developing a simple game, this could be a make-or-break feature. For the most part, every tool provider expressly lists the limitations of their product.
When working with a cross-platform tool such as Mono for Android, a devel-oper is often trading features or fl exibility for simplicity and familiarity. Before you choose a cross-platform tool, be sure to have a general concept of what you are trying to create and ensure that the tool supports the features that you desire. Thankfully, Mono for Android has very few limitations and has them clearly defi ned at http://docs.xamarin.com/android/about/limitations.
c01.indd 13c01.indd 13 22/02/13 4:25 PM22/02/13 4:25 PM
14 ❘ CHAPTER 1 INTRODUCTION TO ANDROID, MOBILE DEVICES, AND THE MARKETPLACE
What Platforms Does the Tool Support?
There are a wide variety of cross-platform tools out there, and each of them supports a different number of platforms that range from most mobile device OSs to even the various desktop OSs. When selecting your tool, consider where you plan to deploy your application as well as whether the deployed application’s design and usage patterns would fi t with the target platform.
For instance, Appcelerator Titanium boasts the ability to deploy not only to some of the major mobile platforms but also to Windows, Linux, and Mac. On the other hand, Rhodes focuses on supporting the major mobile platforms — including Windows Phone 7, RIM, and Windows Mobile.
Although we have discussed the feature support consideration, make sure that your needed feature is supported across all the platforms that you want to deploy to. For instance, if you have an appli-cation that is dependent upon the compass feature of the device and you want to target Android and WebOS, PhoneGap would not be the platform for you.
What Skill Sets Does the Tool Require?
Each approach offers some kind of common language to begin application development. Whether that language is HTML or C#, it is important to ensure that you have the skills in house to cover the development needs of the tool. In addition to this, some solutions require you to have intimate knowl-edge of the mobile platform’s framework or, at times, intimate knowledge of the tool’s custom APIs.
With the HTML approach, a strong understanding of HTML and JavaScript can take a developer a long way. On the other hand, the translation/compilation approach often requires a basic under-standing of the target platform framework — especially in regards to developing the user interface.
What Tools Exist to Support Development?
One of the most important considerations of your cross-platform tool is what kind of development tools exist to support the coding process. Development time for a solution can be vastly different when using a specialty, proprietary tool versus a full-featured development environment, such as Visual Studio.
How Active Are the Development Community and Support Channels?
When considering the cross-platform tool of your choice, take some time to familiarize yourself with the development community. Are there active mailing lists or forums? How frequently do developers respond to users’ requests? How often are other developers answering each other’s issues? Solutions with poor developer support or a stagnant community are unhealthy signs.
What Are the Successful Application Deployments for This Tool?
Most cross-platform tool vendors will quickly list any application success stories as a way to brag about their solution. Take some time to download these applications and see how they interact
c01.indd 14c01.indd 14 22/02/13 4:25 PM22/02/13 4:25 PM
Summary ❘ 15
and perform on your target mobile devices. Given the chance, take a moment to communicate with the application developer to ask them about their development experience using this toolset.
If you are reading this book, you are clearly interested in Mono for Android as a solution. With that in mind, it may seem somewhat strange to discuss alternative approaches to cross-platform develop-ment. The reason for this approach is to help you make an informed decision about a development tool rather than an incidental one. By taking the time to understand the strengths and weaknesses of other solutions, you will, hopefully, be able to make the best choice for your application. Mono for Android (and Mono Touch) has many strong features that enable it to accommodate just about any development scenario.
To answer our own previous question, there are very clear reasons why Mono for Android stands out as an excellent cross-platform development tool:
Mono for Android gives a developer access to the tooling and developer stack as provided by Microsoft. Considering the kind of investment that Microsoft puts into Visual Studio, this is a huge benefi t to the developer. You can continue to work in Visual Studio and use your existing tools, like ReSharper.
Mono for Android runs natively, providing almost all of the native capabilities. In addition, by supporting mobile platform–specifi c UI elements, it allows developers to reuse large por-tions of their code without sacrifi cing the performance and agility to match user expectations.
Mono for Android has a large, active development community. Mono for Android develop-ers actively work to address any developer concerns or issues.
SUMMARY
This chapter looked at the following items:
A product comparison of the .NET Framework and Mono
Mono for Android, which allows .NET developers to target Android
The Android platform, its licensing, and its operating system
Cross-platform alternatives for developing Android applications
You should now understand which tools are needed to build a native application with .NET/C# for Android. The next chapter explores the specifi cs of building a Mono for Android application with Visual Studio and MonoDevelop. Chapters 4 and 5 describe how to work with the user controls for user input and how to present data to the user in a standard form factor. Other chapters in the book discuss specifi c parts of Android, such as maps and acceleration.
c01.indd 15c01.indd 15 22/02/13 4:25 PM22/02/13 4:25 PM

c01.indd 16c01.indd 16 22/02/13 4:25 PM22/02/13 4:25 PM
2Introduction to Mono for Android
WHAT’S IN THIS CHAPTER?
Introduction to Mono and Mono for Android
Confi guring the development environment
Mono for Android tools for Visual Studio
Debugging and deploying
What is Mono for Android? This chapter provides the basis for Mono for Android devel-opment. It starts with an overview of Mono and then moves to a discussion of Mono for Android, confi guring the development stack, and developing and deploying a “Hello Mono for Android” application — fi rst to an emulator and then to your Android-based phone.
BEFORE YOU BEGIN DEVELOPING
Before getting started with development, you need to learn about a number of items that will help you understand the development environment and the tools that are involved. This section covers what Mono is and how it is implemented. Then it discusses what Mono for Android is, along with its benefi ts and implementation. Finally, this section discusses the development stack before moving on to development.
What Is Mono?
Mono is an open source project sponsored by Xamarin to create an Ecma standard imple-mentation of the .NET common language infrastructure (CLI), a C# compiler, and an open development stack. The Mono project was started by Ximian in 2001, and version 1.0 was released in 2004.
c02.indd 17c02.indd 17 22/02/13 3:54 PM22/02/13 3:54 PM
18 ❘ CHAPTER 2 INTRODUCTION TO MONO FOR ANDROID
Mono Implementation Goals
The Mono implementation is currently targeting three goals:
An open source CLI
A C# compiler
An open development stack
The CLI provides the runtime environment for languages that have been compiled to the Common Intermediate Language (CIL). The C# compiler is responsible for compiling C# code to CIL for execution on the runtime. The open development stack facilitates development and includes an IDE in MonoDevelop and several libraries beyond the core libraries to provide open cross-platform development. These libraries include GTK# for graphical user interface develop-ment, POSIX libraries for UNIX/Linux compatibility, Gecko libraries, database connectivity libraries, and XML schema language support via RELAX NG.
Mono Standards
Mono adheres to the Ecma Standard. Ecma International was formed in 1961 to support the stan-dardization of information and communication technology. In 2005, Ecma approved version 3 of C# and CLI as updates to Ecma 334 and 335. Currently, a working draft of the Ecma 335 CLI is in progress.
The Mono C# compiler is currently feature-complete per the Ecma standards for C# versions 1, 2, and 3 in version 2.6. Version 2.6 also includes a preview of C# 4, with a feature-complete version of C# 4 available in the trunk of version 2.8.
What Is Mono for Android?
Mono for Android is a runtime and development stack that allows .NET developers to leverage their knowledge of Visual Studio and C# to develop applications for Android-based devices.
Runtime: The Mono for Android runtime is an application that runs on the Linux kernel in the Android stack. It interprets the Mono byte code and handles communication with the Dalvik runtime for calls to native Android APIs.
Development stack: Mono for Android is also a development stack, providing the tools necessary to create and package applications for Android devices.
Why Do I Need Mono for Android?
Given that the Android platform has an open development stack based on Java with Eclipse as a visual development environment, it would be reasonable to ask why you need Mono for Android. A .NET developer who uses Visual Studio has three main reasons: a familiar development environ-ment, familiar APIs, and, as a result, rapid start-up.
c02.indd 18c02.indd 18 22/02/13 3:54 PM22/02/13 3:54 PM

Before You Begin Developing ❘ 19
Familiar Development Environment
As every developer knows, learning a new development stack is time-consuming and can be painful. Mono for Android allows the .NET developer to stick with the two core tools of .NET development: Visual Studio and C#.
Visual Studio: Visual Studio is an excellent and robust IDE geared toward .NET. By using the Mono for Android tools for Visual Studio, you won’t have to change your IDE or the settings you like.
C#: Some .NET developers work only with Visual Basic .NET, but most .NET developers are familiar with C#. Although C# and Java are similar in structure, many differences in the idioms of each language make for fl uent writing. And although profi cient C# developers would not have to spend extensive amounts of time learning the Java idioms, they would not have to spend any time if they could stick with a language they already knew.
Familiar API and Library Structure
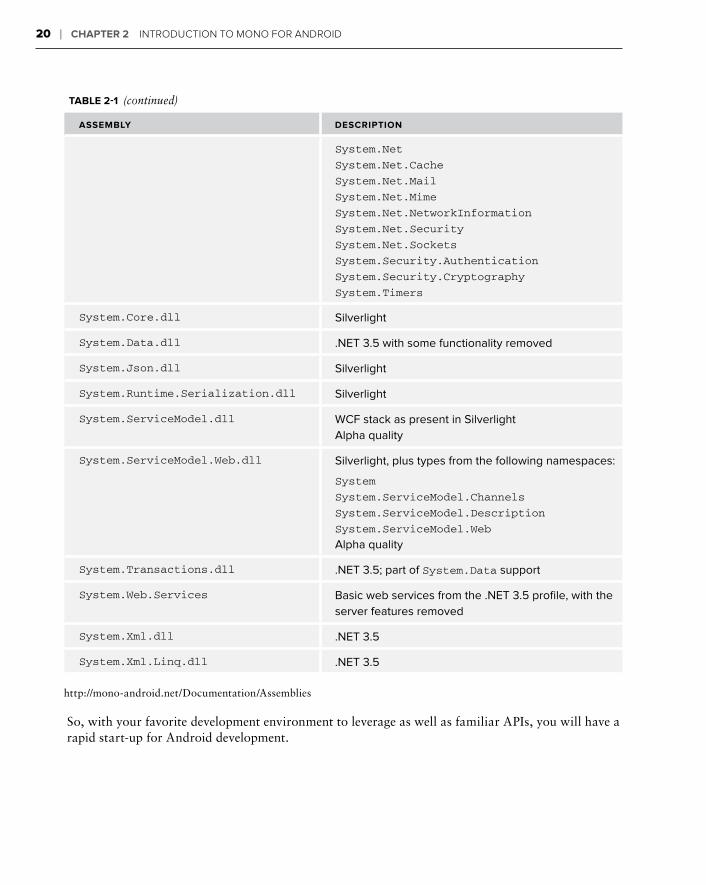
Staying within the .NET world allows you to work with a familiar API and library structure. Table 2-1 shows the assemblies that are a part of Mono for Android 4.0.1.
TABLE 2-1: Mono for Android Assemblies
ASSEMBLY DESCRIPTION
Mono.Android.dll This assembly contains the C# binding to the Android
API.
Mono.CompilerServices.
SymbolWriter.dll
For compiler writers
Mono.Data.Sqlite.dll ADO.NET provider for SQLite
Mono.Data.Tds.dll TDS protocol support; used for System.Data.
SqlClient support within System.Data
Mono.Security.dll Cryptographic APIs
mscorlib.dll Silverlight
OpenTK.dll The OpenGL/OpenAL object-oriented APIs, extended
to provide Android device support
System.dll Silverlight, plus types from the following namespaces:
System.Collections.Specialized
System.ComponentModel
System.ComponentModel.Design
System.Diagnostics
System.IO.Compression
continues
c02.indd 19c02.indd 19 22/02/13 3:54 PM22/02/13 3:54 PM
20 ❘ CHAPTER 2 INTRODUCTION TO MONO FOR ANDROID
ASSEMBLY DESCRIPTION
System.Net
System.Net.Cache
System.Net.Mail
System.Net.Mime
System.Net.NetworkInformation
System.Net.Security
System.Net.Sockets
System.Security.Authentication
System.Security.Cryptography
System.Timers
System.Core.dll Silverlight
System.Data.dll .NET 3.5 with some functionality removed
System.Json.dll Silverlight
System.Runtime.Serialization.dll Silverlight
System.ServiceModel.dll WCF stack as present in Silverlight
Alpha quality
System.ServiceModel.Web.dll Silverlight, plus types from the following namespaces:
System
System.ServiceModel.Channels
System.ServiceModel.Description
System.ServiceModel.Web
Alpha quality
System.Transactions.dll .NET 3.5; part of System.Data support
System.Web.Services Basic web services from the .NET 3.5 profi le, with the
server features removed
System.Xml.dll .NET 3.5
System.Xml.Linq.dll .NET 3.5
http://mono-android.net/Documentation/Assemblies
So, with your favorite development environment to leverage as well as familiar APIs, you will have a rapid start-up for Android development.
TABLE 2-1 (continued)
c02.indd 20c02.indd 20 22/02/13 3:54 PM22/02/13 3:54 PM
Before You Begin Developing ❘ 21
What Are the Trade-Off s of Working with Mono for Android?
When you decide not to work with a native API and development stack, trade-offs will be necessary. They need to be weighed against the advantages of working with a more comfortable, but abstract, layer.
Waiting for Improvements
Although moving away from the native Java and Eclipse in favor of Visual Studio has the benefi ts just mentioned, it also has some downsides. The fi rst is that you generally have to wait for the latest improvements. That is, usually as soon as a new feature or performance enhancement is available in the Android SDK, you have to wait for the next release of Mono for Android for it to be available.
Taking a Potential Performance Hit
The second trade-off is performance. The Mono for Android runtime has to communicate with the Dalvik runtime to get a number of things done. This overhead, however, generally is minor and is more than offset by the benefi ts mentioned previously.
After you install the Mono for Android tools for Visual Studio, starting a new Mono for Android project is as easy as selecting File New Project C# Mono for Android. We will cover this in more detail next.
Memory Management
Many of the objects that are allocated by Mono for Android are wrappers for the Java objects they represent. So what happens is this: Every time you allocate a type which is wrapping a correspond-ing Java type, two objects are created:
1. The Java object, in the Java heap
2. The Mono “proxy” object, in the Mono heap
Mono for Android does some work to ensure that both objects stay alive as long as one is referenc-ing the other. That is, as long as the Mono garbage collector (GC) refers to an object, the Java-side object will be kept alive and vice versa. This is accomplished by the proxy objects that are created by the mandroid.exe tool at build time.
However, the GCs are by nature lazy, only performing a collection on demand and not simply when objects go out of scope. So that means that cross-VM garbage will stick around longer than average, and this is unavoidable.
So, when allocating a large number of objects for temporary use, it is worthwhile to explic-itly dispose of those objects. A convenient approach to this is to use a using block with a new object, as this will implicitly dispose of the new object that is the target of the using clause, and
c02.indd 21c02.indd 21 22/02/13 3:54 PM22/02/13 3:54 PM
22 ❘ CHAPTER 2 INTRODUCTION TO MONO FOR ANDROID
thereby dispose of the Mono-side wrapper, which will allow the Java-VM to collect the object, preventing too many temporary objects from sticking around for too long.
For more details on garbage collection, you should refer to the docu-mentation at the following link: http://mono-android.net/index.php?title=Documentation/GC&highlight=garbage+collection.
What Do I Need for the Mono for Android Development Environment?
Although the development environment for Mono for Android is geared toward working in Visual Studio with C#, many pieces beyond that are required.
Java SDK
First, you need to install the Java SDK, which can be found at http://java.sun.com. You might wonder why you need Java if Mono for Android is supposed to allow you to develop with C# on Visual Studio. The Android SDK is developed in Java, so it is required to run all the tools that come with the SDK. The most signifi cant tool is the Android emulator, which is required for rapid debug-ging and testing before deploying to an actual device. However, other tools you will become familiar with are also Java-dependent.
Android SDK
Following the installation of the Java SDK, the Android SDK can be installed. The Android SDK can be downloaded from http://developer.android.com/sdk/index.html, where you will fi nd a link to download a Windows installer. After you have downloaded the SDK, the installation has four steps.
1. The fi rst step is to run the SDK installation. This is as straightforward as it sounds. Run the Windows installer, and you’re done.
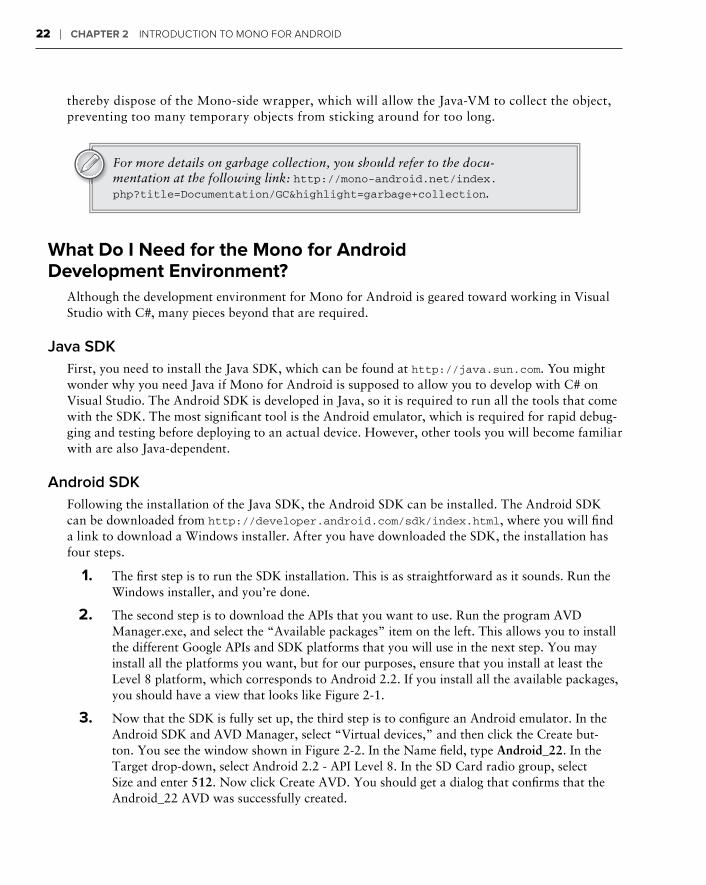
2. The second step is to download the APIs that you want to use. Run the program AVD Manager.exe, and select the “Available packages” item on the left. This allows you to install the different Google APIs and SDK platforms that you will use in the next step. You may install all the platforms you want, but for our purposes, ensure that you install at least the Level 8 platform, which corresponds to Android 2.2. If you install all the available packages, you should have a view that looks like Figure 2-1.
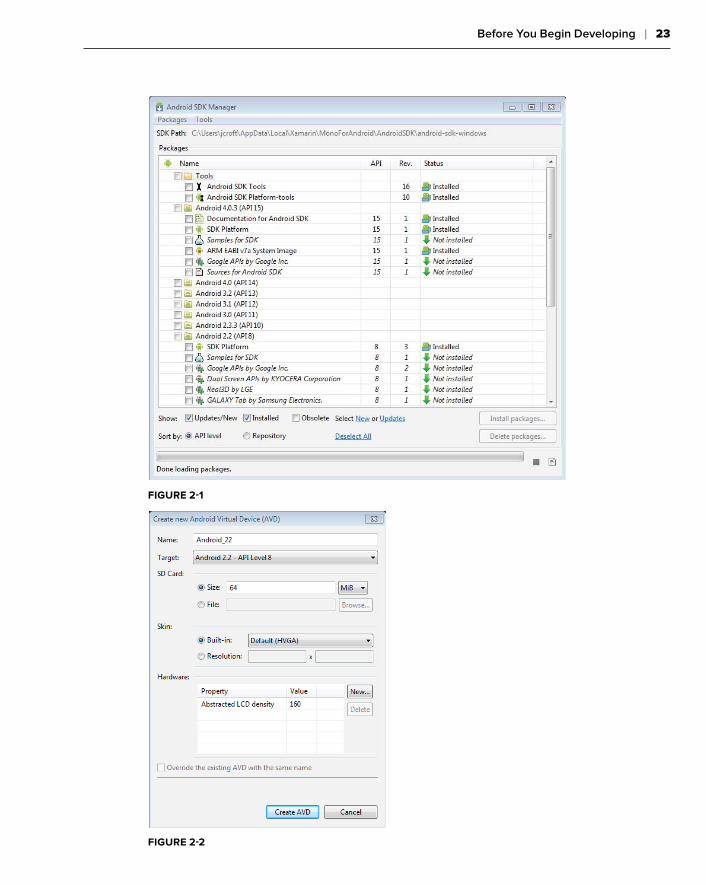
3. Now that the SDK is fully set up, the third step is to confi gure an Android emulator. In the Android SDK and AVD Manager, select “Virtual devices,” and then click the Create but-ton. You see the window shown in Figure 2-2. In the Name fi eld, type Android_22. In the Target drop-down, select Android 2.2 - API Level 8. In the SD Card radio group, select Size and enter 512. Now click Create AVD. You should get a dialog that confi rms that the Android_22 AVD was successfully created.
c02.indd 22c02.indd 22 22/02/13 3:54 PM22/02/13 3:54 PM
Before You Begin Developing ❘ 23
FIGURE 2-1
FIGURE 2-2
c02.indd 23c02.indd 23 22/02/13 3:54 PM22/02/13 3:54 PM
24 ❘ CHAPTER 2 INTRODUCTION TO MONO FOR ANDROID
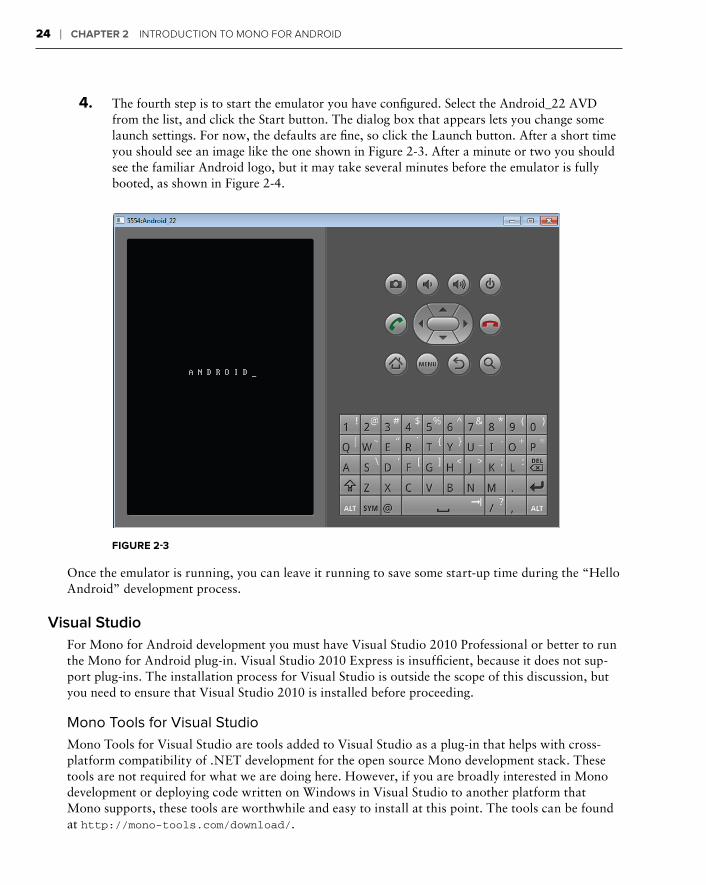
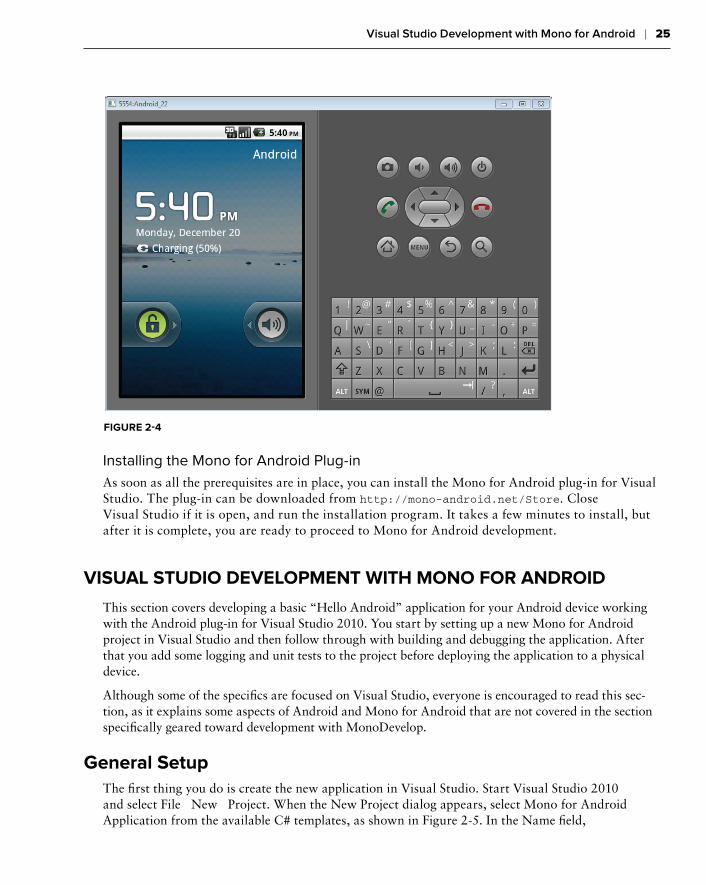
4. The fourth step is to start the emulator you have confi gured. Select the Android_22 AVD from the list, and click the Start button. The dialog box that appears lets you change some launch settings. For now, the defaults are fi ne, so click the Launch button. After a short time you should see an image like the one shown in Figure 2-3. After a minute or two you should see the familiar Android logo, but it may take several minutes before the emulator is fully booted, as shown in Figure 2-4.
FIGURE 2-3
Once the emulator is running, you can leave it running to save some start-up time during the “Hello Android” development process.
Visual Studio
For Mono for Android development you must have Visual Studio 2010 Professional or better to run the Mono for Android plug-in. Visual Studio 2010 Express is insuffi cient, because it does not sup-port plug-ins. The installation process for Visual Studio is outside the scope of this discussion, but you need to ensure that Visual Studio 2010 is installed before proceeding.
Mono Tools for Visual Studio
Mono Tools for Visual Studio are tools added to Visual Studio as a plug-in that helps with cross-platform compatibility of .NET development for the open source Mono development stack. These tools are not required for what we are doing here. However, if you are broadly interested in Mono development or deploying code written on Windows in Visual Studio to another platform that Mono supports, these tools are worthwhile and easy to install at this point. The tools can be found at http://mono-tools.com/download/.
c02.indd 24c02.indd 24 22/02/13 3:54 PM22/02/13 3:54 PM
Visual Studio Development with Mono for Android ❘ 25
FIGURE 2-4
Installing the Mono for Android Plug-in
As soon as all the prerequisites are in place, you can install the Mono for Android plug-in for Visual Studio. The plug-in can be downloaded from http://mono-android.net/Store. Close Visual Studio if it is open, and run the installation program. It takes a few minutes to install, but after it is complete, you are ready to proceed to Mono for Android development.
VISUAL STUDIO DEVELOPMENT WITH MONO FOR ANDROID
This section covers developing a basic “Hello Android” application for your Android device working with the Android plug-in for Visual Studio 2010. You start by setting up a new Mono for Android project in Visual Studio and then follow through with building and debugging the application. After that you add some logging and unit tests to the project before deploying the application to a physical device.
Although some of the specifi cs are focused on Visual Studio, everyone is encouraged to read this sec-tion, as it explains some aspects of Android and Mono for Android that are not covered in the section specifi cally geared toward development with MonoDevelop.
General Setup
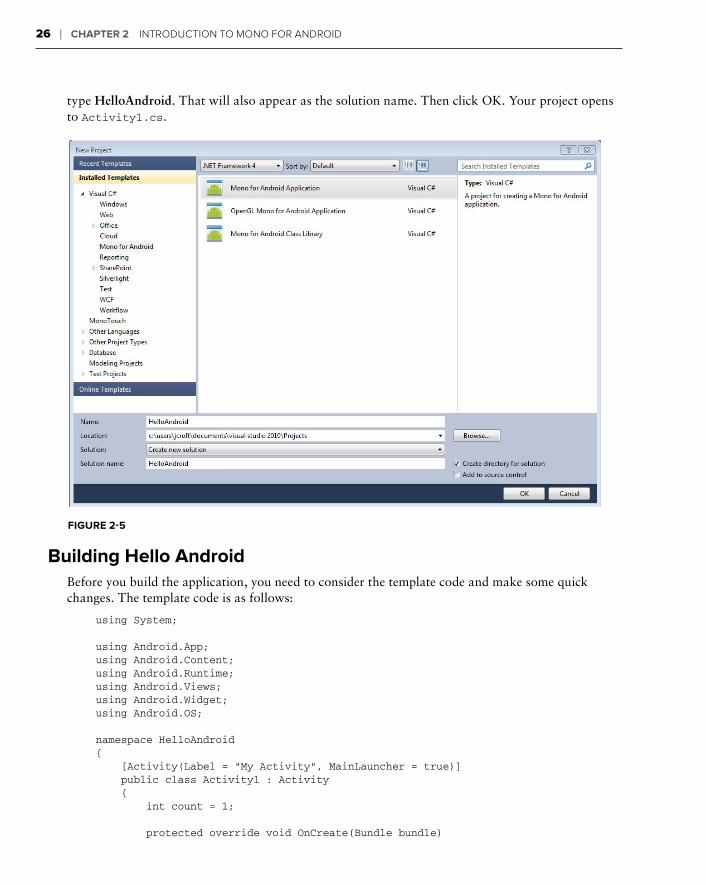
The fi rst thing you do is create the new application in Visual Studio. Start Visual Studio 2010 and select File New Project. When the New Project dialog appears, select Mono for Android Application from the available C# templates, as shown in Figure 2-5. In the Name fi eld,
c02.indd 25c02.indd 25 22/02/13 3:54 PM22/02/13 3:54 PM
26 ❘ CHAPTER 2 INTRODUCTION TO MONO FOR ANDROID
type HelloAndroid. That will also appear as the solution name. Then click OK. Your project opens to Activity1.cs.
FIGURE 2-5
Building Hello Android
Before you build the application, you need to consider the template code and make some quick changes. The template code is as follows:
using System;
using Android.App;using Android.Content;using Android.Runtime;using Android.Views;using Android.Widget;using Android.OS;
namespace HelloAndroid{ [Activity(Label = “My Activity”, MainLauncher = true)] public class Activity1 : Activity { int count = 1;
protected override void OnCreate(Bundle bundle)
c02.indd 26c02.indd 26 22/02/13 3:54 PM22/02/13 3:54 PM
Visual Studio Development with Mono for Android ❘ 27
{ base.OnCreate(bundle);
// Set our view from the “main” layout resource SetContentView(Resource.layout.main);
// Get our button from the layout resource, // and attach an event to it Button button = FindViewById<Button>(Resource.id.myButton); button.Click += delegate { button.Text = string.Format(“{0} clicks!”, count++); }; } }}
This block of code shows a few things.
First are the using clauses needed for this code.
Then you have the namespace declaration that is set to your application name, HelloAndroid.
Then you have the class declaration for Activity1, which is of type Activity.
An Activity is central to the design of Android-based programs, and they are discussed more in upcoming chapters, particularly Chapter 3. However, the annotations on this class are also of note. First is the label My Activity, which will be the label seen in the Android application window. Second is the MainLauncher annotation, which indicates that this Activity is the main one to be launched in this application.
Finally, you have the OnCreate function. Activity creation is just one of several life cycle steps that an Activity may be subjected to. The whole life cycle will be discussed further in Chapter 3. In this function you initialize a resource bundle, set your view, get a button from the view, and attach an event to it.
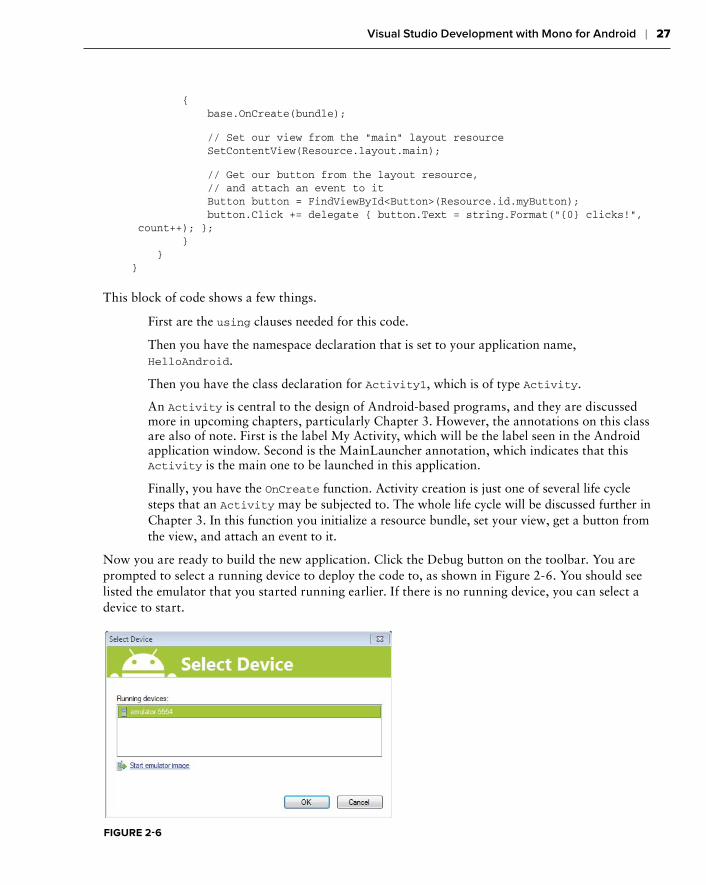
Now you are ready to build the new application. Click the Debug button on the toolbar. You are prompted to select a running device to deploy the code to, as shown in Figure 2-6. You should see listed the emulator that you started running earlier. If there is no running device, you can select a device to start.
FIGURE 2-6
c02.indd 27c02.indd 27 22/02/13 3:54 PM22/02/13 3:54 PM
28 ❘ CHAPTER 2 INTRODUCTION TO MONO FOR ANDROID
Select that emulator, and click OK. The Mono for Android toolkit then checks for an installed version of the Mono for Android runtime. If the runtime is not found, the toolkit installs it. This process can take quite some time. Once the runtime is installed, the toolkit signs and installs the application into the running emulator.
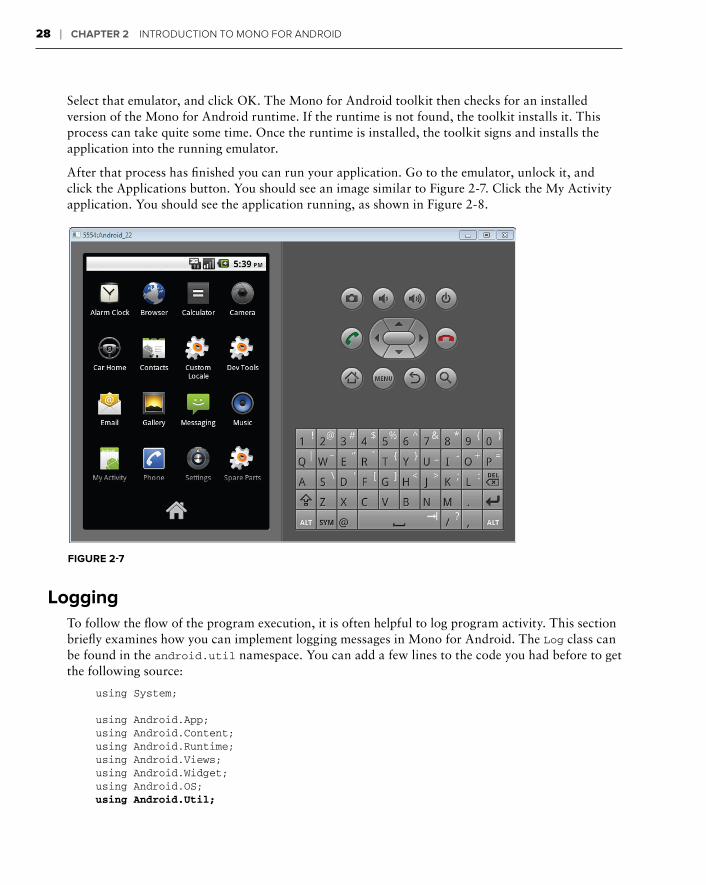
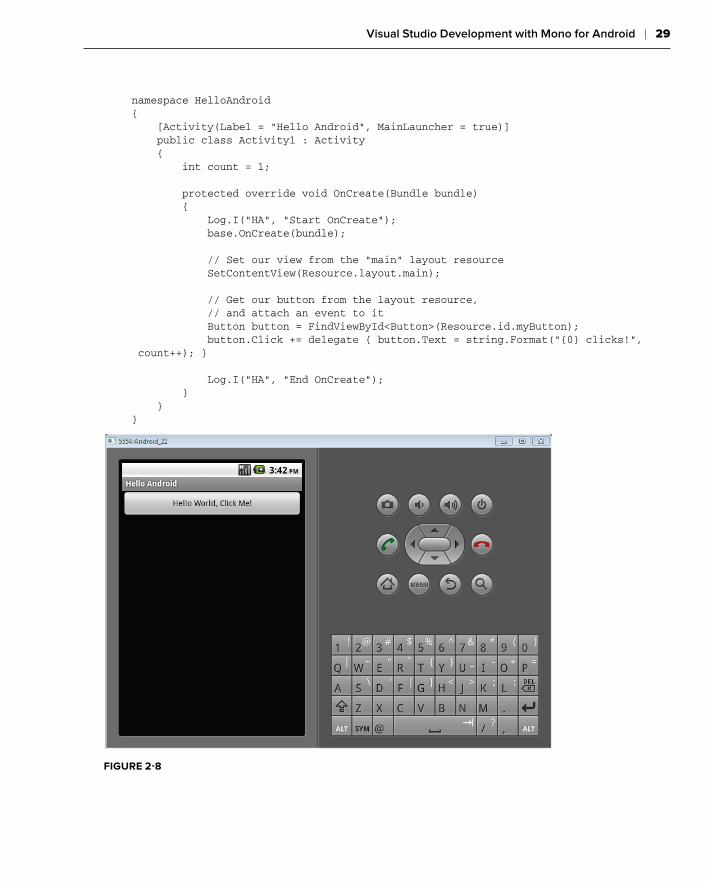
After that process has fi nished you can run your application. Go to the emulator, unlock it, and click the Applications button. You should see an image similar to Figure 2-7. Click the My Activity application. You should see the application running, as shown in Figure 2-8.
FIGURE 2-7
Logging
To follow the fl ow of the program execution, it is often helpful to log program activity. This section briefl y examines how you can implement logging messages in Mono for Android. The Log class can be found in the android.util namespace. You can add a few lines to the code you had before to get the following source:
using System;
using Android.App;using Android.Content;using Android.Runtime;using Android.Views;using Android.Widget;using Android.OS;using Android.Util;
c02.indd 28c02.indd 28 22/02/13 3:54 PM22/02/13 3:54 PM
Visual Studio Development with Mono for Android ❘ 29
namespace HelloAndroid{ [Activity(Label = “Hello Android”, MainLauncher = true)] public class Activity1 : Activity { int count = 1;
protected override void OnCreate(Bundle bundle) { Log.I(“HA”, “Start OnCreate”); base.OnCreate(bundle);
// Set our view from the “main” layout resource SetContentView(Resource.layout.main);
// Get our button from the layout resource, // and attach an event to it Button button = FindViewById<Button>(Resource.id.myButton); button.Click += delegate { button.Text = string.Format(“{0} clicks!”, count++); }
Log.I(“HA”, “End OnCreate”); } }}
FIGURE 2-8
c02.indd 29c02.indd 29 22/02/13 3:54 PM22/02/13 3:54 PM

30 ❘ CHAPTER 2 INTRODUCTION TO MONO FOR ANDROID
Here you can see the added using Android.Util that provides access to the Log class, which contains the following convenience functions (among others):
Log.I(string tag, string message) logs information.
Log.W(string tag, string message) logs warnings.
Log.E(string tag, string message) logs errors.
The tag parameter provides context for the log message. In this case you can use a tag of “HA” for HelloAndroid. To view the messages in Visual Studio, select View Other Windows Android Device Logging, and all the messages will be available.
Debugging
Having successfully executed the application in your emulator, you can look at how to debug a problem that we will introduce. If you are using a physical phone, you need to go to the applications page on your phone and select Settings. Then select Applications, Development, and check USB Debugging. After that, return to your code.
Change the following line:
Button button = FindViewById<Button>(Resource.id.myButton);
To the following:
TextView button = FindViewById<TextView>(Resource.id.myButton);
Rerun the application. This time the application will throw an error on start-up because you are try-ing to treat a Button as a TextView. While this example may be contrived, take a look at how you can debug the application.
Set a break point on the following line:
base.OnCreate(bundle);
Now, click the run/debug button on the toolbar. This time, as the application starts up the software will stop at the break point. You can now step through the application until you arrive at the offend-ing line. Trying to step over that instruction will result in the previously seen error, and, in this case, fi xing it is trivial.
Testing
The days of merely testing software through usage are long gone. All reliably built software relies on unit tests as a best practice and to make the testing cycle shorter and more reliable. So, how do you build unit tests with Mono for Android?
The short answer is NUnit, just as it is for any other Mono application. The longer answer involves structuring your program to make it amenable to testing. That is, the NUnit testing framework is not geared toward UI testing, so it is best to isolate your non-UI code into a separate library and set up any tests to run against that library.
It is also worth noting that if you intend to leverage code for other platforms, for example, the iPhone with MonoTouch or Windows Phone 7 with Mono or .NET, then you also want to isolate platform-specifi c code from generically reusable code. This code would also be good code to build test cases against.
c02.indd 30c02.indd 30 22/02/13 3:54 PM22/02/13 3:54 PM
Mono for Android Development with MonoDevelop ❘ 31
So for non-UI and platform-independent code, instead of building program logic into the Android activities you want to extract that code to an Android library. You can create an Android library by creating a new solution, but instead of selecting Android application, select Android library. Then use NUnit to provide automated tests for that code.
Deploying
Having run the gamut from “Hello Android” through debugging, logging, and testing, it’s now time to look at deploying an application to an actual Android device. This process has three steps: con-nect the phone via USB, set the phone into development mode, and deploy the application.
1. The fi rst step is obvious.
2. The second step requires you to go into the phone’s settings and select Application Settings. Under Application Settings, check the option for Unknown Sources. This lets you install non-Android market apps, which you want. Second, on the same page, select the Development option. This takes you to a screen with three options. Select USB Debugging and Stay Awake. You aren’t using mock locations, so don’t worry about that now.
3. Now for the fi nal step: click the Debug button on the toolbar. This time, when the Running Devices list comes up, your device is on it! Select your device. This time the installation process runs over USB to your device.
When it is fi nished, give the Hello Android app a try.
MONO FOR ANDROID DEVELOPMENT WITH MONODEVELOP
This section covers developing a basic “Hello Android” application for your Android device work-ing with the Android plug-in for MonoDevelop. If you skipped the Visual Studio section because you are on a Mac or use MonoDevelop anyway, I would encourage you to read the Visual Studio section because it covers some generally applicable concepts, but if you want to jump right in and catch up along the way you should be fi ne.
General Setup
Installing the development environment on the Mac is straightforward. There are six steps to the process:
Install the Android SDK: This can be found at http://developer.android.com/sdk/index.html. This is Java-based and leverages the Java SDK installed by default on OSX.
Install Mono for Mac: This can be found at http://www.go-mono.com/mono-downloads/download.html. This provides the Mono platform, which is the basis for the Mono develop-ment tools that will also be installed.
Install MonoDevelop for Mac: This can be found at http://monodevelop.com/download. This provides an IDE for developing Mono applications on the Mac. Also, it is required because Mono for Android for the Mac installs as a plug-in for this IDE.
Install Mono for Android for Mac: This can be found at http://mono-android.net/Store. At the store page you can also download a trial version of the software.
c02.indd 31c02.indd 31 22/02/13 3:54 PM22/02/13 3:54 PM
32 ❘ CHAPTER 2 INTRODUCTION TO MONO FOR ANDROID
Confi gure the Mono for Android MonoDevelop add-in: Once the plug-in is installed you need to go to MonoDevelop Preferences, which will display the preferences dialog. After this, select the Other category and select Mono for Android SDKs. This will allow you to confi gure the Java and Android SDKs that you are using.
Confi gure your Android Emulator: Finally, run the Android SDK installer and select Virtual Devices. Create a new virtual device. It’s important to note that you may fi nd developing on an actual device to be somewhat faster than it is on an emulated device.
If you want to read about this process in more detail please refer to the following link: http://mono-android.net/Installation/Installation_for_Mac.
Also, if you are running in a Mono for Windows environment you may want to refer to the installation instructions at http://mono-android.net/Installation/Windows, as there are some minor differences in setup.
Building Hello Android
To get a program up and running with MonoDevelop and Android is very simple. If you read the Visual Studio section, you can probably skip this section and fi nd the details on your own, but for those who skipped the Visual Studio section you can run through the process now.
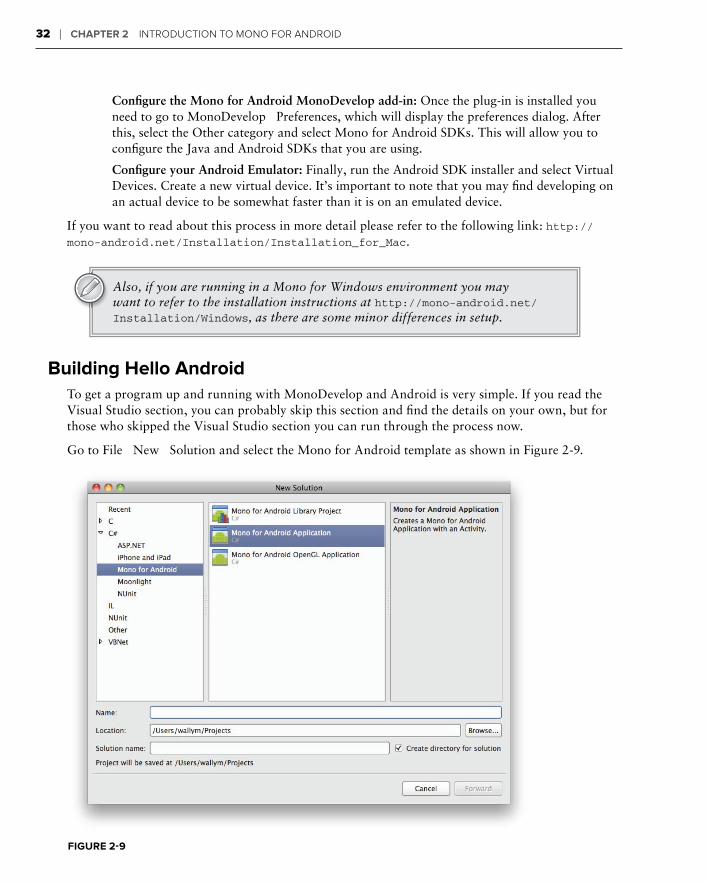
Go to File New Solution and select the Mono for Android template as shown in Figure 2-9.
FIGURE 2-9
c02.indd 32c02.indd 32 22/02/13 3:54 PM22/02/13 3:54 PM
Mono for Android Development with MonoDevelop ❘ 33
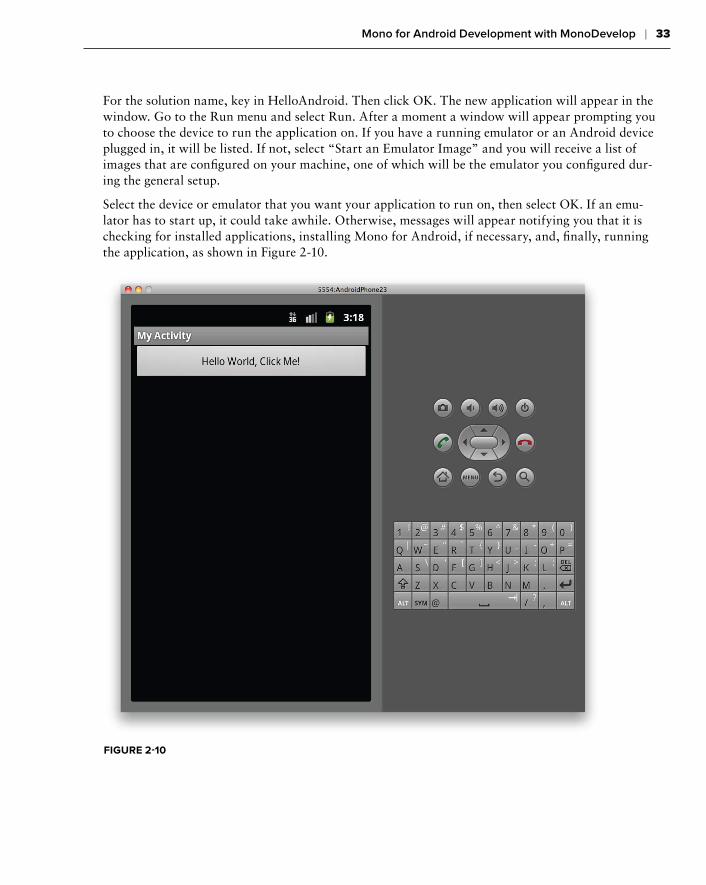
For the solution name, key in HelloAndroid. Then click OK. The new application will appear in the window. Go to the Run menu and select Run. After a moment a window will appear prompting you to choose the device to run the application on. If you have a running emulator or an Android device plugged in, it will be listed. If not, select “Start an Emulator Image” and you will receive a list of images that are confi gured on your machine, one of which will be the emulator you confi gured dur-ing the general setup.
Select the device or emulator that you want your application to run on, then select OK. If an emu-lator has to start up, it could take awhile. Otherwise, messages will appear notifying you that it is checking for installed applications, installing Mono for Android, if necessary, and, fi nally, running the application, as shown in Figure 2-10.
FIGURE 2-10
c02.indd 33c02.indd 33 22/02/13 3:54 PM22/02/13 3:54 PM

34 ❘ CHAPTER 2 INTRODUCTION TO MONO FOR ANDROID
Logging
Logging in MonoDevelop is identical to logging in Visual Studio, as it is a function of the API and not of the IDE. To recap, in case you skipped the Visual Studio section, here are the logging functions:
Log.I(string tag, string message) logs information.
Log.W(string tag, string message) logs warnings.
Log.E(string tag, string message) logs errors.
The tag parameter provides context for the log message. For instance, if you add some logging to your HelloAndroid application, you might use a tag of “HA” in the logging functions.
Debugging
Having successfully executed the application in the emulator, it’s time to look at how to debug a problem that we will introduce. If you are using a physical phone, you need to go to the Applications page on your phone and select Settings. Then select Applications, Development, and check USB Debugging. After that, return to your code.
Change the following line:
Button button = FindViewById<Button>(Resource.id.myButton);
To the following:
TextView button = FindViewById<TextView>(Resource.id.myButton);
Rerun the application. This time the application will throw an error on start-up because you are trying to treat a Button as a TextView. While this example may be contrived, take look at how you can debug the application.
Set a break point on the following line:
base.OnCreate(bundle);
Now, click the Run/Debug button on the toolbar. This time, as the application starts up the soft-ware will stop at the break point. You can now step through the application until you arrive at the offending line. Trying to step over that instruction will result in the previously seen error, and, in this case, fi xing it is trivial.
Testing
The days of merely testing software through usage are long gone. All reliably built software relies on unit tests as a best practice and to make the testing cycle shorter and more reliable. So, how do you build unit tests with Mono for Android?
The short answer is NUnit, just as it is for any other Mono application. The longer answer involves structuring your program to make it amenable to testing. That is, the NUnit testing framework is not geared toward UI testing, so it is best to isolate your non-UI code into a separate library and set up any tests to run against that library.
c02.indd 34c02.indd 34 22/02/13 3:54 PM22/02/13 3:54 PM
Summary ❘ 35
Deploying
Deployment of your HelloAndroid application to a device is very simple.
This process has three steps: connect the phone via USB, set the phone into development mode, and deploy the application.
1. The fi rst step is obvious.
2. The second step requires you to go into the phone’s settings and select Application Settings. Under Application Settings, check the option for Unknown Sources. This lets you install non-Android market apps, which you want. Second, on the same page, select the Development option. This takes you to a screen with three options. Select USB Debugging and Stay Awake. You aren’t using mock locations, so don’t worry about that now.
3. Now for the fi nal step: click the Debug button on the toolbar. This time, when the running devices list comes up, your device is on it! Select your device. This time the installation process runs over USB to your device.
When it is fi nished, give the HelloAndroid app a try.
SUMMARY
In this chapter you covered installing the development environment for Android on Windows using the Visual Studio 2010 plug-in, and you covered installing the development environment on the Mac using MonoDevelop. In each case, the process is similar: install the software stack including the Java SDK, the Android SDK, and the Mono SDK. Have your IDE installed, either Visual Studio or MonoDevelop. Then install the Mono for Android add-in. If you are using MonoDevelop, confi gure the add-in. Then, using the installed platform, create a default HelloAndroid application.
In addition, this chapter covered logging, testing, and deploying applications. You saw that logging was a simple matter of adding one of the three log calls to your application, and that these logs can be seen in the console of either Visual Studio or MonoDevelop. Testing is always considered a best practice to assist in validating the behavior of your software before it is deployed. Deployment is what software development is about. These skills will be used over and over in all the chapters to come.
c02.indd 35c02.indd 35 22/02/13 3:54 PM22/02/13 3:54 PM

c02.indd 36c02.indd 36 22/02/13 3:54 PM22/02/13 3:54 PM
3Understanding Android/Mono for Android Applications
WHAT’S IN THIS CHAPTER?
What comprises Android and Mono for Android applications
Explaining the Android core components
Describing purpose of intents and how they interact within the
Android platform
Exploring the Android manifest fi le and its key features
To develop Mono for Android applications, you need a good working knowledge of the key components of an Android application. Not only will this understanding enable you to build a feature-rich application, but it also will help you communicate between other applications and processes on the Android device.
One of the selling points of Mono for Android is that it enables you to write Android applica-tions in a .NET-specifi c language. However, this does not imply that you do not need a basic understanding of the Android runtime as well as the underlying Java-based architecture. To write a full-featured application, you must be able to interface with Android’s Java APIs and, potentially, other applications that are not necessarily written using Mono for Android. Furthermore, it is imperative that you understand the “Android way” of writing an applica-tion, because the Mono for Android runtime is built on that understanding and, in many ways, refl ects those “Androidisms” in its architecture. The overall goal of this chapter is to provide the foundation for that understanding.
To accomplish its goals, this chapter gives you a broad understanding of the Android platform but does so in a Mono for Android context where applicable. All key differences between Mono for Android and Android are called out specifi cally. This chapter introduces the dif-ferent components of the Android stack and how they interact with one another to form an
c03.indd 37c03.indd 37 22/02/13 4:00 PM22/02/13 4:00 PM
38 ❘ CHAPTER 3 UNDERSTANDING ANDROID/MONO FOR ANDROID APPLICATIONS
application. In addition, it spends some time reviewing how the Android OS manages those applica-tion components in terms of priority, memory usage, resources, and other life cycle–related topics. If you are already familiar with Android, you may consider this chapter a review or even skip it. If you’re new to the Android platform, this is a great place to get a broad understanding of the system. Either way, this chapter should serve as a great introduction to the bridge between Android and the Mono for Android runtime.
Although most of this chapter’s content focuses on features that are specifi c to the Android core classes, all code samples and naming conventions are presented as if you are working in a Mono for Android environment. For the most part, Mono for Android namespaces mirror those of Android. However, the casing, nonalphanumeric character usage, and names are sometimes modifi ed to favor the suggested practices of the C# language.
WHAT IS AN ANDROID APPLICATION?
Most applications have one entry point at which the developer can defi ne start-up procedures, resource initialization, and other steps. In the case of Windows programming, this is characterized by the Main() function. Although Android applications have settings that identify an application’s default entry point, Android apps are not what you would consider typical. When you look at an Android application, no single function unilaterally instantiates the entire application. This is because Android applications behave and interact much like a group of related subapplications rather than a single rigid entity.
Android applications are an association of core components that can be called and instantiated upon demand. In fact, these components can work independently of each other but still maintain a cohesive story via loose coupling and preestablished means of communicating with one another. Furthermore, the interactions between the application’s components are not limited to the applica-tion but may be accessed from other Android applications as well.
The reason for this structure is to allow for as much fl uidity between different applications, compo-nents, and features within an Android device as possible. Although this may increase the complexity of speaking from component to component, it gives the developer a lot of freedom to share data, share behaviors, or even create something of a distributed application.
For example, suppose you needed to create an application to store grocery data while a person was shopping. For this application to succeed, you would need to leverage the bar code on the back of the grocery item by reading it with the device. In most situations, you would likely have to down-load a bar code–scanning library and include it as part of your application build.
In addition to the application architecture, you should keep in mind a few other key points when developing any Mono for Android or Android application:
Every Android application runs in its own process. When an Android application is started, the Android OS starts a single Linux process. This makes it much simpler for the Android OS to create and destroy application processes upon request or when the system needs additional resources.
c03.indd 38c03.indd 38 22/02/13 4:00 PM22/02/13 4:00 PM
What Is an Android Application? ❘ 39
Android starts only one thread per process. If you remember nothing else from this chapter, remember this! When you are dealing with different application components within an Android application, it is easy to forget that, with a few exceptions, everything in an application runs in a single thread. Although it is a small matter to create additional threads to complete work, it is up to you as a developer to do so.
Every application runs in its own instance of the Dalvik virtual machine. This sandboxing method protects your application from being corrupted by other running applications. One badly planned application does not affect the stability of other applications on the device.
Every application is protected so that only the device user and the application can access the application’s data or resources. By default, all applications live in a silo in which other appli-cations cannot see stored or sensitive data or user actions. As a developer you can expose as many features or as much data as you want, but it has to be explicitly named. In addition, upon application installation or update, the user can accept or refuse any permission requests that the installing application may make of other applications.
Although these are default rule settings for applications, you can bend them by specifi cally writing the appropriate code or requesting the appropriate permission level from the device user. These rules are intended to help ensure the stability of your application and the Android device by allowing each application to live in its own world. In addition, they play a large role in protecting your application data from malicious attacks.
The Building Blocks of an Android Application
Android applications are composed of four building blocks that are often called the Android components. These components encapsulate different usage patterns and behaviors on the Android platform. Specifi cally, they can be defi ned as follows:
Activities
Services
Content providers
Broadcast receivers
An Android application may have one or many of each of these components. The following sections walk through what each of these items is, discuss their usage scenarios, and defi ne what native ver-sions of these items exist in the Android platform.
Activities
An activity is a user interface component that can be used to accomplish a single task. If you are working with Mono for Android or Android applications for the fi rst time, odds are that the fi rst application component you develop will be an activity. When you are running an Android applica-tion, every screen that the application displays or that you interact with is launched by one or more activities. Broadly speaking, activities comprise the application’s presentation layer. They handle the logic to display information to the user, present controls and collect their data, and direct the user to other activities as needed.
c03.indd 39c03.indd 39 22/02/13 4:00 PM22/02/13 4:00 PM
40 ❘ CHAPTER 3 UNDERSTANDING ANDROID/MONO FOR ANDROID APPLICATIONS
An application may consist of one or many activities. The number that an application may have is based on an application’s complexity and the developer’s design decisions. Since each component of an Android application is expected to be able to function independently of the others, activities can be launched by being marked as the application’s startup activity in the Android manifest or by the current activity launching a new activity directly.
In Android, you can identify the start-up activity by adding the appropriate action to the activity’s intent fi lter. This occurs within the Android manifest. This differs quite a bit from Mono for Android in that Mono for Android allows you to specify the start-up activity by using the following attribute in your activ-ity’s class declaration:
[Activity(Label = “My Activity”, MainLauncher = true)]public class Activity1 : Activity{ //Activity class implementation...}
The Android manifest, intent fi lters, and actions are covered later in this chapter and in Chapter 11.
An activity is probably the simplest of the application components to work with. For the most part, you can think of an activity as having two basic operating parts:
A collection of one or more views: These items comprise the different interfaces that can be presented to the user. This can vary from simple Toast() messages to full, complex data tables to animations. Views are discussed at more length in the following sections.
The activity class: This acts as the controller for the activity. Based on user interaction, it handles the launching of additional layouts and views, the fetching and binding of appropri-ate data, and the collection and delegating of collected data.
If you’re familiar with the MVC pattern, you will quickly recognize how activities are structured, because Android activities and views were developed with this in mind. The Activity class acts as the controller. The class receives input and acts on that input, calling the appropriate model objects and presenting various views. On the other hand, Android views are responsible for knowing how to present the model objects they are passed. One Android activity (controller) may present many different views, based on the user input.
The Activity Life Cycle
The life cycle of an Android component runs from the time when the component is created to the time when it is destroyed. In the larger scheme of things, component life cycles are a part of the overall Android resource management process. By gauging where different components are within their life cycle pattern, the Android OS can decide how to allocate resources and manage memory requirements. Specifi cally, an activity’s life cycle is a series of states that starts with the activity’s
c03.indd 40c03.indd 40 22/02/13 4:00 PM22/02/13 4:00 PM
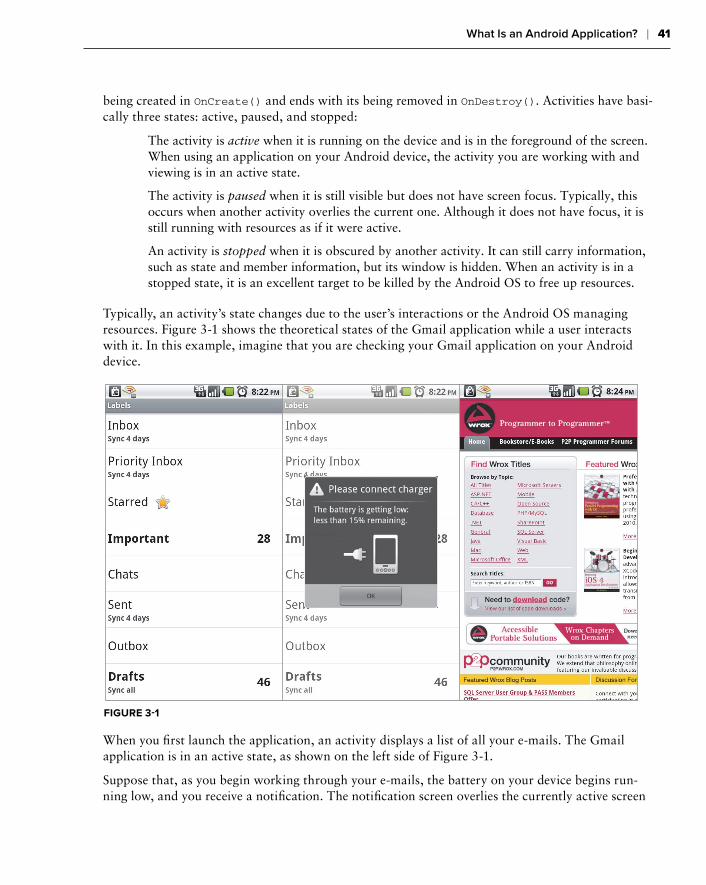
What Is an Android Application? ❘ 41
being created in OnCreate() and ends with its being removed in OnDestroy(). Activities have basi-cally three states: active, paused, and stopped:
The activity is active when it is running on the device and is in the foreground of the screen. When using an application on your Android device, the activity you are working with and viewing is in an active state.
The activity is paused when it is still visible but does not have screen focus. Typically, this occurs when another activity overlies the current one. Although it does not have focus, it is still running with resources as if it were active.
An activity is stopped when it is obscured by another activity. It can still carry information, such as state and member information, but its window is hidden. When an activity is in a stopped state, it is an excellent target to be killed by the Android OS to free up resources.
Typically, an activity’s state changes due to the user’s interactions or the Android OS managing resources. Figure 3-1 shows the theoretical states of the Gmail application while a user interacts with it. In this example, imagine that you are checking your Gmail application on your Android device.
FIGURE 3-1
When you fi rst launch the application, an activity displays a list of all your e-mails. The Gmail application is in an active state, as shown on the left side of Figure 3-1.
Suppose that, as you begin working through your e-mails, the battery on your device begins run-ning low, and you receive a notifi cation. The notifi cation screen overlies the currently active screen
c03.indd 41c03.indd 41 22/02/13 4:00 PM22/02/13 4:00 PM
42 ❘ CHAPTER 3 UNDERSTANDING ANDROID/MONO FOR ANDROID APPLICATIONS
to warn you, as shown in the middle of Figure 3-1. You can see your Gmail application in the back-ground, but it is in a paused state.
You clear the warning message and fi nd the e-mail you are looking for. You open it and follow a link within it. This launches the browser app, which completely covers the Gmail activity (the right side of Figure 3-1). At this point, the Gmail activity is in a stopped state. Even though it may still be running and may contain some instance values, the Android OS will possibly kill it as more resources are requested by your browsing or by using other applications.
As an activity is moved from one state to another, the application developer needs to be able to respond to the changes in state. Therefore, the Activity class exposes several events that trigger when the activity state changes. These events allow you to respond to the state change appropri-ately to preserve your application’s data and free unnecessary resources. The available events are OnCreate(), OnStart(), OnRestart(), OnResume(), OnPause(), OnStop(), and OnDestroy().
Although you may have occasion to use any of these events, OnCreate() and OnPause() typically are the ones that are used most frequently:
The OnCreate() method is reserved for defi ning whatever initialization activities your appli-cation may require. In this method, you defi ne the fi rst view that you will present to the user by using the SetContentView() method of the Activity base class. Also, you may choose to request access to various system resources. Finally, you use this class to assign delegates to the appropriate event handlers for controls such as a button press.
The OnPause() method is a key tool for handling situations in which your activity is going into the background. During an activity’s life cycle, this method is called when the user navi-gates away from your activity. This method lets you clean up your application’s resource usage by closing access to system resources, such as the device’s camera, or halt expensive tasks such as animations.
By understanding the activity life cycle, you can ensure the stability of your application, protect the integrity of your data, and improve system performance by proactively freeing resources when they are no longer necessary.
Activities and Views
To fully utilize activities, you need a pretty solid understanding of what views are, as well as how they are used throughout Mono for Android and Android. When an activity runs, the Android OS assigns that activity a window in which it can draw whatever content it needs to present. The content to display within this window space is communicated via views. In short, views are the basic build-ing blocks used to defi ne the controls and layout that the activity presents to the user to interact with.
Each activity can present a single view or a hierarchy of views within its window space. This is accomplished by calling the activity’s SetContentView() method and by providing the appropri-ate view item to display. In addition to setting the initial view within the OnCreate() event of the Activity class, activities can change the view that is displayed based on triggered events or by launching into a different activity.
The Android platform has several different implementations of views. Every view type extends the View class, which defi nes the basic interface behaviors such as creation, layout, event processing,
c03.indd 42c03.indd 42 22/02/13 4:00 PM22/02/13 4:00 PM
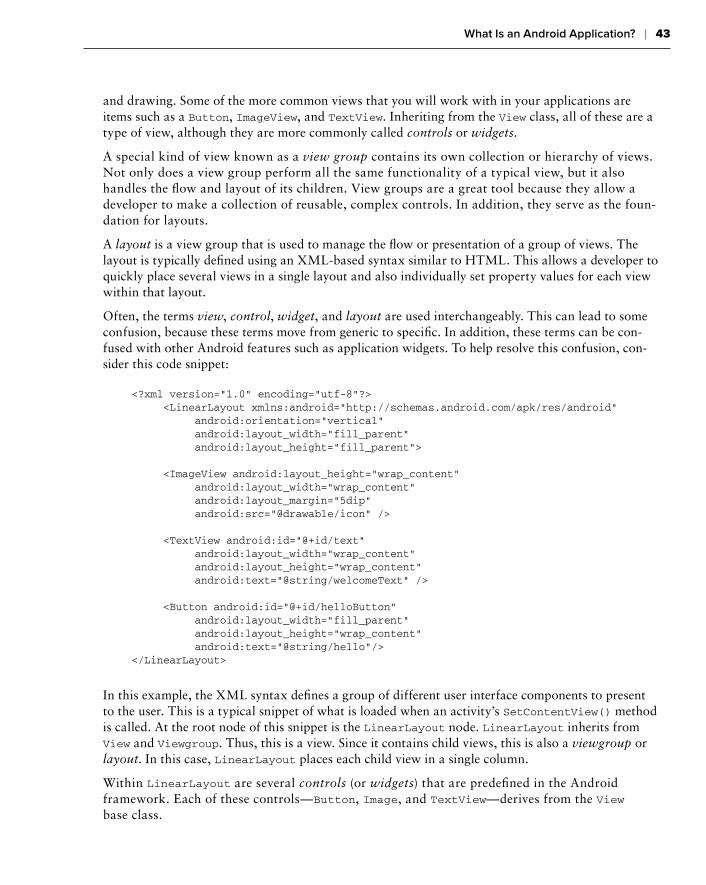
What Is an Android Application? ❘ 43
and drawing. Some of the more common views that you will work with in your applications are items such as a Button, ImageView, and TextView. Inheriting from the View class, all of these are a type of view, although they are more commonly called controls or widgets.
A special kind of view known as a view group contains its own collection or hierarchy of views. Not only does a view group perform all the same functionality of a typical view, but it also handles the fl ow and layout of its children. View groups are a great tool because they allow a developer to make a collection of reusable, complex controls. In addition, they serve as the foun-dation for layouts.
A layout is a view group that is used to manage the fl ow or presentation of a group of views. The layout is typically defi ned using an XML-based syntax similar to HTML. This allows a developer to quickly place several views in a single layout and also individually set property values for each view within that layout.
Often, the terms view, control, widget, and layout are used interchangeably. This can lead to some confusion, because these terms move from generic to specifi c. In addition, these terms can be con-fused with other Android features such as application widgets. To help resolve this confusion, con-sider this code snippet:
<?xml version=”1.0” encoding=”utf-8”?> <LinearLayout xmlns:android=”http://schemas.android.com/apk/res/android” android:orientation=”vertical” android:layout_width=”fill_parent” android:layout_height=”fill_parent”>
<ImageView android:layout_height=”wrap_content” android:layout_width=”wrap_content” android:layout_margin=”5dip” android:src=”@drawable/icon” />
<TextView android:id=”@+id/text” android:layout_width=”wrap_content” android:layout_height=”wrap_content” android:text=”@string/welcomeText” />
<Button android:id=”@+id/helloButton” android:layout_width=”fill_parent” android:layout_height=”wrap_content” android:text=”@string/hello”/></LinearLayout>
In this example, the XML syntax defi nes a group of different user interface components to present to the user. This is a typical snippet of what is loaded when an activity’s SetContentView() method is called. At the root node of this snippet is the LinearLayout node. LinearLayout inherits from View and Viewgroup. Thus, this is a view. Since it contains child views, this is also a viewgroup or layout. In this case, LinearLayout places each child view in a single column.
Within LinearLayout are several controls (or widgets) that are predefi ned in the Android framework. Each of these controls—Button, Image, and TextView—derives from the View base class.
c03.indd 43c03.indd 43 22/02/13 4:00 PM22/02/13 4:00 PM
44 ❘ CHAPTER 3 UNDERSTANDING ANDROID/MONO FOR ANDROID APPLICATIONS
Chapter 4 delves deeper into types of views and how to utilize them in conjunc-tion with your activities.
Services
A service is a unit of work defi ned by the developer that can run for an indefi nite period of time. Unlike activities, services do not have a visual component. In addition, they do not rely on the appli-cation user to function. They can be used for a plethora of tasks, such as fetching data from the network, playing music while you are browsing through other applications, or working on a longer-running task. When you think of any kind of automated or timed task on an Android device, you are most likely thinking of something that runs as a service.
Services often confuse those who have not worked in the Android environment before. When devel-opers hear the term service, they often think of a “background service.” Although services are used for just this purpose, developers often make the mistake of assuming that services run on a differ-ent thread than other components of an application. This is not the case. As a developer, you are responsible for creating additional threads as necessary. All items in an Android application run within the same thread unless specifi cally handled by the developer.
In a nutshell, services are the workforce of an Android application. They can be used to queue a set of tasks to be processed or to systematically check the status of a network resource. Also, a service is a way to expose a task to other applications, allowing them to interact with that particular work. Services are a great way to handle repetitive or ongoing tasks, even when your application’s activities are inactive or closed. Typical Android services include mail applications, RSS readers that periodi-cally check for updates, podcast playback applications, and Twitter clients.
Services are both a broad and deep topic that goes beyond the scope of this chapter. Chapter 11 digs deeper into the inner workings of a service, the different aspects of the service life cycle, and how to implement services in your Mono for Android applications.
When an application is initially asked to run, Android starts a process for it with a single thread. All components within that application run in that single thread. To prevent the application from locking while the service is being executed, it is vital to spawn different threads or defi ne different processes to handle the ser-vice task while allowing the user to enjoy a responsive interface.
Content Providers
Content providers are the preferred means of sharing information across multiple applications. They can be thought of as a type of community data storage that allows developers to expose spe-cifi c sets of data to be queried or even manipulated by other applications and processes. Because the Android platform has no universal data storage mechanism, content providers are a great way to create common data pools for Android applications.
Content providers have the fl exibility to allow you to defi ne one or many data sets that target different subsets of your data. With this fl exibility, you can protect data that you want to exist in only your appli-cation, such as personal user data, while sharing other data with applications that meet the security
c03.indd 44c03.indd 44 22/02/13 4:00 PM22/02/13 4:00 PM
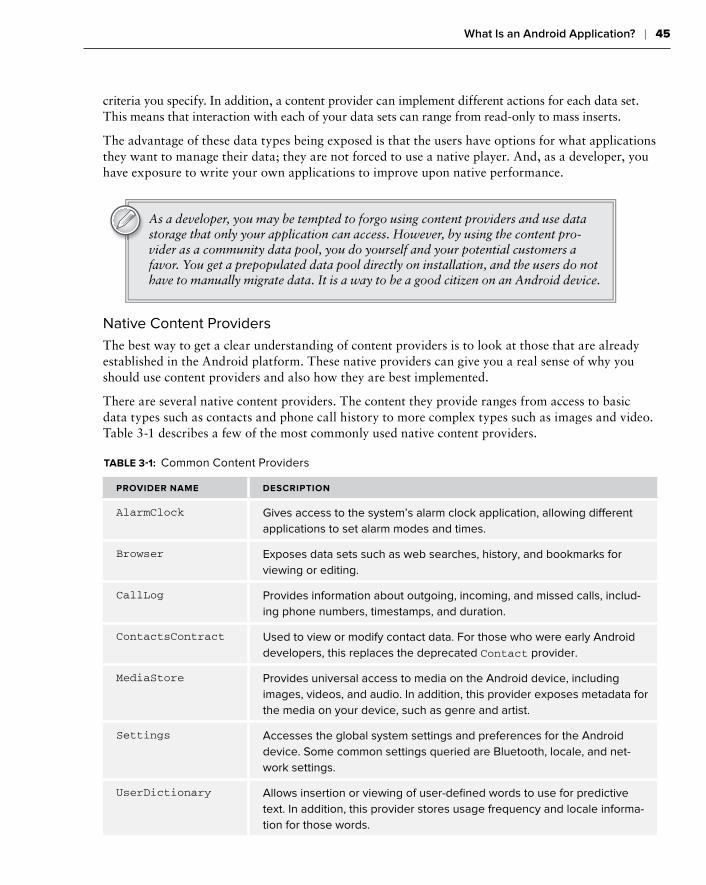
What Is an Android Application? ❘ 45
criteria you specify. In addition, a content provider can implement different actions for each data set. This means that interaction with each of your data sets can range from read-only to mass inserts.
The advantage of these data types being exposed is that the users have options for what applications they want to manage their data; they are not forced to use a native player. And, as a developer, you have exposure to write your own applications to improve upon native performance.
As a developer, you may be tempted to forgo using content providers and use data storage that only your application can access. However, by using the content pro-vider as a community data pool, you do yourself and your potential customers a favor. You get a prepopulated data pool directly on installation, and the users do not have to manually migrate data. It is a way to be a good citizen on an Android device.
Native Content Providers
The best way to get a clear understanding of content providers is to look at those that are already established in the Android platform. These native providers can give you a real sense of why you should use content providers and also how they are best implemented.
There are several native content providers. The content they provide ranges from access to basic data types such as contacts and phone call history to more complex types such as images and video. Table 3-1 describes a few of the most commonly used native content providers.
TABLE 3-1: Common Content Providers
PROVIDER NAME DESCRIPTION
AlarmClock Gives access to the system’s alarm clock application, allowing diff erent
applications to set alarm modes and times.
Browser Exposes data sets such as web searches, history, and bookmarks for
viewing or editing.
CallLog Provides information about outgoing, incoming, and missed calls, includ-
ing phone numbers, timestamps, and duration.
ContactsContract Used to view or modify contact data. For those who were early Android
developers, this replaces the deprecated Contact provider.
MediaStore Provides universal access to media on the Android device, including
images, videos, and audio. In addition, this provider exposes metadata for
the media on your device, such as genre and artist.
Settings Accesses the global system settings and preferences for the Android
device. Some common settings queried are Bluetooth, locale, and net-
work settings.
UserDictionary Allows insertion or viewing of user-defi ned words to use for predictive
text. In addition, this provider stores usage frequency and locale informa-
tion for those words.
c03.indd 45c03.indd 45 22/02/13 4:00 PM22/02/13 4:00 PM
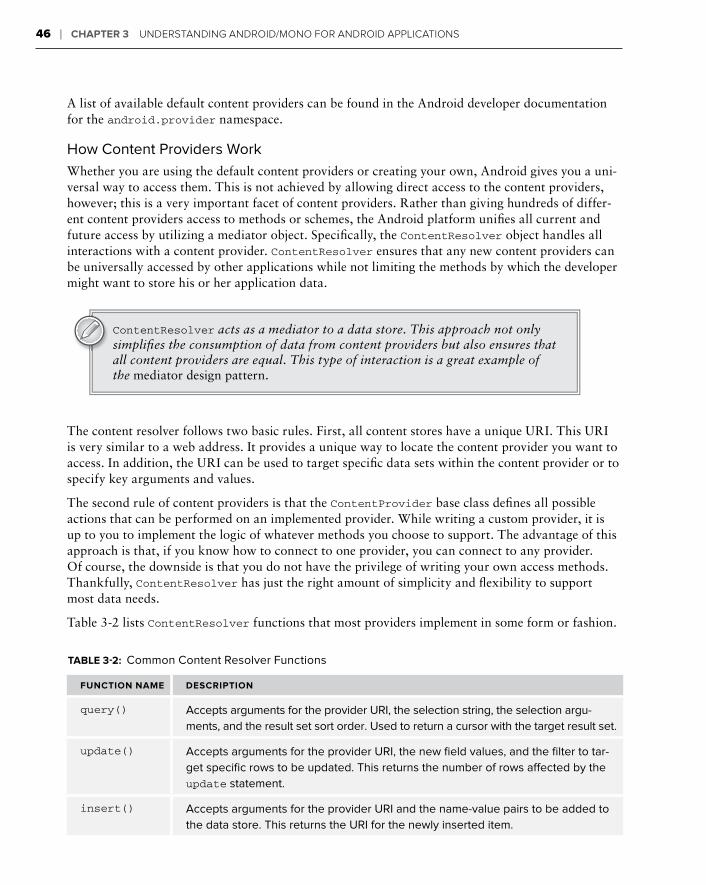
46 ❘ CHAPTER 3 UNDERSTANDING ANDROID/MONO FOR ANDROID APPLICATIONS
A list of available default content providers can be found in the Android developer documentation for the android.provider namespace.
How Content Providers Work
Whether you are using the default content providers or creating your own, Android gives you a uni-versal way to access them. This is not achieved by allowing direct access to the content providers, however; this is a very important facet of content providers. Rather than giving hundreds of differ-ent content providers access to methods or schemes, the Android platform unifi es all current and future access by utilizing a mediator object. Specifi cally, the ContentResolver object handles all interactions with a content provider. ContentResolver ensures that any new content providers can be universally accessed by other applications while not limiting the methods by which the developer might want to store his or her application data.
ContentResolver acts as a mediator to a data store. This approach not only simplifi es the consumption of data from content providers but also ensures that all content providers are equal. This type of interaction is a great example of the mediator design pattern.
The content resolver follows two basic rules. First, all content stores have a unique URI. This URI is very similar to a web address. It provides a unique way to locate the content provider you want to access. In addition, the URI can be used to target specifi c data sets within the content provider or to specify key arguments and values.
The second rule of content providers is that the ContentProvider base class defi nes all possible actions that can be performed on an implemented provider. While writing a custom provider, it is up to you to implement the logic of whatever methods you choose to support. The advantage of this approach is that, if you know how to connect to one provider, you can connect to any provider. Of course, the downside is that you do not have the privilege of writing your own access methods. Thankfully, ContentResolver has just the right amount of simplicity and fl exibility to support most data needs.
Table 3-2 lists ContentResolver functions that most providers implement in some form or fashion.
TABLE 3-2: Common Content Resolver Functions
FUNCTION NAME DESCRIPTION
query() Accepts arguments for the provider URI, the selection string, the selection argu-
ments, and the result set sort order. Used to return a cursor with the target result set.
update() Accepts arguments for the provider URI, the new fi eld values, and the fi lter to tar-
get specifi c rows to be updated. This returns the number of rows aff ected by the
update statement.
insert() Accepts arguments for the provider URI and the name-value pairs to be added to
the data store. This returns the URI for the newly inserted item.
c03.indd 46c03.indd 46 22/02/13 4:00 PM22/02/13 4:00 PM
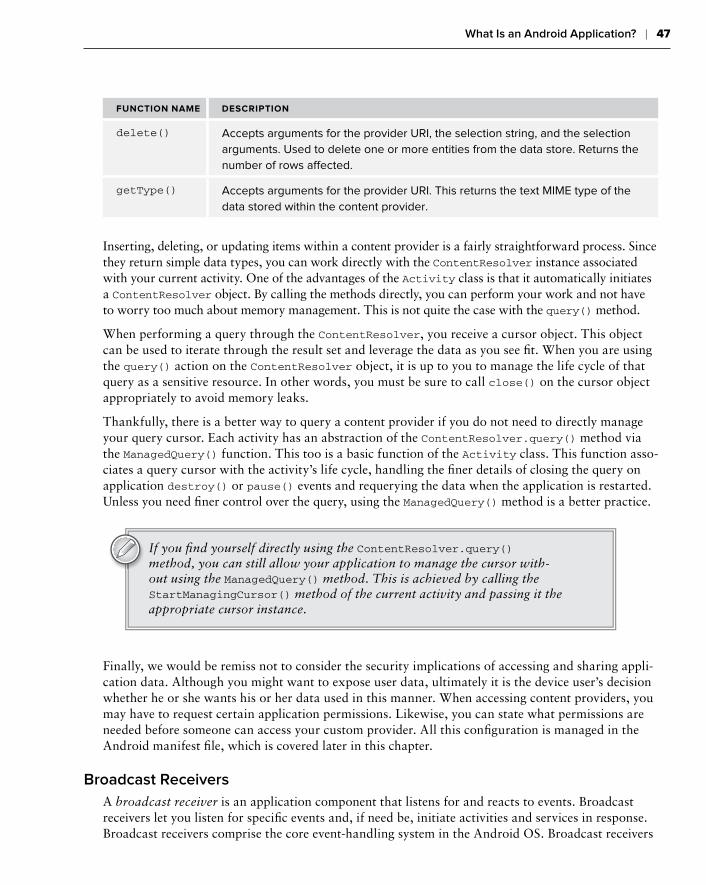
What Is an Android Application? ❘ 47
FUNCTION NAME DESCRIPTION
delete() Accepts arguments for the provider URI, the selection string, and the selection
arguments. Used to delete one or more entities from the data store. Returns the
number of rows aff ected.
getType() Accepts arguments for the provider URI. This returns the text MIME type of the
data stored within the content provider.
Inserting, deleting, or updating items within a content provider is a fairly straightforward process. Since they return simple data types, you can work directly with the ContentResolver instance associated with your current activity. One of the advantages of the Activity class is that it automatically initiates a ContentResolver object. By calling the methods directly, you can perform your work and not have to worry too much about memory management. This is not quite the case with the query() method.
When performing a query through the ContentResolver, you receive a cursor object. This object can be used to iterate through the result set and leverage the data as you see fi t. When you are using the query() action on the ContentResolver object, it is up to you to manage the life cycle of that query as a sensitive resource. In other words, you must be sure to call close() on the cursor object appropriately to avoid memory leaks.
Thankfully, there is a better way to query a content provider if you do not need to directly manage your query cursor. Each activity has an abstraction of the ContentResolver.query() method via the ManagedQuery() function. This too is a basic function of the Activity class. This function asso-ciates a query cursor with the activity’s life cycle, handling the fi ner details of closing the query on application destroy() or pause() events and requerying the data when the application is restarted. Unless you need fi ner control over the query, using the ManagedQuery() method is a better practice.
If you fi nd yourself directly using the ContentResolver.query() method, you can still allow your application to manage the cursor with-out using the ManagedQuery() method. This is achieved by calling the StartManagingCursor() method of the current activity and passing it the appropriate cursor instance.
Finally, we would be remiss not to consider the security implications of accessing and sharing appli-cation data. Although you might want to expose user data, ultimately it is the device user’s decision whether he or she wants his or her data used in this manner. When accessing content providers, you may have to request certain application permissions. Likewise, you can state what permissions are needed before someone can access your custom provider. All this confi guration is managed in the Android manifest fi le, which is covered later in this chapter.
Broadcast Receivers
A broadcast receiver is an application component that listens for and reacts to events. Broadcast receivers let you listen for specifi c events and, if need be, initiate activities and services in response. Broadcast receivers comprise the core event-handling system in the Android OS. Broadcast receivers
c03.indd 47c03.indd 47 22/02/13 4:00 PM22/02/13 4:00 PM
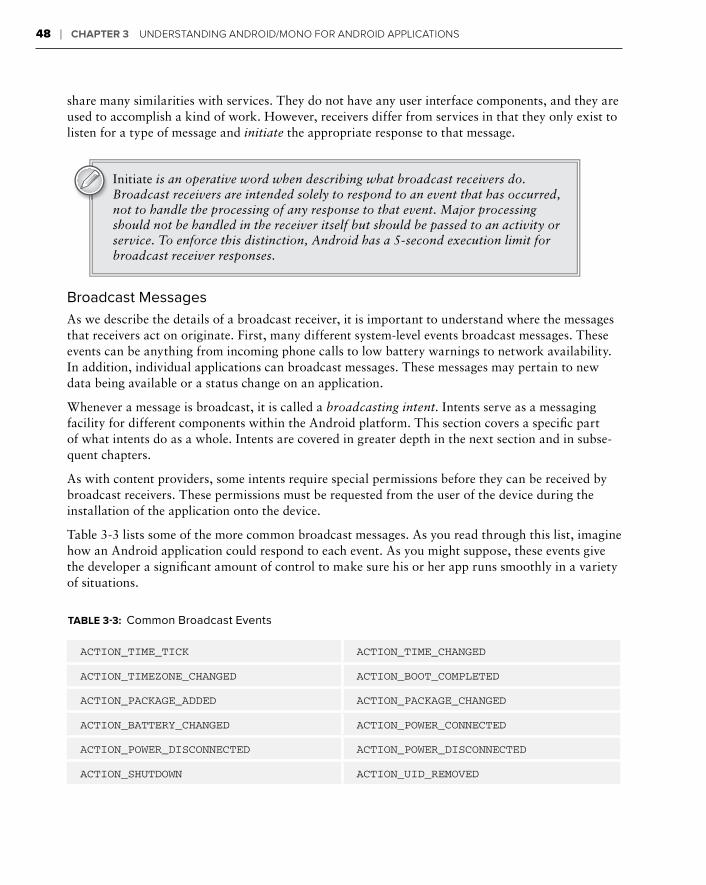
48 ❘ CHAPTER 3 UNDERSTANDING ANDROID/MONO FOR ANDROID APPLICATIONS
share many similarities with services. They do not have any user interface components, and they are used to accomplish a kind of work. However, receivers differ from services in that they only exist to listen for a type of message and initiate the appropriate response to that message.
Initiate is an operative word when describing what broadcast receivers do. Broadcast receivers are intended solely to respond to an event that has occurred, not to handle the processing of any response to that event. Major processing should not be handled in the receiver itself but should be passed to an activity or service. To enforce this distinction, Android has a 5-second execution limit for broadcast receiver responses.
Broadcast Messages
As we describe the details of a broadcast receiver, it is important to understand where the messages that receivers act on originate. First, many different system-level events broadcast messages. These events can be anything from incoming phone calls to low battery warnings to network availability. In addition, individual applications can broadcast messages. These messages may pertain to new data being available or a status change on an application.
Whenever a message is broadcast, it is called a broadcasting intent. Intents serve as a messaging facility for different components within the Android platform. This section covers a specifi c part of what intents do as a whole. Intents are covered in greater depth in the next section and in subse-quent chapters.
As with content providers, some intents require special permissions before they can be received by broadcast receivers. These permissions must be requested from the user of the device during the installation of the application onto the device.
Table 3-3 lists some of the more common broadcast messages. As you read through this list, imagine how an Android application could respond to each event. As you might suppose, these events give the developer a signifi cant amount of control to make sure his or her app runs smoothly in a variety of situations.
TABLE 3-3: Common Broadcast Events
ACTION_TIME_TICK ACTION_TIME_CHANGED
ACTION_TIMEZONE_CHANGED ACTION_BOOT_COMPLETED
ACTION_PACKAGE_ADDED ACTION_PACKAGE_CHANGED
ACTION_BATTERY_CHANGED ACTION_POWER_CONNECTED
ACTION_POWER_DISCONNECTED ACTION_POWER_DISCONNECTED
ACTION_SHUTDOWN ACTION_UID_REMOVED
c03.indd 48c03.indd 48 22/02/13 4:00 PM22/02/13 4:00 PM
What Is an Android Application? ❘ 49
Broadcast Receiver Life Cycle
A broadcast receiver has the simplest life cycle of all the components. Basically, it has only one call-back method, OnReceive(). When a message is received, the intent message’s data is passed to the receiver. At this point, the receiver is considered to be active while it handles the message and per-forms the proper actions. Once the OnReceive() method returns, a receiver is considered to be in an inactive status again.
Any process that has an active receiver is protected from being killed by the OS. This is an impor-tant point to bear in mind, because it can interfere with the system’s ability to free needed resources. Therefore, as previously noted, receivers have a 5-second execution limit. Any long-running work should be pushed to a different component, such as a service.
For more information regarding the basic building blocks of a Mono for Android or an Android application, please refer to the application fundamentals sections of the offi cial Android documentation at http://developer.android.com/guide/topics/fundamentals.html.
Communicating between Components: Android Intents
Now that you have had a look at the core components of an Android application, you need to work on understanding how those application pieces interact. To allow different pieces of the Android platform to communicate with one another, Android needed a universal messaging system. This messaging system had to support a variety of different usage scenarios while respecting the auton-omy of the application components. In addition, this messaging system would have to be a generic, passive system that could be consumed by any application component whether or not the originat-ing process knew who was receiving the message. These notions led to the creation of intents.
Intents form the messaging system for the Android platform. Because Android components operate in proverbial silos, intents provide a critical function by allowing them to communicate with one another seamlessly. In particular, intents can be used to do the following:
Interact with an activity either by requesting that the activity start a new task or by starting a new activity
Interact with a service by either initializing a new service or delivering a new instruction set to an ongoing service
Interact with broadcast receivers by serving as the medium by which messages are broadcast
In some ways, you can think of the intent system as a way to transform your application into part of a much larger, distributed application. This allows you to make signifi cant time savings by leveraging another application’s functionality for your own. Some common usage scenarios for intents include playing a piece of downloaded music, notifying interested applications that the cell phone signal has been lost, or passing changes in an application state to other listening applications.
c03.indd 49c03.indd 49 22/02/13 4:00 PM22/02/13 4:00 PM
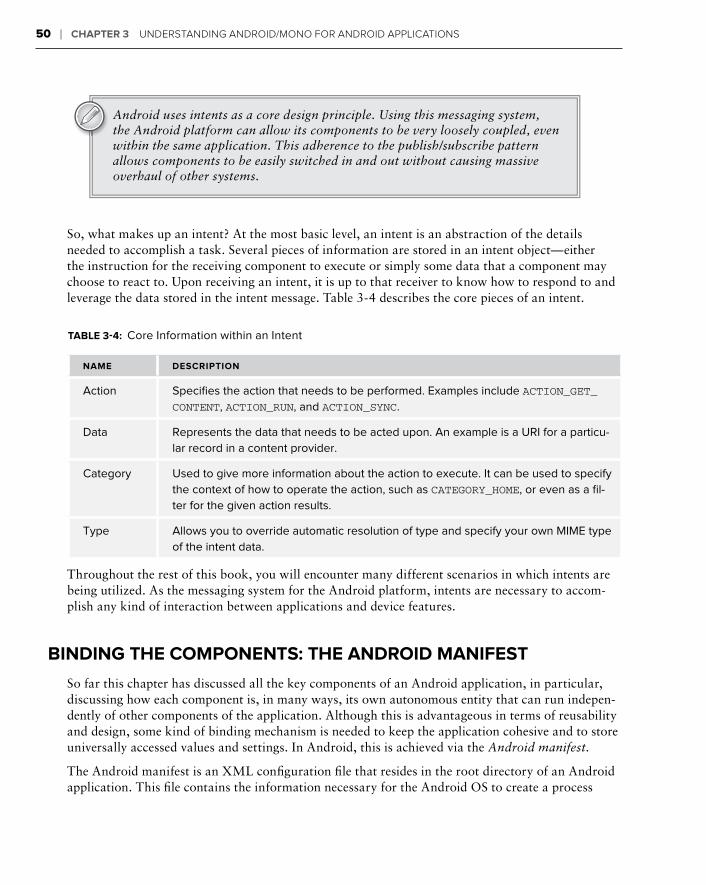
50 ❘ CHAPTER 3 UNDERSTANDING ANDROID/MONO FOR ANDROID APPLICATIONS
Android uses intents as a core design principle. Using this messaging system, the Android platform can allow its components to be very loosely coupled, even within the same application. This adherence to the publish/subscribe pattern allows components to be easily switched in and out without causing massive overhaul of other systems.
So, what makes up an intent? At the most basic level, an intent is an abstraction of the details needed to accomplish a task. Several pieces of information are stored in an intent object—either the instruction for the receiving component to execute or simply some data that a component may choose to react to. Upon receiving an intent, it is up to that receiver to know how to respond to and leverage the data stored in the intent message. Table 3-4 describes the core pieces of an intent.
TABLE 3-4: Core Information within an Intent
NAME DESCRIPTION
Action Specifi es the action that needs to be performed. Examples include ACTION_GET_
CONTENT, ACTION_RUN, and ACTION_SYNC.
Data Represents the data that needs to be acted upon. An example is a URI for a particu-
lar record in a content provider.
Category Used to give more information about the action to execute. It can be used to specify
the context of how to operate the action, such as CATEGORY_HOME, or even as a fi l-
ter for the given action results.
Type Allows you to override automatic resolution of type and specify your own MIME type
of the intent data.
Throughout the rest of this book, you will encounter many different scenarios in which intents are being utilized. As the messaging system for the Android platform, intents are necessary to accom-plish any kind of interaction between applications and device features.
BINDING THE COMPONENTS: THE ANDROID MANIFEST
So far this chapter has discussed all the key components of an Android application, in particular, discussing how each component is, in many ways, its own autonomous entity that can run indepen-dently of other components of the application. Although this is advantageous in terms of reusability and design, some kind of binding mechanism is needed to keep the application cohesive and to store universally accessed values and settings. In Android, this is achieved via the Android manifest.
The Android manifest is an XML confi guration fi le that resides in the root directory of an Android application. This fi le contains the information necessary for the Android OS to create a process
c03.indd 50c03.indd 50 22/02/13 4:00 PM22/02/13 4:00 PM
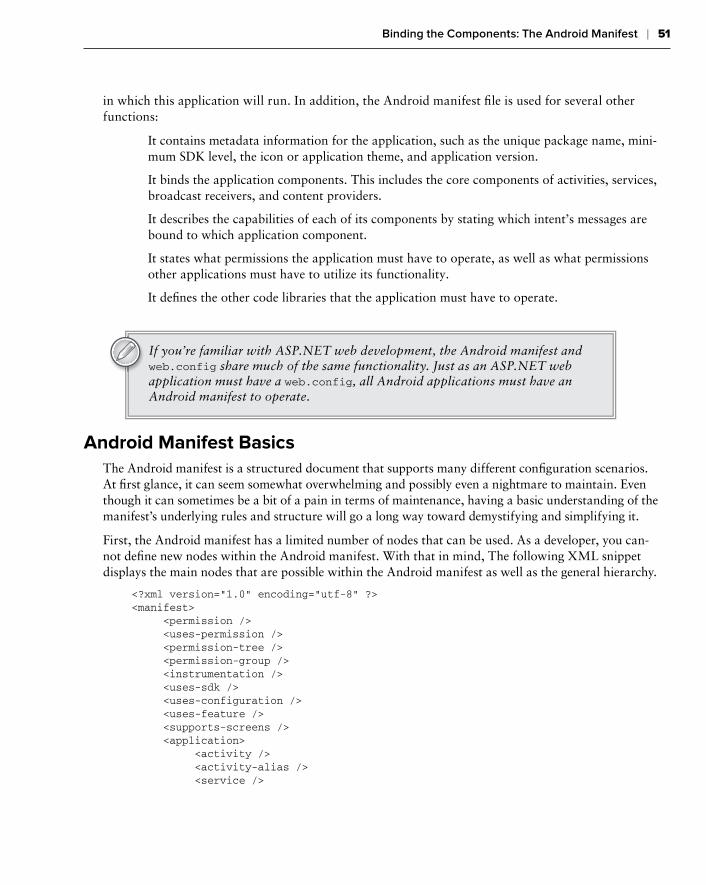
Binding the Components: The Android Manifest ❘ 51
in which this application will run. In addition, the Android manifest fi le is used for several other functions:
It contains metadata information for the application, such as the unique package name, mini-mum SDK level, the icon or application theme, and application version.
It binds the application components. This includes the core components of activities, services, broadcast receivers, and content providers.
It describes the capabilities of each of its components by stating which intent’s messages are bound to which application component.
It states what permissions the application must have to operate, as well as what permissions other applications must have to utilize its functionality.
It defi nes the other code libraries that the application must have to operate.
If you’re familiar with ASP.NET web development, the Android manifest and web.config share much of the same functionality. Just as an ASP.NET web application must have a web.config, all Android applications must have an Android manifest to operate.
Android Manifest Basics
The Android manifest is a structured document that supports many different confi guration scenarios. At fi rst glance, it can seem somewhat overwhelming and possibly even a nightmare to maintain. Even though it can sometimes be a bit of a pain in terms of maintenance, having a basic understanding of the manifest’s underlying rules and structure will go a long way toward demystifying and simplifying it.
First, the Android manifest has a limited number of nodes that can be used. As a developer, you can-not defi ne new nodes within the Android manifest. With that in mind, The following XML snippet displays the main nodes that are possible within the Android manifest as well as the general hierarchy.
<?xml version=”1.0” encoding=”utf-8” ?><manifest> <permission /> <uses-permission /> <permission-tree /> <permission-group /> <instrumentation /> <uses-sdk /> <uses-configuration /> <uses-feature /> <supports-screens /> <application> <activity /> <activity-alias /> <service />
c03.indd 51c03.indd 51 22/02/13 4:00 PM22/02/13 4:00 PM
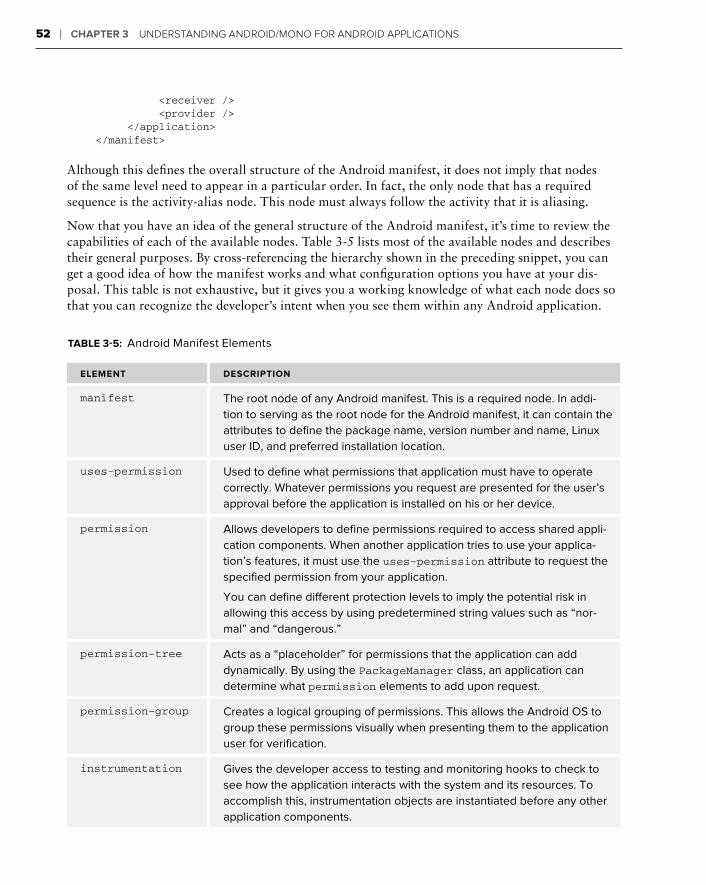
52 ❘ CHAPTER 3 UNDERSTANDING ANDROID/MONO FOR ANDROID APPLICATIONS
<receiver /> <provider /> </application></manifest>
Although this defi nes the overall structure of the Android manifest, it does not imply that nodes of the same level need to appear in a particular order. In fact, the only node that has a required sequence is the activity-alias node. This node must always follow the activity that it is aliasing.
Now that you have an idea of the general structure of the Android manifest, it’s time to review the capabilities of each of the available nodes. Table 3-5 lists most of the available nodes and describes their general purposes. By cross-referencing the hierarchy shown in the preceding snippet, you can get a good idea of how the manifest works and what confi guration options you have at your dis-posal. This table is not exhaustive, but it gives you a working knowledge of what each node does so that you can recognize the developer’s intent when you see them within any Android application.
TABLE 3-5: Android Manifest Elements
ELEMENT DESCRIPTION
manifest The root node of any Android manifest. This is a required node. In addi-
tion to serving as the root node for the Android manifest, it can contain the
attributes to defi ne the package name, version number and name, Linux
user ID, and preferred installation location.
uses-permission Used to defi ne what permissions that application must have to operate
correctly. Whatever permissions you request are presented for the user’s
approval before the application is installed on his or her device.
permission Allows developers to defi ne permissions required to access shared appli-
cation components. When another application tries to use your applica-
tion’s features, it must use the uses-permission attribute to request the
specifi ed permission from your application.
You can defi ne diff erent protection levels to imply the potential risk in
allowing this access by using predetermined string values such as “nor-
mal” and “dangerous.”
permission-tree Acts as a “placeholder” for permissions that the application can add
dynamically. By using the PackageManager class, an application can
determine what permission elements to add upon request.
permission-group Creates a logical grouping of permissions. This allows the Android OS to
group these permissions visually when presenting them to the application
user for verifi cation.
instrumentation Gives the developer access to testing and monitoring hooks to check to
see how the application interacts with the system and its resources. To
accomplish this, instrumentation objects are instantiated before any other
application components.
c03.indd 52c03.indd 52 22/02/13 4:00 PM22/02/13 4:00 PM
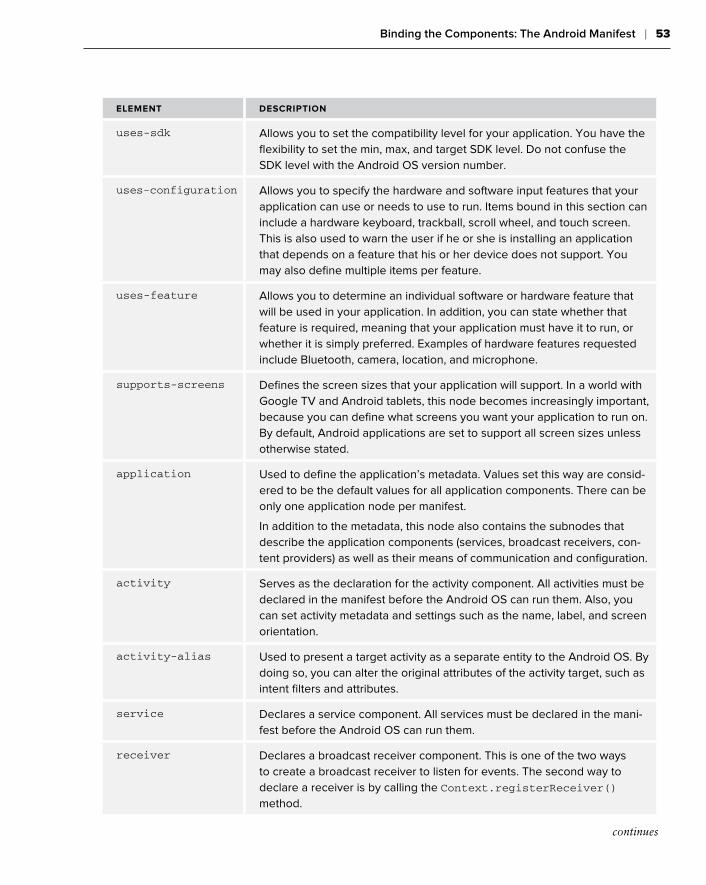
Binding the Components: The Android Manifest ❘ 53
ELEMENT DESCRIPTION
uses-sdk Allows you to set the compatibility level for your application. You have the
fl exibility to set the min, max, and target SDK level. Do not confuse the
SDK level with the Android OS version number.
uses-configuration Allows you to specify the hardware and software input features that your
application can use or needs to use to run. Items bound in this section can
include a hardware keyboard, trackball, scroll wheel, and touch screen.
This is also used to warn the user if he or she is installing an application
that depends on a feature that his or her device does not support. You
may also defi ne multiple items per feature.
uses-feature Allows you to determine an individual software or hardware feature that
will be used in your application. In addition, you can state whether that
feature is required, meaning that your application must have it to run, or
whether it is simply preferred. Examples of hardware features requested
include Bluetooth, camera, location, and microphone.
supports-screens Defi nes the screen sizes that your application will support. In a world with
Google TV and Android tablets, this node becomes increasingly important,
because you can defi ne what screens you want your application to run on.
By default, Android applications are set to support all screen sizes unless
otherwise stated.
application Used to defi ne the application’s metadata. Values set this way are consid-
ered to be the default values for all application components. There can be
only one application node per manifest.
In addition to the metadata, this node also contains the subnodes that
describe the application components (services, broadcast receivers, con-
tent providers) as well as their means of communication and confi guration.
activity Serves as the declaration for the activity component. All activities must be
declared in the manifest before the Android OS can run them. Also, you
can set activity metadata and settings such as the name, label, and screen
orientation.
activity-alias Used to present a target activity as a separate entity to the Android OS. By
doing so, you can alter the original attributes of the activity target, such as
intent fi lters and attributes.
service Declares a service component. All services must be declared in the mani-
fest before the Android OS can run them.
receiver Declares a broadcast receiver component. This is one of the two ways
to create a broadcast receiver to listen for events. The second way to
declare a receiver is by calling the Context.registerReceiver()
method.
continues
c03.indd 53c03.indd 53 22/02/13 4:00 PM22/02/13 4:00 PM

54 ❘ CHAPTER 3 UNDERSTANDING ANDROID/MONO FOR ANDROID APPLICATIONS
ELEMENT DESCRIPTION
provider Specifi es each of your application’s content providers. If your application
is creating a custom provider, the system is unable to use that content pro-
vider unless it is declared within the Android manifest.
intent-filter Specifi es the kind of intents that a given application component can
respond to. This can be a subnode of the activity, service, and
receiver nodes. This node allows you to defi ne a type of intent you
would like to receive, while fi ltering out all other kinds of intents.
meta-data Contains additional developer-defi ned key-value pair data that can be
utilized by the application component in which it is located. This serves as
a subnode of activity, service, provider, and receiver.
uses-library Allows you to specify any shared libraries on which your application may
depend.
Do not let the number of available nodes and attributes overwhelm you. Despite the number of options within the manifest, the Android OS requires only the manifest and application nodes. Other nodes are used to defi ne details and permissions to perform actions you will add as you develop your application.
The Android manifest is a powerful tool that serves as the “glue” for your application. Not only does it give your application an identity and purpose, but it also brings together all the individual components of your application. Finally, you can use the Android manifest to fi ne-tune the permis-sions and general confi guration properties for all your application components in a single location.
For more information regarding the Android manifest or any of its components, please check out the Mono for Android documentation or the offi cial Android documentation:
Mono for Android: http://mono-android.net/Documentation/Guides/Working_with_AndroidManifest.xml
Offi cial Android: http://developer.android.com/guide/topics/manifest/manifest-intro.html
Editing the Manifest for Mono for Android via Visual Studio
Although many “Androidisms” carry over quite nicely into the Mono for Android world, some areas pertain to Mono for Android alone. In this case, the location and the toolset used to edit the Android manifest differ greatly from those of a typical Android application.
When a new application is created, the Android manifest is not part of the project. As you learned in the previous chapter, Mono for Android is possible because it generates the appropriate Java and
TABLE 3-5 (continued)
c03.indd 54c03.indd 54 22/02/13 4:00 PM22/02/13 4:00 PM
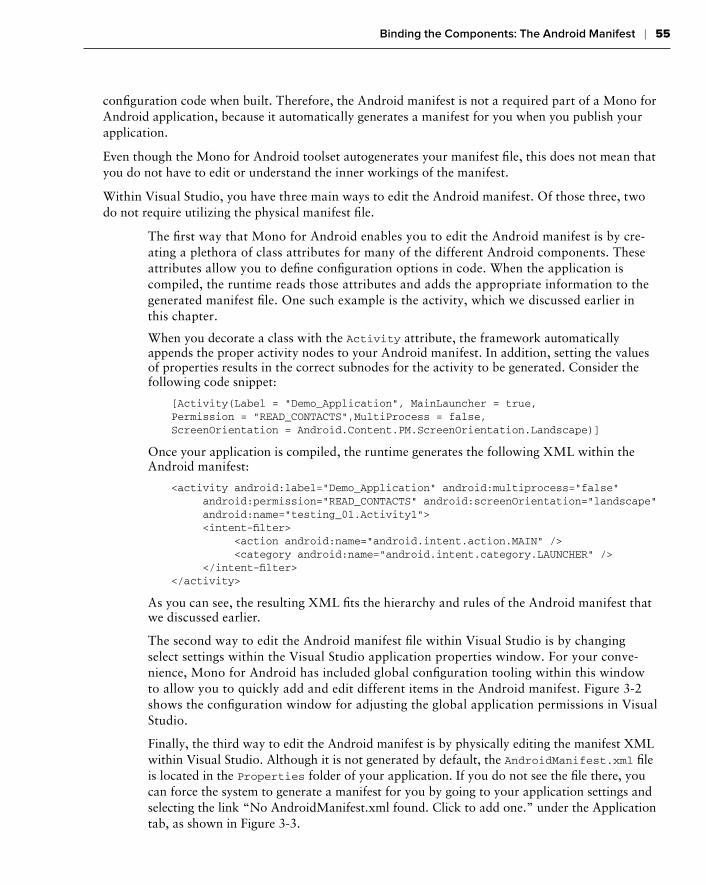
Binding the Components: The Android Manifest ❘ 55
confi guration code when built. Therefore, the Android manifest is not a required part of a Mono for Android application, because it automatically generates a manifest for you when you publish your application.
Even though the Mono for Android toolset autogenerates your manifest fi le, this does not mean that you do not have to edit or understand the inner workings of the manifest.
Within Visual Studio, you have three main ways to edit the Android manifest. Of those three, two do not require utilizing the physical manifest fi le.
The fi rst way that Mono for Android enables you to edit the Android manifest is by cre-ating a plethora of class attributes for many of the different Android components. These attributes allow you to defi ne confi guration options in code. When the application is compiled, the runtime reads those attributes and adds the appropriate information to the generated manifest fi le. One such example is the activity, which we discussed earlier in this chapter.
When you decorate a class with the Activity attribute, the framework automatically appends the proper activity nodes to your Android manifest. In addition, setting the values of properties results in the correct subnodes for the activity to be generated. Consider the following code snippet:
[Activity(Label = “Demo_Application”, MainLauncher = true,Permission = “READ_CONTACTS”,MultiProcess = false,ScreenOrientation = Android.Content.PM.ScreenOrientation.Landscape)]
Once your application is compiled, the runtime generates the following XML within the Android manifest:
<activity android:label=”Demo_Application” android:multiprocess=”false” android:permission=”READ_CONTACTS” android:screenOrientation=”landscape” android:name=”testing_01.Activity1”> <intent-fi lter> <action android:name=”android.intent.action.MAIN” /> <category android:name=”android.intent.category.LAUNCHER” /> </intent-fi lter></activity>
As you can see, the resulting XML fi ts the hierarchy and rules of the Android manifest that we discussed earlier.
The second way to edit the Android manifest fi le within Visual Studio is by changing select settings within the Visual Studio application properties window. For your conve-nience, Mono for Android has included global confi guration tooling within this window to allow you to quickly add and edit different items in the Android manifest. Figure 3-2 shows the confi guration window for adjusting the global application permissions in Visual Studio.
Finally, the third way to edit the Android manifest is by physically editing the manifest XML within Visual Studio. Although it is not generated by default, the AndroidManifest.xml fi le is located in the Properties folder of your application. If you do not see the fi le there, you can force the system to generate a manifest for you by going to your application settings and selecting the link “No AndroidManifest.xml found. Click to add one.” under the Application tab, as shown in Figure 3-3.
c03.indd 55c03.indd 55 22/02/13 4:00 PM22/02/13 4:00 PM
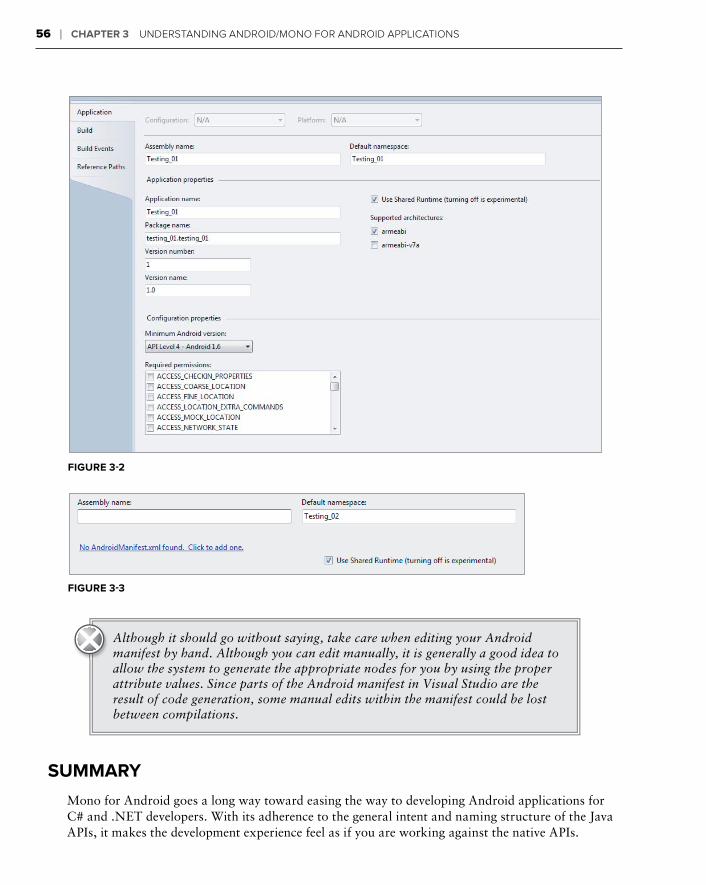
56 ❘ CHAPTER 3 UNDERSTANDING ANDROID/MONO FOR ANDROID APPLICATIONS
FIGURE 3-2
FIGURE 3-3
Although it should go without saying, take care when editing your Android manifest by hand. Although you can edit manually, it is generally a good idea to allow the system to generate the appropriate nodes for you by using the proper attribute values. Since parts of the Android manifest in Visual Studio are the result of code generation, some manual edits within the manifest could be lost between compilations.
SUMMARY
Mono for Android goes a long way toward easing the way to developing Android applications for C# and .NET developers. With its adherence to the general intent and naming structure of the Java APIs, it makes the development experience feel as if you are working against the native APIs.
c03.indd 56c03.indd 56 22/02/13 4:00 PM22/02/13 4:00 PM
Summary ❘ 57
However, this does not mean that you do not need a good understanding of the Android platform and how its basic components function and interact. By having a great understanding of the under-lying ideas behind intents, content providers, services, broadcast receivers, and activities, you can develop applications that not only fully utilize the features of the Android device but also interact with other Java-based applications.
Finally, you create a cohesive application of independent but cooperating components by using the Android manifest.
c03.indd 57c03.indd 57 22/02/13 4:00 PM22/02/13 4:00 PM

c03.indd 58c03.indd 58 22/02/13 4:00 PM22/02/13 4:00 PM
4Planning and Building Your Application’s User Interface
WHAT’S IN THIS CHAPTER?
Mobile UI guidelines
Building a UI for Android
Examining the layout of controls
Exploring the UI controls
Designing screen-independent UI
In this chapter you’ll learn about creating your application’s user interface (UI). You’ll get a look at a base set of guidelines for building a successful user interface on Android, examine the options for building a user interface, and see how controls are laid out in Android. Finally, you’ll get to explore the controls available to Android developers.
GUIDELINES FOR A SUCCESSFUL MOBILE UI
Before you dig into building a user interface, it’s important to understand some guidelines for doing so successfully. These guidelines affect how users will use applications when they are mobile, as well as how your applications can be good citizens when running:
The device’s screen size is much smaller than that on a desktop system. As such, appli-cations should limit the number of screen controls presented to the user at one time.
Applications should require the users to enter the smallest amount of data possible. A spinner control (similar to a drop-down list box), where the user is required to select a pre-entered value, is preferable to requiring the user to type in some amount of text. Typing on a mobile device is problematic. Tapping several times is preferable to enter-ing 30 letters into a text form.
c04.indd 59c04.indd 59 22/02/13 4:13 PM22/02/13 4:13 PM
60 ❘ CHAPTER 4 PLANNING AND BUILDING YOUR APPLICATION’S USER INTERFACE
Be a good citizen on the device. Caching data locally is preferred to pulling data over a wire-less connection. For example, a spinner control is populated once with data from a web service. The next time that data is needed, there is no reason to pull that data from the web service. The data should be cached locally on the device and reused from the cache as much as possible.
Users typically are moving when they are using their devices. Think about the number of users who are walking through an airport, walking the halls of an offi ce, or exercising when accessing an application. An application’s user interface needs to take movement and jar-ring into account. For example, presenting data in a listview is common. The user expects to select a cell and get more detailed information. The size of the cell should be such that there is some margin for error when selecting a cell. This will improve the user’s ability to select the correct item.
Because mobile devices have small screens, the text that is presented to the user needs to be large enough for the user to easily view the data presented.
There is no control over where a mobile device is located when it is running an application. It may be directly in the sunlight, or it could be in a parking lot at midnight. The application needs to be easily readable when it runs. This may involve a combination of screen colors or the application’s theme.
Of course, this is a very short list of some of the most common guidelines to keep in mind. For more guidelines, we recommend that you check out the Android User Interface Guidelines. The various documents can be found at http://developer.android.com/guide/practices/ui_guidelines/index.html.
BUILDING AN ANDROID UI
Developers who are building a user interface in Android will fi nd concepts that are similar to those of their existing .NET applications. Android uses the concept of controls that programmers are familiar with. Here are some characteristics of controls that will seem familiar:
Properties can be set to get a control’s value or change a control’s default functionality.
A program can process events, such as a button click or value change.
Controls can be grouped in a hierarchy known as a View or ViewGroup.
Controls can be themed so that the look of a set of controls can be changed in a group.
Views
An Android user interface is based on View and ViewGroup objects. A View class is the basis for widgets, which are UI objects such as text fi elds, spinners, buttons, clocks, and date pickers. A ViewGroup is the basis for layout subclasses. An Activity’s user interface consists of a tree of View and ViewGroup nodes. The top of the tree is a ViewGroup. To display a view hierarchy, an Activity calls SetContentView(Resource) to load the Resource view and begin drawing the tree.
c04.indd 60c04.indd 60 22/02/13 4:13 PM22/02/13 4:13 PM
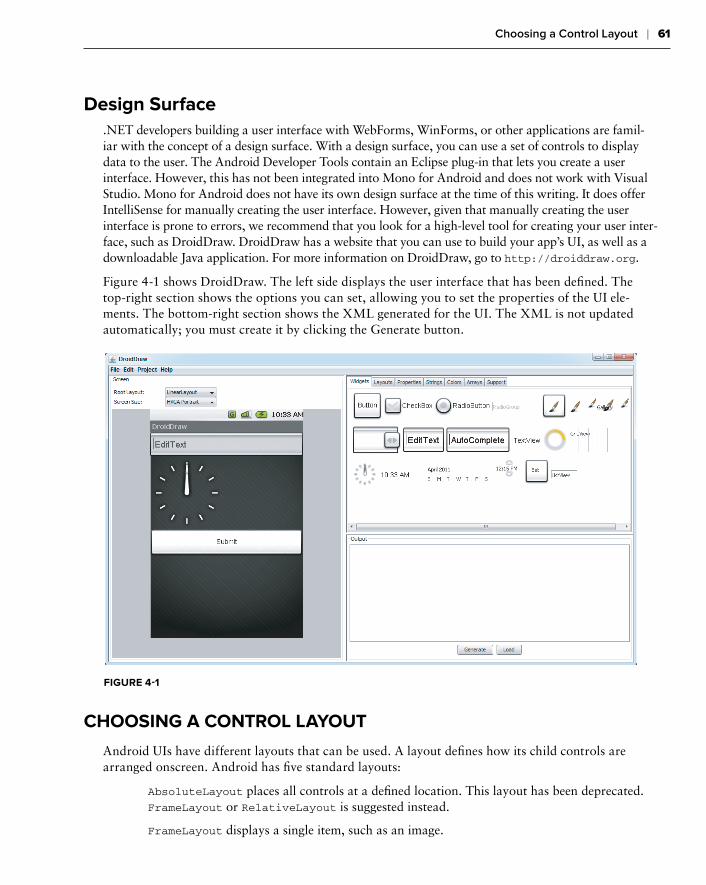
Choosing a Control Layout ❘ 61
Design Surface
.NET developers building a user interface with WebForms, WinForms, or other applications are famil-iar with the concept of a design surface. With a design surface, you can use a set of controls to display data to the user. The Android Developer Tools contain an Eclipse plug-in that lets you create a user interface. However, this has not been integrated into Mono for Android and does not work with Visual Studio. Mono for Android does not have its own design surface at the time of this writing. It does offer IntelliSense for manually creating the user interface. However, given that manually creating the user interface is prone to errors, we recommend that you look for a high-level tool for creating your user inter-face, such as DroidDraw. DroidDraw has a website that you can use to build your app’s UI, as well as a downloadable Java application. For more information on DroidDraw, go to http://droiddraw.org.
Figure 4-1 shows DroidDraw. The left side displays the user interface that has been defi ned. The top-right section shows the options you can set, allowing you to set the properties of the UI ele-ments. The bottom-right section shows the XML generated for the UI. The XML is not updated automatically; you must create it by clicking the Generate button.
FIGURE 4-1
CHOOSING A CONTROL LAYOUT
Android UIs have different layouts that can be used. A layout defi nes how its child controls are arranged onscreen. Android has fi ve standard layouts:
AbsoluteLayout places all controls at a defi ned location. This layout has been deprecated. FrameLayout or RelativeLayout is suggested instead.
FrameLayout displays a single item, such as an image.
c04.indd 61c04.indd 61 22/02/13 4:13 PM22/02/13 4:13 PM
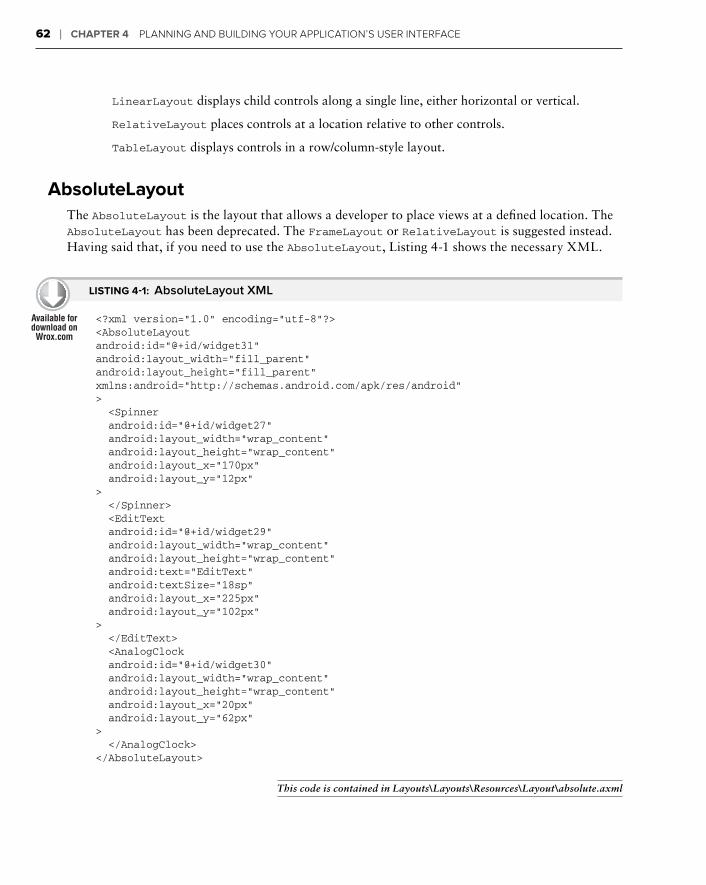
62 ❘ CHAPTER 4 PLANNING AND BUILDING YOUR APPLICATION’S USER INTERFACE
LinearLayout displays child controls along a single line, either horizontal or vertical.
RelativeLayout places controls at a location relative to other controls.
TableLayout displays controls in a row/column-style layout.
AbsoluteLayout
The AbsoluteLayout is the layout that allows a developer to place views at a defi ned location. The AbsoluteLayout has been deprecated. The FrameLayout or RelativeLayout is suggested instead. Having said that, if you need to use the AbsoluteLayout, Listing 4-1 shows the necessary XML.
LISTING 4-1: AbsoluteLayout XML
<?xml version=”1.0” encoding=”utf-8”?><AbsoluteLayoutandroid:id=”@+id/widget31”android:layout_width=”fill_parent”android:layout_height=”fill_parent”xmlns:android=”http://schemas.android.com/apk/res/android”> <Spinner android:id=”@+id/widget27” android:layout_width=”wrap_content” android:layout_height=”wrap_content” android:layout_x=”170px” android:layout_y=”12px”> </Spinner> <EditText android:id=”@+id/widget29” android:layout_width=”wrap_content” android:layout_height=”wrap_content” android:text=”EditText” android:textSize=”18sp” android:layout_x=”225px” android:layout_y=”102px”> </EditText> <AnalogClock android:id=”@+id/widget30” android:layout_width=”wrap_content” android:layout_height=”wrap_content” android:layout_x=”20px” android:layout_y=”62px”> </AnalogClock></AbsoluteLayout>
This code is contained in Layouts\Layouts\Resources\Layout\absolute.axml
c04.indd 62c04.indd 62 22/02/13 4:13 PM22/02/13 4:13 PM
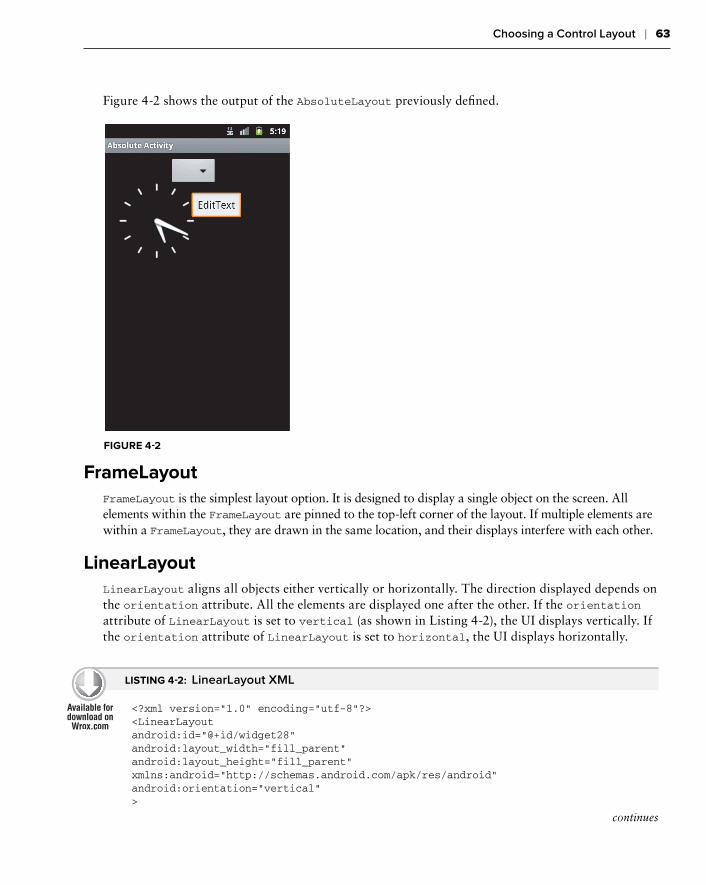
Choosing a Control Layout ❘ 63
Figure 4-2 shows the output of the AbsoluteLayout previously defi ned.
FIGURE 4-2
FrameLayout
FrameLayout is the simplest layout option. It is designed to display a single object on the screen. All elements within the FrameLayout are pinned to the top-left corner of the layout. If multiple elements are within a FrameLayout, they are drawn in the same location, and their displays interfere with each other.
LinearLayout
LinearLayout aligns all objects either vertically or horizontally. The direction displayed depends on the orientation attribute. All the elements are displayed one after the other. If the orientation attribute of LinearLayout is set to vertical (as shown in Listing 4-2), the UI displays vertically. If the orientation attribute of LinearLayout is set to horizontal, the UI displays horizontally.
LISTING 4-2: LinearLayout XML
<?xml version=”1.0” encoding=”utf-8”?><LinearLayoutandroid:id=”@+id/widget28”android:layout_width=“fill_parent“android:layout_height=“fill_parent“xmlns:android=“http://schemas.android.com/apk/res/android“android:orientation=“vertical“>
continues
c04.indd 63c04.indd 63 22/02/13 4:13 PM22/02/13 4:13 PM
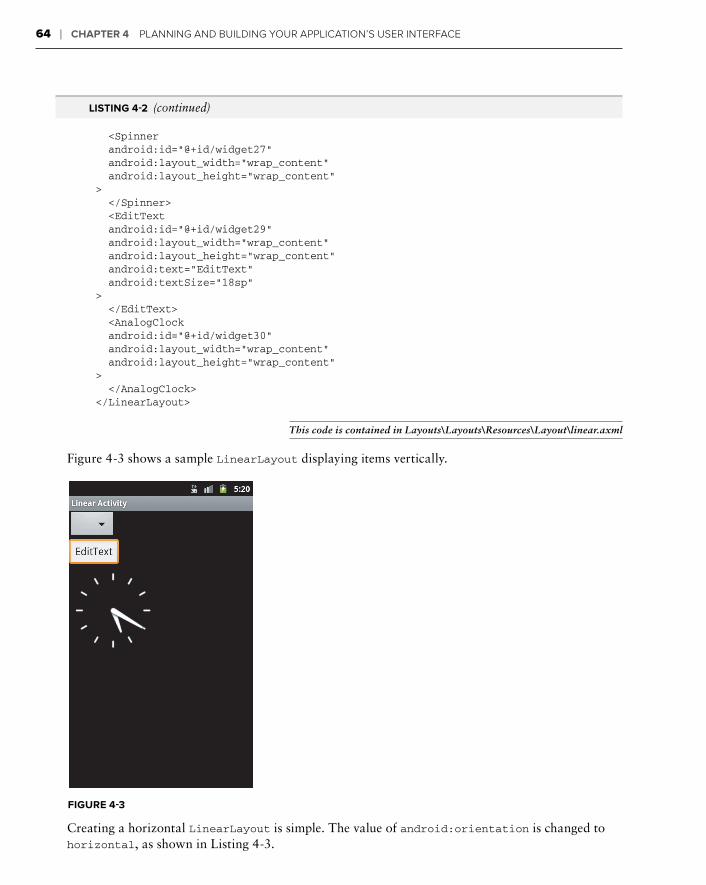
64 ❘ CHAPTER 4 PLANNING AND BUILDING YOUR APPLICATION’S USER INTERFACE
<Spinner android:id=“@+id/widget27“ android:layout_width=“wrap_content“ android:layout_height=“wrap_content“> </Spinner> <EditText android:id=“@+id/widget29“ android:layout_width=“wrap_content“ android:layout_height=“wrap_content“ android:text=“EditText“ android:textSize=“18sp“> </EditText> <AnalogClock android:id=“@+id/widget30“ android:layout_width=“wrap_content“ android:layout_height=“wrap_content“> </AnalogClock></LinearLayout>
This code is contained in Layouts\Layouts\Resources\Layout\linear.axml
Figure 4-3 shows a sample LinearLayout displaying items vertically.
FIGURE 4-3
Creating a horizontal LinearLayout is simple. The value of android:orientation is changed to horizontal, as shown in Listing 4-3.
LISTING 4-2 (continued)
c04.indd 64c04.indd 64 22/02/13 4:13 PM22/02/13 4:13 PM
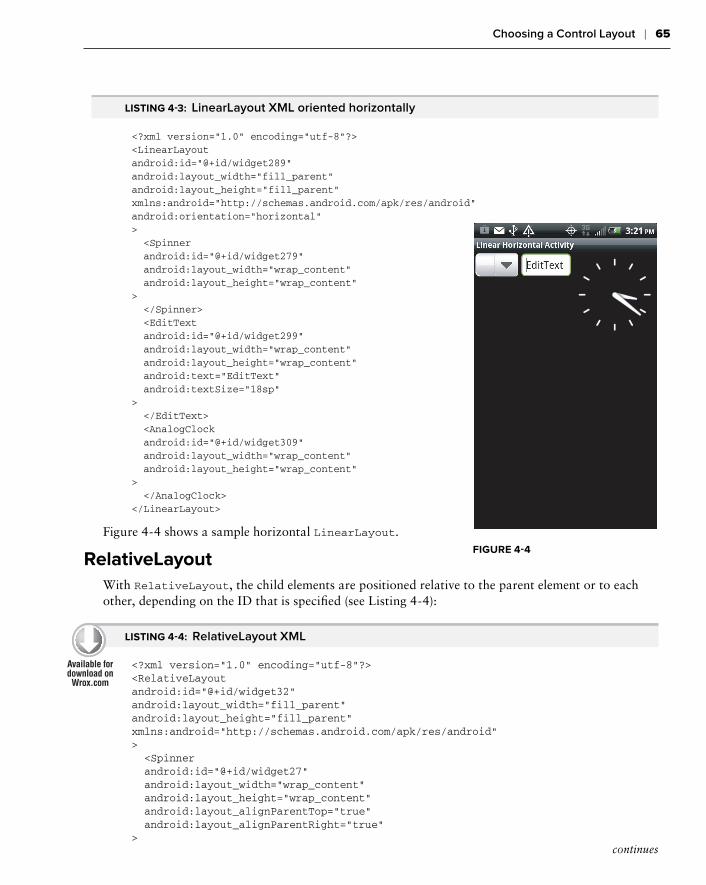
Choosing a Control Layout ❘ 65
LISTING 4-3: LinearLayout XML oriented horizontally
<?xml version=”1.0” encoding=”utf-8”?>
<LinearLayout
android:id=”@+id/widget289”
android:layout_width=”fill_parent”
android:layout_height=”fill_parent”
xmlns:android=”http://schemas.android.com/apk/res/android”
android:orientation=”horizontal”
>
<Spinner
android:id=”@+id/widget279”
android:layout_width=”wrap_content”
android:layout_height=”wrap_content”
>
</Spinner>
<EditText
android:id=”@+id/widget299”
android:layout_width=”wrap_content”
android:layout_height=”wrap_content”
android:text=”EditText”
android:textSize=”18sp”
>
</EditText>
<AnalogClock
android:id=”@+id/widget309”
android:layout_width=”wrap_content”
android:layout_height=”wrap_content”
>
</AnalogClock>
</LinearLayout>
Figure 4-4 shows a sample horizontal LinearLayout.
RelativeLayout
With RelativeLayout, the child elements are positioned relative to the parent element or to each other, depending on the ID that is specifi ed (see Listing 4-4):
LISTING 4-4: RelativeLayout XML
<?xml version=”1.0” encoding=”utf-8”?><RelativeLayoutandroid:id=”@+id/widget32”android:layout_width=“fill_parent“android:layout_height=“fill_parent“xmlns:android=“http://schemas.android.com/apk/res/android“> <Spinner android:id=”@+id/widget27” android:layout_width=“wrap_content“ android:layout_height=“wrap_content“ android:layout_alignParentTop=“true“ android:layout_alignParentRight=“true“>
FIGURE 4-4
continues
c04.indd 65c04.indd 65 22/02/13 4:13 PM22/02/13 4:13 PM
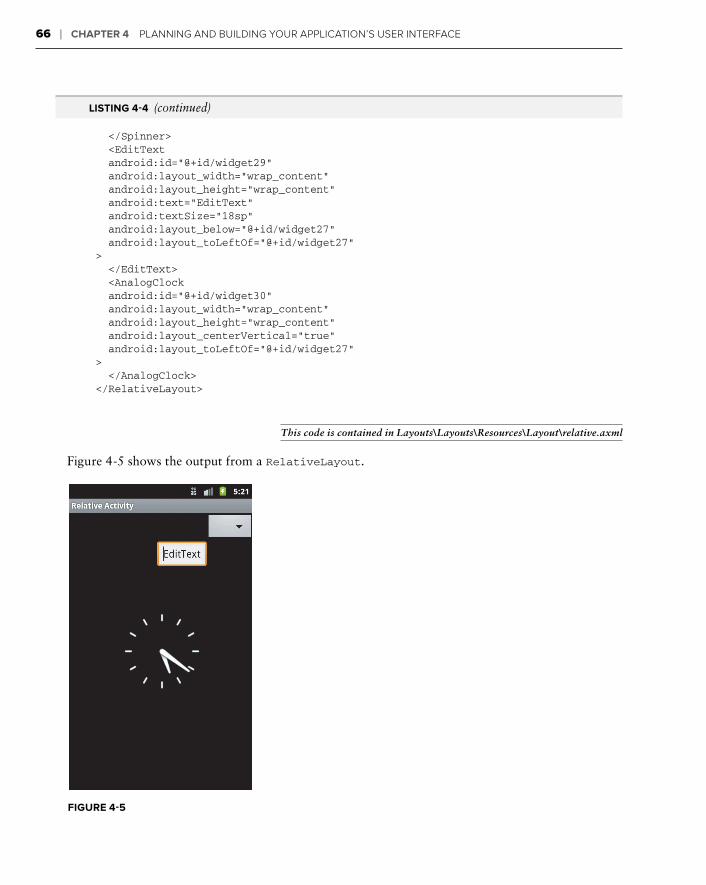
66 ❘ CHAPTER 4 PLANNING AND BUILDING YOUR APPLICATION’S USER INTERFACE
</Spinner> <EditText android:id=“@+id/widget29“ android:layout_width=“wrap_content“ android:layout_height=“wrap_content“ android:text=“EditText“ android:textSize=“18sp“ android:layout_below=“@+id/widget27“ android:layout_toLeftOf=“@+id/widget27“> </EditText> <AnalogClock android:id=“@+id/widget30“ android:layout_width=“wrap_content“ android:layout_height=“wrap_content“ android:layout_centerVertical=“true“ android:layout_toLeftOf=“@+id/widget27“> </AnalogClock></RelativeLayout>
This code is contained in Layouts\Layouts\Resources\Layout\relative.axml
Figure 4-5 shows the output from a RelativeLayout.
FIGURE 4-5
LISTING 4-4 (continued)
c04.indd 66c04.indd 66 22/02/13 4:13 PM22/02/13 4:13 PM
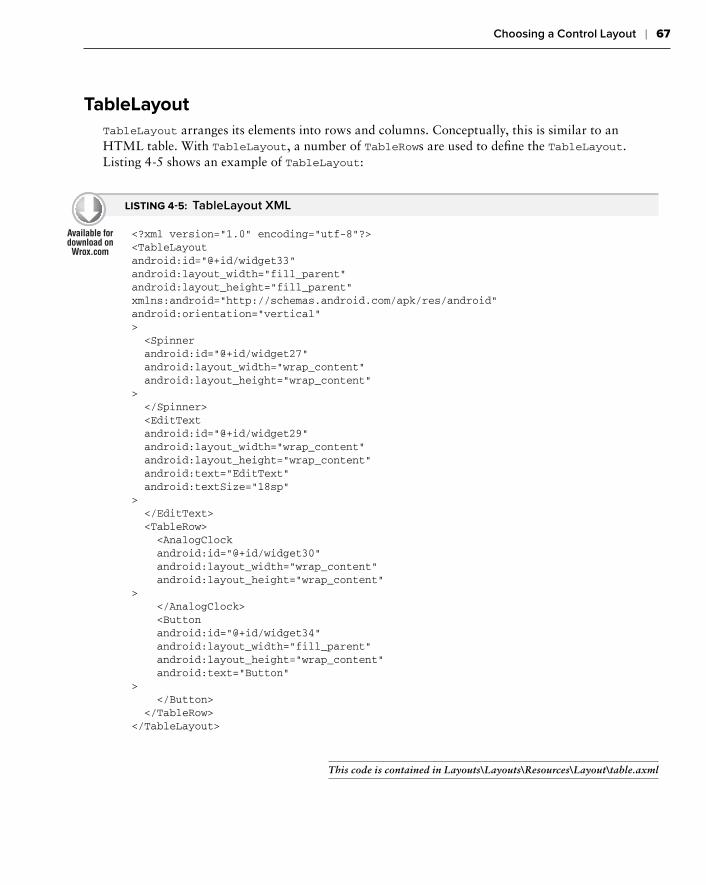
Choosing a Control Layout ❘ 67
TableLayout
TableLayout arranges its elements into rows and columns. Conceptually, this is similar to an HTML table. With TableLayout, a number of TableRows are used to defi ne the TableLayout. Listing 4-5 shows an example of TableLayout:
LISTING 4-5: TableLayout XML
<?xml version=”1.0” encoding=”utf-8”?><TableLayoutandroid:id=”@+id/widget33”android:layout_width=“fill_parent“android:layout_height=“fill_parent“xmlns:android=“http://schemas.android.com/apk/res/android“android:orientation=“vertical“> <Spinner android:id=“@+id/widget27“ android:layout_width=“wrap_content“ android:layout_height=“wrap_content“> </Spinner> <EditText android:id=“@+id/widget29“ android:layout_width=“wrap_content“ android:layout_height=“wrap_content“ android:text=“EditText“ android:textSize=“18sp“> </EditText> <TableRow> <AnalogClock android:id=“@+id/widget30“ android:layout_width=“wrap_content“ android:layout_height=“wrap_content“> </AnalogClock> <Button android:id=“@+id/widget34“ android:layout_width=“fill_parent“ android:layout_height=“wrap_content“ android:text=“Button“> </Button> </TableRow></TableLayout>
This code is contained in Layouts\Layouts\Resources\Layout\table.axml
c04.indd 67c04.indd 67 22/02/13 4:13 PM22/02/13 4:13 PM
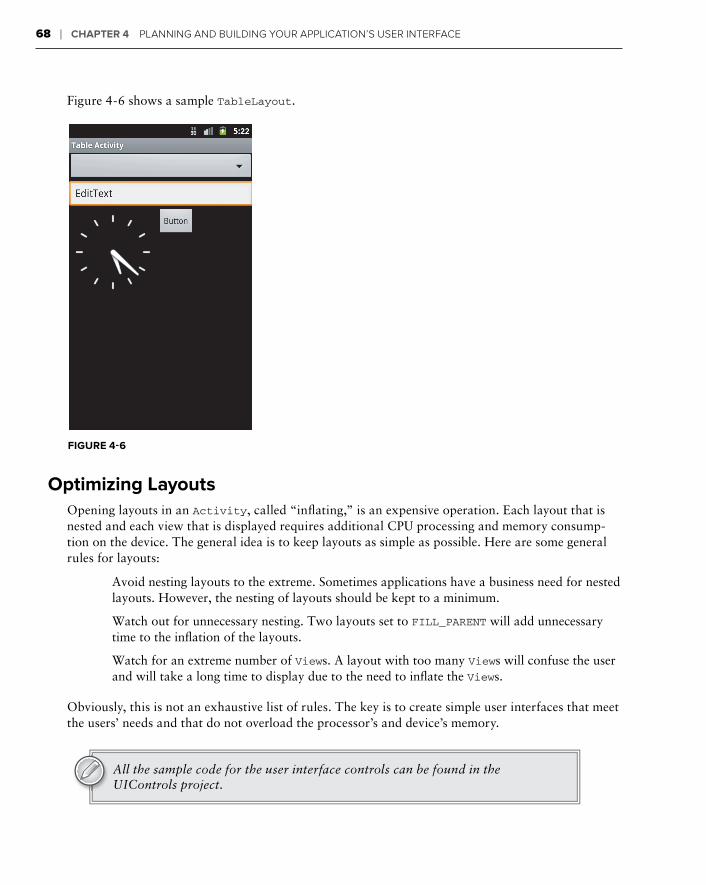
68 ❘ CHAPTER 4 PLANNING AND BUILDING YOUR APPLICATION’S USER INTERFACE
Figure 4-6 shows a sample TableLayout.
FIGURE 4-6
Optimizing Layouts
Opening layouts in an Activity, called “infl ating,” is an expensive operation. Each layout that is nested and each view that is displayed requires additional CPU processing and memory consump-tion on the device. The general idea is to keep layouts as simple as possible. Here are some general rules for layouts:
Avoid nesting layouts to the extreme. Sometimes applications have a business need for nested layouts. However, the nesting of layouts should be kept to a minimum.
Watch out for unnecessary nesting. Two layouts set to FILL_PARENT will add unnecessary time to the infl ation of the layouts.
Watch for an extreme number of Views. A layout with too many Views will confuse the user and will take a long time to display due to the need to infl ate the Views.
Obviously, this is not an exhaustive list of rules. The key is to create simple user interfaces that meet the users’ needs and that do not overload the processor’s and device’s memory.
All the sample code for the user interface controls can be found in the UIControls project.
c04.indd 68c04.indd 68 22/02/13 4:13 PM22/02/13 4:13 PM
Designing Your User Interface Controls ❘ 69
DESIGNING YOUR USER INTERFACE CONTROLS
For the user, the most important part of any application is the user interface; in essence, for the user the user interface is the application. Desktop applications can have rather complicated user inter-faces, but creating a user interface for a mobile device is the single most important feature of an application.
Here are some guidelines for creating a successful mobile user interface:
Number of form elements: Because of the display size of a mobile device, the user should not be subjected to a large number of form elements.
Size of form elements: Mobile devices are, by defi nition, mobile. Users may be in an indus-trial plant, on the elliptical at the gym, or taking their children for a walk in the park. Form elements must be large enough to be readable and to allow users to make selections when they are not standing still. At the same time, form elements must be small enough to fi t on the screen rather easily.
Testing: Android devices have different screen sizes and resolutions. As a result, thinking about and testing your application on various screen sizes and capabilities is important.
Android provides a set of controls that developers can use to create a user interface. These controls can be used individually or as part of a composite control. In addition, these controls allow you to create an application with a consistent look and feel as well as simplify and speed development. Here are some of the more valuable controls:
TextView is similar to a label. It allows data to be displayed to the user.
EditText is similar to a .NET textbox. It allows for multiline entry and word wrapping.
AutoCompleteTextView is a textbox that will display a set of items that a user can pick from. As the user enters more data, the set of items displayed narrows. At any point, the user may select on the displayed items.
ListView is a view group that creates a vertical list of views. This is similar to a gridview in .NET. The ListView is covered in Chapter 6.
Spinner is a composite control. It contains a textview and an associated listview for selecting items that will be displayed in the textview. This control is similar to a drop-down list box in .NET.
Button is a standard push button, which should be familiar to .NET developers.
Checkbox is a button that contains two states — checked and unchecked. The check box should be familiar to all .NET developers.
RadioButton is a two-state button in a group. The group of radio buttons allows only one item to be selected at a time. The radio button should be familiar to all .NET developers as a radio button list.
c04.indd 69c04.indd 69 22/02/13 4:13 PM22/02/13 4:13 PM
70 ❘ CHAPTER 4 PLANNING AND BUILDING YOUR APPLICATION’S USER INTERFACE
Clock has digital and analog clock controls. They are time picker controls and allow the developer to get or set the time.
TimePicker is associated with the clock controls. The time picker is an up/down control along with a button.
Image(s) are a series of controls that are used to deal with images. These controls include a single image, an image button, and an image gallery.
While not available in all devices, virtual keyboards are a feature available for touch devices like the HTC and Motorola lines of Android devices.
These are just some of the controls that are available to a developer. Many more are available with Android. They are contained within the Android.Widget namespace.
The next sections examine the defi nition of these controls, the values they support, and the controls themselves.
SOMETHING FAMILIAR — XML, ATTRIBUTES, AND VALUES
ASP.NET developers will be familiar with the concept of the XML layout for Android fi les. ASP.NET WebForms keeps its display information in its front-end .aspx fi les, and the back-end logic is contained within the .cs and .vb fi les. Android applications use a similar concept. The display information is contained within the Views. An Activity’s user interface can be loaded by calling SetContentView and passing in a layout resource ID or a single View instance. As a result, a developer can actually create his or her own user interface programmatically.
TextView
TextView is a control that displays text to the user. By default, the TextView class does not allow editing. For the .NET developer, this control is similar in concept to a label in WinForms or WebForms. Take a look at a couple members that the class exposes from a programmability standpoint:
The Text property of the TextView allows a program to get/set the value that is displayed in the TextView.
The Width property sets the width of the TextView. This can be set with the value fill_parent or in pixels as an integer.
EditText
EditText is a subclass that allows the user to input and edit text. Figure 4-7 shows sample output for EditText.
c04.indd 70c04.indd 70 22/02/13 4:13 PM22/02/13 4:13 PM
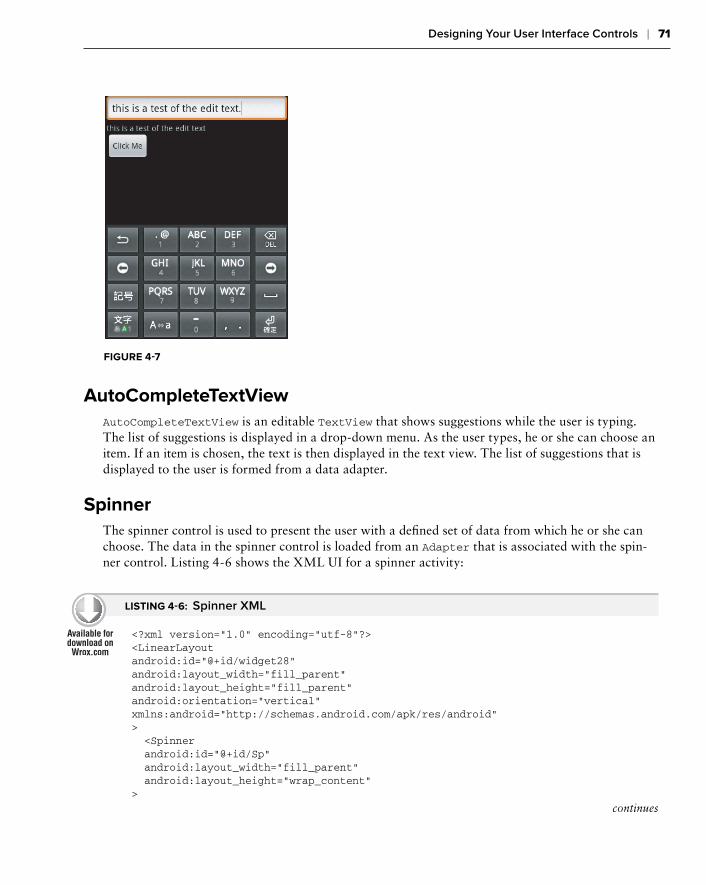
Designing Your User Interface Controls ❘ 71
FIGURE 4-7
AutoCompleteTextView
AutoCompleteTextView is an editable TextView that shows suggestions while the user is typing. The list of suggestions is displayed in a drop-down menu. As the user types, he or she can choose an item. If an item is chosen, the text is then displayed in the text view. The list of suggestions that is displayed to the user is formed from a data adapter.
Spinner
The spinner control is used to present the user with a defi ned set of data from which he or she can choose. The data in the spinner control is loaded from an Adapter that is associated with the spin-ner control. Listing 4-6 shows the XML UI for a spinner activity:
LISTING 4-6: Spinner XML
<?xml version=”1.0” encoding=”utf-8”?><LinearLayoutandroid:id=”@+id/widget28”android:layout_width=”fill_parent”android:layout_height=”fill_parent”android:orientation=”vertical”xmlns:android=”http://schemas.android.com/apk/res/android”> <Spinner android:id=”@+id/Sp” android:layout_width=“fill_parent“ android:layout_height=“wrap_content“>
continues
c04.indd 71c04.indd 71 22/02/13 4:13 PM22/02/13 4:13 PM
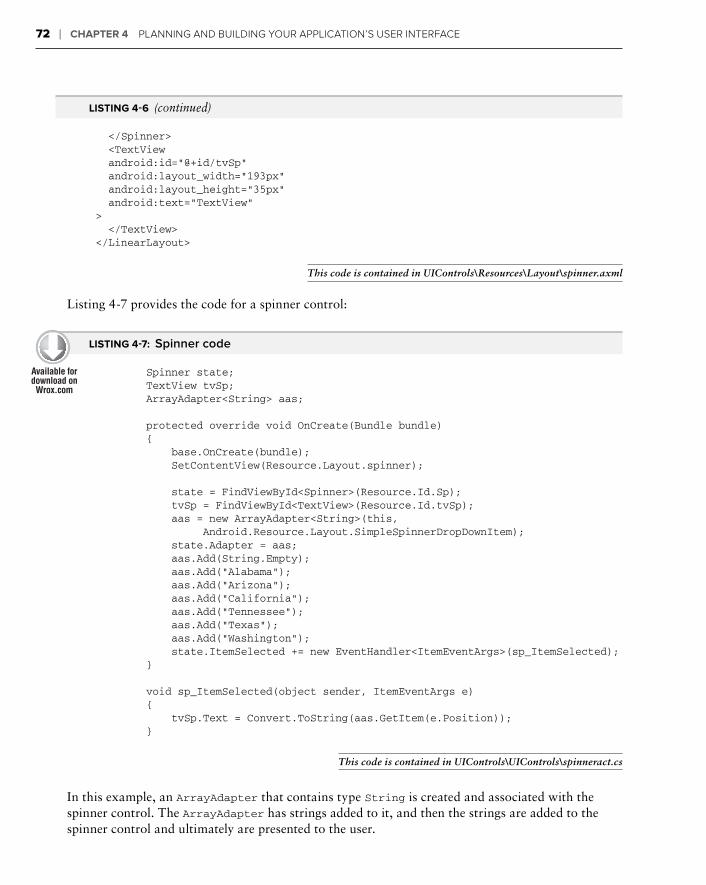
72 ❘ CHAPTER 4 PLANNING AND BUILDING YOUR APPLICATION’S USER INTERFACE
</Spinner> <TextView android:id=”@+id/tvSp” android:layout_width=”193px” android:layout_height=”35px” android:text=”TextView”> </TextView></LinearLayout>
This code is contained in UIControls\Resources\Layout\spinner.axml
Listing 4-7 provides the code for a spinner control:
LISTING 4-7: Spinner code
Spinner state; TextView tvSp; ArrayAdapter<String> aas;
protected override void OnCreate(Bundle bundle) { base.OnCreate(bundle); SetContentView(Resource.Layout.spinner);
state = FindViewById<Spinner>(Resource.Id.Sp); tvSp = FindViewById<TextView>(Resource.Id.tvSp); aas = new ArrayAdapter<String>(this, Android.Resource.Layout.SimpleSpinnerDropDownItem); state.Adapter = aas; aas.Add(String.Empty); aas.Add(“Alabama”); aas.Add(“Arizona”); aas.Add(“California”); aas.Add(“Tennessee”); aas.Add(“Texas”); aas.Add(“Washington”); state.ItemSelected += new EventHandler<ItemEventArgs>(sp_ItemSelected); }
void sp_ItemSelected(object sender, ItemEventArgs e) { tvSp.Text = Convert.ToString(aas.GetItem(e.Position)); }
This code is contained in UIControls\UIControls\spinneract.cs
In this example, an ArrayAdapter that contains type String is created and associated with the spinner control. The ArrayAdapter has strings added to it, and then the strings are added to the spinner control and ultimately are presented to the user.
LISTING 4-6 (continued)
c04.indd 72c04.indd 72 22/02/13 4:13 PM22/02/13 4:13 PM
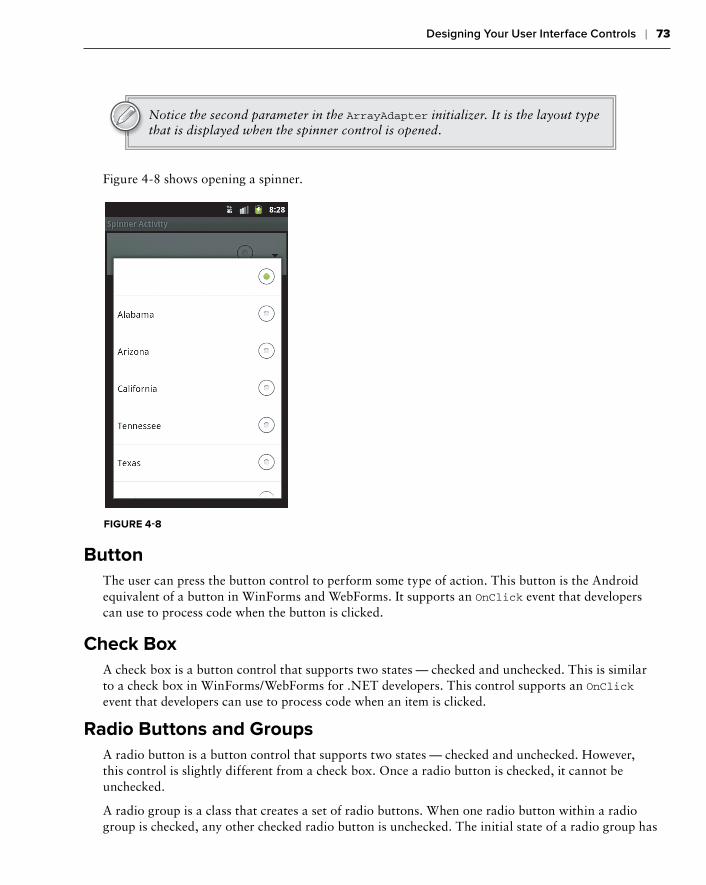
Designing Your User Interface Controls ❘ 73
Notice the second parameter in the ArrayAdapter initializer. It is the layout type that is displayed when the spinner control is opened.
Figure 4-8 shows opening a spinner.
FIGURE 4-8
Button
The user can press the button control to perform some type of action. This button is the Android equivalent of a button in WinForms and WebForms. It supports an OnClick event that developers can use to process code when the button is clicked.
Check Box
A check box is a button control that supports two states — checked and unchecked. This is similar to a check box in WinForms/WebForms for .NET developers. This control supports an OnClick event that developers can use to process code when an item is clicked.
Radio Buttons and Groups
A radio button is a button control that supports two states — checked and unchecked. However, this control is slightly different from a check box. Once a radio button is checked, it cannot be unchecked.
A radio group is a class that creates a set of radio buttons. When one radio button within a radio group is checked, any other checked radio button is unchecked. The initial state of a radio group has
c04.indd 73c04.indd 73 22/02/13 4:13 PM22/02/13 4:13 PM
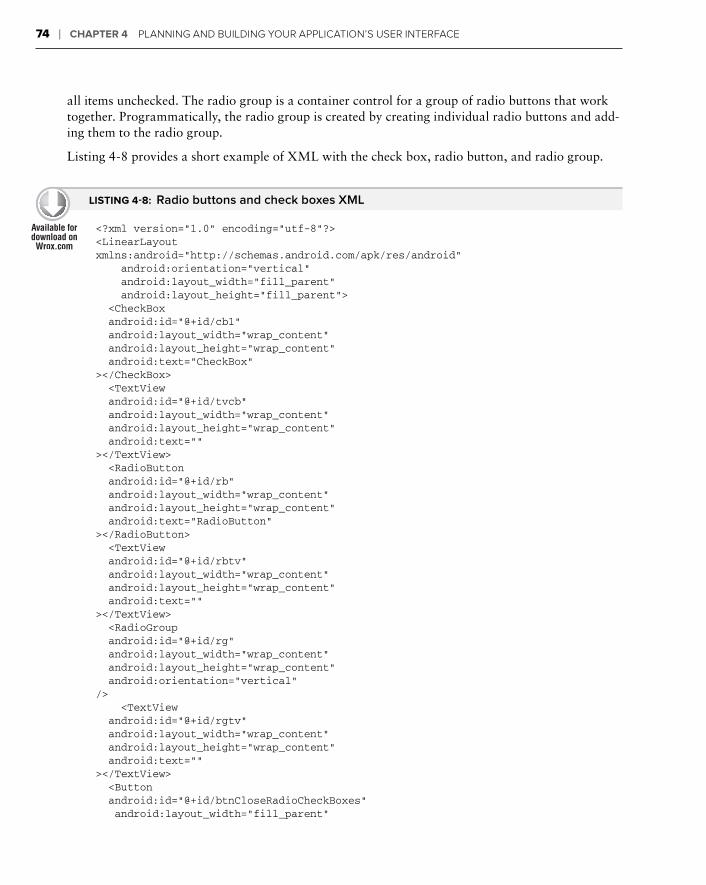
74 ❘ CHAPTER 4 PLANNING AND BUILDING YOUR APPLICATION’S USER INTERFACE
all items unchecked. The radio group is a container control for a group of radio buttons that work together. Programmatically, the radio group is created by creating individual radio buttons and add-ing them to the radio group.
Listing 4-8 provides a short example of XML with the check box, radio button, and radio group.
LISTING 4-8: Radio buttons and check boxes XML
<?xml version=”1.0” encoding=”utf-8”?><LinearLayoutxmlns:android=”http://schemas.android.com/apk/res/android” android:orientation=”vertical” android:layout_width=”fill_parent” android:layout_height=”fill_parent”> <CheckBox android:id=”@+id/cb1” android:layout_width=”wrap_content” android:layout_height=”wrap_content” android:text=”CheckBox”></CheckBox> <TextView android:id=”@+id/tvcb” android:layout_width=”wrap_content” android:layout_height=”wrap_content” android:text=””></TextView> <RadioButton android:id=”@+id/rb” android:layout_width=”wrap_content” android:layout_height=”wrap_content” android:text=”RadioButton”></RadioButton> <TextView android:id=”@+id/rbtv” android:layout_width=”wrap_content” android:layout_height=”wrap_content” android:text=””></TextView> <RadioGroup android:id=”@+id/rg” android:layout_width=”wrap_content” android:layout_height=”wrap_content” android:orientation=”vertical”/> <TextView android:id=”@+id/rgtv” android:layout_width=”wrap_content” android:layout_height=”wrap_content” android:text=””></TextView> <Button android:id=”@+id/btnCloseRadioCheckBoxes” android:layout_width=”fill_parent”
c04.indd 74c04.indd 74 22/02/13 4:13 PM22/02/13 4:13 PM

Designing Your User Interface Controls ❘ 75
android:layout_height=”wrap_content” android:text=”Close” /></LinearLayout>
This code is contained in UIControls\Resources\Layout\radiocheckboxes.axml
Listing 4-9 gives the code listing for buttons, check boxes, radio buttons, and radio groups:
LISTING 4-9: Radio buttons, radio groups, and check boxes
[Activity(Label = “Radio & Checkboxes”, Name=”uicontrols.radiocheckboxes”)]public class radiocheckboxes : Activity{Button btn;RadioButton rb;CheckBox cb;RadioGroup rg;TextView rbtv, cbtv, rgtv;protected override void OnCreate(Bundle bundle){ base.OnCreate(bundle); SetContentView(Resource.Layout.radiocheckboxes); // Create your application here rg = FindViewById<RadioGroup>(Resource.Id.rg); rg.Click += new EventHandler(rg_Click); cb = FindViewById<CheckBox>(Resource.Id.cb1); rb = FindViewById<RadioButton>(Resource.Id.rb); btn = FindViewById<Button>(Resource.Id.btnCloseRadioCheckBoxes); rbtv = FindViewById<TextView>(Resource.Id.rbtv); cbtv = FindViewById<TextView>(Resource.Id.tvcb); rgtv = FindViewById<TextView>(Resource.Id.rgtv); btn.Click += new EventHandler(btn_Click); cb.Click += new EventHandler(cb_Click);
rb.Click += new EventHandler(rb_Click);
RadioButton rb1; for (int i = 0; i < 3; i++) { rb1 = new RadioButton(this); rb1.Text = “Item “ + i.ToString(); rb1.Click += new EventHandler(rb1_Click); rg.AddView(rb1, i); }}
void rg_Click(object sender, EventArgs e){ rgtv.Text = ((RadioButton)sender).Text;}void rb1_Click(object sender, EventArgs e){
continues
c04.indd 75c04.indd 75 22/02/13 4:13 PM22/02/13 4:13 PM
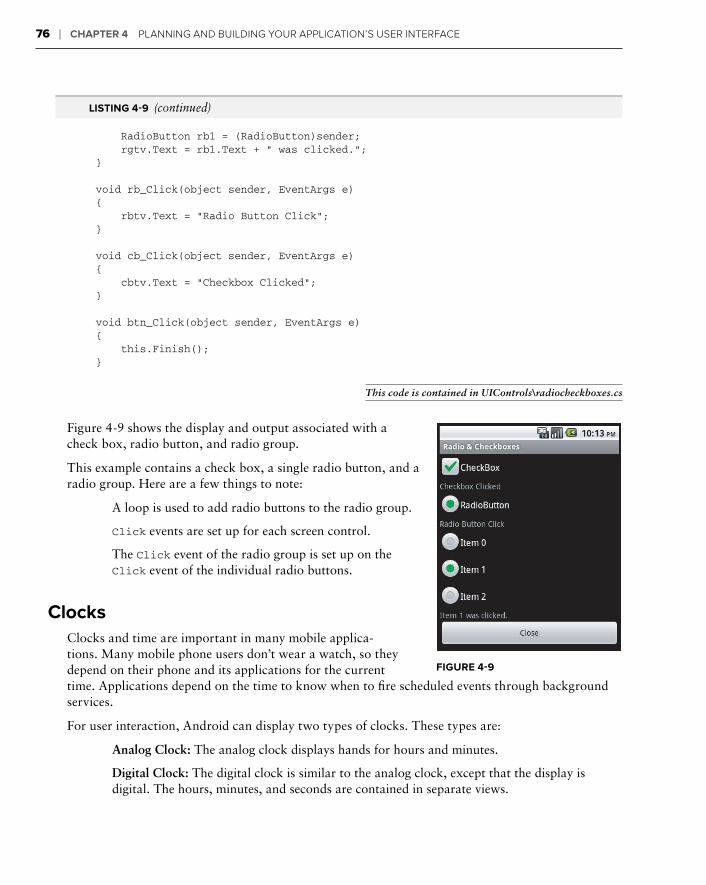
76 ❘ CHAPTER 4 PLANNING AND BUILDING YOUR APPLICATION’S USER INTERFACE
RadioButton rb1 = (RadioButton)sender; rgtv.Text = rb1.Text + “ was clicked.”;}
void rb_Click(object sender, EventArgs e){ rbtv.Text = “Radio Button Click”;}
void cb_Click(object sender, EventArgs e){ cbtv.Text = “Checkbox Clicked”;}
void btn_Click(object sender, EventArgs e){ this.Finish();}
This code is contained in UIControls\radiocheckboxes.cs
Figure 4-9 shows the display and output associated with a check box, radio button, and radio group.
This example contains a check box, a single radio button, and a radio group. Here are a few things to note:
A loop is used to add radio buttons to the radio group.
Click events are set up for each screen control.
The Click event of the radio group is set up on the Click event of the individual radio buttons.
Clocks
Clocks and time are important in many mobile applica-tions. Many mobile phone users don’t wear a watch, so they depend on their phone and its applications for the current time. Applications depend on the time to know when to fi re scheduled events through background services.
For user interaction, Android can display two types of clocks. These types are:
Analog Clock: The analog clock displays hands for hours and minutes.
Digital Clock: The digital clock is similar to the analog clock, except that the display is digital. The hours, minutes, and seconds are contained in separate views.
FIGURE 4-9
LISTING 4-9 (continued)
c04.indd 76c04.indd 76 22/02/13 4:13 PM22/02/13 4:13 PM
Designing Your User Interface Controls ❘ 77
Pickers
Android provides a time picker and a date picker. These controls allow the user to select the date and time.
Time Picker: The time picker allows the user to select the hours and minutes. The time picker can be confi gured for 12- or 24-hour days, with a.m./p.m. as necessary.
TimePicker only seems to expose a change event that can be used to obtain the time that is currently selected.
Date Picker: The date picker allows the user to select the month, day, and year. Thankfully, the date picker exposes the selected day, month, and year in the control as properties.
The Month integer that the DatePicker returns runs from 0 to 11.
Listing 4-10 shows a sample XML layout involving date and time pickers.
LISTING 4-10: Date and time pickers XML
<?xml version=”1.0” encoding=”utf-8”?><LinearLayoutxmlns:android=”http://schemas.android.com/apk/res/android” android:orientation=”vertical” android:layout_width=”fill_parent” android:layout_height=”fill_parent”> <DigitalClock android:id=”@+id/dc” android:layout_width=”wrap_content” android:layout_height=”wrap_content” android:text=”11:00 PM”></DigitalClock> <TextView android:id=”@+id/dctv” android:layout_width=”wrap_content” android:layout_height=”wrap_content” android:text=”TextView”></TextView> <DatePicker android:id=”@+id/dp” android:layout_width=”wrap_content” android:layout_height=”wrap_content”></DatePicker> <TextView
continues
c04.indd 77c04.indd 77 22/02/13 4:13 PM22/02/13 4:13 PM
78 ❘ CHAPTER 4 PLANNING AND BUILDING YOUR APPLICATION’S USER INTERFACE
android:id=”@+id/dptv” android:layout_width=”wrap_content” android:layout_height=”wrap_content” android:text=”TextView”></TextView> <TimePicker android:id=”@+id/tp” android:layout_width=”wrap_content” android:layout_height=”wrap_content”></TimePicker> <TextView android:id=”@+id/tptv” android:layout_width=”wrap_content” android:layout_height=”wrap_content” android:text=”TextView”></TextView> <Button android:id=”@+id/btnTimeValues” android:layout_width=”wrap_content” android:layout_height=”wrap_content” android:text=”Get Values”></Button> <Button android:id=”@+id/btnTimeClose” android:layout_width=”wrap_content” android:layout_height=”wrap_content” android:text=”Close”></Button></LinearLayout>
This code is contained in UIControls\Resources\Layout\time.axml
Listing 4-11 shows an example of the class for the date controls:
LISTING 4-11: Date and time pickers
[Activity(Label = “Time Activity”)]public class timeact : Activity{ Button btnClose, btnTimeValues; int nowHour, nowMinute; TimePicker tp; protected override void OnCreate(Bundle bundle) { base.OnCreate(bundle); SetContentView(Resource.Layout.time); btnClose = FindViewById<Button>(Resource.Id.btnTimeClose); btnClose.Click += new EventHandler(btnClose_Click); btnTimeValues = FindViewById<Button>(Resource.Id.btnTimeValues);
LISTING 4-10 (continued)
c04.indd 78c04.indd 78 22/02/13 4:13 PM22/02/13 4:13 PM
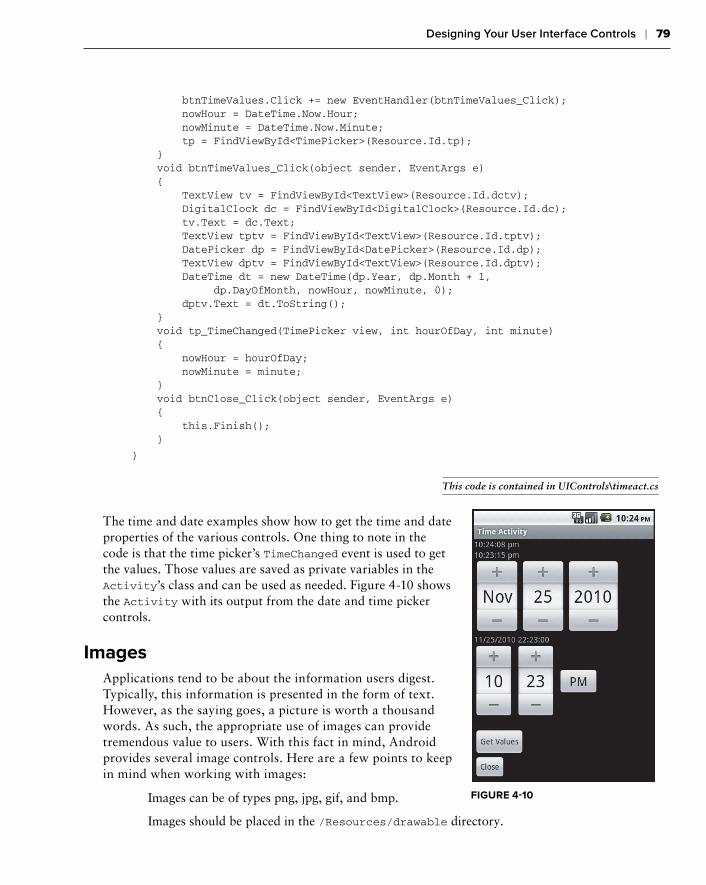
Designing Your User Interface Controls ❘ 79
btnTimeValues.Click += new EventHandler(btnTimeValues_Click); nowHour = DateTime.Now.Hour; nowMinute = DateTime.Now.Minute; tp = FindViewById<TimePicker>(Resource.Id.tp); } void btnTimeValues_Click(object sender, EventArgs e) { TextView tv = FindViewById<TextView>(Resource.Id.dctv); DigitalClock dc = FindViewById<DigitalClock>(Resource.Id.dc); tv.Text = dc.Text; TextView tptv = FindViewById<TextView>(Resource.Id.tptv); DatePicker dp = FindViewById<DatePicker>(Resource.Id.dp); TextView dptv = FindViewById<TextView>(Resource.Id.dptv); DateTime dt = new DateTime(dp.Year, dp.Month + 1, dp.DayOfMonth, nowHour, nowMinute, 0); dptv.Text = dt.ToString(); } void tp_TimeChanged(TimePicker view, int hourOfDay, int minute) { nowHour = hourOfDay; nowMinute = minute; } void btnClose_Click(object sender, EventArgs e) { this.Finish(); }
}
This code is contained in UIControls\timeact.cs
The time and date examples show how to get the time and date properties of the various controls. One thing to note in the code is that the time picker’s TimeChanged event is used to get the values. Those values are saved as private variables in the Activity’s class and can be used as needed. Figure 4-10 shows the Activity with its output from the date and time picker controls.
Images
Applications tend to be about the information users digest. Typically, this information is presented in the form of text. However, as the saying goes, a picture is worth a thousand words. As such, the appropriate use of images can provide tremendous value to users. With this fact in mind, Android provides several image controls. Here are a few points to keep in mind when working with images:
Images can be of types png, jpg, gif, and bmp.
Images should be placed in the /Resources/drawable directory.
FIGURE 4-10
c04.indd 79c04.indd 79 22/02/13 4:13 PM22/02/13 4:13 PM
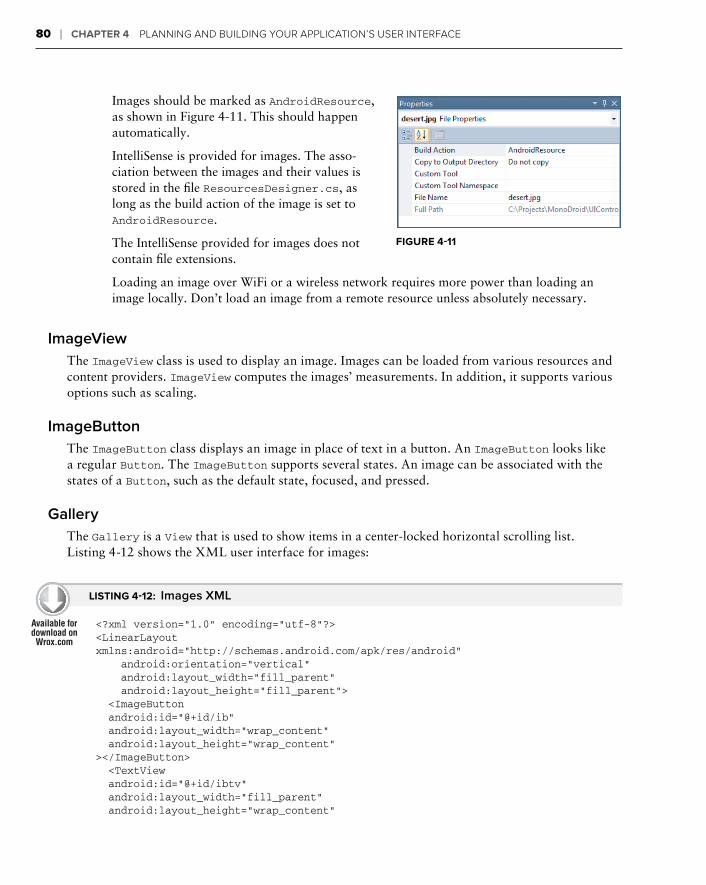
80 ❘ CHAPTER 4 PLANNING AND BUILDING YOUR APPLICATION’S USER INTERFACE
Images should be marked as AndroidResource, as shown in Figure 4-11. This should happen automatically.
IntelliSense is provided for images. The asso-ciation between the images and their values is stored in the fi le ResourcesDesigner.cs, as long as the build action of the image is set to AndroidResource.
The IntelliSense provided for images does not contain fi le extensions.
Loading an image over WiFi or a wireless network requires more power than loading an image locally. Don’t load an image from a remote resource unless absolutely necessary.
ImageView
The ImageView class is used to display an image. Images can be loaded from various resources and content providers. ImageView computes the images’ measurements. In addition, it supports various options such as scaling.
ImageButton
The ImageButton class displays an image in place of text in a button. An ImageButton looks like a regular Button. The ImageButton supports several states. An image can be associated with the states of a Button, such as the default state, focused, and pressed.
Gallery
The Gallery is a View that is used to show items in a center-locked horizontal scrolling list. Listing 4-12 shows the XML user interface for images:
LISTING 4-12: Images XML
<?xml version=”1.0” encoding=”utf-8”?><LinearLayoutxmlns:android=”http://schemas.android.com/apk/res/android” android:orientation=”vertical” android:layout_width=”fill_parent” android:layout_height=”fill_parent”> <ImageButton android:id=”@+id/ib” android:layout_width=”wrap_content” android:layout_height=”wrap_content”></ImageButton> <TextView android:id=”@+id/ibtv” android:layout_width=”fill_parent” android:layout_height=”wrap_content”
FIGURE 4-11
c04.indd 80c04.indd 80 22/02/13 4:13 PM22/02/13 4:13 PM
Designing Your User Interface Controls ❘ 81
></TextView> <Gallery android:id=”@+id/gal” android:layout_width=”wrap_content” android:layout_height=”wrap_content”></Gallery> <TextView android:id=”@+id/galtv” android:layout_width=”wrap_content” android:layout_height=”wrap_content”></TextView> <ImageView android:id=”@+id/iv” android:layout_width=”fill_parent” android:layout_height=”wrap_content”></ImageView> <Button android:id=”@+id/btnImageClose” android:layout_width=”wrap_content” android:layout_height=”wrap_content” android:text=”Close”></Button></LinearLayout>
This code is contained in UIControls\Resources\Layout\images.axml
Listing 4-13 exemplifi es the Activity for displaying images:
LISTING 4-13: Working with images
[Activity(Label = “Image Activity”)]public class imagesact : Activity{ Button btnImageClose; ImageButton ib; ImageView iv; Gallery g;
protected override void OnCreate(Bundle bundle) { base.OnCreate(bundle); SetContentView(Resource.layout.images); btnImageClose = FindViewById<Button>(Resource.Id.btnImageClose); btnImageClose.Click += new EventHandler(btnClose_Click); g = FindViewById<Gallery>(Resource.Id.gal); TextView gtv = FindViewById<TextView>(Resource.Id.galtv); ib = FindViewById<ImageButton>(Resource.Id.ib); ib.SetImageResource(Resource.Drawable.blue); ib.Click += new EventHandler(ib_Click); ib.FocusChange += new EventHandler<View.FocusChangeEventArgs> (ib_FocusChange); iv = FindViewById<ImageView>(Resource.id.iv);
continues
c04.indd 81c04.indd 81 22/02/13 4:13 PM22/02/13 4:13 PM
82 ❘ CHAPTER 4 PLANNING AND BUILDING YOUR APPLICATION’S USER INTERFACE
iv.SetImageResource(Resource.drawable.desert); g.Adapter = new ImageAdapter(this); }
void ib_FocusChange(object sender, View.FocusChangeEventArgs e) { if (e.HasFocus) { ib.SetImageResource(Resource.drawable.red); } else { ib.SetImageResource(Resource.drawable.purple); } } void ib_Click(object sender, EventArgs e) { ib.SetImageResource(Resource.drawable.purple); } void btnClose_Click(object sender, EventArgs e) { this.Finish(); }//menu items are included in this .cs file; however// they are not used in this section.}
This code is contained in UIControls\imagesact.cs
Listing 4-14 gives a custom image array class for fi lling an image gallery.
LISTING 4-14: ImageAdapter for the gallery
public class ImageAdapter : BaseAdapter{ Context context; Dictionary<int, ImageView> dict; public ImageAdapter(Context c) { context = c; dict = new Dictionary<int, ImageView>(); }
public override int Count { get { return thumbIds.Length; } }
public override Java.Lang.Object GetItem(int position){ return null; }
public override long GetItemId(int position){ return 0; }
// create a new ImageView for each item referenced by the Adapter public override View GetView(int position, View convertView, ViewGroup parent) {
LISTING 4-13 (continued)
c04.indd 82c04.indd 82 22/02/13 4:13 PM22/02/13 4:13 PM
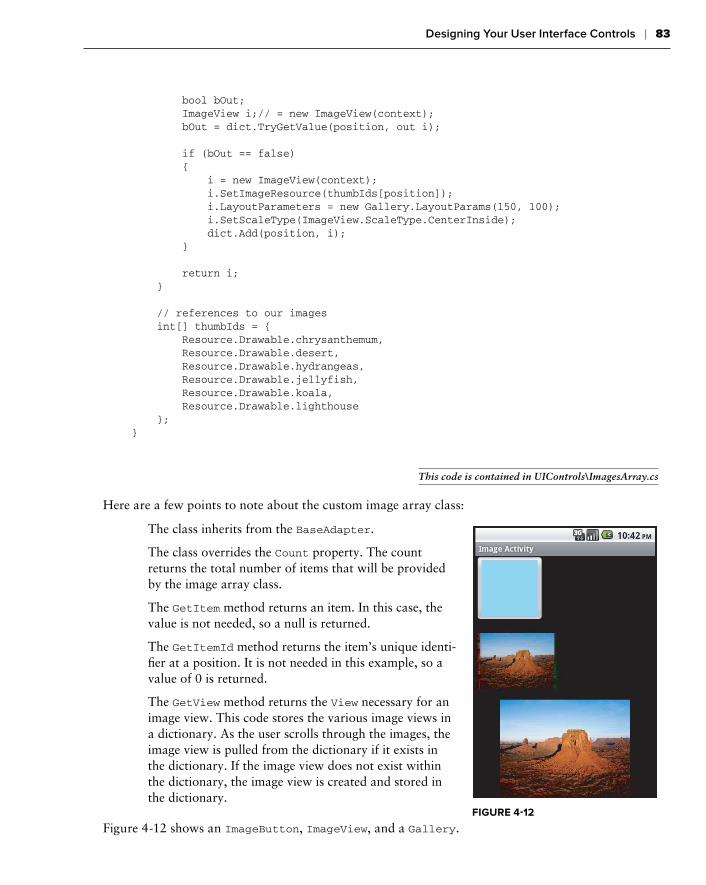
Designing Your User Interface Controls ❘ 83
bool bOut; ImageView i;// = new ImageView(context); bOut = dict.TryGetValue(position, out i);
if (bOut == false) { i = new ImageView(context); i.SetImageResource(thumbIds[position]); i.LayoutParameters = new Gallery.LayoutParams(150, 100); i.SetScaleType(ImageView.ScaleType.CenterInside); dict.Add(position, i); }
return i; }
// references to our images int[] thumbIds = { Resource.Drawable.chrysanthemum, Resource.Drawable.desert, Resource.Drawable.hydrangeas, Resource.Drawable.jellyfish, Resource.Drawable.koala, Resource.Drawable.lighthouse };}
This code is contained in UIControls\ImagesArray.cs
Here are a few points to note about the custom image array class:
The class inherits from the BaseAdapter.
The class overrides the Count property. The count returns the total number of items that will be provided by the image array class.
The GetItem method returns an item. In this case, the value is not needed, so a null is returned.
The GetItemId method returns the item’s unique identi-fi er at a position. It is not needed in this example, so a value of 0 is returned.
The GetView method returns the View necessary for an image view. This code stores the various image views in a dictionary. As the user scrolls through the images, the image view is pulled from the dictionary if it exists in the dictionary. If the image view does not exist within the dictionary, the image view is created and stored in the dictionary.
Figure 4-12 shows an ImageButton, ImageView, and a Gallery.FIGURE 4-12
c04.indd 83c04.indd 83 22/02/13 4:13 PM22/02/13 4:13 PM
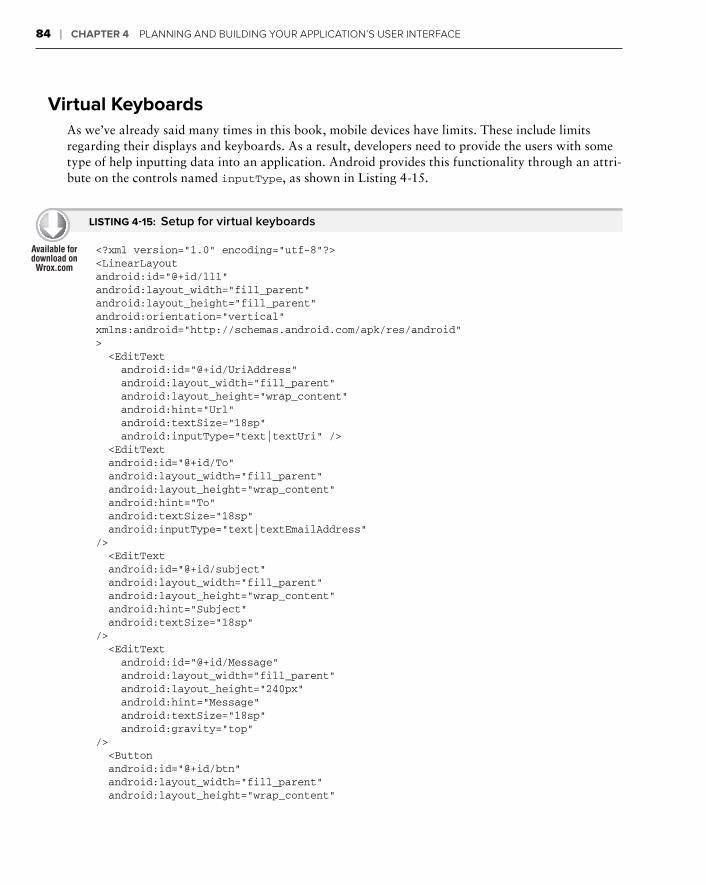
84 ❘ CHAPTER 4 PLANNING AND BUILDING YOUR APPLICATION’S USER INTERFACE
Virtual Keyboards
As we’ve already said many times in this book, mobile devices have limits. These include limits regarding their displays and keyboards. As a result, developers need to provide the users with some type of help inputting data into an application. Android provides this functionality through an attri-bute on the controls named inputType, as shown in Listing 4-15.
LISTING 4-15: Setup for virtual keyboards
<?xml version=”1.0” encoding=”utf-8”?><LinearLayoutandroid:id=”@+id/ll1”android:layout_width=”fill_parent”android:layout_height=”fill_parent”android:orientation=”vertical”xmlns:android=”http://schemas.android.com/apk/res/android”> <EditText android:id=”@+id/UriAddress” android:layout_width=”fill_parent” android:layout_height=”wrap_content” android:hint=”Url” android:textSize=”18sp” android:inputType=”text|textUri” /> <EditText android:id=”@+id/To” android:layout_width=”fill_parent” android:layout_height=”wrap_content” android:hint=”To” android:textSize=”18sp” android:inputType=”text|textEmailAddress”/> <EditText android:id=”@+id/subject” android:layout_width=”fill_parent” android:layout_height=”wrap_content” android:hint=”Subject” android:textSize=”18sp”/> <EditText android:id=”@+id/Message” android:layout_width=”fill_parent” android:layout_height=”240px” android:hint=”Message” android:textSize=”18sp” android:gravity=”top”/> <Button android:id=”@+id/btn” android:layout_width=”fill_parent” android:layout_height=”wrap_content”
c04.indd 84c04.indd 84 22/02/13 4:13 PM22/02/13 4:13 PM
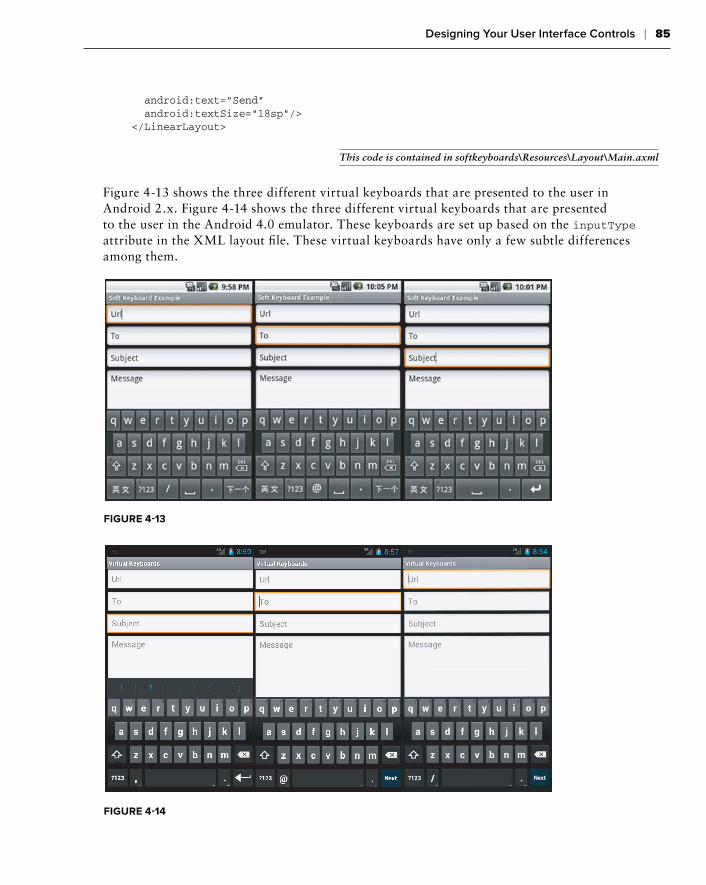
Designing Your User Interface Controls ❘ 85
android:text=”Send” android:textSize=”18sp”/></LinearLayout>
This code is contained in softkeyboards\Resources\Layout\Main.axml
Figure 4-13 shows the three different virtual keyboards that are presented to the user in Android 2.x. Figure 4-14 shows the three different virtual keyboards that are presented to the user in the Android 4.0 emulator. These keyboards are set up based on the inputType attribute in the XML layout fi le. These virtual keyboards have only a few subtle differences among them.
FIGURE 4-13
FIGURE 4-14
c04.indd 85c04.indd 85 22/02/13 4:13 PM22/02/13 4:13 PM
86 ❘ CHAPTER 4 PLANNING AND BUILDING YOUR APPLICATION’S USER INTERFACE
You may want to set the keyboard support in the emulator to true to get a more realistic visual when using an emulator session. To do this, the parameter to set is Keyboard Support to yes in an Android 2.3 Emulator Session. In an Android 4.0 Emulator Session, set the Keyboard Support to no to get the virtual key-board support.
Selecting Your Virtual Keyboard
Many types of keyboards can be used to help users input data. These keyboards fall into the areas of text, number, phone, and date/time. Here are some of the possible virtual keyboards:
none: The text is not editable.
datetime: The input will be used for a date/time.
number: The input text will be a number.
phone: The input will be used as a phone number.
text: Plain text with a basic keyboard.
textAutoCorrect: Autocorrection support is provided.
textCapCharacters: Text with all the characters in uppercase.
textEmailAddress: The text will be used as an e-mail address.
textPassword: The text will be displayed as a password input.
textUri: The text will be used as a URI.
Many more input types can be specifi ed, of course.
Removing the Keyboard
When the user is done with input, he or she wants the virtual keyboard to slide away. There is a user interface control within a virtual keyboard that allows the user to specify when the keyboard should slide away. If this needs to be performed programmatically, the following code will make the virtual keyboard slide away:
Android.Views.InputMethods.InputMethodManager imm = (Android.Views.InputMethods.InputMethodManager)GetSystemService(Context.InputMethodService);imm.HideSoftInputFromWindow(btn.WindowToken, Android.Views.InputMethods.HideSoftInputFlags.None);
This code can be placed in a number of locations that are particular to a specifi c application.
c04.indd 86c04.indd 86 22/02/13 4:13 PM22/02/13 4:13 PM
Controlling Your Menus ❘ 87
Programmatically hiding a virtual keyboard is not commonly done in Android applications, so this is not a requirement for you to implement.
CONTROLLING YOUR MENUS
Because screen real estate is at a premium with a mobile application, Android exposes a mechanism to provide application functionality without sacrifi cing too much screen real estate. Android allows each Activity to display its own menu when the device’s menu button is selected. In addition, Android supports a context menu system that can be assigned to any View. Context menus are triggered when the user holds the touch screen for 3 seconds or longer within a View, presses the trackball, or presses the middle D-pad button; this depends on the device’s input mechanism. Activity and context menus support additional submenus and context menus on the UI controls.
Introducing the Menu System
Given the small screen and the need to navigate applications that may have a large number of onscreen options, Android provides a multistage menu system. This menu system is optimized for small screens and the input they allow. These menu stages are as follows:
The icon menu: The icon menu appears along the bottom of an Activity when the Menu button is pressed and an Activity has the menu setup. The icon menu does not display check boxes, radio buttons, or shortcut keys for menu items. When an Activity’s menu has more items than the maximum, an option to display more is shown.
The expanded menu: The expanded menu appears when the user clicks the More option on a menu. The expanded menu displays items not shown in the icon menu’s fi rst set of options.
The submenu: Faced with the icon menu and the possible expanded menu, the user can be overwhelmed with menus. Thankfully, Android implements a submenu system. This allows an application to present the user with a simple hierarchical set of menus that the user may drill into. At this time, submenus cannot be nested. Note that controls may be displayed, but icons are not displayed within the submenu items.
The context menu: Context menus are associated with a View. A context menu offers options associated with that view.
Menus
The fi rst issue in creating a menu is to understand where and when it is created. Menus are associ-ated with an Activity. The menu is created by overriding the OnCreateOptionsMenu method of an Activity. The method is called when the device’s Menu button is pressed while the Activity is being displayed. When the Menu button is pressed, the method is called, and a menu is displayed. Take a look at some sample code in Listing 4-16:
c04.indd 87c04.indd 87 22/02/13 4:13 PM22/02/13 4:13 PM
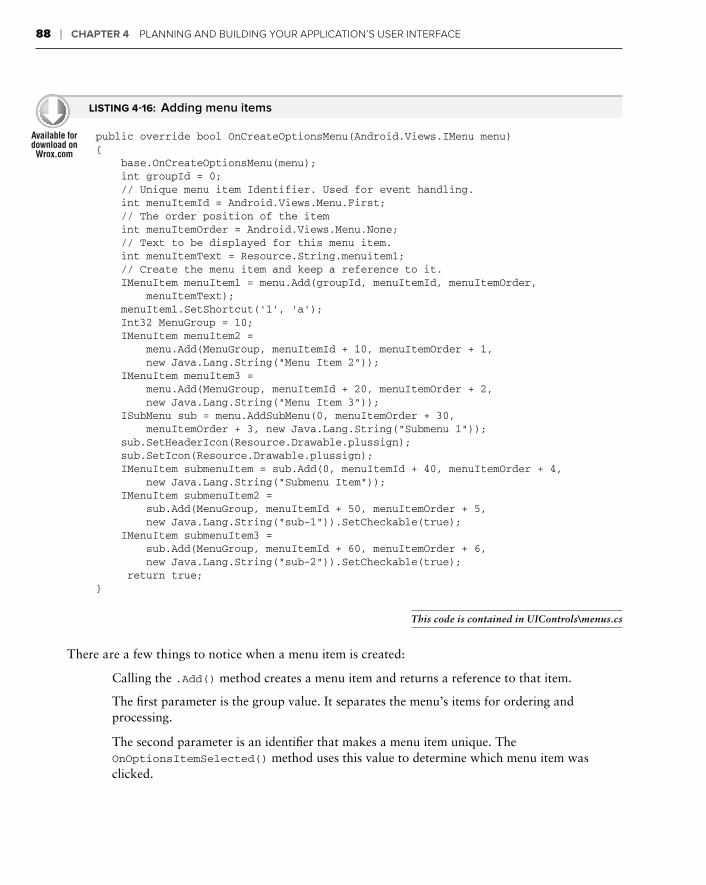
88 ❘ CHAPTER 4 PLANNING AND BUILDING YOUR APPLICATION’S USER INTERFACE
LISTING 4-16: Adding menu items
public override bool OnCreateOptionsMenu(Android.Views.IMenu menu){ base.OnCreateOptionsMenu(menu); int groupId = 0; // Unique menu item Identifier. Used for event handling. int menuItemId = Android.Views.Menu.First; // The order position of the item int menuItemOrder = Android.Views.Menu.None; // Text to be displayed for this menu item. int menuItemText = Resource.String.menuitem1; // Create the menu item and keep a reference to it. IMenuItem menuItem1 = menu.Add(groupId, menuItemId, menuItemOrder, menuItemText); menuItem1.SetShortcut(‘1’, ‘a’); Int32 MenuGroup = 10; IMenuItem menuItem2 = menu.Add(MenuGroup, menuItemId + 10, menuItemOrder + 1, new Java.Lang.String(“Menu Item 2”)); IMenuItem menuItem3 = menu.Add(MenuGroup, menuItemId + 20, menuItemOrder + 2, new Java.Lang.String(“Menu Item 3”)); ISubMenu sub = menu.AddSubMenu(0, menuItemOrder + 30, menuItemOrder + 3, new Java.Lang.String(“Submenu 1”)); sub.SetHeaderIcon(Resource.Drawable.plussign); sub.SetIcon(Resource.Drawable.plussign); IMenuItem submenuItem = sub.Add(0, menuItemId + 40, menuItemOrder + 4, new Java.Lang.String(“Submenu Item”)); IMenuItem submenuItem2 = sub.Add(MenuGroup, menuItemId + 50, menuItemOrder + 5, new Java.Lang.String(“sub-1”)).SetCheckable(true); IMenuItem submenuItem3 = sub.Add(MenuGroup, menuItemId + 60, menuItemOrder + 6, new Java.Lang.String(“sub-2”)).SetCheckable(true); return true;}
This code is contained in UIControls\menus.cs
There are a few things to notice when a menu item is created:
Calling the .Add() method creates a menu item and returns a reference to that item.
The fi rst parameter is the group value. It separates the menu’s items for ordering and processing.
The second parameter is an identifi er that makes a menu item unique. The OnOptionsItemSelected() method uses this value to determine which menu item was clicked.
c04.indd 88c04.indd 88 22/02/13 4:13 PM22/02/13 4:13 PM
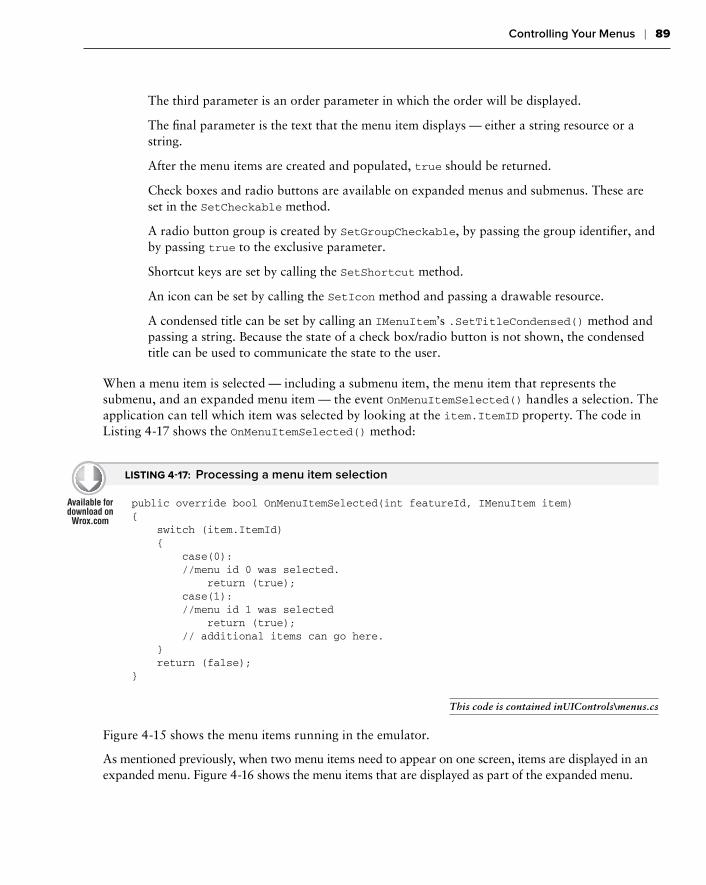
Controlling Your Menus ❘ 89
The third parameter is an order parameter in which the order will be displayed.
The fi nal parameter is the text that the menu item displays — either a string resource or a string.
After the menu items are created and populated, true should be returned.
Check boxes and radio buttons are available on expanded menus and submenus. These are set in the SetCheckable method.
A radio button group is created by SetGroupCheckable, by passing the group identifi er, and by passing true to the exclusive parameter.
Shortcut keys are set by calling the SetShortcut method.
An icon can be set by calling the SetIcon method and passing a drawable resource.
A condensed title can be set by calling an IMenuItem’s .SetTitleCondensed() method and passing a string. Because the state of a check box/radio button is not shown, the condensed title can be used to communicate the state to the user.
When a menu item is selected — including a submenu item, the menu item that represents the submenu, and an expanded menu item — the event OnMenuItemSelected() handles a selection. The application can tell which item was selected by looking at the item.ItemID property. The code in Listing 4-17 shows the OnMenuItemSelected() method:
LISTING 4-17: Processing a menu item selection
public override bool OnMenuItemSelected(int featureId, IMenuItem item){ switch (item.ItemId) { case(0): //menu id 0 was selected. return (true); case(1): //menu id 1 was selected return (true); // additional items can go here. } return (false);}
This code is contained inUIControls\menus.cs
Figure 4-15 shows the menu items running in the emulator.
As mentioned previously, when two menu items need to appear on one screen, items are displayed in an expanded menu. Figure 4-16 shows the menu items that are displayed as part of the expanded menu.
c04.indd 89c04.indd 89 22/02/13 4:13 PM22/02/13 4:13 PM
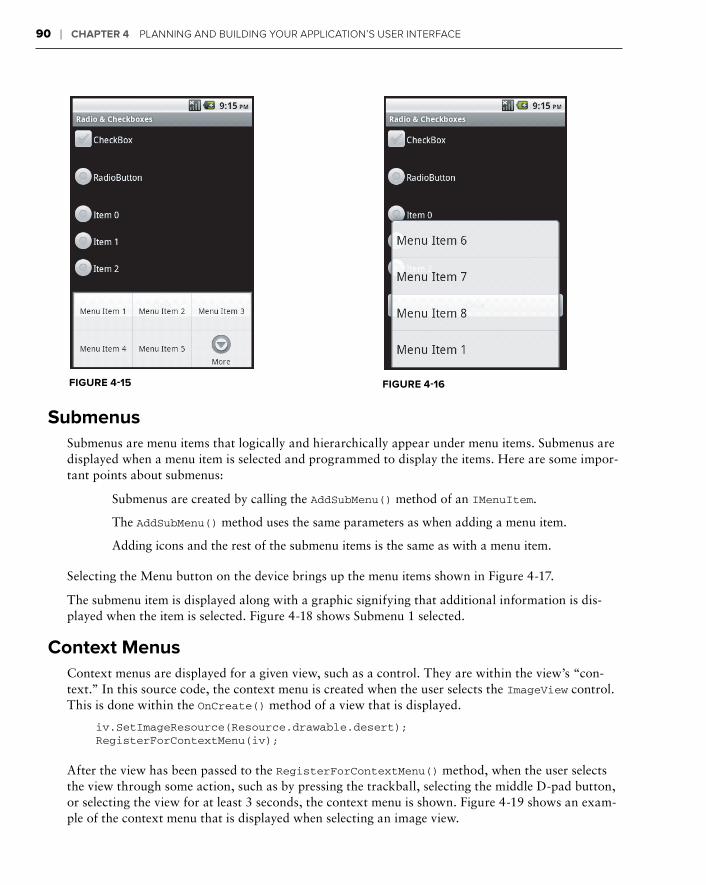
90 ❘ CHAPTER 4 PLANNING AND BUILDING YOUR APPLICATION’S USER INTERFACE
Submenus
Submenus are menu items that logically and hierarchically appear under menu items. Submenus are displayed when a menu item is selected and programmed to display the items. Here are some impor-tant points about submenus:
Submenus are created by calling the AddSubMenu() method of an IMenuItem.
The AddSubMenu() method uses the same parameters as when adding a menu item.
Adding icons and the rest of the submenu items is the same as with a menu item.
Selecting the Menu button on the device brings up the menu items shown in Figure 4-17.
The submenu item is displayed along with a graphic signifying that additional information is dis-played when the item is selected. Figure 4-18 shows Submenu 1 selected.
Context Menus
Context menus are displayed for a given view, such as a control. They are within the view’s “con-text.” In this source code, the context menu is created when the user selects the ImageView control. This is done within the OnCreate() method of a view that is displayed.
iv.SetImageResource(Resource.drawable.desert);RegisterForContextMenu(iv);
After the view has been passed to the RegisterForContextMenu() method, when the user selects the view through some action, such as by pressing the trackball, selecting the middle D-pad button, or selecting the view for at least 3 seconds, the context menu is shown. Figure 4-19 shows an exam-ple of the context menu that is displayed when selecting an image view.
FIGURE 4-16FIGURE 4-15
c04.indd 90c04.indd 90 22/02/13 4:13 PM22/02/13 4:13 PM
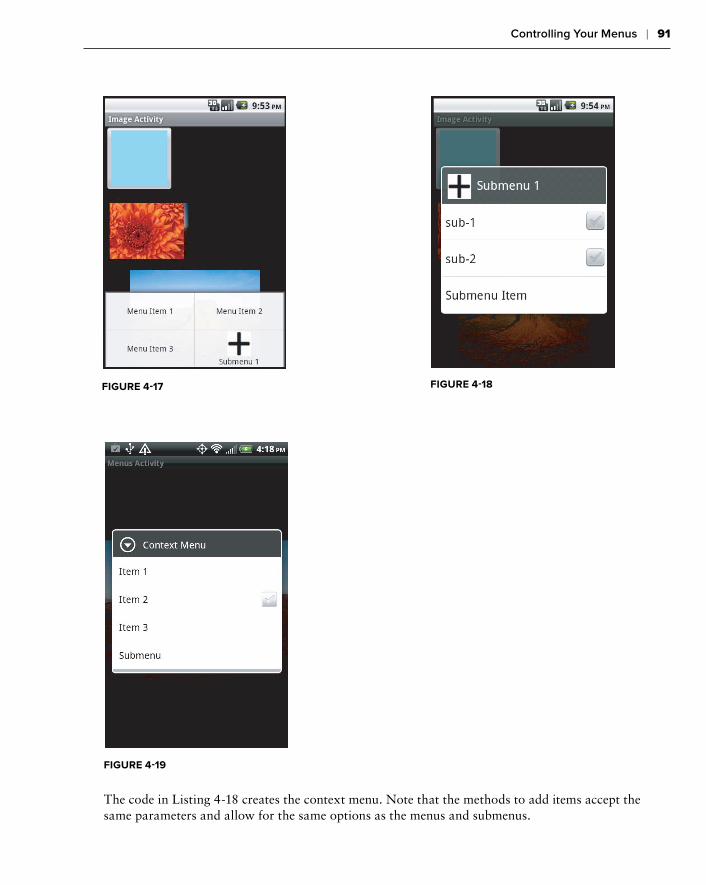
Controlling Your Menus ❘ 91
FIGURE 4-19
The code in Listing 4-18 creates the context menu. Note that the methods to add items accept the same parameters and allow for the same options as the menus and submenus.
FIGURE 4-18FIGURE 4-17
c04.indd 91c04.indd 91 22/02/13 4:13 PM22/02/13 4:13 PM
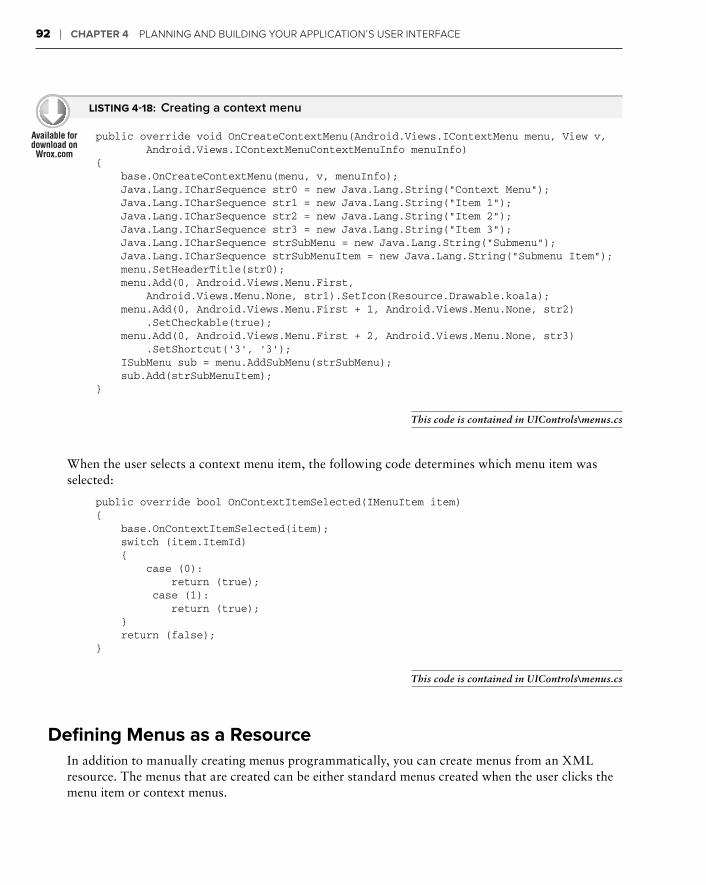
92 ❘ CHAPTER 4 PLANNING AND BUILDING YOUR APPLICATION’S USER INTERFACE
LISTING 4-18: Creating a context menu
public override void OnCreateContextMenu(Android.Views.IContextMenu menu, View v, Android.Views.IContextMenuContextMenuInfo menuInfo){ base.OnCreateContextMenu(menu, v, menuInfo); Java.Lang.ICharSequence str0 = new Java.Lang.String(“Context Menu”); Java.Lang.ICharSequence str1 = new Java.Lang.String(“Item 1”); Java.Lang.ICharSequence str2 = new Java.Lang.String(“Item 2”); Java.Lang.ICharSequence str3 = new Java.Lang.String(“Item 3”); Java.Lang.ICharSequence strSubMenu = new Java.Lang.String(“Submenu”); Java.Lang.ICharSequence strSubMenuItem = new Java.Lang.String(“Submenu Item”); menu.SetHeaderTitle(str0); menu.Add(0, Android.Views.Menu.First, Android.Views.Menu.None, str1).SetIcon(Resource.Drawable.koala); menu.Add(0, Android.Views.Menu.First + 1, Android.Views.Menu.None, str2) .SetCheckable(true); menu.Add(0, Android.Views.Menu.First + 2, Android.Views.Menu.None, str3) .SetShortcut(‘3’, ‘3’); ISubMenu sub = menu.AddSubMenu(strSubMenu); sub.Add(strSubMenuItem);}
This code is contained in UIControls\menus.cs
When the user selects a context menu item, the following code determines which menu item was selected:
public override bool OnContextItemSelected(IMenuItem item){ base.OnContextItemSelected(item); switch (item.ItemId) { case (0): return (true); case (1): return (true); } return (false);}
This code is contained in UIControls\menus.cs
Defi ning Menus as a Resource
In addition to manually creating menus programmatically, you can create menus from an XML resource. The menus that are created can be either standard menus created when the user clicks the menu item or context menus.
c04.indd 92c04.indd 92 22/02/13 4:13 PM22/02/13 4:13 PM
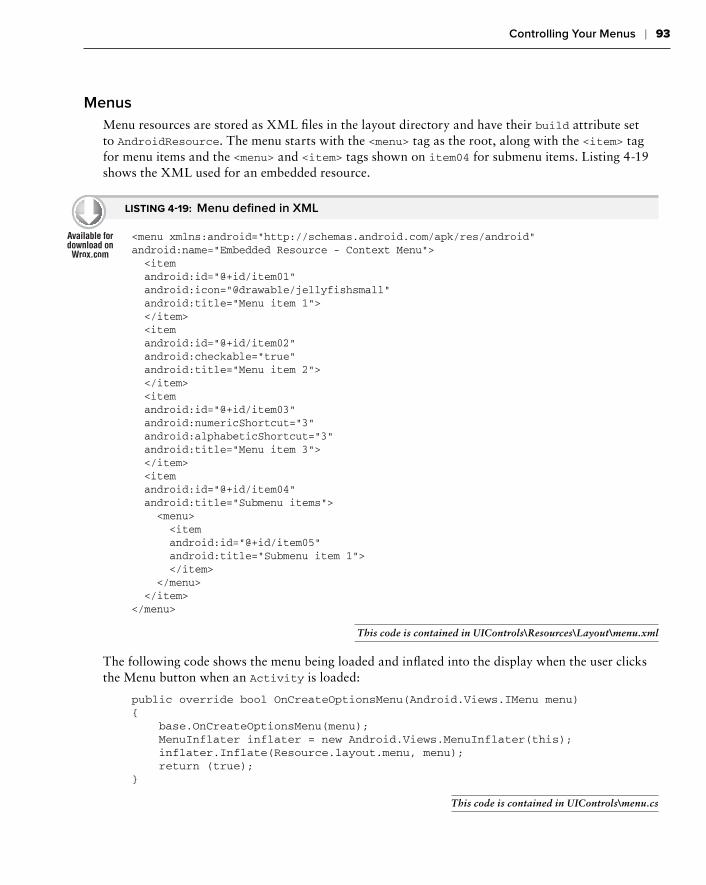
Controlling Your Menus ❘ 93
Menus
Menu resources are stored as XML fi les in the layout directory and have their build attribute set to AndroidResource. The menu starts with the <menu> tag as the root, along with the <item> tag for menu items and the <menu> and <item> tags shown on item04 for submenu items. Listing 4-19 shows the XML used for an embedded resource.
LISTING 4-19: Menu defi ned in XML
<menu xmlns:android=”http://schemas.android.com/apk/res/android”android:name=”Embedded Resource - Context Menu”> <item android:id=”@+id/item01” android:icon=”@drawable/jellyfishsmall” android:title=”Menu item 1”> </item> <item android:id=”@+id/item02” android:checkable=”true” android:title=”Menu item 2”> </item> <item android:id=”@+id/item03” android:numericShortcut=”3” android:alphabeticShortcut=”3” android:title=”Menu item 3”> </item> <item android:id=”@+id/item04” android:title=”Submenu items”> <menu> <item android:id=”@+id/item05” android:title=”Submenu item 1”> </item> </menu> </item></menu>
This code is contained in UIControls\Resources\Layout\menu.xml
The following code shows the menu being loaded and infl ated into the display when the user clicks the Menu button when an Activity is loaded:
public override bool OnCreateOptionsMenu(Android.Views.IMenu menu){ base.OnCreateOptionsMenu(menu); MenuInflater inflater = new Android.Views.MenuInflater(this); inflater.Inflate(Resource.layout.menu, menu); return (true);}
This code is contained in UIControls\menu.cs
c04.indd 93c04.indd 93 22/02/13 4:13 PM22/02/13 4:13 PM
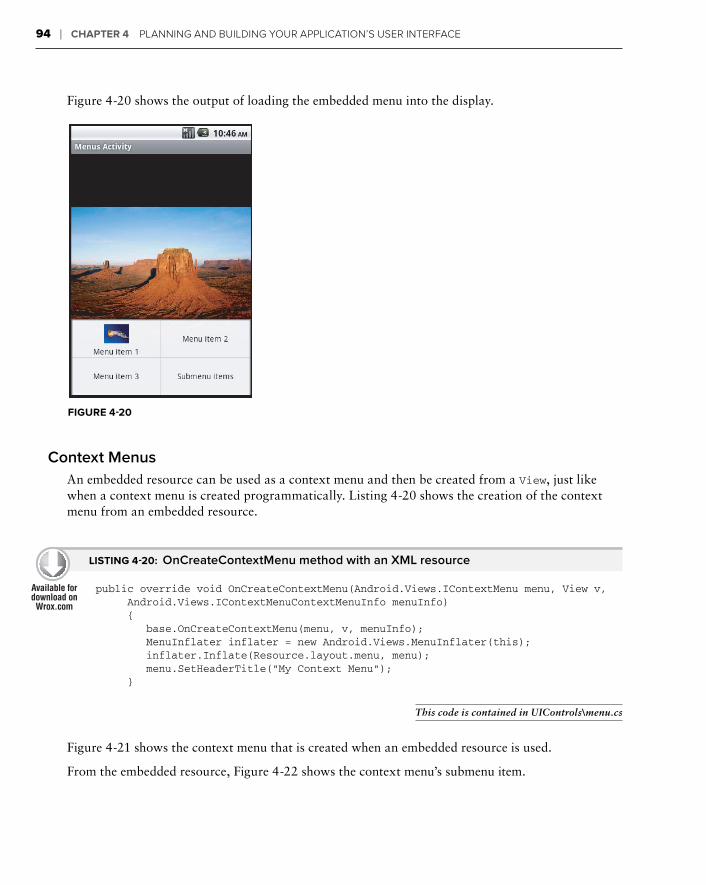
94 ❘ CHAPTER 4 PLANNING AND BUILDING YOUR APPLICATION’S USER INTERFACE
Figure 4-20 shows the output of loading the embedded menu into the display.
FIGURE 4-20
Context Menus
An embedded resource can be used as a context menu and then be created from a View, just like when a context menu is created programmatically. Listing 4-20 shows the creation of the context menu from an embedded resource.
LISTING 4-20: OnCreateContextMenu method with an XML resource
public override void OnCreateContextMenu(Android.Views.IContextMenu menu, View v, Android.Views.IContextMenuContextMenuInfo menuInfo) { base.OnCreateContextMenu(menu, v, menuInfo); MenuInflater inflater = new Android.Views.MenuInflater(this); inflater.Inflate(Resource.layout.menu, menu); menu.SetHeaderTitle(“My Context Menu”); }
This code is contained in UIControls\menu.cs
Figure 4-21 shows the context menu that is created when an embedded resource is used.
From the embedded resource, Figure 4-22 shows the context menu’s submenu item.
c04.indd 94c04.indd 94 22/02/13 4:13 PM22/02/13 4:13 PM
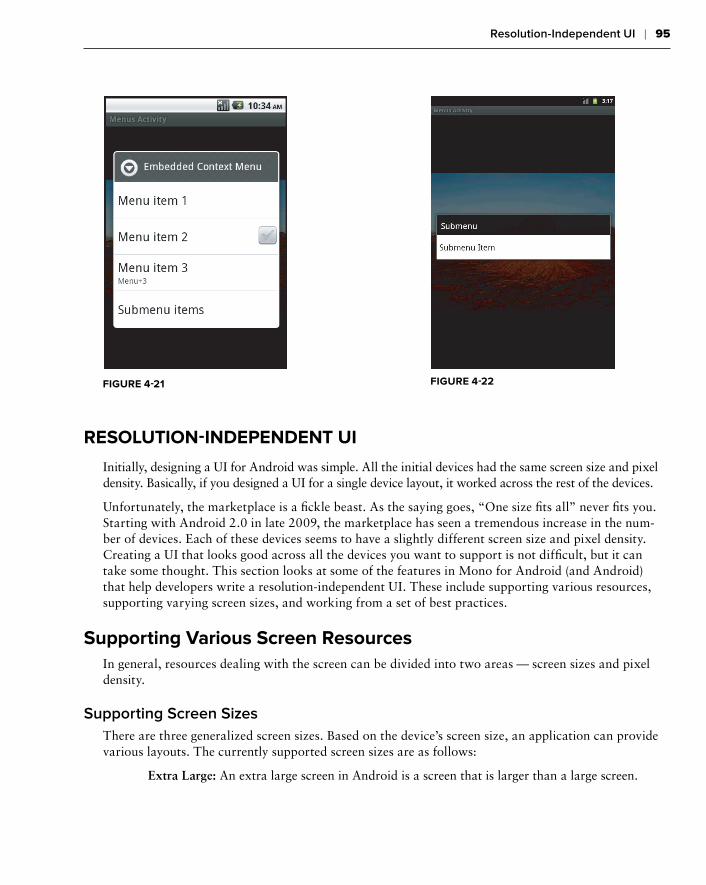
Resolution-Independent UI ❘ 95
RESOLUTION-INDEPENDENT UI
Initially, designing a UI for Android was simple. All the initial devices had the same screen size and pixel density. Basically, if you designed a UI for a single device layout, it worked across the rest of the devices.
Unfortunately, the marketplace is a fi ckle beast. As the saying goes, “One size fi ts all” never fi ts you. Starting with Android 2.0 in late 2009, the marketplace has seen a tremendous increase in the num-ber of devices. Each of these devices seems to have a slightly different screen size and pixel density. Creating a UI that looks good across all the devices you want to support is not diffi cult, but it can take some thought. This section looks at some of the features in Mono for Android (and Android) that help developers write a resolution-independent UI. These include supporting various resources, supporting varying screen sizes, and working from a set of best practices.
Supporting Various Screen Resources
In general, resources dealing with the screen can be divided into two areas — screen sizes and pixel density.
Supporting Screen Sizes
There are three generalized screen sizes. Based on the device’s screen size, an application can provide various layouts. The currently supported screen sizes are as follows:
Extra Large: An extra large screen in Android is a screen that is larger than a large screen.
FIGURE 4-21 FIGURE 4-22
c04.indd 95c04.indd 95 22/02/13 4:13 PM22/02/13 4:13 PM
96 ❘ CHAPTER 4 PLANNING AND BUILDING YOUR APPLICATION’S USER INTERFACE
Large: A large screen typically is much larger than the screen on a standard-sized smart-phone. Usually this is a tablet–or netbook-size screen or larger.
Medium: A medium screen equates to the typical screen size of a smartphone.
Small: A small screen is smaller than a standard 3.2-inch smartphone screen.
Screen size support for an application can be placed within the AndroidManifest.xml fi le that is stored within the Properties folder of an Android application. The support is set by the following XML:
<supports-screens android:smallScreens=”false” android:normalScreens=”true” android:largeScreens=”true” android:xlargeScreens=”true” android:anyDensity=”true” />
The attributes have the following meanings:
android:smallScreens indicates whether the application supports screen form factors with a smaller aspect ratio than the traditional HVGA screen (smaller than “normal”). If an applica-tion does not support small screen sizes, it will be unavailable to a device with a small screen. By default, this value is true for API level 4 and later, so it is true for Mono for Android.
android:normalScreens indicates whether a normal size screen is supported. By default, this attribute is true.
android:largeScreens indicates whether a larger-than-normal (tablet or netbook) screen size is supported. By default, this setting is true for API level 4 and later, so it is true for Mono for Android.
android:xlargeScreens indicates whether or not an extra large screen is supported. By default, this setting is false for API level below 9. This attribute will require the API level to be 9 or higher.
android:anyDensity indicates whether an application can support any screen density. This is true by default for API level 4 and later, so it is true for Mono for Android.
The values for true and false are slightly different from what developers assume. A value of false does not mean that an application will not run on the device. It means that Android will attempt to apply some sizing features and fi t the application into the device. A value of true means that the application has been checked by the application developer, should support that resolution, and does not need the device to apply any screen-sizing magic.
Supporting Pixel Densities
Pixel density is another issue that must be fi gured into an application. Resources are stored in the drawable directory and may be stored in several subdirectories, depending on their screen resolu-tion. Android has these standard pixel densities:
c04.indd 96c04.indd 96 22/02/13 4:13 PM22/02/13 4:13 PM
Resolution-Independent UI ❘ 97
ldpi: Low-density resources are designed for devices with a screen pixel density of 100 to 140 dpi. These resources are stored in the Resources/drawable-ldpi folder.
mdpi: Medium-density resources are designed for devices with a screen pixel density of 140 to 190 dpi. These resources are stored in the Resources/drawable-mdpi folder.
hdpi: High-density resources are designed for devices with a screen pixel density of 190 dpi and higher. These resources are stored in the Resources/drawable-hdpi folder.
xhdpi: Extra high-density resources are designed for devices with a screen pixel density of 320 dpi. These resources are stored in the Resources/drawable-xhdpi folder.
Mono for Android running in Visual Studio provides a drawable folder. The other directories may be created manually based on the need. Mono for Android running in MonoDevelop on the Mac provides the drawable-hdpi, drawable-mdpi, drawable-ldpi folders. These are optional directories and are provided as a convention to provide alternative resources depending on the device’s capabilities. The decision as to which resources to use is determined at runtime. The order for determining the resources is ldpi, mdpi, hdpi, xhdpi, and nodpi.
For the most up-to-date information on the support for resources in Android, check the Android Developer site on Providing Resources. The url is http://developer.android.com/guide/topics/resources/
providing-resources.html.
It is worth noting that Google did a survey and found that, as of August 2, 2010, 97 percent of devices have a pixel density of mdpi or hdpi. Developers are probably safe to assume that devices are mdpi or better.
Using Android Market Support
In addition to application support for various screen sizes and pixel densities, the Android Market uses the <support-screens /> attributes. Applications that specify these values are fi ltered within the marketplace so that the user is presented with only applications that fi t the device that is cur-rently being used to connect to the Market. If an application does not support a small screen, the application will not be listed when a small screen device searches the Android Market.
Multiple Screen Resolution Best Practices
The following are best practices for building an application that supports multiple screen resolutions:
AbsoluteLayout should not be used. AbsoluteLayout uses the concept of specifi c positions for controls. Although this will work for the initial screen design, it will most likely cause
c04.indd 97c04.indd 97 22/02/13 4:13 PM22/02/13 4:13 PM
98 ❘ CHAPTER 4 PLANNING AND BUILDING YOUR APPLICATION’S USER INTERFACE
problems when an application is run on a different device with a different screen resolution. It is suggested that developers use RelativeLayout and FrameLayout and set layout_margin attributes within the child controls.
Use fill_parent, wrap_content, and dip (density-independent pixel) units instead of pixel sizes in UI attributes.
Avoid placing pixel values directly in code. Although the Android framework uses pixel values in code for performance reasons, it is suggested that dips be used for calculations and conversions as necessary. The class Android.Util.DisplayMetrics can be used to get the necessary screen dimensions for the currently running device.
Use the density and image-specifi c resources.
Test your application in the simulator in various confi gurations as well as on multiple devices.
CONSTRUCTING A USER INTERFACE: A PHONE AND TABLET EXAMPLE
Putting together an application’s user interface using these standard controls and having that appli-cation run across multiple form factors is the goal of any Android application. In this example, the user is presented with a user registration screen. The user is provided with assistance during the reg-istration process. The assistance provided in this app is as follows:
Scrolling is turned on via the ScrollView control. This allows for the user interface of an application to scroll as needed. (For a tablet, or larger screen device, this is not an issue.) The ScrollView enables the controls to be scrolled.
Virtual keyboards are used in the various input fi elds. For example, the e-mail fi eld provides the keyboard layout optimized for e-mail, while the phone number fi eld provides the key-board optimized for numeric input.
A spinner is used to provide a list of states. Instead of typing the state in, the user selects the spinner, navigates to the appropriate state, and then selects the state.
An autocomplete is used to enter the country of the user.
Location services are used to calculate the user’s current location. From this location, the user’s city and zip code are then prefi lled. Once the location is determined, the location ser-vices are no longer used and are turned off.
Figures 4-23 and 4-24 show the same application running in a tablet device (the Motorola Xoom) and on a phone (an HTC EVO 4G device).
c04.indd 98c04.indd 98 22/02/13 4:13 PM22/02/13 4:13 PM
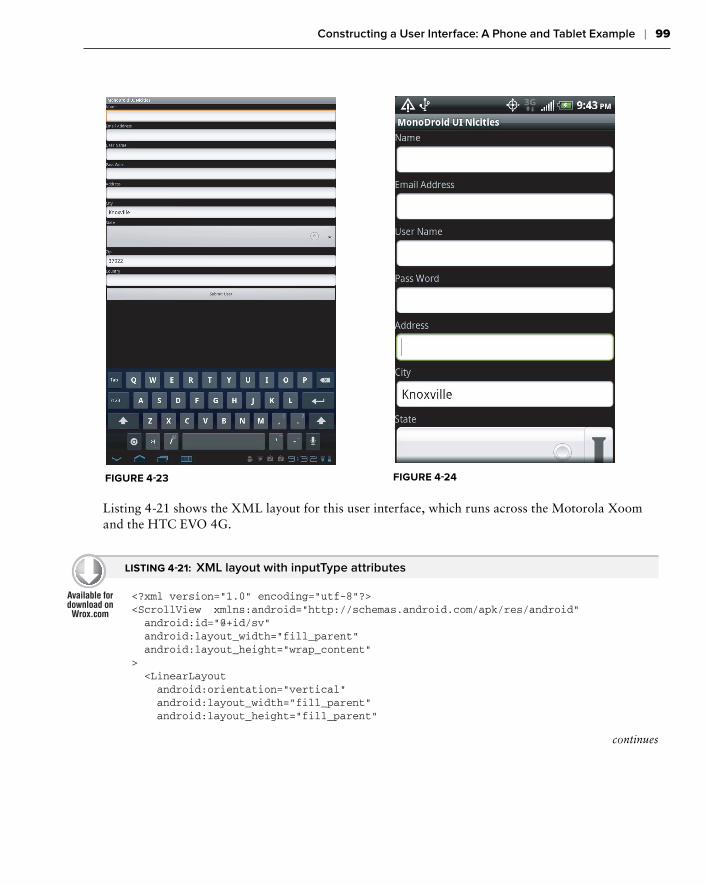
Constructing a User Interface: A Phone and Tablet Example ❘ 99
Listing 4-21 shows the XML layout for this user interface, which runs across the Motorola Xoom and the HTC EVO 4G.
LISTING 4-21: XML layout with inputType attributes
<?xml version=”1.0” encoding=”utf-8”?><ScrollView xmlns:android=”http://schemas.android.com/apk/res/android” android:id=”@+id/sv” android:layout_width=”fill_parent” android:layout_height=”wrap_content”> <LinearLayout android:orientation=”vertical” android:layout_width=”fill_parent” android:layout_height=”fill_parent”
FIGURE 4-23 FIGURE 4-24
continues
c04.indd 99c04.indd 99 22/02/13 4:13 PM22/02/13 4:13 PM
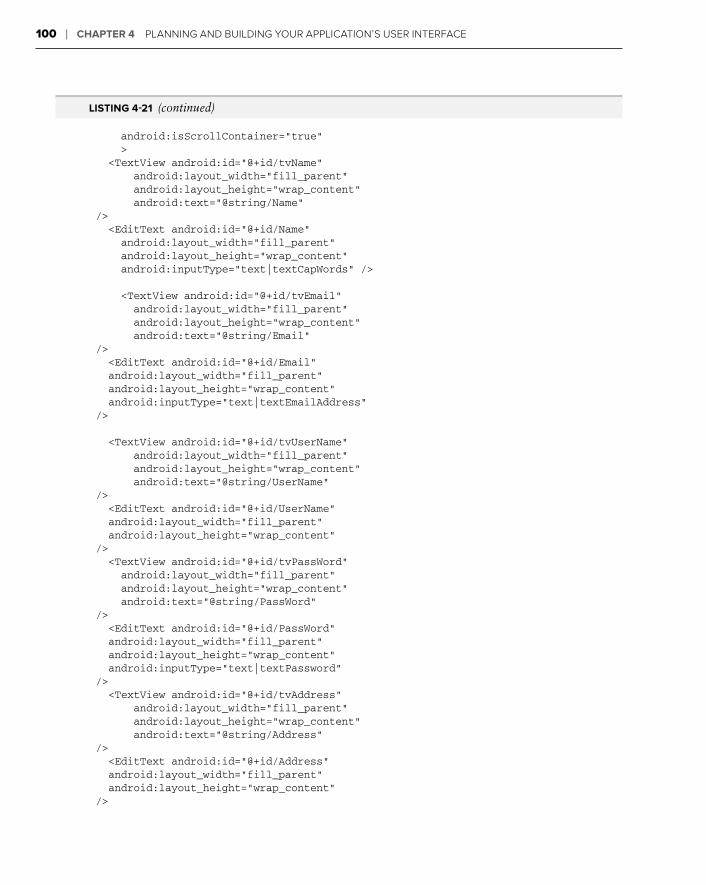
100 ❘ CHAPTER 4 PLANNING AND BUILDING YOUR APPLICATION’S USER INTERFACE
android:isScrollContainer=”true” > <TextView android:id=”@+id/tvName” android:layout_width=”fill_parent” android:layout_height=”wrap_content” android:text=”@string/Name”/> <EditText android:id=”@+id/Name” android:layout_width=”fill_parent” android:layout_height=”wrap_content” android:inputType=”text|textCapWords” />
<TextView android:id=”@+id/tvEmail” android:layout_width=”fill_parent” android:layout_height=”wrap_content” android:text=”@string/Email”/> <EditText android:id=”@+id/Email” android:layout_width=”fill_parent” android:layout_height=”wrap_content” android:inputType=”text|textEmailAddress”/>
<TextView android:id=”@+id/tvUserName” android:layout_width=”fill_parent” android:layout_height=”wrap_content” android:text=”@string/UserName”/> <EditText android:id=”@+id/UserName” android:layout_width=”fill_parent” android:layout_height=”wrap_content”/> <TextView android:id=”@+id/tvPassWord” android:layout_width=”fill_parent” android:layout_height=”wrap_content” android:text=”@string/PassWord”/> <EditText android:id=”@+id/PassWord” android:layout_width=”fill_parent” android:layout_height=”wrap_content” android:inputType=”text|textPassword”/> <TextView android:id=”@+id/tvAddress” android:layout_width=”fill_parent” android:layout_height=”wrap_content” android:text=”@string/Address”/> <EditText android:id=”@+id/Address” android:layout_width=”fill_parent” android:layout_height=”wrap_content”/>
LISTING 4-21 (continued)
c04.indd 100c04.indd 100 22/02/13 4:13 PM22/02/13 4:13 PM
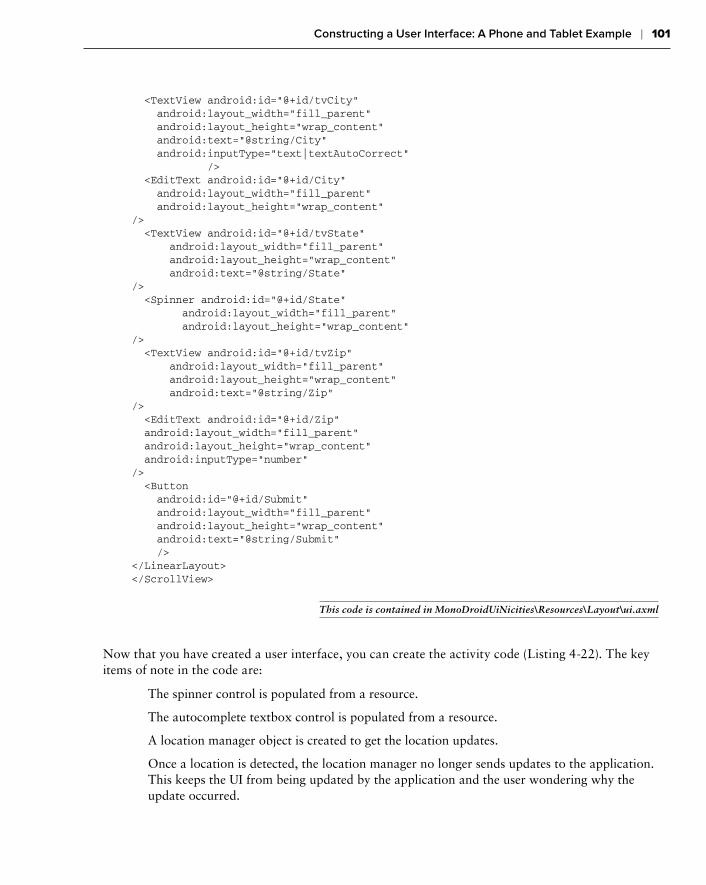
Constructing a User Interface: A Phone and Tablet Example ❘ 101
<TextView android:id=”@+id/tvCity” android:layout_width=”fill_parent” android:layout_height=”wrap_content” android:text=”@string/City” android:inputType=”text|textAutoCorrect” /> <EditText android:id=”@+id/City” android:layout_width=”fill_parent” android:layout_height=”wrap_content”/> <TextView android:id=”@+id/tvState” android:layout_width=”fill_parent” android:layout_height=”wrap_content” android:text=”@string/State”/> <Spinner android:id=”@+id/State” android:layout_width=”fill_parent” android:layout_height=”wrap_content”/> <TextView android:id=”@+id/tvZip” android:layout_width=”fill_parent” android:layout_height=”wrap_content” android:text=”@string/Zip”/> <EditText android:id=”@+id/Zip” android:layout_width=”fill_parent” android:layout_height=”wrap_content” android:inputType=”number”/> <Button android:id=”@+id/Submit” android:layout_width=”fill_parent” android:layout_height=”wrap_content” android:text=”@string/Submit” /></LinearLayout></ScrollView>
This code is contained in MonoDroidUiNicities\Resources\Layout\ui.axml
Now that you have created a user interface, you can create the activity code (Listing 4-22). The key items of note in the code are:
The spinner control is populated from a resource.
The autocomplete textbox control is populated from a resource.
A location manager object is created to get the location updates.
Once a location is detected, the location manager no longer sends updates to the application. This keeps the UI from being updated by the application and the user wondering why the update occurred.
c04.indd 101c04.indd 101 22/02/13 4:13 PM22/02/13 4:13 PM
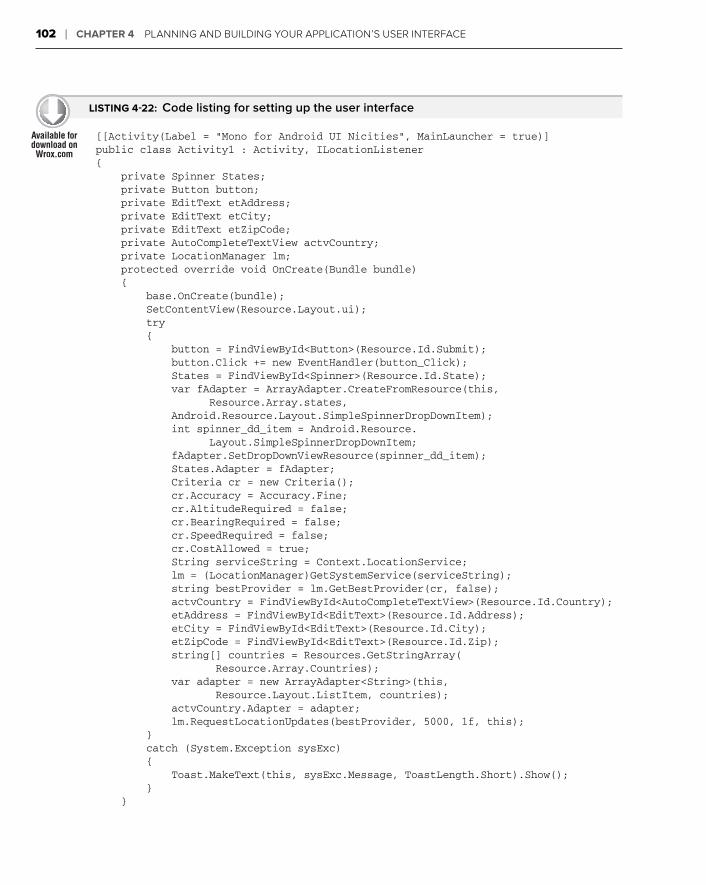
102 ❘ CHAPTER 4 PLANNING AND BUILDING YOUR APPLICATION’S USER INTERFACE
LISTING 4-22: Code listing for setting up the user interface
[[Activity(Label = “Mono for Android UI Nicities”, MainLauncher = true)]public class Activity1 : Activity, ILocationListener{ private Spinner States; private Button button; private EditText etAddress; private EditText etCity; private EditText etZipCode; private AutoCompleteTextView actvCountry; private LocationManager lm; protected override void OnCreate(Bundle bundle) { base.OnCreate(bundle); SetContentView(Resource.Layout.ui); try { button = FindViewById<Button>(Resource.Id.Submit); button.Click += new EventHandler(button_Click); States = FindViewById<Spinner>(Resource.Id.State); var fAdapter = ArrayAdapter.CreateFromResource(this, Resource.Array.states, Android.Resource.Layout.SimpleSpinnerDropDownItem); int spinner_dd_item = Android.Resource. Layout.SimpleSpinnerDropDownItem; fAdapter.SetDropDownViewResource(spinner_dd_item); States.Adapter = fAdapter; Criteria cr = new Criteria(); cr.Accuracy = Accuracy.Fine; cr.AltitudeRequired = false; cr.BearingRequired = false; cr.SpeedRequired = false; cr.CostAllowed = true; String serviceString = Context.LocationService; lm = (LocationManager)GetSystemService(serviceString); string bestProvider = lm.GetBestProvider(cr, false); actvCountry = FindViewById<AutoCompleteTextView>(Resource.Id.Country); etAddress = FindViewById<EditText>(Resource.Id.Address); etCity = FindViewById<EditText>(Resource.Id.City); etZipCode = FindViewById<EditText>(Resource.Id.Zip); string[] countries = Resources.GetStringArray( Resource.Array.Countries); var adapter = new ArrayAdapter<String>(this, Resource.Layout.ListItem, countries); actvCountry.Adapter = adapter; lm.RequestLocationUpdates(bestProvider, 5000, 1f, this); } catch (System.Exception sysExc) { Toast.MakeText(this, sysExc.Message, ToastLength.Short).Show(); } }
c04.indd 102c04.indd 102 22/02/13 4:13 PM22/02/13 4:13 PM
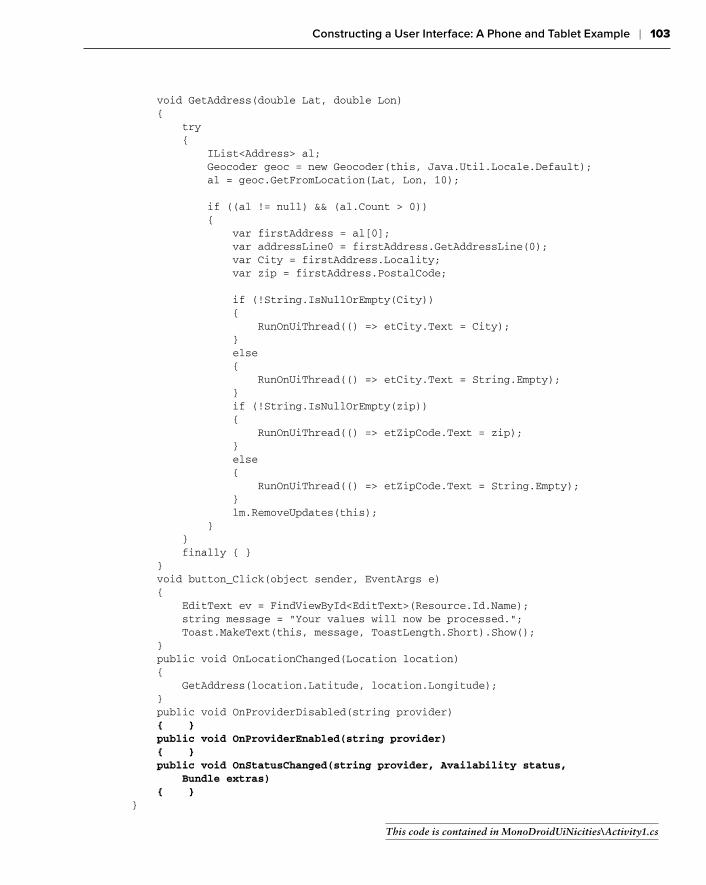
Constructing a User Interface: A Phone and Tablet Example ❘ 103
void GetAddress(double Lat, double Lon) { try { IList<Address> al; Geocoder geoc = new Geocoder(this, Java.Util.Locale.Default); al = geoc.GetFromLocation(Lat, Lon, 10);
if ((al != null) && (al.Count > 0)) { var firstAddress = al[0]; var addressLine0 = firstAddress.GetAddressLine(0); var City = firstAddress.Locality; var zip = firstAddress.PostalCode;
if (!String.IsNullOrEmpty(City)) { RunOnUiThread(() => etCity.Text = City); } else { RunOnUiThread(() => etCity.Text = String.Empty); } if (!String.IsNullOrEmpty(zip)) { RunOnUiThread(() => etZipCode.Text = zip); } else { RunOnUiThread(() => etZipCode.Text = String.Empty); } lm.RemoveUpdates(this); } } finally { } } void button_Click(object sender, EventArgs e) { EditText ev = FindViewById<EditText>(Resource.Id.Name); string message = “Your values will now be processed.”; Toast.MakeText(this, message, ToastLength.Short).Show(); } public void OnLocationChanged(Location location) { GetAddress(location.Latitude, location.Longitude); } public void OnProviderDisabled(string provider) { } public void OnProviderEnabled(string provider) { } public void OnStatusChanged(string provider, Availability status, Bundle extras) { }}
This code is contained in MonoDroidUiNicities\Activity1.cs
c04.indd 103c04.indd 103 22/02/13 4:13 PM22/02/13 4:13 PM
104 ❘ CHAPTER 4 PLANNING AND BUILDING YOUR APPLICATION’S USER INTERFACE
SUMMARY
This chapter has introduced some of the ideas, concepts, and controls you can use in building your Android user interface. Some of the key concepts presented include the following:
Views and ViewGroups
Layouts for placing controls on an Activity
Some of the key controls used to build a user interface
Some of the key ideas behind building a successful user interface
This chapter completes the fi rst part of the book on building the basics of an application with Mono for Android.
c04.indd 104c04.indd 104 22/02/13 4:13 PM22/02/13 4:13 PM

Professional Android™ Programming with Mono® for Android and .NET/C#
Published byJohn Wiley & Sons, Inc.10475 Crosspoint BoulevardIndianapolis, IN 46256www.wiley.com
Copyright © 2012 by Wallace B. McClure, Nathan Blevins, John J. Croft IV, Jonathan Dick, Chris Hardy
Published by John Wiley & Sons, Inc., Indianapolis, Indiana
Published simultaneously in Canada
ISBN: 978-1-118-02643-4ISBN: 978-1-118-22215-7 (ebk)ISBN: 978-1-118-23581-2 (ebk)ISBN: 978-1-118-26075-3 (ebk)
Manufactured in the United States of America
10 9 8 7 6 5 4 3 2 1
No part of this publication may be reproduced, stored in a retrieval system or transmitted in any form or by any means, elec-tronic, mechanical, photocopying, recording, scanning or otherwise, except as permitted under Sections 107 or 108 of the 1976 United States Copyright Act, without either the prior written permission of the Publisher, or authorization through pay-ment of the appropriate per-copy fee to the Copyright Clearance Center, 222 Rosewood Drive, Danvers, MA 01923, (978) 750-8400, fax (978) 646-8600. Requests to the Publisher for permission should be addressed to the Permissions Department, John Wiley & Sons, Inc., 111 River Street, Hoboken, NJ 07030, (201) 748-6011, fax (201) 748-6008, or online at http://www.wiley.com/go/permissions.
Limit of Liability/Disclaimer of Warranty: The publisher and the author make no representations or warranties with respect to the accuracy or completeness of the contents of this work and specifi cally disclaim all warranties, including without limitation warranties of fi tness for a particular purpose. No warranty may be created or extended by sales or promotional materials. The advice and strategies contained herein may not be suitable for every situation. This work is sold with the understanding that the publisher is not engaged in rendering legal, accounting, or other professional services. If professional assistance is required, the services of a competent professional person should be sought. Neither the publisher nor the author shall be liable for damages arising herefrom. The fact that an organization or Web site is referred to in this work as a citation and/or a potential source of further information does not mean that the author or the publisher endorses the information the organization or Web site may provide or recommendations it may make. Further, readers should be aware that Internet Web sites listed in this work may have changed or disappeared between when this work was written and when it is read.
For general information on our other products and services please contact our Customer Care Department within the United States at (877) 762-2974, outside the United States at (317) 572-3993 or fax (317) 572-4002.
Wiley also publishes its books in a variety of electronic formats and by print-on-demand. Not all content that is available in standard print versions of this book may appear or be packaged in all book formats. If you have purchased a version of this book that did not include media that is referenced by or accompanies a standard print version, you may request this media by visiting http://booksupport.wiley.com. For more information about Wiley products, visit us at www.wiley.com.
Library of Congress Control Number: 2011930295
Trademarks: Wiley, the Wiley logo, Wrox, the Wrox logo, Wrox Programmer to Programmer, and related trade dress are trademarks or registered trademarks of John Wiley & Sons, Inc. and/or its affi liates, in the United States and other countries, and may not be used without written permission. Mono is a registered trademark of Novell, Inc. Android is a trademark of Google, Inc. All other trademarks are the property of their respective owners. Wiley Publishing, Inc., is not associated with any product or vendor mentioned in this book.
ffirs.indd ivffirs.indd iv 22/02/13 4:44 PM22/02/13 4:44 PM
Related Documents