Programming Manual DDP ( Dynamic Display Panel ) V 2.1 2012 Created By Sameh and Basem

Welcome message from author
This document is posted to help you gain knowledge. Please leave a comment to let me know what you think about it! Share it to your friends and learn new things together.
Transcript
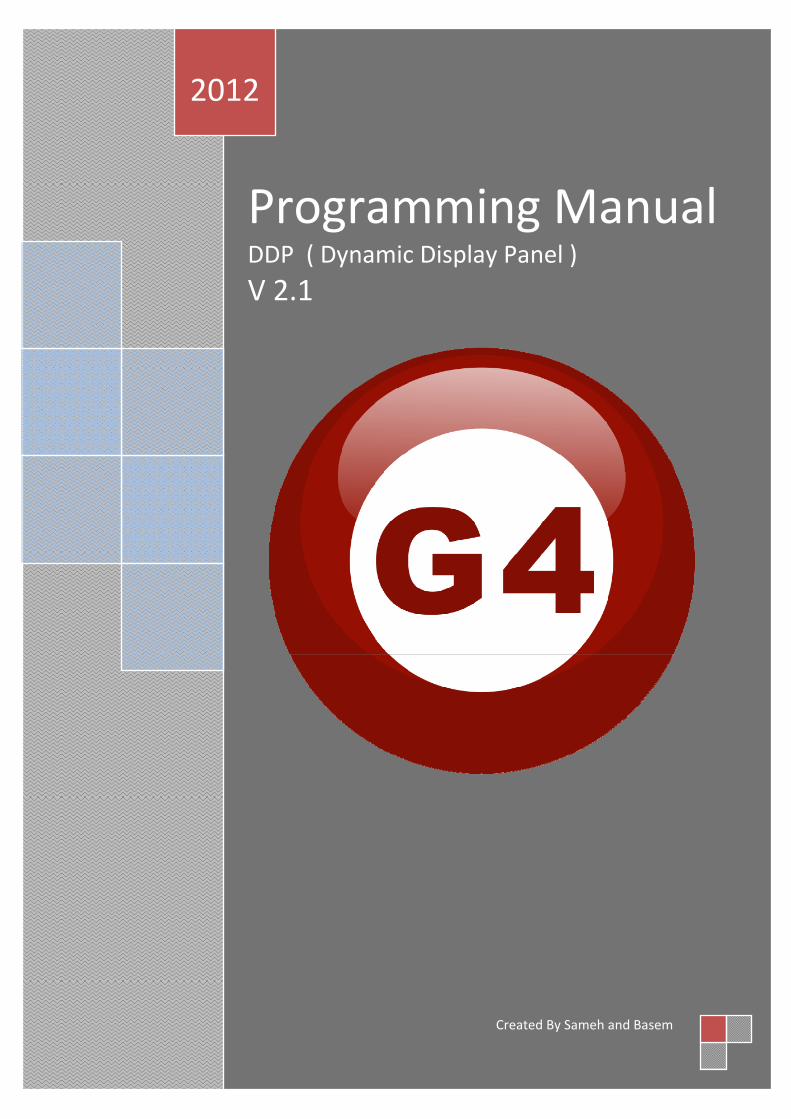
Programming ManualDDP ( Dynamic Display Panel ) V 2.1
2012
Created By Sameh and Basem

Contents
1-Introduction Objective 1-1 S-bus products 1-2
2- Start Programming S-Bus Programming Software overview 2-1 S-bus Configuration Software basic setting 2-2 Devices address and Search 2-3 Steps of basic programming 2-4 What is the MAGIC LINE 2-5
3- DDP (Dynamic Display Panel) DDP Overview 3-1 DDP Address Page Password and Language Setting 3-2 DDP Basic setting 3-3 DDP 4 Pages Button Remarks and Modes 3-4 DDP Buttons Function setting 3-5 DDP Buttons Memory, Dimming, and LED Setting 3-6 DDP Setup (Minimum Diming Value and Infrared) 3-7 DDP Combination Way 3-8 DDP Button Picture Edit and Download 3-9 DDP Mutual Exclusion Function 3-10 DDP Air condition Basic Setting and testing 3-11 DDP AC Page control Setup 3-12 DDP Temp Calibration and Lock function 3-13 DDP Slave to other DDP AC setting 3-14 DDP Broadcast Function 3-15 DDP AC Graphic setting 3-16 DDP Infrared Function overview 3-17
4- Relays and Dimmers Programming Relays and Dimmers type overview 4-1 Setting Relay and Dimmers Address 4-2 Channels search and Remarks 4-3 Relay Channel Setting 4-4 Dimmer Channel Setting 4-5 Area Setting 4-6 Scene Setting 4-7 Scene Restore 4-8 Sequence Setting 4-9 Motor Setting 4-10
Before you begin this course
Before you begin this course, you should have: • Understand the basic bus Diagram Connection Topology • Understand the Lighting and HVAC Connections Diagram • Basic Knowledge about IP setting. (please see 2-2) • Basic Knowledge of using Windows operating system. • Basic Knowledge of using Windows Painter.
Prerequisites
Either • Products overview course. • Installation Course.
How this course is organized
Lighting and HVAC Programming Guide Course Organized in Simple way of
Product overview, Example Picture, ( Notices) , ( Advices),
( Example) . For Training Course Request Please apply online www.smarthomebus.com
4
S‐BUS ‐ Smart Home Programming Guide Ver. 2.1
1- Introduction
Welcome to S-BUS manual Programming Guide, you are now a Beginner Programmer who well know soon how the S-bus Programming is simple.
1-1 Objective:
After this course you will be able to program the Lights Dimmers ad relays with the switches Panel, Program curtain shades control, program the Air condition setting and DDP panel, create and download different Picture on the LCD, and start with Motion sensor and Automate your Project and many more…
1-2 S-Bus products:
S-BUS Products is vary with its powerful and multi functions, it have the high power dimmer and relay, Curtain, DMX and LED controller, Wall switches and Dynamic Display Panel "DDP", HVAC2 Air condition control and different type of sensors, like Motion sensor, light intensity sensor, Ultrasonic sensor, Dry input sensor, Analog input, current sensor, Power meter, Infrared receivers and transmitter, Security and Automation, Audio Module, Rs232, Programming and integrations Module
5
S‐BUS ‐ Smart Home Programming Guide Ver. 2.1
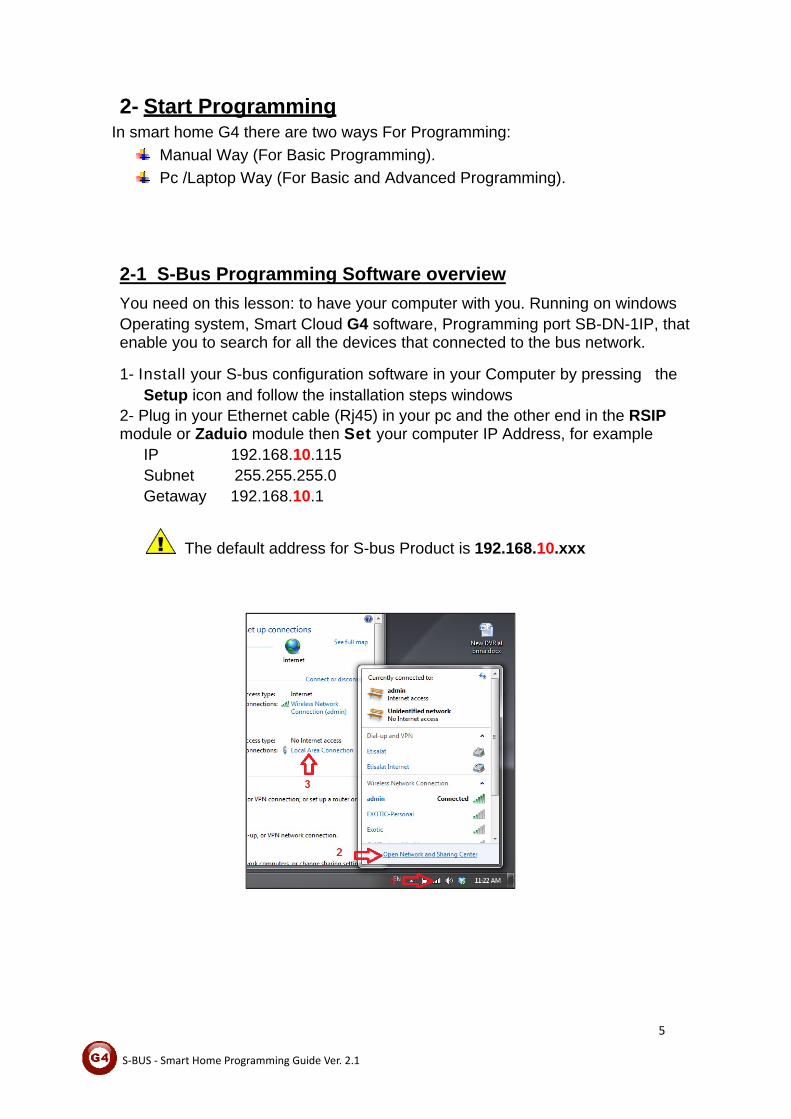
2- Start Programming In smart home G4 there are two ways For Programming:
Manual Way (For Basic Programming). Pc /Laptop Way (For Basic and Advanced Programming).
2-1 S-Bus Programming Software overview
You need on this lesson: to have your computer with you. Running on windows Operating system, Smart Cloud G4 software, Programming port SB-DN-1IP, that enable you to search for all the devices that connected to the bus network.
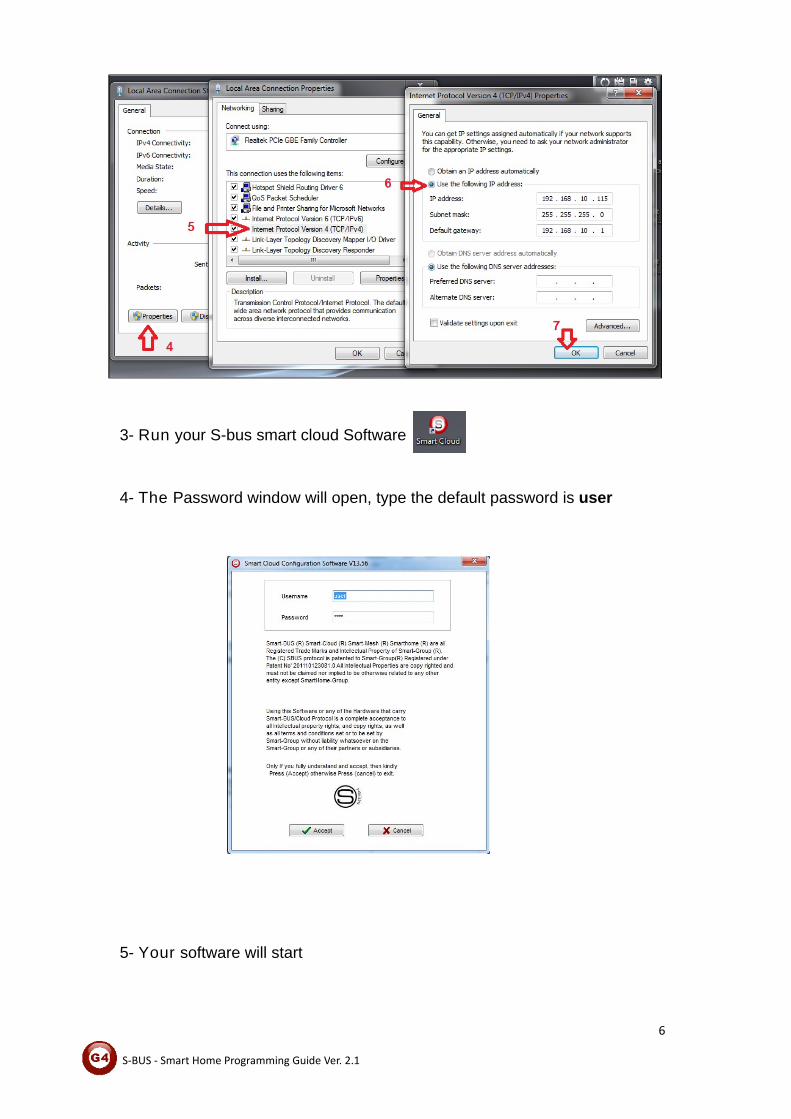
1- Install your S-bus configuration software in your Computer by pressing the
Setup icon and follow the installation steps windows 2- Plug in your Ethernet cable (Rj45) in your pc and the other end in the RSIP module or Zaduio module then Set your computer IP Address, for example
IP 192.168.10.115 Subnet 255.255.255.0 Getaway 192.168.10.1
The default address for S-bus Product is 192.168.10.xxx
6
S‐BUS ‐ Smart Home Programming Guide Ver. 2.1
3- Run your S-bus smart cloud Software 4- The Password window will open, type the default password is user
5- Your software will start
7
S‐BUS ‐ Smart Home Programming Guide Ver. 2.1
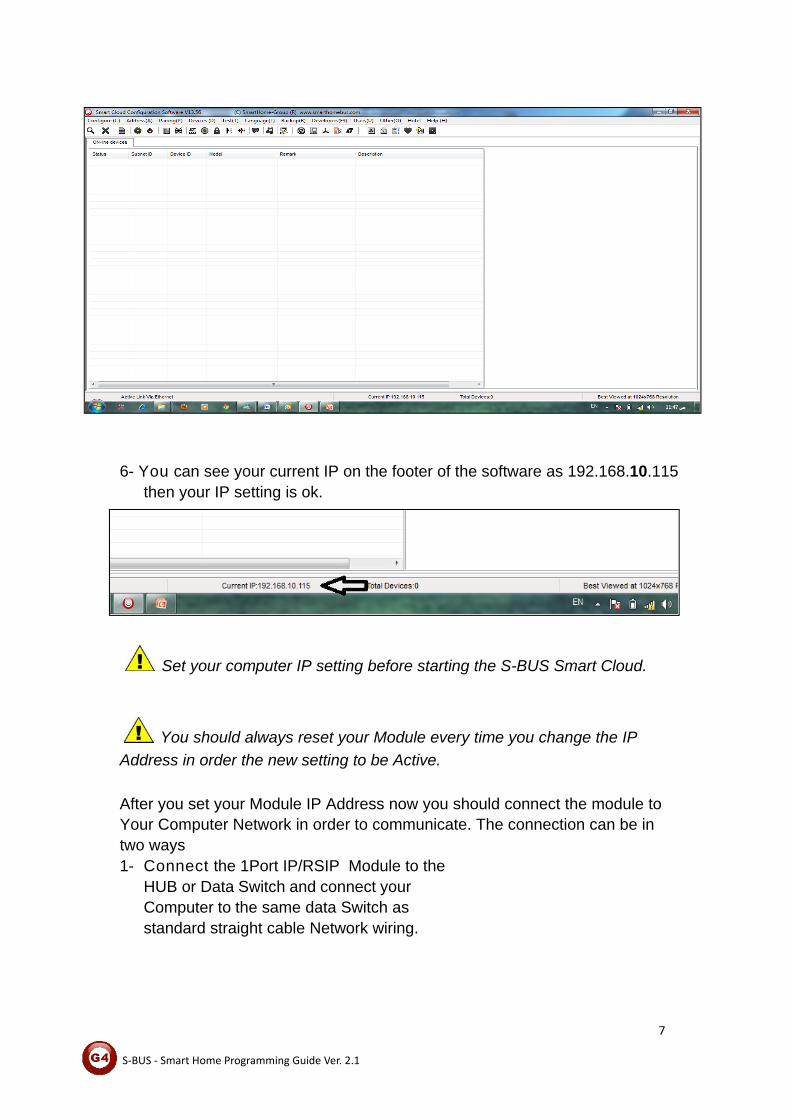
6- You can see your current IP on the footer of the software as 192.168.10.115
then your IP setting is ok.
Set your computer IP setting before starting the S-BUS Smart Cloud.
You should always reset your Module every time you change the IP Address in order the new setting to be Active. After you set your Module IP Address now you should connect the module to Your Computer Network in order to communicate. The connection can be in two ways 1- Connect the 1Port IP/RSIP Module to the
HUB or Data Switch and connect your Computer to the same data Switch as standard straight cable Network wiring.
8
S‐BUS ‐ Smart Home Programming Guide Ver. 2.1
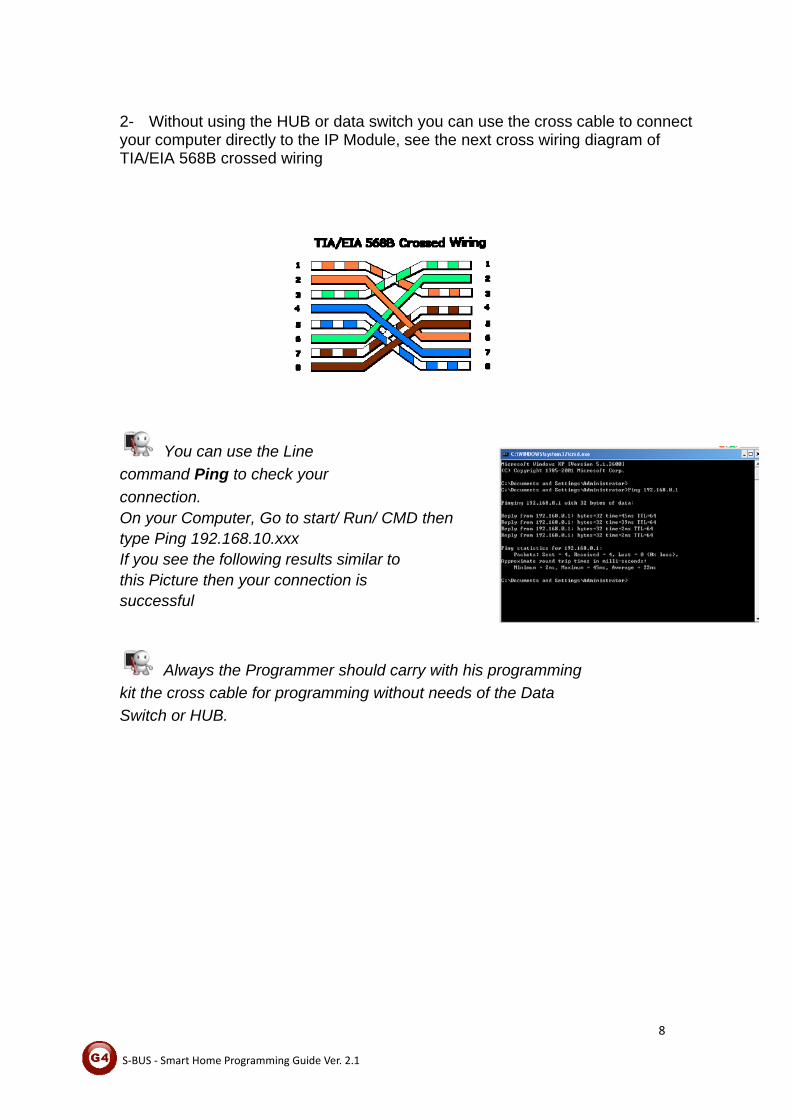
2- Without using the HUB or data switch you can use the cross cable to connect your computer directly to the IP Module, see the next cross wiring diagram of TIA/EIA 568B crossed wiring
You can use the Line command Ping to check your connection. On your Computer, Go to start/ Run/ CMD then type Ping 192.168.10.xxx If you see the following results similar to this Picture then your connection is successful
Always the Programmer should carry with his programming kit the cross cable for programming without needs of the Data Switch or HUB.
9
S‐BUS ‐ Smart Home Programming Guide Ver. 2.1
2-2 S-bus Smart cloud Software basic setting
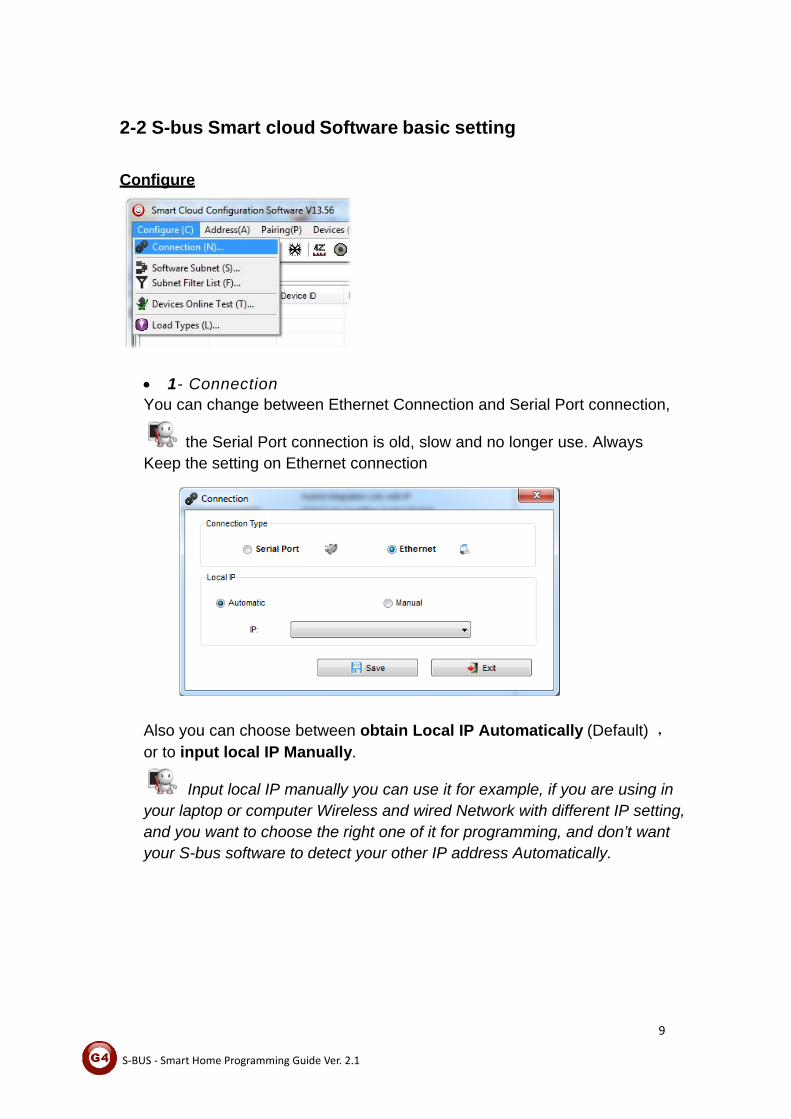
Configure
• 1- Connection You can change between Ethernet Connection and Serial Port connection,
the Serial Port connection is old, slow and no longer use. Always Keep the setting on Ethernet connection
Also you can choose between obtain Local IP Automatically (Default) ,or to input local IP Manually.
Input local IP manually you can use it for example, if you are using in your laptop or computer Wireless and wired Network with different IP setting, and you want to choose the right one of it for programming, and don’t want your S-bus software to detect your other IP address Automatically.
10
S‐BUS ‐ Smart Home Programming Guide Ver. 2.1
• 2- Software Subnet ID The S-bus configuration software have fixed Device ID (254), but you can change its subnet ID only, the default software subnet is (Default = 254)
The software default subnet ID address is 254, Device ID 254, this address must be unique, in case other Device has the same address you will not be able to find that Device unless you change the Subnet of the software. • 3- Subnet Filter List: Here you can filter your subnet ID's that mean you can add more ranges if you have more than 254 devicess so you can add another subnet ID • 4- Devices On-Line test You can Deactivate or activate the auto test of Online devices (Activate is Default). • 5- Load type You can add some Remarks to your Load type to use it as reference and print it out later on the excel sheet.
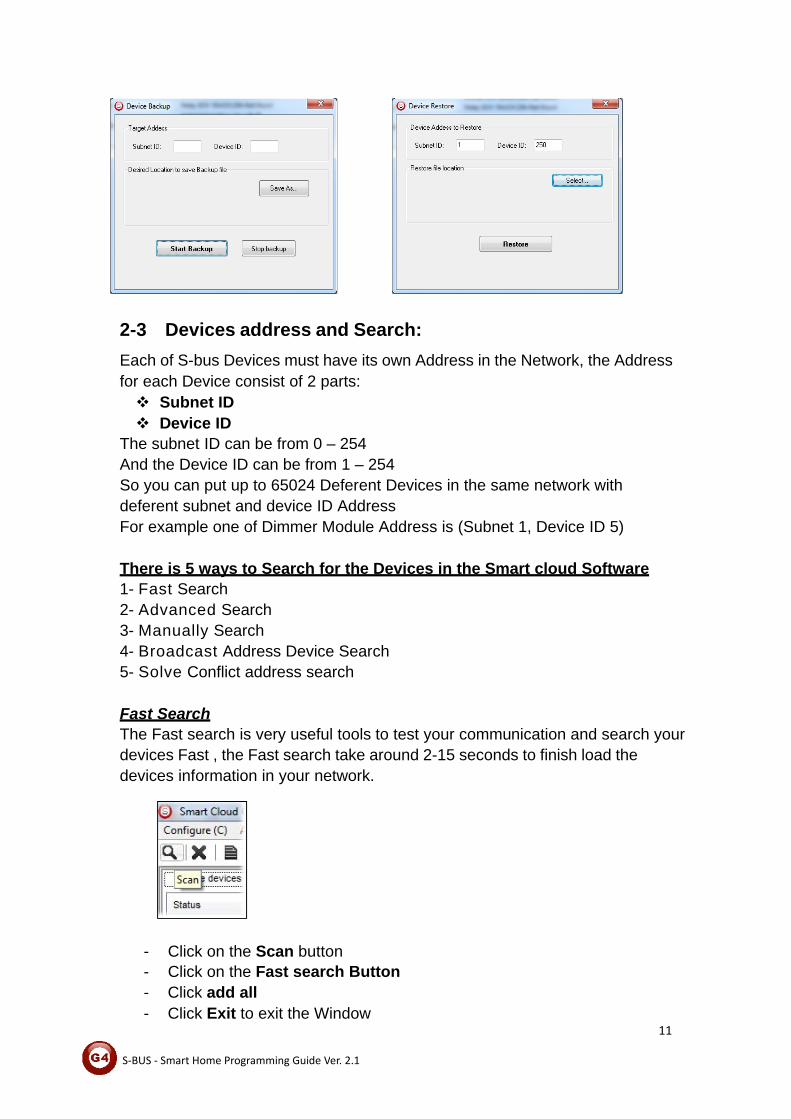
Address Here you can search for the Device Addresses and load the Network and solve any conflict in the address. (For more Information see 3-2) Pairing You can enable pairing or disable either for one device or for all devices, disable meaning you can't program S-bus modules in manual anymore until you enable it again. Devices You can go here directly to Devices setting Categorized by type Test This is important Function to check your Lights Circuit by flashing the lights ON/OFF and then you can give it name (for more information see 3-3 section). Language You can change the Language between English and Chinese, and other Languages Backup Important to backup and restore your Devices address and setting.
For Backup: put the subnet and device ID for desire device , choose the location for the backup file then click "Start backup" ,
For Restore: put the subnet and device ID for desire device, choose the backup which you already made then click "Restore".
11
S‐BUS ‐ Smart Home Programming Guide Ver. 2.1
2-3 Devices address and Search:
Each of S-bus Devices must have its own Address in the Network, the Address for each Device consist of 2 parts:
Subnet ID Device ID
The subnet ID can be from 0 – 254 And the Device ID can be from 1 – 254 So you can put up to 65024 Deferent Devices in the same network with deferent subnet and device ID Address For example one of Dimmer Module Address is (Subnet 1, Device ID 5)
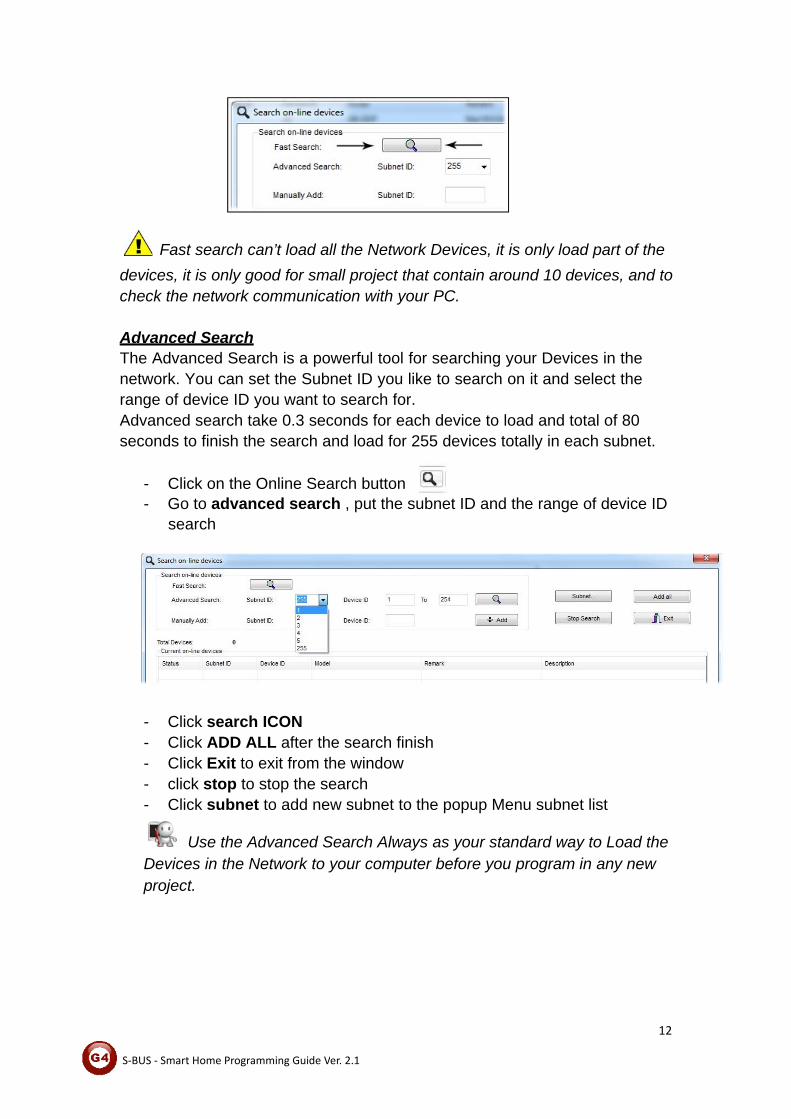
There is 5 ways to Search for the Devices in the Smart cloud Software 1- Fast Search 2- Advanced Search 3- Manually Search 4- Broadcast Address Device Search 5- Solve Conflict address search
Fast Search The Fast search is very useful tools to test your communication and search your devices Fast , the Fast search take around 2-15 seconds to finish load the devices information in your network.
- Click on the Scan button - Click on the Fast search Button - Click add all - Click Exit to exit the Window
12
S‐BUS ‐ Smart Home Programming Guide Ver. 2.1
Fast search can’t load all the Network Devices, it is only load part of the devices, it is only good for small project that contain around 10 devices, and to check the network communication with your PC.
Advanced Search The Advanced Search is a powerful tool for searching your Devices in the network. You can set the Subnet ID you like to search on it and select the range of device ID you want to search for. Advanced search take 0.3 seconds for each device to load and total of 80 seconds to finish the search and load for 255 devices totally in each subnet.
- Click on the Online Search button - Go to advanced search , put the subnet ID and the range of device ID
search
- Click search ICON - Click ADD ALL after the search finish - Click Exit to exit from the window - click stop to stop the search - Click subnet to add new subnet to the popup Menu subnet list
Use the Advanced Search Always as your standard way to Load the Devices in the Network to your computer before you program in any new project.

13
S‐BUS ‐ Smart Home Programming Guide Ver. 2.1
Manual Search Manual Search is a very fast and useful way to add known Device ID and subnet to your network
- Type the subnet and device ID that you know - Click ADD - Exit the Menu
Broadcast Address Device Search This tool is important when you add new devices or you start your new Project installation, many devices could have the same Address or the communication is not yet tested, this tool is important to check the communication between your device and the bus network and to change its initial address in the first time installation.
- On your software Click Address then broadcast detection - Go to your device like Dimmer / Relay / sensor or Panel and
keep pressing the broadcast Address button for 2 ~ 4seconds until the button LED color change to RED.
- In your software in the Broadcast Detection window click the Detect Address Button.
- Your Device ID and Subnet well appear automatically - To change the address just type the new subnet ID or device ID
you want then click Save Address - Click ADD to online device list to load your device in the Devices
Network List. - Click Exit to Close the Window

14
S‐BUS ‐ Smart Home Programming Guide Ver. 2.1
Solve Conflict address search This type of search used to solve the conflict address, for example if 2 devices have the same address, then you can easily change the address of it without the need of disconnecting its wires from the network.
- Click Address or click the Address Shortcut icon
- Select Subnet 255 (recommended) or any desired subnet then click the search icon.
- Select the device you want to modify its address then click modify Address or double click
on it - New window will open, and then type the new Subnet ID and
Device ID, then Click Save
15
S‐BUS ‐ Smart Home Programming Guide Ver. 2.1
2-4 Steps of Basic Programming The Basic Programming for Lighting Motor and HVAC of S-bus Products has procedure of Basic Steps as following A- Check the communication between your computer and the Bus B- Broadcast each Dimmer, Relay, Motor curtain HVAC control++ initial Address C- Change the initial addresses to the desired one (kindly check 2.5 for addresses range). D- Give name of each Dimmer, Relay Module (Remark). E- Check each Lighting channel circuit if working and connected good F- Give name for each channel (remark). G- Make an excel sheet for all your Dimmers, relays, other module
address and circuit name. H- Make Area for each Dimmer, Relay module if required . I- Make Scene and Sequence for each Module if required . J- Make safety power restore and delay time for scenes and safety as
required. K- Check the curtain module gives it address and name. L- Set the channel name, the running time open and close running time. M- Give the switch (6 gangs) and panel (DDP) its addresses and Name. N- Assign the panel button to the corresponding scene or channel. O- Set the button graphic picture for the DDP for each button. P- Check the HVAC address give it address and name. Q-Set on off relay sequence. R- Set the VAV Voltage output if required. S- Set the safety HVAC running sequence T- assign the DDP Panel to its HVAC unit. U- Set the FAN speed, cool set point, type, adjust temperature sensor on the
panel setting. V- Set the required graphic for AC, and panel basic setting W- Search for PIR motion sensor and give it address and name X- Set the sensitivity, way of triggering, motion, no movement delay and
commands Y-connect the Z-audio 2 to the s-bus And address it Z-Test and enhance your programming.
Following the basic Programming steps procedure will save the programmers time and effort.
16
S‐BUS ‐ Smart Home Programming Guide Ver. 2.1
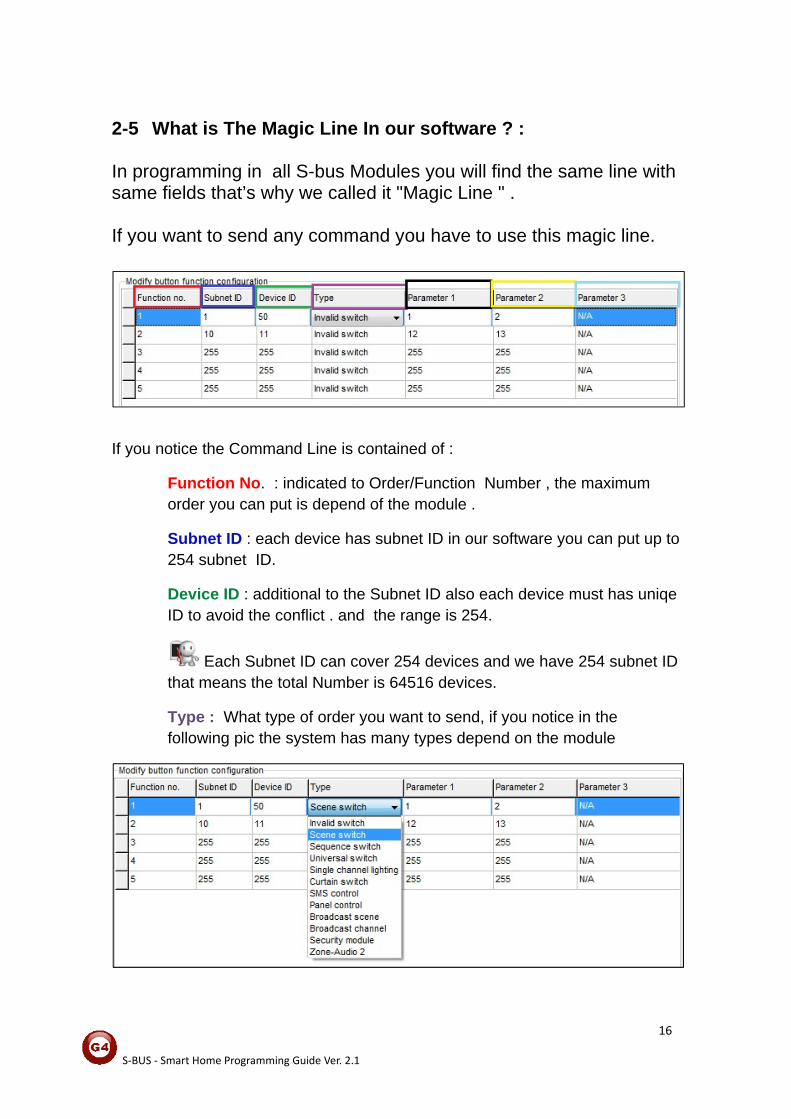
2-5 What is The Magic Line In our software ? : In programming in all S-bus Modules you will find the same line with same fields that’s why we called it "Magic Line " . If you want to send any command you have to use this magic line.
If you notice the Command Line is contained of :
Function No. : indicated to Order/Function Number , the maximum order you can put is depend of the module .
Subnet ID : each device has subnet ID in our software you can put up to 254 subnet ID.
Device ID : additional to the Subnet ID also each device must has uniqe ID to avoid the conflict . and the range is 254.
Each Subnet ID can cover 254 devices and we have 254 subnet ID that means the total Number is 64516 devices.
Type : What type of order you want to send, if you notice in the following pic the system has many types depend on the module
17
S‐BUS ‐ Smart Home Programming Guide Ver. 2.1
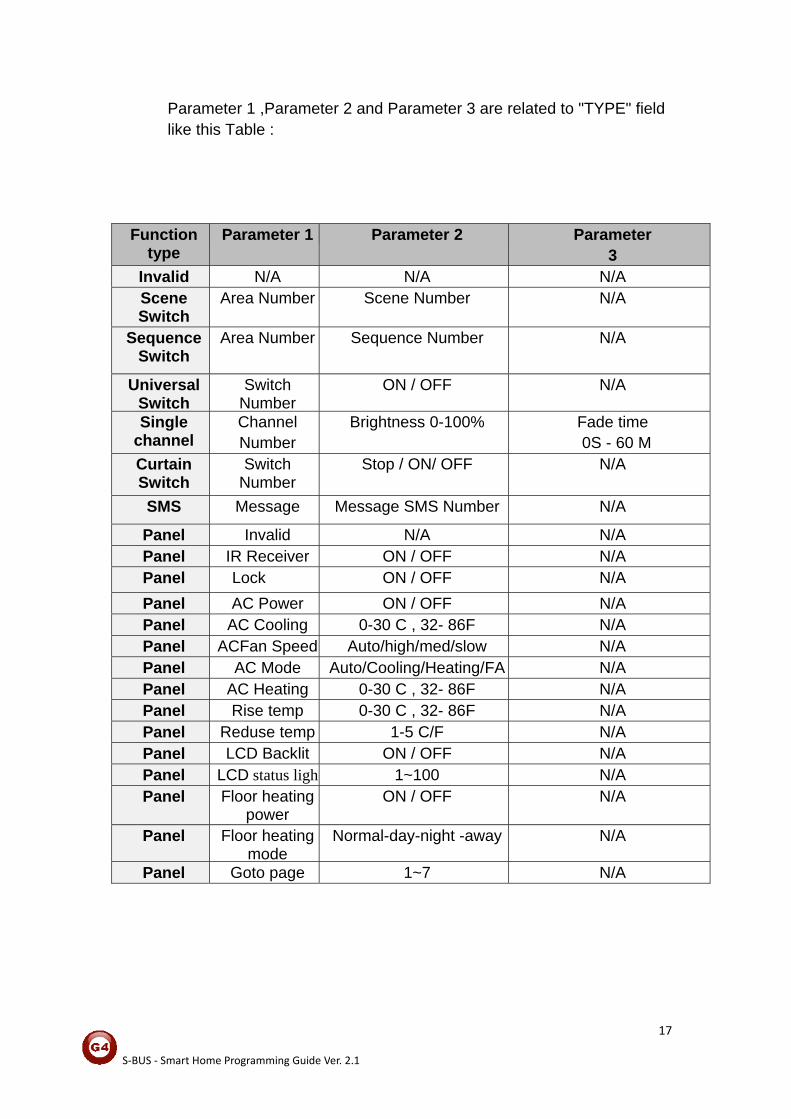
Parameter 1 ,Parameter 2 and Parameter 3 are related to "TYPE" field like this Table :
Parameter 3
Parameter 2 Parameter 1 Function type
N/A N/A N/A Invalid N/A Scene Number Area Number Scene
Switch N/A Sequence Number Area Number Sequence
Switch
N/A ON / OFF Switch Number
Universal Switch
Fade time 0S - 60 M
Brightness 0-100% Channel Number
Single channel
N/A Stop / ON/ OFF Switch Number
Curtain Switch
N/A Message SMS Number Message SMS
N/A N/A Invalid Panel N/A ON / OFF IR Receiver Panel N/A ON / OFF Lock Panel N/A ON / OFF AC Power Panel N/A 0-30 C , 32- 86F AC Cooling Panel N/A Auto/high/med/slow ACFan Speed Panel N/A Auto/Cooling/Heating/FAAC Mode Panel N/A 0-30 C , 32- 86F AC Heating Panel N/A 0-30 C , 32- 86F Rise temp Panel N/A 1-5 C/F Reduse temp Panel N/A ON / OFF LCD Backlit Panel N/A 1~100 LCD status ligh Panel N/A ON / OFF Floor heating
power Panel
N/A Normal-day-night -awayFloor heating mode
Panel
N/A 1~7 Goto page Panel
18
S‐BUS ‐ Smart Home Programming Guide Ver. 2.1
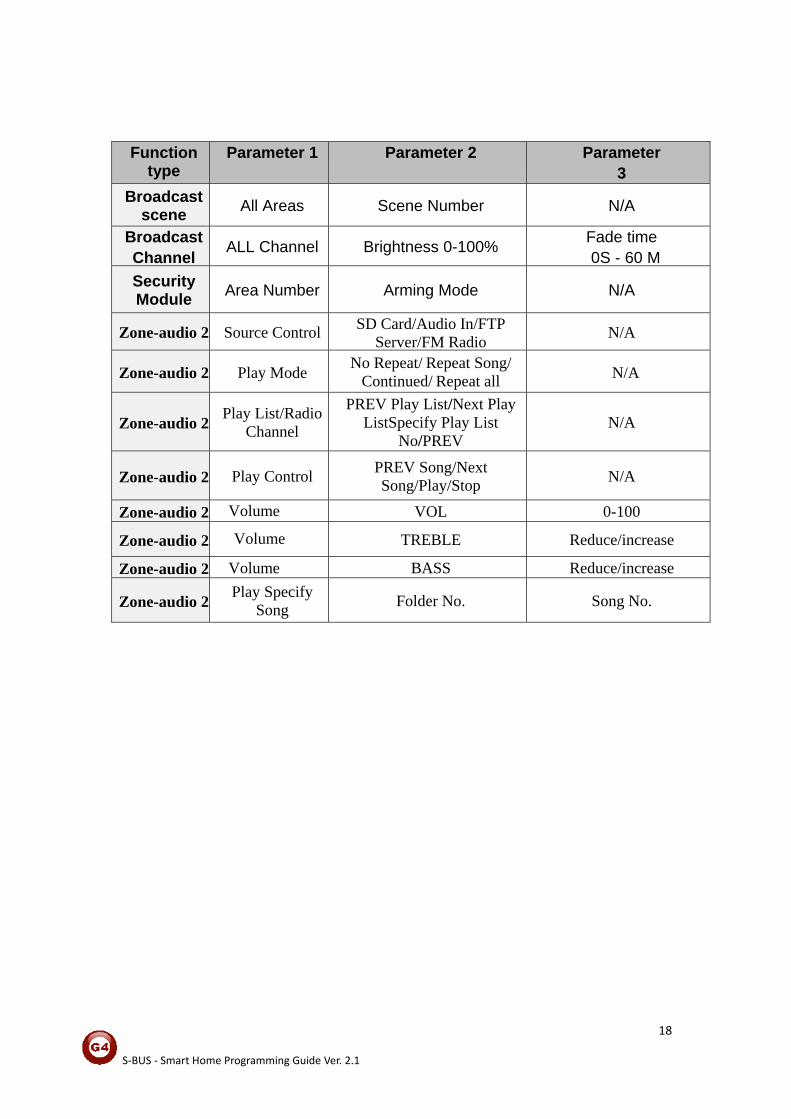
Parameter 3
Parameter 2 Parameter 1 Function type
N/A Scene Number All Areas Broadcast scene
Fade time 0S - 60 M
Brightness 0-100% ALL Channel Broadcast Channel
N/A Arming Mode Area Number Security Module
N/A SD Card/Audio In/FTP Server/FM RadioSource Control Zone-audio 2
N/A No Repeat/ Repeat Song/ Continued/ Repeat all Play Mode Zone-audio 2
N/A PREV Play List/Next Play
ListSpecify Play List No/PREV
Play List/Radio Channel Zone-audio 2
N/A PREV Song/Next Song/Play/Stop Play Control Zone-audio 2
0-100 VOL Volume Zone-audio 2
Reduce/increase TREBLE Volume Zone-audio 2
Reduce/increase BASS Volume Zone-audio 2
Song No. Folder No. Play Specify Song Zone-audio 2
19
S‐BUS ‐ Smart Home Programming Guide Ver. 2.1
3- DDP LCD Panel (Dynamic Display Panel)
In this lesson we will learn about some of the function of the DDP that will cover the Lighting, scenes and HVAC setting.
3-1 DDP Overview
The wall Dynamic Display Panel DDP is the first LCD panel in the world that can control lights, shade, security ,Gate Motor, Air-condition, music, infrared. With built in temp. sensor. The DDP has ( 4 commands button + 1 button to change between pages) of 4 multi usage pages with AC master page and 8 slave AC pages, music page, password page, and the settings pages. Each button can be used as single press, keep press, double click, right and left pressing, momentary pressing function ++
3-2 DDP Address Page Password and Language Setting
The DDP panel Address setting can be set by S-bus configuration software, or manually from the DDP panel setting
To set the Address manually, please do the following:
- On your DDP panel keep pressing on the buttons (4 and 1) together for couple of second
- Setting page will appear for you as you can see
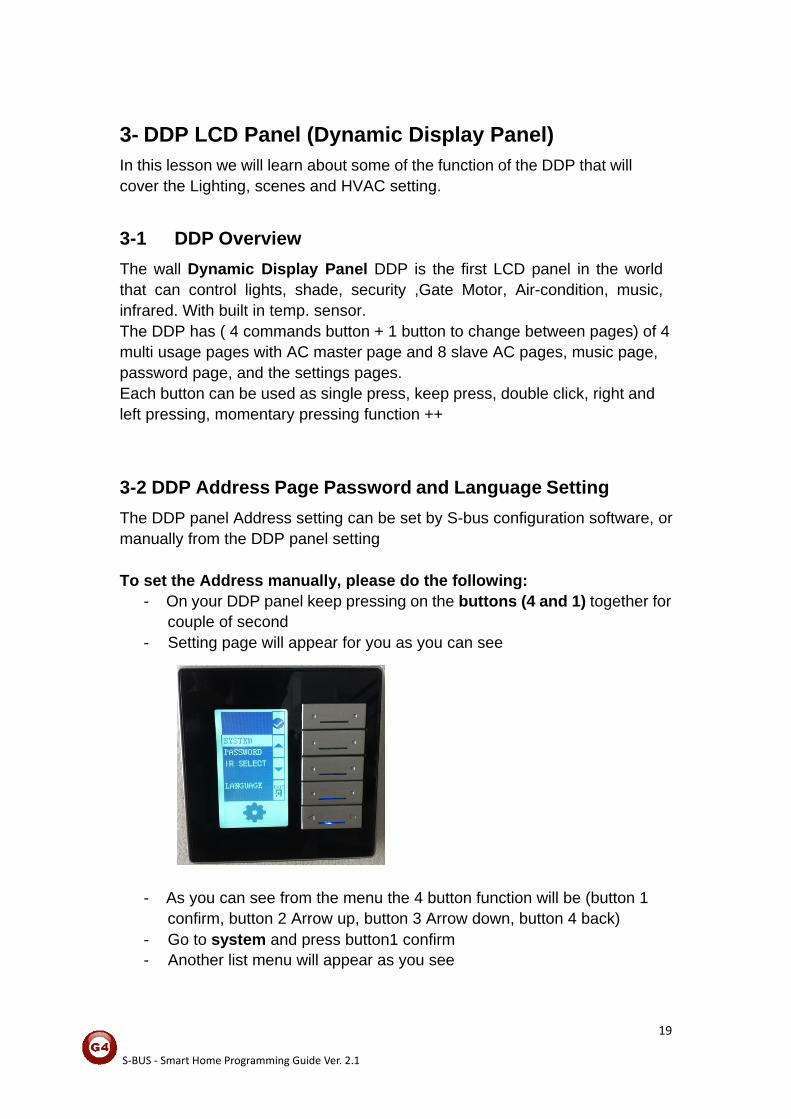
- As you can see from the menu the 4 button function will be (button 1
confirm, button 2 Arrow up, button 3 Arrow down, button 4 back) - Go to system and press button1 confirm - Another list menu will appear as you see
20S‐BUS ‐ Smart Home Programming Guide Ver. 2.1
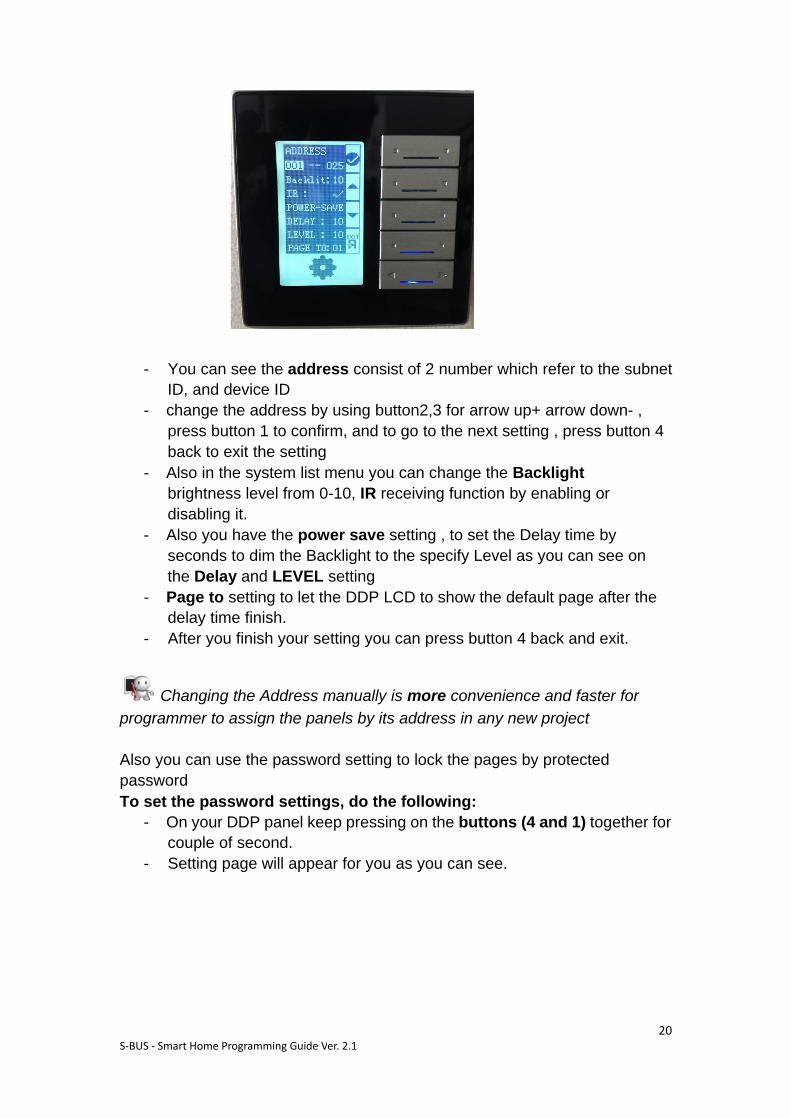
- You can see the address consist of 2 number which refer to the subnet
ID, and device ID - change the address by using button2,3 for arrow up+ arrow down- ,
press button 1 to confirm, and to go to the next setting , press button 4 back to exit the setting
- Also in the system list menu you can change the Backlight brightness level from 0-10, IR receiving function by enabling or disabling it.
- Also you have the power save setting , to set the Delay time by seconds to dim the Backlight to the specify Level as you can see on the Delay and LEVEL setting
- Page to setting to let the DDP LCD to show the default page after the delay time finish.
- After you finish your setting you can press button 4 back and exit.
Changing the Address manually is more convenience and faster for programmer to assign the panels by its address in any new project
Also you can use the password setting to lock the pages by protected password To set the password settings, do the following:
- On your DDP panel keep pressing on the buttons (4 and 1) together for couple of second.
- Setting page will appear for you as you can see.
21S‐BUS ‐ Smart Home Programming Guide Ver. 2.1
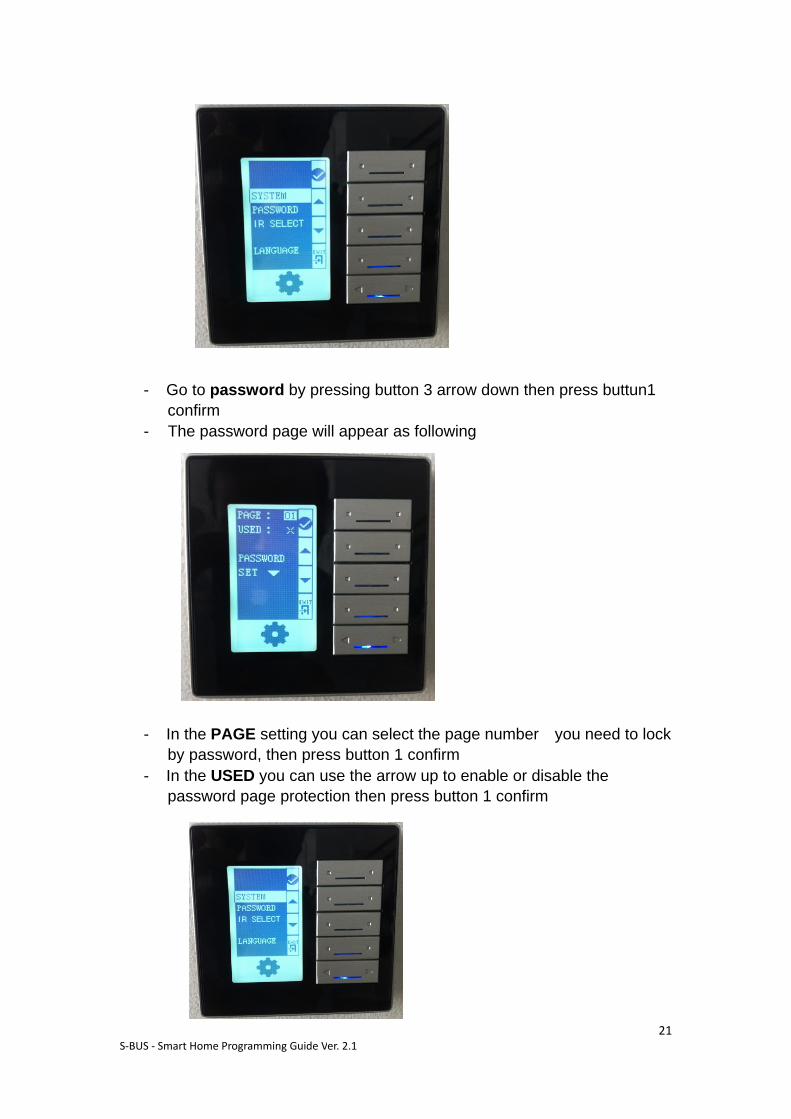
- Go to password by pressing button 3 arrow down then press buttun1
confirm - The password page will appear as following - In the PAGE setting you can select the page number you need to lock
by password, then press button 1 confirm - In the USED you can use the arrow up to enable or disable the
password page protection then press button 1 confirm

22S‐BUS ‐ Smart Home Programming Guide Ver. 2.1
- In the PASSWORD you can press button 3 Arrow down to change the
password the following menu will appear
- To change the password you should enter your old password and then
your new password, the default password is 0000 - In the OLD type your password by using button 2, 3 to change the
number and button 1 confirm to go to the next number digit - In the NEW use the same buttons to type your new password - After you finish press button 4 back
The following page will appear to confirm the password new setting
- Select between YES or NO by pressing button 2,3.
23S‐BUS ‐ Smart Home Programming Guide Ver. 2.1
- To save the change select yes and press button 1 confirm - The page that protected by password will be locked after 20 seconds
automatically and cannot be open unless you type your right password To change the setting menu language, do the following
- On your DDP panel Keep pressing on the buttons (4 and1) together for couple of second
- Setting page will appear for you as you can see - Go to Language setting and press button 1 - Chose between the language you have then press confirm button 1
The DDP Language setting will affect the default picture showing on the
AC page.
In case you forget your password you use the Master password which is 8465
24S‐BUS ‐ Smart Home Programming Guide Ver. 2.1
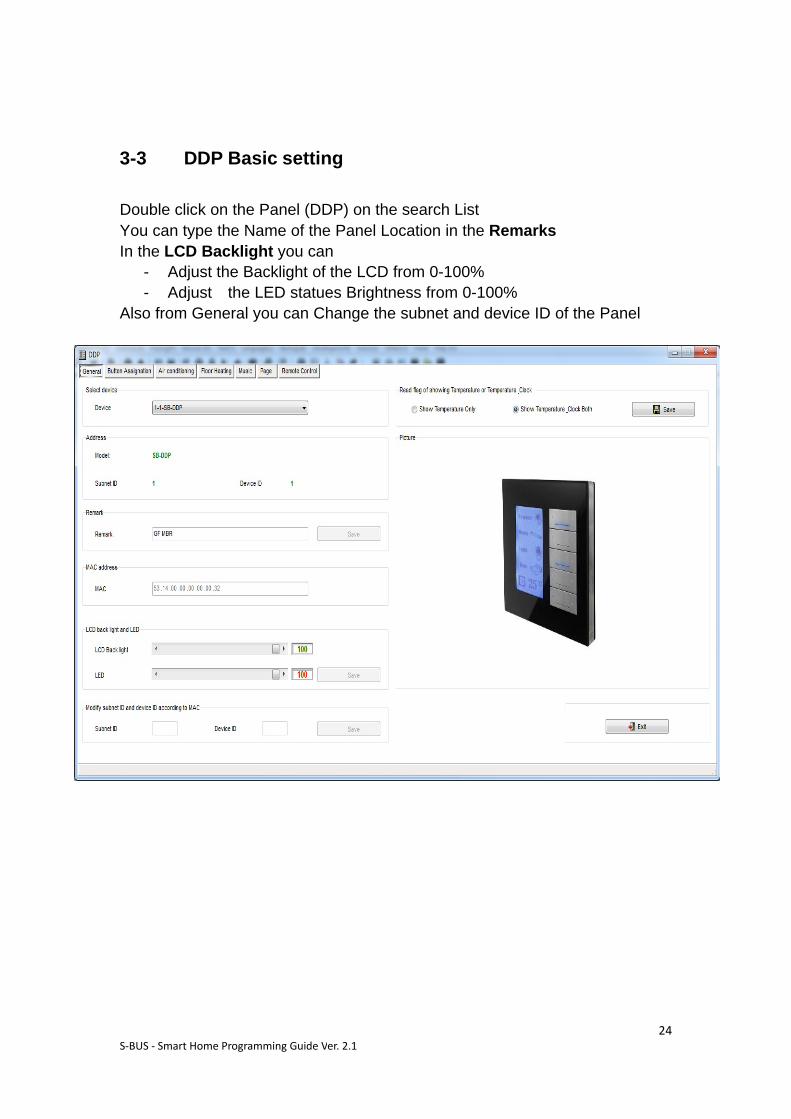
3-3 DDP Basic setting
Double click on the Panel (DDP) on the search List You can type the Name of the Panel Location in the Remarks In the LCD Backlight you can
- Adjust the Backlight of the LCD from 0-100% - Adjust the LED statues Brightness from 0-100%
Also from General you can Change the subnet and device ID of the Panel
25S‐BUS ‐ Smart Home Programming Guide Ver. 2.1
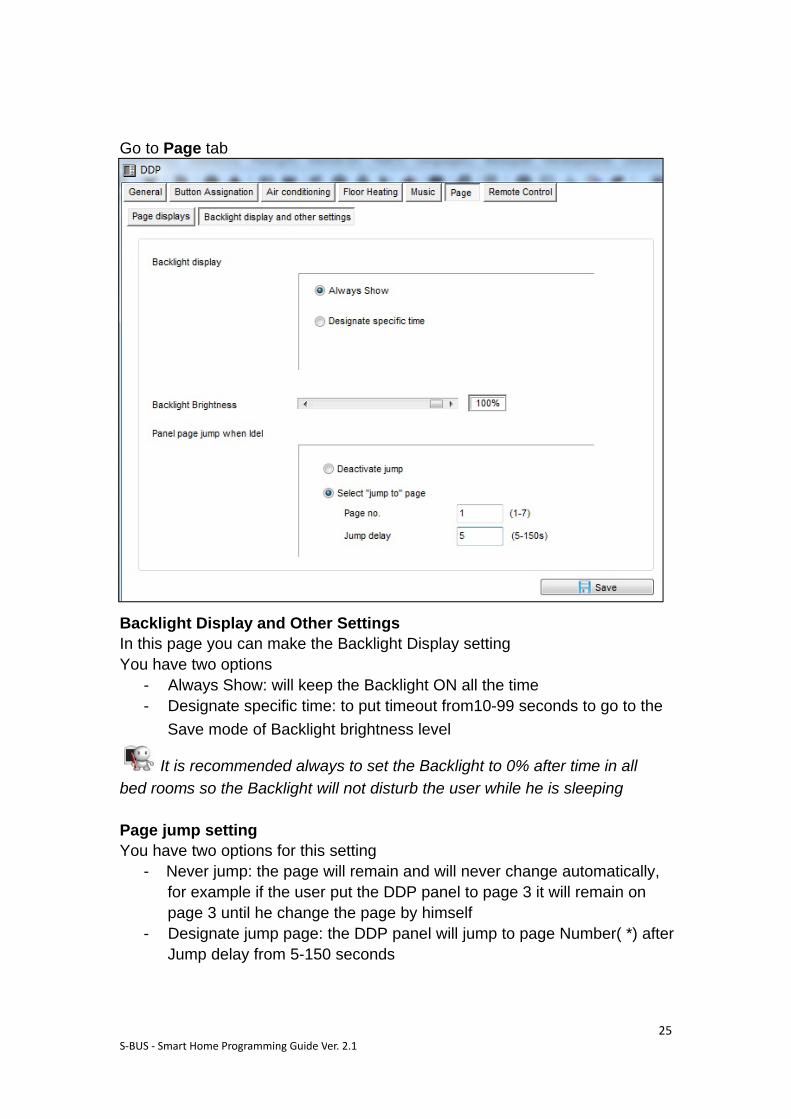
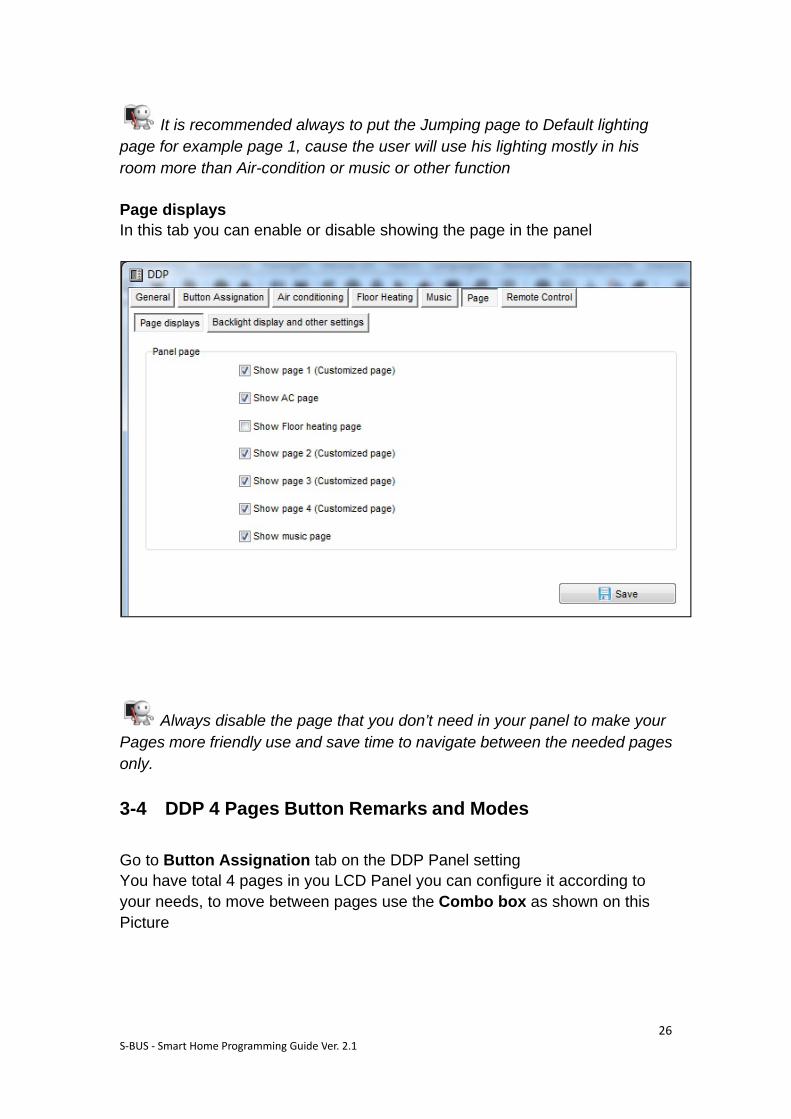
Go to Page tab
Backlight Display and Other Settings In this page you can make the Backlight Display setting You have two options
- Always Show: will keep the Backlight ON all the time - Designate specific time: to put timeout from10-99 seconds to go to the
Save mode of Backlight brightness level
It is recommended always to set the Backlight to 0% after time in all bed rooms so the Backlight will not disturb the user while he is sleeping
Page jump setting You have two options for this setting
- Never jump: the page will remain and will never change automatically, for example if the user put the DDP panel to page 3 it will remain on page 3 until he change the page by himself
- Designate jump page: the DDP panel will jump to page Number( *) after Jump delay from 5-150 seconds
26S‐BUS ‐ Smart Home Programming Guide Ver. 2.1
It is recommended always to put the Jumping page to Default lighting page for example page 1, cause the user will use his lighting mostly in his room more than Air-condition or music or other function
Page displays In this tab you can enable or disable showing the page in the panel
Always disable the page that you don’t need in your panel to make your Pages more friendly use and save time to navigate between the needed pages only.
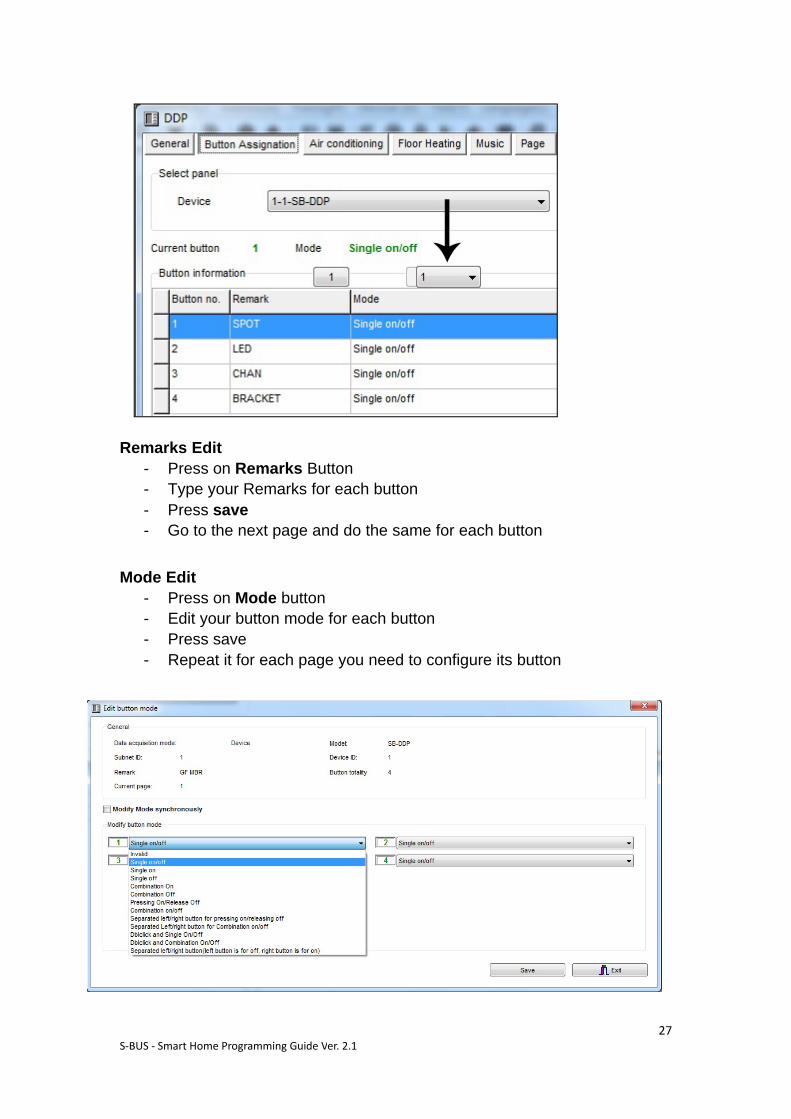
3-4 DDP 4 Pages Button Remarks and Modes
Go to Button Assignation tab on the DDP Panel setting You have total 4 pages in you LCD Panel you can configure it according to your needs, to move between pages use the Combo box as shown on this Picture
27S‐BUS ‐ Smart Home Programming Guide Ver. 2.1
Remarks Edit
- Press on Remarks Button - Type your Remarks for each button - Press save - Go to the next page and do the same for each button
Mode Edit
- Press on Mode button - Edit your button mode for each button - Press save - Repeat it for each page you need to configure its button

57S‐BUS ‐ Lighting Motor and HVAC Programming Guide Ver. 1.2
Function Where to use
example How to use Mode
No function
When you have extra button that you don’t need to
use it
No use Invalid
To OFF Light or scene,
In room off mode to close the Light
channel Single Press Single OFF
To run scene ON , or
Lights on every time
Usually used to trigger scene like visitor, meeting
mode etc...
Single Press Single ON
The classical use of
toggling of
Widely use for ON/OFF light , scene by single
press
Single Press ON
, Single Press OFF,
Single ON/OFF
To trigger up to 99
different commands every time
to Run complex mode that required more than 1 scene
and mode by single press
Single Press Combination
ON
To OFF up to 99
commands every time the button
To OFF complex mode that required more than 1 scene
and mode by single press
Single Press Combination
OFF
toggling between
ON/OFF up to 99
To run ON and OFF complex mode that required more than 1 scene
Single Press ON,
Single Press OFF
Combination ON/OFF
To trigger single
command ON/OFF
Used to open close curtain,
Lights,
Press on the Right side ON, Left side
OFF
Separated Single
To trigger 50
commands by pressing Right side, other 50
commands
Used to trigger different IR, as
CH+,CH- , VOL+ , VOL-, curtain Open close , different IR codes triggering
Press on the Right side
ON 50 commands,
Left side OFF other
50
Separated Combination
on
59S‐BUS ‐ Smart Home Programming Guide Ver. 2.1
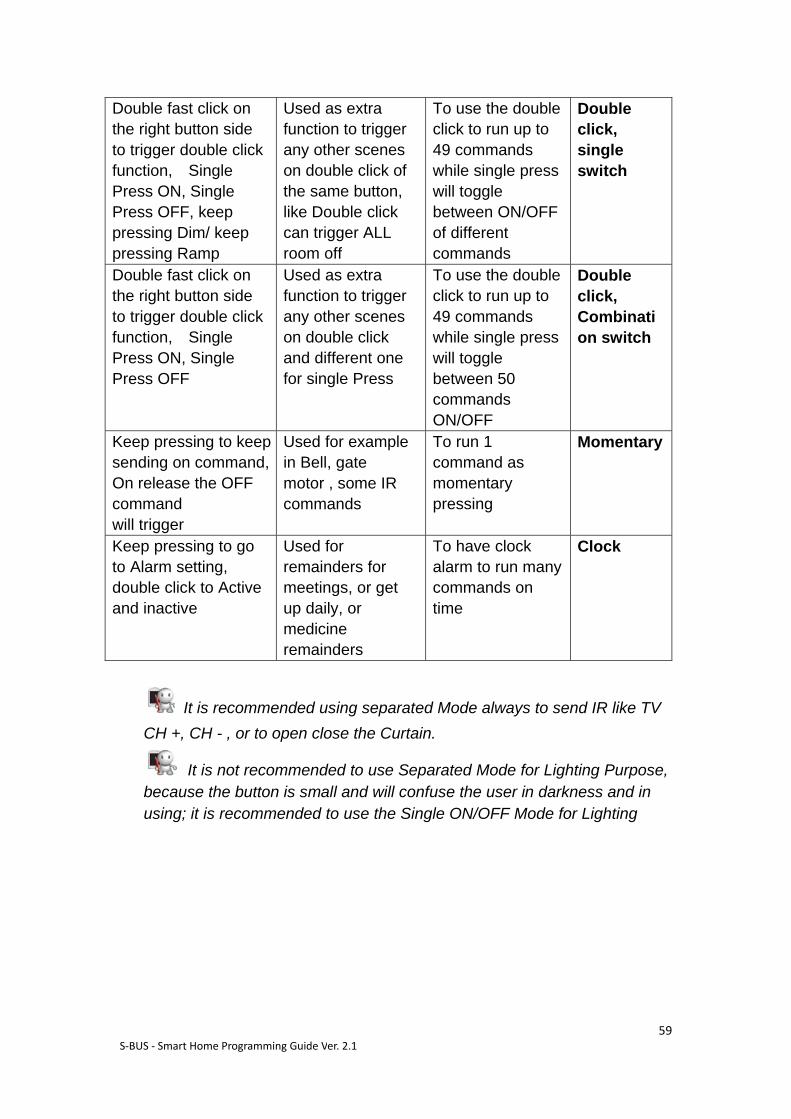
Double click, single switch
To use the double click to run up to 49 commands while single press will toggle between ON/OFF of different commands
Used as extra function to trigger any other scenes on double click of the same button, like Double click can trigger ALL room off
Double fast click on the right button side to trigger double click function, Single Press ON, Single Press OFF, keep pressing Dim/ keep pressing Ramp
Double click, Combinati on switch
To use the double click to run up to 49 commands while single press will toggle between 50 commands ON/OFF
Used as extra function to trigger any other scenes on double click and different one for single Press
Double fast click on the right button side to trigger double click function, Single Press ON, Single Press OFF
Momentary To run 1 command as momentary pressing
Used for example in Bell, gate motor , some IR commands
Keep pressing to keep sending on command, On release the OFF command will trigger
Clock To have clock alarm to run many commands on time
Used for remainders for meetings, or get up daily, or medicine remainders
Keep pressing to go to Alarm setting, double click to Active and inactive
It is recommended using separated Mode always to send IR like TV CH +, CH - , or to open close the Curtain.
It is not recommended to use Separated Mode for Lighting Purpose, because the button is small and will confuse the user in darkness and in using; it is recommended to use the Single ON/OFF Mode for Lighting
59S‐BUS ‐ Smart Home Programming Guide Ver. 2.1
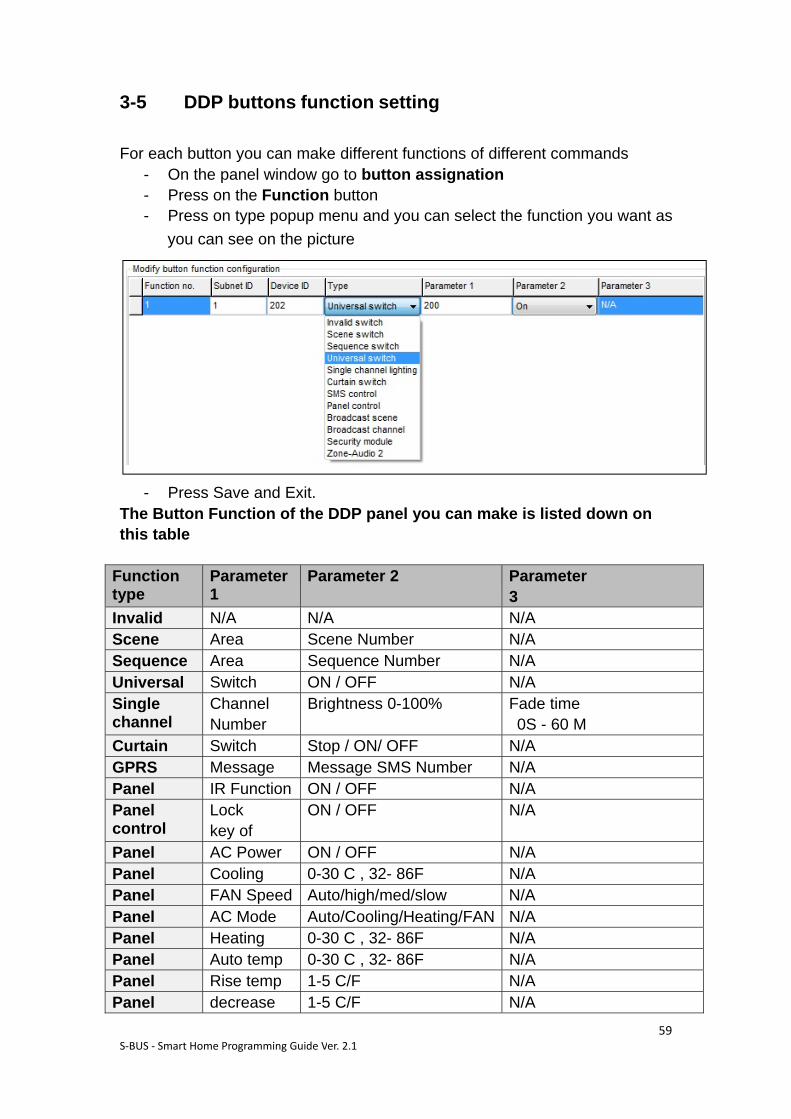
3-5 DDP buttons function setting
For each button you can make different functions of different commands - On the panel window go to button assignation - Press on the Function button - Press on type popup menu and you can select the function you want as
you can see on the picture
- Press Save and Exit.
The Button Function of the DDP panel you can make is listed down on this table
Parameter 3
Parameter 2 Parameter 1
Function type
N/A N/A N/A Invalid N/A Scene Number Area Scene N/A Sequence Number Area Sequence N/A ON / OFF Switch Universal Fade time 0S - 60 M
Brightness 0-100% Channel Number
Single channel
N/A Stop / ON/ OFF Switch Curtain N/A Message SMS Number Message GPRS N/A ON / OFF IR Function Panel N/A ON / OFF Lock
key of Panel control
N/A ON / OFF AC Power Panel N/A 0-30 C , 32- 86F Cooling Panel N/A Auto/high/med/slow FAN Speed Panel N/A Auto/Cooling/Heating/FANAC Mode Panel N/A 0-30 C , 32- 86F Heating Panel N/A 0-30 C , 32- 86F Auto temp Panel N/A 1-5 C/F Rise temp Panel N/A 1-5 C/F decrease Panel
59S‐BUS ‐ Smart Home Programming Guide Ver. 2.1
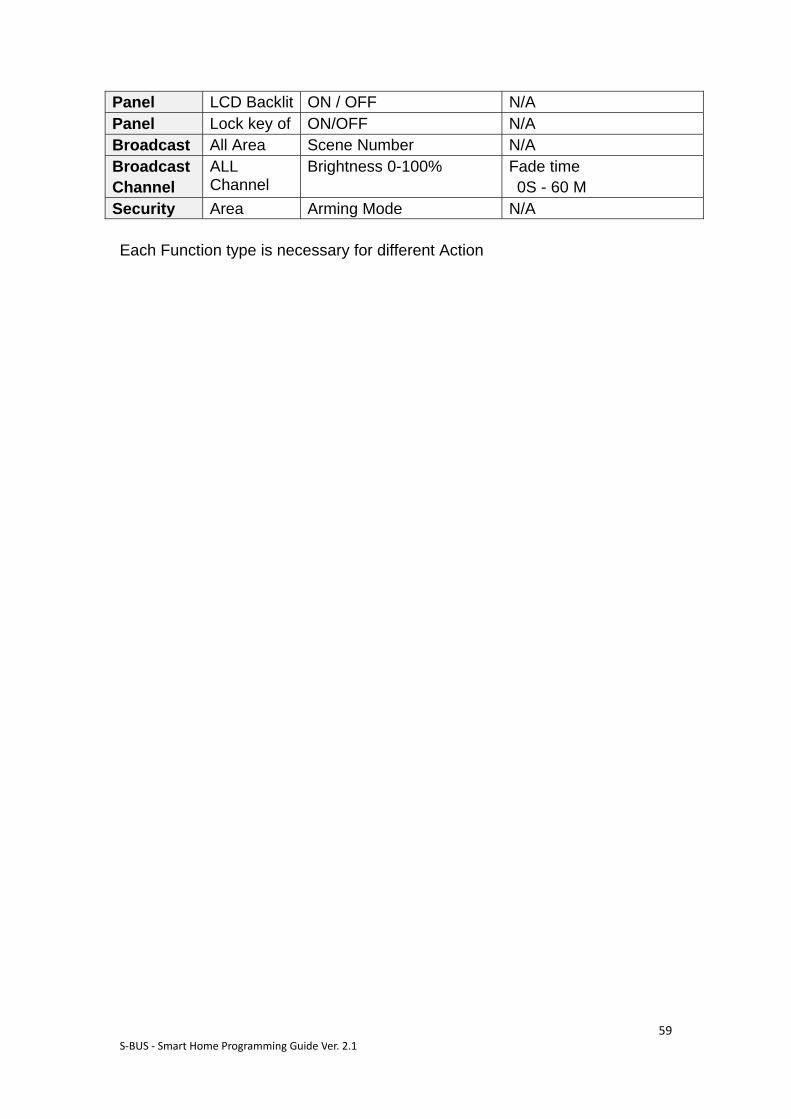
N/A ON / OFF LCD Backlit Panel N/A ON/OFF Lock key of Panel N/A Scene Number All Area Broadcast Fade time 0S - 60 M
Brightness 0-100% ALL Channel
Broadcast Channel
N/A Arming Mode Area Security
Each Function type is necessary for different Action
60
S‐BUS ‐ Smart Home Programming Guide Ver. 2.1
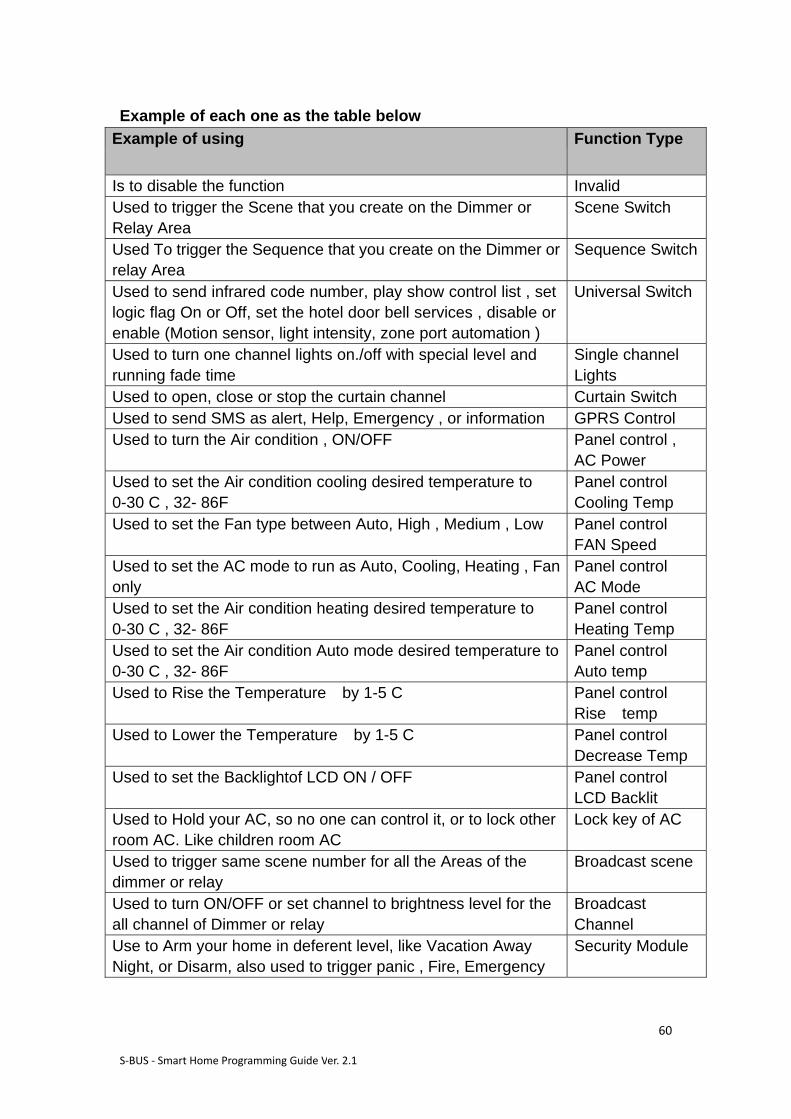
Example of each one as the table below
Function Type Example of using
Invalid Is to disable the function Scene Switch Used to trigger the Scene that you create on the Dimmer or
Relay Area Sequence Switch Used To trigger the Sequence that you create on the Dimmer or
relay Area Universal Switch Used to send infrared code number, play show control list , set
logic flag On or Off, set the hotel door bell services , disable or enable (Motion sensor, light intensity, zone port automation )
Single channel Lights
Used to turn one channel lights on./off with special level and running fade time
Curtain Switch Used to open, close or stop the curtain channel GPRS Control Used to send SMS as alert, Help, Emergency , or information Panel control , AC Power
Used to turn the Air condition , ON/OFF
Panel control Cooling Temp
Used to set the Air condition cooling desired temperature to 0-30 C , 32- 86F
Panel control FAN Speed
Used to set the Fan type between Auto, High , Medium , Low
Panel control AC Mode
Used to set the AC mode to run as Auto, Cooling, Heating , Fan only
Panel control Heating Temp
Used to set the Air condition heating desired temperature to 0-30 C , 32- 86F
Panel control Auto temp
Used to set the Air condition Auto mode desired temperature to0-30 C , 32- 86F
Panel control Rise temp
Used to Rise the Temperature by 1-5 C
Panel control Decrease Temp
Used to Lower the Temperature by 1-5 C
Panel control LCD Backlit
Used to set the Backlightof LCD ON / OFF
Lock key of AC Used to Hold your AC, so no one can control it, or to lock other room AC. Like children room AC
Broadcast scene Used to trigger same scene number for all the Areas of the dimmer or relay
Broadcast Channel
Used to turn ON/OFF or set channel to brightness level for the all channel of Dimmer or relay
Security Module Use to Arm your home in deferent level, like Vacation Away Night, or Disarm, also used to trigger panic , Fire, Emergency
61
S‐BUS ‐ Smart Home Programming Guide Ver. 2.1
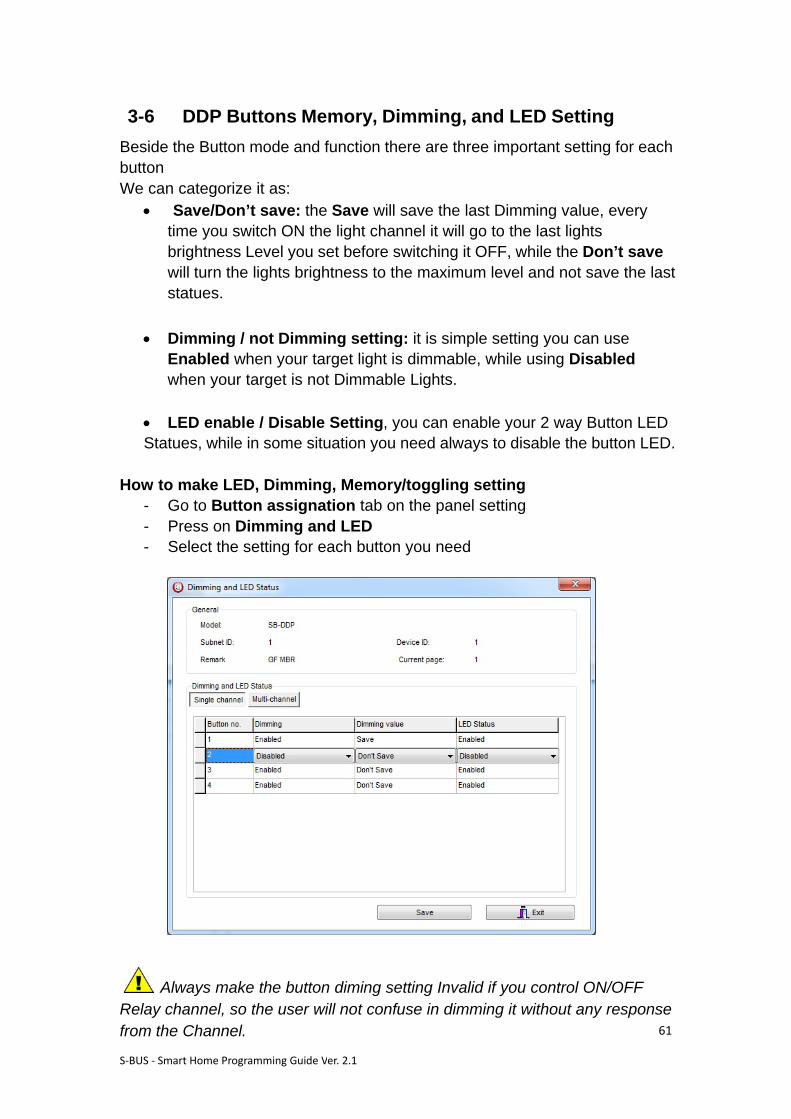
3-6 DDP Buttons Memory, Dimming, and LED Setting Beside the Button mode and function there are three important setting for each button We can categorize it as:
• Save/Don’t save: the Save will save the last Dimming value, every time you switch ON the light channel it will go to the last lights brightness Level you set before switching it OFF, while the Don’t save will turn the lights brightness to the maximum level and not save the last statues.
• Dimming / not Dimming setting: it is simple setting you can use Enabled when your target light is dimmable, while using Disabled when your target is not Dimmable Lights.
• LED enable / Disable Setting, you can enable your 2 way Button LED Statues, while in some situation you need always to disable the button LED.
How to make LED, Dimming, Memory/toggling setting
- Go to Button assignation tab on the panel setting - Press on Dimming and LED - Select the setting for each button you need
Always make the button diming setting Invalid if you control ON/OFF Relay channel, so the user will not confuse in dimming it without any response from the Channel.
62
S‐BUS ‐ Smart Home Programming Guide Ver. 2.1
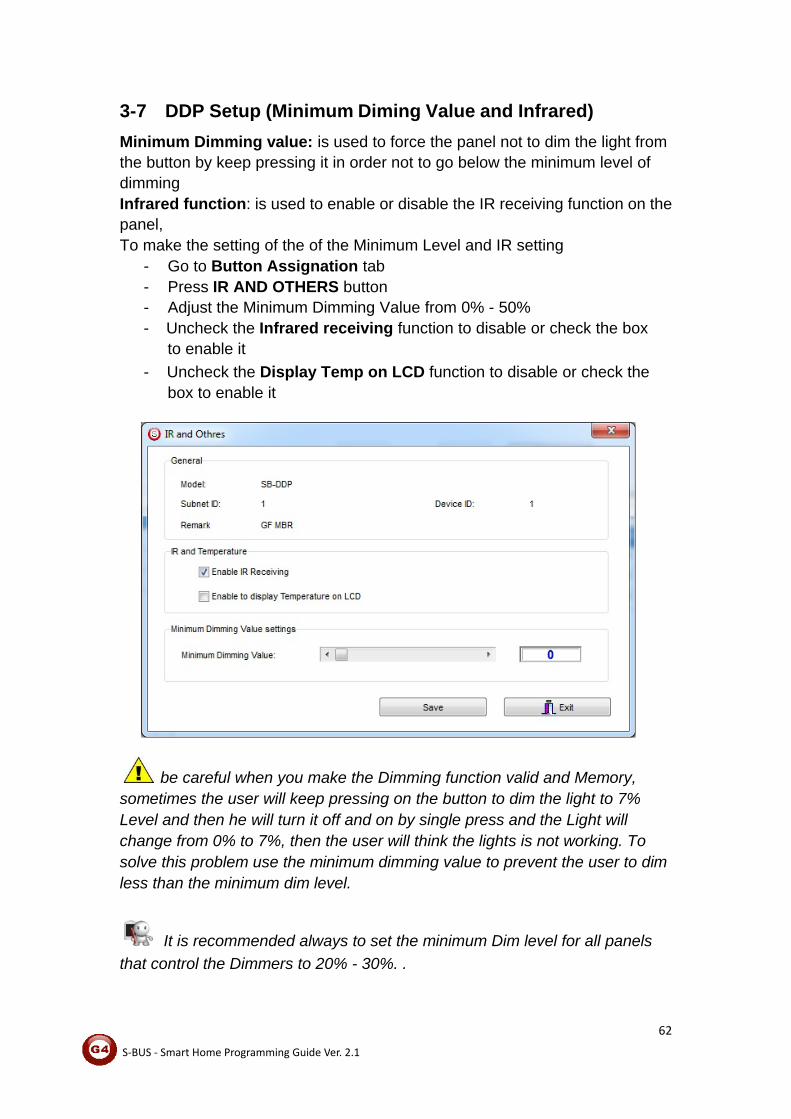
3-7 DDP Setup (Minimum Diming Value and Infrared) Minimum Dimming value: is used to force the panel not to dim the light from the button by keep pressing it in order not to go below the minimum level of dimming Infrared function: is used to enable or disable the IR receiving function on the panel, To make the setting of the of the Minimum Level and IR setting
- Go to Button Assignation tab - Press IR AND OTHERS button - Adjust the Minimum Dimming Value from 0% - 50% - Uncheck the Infrared receiving function to disable or check the box
to enable it - Uncheck the Display Temp on LCD function to disable or check the
box to enable it
be careful when you make the Dimming function valid and Memory, sometimes the user will keep pressing on the button to dim the light to 7% Level and then he will turn it off and on by single press and the Light will change from 0% to 7%, then the user will think the lights is not working. To solve this problem use the minimum dimming value to prevent the user to dim less than the minimum dim level.
It is recommended always to set the minimum Dim level for all panels that control the Dimmers to 20% - 30%. .
63
S‐BUS ‐ Smart Home Programming Guide Ver. 2.1
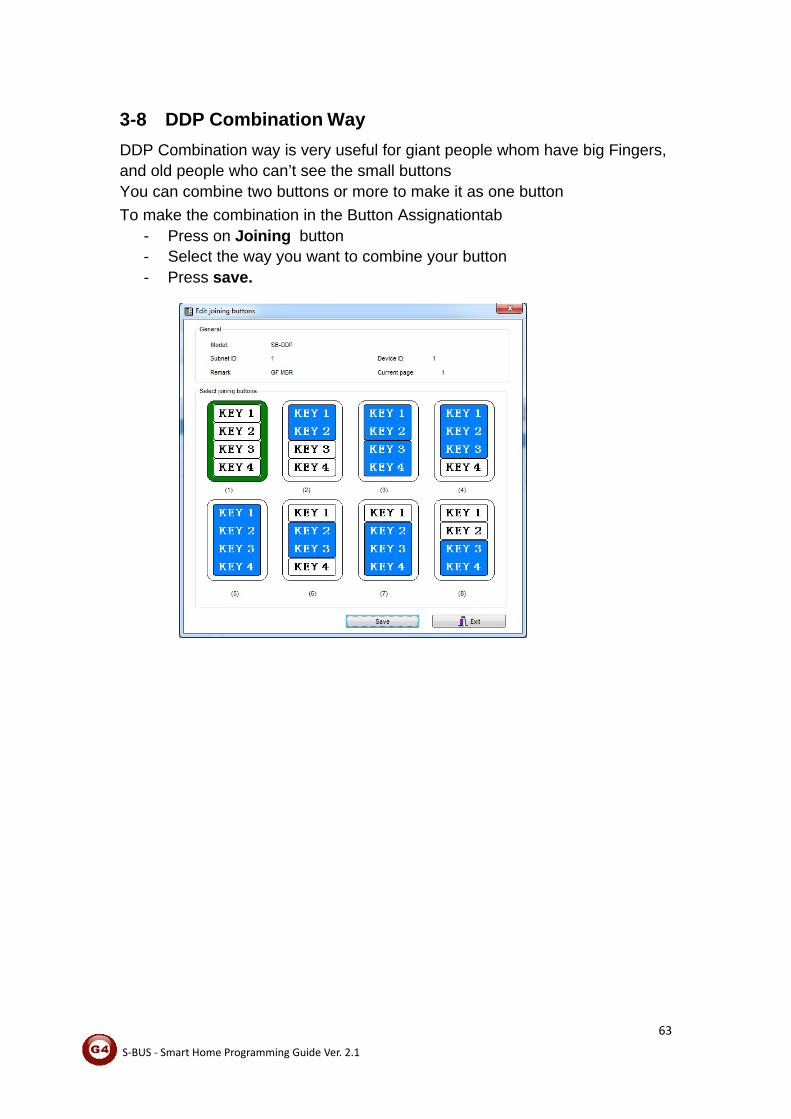
3-8 DDP Combination Way
DDP Combination way is very useful for giant people whom have big Fingers, and old people who can’t see the small buttons You can combine two buttons or more to make it as one button To make the combination in the Button Assignationtab
- Press on Joining button - Select the way you want to combine your button - Press save.
64
S‐BUS ‐ Smart Home Programming Guide Ver. 2.1
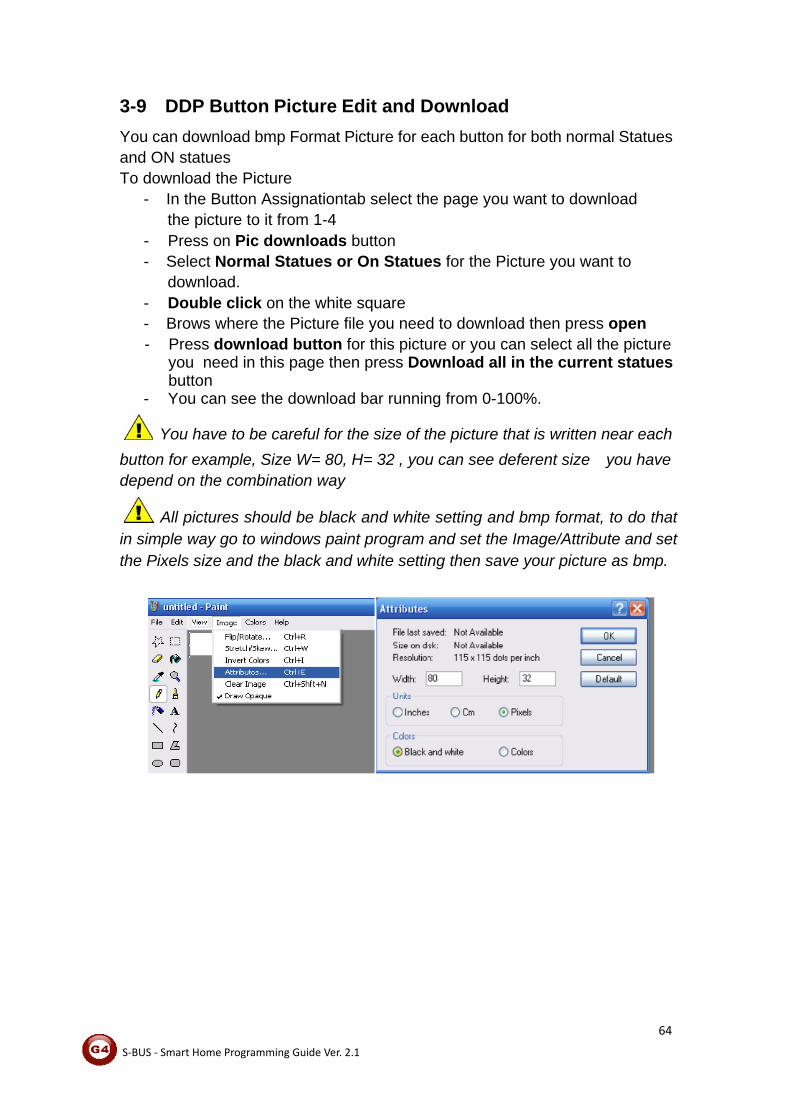
3-9 DDP Button Picture Edit and Download You can download bmp Format Picture for each button for both normal Statues and ON statues To download the Picture
- In the Button Assignationtab select the page you want to download the picture to it from 1-4
- Press on Pic downloads button - Select Normal Statues or On Statues for the Picture you want to
download. - Double click on the white square - Brows where the Picture file you need to download then press open - Press download button for this picture or you can select all the picture
you need in this page then press Download all in the current statues button
- You can see the download bar running from 0-100%.
You have to be careful for the size of the picture that is written near each button for example, Size W= 80, H= 32 , you can see deferent size you have depend on the combination way
All pictures should be black and white setting and bmp format, to do that in simple way go to windows paint program and set the Image/Attribute and set the Pixels size and the black and white setting then save your picture as bmp.
65
S‐BUS ‐ Smart Home Programming Guide Ver. 2.1
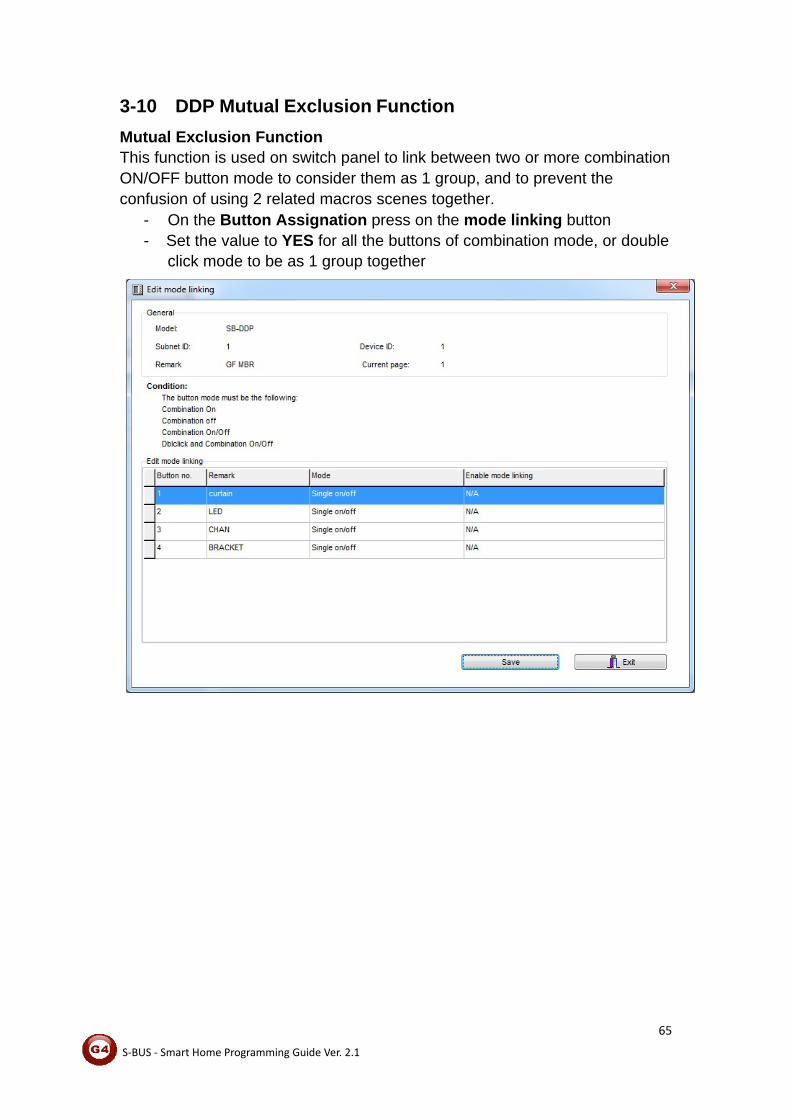
3-10 DDP Mutual Exclusion Function Mutual Exclusion Function This function is used on switch panel to link between two or more combination ON/OFF button mode to consider them as 1 group, and to prevent the confusion of using 2 related macros scenes together.
- On the Button Assignation press on the mode linking button - Set the value to YES for all the buttons of combination mode, or double
click mode to be as 1 group together
66
S‐BUS ‐ Smart Home Programming Guide Ver. 2.1
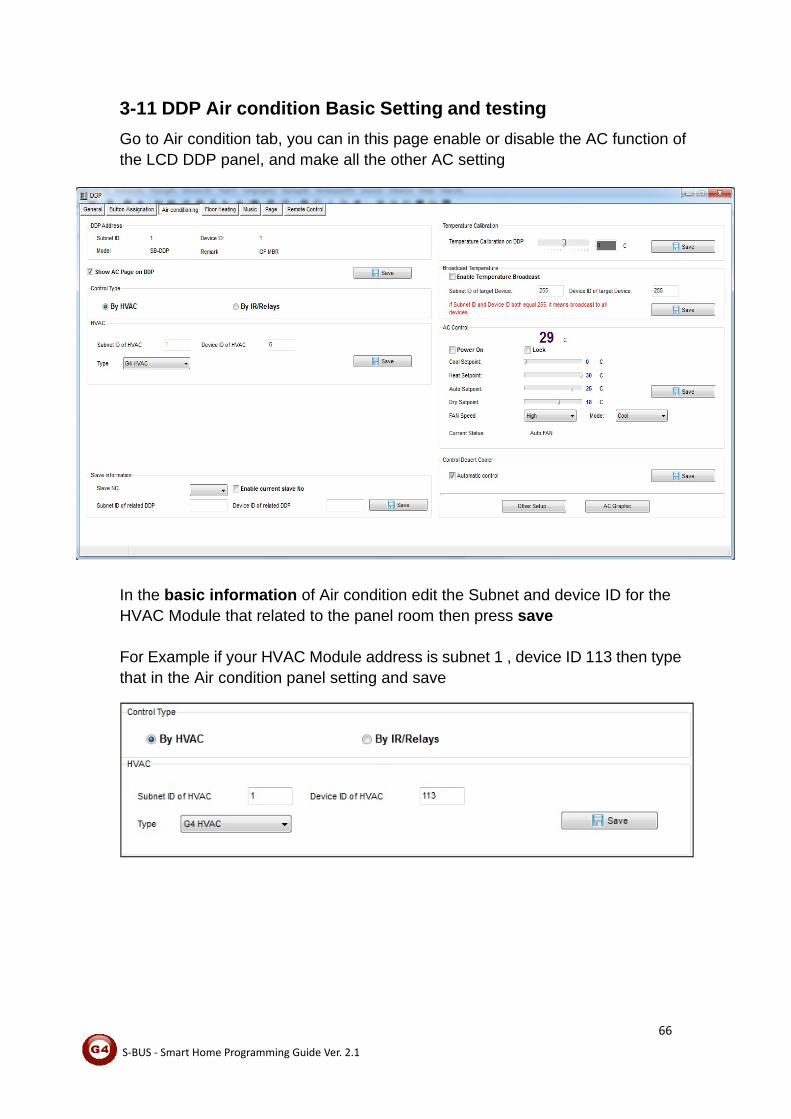
3-11 DDP Air condition Basic Setting and testing Go to Air condition tab, you can in this page enable or disable the AC function of the LCD DDP panel, and make all the other AC setting
In the basic information of Air condition edit the Subnet and device ID for the HVAC Module that related to the panel room then press save For Example if your HVAC Module address is subnet 1 , device ID 113 then type that in the Air condition panel setting and save
67
S‐BUS ‐ Smart Home Programming Guide Ver. 2.1
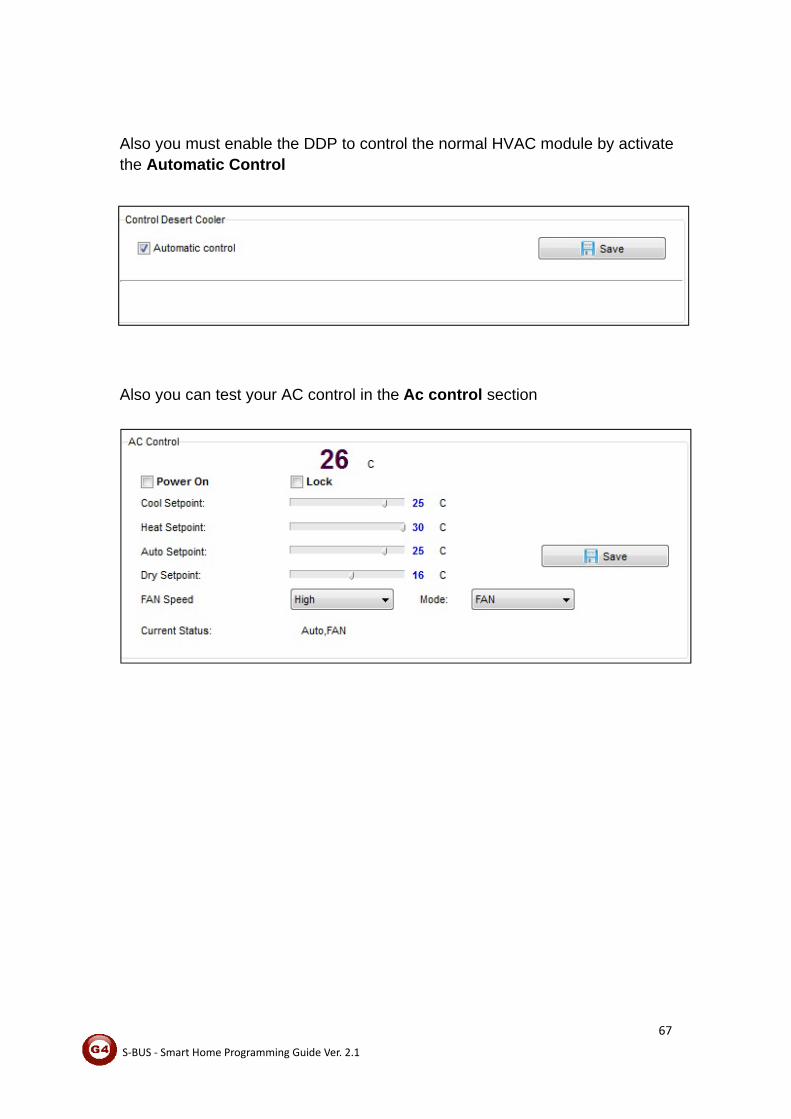
Also you must enable the DDP to control the normal HVAC module by activate the Automatic Control
Also you can test your AC control in the Ac control section
68
S‐BUS ‐ Smart Home Programming Guide Ver. 2.1
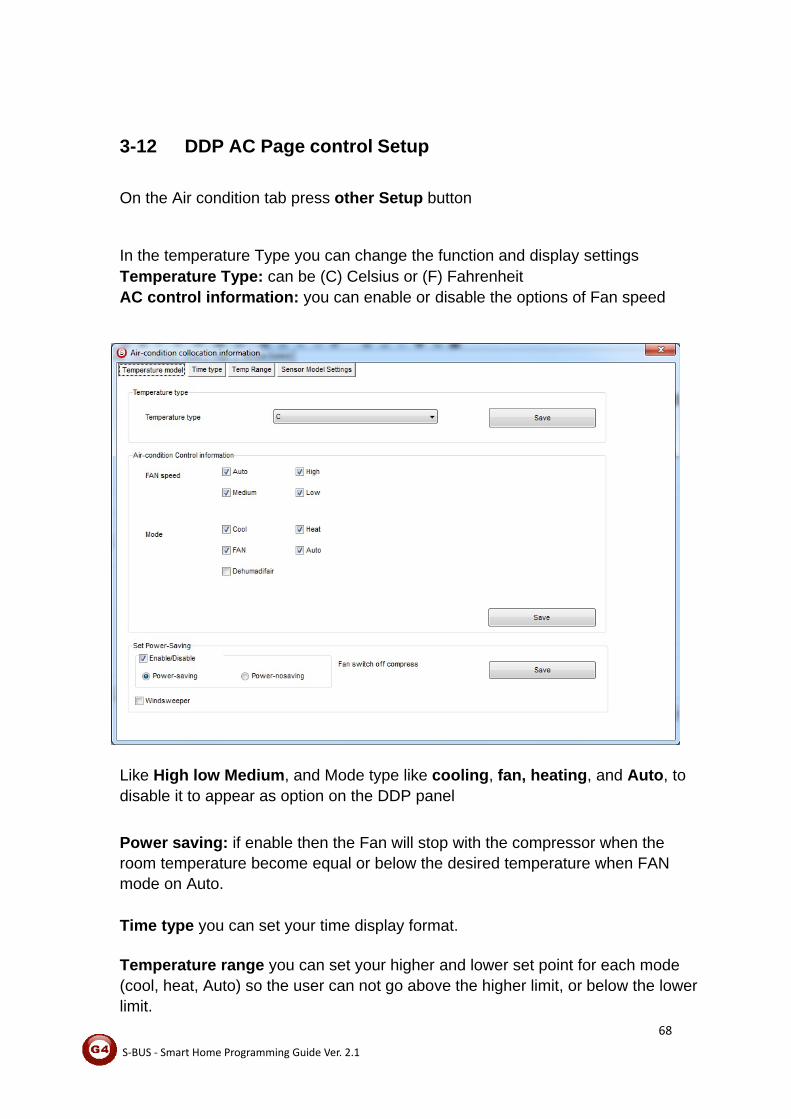
3-12 DDP AC Page control Setup
On the Air condition tab press other Setup button
In the temperature Type you can change the function and display settings Temperature Type: can be (C) Celsius or (F) Fahrenheit AC control information: you can enable or disable the options of Fan speed Like High low Medium, and Mode type like cooling, fan, heating, and Auto, to disable it to appear as option on the DDP panel Power saving: if enable then the Fan will stop with the compressor when the room temperature become equal or below the desired temperature when FAN mode on Auto. Time type you can set your time display format. Temperature range you can set your higher and lower set point for each mode (cool, heat, Auto) so the user can not go above the higher limit, or below the lower limit.
69
S‐BUS ‐ Smart Home Programming Guide Ver. 2.1
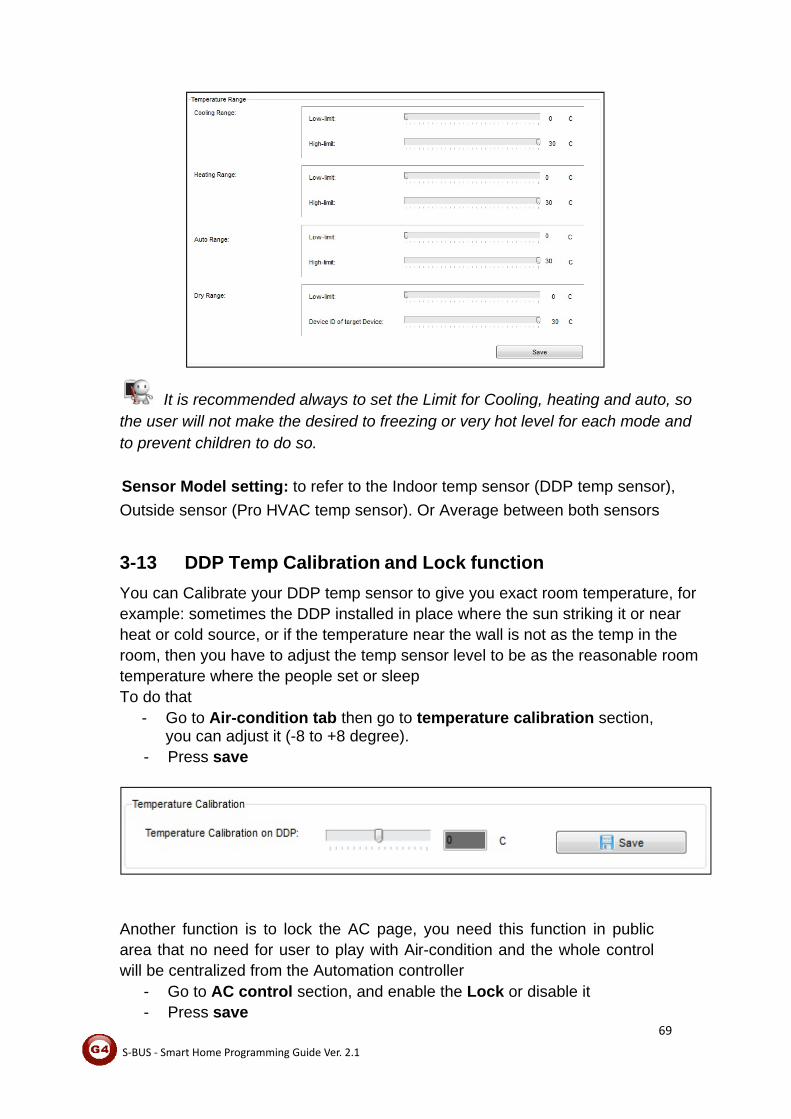
It is recommended always to set the Limit for Cooling, heating and auto, so the user will not make the desired to freezing or very hot level for each mode and to prevent children to do so. Sensor Model setting: to refer to the Indoor temp sensor (DDP temp sensor), Outside sensor (Pro HVAC temp sensor). Or Average between both sensors
3-13 DDP Temp Calibration and Lock function
You can Calibrate your DDP temp sensor to give you exact room temperature, for example: sometimes the DDP installed in place where the sun striking it or near heat or cold source, or if the temperature near the wall is not as the temp in the room, then you have to adjust the temp sensor level to be as the reasonable room temperature where the people set or sleep To do that
- Go to Air-condition tab then go to temperature calibration section, you can adjust it (-8 to +8 degree).
- Press save
Another function is to lock the AC page, you need this function in public area that no need for user to play with Air-condition and the whole control will be centralized from the Automation controller
- Go to AC control section, and enable the Lock or disable it - Press save
70
S‐BUS ‐ Smart Home Programming Guide Ver. 2.1
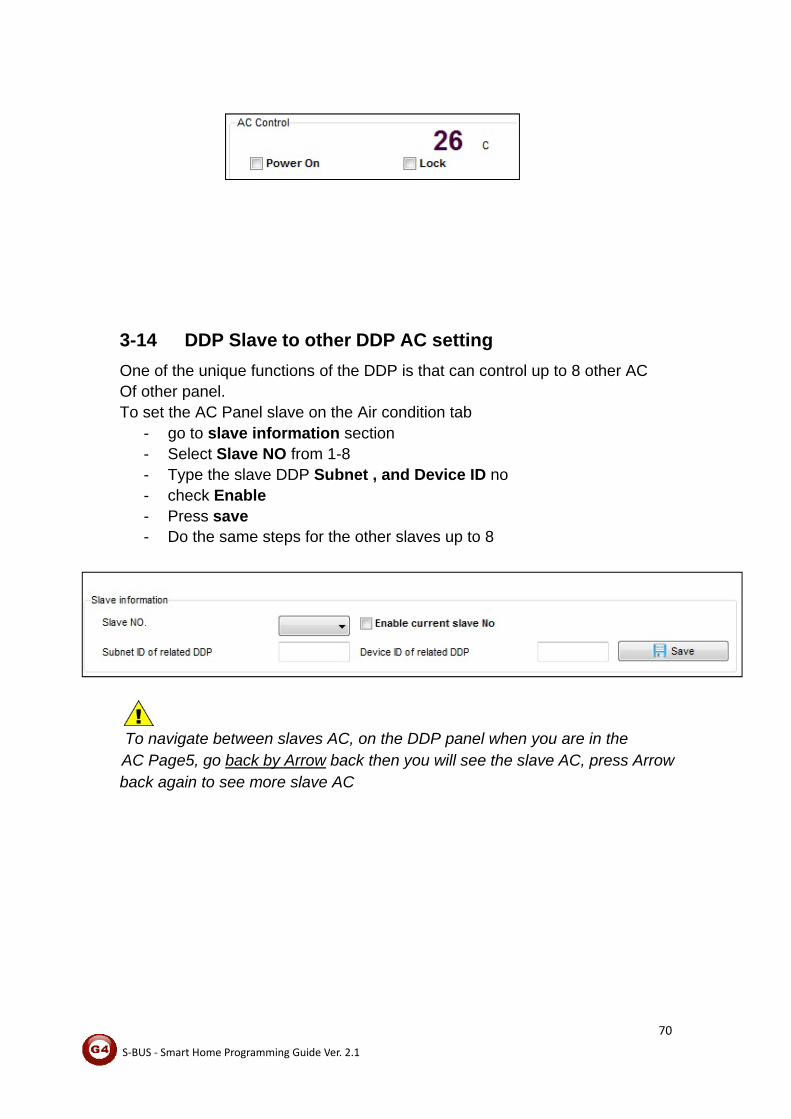
3-14 DDP Slave to other DDP AC setting
One of the unique functions of the DDP is that can control up to 8 other AC Of other panel. To set the AC Panel slave on the Air condition tab
- go to slave information section - Select Slave NO from 1-8 - Type the slave DDP Subnet , and Device ID no - check Enable - Press save - Do the same steps for the other slaves up to 8
To navigate between slaves AC, on the DDP panel when you are in the AC Page5, go back by Arrow back then you will see the slave AC, press Arrow back again to see more slave AC
71
S‐BUS ‐ Smart Home Programming Guide Ver. 2.1
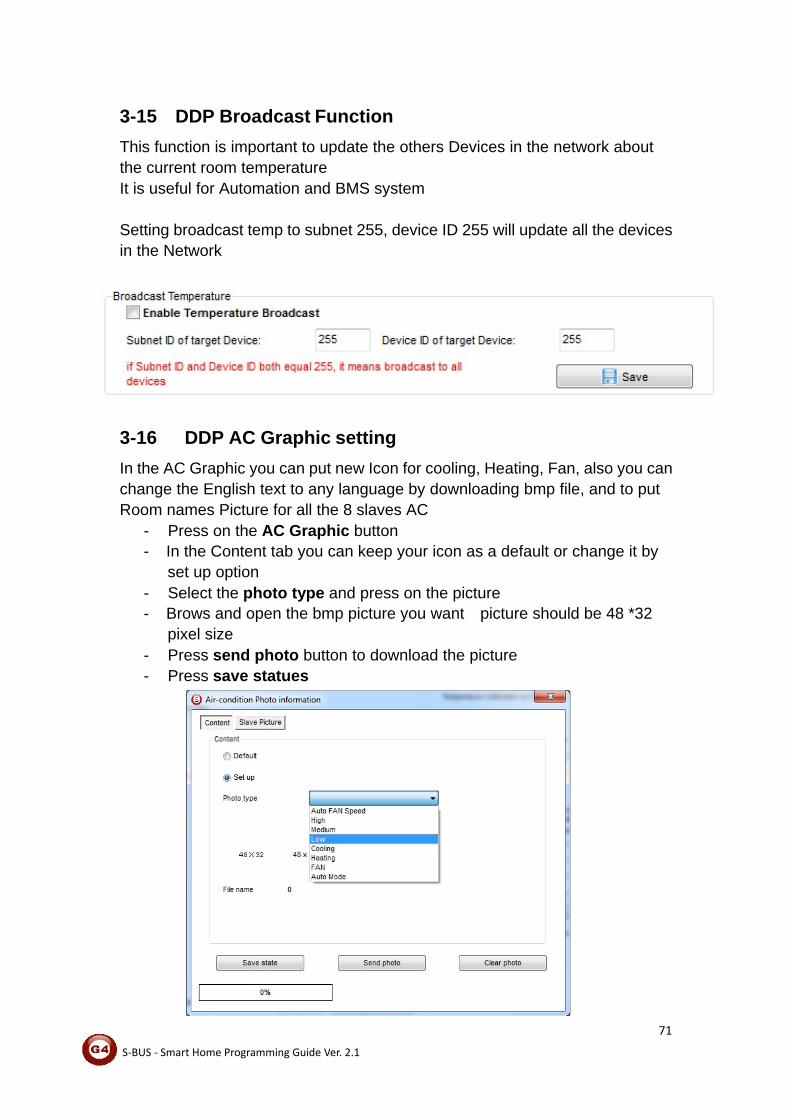
3-15 DDP Broadcast Function This function is important to update the others Devices in the network about the current room temperature It is useful for Automation and BMS system
Setting broadcast temp to subnet 255, device ID 255 will update all the devices in the Network
3-16 DDP AC Graphic setting
In the AC Graphic you can put new Icon for cooling, Heating, Fan, also you can change the English text to any language by downloading bmp file, and to put Room names Picture for all the 8 slaves AC
- Press on the AC Graphic button - In the Content tab you can keep your icon as a default or change it by
set up option - Select the photo type and press on the picture - Brows and open the bmp picture you want picture should be 48 *32
pixel size - Press send photo button to download the picture - Press save statues
72
S‐BUS ‐ Smart Home Programming Guide Ver. 2.1
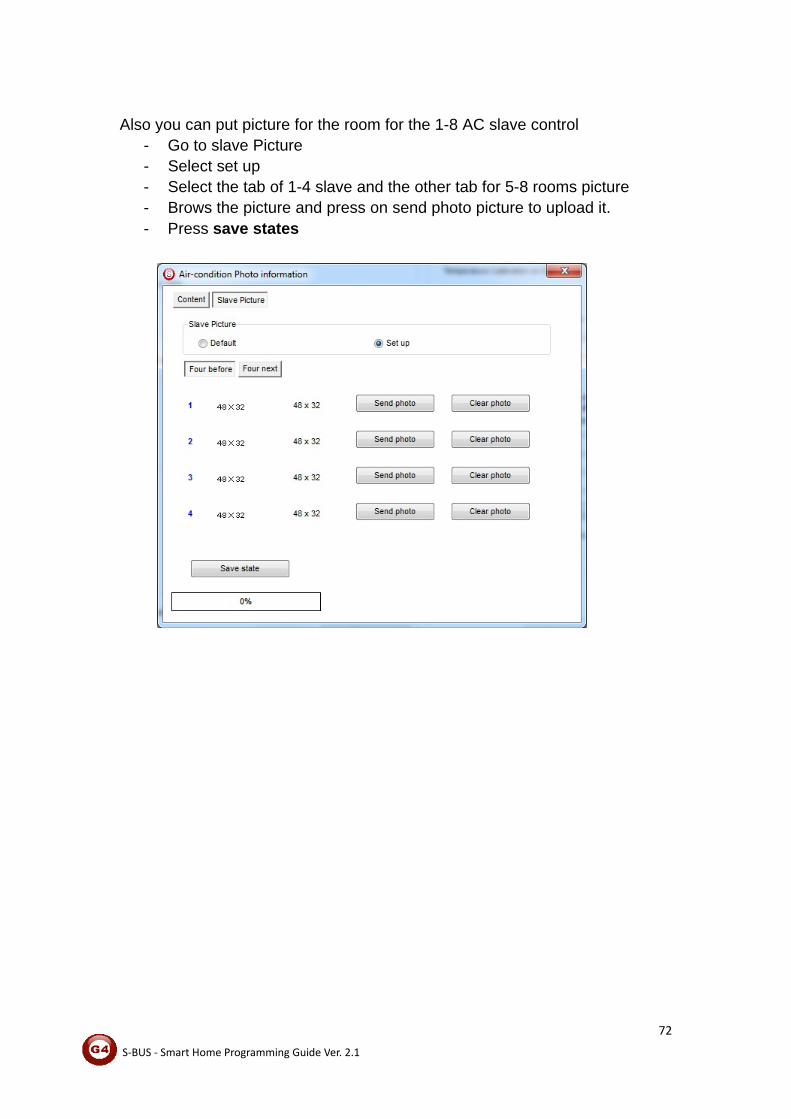
Also you can put picture for the room for the 1-8 AC slave control - Go to slave Picture - Select set up - Select the tab of 1-4 slave and the other tab for 5-8 rooms picture - Brows the picture and press on send photo picture to upload it. - Press save states
73
S‐BUS ‐ Smart Home Programming Guide Ver. 2.1
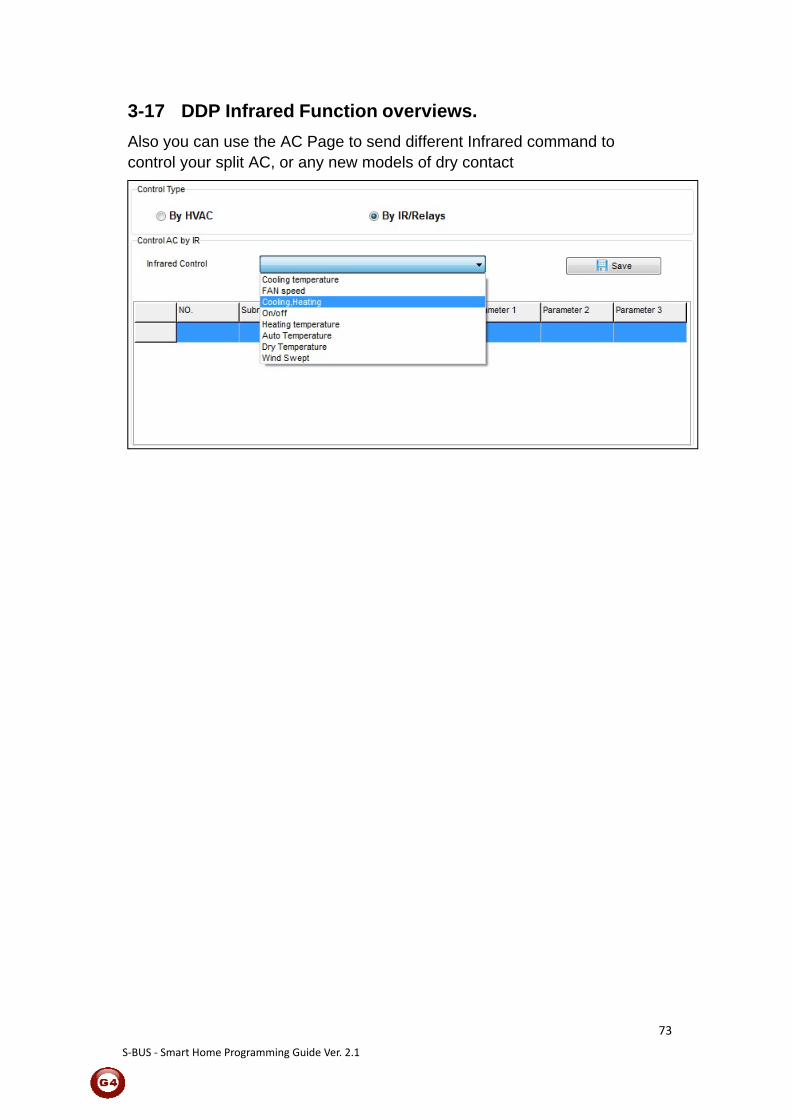
3-17 DDP Infrared Function overviews. Also you can use the AC Page to send different Infrared command to control your split AC, or any new models of dry contact
Related Documents