iAuditor User Guide

iAuditor Instructions
Dec 02, 2015
Instructions on using Safety Culture's IAuditor
Welcome message from author
This document is posted to help you gain knowledge. Please leave a comment to let me know what you think about it! Share it to your friends and learn new things together.
Transcript

iAuditor User Guide

- 2 - © SafetyCulture 2012. All Rights Reserved
The Home Page
You are on the home page.
start a new audit – choose from an existing template or create a new one
view my completed audits – choose an audit from the list. Viuew or email direct from your iPad
locations – a full screen version of MAP view
download more templates – download a ready-to-use template from the SafetyCulture Cloud. Share your own templates with users all over the world.
edit my profile – enter your company name and details; add your logo by taking a photo or upload from an exiting file
iAuditor Home Screen
FAQ – helpful answers to your common questions
Start a new audit
Select a template to start a new audit
Select from one of the existing templates in the iAuditor app
- Accommodation Inspection Checklist
- Construction Hazard Identification and Risk Assessm ent
- General Workplace Inspection

- 3 - © SafetyCulture 2012. All Rights Reserved
Template Screen - Icons
duplicate
delete
Opens the ‘Audit Editor’ screen of your selected template
Opens the ‘share your template’ window
Allows you to select a rating for the template
More options – duplicate, delete
Duplicates the selected template
Delete unwanted templates here
Customise the Audit/Inspection/Checklist
Customise your audit by entering required details. Select answers to questions and add
more information if needed.
Enter Details of site, date, location, personnel involved
You can use the GPS icon to enter your current location Start the Audit/Inspection/Checklist Select ‘YES’, ‘NO’, OR ‘N/A’ in response to the questions.
Select ‘SAFE’ ‘AT RISK’ or ‘N/A’ in response to the questions
If ‘No’ or ‘At Risk’ is selected a space will open for details to be entered including media of the item. Eg. A photo can be added.
- 4 - © SafetyCulture 2012. All Rights Reserved
Adding Text
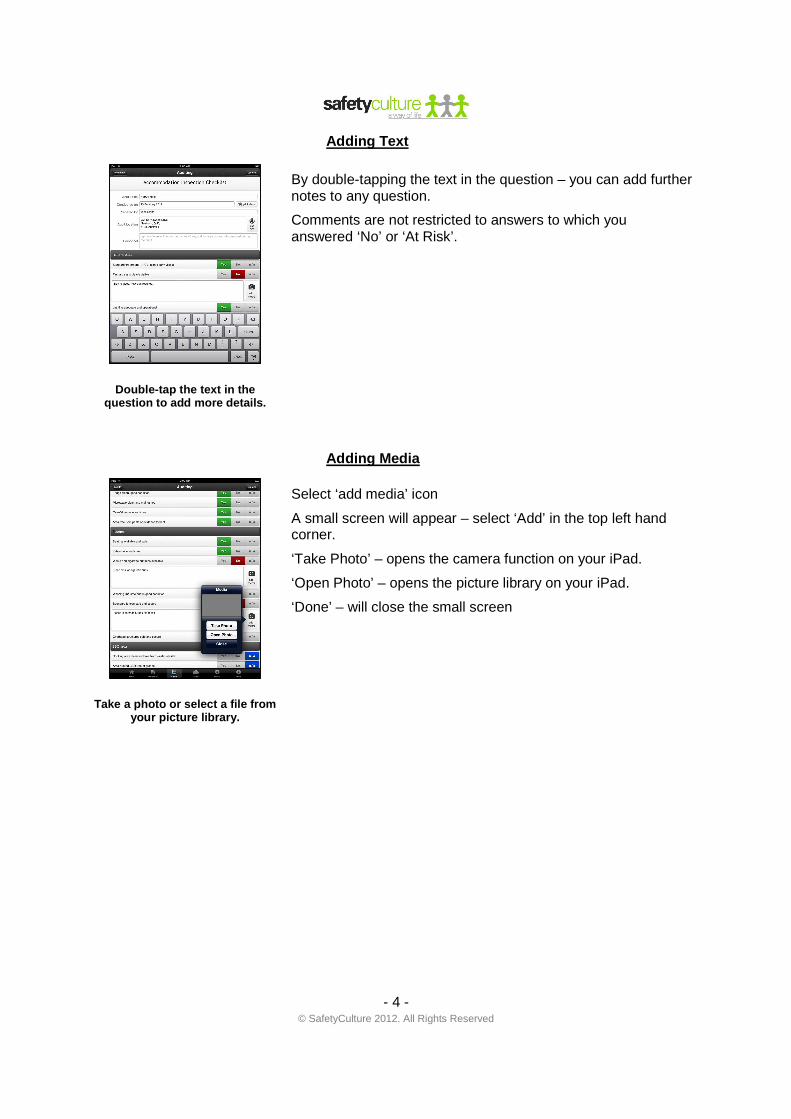
Adding Media
Double-tap the text in the question to add more details.
By double-tapping the text in the question – you can add further notes to any question.
Comments are not restricted to answers to which you answered ‘No’ or ‘At Risk’.
Take a photo or select a file from your picture library.
Select ‘add media’ icon
A small screen will appear – select ‘Add’ in the top left hand corner.
‘Take Photo’ – opens the camera function on your iPad.
‘Open Photo’ – opens the picture library on your iPad.
‘Done’ – will close the small screen

- 5 - © SafetyCulture 2012. All Rights Reserved
Review your picture before inserting it in the audit.
‘Take Photo’ – after taking the photo you will be presented with a Preview of the picture.
If you choose to use it, select ‘Use’.
You can also ‘Retake’ the picture.
Review the picture within the report.
Select ‘Done’ and the picture will be automatically embedded in the report.
The ‘Add Media’ icon will change to a ‘View Media’ icon so you can check the picture you are using.
You can check how it looks in the report by going to ‘Options’ in the top right hand corner and selecting ‘Preview’. This will show you a preview of your report with the picture embedded in the appropriate space.
This is how the pictures look within the report.
Any pictures you took will be embedded in your Audit Report.

- 6 - © SafetyCulture 2012. All Rights Reserved
Adding Drawings
Add Signatures
Saving Audits
Add your own drawing with the tools available. You can select colours and thickness of lines.
Where asked to ‘Edit Drawing’ – select the icon; the drawing page will open.
You can select a colour: black, red, blue, green, yellow, orange, purple or white.
Width of lines: thick, medium or fine.
Select ‘Done’ when the drawing is complete. It will be embedded in your report.
Click on ‘Options’ in the top right hand corner to ‘Review’ your drawing within the report.
Have the relevant person sign off on the report right on the
iPad ready for export and printing.
At the end of the Audit/Checklist/Inspection will be a ‘Sign Off’ section.
Add the name of the signee in the space provided.
Select the ‘sign’ button – sign on the screen which appears.
Select the ‘Done’ button – the date will be automatically entered and the signature will be embedded in the appropriate spot on the audit report.
Save your audit for viewing, exporting printing.
To save your Audit – in the upper right hand corner, select the ‘OPTIONS’ button.
You will be given four options –
‘PREVIEW’ ; ‘SAVE NOW’ ; QUESTION SETTINGS; ‘DISCARD’ .
Select ‘Save Now’.
Now when you go to the Home Page – select
‘view my completed audits’.

- 7 - © SafetyCulture 2012. All Rights Reserved
Completed Audits
Sending Reports
Site/client; location; start date; completion
date
From the Home Screen – select OR ‘view my completed audits’
If you touch the TITLE of your Audit – you will be taken into the body of the audit.
Export – Takes you to the Export Audit screen
Delete – delete unwanted audits here
Across the top of the screen you can select one of these options to order your audits.
Reports can be exported in two ways.
1. From the Home Screen – select OR ‘view my completed audits’
Select ‘export’ – the ‘Export Audit’ screen will appear.
Select from the list of ‘Basic Options’; ‘PDF Options’; ‘PDF Customisation’; ‘Extra Customisation’ etc.
By selecting ‘Export as’ under the ‘Basic Options’ – you can choose to export your report as a CSV File.
Select ‘Export’ in the top right hand corner – you will be taken to the ‘PDF Viewer’.
Select ‘Send’ in the top right hand corner to send your report in an email.
2. From within the audit/checklist/inspection – select ‘Options’ in the top right hand corner.
Select ‘Preview’ from the list of options – you will be taken to the ‘PDF Viewer’.
Select ‘Send’ in the top right hand corner to send your report in an email.

- 8 - © SafetyCulture 2012. All Rights Reserved
Create a New Template
Create your own template for an audit, check list or inspection.
From the home page choose ‘create a new template’.
Enter the template name and a description.
Select ‘choose type’ – to select Audit, Check List, or Inspection.
Select ‘choose industry’ – to select from the industries listed or select ‘not listed’ if your industry doesn’t appear. When you select an industry – further options will appear to narrow down your selection.
Select ‘add tags’ – to identify your template.
Select ‘add image’ – take a photo, or select one from your file.
Select from the many items you would like to include in the
construction of your template.
Select the ‘+’ button – to add the Item you want to include. Categories – group sets of questions together (eg.fire prevention) Date/Time – date/time can be inserted into an audit. Drawing – draw on the screen of your iPad to add detail to your audit. Label – help add more information to a particular questions by using a label Media – take photos of risks, they will be embedded in your finished audit. Multiple Choice – Add a multiple choice question to your audit, specifiy the question, then write the answers separated by a semicolon (eg.one;two;three) Questions – add basic questions with response options of Yes-No-n/a OR Safe-At Risk-n/a Signature – have the user sign on-screen and it will be embedded in the finished audit. Sliders – enter a question and choose a value between a minimum and a maximum in response. Switch – enter a question with a simple on-off switch in response. Text – Allows a larger section of text
- 9 - © SafetyCulture 2012. All Rights Reserved
Importing CSV files
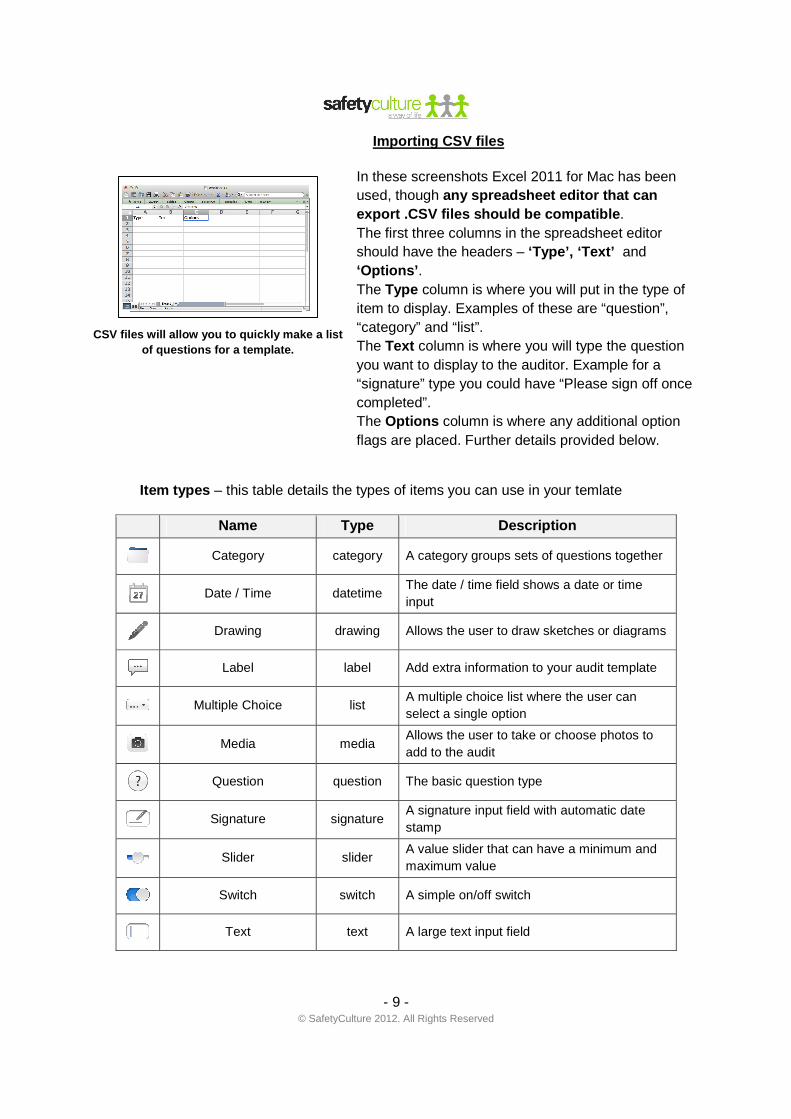
Item types – this table details the types of items you can use in your temlate
Name Type Description
Category category A category groups sets of questions together
Date / Time datetime The date / time field shows a date or time input
Drawing drawing Allows the user to draw sketches or diagrams
Label label Add extra information to your audit template
Multiple Choice list A multiple choice list where the user can select a single option
Media media Allows the user to take or choose photos to add to the audit
Question question The basic question type
Signature signature A signature input field with automatic date stamp
Slider slider A value slider that can have a minimum and maximum value
Switch switch A simple on/off switch
Text text A large text input field
CSV files will allow you to quickly make a list of questions for a template.
In these screenshots Excel 2011 for Mac has been used, though any spreadsheet editor that can export .CSV files should be compatible . The first three columns in the spreadsheet editor should have the headers – ‘Type’, ‘Text’ and ‘Options’ . The Type column is where you will put in the type of item to display. Examples of these are “question”, “category” and “list”. The Text column is where you will type the question you want to display to the auditor. Example for a “signature” type you could have “Please sign off once completed”. The Options column is where any additional option flags are placed. Further details provided below.

- 10 - © SafetyCulture 2012. All Rights Reserved
Item Options
The “Options" column will contain any extra settings relating to the type of the item – separated by semicolons.
It is mainly a number based field. So for “No” you would put 0, for “Yes” you would put 1.
This may sound a little confusing but it is quite easy. Example being for a “datetime” item which has two options, “do we show the date” and “do we show the time”. If you only wanted to get the time from the user, in the “Options” column you would put “0;1”.
Note that if you don’t put anything in “Options” the app will use the default values. So if you don’t think you need to change anything then you can leave this cell blank.
Further details below:
Type Options Description Example
datetime
Show date (0 or 1) Show time (0 or 1)
The first option is if you want the date button to be visible. The second option is if you want the time button to be visible.
1;1 (show date and time buttons) 1;0 (show date button only) 0;1 (show time button only)
list List items separated by semicolons
In a list you will put in each item you want separated by a semicolon.
one;two;three
question The response type (0 or 1) The question response options
will change depending on the value.
0 (yes / no / N/A) 1 (safe / at risk / N/A)
slider`
Minimum value Maximum value Snap to whole numbers
The first option is the minimum value, the second is the maximum value and the last option is whether it should snap to the nearest whole number.
0;5;1 (will go from 0 to 5, snapping to whole numbers) 50;100;0 (will go from 50 to 100 with incremental numbers)
One item type per cell – be sure to spell it correctly.
You can only have one item type per cell and it must be spelt correctly, otherwise it will be skipped during the import process. This is an example of a signature field with text.

- 11 - © SafetyCulture 2012. All Rights Reserved
There are various options for the items.
Here is an example of some items with various options.
Save your file for your template in a format the iAuditor can read.
Saving your file Once you have finished creating all the items for your template you will want to save it in the format iAuditor can read. This lab audit will be used as an example.
Ensure the file is saved in CSV format.
To save it as a CSV file, choose “File > Save As” from the menu. Then select “Comma Separated Values (.csv)” from the “Format” menu. This might be different in your spreadsheet editor – it could come under a “File type” menu. Save your template in an easily accessible area (such as the Desktop). It may warn you about losing formatting, just click Yes/Continue on any prompts.
Email the file to yourself on your device.
Importing a CSV file on your device To import a CSV file with iAuditor you must first get it on your device. The easiest way of doing this is to email it to yourself. Once you can see your CSV file in the Mail app you can then tap and hold on it and choose “Open with iAuditor” from the menu that pops up.

- 12 - © SafetyCulture 2012. All Rights Reserved
The CSV importer screen will launch in iAuditor.
This will then launch iAuditor and present the CSV importer screen along with a preview of the CSV file.
Scroll through the log to check for any warnings or errors.
If you are happy with the contents of the CSV file, tap the “Next” button to continue. The app will then attempt to import all the CSV items. If everything was successful you should be presented with this screen. You can scroll up through the log to see if there are any warnings or errors. If you are happy with how it was imported, tap the “Next” button to continue.
Complete the description details for your template.
You will now be presented with a screen to enter in the template information, such as the name and description. When you are happy with the template information, tap the “Import” button. You should then be presented with a message if everything went well. Congratulations you have imported your CSV file!
- 13 - © SafetyCulture 2012. All Rights Reserved
Sharing Templates – The SafetyCulture Cloud
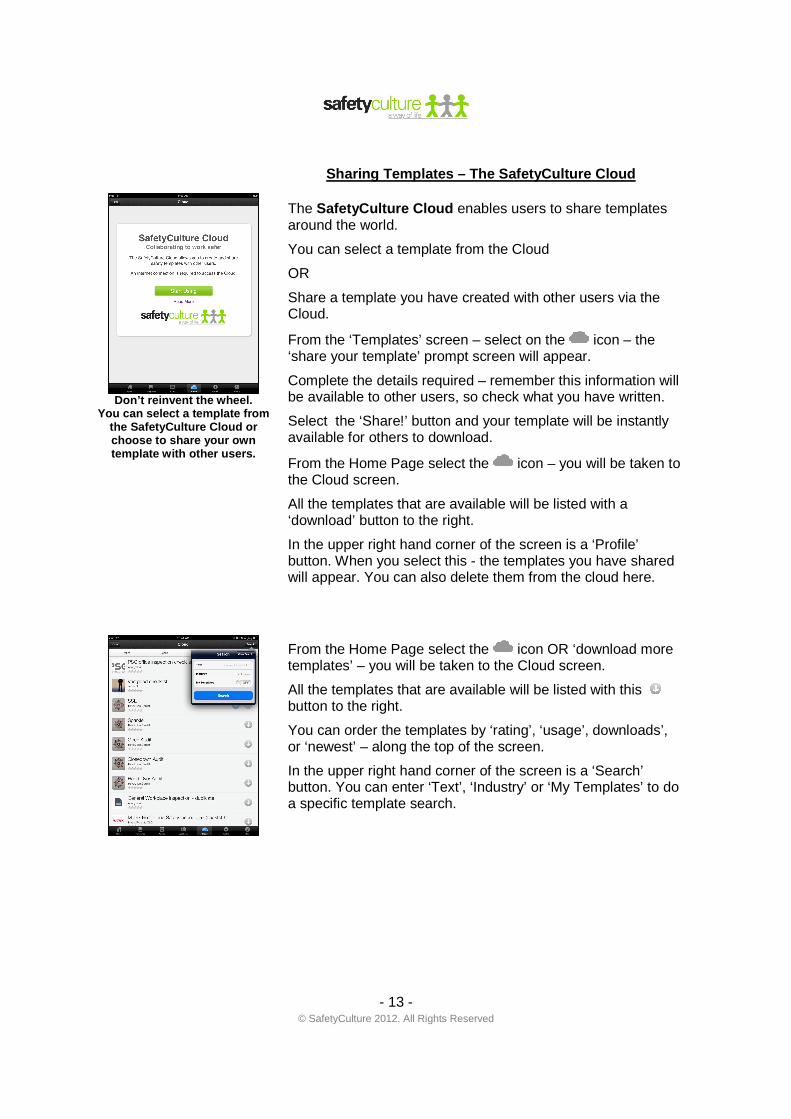
Don’t reinvent the wheel. You can select a template from
the SafetyCulture Cloud or choose to share your own template with other users.
The SafetyCulture Cloud enables users to share templates around the world.
You can select a template from the Cloud
OR
Share a template you have created with other users via the Cloud.
From the ‘Templates’ screen – select on the icon – the ‘share your template’ prompt screen will appear.
Complete the details required – remember this information will be available to other users, so check what you have written.
Select the ‘Share!’ button and your template will be instantly available for others to download.
From the Home Page select the icon – you will be taken to the Cloud screen.
All the templates that are available will be listed with a ‘download’ button to the right.
In the upper right hand corner of the screen is a ‘Profile’ button. When you select this - the templates you have shared will appear. You can also delete them from the cloud here.
From the Home Page select the icon OR ‘download more templates’ – you will be taken to the Cloud screen.
All the templates that are available will be listed with this button to the right.
You can order the templates by ‘rating’, ‘usage’, downloads’, or ‘newest’ – along the top of the screen.
In the upper right hand corner of the screen is a ‘Search’ button. You can enter ‘Text’, ‘Industry’ or ‘My Templates’ to do a specific template search.

- 14 - © SafetyCulture 2012. All Rights Reserved
Deleting Templates from the Cloud
Have you got more questions? For more information visit: www.safetyculture.com.au/iauditor Follow us on: Facebook https://www.facebook.com/SafetyCultureAustralia?ref =ts
When you click on a template that you have uploaded to the Cloud – you can view several features – including the number of times it has been dowloaded/used.
Scroll to the bottom and you will see the following in a red box:
‘Tap here to remove this template from the Cloud’
Related Documents