Introduction to iAuditor +

Welcome message from author
This document is posted to help you gain knowledge. Please leave a comment to let me know what you think about it! Share it to your friends and learn new things together.
Transcript

Introduction to iAuditor +

Login & Setup

Login Page
When you first launch the iAuditor app you will be asked for a username and Password.
1.
2.
3.
1. Tap in the first cell to enter your username. Your username will be the same e-mail address that you use to access the web software.
2. Tap in the next cell to enter your password. This will be the same password that you use for the web software.
3. Tap on the Login button. Note: Once you login for the first time iAuditor will remember your credentials.
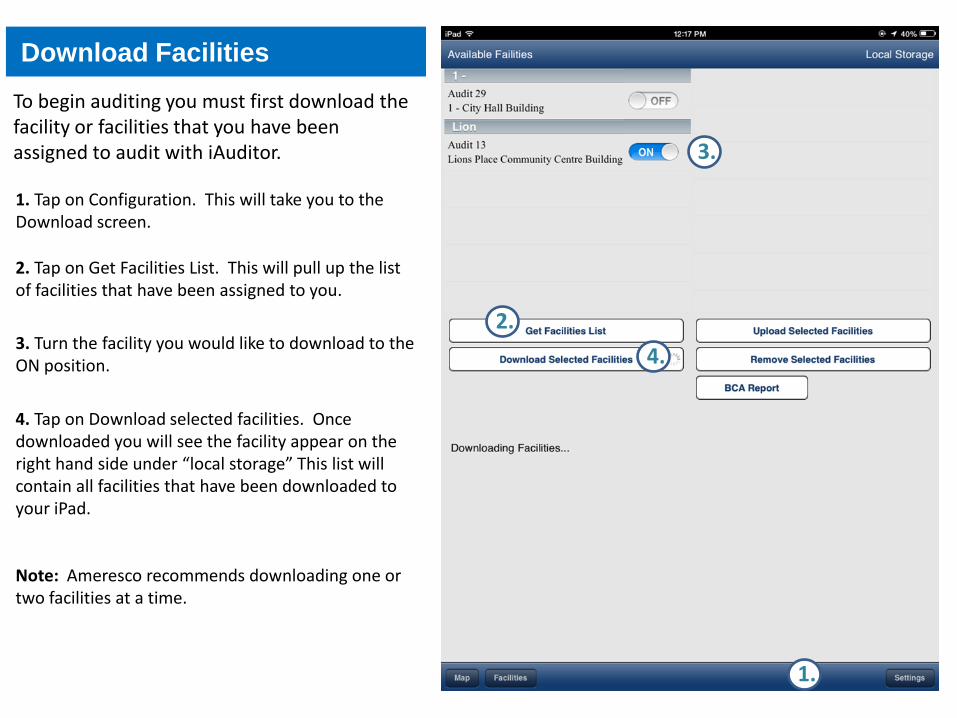
Download Facilities
To begin auditing you must first download the facility or facilities that you have been assigned to audit with iAuditor.
2. Tap on Get Facilities List. This will pull up the list of facilities that have been assigned to you.
3.
3. Turn the facility you would like to download to the ON position.
2.
4.
4. Tap on Download selected facilities. Once downloaded you will see the facility appear on the right hand side under “local storage” This list will contain all facilities that have been downloaded to your iPad. Note: Ameresco recommends downloading one or two facilities at a time.
1. Tap on Configuration. This will take you to the Download screen.
1.
Navigation & Data Entry
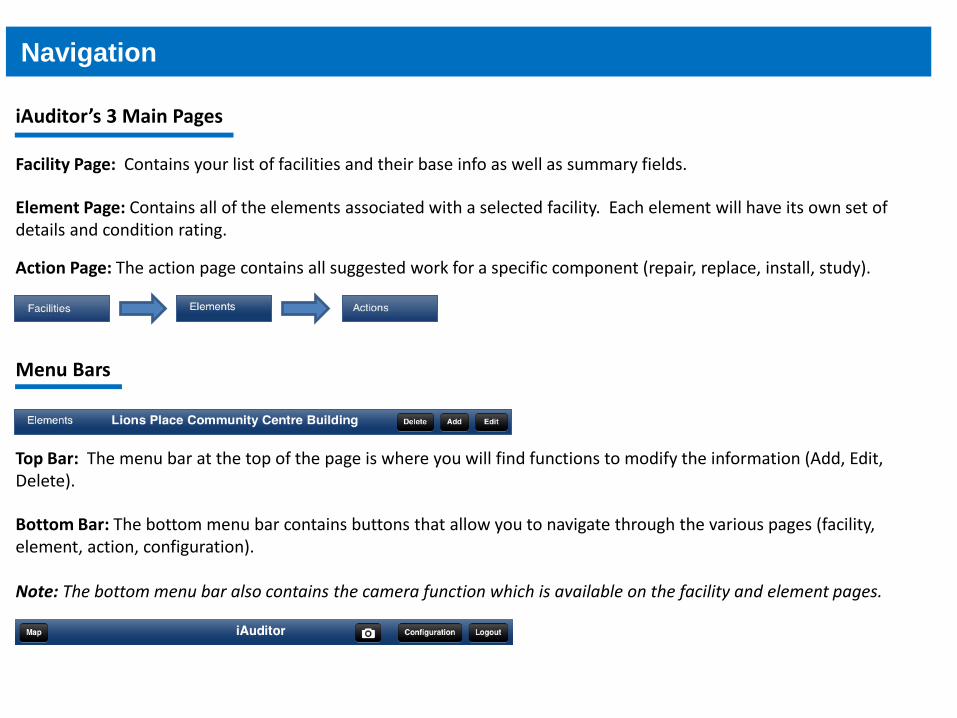
iAuditor’s 3 Main Pages
Navigation
Menu Bars
Facility Page: Contains your list of facilities and their base info as well as summary fields.
Element Page: Contains all of the elements associated with a selected facility. Each element will have its own set of details and condition rating.
Action Page: The action page contains all suggested work for a specific component (repair, replace, install, study).
Bottom Bar: The bottom menu bar contains buttons that allow you to navigate through the various pages (facility, element, action, configuration). Note: The bottom menu bar also contains the camera function which is available on the facility and element pages.
Top Bar: The menu bar at the top of the page is where you will find functions to modify the information (Add, Edit, Delete).

Facility Page
Once you have downloaded a facility tap on the “Facilities” button at the bottom right of the screen. This will take you to your list of facilities. If you have more than one you can view the base details by tapping on the facility name.
1. Tap on the ‘Edit’ button in the top right to edit your facility details.
1.
2. Tap on the Camera button to take a photo of the facility. For now choose ‘take a photo’ Photos are covered in more detail on slide 10.
2.
3. To view the inventory information of a facility tap on the “>” arrow next to the facility. The “>” arrow will take you to the Element Page which contains all elements associated with this facility.
3.

Element Page
The inventory page will display all elements that are linked to the facility. Here is where you can update the inventory information and take photos of the elements on site.
1. Element Numbering: Following each element name will be a number in square brackets. ‘1’ indicates that the Element exists in the facility and ‘0’ indicates that it does not exist.
2. Selecting Elements: To select an element tap on the name. It will appear with a blue highlight and its information will be displayed to the right.
3. Add/Delete/Edit: the controls to add, delete or edit an element are located in the top right corner. When adding or editing hit ‘Save’ to save your changes or ‘cancel’ to discard changes.
4. Action Information: If an element has a linked action the box to the right of the name will contain a number indicating how many actions are linked. If the box is orange it means an action has been suggested within the next 5 years. Tap on the ‘>’ to go to the Action Page.
1.
2.
3.
4.

Action Page
The Action page contains information relating to work (repair, replace, install, study) that needs to be done on the selected element. The Action Cost and Action year fields will form the basis for your capital plan.
1. Action Numbering: In almost all cases you will have a replacement action. However in the case where you have multiple actions linked to an element they will be numbered in the order that they were added.
2. Selecting Actions: To select an action tap on the name. It will appear with a blue highlight and its information will be displayed to the right.
3. Add/Delete/Edit: the controls to add, delete or edit an action are located in the top right corner.
4. Navigate back to Elements: To navigate back to the Element Page tap on “Elements” in the bottom left corner. You’ll notice that you can also use this navigation to get back to the Facility Page either on the action or on the element page.
2.
1.
3.
4.

Custom Details

Custom Details
1.
2.
Custom details are additional pieces of information on a facility or element that are configured by the client or based on a targeted audit (ex. energy audit).
2. Tap the edit button to enable editing of the selected element.
3. While in edit mode swipe in an upward direction on the right panel. Depending on the number of details you can continue to swipe up until you find the one you would like to edit.
1. First select an element that has custom details associated with it.
4. Grid View: Items with a ‘>>’ and blue ‘>’ indicate that these are grid based fields. Tap on the white bar to open up a grid for editing.
4.
5. Drop Down Selection: Items with a single ‘>’ at the end indicate that these are drop down selections. Tap on the white bar to view the drop down options.
5.
3.

Taking & Linking Photos

Taking Photos
The Camera button is located on the Bottom toolbar next to ‘configuration’. The camera button will be available on the Facility and Element pages.
2. Photo Menu: Tap on the camera button to take or link a photo. A menu will appear asking if you want to choose from your photo library or take a photo.
3. Taking Photos: When taking a photo tap the white button in the center and once your photo has been taken iAuditor will ask you if you want to use or retake your photo. Tap use to link your photo.
1. Linking Photos to Elements: When on the element page first tap on the element you want to take a picture of. This will link your photo directly to the selected element.
4. Photo Options: Double tap on a photo to reveal a menu with some editing options. You can delete a photo, set the default photo, or add a description.
2.
1.
3.
4.

Tips & Tricks

Tips & Tricks
1. Element List Management: Double tap on the ‘Elements’ text in the top bar to hide ‘0’ elements, double tap again to show all ‘0’ and double tap a third time to re-set .
2. Photo Bar Show/Hide: Double tap on the “iAuditor” text in the bottom bar to hide the photo preview bar. Double tap again to bring it back.
3. Tracking Reviewed Elements: Tap on ‘Edit’ and then while in edit mode tap on the “Yes” button near the bottom of the element details and then tap save. This will place a checkmark beside the element which will allow you to keep track of the elements you have reviewed.
1.
2.
3.
3. Below are some tips and tricks to help simplify the auditing process.
4. Timesaver – Photo Linking: The linking of photos to the appropriate elements and facilities is a huge timesaver vs. traditional audits. Take your photos with iAuditor and you will no longer have to sort through hundreds of photos and re-name and link them manually!
Uploading Audit Data

Uploading Audits
Once you have finished your audit the next step is to upload the audit to Asset Planner. To begin tap on Configuration. This will take you to the Upload screen.
2. Tap on Upload Selected Facilities. This will start the upload process.
1.
1. Turn the facility you would like to upload to the ON position.
2.
4.
4. Remove Selected Facilities will remove the facility from your local storage. Note: Only remove facilities after confirmation of successful upload.
3.
3. Make note of the upload status information below as this will provide confirmation upon successful upload. Note: Ameresco recommends uploading one facility at a time.
5. BCA Report will generate a PDF report and excel style grid that can be printed or e-mailed.
5.
Related Documents