BRATT PAN PRINCE SUPERPRINCE FUTURA PM FUTURA PMS FUTURA PMD FUTURA PE FUTURA PES FUTURA PED TYPE: 500, 660, 20, 30, 60, 85, 110 Service Manual S/N: Rev.: 3.5

Welcome message from author
This document is posted to help you gain knowledge. Please leave a comment to let me know what you think about it! Share it to your friends and learn new things together.
Transcript

BRATT PAN
PRINCESUPERPRINCEFUTURA PM
FUTURA PMSFUTURA PMDFUTURA PE
FUTURA PESFUTURA PED
TYPE: 500, 660, 20, 30, 60, 85, 110
Service Manual
S/N: Rev.: 3.5

3.3.2006 Rev.
1. General .......................................................................................................... 11.1 Symbols used in the manual .......................................................................................... 11.2 Symbols used on the appliance ...................................................................................... 11.3 Checking the relationship of the appliance and the manual .......................................... 1
2. Safety .............................................................................................................. 22.1 Safe use of the appliance ............................................................................................... 22.2 Safety instructions in case of malfunction ..................................................................... 22.3 Disposal of the appliance ............................................................................................... 2
3. Functional description .................................................................................. 33.1 Intended use of the appliance ........................................................................................ 3
3.1.1 Use for other purposes ........................................................................................... 33.2 Operating principle [P] .................................................................................................. 33.3 Operating principle [S] .................................................................................................. 33.4 Operating principle [PM] .............................................................................................. 33.5 Operating principle [PE] ................................................................................................ 4
4. Operation instructions ................................................................................. 54.1 Before use ...................................................................................................................... 5
4.1.1 Preparing the use .................................................................................................... 54.2 Operation ....................................................................................................................... 5
4.2.1 Switching on the bratt pan [P] ............................................................................... 54.2.2 Switching on the bratt pan [S] ............................................................................... 64.2.3 Switching on the bratt pan [PM] ............................................................................ 74.2.4 Switching on the bratt pan [PE] ............................................................................. 84.2.5 Setting of the frying temperature [P, S] ............................................................... 104.2.6 Setting of the frying temperature [PM] ................................................................ 104.2.7 Setting of the frying temperature [PE] ................................................................. 104.2.8 Frying temperature [P] ......................................................................................... 114.2.9 Frying temperature [S, PM, PE] .......................................................................... 124.2.10 Tilting [P] ........................................................................................................... 124.2.11 Tilting [S] ........................................................................................................... 124.2.12 Tilting [PM] ....................................................................................................... 134.2.13 Tilting [PE] ........................................................................................................ 134.2.14 Adjusting the working height [PE; 85, 110; HE] ............................................... 13
4.3 After use ...................................................................................................................... 144.3.1 Cleaning ............................................................................................................... 144.3.2 Service ................................................................................................................. 15
5. Installation ................................................................................................... 16

3.3.2006 Rev.
5.1 Transporting and unpacking the bratt pan ................................................................... 165.2 Positioning the bratt pan .............................................................................................. 165.3 Electrical connections .................................................................................................. 165.4 Test-run [P, S] ............................................................................................................. 175.5 Test-run [PM] .............................................................................................................. 175.6 Test-run [PE] ............................................................................................................... 18
6. Service .......................................................................................................... 196.1 Service by authorised service personnel ...................................................................... 19
7. Troubleshooting .......................................................................................... 20
8. Spare parts .................................................................................................. 218.1 Voltage codes .............................................................................................................. 238.2 Product codes ............................................................................................................... 23
9. Technical specifications .............................................................................. 55
3.3.2006 Rev. 3.5General
1. General
Carefully read the instructions in this manual as they contain important information re-garding proper, efficient and safe installation, use and maintenance of the appliance.
Keep this manual in a safe place for eventual use by other operators of the appliance.
The installation of this appliance must be carried out in accordance with the manufactur-er’s instructions and following local regulations. The connection of the appliance to theelectric and water supply must be carried out by qualified persons only.
Persons using this appliance should be specifically trained in its operation.
Switch off the appliance in case of failure or malfunction. The periodical function checksrequested in the manual must be carried out according to the instructions. Have the appli-ance serviced by a technically qualified person authorized by the manufacturer and usingoriginal spare parts.
Not complying with the above may put the safety of the appliance in danger.
1.1 Symbols used in the manual
This symbol informs about a situation where a safety risk might be at hand. Given instruc-tions are mandatory in order to prevent injury.
This symbol informs about the right way to perform in order to prevent bad results, appli-ance damage or hazardous situations.
This symbol informs about recommendations and hints that help to get the best perform-ance out of the appliance.
1.2 Symbols used on the appliance
This symbol on a part informs about electrical terminals behind the part. The removal ofthe part must be carried out by qualified persons only.
1.3 Checking the relationship of the appliance and the manual
The rating plate of the appliance indicates the serial number of the appliance. If the man-uals are missing, it is possible to order new ones from the manufacturer or the local rep-resentative. When ordering new manuals it is essential to quote the serial number shownon the rating plate.
1
3.3.2006 Rev. 3.5Safety
2. Safety
2.1 Safe use of the appliance
Because the bratt pan is a heated appliance that has hot surfaces during normal use, thefollowing warnings and instructions must be followed to avoid burns.
• During long-time operation even the sides of the frying surfaces, the pouring lipand the lid get hot.
• For safe frying, always use heat protective gloves and appropriate accessories.• Look out for discharging steam when opening the lid, especially when simmering
or stewing.• Do not leave the bratt pan on for long periods totally without supervision.
2.2 Safety instructions in case of malfunction
Switch off the appliance if it is damaged or malfunctioning. Contact authorised servicepersonnel using original spare parts for service of the appliance.
2.3 Disposal of the appliance
The destroying of the appliance when the end of its economical lifetime has been reachedmust be carried out in accordance with local rules and regulations. Taking care of sub-stances that might be harmful to the environment, if not properly handled, and utilizatonof reusable materials is best done by using professional personnel specializing in recy-cling.
2
3.3.2006 Rev. 3.5Functional description
3. Functional description
3.1 Intended use of the appliance
The Prince bratt pan is intended for heating and frying of food. [P]
The Superprince bratt pan is intended for heating and frying of food. [S]
The Futura PM bratt pan is intended for heating and frying of food. [PM]
The Futura PE bratt pan is intended for heating and frying of food. [PE]
3.1.1 Use for other purposes
Use of the appliance for other purposes than stated above is prohibited.
The manufacturer of the appliance takes no responsibility for situations that may occur ifwarnings and instructions in this manual are neglected.
3.2 Operating principle [P]
The frying surface of the bratt pan is heated by heating elements that are controlled by athermostat. The yellow pilot light goes off when the preset frying temperature is reached.
The bratt pan is fitted with handwheel tilting. The tilting is controlled by means of a tiltingwheel on the right-hand side of the pan.
3.3 Operating principle [S]
The frying surface of the bratt pan is heated by heating elements that are controlled by athermostat. The yellow pilot light goes off when the preset frying temperature is reached.
The tilting of the bratt pan is done electrically by means of a tilting lever.
3.4 Operating principle [PM]
The frying surface of the bratt pan is heated by specially designed heating elements thatare controlled by a thermostat. The yellow pilot light goes off when the preset frying tem-perature is reached.
3

3.3.2006 Rev. 3.5Functional description
In the largest bratt pan PM 110, the frying surface is divided into two frying zones. Thetemperatures of both zones can be controlled individually.
The tilting of the bratt pan is self-locking and is done by means of a handwheel.
3.5 Operating principle [PE]
The frying surface of the bratt pan is heated by specially designed heating elements thatare controlled electronically in order to achieve a fast temperature response.
In the two larger bratt pans, PE 85 and PE 110, the frying surface is divided into two fryingzones. The temperatures of both zones can be controlled individually. The set temperatureis shown on a digital display, one for each frying zone.
The tilting of the bratt pan is electrical and it is controlled by a foot-operated tilting pedal.
Bratt pan models with the letter H in the type marking are equipped with the possibilityto adjust the working height of the bratt pan.
4

3.3.2006 Rev. 3.5Operation instructions
4. Operation instructions
4.1 Before use
4.1.1 Preparing the use
The frying surface of the bratt pan is protected with a thin layer of grease during storageand transportation. Before first-time use the grease must be removed by using hot waterand detergent.
After the cleaning, the frying surface must be burned in with salt-free grease. Heat up thepan to 200°C keeping the lid closed. Burn the grease for 5-10 minutes, let the pan cooldown and wipe off excessive grease. Repeat when necessary. Do not use oil for burning.Heated oil would create a tough surface, which is difficult to clean. A well greased panreduces fat consumption in frying and minimises burning of foodstuffs.
4.2 Operation
4.2.1 Switching on the bratt pan [P]
During the installation, a mains switch may have been fitted near the bratt pan, often on awall nearby. Check that the mains switch is in the ON position.
The bratt pan is switched on by turning the thermostat knob to the desired temperature.
5
3.3.2006 Rev. 3.5Operation instructions
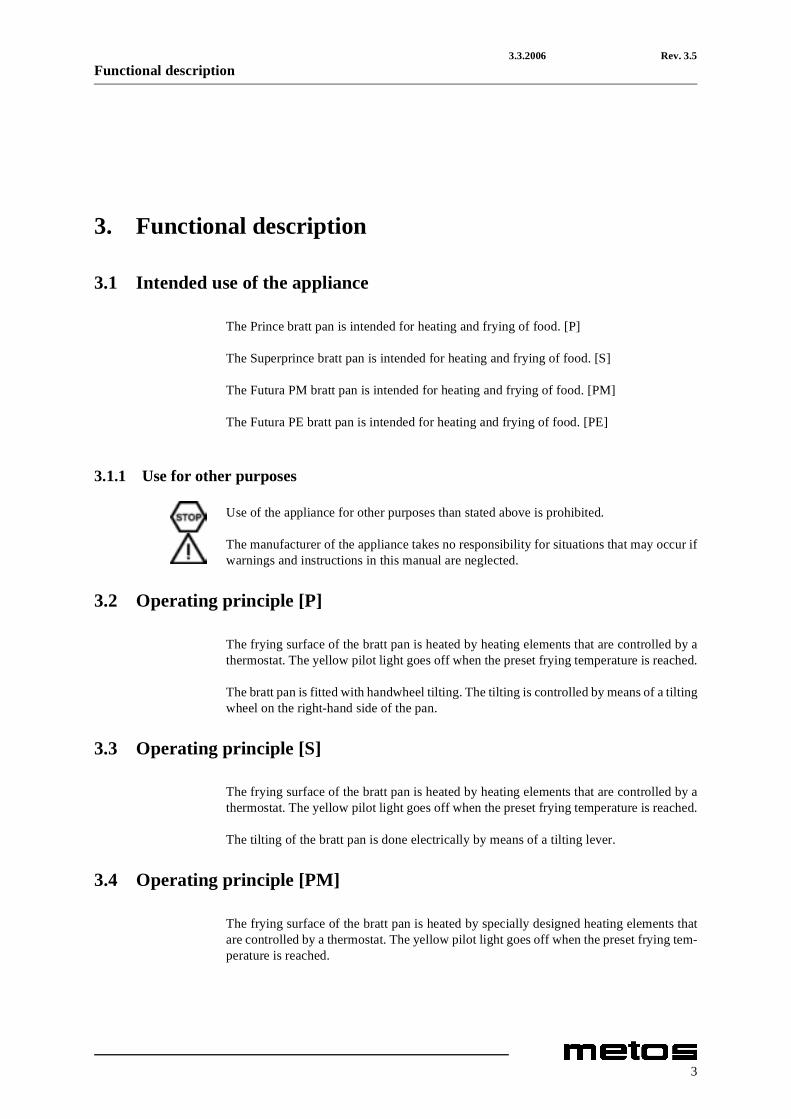
Operating devices1. Green pilot light PAN SWITCHED ON2. Yellow pilot light TEMPERATURE3. Thermostat4. Lever for the lid5. Handwheel for tilting
Heating up to the frying temperature (+200°C) takes about 11 minutes. When the presetfrying temperature is reached, the yellow pilot light goes off.
If there are longer interruptions in the electricity distribution, the thermostat should be setto the 0 position. This should be done in order to prevent unexpected start-up of the panwhen the electricity distribution is restored.
Due to the very short preheating time of the bratt pan, energy can be saved by not switch-ing the pan on until the frying is started. If there is a longer pause during the frying, thebratt pan can be switched off or the temperature can be set to a lower value. Energy canalso be saved by keeping the lid closed always when possible, for instance when simmer-ing or stewing.
4.2.2 Switching on the bratt pan [S]
During the installation, a mains switch may have been fitted near the bratt pan, often on awall nearby. Check that the mains switch is in the ON position.
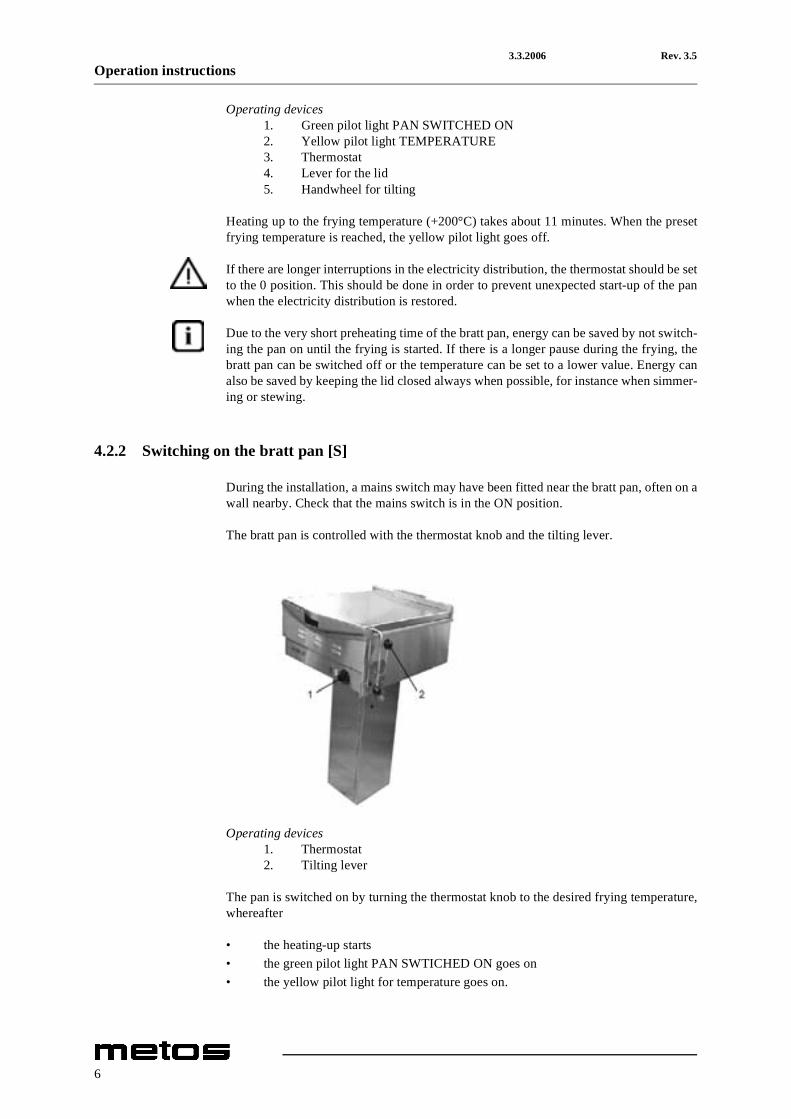
The bratt pan is controlled with the thermostat knob and the tilting lever.
Operating devices1. Thermostat2. Tilting lever
The pan is switched on by turning the thermostat knob to the desired frying temperature,whereafter
• the heating-up starts• the green pilot light PAN SWTICHED ON goes on• the yellow pilot light for temperature goes on.
6
3.3.2006 Rev. 3.5Operation instructions
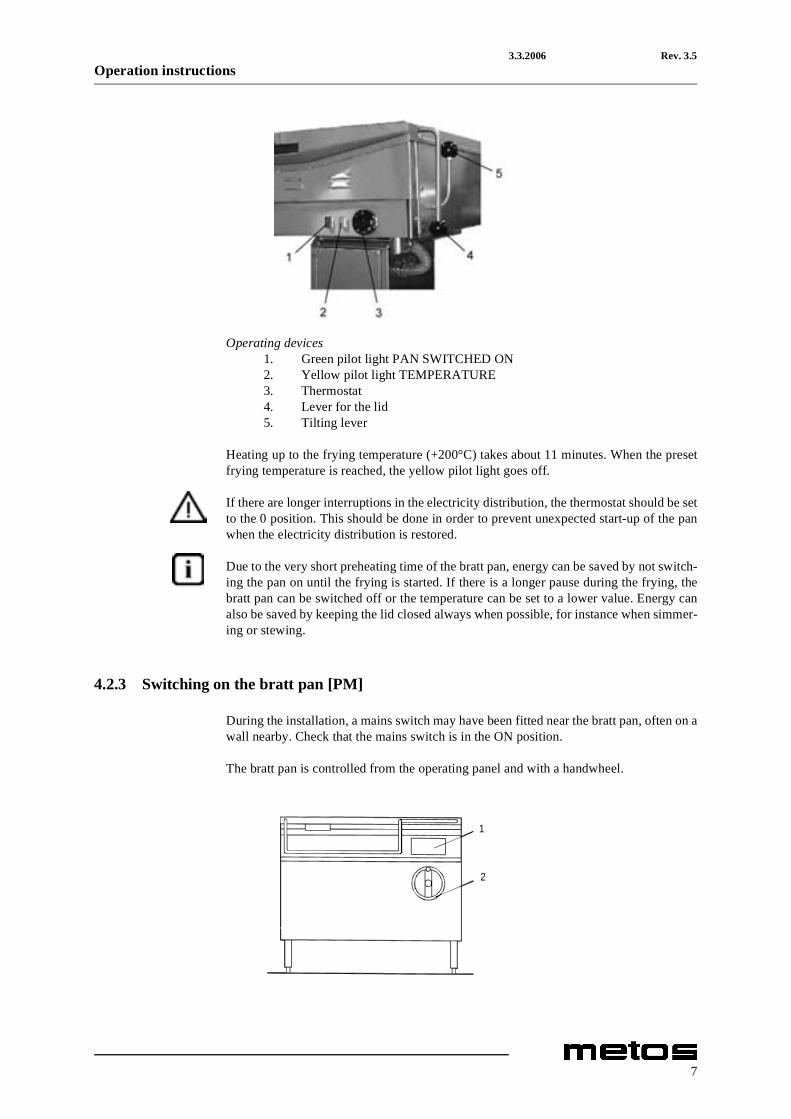
Operating devices1. Green pilot light PAN SWITCHED ON2. Yellow pilot light TEMPERATURE3. Thermostat4. Lever for the lid5. Tilting lever
Heating up to the frying temperature (+200°C) takes about 11 minutes. When the presetfrying temperature is reached, the yellow pilot light goes off.
If there are longer interruptions in the electricity distribution, the thermostat should be setto the 0 position. This should be done in order to prevent unexpected start-up of the panwhen the electricity distribution is restored.
Due to the very short preheating time of the bratt pan, energy can be saved by not switch-ing the pan on until the frying is started. If there is a longer pause during the frying, thebratt pan can be switched off or the temperature can be set to a lower value. Energy canalso be saved by keeping the lid closed always when possible, for instance when simmer-ing or stewing.
4.2.3 Switching on the bratt pan [PM]
During the installation, a mains switch may have been fitted near the bratt pan, often on awall nearby. Check that the mains switch is in the ON position.
The bratt pan is controlled from the operating panel and with a handwheel.
1
2
7

3.3.2006 Rev. 3.5Operation instructions
Operating devices1. Operating panel2. Handwheel for tilting
The pan is switched on by turning the thermostat knob to the desired frying temperature,whereafter
• the heating-up starts• the green pilot light goes on• the yellow pilot light goes on, and it goes off when the preset temperature is
reached (only PM 110 models are fitted with two thermostats)
Operating panel1. Green pilot light PAN SWITCHED ON2. Yellow pilot light TEMPERATURE3. Temperature adjustment (PM 60, PM 85, PM 110)4. Temperature adjustment (PM 110)
Heating up to the frying temperature takes about 5-6 minutes. When the preset frying tem-perature is reached, the yellow pilot light goes off.
If there are longer interruptions in the electricity distribution, the thermostat (both ther-mostats on the PM 110 models) should be set to the 0 position. This should be done inorder to prevent unexpected start-up of the pan when the electricity distribution is re-stored.
Due to the very short preheating time of the bratt pan, energy can be saved by not switch-ing the pan on until the frying is started. If there is a longer pause during the frying, thebratt pan can be switched off or the temperature can be set to a lower value. Energy canalso be saved by keeping the lid closed always when possible, for instance when simmer-ing or stewing.
4.2.4 Switching on the bratt pan [PE]
During the installation, a mains switch may have been fitted near the bratt pan, often on awall nearby. Check that the mains switch is in the ON position.
1
2
3 4
8

3.3.2006 Rev. 3.5Operation instructions
The bratt pan is controlled from the operating panel and with a tilting pedal.
Operating devices1. Operating panel2. Tilting pedal3. Tilting4. Return
The pan is switched on by pressing the ON/OFF button, whereafter
• the heating-up starts• the green pilot light goes on• the temperature displays show the preset temperature of 180°C (only one display
in model PE 60).
Operating panel1. ON/OFF button2. Green pilot light PAN SWITCHED ON3. Red temperature display (PE 60, PE 85, PE 110)4. Setting buttons for temperature (PE 60, PE 85, PE 110)5. Red temperature display (PE 85, PE 110)6. Setting buttons for temperature (PE 85, PE 110)7. Adjustment of working height (only H models)
Heating up to the frying temperature takes about 5-6 minutes. The preset frying tempera-ture is flashing on the display until the temperature is about 30°C under the frying tem-perature.
2 2
1
3
4
7 2 1
3 4 5 6
9
3.3.2006 Rev. 3.5Operation instructions
Due to the very short preheating time of the bratt pan, energy can be saved by not switch-ing the pan on until the frying is started. If there is a longer pause during the frying, thebratt pan can be switched off or the temperature can be set to a lower value. Energy canalso be saved by keeping the lid closed always when possible, for instance when simmer-ing or stewing.
4.2.5 Setting of the frying temperature [P, S]
The frying temperature can be changed by turning the thermostat knob to the desired tem-perature. When lowering the temperature, some time will be needed for the frying surfaceto cool down. Increasing of the temperature turns on the green pilot light. The new tem-perature is reached when the light goes off.
4.2.6 Setting of the frying temperature [PM]
The frying temperature can be changed by turning the thermostat knob to the desired tem-perature. When lowering the temperature, some time will be needed for the frying surfaceto cool down. Increasing of the temperature turns on the green pilot light. The new tem-perature is reached when the light goes off.
On the PM 110 model, the frying surface has been divided into two frying zones that canbe controlled separately. This makes it possible to fry two product types requiring differ-ent frying temperatures at the same time. By turning the thermostat to the 0 position, theother zone can be switched off when lower frying capacity is needed. [110]
During long-time use, heat is transferred from one zone to the other. Although one zonewould be switched off, it gets gradually warm, reaching a temperature that is about halfof the temperature of the heated zone. If so desired, the temperature of this zone can bechecked by turning the thermostat knob to a position where the yellow pilot light goes on.[110]
4.2.7 Setting of the frying temperature [PE]
PE 60: The frying temperature can be changed by using the “+” and “-” buttons.
PE 85 and PE 110:
The frying temperature can be changed as follows:
• Set the temperature for the desired zone with the “+” and “-” buttons.• Repeat for the other zone when needed.• The heating-up of the other zone can be switched off by setting the temperature to
0°C.
The preset frying temperature 180°C remains in memory and is activated for use byswitching off the pan with the ON/OFF button and then turning it on again.
During long-time use, heat is transferred from one zone to the other. Although one zonewould be switched off, it gets gradually warm, reaching a temperature that is about halfof the temperature of the heated zone. If so desired, the temperature of this zone can be
10
3.3.2006 Rev. 3.5Operation instructions
checked by searching with the setting buttons the area where the temperature display stopsflashing (±30°C). [85, 110]
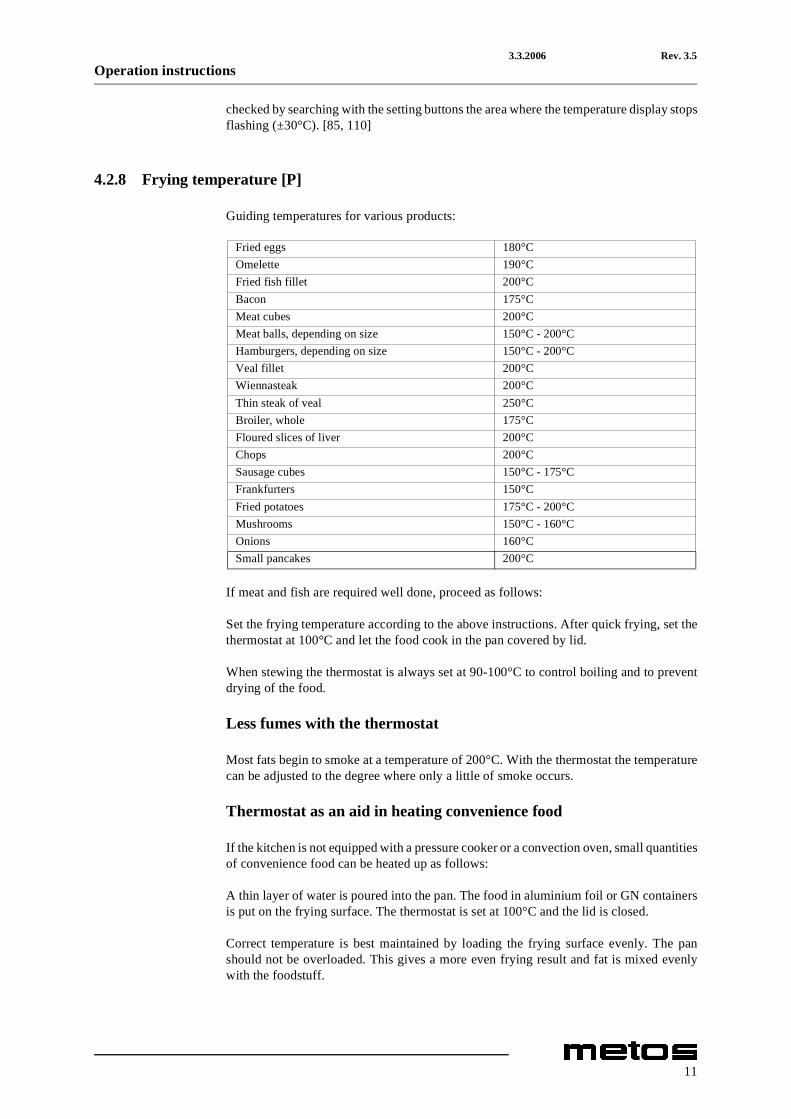
4.2.8 Frying temperature [P]
Guiding temperatures for various products:
If meat and fish are required well done, proceed as follows:
Set the frying temperature according to the above instructions. After quick frying, set thethermostat at 100°C and let the food cook in the pan covered by lid.
When stewing the thermostat is always set at 90-100°C to control boiling and to preventdrying of the food.
Less fumes with the thermostat
Most fats begin to smoke at a temperature of 200°C. With the thermostat the temperaturecan be adjusted to the degree where only a little of smoke occurs.
Thermostat as an aid in heating convenience food
If the kitchen is not equipped with a pressure cooker or a convection oven, small quantitiesof convenience food can be heated up as follows:
A thin layer of water is poured into the pan. The food in aluminium foil or GN containersis put on the frying surface. The thermostat is set at 100°C and the lid is closed.
Correct temperature is best maintained by loading the frying surface evenly. The panshould not be overloaded. This gives a more even frying result and fat is mixed evenlywith the foodstuff.
Fried eggs 180°COmelette 190°CFried fish fillet 200°CBacon 175°CMeat cubes 200°CMeat balls, depending on size 150°C - 200°CHamburgers, depending on size 150°C - 200°CVeal fillet 200°CWiennasteak 200°CThin steak of veal 250°CBroiler, whole 175°CFloured slices of liver 200°CChops 200°CSausage cubes 150°C - 175°CFrankfurters 150°CFried potatoes 175°C - 200°CMushrooms 150°C - 160°COnions 160°CSmall pancakes 200°C
11
3.3.2006 Rev. 3.5Operation instructions
4.2.9 Frying temperature [S, PM, PE]
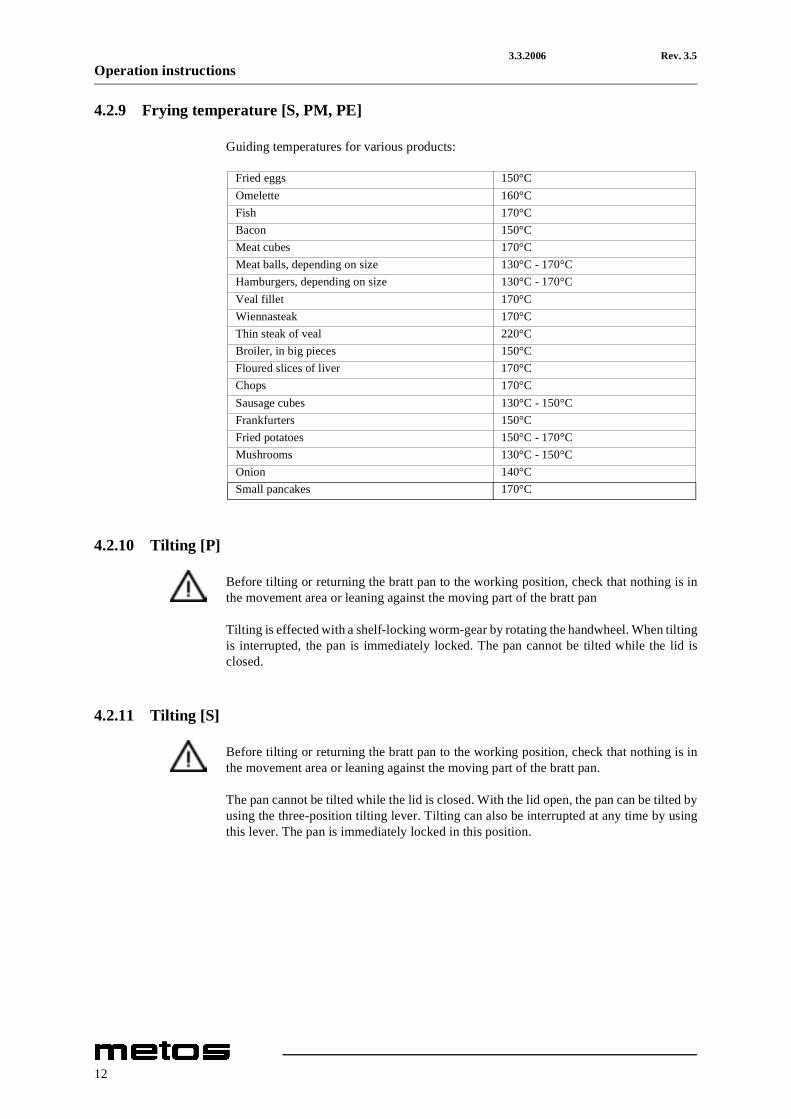
Guiding temperatures for various products:
4.2.10 Tilting [P]
Before tilting or returning the bratt pan to the working position, check that nothing is inthe movement area or leaning against the moving part of the bratt pan
Tilting is effected with a shelf-locking worm-gear by rotating the handwheel. When tiltingis interrupted, the pan is immediately locked. The pan cannot be tilted while the lid isclosed.
4.2.11 Tilting [S]
Before tilting or returning the bratt pan to the working position, check that nothing is inthe movement area or leaning against the moving part of the bratt pan.
The pan cannot be tilted while the lid is closed. With the lid open, the pan can be tilted byusing the three-position tilting lever. Tilting can also be interrupted at any time by usingthis lever. The pan is immediately locked in this position.
Fried eggs 150°COmelette 160°CFish 170°CBacon 150°CMeat cubes 170°CMeat balls, depending on size 130°C - 170°CHamburgers, depending on size 130°C - 170°CVeal fillet 170°CWiennasteak 170°CThin steak of veal 220°CBroiler, in big pieces 150°CFloured slices of liver 170°CChops 170°CSausage cubes 130°C - 150°CFrankfurters 150°CFried potatoes 150°C - 170°CMushrooms 130°C - 150°COnion 140°CSmall pancakes 170°C
12
3.3.2006 Rev. 3.5Operation instructions
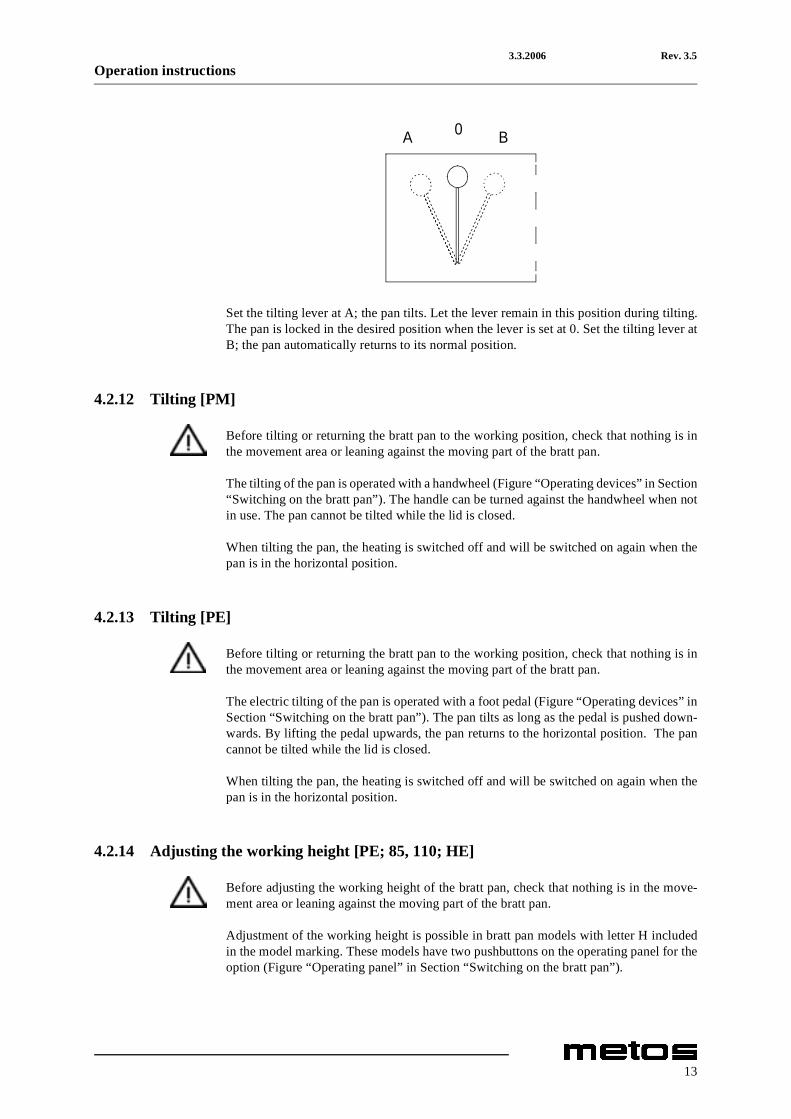
Set the tilting lever at A; the pan tilts. Let the lever remain in this position during tilting.The pan is locked in the desired position when the lever is set at 0. Set the tilting lever atB; the pan automatically returns to its normal position.
4.2.12 Tilting [PM]
Before tilting or returning the bratt pan to the working position, check that nothing is inthe movement area or leaning against the moving part of the bratt pan.
The tilting of the pan is operated with a handwheel (Figure “Operating devices” in Section“Switching on the bratt pan”). The handle can be turned against the handwheel when notin use. The pan cannot be tilted while the lid is closed.
When tilting the pan, the heating is switched off and will be switched on again when thepan is in the horizontal position.
4.2.13 Tilting [PE]
Before tilting or returning the bratt pan to the working position, check that nothing is inthe movement area or leaning against the moving part of the bratt pan.
The electric tilting of the pan is operated with a foot pedal (Figure “Operating devices” inSection “Switching on the bratt pan”). The pan tilts as long as the pedal is pushed down-wards. By lifting the pedal upwards, the pan returns to the horizontal position. The pancannot be tilted while the lid is closed.
When tilting the pan, the heating is switched off and will be switched on again when thepan is in the horizontal position.
4.2.14 Adjusting the working height [PE; 85, 110; HE]
Before adjusting the working height of the bratt pan, check that nothing is in the move-ment area or leaning against the moving part of the bratt pan.
Adjustment of the working height is possible in bratt pan models with letter H includedin the model marking. These models have two pushbuttons on the operating panel for theoption (Figure “Operating panel” in Section “Switching on the bratt pan”).
A 0 B
13

3.3.2006 Rev. 3.5Operation instructions
The working height can be electrically adjusted to the desired height by pushing the cor-responding button. The working height is adjustable between 800-950 mm. [valid to SN025440/1]
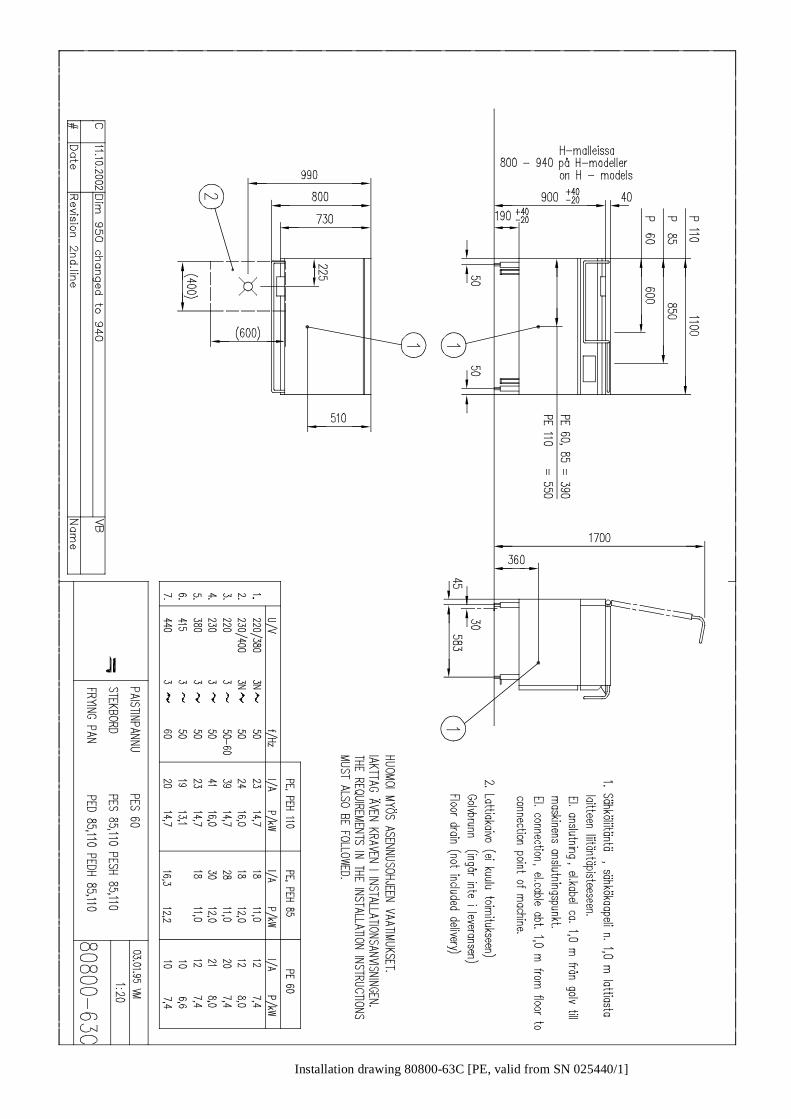
The working height can be electrically adjusted to the desired height by pushing the cor-responding button. The working height is adjustable between 800-940 mm. [valid fromSN 25440/1]
Adjustment is not possible if the pan is in a tilted position.
4.3 After use
4.3.1 Cleaning
Burned deposits on the frying surface of the pan form an isolating layer which slows upthe frying and creates poor frying results. A clean frying surface is a must for good-qualityresults.
The effect of burned deposits on the surface temperature: 2 mm of deposits lower the sur-face temperature with 24 %.
180°C about 135°C
Cleaning equipment: scraper, hard brush, scouring plate, towel, kitchen paper
Cleaning detergent: slightly alkaline detergent (pH 8-10)
Cleaning method: scraping, dry, wet, damp
Precleaning:
Scrape out frying remains and wipe out grease and loose remains with paper. When nec-essary, pour hot water into the pan and let soak.
Cleaning:
The inside of the pan is cleaned with a brush and hot water. Spots are removed with ascouring plate. Cleaning detergent should be used only for frying surfaces extremely cov-ered with burned deposits, because it removes grease from the frying surface.
Inner and outer surfaces of the lid are cleaned with a brush and cleaning detergent solu-tion. Pay special attention to the edges and hinges of the lid. The base and outer surfacesof the pan are cleaned with a brush and cleaning detergent solution and rinsed with water.The frying surface of the pan is rinsed with hot water, dried by heating up and greasedwith salt-free grease. All other surfaces are rinsed and wiped dry.
Water usage on the control panel and the electric box must be avoided.
Use of a water hose or pressure cleaning jet is strictly forbidden.
14

3.3.2006 Rev. 3.5Operation instructions
In order to remain in good condition, the frying surface must be burned with salt-freegrease when the pan is taken into use for the first time, and after that at intervals duringuse. This is especially necessary in connection with thorough cleaning.
4.3.2 Service
Switch the appliance off if it is damaged or is malfunctioning. Contact authorised servicepersonnel using original spare parts for service of the appliance.
The appliance does not include any user serviceable parts inside. Service must be left toauthorised service personnel.
15
3.3.2006 Rev. 3.5Installation
5. Installation
5.1 Transporting and unpacking the bratt pan
The best way to move the bratt pan is to keep it in its own package as long as possiblewhile it also protects the pan from outer damage. If it is necessary to unpack the pan, pos-sible lifting must thereafter be done from the bottom frame of the base by using suitablespacers of wood. In order to avoid damage, it is not allowed to use the lid as a workbenchduring installation.
When unpacking the H-models of the bratt pan, it is very important to remove the twotransportation supports made of veneer. [PE; 85,110; HE]
5.2 Positioning the bratt pan
The installation is started by mounting the installation frame by bolts to the floor consid-ering a possible floor drain. The recommended distances needed for full service are shownin the installation drawing. After this, lift the pan onto the installation frame. [P, S]
Thereafter the pan is adjusted into a horizontal position by fixing bolts. The correct posi-tion is checked from the frying surface, not from the outer edges of the pan. [P, S]
The installation is started by moving the pan exactly to the right installation spot consid-ering a possible floor drain. The distances needed are shown in the installation drawing.For service, most pans can be accessed from the front.
Thereafter the pan is adjusted into a horizontal position by turning the adjustable legs. Thecorrect position is checked from the frying surface, not from the outer edges of the pan.When adjusting, consider that there must be a clearance between the tilting foot pedal andthe floor that allows handling of the pedal with the tip of a workshoe. The space betweenthe pan and the base is correctly set by these bolts.
When the bratt pan is on the correct location and in a horizontal position, it must be boltedto the floor, the land models by the flanges in the rear adjusting legs and the marine mod-els by all four leg flanges.
5.3 Electrical connections
In order to make eventual future service easier and to increase safety, a mains switch mustbe installed near the appliance. This switch must disconnect the appliance completelyfrom the electrical supply network.
The feedthrough grommet for the connection cable is located on the bottom of the base asshown in the installation drawing. In order to make the connection, the lower front siding
16
3.3.2006 Rev. 3.5Installation
must be removed by loosening the four screws that are located on the lower and upperedge of the siding and then lifting the siding away. [P, S]
The feedthrough grommet for the connection cable is located on the bottom plate of thebase, just under the connection terminal as shown in the installation drawing. In order tomake the connection, the lower front siding must be removed by loosening the two screwsthat are located on the lower edge of the siding and then lifting the siding upwards. [PM,PE]
5.4 Test-run [P, S]
Besides the live electrical parts, also look out for possible moving mechanisms in the low-er part of the appliance, if there is a need for testing the appliance during installation whilethe guards or cover plates are detached.
Make sure that the protective grease has been removed from the frying surface before tak-ing the pan into use. See “Preparing the use”.
After connecting the cable check the function of the bratt pan.
Check that
• when turning the thermostat knob both green and yellow pilot light goes on• the yellow pilot light goes off after a few minutes when the frying surface has
reached the set temperature.
Before refitting the front siding check that no wires in the base interfere with movingparts.
Refit the lower front siding.
5.5 Test-run [PM]
Besides the live electrical parts also look out for possible moving mechanisms in the low-er part of the appliance, if there is a need for testing the appliance during installation whilethe guards or cover plates are detached.
Make sure that the protective grease has been removed from the frying surface before tak-ing the pan into use. See “Preparing the use”.
After connecting the cable check the function of the bratt pan.
Check that
• when turning the thermostat knob, both the green and yellow pilot light goes on(two zones in the PM 110 models)
• the yellow pilot light goes off after a few minutes when the frying surface hasreached the set temperature
• the limit switches of the heating work properly: when tilting the heating isswitched off, the return movement stops when the pan reaches the base and theheating is switched on. If necessary, adjust the limit switches.
17
3.3.2006 Rev. 3.5Installation
• before refitting the front siding, check that no wires in the base interfere with mov-ing parts.
Refit the lower front siding.
5.6 Test-run [PE]
Besides the live electrical parts also look out for possible moving mechanisms in the low-er part of the appliance, if there is a need for testing the appliance during installation whilethe guards or cover plates are detached.
Make sure that the protective grease has been removed from the frying surface before tak-ing the pan into use. See “Preparing the use”.
After connecting the cable check the function of the bratt pan by turning it on with theON/OFF button.
Check that
• the temperature displays of both heating zones (only one zone in the model PE 60)flashes the set reading which after a few minutes stays continuously on.
• the limit switches of the tilting and heating work properly: When tilting the heatingis switched off, in the fully tilted position tilting stops and the power is cut fromthe tilting motor. The return movement stops when the pan reaches the base, theheating is switched on and the power is cut from the tilting motor. If necessary, ad-just the limit switches.
Before refitting the front siding, check that no wires in the base interfere with movingparts.
Refit the lower front siding.
18
3.3.2006 Rev. 3.5Service
6. Service
6.1 Service by authorised service personnel
Whenever it is possible, the appliance should be disconnected from the electrical supplynetwork before starting the service work. If the appliance according to the installation in-structions is fitted with a mains switch, it is done by turning the mains switch to the 0 po-sition. If no mains switch is fitted, the circuit breakers (fuses) of the appliance must beopened or detached.
Besides the live electrical parts, especially look out for possible moving mechanisms inthe lower part of the appliance if there is a need for testing during service while the guardsor cover plates are detached.
If the tilting part of the bratt pan is detached from the tilting mechanism during servicework, it must be properly and safely supported due to the weight of the tilting part.
It is not allowed to remove the springs that lighten the tilting when the tilting part of thepan is in the horizontal working position and the springs are tensioned. Before removal ofthe springs, the pan must be tilted to a fully upright position. [PM]
When the service work is finished and before refitting the front siding, check that all wiresare repositioned and no wires in the base interfere with moving parts.
If the above instructions are neglected, the safety of the appliance and the service workmay be jeopardized.
19

3.3.2006 Rev. 3.5Troubleshooting
7. Troubleshooting
If the appliance does not function, check the following:
• Has the appliance been used according to the instructions?• Are all possibly removable parts refitted?• Are the mains switch on the appliance or nearby - often on the wall - in the ON
position?
If even this does not help, figure out in advance how to briefly describe the break-downand contact an authorized service person.
The appliance does not include any user serviceable parts inside. Service must be left toauthorized service personnel.
20
3.3.2006 Rev. 3.5Spare parts
8. Spare parts
General parts and el.components P .... 25
Tilting device P ..................................... 27
General parts and el. Components S .. 29
General parts and el. Components S .. 31
General parts PM................................. 33
General parts PM................................. 35
Tilting device PM ................................. 37
Electrical components PM................... 39
Electrical components PM................... 41
General parts PE ..................................43
General parts PE ..................................45
Tilting device PE................................... 47
Height adjustment device PE .............. 49
Electrical components PE....................51
Electrical components PE....................53
21

3.3.2006 Rev. 3.5Spare parts
22

3.3.2006 Rev. 3.5Spare parts
8.1 Voltage codes
8.2 Product codes
Voltage Voltage codeA 3/N/PE∼400/230V 50HzB ∼250V 16A 50HzC 3/N/PE∼380/220V 50HzD 3/PE∼200V 50-60HzF 2/PE 220−240V 50HzG 3/N/PE∼415/240V 50HzH 3/PE∼230V 50HzI 3/PE∼220V 60HzJ 3/PE∼380 50HzK 3/PE∼400V 50HzL 3/PE∼415V 50HzM 3/PE∼440V 60HzN 3/PE∼460V 60HzO 3/PE∼480V 60HzP 1/N/PE~220-240V 50HzR 2/PE~220-230V 60HzS 3/N/PE∼400/230V 50HzT 3/PE∼230V 60HzU 1/N/PE~100V 50-60Hz
Product code Full nameModel codesP PRINCES SUPERPRINCEPM FUTURA PMPMS FUTURA PMSPMD FUTURA PMDPE FUTURA PEPES FUTURA PESPED FUTURA PEDType codes500 500660 66020 2030 3060 6085 85110 110Accessory codesHE HEIGHT ADJUSTMENT
23

3.3.2006 Rev. 3.5Spare parts
24
3.3.2006 Rev. 3.5Spare parts
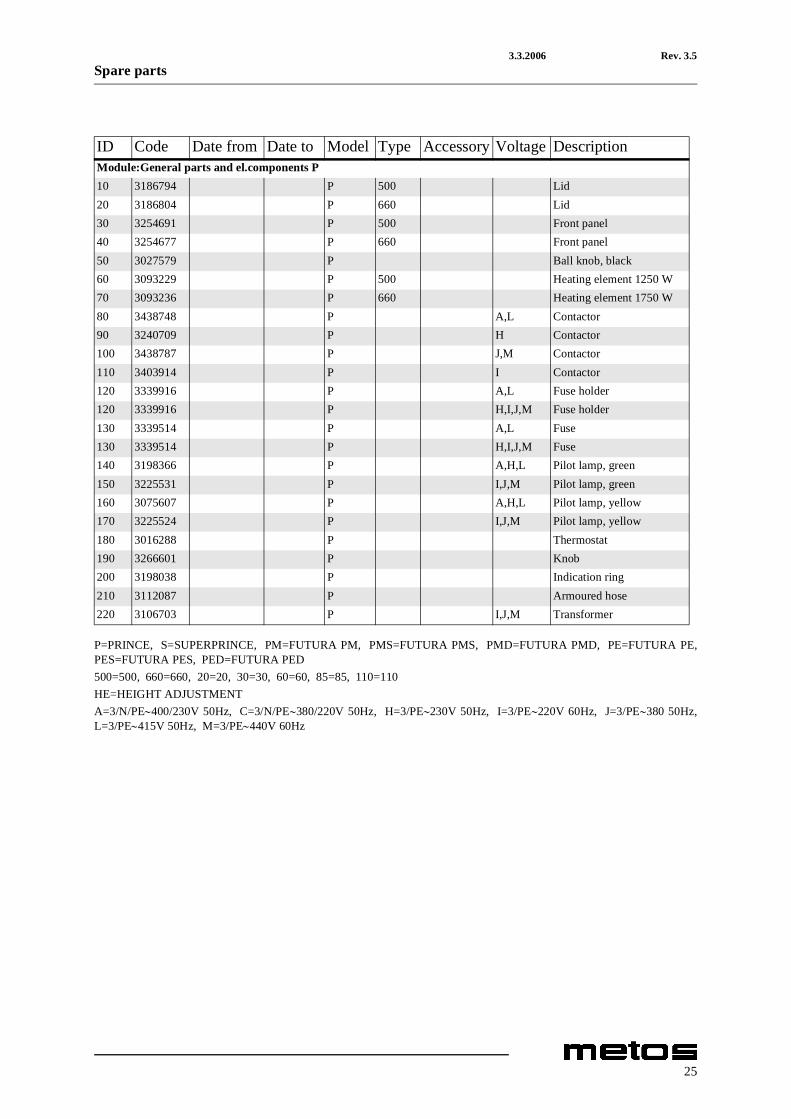
P=PRINCE, S=SUPERPRINCE, PM=FUTURA PM, PMS=FUTURA PMS, PMD=FUTURA PMD, PE=FUTURA PE,PES=FUTURA PES, PED=FUTURA PED500=500, 660=660, 20=20, 30=30, 60=60, 85=85, 110=110HE=HEIGHT ADJUSTMENTA=3/N/PE∼400/230V 50Hz, C=3/N/PE∼380/220V 50Hz, H=3/PE∼230V 50Hz, I=3/PE∼220V 60Hz, J=3/PE∼380 50Hz,L=3/PE∼415V 50Hz, M=3/PE∼440V 60Hz
ID Code Date from Date to Model Type Accessory Voltage DescriptionModule:General parts and el.components P10 3186794 P 500 Lid20 3186804 P 660 Lid30 3254691 P 500 Front panel40 3254677 P 660 Front panel50 3027579 P Ball knob, black60 3093229 P 500 Heating element 1250 W70 3093236 P 660 Heating element 1750 W80 3438748 P A,L Contactor90 3240709 P H Contactor100 3438787 P J,M Contactor110 3403914 P I Contactor120 3339916 P A,L Fuse holder120 3339916 P H,I,J,M Fuse holder130 3339514 P A,L Fuse130 3339514 P H,I,J,M Fuse140 3198366 P A,H,L Pilot lamp, green150 3225531 P I,J,M Pilot lamp, green160 3075607 P A,H,L Pilot lamp, yellow170 3225524 P I,J,M Pilot lamp, yellow180 3016288 P Thermostat190 3266601 P Knob200 3198038 P Indication ring210 3112087 P Armoured hose220 3106703 P I,J,M Transformer
25
3.3.2006 Rev. 3.5Spare parts
300
290
280
340
350
360
320
260 240
230310
330
330
250
270
26

3.3.2006 Rev. 3.5Spare parts
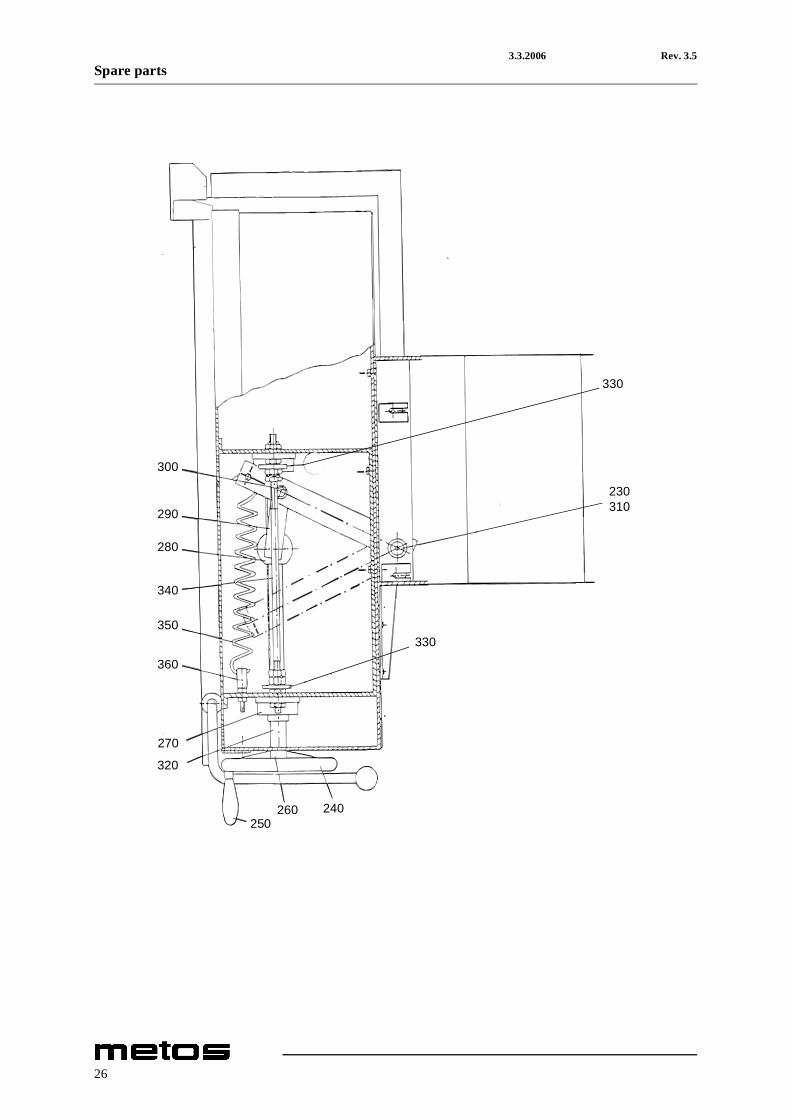
P=PRINCE, S=SUPERPRINCE, PM=FUTURA PM, PMS=FUTURA PMS, PMD=FUTURA PMD, PE=FUTURA PE,PES=FUTURA PES, PED=FUTURA PED500=500, 660=660, 20=20, 30=30, 60=60, 85=85, 110=110HE=HEIGHT ADJUSTMENTA=3/N/PE∼400/230V 50Hz, C=3/N/PE∼380/220V 50Hz, H=3/PE∼230V 50Hz, I=3/PE∼220V 60Hz, J=3/PE∼380 50Hz,L=3/PE∼415V 50Hz, M=3/PE∼440V 60Hz
ID Code Date from Date to Model Type Accessory Voltage DescriptionModule:Tilting device P230 3187967 P Tilting shaft240 3024024 P Handwheel250 3059299 P Handle260 3043771 P Locking tab270 3025204 P Bearing280 3214346 P Screw's nut290 3241519 P Flat iron300 3100148 P Circlip310 3214018 P Tilting shaft's bearing320 3188047 P Tilting screw330 3086158 P Limiter340 3188093 P Tie bar350 3292827 P Spring360 3188128 P Lug
27
3.3.2006 Rev. 3.5Spare parts
28
3.3.2006 Rev. 3.5Spare parts
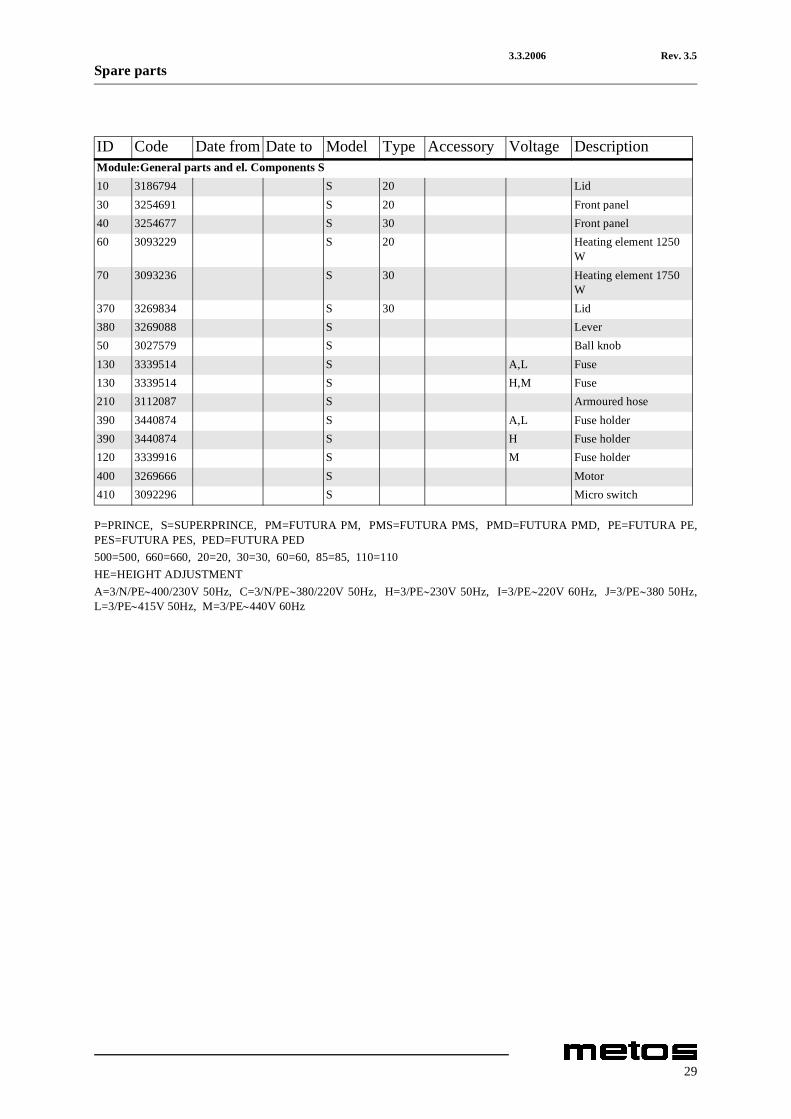
P=PRINCE, S=SUPERPRINCE, PM=FUTURA PM, PMS=FUTURA PMS, PMD=FUTURA PMD, PE=FUTURA PE,PES=FUTURA PES, PED=FUTURA PED500=500, 660=660, 20=20, 30=30, 60=60, 85=85, 110=110HE=HEIGHT ADJUSTMENTA=3/N/PE∼400/230V 50Hz, C=3/N/PE∼380/220V 50Hz, H=3/PE∼230V 50Hz, I=3/PE∼220V 60Hz, J=3/PE∼380 50Hz,L=3/PE∼415V 50Hz, M=3/PE∼440V 60Hz
ID Code Date from Date to Model Type Accessory Voltage DescriptionModule:General parts and el. Components S10 3186794 S 20 Lid30 3254691 S 20 Front panel40 3254677 S 30 Front panel60 3093229 S 20 Heating element 1250
W70 3093236 S 30 Heating element 1750
W370 3269834 S 30 Lid380 3269088 S Lever50 3027579 S Ball knob130 3339514 S A,L Fuse130 3339514 S H,M Fuse210 3112087 S Armoured hose390 3440874 S A,L Fuse holder390 3440874 S H Fuse holder120 3339916 S M Fuse holder400 3269666 S Motor410 3092296 S Micro switch
29

3.3.2006 Rev. 3.5Spare parts
30

3.3.2006 Rev. 3.5Spare parts
P=PRINCE, S=SUPERPRINCE, PM=FUTURA PM, PMS=FUTURA PMS, PMD=FUTURA PMD, PE=FUTURA PE,PES=FUTURA PES, PED=FUTURA PED500=500, 660=660, 20=20, 30=30, 60=60, 85=85, 110=110HE=HEIGHT ADJUSTMENTA=3/N/PE∼400/230V 50Hz, C=3/N/PE∼380/220V 50Hz, H=3/PE∼230V 50Hz, I=3/PE∼220V 60Hz, J=3/PE∼380 50Hz,L=3/PE∼415V 50Hz, M=3/PE∼440V 60Hz
ID Code Date from Date to Model Type Accessory Voltage DescriptionModule:General parts and el. Components S140 3198366 S Pilot light, green150 3225531 S M Pilot light, green160 3075607 S Pilot light, yellow170 3225524 S M Pilot light, yellow180 3016288 S Thermostat200 3198038 S Indication ring420 3266601 S Knob425 3286301 S M Knob90 3240709 S Contactor110 3403914 S M Contactor95 3750463 S M Relay96 3750464 S M Socket900 3347378 S M Transformer220 3106703 S M Transformer
31
3.3.2006 Rev. 3.5Spare parts
32
3.3.2006 Rev. 3.5Spare parts
P=PRINCE, S=SUPERPRINCE, PM=FUTURA PM, PMS=FUTURA PMS, PMD=FUTURA PMD, PE=FUTURA PE,PES=FUTURA PES, PED=FUTURA PED500=500, 660=660, 20=20, 30=30, 60=60, 85=85, 110=110HE=HEIGHT ADJUSTMENTA=3/N/PE∼400/230V 50Hz, C=3/N/PE∼380/220V 50Hz, H=3/PE∼230V 50Hz, I=3/PE∼220V 60Hz, J=3/PE∼380 50Hz,L=3/PE∼415V 50Hz, M=3/PE∼440V 60Hz
ID Code Date from Date to Model Type Accessory Voltage DescriptionModule:General parts PM430 3492174 20030506 PM 60 Lid430 3750363 20030507 PM 60 Lid440 3492167 20030506 PM 85 Lid440 3750164 20030507 PM 85 Lid450 3492142 20030506 PM 110 Lid450 3750165 20030507 PM 110 Lid460 3462405 PM 60 Handle470 3462395 PM 85 Handle480 3447559 PM 110 Handle490 3491163 20030506 PM 60 Cover500 3491188 20030506 PM 85 Cover510 3447541 20030506 PM 110 Cover520 3445279 PM Spring, left530 3445286 PM 85,110 Spring, right540 3491117 20030506 PM Bearing540 3750149 20030507 PM Bearing550 3469023 PM 60 Rear case555 3750150 20030507 PM Bearing560 3469048 PM 85 Rear case570 3469055 PM 110 Rear case580 3469104 PM 60 Cover plate590 3469111 PM 85 Cover plate600 3469129 PM 110 Cover plate610 3490032 PM 60 Siding plate620 3490057 PM 85 Siding plate630 3490064 PM 110 Siding plate
33
3.3.2006 Rev. 3.5Spare parts
34

3.3.2006 Rev. 3.5Spare parts
P=PRINCE, S=SUPERPRINCE, PM=FUTURA PM, PMS=FUTURA PMS, PMD=FUTURA PMD, PE=FUTURA PE,PES=FUTURA PES, PED=FUTURA PED500=500, 660=660, 20=20, 30=30, 60=60, 85=85, 110=110HE=HEIGHT ADJUSTMENTA=3/N/PE∼400/230V 50Hz, C=3/N/PE∼380/220V 50Hz, H=3/PE∼230V 50Hz, I=3/PE∼220V 60Hz, J=3/PE∼380 50Hz,L=3/PE∼415V 50Hz, M=3/PE∼440V 60Hz
ID Code Date from Date to Model Type Accessory Voltage DescriptionModule:General parts PM640 3498514 PMS 60 Front panel, upper650 3498521 PMS 85 Front panel, upper655 3522245 PMD 85 Front panel, upper660 3498539 PMS 110 Front panel, upper665 3522252 PMD 110 Front panel, upper670 3492865 PM 60 Front panel, lower680 3492872 PM 85 Front panel, lower690 3492897 PM 110 Front panel, lower700 3149538 PM Adjustable leg710 3205278 PM Flange720 3468975 PM Siding plate730 3468982 PM 60 Rear siding plate740 3469009 PM 85 Rear siding plate750 3469016 PM 110 Rear siding plate
35
3.3.2006 Rev. 3.5Spare parts
760
270
790800
780
770
300
36
3.3.2006 Rev. 3.5Spare parts
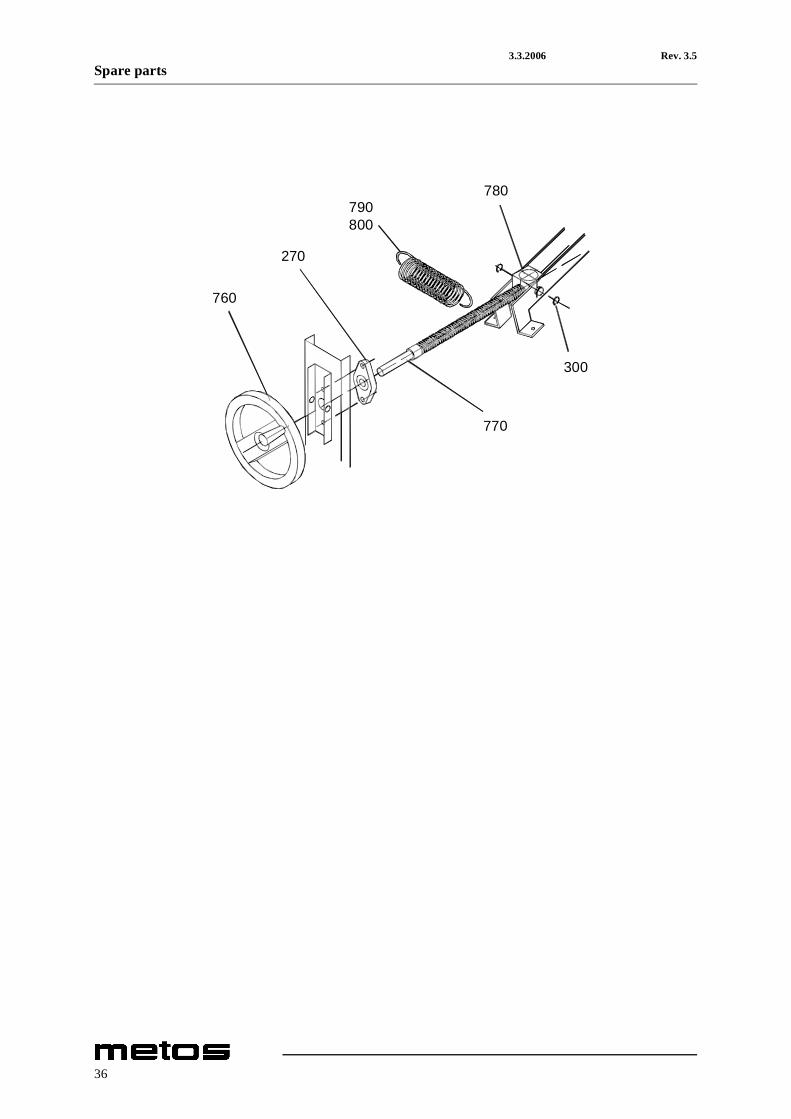
P=PRINCE, S=SUPERPRINCE, PM=FUTURA PM, PMS=FUTURA PMS, PMD=FUTURA PMD, PE=FUTURA PE,PES=FUTURA PES, PED=FUTURA PED500=500, 660=660, 20=20, 30=30, 60=60, 85=85, 110=110HE=HEIGHT ADJUSTMENTA=3/N/PE∼400/230V 50Hz, C=3/N/PE∼380/220V 50Hz, H=3/PE∼230V 50Hz, I=3/PE∼220V 60Hz, J=3/PE∼380 50Hz,L=3/PE∼415V 50Hz, M=3/PE∼440V 60Hz
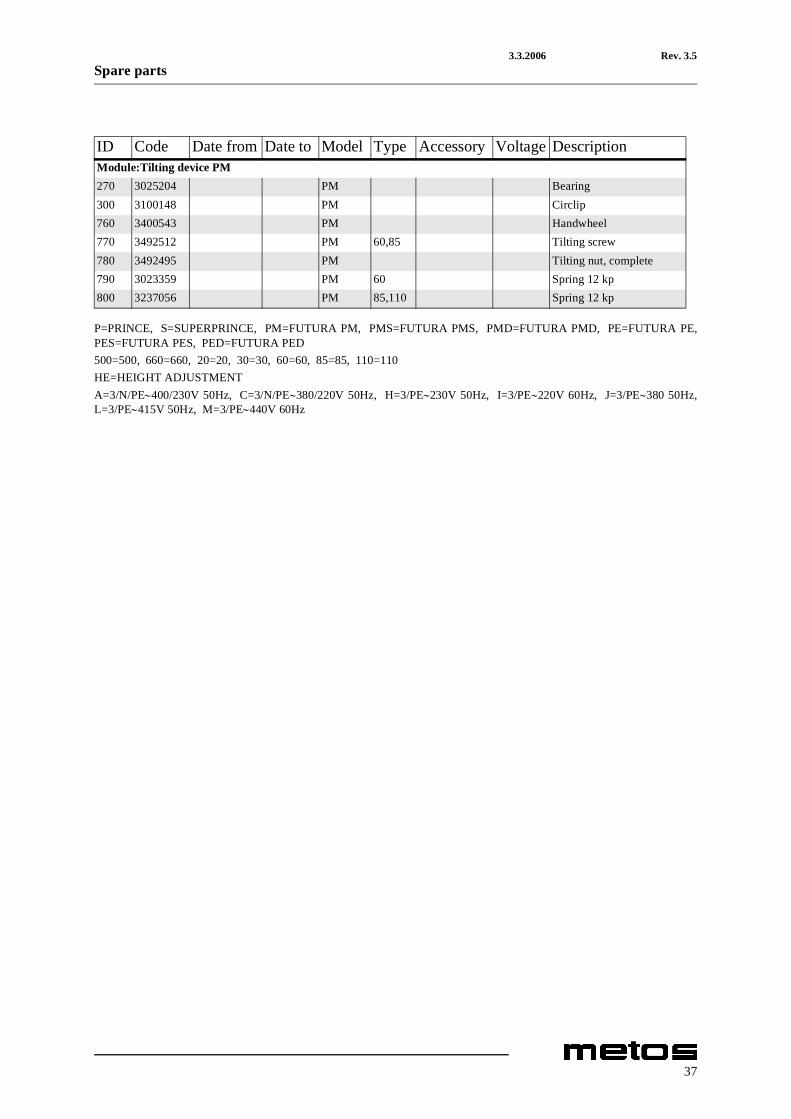
ID Code Date from Date to Model Type Accessory Voltage DescriptionModule:Tilting device PM270 3025204 PM Bearing300 3100148 PM Circlip760 3400543 PM Handwheel770 3492512 PM 60,85 Tilting screw780 3492495 PM Tilting nut, complete790 3023359 PM 60 Spring 12 kp800 3237056 PM 85,110 Spring 12 kp
37

3.3.2006 Rev. 3.5Spare parts
810820
850
880
410
870
8308090
890 130 860
38

3.3.2006 Rev. 3.5Spare parts
P=PRINCE, S=SUPERPRINCE, PM=FUTURA PM, PMS=FUTURA PMS, PMD=FUTURA PMD, PE=FUTURA PE,PES=FUTURA PES, PED=FUTURA PED500=500, 660=660, 20=20, 30=30, 60=60, 85=85, 110=110HE=HEIGHT ADJUSTMENTA=3/N/PE∼400/230V 50Hz, C=3/N/PE∼380/220V 50Hz, H=3/PE∼230V 50Hz, I=3/PE∼220V 60Hz, J=3/PE∼380 50Hz,L=3/PE∼415V 50Hz, M=3/PE∼440V 60Hz
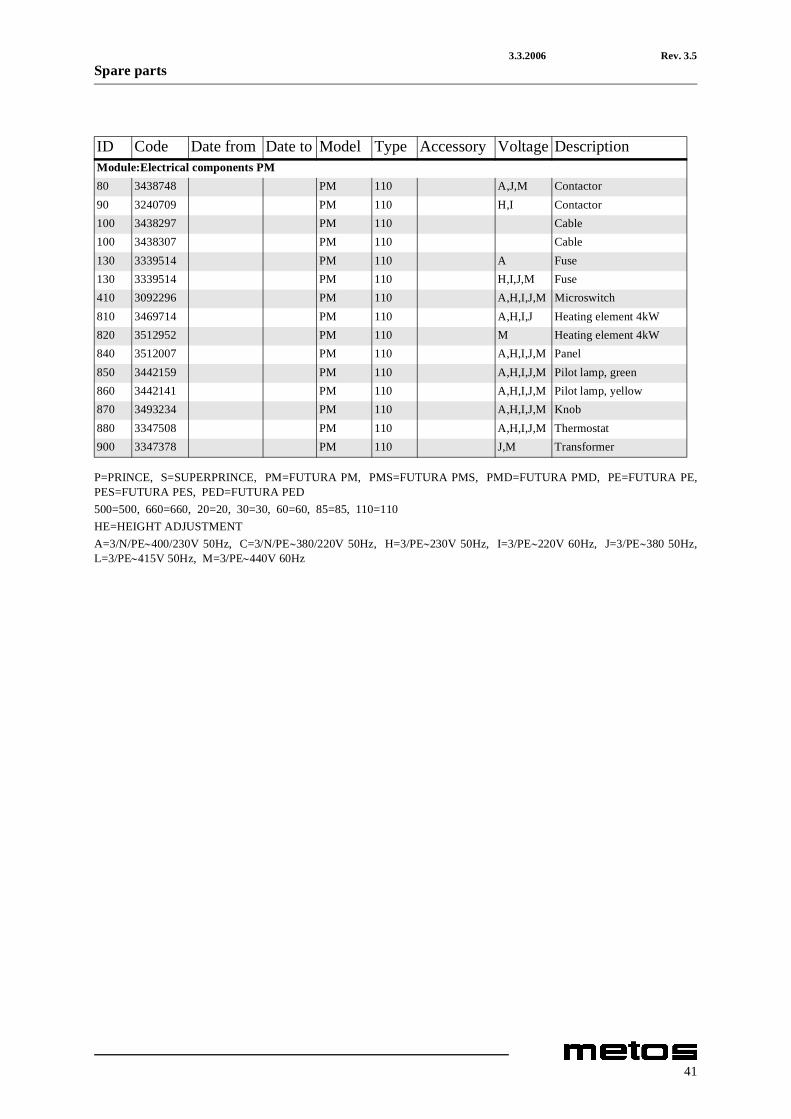
ID Code Date from Date to Model Type Accessory Voltage DescriptionModule:Electrical components PM80 3438748 PM 60 A,J,M Contactor80 3438748 PM 85 A,J,M Contactor90 3240709 PM 60 H,I Contactor90 3240709 PM 85 H,I Contactor100 3438297 PM 60,85 Cable100 3438307 PM 60,85 Cable130 3339514 PM 60,85 A Fuse130 3339514 PM 60,85 H,I,J,M Fuse410 3092296 PM 60,85 A,H,I,J,M Microswitch810 3469714 PM 60 A,H,I,J Heating element 4kW810 3469714 PM 85 A,H,I,J Heating element 4kW820 3512952 PM 60 M Heating element 4kW820 3512952 PM 85 M Heating element 4kW830 3512014 PM 60,85 A,H,I,J,M Panel850 3442159 PM 60,85 A,H,I,J,M Pilot lamp, green860 3442141 PM 60,85 A,H,I,J,M Pilot lamp, yellow870 3493234 PM 60,85 A,H,I,J,M Knob880 3347508 PM 60,85 A,H,I,J,M Thermostat890 3106693 PM 60 J,M Transformer900 3347378 PM 85 J,M Transformer
39

3.3.2006 Rev. 3.5Spare parts
810820
850
880
410
870
8408090 900 130 860
40
3.3.2006 Rev. 3.5Spare parts
P=PRINCE, S=SUPERPRINCE, PM=FUTURA PM, PMS=FUTURA PMS, PMD=FUTURA PMD, PE=FUTURA PE,PES=FUTURA PES, PED=FUTURA PED500=500, 660=660, 20=20, 30=30, 60=60, 85=85, 110=110HE=HEIGHT ADJUSTMENTA=3/N/PE∼400/230V 50Hz, C=3/N/PE∼380/220V 50Hz, H=3/PE∼230V 50Hz, I=3/PE∼220V 60Hz, J=3/PE∼380 50Hz,L=3/PE∼415V 50Hz, M=3/PE∼440V 60Hz
ID Code Date from Date to Model Type Accessory Voltage DescriptionModule:Electrical components PM80 3438748 PM 110 A,J,M Contactor90 3240709 PM 110 H,I Contactor100 3438297 PM 110 Cable100 3438307 PM 110 Cable130 3339514 PM 110 A Fuse130 3339514 PM 110 H,I,J,M Fuse410 3092296 PM 110 A,H,I,J,M Microswitch810 3469714 PM 110 A,H,I,J Heating element 4kW820 3512952 PM 110 M Heating element 4kW840 3512007 PM 110 A,H,I,J,M Panel850 3442159 PM 110 A,H,I,J,M Pilot lamp, green860 3442141 PM 110 A,H,I,J,M Pilot lamp, yellow870 3493234 PM 110 A,H,I,J,M Knob880 3347508 PM 110 A,H,I,J,M Thermostat900 3347378 PM 110 J,M Transformer
41

3.3.2006 Rev. 3.5Spare parts
520540
490500510
430440450
530540
460470480 910
920925930935
940950960
550, 560, 570,580, 590, 600
610, 620, 630
730, 740, 750
720
700, 710
42

3.3.2006 Rev. 3.5Spare parts
P=PRINCE, S=SUPERPRINCE, PM=FUTURA PM, PMS=FUTURA PMS, PMD=FUTURA PMD, PE=FUTURA PE,PES=FUTURA PES, PED=FUTURA PED500=500, 660=660, 20=20, 30=30, 60=60, 85=85, 110=110HE=HEIGHT ADJUSTMENTA=3/N/PE∼400/230V 50Hz, C=3/N/PE∼380/220V 50Hz, H=3/PE∼230V 50Hz, I=3/PE∼220V 60Hz, J=3/PE∼380 50Hz,L=3/PE∼415V 50Hz, M=3/PE∼440V 60Hz
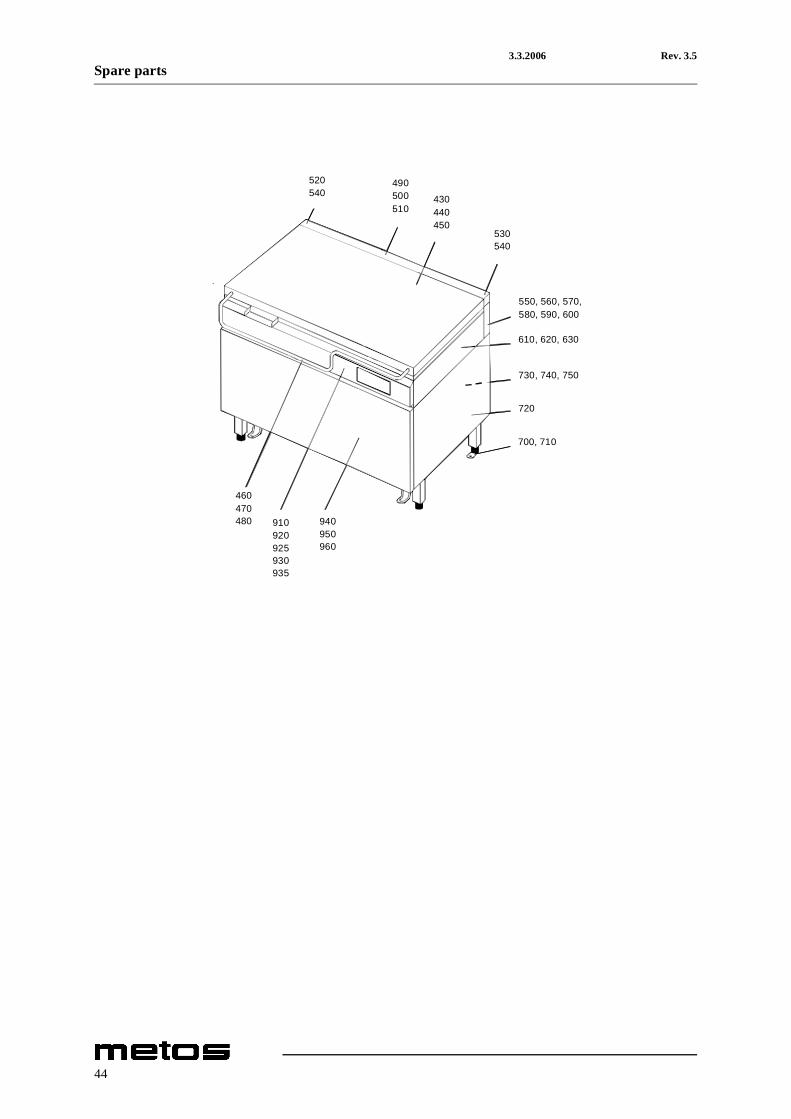
ID Code Date from Date to Model Type Accessory Voltage DescriptionModule:General parts PE430 3492174 PE 60 Lid440 3492167 PE 85 Lid450 3492142 PE 110 Lid460 3462405 PE 60 Handle470 3462395 PE 85 Handle480 3447559 PE 110 Handle490 3491163 PE 60 Cover500 3491188 PE 85 Cover510 3447541 PE 110 Cover520 3445279 PE Spring, left530 3445286 PE 85,110 Spring, right540 3491117 PE Bearing550 3469023 PE 60 Rear case560 3469048 PE 85 Rear case570 3469055 PE 110 Rear case580 3469104 PE 60 Cover plate590 3469111 PE 85 Cover plate600 3469129 PE 110 Cover plate610 3490032 PE 60 Siding plate620 3490057 PE 85 Siding plate630 3490064 PE 110 Siding plate
43
3.3.2006 Rev. 3.5Spare parts
520540
490500510
430440450
530540
460470480 910
920925930935
940950960
550, 560, 570,580, 590, 600
610, 620, 630
730, 740, 750
720
700, 710
44
3.3.2006 Rev. 3.5Spare parts
P=PRINCE, S=SUPERPRINCE, PM=FUTURA PM, PMS=FUTURA PMS, PMD=FUTURA PMD, PE=FUTURA PE,PES=FUTURA PES, PED=FUTURA PED500=500, 660=660, 20=20, 30=30, 60=60, 85=85, 110=110HE=HEIGHT ADJUSTMENTA=3/N/PE∼400/230V 50Hz, C=3/N/PE∼380/220V 50Hz, H=3/PE∼230V 50Hz, I=3/PE∼220V 60Hz, J=3/PE∼380 50Hz,L=3/PE∼415V 50Hz, M=3/PE∼440V 60Hz
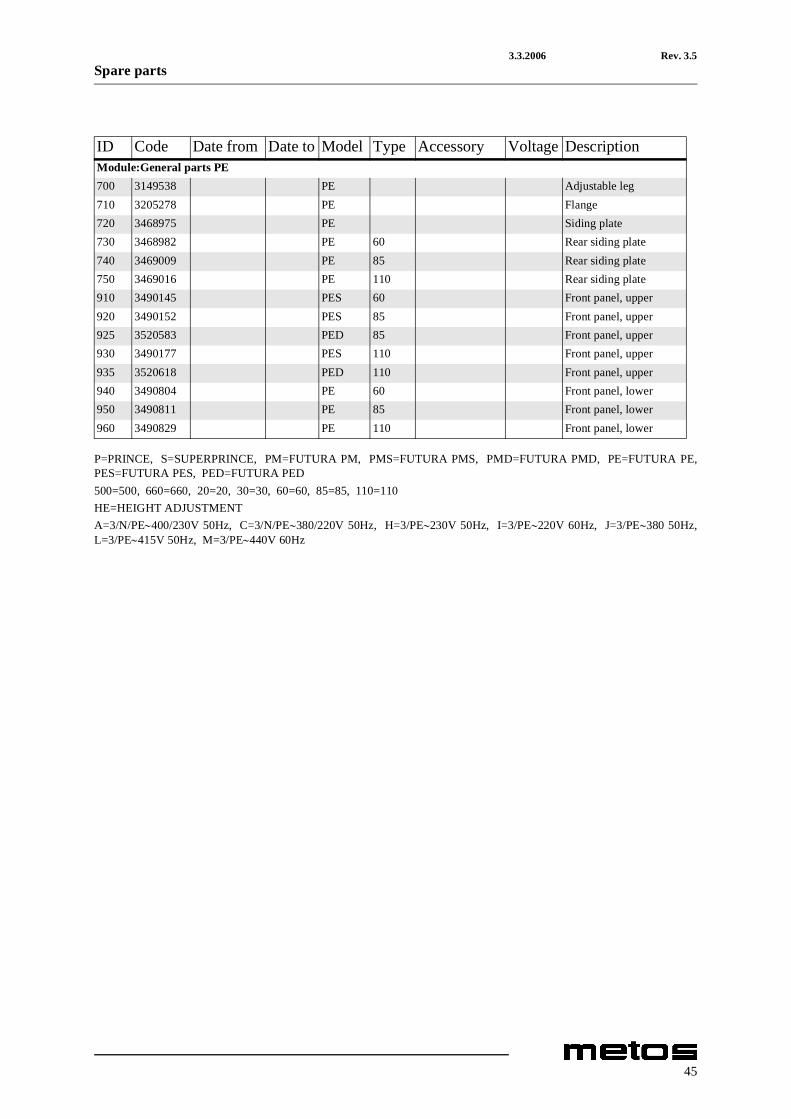
ID Code Date from Date to Model Type Accessory Voltage DescriptionModule:General parts PE700 3149538 PE Adjustable leg710 3205278 PE Flange720 3468975 PE Siding plate730 3468982 PE 60 Rear siding plate740 3469009 PE 85 Rear siding plate750 3469016 PE 110 Rear siding plate910 3490145 PES 60 Front panel, upper920 3490152 PES 85 Front panel, upper925 3520583 PED 85 Front panel, upper930 3490177 PES 110 Front panel, upper935 3520618 PED 110 Front panel, upper940 3490804 PE 60 Front panel, lower950 3490811 PE 85 Front panel, lower960 3490829 PE 110 Front panel, lower
45

3.3.2006 Rev. 3.5Spare parts
1000
990
1010
970
970
980
990
46
3.3.2006 Rev. 3.5Spare parts
P=PRINCE, S=SUPERPRINCE, PM=FUTURA PM, PMS=FUTURA PMS, PMD=FUTURA PMD, PE=FUTURA PE,PES=FUTURA PES, PED=FUTURA PED500=500, 660=660, 20=20, 30=30, 60=60, 85=85, 110=110HE=HEIGHT ADJUSTMENTA=3/N/PE∼400/230V 50Hz, C=3/N/PE∼380/220V 50Hz, H=3/PE∼230V 50Hz, I=3/PE∼220V 60Hz, J=3/PE∼380 50Hz,L=3/PE∼415V 50Hz, M=3/PE∼440V 60Hz
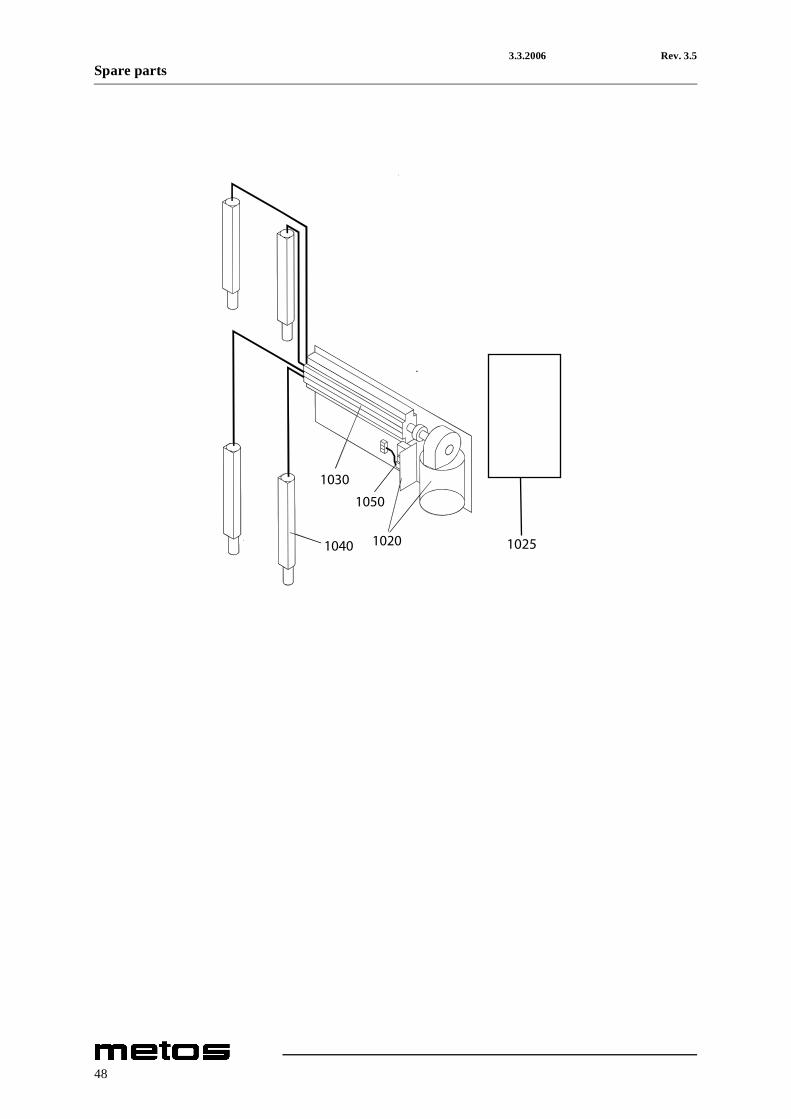
ID Code Date from Date to Model Type Accessory Voltage DescriptionModule:Tilting device PE970 3490674 PE Motor980 3490307 PE Pin990 3356848 PE Cotter pin1000 3492551 PE Joint1010 3490392 PE Switch unit
47
3.3.2006 Rev. 3.5Spare parts
48
3.3.2006 Rev. 3.5Spare parts
P=PRINCE, S=SUPERPRINCE, PM=FUTURA PM, PMS=FUTURA PMS, PMD=FUTURA PMD, PE=FUTURA PE,PES=FUTURA PES, PED=FUTURA PED500=500, 660=660, 20=20, 30=30, 60=60, 85=85, 110=110HE=HEIGHT ADJUSTMENTA=3/N/PE∼400/230V 50Hz, C=3/N/PE∼380/220V 50Hz, H=3/PE∼230V 50Hz, I=3/PE∼220V 60Hz, J=3/PE∼380 50Hz,L=3/PE∼415V 50Hz, M=3/PE∼440V 60Hz
ID Code Date from Date to Model Type Accessory Voltage DescriptionModule:Height adjustment device PE1020 3490635 20051003 PE 85,110 HE Motor unit1020 3751330 20051004 PE 85,110 HE Motor unit1025 3751331 20051004 PE 85,110 HE Motor drive1030 3490628 PE 85,110 HE Pump unit1040 3490603 PE 85,110 HE Cylinder1050 3490642 PE 85,110 HE 3-pole connector
49

3.3.2006 Rev. 3.5Spare parts
1070
10808090
1170
1190
1200
900
116010601180
1090
1100
1210810
1230
11101130
410
1220
50

3.3.2006 Rev. 3.5Spare parts
P=PRINCE, S=SUPERPRINCE, PM=FUTURA PM, PMS=FUTURA PMS, PMD=FUTURA PMD, PE=FUTURA PE,PES=FUTURA PES, PED=FUTURA PED500=500, 660=660, 20=20, 30=30, 60=60, 85=85, 110=110HE=HEIGHT ADJUSTMENTA=3/N/PE∼400/230V 50Hz, C=3/N/PE∼380/220V 50Hz, H=3/PE∼230V 50Hz, I=3/PE∼220V 60Hz, J=3/PE∼380 50Hz,L=3/PE∼415V 50Hz, M=3/PE∼440V 60Hz
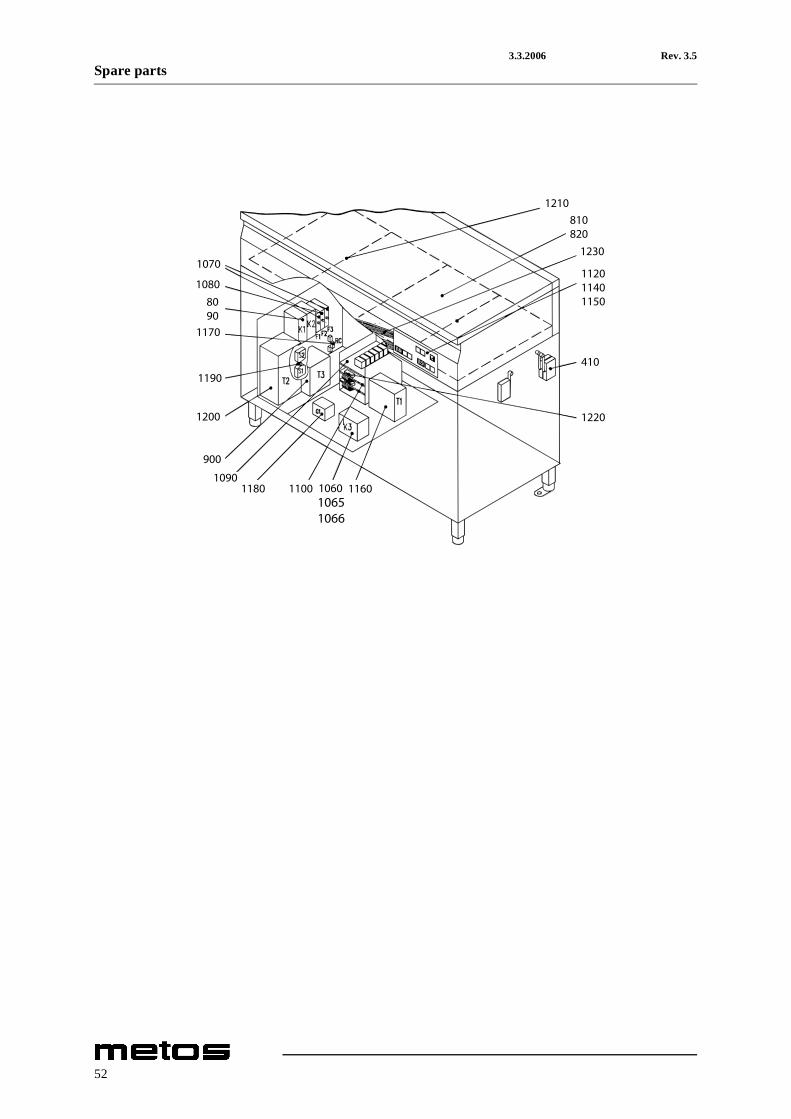
ID Code Date from Date to Model Type Accessory Voltage DescriptionModule:Electrical components PE80 3438748 PE 60 A,J,M Contactor90 3240709 PE 60 H,I Contactor100 3438297 PE 60 Cable100 3438307 PE 60 Cable410 3092296 PE 60 A,H,I,J,M Microswitch810 3469714 PE 60 A,H,I,J,M Heating element 4 kW900 3347378 PE 60 J,M Transformer1060 3439727 20041108 PE 60 A,H,I,J,M Relay1065 3750636 20041109 PE 60 A,H,I,J,M Relay card1066 3750727 20041109 PE 60 A,H,I,J,M Relay card socket1070 3512046 PE 60 A Fuse1070 3512046 PE 60 H,I,J,M Fuse1080 3512053 PE 60 A,H,I,J,M Fuse1090 3438089 PE 60 A,H,I,J,M Circuit board1100 3438071 PE 60 A,H,I,J,M Circuit board1110 3438113 PE 60 A,H,I,J,M Circuit board1130 3448979 PE 60 A,H,I,J,M Panel1160 3438184 PE 60 A,H,I,J,M Transformer1170 3339786 PE 60 A,H,I,J,M RC protector1180 3434334 PE 60 A,H,I,J,M Rectifier bridge1190 3145389 PE 60 A,H,I,J,M Limit switch1200 3439692 PE 60 A,H,I,J,M Transformer1210 3439357 PE 60 A,H,I,J,M Sensor, complete1220 3439928 PE 60 A,H,I,J,M Flat cable 0,3m 16 poles1230 3439935 PE 60 A,H,I,J,M Flat cable 2,3m 20 poles
51
3.3.2006 Rev. 3.5Spare parts
52
3.3.2006 Rev. 3.5Spare parts
P=PRINCE, S=SUPERPRINCE, PM=FUTURA PM, PMS=FUTURA PMS, PMD=FUTURA PMD, PE=FUTURA PE,PES=FUTURA PES, PED=FUTURA PED500=500, 660=660, 20=20, 30=30, 60=60, 85=85, 110=110HE=HEIGHT ADJUSTMENTA=3/N/PE∼400/230V 50Hz, C=3/N/PE∼380/220V 50Hz, H=3/PE∼230V 50Hz, I=3/PE∼220V 60Hz, J=3/PE∼380 50Hz,L=3/PE∼415V 50Hz, M=3/PE∼440V 60Hz
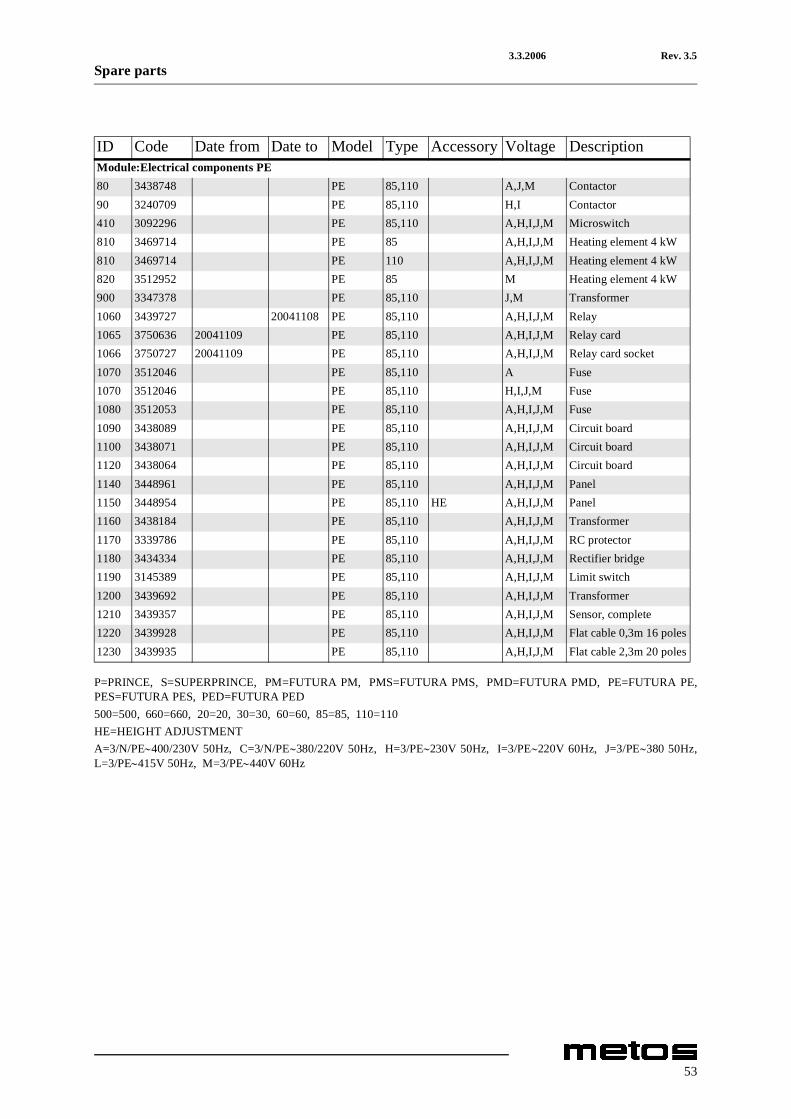
ID Code Date from Date to Model Type Accessory Voltage DescriptionModule:Electrical components PE80 3438748 PE 85,110 A,J,M Contactor90 3240709 PE 85,110 H,I Contactor410 3092296 PE 85,110 A,H,I,J,M Microswitch810 3469714 PE 85 A,H,I,J,M Heating element 4 kW810 3469714 PE 110 A,H,I,J,M Heating element 4 kW820 3512952 PE 85 M Heating element 4 kW900 3347378 PE 85,110 J,M Transformer1060 3439727 20041108 PE 85,110 A,H,I,J,M Relay1065 3750636 20041109 PE 85,110 A,H,I,J,M Relay card1066 3750727 20041109 PE 85,110 A,H,I,J,M Relay card socket1070 3512046 PE 85,110 A Fuse1070 3512046 PE 85,110 H,I,J,M Fuse1080 3512053 PE 85,110 A,H,I,J,M Fuse1090 3438089 PE 85,110 A,H,I,J,M Circuit board1100 3438071 PE 85,110 A,H,I,J,M Circuit board1120 3438064 PE 85,110 A,H,I,J,M Circuit board1140 3448961 PE 85,110 A,H,I,J,M Panel1150 3448954 PE 85,110 HE A,H,I,J,M Panel1160 3438184 PE 85,110 A,H,I,J,M Transformer1170 3339786 PE 85,110 A,H,I,J,M RC protector1180 3434334 PE 85,110 A,H,I,J,M Rectifier bridge1190 3145389 PE 85,110 A,H,I,J,M Limit switch1200 3439692 PE 85,110 A,H,I,J,M Transformer1210 3439357 PE 85,110 A,H,I,J,M Sensor, complete1220 3439928 PE 85,110 A,H,I,J,M Flat cable 0,3m 16 poles1230 3439935 PE 85,110 A,H,I,J,M Flat cable 2,3m 20 poles
53

3.3.2006 Rev. 3.5Spare parts
54

3.3.2006 Rev. 3.5Technical specifications
9. Technical specifications
Connection diagram 76803-83 [P] ......
Main and control circuit S00108 A3 [S]
Wiring diagram T00107A3[S Valid to 02.12.2004]
Wiring diagram T00107A3[S Valid from 03.12.2004 to 03.10.2005] ....................................
Wiring diagram T00107C3[S Valid from 04.10.2005]
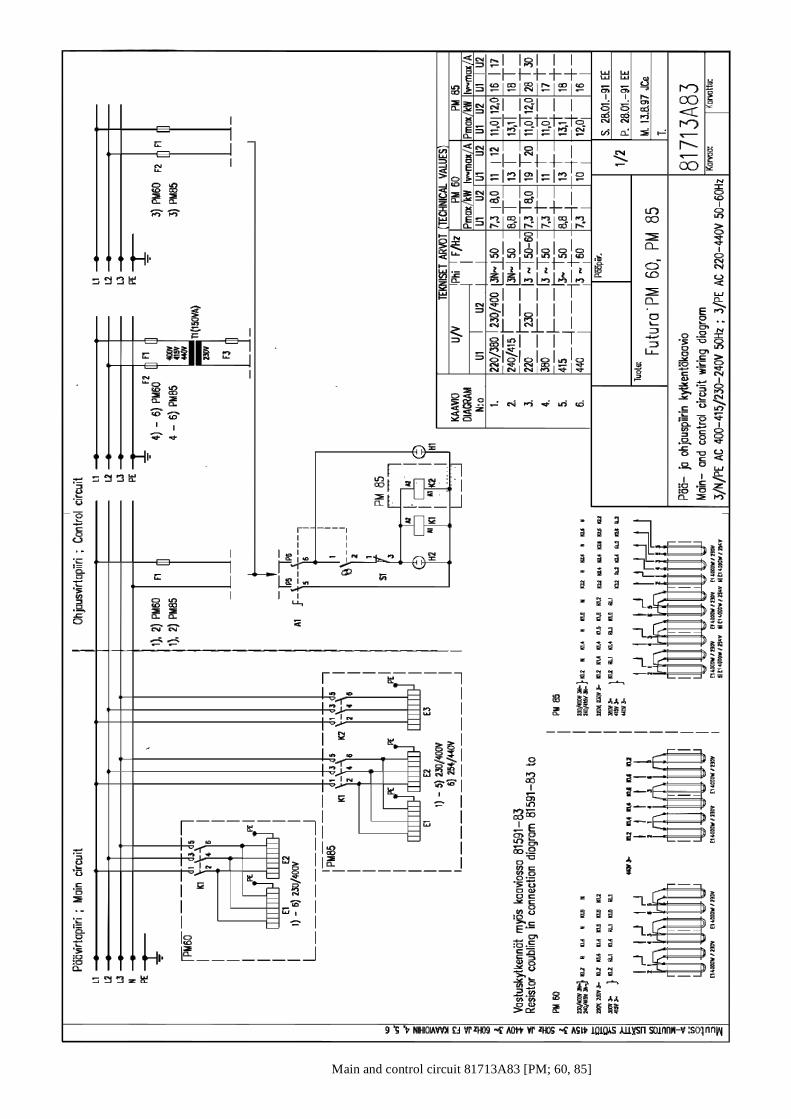
Main and control circuit 81713A83 [PM; 60, 85]
Connection diagram 81712-83 [PM; 110]
Heating control, circuit board connections [PE; 60]
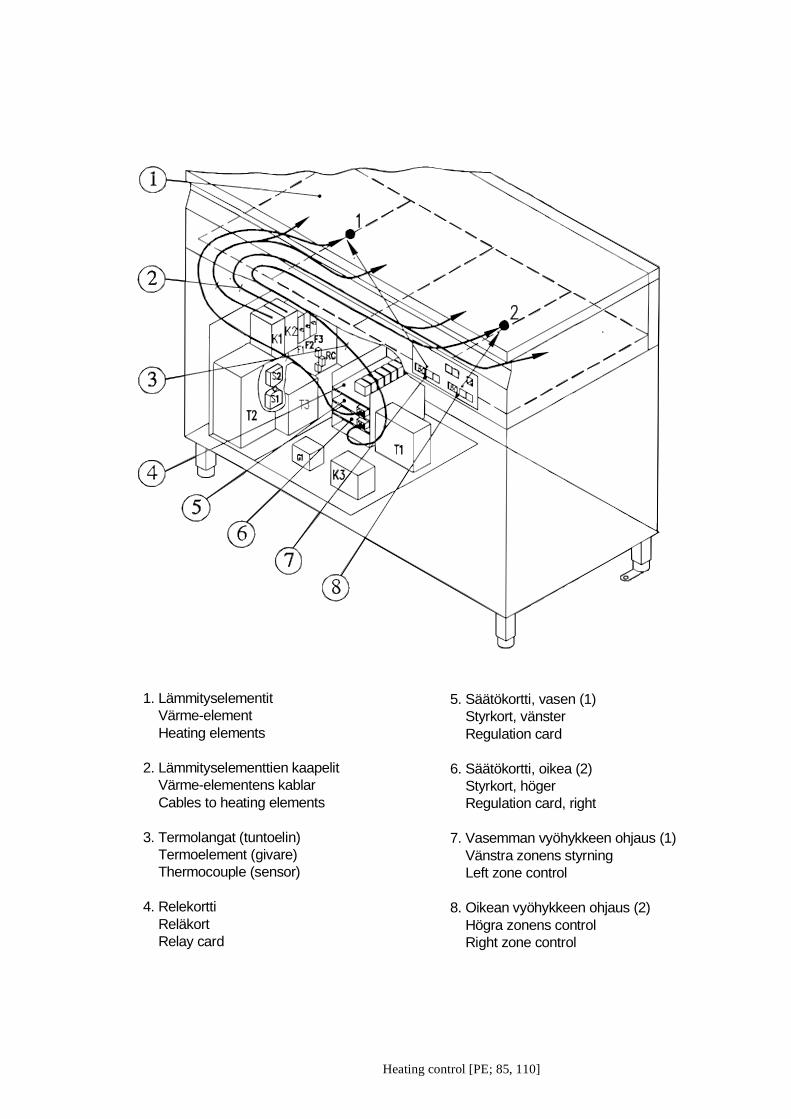
Heating control [PE; 85, 110] ..............
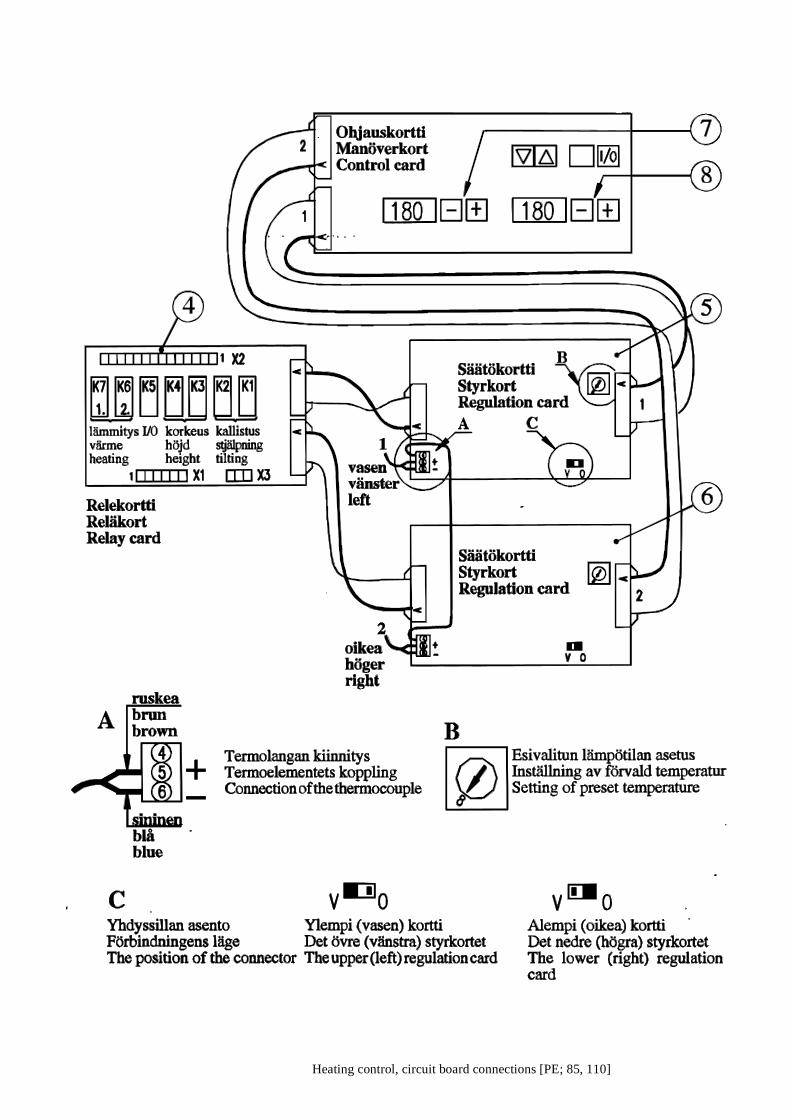
Heating control, circuit board connections [PE; 85, 110]
Wiring diagram 81589A83 [PE; 60 Valid to 08.11.2004]
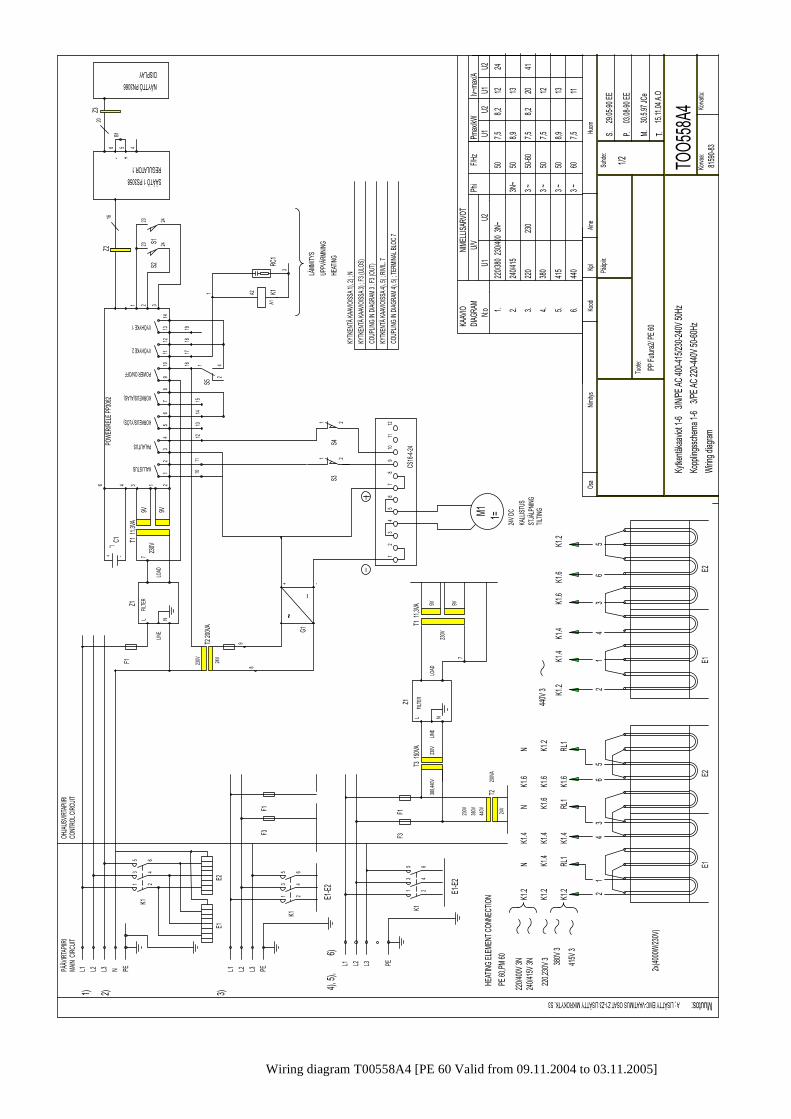
Wiring diagram T00558A4 [PE 60 Valid from 09.11.2004 to 03.11.2005] ...................................
Wiring diagram T00558B4 [PE 60, Valid from 04.11.2005]
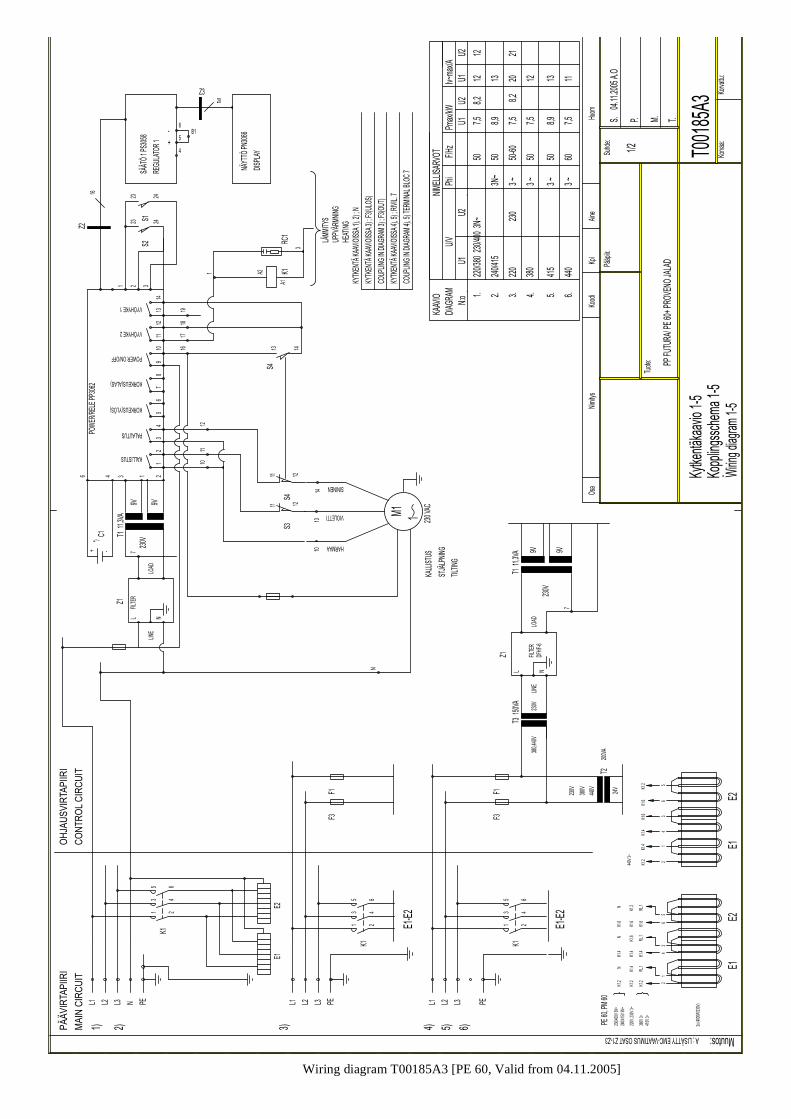
Wiring diagram T00185A3 [PE 60, Valid from 04.11.2005]
Wiring diagram 81590A83 [PE; 85, 110 Valid to 08.11.2004]
55

3.3.2006 Rev. 3.5Technical specifications
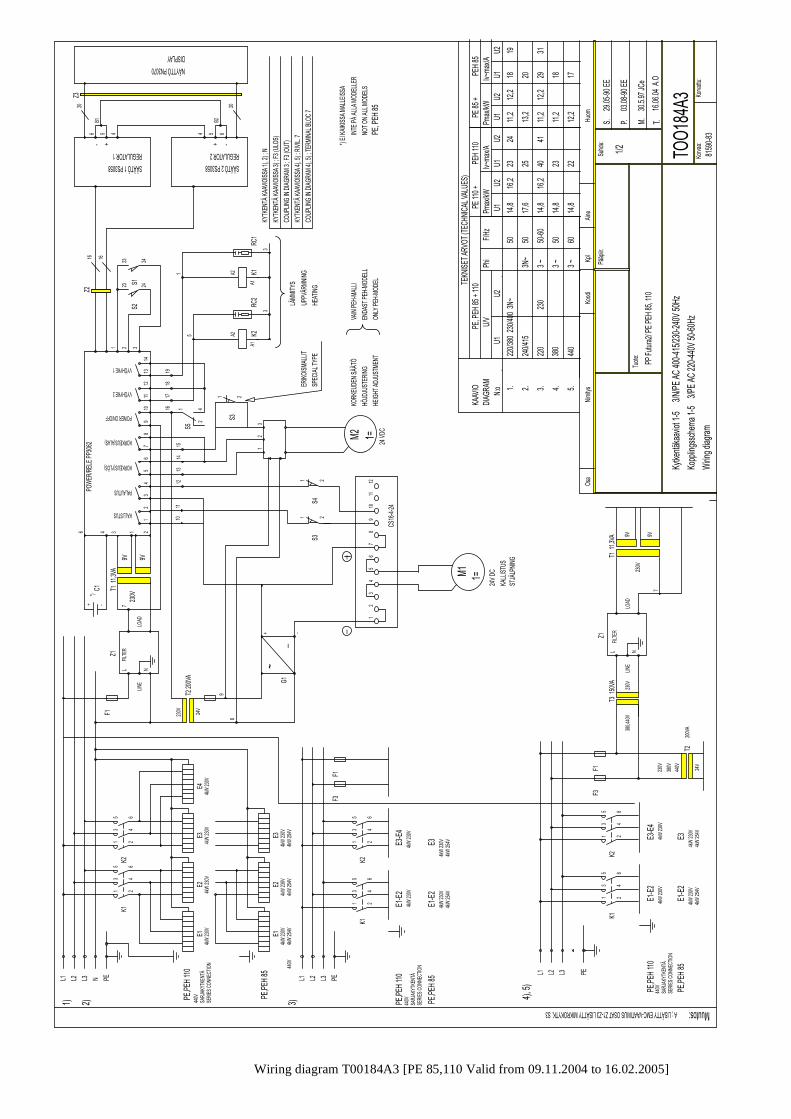
Wiring diagram T00184A3 [PE 85,110 Valid from 09.11.2004 to 16.02.2005] .............
Wiring diagram T00184B3 (PE 85,110 Valid from 17.02.2005 to 20.10.2005 ) ............
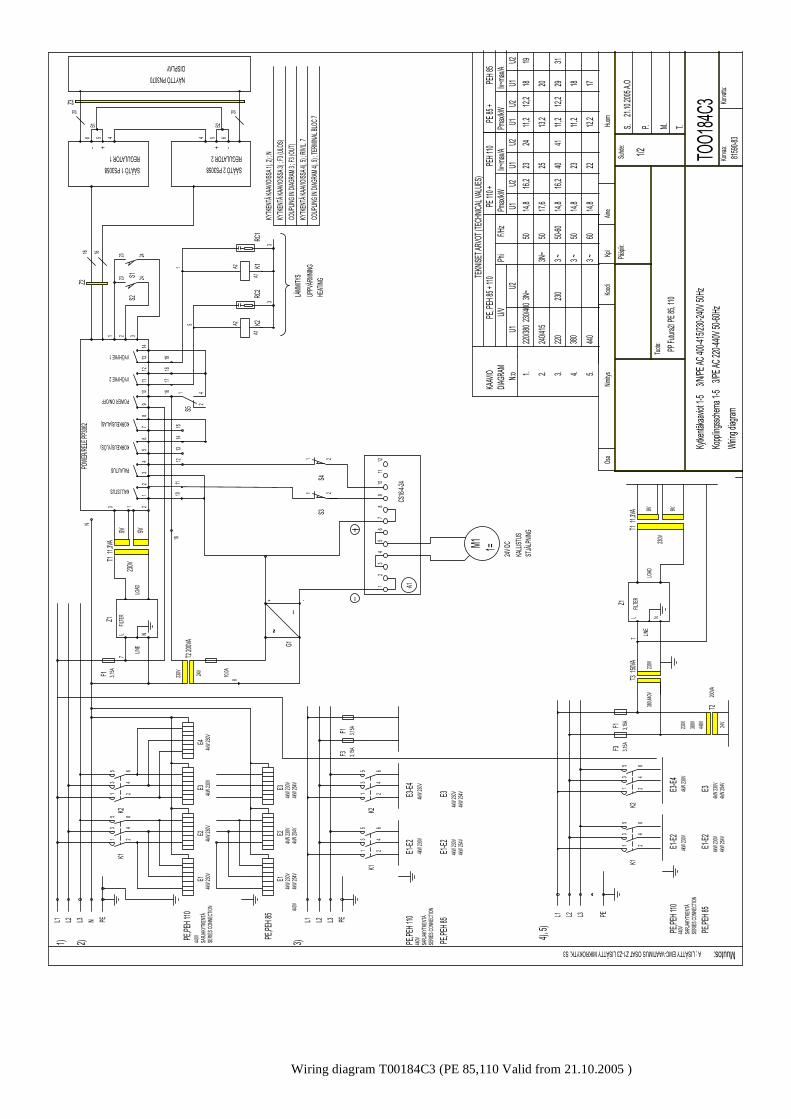
Wiring diagram T00184C3 (PE 85,110 Valid from 21.10.2005 ) ...................................
Wiring diagram T00942A3 (PE 85,110 Valid from 21.10.2005 ) ...................................
Main and control circuit 82947N83 [PE; 85, 110]
Heating element connection 81591-83 [PM, PE]
Installation drawing 76708-62B [P] ....
Installation drawing L00008A3 [S].....
Installation drawing 81852-63B [PM]
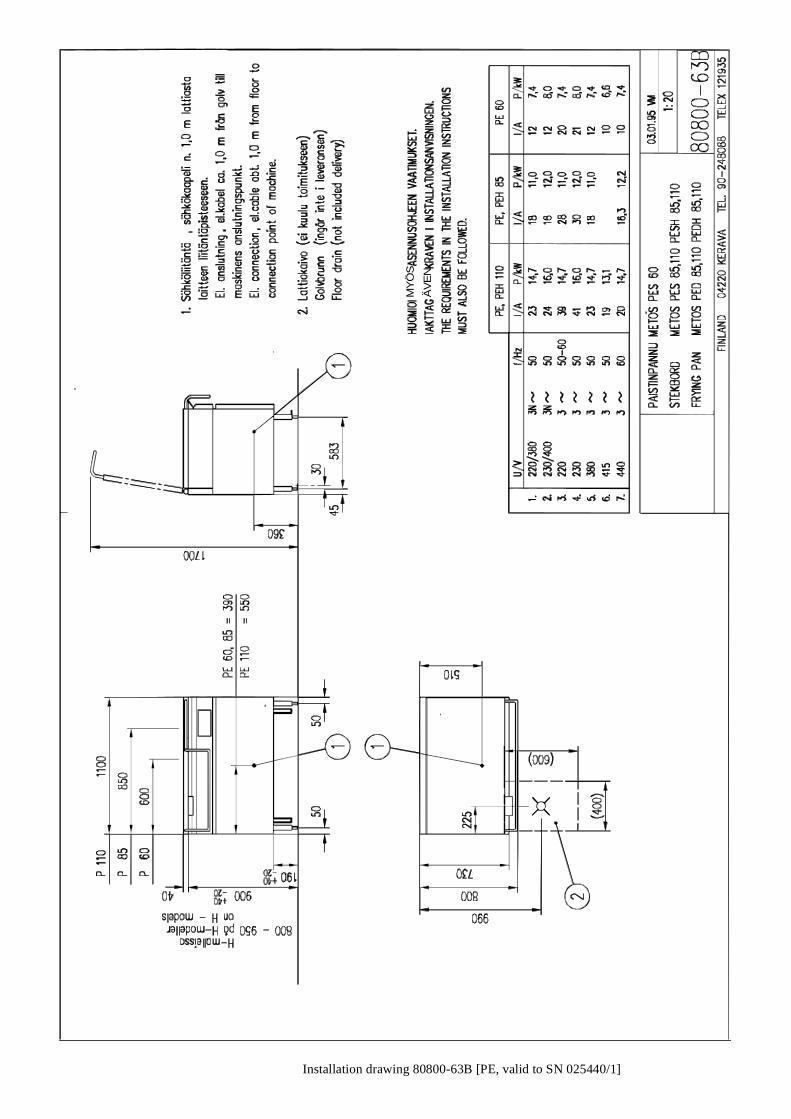
Installation drawing 80800-63B [PE, valid to SN 025440/1]
Installation drawing 80800-63C [PE, valid from SN 025440/1] ....................................................
56
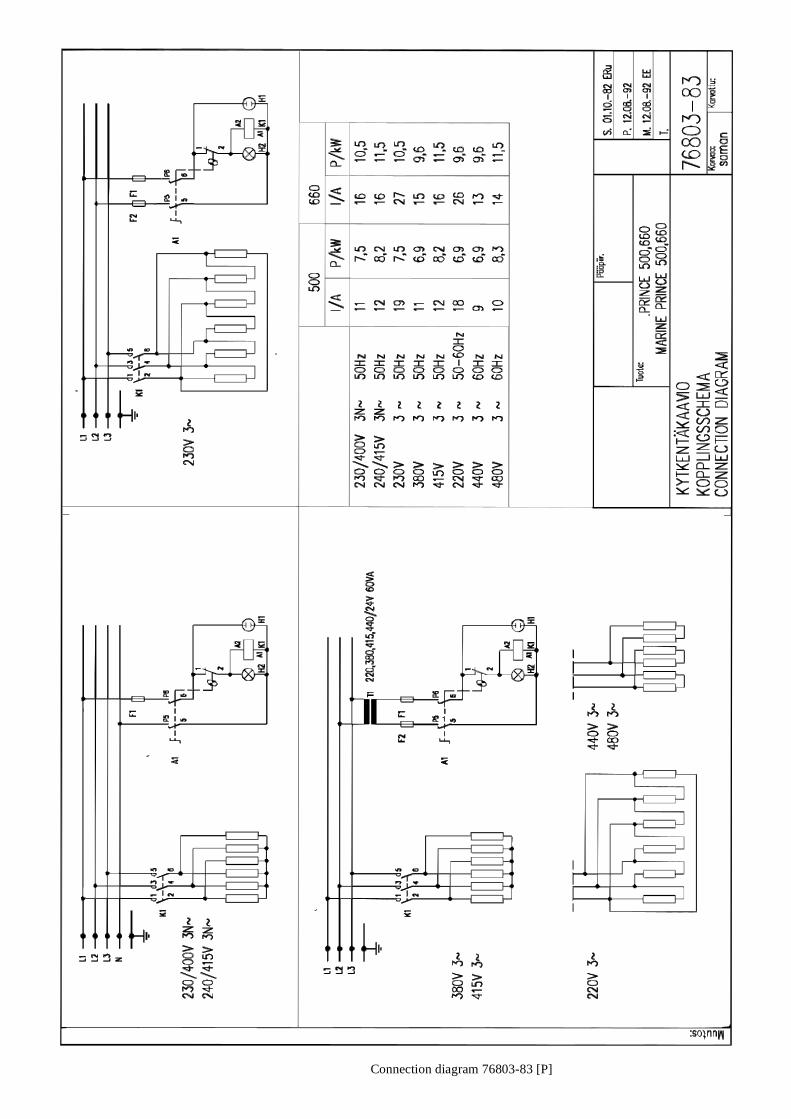
Connection diagram 76803-83 [P]
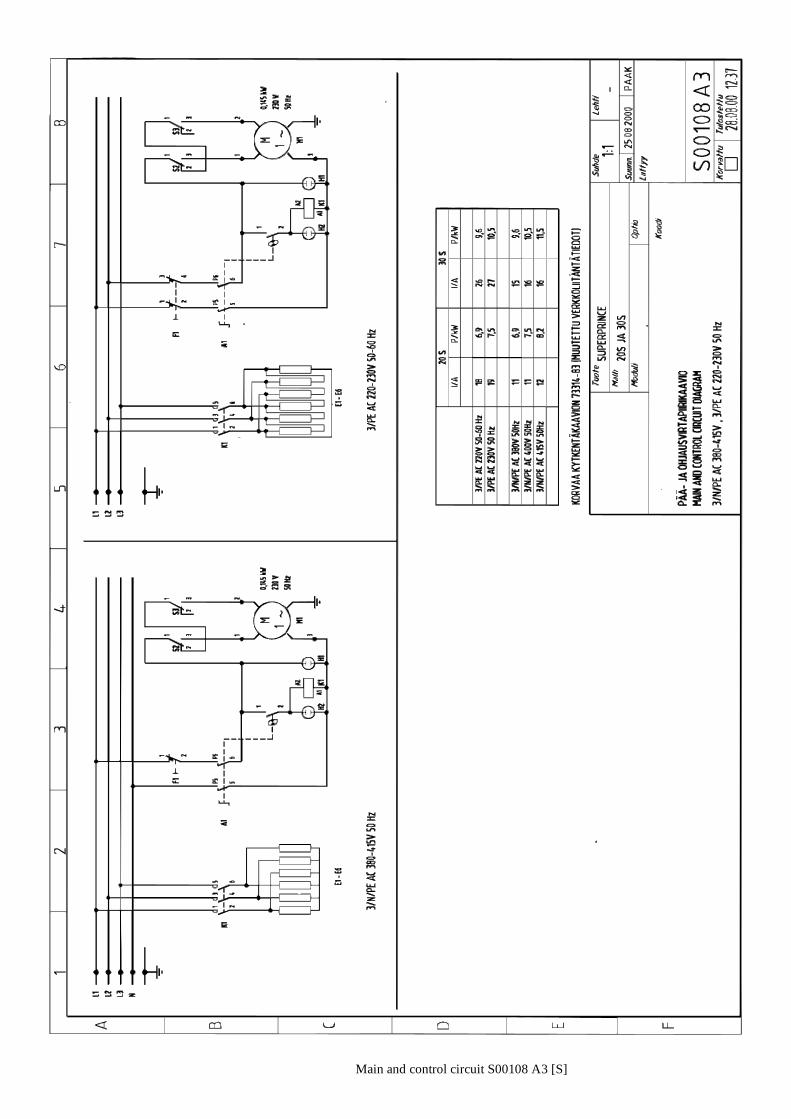
Main and control circuit S00108 A3 [S]
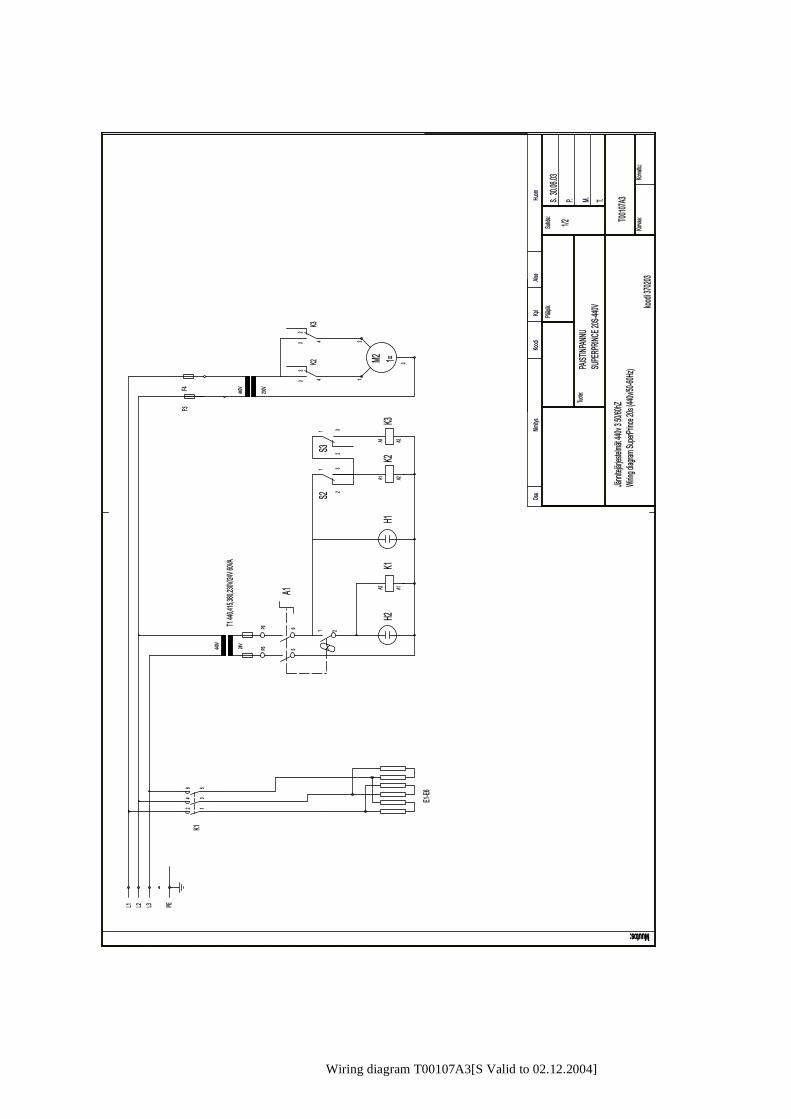
Wiring diagram T00107A3[S Valid to 02.12.2004]

Wiring diagram T00107A3[S Valid from 03.12.2004 to 03.10.2005]

Wiring diagram T00107C3[S Valid from 04.10.2005]
Main and control circuit 81713A83 [PM; 60, 85]

Connection diagram 81712-83 [PM; 110]
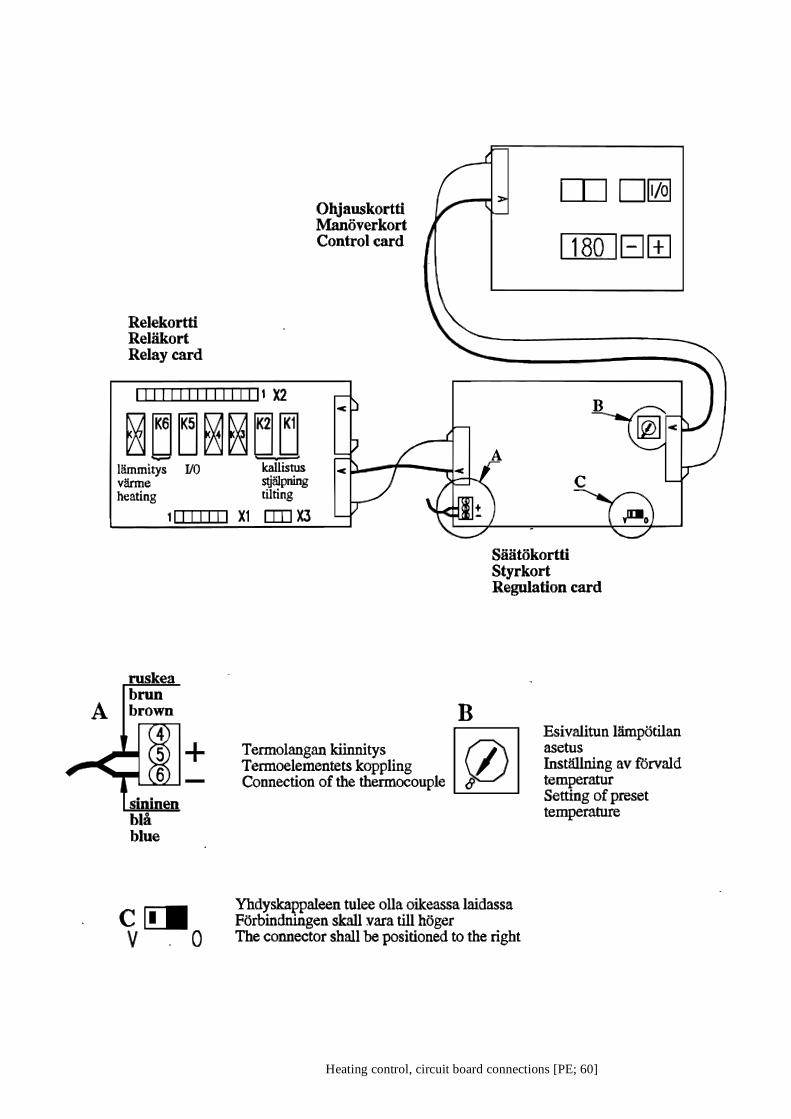
Heating control, circuit board connections [PE; 60]
Heating control [PE; 85, 110]
1. Lämmityselementit Värme-element Heating elements
2. Lämmityselementtien kaapelit Värme-elementens kablar Cables to heating elements
3. Termolangat (tuntoelin) Termoelement (givare) Thermocouple (sensor)
4. Relekortti Reläkort Relay card
5. Säätökortti, vasen (1) Styrkort, vänster Regulation card
6. Säätökortti, oikea (2) Styrkort, höger Regulation card, right
7. Vasemman vyöhykkeen ohjaus (1) Vänstra zonens styrning Left zone control
8. Oikean vyöhykkeen ohjaus (2) Högra zonens control Right zone control
Heating control, circuit board connections [PE; 85, 110]

Wiring diagram 81589A83 [PE; 60 Valid to 08.11.2004]
Wiring diagram T00558A4 [PE 60 Valid from 09.11.2004 to 03.11.2005]

Wiring diagram T00558B4 [PE 60, Valid from 04.11.2005]
Wiring diagram T00185A3 [PE 60, Valid from 04.11.2005]

Wiring diagram 81590A83 [PE; 85, 110 Valid to 08.11.2004]
Wiring diagram T00184A3 [PE 85,110 Valid from 09.11.2004 to 16.02.2005]

Wiring diagram T00184B3 (PE 85,110 Valid from 17.02.2005 to 20.10.2005 )
Wiring diagram T00184C3 (PE 85,110 Valid from 21.10.2005 )

Wiring diagram T00942A3 (PE 85,110 Valid from 21.10.2005 )

Main and control circuit 82947N83 [PE; 85, 110]

Heating element connection 81591-83 [PM, PE]

Installation drawing 76708-62B [P]
1. Sähköliitäntä 7,5 kW / 10,5 kW 400V 3N~50Hz.2. Lattiakaivo min. 160/70 mm ei kuulu toimitukseen.3. Kiinnitysruuvin reikä Ø 14 mm. Kiinnitysruuvien pituus ja tyyppi valittava lattiarakenteen mukaan riittävän kiinnityslujuuden saavuttamiseksi.
1. El.anslutning 7,5 kW / 10,5 kW 400V 3N~50Hz.2. Rostfritt golvbrunn min. 160/70 mm ingår inte i leveransen.3. Hål för skruv Ø 14 mm. Fästskruvarnas längd och typ bör väljas enligt golvkonstruktion för att uppnå tillräcklig hållfasthet.
1. El. connection 7,5 kW / 10,5 kW 400V 3N~50Hz.2. Floor drain min. 160/70 mm not included.3. Hole for fixing screw, dia 14 mm. Length and type of screws to be chosen according to floor construction to ensure sufficient durability.
830 / 990
610 / 770

Installation drawing L00008A3 [S]

Installation drawing 81852-63B [PM]
MY
ÖS
ÄV
EN
Installation drawing 80800-63B [PE, valid to SN 025440/1]
MY
ÖS
ÄV
EN
Installation drawing 80800-63C [PE, valid from SN 025440/1]
3.3.2006 Rev. 3.5Technical specifications
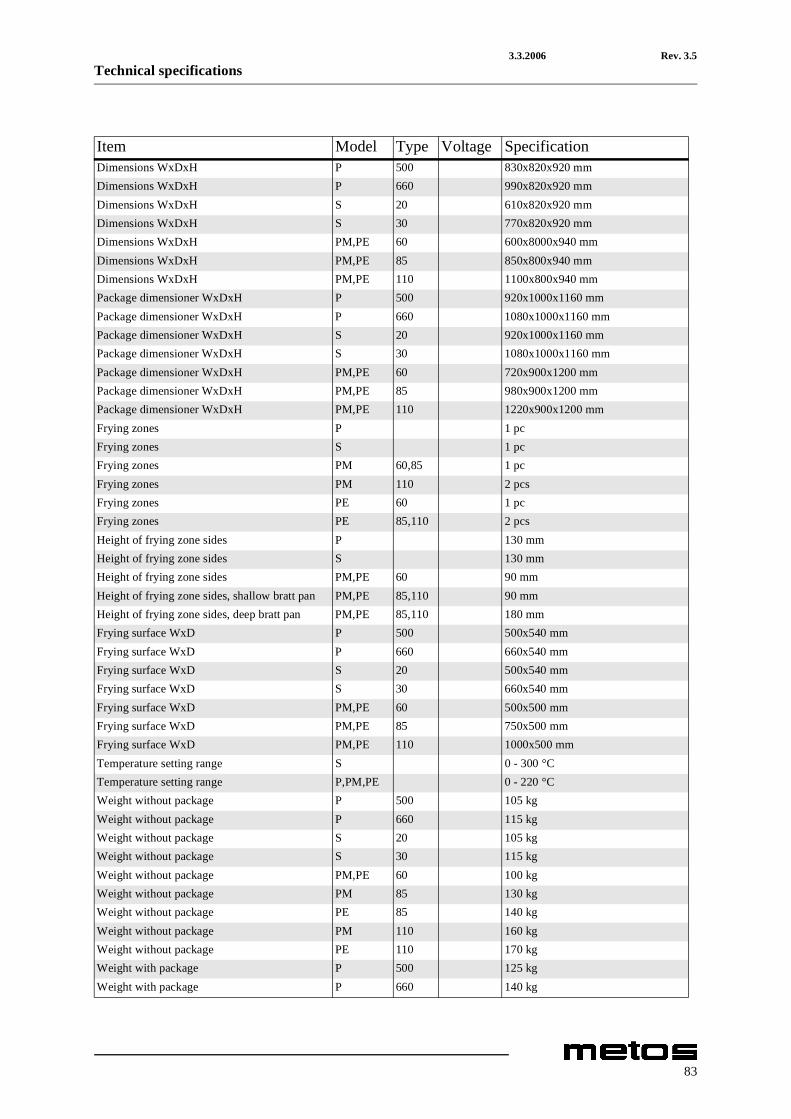
Item Model Type Voltage SpecificationDimensions WxDxH P 500 830x820x920 mmDimensions WxDxH P 660 990x820x920 mmDimensions WxDxH S 20 610x820x920 mmDimensions WxDxH S 30 770x820x920 mmDimensions WxDxH PM,PE 60 600x8000x940 mmDimensions WxDxH PM,PE 85 850x800x940 mmDimensions WxDxH PM,PE 110 1100x800x940 mmPackage dimensioner WxDxH P 500 920x1000x1160 mmPackage dimensioner WxDxH P 660 1080x1000x1160 mmPackage dimensioner WxDxH S 20 920x1000x1160 mmPackage dimensioner WxDxH S 30 1080x1000x1160 mmPackage dimensioner WxDxH PM,PE 60 720x900x1200 mmPackage dimensioner WxDxH PM,PE 85 980x900x1200 mmPackage dimensioner WxDxH PM,PE 110 1220x900x1200 mmFrying zones P 1 pcFrying zones S 1 pcFrying zones PM 60,85 1 pcFrying zones PM 110 2 pcsFrying zones PE 60 1 pcFrying zones PE 85,110 2 pcsHeight of frying zone sides P 130 mmHeight of frying zone sides S 130 mmHeight of frying zone sides PM,PE 60 90 mmHeight of frying zone sides, shallow bratt pan PM,PE 85,110 90 mmHeight of frying zone sides, deep bratt pan PM,PE 85,110 180 mmFrying surface WxD P 500 500x540 mmFrying surface WxD P 660 660x540 mmFrying surface WxD S 20 500x540 mmFrying surface WxD S 30 660x540 mmFrying surface WxD PM,PE 60 500x500 mmFrying surface WxD PM,PE 85 750x500 mmFrying surface WxD PM,PE 110 1000x500 mmTemperature setting range S 0 - 300 °CTemperature setting range P,PM,PE 0 - 220 °CWeight without package P 500 105 kgWeight without package P 660 115 kgWeight without package S 20 105 kgWeight without package S 30 115 kgWeight without package PM,PE 60 100 kgWeight without package PM 85 130 kgWeight without package PE 85 140 kgWeight without package PM 110 160 kgWeight without package PE 110 170 kgWeight with package P 500 125 kgWeight with package P 660 140 kg
83
3.3.2006 Rev. 3.5Technical specifications
P=PRINCE, S=SUPERPRINCE, PM=FUTURA PM, PMS=FUTURA PMS, PMD=FUTURA PMD, PE=FUTURA PE,PES=FUTURA PES, PED=FUTURA PED500=500, 660=660, 20=20, 30=30, 60=60, 85=85, 110=110HE=HEIGHT ADJUSTMENTA=3/N/PE∼400/230V 50Hz, C=3/N/PE∼380/220V 50Hz, H=3/PE∼230V 50Hz, I=3/PE∼220V 60Hz, J=3/PE∼380 50Hz,L=3/PE∼415V 50Hz, M=3/PE∼440V 60Hz
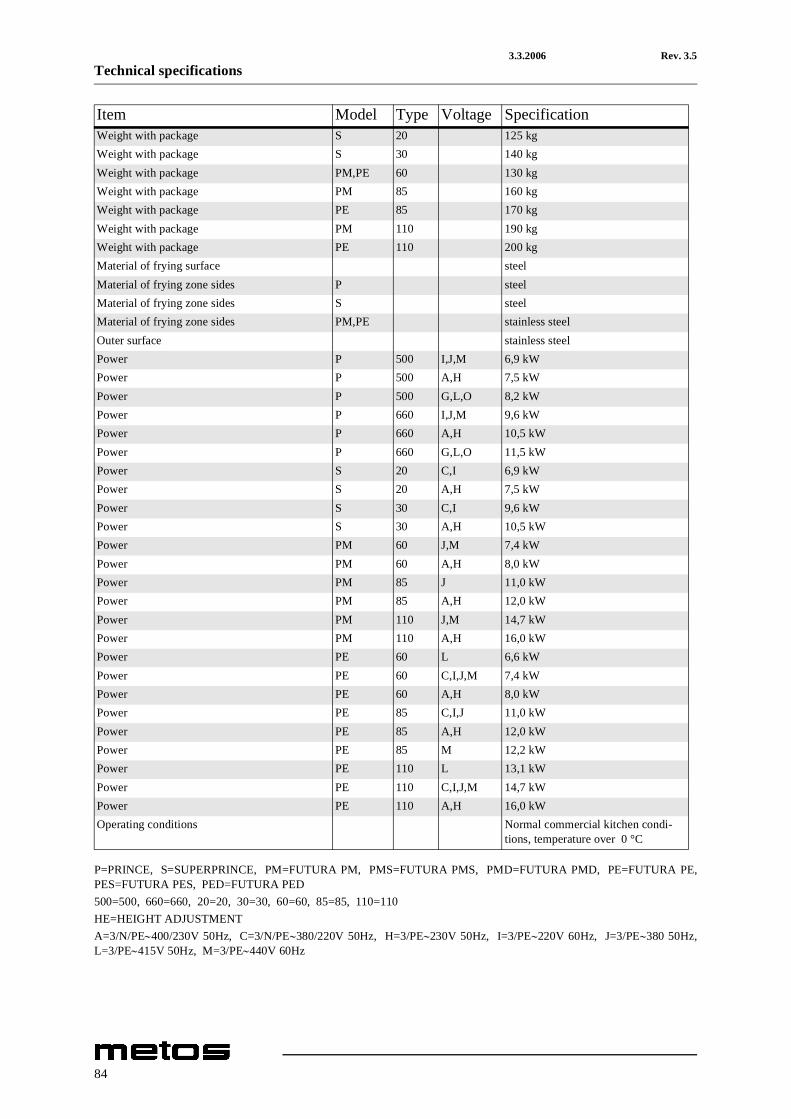
Weight with package S 20 125 kgWeight with package S 30 140 kgWeight with package PM,PE 60 130 kgWeight with package PM 85 160 kgWeight with package PE 85 170 kgWeight with package PM 110 190 kgWeight with package PE 110 200 kgMaterial of frying surface steelMaterial of frying zone sides P steelMaterial of frying zone sides S steelMaterial of frying zone sides PM,PE stainless steelOuter surface stainless steelPower P 500 I,J,M 6,9 kWPower P 500 A,H 7,5 kWPower P 500 G,L,O 8,2 kWPower P 660 I,J,M 9,6 kWPower P 660 A,H 10,5 kWPower P 660 G,L,O 11,5 kWPower S 20 C,I 6,9 kWPower S 20 A,H 7,5 kWPower S 30 C,I 9,6 kWPower S 30 A,H 10,5 kWPower PM 60 J,M 7,4 kWPower PM 60 A,H 8,0 kWPower PM 85 J 11,0 kWPower PM 85 A,H 12,0 kWPower PM 110 J,M 14,7 kWPower PM 110 A,H 16,0 kWPower PE 60 L 6,6 kWPower PE 60 C,I,J,M 7,4 kWPower PE 60 A,H 8,0 kWPower PE 85 C,I,J 11,0 kWPower PE 85 A,H 12,0 kWPower PE 85 M 12,2 kWPower PE 110 L 13,1 kWPower PE 110 C,I,J,M 14,7 kWPower PE 110 A,H 16,0 kWOperating conditions Normal commercial kitchen condi-
tions, temperature over 0 °C
Item Model Type Voltage Specification
84

Related Documents