ENGINE Removal 1. Release fuel pressure. See FUEL PRESSURE RELEASE under REMOVAL & INSTALLATION. Remove hood, battery and battery tray. Drain cooling system and engine oil. 2. Disconnect control cables at throttle body. Remove air intake duct with air cleaner assembly and air cleaner case. Remove cruise control actuator (if equipped). Remove radiator. 3. Disconnect electrical connections at relay box, located near driver's side front corner of engine compartment. Disconnect electrical connections at ignitor and noise filter on driver's side front fender. 4. Disconnect necessary electrical connections, coolant hose, vacuum hoses and fuel lines. Remove A/C compressor (if equipped) and power steering pump with hoses attached and secure aside. 5. Remove lower instrument panel cover and glove box. Disconnect connectors at Engine Control Module (ECM) and remaining engine wiring connectors. See Fig. 9 . Remove nuts from firewall and pull engine wiring out through firewall. Fig. 9: Identifying ECM & Engine Wiring Connectors Courtesy of TOYOTA MOTOR SALES, U.S.A., INC. NOTE: Remove engine and transaxle as an assembly. 1994 Toyota Camry LE 2.2L 4-CYL - VIN [S] 1994 ENGINES Toyota 2.2L 4-Cylinder 1994 Toyota Camry LE 2.2L 4-CYL - VIN [S] 1994 ENGINES Toyota 2.2L 4-Cylinder TxMechs (512) 945-2757 Monday, January 28, 2013 10:23:56 AM Page 1 © 2005 Mitchell Repair Information Company, LLC. TxMechs (512) 945-2757 Monday, January 28, 2013 10:24:05 AM Page 1 © 2005 Mitchell Repair Information Company, LLC.

94camry-Engine removal & installation
Dec 25, 2015
1994 toyota camry - Engine removal & installation
Welcome message from author
This document is posted to help you gain knowledge. Please leave a comment to let me know what you think about it! Share it to your friends and learn new things together.
Transcript

ENGINE
Removal
1. Release fuel pressure. See FUEL PRESSURE RELEASE under REMOVAL & INSTALLATION. Remove hood, battery and battery tray. Drain cooling system and engine oil.
2. Disconnect control cables at throttle body. Remove air intake duct with air cleaner assembly and air cleaner case. Remove cruise control actuator (if equipped). Remove radiator.
3. Disconnect electrical connections at relay box, located near driver's side front corner of engine compartment. Disconnect electrical connections at ignitor and noise filter on driver's side front fender.
4. Disconnect necessary electrical connections, coolant hose, vacuum hoses and fuel lines. Remove A/C compressor (if equipped) and power steering pump with hoses attached and secure aside.
5. Remove lower instrument panel cover and glove box. Disconnect connectors at Engine Control Module (ECM) and remaining engine wiring connectors. See Fig. 9 . Remove nuts from firewall and pull engine wiring out through firewall.
Fig. 9: Identifying ECM & Engine Wiring Connectors
Courtesy of TOYOTA MOTOR SALES, U.S.A., INC.
NOTE: Remove engine and transaxle as an assembly.
1994 Toyota Camry LE
2.2L 4-CYL - VIN [S] 1994 ENGINES Toyota 2.2L 4-Cylinder
1994 Toyota Camry LE
2.2L 4-CYL - VIN [S] 1994 ENGINES Toyota 2.2L 4-Cylinder
TxMechs (512) 945-2757
Monday, January 28, 2013 10:23:56 AM Page 1 © 2005 Mitchell Repair Information Company, LLC.
TxMechs (512) 945-2757
Monday, January 28, 2013 10:24:05 AM Page 1 © 2005 Mitchell Repair Information Company, LLC.

6. Raise and support vehicle. Remove lower engine covers. On M/T models, remove clutch release cylinder with hose attached and secure aside. Remove starter. On A/T models, disconnect oil cooler lines at transaxle.
7. Disconnect control cables and electrical connections at transaxle. Disconnect front exhaust pipe from front catalytic converter on exhaust manifold.
8. Remove front wheels. Remove cotter pin and retainer from end of axle shaft. Loosen axle shaft nut while applying the brakes. Remove axle shaft nut.
9. Remove inner fenderwell aprons for access to axle shaft. Drain transaxle fluid. Remove nut and separate tie rod from steering knuckle.
10. Disconnect stabilizer bar link from lower control arm. Remove ball joint-to-lower control arm bolts/nuts. Cover axle shaft boots with shop towel.
11. Using soft-faced hammer, tap axle shaft from hub assembly. Pull steering knuckle outward and separate axle shaft from hub assembly.
12. To remove left (driver's side) axle shaft, pry between transaxle case and axle shaft until axle shaft disengages from transaxle. See Fig. 10 .
13. To remove right (passenger's side) axle shaft, remove axle shaft bearing bolt. See Fig. 11 . Remove snap ring from axle shaft bearing retainer. See Fig. 11 . Pull right axle shaft from transaxle.
14. Support engine with hoist. Disconnect engine and transaxle mounts. Lift engine and transaxle from vehicle.
Fig. 10: Removing Left Axle Shafts
Courtesy of TOYOTA MOTOR SALES, U.S.A., INC.
1994 Toyota Camry LE
2.2L 4-CYL - VIN [S] 1994 ENGINES Toyota 2.2L 4-Cylinder
TxMechs (512) 945-2757
Monday, January 28, 2013 10:23:56 AM Page 2 © 2005 Mitchell Repair Information Company, LLC.
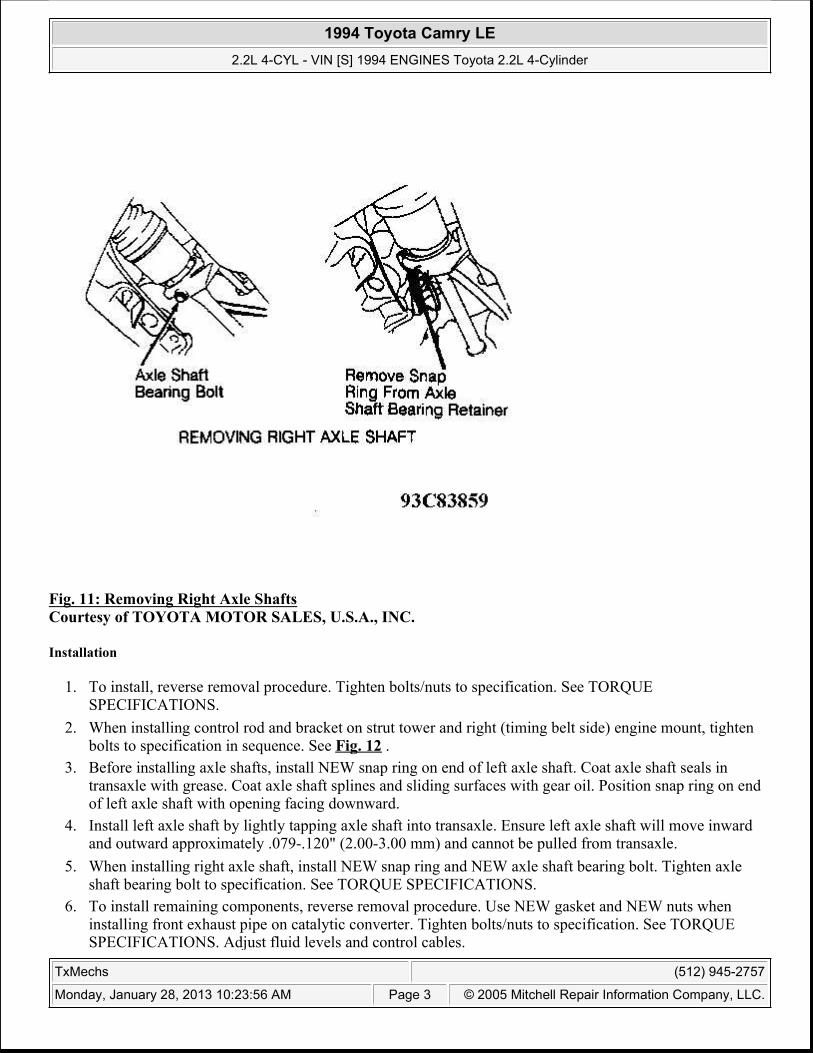
Fig. 11: Removing Right Axle Shafts
Courtesy of TOYOTA MOTOR SALES, U.S.A., INC.
Installation
1. To install, reverse removal procedure. Tighten bolts/nuts to specification. See TORQUE SPECIFICATIONS.
2. When installing control rod and bracket on strut tower and right (timing belt side) engine mount, tighten bolts to specification in sequence. See Fig. 12 .
3. Before installing axle shafts, install NEW snap ring on end of left axle shaft. Coat axle shaft seals in transaxle with grease. Coat axle shaft splines and sliding surfaces with gear oil. Position snap ring on end of left axle shaft with opening facing downward.
4. Install left axle shaft by lightly tapping axle shaft into transaxle. Ensure left axle shaft will move inward and outward approximately .079-.120" (2.00-3.00 mm) and cannot be pulled from transaxle.
5. When installing right axle shaft, install NEW snap ring and NEW axle shaft bearing bolt. Tighten axle shaft bearing bolt to specification. See TORQUE SPECIFICATIONS.
6. To install remaining components, reverse removal procedure. Use NEW gasket and NEW nuts when installing front exhaust pipe on catalytic converter. Tighten bolts/nuts to specification. See TORQUE SPECIFICATIONS. Adjust fluid levels and control cables.
1994 Toyota Camry LE
2.2L 4-CYL - VIN [S] 1994 ENGINES Toyota 2.2L 4-Cylinder
TxMechs (512) 945-2757
Monday, January 28, 2013 10:23:56 AM Page 3 © 2005 Mitchell Repair Information Company, LLC.

Fig. 12: Control Rod & Bracket Bolt Installation Sequence
Courtesy of TOYOTA MOTOR SALES, U.S.A., INC.
OIL PAN
Removal
1. Disconnect negative battery cable. Raise and support vehicle. Remove lower engine covers. Drain engine oil. Remove front exhaust pipe located below oil pan.
2. Remove catalytic converter braces, catalytic converter, cushion, retainer and gasket to access oil pan (if necessary). See Fig. 13 .
3. Remove stiffener plate at rear of oil pan (if equipped). Remove dipstick. Remove bolts/nuts and oil pan.
Installation
1. Ensure sealing surfaces are clean. Apply bead of sealant at center of oil pan sealing surface, between bolt/nut holes and on inside of bolt/nut holes.
2. Install oil pan. Install and tighten bolts/nuts to specification. See TORQUE SPECIFICATIONS. To install remaining components, reverse removal procedure.
3. Use NEW nuts when installing exhaust pipe on catalytic converter. Use NEW gasket when installing catalytic converter (if removed). Fill crankcase with oil.
NOTE: Remove engine and transaxle as an assembly.
1994 Toyota Camry LE
2.2L 4-CYL - VIN [S] 1994 ENGINES Toyota 2.2L 4-Cylinder
TxMechs (512) 945-2757
Monday, January 28, 2013 10:23:56 AM Page 4 © 2005 Mitchell Repair Information Company, LLC.

TORQUE SPECIFICATIONS
TORQUE SPECIFICATIONS
Application Ft. Lbs. (N.m)
A/C Compressor Bolt 20 (27)
Alternator Bracket Bolt 31 (42)
Axle Shaft Bearing Bolt 24 (33)
Axle Shaft Nut 217 (294)
Balance Shaft Assembly-To-Cylinder Block Bolt (1) 36 (49)
Ball Joint-To-Lower Control Arm Bolt/Nut 94 (127)
Camshaft Bearing Cap Bolt (2) 14 (19)
Camshaft Sprocket Bolt 40 (54)
Catalytic Converter Brace Bolt/Nut 31 (42)
Catalytic Converter-To-Exhaust Manifold Bolt/Nut 21 (29)
Connecting Rod Nut
Step 1 18 (24)
Step 2 Additional 90 Degrees
Coolant Outlet Bolt 11 (15)
Crankshaft Pulley Bolt 80 (109)
Cylinder Head Bolt (3)
Step 1 36 (49)
Step 2 Additional 90 Degrees
EGR Valve
Bolt (4)
Union Nut 43 (58)
Engine Hanger Bolt 18 (24)
Engine Mounts & Brackets
Control Rod Bracket-To-Right (Timing Belt Side) Engine Mount Bracket
Bolt (5)47 (64)
Control Rod-To-Strut Tower Bolt 47 (64)
Front (Exhaust Manifold Side) Engine Mount-To-Cylinder Block Bolt 57 (77)
Front (Exhaust Manifold Side) Engine Mount-To-Frame Bolt 59 (80)
Rear (Intake Manifold Side) Engine Mount-To-Cylinder Block Bolt 47 (64)
Rear (Intake Manifold Side) Engine Mount Insulator-To-Frame Nut 49 (66)
Right (Timing Belt Side) Engine Mount Bracket-To-Cylinder Block Bolt 38 (52)
Transaxle Mount-To-Transaxle Bolt 47 (64)
Exhaust Manifold Nut 36 (49)
Flywheel/Drive Plate Bolt
A/T 61 (83)
M/T 65 (88)
1994 Toyota Camry LE
2.2L 4-CYL - VIN [S] 1994 ENGINES Toyota 2.2L 4-Cylinder
TxMechs (512) 945-2757
Monday, January 28, 2013 10:23:56 AM Page 5 © 2005 Mitchell Repair Information Company, LLC.

Front Exhaust Pipe-To-Catalytic Converter Nut 46 (62)
Front Exhaust Pipe-To-Exhaust Pipe Bolt/Nut 41 (56)
Fuel Line-To-Fuel Filter Union Bolt 21 (29)
Fuel Pulsation Damper 25 (34)
Intake Manifold Bolt/Nut 14 (19)
Intake Manifold Brace Bolt
12-mm Bolt 16 (22)
14-mm Bolt 31 (42)
Knock Sensor 27 (37)
Main Bearing Cap Bolt (6) 43 (58)
No. 1 Idler Pulley Bolt 31 (42)
No. 2 Idler Pulley Bolt 31 (42)
Oil Cooler Relief Valve-To-Cylinder Block 58 (79)
Oil Pump Sprocket Nut 21 (29)
Power Steering Pump Bracket Bolt 32 (43)
Power Steering Pump-To-Bracket Bolt 32 (43)
Spark Plug 13 (18)
Stabilizer Bar Link-To-Lower Control Arm Nut 29 (39)
Stiffener Plate Bolt 27 (37)
Throttle Body Bolt 14 (19)
Tie Rod Nut 36 (49)
Valve Cover Nut 17 (23)
Wheel Lug Nut 76 (103)
INCH Lbs. (N.m)
Coolant By-Pass Pipe-To-Water Pump Nut 78 (8.8)
Fuel Delivery Pipe Bolt 115 (13.0)
No. 3 Timing Belt Cover Bolt 69 (7.8)
Oil Cooler-To-Cylinder Block Nut 69 (7.8)
Oil Pan Bolt/Nut 48 (5.4)
Oil Pump Body Cover Bolt 78 (8.8)
Oil Pump Pick-Up Tube Bolt/Nut 48 (5.4)
Oil Pump-To-Cylinder Block Bolt 82 (9.3)
Rear Plate-To-Cylinder Block Bolt 82 (9.3)
Rear Seal Housing Bolt 82 (9.3)
Water Pump-To-Cylinder Block Bolt (7) 82 (9.3)
Water Pump-To-Water Pump Cover Bolt 82 (9.3)
(1) Tighten bolts to specification in sequence. See Fig. 32 .
(2) Tighten bolts to specification in sequence. See Fig. 24 and Fig. 25 .
(3) Tighten bolts to specification in sequence. See Fig. 14 .
1994 Toyota Camry LE
2.2L 4-CYL - VIN [S] 1994 ENGINES Toyota 2.2L 4-Cylinder
TxMechs (512) 945-2757
Monday, January 28, 2013 10:23:56 AM Page 6 © 2005 Mitchell Repair Information Company, LLC.
ENGINE SPECIFICATIONS
GENERAL ENGINE SPECIFICATIONS
GENERAL SPECIFICATIONS
CRANKSHAFT, MAIN & CONNECTING ROD BEARINGS SPECS
CRANKSHAFT, MAIN & CONNECTING ROD BEARINGS SPECS
(4) Tighten bolt 115 INCH lbs. (13.0 N.m).
(5) Tighten bolts to specification in sequence. See Fig. 12 .
(6) Tighten bolts to specification in sequence. See Fig. 45 .
(7) Tighten bolts to specification in sequence. See Fig. 35 .
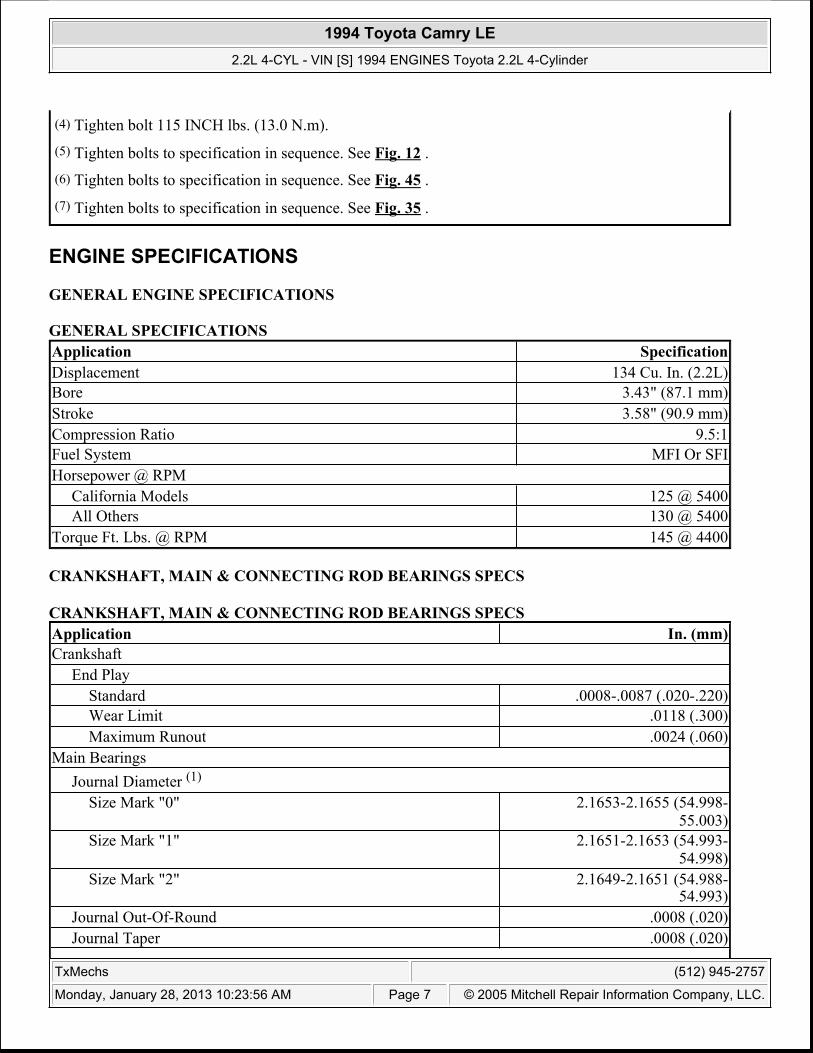
Application Specification
Displacement 134 Cu. In. (2.2L)
Bore 3.43" (87.1 mm)
Stroke 3.58" (90.9 mm)
Compression Ratio 9.5:1
Fuel System MFI Or SFI
Horsepower @ RPM
California Models 125 @ 5400
All Others 130 @ 5400
Torque Ft. Lbs. @ RPM 145 @ 4400
Application In. (mm)
Crankshaft
End Play
Standard .0008-.0087 (.020-.220)
Wear Limit .0118 (.300)
Maximum Runout .0024 (.060)
Main Bearings
Journal Diameter (1)
Size Mark "0" 2.1653-2.1655 (54.998-55.003)
Size Mark "1" 2.1651-2.1653 (54.993-54.998)
Size Mark "2" 2.1649-2.1651 (54.988-54.993)
Journal Out-Of-Round .0008 (.020)
Journal Taper .0008 (.020)
1994 Toyota Camry LE
2.2L 4-CYL - VIN [S] 1994 ENGINES Toyota 2.2L 4-Cylinder
TxMechs (512) 945-2757
Monday, January 28, 2013 10:23:56 AM Page 7 © 2005 Mitchell Repair Information Company, LLC.
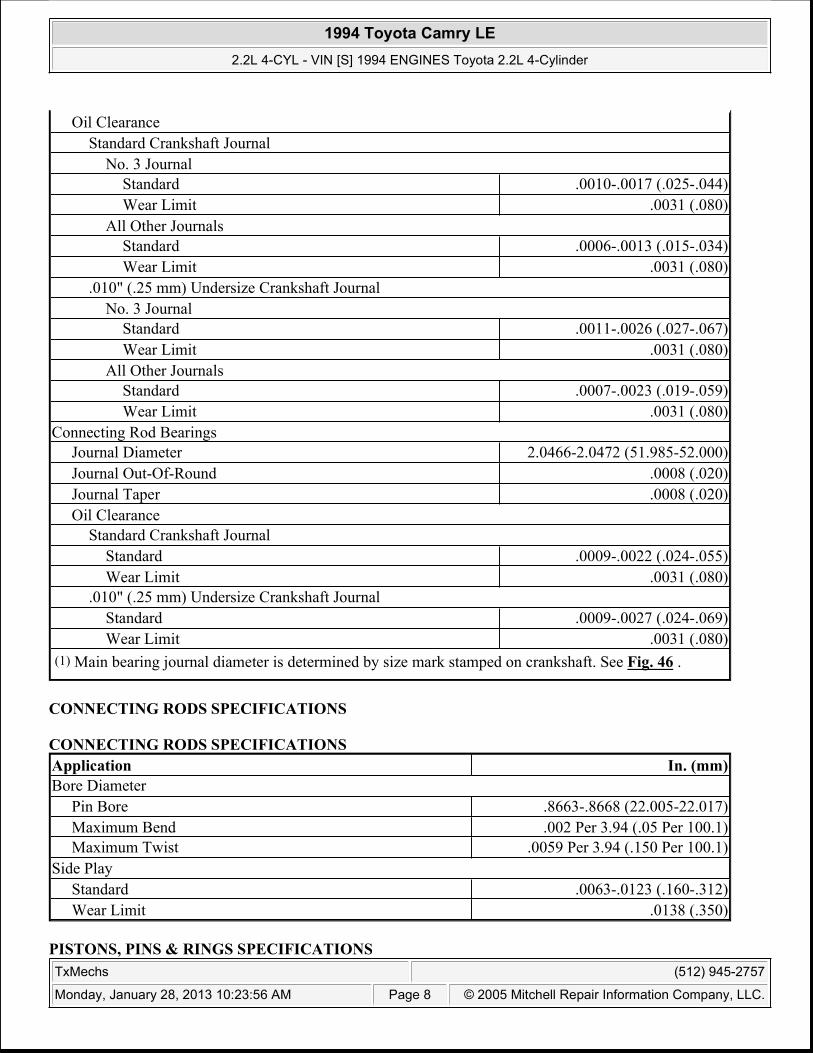
CONNECTING RODS SPECIFICATIONS
CONNECTING RODS SPECIFICATIONS
PISTONS, PINS & RINGS SPECIFICATIONS
Oil Clearance
Standard Crankshaft Journal
No. 3 Journal
Standard .0010-.0017 (.025-.044)
Wear Limit .0031 (.080)
All Other Journals
Standard .0006-.0013 (.015-.034)
Wear Limit .0031 (.080)
.010" (.25 mm) Undersize Crankshaft Journal
No. 3 Journal
Standard .0011-.0026 (.027-.067)
Wear Limit .0031 (.080)
All Other Journals
Standard .0007-.0023 (.019-.059)
Wear Limit .0031 (.080)
Connecting Rod Bearings
Journal Diameter 2.0466-2.0472 (51.985-52.000)
Journal Out-Of-Round .0008 (.020)
Journal Taper .0008 (.020)
Oil Clearance
Standard Crankshaft Journal
Standard .0009-.0022 (.024-.055)
Wear Limit .0031 (.080)
.010" (.25 mm) Undersize Crankshaft Journal
Standard .0009-.0027 (.024-.069)
Wear Limit .0031 (.080)
(1) Main bearing journal diameter is determined by size mark stamped on crankshaft. See Fig. 46 .
Application In. (mm)
Bore Diameter
Pin Bore .8663-.8668 (22.005-22.017)
Maximum Bend .002 Per 3.94 (.05 Per 100.1)
Maximum Twist .0059 Per 3.94 (.150 Per 100.1)
Side Play
Standard .0063-.0123 (.160-.312)
Wear Limit .0138 (.350)
1994 Toyota Camry LE
2.2L 4-CYL - VIN [S] 1994 ENGINES Toyota 2.2L 4-Cylinder
TxMechs (512) 945-2757
Monday, January 28, 2013 10:23:56 AM Page 8 © 2005 Mitchell Repair Information Company, LLC.

PISTONS, PINS & RINGS SPECIFICATIONS
CYLINDER BLOCK SPECIFICATIONS
CYLINDER BLOCK SPECIFICATIONS
Application In. (mm)
Pistons
Clearance
Standard .0055-.0063 (.140-.160)
Wear Limit .0071 (.180)
Diameter (1)
Size Mark "1" 3.4193-3.4197 (86.850-86.860)
Size Mark "2" 3.4197-3.4201 (86.860-86.870)
Size Mark "3" 3.4201-3.4205 (86.870-86.880)
Pins
Diameter .8660-.8665 (21.997-22.009)
Piston Fit (2)
Rod Fit
Standard .0002-.0004 (.005-.011)
Wear Limit .0020 (.050)
Rings
No. 1
End Gap
Standard .0106-.0197 (.270-.500)
Wear Limit .0433 (1.100)
Side Clearance .0016-.0031 (.040-.080)
No. 2
End Gap
Standard .0138-.0236 (.350-.600)
Wear Limit .0472 (1.200)
Side Clearance .0012-.0028 (.030-.070)
No. 3 (Oil)
End Gap
Standard .0079-.0217 (.200-.550)
Wear Limit .0453 (1.150)
(1) Piston diameter is determined by size mark stamped on top of piston. See Fig. 41 .
(2) With piston temperature at 140°F (60°C), piston pin should slide through piston with thumb pressure.
Application In. (mm)
Cylinder Bore (1)
Size Mark "1" 3.4252-3.4256 (87.000-87.010)
1994 Toyota Camry LE
2.2L 4-CYL - VIN [S] 1994 ENGINES Toyota 2.2L 4-Cylinder
TxMechs (512) 945-2757
Monday, January 28, 2013 10:23:56 AM Page 9 © 2005 Mitchell Repair Information Company, LLC.

VALVES & VALVE SPRINGS SPECIFICATIONS
VALVES & VALVE SPRINGS SPECIFICATIONS
CYLINDER HEAD SPECIFICATIONS
CYLINDER HEAD SPECIFICATIONS
Size Mark "2" 3.4256-3.4260 (87.010-87.020)
Size Mark "3" 3.4260-3.4264 (87.020-87.030)
Maximum Deck Warpage .002 (.05)
Main Bearing Bore I.D. (2)
Size Mark "1" 2.3326-2.3239 (59.020-59.026)
Size Mark "2" 2.3239-2.3241 (59.026-59.032)
Size Mark "3" 2.3241-2.3243 (59.032-59.038)
(1) Cylinder bore diameter is determined by size mark on cylinder block deck surface. See Fig. 42 . Maximum bore diameter is 3.4342" (87.230 mm).
(2) Main bearing bore I.D. is determined by main bearing bore size mark on cylinder block. See Fig. 46 .
Application Specification
Intake Valves
Face Angle 44.5°
Minimum Margin .020" (.50 mm)
Minimum Refinish Length 3.823" (97.10 mm)
Stem Diameter .2350-.2356" (5.970-5.985 mm)
Exhaust Valves
Face Angle 44.5°
Minimum Margin .020" (.50 mm)
Minimum Refinish Length 3.858" (98.00 mm)
Stem Diameter .2348-.2354" (5.965-5.980 mm)
Valve Springs
Free Length 1.6520-1.6531" (41.96-41.99 mm)
Out-Of-Square Limit .079" (2.00 mm)
Lbs. @ In. (kg @ mm)
Pressure 37-43 @ 1.366 (16.7-19.5 @ 34.70)
Application Specification
Maximum Warpage
Cylinder Block Surface .002" (.05 mm)
1994 Toyota Camry LE
2.2L 4-CYL - VIN [S] 1994 ENGINES Toyota 2.2L 4-Cylinder
TxMechs (512) 945-2757
Monday, January 28, 2013 10:23:56 AM Page 10 © 2005 Mitchell Repair Information Company, LLC.

CAMSHAFT SPECIFICATIONS
CAMSHAFT SPECIFICATIONS
Intake & Exhaust Manifold Surface .003" (.08 mm)
Valve Seats
Intake Valve
Seat Angle 45°
Seat Width .039-.055" (1.00-1.40 mm)
Exhaust Valve
Seat Angle 45°
Seat Width .039-.055" (1.00-1.40 mm)
Valve Guides
Intake Valve
Valve Guide Cylinder Head Bore I.D.
Standard Valve Guide .4331-.4341" (11.000-11.027 mm)
Oversize Valve Guide .4350-.4361" (11.050-11.077 mm)
Valve Guide I.D. .2366-.2374" (6.010-6.030 mm)
Valve Stem-To-Guide Oil Clearance
Standard .0010-.0024" (.025-.060 mm)
Wear Limit .0031" (.080 mm)
Exhaust Valve
Valve Guide Cylinder Head Bore I.D.
Standard Valve Guide .4331-.4341" (11.000-11.027 mm)
Oversize Valve Guide Oversize Valve Guide
Valve Guide I.D. .2366-.2374" (6.010-6.030 mm)
Valve Stem-To-Guide Oil Clearance
Standard .0012-.0026" (.030-.065 mm)
Wear Limit .0039" (.100 mm)
Application In. (mm)
End Play
Intake Camshaft
Standard .0018-.0039 (.045-.100)
Wear Limit .0047 (.120)
Exhaust Camshaft
Standard .0012-.0033 (.030-.085)
Wear Limit .0039 (.100)
Gear Backlash
1994 Toyota Camry LE
2.2L 4-CYL - VIN [S] 1994 ENGINES Toyota 2.2L 4-Cylinder
TxMechs (512) 945-2757
Monday, January 28, 2013 10:23:56 AM Page 11 © 2005 Mitchell Repair Information Company, LLC.
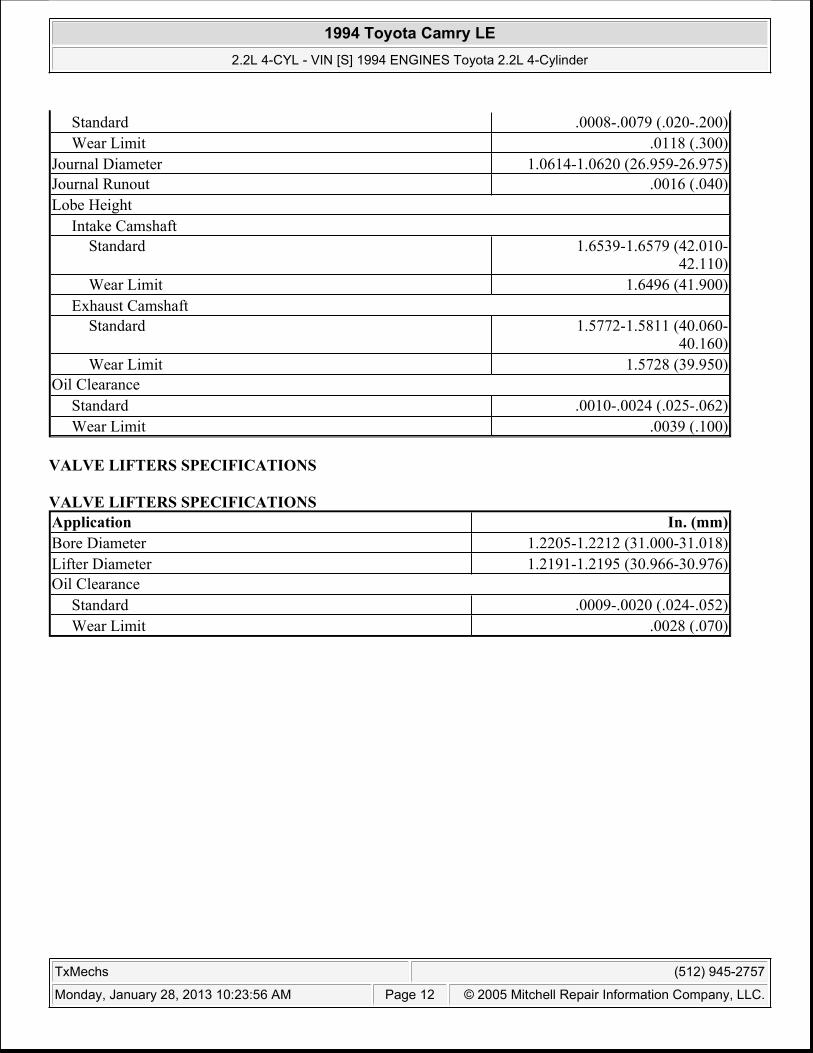
VALVE LIFTERS SPECIFICATIONS
VALVE LIFTERS SPECIFICATIONS
Standard .0008-.0079 (.020-.200)
Wear Limit .0118 (.300)
Journal Diameter 1.0614-1.0620 (26.959-26.975)
Journal Runout .0016 (.040)
Lobe Height
Intake Camshaft
Standard 1.6539-1.6579 (42.010-42.110)
Wear Limit 1.6496 (41.900)
Exhaust Camshaft
Standard 1.5772-1.5811 (40.060-40.160)
Wear Limit 1.5728 (39.950)
Oil Clearance
Standard .0010-.0024 (.025-.062)
Wear Limit .0039 (.100)
Application In. (mm)
Bore Diameter 1.2205-1.2212 (31.000-31.018)
Lifter Diameter 1.2191-1.2195 (30.966-30.976)
Oil Clearance
Standard .0009-.0020 (.024-.052)
Wear Limit .0028 (.070)
1994 Toyota Camry LE
2.2L 4-CYL - VIN [S] 1994 ENGINES Toyota 2.2L 4-Cylinder
TxMechs (512) 945-2757
Monday, January 28, 2013 10:23:56 AM Page 12 © 2005 Mitchell Repair Information Company, LLC.
Related Documents