
2
3
Table of Contents
8” Display ____________________ pg. 3
Night Mode ______________pg. 4
Gauges Screen ____________pg. 4
Controls Screen _______________pg. 4
Ballast Screen ________________ pg. 5
Cruise Control ____________ pg. 5
User Presets _________________ pg. 6
Audio Screen _________________ pg. 7
Audio Adjustment __________ pg. 8
Bluetooth ________________ pg. 9
USB/AUX Input ___________ pg. 9
Sirius XM Radio ______________ pg. 10
Activation _______________pg. 11
Operation ________________pg. 11
Parental Control __________ pg. 12
Trouble Shooting __________ pg. 13
Settings __________________ pg. 14-16
12 Button Pad _______________ pg. 17
4
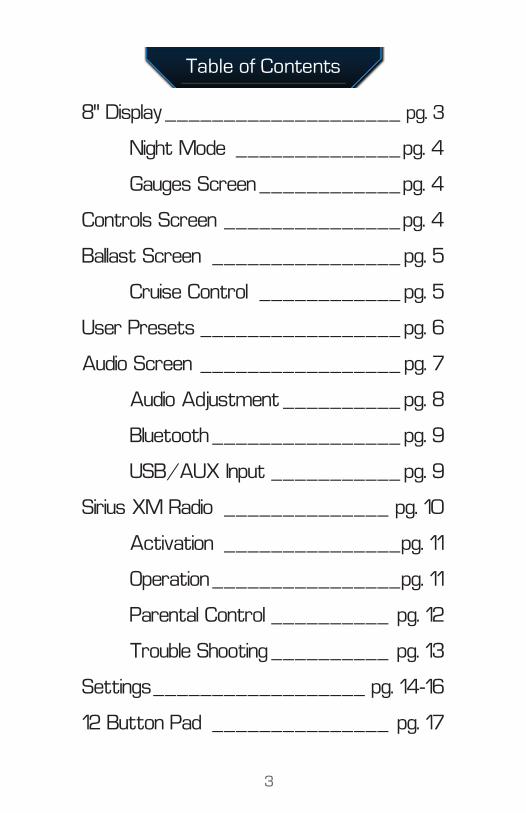
1- Cruise Control On/Off2- Audio Menu3- Gauge Menu4- Controls Menu5- Depth Screen6- Presets Menu7- Settings Menu8- Engine Start/Stop9- Preset Selection10- Day/Night Mode
Night Mode
The NIGHT MODE button at the bottom right of the display toggles the backlighting between the DAYTIME and NIGHTTIME set points that can be found in the SETTINGS MENU. NIGHT MODE not only controls the brightness of the screens, but also the lighting of the various buttons found on the DASH.
8” Display
1 2 3 4 5 6 7
8 9 10
Gauges Screen
Touch the GAUGES button at the top of the screen to view the current data of your boat systems.This page will show coolant temperature, voltage, oil pressure, engine hours, and engine RPMs.
To change the units between Imperial and Metric, see the UNITS & DEPTH menu in SETTINGS > CONFIGURATION

5
Controls Screen
1- All Off2- Nav Lights3- Anchor Lights4- Blower5- Floor Lights6- Courtesy Lights7- Cup Holder Lights8- Seat Heater9- Docking Light10- Underwater Lights11- Bilge
Touch ALL OFF to turn OFF any devices that are running on the CONTROLS page.
Ballast Screen
Navigate to the BALLAST page by selecting the BALLAST button at the top of the display
Use the on-screen controls to
adjust the ballast to the desired levels.
1
5
8
2
6
9
3 4
11
7
10
-To FILL the floor tanks the boat must be below 2 mph. When below 2 mph, FILLING will be displayed. After its done the FILLING will change to FULL
-To DRAIN the floor tanks the boat must be above 10 mph. When the boat is above 10 mph DRAINING will be displayed. After the tank has finished DRAINING, EMPTY will be displayed.
-If the tanks are not empty, you are not at the proper speeds, or are in the OFF position,
you will see HALF displayed.
6
Tabs Screen
Cruise Control
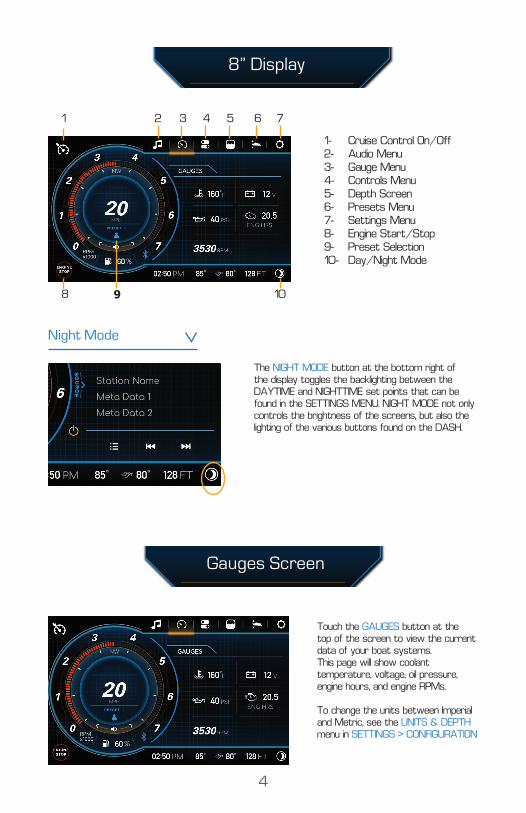
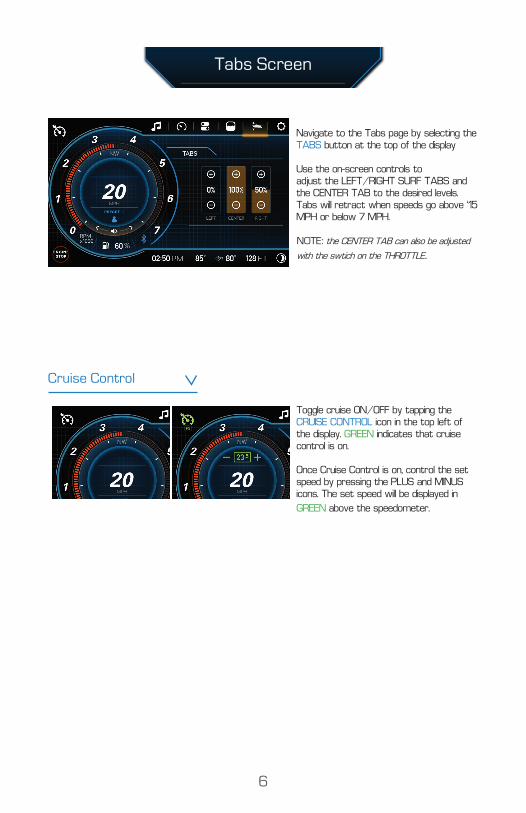
Toggle cruise ON/OFF by tapping the CRUISE CONTROL icon in the top left of the display. GREEN indicates that cruise control is on.
Once Cruise Control is on, control the set speed by pressing the PLUS and MINUS icons. The set speed will be displayed in
GREEN above the speedometer.
Navigate to the Tabs page by selecting the TABS button at the top of the display
Use the on-screen controls to adjust the LEFT/RIGHT SURF TABS and the CENTER TAB to the desired levels. Tabs will retract when speeds go above `15 MPH or below 7 MPH.
NOTE: the CENTER TAB can also be adjusted
with the swtich on the THROTTLE..

7
User Presets
Navigate to the USER PRESETS page by selecting the PRESETS button at the top of the display or by tapping the blue preset icon beneath the Speedometer.
GO HOME MODEStows the surf tabs to allow the Captain to drive without creating a surf wave.
SURF RIGHT/LEFTAdjusts the surf tabs to control which side of the boat the surf wave is on.
LOAD A PRESET1. View the available PRESETS in the list box. The the UP and DOWN ARROWS to scroll through.
2. select the PRESET that is to be applied. It will be highlighted ORANGE.
3. Touch the LOAD button. The running preset will now be displayed under the speedometer.
4. The system will begin to take action to match the defined PRESET (BALLAST LEVELS and
CRUISE SPEED).
SAVE A PRESET1. Create a desired ride setting on the BALLAST SCREEN and a desired CRUISE SPEED(optional).
2. Select PRESET 1, PRESET 2, or PRESET 3 from the list of presets. Choose the one that you
want to create/change to your new settings.
3. When the desired PRESET is selected, select SAVE.
4. A pop-up will appear asking if you want to “Save Over Selected Preset?” Select YES or NO
accordingly. If you selected yes, you may now load the PRESET with your personal settings.
On-Board Presets
Custom Presets
8
AM/FM/Weather
Audio Screen
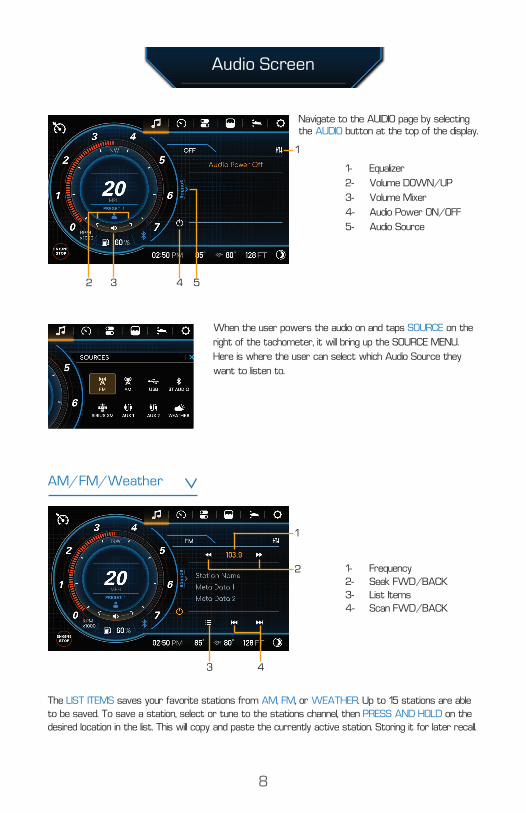
Navigate to the AUIDIO page by selecting the AUDIO button at the top of the display.
1- Equalizer
2- Volume DOWN/UP
3- Volume Mixer
4- Audio Power ON/OFF
5- Audio Source
3 2 4 5
1
When the user powers the audio on and taps SOURCE on the
right of the tachometer, it will bring up the SOURCE MENU.
Here is where the user can select which Audio Source they
want to listen to.
3
1
4
2 1- Frequency
2- Seek FWD/BACK
3- List Items
4- Scan FWD/BACK
The LIST ITEMS saves your favorite stations from AM, FM, or WEATHER. Up to 15 stations are able
to be saved. To save a station, select or tune to the stations channel, then PRESS AND HOLD on the
desired location in the list. This will copy and paste the currently active station. Storing it for later recall.
9
Sound Adjustment
Bluetooth
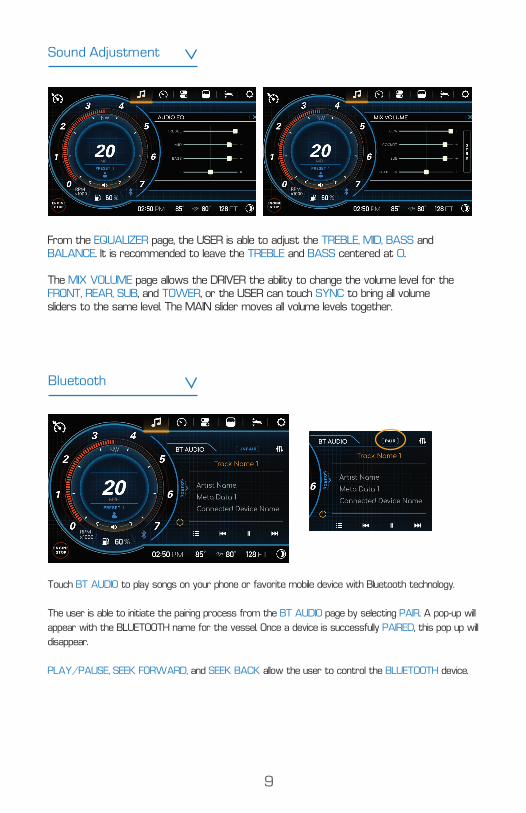
From the EQUALIZER page, the USER is able to adjust the TREBLE, MID, BASS and BALANCE. It is recommended to leave the TREBLE and BASS centered at 0.
The MIX VOLUME page allows the DRIVER the ability to change the volume level for the FRONT, REAR, SUB, and TOWER, or the USER can touch SYNC to bring all volume sliders to the same level. The MAIN slider moves all volume levels together.
Touch BT AUDIO to play songs on your phone or favorite mobile device with Bluetooth technology.
The user is able to initiate the pairing process from the BT AUDIO page by selecting PAIR. A pop-up will
appear with the BLUETOOTH name for the vessel. Once a device is successfully PAIRED, this pop up will
disappear.
PLAY/PAUSE, SEEK FORWARD, and SEEK BACK allow the user to control the BLUETOOTH device.

10
USB Input
Auxiliary Input
1- Browse USB device files
2- Replay
3- Shuffle Playlist
Touch USB to access a device plugged into the DASH USB PORT. USB INPUT DEVICES with music
stored on them are able to be accessed from this screen.
If a USB INPUT DEVICE is plugged in that has music stored on it, the AUDIO SOURCE will automatically
switch to USB.
The System supports the following media formats for audio playback:
.ac3 (dolby digital) / .hdcd / .lpcm / .mpeg / .mpeg 2.5 /.pcm /.wmv
Touch AUX to access the AUXILIARY INPUT PORT that is located in the GLOVEBOX.
1 2 3
11
SiriusXM Radio
1
2
3
5
4
6 7 8 9
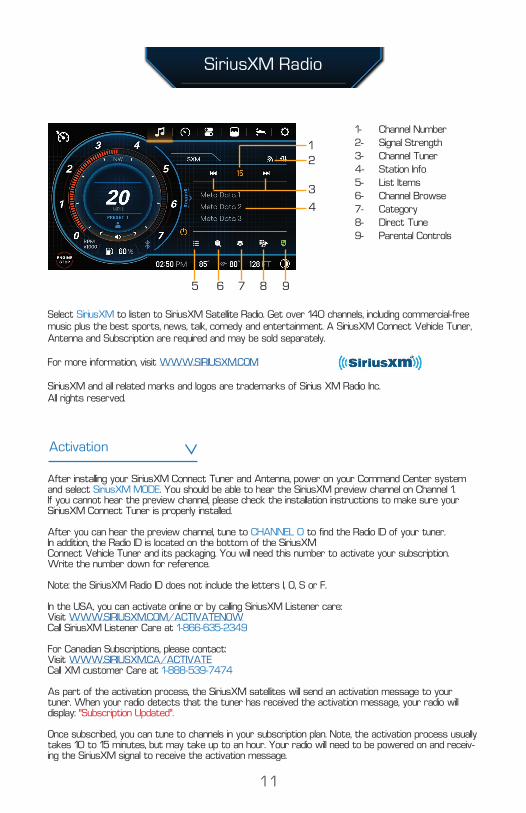
1- Channel Number
2- Signal Strength
3- Channel Tuner
4- Station Info
5- List Items
6- Channel Browse
7- Category
8- Direct Tune
9- Parental Controls
Select SiriusXM to listen to SiriusXM Satellite Radio. Get over 140 channels, including commercial-free music plus the best sports, news, talk, comedy and entertainment. A SiriusXM Connect Vehicle Tuner, Antenna and Subscription are required and may be sold separately. For more information, visit WWW.SIRIUSXM.COM
SiriusXM and all related marks and logos are trademarks of Sirius XM Radio Inc. All rights reserved.
After installing your SiriusXM Connect Tuner and Antenna, power on your Command Center system and select SiriusXM MODE. You should be able to hear the SiriusXM preview channel on Channel 1. If you cannot hear the preview channel, please check the installation instructions to make sure your SiriusXM Connect Tuner is properly installed.
After you can hear the preview channel, tune to CHANNEL 0 to find the Radio ID of your tuner. In addition, the Radio ID is located on the bottom of the SiriusXM Connect Vehicle Tuner and its packaging. You will need this number to activate your subscription. Write the number down for reference.
Note: the SiriusXM Radio ID does not include the letters I, O, S or F.
In the USA, you can activate online or by calling SiriusXM Listener care: Visit WWW.SIRIUSXM.COM/ACTIVATENOW Call SiriusXM Listener Care at 1-866-635-2349
For Canadian Subscriptions, please contact:Visit WWW.SIRIUSXM.CA/ACTIVATECall XM customer Care at 1-888-539-7474
As part of the activation process, the SiriusXM satellites will send an activation message to your tuner. When your radio detects that the tuner has received the activation message, your radio will display: “Subscription Updated”.
Once subscribed, you can tune to channels in your subscription plan. Note, the activation process usually takes 10 to 15 minutes, but may take up to an hour. Your radio will need to be powered on and receiv-ing the SiriusXM signal to receive the activation message.
Activation
12
Operation
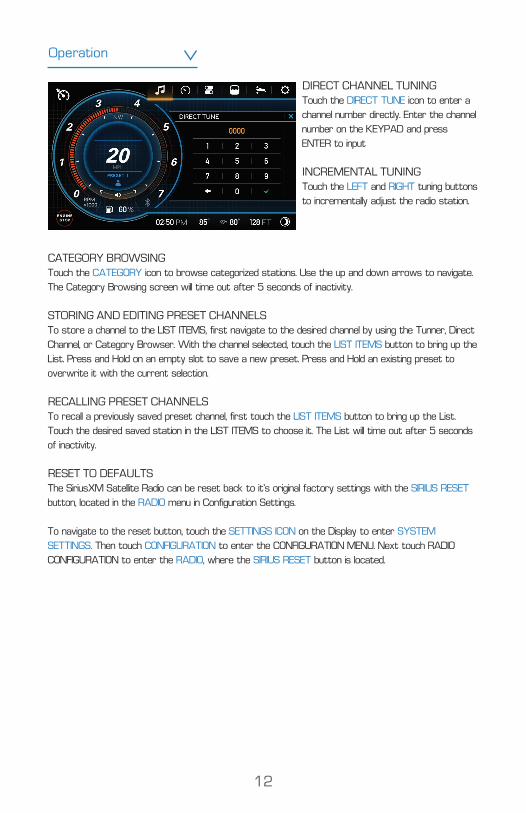
DIRECT CHANNEL TUNINGTouch the DIRECT TUNE icon to enter a
channel number directly. Enter the channel
number on the KEYPAD and press
ENTER to input
INCREMENTAL TUNINGTouch the LEFT and RIGHT tuning buttons
to incrementally adjust the radio station.
CATEGORY BROWSING Touch the CATEGORY icon to browse categorized stations. Use the up and down arrows to navigate.
The Category Browsing screen will time out after 5 seconds of inactivity.
STORING AND EDITING PRESET CHANNELSTo store a channel to the LIST ITEMS, first navigate to the desired channel by using the Tunner, Direct
Channel, or Category Browser. With the channel selected, touch the LIST ITEMS button to bring up the
List. Press and Hold on an empty slot to save a new preset. Press and Hold an existing preset to
overwrite it with the current selection.
RECALLING PRESET CHANNELSTo recall a previously saved preset channel, first touch the LIST ITEMS button to bring up the List.
Touch the desired saved station in the LIST ITEMS to choose it. The List will time out after 5 seconds
of inactivity.
RESET TO DEFAULTS The SiriusXM Satellite Radio can be reset back to it’s original factory settings with the SIRIUS RESET
button, located in the RADIO menu in Configuration Settings.
To navigate to the reset button, touch the SETTINGS ICON on the Display to enter SYSTEM
SETTINGS. Then touch CONFIGURATION to enter the CONFIGURATION MENU. Next touch RADIO
CONFIGURATION to enter the RADIO, where the SIRIUS RESET button is located.
13
Parental Control
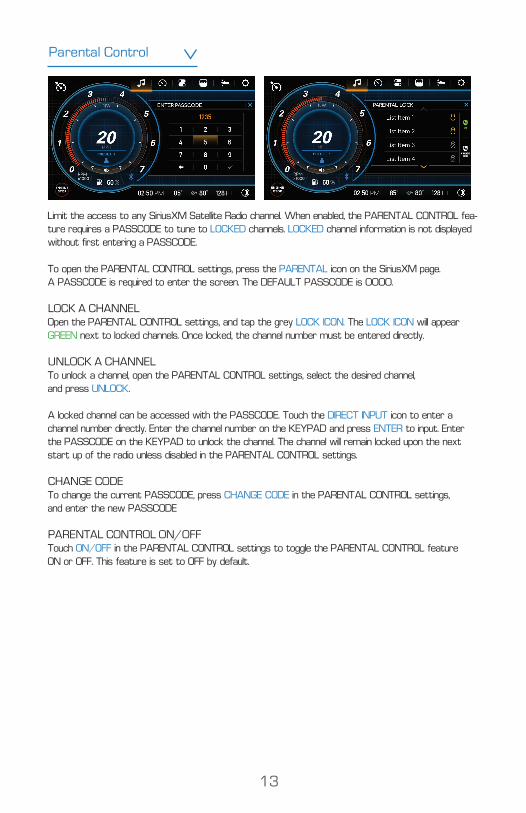
Limit the access to any SiriusXM Satellite Radio channel. When enabled, the PARENTAL CONTROL fea-
ture requires a PASSCODE to tune to LOCKED channels. LOCKED channel information is not displayed
without first entering a PASSCODE.
To open the PARENTAL CONTROL settings, press the PARENTAL icon on the SiriusXM page.
A PASSCODE is required to enter the screen. The DEFAULT PASSCODE is 0000.
LOCK A CHANNELOpen the PARENTAL CONTROL settings, and tap the grey LOCK ICON. The LOCK ICON will appear
GREEN next to locked channels. Once locked, the channel number must be entered directly.
UNLOCK A CHANNELTo unlock a channel, open the PARENTAL CONTROL settings, select the desired channel,
and press UNLOCK.
A locked channel can be accessed with the PASSCODE. Touch the DIRECT INPUT icon to enter a
channel number directly. Enter the channel number on the KEYPAD and press ENTER to input. Enter
the PASSCODE on the KEYPAD to unlock the channel. The channel will remain locked upon the next
start up of the radio unless disabled in the PARENTAL CONTROL settings.
CHANGE CODETo change the current PASSCODE, press CHANGE CODE in the PARENTAL CONTROL settings,
and enter the new PASSCODE
PARENTAL CONTROL ON/OFFTouch ON/OFF in the PARENTAL CONTROL settings to toggle the PARENTAL CONTROL feature
ON or OFF. This feature is set to OFF by default.
14
Troubleshooting
CHECK TUNERThe radio is having difficulty communicating with the SiriusXM Connect Vehicle Tuner. The tuner may be
disconnected or damaged. Verify that the SiriusXM Connect Vehicle Tuner cable is securely connected
to the radio.
CHECK ANTENNAThe radio has detected a fault with the SiriusXM Antenna. The antenna cable may be either discon-
nected or damaged.Verify that the antenna cable is connected to the SiriusXM Connect Vehicle Tuner.
Inspect the antenna cable for damage and kinks. Replace the antenna if the cable is
damaged. SiriusXM products are available at your local car audio retailer or online at:
WWW.SHOP.SIRIUSXM.COM.
NO SIGNALThe SiriusXM connect Vehicle Tuner is having difficulty receiving the SiriusXM satellite signal.
Verify that your vehicle is outdoors with a clear view of the sky.
Verify that the SiriusXM magnetic mount antenna is mounted on a metal surface on the outside
of the vehicle.
Move the SiriusXM antenna away from any obstructions.
Inspect the antenna cable for damage and kinks.
Consult the SiriusXM Connect Vehicle tuner installation manual for more information on antenna installa-
tion. Replace the antenna if the cable is damaged. SiriusXM products are available at your local car audio
retailer or online at WWW.SHOP.SIRIUSXM.COM.
SUBSCRIPTION UPDATEDThe radio has detected a change in your SiriusXM subscription status. Confirm to clear the message.
In the U.S.A., visit WWW.SIRIUSXM.COM or call 1-866-635-2349 if you have questions about your
subscription. In Canada, visit WWW.SIRIUSXM.CA or call 1-888-539-7474 if you have questions about
your subscription.
CHANNEL UNAVAILABLEThe channel that you have requested is not a valid SiriusXM channel or the channel that your were
listening to is no longer available. You may also see this message briefly when first connecting a new
SiriusXM Connect Vehicle tuner. In the U.S.A., visit WWW.SIRIUSXM.COM or in Canada visit WWW.
SIRIUSXM.CA for more information about the SiriusXM channel lineup.
CHANNEL LOCKEDThe channel that you have requested is Locked by the radio Parental Control feature. See previous
PARENTAL CONTROL LOCK, page 24 for more information on the PARENTAL CONTROL feature and
how to access locked channels.
INVALID CODEThe code entered to unlock the selected channel is invalid. See previous
PARENTAL CONTROL LOCK, page 24 for more information on the PARENTAL CONTROL feature
and how to access locked channels. See previous RESET TO DEFAULTS, page 24 for more information
on how to reset The SiriusXM Satellite Radio back to it’s original factory settings.
15
Settings
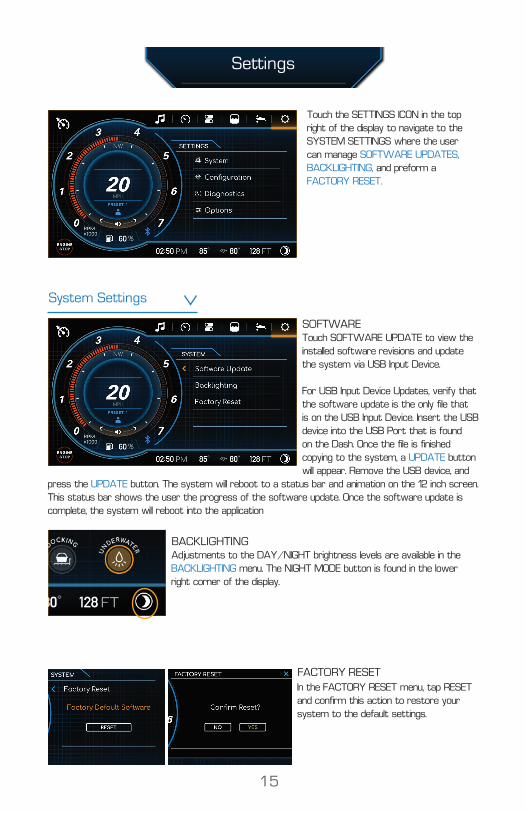
Touch the SETTINGS ICON in the top
right of the display to navigate to the
SYSTEM SETTINGS where the user
can manage SOFTWARE UPDATES,
BACKLIGHTING, and preform a
FACTORY RESET.
SOFTWARETouch SOFTWARE UPDATE to view the
installed software revisions and update
the system via USB Input Device.
For USB Input Device Updates, verify that
the software update is the only file that
is on the USB Input Device. Insert the USB
device into the USB Port that is found
on the Dash. Once the file is finished
copying to the system, a UPDATE button
will appear. Remove the USB device, and
press the UPDATE button. The system will reboot to a status bar and animation on the 12 inch screen.
This status bar shows the user the progress of the software update. Once the software update is
complete, the system will reboot into the application
System Settings
BACKLIGHTINGAdjustments to the DAY/NIGHT brightness levels are available in the
BACKLIGHTING menu. The NIGHT MODE button is found in the lower
right corner of the display.
FACTORY RESETIn the FACTORY RESET menu, tap RESET
and confirm this action to restore your
system to the default settings.
16
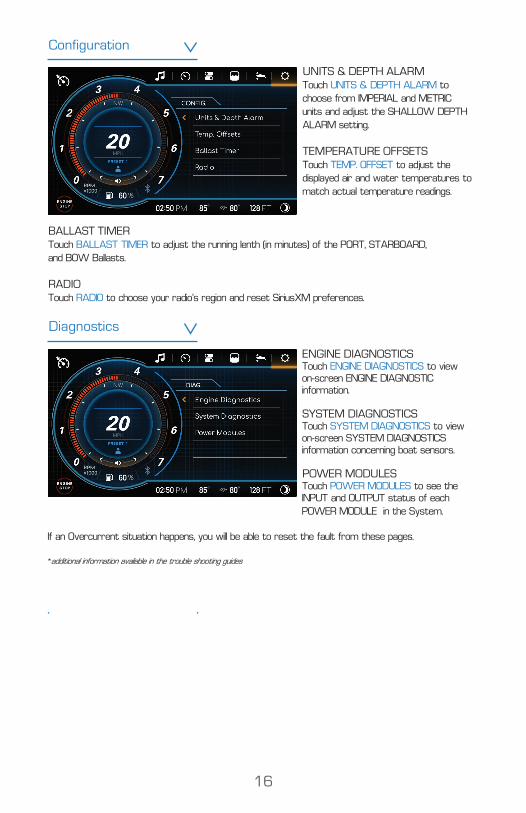
ENGINE DIAGNOSTICSTouch ENGINE DIAGNOSTICS to view on-screen ENGINE DIAGNOSTIC information.
SYSTEM DIAGNOSTICSTouch SYSTEM DIAGNOSTICS to view on-screen SYSTEM DIAGNOSTICS information concerning boat sensors.
POWER MODULESTouch POWER MODULES to see the INPUT and OUTPUT status of each
POWER MODULE in the System.
If an Overcurrent situation happens, you will be able to reset the fault from these pages.
*additional information available in the trouble shooting guides
UNITS & DEPTH ALARMTouch UNITS & DEPTH ALARM to
choose from IMPERIAL and METRIC
units and adjust the SHALLOW DEPTH
ALARM setting.
TEMPERATURE OFFSETSTouch TEMP. OFFSET to adjust the
displayed air and water temperatures to
match actual temperature readings.
BALLAST TIMERTouch BALLAST TIMER to adjust the running lenth (in minutes) of the PORT, STARBOARD,
and BOW Ballasts.
RADIOTouch RADIO to choose your radio’s region and reset SiriusXM preferences.
Configuration
Diagnostics
17
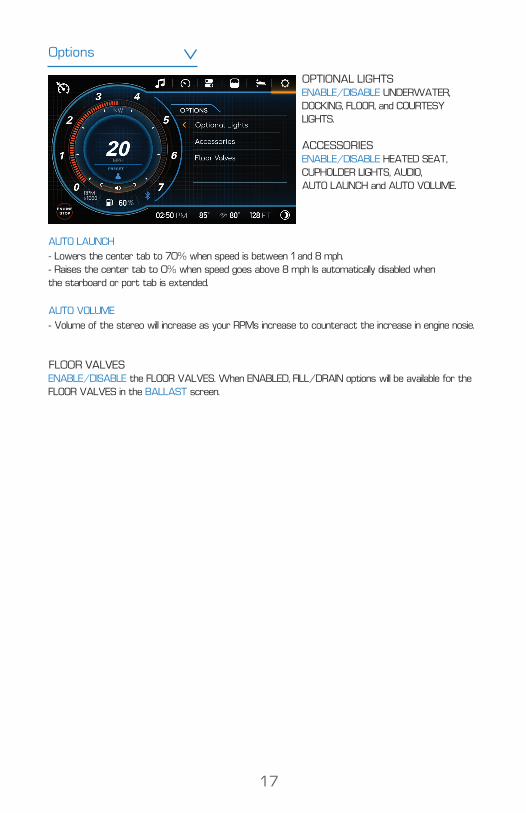
Options
OPTIONAL LIGHTSENABLE/DISABLE UNDERWATER,
DOCKING, FLOOR, and COURTESY
LIGHTS.
ACCESSORIESENABLE/DISABLE HEATED SEAT,
CUPHOLDER LIGHTS, AUDIO,
AUTO LAUNCH and AUTO VOLUME.
AUTO LAUNCH
- Lowers the center tab to 70% when speed is between 1 and 8 mph.
- Raises the center tab to 0% when speed goes above 8 mph Is automatically disabled when
the starboard or port tab is extended.
AUTO VOLUME
- Volume of the stereo will increase as your RPMs increase to counteract the increase in engine nosie.
FLOOR VALVESENABLE/DISABLE the FLOOR VALVES. When ENABLED, FILL/DRAIN options will be available for the
FLOOR VALVES in the BALLAST screen.
18
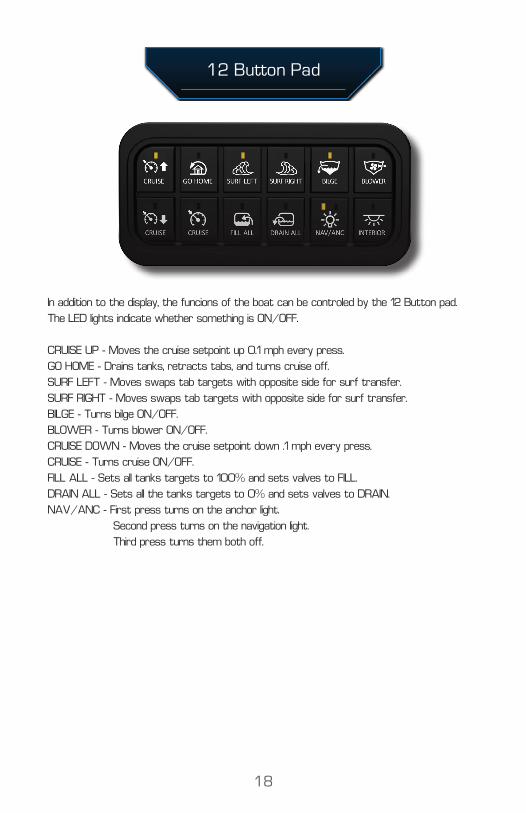
12 Button Pad
In addition to the display, the funcions of the boat can be controled by the 12 Button pad.
The LED lights indicate whether something is ON/OFF.
CRUISE UP - Moves the cruise setpoint up 0.1 mph every press.
GO HOME - Drains tanks, retracts tabs, and turns cruise off.
SURF LEFT - Moves swaps tab targets with opposite side for surf transfer.
SURF RIGHT - Moves swaps tab targets with opposite side for surf transfer.
BILGE - Turns bilge ON/OFF.
BLOWER - Turns blower ON/OFF.
CRUISE DOWN - Moves the cruise setpoint down .1 mph every press.
CRUISE - Turns cruise ON/OFF.
FILL ALL - Sets all tanks targets to 100% and sets valves to FILL.
DRAIN ALL - Sets all the tanks targets to 0% and sets valves to DRAIN.
NAV/ANC - First press turns on the anchor light.
Second press turns on the navigation light.
Third press turns them both off.
19
1
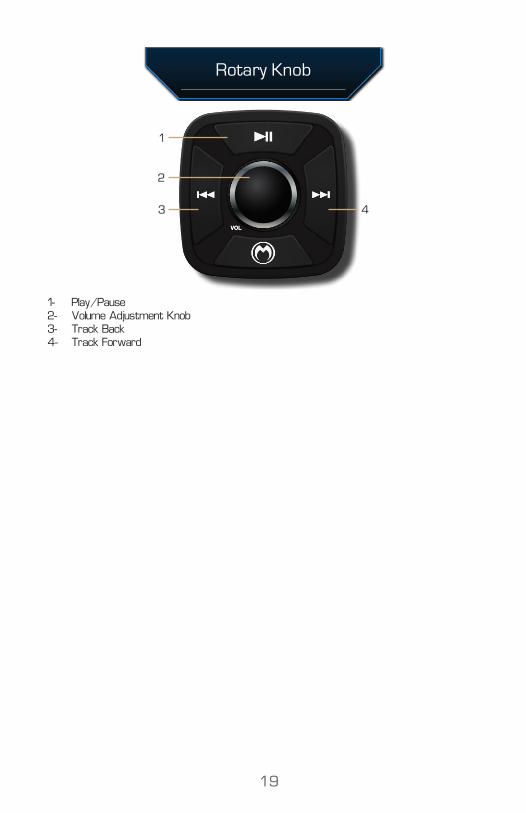
Rotary Knob
1- Play/Pause2- Volume Adjustment Knob3- Track Back4- Track Forward
2
3 4

MY22_Sanger_Guide_Draft7 Not For Production