1
RingCentral for Salesforce Classic
Administrator Guide
RingCentral for Salesforce Classic | Administrator Guide | Introduction
2
Contents
Introduction . . . . . . . . . . . . . . . . . . . . . . . . . . . . . . . . . . . . . . . . . . . . . . . . . . . . . . . . 3
About RingCentral for Salesforce . . . . . . . . . . . . . . . . . . . . . . . . . . . . . . . . . . . . . . . . . . . . . . . . . 3
About this Guide . . . . . . . . . . . . . . . . . . . . . . . . . . . . . . . . . . . . . . . . . . . . . . . . . . . . . . . . . . . . 3
Setting up the Call Center . . . . . . . . . . . . . . . . . . . . . . . . . . . . . . . . . . . . . . . . . . . . . . . 4
Step 1: Install RingCentral for Salesforce . . . . . . . . . . . . . . . . . . . . . . . . . . . . . . . . . . . . . . . . . . . . . 4
Step 2: Configure the Call Center . . . . . . . . . . . . . . . . . . . . . . . . . . . . . . . . . . . . . . . . . . . . . . . . 4
Step 3: Add Users to the Call Center . . . . . . . . . . . . . . . . . . . . . . . . . . . . . . . . . . . . . . . . . . . . . . . 6
Setting up SoftPhone Layouts in Salesforce . . . . . . . . . . . . . . . . . . . . . . . . . . . . . . . . . . 7
Step 1: Set up a SoftPhone Layout . . . . . . . . . . . . . . . . . . . . . . . . . . . . . . . . . . . . . . . . . . . . . . . . . 7
Step 2: Assign the SoftPhone Layout to Users . . . . . . . . . . . . . . . . . . . . . . . . . . . . . . . . . . . . . . . . . . 8
Setting up Preset Call Dispositions . . . . . . . . . . . . . . . . . . . . . . . . . . . . . . . . . . . . . . . . 9
Share Report Folder with Users . . . . . . . . . . . . . . . . . . . . . . . . . . . . . . . . . . . . . . . . . . 10
Admin UI . . . . . . . . . . . . . . . . . . . . . . . . . . . . . . . . . . . . . . . . . . . . . . . . . . . . . . . . . . . 11
Call Recording . . . . . . . . . . . . . . . . . . . . . . . . . . . . . . . . . . . . . . . . . . . . . . . . . . . . . . . 13
Add RingCentral Call and SMS Options to Salesforce1 . . . . . . . . . . . . . . . . . . . . . . . . . 14
Troubleshooting . . . . . . . . . . . . . . . . . . . . . . . . . . . . . . . . . . . . . . . . . . . . . . . . . . . . . 22

RingCentral for Salesforce Classic | Administrator Guide | Introduction
3
Introduction
About RingCentral for Salesforce
RingCentral for Salesforce provides seamless integration between
Salesforce.com and your RingCentral services to enable improved
customer retention, greater agent productivity, and advanced
business processes.
About this Guide This guide is specifically designed for System Administrators of the
Salesforce.com application. This guide is not intended for end users and
does not provide any information on how to use the application or any
related information. This Administrator guide will show you how to set up
your Salesforce.com instance to enable your users to use RingCentral for
Salesforce within their Salesforce.com interface.

RingCentral for Salesforce Classic | Administrator Guide | Setting up the Call Center
4
Setting up the Call Center
Figure 1
Step 1: Install RingCentral for Salesforce
Install RingCentral for Salesforce package from the AppExchange here. Installation of this application requires an administrator login to Salesforce.com. During installation, you will be asked what subset of users to whom you wish to grant access. It is generally recommended to select Grant Access to All Users, as this will ensure that Step 2 below will go smoothly; users will not actually have access to RingCentral for Salesforce until the administrator adds them to the Call Center as detailed below.
Step 2: Configure the Call Center
Go to Setup > Visualforce Pages and click the Preview icon next to the OpenCTIIndex999 page. (Figure 1)

RingCentral for Salesforce Classic | Administrator Guide | Setting up the Call Center
5
Figure 2
After the page opens in a new tab or window, copy its URL (until # symbol). For example, if the full URL is https://redabacus-dev-ed--
rcsfl.na30.visual.force.com/apex/OpenCTIIndex999#/dialer, you should take https://redabacus-dev-ed--rcsfl.na30.visual.force.com/apex/OpenCTIIndex999
from here.
Go to Setup Home > Call Centers, select the call center Cloud Phone App and click Edit. Paste the URL from OpenCTIIndex999 page to CTI Adapter URL; then
click Save. (Figure 2)
The above is an example of a Salesforce Org where a custom URL redabacus-dev-ed is set. In case you are not using a custom URL, follow the same steps
and make sure the Salesforce POD# in the Call Center URL, na30 in this example, matches with Call Center where Salesforce Org resides. Your Salesforce
POD# is specified in the browser address bar after you login to Salesforce. (Figure 2A)
Figure 2A

RingCentral for Salesforce Classic | Administrator Guide | Setting up the Call Center
6
Step 3: Add Users to the Call Center
Once you have installed the package from the AppExchange page given in
Step 1, you should see a new entry in Salesforce.com Setup > Call Center.
Navigate to Customize > Call Center > Call Centers. You should see an
entry named Cloud Phone App. (Figure 3)
Figure 3
Upon clicking RingCentral Cloud App, you will see the Call Center details.
(Figure 4). It is not necessary to edit this Call Center definition. From here,
you can add users to this Call Center using the Manage Call Center Users
button, which opens the Manage Users screen (Figure 5).
Note: If your users are added to another call center already, please first
remove them from that call center before you try to add them in the
Cloud Phone App.
Figure 4
Figure 5

RingCentral for Salesforce Classic | Administrator Guide | Setting up Softphone Layouts in Salesforce
7
Setting up Softphone Layouts in Salesforce
Step 1: Set up a Softphone Layout
From the left-hand side menu, go to Setup > Customize > Call Center
> SoftPhone Layouts and click the New button (Figure 6).
Figure 6
In the Name field, fill in “RingCentral SoftPhone Layout” and select the
Is Default Layout checkbox if you want this layout to be the default for
all users (Figures 7 & 8).
Figure 7
Figure 8
Note that according to Open CTI Developer Guide https://developer.salesforce.com/docs/atlas.en- us.api_cti.meta/api_cti/sforce_api_cti_screenpop_lex.htm.

RingCentral for Salesforce Classic | Administrator Guide | Setting up Softphone Layouts in Salesforce
8
In Screen Pop Settings (Figure 8 above):
• In the first set, Screen pops open within, choose whether you’d like screen
pops to appear in a new window or to overwrite the existing Salesforce.com
window when a new call arrives.
• For the second set, No matching records, if you’d like a new record to be
created if there’s no match on an inbound call, select the Pop to New option
and from the dropdown select the appropriate object you would like to be
created when there is an incoming call from a number which does not match
any existing record.
• In the third set, Single-matching record, select the Pop detail page option.
• In the fourth set, Multiple-matching records, select the Pop to search page.
Now click the Save button on the top.
Step 2: Assign the SoftPhone Layout to Users
Back on the SoftPhone Layouts page (Figure 9), click the SoftPhone Layout
Assignment, and assign the SoftPhone Layout to the relevant profiles.
Figure 9

RingCentral for Salesforce Classic | Administrator Guide | Setting up Preset Call Dispositions
9
Setting up Preset Call Dispositions
RingCentral for Salesforce includes the capability to provide a list of preset
call dispositions to your end users to make logging calls quick and easy.
These dispositions appear in a dropdown list under the Subject area of
the call log (Figure 10):
These preset dispositions are gathered from the Subject picklist on the
Salesforce.com Task object. To edit these dispositions, navigate to App
Setup > Activities > Task Fields. On the Task Fields page, click the label of
the Subject field, and you’ll see a page like this (Figure 11):
Figure 11
Adding or editing picklist values here will instantly modify the dispositions
available to users.
Figure 10
RingCentral for Salesforce Classic | Administrator Guide | Share Report Folder with Users
10
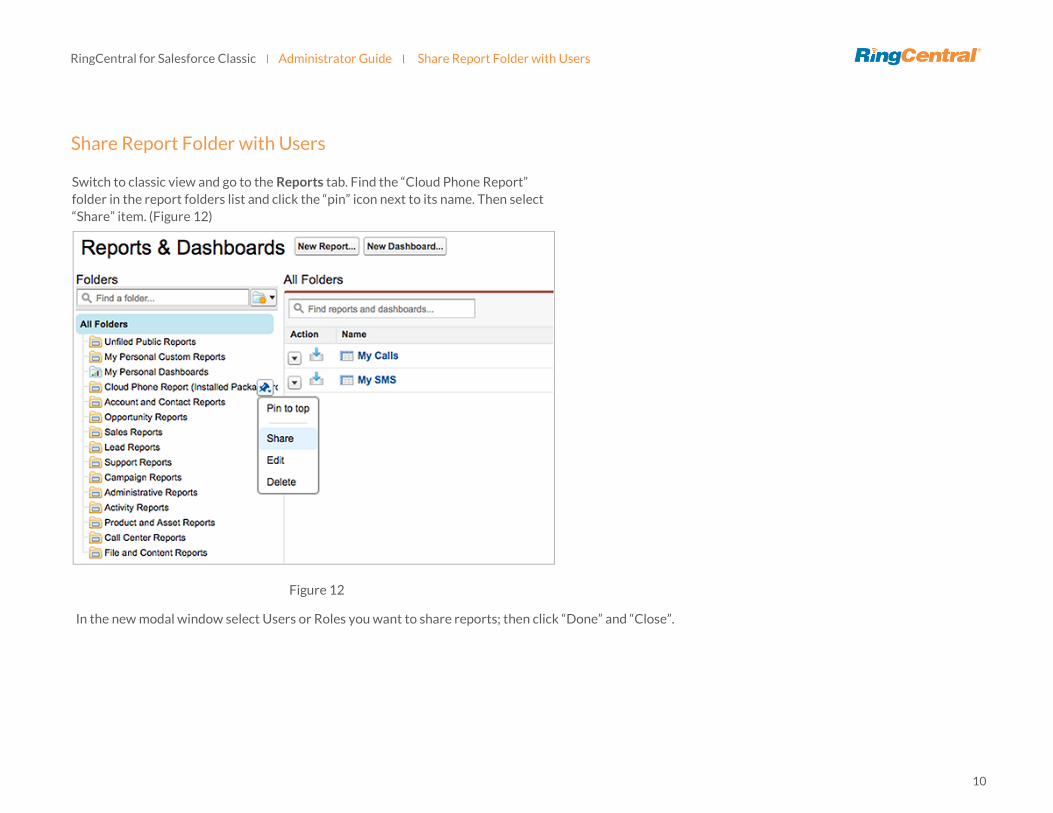
Share Report Folder with Users
Switch to classic view and go to the Reports tab. Find the “Cloud Phone Report”
folder in the report folders list and click the “pin” icon next to its name. Then select
“Share” item. (Figure 12)
Figure 12
In the new modal window select Users or Roles you want to share reports; then click “Done” and “Close”.

RingCentral for Salesforce Classic | Administrator Guide | Admin UI
11
Admin UI
AdminUI is a VisualForce page created for you to do organization-wide settings for your RingCentral for Lightning app as account administrator.
The page URL is: /apex/rcsfl adminUI999 (Figure 13)
For example, if your Salesforce instance home page is https://ap2.salesforce.com/home/home.jsp your adminUI URL would be
https://ap2.salesforce.com/apex/rcsfl adminUI999. You’ll be prompted after you enter the URL to: Please press ‘Initialize’ to go the AdminUI.
On the Cloud Phone Settings page you can access the following:
Auto Save Call Log Setting
Besides the Screen Pop Settings you made in Setup Home > Softphone Layout, in this section you can further define when to do the screen pop: whether to pop when an inbound call is ringing or when it’s answered.
Also you can define whether to auto-create call logs and when to log them. This setting will override the settings the user does on the app > Settings page.
Log Customization
Add/remove call log fields by using the left/right arrows and order the selected call log fields by using the up/down arrows. Click Save button when call log settings are as expected and refresh the page. The call log UI of the RingCentral for Salesforce app should render these fields in the exact order they are listed in the Selected Fields box.
Note: the field types supported in Call Log are Lookup Relationship, Date, Date/Time, Picklist, Text and Text Area.
With Auto-select call log object in ‘Related To’ / ‘Name’ checked, the app will auto-select a matching record in ‘Related To’ /’Name’; if the user navigates away to view some other record, the record user views will override the previous auto-selected value in ‘Related To’ /’Name’.
The user could manually select a record in ‘Related To’ /’Name’ dropdown, app will not change what user manually selects even if he/she navigates to some other record details page. The section “Associate calls with person account” is hidden by default. If you want to show it you are required to be partners of Salesforce and just open a case asking Salesforce Support to enable person account by providing Organization ID. Go to Settings > Company Information and use “Salesforce.com Organization ID” field.
Figure 13
RingCentral for Salesforce Classic | Administrator Guide | Admin UI
12
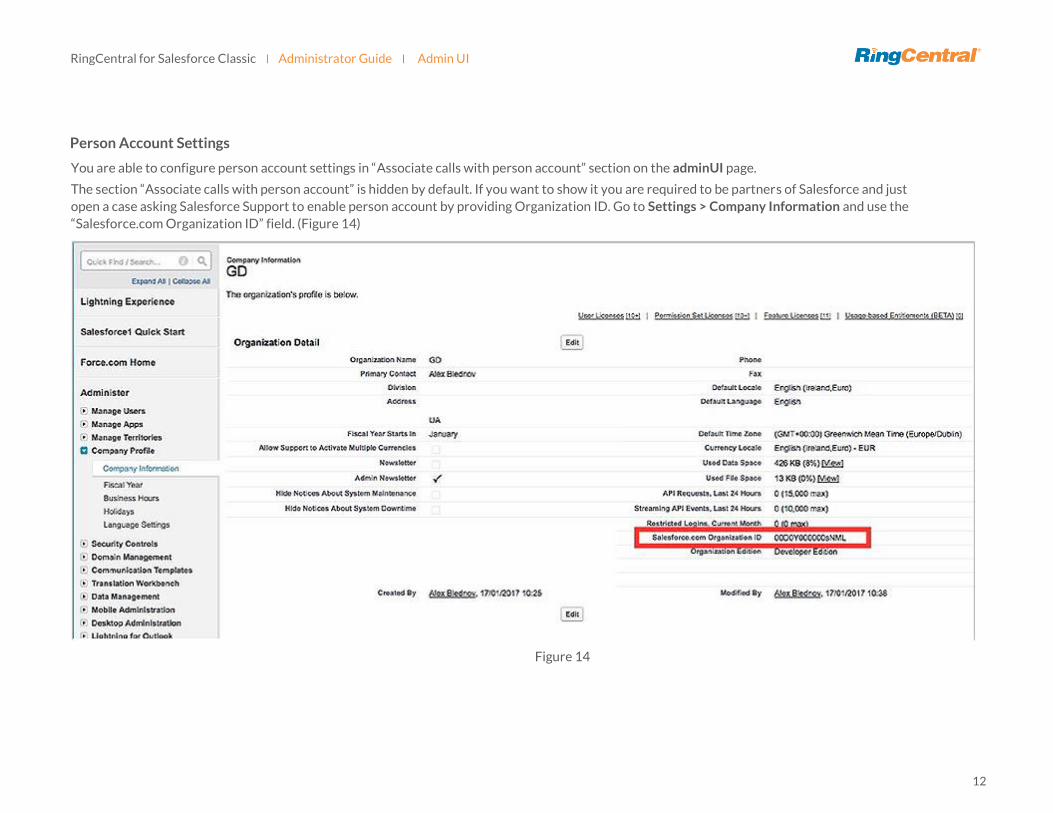
Person Account Settings
You are able to configure person account settings in “Associate calls with person account” section on the adminUI page.
The section “Associate calls with person account” is hidden by default. If you want to show it you are required to be partners of Salesforce and just
open a case asking Salesforce Support to enable person account by providing Organization ID. Go to Settings > Company Information and use the
“Salesforce.com Organization ID” field. (Figure 14)
Figure 14
RingCentral for Salesforce Classic | Administrator Guide | Call Recording
13
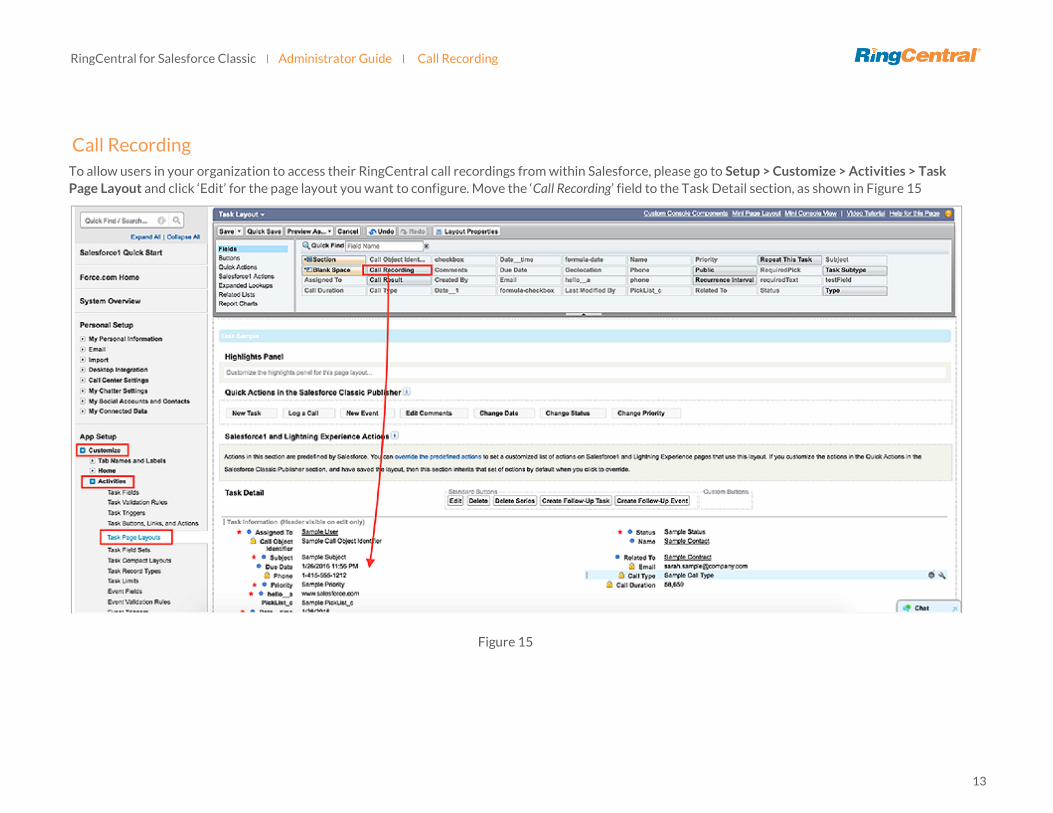
Call Recording
Figure 15
To allow users in your organization to access their RingCentral call recordings from within Salesforce, please go to Setup > Customize > Activities > Task
Page Layout and click ‘Edit’ for the page layout you want to configure. Move the ‘Call Recording’ field to the Task Detail section, as shown in Figure 15

RingCentral for Salesforce Classic | Administrator Guide | Add RingCentral Call and SMS Options to Salesforce1
14
Figure 16
Add RingCentral Call and SMS Options to Salesforce1
Follow the steps below you could add Call with RingCentral and SMS with RingCentral options to Account/Contact/Lead details tab in the Salesforce1 app.
As an example, below are steps to add the options to the Accounts Page Layout.
Create New Actions
Go to App Setup > Customize > Accounts > Buttons, Links, and Actions > New Action. (Figure 16)

RingCentral for Salesforce Classic | Administrator Guide | Add RingCentral Call and SMS Options to Salesforce1
15
Figure 17
Select ‘Custom Visualforce’ as Action type and select ‘Phone Numbers Account999 [Phone_Numbers_Account999]’ in Visualforce Page dropdown list, enter
‘Call with RingCentral’ as Label, click Save. (Figure 17)
RingCentral for Salesforce Classic | Administrator Guide | Add RingCentral Call and SMS Options to Salesforce1
16
Figure 18
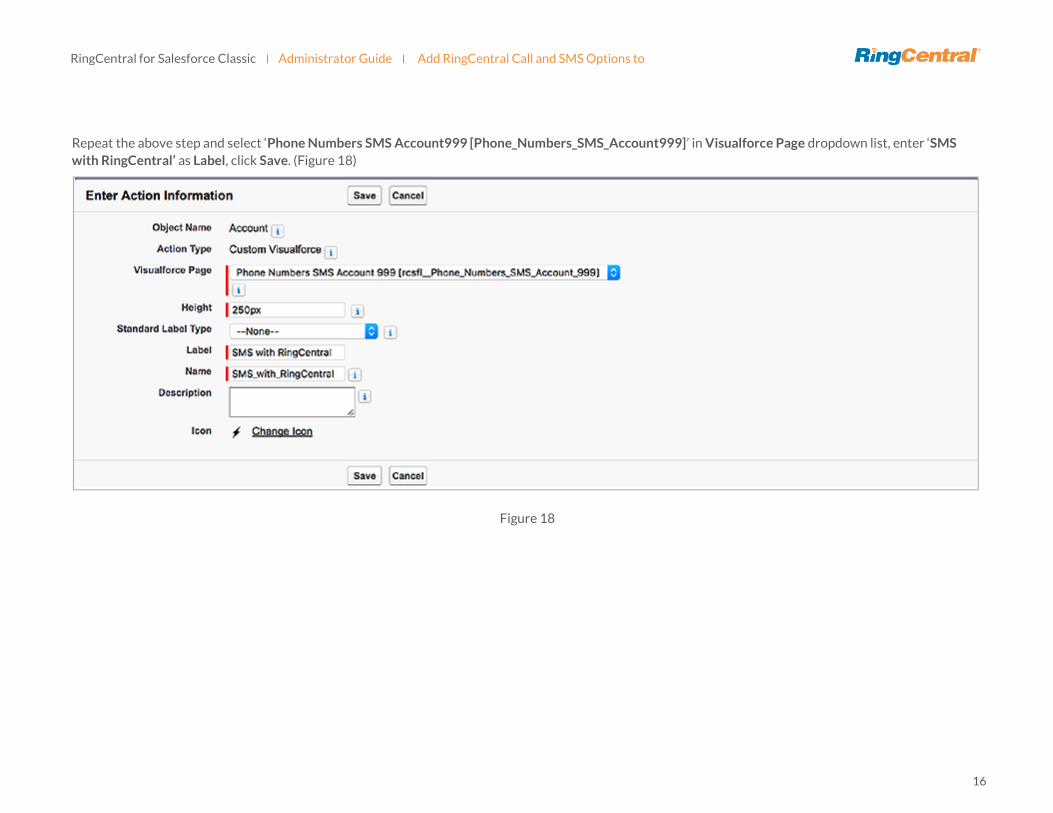
Repeat the above step and select ‘Phone Numbers SMS Account999 [Phone_Numbers_SMS_Account999]’ in Visualforce Page dropdown list, enter ‘SMS
with RingCentral’ as Label, click Save. (Figure 18)

RingCentral for Salesforce Classic | Administrator Guide | Add RingCentral Call and SMS Options to Salesforce1
17
Add Actions to Salesforce1
Go to Setup > Customize > Accounts > Page Layouts > Page Layout Assignment. (Figure 19)
Figure 19

RingCentral for Salesforce Classic | Administrator Guide | Add RingCentral Call and SMS Options to Salesforce1
18
Select the Page Layout you want to change and click Edit. (Figure 20).
Figure 20
RingCentral for Salesforce Classic | Administrator Guide | Add RingCentral Call and SMS Options to Salesforce1
19
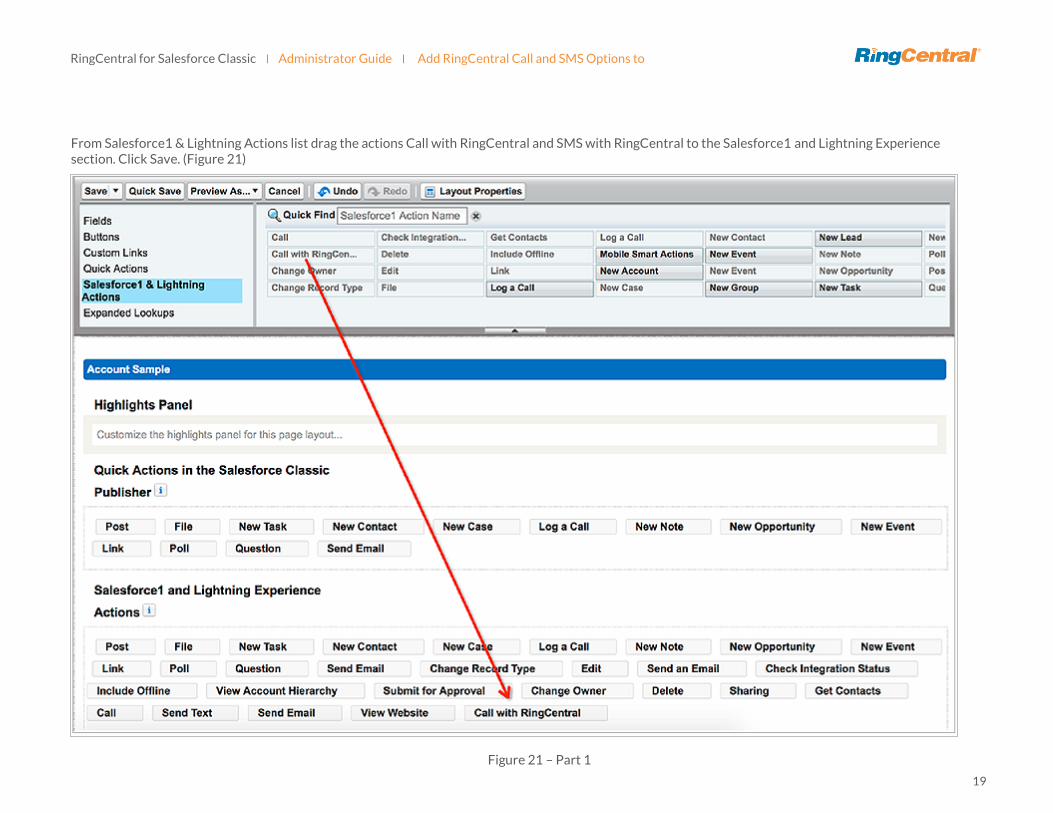
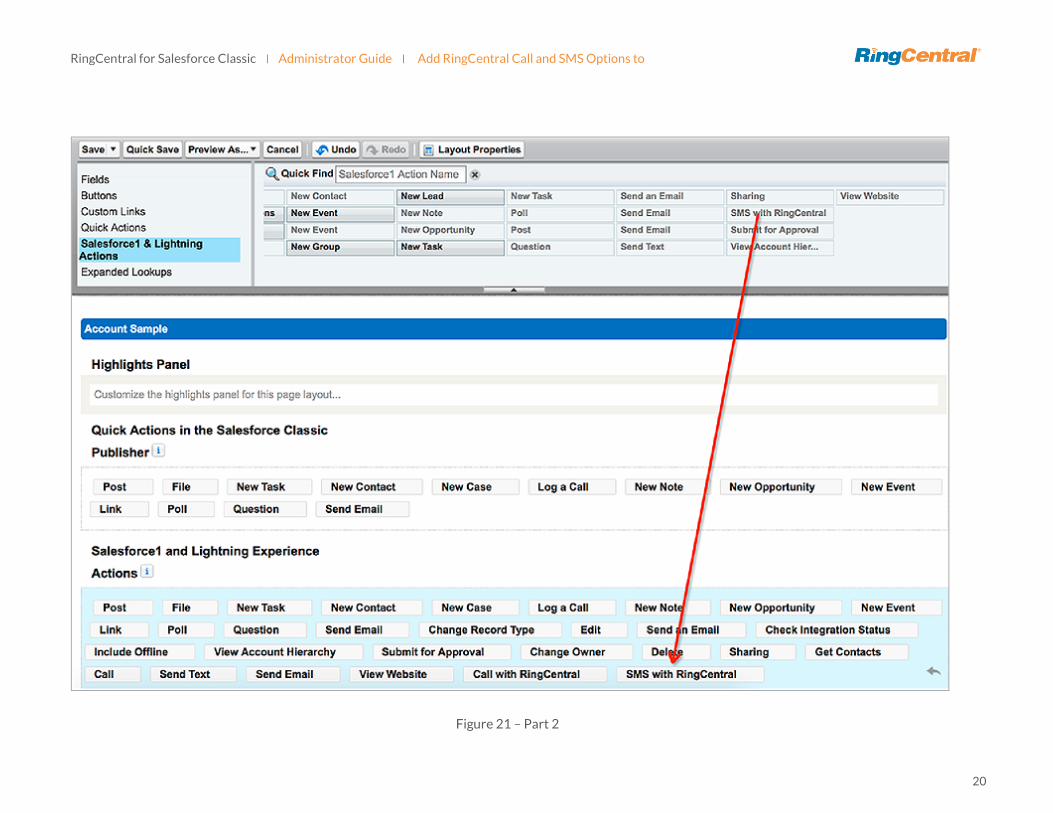
From Salesforce1 & Lightning Actions list drag the actions Call with RingCentral and SMS with RingCentral to the Salesforce1 and Lightning Experience section. Click Save. (Figure 21)
Figure 21 – Part 1
RingCentral for Salesforce Classic | Administrator Guide | Add RingCentral Call and SMS Options to Salesforce1
20
Figure 21 – Part 2

RingCentral for Salesforce Classic | Administrator Guide | Add RingCentral Call and SMS Options to Salesforce1
21
Buttons are added. Go to Salesforce1 and check an account’s details; there will be Call with RingCentral and SMS with RingCentral options. (Figure 22)
Figure 22
RingCentral for Salesforce Classic | Administrator Guide | Troubleshooting
22
Troubleshooting
Q: RingCentral for Salesforce is not visible for some profiles. What is the problem? Does RingCentral for Salesforce require any special permissions?
A: RingCentral for Salesforce does not require any special permissions and it should work for all out-of-the-box profiles. First, ensure that the relevant users have been added to the Call Center as given here in Step 3 of the Call Center setup above.
It is also possible that there is a custom component in the sidebar layout and the JavaScript in those components is interfering with RingCentral for Salesforce.
To resolve this issue, temporarily remove all customizations that have been applied to the sidebar component. Once you see RingCentral for Salesforce rendered properly, add your custom components back one by one so you can pinpoint which bit is creating the issue. Once you find the component causing the problem, contact the developer of that component to fix the issue.
Q: Users don’t see a new tab or window opening on incoming calls. What’s wrong?
A: Please ensure that the pop-up is not blocked by browser settings or by some other pop-up blocker software installed on your desktop.
Q: I would like to disable this feature for now.
A: You can do this by removing the users from
RingCentral for Salesforce Call Center profile.
Q: What browsers does the app support?
A: The following browsers are supported by
the App:
• Internet Explorer 11 + (Windows 7, 8 or higher)
IE Edge 38+ (Windows 7, 8 or higher)
• Firefox 52+ (Windows, Mac)
• Chrome 56+ (Windows, Mac)
Q: On logging into RingCentral for Salesforce, users are getting this error message: “Your RingCentral edition does not support Salesforce Integration - please call your RingCentral account representative to upgrade your RingCentral edition.” What does that mean?
A: Not all RingCentral editions have the ability to use this feature of Salesforce integration. You may have to upgrade your account to be able to use this feature. Please contact your RingCentral representative to get more information.
Q: Some of my users are getting a message saying “Insufficient Privileges” where the RingCentral integration should be.
A: These users require access to the RingCentral
Visualforce page in their profile. To enable this
access, go to the user’s profile. You’ll find a
section called Visualforce Page Access. Ensure
that the page RingCentral_OpenCTIIndex is included for this profile.
Q: Click To Dial is not working for some or all of my users. How do I fix it?
A: First, go to App Setup > Call Center > Customize Call Centers and verify that the CTI Adapter URL is pointing at:
/apex/RingCentral_OpenCTIIndex#/
If it is not pointing at the URL above, then change it to that URL and see if that fixes the issue.
If the issue is still not fixed, ensure your users don’t have other apps that are handling click-to- dial calls, like InsideSales_PowerDialer.
©2018 RingCentral, Inc. All rights reserved. RingCentral, RingCentral Office, RingCentral Meetings, and the RingCentral logo are registered trademarks of RingCentral, Inc. Other third-party
marks and logos displayed in this document are the trademarks of their respective owners.
KID-10444