National Finance Center Office of the Chief Financial Officer U.S. Department of Agriculture March 2016
EmpowHR: Section 1 - Basics
PUBLICATION CATEGORY HR and Payroll Processing
PROCEDURE MANUAL EmpowHR
SECTION 1 Basics

Publication Category: HR and Payroll Processing EmpowHR: Section 1 - Basics
i
Table of Contents
Latest Update Information ........................................................................................... 1
Overview ........................................................................................................................ 1
Roles ................................................................................................................................... 2
Reporting ........................................................................................................................... 3
Agency Responsibilities .................................................................................................. 4
National Finance Center Responsibilities ...................................................................... 4
National Finance Center Security Responsibilities ...................................................... 5
Access Management Branch's (AMB) Monitoring and Reporting Section (MARS) will: .6
SAAG will: ..........................................................................................................................6
Access/Security ................................................................................................................ 7
Logging On ........................................................................................................................ 7
Use the eAuthentication Login (for Department of Justice (DOJ) and United States Department of Agriculture (USDA) Employees Only) ................................................. 10
Did You Forget Your Password? ................................................................................... 10
Changing Password ....................................................................................................... 11
Exiting .............................................................................................................................. 12
Menus ............................................................................................................................... 12
Processing ....................................................................................................................... 29
Payroll/Processing Cycle .........................................................................................................30
Payroll/Personnel System Flow ...............................................................................................31
Using the Application ................................................................................................. 33
Effective Dates ................................................................................................................ 33
Page Groups .................................................................................................................... 34
Hyperlinks ........................................................................................................................ 34
New Windows .................................................................................................................. 34
Fields ................................................................................................................................ 34
Statuses ........................................................................................................................... 36
Navigation ................................................................................................................... 39
Search .............................................................................................................................. 48
Calendar Icon .................................................................................................................. 55
Tabs .................................................................................................................................. 56

Publication Category: HR and Payroll Processing
EmpowHR: Section 1 - Basics
ii
Sequencing ...................................................................................................................... 57
Tips ................................................................................................................................... 58
Index ............................................................................................................................ 63

Publication Category: HR and Payroll Processing EmpowHR: Section 1 - Basics
1
Latest Update Information
Section Description of Change
Agency Responsibilities Information has been added to instruct users on how to submit table change requests.


Publication Category: HR and Payroll Processing EmpowHR: Section 1 - Basics
1
Overview
EmpowHR is a Human Capital Management System that fully supports the achievement and
effective delivery of the human capital goals of the President’s Management Agenda. EmpowHR
is an integrated suite of commercial and Government applications that support all critical Human
Resources (HR) components in a single enterprise system. It provides comprehensive employee
information enabling Agencies to: (1) make critical decisions concerning workforce utilization,
(2) forecast workforce turnover and placement, and (3) project future resource budget allocations
on a fiscal year basis, for optimum achievement of Agency mission goals.
The goal of EmpowHR is to offer a streamlined, integrated set of business processes within a
National Finance Center (NFC)-hosted technology suite, which can be leveraged by the client to
automate common administrative tasks associated with HR management and reduce internal
operational costs using industry best practices.
EmpowHR allows the Agency to focus resources on important mission-related activities rather
than time-consuming payroll and personnel office processing.
EmpowHR offers an advantageous environment where efficient and effective solutions can be
quickly leveraged across the Federal enterprise. Its table-driven environment affords rapid
implementation of changing HR rules and practices. It also features a robust COTS (Commercial
off-the-shelf)-based front-end system utilizing Oracle/PeopleSoft’s pure Internet/Web-based
architecture. It ultimately facilitates easily sharing of information between and among HR,
payroll, financial management, and related functions.
NFC continues to be the recordkeeper for all payroll/personnel transactions. HR professionals
will use EmpowHR to enter all personnel actions, performance appraisals, awards, and employee
addresses for accessions and payroll documents such as health benefits, bonds, and Combined
Federal Campaign (CFC) contributions. EmpowHR includes additional benefits tailored to the
needs of the employee, as well as the managers. For managers and supervisors, EmpowHR has a
workflow system that defines who needs access to what information and routes the work
accordingly.
The outbound interface is designed to capture all transactions that originate in EmpowHR and
transmit them to NFC for payroll/personnel processing. The Front End System Interface (FESI)
takes a snapshot of data on one system and transmits it to another system. It translates the data
from the front-end system, EmpowHR, to the system of record, NFC. This allows user to enter
data via EmpowHR and then transmit the data to NFC on a regular processing schedule. Daily
batches are collected in EmpowHR at 11 a.m. and 4 p.m. and transmitted to NFC between 5 p.m.
and 7 p.m. central time (CT). The NFC return-feed process updates EmpowHR with the results
of the nightly Personnel Input and Edit System (PINE) process which occurs between 1:00 a.m.
and 3:30 a.m. CT.
When a client or customer decides to use EmpowHR, the Agency must decide what modules
(functions) to use. This is customized on a client-to-client basis. What a user sees while using
EmpowHR is determined by the Agency specifications during the implementation process.

Publication Category: HR and Payroll Processing
EmpowHR: Section 1 - Basics
2
EmpowHR’s components include:
Recruitment
Position Classification
HR Processing
Strategic Workforce Reporting
Training and Employee Development
Employee and Labor Relations
Employee Benefits Administration
Succession Planning
Employee Performance and Accountability
Organizational Management
This section includes the following topics:
Roles............................................................................................................................. 2
Reporting ..................................................................................................................... 3
Agency Responsibilities ............................................................................................. 4
National Finance Center Responsibilities ................................................................. 4
National Finance Center Security Responsibilities .................................................. 5
Access/Security ........................................................................................................... 7
Logging On .................................................................................................................. 7
Use the eAuthentication Login (for Department of Justice (DOJ) and United States Department of Agriculture (USDA) Employees Only)............................................. 10
Did You Forget Your Password? ............................................................................. 10
Changing Password .................................................................................................. 11
Exiting ........................................................................................................................ 12
Menus ......................................................................................................................... 12
Processing ................................................................................................................. 29
Roles
A role is a class of users who perform the same type of work, such as clerks or managers. The
Agency’s business processes typically specify what the user role needs to conduct their daily
activity. The Agency determines the prescribed workflow path (for a document/action) from the
initiation of the action to the final approval process.
Publication Category: HR and Payroll Processing EmpowHR: Section 1 - Basics
3
A role user is a person who is in a workflow. A person’s role user identification (ID) number is
used to determine how to route worklist items to users (through an email address) and to track
the roles that users play in the workflow. Role users do not need EmpowHR user IDs.
Agencies determine what roles they will use when they implement EmpowHR. The roles most
frequently used in EmpowHR are:
Initiator
Employee
Manager
Reviewer
Approver
HR Staff
Workflow Administrator
Security Administrator
Reporting
Reporting enables users to access business intelligence information from within a specific
module or by using records from multiple modules using a reporting tool such as Query.
Reporting tools are available within EmpowHR. The following are the reporting options
available:
Run an existing query
Create/build a basic query
Run a basic query
Save a basic query
Add criteria to query
Update an existing query
Send query results to an Excel spreadsheet
Run a standard report
Select a report
View report output
Set up a Run Control ID

Publication Category: HR and Payroll Processing
EmpowHR: Section 1 - Basics
4
The following pages, on the PAR Processing menu, have Report Manager and Process Monitor:
Org Structure Mass Change
Schools
Agency Responsibilities
Electronically enters employee data into EmpowHR.
Maintains remote (peripheral) hardware and communications to use the application.
Provides detailed specifications for new requirements for modifications to the
application.
Submits table change requests via email to [email protected].
Note: If there are less than 50 changes, the Agency updates TMGT Table 005 manually, or the
Agency may request for NFC to update Table 005 by sending a request to [email protected].
If there are more than 50 changes, an Agency can make their own changes, or the Agency may
submit request to [email protected] and include an ASCII formatted file. The NFC
developers will run a job to update the table with the contents of the file.
Provides a representative(s) to participate in user group meetings.
Maintains internal procedures for coordination requests to NFC on new requirements or
modifications to the application.
Designates a Security Officer who will serve as the authorizing official for security
access and the official point-of-contact for ongoing security requirements and issues.
Participates in testing of customer-specific modifications and version-upgrade user
acceptance testing.
Participates in business resumption/disaster recovery drill as required.
Ensures that all requirements of the Economy Act are met.
National Finance Center Responsibilities
Ensures adequate resources are available to maintain and operate EmpowHR.
Manages the interface of employee and pay-related information from EmpowHR to
NFC’s Payroll/Personnel System (PPS).
Coordinates upgrade of PeopleSoft application versions with customers.
Manages application configuration management.

Publication Category: HR and Payroll Processing EmpowHR: Section 1 - Basics
5
Provides application development including coding, integration testing, and acceptance
testing.
Implements high priority system enhancements identified by the customer user group(s).
Coordinates end-user acceptance testing.
Provides ad hoc reporting access to users.
Provides a Human Resources Help Desk to assist field HR office staff with resolution of
subject-matter specific questions affecting EmpowHR.
Provides comprehensive data-center system maintenance and operations support.
Provides continuous online availability during normal business hours.
Maintains multiple application environments (production, test, development, etc.).
Performs regular maintenance on all production, test, and development data sets.
Provides ongoing system tuning.
Operates a 24-hour-a-day, 7-day-a-week Help Desk for systems connectivity and
availability issues.
Operates a multi-tiered troubleshooting service for the Data Center.
Processes system transactions on a predetermined schedule.
Provides a secure data processing environment for operation of the application software.
Operates a security access process for client Agencies and their staffs.
Establishes and monitors security procedures.
Provides disaster recovery and business continuity planning and testing.
Provides technical support for Agency security officers.
Troubleshoots access problems.
Complies with Federal certification and accreditation requirements to ensure
operation at an acceptable level of risk.
Provides the degree of protection (administrative, technical, and physical safeguards)
for the EmpowHR database as prescribed by the Privacy Act of 1974, 5 U.S.C.
Section 552A.
National Finance Center Security Responsibilities
Notifications of user accounts not used for a period of 30 days and 60 days are sent to
division/staff security coordinators and Agency security officers. Any user account not used for a
period of 60 days is suspended or de-activated. Supervisors will indicate on the 60-day report the
action to be taken and return them to their division/staff security coordinator. Any user account

Publication Category: HR and Payroll Processing
EmpowHR: Section 1 - Basics
6
not used for a period of 120 days is deleted from all platforms. Deleted user accounts are only
re-activated for the individual to whom it was originally assigned.
Note: For more information refer to Directive 46, Suspension/Deletion of Inactive User A.
Access Management Branch's (AMB) Monitoring and Reporting Section (MARS) will:
Run a process at least monthly to purge the inactive, suspended, and obsolete user
accounts.
Report Mainframe/Top Secret Security (TSS) user accounts that have been inactive for
30 days (Inactivity Report) and 60 days (Suspended Report) to division/staff security
coordinators and Agency security officers.
Report Active Directory user accounts that have been inactive for
30 days (Inactivity Report) and 60 days (Disabled Report) to division/staff security
coordinators.
Notify division/staff security coordinators and Agency security officers when the 30-day
and 60-day reports displaying inactive used accounts are available on the Reporting
Center.
Notify AMB’s Systems Access Administration Group (SAAG) when the Active
Directory 60-day report (Disabled Report) is available on the Reporting Center.
Notify SAAG that Active Directory reports (Deleted Report) displaying user accounts
that have been inactive for 120 days are available on the Reporting Center.
AMB’s Security Software Development and Maintenance Group (SSDMG) will automatically
suspend Mainframe/TSS user accounts that have been inactive for 60 days.
SAAG will:
Receive NFC-1106s and supporting documentation from division/staff security
coordinators and process them accordingly.
Receive access requests and supporting documentation from Agency security officers and
process them accordingly.
Disable Active Directory user accounts that have been inactive for 60 days.
Verify and delete user accounts from all platforms that have been inactive for 120 days or
have been marked for deletion by division/staff security coordinators and Agency
security officers without use (except for the reasons noted below).
Note: For more information refer to Directive 46, Suspension/Deletion of Inactive User
Accounts (Revision 3).
Publication Category: HR and Payroll Processing EmpowHR: Section 1 - Basics
7
Access/Security
There are two levels of security in EmpowHR, Role and Data level. Role-level security
determines what types of functions are available for processing. Data-level security determines
what organization the employee can view and/or process. Each Agency’s Security Administrator
creates the user IDs and passwords based on the roles and grants the access. A Security
Administrator grants a security profile that defines the menus, pages, and records the user can
access. The user ID and password indicate the users authorization level.
For security purposes, EmpowHR automatically signs users off the application after a defined
period of inactivity.
Logging On
There are two levels of security in EmpowHR: Role and Data level. Role-level security
determines the types of functions available for processing. Data-level security determines the
organizations the employee can view and process. Each Agency’s Security
Administrator/Distributed Security Administrator creates the user IDs and passwords based on
the roles and submits the information to NFC to grant the access. A personal computer with
Internet capabilities is the only hardware requirement when an Agency implements EmpowHR.
EmpowHR requires everyone to enter an assigned, unique user ID and password. The security
access attached to the user ID is based on the tasks an individual performs. EmpowHR is
accessed via a Web site address. In addition, the Web address can be added as a shortcut from
the desktop or as an Internet Explorer Favorite. Passwords are changed when the user changes
their system login password. Multiple pages can be opened simultaneously without the need for a
second user ID. Commonly used EmpowHR pages from many applications can be added to My
Favorites.
To log on to EmpowHR:
1. Log in to the Internet and go to the NFC Web site (http://www.nfc.usda.gov).
2. Select the HR and Payroll Clients page from the MyNFC drop-down menu.

Publication Category: HR and Payroll Processing
EmpowHR: Section 1 - Basics
8
3. Select the EmpowHR icon on the Application Launchpad. The EmpowHR Sign-In page
is displayed.
Figure 1: EmpowHR Sign-In Page
4. Complete the fields as follows:
Field Description/Instruction
User ID Type your EmpowHR user ID.
Password Type your EmpowHR password.
Publication Category: HR and Payroll Processing EmpowHR: Section 1 - Basics
9
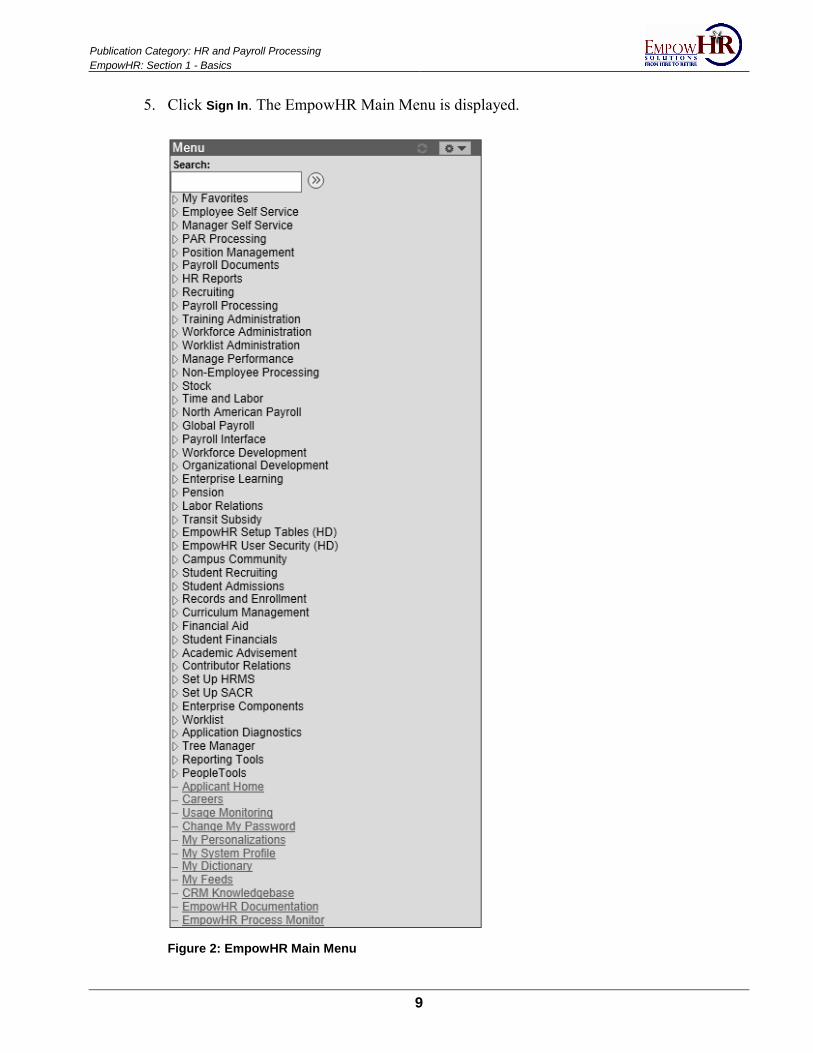
5. Click Sign In. The EmpowHR Main Menu is displayed.
Figure 2: EmpowHR Main Menu
Publication Category: HR and Payroll Processing
EmpowHR: Section 1 - Basics
10
Use the eAuthentication Login (for Department of Justice (DOJ) and United States Department of Agriculture (USDA) Employees Only)
USDA employees have the option of logging on to the Reporting Center using an
eAuthentication user ID.
To log on to the Reporting Center using an eAuthentication user ID (for USDA employees only):
1. Connect to the NFC Home Page (http://www.nfc.usda.gov).
2. On the Application Launchpad on the NFC Home Page, select the EmpowHR icon. A
Warning Message appears.
3. After reading, agreeing to, and accepting the Warning Message, click OK. The eAuth
Login is displayed.
4. Click eAuth Login. The USDA eAuth Web site is displayed.
Did You Forget Your Password?
When the password is forgotten, the user can respond to preset questions and obtain the
password.
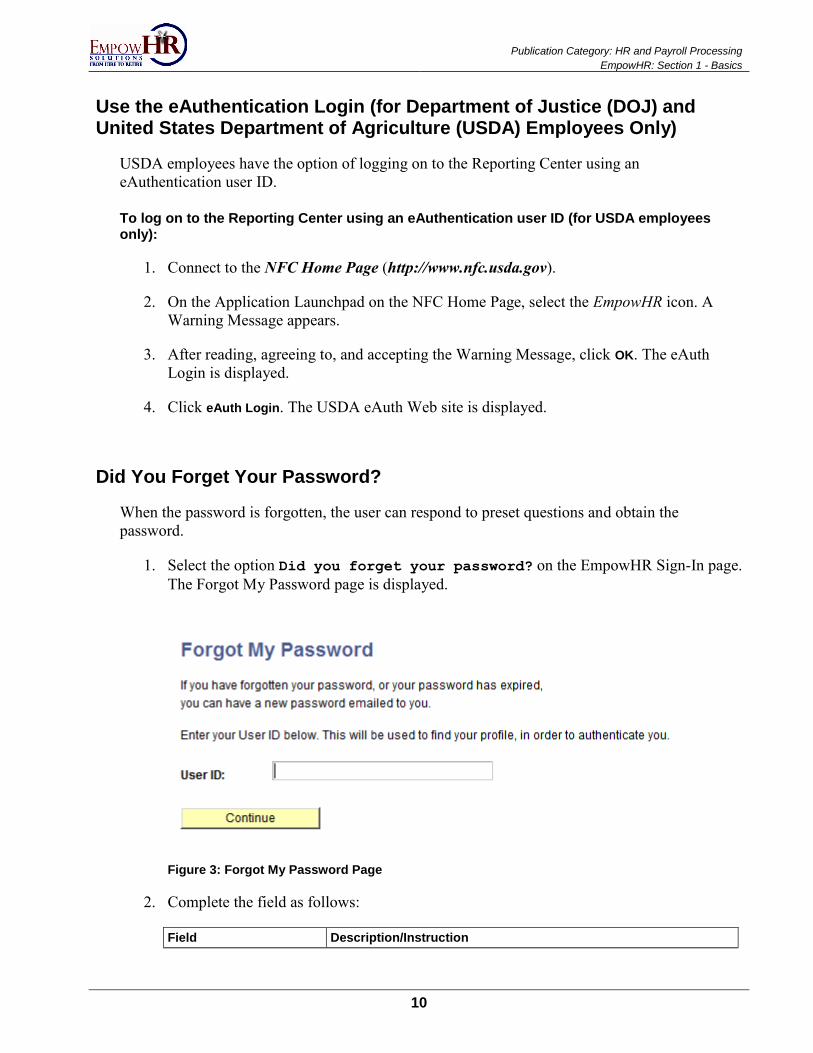
1. Select the option Did you forget your password? on the EmpowHR Sign-In page.
The Forgot My Password page is displayed.
Figure 3: Forgot My Password Page
2. Complete the field as follows:
Field Description/Instruction

Publication Category: HR and Payroll Processing EmpowHR: Section 1 - Basics
11
Field Description/Instruction
User ID Enter the current EmpowHR user ID.
3. Click Continue. A list of predefined questions is displayed.
Changing Password
To change your password:
1. Select the Change Password component. The Change Password page is displayed.
Figure 4: Change Password Page
2. Complete the fields as follows:
Field Description/Instruction
*Current Password Enter the current password.
*New Password Enter the new password. The password configuration is set up by the Agency Security Administrator.
*Confirm Password Enter the new password to confirm the change.
Publication Category: HR and Payroll Processing
EmpowHR: Section 1 - Basics
12
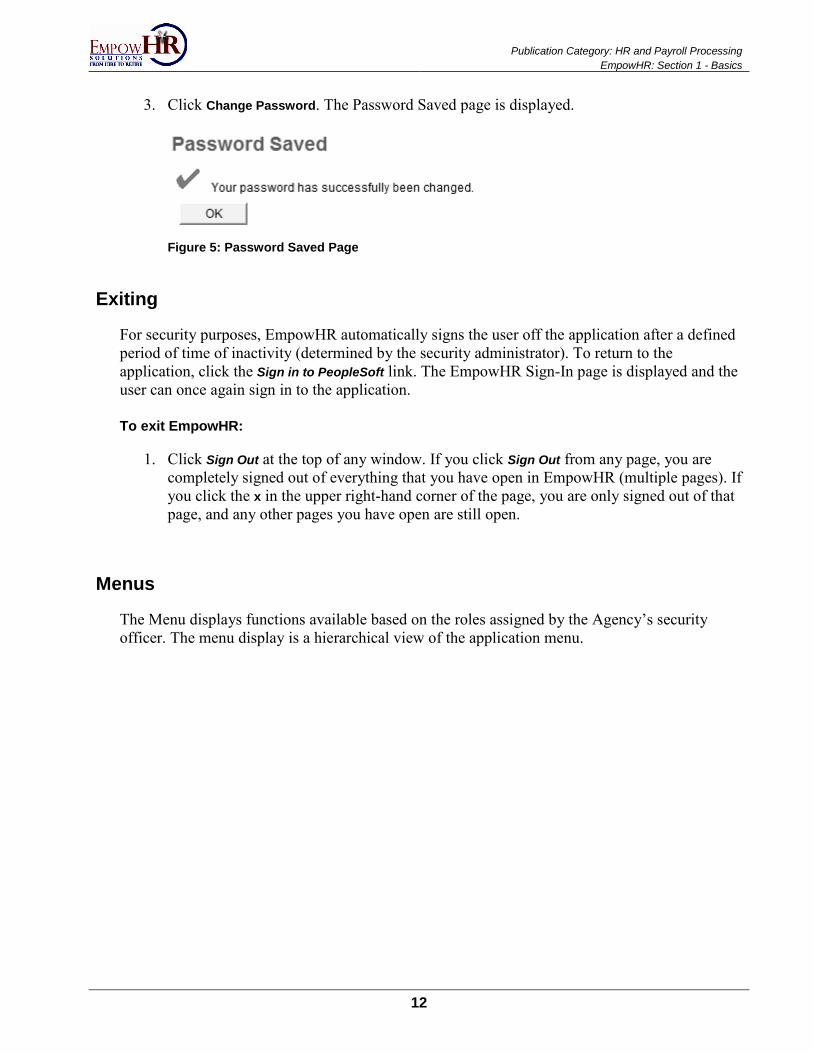
3. Click Change Password. The Password Saved page is displayed.
Figure 5: Password Saved Page
Exiting
For security purposes, EmpowHR automatically signs the user off the application after a defined
period of time of inactivity (determined by the security administrator). To return to the
application, click the Sign in to PeopleSoft link. The EmpowHR Sign-In page is displayed and the
user can once again sign in to the application.
To exit EmpowHR:
1. Click Sign Out at the top of any window. If you click Sign Out from any page, you are
completely signed out of everything that you have open in EmpowHR (multiple pages). If
you click the x in the upper right-hand corner of the page, you are only signed out of that
page, and any other pages you have open are still open.
Menus
The Menu displays functions available based on the roles assigned by the Agency’s security
officer. The menu display is a hierarchical view of the application menu.
Publication Category: HR and Payroll Processing EmpowHR: Section 1 - Basics
13
Main Menu
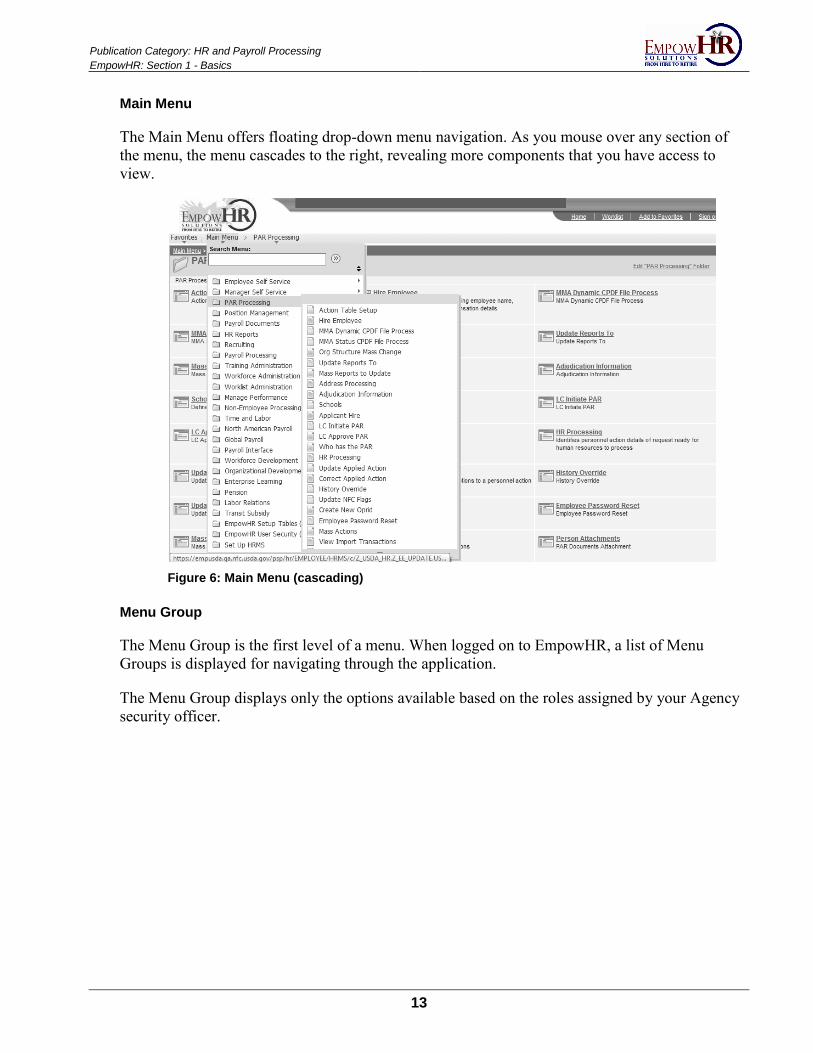
The Main Menu offers floating drop-down menu navigation. As you mouse over any section of
the menu, the menu cascades to the right, revealing more components that you have access to
view.
Figure 6: Main Menu (cascading)
Menu Group
The Menu Group is the first level of a menu. When logged on to EmpowHR, a list of Menu
Groups is displayed for navigating through the application.
The Menu Group displays only the options available based on the roles assigned by your Agency
security officer.
Publication Category: HR and Payroll Processing
EmpowHR: Section 1 - Basics
14
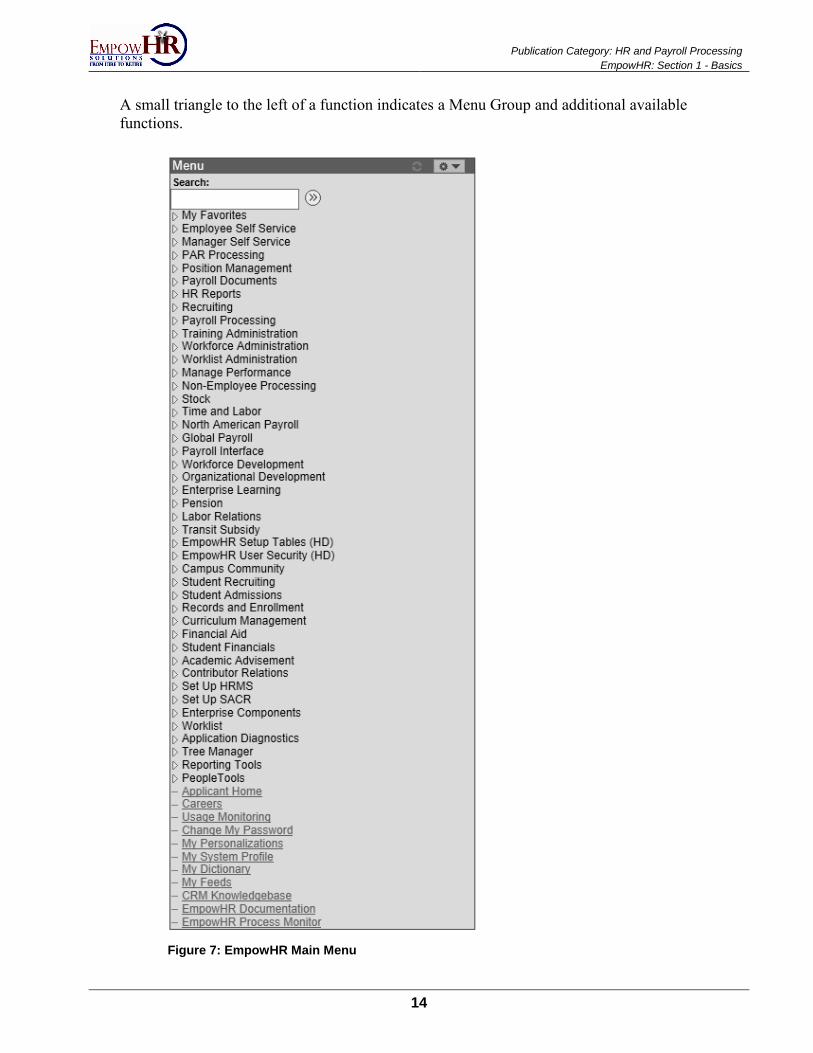
A small triangle to the left of a function indicates a Menu Group and additional available
functions.
Figure 7: EmpowHR Main Menu

Publication Category: HR and Payroll Processing EmpowHR: Section 1 - Basics
15
Menu
The menu consists of folders with additional options. These options are listed under each folder.
Figure 8: Menu
Menu Item
The Menu Item is the third level of a menu. Notice the items under the Menu Item are indented
with a triangle to the right.
Figure 9: Menu Item
Publication Category: HR and Payroll Processing
EmpowHR: Section 1 - Basics
16
Menu Component
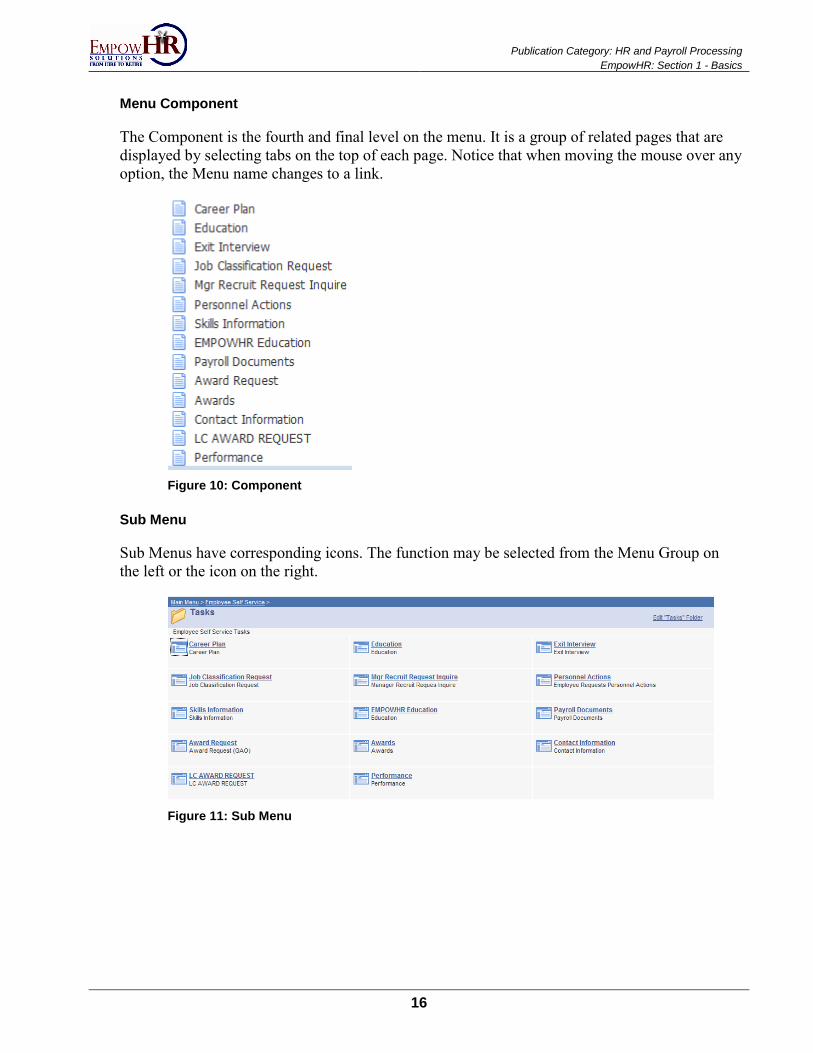
The Component is the fourth and final level on the menu. It is a group of related pages that are
displayed by selecting tabs on the top of each page. Notice that when moving the mouse over any
option, the Menu name changes to a link.
Figure 10: Component
Sub Menu
Sub Menus have corresponding icons. The function may be selected from the Menu Group on
the left or the icon on the right.
Figure 11: Sub Menu

Publication Category: HR and Payroll Processing EmpowHR: Section 1 - Basics
17
Header Menu
The Header Menu in the EmpowHR Internet architecture remains static as the user navigates
through the application. The Header Menu is displayed on every window.
Figure 12: Header Menu
The options below are on the Header Menu:
Home - The Home link reverts back to the default page seen when a user first logs in.
Worklist - A quick link to items that need to be completed, processed, or verified. Each
EmpowHR user has an individual worklist.
Add to Favorites - Used to add a function to your list of favorites.
Sign Out - Logs out of EmpowHR.
Emailing the URL
In EmpowHR, the user can email the URL of the current page to another user.
To email a URL to another user:
1. On the applicable page, click the http button. A copy of the URL is copied to the
clipboard.
Note: The http button is located in the top right corner of each entry page.
Figure 13: http Button
2. Paste the URL in a document, email, etc.
Report Manager
The Report Manager component is used to retrieve a report in various locations regardless of
where the report was run. By using Report Manager, reports can be saved to a desktop. The name
given to the report in the Run Control ID field is the name used when using the Report Manager
component.
Breadcrumbs
Breadcrumbs is a small horizontal menu of links that is always present across the top of the page.
The links show the pages, components, or menu navigation links used to get to the current page.
Note: Always single click options when working in EmpowHR. Do not double click.
Publication Category: HR and Payroll Processing
EmpowHR: Section 1 - Basics
18
Personalizations
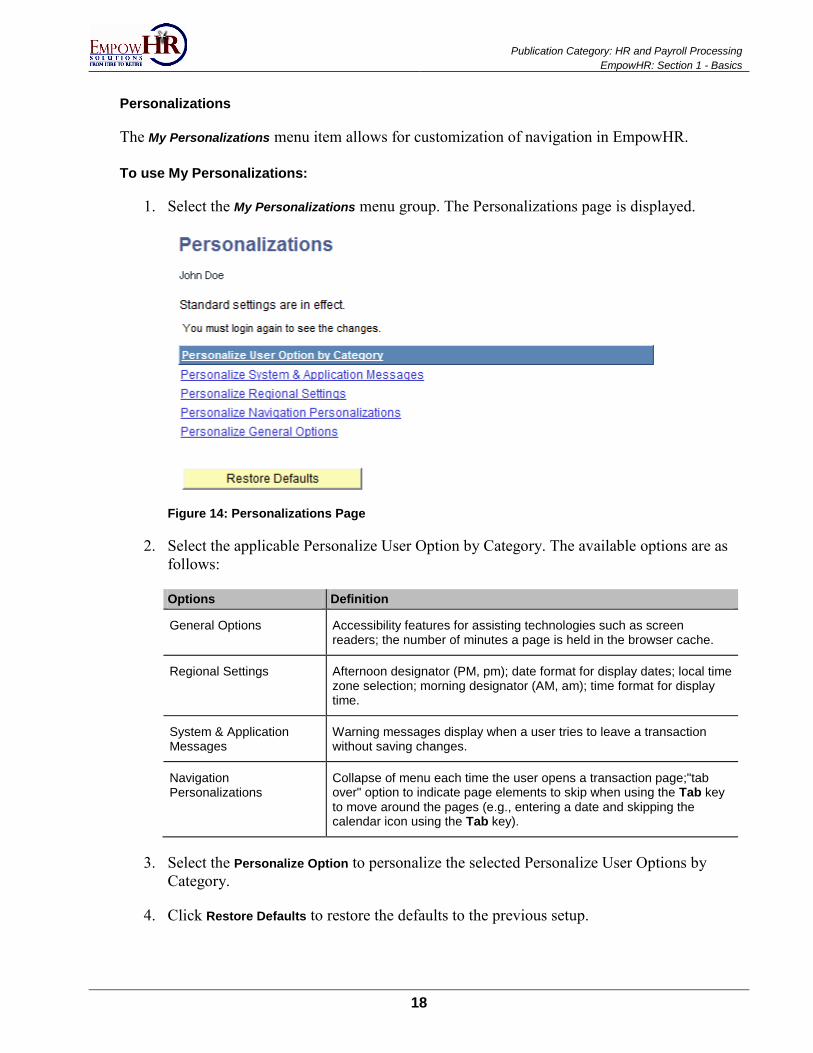
The My Personalizations menu item allows for customization of navigation in EmpowHR.
To use My Personalizations:
1. Select the My Personalizations menu group. The Personalizations page is displayed.
Figure 14: Personalizations Page
2. Select the applicable Personalize User Option by Category. The available options are as
follows:
Options Definition
General Options Accessibility features for assisting technologies such as screen readers; the number of minutes a page is held in the browser cache.
Regional Settings Afternoon designator (PM, pm); date format for display dates; local time zone selection; morning designator (AM, am); time format for display time.
System & Application Messages
Warning messages display when a user tries to leave a transaction without saving changes.
Navigation Personalizations
Collapse of menu each time the user opens a transaction page;"tab over" option to indicate page elements to skip when using the Tab key to move around the pages (e.g., entering a date and skipping the calendar icon using the Tab key).
3. Select the Personalize Option to personalize the selected Personalize User Options by
Category.
4. Click Restore Defaults to restore the defaults to the previous setup.

Publication Category: HR and Payroll Processing EmpowHR: Section 1 - Basics
19
To personalize the General Options Description:
1. On the Personalizations page, click Personalization Option to the right of General Options.
The Option Category: General Options-Personalization Option page is displayed. On this
page there is a Default Value column heading. The values for the defaults are set in
the application.
Figure 15: Option Category: General Options - Personalizations Page
2. Select the Override Value next to the applicable Personalization Option to
personalize the selected Description.
3. Complete the fields as follows:
Field Description/Instruction
Accessibility Features This field is used to better support technologies (without altering the design of the page). This option is to be used with screen readers. This field defaults to Accessibility Features Off. To change the
default, select data from the drop-down list. The valid values are Accessibility Features Off, Use Accessible
Layout Mode, and Use Standard Layout Mode.
Display Keyword Search Help
The field is used to enable components within EmpowHR to display enhanced help text. The field defaults to Yes. To change the default,
select data from the drop-down list. The valid values are Yes and No.
Time Page Held in Cache The field is used to determine how long (in minutes) EmpowHR information is held in the cache. This setting can only be set once for the entire application. The maximum amount of minutes that can be set is 525600 (1 year). This field can also be set to 0 (zero) minutes.
Multi Language Entry This field is used in conjunction with the Multi Language Entry drop-down list throughout the application. If this field is enabled, users can enter data in the language selected in the Multi Language Entry drop-down list. The valid values are Yes and No.

Publication Category: HR and Payroll Processing
EmpowHR: Section 1 - Basics
20
Field Description/Instruction
Spell Check Dictionary This field is also used in conjunction with the Multi Language. Entry drop-down lists are throughout the application. If this field is enabled, the Spell Check function will default to the language selected. This field defaults to Use Session Language. To change the default, select
data from the drop-down list. A list of the various languages is available.
4. Click Restore Default to restore the defaults to the previous setup.
5. Click OK to save the revised personalizations.
OR
Click Cancel to return to the Personalizations page to cancel the revised personalizations.
OR
Click Restore Category Defaults to clear any personalizations set on the Option Category:
General Options-Personalizations page. The Option Category: General Options page is
still displayed, but all fields are cleared.
To personalize the Regional Settings:
1. On the Personalizations page, click Personalize Option to the right of Regional Settings.
The Option Category: Regional Settings - Personalizations page is displayed.
Figure 16: Option Category: Regional Settings - Personalizations Page
Publication Category: HR and Payroll Processing EmpowHR: Section 1 - Basics
21
2. Select the Override Value next to the applicable Personalize Option to
personalize the selected Description.
3. Complete the fields as follows:
Field Description/Instruction
Afternoon Designator (PM, pm)
This field is used to designate the description for afternoon time. This is field defaults to PM. To change the default, select data from the
drop-down list. This designator may be five characters long. The most common valid values are PM and pm.
Auto-Recognize Gregorian Dates
This field is used to recognize dates as Gregorian dates if the dates are between 1800 and 2300. The field defaults to Yes. To change the
default, select data from the drop-down list. The valid values are Yes
and No.
Calendar This field is used to determine which calendar to recognize. The Gregorian calendar is the most common in international business; however, this setting can be changed. This field defaults to Gregorian. To change the default, select data from the drop-down
list. The valid values are Gregorian, Hijri (Umm Al Qura),
and Thai.
Date Format This field is used to determine whether the day, month, or year will be displayed first in dates in EmpowHR. This field defaults to MMDDYY. To
change the default, select data from the drop-down list. The valid values are DDMMYY, MMDDYY, and YYMMDD.
Local Time Zone This field is used when the Use Local Time Zone field is set to Yes.
This field defaults to Pacific Time (US). To change the default,
select data from the drop-down list.
Morning Designator (AM, am)
This field is used to designate the description for morning time. This designator may be five characters long. This field defaults to AM. The
most common values are AM and am.
Time Format This field is used to designate whether time is recorded in military (24-hour intervals) or civilian (12-hour intervals) hours. This field defaults to 12 Hour Clock. To change the default, select data from
the drop-down list. The valid values are 12 Hour Clock and 24
Hour Clock.
Use Local Timezone This field is used to designate whether or not to use the local time zone. This field is used in conjunction with the Local Time Zone/Override
Value field. If this field is set to Yes, a local time zone must be selected
in the Local Time Zone/Override Value field. This field defaults to No.
To change the default, select data from the drop-down list. The valid values are Yes and No.
First day of week This field is used to determine the day of the week displayed first on calendars throughout EmpowHR. This field defaults to Sunday. To
change the default, select data from the drop-down list. The valid
Publication Category: HR and Payroll Processing
EmpowHR: Section 1 - Basics
22
values are Sunday, Monday , Tuesday, Wednesday,
Thursday, Friday, and Saturday.
4. Click OK to save the personalizations set.
OR
Click Cancel to return to the Personalizations page to cancel any personalizations set. At
this point the following options are available:
Step Action
Click Restore Defaults To clear any personalizations set on the Option Category: Regional Settings Personalizations page. The Option Category: Regional Settings page is still displayed, but all fields are cleared.
Click Explain link To display an explanation of each field.
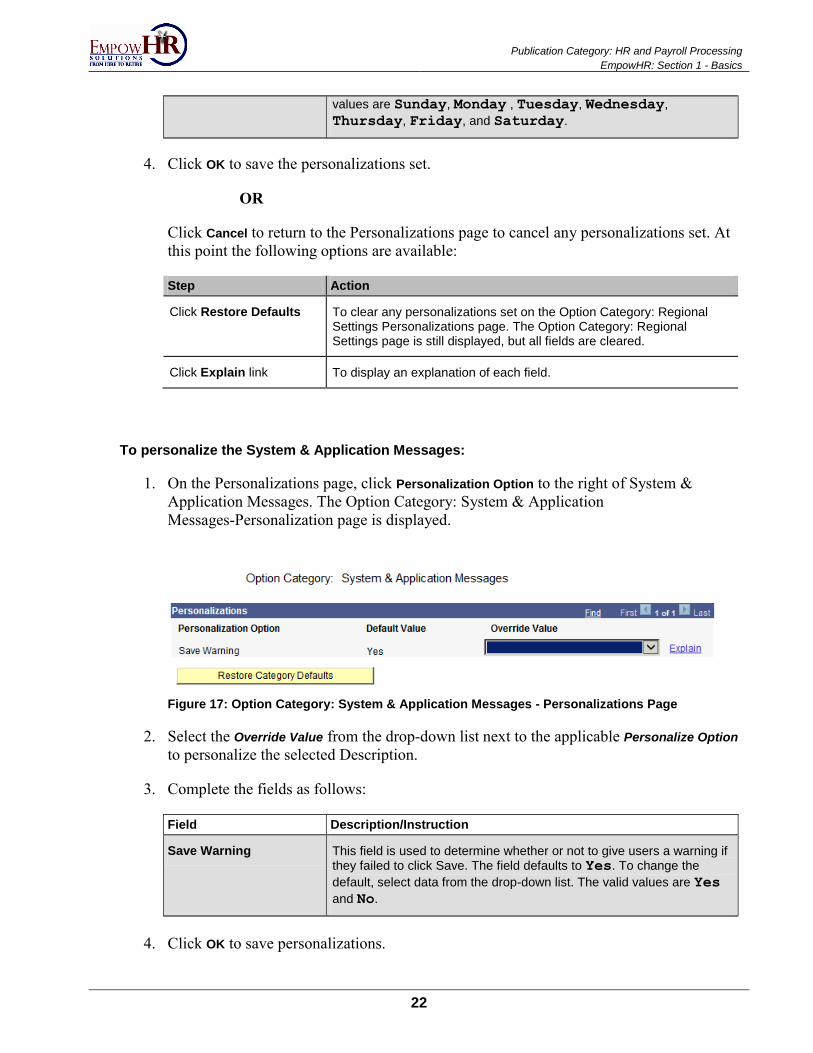
To personalize the System & Application Messages:
1. On the Personalizations page, click Personalization Option to the right of System &
Application Messages. The Option Category: System & Application
Messages-Personalization page is displayed.
Figure 17: Option Category: System & Application Messages - Personalizations Page
2. Select the Override Value from the drop-down list next to the applicable Personalize Option
to personalize the selected Description.
3. Complete the fields as follows:
Field Description/Instruction
Save Warning This field is used to determine whether or not to give users a warning if they failed to click Save. The field defaults to Yes. To change the
default, select data from the drop-down list. The valid values are Yes
and No.
4. Click OK to save personalizations.
Publication Category: HR and Payroll Processing EmpowHR: Section 1 - Basics
23
OR
Click Cancel to return to the Personalizations page to cancel any personalizations set. At
this point, the following options are available:
Step Action
Click Restore Category Defaults
To clear any personalizations set on the Option Category: System & Application Messages page. The Option Category: System & Application Messages - Personalization page is still displayed, but all fields are cleared.
Click Explain link To display an explanation of each field.
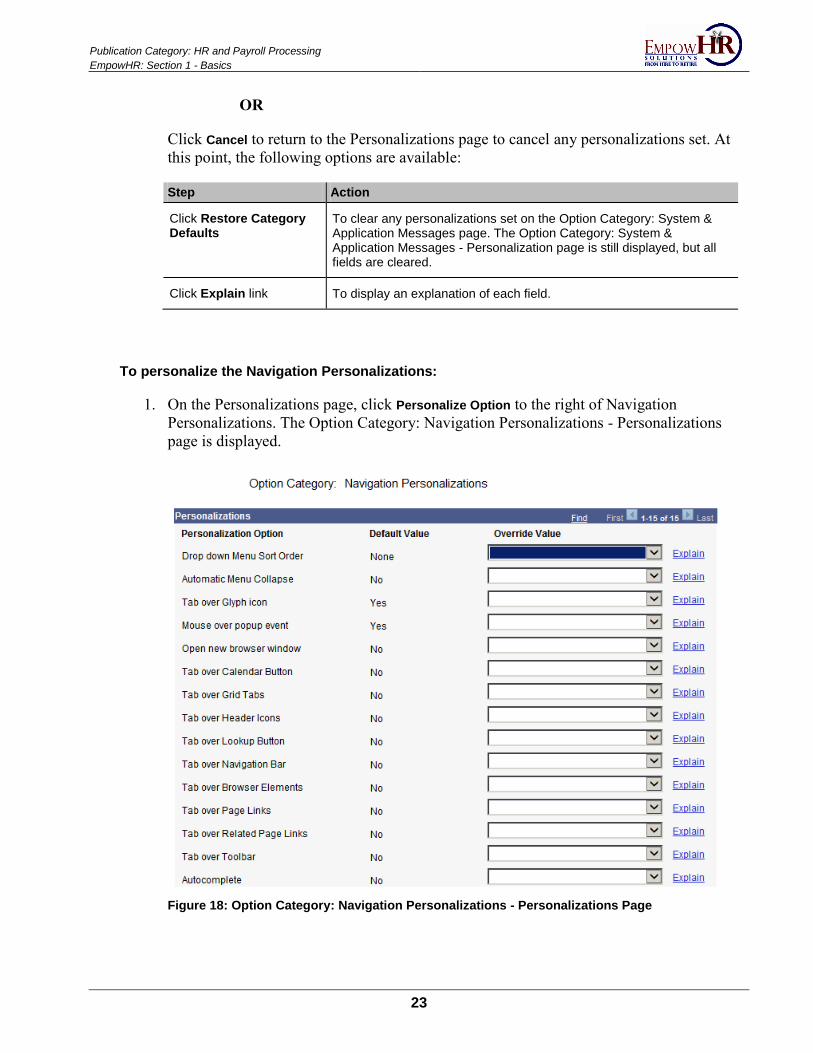
To personalize the Navigation Personalizations:
1. On the Personalizations page, click Personalize Option to the right of Navigation
Personalizations. The Option Category: Navigation Personalizations - Personalizations
page is displayed.
Figure 18: Option Category: Navigation Personalizations - Personalizations Page

Publication Category: HR and Payroll Processing
EmpowHR: Section 1 - Basics
24
2. Select the Override Value from the drop-down list next to the applicable Personalize
Option. Below is a description of each Personalization Option.
Field Description/Instruction
Drop down Menu Sort Order
This field is used to presort the drop-down menu. This field defaults to None. To change the default, select data from the drop-down list. The
valid values are Ascending, Descending, and None.
Automatic Menu Collapse This field is used to collapse the menu after making a selection in EmpowHR. This allows for more space for the active page. This field defaults to No. To change the default, select data from the drop-down
list. The valid values are Yes and No.
Tab over Glyph icon This field is used to display the related contextual menu for the applicable field. This field defaults to Yes. To change the default,
select data from the drop-down list. The valid values are Yes and No.
Mouse over popup event This field is used to display a popup containing related information when you hover the mouse over the applicable field(s). Mouse over popups are only enabled for some fields. This field defaults to Yes. To
change the default, select data from the drop-down list. The valid values are Yes and No.
Open new browser window
This field is used to always open a new page in a new browser window (even when the browser setting is set to open in a new tab. This field defaults to No. To change the default, select data from the drop-down
list. The valid values are Yes and No.
Tab over Calendar Button This field is used to tab over the calendar icon that displays next to date fields in EmpowHR. By selecting Yes, the cursor will not stop on the
calendar icons throughout EmpowHR. This field defaults to No. To
change the default, select data from the drop-down list. The valid values are Yes and No.
Tab over Grid Tabs This field is used to tab over grid tabs located at the tops of grids in EmpowHR. By selecting Yes, the cursor will not stop on the grid tabs
throughout EmpowHR. This field defaults to No. To change the default,
select data from the drop-down list. The valid values are Yes and No.
Tab over Header Icons This field is used to tab over the header icons on EmpowHR pages. The header icons are Home, Worklist, Add To Favorites, and Sign
Out. This field defaults to No. To change the default, select data from
the drop-down list. The valid values are Yes and No.
Tab over Lookup Button This field is used to tab over lookup buttons in EmpowHR. By selecting Yes, the cursor will not stop on lookup buttons throughout EmpowHR.
This field defaults to No. To change the default, select data from the
drop-down list. To change the default, select data from the drop-down list. The valid values are Yes and No.
Tab over Navigation Bar This field is used to tab over navigation bars in EmpowHR. By selecting Yes, the cursor will not stop on lookup buttons throughout EmpowHR.

Publication Category: HR and Payroll Processing EmpowHR: Section 1 - Basics
25
This field defaults to No. To change the default, select data from the
drop-down list. To change the default, select data from the drop-down list. The valid values are Yes and No.
Tab over Browser Elements
This field is used to tab over browser elements (PeopleSoft elements) in EmpowHR. By selecting Yes, the cursor will not stop on the browser
elements throughout EmpowHR. This field defaults to No. To change
the default, select data from the drop-down list. The valid values are Yes and No.
Tab over Page Links This field is used to tab over links in EmpowHR. By selecting Yes, the
cursor will not stop on the links throughout EmpowHR. These links are displayed on the bottom of certain pages in EmpowHR. This field defaults to No. To change the default, select data from the drop-down
list. The valid values are Yes and No.
Tab over Related Page Links
This field is used to tab over lists of related links in EmpowHR. By selecting Yes, the cursor will not stop on the lists of related hyperlinks
throughout EmpowHR. This field defaults to No. To change the default,
select data from the drop-down list. The valid values are Yes and No.
Tab over Toolbar This field is used to tab over the buttons (options) at the bottom of pages in EmpowHR. By selecting Yes, the cursor will not stop on these
rectangular buttons throughout EmpowHR. This field defaults to No. To
change the default, select data from the drop-down list. The valid values are Yes and No.
Autocomplete This field is used to prompt a lookup to suggest appropriate values as you are typing in the field. Autocomplete is enabled for any field with a prompt edit defined for it. This field defaults to No. To change the
default, select data from the drop-down list. The valid values are Yes
and No.
3. Click OK to save the personalizations set.
OR
Click Cancel to return to the Personalizations page to cancel any personalizations set. At
this point, the following options are available:
Step Action
Click Restore Category Defaults
To clear any personalizations set on the Option Category: Navigation Personalizations page. The Option Category: Navigation Personalizations page is still displayed, but all fields are cleared.
Click Explain To display an explanation of each field.
Publication Category: HR and Payroll Processing
EmpowHR: Section 1 - Basics
26
Adding to Favorites
Using My Favorites from the menu is helpful when there are frequently used pages. Adding a site
to My Favorites allows direct navigation to the page within EmpowHR. The pages can be
organized in the most useful order to edit the sequence.
This section explains how to add items under My Favorites.
To add to My Favorites:
1. Select the applicable page to be added to My Favorites.
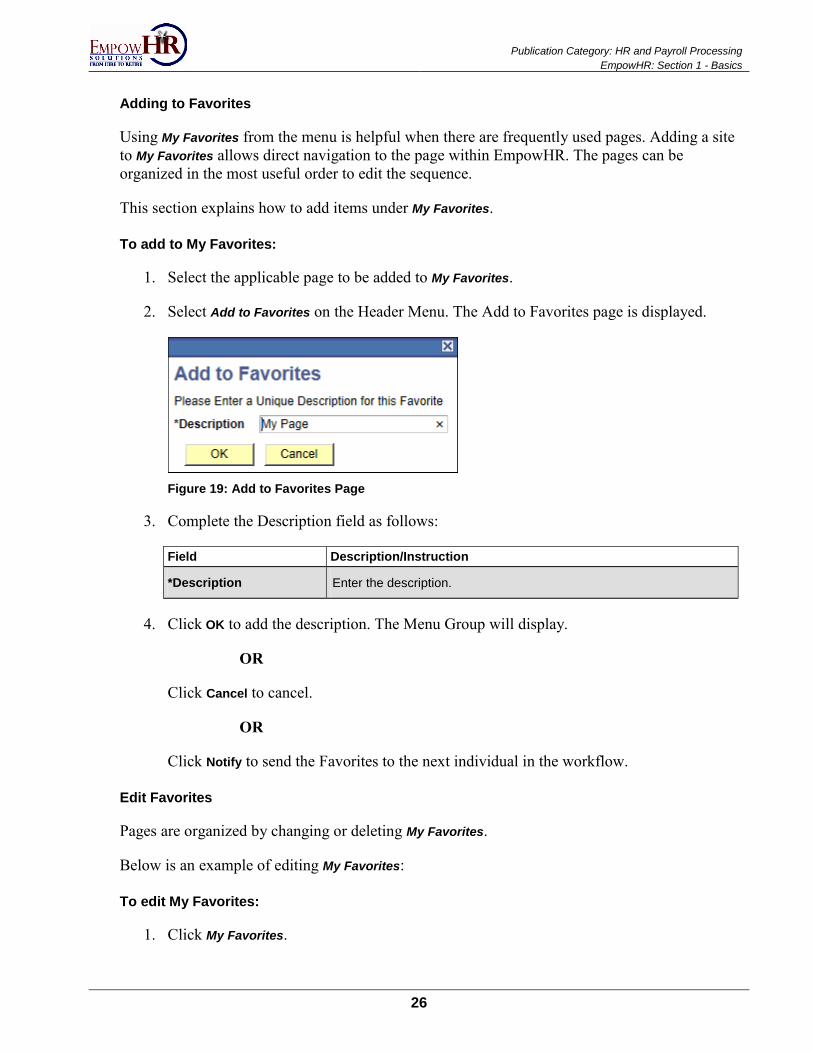
2. Select Add to Favorites on the Header Menu. The Add to Favorites page is displayed.
Figure 19: Add to Favorites Page
3. Complete the Description field as follows:
Field Description/Instruction
*Description Enter the description.
4. Click OK to add the description. The Menu Group will display.
OR
Click Cancel to cancel.
OR
Click Notify to send the Favorites to the next individual in the workflow.
Edit Favorites
Pages are organized by changing or deleting My Favorites.
Below is an example of editing My Favorites:
To edit My Favorites:
1. Click My Favorites.
Publication Category: HR and Payroll Processing EmpowHR: Section 1 - Basics
27
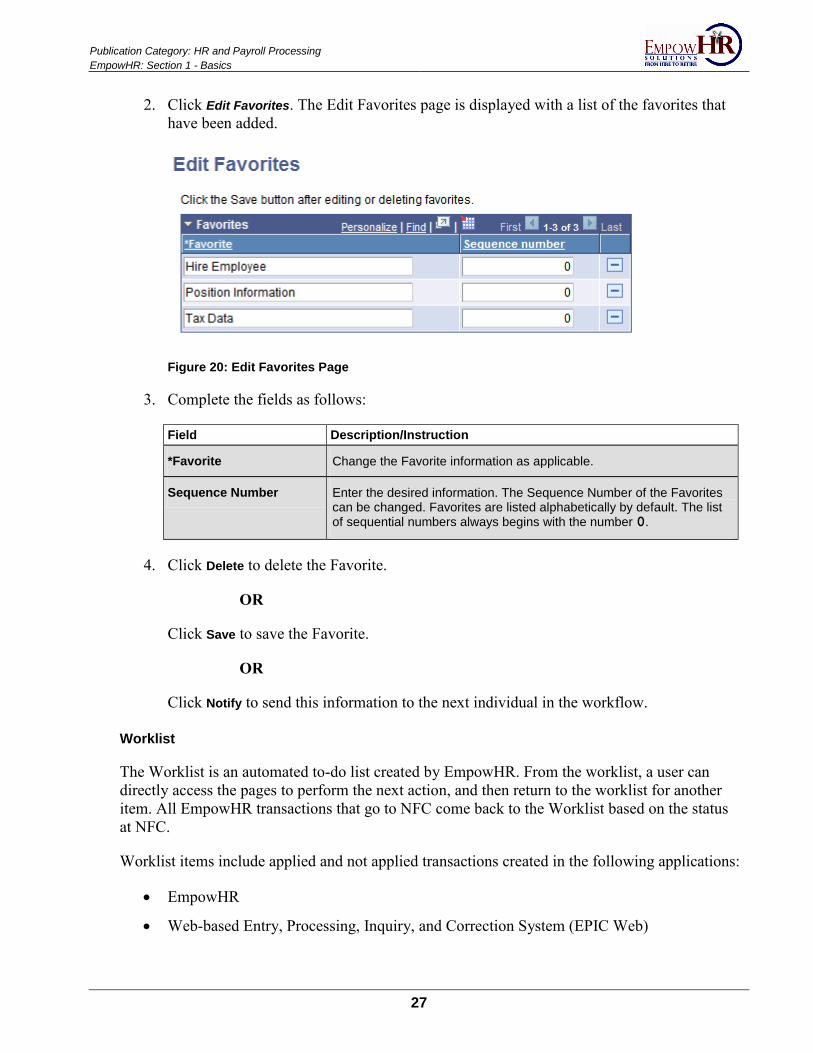
2. Click Edit Favorites. The Edit Favorites page is displayed with a list of the favorites that
have been added.
Figure 20: Edit Favorites Page
3. Complete the fields as follows:
Field Description/Instruction
*Favorite Change the Favorite information as applicable.
Sequence Number Enter the desired information. The Sequence Number of the Favorites can be changed. Favorites are listed alphabetically by default. The list of sequential numbers always begins with the number 0.
4. Click Delete to delete the Favorite.
OR
Click Save to save the Favorite.
OR
Click Notify to send this information to the next individual in the workflow.
Worklist
The Worklist is an automated to-do list created by EmpowHR. From the worklist, a user can
directly access the pages to perform the next action, and then return to the worklist for another
item. All EmpowHR transactions that go to NFC come back to the Worklist based on the status
at NFC.
Worklist items include applied and not applied transactions created in the following applications:
EmpowHR
Web-based Entry, Processing, Inquiry, and Correction System (EPIC Web)
Publication Category: HR and Payroll Processing
EmpowHR: Section 1 - Basics
28
Employee Personal Page (EPP)
Bi-Weekly Examination Analysis and Reporting System (BEAR)
Batch numbers beginning with 67
Worklist items with error messages must be resolved in EmpowHR. The worklist items that
originate in EPIC are marked for delete in EPIC. If the transaction requires an override code, the
transaction must be worked in EPIC before the end of the pay period and released. At the end of
the pay period, the deleted transactions in EPIC are removed. A deleted transaction needing an
override code must be re-entered in EPIC and released. Once the transaction is edited in PINE,
the transaction is again stored and viewed in EmpowHR.
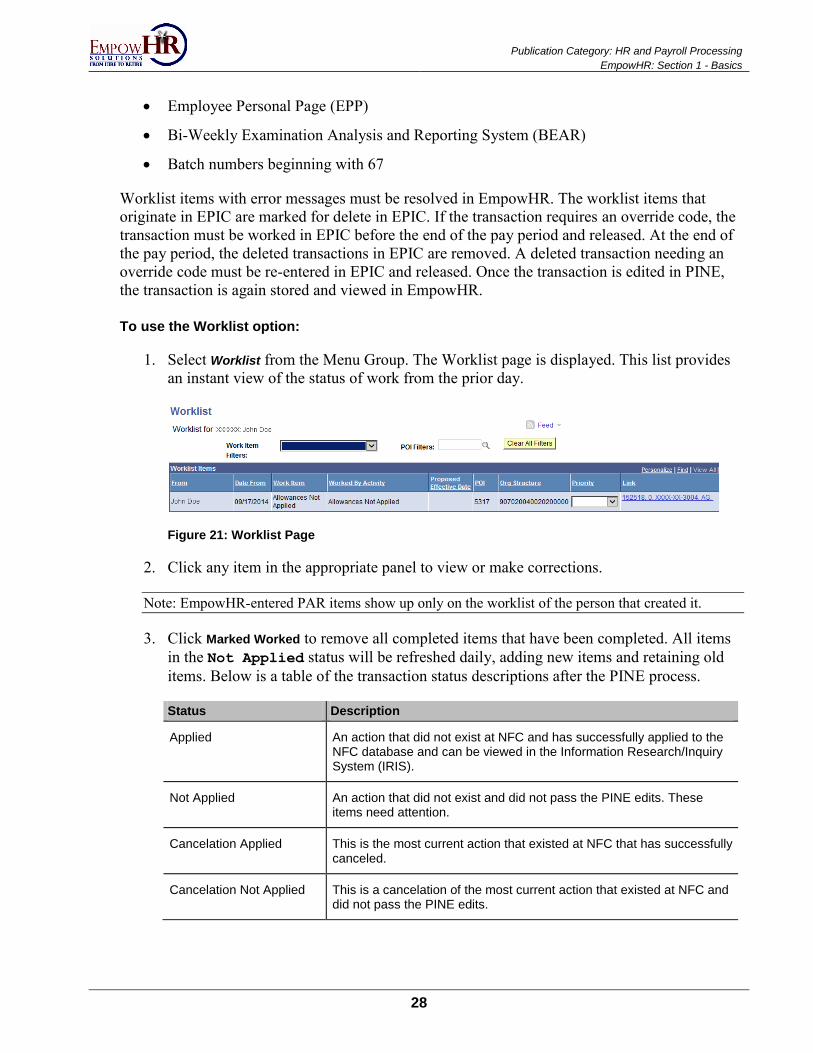
To use the Worklist option:
1. Select Worklist from the Menu Group. The Worklist page is displayed. This list provides
an instant view of the status of work from the prior day.
Figure 21: Worklist Page
2. Click any item in the appropriate panel to view or make corrections.
Note: EmpowHR-entered PAR items show up only on the worklist of the person that created it.
3. Click Marked Worked to remove all completed items that have been completed. All items
in the Not Applied status will be refreshed daily, adding new items and retaining old
items. Below is a table of the transaction status descriptions after the PINE process.
Status Description
Applied An action that did not exist at NFC and has successfully applied to the NFC database and can be viewed in the Information Research/Inquiry System (IRIS).
Not Applied An action that did not exist and did not pass the PINE edits. These items need attention.
Cancelation Applied This is the most current action that existed at NFC that has successfully canceled.
Cancelation Not Applied This is a cancelation of the most current action that existed at NFC and did not pass the PINE edits.

Publication Category: HR and Payroll Processing EmpowHR: Section 1 - Basics
29
Status Description
Correction Applied This is the latest action that existed at NFC that has been successfully corrected.
Correction Did Not Apply This is the latest action that existed at NFC that did not pass the PINE edits.
Note: The Worklist Filter is used to select a specific type of work item for review.
Future Actions - An action with a future effective date remains in EmpowHR with a status of
RDY Future. Future actions are not sent to NFC until the pay period they are effective. An
exception Standard Form (SF) 2809, Health Benefits Registration. This type document will not
have a future date.
Expanding and Collapsing Nodes
The following actions can be performed on the Tree Manager component on the tree that is
selected by using links and images on the navigation bar (the horizontal bar at the top of the
tree).
Action Description
Collapse Select to close all of the visible nodes except for the root node. The root node is always expanded.
Expand All Select to expand all of the nodes on the tree, so that the entire tree or branch hierarchy is visible.
Expands all parent/child relationships, but the tree hierarchy is still presented one page at a time.
Find Select to access the Find Value page and search for nodes and detail values.
Processing
Daily batch transmissions from EmpowHR to NFC occur at 11:30 a.m. and 4:30 p.m. CT. The
NFC return feed process occurs between l:00 a.m. and 3:30 a.m. CT to update EmpowHR with
the results of the nightly PINE Process.
The Payroll/Personnel Processing Cycle illustrates the daily processing of payroll/personnel
transactions effective for Pay Period 24 which is processed in Pay Period 25.
For more information see:
Payroll/Processing Cycle .......................................................................................... 30
Payroll/Personnel System Flow................................................................................ 31

Publication Category: HR and Payroll Processing
EmpowHR: Section 1 - Basics
30
Payroll/Processing Cycle
Payroll/Personnel transactions are processed through PINE every Monday through Friday and
the first Saturday of each pay period. The first pass of PINE for the current pay period processes
on the second Monday of the pay period.
Note: These transactions must be entered before the first pass of Payroll Processing System (PAYE)
which is the first Thursday or Friday of the following pay period.
Time and Attendance (T&A) reports are processed through Time and Attendance Validation
System (TIME) on the first Monday through Saturday of the following pay period. T&As must
be transmitted before the first pass of PAYE which is the first Thursday or Friday of the
following pay period.
Note: All T&As should be transmitted to NFC no later than the Tuesday following the last day of the pay
period.
PAYE is completed by the first Saturday after the pay period.
BEAR processes on the Sunday after PAYE runs.
Direct Deposit/Electronic Funds Transfer (DD/EFT) payday is the second Monday of the
following pay period, or the second Tuesday if the second Monday falls on a Federal holiday.

Publication Category: HR and Payroll Processing EmpowHR: Section 1 - Basics
31
Payday (official) is the second Thursday of the following pay period.
Figure 22: Payroll/Personnel Processing Cycle
Payroll/Personnel System Flow
The Payroll/Personnel System Flow illustrates how the application interfaces with the
Payroll/Personnel Corporate Database. EmpowHR is an application where transactions are
processed and sent via FESI.
The data entered into EmpowHR, flows to either the Position Management System Online
(PMSO) or PINE which runs edits against the data before either sending the data to the IRIS/
Payroll/Personnel Inquiry System (PINQ). The transactions are edited for correctness/accuracy.
If the transactions are error free, the transactions are updated to the Payroll/Personnel Corporate
Database and EmpowHR. If the transaction(s) are in error, they are sent back to EmpowHR for
reconciliation.
When the data is correct and passes edits, the status in EmpowHR displays Applied. At the
same time, the data becomes available for viewing in IRIS/PINQ. If the data fails the edits, the
status in EmpowHR displays Not Applied. The transaction should be corrected and sent back
through the edit process. Mark the transaction NFC Ready.

Publication Category: HR and Payroll Processing
EmpowHR: Section 1 - Basics
32
Figure 23: Payroll/Personnel Processing Flowchart

Publication Category: HR and Payroll Processing EmpowHR: Section 1 - Basics
33
Using the Application
EmpowHR is made up of navigational structures, menus, components (groups of pages), and
pages. Using these elements, the user will be able to enter new data or change, delete, and
modify the existing data in the application.
This section includes the following topics:
Effective Dates ........................................................................................................... 33
Page Groups .............................................................................................................. 34
Hyperlinks .................................................................................................................. 34
New Windows............................................................................................................. 34
Fields .......................................................................................................................... 34
Statuses ...................................................................................................................... 36
Effective Dates
The effective dates is a method of dating information in EmpowHR. Information can be redated
to add historical data. A user can also postdate information to enter data before it actually goes
into effect. By using effective dates, the user does not delete values; the user enters a new value
with a current effective date. Effective dates maintain a complete chronological history of all
data and tables.
Effective dates are always important in HR, but they take on special significance when
maintaining positions, particularly when the user changes data in the fields that appear in both
the Position Data and Job Data options. To update this information, enter the changes by
inserting a new data row in the Position Data pages. The system maintains the data in the current
incumbent Job Data pages by inserting a new data row with the same effective date. An effective
date is attached to a PAR and identifies the date the transaction goes into effect.
There are three types of effective dates:
Future - Data rows with an Effective Date later than the system data (the action is
effective at a later date).
Current -The data row with an Effective Date equal to or earlier than the system date
(today, the current date, indicating the action is now in effect). Only one row can be the
current row. When there are two rows with the same date, the row with the higher
sequence number is the current row.
History - Data rows with Effective Dates earlier than the current data row (all actions
before the current date).
Publication Category: HR and Payroll Processing
EmpowHR: Section 1 - Basics
34
Occasionally, there may be a need to enter more than one personnel action with the same
effective date. Enter an effective date on each action and EmpowHR generates the transaction
sequence number for each action. By entering a T in a date field, the field is populated with the
current date.
Page Groups
Page groups are used to organize pages in a logical order. A particular topic may contain too
much information to be displayed on one page; therefore, it requires multiple pages to be
grouped together.
Hyperlinks
In addition to fields on a page, sometimes there are other objects that do not display information
or allow the user to enter information into them. These objects are known as hyperlinks.
Hyperlinks appear as bold, underlined text. When the user moves the mouse pointer over a
hyperlink, the mouse pointer becomes a pointing finger. Hyperlinks are used to access another
page. At times it is beneficial to use hyperlinks rather than simply displaying all the information
on the page because it alleviates congestion of fields and keeps data that is not frequently
referenced out of site. Click Hyperlinks at the bottom of the page to access subpages in the group.
New Windows
It is possible to work in more than one open window at a time. Once the user has accessed the
first window, the user may access the second by clicking the New Window hyperlink located in
the top right corner of the window. Be sure to save work in both open windows. Click the X to
close the window. Do not use the Sign Out option. This will close the application.
Fields
Fields are single items of information displayed on pages. The field may be represented in
various ways:
Look up (search icon) - If the information for this field is known, the user can type
directly into the field. If the user needs to look up the correct value for the field, click the
search icon (look up) button .
Radio buttons - If a solid circle appears inside the button, then the option is selected. If
the button is empty, then the option is not selected. The user can only select one radio

Publication Category: HR and Payroll Processing EmpowHR: Section 1 - Basics
35
button in a group. Click a radio button to select it (any previously selected radio
button is automatically deselected).
Date field - The user can enter a date in MMDDYY or MMDDYYYY format (it is not
necessary to enter the slashes) or the user can click the calendar icon to select a date from
the calendar.
Drop-down lists - This field permits only a specific list of valid values. Click the
drop-down list arrow to select from the list.
Edit field - Type information directly into this field. There is usually a limit to the
number of characters that the user can enter.
Long Edit field - This is a text-entry field that enables the user to type multiple lines of
text. As the user types, the lines will automatically wrap. The user can also press Enter to
move to the next line. This field is not validated or formatted.
Check box - If the check box appears empty, then the option is not selected (unchecked).
If there is a checkmark in the box, then the option is selected (checked). Click the check
box to check or uncheck an option.
Field names that are preceded with an asterisk (*) are required fields. The user must enter data in
these fields before proceeding.
Pages have fields highlighted with various colors. Fields highlighted in yellow are NFC
Mandatory fields, lavender are Optional fields (based on data entered, additional fields may be
required), and other fields are not required or EmpowHR-only fields. The following are ways to
help navigate through the EmpowHR application as efficiently as possible. Frequently, there is
more than one way to get where the user wants to go:
Tab Key - Pressing the Tab key is the recommended way to move between fields on a
page. To move forward, press the Tab key. To move backwards, press the Shift and Tab
keys simultaneously. Note that the translations associated with the valid value lists or
drop-down lists menu may not appear until after the user has tabbed to the next field.
When the user uses Tab to move between fields, the field is highlighted as you move into
it. This allows the user to type over the existing data more easily.
Mouse - Use the mouse to move the cursor to enter data or select an item and click. This
is not usually the fastest way to navigate; though sometimes it is the only option.
View-Only Fields - Often users add or edit data in fields by entering values or selecting a
choice from a drop-down list. However, there are times when users may only be allowed
to view the information, not modify it. These view-only fields are displayed slightly
different on the pages. They appear gray rather than dark, and it is impossible to alter
their values.
Default Fields - Users will also notice that it is common for some information to default
on the page, whether or not the field is view-only. On many occasions the information
needed in a field is repetitive from session to session or may be related to another field

Publication Category: HR and Payroll Processing
EmpowHR: Section 1 - Basics
36
that as been previously entered. To make data entry more efficient, these fields are
populated.
Statuses
When an action is processed through EmpowHR, a variety of statuses track the action. The
following is a table of statuses:
Transactional Status Description
NFC Auto (NFC Auto Action)
System generated action such as Nature of Action Code (NOAC), 893, 880, and 894s. This status is used for Job Code, Position, PAR, Payroll Documents, and History Override Packages.
Rolled Back Initiated by the user or by the system for actions that applied during the current processing pay period.
PI Error (Payroll Interface Error)
Internal EmpowHR record's field value must be reconciled (data conflict).
Rdy-Future (Ready Future) Effective in a future pay period and held until the effective processing pay period. This status is used for Job Code, Position, PAR, and Payroll Documents. Nothing goes to Rdy-Future until the current (or post) processing pay period.
History Override Hold History Override package waiting for action. A package can be started and put on hold at any time to not lose your work. If you are attempting to place a package on hold and the person has already been paid, hold the package until Tuesday.
In Progress New action waiting for completion.
Data Load Records loaded during an Agency migration to EmpowHR or a special request load. This is done when NFC is loading an Agency's data.
Applied (Applied at NFC) Action applied on the NFC Payroll Personnel Database. Current data can be viewed in IRIS and the Reporting Center. History data can only be viewed in IRIS.
Sent to NFC Picked up and in the batch transmission to NFC. There are two export jobs everyday. All fields are grayed out, and data cannot be changed during this time (Monday-Friday and when PINE runs on the weekend).
Appl-WList (Applied Loading to Worklist)
Needs to be reconciled.
NFC Ready (Ready for NFC Transmission)
Action saved and ready to be sent to PPS. This status is used for Job Code, Position, PAR, Payroll Documents, and History Override. This is after all edits have passed.
Not Applied (Not Applied at NFC)
Action rejected by PINE edits. The action did not pass the PINE edits.

Publication Category: HR and Payroll Processing EmpowHR: Section 1 - Basics
37
Transactional Status Description
Non-NFC (Non-NFC Internal)
Agency use and not sent to NFC.
Invalid Value Work-in-Progress Status in HCUP packages only.

Publication Category: HR and Payroll Processing EmpowHR: Section 1 - Basics
39
Navigation
Navigation Header
The Navigation Header area in the EmpowHR Internet Architecture remains static when
navigating through the pages. The navigation header contains links back to the home page and a
Signoff button. If the portal is running, the navigation header also has Categories, Favorites, and
Search features.
Component
A component is a group of related pages that pertain to a specific task. Components can be
accessed from the menu. Components contain folder tabs with each tab containing a related page.
Keys
Keys are display-only fields that uniquely identify data. To display a page, enter the keys so that
the system can retrieve the correct row of data.
Page
The page is the individual display and data-entry screens for each part of the EmpowHR
application. Pages appear in the browser window.
Navigational Techniques
EmpowHR provides a multitude of buttons and links on the pages to help process transactions in
the system. If the action to be performed is navigation related, it will be displayed as a link,
which will bring up another page to view/modify/add. Click the buttons and the link to execute a
command.
The following is recommended to help move around as efficiently as possible. Frequently, there
may be more than one way to navigate through the application.
Cursor. Use the mouse to move the cursor from one field to another. Click in the field to
enter data.
Tab/Shift+Tab. Use to navigate efficiently between fields on a page. To move forward,
use Tab. To move backward, use Shift Tab.
Note: The options selected from the drop-down list may not appear until the user tabs to the next
field. When Tab is used between fields, the field is highlighted when the cursor is in the field. Type
over the information, if applicable.
Save. Use Save to save the data after the transaction is completed. If Save is used before
the transaction is completed, an error message may appear prompting for entry of
Publication Category: HR and Payroll Processing
EmpowHR: Section 1 - Basics
40
required fields. Click Save and, in the upper right side of the page, the word Processing
appears.
Enter. Use Enter for the following uses:
Activates the OK button where applicable.
On a Search page, activates the Search button.
On a Search Lookup page, activates the Lookup button.
Opens the next menu level or the Search page for selected option.
Selects highlighted options from the drop-down list.
Right/Left Arrows. Use the arrows to view rows of data.
Magnifying Glass. Use the magnifying glass when it appears at the right of the
applicable field. Click the magnifying glass and a list of valid values or a Lookup page
for that field is displayed. Use these whenever they are available rather than typing the
data. Frequently, it is faster, and it avoids data entry mistakes.
Lookup Page. Use this page to enter known data that will narrow the options provided in
a valid value box. For example, to locate a record for an employee named Smith. The
application could have 50 persons named Smith. Click the magnifying glass to get the
Lookup page and enter data that will narrow the options.
New Window. Select New Window to open more than one window. The window
previously used will minimize at the bottom of the desktop. This option will allow
toggling between processes. Do not click Sign Out with the New Window option. This will
close the application. Use the X when closing individual windows while using the New
Window option.
Buttons
Buttons are used to execute a command. If the button appears gray on a page, that action is not
available for use.
Command Buttons
Button Description
Add Inserts a row in a grid or scroll area.
Add (+) Inserts a row in a grid or scroll area.
Add a Child Adds a child. This adds a new row one level lower in the table hierarchy.
Add a Detail Value Adds a detail value. This adds a detailed row of data to the tree.
Add a New Note Adds a new performance or development note.
Add a New Value Adds a new record.

Publication Category: HR and Payroll Processing EmpowHR: Section 1 - Basics
41
Command Buttons
Button Description
Add a Sibling Adds a sibling. This adds another row at the same node level as the current row.
Add Attachment Adds an attachment to a performance or development plan.
Add Behavior Adds an additional behavior.
Add the Relationship Establishes the relationship between a person and an organization.
Address/Message (Envelope)
Enters an address and ad-hoc notification message or displays the Send Notification page.
Apply Enables the user to apply the data input without returning to the main page.
Approve Approves the transaction.
Available for Review Enables the employee to view the consolidated document and adds comments to the Employee Comments section.
Marks a performance or development plan for review by either the employee or a reviewer in the workflow.
Back Reverts to the previous page in ePerformance.
Breech Splits a tree that is too large to manage.
Browse Searches for the location where the attachment is located.
Build Builds multiple positions from a position already established.
Calculate All Ratings Calculates all of the item and section ratings, as well as, the overall rating that appears on the performance document.
Calculate Ratings (Calculator)
Calculates ratings in ePerformance.
Calculate Status and Dates
Calculates the person's HR, job, or payroll status and employment dates.
Cancel Exits the page without saving data.
Cancel Evaluation Indicates that the document and all its associated evaluations are canceled.
Check Spelling Checks the spelling of the text entered in a long entry field.
Clear Clears all information entered in search/data fields on the current page.
Collapsed Node Represents a node with its contents out of sight until expanded.
Complete Indicates that the evaluation process is finished.
Continue Advances to the next page.

Publication Category: HR and Payroll Processing
EmpowHR: Section 1 - Basics
42
Command Buttons
Button Description
Copy Plan from Previous
Copies a performance plan from a plan that was previously established.
Correct History Accesses existing rows of data and displays all effective-dated rows. Allows the updating of all rows, including history rows.
Create Documents Creates the performance or development document.
Currency Displays the dollar amount in another currency.
Cut (Scissors) Cuts the current row. Use this for moving data within the tree. Following a cut operation, a past icon becomes available.
Deny Denies the transaction.
Deselect All Unselects the values that were previously selected by the Select All button.
Delete Deletes a transaction.
Delete (X) Deletes the row, node level.
Delete Selected Deletes the selected item.
Display Displays the information on a report for the criteria entered.
Down Arrow Searches for data on a drop-down list.
Edit (Pencil) Changes the description information at the detail level.
Email Address Establishes an email address.
EmpowHR Sign In Allows you to log in to EmpowHR.
Expand Expands the node hierarchy and adds more node levels to a table.
Expanded Node Represents an open node, showing all lower levels of the hierarchy.
Explanation of Rating Displays a page that provides an explanation of the rating.
Get Enabled Security Types
Adds and enables all security access types.
I Agree to the Above Agrees to the information that is present on the plan.
Include History Displays all rows of data; current, future, and history.
Initialize Contract Displays a description of the contract and its default contents.
Left Arrow Displays the previous grid, scroll, or search page results.

Publication Category: HR and Payroll Processing EmpowHR: Section 1 - Basics
43
Command Buttons
Button Description
Lookup Provides a way to view valid entries for a field. The Lookup feature will display a maximum of 300 search results on a page at a time.
Mark Worked Removes the transaction from the Worklist.
Next Advances to the next item.
Next Contract Number Populates the contract number field with the next available contract number.
Next in List Conducts search, scroll between records that were found as a result of this selection. Displays the next data row in the search results grid. This button appears gray when the user did not select the data row from a search results grid, if there was only one row in the grid, or if the data displayed is the last row in the grid.
Next Tab Displays the next page in the current component. If the user is in the last page of the component, this button is grayed.
Notes
(Notebook)
Displays, adds, or modifies notes for the transactions.
Notify Sends a message to a person’s email or sends the transaction to a person’s worklist.
Numbered Date Used to click the calendar icon to select the applicable date.
OK Accepts the data input made on an auxiliary page and returns the user to the main page.
Override Position Data Enters exceptions to the default position data.
Previous in List Conducts search, scroll between records that were found as a result of this selection. Displays the previous data row in the search results grid. This button appears gray if the user did not select the data row from a search results grid, if there was only one row in the grid, or if the data displayed is the last row in the grid.
Previous Tab Displays the previous page in the current component. If the user is in the first page of the component, this button is grayed.
Printable Version (Printer)
Displays a printable version of a document/form.
Ready for Review Marks a performance or development plan for review by either the employee or reviewer in the workflow.
Reassign Reassigns a transaction to another person’s Worklist.
Refresh Updates the page with newly entered data.
Refresh Name Updates the page to reflect the new data entered.
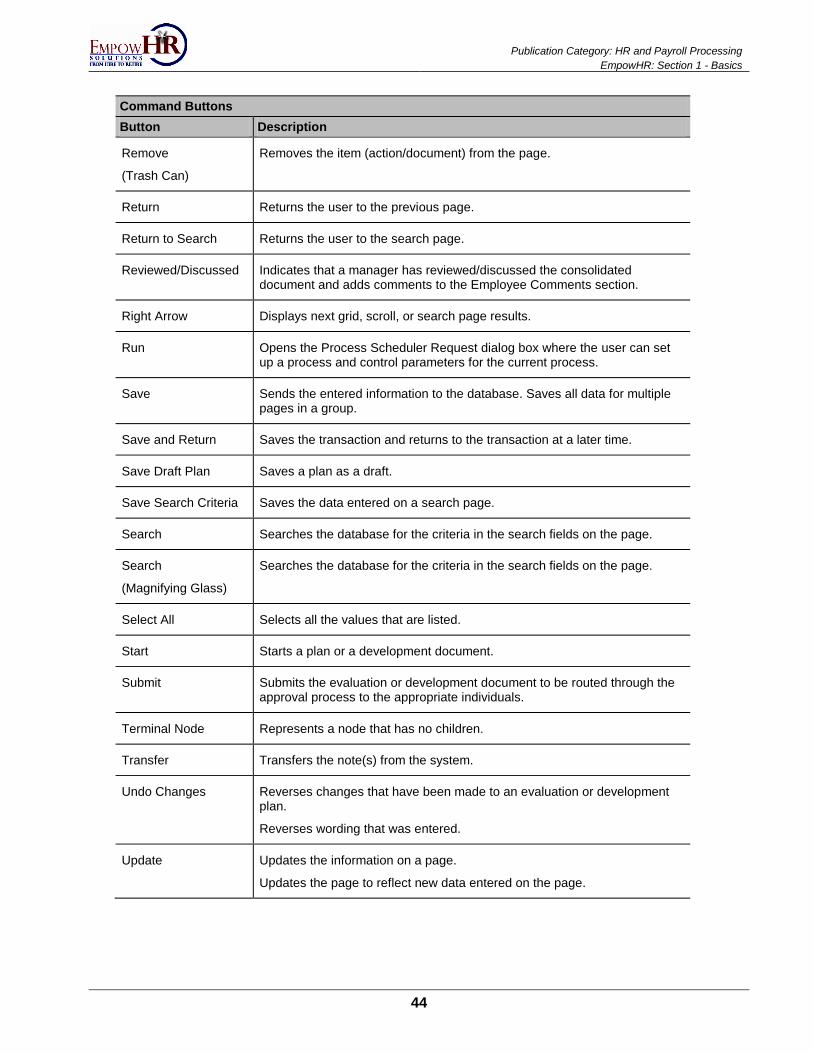
Publication Category: HR and Payroll Processing
EmpowHR: Section 1 - Basics
44
Command Buttons
Button Description
Remove
(Trash Can)
Removes the item (action/document) from the page.
Return Returns the user to the previous page.
Return to Search Returns the user to the search page.
Reviewed/Discussed Indicates that a manager has reviewed/discussed the consolidated document and adds comments to the Employee Comments section.
Right Arrow Displays next grid, scroll, or search page results.
Run Opens the Process Scheduler Request dialog box where the user can set up a process and control parameters for the current process.
Save Sends the entered information to the database. Saves all data for multiple pages in a group.
Save and Return Saves the transaction and returns to the transaction at a later time.
Save Draft Plan Saves a plan as a draft.
Save Search Criteria Saves the data entered on a search page.
Search Searches the database for the criteria in the search fields on the page.
Search
(Magnifying Glass)
Searches the database for the criteria in the search fields on the page.
Select All Selects all the values that are listed.
Start Starts a plan or a development document.
Submit Submits the evaluation or development document to be routed through the approval process to the appropriate individuals.
Terminal Node Represents a node that has no children.
Transfer Transfers the note(s) from the system.
Undo Changes Reverses changes that have been made to an evaluation or development plan.
Reverses wording that was entered.
Update Updates the information on a page.
Updates the page to reflect new data entered on the page.

Publication Category: HR and Payroll Processing EmpowHR: Section 1 - Basics
45
Command Buttons
Button Description
Update/Display Accesses existing rows of data on the database. If data is effective dated, displays only current and future rows. It is also used to update or display information.
Upload Uploads a document or a file to a performance or development plan.
+ Inserts a row in a grid or scroll area.
- Deletes a row in a grid or scroll area.
Find an Existing Value
The Find an Existing Value tab allows the user to locate an existing record. To find an employee
record, the user will need to enter the employee identification (EmplID). When the EmplID is
not known, the user can enter various search criteria. There are check boxes at the bottom of
each search page Include History, Correct History, and Case Sensitive. The Include History and
Correct History check boxes determine the data displayed. If the Include History box is checked, it
will display the history for review. The Correct History box is used to make a correction on
records that have not applied at NFC. The Case Sensitive check box is used for lower/uppercase
search criteria. Clicking Search after completing the Find an Existing Value tab returns a set of
matching results with keys to the source document.
If neither box is checked, only current and future dated rows will display. This is an example of
an HR Processing search page.
For faster searches, the following tips are recommended:
Do not leave the search criteria fields blank.
Enter two or more characters in search field(s) to maximize response time and to
minimize the number of data rows returned.
Enter full field search criteria, when available, to maximize return response time.
To use the Find an Existing Value tab:
1. Enter the criteria and the appropriate check boxes.

Publication Category: HR and Payroll Processing
EmpowHR: Section 1 - Basics
46
2. Click Search. The Search Results - Find an Existing Value tab is displayed.
Figure 24: Search Results - Find an Existing Value Tab
3. Select the applicable Agency/Department.
4. Click the link. The selected information will populate the field.

Publication Category: HR and Payroll Processing EmpowHR: Section 1 - Basics
47
Add a Value
The Add a New Value tab allows the adding of a transaction. This is an example of the Add a New
Value tab to enter a new Job Code.
Figure 25: Add a New Value Tab
Viewing Rows
On any EmpowHR page that contains data rows, the number of rows displayed varies depending
on how many rows will fit on a page. For some data rows, only one data row is visible at a time.
The user can move through the rows on that page/tab using the row navigation button at the top
right-hand corner of the page.
Insert a Row
A Row is a new action. The most common way to make a change is by inserting new data rows.
Enter a new effective date and make changes without losing the integrity of the historical data.
To add or insert a new transaction/row, click + and change the effective date for the new
information. When a new data row has been saved and the wrong information has been entered
in a field, do not enter a new row or delete the row to correct a mistake. Use the Correction action
to fix the data, but keep the row intact. The effective date cannot be changed.
When a new row is added, the new row has the small number (i.e., 1 of 4 with 1 being the row
(action) just added). Previous actions have the larger numbers.
The Correction button is used to update EmpowHR only. This information is not transferred to
NFC. Use the + to add a new row. For more information refer to the EmpowHR, Section 4,
Publication Category: HR and Payroll Processing
EmpowHR: Section 1 - Basics
48
Position Management, under the HR and Payroll Processing publication category on the
Publications page of the NFC Web site.
Scroll areas on a page allow for inserting multiple rows of data on a page. As new rows are
inserted, the system copies key information to the new rows. Use the arrows pointing left ( ) and
right ( ) to scroll through multiple occurrences of data when the arrows indicate the current
record is 1 of 3 ( 1 of 3 ). Click View All to view all of the transactions.
Delete a Row
A row that has just been created and has not applied at NFC can be deleted. To delete incorrect
information, position the cursor in the Effective Date field for the row that needs to be deleted
and click the - on the top right-hand corner of the page. To delete a transaction/row, click -.
Message Popups
Throughout EmpowHR, message popups appear when certain actions are performed. These
popups can be informational, or they can notify the user of an action that must be taken and/or an
error condition that must be satisfied. Command buttons are used on these popups to accept,
cancel, or return to the active page. The following is an example of a message popup.
Figure 26: Example of a Message Popup
This section includes the following topics:
Search ........................................................................................................................ 48
Calendar Icon ............................................................................................................. 55
Tabs ............................................................................................................................ 56
Sequencing ................................................................................................................ 57
Tips ............................................................................................................................. 58
Search
Users can search throughout EmpowHR by using the Find an Existing Value tab. After a search
is complete, up to 300 results at one time are displayed for the user to select the applicable
record.
Publication Category: HR and Payroll Processing EmpowHR: Section 1 - Basics
49
Search Icons
The Search icon appears at the right side of a field and reveals a list of valid values. Choose a
valid value, and the data will populate the applicable field. To narrow the search, enter as much
data as possible in the search criteria. The Basic Search will allow the search by one field.
When entering dates on pages, click the calendar icon to select the applicable date. By entering a
T in a date field, the field is populated with the current date.
Wildcard Values
EmpowHR allows the use of wildcard characters when searching for values. The Wildcards
allow a broad search of many different data combinations when the user does not know a
complete value or is unsure of how to spell something. If the user does not enter a wildcard,
EmpowHR assumes an exact match is required.
EmpowHR applications support three wildcard features when searching for data in character
fields. These wildcards can be helpful in finding the exact information a user desires to process.
Wildcards cannot be used in every instance or in every menu group, menu, menu item, or
component. For example, Wildcards are not viable in date fields.
The table below shows how to use Wildcards:
Wildcard Definition
% (percent sign) Match one or more characters.
_ (underscore) Match any single character.
Example Description
S%N Will return any name that begins with the letter S and ends with the letter N.
_man Will return all names ending in "man".
%man% Users can combine Wildcards. This example returns any name that contains "man"... (like Manual or Sandmanson or Hillman)
To use the % Wildcard Value:
1. When entering search criteria, enter all characters known.
2. Replace any characters (or string of characters) with %.
3. Click Search. EmpowHR searches for all values containing the characters entered
including any character(s) in place of the %.

Publication Category: HR and Payroll Processing
EmpowHR: Section 1 - Basics
50
To use the _ Wildcard Value:
1. When entering search criteria, enter all characters known.
2. Replace any unknown character(s) with _.
3. Click Search. EmpowHR searches for all values containing the characters entered
including any character in place of the _.
Advanced/Basic Search
Many EmpowHR search pages can be viewed as Basic or Advanced Search. The Basic Search
lets the user choose one field on which to search. On the Basic Search, select a search field by
clicking the drop-down list. The Advanced Search displays all search fields so that the user can
enter multiple search criteria.

Publication Category: HR and Payroll Processing EmpowHR: Section 1 - Basics
51
To use the Advanced Search feature:
1. Click the Advanced Search link. The Advanced Search - Find an Existing Value tab is
displayed.
Figure 27: Advanced Search - Find an Existing Value Tab
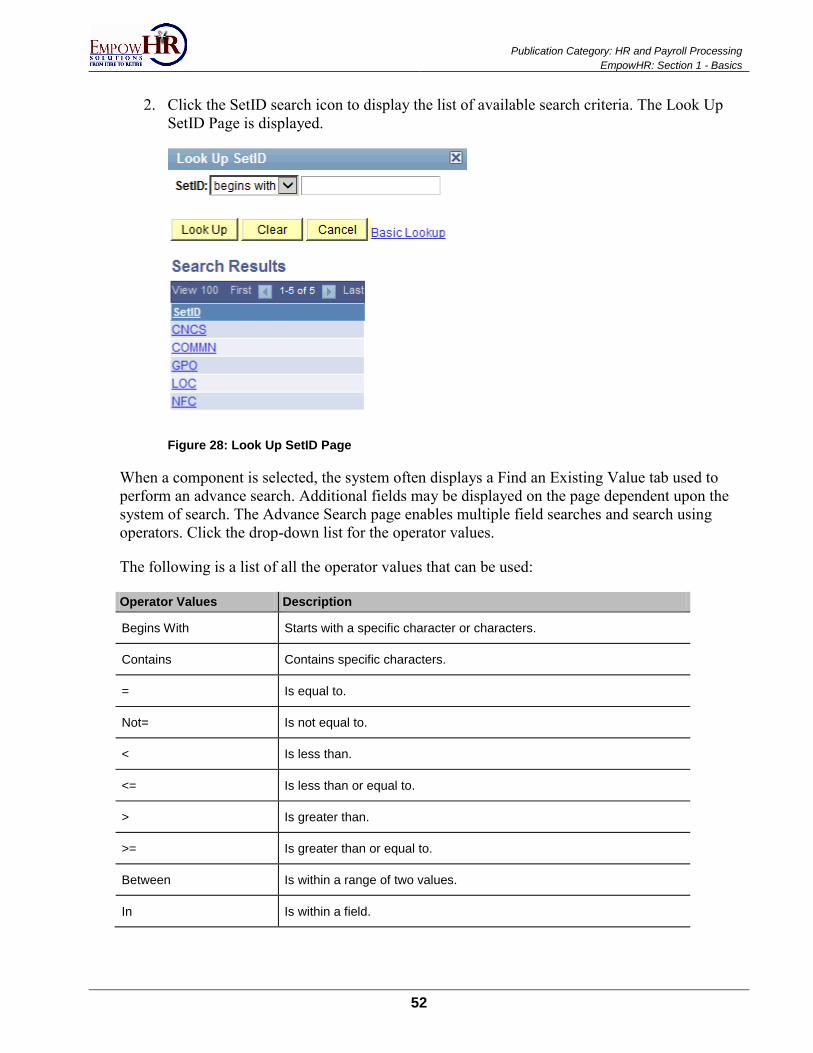
Publication Category: HR and Payroll Processing
EmpowHR: Section 1 - Basics
52
2. Click the SetID search icon to display the list of available search criteria. The Look Up
SetID Page is displayed.
Figure 28: Look Up SetID Page
When a component is selected, the system often displays a Find an Existing Value tab used to
perform an advance search. Additional fields may be displayed on the page dependent upon the
system of search. The Advance Search page enables multiple field searches and search using
operators. Click the drop-down list for the operator values.
The following is a list of all the operator values that can be used:
Operator Values Description
Begins With Starts with a specific character or characters.
Contains Contains specific characters.
= Is equal to.
Not= Is not equal to.
< Is less than.
<= Is less than or equal to.
> Is greater than.
>= Is greater than or equal to.
Between Is within a range of two values.
In Is within a field.

Publication Category: HR and Payroll Processing EmpowHR: Section 1 - Basics
53
To use the Basic Search option:
1. Click the Basic Search link. The Basic Search - Find an Existing Value tab is displayed.
Figure 29: Basic Search - Find an Existing Value Tab
2. Enter the applicable data.
3. Click Search. The Search Results page is displayed.
Figure 30: Search Results Page
4. Select a value from the list. The value will populate the applicable page.
Saving Search Criteria
EmpowHR allows the user to save search criteria on pages that contain the Save Search Criteria
link.
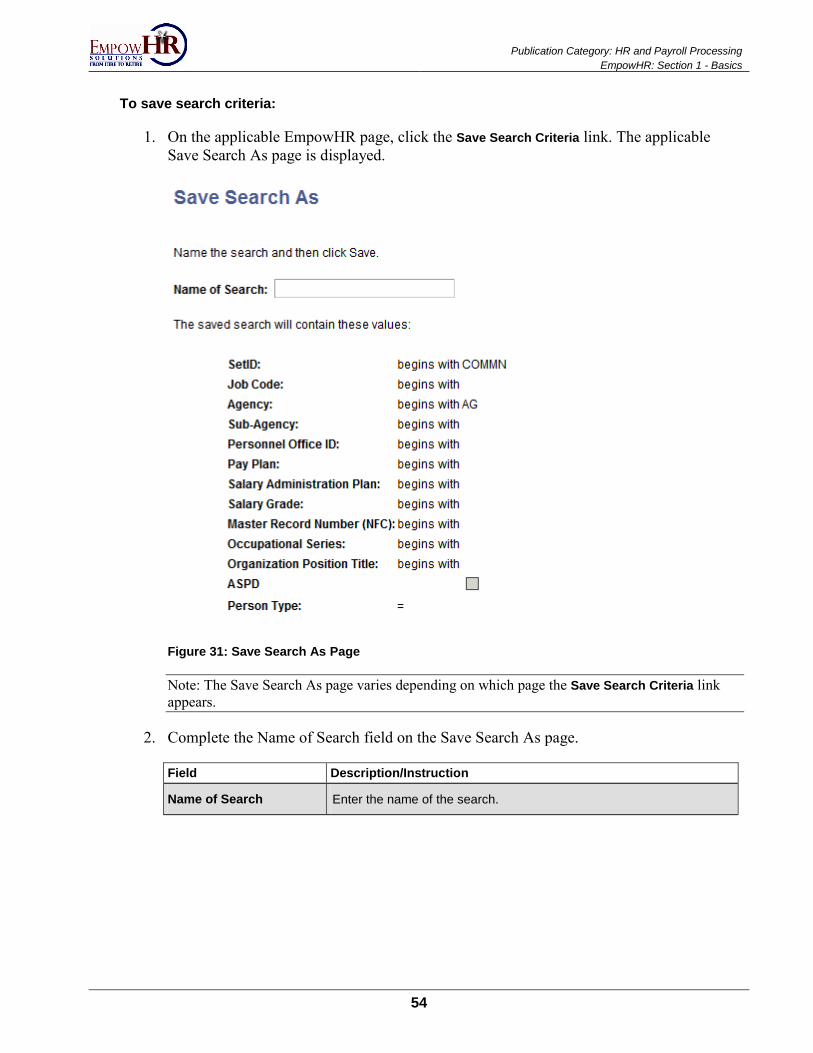
Publication Category: HR and Payroll Processing
EmpowHR: Section 1 - Basics
54
To save search criteria:
1. On the applicable EmpowHR page, click the Save Search Criteria link. The applicable
Save Search As page is displayed.
Figure 31: Save Search As Page
Note: The Save Search As page varies depending on which page the Save Search Criteria link
appears.
2. Complete the Name of Search field on the Save Search As page.
Field Description/Instruction
Name of Search Enter the name of the search.

Publication Category: HR and Payroll Processing EmpowHR: Section 1 - Basics
55
3. Click Save. The Save Search As page is displayed.
Figure 32: Save Search As Page
Deleting Search Criteria
This option allows the user to delete a saved search.
1. Navigate to the desired page to be deleted.
2. Click the Delete Saved Search link. The Delete Saved Searches page is displayed.
Figure 33: Delete Saved Searches Page
3. Enter the search to be deleted.
4. Click Delete. The Delete Saved Searches results page is displayed. If this is the only
saved search, the message states that there are no saved searches.
Figure 34: Delete Saved Searches Page
Calendar Icon
The calendar icon allows the user to select a date from a calendar to populate a data field.
1. Click the calendar icon. The icon is displayed. The calendar icon includes both a field
where the date can be typed and an icon where the date can be selected.
Figure 35: Calendar Icon
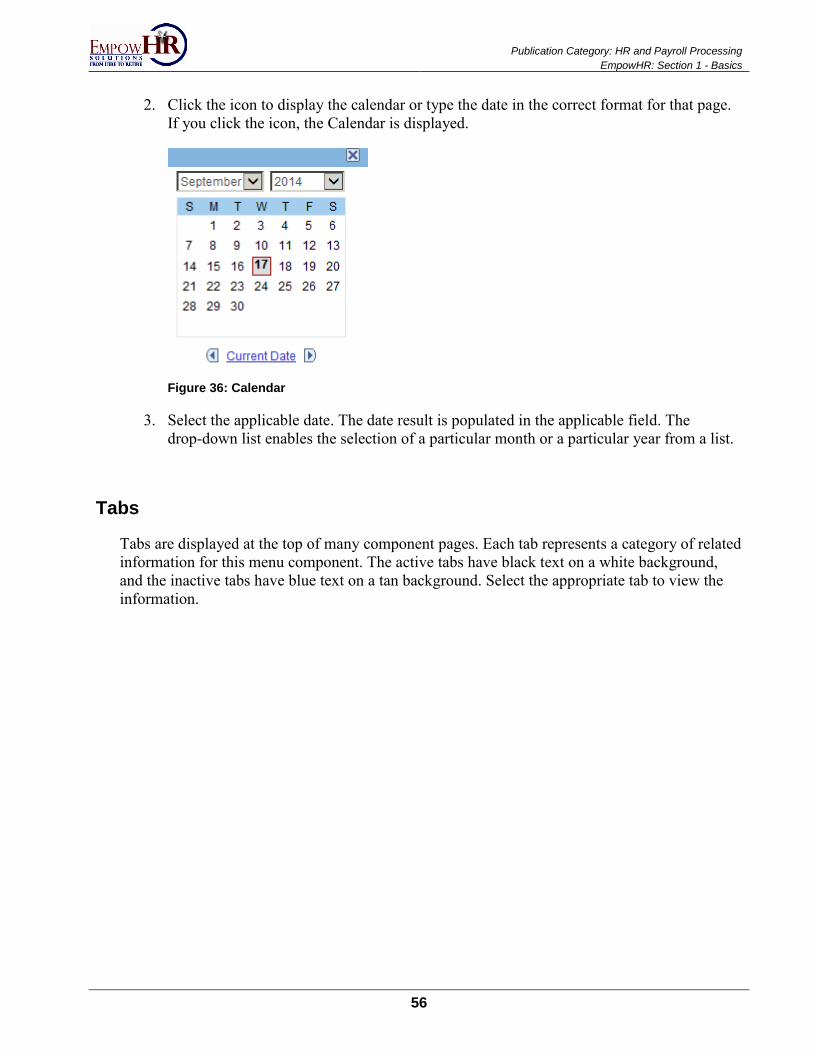
Publication Category: HR and Payroll Processing
EmpowHR: Section 1 - Basics
56
2. Click the icon to display the calendar or type the date in the correct format for that page.
If you click the icon, the Calendar is displayed.
Figure 36: Calendar
3. Select the applicable date. The date result is populated in the applicable field. The
drop-down list enables the selection of a particular month or a particular year from a list.
Tabs
Tabs are displayed at the top of many component pages. Each tab represents a category of related
information for this menu component. The active tabs have black text on a white background,
and the inactive tabs have blue text on a tan background. Select the appropriate tab to view the
information.
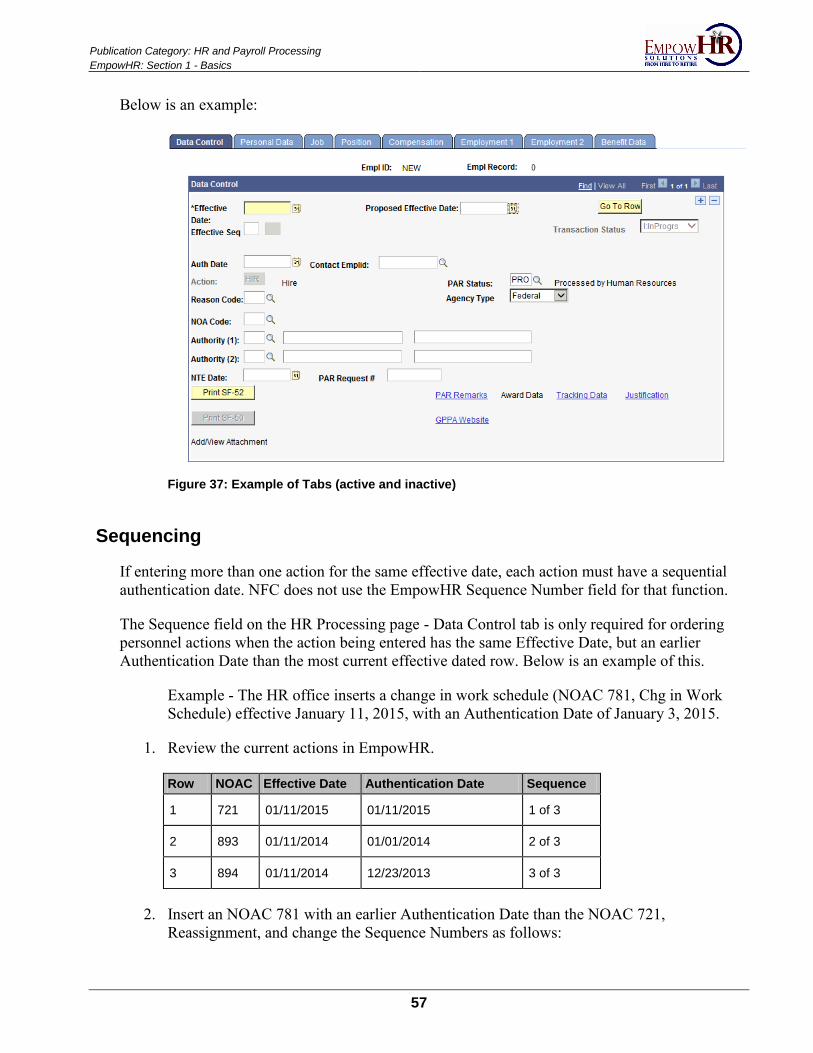
Publication Category: HR and Payroll Processing EmpowHR: Section 1 - Basics
57
Below is an example:
Figure 37: Example of Tabs (active and inactive)
Sequencing
If entering more than one action for the same effective date, each action must have a sequential
authentication date. NFC does not use the EmpowHR Sequence Number field for that function.
The Sequence field on the HR Processing page - Data Control tab is only required for ordering
personnel actions when the action being entered has the same Effective Date, but an earlier
Authentication Date than the most current effective dated row. Below is an example of this.
Example - The HR office inserts a change in work schedule (NOAC 781, Chg in Work
Schedule) effective January 11, 2015, with an Authentication Date of January 3, 2015.
1. Review the current actions in EmpowHR.
Row NOAC Effective Date Authentication Date Sequence
1 721 01/11/2015 01/11/2015 1 of 3
2 893 01/11/2014 01/01/2014 2 of 3
3 894 01/11/2014 12/23/2013 3 of 3
2. Insert an NOAC 781 with an earlier Authentication Date than the NOAC 721,
Reassignment, and change the Sequence Numbers as follows:
Publication Category: HR and Payroll Processing
EmpowHR: Section 1 - Basics
58
Note: The Sequence Number only orders the actions within EmpowHR. Therefore, you must
change the Effective Sequence in EmpowHR so that the actions are processed in the correct order
in PPS.
Row NOAC Effective Date Authentication Date Sequence Effective Sequence
1 781 01/11/2015 01/03/2015 3 of 4 Change from 2 1 to 1 1
2 721 01/11/2015 01/11/2015 4 of 4 Change from 1 1 to 2 1
3 893 01/11/2014 01/01/2014 2 of 4 2 1
4 894 01/11/2014 12/23/2013 1 of 4 1 1
3. Upon saving the action, EmpowHR will reorder the actions with the same Effective Date
by the Effective Sequence Number. Please note that the Sequence Number does not
dictate the order that PINE processes the actions. Below is a depiction of the actions in
EmpowHR after the actions have been saved.
Row NOAC Effective Date Authentication Date Sequence Effective Sequence
1 721 01/11/2015 01/11/2015 4 of 4 2 1
2 781 01/11/2015 01/03/2015 3 of 4 1 1
3 893 01/11/2014 01/01/2014 2 of 4 2 1
4 894 01/11/2014 12/23/2013 1 of 4 1 1
4. The results of the step above should match the order of the actions as they are reflected in
PPS on IRIS Program IR125, Personnel Action Summary, or IRIS Program IR525,
PERHIS Personnel Actions Summary, (after BEAR has run at the end of the pay period).
Verify the following in either IRIS Program IR125 or IRIS Program IR525:
NOAC Effective Date Authentication Date
721 01/11/2015 01/11/2015
781 01/11/2015 01/03/2015
893 01/11/2014 01/01/2014
894 01/11/2014 12/23/2013
Tips
The following are a few reminders:

Publication Category: HR and Payroll Processing EmpowHR: Section 1 - Basics
59
Preserve old records. Changing the data on a historical record compromises the integrity
of the record and may not be in accordance with regulations. When making a change,
insert a new row and enter the information under the appropriate NOAC and new
effective date.
Whenever available, use drop-down lists or search results (magnifying glass) to select
valid values to avoid typing errors.
Use the tab or arrows to scroll through the fields to change data.
Use the X to close a window.
Use the Home option on the top of the window to get back to the menu.
Use the Save button to save a completed transaction. If the save button is used before the
transaction is completed, one or more error messages will display stating that required
fields are missing. When Save is clicked, notice in the upper right side of the page the
word Processing and then the word Saved will appear. The word Saved will disappear.
When the record is saved, a message also appears.
Use full names, Social Security numbers, or the full EmplID when searching for an
employee.
Periodically, clear your cache by deleting temporary files and cookies from the hard
drive.
Do not log out of the application while a document is processing. The application is still
running in the background. Wait until the Transaction Status has updated to log out of the
application.
Do not select Stop on the browser when the transaction is processing. Wait until the
processing is completed before closing the window.
Do not use the Back button on the browser.
Populate the date field with the current date by entering a T in the date field.
Complete the required when a field has an * (asterisk) before the field name.
Use the following EmpowHR status codes:
Status Codes
Status Short Name Notes
NFC Auto Action NFC Auto All NOACs.
Payroll Interface Error
PI Error EmpowHR record field values need to be reconciled.

Publication Category: HR and Payroll Processing
EmpowHR: Section 1 - Basics
60
Status Codes
Status Short Name Notes
Ready Future Rdy-Future Action is effective in a pay period that occurs after the current processing pay period.
History Override Hold
History Override Hold
This document is released when the user changes the status to History Override Release.
In Progress In Progress This status is displayed when a new row is inserted.
Data Load Data Load This is data loaded from PPS.
NFC Auto Applied This was processed outside of EmpowHR, applied to PPS, and was loaded to EmpowHR.
Sent to NFC Sent to NFC This status is displayed after an action has been sent to NFC at 11 a.m. (CT) and 4 p.m. (CT) daily.
Applied Applied This action has applied in PPS.
Applied-Loading to Worklist
Appl-Wlist This action has applied in PPS and will be displayed on the user's Worklist.
Ready for NFC Transmission
NFC Ready This action is displayed after the action is saved.
Not Applied at NFC
Not Applied This action did not pass the PINE edits.
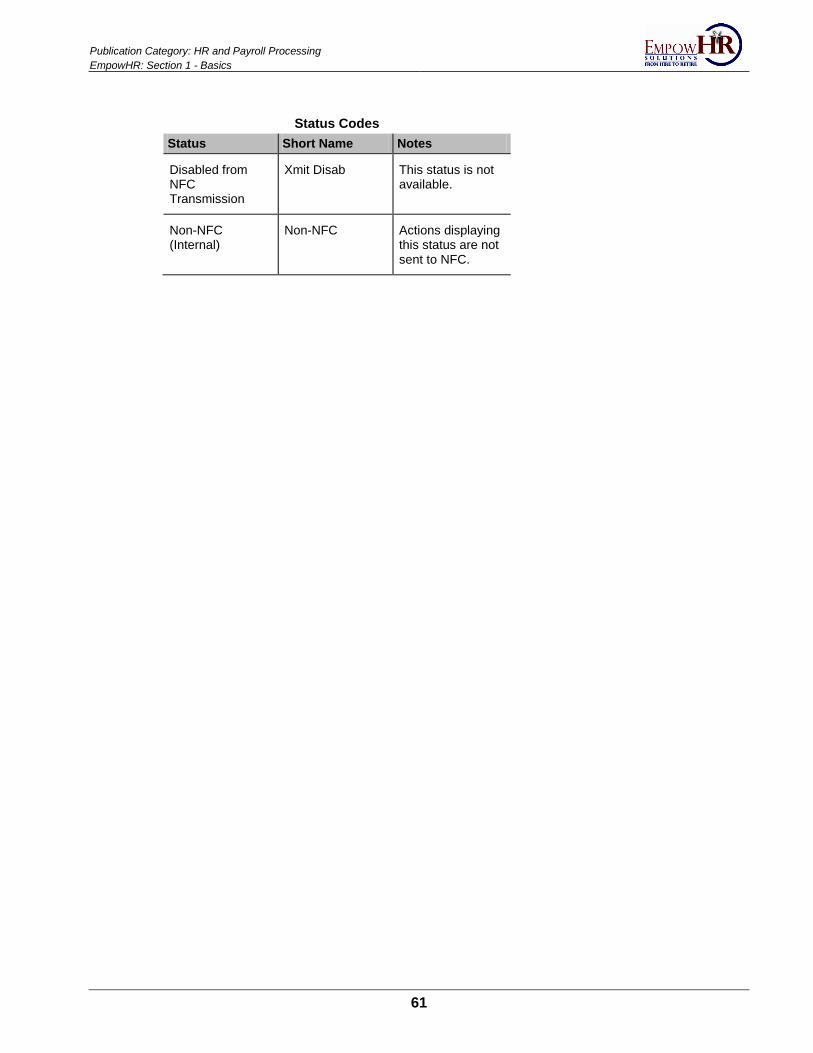
Publication Category: HR and Payroll Processing EmpowHR: Section 1 - Basics
61
Status Codes
Status Short Name Notes
Disabled from NFC Transmission
Xmit Disab This status is not available.
Non-NFC (Internal)
Non-NFC Actions displaying this status are not sent to NFC.

Publication Category: HR and Payroll Processing EmpowHR: Section 1 - Basics
63
Index
A
Access/Security • 7
Agency Responsibilities • 4
C
Calendar Icon • 55
Changing Password • 11
D
Did You Forget Your Password? • 10
E
Effective Dates • 33
Exiting • 12
F
Fields • 34
H
Hyperlinks • 34
L
Latest Update Information • 1
Logging On • 7
M
Menus • 12
N
National Finance Center Responsibilities • 4
National Finance Center Security Responsibilities • 5
Navigation • 39
New Windows • 34
O
Overview • 1
P
Page Groups • 34
Payroll/Personnel System Flow • 31
Payroll/Processing Cycle • 30
Processing • 29
R
Reporting • 3
Roles • 2

Publication Category: HR and Payroll Processing
EmpowHR: Section 1 - Basics
64
S
Search • 48
Sequencing • 57
Statuses • 36
T
Tabs • 56
Tips • 58
U
Use the eAuthentication Login (for Department of
Justice (DOJ) and United States Department of
Agriculture (USDA) Employees Only) • 10
Using the Application • 33