Detroit Tuned 1303 Anderson Rd. Clawson MI 48017 586.792.6464 [email protected]
Detroit Tuned Fan Relay Kit
This fan relay kit will fix the broken diode that controls the high and low speed fan on all generation one cars
(R50, R52, & R53 MINI Cooper & MINI Copper S). We will cover how to install the kit itself, but will not
cover getting to the fan or putting it back in. We recommended using a Bentley Manual with all the information
within it to help complete this job for anyone that is a weekend mechanic. There is also electrical wiring in
these directions and you should be confident in your ability with electrical wiring.
READ ALL DIRECTIONS THROUGHLY BEFORE YOU START!!!
NOTE: WHENEVER WORKING IN THE ENGINE BAY, YOU SHOULD WEAR SAFETY GLASSES
AND THE ENGINE SHOULD BE COOL. IF AFTER READING THESE DIRECTIONS, YOU FEEL
THIS IS WORK YOU CANNOT COMPLETE, YOU SHOULD CONSULT A TRAINED MECHANIC.
Tools Needed:
8mm socket w/ 1/4” Ratchet
Wire snips
Wire strippers
Solider Gun
Heat Gun w/shrink wrap OR electrical tape
Jack & Jack Sands
Safety Glasses
Directions:
1. On level ground, jack up your vehicle and support the front end with jack stands so that it is secure.
Because you’re only jacking up the front end, set the hand brake and/or block the rear wheels so the
vehicle will not roll. With your safety glasses on, put the front end into service mode. Remove the
radiator so that you will be able to remove the fan assembly. Make sure you unplug it and unclip the
wire harness so that it will swing forward easily. Use a Bentley Manual for all the needed details to put
the car into service mode. Have a catch pan ready for any spilled coolant.
2. You now have your fan out and are ready to start.
Detroit Tuned 1303 Anderson Rd. Clawson MI 48017 586.792.6464 [email protected]
3. Remove both the screws and open the cover that is lightly glued over the wires. Don't worry about
breaking this cover as you will not reuse any of these parts other than the two screws. If you can not
get the cover off, you can just clip the wires close to the case and set it aside.
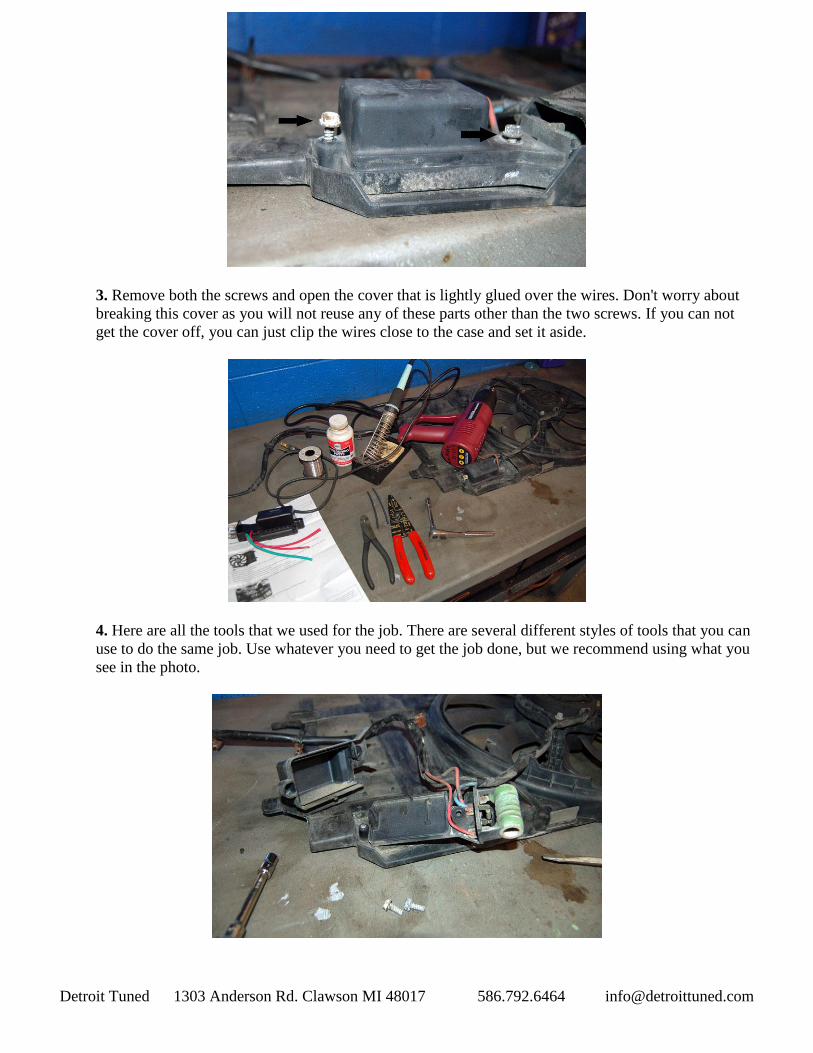
4. Here are all the tools that we used for the job. There are several different styles of tools that you can
use to do the same job. Use whatever you need to get the job done, but we recommend using what you
see in the photo.

Detroit Tuned 1303 Anderson Rd. Clawson MI 48017 586.792.6464 [email protected]
5. This now what it should look like.
6. Cut the wires as close to the terminal so that you have as much wire as you need to make the install go
smoothly.
7. Strip the wires and get shrink wraps ready. This is where you need to plan ahead a bit. If you have a
one plug fan, it will be wired in like the directions say to that come with the unit (or can be found on the
Detroit Tuned web site). If to have a two-plug fan, wire it in like the photo shows in step 12. Planning is
key now. Making the wires too long or to short will make the unit not fit well or make the wire harness
lay flat or even break over long term use. Look at the photos in step 10 (one plug unit) and step 12 (two
plug unit). Cut the wires as needed to fit correctly and you should end up with a final look as the photo
in step 13. Double check fitment, correct wires to attach to each other, and get ready to solder them
together. Make sure you slide the shrink wrap on before you solder the wires.
Detroit Tuned 1303 Anderson Rd. Clawson MI 48017 586.792.6464 [email protected]
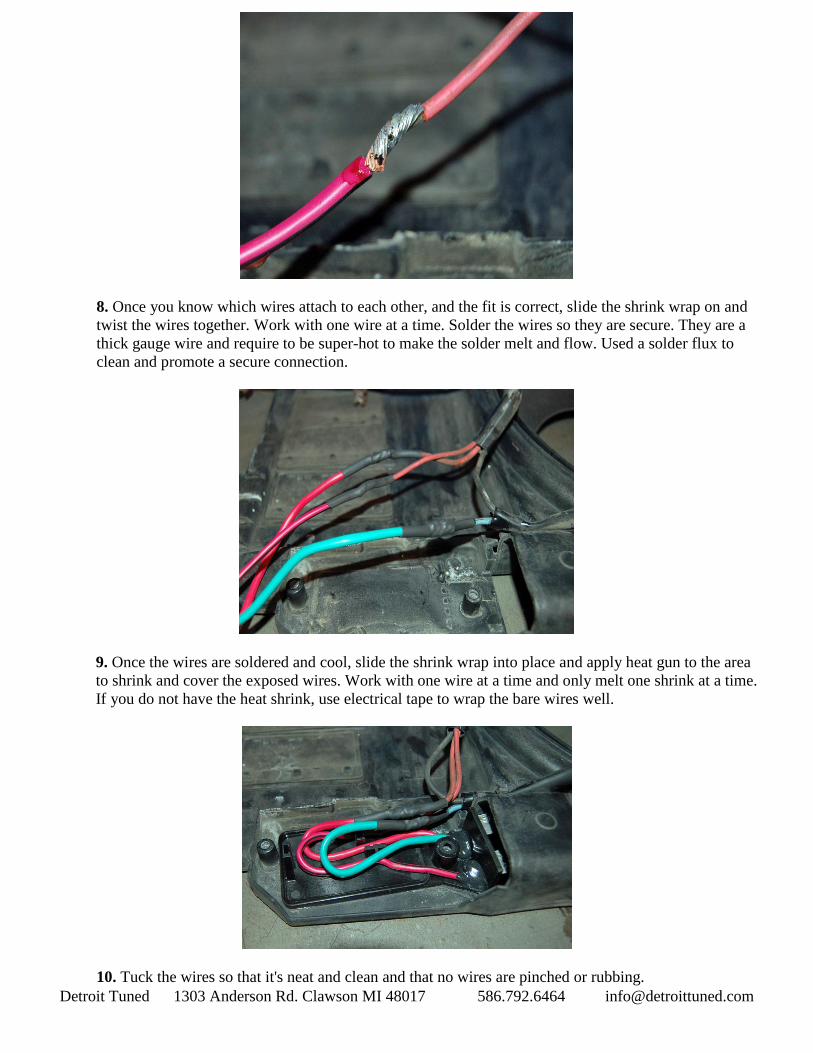
8. Once you know which wires attach to each other, and the fit is correct, slide the shrink wrap on and
twist the wires together. Work with one wire at a time. Solder the wires so they are secure. They are a
thick gauge wire and require to be super-hot to make the solder melt and flow. Used a solder flux to
clean and promote a secure connection.
9. Once the wires are soldered and cool, slide the shrink wrap into place and apply heat gun to the area
to shrink and cover the exposed wires. Work with one wire at a time and only melt one shrink at a time.
If you do not have the heat shrink, use electrical tape to wrap the bare wires well.
10. Tuck the wires so that it's neat and clean and that no wires are pinched or rubbing.
Detroit Tuned 1303 Anderson Rd. Clawson MI 48017 586.792.6464 [email protected]
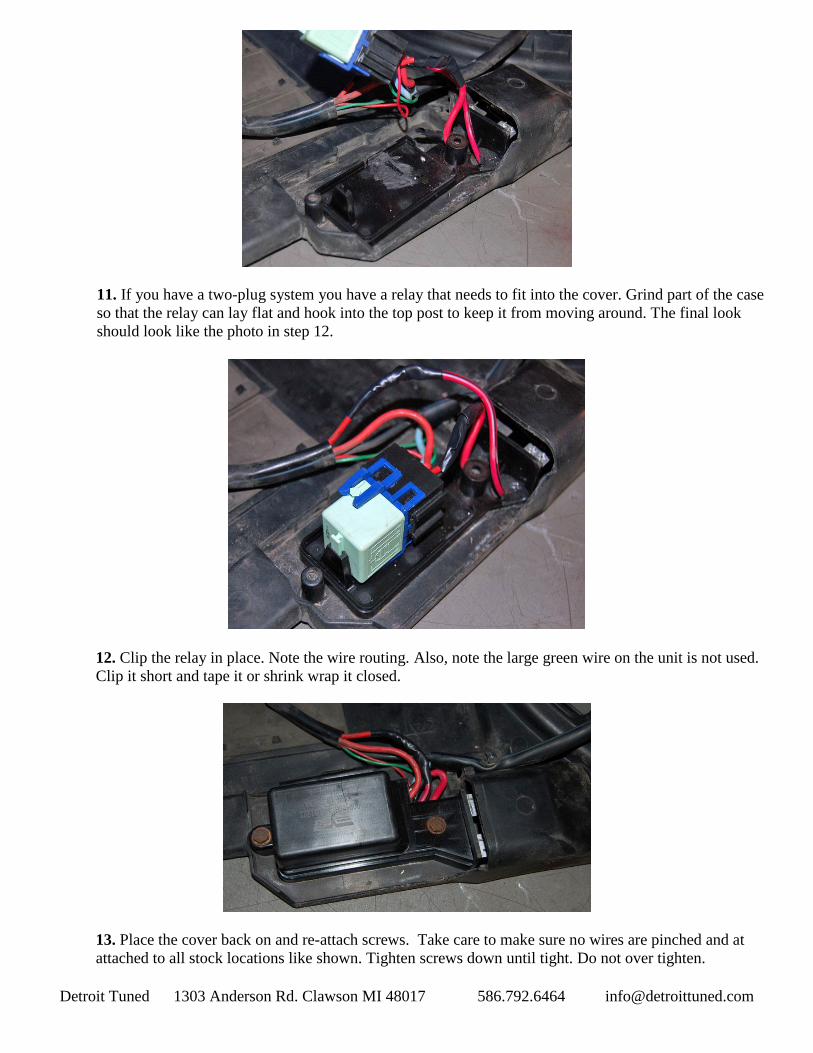
11. If you have a two-plug system you have a relay that needs to fit into the cover. Grind part of the case
so that the relay can lay flat and hook into the top post to keep it from moving around. The final look
should look like the photo in step 12.
12. Clip the relay in place. Note the wire routing. Also, note the large green wire on the unit is not used.
Clip it short and tape it or shrink wrap it closed.
13. Place the cover back on and re-attach screws. Take care to make sure no wires are pinched and at
attached to all stock locations like shown. Tighten screws down until tight. Do not over tighten.

Detroit Tuned 1303 Anderson Rd. Clawson MI 48017 586.792.6464 [email protected]
You are now done with the installation. If you have any questions give us a call or send us an email.
Detroit Tuned (586) 792-MINI or [email protected]


![Vibration suppression of cables using tuned inerter dampers · tuned viscous mass dampers [28,29], tuned mass-damper-inerter systems [30] and tuned inerter dampers (TID) [31]. Unlike](https://static.cupdf.com/doc/110x72/5ebe7d97c8153850be39552a/vibration-suppression-of-cables-using-tuned-inerter-dampers-tuned-viscous-mass-dampers.jpg)