Lecture 4: Shoot Basketball Game #2
Dr. Kobkrit ViriyayudhakorniApp Technology Limited
ITS488 (Digital Content Creation with Unity - Game and VR Programming)


Exercise 0: Texture

Download the Starting code
• Go to https://github.com/kobkrit/VR_basketball_lecture_3 to download the starting code.
• Unzip the project.
• Open Unity.
• Open the project by selecting the unzipped folder.

Object Collider
Click at a Ground Game Object. Uncheck the Sphere Collider and Press "Run" to see the effect.

Collision
• We can check the collision between objects in Unity very easy.
• To demonstrate, We will create a mini shooter game which use a cube as a target.
• If user shoot a ball that hit the target, user get a score.

Collision: Adding Target
1. Right click to create cube as the target. 2. Move the target to the center of the field. Make it see within camera.

Collision: Counting Score
3. Change the name of the cube in the inspector,as "Target"
4. Add the C# Script 5. Name it as "Score Count" and Make it associated with the "Target".

Collision: OnCollsionEnter Method
6. Adding the OnCollisionEnter method. 7. Run

Exercise 1
• Modify the ScoreCount.cs code to be able to count the score.
• When a ball hit the target, the score increases by 1.
• Print out the score byprint() command.

Add multiple targets• To complete the game, we are
going to have multiple targets, as we have designed to have multiple basketball’s backboards
• We will cloning the target into 2-3 targets.
• Move the newly cloned target to different locations.

Duplicate the target
1. Select the target, right click, select "Duplicate".
2. Move the newly cloned object into different locations. 3. Repeat few times.

Local Score Problem
Press Run. We will see the local score problem. When we shoot a ball to the same target, the score increase, but when we change the target, the score will be reset to 1. We need to do the global score system.

Global Score System
1. Remove the duplicated target. 2. Select the target, and remove the Score Count component.

Global Score System #2
1. Create a new empty object, and name it "ScoreCounter"
2. Associate "ScoreCount.cs" code tothe ScoreCounter game object.
3. Create a new C# script file called"DetectCollision.cs" and associate it
with the Target.

Global Score System #3
• Changing the method to other name, like "IncreaseScore()"
• Add "public" in front of the method to allow other classes to call this method.
• By convention of the Unity, the first letter of a method’s name must be capitalized.
Edit your ScoreCount.cs to this content.

Global Score System #4
Make DetectCollision.cs call the ScoreCount’s Increase Score method, when there is a collision.
DetectCollision.cs

Run

Continue here...

Exercise 2: Create a target prefab.
• Use the prefab to make multiple targets
• Position them apart in the scene.
• Check if the score is update in one place.
• BONUS: If you can allow different targets to score differently.
• HINT: IncreaseScore() need an argument.

Making Multiple Scene
• We need the splash screen to introduce the user about the game.
• We also need the end score screen to show the final result of the game.
• We can make it by having multiple scenes. One screen = One scene.

Making Multiple Scene #1
1. Create a new folder named "Scenes" 2. Move the scene that we already have into the Scenes folder by drag-and-drop.
3. Click, Press "Enter"and rename it "2_Main"

Making Multiple Scene #2
4. Create a new Scene by right click, Create, Scene 5. Named it "1_Splash"

Making Multiple Scene #3
6. Double Click at the 1_Splash icon at the bottom panel, You will get the new empty scene.

Include Scenes into the Build
1. Go to File > Build Settings
2. Drag and drop both scenes into the "Scenes In Build".***The order is very important***
"1_Splash" scene must be at the top of "2_Main" scene.

Moving one scene to another #11. Double click at the "1_Splash" scene.
2. Create a new empty game object named it "LevelManager"
3. Create a new C# script, named it "LevelManager" as well.
4. Associate the C# script into the Level Manager game object by drag-and-drop.

Moving one scene to another #2
LevelManager.cs

Run
1_Splash
2_Main
SKIP IMMEDIATELY

Exercise 3: Trigger to next scene by spacebar
• Move from the 1_Splash scene to the 2_Main scene when user press spacebar.
• Use GetKeyDown() method
• Seperate the logic for moving to the next scene in a new method.
• HINT: Edit at LevelManager.cs

Create Menu UI
1. Add the 1_Splash scene, change to 2D mode. 2. Create a new Canvas 3. Double click at "Canvas" game objectin the Hierarchy window or Zoom out a lot
(By middle mouse button).You will see the boundary of the canvas.

Find image to put into canvas
1. Find in Google Image Search with the Noncommerical Reuse. 2. Download any image you like.

Import Images
1. Create a new folder called "Images"
2. Drag and drop the download image into that folder.

Add Image into Canvas
1. Select Canvas, Right click, UI, and Raw Image 2. Drag and drop the image into the RawImage’s Texture part.

Resize the Raw Image• Make it bigger the canvas
by moving at the blue dot of the Raw Image.
• Press Run to see the result.
• Try it in different screen ratio. Resize the window in different ways to make sure that the raw image covered all the display.

Exercise 4: Create a Game Over scene.
• Create a new scene
• Put it last in the build order.
• Add a canvas with the background image.
• Make it reachable from the game.

Adding Text into UI
1. Select the Canvas. Right-click, UI, Text 2. Select Text, Resize the text box by blue dot, Add text on the right"Basketball Game", Change size, color, alignment as you wish.

Aerial is boring font.
1. Search Google for a matched font. 2. Download them.

Import Font into Unity
1. Create a new folder called "Fonts".Drag and drop the font file into Unity
2. Select Text. Drag the font into Font box.(GAME OF BRUSH font required ALL CAPITAL LETTERS)
Change text to match with the style.

Exercise 5: Complete Adding the Text
• Add "Hit space to play" instruction in the Splash Screen
• Add "Game Over" title in the Game Over Screen.
• Add "Hit space to try again" instruction in the Game Over Screen.
• Be Creative!!

Adding Button into UI
1. Add a button, by right-click at Canvas >UI > Button.
2. Move the button to appropriate location.Button always come with a text (as a child).
Select the text, change front, change message as you wish.
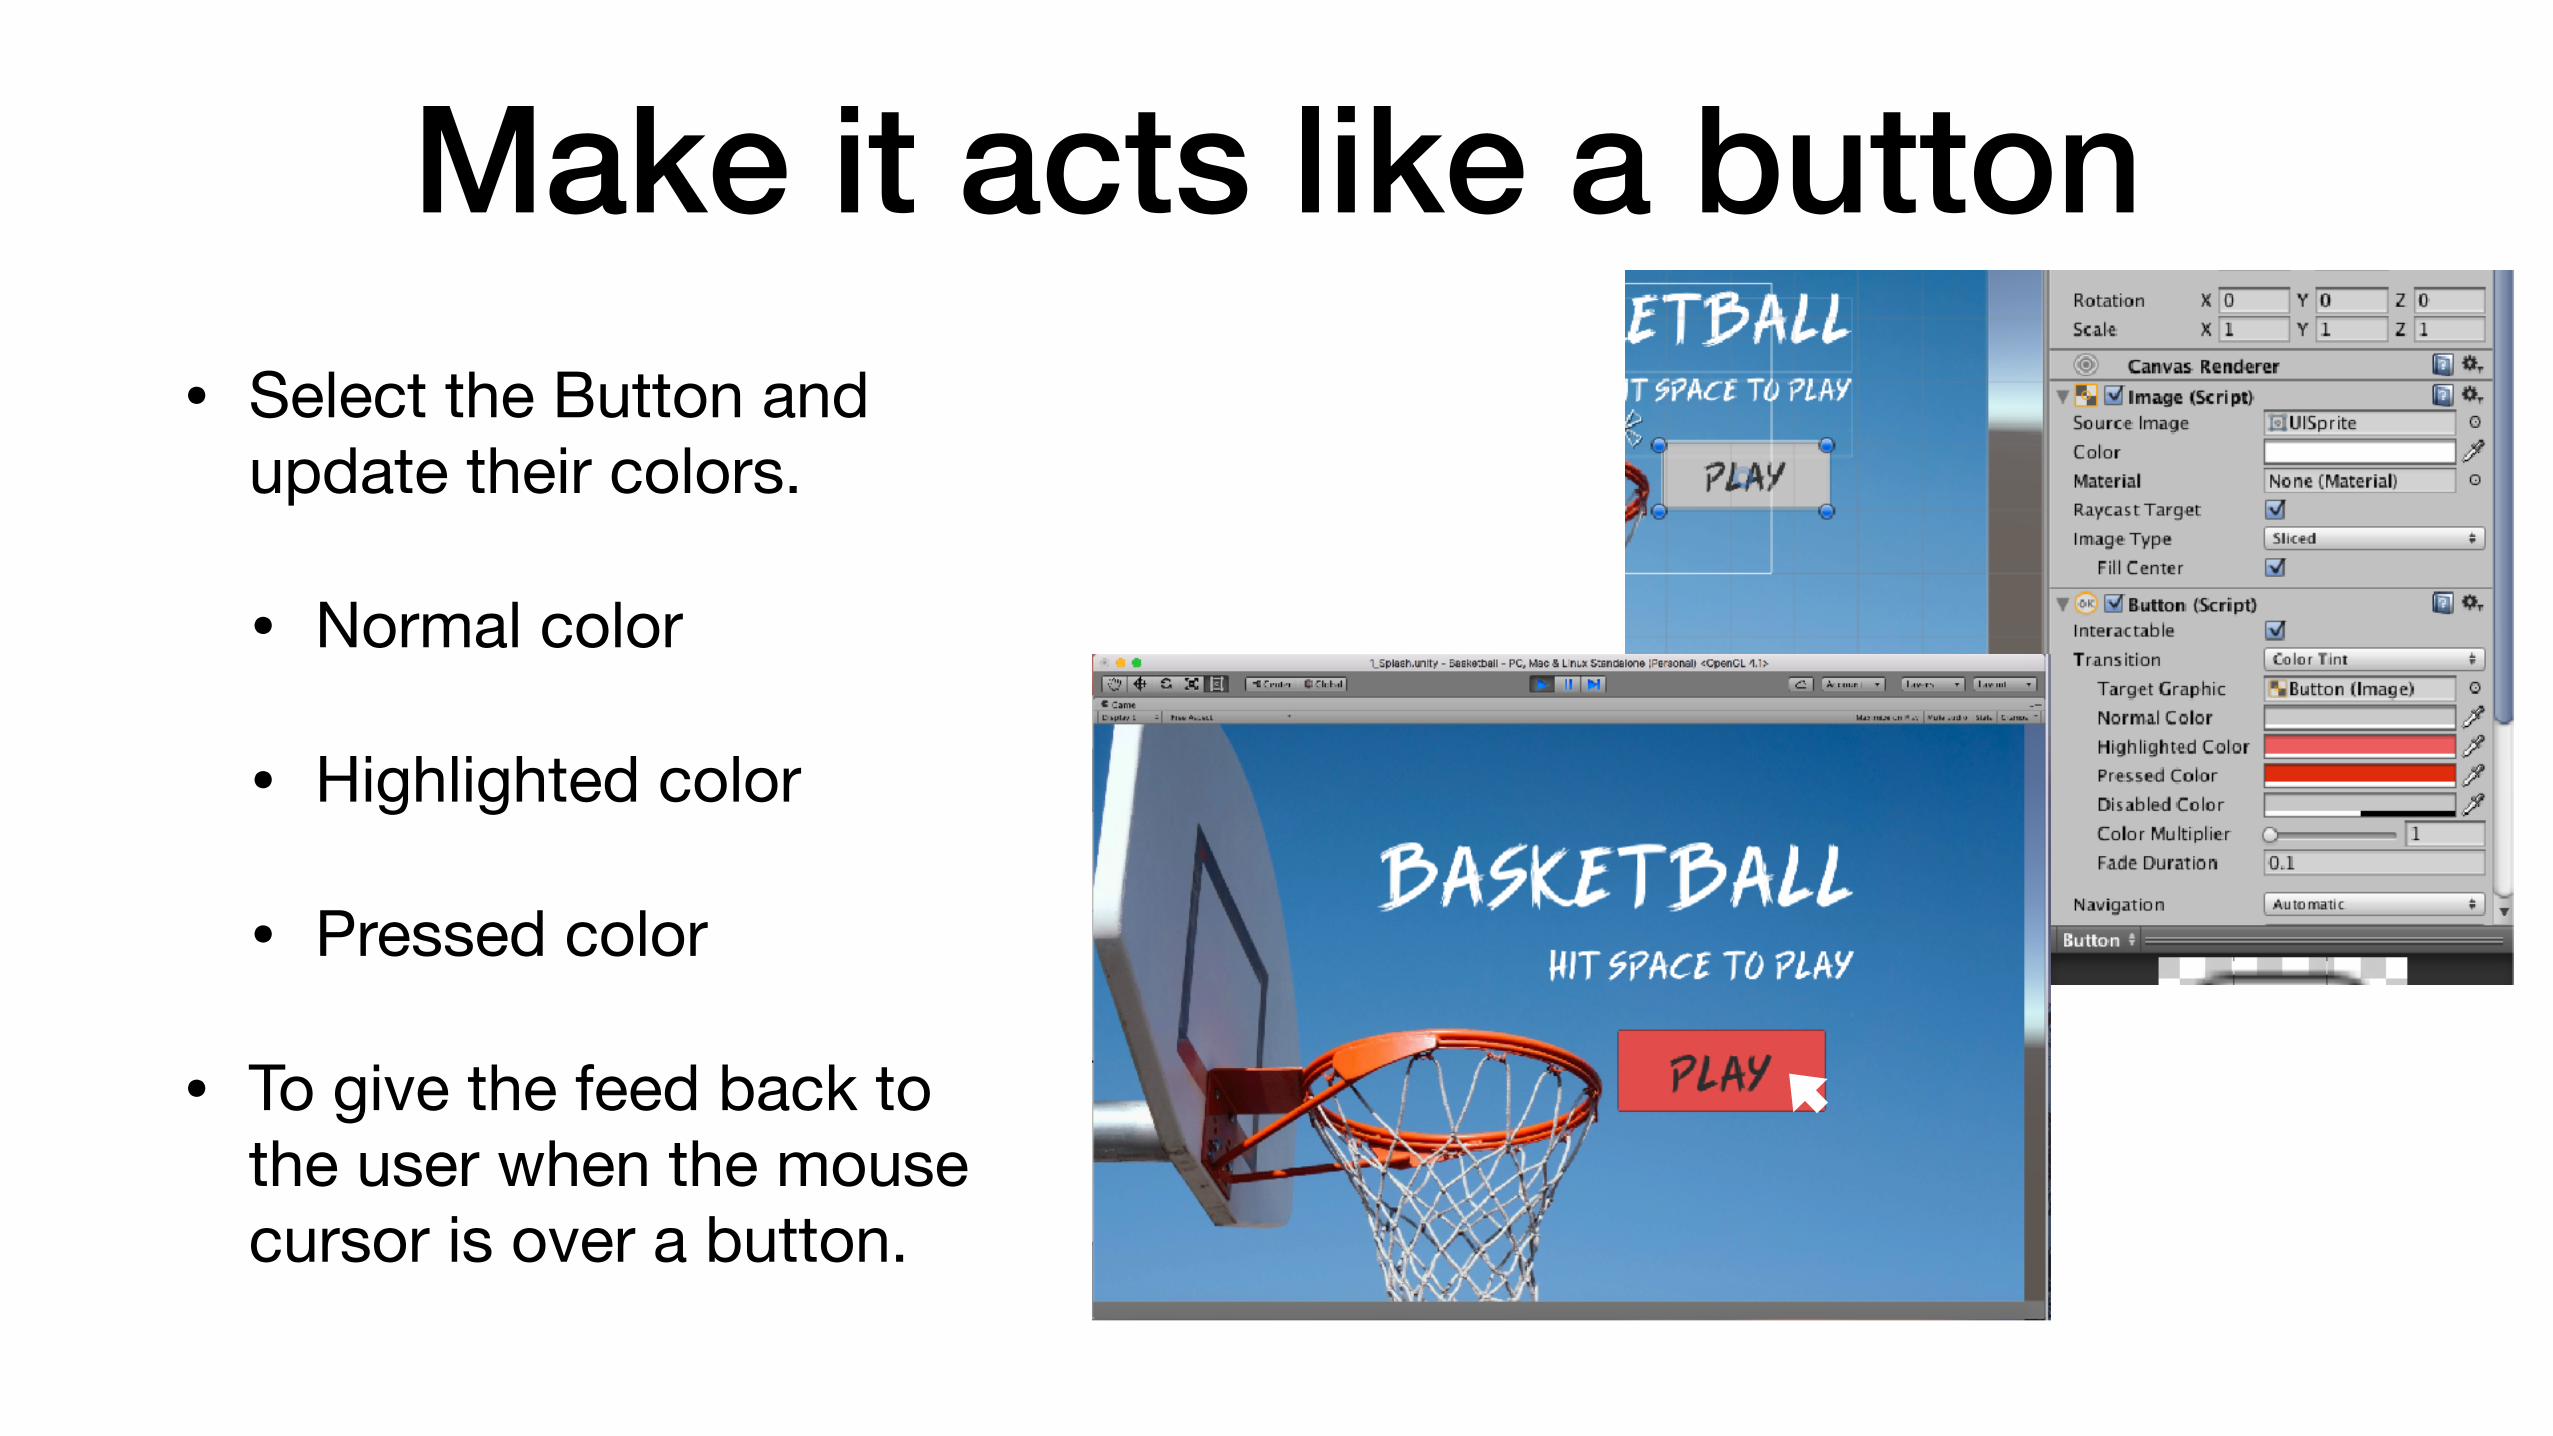
Make it acts like a button• Select the Button and
update their colors.
• Normal color
• Highlighted color
• Pressed color
• To give the feed back to the user when the mouse cursor is over a button.

Make Button OnClick() Working
1. Select Button. Press + at the On Click()at the inspector window 2. Drag and drop the Level Manager Game Object to the OnClick Object Textbox

Make Button OnClick() Working #2
3. At LevelManager.csAdd "public" at LoadNextScene() method
to make it visible for Unity.4. At the On Click() property of the button
Function > Level Manager > LoadNextScene()

Exercise 6: Add a "Play Again" Button
• Edit in the LevelManager script.
• You will need a LoadPreviousLevel() method.
• Add the button.
• Link it.

Adding Timer into the game!

Exercise 7: Progress after N seconds.
• Make the timeTillNextLevel configurable.
• Progress to next level when time run out.
• Make the default behavior to never progress.


Update TimeTillNextLevel for each Scene

Display Score on the Screen
1. Select 2_Main Scene, Right click on the Hierarchy > UI > Text
2. Select Newly Created Text,Drag and drop the font we used in to Font box in Inspector

Display Score on Screen #2• Change Text to "Score:
0"
• Change it to red color.
• Move it to the top of canvas (still be inside canvas)
• Press "Play"

Display Score on Screen #3

Display Score on Screen #4
• Try to change many resolution in the Play mode.
• Sometime, the score is not visible due to the different screen size.
• To fix this, we need to lock down the Canvas tobe resized according to the Screen size.

Display Score on Screen #5• Select Canvas. At the Inspector, See the Canvas Scaler.
• Choose UI Scale Mode = Scale with Screen Size.
• Move Match to Height = 1
• At the Scene Screen, Re-adjust the Text to be inside the canvas (toward middle of the screen) as need.

Update Score
• Add a new C# script "ScoreDisplay"
• Make it links with the score displaying text (drag and drop to Text in Hierarchy screen).
• Write down the following code...

Update Score #2
ScoreDisplay.cs After that Saved. Run.

Exercise 8: Display Score
• Set the correct score.
• Use FindObjectOfType<>() to access ScoreCount.
• Expose the score as public variable
• Use string concatenation (+) to update score text.
• Repeat for the time remaining UI text.


Show Score on GameOver Scene• When you change the
scene. All useful game objects are gone.
• Make ScoreCount survive the next scene.
• Add DontDestroyOnLoad(gameObject); in the Start Method.

ScoreCount Keep Creatings When User Press "Play Again?"

Solve by ScoreAbsorber
• Create a new ScoreAbsorber GameObject in Scene #3 (Gameover scene)
• Create a new C# Script ScoreAbsorber.cs
• Drag the ScoreAbsorber.cs to associated with GameObject
• Write down the following code.

ScoreAbsorber.cs

Exercise 9: Display Screen On GameOver
• Create a new GameOverScoreDisplay C# file.
• Create a new Text item.
• Associate between GameOverScoreDisplay and Text.
• Find the ScoreAbsorber and update the text.


Q/A