


Esri Inc.
Exercise 1 - Getting Started with GeoPlanner for ArcGIS GeoPlanner℠ for ArcGIS®
Esri Inc. 4-8-2016

1
Contents Introduction .................................................................................................................................................. 2
Getting Started .............................................................................................................................................. 2
Establish your ArcGIS Online Account ...................................................................................................... 3
Grant access to GeoPlanner ...................................................................................................................... 4
Access the application .............................................................................................................................. 4
Create your first project ............................................................................................................................ 6
A Quick Tour of the User Interface ............................................................................................................... 8
Application Status Bar ............................................................................................................................... 8
Project Backstage ...................................................................................................................................... 9
Application Toolbar ................................................................................................................................. 10
Common Tools ........................................................................................................................................ 10
Working with Project Properties ................................................................................................................ 11
Update basic project information ........................................................................................................... 11
Set a project extent ................................................................................................................................. 12
Manage user access to projects .............................................................................................................. 14
Summary ..................................................................................................................................................... 15

2
Exercise 1 – Getting Started with GeoPlanner for ArcGIS
Introduction GeoPlanner℠ for ArcGIS® is a browser-based web application that supports land-related planning and
design activities. It is built on top of ArcGIS Online and is offered as a premium app in the Esri
Marketplace. GeoPlanner integrates the landscape services and content produced by other Esri apps
(e.g. Landscape Modeler and Landscape Analyst) with the core analysis services provided by ArcGIS
Online to provide users with a single application that brings the power of GIS and geodesign processes
to land planning and design workflows. The Geodesign process, which includes project
conceptualization, analysis, design creation, stakeholder participation and collaboration, simulation, and
evaluation, is integrated in this app.
A number of ready-to-use templates are available for quickly getting started using GeoPlanner for a
variety of planning scenarios. GIS professionals with ArcGIS for Desktop can easily publish additional
data and layers to ArcGIS Online for use within the app. These templates provide symbologies for
feature types specific to a certain industry. Currently, these templates enable the use of GeoPlanner in
support of a small number of potential use cases. The number and type of these templates will grow to
include other industries that use land-based planning activities and would benefit from a Geodesign
approach. Additionally, members of any ArcGIS Online Organization can create and publish GeoPlanner
Templates of their own to address specific planning types and design standards used by their
organization.
For the remainder of these tutorials, we will focus on using the GeoPlanner Template for Land Use
Planning. While instructions will focus specifically on using the Land Use Planning template, all of the
same functions and capabilities can be applied while working from the other available templates. You
are encouraged to “go off script” and experiment with applying the instructions laid out in this and the
following tutorials to different projects that leverage the other planning templates.
Getting Started Before you can get started using the GeoPlanner application, you need to have a named user account
associated with an ArcGIS Online organizational subscription. Note that simply having a public (aka
“personal”) account in ArcGIS Online is not sufficient for using the GeoPlanner application. This is
because certain functions within the GeoPlanner app require the use of credits which are only available
with organizational subscriptions to ArcGIS Online.
Note: If you already have an account that is a member of an ArcGIS Online Organization, then there is
nothing more you need to do. You are ready to get started using the application, and you can skip ahead
to the “Access the Application” section of this tutorial.

3
Establish your ArcGIS Online Account If you do not already have an ArcGIS Online organizational subscription, you can request a free 30-day
trial prior to using the application. To establish a trial of ArcGIS Online, follow these simple steps:
1. Open your browser of choice and navigate to http://www.arcgis.com
2. Click on “Try ArcGIS”.
3. On the next page, scroll down, then enter your first name, last name, and the email address
where you want to receive the activation information for your trial.

4
4. After you have that information entered, click the “Start Trial” button. You will be informed that
a confirmation email has been sent to the address listed in the form above. This email will
contain the instructions necessary for completing the activation of your 60-day free trial.
5. Once you receive the email, clicking on the activation link will take you to a web page where you
can finish setting up your ArcGIS Online Organization.
a. Enter a username and password. Note: This is your “named user account” and will
become the administrator of your ArcGIS Online Organization.
b. Enter the email address that you want associated with this account. Note: This is the
address where system notifications, including trial expiration notices, will be sent in the
future.
c. Enter a name for your Organization.
d. Select a Security Question and provide the answer.
e. Review and select the checkbox to indicate that you accept the terms of use.
f. Click the “Create My Account” button.
6. Once the account is created, you will be logged into ArcGIS Online and taken to the setup page
for your Organization. Here you can specify a number of settings for your Organization. Be sure
to set each property, including Short Name, which establishes the base URL for your
organization.
7. Click the “Save and Continue” button at the very bottom of the page and you will be directed to
the Organization administration page. From here you can invite additional users, if needed, and
also monitor the usage and remaining credits available to your Organization.
Provision GeoPlanner to your Organization Now that you have your ArcGIS Online Organization account setup, you will need to provision the
GeoPlanner to your organization before you are able to access the app. To accomplish this, you can
follow the steps below:
1. Make sure that you have the administrator role in your ArcGIS Online subscription. If not, talk
to your ArcGIS Online administrator to sign up for the trial.
2. Go to the GeoPlanner listing on ArcGIS Marketplace.
3. Click the “Free Trial” button and enter your ArcGIS Online credentials to submit your trial
request in ArcGIS Marketplace.
Access the application GeoPlanner is a web application built using the ArcGIS JavaScript Web API. You can access the
application from browsers in both desktop and tablet environments that support a minimum resolution
of 1024x768. The application makes heavy use of HTML5 and, as such, is currently best supported using
the latest versions of Mozilla Firefox, Google Chrome, and Microsoft Internet Explorer.
To access the GeoPlanner application, follow these simple steps:
1. Open your internet browser on your desktop or tablet device and navigate to
http://geoplanner.arcgis.com to display the application landing page.

5
2. Clicking the “Sign In” button will present you with the Sign In page. Here you will need to enter
the username and password for a named user that has access to an ArcGIS Online organization
subscription. Clicking the “Keep me signed in” check box will store your credentials for this app
so that this screen will be skipped on subsequent visits to sign in to the app.
3. Upon successfully entering a valid username and password, the GeoPlanner application will
launch and you will be presented with a message on the GeoPlanner Update. Click on “GOT IT”
to dismiss the message.

6
Create your first project A “project” is central to everything you do with the GeoPlanner app. From the user perspective, a project represents a single, distinct planning goal that needs to be accomplished, coupled with the set of items, processes and decisions that have to be made to meet that goal. Throughout this and the following tutorial exercises, you will conduct a mock land planning project related to a redevelopment initiative near the city of Lakeside, California. The goals of this redevelopment initiative are the following:
Identify a suitable area for redevelopment where activities will not occur within one-half mile of local streams.
Identify a suitable area for redevelopment where activities will not occur within one-half mile of existing highways.
Identify a suitable area for redevelopment where activities will minimize the potential impact on any existing conservation lands in the area.
Provide a detailed redevelopment proposal that demonstrates a strong correlation between Industrial Use areas and Light Railways needed to transport goods to and from those locations.
From the GeoPlanner app perspective, a project is a collection of associated items in your ArcGIS Online account. At its core is the Project Group. The Project Group is a standard ArcGIS Online group and can be used to define the subset of members in your organization that have access to participate in the planning activities for the project. Throughout the iterative planning process, additional items such as analysis layers and web maps are created and used to support the decision making and analysis processes required to meet the overall planning goals of the project. These artifacts are automatically stored in ArcGIS Online by the GeoPlanner application and are shared with the associated project group so that other members of the project team can discover and use them for their own activities and analysis. It is this physical collection of items in ArcGIS Online that technically define a project to the GeoPlanner application.
To create your first project, follow these steps:
1. Upon successfully signing in to the application, you will be presented with the option to open an
existing project or create a new project. Click the “CREATE NEW” button to create a new
project.

7
2. In the “Create Project” window, you will see a number of GeoPlanner Templates available from
which to create your project. These templates contain pre-built configurations of feature types
used to support scenario sketching for a variety of use cases. The dialog provides a variety of
ways to filter and sort the results that are returned from ArcGIS Online to help find the specific
entry of interest to you.
a. Click the “Curated” tab if not already selected. A set of preselected templates are shown
under this tab.
b. Locate “GeoPlanner Template for Land Use Planning” in the list of results and click the
“Select” button to use it as the template for your new project.
NOTE: Currently, Esri has published sample templates for a small number of use cases. For
more information about how to create and publish your own custom template for use with
the application, refer to the help documentation
(http://doc.arcgis.com/en/geoplanner/documentation/create-a-template.htm).
3. Enter a Project Title, Summary, Description, and Tags on the Create Project dialog that shows
next and then click the “CREATE” button to initiate creation of your new project.

8
Note: Project Titles must be unique within an organization. If you enter a title for your project
which conflicts with that of an existing project in your organization, you will be prompted to
enter a new title.
4. Upon successful project creation, the application will present itself ready for use with the new
project loaded.
Congratulations! You are now ready to start using GeoPlanner to execute your planning activities in
support of your project goals.
A Quick Tour of the User Interface Before we go any further, let’s take a moment to get a quick overview of the main user interface (UI)
components of the GeoPlanner app. These components provide a consistent UI framework that applies
across all segments of the process and provides a common look and feel when using the application
from multiple devices (i.e. desktops and tablets) and across multiple clients (i.e. Chrome, Firefox, Safari).
Application Status Bar Extending across the top of the application UI is the Application Status Bar. This UI component displays
the Project Backstage Button, the name of the currently loaded project, the name of the active scenario
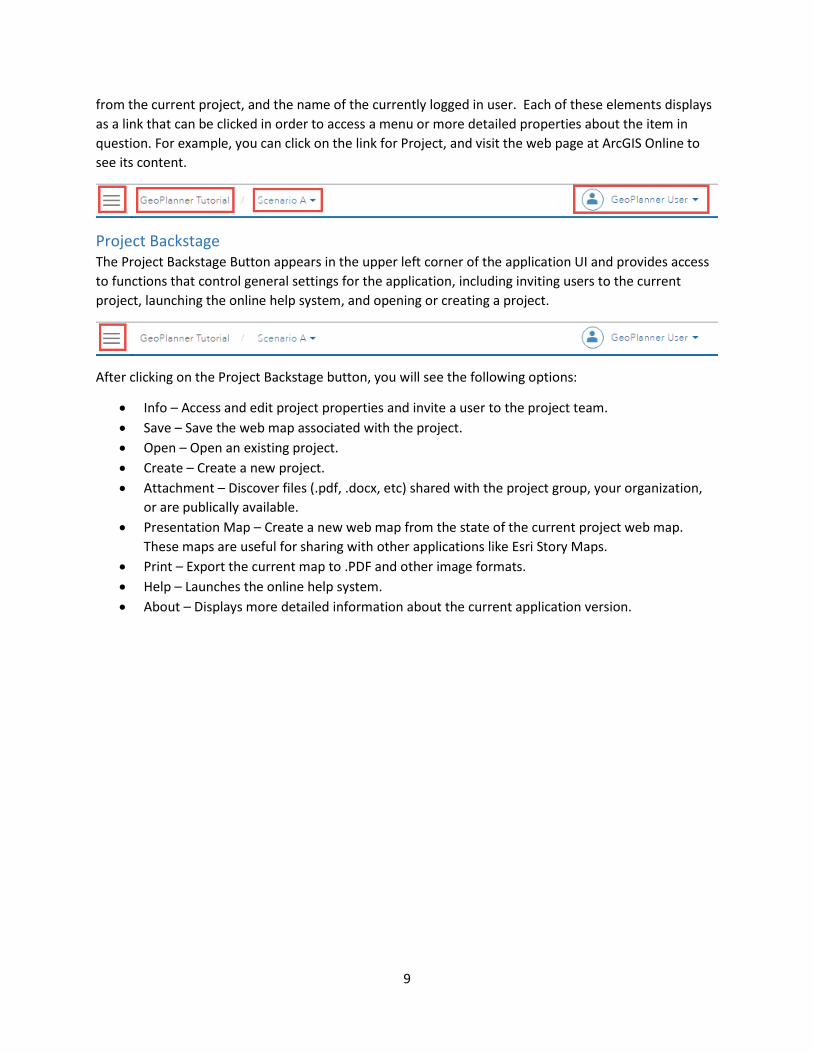
9
from the current project, and the name of the currently logged in user. Each of these elements displays
as a link that can be clicked in order to access a menu or more detailed properties about the item in
question. For example, you can click on the link for Project, and visit the web page at ArcGIS Online to
see its content.
Project Backstage The Project Backstage Button appears in the upper left corner of the application UI and provides access
to functions that control general settings for the application, including inviting users to the current
project, launching the online help system, and opening or creating a project.
After clicking on the Project Backstage button, you will see the following options:
Info – Access and edit project properties and invite a user to the project team.
Save – Save the web map associated with the project.
Open – Open an existing project.
Create – Create a new project.
Attachment – Discover files (.pdf, .docx, etc) shared with the project group, your organization,
or are publically available.
Presentation Map – Create a new web map from the state of the current project web map.
These maps are useful for sharing with other applications like Esri Story Maps.
Print – Export the current map to .PDF and other image formats.
Help – Launches the online help system.
About – Displays more detailed information about the current application version.

10
Application Toolbar The Application Toolbar is displayed underneath the Application Status Bar at the top portion of the
application and provides a point of interaction for accessing and executing the various tools provided by
the app in support of each segment in the GeoPlanner process. The toolbar consists of the Contents
button and the Segment buttons.
The Contents button toggles visibility of the Contents control, and clicking any of the segment buttons
(Explore, Design, Evaluate) will display the segment-specific tools. We will cover the segment-specific
tools for each of the workflow segments in more detail during the later tutorials.
Common Tools The common tools section of the toolbar is comprised of the set of vertical icons on the left side of the
map. These tools are available at all times while the application is in use and are not associated with
any single segment in the GeoPlanner workflow. The common tools section contains tools for the
following functions:

11
Zoom tools – Zooms the map extent in or out.
Place Finder – Performs place name searches and zooms the map extent to the result.
Extent – Exposes tools that set and zoom to a project map extent and allows saving and
managing extent bookmarks.
Measure – Performs interactive distance and area measurements on the map.
Dashboard – Opens the Dashboard tool which displays charts and performance indicators
related to the current project.
Working with Project Properties When you created your project, you gave it a name, a summary, a description, and tags. In addition to
these properties, a few other properties were set to default values in your new project, including the
project group membership and the default map extent. You will likely need to change some, if not all, of
these properties at some point during your project execution.
Update basic project information As mentioned above, the GeoPlanner app recognizes a project as an ArcGIS Online group and its
associated collection of shared items. Updating basic project properties such as Title, Summary,
Description, and Tags is actually done by simply changing those corresponding item details on the
underlying ArcGIS Online group item. Fortunately, you can more easily edit these properties directly
from the GeoPlanner app by following these steps:
1. Click on the Project Backstage button in the Application Status Bar, then under the Info tab, click
on the EDIT button to display the Edit Project Properties dialog. (Note: You can also access the
Edit Project Properties dialog by clicking on the project name in the Application Status Bar, then

12
clicking EDIT in the Project Properties dialog.)
2. Change the Title, Summary, Description, and Tags information as needed and click the SAVE
button to complete the update.
Set a project extent In addition to basic properties like Title, Summary, Description, and Tags, your project also carries with it
a map extent that can be used to define a common area within which team members’ planning activities
are intended to take place. Only the user that created a project or those users with the Administrator
role defined in their ArcGIS Online organization can update the common project map extent. This is by
design and ensures that only a small subset of users are able to update and communicate the location of
planning activities to other contributing members of a collaborative project team. To set a project
boundary polygon, refer to Exercise 6 which details how to create a polygon layer and add that as a data
layer to the project. This is an additional step, and will be useful if your project area is defined by an
arbitrary polygon shape.
13
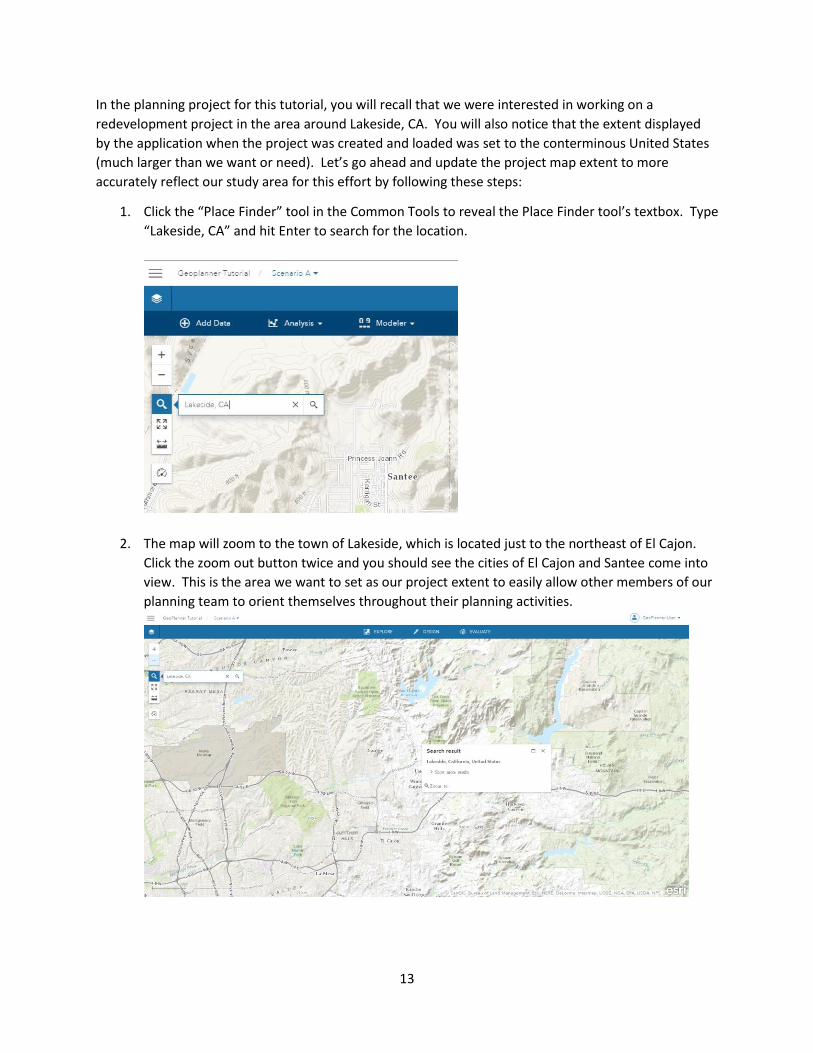
In the planning project for this tutorial, you will recall that we were interested in working on a
redevelopment project in the area around Lakeside, CA. You will also notice that the extent displayed
by the application when the project was created and loaded was set to the conterminous United States
(much larger than we want or need). Let’s go ahead and update the project map extent to more
accurately reflect our study area for this effort by following these steps:
1. Click the “Place Finder” tool in the Common Tools to reveal the Place Finder tool’s textbox. Type
“Lakeside, CA” and hit Enter to search for the location.
2. The map will zoom to the town of Lakeside, which is located just to the northeast of El Cajon.
Click the zoom out button twice and you should see the cities of El Cajon and Santee come into
view. This is the area we want to set as our project extent to easily allow other members of our
planning team to orient themselves throughout their planning activities.
14
3. From the Common Tools section on the left side of the map, click the “Extent” button and then
select “Save Project Extent”. You will be presented with a dialog to confirm that you would like
to save the current map extent as the default for the project.
4. Click “Save” and you have successfully updated the default map extent for the project. You can
confirm that your new extent is set by panning and zooming the map to a different location and
then clicking the “Extent” button and selecting “Zoom to Project Extent”. This is now the extent
that will be zoomed to any time *any member* of the project team clicks the “Zoom to Project
Extent” button (i.e. the extent is used by all members of the project, not just you).
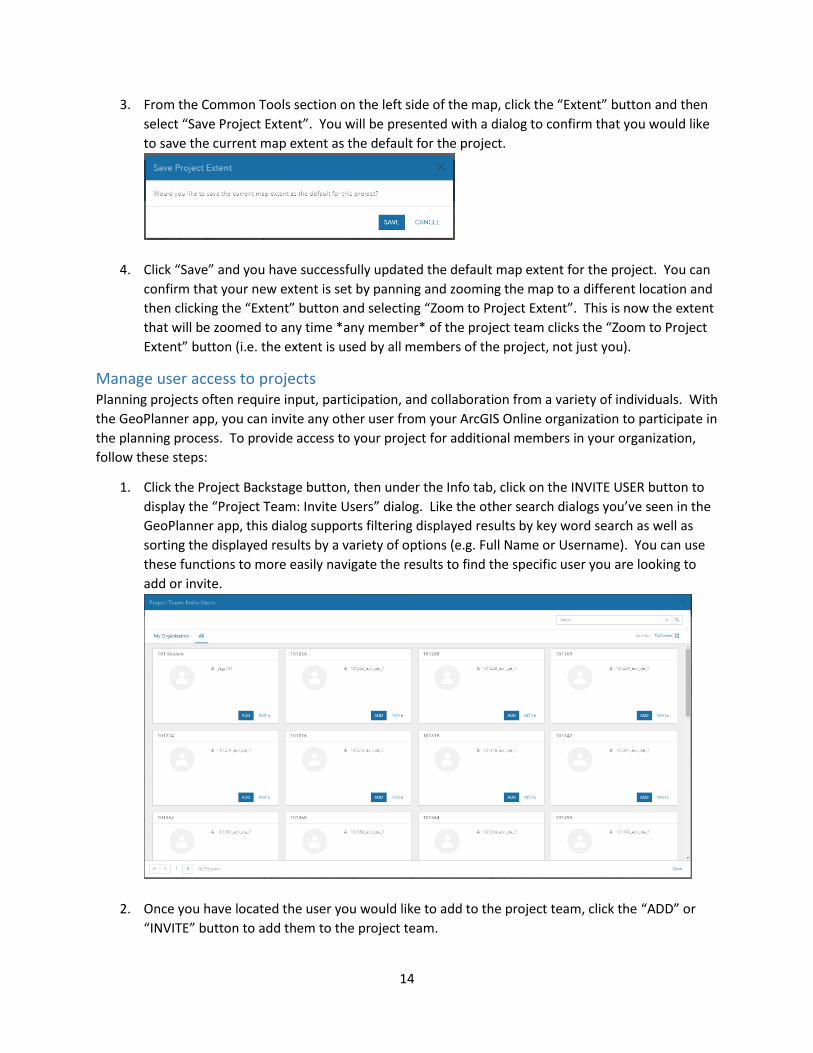
Manage user access to projects Planning projects often require input, participation, and collaboration from a variety of individuals. With
the GeoPlanner app, you can invite any other user from your ArcGIS Online organization to participate in
the planning process. To provide access to your project for additional members in your organization,
follow these steps:
1. Click the Project Backstage button, then under the Info tab, click on the INVITE USER button to
display the “Project Team: Invite Users” dialog. Like the other search dialogs you’ve seen in the
GeoPlanner app, this dialog supports filtering displayed results by key word search as well as
sorting the displayed results by a variety of options (e.g. Full Name or Username). You can use
these functions to more easily navigate the results to find the specific user you are looking to
add or invite.
2. Once you have located the user you would like to add to the project team, click the “ADD” or
“INVITE” button to add them to the project team.

15
a. The Add option is only available if you are an Administrator in your organization. It will
allow you to directly add the user to the project group.
b. If you are not an Administrator in your organization, you will only see the “Invite”
option. This will allow you to send a notification to the user of your choice inviting them
to join the project group. They will then need to log in to ArcGIS Online to “accept” the
invitation to join the group before they can access the project. If you have been invited
to a Project Group, but are unable to open the project from the app, you may want to
verify if you accepted the invitation to join the group at ArcGIS Online. Failure to accept
invitations to join a group will prevent opening that project in the app with you as user.
3. Clicking the Project Backstage button in the upper left corner of the app will present a list of
current users with access to the project under the “USERS” section of the Info tab. Clicking a
name from this list will present a dialog that contains more detailed information about the user.
Summary In this tutorial, you were able to accomplish all of the steps necessary to successfully create a planning
project for use with the GeoPlanner app. This included establishing a trial ArcGIS Online subscription,
signing in to the GeoPlanner app, creating a new planning project for Land Use Planning, setting a
default project extent for use by all members of the project team, and managing which users from your
ArcGIS Online organization will have access to participate in planning activities related to the project.
In the remaining tutorials, we will continue to work with this same project in order to iterate through
the entire planning process. Next, we will focus on how to find and add data layers useful to your
various planning needs as well as how to use analysis services from ArcGIS Online to create derived
layers that can be used to assess site suitability.
![STATEWIDE MEDICAL AND HEALTH EXERCISE SWMHE EXERCISE DEBRIEF [Exercise Name/Exercise Date] SWMHE EXERCISE DEBRIEF.](https://static.cupdf.com/doc/110x72/56649d755503460f94a56498/statewide-medical-and-health-exercise-swmhe-exercise-debrief-exercise-nameexercise.jpg)


![[EXERCISE NAME} Player Briefing [Exercise Date] Player Briefing [Exercise Date]](https://static.cupdf.com/doc/110x72/56649ee65503460f94bf6431/exercise-name-player-briefing-exercise-date-player-briefing-exercise-date.jpg)


![EDS Demobilization Tabletop Exercise [Exercise Location] [Exercise Date] [Insert Logo Here]](https://static.cupdf.com/doc/110x72/56649e865503460f94b898d0/eds-demobilization-tabletop-exercise-exercise-location-exercise-date-insert.jpg)


![[Exercise Name] Exercise Plan](https://static.cupdf.com/doc/110x72/629a016aca1e2365472404dc/exercise-name-exercise-plan.jpg)