


Standard: Q/GMY 006-2016Veision: GT8907-EN-00
Digital Anemometer
Instruction Manual
MODEL: GT8907
GT8907

CONTENTS1.Before Use Notice
2.Operation manual
Check up----------------------------------------------------- 1)(0Introduction and functions-------------------------------- (02)Name of parts----------------------------------------------- (03)LCD Displays------------------------------------------------ (05)Specifications----------------------------------------------- (07)
Measurement of wind speed, temperature and humidity ----(09)
Wind volume 2/3V MAX value measurement------------------(12)Wind volume measurement------------------------------- (10)
Measurement of maximum/average/minimum value --------(12)Measurement and calibration of wind direction angle ------ (14)Data holding ---- (14)------------------------------------------------------
Data reading ---- (16)-----------------------------------------------------Data clearing and Automatic shutdown ------(17)-------------------
3.Host and PC connection
Software installation instructions ---------------------------- ----(18 )Software interface instruction ----------------------------(20)
4.Others
Familiar trouble shooting -------------- (23)----------------------- ------Maintenance & Warranty---------- ---------- (24)--------------
Data storage --- ------------------------------------------------------ (15)
-25-
2. Warranty:
About relative warranties please read provided warranty card.
We disclaim any liability due to: transportation damages;
incorrect use or operation; manipulation,alterations or repair
attempts; without warranty card,invoice.
Special Statement:
a.Disposal of battery should be handled in accordance with
local lawsand regulations.
b.Our company shall hold no any responisibility resultingfr-
omusing output from this product as an direct or indirect
evidence.
c.This company reserves the right of changing the product
design and contents of instruction if changed the separate
notice isn’t given.

-01-
Digital Anemometer 1PCS
Auxiliary Fan 1PCS
USB Computer connecting cable 1PCS
1.5V AAA alkaline battery 4PCS
English Instruction Manual 1PCS
PP Packing box 1PCS
1.Before Use Notice
Thank you for purchasing our Air Flow Anemometer!
Carefully unpack your kit and ensure that you have the
following Items .In case that any item is missing or if you
find any mismatch or damage ,promptly contact your local
dealer .
Check up
-24-
Maintenance & Warranty
1.Maintenance:
Replacing the battery and product maintenance:
a. Remove the battery from the unit if it is not required for exten-
ded periods of time in order to avoid damage to the battery
compartment and the electrode resulting from a leaking battery.
b. After power on, if a symbol “ ”appears on the LCD,
indicating that you should replace the battery in order to avoid
inaccurate measuring reading.
Otherwise the battery is very possible leak that will seriously
damage the unit life.
The battery compartment is on the down rear of the unit, open
the battery door, replace the old battery for new battery (notice
the battery polarity), close the battery door.
Cleaning the casing:
Never use alcohol or thinner to clean the unit casing,which will
especially erode the LCD surface; just clean the unit lightly as
needed with little clean water.
Never impact the unit or use on humidity condition.
Do not store or use the unit in following locations where the unit
may be subject to:
a. Splashes of water or high levels of dust.
b. Air with high salt or sulphur content.
c. Air with other gases or chemical materials.
d. High temperature or humidity or direct sunlight.
-23-
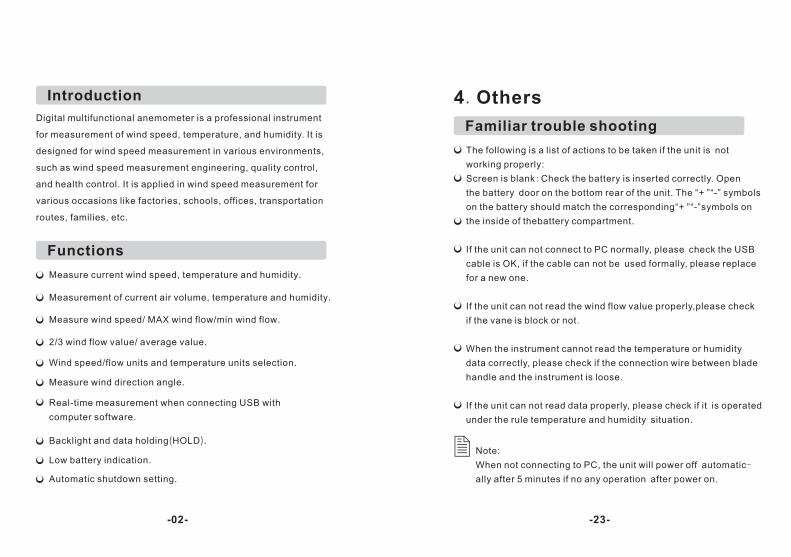
Familiar trouble shooting
The following is a list of actions to be taken if the unit is not
working properly:
Screen is blank:Check the battery is inserted correctly. Open
the battery door on the bottom rear of the unit. The “+ ”“-” symbols
on the battery should match the corresponding“+ ”“-”symbols on
the inside of thebattery compartment.
If the unit can not connect to PC normally, please check the USB
cable is OK, if the cable can not be used formally, please replace
for a new one.
If the unit can not read the wind flow value properly,please check
if the vane is block or not.
When the instrument cannot read the temperature or humidity
data correctly, please check if the connection wire between blade
handle and the instrument is loose.
If the unit can not read data properly, please check if it is operated
under the rule temperature and humidity situation.
Note:
When not connecting to PC, the unit will power off automatic-
ally after 5 minutes if no any operation after power on.
4.Others
-02-
Digital multifunctional anemometer is a professional instrument
for measurement of wind speed, temperature, and humidity. It is
designed for wind speed measurement in various environments,
such as wind speed measurement engineering, quality control,
and health control. It is applied in wind speed measurement for
various occasions like factories, schools, offices, transportation
routes, families, etc.
Introduction
Measure current wind speed, temperature and humidity.
Measurement of current air volume, temperature and humidity.
Measure wind speed/ MAX wind flow/min wind flow.
2/3 wind flow value/ average value.
Wind speed/flow units and temperature units selection.
Measure wind direction angle.
Real-time measurement when connecting USB with
computer software.
Backlight and data holding(HOLD).
Low battery indication.
Automatic shutdown setting.
Functions

-03-
ENTER
AREA/SAMPLE
MAX/MIN HOLD
VEL/FLOW
READ REC DEL
1 2 3
4
8
9 0●
C F/ 7
UNIT/
5 6
12
3
4
5
1
2
13
6
7
8
9
10
11
14
15
16
17
18
↓
ANEMOMETER
Name of parts(Figure 1)
Figure 1
ENTER
2
MAX/MIN
11: button 1: MAX/AVG/MIN
2. button 2: confirm (ENTER),
3/2VMAX wind flow, long press to
enter into direction angle
calibration.
-22-
List: Record the data passed by the meter, you can import and
export data (can have Two formats. save form in ane/.xls .
Status bar: The status of operation process will be presented in
the lowermost column.
Print button: The current page can be printed out.
Remarks:
1 Real-time measurement operation cannot be performed after
entering reading instrument storage interface, so you must pr
ess the “real-time measurement since file start page”.
2.The lower left corner will inform the current connection status
of the instrument.
3.The content in pop-up window of button bar will be displayed in
the first line of the exported Excel.
4.After successful installation, the default language is English,
which can be changed by the user.
5.Click on line chart to display the current X, Y axis labels, drag
for enlarged image, double click to return to the pre-state.
6.Click on any cell in the list to display X and Y axis labels on the
line graph.
)
.

-21-
Button bar: as shown in Figure 6 below
(1) Start measurement (2) Pause (3) Import
(4) Export (5) Configuration (6) Open
(7) Save (8) Off - Real-time measurement
(9) Empty (10) Exit
Display area: switch wind speed and volume according to the
instrument, the corresponding curve will be displayed in display
area (line chart); as shown in Figure 8 below.
Line chart: Figure 1 is wind speed / volume chart; Figure 2 is
temperature and humidity chart; print button; measured data
list.Button bar
Measurement data list
Print button bar
Figure 1 :wind speed /volume chart
Figure 2 :temperature and humidity chart
Figure 8
READ9
REC
0
DEL●
VEL/FLOW4
HOLD
3
6
UNIT/
5
8AREA/SAMPLE
C F/ 7
3. button 3: data holding (HOLD).
4. button 4:switch between wind velocity and wind flow.
5. button 5: Short press unit switch (UNIT) and long press
to open or close keytone.
6. button 6: startup, short press to turn on/off backlight,
long press to shutdown.
7. button 7: short press ℃/℉ to switch temperature unit,
long press to switch between temperature and humidity.8. button 8: aera setting (AREA), record time interval
(SAMPLE), read recording number.
9. button 9: enter into read/save/record interface.
10. button 0: save one datum or enter into data recording
interface (REC).
11. button ●: saving a piece of datum or entering into data
recording interface.
12.USB interface.
13.LCD display.
14.Connector (align with joint hole during insertion↓).
15.Connection line. 16.Slip resistant handle.
17.Retractable drag rod. 18.Six wind wheels.
-04-
Note: In the setting interface for area, time interval of recording and reading
serial number of record, buttons can be used as number button, you can
complete the input by long pressing ENTER button to confirm the set value.
During input, You can also press “SAMPLE/AREA" button to cancel the
current setting operation.
Note:The above is only a brief introduction to button functions. For detailed
function and operation description, please refer to “Operation
Instruction” section in this manual.
-05-
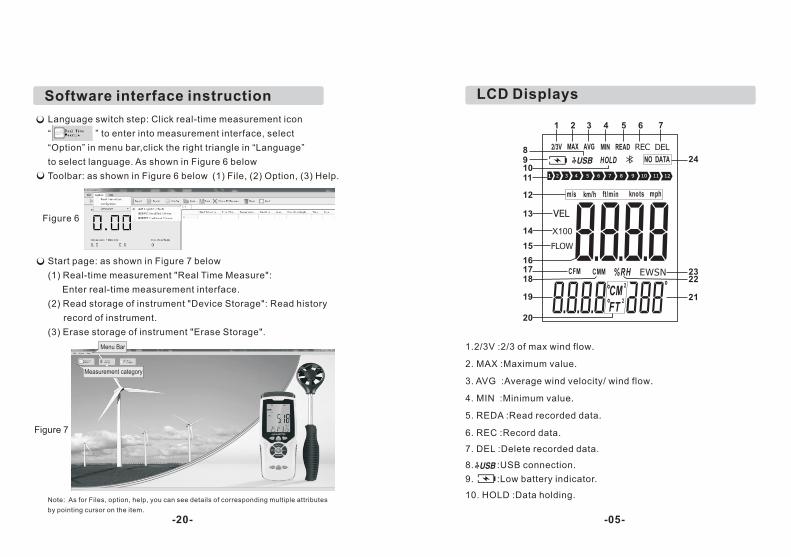
1.2/3V :2/3 of max wind flow.
2. MAX :Maximum value.
3. AVG :Average wind velocity/ wind flow.
4. MIN :Minimum value.
5. REDA :Read recorded data.
6. REC :Record data.
7. DEL :Delete recorded data.
8. :USB connection.
9. :Low battery indicator.
10. HOLD :Data holding.
LCD Displays
1 2 3 4 5 6 7
891011
12
13
14
15
161718
19
20
21
2223
24
-20-
Software interface instruction
Language switch step: Click real-time measurement icon
“ to enter into measurement interface, select
“Option” in menu bar,click the right triangle in “Language”
to select language. As shown in Figure 6 below
Start page: as shown in Figure 7 below
(1) Real-time measurement "Real Time Measure":
Enter real-time measurement interface.
(2) Read storage of instrument "Device Storage": Read history
record of instrument.
(3) Erase storage of instrument "Erase Storage".
Note: As for Files, option, help, you can see details of corresponding multiple attributes
by pointing cursor on the item.
”
Toolbar: as shown in Figure 6 below (1) File, (2) Option, (3) Help.
Figure 6
Menu Bar
Measurement category
Figure 7

-19-
Just follow installation prompt: click after prompt “Next” for 2
consecutive until “Create a desktop shortcut” and “Create a
Quick Launch shortcut” appear on the screen. Tick and click
“Next”, choose "Install” in the next prompt (do not click
"Cancel"); wait for the progress bar to complete; click "Finish"
directly to complete the installation, as shown in Figure 5
below.
3).
Finish
Figure 5
Remarks:
Launch shortcut on user's desktop: right click Anemometer” in
Start\Programs\Anemometer, and send shortcut icon to desktop.
If you want to delete the software, you can also select
Anemometer in Start\Programs\Select, then select Delete
icon.
“
“ ” “ ”
-06-
11. :Wind level.
12.Wind velocity unit :m/s、km/h、 ft/min、knots、mph.
13. VEL : wind velocity.
14. X100 : wind flow multiplier.
15. FLOW : wind flow measurement.
16.Wind velocity/flow value.
17. CFM :wind flow unit (cubic feet/minute).
18. CMM :wind flow unit (cubic meter/minute).
19.Wind temperature value/ vent area value.220. °CM :Indicating duct area in square meter in flowfunction,"°C"
is used to indicatewind temperature in metric.o 2 FT :Indicating duct area in square feetwhen in flow function ;
is used to indicate wind temperature in metric;
21. wind direction angle
22. %RH : humidty unit
23. EWSN : wind direction
E( ),W( )
S( ),N( )
ES( ),EN( )
WS( ),WN( )
24. NO DATA : no recorded data
"°F "
east wind west wind
south wind north wind
southeast wind northeast wind
southwest wind northwest wind
-07-
Resolution
0.001-100
0.001-100
Area20.001-9999ft20.001-9999m
Range
0-999900
0-999900
3CFM(FT /MIN)
3CMM(M /MIN)
±3%±0.1
±3%±20
±3%±0.2
±3%±0.4
±3%±0.2
0.3
60
0.6
1
0.7
0.01
0.01/0.1/1
0.01
0.01
0.01
0.0~45.0
0.0~8800
0.0~88.0
0.0~140.0
0.0~100
m/s
Ft/min
Knots
Km/h
Mph
±1.0℃
±1.8℉
℃
℉
0~45
32~113
0.1
0.18
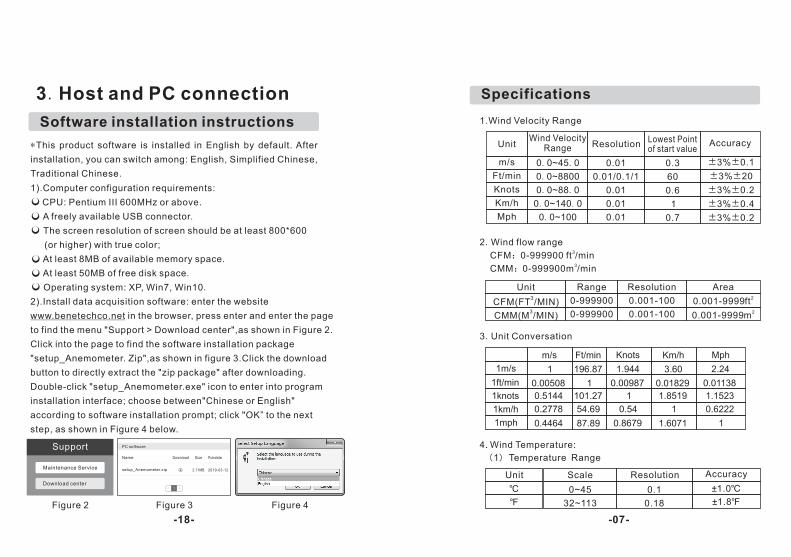
4. Wind Temperature: (1) Temperature Range
Specifications
1.Wind Velocity Range
UnitWind Velocity
Range ResolutionLowest Point of start value
Accuracy
2.Wind flow range3 CFM:0-999900 ft /min3 CMM:0-999900m /min
Unit
Unit Scale Resolution Accuracy
3.Unit Conversation
Km/h
3.60
0.01829
1.8519
1
1.6071
Mph
2.24
0.01138
1.1523
0.6222
1
Knots
1.944
0.00987
1
0.54
0.8679
Ft/min
196.87
1
101.27
54.69
87.89
m/s
1
0.00508
0.5144
0.2778
0.4464
1m/s
1ft/min
1knots
1km/h
1mph
-18-
Figure 2
3.Host and PC connection
Software installation instructions
*This product software is installed in English by default. After
installation, you can switch among: English, Simplified Chinese,
Traditional Chinese.
1).Computer configuration requirements:
CPU: Pentium III 600MHz or above.
A freely available USB connector.
The screen resolution of screen should be at least 800*600
(or higher) with true color;
At least 8MB of available memory space.
At least 50MB of free disk space.
Operating system: XP, Win7, Win10.
2).Install data acquisition software: enter the website
www.benetechco.net in the browser, press enter and enter the page
to find the menu "Support > Download center",as shown in Figure 2.
Click into the page to find the software installation package
"setup_Anemometer. Zip",as shown in figure 3.Click the download
button to directly extract the "zip package" after downloading.
Double-click "setup_Anemometer.exe" icon to enter into program
installation interface; choose between"Chinese or English"
according to software installation prompt; click "OK” to the next
step, as shown in Figure 4 below.
Figure 3 Figure 4
Support
Maintenance Service
Download center
PC software
Name Download
setup_Anemometer.zip 2.71MB 2019-03-12
1
Size Pubdate
-17-
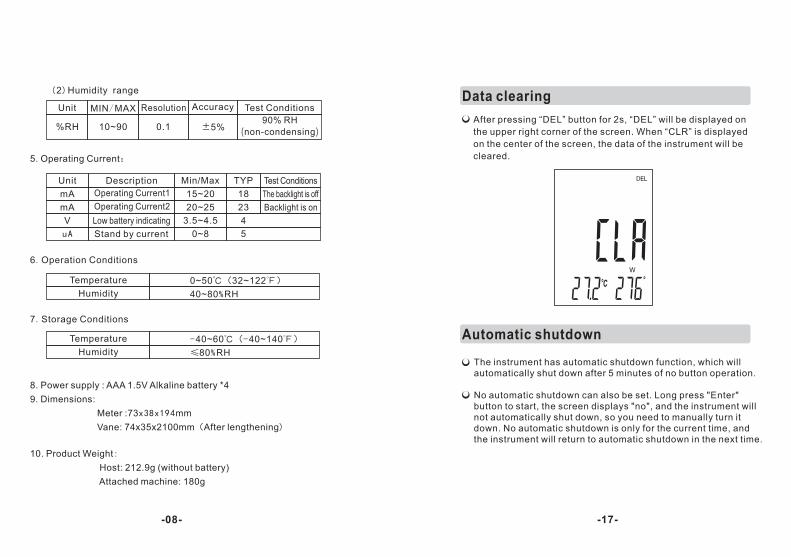
Data clearing
Automatic shutdown
The instrument has automatic shutdown function, which will automatically shut down after 5 minutes of no button operation.
No automatic shutdown can also be set. Long press "Enter" button to start, the screen displays "no", and the instrument will not automatically shut down, so you need to manually turn it down. No automatic shutdown is only for the current time, and the instrument will return to automatic shutdown in the next time.
After pressing “DEL” button for 2s, “DEL” will be displayed on
the upper right corner of the screen. When “CLR” is displayed
on the center of the screen, the data of the instrument will be
cleared.
-08-
0~50℃(32~122℉)
40~80%RH Humidity
Temperature
5. Operating Current:
8. Power supply : AAA 1.5V Alkaline battery *4
9. Dimensions:
Meter :73x38x194mm
Vane: 74x35x2100mm(After lengthening)
10. Product Weight:
Host: 212.9g (without battery)
Attached machine: 180g
Min/Max
15~20
20~25
3.5~4.5
0~8
Description
Low battery indicating
Stand by current
Test Conditions
The backlight is off
Backlight is on
TYP
18
23
4
5
-40~60℃(-40~140℉)
≤80%RH Humidity
Temperature
6.Operation Conditions
7.Storage Conditions
Operating Current1
Operating Current2
mA
mA
V
uA
Unit
90% RH (non-condensing)±5%0.1
MIN/MAX
10~90%RH
(2)Humidity range
Unit Resolution Accuracy Test Conditions

-09-
2.Operation manualMeasurement of wind speed, temperature and humidity
Before measurement: make sure to insert the connector plug of fan auxiliary unit with ↓ mark downwards into host socket. If the direction is wrong, the plug may be damaged.Press ON button to turn on the instrument. After 1s of LCD full screen, wind speed and wind temperature are displayed, and VEL shows up on the screen.
Press the " UNIT " key, the wind flow unit changes among m/s 、km/h 、ft/min、knots、mph,(default unit is m/s);
Press the " / " ,the temperature changes between / mode(defaulted as ).
℃ ℉ ℃ ℉℃
Long press ℃/℉ button to switch to display of humidity.
-16-
Data reading
b.Press “REC” button to enter into recording interface and start recording a sum of data continuously at the set recording int- erval. At this time, each time “ENTER” button is pressed, the recording interval and measured data will be displayed at the lower left of the screen; if the data is full, the screen will display “FULL” and then return to the normal measurement interface.c.Long press “REC” button to exit recording interface and stop recording; “REC” is no longer displayed.
Under normal measurement interface, press “READ” button to enter reading interface of recorded data. The bottom left side will display the serial number of recorded data first and then me asured data. Every time you press “ENTER” button, the bottom left of the screen will display the serial number first and then the recorded value.
Press “READ” button to view the record data of next serial number.
Press “SAMPLE” button to input the serial number of recorded data to be viewed. After finishing input, long press “ENTER” to confirm, when the input serial number is bigger than the serial number of stored record, the recorded data with the largest serial number will be displayed.
Long press “READ” button to exit data reading interface. The icon “READ” will no longer be displayed.

-15-
Data storage (TB:960 data)
Record single datum:a.Under “VEL” state, press the “SAMPLE” button, input “0”, and press “ENTER” button to confirm.b.Each time you press “REC” button, the data can be stored at a time. If data is full, the screen will display “FULL”.
Continuously record data:a.Under "VEL" state, press "SAMPLE" button,input recording interval (0~9999 seconds), and long press "ENTER" button to confirm.
-10-
Hold the Anemometer with your hand , place the vane in the air flow with the air direction matching the direction of the arrows printed on the inner walls of the vane (please do not extrude the fan leaf, which may cause the inaccuracy measurement )
1). Wait for 2 seconds with the unit is ready for use.2). Place the vane in the same direction of the wind to capture the accurate data ,temperature within 20℃3). The dynamic indicator bar of wind speed will increase gradually as wind speed increases.
Wind direction
ENTER
AREA/SAMPLE
MAX/MIN HOLD
VEL/FLOW
READ REC DEL
1 2 3
4
8
9 0●
C F/ 7
UNIT/
5 6
ANEMOMETER
Duct area
Wind volume measurement
Press VEL/FLOW button to switch to FLOW mode and display wind volume.
Press UNIT button to switch wind volume unit, and area unit will also change with wind volume unit as CMM---M²,CFM---FT².
Press AREA button to enter into area setting interface. __ is displayed at the bottom left of the screen, and the spot for input flashes. At this time, the area of the tuyere can be input.You can complete the input by pressing ENTER button; for example, input 1.2, then long press ENTER button and the area value is set as 1.2. In the process of inputing area value, long press ARER button to cancel the current area setting.

-11-
Place the vane in the duct area to measure current wind flow value right away.As shown in following figure:
Wind Flow Calculate Formula : Flow =velocity *(Free Area)Testing Wind velocity : The bar icon (showing on the middle of LCD )changes accordingly with wind Flow/Velocity.
ENTER
AREA/SAMPLE
MAX/MIN HOLD
VEL/FLOW
READ REC DEL
1 2 3
4
8
9 0●
C F/ 7
UNIT/
5 6
ANEMOMETER
Note:a. failing to enter the duct area leads to failure of measurement of the wind flow.b. If wind flow is larger than 9999, the LCD screen will show x10 or x100, indicating the measured value multiplied by x10 or x100.
-14-
Measurement and calibration of wind direction angle
A three-axis magnetic field sensor is installed under wind bladeof the instrument to measure wind direction angle. When meas-uring wind direction, keep the handle vertical, and direct windblade at the measured wind according to the wind directionarrow, and the corresponding wind direction and angle will bedisplayed at the bottom right of the screen.Wind directionsare as follows: E—East wind, W--West Wind, S--South Wind,N--North Wind, ES--Southeast Wind, EN--Northeast Wind,WS--Southwest Wind, WN--Northwest Wind.
Data holding
During measurement of wind speed and volume, press “HOLD”
button to lock the data, and then press “HOLD” button to release.
Due to different magnetic field distribution in different regions,wind direction angle value can be self-calibrated when youfeel reading error is big. Long press ENTER button to entercalibration interface of wind direction and “EWSN” and “--”flashes at the lower right side. Then make the handle vertical,slowly rotating the handle for two rounds (about 8 seconds perround), then press ENTER button to save and completecalibration.
-13-
AVG: The displayed wind speed or volume value is the average
value in the last 10s.
MIN: The displayed wind speed or volume value is the minimumvalue measured since the wind speed or volume value is set as MIN.
-12-
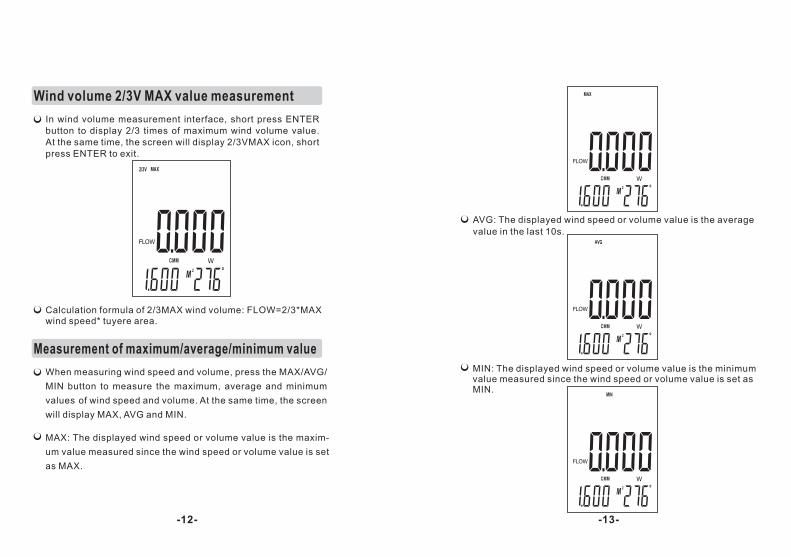
Wind volume 2/3V MAX value measurement
In wind volume measurement interface, short press ENTER button to display 2/3 times of maximum wind volume value. At the same time, the screen will display 2/3VMAX icon, shortpress ENTER to exit.
Calculation formula of 2/3MAX wind volume: FLOW=2/3*MAX wind speed* tuyere area.
Measurement of maximum/average/minimum value
MAX: The displayed wind speed or volume value is the maxim-
um value measured since the wind speed or volume value is set
as MAX.
When measuring wind speed and volume, press the MAX/AVG/
MIN button to measure the maximum, average and minimum
values of wind speed and volume. At the same time, the screen
will display MAX, AVG and MIN.


![October 2000[NUMUG] Comparison of Wind Sensors1 of 14 Comparison of Wind Sensors - Ultrasonic versus Wind Vane/Anemometer Kenneth G. Wastrack Doyle E.](https://static.cupdf.com/doc/110x72/5516f47b55034603568b4bd9/october-2000numug-comparison-of-wind-sensors1-of-14-comparison-of-wind-sensors-ultrasonic-versus-wind-vaneanemometer-kenneth-g-wastrack-doyle-e.jpg)
