User's Guide
PowerDirectorCyberLink
Copyright and DisclaimerAll rights reserved.
To the extent allowed by law, PowerDirector IS PROVIDED “AS IS”,WITHOUT WARRANTY OF ANY KIND, EITHER EXPRESS OR IMPLIED,INCLUDING WITHOUT LIMITATION ANY WARRANTY FORINFORMATION, SERVICES, OR PRODUCTS PROVIDED THROUGH OR INCONNECTION WITH PowerDirector AND ANY IMPLIED WARRANTIES OFMERCHANTABILITY, FITNESS FOR A PARTICULAR PURPOSE,EXPECTATION OF PRIVACY, OR NON-INFRINGEMENT.BY USING THIS SOFTWARE, YOU AGREE THAT CYBERLINK WILL NOT BELIABLE FOR ANY DIRECT, INDIRECT, OR CONSEQUENTIAL LOSSARISING FROM THE USE OF THIS SOFTWARE OR MATERIALSCONTAINED EITHER IN THIS PACKAGE.
The terms and conditions here under shall be governed andconstrued in accordance with the laws of Taiwan.
PowerDirector is a registered trademark along with other companyand product names mentioned in this publication, used foridentification purposes and remain the exclusive property of theirrespective owners.
Manufactured under license from Dolby Laboratories. Dolby and thedouble-D symbol are registered trademarks of Dolby Laboratories.Confidential unpublished works. Copyright 1995-2005 DolbyLaboratories. All rights reserved.
For DTS patents, see http://patents.dts.com. Manufactured underlicense from DTS Licensing Limited. DTS, the Symbol, & DTS and theSymbol together are registered trademarks, and DTS 5.1 Producer is atrademark of DTS, Inc. © DTS, Inc. All Rights Reserved.
International HeadquartersMailing Address CyberLink Corporation
15F., No. 100, Minquan Rd., Xindian Dist.New Taipei City 231, Taiwan (R.O.C.)
Web Site http://www.cyberlink.comTelephone 886-2-8667-1298Fax 886-2-8667-1385Copyright © 2018 CyberLink Corporation. All rights reserved.
i
Contents..................................................1Introduction
................................................................................................1Welcome.................................................................................................1Latest Features .................................................................................................2DirectorZone and CyberLink Cloud .................................................................................................3PowerDirector Versions
................................................................................................4System Requirements
..................................................7PowerDirector Editing Modes
................................................................................................8Full Feature Editor
................................................................................................9Easy Editor
................................................................................................11Slideshow Creator.................................................................................................13Setting Music Preferences .................................................................................................14Customizing Slideshows in the Slideshow Designer
..................................................18PowerDirector Workspace
................................................................................................18Rooms.................................................................................................19Media Room .................................................................................................20Effect Room .................................................................................................20PiP Objects Room .................................................................................................21Particle Room .................................................................................................21Title Room .................................................................................................21Transition Room .................................................................................................22Audio Mixing Room .................................................................................................22Voice-Over Recording Room .................................................................................................22Chapter Room .................................................................................................22Subtitle Room
CyberLink PowerDirector
ii
................................................................................................22Library Window.................................................................................................24Explorer View .................................................................................................24Searching the PowerDirector Library .................................................................................................25Filtering Media in the Library .................................................................................................27Library Menu
................................................................................................27Expanding the Workspace
................................................................................................28Preview Window.................................................................................................29Preview Player Controls .................................................................................................30Taking a Screen Snapshot .................................................................................................30Preview/Display Options .................................................................................................32Zoom In/Out .................................................................................................33Undocking the Preview Window .................................................................................................33Previewing in 3D Mode
................................................................................................34Editing Workspace.................................................................................................34Timeline View .................................................................................................45Storyboard View
..................................................47PowerDirector Projects
................................................................................................47Setting Project Aspect Ratio
................................................................................................48Exporting Projects
................................................................................................48Reusing PowerDirector Projects
................................................................................................51CyberLink Cloud Projects
..................................................53Importing Media intoPowerDirector
................................................................................................53Importing Media Files.................................................................................................543D Media .................................................................................................56Importing PowerDirector Projects
................................................................................................57Capturing Media.................................................................................................57Capturing from a DV Camcorder .................................................................................................59Capturing from an HDV Camcorder .................................................................................................59Capturing from a TV Signal
iii
.................................................................................................60Capturing from a Digital TV Signal
.................................................................................................60Capturing from a Webcam
.................................................................................................60Capturing from a Microphone
.................................................................................................60Capturing from a CD
.................................................................................................60Capturing from an AVCHD Camcorder
.................................................................................................61Capturing from an Optical Device
.................................................................................................61Capture Desktop with Screen Recorder
.................................................................................................61Captured Content
.................................................................................................62Quality Profile Setup
.................................................................................................62Capture Settings
.................................................................................................62Capture Preferences
................................................................................................63Downloading Media.................................................................................................63Downloading Photos From Flickr .................................................................................................64Downloading Content from DirectorZone/CyberLink Cloud
................................................................................................66Detecting Scenes and Extracting Audio.................................................................................................66Detecting Scenes in a Video Clip .................................................................................................68Extracting Audio from a Video Clip
..................................................69PowerDirector Plug-ins
................................................................................................69Using the MultiCam Designer.................................................................................................70Importing Media .................................................................................................72Synchronizing Clips .................................................................................................73Creating Recorded Content .................................................................................................75Changing the Recorded Content
................................................................................................77Using the Theme Designer.................................................................................................78Overview .................................................................................................78Adding Theme Templates/Sequences .................................................................................................81Adding Media Clips .................................................................................................83Editing Media Clips .................................................................................................85Editing Background Music .................................................................................................86Editing Title Text .................................................................................................87Replacing Background Images .................................................................................................87Adding Transitions Between Sequences
CyberLink PowerDirector
iv
.................................................................................................88Previewing and Saving Movies
.................................................................................................88Editing Created Movies
................................................................................................89Editing Video in the Action Camera Center.................................................................................................91Fixing Video Clips .................................................................................................93Creating Action Effects on Video Clips .................................................................................................96Action Camera Center Settings .................................................................................................96Changing the Action Camera Center Content
................................................................................................98Using an Express Project
................................................................................................99Recording Your Desktop with the Screen Recorder.................................................................................................101Setting Capture Area .................................................................................................106Configuring the Screen Recorder Settings
..................................................109Arranging Media in YourProduction
................................................................................................110Adding Video Clips and Images to the Timeline.................................................................................................111Adding Video Clips and Images .................................................................................................112Adding Color Boards and Backgrounds
................................................................................................115Adding Audio Clips.................................................................................................117Magic Music .................................................................................................118Syncing Audio
................................................................................................120Syncing Clips by Audio
................................................................................................121Using the Magic Movie Wizard
................................................................................................122Using the Slideshow Creator
..................................................123Editing Your Media
................................................................................................123Content Aware Editing.................................................................................................124Using Content Aware Editing
................................................................................................128Splitting a Clip
................................................................................................129Unlinking Video/Audio Clips
................................................................................................130Trimming Video and Audio Clips.................................................................................................130Trimming a Video Clip .................................................................................................134Trimming an Audio Clip
v
................................................................................................136Setting a Media Clip's Duration
................................................................................................137Setting TV (Video Clip Interlacing) Format
................................................................................................137Adjusting Video Clip Aspect Ratio
................................................................................................138Stretching Images
................................................................................................139Cropping Images
................................................................................................140Changing the Shape of Media
................................................................................................141Fixing and Enhancing Images/Videos.................................................................................................142Applying ColorDirector Color Presets .................................................................................................142Advanced Fixes and Enhancements
................................................................................................143Utilizing Keyframes on Media.................................................................................................146Adding Keyframes
................................................................................................149Muting Audio
................................................................................................149Advanced Audio Editing
................................................................................................150Time Info
................................................................................................150Magic Fix
................................................................................................150Magic Cut
..................................................152Using the Tools
................................................................................................152Using the Power Tools.................................................................................................153Adjusting Video Speed in the Video Speed Designer
................................................................................................157Motion Tracker.................................................................................................158Tracking the Motion of Objects in Videos .................................................................................................162Adding and Editing Trackers .................................................................................................164Adding Motion Tracking Effects
................................................................................................167Action Camera Center
..................................................169Adding Effects
................................................................................................169Adding Video Effects.................................................................................................170Modifying a Video Effect
................................................................................................171Using Magic Motion
CyberLink PowerDirector
vi
.................................................................................................173Magic Motion Designer
................................................................................................174Using Magic Style
................................................................................................175Using the Freeze Frame Effect
..................................................176Creating PiP Effects
................................................................................................176Adding PiP Objects.................................................................................................178Creating Custom PiP Objects
................................................................................................178Using the Paint Designer.................................................................................................179Creating a Paint Animation
................................................................................................182Modifying Media in the PiP Designer.................................................................................................184Mode Selection and Zoom Tools .................................................................................................184Modifying PiP Media Size and Position .................................................................................................185Modifying PiP Media Properties .................................................................................................189Adding Motion to PiP Media .................................................................................................192Adding PiP Masks .................................................................................................193Utilizing PiP Keyframes .................................................................................................198Saving and Sharing PiP Objects
..................................................200Adding Particle Effects
................................................................................................202Modifying Particle Effects in the Particle Designer.................................................................................................203Mode Selection and Zoom Tools .................................................................................................204Adding Objects, Images, and Backgrounds .................................................................................................205Modifying Particle Object Range and Position .................................................................................................206Modifying Particle Object Properties .................................................................................................210Adding Motion to Particle Objects .................................................................................................211Utilizing Particle Keyframes .................................................................................................213Saving and Sharing Particle Effect Templates
..................................................215Adding Title Effects
................................................................................................217Modifying Titles in the Title Designer.................................................................................................218Mode Selection and Zoom Tools .................................................................................................223Adding Text, Particles, Images, and Backgrounds .................................................................................................224Modifying Title Effect Position
vii
.................................................................................................225Modifying Title Text Properties
.................................................................................................231Applying Animation Effects to Title Text
.................................................................................................234Adding Motion to Title Text
.................................................................................................237Utilizing Title Effect Keyframes
.................................................................................................242Saving and Sharing Title Templates
..................................................244Using Transitions
................................................................................................244Adding Transitions to a Single Clip
................................................................................................246Adding Transitions Between Two Clips
................................................................................................247Using Audio Transitions
................................................................................................248Setting Transition Behavior
................................................................................................249Modifying Transition Settings
................................................................................................250Modifying Alpha Transitions in the Transition Designer.................................................................................................251Creating New Alpha Transitions .................................................................................................252Modifying Alpha Transition Properties .................................................................................................265Saving Alpha Transitions
..................................................268Mixing Audio and RecordingVoice-Overs
................................................................................................268Adjusting Audio Clip Volume Levels.................................................................................................268Mixing Audio In-Track .................................................................................................269Mixing Audio in the Audio Mixing Room .................................................................................................270Adding Fade Effects to Audio Clips .................................................................................................270Restoring Audio Clip Volume Levels
................................................................................................271Recording Voice-Overs
..................................................273Adding Chapters
................................................................................................273Adding Chapters Markers
................................................................................................273Setting Chapter Thumbnails
..................................................275Adding Subtitles
................................................................................................275Adding Subtitle Markers
................................................................................................276Importing Subtitles from a File
CyberLink PowerDirector
viii
................................................................................................276Extracting Subtitles from an MKV File
................................................................................................277Editing Subtitles
................................................................................................278Syncing Subtitles
..................................................279Producing Your Project
................................................................................................279Utilizing Intelligent SVRT
................................................................................................280Produce Window.................................................................................................281Outputting to a Standard 2D File .................................................................................................284Outputting in a 3D Format .................................................................................................287Outputting to a Device .................................................................................................289Uploading Video to Online Media Sites .................................................................................................297Batch Produce
..................................................299Creating Discs
................................................................................................300Importing Additional Disc Content
................................................................................................302Selecting a Disc Menu
................................................................................................304Editing Disc Menu Properties.................................................................................................304Configuring Disc Menu Settings .................................................................................................305Editing Disc Menu Text .................................................................................................305Setting Disc Menu Music .................................................................................................306Adding a First Play Video .................................................................................................307Setting Disc Playback Mode .................................................................................................307Specifying Buttons Per Page .................................................................................................308Modifying Menu Object Properties
................................................................................................309Customizing Disc Menus in the Menu Designer.................................................................................................310Mode Selection, Zoom Tools, and Context Menu .................................................................................................311Setting Menu Opening and Background .................................................................................................313Adding Images to Menus .................................................................................................313Adding and Editing Disc Menu Title Text .................................................................................................319Adding and Editing Menu Buttons .................................................................................................321Enabling 3D Depth in Disc Menus .................................................................................................321Saving and Sharing Disc Menu Templates
ix
................................................................................................323Burning Your Production to Disc.................................................................................................323Burning a Disc in 2D .................................................................................................326Burning a Disc in 3D .................................................................................................328Configuring Burn Settings .................................................................................................329Erasing Discs
..................................................330PowerDirector Preferences
................................................................................................330General Preferences
................................................................................................331Capture Preferences
................................................................................................332Confirmation Preferences
................................................................................................333DirectorZone Preferences
................................................................................................334Editing Preferences
................................................................................................335File Preferences
................................................................................................336Display Preferences
................................................................................................337Hardware Acceleration Preferences
................................................................................................338Project Preferences
................................................................................................339Produce Preferences
................................................................................................339Improvement Program Preferences
................................................................................................340CyberLink Cloud Preferences
..................................................341PowerDirector Hotkeys
................................................................................................341Default Keyboard Hotkeys.................................................................................................342Application Menu Bar Hotkeys .................................................................................................345System Hotkeys .................................................................................................345Capture Hotkeys .................................................................................................346Edit Hotkeys .................................................................................................346Designer Hotkeys
................................................................................................347Customizing Keyboard Hotkeys.................................................................................................348Hotkey Sets
..................................................350Appendix
CyberLink PowerDirector
x
................................................................................................350Intelligent SVRT: When Is Used?
................................................................................................351Licensing and Copyright Information.................................................................................................353Licenses and Copyrights
..................................................365Technical Support
................................................................................................365Before Contacting Technical Support
................................................................................................366Web Support
................................................................................................366Help Resources
1
Introduction
Introduction
Chapter 1:
This chapter introduces CyberLink PowerDirector and the digital video editingprocess. It also outlines all of the latest features, available versions, and reviews theminimum system requirements for CyberLink PowerDirector.
Note: this document is for reference and informational use only. Its content
and the corresponding program are subject to change without notice. For
more helpful tips on using the program, please visit our members forum or
see the video tutorials at http://directorzone.cyberlink.com/tutorial/pdr.
WelcomeWelcome to the CyberLink family of digital media tools. CyberLink PowerDirector isa digital video editing program that lets you create professional-looking videos andphoto slideshows, complete with music, voice-overs, special effects, transitions,and much more. You can then output your project to a file, camcorder, portabledevice, upload it directly to various online video sharing web sites, or burn it to adisc, complete with stylish menus.
Latest FeaturesThis section outlines the latest features within the CyberLink PowerDirectorprogram.
· Unleash your PC's speed with TrueVelocity 5.
· Adds support for hardware encoding for H.265 HEVC* video.
· Create impressive action sequences with ease in the Action Camera Center*.
· Track and add text and effects to moving objects in video clips using theMotion Tracker*.
· Record a video of your computer's desktop movements with the ScreenRecorder.
· Create movie productions faster using express project templates.
· Change the video speed for the entire or just portions of a clip in the VideoSpeed Designer*.
2
CyberLink PowerDirector
· Correct lens imperfections for both photos and videos*.
· Use ease in/out to create smoother movement of titles and PiP objects in theTitle/PiP Designer.
Note: * optional feature in CyberLink PowerDirector. Check the version
table on our web site for detailed versioning information.
DirectorZone and CyberLink CloudYou can upload/download effects and templates, and back up media, preferences,projects, and more with the DirectorZone and CyberLink Cloud* features.
Note: * optional feature in CyberLink PowerDirector. Check the version
table on our web site for detailed versioning information.
DirectorZone
DirectorZone is a free web service that lets you search for and download themetemplates, PiP objects, paint animations, title templates, particle objects, soundclips, and disc menus created by other users of CyberLink PowerDirector.
To access the benefits of DirectorZone, you can sign in by:
· clicking the Sign in to DirectorZone link in the top right corner of theCyberLink PowerDirector window.
· clicking the button at the top of the window to open the PowerDirectorpreferences, and then on the DirectorZone tab. See DirectorZone Preferencesfor more information.
Also, be sure to periodically click the button to check out the latestDirectorZone Bulletin and view the Popular templates on DirectorZone. Just clickin either of these sections in the Notifications window to view the bulletin ordownload these templates. Or go to http://directorzone.cyberlink.com to find outmore information on the features and benefits of the DirectorZone web service.

3
Introduction
CyberLink Cloud
CyberLink Cloud is a cloud storage service from CyberLink where users can uploadand download their effects and templates, PowerDirector projects, produced videoclips, and more. CyberLink Cloud allows users to back up media, preferences,projects, etc., and ensure their working environment is the same on multiplecomputers.
Note: CyberLink Cloud is a subscription cloud storage service that is
included with some CyberLink products, and is available for purchase
through our web site. For more detailed information, see
http://www.cyberlink.com/products/cyberlink-cloud/.
PowerDirector VersionsThe features that are available to you within CyberLink PowerDirector arecompletely dependent on the version you have installed on your computer.Supported file formats, editing features, disc-making functions, and other featuresvary depending on the version that you have.
To view the PowerDirector version table, please go to our web site:http://www.cyberlink.com/products/powerdirector-ultra/compare_en_US.html
To determine your version of CyberLink PowerDirector, click on the CyberLinkPowerDirector logo in the top right corner or select ? > About CyberLinkPowerDirector.
PowerDirector Live
PowerDirector Live is a subscription based version of CyberLink PowerDirector thatprovides all the editing features you expect, and adds the CyberLink Cloud storageservice and more.
With a PowerDirector Live subscription, you get:
· All the award-winning features of the Ultimate version of CyberLinkPowerDirector, including the production of 4K ultra HD video and stunning 3Dmovies.
· The ability to back up program preferences, projects, project media, and (PiPobject, paint animation, title effect, particle effect, disc menu) templates onthe cloud storage space CyberLink Cloud.
4
CyberLink PowerDirector
· Guaranteed updates to the latest versions of CyberLink PowerDirectorUltimate.
PowerDirector Live is the must-have solution for on-the-go video editors who wanteasy access to their media and the latest up-to-date editing technologies.
Updating PowerDirector
Software upgrades and updates (patches) are periodically available from CyberLink.CyberLink PowerDirector automatically prompts you when either is available.
Note: you can prevent CyberLink PowerDirector from auto checking for
updates/upgrades in General Preferences.
To update your software, do this:
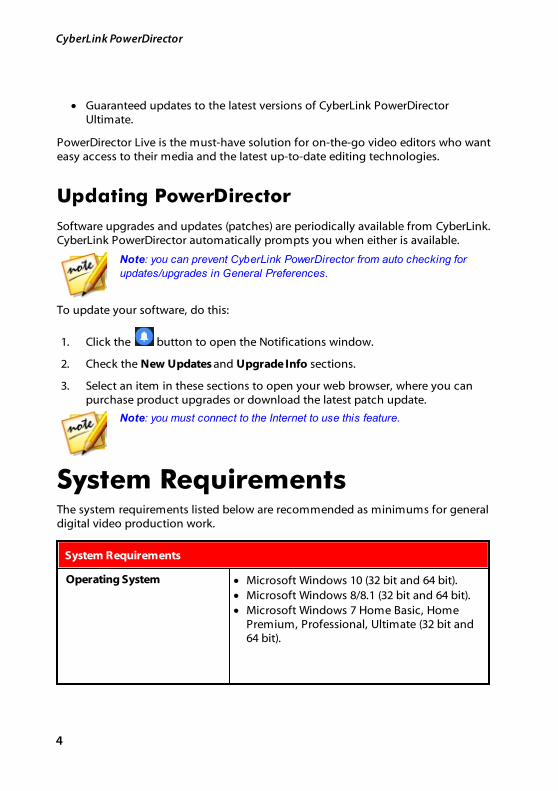
1. Click the button to open the Notifications window.
2. Check the New Updates and Upgrade Info sections.
3. Select an item in these sections to open your web browser, where you canpurchase product upgrades or download the latest patch update.
Note: you must connect to the Internet to use this feature.
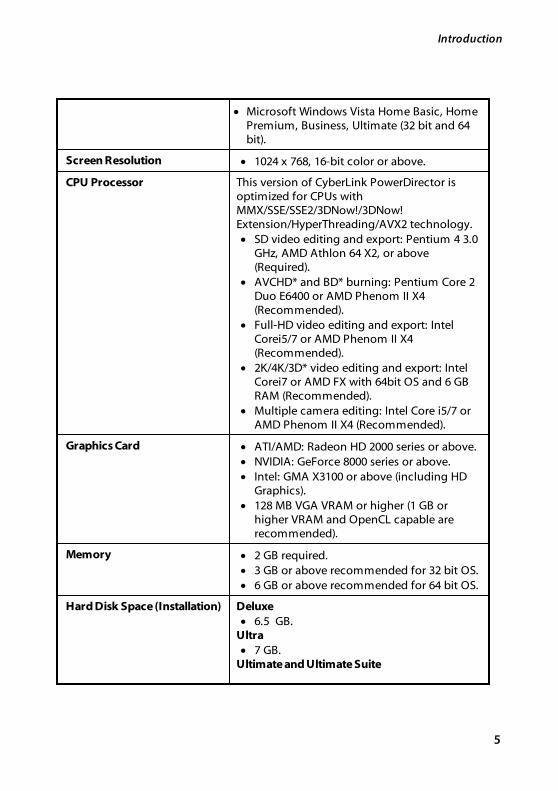
System RequirementsThe system requirements listed below are recommended as minimums for generaldigital video production work.
System Requirements
Operating System · Microsoft Windows 10 (32 bit and 64 bit).· Microsoft Windows 8/8.1 (32 bit and 64 bit).· Microsoft Windows 7 Home Basic, Home
Premium, Professional, Ultimate (32 bit and64 bit).
5
Introduction
· Microsoft Windows Vista Home Basic, HomePremium, Business, Ultimate (32 bit and 64bit).
Screen Resolution · 1024 x 768, 16-bit color or above.
CPU Processor This version of CyberLink PowerDirector isoptimized for CPUs withMMX/SSE/SSE2/3DNow!/3DNow!Extension/HyperThreading/AVX2 technology.· SD video editing and export: Pentium 4 3.0
GHz, AMD Athlon 64 X2, or above(Required).
· AVCHD* and BD* burning: Pentium Core 2Duo E6400 or AMD Phenom II X4(Recommended).
· Full-HD video editing and export: IntelCorei5/7 or AMD Phenom II X4(Recommended).
· 2K/4K/3D* video editing and export: IntelCorei7 or AMD FX with 64bit OS and 6 GBRAM (Recommended).
· Multiple camera editing: Intel Core i5/7 orAMD Phenom II X4 (Recommended).
Graphics Card · ATI/AMD: Radeon HD 2000 series or above.· NVIDIA: GeForce 8000 series or above.· Intel: GMA X3100 or above (including HD
Graphics).· 128 MB VGA VRAM or higher (1 GB or
higher VRAM and OpenCL capable arerecommended).
Memory · 2 GB required.· 3 GB or above recommended for 32 bit OS.· 6 GB or above recommended for 64 bit OS.
Hard Disk Space (Installation) Deluxe· 6.5 GB.
Ultra· 7 GB.
Ultimate and Ultimate Suite
6
CyberLink PowerDirector
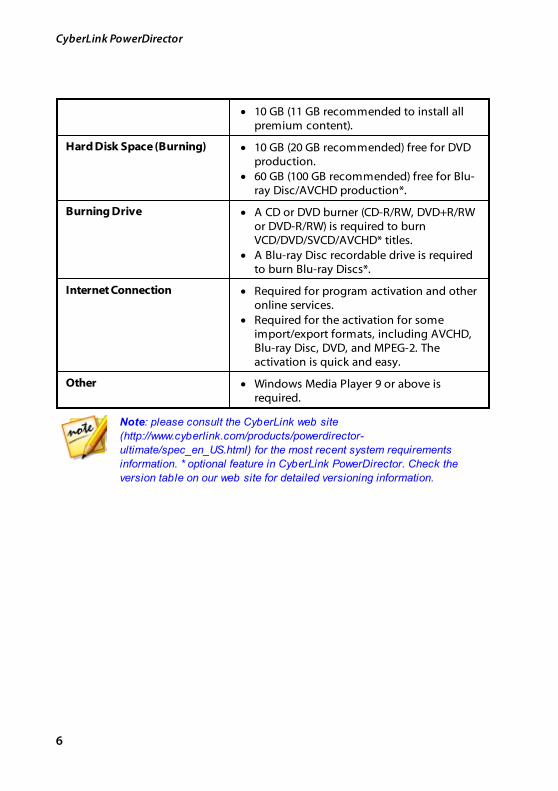
· 10 GB (11 GB recommended to install allpremium content).
Hard Disk Space (Burning) · 10 GB (20 GB recommended) free for DVDproduction.
· 60 GB (100 GB recommended) free for Blu-ray Disc/AVCHD production*.
Burning Drive · A CD or DVD burner (CD-R/RW, DVD+R/RWor DVD-R/RW) is required to burnVCD/DVD/SVCD/AVCHD* titles.
· A Blu-ray Disc recordable drive is requiredto burn Blu-ray Discs*.
Internet Connection · Required for program activation and otheronline services.
· Required for the activation for someimport/export formats, including AVCHD,Blu-ray Disc, DVD, and MPEG-2. Theactivation is quick and easy.
Other · Windows Media Player 9 or above isrequired.
Note: please consult the CyberLink web site
(http://www.cyberlink.com/products/powerdirector-
ultimate/spec_en_US.html) for the most recent system requirements
information. * optional feature in CyberLink PowerDirector. Check the
version table on our web site for detailed versioning information.

7
PowerDirector Editing Modes
PowerDirector EditingModes
Chapter 2:
CyberLink PowerDirector has five separate editors to fit your editing requirements.When you launch the program from the start menu, or the CyberLink PowerDirectorshortcut on the desktop, you are prompted to choose one of the following editingmodes:
Note: before selecting your preferred editing mode, be sure to set the video
aspect ratio for your project (16:9 or 4:3).
· Full Feature Editor: select this option to enter the classic editing mode ofCyberLink PowerDirector, where all of the program's features are available toyou.
· Easy Editor: if you are new to the editing process and not sure how or whereto get started, then the Easy Editor can help. The Magic Movie Wizard takesyou through a step-by-step process to import, style, adjust, and preview yourfinished movie, in just a few steps. You can then edit the created production,output it to a video file, or burn it to a disc.
· Express Project: select this option to choose from a number of projecttemplates that will help you speed up the editing process. See Using anExpress Project for more detailed information.
· Theme Designer: in the Theme Designer* you can customize the themetemplates used in the Magic Movie Wizard to fit your specific project. See Using the Theme Designer for more information and detailed steps on usingthis feature.
· Slideshow Creator: with the Slideshow Creator you can instantly turn yourphotos into a dynamic slideshow. Follow the steps in the Slideshow Creator toimport your photos, add background music, and stylish slideshow templates.Once done, you can preview the slideshow, before outputting it as a video fileor burning it to disc.
Note: select the Always enter the full feature editor option at the bottom
of this dialog to skip this window at startup. You can always reset this
selection at any time in Confirmation Preferences.
8
CyberLink PowerDirector
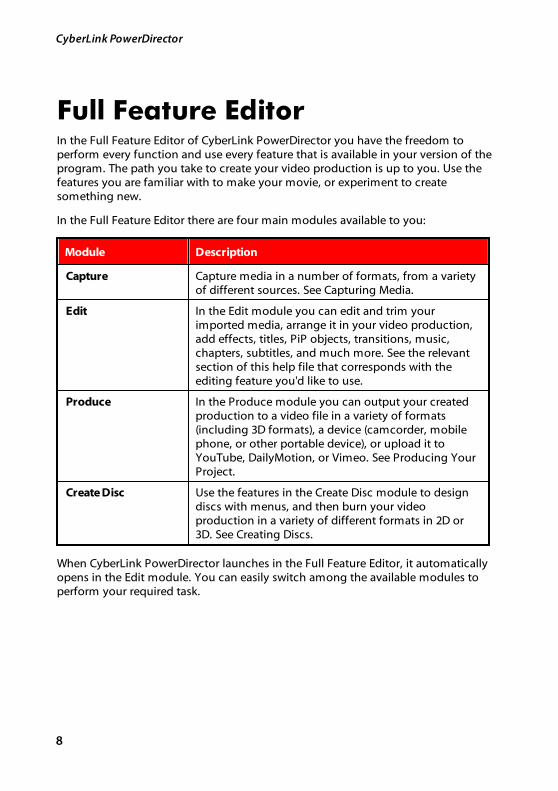
Full Feature EditorIn the Full Feature Editor of CyberLink PowerDirector you have the freedom toperform every function and use every feature that is available in your version of theprogram. The path you take to create your video production is up to you. Use thefeatures you are familiar with to make your movie, or experiment to createsomething new.
In the Full Feature Editor there are four main modules available to you:
Module Description
Capture Capture media in a number of formats, from a varietyof different sources. See Capturing Media.
Edit In the Edit module you can edit and trim yourimported media, arrange it in your video production,add effects, titles, PiP objects, transitions, music,chapters, subtitles, and much more. See the relevantsection of this help file that corresponds with theediting feature you'd like to use.
Produce In the Produce module you can output your createdproduction to a video file in a variety of formats(including 3D formats), a device (camcorder, mobilephone, or other portable device), or upload it toYouTube, DailyMotion, or Vimeo. See Producing YourProject.
Create Disc Use the features in the Create Disc module to designdiscs with menus, and then burn your videoproduction in a variety of different formats in 2D or3D. See Creating Discs.
When CyberLink PowerDirector launches in the Full Feature Editor, it automaticallyopens in the Edit module. You can easily switch among the available modules toperform your required task.
9
PowerDirector Editing Modes
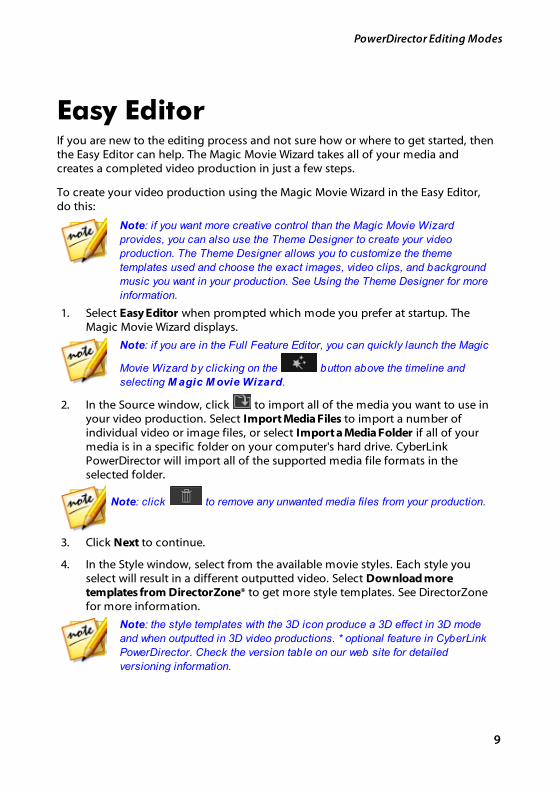
Easy EditorIf you are new to the editing process and not sure how or where to get started, thenthe Easy Editor can help. The Magic Movie Wizard takes all of your media andcreates a completed video production in just a few steps.
To create your video production using the Magic Movie Wizard in the Easy Editor,do this:
Note: if you want more creative control than the Magic Movie Wizard
provides, you can also use the Theme Designer to create your video
production. The Theme Designer allows you to customize the theme
templates used and choose the exact images, video clips, and background
music you want in your production. See Using the Theme Designer for more
information.
1. Select Easy Editor when prompted which mode you prefer at startup. TheMagic Movie Wizard displays.
Note: if you are in the Full Feature Editor, you can quickly launch the Magic
Movie Wizard by clicking on the button above the timeline and
selecting M agic M ovie Wizard.
2. In the Source window, click to import all of the media you want to use inyour video production. Select Import Media Files to import a number ofindividual video or image files, or select Import a Media Folder if all of yourmedia is in a specific folder on your computer's hard drive. CyberLinkPowerDirector will import all of the supported media file formats in theselected folder.
Note: click to remove any unwanted media files from your production.
3. Click Next to continue.
4. In the Style window, select from the available movie styles. Each style youselect will result in a different outputted video. Select Download moretemplates from DirectorZone* to get more style templates. See DirectorZonefor more information.
Note: the style templates with the 3D icon produce a 3D effect in 3D mode
and when outputted in 3D video productions. * optional feature in CyberLink
PowerDirector. Check the version table on our web site for detailed
versioning information.
10
CyberLink PowerDirector
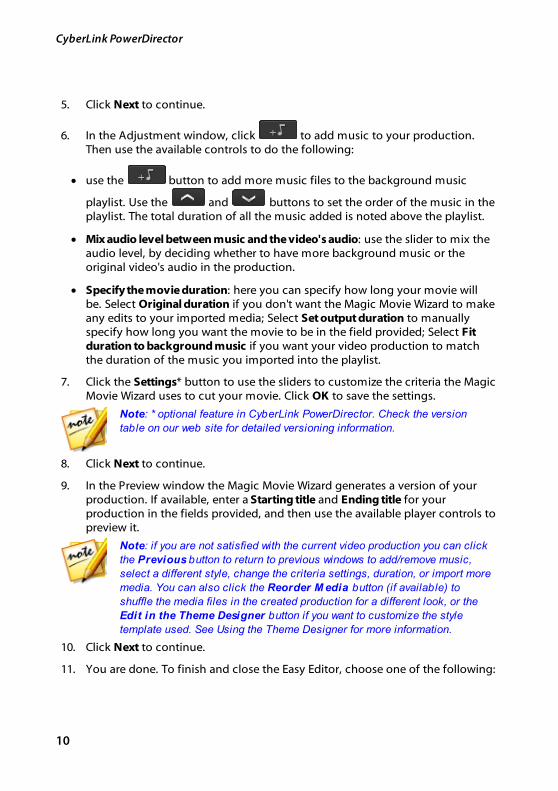
5. Click Next to continue.
6. In the Adjustment window, click to add music to your production.Then use the available controls to do the following:
· use the button to add more music files to the background music
playlist. Use the and buttons to set the order of the music in theplaylist. The total duration of all the music added is noted above the playlist.
· Mix audio level between music and the video's audio: use the slider to mix theaudio level, by deciding whether to have more background music or theoriginal video's audio in the production.
· Specify the movie duration: here you can specify how long your movie willbe. Select Original duration if you don't want the Magic Movie Wizard to makeany edits to your imported media; Select Set output duration to manuallyspecify how long you want the movie to be in the field provided; Select Fitduration to background music if you want your video production to matchthe duration of the music you imported into the playlist.
7. Click the Settings* button to use the sliders to customize the criteria the MagicMovie Wizard uses to cut your movie. Click OK to save the settings.
Note: * optional feature in CyberLink PowerDirector. Check the version
table on our web site for detailed versioning information.
8. Click Next to continue.
9. In the Preview window the Magic Movie Wizard generates a version of yourproduction. If available, enter a Starting title and Ending title for yourproduction in the fields provided, and then use the available player controls topreview it.
Note: if you are not satisfied with the current video production you can click
the Previous button to return to previous windows to add/remove music,
select a different style, change the criteria settings, duration, or import more
media. You can also click the Reorder M edia button (if available) to
shuffle the media files in the created production for a different look, or the
Edit in the Theme Designer button if you want to customize the style
template used. See Using the Theme Designer for more information.
10. Click Next to continue.
11. You are done. To finish and close the Easy Editor, choose one of the following:
11
PowerDirector Editing Modes
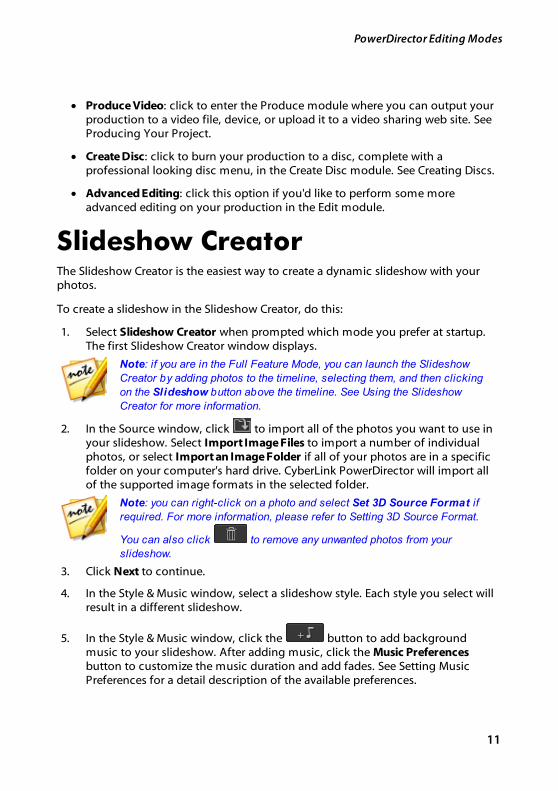
· Produce Video: click to enter the Produce module where you can output yourproduction to a video file, device, or upload it to a video sharing web site. See Producing Your Project.
· Create Disc: click to burn your production to a disc, complete with aprofessional looking disc menu, in the Create Disc module. See Creating Discs.
· Advanced Editing: click this option if you'd like to perform some moreadvanced editing on your production in the Edit module.
Slideshow CreatorThe Slideshow Creator is the easiest way to create a dynamic slideshow with yourphotos.
To create a slideshow in the Slideshow Creator, do this:
1. Select Slideshow Creator when prompted which mode you prefer at startup.The first Slideshow Creator window displays.
Note: if you are in the Full Feature Mode, you can launch the Slideshow
Creator by adding photos to the timeline, selecting them, and then clicking
on the Slideshow button above the timeline. See Using the Slideshow
Creator for more information.
2. In the Source window, click to import all of the photos you want to use inyour slideshow. Select Import Image Files to import a number of individualphotos, or select Import an Image Folder if all of your photos are in a specificfolder on your computer's hard drive. CyberLink PowerDirector will import allof the supported image formats in the selected folder.
Note: you can right-click on a photo and select Set 3D Source Format if
required. For more information, please refer to Setting 3D Source Format.
You can also click to remove any unwanted photos from your
slideshow.
3. Click Next to continue.
4. In the Style & Music window, select a slideshow style. Each style you select willresult in a different slideshow.
5. In the Style & Music window, click the button to add backgroundmusic to your slideshow. After adding music, click the Music Preferencesbutton to customize the music duration and add fades. See Setting MusicPreferences for a detail description of the available preferences.
12
CyberLink PowerDirector
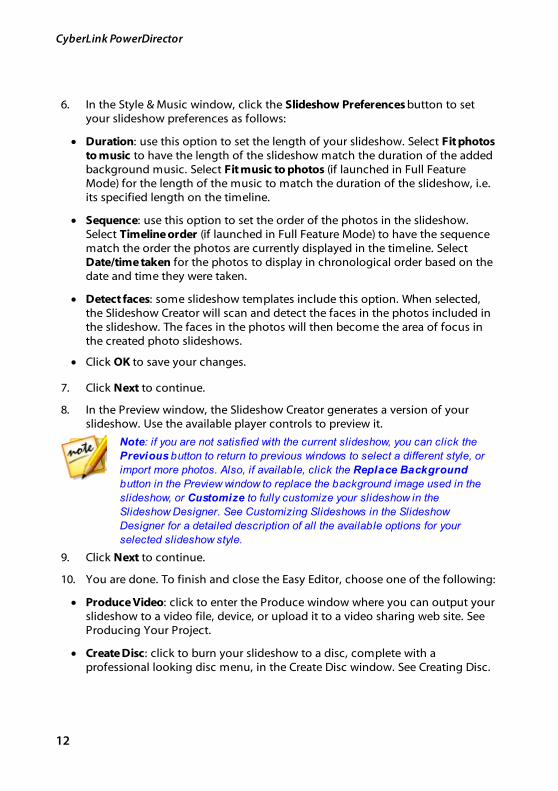
6. In the Style & Music window, click the Slideshow Preferences button to setyour slideshow preferences as follows:
· Duration: use this option to set the length of your slideshow. Select Fit photosto music to have the length of the slideshow match the duration of the addedbackground music. Select Fit music to photos (if launched in Full FeatureMode) for the length of the music to match the duration of the slideshow, i.e.its specified length on the timeline.
· Sequence: use this option to set the order of the photos in the slideshow.Select Timeline order (if launched in Full Feature Mode) to have the sequencematch the order the photos are currently displayed in the timeline. Select Date/time taken for the photos to display in chronological order based on thedate and time they were taken.
· Detect faces: some slideshow templates include this option. When selected,the Slideshow Creator will scan and detect the faces in the photos included inthe slideshow. The faces in the photos will then become the area of focus inthe created photo slideshows.
· Click OK to save your changes.
7. Click Next to continue.
8. In the Preview window, the Slideshow Creator generates a version of yourslideshow. Use the available player controls to preview it.
Note: if you are not satisfied with the current slideshow, you can click the
Previous button to return to previous windows to select a different style, or
import more photos. Also, if available, click the Replace Background
button in the Preview window to replace the background image used in the
slideshow, or Customize to fully customize your slideshow in the
Slideshow Designer. See Customizing Slideshows in the Slideshow
Designer for a detailed description of all the available options for your
selected slideshow style.
9. Click Next to continue.
10. You are done. To finish and close the Easy Editor, choose one of the following:
· Produce Video: click to enter the Produce window where you can output yourslideshow to a video file, device, or upload it to a video sharing web site. See Producing Your Project.
· Create Disc: click to burn your slideshow to a disc, complete with aprofessional looking disc menu, in the Create Disc window. See Creating Disc.
13
PowerDirector Editing Modes
· Advanced Editing: click this option if you'd like to perform some moreadvanced editing on your slideshow in the Edit window.
Note: if you select the Advanced Editing option, the Slideshow Creator
adds your created slideshow to the timeline in the Edit window as a
combined video file. If you'd like to do further editing on this slideshow
(combined video file), just select it and click the Customize button above
the timeline to edit in the Slideshow Designer. If you would like to remove
the slideshow effects added by the template and display each individual
photo in the slideshow on the timeline, just right-click on the file and then
select Remove Slideshow Effects.
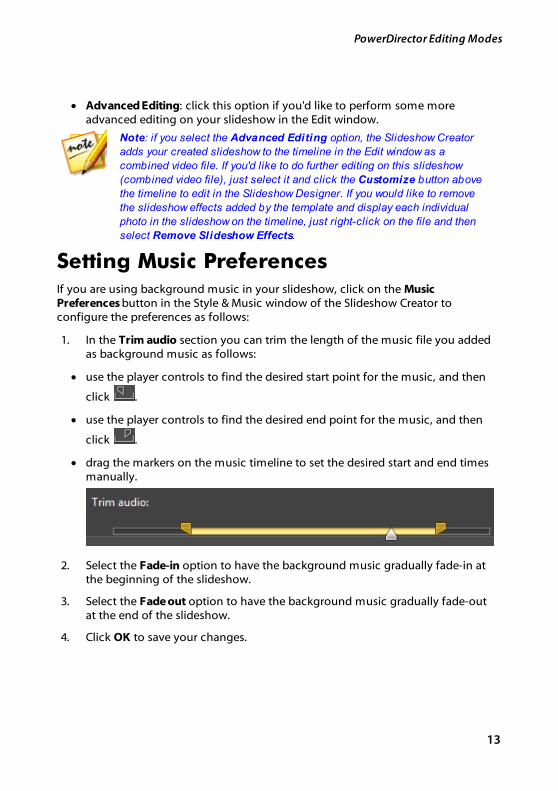
Setting Music PreferencesIf you are using background music in your slideshow, click on the MusicPreferences button in the Style & Music window of the Slideshow Creator toconfigure the preferences as follows:
1. In the Trim audio section you can trim the length of the music file you addedas background music as follows:
· use the player controls to find the desired start point for the music, and then
click .
· use the player controls to find the desired end point for the music, and then
click .
· drag the markers on the music timeline to set the desired start and end timesmanually.
2. Select the Fade-in option to have the background music gradually fade-in atthe beginning of the slideshow.
3. Select the Fade out option to have the background music gradually fade-outat the end of the slideshow.
4. Click OK to save your changes.
14
CyberLink PowerDirector
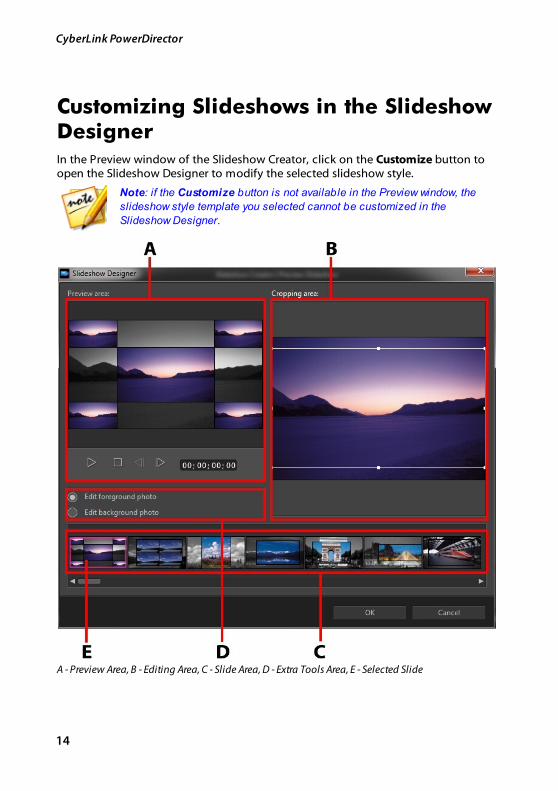
Customizing Slideshows in the SlideshowDesignerIn the Preview window of the Slideshow Creator, click on the Customize button toopen the Slideshow Designer to modify the selected slideshow style.
Note: if the Customize button is not available in the Preview window, the
slideshow style template you selected cannot be customized in the
Slideshow Designer.
A - Preview Area, B - Editing Area, C - Slide Area, D - Extra Tools Area, E - Selected Slide
15
PowerDirector Editing Modes
The editing options and tools that are available in the Slideshow Designer, dependon the slideshow style template you selected. The following outlines the editingoptions available for the style templates that utilize the Slideshow Designer.
Camera/Cell Slideshow
When customizing a Camera or Cell slideshow in the Slideshow Designer, you canperform the following functions:
· in the slide area, click on a specific slideshow slide to view and edit it.
· in the preview area, click and drag a photo to an alternative cell.
· in the editing area (Unused photos), click the Add Photos button to importadditional photos for use in the slideshow.
· in the editing area (Unused photos), indicate the maximum number of photosthat are displayed on a slide.
· in the editing area, drag and drop the photos from Unused photos to the cellin the preview area where you want it on the slide. You can also highlight a
cell by clicking it and use the buttons to add or remove selectedphotos.
· in the preview area, select a cell with a photo and then click on the buttonto set the focus of that cell on a specific portion of the photo. Manually resizeand drag the box to set the desired focus area.
· in the extra tools area, click the Remix button to generate a new version of theslideshow.
· in the preview area, use the player controls to preview the slideshow.
Motion Slideshow
When customizing a Motion slideshow in the Slideshow Designer, you can performthe following functions:
· in the slide area, click on a specific slideshow slide to view and edit it.
16
CyberLink PowerDirector
· in the editing area (Cropping area), use the Magic Motion Designer tocustomize the motion on the slide. See Magic Motion Designer for detailedinstructions on using all its features.
· in the preview area, use the player controls to preview the slideshow.
Highlight Slideshow
When customizing a Highlight slideshow in the Slideshow Designer, you canperform the following functions:
· in the slide area, click on a specific slideshow slide to view and edit it.
· in the extra tools area, select whether you want to edit the foreground orbackground photo.
· in the editing area (Cropping area), resize and drag the box to the area of thephoto you want highlighted on the slide.
· in the preview area, use the player controls to preview the slideshow.
3D/Balloon/Frozen Space/Outer SpaceSlideshow
When customizing a 3D, Frozen Space, or Future slideshow in the SlideshowDesigner, you can perform the following functions:
· in the slide area, click on a specific slideshow slide to view and edit it.
· in the editing area (Cropping area), resize and drag the box to the area of thephoto you want highlighted in the photo on the slide.
· click the Replace Background button if you want to import a custom imageto use as the slideshow's background.
Note: the slideshow background cannot be replaced for slideshows using
the Balloon template.
· in the preview area, use the player controls to preview the slideshow.
Time-Lapse Slideshow
17
PowerDirector Editing Modes
When customizing a time-lapse slideshow in the Slideshow Designer, you canspecify the following settings:
Note: to create a time-lapse slideshow, you need to prepare the photos for it
ahead of time. This feature works best with a series of photos taken with a
camera that supports time-lapse photography.
· Duration of each image: in the field provided, specify how long you want eachof the imported images to display. Each image can display for as long as 99frames, or as short as for 1 single video frame.
· For each displayed image, skip: when importing a large number of imagesthat were taken over a period of time, you may find the need to remove someof the images to reduce the slideshow's duration. In the field provided, enterthe number of images you want to remove for each displayed image in yourslideshow.
18
CyberLink PowerDirector
PowerDirector Workspace
Chapter 3:
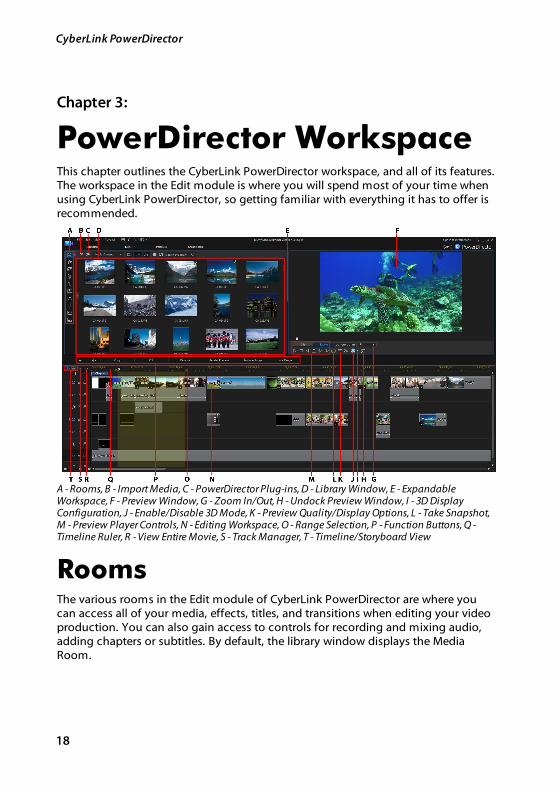
This chapter outlines the CyberLink PowerDirector workspace, and all of its features.The workspace in the Edit module is where you will spend most of your time whenusing CyberLink PowerDirector, so getting familiar with everything it has to offer isrecommended.
A - Rooms, B - Import Media, C - PowerDirector Plug-ins, D - Library Window, E - ExpandableWorkspace, F - Preview Window, G - Zoom In/Out, H - Undock Preview Window, I - 3D DisplayConfiguration, J - Enable/Disable 3D Mode, K - Preview Quality/Display Options, L - Take Snapshot,M - Preview Player Controls, N - Editing Workspace, O - Range Selection, P - Function Buttons, Q -Timeline Ruler, R - View Entire Movie, S - Track Manager, T - Timeline/Storyboard View
RoomsThe various rooms in the Edit module of CyberLink PowerDirector are where youcan access all of your media, effects, titles, and transitions when editing your videoproduction. You can also gain access to controls for recording and mixing audio,adding chapters or subtitles. By default, the library window displays the MediaRoom.
19
PowerDirector Workspace
Media RoomThe Media Room provides access to your media library and the PowerDirector plug-ins. The media library contains your video, audio, and image files. You can alsoaccess a number of useful color boards and backgrounds for use in your videoproductions, or view your library of saved and express projects.
Click to access the PowerDirector plug-ins. See PowerDirector Plug-ins for adetailed description of the plug-ins and their available features.
Managing the Media Library
Use the button to manage the media in your media library. You can sort themedia, change the media thumbnail icon size, or select Details to view fileinformation instead of a thumbnail.
Note: if you cannot find this button when in the media library, you may need
to resize the preview window to reveal it. See Expanding the Workspace for
more information.
Other media library management options include:
Note: see Library Window for more information about the library menu
options available in all rooms.
· Export Library: select to export your entire media library as a file for backup,in the PDL (PowerDirector Library) format.
· Import Library: select to import a media library PDL file, exported fromanother project or version of CyberLink PowerDirector.
· Empty the Library: select to empty the entire contents of the media library.
· Remove All Unused Content from Library: select if you just want to removethe media that is not being used in the current project.
Content Aware Details
When in the Media Room, you can select the Content Aware Details* option fromthe library menu to view the analysis results for all the video clips analyzed and
20
CyberLink PowerDirector
edited in Content Aware Editing. Clips that were previously analyzed are indicatedby the green (good parts) and light brown (bad parts) dots in the specific columns.
Note: * optional feature in CyberLink PowerDirector. Check the version
table on our web site for detailed versioning information.
To analyze video clips in this view, select them in the Analyze column and thenclick the Analyze button.
To edit a video clip using Content Aware Editing, click . If the video clip hasnot yet been analyzed, CyberLink PowerDirector will do this first before opening theContent Aware Editing window. See Content Aware Editing for more detailedinformation on this feature.
Effect RoomThe Effect Room contains a library of special effects that are used on the video filesand images in your project. For more information, see Adding Effects.
Note: the video effects with the 3D icon produce a 3D effect in 3D mode and
when outputted in 3D video productions.
PiP Objects RoomThe PiP Objects Room contains a library of PiP objects, or graphics, that you canadd on top of the video or images on a video track. You can place PiP objects ontoany track in the timeline. The PiP Objects Room also includes paint animationobjects and access to the Paint Designer.
Note: the PiP objects with the 3D icon produce a 3D effect in 3D mode and
when outputted in 3D video productions.
There are four main types of objects in the PiP Objects Room:
· static graphics.
· motion graphics that move through clips.
· decorative borders that are added to frame your video.
· hand drawn paint animation objects you create in the Paint Designer.

21
PowerDirector Workspace
For information on adding PiP objects, see Adding PiP Objects. For information onthe hand drawn paint animation objects you can create in the Paint Designer, see Using the Paint Designer.
Particle RoomThe Particle Room contains a library of effects you can place on a video track toadd a particle object (snow, clouds, smoke, etc.) on top of a video or image on avideo track.
Note: the particle effects with the 3D icon produce a 3D effect in 3D mode
and when outputted in 3D video productions.
You can modify particles in the Particle Designer. For more information, see AddingParticle Effects.
Title RoomThe Title Room contains the library of title effects that when applied to your project,add credits or comments to your production. For more information, see AddingTitle Effects.
Note: the title templates with the 3D icon produce a 3D effect in 3D mode
and when outputted in 3D video productions. See The Difference Between
3D and 3D-Like Effects to learn more about both types of effects.
Transition RoomThe Transition Room contains transitions that you can use on or between clips inyour project. Transitions let you control how media appears and disappears in yourproject, and changes from one clip to the next. For more information, see UsingTransitions.
Note: you can create your own custom transitions, or edit existing alpha
transitions, using the Transition Designer. See Modifying Alpha Transitions
in the Transition Designer for more information.
The transitions with the 3D icon produce a 3D effect in 3D mode and whenoutputted in 3D video productions. See The Difference Between 3D and 3D-LikeEffects to learn more about both types of effects.
22
CyberLink PowerDirector
Audio Mixing RoomIn the Audio Mixing Room you can use controls to mix all of the audio tracks inyour project. For more information, see Mixing Audio and Recording Voice-Overs.
Voice-Over Recording RoomIn the Voice-Over Recording Room you can record a voice over for your videoproduction, while you are watching it play back. For more information, see Recording Voice-Overs.
Chapter RoomIn the Chapter Room* you can automatically or manually set chapter markers foryour project. Setting chapters on your final disc allows viewers to jump from themenu page to the chapter markers you have set in order to navigate through yourdisc. For more information, see Adding Chapters.
Note: * optional feature in CyberLink PowerDirector. Check the version
table on our web site for detailed versioning information.
Subtitle RoomIn the Subtitle Room you can add subtitles to your video production manually orthrough the import of a TXT, SRT, or MKV file. For more information, see AddingSubtitles.
Library WindowThe library window contains all of the media in CyberLink PowerDirector, includingyour video, images, and audio files. When you are in other rooms (Effect Room, PiPObjects Room, etc.), it contains the effects, titles, and transitions you apply to yourmedia.
The media content and available buttons that display in the library window dependon the room you are currently in.
Click the button above the library window and then use the slider to adjust thesize of the media thumbnails in the library.

23
PowerDirector Workspace
You can also resize the media thumbnails by selecting a default size from the librarymenu.
24
CyberLink PowerDirector
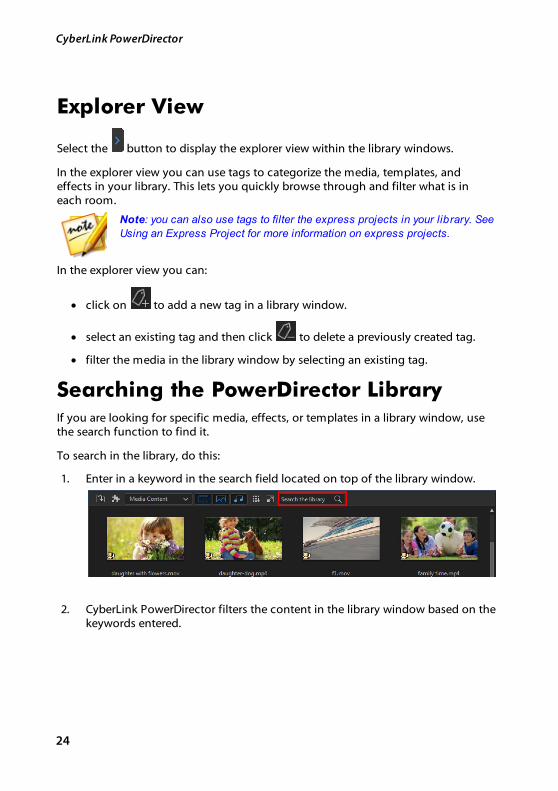
Explorer View
Select the button to display the explorer view within the library windows.
In the explorer view you can use tags to categorize the media, templates, andeffects in your library. This lets you quickly browse through and filter what is ineach room.
Note: you can also use tags to filter the express projects in your library. See
Using an Express Project for more information on express projects.
In the explorer view you can:
· click on to add a new tag in a library window.
· select an existing tag and then click to delete a previously created tag.
· filter the media in the library window by selecting an existing tag.
Searching the PowerDirector LibraryIf you are looking for specific media, effects, or templates in a library window, usethe search function to find it.
To search in the library, do this:
1. Enter in a keyword in the search field located on top of the library window.
2. CyberLink PowerDirector filters the content in the library window based on thekeywords entered.

25
PowerDirector Workspace
Note: click on to clear the search results.
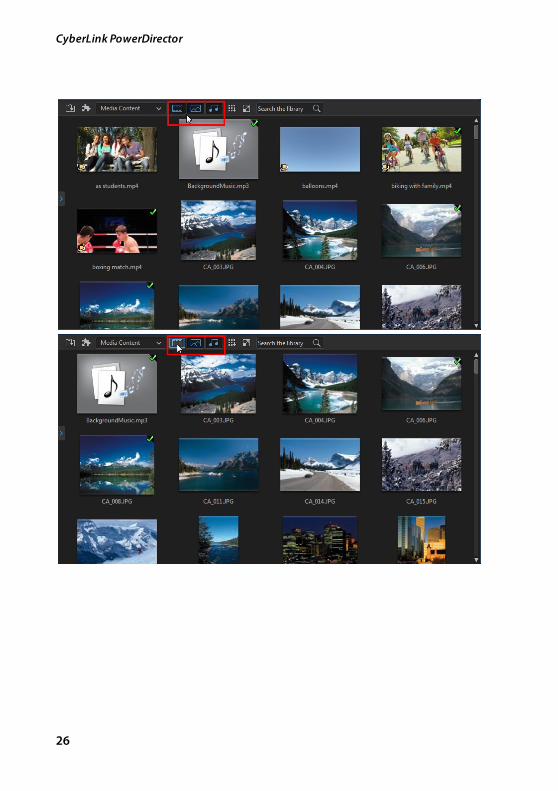
Filtering Media in the LibraryUse the available drop-down menus at the top of the library window to filter themedia that is displayed. For example, when viewing the media in the Media Room,use the Media Content drop-down to display just your media content, the availablecolor boards, backgrounds, your saved projects, or to select a tag. Select ExpressProjects to view a library of project templates you can use. See Using an ExpressProject for more information.
If you'd like to filter the media files that are in the library by file type, use the threebuttons above the library window. Click these buttons to hide media so you canmore easily find what you are looking for.
26
CyberLink PowerDirector
27
PowerDirector Workspace
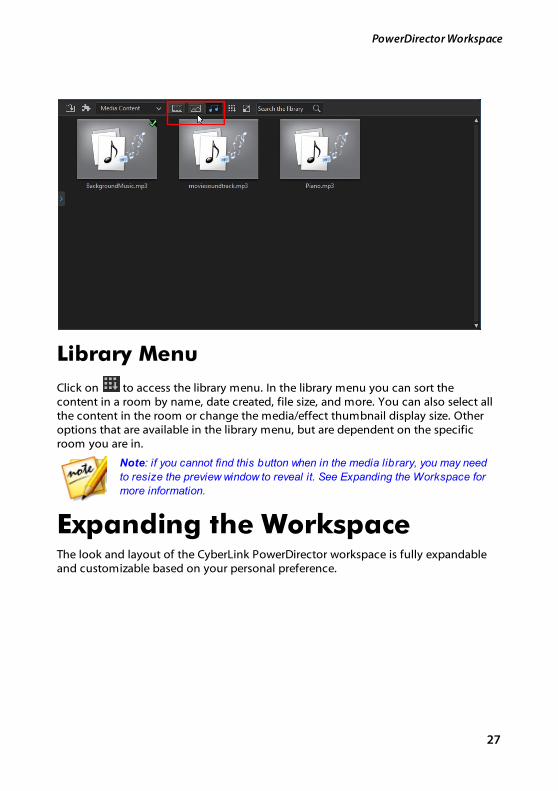
Library Menu
Click on to access the library menu. In the library menu you can sort thecontent in a room by name, date created, file size, and more. You can also select allthe content in the room or change the media/effect thumbnail display size. Otheroptions that are available in the library menu, but are dependent on the specificroom you are in.
Note: if you cannot find this button when in the media library, you may need
to resize the preview window to reveal it. See Expanding the Workspace for
more information.
Expanding the WorkspaceThe look and layout of the CyberLink PowerDirector workspace is fully expandableand customizable based on your personal preference.
28
CyberLink PowerDirector
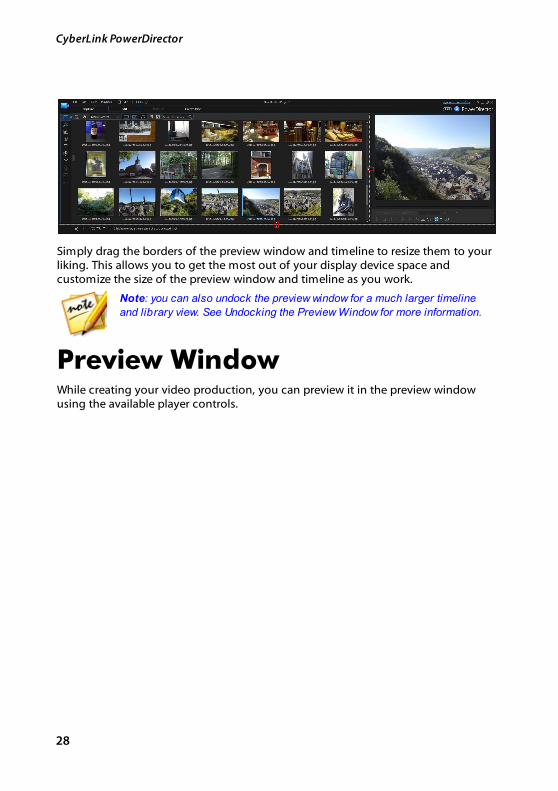
Simply drag the borders of the preview window and timeline to resize them to yourliking. This allows you to get the most out of your display device space andcustomize the size of the preview window and timeline as you work.
Note: you can also undock the preview window for a much larger timeline
and library view. See Undocking the Preview Window for more information.
Preview WindowWhile creating your video production, you can preview it in the preview windowusing the available player controls.

29
PowerDirector Workspace
Preview Player ControlsWith the player controls you can preview your production as you edit, includingplaying your project from the current timeline position, or pausing and stoppingplayback.
Click the Clip button to play back only the clip that is selected in the timeline, orMovie to play the entire video production. When viewing media in Clip mode, thecross hairs and grid lines/TV safe zone (if enabled) are visible to help with theplacement of the selected clip in the video display area. When in Movie mode,these items are hidden.
Note: you can set PowerDirector to auto switch the playback mode to
M ovie mode in Editing Preferences.
Use the button to select a seek by method (frame, second, minute, scene,subtitle, chapter, segment) and then use the buttons on either side of it for a moreprecise step through of your current production.
30
CyberLink PowerDirector
You can also click and drag the playback slider, or enter in a specific timecode inthe time field, and then press the enter key on your keyboard to quickly find aspecific scene.
Click the button to undock the preview window for a larger view of yourproduction. See Undocking the Preview Window for more information.
Taking a Screen SnapshotWhile previewing your project, you can take a still 2D screen snapshot and save it asa BMP, JPG, GIF, or PNG image file. You can also take a still 3D* screen snapshot(just enable 3D mode) and then save it as an MPO or JPS image file. To do this click
the button on the player controls.
Note: * Optional feature in CyberLink PowerDirector. Check the version
table on our web site for detailed versioning information.
Before capture, you can set the image file format (or the default image file name)on the File Preferences tab. See File Preferences for more information.
Preview/Display OptionsCyberLink PowerDirector includes some preview and display options that help
make your editing experience easier. Click on to set the preview quality, showthe TV safe zone, display grid lines, or enable dual preview.
Note: you can set the default settings for these options in Display
Preferences.
Preview Quality
Click , select Preview Quality, and then a preview quality from the list (Full HD*,HD*, high, normal, low) to set the resolution/quality of the video used whenpreviewing your movie in the preview window. The higher the quality you select,the more resources that are required to preview your video project.
Note: Full HD and HD preview resolution are only available when the Ultra
or Ultimate version of CyberLink PowerDirector is installed on a 64-bit
operating system.
31
PowerDirector Workspace
Preview Mode
CyberLink PowerDirector provides two modes you can use to preview your videoproduction:
· Real-time Preview: synchronizes and renders clips and effects in real-time,displaying a preview of your video at the specified frames per second. See thetimeline frame rate option in General Preferences for information on settingthe correct frame rate for your production.
· Non Real-time Preview: mutes the audio and displays a preview at a reducedspeed to help make editing go more smoothly. Useful when editing high-definition video, using multiple PiP tracks on a less powerful computer, orwhen you receive dropped frames when previewing. By muting the audio andslowing down the video, CyberLink PowerDirector lets you view more framesper second when your computer has trouble providing a smooth previewduring editing.
Note: you can also preview a portion of your video using the Render Preview
and Produce Range options. See Range Selection for more information on
these functions.
TV Safe Zone/Grid Lines
When you place media on the timeline, use the TV safe zone and grid lines to helpwith the precise placement on your video project's image. These display options areonly available when in the Clip preview mode.
· Click the button and then select TV Safe Zone > On to enable a box thatindicates the on-screen area of most TV displays.
· Click the button, select Grid Lines, and then select the number of linesyou want to display in a grid over the video image. Use this grid to moreprecisely place the PiP media and title text on the video image.
Once enabled, select Snap to Reference Lines* to have the selected objects snap tothe grid lines, TV safe zone, and the boundary of the preview window.
32
CyberLink PowerDirector
Dual Preview
If you have a secondary display device, such as a monitor, TV, or DV camcorder
connected to your computer, click the button and then select Dual Preview*to extend your workspace and preview your project on a secondary display.
Note: to use a connected monitor or TV as a secondary preview window,
you must first enable extend desktop to a secondary display in the Windows
Display Properties Settings. * optional feature in CyberLink PowerDirector.
Check the version table on our web site for detailed versioning information.
Once enabled, when you click play in the preview window, you can preview yourproduction on both your primary and secondary display when Primary 2D andSecondary 2D Display is selected. Select DV Camcorder to extend your productionpreview to a connected DV camcorder device.
3D Dual Preview
When your desktop is extended to a secondary display, you can enable 3D on oneof the two devices. If you want one of your previews to be in 3D, select either Primary 2D and Secondary 3D Display or Primary 3D and Secondary 2D Display toenable it. Your selection depends on which device you want to enable, and whichone supports 3D.
Note: if both of your displays are 3D devices, you can only enable 3D on
one of the two devices in dual preview mode.
Zoom In/OutWhen you place media on the timeline, use the Fit* drop-down underneath thepreview window to zoom in or out on the video. Zooming in is useful for preciseplacement of media, while zooming out lets you add media that begins off screen.
Note: * optional feature in CyberLink PowerDirector. Check the version
table on our web site for detailed versioning information.

33
PowerDirector Workspace
Undocking the Preview Window
Click the button to undock the preview window. Once undocked, you canpreview your production at full screen or move it to an extended desktop. You canalso resize the timeline and library window to your liking.
Once undocked, you can:
· click to view your production at full screen, or to maximize thepreview window.
· click to minimize the preview window, and hide it so you can edit more
freely. Click on next to the APP button to show the minimized previewwindow.
· click on to re-dock the preview window.
Previewing in 3D ModeIn the preview window you can enable 3D* mode to view the media in yourproduction in 3D, while you work.
Note: for detailed information on adding and setting the source format of 3D
media, see 3D Media. * Optional feature in CyberLink PowerDirector.
Check the version table on our web site for detailed versioning information.
3D Configuration
Before you can enable 3D mode, you must first set your 3D display device.
To set your 3D display device, do this:
1. Select the 3D configuration menu underneath the preview window .
2. Select one of the following options:
· select your 3D display type from the list, i.e. 3D-Ready HDTV (Checkerboard),Micro-polarizer LCD 3D (Row-Interleaved), 120Hz Time-sequential 3D LCD,HDMI 1.4 Enabled 3D TV, etc.
· if you are not sure which type of 3D display you have, select the Auto Detect3D Mode option to have CyberLink PowerDirector detect it for you.
34
CyberLink PowerDirector
· if you do not have a 3D display, select Anaglyph Red/Cyan mode and then useanaglyphic (red/cyan) 3D glasses to view 3D content.
Enabling 3D Mode
Once you have set your 3D display device, you can enable 3D mode at any time to
preview your video production in 3D. To enable, just click the button.
Note: any 2D media in your production will not display in 3D. However, you
can convert all of the 2D media to 3D using TrueTheater 3D in Power Tools.
See Power Tools: 2D to 3D for more information.
To disable 3D mode, just click the button.
Editing WorkspaceThe editing workspace is where you create your project by adding your media,various effects, transitions, and title effects. The editing workspace has two different
views, the timeline and storyboard views, which are accessed by clicking the
or button.
Note: you can set which workspace view is displayed by default in Editing
Preferences.
Timeline ViewThe timeline view lets you view your entire project based on running time. This viewis useful if you want to insert media, effects, subtitles, etc. at a specific moment inproduction. The timeline view also provides a view of all the tracks, media, andother content (chapter markers, subtitle markers) that are displayed in the timeline.
To switch to timeline view, click .
Timeline Tracks
The timeline contains the following tracks:
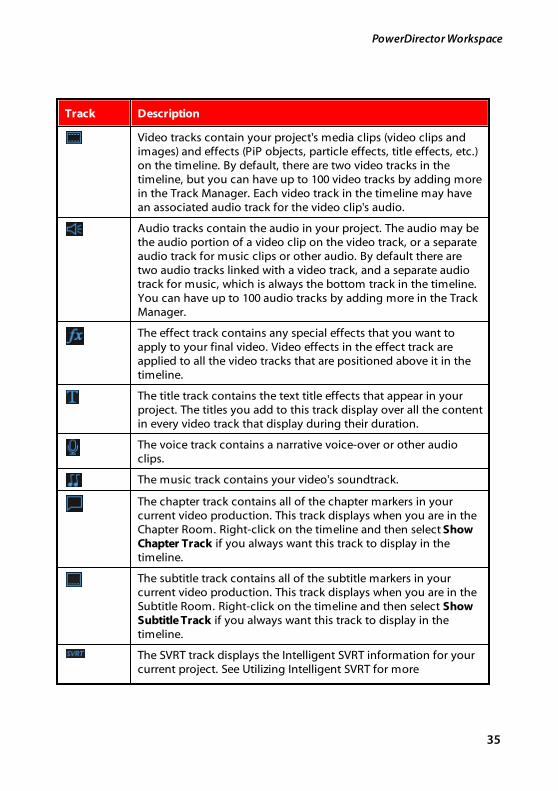
35
PowerDirector Workspace
Track Description
Video tracks contain your project's media clips (video clips andimages) and effects (PiP objects, particle effects, title effects, etc.)on the timeline. By default, there are two video tracks in thetimeline, but you can have up to 100 video tracks by adding morein the Track Manager. Each video track in the timeline may havean associated audio track for the video clip's audio.
Audio tracks contain the audio in your project. The audio may bethe audio portion of a video clip on the video track, or a separateaudio track for music clips or other audio. By default there aretwo audio tracks linked with a video track, and a separate audiotrack for music, which is always the bottom track in the timeline.You can have up to 100 audio tracks by adding more in the TrackManager.
The effect track contains any special effects that you want toapply to your final video. Video effects in the effect track areapplied to all the video tracks that are positioned above it in thetimeline.
The title track contains the text title effects that appear in yourproject. The titles you add to this track display over all the contentin every video track that display during their duration.
The voice track contains a narrative voice-over or other audioclips.
The music track contains your video's soundtrack.
The chapter track contains all of the chapter markers in yourcurrent video production. This track displays when you are in theChapter Room. Right-click on the timeline and then select ShowChapter Track if you always want this track to display in thetimeline.
The subtitle track contains all of the subtitle markers in yourcurrent video production. This track displays when you are in theSubtitle Room. Right-click on the timeline and then select ShowSubtitle Track if you always want this track to display in thetimeline.
The SVRT track displays the Intelligent SVRT information for yourcurrent project. See Utilizing Intelligent SVRT for more
36
CyberLink PowerDirector
information. Right-click on the timeline and then select ShowSVRT Track if you always want this track to display in thetimeline.
The clip marker track can display all of the music beat clipmarkers in your audio clips or video clip's with music, or themouse clicks in videos recorded with the Screen Recorder. See Music Beat Detection and Recording Your Desktop with theScreen Recorder for more information on enabling these features.Right-click on the timeline and then select Show Clip MarkerTrack if you always want this track to display in the timeline.
Timeline Behavior
The CyberLink PowerDirector timeline has several behavior features that make iteasy to manage media on the timeline.
On the timeline you can:
· place media clips at any position on a video track. If no media is placed beforea media clip on the timeline, your video production displays a black screenuntil the timeline position of your media clip is reached.
· media clips will snap to other clips on the timeline for easy placement in yourproduction. If want to move the clips more freely on the timeline, you candisable snap to clips in Editing Preferences.
· hold down the Ctrl key on the keyboard and select multiple media clips on thetimeline.
· click and drag the mouse to select multiple media clips on the timeline.
· right-click on select media in the timeline and select Group Objects. Doingthis allows you to move all the selected media clips as a group. Select Ungroup Objects to once again allow for individual media clip movement.
Note: you cannot include transitions in grouped objects.
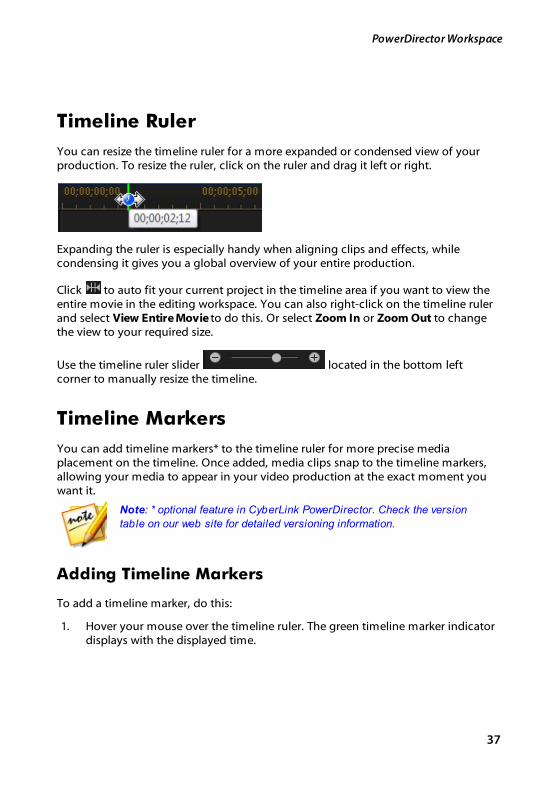
37
PowerDirector Workspace
Timeline Ruler
You can resize the timeline ruler for a more expanded or condensed view of yourproduction. To resize the ruler, click on the ruler and drag it left or right.
Expanding the ruler is especially handy when aligning clips and effects, whilecondensing it gives you a global overview of your entire production.
Click to auto fit your current project in the timeline area if you want to view theentire movie in the editing workspace. You can also right-click on the timeline rulerand select View Entire Movie to do this. Or select Zoom In or Zoom Out to changethe view to your required size.
Use the timeline ruler slider located in the bottom leftcorner to manually resize the timeline.
Timeline Markers
You can add timeline markers* to the timeline ruler for more precise mediaplacement on the timeline. Once added, media clips snap to the timeline markers,allowing your media to appear in your video production at the exact moment youwant it.
Note: * optional feature in CyberLink PowerDirector. Check the version
table on our web site for detailed versioning information.
Adding Timeline Markers
To add a timeline marker, do this:
1. Hover your mouse over the timeline ruler. The green timeline marker indicatordisplays with the displayed time.
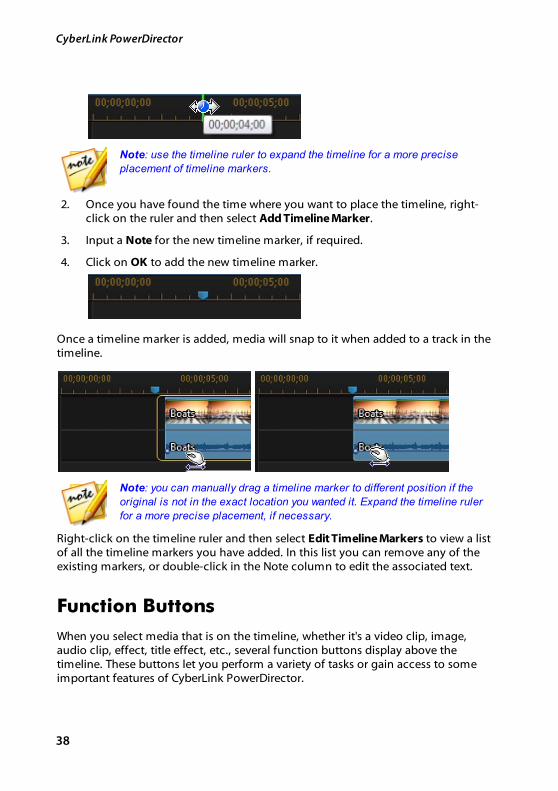
38
CyberLink PowerDirector
Note: use the timeline ruler to expand the timeline for a more precise
placement of timeline markers.
2. Once you have found the time where you want to place the timeline, right-click on the ruler and then select Add Timeline Marker.
3. Input a Note for the new timeline marker, if required.
4. Click on OK to add the new timeline marker.
Once a timeline marker is added, media will snap to it when added to a track in thetimeline.
Note: you can manually drag a timeline marker to different position if the
original is not in the exact location you wanted it. Expand the timeline ruler
for a more precise placement, if necessary.
Right-click on the timeline ruler and then select Edit Timeline Markers to view a listof all the timeline markers you have added. In this list you can remove any of theexisting markers, or double-click in the Note column to edit the associated text.
Function Buttons
When you select media that is on the timeline, whether it's a video clip, image,audio clip, effect, title effect, etc., several function buttons display above thetimeline. These buttons let you perform a variety of tasks or gain access to someimportant features of CyberLink PowerDirector.
39
PowerDirector Workspace
The function buttons that are available depend on the type of media content you
select. However, whenever you select media, the and buttons are
always displayed. Click to remove the selected media content from the
timeline, or to gain access to more timeline functions, which varydepending on the selected media.
Magic Tools
When editing your video project in the timeline, you can click the button touse the magic tools to edit and touch up your audio, video, and image clips. Magictools can also help you add a creative style to your video production or add theright background music.
CyberLink PowerDirector offers the following magic tools:
· Magic Movie Wizard: automatically creates an edited video blended withstylish effects and transitions.
· Magic Fix: fixes and enhances your photos and videos, including fixing shakyvideo, enhancing video quality, removing red-eye, and enhancing the focuson photos.
· Magic Motion: applies zooms and pans to your images. You can also use theMagic Motion Designer to manually customize motion on an image.
· Magic Cut: condenses long video segments into shorter clips that contain onlythe best moments.
· Magic Style: creates professional videos with pre-designed style templatesautomatically.
· Magic Music*: adds background music that automatically adjusts to suitdifferent durations.
Click on the button within these tools to consult the iHelp for assistance onusing them.
Note: * optional feature in CyberLink PowerDirector. Check the version
table on our web site for detailed versioning information.
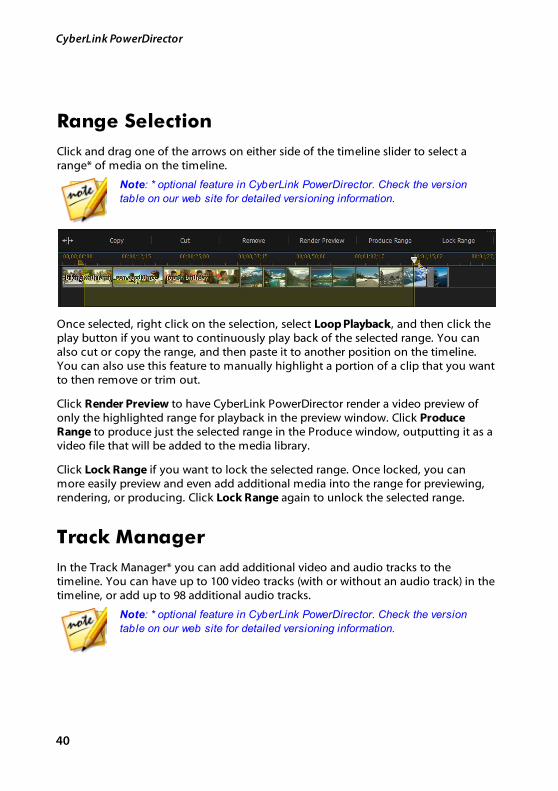
40
CyberLink PowerDirector
Range Selection
Click and drag one of the arrows on either side of the timeline slider to select arange* of media on the timeline.
Note: * optional feature in CyberLink PowerDirector. Check the version
table on our web site for detailed versioning information.
Once selected, right click on the selection, select Loop Playback, and then click theplay button if you want to continuously play back of the selected range. You canalso cut or copy the range, and then paste it to another position on the timeline.You can also use this feature to manually highlight a portion of a clip that you wantto then remove or trim out.
Click Render Preview to have CyberLink PowerDirector render a video preview ofonly the highlighted range for playback in the preview window. Click ProduceRange to produce just the selected range in the Produce window, outputting it as avideo file that will be added to the media library.
Click Lock Range if you want to lock the selected range. Once locked, you canmore easily preview and even add additional media into the range for previewing,rendering, or producing. Click Lock Range again to unlock the selected range.
Track Manager
In the Track Manager* you can add additional video and audio tracks to thetimeline. You can have up to 100 video tracks (with or without an audio track) in thetimeline, or add up to 98 additional audio tracks.
Note: * optional feature in CyberLink PowerDirector. Check the version
table on our web site for detailed versioning information.
41
PowerDirector Workspace
Adding Tracks to Timeline
Each video track you add, adds another layer of PiP video on the tracks above it inthe timeline.
To add tracks to the timeline, do this:
Note: CyberLink PowerDirector auto adds a video and audio track for you
when all the current video/audio tracks in the timeline have media on them.
1. In the timeline view, click on to open the Track Manager.
2. In the Video section, enter in the number of video tracks you want to add tothe timeline. By default, one track is added, but you can add up to 98 videotracks (100 in total) to the timeline, as required.
Note: if you don't want your additional video tracks to have a track for its
audio, enter in 0 tracks in the Audio section.
3. In the Video section, select the Position in the timeline where you want to addthe tracks.
4. In the Audio section, enter in the number of audio tracks you want to add tothe timeline. By default, one track is added, but you can add up to 98 audiotracks (100 in total) to the timeline, as required.
Note: if you only want to add an audio track (i.e. without a linked video
track), enter in 0 tracks in the Video section.
5. In the Audio section, select the Position in the timeline where you want to addthe tracks.
6. Click on OK to add the tracks to the timeline.
To quickly remove any unwanted tracks from the timeline, just right-click on thetimeline and then select Remove Empty Tracks.
42
CyberLink PowerDirector
Customizing Timeline Tracks
In CyberLink PowerDirector you can customize the layout of the workspace timelineand its tracks to fit your preference.
Customizing Track Names
To make it easy to identify all of your tracks if you have lots of media on multipletracks, drag the left sidebar to reveal the track names.

43
PowerDirector Workspace
You can give all the tracks in the timeline a custom name as required.
Reordering Tracks
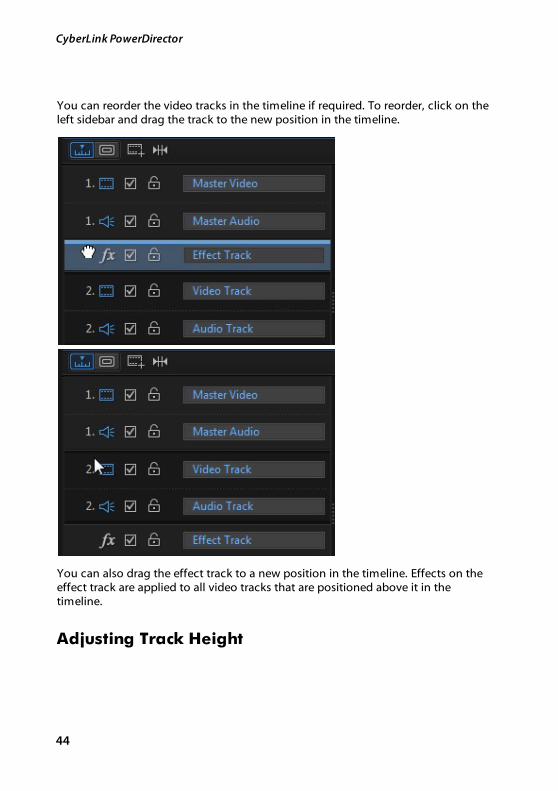
44
CyberLink PowerDirector
You can reorder the video tracks in the timeline if required. To reorder, click on theleft sidebar and drag the track to the new position in the timeline.
You can also drag the effect track to a new position in the timeline. Effects on theeffect track are applied to all video tracks that are positioned above it in thetimeline.
Adjusting Track Height
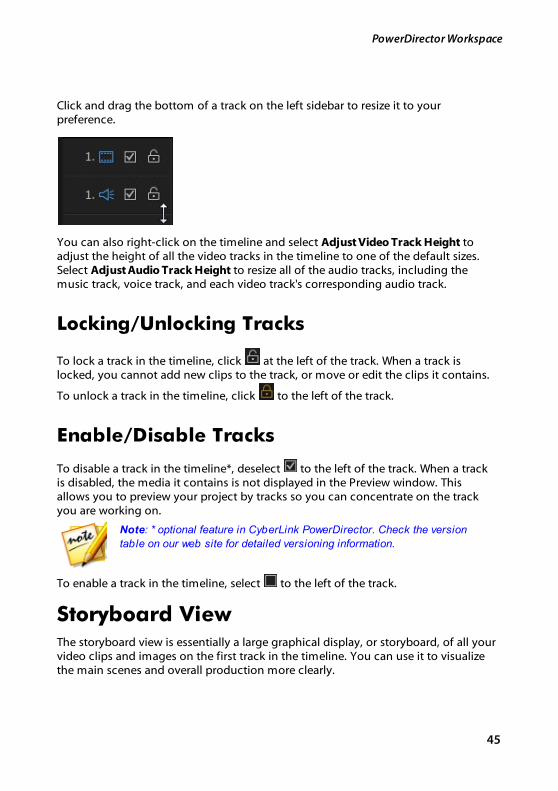
45
PowerDirector Workspace
Click and drag the bottom of a track on the left sidebar to resize it to yourpreference.
You can also right-click on the timeline and select Adjust Video Track Height toadjust the height of all the video tracks in the timeline to one of the default sizes.Select Adjust Audio Track Height to resize all of the audio tracks, including themusic track, voice track, and each video track's corresponding audio track.
Locking/Unlocking Tracks
To lock a track in the timeline, click at the left of the track. When a track islocked, you cannot add new clips to the track, or move or edit the clips it contains.
To unlock a track in the timeline, click to the left of the track.
Enable/Disable Tracks
To disable a track in the timeline*, deselect to the left of the track. When a trackis disabled, the media it contains is not displayed in the Preview window. Thisallows you to preview your project by tracks so you can concentrate on the trackyou are working on.
Note: * optional feature in CyberLink PowerDirector. Check the version
table on our web site for detailed versioning information.
To enable a track in the timeline, select to the left of the track.
Storyboard ViewThe storyboard view is essentially a large graphical display, or storyboard, of all yourvideo clips and images on the first track in the timeline. You can use it to visualizethe main scenes and overall production more clearly.
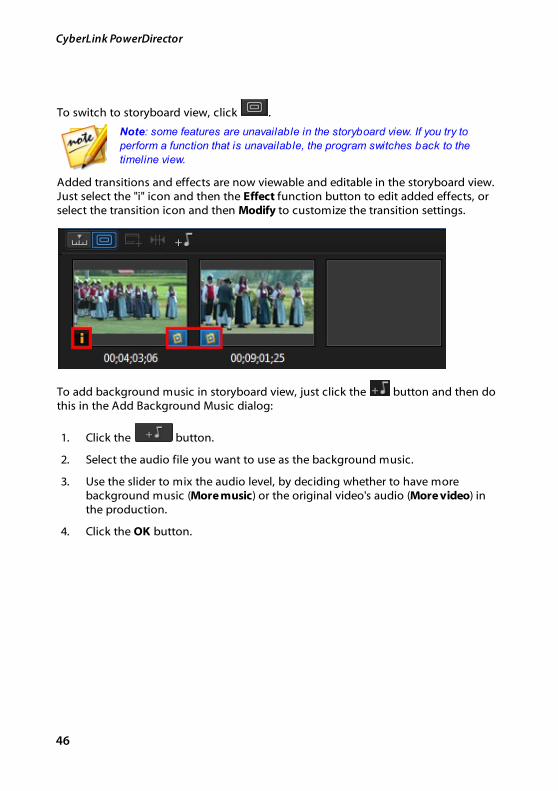
46
CyberLink PowerDirector
To switch to storyboard view, click .
Note: some features are unavailable in the storyboard view. If you try to
perform a function that is unavailable, the program switches back to the
timeline view.
Added transitions and effects are now viewable and editable in the storyboard view.Just select the "i" icon and then the Effect function button to edit added effects, orselect the transition icon and then Modify to customize the transition settings.
To add background music in storyboard view, just click the button and then dothis in the Add Background Music dialog:
1. Click the button.
2. Select the audio file you want to use as the background music.
3. Use the slider to mix the audio level, by deciding whether to have morebackground music (More music) or the original video's audio (More video) inthe production.
4. Click the OK button.
47
PowerDirector Projects
PowerDirector Projects
Chapter 4:
When working on a new video production, click the button to save it as a .pdsfile, a project file format that is used exclusively by CyberLink PowerDirector. Theseproject files can be imported directly into the timeline, if required. See ImportingPowerDirector Projects for more information.
Note: a CyberLink PowerDirector project (.pds) file essentially contains a
list of the media clips and effects used in your project, and a log of all the
edits you want to make to your media. Project files do not include the media
clips in them. If you want to save all your video production files in one place,
use the Pack Project Materials function. To do this select, File > Pack
Project M aterials from the menu.
Use the options in the File menu to save, create new, or open existing projects inCyberLink PowerDirector. When you create a new project, CyberLink PowerDirectorresets your media library. If you want to create a new video production using thesame media that's currently in your library, select File > New Workspace.
Note: saved PowerDirector projects are now easily accessible in the media
library, and they are also reusable. See Reusing PowerDirector Projects for
more information.
If you have a CyberLink Cloud subscription you can upload saved projects andmore to CyberLink Cloud*. See CyberLink Cloud Projects for more information.
Note: * optional feature in CyberLink PowerDirector. Check the version
table on our web site for detailed versioning information.
The changes you make to your media in CyberLink PowerDirector do not affect theoriginal media you imported into the program. Since your edits are all saved in theproject file, you can trim, edit, or remove clips, but still keep your original files onyour hard drive, untouched. So let yourself get creative. If you end up changingthings too drastically, you can always start over.
Setting Project Aspect RatioTo set the aspect ratio for your project, and your outputted video, select 4:3 or 16:9from the aspect ratio drop-down at the top of the window.
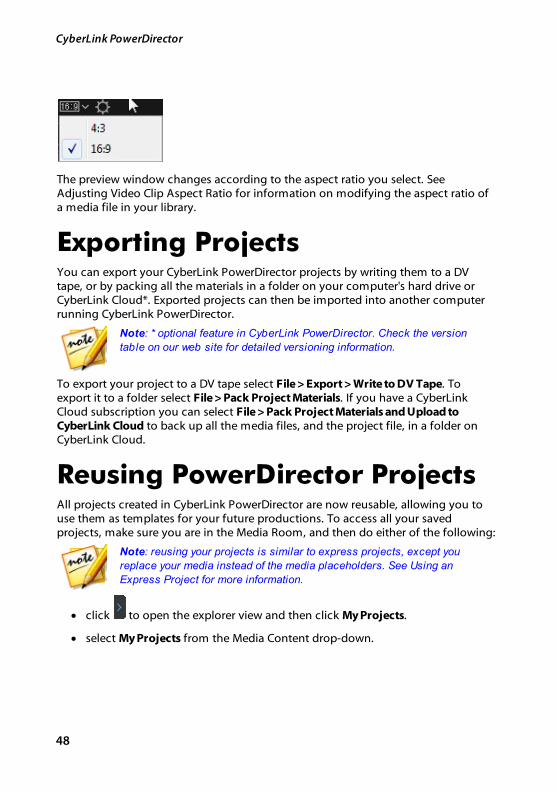
48
CyberLink PowerDirector
The preview window changes according to the aspect ratio you select. See Adjusting Video Clip Aspect Ratio for information on modifying the aspect ratio ofa media file in your library.
Exporting ProjectsYou can export your CyberLink PowerDirector projects by writing them to a DVtape, or by packing all the materials in a folder on your computer's hard drive orCyberLink Cloud*. Exported projects can then be imported into another computerrunning CyberLink PowerDirector.
Note: * optional feature in CyberLink PowerDirector. Check the version
table on our web site for detailed versioning information.
To export your project to a DV tape select File > Export > Write to DV Tape. Toexport it to a folder select File > Pack Project Materials. If you have a CyberLinkCloud subscription you can select File > Pack Project Materials and Upload toCyberLink Cloud to back up all the media files, and the project file, in a folder onCyberLink Cloud.
Reusing PowerDirector ProjectsAll projects created in CyberLink PowerDirector are now reusable, allowing you touse them as templates for your future productions. To access all your savedprojects, make sure you are in the Media Room, and then do either of the following:
Note: reusing your projects is similar to express projects, except you
replace your media instead of the media placeholders. See Using an
Express Project for more information.
· click to open the explorer view and then click My Projects.
· select My Projects from the Media Content drop-down.
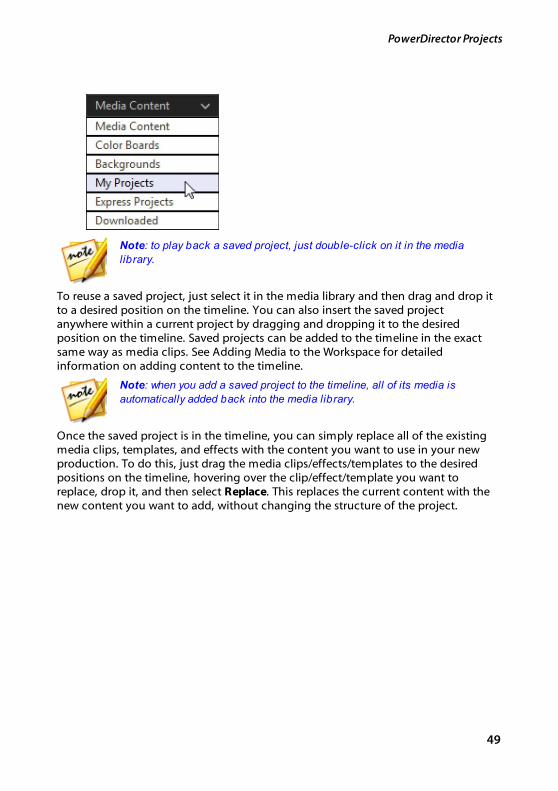
49
PowerDirector Projects
Note: to play back a saved project, just double-click on it in the media
library.
To reuse a saved project, just select it in the media library and then drag and drop itto a desired position on the timeline. You can also insert the saved projectanywhere within a current project by dragging and dropping it to the desiredposition on the timeline. Saved projects can be added to the timeline in the exactsame way as media clips. See Adding Media to the Workspace for detailedinformation on adding content to the timeline.
Note: when you add a saved project to the timeline, all of its media is
automatically added back into the media library.
Once the saved project is in the timeline, you can simply replace all of the existingmedia clips, templates, and effects with the content you want to use in your newproduction. To do this, just drag the media clips/effects/templates to the desiredpositions on the timeline, hovering over the clip/effect/template you want toreplace, drop it, and then select Replace. This replaces the current content with thenew content you want to add, without changing the structure of the project.
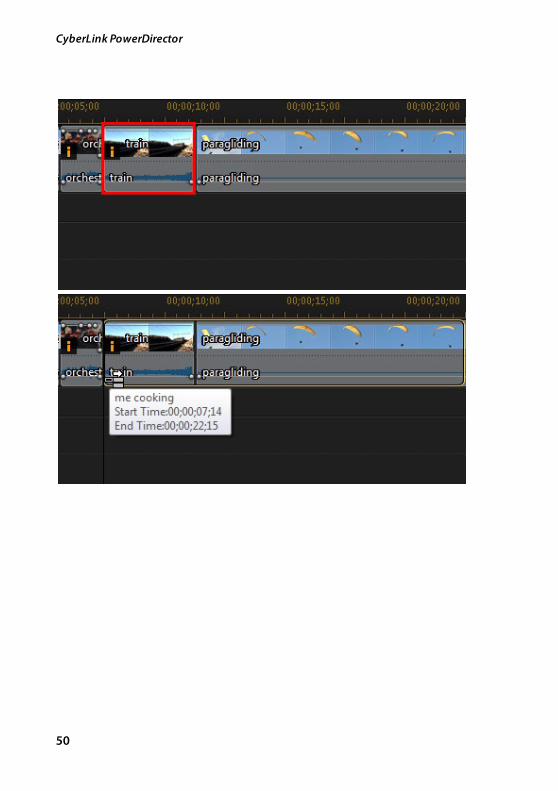
50
CyberLink PowerDirector

51
PowerDirector Projects
Note: if a media clip you are replacing is shorter than a newly added
video/audio clip, CyberLink PowerDirector automatically trims the
video/audio clip to fit the space. For all other media clips, CyberLink
PowerDirector automatically resizes them to fit the original clip's duration.
CyberLink Cloud ProjectsIf you have a CyberLink Cloud subscription you can select File > Upload Project toCyberLink Cloud to store project files on the CyberLink Cloud* service fromCyberLink.
Note: * optional feature in CyberLink PowerDirector. Check the version
table on our web site for detailed versioning information.

52
CyberLink PowerDirector
To download a project that was saved on CyberLink Cloud, including projects thatwere packed in a folder with their media (materials), select Download Project fromCyberLink Cloud from the File menu. In the window that displays, select a projectand then click Download.
Note: when you open a packed project stored on CyberLink Cloud, the
project file and all the project media is downloaded to your local computer
and stored in the download folder specified in CyberLink Cloud
Preferences.
53
Importing Media into PowerDirector
Importing Media intoPowerDirector
Chapter 5:
You can import media in a wide variety of formats into CyberLink PowerDirector, inmany different ways. Whether you need to capture media from external sources,import media that is already on your computer's hard drive, or download it fromthe Internet. CyberLink PowerDirector makes it easy to get all your media into theprogram quickly, so you can start working on your video production.
Note: media you import is saved in the current CyberLink PowerDirector
project you are working on. If you create a new project, you will be asked if
you want to merge the media in your library into the new project. You can
also select File > New Workspace to create a new project, while
maintaining the current media in the library.
Importing Media FilesIf you already have video, audio, and image files that you want to use in yourproduction on your computer's hard drive, you can import the files directly intoCyberLink PowerDirector's media library in the Media Room. You can also importmedia files that are on a removable device.
Note: if you import media files that are on a removable device into the
media library, they will be removed if the removable device is disconnected.
For best results, it is recommended that you copy the media to your
computer's hard drive before importing.
CyberLink PowerDirector supports the following file formats:
Note: for a more complete and up-to-date list of the supported file formats,
and supported devices, please visit out web site:
http://www.cyberlink.com/products/powerdirector-ultimate/spec_en_US.html.
Image: Animated-GIF, BMP, GIF, JPEG, PNG, TIFF
3D Image Format: JPS*, MPO*
CyberLink PowerDirector also supports the import of the following camera RAWimage formats, which are then converted to JPEG once imported: ARW (SONY), CR2(Canon), DNG (Ricoh), ERF (Epson), KDC (Kodak), MRW (Konica Minolta), NEF (Nikon),
54
CyberLink PowerDirector
NRW (Nikon), ORF (OLYMPUS), PEF (Pentax), RAF (Fujifilm), RW2 (Panasonic), SR2(SONY), SRF (SONY)
Video: 3GPP2, AVI, DAT, DivX**, DV-AVI, DVR-MS*, FLV (H.264), HD MPEG-2, M2T*,MKV (H.264, H.265), MOD*, MOV, MOV (H.264), MP4, MPEG-1*, MPEG-2*, MPEG-4AVC (H.264)*, MPEG-4 HEVC (H.265)*, MTS*, TOD*, VOB*, VRO*, WMV, WMV-HD,WTV*, XAVC S*
Note: ** to enable, you must download the DivX codec online. Available on
Windows 32bit only.
3D Video Format: Dual-stream AVI, MVC*, Side-by-Side Video*, Over/Under Video
Audio: ALAC, M4A, MP3, OGG, WAV, WMA
Note: * optional feature in CyberLink PowerDirector. Check the version
table on our web site for detailed versioning information.
To import media into CyberLink PowerDirector, click and then select one of thefollowing options:
· Import Media Files: import media files individually.
· Import a Media Folder: import the entire contents of a folder that contains themedia files you want to use in your current project.
Note: you can also drag and drop media onto the CyberLink PowerDirector
window to import it into the program.
3D MediaCyberLink PowerDirector supports various 3D* video and image formats. You canuse 3D media to create both 3D videos, and standard 2D video productions. All 3Dmedia in the library is indicated by a 3D icon in the top left of its thumbnail.
Note: click the button to enable 3D mode to view the 3D content during
the editing process. For more information on enabling 3D mode and
configuring your 3D display settings, see Previewing in 3D Mode. * Optional
feature in CyberLink PowerDirector. Check the version table on our web
site for detailed versioning information.
You can use and arrange 3D video clips and images in your video productions thesame way you use 2D media. However, note that if you want to create a 3D video
55
Importing Media into PowerDirector
production, any 2D media in your project must be converted to 3D beforeproduction. See PowerTools: 2D to 3D for more information.
Setting 3D Source Format
When 3D media is imported into the media library, you may need to set the formatof the 3D source video. This is because 3D media comes in a variety of differentvideo source formats. CyberLink PowerDirector needs to know the source format ofeach 3D media file so that it can display it properly in 3D.
Note: if you want to use 3D video clips and images in a 2D video
production, you still need to set the correct 3D source format to ensure the
media displays properly in 2D. CyberLink PowerDirector will incorporate the
specified eye frames into your 2D video.
To set the 3D source format of your 3D media, do this:
1. Right-click on a 3D media file in the media library and then select Set 3DSource Format. If the media file is on the timeline, right-click on it, select SetClip Attributes, and then Set 3D Source Format. The Set 3D Source Formatwindow displays.
2. Select the 3D source format by selecting one of the following:
· Auto Detect 3D Source Format: if you are not sure what the source format isof your 3D video, click this button to have CyberLink PowerDirectorautomatically detect and set it for you.
· 2D: select this option if the selected media file is actually 2D content.
· Side by side format: select this option if the 3D content has two differentimages side by side. CyberLink PowerDirector merges the two images toproduce the 3D effect.
· Over/Under format: select this option if the 3D content has two differentvideo images, one on top of the other. CyberLink PowerDirector merges thetwo images to produce the 3D effect.
· Multiview video coding: select this option if the 3D content is in the MVCvideo format (.mts or .m2ts file format).
· Dual view format: select this option if the 3D content is in the dual viewsource format (.avi file format).
56
CyberLink PowerDirector
3. From the drop-down available, Specify whether to display the left or right eyeframe first. Use this feature if while editing or playing back 3D content youbegin to feel uncomfortable or uneasy. This may be because the layout of the3D image is displayed differently than most standard content. If this occurs,try selecting the opposite eye view. This switches the way the 3D content isdisplayed on your display device, and may reduce the discomfort.
4. Click OK to set your changes to the selected media file.
The Difference Between 3D and 3D-LikeEffects
In supported versions of CyberLink PowerDirector, there are both 3D effects* andeffects that have "3D-Like" properties.
Like 3D media that can be imported into the library, 3D effects* are composed oftwo images from slightly different perspectives. 3D effects have one image for theleft eye, and one image for the right eye. When these images are viewed togetherwith compatible 3D hardware and software, they produce an effect that gives theperception of depth. In supported versions of CyberLink PowerDirector, you canenable this type of 3D effect for PiP media, particle effects, title effects, and on discmenus. The video effects and transitions indicated with the 3D icon on theirthumbnail, also have these 3D effect properties when viewed and included in 3Dvideo productions.
Some title effects, transitions, and other features in CyberLink PowerDirector have3D-Like properties. Available in all versions of the program, these effects are simply3D animations that only consist of one image. 3D-Like effects do not produce a 3Ddepth effect when viewed in 3D mode.
Note: * optional feature in CyberLink PowerDirector. Check the version
table on our web site for detailed versioning information.
Importing PowerDirector ProjectsCyberLink PowerDirector projects (.pds files) you worked on and saved previouslycan be imported and then directly inserted into your video production's timeline.
To do this, select File > Insert Project from the menu. All of the media in theoriginal project will be imported into the current project's media library, and alsoinserted at the current position of the timeline slider.
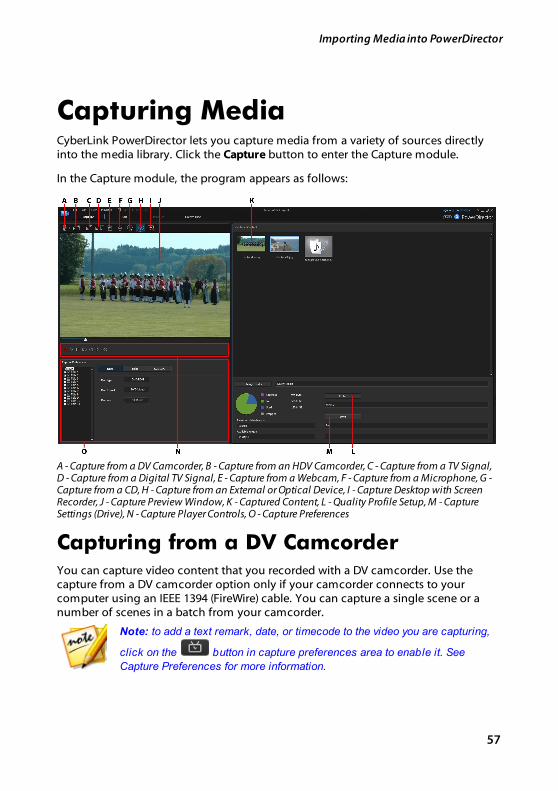
57
Importing Media into PowerDirector
Capturing MediaCyberLink PowerDirector lets you capture media from a variety of sources directlyinto the media library. Click the Capture button to enter the Capture module.
In the Capture module, the program appears as follows:
A - Capture from a DV Camcorder, B - Capture from an HDV Camcorder, C - Capture from a TV Signal,D - Capture from a Digital TV Signal, E - Capture from a Webcam, F - Capture from a Microphone, G -Capture from a CD, H - Capture from an External or Optical Device, I - Capture Desktop with ScreenRecorder, J - Capture Preview Window, K - Captured Content, L - Quality Profile Setup, M - CaptureSettings (Drive), N - Capture Player Controls, O - Capture Preferences
Capturing from a DV CamcorderYou can capture video content that you recorded with a DV camcorder. Use thecapture from a DV camcorder option only if your camcorder connects to yourcomputer using an IEEE 1394 (FireWire) cable. You can capture a single scene or anumber of scenes in a batch from your camcorder.
Note: to add a text remark, date, or timecode to the video you are capturing,
click on the button in capture preferences area to enable it. See
Capture Preferences for more information.
58
CyberLink PowerDirector
If your DV camcorder connects to your computer via a USB connection, just importthe video files directly from your camcorder, as if it was another hard drive on yourcomputer. See Importing Media for information on importing video files onto yourcomputer.
Capturing a Single Scene
You can capture a single segment of video from your camcorder using the captureplayer controls (record, stop, fast forward, rewind, etc.) underneath the capturepreview window. This function is particularly useful, for example, if you want toacquire a long video segment in its entirety without skipping over sections.
DV Backup
The DV Backup* feature lets you back up the digital video from your DV camcorderdirectly to DVD using CyberLink PowerDirector.
Insert a blank DVD disc into your disc drive and then click the button to beginbacking up your video.
Note: this feature requires a DVD burner. * Optional feature in CyberLink
PowerDirector. Check the version table on our web site for detailed
versioning information.
Batch Capture from a DV Camcorder
With Batch Capture, CyberLink PowerDirector scans your DV camcorder for intervalsor scenes (or allows you to set them manually) on the tape, and then captures thesescenes as separate video files and imports each of them into the program.
Automatic Batch Capture
If you want CyberLink PowerDirector to auto capture and import each of the
intervals/scenes on your DV camcorder, click the button on the DVCamcorder tab.
59
Importing Media into PowerDirector
An interval/scene is the content you recorded each time you pressed record andthen stop during the video shooting process. For help on using this function, usethe tips on the user interface.
Manual Batch Capture
Using manual batch capture* gives you more control over the capturing processand ensures that the scenes you want to include are captured. Manual batchcapture is recommended when you know which scenes you want to capture andhave a good idea where they are located on the tape.
Click the button to access the manual batch capture feature. For help onusing this function, use the helpful tips on the user interface.
Note: * optional feature in CyberLink PowerDirector. Check the version
table on our web site for detailed versioning information.
Capturing from an HDV CamcorderYou can capture video footage you shot with an HDV* camcorder. Use the capturefrom an HDV camcorder option only if your camcorder connects to your computerusing an IEEE 1394 (FireWire) cable. To a capture scene from your HDV camcorder,use the capture player controls (record, stop, fast forward, rewind, etc.) underneaththe capture preview window.
If your HDV camcorder connects to your computer via a USB connection, justimport the video files directly from your camcorder, as if it was another hard driveon your computer. See Importing Media for information on importing video filesonto your computer.
Note: * optional feature in CyberLink PowerDirector. Check the version
table on our web site for detailed versioning information.
Capturing from a TV SignalIf your computer has a TV* tuner card installed and you want to capture segmentsfrom your favorite programs, select this option. To capture, use the capture playercontrols (record, stop, change channel, etc.) underneath the capture previewwindow.
60
CyberLink PowerDirector
Note: * optional feature in CyberLink PowerDirector. Check the version
table on our web site for detailed versioning information.
Capturing from a Digital TV SignalIf your computer has a TV tuner card installed that receives a digital* TV signal andyou want to capture segments from your favorite programs, select this option. Tocapture, use the capture player controls (record, stop, change channel, etc.)underneath the capture preview window.
Note: this feature is not available in all regions. * Optional feature in
CyberLink PowerDirector. Check the version table on our web site for
detailed versioning information.
Capturing from a WebcamYou can record live content with a webcam that is attached to your computer andthen import it directly into your CyberLink PowerDirector media library. To capture,use the capture player controls (record, stop, etc.) underneath the capture previewwindow.
Capturing from a MicrophoneSelect this option to record audio with a microphone that is attached to yourcomputer. To capture, use the capture player controls (record, stop, etc.)underneath the capture preview window.
Capturing from a CDUse this option to rip your favorite music, or other audio, from an audio CD. Tocapture, use the capture player controls (record, play, stop, next/previous track, etc.)underneath the capture preview window.
Capturing from an AVCHD CamcorderYou can capture video content that is on an external device, such as an AVCHDcamcorder. Use the capture from an AVCHD camcorder option only if yourcamcorder connects to your computer using an IEEE 1394 (FireWire) cable. To acapture scene from your AVCHD camcorder, use the capture player controls(record, stop, etc.) underneath the capture preview window.
61
Importing Media into PowerDirector
If your AVCHD camcorder connects to your computer via a USB connection, justimport the video files directly from your camcorder, as if it was another hard driveon your computer. See Importing Media for information on importing video filesonto your computer.
Note: * optional feature in CyberLink PowerDirector. Check the version
table on our web site for detailed versioning information.
Capturing from an Optical DeviceYou can capture content from an optical device, such as video scenes from a DVD.To capture, use the capture player controls (record, play, stop, next/previous frame,etc.) underneath the capture preview window. You can also use the DVD discstructure tree to quickly select the titles and chapters you want to capture.
Note: some DVDs are protected by technology that does not allow you to
capture the content they contain. * Optional feature in CyberLink
PowerDirector. Check the version table on our web site for detailed
versioning information.
Capture Desktop with Screen RecorderCyberLink PowerDirector's Screen Recorder lets you capture a video of your mousemovements on your computer's desktop. See Recording Your Desktop with theScreen Recorder for a detailed description of this feature.
Captured ContentAll of the media you capture in the capture window is displayed in the CapturedContent area. When you return to the Edit module, all of the media is automaticallyimported into your media library.
In the Captured Content area you can right-click on media to perform a number ofoptions, including detecting scenes in video clips and deleting unwanted contentso that it won't import into the Edit module.
The content captured in CyberLink PowerDirector is stored in the folder notedunderneath the Captured Content area. If you want to store it in a different location,click the Change Folder button and select a different folder.
62
CyberLink PowerDirector
Quality Profile SetupTo set the file format and quality of the media you capture, click the Profile button.If this button is grayed out, that means that the original format and quality of themedia is maintained, as set on the original media device (camcorder, etc.).
The profile settings that are available depend on the capture device connected andthe capture mode you have selected.
Capture SettingsUse the Settings button to configure the set up of your selected capture device. Thecapture settings that are available depend on the capture device connected and thecapture mode you have selected.
Note: when capturing from a DVD, this button reads Drive, allowing you to
select the specific disc drive you want to capture from.
Capture PreferencesBefore capturing media, you can set the preferences for your captured content. Thecapture preferences that are available, depend on the content you are capturing.
Set the capture preferences as follows:
· to set a maximum capture length, select Time limit and then enter a time inthe timecode box.
· to set a maximum captured file size, select Size limit and then enter a sizelimit (in MB).
· to add a text remark, date stamp, or time stamp to the video being captured,
click on the button. In the Add Text Overlay window, select which typeand display format of text overlay you want to include on your recorded videoon the Text tab. Select the Format tab to set the font and text position for thetext.
· to take a still photo of a frame of video for use in your project, just click on
at the point where you want to take the snapshot. The image is saved tothe Captured content area. You can specify your preferred snapshot image fileformat in preferences. See File Preferences for detailed information.
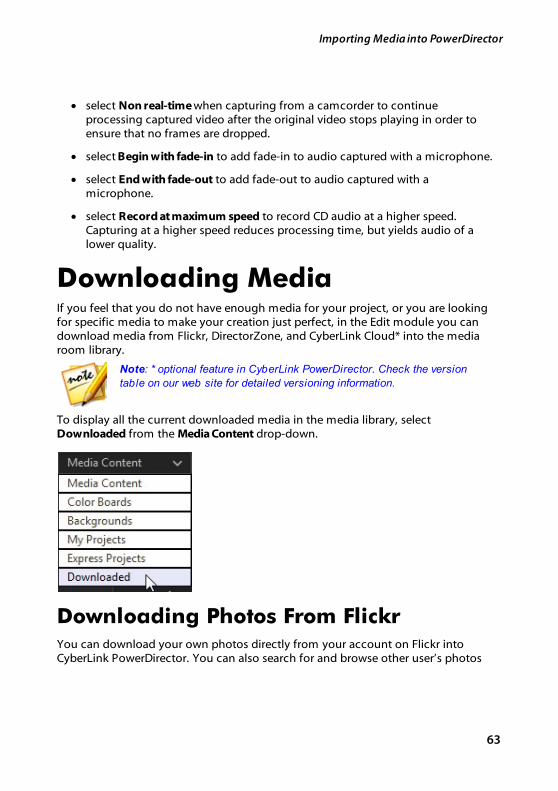
63
Importing Media into PowerDirector
· select Non real-time when capturing from a camcorder to continueprocessing captured video after the original video stops playing in order toensure that no frames are dropped.
· select Begin with fade-in to add fade-in to audio captured with a microphone.
· select End with fade-out to add fade-out to audio captured with amicrophone.
· select Record at maximum speed to record CD audio at a higher speed.Capturing at a higher speed reduces processing time, but yields audio of alower quality.
Downloading MediaIf you feel that you do not have enough media for your project, or you are lookingfor specific media to make your creation just perfect, in the Edit module you candownload media from Flickr, DirectorZone, and CyberLink Cloud* into the mediaroom library.
Note: * optional feature in CyberLink PowerDirector. Check the version
table on our web site for detailed versioning information.
To display all the current downloaded media in the media library, select Downloaded from the Media Content drop-down.
Downloading Photos From FlickrYou can download your own photos directly from your account on Flickr intoCyberLink PowerDirector. You can also search for and browse other user’s photos
64
CyberLink PowerDirector
from within CyberLink PowerDirector, and then import them into your medialibrary for use in a project.
To download photos from Flickr, do this:
1. Click on and then select Download Photos from Flickr.
2. Follow the steps in the wizard window to authorize CyberLink PowerDirectorto use your Flickr account and accept the Terms of Use from Flickr.
Note: having a Flickr account is not required to search for, browse, and
download photos from Flickr.
3. Select from the drop-down whether to search for photos from:
· My Photos on Flickr: this option displays thumbnails of all the photos youhave uploaded to your Flickr account.
· My Contacts' Photos: this option displays thumbnails of all the photos yourFlickr contacts have uploaded to Flickr.
· Search for Photos on Flickr: select this option to perform a search for photoson Flickr.
Note: use the drop-down filter menu at the top of the search window to sort
the photos.
4. Select all of the photos that you want to import into your media library andthen click on the Download button.
Note: you cannot use the photos downloaded into your media library for
commercial use. Click on the button underneath a photo thumbnail to
view its copyright information.
Downloading Content fromDirectorZone/CyberLink CloudYou can download templates and effects created by CyberLink and otherPowerDirector users from DirectorZone. Users that have a CyberLink Cloudsubscription can also download any effects and templates you backed up onCyberLink Cloud*.
65
Importing Media into PowerDirector
Note: * optional feature in CyberLink PowerDirector. Check the version
table on our web site for detailed versioning information.
Downloading Effects and Templates fromDirectorZone
If you are looking for additional PiP objects, paint animation objects, title effects,particle effects, or disc menu templates for your library, you can click DownloadTemplates to download them directly from the DirectorZone web site in to the PiPObjects Room, Particle Room, Title Room, or Create Disc module.
When in the Edit module's Media Room, you can download sound clips into the
media library. To do this, click on and then select Download Sound Clips fromDirectorZone.
Visit the DirectorZone web site for more information: www.directorzone.com.
My DirectorZone Templates
In the My DirectorZone window you can conveniently download your custom PiPobject, paint animation object, title effect, particle effect, and disc menu templatesthat you previously uploaded to DirectorZone. You can also access and downloadtemplates from your DirectorZone download history and also your favoritetemplates.
To download My DirectorZone templates, do this:
1. Click in the PiP Objects Room, Particle Room, Title Room, or Create Discmodule.
2. Click the My DirectorZone tab.
3. Filter the templates by My Uploads, Download History, or My Favorites, orenter a search keyword in the field provided.
4. Select all of the templates you want to download.
5. Click Download to download them to your computer and import them intothe library.
66
CyberLink PowerDirector
Downloading Effects and Templates fromCyberLink Cloud
If you have a CyberLink Cloud subscription you can download the PiP object, paintanimation, title effect, particle effect, and disc menu templates you previouslybacked up to CyberLink Cloud. Once downloaded, these templates are stored in thedownload folder specified in CyberLink Cloud Preferences, and imported into yourmedia library.
To download template from CyberLink Cloud, do this:
1. Click in the PiP Objects Room, Particle Room, Title Room, or Create Discmodule.
2. Click the My CyberLink Cloud tab.
3. Filter the templates by selecting a collection from the drop-down, or enter asearch keyword in the field provided.
4. Select all of the templates you want to download.
5. Click Download to download them to your computer and import them intothe library.
Detecting Scenes and ExtractingAudioTo assist with the editing process, CyberLink PowerDirector can detect scenes inyour video clips or extract the audio from them. These new clips are displayed,separately from the original clips, in the media library.
Detecting Scenes in a Video ClipThe scene detection function automatically creates individual clips based on theindividual scenes (or pre-edited shots) contained within a video clip. Detectedscenes are not split from the original clip, but can be added to the workspace likeany other media clip.
67
Importing Media into PowerDirector
Note: depending on the file format, scene detection on certain clips may not
work as precisely as it does for others. You may need to split the scenes
manually in the Scene Detection window.
To detect the scenes in a video clip, do this:
1. Right-click on it in either the Captured Content area (Capture window), or inthe media library, and then select Detect Scenes.
2. The scenes in the video clip are automatically detected and then displayed inthe Scenes panel.
3. Once you are done detecting the scenes in the video clip, click OK. Thedetected clips are displayed in a sub folder under the original video clip.
When using scene detection, please note:
· if required, use the Sensitivity slider to increase or decrease scene detectionsensitivity. Doing this may yield an increased or decreased number of scenesthat are detected. Click Detect to redetect the scenes in the video clip. You areasked to confirm the clearing of the previously detected clips and then theupdated scenes are detected and displayed in the Scenes panel.
· click on the button to configure the Advanced Scene Detection Settings. Ifthe selected video clip is a DV-AVI file, you have the option to Detect bychange of video frame (used on all other file formats) or Detect by change oftimecodes (i.e.: timecodes are automatically set when you start and stoprecording). Select the Disable preview during detection option to speed upthe detection process if you find your computer runs slow during theprocess.
· to stop the scene detection process before completion, click the stop buttonon the playback controls.
· to detect scenes manually, drag the slider (in Clip mode) to the beginning of
each new scene and then click .
· to preview a detected scene, just select it in the Scenes panel (ensure Segmentis selected) and then click the play button.
· to view all the detected scene markers on the clip timeline, ensure that Clip isselected.
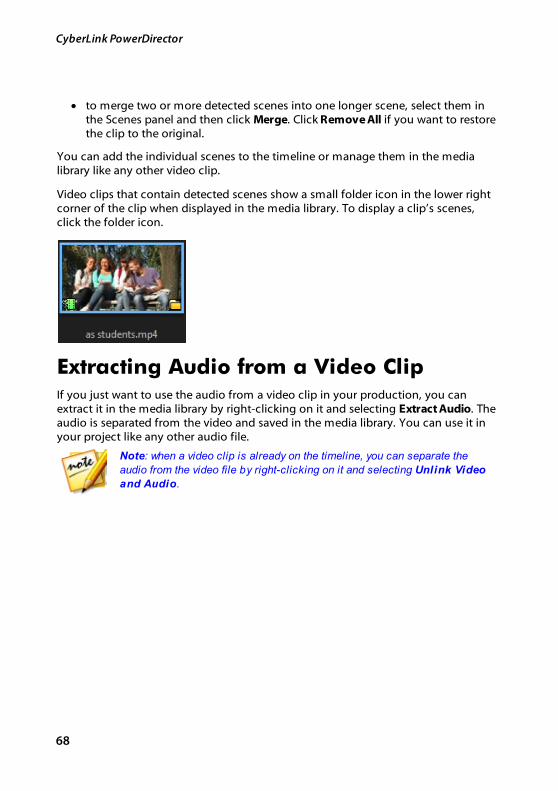
68
CyberLink PowerDirector
· to merge two or more detected scenes into one longer scene, select them inthe Scenes panel and then click Merge. Click Remove All if you want to restorethe clip to the original.
You can add the individual scenes to the timeline or manage them in the medialibrary like any other video clip.
Video clips that contain detected scenes show a small folder icon in the lower rightcorner of the clip when displayed in the media library. To display a clip’s scenes,click the folder icon.
Extracting Audio from a Video ClipIf you just want to use the audio from a video clip in your production, you canextract it in the media library by right-clicking on it and selecting Extract Audio. Theaudio is separated from the video and saved in the media library. You can use it inyour project like any other audio file.
Note: when a video clip is already on the timeline, you can separate the
audio from the video file by right-clicking on it and selecting Unlink Video
and Audio.
69
PowerDirector Plug-ins
PowerDirector Plug-ins
Chapter 6:
CyberLink PowerDirector includes a number of plug-ins that can help you create
video content for your production. Click the button above the Media Roomlibrary in the Edit module to view the available PowerDirector plug-ins. See thefollowing sections for detailed information:
· Using the MultiCam Designer*
· Using the Theme Designer*
· Editing Video in the Action Camera Center
· Using an Express Project
· Recording Your Desktop with the Screen Recorder
Note: * optional feature in CyberLink PowerDirector. Check the version
table on our web site for detailed versioning information.
Using the MultiCam DesignerThe MultiCam Designer lets you seamlessly edit footage from multiple cameras,simulating the use of a live camera switcher. The MultiCam Designer* createsprofessional-looking edited content for use in your CyberLink PowerDirectorprojects.
Note: * optional feature in CyberLink PowerDirector. Check the version
table on our web site for detailed versioning information.
To open the MultiCam Designer click the button and then select MultiCamDesigner.
Note: when entering the MultiCam Designer, any selected video files are
automatically imported into the available camera (video source) areas.
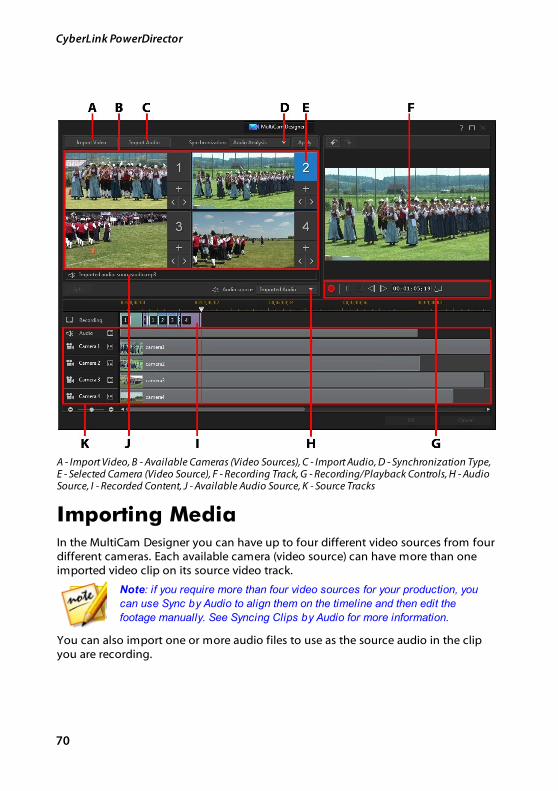
70
CyberLink PowerDirector
A - Import Video, B - Available Cameras (Video Sources), C - Import Audio, D - Synchronization Type,E - Selected Camera (Video Source), F - Recording Track, G - Recording/Playback Controls, H - AudioSource, I - Recorded Content, J - Available Audio Source, K - Source Tracks
Importing MediaIn the MultiCam Designer you can have up to four different video sources from fourdifferent cameras. Each available camera (video source) can have more than oneimported video clip on its source video track.
Note: if you require more than four video sources for your production, you
can use Sync by Audio to align them on the timeline and then edit the
footage manually. See Syncing Clips by Audio for more information.
You can also import one or more audio files to use as the source audio in the clipyou are recording.
71
PowerDirector Plug-ins
Importing Video Clips
When you enter the MultiCam Designer, any video clips that were selected in themedia library are automatically imported into the empty camera (video source)areas and the corresponding source video tracks.
If no clips were selected, you are prompted to select clips from your hard drive forimport. You can select multiple video clips for import. Each selected clip is placedin the next available camera area. Once all the camera areas are full, the next clip isimported into the first camera area, after (on the corresponding source video track)the previously imported clip.
To import additional video clips, do either of the following:
· click the Import Video button and then Import From Hard Drive to importvideo clips from your computer's hard drive, or Import From Media Room toimport clips from the existing media in the Media Room library. Select one ormore clips and then click Open. The clips are placed in the next availablecamera areas and the corresponding source video tracks.
Note: once all the available camera areas are full, the next clip is imported
into the first camera area, after (on the corresponding source video track)
the previously imported clip.
· to import video clips into a specific camera (video source) area, click the
corresponding button. Next, select Import From Hard Drive to importvideo clips from your computer's hard drive, or Import From Media Room toimport clips from the existing media in the Media Room library. Select one ormore clips and then click Open. The clips are placed in the camera area andthe corresponding source video tracks.
Source Video Tracks
All of the imported video clips are imported into the corresponding source videotracks. You can move the video clips to different locations on the video tracks, oreven drag them to different tracks. You can also reorder the video clips on a source
track by clicking the button next to the track and then using the and
buttons to reorder them as required.
72
CyberLink PowerDirector
To remove a video clip from a source video track, click next to the track, select
the check box next to the clip you want to remove, and then click . To add
additional video clips to the source track, click the button.
Importing Audio Clips
If you want to use an audio clip as the audio source in your recording instead of theaudio of the imported video clips, you can import it separately into the MultiCamDesigner.
To import audio clips, click the Import Audio button and then Import From HardDrive to import audio clips from your computer's hard drive, or Import FromMedia Room to import clips from the existing media in the Media Room library.Select one or more clips and then click Open. The clips are placed on the sourceaudio track in the timeline.
Source Audio Track
All of the imported audio clips are imported into the source audio track. You canmove the audio clips to different locations on the audio track. You can also reorder
the audio clips on the source track by clicking the button next to the track and
then using the and buttons to reorder them as required.
To remove an audio clip from the source track, click next to the track, select the
check box next to the clip you want to remove, and then click . To add
additional audio clips to the source track, click the button.
Synchronizing ClipsOnce you have imported all of the media clips into the MultiCam Designer that youwant to use in your recording, the next step is to synchronize them.
To synchronize the clips in the MultiCam Designer, do this:
1. Select the Audio source for your recording from the drop-down. You can usethe audio of any of the imported video clips or select Imported Audio to usethe audio that was imported on to the source audio track.
2. In the Synchronization drop-down, select one of the following:
73
PowerDirector Plug-ins
· Manual: select this option if you want to manually adjust the starting positionof each clip on the source tracks. You can do this by clicking and draggingthe clips on the source track to a new position.
Note: you can also click the button in the camera area to manually
move the clip on the source track back one frame. Click to move it
forward one frame.
· Timecodes: select this option and then click Apply if you want the MultiCamDesigner to synchronize using the video clip's timecodes. The MultiCamDesigner will auto adjust the clips on the source tracks.
Note: this option can only be used if the video clips were recorded with a
DV or HDV camera that imprinted the timecode information in the clips and
were captured by CyberLink PowerDirector.
· File Created Time: select this option and then click Apply to use the date andtime the file was created as the synchronization points. The MultiCamDesigner will auto adjust the clips on the source tracks.
· Audio Analysis: select this option and then click Apply if you want theMultiCam Designer to analyze the audio and then sync the files based on theaudio in them. The MultiCam Designer will auto adjust the clips on the sourcetracks.
· Markers on Clips: select this option and then use the playback controls to findthe synchronization points in each clip. Once you find a point, right click onthe source track and then select Set Marker. Once you have manually addedall the markers, click the Apply button. The MultiCam Designer will adjust theclips on the source tracks.
Creating Recorded ContentOnce you have imported and then synchronized all the media clips in the MultiCamDesigner, you are ready to record your video. The recorded video is placed on therecording track and then is imported into the Edit module's timeline once you click OK.
To record your content, do this:
1. Select the camera (video source) you want to start off the recording with. Youcan do this by simply clicking on the camera preview area.

74
CyberLink PowerDirector
2. If required, click on in the recording controls to set the preview windowresolution. Select the Create Shadow File for HD Video option to also create ashadow file for the recorded file. This can help speed up editing when usinghigh definition files in your production.
3. When you are ready, click to begin recording. The MultiCam Designer willstart recording, adding the current selected camera footage as recordedcontent on the recording track.
4. As required during the recording process, click another camera (video source)or use keyboard hotkeys 1-4 to switch the recording to that source's content.
5. Continue switching the camera (video source) as required, creating yourrecorded content on the recording track.
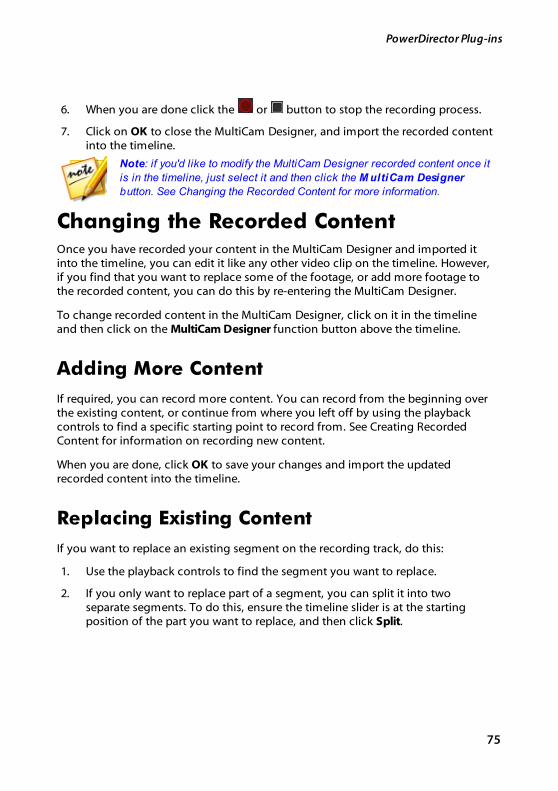
75
PowerDirector Plug-ins
6. When you are done click the or button to stop the recording process.
7. Click on OK to close the MultiCam Designer, and import the recorded contentinto the timeline.
Note: if you'd like to modify the MultiCam Designer recorded content once it
is in the timeline, just select it and then click the M ultiCam Designer
button. See Changing the Recorded Content for more information.
Changing the Recorded ContentOnce you have recorded your content in the MultiCam Designer and imported itinto the timeline, you can edit it like any other video clip on the timeline. However,if you find that you want to replace some of the footage, or add more footage tothe recorded content, you can do this by re-entering the MultiCam Designer.
To change recorded content in the MultiCam Designer, click on it in the timelineand then click on the MultiCam Designer function button above the timeline.
Adding More Content
If required, you can record more content. You can record from the beginning overthe existing content, or continue from where you left off by using the playbackcontrols to find a specific starting point to record from. See Creating RecordedContent for information on recording new content.
When you are done, click OK to save your changes and import the updatedrecorded content into the timeline.
Replacing Existing Content
If you want to replace an existing segment on the recording track, do this:
1. Use the playback controls to find the segment you want to replace.
2. If you only want to replace part of a segment, you can split it into twoseparate segments. To do this, ensure the timeline slider is at the startingposition of the part you want to replace, and then click Split.
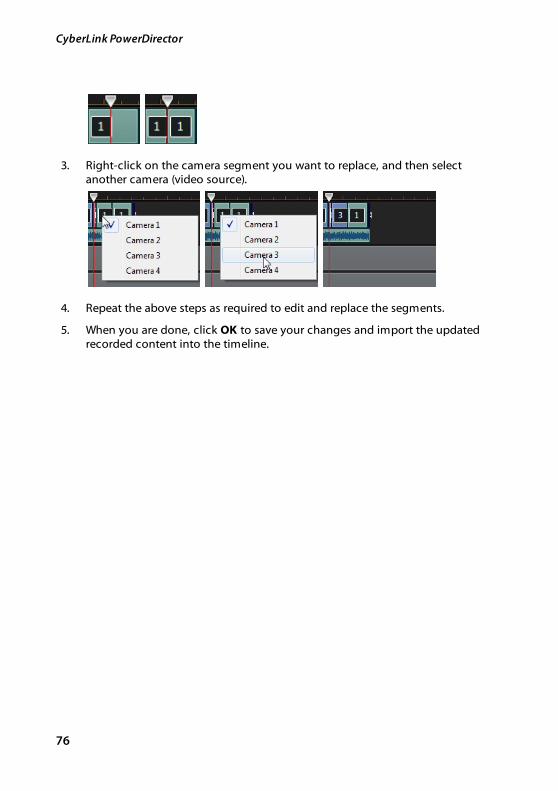
76
CyberLink PowerDirector
3. Right-click on the camera segment you want to replace, and then selectanother camera (video source).
4. Repeat the above steps as required to edit and replace the segments.
5. When you are done, click OK to save your changes and import the updatedrecorded content into the timeline.
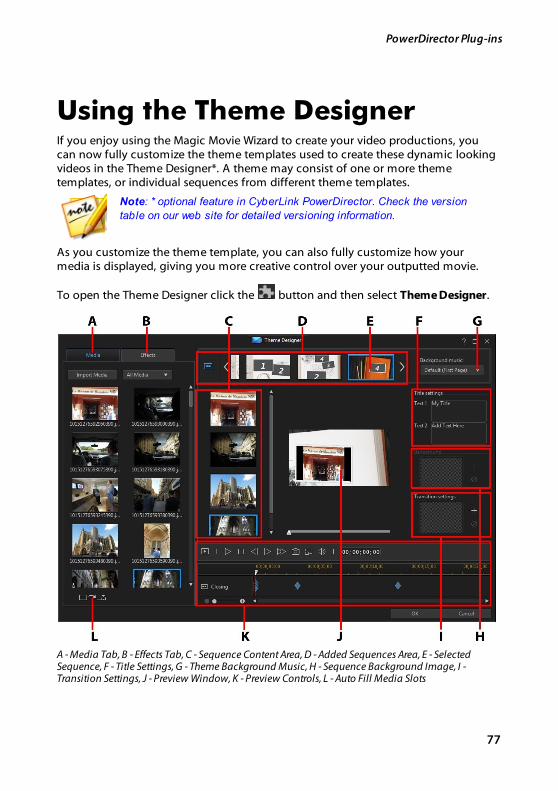
77
PowerDirector Plug-ins
Using the Theme DesignerIf you enjoy using the Magic Movie Wizard to create your video productions, youcan now fully customize the theme templates used to create these dynamic lookingvideos in the Theme Designer*. A theme may consist of one or more themetemplates, or individual sequences from different theme templates.
Note: * optional feature in CyberLink PowerDirector. Check the version
table on our web site for detailed versioning information.
As you customize the theme template, you can also fully customize how yourmedia is displayed, giving you more creative control over your outputted movie.
To open the Theme Designer click the button and then select Theme Designer.
A - Media Tab, B - Effects Tab, C - Sequence Content Area, D - Added Sequences Area, E - SelectedSequence, F - Title Settings, G - Theme Background Music, H - Sequence Background Image, I -Transition Settings, J - Preview Window, K - Preview Controls, L - Auto Fill Media Slots
78
CyberLink PowerDirector
OverviewThemes that you edit in the Theme Designer consist of theme templates and yourmedia (images and video clips). The resulting video is similar to the movie contentcreated by the Magic Movie Wizard and Magic Style, but the Theme Designerprovides much more creative control over the outputted movie.
Theme Templates
Theme templates are used to create a video production, with a specific type oftheme or style, and can be downloaded from DirectorZone. Theme templatesconsist of a number of sequences. Each of these sequences contain elements, someof which are customizable and some of which are not.
The customizable elements include the text and media (images, videos, andbackground music) you add to each sequence. You can add effects on this mediaand set how and when it is displayed. You can also set the background image onsome sequences, and select the transition between each sequence in templatesnamed "with transitions". Non-customizable elements include any animationincluded in the sequences.
When selecting a theme template to use in the Theme Designer, you can choose toadd one or more theme templates, creating a more original production. You caneven just select some of the sequences in a theme template, or mix and match thesequences used.
There are three types of sequences: opening, middle, and closing sequences.Opening and closing sequences usually contain text, while the elements in middlesequences are much more random.
Adding Theme Templates/SequencesIn the Theme Designer you can use one or more theme templates, or just certainselected sequences, to create your video.
When you first enter the Theme Designer, you are prompted to select a themetemplate.
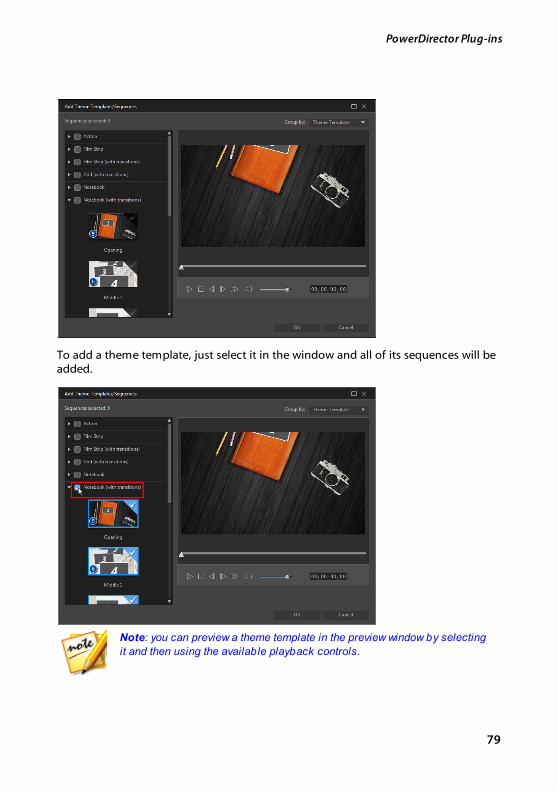
79
PowerDirector Plug-ins
To add a theme template, just select it in the window and all of its sequences will beadded.
Note: you can preview a theme template in the preview window by selecting
it and then using the available playback controls.
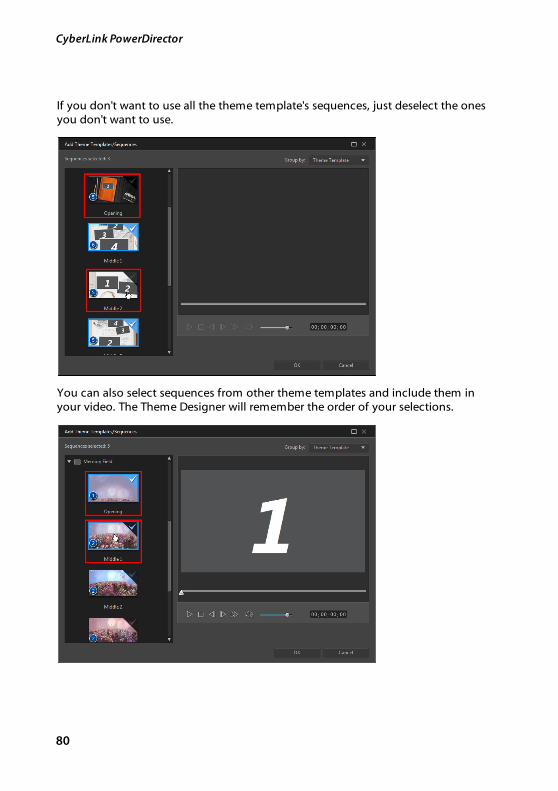
80
CyberLink PowerDirector
If you don't want to use all the theme template's sequences, just deselect the onesyou don't want to use.
You can also select sequences from other theme templates and include them inyour video. The Theme Designer will remember the order of your selections.
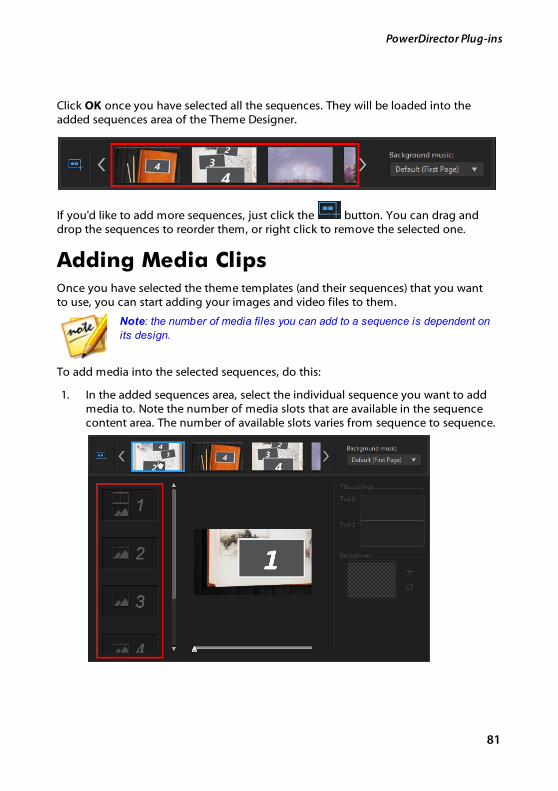
81
PowerDirector Plug-ins
Click OK once you have selected all the sequences. They will be loaded into theadded sequences area of the Theme Designer.
If you'd like to add more sequences, just click the button. You can drag anddrop the sequences to reorder them, or right click to remove the selected one.
Adding Media ClipsOnce you have selected the theme templates (and their sequences) that you wantto use, you can start adding your images and video files to them.
Note: the number of media files you can add to a sequence is dependent on
its design.
To add media into the selected sequences, do this:
1. In the added sequences area, select the individual sequence you want to addmedia to. Note the number of media slots that are available in the sequencecontent area. The number of available slots varies from sequence to sequence.
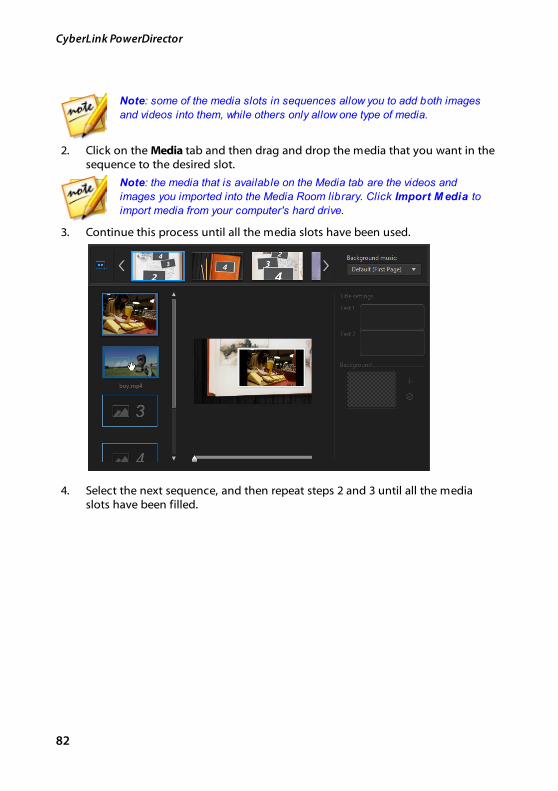
82
CyberLink PowerDirector
Note: some of the media slots in sequences allow you to add both images
and videos into them, while others only allow one type of media.
2. Click on the Media tab and then drag and drop the media that you want in thesequence to the desired slot.
Note: the media that is available on the Media tab are the videos and
images you imported into the Media Room library. Click Import M edia to
import media from your computer's hard drive.
3. Continue this process until all the media slots have been used.
4. Select the next sequence, and then repeat steps 2 and 3 until all the mediaslots have been filled.
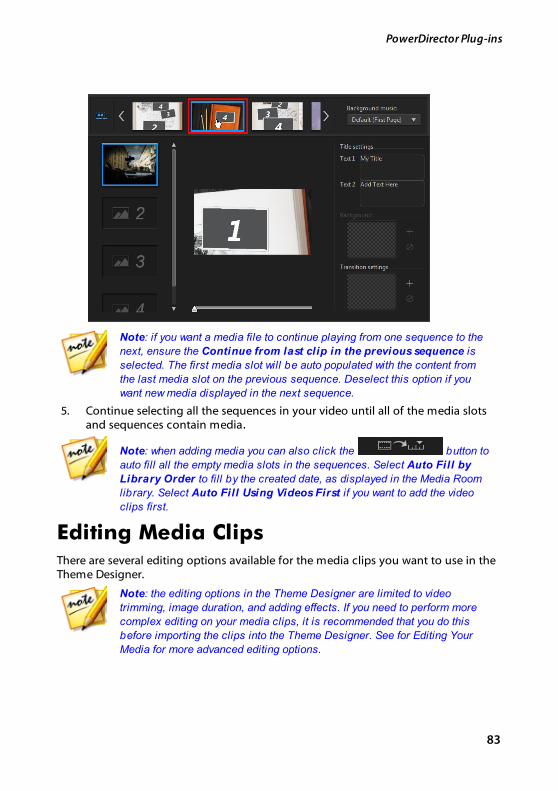
83
PowerDirector Plug-ins
Note: if you want a media file to continue playing from one sequence to the
next, ensure the Continue from last clip in the previous sequence is
selected. The first media slot will be auto populated with the content from
the last media slot on the previous sequence. Deselect this option if you
want new media displayed in the next sequence.
5. Continue selecting all the sequences in your video until all of the media slotsand sequences contain media.
Note: when adding media you can also click the button to
auto fill all the empty media slots in the sequences. Select Auto Fill by
Library Order to fill by the created date, as displayed in the Media Room
library. Select Auto Fill Using Videos First if you want to add the video
clips first.
Editing Media ClipsThere are several editing options available for the media clips you want to use in theTheme Designer.
Note: the editing options in the Theme Designer are limited to video
trimming, image duration, and adding effects. If you need to perform more
complex editing on your media clips, it is recommended that you do this
before importing the clips into the Theme Designer. See for Editing Your
Media for more advanced editing options.
84
CyberLink PowerDirector
Trimming Video Clips
You can perform trims on the video clips used in the Theme Designer. To trim avideo clip, right-click on it in the Theme Designer and then select Trim. Or hover
your mouse over the video clip and click on in its thumbnail. See Performing aSingle Trim for detailed information on trimming video clips.
Muting Video Clips
Some theme templates and sequences contain background music that will be usedin your video. Because of this, you may want to mute the audio in the importedvideo clips, so that it doesn't conflict with the background music.
To mute the audio in a video clip, hover your mouse over the video clip and then
click on in its thumbnail.
Modifying Image Duration
To modify the duration that an image clip is displayed in your outputted video, dothis:
1. Right-click on it in the Theme Designer and then select Set Duration. Or hover
your mouse over the image clip and then click on in its thumbnail.
2. In the Duration Settings window, enter in the how long you want it to displayin your video production. You can set the duration down to the number offrames.
3. Click on OK.
Applying Zoom In on Media Clips
Some media slots in sequences allow you to zoom in on the media clip that was
added to it. If a zoom is available, then the icon is displayed in the top rightcorner.
85
PowerDirector Plug-ins
To apply a zoom in on the media clip, click on the icon. Click to remove itif required.
Adding Video Effects to Clips
In the Theme Designer you can add special effects to your images and video clips.Each special effect has unique attributes that you can customize to help achieve theimpression you want in your video production.
To add a video effect to a clip, do this:
1. Click on the Effects tab.
2. Select an effect and then drag and drop it on the clip.
3. If required, right-click on the clip and then select Modify Effect Settings. Usethe available sliders and options to customize the video effect to yourpreference. Click on OK to save your changes.
See Adding Video Effects for more information on video effects.
Editing Background MusicYou can customize the music that is used in your video. To edit the backgroundmusic, select one of the following options in the Background music drop-down:
· Default (First Page): select this option to use the background music that isincluded by default in theme templates.
Note: if you select sequences from more than one theme template, the
Theme Designer uses the background music that is applied to the first
sequence in the video.
· Imported: select this option if you want to import your own custombackground music from your computer's hard drive. Select the music youwant to use and then click OK to set it as the music used.
· No Music: select this option if you don't want to have any background musicin your video.
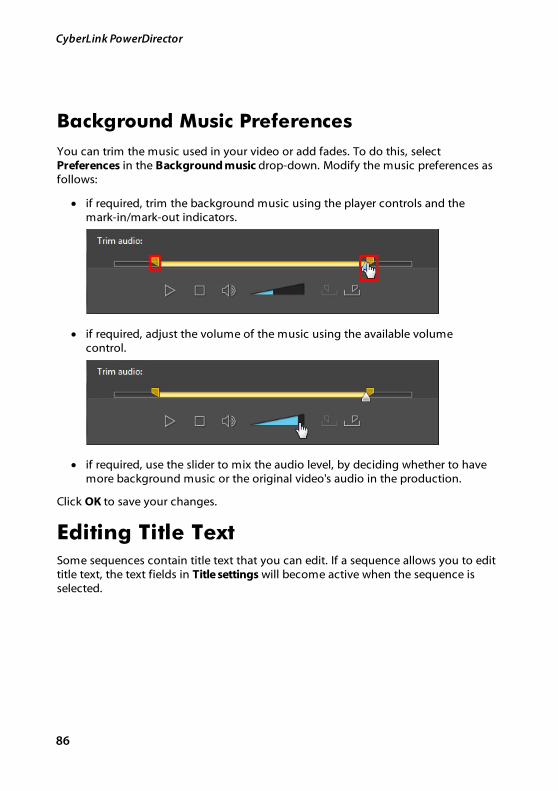
86
CyberLink PowerDirector
Background Music Preferences
You can trim the music used in your video or add fades. To do this, select Preferences in the Background music drop-down. Modify the music preferences asfollows:
· if required, trim the background music using the player controls and themark-in/mark-out indicators.
· if required, adjust the volume of the music using the available volumecontrol.
· if required, use the slider to mix the audio level, by deciding whether to havemore background music or the original video's audio in the production.
Click OK to save your changes.
Editing Title TextSome sequences contain title text that you can edit. If a sequence allows you to edittitle text, the text fields in Title settings will become active when the sequence isselected.
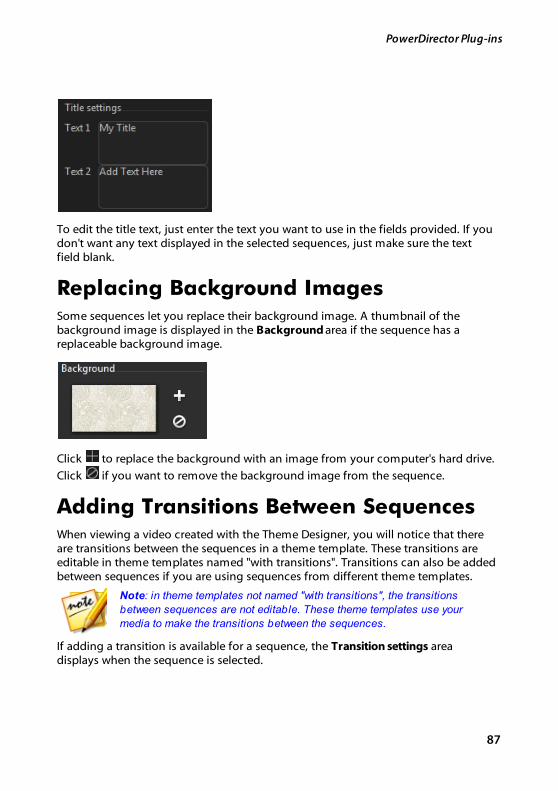
87
PowerDirector Plug-ins
To edit the title text, just enter the text you want to use in the fields provided. If youdon't want any text displayed in the selected sequences, just make sure the textfield blank.
Replacing Background ImagesSome sequences let you replace their background image. A thumbnail of thebackground image is displayed in the Background area if the sequence has areplaceable background image.
Click to replace the background with an image from your computer's hard drive.
Click if you want to remove the background image from the sequence.
Adding Transitions Between SequencesWhen viewing a video created with the Theme Designer, you will notice that thereare transitions between the sequences in a theme template. These transitions areeditable in theme templates named "with transitions". Transitions can also be addedbetween sequences if you are using sequences from different theme templates.
Note: in theme templates not named "with transitions", the transitions
between sequences are not editable. These theme templates use your
media to make the transitions between the sequences.
If adding a transition is available for a sequence, the Transition settings areadisplays when the sequence is selected.

88
CyberLink PowerDirector
Click to add a transition before the selected sequence. Click if you want toremove a selected transition from the sequence. See Using Transitions for moreinformation on transitions.
Previewing and Saving MoviesAs you are creating your video in the Theme Designer, you can preview yourcreation using the available preview controls.
Click to preview the entire movie, or to preview just the selected sequence.
Click to change the preview resolution, or to take a photo snapshot of yourmovie.
The keyframe indicators on the preview timeline indicate where the media files inthe sequence are in the movie. Hover your mouse over a keyframe to view the clipinformation.
Once you are done previewing your movie and you are satisfied with the results,click on OK to close the Theme Designer, and import the created movie into thetimeline.
Editing Created MoviesOnce you have created your content in the Theme Designer and imported it intothe timeline, you can edit it like any other video clip on the timeline. If you want to
89
PowerDirector Plug-ins
edit or replace the media used in the created movie you can do this in the ThemeDesigner.
To edit created content in the Theme Designer, do this:
1. Click on the created content in the timeline and then the Theme Designerfunction button.
2. As required, edit the video in the Theme Designer.
3. When you are satisfied, click OK to save your changes and import the updatedcreated content into the timeline.
Editing Video in the ActionCamera CenterIn the Action Camera Center* you can fix video clips or add effects that highlightthe action sequences in the video.
Note: * optional feature in CyberLink PowerDirector. Check the version
table on our web site for detailed versioning information.
To open the Action Camera Center, select a video clip in the media library, click the
button, and then select Action Camera Center.
Note: if your video clip is already on the timeline, you must select it and
then click Tools > Action Camera Center to open it in the Action Camera
Center.

90
CyberLink PowerDirector
A - Fix Video Clips, B - Add Action Effects, C - Preview Window, D - Action Camera Center Settings, E -Zoom on Timeline, F - Action Camera Center Timeline
Once in the Action Camera Center, you can:
· Fix Video Clips
· Create Action Effects
When you are done editing the video clip, click the OK button to save yourchanges. Your changes are applied to the video clip and updated on the videotimeline.
Note: to edit content created with the Action Camera Center, click on it in
the timeline and then click on the Action Camera Center function button
above the timeline. If you would like to view the individual clips created by
the Action Camera Center for editing directly in the timeline, just right-click
on the file and then select Show Individual Clips.
91
PowerDirector Plug-ins
Fixing Video ClipsWhen in the Action Camera Center, click on the Fix tab to stabilize shaky video,adjust video white balance, or add color presets. You can also use lens correction toremove fisheye distortions and vignettes.
Lens Correction
Select the Lens Correction option to import lens profiles to auto correct distortedvideos, or use the controls to manually correct them if they have a fisheyedistortion or vignette effect.
When you enter the Action Camera Center, manually select the lens profile, usingthe Maker and Model drop-downs, that matches the camera your video was shotwith. Once selected, CyberLink PowerDirector will auto correct the video.
Note: if none of the lens profiles match your camera, you can download more
from DirectorZone or manually fix the distorted video using the controls in
this window. See more details below.
Downloading Lens Profiles from DirectorZone
If your video camera's lens and profile are not available in CyberLink PowerDirector
you can click the button to download more lens profiles from DirectorZone.
Once downloaded, click the button to import it. CyberLink PowerDirectorshould auto detect the imported profile and then correct the selected video.
Fisheye Distortion
The fisheye distortion section helps correct videos that appear distorted. Draggingthe slider to the right straightens lines that bend away from the center, correctingbarrel distortions. Dragging it to the left straightens lines that bend towards thecenter, fixing pincushion distortions in videos.
92
CyberLink PowerDirector
Vignette Removal
Use the following sliders to remove an unwanted vignette effect on videos that wascaused by a camera lens or the lighting environment:
· Vignette amount: use this slider to adjust the level of vignette removal on thevideo.
· Vignette midpoint: drag the midpoint slider to the left to increase the size ofthe area (towards the center of the video) where the vignette removal isapplied. Drag it right to decrease the size, towards the corners.
Video Stabilizer
Select the Video Stabilizer option to employ motion compensation technology tocorrect shaking videos. This tool is ideal for use with videos taken without a tripodor recorded while moving.
Once enabled, drag the Strength slider to increase or decrease the level ofcorrection. Select the Fix rotational camera shake option if the clip has segmentswhere the camera rotates from side to side.
Select the Enhanced stabilizer option to improve the output quality of some videoclips. Using this feature requires more computing power, so it is recommended thatyou switch to non-real time preview or render a preview for the applied range.
White Balance
Select the White Balance option and then Color temperature to adjust the video'scolor temperature or create a specific atmosphere. Once enabled, use the slider toadjust the color of the video image. A lower value applies a colder temperature,while a higher value creates an atmosphere that is warmer. Use the Tint slider toadjust the color level of the clip.
Select the White calibration option and then click to color correct the videoimage. By indicating which portion of the video image should be white, CyberLinkPowerDirector automatically adjusts the other colors accordingly to be more vividand true.
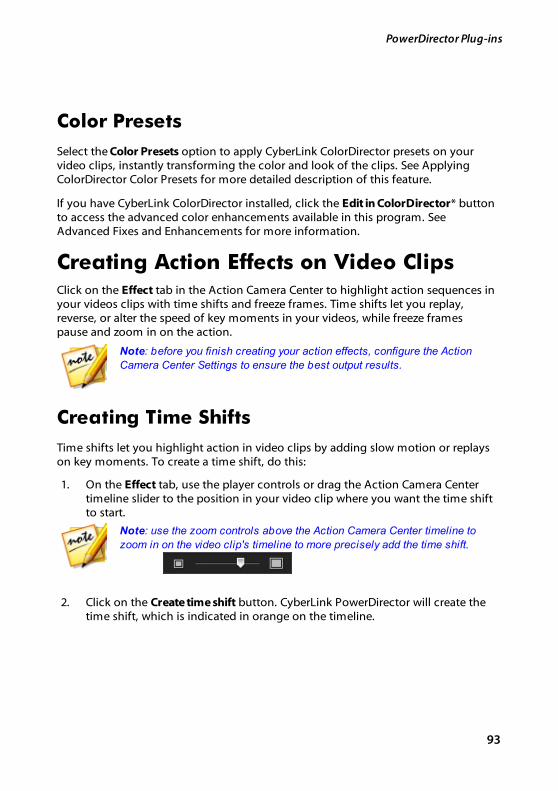
93
PowerDirector Plug-ins
Color Presets
Select the Color Presets option to apply CyberLink ColorDirector presets on yourvideo clips, instantly transforming the color and look of the clips. See ApplyingColorDirector Color Presets for more detailed description of this feature.
If you have CyberLink ColorDirector installed, click the Edit in ColorDirector* buttonto access the advanced color enhancements available in this program. See Advanced Fixes and Enhancements for more information.
Creating Action Effects on Video ClipsClick on the Effect tab in the Action Camera Center to highlight action sequences inyour videos clips with time shifts and freeze frames. Time shifts let you replay,reverse, or alter the speed of key moments in your videos, while freeze framespause and zoom in on the action.
Note: before you finish creating your action effects, configure the Action
Camera Center Settings to ensure the best output results.
Creating Time Shifts
Time shifts let you highlight action in video clips by adding slow motion or replayson key moments. To create a time shift, do this:
1. On the Effect tab, use the player controls or drag the Action Camera Centertimeline slider to the position in your video clip where you want the time shiftto start.
Note: use the zoom controls above the Action Camera Center timeline to
zoom in on the video clip's timeline to more precisely add the time shift.
2. Click on the Create time shift button. CyberLink PowerDirector will create thetime shift, which is indicated in orange on the timeline.
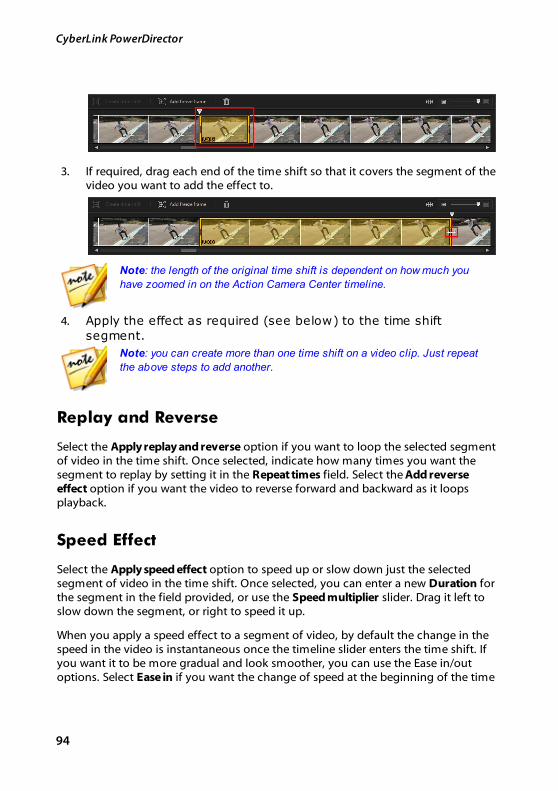
94
CyberLink PowerDirector
3. If required, drag each end of the time shift so that it covers the segment of thevideo you want to add the effect to.
Note: the length of the original time shift is dependent on how much you
have zoomed in on the Action Camera Center timeline.
4. Apply the effect as required (see below) to the time shiftsegment.
Note: you can create more than one time shift on a video clip. Just repeat
the above steps to add another.
Replay and Reverse
Select the Apply replay and reverse option if you want to loop the selected segmentof video in the time shift. Once selected, indicate how many times you want thesegment to replay by setting it in the Repeat times field. Select the Add reverseeffect option if you want the video to reverse forward and backward as it loopsplayback.
Speed Effect
Select the Apply speed effect option to speed up or slow down just the selectedsegment of video in the time shift. Once selected, you can enter a new Duration forthe segment in the field provided, or use the Speed multiplier slider. Drag it left toslow down the segment, or right to speed it up.
When you apply a speed effect to a segment of video, by default the change in thespeed in the video is instantaneous once the timeline slider enters the time shift. Ifyou want it to be more gradual and look smoother, you can use the Ease in/outoptions. Select Ease in if you want the change of speed at the beginning of the time

95
PowerDirector Plug-ins
shift to gradually speed up/slow down to the specified speed. Select Ease out if youwant the video to gradually return to the original video speed at the end of the timeshift.
Note: if you also selected the Apply replay and reverse option, in the
Apply effect to drop down select whether to apply the speed effect to the
first or last play of the time shift segment.
Adding Freeze Frames
Add a freeze frame to pause a frame of video for a specified duration. To add afreeze frame, do this:
1. On the Effect tab, use the player controls or drag the Action Camera Centertimeline slider to the position in your video clip where you want the freezeframe.
Note: use the zoom controls above the Action Camera Center timeline to
zoom in on the video clip's timeline to more precisely find the frame.
2. Click on the Add freeze frame button. CyberLink PowerDirector will add afreeze frame, which is indicated by the blue indicator.
3. In the Duration field, enter how long you want the video to pause on thisframe of video.
Note: you can add more than one freeze frame to a video clip. Just repeat
the above steps to add another.
Applying Zoom Effect
Select the Apply zoom effect option if you want to zoom in and out on the pausedframe of video. Once selected, resize and align the focus box to the part of thevideo frame where you want the zoom to occur.
96
CyberLink PowerDirector
Note: if you also selected the Apply replay and reverse option, in the
Apply effect to drop down select whether to apply the freeze frame to the
first or last play of the time shift segment.
Action Camera Center Settings
Click the button in the Action Camera Center window to open the settingswindow. The available options are as follows:
Audio setting:
· Remove audio: select this option if you want to mute the audio in the entirevideo clip.
· Keep audio: select this option if you want to keep the audio in the editedvideo clip. Select the Keep audio pitch (05X to 2X only) if you are changing thespeed of the video. Selecting this will stretch the audio to match the newvideo's length, minimizing the warping of the sound as the video speedchanges.
Interpolation setting:
· Apply interpolated technology when available: select this option whenreducing the speed of the video. CyberLink PowerDirector uses frameinterpolated technology* to create a more advanced and smooth slow motioneffect.
Note: * optional feature in CyberLink PowerDirector. Check the version
table on our web site for detailed versioning information.
Changing the Action Camera CenterContentOnce you have created your action effects in the Action Camera Center andimported the resulting video clip into the timeline, you can edit it like any othervideo clip on the timeline. However, if you find that you want to edit or refine theeffects more, you can do this by re-entering the Action Camera Center.
Note: if you would like to view the individual clips created by the Action
Camera Center so you can edit them directly in the timeline, just right-click
on the file and then select Show Individual Clips.
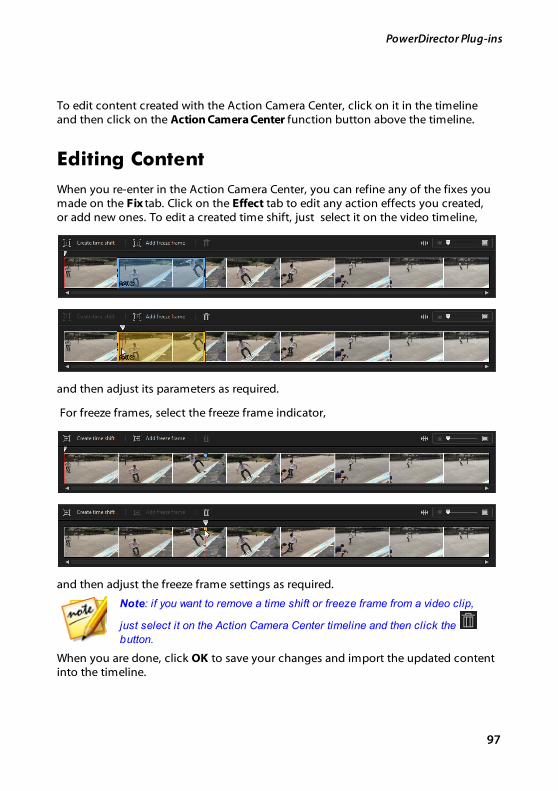
97
PowerDirector Plug-ins
To edit content created with the Action Camera Center, click on it in the timelineand then click on the Action Camera Center function button above the timeline.
Editing Content
When you re-enter in the Action Camera Center, you can refine any of the fixes youmade on the Fix tab. Click on the Effect tab to edit any action effects you created,or add new ones. To edit a created time shift, just select it on the video timeline,
and then adjust its parameters as required.
For freeze frames, select the freeze frame indicator,
and then adjust the freeze frame settings as required.
Note: if you want to remove a time shift or freeze frame from a video clip,
just select it on the Action Camera Center timeline and then click the
button.
When you are done, click OK to save your changes and import the updated contentinto the timeline.
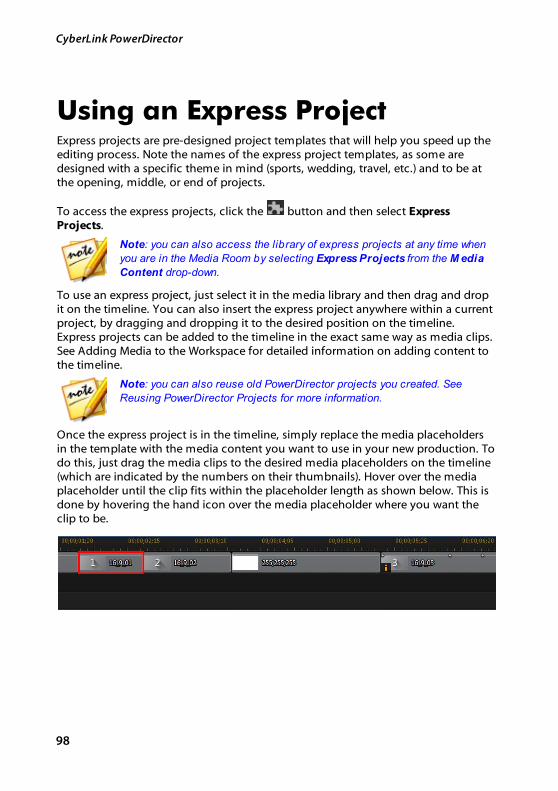
98
CyberLink PowerDirector
Using an Express ProjectExpress projects are pre-designed project templates that will help you speed up theediting process. Note the names of the express project templates, as some aredesigned with a specific theme in mind (sports, wedding, travel, etc.) and to be atthe opening, middle, or end of projects.
To access the express projects, click the button and then select ExpressProjects.
Note: you can also access the library of express projects at any time when
you are in the Media Room by selecting Express Projects from the M edia
Content drop-down.
To use an express project, just select it in the media library and then drag and dropit on the timeline. You can also insert the express project anywhere within a currentproject, by dragging and dropping it to the desired position on the timeline.Express projects can be added to the timeline in the exact same way as media clips.See Adding Media to the Workspace for detailed information on adding content tothe timeline.
Note: you can also reuse old PowerDirector projects you created. See
Reusing PowerDirector Projects for more information.
Once the express project is in the timeline, simply replace the media placeholdersin the template with the media content you want to use in your new production. Todo this, just drag the media clips to the desired media placeholders on the timeline(which are indicated by the numbers on their thumbnails). Hover over the mediaplaceholder until the clip fits within the placeholder length as shown below. This isdone by hovering the hand icon over the media placeholder where you want theclip to be.

99
PowerDirector Plug-ins
Doing this replaces the media placeholders with the content you want to add,without changing the structure of the express project. Continue this process untilall the media placeholders have been filled. Once you are done, you can continueto edit the project like any other project, including the effects and transitions thathave been included in the express project.
Recording Your Desktop withthe Screen RecorderThe Screen Recorder lets you record a video of your mouse movements andcomputer usage, allowing you to create instruction videos, record webcasts, and
more. To access the Screen Recorder dialog, click the button and then selectScreen Recorder.
Note: you can also access the screen recorder from the Capture module,
by double-clicking on the desktop shortcut that was created during
installation, or from the Windows start menu by selecting All Programs >
CyberLink Screen Recorder.
To capture with the screen recorder, do this:
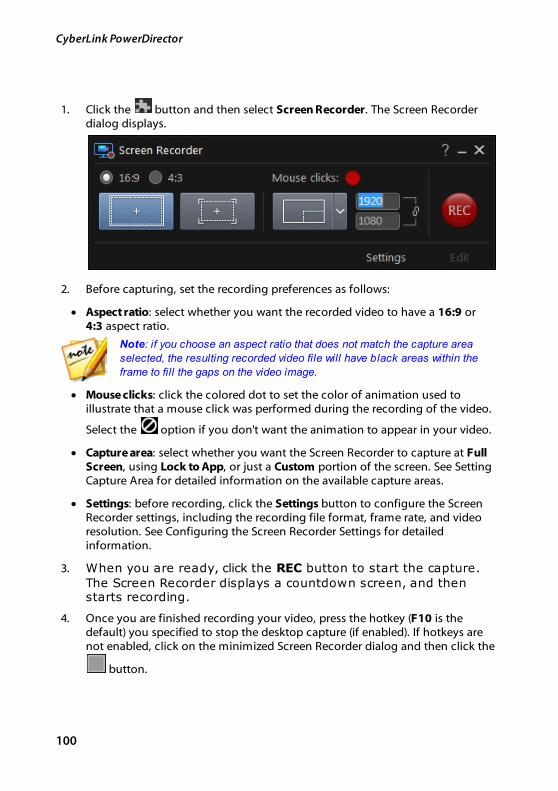
100
CyberLink PowerDirector
1. Click the button and then select Screen Recorder. The Screen Recorderdialog displays.
2. Before capturing, set the recording preferences as follows:
· Aspect ratio: select whether you want the recorded video to have a 16:9 or 4:3 aspect ratio.
Note: if you choose an aspect ratio that does not match the capture area
selected, the resulting recorded video file will have black areas within the
frame to fill the gaps on the video image.
· Mouse clicks: click the colored dot to set the color of animation used toillustrate that a mouse click was performed during the recording of the video.
Select the option if you don't want the animation to appear in your video.
· Capture area: select whether you want the Screen Recorder to capture at FullScreen, using Lock to App, or just a Custom portion of the screen. See SettingCapture Area for detailed information on the available capture areas.
· Settings: before recording, click the Settings button to configure the ScreenRecorder settings, including the recording file format, frame rate, and videoresolution. See Configuring the Screen Recorder Settings for detailedinformation.
3. When you are ready, click the REC button to start the capture.The Screen Recorder displays a countdown screen, and thenstarts recording.
4. Once you are finished recording your video, press the hotkey (F10 is thedefault) you specified to stop the desktop capture (if enabled). If hotkeys arenot enabled, click on the minimized Screen Recorder dialog and then click the
button.
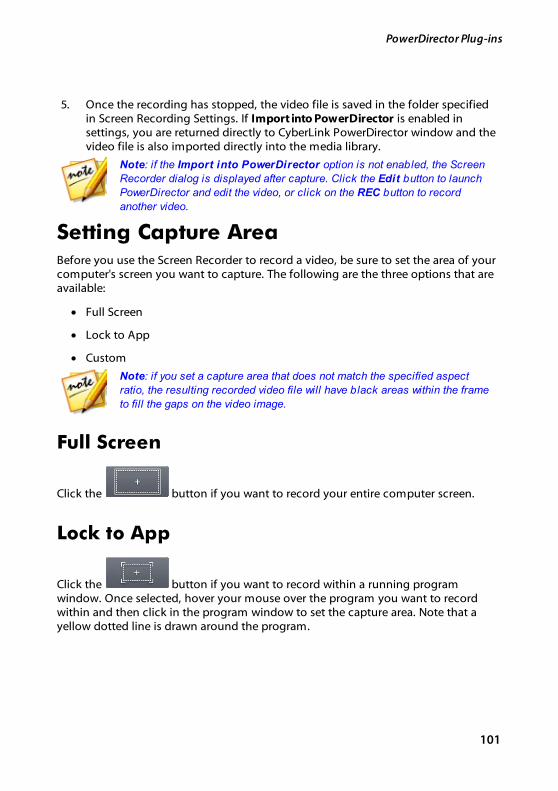
101
PowerDirector Plug-ins
5. Once the recording has stopped, the video file is saved in the folder specifiedin Screen Recording Settings. If Import into PowerDirector is enabled insettings, you are returned directly to CyberLink PowerDirector window and thevideo file is also imported directly into the media library.
Note: if the Import into PowerDirector option is not enabled, the Screen
Recorder dialog is displayed after capture. Click the Edit button to launch
PowerDirector and edit the video, or click on the REC button to record
another video.
Setting Capture AreaBefore you use the Screen Recorder to record a video, be sure to set the area of yourcomputer's screen you want to capture. The following are the three options that areavailable:
· Full Screen
· Lock to App
· Custom
Note: if you set a capture area that does not match the specified aspect
ratio, the resulting recorded video file will have black areas within the frame
to fill the gaps on the video image.
Full Screen
Click the button if you want to record your entire computer screen.
Lock to App
Click the button if you want to record within a running programwindow. Once selected, hover your mouse over the program you want to recordwithin and then click in the program window to set the capture area. Note that ayellow dotted line is drawn around the program.
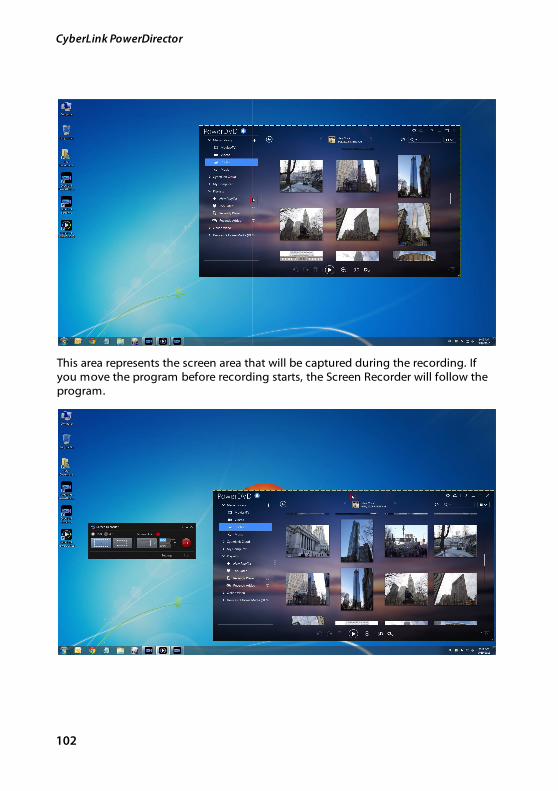
102
CyberLink PowerDirector
This area represents the screen area that will be captured during the recording. Ifyou move the program before recording starts, the Screen Recorder will follow theprogram.
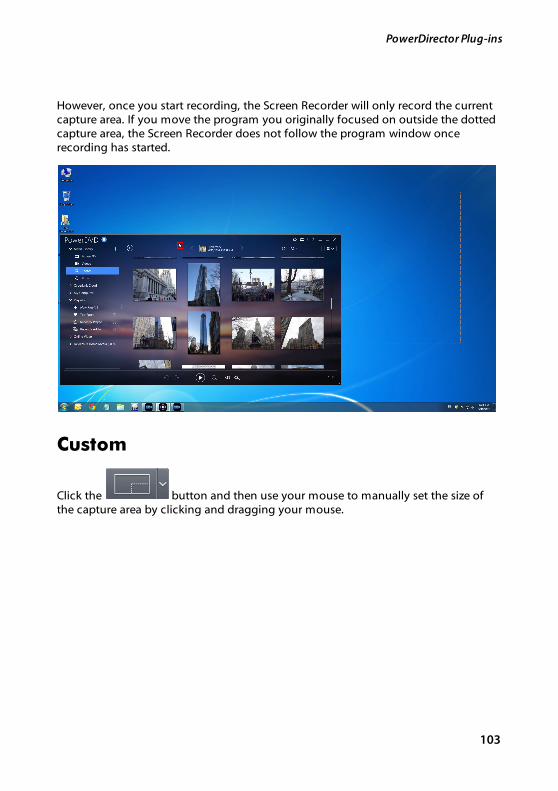
103
PowerDirector Plug-ins
However, once you start recording, the Screen Recorder will only record the currentcapture area. If you move the program you originally focused on outside the dottedcapture area, the Screen Recorder does not follow the program window oncerecording has started.
Custom
Click the button and then use your mouse to manually set the size ofthe capture area by clicking and dragging your mouse.
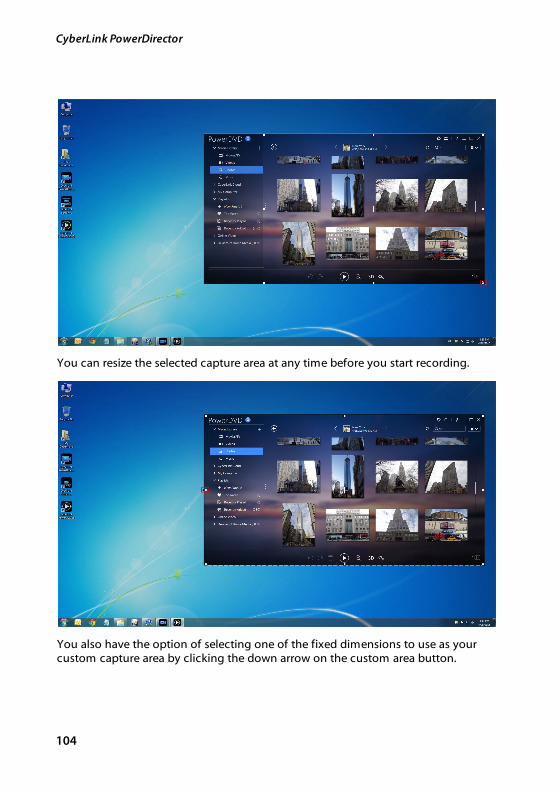
104
CyberLink PowerDirector
You can resize the selected capture area at any time before you start recording.
You also have the option of selecting one of the fixed dimensions to use as yourcustom capture area by clicking the down arrow on the custom area button.
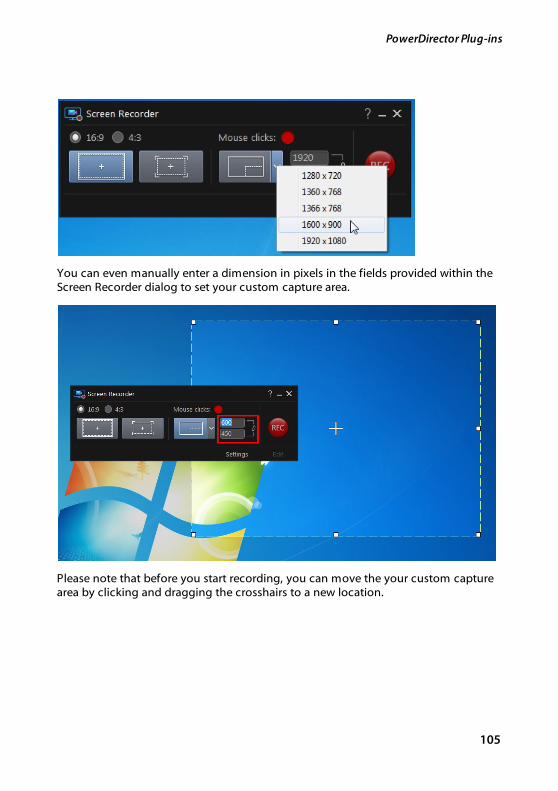
105
PowerDirector Plug-ins
You can even manually enter a dimension in pixels in the fields provided within theScreen Recorder dialog to set your custom capture area.
Please note that before you start recording, you can move the your custom capturearea by clicking and dragging the crosshairs to a new location.
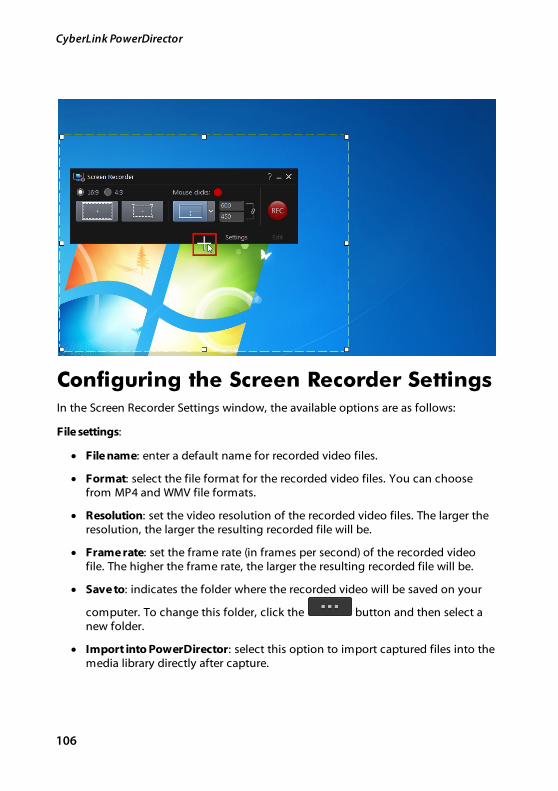
106
CyberLink PowerDirector
Configuring the Screen Recorder SettingsIn the Screen Recorder Settings window, the available options are as follows:
File settings:
· File name: enter a default name for recorded video files.
· Format: select the file format for the recorded video files. You can choosefrom MP4 and WMV file formats.
· Resolution: set the video resolution of the recorded video files. The larger theresolution, the larger the resulting recorded file will be.
· Frame rate: set the frame rate (in frames per second) of the recorded videofile. The higher the frame rate, the larger the resulting recorded file will be.
· Save to: indicates the folder where the recorded video will be saved on your
computer. To change this folder, click the button and then select anew folder.
· Import into PowerDirector: select this option to import captured files into themedia library directly after capture.
107
PowerDirector Plug-ins
Audio settings:
· Voice over: select the On option if you have a microphone connected to yourcomputer and you want to record a voice over while recording your video.Click the Setup button to set up your microphone as follows: select yourconnected microphone or other input device from the Input Device drop-down. Speak into the microphone, and then use the Input volume slider to setthe recording level. Click OK to save the changes.
· System audio: select the On option if you want to loop back record the audiofrom your computer's sound card as you record. Any system sounds andaudio being played by your computer will be included in your video.
· Mix: use the slider to mix the audio levels, by deciding whether to have morefrom the microphone or from your computer's sound card (loop back record).
Control settings:
· Pause/Resume: set the hotkey for pausing the recording during capture. Thishotkey is also used to resume the recording once paused.
· Stop: set the hotkey for stopping the recording.
· Enable hotkeys: select this option to enable the above hotkeys duringrecording. If this option is not selected, you must pause or stop the recordingby clicking on the minimized Screen Recorder dialog and then clicking theavailable buttons.
Advanced Screen Recorder Settings
Click the Advanced button to access the Advanced Screen Recorder Settingswindow to configure the following options:
Monitor settings:
· if you have two monitors connected to your computer and you haveextended your desktop, select whether you want to capture on the Primary orSecondary monitor.
Performance settings:
· Hardware video encoding: if your computer supports it, select this option toimprove recording performance using hardware encoding.
108
CyberLink PowerDirector
· Enable high performance mode: select this option to disable Windows Aerofor improved recording performance (Windows 7/Vista only).
Editing settings:
· Create .mrk file when recording: select this option if you want CyberLinkPowerDirector to create a log file that tracks the mouse clicks when youcapture with the Screen Recorder. These mouse clicks will be indicated on theclip marker track when the captured file is added to the timeline. Other mediaclips added to the timeline will snap to these clip markers to help you syncvoice overs, music, etc. in your video production.
109
Arranging Media in Your Production
Arranging Media in YourProduction
Chapter 7:
Once you have your media in the media library, you can begin putting your videoproduction together by adding media clips to the editing workspace. You add themedia clips in the order that tells the story you want to tell.
Note: the timeline view of the CyberLink PowerDirector workspace offers
more editing freedom and ease of movement in your production. Be sure to
consult the Timeline View and Timeline Behavior sections to get the most
out of this view.
There are several program features you can utilize to assist with the arrangement ofmedia in your video production, including:
· Magic Movie Wizard: auto creates a movie for you, using the media clips andeffects in your library. See Using the Magic Movie Wizard for moreinformation.
· Slideshow Creator: auto creates a slideshow with your photos, in a few simplesteps. See Using the Slideshow Creator for more information.
· Express Projects: choose from a number of project templates that will helpyou speed up the editing process. See Using an Express Project for moredetailed information.
· Timeline markers*: add to the timeline ruler for more precise media clipplacement on the timeline. See Timeline Markers for more information.
· Music Beat Detection*: use this feature to add music beat clip markers on theclip marker track, which you can use to arrange media clips to music. See Music Beat Detection for more information.
· Sync by Audio: you can sync two or more clips that are on different timelinetracks using the Sync by Audio feature. See Syncing Clips by Audio for moreinformation.
Note: * optional feature in CyberLink PowerDirector. Check the version
table on our web site for detailed versioning information.

110
CyberLink PowerDirector
Adding Video Clips and Imagesto the TimelineTo start creating your video production, begin adding video clips and images to thevideo tracks in the timeline.
If you are not sure which tracks you can add your media to, just select a clip in themedia library. The tracks in the timeline you can add the media to will "light up".For more information on what media you can add to which track, see TimelineTracks.
Note: you may prefer to add video clips and images using the storyboard
view, since this view is simpler than the timeline view. However, you can
only add clips to the first track in this view. Therefore, this section uses the
timeline view in all of the procedures.
You can add video clips and images at any position on any video track in thetimeline. You no longer need to place your media on the top track or at thebeginning of the timeline. You now have total freedom to add the media exactlywhere you want, and in the order you want it. Just start placing the media on atimeline track, in a sequence that tells your story.
Note: if you want to add media to a precise position on the timeline,
consider using timeline markers. See Adding Timeline Markers for more
information.
If you insert or drop media onto other existing media clips that are on the timeline,don't worry. CyberLink PowerDirector will prompt you to use its ripple editingfeature to overwrite, insert, replace, split, trim, transition, or speed up media to helpyou easily place the media where you want it.
Once you add a video clip or image to any timeline track, click the Modify buttonabove the timeline to edit its properties in the PiP Designer. See Modifying Media inthe PiP Designer for more information.
Note: you can add additional tracks to your project's timeline in the Track
Manager, allowing you to have up to 99 PiP objects displayed on a video at
the same time. See Track Manager for more information.
111
Arranging Media in Your Production
Adding Video Clips and ImagesYou can add video clips and images onto any video track in the timeline, and at anyposition.
Note: when you add video clips to the timeline, CyberLink PowerDirector
automatically adds its audio track (if available) to the linked audio track.
To insert video clips or images into the workspace, do one of the following:
· use the timeline slider to set the position where you want the media, select
the media in the library, and then click to add it to theselected video track.
· use the timeline slider to set the position where you want the media, right-click on the media in the library, and then select Insert on Selected Track toadd it to the selected video track.
You can also manually drag and drop a media clip to a desired position on a videotrack to add it to the timeline.
When adding a clip to the timeline (inserting or dragging and dropping), if thetimeline slider is over an existing clip, or you drop it on an existing clip, you areprompted to use one of the ripple editing options to insert the clip:
· Overwrite: select to overwrite the existing clip with the newly added clip.
· Insert: select to split the clip and insert the new clip between the two portions.CyberLink PowerDirector also only moves the clips on the same track to theright.
· Insert and Move All Clips: select to split the clip and insert the new clipbetween the two portions. CyberLink PowerDirector also moves all of themedia clips on the timeline that lie to the right of the inserted clip, right.
· Crossfade: select to lay the clip over a portion of the existing clip and autoadd a transition between the two clips. CyberLink PowerDirector uses the fadetransition on the video track, and the constant gain audio transition if bothclips have audio on the corresponding audio track.
Note: the Crossfade option does not overwrite the content on the track,
instead adding an overlap transition between the two clips. See Setting
Transition Behavior for more information. The Crossfade option is only
available if the end of the new clip is not over any existing content on the
track.

112
CyberLink PowerDirector
· Replace: select to replace the current clip on the timeline with the new clip.Use this option if you don't want to change the structure of the currentcontent on the timeline.
Note: if the duration of the clip you are replacing is shorter than the newly
added video clip, CyberLink PowerDirector automatically trims the video
clip to fit the original clip's duration. For images, CyberLink PowerDirector
automatically resizes them to fit the original clip's duration.
When inserting a video file, if the timeline slider is in a gap between two clips on atimeline track, you are prompted to use one of these ripple editing options to insertthe clip:
· Trim to Fit: select to have CyberLink PowerDirector auto trim off the end ofthe video clip to fit the gap to the right of the timeline slider.
Note: this feature is also available when inserting image clips into a
timeline gap that have durations longer than the gap.
· Speed up to Fit: select to have CyberLink PowerDirector auto speed up thevideo clip so that it fits the gap to the right of the timeline slider.
Adding Color Boards and BackgroundsThe use of color boards allows you to insert solid frames of color into your video.Color boards are really useful as quick transitions between video clips or as abackground for titles and ending credits. Backgrounds provide interesting andcreative environments for PiP objects, titles, and more.
Note: you can create your own custom color boards in the Media Room.
See Creating New Color Boards for more information.
You can find color boards and backgrounds in your media library, by clicking toopen the explorer view, or selecting Color Boards or Backgrounds from the MediaContent drop-down.
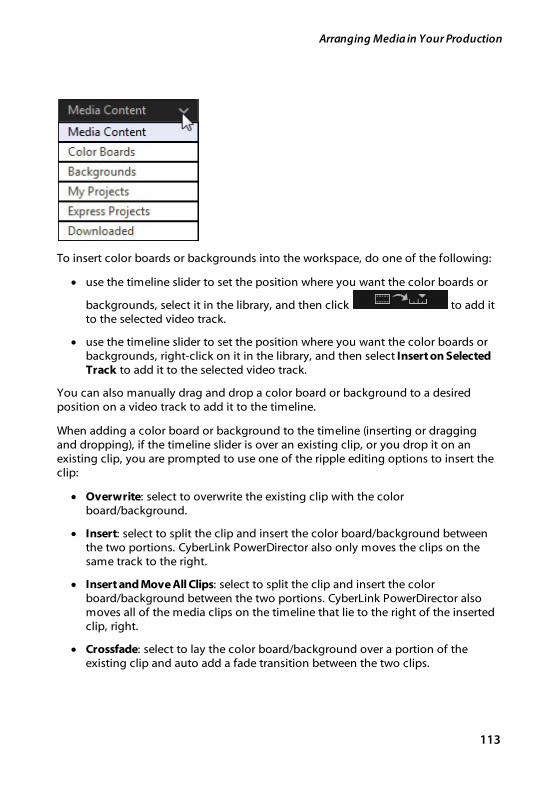
113
Arranging Media in Your Production
To insert color boards or backgrounds into the workspace, do one of the following:
· use the timeline slider to set the position where you want the color boards or
backgrounds, select it in the library, and then click to add itto the selected video track.
· use the timeline slider to set the position where you want the color boards orbackgrounds, right-click on it in the library, and then select Insert on SelectedTrack to add it to the selected video track.
You can also manually drag and drop a color board or background to a desiredposition on a video track to add it to the timeline.
When adding a color board or background to the timeline (inserting or draggingand dropping), if the timeline slider is over an existing clip, or you drop it on anexisting clip, you are prompted to use one of the ripple editing options to insert theclip:
· Overwrite: select to overwrite the existing clip with the colorboard/background.
· Insert: select to split the clip and insert the color board/background betweenthe two portions. CyberLink PowerDirector also only moves the clips on thesame track to the right.
· Insert and Move All Clips: select to split the clip and insert the colorboard/background between the two portions. CyberLink PowerDirector alsomoves all of the media clips on the timeline that lie to the right of the insertedclip, right.
· Crossfade: select to lay the color board/background over a portion of theexisting clip and auto add a fade transition between the two clips.
114
CyberLink PowerDirector
Note: the Crossfade option does not overwrite the content on the track,
instead adding an overlap transition between the two clips. See Setting
Transition Behavior for more information. The Crossfade option is only
available if the end of the new clip is not over any existing content on the
track.
· Replace: select to replace the current clip on the timeline with the colorboard/background. Use this option if you don't want to change the structureof the current content on the timeline.
Note: if the duration of the clip you are replacing is longer or shorter than
the newly added clip, CyberLink PowerDirector automatically resizes it to fit
the original clip's duration.
If the timeline slider is in a gap between two clips on a timeline track when insertinga color board or background, you are prompted to use this ripple editing option toinsert the clip:
· Trim to Fit: select to have CyberLink PowerDirector auto set the duration ofthe color board/background to fit the gap to the right of the timeline slider.
Creating New Color Boards
CyberLink PowerDirector lets you create custom color boards using the colorselector, or by selecting an area in the media file preview window.
Creating a Color Board Using the Color Selector
To create a color board using the color selector, do this:
1. Click on the button.
2. Select From Color Selector.
3. In the color palette, do any of the following:
· Select one of the basic colors.
· Use the color picker to choose a color, and the leveler on the right to adjustthe shade.
· Type in the desired HSL or RGB values.
4. Click OK to close the color palette and add the new color board to the medialibrary.
115
Arranging Media in Your Production
Creating a Color Board from a Media File
To create a color board by selecting a pixel in the preview window, do this:
1. Add the media clip to the timeline that you want to use to create the colorboard.
2. If required, use the playback controls to find the frame of video that containsthe color you want to use to create the color board.
3. Make sure the media file is selected in the timeline, i.e. that a preview of themedia file is displayed in the preview window.
4. Click on the button.
5. Select From Preview.
6. In the Select Color from Preview window, use the eye dropper to select thepixel in the video preview image that you want to use to create a color board.
7. Click OK to close the window and add the new color board to the medialibrary.
Adding Audio ClipsAudio clips allow you to add background music or a narrative voice-over to yourvideo production. You can add audio clips to the audio portion of a video track, tothe voice track, or to the music track.
Note: you can add transitions between two audio clips on any of the
available audio tracks. To do this, go to the Transitions Room and then
select Audio from the transition library filter drop-down. See Using
Transitions for more information on adding transitions between two clips.
If you are not sure which tracks you can add audio to, just select a clip in the medialibrary. The tracks in the timeline you can add the audio to will "light up". For moreinformation on what media you can add to which track, see Timeline Tracks.
Note: you can add additional audio tracks to your project's timeline in the
Track Manager. See Track Manager for more information.
To insert audio into the workspace, do one of the following:
116
CyberLink PowerDirector
Note: if you want to add audio to a precise position on the timeline, consider
using timeline markers. See Adding Timeline Markers for more information.
· use the timeline slider to set the position where you want the audio, select theaudio file in the library, and then click:
· to add it to the audio portion of the selected video track.
· to add it to the voice track.
· to add it to the music track. The music track is alwaysthe bottom track in the timeline.
· use the timeline slider to set the position where you want the audio, right-click on the audio file in the library, and then select:
· Add to Voice Track to add it to the voice track.
· Add to Music Track to add it to the music track. The music track is alwaysthe bottom track in the timeline.
You can also manually drag and drop an audio clip to a desired position on any ofthe audio tracks available it the timeline.
When adding audio to the timeline (inserting or dragging and dropping), if thetimeline slider is over an existing clip, or you drop it on an existing clip, you areprompted to use one of the ripple editing options to insert the clip:
· Overwrite: select to overwrite the existing clip with the newly added audioclip.
· Insert: select to split the clip and insert the new audio clip between the twoportions. CyberLink PowerDirector also only moves the clips on the sametrack to the right.
· Insert and Move All Clips: select to split the clip and insert the new audio clipbetween the two portions. CyberLink PowerDirector also moves all of themedia clips on the timeline that lie to the right of the inserted clip, right.
· Crossfade: select to lay the audio over a portion of the existing clip and autoadd a constant gain transition between the two clips.
117
Arranging Media in Your Production
Note: the Crossfade option does not overwrite the content on the track,
instead adding a transition between the two clips. The Crossfade option is
only available if the end of the new clip is not over any existing content on
the track.
· Replace: select to replace the current audio clip on the timeline with the newaudio clip. Use this option if you don't want to change the structure of thecurrent content on the timeline.
Note: if the duration of the audio clip you are replacing is shorter than the
newly added audio clip, CyberLink PowerDirector automatically trims it to fit
the original clip's duration.
If the timeline slider is in a gap between two clips on an audio timeline track wheninserting audio, you are prompted to use one of these ripple editing options toinsert the clip:
· Trim to Fit: select to have CyberLink PowerDirector auto trim off the end ofthe audio clip to fit the gap to the right of the timeline slider.
· Speed up to Fit: select to have CyberLink PowerDirector auto speed up theaudio clip so that it fits the gap to the right of the timeline slider.
Magic MusicMagic Music* is designed to help you add music into your video production. In justa few simple steps, Magic Music can turn your video production into a professionallooking movie through the addition of background music.
Note: * optional feature in CyberLink PowerDirector. Check the version
table on our web site for detailed versioning information.
Click the button located to the left of the timeline and then select MagicMusic to open the Magic Music panel. Magic Music uses SmartSound to add musicto your video production. Just follow the four steps on the user interface to selectthe music style (genre), song, and then duration, before applying your selection toyour video production.
Note: SmartSound provides some music for you to use in your video
production, but you can also purchase music. Click the SmartSound
button to view SmartSound related copyright and purchasing information.
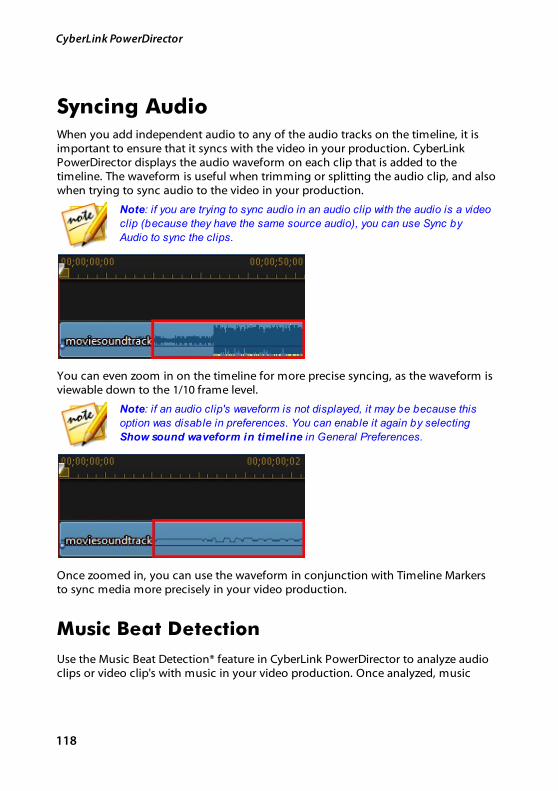
118
CyberLink PowerDirector
Syncing AudioWhen you add independent audio to any of the audio tracks on the timeline, it isimportant to ensure that it syncs with the video in your production. CyberLinkPowerDirector displays the audio waveform on each clip that is added to thetimeline. The waveform is useful when trimming or splitting the audio clip, and alsowhen trying to sync audio to the video in your production.
Note: if you are trying to sync audio in an audio clip with the audio is a video
clip (because they have the same source audio), you can use Sync by
Audio to sync the clips.
You can even zoom in on the timeline for more precise syncing, as the waveform isviewable down to the 1/10 frame level.
Note: if an audio clip's waveform is not displayed, it may be because this
option was disable in preferences. You can enable it again by selecting
Show sound waveform in timeline in General Preferences.
Once zoomed in, you can use the waveform in conjunction with Timeline Markersto sync media more precisely in your video production.
Music Beat Detection
Use the Music Beat Detection* feature in CyberLink PowerDirector to analyze audioclips or video clip's with music in your video production. Once analyzed, music
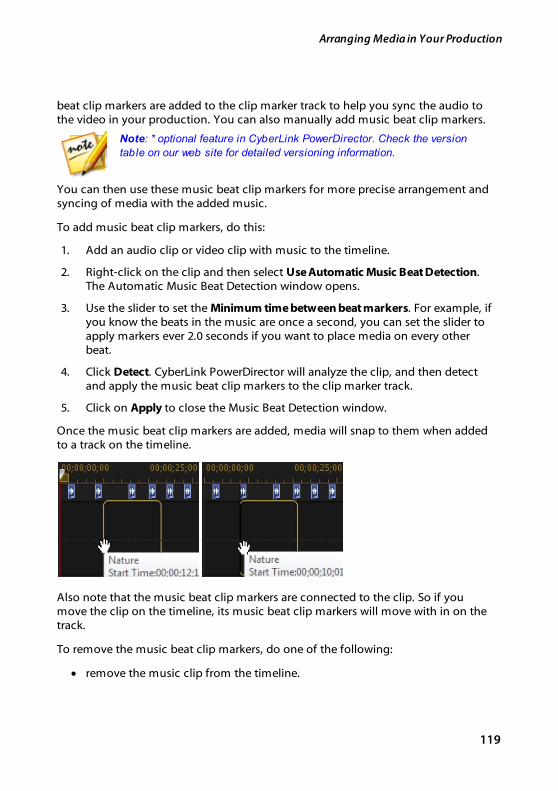
119
Arranging Media in Your Production
beat clip markers are added to the clip marker track to help you sync the audio tothe video in your production. You can also manually add music beat clip markers.
Note: * optional feature in CyberLink PowerDirector. Check the version
table on our web site for detailed versioning information.
You can then use these music beat clip markers for more precise arrangement andsyncing of media with the added music.
To add music beat clip markers, do this:
1. Add an audio clip or video clip with music to the timeline.
2. Right-click on the clip and then select Use Automatic Music Beat Detection.The Automatic Music Beat Detection window opens.
3. Use the slider to set the Minimum time between beat markers. For example, ifyou know the beats in the music are once a second, you can set the slider toapply markers ever 2.0 seconds if you want to place media on every otherbeat.
4. Click Detect. CyberLink PowerDirector will analyze the clip, and then detectand apply the music beat clip markers to the clip marker track.
5. Click on Apply to close the Music Beat Detection window.
Once the music beat clip markers are added, media will snap to them when addedto a track on the timeline.
Also note that the music beat clip markers are connected to the clip. So if youmove the clip on the timeline, its music beat clip markers will move with in on thetrack.
To remove the music beat clip markers, do one of the following:
· remove the music clip from the timeline.
120
CyberLink PowerDirector
· right-click on a music beat marker on the clip marker track, and then selectRemove Selected Clip Marker.
· right-click on the clip marker track, and then select Remove All Music ClipMarkers.
Manually Adding Music Beat Clip Markers
To manually add music beat clip markers to the clip marker track, do this:
1. Add an audio clip or video clip with music to the timeline.
2. Right-click on the clip and then select Use Automatic Music Beat Detection.The Use Automatic Music Beat Detection window opens.
3. If required, use the magnification tools to zoom in on the audio waveform forthe selected clip.
4. Manually drag the timeline slider to the position on the audio waveformwhere you want to add the music beat clip marker.
5. Click Add (or the press the A key on your keyboard) to add a music beat clipmarker at the current position.
6. Repeat the above steps to add as many music beat clip markers as you want.
7. Click on Apply to close the Music Beat Detection window.
Note: you can also use the player controls to play the clip, and then
continually click the Add button (or press the A key on your keyboard) to
add the music beat clip markers when you hear a beat.
Syncing Clips by AudioIf you have two or more clips that have the same source audio, you can use Sync byAudio to align the starting positions of the clips on the timeline so that they are allin sync.
Note: you can sync both video and audio clips using this feature.
To sync two or more clips by audio*, do this:
121
Arranging Media in Your Production
Note: * optional feature in CyberLink PowerDirector. Check the version
table on our web site for detailed versioning information.
1. Select all of the clips on the timeline that you want to sync.
2. Click the Sync by Audio function button that displays after selecting the clips.
3. CyberLink PowerDirector analyzes all the selected clips and then realigns themso that their audio is in sync.
Using the Magic Movie WizardIf you are new to the editing process and not sure how or where to get started, thenthe Magic Movie Wizard can help. The Magic Movie Wizard takes all of your mediaand creates a completed video production in just a few steps. You can then edit thecreated production, output it to a file, or burn it to a disc.
Note: if you want more creative control than the Magic Movie Wizard
provides, you can also use the Theme Designer to create your video
production. The Theme Designer allows you to customize the theme
templates used and choose the exact images, video clips, and background
music you want in your production. See Using the Theme Designer for more
information.
To use the Magic Movie Wizard, do this:
1. Click the button above the timeline and then select Magic MovieWizard.
2. Select which media you want to use in your movie, as follows:
· Media Library: the Magic Movie Wizard uses all of the media in the library tocreate your movie.
· Timeline: the Magic Movie Wizard only uses the media that is currently on thetimeline.
Note: any edits you previously made in your project to the clips in the
timeline are ignored. The Magic Movie Wizard uses the source clips to
create you final movie.
· Select items: the Magic Movie Wizard only uses the media that is currentlyselected in the library.
3. Click Next to continue.
122
CyberLink PowerDirector
4. See the step by step description in Easy Editor for more information on theremaining steps in the Magic Movie Wizard.
Using the Slideshow CreatorThe Slideshow Creator is the easiest way to instantly turn your photos into adynamic slideshow.
To create a slideshow using the Slideshow Creator, do this:
1. Drag all the photos that you want in the slideshow into the timeline.
2. Make sure the photos are selected, and then click on the Slideshow button tolaunch the Slideshow Creator.
3. See the step by step description in Slideshow Creator for more information onthe remaining steps required to create your slideshow.
Note: after the Slideshow Creator has created your slideshow and inserted
it into the timeline, if you would like to view each individual slide/photo in the
slideshow for advanced editing, just right-click on the file in the timeline and
then select Show Individual Photos.
123
Editing Your Media
Editing Your Media
Chapter 8:
Once you have your video clips, audio files, and images in the editingworkspace/timeline you can start editing them. Editing is a broad term thatencompasses a number of different functions, including splitting, trimming,applying fixes, and much more.
This section describes all of the editing processes you can perform on your mediaclips.
Content Aware EditingUse Content Aware Editing* on your video clips to automatically generate the bestoutputted video content for your production.
Note: * optional feature in CyberLink PowerDirector.
Content Aware Editing analyzes your video clips to find the portions that it believesare the best and most interesting moments, and also the portions that need fixing.You can then simply click on the "good parts" to include them in the videoproduction, and choose to fix or trim away the "bad parts".
Note: during the analysis process, CyberLink PowerDirector also detects
all the scenes in the video clips and marks them on the Content Aware
Editing window timeline with .
To analyze the video clips and then open the Content Aware Editing window, right-click on a video clip in the media library or the timeline, and then select ContentAware Editing.
If you would like to perform a batch analysis on multiple video clips at once, dothis:
1. In the Media Room, click on to access the library menu and then selectContent Aware Details.
2. Select all the video clips in the Analyze column and then click the Analyzebutton.
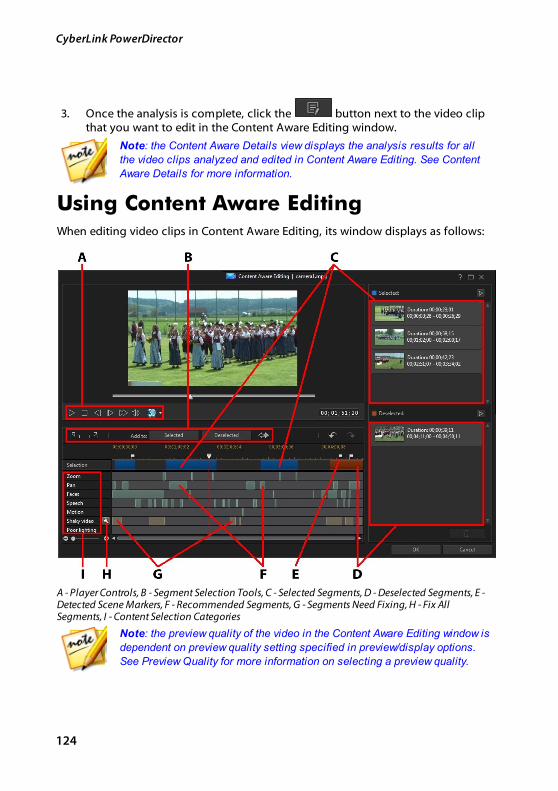
124
CyberLink PowerDirector
3. Once the analysis is complete, click the button next to the video clipthat you want to edit in the Content Aware Editing window.
Note: the Content Aware Details view displays the analysis results for all
the video clips analyzed and edited in Content Aware Editing. See Content
Aware Details for more information.
Using Content Aware EditingWhen editing video clips in Content Aware Editing, its window displays as follows:
A - Player Controls, B - Segment Selection Tools, C - Selected Segments, D - Deselected Segments, E -Detected Scene Markers, F - Recommended Segments, G - Segments Need Fixing, H - Fix AllSegments, I - Content Selection Categories
Note: the preview quality of the video in the Content Aware Editing window is
dependent on preview quality setting specified in preview/display options.
See Preview Quality for more information on selecting a preview quality.
125
Editing Your Media
In the Content Aware Editing window, the segments indicated in green are therecommended portions of the clip that CyberLink PowerDirector believes are themost interesting, or are the "good parts". They may include camera zooms or pans,and segments that contain a lot of motion or people talking (speech). CyberLinkPowerDirector also performs face detection on the video clip to highlight sectionsthat include people's faces.
The light brown segments are parts that need fixing, because either the video isshaky or poorly lit. You can choose to fix or remove these "bad parts".
Check the content selection categories for details of what each highlightedsegment consists of.
Note: hover your mouse over the highlighted segments for more detailed
information about what they include.
The segments that are not highlighted are parts of your video that CyberLinkPowerDirector believes are not necessary to include. You can however include thesesegments by selecting them with the mark in and out buttons.
Previewing the Video Content
Use the player controls to preview the entire video clip. To preview a specifichighlighted segment, right-click on it and then select Preview this Segment.Playback stops once the selected segment playback is complete.
Fixing Content
If the segments that CyberLink PowerDirector has highlighted for removal containparts of your video that you don't want to exclude, you can instantly fix them in theContent Aware Editing window.
To fix segments, do either of the following:
· right-click on the highlighted segment and then select Apply Fix to EntireScene. Select this option to apply the required fix to the entire scene in thevideo clip, which is indicated by the detected scene markers. This ensuresthere are no sudden changes in lighting or other video properties in the scene.In the Auto Fixer window use the player controls to preview how the fixedcontent will look. If satisfied with the results, ensure that Apply auto fix isselected and then click on OK to apply the fix to the scene.
126
CyberLink PowerDirector
Note: if no scenes were detected in your video clip, the fix is applied to the
entire clip when Apply Fix to Entire Scene is selected.
· right-click on the highlighted segment and then select Apply Fix to thisSegment. Select this option to apply the required fix to just the selectedsegment of video. In the Auto Fixer window use the player controls to previewhow the fixed content will look. If satisfied with the results, ensure that Applyauto fix is selected and then click on OK to apply the fix to the selectedsegment of the video clip only.
· click the button to have CyberLink PowerDirector auto fix each of thehighlighted segments in the same content selection category.
CyberLink PowerDirector will fix the segments, which are then indicated with awrench icon.
Note: if you'd like to undo any of the fixes you made in the Content Aware
Editing window, just right-click on a fixed segment and then select Remove
Applied Fix.
Content Selection
Use the segment selection tools to begin selecting the video content you want toinclude in the trimmed clip. Any content segments you add to the deselected list,or do not select, will be trimmed out of the video clip.
Note: you must add at least one segment to the Selected list to enable the
OK button and trim the video clip.
Selecting Content
To select video content, do any of the following:
· click on a highlighted segment and then click the Selected button.
· right-click on a segment and then select Add to Selected List.
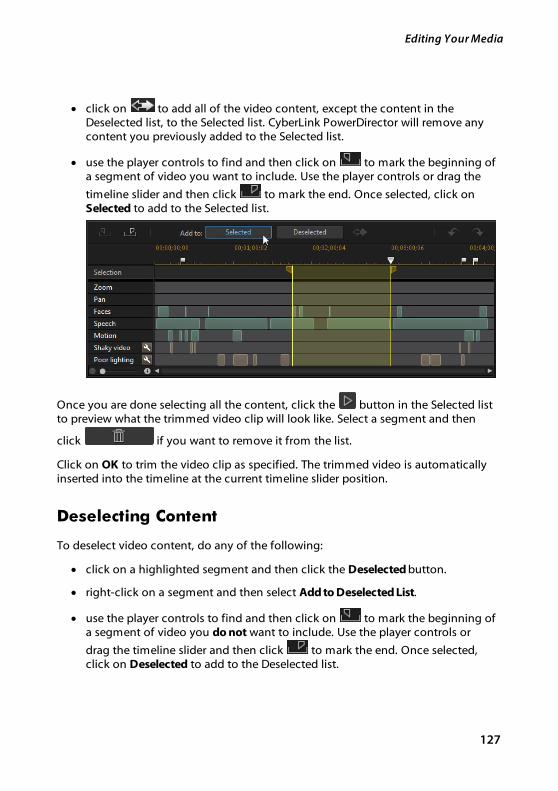
127
Editing Your Media
· click on to add all of the video content, except the content in theDeselected list, to the Selected list. CyberLink PowerDirector will remove anycontent you previously added to the Selected list.
· use the player controls to find and then click on to mark the beginning ofa segment of video you want to include. Use the player controls or drag the
timeline slider and then click to mark the end. Once selected, click onSelected to add to the Selected list.
Once you are done selecting all the content, click the button in the Selected listto preview what the trimmed video clip will look like. Select a segment and then
click if you want to remove it from the list.
Click on OK to trim the video clip as specified. The trimmed video is automaticallyinserted into the timeline at the current timeline slider position.
Deselecting Content
To deselect video content, do any of the following:
· click on a highlighted segment and then click the Deselected button.
· right-click on a segment and then select Add to Deselected List.
· use the player controls to find and then click on to mark the beginning ofa segment of video you do not want to include. Use the player controls or
drag the timeline slider and then click to mark the end. Once selected,click on Deselected to add to the Deselected list.
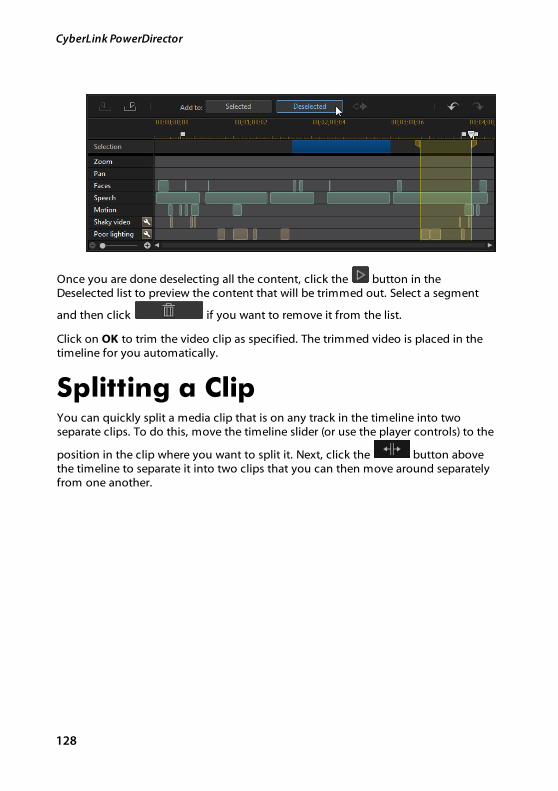
128
CyberLink PowerDirector
Once you are done deselecting all the content, click the button in theDeselected list to preview the content that will be trimmed out. Select a segment
and then click if you want to remove it from the list.
Click on OK to trim the video clip as specified. The trimmed video is placed in thetimeline for you automatically.
Splitting a ClipYou can quickly split a media clip that is on any track in the timeline into twoseparate clips. To do this, move the timeline slider (or use the player controls) to the
position in the clip where you want to split it. Next, click the button abovethe timeline to separate it into two clips that you can then move around separatelyfrom one another.

129
Editing Your Media
You can also use it to quickly remove unwanted portions of a media clip, or if youwant to insert other media between the two portions.
Unlinking Video/Audio ClipsWhen you add a video clip with audio to the timeline, its audio portion is visible onits corresponding audio track. You can unlink the two portions of the clip, allowing
130
CyberLink PowerDirector
you to modify them separately, remove one completely from the timeline, or use itelsewhere in your project.
To unlink the audio from a video clip, right-click on it in the timeline and thenselect Unlink Video and Audio. To link the two files back together, select them both,right-click on them, and then select Link Video and Audio.
Trimming Video and Audio ClipsUse the trim functions to remove unwanted portions from your video and audioclips. You can use the Single Trim function to trim off the beginning and/or ends ofa video clip, or the Multi Trim function to remove multiple portions at once. TheTrim Audio function lets you trim audio visually, using its waveform.
Note: when you trim media clips, the program does not delete any of the
original source media's content. It just marks the requested edits on the
clips and then applies the edits when it renders the final video during
production.
Trimming a Video Clip
To trim a video clip, select it in the timeline and then click the button abovethe timeline.
Performing a Single Trim
Use the video trim function to quickly trim off unwanted portions at the beginningand end of a video clip on the timeline.
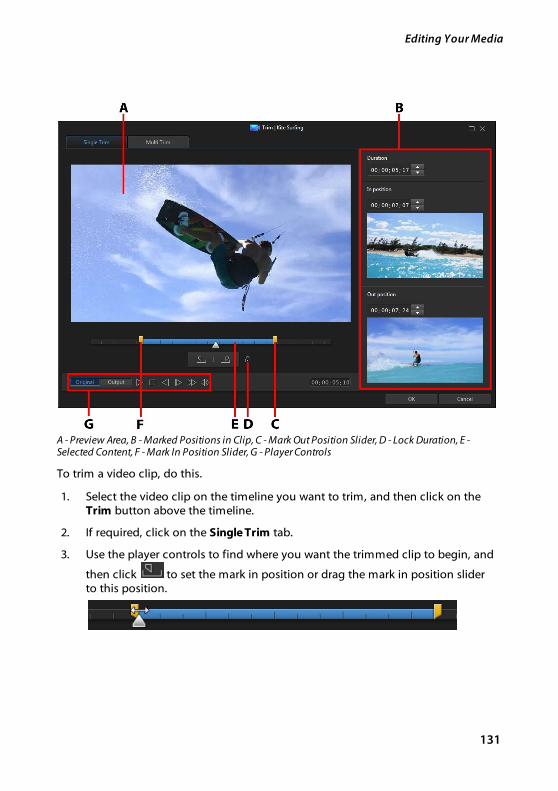
131
Editing Your Media
A - Preview Area, B - Marked Positions in Clip, C - Mark Out Position Slider, D - Lock Duration, E -Selected Content, F - Mark In Position Slider, G - Player Controls
To trim a video clip, do this.
1. Select the video clip on the timeline you want to trim, and then click on the Trim button above the timeline.
2. If required, click on the Single Trim tab.
3. Use the player controls to find where you want the trimmed clip to begin, and
then click to set the mark in position or drag the mark in position sliderto this position.

132
CyberLink PowerDirector
4. Use the player controls to find where you want the trimmed clip to end, and
then click to set the mark out position or drag the mark out positionslider to this position.
Note: you can click to lock the duration of the video you want trimmed.
Once locked, click and drag the selected content to the exact position you
want trimmed.
5. If required, you can preview what the trimmed clip will look like by clicking Output and then clicking the play button on the player controls. Click Originalif you want to play the original video.
6. Click OK to set your changes and trim the clip.
Note: you can reenter the trim window to refine the trimmed clip at any time.
You can also drag the trimmed edges of a video clip on the timeline as well.
Performing a Multi Trim
The multi trim function lets you trim out one or more segments of a video clip atonce, resulting in a series of clips that are independent from the original video.
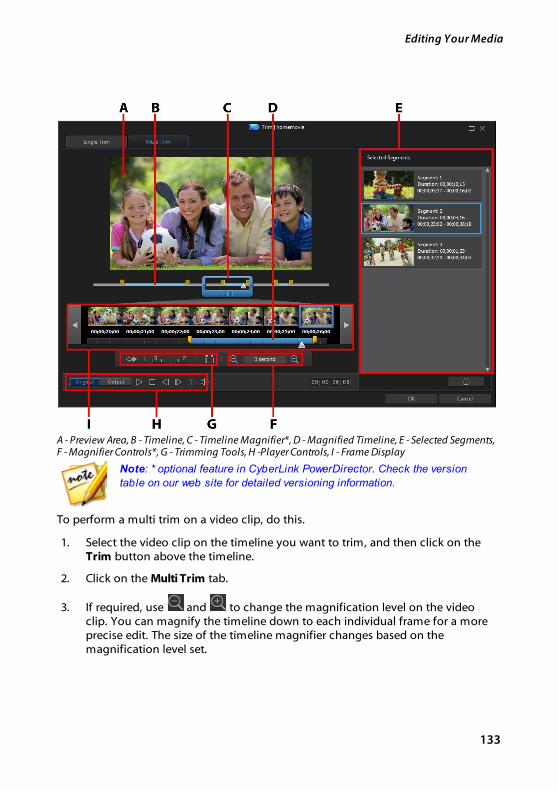
133
Editing Your Media
A - Preview Area, B - Timeline, C - Timeline Magnifier*, D - Magnified Timeline, E - Selected Segments,F - Magnifier Controls*, G - Trimming Tools, H -Player Controls, I - Frame Display
Note: * optional feature in CyberLink PowerDirector. Check the version
table on our web site for detailed versioning information.
To perform a multi trim on a video clip, do this.
1. Select the video clip on the timeline you want to trim, and then click on the Trim button above the timeline.
2. Click on the Multi Trim tab.
3. If required, use and to change the magnification level on the videoclip. You can magnify the timeline down to each individual frame for a moreprecise edit. The size of the timeline magnifier changes based on themagnification level set.
134
CyberLink PowerDirector
4. Use the player controls to find the beginning of the first trimmed segments,or the mark in position.
5. Click to set the mark in position.
6. Use the player controls or drag the timeline slider to position where you want
the first segment to end, and then click to set the mark out position. Thetrimmed segment is added to Selected Segments section.
7. Repeat the above steps to trim out all the required segments.
8. If required, you can preview what the trimmed clip will look like by clicking Output and then clicking the play button on the player controls. Click Originalif you want to play the original video.
9. Click OK to set your changes and trim the clip.
Note: the segments of video that CyberLink PowerDirector inserts into the
timeline are indicated in blue. If you want to remove these segments from
the trimmed video clip, click the button to invert the trimming results.
Extra Trimming Tools
On the Multi Trim tab, you can also use the following extra trimming tools to:
· you can manually drag the mark in and out sliders on the timeline ormagnified timeline to edit the current positions if required.
· detect all the scenes in the selected video clip by clicking on . Onceselected, choose whether you want the program to add all the scenes to thetrimmed segments area, or just mark the scene breaks for you on the timeline.
Trimming an Audio ClipUse the audio trim function to quickly trim off unwanted portions at the beginningand end of an audio clip on the timeline.
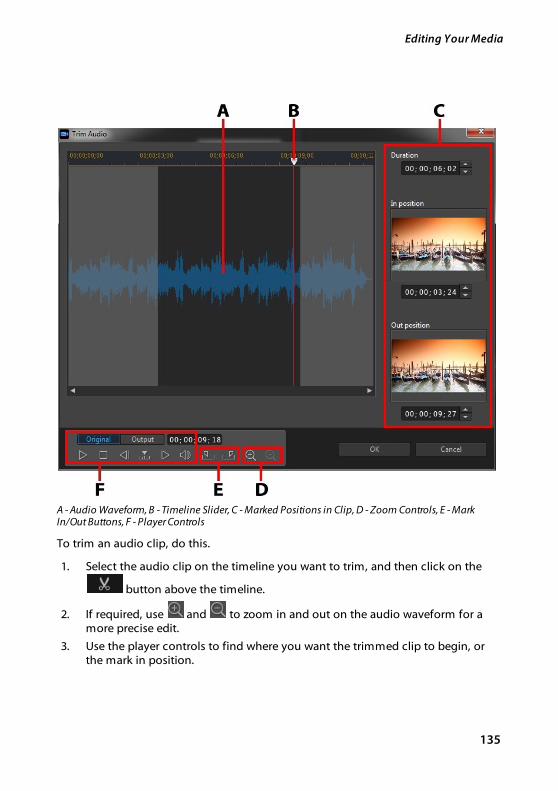
135
Editing Your Media
A - Audio Waveform, B - Timeline Slider, C - Marked Positions in Clip, D - Zoom Controls, E - MarkIn/Out Buttons, F - Player Controls
To trim an audio clip, do this.
1. Select the audio clip on the timeline you want to trim, and then click on the
button above the timeline.
2. If required, use and to zoom in and out on the audio waveform for amore precise edit.
3. Use the player controls to find where you want the trimmed clip to begin, orthe mark in position.
136
CyberLink PowerDirector
4. Click to set the mark in position.
5. Use the player controls or drag the timeline slider to position where you want
to audio clip to end, and then click to set the mark out position.
6. Click OK to set your changes and trim the clip.
Note: you can reenter the trim window to refine the trimmed clip at any time.
You can also drag the trimmed edges of the audio clip on the timeline as
well.
Setting a Media Clip's DurationWhen you add images, color boards, and backgrounds to a timeline track, you sethow long they are displayed in your video production. Unlike video and audio clipswhich have a maximum length, these media clips can have any duration you want.
Note: to set the duration of a video or audio clip, see Trimming Video and
Audio Clips.
To set a media clip's duration, do this:
Note: you can also set the duration of effects, such as PiP objects, particle
effects, and title effects, using this same method.
1. Select the clip in the timeline.
2. Click the Duration button (or right-click on the clip, select Set Clip Attributes,and then select Set Duration).
3. In the Duration Settings window, enter in the how long you want it to displayin your video production. You can set the duration down to the number offrames.
4. Click on OK.
You can also change the duration of a media clip (including video and audio clips)by selecting it and then dragging the end of the clip to the desired length.
Note: you can only lengthen a video or audio clip back to its original
duration.
137
Editing Your Media
Setting TV (Video ClipInterlacing) FormatAll video clips have an interlacing (TV) format, which specifies how frames aredisplayed. Using video clips with conflicting (or incorrect) TV formats can result indegraded video quality in your final production.
Before you produce your video, it is recommended that you set all of the videoclips to the same format. While CyberLink PowerDirector can normally detect andsuggest the correct format, some interlaced video (such as a video with very littlemotion) may be misjudged as a progressive video.
CyberLink PowerDirector automatically produces interlaced video for DVD, SVCDand DV-AVI. Only change this setting if you are sure that CyberLink PowerDirectorhas wrongly set the format.
Note: this is an extremely important step to take before production, as it
can drastically affect final video quality. It is recommended that you check
the user guide for your video camcorder to determine what format your video
should be.
To set a video clip's TV format, do this:
1. Right-click on a video clip in the timeline, select Set Clip Attributes, and thenSet TV format.
2. In the Interlace/Progressive Settings window, do one of the following:
· click the Scan and Suggest Format button to have CyberLink PowerDirectorauto detect and set the format for you.
· manually select one of the three available formats. See the description on theright of the window for a detailed description of each format.
3. Click OK to set your changes.
Adjusting Video Clip AspectRatioSome of the video clips in the timeline may not have the same aspect ratio as yourvideo production. You can adjust the aspect ratio for these clips, so that all themedia in your video production has the same aspect ratio.
138
CyberLink PowerDirector
To adjust a video clip's aspect ratio, do this:
1. Right-click on a video clip in the timeline, select Set Clip Attributes, and thenSet Aspect Ratio.
2. In the Clip Aspect Ratio Settings window, do one of the following:
· if you want your project to use the original aspect ratio of the selected videoclip, select Detect aspect ratio automatically. If the clip's aspect ratio isdifferent from the project's, then CyberLink PowerDirector will letterbox thevideo clip to fill in the rest of the frame.
· if the aspect ratio of the selected clip is 4:3, then select The aspect ratio of thevideo is 4:3 option. If the project ratio is 16:9, select the stretch method toconvert the 4:3 clip to 16:9.
· if the aspect ratio of the selected clip is 16:9, then select The aspect ratio of thevideo is 16:9 option. If the project ratio is 4:3, select the stretch method toconvert the 16:9 clip to 4:3.
· if the selected clip has an aspect ratio other than 4:3 or 16:9, then select theNeither 4:3 nor 16:9 option. Next, select the stretch method to convert thevideo clip's aspect ratio to the project's aspect ratio.
· if you are not sure what the aspect ratio of the original video clip is, click the Detect and Suggest button. CyberLink PowerDirector will select one of theabove options for you.
Note: for best results when changing a clip's aspect ratio, select the CLPV
option. CLPV (CyberLink Pano Vision) is video stretching technology from
CyberLink that produces minimal distortion in the center of the picture.
3. Select the Apply to all video clips option if you want to apply the currentsetting to all the video clips on the same track.
4. Click OK to set your changes.
Stretching ImagesSome of the images/photos in the timeline may not have the same aspect ratio asyour video production. You can stretch these images, so that all the media in yourvideo production has the same aspect ratio.
To stretch an image, do this:
139
Editing Your Media
1. Right-click on an image in the timeline, select Set Clip Attributes, and thenselect Set Image Stretch Mode.
2. In the drop-down in the Image Stretch Mode Settings window, select one ofthe following:
· Stretch clip to 4:3/16:9 aspect ratio: select this option if you want CyberLinkPowerDirector to stretch the sides of the select image to fit your project'saspect ratio.
· Use CLPV to stretch clip to 4:3/16:9 aspect ratio: select this option to use CLPVto stretch the image. CLPV (CyberLink Pano Vision) is an image stretchingtechnology from CyberLink that produces minimal distortion in the center ofthe image.
3. Select the Apply to all image clips option if you want to apply the
current setting to all the image clips on the same track.
4. Click OK to set your changes.
Cropping ImagesYou can completely customize the aspect ratio of the images in your videoproduction or crop out unwanted portions of a photo, using the crop imagefunction.
To crop an image, do this:
1. Select the image in the timeline and then click the button above thetimeline. You can also right-click on the image and then select Crop Image.
2. Set the size of the crop area by selecting one of the following:
· 4:3: gives the crop area, and the resulting cropped image, a 4:3 aspect ratio.
· 16:9: gives the crop area, and the resulting cropped image, a 16:9 aspect ratio.
· Freeform: select if you want to manually resize the crop area on the imageand give the resulting cropped image a custom aspect ratio.
· Custom: select if you want to set a custom aspect ratio for the cropped imageusing the Width and Height fields.
3. Use the Crop size controls to set the size of the crop area, and the resultingcropped image. You can also manually drag the edges of the crop area on theimage to resize it as required.

140
CyberLink PowerDirector
4. Click OK to set your changes and crop the image.
Changing the Shape of MediaCyberLink PowerDirector lets you change the shape of the media in your videoproduction. Videos, images, and PiP objects added to the timeline have freeformproperties, so you can easily change their shape to create media that is differentfrom the usual rectangle or square shape.
CyberLink PowerDirector lets you change the X and Y positions for the four cornersand the center of a media clip, giving it a custom freeform shape.
Note: the top-left corner of the video frame is the 0 axis, with the bottom-
right corner having a value of 1.0, 1.0. The center position in the video frame
is 0.500, 0.500.
To change the shape of a media clip, do this:
1. Select a media clip on the timeline, and then ensure that you are in the Clippreview mode so that the media crosshairs are displayed.
2. Use your mouse to click and drag the blue nodes in the corners of the mediaclip, changing it to the desired freeform shape.
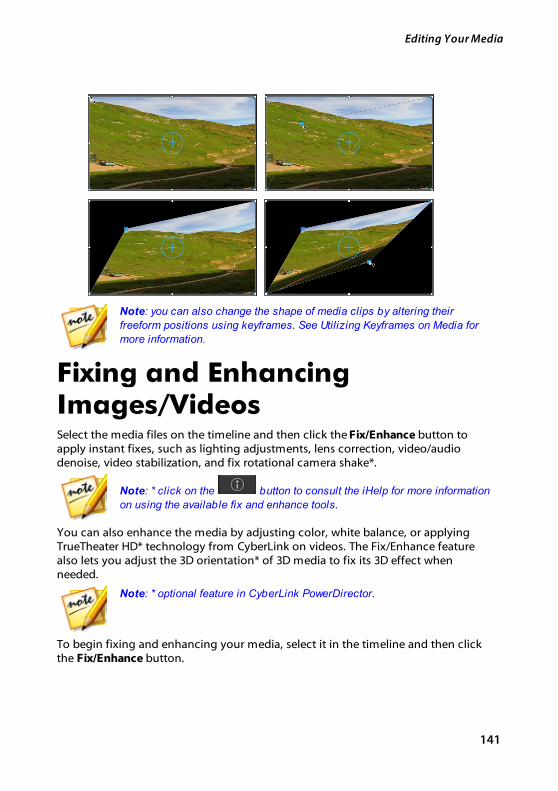
141
Editing Your Media
Note: you can also change the shape of media clips by altering their
freeform positions using keyframes. See Utilizing Keyframes on Media for
more information.
Fixing and EnhancingImages/VideosSelect the media files on the timeline and then click the Fix/Enhance button toapply instant fixes, such as lighting adjustments, lens correction, video/audiodenoise, video stabilization, and fix rotational camera shake*.
Note: * click on the button to consult the iHelp for more information
on using the available fix and enhance tools.
You can also enhance the media by adjusting color, white balance, or applyingTrueTheater HD* technology from CyberLink on videos. The Fix/Enhance featurealso lets you adjust the 3D orientation* of 3D media to fix its 3D effect whenneeded.
Note: * optional feature in CyberLink PowerDirector.
To begin fixing and enhancing your media, select it in the timeline and then clickthe Fix/Enhance button.
142
CyberLink PowerDirector
You can apply fixes and video enhancements to the entire duration of a media clip,or customize how they are displayed using keyframes. See Utilizing Keyframes onMedia for more information on customizing the way the fixes and enhancementsare displayed in your video production.
Applying ColorDirector Color PresetsIn the Fix/Enhance panel you can apply CyberLink ColorDirector presets on yourvideo clips, instantly transforming the color and look of the clips.
Note: ColorDirector presets can be downloaded from DirectorZone and
imported into the Fix/Enhance panel by clicking and then selecting the
downloaded preset file on your hard drive.
To apply a ColorDirector color preset, do this:
1. Select the video clip in the timeline and then click the Fix/Enhance button.
2. Select the Color Presets check box.
3. Select one of the available color presets to apply it to the selected clip.
Advanced Fixes and EnhancementsIf you have CyberLink PhotoDirector* and/or ColorDirector* installed on yourcomputer, you can access the advanced fixes and enhancements available in theseprograms from within CyberLink PowerDirector. The adjustments you make to yourmedia clips are then imported back into your current video production.
Note: * optional feature in CyberLink PowerDirector.
CyberLink PhotoDirector is a photography program that lets you manage andadjust your digital photos. CyberLink ColorDirector is a video editing program thatturns your video footage into eye-catching movies through the use of video colorcreating and correcting.
To adjust an image in CyberLink PhotoDirector, do this:
1. Select the image clip on the timeline, click the Fix / Enhance button above thetimeline, and then the PhotoDirector button. The CyberLink PhotoDirectorprogram opens.
143
Editing Your Media
2. Perform the adjustments on the image as necessary. Please consult the helpfile in CyberLink PhotoDirector for detailed information on adjusting andediting images in that program.
3. Once you finish adjusting the image file in CyberLink PhotoDirector, click the Back button within the program. Your changes are saved and the adjustedimage is imported back into the timeline.
To adjust a video clip in CyberLink ColorDirector, do this:
1. Select the video clip on the timeline, click the Fix / Enhance button above thetimeline, and then the ColorDirector button. The CyberLink ColorDirectorprogram opens.
2. Perform the adjustments on the video clip as necessary. Please consult thehelp file in CyberLink ColorDirector for detailed information on adjustingvideo clips in that program.
3. Once you finish editing the video clip in CyberLink ColorDirector, click theBack button within the program. Your changes are saved and the adjustedvideo clip is imported back into the timeline.
Utilizing Keyframes on MediaUse keyframes in your video production to define the start and end points of anapplied fix, enhancement, or effect on images, videos, and audio. You can also usekeyframes to change the volume level of your video and audio clips at specificmoments.
To use keyframes on your media, select the clip on the timeline and then click the Keyframe* button to open the Keyframe Settings panel. See the available KeyframeSettings below, and Adding Keyframes for information on applying these settingsat different moments in your video production.
Note: * optional feature in CyberLink PowerDirector. Check the version
table on our web site for detailed versioning information.
In the Keyframe Settings panel, the following options are available, depending onthe type of media selected:
144
CyberLink PowerDirector
Note: once you have customized the fixes, enhancements, and effects on a
clip using keyframes, you can right click on the clip and select Copy
Keyframe Attributes. This allows you to paste all of its keyframe
attributes onto another clip in the timeline, applying the same changes to
the clip. To apply just some of the keyframe attributes modified in this
panel, just right click on Fix/Enhance, Effect, Clip Attributes, or Volume
to copy and paste the changes to another clip.
Fix/Enhance
Use the available sliders to fix and enhance images, videos, and audio clips at thecurrent keyframe in your video production.
· Lighting Adjustment: adjust the lighting in video clips using the Degree slider.Select Extreme backlight if you need to adjust the back lighting in the clip.
· Video Denoise: use the Degree slider to increase or decrease the amount ofvideo noise in video clips.
· Audio Denoise: for video and audio clips, use the Audio Denoise feature toremove unwanted noise from clips. Select the type of noise from the drop-down you are removing, and then use the Degree slider to set the intensity ofdenoise on the clip.
· Video Enhancement: use the Degree slider to set the amount of TrueTheaterHD video enhancement applied to video clips.
· Color Adjustment: use the available sliders to adjust the exposure, brightness,contrast, hue, saturation, sharpness, and more on images and videos.
· White Balance: use the Color temperature and Tint sliders to manually adjustthe white balance in images and videos, or select White calibration and then
click to have CyberLink PowerDirector auto calibrate for you.
Effect
When you apply video effects to media clips on the timeline, you can usekeyframes to adjust the intensity of the effect at different moments of the clip. See Adding Video Effects for information on adding effects to your media.
Note: the settings and sliders that are available in the Keyframe Settings
panel are completely dependent on the type of effect you are editing.
145
Editing Your Media
Clip Attributes
In the Clip Attributes section you can adjust the position, size, opacity, freeformshape, and more for media clips in your video production.
· Position: set the position of media clips at different moments (keyframes) inyour video production. Adjusting the X and Y values between keyframes letsyou manually create motion in your video. When you create motion for PiPmedia, you indicate where on the video image you want the PiP media toappear by adding keyframes. To create the motion, CyberLink PowerDirectorwill ensure it is in the desired location at the specified time. This can cause thePiP media to appear jerky, as it speeds up and slows down as it movesthrough the frame. To make the movement look smoother, you can use theEase in/out options. Select Ease in to slow down the PiP media as it enters akeyframe. Select Ease out if you want it to gradually accelerate out of thekeyframe.
Note: CyberLink PowerDirector sets the value of the top-left corner of the
media as the 0 axis, with the bottom-right corner having a value of 1.0, 1.0.
The center position in the video frame is 0.500, 0.500.You can more easily
adjust clip position and motion in the PiP Designer. See Adding Motion to
PiP Media for more details.
· Height: set the height of media clips at different moments (keyframes) in yourvideo production.
· Width: set the width of media clips at different moments (keyframes) in yourvideo production.
Note: by default, when you adjust the height or width of a clip, the other
value is also changed. Deselect the M aintain Aspect Ratio checkbox if
you just want to change a clip's height or width.
· Opacity: use the slider to adjust the opacity of images and video clips atdifferent moments (keyframes) in your video production.
· Rotation: enter in the preferred orientation in degrees for media clips atdifferent moments (keyframes) in your video production.
· Freeform position: in the eight freeform position fields provided, define theshape of the selected media clip by setting the X and Y positions for its fourcorners in the video frame. By entering different values at different moments(keyframes) in your video production, the clip's freeform shape can changeover time in your video production. See Changing the Shape of Media formore information on freeform media clips.
146
CyberLink PowerDirector
· Enable 3D depth on the PiP media: if you are creating a 3D video production,select this option to give the PiP media a 3D* effect. Once enabled, use theslider to set the amount of depth you want the PiP media to have in 3D.Dragging the slider left will make the 3D PiP object seem nearer to theaudience (in the foreground), while dragging it right will make it appearfarther away (in the background).
Note: when using this feature, select the button to enable 3D mode for
best editing results. See Previewing in 3D Mode for more information on
using this mode. * Optional feature in CyberLink PowerDirector. Check the
version table on our web site for detailed versioning information.
Volume
For video and audio clips in your video production, use the available slider to adjustthe level of the selected clip's volume at different moments in your production.
Adding KeyframesIn the Keyframe Settings window, there is a mini timeline for the selected mediaclip. The timeline matches the duration of the selected media clip.
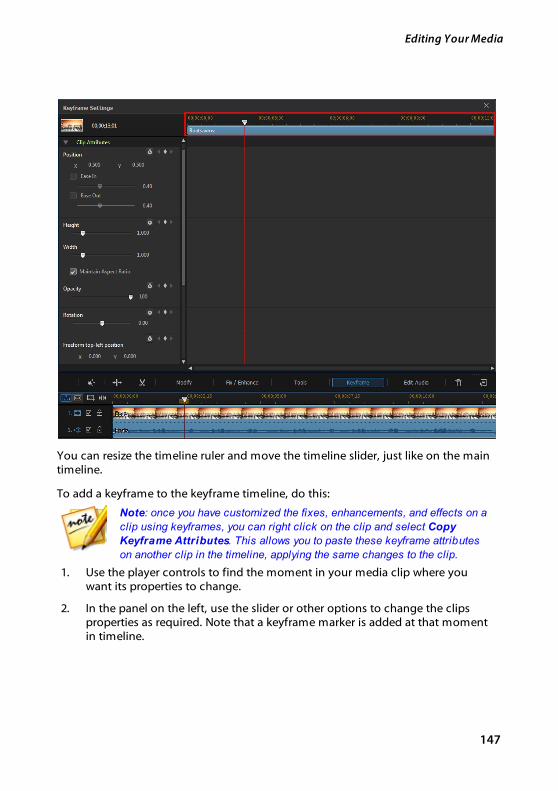
147
Editing Your Media
You can resize the timeline ruler and move the timeline slider, just like on the maintimeline.
To add a keyframe to the keyframe timeline, do this:
Note: once you have customized the fixes, enhancements, and effects on a
clip using keyframes, you can right click on the clip and select Copy
Keyframe Attributes. This allows you to paste these keyframe attributes
on another clip in the timeline, applying the same changes to the clip.
1. Use the player controls to find the moment in your media clip where youwant its properties to change.
2. In the panel on the left, use the slider or other options to change the clipsproperties as required. Note that a keyframe marker is added at that momentin timeline.
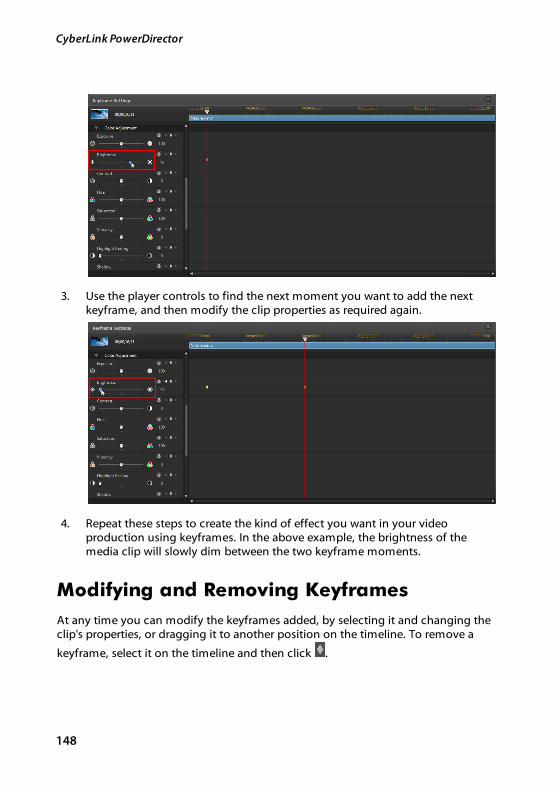
148
CyberLink PowerDirector
3. Use the player controls to find the next moment you want to add the nextkeyframe, and then modify the clip properties as required again.
4. Repeat these steps to create the kind of effect you want in your videoproduction using keyframes. In the above example, the brightness of themedia clip will slowly dim between the two keyframe moments.
Modifying and Removing Keyframes
At any time you can modify the keyframes added, by selecting it and changing theclip's properties, or dragging it to another position on the timeline. To remove a
keyframe, select it on the timeline and then click .
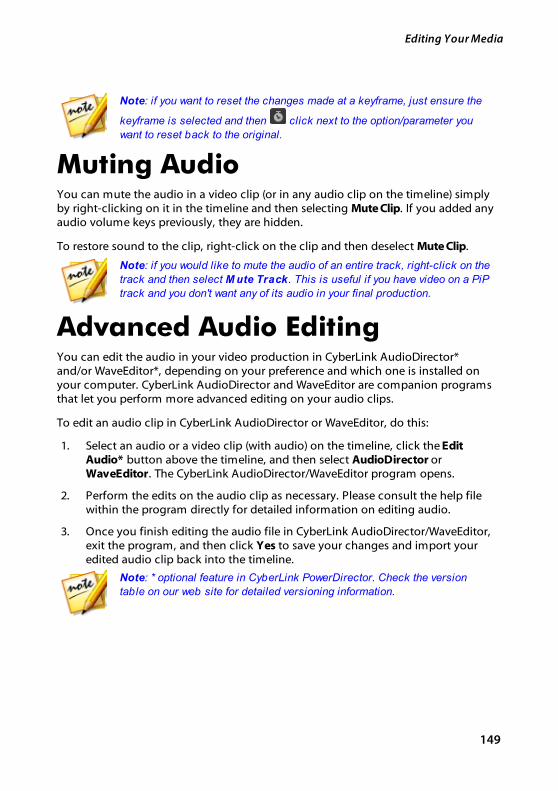
149
Editing Your Media
Note: if you want to reset the changes made at a keyframe, just ensure the
keyframe is selected and then click next to the option/parameter you
want to reset back to the original.
Muting AudioYou can mute the audio in a video clip (or in any audio clip on the timeline) simplyby right-clicking on it in the timeline and then selecting Mute Clip. If you added anyaudio volume keys previously, they are hidden.
To restore sound to the clip, right-click on the clip and then deselect Mute Clip.
Note: if you would like to mute the audio of an entire track, right-click on the
track and then select M ute Track. This is useful if you have video on a PiP
track and you don't want any of its audio in your final production.
Advanced Audio EditingYou can edit the audio in your video production in CyberLink AudioDirector*and/or WaveEditor*, depending on your preference and which one is installed onyour computer. CyberLink AudioDirector and WaveEditor are companion programsthat let you perform more advanced editing on your audio clips.
To edit an audio clip in CyberLink AudioDirector or WaveEditor, do this:
1. Select an audio or a video clip (with audio) on the timeline, click the EditAudio* button above the timeline, and then select AudioDirector orWaveEditor. The CyberLink AudioDirector/WaveEditor program opens.
2. Perform the edits on the audio clip as necessary. Please consult the help filewithin the program directly for detailed information on editing audio.
3. Once you finish editing the audio file in CyberLink AudioDirector/WaveEditor,exit the program, and then click Yes to save your changes and import youredited audio clip back into the timeline.
Note: * optional feature in CyberLink PowerDirector. Check the version
table on our web site for detailed versioning information.
150
CyberLink PowerDirector
Time InfoWhen a DV-AVI video clip captured from a DV tape camcorder or an EXIF image isadded to the timeline, the Time Info button is enabled. Click the Time Info buttonto enable the date or time stamp (displayed as an image) that was captured fromthe original camcorder or digital camera. You may also add a text remark to yourvideo or image if required.
Note: CyberLink PowerDirector does not support the enabling of running
time codes on video files.
Magic FixWith Magic Fix CyberLink PowerDirector can auto stabilize videos taken with shakyhands, enhance a video's audio, or the quality of a video's image. Magic Fix can alsoauto remove red-eye from photos, or improve the clarity on photos that are out offocus.
To use Magic Fix to fix and edit a media clip, select it on the timeline, click on the
button above the timeline, and then select Magic Fix.
Click on the button to consult the iHelp for more information on usingthese features.
Magic CutYou can use Magic Cut* to have CyberLink PowerDirector auto-edit your video clipsusing video technology that locates and keeps the most interesting moments,while discarding sections of lesser importance. The Magic Cut tool is ideal forcondensing long video segments into shorter clips. For example Magic Cut can edita one hour video down to ten minutes.
Note: * optional feature in CyberLink PowerDirector. Check the version
table on our web site for detailed versioning information.
To use Magic Cut on a video clip, select it on the timeline, click on the button above the timeline, and then select Magic Cut.

151
Editing Your Media
Click on the button to consult the iHelp for more information on using thisfeature.

152
CyberLink PowerDirector
Using the Tools
Chapter 9:
CyberLink PowerDirector includes a number of tools you can use to edit your mediaand add cool and creative effects. Select a media clip on the timeline, and thenclick the Tools button to use one of the following tools:
· Power Tools
· Motion Tracker
· Action Camera Center
Note: * optional feature in CyberLink PowerDirector. Check the version
table on our web site for detailed versioning information.
Using the Power ToolsSelect a media clip on the timeline, then the Tools button, and then Power Tools toperform a range of powerful functions, including:
· 2D to 3D*: select this option to convert any 2D images or videos into 3D,using TrueTheater 3D. Use the Scene Depth slider to adjust the amount ofdepth in the resulting 3D image.
· Video/Audio in Reverse*: when enabled on a selected video or audio clip, itplays backwards.
· Crop & Zoom: select this option to crop out the edges of the video frame orzoom in on a specific portion of the video. Select the Crop/Zoom button todefine the area you want to crop out/zoom in on. If you just want to crop the
video, ensure the first and last keyframes are the same using the button.If you want a zooming in effect, the first and last keyframes should bedifferent by adjusting the focus area. See Magic Motion Designer for detailedinformation on customizing the zoom by adjusting the cropped area (focusarea) of the video.
· Video/Audio Speed: select this option to change the speed of a video or audioclip. For audio clips, just enter the desired audio length in the Modified audiolength field to change the clip's speed. You can also use the Speed multiplierslider to speed audio up by 2X, or slow it down by 0.5X. Drag it left to slow
153
Using the Tools
down the clip, or right to speed it up. For video clips, click the SpeedAdjustment button to adjust the video speed in the Video Speed Designer. SeeAdjusting Video Speed in the Video Speed Designer for more details onadjusting the speed.
Note: you can also hold down the Ctrl key on your keyboard and then click
and drag the edge of a video or audio clip on the timeline to manually
change its speed to fit your required duration.
· Video/Photo Rotation: select this option and then use the buttons to rotate avideo or image up to 360 degrees in either direction. You can also enter in acustom rotation amount in the field provided, and press the Enter key on yourkeyboard to apply it.
Note: * optional feature in CyberLink PowerDirector. Check the version
table on our web site for detailed versioning information.
Adjusting Video Speed in the VideoSpeed DesignerThe Video Speed Designer* let's you change the speed of an entire video clip, or justa selected range using time shifts.
Note: * optional feature in CyberLink PowerDirector. Check the version
table on our web site for detailed versioning information.
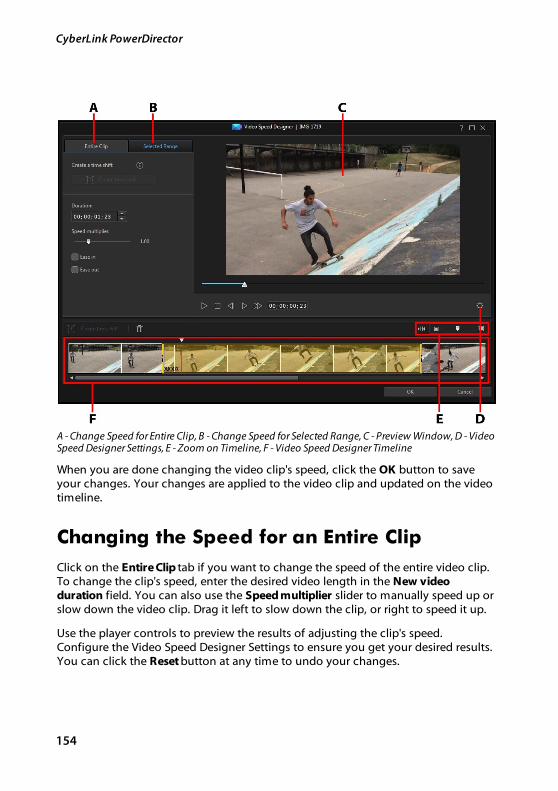
154
CyberLink PowerDirector
A - Change Speed for Entire Clip, B - Change Speed for Selected Range, C - Preview Window, D - VideoSpeed Designer Settings, E - Zoom on Timeline, F - Video Speed Designer Timeline
When you are done changing the video clip's speed, click the OK button to saveyour changes. Your changes are applied to the video clip and updated on the videotimeline.
Changing the Speed for an Entire Clip
Click on the Entire Clip tab if you want to change the speed of the entire video clip.To change the clip's speed, enter the desired video length in the New videoduration field. You can also use the Speed multiplier slider to manually speed up orslow down the video clip. Drag it left to slow down the clip, or right to speed it up.
Use the player controls to preview the results of adjusting the clip's speed.Configure the Video Speed Designer Settings to ensure you get your desired results.You can click the Reset button at any time to undo your changes.
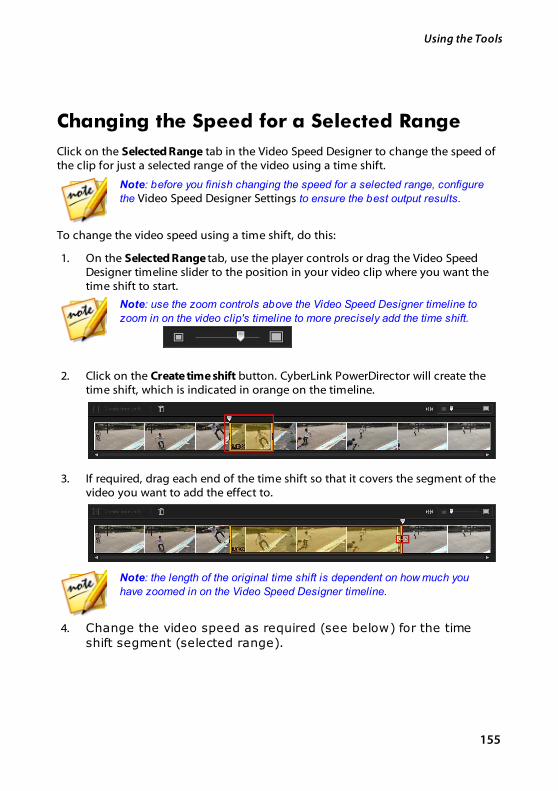
155
Using the Tools
Changing the Speed for a Selected Range
Click on the Selected Range tab in the Video Speed Designer to change the speed ofthe clip for just a selected range of the video using a time shift.
Note: before you finish changing the speed for a selected range, configure
the Video Speed Designer Settings to ensure the best output results.
To change the video speed using a time shift, do this:
1. On the Selected Range tab, use the player controls or drag the Video SpeedDesigner timeline slider to the position in your video clip where you want thetime shift to start.
Note: use the zoom controls above the Video Speed Designer timeline to
zoom in on the video clip's timeline to more precisely add the time shift.
2. Click on the Create time shift button. CyberLink PowerDirector will create thetime shift, which is indicated in orange on the timeline.
3. If required, drag each end of the time shift so that it covers the segment of thevideo you want to add the effect to.
Note: the length of the original time shift is dependent on how much you
have zoomed in on the Video Speed Designer timeline.
4. Change the video speed as required (see below) for the timeshift segment (selected range).
156
CyberLink PowerDirector
Note: you can create more than one time shift on a video clip. Just repeat
the above steps to add another.
Speed Effect
Make sure the created time shift is selected on the Video Speed Designer timelineand enter a new Duration for the selected range in the field provided, or use theSpeed multiplier slider. Drag it left to slow down the segment, or right to speed itup.
When you apply a speed effect to a selected range, by default the change in thespeed in the video is instantaneous once the timeline slider enters the time shift. Ifyou want it to be more gradual and look smoother, you can use the Ease in/outoptions. Select Ease in if you want the change of speed at the beginning of the timeshift to gradually speed up/slow down to the specified speed. Select Ease out if youwant the video to gradually return to the original video speed at the end of the timeshift.
Video Speed Designer Settings
Click the button in the Video Speed Designer window to open the settingswindow. The available options are as follows:
Audio setting:
· Remove audio: select this option if you want to mute the audio in the entirevideo clip.
· Keep audio: select this option if you want to keep the audio in the editedvideo clip. Select the Keep audio pitch (05X to 2X only) if you are changing thespeed of the video. Selecting this will stretch the audio to match the newvideo's length, minimizing the warping of the sound as the video speedchanges.
Interpolation setting:
· Apply interpolated technology when available: select this option whenreducing the speed of the video. CyberLink PowerDirector uses frameinterpolated technology* to create a more advanced and smooth slow motioneffect.
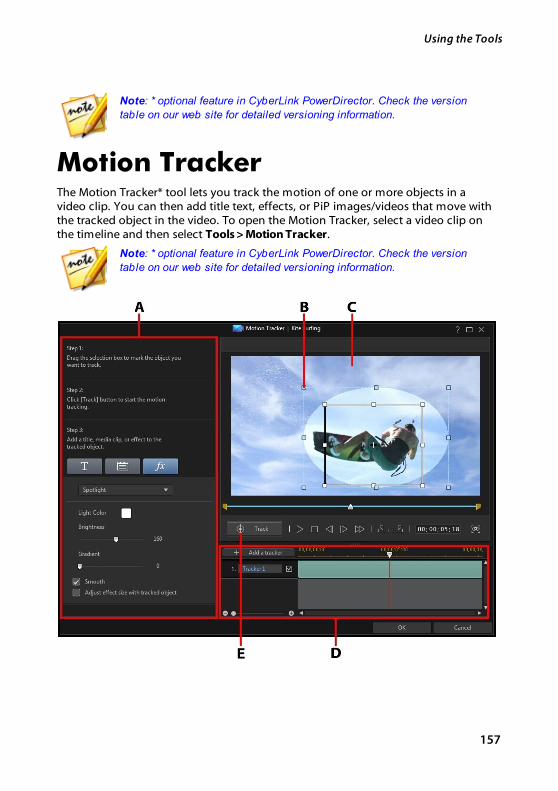
157
Using the Tools
Note: * optional feature in CyberLink PowerDirector. Check the version
table on our web site for detailed versioning information.
Motion TrackerThe Motion Tracker* tool lets you track the motion of one or more objects in avideo clip. You can then add title text, effects, or PiP images/videos that move withthe tracked object in the video. To open the Motion Tracker, select a video clip onthe timeline and then select Tools > Motion Tracker.
Note: * optional feature in CyberLink PowerDirector. Check the version
table on our web site for detailed versioning information.
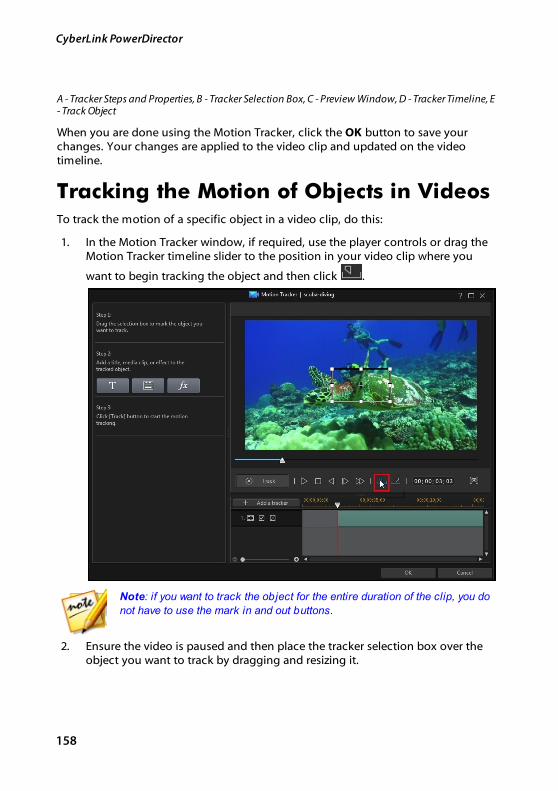
158
CyberLink PowerDirector
A - Tracker Steps and Properties, B - Tracker Selection Box, C - Preview Window, D - Tracker Timeline, E- Track Object
When you are done using the Motion Tracker, click the OK button to save yourchanges. Your changes are applied to the video clip and updated on the videotimeline.
Tracking the Motion of Objects in VideosTo track the motion of a specific object in a video clip, do this:
1. In the Motion Tracker window, if required, use the player controls or drag theMotion Tracker timeline slider to the position in your video clip where you
want to begin tracking the object and then click .
Note: if you want to track the object for the entire duration of the clip, you do
not have to use the mark in and out buttons.
2. Ensure the video is paused and then place the tracker selection box over theobject you want to track by dragging and resizing it.
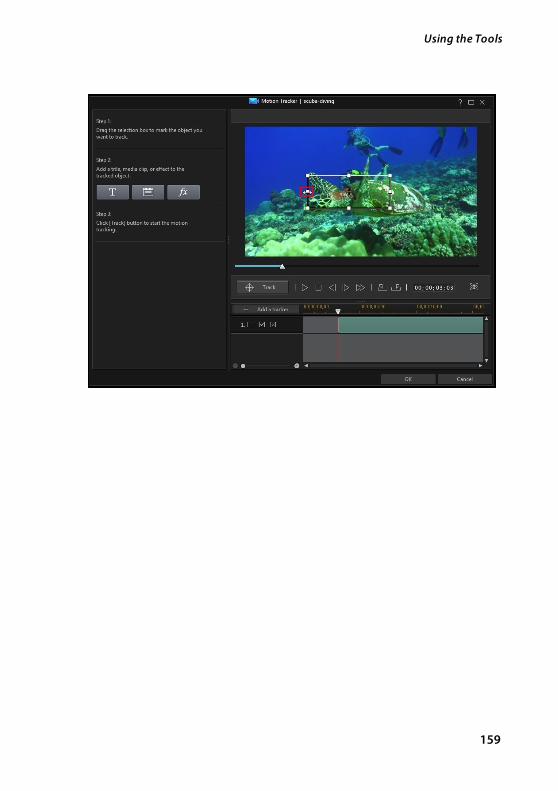
159
Using the Tools
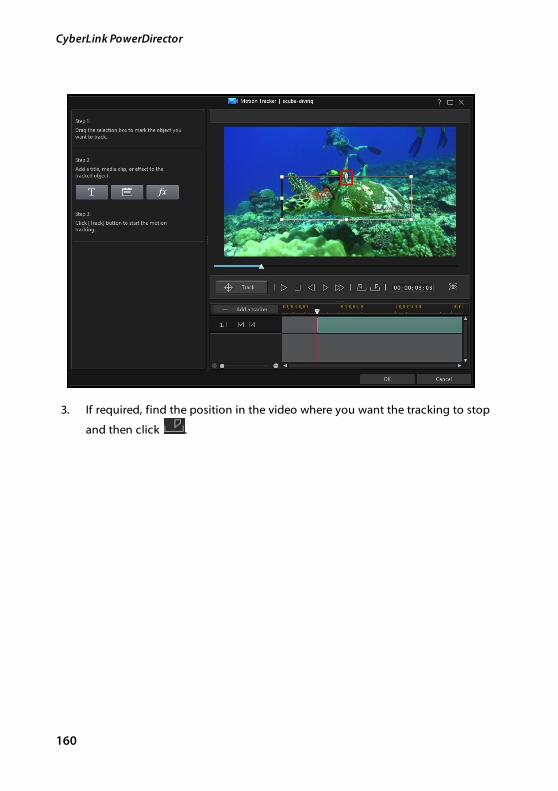
160
CyberLink PowerDirector
3. If required, find the position in the video where you want the tracking to stop
and then click .
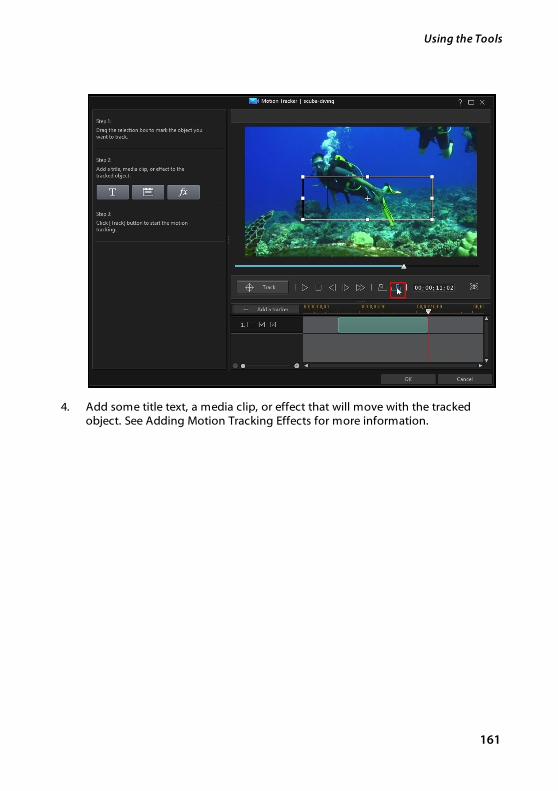
161
Using the Tools
4. Add some title text, a media clip, or effect that will move with the trackedobject. See Adding Motion Tracking Effects for more information.
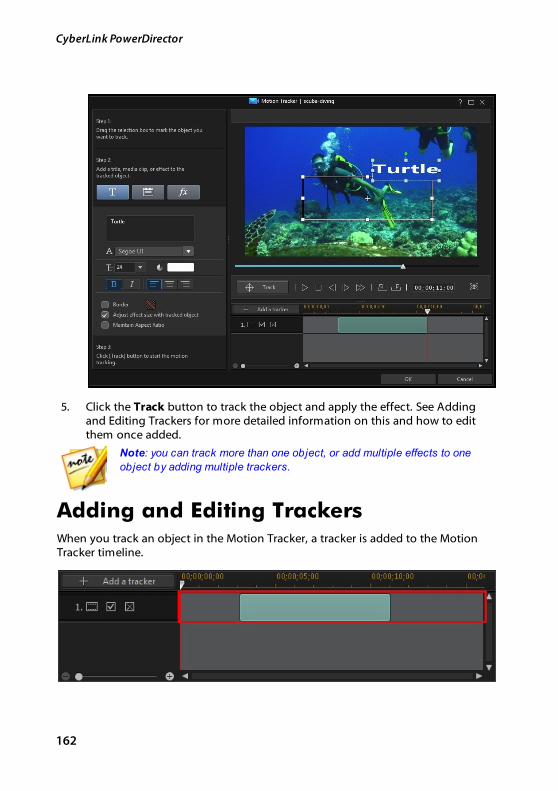
162
CyberLink PowerDirector
5. Click the Track button to track the object and apply the effect. See Addingand Editing Trackers for more detailed information on this and how to editthem once added.
Note: you can track more than one object, or add multiple effects to one
object by adding multiple trackers.
Adding and Editing TrackersWhen you track an object in the Motion Tracker, a tracker is added to the MotionTracker timeline.
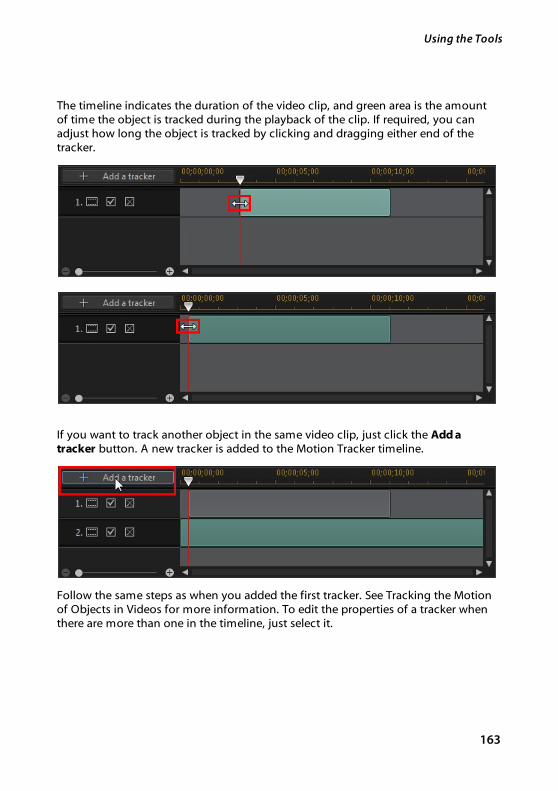
163
Using the Tools
The timeline indicates the duration of the video clip, and green area is the amountof time the object is tracked during the playback of the clip. If required, you canadjust how long the object is tracked by clicking and dragging either end of thetracker.
If you want to track another object in the same video clip, just click the Add atracker button. A new tracker is added to the Motion Tracker timeline.
Follow the same steps as when you added the first tracker. See Tracking the Motionof Objects in Videos for more information. To edit the properties of a tracker whenthere are more than one in the timeline, just select it.
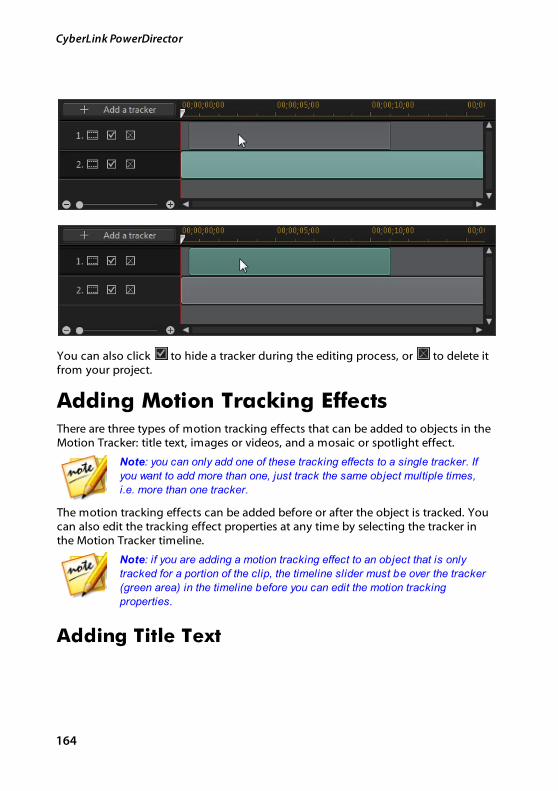
164
CyberLink PowerDirector
You can also click to hide a tracker during the editing process, or to delete itfrom your project.
Adding Motion Tracking EffectsThere are three types of motion tracking effects that can be added to objects in theMotion Tracker: title text, images or videos, and a mosaic or spotlight effect.
Note: you can only add one of these tracking effects to a single tracker. If
you want to add more than one, just track the same object multiple times,
i.e. more than one tracker.
The motion tracking effects can be added before or after the object is tracked. Youcan also edit the tracking effect properties at any time by selecting the tracker inthe Motion Tracker timeline.
Note: if you are adding a motion tracking effect to an object that is only
tracked for a portion of the clip, the timeline slider must be over the tracker
(green area) in the timeline before you can edit the motion tracking
properties.
Adding Title Text
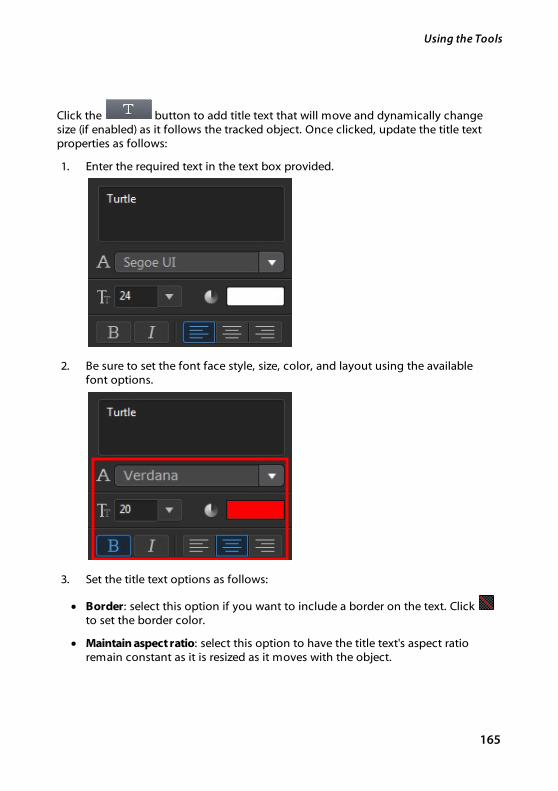
165
Using the Tools
Click the button to add title text that will move and dynamically changesize (if enabled) as it follows the tracked object. Once clicked, update the title textproperties as follows:
1. Enter the required text in the text box provided.
2. Be sure to set the font face style, size, color, and layout using the availablefont options.
3. Set the title text options as follows:
· Border: select this option if you want to include a border on the text. Click to set the border color.
· Maintain aspect ratio: select this option to have the title text's aspect ratioremain constant as it is resized as it moves with the object.
166
CyberLink PowerDirector
· Adjust effect size with tracked object: select this option if you want the titletext to dynamically resize as the tracked object's size changes.
Note: once you exit the Motion Tracker and your changes are applied to the
video clip, a title text template is added to the video timeline independently.
If required, you can perform advanced editing on the title text's font, motion,
size, etc. in the Title Designer. See Modifying Titles in the Title Designer
for more information.
Adding Images and Videos
Click the button to add an image or video clip that will move anddynamically change size (if enabled) as it follows the tracked object. Once clicked,add the image/video clip as follows:
1. Click the Import an Image or Video button, and then:
· Import From Hard Drive: to import a file that is on your computer's harddrive.
· Import From Media Room: to import a file you previously imported into thecurrent PowerDirector project.
2. If required, resize the image or video clip in the preview window to your liking.
3. Set the image/video options as follows:
· Border: select this option if you want to include a border around the
image/video. Click to set the border color.
· Smooth: selecting this option if there is a lot of movement by the object. Thiswill minimize the amount of shake on the image/video at it follows the object.
· Adjust effect size with tracked object: select this option if you want theimage/video to dynamically resize as the tracked object's size changes.
Note: once you exit the Motion Tracker and your changes are applied to the
video clip, the added image/video clip is added to the video timeline
independently. If required, you can perform advanced editing on the clip's
motion, size, etc. in the PiP Designer. See Modifying Media in the PiP
Designer for more information.
167
Using the Tools
Adding Mosaic and Spotlight Effects
Click the button to add a mosaic or spotlight effect that will move anddynamically change size (if enabled) as it follows the tracked object. Once clicked,add the effects as follows:
1. From the available drop-down, select the effect you want to apply:
· Mosaic: this effects lets you blur out portions of the tracked object, forexample a person's face.
· Spotlight: this effect highlights the tracked object in the video.
2. If required, resize the effect in the preview window to your liking.
3. Depending on the effect you selected, modify the effect properties as follows:
· Grid scale: for the mosaic effect, drag this slider to adjust the size of thesquares that create the blur effect.
· Light color: for the spotlight effect, click the colored box to set the color ofthe spotlight.
· Brightness: for the spotlight effect, drag this slider to adjust the brightness ofthe spotlight.
· Gradient: for the spotlight effect, drag this slider to adjust gradient and size ofthe spotlight.
· Adjust effect size with tracked object: for both effects, select this option if youwant the effect to dynamically resize as the tracked object's size changes.
Note: once you exit the Motion Tracker and your changes are applied to the
video clip, you can perform advanced editing on the effect in the Effect
Settings panel. See Modifying a Video Effect for more information.
Action Camera CenterIn the Action Camera Center you can fix video clips or add effects that highlight theaction sequences in the video. To open the Action Camera Center, select a videoclip on the timeline and then select Tools > Action Camera Center.

168
CyberLink PowerDirector
Note: you can also use the Action Camera Center on clips that are still in
the media library. To do this, select it in media library, click the button,
and then select Action Camera Center.
See Editing Video in the Action Camera Center for a detailed description of thisfeature.
169
Adding Effects
Adding Effects
Chapter 10:
You can add many different kinds of effects to your video production, includingvideo effects that you apply to a portion or the entire media clip. Use Magic Motionto apply a motion effect to images in your video production, or the Magic Style andFreeze Frame features to auto create some effects for you.
Adding Video Effects
Select the button to open the Effect Room and access over 100 effects you canadd to your images and video clips. Each effect has unique attributes that you cancustomize to help achieve the impression you want in your video production.
Note: CyberLink PowerDirector includes the video effects lens flare, tilt
shift, water reflection, and magnifier. You can find these effects by clicking
on the Special tag in the explorer view.
CyberLink PowerDirector includes many video effects from NewBlue*. To view theseeffects, select the NewBlue Art Effects filter from the drop-down in the effectslibrary. To view extra help and information about these effects, add them to yourproduction, select them, and then click the Modify button. In the Effect Settingspanel, select the Help and Information buttons for more detailed information.
Note: * optional feature in CyberLink PowerDirector. Check the version
table on our web site for detailed versioning information.
To insert a video effect to a portion of a clip in the timeline, do one of thefollowing:
· select an effect in the Effect Room and then click to add itto the effect track at the current position of the timeline slider.
Note: videos effects in the effect track are applied to all the video tracks
that are positioned above it in the timeline.
· drag an effect from the Effect Room into the effect track directly beneath theclips on the tracks that you want to apply it to.
170
CyberLink PowerDirector
· right-click on an effect and select Add to Timeline to add it to the currentposition of the timeline slider.
· click and then select Apply Random Video Effect to add a random videoeffect at the current position of the timeline slider.
When adding an effect to the timeline (inserting or dragging and dropping), if thetimeline slider is over an existing effect, or you drop it on an existing effect, you areprompted to do one of the following:
· Overwrite: select to overwrite the existing effect with the newly added effect.
· Insert: select to split the effect and insert the new effect between the twoportions. CyberLink PowerDirector also only moves the effects on the sametrack to the right.
· Insert and Move All Clips: select to split the effect and insert the new effectbetween the two portions. CyberLink PowerDirector also moves all of themedia clips on the timeline that lie to the right of the inserted effect, right.
Note: once an effect is added to the effect track, select it and then click the
M odify button to edit the effect's settings. See Modifying a Video Effect for
more information.
To add a video effect to an entire media, PiP object, or title template clip in thetimeline, do this:
Note: video effects cannot be added to an entire paint animation or particle
effect clip.
· select an effect in the Effect Room, drag it to a video track, and then drop iton top of the media, PiP object, or title effect clip you want to apply it to. Thevideo effect is applied to the entire duration of the clip.
Note: to modify the settings of a video effect applied to the entire clip, select
the clip on the timeline and then click the Effect button. See Modifying a
Video Effect for more information.
Modifying a Video EffectMany video effects let you customize their properties, such as the intensity,position, and much more. You can customize a video effect for the entire duration(clip mode) or customize it using keyframes (keyframe mode).
171
Adding Effects
To modify a video effect, double click on it in the timeline or select it and then clickModify. To modify a video effect that is applied to an entire clip, select the clip andthen click the Effect button above the timeline.
You can modify video effects in one of two modes:
Note: the type of modifications that are available in the Effect Settings panel
are completely dependent on the effect you selected.
· Clip Mode: when the Effect Settings panel first opens, it displays in clip mode.Any changes you make to the effect's settings are applied for the entireduration of the effect. Use the available sliders and options to customize thevideo effect to your preference.
· Keyframe Mode*: some effects utilize keyframes to customize an effect'ssettings. Keyframes are frames of your video that define the start and endpoints of an effect, for example the intensity of an effect between twokeyframes. To customize an effect in keyframe mode, click the Keyframebutton in the Effect Settings panel. See Utilizing Keyframes on Media fordetailed information on using keyframes to customize effects in yourproduction.
Note: to remove an effect applied to an entire clip, deselect the effect name
in the Effect Settings panel when in Clip Mode. * optional feature in
CyberLink PowerDirector. Check the version table on our web site for
detailed versioning information.
Using Magic MotionCyberLink PowerDirector's Magic Motion tool adds zooms or pans to images,creating a motion effect in your final video. You can select from a number ofmotion templates for each photo in your project, or use the Magic Motion Designerto customize the motion to your liking.
To use Magic Motion, do this:
1. Select an image on the timeline, click the button above the timeline,and then select Magic Motion. The Magic Motion panel opens.
2. Select one of the available Magic Motion templates.
3. Use the preview player controls to preview the applied motion template.

172
CyberLink PowerDirector
4. If required, click on the Motion Designer button to customize the motion inthe Magic Motion Designer.
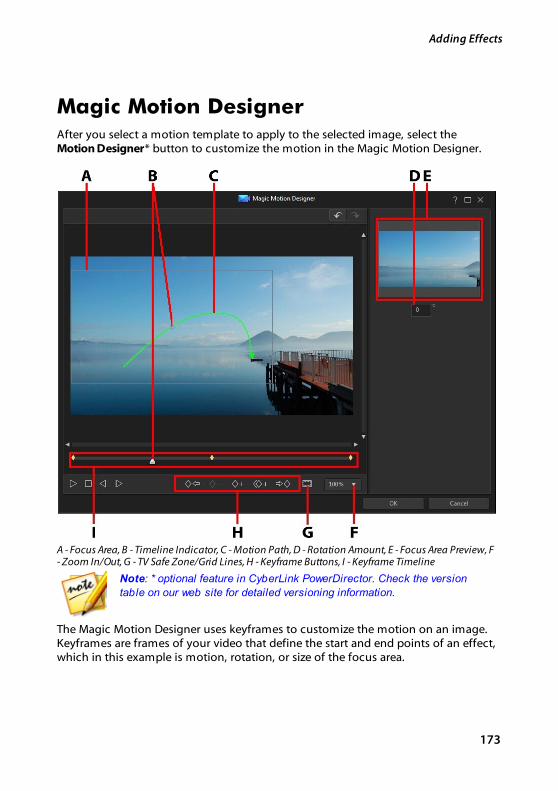
173
Adding Effects
Magic Motion DesignerAfter you select a motion template to apply to the selected image, select the Motion Designer* button to customize the motion in the Magic Motion Designer.
A - Focus Area, B - Timeline Indicator, C - Motion Path, D - Rotation Amount, E - Focus Area Preview, F- Zoom In/Out, G - TV Safe Zone/Grid Lines, H - Keyframe Buttons, I - Keyframe Timeline
Note: * optional feature in CyberLink PowerDirector. Check the version
table on our web site for detailed versioning information.
The Magic Motion Designer uses keyframes to customize the motion on an image.Keyframes are frames of your video that define the start and end points of an effect,which in this example is motion, rotation, or size of the focus area.
174
CyberLink PowerDirector
In the Magic Motion Designer you can:
· use the player controls or drag the slider to preview the current motion in thepreview window.
· click on to add keyframes to the keyframe timeline. By adding keyframesyou can alter the motion, rotation, or size of the focus area between twopoints on the keyframe timeline.
· click on to duplicate the previous or next keyframe on the keyframetimeline. Doing this copies the properties of the specified keyframe to the newposition.
· resize the focus area at keyframe positions on the keyframe timeline to definethe areas on the image you want to highlight or focus on.
· click and drag the motion path to alter the movement of the focus area.
· add a rotation effect at keyframe positions on the keyframe timeline byentering the rotation amount in the field provided and then pressing the Enter
key on your keyboard. You can also click and drag on top of the focus areato rotate the focus area manually.
· click on to to zoom in or out on the preview window. Zooming inis useful for precise movement of motion, while you can zoom out if youwant to start the motion off screen.
· click on to use the TV safe zone and grid lines to help with the preciseplacement of the focus area on the image. Select Snap to Reference Lines tohave the focus area snap to the grid lines, TV safe zone, and boundary of thevideo area.
Using Magic StyleWith Magic Style you can auto create professional looking videos using pre-designed style templates. Magic Style includes pre-designed opening sequences,transitions, and effects to automatically generate professional-looking videos onyour timeline.
Note: the Magic Style templates with the 3D icon produce a 3D effect in 3D
mode and when outputted in 3D video productions.
175
Adding Effects
To use Magic Style to add effects and some style to media clips in your video
production, select them on the timeline, click the button above thetimeline, and then select Magic Style.
Click on the button to consult the iHelp for more information on using thisfeature.
Note: if you want more creative control than the Magic Style provides, you
can also use the Theme Designer to create your video production. The
Theme Designer allows you to customize the theme templates used and
choose the exact photos, video clips, and background music you want in
your production. See Using the Theme Designer for more information.
Using the Freeze Frame EffectRight-click on a video clip on the timeline, select Edit Video/Photo and then FreezeFrame to instantly create a freeze frame effect. CyberLink PowerDirector takes asnapshot of the current frame of video and then inserts it into the timeline, alongwith a video and title effect, creating a freeze frame effect. Edit the inserted imageand effects to your specification to ensure the freeze frame effect fits yourrequirements.
You can choose to not have CyberLink PowerDirector insert the effects bydeselecting the option in preferences. See Editing Preferences for moreinformation.
176
CyberLink PowerDirector
Creating PiP Effects
Chapter 11:
In CyberLink PowerDirector there are many PiP (picture in picture) effects you cancreate and use in your video production. PiP effects not only include the use of PiPobjects, but also adding motion or modifying the properties of media clips on anytrack in timeline, creating custom hand drawn paint animation objects in the PaintDesigner, using the chroma key effect, and much more.
Adding PiP ObjectsClick the button to open the PiP Objects Room to access a library of PiPobjects, or graphics, that you can add on top of the video or images on a videotrack.
Note: the PiP Objects Room also includes paint animation objects. See
Using the Paint Designer for more information.
To insert a PiP object, or paint animation object, to the timeline, do one of thefollowing:
Note: you can download additional PiP and paint animation objects from the
DirectorZone web site. See Downloading from DirectorZone for more
information.
· use the timeline slider to set the position where you want the PiP or paint
animation object, select it in the library, and then click toadd it to the selected video track.
· use the timeline slider to set the position where you want the PiP or paintanimation object, right-click on it in the library, and then select Add toTimeline to add it to the selected video track.
You can also manually drag and drop a PiP or paint animation object to a desiredposition on a video track to add it to the timeline.
When adding a PiP or paint animation object to the timeline (inserting or draggingand dropping), if the timeline slider is over an existing clip, or you drop it on anexisting clip, you are prompted to use one of these ripple editing options to insertthe clip:
177
Creating PiP Effects
· Overwrite: select to overwrite the existing clip with the PiP/paint animationobject.
· Insert: select to split the clip and insert the PiP object/paint animation objectbetween the two portions. CyberLink PowerDirector also only moves the clipson the same track to the right.
· Insert and Move All Clips: select to split the clip and insert the PiP/paintanimation object between the two portions. CyberLink PowerDirector alsomoves all of the media clips on the timeline that lie to the right of the insertedclip, right.
· Crossfade: select to lay the PiP/paint animation object over a portion of theexisting clip and auto add a fade transition between the two clips.
Note: the Crossfade option does not overwrite the content on the track,
instead adding an overlap transition between the two clips. See Setting
Transition Behavior for more information. The Crossfade option is only
available if the end of the new clip is not over any existing content on the
track.
· Replace: select to replace a current clip on the timeline with the PiP or paintanimation object. Use this option if you don't want to change the structure ofthe current content on the timeline.
Note: if the duration of the clip you are replacing is longer or shorter than
the PiP or paint animation object, CyberLink PowerDirector automatically
resizes it to fit the original clip's duration.
If the timeline slider is in a gap between two clips on a timeline track when insertinga PiP or paint animation object, you are prompted to use this ripple editing optionto insert the clip:
· Trim to Fit: select to have CyberLink PowerDirector auto set the duration ofthe PiP/paint animation object to fit the gap to the right of the timeline slider.
Once added to the timeline, select the PiP object and then click the Modify buttonto edit its placement, motion, and more in the PiP Designer. See Modifying Mediain the PiP Designer for more information. For information on setting the amount oftime the PiP effect appears in your video production, see Setting a Media Clip'sDuration.
178
CyberLink PowerDirector
Creating Custom PiP ObjectsYou can create a custom PiP object using your own graphics and images. To createa custom PiP object, do this:
1. Click on to open the PiP Objects room.
2. In the PiP Objects room, click on .
3. Select the image file on your computer you want to use.
4. Click Open to import it and open the PiP Designer. See Modifying Media in thePiP Designer for details on editing the object's properties in the PiP Designer.
Using the Paint DesignerThe Paint Designer* lets you create hand drawn paint animation objects (such asyour written signature) on top of a color board, image, or video clip in your videoproduction.
Click on and then to open the Paint Designer.
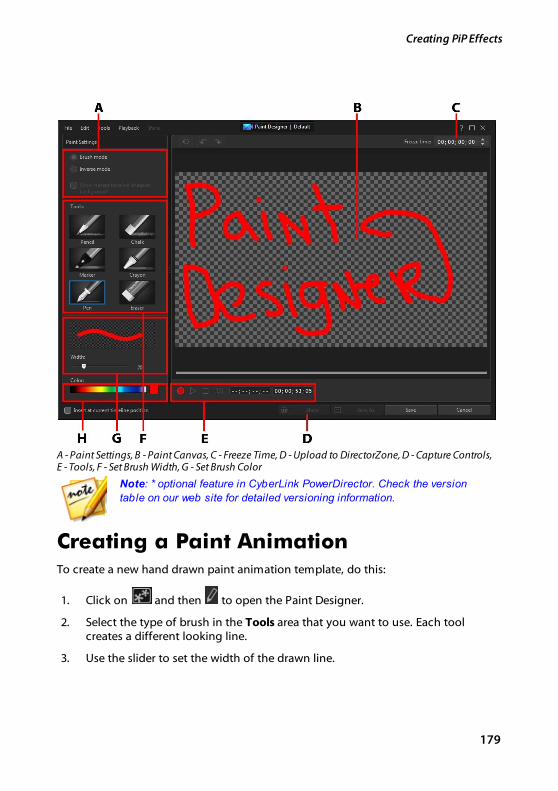
179
Creating PiP Effects
A - Paint Settings, B - Paint Canvas, C - Freeze Time, D - Upload to DirectorZone, D - Capture Controls,E - Tools, F - Set Brush Width, G - Set Brush Color
Note: * optional feature in CyberLink PowerDirector. Check the version
table on our web site for detailed versioning information.
Creating a Paint AnimationTo create a new hand drawn paint animation template, do this:
1. Click on and then to open the Paint Designer.
2. Select the type of brush in the Tools area that you want to use. Each toolcreates a different looking line.
3. Use the slider to set the width of the drawn line.
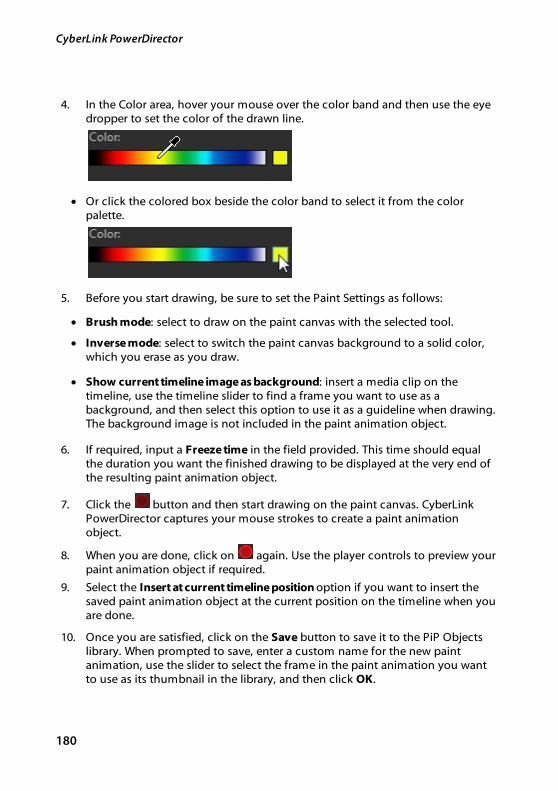
180
CyberLink PowerDirector
4. In the Color area, hover your mouse over the color band and then use the eyedropper to set the color of the drawn line.
· Or click the colored box beside the color band to select it from the colorpalette.
5. Before you start drawing, be sure to set the Paint Settings as follows:
· Brush mode: select to draw on the paint canvas with the selected tool.
· Inverse mode: select to switch the paint canvas background to a solid color,which you erase as you draw.
· Show current timeline image as background: insert a media clip on thetimeline, use the timeline slider to find a frame you want to use as abackground, and then select this option to use it as a guideline when drawing.The background image is not included in the paint animation object.
6. If required, input a Freeze time in the field provided. This time should equalthe duration you want the finished drawing to be displayed at the very end ofthe resulting paint animation object.
7. Click the button and then start drawing on the paint canvas. CyberLinkPowerDirector captures your mouse strokes to create a paint animationobject.
8. When you are done, click on again. Use the player controls to preview yourpaint animation object if required.
9. Select the Insert at current timeline position option if you want to insert thesaved paint animation object at the current position on the timeline when youare done.
10. Once you are satisfied, click on the Save button to save it to the PiP Objectslibrary. When prompted to save, enter a custom name for the new paintanimation, use the slider to select the frame in the paint animation you wantto use as its thumbnail in the library, and then click OK.

181
Creating PiP Effects
Editing Paint Animation Templates
At anytime you can edit the paint animation templates that are in the PiP objects
library. Just select the paint animation and then click on .
When editing a paint animation template, you can:
· use the player controls to preview the paint animation.
· click the button to add more content to the end of the drawing.
· click the button to take a snapshot of a frame in the paint animation, andsave it as a new image in the media library.
Saving and Sharing Paint AnimationTemplates
Once you are finished modifying/customizing a paint animation template you cansave it in your PiP objects library for future use, upload it to DirectorZone to share itwith others, or back it up on CyberLink Cloud*.
Note: * optional feature in CyberLink PowerDirector. Check the version
table on our web site for detailed versioning information.
· click on Share to upload your custom template to DirectorZone or back it upon CyberLink Cloud. See Sharing and Backing Up Paint Animation Templatesfor more information.
· click on Save As to save a modified template as a new template to the discmenu library.
· click on Save to save a new template to the disc menu library.
Sharing and Backing Up Paint Animation Templates
You can share your customized paint animation templates with other CyberLinkPowerDirector users by uploading them to DirectorZone. If you have a CyberLinkCloud subscription you can back up all your customized templates by storing themon CyberLink Cloud.

182
CyberLink PowerDirector
To share and back up your paint animation templates, do this:
1. Do either of the following:
· in the Paint Designer, click on Share, enter a name for the custom template,and then click OK.
· select the paint animation template in the library, and then click .
2. In the upload window, enter the information as follows:
· Upload to: select where you want to upload the template.
· Title: name of the template as it will display once uploaded.
· Style: select a style or category for the template.
· Type: if required, select the type of template you are uploading.
· Tags: enter some keyword search tags that will help users find the templatewhen searching.
Note: separate each tag you enter with a space. If you want to use two words
as the tag, just put quotes around them, e.g. "dollar bill".
· Collection: enter the name of the collection you want the template added to.
· Description: enter a short description of your template.
3. Click Next to proceed.
4. Confirm the copyright disclaimer, and then click Next to proceed with theupload.
5. Click on Finish to close the upload window.
Modifying Media in the PiPDesignerWhen you add a video clip, image, or PiP object to a video track you can apply PiPeffects to it in the PiP Designer*. PiP (picture-in-picture) effects include making yourmedia transparent, applying borders, shadows, chroma key (green screen), motion,motion blur, and more.
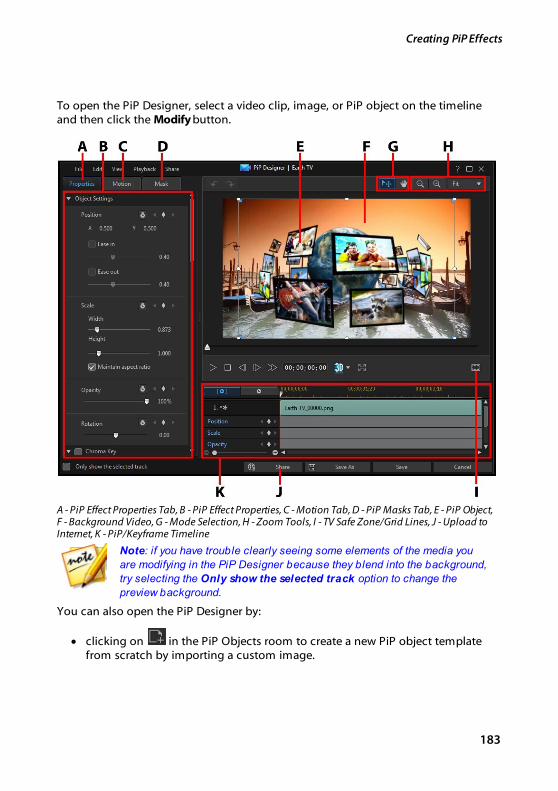
183
Creating PiP Effects
To open the PiP Designer, select a video clip, image, or PiP object on the timelineand then click the Modify button.
A - PiP Effect Properties Tab, B - PiP Effect Properties, C - Motion Tab, D - PiP Masks Tab, E - PiP Object,F - Background Video, G - Mode Selection, H - Zoom Tools, I - TV Safe Zone/Grid Lines, J - Upload toInternet, K - PiP/Keyframe Timeline
Note: if you have trouble clearly seeing some elements of the media you
are modifying in the PiP Designer because they blend into the background,
try selecting the Only show the selected track option to change the
preview background.
You can also open the PiP Designer by:
· clicking on in the PiP Objects room to create a new PiP object templatefrom scratch by importing a custom image.
184
CyberLink PowerDirector
· selecting an existing PiP object in the PiP Objects room, and then clicking on
to edit the template.
Mode Selection and Zoom ToolsWhen modifying PiP media in the PiP Designer use the mode selection and zoomtools for assistance.
Note: when modifying PiP media in the PiP Designer, use the player
controls to preview, and click to preview the effect at full screen.
Mode Selection
In the PiP Designer there are two selection modes. Click the button to enablethe PiP media selection. When selected, you can freely click and move the PiPmedia to different areas of the video frame.
Click the button to enable a mode that lets you drag the view in the PiPDesigner. This mode is especially helpful when applying PiP motion effects tomedia that start off screen.
Zoom Tools
Use the zoom tools and to zoom out and in on the preview windowwhen modifying PiP media. You can also select the viewer zoom amount from thedrop-down to set the size of the PiP media preview. Select Fit to resize the PiPmedia so that is fits in the PiP Designer's viewer window.
Note: you can also hold down the Ctrl key on your keyboard and then use
the mouse scroll wheel to zoom in or out on the PiP media.
Modifying PiP Media Size and PositionYou can change the size, position, and orientation of the media clip or object in aPiP effect. The resizing options are unrestricted. You can reduce the clip tominiature size or enlarge it to completely obscure any underlying media content onthe timeline.
185
Creating PiP Effects
Note: click on to use the TV safe zone and grid lines to help with the
precise placement of the PiP effect on the video. Select Snap to Reference
Lines to have the PiP effect snap to the grid lines, TV safe zone, and
boundary of the video area.
To modify PiP media size, position, or orientation:
· click and drag a corner or side to resize the PiP media.
Note: click the Aspect Ratio item on the Properties tab, and then deselect
M aintain aspect ratio to resize the media clip or PiP object more freely.
· click on the PiP media and drag it to a new position.
· click on above the PiP media and drag it left or right to change itsorientation.
· click and drag the blue nodes in corners to change its shape. See Changingthe Shape of Media for more information.
Note: you can use keyframes to customize the size and shape of PiP
media. See Utilizing PiP Keyframes for more information.
Modifying PiP Media PropertiesClick on the PiP effect Properties tab to change the properties of the PiP media. Seethe following sections for detailed information on the properties you can modifyon this tab.
· Changing Object Settings
· Using Chroma Key
· Applying a Shadow
· Adding a Reflection
· Applying a Border
· Flipping PiP Media
· Enabling 3D Depth
· Applying Fades
186
CyberLink PowerDirector
Note: while modifying the PiP effect properties, you can select the Only
show the selected track option to hide any other media that is displayed in
the preview window while modifying.
Changing Object Settings
Use the Object Settings option to change some of the basic properties of the PiPmedia. Use the X and Y position fields to set the precise location of the top leftcorner of the PiP media on the video image. When used with keyframes, you canmanually create motion of the PiP media.
Note: CyberLink PowerDirector sets the value of the top-left corner of the
media as the 0 axis, with the bottom-right corner having a value of 1.0, 1.0.
The center position in the video frame is 0.500, 0.500. You can more easily
adjust clip position and motion on the M otion tab. See Adding Motion to
PiP Media for motion information.
When you create motion for PiP media, you indicate where on the video image youwant the PiP media to appear by adding keyframes. To create the motion,CyberLink PowerDirector will ensure it is in the desired location at the specifiedtime. This can cause the PiP media to appear jerky, as it speeds up and slows downwhen it moves through the frame. To make the movement look smoother, you canuse the Ease in/out options. Select Ease in to slow down the PiP media as it enters akeyframe. Select Ease out if you want it to gradually accelerate out of the keyframe.
Use the Scale sliders to change PiP media size, or Opacity to make it moretransparent.
Note: select the M aintain aspect ratio option if you want to ensure the
PiP media's aspect ratio does not change while you are moving or resizing
it. Deselect this option if you want to change the PiP media's shape or alter
its aspect ratio.
To rotate the PiP media, use the Rotation slider to set the angle.
Note: you can use keyframes to customize each of these object settings.
See Utilizing PiP Keyframes for more information.
Using Chroma Key
Select the Chroma Key option to add a chroma key (green screen) effect to your PiPmedia. Once enable, do this:
187
Creating PiP Effects
1. Click on and then select the color in the image or video clip that youwant to replace/make transparent.
2. Adjust the Tolerance of hue, Tolerance of saturation, and Tolerance ofluminance sliders to remove the selected color/background (green screen).Adjust until the image or video behind your PiP media is completely revealed,without any loss of quality on the PiP media.
3. Use the Edge sharpness slider to fine tune the edges of the PiP media on therevealed background. Using this slider can make the PiP effect look moreauthentic by sharpening the edges.
Applying a Shadow
Select the Shadow* option to add a shadow on the PiP media. Available optionsallow you to change the shadow's color, direction, and distance from the PiP effect.You can also set the opacity and blur levels of the shadow using the availablesliders.
Note: * optional feature in CyberLink PowerDirector. Check the version
table on our web site for detailed versioning information.
Adding a Reflection
Select the Reflection option to reflect the PiP media onto the background media.Use the Distance slider to set space between the reflection and the PiP media. Usethe Opacity slider to set the opacity of the reflection.
Applying a Border
Select the Border option to add a border around the PiP media. Use the Size sliderto set the width of the border, and the Blur and Opacity sliders to customize itsappearance.
Selecting Border Color
When selecting the color of the border, you have the following options in the Filltype drop-down:
188
CyberLink PowerDirector
· Uniform color: select this option if you want the border to be one solid color.Click the colored square to open the color palette and select the desiredborder color.
· 2 color gradient: select this option if you want the border color to changefrom one color to another using a gradient. Click the colored squares to setthe beginning and ending colors, and then drag the Gradient directioncontrol to set which way the color flows.
· 4 color gradient*: select this option if you want the border to consist of fourcolors. Click the colored squares to set the colors in each of the four cornersof the border.
Note: * optional feature in CyberLink PowerDirector. Check the version
table on our web site for detailed versioning information.
Flipping PiP Media
Select the Flip option to flip the PiP media upside down or from left to right,depending on your requirement.
Enabling 3D Depth
If you are creating a 3D video production, select the 3D Settings* option to give thePiP media a 3D effect.
Note: when using this feature, select the button to enable 3D mode for
best editing results. See Previewing in 3D Mode for more information on
using this mode. * Optional feature in CyberLink PowerDirector. Check the
version table on our web site for detailed versioning information.
Once enabled, use the slider to set the amount of depth you want the PiP media tohave in 3D. Dragging the slider left will make the 3D PiP object seem nearer to theaudience (in the foreground), while dragging it right will make it appear fartheraway (in the background).
Note: you can use keyframes to customize when the 3D depth is applied.
See Utilizing PiP Keyframes for more information.
189
Creating PiP Effects
Applying Fades
Select the Fades option to apply a fade effect on the PiP media. Select whether toenable a fade-in and/or fade-out on the PiP media.
Note: when a fade is applied, note that keyframes are added to the Opacity
keyframe timeline so you can customize the length of the fade, if required.
See Utilizing PiP Keyframes for more information.
Adding Motion to PiP MediaClick on the Motion tab to add motion* to PiP media, allowing it to move acrossthe screen. You can choose from a number of predefined motion paths or createyour own custom PiP motion. You can also add a rotation effect to the PiP media.
Note: * optional feature in CyberLink PowerDirector. Check the version
table on our web site for detailed versioning information.
Using a Motion Path Template
To add motion to PiP media you can select a motion path template on the Motiontab that fits your requirements. Note that keyframes are added to the Position trackof the PiP Designer keyframe timeline. These motion path templates havepredefined motion in them, but you can customize the motion. See CustomizingPiP Motion and Utilizing PiP Keyframes for detailed information on using keyframesto customize PiP motion.
Customizing PiP Motion
The PiP Designer uses keyframes to customize the motion of PiP media. Keyframesare frames of your video that define the start and end points of an effect, which inthis example is motion.
Note: some PiP objects have predefined motion already applied.
To customize the motion of PiP media:
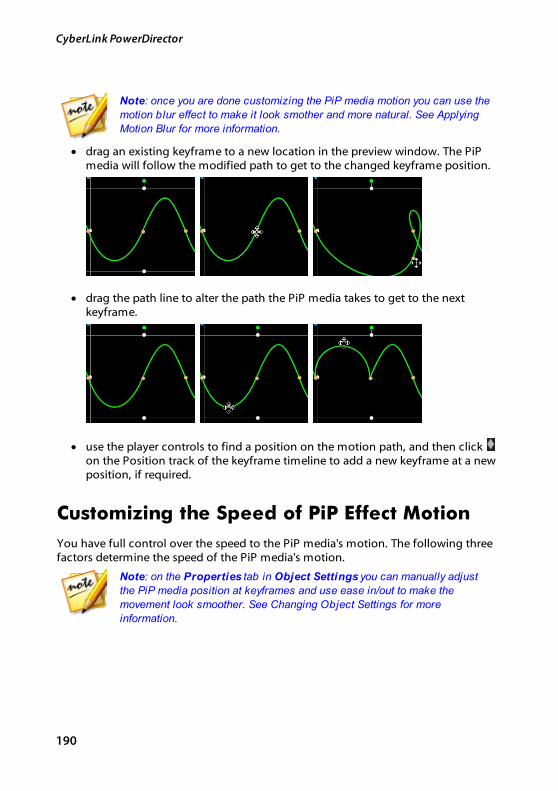
190
CyberLink PowerDirector
Note: once you are done customizing the PiP media motion you can use the
motion blur effect to make it look smother and more natural. See Applying
Motion Blur for more information.
· drag an existing keyframe to a new location in the preview window. The PiPmedia will follow the modified path to get to the changed keyframe position.
· drag the path line to alter the path the PiP media takes to get to the nextkeyframe.
· use the player controls to find a position on the motion path, and then click on the Position track of the keyframe timeline to add a new keyframe at a newposition, if required.
Customizing the Speed of PiP Effect Motion
You have full control over the speed to the PiP media's motion. The following threefactors determine the speed of the PiP media's motion.
Note: on the Properties tab in Object Settings you can manually adjust
the PiP media position at keyframes and use ease in/out to make the
movement look smoother. See Changing Object Settings for more
information.
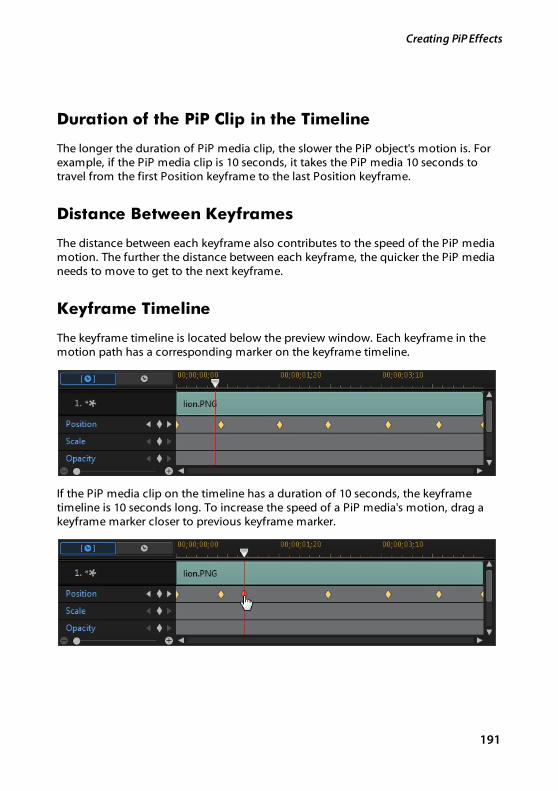
191
Creating PiP Effects
Duration of the PiP Clip in the Timeline
The longer the duration of PiP media clip, the slower the PiP object's motion is. Forexample, if the PiP media clip is 10 seconds, it takes the PiP media 10 seconds totravel from the first Position keyframe to the last Position keyframe.
Distance Between Keyframes
The distance between each keyframe also contributes to the speed of the PiP mediamotion. The further the distance between each keyframe, the quicker the PiP medianeeds to move to get to the next keyframe.
Keyframe Timeline
The keyframe timeline is located below the preview window. Each keyframe in themotion path has a corresponding marker on the keyframe timeline.
If the PiP media clip on the timeline has a duration of 10 seconds, the keyframetimeline is 10 seconds long. To increase the speed of a PiP media's motion, drag akeyframe marker closer to previous keyframe marker.

192
CyberLink PowerDirector
Saving a Custom PiP Motion Path
Once you finish modifying your PiP motion path you can save it for future use. To
save a motion path, click on to save it as a custom path. It is then availablein motion path list the next time you want to use it.
Customizing PiP Effect Rotation
Select the Rotation Settings option to customize the rotation of moving PiP media.Use the slider to set the amount the PiP media will rotate as it moves across thescreen. Select whether PiP media rotates counter clockwise, or clockwise.
Note: click the button to reset the rotation amount to 0. Any added
rotation is removed.
Applying Motion Blur
Select the Motion blur option to make PiP media movement appear smoother,giving it a more natural and authentic look.
Once selected, use the available sliders as follows:
· Blur length: drag this slider to set the duration (number of frames) you wantblended into a single frame (the blur). Dragging the slider right will applymore of a blur to the moving PiP media.
· Blur density: drag this slider to set the number of samples (of PiP media) usedper frame. Dragging the slider right will make the PiP media less blurry as itadds samples to fill the missing content caused by the movement.
Adding PiP MasksMasks are useful if you want to show/hide portions of your media on the timeline inthe final production. Click on the Mask tab and then select a mask from the list tooverlay portions of the PiP media. Click the Create Mask button to import andcreate your own custom mask by importing any image in the .PNG format.
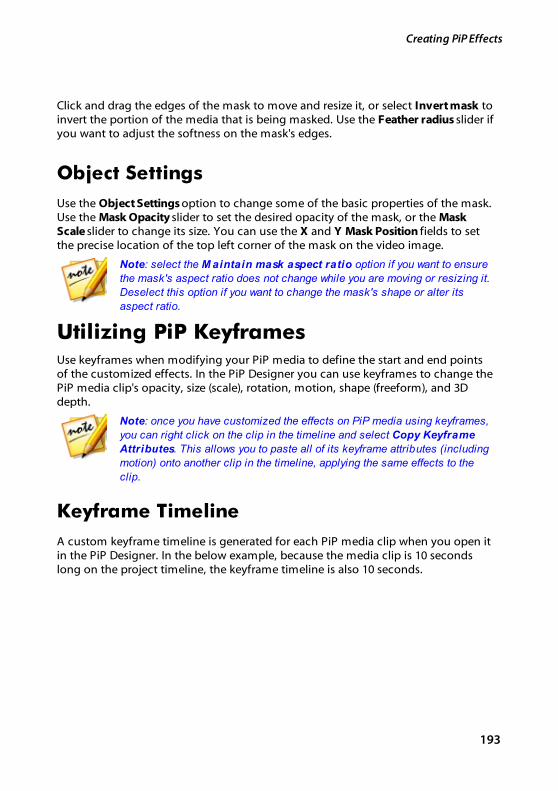
193
Creating PiP Effects
Click and drag the edges of the mask to move and resize it, or select Invert mask toinvert the portion of the media that is being masked. Use the Feather radius slider ifyou want to adjust the softness on the mask's edges.
Object Settings
Use the Object Settings option to change some of the basic properties of the mask.Use the Mask Opacity slider to set the desired opacity of the mask, or the MaskScale slider to change its size. You can use the X and Y Mask Position fields to setthe precise location of the top left corner of the mask on the video image.
Note: select the M aintain mask aspect ratio option if you want to ensure
the mask's aspect ratio does not change while you are moving or resizing it.
Deselect this option if you want to change the mask's shape or alter its
aspect ratio.
Utilizing PiP KeyframesUse keyframes when modifying your PiP media to define the start and end pointsof the customized effects. In the PiP Designer you can use keyframes to change thePiP media clip's opacity, size (scale), rotation, motion, shape (freeform), and 3Ddepth.
Note: once you have customized the effects on PiP media using keyframes,
you can right click on the clip in the timeline and select Copy Keyframe
Attributes. This allows you to paste all of its keyframe attributes (including
motion) onto another clip in the timeline, applying the same effects to the
clip.
Keyframe Timeline
A custom keyframe timeline is generated for each PiP media clip when you open itin the PiP Designer. In the below example, because the media clip is 10 secondslong on the project timeline, the keyframe timeline is also 10 seconds.
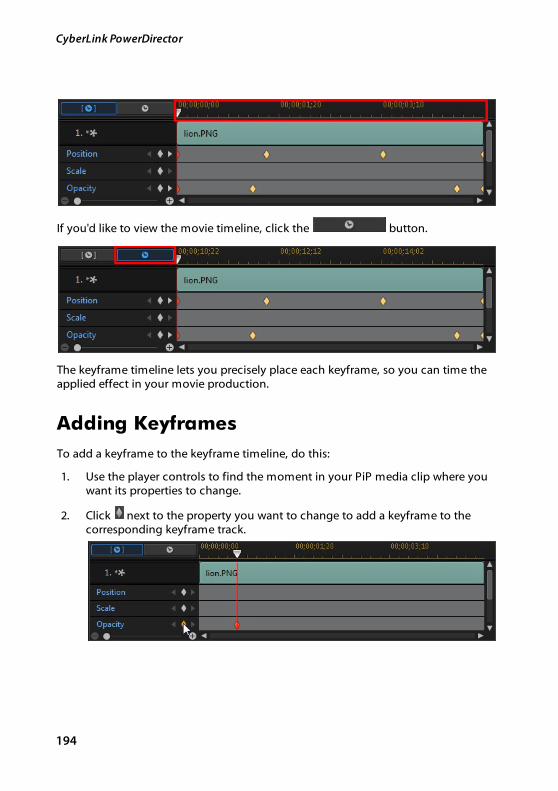
194
CyberLink PowerDirector
If you'd like to view the movie timeline, click the button.
The keyframe timeline lets you precisely place each keyframe, so you can time theapplied effect in your movie production.
Adding Keyframes
To add a keyframe to the keyframe timeline, do this:
1. Use the player controls to find the moment in your PiP media clip where youwant its properties to change.
2. Click next to the property you want to change to add a keyframe to thecorresponding keyframe track.
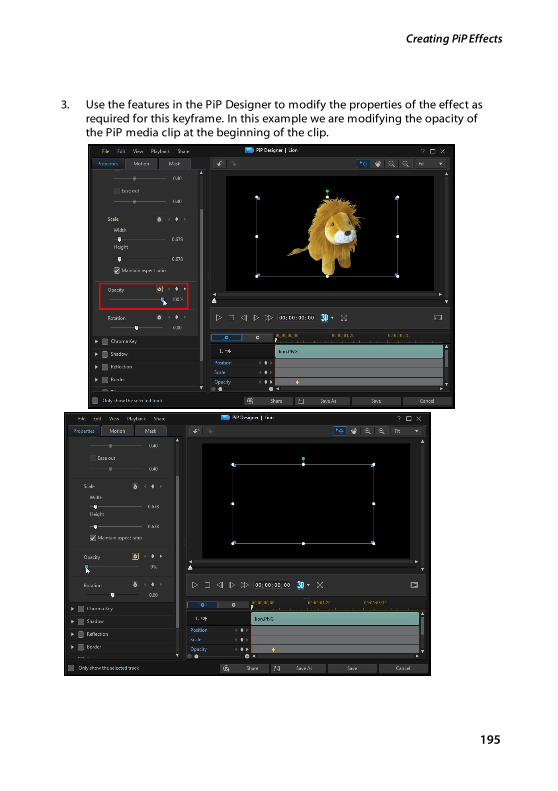
195
Creating PiP Effects
3. Use the features in the PiP Designer to modify the properties of the effect asrequired for this keyframe. In this example we are modifying the opacity ofthe PiP media clip at the beginning of the clip.
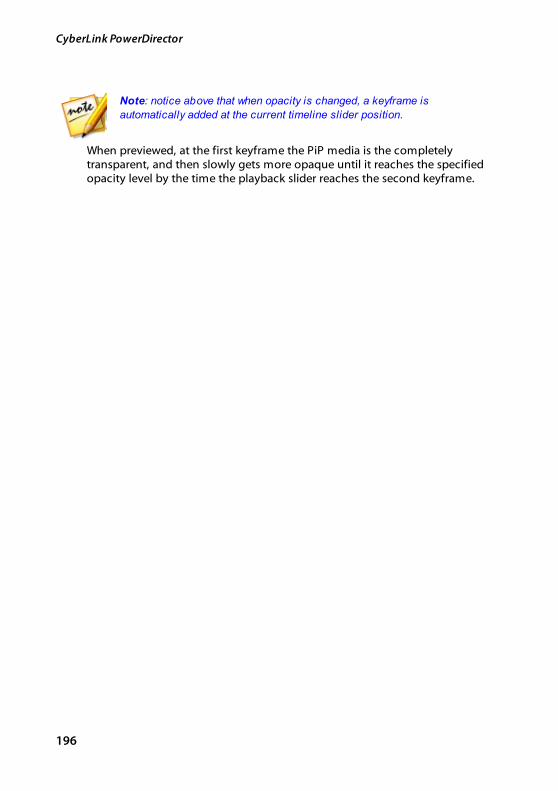
196
CyberLink PowerDirector
Note: notice above that when opacity is changed, a keyframe is
automatically added at the current timeline slider position.
When previewed, at the first keyframe the PiP media is the completelytransparent, and then slowly gets more opaque until it reaches the specifiedopacity level by the time the playback slider reaches the second keyframe.

197
Creating PiP Effects
It will maintain this opacity until the playback slider reaches the last keyframe,unless you add more keyframes or change the properties of the last keyframe.
198
CyberLink PowerDirector
Note: you can also modify the properties of a keyframe by right clicking on
it and selecting Duplicate Previous Keyframe or Duplicate Next
Keyframe. Doing this copies the properties of the specified keyframe to the
keyframe you right clicked on.
4. Repeat these steps to create the kind of effect you want in your videoproduction using keyframes to modify the PiP media clip's properties andmotion.
Modifying and Removing Keyframes
At any time you can modify the keyframes added, by selecting it and changing thePiP media clip's properties, or by dragging the keyframe to another position on thekeyframe timeline.
To remove a keyframe, select it on the keyframe timeline and then click .
Saving and Sharing PiP ObjectsOnce you are finished modifying/customizing a PiP object you can save it to yourPiP objects library for future use, upload it to DirectorZone to share it with others,or back it up on CyberLink Cloud*.
Note: * optional feature in CyberLink PowerDirector. Check the version
table on our web site for detailed versioning information.
· click on Share to upload your custom template to DirectorZone or back it upon CyberLink Cloud. See Sharing and Backing Up PiP Objects for moreinformation.
· click on Save As to save a modified template as a new template to the PiPObjects Room.
· click on Save to save a new template to the PiP Objects Room.
Sharing and Backing Up PiP Objects
You can share your customized PiP objects with other CyberLink PowerDirectorusers by uploading them to DirectorZone. If you have a CyberLink Cloudsubscription you can back up all your customized templates by storing them onCyberLink Cloud.
199
Creating PiP Effects
To share and back up your PiP objects, do this:
1. Do either of the following:
· in the PiP Designer, click on Share, enter a name for the custom template,and then click OK.
· select the PiP object in the library, and then click .
2. In the upload window, enter the information as follows:
· Upload to: select where you want to upload the template.
· Title: name of the template as it will display once uploaded.
· Style: select a style or category for the template.
· Type: if required, select the type of template you are uploading.
· Tags: enter some keyword search tags that will help users find the templatewhen searching.
Note: separate each tag you enter with a space. If you want to use two words
as the tag, just put quotes around them, e.g. "dollar bill".
· Collection: enter the name of the collection you want the template added to.
· Description: enter a short description of your template.
3. Click Next to proceed.
4. Confirm the copyright disclaimer, and then click Next to proceed with theupload.
5. Click on Finish to close the upload window.
200
CyberLink PowerDirector
Adding Particle Effects
Chapter 12:
Click the button to open the Particle Effects Room to access a library of effectsyou can place on a video track to add a particle effect (snow, cloud cover, fireeffects, and more) on top of a video or image.
To insert a particle effect to the timeline, do one of the following:
Note: you can download additional particle effects from the DirectorZone
web site. See Downloading from DirectorZone for more information.
· use the timeline slider to set the position where you want the particle effect,
select it in the library, and then click to add it to theselected video track.
· use the timeline slider to set the position where you want the particle effect,right-click on it in the library, and then select Add to Timeline to add it to theselected video track.
You can also manually drag and drop a particle effect to a desired position on avideo track to add it to the timeline.
When adding a particle effect to the timeline (inserting or dragging and dropping),if the timeline slider is over an existing clip, or you drop it on an existing clip, youare prompted to use one of the ripple editing options to insert the clip:
· Overwrite: select to overwrite the existing clip with the particle effect.
· Insert: select to split the clip and insert the particle effect between the twoportions. CyberLink PowerDirector also only moves the clips on the sametrack to the right.
· Insert and Move All Clips: select to split the clip and insert the particle effectbetween the two portions. CyberLink PowerDirector also moves all of themedia clips on the timeline that lie to the right of the inserted clip, right.
· Crossfade: select to lay the particle effect over a portion of the existing clipand auto add a fade transition between the two clips.
201
Adding Particle Effects
Note: the Crossfade option does not overwrite the content on the track,
instead adding an overlap transition between the two clips. See Setting
Transition Behavior for more information. The Crossfade option is only
available if the end of the new clip is not over any existing content on the
track.
· Replace: select to replace a current clip on the timeline with the particleeffect. Use this option if you don't want to change the structure of the currentcontent on the timeline.
Note: if the duration of the clip you are replacing is longer or shorter than
the particle effect, CyberLink PowerDirector automatically resizes it to fit
the original clip's duration.
If the timeline slider is in a gap between two clips on a timeline track when insertinga particle effect, you are prompted to use this ripple editing option to insert theclip:
· Trim to Fit: select to have CyberLink PowerDirector auto set the duration ofthe particle effect to fit the gap to the right of the timeline slider.
Once added to the timeline, select the particle effect and then click the Modifybutton to edit its properties in the Particle Designer. See Modifying Particle Effectsin the Particle Designer for more information. For information on setting theamount of time the particle effect appears in your video production, see Setting aMedia Clip's Duration.
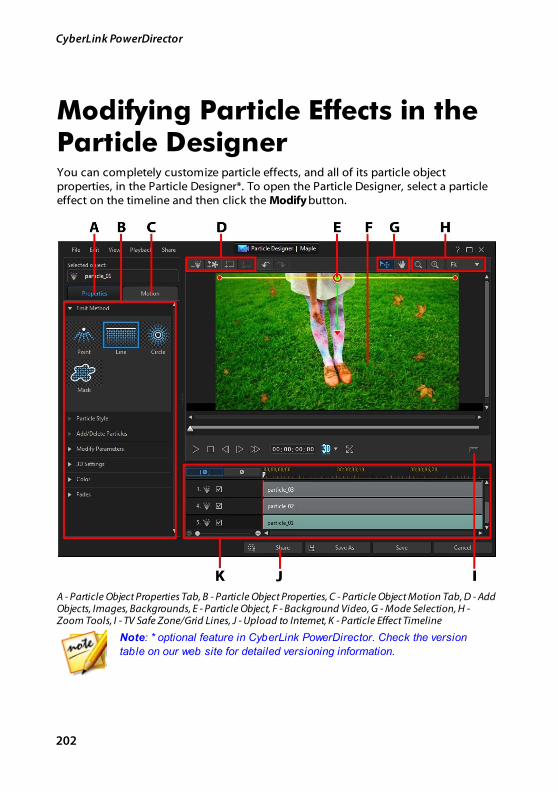
202
CyberLink PowerDirector
Modifying Particle Effects in theParticle DesignerYou can completely customize particle effects, and all of its particle objectproperties, in the Particle Designer*. To open the Particle Designer, select a particleeffect on the timeline and then click the Modify button.
A - Particle Object Properties Tab, B - Particle Object Properties, C - Particle Object Motion Tab, D - AddObjects, Images, Backgrounds, E - Particle Object, F - Background Video, G - Mode Selection, H -Zoom Tools, I - TV Safe Zone/Grid Lines, J - Upload to Internet, K - Particle Effect Timeline
Note: * optional feature in CyberLink PowerDirector. Check the version
table on our web site for detailed versioning information.
203
Adding Particle Effects
You can also open the Particle Designer by:
· clicking on in the Particle Room to create a new particle effect templatefrom scratch by importing a custom image.
· selecting a particle effect in the Particle Room and then clicking on the button to edit it.
Mode Selection and Zoom ToolsWhen modifying particle effects in the Particle Designer use the mode selection andzoom tools for assistance.
Note: when modifying particle effects in the Particle Designer, use the
player controls to preview, and click to preview the effect at full screen.
Mode Selection
In the Particle Designer there are two selection modes. Click the button toenable the object selection. When selected, you can freely click and move theparticle objects, images, etc. to different areas of the video frame.
Click the button to enable a mode that lets you drag the view in the ParticleDesigner. This mode is especially helpful when applying particle motion effects ifthe object starts off screen.
Zoom Tools
Use the zoom tools and to zoom out and in on the preview windowwhen modifying the particle effect. You can also select the viewer zoom amountfrom the drop-down to set the size of the particle effect preview. Select Fit to resizethe particle effect so that is fits in the Particle Designer's viewer window.
Note: you can also hold down the Ctrl key on your keyboard and then use
the mouse scroll wheel to zoom in or out on the particle effect.
204
CyberLink PowerDirector
Adding Objects, Images, andBackgroundsEach particle effect template can contain one or more particle objects, or attributesthat create the desired effect. It may also include a background and other images.
Note: you can give all the added objects, images, and backgrounds custom
names in the Particle Designer to make them easily identifiable in the
keyframe timeline. Just enter the desired name in the Selected object
field.
Adding New Particle Objects
You can add additional particle objects to a particle effect template.
To add a new particle object to a particle effect, click on the button. CyberLinkPowerDirector adds a default particle object to the particle effect template. See Modifying Particle Object Properties for more information on customizing thedefault particle object to fit the particle effect you are trying to create.
Adding Images
You can insert your own images into your particle effect template.
To add a image, do this:
1. Click on the button.
2. Browse to and then select the image on your computer you want to add, andthen click Open.
3. Once added, resize and reposition the image in the Particle Designer asrequired.
Setting Backgrounds
Your particle effect can consist of a background that the particle objects emit over.You can choose from the default backgrounds, or import your own custombackground.
205
Adding Particle Effects
To set a background, do this:
1. Click on the button.
2. Select:
· Add Default Background Image: if you want to select one of the backgroundsprovided with your copy of CyberLink PowerDirector. Select the background,and then click Open.
· Add Custom Background Image: if you want to import your own custombackground. Select the background, and then click Open.
3. When prompted, set the adjustment settings for the background, as required.
Note: to remove the imported background image, just click the
button.
Modifying Particle Object Range andPositionYou can increase the range of the particle object so that it covers more of thebackground, or modify the position or direction particles fall/emit from their sourcepoint. You can also change the position and size of images and backgrounds usedin the effect.
Note: click on to use the TV safe zone and grid lines to help with the
precise placement of the particle object on the video. Select Snap to
Reference Lines to have the particle effect snap to the grid lines, TV safe
zone, and boundary of the video area.
To modify range and position of objects, image, and backgrounds in a particleeffect, do this:
· to change the position and source (emit) point of a particle object, select the
particle object in the keyframe timeline, and then click and drag to a newposition.
· if the particle effect has an image, select the Image track in the keyframe
timeline. Next click and drag a corner or side to resize the image. Click on to drag the image to a new position, if required.
206
CyberLink PowerDirector
· to rotate a particle object, select it in the keyframe timeline, and then click
and drag to the desired orientation.
· to change the range and direction an effect emits from the particle object'ssource point, select the particle object in the keyframe timeline, and then clickand drag to a new position.
Modifying Particle Object PropertiesClick on the particle object Properties tab to change the properties of the selectedparticle object. See the following sections for detailed information on the propertiesyou can modify on this tab.
· Selecting Emit Method
· Selecting Particle Style
· Adding/Deleting Particles
· Modifying Parameters
· Enabling 3D Depth
· Adding Color
· Applying Fades
Selecting Emit Method
Select a particle object in the keyframe timeline and then the Emit Method optionto select how the particles emit from the source point. You can have them emitfrom a single point, from a line, or spray out in a circle.
Select the Mask option, and then select a mask from the list (or click toimport a custom mask image) to create a masked area where particles emit from.Depending on the mask you select/import and how you resize it, the particles willemit differently.
Selecting Particle Style
Select a particle object in the keyframe timeline and then the Particle Style optionto select the style of the emitting particle object. Depending on the property you
207
Adding Particle Effects
select, the particle shape and behavior changes. Select the style that best suits theeffect you are trying to accomplish.
Adding/Deleting Particles
Particle objects can consist of one or more particles, or small customizable images.Select a particle object in the keyframe timeline and then the Add/Delete Particlesoption to add or remove individual particles from a particle object.
Click on and then select Insert a Default Image if you want to select one of theparticle images provided with your copy of CyberLink PowerDirector. Select Insert aCustom Image if you want to import your own custom particle image. You can addas many custom particles as you like to a particle object.
Select an existing particle and then click to delete it from the particle object.
Modifying Parameters
Select a particle object in the keyframe timeline and then the Modify Parametersoption to completely customize the properties of the particle object as follows:
Note: you can use keyframes to customize the parameters of particle
objects. See Utilizing Particle Keyframes for more information.
· Emit rate: use the slider or enter in a value in the box provided to set the rateor speed particles emit from the source point.
· Max count: use the slider or enter in a value in the box provided to set thenumber of particles that emit from the source point.
· Life: use the slider or enter in a value in the box provided to set the life, or howlong the particle displays in the effect. The lower the number, the shorteramount of time each particle displays before fading out. For example, if youenter 100, the life will equal the entire length of the clip.
· Life variation: use the slider or enter in a value in the box provided to set theamount of variation there is in particle life. For example, if you enter 50, thenhalf of the particles will die out before they meet the specified life amount.
· Size: use the slider or enter in a value in the box provided to set the size of theparticle.
208
CyberLink PowerDirector
· Size variation: use the slider or enter in a value in the box provided to set theamount of variation there is in particle size. For example, if you enter 50, thenhalf of the particles will equal the defined size.
· Speed: use the slider or enter in a value in the box provided to set the speed ofthe particle.
· Speed variation: use the slider or enter in a value in the box provided to setthe amount of variation there is in particle speed. For example, if you enter 50,then half of the particles will have the defined speed.
· Wave (amplitude): use the slider or enter in a value in the box provided if youwant your particle to travel in a wave pattern. The higher the number, thebigger the amplitude of the wave. If the value is 0, then the particle travels in astraight line.
· Wave (amplitude) variation: use the slider or enter in a value in the boxprovided to set the amount of variation there is in wave's amplitude. Forexample, if you enter 50, then half of the particles will have the sameamplitude.
· Wave (frequency): use the slider or enter in a value in the box provided if youwant your particle to travel in a wave pattern. The higher the number, thelarger the frequency of the wave. If the value is 0, then the particle travels in astraight line.
· Wave (frequency) variation: use the slider or enter in a value in the boxprovided to set the amount of variation there is in wave's frequency. Forexample, if you enter 50, then half of the particles will have the samefrequency.
· Symmetry: use the slider or enter in a value to set the symmetry of the wave.The higher the value, the more asymmetrical the wave will be.
· Rotation speed: use the slider or enter in a value in the box provided to set therotation speed of the particle. The higher the value, the faster it rotates.Depending on whether the parameter has a positive or negative valuedetermines the direction of the rotation.
· Rotation speed variation: use the slider or enter in a value in the box providedto set the amount of variation there is in the particle's rotation speed. Forexample, if you enter 50, then half of the particles will have the same rotationspeed.
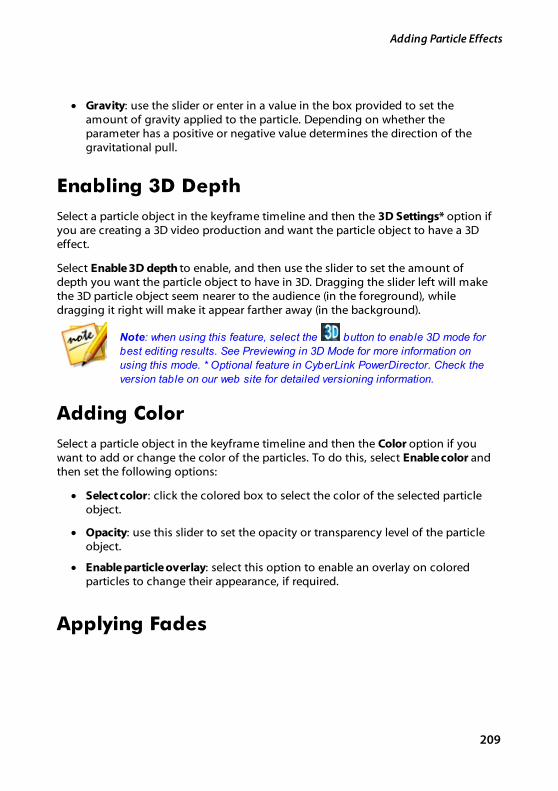
209
Adding Particle Effects
· Gravity: use the slider or enter in a value in the box provided to set theamount of gravity applied to the particle. Depending on whether theparameter has a positive or negative value determines the direction of thegravitational pull.
Enabling 3D Depth
Select a particle object in the keyframe timeline and then the 3D Settings* option ifyou are creating a 3D video production and want the particle object to have a 3Deffect.
Select Enable 3D depth to enable, and then use the slider to set the amount ofdepth you want the particle object to have in 3D. Dragging the slider left will makethe 3D particle object seem nearer to the audience (in the foreground), whiledragging it right will make it appear farther away (in the background).
Note: when using this feature, select the button to enable 3D mode for
best editing results. See Previewing in 3D Mode for more information on
using this mode. * Optional feature in CyberLink PowerDirector. Check the
version table on our web site for detailed versioning information.
Adding Color
Select a particle object in the keyframe timeline and then the Color option if youwant to add or change the color of the particles. To do this, select Enable color andthen set the following options:
· Select color: click the colored box to select the color of the selected particleobject.
· Opacity: use this slider to set the opacity or transparency level of the particleobject.
· Enable particle overlay: select this option to enable an overlay on coloredparticles to change their appearance, if required.
Applying Fades
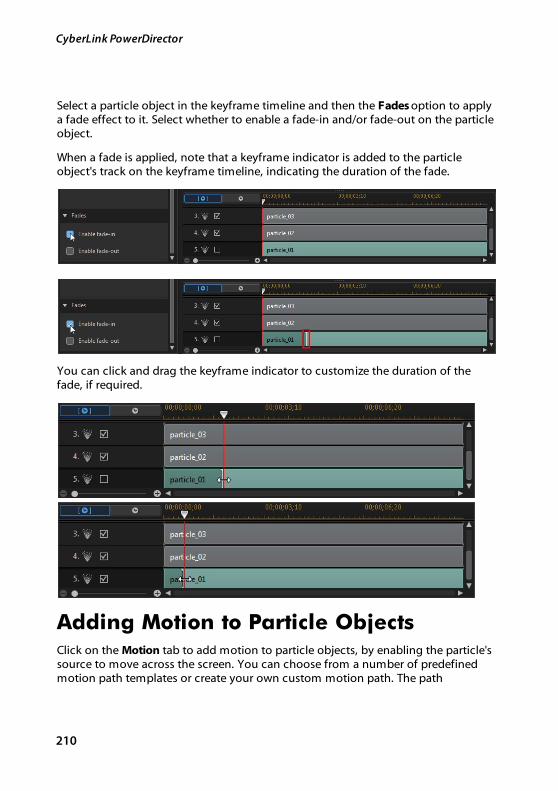
210
CyberLink PowerDirector
Select a particle object in the keyframe timeline and then the Fades option to applya fade effect to it. Select whether to enable a fade-in and/or fade-out on the particleobject.
When a fade is applied, note that a keyframe indicator is added to the particleobject's track on the keyframe timeline, indicating the duration of the fade.
You can click and drag the keyframe indicator to customize the duration of thefade, if required.
Adding Motion to Particle ObjectsClick on the Motion tab to add motion to particle objects, by enabling the particle'ssource to move across the screen. You can choose from a number of predefinedmotion path templates or create your own custom motion path. The path
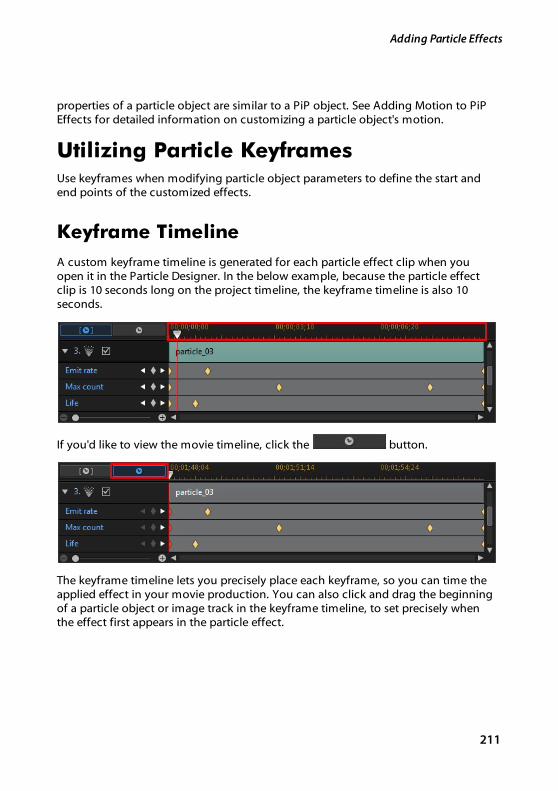
211
Adding Particle Effects
properties of a particle object are similar to a PiP object. See Adding Motion to PiPEffects for detailed information on customizing a particle object's motion.
Utilizing Particle KeyframesUse keyframes when modifying particle object parameters to define the start andend points of the customized effects.
Keyframe Timeline
A custom keyframe timeline is generated for each particle effect clip when youopen it in the Particle Designer. In the below example, because the particle effectclip is 10 seconds long on the project timeline, the keyframe timeline is also 10seconds.
If you'd like to view the movie timeline, click the button.
The keyframe timeline lets you precisely place each keyframe, so you can time theapplied effect in your movie production. You can also click and drag the beginningof a particle object or image track in the keyframe timeline, to set precisely whenthe effect first appears in the particle effect.
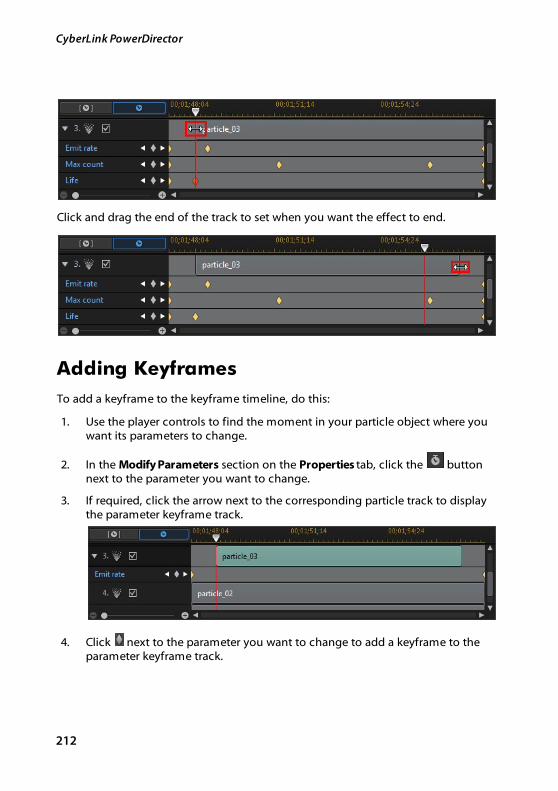
212
CyberLink PowerDirector
Click and drag the end of the track to set when you want the effect to end.
Adding Keyframes
To add a keyframe to the keyframe timeline, do this:
1. Use the player controls to find the moment in your particle object where youwant its parameters to change.
2. In the Modify Parameters section on the Properties tab, click the buttonnext to the parameter you want to change.
3. If required, click the arrow next to the corresponding particle track to displaythe parameter keyframe track.
4. Click next to the parameter you want to change to add a keyframe to theparameter keyframe track.
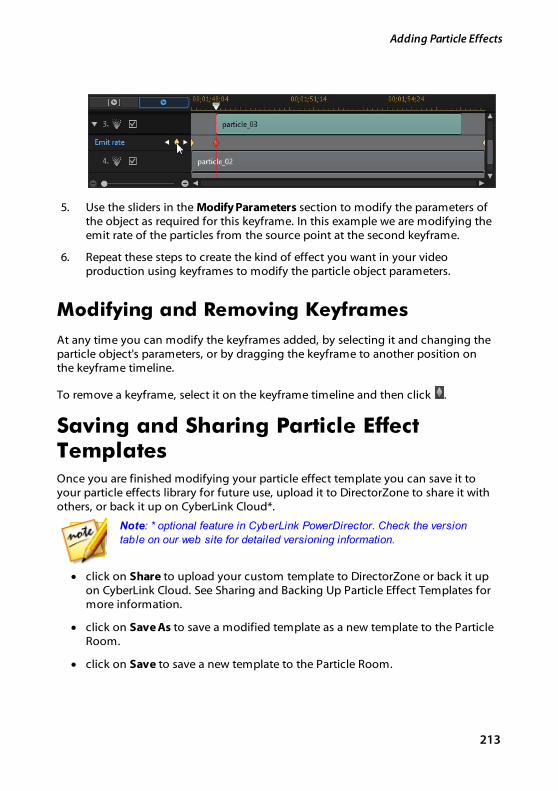
213
Adding Particle Effects
5. Use the sliders in the Modify Parameters section to modify the parameters ofthe object as required for this keyframe. In this example we are modifying theemit rate of the particles from the source point at the second keyframe.
6. Repeat these steps to create the kind of effect you want in your videoproduction using keyframes to modify the particle object parameters.
Modifying and Removing Keyframes
At any time you can modify the keyframes added, by selecting it and changing theparticle object's parameters, or by dragging the keyframe to another position onthe keyframe timeline.
To remove a keyframe, select it on the keyframe timeline and then click .
Saving and Sharing Particle EffectTemplatesOnce you are finished modifying your particle effect template you can save it toyour particle effects library for future use, upload it to DirectorZone to share it withothers, or back it up on CyberLink Cloud*.
Note: * optional feature in CyberLink PowerDirector. Check the version
table on our web site for detailed versioning information.
· click on Share to upload your custom template to DirectorZone or back it upon CyberLink Cloud. See Sharing and Backing Up Particle Effect Templates formore information.
· click on Save As to save a modified template as a new template to the ParticleRoom.
· click on Save to save a new template to the Particle Room.
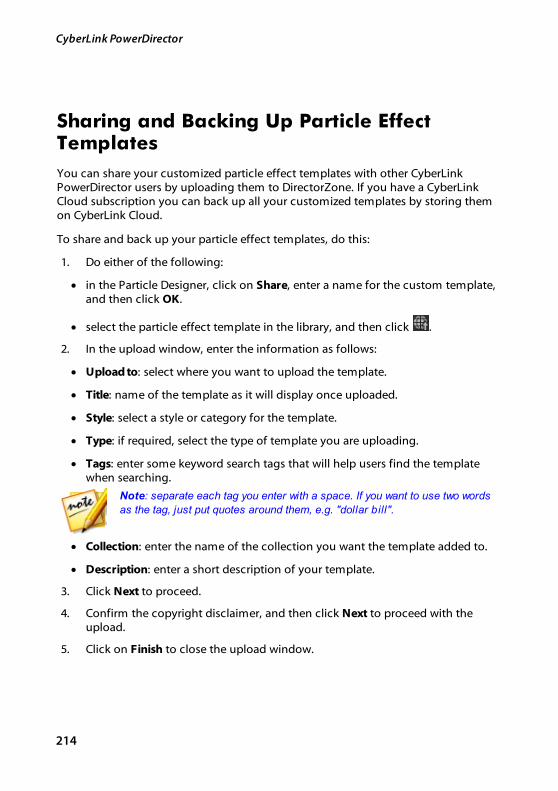
214
CyberLink PowerDirector
Sharing and Backing Up Particle EffectTemplates
You can share your customized particle effect templates with other CyberLinkPowerDirector users by uploading them to DirectorZone. If you have a CyberLinkCloud subscription you can back up all your customized templates by storing themon CyberLink Cloud.
To share and back up your particle effect templates, do this:
1. Do either of the following:
· in the Particle Designer, click on Share, enter a name for the custom template,and then click OK.
· select the particle effect template in the library, and then click .
2. In the upload window, enter the information as follows:
· Upload to: select where you want to upload the template.
· Title: name of the template as it will display once uploaded.
· Style: select a style or category for the template.
· Type: if required, select the type of template you are uploading.
· Tags: enter some keyword search tags that will help users find the templatewhen searching.
Note: separate each tag you enter with a space. If you want to use two words
as the tag, just put quotes around them, e.g. "dollar bill".
· Collection: enter the name of the collection you want the template added to.
· Description: enter a short description of your template.
3. Click Next to proceed.
4. Confirm the copyright disclaimer, and then click Next to proceed with theupload.
5. Click on Finish to close the upload window.
215
Adding Title Effects
Adding Title Effects
Chapter 13:
Click the button to open the Title Room to access a library of title effecttemplates, which when applied to your project, add credits or comments to yourproduction. You can add title effects to a video track or to the title track.
To insert a title effect to the timeline, do one of the following:
Note: once the latest content pack is installed, the Title Room includes title
sets, or groups of four themed title templates. These title sets are useful if
you want to add titles with themed animations that include video opening and
closing credits.
· use the timeline slider to set the position where you want the title, select the
title effect template in the library, and then click to add itto the selected video track.
· use the timeline slider to set the position where you want the title, select the
title effect template in the library, and then click to add itto the title track.
· use the timeline slider to set the position where you want the title, right-clickon the title effect template in the library, and then select Add to Timeline toadd it to the title track.
You can also manually drag and drop a title effect template to a desired position onthe title track (or any video track) to add it to the timeline.
Note: you can now add video effects onto entire title effect clips in the
timeline, like any other media clip. See Adding Video Effects for more
information.
When adding a title effect to the timeline (inserting or dragging and dropping), ifthe timeline slider is over an existing clip, or you drop it on an existing clip, you areprompted to use one of the ripple editing options to insert the clip:
· Overwrite: select to overwrite the existing clip with the title effect.
· Insert: select to split the clip and insert the title effect between the twoportions. CyberLink PowerDirector also only moves the clips on the sametrack to the right.
216
CyberLink PowerDirector
· Insert and Move All Clips: select to split the clip and insert the title effectbetween the two portions. CyberLink PowerDirector also moves all of themedia clips on the timeline that lie to the right of the inserted clip, right.
· Crossfade: select to lay the title effect over a portion of the existing clip andauto add a fade transition between the two clips.
Note: the Crossfade option does not overwrite the content on the track,
instead adding an overlap transition between the two clips. See Setting
Transition Behavior for more information. The Crossfade option is only
available if the end of the new clip is not over any existing content on the
track.
· Replace: select to replace a current clip on the timeline with the title effect.Use this option if you don't want to change the structure of the currentcontent on the timeline.
Note: if the duration of the clip you are replacing is longer or shorter than
the title effect, CyberLink PowerDirector automatically resizes it to fit the
original clip's duration.
If the timeline slider is in a gap between two clips on a timeline track when insertinga title effect, you are prompted to use this ripple editing option to insert the clip:
· Trim to Fit: select to have CyberLink PowerDirector auto set the duration ofthe title effect to fit the gap to the right of the timeline slider.
Once added to the timeline, select the title effect template and then click theModify button to edit it in the Title Designer. See Modifying Titles in the TitleDesigner for more information. For information on setting the amount of time thetitle effect appears in your video production, see Setting a Media Clip's Duration.
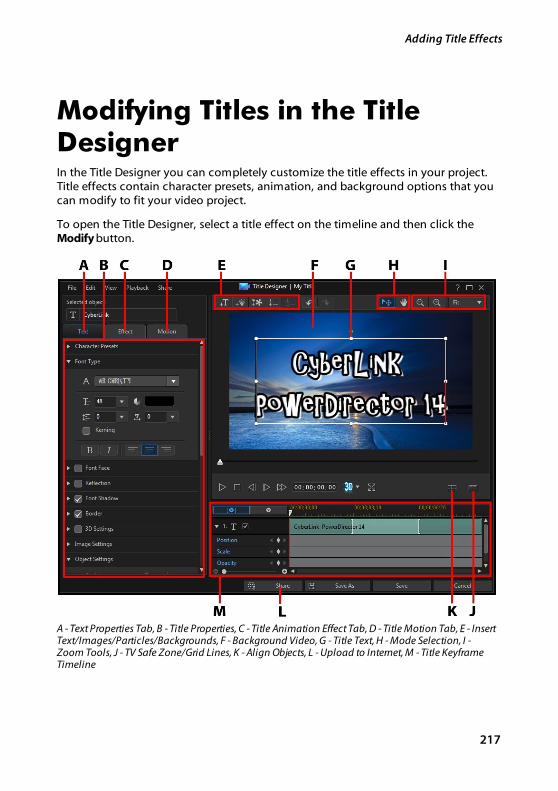
217
Adding Title Effects
Modifying Titles in the TitleDesignerIn the Title Designer you can completely customize the title effects in your project.Title effects contain character presets, animation, and background options that youcan modify to fit your video project.
To open the Title Designer, select a title effect on the timeline and then click the Modify button.
A - Text Properties Tab, B - Title Properties, C - Title Animation Effect Tab, D - Title Motion Tab, E - InsertText/Images/Particles/Backgrounds, F - Background Video, G - Title Text, H - Mode Selection, I -Zoom Tools, J - TV Safe Zone/Grid Lines, K - Align Objects, L - Upload to Internet, M - Title KeyframeTimeline
218
CyberLink PowerDirector
You can also open the Title Designer by:
· clicking on in the Title Room and then select:
· 2D Title to create a new 2D title template from scratch. See Modifying 2DText Properties for information on editing its title text properties.
· 3D-Like Title to create a new title template with 3D-Like effect properties.See Modifying 3D-Like Text Properties for information on editing its titletext properties.
· selecting an existing title effect in the Title Room and then clicking on toedit the existing template.
Mode Selection and Zoom ToolsWhen modifying title effects in the Title Designer use the mode selection and zoomtools for assistance.
Note: when modifying title effects in the Title Designer, use the player
controls to preview, and click to preview the effect at full screen.
Mode Selection
In the Title Designer there are two selection modes. Click the button to enablethe object selection. When selected, you can freely click and move the title text,particles, images, etc. to different areas of the video frame.
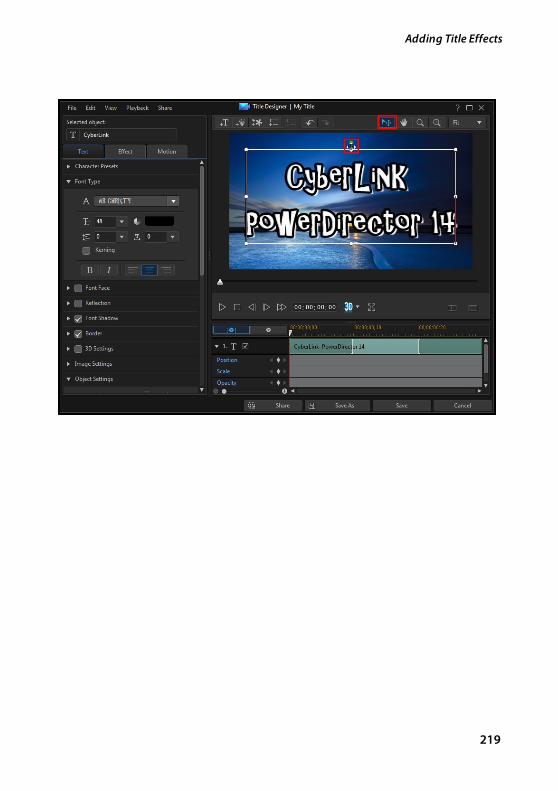
219
Adding Title Effects

220
CyberLink PowerDirector
Click the button to enable a mode that lets you drag the view in the TitleDesigner. This mode is especially helpful if zoomed in on the title effect.
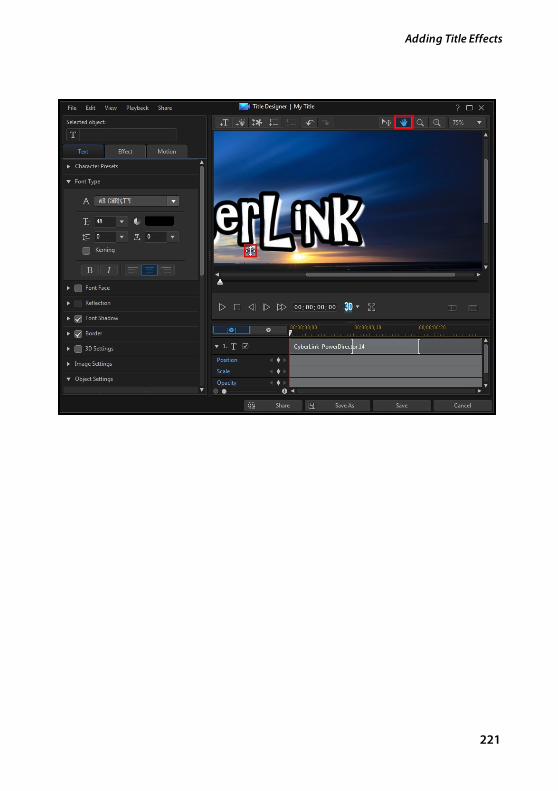
221
Adding Title Effects
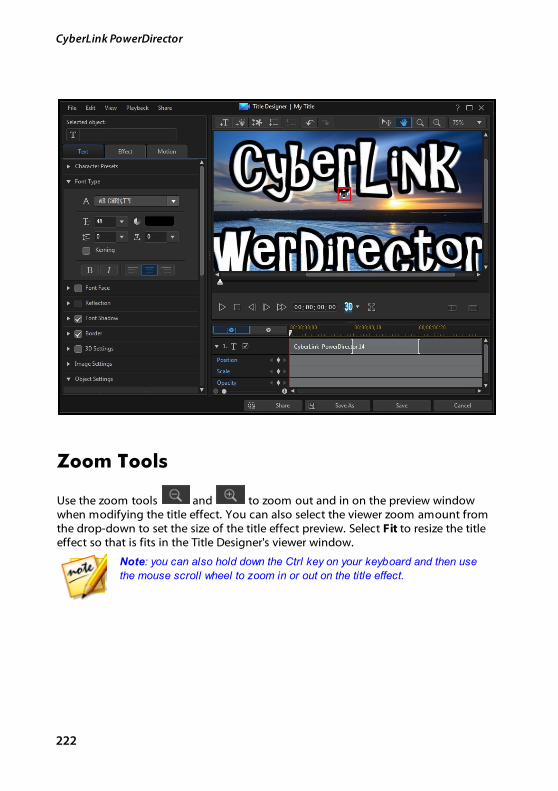
222
CyberLink PowerDirector
Zoom Tools
Use the zoom tools and to zoom out and in on the preview windowwhen modifying the title effect. You can also select the viewer zoom amount fromthe drop-down to set the size of the title effect preview. Select Fit to resize the titleeffect so that is fits in the Title Designer's viewer window.
Note: you can also hold down the Ctrl key on your keyboard and then use
the mouse scroll wheel to zoom in or out on the title effect.
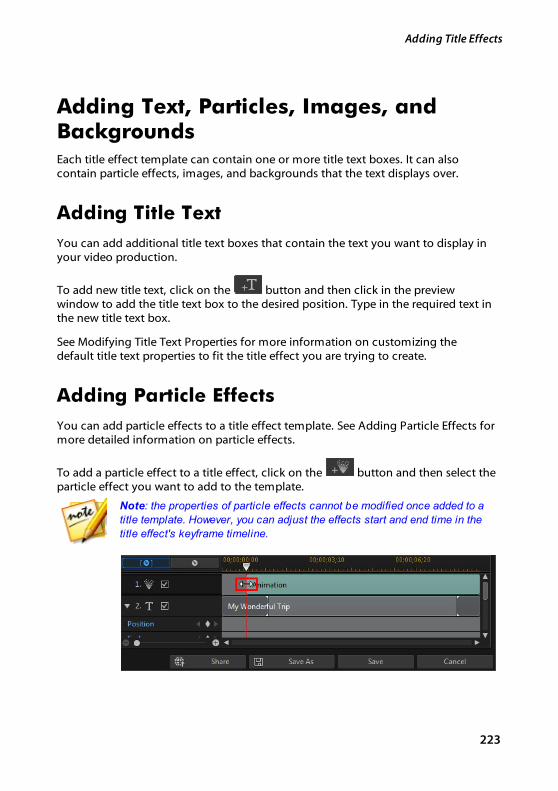
223
Adding Title Effects
Adding Text, Particles, Images, andBackgroundsEach title effect template can contain one or more title text boxes. It can alsocontain particle effects, images, and backgrounds that the text displays over.
Adding Title Text
You can add additional title text boxes that contain the text you want to display inyour video production.
To add new title text, click on the button and then click in the previewwindow to add the title text box to the desired position. Type in the required text inthe new title text box.
See Modifying Title Text Properties for more information on customizing thedefault title text properties to fit the title effect you are trying to create.
Adding Particle Effects
You can add particle effects to a title effect template. See Adding Particle Effects formore detailed information on particle effects.
To add a particle effect to a title effect, click on the button and then select theparticle effect you want to add to the template.
Note: the properties of particle effects cannot be modified once added to a
title template. However, you can adjust the effects start and end time in the
title effect's keyframe timeline.
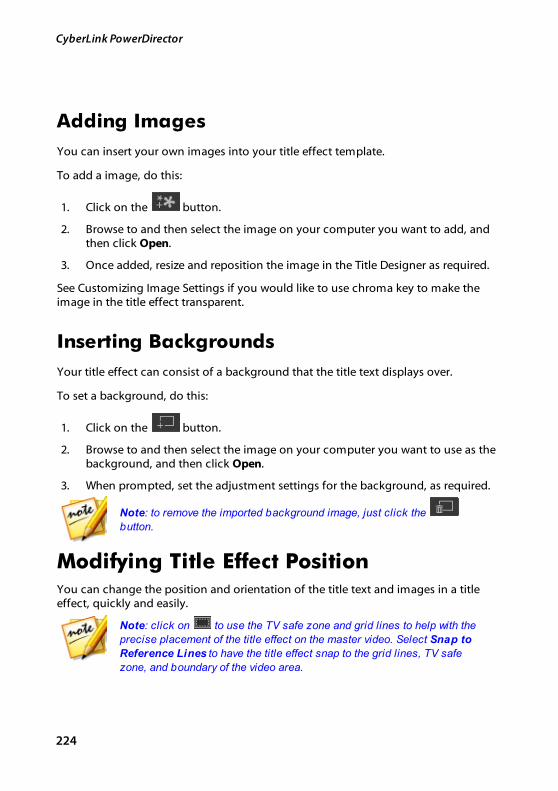
224
CyberLink PowerDirector
Adding Images
You can insert your own images into your title effect template.
To add a image, do this:
1. Click on the button.
2. Browse to and then select the image on your computer you want to add, andthen click Open.
3. Once added, resize and reposition the image in the Title Designer as required.
See Customizing Image Settings if you would like to use chroma key to make theimage in the title effect transparent.
Inserting Backgrounds
Your title effect can consist of a background that the title text displays over.
To set a background, do this:
1. Click on the button.
2. Browse to and then select the image on your computer you want to use as thebackground, and then click Open.
3. When prompted, set the adjustment settings for the background, as required.
Note: to remove the imported background image, just click the
button.
Modifying Title Effect PositionYou can change the position and orientation of the title text and images in a titleeffect, quickly and easily.
Note: click on to use the TV safe zone and grid lines to help with the
precise placement of the title effect on the master video. Select Snap to
Reference Lines to have the title effect snap to the grid lines, TV safe
zone, and boundary of the video area.
225
Adding Title Effects
To modify title text and image position or orientation:
· click on the title text or an image, and then drag it to a new position.
· if editing a 2D title, click on above the title text or image, and drag it rightor left to change its orientation.
· if the title effect contains an image, select it and then click and drag a corneror side to resize the image.
Modifying Title Text PropertiesClick on the Text tab to change the properties of the selected title text. Theproperties that are available on the tab depend on the type of title text you areediting. See Modifying 2D Text Properties if you are editing 2D title text, orModifying 3D-Like Text Properties if editing 3D-Like title text.
Modifying 2D Text Properties
If you are creating or editing a 2D title effect template, on the text properties tabyou can modify everything from the text size, style, color, as well as addingshadows, borders, motion blur, and much more.
Applying Character Presets to Title Text
Select the Character Presets option to apply a defined character preset to title text.After you have applied a defined character preset you can refine it using the otherproperties on the tab, if required.
To apply a character preset to title text, ensure the text box is selected in thepreview window and then click on a character preset in the list.
Note: once you are done customizing all of the text properties on the tab,
click on to save the character preset to your favorites. To find and
use saved character presets, select M y Favorites in the Character types
drop-down.
Customizing Font Type
226
CyberLink PowerDirector
Select the Font Type option to set the font type and size of the selected title text.You can also select the font face color, bold or italicize text, change the line andtext spacing, and set the text alignment in the text box.
If the font type you are using supports it, you can select the Kerning check box toreduce the space between the letters in the title text.
Customizing Font Face
Select the Font Face option to customize the font color, blur, and opacity. Onceselected, use the Blur and Opacity sliders to customize its appearance.
When customizing the font face color, you have the following options in the Filltype drop-down:
· Uniform color: select this option if you want the font to be one solid color.Click the colored square to open the color palette and select the desired fontcolor.
· 2 color gradient: select this option if you want the font color to change fromone color to another using a gradient. Click the colored squares to set thebeginning and ending colors, and then drag the Gradient direction control toset which way the color flows.
· 4 color gradient*: select this option if you want the font to consist of fourcolors. Click the colored squares to set the colors in each of the four cornersof the text.
Note: * optional feature in CyberLink PowerDirector. Check the version
table on our web site for detailed versioning information.
Adding a Reflection
Select the Reflection option to add a reflection of the title text onto the backgroundmedia. Use the Distance slider to set space between the reflection and the title text.Use the Opacity slider to set the opacity of the reflection.
Applying Font Shadow
227
Adding Title Effects
Select the Font Shadow option to add a shadow to the title text. Available optionsallow you to change the shadow's color, direction, distance from the text, and adda opacity or blur effect.
Applying Border
Select the Border option to add a border around the title text. Available optionsallow you to change the border's size, and add a opacity or blur effect.
You can customize the border color using the following options in the Fill typedrop-down:
· Uniform color: select this option if you want the border to be one solid color.Click the colored square to open the color palette and select the desired border color.
· 2 color gradient: select this option if you want the border color to changefrom one color to another using a gradient. Click the colored squares to setthe beginning and ending colors, and then drag the Gradient directioncontrol to set which way the color flows.
· 4 color gradient*: select this option if you want the border to consist of fourcolors. Click the colored squares to set the colors in each of the four cornersof the border.
Note: * optional feature in CyberLink PowerDirector. Check the version
table on our web site for detailed versioning information.
Enabling 3D Depth
If you are creating a 3D video production, select the 3D Settings* to give the titletext a 3D effect.
Note: when using this feature, select the button to enable 3D mode for
best editing results. See Previewing in 3D Mode for more information on
using this mode. * Optional feature in CyberLink PowerDirector. Check the
version table on our web site for detailed versioning information.
Once enabled, use the slider to set the amount of depth you want the title text tohave in 3D. Dragging the slider left will make the 3D title text seem nearer to theaudience (in the foreground), while dragging it right will make it appear fartheraway (in the background).

228
CyberLink PowerDirector
Customizing Image Settings
If your title effect contains an image, select it in the preview window, and then clickthe Image Settings option to customize it.
To apply a chroma key (green screen) effect on the image, select Apply chroma key.
Next, click on and then select the color in the image that you want toreplace/make transparent. Use the Tolerance of intensity and Tolerance of huesliders to set the level of chroma key applied, revealing the content behind theselected image.
Select Enable flip object if you want to to flip the image in the title text upside downor from left to right, depending on your requirement. You can also enable a fadeeffect on the image. Select whether to enable a fade-in and/or fade-out on theimage.
Note: when a fade is applied, note that keyframes are added to the Opacity
keyframe timeline so you can customize the length of the fade, if required.
See Utilizing PiP Keyframes for more information.
Changing Object Settings
Use the Object Settings option to change some of the basic properties of the titletext. Use the X and Y position fields to set the precise location of the top left cornerof the title text on the video image. When used with keyframes, you can manuallycreate motion of the title text.
Note: CyberLink PowerDirector sets the value of the top-left corner of the
title text as the 0 axis, with the bottom-right corner having a value of 1.0,
1.0. The center position in the video frame is 0.500, 0.500. You can more
easily adjust title text position and motion on the M otion tab. See Applying
Motion to Title Text for motion information.
When you create motion for title text, you indicate where on the video image youwant the title text to appear by adding keyframes. To create the motion, CyberLinkPowerDirector will ensure it is in the desired location at the specified time. This cancause the title text to appear jerky, as it speeds up and slows down when it movesthrough the frame. To make the movement look smoother, you can use the Easein/out options. Select Ease in to slow down the title text as it enters a keyframe.Select Ease out if you want it to gradually accelerate out of the keyframe.
229
Adding Title Effects
Use the Scale sliders to change title text size, or Opacity to make the text moretransparent.
Note: select the M aintain aspect ratio option if you want to ensure the
title text's aspect ratio does not change while you are moving or resizing it.
Deselect this option if you want to change the title text's shape or alter its
aspect ratio.
To rotate the title text, use the Rotation slider to set the angle.
Note: you can use keyframes to customize each of these object settings.
See Utilizing Title Effect Keyframes for more information.
Modifying 3D-Like Text Properties
If you are creating or editing a 3D-Like title template, on the text properties tab youcan modify the text size, style, color, as well as its extrusion, opacity, texture, androtation settings.
Note: see The Difference Between 3D and 3D-Like Effects to learn more
about both types of effects.
Applying Character Presets to 3D-Like Title Text
Select the Character Presets option to apply a defined character preset to 3D-Liketitle text. After you have applied a defined character preset you can refine it usingthe other properties on the tab, if required.
To apply a character preset to 3D-Like title text, ensure the text box is selected in thepreview window and then click on a character preset in the list.
Note: once you are done customizing all of the 3D-Like text properties,
click on to save the character preset to your favorites. To find and
use saved character presets, select M y Favorites in the Character types
drop-down.
Customizing Font Type Settings
230
CyberLink PowerDirector
Select the Font Type Settings option to set the font type and size of the selected 3D-Like title text. You can also select the font face color, bold or italicize the text, andset the text spacing in the text box.
If the font type you are using supports it, you can select the Kerning check box toreduce the space between the letters in the title text.
Customizing Font Face Settings
In Font Face Settings you can customize the font extrusion and opacity amount. Toset the font color, click the colored square to open the color palette and select thedesired color of the 3D-Like title text.
Note: when applying an extrusion to the 3D-Like title text, the angle of the
extruded text changes as you move the text to different areas of the video
frame.
Adding a Reflection
Select the Reflection option to add a reflection of the 3D-Like title text onto thebackground media. Use the Distance slider to set space between the reflection andthe 3D-Like title text.
Customizing 3D Rotation Settings
Select the 3D Rotation Settings option to customize the rotation of your 3D-Liketitle text. If you applied extrusion in the font face settings, use the available slidersto rotate the 3D text to generate your preferred 3D-Like effect and orientation.
Applying 3D Texture Settings
Select the 3D Texture Settings option to apply texture to the 3D-Like text byselecting a text skin from the list. Click the Add Texture button to import your ownimage. Based on the color properties of the imported image, CyberLinkPowerDirector applies a custom texture to the title text.
Enabling 3D Depth
231
Adding Title Effects
If you are creating a 3D video production, select the 3D Settings*option to give the3D-Like title text a 3D effect.
Note: when using this feature, select the button to enable 3D mode for
best editing results. See Previewing in 3D Mode for more information on
using this mode. * Optional feature in CyberLink PowerDirector. Check the
version table on our web site for detailed versioning information.
Once enabled, use the slider to set the amount of depth you want the 3D-Like titletext to have in 3D. Dragging the slider left will make the 3D title text seem nearer tothe audience (in the foreground), while dragging it right will make it appear fartheraway (in the background).
Customizing Image Settings
If your title effect contains an image, select it in the preview window, and then clickthe Image Settings option to customize it.
To apply a chroma key (green screen) effect on the image, select Apply chroma key.
Next, click on and then select the color in the image that you want toreplace/make transparent. Use the Tolerance of intensity and Tolerance of huesliders to set the level of chroma key applied, revealing the content behind theselected image.
Select Enable flip object if you want to to flip the image in the title text upside downor from left to right, depending on your requirement. You can also enable a fadeeffect on the image. Select whether to enable a fade-in and/or fade-out on theimage.
Note: when a fade is applied, note that keyframes are added to the Opacity
keyframe timeline so you can customize the length of the fade, if required.
See Utilizing PiP Keyframes for more information.
Applying Animation Effects to Title TextClick on the Effects tab to apply animations to title text, such as text fades, textmotion, or wipes.
Note: once you are done customizing the title text animation you can use
the motion blur effect to make it look smother. See Applying Motion Blur for
more information.
To apply animation to text, do this:
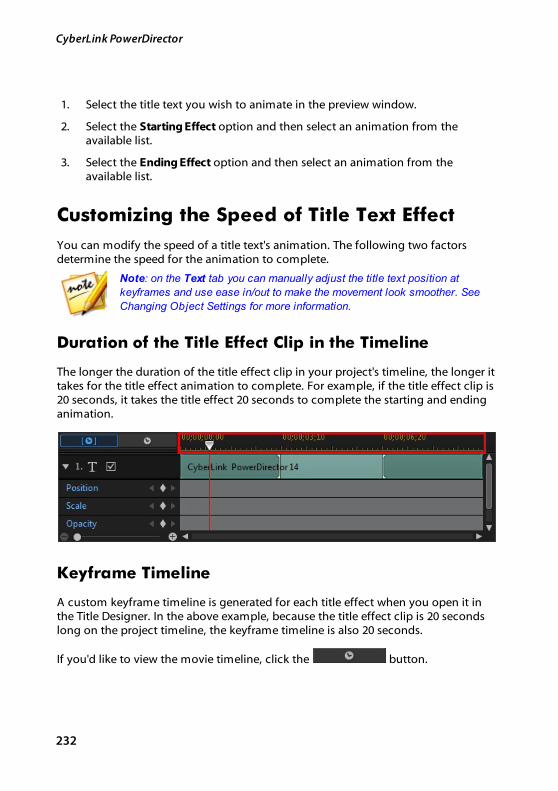
232
CyberLink PowerDirector
1. Select the title text you wish to animate in the preview window.
2. Select the Starting Effect option and then select an animation from theavailable list.
3. Select the Ending Effect option and then select an animation from theavailable list.
Customizing the Speed of Title Text Effect
You can modify the speed of a title text's animation. The following two factorsdetermine the speed for the animation to complete.
Note: on the Text tab you can manually adjust the title text position at
keyframes and use ease in/out to make the movement look smoother. See
Changing Object Settings for more information.
Duration of the Title Effect Clip in the Timeline
The longer the duration of the title effect clip in your project's timeline, the longer ittakes for the title effect animation to complete. For example, if the title effect clip is20 seconds, it takes the title effect 20 seconds to complete the starting and endinganimation.
Keyframe Timeline
A custom keyframe timeline is generated for each title effect when you open it inthe Title Designer. In the above example, because the title effect clip is 20 secondslong on the project timeline, the keyframe timeline is also 20 seconds.
If you'd like to view the movie timeline, click the button.
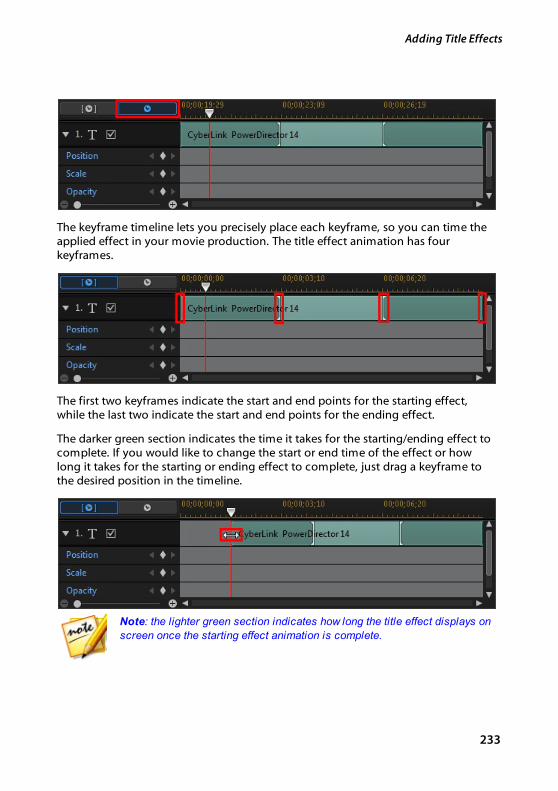
233
Adding Title Effects
The keyframe timeline lets you precisely place each keyframe, so you can time theapplied effect in your movie production. The title effect animation has fourkeyframes.
The first two keyframes indicate the start and end points for the starting effect,while the last two indicate the start and end points for the ending effect.
The darker green section indicates the time it takes for the starting/ending effect tocomplete. If you would like to change the start or end time of the effect or howlong it takes for the starting or ending effect to complete, just drag a keyframe tothe desired position in the timeline.
Note: the lighter green section indicates how long the title effect displays on
screen once the starting effect animation is complete.

234
CyberLink PowerDirector
Applying Motion Blur
Select the Enable motion blur option if your title text has an animation effectapplied. Motion blur makes the animation appear smoother.
Once selected, use the available sliders as follows:
· Blur length: drag this slider to set the duration (number of frames) you wantblended into a single frame (the blur). Dragging the slider right will applymore of a blur to the title text.
· Blur density: drag this slider to set the number of samples (of title effect) usedper frame. Dragging the slider right will make the title text less blurry as itadds samples to fill the missing content caused by the movement.
Adding Motion to Title TextClick on the Motion tab to add motion* to title text, allowing it to move across thescreen. You can choose from a number of predefined motion paths or create yourown custom title text motion.
Note: * optional feature in CyberLink PowerDirector. Check the version
table on our web site for detailed versioning information.
Using a Motion Path Template
To add motion to title text you can select a motion path template on the Motiontab that fits your requirements. Note that keyframes are added to the Position trackof the Title Designer keyframe timeline. These motion path templates havepredefined motion in them, but you can customize the motion. See CustomizingTitle Text Motion and Utilizing Title Effect Keyframes for detailed information onusing keyframes to customize title text motion.
Customizing Title Text Motion
The Title Designer uses keyframes to customize the motion of title text. Keyframesare frames of your video that define the start and end points of an effect, which inthis example is motion.

235
Adding Title Effects
Note: if you added an animation effect to your title text, it may already have
motion. However, you can combine these two types of effects to create
impressive titles in your production.
To customize the motion of title text:
· drag an existing keyframe to a new location in the preview window. The titletext will follow the modified path to get to the changed keyframe position.
· drag the path line to alter the path the title text takes to get to the nextkeyframe.
· use the player controls to find a position on the motion path, and then click on the Position track of the keyframe timeline to add a new keyframe at a newposition, if required.
Customizing the Speed of Title Text Motion
You have full control over the speed to the title text's motion. The following threefactors determine the speed of the title text's motion.
Note: on the Properties tab in Object Settings you can manually adjust
the title text position at keyframes and use ease in/out to make the
movement look smoother. See Changing Object Settings for more
information.
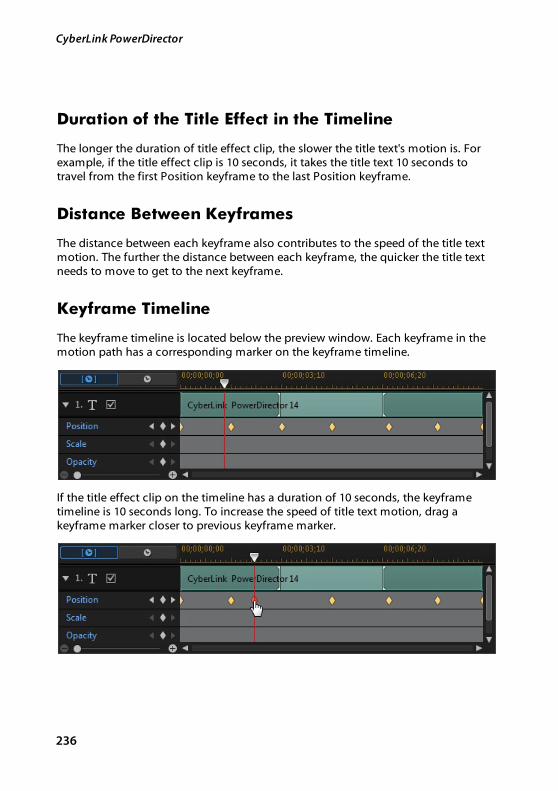
236
CyberLink PowerDirector
Duration of the Title Effect in the Timeline
The longer the duration of title effect clip, the slower the title text's motion is. Forexample, if the title effect clip is 10 seconds, it takes the title text 10 seconds totravel from the first Position keyframe to the last Position keyframe.
Distance Between Keyframes
The distance between each keyframe also contributes to the speed of the title textmotion. The further the distance between each keyframe, the quicker the title textneeds to move to get to the next keyframe.
Keyframe Timeline
The keyframe timeline is located below the preview window. Each keyframe in themotion path has a corresponding marker on the keyframe timeline.
If the title effect clip on the timeline has a duration of 10 seconds, the keyframetimeline is 10 seconds long. To increase the speed of title text motion, drag akeyframe marker closer to previous keyframe marker.
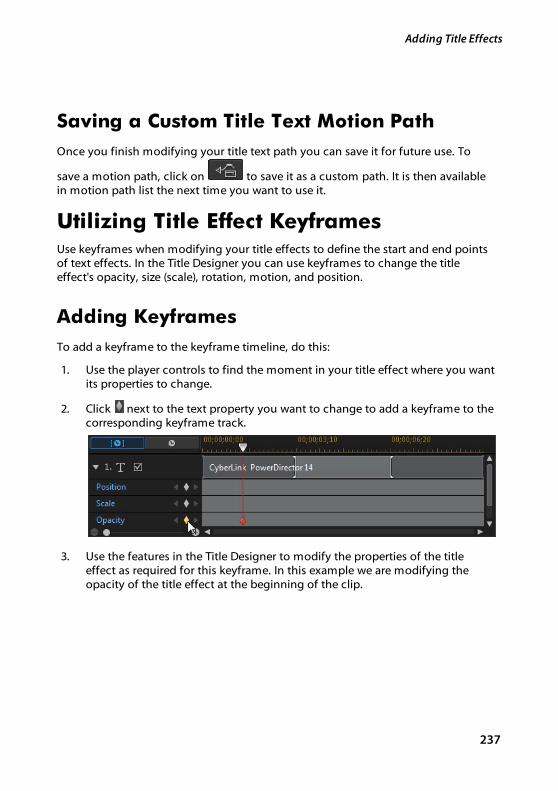
237
Adding Title Effects
Saving a Custom Title Text Motion Path
Once you finish modifying your title text path you can save it for future use. To
save a motion path, click on to save it as a custom path. It is then availablein motion path list the next time you want to use it.
Utilizing Title Effect KeyframesUse keyframes when modifying your title effects to define the start and end pointsof text effects. In the Title Designer you can use keyframes to change the titleeffect's opacity, size (scale), rotation, motion, and position.
Adding Keyframes
To add a keyframe to the keyframe timeline, do this:
1. Use the player controls to find the moment in your title effect where you wantits properties to change.
2. Click next to the text property you want to change to add a keyframe to thecorresponding keyframe track.
3. Use the features in the Title Designer to modify the properties of the titleeffect as required for this keyframe. In this example we are modifying theopacity of the title effect at the beginning of the clip.

238
CyberLink PowerDirector
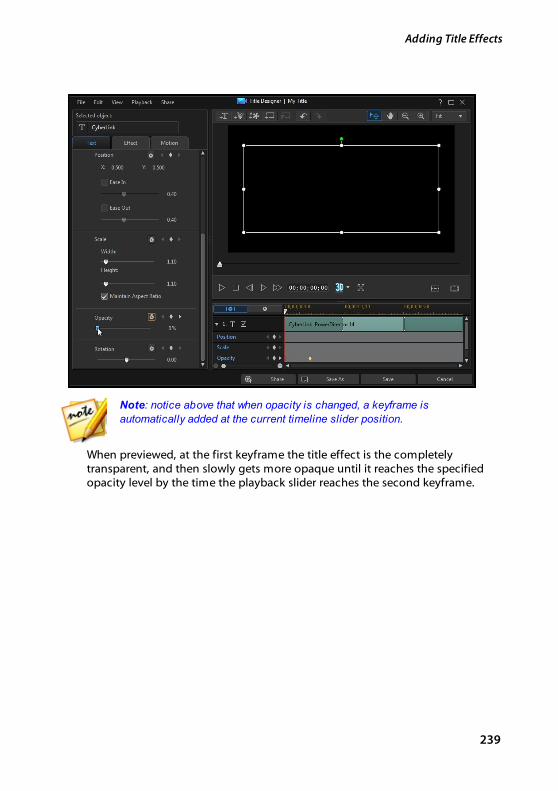
239
Adding Title Effects
Note: notice above that when opacity is changed, a keyframe is
automatically added at the current timeline slider position.
When previewed, at the first keyframe the title effect is the completelytransparent, and then slowly gets more opaque until it reaches the specifiedopacity level by the time the playback slider reaches the second keyframe.
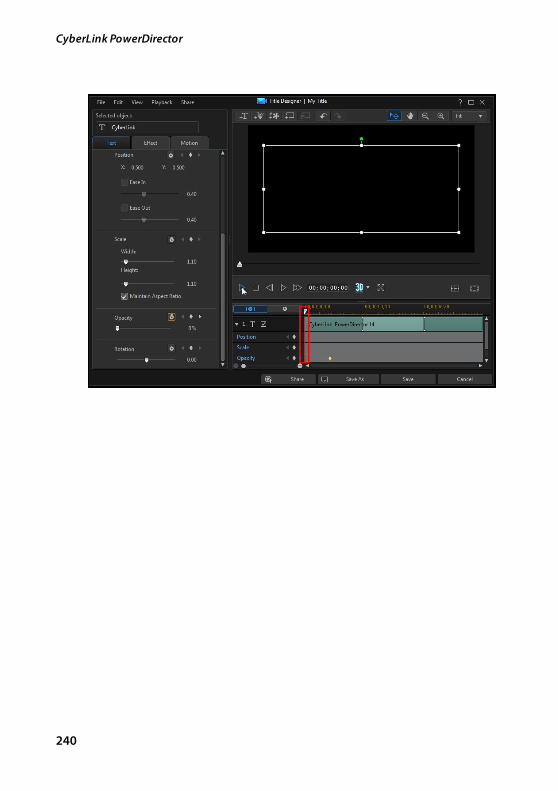
240
CyberLink PowerDirector

241
Adding Title Effects
It will maintain this opacity until the playback slider reaches the last keyframe,unless you add more keyframes or change the properties of the last keyframe.
Note: you can also modify the properties of a keyframe by right clicking on
it and selecting Duplicate Previous Keyframe or Duplicate Next
Keyframe. Doing this copies the properties of the specified keyframe to the
keyframe you right clicked on.
4. Repeat these steps to create the kind of effect you want in your videoproduction using keyframes to modify the title effect's properties.
Modifying and Removing Keyframes
At any time you can modify the keyframes added, by selecting it and changing thetitle effect's object properties, or by dragging the keyframe to another position onthe keyframe timeline.
To remove a keyframe, select it on the keyframe timeline and then click .
242
CyberLink PowerDirector
Saving and Sharing Title TemplatesOnce you finish modifying your title template you can save it to your title effectslibrary for future use, upload it to DirectorZone to share it with others, or back it upon CyberLink Cloud*.
Note: * optional feature in CyberLink PowerDirector. Check the version
table on our web site for detailed versioning information.
· click on Share to upload your custom template to DirectorZone or back it upon CyberLink Cloud. See Sharing and Backing Up Title Templates for moreinformation.
· click on Save As to save a modified template as a new template to the TitleRoom.
· click on Save to save a new template to the Title Room.
Sharing and Backing Up Title Templates
You can share your customized title templates with other CyberLink PowerDirectorusers by uploading them to DirectorZone. If you have a CyberLink Cloudsubscription you can back up all your customized templates by storing them onCyberLink Cloud.
To share and back up your title templates, do this:
1. Do either of the following:
· in the Title Designer, click on Share, enter a name for the custom template,and then click OK.
· select the title template in the library, and then click .
2. In the upload window, enter the information as follows:
· Upload to: select where you want to upload the template.
· Title: name of the template as it will display once uploaded.
· Style: select a style or category for the template.
· Type: if required, select the type of template you are uploading.
243
Adding Title Effects
· Tags: enter some keyword search tags that will help users find the templatewhen searching.
Note: separate each tag you enter with a space. If you want to use two words
as the tag, just put quotes around them, e.g. "dollar bill".
· Collection: enter the name of the collection you want the template added to.
· Description: enter a short description of your template.
3. Click Next to proceed.
4. Confirm the copyright disclaimer, and then click Next to proceed with theupload.
5. Click on Finish to close the upload window.
244
CyberLink PowerDirector
Using Transitions
Chapter 14:
Click the button to open the Transition Room to access a library of transitionsthat you can use on or between image and video clips in your video production.You can also use the available audio transitions between two audio clips on thevoice or music tracks, or on an audio track.
Transitions let you control how media appears and disappears in your project, andchanges, or transitions, from one clip to the next. You can add a transition to asingle clip, or between two clips on a track.
Adding Transitions to a SingleClipBy adding a transition to a single clip, you can control how the clip appears and/ordisappears in your production. For example, you can add transitions to PiP video(including images, video clips, color boards, PiP objects, paint animation objects,title effects, and particle effects) and fully control its appearance in your final video.
Note: you can set the default behavior and duration of transitions added to
the timeline on the Editing preferences tab. See Editing Preferences for
more information.
To add a transition to a single clip, do this:
1. Click on to open the Transition Room.
2. Select a transition effect and then drag it to the beginning (prefix transition) orending (postfix transition) of a clip on a video track.
3. To change the duration of the transition, click on the Duration button or clickand drag its start/end points within the clip.
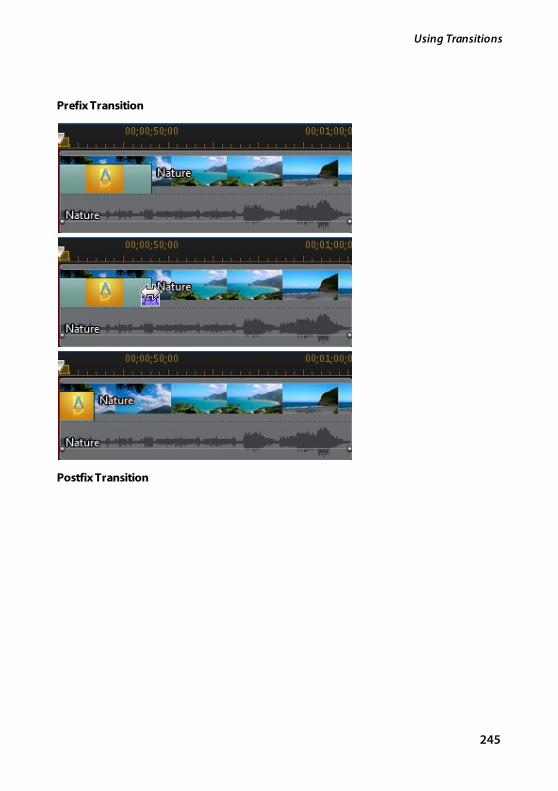
245
Using Transitions
Prefix Transition
Postfix Transition
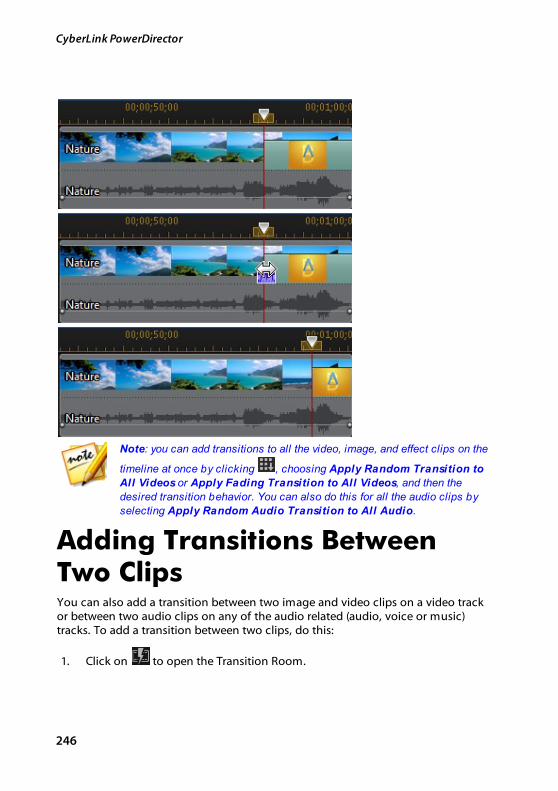
246
CyberLink PowerDirector
Note: you can add transitions to all the video, image, and effect clips on the
timeline at once by clicking , choosing Apply Random Transition to
All Videos or Apply Fading Transition to All Videos, and then the
desired transition behavior. You can also do this for all the audio clips by
selecting Apply Random Audio Transition to All Audio.
Adding Transitions BetweenTwo ClipsYou can also add a transition between two image and video clips on a video trackor between two audio clips on any of the audio related (audio, voice or music)tracks. To add a transition between two clips, do this:
1. Click on to open the Transition Room.
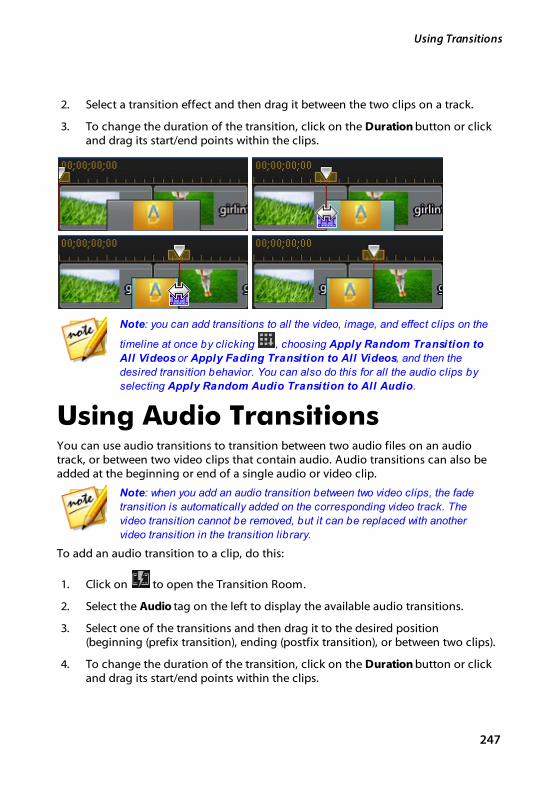
247
Using Transitions
2. Select a transition effect and then drag it between the two clips on a track.
3. To change the duration of the transition, click on the Duration button or clickand drag its start/end points within the clips.
Note: you can add transitions to all the video, image, and effect clips on the
timeline at once by clicking , choosing Apply Random Transition to
All Videos or Apply Fading Transition to All Videos, and then the
desired transition behavior. You can also do this for all the audio clips by
selecting Apply Random Audio Transition to All Audio.
Using Audio TransitionsYou can use audio transitions to transition between two audio files on an audiotrack, or between two video clips that contain audio. Audio transitions can also beadded at the beginning or end of a single audio or video clip.
Note: when you add an audio transition between two video clips, the fade
transition is automatically added on the corresponding video track. The
video transition cannot be removed, but it can be replaced with another
video transition in the transition library.
To add an audio transition to a clip, do this:
1. Click on to open the Transition Room.
2. Select the Audio tag on the left to display the available audio transitions.
3. Select one of the transitions and then drag it to the desired position(beginning (prefix transition), ending (postfix transition), or between two clips).
4. To change the duration of the transition, click on the Duration button or clickand drag its start/end points within the clips.
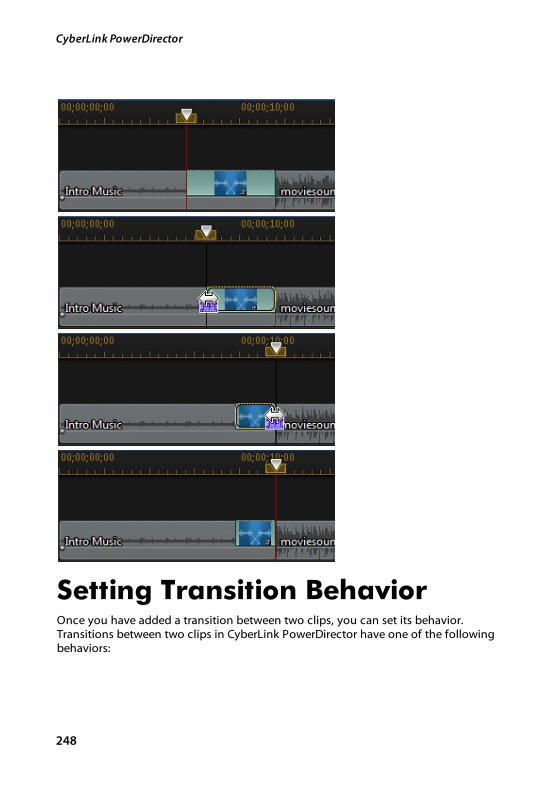
248
CyberLink PowerDirector
Setting Transition BehaviorOnce you have added a transition between two clips, you can set its behavior.Transitions between two clips in CyberLink PowerDirector have one of the followingbehaviors:

249
Using Transitions
Note: you can set the default behaviour of transitions added to the timeline
on the Editing preferences tab. See Editing Preferences for more
information.
· Cross Transition: when using a cross transition, the two clips are side by sideon the timeline and the transition acts like a bridge between them. Forexample, if you add a two second transition between two five second clips,the total duration is 10 seconds. The transition begins at the four second markof the first clip, and ends at the one second mark of the second clip.
· Overlap Transition: when using an overlap transition, the two clips overlapwhile the transition is taking place. This allows for parts of the two clips toplay over each other during the transition. Using the same example as above,the total duration is eight seconds, with the transition playing for two secondsover both clips.
To set a transition's behavior, do this:
1. Click on the transition between two clips.
2. Click the Modify button to change to the other transition type, or right-clickon the transition and then select Modify Transition.
3. In the Transition Settings panel, set the behavior of the transition.
Modifying Transition SettingsSome transitions have settings you can modify in the Transition Settings panel.These settings may include the ability to modify the background color used in thetransition, the direction of the transition effect, the type of effect used, and more.
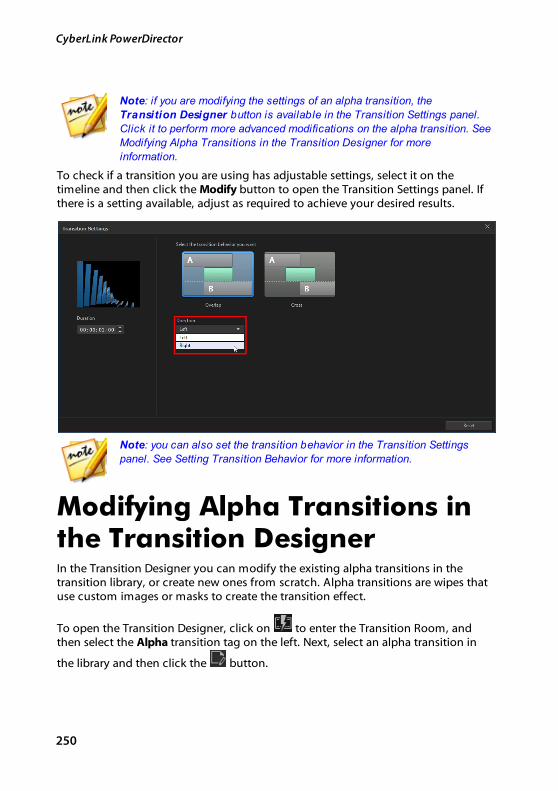
250
CyberLink PowerDirector
Note: if you are modifying the settings of an alpha transition, the
Transition Designer button is available in the Transition Settings panel.
Click it to perform more advanced modifications on the alpha transition. See
Modifying Alpha Transitions in the Transition Designer for more
information.
To check if a transition you are using has adjustable settings, select it on thetimeline and then click the Modify button to open the Transition Settings panel. Ifthere is a setting available, adjust as required to achieve your desired results.
Note: you can also set the transition behavior in the Transition Settings
panel. See Setting Transition Behavior for more information.
Modifying Alpha Transitions inthe Transition DesignerIn the Transition Designer you can modify the existing alpha transitions in thetransition library, or create new ones from scratch. Alpha transitions are wipes thatuse custom images or masks to create the transition effect.
To open the Transition Designer, click on to enter the Transition Room, andthen select the Alpha transition tag on the left. Next, select an alpha transition in
the library and then click the button.
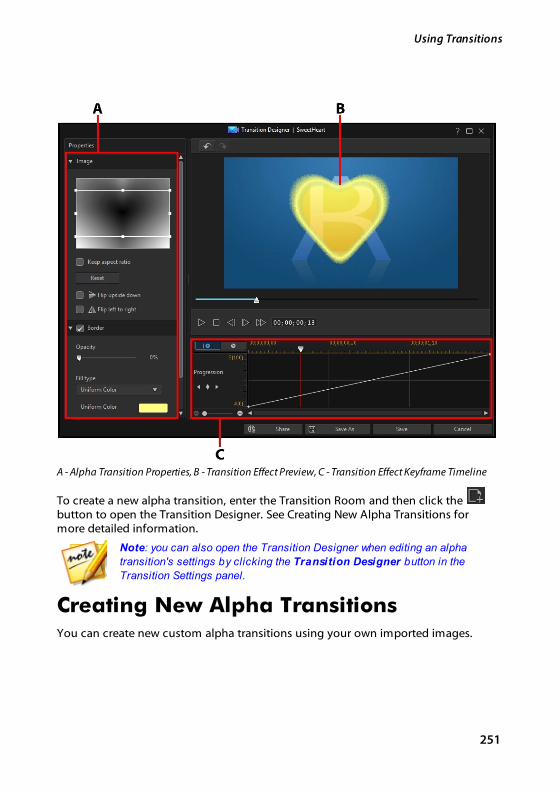
251
Using Transitions
A - Alpha Transition Properties, B - Transition Effect Preview, C - Transition Effect Keyframe Timeline
To create a new alpha transition, enter the Transition Room and then click the button to open the Transition Designer. See Creating New Alpha Transitions formore detailed information.
Note: you can also open the Transition Designer when editing an alpha
transition's settings by clicking the Transition Designer button in the
Transition Settings panel.
Creating New Alpha TransitionsYou can create new custom alpha transitions using your own imported images.
252
CyberLink PowerDirector
Note: when you create a new alpha transition, it is saved under the Custom
tag in the transition library, not under the Alpha tag.
To create a new alpha transition, do this:
1. Click to enter the Transition Room and then the button above thetransition library.
2. Browse to and then select the image you want to use in the alpha transition.Once selected, click the Open button to import it into the Transition Designer.
Note: for the best results, it is recommended that you use images that
contain gradients.
3. Proceed to modify the properties of the alpha transition as required. See Modifying Alpha Transition Properties for more detailed information.
Note: once the image is imported, it is converted to grayscale for use in the
Transition Designer.
Modifying Alpha Transition PropertiesIn the Properties tab of the Transition Designer you can customize the alphatransition's properties. See the following sections for detailed information on theproperties you can modify on this tab.
· Alpha Transition Overview
· Changing Image Properties
· Applying a Border
· Customizing the Shift Progression
· Setting Edge Sharpness
Alpha Transition Overview
Alpha transitions use an image's properties to perform the transition, i.e. shift fromone clip to another when used in your video production.
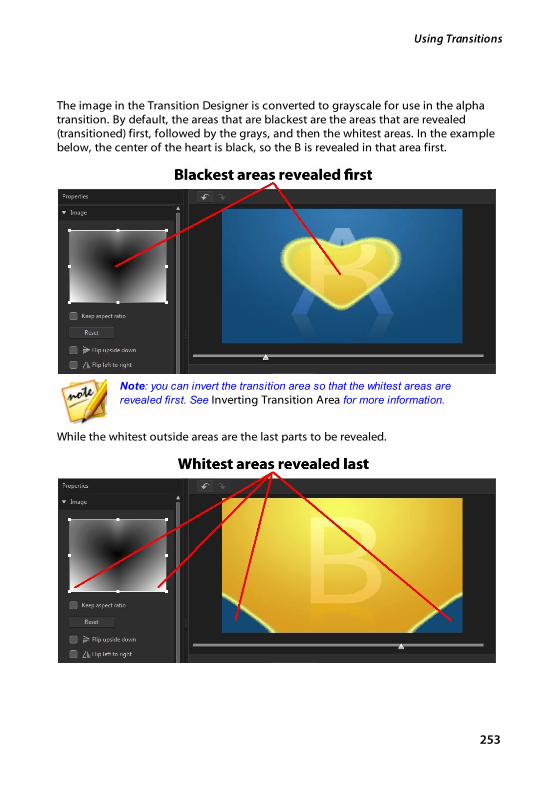
253
Using Transitions
The image in the Transition Designer is converted to grayscale for use in the alphatransition. By default, the areas that are blackest are the areas that are revealed(transitioned) first, followed by the grays, and then the whitest areas. In the examplebelow, the center of the heart is black, so the B is revealed in that area first.
Note: you can invert the transition area so that the whitest areas are
revealed first. See Inverting Transition Area for more information.
While the whitest outside areas are the last parts to be revealed.
254
CyberLink PowerDirector
Note: you can fully customize the progression of the shift (from A to B) in
the alpha transition. See Customizing the Shift Progression for more
information.
Changing Image Properties
In the Image section of the Transition Designer you can change some of theproperties for the image used in the alpha transition. If required, change theposition of the focus area in the Image preview, or the area of the image that will beused in the alpha transition.
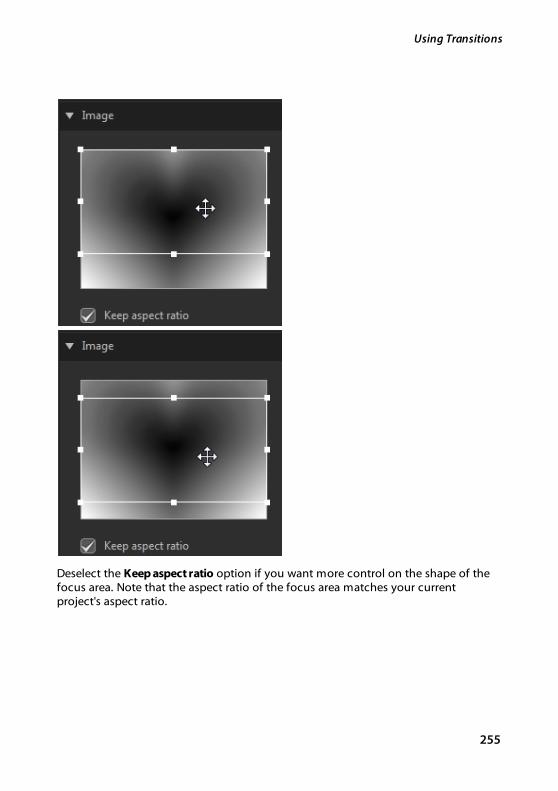
255
Using Transitions
Deselect the Keep aspect ratio option if you want more control on the shape of thefocus area. Note that the aspect ratio of the focus area matches your currentproject's aspect ratio.
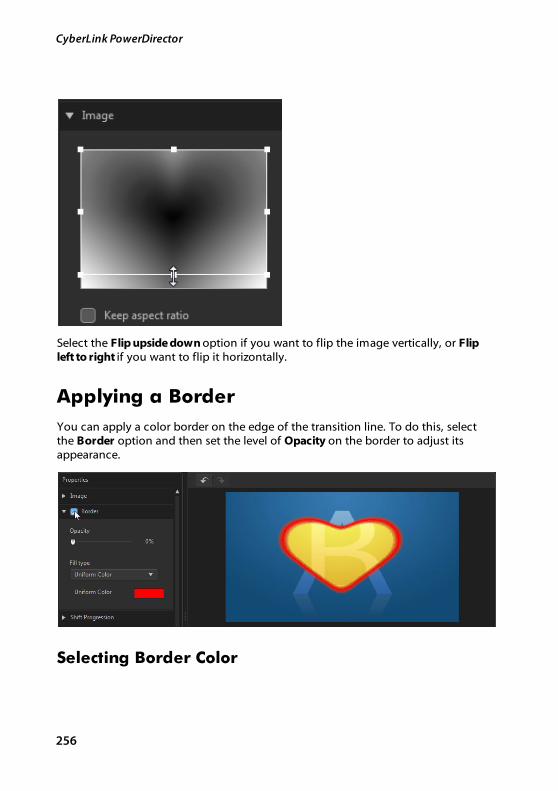
256
CyberLink PowerDirector
Select the Flip upside down option if you want to flip the image vertically, or Flipleft to right if you want to flip it horizontally.
Applying a Border
You can apply a color border on the edge of the transition line. To do this, selectthe Border option and then set the level of Opacity on the border to adjust itsappearance.
Selecting Border Color
257
Using Transitions
When selecting the color of the border, you have the following options in the Filltype drop-down:
· Uniform color: select this option if you want the border to be one solid color.Click the colored square to open the color palette and select the desiredborder color.
· 2 color gradient: select this option if you want the border color to changefrom one color to another using a gradient. Click the colored squares to setthe beginning and ending colors.
Customizing the Shift Progression
In this section you can customize the shift progression of the alpha transition, orhow it transitions from one clip to another when used in your video production.
Shift Progression Timeline
The shift progression timeline is a graphical representation of how the transitionprogresses, i.e. how the alpha transition shifts from the A to the B as shown in thebelow example.
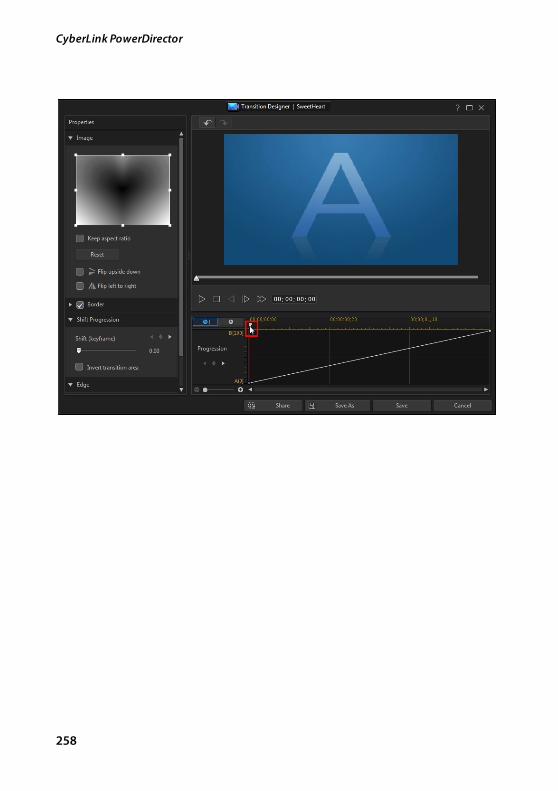
258
CyberLink PowerDirector
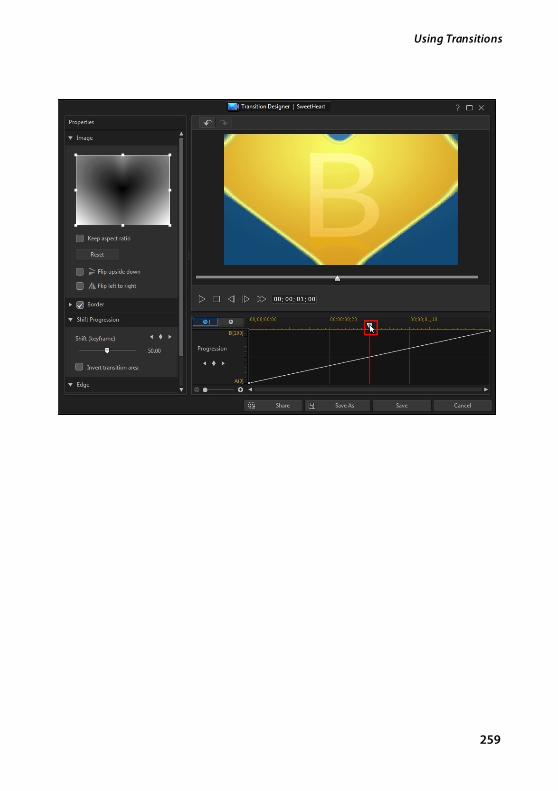
259
Using Transitions
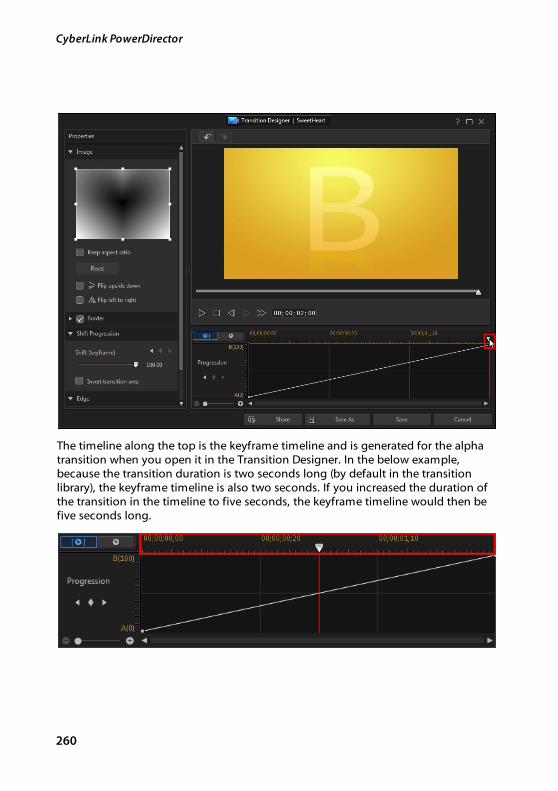
260
CyberLink PowerDirector
The timeline along the top is the keyframe timeline and is generated for the alphatransition when you open it in the Transition Designer. In the below example,because the transition duration is two seconds long (by default in the transitionlibrary), the keyframe timeline is also two seconds. If you increased the duration ofthe transition in the timeline to five seconds, the keyframe timeline would then befive seconds long.
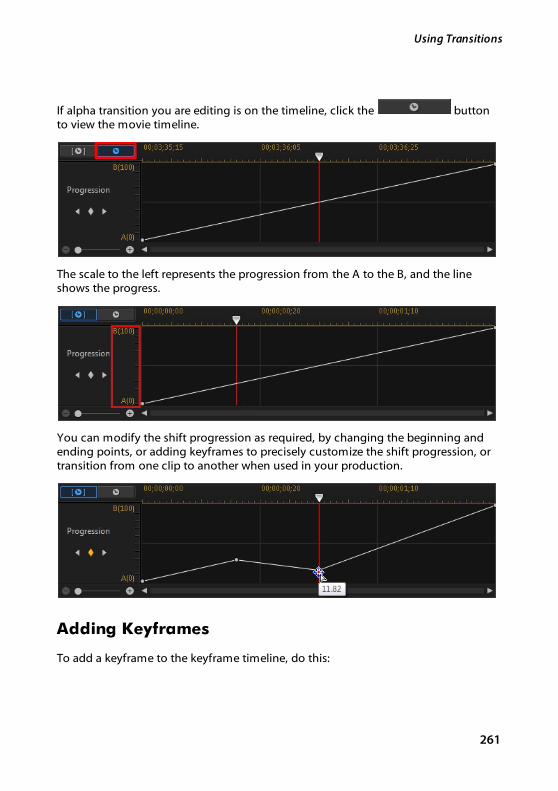
261
Using Transitions
If alpha transition you are editing is on the timeline, click the buttonto view the movie timeline.
The scale to the left represents the progression from the A to the B, and the lineshows the progress.
You can modify the shift progression as required, by changing the beginning andending points, or adding keyframes to precisely customize the shift progression, ortransition from one clip to another when used in your production.
Adding Keyframes
To add a keyframe to the keyframe timeline, do this:

262
CyberLink PowerDirector
1. Use the player controls to find the moment in the transition where you wantthe progression to shift.
2. Click in the Shift Progression section to add a keyframe to the progressionline.
3. If required, use the Shift slider to change the progression position of the line.
In this above example, the transition will now shift 75% from A to B in the firstsecond of the transition, and then progress the final 25% in the last second.
4. Repeat these steps to customize the shift progression as required usingkeyframes.
Removing Keyframes
To remove a keyframe, drag the timeline slider over it so that it is highlighted and
then click .
Inverting Transition Area
Select the Invert transition area option if you want the whitest areas of the alphatransition image to transition first, followed by the grays, and then the blackestareas.
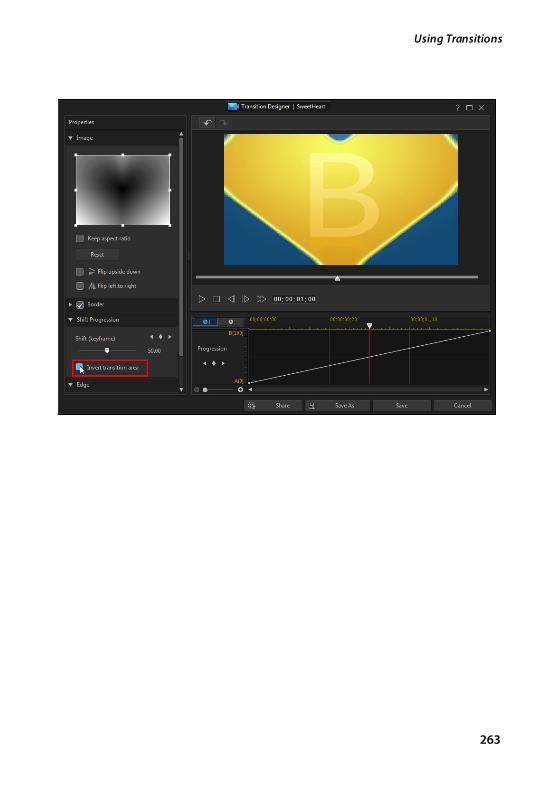
263
Using Transitions
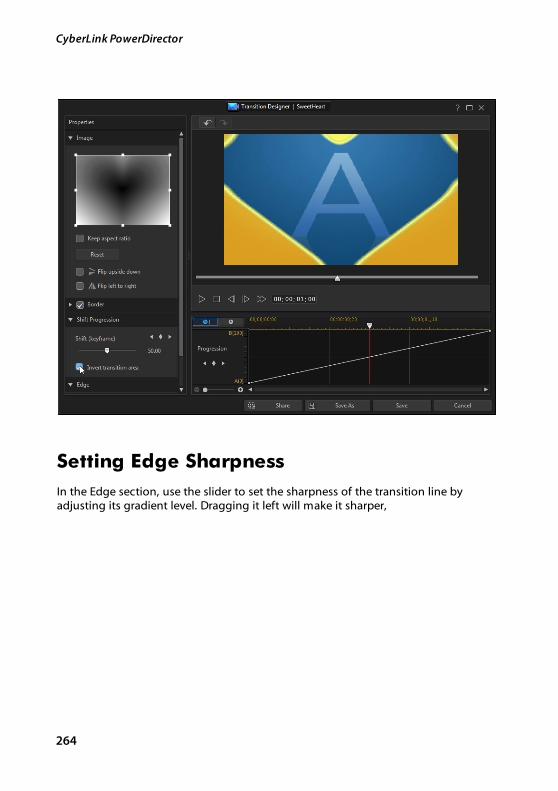
264
CyberLink PowerDirector
Setting Edge Sharpness
In the Edge section, use the slider to set the sharpness of the transition line byadjusting its gradient level. Dragging it left will make it sharper,
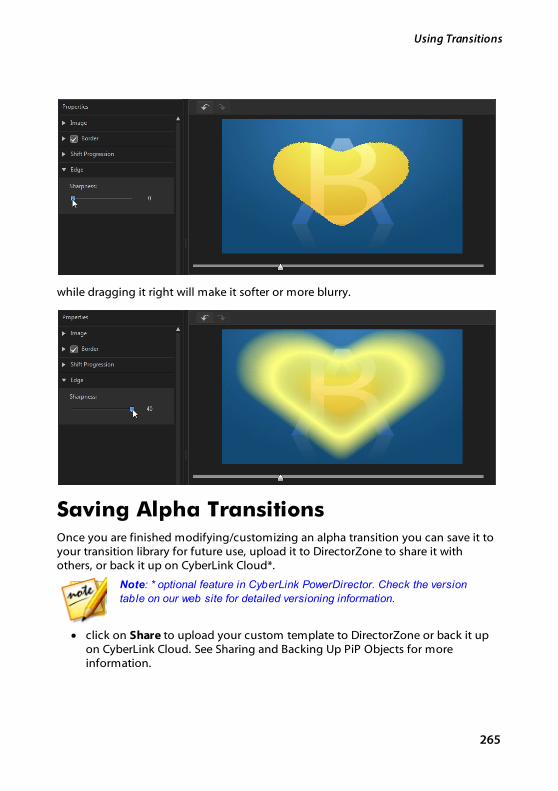
265
Using Transitions
while dragging it right will make it softer or more blurry.
Saving Alpha TransitionsOnce you are finished modifying/customizing an alpha transition you can save it toyour transition library for future use, upload it to DirectorZone to share it withothers, or back it up on CyberLink Cloud*.
Note: * optional feature in CyberLink PowerDirector. Check the version
table on our web site for detailed versioning information.
· click on Share to upload your custom template to DirectorZone or back it upon CyberLink Cloud. See Sharing and Backing Up PiP Objects for moreinformation.
266
CyberLink PowerDirector
· click on Save As to save a modified template as a new template to theTransition Room.
· click on Save to save a new template to the Transition Room.
Note: when you create a new alpha transition, or edit an existing one, it is
saved under the Custom tag in the transition library, not under the Alpha
tag.
Sharing and Backing Up Alpha Transitions
You can share your customized alpha transitions with other CyberLinkPowerDirector users by uploading them to DirectorZone. If you have a CyberLinkCloud subscription you can back up all your customized alpha transitions bystoring them on CyberLink Cloud.
To share and back up your alpha transitions, do this:
1. Do either of the following:
· in the Transitions Designer, click on Share, enter a name for the customtemplate, and then click OK.
· select the alpha transitions in the library, and then click .
2. In the upload window, enter the information as follows:
· Upload to: select where you want to upload the template.
· Title: name of the template as it will display once uploaded.
· Style: select a style or category for the template.
· Type: if required, select the type of template you are uploading.
· Tags: enter some keyword search tags that will help users find the templatewhen searching.
Note: separate each tag you enter with a space. If you want to use two words
as the tag, just put quotes around them, e.g. "dollar bill".
· Collection: enter the name of the collection you want the template added to.
· Description: enter a short description of your template.
3. Click Next to proceed.

267
Using Transitions
4. Confirm the copyright disclaimer, and then click Next to proceed with theupload.
5. Click on Finish to close the upload window.
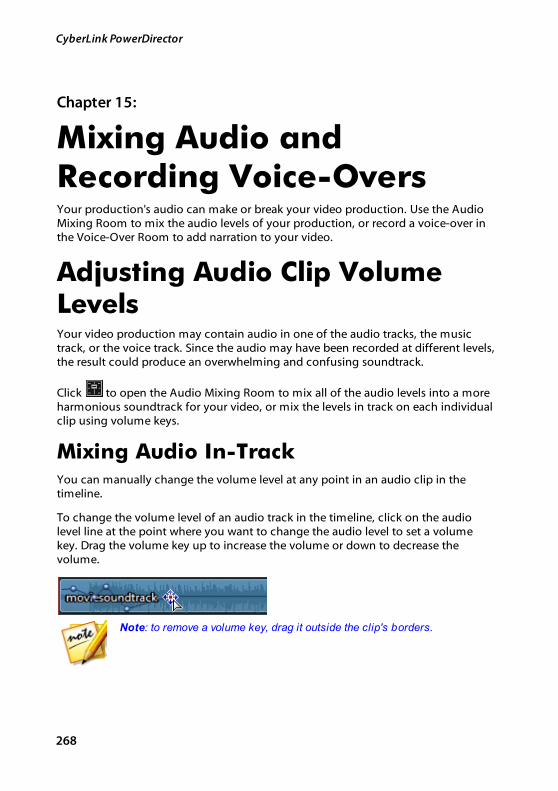
268
CyberLink PowerDirector
Mixing Audio andRecording Voice-Overs
Chapter 15:
Your production's audio can make or break your video production. Use the AudioMixing Room to mix the audio levels of your production, or record a voice-over inthe Voice-Over Room to add narration to your video.
Adjusting Audio Clip VolumeLevelsYour video production may contain audio in one of the audio tracks, the musictrack, or the voice track. Since the audio may have been recorded at different levels,the result could produce an overwhelming and confusing soundtrack.
Click to open the Audio Mixing Room to mix all of the audio levels into a moreharmonious soundtrack for your video, or mix the levels in track on each individualclip using volume keys.
Mixing Audio In-TrackYou can manually change the volume level at any point in an audio clip in thetimeline.
To change the volume level of an audio track in the timeline, click on the audiolevel line at the point where you want to change the audio level to set a volumekey. Drag the volume key up to increase the volume or down to decrease thevolume.
Note: to remove a volume key, drag it outside the clip's borders.
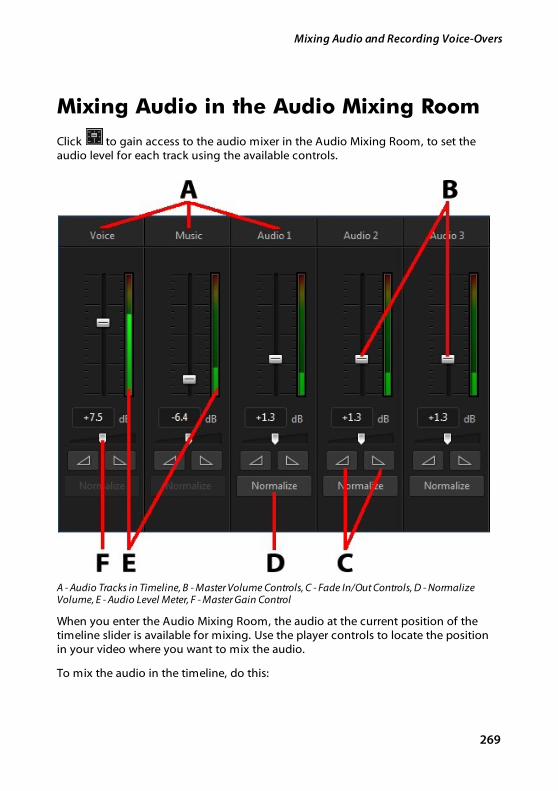
269
Mixing Audio and Recording Voice-Overs
Mixing Audio in the Audio Mixing Room
Click to gain access to the audio mixer in the Audio Mixing Room, to set theaudio level for each track using the available controls.
A - Audio Tracks in Timeline, B - Master Volume Controls, C - Fade In/Out Controls, D - NormalizeVolume, E - Audio Level Meter, F - Master Gain Control
When you enter the Audio Mixing Room, the audio at the current position of thetimeline slider is available for mixing. Use the player controls to locate the positionin your video where you want to mix the audio.
To mix the audio in the timeline, do this:
270
CyberLink PowerDirector
· select a clip in the timeline, and then use the master volume controls toincrease or decrease the volume at the current position.
· if there is more than one audio clip on the voice or music track, or on any ofthe audio tracks, click the Normalize* button to have CyberLinkPowerDirector set the volume for all the clips to the same level.
Note: * optional feature in CyberLink PowerDirector. Check the version table
on our web site for detailed versioning information.
· use the master gain control sliders to increase or decrease the volume of allthe media on a track.
· use the audio level meter to view the audio level, or loudness in decibels,during playback. If the audio levels rise to the red levels, you can adjust themaster volume to lower the audio level.
Note: if audio in a clip enters the red level of the audio level meter, CyberLink
PowerDirector marks the area on the timeline in red. Use the master volume
controls and audio level meter to fix the problem area as required.
Adding Fade Effects to Audio ClipsTo add a fade-in/fade-out effect to an audio clip, do this:
1. Click open the Audio Mixing Room
2. Select the audio clip in the timeline.
3. Ensure the timeline slider is at the beginning of the audio clip, and then click
to add a fade-in effect.
4. Drag the timeline slider to the position in your audio clip where you want the
audio to start fading out, and then click effect.
Note: when you add fade effects, volume keys are added to the audio clip in
the timeline. You can adjust these volume keys to customize the fade effect.
See Mixing Audio In-Track for more information on adjust volume keys.
Restoring Audio Clip Volume LevelsIf you are dissatisfied with the volume level of any audio clip, you can easily restorethe clip's original volume level. To do this, right-click on the audio clip and thenselect Restore to Original Volume Level.
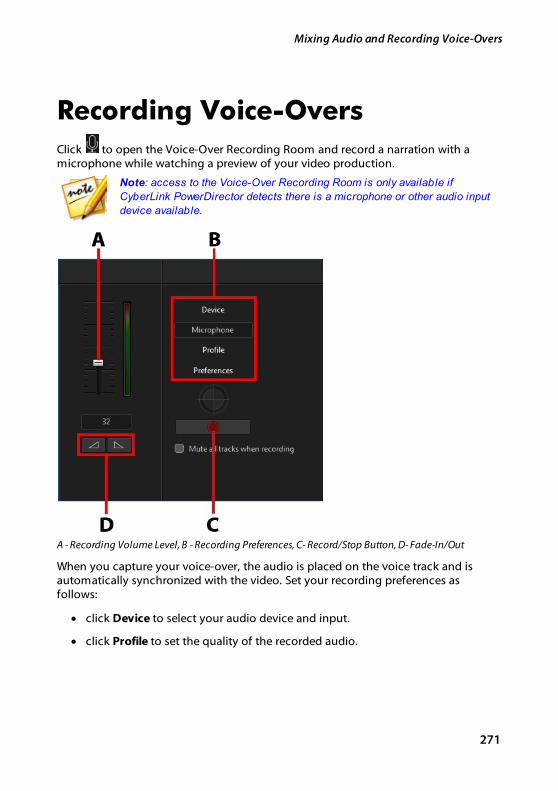
271
Mixing Audio and Recording Voice-Overs
Recording Voice-Overs
Click to open the Voice-Over Recording Room and record a narration with amicrophone while watching a preview of your video production.
Note: access to the Voice-Over Recording Room is only available if
CyberLink PowerDirector detects there is a microphone or other audio input
device available.
A - Recording Volume Level, B - Recording Preferences, C- Record/Stop Button, D- Fade-In/Out
When you capture your voice-over, the audio is placed on the voice track and isautomatically synchronized with the video. Set your recording preferences asfollows:
· click Device to select your audio device and input.
· click Profile to set the quality of the recorded audio.
272
CyberLink PowerDirector
· click Preferences to set a recording time limit or three second delay beforerecording begins to ensure you are ready to record. You can also set autofades.
· select Mute all tracks when recording if you want CyberLink PowerDirector tomute all the other audio while you are recording the voice over.
· select fade-in the voice over, or to add a fade-out effect.
To record a voice over, do this:
1. Set the recording volume level using the available slider.
2. Click to begin recording. Record your voice over as youwatch the video in the preview window.
3. Click to stop recording. The captured voice clip is placed onthe voice track.
273
Adding Chapters
Adding Chapters
Chapter 16:
Click the button to open the Chapter Room*. Chapters are used to easenavigation of your finalized production if you decide to burn it to a disc. Chaptersallow viewers to watch only the content they want or easily find their place if thedisc was stopped before completion.
Note: for best results, adding chapters should be the last editing step
before burning your video production to disc. * Optional feature in
CyberLink PowerDirector. Check the version table on our web site for
detailed versioning information.
Adding Chapters MarkersTo auto add chapter markers in the Chapter Room do one of the following:
· select Insert chapter at the start of each clip on the first video track to add achapter marker before each clip on the top track in the timeline.
· select Insert chapters at fixed intervals, and then enter the interval (in minutes)in the field provided.
· select Insert chapters evenly and then enter the number of chapters in thefield provided, to set a specified number of chapters evenly in your project.
Click the Start button to auto add the chapter markers as specified.
To set chapter markers manually, navigate to a point in your video production and
then click . To remove a chapter marker, select it and then click . Click
to remove all of the chapter markers in your production.
Setting Chapter ThumbnailsYou can set the thumbnail image for each of your chapters, which display in thedisc menu on a finalized disc. Just drag the timeline slider to the frame in your

274
CyberLink PowerDirector
video production you want to use as the chapter thumbnail, and then click the
button.

275
Adding Subtitles
Adding Subtitles
Chapter 17:
CyberLink PowerDirector lets you add subtitles to your video production, either fora disc or imprinted on a video file. You can also import subtitles from a file, extractthem from an MKV file, or add them manually in the Subtitle Room.
To add subtitles to your video production, click on in the Subtitle Room and
then to select one of the following types of subtitles:
· Create subtitles for discs/files*: select this option to create subtitles that arecompatible with most DVD/BDMV/AVCHD/MKV playback software and can beswitched on/off like those found on commercial discs.
Note: when you select Create subtitles for discs/files, there is a Subtitles
option by default in your created disc menu in the Create Disc window. Text
formatting for disc subtitles is more limited. * Optional feature in CyberLink
PowerDirector. Check the version table on our web site for detailed
versioning information.
· Create subtitles imprinted on a video file: select this option to blend subtitlesinto the video.
Note: if you are creating subtitles for an MKV file, make sure you select the
Create subtitles for disc/files option, not the option where the subtitles
are imprinted on the video file.
Adding Subtitle MarkersSubtitle markers are the placeholders for the subtitle text added to your production.They are added to display at the exact time the dialogue is spoken in the videoproduction, and display until it has completed. Unless you are importing subtitlesfrom an SRT file or extracting them from an MKV file, you must add all the subtitlemarkers manually to your video production.
To manually add subtitle markers to your video production, you can:
· click the play button on the player controls and then click the buttonat the beginning of every piece of dialogue spoken to create all the subtitlemarkers required for your production. Continue this process until the video is

276
CyberLink PowerDirector
complete, and then click the stop button to load the subtitle markers into theSubtitle Room.
· use the player controls to find the position in the video where you want to
add the subtitle, and then click the button to add a single subtitlemarker.
Once you have added the subtitle markers, the next step is to edit the subtitle textand duration. See Editing Subtitles for more information.
Importing Subtitles from a FileClick the button in the Subtitle Room to import subtitles from a file* in theSRT or TXT formats. This allows you to compose subtitles outside the program orretrieve them from another source, and then import them into CyberLinkPowerDirector.
Note: when an SRT file is imported, the subtitle markers are created
automatically in the Subtitle Room. However for TXT files you must first add
all of the subtitle markers before you can import the file. See Adding
Subtitle Markers fore more information.
If importing from a TXT file, you should ensure the subtitle markers in the SubtitleRoom match the number of lines of subtitle text in the file. When composing thesubtitles in a TXT file, each subtitle should be placed on a new line in the file.CyberLink PowerDirector detects each line, and then imports the correspondingtext into the subtitles markers in the Subtitle Room.
Note: * optional feature in CyberLink PowerDirector. Check the version
table on our web site for detailed versioning information.
Extracting Subtitles from anMKV FileCyberLink PowerDirector lets you extract the subtitles from an MKV file, importingthem directly into the Subtitles Room. This allows you to manually edit thesubtitles, and then re-produce the file with the updated subtitle text.
To extract subtitles from an MKV file, do this:

277
Adding Subtitles
1. Import the MKV file into the media library, and then place the video file on thetimeline.
2. Right-click on the file, select Extract Subtitles, and then the language of thesubtitles you want to extract.
3. CyberLink PowerDirector will extract the subtitles into the Subtitle Room.
Once you have extracted the subtitles from the file, you can then edit the subtitletext. See Editing Subtitles for more information.
Editing SubtitlesOnce the subtitle markers are added in the Subtitle Room, you can perform avariety of edits on them, including editing subtitle text, changing the subtitle textfont, positioning them on the screen, and more.
To edit the subtitles in your video production, do this:
· double-click on each subtitle marker in the timeline (or in the Subtitle Textcolumn), and then enter the text as required.
· click the button to set the position of the subtitles on the screen. Usethe X position slider to set its position on the horizontal, use the Y positionslider to set its vertical position.
· click the button to format the subtitle text as required. If you arecreating a 3D video production, use the 3D Depth* slider to set the amount ofdepth you want the subtitles to have in 3D. Dragging the slider left will makethe 3D subtitles seem nearer to the audience (in the foreground), whiledragging it right will make them appear farther away (in the background).
Note: when using this feature, select the button to enable 3D mode for
best editing results. See Previewing in 3D Mode for more information on
using this mode. * Optional feature in CyberLink PowerDirector. Check the
version table on our web site for detailed versioning information.
· to remove a subtitle marker, select it and then click the button.
Note: once you are done editing the subtitles, you can click the
button to export and save them as an SRT file.
278
CyberLink PowerDirector
Syncing SubtitlesTo ensure the subtitles in your video production sync with the video dialogue, youcan manually adjust the start and end time for each subtitle marker, or the durationthey display on screen.
To set a start time for a subtitle marker, do either of the following:
· double click on the Start Time column for the subtitle marker, and then entera time code.
· position your cursor at the beginning of the subtitle marker on the subtitletrack, and then drag it to the new position.
To set an end time for a subtitle, do either of the following:
· double click on the End Time column for the subtitle marker, and then enter atime code.
· position your cursor at the end of the subtitle marker on the subtitle track,and then drag it to the new position.
You can also easily set the duration of each subtitle marker by selecting it on thesubtitle track and then clicking the Duration button above the timeline. In theDuration Settings window, enter in the how long you want it to display, and thenclick on OK.

279
Producing Your Project
Producing Your Project
Chapter 18:
When you are done editing your project, it's time to produce it. Producing simplymeans compiling (or rendering) the separate elements your project contains into aplayable file. As your production may be destined for many different uses,CyberLink PowerDirector has several options suited for all your requirements. Youcan even produce just your project's audio into a music file, creating your ownproduction soundtrack in one easy step.
Utilizing Intelligent SVRTIntelligent SVRT* (Smart Video Rendering Technology) is a proprietary renderingtechnology from CyberLink that assists in the output of your video productions bysuggesting which video profile you should use.
Note: * optional feature in CyberLink PowerDirector. Check the version table
on our web site for detailed versioning information.
Based on the format of original video clips in your project, what portions of theclips were modified (and therefore require rendering during production), and whichportions of them were not changed (and thus can be skipped over during therendering process), Intelligent SVRT suggests the video profile that will result in thebest output quality possible, and save you the most time during production.
To utilize Intelligent SVRT, do one of the following:
· when editing your video production in the Edit window, right-click on thetimeline and select Show SVRT Track.
· in the Produce window, click the Intelligent SVRT button on the Standard 2Dor 3D tab.
In the Intelligent SVRT dialog that displays, CyberLink PowerDirector auto selectsthe video profile it suggests you use to output your video production, and someother video profiles you can utilize.
Note: view the SVRT information in the Edit window for more detailed
information, including which video clips need rendering. If you viewing the
SVRT information in the Produce window, click the Details (Edit) button to
quickly switch to the Edit window.
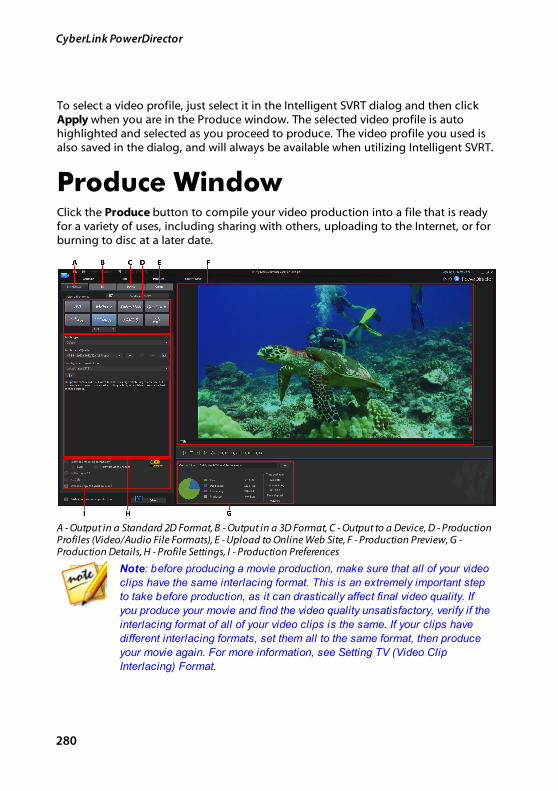
280
CyberLink PowerDirector
To select a video profile, just select it in the Intelligent SVRT dialog and then click Apply when you are in the Produce window. The selected video profile is autohighlighted and selected as you proceed to produce. The video profile you used isalso saved in the dialog, and will always be available when utilizing Intelligent SVRT.
Produce WindowClick the Produce button to compile your video production into a file that is readyfor a variety of uses, including sharing with others, uploading to the Internet, or forburning to disc at a later date.
A - Output in a Standard 2D Format, B - Output in a 3D Format, C - Output to a Device, D - ProductionProfiles (Video/Audio File Formats), E - Upload to Online Web Site, F - Production Preview, G -Production Details, H - Profile Settings, I - Production Preferences
Note: before producing a movie production, make sure that all of your video
clips have the same interlacing format. This is an extremely important step
to take before production, as it can drastically affect final video quality. If
you produce your movie and find the video quality unsatisfactory, verify if the
interlacing format of all of your video clips is the same. If your clips have
different interlacing formats, set them all to the same format, then produce
your movie again. For more information, see Setting TV (Video Clip
Interlacing) Format.
281
Producing Your Project
In the produce window, select the production option that matches the task youwant to perform. You can select one of the following production options:
Tab Description
Standard 2D Click on the Standard 2D tab if you want to outputyour production to a 2D video file that you canwatch on a computer or burn to a disc at a laterdate. You can also output just the audio into aaudio file for playback on a variety of devices. See Outputting to a Standard 2D File for moreinformation.
3D Click on the 3D tab if you want to output yourproduction in a 3D video file format. See Outputting in a 3D Format for more information.
Device Click on the Device tab if you want to produceyour video and then output it to a camcorder orportable device. See Outputting to a Device formore information.
Online Click on the Online tab if you want to upload yourvideo to YouTube, Dailymotion, or Vimeo. See Uploading Video to Social Web Sites for moreinformation.
Note: you can also produce multiple created video production projects at
one time in the Edit window using the Batch Produce feature. See Batch
Produce for more information.
Outputting to a Standard 2D FileYou can output your video production as a standard 2D video file, which you canwatch on a computer, burn to disc, or output to a portable device. You can alsooutput just the audio into a audio file format for playback.
Note: if you're not sure which video file format you should output your
production in, click the Intelligent SVRT button for assistance. See Utilizing
Intelligent SVRT for more information on using this feature.
You can output your project to one of the following formats:
· AVI
282
CyberLink PowerDirector
· MPEG-2*
· Windows Media
· QuickTime*
· H.264 AVC*
· H.265 HEVC*
· XAVC S*
· Audio file
To output your video production in standard 2D, do this:
Note: if there is any 3D media in your video production, you must ensure the
file's 3D source format is set prior to production to ensure the media displays
properly in 2D. CyberLink PowerDirector will incorporate the specified eye
frames into your 2D video. See Setting 3D Source Format for more
information.
1. Select a video file format by clicking it (or the audio file option if you just wantto output your production's audio).
Note: if you select the H.265 HEVC or H.264 AVC output format, you must
also select the container from the drop-down. You can choose from the
.M2TS, .MKV, or .MP4 container file format. If you want to output to an audio
file, select the audio file format in the drop-down that displays. You can
output in the WMA, WAV, or M4A file format.
2. Select the Profile name/Quality you want to use to create the file. Thisselection determines the video resolution, file size, and overall quality of theoutputted file. See Customizing Profiles for more information.
Note: in some versions of CyberLink PowerDirector, the H.265 HEVC, H.264
AVC, and WMV video file formats support up to 4K* resolution (Ultra HD).
Before production, be sure to select the desired video resolution in the
Profile name/Quality drop-down. * optional feature in CyberLink
PowerDirector. Check the version table on our web site for detailed
versioning information.
3. Configure the production options as required. See Configuring ProductionOptions for more information.
4. Check the production details and that the file will be outputted to the folder
on your computer where you want it. Click to set another outputfolder.
283
Producing Your Project
5. Click the Start button to begin producing your file.
Customizing Profiles
After you select a file format for your outputted file, depending on the format youselected, there may be quality settings you can customize in the profiles section.
These quality settings are called profiles, and can consist of a video file's resolution,bitrate compression, audio compression type, and more.
Before you output your production, you may want to create a new quality profile,edit an existing one, or select a different profile and other options from one of theavailable drop-downs in the production options section.
Configuring Production Options
Before you begin producing your file, you can select from the following productionoptions:
Note: the options that are available depend on the file format you selected
and the version of CyberLink PowerDirector that is installed on your
computer.
· Fast video rendering technology: SVRT and Hardware video encoder areoptions that can reduce production time. The Hardware video encoderoption is only enabled if your computer supports hardware acceleration(NVIDIA graphics card that supports CUDA, an AMD graphics card thatsupports AMD Accelerated Parallel Processing, or a computer with Intel CoreProcessor Family technology), and you are outputting in a file format thatsupports it (H.264 and MPEG-4).
· Dolby Digital 5.1: select this preference if you want to include Dolby Digital5.1 audio in your produced video file.
· x.v.Color: x.v.Color is a color system that can display a wider color range thanusual. CyberLink PowerDirector can generate an x.v.Color-compliant stream,which is backward compatible with RGB displays, while offering theopportunity to achieve better visual quality if your playback environment isx.v.Color ready.

284
CyberLink PowerDirector
· Upload a copy to CyberLink Cloud*: if you have a CyberLink Cloudsubscription, select this option if you also want the program to upload theproduced file to your CyberLink Cloud storage space after production.
Note: if you selected to upload a copy of the produced file to CyberLink
Cloud, PowerDirector will ask you if you want to convert it before uploading.
Click Yes to convert it to an .MP4 file that is playable on a portable device,
or No if you want to upload the original produced file.
· Enable preview during production: select this option to preview your movieduring production. Selecting this option will increase the time required toproduce your file.
Note: * optional feature in CyberLink PowerDirector. Check the version
table on our web site for detailed versioning information.
Outputting in a 3D FormatYou can output your production in a 3D* video file format. To output your projectto a file, select the 3D tab and then select the desired file format.
Note: if you're not sure which video file format you should output your
production in, click the Intelligent SVRT button for assistance. See
Utilizing Intelligent SVRT for more information on using this feature. *
Optional feature in CyberLink PowerDirector. Check the version table on
our web site for detailed versioning information.
You can output your production to one of the following file formats:
· Windows Media
· MPEG-2*
· QuickTime*
· H.264 AVC*
To output your video production in 3D, do this:
Note: if there is any 2D media in your video production, you must convert it
to 3D before production. See Power Tools: 2D to 3D for more information.
1. Select a 3D video file format by clicking it.

285
Producing Your Project
Note: if you select the H.264 AVC output format, you must also select the
container from the drop-down. You can choose from the .M2TS, .MKV, or
.MP4 container file format.
2. Select the 3D output format from the drop-down. See 3D Output Formats formore information.
3. Select the Profile name/Quality you want to use to create the file. Thisselection determines the video resolution, file size, and overall quality of theoutputted file. See Customizing Profiles for more information.
Note: in some versions of CyberLink PowerDirector, the H.264 AVC/WMV
video file formats support up to 4K* resolution (Ultra HD). Before production,
be sure to select the desired video resolution in the Profile name/Quality
drop-down. * optional feature in CyberLink PowerDirector. Check the
version table on our web site for detailed versioning information.
4. Configure the production options as required. See Configuring ProductionOptions for more information.
5. Check the production details and that the file will be outputted to the folder
on your computer where you want it. Click to set another outputfolder.
6. Click the Start button to begin producing your file.
3D Output Formats
Once you select a video file format (or container), you need to select the 3D outputsource format. This selection specifies how the 3D content is displayed. You canselect one of the following 3D output source formats:
· Side-by-Side Half Width (L/R): a side-by-side 3D source format optimized for4:3 or non-HD video productions.
· Side-by-Side Full Width (L/R): a side-by-side 3D source format optimized forHD video productions.*
Note: * 3D MPEG-2 videos cannot be outputted with this source format. The
side-by-side full width format is only available when the Ultra version of
CyberLink PowerDirector is installed on a 64-bit operating system.
· H.264 Multi-View Coding: a Multi-View Coding (MVC) source format.
· Anaglyph: a red/cyan source format. Select this format if you do not have a3D display device, to watch a 3D video production with anaglyphic 3D glasses.
286
CyberLink PowerDirector
Customizing Profiles
After you select a file format for your outputted file, depending on the format youselected, there may be quality settings you can customize in the profiles section.
These quality settings are called profiles, and can consist of a video file's resolution,bitrate compression, audio compression type, and more.
Before you output your production, you may want to create a new quality profile,edit an existing one, or select a different profile and other options from one of theavailable drop-downs in the production options section.
Configuring Production Options
Before you begin producing your file, you can select from the following productionoptions:
Note: the options that are available depend on the file format you selected
and the version of CyberLink PowerDirector that is installed on your
computer.
· Fast video rendering technology: SVRT and Hardware video encoder areoptions that can reduce production time. The Hardware video encoderoption is only enabled if your computer supports hardware acceleration(NVIDIA graphics card that supports CUDA, an AMD graphics card thatsupports AMD Accelerated Parallel Processing, or a computer with Intel CoreProcessor Family technology), and you are outputting in a file format thatsupports it (H.264 and MPEG-4).
· Dolby Digital 5.1: select this preference if you want to include Dolby Digital5.1 audio in your produced video file.
· x.v.Color: x.v.Color is a color system that can display a wider color range thanusual. CyberLink PowerDirector can generate an x.v.Color-compliant stream,which is backward compatible with RGB displays, while offering theopportunity to achieve better visual quality if your playback environment isx.v.Color ready.
· Upload a copy to CyberLink Cloud*: if you have a CyberLink Cloudsubscription, select this option if you also want the program to upload theproduced file to your CyberLink Cloud* storage space after production.
287
Producing Your Project
Note: if you selected to upload a copy of the produced file to CyberLink
Cloud, PowerDirector will ask you if you want to convert it before uploading.
Click Yes to convert it to an .MP4 file that is playable on a portable device,
or No if you want to upload the original produced file.
· Enable preview during production: select this option to preview your movieduring production. Selecting this option will increase the time required toproduce your file.
Note: * optional feature in CyberLink PowerDirector. Check the version
table on our web site for detailed versioning information.
Outputting to a DeviceSelect the Device tab if you want to output your video production back to a DV oran HDV* tape.
Note: you must manually locate the position on your HDV camcorder tape
where you want to write back your content to before proceeding.
You can also output your production to a file that you can then copy back to anHDD (hard disk drive) camcorder*. Or output it in a file format that is compatiblewith a number of portable devices, including for an iPod/iPhone/iPad,PS3*/PSP/Walkman, Xbox/Zune, and a wide variety of mobile phones*.
To output your video production to a device, do this:
Note: if there is any 2D media in your video production, you must convert it
to 3D before production. See PowerTools: 2D to 3D for more information.
1. Select a device type by clicking it. If you are writing back to a DV or HDVcamcorder, ensure it is connected and turned on.
2. Select the Profile Type or Profile name/Quality you want to use to create thefile. This selection determines the video resolution, file size, and overall qualityof the outputted file. See Customizing Profiles for more information.
3. Configure the production options as required. See Configuring ProductionOptions for more information.
4. Check the production details and that the file will be outputted to the folder
on your computer where you want it. Click to set another outputfolder.
288
CyberLink PowerDirector
5. Click the Start button to begin producing your file.
Customizing Profiles
After you select the format of your produced project file, depending on yourselection, there may be video quality settings you can customize in the videoprofiles section.
These video quality settings are called profiles, and can consist of your video'sresolution, bitrate compression, audio compression type, and more.
Before you output your production, you may want to create a new quality profile,edit an existing one, or select a different profile and other options from one of theavailable drop-downs in the production options section.
Configuring Production Options
Before you begin producing, you can select from the following production options:
Note: the preferences that are available depend on the file format you
selected and the version of CyberLink PowerDirector that is installed on
your computer.
· Fast video rendering technology: SVRT and Hardware video encoder areoptions that can reduce production time (available for creating an HDDcamcorder file only). The Hardware video encoder option is only enabled ifyour computer supports hardware acceleration (NVIDIA graphics card thatsupports CUDA technology, an AMD graphics card that supports AMDAccelerated Parallel Processing, or a computer with Intel Core ProcessorFamily technology), and you are outputting in a file format that supports it(H.264 and MPEG-4).
· Dolby Digital 5.1: select this preference if you want to include Dolby Digital5.1 audio in your produced video file (available for creating an HDDcamcorder file only).
· x.v.Color: x.v.Color is a new color system that can display a wider color rangethan usual (available for creating an HDD camcorder file only). CyberLinkPowerDirector can generate an x.v.Color-compliant stream, which is backwardcompatible with RGB displays, while offering the opportunity to achievebetter visual quality if your playback environment is x.v.Color ready.
289
Producing Your Project
· Upload a copy to CyberLink Cloud*: if you have a CyberLink Cloudsubscription, select this option if you also want the program to upload theproduced file to your CyberLink Cloud* storage space after production.
Note: if you selected to upload a copy of the produced file to CyberLink
Cloud, PowerDirector will ask you if you want to convert it before uploading.
Click Yes to convert it to an .MP4 file that is playable on a portable device,
or No if you want to upload the original produced file.
· Delete the file after the write back is complete: select this option to haveCyberLink PowerDirector delete the produced video file after it has written itback to your DV or HDV camcorder.
· Enable preview during production: select this option to preview your movieduring production. Selecting this option will increase the time required toproduce your file.
Note: * optional feature in CyberLink PowerDirector. Check the version
table on our web site for detailed versioning information.
Uploading Video to Online Media SitesClick on the Online tab to upload your video production to one of the followingonline media web sites:
· YouTube
· Dailymotion
· Vimeo
· Niconico Douga
· Youku
Note: in some versions of CyberLink PowerDirector, you can produce and
upload up to 4K* resolution (Ultra HD) video to social web sites. Before
production, be sure to select the desired video resolution in the Profile
name/Quality drop-down.
Uploading Video to YouTube
To upload your video to YouTube, do this:
290
CyberLink PowerDirector
Note: if the size/length of the your video exceeds the maximum allowed,
CyberLink PowerDirector will separate the video into smaller/shorter videos,
upload these videos, and then create a playlist for you on YouTube.
1. Click the YouTube Videos button.
2. Select the desired quality of your video from the Profile type drop-down. Thequality you select will result in the corresponding quality option beingavailable after the video is fully processed on YouTube.
Note: the quality option available on YouTube is also dependent on the
original captured video quality and the bandwidth of the user who is
watching the video.
3. Enter a Title and Description for your video in the fields provided. The textyou enter is included on YouTube once uploaded. Also select one of the Video categories and enter in some keyword Tags that users can search for tofind your video.
4. Set whether you want the video to be Public or Private once it is uploaded toYouTube.
Note: sign in to DirectorZone and then select Share in CyberLink
DirectorZone Video Gallery if you want to show others how you adjusted
the clips in your video production. When selected, an animated version of
your project's storyboard displays, along with your uploaded video, on
DirectorZone.
5. Configure the production options as required. See Configuring ProductionOptions for more information.
6. Click Start to begin.
7. Click Authorize and then grant CyberLink PowerDirector permission to uploadvideos to your YouTube account by following the steps in the YouTubeAuthorization windows.
1. CyberLink PowerDirector proceeds to produce and upload the video file. Click Close when done to return to the program.
Uploading to YouTube 3D
If the video production you are uploading is a 3D production, select the Share as a3D video* option to upload it to YouTube in a 3D video source format. Onceuploaded, you will be able to watch it on YouTube in 3D.
291
Producing Your Project
Note: * optional feature in CyberLink PowerDirector. Check the version
table on our web site for detailed versioning information.
Configuring Production Options
Before you begin producing, you can select the following production preference:
· Hardware video encoding: this option is only enabled if your computersupports hardware acceleration (NVIDIA graphics card that supports CUDA, anAMD graphics card that supports AMD Accelerated Parallel Processing, or acomputer with Intel Core Processor Family technology), and you areoutputting in a file format that supports it.
· Enable preview during production: select this option to preview your movieduring production. Selecting this option will increase the time required toproduce your file.
· Specify the Output folder, or the location where the produced video file that
will be uploaded is saved. Click if you want to select another outputfolder or change the name of the produced file.
Uploading Video to Dailymotion
To upload your video to Dailymotion, do this:
Note: if the size/length of the your video exceeds the maximum allowed,
CyberLink PowerDirector will separate the video into smaller/shorter videos,
upload these videos, and then create a playlist for you on Dailymotion.
1. Click the Dailymotion button.
2. Select the desired quality of your video from the Profile type drop-down. Thequality you select will result in the corresponding quality option beingavailable after the video is fully processed on Dailymotion.
Note: the quality option available on Dailymotion is also dependent on the
original captured video quality and the bandwidth of the user who is
watching the video.
3. Enter a Title and Description for your video in the fields provided. The textyou enter is included on Dailymotion once uploaded. Also select one of the

292
CyberLink PowerDirector
Video categories and enter in some keyword Tags that users can search for tofind your video.
4. Set whether you want the video to be Public or Private once it is uploaded toDailymotion.
Note: sign in to DirectorZone and then select Share in CyberLink
DirectorZone Video Gallery if you want to show others how you adjusted
the clips in your video production. When selected, an animated version of
your project's storyboard displays, along with your uploaded video, on
DirectorZone.
5. Configure the production options as required. See Configuring ProductionOptions for more information.
6. Click Start to begin.
7. Click Authorize and then grant CyberLink PowerDirector permission to uploadvideos to your Dailymotion account by following the steps in the DailymotionAuthorization windows.
8. CyberLink PowerDirector proceeds to produce and upload the video file. Click Close when done to return to the program.
Configuring Production Options
Before you begin producing, you can select the following production options:
· Hardware video encoder: this option is only enabled if your computer supportshardware acceleration (NVIDIA graphics card that supports CUDA, an AMDgraphics card that supports AMD Accelerated Parallel Processing, or a computerwith Intel Core Processor Family technology), and you are outputting in a fileformat that supports it.
· Enable preview during production: select this option to preview your movieduring production. Selecting this option will increase the time required toproduce your file.
· Specify the Output folder, or the location where the produced video file that
will be uploaded is saved. Click if you want to select another outputfolder or change the name of the produced file.
Uploading Video to Vimeo
To upload your video to Vimeo, do this:
293
Producing Your Project
Note: if the size/length of the your video exceeds the maximum allowed,
CyberLink PowerDirector will separate the video into smaller/shorter videos,
upload these videos, and then create a playlist for you on Vimeo.
1. Click the Vimeo button.
2. Select the desired quality of your video from the Profile type drop-down. Thequality you select will result in the corresponding quality option beingavailable after the video is fully processed on Vimeo.
Note: the quality option available on Vimeo is also dependent on the
original captured video quality and the bandwidth of the user who is
watching the video.
3. Enter a Title and Description for your video in the fields provided. The textyou enter is included on Vimeo once uploaded. Also enter in some keywordTags that users can search for to find your video.
4. Set whether you want the video to be Public or Private once it is uploaded toVimeo.
Note: sign in to DirectorZone and then select Share in CyberLink
DirectorZone Video Gallery if you want to show others how you adjusted
the clips in your video production. When selected, an animated version of
your project's storyboard displays, along with your uploaded video, on
DirectorZone.
5. Configure the production options as required. See Configuring ProductionOptions for more information.
6. Click Start to begin.
7. Click Authorize and then grant CyberLink PowerDirector permission to uploadvideos to your Vimeo account by following the steps in the VimeoAuthorization windows.
8. CyberLink PowerDirector proceeds to produce and upload the video file. Click Close when done to return to the program.
294
CyberLink PowerDirector
Configuring Production Options
Before you begin producing, you can select the following production options:
· Hardware video encoder: this option is only enabled if your computer supportshardware acceleration (NVIDIA graphics card that supports CUDA, an AMDgraphics card that supports AMD Accelerated Parallel Processing, or a computerwith Intel Core Processor Family technology), and you are outputting in a fileformat that supports it.
· Enable preview during production: select this option to preview your movieduring production. Selecting this option will increase the time required toproduce your file.
· Specify the Output folder, or the location where the produced video file that
will be uploaded is saved. Click if you want to select another outputfolder or change the name of the produced file.
Uploading Video to Niconico Douga
To upload your video to Niconico Douga, do this:
Note: if the size/length of the your video exceeds the maximum allowed,
CyberLink PowerDirector will separate the video into smaller/shorter videos,
upload these videos, and then create a playlist for you on Niconico Douga.
1. Click the Niconico Douga button.
2. Enter your Niconico Douga Username and Password. If you don't have anaccount, click the Sign Up to Niconico link to get one.
3. Select the desired quality of your video from the Profile type drop-down. Thequality you select will result in the corresponding quality option beingavailable after the video is fully processed on Niconico Douga.
Note: the quality option available on Niconico Douga is also dependent on
the original captured video quality and the bandwidth of the user who is
watching the video.
4. Enter a Title and Description for your video in the fields provided. The textyou enter is included on Niconico Douga once uploaded. Also enter in somekeyword Tags that users can search for to find your video.
295
Producing Your Project
5. Set whether you want the video to be Public or Private once it is uploaded toNiconico Douga.
Note: sign in to DirectorZone and then select Share in CyberLink
DirectorZone Video Gallery if you want to show others how you adjusted
the clips in your video production. When selected, an animated version of
your project's storyboard displays, along with your uploaded video, on
DirectorZone.
6. Configure the production options as required. See Configuring ProductionOptions for more information.
7. Use the player controls in the preview window to find the frame of video inyour production you want to use as the video's thumbnail on the NiconicoDouga web site, and then click the Set Thumbnail button.
8. Click Start to begin.
9. Click Authorize and then grant CyberLink PowerDirector permission to uploadvideos to your Niconico Douga account by following the steps in the NiconicoDouga Authorization windows.
10. CyberLink PowerDirector proceeds to produce and upload the video file. Click Close when done to return to the program.
Configuring Production Options
Before you begin producing, you can select the following production options:
· Hardware video encoder: this option is only enabled if your computersupports hardware acceleration (NVIDIA graphics card that supports CUDA, anAMD graphics card that supports AMD Accelerated Parallel Processing, or acomputer with Intel Core Processor Family technology), and you areoutputting in a file format that supports it.
· Enable preview during production: select this option to preview your movieduring production. Selecting this option will increase the time required toproduce your file.
· Specify the Output folder, or the location where the produced video file that
will be uploaded is saved. Click if you want to select another outputfolder or change the name of the produced file.
296
CyberLink PowerDirector
Uploading Video to Youku
To upload your video to Youku, do this:
Note: if the size/length of the your video exceeds the maximum allowed,
CyberLink PowerDirector will separate the video into smaller/shorter videos,
upload these videos, and then create a playlist for you on Youku.
1. Click the Youku button.
2. Select the desired quality of your video from the Profile type drop-down. Thequality you select will result in the corresponding quality option beingavailable after the video is fully processed on Youku.
Note: the quality option available on Youku is also dependent on the
original captured video quality and the bandwidth of the user who is
watching the video.
3. Enter a Title and Description for your video in the fields provided. The textyou enter is included on Youku once uploaded. Also select one of the Videocategories and enter in some keyword Tags that users can search for to findyour video.
4. Set whether you want the video to be Public or Private once it is uploaded toDailymotion.
Note: sign in to DirectorZone and then select Share in CyberLink
DirectorZone Video Gallery if you want to show others how you adjusted
the clips in your video production. When selected, an animated version of
your project's storyboard displays, along with your uploaded video, on
DirectorZone.
5. Configure the production options as required. See Configuring ProductionOptions for more information.
6. Click Start to begin.
7. Click Authorize and then grant CyberLink PowerDirector permission to uploadvideos to your Youku account by following the steps in the YoukuAuthorization windows.
8. CyberLink PowerDirector proceeds to produce and upload the video file. Click Close when done to return to the program.

297
Producing Your Project
Configuring Production Options
Before you begin producing, you can select the following production options:
· Hardware video encoder: this option is only enabled if your computer supportshardware acceleration (NVIDIA graphics card that supports CUDA, an AMDgraphics card that supports AMD Accelerated Parallel Processing, or a computerwith Intel Core Processor Family technology), and you are outputting in a fileformat that supports it.
· Enable preview during production: select this option to preview your movieduring production. Selecting this option will increase the time required toproduce your file.
· Specify the Output folder, or the location where the produced video file that
will be uploaded is saved. Click if you want to select another outputfolder or change the name of the produced file.
Batch ProduceCyberLink PowerDirector lets you produce multiple projects an once using theBatch Produce feature. In the Batch Produce window, you can import multipleCyberLink PowerDirector projects in the .pds format and output them as video filesin a variety of formats all in one sitting.
To perform a batch production, do this:
Note: if you are currently working on a video production, you must save and
close it before you can perform a batch production.
1. Select File > Batch Produce from the menu.
2. Click , and then browse to and select the CyberLink PowerDirectorproject you want to add to the production queue.
3. If required, click on the file name in the Outputted File Name column tochange the name of the outputted video file.
4. If required, click on to edit the task's production profile settings asfollows:
298
CyberLink PowerDirector
Note: if required, click on the Intelligent SVRT button for assistance on
selecting an output profile. See Utilizing Intelligent SVRT for more
information.
· Output folder: if required, select another location on your computer where
the file will be outputted to by clicking to set another output folder.
· Production type: select whether you want to output the selected task as avideo file, video file for a device, or a 3D* video file.
· Media file format: select the format of the outputted video file from this drop-down.
Note: based on your first two selections, the available drop-downs that
follow will differ. Use them to select 3D* output format, profile, etc.
Click OK to close the Profile Settings window and set your changes.
5. If your computer supports hardware acceleration (NVIDIA graphics card thatsupports CUDA, an AMD graphics card that supports AMD Accelerated ParallelProcessing, or a computer with Intel Core Processor Family technology) andyou are outputting in a file format that supports it (H.264 and MPEG-4), selectthe Enable GPU hardware video encoder automatically option if
you want CyberLink PowerDirector to use it, when available, during thebatch production.
6. Click Start to begin the production of all the tasks in the list.
Note: select the Shut down computer after production option to have
CyberLink PowerDirector shut down the program and your computer once
all the tasks are produced.
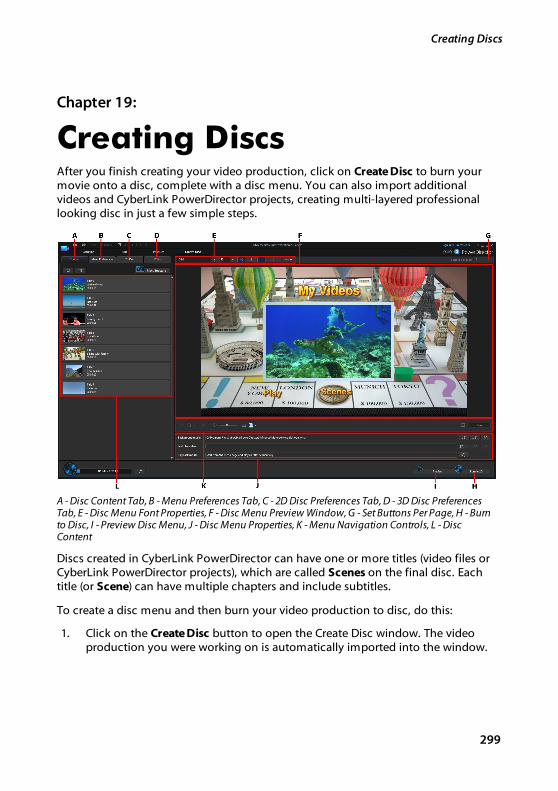
299
Creating Discs
Creating Discs
Chapter 19:
After you finish creating your video production, click on Create Disc to burn yourmovie onto a disc, complete with a disc menu. You can also import additionalvideos and CyberLink PowerDirector projects, creating multi-layered professionallooking disc in just a few simple steps.
A - Disc Content Tab, B - Menu Preferences Tab, C - 2D Disc Preferences Tab, D - 3D Disc PreferencesTab, E - Disc Menu Font Properties, F - Disc Menu Preview Window, G - Set Buttons Per Page, H - Burnto Disc, I - Preview Disc Menu, J - Disc Menu Properties, K - Menu Navigation Controls, L - DiscContent
Discs created in CyberLink PowerDirector can have one or more titles (video files orCyberLink PowerDirector projects), which are called Scenes on the final disc. Eachtitle (or Scene) can have multiple chapters and include subtitles.
To create a disc menu and then burn your video production to disc, do this:
1. Click on the Create Disc button to open the Create Disc window. The videoproduction you were working on is automatically imported into the window.
300
CyberLink PowerDirector
2. On the Content tab, click the and buttons to importadditional titles (video files and/or PowerDirector projects) onto your disc. See Importing Additional Disc Content for more detailed information.
3. Click on the Menu Preferences tab and then select the menu in the library thatyou want to use on your disc. See Selecting a Disc Menu for more detailedinformation on selecting disc menus, or for information on customizing yourown.
4. Edit the selected disc menu's properties, including customizing menu text, thenumber of buttons, background music, and more. See Editing Disc MenuProperties for more information.
5. If required, right-click on your selected disc menu's thumbnail in the libraryand select Modify to perform advanced editing on it in the Menu Designer.You can also create new disc menus and 3D* menus in the Menu Designer.See Customizing Disc Menus in the Menu Designer for more detailedinformation.
6. The last step is to burn your production to disc. Do one of the following:
· if your project is a standard 2D video production, click the 2D Disc tab. SeeBurning a Disc in 2D for more information.
· if your project is a 3D* video production, click the 3D Disc tab. See Burning aDisc in 3D for more information.
Note: * optional feature in CyberLink PowerDirector. Check the version
table on our web site for detailed versioning information.
Importing Additional DiscContentThe Content tab contains your current video production that will be burned to disc.On this tab you can import additional titles (video files and CyberLinkPowerDirector projects), which, with your current video production, are called Scenes on the disc menu.
On the Content tab you can add additional titles to your disc by doing thefollowing:
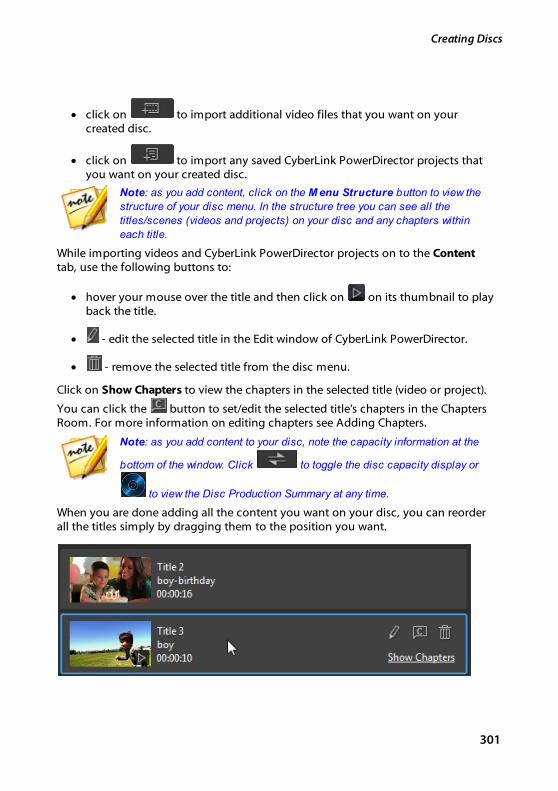
301
Creating Discs
· click on to import additional video files that you want on yourcreated disc.
· click on to import any saved CyberLink PowerDirector projects thatyou want on your created disc.
Note: as you add content, click on the M enu Structure button to view the
structure of your disc menu. In the structure tree you can see all the
titles/scenes (videos and projects) on your disc and any chapters within
each title.
While importing videos and CyberLink PowerDirector projects on to the Contenttab, use the following buttons to:
· hover your mouse over the title and then click on on its thumbnail to playback the title.
· - edit the selected title in the Edit window of CyberLink PowerDirector.
· - remove the selected title from the disc menu.
Click on Show Chapters to view the chapters in the selected title (video or project).
You can click the button to set/edit the selected title's chapters in the ChaptersRoom. For more information on editing chapters see Adding Chapters.
Note: as you add content to your disc, note the capacity information at the
bottom of the window. Click to toggle the disc capacity display or
to view the Disc Production Summary at any time.
When you are done adding all the content you want on your disc, you can reorderall the titles simply by dragging them to the position you want.
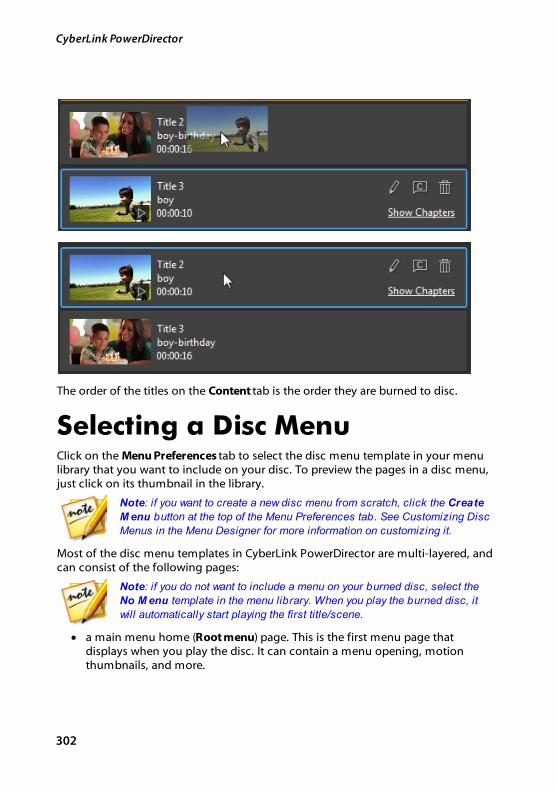
302
CyberLink PowerDirector
The order of the titles on the Content tab is the order they are burned to disc.
Selecting a Disc MenuClick on the Menu Preferences tab to select the disc menu template in your menulibrary that you want to include on your disc. To preview the pages in a disc menu,just click on its thumbnail in the library.
Note: if you want to create a new disc menu from scratch, click the Create
M enu button at the top of the Menu Preferences tab. See Customizing Disc
Menus in the Menu Designer for more information on customizing it.
Most of the disc menu templates in CyberLink PowerDirector are multi-layered, andcan consist of the following pages:
Note: if you do not want to include a menu on your burned disc, select the
No M enu template in the menu library. When you play the burned disc, it
will automatically start playing the first title/scene.
· a main menu home (Root menu) page. This is the first menu page thatdisplays when you play the disc. It can contain a menu opening, motionthumbnails, and more.
303
Creating Discs
Note: you can choose not to include a root menu on your disc. See
Configuring Disc Menu Settings for more information.
· if you have more than one title (video or project), your disc will have a Scenespage in the Disc Preview Window. Note that when in the Menu Designer, it iscalled the Titles page. If you choose to not include a root menu, the scenespage becomes the page displayed when you play the disc.
· a Chapters page where you can navigate through your titles. This page isavailable if you added chapters in the Chapter Room.
· a Subtitles page that lets you enable/disable the subtitles on your disc.
Note: the Subtitles page in a disc menu is only available if you selected
Create subtitles for disc when creating subtitles in the Subtitle Room.
See Adding Subtitles for more information.
To select the disc menu template for your disc, do either of the following:
Note: after you select your menu template be sure to edit its properties. You
can edit the text, menu music, and more right in the disc menu preview
window on the right. See Editing Disc Menu Properties for more information.
You can also customize a disc menu's buttons, background, individual
pages, and much more in the Menu Designer. See Customizing Disc Menus
in the Menu Designer for more information.
· Right-click on the menu template's thumbnail in the menu library that youwant to use and then select:
· Apply to set the menu page to the current menu page you are viewing inthe disc menu preview window. For example, if you navigate to the scenespage in the disc menu preview window and you select Apply, that menutemplate is only used on the scenes page of the menu.
· Apply to All Pages to apply the menu template to all the pages in yourmenu, i.e. home/root, titles/scenes, chapters.
· Click on a menu template thumbnail in the menu library that you want to useand then select:
· Apply to set the menu page to the current menu page you are viewing inthe disc menu preview window. For example, if you navigate to a chapterspage in the disc menu preview window and you select Apply, that menutemplate is only used on the chapters page of the menu.
304
CyberLink PowerDirector
· Apply to All Pages to apply the menu template to all the pages in yourmenu, i.e. home/root, titles/scenes, chapters.
Note: if required, you can download and import additional disc menu
templates from DirectorZone. See Downloading from DirectorZone for more
information.
Editing Disc Menu PropertiesCyberLink PowerDirector gives you full creative control over the look of your discmenu. Use the menu navigation controls in the disc menu preview window topreview the design and behavior of the selected disc menu.
If you want to view the titles/scenes, chapters, or subtitles page, click in the disc
menu preview window on the right, and then use the button and the othermenu navigation controls to navigate through the disc menu. Or click the Previewbutton at the bottom of the window to view what your burned disc will look likewhen played on a disc player.
Note: to perform more advanced editing on a selected disc menu template using
the Menu Designer, right-click on the menu template in the menu library and then
select M odify. See Customizing Disc Menus in the Menu Designer for more
information.
Configuring Disc Menu SettingsAt the bottom of the Menu Preferences tab you can configure the disc menusettings as follows:
· Include root menu: select this option if you want a root menu or home pageon your disc. If you deselect this option, the scenes page is displayed bydefault when you play the burned disc.
· Include menu opening video: deselect this option if you don't want the discmenu to include the menu opening video that is available in some discmenus. This option is different than the first play video, which you caninclude whether this item is selected or not.
· Show thumbnail index: select to add numbering to each scene and chapterthumbnail on your menu pages.
· Enable motion thumbnail: deselect this option if you want to disable themotion preview in the video title thumbnails in your disc menu.
305
Creating Discs
Editing Disc Menu TextTo edit the menu text that appears on the menu page, including clickable buttontext, double-click on it in the disc menu preview window, and then enter the newtext. You can modify menu text style, size, and alignment using the disc menu fontproperties options located at the top of the disc menu window.
To change the position of any menu text on your menu, just click and drag it to thenew position.
Note: when changing menu text position in the disc menu preview window,
click to enable the TV safe zone to help with the placement of the
selected clip in the video display area.
Setting Disc Menu MusicSome of the pre-designed disc menu templates contain menu music. In the discmenu properties area, you can:
· click on to edit or replace the menu's background music. See SettingBackground Music for more information.
· click to remove the current background music from the disc menu.
· click to add background music with Magic Music. See Magic Music formore information.
Setting Background Music
If you are using background music in your disc menu, click the button toperform the following functions:
Note: the final duration of your disc menu's background music is dependent
on the time entered in the Duration field in the Playback Mode Settings
window, not the length of the music file used. See Setting Disc Playback
Mode for more information on setting your menu's duration.
· click the button to add or replace the current disc menu backgroundmusic.
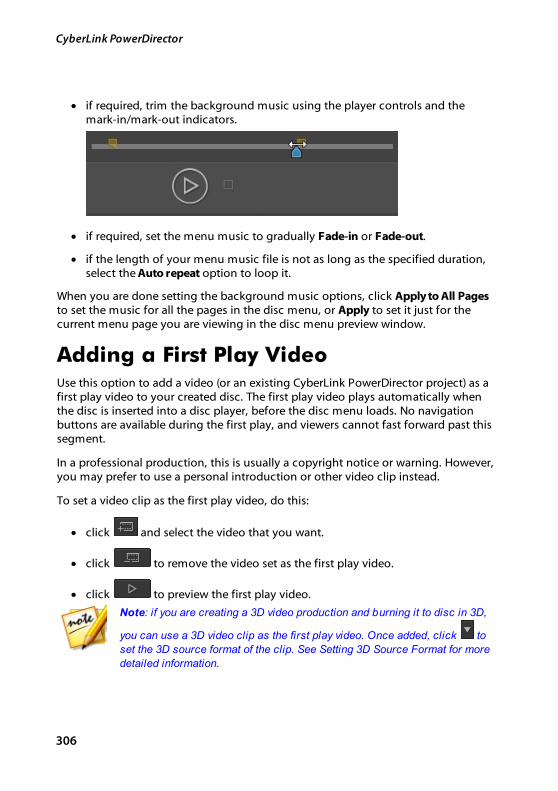
306
CyberLink PowerDirector
· if required, trim the background music using the player controls and themark-in/mark-out indicators.
· if required, set the menu music to gradually Fade-in or Fade-out.
· if the length of your menu music file is not as long as the specified duration,select the Auto repeat option to loop it.
When you are done setting the background music options, click Apply to All Pagesto set the music for all the pages in the disc menu, or Apply to set it just for thecurrent menu page you are viewing in the disc menu preview window.
Adding a First Play VideoUse this option to add a video (or an existing CyberLink PowerDirector project) as afirst play video to your created disc. The first play video plays automatically whenthe disc is inserted into a disc player, before the disc menu loads. No navigationbuttons are available during the first play, and viewers cannot fast forward past thissegment.
In a professional production, this is usually a copyright notice or warning. However,you may prefer to use a personal introduction or other video clip instead.
To set a video clip as the first play video, do this:
· click and select the video that you want.
· click to remove the video set as the first play video.
· click to preview the first play video.
Note: if you are creating a 3D video production and burning it to disc in 3D,
you can use a 3D video clip as the first play video. Once added, click to
set the 3D source format of the clip. See Setting 3D Source Format for more
detailed information.
307
Creating Discs
Setting Disc Playback Mode
Click the button open the Playback Mode Settings window and set how thedisc plays back any scenes/titles that are on your disc.
Note: disc playback mode determines how the titles/scenes (videos and
projects added on the Content tab) play back on your disc, not the
chapters contained within each title/scenes. If your disc only has one title
on it, the settings for disc playback mode have no affect on the burned disc.
In the Playback Mode Settings window you can set the following:
· choose from one of the three available playback modes based on theavailable descriptions. Your disc will follow the selected behavior wheninserted or play is pressed on your disc player.
· Auto menu time out: select this option if you want the disc content to playautomatically when you insert the disc into a disc player. When selected, yourcontent plays automatically after displaying the disc menu for the specifiedduration. If you do not select this option, your menu loops endlessly until youpress the play button on your disc player.
· Duration: enter in the duration the content (background video, backgroundmusic, etc.) in your disc menu is displayed. The minimum duration allowed is10 seconds, while your disc can be up to 99 seconds long before it loops backto the beginning.
Note: the duration you enter is also the length of your menu's background
music, even if the selected music file's length is longer than the duration
specified.
Specifying Buttons Per PageWhen creating a disc with multiple titles or chapters, you can select the number ofbuttons that display on each of the Titles (Scenes) and Chapters menu pages.
To change the number of buttons that display on a title or chapter page, you mustfirst navigate to the page via the disc menu preview window. Next select thenumber of Buttons per page you want on each title and chapter page from thedrop-down above the disc menu preview window. Each individual title and chapterpage can have a different number of buttons, allowing you to make each pageunique.
308
CyberLink PowerDirector
Note: the maximum number of buttons that can display on each menu page
is dependent on the design of the menu template. If you want more buttons
on a page, see Adding Menu Buttons for more information.
Modifying Menu Object PropertiesYou can modify the properties of a disc menu's objects directly in the previewwindow, in both the Create Disc module and the Menu Designer. Menu objectsinclude text, added images, video thumbnails, menu buttons, navigation buttons,etc. To modify the properties of a menu object, just select it and then perform anyof the following options:
· Modify Menu Object Position
· Align Menu Objects
Modifying Menu Object Position
You can change the position and orientation of the title text, images, thumbnails,buttons, etc. in the disc menu.
Note: click on to use the TV safe zone and grid lines to help with the
precise placement of the precise placement of buttons, images, text, etc. on
your menu pages. Select Snap to Reference Lines to have the objects
snap to the grid lines, TV safe zone, and boundary of the menu area.
To modify menu object position or orientation:
· click on a menu object, and then drag it to a new position.
· when in the Menu Designer, click on above the selected object and thendrag it right or left to change its orientation.
· when in the Menu Designer, select images and buttons, and then click anddrag a corner or side to resize them.
Aligning Menu Objects
To align menu objects in the disc menu, select the object and then the desired
alignment from the drop-down. If you just want to align the buttons, click the
button at the top of the Menu Designer window.

309
Creating Discs
Customizing Disc Menus in theMenu DesignerYou can perform more advanced editing on your disc menu in the Menu Designer*.You can also create a brand new disc menu template from scratch.
To edit an existing disc menu, right-click on the disc menu template in the libraryon the Menu Preferences tab and then select on Modify. To create a new disc menutemplate, click on the Create Menu button.
A - Change Menu Text Properties Tab, B - Menu Properties, C - Set Button Properties Tab, D - MenuPage View (Edit page), E - Add Media/Image/Text/Button, F - Set Title/Scene Button Type, G - ModeSelection, H - Zoom Tools, I - TV Safe Zone/Grid Lines, J - Align Objects, K - Select Video Effect, L - SetMenu Motion, M - Upload to Internet, N - Enable 3D Depth
310
CyberLink PowerDirector
Note: * optional feature in CyberLink PowerDirector. Check the version
table on our web site for detailed versioning information.
In the Menu Designer you can edit all three possible disc menu pages. Note that thetitles/scenes (videos and projects on your disc) and chapters pages always have thesame layout.
To modify a specific page, select Root Menu, Titles/Chapters Menu, or SubtitlesMenu from the Edit page drop-down menu.
Note: the subtitles menu page is only available if you selected Create
subtitles for disc when you added subtitles in the Subtitle Room. See
Adding Subtitles for more information.
Mode Selection, Zoom Tools, and ContextMenuWhen customizing menus in the Menu Designer use the mode selection, zoomtools, and context menu for assistance.
Note: when modifying menus in the Menu Designer, use the player controls to
preview, and click to preview the menu at full screen.
Mode Selection
In the Menu Designer there are two selection modes. Click the button toenable object selection. When selected, you can freely click and move the menutext, buttons, images, etc. to different areas of the menu.
Click the button to enable a mode that lets you drag the view in the MenuDesigner. This mode is especially helpful if zoomed in on the disc menu.
Zoom Tools
Use the zoom tools and to zoom out and in on the preview windowwhen modifying the disc menu. You can also select the viewer zoom amount from
311
Creating Discs
the drop-down to set the size of the disc menu preview. Select Fit to resize the discmenu so that is fits in the Menu Designer's viewer window.
Note: you can also hold down the Ctrl key on your keyboard and then use
the mouse scroll wheel to zoom in or out on the disc menu.
Context Menu
When in the Menu Designer, you can right-click on an item in the preview windowto gain access to some functionality you may find useful.
In the context menu you can:
· insert images, title text, and buttons onto the menu page.
· cut, copy, paste, or delete items on the menu page.
· bring the selected item forward, or send it backward.
· quickly align selected items in the menu page how you want them.
· select Align All Menu Buttons to uniformly align all of the menu buttons onthe current menu page.
· go to Full Screen View for a larger view of the current menu page.
Setting Menu Opening and BackgroundYou can import a video that plays in the background while the menu is loading.Usually called a menu opening, it is seen on most commercial discs before themenu options display.
You can also add or replace the background of your disc menu with an image or avideo file, or set a video effect that is applied to the background of your disc menu.
Including a Menu Opening
To include a video as the menu opening, click the button, select the ImportUser Video For Menu Opening option, and then the video you want to use.

312
CyberLink PowerDirector
Note: the Include menu opening video option on the Menu Preferences
tab must be selected for this feature to work when burned to disc.
Setting Menu Background
To set or replace the background image of your menu, with either an image or a
video file. To do this, click the button and then select the Set BackgroundImage or Video option. Once selected, set how the background media is displayedin the Background Media Adjustment Settings window.
Note: to remove the imported background image or video, just click the
button.
Adjusting Menu Background's Media Settings
When you import video clips and images to use as a background for your discmenu, the Background Media Adjustment Settings window displays. In the windowyou can set the following:
· Stretch Setting: on this tab, select what you want CyberLink PowerDirector todo if the video clip or image you selected as the background has a differentaspect ratio than your disc menu template. Select Apply to all menu pages touse this setting on all menu pages.
· Set Source Format: if you are outputting a 3D video production as a 3D-BD*disc, click on this tab to set the 3D source format of the background videoyou imported. See Setting 3D Source Format for more detailed information.
Note: * optional feature in CyberLink PowerDirector. Check the version
table on our web site for detailed versioning information.
Adding Motion to Background Images
If you imported an image to use as the menu's background, you can select amotion effect to make your menu more engaging. To do this, select from theavailable motion options in the drop-down below the preview window.
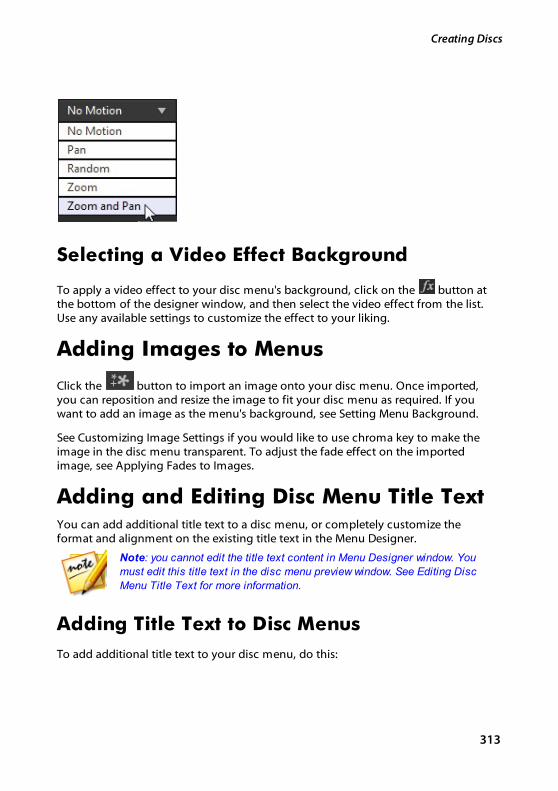
313
Creating Discs
Selecting a Video Effect Background
To apply a video effect to your disc menu's background, click on the button atthe bottom of the designer window, and then select the video effect from the list.Use any available settings to customize the effect to your liking.
Adding Images to Menus
Click the button to import an image onto your disc menu. Once imported,you can reposition and resize the image to fit your disc menu as required. If youwant to add an image as the menu's background, see Setting Menu Background.
See Customizing Image Settings if you would like to use chroma key to make theimage in the disc menu transparent. To adjust the fade effect on the importedimage, see Applying Fades to Images.
Adding and Editing Disc Menu Title TextYou can add additional title text to a disc menu, or completely customize theformat and alignment on the existing title text in the Menu Designer.
Note: you cannot edit the title text content in Menu Designer window. You
must edit this title text in the disc menu preview window. See Editing Disc
Menu Title Text for more information.
Adding Title Text to Disc Menus
To add additional title text to your disc menu, do this:
314
CyberLink PowerDirector
1. Click the button.
2. Type in the text you want to use.
Changing Menu Text Properties
Click on the tab to change the properties of the menu text in your discmenu. You can also change the properties of any images that were added to thedisc menu.
Applying Preset Character Types
Select the Character Presets option to apply a defined character preset to a textobject. After you have applied a defined character preset you can refine it using theother properties on the tab, if required.
To apply a character preset to a text object, ensure the text box is selected in thepreview window and then click on a character preset in the list.
Note: once you are done customizing all of the text properties on the tab,
click on to save the character preset to your favorites. To find and
use saved character presets, select M y Favorites in the Character types
drop-down.
Customizing Font Type
Select the Font Type option to set the font type and size of the selected text object.You can also select the font face color, bold or italicize text, change the line andtext spacing, and set the text alignment in the text box.
If the font type you are using supports it, you can select the Kerning check box toreduce the space between the letters in the text.
315
Creating Discs
Customizing Font Face
In Font Face you can customize the font color, blur, and opacity. Select to enablethe font face properties on the selected text object, and then use the Blur andOpacity sliders to customize its appearance.
When customizing the font face color, you have the following options in the Filltype drop-down:
· Uniform color: select this option if you want the font to be one solid color.Click the colored square to open the color palette and select the desired fontcolor.
· 2 color gradient: select this option if you want the font color to change fromone color to another using a gradient. Click the colored squares to set thebeginning and ending colors, and then drag the Gradient direction control toset which way the color flows.
· 4 color gradient*: select this option if you want the font to consist of fourcolors. Click the colored squares to set the colors in each of the four cornersof the text.
Note: * optional feature in CyberLink PowerDirector. Check the version
table on our web site for detailed versioning information.
Applying Font Shadow
Select the Font Shadow option to add a shadow to the text object. Availableoptions allow you to change the shadow's color, direction, distance from the text,and add a opacity or blur effect.
Applying Border
Select the Border option to add a border around the text object. Available optionsallow you to change the border's size, and add a opacity or blur effect.
You can customize the border color using the following options in the Fill typedrop-down:
316
CyberLink PowerDirector
· Uniform color: select this option if you want the border to be one solid color.Click the colored square to open the color palette and select the desired border color.
· 2 color gradient: select this option if you want the border color to changefrom one color to another using a gradient. Click the colored squares to setthe beginning and ending colors, and then drag the Gradient directioncontrol to set which way the color flows.
· 4 color gradient*: select this option if you want the border to consist of fourcolors. Click the colored squares to set the colors in each of the four cornersof the border.
Note: * optional feature in CyberLink PowerDirector. Check the version table
on our web site for detailed versioning information.
Enable 3D Depth
If you are creating a 3D video production, select the 3D Settings* option to give thetext object a 3D effect.
Note: when using this feature, select the button to enable 3D mode for
best editing results. See Previewing in 3D Mode for more information on
using this mode. * Optional feature in CyberLink PowerDirector. Check the
version table on our web site for detailed versioning information.
Once enabled, use the slider to set the amount of depth you want the text object tohave in 3D. Dragging the slider left will make the 3D text object seem nearer to theaudience (in the foreground), while dragging it right will make it appear fartheraway (in the background).
Customizing Image Settings
If your disc menu contains an imported image, select it in the preview window,click the Image Settings option, and then select Apply chroma key to add a chromakey (green screen) effect to it.
Click on and then select the color in the image that you want to replace/maketransparent. Adjust the Tolerance of hue, Tolerance of saturation, and Tolerance ofluminance sliders to remove the selected color/background. Adjust until the menubackground is completely revealed, without any loss of quality on the added

317
Creating Discs
image. Use the Edge sharpness slider to fine tune the edges of the image on therevealed background. Using this slider can make the image look more authentic bysharpening the edges.
Select the Maintain image's aspect ratio option if you want to ensure the image'saspect ratio does not change while you are moving or resizing it. Deselect thisoption if you want to change the image's shape or alter its aspect ratio.
Adding a Reflection
Select the Reflection option to add a reflection of the text object onto thebackground media. Use the Distance slider to set space between the reflection andthe text object. Use the Opacity slider to set the opacity of the reflection.
Applying Fades to Images
If your disc menu contains an imported image, select it and then the Fades optionto apply a fade effect on it. Select whether to enable a fade-in and/or fade-out onthe image.
You can adjust the fades by clicking and dragging the keyframes below the previewwindow.
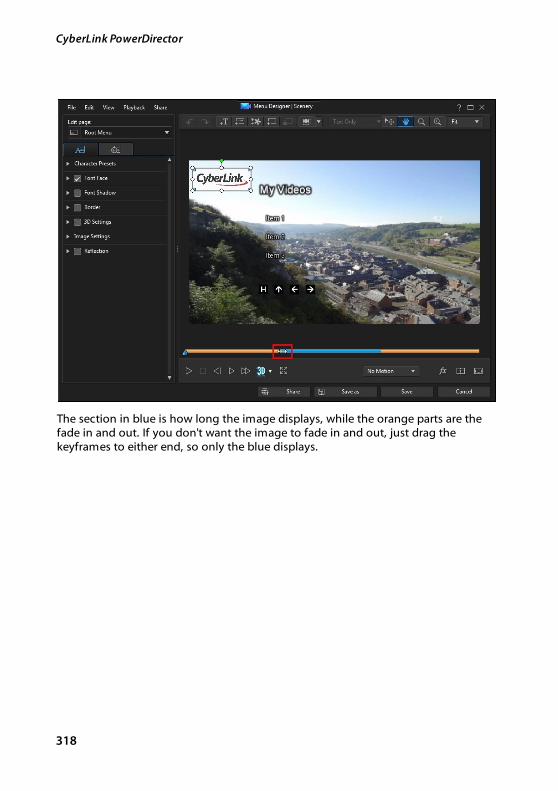
318
CyberLink PowerDirector
The section in blue is how long the image displays, while the orange parts are thefade in and out. If you don't want the image to fade in and out, just drag thekeyframes to either end, so only the blue displays.
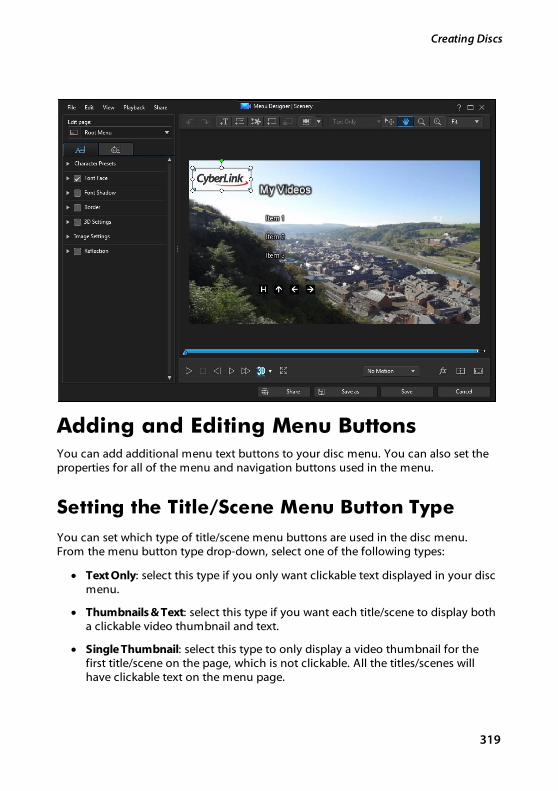
319
Creating Discs
Adding and Editing Menu ButtonsYou can add additional menu text buttons to your disc menu. You can also set theproperties for all of the menu and navigation buttons used in the menu.
Setting the Title/Scene Menu Button Type
You can set which type of title/scene menu buttons are used in the disc menu.From the menu button type drop-down, select one of the following types:
· Text Only: select this type if you only want clickable text displayed in your discmenu.
· Thumbnails & Text: select this type if you want each title/scene to display botha clickable video thumbnail and text.
· Single Thumbnail: select this type to only display a video thumbnail for thefirst title/scene on the page, which is not clickable. All the titles/scenes willhave clickable text on the menu page.
320
CyberLink PowerDirector
Adding Menu Buttons
Menu buttons are the buttons that provide access to your disc's content, chapters,and subtitles. They may consist of just text or text and an accompanyingthumbnail, depending on the menu button type set above and the design of thedisc menu template.
Note: you can add up to 14 menu buttons on each menu page.
To add a menu button, click the button. Depending on the page in your discmenu you add the button to, the new button might just be text or button text anda scene/chapter thumbnail.
Note: click the button at the top of the Menu Designer to align all of
the current menu buttons in the disc menu window. If you want all newly
added menu button to auto align, click next to this button and then
select Auto Align Buttons > On.
Setting Button Properties
Click on the tab and to set the properties of all the buttons in your discmenu. You can customize the button frame, layout, highlight style, and more.
Note: the menu button properties that are available depend on which menu
page you are currently editing.
Changing Navigation Buttons
To change the navigation buttons that are used in your disc menu, select the Navigation Buttons option. Select a set of navigation button (each set contains fournavigation buttons) from the list, or click on Import Custom if you want to use yourown buttons you custom created. If you imported custom buttons, or modified anexisting set, click the Save as button to save the current buttons as a new set ofnavigations buttons.
321
Creating Discs
Setting Button Highlight Style
Select the Button Highlight Style option to set the highlight icon used on a menubutton thumbnail for scenes and chapter buttons. Click on Import Custom if youwant to use your own custom highlight icon.
If your disc menu is using text buttons, select the Enable text highlight option if youwant it to be highlighted on the menu when it is active on the screen. Select Highlight color and then click the colored square to open the color palette to selectthe desired highlight color used.
Enabling 3D Depth in Disc MenusIf you are creating a 3D video production and want your disc menu to be in 3D,click the button and then select the desired 3D format from the drop-down.
Note: when using this feature, select the button to enable 3D mode for
best editing results. See Previewing in 3D Mode for more information on
using this mode. * Optional feature in CyberLink PowerDirector. Check the
version table on our web site for detailed versioning information.
Saving and Sharing Disc MenuTemplatesOnce you are finished modifying/customizing a disc menu template you can save itin your disc menu library for future use, upload it to DirectorZone to share it withothers, or back it up on CyberLink Cloud*.
Note: * optional feature in CyberLink PowerDirector. Check the version
table on our web site for detailed versioning information.
· click on Share to upload your custom template to DirectorZone or back it upon CyberLink Cloud. See Sharing and Backing Up Disc Menu Templates formore information.
· click on Save As to save a modified template as a new template to the discmenu library.
· click on Save to save a new template to the disc menu library.
322
CyberLink PowerDirector
Sharing and Backing Up Disc MenuTemplates
You can share your customized disc menu templates with other CyberLinkPowerDirector users by uploading them to DirectorZone. If you have a CyberLinkCloud subscription you can back up all your customized templates by storing themon CyberLink Cloud.
To share and back up your disc menu templates, do this:
1. Do either of the following:
· in the Menu Designer, click on Share, enter a name for the custom template,and then click OK.
· select the disc menu template in the library, and then click .
2. In the upload window, enter the information as follows:
· Upload to: select where you want to upload the template.
· Title: name of the template as it will display once uploaded.
· Style: select a style or category for the template.
· Type: if required, select the type of template you are uploading.
· Tags: enter some keyword search tags that will help users find the templatewhen searching.
Note: separate each tag you enter with a space. If you want to use two words
as the tag, just put quotes around them, e.g. "dollar bill".
· Collection: enter the name of the collection you want the template added to.
· Description: enter a short description of your template.
3. Click Next to proceed.
4. Confirm the copyright disclaimer, and then click Next to proceed with theupload.
5. Click on Finish to close the upload window.
323
Creating Discs
Burning Your Production to DiscBurning your video production to disc is the final stage of the create disc process.Once your disc is burned, you are able to play it on a disc player. You can alsocreate a disc folder to organize your media files on your hard drive. When finalizingyour disc, you have the choice of:
· Burning a Disc in 2D
· Burning a Disc in 3D
In CyberLink PowerDirector you can burn your video production to one of thefollowing optical disc formats:
· DVD: DVD-R, DVD-RW, DVD+R, DVD+RW
· VCD*/SVCD (2D discs only): CD-R, CD-RW
· Blu-ray Disc(TM)*: BDXL, BD-RE, BD-R
Note: * optional feature in CyberLink PowerDirector. Check the version
table on our web site for detailed versioning information.
Burning a Disc in 2DIf you created a standard 2D video production, click on the 2D Disc tab to configureyour disc's preferences and burn it to disc.
Configuring Disc Preferences
The following preferences are available on the 2D Disc tab:
Disc Format
· select the disc format type you want to use to burn your video to a disc.Depending on the disc format type that you select, there may be a drop-downoption to select the capacity of the disc.
Video and Audio Settings
· Select the video recording format: if available for your selected disc format,select the recording format of the video on your disc and its aspect ratio.
324
CyberLink PowerDirector
· Select the video encoding format and quality: if available for your selected discformat, select a video encoding format and video quality for your disc fromthe drop-downs. For quality, select the Smart Fit option if you want CyberLinkPowerDirector to automatically adjust the bitrate to create the best qualityvideo file possible, which will fit the capacity of the disc you are using.
· Select the audio encoding format and channels: select an audio format foryour disc, and the number of channels it is capable of outputting to. Ifburning a DVD, Blu-ray Disc, or AVCHD disc, you can select Dolby Digital tocreate a disc with Dolby Digital 2 or 5.1 surround sound. If burning a DVD orBlu-ray Disc, you can also select DTS to have CyberLink PowerDirector use theDTS 5.1 Producer to create a disc with DTS 5.1 surround sound.
Note: the video quality and audio type options that are available depend on
the disc format that you have selected.
· Enable CyberLink TrueTheater Surround: if available, select this option toenable CyberLink TrueTheater Surround to enhance the menu backgroundmusic. Choose from Living Room, Theater, or Stadium.
Burning the Disc
To burn your video production and created menu to a disc in 2D, do this:
Note: before you burn the disc, you should ensure there is enough disc
space available (on the export folder drive/partition) for the temp file that is
created and then burned to the disc. For DVD production, 10 GB is required
(20 GB recommended). For Blu-ray Disc/AVCHD production, 60 GB
required (100 GB recommended). You can change the export folder to a
different drive/partition in File Preferences.
1. Click on the 2D Disc tab.
2. Click the Burn in 2D button. The Final Output window displays.
3. Configure the production preferences as follows:
· Current drive: the burning drive (or removable disc for the AVCHD format)CyberLink PowerDirector will use to burn the production to disc. If necessary,
click the button to select another drive and configure the burnsettings. See Configuring Burn Settings for more information. If you are
325
Creating Discs
burning your production to a rewritable disc, you can click to erase it.See Erasing Discs for more information.
· Disc volume label: in the field provided, enter a label for your disc. The disclabel can be up to 16 characters long.
· Burn to disc: ensure this option is selected if you want your productionburned to a disc.
· Number of copies: in the field provided, enter the number of discs you wantCyberLink PowerDirector to burn for you in succession.
· Save as disc image: select this option if you want to create a disc image file onyour computer's hard drive. Disc images can be burned to disc at a later time
if required. Click on to specify the folder where it is created.
· Create a folder: select this option to create a disc folder on your computer that
contains all the files necessary for burning. Click on to specify the folderwhere it is created. Creating a folder overwrites all of the existing data in adirectory.
· Enable x.v.Color: x.v.Color is a color system that can display a wider colorrange than usual. CyberLink PowerDirector can generate an x.v.Color-compliant stream, which is backward compatible with RGB displays, whileoffering the opportunity to achieve better visual quality if your playbackenvironment is x.v.Color ready.
· Enable hardware video encoder: enable this option to speed up rendering andburning time. This option is only enabled if your computer supports hardwareacceleration (NVIDIA graphics card that supports CUDA, an AMD graphics cardthat supports AMD Accelerated Parallel Processing, or a computer with IntelCore Processor Family technology).
4. When ready, click the Start Burning button to burn your production to disc.
Note: the burning process may take a few minutes, depending on the length
and quality of your video, and your computer's processing power. Be
prepared for a short wait while CyberLink PowerDirector renders your movie
and burns it to the disc. Time remaining does not include the time it takes
to finalize/close discs.
326
CyberLink PowerDirector
Burning a Disc in 3DIf you created a 3D* video production, click on the 3D Disc tab to configure yourdisc's preferences and burn it to disc.
Note: * optional feature in CyberLink PowerDirector. Check the version
table on our web site for detailed versioning information.
Configuring Disc Preferences
The following preferences are available on the 3D Disc tab:
Disc Format
· select the disc format type you want to use to burn your video to a disc.Depending on the disc format type that you select, there may be a drop-downoption to select the capacity of the disc.
Video and Audio Settings
· Select the video recording format: if available for your selected disc format,select the recording format of the video on your disc and its aspect ratio.
· Select the video encoding format and quality: if available for your selected discformat, select a video encoding format and video quality for your disc fromthe drop-downs. For quality, select the Smart Fit option if you want CyberLinkPowerDirector to automatically adjust the bitrate to create the best qualityvideo file possible, which will fit the capacity of the disc you are using.
· Select the audio encoding format and channels: select an audio format foryour disc, and the number of channels it is capable of outputting to. Ifburning a DVD, Blu-ray Disc, or AVCHD disc, you can select Dolby Digital tocreate a disc with Dolby Digital 2 or 5.1 surround sound. If burning a DVD orBlu-ray Disc, you can also select DTS to have CyberLink PowerDirector use theDTS 5.1 Producer to create a disc with DTS 5.1 surround sound.
Note: the video quality and audio type options that are available depend on
the disc format that you have selected.
· 3D output format: select the 3D output source format of the video that isrendered and then burned to the disc.
327
Creating Discs
Note: subtitles and disc menus are not supported on 3D discs using the
side-by-side 3D source format.
· Enable CyberLink TrueTheater Surround: if available, select this option toenable CyberLink TrueTheater Surround to enhance the menu backgroundmusic. Choose from Living Room, Theater, or Stadium.
Burning the Disc
To burn your video production and created menu to a disc in 3D, do this:
Note: before you burn the disc, you should ensure there is enough disc
space available (on the export folder drive/partition) for the temp file that is
created and then burned to the disc. For DVD production, 10 GB is required
(20 GB recommended). For Blu-ray Disc/AVCHD production, 60 GB
required (100 GB recommended). You can change the export folder to a
different drive/partition in File Preferences.
1. Click on the 3D Disc tab.
2. Click the Burn in 3D button. The Final Output window displays.
3. Configure the production preferences as follows:
· Current drive: the burning drive (or removable disc for the AVCHD format)CyberLink PowerDirector will use to burn the production to disc. If necessary,
click the button to select another drive and configure the burnsettings. See Configuring Burn Settings for more information. If you are
burning your production to a rewritable disc, you can click to erase it.See Erasing Discs for more information.
· Disc volume label: in the field provided, enter a label for your disc. The disclabel can be up to 16 characters long.
· Burn to disc: ensure this option is selected if you want your productionburned to a disc.
· Number of copies: in the field provided, enter the number of discs you wantCyberLink PowerDirector to burn for you in succession.
· Save as disc image: select this option if you want to create a disc image file onyour computer's hard drive. Disc images can be burned to disc at a later time
if required. Click on to specify the folder where it is created.
328
CyberLink PowerDirector
· Create a folder: select this option to create a disc folder on your computer that
contains all the files necessary for burning. Click on to specify the folderwhere it is created. Creating a folder overwrites all of the existing data in adirectory.
· Enable x.v.Color: x.v.Color is a color system that can display a wider colorrange than usual. CyberLink PowerDirector can generate an x.v.Color-compliant stream, which is backward compatible with RGB displays, whileoffering the opportunity to achieve better visual quality if your playbackenvironment is x.v.Color ready.
· Enable hardware video encoder: enable this option to speed up rendering andburning time. This option is only enabled if your computer supports hardwareacceleration (NVIDIA graphics card that supports CUDA, an AMD graphics cardthat supports AMD Accelerated Parallel Processing, or a computer with IntelCore Processor Family technology).
4. When ready, click the Start Burning button to burn your production to disc.
Note: the burning process may take a few minutes, depending on the length
and quality of your video and your computer's processing power. Be
prepared for a short wait while CyberLink PowerDirector renders your movie
and burns it to the disc. Time remaining does not include the time it takes
to finalize/close discs.
Configuring Burn Settings
Before you burn to a disc for the first time, it is advised that you click on toset your burning configuration as follows:
· Recording drive: select the burning drive CyberLink PowerDirector will use toburn the production to disc.
· Recording speed: set the recording speed used when burning the disc. If youencounter errors during the burning process, try lowering the burning speed.
· Include buffer under-run protection: select this option to ensure that video iswritten to disc without interruption. An interruption in video burning canresult in an unusable disc.
After you set this configuration, CyberLink PowerDirector uses the sameconfiguration each time you burn until you change the settings.
329
Creating Discs
Erasing DiscsIf you are using a rewritable disc, you can erase content that has data previouslyrecorded on it. This allows you to reuse the same discs over and over without the
need to continually buy new discs. Click on the button to begin erasing adisc.
To erase a disc, select:
· the Quick option to erase the disc index contained on the disc.
· the Full option to erase all of the content the disc contains.
Click OK to erase the disc.
330
CyberLink PowerDirector
PowerDirector Preferences
Chapter 20:
To set your preferences in CyberLink PowerDirector, just click the button.
General PreferencesIn the Preferences window, select the General tab. The available options are asfollows:
Application:
· Maximum undo levels: enter the number (between 0 and 100) of undos(Ctrl+Z) you would like to make available while you work on your videoproduction. Setting a higher number consumes more CPU resources.
· Audio channels: select the default number of channels for the audio in yourvideo production when editing and previewing it. If Stereo is selected,CyberLink PowerDirector will downmix any 5.1 channel audio to two channelsduring preview.
Note: when editing and previewing video or audio with 7.1 channels, it is
downmixed to the number of audio channels selected in this preference
option.
· Timeline frame rate: select the TV format (NTSC or PAL) and frame rate foryour video production. The format should correspond to the region in whichyou plan to play your video (if you burn it to disc). The frame rate shouldcorrespond to the source video footage being used in your production.
· Use drop frame timecode: if your selected TV format is NTSC, select "Yes" tosynchronize the timecode of your video to its video length in the timeline.
· Show sound waveform in timeline: select to display the sound waveform inthe timeline that represents the sound levels in audio clips.
· Enable HD video processing (shadow file): select this to speed up the editingof high definition video by enabling CyberLink PowerDirector to process thefile faster. Enabling this consumes more CPU resources.
· Auto delete temporary files every: select to have CyberLink PowerDirectorautomatically delete temporary files created while editing, every specified
331
PowerDirector Preferences
number of days. Click on the Manually Delete button if you want to select anddelete specific temporary files to free up disc space.
Internet:
· Automatically check for software updates: select to periodically check forupdates or new versions of PowerDirector automatically.
Language:
· Use system default language: select this option for the language display to bethe same as the language of your operating system.
· User defined: select this option and then select the language from the drop-down list that you want to use.
Capture PreferencesIn the Preferences window, select the Capture tab. The available options are asfollows:
Capture:
· Add captured files to media library: select this option to import captured filesinto the media library directly after capture.
· Add captured files to empty workspace: select this option to automaticallyimport captured files into an empty area in the workspace (timeline).
· Enable automatic file replacement when recording voice-over: select thisoption to overwrite existing audio if the voice-over overlaps during recording.
Auto scene detection:
· Do not detect scenes after capture: select this option if you do not want toactivate the auto scene detection function after video is captured.
· After capture, detect scenes by change of video frames: select this option toperform scene detection after video capture. Once capture is complete, theDetect Scenes window is opened, displaying the captured video. See Detecting Scenes in a Video Clip for more information.
· During capture, detect scenes by timecode, and then save each scene as aseparate file (DV-VCR mode only): select this option to detect scene breaksignals and to save each scene as a separate file. (DV camcorders generate a
332
CyberLink PowerDirector
scene break signal on the tape whenever users release the REC button.) Thisfeature is only available in DV camcorder capture.
DV parameters setup:
· click the DV Parameters button to set the buffer time (in the Batch capture/Writing to tape sections) for your DV camcorder. Setting a buffer time ensuresthat your DV camcorder and the batch capture/ writing to tape function beginat the same time. Without a buffer, batch capturing or writing to tape maybegin before the camcorder is engaged. In the DV auto stop section of the DVParameters Setup window, select whether you want CyberLink PowerDirectorto automatically stop scanning/capturing after a specified interval of blanktape. You can specific the interval, in seconds, in the field provided.
Confirmation PreferencesIn the Preferences window, select the Confirmation tab. The available options are asfollows:
Confirmation
· Always prompt me when timeline frame rates conflict: select this option toenable a warning message when you add a video clip to the workspace whoseframe rate conflicts with the project's timeline frame rate set in Generalpreferences.
· Always prompt me when aspect ratios conflict: select this option to enable awarning message when you add a video clip to the workspace whose aspectconflicts with that of the project.
· Enable file deletion from hard drive: select this option if you would like toenable the deletion of files from your hard drive when in the media library.
· Enable warning when chapters are removed during editing: select this optionto enable a warning message if chapter points are deleted during videoediting.
· Always prompt me when widescreen is not supported: select this option if youwant PowerDirector to notify you when a widescreen format is not supported.
· Always prompt me when I import high definition video into the library: selectthis option if you want PowerDirector to notify you when you are importinghigh definition video into the media library.
333
PowerDirector Preferences
· Always prompt me to confirm captured video prefix name: select this option ifyou want PowerDirector to ask you for a file name when capturing videos inthe capture window. If you deselect this option, PowerDirector will auto namethe files for you.
· Always prompt me to confirm captured snapshot file name: select this optionif you want PowerDirector to ask you for a file name when capturing screensnapshots of video. If you deselect this option, PowerDirector will auto namethe files for you.
· Always enter the full feature editor at startup: select this option if you don'twant PowerDirector to ask you which editing mode it should open every timeyou launch the program. Once selected, the full feature editor is auto openedevery time you open the program.
· Always prompt me when entering 3D full screen mode: select this option ifyou want PowerDirector to prompt you when it enters 3D full screen mode onsome computers that can only view 3D content at full screen.
· Always prompt me when there is a poor quality segment in Content AwareEditing: select this option if you want PowerDirector to ask if you want to autofix segments of video that are shaky or have poor lighting when encounteredduring the analysis process of Content Aware Editing.
· Always prompt me when entering non real-time preview mode: select thisoption if you want to be prompted every time you click the play button whennon real-time preview mode is enabled.
· Always prompt me before pasting keyframes attributes: select this option ifyou want to be prompted every time you try and paste a clip's keyframeattributes onto another clip.
· Always show tips dialog when entering express projects library: select thisoption if you want to see the helpful tips on how to use express projects everytime you enter the express projects library.
DirectorZone PreferencesIn the Preferences window, select the DirectorZone tab. The available options are asfollows:
Auto sign in:
334
CyberLink PowerDirector
· Auto sign in to DirectorZone: select this option and then enter in your e-mailaddress and password to automatically sign in to DirectorZone when theprogram is opened. If you do not have a DirectorZone account, click on the Get an Account button.
Retrieve templates from DirectorZone:
· Templates Uploaded to DirectorZone: click this button when you have signedin to your DirectorZone account if you want to download and import all ofthe templates you previously uploaded to DirectorZone.
· Templates Downloaded from DirectorZone: click this button when you havesigned in to your DirectorZone account if you want to download and importall of the templates you previously downloaded from DirectorZone.
Privacy rules:
· Allow DirectorZone to gather editing information: select this option to allowDirectorZone to collect all of the names of the templates used in a finishedproject you upload to YouTube.
Editing PreferencesIn the Preferences window, select the Editing tab. The available options are asfollows:
Timeline:
· Set default transition behavior: select the default behavior of transitionsadded between two clips on a timeline track. See Setting Transition Behaviorfor more information on the differences between the overlap and crosstransition.
· Default workspace: select whether to display the timeline or storyboardediting workspace by default in the Edit window.
· Add transition between photos when applying Magic Motion: select thisoption to add the transition selected in Transition type between photos whenusing the Magic Motion tool and apply to all photos.
· Add an effect and a title when using Freeze Frame: select this option toautomatically add an effect and title effect to the timeline when you click theFreeze Frame button.
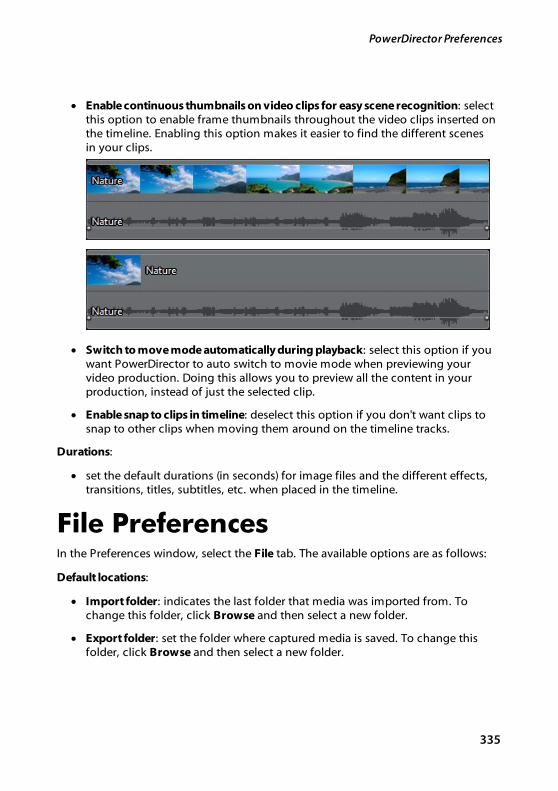
335
PowerDirector Preferences
· Enable continuous thumbnails on video clips for easy scene recognition: selectthis option to enable frame thumbnails throughout the video clips inserted onthe timeline. Enabling this option makes it easier to find the different scenesin your clips.
· Switch to move mode automatically during playback: select this option if youwant PowerDirector to auto switch to movie mode when previewing yourvideo production. Doing this allows you to preview all the content in yourproduction, instead of just the selected clip.
· Enable snap to clips in timeline: deselect this option if you don't want clips tosnap to other clips when moving them around on the timeline tracks.
Durations:
· set the default durations (in seconds) for image files and the different effects,transitions, titles, subtitles, etc. when placed in the timeline.
File PreferencesIn the Preferences window, select the File tab. The available options are as follows:
Default locations:
· Import folder: indicates the last folder that media was imported from. Tochange this folder, click Browse and then select a new folder.
· Export folder: set the folder where captured media is saved. To change thisfolder, click Browse and then select a new folder.
336
CyberLink PowerDirector
Note: the export folder is where produced projects are outputted to by
default. Also, when you burn a file to disc, this folder is where the temp file
is created before burning it to disc.
File name:
· Captured video prefix: enter a default name for captured video files. Whencapturing from a DV/HDV tape, select the Append time information after thefile prefix option to add the date captured information to the file name.
· Production file prefix: enter a default name for your produced files.
· Snapshot file name: enter a default name for captured snapshots in both 2Dand 3D. Select a file format from the drop-down list for your snapshots. Youhave the choice of BMP, JPG, GIF and PNG 2D formats, or MPO and JPS whentaking snapshots of 3D content. The captured 3D snapshots are also in 3D.
· Snapshot destination: select the location where PowerDirector saves capturedsnapshots from the drop-down. You can save them as a file, copy them toyour clipboard, or set them as your wallpaper background on your computer'sdesktop.
· Use original video size as snapshot image quality whenever possible: selectthis option if you want the image to be the same size and quality as theoriginal video, instead of the smaller preview window it is taken in.
Display PreferencesIn the Preferences window, select the Display tab. The available options are asfollows:
· Preview quality: select the default preview quality from the list (Full HD*, HD*,high, normal, low) to set the resolution/quality of the video used whenpreviewing your movie in the preview window. The higher the quality youselect, the more resources that are required to preview your video project.
Note: Full HD and HD preview resolution are only available when the Ultra
version of CyberLink PowerDirector is installed on a 64-bit operating
system.
· Preview mode: select the default preview mode used when previewing videoproduction:
· Real-time Preview: synchronizes and renders clips and effects in real-time,displaying a preview of your video at the specified frames per second.
337
PowerDirector Preferences
· Non Real-time Preview: mutes the audio and displays a preview at areduced speed to help make editing much more fluid. Useful when editinghigh-definition video, using multiple PiP tracks on a less powerfulcomputer, or when you receive dropped frames when previewing. Bymuting the audio and slowing down the video, CyberLink PowerDirectorlets you view more frames per second when your computer has troubleproviding a smooth preview during editing.
· Snap to reference lines*: select to have the selected objects in the previewwindow snap to the grid lines, TV safe zone, and the boundary of the window.
· TV safe zone: select to enable a box on the preview window that indicates theon-screen area of most TV displays.
· Grid lines: select the number of lines you want to display in a grid over thevideo image in the preview window. Use this grid to more precisely place thePiP media and title text where you want on the video image.
· Dual preview*: if you have a secondary display device, such as a monitor, TV,or DV camcorder connected to your computer, you can select it from thisdrop-down to extend your workspace and preview your project on asecondary display. See Dual Preview for more detailed information.
· 3D* display configuration: from the drop-down select your default 3D displaydevice. See 3D Configuration for more detailed information.
Note: * optional feature in CyberLink PowerDirector. Check the version
table on our web site for detailed versioning information.
Hardware AccelerationPreferencesIn the Preferences window, select the Hardware Acceleration tab. The availableoptions are as follows:
Hardware acceleration:
Note: ensure you download and install the latest drivers, and any related
hardware acceleration software, for your computer's graphics card to
enable this feature in CyberLink PowerDirector.

338
CyberLink PowerDirector
· Enable OpenCL technology to speed up video effect preview/render: if yourcomputer supports GPU hardware acceleration, select this option to speed upthe rendering of some video effects by tapping into the multi-core parallelprocessing power of your computer.
Note: to activate hardware acceleration technology during production,
select Hardware video encoder in the production preferences section of
the produce window before production. If your computer does not support
Open CL, the wording on the UI will be replaced with the supported
hardware acceleration technology (Intel Effect Acceleration, NVIDIA CUDA,
or AMD Accelerated Parallel Processing).
· Enable hardware decoding: if your computer supports NVIDIA CUDA/AMDAccelerated Parallel Processing/Intel Core Processor Family technology, selectthis option to use hardware acceleration to decode the video during theediting process and when producing video.
Project PreferencesIn the Preferences window, select the Project tab. The available options are asfollows:
Project:
· Number of recently used projects: enter the number (between 0 and 20) ofrecently used projects that you would like to make available in the File menuwhen you open CyberLink PowerDirector.
· Automatically load the last project when PowerDirector opens: select thisoption to automatically load the last project you were working on.
· Automatically load sample clips when PowerDirector opens: select this optionto automatically load the sample image and video clips into your medialibrary when the program opens.
· Auto save project every: select this to automatically save your project everyspecified number of minutes, so you don't lose your changes by accident. Ifyou want to set a specific location for the auto save files, click the Browsebutton and select a folder location on your computer.
339
PowerDirector Preferences
Produce PreferencesIn the Preferences window, select the Produce tab. The available options are asfollows:
Produce:
· Reduce video blocky artifacts (Intel SSE4 optimized): select this option toimprove the production overall quality of produced video, if your computersupports Intel SSE4 optimization.
· Reduce video noise when using MPEG-1, MPEG-2, and H.264 softwareencoders: select this option if you want CyberLink PowerDirector to autoapply video denoise when encoding MPEG-1, MPEG-2, and H.264 video duringproduction.
H.264 AVC:
· Allow SVRT on single IDR H.264 video: select this option if you wantCyberLink PowerDirector to use SVRT to render a movie project when you onlyhave one H.264 AVC clip on the timeline. See Utilizing Intelligent SVRT formore information on SVRT.
Improvement ProgramPreferencesIn the Preferences window, select the Improvement Program tab. The availableoptions are as follows:
CyberLink Product Improvement Program
· I want to participate: select this item if you would like to participate in theCyberLink Product Improvement Program for PowerDirector. Once enabled,CyberLink PowerDirector will collect information about the hardware andsoftware configuration of your computer system, as well as your usagebehavior and statistics related to the software. Click the Read moreinformation about the improvement program online link to view moredetailed information about the content collected.
Note: the CyberLink Product Improvement Program for PowerDirector will
not collect any personal information for purposes of identifying you.
340
CyberLink PowerDirector
CyberLink Cloud PreferencesIn the Preferences window, select the CyberLink Cloud* tab. The available optionsare as follows:
Note: * optional feature in CyberLink PowerDirector. Check the version
table on our web site for detailed versioning information.
· Back up and restore your program settings: If you have a CyberLink Cloudsubscription you can click Back up to CyberLink Cloud to back up programpreferences, keyboard hotkeys, and custom output profiles to CyberLinkCloud. Click Restore from CyberLink Cloud to replace your current programsettings with the ones you previously backed up on CyberLink Cloud.
· Download folder: click the Browse button to change the folder whereCyberLink Cloud effects, projects, and media are stored when downloaded.
· Clear CyberLink Cloud cache: click the Clear Offline Cache button to free upsome disk space by emptying the temp files stored when downloadingcontent from CyberLink Cloud.
· Sign out from CyberLink Cloud service: if you are currently signed in toCyberLink Cloud, click the button to sign yourself out.
Note: click the Account Information link in the bottom right corner of the
preferences windows if you want to know your CyberLink Cloud subscription
expiry date, how much storage space you have, and more.

341
PowerDirector Hotkeys
PowerDirector Hotkeys
Chapter 21:
CyberLink PowerDirector includes a number of keyboard hotkeys that can make thewhole video editing process go more quickly and smoothly.
CyberLink PowerDirector has many Default Keyboard Hotkeys, but you can alsofully customize the hotkeys to fit your requirements. See Customizing KeyboardHotkeys for detailed information.
Default Keyboard HotkeysThe following is a list of the default keyboard hotkeys in CyberLink PowerDirectorwhen the program is first installed.
Note: if the hotkeys were modified in the Customize Keyboard Hotkeys
window, this list will no longer be accurate. Select PowerDirector Default
from the Hotkey set drop-down in the Customize Keyboard Hotkeys window
to reset them back to these default values.
· Application Menu Bar Hotkeys
· System Hotkeys
· Capture Hotkeys
· Edit Hotkeys
· Designer Hotkeys
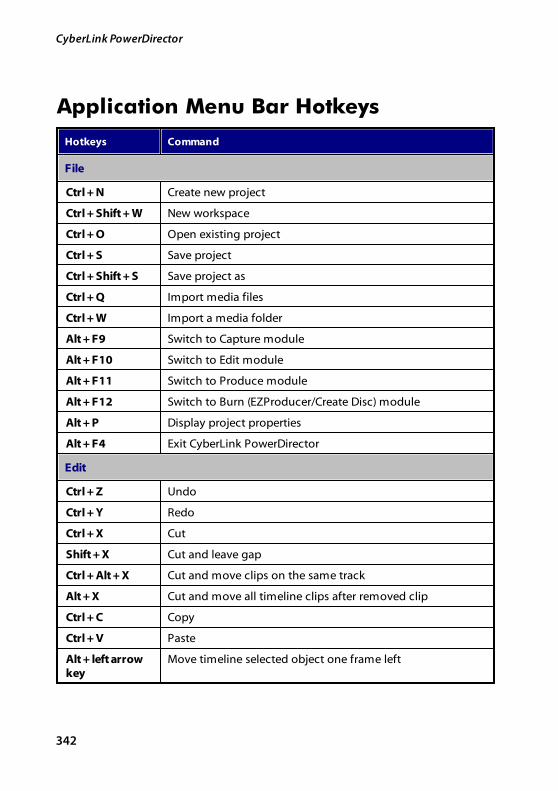
342
CyberLink PowerDirector
Application Menu Bar Hotkeys
Hotkeys Command
File
Ctrl + N Create new project
Ctrl + Shift + W New workspace
Ctrl + O Open existing project
Ctrl + S Save project
Ctrl + Shift + S Save project as
Ctrl + Q Import media files
Ctrl + W Import a media folder
Alt + F9 Switch to Capture module
Alt + F10 Switch to Edit module
Alt + F11 Switch to Produce module
Alt + F12 Switch to Burn (EZProducer/Create Disc) module
Alt + P Display project properties
Alt + F4 Exit CyberLink PowerDirector
Edit
Ctrl + Z Undo
Ctrl + Y Redo
Ctrl + X Cut
Shift + X Cut and leave gap
Ctrl + Alt + X Cut and move clips on the same track
Alt + X Cut and move all timeline clips after removed clip
Ctrl + C Copy
Ctrl + V Paste
Alt + left arrowkey
Move timeline selected object one frame left

343
PowerDirector Hotkeys
Hotkeys Command
Alt + right arrowkey
Move timeline selected object one frame right
Shift + left arrowkey
Go to previous marker
Shift + rightarrow key
Go to next marker
Shift + M Add marker at current timeline position
Alt + 1 Opens Magic Mix function
Alt + 2 Opens Magic Motion function
Alt + 3 Opens Magic Cut function
Alt + 4 Opens Magic Style function
Alt + 5 Opens Magic Music function
Alt + 6 Opens Magic Movie Wizard
F2 Modify (selected clip in PiP/Particle/Title Designer)
Ctrl + Alt + T Open Trim window
Delete Delete/Remove selected item(s)
Shift + Delete Remove and leave gap
Ctrl + Delete Remove and move clips on the same track
Alt + Delete Remove and move all timeline clips after removed clip
Ctrl + A Select all
Ctrl + T Split clip at current timeline slider position
Ctrl + P Take a snapshot of content in the preview window
Ctrl + D Detect scenes
Alt + H Customize keyboard hotkeys
Alt + C Open user preferences window
View
Tab Switch between timeline/storyboard view
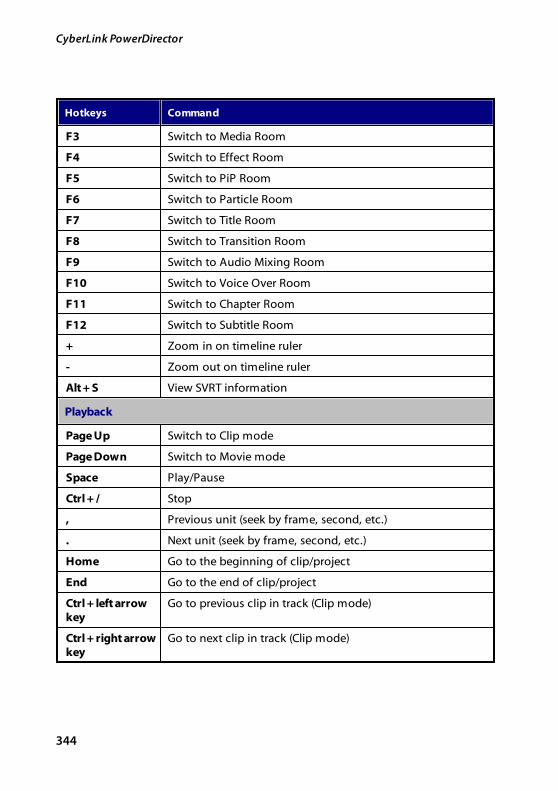
344
CyberLink PowerDirector
Hotkeys Command
F3 Switch to Media Room
F4 Switch to Effect Room
F5 Switch to PiP Room
F6 Switch to Particle Room
F7 Switch to Title Room
F8 Switch to Transition Room
F9 Switch to Audio Mixing Room
F10 Switch to Voice Over Room
F11 Switch to Chapter Room
F12 Switch to Subtitle Room
+ Zoom in on timeline ruler
- Zoom out on timeline ruler
Alt + S View SVRT information
Playback
Page Up Switch to Clip mode
Page Down Switch to Movie mode
Space Play/Pause
Ctrl + / Stop
, Previous unit (seek by frame, second, etc.)
. Next unit (seek by frame, second, etc.)
Home Go to the beginning of clip/project
End Go to the end of clip/project
Ctrl + left arrowkey
Go to previous clip in track (Clip mode)
Ctrl + right arrowkey
Go to next clip in track (Clip mode)
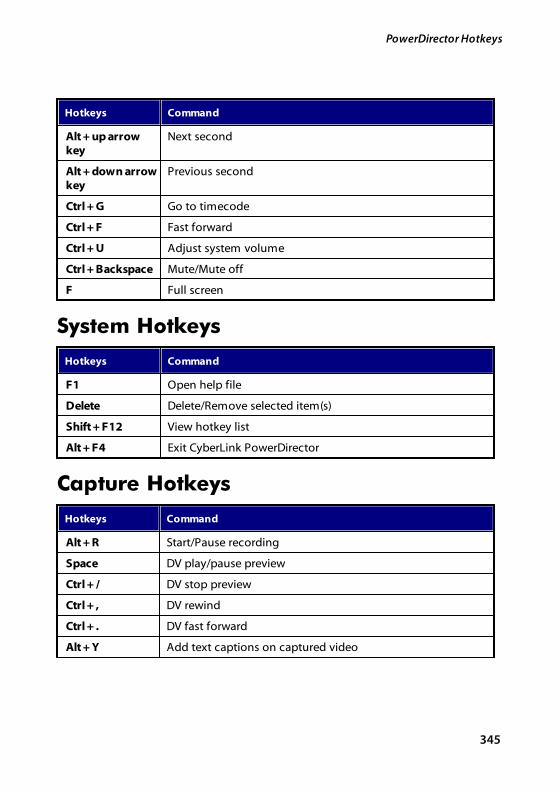
345
PowerDirector Hotkeys
Hotkeys Command
Alt + up arrowkey
Next second
Alt + down arrowkey
Previous second
Ctrl + G Go to timecode
Ctrl + F Fast forward
Ctrl + U Adjust system volume
Ctrl + Backspace Mute/Mute off
F Full screen
System Hotkeys
Hotkeys Command
F1 Open help file
Delete Delete/Remove selected item(s)
Shift + F12 View hotkey list
Alt + F4 Exit CyberLink PowerDirector
Capture Hotkeys
Hotkeys Command
Alt + R Start/Pause recording
Space DV play/pause preview
Ctrl + / DV stop preview
Ctrl + , DV rewind
Ctrl + . DV fast forward
Alt + Y Add text captions on captured video

346
CyberLink PowerDirector
Edit Hotkeys
Hotkeys Command
Library
Ctrl + A Select all
Ctrl + Tab Filter media type in media library
Ctrl + D Detect scenes
Ctrl + Q Import media files
Ctrl + W Import a media folder
Workspace
Ctrl + Drop Overwrite content on track when a clip is dropped onanother clip
Shift + Drop Move all clips on the timeline to the right when a clip isdropped on another clip
Alt + Drop Lay the clip over the existing clip and add a transitionbetween the two clips when a clip is dropped on another clip
[ Mark in
] Mark out
1 Select camera 1 in MultiCam Designer
2 Select camera 2 in MultiCam Designer
3 Select camera 3 in MultiCam Designer
4 Select camera 4 in MultiCam Designer
Designer Hotkeys
Hotkeys Command
Ctrl + B Make text bold
Ctrl + I Make text italic
Ctrl + L Left-align text
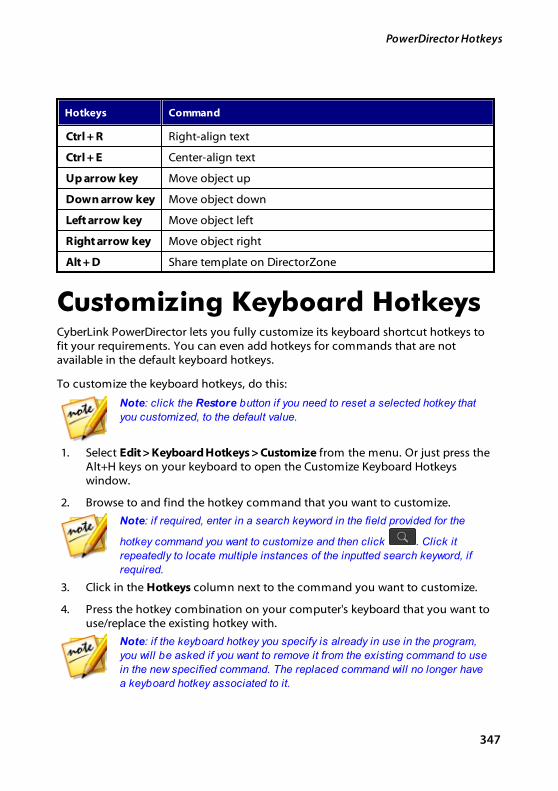
347
PowerDirector Hotkeys
Hotkeys Command
Ctrl + R Right-align text
Ctrl + E Center-align text
Up arrow key Move object up
Down arrow key Move object down
Left arrow key Move object left
Right arrow key Move object right
Alt + D Share template on DirectorZone
Customizing Keyboard HotkeysCyberLink PowerDirector lets you fully customize its keyboard shortcut hotkeys tofit your requirements. You can even add hotkeys for commands that are notavailable in the default keyboard hotkeys.
To customize the keyboard hotkeys, do this:
Note: click the Restore button if you need to reset a selected hotkey that
you customized, to the default value.
1. Select Edit > Keyboard Hotkeys > Customize from the menu. Or just press theAlt+H keys on your keyboard to open the Customize Keyboard Hotkeyswindow.
2. Browse to and find the hotkey command that you want to customize.
Note: if required, enter in a search keyword in the field provided for the
hotkey command you want to customize and then click . Click it
repeatedly to locate multiple instances of the inputted search keyword, if
required.
3. Click in the Hotkeys column next to the command you want to customize.
4. Press the hotkey combination on your computer's keyboard that you want touse/replace the existing hotkey with.
Note: if the keyboard hotkey you specify is already in use in the program,
you will be asked if you want to remove it from the existing command to use
in the new specified command. The replaced command will no longer have
a keyboard hotkey associated to it.
348
CyberLink PowerDirector
5. Repeat the above steps to customize all the keyboard hotkeys to yourpreference.
6. Once you are done, click the Apply button, enter a name for the new set ofcustomized keyboard hotkeys, and then click OK to apply and save thechanges.
Hotkey SetsWhen you customize keyboard hotkeys in CyberLink PowerDirector, they are savedas hotkey sets in the Customize Keyboard Hotkeys window. If required you cancreate multiple sets of hotkeys, which are quickly accessible in the window.
In the Customize Keyboard Hotkeys window, you can:
· quickly switch among the saved hotkey sets by selecting the one you want touse from the Hotkey sets drop-down and then clicking the Apply button.Select the PowerDirector Default hotkey set to use the original hotkeysettings.
· edit an existing hotkey set by further customizing the keyboard hotkeys, andthen clicking the Apply button. Click the Save as button to save it as a brandnew hotkey set.
· delete a custom hotkey set by selecting it in the Hotkey sets drop-down andthen clicking the Delete button.
Importing and Exporting Hotkey Sets
In the Customize Keyboard Hotkeys window you can export all of the hotkey setsyou created. This saves the custom to a file that can then be imported into anotherversion of CyberLink PowerDirector that supports the importing of hotkey sets.
To export a hotkey set, do this:
1. Select Edit > Keyboard Hotkeys > Export from the CyberLink PowerDirectormenu.
2. Specify a file name and save location on your computer.
3. Click the Save button to complete export process.
To import a hotkey set, do this:

349
PowerDirector Hotkeys
4. Select Edit > Keyboard Hotkeys > Import from the CyberLink PowerDirectormenu.
5. Browse to the location of the exported file in the .PDH file format.
6. Click the Open button to complete the import process.
350
CyberLink PowerDirector
Appendix
Chapter 22:
This chapter contains reference information to help answer questions you mayhave about the digital movie production process or about using CyberLinkPowerDirector.
Intelligent SVRT: When Is Used?Intelligent SVRT can be applied to video clips in the MPEG-1, MPEG-2, H.264 and DV-AVI (Type I) formats. In the following conditions, clips (or portions of clips) do notrequire rendering during production, and SVRT can therefore be applied:
· The frame rate, frame size, and file format are the same as those of thedestination production profile.
· The bitrate is similar to that of the destination production profile.
· The TV format is the same as that of the destination production profile. Formore information, see Setting TV (Video Clip Interlacing) Format.
If all of the above conditions are met, SVRT can be used. Any clips that do not meetthe above criteria are fully rendered without SVRT.
In the following conditions, clips (or portions of clips) must be rendered duringproduction, and SVRT can therefore not be applied:
· Adding a title or transition effect
· Modifying the color of a video clip
· Merging two video clips (clips within 2 seconds before or after the mergedclips will be rendered)
· Splitting a video clip (clips within 2 seconds before or after the split will berendered)
· Trimming a video clip (clips within 2 seconds before or after the trimmed clipwill be rendered)
· If the total duration of the production is less than one minute and any portionof the video requires rendering, the entire production will be rendered forefficiency reasons.
351
Appendix
Licensing and CopyrightInformationThis section contains the PowerDirector licensing and copyright information,including a copy of the Intel License Agreement for Open Source Computer Libraryand the GNU Lesser General Public License. There is also a list of the third-partycomponents used in PowerDirector.
License Disclaimer
This product includes certain copyrighted third-party software components licenseunder the terms of the GNU Lesser General Public License and other similar licenseagreements offering free distribution of these software components offered byother organizations, if applicable. Copies of these agreements can be found byclicking the link associated with each of the component provided in the tablebelow. You may also visit http://www.gnu.org/copyleft/lesser.html for a copy ofGNU Lesser General Public License Agreement.
LGPL components and other components listed below are licensed withoutwarranties of any kind, either express or implied warranties, including withoutlimitation the implied warranties of merchantability and fitness for a particularpurpose. The entire risk as the quality and performance of these components iswith you. Please check the respective license agreement for more details.
Copyright Holders under LGPL and/or other license agreements mentioned hereinshall not be responsible for any damages, general, special, incidental orconsequential, arising out of the use or inability to use these components/software.Please check the respective license agreement for more details.
For a list of components of such nature, and to acquire the full source code ofthese licensed components, including any scripts to control compilation andinstallation of the object code, please see "List of Components" below.
Downloading Source Code
You can download the machine-readable source code of the correspondinglicensed component from http://www.cyberlink.com/. Please read the copyrightnotice, the warranty disclaimer, and the license agreement accompanying thesesource codes.
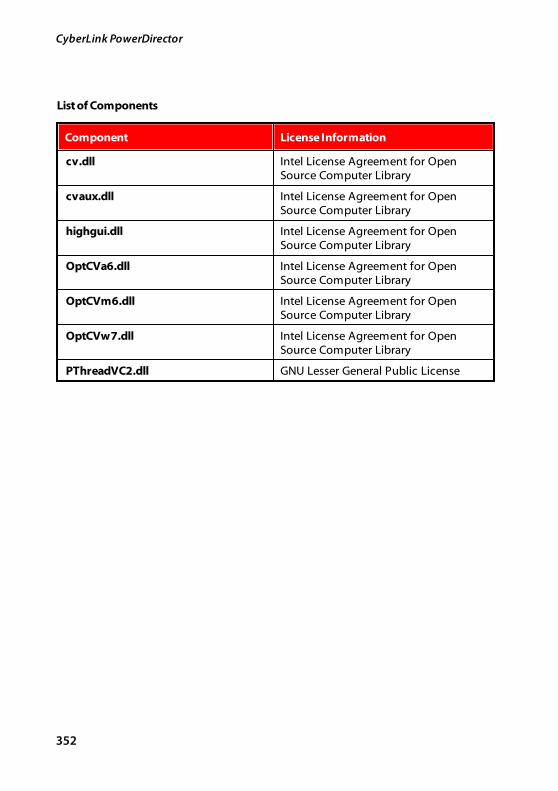
352
CyberLink PowerDirector
List of Components
Component License Information
cv.dll Intel License Agreement for OpenSource Computer Library
cvaux.dll Intel License Agreement for OpenSource Computer Library
highgui.dll Intel License Agreement for OpenSource Computer Library
OptCVa6.dll Intel License Agreement for OpenSource Computer Library
OptCVm6.dll Intel License Agreement for OpenSource Computer Library
OptCVw7.dll Intel License Agreement for OpenSource Computer Library
PThreadVC2.dll GNU Lesser General Public License
353
Appendix
Licenses and CopyrightsBelow are the applicable licenses and copyright information that pertain to thecomponents listed in the List of Components.
Dolby Laboratories
Manufactured under license from Dolby Laboratories. Dolby and the double-Dsymbol are registered trademarks of Dolby Laboratories. Confidential unpublishedworks. Copyright 2003-2005 Dolby Laboratories. All rights reserved.
DTS
For DTS patents, see http://patents.dts.com. Manufactured under license from DTSLicensing Limited. DTS, the Symbol, & DTS and the Symbol together are registeredtrademarks, and DTS 5.1 Producer is a trademark of DTS, Inc. © DTS, Inc. All RightsReserved.
354
CyberLink PowerDirector
MPEG-2 Packaged Media Notice
ANY USE OF THIS PRODUCT IN ANY MANNER OTHER THAN PERSONAL USE THATCOMPLIES WITH THE MPEG-2 STANDARD FOR ENCODING VIDEO INFORMATION FORPACKAGED MEDIA IS EXPRESSLY PROHIBITED WITHOUT A LICENSE UNDERAPPLICABLE PATENTS IN THE MPEG-2 PATENT PORTFOLOP, WHICH LICENSE ISAVAILABLE FROM MPEG LA, LLC, 6312 S. Fiddlers Green Circle, Suite 400E,Greenwood Village, Colorado 80111 U.S.A.
Intel License Agreement For Open SourceComputer Vision Library
Copyright © 2000, Intel Corporation, all rights reserved. Third party copyrights areproperty of their respective owners.
Redistribution and use in source and binary forms, with or without modification,are permitted provided that the following conditions are met:
Redistribution's of source code must retain the above copyright notice, this list ofconditions and the following disclaimer.
Redistribution's in binary form must reproduce the above copyright notice, this listof conditions and the following disclaimer in the documentation and/or othermaterials provided with the distribution.
The name of Intel Corporation may not be used to endorse or promote productsderived from this software without specific prior written permission.
This software is provided by the copyright holders and contributors "as is" and anyexpress or implied warranties, including, but not limited to, the implied warrantiesof merchantability and fitness for a particular purpose are disclaimed. In no eventshall Intel or contributors be liable for any direct, indirect, incidental, special,exemplary, or consequential damages (including, but not limited to, procurementof substitute goods or services; loss of use, data, or profits; or business interruption)however caused and on any theory of liability, whether in contract, strict liability, ortort (including negligence or otherwise) arising in any way out of the use of thissoftware, even if advised of the possibility of such damage.
355
Appendix
GNU Lesser General Public License
Version 2.1, February 1999
Copyright (C) 1991, 1999 Free Software Foundation, Inc.
51 Franklin St, Fifth Floor, Boston, MA 02110-1301 USA
Everyone is permitted to copy and distribute verbatim copies of this licensedocument, but changing it is not allowed.
[This is the first released version of the Lesser GPL. It also counts as the successor ofthe GNU Library Public License, version 2, hence the version number 2.1.]
Preamble
The licenses for most software are designed to take away your freedom to shareand change it. By contrast, the GNU General Public Licenses are intended toguarantee your freedom to share and change free software--to make sure thesoftware is free for all its users.
This license, the Lesser General Public License, applies to some specially designatedsoftware packages--typically libraries--of the Free Software Foundation and otherauthors who decide to use it. You can use it too, but we suggest you first thinkcarefully about whether this license or the ordinary General Public License is thebetter strategy to use in any particular case, based on the explanations below.
When we speak of free software, we are referring to freedom of use, not price. OurGeneral Public Licenses are designed to make sure that you have the freedom todistribute copies of free software (and charge for this service if you wish); that youreceive source code or can get it if you want it; that you can change the softwareand use pieces of it in new free programs; and that you are informed that you cando these things.
To protect your rights, we need to make restrictions that forbid distributors to denyyou these rights or to ask you to surrender these rights. These restrictions translateto certain responsibilities for you if you distribute copies of the library or if youmodify it.
For example, if you distribute copies of the library, whether gratis or for a fee, youmust give the recipients all the rights that we gave you. You must make sure thatthey, too, receive or can get the source code. If you link other code with the library,
356
CyberLink PowerDirector
you must provide complete object files to the recipients, so that they can relinkthem with the library after making changes to the library and recompiling it. Andyou must show them these terms so they know their rights.
We protect your rights with a two-step method: (1) we copyright the library, and (2)we offer you this license, which gives you legal permission to copy, distributeand/or modify the library.
To protect each distributor, we want to make it very clear that there is no warrantyfor the free library. Also, if the library is modified by someone else and passed on,the recipients should know that what they have is not the original version, so thatthe original author's reputation will not be affected by problems that might beintroduced by others.
Finally, software patents pose a constant threat to the existence of any freeprogram. We wish to make sure that a company cannot effectively restrict the usersof a free program by obtaining a restrictive license from a patent holder. Therefore,we insist that any patent license obtained for a version of the library must beconsistent with the full freedom of use specified in this license.
Most GNU software, including some libraries, is covered by the ordinary GNUGeneral Public License. This license, the GNU Lesser General Public License, appliesto certain designated libraries, and is quite different from the ordinary GeneralPublic License. We use this license for certain libraries in order to permit linkingthose libraries into non-free programs.
When a program is linked with a library, whether statically or using a shared library,the combination of the two is legally speaking a combined work, a derivative of theoriginal library. The ordinary General Public License therefore permits such linkingonly if the entire combination fits its criteria of freedom. The Lesser General PublicLicense permits more lax criteria for linking other code with the library.
We call this license the "Lesser" General Public License because it does Less toprotect the user's freedom than the ordinary General Public License. It also providesother free software developers Less of an advantage over competing non-freeprograms. These disadvantages are the reason we use the ordinary General PublicLicense for many libraries. However, the Lesser license provides advantages incertain special circumstances.
For example, on rare occasions, there may be a special need to encourage thewidest possible use of a certain library, so that it becomes a de-facto standard. Toachieve this, non-free programs must be allowed to use the library. A morefrequent case is that a free library does the same job as widely used non-free
357
Appendix
libraries. In this case, there is little to gain by limiting the free library to free softwareonly, so we use the Lesser General Public License.
In other cases, permission to use a particular library in non-free programs enables agreater number of people to use a large body of free software. For example,permission to use the GNU C Library in non-free programs enables many morepeople to use the whole GNU operating system, as well as its variant, the GNU/Linuxoperating system.
Although the Lesser General Public License is Less protective of the users' freedom,it does ensure that the user of a program that is linked with the Library has thefreedom and the wherewithal to run that program using a modified version of theLibrary.
The precise terms and conditions for copying, distribution and modification follow.Pay close attention to the difference between a "work based on the library" and a"work that uses the library". The former contains code derived from the library,whereas the latter must be combined with the library in order to run.
TERMS AND CONDITIONS FOR COPYING,DISTRIBUTION AND MODIFICATION
0. This License Agreement applies to any software library or other program whichcontains a notice placed by the copyright holder or other authorized party saying itmay be distributed under the terms of this Lesser General Public License (also called"this License"). Each licensee is addressed as "you".
A "library" means a collection of software functions and/or data prepared so as tobe conveniently linked with application programs (which use some of thosefunctions and data) to form executables.
The "Library", below, refers to any such software library or work which has beendistributed under these terms. A "work based on the Library" means either theLibrary or any derivative work under copyright law: that is to say, a work containingthe Library or a portion of it, either verbatim or with modifications and/or translatedstraightforwardly into another language. (Hereinafter, translation is includedwithout limitation in the term "modification".)
"Source code" for a work means the preferred form of the work for makingmodifications to it. For a library, complete source code means all the source codefor all modules it contains, plus any associated interface definition files, plus thescripts used to control compilation and installation of the library.
358
CyberLink PowerDirector
Activities other than copying, distribution and modification are not covered by thisLicense; they are outside its scope. The act of running a program using the Libraryis not restricted, and output from such a program is covered only if its contentsconstitute a work based on the Library (independent of the use of the Library in atool for writing it). Whether that is true depends on what the Library does and whatthe program that uses the Library does.
1. You may copy and distribute verbatim copies of the Library's complete sourcecode as you receive it, in any medium, provided that you conspicuously andappropriately publish on each copy an appropriate copyright notice and disclaimerof warranty; keep intact all the notices that refer to this License and to the absenceof any warranty; and distribute a copy of this License along with the Library.
You may charge a fee for the physical act of transferring a copy, and you may atyour option offer warranty protection in exchange for a fee.
2. You may modify your copy or copies of the Library or any portion of it, thusforming a work based on the Library, and copy and distribute such modifications orwork under the terms of Section 1 above, provided that you also meet all of theseconditions:
a) The modified work must itself be a software library.
b) You must cause the files modified to carry prominent notices stating that youchanged the files and the date of any change.
c) You must cause the whole of the work to be licensed at no charge to all thirdparties under the terms of this License.
d) If a facility in the modified Library refers to a function or a table of data to besupplied by an application program that uses the facility, other than as anargument passed when the facility is invoked, then you must make a good faitheffort to ensure that, in the event an application does not supply such function ortable, the facility still operates, and performs whatever part of its purpose remainsmeaningful.
(For example, a function in a library to compute square roots has a purpose that isentirely well-defined independent of the application. Therefore, Subsection 2drequires that any application-supplied function or table used by this function mustbe optional: if the application does not supply it, the square root function must stillcompute square roots.)
These requirements apply to the modified work as a whole. If identifiable sectionsof that work are not derived from the Library, and can be reasonably considered
359
Appendix
independent and separate works in themselves, then this License, and its terms, donot apply to those sections when you distribute them as separate works. But whenyou distribute the same sections as part of a whole which is a work based on theLibrary, the distribution of the whole must be on the terms of this License, whosepermissions for other licensees extend to the entire whole, and thus to each andevery part regardless of who wrote it.
Thus, it is not the intent of this section to claim rights or contest your rights to workwritten entirely by you; rather, the intent is to exercise the right to control thedistribution of derivative or collective works based on the Library.
In addition, mere aggregation of another work not based on the Library with theLibrary (or with a work based on the Library) on a volume of a storage ordistribution medium does not bring the other work under the scope of this License.
3. You may opt to apply the terms of the ordinary GNU General Public Licenseinstead of this License to a given copy of the Library. To do this, you must alter allthe notices that refer to this License, so that they refer to the ordinary GNU GeneralPublic License, version 2, instead of to this License. (If a newer version than version2 of the ordinary GNU General Public License has appeared, then you can specifythat version instead if you wish.) Do not make any other change in these notices.
Once this change is made in a given copy, it is irreversible for that copy, so theordinary GNU General Public License applies to all subsequent copies and derivativeworks made from that copy.
This option is useful when you wish to copy part of the code of the Library into aprogram that is not a library.
4. You may copy and distribute the Library (or a portion or derivative of it, underSection 2) in object code or executable form under the terms of Sections 1 and 2above provided that you accompany it with the complete corresponding machine-readable source code, which must be distributed under the terms of Sections 1 and2 above on a medium customarily used for software interchange.
If distribution of object code is made by offering access to copy from a designatedplace, then offering equivalent access to copy the source code from the same placesatisfies the requirement to distribute the source code, even though third partiesare not compelled to copy the source along with the object code.
5. A program that contains no derivative of any portion of the Library, but isdesigned to work with the Library by being compiled or linked with it, is called a"work that uses the Library". Such a work, in isolation, is not a derivative work of theLibrary, and therefore falls outside the scope of this License.
360
CyberLink PowerDirector
However, linking a "work that uses the Library" with the Library creates anexecutable that is a derivative of the Library (because it contains portions of theLibrary), rather than a "work that uses the library". The executable is thereforecovered by this License. Section 6 states terms for distribution of such executables.
When a "work that uses the Library" uses material from a header file that is part ofthe Library, the object code for the work may be a derivative work of the Libraryeven though the source code is not. Whether this is true is especially significant ifthe work can be linked without the Library, or if the work is itself a library. Thethreshold for this to be true is not precisely defined by law.
If such an object file uses only numerical parameters, data structure layouts andaccessors, and small macros and small inline functions (ten lines or less in length),then the use of the object file is unrestricted, regardless of whether it is legally aderivative work. (Executables containing this object code plus portions of theLibrary will still fall under Section 6.)
Otherwise, if the work is a derivative of the Library, you may distribute the objectcode for the work under the terms of Section 6. Any executables containing thatwork also fall under Section 6, whether or not they are linked directly with theLibrary itself.
6. As an exception to the Sections above, you may also combine or link a "work thatuses the Library" with the Library to produce a work containing portions of theLibrary, and distribute that work under terms of your choice, provided that theterms permit modification of the work for the customer's own use and reverseengineering for debugging such modifications.
You must give prominent notice with each copy of the work that the Library is usedin it and that the Library and its use are covered by this License. You must supply acopy of this License. If the work during execution displays copyright notices, youmust include the copyright notice for the Library among them, as well as areference directing the user to the copy of this License.
Also, you must do one of these things:
a) Accompany the work with the complete corresponding machine-readable sourcecode for the Library including whatever changes were used in the work (which mustbe distributed under Sections 1 and 2 above); and, if the work is an executablelinked with the Library, with the complete machine-readable "work that uses theLibrary", as object code and/or source code, so that the user can modify the Libraryand then relink to produce a modified executable containing the modified Library.(It is understood that the user who changes the contents of definitions files in the
361
Appendix
Library will not necessarily be able to recompile the application to use the modifieddefinitions.)
b) Use a suitable shared library mechanism for linking with the Library. A suitablemechanism is one that (1) uses at run time a copy of the library already present onthe user's computer system, rather than copying library functions into theexecutable, and (2) will operate properly with a modified version of the library, if theuser installs one, as long as the modified version is interface-compatible with theversion that the work was made with.
c) Accompany the work with a written offer, valid for at least three years, to give thesame user the materials specified in Subsection 6a, above, for a charge no morethan the cost of performing this distribution.
d) If distribution of the work is made by offering access to copy from a designatedplace, offer equivalent access to copy the above specified materials from the sameplace.
e) Verify that the user has already received a copy of these materials or that youhave already sent this user a copy.
For an executable, the required form of the "work that uses the Library" mustinclude any data and utility programs needed for reproducing the executable fromit. However, as a special exception, the materials to be distributed need not includeanything that is normally distributed (in either source or binary form) with themajor components (compiler, kernel, and so on) of the operating system on whichthe executable runs, unless that component itself accompanies the executable.
It may happen that this requirement contradicts the license restrictions of otherproprietary libraries that do not normally accompany the operating system. Such acontradiction means you cannot use both them and the Library together in anexecutable that you distribute.
7. You may place library facilities that are a work based on the Library side-by-sidein a single library together with other library facilities not covered by this License,and distribute such a combined library, provided that the separate distribution ofthe work based on the Library and of the other library facilities is otherwisepermitted, and provided that you do these two things:
a) Accompany the combined library with a copy of the same work based on theLibrary, uncombined with any other library facilities. This must be distributed underthe terms of the Sections above.
362
CyberLink PowerDirector
b) Give prominent notice with the combined library of the fact that part of it is awork based on the Library, and explaining where to find the accompanyinguncombined form of the same work.
8. You may not copy, modify, sublicense, link with, or distribute the Library exceptas expressly provided under this License. Any attempt otherwise to copy, modify,sublicense, link with, or distribute the Library is void, and will automaticallyterminate your rights under this License. However, parties who have receivedcopies, or rights, from you under this License will not have their licenses terminatedso long as such parties remain in full compliance.
9. You are not required to accept this License, since you have not signed it.However, nothing else grants you permission to modify or distribute the Library orits derivative works. These actions are prohibited by law if you do not accept thisLicense. Therefore, by modifying or distributing the Library (or any work based onthe Library), you indicate your acceptance of this License to do so, and all its termsand conditions for copying, distributing or modifying the Library or works based onit.
10. Each time you redistribute the Library (or any work based on the Library), therecipient automatically receives a license from the original licensor to copy,distribute, link with or modify the Library subject to these terms and conditions.You may not impose any further restrictions on the recipients' exercise of the rightsgranted herein. You are not responsible for enforcing compliance by third partieswith this License.
11. If, as a consequence of a court judgment or allegation of patent infringement orfor any other reason (not limited to patent issues), conditions are imposed on you(whether by court order, agreement or otherwise) that contradict the conditions ofthis License, they do not excuse you from the conditions of this License. If youcannot distribute so as to satisfy simultaneously your obligations under this Licenseand any other pertinent obligations, then as a consequence you may not distributethe Library at all. For example, if a patent license would not permit royalty-freeredistribution of the Library by all those who receive copies directly or indirectlythrough you, then the only way you could satisfy both it and this License would beto refrain entirely from distribution of the Library.
If any portion of this section is held invalid or unenforceable under any particularcircumstance, the balance of the section is intended to apply, and the section as awhole is intended to apply in other circumstances.
It is not the purpose of this section to induce you to infringe any patents or otherproperty right claims or to contest validity of any such claims; this section has the
363
Appendix
sole purpose of protecting the integrity of the free software distribution systemwhich is implemented by public license practices. Many people have madegenerous contributions to the wide range of software distributed through thatsystem in reliance on consistent application of that system; it is up to theauthor/donor to decide if he or she is willing to distribute software through anyother system and a licensee cannot impose that choice.
This section is intended to make thoroughly clear what is believed to be aconsequence of the rest of this License.
12. If the distribution and/or use of the Library is restricted in certain countrieseither by patents or by copyrighted interfaces, the original copyright holder whoplaces the Library under this License may add an explicit geographical distributionlimitation excluding those countries, so that distribution is permitted only in oramong countries not thus excluded. In such case, this License incorporates thelimitation as if written in the body of this License.
13. The Free Software Foundation may publish revised and/or new versions of theLesser General Public License from time to time. Such new versions will be similarin spirit to the present version, but may differ in detail to address new problems orconcerns.
Each version is given a distinguishing version number. If the Library specifies aversion number of this License which applies to it and "any later version", you havethe option of following the terms and conditions either of that version or of anylater version published by the Free Software Foundation. If the Library does notspecify a license version number, you may choose any version ever published bythe Free Software Foundation.
14. If you wish to incorporate parts of the Library into other free programs whosedistribution conditions are incompatible with these, write to the author to ask forpermission. For software which is copyrighted by the Free Software Foundation,write to the Free Software Foundation; we sometimes make exceptions for this. Ourdecision will be guided by the two goals of preserving the free status of allderivatives of our free software and of promoting the sharing and reuse of softwaregenerally.
NO WARRANTY
15. BECAUSE THE LIBRARY IS LICENSED FREE OF CHARGE, THERE IS NO WARRANTYFOR THE LIBRARY, TO THE EXTENT PERMITTED BY APPLICABLE LAW. EXCEPT WHENOTHERWISE STATED IN WRITING THE COPYRIGHT HOLDERS AND/OR OTHER PARTIES
364
CyberLink PowerDirector
PROVIDE THE LIBRARY "AS IS" WITHOUT WARRANTY OF ANY KIND, EITHEREXPRESSED OR IMPLIED, INCLUDING, BUT NOT LIMITED TO, THE IMPLIEDWARRANTIES OF MERCHANTABILITY AND FITNESS FOR A PARTICULAR PURPOSE.THE ENTIRE RISK AS TO THE QUALITY AND PERFORMANCE OF THE LIBRARY IS WITHYOU. SHOULD THE LIBRARY PROVE DEFECTIVE, YOU ASSUME THE COST OF ALLNECESSARY SERVICING, REPAIR OR CORRECTION.
16. IN NO EVENT UNLESS REQUIRED BY APPLICABLE LAW OR AGREED TO INWRITING WILL ANY COPYRIGHT HOLDER, OR ANY OTHER PARTY WHO MAY MODIFYAND/OR REDISTRIBUTE THE LIBRARY AS PERMITTED ABOVE, BE LIABLE TO YOU FORDAMAGES, INCLUDING ANY GENERAL, SPECIAL, INCIDENTAL OR CONSEQUENTIALDAMAGES ARISING OUT OF THE USE OR INABILITY TO USE THE LIBRARY (INCLUDINGBUT NOT LIMITED TO LOSS OF DATA OR DATA BEING RENDERED INACCURATE ORLOSSES SUSTAINED BY YOU OR THIRD PARTIES OR A FAILURE OF THE LIBRARY TOOPERATE WITH ANY OTHER SOFTWARE), EVEN IF SUCH HOLDER OR OTHER PARTYHAS BEEN ADVISED OF THE POSSIBILITY OF SUCH DAMAGES.
CLAPACK Copyright Notice
Anderson, E. and Bai, Z. and Bischof, C. and Blackford, S. and Demmel, J. andDongarra, J. and Du Croz, J. and Greenbaum, A. and Hammarling, S. and McKenney,A. and Sorensen, D. LAPACK User's Guide. Third Edition. Philadelphia, PA: Societyfor Industrial and Applied Mathematics, 1999. ISBN: 0-89871-447-8 (paperback)
365
Technical Support
Technical Support
Chapter 23:
If you require technical support, then this chapter can help. It includes all theinformation you need to find the answers you are looking for. You may also findanswers quickly by contacting your local distributor/dealer.
Before Contacting TechnicalSupportBefore contacting CyberLink technical support, please take advantage of one ormore of the following free support options:
· consult the user’s guide or the online help installed with your program.
· refer to the Knowledge Base at the following link on the CyberLink web site:http://www.cyberlink.com/support/search-product-result.do
· check the Help Resources page in this document.
When contacting technical support by e-mail or phone, please have the followinginformation ready:
· registered product key (your product key can be found on the software discenvelope, the box cover, or in the e-mail received after you purchasedCyberLink products on the CyberLink store).
· the product name, version and build number, which generally can be foundby clicking on the product name image on the user interface.
· the version of Windows installed on your system.
· list of hardware devices on your system (capture card, sound card, VGA card)and their specifications. For fastest results, please generate and attach yoursystem info using the DxDiag.txt.
Note: here are the steps to generate the system info DxDiag.txt file: Click
Windows (start) button, and then search for "dxdiag". Click Save All
Information button to save the DxDiag.txt file.
· the wording of any warning messages that were displayed (you may want towrite this down or take a screen capture).

366
CyberLink PowerDirector
· a detailed description of the problem and under what circumstances itoccurred.
Web SupportSolutions to your problems are available 24 hours a day at no cost on the CyberLinkweb site:
Note: you must first register as a member before using CyberLink web
support.
CyberLink provides a wide range of web support options, including FAQs, in thefollowing languages:
Language Web Support URL
English http://www.cyberlink.com/cs-help
Traditional Chinese http://tw.cyberlink.com/cs-help
Japanese http://jp.cyberlink.com/cs-help
Spanish http://es.cyberlink.com/cs-help
Korean http://kr.cyberlink.com/cs-help
Simplified Chinese http://cn.cyberlink.com/cs-help
German http://de.cyberlink.com/cs-help
French http://fr.cyberlink.com/cs-help
Italian http://it.cyberlink.com/cs-help
Help ResourcesThe following is a list of help resources that may assist you when using any ofCyberLink's products.
· Access CyberLink's Knowledge base and FAQ (frequently asked questions):http://www.cyberlink.com/cs-resource
· View video tutorials for your software:http://directorzone.cyberlink.com/tutorial/

367
Technical Support
· Ask questions and get answers from our users on the CyberLink CommunityForum: http://forum.cyberlink.com/forum/forums/list/ENU.page
Note: CyberLink’s user community forum is only available in English and
German.

368
CyberLink PowerDirector

369
Index
Index1120Hz Time-sequential 33
22D
burning disc in 323
converting to 3D 152
producing in 281
2K resolution
outputting in 2D 281
outputting in 3D 284
uploading 289
33D
burn disc in 326
configuration 336
disc menu text 316
disc menus 321
output formats 285
overview 56
particle effects 209
PiP effects 188
preferences 336
producing in 284
setting source format 54
subtitles 277
title text 230
3D mode
enabling 33
3D-BD 311
3D-Like
overview 56
3D-Ready HDTV 33
44 color gradient
disc menu text 314
PiP effects 187
title text 225
4K resolution
outputting in 2D 281
outputting in 3D 284
uploading 289
55.1 surround 330
77.1 channels
downmixing 330
AAction Camera Center 91
Align 311
CyberLink PowerDirector
370
Anaglyph 33, 284
Android 287
Animation
paint 179
Aspect ratio
PiP media 186
setting project 47
setting video 137
title effects 228
Audio
5.1 surround 330
7.1 channel 330
adding 115
AudioDirector 149
beat detection 118
capturing 57
channels 330
dB meter 269
denoise 143
editing 123, 149
extracting 68
gain 269
importing 53
keyframes 143, 145
level meter 269
mixing 269
mixing in track 268
muting 149
normalizing 269
reversing 152
speed 152
stereo 330
sync by audio 120
syncing to video 118
transitions 247
trimming 134
unlinking 129
WaveEditor 149
waveform 118, 268
AudioDirector 149
AVCHD 2.0
burning to disc 323
capturing 60
outputting in 2D 281
BBackground music
disc menus 305
slideshows 13
themes 85
Backgrounds
adding to video 112
disc menus 312
particle effects 204
title effects 224
Batch produce 297
Blu-ray Discs
burning 299
disc image 325, 327
selecting 2D format 323
selecting 3D format 326
Bring forward 311
Burn
2D disc 323
3D disc 326
disc image 325, 327
disc space 324, 327
settings 328
371
Index
Burn
temp file 324, 327
Buttons
highlight style 320
menu 319
navigation 320
per page 307
properties 320
CCapture
content 61
desktop 61
media 57
preferences 62, 331
quality 62
screen 61
settings 62
CD 60
Chapters
adding 273
menu page 302
thumbnails 273
Checkerboard 33
Chroma key
disc menu images 316
pip effects 186
title effects 228, 231
Clip markers 118
Clip mode 29
CLPV 137, 138
Color
effects 142
fixing 143
Color boards
adding 112
creating 114
ColorDirector
accessing 142
presets 142
Confirmation preferences 332
Content aware editing 19, 123
Context menu 311
Convert 2D to 3D 152
Copy keyframe attributes 193
Create disc 299
Crop
images 139
videos 152
Cross transition 248
Crossfade 111, 112, 115, 176, 200
CyberLink Cloud
account information 340
downloading effects 66
overview 2
pack project materials 48
preferences 340
projects 51
signing out 340
uploading disc menu templates 322
uploading paint animations 181
uploading particle effects 214
uploading PiP effects 198
uploading title effects 242
uploading transitions 266
uploading videos 284, 286, 289
CyberLink Product Improvement Program 339
CyberLink PowerDirector
372
DDailymotion 289
dB meter 269
Default language 330
Design Studio
Menu Designer 309
Paint Designer 178
Particle Designer 202
PiP Designer 182
Title Designer 217
Transition Designer 250
Detect
faces 11
music beats 118
scenes, library 66
scenes, trim 130
Devices 287
Digital TV 60
DirectorZone
bulletin 2
downloading from 64
downloading lens profiles 91
overview 2
popular templates 2
preferences 333
uploading disc menu templates 322
uploading paint animations 181
uploading particle effects 214
uploading title effects 242
uploading transitions 266
uploadng PiP effects 198
Disc image
2D 325
3D 327
Disc menu text
3D depth 316
Disc menus
3D 321
adding images 313
adding menu buttons 319
adding text 313
alignment 308
background 311
background music 305
chroma key 316
creating new 309
customizing 309
duration 307
editing properties 304
first play video 306
Menu Designer 309
menu music duration 307
menu objects 308
motion 312
opening, disable 304
playback mode 307
selecting 302
settings 304
uploading 321
Discs
3D menus 321
burning 323
creating 299
customizing menus 309
editing menu 304
erasing 329
importing content 300

373
Index
Discs
Menu Designer 309
selecting menu 302
Display
3D 33, 336
dual preview 32
preferences 336
Dolby
copyright 353
Dolby Digital 323, 326
Download
media 63
Drawing 179
DTS 5.1 Producer 323, 326
Dual preview 32
Duration 136
DV camcorder 57
DVDs
burning 299
capturing from 61
disc image 325, 327
selecting format 323, 326
EEasy editor 9
Edge sharpness 264
Edit
audio 149
content aware editing 123
media 123
Editing preferences 334
Effects
action 93
adding 169
color 142
downloading 64
freeze frame 175
keyframes 146
modifying 170
motion 164
NewBlue 169
particles 200
PiP objects 176
shape 140
speed 93, 153
titles 215
video 169
Emit method 206
Emit rate 207
Enhanced stabilizer 92, 141
Erase
discs 329
Paint Designer 179
Explorer view 24
Export
projects 48
projects to CyberLink Cloud 51
Express projects 25, 98
filtering 24
Extend desktop 32
Extract audio 68
FFades 270
disc menu images 317
PiP effects 189
CyberLink PowerDirector
374
Features
overview 1
File preferences 335
Flickr 63
Formats
supported, 2D export 281
supported, 3D import 284
supported, discs 323
supported, import 53
Frame rate
preview window 30
setting project 330
Freeform
media 140
position 145
Freeze
frame 175
time 179
Full feature editor 8
GGain 269
General preferences 330
Gravity 207
Green screen 186
Grid lines 30
Group objects 36
HH.264 AVC
outputting in 2D 281
outputting in 3D 284
H.265 HEVC
outputting in 2D 281
Hardware acceleration
preferences 337
HDMI 1.4 Enabled 33
HDV camcorder 59
Help 366
Hotkeys 341
customizing 347
default 341
IImages
adding 111
aspect ratio 138
cropping 139
effects 169, 171
enhancing 141
fades 317
fixing 141
importing 53
keyframes 143
Magic Motion 173
opacity 145
PhotoDirector 142
shape 140
transitions 244
Import
media 53
projects 56
Insert 111
projects 56
Intelligent SVRT
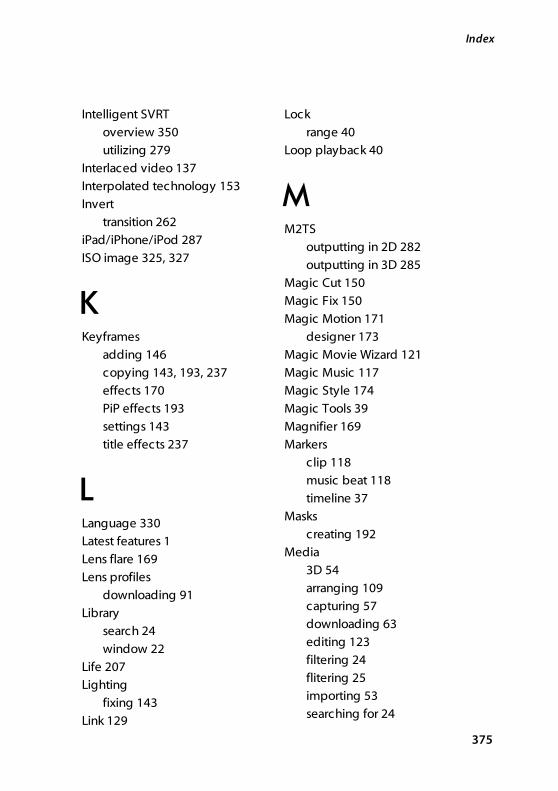
375
Index
Intelligent SVRT
overview 350
utilizing 279
Interlaced video 137
Interpolated technology 153
Invert
transition 262
iPad/iPhone/iPod 287
ISO image 325, 327
KKeyframes
adding 146
copying 143, 193, 237
effects 170
PiP effects 193
settings 143
title effects 237
LLanguage 330
Latest features 1
Lens flare 169
Lens profiles
downloading 91
Library
search 24
window 22
Life 207
Lighting
fixing 143
Link 129
Lock
range 40
Loop playback 40
MM2TS
outputting in 2D 282
outputting in 3D 285
Magic Cut 150
Magic Fix 150
Magic Motion 171
designer 173
Magic Movie Wizard 121
Magic Music 117
Magic Style 174
Magic Tools 39
Magnifier 169
Markers
clip 118
music beat 118
timeline 37
Masks
creating 192
Media
3D 54
arranging 109
capturing 57
downloading 63
editing 123
filtering 24
flitering 25
importing 53
searching for 24
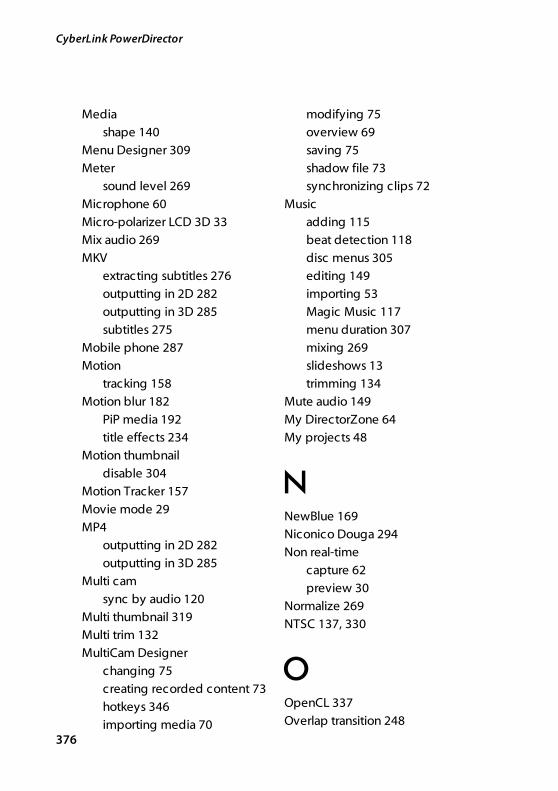
CyberLink PowerDirector
376
Media
shape 140
Menu Designer 309
Meter
sound level 269
Microphone 60
Micro-polarizer LCD 3D 33
Mix audio 269
MKV
extracting subtitles 276
outputting in 2D 282
outputting in 3D 285
subtitles 275
Mobile phone 287
Motion
tracking 158
Motion blur 182
PiP media 192
title effects 234
Motion thumbnail
disable 304
Motion Tracker 157
Movie mode 29
MP4
outputting in 2D 282
outputting in 3D 285
Multi cam
sync by audio 120
Multi thumbnail 319
Multi trim 132
MultiCam Designer
changing 75
creating recorded content 73
hotkeys 346
importing media 70
modifying 75
overview 69
saving 75
shadow file 73
synchronizing clips 72
Music
adding 115
beat detection 118
disc menus 305
editing 149
importing 53
Magic Music 117
menu duration 307
mixing 269
slideshows 13
trimming 134
Mute audio 149
My DirectorZone 64
My projects 48
NNewBlue 169
Niconico Douga 294
Non real-time
capture 62
preview 30
Normalize 269
NTSC 137, 330
OOpenCL 337
Overlap transition 248
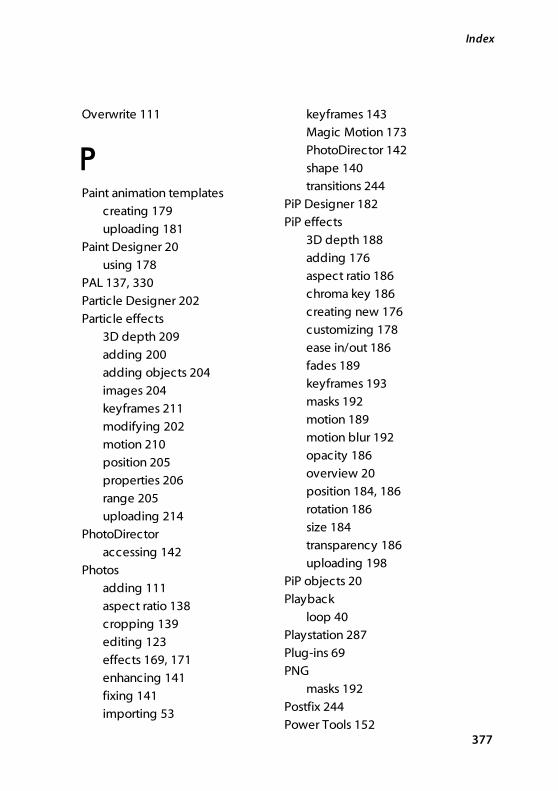
377
Index
Overwrite 111
PPaint animation templates
creating 179
uploading 181
Paint Designer 20
using 178
PAL 137, 330
Particle Designer 202
Particle effects
3D depth 209
adding 200
adding objects 204
images 204
keyframes 211
modifying 202
motion 210
position 205
properties 206
range 205
uploading 214
PhotoDirector
accessing 142
Photos
adding 111
aspect ratio 138
cropping 139
editing 123
effects 169, 171
enhancing 141
fixing 141
importing 53
keyframes 143
Magic Motion 173
PhotoDirector 142
shape 140
transitions 244
PiP Designer 182
PiP effects
3D depth 188
adding 176
aspect ratio 186
chroma key 186
creating new 176
customizing 178
ease in/out 186
fades 189
keyframes 193
masks 192
motion 189
motion blur 192
opacity 186
overview 20
position 184, 186
rotation 186
size 184
transparency 186
uploading 198
PiP objects 20
Playback
loop 40
Playstation 287
Plug-ins 69
PNG
masks 192
Postfix 244
Power Tools 152
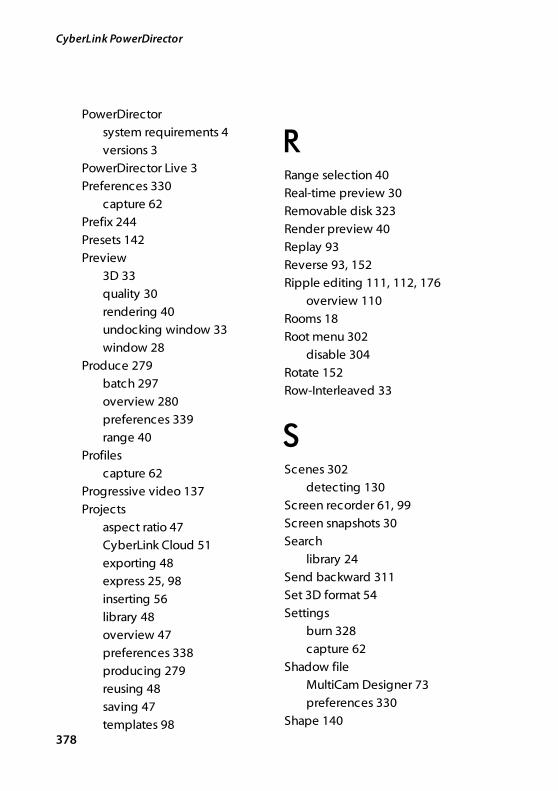
CyberLink PowerDirector
378
PowerDirector
system requirements 4
versions 3
PowerDirector Live 3
Preferences 330
capture 62
Prefix 244
Presets 142
Preview
3D 33
quality 30
rendering 40
undocking window 33
window 28
Produce 279
batch 297
overview 280
preferences 339
range 40
Profiles
capture 62
Progressive video 137
Projects
aspect ratio 47
CyberLink Cloud 51
exporting 48
express 25, 98
inserting 56
library 48
overview 47
preferences 338
producing 279
reusing 48
saving 47
templates 98
RRange selection 40
Real-time preview 30
Removable disk 323
Render preview 40
Replay 93
Reverse 93, 152
Ripple editing 111, 112, 176
overview 110
Rooms 18
Root menu 302
disable 304
Rotate 152
Row-Interleaved 33
SScenes 302
detecting 130
Screen recorder 61, 99
Screen snapshots 30
Search
library 24
Send backward 311
Set 3D format 54
Settings
burn 328
capture 62
Shadow file
MultiCam Designer 73
preferences 330
Shape 140
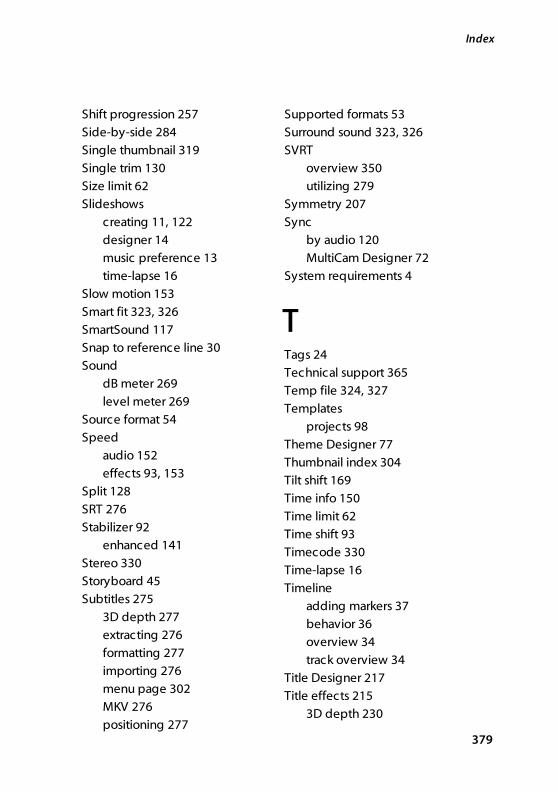
379
Index
Shift progression 257
Side-by-side 284
Single thumbnail 319
Single trim 130
Size limit 62
Slideshows
creating 11, 122
designer 14
music preference 13
time-lapse 16
Slow motion 153
Smart fit 323, 326
SmartSound 117
Snap to reference line 30
Sound
dB meter 269
level meter 269
Source format 54
Speed
audio 152
effects 93, 153
Split 128
SRT 276
Stabilizer 92
enhanced 141
Stereo 330
Storyboard 45
Subtitles 275
3D depth 277
extracting 276
formatting 277
importing 276
menu page 302
MKV 276
positioning 277
Supported formats 53
Surround sound 323, 326
SVRT
overview 350
utilizing 279
Symmetry 207
Sync
by audio 120
MultiCam Designer 72
System requirements 4
TTags 24
Technical support 365
Temp file 324, 327
Templates
projects 98
Theme Designer 77
Thumbnail index 304
Tilt shift 169
Time info 150
Time limit 62
Time shift 93
Timecode 330
Time-lapse 16
Timeline
adding markers 37
behavior 36
overview 34
track overview 34
Title Designer 217
Title effects 215
3D depth 230
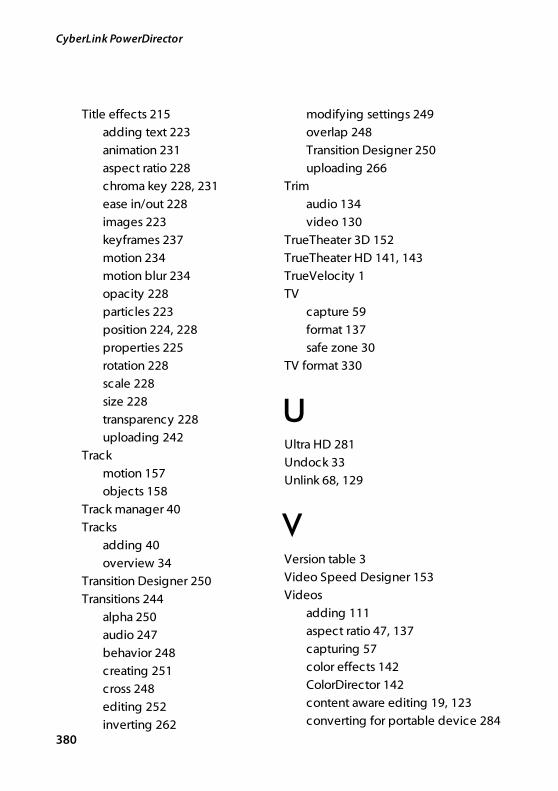
CyberLink PowerDirector
380
Title effects 215
adding text 223
animation 231
aspect ratio 228
chroma key 228, 231
ease in/out 228
images 223
keyframes 237
motion 234
motion blur 234
opacity 228
particles 223
position 224, 228
properties 225
rotation 228
scale 228
size 228
transparency 228
uploading 242
Track
motion 157
objects 158
Track manager 40
Tracks
adding 40
overview 34
Transition Designer 250
Transitions 244
alpha 250
audio 247
behavior 248
creating 251
cross 248
editing 252
inverting 262
modifying settings 249
overlap 248
Transition Designer 250
uploading 266
Trim
audio 134
video 130
TrueTheater 3D 152
TrueTheater HD 141, 143
TrueVelocity 1
TV
capture 59
format 137
safe zone 30
TV format 330
UUltra HD 281
Undock 33
Unlink 68, 129
VVersion table 3
Video Speed Designer 153
Videos
adding 111
aspect ratio 47, 137
capturing 57
color effects 142
ColorDirector 142
content aware editing 19, 123
converting for portable device 284
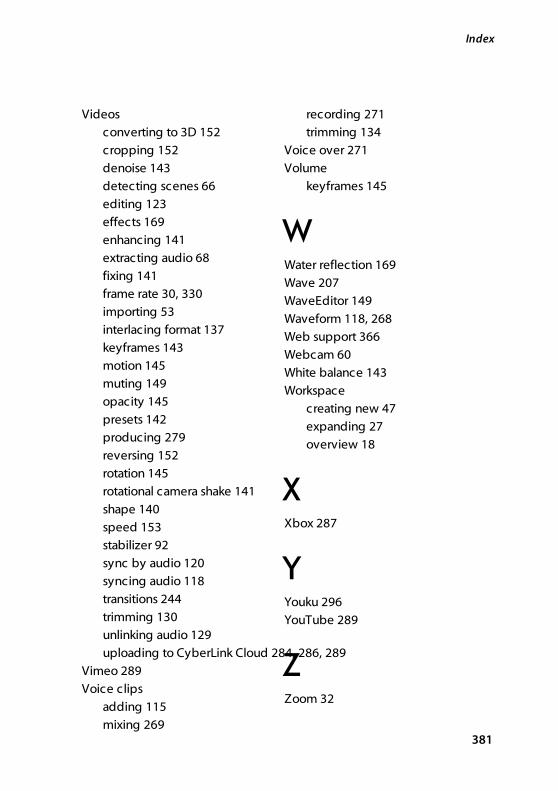
381
Index
Videos
converting to 3D 152
cropping 152
denoise 143
detecting scenes 66
editing 123
effects 169
enhancing 141
extracting audio 68
fixing 141
frame rate 30, 330
importing 53
interlacing format 137
keyframes 143
motion 145
muting 149
opacity 145
presets 142
producing 279
reversing 152
rotation 145
rotational camera shake 141
shape 140
speed 153
stabilizer 92
sync by audio 120
syncing audio 118
transitions 244
trimming 130
unlinking audio 129
uploading to CyberLink Cloud 284, 286, 289
Vimeo 289
Voice clips
adding 115
mixing 269
recording 271
trimming 134
Voice over 271
Volume
keyframes 145
WWater reflection 169
Wave 207
WaveEditor 149
Waveform 118, 268
Web support 366
Webcam 60
White balance 143
Workspace
creating new 47
expanding 27
overview 18
XXbox 287
YYouku 296
YouTube 289
ZZoom 32