Creative Garden Design
A Share-Net Resource Book
Reading-to-learn curriculum materials to support
Technology, Natural Sciences and Language learning areas
1
Acknowledgments
The Handprint resource books have been compiled by Rob O’Donoghue and Helen Fox of
the Rhodes University Environmental Education and Sustainability Unit. Lawrence Sisitka
was responsible for coordination and review, and Kim Ward for editorial review and
production for curriculum and Eco-School use. Development funding was provided by
CAPE. Cover illustrations are by Tammy Griffin.
Knowledge and activity support materials have been adapted from various sources
including the Internet, and web addresses have been provided for readers to access any
copyright materials directly.
For this particular resource book, thank you to Laura Condi, from WESSA, East London
for the idea of this school story, after seeing a number of schools successfully building
tower gardens. Thanks also to Tim Wigely, a successful practitioner in making tower
gardens, who willingly shared useful information on making tower gardens. A number of
publications were used to compile this resource book. In particular, we found most useful
Crosby’s article in the Water Wheel, titled “Food from Used Water: Making the Previously
Impossible Happen”.
Any part of this resource book may be reproduced copyright free, provided that if the materials are
produced in booklet or published form, there is acknowledgment of Share-Net.
Available from Share-Net
P O Box 394, Howick, 3290, South Africa
Tel (033) 3303931
January 2009
ISBN 978-1-919991-57-3
2
RESOURCE BOOKS The Handprint Resource Books have been designed for creative educators who are
looking for practical ideas to work with in the learning areas of the National Curriculum.
The focus is on sustainability practices that can be taken up within the perspective
that each learning area brings to environment and sustainability concerns.
The resource books are intended to provide teachers with authentic start-up materials for
change-orientated learning. The aim is to work towards re-imagining more sustainable
livelihood practices in a warming world. Each start-up story was developed as a reading-
to-learn account of environmental learning and change. Included are copies of the
knowledge resources that informed those involved in the actual learning experiences
described here. Working with local cases of learning and change has allowed us to
develop the resource books around locally relevant knowledge resources and
practical learning activities that relate to our African context. We are grateful to
teachers and Eco-School support groups who have willingly shared their learning
experiences and activities.
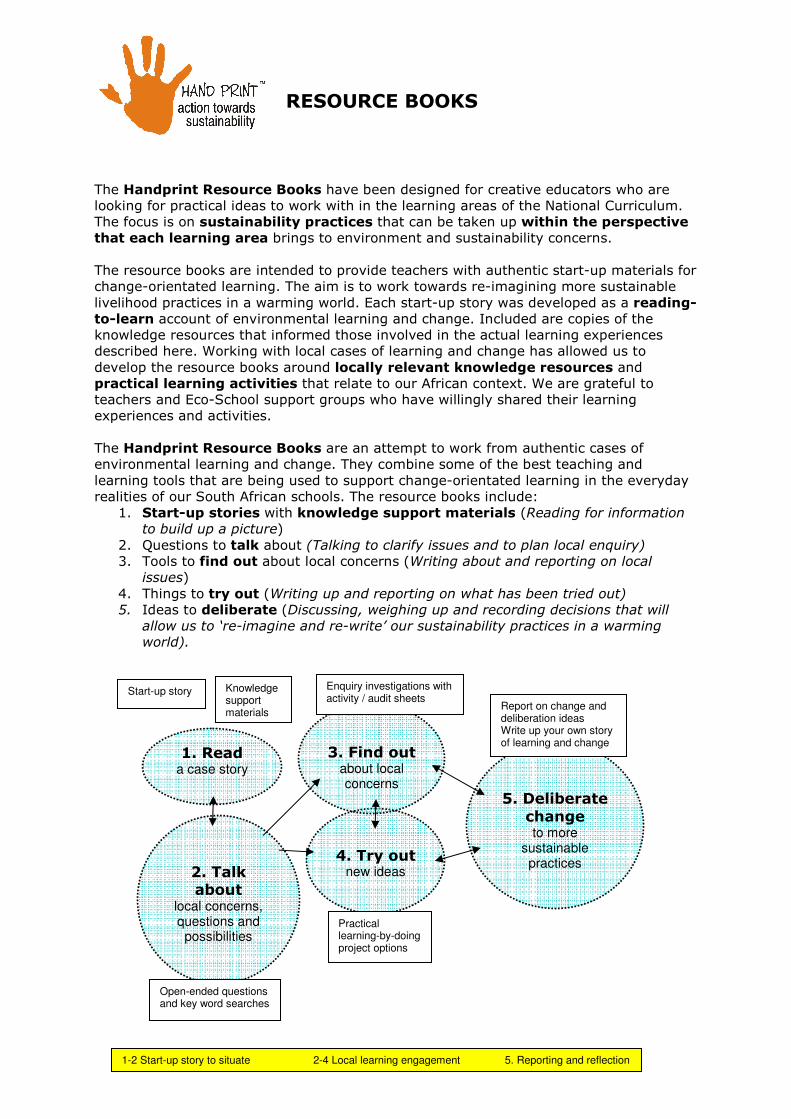
The Handprint Resource Books are an attempt to work from authentic cases of
environmental learning and change. They combine some of the best teaching and
learning tools that are being used to support change-orientated learning in the everyday
realities of our South African schools. The resource books include:
1. Start-up stories with knowledge support materials (Reading for information
to build up a picture)
2. Questions to talk about (Talking to clarify issues and to plan local enquiry)
3. Tools to find out about local concerns (Writing about and reporting on local
issues)
4. Things to try out (Writing up and reporting on what has been tried out)
5. Ideas to deliberate (Discussing, weighing up and recording decisions that will
allow us to ‘re-imagine and re-write’ our sustainability practices in a warming
world).
2. Talk about
local concerns, questions and possibilities
1. Read a case story
5. Deliberate
change to more
sustainable practices
4. Try out
new ideas
3. Find out
about local concerns
Start-up story Knowledge support materials
Open-ended questions and key word searches
Enquiry investigations with activity / audit sheets
Practical learning-by-doing project options
Report on change and deliberation ideas Write up your own story of learning and change
1-2 Start-up story to situate 2-4 Local learning engagement 5. Reporting and reflection
1
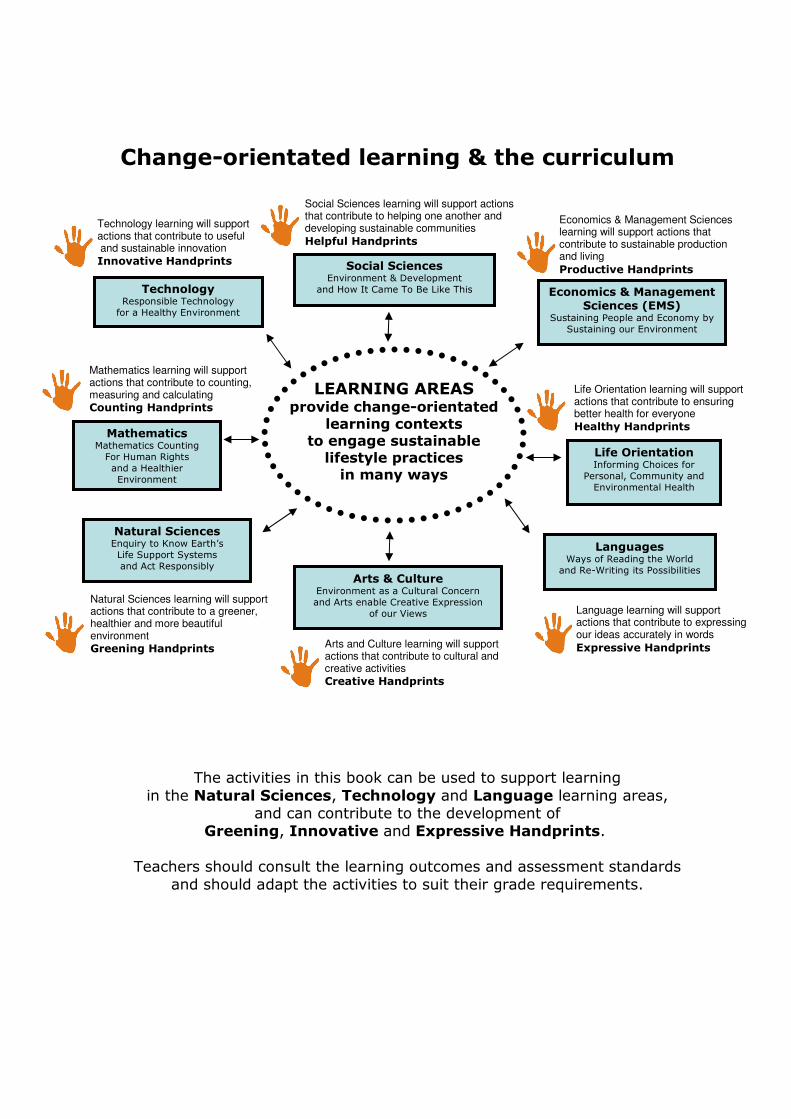
LEARNING AREAS provide change-orientated
learning contexts to engage sustainable lifestyle practices in many ways
Change-orientated learning & the curriculum
Technology Responsible Technology
for a Healthy Environment
Social Sciences Environment & Development
and How It Came To Be Like This Economics & Management Sciences (EMS)
Sustaining People and Economy by
Sustaining our Environment
Life Orientation Informing Choices for
Personal, Community and
Environmental Health
Languages Ways of Reading the World
and Re-Writing its Possibilities
Mathematics Mathematics Counting
For Human Rights
and a Healthier
Environment
Natural Sciences Enquiry to Know Earth’s
Life Support Systems
and Act Responsibly
Arts & Culture Environment as a Cultural Concern
and Arts enable Creative Expression
of our Views
Social Sciences learning will support actions that contribute to helping one another and developing sustainable communities
Helpful Handprints
Arts and Culture learning will support actions that contribute to cultural and creative activities
Creative Handprints
Economics & Management Sciences learning will support actions that contribute to sustainable production and living
Productive Handprints
Mathematics learning will support actions that contribute to counting, measuring and calculating
Counting Handprints
Technology learning will support actions that contribute to useful and sustainable innovation
Innovative Handprints
Life Orientation learning will support actions that contribute to ensuring better health for everyone
Healthy Handprints
Language learning will support actions that contribute to expressing our ideas accurately in words
Expressive Handprints
Natural Sciences learning will support actions that contribute to a greener, healthier and more beautiful environment
Greening Handprints
The activities in this book can be used to support learning
in the Natural Sciences, Technology and Language learning areas, and can contribute to the development of
Greening, Innovative and Expressive Handprints.
Teachers should consult the learning outcomes and assessment standards
and should adapt the activities to suit their grade requirements.
1
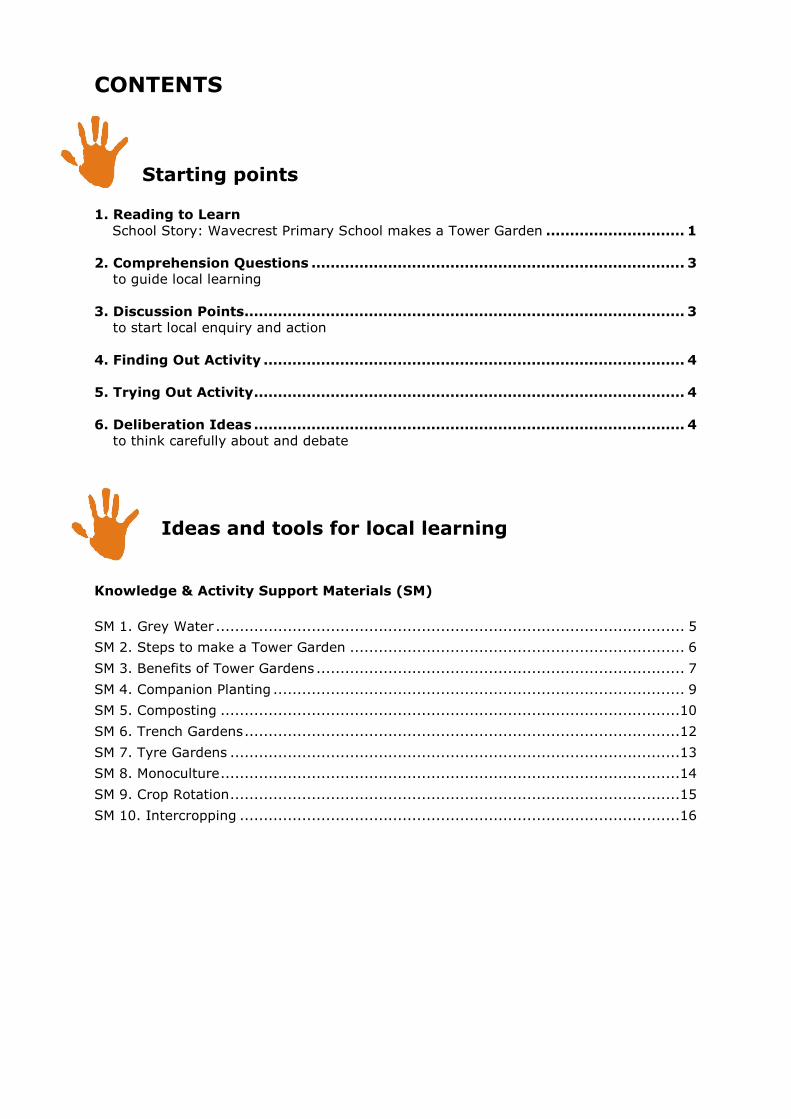
CONTENTS
Starting points
1. Reading to Learn
School Story: Wavecrest Primary School makes a Tower Garden ............................. 1
2. Comprehension Questions .............................................................................. 3
to guide local learning
3. Discussion Points............................................................................................ 3
to start local enquiry and action
4. Finding Out Activity ........................................................................................ 4
5. Trying Out Activity.......................................................................................... 4
6. Deliberation Ideas .......................................................................................... 4
to think carefully about and debate
Ideas and tools for local learning
Knowledge & Activity Support Materials (SM)
SM 1. Grey Water .................................................................................................. 5
SM 2. Steps to make a Tower Garden ...................................................................... 6
SM 3. Benefits of Tower Gardens ............................................................................. 7
SM 4. Companion Planting ...................................................................................... 9
SM 5. Composting ................................................................................................10
SM 6. Trench Gardens...........................................................................................12
SM 7. Tyre Gardens ..............................................................................................13
SM 8. Monoculture................................................................................................14
SM 9. Crop Rotation..............................................................................................15
SM 10. Intercropping ............................................................................................16
1
Wavecrest Primary School makes a Tower Garden
The story I would like to tell
began when I heard my
mother and father talking
about the cost of food. Last
year a cabbage was R5.00;
it now costs R7.00. I got
more worried when they said we could
no longer afford some of the vegetables
we have always enjoyed. My
grandmother said vegetables had tasted
good in the olden days, when her family
had a garden. But the RDP houses are so
close together that there is little garden
space for growing vegetables. Another
problem is that my sisters and I have to
collect water from the river or stand in
long queues at the only street tap. I was
worried because if my grandmother
started a garden, we would have to
collect more water.
In agricultural class a few weeks later we
learnt how vegetables are grown. Most
of them are grown as a monoculture and
pesticides are used to kill the insects
that eat the crops. It sounded
impressive, but I didn’t know what was
meant by ‘monoculture’ or ‘pesticides’.
That afternoon I used the school
computer that had Internet and did a
definition search. I learnt that
monoculture is the practice of producing
or growing one single crop over a wide
area. Vegetables are grown like this as it
is an easy way to grow plenty of cheap
food. I did a Google image search and
found many photographs of what this
looks like.
I also learnt that because the same
plants are all growing in one area it
becomes a delicious feasting ground for
cabbage worms who love to eat
cabbages, or cucumber beetles who eat
cucumbers. This is why pesticides are
used to kill these cabbage and cucumber
eating bugs. Pesticides are chemical
compounds used to control undesirable
plants and animals. They are toxic to
some degree and can kill beneficial
earthworms and organisms. They can be
a threat to people if overused or
carelessly applied. I began to wonder
whether it is a good thing to be having
cheap abundant food if it means
pesticides have to be used that could be
harmful to human health.
A couple of days later our teacher
announced that an expert in gardening
Key words
Biological control Companion planting Grey water Monoculture Pesticides
Our house
Monoculture
School story
2
was going to take our agricultural class.
What I remember most was his passion
and how excited he became when he
started talking about the benefits of a
gardening technique he had begun using
and teaching in many primary schools
similar to Wavecrest. This gardening
technique he called ‘tower gardens’
which he said works very well in areas
where space, water and heat are limiting
factors to gardening. I started listening
closely. These are the very conditions
that have been preventing my family
from gardening. He explained that tower
gardening is one of the most innovative
and user-friendly ways to use grey water
which he explained is any water that was
not used in the toilet but that is normally
thrown away. It includes water from the
sink, bath, laundry tub and kitchen sink
(SM 1).
On the chalkboard he drew up the steps
to make the tower garden the materials
that we would need. I copied them to
show to my grandmother (SM 2). He
also handed out an article that described
the benefits of tower gardens, with
details on how to make them (SM 3).
Our school had recently joined the Eco-
Schools programme. Our teacher, Mrs
Jadi, asked us if we would like to make
our own tower garden as our project. It
seemed that everyone was as excited
about tower gardens as me because we
all said “YES PLEASE!” So that’s exactly
what we did.
The next day we used our lesson to plan
how we were going to make the tower
garden, where we could collect
everything we needed, and what
vegetables we should grow together. Our
teacher introduced us to a gardening
technique called ‘companion planting’.
She gave us a sheet of information on
useful plants to grow and which ones
grow together well (SM 4). After reading
this we decided to grow onions and garlic
as they biologically control diseases and
pests. Our teacher also gave us a sheet
on the value of composting and how to
make a compost heap (SM 5). We
decided to start our own compost heap
to improve the quality of our soil.
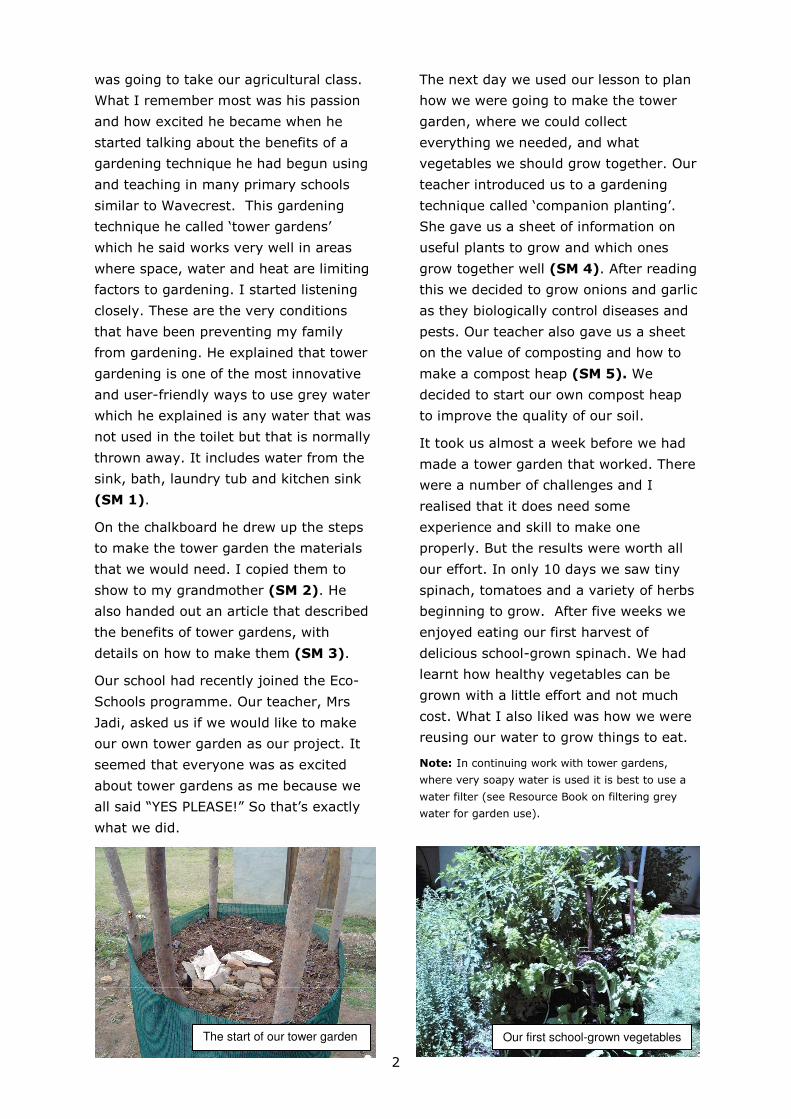
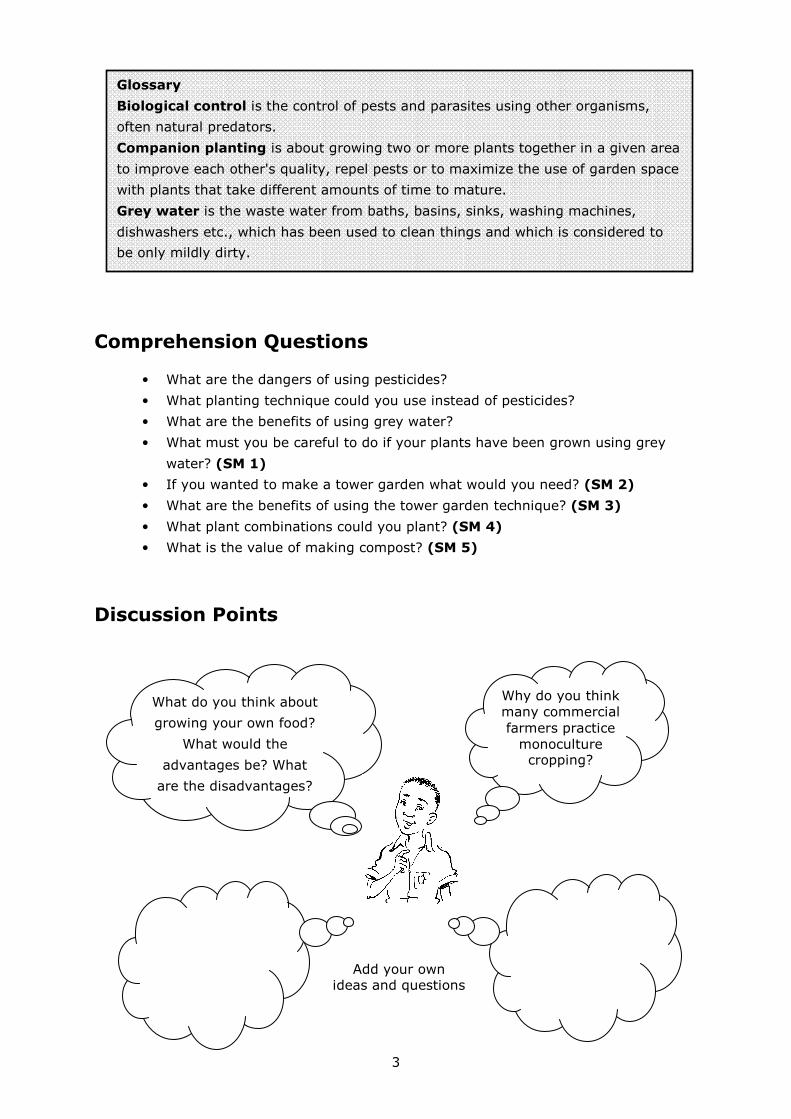
It took us almost a week before we had
made a tower garden that worked. There
were a number of challenges and I
realised that it does need some
experience and skill to make one
properly. But the results were worth all
our effort. In only 10 days we saw tiny
spinach, tomatoes and a variety of herbs
beginning to grow. After five weeks we
enjoyed eating our first harvest of
delicious school-grown spinach. We had
learnt how healthy vegetables can be
grown with a little effort and not much
cost. What I also liked was how we were
reusing our water to grow things to eat.
Note: In continuing work with tower gardens,
where very soapy water is used it is best to use a
water filter (see Resource Book on filtering grey
water for garden use).
The start of our tower garden Our first school-grown vegetables
3
Comprehension Questions
• What are the dangers of using pesticides?
• What planting technique could you use instead of pesticides?
• What are the benefits of using grey water?
• What must you be careful to do if your plants have been grown using grey
water? (SM 1)
• If you wanted to make a tower garden what would you need? (SM 2)
• What are the benefits of using the tower garden technique? (SM 3)
• What plant combinations could you plant? (SM 4)
• What is the value of making compost? (SM 5)
Discussion Points
What do you think about
growing your own food?
What would the
advantages be? What
are the disadvantages?
Why do you think
many commercial
farmers practice
monoculture cropping?
Glossary
Biological control is the control of pests and parasites using other organisms,
often natural predators.
Companion planting is about growing two or more plants together in a given area
to improve each other's quality, repel pests or to maximize the use of garden space
with plants that take different amounts of time to mature.
Grey water is the waste water from baths, basins, sinks, washing machines,
dishwashers etc., which has been used to clean things and which is considered to
be only mildly dirty.
Add your own ideas and questions
4
FINDING OUT ACTIVITY
Find out who has vegetable gardens in your neighbourhood. Conduct interviews among
local residents to find out what factors encourage and discourage people from growing
their own food.
TRYING OUT ACTIVITY
Start your own vegetable garden at school. A very useful resource to look at is called
“Setting up and running a school garden” and can be found on the web at the following
address: http://www.fao.org/docrep/009/a0218e/a0218e00.htm
DELIBERATION IDEAS
To deliberate is to think carefully about, to consider, to discuss in
a focused way, to weigh up and debate. Here are some ideas to
support this process in your learners.
• Before starting your own vegetable garden let all learners
participate in a deliberation exercise to decide which
gardening technique (tower garden, trench garden or tyre
garden) they want to use. (SM 3, SM 6, SM 7)
• Deliberate the strengths and weaknesses of monocultures (SM 8), crop rotation
(SM 9), and intercropping (SM 10) – see glossary below.
Glossary
Crop rotation is the practice of growing several different crops on the same land in
successive years or seasons. It is usually practised to replenish soil, and curb pests
and diseases.
Intercropping is the growing of two or more crops simultaneously on the same piece
of land. There are benefits because crops need different soil, water, light, and other
resources, or mutually interact with one another, to increase yields or control pests
and weeds.
Monoculture is the practice of producing or growing one single crop over a wide area.
5
GREY WATER
Domestic grey water is defined as household wastewater which does not contain faeces
(human poo) and urine in large quantities. Grey water has been used for yard irrigation
including crop production for a number of years in various overseas countries and to
some extent in South Africa. In this country, grey water is used for such purposes by
people with small and large incomes. Very few negative effects as a result of grey water
irrigation have been reported in South Africa. High and middle income householders are
motivated primarily by the need to save money, and also by wanting to conserve a
precious resource in a semi-arid land. Low income householders with water systems in
the form of street standpipes (limited data available) are also motivated by a desire to
save money. Residents in remote areas may have to carry water long distances to the
household. The benefits of using grey water for gardening in such circumstances are
clearly evident. The use of domestic grey water as a valuable additional supply/plant
nutrition resource for low income households has been supported by a number of small
intervention programmes which have been undertaken mainly in the drier western half of
South Africa. These programmes concentrate on both agricultural and non-agricultural
aspects where a broad health, family well-being and environmental theme is stressed.
The use of household grey water for irrigating vegetables and fruit trees involves some
degree of risk in terms of potential chemical damage to plants and the soil. A major
concern is the possible spread of human pathogens in the grey water. Measures which
will considerably reduce or eliminate difficulties include (a) regular leaching of the soil by
using fresh water or stored rainwater, (b) carefully applying diluted grey water
(preferably bath water) to vegetables in particular, (c) regularly inspecting the garden to
detect any early signs of crop damage - which if sustained also suggests declining soil
properties, and (d) avoiding the use of grey water contaminated with faecal matter. A
further factor of safety involves the use of stakes or a trellis network to raise certain
vegetables above the ground. It is essential to thoroughly wash produce irrigated by
means of grey water, and to place the produce in the sun for at least an hour. Crops
eaten raw should be washed again before being eaten. Crops which can be eaten raw or
cooked should rather be cooked. It is also necessary for households to maintain
acceptable standards of hygiene to prevent any ponding of grey water, odour and the
possible breeding of flies and mosquitoes. Grey water generated in the small volumes
typical of low income households is unlikely to constitute a major environmental hazard.
It is concluded that grey water can be used for yard vegetable and fruit tree cultivation
provided that several precautions are strictly observed.
Reference Adapted from Alcock, P.G. 2002. Executive summary: The possible use of grey water at low income
households for agricultural and non agricultural purposes: a South African overview. For the full
report email: [email protected]
Knowledge & activity support material 1
6
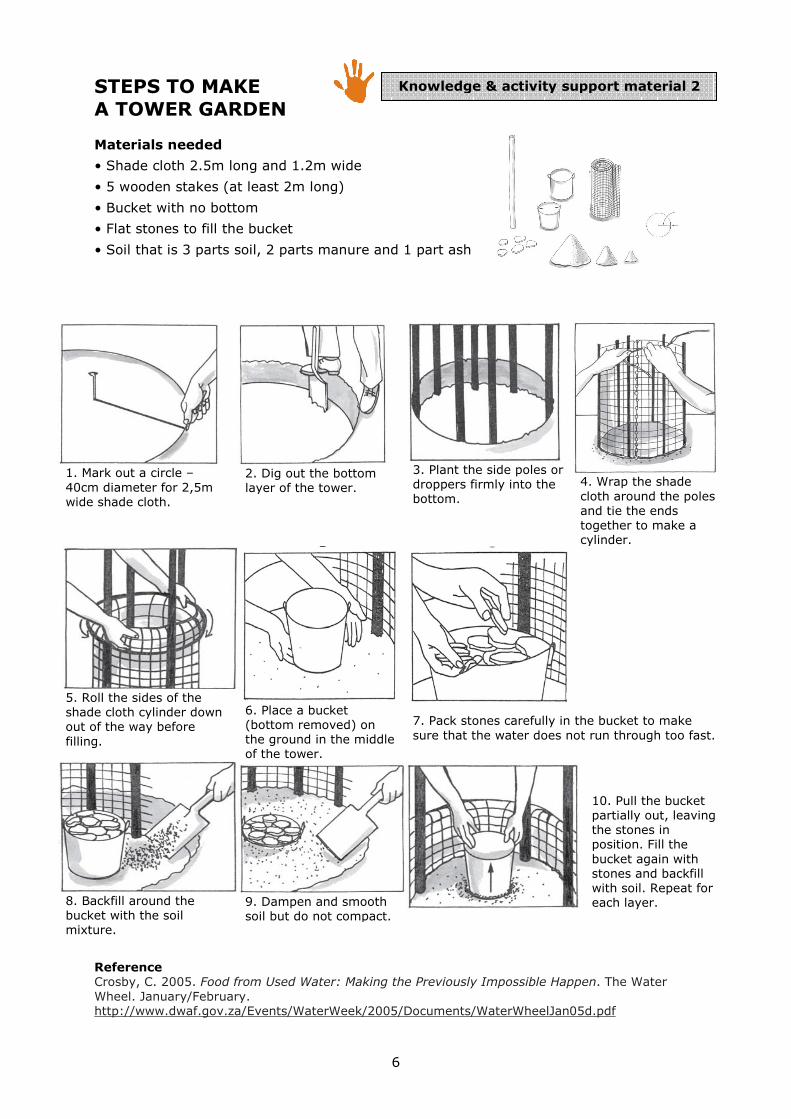
STEPS TO MAKE A TOWER GARDEN Materials needed
• Shade cloth 2.5m long and 1.2m wide
• 5 wooden stakes (at least 2m long)
• Bucket with no bottom
• Flat stones to fill the bucket
• Soil that is 3 parts soil, 2 parts manure and 1 part ash
1. Mark out a circle –
40cm diameter for 2,5m
wide shade cloth.
2. Dig out the bottom
layer of the tower.
3. Plant the side poles or
droppers firmly into the
bottom.
4. Wrap the shade
cloth around the poles
and tie the ends
together to make a
cylinder.
5. Roll the sides of the
shade cloth cylinder down
out of the way before
filling.
6. Place a bucket
(bottom removed) on
the ground in the middle
of the tower.
7. Pack stones carefully in the bucket to make
sure that the water does not run through too fast.
8. Backfill around the
bucket with the soil
mixture.
9. Dampen and smooth
soil but do not compact.
10. Pull the bucket
partially out, leaving
the stones in
position. Fill the
bucket again with
stones and backfill
with soil. Repeat for
each layer.
Reference Crosby, C. 2005. Food from Used Water: Making the Previously Impossible Happen. The Water
Wheel. January/February.
http://www.dwaf.gov.za/Events/WaterWeek/2005/Documents/WaterWheelJan05d.pdf
Knowledge & activity support material 2
7
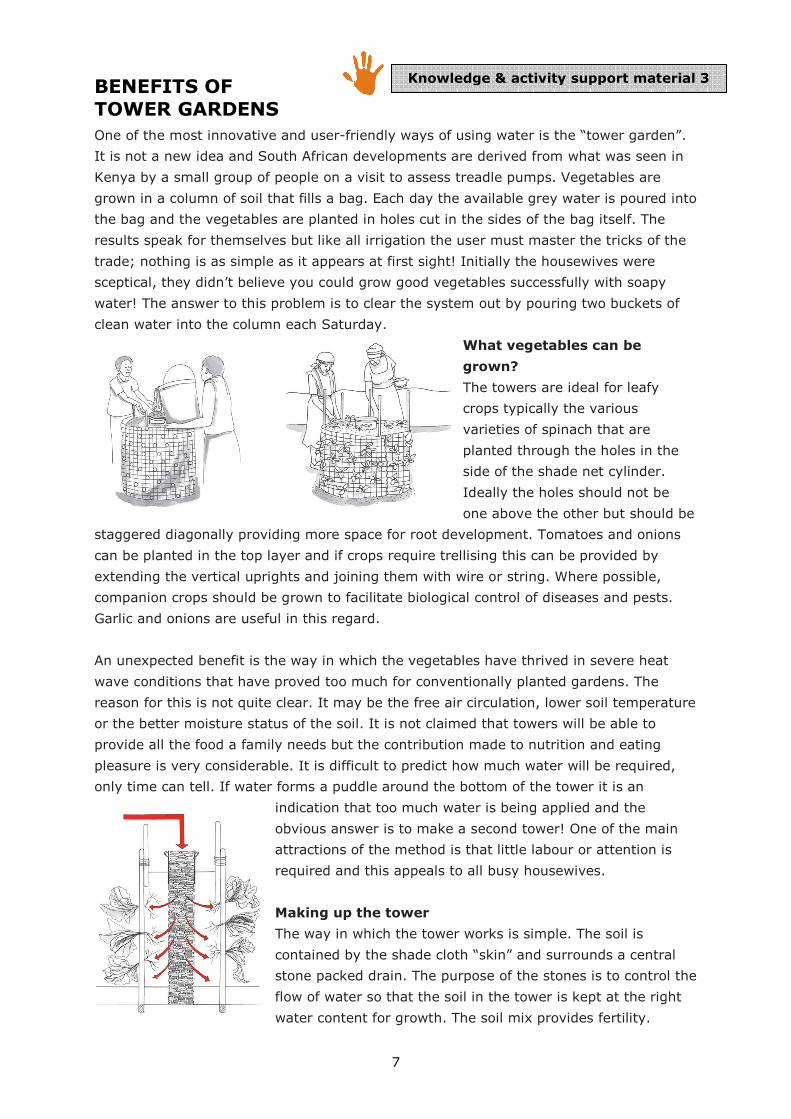
BENEFITS OF TOWER GARDENS
One of the most innovative and user-friendly ways of using water is the “tower garden”.
It is not a new idea and South African developments are derived from what was seen in
Kenya by a small group of people on a visit to assess treadle pumps. Vegetables are
grown in a column of soil that fills a bag. Each day the available grey water is poured into
the bag and the vegetables are planted in holes cut in the sides of the bag itself. The
results speak for themselves but like all irrigation the user must master the tricks of the
trade; nothing is as simple as it appears at first sight! Initially the housewives were
sceptical, they didn’t believe you could grow good vegetables successfully with soapy
water! The answer to this problem is to clear the system out by pouring two buckets of
clean water into the column each Saturday.
What vegetables can be
grown?
The towers are ideal for leafy
crops typically the various
varieties of spinach that are
planted through the holes in the
side of the shade net cylinder.
Ideally the holes should not be
one above the other but should be
staggered diagonally providing more space for root development. Tomatoes and onions
can be planted in the top layer and if crops require trellising this can be provided by
extending the vertical uprights and joining them with wire or string. Where possible,
companion crops should be grown to facilitate biological control of diseases and pests.
Garlic and onions are useful in this regard.
An unexpected benefit is the way in which the vegetables have thrived in severe heat
wave conditions that have proved too much for conventionally planted gardens. The
reason for this is not quite clear. It may be the free air circulation, lower soil temperature
or the better moisture status of the soil. It is not claimed that towers will be able to
provide all the food a family needs but the contribution made to nutrition and eating
pleasure is very considerable. It is difficult to predict how much water will be required,
only time can tell. If water forms a puddle around the bottom of the tower it is an
indication that too much water is being applied and the
obvious answer is to make a second tower! One of the main
attractions of the method is that little labour or attention is
required and this appeals to all busy housewives.
Making up the tower
The way in which the tower works is simple. The soil is
contained by the shade cloth “skin” and surrounds a central
stone packed drain. The purpose of the stones is to control the
flow of water so that the soil in the tower is kept at the right
water content for growth. The soil mix provides fertility.
Knowledge & activity support material 3

8
The upright poles are not critical. Branch trimmings or fencing standards are suitable and
where crops such as tomatoes are planted in the top layer of soil, extensions can be
wired on to provide trellising. The selection of the cloth that forms the sides of the tower
is, however, critical. All sorts of materials were tried initially in South Africa. In Kenya
nylon gunny bags were used but were found to only last about two years. In South Africa
sacking, as shown in some of the photographs, did not last the season. Black plastic
sheets deteriorated rapidly in the sunlight. Shade netting proved to be far more durable
but it was important to use nylon string or fishing line to join up the ends of the shade
netting to form a cylinder as shown in the diagram.
Filling the tower with the soil is an art. The soil should be dampened to provide cohesion
but not compacted. The water must be distributed evenly throughout the soil mass and
will not penetrate the compacted areas. Similarly the stone filling is critical. When the
first attempts were made in South Africa round stones were used and the water simply
ran down the centre of the tower and did not filter through evenly into the soil mass.
Packing flat stones or building rubble carefully, solved the problem. It is possible to use
smallish round stones provided they are arranged in a way that water is well distributed.
The soil must be fertile and retain moisture and it has been found that a mixture of six
parts of soil, four parts of manure and two parts of wood ash is satisfactory. It is likely
that people will be able to develop appropriate soil mixtures using locally available
material but experimentation will be required.
Tower gardens are still new in South Africa but have the potential to make a real
difference in areas where extreme climate and adverse circumstances have led to
household vegetable gardening being considered out of the question. The initial examples
are in the Ndonga area near Queenstown in the Eastern Cape and there are two areas in
Limpopo Province, both with hot arid conditions. One is the Nzhelele valley north of the
Soutspansberg and the other Makuleke in the north east of the province.
Further information can be obtained from Johann Adendorff at (014) 717 3336,
cell 082 8594896 and Chris Stimie at (012) 842 4103, cell 082 4694535.
The assistance given by Johann and Marie Adendorff, Chris Stimie and Gerhard Nel in
providing information and pictures is gratefully acknowledged.
Reference (Adapted from) Crosby, C. 2005. Food from Used Water: Making the Previously Impossible
Happen. The Water Wheel. January/February.
http://www.dwaf.gov.za/Events/WaterWeek/2005/Documents/WaterWheelJan05d.pdf

9
COMPANION PLANTING
Facts of companion planting
• Plants with strong odours confuse, deter, and often stop certain pests.
• Certain plants hide other plants we may not want to be detected.
• Certain plants, and especially herbs, are considered nursery plants for the good
insects providing shelter, nectar, pollen, and even dark, cool moist spots for
lacewings, lady beetles, parasitic flies, and wasps.
• Certain plants serve as a “trap” crop, which pushes insects away from other essential
plants (rue’s bad odour and disagreeable taste will keep even the most persistent of
pests away).
• Certain plants create habitats which attract more beneficial insects (such as lady
beetles, praying mantis, and ambush bugs).
Planting particular plants together can attract good insects and drive away pests. In
general, mixed crops and strong smells repel garden enemies, while flowers attract
beneficial insects. ‘Companion planting’ is a natural way to protect plants.
Flowers which attract beneficial insects are camomile, carrot, celery, clover,
coriander, daisy, dill, canna, carrot, citrus, mint, nasturtiums, parsley, parsnip,
rosemary, rue, thyme and yarrow. Let some of your vegetables flower.
Strong-smelling plants which deter pests by “putting them off the scent” are aloe
vera, artemisia, basil, calendula, camomile, catnip, chilli, chives, citronella, garlic, ginger,
horehound, lantana, lavender, leeks, lemon grass, marigold, mint, onions, tansy, thyme
and tobacco.
Plants which repel soil pests
• Garlic plants kill off some fungi in the soil.
• Some marigolds kill nematodes in the soil. Get the right kind.
• Cabbage smell repels soil pests.
Special combinations
Some say these combinations work well. Try them and see!
• Basil repels tomato hornworms.
• Nasturtiums get rid of squash bugs.
• Marigolds, mint, thyme and camomile drive away cabbage moths.
• Radishes trap beetles that attack cucumber and squash.
• Thyme and lavender deter slugs.
• Tansy and pennyroyal get rid of ants.
• Tomatoes repel asparagus beetles.
• Beans and brassicas planted together confuse each other’s pests.
Reference (Adapted from) Mettot, B. 2007. Companion Planting. In Backwoods home magazine. May/June: 11, http://www.backwoodshome.com/articles2/mettot81.html
Knowledge & activity support material 4
10
COMPOSTING
Definition: the aerobic decomposition of biodegradable organic matter, to produce
compost.
How a compost pile works
Composting uses nature's own recycling system. When leaves drop from a tree, they
decay into soft black humus over time, without any help from people. Anything that once
lived will eventually decompose. Composting is based on this natural process and begins
with the thousands of micro-organisms which live naturally in soil. They feed on a moist
heap of organic waste materials, generating considerable heat in the process. Other
groups of "decomposer" organisms go to work as the temperature rises, an ever-
changing workforce of bacteria, fungi, and insects. When the temperature drops, turning
or stirring the pile gives the decomposers more oxygen and the heat builds again,
helping to kill harmful bacteria. When all the easily decomposed material has been
consumed, the temperature drops for the last time and earthworms and ants may move
in, signalling that the compost is ready to feed new plants with its "recycled" nutrients.
Finished compost has the distinctive fresh smell of newly-turned soil and won't heat up
again no matter how often you turn air into the pile. The ideal result of the composting
process is crumbly, dark, soil-like humus.
Many different materials are suitable for composting organisms. Some materials contain
high amounts of carbon in the form of cellulose which the bacteria need for their energy
(brown materials). Other materials contain nitrogen in the form of protein, which provide
nutrients for the energy exchanges (green materials). Suitable brown materials with
relatively high carbon content include:
• Dry, straw-type material, such as cereal straws
• Autumn leaves
• Sawdust and wood chips
• Paper and cardboard (such as corrugated cardboard or newsprint with soy-based
inks).
Green materials with relatively high nitrogen content include:
• Green plant material (fresh or wilted) such as crop residues, hay, grass clippings,
weeds
• Manure of poultry and herbivorous animals such as horses, cows and llamas
• Fruit and vegetable trimmings.
Making compost
Start with a layer of sticks for drainage, followed with layers of grass, leaves, manure,
and soil, alternating brown and green materials. Chop up big leaves. Add a final layer of
soil, make a hole in the middle to let air in, water the heap and cover with grass or with a
cloth to keep it damp. After about five days the heap will heat up as bacteria work to
break it down. Keep the compost damp. After about six weeks, turn the compost, and
then every few weeks. After three months, test it. If it is dark, crumbly, light and moist,
it is ready to use.
Knowledge & activity support material 5
11
Benefits of compost
- Reducing garbage: Up to 30% of the garbage we throw out each week can go in
the compost pile. Cutting domestic waste generation means a longer life for landfill
sites and better environmental management for the entire community.
- Helping plants grow: Your garden and house plants can never get too much
compost. It gradually releases a variety of nutrients just when they're required by the
growing plants. Insects and diseases don't seem to do as much damage where the
soil is enriched with plenty of decayed organic matter.
- Building up the soil: Plenty of compost added to the soil will act like a sponge,
soaking up water when it rains and releasing it in dry spells. It improves the structure
of both sand and clay soils, protecting them against drought and erosion.
Can I compost this?
Ashes Maybe From untreated wood or paper, yes, in small amounts; but not from
barbecues, plywood, coloured or glossy paper
Banana
Skins
Yes Decompose rapidly; can help to activate a slow compost; loaded with plant
nutrients
Cardboard Yes Shred, soak, and mix with "greens"; but try first to reuse or recycle it
Citrus Fruits Yes Shred rinds; bury in compost to discourage fruit flies
Coffee
Grounds
Yes Good earthworm food; use directly on many plants; compost shredded
filters, too
Corn Cobs Yes Shred; adds both fibre and nutrients to compost; good mulch; slow to break
down
Dairy
Products
No Fats seal off air from compost; odours attract pests
Dishwater Maybe If water doesn't contain grease or chemical cleansers, use it to wet pile
Eggshells Yes Dry and crush first; good earthworm food; slow to break down; help
neutralize acidity; as mulch, may discourage slugs
Fabrics Maybe Small scraps of wool, cotton, felt and silk; not synthetic fibres or blends
Feathers Yes Keep somewhat wetter than usual; extremely high in nitrogen
Grass
Clippings
Yes Available and valuable; mix well to avoid clumps; leave some clippings to
feed lawn
Hair Yes Both human and pet hair; keep quite damp
Hay / Straw Yes Very good fibre, nutrients usually low
Leaves Yes Shred and soak; add both nutrients and fibre; tend to be slightly acidic
Manure Yes Cow, horse, pig, rabbit, poultry -- the fresher the better -- helps any
compost
Meat and
Bones
No Odours and pests are problems; but dried, ground bonemeal is fine source
of nitrogen
Soil Yes Adds decomposer soil organisms; scatter lightly to avoid compacting
Nutshells Maybe Crush delicate shells like peanuts; heavier shells are better used as
decorative mulch
Pet Wastes No Risk of pathogens and parasites; use only barnyard manure (horse, cow,
sheep, etc.)
Seafood
Shells
Yes Crush or grind very finely; break down very slowly; reduce acidity; good
mulch
Seaweed Yes Rinse off salt so it won't contaminate soil; great fertilizer
Tea Leaves Yes High in nitrogen; can be applied directly to some plants; compost tea bags
Toadstools Yes Decompose quickly; excellent source of many minerals
References Adapted from
• Department of the Environment. New Brunswick, Canada. Backyard Magic: The Composting
Handbook. http://www.gnb.ca/0009/0372/0003/0001-e.asp
• Setting up and Running a School Garden. A Manual for Teachers, Parents and
Communities. Food and Agriculture Organization of the United Nations Rome.
http://www.fao.org/docrep/009/a0218e/a0218e00.htm
12
TRENCH GARDENS
In 1955 this technique was developed in Kwazulu-Natal. It is the perfect way to feed and
improve the quality of the soil, use organic waste material, and grow vegetables
organically on a relatively small patch of ground.
1. Dig a trench, the size of a door, 50 cm deep, separating subsoil and topsoil.
2. Half fill with organic material i.e. vegetable and fruit peelings, leaves, grass, maize
stalks and cobs, bones, feathers, newspapers, egg shells and manure.
3. When half-full, water well and cover with 15 cm of subsoil and then topsoil is mixed
with manure above that - do not trample!
4. Cover the soil with 6cm of mulch. Mulching means putting dry organic material
(grass, straw, leaves) about 6cm deep around the base of plants. The mulch keeps
moisture in the soil, keeps the soil surface cool and soft, prevents weeds, and
gradually decays like compost to enrich the soil. It is particularly useful where the
soil is poor or there is very little water, in hot climates and hot seasons. The best
mulching material is light-coloured and reflects the light. Use grass and weeds
before they produce seeds, otherwise they will be provide competition.
5. Build a low fence of sticks around your bed to protect it from animals and the wind.
Plant beans against this fence.
6. Plant your seedlings or seeds [according to the season].
7. Separate the mulch with a stick and plant the seedlings or seeds across the bed.
Plant a good variety of vegetables in alternate rows. If you plant marigolds in some
rows you will have fewer insect pests. If the sun is scorching them build a light
frame of twigs and dry grass over the bed for shade. Remove the grass bit by bit as
the seedlings grow stronger.
8. Water regularly and lightly with a punched tin can, keeping the soil surface damp
under the mulch.
9. When the seedlings reach 5cm tuck the mulch up against the plants.
10. Start a new trench each month, for 4 months. This will ensure a regular supply of
fresh vegetables all year round.
11. Such a trench garden can be planted continuously for 5 years but it is wise to plant
different types of plants in rows by rotation for best results. For example: ROOTS
(e.g. beetroot, turnips, carrot) then LEAVES (e.g. cabbage, lettuce, onions,
spinach) then LEGUMES (beans, peas). This will require you to keep good records
of where you planted your last crop.
12. Practice intercropping (growing different crops near to one another) as it helps to
utilize and conserve the soil and protect plants. A multi-layered garden, with plants
at different heights, is a form of intercropping that makes the most of garden space
and sunshine. Putting plants with different needs together cuts competition. In
particular, try growing tall plants next to small ones, e.g. maize with cabbage,
fruit trees next to vegetables; deep-rooted plants next to shallow-rooted
plants, e.g. maize with sorghum and pigeon pea; climbing plants next to
ground plants, e.g. passionfruit, beans or corn with lettuce, onions, or carrots;
broad leaves next to narrow leaves, e.g. cabbage with carrots.
Reference Adapted from Opie, F. Be Prepared for Life. Activity Kit Three: Food for Life.
http://www.scouting.org.za/bp4life/kit3-1.html
Knowledge & activity support material 6
13
TYRE GARDENS
The best thing about tyre gardens is that you can set them up and move them just about
anywhere. You can garden on a cement patio, on flat rock, on a rooftop, on a steep
hillside, even on the roots under a tree. All you will need to start are several old tyres,
some plastic sheets, soil or growing mix, and plant seeds. A tyre garden is easy to make.
You can cut off the top rim of the tyre for a wider space to garden or you can garden in
the tyre without cutting it at all. To cut the rim, lay a tyre flat on the ground. The rim is
the whole top section from the side to the hole in the centre. Notice that the top rim and
bottom rim are exactly the same size. With a knife or machete, cut off the top rim. You
can prevent the knife from sticking by pouring a small trickle of water on the rubber just
behind the knife.
Next, place a piece of plastic such as a garbage bag inside the tyre over the bottom rim.
The plastic should be large enough so that it covers the bottom of the tyre and 3 or 4 cm
stand up along the walls. Now turn the top rim that has been cut off upside down and
press it in against the bottom rim. It will fit tightly and hold the plastic in place. If you
have not cut the rim, use a few stones or gravel to hold the plastic in place on the
bottom of the tyre.
The plastic sheet in the bottom of the tyre helps
your garden in two ways. It holds water at the
bottom of your garden so your soil does not
completely dry out. Any extra water can seep
between the plastic and the side of the tyre, then
out through the bottom. You may want to cut one
or two extra small holes in the bottom rim for extra drainage. Plastic also prevents tree
roots from growing up into the tyre garden. Now fill the tyre with good soil or compost.
Make sure the soil is pushed well up against the walls of the tyre. Now it is time to sow
your seeds. If you are gardening on a cement patio or rooftop, you can place your tyre
gardens on top of sticks, large stones, bricks, or cement blocks. This will let air blow
beneath them and keep the patio or roof dry between waterings.
Most vegetables and herbs grow well in tyre gardens as long as you water them
regularly. People around the world have successfully grown carrots, onions, cabbages,
spinach, tomatoes, lettuce and peppers. Certain crops do not grow well in tyres. Trees
are just too tall to grow properly. In the hottest, dry months, plants that need a lot of
water such as sweet potatoes may not survive, even if you are watering them properly.
Plants with big leaves that spread over a large area such as pumpkins probably need
more soil than a tyre garden can hold, so you may want to avoid planting them. Some
very tall plants, 1.5 metres or taller, may be hard to grow because they might tend to
lean over and break. However, you could use sticks to support them. But there are no
rules for tyre gardening. You can experiment with many types of plants.
Every six months, or after two crops have been planted, replace the soil mix in the tyre
completely with fresh compost and manure. It is possible to use the soil mix longer than
this, but other tyre gardeners have found that crop production goes down.
Reference
PACE: The Pan African Conservation Education Project. Growing Vegetables in the City: Action
sheet 76. www.paceproject.net
Knowledge & activity support material 7
14
MONOCULTURE
Monoculture is the practice of producing or growing one single crop over a wide area.
The term is also applied in several fields.
The term is mostly used in agriculture and describes the practice of planting crops with
the same patterns of growth resulting from genetic similarity. Examples include wheat
fields or apple orchards or grape vineyards. These cultivars have uniform growing
requirements and habits resulting in greater yields on less land because planting,
maintenance (including pest control) and harvesting can be standardized. This
standardization results in less waste and loss from inefficient harvesting and planting. It
also is beneficial because a crop can be tailor planted for a location that has special
problems - like soil salt or drought or a short growing season.
Monoculture produces great yields by utilizing plants' abilities to maximize growth under
less pressure from other species and more uniform plant structure. Uniform cultivars are
able to better use available light and space, but also have a greater drain on soil
nutrients. In the last 40 years modern practices such as monoculture planting and the
use of synthesized fertilizers have greatly reduced the amount of land needed to produce
much higher yielding crops. The success of monoculture cropping has produced a
worldwide surplus of food stuffs that has depressed crop prices that farms receive.
Catastrophic crop failure
The dependence on monoculture crops can lead to large scale failures when the single
genetic variant or cultivar becomes susceptible to a pathogen or change in weather
patterns. The Great Irish Famine (1845-1849) was caused by susceptibility of the potato
to Phytophthora infestans. The wine industry in Europe was devastated by susceptibility
to Phylloxera during the late 19th century. Each crop then had to be replaced by a new
cultivar imported from another country that had used a different genetic variant that was
not susceptible to the pathogen.
Reference Wikipedia, the free encyclopedia. 2008. Monoculture. http://en.wikipedia.org/wiki/Monoculture
Knowledge & activity support material 8
15
CROP ROTATION
Crop rotation is one of the oldest and most effective cultural control strategies. It means
the planned order of specific crops planted on the same field. It also means that the
succeeding crop belongs to a different family to the previous one. The planned rotation
may vary from two or three years or could be a longer period.
Some insect pests and disease-causing organisms are host specific. For example, rice
stem borer feeds mostly on rice. If you don't rotate rice with other crops belonging to a
different family, the problem continues as food is always available to the pest. However,
if you plant a legume as the next crop, then corn, then beans the insect pest will likely
die due to a lack of food.
Advantages of crop rotation
1. Prevents soil depletion/maintains soil fertility and reduces soil erosion
2. Controls insect/mite pests and reduces the pests' build-up
3. Reduces reliance on synthetic chemicals
4. Prevents diseases
5. Helps control weeds
Useful tips in planning crop rotation
1. Know the family of your crop to make sure that you plant a crop that belongs to
a different family the next season (see table below).
2. Make a list of the crops you want to grow and plant them in the right order.
3. Grow legumes before grains or cereals.
4. Always keep farm records.
Crop groups
Family Common names
Allium Chive, garlic, leek, onion, shallot
Cucurbit (Gourd
family)
Bitter gourd, bottle gourd, chayote, cucumber, ivy gourd, luffa gourd, melons,
pumpkins, snake gourd, squash, wax gourd
Crucifer
(Brassica)
Bok choy (petchay), broccoli, brussel sprouts, cabbage, Chinese cabbage,
cauliflower, collard, kale, kohlrabi, mustard, radish, turnip, watercress
Legume Common beans, black bean, broad bean (Fava), clover, cowpea, garbanzo,
hyacinth bean, kidney bean, Lima bean, lintel, mungbean, peanut, pigeon
pea, pinto bean, runner bean, snap pea, snow pea, soybean, string bean
Aster Lettuce, artichoke
Solanaceous Potato, tomato, pepper, eggplant
Grains/cereals Corn, rice, sorghum, wheat, oat, barley, millet
Carrot family Carrot, celery, dill, parsnip, parsley
Root crops Cassava, sweet potato, taro, yam
Reference PAN Germany, OISAT. Intercropping.
http://www.oisat.org/control_methods/cultural practices/intercropping.html
Knowledge & activity support material 9
16
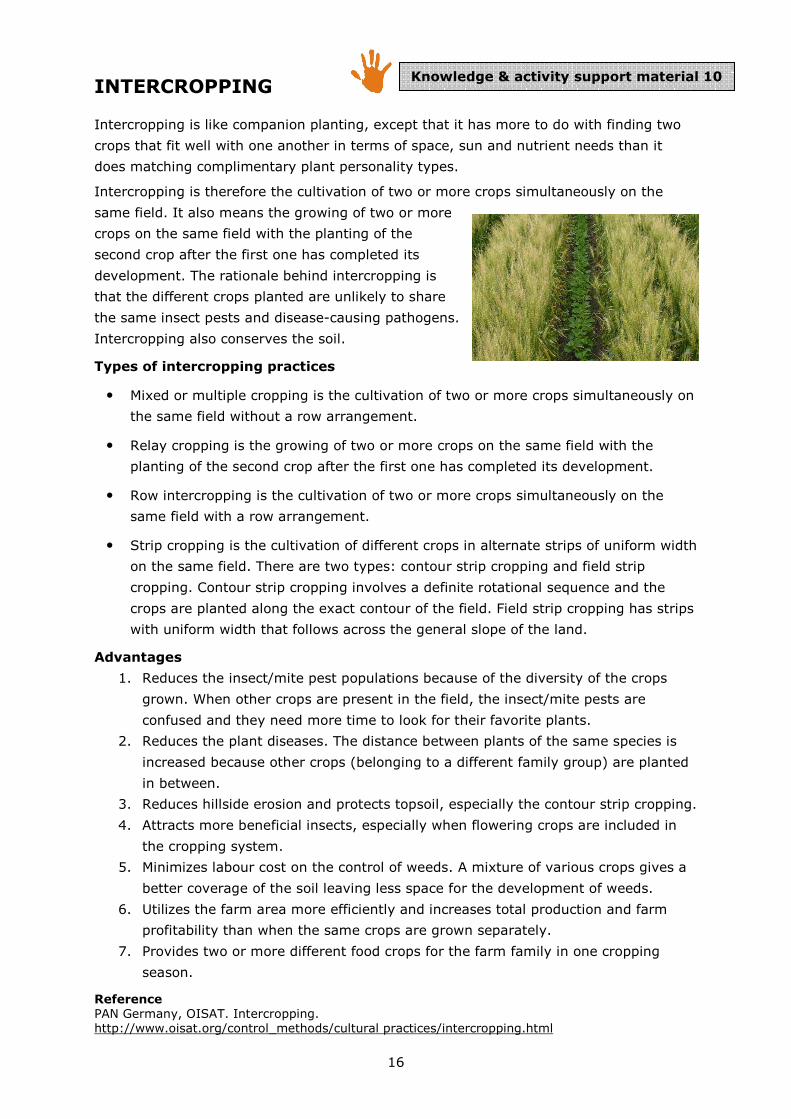
INTERCROPPING
Intercropping is like companion planting, except that it has more to do with finding two
crops that fit well with one another in terms of space, sun and nutrient needs than it
does matching complimentary plant personality types.
Intercropping is therefore the cultivation of two or more crops simultaneously on the
same field. It also means the growing of two or more
crops on the same field with the planting of the
second crop after the first one has completed its
development. The rationale behind intercropping is
that the different crops planted are unlikely to share
the same insect pests and disease-causing pathogens.
Intercropping also conserves the soil.
Types of intercropping practices
• Mixed or multiple cropping is the cultivation of two or more crops simultaneously on
the same field without a row arrangement.
• Relay cropping is the growing of two or more crops on the same field with the
planting of the second crop after the first one has completed its development.
• Row intercropping is the cultivation of two or more crops simultaneously on the
same field with a row arrangement.
• Strip cropping is the cultivation of different crops in alternate strips of uniform width
on the same field. There are two types: contour strip cropping and field strip
cropping. Contour strip cropping involves a definite rotational sequence and the
crops are planted along the exact contour of the field. Field strip cropping has strips
with uniform width that follows across the general slope of the land.
Advantages
1. Reduces the insect/mite pest populations because of the diversity of the crops
grown. When other crops are present in the field, the insect/mite pests are
confused and they need more time to look for their favorite plants.
2. Reduces the plant diseases. The distance between plants of the same species is
increased because other crops (belonging to a different family group) are planted
in between.
3. Reduces hillside erosion and protects topsoil, especially the contour strip cropping.
4. Attracts more beneficial insects, especially when flowering crops are included in
the cropping system.
5. Minimizes labour cost on the control of weeds. A mixture of various crops gives a
better coverage of the soil leaving less space for the development of weeds.
6. Utilizes the farm area more efficiently and increases total production and farm
profitability than when the same crops are grown separately.
7. Provides two or more different food crops for the farm family in one cropping
season.
Reference PAN Germany, OISAT. Intercropping.
http://www.oisat.org/control_methods/cultural practices/intercropping.html
Knowledge & activity support material 10

17
NOTES
18
TITLE
LEARNING AREAS COVERED (BROADLY) 1. Reusing Shower and Bath
Water
Language Natural Sciences Technology
2. The Buzz on Honey Bee Economics
Language Natural Sciences Social Sciences Technology Economics & Management Sciences
3. Have you Sequestrated your Carbon?
Language Natural Sciences Technology Mathematics
4. Did you Grow your Greens? Language Natural Sciences Social Sciences Life Orientation Arts & Culture
5. Clearing Invasive Weeds
Language Natural Sciences Technology
6. The Secret of a Spring Language Natural Sciences Social Sciences Life Orientation Technology Mathematics
7. The Secret of the
Disappearing River
Language Life Orientation Social Sciences
Economics & Management Sciences
8. Creative Garden Design
Language Natural Sciences Technology
9. Recycling, Waste Reduction
and Creative Re-use
Language Social Sciences Life Orientation
Arts & Culture Technology Economics & Management Sciences
10. Worming Waste
Language Natural Sciences Technology
11. Growing Mother-tree Seedlings
Language Natural Sciences Technology
12. Rooibos: a Biodiversity Economy at Risk
Language Natural Sciences Economics & Management Sciences
Many more Handprint resource books are in the planning stages. These resource books and many others for teacher educators and teachers are available electronically in pdf format on www.tessafrica.net. The Handprint resource books
can also be downloaded from www.handsforchange.org.
The adaptive use of these resource books for educational purposes is encouraged. Anyone wishing to develop their own resource or adapt one, can contact Share-Net [email protected] for a version in Microsoft Word.
Handprint resource books available from Share-Net

19
Increase your handprint. Decrease your footprint.Increase your handprint. Decrease your footprint.Increase your handprint. Decrease your footprint.Increase your handprint. Decrease your footprint.
Human impact on the Earth has tripled since 1961 and our human footprint is now 25% bigger than the planet can support. In other words we are using 25% more natural resources and services than the planet can create and provide. The ‘Ecological Footprint’ is one way to measure what area of land and water the whole human population requires to produce the resources it consumes and to absorb its wastes, and we now need 25% more area than is available on the whole planet. This means that the planet is simply being damaged beyond what it can repair, and this cannot continue without causing very serious threats to all life, including our own. Education is a key way to achieve the changes we need to live in a manner that the planet can support. Environment and Sustainability Education (an environmentally focussed approach to Education for Sustainable Development – ESD) is a move away from seeing education just as a means of producing the skills to carry on doing what we are doing. It develops the abilities needed to address the big issues affecting the planet, and builds the capacity in communities to make important decisions about their future. Environment and Sustainability Education calls for action. The Handprint is one measure of Environment and Sustainability Education action. The idea is to decrease the human footprint and to make the world more sustainable. The Handprint is a new approach or ‘tool’ being developed by the Centre for Environment Education (CEE), in Ahmedabad India, with many partners across the globe. The purpose of the Handprint is to help measure positive action for change at different levels. We all need to decide what we can do at the individual, community, national and global level in order to increase our Handprint, and decrease our Footprint.
“Through our actions, we add substance and vigour to the quest for sustainable living.”
The Ahmedabad Declaration 2007: A Call to Action, 4th International Conference for Environmental Education
This handprint is of a 10-year-old girl, Srija, from a school in Hyderabad, India, who was involved in a project taking action for sustainability. Her handprint can be taken as a symbol for positive action.
wwwwwwwwwwww....hhhhaaaannnnddddssssffffoooorrrrcccchhhhaaaannnnggggeeee....oooorrrrgggg