http://www.instructables.com/id/Simple-CNC-Machine/
Food Living Outside Play Technology Workshop
Simple CNC Machineby hackitbuildit on January 26, 2012
Table of Contents
Simple CNC Machine . . . . . . . . . . . . . . . . . . . . . . . . . . . . . . . . . . . . . . . . . . . . . . . . . . . . . . . . . . . . . . . . . . . . . . . . . . . . . . . . . . . . . . . . . . . . . . . . . . . . . . . . . . 1
Intro: Simple CNC Machine . . . . . . . . . . . . . . . . . . . . . . . . . . . . . . . . . . . . . . . . . . . . . . . . . . . . . . . . . . . . . . . . . . . . . . . . . . . . . . . . . . . . . . . . . . . . . . . . . . . 2
Step 1: What you need . . . . . . . . . . . . . . . . . . . . . . . . . . . . . . . . . . . . . . . . . . . . . . . . . . . . . . . . . . . . . . . . . . . . . . . . . . . . . . . . . . . . . . . . . . . . . . . . . . . . . . 4
Step 2: X Axis . . . . . . . . . . . . . . . . . . . . . . . . . . . . . . . . . . . . . . . . . . . . . . . . . . . . . . . . . . . . . . . . . . . . . . . . . . . . . . . . . . . . . . . . . . . . . . . . . . . . . . . . . . . . . 5
Step 3: Y Axis . . . . . . . . . . . . . . . . . . . . . . . . . . . . . . . . . . . . . . . . . . . . . . . . . . . . . . . . . . . . . . . . . . . . . . . . . . . . . . . . . . . . . . . . . . . . . . . . . . . . . . . . . . . . . 7
Step 4: Z Axis & Tool . . . . . . . . . . . . . . . . . . . . . . . . . . . . . . . . . . . . . . . . . . . . . . . . . . . . . . . . . . . . . . . . . . . . . . . . . . . . . . . . . . . . . . . . . . . . . . . . . . . . . . . . 8
Step 5: Motors & Wire Up . . . . . . . . . . . . . . . . . . . . . . . . . . . . . . . . . . . . . . . . . . . . . . . . . . . . . . . . . . . . . . . . . . . . . . . . . . . . . . . . . . . . . . . . . . . . . . . . . . . . 10
Step 6: EMC2 & Google setchup to G-gode . . . . . . . . . . . . . . . . . . . . . . . . . . . . . . . . . . . . . . . . . . . . . . . . . . . . . . . . . . . . . . . . . . . . . . . . . . . . . . . . . . . . . . . 11
Step 7: Test it Use it . . . . . . . . . . . . . . . . . . . . . . . . . . . . . . . . . . . . . . . . . . . . . . . . . . . . . . . . . . . . . . . . . . . . . . . . . . . . . . . . . . . . . . . . . . . . . . . . . . . . . . . . 13
Related Instructables . . . . . . . . . . . . . . . . . . . . . . . . . . . . . . . . . . . . . . . . . . . . . . . . . . . . . . . . . . . . . . . . . . . . . . . . . . . . . . . . . . . . . . . . . . . . . . . . . . . . . . . . 13

http://www.instructables.com/id/Simple-CNC-Machine/
Author:hackitbuildit author's websiteI love to build stuff, some good stuff, some bad stuff and some useful stuff. Youtube Channel: www.youtube.com/koffers Twitter:http://twitter.com/hackitbuildit
Intro: Simple CNC MachineWhat I'm going to try and show you in this instructable is how to build a simple CNC machine.
Now when I say Simple I mean you only require basic tools & materials to build the machine.
The machine is made out of Sawn Timber, drawer sliders, nema 17 Stepper motors, a TB6560 Driver Controller Board and a Dremel Trio as the milling/cutting tool
I started about year ago trying to build a CNC machine, I tried a few different designs but i struggled to get the building of them right. This was mainly down to thecomplexity of some of the designs and the lack of equipment I needed to build them and the money that they cost. So I went back to the drawing board and tried to builda machine that was easy to make and used readily available parts to keep the price down. The machine that i've produce seems a little ruff around the edges but theresults of the stuff made have been ok
The Video Gives a quick overview of the Machine
Image Notes1. Dremel Tro2. A-Axis (Forward and Backwards)3. Z-Axis ( Up & Down)4. Y-Axis ( Left & Right)5. Stepper motor Nema176. Threaded Rod7. Drawer Slider8. Cactus (Very Sharp)9. Support Strut

http://www.instructables.com/id/Simple-CNC-Machine/
Image Notes1. A-Axis2. Threaded Rod
Image Notes1. Y-Aixs2. Threaded Rod
Image Notes1. Z-Axis2. Wire for stepper Motor.3. Y-Axis Stepper Motor
Image Notes1. Dremel Tro2. Poloymorth
Image Notes1. Google SketchUp
Image Notes1. G-Code Converter

http://www.instructables.com/id/Simple-CNC-Machine/
Image Notes1. Stepper motor Controller - TB6560 Driver Controller Board 1/16Microstep
Image Notes1. Pulley and Belts2. Poloymorth motor mount3. A-Axis Motor
Step 1: What you needCNC Driver and stepper motor kitBall Bearing Full Extension Drawer SlideA computer to run Linux EMC2 software (the computer will need a parallel port)A copy of Linux EMC2 (which is fully functional CNC control software)WoodThreaded RodsNutsBearingsA routing tool (I've used a Dremel trio)PulleysPolymorph
A miter SawA hot glue gunDrillScrews and Screw driver
What you need video
Image Notes1. Controller board2. Power Supply
Image Notes1. A-Axis2. Threaded Rod
http://www.instructables.com/id/Simple-CNC-Machine/
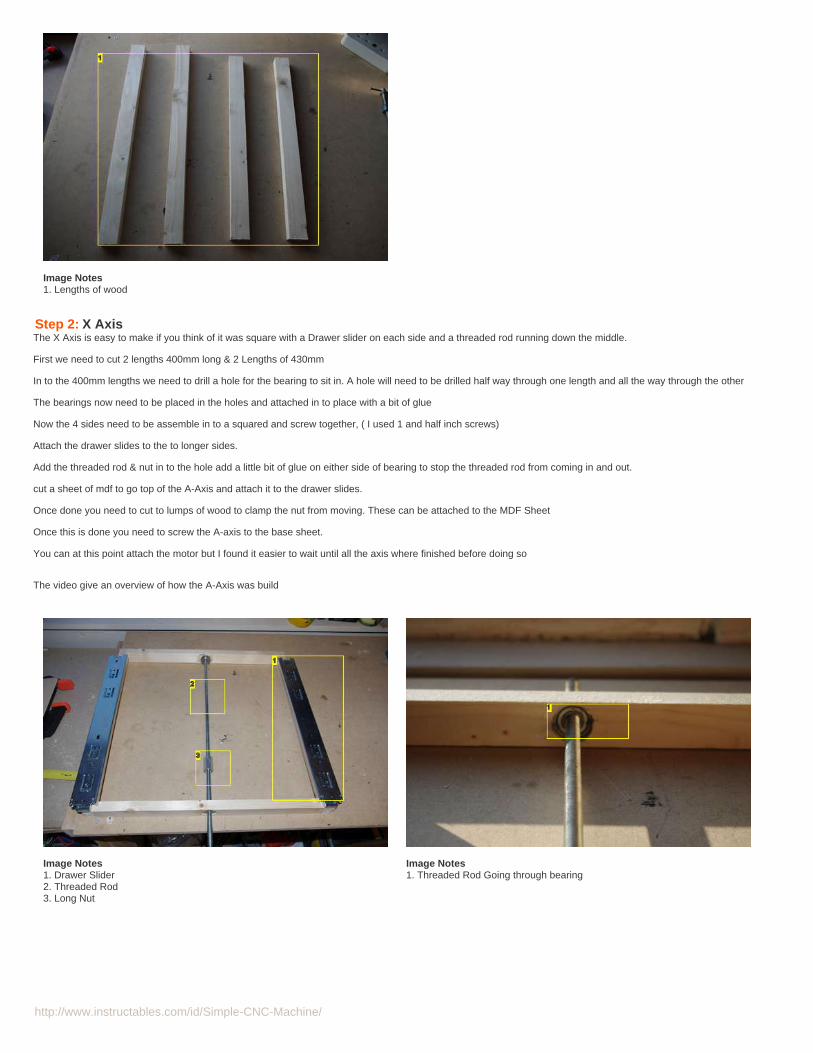
Image Notes1. Lengths of wood
Step 2: X AxisThe X Axis is easy to make if you think of it was square with a Drawer slider on each side and a threaded rod running down the middle.
First we need to cut 2 lengths 400mm long & 2 Lengths of 430mm
In to the 400mm lengths we need to drill a hole for the bearing to sit in. A hole will need to be drilled half way through one length and all the way through the other
The bearings now need to be placed in the holes and attached in to place with a bit of glue
Now the 4 sides need to be assemble in to a squared and screw together, ( I used 1 and half inch screws)
Attach the drawer slides to the to longer sides.
Add the threaded rod & nut in to the hole add a little bit of glue on either side of bearing to stop the threaded rod from coming in and out.
cut a sheet of mdf to go top of the A-Axis and attach it to the drawer slides.
Once done you need to cut to lumps of wood to clamp the nut from moving. These can be attached to the MDF Sheet
Once this is done you need to screw the A-axis to the base sheet.
You can at this point attach the motor but I found it easier to wait until all the axis where finished before doing so
The video give an overview of how the A-Axis was build
Image Notes1. Drawer Slider2. Threaded Rod3. Long Nut
Image Notes1. Threaded Rod Going through bearing

http://www.instructables.com/id/Simple-CNC-Machine/
Image Notes1. Lump of wood Clamping Long Nut
Image Notes1. Making the A-axis Square
Image Notes1. Holes for bearings
Image Notes1. Lengths of wood Image Notes
1. A-Axis2. Threaded Rod

http://www.instructables.com/id/Simple-CNC-Machine/
Image Notes1. Pulley and Belts2. Poloymorth motor mount3. A-Axis Motor
Step 3: Y AxisFirst we need to cut some lengths of wood
2 x 400mm1 x 500mm4 x 300mm
The 2 lengths of 400mm long need holes drilling 100mm from the top for bearings (like the A-Axis)
The Drawer Sliders now need attaching to the 500mm length
After this is done the 2 400mm lengths need screwing to the 500mm length
Attach 2 of the 300mm lengths to one side of the drawer sliders and the other 2 lengths of 300mm on the other side of the drawer sliders.
Add the threaded rod & 2 nuts. Add a little bit of glue on either side of the bearing to stop the threaded rod from coming in and out.
Cut 4 lengths of wood to go on the top and bottom of the nut attach these to the 300mm lengths which are attached to the drawer sliders. Glue the nut into place
Cut 2 more lengths to join the bottom of the 300mm lengths to each other
This is a quick video of overview of the Y-Axis Build
Image Notes1. Y-Aixs2. Threaded Rod
http://www.instructables.com/id/Simple-CNC-Machine/
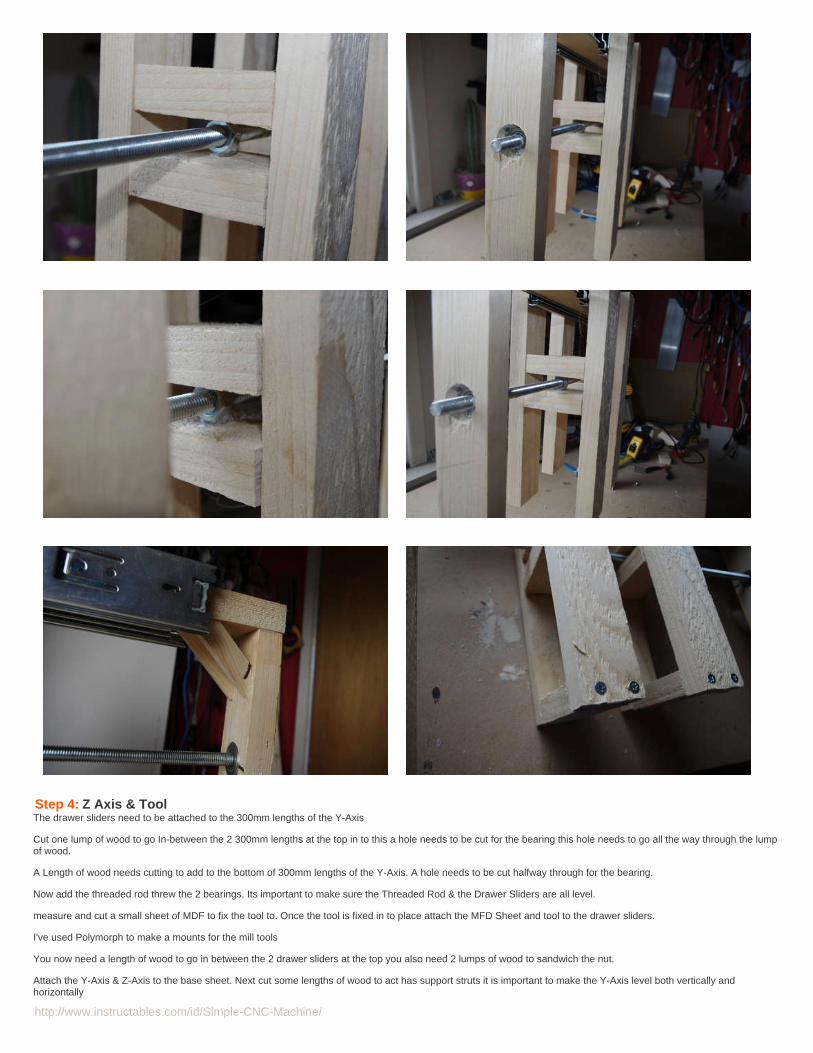
Step 4: Z Axis & ToolThe drawer sliders need to be attached to the 300mm lengths of the Y-Axis
Cut one lump of wood to go In-between the 2 300mm lengths at the top in to this a hole needs to be cut for the bearing this hole needs to go all the way through the lumpof wood.
A Length of wood needs cutting to add to the bottom of 300mm lengths of the Y-Axis. A hole needs to be cut halfway through for the bearing.
Now add the threaded rod threw the 2 bearings. Its important to make sure the Threaded Rod & the Drawer Sliders are all level.
measure and cut a small sheet of MDF to fix the tool to. Once the tool is fixed in to place attach the MFD Sheet and tool to the drawer sliders.
I've used Polymorph to make a mounts for the mill tools
You now need a length of wood to go in between the 2 drawer sliders at the top you also need 2 lumps of wood to sandwich the nut.
Attach the Y-Axis & Z-Axis to the base sheet. Next cut some lengths of wood to act has support struts it is important to make the Y-Axis level both vertically andhorizontally
http://www.instructables.com/id/Simple-CNC-Machine/
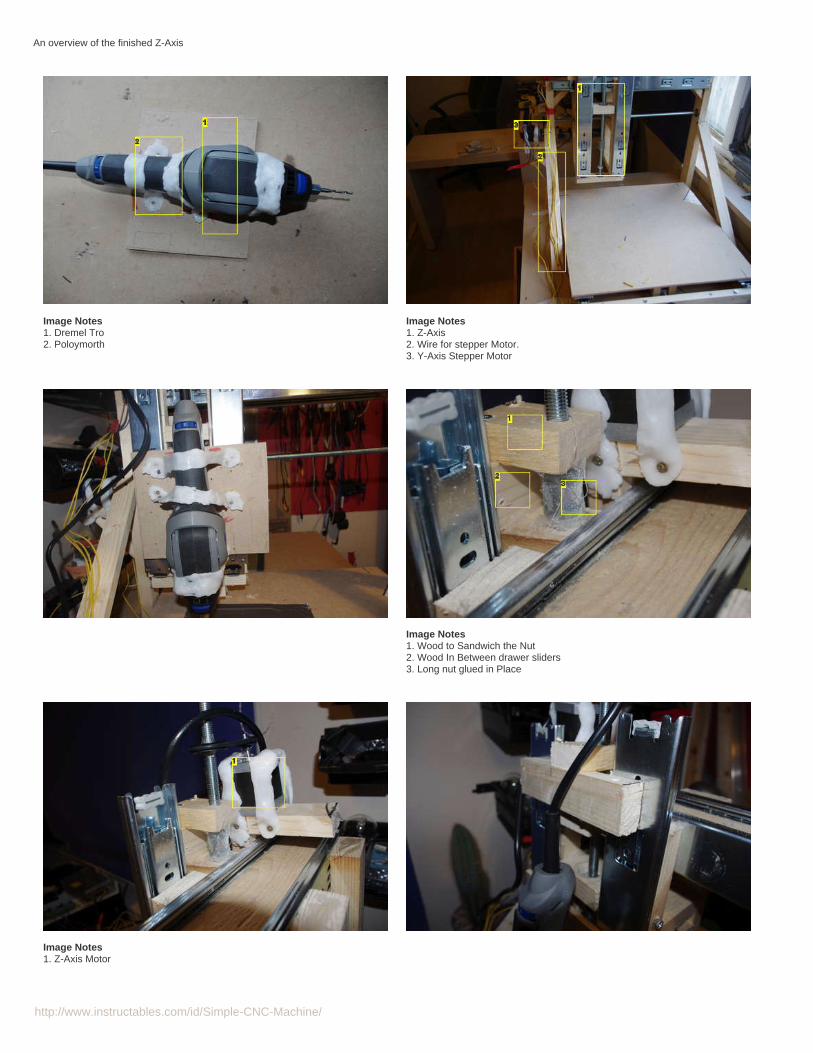
An overview of the finished Z-Axis
Image Notes1. Dremel Tro2. Poloymorth
Image Notes1. Z-Axis2. Wire for stepper Motor.3. Y-Axis Stepper Motor
Image Notes1. Wood to Sandwich the Nut2. Wood In Between drawer sliders3. Long nut glued in Place
Image Notes1. Z-Axis Motor

http://www.instructables.com/id/Simple-CNC-Machine/
Image Notes1. Bottom on Z-Aixs2. Top of the Z-Axis
Step 5: Motors & Wire UpThe motors now need attaching to the machine. I've used Polymorph to make motor clips to keep the motors in place.
The pulleys need placing on to the threaded rods & the motors and then they need glueing in to place.
Once the motors are in place add extra wire so that the machine can move without the wire getting caught
Image Notes1. Controller board2. Power Supply
Image Notes1. Electrical Tape
Image Notes1. Z-Axis

http://www.instructables.com/id/Simple-CNC-Machine/
2. Wire for stepper Motor.3. Y-Axis Stepper Motor
Image Notes1. Motor wire
Image Notes1. Y-Axis Motor2. Pully and belt
Image Notes1. Pulley and Belts2. Poloymorth motor mount3. A-Axis Motor
Image Notes1. Z-Axis Motor
Step 6: EMC2 & Google setchup to G-godeThis is a quick intro on what software to use to make the CNC machine do something.
The software used to produce the DXF and g-code works on Windows Linux Or Mac.
The Software used to operate the stepper motors is EMC2 which, is a turnkey linux distro with EMC2 CNC application set up and ready to go.
You will need to read the getting started guide for EMC2 to help you with setting up the software.
EMC2 reads G-code which is then used to control the machine. To produce G-code, first you need to draw what you want to cut out in a package like Google SketchUpor AutoCad 123.
The program needs to be able to export a file type called DXF, If you are using google SketchUp then you'll need to install a this plugin
Once you have done the drawing (make sure you make it the right size) export it to DXF (select lines)
Now that its been exported you need to turn in in to g-code, this can be done using a program called "dxf2gcode"
All you need to do is open the DXF file in dxf2gcode and export it to g-code. The file that has been produced can now be opened on EMC2

http://www.instructables.com/id/Simple-CNC-Machine/
Image Notes1. Google SketchUp
Image Notes1. G-Code Converter
http://www.instructables.com/id/Simple-CNC-Machine/
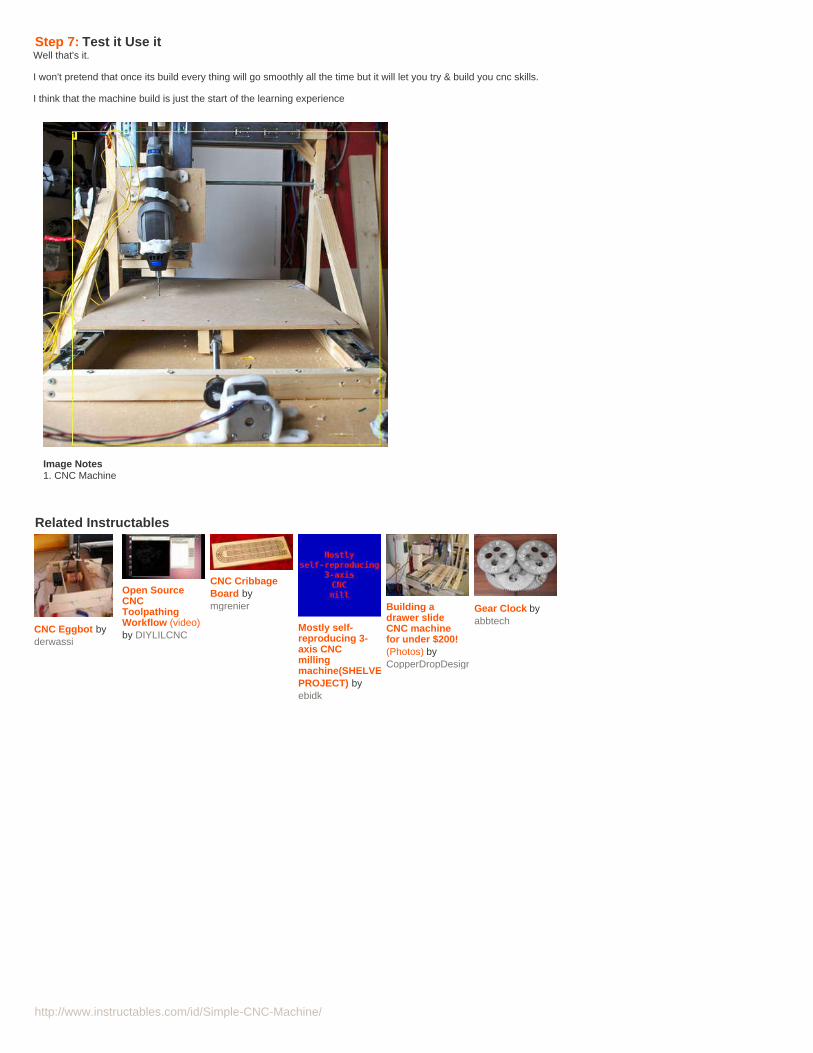
Step 7: Test it Use itWell that's it.
I won't pretend that once its build every thing will go smoothly all the time but it will let you try & build you cnc skills.
I think that the machine build is just the start of the learning experience
Image Notes1. CNC Machine
Related Instructables
CNC Eggbot byderwassi
Open SourceCNCToolpathingWorkflow (video)by DIYLILCNC
CNC CribbageBoard bymgrenier
Mostly self-reproducing 3-axis CNCmillingmachine(SHELVEDPROJECT) byebidk
Building adrawer slideCNC machinefor under $200!(Photos) byCopperDropDesigns
Gear Clock byabbtech