www.philips.com/welcome HD 3075 HD 3077 e subject to change without notice ©2013 Koninklijke Philips N.V. All rights reserved. HD3075_HD3077_UM_V2.0 1 a b c d e f g h i j k l HD3075 HD3077 Rice cooking राइस कुकिंग การหงหาว Nấu cơm Apa dalam kotak ini Using the fuzzy rice cooker फज़ी चावल कूकर का उपयोग การใชหมอหงขาวระบบ Fuzzy Sử dụng nồi cơm điện Menggunakan pemasak nasi fuzzy What’s in the box बॉक्स में क्या है ภายในกลองมอะไรบาง Trong hộp có gì Apa dalam kotak ini Clay pot rice cooking मिट्टी के बर्तन में चावल कुकिंग การหงขาวในหมอดน Nấu cơm bằng nồi đất Memasak nasi merendidih Making soup with rice चावल के साथ सूप बनाना การหงขาวตม Nấu xúp với cơm Memasak sup dengan nasi Cooking congee and making soup कॉन्जी कुकिंग और सूप बनाना การตมโจกและการทำซป Nấu cháo và nấu xúp Memasak bubur dan membuat sup Baking cake केक बेक करना วธอบเคก Nướng bánh Membakar kek Steaming स्टीमिंग การนงอาหาร Hấp thức ăn Mengukus Reheating पुनः गर्म करना การอนรอน Hâm nó ng Panas semula Setting up child lock चाइल्ड लॉक सेट करें การตงคาระบบปองกนเดก Cài đặt chế độ khóa trẻ em. Preset time for delayed cooking लंबित कुकिंग के लिए समय प्रिसेट करें. Cài đặt sẵn thời gian để nấu chậm Masa dipraset bagi masakan tertangguh การตงเวลาสำหรบการท ำอาหารไวลวงหนา Menyediakan kunci keselamatan kanak-kanak User manual HD 3031 HD 3038 Safety leaflet HD 3031 HD 3038 Warranty HD 3031 HD 3038 Standard cook Ultra quick cook Small portion rice Reheat Rice with soup Steam Claypot rice Congee Soup Cake m n o p q r s t u Standard cook Ultra quick cook Small portion rice Reheat Rice with soup Steam Claypot rice Congee Soup Standard cook Ultra quick cook Small portion rice Rice with soup Claypot rice Congee Soup Cake EN Congratulations on your purchase, and welcome to Philips! To fully benefit from the support that Philips offers, register your product at www.Philips.com/welcome. 1 What’s in the box Fuzzy rice cooker main unit Steam basket Rice scoop Soup ladle Measuring cup User manual Safety Warranty card Overview a Sealing ring g Power plug b Detachable steam vent cap h Heating element c Inner pot i Cooker handle d Lid release button j Water level indications e Control pane k Detachable inner lid f Main body l Outer lid Controls overview m Keep warm/ Off button r Child lock n Hour button s Hour button o Minute button t Cooking time button p Cooking time button u Cooking functions q Preset time button Specifications Model Capacity HD3075 4.0L HD3077 5.0L Before first use 1 Take out all the accessories from the inner pot. Remove the sheet between the inner pot and the heating element. 2 Clean the parts of the rice cooker thoroughly before using the rice cooker for the first time ( see chapter ‘Cleaning’ ). Note • Make sure all parts are completely dry before you start using the rice cooker. Note • Each cup of uncooked rice normally gives 2 bowls of cooked rice. Do not exceed the quantities indicated on the inside of the inner pot. 1 cup of rice is approximately 180ml. • Use a separate container to wash the rice to avoid damaging the non-stick coating of the inner pot. • The level marked inside the inner pot is just an indication. You can always adjust the water level for different types of rice and your own preference. • Make sure that the outside of the inner pot is dry and clean, and that there is no foreign residue on the heating element or the magnetic switch. Note • Do not exceed the volume indicated nor exceed the maximum water level indicated in the inner pot, as this may cause the rice cooker to overflow. • After you press the menu button ( ) and left it in idle for 15 seconds, your rice cooker will sound and return to waiting mode automatically. • You can press the off button ( ) or unplug the rice cooker to turn off the keep warm function or when not in use. Rice cooking There are three rice cooking functions for HD3075 and HD3077. Cooking function Estimated cooking time for 8 cups of rice ( HD3075 ) and 10 cups of rice ( HD3077 ) Normal rice cooking ( Standard cook ) 45 minutes Express rice cooking ( Ultra quick cook ) 40 minutes Small amount of rice cooking ( Small portion rice ) 35 minutes Clay pot rice cooking Cooking function Estimated cooking time for 2 - 4 cups of rice ( HD3075 and HD3077 ) Clay pot rice cooking ( Claypot rice ) 1 hour 20 minutes Cooking congee and making soup Cooking function Estimated cooking time Cooking congee ( Congee ) 1 hour ( for 1 cups of rice for both HD3075 and HD3077 ) Making soup ( Soup ) 1 hour Making soup with rice Cooking function Estimated cooking time for 8 cups of rice ( HD3075 ) and 10 cups of rice ( HD3077 ) Soup with rice ( Rice with soup ) 35 minutes Tip • Press the minute button ( ) once to increase the timer by 1 minute. Press and hold the minute button ( ) to fast forward the timer by 10 minutes.. • You can select the cooking time between 25 to 59 minutes. Baking cake Cooking function Estimated cooking time Baking cake ( Cake ) 45 minutes Note • After you press the menu button ( ) and left it in idle for 15 seconds, your rice cooker will sound and return to waiting mode automatically. • Use a kitchen glove or a cloth, as the inner pot will be very hot. • You can press the off button ( ) or unplug the rice cooker to turn off the keep warm function or when not in use. Tip • Press the minute button ( ) once to increase the timer by 1 minute. Press and hold the minute button ( ) to fast forward the timer by 10 minutes. Steaming Cooking function Estimated cooking time Steaming ( Steam ) 20 minutes Note • Use a kitchen glove or a cloth, as the plate and steam basket will be very hot. • Do not exceed the volume indicated nor exceed the maximum water level indicated in the inner pot, as this may cause the rice cooker to overflow. • You can adjust the water level as needed. • After you press the menu button ( ) and left it in idle for 15 seconds, your rice cooker will sound and return to waiting mode automatically. • You can press the off button ( ) or unplug the rice cooker to turn off the keep warm function or when not in use. Tip • Press the minute button ( ) once to increase the timer by 1 minute. Press and hold the minute button ( ) to fast forward in adjusting the minute unit. • You can select the cooking time between 10 to 40 minutes. Reheating Cooking function Estimated cooking time Reheating ( Reheat ) 25 minutes Note • After you press the menu button ( ) and left it in idle for 15 seconds, your rice cooker will sound and return to waiting mode automatically. • You can press the off button ( ) or unplug the rice cooker to turn off the keep warm function or when not in use. Tip • Press the minute button ( ) once to increase the timer by 1 minute. Press and hold the minute button ( ) to fast forward in adjusting the minute unit. • You can select the cooking time between 25 to 59 minutes. Preset time for delayed cooking You can preset the delayed cooking time for different cooking functions. The preset timer is available up to 24 hours, and is not applicable to cake baking, steaming and reheating functions. Note • Do not exceed the volume indicated nor exceed the maximum water level indicated in the inner pot, as this may cause the rice cooker to overflow. • After you press the menu button ( ) and left it in idle for 15 seconds, your rice cooker will sound and return to waiting mode automatically. • Once the rice cooker enters preset mode, the preset time button will not response. • The default preset time is 4 hours. • Press the hour button ( ) once to increase the timer by 1 hour. Press and hold the minute button ( ) to fast forward the timer by 10 minutes. Tip • You can press the off button ( ) or unplug the rice cooker to turn off the keep warm function or when not in use. Setting up child lock To protect your child from starting the rice cooker, you may set up the child lock function. 2 Cleaning and Maintenance Note • Uplug the rice cooker before starting to clean it. • Wait until the rice cooker has cooled down sufficiently before cleaning it. Interior Inside of the outer lid and the main body: • Wipe with wrung out and damp cloth. • Make sure to remove all the food residues stuck to the rice cooker. Heating element: • Wipe with wrung out and damp cloth. • Remove food residues with wrung out and damp cloth or toothpicks. Exterior Surface of the outer lid and outside of the main body: • Wipe with a cloth damped with soap water. • ONLY use soft and dry cloth to wipe the control panel. • Make sure to remove all the food residues around the control buttons. Accessories Rice scoop, soup ladle, inner pot, power cord holder, scoop holder, steam basket, steam vent cap, and inner lid: • Soak in hot water and clean with sponge. 3 Environment Do not throw away the appliance with normal household waste at the end of its life, but hand it in at an official collection point for recycling. By doing this, you can help to preserve the environment. 4 Guarantee and service If you need service or information, or if you have a problem, visit the Philips website at www.philips.com or contact the Philips Customer Care Center in your country. You can find its phone number in the worldwide guarantee leaflet. If there is no Customer Care Center in your country, go to your local Philips dealer. 5 Troubleshooting If you encounter problems when using this rice cooker, check the following points before requesting service. If you cannot solve the problem, contact the Philips Consumer Care Center in your country. Problem Solution The lights on the buttons does not go on. There is a connection problem. Check if the power cord is connected to the cooker properly and if the plug is inserted firmly into the power outlet. The light is defective. Take the appliance to your Philips dealer or a service center authorized by Philips. The display does not function. The rice cooker is not connected to the power supply. If there is no power supply, the power failure backup function does not work and the display does not function. The battery for the display runs out of power. Take the appliance to your Philips dealer or a service center authorized by Philips to have the battery replaced. The rice is not cooked. There is not enough water. Add water according to the scale on the inside of the inner pot. You did not press the cooking button ( ). Make sure that there is no foreign residue on the heating element and the outside of the inner pot before switching the rice cooker on. The heating element is damaged, or the inner pot is deformed. Take the cooker to your Philips dealer or a service center authorized by Philips. The rice is not well cooked. Add more water. The cooker does not switch to keep warm mode automatically. The temperature control is defective. Take the appliance to your Philips dealer or a service center authorized by Philips. The rice is scorched. You have not rinse the rice properly. Rinse the rice until the water runs clear. Water spills out of the rice cooker during cooking. • Make sure that you add water to the level indicated on the scale inside the inner pot that corresponds to the number of cups of rice used. • Make sure the water does not exceed the next level on the scale, as this may cause the appliance to overflow during cooking. The cake result is too hard. Please use cake mix and follow the instructions provided in the user manual. I cannot get to the desired cooking function. Press the menu button ( ) repeatedly to select the desired menu as shown by the LED indicator. Rice smells bad after cooking Clean the inner pot with some washing detergent and warm water. After cooking, make sure the steam vent cap, inner lid and inner pot is cleaned thoroughly. Error message ( E1, E2, E3, or E4 ) appears on the display. There has been a power failure during cooking. Take the appliance to your Philips dealer or a service center authorized by Philips. ZH-CN 感谢您的惠顾,欢迎光临飞利浦! 为了您能充分享受飞利浦提供的支持,请在 www.Philips.com/ welcome 上注册您的产品。 1 包装盒内物品 模糊控制电饭煲主装置 蒸篮 饭勺 汤勺 量杯 用户手册 安全指南 保修卡 概述 a 密封圈 g 电源插头 b 可分离式蒸汽孔帽 h 加热元件 c 内胆 i 电饭煲把手 d 锅盖打开键 j 水位指示 e 控制面板 k 可拆除内盖 f 煲身 l 外盖 控件概述 m 菜单按钮 r 烹饪按钮 n 烹饪功能 s 小时按钮 o 分钟按钮 t 烹饪时间按钮 p 预设时间按钮 u 儿童锁 q 保温/关闭按钮 规格 型号 容量 HD3075 4.0 升 HD3077 5.0 升 首次使用之前 1 从内锅中取出所有附件。 取出内锅和加热元件之间的隔板。 2 首次使用前,请彻底清洁电饭煲的部件(请参阅“清洁”一 章)。 注 • 开始使用之前,确保所有电饭煲部件均已完全干燥。 注 • 每杯生米通常可以煮 2 碗米饭。 不要超过锅内标示的量。 1 杯米约 为 180 毫升。 • 为避免损伤内锅的不粘涂层,应使用另外的容器淘米, • 内锅的水位标记只是一个参考。 您始终可以根据米的品种及个人喜 好调整水位。 • 请确保内锅的外表面是洁净且干燥的,并且没有其他杂物黏附在加热 元件及限温器上。 注 • 请勿超过内锅中标注的量,也不要超过最高水位标示,否则可能导 致电饭煲溢出。 • 按菜单按钮 ( ) 后,将其闲置 15 秒钟,电饭煲将发出声音并自 动返回等待模式。 • 不用时,您可以按关闭按钮 ( ) 或拔掉电饭煲的电源插头以关 闭保温功能。 煮饭 HD3075 和 HD3077 有三种煮饭功能。 烹饪功能 8 杯米 ( HD3075 ) 和 10 杯米 ( HD3077 ) 的估计烹饪时间 正常煮饭 ( Standard cook ) 45 分钟 快速煮饭 ( Ultra quick cook ) 40 分钟 烹饪少量米饭 ( Small portion rice ) 35 分钟 煲仔饭 烹饪功能 2 - 4 杯米的估计烹饪时间(HD3075 和 HD3077) 煲仔饭 ( Claypot rice ) 1 小时 20 分钟 煮粥和做汤 烹饪功能 估计的烹饪时间 煮粥 ( Congee ) 1 小时(1 杯米,适用于 HD3075 和 HD3077) 做汤 ( Soup ) 1 小时 制作泡饭 烹饪功能 8 杯米 ( HD3075 ) 和 10 杯米 ( HD3077 ) 的 估计烹饪时间 泡饭 ( Rice with soup ) 35 分钟 提示 • 按一次分钟按钮 ( ) 可使计时器增加 1 分钟。 按住分钟 按钮 ( ) 可使计时器快进 10 分钟。 • 您可以选择 25 至 59 分钟之间的烹饪时间。 烘焙蛋糕 烹饪功能 估计的烹饪时间 烘焙蛋糕 ( Cake ) 45 分钟 注 • 按菜单按钮 ( ) 后,将其闲置 15 秒钟,电饭煲将发出声音并自 动返回等待模式。 • 请使用厨房手套或棉布,因为内锅会非常烫。 • 不用时,您可以按关闭按钮 ( ) 或拔掉电饭煲的电源插头以关 闭保温功能。 提示 • 按一次分钟按钮 ( ) 可使计时器增加 1 分钟。 按住分钟 按钮 ( ) 可使计时器快进 10 分钟。 蒸食品 烹饪功能 估计的烹饪时间 蒸食品 ( Steam ) 20 分钟 注 • 请使用厨房手套或棉布,因为盘子和蒸篮会非常烫。 • 请勿超过内锅中标注的量,也不要超过最高水位标示,否则可能导 致电饭煲溢出。 • 您可以根据需要调整水位。 • 按菜单按钮 ( ) 后,将其闲置 15 秒钟,电饭煲将发出声音并自 动返回等待模式。 • 不用时,您可以按关闭按钮 ( ) 或拔掉电饭煲的电源插头以关 闭保温功能。 提示 • 按一次分钟按钮 ( ) 可使计时器增加 1 分钟。 按住分钟 按钮 ( ) 可以快进方式调整分钟单位。 • 您可以选择 10 至 40 分钟之间的烹饪时间。 加热 烹饪功能 估计的烹饪时间 加热 ( Reheat ) 25 分钟 注 • 按菜单按钮 ( ) 后,将其闲置 15 秒钟,电饭煲将发出声音并自 动返回等待模式。 • 不用时,您可以按关闭按钮 ( ) 或拔掉电饭煲的电源插头以关 闭保温功能。 提示 • 按一次分钟按钮 ( ) 可使计时器增加 1 分钟。 按住分钟 按钮 ( ) 可以快进方式调整分钟单位。 • 您可以选择 25 至 59 分钟之间的烹饪时间。 预约烹饪 您可以为不同的烹饪功能预设延迟烹饪时间。预设计时器最长可 达 24 小时,但不适用于烘焙蛋糕,蒸食品和加热功能。 注 • 请勿超过内锅中标注的量,也不要超过最高水位标示,否则可能导 致电饭煲溢出。 • 按菜单按钮 ( ) 后,将其闲置 15 秒钟,电饭煲将发出声音并自 动返回等待模式。 • 电饭煲进入预设模式后,预设时间按钮将不会作出响应。 • 默认预设时间为 4 小时。 • 按一次小时按钮 ( ) 可使计时器增加 1 小时。 按住分钟按钮 ( ) 可使计时器快进 10 分钟。 提示 • 不用时,您可以按关闭按钮 ( ) 或拔掉电饭煲的电源插 头以关闭保温功能。 设置儿童锁 为防止儿童启动电饭煲,可以设置儿童锁功能。 2 清洁和保养 注 • 在开始清洗之前,请拔掉电饭煲的电源线。 • 等到电饭煲完全冷却后再开始清洗。 内部 外盖及煲身内侧: • 用拧干的湿布进行擦拭。 • 确保清理掉黏在电饭煲上的所有食物残渣。 加热元件: • 用拧干的湿布进行擦拭。 • 用拧干的湿布或牙签清理食物残渣。 外部 外盖表面和煲身外侧: • 用蘸有肥皂水的布进行擦拭。 • 只能使用柔软的干布擦拭控制面板。 • 确保清理掉控制按钮周围的所有食物残渣。 附件 饭勺、汤勺、内锅、电线扣环、饭勺支架、蒸篮、蒸汽孔帽和 内盖: • 浸泡到热水中并用海绵清洁。 3 环境 弃置产品时,请不要将其与一般生活垃圾堆放在一起,应将其交 给官方指定的回收中心。 这样做有利于环保。 4 保修与服务 如果需要服务或信息,或有任何疑问,请访问飞利浦网 站:www.philips.com,或联系您所在国家/地区的飞利浦客户 服务中心。 可在全球保修卡中找到其电话号码。 如果您所在的 国家/地区没有飞利浦客户服务中心,请向当地的飞利浦经销商 求助。 5 故障种类和处理方法 如果在使用本电饭煲时遇到问题,请在申请服务之前检查以下 事项。 如果无法解决问题,请联系您所在国家/地区的飞利浦服 务中心。 问题 解决方法 按钮上的指示 灯不亮。 接触不良。 检查是否已将电源线正确连接至 电饭煲,插头是否已在电源插座中插牢。 指示灯有故障。 请将本产品送往当地的飞 利浦经销商,或经飞利浦授权的客户服务中 心。 显示屏不能工 作。 电饭煲未连接至电源。 断电时,电源故障备 份功能不工作,并且显示屏不起作用。 显示屏的电池电量已耗尽。 请将产品送往飞 利浦经销商处或飞利浦授权的服务中心,让 其为您更换电池。 饭没煮好。 水量不足。 将水加到内锅的相应水位标示。 您未按烹饪按钮 ( )。 确保加热元件以及内锅外部没有杂物黏附, 再打开电饭煲。 加热元件损坏或内锅变形。 请将电饭煲送往 当地的飞利浦经销商,或经飞利浦授权的客 户服务中心。 饭没煮透。 尝试多加水。 电饭煲未自动 切换至保温模 式。 温度控制有故障。 请将本产品送往当地的 飞利浦经销商,或经飞利浦授权的客户服务 中心。 饭煮糊了。 大米未洗干净。 请漂洗大米,直至水变清。 烹饪期间,电 饭煲中有水溢 出。 • 确保根据所倒入白米的杯数和类型,依 照刻在内锅上的相应水位标记加入适量 的水。 • 确保水不超过水位标示上的另一个水 位,否则可能导致产品在烹饪期间溢 出。 制作的蛋糕太 硬。 请使用蛋糕预拌粉并按照用户手册中随附的 制作说明进行操作。 无法获得所需 的烹饪功能。 反复按菜单按钮 ( ),按 LED 指示灯所 示,选择所需的菜单。 米饭在煮好后 味道不好闻 请用一些清洁剂和温水清洗内锅。 烹饪后,确保蒸汽孔帽、内盖和内锅彻底干 净。 显示屏上出现 错误信息(E1 、E2、E3 或 E4)。 烹饪期间电源出现故障。 请将本产品送往当 地的飞利浦经销商,或经飞利浦授权的客户 服务中心。 HI अपकी रीद पर बधाई और Philips में स्वागत है! Philips द्वारा प्रस्तावित समर्थन का पूर्ण लाभ लेने के लिए, अपने उत्पाद को www. Philips.com/welcome पर पंजीकृत करें. 1 बॉक्स में क्या है फज़ी चावल कूकर मुख्य यूनिट स्टीम बास्केट राइस स्कूप सूप लेडल मापक कप उपयोगकर्ता मैन्युअल सुरक्षा वारंटी कार्ड ओवरव्यू a सीलिंग रिंग g पावर प्लग b वियोज्य भाप छिद्र आवरण h ताप तत्व c इनर पॉट i कुकर हैंडल d लिड रिली बटन j जल स्तर संकेत e नियंत्रण पैनल k वियोज्य भीतरी लिड f मुख्य भाग l आउटर लिड नियंत्रण ओवरव्यू m गर्म बनाए रखें/ रद्द करें बटन r चाइल्ड लॉक n घंटा बटन s घंटा बटन o मिनट बटन t कुकिंग समय बटन p कुकिंग समय बटन u कुकिंग फ़ंक्शंस q गर्म बनाए रखें/ रद्द करें बटन विनिर्देशन मॉडल क्षमता HD3075 4.0L HD3077 5.0L पहली बार उपयोग करने से पहले 1 इनर पॉट से सभी सामान निकाल लें. इनर पॉट और गर्म करने वाले भाग के बीच से शीट निकाल लें. 2 पहली बार चावल कूकर का उपयोग करने से पहले चावल कूकर के पार्ट्स को अच्छी तरह से साफ करें ( अध्याय ‘सफाई’ देखें ). नोट • आपके द्वारा चावल कूकर का उपयोग शुरू करने से पहले सुनिश्चित करें कि सभी पार्ट्स पूरी तरह से सूख गए हों. नोट • कच्चे चावल के प्रत्येक कप से सामान्य रूप से पके हुए चावल के 2 कटोरे बनते हैं. इनर पॉट के अंदर इंगित की गई मात्रा से अधिक ना डालें. 1 कप चावल अनुमानित 180ml होता है. • इनर पॉट की नॉन-स्टिक कोटिंग को खराब होने से बचाने के लिए चावल धोने के लिए एक अलग बर्तन का उपयोग करें. • इनर पॉट के अंदर चिह्नित स्तर केवल एक संकेत है. अपनी पसंद और विभिन्न प्रकार के चावल के लिए आप हमेशा पानी का स्तर समायोजित कर सकते हैं. • सुनिश्चित करें कि इनर पॉट बाहर से सूखा और साफ हो और यह कि कोई बाहरी अवशेष गर्म करने वाले भाग या चुंबकीय स्विच पर ना हो. नोट • इनर पॉट में संकेतक से अधिक मात्रा में और अधिकतम पानी स्तर से अधिक पानी ना डालें क्योंकि इससे चावल कूकर ओवरफ़्लो कर सकता है. • मेनू बटन ( ) को दबाने और 15 सेकंड के लिए इसे निष्क्रिय छो दिए जाने के बाद आपका चावल कूकर आवा करेगा और स्वचालित रूप से प्रतीक्षा मोड के लिए वापस आएगा. • गर्म फ़ंक्शन को बंद करने के लिए जब आप उसका उपयोग नहीं कर रहे हों आप रद्द करें बटन ( ) दबा सकते हैं या चावल कूकर को अनप्लग कर सकते हैं. राइस कुकिंग HD3075 और HD3077 के लिए तीन राइस कुकिंग फ़ंक्शंस हैं. कुकिंग फ़ंक्शन 8 कप चावल ( HD3075 ) और 10 कप चावल ( HD3077 ) के लिए अनुमानित कुकिंग समय सामान्य राइस कुकिंग ( Standard cook ) 45 मिनट एक्सप्रेस राइस कुकिंग ( Ultra quick cook ) 40 मिनट थोड़ी मात्रा में राइस कुकिंग ( Small portion rice ) 35 मिनट मिट्टी के बर्तन में चावल कुकिंग कुकिंग फ़ंक्शन 2 - 4 कप चावल के लिए अनुमानित कुकिंग समय ( HD3075 और HD3077 ) मिट्टी के बर्तन में राइस कुकिंग ( Claypot rice ) 1 घंटा 20 मिनट कॉन्जी कुकिंग और सूप बनाना कुकिंग फ़ंक्शन खाना पकाने के लिए अनुमानित समय कॉन्जी कुकिंग ( Congee ) 1 घंटा ( HD3075 और HD3077 दोनों के लिए 1 कप चावल के लिए ) सूप बनाना ( Soup ) 1 घंटा चावल के साथ सूप बनाना कुकिंग फ़ंक्शन 8 कप चावल ( HD3075 ) और 10 कप चावल ( HD3077 ) के लिए अनुमानित कुकिंग समय चावल के साथ सूप ( Rice with soup ) 35 मिनट युक्ति 1 बार 1 मिनट से टाइमर को बढ़ाने के लिए मिनट बटन ( ) को दबाएँ. टाइमर से 10 मिनट तेजी से बढ़ाने के लिए मिनट बटन ( ) को दबाएँ और दबाए रखें. आप खाना पकाने के लिए 25 से 59 मिनट के बीच समय का चयन कर सकते हैं. केक बेक करना कुकिंग फ़ंक्शन खाना पकाने के लिए अनुमानित समय केक बेक करना ( Cake ) 45 मिनट नोट • मेनू बटन ( ) को दबाने और 15 सेकंड के लिए इसे निष्क्रिय छो दिए जाने के बाद आपका चावल कूकर आवा करेगा और स्वचालित रूप से प्रतीक्षा मोड के लिए वापस आएगा. • रसोई के दस्ताने या कपड़े का उपयोग करें क्योंकि इनर पॉट बहुत गर्म होगा. • गर्म फ़ंक्शन को बंद करने के लिए जब आप उसका उपयोग नहीं कर रहे हों आप रद्द करें बटन ( ) दबा सकते हैं या चावल कूकर को अनप्लग कर सकते हैं. युक्ति • 1 बार 1 मिनट से टाइमर को बढ़ाने के लिए मिनट बटन ( ) को दबाएँ. टाइमर को 10 मिनट तेजी से आगे बढ़ाने के लिए मिनट बटन ( ) को होल्ड करें और दबाएँ. स्टीमिंग कुकिंग फ़ंक्शन खाना पकाने के लिए अनुमानित समय स्टीमिंग( Steam ) 20 मिनट नोट • प्लेट और स्टीम बॉस्केट बहुत गर्म हो जाएगा एक रसोई दस्ताने या एक कपड़े का उपयोग करें. • इनर पॉट में संकेतक से अधिक मात्रा में और अधिकतम पानी स्तर से अधिक पानी ना डालें क्योंकि इससे चावल कूकर ओवरफ़्लो कर सकता है. • आवश्यकतानुसार आप पानी के स्तर को समायोजित कर सकते हैं. • मेनू बटन ( ) को दबाने और 15 सेकंड के लिए इसे निष्क्रिय छो दिए जाने के बाद आपका चावल कूकर आवा करेगा और स्वचालित रूप से प्रतीक्षा मोड के लिए वापस आएगा. • गर्म फ़ंक्शन को बंद करने के लिए जब आप उसका उपयोग नहीं कर रहे हों आप रद्द करें बटन ( ) दबा सकते हैं या चावल कूकर को अनप्लग कर सकते हैं. युक्ति • 1 बार 1 मिनट से टाइमर को बढ़ाने के लिए मिनट बटन ( ) को दबाएँ. मिनट यूनिट में तेजी से समायोजन करने के लिए मिनट बटन ( ) को होल्ड करें और दबाएँ. • आप खाना पकाने के लिए 10 से 40 मिनट के बीच समय का चयन कर सकते हैं. पुनः गर्म करना कुकिंग फ़ंक्शन खाना पकाने के लिए अनुमानित समय पुनः गर्म करना ( Reheat ) 25 मिनट नोट • मेनू बटन ( ) को दबाने और 15 सेकंड के लिए इसे निष्क्रिय छो दिए जाने के बाद आपका चावल कूकर आवा करेगा और स्वचालित रूप से प्रतीक्षा मोड के लिए वापस आएगा. • गर्म फ़ंक्शन को बंद करने के लिए जब आप उसका उपयोग नहीं कर रहे हों आप रद्द करें बटन ( ) दबा सकते हैं या चावल कूकर को अनप्लग कर सकते हैं. युक्ति • 1 बार 1 मिनट से टाइमर को बढ़ाने के लिए मिनट बटन ( ) को दबाएँ. मिनट यूनिट में तेजी से समायोजन करने के लिए मिनट बटन ( ) को होल्ड करें और दबाएँ. • आप खाना पकाने के लिए 25 से 59 मिनट के बीच समय का चयन कर सकते हैं. लंबित कुकिंग के लिए समय प्रिसेट करें. आप विभिन्न कुकिंग फ़ंक्शन के लिए लंबित कुकिंग समय को प्रीसेट कर सकते हैं. प्रीसेट टाइमर 24 घंटों तक उपलब्ध रहता है और यह केक बेकिंग स्टीमिंग और रीहीटिंग फ़ंक्शंस के लिए लागू नहीं होता है. नोट • इनर पॉट में संकेतक से अधिक मात्रा में और अधिकतम पानी स्तर से अधिक पानी ना डालें क्योंकि इससे चावल कूकर ओवरफ़्लो कर सकता है. • मेनू बटन ( ) को दबाने और 15 सेकंड के लिए इसे निष्क्रिय छो दिए जाने के बाद आपका चावल कूकर आवा करेगा और स्वचालित रूप से प्रतीक्षा मोड के लिए वापस आएगा. • चावल कूकर के प्रिसेट में प्रवेश होने के बाद प्रिसेट समय बटन काम नहीं करेगा. • डिफ़ॉल्ट रूप से प्रिसेट समय 4 घंटे का है. • 1 बार 1 घंटे से टाइमर को बढ़ाने के लिए घंटा बटन ( ) को दबाएँ. टाइमर को 10 मिनट तेजी से आगे बढ़ाने के लिए मिनट बटन ( ) को पकड़े और दबाएँ. युक्ति • गर्म फ़ंक्शन को बंद करने के लिए जब आप उसका उपयोग नहीं कर रहे हों आप रद्द करें बटन ( ) दबा सकते हैं या चावल कूकर को अनप्लग कर सकते हैं. चाइल्ड लॉक सेट करें आपके बच्चे को चावल कूकर प्रारंभ करने से रोकने के लिए आप चाइल्ड लॉक फ़ंक्शन सेट अप कर सकते हैं. चाइल्ड लॉक मोड में डालने के लिए चाइल्ड लॉक बटन ( ) को दबाएँ. 2 सफाई और रखरखाव नोट • चावल कूकर सा करने से पहले इसे अनप्लग करें. • चावल कूकर के पर्याप्त रूप से ठंडे हो जाने तक इसे सा करने के लिए प्रतीक्षा करें. आंतरिक भाग बाहरी लिड और मुख्य भाग के भीतर: • इसे निचोड़े हुए और नम कपड़े से पोंछें. • चावल कूकर में बचे हुए खाद्य अवशेष जो अटक गए हैं उन्हें हटाना सुनिश्चित करें. हीटिंग भाग: • इसे निचोड़े हुए और नम कपड़े से पोंछें. • खाद्य अवशेष को निचोड़े हुए और नम कपड़े या टूथपिक्स से हटाएँ. बाहरी भाग बाहरी लिड की सतह और मुख्य भाग का बाहरी हिस्सा: • साबुन में भीगे हुए कपड़े से पोछें. • कंट्रोल पैनल को केवल मुलायम और सूखे कपड़े से पोछें. • कंट्रोल बटन के चारों ओर सभी खाद्य अवशेष को हटाना सुनिश्चित करें. सहायक उपकरण चावल स्कूप, सूप लैडल, इनर पॉट, पॉवर कॉर्ड धारक, स्कूप धारक, स्टीम बॉस्केट, स्टीम वेंट कैप और इनर लिड: • इसे गर्म पानी में डुबोएं और स्पॉज से सा करें. 3 पर्यावरण सामान्य घरेलू कचरे के साथ उन उपकरण को ना फैंके जो अब अनोपयोगी हो गए हैं बल्कि इसे आधिकारिक संग्रह स्थान पर पुनः उपयोग करने के लिए जमा करें. ऐसा करके आप पर्यावरण को बचाने में मदद कर सकते हैं. 4 गारंटी और सेवा यदि आप सेवा या जानकारी चाहते हैं या यदि आपकी कोई समस्या है तो Philips वेबसाइट पर जाएँ www.philips.com या अपने देश के Philips ग्राहक सेवा केंद्र से सम्पर्क करें. आपको विश्वव्यापी गारंटी पत्रक में इसका फोन नंबर मिल सकता है. यदि आपके देश में ग्राहक सेवा केंद्र नहीं है तो स्थानीय Philips डीलर के पास जाएँ. 5 समस्या निवारण इस चावल कूकर का उपयोग करते समय यदि आपको कोई समस्या आती है तो सेवा अनुरोध करने से पहले निम्नलिखित बातों की जाँच करें. यदि आप इस समस्या को हल नहीं कर सकते तो अपने देश में Philips उपभोक्ता देखभाल केंद्र से संपर्क करें. समस्या निवारण बटन पर रोशनी ऑन नहीं हो रही. कनेक्शन की कोई समस्या है. जाँच करें कि पॉवर कॉर्ड कुकर के साथ ठीक से जुड़ा हुआ है और पॉवर के आउटलेट में प्लग मजबूती से डाला गया है. लाइट राब है. अपने Philips डीलर के या फिलिप्स द्वारा प्राधिकृत एक सेवा केंद्र के पास उपकरण ले जाएँ. डिस्प्ले काम नहीं करता है. चावल कूकर पॉवर आपूर्ति से कनेक्टेड नहीं है. यदि यहाँ पॉवर आपूर्ति नहीं है, पॉवर विफलता बैकअप फ़ंक्शन काम नहीं करता है और डिस्प्ले फ़ंक्शन नहीं करता है. डिसप्ले के लिए बैटरी पॉवर की कमी है. बैटरी को बदलने के लिए उपकरण को अपने Philips डीलर या एक Philips द्वारा प्राधिकृत सेवा केंद्र पर ले जाएँ. चावल पके नहीं हैं. इसमें पर्याप्त पानी नहीं है. इनर पॉट के अंदर स्केल के अनुसार पानी डालें. आपने कुकिंग बटन ( ) नहीं दबाया है. चावल कूकर के स्विच को ऑन करने से पहले सुनिश्चित करें कि कोई भी बाहरी अवशेष और इनर पॉट का बाहरी हिस्सा हीटिंग भाग पर नहीं है. हीटिंग भाग क्षतिग्रस्त है या इनर पॉट विकृत हो गया है. अपने Philips डीलर के या Philips द्वारा प्राधिकृत एक सेवा केंद्र के पास कुकर ले जाएँ. चावल ठीक से नहीं पके हैं. और पानी डालें. स्वचालित रूप से कुकर गर्म मोड में रखने के लिए स्विच नहीं करता है. तापमान नियंत्रण दोषपूर्ण है. अपने Philips डीलर के या फिलिप्स द्वारा प्राधिकृत एक सेवा केंद्र के पास उपकरण ले जाएँ. चावल सूखे हुए हैं. आपने चावल को ठीक से धोया नहीं है. चावल को तब तक धोएँ जब तक कि पानी सा न आने लगे. कुकिंग के दौरान पानी चावल कूकर से बाहर निकल जाता है. • सुनिश्चित करें कि आप उतना पानी डालें जितना बर्तन के भितरी भाग में स्केल पर दर्शाया गया है जो कि उपयोग किए गए चावल की संख्या से संबंधित है. • सुनिश्चित करें कि पानी पैमाने पर अगले स्तर से अधिक न हो यह कुकिंग करते समय उपकरण में ओवरफ्लो का कारण हो सकता है. केक बहुत कक है. कृपया केक मिश्रण का उपयोग करें और उपयोगकर्ता मैनुअल में दिए गए निर्देशों का पालन करें. मुझे इच्छित कुकिंग फ़ंक्शन नहीं मिल रहा है. LED संकेतक द्वारा दिखाए गए इच्छित मेनू का चयन करने के लिए मेनू बटन ( ) को बार बार दबाएं. चावल पकने के बाद दुर्गंध छोते हैं. इनर पॉ़ट को धोने के साबुन और गर्म पानी के साथ सा करें. कुकिंग करने के बाद सुनिश्चित करें कि स्टीम वेंट कैप, इनर लिड और इनर पॉट को अच्छी तरह से सा किया गया है. लत संदेश ( E1, E2, E3, या E4 ) प्रदर्शन पर दिखाई देता है. यदि कुकिंग करते समय पॉवर फेल हो जाए. अपने Philips डीलर के या फिलिप्स द्वारा प्राधिकृत एक सेवा केंद्र के पास उपकरण ले जाएँ. EN User manual HI उपयोगकर्ता मैन्युअल MS-MY Manual pengguna TH คมอผใช VI Hướng dẫn sử dụng ZH-CN 用户手册

Welcome message from author
This document is posted to help you gain knowledge. Please leave a comment to let me know what you think about it! Share it to your friends and learn new things together.
Transcript
www.philips.com/welcomeHD 3075HD 3077
e subject to change without notice©2013 Koninklijke Philips N.V.All rights reserved.
HD3075_HD3077_UM_V2.0
1
a
b
c
de
f g
h
ij
k
l
HD3075HD3077
Rice cookingराइस ककिगการหงหาว
Nấu cơmApa dalam kotak ini
Using the fuzzy rice cookerफजी चावल ककर का उपयोगการใชหมอหงขาวระบบ Fuzzy
Sử dụng nồi cơm điệnMenggunakan pemasak nasi fuzzyWhat’s in the box
बॉकस म कया हภายในกลองมอะไรบางTrong hộp có gì
Apa dalam kotak ini
Clay pot rice cookingमिटटी क बरतन म चावल ककिगการหงขาวในหมอดน
Nấu cơm bằng nồi đấtMemasak nasi merendidih
Making soup with riceचावल क साथ सप बनानाการหงขาวตม
Nấu xúp với cơmMemasak sup dengan nasi
Cooking congee and making soupकॉनजी ककिग और सप बनानाการตมโจกและการทำซป
Nấu cháo và nấu xúpMemasak bubur dan membuat sup
Baking cakeकक बक करनाวธอบเคก
Nướng bánhMembakar kek
Steamingसटीमिगการนงอาหาร
Hấp thức ănMengukus
Reheatingपनः गरम करनाการอนรอน
Hâm nó ngPanas semula
Setting up child lockचाइलड लॉक सट करการตงคาระบบปองกนเดก
Cài đặt chế độ khóa trẻ em.
Preset time for delayed cookingलबित ककिग क लिए समय परिसट कर.
Cài đặt sẵn thời gian để nấu chậmMasa dipraset bagimasakan tertangguhการตงเวลาสำหรบการท
ำอาหารไวลวงหนา
Menyediakan kunci keselamatan kanak-kanak
www.philips.com/welcome
User manual
HD 3031HD 3038
www.philips.com/welcome
Safety leaflet
HD 3031HD 3038
www.philips.com/welcome
Warranty
HD 3031HD 3038
Standard cook
Ultra quick cook
Small portion rice
Reheat Rice with soup Steam
Claypot rice
Congee
Soup
Cake
m
n
o
p q
r
s
tu
Standard cook
Ultra quick cook
Small portion rice
Reheat
Rice with soup
Steam
Claypot rice
Congee
Soup
Standard cook
Ultra quick cook
Small portion rice
Rice with soup
Claypot rice
Congee
Soup
Cake
ENCongratulations on your purchase, and welcome to Philips!To fully benefit from the support that Philips offers, register your product at www.Philips.com/welcome.
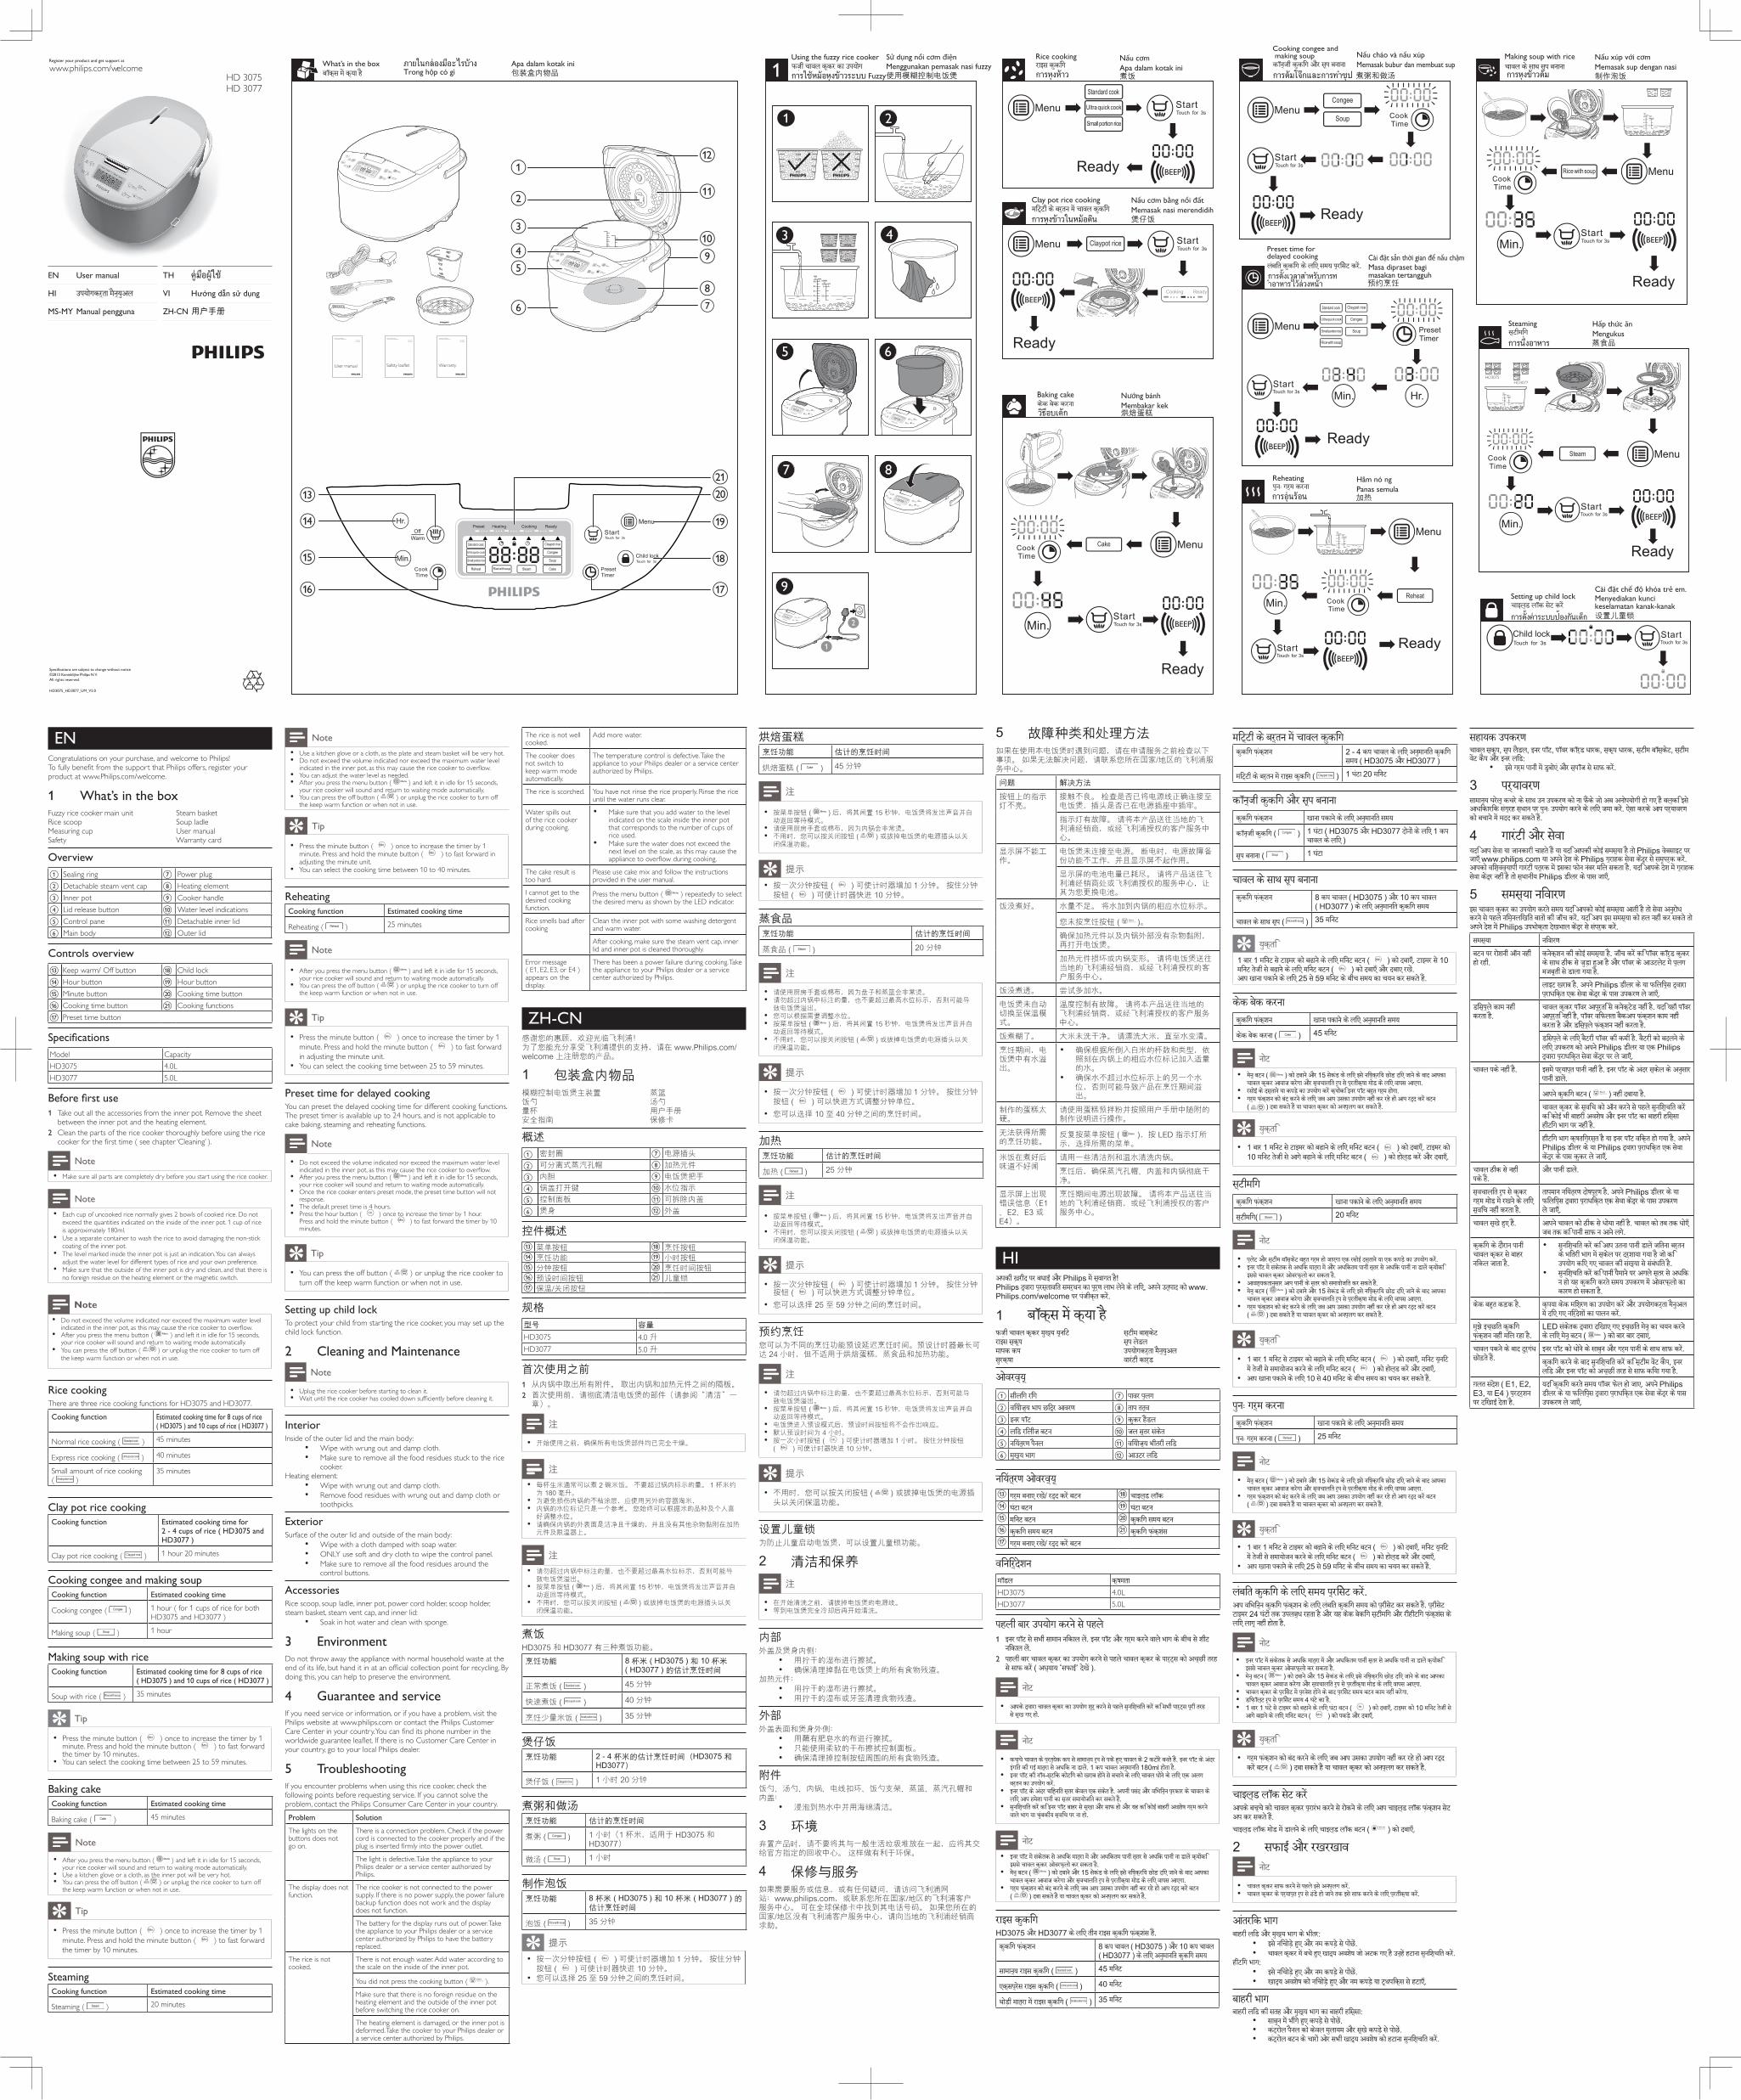
1 What’s in the boxFuzzy rice cooker main unit Steam basketRice scoop Soup ladleMeasuring cup User manualSafety Warranty card
Overviewa Sealing ring g Power plugb Detachable steam vent cap h Heating elementc Inner pot i Cooker handled Lid release button j Water level indicationse Control pane k Detachable inner lidf Main body l Outer lid
Controls overviewm Keep warm/ Off button r Child lockn Hour button s Hour buttono Minute button t Cooking time buttonp Cooking time button u Cooking functionsq Preset time button
SpecificationsModel CapacityHD3075 4.0LHD3077 5.0L
Before first use1 Take out all the accessories from the inner pot. Remove the sheet
between the inner pot and the heating element.2 Clean the parts of the rice cooker thoroughly before using the rice
cooker for the first time ( see chapter ‘Cleaning’ ).
Note • Make sure all parts are completely dry before you start using the rice cooker.
Note • Each cup of uncooked rice normally gives 2 bowls of cooked rice. Do not
exceed the quantities indicated on the inside of the inner pot. 1 cup of rice is approximately 180ml.
• Use a separate container to wash the rice to avoid damaging the non-stick coating of the inner pot.
• The level marked inside the inner pot is just an indication. You can always adjust the water level for different types of rice and your own preference.
• Make sure that the outside of the inner pot is dry and clean, and that there is no foreign residue on the heating element or the magnetic switch.
Note • Do not exceed the volume indicated nor exceed the maximum water level
indicated in the inner pot, as this may cause the rice cooker to overflow. • After you press the menu button ( ) and left it in idle for 15 seconds,
your rice cooker will sound and return to waiting mode automatically. • You can press the off button ( ) or unplug the rice cooker to turn off
the keep warm function or when not in use.
Rice cookingThere are three rice cooking functions for HD3075 and HD3077.
Cooking function Estimated cooking time for 8 cups of rice ( HD3075 ) and 10 cups of rice ( HD3077 )
Normal rice cooking ( Standard cook ) 45 minutes
Express rice cooking ( Ultra quick cook ) 40 minutes
Small amount of rice cooking ( Small portion rice )
35 minutes
Clay pot rice cookingCooking function Estimated cooking time for
2 - 4 cups of rice ( HD3075 and HD3077 )
Clay pot rice cooking ( Claypot rice ) 1 hour 20 minutes
Cooking congee and making soupCooking function Estimated cooking time
Cooking congee ( Congee ) 1 hour ( for 1 cups of rice for both HD3075 and HD3077 )
Making soup ( Soup ) 1 hour
Making soup with riceCooking function Estimated cooking time for 8 cups of rice
( HD3075 ) and 10 cups of rice ( HD3077 )
Soup with rice ( Rice with soup ) 35 minutes
Tip
• Press the minute button ( ) once to increase the timer by 1 minute. Press and hold the minute button ( ) to fast forward the timer by 10 minutes..
• You can select the cooking time between 25 to 59 minutes.
Baking cakeCooking function Estimated cooking time
Baking cake ( Cake ) 45 minutes
Note
• After you press the menu button ( ) and left it in idle for 15 seconds, your rice cooker will sound and return to waiting mode automatically.
• Use a kitchen glove or a cloth, as the inner pot will be very hot. • You can press the off button ( ) or unplug the rice cooker to turn off
the keep warm function or when not in use.
Tip
• Press the minute button ( ) once to increase the timer by 1 minute. Press and hold the minute button ( ) to fast forward the timer by 10 minutes.
SteamingCooking function Estimated cooking time
Steaming ( Steam ) 20 minutes
Note • Use a kitchen glove or a cloth, as the plate and steam basket will be very hot. • Do not exceed the volume indicated nor exceed the maximum water level
indicated in the inner pot, as this may cause the rice cooker to overflow. • You can adjust the water level as needed. • After you press the menu button ( ) and left it in idle for 15 seconds,
your rice cooker will sound and return to waiting mode automatically. • You can press the off button ( ) or unplug the rice cooker to turn off
the keep warm function or when not in use.
Tip
• Press the minute button ( ) once to increase the timer by 1 minute. Press and hold the minute button ( ) to fast forward in adjusting the minute unit.
• You can select the cooking time between 10 to 40 minutes.
ReheatingCooking function Estimated cooking time
Reheating ( Reheat ) 25 minutes
Note
• After you press the menu button ( ) and left it in idle for 15 seconds, your rice cooker will sound and return to waiting mode automatically.
• You can press the off button ( ) or unplug the rice cooker to turn off the keep warm function or when not in use.
Tip
• Press the minute button ( ) once to increase the timer by 1 minute. Press and hold the minute button ( ) to fast forward in adjusting the minute unit.
• You can select the cooking time between 25 to 59 minutes.
Preset time for delayed cookingYou can preset the delayed cooking time for different cooking functions. The preset timer is available up to 24 hours, and is not applicable to cake baking, steaming and reheating functions.
Note
• Do not exceed the volume indicated nor exceed the maximum water level indicated in the inner pot, as this may cause the rice cooker to overflow.
• After you press the menu button ( ) and left it in idle for 15 seconds, your rice cooker will sound and return to waiting mode automatically.
• Once the rice cooker enters preset mode, the preset time button will not response.
• The default preset time is 4 hours. • Press the hour button ( ) once to increase the timer by 1 hour.
Press and hold the minute button ( ) to fast forward the timer by 10 minutes.
Tip
• You can press the off button ( ) or unplug the rice cooker to turn off the keep warm function or when not in use.
Setting up child lockTo protect your child from starting the rice cooker, you may set up the child lock function.
2 Cleaning and MaintenanceNote
• Uplug the rice cooker before starting to clean it. • Wait until the rice cooker has cooled down sufficiently before cleaning it.
InteriorInside of the outer lid and the main body:
• Wipe with wrung out and damp cloth.• Make sure to remove all the food residues stuck to the rice
cooker.Heating element:
• Wipe with wrung out and damp cloth.• Remove food residues with wrung out and damp cloth or
toothpicks.
ExteriorSurface of the outer lid and outside of the main body:
• Wipe with a cloth damped with soap water.• ONLY use soft and dry cloth to wipe the control panel.• Make sure to remove all the food residues around the
control buttons.
AccessoriesRice scoop, soup ladle, inner pot, power cord holder, scoop holder, steam basket, steam vent cap, and inner lid:
• Soak in hot water and clean with sponge.
3 EnvironmentDo not throw away the appliance with normal household waste at the end of its life, but hand it in at an official collection point for recycling. By doing this, you can help to preserve the environment.
4 Guarantee and serviceIf you need service or information, or if you have a problem, visit the Philips website at www.philips.com or contact the Philips Customer Care Center in your country. You can find its phone number in the worldwide guarantee leaflet. If there is no Customer Care Center in your country, go to your local Philips dealer.
5 TroubleshootingIf you encounter problems when using this rice cooker, check the following points before requesting service. If you cannot solve the problem, contact the Philips Consumer Care Center in your country.
Problem SolutionThe lights on the buttons does not go on.
There is a connection problem. Check if the power cord is connected to the cooker properly and if the plug is inserted firmly into the power outlet.
The light is defective. Take the appliance to your Philips dealer or a service center authorized by Philips.
The display does not function.
The rice cooker is not connected to the power supply. If there is no power supply, the power failure backup function does not work and the display does not function.
The battery for the display runs out of power. Take the appliance to your Philips dealer or a service center authorized by Philips to have the battery replaced.
The rice is not cooked.
There is not enough water. Add water according to the scale on the inside of the inner pot.
You did not press the cooking button ( ).
Make sure that there is no foreign residue on the heating element and the outside of the inner pot before switching the rice cooker on.
The heating element is damaged, or the inner pot is deformed. Take the cooker to your Philips dealer or a service center authorized by Philips.
The rice is not well cooked.
Add more water.
The cooker does not switch to keep warm mode automatically.
The temperature control is defective. Take the appliance to your Philips dealer or a service center authorized by Philips.
The rice is scorched. You have not rinse the rice properly. Rinse the rice until the water runs clear.
Water spills out of the rice cooker during cooking.
• Make sure that you add water to the level indicated on the scale inside the inner pot that corresponds to the number of cups of rice used.
• Make sure the water does not exceed the next level on the scale, as this may cause the appliance to overflow during cooking.
The cake result is too hard.
Please use cake mix and follow the instructions provided in the user manual.
I cannot get to the desired cooking function.
Press the menu button ( ) repeatedly to select the desired menu as shown by the LED indicator.
Rice smells bad after cooking
Clean the inner pot with some washing detergent and warm water.
After cooking, make sure the steam vent cap, inner lid and inner pot is cleaned thoroughly.
Error message ( E1, E2, E3, or E4 ) appears on the display.
There has been a power failure during cooking. Take the appliance to your Philips dealer or a service center authorized by Philips.
ZH-CN感谢您的惠顾,欢迎光临飞利浦!为了您能充分享受飞利浦提供的支持,请在 www.Philips.com/welcome 上注册您的产品。
1 包装盒内物品模糊控制电饭煲主装置 蒸篮饭勺 汤勺量杯 用户手册安全指南 保修卡
概述
a 密封圈 g 电源插头
b 可分离式蒸汽孔帽 h 加热元件
c 内胆 i 电饭煲把手
d 锅盖打开键 j 水位指示
e 控制面板 k 可拆除内盖
f 煲身 l 外盖
控件概述m 菜单按钮 r 烹饪按钮n 烹饪功能 s 小时按钮o 分钟按钮 t 烹饪时间按钮p 预设时间按钮 u 儿童锁q 保温/关闭按钮
规格
型号 容量
HD3075 4.0 升HD3077 5.0 升
首次使用之前1 从内锅中取出所有附件。 取出内锅和加热元件之间的隔板。2 首次使用前,请彻底清洁电饭煲的部件(请参阅“清洁”一
章)。
注
• 开始使用之前,确保所有电饭煲部件均已完全干燥。
注
• 每杯生米通常可以煮 2 碗米饭。 不要超过锅内标示的量。 1 杯米约为 180 毫升。
• 为避免损伤内锅的不粘涂层,应使用另外的容器淘米, • 内锅的水位标记只是一个参考。 您始终可以根据米的品种及个人喜
好调整水位。 • 请确保内锅的外表面是洁净且干燥的,并且没有其他杂物黏附在加热
元件及限温器上。
注
• 请勿超过内锅中标注的量,也不要超过最高水位标示,否则可能导致电饭煲溢出。
• 按菜单按钮 ( ) 后,将其闲置 15 秒钟,电饭煲将发出声音并自动返回等待模式。
• 不用时,您可以按关闭按钮 ( ) 或拔掉电饭煲的电源插头以关闭保温功能。
煮饭HD3075 和 HD3077 有三种煮饭功能。
烹饪功能 8杯米(HD3075)和10杯米(HD3077)的估计烹饪时间
正常煮饭 ( Standard cook ) 45 分钟
快速煮饭 ( Ultra quick cook ) 40 分钟
烹饪少量米饭 ( Small portion rice ) 35 分钟
煲仔饭烹饪功能 2-4杯米的估计烹饪时间(HD3075和
HD3077)
煲仔饭 ( Claypot rice ) 1 小时 20 分钟
煮粥和做汤烹饪功能 估计的烹饪时间
煮粥 ( Congee ) 1 小时(1 杯米,适用于 HD3075 和 HD3077)
做汤 ( Soup ) 1 小时
制作泡饭烹饪功能 8杯米(HD3075)和10杯米(HD3077)的
估计烹饪时间
泡饭 ( Rice with soup ) 35 分钟
提示
• 按一次分钟按钮 ( ) 可使计时器增加 1 分钟。 按住分钟按钮 ( ) 可使计时器快进 10 分钟。
• 您可以选择 25 至 59 分钟之间的烹饪时间。
烘焙蛋糕烹饪功能 估计的烹饪时间
烘焙蛋糕 ( Cake ) 45 分钟
注
• 按菜单按钮 ( ) 后,将其闲置 15 秒钟,电饭煲将发出声音并自动返回等待模式。
• 请使用厨房手套或棉布,因为内锅会非常烫。 • 不用时,您可以按关闭按钮 ( ) 或拔掉电饭煲的电源插头以关
闭保温功能。
提示
• 按一次分钟按钮 ( ) 可使计时器增加 1 分钟。 按住分钟按钮 ( ) 可使计时器快进 10 分钟。
蒸食品烹饪功能 估计的烹饪时间
蒸食品 ( Steam ) 20 分钟
注
• 请使用厨房手套或棉布,因为盘子和蒸篮会非常烫。 • 请勿超过内锅中标注的量,也不要超过最高水位标示,否则可能导
致电饭煲溢出。 • 您可以根据需要调整水位。 • 按菜单按钮 ( ) 后,将其闲置 15 秒钟,电饭煲将发出声音并自
动返回等待模式。 • 不用时,您可以按关闭按钮 ( ) 或拔掉电饭煲的电源插头以关
闭保温功能。
提示
• 按一次分钟按钮 ( ) 可使计时器增加 1 分钟。 按住分钟按钮 ( ) 可以快进方式调整分钟单位。
• 您可以选择 10 至 40 分钟之间的烹饪时间。
加热烹饪功能 估计的烹饪时间
加热 ( Reheat ) 25 分钟
注
• 按菜单按钮 ( ) 后,将其闲置 15 秒钟,电饭煲将发出声音并自动返回等待模式。
• 不用时,您可以按关闭按钮 ( ) 或拔掉电饭煲的电源插头以关闭保温功能。
提示
• 按一次分钟按钮 ( ) 可使计时器增加 1 分钟。 按住分钟按钮 ( ) 可以快进方式调整分钟单位。
• 您可以选择 25 至 59 分钟之间的烹饪时间。
预约烹饪您可以为不同的烹饪功能预设延迟烹饪时间。预设计时器最长可达 24 小时,但不适用于烘焙蛋糕,蒸食品和加热功能。
注
• 请勿超过内锅中标注的量,也不要超过最高水位标示,否则可能导致电饭煲溢出。
• 按菜单按钮 ( ) 后,将其闲置 15 秒钟,电饭煲将发出声音并自动返回等待模式。
• 电饭煲进入预设模式后,预设时间按钮将不会作出响应。 • 默认预设时间为 4 小时。 • 按一次小时按钮 ( ) 可使计时器增加 1 小时。 按住分钟按钮
( ) 可使计时器快进 10 分钟。
提示
• 不用时,您可以按关闭按钮 ( ) 或拔掉电饭煲的电源插头以关闭保温功能。
设置儿童锁为防止儿童启动电饭煲,可以设置儿童锁功能。
2 清洁和保养
注
• 在开始清洗之前,请拔掉电饭煲的电源线。 • 等到电饭煲完全冷却后再开始清洗。
内部外盖及煲身内侧:
• 用拧干的湿布进行擦拭。• 确保清理掉黏在电饭煲上的所有食物残渣。
加热元件:• 用拧干的湿布进行擦拭。• 用拧干的湿布或牙签清理食物残渣。
外部外盖表面和煲身外侧:
• 用蘸有肥皂水的布进行擦拭。• 只能使用柔软的干布擦拭控制面板。• 确保清理掉控制按钮周围的所有食物残渣。
附件饭勺、汤勺、内锅、电线扣环、饭勺支架、蒸篮、蒸汽孔帽和内盖:
• 浸泡到热水中并用海绵清洁。
3 环境弃置产品时,请不要将其与一般生活垃圾堆放在一起,应将其交给官方指定的回收中心。 这样做有利于环保。
4 保修与服务如果需要服务或信息,或有任何疑问,请访问飞利浦网站:www.philips.com,或联系您所在国家/地区的飞利浦客户服务中心。 可在全球保修卡中找到其电话号码。 如果您所在的国家/地区没有飞利浦客户服务中心,请向当地的飞利浦经销商求助。
5 故障种类和处理方法如果在使用本电饭煲时遇到问题,请在申请服务之前检查以下事项。 如果无法解决问题,请联系您所在国家/地区的飞利浦服务中心。
问题 解决方法
按钮上的指示灯不亮。
接触不良。 检查是否已将电源线正确连接至电饭煲,插头是否已在电源插座中插牢。
指示灯有故障。 请将本产品送往当地的飞利浦经销商,或经飞利浦授权的客户服务中心。
显示屏不能工作。
电饭煲未连接至电源。 断电时,电源故障备份功能不工作,并且显示屏不起作用。
显示屏的电池电量已耗尽。 请将产品送往飞利浦经销商处或飞利浦授权的服务中心,让其为您更换电池。
饭没煮好。 水量不足。 将水加到内锅的相应水位标示。
您未按烹饪按钮 ( )。
确保加热元件以及内锅外部没有杂物黏附,再打开电饭煲。
加热元件损坏或内锅变形。 请将电饭煲送往当地的飞利浦经销商,或经飞利浦授权的客户服务中心。
饭没煮透。 尝试多加水。
电饭煲未自动切换至保温模式。
温度控制有故障。 请将本产品送往当地的飞利浦经销商,或经飞利浦授权的客户服务中心。
饭煮糊了。 大米未洗干净。 请漂洗大米,直至水变清。
烹饪期间,电饭煲中有水溢出。
• 确保根据所倒入白米的杯数和类型,依照刻在内锅上的相应水位标记加入适量的水。
• 确保水不超过水位标示上的另一个水位,否则可能导致产品在烹饪期间溢出。
制作的蛋糕太硬。
请使用蛋糕预拌粉并按照用户手册中随附的制作说明进行操作。
无法获得所需的烹饪功能。
反复按菜单按钮 ( ),按 LED 指示灯所示,选择所需的菜单。
米饭在煮好后味道不好闻
请用一些清洁剂和温水清洗内锅。
烹饪后,确保蒸汽孔帽、内盖和内锅彻底干净。
显示屏上出现错误信息(E1、E2、E3 或 E4)。
烹饪期间电源出现故障。 请将本产品送往当地的飞利浦经销商,或经飞利浦授权的客户服务中心。
HIअपकी खरीद पर बधाई और Philips म सवागत ह!Philips दवारा परसतावित समरथन का परण लाभ लन क लिए, अपन उतपाद को www.Philips.com/welcome पर पजीकत कर.
1 बॉकस म कया हफजी चावल ककर मखय यनिट सटीम बासकटराइस सकप सप लडलमापक कप उपयोगकरता मनयअलसरकषा वारटी कारड
ओवरवयa सीलिग रिग g पावर पलगb वियोजय भाप छिदर आवरण h ताप ततवc इनर पॉट i ककर हडलd लिड रिलीज बटन j जल सतर सकतe नियतरण पनल k वियोजय भीतरी लिडf मखय भाग l आउटर लिड
नियतरण ओवरवयm गरम बनाए रख/ रदद कर बटन r चाइलड लॉकn घटा बटन s घटा बटनo मिनट बटन t ककिग समय बटनp ककिग समय बटन u ककिग फकशसq गरम बनाए रख/ रदद कर बटन
विनिरदशनमॉडल कषमताHD3075 4.0LHD3077 5.0L
पहली बार उपयोग करन स पहल1 इनर पॉट स सभी सामान निकाल ल. इनर पॉट और गरम करन वाल भाग क बीच स शीट
निकाल ल.2 पहली बार चावल ककर का उपयोग करन स पहल चावल ककर क पारटस को अचछी तरह
स साफ कर ( अधयाय ‘सफाई’ दख ).
नोट
• आपक दवारा चावल ककर का उपयोग शर करन स पहल सनिशचित कर कि सभी पारटस परी तरह स सख गए हो.
नोट
• कचच चावल क परतयक कप स सामानय रप स पक हए चावल क 2 कटोर बनत ह. इनर पॉट क अदर इगित की गई मातरा स अधिक ना डाल. 1 कप चावल अनमानित 180ml होता ह.
• इनर पॉट की नॉन-सटिक कोटिग को खराब होन स बचान क लिए चावल धोन क लिए एक अलग बरतन का उपयोग कर.
• इनर पॉट क अदर चिहनित सतर कवल एक सकत ह. अपनी पसद और विभिनन परकार क चावल क लिए आप हमशा पानी का सतर समायोजित कर सकत ह.
• सनिशचित कर कि इनर पॉट बाहर स सखा और साफ हो और यह कि कोई बाहरी अवशष गरम करन वाल भाग या चबकीय सविच पर ना हो.
नोट • इनर पॉट म सकतक स अधिक मातरा म और अधिकतम पानी सतर स अधिक पानी ना डाल कयोकि
इसस चावल ककर ओवरफलो कर सकता ह. • मन बटन ( ) को दबान और 15 सकड क लिए इस निषकरिय छोड दिए जान क बाद आपका
चावल ककर आवाज करगा और सवचालित रप स परतीकषा मोड क लिए वापस आएगा. • गरम फकशन को बद करन क लिए जब आप उसका उपयोग नही कर रह हो आप रदद कर बटन
( ) दबा सकत ह या चावल ककर को अनपलग कर सकत ह.
राइस ककिगHD3075 और HD3077 क लिए तीन राइस ककिग फकशस ह.ककिग फकशन 8 कप चावल ( HD3075 ) और 10 कप चावल
( HD3077 ) क लिए अनमानित ककिग समय
सामानय राइस ककिग ( Standard cook ) 45 मिनट
एकसपरस राइस ककिग ( Ultra quick cook ) 40 मिनट
थोडी मातरा म राइस ककिग ( Small portion rice ) 35 मिनट
मिटटी क बरतन म चावल ककिगककिग फकशन 2 - 4 कप चावल क लिए अनमानित ककिग
समय ( HD3075 और HD3077 )
मिटटी क बरतन म राइस ककिग ( Claypot rice ) 1 घटा 20 मिनट
कॉनजी ककिग और सप बनानाककिग फकशन खाना पकान क लिए अनमानित समय
कॉनजी ककिग ( Congee ) 1 घटा ( HD3075 और HD3077 दोनो क लिए 1 कप चावल क लिए )
सप बनाना ( Soup ) 1 घटा
चावल क साथ सप बनानाककिग फकशन 8 कप चावल ( HD3075 ) और 10 कप चावल
( HD3077 ) क लिए अनमानित ककिग समय
चावल क साथ सप ( Rice with soup ) 35 मिनट
यकति1 बार 1 मिनट स टाइमर को बढान क लिए मिनट बटन ( ) को दबाए. टाइमर स 10 मिनट तजी स बढान क लिए मिनट बटन ( ) को दबाए और दबाए रख.आप खाना पकान क लिए 25 स 59 मिनट क बीच समय का चयन कर सकत ह.
कक बक करनाककिग फकशन खाना पकान क लिए अनमानित समय
कक बक करना ( Cake ) 45 मिनट
नोट • मन बटन ( ) को दबान और 15 सकड क लिए इस निषकरिय छोड दिए जान क बाद आपका
चावल ककर आवाज करगा और सवचालित रप स परतीकषा मोड क लिए वापस आएगा. • रसोई क दसतान या कपड का उपयोग कर कयोकि इनर पॉट बहत गरम होगा. • गरम फकशन को बद करन क लिए जब आप उसका उपयोग नही कर रह हो आप रदद कर बटन
( ) दबा सकत ह या चावल ककर को अनपलग कर सकत ह.
यकति
• 1 बार 1 मिनट स टाइमर को बढान क लिए मिनट बटन ( ) को दबाए. टाइमर को 10 मिनट तजी स आग बढान क लिए मिनट बटन ( ) को होलड कर और दबाए.
सटीमिगककिग फकशन खाना पकान क लिए अनमानित समय
सटीमिग( Steam ) 20 मिनट
नोट
• पलट और सटीम बॉसकट बहत गरम हो जाएगा एक रसोई दसतान या एक कपड का उपयोग कर. • इनर पॉट म सकतक स अधिक मातरा म और अधिकतम पानी सतर स अधिक पानी ना डाल कयोकि
इसस चावल ककर ओवरफलो कर सकता ह. • आवशयकतानसार आप पानी क सतर को समायोजित कर सकत ह. • मन बटन ( ) को दबान और 15 सकड क लिए इस निषकरिय छोड दिए जान क बाद आपका
चावल ककर आवाज करगा और सवचालित रप स परतीकषा मोड क लिए वापस आएगा. • गरम फकशन को बद करन क लिए जब आप उसका उपयोग नही कर रह हो आप रदद कर बटन
( ) दबा सकत ह या चावल ककर को अनपलग कर सकत ह.
यकति
• 1 बार 1 मिनट स टाइमर को बढान क लिए मिनट बटन ( ) को दबाए. मिनट यनिट म तजी स समायोजन करन क लिए मिनट बटन ( ) को होलड कर और दबाए.
• आप खाना पकान क लिए 10 स 40 मिनट क बीच समय का चयन कर सकत ह.
पनः गरम करनाककिग फकशन खाना पकान क लिए अनमानित समय
पनः गरम करना ( Reheat ) 25 मिनट
नोट
• मन बटन ( ) को दबान और 15 सकड क लिए इस निषकरिय छोड दिए जान क बाद आपका चावल ककर आवाज करगा और सवचालित रप स परतीकषा मोड क लिए वापस आएगा.
• गरम फकशन को बद करन क लिए जब आप उसका उपयोग नही कर रह हो आप रदद कर बटन ( ) दबा सकत ह या चावल ककर को अनपलग कर सकत ह.
यकति • 1 बार 1 मिनट स टाइमर को बढान क लिए मिनट बटन ( ) को दबाए. मिनट यनिट
म तजी स समायोजन करन क लिए मिनट बटन ( ) को होलड कर और दबाए. • आप खाना पकान क लिए 25 स 59 मिनट क बीच समय का चयन कर सकत ह.
लबित ककिग क लिए समय परिसट कर.आप विभिनन ककिग फकशन क लिए लबित ककिग समय को परीसट कर सकत ह. परीसट टाइमर 24 घटो तक उपलबध रहता ह और यह कक बकिग सटीमिग और रीहीटिग फकशस क लिए लाग नही होता ह.
नोट • इनर पॉट म सकतक स अधिक मातरा म और अधिकतम पानी सतर स अधिक पानी ना डाल कयोकि
इसस चावल ककर ओवरफलो कर सकता ह. • मन बटन ( ) को दबान और 15 सकड क लिए इस निषकरिय छोड दिए जान क बाद आपका
चावल ककर आवाज करगा और सवचालित रप स परतीकषा मोड क लिए वापस आएगा. • चावल ककर क परिसट म परवश होन क बाद परिसट समय बटन काम नही करगा. • डिफॉलट रप स परिसट समय 4 घट का ह. • 1 बार 1 घट स टाइमर को बढान क लिए घटा बटन ( ) को दबाए. टाइमर को 10 मिनट तजी स
आग बढान क लिए मिनट बटन ( ) को पकड और दबाए.
यकति
• गरम फकशन को बद करन क लिए जब आप उसका उपयोग नही कर रह हो आप रदद कर बटन ( ) दबा सकत ह या चावल ककर को अनपलग कर सकत ह.
चाइलड लॉक सट करआपक बचच को चावल ककर परारभ करन स रोकन क लिए आप चाइलड लॉक फकशन सट अप कर सकत ह.चाइलड लॉक मोड म डालन क लिए चाइलड लॉक बटन ( ) को दबाए.
2 सफाई और रखरखावनोट
• चावल ककर साफ करन स पहल इस अनपलग कर. • चावल ककर क परयापत रप स ठड हो जान तक इस साफ करन क लिए परतीकषा कर.
आतरिक भागबाहरी लिड और मखय भाग क भीतर:
• इस निचोड हए और नम कपड स पोछ.• चावल ककर म बच हए खादय अवशष जो अटक गए ह उनह हटाना सनिशचित कर.
हीटिग भाग:• इस निचोड हए और नम कपड स पोछ.• खादय अवशष को निचोड हए और नम कपड या टथपिकस स हटाए.
बाहरी भागबाहरी लिड की सतह और मखय भाग का बाहरी हिससा:
• साबन म भीग हए कपड स पोछ.• कटरोल पनल को कवल मलायम और सख कपड स पोछ.• कटरोल बटन क चारो ओर सभी खादय अवशष को हटाना सनिशचित कर.
सहायक उपकरणचावल सकप, सप लडल, इनर पॉट, पॉवर कॉरड धारक, सकप धारक, सटीम बॉसकट, सटीम वट कप और इनर लिड:
• इस गरम पानी म डबोए और सपॉज स साफ कर.
3 परयावरणसामानय घरल कचर क साथ उन उपकरण को ना फक जो अब अनोपयोगी हो गए ह बलकि इस आधिकारिक सगरह सथान पर पनः उपयोग करन क लिए जमा कर. ऐसा करक आप परयावरण को बचान म मदद कर सकत ह.
4 गारटी और सवायदि आप सवा या जानकारी चाहत ह या यदि आपकी कोई समसया ह तो Philips वबसाइट पर जाए www.philips.com या अपन दश क Philips गराहक सवा कदर स समपरक कर. आपको विशववयापी गारटी पतरक म इसका फोन नबर मिल सकता ह. यदि आपक दश म गराहक सवा कदर नही ह तो सथानीय Philips डीलर क पास जाए.
5 समसया निवारणइस चावल ककर का उपयोग करत समय यदि आपको कोई समसया आती ह तो सवा अनरोध करन स पहल निमनलिखित बातो की जाच कर. यदि आप इस समसया को हल नही कर सकत तो अपन दश म Philips उपभोकता दखभाल कदर स सपरक कर.समसया निवारणबटन पर रोशनी ऑन नही हो रही.
कनकशन की कोई समसया ह. जाच कर कि पॉवर कॉरड ककर क साथ ठीक स जडा हआ ह और पॉवर क आउटलट म पलग मजबती स डाला गया ह.लाइट खराब ह. अपन Philips डीलर क या फिलिपस दवारा पराधिकत एक सवा कदर क पास उपकरण ल जाए.
डिसपल काम नही करता ह.
चावल ककर पॉवर आपरति स कनकटड नही ह. यदि यहा पॉवर आपरति नही ह, पॉवर विफलता बकअप फकशन काम नही करता ह और डिसपल फकशन नही करता ह.डिसपल क लिए बटरी पॉवर की कमी ह. बटरी को बदलन क लिए उपकरण को अपन Philips डीलर या एक Philips दवारा पराधिकत सवा कदर पर ल जाए.
चावल पक नही ह. इसम परयापत पानी नही ह. इनर पॉट क अदर सकल क अनसार पानी डाल.
आपन ककिग बटन ( ) नही दबाया ह.चावल ककर क सविच को ऑन करन स पहल सनिशचित कर कि कोई भी बाहरी अवशष और इनर पॉट का बाहरी हिससा हीटिग भाग पर नही ह.हीटिग भाग कषतिगरसत ह या इनर पॉट विकत हो गया ह. अपन Philips डीलर क या Philips दवारा पराधिकत एक सवा कदर क पास ककर ल जाए.
चावल ठीक स नही पक ह.
और पानी डाल.
सवचालित रप स ककर गरम मोड म रखन क लिए सविच नही करता ह.
तापमान नियतरण दोषपरण ह. अपन Philips डीलर क या फिलिपस दवारा पराधिकत एक सवा कदर क पास उपकरण ल जाए.
चावल सख हए ह. आपन चावल को ठीक स धोया नही ह. चावल को तब तक धोए जब तक कि पानी साफ न आन लग.
ककिग क दौरान पानी चावल ककर स बाहर निकल जाता ह.
• सनिशचित कर कि आप उतना पानी डाल जितना बरतन क भितरी भाग म सकल पर दरशाया गया ह जो कि उपयोग किए गए चावल की सखया स सबधित ह.
• सनिशचित कर कि पानी पमान पर अगल सतर स अधिक न हो यह ककिग करत समय उपकरण म ओवरफलो का कारण हो सकता ह.
कक बहत कडक ह. कपया कक मिशरण का उपयोग कर और उपयोगकरता मनअल म दिए गए निरदशो का पालन कर.
मझ इचछित ककिग फकशन नही मिल रहा ह.
LED सकतक दवारा दिखाए गए इचछित मन का चयन करन क लिए मन बटन ( ) को बार बार दबाए.
चावल पकन क बाद दरगध छोडत ह.
इनर पॉट को धोन क साबन और गरम पानी क साथ साफ कर.ककिग करन क बाद सनिशचित कर कि सटीम वट कप, इनर लिड और इनर पॉट को अचछी तरह स साफ किया गया ह.
गलत सदश ( E1, E2, E3, या E4 ) परदरशन पर दिखाई दता ह.
यदि ककिग करत समय पॉवर फल हो जाए. अपन Philips डीलर क या फिलिपस दवारा पराधिकत एक सवा कदर क पास उपकरण ल जाए.
EN User manual
HI उपयोगकरता मनयअल
MS-MY Manual pengguna
TH คมอผใช
VI Hướng dẫn sử dụng
ZH-CN 用户手册

1
a
b
c
de
f g
h
ij
k
l
HD3075HD3077
Rice cookingराइस ककिगการหงหาว
Nấu cơmApa dalam kotak ini
Using the fuzzy rice cookerफजी चावल ककर का उपयोगการใชหมอหงขาวระบบ Fuzzy
Sử dụng nồi cơm điệnMenggunakan pemasak nasi fuzzyWhat’s in the box
बॉकस म कया हภายในกลองมอะไรบางTrong hộp có gì
Apa dalam kotak ini
Clay pot rice cookingमिटटी क बरतन म चावल ककिगการหงขาวในหมอดน
Nấu cơm bằng nồi đấtMemasak nasi merendidih
Making soup with riceचावल क साथ सप बनानाการหงขาวตม
Nấu xúp với cơmMemasak sup dengan nasi
Cooking congee and making soupकॉनजी ककिग और सप बनानाการตมโจกและการทำซป
Nấu cháo và nấu xúpMemasak bubur dan membuat sup
Baking cakeकक बक करनाวธอบเคก
Nướng bánhMembakar kek
Steamingसटीमिगการนงอาหาร
Hấp thức ănMengukus
Reheatingपनः गरम करनाการอนรอน
Hâm nó ngPanas semula
Setting up child lockचाइलड लॉक सट करการตงคาระบบปองกนเดก
Cài đặt chế độ khóa trẻ em.
Preset time for delayed cookingलबित ककिग क लिए समय परिसट कर.
Cài đặt sẵn thời gian để nấu chậmMasa dipraset bagimasakan tertangguhการตงเวลาสำหรบการท
ำอาหารไวลวงหนา
Menyediakan kunci keselamatan kanak-kanak
www.philips.com/welcome
User manual
HD 3031HD 3038
www.philips.com/welcome
Safety leaflet
HD 3031HD 3038
www.philips.com/welcome
Warranty
HD 3031HD 3038
Standard cook
Ultra quick cook
Small portion rice
Reheat Rice with soup Steam
Claypot rice
Congee
Soup
Cake
m
n
o
p q
r
s
tu
Standard cook
Ultra quick cook
Small portion rice
Reheat
Rice with soup
Steam
Claypot rice
Congee
Soup
Standard cook
Ultra quick cook
Small portion rice
Rice with soup
Claypot rice
Congee
Soup
Cake
THขอแสดงความยนดทคณสงซอผลตภณฑของเรา และยนดตอนรบสผลตภณฑของ Philips!เพอใหคณไดรบประโยชนอยางเตมทจากบรการท Philips มอบให โปรดลงทะเบยนผลตภณฑของคณท www.Philips.com/welcome
1 ภายในกลองมอะไรบางตวเครองหมอหงขาวระบบ Fuzzy ถาดสำาหรบนงทพพตกขาว ทพพตกซปถวยตวง คมอผใชความปลอดภย ใบรบประกน
ภาพรวมa หวงยางกนรวซม g ปลกไฟ
b ฝาปดชองไอนถอดออกได h แผนทำาความรอน
c หมอชนใน i ทจบหมอหงขาว
d ปมปลดลอคฝาปด j ขดแสดงระดบน
e ปมควบคม k ฝาดานในทถอดออกได
f ตวหมอ l ฝาดานนอก
ภาพรวมของการควบคมm ปมอน/ ยกเลกการทำางาน r ลอคกนเปดn ปมชวโมง s ปมเมนo ปมนาท t ปมการหงp ปมเวลาหง u ฟงกชนการหงq ปมตงเวลาลวงหนา
ขอมลจำาเพาะผลตภณฑรน ความจHD3075 4.0 ลตรHD3077 5.0 ลตร
กอนใชงานครงแรก1 นำาอปกรณเสรมทงหมดออกจากหมอชนใน ลอกแผนรองระหวางหมอในและ
แผนทำาความรอนออกกอน2 ทำาความสะอาดสวนตางๆ ของหมอหงขาวใหเรยบรอยกอนการใชงานครงแรก
( ดหวขอ ‘การทำาความสะอาด’ )
หมายเหต
• เชดสวนตางๆ ใหแหงกอนเรมใชงาน
หมายเหต
• โดยปกตแลวขาวสารหนงถวยตวงจะหงไดขาวสวย 2 ถวย อยาใสขาวเกนกวาปรมาณทระบไวดานในของหมอใน ขาว 1 ถวยมปรมาตรประมาณ 180 มล.
• ไมควรใชหมอชนในซาวขาว เพราะผวเคลอบอาจเสยหายได • ระดบนทแสดงไวดานในของหมอชนในเปนเพยงสญลกษณแสดงระดบเทานน คณสามารถปรบระดบ
นไดตามประเภทของขาวและตามความพอใจของคณ • ตรวจสอบใหแนใจวาดานนอกของหมอชนในแหงสะอาดและปราศจากสงแปลกปลอมบนตวนำาความ
รอนและสวตชแมเหลก
หมายเหต
• อยาใสนในปรมาณเกนกวาระดบนสงสดทระบไวดานในของหมอใน เนองจากอาจทำาใหนลนออกจากหมอหงขาวได
• หลงจากทคณกดปมเมน ( ) และไมไดใชงานเปนเวลา 15 วนาท หมอหงขาวของคณจะสงเสยงและกลบเขาสโหมดรอโดยอตโนมต
• คณสามารถกดปมยกเลก ( ) หรอถอดปลกไฟของหมอหงขาวออกเพอปดฟงกชนการอนเมอไมไดใช
การหงหาวฟงกชนการหงขาวมอยดวยกนสามฟงกชนสำาหรบ HD3075 และ HD3077
ฟงกชนการหงขาว เวลาในการหงขาวโดยประมาณสำาหรบขาว 8 ถวย ( HD3075 ) และขาว 10 ถวย ( HD3077 )
การหงขาวทวไป ( Standard cook ) 45 นาท
การหงขาวแบบดวน ( Ultra quick cook ) 40 นาท
การหงขาวปรมาณนอย ( Small portion rice ) 35 นาท
การหงขาวในหมอดนฟงกชนการหงขาว เวลาในการหงขาวโดยประมาณสำาหรบขาว
2 - 4 ถวย ( HD3075 และ HD3077 )
การหงขาวในหมอดน ( Claypot rice ) 1 ชวโมง 20 นาท
การตมโจกและการทำาซปฟงกชนการหงขาว เวลาในการหงโดยประมาณ
การตมโจก ( Congee ) 1 ชวโมง ( สำาหรบขาว 1 ถวย ทง HD3075 และ HD3077 )
การทำาซป ( Soup ) 1 ชวโมง
การหงขาวตมฟงกชนการหงขาว เวลาในการหงขาวโดยประมาณสำาหรบขาว 8 ถวย
( HD3075 ) และขาว 10 ถวย ( HD3077 )
การหงขาวตม ( Rice with soup ) 35 นาท
เคลดลบ
• กดปมนาท ( ) หนงครงเพอเพมเวลาอก 1 นาท กดปมนาท ( ) คางไวเพอเรงเวลาไปขางหนาอก 10 นาท
• คณสามารถเลอกเวลาการหงขาวไดตงแต 25 ถง 59 นาท
วธอบเคกฟงกชนการหงขาว เวลาในการหงโดยประมาณ
วธอบเคก ( Cake ) 45 นาท
หมายเหต
• หลงจากทคณกดปมเมน ( ) และไมไดใชงานเปนเวลา 15 วนาท หมอหงขาวของคณจะสงเสยงและกลบเขาสโหมดรอโดยอตโนมต
• ควรใสถงมอหรอใชผาหม เนองจากหมอในจะรอนมาก • คณสามารถกดปมยกเลก ( ) หรอถอดปลกไฟของหมอหงขาวออกเพอปดฟงกชน
การอนเมอไมไดใช
เคลดลบ
• กดปมนาท ( ) หนงครงเพอเพมเวลาอก 1 นาท กดปมนาท ( ) คางไวเพอเรงเวลาไปขางหนาอก 10 นาท
การนงอาหารฟงกชนการหงขาว เวลาในการหงโดยประมาณ
การนงอาหาร ( Steam ) 20 นาท
หมายเหต
• ควรใสถงมอหรอใชผาหม เนองจากจานและถาดสำาหรบนงจะรอนมาก • อยาใสนในปรมาณเกนกวาระดบนสงสดทระบไวดานในของหมอใน เนองจากอาจ
ทำาใหนลนออกจากหมอหงขาวได • คณสามารถปรบระดบนไดตามตองการ • หลงจากทคณกดปมเมน ( ) และไมไดใชงานเปนเวลา 15 วนาท หมอหงขาวของ
คณจะสงเสยงและกลบเขาสโหมดรอโดยอตโนมต • คณสามารถกดปมยกเลก ( ) หรอถอดปลกไฟของหมอหงขาวออกเพอปดฟงกชน
การอนเมอไมไดใช
เคลดลบ
• กดปมนาท ( ) หนงครงเพอเพมเวลาอก 1 นาท กดปมนาท ( ) คางไวเพอเรงเวลาไปขางหนาในหนวยนาท
• คณสามารถเลอกเวลาการหงขาวไดตงแต 10 ถง 40 นาท
การอนรอนฟงกชนการหงขาว เวลาในการหงโดยประมาณ
การอนรอน ( Reheat ) 25 นาท
หมายเหต
• หลงจากทคณกดปมเมน ( ) และไมไดใชงานเปนเวลา 15 วนาท หมอหงขาวของคณจะสงเสยงและกลบเขาสโหมดรอโดยอตโนมต
• คณสามารถกดปมยกเลก ( ) หรอถอดปลกไฟของหมอหงขาวออกเพอปดฟงกชนการอนเมอไมไดใช
เคลดลบ
• กดปมนาท ( ) หนงครงเพอเพมเวลาอก 1 นาท กดปมนาท ( ) คางไวเพอเรงเวลาไปขางหนาในหนวยนาท
• คณสามารถเลอกเวลาการหงขาวไดตงแต 25 ถง 59 นาท
การตงเวลาสำาหรบการทำาอาหารไวลวงหนาคณสามารถตงเวลาลวงหนาสำาหรบฟงกชนการหงทแตกตางกนได การตงเวลาลวงหนาพรอมใชงานถง 24 ชวโมง และไมสามารถใชงานกบการอบขนมเคกการนงอาหารและฟงกชนการอนรอน
หมายเหต
• อยาใสนในปรมาณเกนกวาระดบนสงสดทระบไวดานในของหมอใน เนองจากอาจทำาใหนลนออกจากหมอหงขาวได
• หลงจากทคณกดปมเมน ( ) และไมไดใชงานเปนเวลา 15 วนาท หมอหงขาวของคณจะสงเสยงและกลบเขาสโหมดรอโดยอตโนมต
• เมอหมอหงขาวเขาสโหมดการตงคาลวงหนา ปมตงเวลาลวงหนาจะไมตอบสนอง • การตงเวลาลวงหนาตามคาเรมตนคอ 4 ชวโมง • กดปมชวโมง ( ) หนงครงเพอเพมเวลาอก 1 ชวโมง กดปมนาท ( ) คางไวเพอ
เรงเวลาไปขางหนาอก 10 นาท
เคลดลบ
• คณสามารถกดปมยกเลก ( ) หรอถอดปลกไฟของหมอหงขาวออกเพอปดฟงกชนการอนเมอไมไดใช
การตงคาระบบปองกนเดกในการปองกนไมใหลกของคณเปดใชงานหมอหงขาว คณสามารถตงคาฟงกชนระบบปองกนเดก เพอปองกนไมใหลกของคณเปดใชงานหมอหงขาวไดกดปมระบบปองกนเดก ( ) เพอเขาสโหมดปองกนเดก
2 การทำาความสะอาดและบำารงรกษาหมายเหต
• ถอดปลกไฟหมอหงขาวออกกอนเรมทำาความสะอาด • รอจนกวาหมอหงขาวเยนลงกอนเรมทำาความสะอาด
ภายในภายในฝาดานนอกและตวเครอง:
• เชดดวยผาเชดทำาความสะอาดทเปยกพอหมาด• ตรวจสอบใหแนใจวาไดทำาความสะอาดเศษอาหารทตดอยภาย
ในหมอหงขาวออกจนหมดแผนทำาความรอน:
• เชดดวยผาเชดทำาความสะอาดทเปยกพอหมาด• ทำาความสะอาดเศษอาหารดวยผาเชดทำาความสะอาดหมาดๆ หรอ
ไมจมฟน
ภายนอกผวของฝาดานนอกและดานนอกตวเครอง:
• เชดดวยผาเชดทำาความสะอาดเปยกพอหมาดชบนสบ• สำาหรบแผงควบคม ใหเชดดวยผาเชดทำาความสะอาดเนอนมทแหงเทานน• ตรวจสอบใหแนใจวาไดทำาความสะอาดเศษอาหารบรเวณปมควบคมออกจนหมด
อปกรณเสรมทพพตกขาว, ทพพตกซป, หมอชนใน, ทเกบสายไฟ, ทเกบทพพ, ถาดสำาหรบนงอาหาร, ฝาหมอสำาหรบนงและฝาชนใน:
• ใหแชในนรอนและลางดวยฟองน
3 สงแวดลอมหามทงเครองรวมกบขยะในครวเรอนทวไป เมอเครองหมดอายการใชงานแลว ควรนำาไปทงทจดรวบรวมขยะเพอการนำากลบไปใชใหม เพอชวยรกษาสภาวะสงแวดลอมทด
4 การรบประกนและบรการหากคณตองการขอรบบรการหรอตองการทราบขอมลหรอมปญหา โปรดเขาชมเวบไซตของ Philips ไดท www.philips.com หรอตดตอศนยบรการดแลลกคาของบรษท Philips ในประเทศของคณ คณสามารถคนหาหมายเลขโทรศพทไดในแผนพบเกยวกบการรบประกนทวโลก หากในประเทศของคณไมมศนยบรการลกคา โปรดตดตอตวแทนจำาหนายผลตภณฑ Philips ในประเทศ
5 วธแกไขปญหาหากคณประสบปญหาในการใชงานหมอหงขาวน โปรดตรวจสอบจดตอไปนกอนนำาเครองเขารบบรการ หากคณไมสามารถแกปญหาได กรณาตดตอศนยบรการดแลลกคาของ Philips ในประเทศของคณ
ปญหา การแกปญหาไฟบนปมตางๆ ไมสวางขน
อาจมปญหาเกยวกบการตอสายไฟ ตรวจสอบวาไดเชอมตอสายไฟเขากบหมอหงขาวแลวและเสยบปลกไฟเขากบเตารบแนนดแลวหลอดไฟเสย นำาเครองไปทตวแทนจำาหนาย Philips หรอศนยบรการทไดรบการรบรองจาก Philips
จอแสดงผลไมทำางาน
หมอหงขาวไมไดเชอมตอกบแหลงจายไฟ หากไมมการเชอมตอกบแหลงจายไฟ ฟงกชนสำารองเมอไฟดบจะใชงานไมไดและจอแสดงผลจะไมทำางานแบตเตอรของจอแสดงผลหมด นำาเครองไปเปลยนแบตเตอรทตวแทนจำาหนายของ Philips หรอศนยบรการทไดรบการรบรองของ Philips
หมอหงขาวไมทำางาน
ระดบนไมเพยงพอ เตมนใหไดปรมาณตามระดบทแสดงภายในหมอชนใน
คณไมไดกดปมการหง ( )ตรวจสอบใหแนใจวาไมมคราบแปลกปลอมบนแผนทำาความรอนและบรเวณพนผวภายนอกของหมอชนในกอนเปดสวตชหมอหงขาวแผนทำาความรอนชำารด หรอหมอชนในเกดการบบ นำาหมอหงขาวไปทตวแทนจำาหนาย Philips หรอศนยบรการทไดรบการรบรองจาก Philips
ขาวทหงยงไมสกด
เตมนำาลงไปอก
หมอหงขาวไมเปลยนไปทโหมดอนโดยอตโนมต
ปมควบคมอณหภมมความผดปกต นำาเครองไปทตวแทนจำาหนาย Philips หรอศนยบรการทไดรบการรบรองจาก Philips
ขาวไหมเกรยม คณไมไดซาวขาวอยางถกตอง ซาวขาวจนกระทงนใสขนนลนออกจากหมอหงขาวขณะหงขาว
• ตรวจสอบใหแนใจวาคณไดเตมนตามระดบนทแสดงอยภายในหมอชนในตามจำานวนขาวทตวง
• ตรวจสอบระดบนไมใหเกนขดแสดงระดบนระดบถดไป เนองจากอาจเปนเหตใหนลนขณะหงขาวได
เคกแขงเกนไป โปรดใชสวนผสมเคกและทำาตามสตรทอยในคมอผใชฉนไมสามารถใชฟงกชนการหงทตองการได
กดปมเมน ( ) ซๆ เพอเลอกเมนทตองการซงจะแสดงบนจอ LED
ขาวทหงเสรจแลวมกลนเหมน
ทำาความสะอาดหมอชนในดวยนยาลางจานและนอนตรวจสอบใหแนใจวาหลงจากทำาอาหารเรยบรอยแลวไดทำาความสะอาดฝาหมอ ฝาใน และหมอชนในอยางทวถง
ในขอความแสดงขอผดพลาด ( E1, E2, E3, หรอ E4 ) ปรากฏขนบนจอแสดงผล
เกดกระแสไฟฟาขดของขณะหงขาว นำาเครองไปทตวแทนจำาหนาย Philips หรอศนยบรการทไดรบการรบรองจาก Philips
VIChúc mừng bạn đã mua hàng và chào mừng bạn đến với Philips!Để được hưởng lợi ích đầy đủ từ hỗ trợ do Philips cung cấp, hãy đăng ký sản phẩm tại www.philips.com/welcome.
1 Trong hộp có gìBộ phận chính của nồi cơm điện Khay hấpMuỗng cơm Môi xúpCôc đinh lượng Hướng dẫn sử dụngAn toàn Thẻ bảo hành
Tổng quana Vòng đệm g Phích cắm điệnb Nắp thông hơi có thể tháo rời h Đế nhiệtc Nồi trong i Tay cầm nồid Nút mở nắp j Chỉ báo mức nướce Panen điều khiển k Nắp trong có thể tháo rờif Thân chính l Nắp ngoài
Tổng quan về điều khiểnm Nút giữ ấm/ hủy r Khóa trẻ emn Nút giờ s Nút menuo Nút phút t Nút nấup Nút thời gian nấu u Chức năng nấu cơmq Nút cài đặt sẵn thời gian
Đặc tính kỹ thuậtKiểu máy Dung tíchHD3075 4,0LHD3077 5,0L
Trước khi sử dụng lân đâu1 Lấy toàn bộ phụ kiện ra khỏi nồi trong. Tháo tấm giữa nồi trong và
bộ phận làm nóng.2 Làm sạch kỹ các bộ phận của nồi cơm điện trước khi sử dụng nồi
cơm điện lần đầu tiên ( xem chương ‘Cách làm sạch’ ).
Ghi chú
• Đảm bảo tất cả các bộ phận khô hoàn toàn trước khi bắt đầu sử dụng nồi cơm điện.
Ghi chú
• Không vượt quá thể tích được chỉ báo hoặc vượt quá mức nước tôi đa được đánh dấu ở nồi trong, vì như vậy có thể làm cho nồi cơm điện bi trào.
• Sau khi nhấn nút menu ( ) và để nghỉ trong 15 giây, nồi cơm điện sẽ an toàn và tự động trở về chế độ chờ.
• Bạn có thể nhấn nút hủy ( ) hoặc rút phích cắm nồi cơm điện để tắt chức năng giữ ấm hoặc khi không sử dụng.
Ghi chú
• Thông thường mỗi chén lường gạo có thể cho ra 2 bát cơm. Không nấu nhiều hơn sô lượng được ghi ở trong nồi. 1chén lường gạo có thể tích khoảng 180ml.
• Sử dụng một đồ đựng khác để vo gạo nhăm tránh làm hư hỏng lớp tráng chông dính ở nồi trong.
• Mức nước được đánh dấu bên trong nồi trong chỉ là một chỉ báo. Bạn luôn có thể điều chỉnh mức nước cho thích hợp với các loại gạo khác nhau và theo sở thích của riêng bạn.
• Đảm bảo răng mặt ngoài của nồi trong khô ráo và sạch sẽ và không có vật gì hay cáu cặn bám dính trên bề mặt bộ phận làm nóng hay trên công tắc từ.
Nấu cơmCó ba chức năng nấu cơm cho sản phẩm HD3075 và HD3077.
Chức năng nấu Thời gian nấu ước tính cho 8 chén gạo ( HD3075 ) và 10 chén gạo ( HD3077 )
Nấu cơm thường ( Standard cook ) 45 phút
Nấu cơm nhanh ( Ultra quick cook ) 40 phút
Nấu ít gạo ( Small portion rice ) 35 phút
Nấu cơm bằng nồi đấtChức năng nấu Thời gian nấu ước tính cho 2 - 4 chén gạo
( HD3075 và HD3077 )Nấu cơm băng nồi đất ( Claypot rice )
1 giờ 20 phút
Nấu cháo và nấu xúpChức năng nấu Thời gian nấu ước tính
Nấu cháo ( Congee ) 1 giờ ( cho 1 chén gạo với cả hai sản phẩm HD3075 và HD3077 )
Nấu xúp ( Soup ) 1 giờ
Nấu xúp với cơmChức năng nấu Thời gian nấu ước tính cho 8 chén gạo
( HD3075 ) và 10 chén gạo ( HD3077 )Nấu xúp với cơm ( Rice with soup )
35 phút
Mẹo
• Nhấn nút phút ( ) một lần để tăng 1 phút trong đồng hồ hẹn giờ. Nhấn và giữ nút phút ( ) để đẩy nhanh đồng hồ hẹn giờ lên 10 phút.
• Có thể chọn thời gian nấu từ 25 đến 59 phút.
Nướng bánhChức năng nấu Thời gian nấu ước tính
Nướng bánh ( Cake ) 45 phút
Ghi chú
• Sau khi nhấn nút menu ( ) và để nghỉ trong 15 giây, nồi cơm điện sẽ an toàn và tự động trở về chế độ chờ.
• Sử dụng găng tay nhà bếp hay vải lót, vì nồi trong sẽ rất nóng. • Bạn có thể nhấn nút hủy ( ) hoặc rút phích cắm nồi cơm điện để tắt
chức năng giữ ấm hoặc khi không sử dụng.
Mẹo
• Nhấn nút phút ( ) một lần để tăng 1 phút trong đồng hồ hẹn giờ. Nhấn và giữ nút phút ( ) để đẩy nhanh đồng hồ hẹn giờ lên 10 phút.
Hấp thức ănChức năng nấu Thời gian nấu ước tính
Hấp thức ăn ( Steam ) 20 phút
Ghi chú
• Sử dụng găng tay nhà bép hay vải lót, vì đĩa và khay hấp thức ăn sẽ rất nóng. • Không vượt quá thể tích được chỉ báo hoặc vượt quá mức nước tôi đa được
đánh dấu ở nồi trong, vì như vậy có thể làm cho nồi cơm điện bi trào. • Bạn có thể điều chỉnh mức nước theo nhu cầu. • Sau khi nhấn nút menu ( ) và để nghỉ trong 15 giây, nồi cơm điện sẽ an
toàn và tự động trở về chế độ chờ. • Bạn có thể nhấn nút hủy ( ) hoặc rút phích cắm nồi cơm điện để tắt
chức năng giữ ấm hoặc khi không sử dụng.
Mẹo
• Nhấn nút phút ( ) một lần để tăng 1 phút trong đồng hồ hẹn giờ. Nhấn và giữ nút phút ( ) một lần để đẩy nhanh điều chỉnh đơn vi phút.
• Có thể chọn thời gian nấu từ 10 đến 40 phút.
Hâm nóngChức năng nấu Thời gian nấu ước tính
Hâm nóng ( Reheat ) 25 phút
Ghi chú
• Sau khi nhấn nút menu ( ) và để nghỉ trong 15 giây, nồi cơm điện sẽ an toàn và tự động trở về chế độ chờ.
• Bạn có thể nhấn nút hủy ( ) hoặc rút phích cắm nồi cơm điện để tắt chức năng giữ ấm hoặc khi không sử dụng.
Mẹo
• Nhấn nút phút ( ) một lần để tăng 1 phút trong đồng hồ hẹn giờ. Nhấn và giữ nút phút ( ) một lần để đẩy nhanh điều chỉnh đơn vi phút.
• Có thể chọn thời gian nấu từ 25 đến 59 phút.
Cài đặt sẵn thời gian để nấu chậmBạn có thể đặt sẵn thời gian nấu chậm cho các chức năng nấu khác nhau. Chế độ hẹn giờ đặt sẵn có thể đặt đến mức 24 giờ, và không áp dụng cho các chức năng nướng bánh, hấp thức ăn và hâm nóng.
Ghi chú
• Không vượt quá thể tích được chỉ báo hoặc vượt quá mức nước tôi đa được đánh dấu ở nồi trong, vì như vậy có thể làm cho nồi cơm điện bi trào.
• Sau khi nhấn nút menu ( ) và để nghỉ trong 15 giây, nồi cơm điện sẽ an toàn và tự động trở về chế độ chờ.
• Khi nồi cơm điện đang ở chế độ cài đặt sẵn, nút cài đặt sẵn thời gian sẽ không nhấn được.
• Thời gian cài đặt sẵn mặc đinh là 4 giờ. • Nhấn nút giờ ( ) một lần để tăng 1 giờ trong đồng hồ hẹn giờ. Nhấn và
giữ nút phút ( ) để đẩy nhanh đồng hồ hẹn giờ lên 10 phút.
Mẹo
• Bạn có thể nhấn nút hủy ( ) hoặc rút phích cắm nồi cơm điện để tắt chức năng giữ ấm hoặc khi không sử dụng.
Cài đặt chế độ khóa trẻ em.Để bảo vệ không cho con bạn khởi động nồi cơm điện, bạn có thể cài đặt chức năng khóa trẻ em.Nhấn nút khóa trẻ em ( ) để vào chế độ khóa trẻ em.
2 Vệ sinh và Bảo dưỡngGhi chú
• Rút phích cắm nồi cơm điện trước khi làm sạch nồi. • Chờ cho tới khi nồi cơm điện đủ nguội trước khi làm sạch.
Bên trongBên trong nắp ngoài và thân chính:
• Lau sạch băng vải ẩm vắt khô.• Đảm bảo lấy ra hết thức ăn dính trong nồi cơm điện.
Đế nhiệt:• Lau sạch băng vải ẩm vắt khô.• Lấy ra hết thức ăn dính trong nồi băng vải ẩm vắt khô hoặc
tăm xỉa răng.
Bên ngoàiBề mặt của nắp ngoài và bên ngoài thân chính:
• Lau sạch băng vải ẩm nhúng nước xà phòng.• CHỈ sử dụng vải khô và mềm để lau sạch bảng điều khiển.• Đảm bảo lấy ra hết toàn bộ thực ăn dính xung quanh các
nút điều khiển.
Phụ kiệnMuỗng cơm, môi xúp, nồi trong, bộ phận giữ dây điện, bộ phận giữ muỗng, khay hấp, nắp thông hơi, và nắp trong:
• Ngâm vào nước nóng và lau sạch băng miếng xôp.
3 Môi trườngKhông vứt thiết bi cùng chung với rác thải gia đình thông thường khi ngừng sử dụng nó mà hãy đem thiết bi đến điểm thu gom chính thức để tái chế. Làm như vậy, bạn sẽ giúp bảo vệ môi trường.
4 Bảo hành và dịch vụNếu bạn cần dich vụ hoặc thông tin, hay gặp trục trặc, hãy vào website của Philips tại www.philips.com hoặc liên hệ Trung Tâm Chăm Sóc Khách Hàng của Philips ớ nước bạn. Bạn có thể tìm thấy sô điện thoại của trung tâm này trong phiếu bảo hành toàn cầu. Nếu không có Trung Tâm Chăm Sóc Khách Hàng nào ở nước bạn, hãy liên hệ với đại lý Philips tại đia phương bạn.
8 Xử lý sự cốNếu bạn gặp sự cô khi sử dụng nồi cơm điện này, hãy kiểm tra các điểm sau trước khi yêu cầu dich vụ. Nếu bạn không thể giải quyết được vấn đề, hãy liên hệ Trung Tâm Chăm Sóc Khách Hàng của Philips tại nước bạn.Sự cố Giải phápĐèn trên các nút không bật sáng.
Có sự cô về dây nôi hay phích cắm điện. Kiểm tra xem dây điện có nôi chặt với nồi cơm điện không và xem phích cắm có cắm chặt vào ổ điện không.Đèn báo bi trục trặc. Mang thiết bi đến đại lý Philips của bạn hoặc trung tâm dich vụ được ủy quyền bởi Philips.
Màn hình không hoạt động.
Nồi cơm điện không được cắm vào nguồn điện. Nếu không có nguồn điện, chức năng dự phòng mất điện không hoạt động và màn hình không hoạt động.Màn hình hết pin. Mang thiết bi tới đại lý Philips hoặc trung tâm dich vụ được Philips ủy quyền để thay pin.
Cơm không chín.
Không có đủ nước. Cho thêm nước theo thang phân chia các mức nước ở nồi trong.
Bạn không nhấn nút nấu ( ).Đảm bảo không có vật lạ dính vào đế nhiệt và bên ngoài nồi trong trước khi bật nồi cơm điện.Đế nhiệt bi hỏng, hoặc nồi trong bi biến dạng. Mang nồi cơm điện đến đại lý Philips của bạn hoặc trung tâm dich vụ được ủy quyền bởi Philips.
Cơm chưa chín.
Hãy đổ thêm nước.
Nồi cơm điện không tự động chuyển sang chế độ giữ ấm.
Bộ điều khiển nhiệt độ bi hư hỏng. Mang thiết bi đến đại lý Philips của bạn hoặc trung tâm dich vụ được ủy quyền bởi Philips.
Cơm bi khét. Bạn không vo gạo đúng cách. Rửa sạch gạo đến khi nước vo gạo trong hoàn toàn.
Nước trào ra nồi cơm điện trong khi nấu.
• Nhớ cho nước vào đến mức nước hướng dẫn trên thang phân chia các mức nước ở nồi trong, chọn mức nước tương ứng với sô lượng chén gạo sử dụng.
• Đảm bảo nước không vượt quá mức tiếp theo trên thang, vì làm như vậy có thể làm cho nước trong nồi bi trào ra ngoài trong khi nấu.
Bánh bi chai cứng.
Vui lòng sử dụng máy làm bánh và thực hiện theo các hướng dẫn trong hướng dẫn sử dụng.
Tôi không thể tới được chức năng nấu mong muôn.
Nhấn nút menu ( ) liên tục để chọn menu mong muôn thể hiện bởi chỉ báo LED.
Cơm có mùi sau khi nấu
Làm sạch nồi trong băng xà phòng rửa chén và nước ấm.Sau khi nấu, đảm bảo lau sạch kỹ nắp thông hơi, nắp trong và nồi trong.
Thông báo lỗi ( E1, E2, E3, hoặc E4 ) xuất hiện trên màn hình.
Đã có sự mất điện trong quá trình nấu. Mang thiết bi đến đại lý Philips của bạn hoặc trung tâm dich vụ được ủy quyền bởi Philips.
MS-MYTahniah atas pembelian anda dan selamat menggunakan Philips!Untuk mendapatkan manfaat sepenuhnya daripada sokongan yang ditawarkan oleh Philips, daftarkan produk anda di www.philips.com/welcome.
1 Apa dalam kotak iniUnit utama pemasak nasi fuzzy Bakul kukusSenduk nasi Senduk supCawan penyukat Manual penggunaKeselamatan Kad waranti
Gambaran keseluruhana Gegelang kedap g Plag kuasab Tukup bolong stim boleh tanggal h Elemen pemanasanc Periuk dalam i Pemegang pemasakd Butang pelepas tudung j Penunjuk paras are Panel kawalan k Tudung dalam boleh tanggalf Jasad utama l Tudung luar
Gambaran keseluruhan kawalanm Butang simpan panas / Batal r Kunci keselamatan kanak-kanakn Butang jam s Butang menuo Butang minit t Butang memasakp Butang masa memasak u Fungsi memasakq Butang masa praset
SpesifikasiModel KapasitiHD3075 4.0LHD3077 5.0L
Sebelum penggunaan pertama1 Keluarkan semua aksesori dari periuk dalam. Keluarkan alas di antara
periuk dalam dan plat pemanas.2 Bersihkan bahagian pemasak nasi dengan menyeluruh sebelum anda
menggunakan pemasak nasi buat kali pertama ( lihat bab ‘Pembersihan’ ).
Catatan • Pastikan semua bahagian telah kering sepenuhnya sebelum anda mula
menggunakan pemasak nasi.
Catatan • Setiap cawan beras yang belum dimasak biasanya menghasilkan dua mangkuk
nasi selepas dimasak. Jangan melebihi kuantiti yang ditunjukkan di bahagian dalam periuk dalam. 1 cawan beras adalah kira-kira 180ml.
• Gunakan bekas lain untuk membasuh beras supaya salutan tidak lekat pada periuk dalam tidak rosak.
• Paras yang ditandai di dalam periuk dalam hanyalah penunjuk. Anda boleh sahaja mengubah suai paras air untuk jenis beras berlainan dan mengikut kesukaan anda.
• Pastikan bahawa bahagian luar periuk dalam adalah kering dan bersih, dan bahawa tiada sisa asing pada elemen pemanasan atau suis magnet.
Catatan • Jangan melebihi isi padu yang ditunjukkan mahupun melebihi paras air
maksimum yang ditunjukkan di dalam periuk dalam, kerana ini boleh menyebabkan pemasak nasi melimpah.
• Selepas anda menekan butang menu ( ) dan membiarkannya tanpa sebarang aktiviti selama 15 saat, pemasak nasi anda akan berbunyi dan kembali ke mod menunggu secara automatik.
• Anda boleh tekan butang batal ( ) atau cabut plag pemasak nasi untuk mematikan fungsi simpan panas atau apabila ia tidak digunakan.
Memasak nasiTerdapat tiga fungsi memasak nasi bagi HD3075 dan HD3077.
Fungsi memasak Masa memasak yang dianggarkan untuk 8 cawan beras ( HD3075 ) dan 10 cawan beras ( HD3077 )
Memasak nasi biasa ( Standard cook ) 45 minit
Memasak nasi ekspres ( Ultra quick cook ) 40 minit
Memasak nasi dalam jumlah yang sedikit ( Small portion rice )
35 minit
Memasak nasi merendidihFungsi memasak Masa memasak yang dianggarkan untuk 2
- 4 cawan beras ( HD3075 dan HD3077 )Memasak nasi merendidih ( Claypot rice )
1 jam 20 minit
Memasak bubur dan membuat supFungsi memasak Masa memasak yang dianggarkan
Memasak bubur ( Congee ) 1 jam ( untuk 1 cawan beras bagi kedua-dua HD3075 dan HD3077 )
Membuat sup ( Soup ) 1 jam
Memasak sup dengan nasiFungsi memasak Masa memasak yang dianggarkan untuk
8 cawan beras ( HD3075 ) dan 10 cawan beras ( HD3077 )
Sup dengan nasi ( Rice with soup ) 35 minit
PetuaPetua
• Tekan butang minit ( ) sekali untuk menambah pemasa sebanyak 1 minit. Tekan dan tahan butang minit ( ) untuk pemasa ke hadapan pantas sebanyak 10 minit.
• Anda boleh memilih masa memasak antara 25 hingga 59 minit.
Membakar kekFungsi memasak Masa memasak yang dianggarkan
Memasak kek ( Cake ) 45 minit
Catatan
• Selepas anda menekan butang menu ( ) dan membiarkannya tanpa sebarang aktiviti selama 15 saat, pemasak nasi anda akan berbunyi dan kembali ke mod menunggu secara automatik.
• Gunakan sarung tangan dapur atau kain, kerana periuk dalam sangat panas. • Anda boleh tekan butang batal ( ) atau cabut plag pemasak nasi untuk
mematikan fungsi simpan panas atau apabila ia tidak digunakan.
PetuaPetua
• Tekan butang minit ( ) sekali untuk menambah pemasa sebanyak 1 minit. Tekan dan tahan butang minit ( ) untuk ke hadapan pantas sebanyak 10 minit.
MengukusFungsi memasak Masa memasak yang dianggarkan
Mengukus ( Steam ) 20 minit
Catatan • Gunakan sarung tangan dapur atau kain, kerana pinggan dan bakul kukus
sangat panas. • Jangan melebihi isi padu yang ditunjukkan mahupun melebihi paras air
maksimum yang ditunjukkan di dalam periuk dalam, kerana ini boleh menyebabkan pemasak nasi melimpah.
• Anda boleh melaraskan paras air seperlunya. • Selepas anda menekan butang menu ( ) dan membiarkannya tanpa
sebarang aktiviti selama 15 saat, pemasak nasi anda akan berbunyi dan kembali ke mod menunggu secara automatik.
• Anda boleh tekan butang batal ( ) atau cabut plag pemasak nasi untuk mematikan fungsi simpan panas atau apabila ia tidak digunakan.
PetuaPetua
• Tekan butang minit ( ) sekali untuk menambah pemasa sebanyak 1 minit. Tekan dan tahan butang minit ( ) untuk ke hadapan pantas dalam melaraskan unit minit.
• Anda boleh memilih masa memasak antara 10 hingga 40 minit.
Panas semulaFungsi memasak Masa memasak yang dianggarkan
Memanaskan semula ( Reheat ) 25 minit
Catatan
• Selepas anda menekan butang menu ( ) dan membiarkannya tanpa sebarang aktiviti selama 15 saat, pemasak nasi anda akan berbunyi dan kembali ke mod menunggu secara automatik.
• Anda boleh tekan butang batal ( ) atau cabut plag pemasak nasi untuk mematikan fungsi simpan panas atau apabila ia tidak digunakan.
PetuaPetua
• Tekan butang minit ( ) sekali untuk menambah pemasa sebanyak 1 minit. Tekan dan tahan butang minit ( ) untuk ke hadapan pantas dalam melaraskan unit minit.
• Anda boleh memilih masa memasak antara 25 hingga 59 minit.
Masa dipraset bagi masakan tertangguhAnda boleh praset masa memasak tertangguh bagi fungsi memasak yang berlainan. Pemasa praset tersedia sehingga 24 jam, dan tidak boleh digunakan untuk pembakaran kek, mengukus dan fungsi pemanasan.
Catatan • Jangan melebihi isi padu yang ditunjukkan mahupun melebihi paras air
maksimum yang ditunjukkan di dalam periuk dalam, kerana ini boleh menyebabkan pemasak nasi melimpah.
• Selepas anda menekan butang menu ( ) dan membiarkannya tanpa sebarang aktiviti selama 15 saat, pemasak nasi anda akan berbunyi dan kembali ke mod menunggu secara automatik.
• Sebaik sahaja pemasak nasi memasuki mod praset, butang masa praset tidak akan memberi respons.
• Masa praset lalai ialah 4 jam. • Tekan butang jam ( ) sekali untuk menambah pemasa sebanyak 1 jam.
Tekan dan tahan butang minit ( ) untuk pemasa ke hadapan pantas sebanyak 10 minit.
PetuaPetua
• Anda boleh tekan butang batal ( ) atau cabut plag pemasak nasi untuk mematikan fungsi simpan panas atau apabila tidak menggunakannya.
Menyediakan kunci keselamatan kanak-kanakUntuk melindungi anak anda daripada menghidupkan pemasak nasi, anda boleh menyediakan fungsi kunci keselamatan kanak-kanak.Tekan butang kunci keselamatan kanak-kanak ( ) untuk memasuki mod kunci keselamatan kanak-kanak.
2 Pembersihan dan Penyelenggaraan
Catatan
• Cabut plag pemasak nasi sebelum anda mula membersihkannya. • Tunggu sehingga periuk pemasak nasi telah sejuk secukupnya sebelum
membersihkannya.
DalamanDi bahagian dalam tudung luar dan badan utama:
• Lap dengan kain lembap yang telah diperah.• Pastikan semua sisa makanan yang melekat pada pemasak
nasi dibuang.Elemen pemanas:
• Lap dengan kain lembap yang telah diperah.• Buang sisa makanan dengan kain lembap yang telah diperah
atau cungkil gigi.
LuaranPermukaan tudung luar dan bahagian luar jasad utama:
• Lap dengan kain yang dilembapkan dengan air sabun.• HANYA gunakan kain lembut dan kering untuk melap panel
kawalan.• Pastikan semua sisa makanan di sekeliling butang kawalan
dibuang.
AksesoriSenduk nasi, senduk sup, periuk dalam, pemegang kord sesalur kuasa, pemegang senduk, bakul kukus, tukup bolong stim dan tudung dalam:
• Rendam di dalam air panas dan bersihkan dengan span.
3 Alam sekitarJangan buang perkakas ini dengan sampah rumah biasa di akhir hayatnya, sebaliknya bawa ia ke pusat pungutan rasmi untuk dikitar semula. Dengan melakukan ini, anda membantu memelihara alam sekitar.
4 Jaminan dan perkhidmatanJika anda memerlukan servis atau maklumat, atau jika anda mengalami masalah, lawati laman web Philips di www.philips.com atau hubungi Pusat Layanan Pelanggan Philips di negara anda. Anda boleh mendapatkan nombor telefonnya dalam risalah jaminan seluruh dunia. Jika tiada Pusat Layanan Pelanggan di negara anda, pergi ke penjual Philips tempatan anda.
5 Menyelesaikan masalahJika anda menghadapi masalah semasa menggunakan pemasak nasi ini, periksa perkara-perkara berikut sebelum memohon servis. Jika anda tidak dapat menyelesaikan masalah ini, hubungi Pusat Layanan Pelanggan Philips di negara anda.
Masalah PenyelesaianLampu pada butang tidak menyala.
Terdapat masalah sambungan. Periksa sama ada kord kuasa telah disambung kepada pemasak dengan betul dan sama ada plag telah dimasukkan dengan kukuh ke dalam saluran keluar kuasa.Lampu rosak. Bawa perkakas ke penjual Philips anda atau pusat servis yang disahkan oleh Philips.
Paparan tidak berfungsi.
Pemasak nasi tidak disambung kepada bekalan kuasa. Jika tiada bekalan kuasa, fungsi sandaran bekalan elektrik terputus tidak berjalan dan paparan tidak akan berfungsi.Bateri untuk paparan kehabisan kuasa. Bawa perkakas kepada wakil penjual Philips anda atau pusat servis yang diluluskan oleh Philips untuk mengganti bateri.
Nasi masih mentah. Air tidak mencukupi. Tambah air mengikut skala pada bahagian dalam periuk dalam.
Anda tidak menekan butang memasak ( ).Pastikan tidak terdapat sisa asing pada elemen pemanasan dan bahagian luar periuk dalam sebelum menghidupkan pemasak nasi.Elemen pemanasan rosak, atau periuk dalam cacat. Bawa perkakas kepada wakil penjual Philips anda atau pusat servis yang diluluskan oleh Philips.
Nasi tidak sempurna masak.
Tambah lebih banyak air.
Pemasak nasi tidak beralih ke mod simpan panas secara automatik.
Kawalan suhu rosak. Bawa perkakas ke penjual Philips anda atau pusat servis yang disahkan oleh Philips.
Nasinya hangus. Anda telah tidak membilas beras dengan betul. Bilas beras sehingga air yang mengalir bersih.
Air melimpah keluar daripada pemasak nasi semasa memasak.
• Pastikan anda menambahkan air seh-ingga aras yang ditunjukkan pada skala di dalam periuk dalam yang sepadan dengan bilangan cawan beras yang digunakan.
• Pastikan bahawa air tidak melebihi paras seterusnya pada skala, kerana ini akan menyebabkan perkakas melimpah semasa memasak.
Kek yang dimasak terlalu keras.
Sila gunakan campuran kek dan ikut arahan yang disediakan dalam manual pengguna.
Saya tidak dapat pergi ke fungsi memasak yang dikehendaki.
Tekan butang menu ( ) berulang kali untuk memilih menu yang dikehendaki sebagaimana yang ditunjukkan oleh penunjuk LED.
Bau nasi kurang menyenangkan selepas dimasak
Bersihkan periuk dalam dengan sedikit bahan cuci dan air suam.Selepas memasak, pastikan tukup bolong stim, tudung dalam dan periuk dalam dibersihkan dengan menyeluruh.
Mesej ralat ( E1, E2, E3, atau E4 ) kelihatan pada paparan.
Bekalan kuasa terputus ketika sedang memasak. Bawa perkakas ke penjual Philips anda atau pusat servis yang disahkan oleh Philips.
Related Documents