X.90 Access Control System - Installation Guide __________________________________________________________________________ _______________________________________________________________________________________________________________ Version 1.0 2014-10-15 Design . Innovations Page 1 of 15 Installation on the computer 1. Please remove any residual folder for previous installed X90. Double Click the installation file to start the installation wizard 2. Select the destination folder and access permission, Click next to finish the wizard 3. Then double click the icon in the desktop

Welcome message from author
This document is posted to help you gain knowledge. Please leave a comment to let me know what you think about it! Share it to your friends and learn new things together.
Transcript

X.90 Access Control System - Installation Guide __________________________________________________________________________
_______________________________________________________________________________________________________________
Version 1.0 2014-10-15 Design . Innovations Page 1 of 15
Installation on the computer
1. Please remove any residual folder for previous installed X90. Double Click the installation file
to start the installation wizard
2. Select the destination folder and access permission, Click next to finish the wizard
3. Then double click the icon in the desktop

X.90 Access Control System - Installation Guide __________________________________________________________________________
_______________________________________________________________________________________________________________
Version 1.0 2014-10-15 Design . Innovations Page 2 of 15
4. Input the database setting. Specify the instance name by using \ after the IP address. Specify the
port by using , after the IP address.
5. Input the SN and release code
6. Please make sure install all the patches in the folder of C:\Program Files (x86)\ACX\X.90
Access Control System\Other before proceeding.
X.90 Access Control System - Installation Guide __________________________________________________________________________
_______________________________________________________________________________________________________________
Version 1.0 2014-10-15 Design . Innovations Page 3 of 15
Set up the communication with control panel
1. Click “Install Panel” icon to add panel to the system
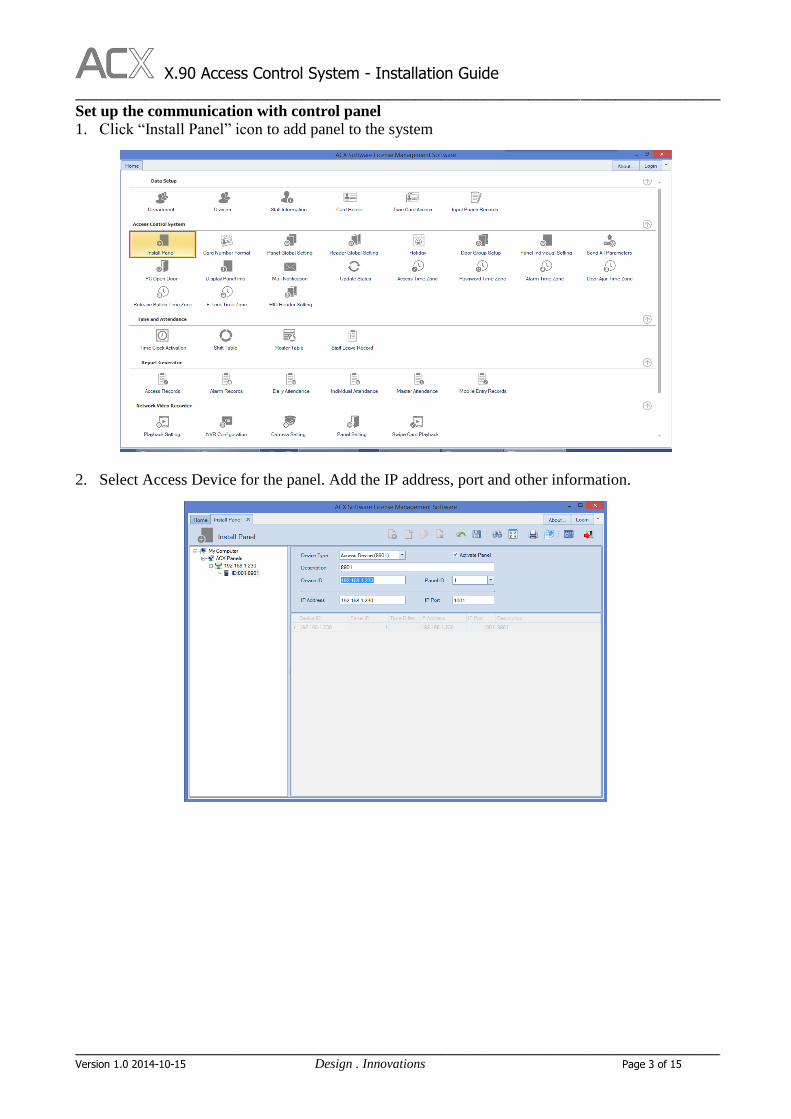
2. Select Access Device for the panel. Add the IP address, port and other information.

X.90 Access Control System - Installation Guide __________________________________________________________________________
_______________________________________________________________________________________________________________
Version 1.0 2014-10-15 Design . Innovations Page 4 of 15
3. After setting up the panel, please start up the ACX COM Server to start the communication.
4. Click “Comm Server Start” icon in the services manager.
X.90 Access Control System - Installation Guide __________________________________________________________________________
_______________________________________________________________________________________________________________
Version 1.0 2014-10-15 Design . Innovations Page 5 of 15
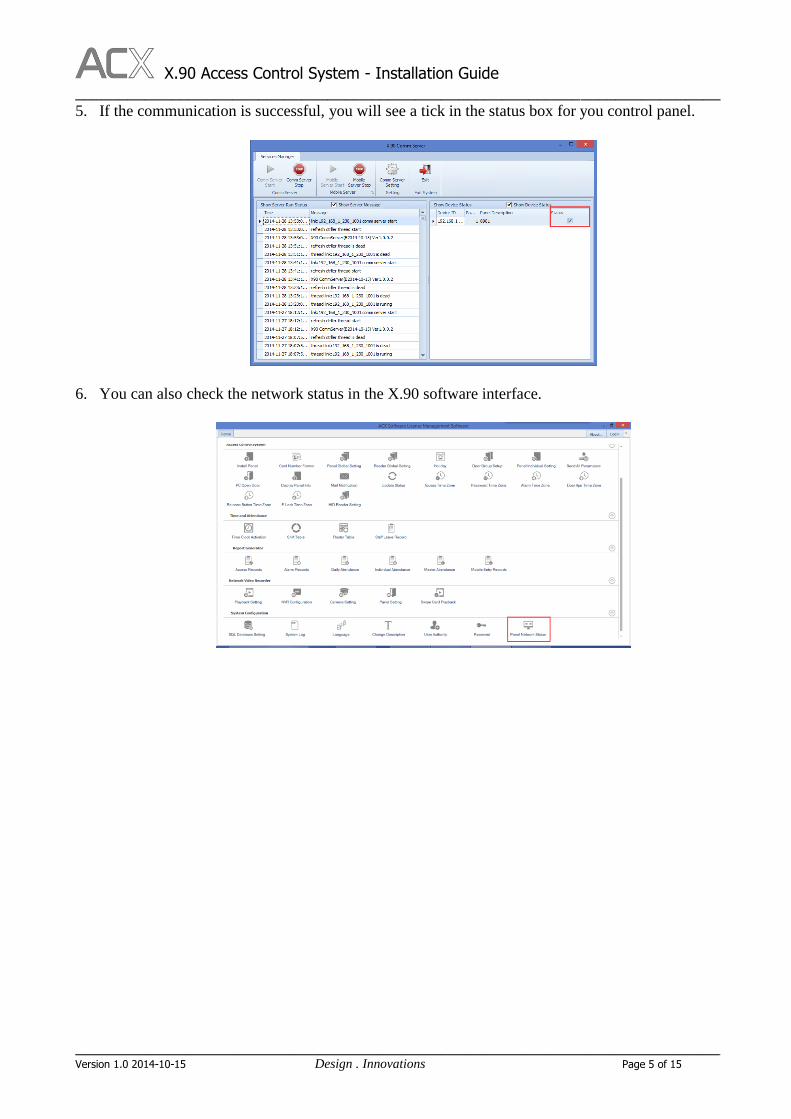
5. If the communication is successful, you will see a tick in the status box for you control panel.
6. You can also check the network status in the X.90 software interface.

X.90 Access Control System - Installation Guide __________________________________________________________________________
_______________________________________________________________________________________________________________
Version 1.0 2014-10-15 Design . Innovations Page 6 of 15
Add the first cardholder with access right
1. For creating access right, user should pay attention to the access time zone and the door group.
By default, there is a “000-[24 Hours In/Out]” access time zone. We will use this access time
zone for simplicity. Go to the “Door Group Setup”. First create a door group named “All” to
include the control panel just added. Please choose the Access Time Zone to “000-[24 Hours
In/Out]”.

X.90 Access Control System - Installation Guide __________________________________________________________________________
_______________________________________________________________________________________________________________
Version 1.0 2014-10-15 Design . Innovations Page 7 of 15
2. Go to “Cardholder”. Create a new card or edit an old card. In the “Access Rights”, please select
the “By Door Group” and choose the door group just added. So the card will pass the control
panel in the door group. User can also add door groups to departments so the card can be
grouped by department.

X.90 Access Control System - Installation Guide __________________________________________________________________________
_______________________________________________________________________________________________________________
Version 1.0 2014-10-15 Design . Innovations Page 8 of 15
3. Start up the ACX COM Server to start the communication.
4. Click “Comm Server Start” to start the COM Server

X.90 Access Control System - Installation Guide __________________________________________________________________________
_______________________________________________________________________________________________________________
Version 1.0 2014-10-15 Design . Innovations Page 9 of 15
Enable Alarms in the control panels
Press the Panel Global Setting icon the main page.
Enable the alarms as the system requires. Press save to make the changes effective.

X.90 Access Control System - Installation Guide __________________________________________________________________________
_______________________________________________________________________________________________________________
Version 1.0 2014-10-15 Design . Innovations Page 10 of 15
Launch the application server for Milestone®
Copy the “VideoOS.Matrix.AccessControl.Plugin” folder into the C:\Program Files
(x86)\Milestone\XProtect Event Server\MIPPlugins. Please restart the event server for Milestone
Xprotect
Click the “Milestone” icon in the X90 main page
Launch the application server

X.90 Access Control System - Installation Guide __________________________________________________________________________
_______________________________________________________________________________________________________________
Version 1.0 2014-10-15 Design . Innovations Page 11 of 15
Launch the Milestone Management Application, Right click the Acces Control in the menu to
create a new access control server.
Select the “Matrix Access Control System”. Input the right communcation login information.

X.90 Access Control System - Installation Guide __________________________________________________________________________
_______________________________________________________________________________________________________________
Version 1.0 2014-10-15 Design . Innovations Page 12 of 15
Make sure the X90 application server for Milestone is on. Then it will shows the information
retrieved from the X90 system.
Select cameras associated with the doors

X.90 Access Control System - Installation Guide __________________________________________________________________________
_______________________________________________________________________________________________________________
Version 1.0 2014-10-15 Design . Innovations Page 13 of 15
Press “Next” and there will be a server generated under the Access Control
Launch the Milestone Smart Client. Press Setup in the Live tab.

X.90 Access Control System - Installation Guide __________________________________________________________________________
_______________________________________________________________________________________________________________
Version 1.0 2014-10-15 Design . Innovations Page 14 of 15
Drag the Access Monitor into the view
Select the door and the camera for viewing. Be careful about the Events where you can select which
events you want to monitor in the view.

X.90 Access Control System - Installation Guide __________________________________________________________________________
_______________________________________________________________________________________________________________
Version 1.0 2014-10-15 Design . Innovations Page 15 of 15
After exit the setup, users can monitor the door with Milestone Smart Client
Related Documents