Welcome to the Point of Sale Professional Version 4.05 Manual Our Is Your Solution MAS 90 How To Use This Guide Contents Index

Welcome message from author
This document is posted to help you gain knowledge. Please leave a comment to let me know what you think about it! Share it to your friends and learn new things together.
Transcript

Welcome to the Point of Sale ProfessionalVersion 4.05 Manual
Our
Is Y
our
Solu
tion
MAS 90
How To Use This Guide
Contents
Index

How to Use This Guide
� Bookmarks appear in the overview window to the left of the document window. These bookmarks are similar to a table of contents.
Note: This manual is best viewed using Acrobat Reader 5.0, which can be installed from the CD-ROM. For best printing results, print to a PostScript printer.
BACK
INDEX
CONTENTS
Text on page...
�
�
Go to the How to Use This Guide page (this page).
Go to the Contents.
Go to the previous page.
Go to the next page.
Go back to the previous link.
Go to the Index.
Indicates a jump to a topic.

Information in this document is furnished only under a Customer License Agreement or non-disclosure agreement, and may be used or copied only in accordance with the terms of such agreement. The software described in this document is protected by copyright, and may not be copied on any medium except as specifically authorized in the license or non-disclosure agreement.
This document is also protected by copyright, and may not be reproduced or transmitted, in whole or in part, by any means, including photocopying, facsimile transmission, or reduction to any electronic medium or machine readable form, without the express written consent of HighTower, Inc.
Copyright Statements:Food Distribution, MICR Encoded Laser Checks, Multi-Bin Advanced Distribution, Point of Sale® Professional, Professional Retainer Control, Remote Salesperson, Remote Salesperson Laptop, ScanBlaster, Time and Billing®, Time and Billing® Professional, and Timekeeper® are products of HighTower, Inc. Copyright © 2005. All rights reserved.
MAS 90®, MAS 200®, and MAS 500® are products of Best Software. Copyright © 2005. All rights reserved.
PCCharge™ name and logo are trademarks of GO Software, Incorporated. Copyright © 2005.
Microsoft® Windows® NT®, 95®, 98®, 2000®, ME®, and XP® names and logos are registered trademarks of the Microsoft Corporation. Copyright © 2005.
All other trademarks and copyrights are the property of their respective holders.
This manual was written for Point of Sale Professional version 4.05. It was last updated on 1/13/2005.
New Features for Point of Sale Professional Version 4.05
The 4.05 version of Point of Sale Professional has been enhanced with new manager capabilities, new reports, and new features for voided transactions.
View Unencrypted Credit Card Number
An option was added in Manager Maintenance to view unencrypted credit card information. Check this field to allow managers to view a customer’s unencrypted credit card number. This option allows the manager to view the customer’s full credit card number on historical transactions available in the Point of Sale Entry window and inquiries. If this option is not selected, the manager will only be able to view the encrypted number on historical reports and inquiries. (See page 117 for more information.)
Tab Sequence Includes User Defined Fields
In Transaction Type Maintenance, UDF's (User Defined Fields) are now included on the list of available fields to include in the tab sequence. (See page 80 for more information.)
New Monthly Recap Reports Available in Reports Menu
The following reports have been added to the Reports menu and can also be printed during Period End Processing:
• Monthly Recap by Product Line - This report summarizes the sales data for each product line sold during the current month. (See page 282 for more information.)
• Monthly Recap by Warehouse/Product Line - This report summarizes the sales data for each warehouse and product line sold during the current month. (See page 284 for more information.)
• Monthly Recap by Warehouse - This report summarizes the sales data for each warehouse during the current month. (See page 286 for more information.)

• Monthly Recap by Division - This report summarizes the sales data for each company division during the current month. (See page 288 for more information.)
• Monthly Recap by Location - This report summarizes the sales data for each store location during the current month. (See page 289 for more information.)
Voided Transactions
Voided transactions can now be printed from Point of Sale Entry and from Transaction History Inquiry. When printing voids, the word "VOID" will appear on the bottom of the receipt. (See pages 173 and 255 for more information.)
When a transaction is voided, the cashier who voided it and the reason for the void are retained. These fields are displayed on the Transaction Detail window in Point of Sale Entry and Transaction History Inquiry.
The Voided Transaction Report was added in the Reports menu to track who is voiding transactions and the reason for the void. It can be sorted by Transaction Number, Transaction Date, Cash Drawer Number, or Customer Number. (See page 290 for more information.)
Change in Location Maintenance Form
In the 4.05 release of Point of Sale Professional, the definition field, Standard Transaction Type, was replaced with Reference No. on the Details tab of the Forms Customization window available in Location Maintenance. (See page 99 for more information).

6
INDEX
�
�BACK
Contents
New Features for Point of Sale Professional Version 4.05 4View Unencrypted Credit Card Number 4Tab Sequence Includes User Defined Fields 4New Monthly Recap Reports Available in Reports Menu 4Voided Transactions 5Change in Location Maintenance Form 5
Chapter 1 — Introduction 16The HighTower Ideal 16Welcome to Point of Sale Professional 16
Integrating Point of Sale Professional with other MAS 90/MAS 200 Modules 17Accounts Receivable 18Inventory Management 18
Multi-Bin Advanced Distribution 19Bank Reconciliation 19Sales Order 20General Ledger 20
Using the Point of Sale Professional Manual 21Sections in this Manual 21Graphic Conventions 22Text Conventions 23
Getting Additional Help 23Getting Additional Copies of the Manual 23
Open the Point of Sale Professional Online Manual 24Using the Point of Sale Professional Online Help 26
Open the Point of Sale Professional Online Help 26Support Services 27Related Manuals 28
Chapter 2 — Point of Sale Professional Concepts 29What is a Cashier in Point of Sale Professional? 29What is a Cash Drawer in Point of Sale Professional? 29What is a Location in Point of Sale Professional? 30What is a Register in Point of Sale Professional? 30What is a Bank Deposit in Point of Sale Professional? 30What is a Register Pay Out in Point of Sale Professional? 30What is a Register Withdrawal in Point of Sale Professional? 30
Table of Contents Point of Sale Professional Manual

7
INDEX
�
�BACK
Chapter 3 — Installing the Point of Sale Professional Module 31System Requirements 31Pre-installation Instructions 32Installing Point of Sale Professional 33System Startup 37
Setup the Point of Sale Professional Module in the Role Maintenance 37Register the Point of Sale Professional Enhancement 38MAS 200 or MAS 200 for SQL Installations 39Defining the Point of Sale Professional Enhancement 39
Chapter 4 — Migrating Data from the Point of Sale Module 42Migration Procedures 42
Recreate Customers in the Accounts Receivable Module 42Recreate Salespeople in the Accounts Receivable Module 43Recreate Payment Types in the Point of Sale Professional Module 43Recreate Orders without Deposits in the Sales Order Module 43Recreate Orders with Deposits in the Point of Sale Professional Module 44Recreate Layaways without Deposits in the Point of Sale Professional Module 44Recreate Layaways with Deposits in the Point of Sale Professional Module 45Recreate Quotes in the Point of Sale Professional Module 45
Chapter 5 — Navigating in Point of Sale Professional 46Using the Modules Tree 46
Open a Point of Sale Professional Window through the Modules Tree 47Using the Point of Sale Professional Menu Bar 48
Open a Point of Sale Professional Window through the Menu Bar 48Using Button Fields in Point of Sale Professional 49
Chapter 6 — Using the Setup Menu 56How to Use the Setup Menu 56
Open a Window from the Setup Menu 56Add a Record 57Change a Record 58Delete a Record 58Print a Setup Listing 58
Point of Sale Professional Options 59Configure the Standard Point of Sale Professional Options in the Main Tab 60Configure How to Post General Ledger Data in the General Ledger Tab 65
Table of Contents Point of Sale Professional Manual

8
INDEX
�
�BACK
Configure Point of Sale Transaction Entry Options 66Configure the Reports to Print during the Daily Sales Reports/Updates Process 69Configure the Recaps to Print during the Daily Sales Reports/Updates Process 70
Discount Maintenance 72Create a New Discount Code 73
Miscellaneous Charge Code Maintenance 74Create a Miscellaneous Charge Code 75Create a Miscellaneous Item Code 76Create a Miscellaneous Comment Code 77
Transaction Type Maintenance 78Create a Transaction Type 79Configure Point of Sale Entry Settings for the Transaction Type 80
Bank Maintenance 83Create a Bank 83
Payment Type Maintenance 84Create a Payment Type 85Configure Point of Sale Entry Settings for the Payment Type 86Configure the Bank Information for the Credit Card Payment Type 88Configure the Check Payment Type 91
Sales Tax Account Maintenance 92Create a Sales Tax Account 93
Location Maintenance 94Create a Location 95Configure the Location’s General Ledger Accounts 96Configure Point of Sale Entry Settings for the Location 98Configure Forms for the Location 99
Department Maintenance 105Create a Department 106
Register Maintenance 106Create a Register 106Configure the Register’s Devices 108Configure the Printers for the Register 109
Cashier Maintenance 110Create a Cashier 110Configure Point of Sale Entry Settings for the Cashier 111View an Cashier’s History 113Determine a Cashier’s Sales Information by Transaction Type and Period 113
Table of Contents Point of Sale Professional Manual

9
INDEX
�
�BACK
Review a Cashier’s Cash Drawer Details 114Manager Maintenance 115
Add a Manager 117Configure Point of Sale Entry Settings for a Manager 117
Reason Code Maintenance 119Create a Reason Code 119
Register Pay Out Maintenance 119Create a Pay Out Code 120
Chapter 7 — Using the Main Menu 121How to Use the Main Menu 121
Open a Window from the Main Menu 121Select Items from a Lookup List 122Delete a Record 122Print from a Window 123
Cash Drawer Maintenance 124Create a Cash Drawer 124Change the Status of a Cash Drawer 125
Point of Sale Entry 126Logging into Point of Sale Entry 127
Logon to the Register 127Before a Transaction 128
Activities Before a Transaction 128View Completed Transactions 129Void Completed Transactions 129Access Customer Maintenance 130View Updated Transactions 131Lookup the Price of an Item 132Lock/Unlock Register 134Withdraw Funds from a Cash Drawer 134Record a Payout with a Cash Drawer 136Open the Cash Drawer 138
Entering Transactions 138Salesperson Commission Reporting 139
If AR Customer and Point of Sale Professional (P2) Cashier Salesperson Are in the Same Division 140If AR Customer and Point of Sale Professional (P2) Cashier Salesperson Are Not
Table of Contents Point of Sale Professional Manual

10
INDEX
�
�BACK
in the Same Division 142Point of Sale Entry Window During a Transaction 143Sale Transactions 143
Enter a Fast Sale Transaction 145Enter a Customer Sale Transaction 147Enter a Layaway Sales Transaction 148Enter a Rental Transaction 151
Order Transactions 153Enter an Order Transaction 157Create a Back Order 158Update a Back Order 161Convert an Order to a Sale 163
Quote Transactions 165Enter a Quote Transaction 165Convert a Quote to a Sale 166
Customer Payment Transactions 168Enter a Customer Payment Transaction 168Enter a Prepayment Transaction 169
Layaway Payment Transactions 170Enter a Layaway Payment Transaction 170
Return Transactions 171Enter a Return Transaction 171
Suspending/Voiding Transactions 172Suspend a Transaction 172Void a Transaction 173Void a Completed Transaction 173
Using Different Payment Types 174Customer Pays with Cash 174Customer Charges Transaction 175Customer Charges Transaction and PCCharge is Integrated with Point of Sale Professional 176Customer Pays with a Check 178Customer Pays with a Check and PCCharge is Integrated with Point of Sale Pro-fessional 180Customer Pays with a Gift Certificate 181Apply a Term to a Transaction 182If You Entered the Wrong Payment Information 183
Using Additional Features of the Point of Sale Entry Window 185Using Features in the Header Section 186
Table of Contents Point of Sale Professional Manual

11
INDEX
�
�BACK
View Details of a Transaction 186Using Features in the Customer Details Section 187
View the Customer Details for a Transaction 187View a Customer Memo 188Check a Customer’s Credit 189Launch Customer Maintenance 190Search for the Customer’s Last Purchase 191Change the Salesperson for the Customer’s Transaction 192Search for the Customer Contact 193
Using Features in the Line Item Details Section 194Search for an Item by the Alias Item Number 194Add a Sales Kit/Bill of Materials 194View the Details of an Item 195Change or Delete an Item 196Add an Extended Description to an Item 197View the Individual Items in a Sales Kit 198Change the Price of an Item 198Add an Item with a Lot/Serial Number 199View the Details of an Invoice 200
Using Features in the Totals Section 201Set a Discount to a Transaction 201Add a Freight Charge 201Change Sales Tax 203
Closing Point of Sale Entry 203Logoff Register 204
Manager Features 204Log into Point of Sale Entry as a Manager 206Log into a Cash Drawer 206Allow Customer Transactions 208Select Payment Types for Customers 208Void Transaction without a Reason Code 209
Reconciling a Cash Drawer 210Reconcile a Cash Drawer 210
Performing Daily Sales Updates 213Daily Sales Reports/Updates 213
Print the Daily Sales Reports 214Daily Transaction Register 230
Print the Daily Transaction Register 231Bank Deposit Maintenance 232
Table of Contents Point of Sale Professional Manual

12
INDEX
�
�BACK
Create a Bank Deposit 234Bank Deposit Register/Update 234
Print the Bank Deposit Register 235Layaway Cancellations 237
Layaway Cancellation Maintenance 237Enter a Layaway Cancellation 237Cancel a Layaway with a Deposit 238
Layaway Cancellation Register/Update 238Print the Layaway Cancellation Register 239
Chapter 8 — Using the Inquiries Menu 241How to Use the Inquiries Menu 241
Open a Window from the Inquiries Menu 241Display a Record in an Inquiry Window 241
Types of Inquires 242Customer Inquiry 243
View Customer Information in Point of Sale Professional 243Inventory Inquiry 244
View Inventory Information in Point of Sale Professional 244Sales Order Inquiry 245
View Sales Order Information in Point of Sale Professional 245Transaction History Inquiry 246
View Transaction History Information 246View Details for a Transaction 246View the Customer Details for a Transaction 247View a Customer Memo 248View a Customer’s Credit 249View the Details of an Item 250View the Extended Description of an Item 251View the Lot/Serial Number of an Item 252View the Individual Items in a Sales Kit 253View the Shipping Charges 254View the Tax Details from an Updated Transaction 255Print a Duplicate Receipt for an Updated Transaction 255
Active Cash Drawer Inquiry 256View an Active Cash Drawer 256View Totals for Each Payment Type in an Active Cash Drawer 257View Transaction History for a Transaction in an Active Cash Drawer 257
Cash Drawer History Inquiry 257
Table of Contents Point of Sale Professional Manual

13
INDEX
�
�BACK
View a Cash Drawer’s History 258View Totals for Each Payment Type in the Cash Drawer History Inquiry 258View Transaction History for a Transaction in the Cash Drawer History Inquiry 259
Chapter 9 — Using the Reports Menu 260How to Use the Reports Menu 260
Open a Window from the Reports Menu 260Select Data for a Report 261
Types of Reports 261Transaction History Report 263
Print a Transaction History Report 263Active Cash Drawer Report 264
Print an Active Cash Drawer Report 265Cash Drawer History Report 267
Print a Cash Drawer History Report 268Open Layaway Report 270
Print an Open Layaway Report 271Outstanding Rental Report 272
Print an Outstanding Rental Report 273Sales Tax Report 274
Print a Sales Tax Report 275Credit Card Report 276
Print a Credit Card Report 277Troubleshooting the Credit Card Report 278
General Ledger Posting Recap 279Print a General Ledger Posting Recap. 280
Monthly Recap by Product Line 282Print a Monthly Recap by Product Line Report. 283
Monthly Recap by Warehouse/Product Line 284Print a Monthly Recap by Warehouse/Product Line Report. 285
Monthly Recap by Warehouse 286Print a Monthly Recap by Warehouse Report. 287
Monthly Recap by Division 288Print a Monthly Recap by Division Report. 288
Monthly Recap by Location 289Print a Monthly Recap by Location Report. 289
Voided Transaction Report 290
Table of Contents Point of Sale Professional Manual
14
INDEX
�
�BACK
Print a Voided Transaction Report. 291
Chapter 10 — Using the Period End Menu 293When to Run Period End Processing 293
Prior to Processing the Period End 293Using the Period End Processing Feature 294
Open the P/2 Period End Processing Window 294Full Period End Processing 295
Complete Full Period End Processing 295Full Period End and Year End Processing 296
Complete Full Period End and Year End Processing 297Only Clear Transaction History File 298
Clear Transaction History 298Only Purge Sales Tax History File 299
Clear Sales Tax History 299Only Purge Rental History File 301
Clear Rental History 301
Chapter 11 — Using the Optional Menu 303How to Use the Optional Menu 303
Open a Window from the Optional Menu 303Add Optional Settings to a Record 304Change a Record 304Delete a Record 304Print an Optional Listing 305
Membership Maintenance 306Create a Member 306View a Member’s Rentals 308
Rental Charge Code Maintenance 308Create a Rental Charge Code 309
Rental Returns 310Rental Return Entry 310
Enter a Rental Return 310Rental Return Report/Update 311
Print the Rental Return Report 311Customer Last Purchase Maintenance 313
Create the Customer’s Last Purchase File 313View a Customer’s Last Purchase 314
Table of Contents Point of Sale Professional Manual

15
INDEX
�
�BACK
Delete a Customer’s Last Purchase Information 315Clear the Customer Last Purchase Information 315
Index 317
Table of Contents Point of Sale Professional Manual

16
Chapter 1
INDEX
�
�
CONTENTS
BACK
IntroductionChapter 1
The HighTower Ideal
At HighTower, we are committed to delivering superior accounting, time management, manufacturing and distribution solutions to small and mid-sized businesses.
HighTower is a Best Software Master Developer for MAS 90® and MAS 200® software with titles such as Food Distribution, MICR Encoded Laser Checks, Multi-Bin® Advanced Distribution, Point of Sale® Professional, Remote Salesperson PDA, Remote Salesperson Laptop, ScanBlaster, Time and Billing®, Time and Billing® Professional, and Timekeeper® to our credit.
HighTower uses a unique Patch Installation system, which installs the HighTower enhancements without overwriting your original Best Software program. Our patch installation method makes our products attractive to users installing enhancements from multiple Best Software Master Developers.
Our promise of exceptional technical products is only exceeded by our commitment to customer service. Our success is measured in customer satisfaction.
Welcome to Point of Sale Professional
Point of Sale® Professional is an enhancement for the MAS 90 and MAS 200 applications developed by Best Software. The Point of Sale Professional module works with MAS 90/MAS 200 to provide an effective and time-efficient product for any retail or wholesale business in need of a point of sale system. This module is designed to support multiple store locations, and will give you more control over you retail business.
Point of Sale Professional features several types of transactions used by many businesses, including sales, orders, layaways, rentals, customer payments, and quotes, and allows you to add discounts and miscellaneous charges to transactions or line items. This module is also the idea solution for businesses that use membership fees, such as health clubs. Point of
Chapter 1: Introduction Point of Sale Professional Manual

17
INDEX
�
�
CONTENTS
BACK
Sale Professional’s membership support gives you the ability to track membership attendance and utilize scannable ID cards. This module’s user interface for entering transactions allows cashiers and sales staff to easily enter customer transactions, and provides access to detailed information about completed transactions, customer details, and item details. The user interface of the entire Point of Sale Professional module was designed to streamline the transaction process.
Point of Sale Professional provides your company with detailed reports about transactions and other financial totals for the day and accounting period. Your company can use these reports to double-check accuracy and then update the MAS 90/MAS 200 system with the Point of Sale Professional data.
Point of Sale Professional works with standard point of sale equipment including cash drawers, receipt printers, credit card processors, check readers, bar code scanners, and pole displays, to provide your customers with fast and accurate transactions each and every time. For more information about hardware devices that the Point of Sale Professional module can use, see the Point of Sale Professional Hardware Configuration Manual.
Integrating Point of Sale Professional with other MAS 90/MAS 200 Modules
The Point of Sale Professional module can be integrated with other MAS 90/MAS 200 modules to create a comprehensive point of sale, inventory, and accounting system. When integrated, each module "shares" common information with any related modules. Your company can integrate the following MAS 90/MAS 200 modules with the Point of Sale Professional module:
• Accounts Receivable• Inventory Management• Bank Reconciliation• Sales Order • General Ledger To integrate the Point of Sale Professional module with the Accounts Receivable, Inventory Management, and/or Sales Order modules, you must set up these modules before installing Point of Sale Professional.
Chapter 1: Introduction Point of Sale Professional Manual

18
INDEX
�
�
CONTENTS
BACK
Accounts Receivable
When the MAS 90/MAS 200 Accounts Receivable module is integrated with the Point of Sale Professional module, it provides automatic access to the Accounts Receivable Customer Masterfile, and the files for payment types, salesperson, and sales tax. With the Customer Masterfile, Point of Sale Professional will be able to retrieve a customer’s address, payment terms, discount information, sales commissions, and sales tax information.
Point of Sale Professional uses the Accounts Receivable Customer Masterfile to check customer’s credit limit when processing transactions. When integrated with Accounts Receivable, Point of Sale Professional can create open invoices that may be paid through Accounts Receivable Cash Receipts Entry or through Point of Sale Entry.
When integrated with Accounts Receivable, the Customer Inquiry option in the Point of Sale Professional Inquiries menu becomes available. This option allows you view the Customer Masterfile information.
Inventory Management
When the MAS 90/MAS 200 Inventory Management module is integrated with the Point of Sale Professional module, you can track the sales and purchases of inventory items for cost, resale, and purchasing purposes. When integrated with Inventory Management, the Point of Sale Professional module will provide a comprehensive pricing structure incorporating quantity breaks, price overrides, and discounts by item, product line, customer price level, or contract pricing by customer.
You also can use the MAS 90/MAS 200 Inventory Management module to set up and maintain multiple warehouses. In Point of Sale Professional, you can specify a "default" or primary warehouse (in the Location Maintenance window) for checking quantity availability when entering transactions. In addition to multiple warehouses, the Inventory Management module allows you to establish alternate items as substitutes for out of stock conditions during transaction entry.
To integrate the Accounts Receivable module with Point of Sale Professional, check the Accounts Receivable box in the Point of Sale Professional Options window.
To integrate the Inventory Management module with Point of Sale Professional, check the Inventory Management box in the Point of Sale Professional Options window.
Chapter 1: Introduction Point of Sale Professional Manual

19
INDEX
�
�
CONTENTS
BACK
The MAS 90/MAS 200 Inventory Management module provides sales kits that can be used to sell a group of component items. Each sales kit can consist of any number of component items, and you can expand a kit into the separate items in Inventory Management. When the sales kit is sold through Point of Sale Professional, the component items are added automatically to the transaction.
When integrated with Inventory Management, the Inventory Inquiry option in the Point of Sale Professional Inquiries menu will include items from the Inventory Management module. This option allows you view the inventory available.
Multi-Bin Advanced Distribution
When the MAS 90/MAS 200 Inventory Management module is integrated with the Point of Sale Professional module, and Multi-Bin Advanced Distribution is activated, you will have the full Multi-Bin Advanced Distribution functionality in Point of Sale Entry. You will be required to select a bin location when distributing an inventory item for all sale type transactions. As in Sales Order Entry, you also have the option to select a bin location when distributing an inventory item when creating order type transactions in Point of Sale Entry.
See the Multi-Bin Advanced Distribution Manual by HighTower for more information about the Multi-Bin Advanced Distribution enhancement.
Bank Reconciliation
When the MAS 90/MAS 200 Bank Reconciliation module is integrated with the Point of Sale Professional module, the deposits and payments processed through Point of Sale Professional can be updated to the Bank Reconciliation Bank Code file. If you do not integrate the Bank Reconciliation module with the Point of Sale Professional module, all bank deposit information is handled only through the Bank Reconciliation module.
You can set in Point of Sale Professional to create bank deposits by payment types, since certain payment types (for example, cash) clear faster than other payment types. When Point of Sale Professional and Bank Reconciliation are integrated, the Bank Reconciliation will be updated with the individual payment type deposits created in Point of Sale Professional, which will allow for faster clearing.
To integrate the Bank Reconciliation module with Point of Sale Professional, check the Bank Reconciliation box in the Point of Sale Professional Options window.
Chapter 1: Introduction Point of Sale Professional Manual
20
INDEX
�
�
CONTENTS
BACK
Sales Order
When the MAS 90/MAS 200 Sales Order module is integrated with the Point of Sale Professional module, you can enter quotes and orders through the Point of Sale Professional module. You can also determine whether the Point of Sale Professional module will create the Sales Order information after the transaction, or if it will display the Sales Order Entry window for the transaction rather than the Point of Sale Entry window. By integrating the Sales Order module with the Point of Sale Professional module, the Point of Sale Professional module becomes the main module for all transaction entries.
General Ledger
The General Ledger module is the key to integrating all financial information from the Point of Sale Professional module, as well as from the other MAS 90/MAS 200 accounting modules. The General Ledger module provides complete, timely, financial reports that consistently reflect current information.
If the General Ledger module is installed, all journal entries generated from Point of Sale Professional are posted directly to the General Ledger module after you print and update the Daily Transaction Register. The Daily Transaction Register prints financial statements and other General Ledger reports that reflect postings on the register.
If the General Ledger module is not installed, the Point of Sale Professional journal entries are posted to the General Ledger Detail Posting file after printing the Daily Transaction Register. The General Ledger Posting Recap report printed from this file provides the necessary audit information to prepare monthly journal entries for your manual General Ledger. The information on this report is purged after processing the period end using Point of Sale Professional.
To integrate the Sales Order module with Point of Sale Professional, check the Sales Order box in the Point of Sale Professional Options window.
Chapter 1: Introduction Point of Sale Professional Manual

21
INDEX
�
�
CONTENTS
BACK
Using the Point of Sale Professional Manual
This manual provides the information necessary for setting up and operating your Point of Sale Professional module. Use the Point of Sale Professional manual as a guide when initially setting up Point of Sale Professional, and then as a resource for understanding features of the application. The manual contains overviews and samples of windows and menus.
Sections in this Manual
This manual is divided by the different menus available in Point of Sale Professional. The following table describes the chapters available in this manual.
Chapter Description
Chapter 2: Point of Sale Professional Concepts
This chapter explains different concepts you need to know about using your Point of Sale Professional system.
Chapter 3: Installing the Point of Sale Professional Module
This chapter details the installation procedures for Point of Sale Professional.
Chapter 4: Migrating Data from the Point of Sale Module
This chapter is for companies that currently use the old Point of Sale module and want to migrate to the Point of Sale Professional module.
Chapter 5: Navigating in Point of Sale Professional
This chapter describes the basic features available in the Point of Sale Professional module.
Chapter 6: Using the Setup Menu
This chapter describes how to enter the basic information required to use the Point of Sale Professional module. This chapter includes setting general options for the module.
Chapter 7: Using the Main Menu
This chapter includes how to open a cash drawer, how to make a bank deposit, and how to setup a cashier’s drawer. This chapter details each type of transaction, including sale orders, layaways, and rentals. This chapter also includes the features that managers can access that cashiers cannot without a password.
Chapter 8: Using the Inquiries Menu
This chapter details how to search for details about customers, sales orders, inventory items, transactions, and cash drawer activities.
Chapter 1: Introduction Point of Sale Professional Manual
22
INDEX
�
�
CONTENTS
BACK
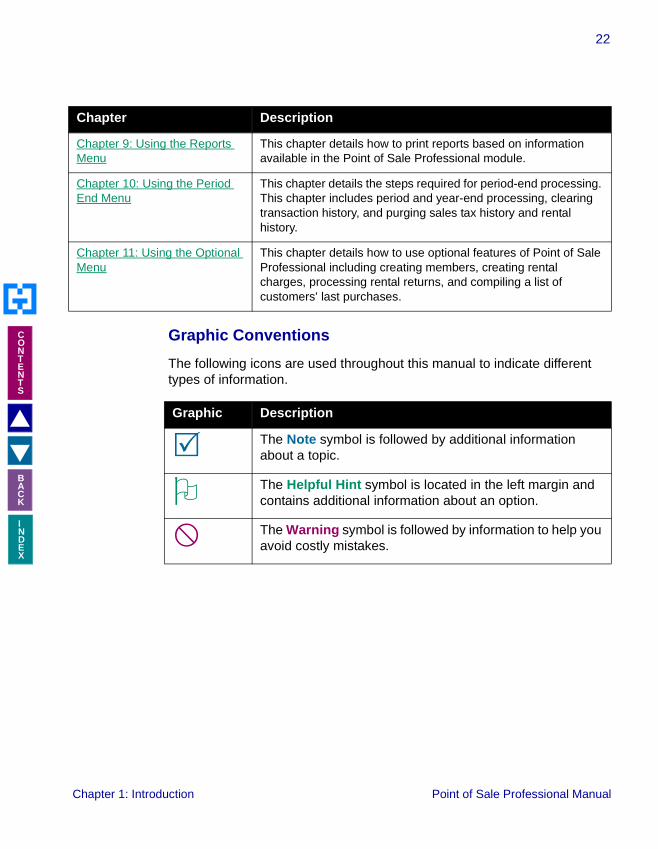
Graphic Conventions
The following icons are used throughout this manual to indicate different types of information.
Chapter 9: Using the Reports Menu
This chapter details how to print reports based on information available in the Point of Sale Professional module.
Chapter 10: Using the Period End Menu
This chapter details the steps required for period-end processing. This chapter includes period and year-end processing, clearing transaction history, and purging sales tax history and rental history.
Chapter 11: Using the Optional Menu
This chapter details how to use optional features of Point of Sale Professional including creating members, creating rental charges, processing rental returns, and compiling a list of customers’ last purchases.
Graphic Description
� The Note symbol is followed by additional information about a topic.
� The Helpful Hint symbol is located in the left margin and contains additional information about an option.
� The Warning symbol is followed by information to help you avoid costly mistakes.
Chapter Description
Chapter 1: Introduction Point of Sale Professional Manual

23
INDEX
�
�
CONTENTS
BACK
Text Conventions
The following table describes the text conventions used in this manual.
Getting Additional Help
There are online manuals, online help, and technical support for the Point of Sale Professional enhancement.
Getting Additional Copies of the Manual
The Point of Sale Professional manual is available when you install the module.
Text Convention Explanation
Field font Indicates a field name, list box name, options in a list, column name, or check box.
Example: The Modes button is available only if Windows Printer Port or Physical Device is selected at the Device Type field.
Italic font Indicates directory names or references to other manuals.
Example: For more information about setting up and processing sales tax, refer to your Accounts Receivable or Accounts Payable manual.
Chapter 1: Introduction Point of Sale Professional Manual
24
INDEX
�
�
CONTENTS
BACK
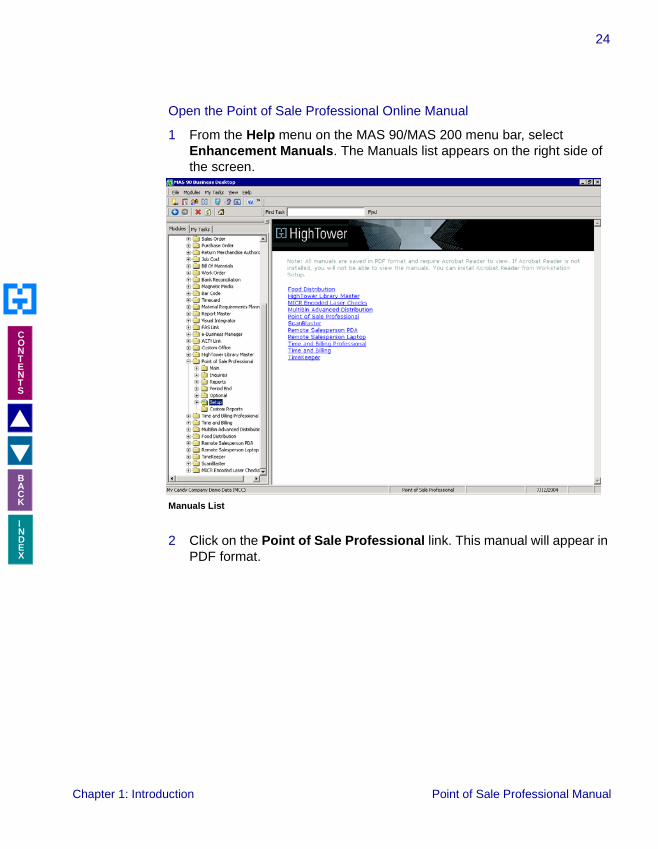
Open the Point of Sale Professional Online Manual
1 From the Help menu on the MAS 90/MAS 200 menu bar, select Enhancement Manuals. The Manuals list appears on the right side of the screen.
2 Click on the Point of Sale Professional link. This manual will appear in PDF format.
Manuals List
Chapter 1: Introduction Point of Sale Professional Manual
25
INDEX
�
�
CONTENTS
BACK
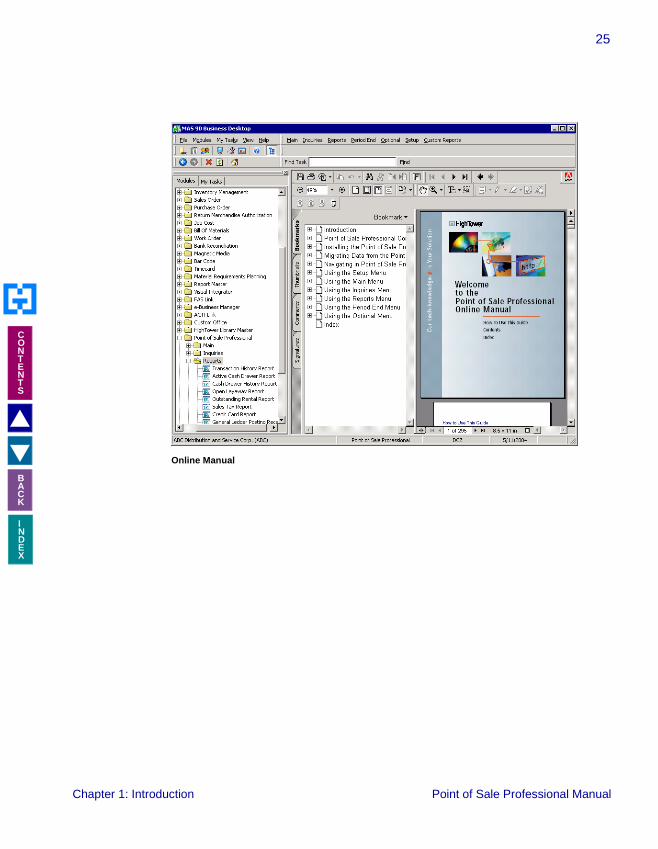
Online Manual
Chapter 1: Introduction Point of Sale Professional Manual

26
INDEX
�
�
CONTENTS
BACK
Using the Point of Sale Professional Online Help
The Point of Sale Professional module includes an extensive online help with the standard content online help and context-sensitive online help for fields and windows.
Open the Point of Sale Professional Online Help
• For field level context-sensitive help, move your cursor to the field and press F1. A pop-up window appears with help for the field.
• For window level context-sensitive help, click the button on the window. The help screen for the window appears.
Online Help
Chapter 1: Introduction Point of Sale Professional Manual

27
INDEX
�
�
CONTENTS
BACK
Support Services
There are several methods of support for your Point of Sale Professional module:
• Contact your Authorized Reseller or Consultant. If you do not have an Authorized Reseller or Consultant, access the Point of Sale Professional website (www.pos-pro-software.com).
• Refer to the Enhancement Data Definitions available in the Library Master Extensions module in the Utilities menu. This feature lists all the data fields available on each window of the Point of Sale Professional module.
• Access technical bulletins and download program corrections through the Point of Sale Professional website (www.pos-pro-software.com). Note that program corrections are available exclusively through the Internet.
For more information about HighTower’s fee-based customer support services, contact our Help Desk Department. Regular Help Desk hours are 9:00 A.M. to 5:00 P.M. Central Standard Time Monday through Friday. You can reach our Help Desk Department in the following ways:
• Phone: 1.888.583.3000• Fax: 847.674.0544• E-mail: [email protected]
Chapter 1: Introduction Point of Sale Professional Manual
28
INDEX
�
�
CONTENTS
BACK
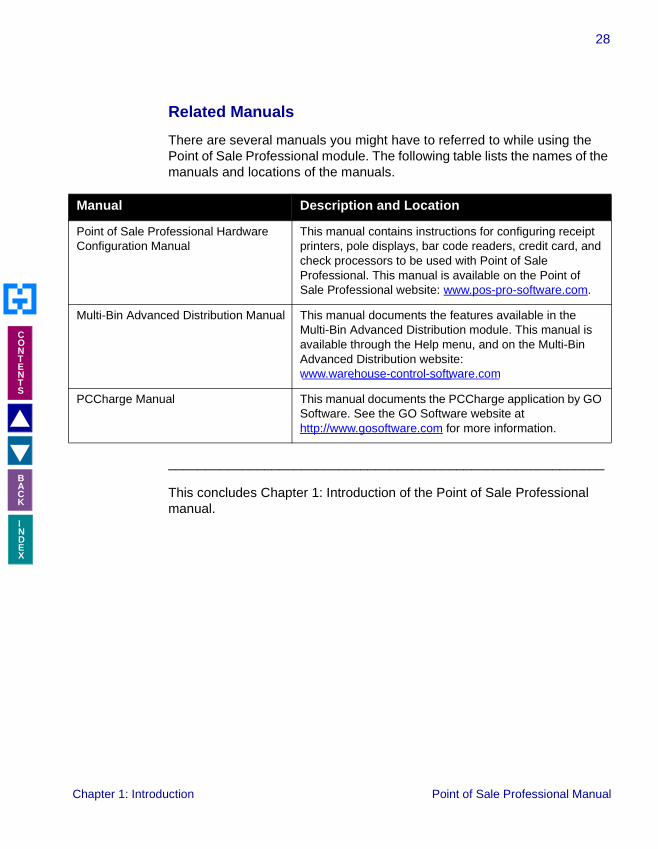
Related Manuals
There are several manuals you might have to referred to while using the Point of Sale Professional module. The following table lists the names of the manuals and locations of the manuals.
___________________________________________________________
This concludes Chapter 1: Introduction of the Point of Sale Professional manual.
Manual Description and Location
Point of Sale Professional Hardware Configuration Manual
This manual contains instructions for configuring receipt printers, pole displays, bar code readers, credit card, and check processors to be used with Point of Sale Professional. This manual is available on the Point of Sale Professional website: www.pos-pro-software.com.
Multi-Bin Advanced Distribution Manual This manual documents the features available in the Multi-Bin Advanced Distribution module. This manual is available through the Help menu, and on the Multi-Bin Advanced Distribution website: www.warehouse-control-software.com.
PCCharge Manual This manual documents the PCCharge application by GO Software. See the GO Software website at http://www.gosoftware.com for more information.
Chapter 1: Introduction Point of Sale Professional Manual

29
Chapter 2
INDEX
�
�
CONTENTS
BACK
Point of Sale Professional ConceptsChapter 2
Chapter 2: Point of Sale Professional Concepts explains different concepts you need to know to use your Point of Sale Professional module to the fullest extent.
What is a Cashier in Point of Sale Professional?
A person entering transactions at a register is referred to as a cashier instead of a salesperson. A cashier might be a salesperson. However, salespeople are setup and maintained in the Accounts Receivable module. The term cashier was used to reduce confusion and the overlapping of the term salesperson.
If a cashier and a salesperson are the same person, once a salesperson code is created in the Accounts Receivable module, it may then be assigned to a cashier in Cashier Maintenance in Point of Sale Professional.
Commissions from Point of Sale transactions are updated to the Accounts Receivable module.
What is a Cash Drawer in Point of Sale Professional?
A cash drawer represents a batch of transactions entered in Point of Sale Entry, not the actual cash drawer hardware. By employing a cash drawer batch concept for transactions, each cash drawer is able to retain its autonomy from other cash drawers. This autonomy is important for security but also allows history to be kept by drawer, transaction, and cashier. Therefore, when a cash drawer batch is reconciled, the physical cash drawer may be used again, but the cash drawer batch number may not.
�HINT: If the Accounts Receivable module is integrated with the Point of Sale Professional module, but your company does not issue commissions to cashiers, then assign a salesperson with a zero commission rate to your cashiers.
Chapter 2: Point of Sale Professional Concepts Point of Sale Professional Manual
30
INDEX
�
�
CONTENTS
BACK
What is a Location in Point of Sale Professional?
A location represents an actual store location. A store location is created and maintained in Location Maintenance in the Point of Sale Professional module. The options in Location Maintenance are specific to that location, such as sales tax schedules and bank codes to which deposits will be made.
What is a Register in Point of Sale Professional?
A register represents a terminal in a store location. The register number, derived from the MAS 90/MAS 200 terminal ID, differentiates between registers. The options in Register Maintenance allow each register to be configured to address specific needs, such as default payment types and hardware setups.
What is a Bank Deposit in Point of Sale Professional?
Bank deposits represent when deposit bags are taken to the bank to be deposited. When a cash drawer is reconciled and updated, an entry for the deposit amount of each reconciled cash drawer is created in Bank Deposit Maintenance in Point of Sale Professional not the Bank Reconciliation module. Only when a drawer is selected and updated in Bank Deposit Maintenance will the deposit amount be updated to the Bank Reconciliation module.
What is a Register Pay Out in Point of Sale Professional?
A register pay out represents when money in a cash drawer is used to pay a business expense, such as deliveries. In Cash Drawer Reconciliation, pay outs are totaled and are subtracted from the cash drawer totals.
What is a Register Withdrawal in Point of Sale Professional?
A register withdrawal, also referred to as a safe drop, represents when money in a cash drawer is removed for security purposes. In Cash Drawer Reconciliation, withdrawals remain in the cash drawer totals.
___________________________________________________________
This concludes Chapter 2: Point of Sale Professional Concepts of the Point of Sale Professional manual.
Chapter 2: Point of Sale Professional Concepts Point of Sale Professional Manual

31
Chapter 3
INDEX
�
�
CONTENTS
BACK
Installing the Point of Sale Professional ModuleChapter 3
Chapter 3: Installing the Point of Sale Professional Module provides detailed installation instructions, and contains the steps to register the Point of Sale Professional module.
System Requirements
Best Software does set standard system requirements for workstations using MAS 90/MAS 200. See the system requirements determined by Best (www.bestsoftware.com).
�SPECIAL NOTE: There are optional hardware devices that you can use with the Point of Sale Professional module, including bar code scanners, cash drawers, and credit card processors. For information on how to install these devices, see the Point of Sale Professional Hardware Configuration Manual.
�WARNING FOR PRINTERS: Currently, Microsoft Terminal Services does not support static port mapping in Terminal Service sessions. Terminal Service ports are mapped using the current session number, and this session number is used in the naming of the printer. This session number changes from login to login, meaning the printer name changes as well. Point of Sale Professional’s print feature searches for a specific printer name during the print process. If this name changes, the print job will fail. Citrix Metaframe XP supports static port mappings, allowing the printer name to remain the same across logins.
Chapter 3: Installing the Point of Sale Professional Module Point of Sale Professional Manual

32
INDEX
�
�
CONTENTS
BACK
Pre-installation Instructions
1 Before installing the Point of Sale Professional module, you must have MAS 90/MAS 200 installed on your system. Install the correct version of MAS 90/MAS 200 that works with the version of Point of Sale Professional. You may be required to upgrade your MAS 90/MAS 200 system before installing Point of Sale Professional. See the installation documentation provided by Best Software for installation instructions.
2 If the MAS 90/MAS 200 program or any upgrades have just been installed, enter the MAS 90/MAS 200 system to finish the installation procedures.
3 Be sure the MAS 90/MAS 200 General Ledger, Accounts Receivable, Bank Reconciliation, Inventory Management, and Sales Order modules are completely installed and configured. See the online documentation provided by Best Software for full instructions.
4 Be sure that all of the following entry files have been updated or cleared BEFORE installing Point of Sale Professional to avoid any data corruption.
• General Ledger General Journal Entry
• General Ledger Recurring Journal Entry
• General Ledger Transaction Journal Entry
• Accounts Receivable Invoice Data Entry
• Accounts Receivable Cash Receipts Entry
• Bank Reconciliation Register
• Inventory Transaction Entry
• Inventory Management Physical Count Entry
• Sales Order Entry
• Sales Order Shipping Data Entry
• S/O Invoice Data Entry
Chapter 3: Installing the Point of Sale Professional Module Point of Sale Professional Manual
33
INDEX
�
�
CONTENTS
BACK
5 If you are upgrading from a previous version of Point of Sale Professional, make sure all Point of Sale Professional entry files have been updated or cleared BEFORE installing the latest version.
6 All users should exit from MAS 90/MAS 200 before beginning the Point of Sale Professional installation.
Installing Point of Sale Professional
Complete the following steps to install the Point of Sale Professional module.
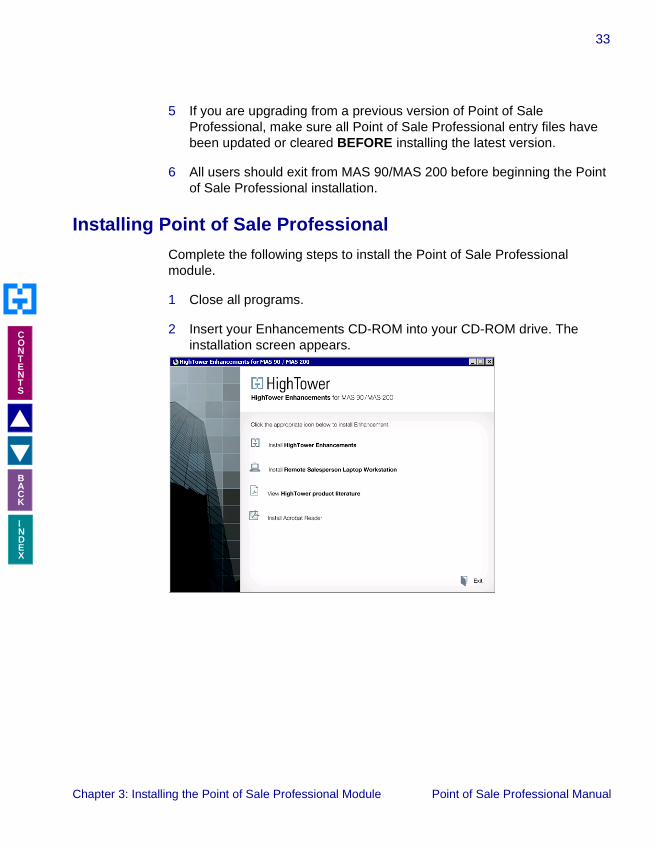
1 Close all programs.
2 Insert your Enhancements CD-ROM into your CD-ROM drive. The installation screen appears.
Chapter 3: Installing the Point of Sale Professional Module Point of Sale Professional Manual

34
INDEX
�
�
CONTENTS
BACK
3 Select Install Enhancements. The system starts the installation wizard.
4 Click Next from the main welcome screen to begin installation.
Welcome Window
Software License Agreement Window
Chapter 3: Installing the Point of Sale Professional Module Point of Sale Professional Manual

35
INDEX
�
�
CONTENTS
BACK
5 Click Yes in the software license agreement screen.
6 Browse to the location on your computer where your MAS 90/MAS 200 system is installed and click Next.
7 Select the Point of Sale Professional option from the list of applications and click Next.
Installation Location Window
HighTower Components Window
Chapter 3: Installing the Point of Sale Professional Module Point of Sale Professional Manual

36
INDEX
�
�
CONTENTS
BACK
A warning dialog box displays reminding you to close MAS 90/MAS 200 before proceeding with the installation.
8 Verify the installation settings and click Next.
Current Settings Window
Finish Installation Window
Chapter 3: Installing the Point of Sale Professional Module Point of Sale Professional Manual

37
INDEX
�
�
CONTENTS
BACK
9 Click Finish to complete the installation. You may view the Read Me file by selecting the Launch Read Me check box.
System Startup
System Startup is an automatic procedure that must be performed once per company. This procedure is initiated the first time you access Point of Sale Professional for a specific company.
Setup the Point of Sale Professional Module in the Role Maintenance
You must make sure that you check the module in the Role Maintenance feature of the MAS 90/MAS 200’s Library Master module.
1 From the MAS 90/MAS 200’s Library Master, select Role Maintenance from the Main menu.
�WARNING: If you had Point of Sale Professional installed on an older version of MAS 90 or MAS 200 and have migrated your data using Best Software’s Migrate Level 3 Data utility, you must run the Migrate Level 3 Data Wizard from the Utilities menu in the Library Master Extensions module. Your Point of Sale Professional system will not recognize your registers properly if this utility is not run. Refer to the Library Master Extensions manual for information on how to run this utility.
Role Maintenance Window
Chapter 3: Installing the Point of Sale Professional Module Point of Sale Professional Manual

38
INDEX
�
�
CONTENTS
BACK
2 Select your user role defined for your MAS 90/MAS 200 system. See your MAS 90/MAS 200 Library Master Manual for more information.
3 Check the Point of Sale Professional option.
4 Click the Accept button.
Register the Point of Sale Professional Enhancement
When you try to open the Point of Sale Professional module for the first time, you will need to register the enhancement. You can install enhancements for a 45-access trial period. When you purchase an enhancement, you will receive a registration ID and key from your Point of Sale Professional representative. You register this enhancement through the Library Master Extensions module.
1 From the Library Master Extensions module, select Enhancement Registration from the Main menu. The Enhancement Registration window appears.
2 Enter the registration key in the Registration Key field.
3 Enter the unlocking key in the Product Key field.
Enhancement Registration Window
Chapter 3: Installing the Point of Sale Professional Module Point of Sale Professional Manual

39
INDEX
�
�
CONTENTS
BACK
4 Click Accept. The system will register the purchased enhancements.
See the Library Master Extensions Manual for more information.
MAS 200 or MAS 200 for SQL Installations
After the installation or upgrade is completed on the MAS 200 server, you must run the a Client Server Workstation Install on each workstation for each enhancement that has been installed or upgraded.
1 To run the Client Server Workstation Install, click on the Utilities menu of Library Master Extensions module. Click on the Client Server Workstation Install menu option to display the Client Server Workstation Installation window.
2 For each enhancement there are three options that may be selected - Install, Help, and Manual. Select Install (the Help and Manual options are not required). After the options have been selected, click Proceed to install the selected options to the workstation.
See the Library Master Extensions Manual for more information.
Defining the Point of Sale Professional Enhancement
The System Startup occurs when you try to access the Point of Sale Professional module for the first time.
1 Select an option from the Point of Sale Professional module. If the application has not been activated, the following dialog box displays.
MAS 90 Dialog Box
Chapter 3: Installing the Point of Sale Professional Module Point of Sale Professional Manual

40
INDEX
�
�
CONTENTS
BACK
2 Click Yes. The Company Maintenance window appears.
3 Click the Activate button. The Activate Application window appears.
4 Select the Point of Sale Professional module and click Proceed.
�NOTE: For more information about activating modules, see the Library Master Module Manual by Best Software.
Company Maintenance Window
Activate Application Window
Chapter 3: Installing the Point of Sale Professional Module Point of Sale Professional Manual

41
INDEX
�
�
CONTENTS
BACK
5 On the Modules menu, click Point of Sale Professional. The application displays the Change Date window.
6 Click OK. You can change the date, but the application defaults to the current accounting date. The following dialog box displays.
7 Click Yes to begin defining files to start Point of Sale Professional.
When all data files are defined, you automatically advance to options in the Point of Sale Professional Setup menu. See Chapter 6: Using the Setup Menu for more information about the options in the Setup menu. You will also be able to access the online help.
___________________________________________________________
This concludes Chapter 3: Installing the Point of Sale Professional Module of the Point of Sale Professional manual.
Change Date Window
MAS 90 Dialog Box
Chapter 3: Installing the Point of Sale Professional Module Point of Sale Professional Manual

42
Chapter 4
INDEX
�
�
CONTENTS
BACK
Migrating Data from the Point of Sale ModuleChapter 4
If your company currently uses the Point of Sale module and is migrating to the Point of Sale Professional module, you must recreate the data from the Point of Sale module to the Point of Sale Professional module. Read all the procedures in Chapter 4: Migrating Data from the Point of Sale Module prior to beginning this process to ensure the Point of Sale Professional module has the correct data.
Migration Procedures
Copy your entire MAS 90/MAS 200 directory before you begin this process. Use the following procedures as a checklist to ensure that Point of Sale Professional will have the correct data.
Recreate Customers in the Accounts Receivable Module
If you did not integrate the Point of Sale module with the Accounts Receivable module, you are required to recreate the customers in Accounts Receivable for the Point of Sale Professional module.
1 Ensure you have a copy of your entire MAS 90/MAS 200 directory.
2 Print the Point of Sale Customer Listing from the Point of Sale module.
3 In the Accounts Receivable module, recreate any relevant customers. See the Accounts Receivable online help by Best Software for more information.
�NOTE: If you are upgrading to Point of Sale Professional from an accounting system other than MAS 90/MAS 200, contact your Point of Sale Professional representative for migration procedures.
�WARNING: You MUST backup the entire MAS 90/MAS 200 directory before migrating data from the Point of Sale module to the Point of Sale Professional module.
Chapter 4: Migrating Data from the Point of Sale Module Point of Sale Professional Manual

43
INDEX
�
�
CONTENTS
BACK
Recreate Salespeople in the Accounts Receivable Module
If you did not integrate the Point of Sale module with the Accounts Receivable module, you are required to recreate the salespeople in Accounts Receivable for the Point of Sale Professional module.
1 Ensure you have a copy of your entire MAS 90/MAS 200 directory.
2 Print the Salesperson Listing from the Point of Sale module.
3 In the Accounts Receivable module, recreate any relevant salespeople. See the Accounts Receivable online help by Best Software for more information.
Recreate Payment Types in the Point of Sale Professional Module
You are required to recreate the payment types from the Point of Sale module in the Point of Sale Professional module.
1 Ensure you have a copy of your entire MAS 90/MAS 200 directory.
2 Print the Point of Sale Payment Type Listing from the Point of Sale module.
3 Recreate any relevant payment types in the Point of Sale Professional module. See the Payment Type Maintenance section for instructions.
Recreate Orders without Deposits in the Sales Order Module
You are required to recreate orders without deposits from the Point of Sale module in the Sales Order module for the Point of Sale Professional module.
1 Ensure you have a copy of your entire MAS 90/MAS 200 directory.
2 Print the Open Order Report and select Order Only from the Order Type to Print selection from the Point of Sale module.
3 Use Sales Order Entry from Sales Order module to enter all the relevant orders. See the Sales Order online help by Best Software for more information.
Chapter 4: Migrating Data from the Point of Sale Module Point of Sale Professional Manual

44
INDEX
�
�
CONTENTS
BACK
4 Delete all orders entered in step 3 from the Point of Sale module. Deleting the existing orders will ensure that your inventory quantities are correct.
Recreate Orders with Deposits in the Point of Sale Professional Module
You are required to recreate orders with deposits from the Point of Sale module in the Point of Sale Professional module.
1 Ensure you have a copy of your entire MAS 90/MAS 200 directory.
2 Print the Open Order Report and select Order Only from the Order Type to Print selection in the Point of Sale module.
3 If a deposit from an order from the Point of Sale module was updated to the General Ledger module, use Point of Sale Professional Entry to enter all the relevant orders including any deposits. See the Enter an Order Transaction section for instructions.
4 If a deposit from an order from the Point of Sale module was not updated to the General Ledger module, use Sales Order Entry to enter all the relevant orders including any deposits. See the Sales Order online help by Best Software for more information.
5 Delete all orders entered in steps 3 and 4 from the Point of Sale module. Deleting the existing orders will ensure that your inventory quantities are correct. To delete an order with a deposit from the Point of Sale module, enter a negative deposit to offset the existing deposit to zero. You will be able delete the order only when the total deposit on the order is equal to zero.
Recreate Layaways without Deposits in the Point of Sale Professional Module
You are required to recreate layaways without deposits from the Point of Sale module in the Point of Sale Professional module.
1 Ensure you have a copy of your entire MAS 90/MAS 200 directory.
2 Print the Open Layaway Report from the Point of Sale module.
3 Using Point of Sale Professional Entry, enter all the relevant layaways. See the Enter a Layaway Transaction section for instructions.
Chapter 4: Migrating Data from the Point of Sale Module Point of Sale Professional Manual

45
INDEX
�
�
CONTENTS
BACK
4 Delete all layaways entered in step 3 from the Point of Sale module. Deleting the existing layaways will ensure that your inventory quantities are correct.
Recreate Layaways with Deposits in the Point of Sale Professional Module
You are required to recreate layaways with deposits from the Point of Sale module in the Point of Sale Professional module.
1 Ensure you have a copy of your entire MAS 90/MAS 200 directory.
2 Print the Open Layaway Report from the Point of Sale module.
3 Using Point of Sale Professional Entry, enter all the relevant layaways. See the Enter a Layaway Transaction section for instructions.
4 Delete all layaways entered in step 3 from the Point of Sale module. Deleting the existing layaways will ensure that your inventory quantities are correct. To delete a layaway with a deposit from the Point of Sale module, enter a negative deposit to offset the existing deposit to zero. You will be able delete the layaway only when the total deposit on the layaway is equal to zero.
Recreate Quotes in the Point of Sale Professional Module
1 Ensure you have a copy of your entire MAS 90/MAS 200 directory.
2 Print the Open Order Report and select Quote Only from the Order Type to Print selection in the Point of Sale module.
3 Using Sales Order Entry (see the Sales Order online help by Best Software) or Point of Sale Professional Entry (see the Enter a Quote Transaction section), enter all the necessary quotes.
4 It is not necessary to delete quotes from the Point of Sale module since these transaction types do not affect the inventory quantities.
___________________________________________________________
This concludes Chapter 4: Migrating Data from the Point of Sale Module of the Point of Sale Professional manual.
Chapter 4: Migrating Data from the Point of Sale Module Point of Sale Professional Manual

46
Chapter 5
INDEX
�
�
CONTENTS
BACK
Navigating in Point of Sale ProfessionalChapter 5
Chapter 5: Navigating in Point of Sale Professional contains instructions on how to access specific features of the Point of Sale Professional module. This chapter describes how to access windows in Point of Sale Professional, use the menu bar, and use different button fields available in the module.
Using the Modules Tree
The Point of Sale Professional module displays the menu options in the MAS 90/MAS 200 Modules tab, which contains the "tree-like" view. You can access a window in the Point of Sale Professional module through the tree-like view.
MAS 90 Window
Chapter 5: Navigating in Point of Sale Professional Point of Sale Professional Manual

47
INDEX
�
�
CONTENTS
BACK
Open a Point of Sale Professional Window through the Modules Tree
1 Double-click the Point of Sale Professional module from the Modules tab. The module expands to display all the menu options available in the Point of Sale Professional module.
2 Click on the menu option you want to access. The names of the windows available in the menu appear on the right side of the MAS 90/MAS 200 window.
3 Double-click on the name of the window to open. The system displays the selected window.
Windows Available in the Setup Menu
Chapter 5: Navigating in Point of Sale Professional Point of Sale Professional Manual

48
INDEX
�
�
CONTENTS
BACK
Using the Point of Sale Professional Menu Bar
The Point of Sale Professional menu bar is available through the MAS 90/MAS 200 menu bar. You can access the windows in the Point of Sale Professional module through the menu bar.
Open a Point of Sale Professional Window through the Menu Bar
1 From the Modules menu, select Point of Sale Professional.
2 Select the menu option, then select the name of the window. The system displays the window.
After opening the Point of Sale Professional module, the Point of Sale Professional menu appears in the right side of the menu bar. You can access additional Point of Sale Professional windows using this menu bar.
MAS 90 Window
Point of Sale Professional Menu
Chapter 5: Navigating in Point of Sale Professional Point of Sale Professional Manual

49
INDEX
�
�
CONTENTS
BACK
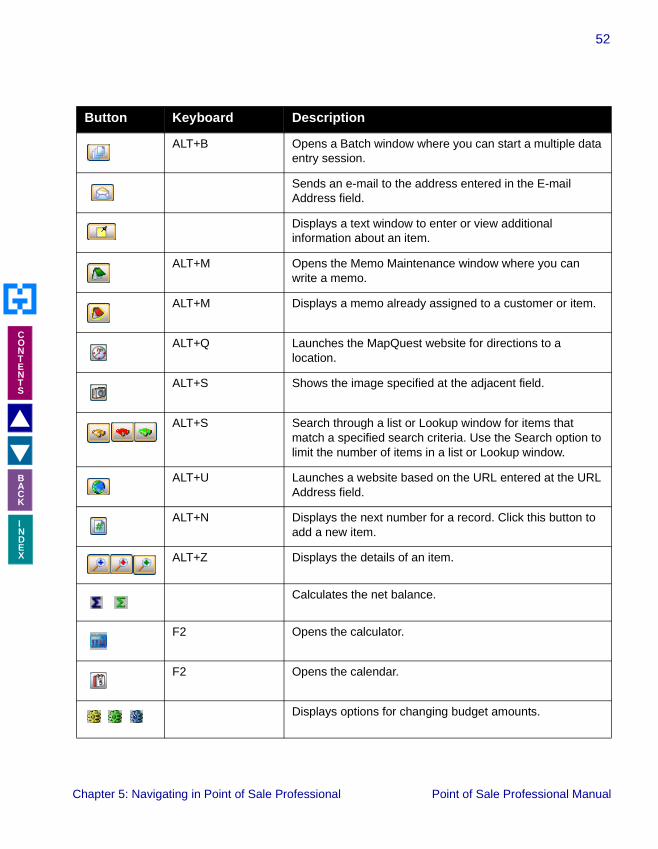
Using Button Fields in Point of Sale Professional
The Point of Sale Professional module uses the standard MAS 90/MAS 200 button fields that you use to perform a specific activity. You can also use the keyboard to perform many of the same functions. The following table describes each button and provides the keyboard variation of the button when applicable.
Button Keyboard Description
TAB Advances you to the next field on a window.In a grid, pressing the TAB key moves focus from cell to cell. At the end of the row, pressing TAB moves the key to the next row.
ENTER Advances you to the next required field on a window and allows you to save changes.
SPACEBAR You can use the spacebar to clear or select a check box or radio button field.
BACKSPACE Deletes the information in a field.
ESC Closes the current window.In a grid, pressing the ESC key cancels a cell entry.
DELETE Deletes information from a field.
HOME Highlights the first item in a list box or Lookup window.In a grid, pressing the HOME key moves focus to the first cell of a row.
END Highlights the last item in a list box or Lookup window.In a grid, pressing the END key moves focus to the last cell of a row.
PAGE UP Highlights an item in the previous page of a list box or Lookup window.
PAGE DOWN Highlights an item in the next page of a list box or Lookup window.
CTRL+HOME In a grid, moves focus to the first row in the same cell position.
Chapter 5: Navigating in Point of Sale Professional Point of Sale Professional Manual

50
INDEX
�
�
CONTENTS
BACK
CTRL+END In a grid, moves focus to the last row in the same cell position.
CTRL+ENTER In a grid, adds line feeds to comments.
CTRL+INSERT Inserts a line.
CTRL+DELETE Deletes the current line.
ARROW In a grid, pressing the ARROW keys moves focus from cell to cell.
F1 in a Field Displays the pop-up help for the current field.
F1 on a Window Displays the help for the entire window.
F2 Displays the Lookup window for the current field. Select an item from the Lookup window and click Select. The item appears in the field.
F3orALT+L
Displays an alternate Lookup window for the current field. This window is usually more tailored for the current field than the general Lookup window. Select an item from the Lookup window and click Select. The item appears in the field.
F4 Allows you to print the information available on a window. This option my display an options window, where you can select the type of data to include in a printout.
F5 In a grid, allows you to toggle between the primary and secondary grids.
Opens a window for you to perform a special task associated to the field or window. Usually allows you to display/enter lot/serial items.
CTRL+F5 Many windows display Browse buttons in the lower left corner, to help you browse through existing records. This button displays the first record available.
CTRL+F6 Many windows display Browse buttons in the lower left corner, to help you browse through existing records. This button displays the previous record available.
Button Keyboard Description
Chapter 5: Navigating in Point of Sale Professional Point of Sale Professional Manual

51
INDEX
�
�
CONTENTS
BACK
CTRL+F7 Many windows display Browse buttons in the lower left corner, to help you browse through existing records. This button displays the next record available.
CTRL+F8 Many windows display Browse buttons in the lower left corner, to help you browse through existing records. This button displays the last record available.
ALT+A Saves the information you added or changed in a window.
ALT+C Disregards any changes you entered in a window.
ALT+D Removes the currently selected record from the MAS 90/MAS 200 system.
ALT+P Click this button to print a report, journal, or listing.
ALT+V Click this button to preview a report, journal, or listing before printing it.
ALT+S Click this button to change the printing configurations for the report, journal, or listing.
SHIFT+F1 Displays Help text for the window.
ALT+O Click OK for dialog boxes and line entries.
ALT+U Undo line changes.
ALT+N Inserts a line.
ALT+E Deletes a line.
ALT+1, 2, 3 . . . In a data entry window, selects the first tab, second tab, third tab . . .
Button Keyboard Description
Chapter 5: Navigating in Point of Sale Professional Point of Sale Professional Manual
52
INDEX
�
�
CONTENTS
BACK
ALT+B Opens a Batch window where you can start a multiple data entry session.
Sends an e-mail to the address entered in the E-mail Address field.
Displays a text window to enter or view additional information about an item.
ALT+M Opens the Memo Maintenance window where you can write a memo.
ALT+M Displays a memo already assigned to a customer or item.
ALT+Q Launches the MapQuest website for directions to a location.
ALT+S Shows the image specified at the adjacent field.
ALT+S Search through a list or Lookup window for items that match a specified search criteria. Use the Search option to limit the number of items in a list or Lookup window.
ALT+U Launches a website based on the URL entered at the URL Address field.
ALT+N Displays the next number for a record. Click this button to add a new item.
ALT+Z Displays the details of an item.
Calculates the net balance.
F2 Opens the calculator.
F2 Opens the calendar.
Displays options for changing budget amounts.
Button Keyboard Description
Chapter 5: Navigating in Point of Sale Professional Point of Sale Professional Manual
53
INDEX
�
�
CONTENTS
BACK
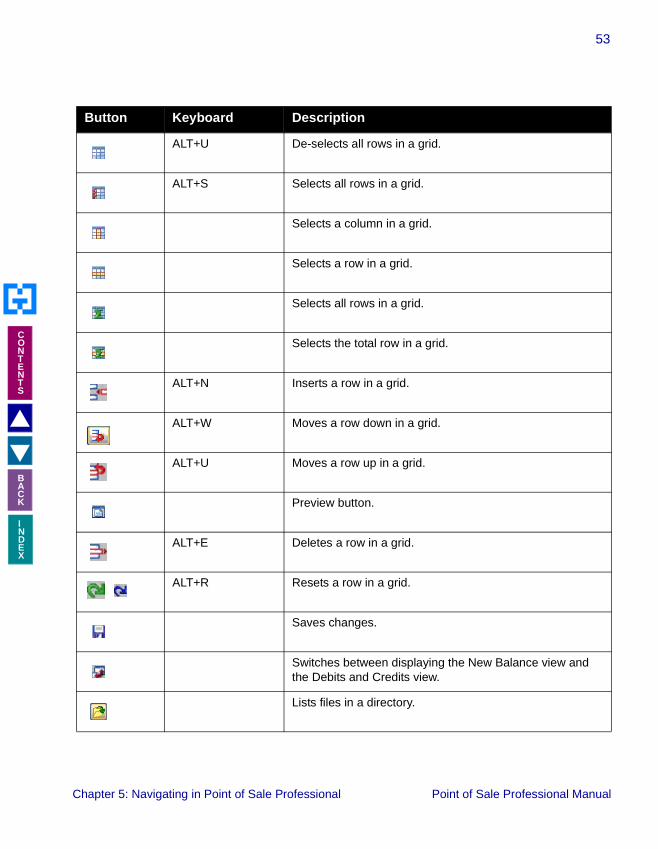
ALT+U De-selects all rows in a grid.
ALT+S Selects all rows in a grid.
Selects a column in a grid.
Selects a row in a grid.
Selects all rows in a grid.
Selects the total row in a grid.
ALT+N Inserts a row in a grid.
ALT+W Moves a row down in a grid.
ALT+U Moves a row up in a grid.
Preview button.
ALT+E Deletes a row in a grid.
ALT+R Resets a row in a grid.
Saves changes.
Switches between displaying the New Balance view and the Debits and Credits view.
Lists files in a directory.
Button Keyboard Description
Chapter 5: Navigating in Point of Sale Professional Point of Sale Professional Manual

54
INDEX
�
�
CONTENTS
BACK
Opens a Text Maintenance window where you can write an extended description.
This button is available on a Lookup window. Click Filters to enter additional filters for the lookup. The text on this button will appear in red, if filters already exist.
This button is available on a Lookup window. Click Custom to create a unique lookup view by adding, removing, and/or modifying columns and filters.
This button is available on a Lookup window. Click Find to activate the search.
Click Select to select a record, or double-click the current line.
Available on the Point of Sale Entry window, this button allows you to search for the price of an item without placing a transaction.
Available on the Point of Sale Entry window, this button allows you to search for an order.
Available on the Point of Sale Entry window, this button displays the Salesperson List. Use this list to change the salesperson for the transaction.
Available on the Point of Sale Entry window, this button displays the Lot/Serial No. - Distribution Entry window.
Available on the Point of Sale Entry window, this button displays the individual items available in a sales kit.
Available on the Point of Sale Entry window, this button displays the Freight Charges window. Use this window to determine shipping charges.
Available on the Point of Sale Entry window, this button allows you to access the details about a customer’s payment information.
Available on the Point of Sale Entry window, this button allows you to suspend a transaction for a customer.
Button Keyboard Description
Chapter 5: Navigating in Point of Sale Professional Point of Sale Professional Manual

55
INDEX
�
�
CONTENTS
BACK
___________________________________________________________
This concludes Chapter 5: Navigating in Point of Sale Professional of the Point of Sale Professional manual.
Available on the Point of Sale Entry window, this button allows you to lock the Point of Sale Entry window and cash drawer.
Available on the Point of Sale Entry window, this button allows you to record a withdrawal from a cash drawer.
Available on the Point of Sale Entry window, this button allows you to open a cash drawer without a transaction.
ALT+Q Available on the Point of Sale Entry window, this button allows you to logout of a cash drawer.
Allows you to save a record or an item in a field.
Allows you to cancel a transaction.
Allows you to delete a transaction.
Button Keyboard Description
Chapter 5: Navigating in Point of Sale Professional Point of Sale Professional Manual

56
Chapter 6
INDEX
�
�
CONTENTS
BACK
Using the Setup MenuChapter 6Chapter 7
Chapter 6: Using the Setup teaches you how to setup options for your company and how to create and maintain standard data used within the Point of Sale Professional module. The activities in this chapter are performed by a manager or system administrator.
How to Use the Setup Menu
The options available in the Setup menu allow your company to setup company-wide standards. You might not need to use every feature available in the Setup menu. Select only the options your company requires.
This chapter does not describe every procedure that can be completed on a Setup window. This chapter describes each option so you can setup your Point of Sale Professional system quickly and start using the module. Detailed instructions about changing information, deleting information, and printing from the Setup windows are available in the online help. The following instructions provide a quick overview of how to complete these procedures.
Open a Window from the Setup Menu
1 Double-click the Point of Sale Professional module from the Modules tab. The module expands to display all the menu options available in the Point of Sale Professional module.
2 Click on the Setup menu. The names of the windows available in the menu appear on the right side of the MAS 90/MAS 200 window.
Chapter 6: Using the Setup Menu Point of Sale Professional Manual

57
INDEX
�
�
CONTENTS
BACK
3 Double-click on the name of the window to open. The system displays the selected window.
Add a Record
1 Enter the new record name or number in the first field on the window.
Each window in the Setup menu, with the exception of the Point of Sale Professional Options window and the Sales Tax Account Maintenance window, allows you to manually enter new information in the first field. The Point of Sale Professional Options window sets the options for the entire module and does not have separate records. You do not create sales tax schedules in the Sales Tax Account Maintenance window. Create sales tax schedules in the Sales Tax Account Maintenance window of the Library Master module (see the Library Master Manual by Best Software). You use the Sales Tax Account Maintenance window to link accounts to sales taxes for the Point of Sale Professional module. You select a sales tax schedule from a Lookup window in the first field.
2 Set the options your company requires from the fields available on the window. See the section in this chapter for detailed information about each option you can set.
3 Click the Accept button to save the changes.
Windows Available in the Setup Menu
Chapter 6: Using the Setup Menu Point of Sale Professional Manual

58
INDEX
�
�
CONTENTS
BACK
Change a Record
1 Click the button in the first field to select a record account from the Lookup window. The system displays the record’s information in the window.
2 Set the options your company requires from the fields available on the window. See the section in this chapter for detailed information about each option you can set.
3 Click the Accept button to save the changes.
Delete a Record
1 Click the button in the first field to select a record account from the Lookup window. The system displays the record’s information in the window.
2 Click the Delete button. The system displays a warning dialog box similar to the following.
3 Click the Yes button. The record is deleted.
4 Click the Accept button to save the changes.
Print a Setup Listing
You can print information from any of the windows available in the Setup menu. These windows provide a listing of the options set or the records available. For many of the windows you can select the type of information to include in the listing. For detailed information about each type of listing, see the online help.
1 Click the button on the window. A Listing window similar to the following appears.
Warning Dialog
Chapter 6: Using the Setup Menu Point of Sale Professional Manual

59
INDEX
�
�
CONTENTS
BACK
2 Select how to sort the list from the Sort Options field.
3 Select the type of information to include in the list from the remaining fields on the Listing window. For many fields you can select all records or a range of information. For example, in the previous picture you can check All to print all discount codes, or you can use the Lookup windows in the Starting and Ending fields and select specific discounts. If there is a date field available in a Listing window and you want to print information for a particular date, enter the same date in the Starting and Ending fields.
4 Click the Print button to print the list or the Preview button to preview the list.
Point of Sale Professional Options
The module "Options" window, a standard feature available in all MAS 90/MAS 200 accounting software modules, allows you to customize each module to fit your company’s specific accounting requirements. The Point of Sale Professional Options window allows you to select from a wide range of options. Using this feature you tailor the Point of Sale Professional module to suite your business requirements. Configure which MAS 90/MAS 200 modules will integrate with Point of Sale Professional, set standards for cashiers during point of sale entry, and design reports for Point of Sale Professional.
Discount Code Listing Window
Chapter 6: Using the Setup Menu Point of Sale Professional Manual
60
INDEX
�
�
CONTENTS
BACK
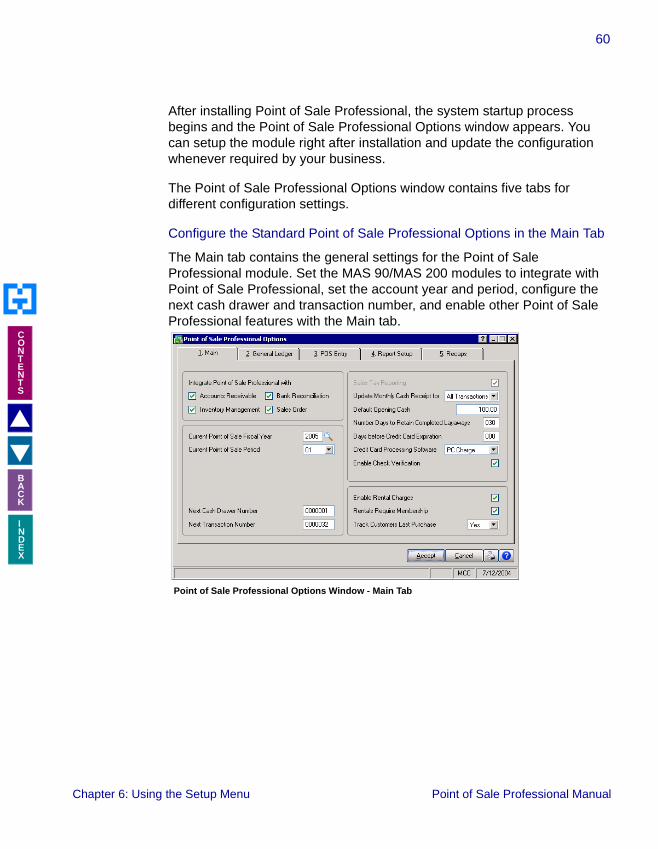
After installing Point of Sale Professional, the system startup process begins and the Point of Sale Professional Options window appears. You can setup the module right after installation and update the configuration whenever required by your business.
The Point of Sale Professional Options window contains five tabs for different configuration settings.
Configure the Standard Point of Sale Professional Options in the Main Tab
The Main tab contains the general settings for the Point of Sale Professional module. Set the MAS 90/MAS 200 modules to integrate with Point of Sale Professional, set the account year and period, configure the next cash drawer and transaction number, and enable other Point of Sale Professional features with the Main tab.
Point of Sale Professional Options Window - Main Tab
Chapter 6: Using the Setup Menu Point of Sale Professional Manual

61
INDEX
�
�
CONTENTS
BACK
1 Check the modules that will integrate with the Point of Sale Professional module in the Integrate Point of Sale with section. The following table describes each option.
Field Description
Accounts Receivable Check this box to integrate Point of Sale Professional with the Accounts Receivable module. The Accounts Receivable module provides automatic access to the Customer Master file, retrieval of address, terms, discounts, commissions, and sales tax information. It can also provide automatic credit limit checking when processing transactions for customers in the Customer Master file. The system allows for customers on credit by creating open invoices that can be paid through Accounts Receivable Cash Receipts Entry. The Point of Sale Professional module provides quick access to the Customer Master file from the Point of Sale Professional Inquiries menu. When you check this field, the Sales Order field on the Main tab of Point of Sale Options becomes available. The Sales Tax Reporting field becomes unavailable because the information is read from the Accounts Receivable module. The Print Sales Tax Journal in Detail field on the Report Setup tab becomes unavailable because the information is read from the Accounts Receivable module. The Customer Inquiry option in the Inquiries menu becomes available, allowing users to view information from the Customer Master file without changing data.
Bank Reconciliation Check this box to integrate Point of Sale Professional with the Bank Reconciliation module. This option allows deposits and payments processed through Point of Sale Professional to be updated to the Bank Reconciliation Bank Code file. Using Bank Reconciliation with the Point of Sale Professional module provides an easy, accurate means to reconcile banking statements.When you check this field, the Post Deposits by Payment Type field in the POS Entry tab becomes available. The Bank Deposit Maintenance option and the Bank Deposit Register/Update option in the Main menu also become available. The Daily Deposits and Payments recorded in Point of Sale Professional Entry are updated during the Bank Deposit Register/Update.
Chapter 6: Using the Setup Menu Point of Sale Professional Manual

62
INDEX
�
�
CONTENTS
BACK
2 Select the current fiscal year for the Point of Sale Professional module in the Current Point of Sale Professional Fiscal Year field. This year must reflect the calendar year associated with the current point of sale period. This field and the Current Point of Sale Period field differentiates between the current year and the future year. The information in this field is automatically updated during the Point of Sale Professional period end or year end processing.
3 Select the current accounting period from the Current Point of Sale Period field. This field and the Current Point of Sale Professional Fiscal Year field differentiates between the current year and the future year. The information in this field is automatically updated during the Point of Sale Professional period end processing.
Inventory Management Check this box to integrate Point of Sale Professional with the Inventory Management module. The Inventory Management module allows you to track the sales and purchases of inventory items for costing resale and purchasing purposes. The Inventory Management module provides comprehensive pricing structure incorporating quantity breaks, price overrides, and discounts by item, product line, customer price level, or contract pricing by customer. You can also use Inventory Management to set up and maintain multiple warehouses. You can specify a default (primary) warehouse to check for stock availability when entering transactions. You can also establish a file of alternate items to be substituted for out-of-stock items. The Inventory Management module provides sales kits that can be used to sell a group of component items. Each sales kit can consist of any number of component items, and when sold through a Point of Sale Professional transaction, the component items are added automatically to the transaction. If you have the Multi-Bin Advanced Distribution module installed, it will also be integrated with Point of Sale Professional when you select Inventory Management.
Sales Order Check this box to integrate Point of Sale Professional with the Sales Order module. This field is only available when the Accounts Receivable box is checked. When you check this field, the Allow Discount Rate by Detail Line field in the POS Entry tab becomes unavailable because the information is read from the Sales Order module.
Field Description
Chapter 6: Using the Setup Menu Point of Sale Professional Manual

63
INDEX
�
�
CONTENTS
BACK
4 Enter the number of the next cash drawer in the Next Cash Drawer Number field. The cash drawer number can be a maximum of 7 characters. The information in this field is automatically incremented when a new cash drawer is created.
5 Enter the number of the next transaction for Point of Sale Entry in the Next Transaction Number field. The transaction number can be a maximum of 7 characters. The information in this field is automatically incremented during a new transaction.
6 Check Sales Tax Reporting to report sales tax through the Point of Sale Professional module. This option is not available when integrating Point of Sale Professional with the Accounts Receivable module. The Point of Sale Professional module will apply the settings defined in the Account Receivable module for sales tax reporting. See the Account Receivable Module Manual by Best Software for more information.
7 Select how to update cash receipts from the Update Monthly Cash Receipts for field. This field is available only when integrating with the Accounts Receivable module. The selection for this field determines the information that is included on the Cash Receipts Report in Accounts Receivable. The following table describes each option.
8 Enter the standard opening cash value for all your locations in the Default Opening Cash field. Managers can override this value for specific cash registers as needed.
Option Description
None None of the payments from Point of Sale Professional will be used to produce the report.
Cust(omer) Payments
Recommended
The Cash Receipts Report will include appropriate Point of Sale Professional data pertaining to customer payments.
All Transactions The Cash Receipt Report will include all the payments from Point of Sale Professional in the report.
Chapter 6: Using the Setup Menu Point of Sale Professional Manual

64
INDEX
�
�
CONTENTS
BACK
9 Enter the number of days to store data for completed layaways after the last payment has been made in the Number of Days to Retain Completed Layaways field. The number of days can be a maximum of 3 digits. Completed layaways are stored in the Layaway Transaction file. Layaways completed on or before the number of days specified will be automatically purged during period end processing.
10 Enter the number of days before a customer’s credit card expiration date to send a reminder to your employee in the Days before Credit Card Expiration field. The number of days can be a maximum of 3 digits. This feature is useful if your company pre-authorizes credit transactions but does not apply the charges immediately.
11 If using a credit card processing software with Point of Sale Professional, select the software from the Credit Card Processing Software field. Currently, the system only supports PCCharge. See the Point of Sale Professional Hardware Configuration Manual for more information.
12 If using PCCharge with Point of Sale Professional, check Enable Check Verification to verify checks during transaction payment.
13 Check Enable Rental Charges to configure the Point of Sale Professional module to allow rentals. When you check this field, the Rental Charge Code Maintenance, Rental Return Entry, and Rental Return Report/Update options will be available in the Optional menu. Rental transactions will also be available in the Point of Sale Entry window. Point of Sale Professional must be integrated with the Inventory Management module to use the rental feature.
14 Check Rentals Require Membership to require membership for rental charges. This field is available only if the Enable Rental Charges options is selected.
15 Select whether or not to track a customer’s last purchase from the Track Customers Last Purchase field. If you select Yes, the Customer Last Purchase Maintenance option becomes available in the Optional menu. Point of Sale Professional must be integrated with the Accounts Receivable module to use the tracking feature. If integrated with
Chapter 6: Using the Setup Menu Point of Sale Professional Manual

65
INDEX
�
�
CONTENTS
BACK
Inventory Management, the customer purchase history is tracked for standard inventory items only. If Point of Sale Professional is not integrated with Inventory Management, the customer purchase history is tracked for miscellaneous items only.
Configure How to Post General Ledger Data in the General Ledger Tab
The General Ledger tab allows you to set how to post data from the Point of Sale Professional module to the MAS 90/MAS 200 General Ledger module.
1 Click on the General Ledger tab from the Point of Sale Professional Options window to access the General Ledger options.
2 Check Post to General Ledger in Detail to post the details of discounts, freight charges, and sales taxes to the General Ledger module.
3 Check Post Inventory Item Costs to General Ledger to post inventory costs to the General Ledger module.
4 Check Allow POS Entry of Miscellaneous (/M) Charges to allow cashiers to enter miscellaneous charge values that are not specific to an inventory item.
Point of Sale Professional Options Window - General Ledger Tab
Chapter 6: Using the Setup Menu Point of Sale Professional Manual
66
INDEX
�
�
CONTENTS
BACK
5 Select a general ledger account for miscellaneous charges from the Sales Account field. This field is only available after checking the POS Entry of Miscellaneous (/M) Charges box.
6 Check Allow POS Entry of Special Items to allow cashiers to enter special items using an asterisk (*).
7 Check Post Special Item Costs to General Ledger to post special item costs to the General Ledger module. This field is only available after checking the POS Entry of Special Items box.
8 Check Default Special Items to Drop Ship to default special items to the drop ship option. This field is only available after checking the POS Entry of Special Items box.
9 Select a general ledger account for special items from the Sales Account field. This field is only available after checking the POS Entry of Special Items box.
10 Select a general ledger account for special items cost of goods from the COGS Account field. This field is only available after checking the POS Entry of Special Items box.
11 Select a purchases account for special items from the Purchases Account field. This field is only available after checking the POS Entry of Special Items box.
Configure Point of Sale Transaction Entry Options
The POS Entry tab allows you to set standards for all cashiers during point of sale entry. You can configure how receipts will look and how to post bank deposits.
1 Click on the POS Entry tab from the Point of Sale Professional Options window to access the point of sale entry options.
Chapter 6: Using the Setup Menu Point of Sale Professional Manual
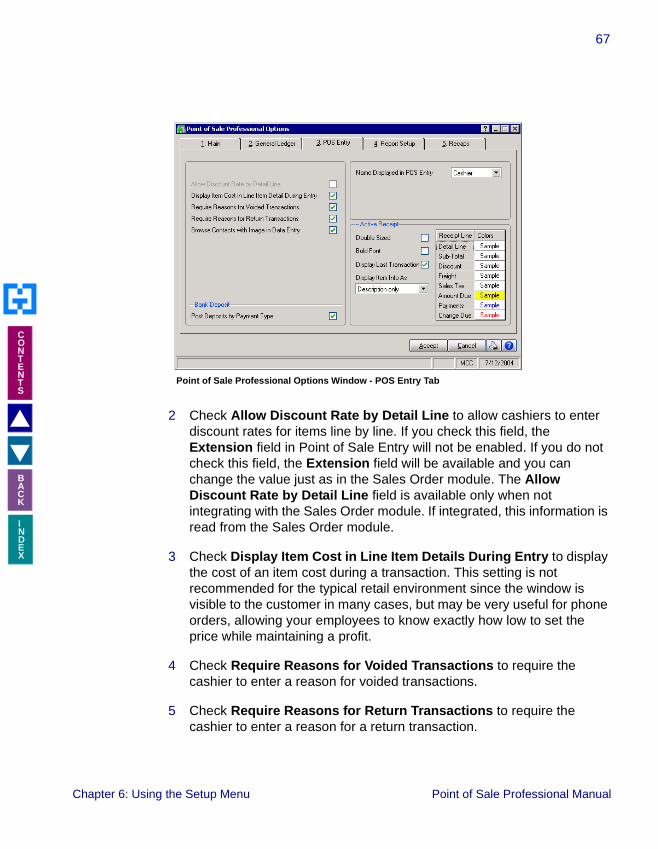
67
INDEX
�
�
CONTENTS
BACK
2 Check Allow Discount Rate by Detail Line to allow cashiers to enter discount rates for items line by line. If you check this field, the Extension field in Point of Sale Entry will not be enabled. If you do not check this field, the Extension field will be available and you can change the value just as in the Sales Order module. The Allow Discount Rate by Detail Line field is available only when not integrating with the Sales Order module. If integrated, this information is read from the Sales Order module.
3 Check Display Item Cost in Line Item Details During Entry to display the cost of an item cost during a transaction. This setting is not recommended for the typical retail environment since the window is visible to the customer in many cases, but may be very useful for phone orders, allowing your employees to know exactly how low to set the price while maintaining a profit.
4 Check Require Reasons for Voided Transactions to require the cashier to enter a reason for voided transactions.
5 Check Require Reasons for Return Transactions to require the cashier to enter a reason for a return transaction.
Point of Sale Professional Options Window - POS Entry Tab
Chapter 6: Using the Setup Menu Point of Sale Professional Manual

68
INDEX
�
�
CONTENTS
BACK
6 Check Browse Contacts with Image in Data Entry to display a photographic image of the customer stored on file, which can be used for verification.
7 Check Post Deposits by Payment Type to post bank deposit information by the payment type. If this option is selected, all payment types (other than cash or check) in each deposit from the Bank Deposit Maintenance will update to the Bank Reconciliation module as individual deposits. Point of Sale Professional must be integrated with the Bank Reconciliation module to use this feature.
8 Select whether to display the name of the Cashier or Salesperson in the Point of Sale Entry window from the Name Displayed in POS Entry field.
9 Check Double Sized to set receipts with the double-sized font.
10 Check Bold Font to set receipts with the bold font.
11 Check Display Last Transaction to display the last transaction on the active receipt, which is helpful for cashiers to determine the amount of change due to a customer.
12 Select how to display an item on a receipt from the Display Item Info As field. Select Item Number only to display only the number of the item, Description only to display only the description of the item, or Description & Item No to display both.
13 Set the colors for each receipt line by clicking on the Colors field and accessing the Color Selections window. Change the foreground and background colors for fields displayed on the receipt.
14 Check Reseller Demo to setup your Point of Sale Professional module in demonstration mode. This option will automatically print preview all forms instead of printing them on a printer. (This option is available only if the Point of Sale Professional module has been registered with a reseller unlocking key.)
Chapter 6: Using the Setup Menu Point of Sale Professional Manual

69
INDEX
�
�
CONTENTS
BACK
Configure the Reports to Print during the Daily Sales Reports/Updates Process
The Report Setup tab allows you to set which reports to print during the Daily Sales Reports/Updates process.
1 Click on the Report Setup tab from the Point of Sale Professional Options window to access the report options.
2 Check Print Cash Drawer Reconciliation to print a report after verifying a cash drawer reconciliation.
3 Check Include Transaction Detail on Reconciliation to include transaction details on the reconciliation report. This field is only available after checking the Print Cash Drawer Reconciliation box.
4 Check Print Sales Journals by Cash Drawer to print a report of all sales by cash drawer.
5 Check Print Sales Tax Journal in Detail to print sales tax journals in detail. This option is only available when not integrating with the Accounts Receivable module.
Point of Sale Professional Options Window - Report Setup Tab
Chapter 6: Using the Setup Menu Point of Sale Professional Manual

70
INDEX
�
�
CONTENTS
BACK
6 Check Print Gross Profit Journal to print the gross profit report in detail.
7 If you have Crystal Reports installed, make any changes to the layout of the reports in the Journals field. Click the Edit button to customize the journal report setup. Click the Reset button to restore the report to its original settings.
Configure the Recaps to Print during the Daily Sales Reports/Updates Process
The Recaps tab allows you to set which recap reports to print during the Daily Sales Reports/Updates process.
1 Click on the Recaps tab from the Point of Sale Professional Options window to access the recap options.
2 Check the recap reports to print during a daily update. The following list describes each report.
• Print Daily Sales Recap Reports - Check this feature to print a daily sales recap. The other recap report check boxes become available when you check this field.
Point of Sale Professional Options Window - Recaps Tab
Chapter 6: Using the Setup Menu Point of Sale Professional Manual

71
INDEX
�
�
CONTENTS
BACK
• Print Recap by Item - This report recaps sales by product line and item number. Information detailed for each item includes warehouse, unit price, quantity, total sale dollars, gross profit amount, and percentage of profit. The report can be printed by warehouse or in summary format with totals for all locations for each item.
• Include Warehouse Detail for Recap by Item - This feature is available if you check Print Recap by Item. This report includes the full warehouse details.
• Print Recap by Warehouse by Item - This report recaps sales by warehouse location and item number. Information detailed for each item includes unit price, quantity, total sales dollars, gross profit amount, and percentage of profit. Totals are provided by product line and warehouse.
• Print Recap by Product Line - This report recaps sales by product line. Information detailed for each product line’s warehouse includes quantity sold; daily, period-to-date, and year-to-date quantities sold; sales dollars; and percentage of profit.
• Print Recap by Warehouse by Product Line - This report recaps sales by warehouse and product line. Information detailed for each warehouse includes daily, period-to-date, and year-to-date quantities sold; sales dollars; and percentage of profit.
• Print Recap by Warehouse - This report recaps sales by warehouse. Daily, period-to-date, and year-to-date sales dollars and percentage of profit are totaled by warehouse with grand total for all warehouses.
• Print Recap by Customer - This report recaps sales by customer. Daily, period-to-date, and year-to-date sales dollars and percentage of profit are provided for each customer. If you are using divisions, divisional totals are provided.
• Print Recap by Division - This report recaps sales by division. Daily, period-to-date, and year-to-date sales dollars and percentage of profit are provided for each division.
Chapter 6: Using the Setup Menu Point of Sale Professional Manual

72
INDEX
�
�
CONTENTS
BACK
• Print Recap by Location - This report recaps sales by location. Daily, period-to-date, and year-to-date sales dollars and percentage of profit are provided for each location.
3 Check Purge P/2 Recap at Period End to purge the recap information during period end processing.
4 If you have Crystal Reports installed, make any changes to the layout of the reports in the Journals field. Click the Edit button to customize the journal report setup. Click the Reset button to restore the report to its original settings.
5 Click the Accept button to save the changes.
Discount Maintenance
Create discount codes to reduce the total transaction amount during a point of sale transaction. Create discounts for employees, specific types of customers, and to offer specials. Discounts can either be a percentage or dollar amount subtracted from the transaction. You can also set whether or not the cashier can override the discount during transaction entry. Use the Discount Maintenance window to view how often a discount was used during the current accounting period, current year, or previous year.
Chapter 6: Using the Setup Menu Point of Sale Professional Manual

73
INDEX
�
�
CONTENTS
BACK
Create a New Discount Code
1 Enter a two-digit code in the Discount Code field. This field accepts alphanumerical values. Do NOT use the code 00 - this code is reserved for Accounts Receivable customers.
2 Enter the description of the code in the Description field.
3 Select the type of discount from the Discount Type field. You can select either Percentage Amount or Dollar Amount.
4 Enter the amount or percentage of the discount in the Discount Percent or Discount Amount field. If you selected Percentage Amount from the Discount Type field, enter the discount percentage in the Discount Percent field. If you selected Dollar Amount from the Discount Type field, enter the discount dollar amount in the Discount Amount field.
5 Select an account to apply discounts to in the Disc. Debit Account field.
�WARNING: You cannot change the 00 discount code. This code is reserved for Account Receivable customers. When a customer is selected in a transaction and the default Discount Amount is set in AR Customer Maintenance, this discount will be applied to the transaction.
Discount Maintenance Window
Chapter 6: Using the Setup Menu Point of Sale Professional Manual

74
INDEX
�
�
CONTENTS
BACK
6 Check the Allow Override in Point of Sale Entry to allow a cashier to override the discount amount during a point of sale transaction. The Minimum Allowed and Maximum Allowed fields become available.
7 Enter the minimum discount that must be applied to a transaction in the Minimum Allowed field.
8 Enter the maximum discount that can be applied to a transaction in the Maximum Allowed field.
9 Click the Accept button to save the changes.
Miscellaneous Charge Code Maintenance
Use the P/2 Miscellaneous Charge Maintenance window to create charge codes, item codes, and comment codes. Create miscellaneous charge codes to cover charges for services, special fees, or other types of sales that do not include inventory items. Create miscellaneous item codes to enter inventory part numbers when the Inventory Management module is not integrated with the Sales Order module. If the modules are integrated, the information is copied from the Sales Order module. Create miscellaneous comment codes to add comments to transaction receipts.
�NOTE: The Point of Sale Professional module updates the Discount Taken fields. It is recommended that you do not manually enter data in these fields. If your company is using Point of Sale Professional for the first time and wants last year’s information from your current system available, you can enter data into these fields.
Chapter 6: Using the Setup Menu Point of Sale Professional Manual
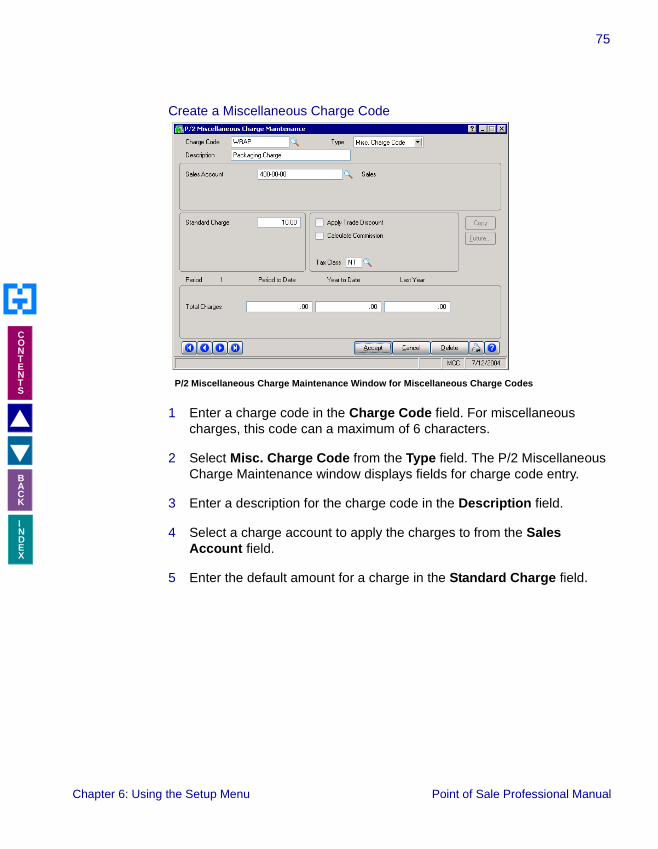
75
INDEX
�
�
CONTENTS
BACK
Create a Miscellaneous Charge Code
1 Enter a charge code in the Charge Code field. For miscellaneous charges, this code can a maximum of 6 characters.
2 Select Misc. Charge Code from the Type field. The P/2 Miscellaneous Charge Maintenance window displays fields for charge code entry.
3 Enter a description for the charge code in the Description field.
4 Select a charge account to apply the charges to from the Sales Account field.
5 Enter the default amount for a charge in the Standard Charge field.
P/2 Miscellaneous Charge Maintenance Window for Miscellaneous Charge Codes
Chapter 6: Using the Setup Menu Point of Sale Professional Manual

76
INDEX
�
�
CONTENTS
BACK
6 Select a sales tax from the Tax Class field. You can assign a particular tax class to a charge.
7 Click the Accept button to save the changes.
Create a Miscellaneous Item Code
1 Enter a charge code in the Charge Code field.
2 Select Misc. Item Code from the Type field. The P/2 Miscellaneous Charge Maintenance window displays fields for item code entry.
3 Enter a description for the charge code in the Description field.
4 Select a sales account from the Sales Account field. You can apply the item code to a particular sales account.
�NOTE: The Point of Sale Professional module updates the fields in the Period section after period end and/or year end processing. It is recommended that you do not manually enter data in these fields. If your company is using Point of Sale Professional for the first time and wants last year’s information from your current system available, you can enter data into these fields.
P/2 Miscellaneous Charge Maintenance Window for Miscellaneous Item Codes
Chapter 6: Using the Setup Menu Point of Sale Professional Manual

77
INDEX
�
�
CONTENTS
BACK
5 Select a cost of goods account from the Cost of Goods Account field. You can apply the item code to a particular cost of goods account.
6 Select an inventory account from the Inventory Account field. You can apply the item code to a particular inventory account.
7 Enter the unit of measure for the item in the Unit of Measure field.
8 Enter the standard cost for the item unit in the Standard Unit Cost field.
9 Enter the standard price for the item unit in the Standard Unit Price field.
10 Check Apply Trade Discount to automatically apply a trade discount to this charge.
11 Check Calculate Commission to automatically calculate sales commissions for this charge.
12 Check Drop Ship Item to automatically set this item to be drop-shipped.
13 Select a sales tax from the Tax Class field. You can assign a particular tax class to a charge.
14 Click the Accept button to save the changes.
Create a Miscellaneous Comment Code
1 Enter a charge code the starts with C0 in the Charge Code field. Comment codes start with the letter C and the number zero. The P/2 Miscellaneous Charge Maintenance window displays fields for comment code entry.
�NOTE: The Point of Sale Professional module updates the fields in the Period section. It is recommended that you do not manually enter data in these fields. If your company is using Point of Sale Professional for the first time and wants last year’s information from your current system available, you can enter data into these fields.
Chapter 6: Using the Setup Menu Point of Sale Professional Manual

78
INDEX
�
�
CONTENTS
BACK
2 Enter a description for the comment code in the Description field.
3 Click the Accept button to save the changes.
Transaction Type Maintenance
Use the Transaction Type Maintenance window to create different types of transactions that can be made with your Point of Sale Professional module. For example, you can create transaction types such as Sale, Quote, or Layaway Payment. You can also determine how cashiers can enter the transaction into the Point of Sale Entry window. For example, you can determine the tab order of the fields in the Point of Sale Entry window.
The Transaction Type Maintenance window contains two tabs for different transaction settings.
�NOTE: In the Entering Transactions section, each transaction type lists the optimal settings you can set to increase efficiency and reduce cashier mistakes. The optimal settings are listed in gray text boxes in that section.
P/2 Miscellaneous Charge Maintenance Window for Miscellaneous Comment Codes
Chapter 6: Using the Setup Menu Point of Sale Professional Manual

79
INDEX
�
�
CONTENTS
BACK
Create a Transaction Type
The Main tab contains the general information for the transaction type. Create the transaction type number, select the standard transaction type, determine defaults for the transaction type, and select additional documents to print.
1 Enter a two-digit code in the Transaction Type field.
2 Enter the name for the transaction in the Description field.
3 Select a standard type of transaction from the Standard Type field. This field includes Sale, Layaway Payment, and Return. If the Accounts Receivable module is integrated with the Point of Sale Professional module, Customer Payment is also available. If the Sales Order module is integrated with the Point of Sale Professional module Order and Quote are also available. Additional fields will be available on the Transaction Type Maintenance window if you select Order or Quote.
4 For an order or quote, check Create S/O records after completed transaction to have a cashier enter the order or quote in the Point of Sale Entry window, and have the MAS 90/MAS 200 system create the record in the Sales Order module. This field is available only if Order or Quote is selected in the Standard Type field.
Transaction Type Maintenance Window - Main Tab
Chapter 6: Using the Setup Menu Point of Sale Professional Manual

80
INDEX
�
�
CONTENTS
BACK
5 For an order or quote, check Use Sales Order Entry for the transaction to have the Point of Sale Professional module to display the Sales Order Entry window for entering the order or quote. This field is available only if Order or Quote is selected in the Standard Type field.
6 Check Gift Receipts to print gift receipts for customers. When you check this field, the drop-down list to the right becomes available. You can select when gift receipts can be applied - for the whole sale, for a line item, or for a specific quantity of the item. Select by Transaction, by Line Item, or by Line Quantity. The Gift Receipts field is available only if Sale is selected in the Standard Type field.
7 Check Address Labels to print either the billing or shipping address. When you check this field, the drop-down list to the right becomes available. Select Ship to Address or Bill to Address.
8 Check User Defined to print additional information as defined by your company. When you check this field, the field to the right becomes available. Enter the data to print.
9 Select a default discount for the transaction in the Discount Code field. When a cashier selects this type of transaction, this discount will be the default and automatically added during point of sale entry.
10 Select a default miscellaneous charge for the transaction in the Misc. Charge field.
Configure Point of Sale Entry Settings for the Transaction Type
The POS Entry tab allows you to set standards for all cashiers during a transaction entry. You can request customer contact confirmation and determine the TAB sequence for transaction entry fields.
1 Click on the POS Entry tab from the Transaction Type Maintenance window to access the Point of Sale Entry options.
Chapter 6: Using the Setup Menu Point of Sale Professional Manual

81
INDEX
�
�
CONTENTS
BACK
2 Select a transaction code from the Transaction Type field. The transaction type’s information appears in the Transaction Type Maintenance window.
3 Check Automatic Line Completion to enable automatic line completion during a point of sale entry. This feature will automatically apply a quantity of 1 and add the line item to the active receipt each time an item is scanned. Check Automatic Line Completion if you are using bar code scanners.
4 Check Print Sales Tax Detail on Receipt to include detailed sales tax information on customer receipts.
5 Check Allow Negative Quantities, Prices, or Extensions to allow cashiers to enter negative values for item quantities, prices, and extensions during point of sale entry.
6 Check Print Second Copy of the Receipt to set the printer to print an additional copy of the receipt for the transaction.
7 Check Require Customer Number to require that the cashier enters the customer number during point of sale entry.
Transaction Type Maintenance Window - POS Entry Tab
Chapter 6: Using the Setup Menu Point of Sale Professional Manual
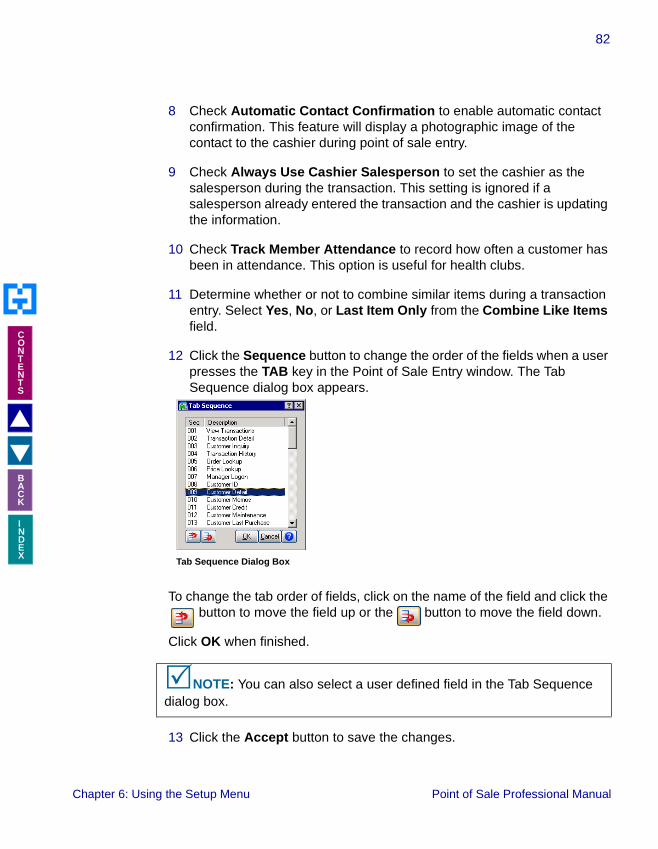
82
INDEX
�
�
CONTENTS
BACK
8 Check Automatic Contact Confirmation to enable automatic contact confirmation. This feature will display a photographic image of the contact to the cashier during point of sale entry.
9 Check Always Use Cashier Salesperson to set the cashier as the salesperson during the transaction. This setting is ignored if a salesperson already entered the transaction and the cashier is updating the information.
10 Check Track Member Attendance to record how often a customer has been in attendance. This option is useful for health clubs.
11 Determine whether or not to combine similar items during a transaction entry. Select Yes, No, or Last Item Only from the Combine Like Items field.
12 Click the Sequence button to change the order of the fields when a user presses the TAB key in the Point of Sale Entry window. The Tab Sequence dialog box appears.
To change the tab order of fields, click on the name of the field and click the button to move the field up or the button to move the field down.
Click OK when finished.
13 Click the Accept button to save the changes.
�NOTE: You can also select a user defined field in the Tab Sequence dialog box.
Tab Sequence Dialog Box
Chapter 6: Using the Setup Menu Point of Sale Professional Manual

83
INDEX
�
�
CONTENTS
BACK
Bank Maintenance
Use the P/2 Bank Code Maintenance window to establish bank accounts for depositing payments. You enter general information about the bank, including the bank address and account number, and determine the general ledger cash account number debited when deposits are updated. Create a maximum of 36 bank accounts.
Create a Bank
1 Enter a one-digit code in the Bank Code field.
2 Enter the bank name in the Description field.
3 Select a general ledger cash account from the Cash Account Number field.
4 Enter the bank number in the Bank ID Number field.
5 Enter the bank address in the Address field.
6 Enter the bank’s zip code in the Zip Code field.
7 Enter the bank’s city in the City field.
8 Enter the bank’s state abbreviation in the State field.
P/2 Bank Code Maintenance Window
Chapter 6: Using the Setup Menu Point of Sale Professional Manual

84
INDEX
�
�
CONTENTS
BACK
9 Select the bank’s country from the Country field.
10 Enter the name of the bank contact in the Contact field.
11 Enter the contact’s e-mail address in the E-mail Address field.
12 Enter the bank’s web address in the URL Address field.
13 Enter the contact’s phone number and extension in the Telephone and Ext fields.
14 Enter the bank’s fax number in the Fax field.
15 Enter any other additional information about the bank in the Comment field.
16 Click the Accept button to save the changes.
Payment Type Maintenance
Use the Payment Type Maintenance window to create different types of payment methods acceptable for a customer to pay for a transaction. For example, you can enter Cash and Check as acceptable payment types. You also configure point of sale entry settings for the payment type, such as opening the cash drawer (usually for a cash payment type) or printing a signature receipt (usually for a credit card payment type).
The Point of Sale Professional module records the history of payments received and refunded for each payment type for the period and year to date, and displays this information on the Payment Type Maintenance window.
The Payment Type Maintenance window contains three tabs for different payment type settings.
�NOTE: If your company integrates Point of Sale Professional with the Accounts Receivable module, the Point of Sale Professional’s Payment Type Maintenance window will be available in both the Point of Sale Professional module and the Accounts Receivable module.
Chapter 6: Using the Setup Menu Point of Sale Professional Manual

85
INDEX
�
�
CONTENTS
BACK
Create a Payment Type
The Main tab contains the general information for the payment type. Select the accounts for the payment type in the Main tab.
1 Enter a brief name for the payment type in the Payment Type field.
2 Enter the full payment type name in the Description field.
3 Select the general type of payment from the Type field. Select Check, Credit Card, Gift Cert, Terms, Cash On Delivery, or Other.
4 Check Include in Location Bank Deposit to include the payment amounts for the payment type with the bank deposits. If the amounts are included in a bank deposit, the Asset Account field will be unavailable.
5 Select an asset account to store the payment amounts from the Asset Account field. This field is not available if the Include in Location Bank Deposit field is checked.
�NOTE: The Cash On Delivery and Other payment types cannot be selected during Point of Sale Entry.
Payment Type Maintenance Window - Main Tab
Chapter 6: Using the Setup Menu Point of Sale Professional Manual
86
INDEX
�
�
CONTENTS
BACK
6 Select an account to store over/under amounts for the payment type from the Over/Short Account field.
7 Select an accounts receivable asset account for the bank deposits from the A/R Asset Account field. This field is only available if the Include in Location Bank Deposit field is checked.
8 Select the accounts receivable category for the payment type from the A/R Category field. Select either Deposit or Payment to use deposit processing or credit card processing. Select Deposit to trigger the transfer of funds when the order is entered. A deposit category transaction will be fully processed as a sale when the Authorize Now or Accept button is clicked in Sales Order Entry or Sales Order Invoice Data Entry and a deposit amount is entered. Select Payment to trigger the transfer of funds when the invoice is updated during the Sales Journal update. A payment category will first be pre-authorized when the Authorize Now or Accept button is clicked in Sales Order Entry or Sales Order Invoice Data Entry. When the sales journal is updated, a payment category card will be post-authorized (the transaction will be sent to PCCharge). The A/R Category field is available only if Credit Card is selected at the Type field.If entering a deposit with a credit card on an order in Point of Sale Professional, it is treated as a Deposit type category. Deposits trigger the transfer of funds when the order is entered. A deposit category transaction will be fully processed when the Authorize Now or Accept button is clicked in Point of Sale Entry and a deposit amount is entered.
Configure Point of Sale Entry Settings for the Payment Type
The POS Entry tab allows you to set standards for all cashiers during Point of Sale Professional transaction entry. You can set information requirements such as credit card numbers and driver license numbers, and print additional copies of a receipt.
�NOTE: The Point of Sale Professional module updates the Payments Received and Payments Refunded fields. It is recommended that you do not manually enter data in these fields. If your company is using Point of Sale Professional for the first time and wants last year’s information from your current system available, you can enter data into these fields.
Chapter 6: Using the Setup Menu Point of Sale Professional Manual

87
INDEX
�
�
CONTENTS
BACK
1 Click on the POS Entry tab from the Payment Type Maintenance window to access the point of sale entry options.
2 Check Open Cash Drawer to set the cash drawer to open when a customer pays for a transaction with the payment type. For example, check this field for a cash payment type, so the drawer will open for the cashier to retrieve the change.
3 Check Print a Second Copy of the Receipt to print an additional copy of a receipt for the payment type.
4 Check Print a Signature Line on the Receipt to print a line for the customer’s signature. You may want to check this field for a credit card payment type.
5 If your company is using a check or credit card authorization process software, you can disable the verification process. Check Disable Verification if you do not want the authorization process software to verify the information automatically.
6 Check the Check Number Entry Required to require cashiers to enter the number of check during transaction entry. This field is only available for the check payment type.
Payment Type Maintenance Window - POS Entry Tab
Chapter 6: Using the Setup Menu Point of Sale Professional Manual

88
INDEX
�
�
CONTENTS
BACK
7 Check Drivers License Required to require cashiers to enter the customer’s driver’s license number during transaction entry. This field is only available for the check payment type.
8 Check Credit Card Number to require cashiers to enter a credit card number during transaction entry. This field is only available for the credit card payment type.
9 Check Validation Number to require cashiers to enter the credit card validation number (usually 3-4 digit code on the back of the credit card) during transaction entry. This field is only available for the credit card payment type.
10 Check Confirm Last 4 Digits to require cashiers to re-enter the last four digits of the credit card number during transaction entry. This field is only available for the credit card payment type.
11 Check Name to require cashiers to enter the customer’s name during transaction entry when a customer pays with a check or credit card.
12 Check Address to require cashiers to enter the customer’s address during transaction entry when a customer pays with a check or credit card.
13 Check Zip Code to require cashiers to enter the customer’s zip code during transaction entry when a customer pays with a check or credit card.
Configure the Bank Information for the Credit Card Payment Type
The Credit Card tab allows you to set credit card authorization information, if your company is using a credit card processing application. Many of the settings in the Credit Card tab will be configured during hardware installation, especially if your company uses PCCharge™ as a credit authorization process tool. See the Point of Sale Professional Hardware Configuration Manual by HighTower or the PCCharge Manual by GO Software for more information.
You must create a payment type for each credit card type your company accepts. For example, if a customer pays with a Visa credit card but your company does not have a Visa payment type available in Point of Sale Professional, the cashier will receive an invalid swipe.
Chapter 6: Using the Setup Menu Point of Sale Professional Manual

89
INDEX
�
�
CONTENTS
BACK
1 Click on the Credit Card tab from the Payment Type Maintenance window to access the credit card information.
2 Select the credit card company in the Credit Card Company field. You must select the correct credit card. Credit card companies use different numbers so be sure to select the correct company. When you select the credit card company, only certain credit card numbers and lengths are accepted as valid entries. The following table lists the different numbers accepted by the major credit card companies.
Credit Card Company Card Number Starts with . . .
Card Number Length
American Express 34 15
Diner’s Club/Carte Blanche 30 14
36 14
38 14
Discover 6011 16
JCB 2131 15
1800 14
Payment Type Maintenance Window - Credit Tab
Chapter 6: Using the Setup Menu Point of Sale Professional Manual

90
INDEX
�
�
CONTENTS
BACK
3 Click the button in the Merchant ID field to search for a merchant ID. DO NOT MANUALLY ENTER THE MERCHANT NUMBER. The Merchant ID’s window appears.
Select the correct ID and click the OK button. The processor code will automatically display in the Processor Code field.
4 Enter the credit card discount percentage in the Discount Percent field. This information is used to calculate credit card expense.
5 Enter the bank fees for a credit card transaction in the Per Transaction Fee field. This information is used to calculate credit card fees.
6 Enter the number of days before the authorization expires in the Authorization Term field.
7 Select a general ledger account to accrue credit card fees from the Fees Accrual Acct field.
8 Click the Accept button to save the changes.
JCB continued 3 16
MasterCard 5 16
Visa 4 13
Credit Card Company Card Number Starts with . . .
Card Number Length
Merchant ID’s Window
Chapter 6: Using the Setup Menu Point of Sale Professional Manual

91
INDEX
�
�
CONTENTS
BACK
Configure the Check Payment Type
The Credit Card tab also allows you to set check verification information, if your company is using a verification processing application. Many of the settings in the Credit Card tab will be configured during hardware installation, especially if your company uses PCCharge™ as an authorization process tool. See the Point of Sale Professional Hardware Configuration Manual by HighTower or the PCCharge Manual by GO Software for more information. Before starting, you must have the following:
• Site ID number from a check processing company, such as Telecheck.
• Modem (external modem is recommended) attached and configured on the server or where PCCharge Payment Server has been installed.
• Select Enable Check Verification on the Point of Sale Professional Options window.
After you have obtained a Site ID number from the check processing company, enter this number in the PCCharge Payment Server program and the Point of Sale Professional module. To configure the check processing within PCCharge, see the PCCharge Payment Server Manual by GO Software. To configure check processing within Point of Sale Professional, complete the following steps.
Chapter 6: Using the Setup Menu Point of Sale Professional Manual

92
INDEX
�
�
CONTENTS
BACK
1 Click on the Credit Card tab from the Payment Type Maintenance window to access the check verification information.
2 Manually enter the Site ID provided by your check processing company in the Merchant ID field. The Lookup available in this field will NOT display the Site ID - you MUST enter it.
3 Enter the processor code for the check processing company in the Processor Code field. Enter the processor code that corresponds to the Site ID.
4 Click the Accept button to save the changes.
Sales Tax Account Maintenance
Use the Sales Tax Account Maintenance window to enter registration numbers, exemption numbers, and to select a sales tax account number for Point of Sale Professional for tax codes. You cannot create Tax Codes in the Sales Tax Account Maintenance window. Tax codes are created in the Sales Tax Account Maintenance window of the Library Master module (see the Library Master Manual by Best Software).
Payment Type Maintenance Window - Credit Tab
Chapter 6: Using the Setup Menu Point of Sale Professional Manual

93
INDEX
�
�
CONTENTS
BACK
Selecting an account for a tax codes in the Point of Sale Professional Sales Tax Account Maintenance window overrides the account selected in the Accounts Receivable Division Maintenance window and Point of Sale Professional Location Maintenance window.
When a tax code is selected on a transaction, the Point of Sale Professional Sales Journal will post the sales tax account in the following order: (1) Point of Sale Professional’s Sales Tax Account Maintenance, (2) Accounts Receivable’s Division Maintenance if a customer is entered on a transaction, and (3) Point of Sale Professional’s Location Maintenance. The Point of Sale Professional Sales Journal updates to the sales tax account found in the order of preference. For example, if an account is selected in Point of Sale Professional Sales Tax Account Maintenance, that account will be used. If no tax codes are selected in Point of Sale Professional Sales Tax Account Maintenance or in Accounts Receivable Division Maintenance, then the account from Point of Sale Professional Location Maintenance will be used.
Create a Sales Tax Account
1 Click the or button in the Tax Code field to select a sales tax code. The sale tax account’s information appears in the Sales Tax Account Maintenance window.
2 Enter a registration number for the sales tax account in the Registration Number field.
3 Enter an exemption number for the sales tax account in the Exemption Number field.
Sales Tax Account Maintenance Window
Chapter 6: Using the Setup Menu Point of Sale Professional Manual

94
INDEX
�
�
CONTENTS
BACK
4 Select a general ledger account from the P/2 Sales Tax Account field. This account will contain the taxes from Point of Sale Professional transaction.
5 Select a general ledger account from the A/P Sales Tax Account field. This account will contain the taxes for the Accounts Payable module.
6 Select a general ledger account from the A/P Use Tax Account field. This account will contain the taxes for the Accounts Payable module.
7 Select a general ledger account from the Non-Recoverable Tax Account field. This account will contain the taxes not recoverable.
8 Click the Accept button to save the changes.
Location Maintenance
Use the Location Maintenance window to set standards for different business locations. For example, if your company owns several stores, you can set different tax schedules to use, different warehouses to search for items, and different opening cash amounts for cash drawers at different locations.
The Location Maintenance window contains four tabs for different location settings.
Chapter 6: Using the Setup Menu Point of Sale Professional Manual

95
INDEX
�
�
CONTENTS
BACK
Create a Location
The Main tab contains the general information for the location. Select the warehouse the location will use, the shipping method used, and the tax schedule.
1 Enter a code for the location in the Location field.
2 Enter the full location name in the Description field.
3 Select a bank from the Bank field. The location will send deposits to the selected bank.
4 Select a sales tax schedule from the Tax Schedule field. The location will default to the selected tax schedule during a transaction.
5 Select a shipping method from the Ship Via field. The location will default to the selected shipping method during a transaction.
6 Select a warehouse from the Warehouse field. The location will default to the selected warehouse when searching for the availability of products.
Location Maintenance Window - Main Tab
Chapter 6: Using the Setup Menu Point of Sale Professional Manual
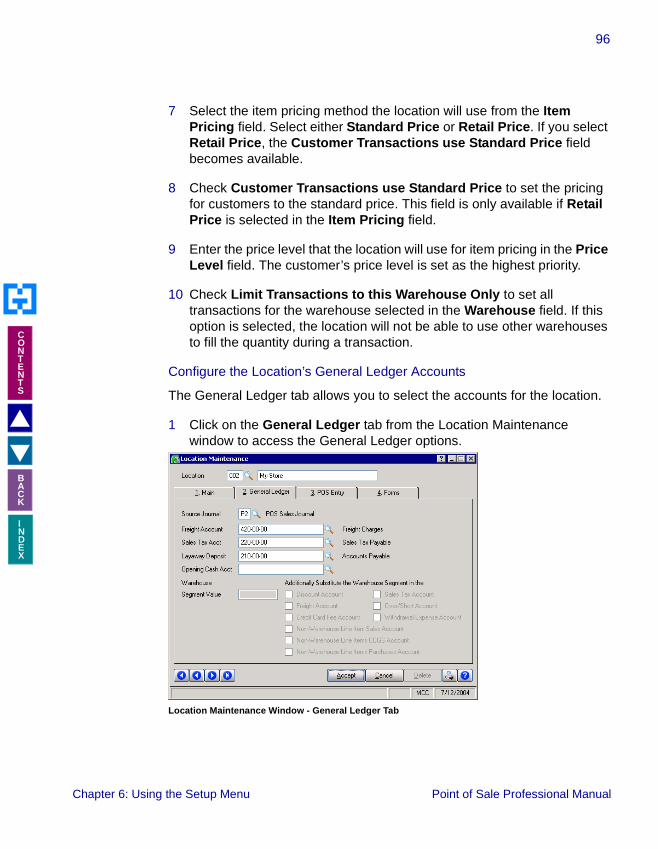
96
INDEX
�
�
CONTENTS
BACK
7 Select the item pricing method the location will use from the Item Pricing field. Select either Standard Price or Retail Price. If you select Retail Price, the Customer Transactions use Standard Price field becomes available.
8 Check Customer Transactions use Standard Price to set the pricing for customers to the standard price. This field is only available if Retail Price is selected in the Item Pricing field.
9 Enter the price level that the location will use for item pricing in the Price Level field. The customer’s price level is set as the highest priority.
10 Check Limit Transactions to this Warehouse Only to set all transactions for the warehouse selected in the Warehouse field. If this option is selected, the location will not be able to use other warehouses to fill the quantity during a transaction.
Configure the Location’s General Ledger Accounts
The General Ledger tab allows you to select the accounts for the location.
1 Click on the General Ledger tab from the Location Maintenance window to access the General Ledger options.
Location Maintenance Window - General Ledger Tab
Chapter 6: Using the Setup Menu Point of Sale Professional Manual

97
INDEX
�
�
CONTENTS
BACK
2 Select a journal as a transaction source for the location from the Source Journal field.
3 Select a shipping account for the location from the Freight Account field.
4 Select a sales tax account for the location from the Sales Tax Acct field. When a tax code is selected on a transaction, the Point of Sale Professional Sales Journal will post the sales tax account in the following order: (1) Point of Sale Professional’s Sales Tax Account Maintenance, (2) Accounts Receivable’s Division Maintenance if a customer is entered on a transaction, and (3) Point of Sale Professional’s Location Maintenance. The Point of Sale Professional Sales Journal updates to the sales tax account found in the order of preference. For example, if an account is selected in Point of Sale Professional Sales Tax Account Maintenance, that account will be used. If no tax codes are selected in Point of Sale Professional Sales Tax Account Maintenance or in Accounts Receivable Division Maintenance, then the account from Point of Sale Professional Location Maintenance will be used.
5 Select an account for layaway deposits for the location from the Layaway Deposit field.
6 Select an account for the location’s opening cash from Opening Cash Acct field. This account offsets any opening cash that is not used in the next cash drawer during reconciliation (see the Reconcile a Cash Drawer section for details). For example, if a cash drawer is supposed to start with $150 but a next cash drawer is set for $100, the remaining $50 is added to the opening cash account to account for the funds.
7 Check the accounts to substitute the warehouse segment value in the Warehouse Segment Value field. The segment value is listed. Check the accounts you want to add the value to. The accounts include: Discount Account, Freight Account, Credit Card Fee Account, Non-Warehouse Line Item Sales Account, Non-Warehouse Line Items COGS Account, Non-Warehouse Line Items Purchases Account, Sales Tax Account, Over/Short Account, and Withdrawal Expense Account.
Chapter 6: Using the Setup Menu Point of Sale Professional Manual
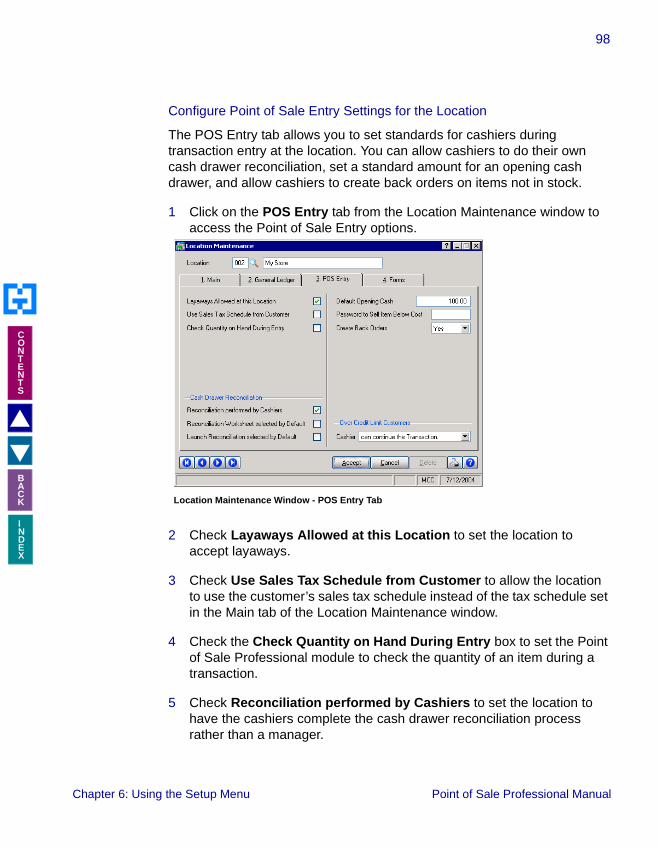
98
INDEX
�
�
CONTENTS
BACK
Configure Point of Sale Entry Settings for the Location
The POS Entry tab allows you to set standards for cashiers during transaction entry at the location. You can allow cashiers to do their own cash drawer reconciliation, set a standard amount for an opening cash drawer, and allow cashiers to create back orders on items not in stock.
1 Click on the POS Entry tab from the Location Maintenance window to access the Point of Sale Entry options.
2 Check Layaways Allowed at this Location to set the location to accept layaways.
3 Check Use Sales Tax Schedule from Customer to allow the location to use the customer’s sales tax schedule instead of the tax schedule set in the Main tab of the Location Maintenance window.
4 Check the Check Quantity on Hand During Entry box to set the Point of Sale Professional module to check the quantity of an item during a transaction.
5 Check Reconciliation performed by Cashiers to set the location to have the cashiers complete the cash drawer reconciliation process rather than a manager.
Location Maintenance Window - POS Entry Tab
Chapter 6: Using the Setup Menu Point of Sale Professional Manual
99
INDEX
�
�
CONTENTS
BACK
6 Check Launch Reconciliation selected by Default to set the location to have the Launch Reconciliation option selected when a cashier logs out of the cash drawer.
7 Enter the default cash drawer amount for the location in the Default Opening Cash field. If you do not enter information in this field, the system uses the default set in the Point of Sale Professional Options window.
8 Enter a password to allow cashiers to sell items below the standard cost in the Password to Sell Item Below Cost field.
9 Determine whether or not cashiers can create back orders for items not in stock from the Create Back Orders field. Select Yes if they can create back orders, or No if they cannot.
10 Determine how a cashier handles a transaction for an over-the-limit customer from the Over Credit Limit Customers field. You can select cannot continue the Transaction, can continue the Transaction, can continue without Term payments, or can continue with initial warning.
Configure Forms for the Location
The Forms tab allows your company to select which graphical or non-graphical forms to use at a specific location. You can also use this tab to create and edit forms.
Chapter 6: Using the Setup Menu Point of Sale Professional Manual

100
INDEX
�
�
CONTENTS
BACK
1 Click on the Forms tab from the Location Maintenance window to access the forms.
The Forms tab lists the default forms for each type of transaction or report. You can select another form, create a new form, change a form, or reset to the Point of Sale Professional default forms. The number of the selected form appears in the Form field. There are two types of forms - graphical and non-graphical.
Graphical Forms
All graphical forms are designed with Crystal Reports.
Location Maintenance Window - Forms Tab
Chapter 6: Using the Setup Menu Point of Sale Professional Manual

101
INDEX
�
�
CONTENTS
BACK
• To select a form - Click the button in the Find field to access the Forms Code list.
Select the form you want and click the Select button. The Forms tab contains the selected form for the report.
• To create a new form - Click on the button in the New field. The New Form dialog box appears.
Enter a code for the form in the New Form Code field and enter a description. Click the OK button when finished. The Crystal Reports application starts. Use this application to design the form. When you save the new form, the Forms tab will display the new form for the report.
• To change a form - Click on the button in the Edit field. The Crystal Reports application starts. Use this application to redesign the form. When you save the form, the Forms tab will display the changed form for the report.
�NOTE: Do not change Form Code 1. Create a new code number.
Forms Code List
New Form Dialog Box
Chapter 6: Using the Setup Menu Point of Sale Professional Manual
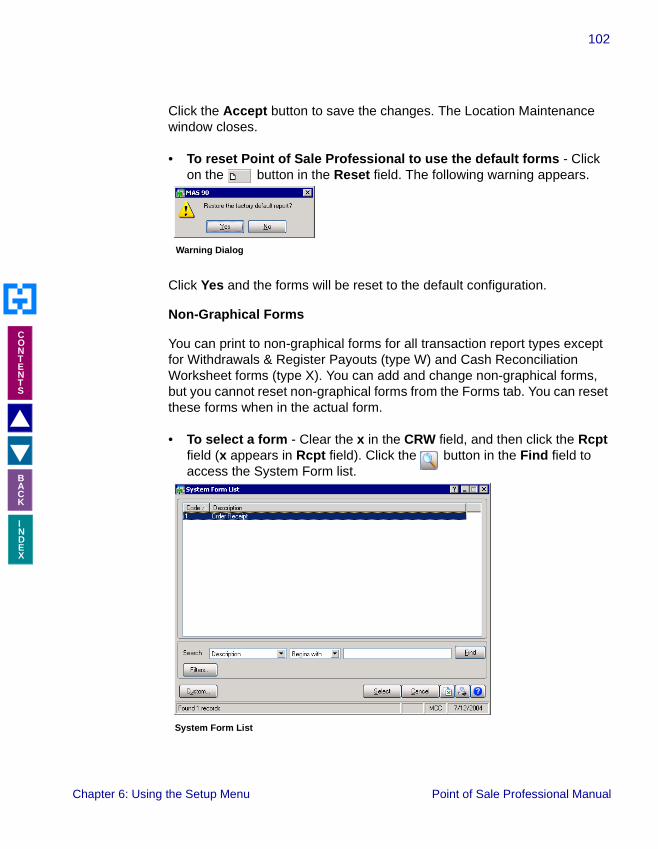
102
INDEX
�
�
CONTENTS
BACK
Click the Accept button to save the changes. The Location Maintenance window closes.
• To reset Point of Sale Professional to use the default forms - Click on the button in the Reset field. The following warning appears.
Click Yes and the forms will be reset to the default configuration.
Non-Graphical Forms
You can print to non-graphical forms for all transaction report types except for Withdrawals & Register Payouts (type W) and Cash Reconciliation Worksheet forms (type X). You can add and change non-graphical forms, but you cannot reset non-graphical forms from the Forms tab. You can reset these forms when in the actual form.
• To select a form - Clear the x in the CRW field, and then click the Rcpt field (x appears in Rcpt field). Click the button in the Find field to access the System Form list.
Warning Dialog
System Form List
Chapter 6: Using the Setup Menu Point of Sale Professional Manual
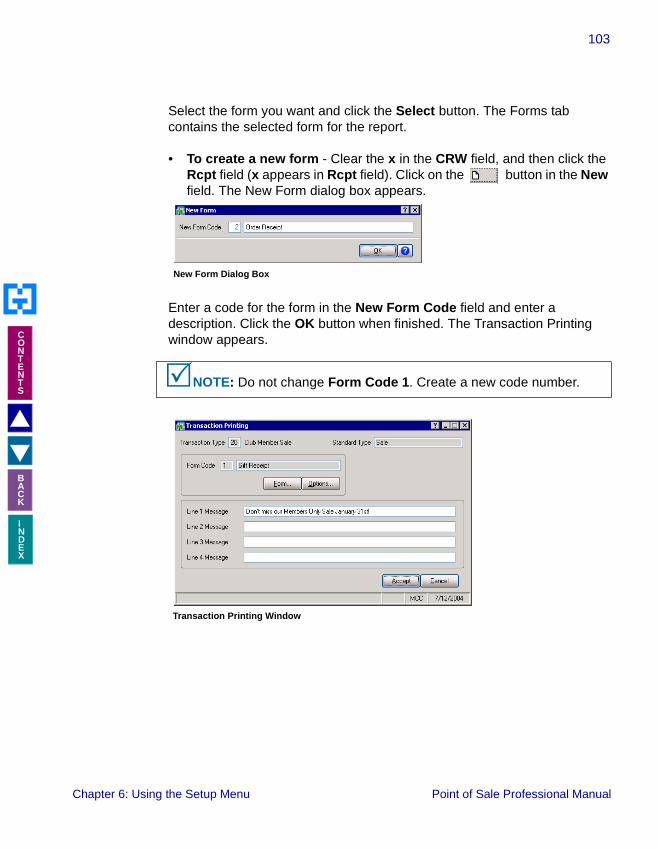
103
INDEX
�
�
CONTENTS
BACK
Select the form you want and click the Select button. The Forms tab contains the selected form for the report.
• To create a new form - Clear the x in the CRW field, and then click the Rcpt field (x appears in Rcpt field). Click on the button in the New field. The New Form dialog box appears.
Enter a code for the form in the New Form Code field and enter a description. Click the OK button when finished. The Transaction Printing window appears.
�NOTE: Do not change Form Code 1. Create a new code number.
New Form Dialog Box
Transaction Printing Window
Chapter 6: Using the Setup Menu Point of Sale Professional Manual

104
INDEX
�
�
CONTENTS
BACK
Enter messages to print on the form in the Line Message field. To change the print details and the field information that is printed, click the Form button to access the Forms Customization window.
Use the Forms Customization window to change the printing size and to add or remove fields from the form. In the 4.05 release of Point of Sale Professional, the field Standard Transaction Type was replaces with Reference No. on the Details tab.
Forms Customization Window
Chapter 6: Using the Setup Menu Point of Sale Professional Manual

105
INDEX
�
�
CONTENTS
BACK
To change the layout of price fields, click the Options button on the Transaction Printing window to access the Form Options window.
Change the number of spaces or add commas in any of the price fields. Click the OK button when finished.
• To change a form - Click on the button in the Edit field. The Transaction Printing window appears. Use this window to redesign the form. When you save the form, the Forms tab will display the changed form for the report.
2 Click the Accept button to save the changes.
Department Maintenance
Use Department Maintenance window to define departments within your store for the Point of Sale Professional module. Your company will be able to determine the amount of profits earned by different store departments.
Form Options Window
Chapter 6: Using the Setup Menu Point of Sale Professional Manual

106
INDEX
�
�
CONTENTS
BACK
Create a Department
1 Enter a code in the Department field.
2 Enter the department name in the Description field.
3 Click the Accept button to save the changes.
Register Maintenance
Use the Register Maintenance window to define the registers used with the Point of Sale Professional module. Each register has its own ID number (created from the MAS 90/MAS 200 terminal ID), description, and location. You can also define a printer, pole display, cash drawer, and product scale for a register.
The Register Maintenance window contains three tabs for different terminal settings.
Create a Register
The Main tab contains the general information for the register. Select the location of the register, the department using the register, and the default transaction type and payment type.
Department Maintenance Window
Chapter 6: Using the Setup Menu Point of Sale Professional Manual
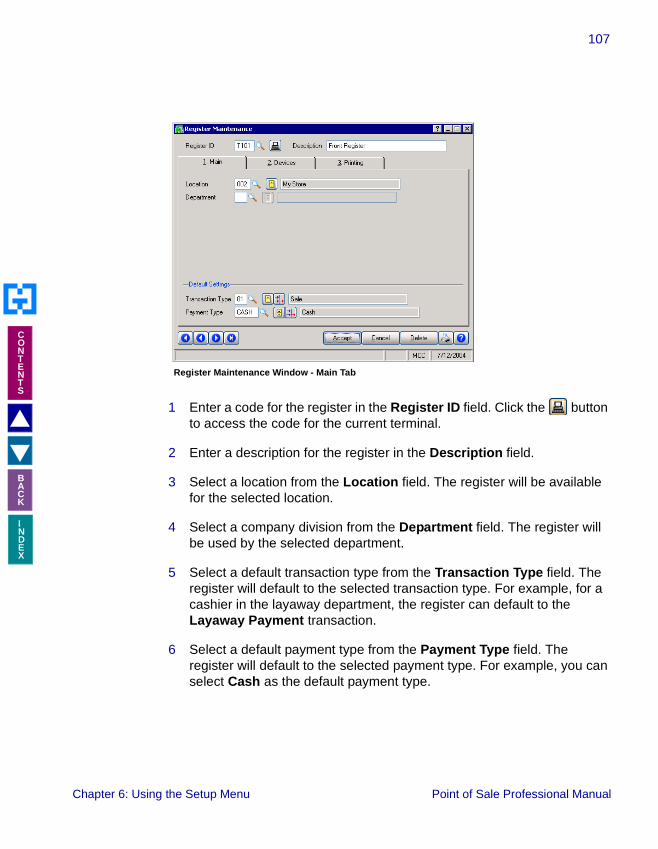
107
INDEX
�
�
CONTENTS
BACK
1 Enter a code for the register in the Register ID field. Click the button to access the code for the current terminal.
2 Enter a description for the register in the Description field.
3 Select a location from the Location field. The register will be available for the selected location.
4 Select a company division from the Department field. The register will be used by the selected department.
5 Select a default transaction type from the Transaction Type field. The register will default to the selected transaction type. For example, for a cashier in the layaway department, the register can default to the Layaway Payment transaction.
6 Select a default payment type from the Payment Type field. The register will default to the selected payment type. For example, you can select Cash as the default payment type.
Register Maintenance Window - Main Tab
Chapter 6: Using the Setup Menu Point of Sale Professional Manual

108
INDEX
�
�
CONTENTS
BACK
Configure the Register’s Devices
The Devices tab allows you to configure different devices for the terminal, including pole displays, product scales, touch screen keypads, and cash drawers.
1 Click on the Devices tab from the Register Maintenance window to access the devices options.
2 Select a pole display the register will connect to from the Pole Display field.
3 Select a scale the register will connect to from the Product Scale field.
4 Check Enable Touch Screen Keypad to set the register to use a touch screen keypad during a transaction.
5 Select the default cash drawer for the register from the First Cash Drawer field.
�NOTE: For detailed information about configuring devices such as pole displays and cash drawers for Point of Sale Professional, see the Point of Sale Professional Hardware Configuration Manual.
Register Maintenance Window - Devices Tab
Chapter 6: Using the Setup Menu Point of Sale Professional Manual
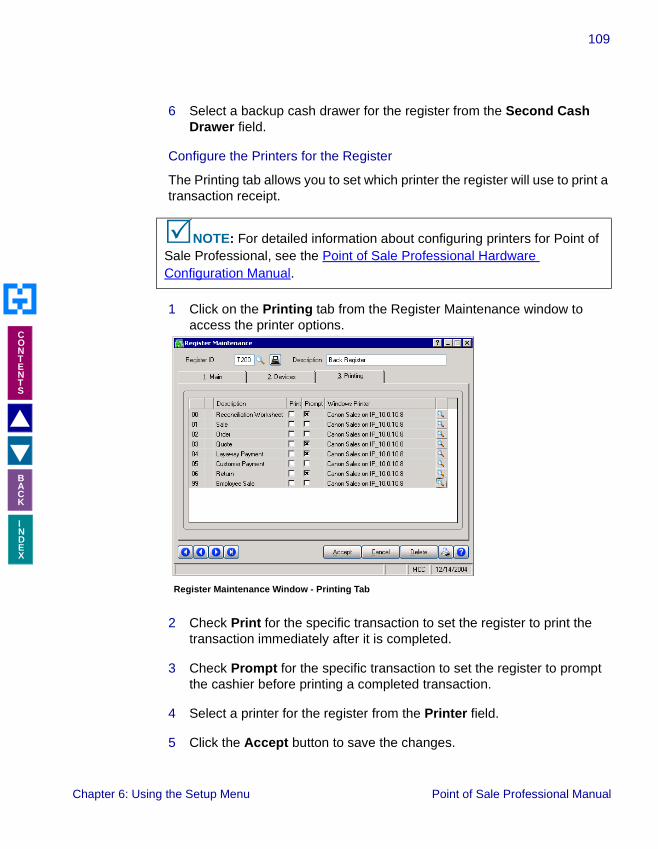
109
INDEX
�
�
CONTENTS
BACK
6 Select a backup cash drawer for the register from the Second Cash Drawer field.
Configure the Printers for the Register
The Printing tab allows you to set which printer the register will use to print a transaction receipt.
1 Click on the Printing tab from the Register Maintenance window to access the printer options.
2 Check Print for the specific transaction to set the register to print the transaction immediately after it is completed.
3 Check Prompt for the specific transaction to set the register to prompt the cashier before printing a completed transaction.
4 Select a printer for the register from the Printer field.
5 Click the Accept button to save the changes.
�NOTE: For detailed information about configuring printers for Point of Sale Professional, see the Point of Sale Professional Hardware Configuration Manual.
Register Maintenance Window - Printing Tab
Chapter 6: Using the Setup Menu Point of Sale Professional Manual

110
INDEX
�
�
CONTENTS
BACK
Cashier Maintenance
Use the Cashier Maintenance window in Point of Sale Professional to define cashiers for your company and assign them to specific locations. You can also determine what activities the cashier is allowed to do during transaction entry.
The Cashier Maintenance window contains five tabs for different cashier settings.
Create a Cashier
The Main tab contains the general information about the cashier. Enter the name of the cashier, password, and location.
1 Enter the cashier’s login name in the Cashier field.
2 Enter the cashier’s full name in the Name field.
3 Select the MAS 90/MAS 200 user from the User Code field. The cashier must first be a MAS 90/MAS 200 user before being a cashier.
4 Enter a password for the cashier in the Password field.
Cashier Maintenance Window - Main Tab
Chapter 6: Using the Setup Menu Point of Sale Professional Manual

111
INDEX
�
�
CONTENTS
BACK
5 Select the store location from the Location field.
6 Select a salesperson from the Salesperson field. If the cashier is also a salesperson, select the cashier from the Salesperson list. MAS 90/MAS 200 salespeople can be configured for commissions. This option is available only if the Point of Sale Professional module is integrated with the Accounts Receivable module.
Configure Point of Sale Entry Settings for the Cashier
The POS Entry tab allows you to set standards for the cashier during transaction entry. You can determine if the cashier can open the drawer without a transaction, if the cashier can void transactions, and if the cashier can override prices.
1 Click on the POS Entry tab from the Cashier Maintenance window to access the Point of Sale Entry options.
2 Check Allowed to Open Drawer without Transaction to allow the cashier to open the cash drawer without starting a transaction.
3 Check Allowed to Suspend Transactions to allow the cashier to halt a transaction and return to it when a customer is ready to finish the transaction.
Cashier Maintenance Window - POS Entry Tab
Chapter 6: Using the Setup Menu Point of Sale Professional Manual
112
INDEX
�
�
CONTENTS
BACK
4 Check Print Transaction on complete Payment to print transactions after the customer payment.
5 Check Allowed to make Withdrawals and Payouts to allow the cashier to withdrawal money from a register. This option is usually set for a manager or a customer service cashier.
6 Check Allowed to Void Transactions to allow the cashier to void a transaction in progress without the approval of a manager.
7 Check Allowed to Void a completed Transaction to allow the cashier to void a transaction already completed without the approval of a manager.
8 Check Allowed to Change the Discount Code to allow the cashier to change a discount during a transaction without the approval of a manager.
9 Check Allowed to Add New Line Items to allow the cashier to create an item number that does not exist in the system during the transaction.
10 Check Allowed to Add New Reason Codes to allow the cashier to enter a new reason for a transaction void or return.
11 Check Allowed to Override the Item Price to allow the cashier to enter a different price for an item.
12 Select how much access the cashier can have when viewing past transactions from the Transaction History Access field. Select None for no access, ALE Listing to allow the cashier to view a list of transactions, or Full Inquiry to all the cashier to have full access to past transactions.
13 Select how much access the cashier can have to customer information from the Customer Data Access field. Select None for no access, Inquiry Only to view customer information, Maintenance Only to update customer information, Inquiry and Maintenance to view and update customer information, or Full Customer Access to allow a cashier full access to customer information.
14 Check Allowed to Add a Customer in POS Entry to allow the cashier to create a new customer during a transaction.
Chapter 6: Using the Setup Menu Point of Sale Professional Manual

113
INDEX
�
�
CONTENTS
BACK
15 Select how much access the cashier can have to customer memo information from the Customer Memo Access field. Select None for no access, Warning Only to view warning messages about customers, Memo Inquiry to view customer memos, or Maintain Memo to allow a cashier full access to customer memo information.
View an Cashier’s History
The History tab displays the cashier’s sales information for the period to date, year to date, last year, and future periods.
• Click on the History tab from the Cashier Maintenance window to access a cashier’s history.
Determine a Cashier’s Sales Information by Transaction Type and Period
The Summary tab displays the cashier’s sales information for each type of transaction. This tab displays the number of sales, the number of sales per hour, the number of transactions, and the number of voids.
1 Click on the Summary tab from the Cashier Maintenance window to access a cashier’s transaction amounts.
Cashier Maintenance Window - History Tab
Chapter 6: Using the Setup Menu Point of Sale Professional Manual

114
INDEX
�
�
CONTENTS
BACK
2 Select the transaction period to view from the Period field. You can view the Period to Date, Year to Date, Last Year, and Next Period.
Review a Cashier’s Cash Drawer Details
The Detail tab displays all the cash drawers the cashier used, the date, location, number of transactions, closing variance, the number of opens, and the number of hours.
1 Click on the Detail tab from the Cashier Maintenance window to access a cashier’s cash drawer information.
Cashier Maintenance Window - Summary Tab
Chapter 6: Using the Setup Menu Point of Sale Professional Manual

115
INDEX
�
�
CONTENTS
BACK
2 To view the individual transactions on a cash drawer, click on the row of the cash drawer and click the button to access the Detail Transactions window.
3 Click the Accept button to save the changes.
Manager Maintenance
Use the Manager Maintenance window to define managers for your company. The Manager Maintenance window contains two tabs for different manager settings. There are certain rights that all managers have. All the rights available in Cashier Maintenance are automatically assigned to the manager. The following rights are also automatically assigned to a manager:
• Allowed to Void Transactions - Managers can void transactions even if the option is not selected in Cashier Maintenance.
• Allowed to Void a Completed Transaction - Managers can void completed transactions even if the option is not selected in Cashier Maintenance.
Cashier Maintenance Window - Detail Tab
Chapter 6: Using the Setup Menu Point of Sale Professional Manual

116
INDEX
�
�
CONTENTS
BACK
• Allowed to Change the Discount Code - Managers can apply discounts to transactions even if the option is not selected in Cashier Maintenance.
• Allowed to Override the Item Price - Managers can override item prices even if the option is not selected in Cashier Maintenance.
• Allowed to Create a Customer during Point of Sale Entry - Managers can create customers during Point of Sale Entry even if the option is not selected in Cashier Maintenance.
• Allowed to Open the Cash Drawer without a Transaction - Managers can open cash drawers even if the option is not selected in Cashier Maintenance.
• Allowed to Make Withdrawals and Payouts - Managers can withdraw funds from a cash drawer even if the option is not selected in Cashier Maintenance.
The following manager features are available only to managers and cannot be assigned to standard cashiers.
• Logon into a Locked Cash Drawer - Managers can logon and unlock a cash drawer that has been locked by a cashier.
• Allow a Customer Transaction - Managers can override the customer credit warning and allow a customer transaction even if the Over Credit Limit Customers field is set to not continue the transaction in Location Maintenance.
• Select Payment Types - Managers can select certain payment types that are unavailable to the cashier if the Over Credit Limit Customers field is set to not continue the transaction in Location Maintenance. Managers can select the over credit payment type.
• Void a Transaction without a Reason Code - Managers can void transactions without a reason even if the Require Reasons for Void is selected in Point of Sale Professional Options.
Chapter 6: Using the Setup Menu Point of Sale Professional Manual
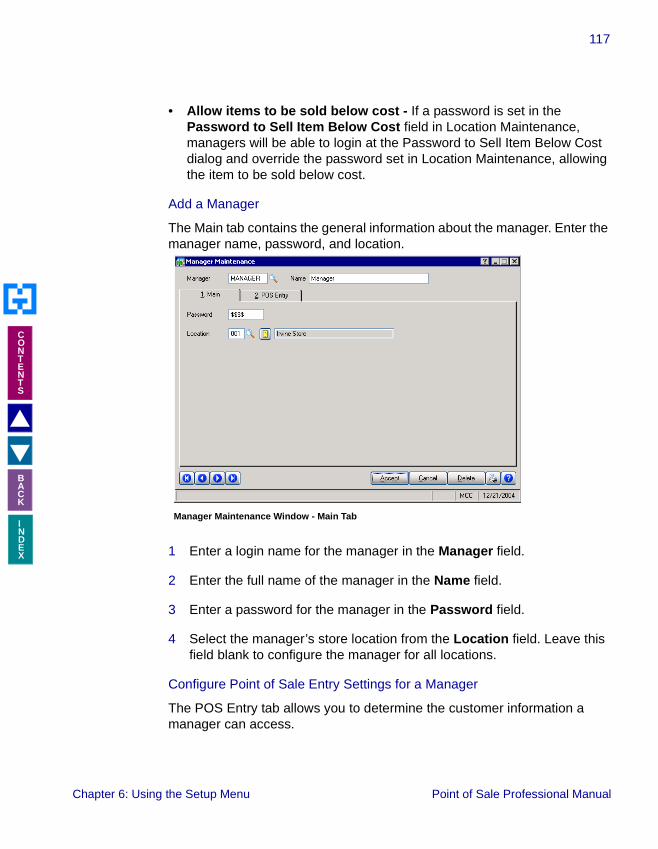
117
INDEX
�
�
CONTENTS
BACK
• Allow items to be sold below cost - If a password is set in the Password to Sell Item Below Cost field in Location Maintenance, managers will be able to login at the Password to Sell Item Below Cost dialog and override the password set in Location Maintenance, allowing the item to be sold below cost.
Add a Manager
The Main tab contains the general information about the manager. Enter the manager name, password, and location.
1 Enter a login name for the manager in the Manager field.
2 Enter the full name of the manager in the Name field.
3 Enter a password for the manager in the Password field.
4 Select the manager’s store location from the Location field. Leave this field blank to configure the manager for all locations.
Configure Point of Sale Entry Settings for a Manager
The POS Entry tab allows you to determine the customer information a manager can access.
Manager Maintenance Window - Main Tab
Chapter 6: Using the Setup Menu Point of Sale Professional Manual

118
INDEX
�
�
CONTENTS
BACK
1 Click on the POS Entry tab from the Manager Maintenance window to access the Point of Sale Entry options.
2 Check Access to Customer Inquiry to allow the manager to view customer information.
3 Select how much access the manager can have to customer memo information from the Customer Memo Access field. Select None for no access, Memo Inquiry to view customer memos, or Maintain Memo to allow a manager full access to customer memo information.
4 Check View Unencrypted Credit Card Number to allow the manager to view a customer’s unencrypted credit card number. This option allows the manager to view the customer’s full credit card number on historical transaction reports and inquiries. If this option is not selected, the manager will only be able to view the encrypted number on historical reports and inquiries.
5 Click the Accept button to save the changes.
Manager Maintenance Window - POS Entry Tab
Chapter 6: Using the Setup Menu Point of Sale Professional Manual

119
INDEX
�
�
CONTENTS
BACK
Reason Code Maintenance
Use the Reason Code Maintenance window to assign reasons a customer would void or return a transaction. Your company must create reason codes if the Require Reasons for Voided Transactions field is checked in the POS Entry tab of the Point of Sale Professional Options window.
Create a Reason Code
1 Enter a short but descriptive code in the Reason field.
2 Enter the full reason in the Description field.
3 Select the type of cancel the code can be used for from the Type field. Select Void, Return, or Both.
4 Click the Accept button to save the changes.
Register Pay Out Maintenance
Use Register Pay Out Maintenance window to define reasons a cashier would have to make a purchase with the funds available in the cash drawer.
Reason Code Maintenance Window
Chapter 6: Using the Setup Menu Point of Sale Professional Manual

120
INDEX
�
�
CONTENTS
BACK
Create a Pay Out Code
1 Enter a short but descriptive code in the Pay Out Code field.
2 Enter the full reason for a pay out in the Description field.
3 Select a general ledger account to be used for the pay outs from the G/L Account field.
4 Click the Accept button to save the changes.
___________________________________________________________
This concludes Chapter 6: Using the Setup Menu of the Point of Sale Professional manual.
Register Pay Out Maintenance Window
Chapter 6: Using the Setup Menu Point of Sale Professional Manual
121
Chapter 7
INDEX
�
�
CONTENTS
BACK
Using the Main MenuChapter 8Chapter 9
Chapter 7: Using the Main Menu teaches managers how to setup cash drawers for cashiers, how to logon to registers as managers, how to reconcile a cash drawer at the end of a shift, and how to pull money from drawers for a bank deposit. It also teaches cashiers how to enter transactions, cancel transactions, and cancel layaways.
How to Use the Main Menu
The Main menu is feature-rich and used by several types of users including managers and cashiers. You might not need to use every feature available in the Menu menu.
This chapter does not describe every procedure that can be completed on a Main window. For example, this chapter does not include detailed instructions on how to print or change information from certain windows available in the Main menu. Detailed instructions about changing, deleting, and printing information from the Main windows are available in the online help. The following instructions provide a quick overview of how to complete these procedures.
Open a Window from the Main Menu
1 Double-click the Point of Sale Professional module from the Modules tab. The module expands to display all the menu options available in the Point of Sale Professional module.
�NOTE: All procedures for the Point of Sale Entry window are included in both the manual and online help.
Chapter 7: Using Main Menu Point of Sale Professional Manual

122
INDEX
�
�
CONTENTS
BACK
2 Click on the Main menu. The names of the windows available in the menu appear on the right side of the MAS 90/MAS 200 window.
3 Double-click on the name of the window to open. The system displays the selected window.
Select Items from a Lookup List
Many fields in the Main menu feature a Lookup list. These lists allow you to select data for the field.
• Click the button in the first field to select an item from the Lookup window. The system displays the information in the field.
Delete a Record
1 Click the button in the first field to select a record account from the Lookup window. The system displays the record’s information in the window.
2 Click the Delete button. The system displays a warning dialog box similar to the following.
3 Click the Yes button. The record is deleted.
4 Click the Accept button to save the changes.
Windows Available in the Main Menu
Warning Dialog
Chapter 7: Using the Main Menu Point of Sale Professional Manual
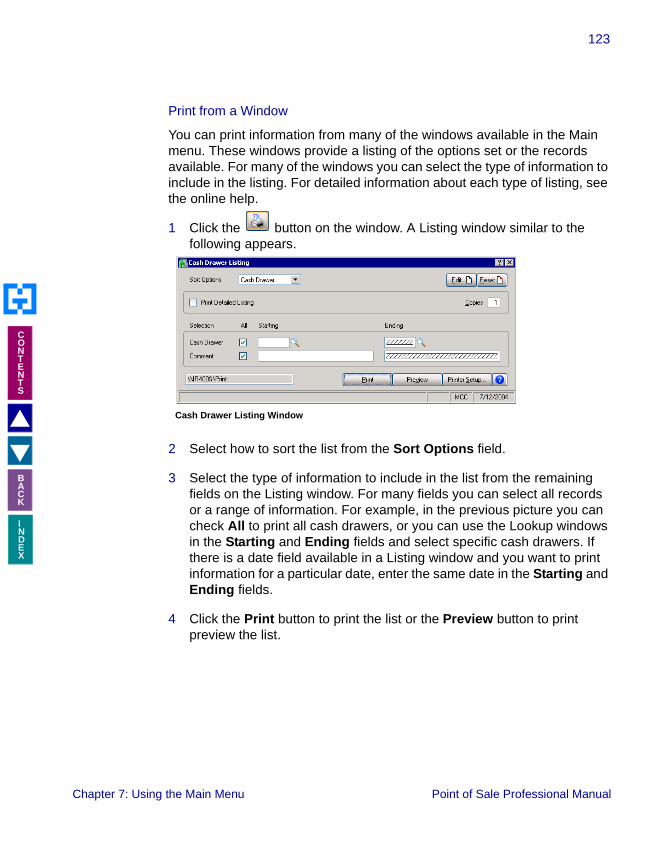
123
INDEX
�
�
CONTENTS
BACK
Print from a Window
You can print information from many of the windows available in the Main menu. These windows provide a listing of the options set or the records available. For many of the windows you can select the type of information to include in the listing. For detailed information about each type of listing, see the online help.
1 Click the button on the window. A Listing window similar to the following appears.
2 Select how to sort the list from the Sort Options field.
3 Select the type of information to include in the list from the remaining fields on the Listing window. For many fields you can select all records or a range of information. For example, in the previous picture you can check All to print all cash drawers, or you can use the Lookup windows in the Starting and Ending fields and select specific cash drawers. If there is a date field available in a Listing window and you want to print information for a particular date, enter the same date in the Starting and Ending fields.
4 Click the Print button to print the list or the Preview button to print preview the list.
Cash Drawer Listing Window
Chapter 7: Using the Main Menu Point of Sale Professional Manual

124
INDEX
�
�
CONTENTS
BACK
Cash Drawer Maintenance
Use the Cash Drawer Maintenance window to create a cash drawer and assign the drawer to a specific cashier or location, and to change the status of a cash drawer if required. You can also use the Cash Drawer Maintenance window to print a list of cash drawers.
Cash Drawer Maintenance allows multiple cashiers to complete transaction simultaneously. Each drawer can be updated individually without affecting the other cashiers and drawers.
Create a Cash Drawer
1 Click the button in the Cash Drawer field to create a cash drawer with the next available cash drawer number. The next cash drawer number appears in the Cash Drawer field. You can also click the button to select a cash drawer that was created from another cash drawer from a previous shift (see the Reconcile a Cash Drawer section). The number of the original cash drawer appears in the Created From field. When you create the cash drawer, the fields on the Cash Drawer Maintenance window become available.
2 Enter any comments about the cash drawer in the Comment field. You can enter a maximum of a 30 alphanumeric code in the Comment field. Enter specific information relevant to the cash drawer such as the location within the store (example - Back Register). If you enter a comment in Cash Drawer Maintenance, it will be available in the next cash drawer created in Cash Drawer Reconciliation.
Cash Drawer Maintenance Window
�HINT: If creating a cash drawer for a day other than the current account date, enter or select the date from the Date field.
Chapter 7: Using the Main Menu Point of Sale Professional Manual

125
INDEX
�
�
CONTENTS
BACK
3 Enter the starting cash drawer amount in the Opening Cash field. Opening cash is the cash available in the drawer before starting transactions. This field defaults to the amount entered in the Default Opening Cash field in Point of Sale Professional Options. If you select a location in the Location field, this field defaults to the amount in the Default Opening Cash field of Location Maintenance.
4 Check Allow Multiple Registers to open this Cash Drawer to set more than one register to use the same cash drawer.
5 Select the store location for the cash drawer from the Location field.
6 Select the cashier that will use the cash drawer from the Cashier field. If a drawer is assigned to a cashier, only that cashier will be able to use that cash drawer, unless the Allow Multiple Registers to open this Cash Drawer option is selected.
7 Click the Accept button to save the changes. The cashier will be able to log into Point of Sale Professional with the cash drawer.
Change the Status of a Cash Drawer
You can change the status of some cash drawers. When you create a cash drawer, the status is set to Ready. This status cannot be changed except when a cashier logs into the cash drawer. When a user is using a cash drawer, the status is set to Open. When a cashier logs off a cash drawer, the status is set to Closed. A cash drawer that is closed and has been reconciled is set to Reconciled. You cannot manually change the status of the cash drawer to Reconciled.
You can change a cash drawer set to Open to Closed.
1 Select an opened cash drawer from the Cash Drawer field. The Cash Drawer Maintenance window displays the selected cash drawer.
2 Select the Closed from the Status field.
3 Click the Accept button to save the changes.
Chapter 7: Using the Main Menu Point of Sale Professional Manual

126
INDEX
�
�
CONTENTS
BACK
Point of Sale Entry
The Point of Sale Entry window is the main feature of the Point of Sale Professional module. Cashiers use this window to enter transactions. The Point of Sale Entry window displays the items being purchased and the total of the transaction. This window also displays the customer’s payment and any change due.
There are six transaction types available in Point of Sale Entry - Sale, Order, Quote, Customer Payment, Layaway Payment, and Return. All sales, returns, and layaway payments must be entered in the Point of Sale Entry window. If Point of Sale Professional is integrated with the Accounts Receivable module, cashiers can enter customer payments and prepayments in either Point of Sale Entry or in the Accounts Receivable module. If Point of Sale Professional is integrated with the Sales Order module, cashiers can enter orders and quotes in either Point of Sale Entry or in the Sales Order module.
There are numerous activities besides entering transactions that a cashier can complete using the Point of Sale Entry window, such as viewing customers or details of items. There are also numerous options that can affect a transaction such as customer discounts, shipping charges, the payment types a customer can use, and the quantity available of an item. There are also hardware devices your company can use to make the Point of Sale Entry quicker, such as using bar code scanners to enter items instead of manually selecting items. This section covers all activities and notes when a company can use specific hardware devices for data entry.
This manual describes the different sections available on the Point of Sale Entry window. After describing the window, the manual discusses how to enter each type of transaction. This section also details how to complete different activities in each section of the Point of Sale Entry window.
Chapter 7: Using the Main Menu Point of Sale Professional Manual

127
INDEX
�
�
CONTENTS
BACK
Your company can customize how to enter each transaction type in the Point of Sale Professional module. A system administrator can set specific options using the Transaction Type Maintenance feature in Point of Sale Professional. The options in Transaction Type Maintenance were designed to increase efficiency and reduce cashier mistakes. This section includes the optimal settings for each transaction type. These settings appear in gray text boxes throughout this section.
Logging into Point of Sale Entry
Before entering point of sale transactions, you must logon to the register. You must know your logon name and password.
Logon to the Register
1 From the Main menu of the Point of Sale Professional menu bar, select Point of Sale Entry. The MCC Register Logon window appears.
2 Enter your logon name in the Cashier field. You can also select your logon name from the Lookup list. Once you log into a cash drawer, no other cashiers will be able to access the drawer.
�NOTE: For security purposes, completed transactions cannot be edited. If a transaction is not accurate, open the transaction in Point of Sale Entry and delete it. See the Void Completed Transactions section for more information.
�NOTE: Managers can use the Manager Logon function to log into a cash drawer. See the Manager Features section for more information about manager procedures.
MCC Register Logon Window
Chapter 7: Using the Main Menu Point of Sale Professional Manual

128
INDEX
�
�
CONTENTS
BACK
3 Enter your password in the Password field and press TAB.
4 If the Cash Drawer field does not display a cash drawer number, select the cash drawer from the Lookup list.
5 Click the button. The Point of Sale Entry window appears.
Before a Transaction
Before starting a transaction, most of the fields in Point of Sale Entry are disabled. However, there are a few button fields that are available before you start the transaction.
Activities Before a Transaction
This section describes the activities a cashier can complete before starting a transaction. For the Manager Function procedures, see the Manager Features section.
View Completed
Point of Sale Entry Window Before a Transaction
Transactions
LaunchCustomerMaintenance
Launch
PriceLookup
TransactionHistory Inquiry
ManagerFunction
Lock CashDrawer
Register Withdrawal& Register Pay Outs
Open CashDrawer
Chapter 7: Using the Main Menu Point of Sale Professional Manual
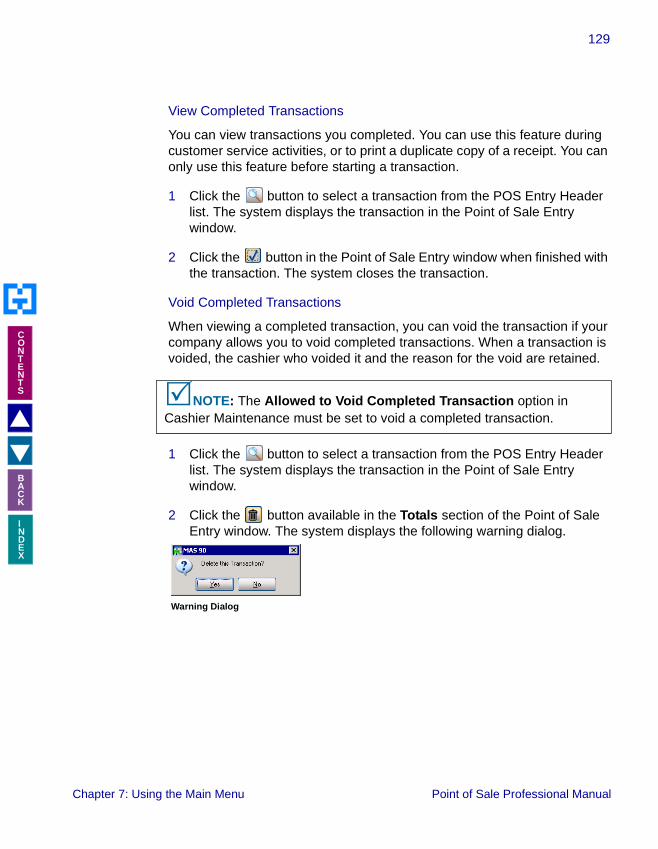
129
INDEX
�
�
CONTENTS
BACK
View Completed Transactions
You can view transactions you completed. You can use this feature during customer service activities, or to print a duplicate copy of a receipt. You can only use this feature before starting a transaction.
1 Click the button to select a transaction from the POS Entry Header list. The system displays the transaction in the Point of Sale Entry window.
2 Click the button in the Point of Sale Entry window when finished with the transaction. The system closes the transaction.
Void Completed Transactions
When viewing a completed transaction, you can void the transaction if your company allows you to void completed transactions. When a transaction is voided, the cashier who voided it and the reason for the void are retained.
1 Click the button to select a transaction from the POS Entry Header list. The system displays the transaction in the Point of Sale Entry window.
2 Click the button available in the Totals section of the Point of Sale Entry window. The system displays the following warning dialog.
�NOTE: The Allowed to Void Completed Transaction option in Cashier Maintenance must be set to void a completed transaction.
Warning Dialog
Chapter 7: Using the Main Menu Point of Sale Professional Manual

130
INDEX
�
�
CONTENTS
BACK
3 Click the Yes button. The Void Transaction window will appear if your company requires a reason for deleted transactions.
4 Select why the transaction is being deleted in the Reason for Void field.
5 Click the button in the Void Transaction window. The system deletes the transaction.
Access Customer Maintenance
The Launch Customer Maintenance feature in the Point of Sale Professional module is a copy of the Customer Maintenance feature in the Accounts Receivable module by Best Software. Access the Customer Maintenance option directly from the Point of Sale Entry window to create, modify, and delete customers without having to open the Accounts Receivable module.
�NOTE: The Customer Maintenance feature is available only if the Accounts Receivable module is integrated with the Point of Sale Professional module. The Customer Data Access option in Cashier Maintenance determines the amount of access the cashier has to the Launch Customer Maintenance option.
Void Transaction Window
Chapter 7: Using the Main Menu Point of Sale Professional Manual

131
INDEX
�
�
CONTENTS
BACK
• Click the button in the Point of Sale Entry window to access the Customer Maintenance window.
See the Accounts Receivable Manual by Best Software or the online help for more information about the Customer Maintenance window.
View Updated Transactions
You can view transactions that have been updated to MAS 90/MAS 200 in the Point of Sale Entry window. The Launch Transaction History Inquiry feature allows you to access the Point of Sale Professional Transaction History file. Use this feature during customer service activities such as returns, or when a customer requires a copy of a receipt.
�NOTE: The Transaction History Access option in Cashier Maintenance determines the amount of access the cashier has to the Launch Transaction History Inquiry option.
Customer Maintenance Window
Chapter 7: Using the Main Menu Point of Sale Professional Manual

132
INDEX
�
�
CONTENTS
BACK
1 Click the button to open the Transaction History Inquiry window.
2 Select a transaction from the Trans No. field.
After selecting a transaction the Transaction History Inquiry window displays the details of the transaction, including the cashier and/or salesperson involved, the items purchased, the customer, the price and payment of the transaction.
For more information about the Transaction History Inquiry feature, see the Transaction History Inquiry section.
Lookup the Price of an Item
You can search for an item’s price before a customer decides whether or not to make the purchase. You must use the Price Lookup feature before starting a transaction. After you start a transaction, the Price Lookup button is replaced by the Orders Lookup button.
Transaction History Inquiry Window
Chapter 7: Using the Main Menu Point of Sale Professional Manual

133
INDEX
�
�
CONTENTS
BACK
1 Click the button. The system displays the Price Lookup window.
2 Select an item to view from the Item field. You can also click the button to select an item from the Alias Item list. The system displays the amount of the item in the Unit Price field.
When you select an item, the Price Level and Warehouse fields default to the values set in Location Maintenance. The Price Lookup window displays any sales information available in Inventory Maintenance for the item. When you access the Qty field, the status bar displays the quantity available in the warehouse from the Inventory Maintenance module.
If you change the price level, the price breaks will be recalculated for that item. If the value in the Sale Price field is lower than the price break discounts, then the sale price will be displayed in the Unit Price field. However, if the price break calculations reduces the value in the Unit Price field to be lower than the Sale Price field, then the price break unit price will be displayed in the Unit Price field.
3 Click the OK button when finished.
�NOTE: The Alias Item list contains items set to the General type in the Alias Item Number Maintenance window. See the Inventory Management Manual by Best Software for more information.
Price Lookup Window
Chapter 7: Using the Main Menu Point of Sale Professional Manual
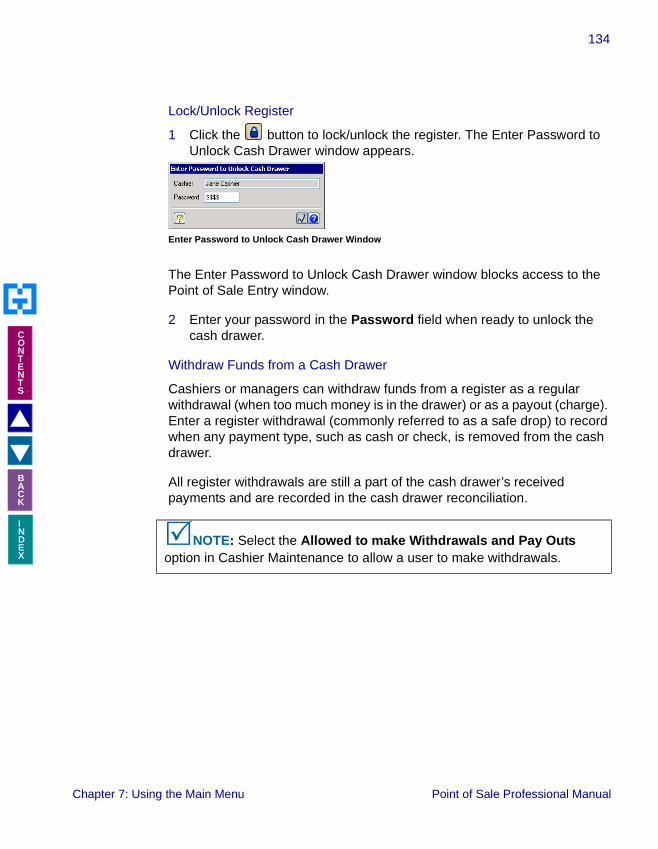
134
INDEX
�
�
CONTENTS
BACK
Lock/Unlock Register
1 Click the button to lock/unlock the register. The Enter Password to Unlock Cash Drawer window appears.
The Enter Password to Unlock Cash Drawer window blocks access to the Point of Sale Entry window.
2 Enter your password in the Password field when ready to unlock the cash drawer.
Withdraw Funds from a Cash Drawer
Cashiers or managers can withdraw funds from a register as a regular withdrawal (when too much money is in the drawer) or as a payout (charge). Enter a register withdrawal (commonly referred to as a safe drop) to record when any payment type, such as cash or check, is removed from the cash drawer.
All register withdrawals are still a part of the cash drawer’s received payments and are recorded in the cash drawer reconciliation.
�NOTE: Select the Allowed to make Withdrawals and Pay Outs option in Cashier Maintenance to allow a user to make withdrawals.
Enter Password to Unlock Cash Drawer Window
Chapter 7: Using the Main Menu Point of Sale Professional Manual

135
INDEX
�
�
CONTENTS
BACK
1 Click the button to open the Register Withdrawal window.
2 Click the button in the Sequence field to create a withdrawal. The next available withdrawal sequence number appears.
3 Select the type of payment type being withdrawn from the Payment Type field.
4 Select Withdrawal from the Withdrawal Type field.
5 Enter the amount being withdrawn from the cash drawer in the Amount field.
6 Click the button to accept the withdrawal.
Register Withdrawal Window
Chapter 7: Using the Main Menu Point of Sale Professional Manual

136
INDEX
�
�
CONTENTS
BACK
7 Click the button to print a receipt with the withdrawal information. The cashier signs the withdrawal statement.
Record a Payout with a Cash Drawer
You can use funds from a cash drawer to record charges, such as delivery charges, commissions, or instant rebates.
�NOTE: Only a manager can delete a completed register withdrawal.
�NOTE: Select the Allowed to make Withdrawals and Pay Outs option in Cashier Maintenance to allow a user to make withdrawals.
Withdrawal Receipt
Chapter 7: Using the Main Menu Point of Sale Professional Manual

137
INDEX
�
�
CONTENTS
BACK
1 Click the button to open the Register Withdrawal window.
2 Click the button in the Sequence field to create a new withdrawal. The next available withdrawal sequence number appears.
3 Select the Cash type of payment method from the Payment Type field. Payouts are cash only.
4 Select Register Payout from the Withdrawal Type field. The Register Pay Out field and Pay Out Account field become available.
5 Select the reason for the pay out from the Register Pay Out field.
6 Select an account for the payout from the Pay Out Account field.
7 Enter the amount being withdrawn from the cash drawer in the Amount field.
8 Click the button to accept the withdrawal.
Register Withdrawal Window
Chapter 7: Using the Main Menu Point of Sale Professional Manual
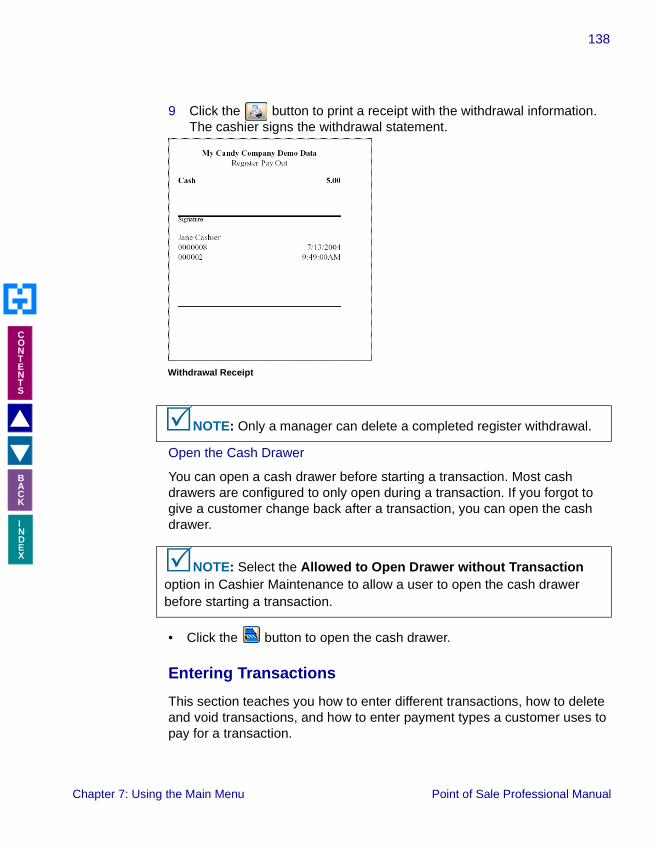
138
INDEX
�
�
CONTENTS
BACK
9 Click the button to print a receipt with the withdrawal information. The cashier signs the withdrawal statement.
Open the Cash Drawer
You can open a cash drawer before starting a transaction. Most cash drawers are configured to only open during a transaction. If you forgot to give a customer change back after a transaction, you can open the cash drawer.
• Click the button to open the cash drawer.
Entering Transactions
This section teaches you how to enter different transactions, how to delete and void transactions, and how to enter payment types a customer uses to pay for a transaction.
�NOTE: Only a manager can delete a completed register withdrawal.
�NOTE: Select the Allowed to Open Drawer without Transaction option in Cashier Maintenance to allow a user to open the cash drawer before starting a transaction.
Withdrawal Receipt
Chapter 7: Using the Main Menu Point of Sale Professional Manual
139
INDEX
�
�
CONTENTS
BACK
Salesperson Commission Reporting
Point of Sale Professional reports commissions in the same manner as the Sales Order module (see the Sales Order Manual by Best Software). Commission changes affects companies who:
• Selected Accounts Receivable Divisions in the Accounts Receivable Option window.
• Selected Sales Commission Reporting in the Accounts Receivable Option window.
• Integrated Point of Sale Professional with the Sales Order module.
• Selected Split Commissions Between Salespersons in the Sales Order Option window.
• Selected Always Use Cashier Salesperson in Transaction Maintenance of the Point of Sale Professional module.
• Use a cashier salesperson and a customer in different divisions on the same transaction.
Depending on the variations of the options selected, the result will vary as to which salesperson will be selected for a transaction in Point of Sale Entry. The following two tables illustrate which salesperson will be selected in the Point of Sale Professional Entry Transaction Detail screen. This salesperson will receive the appropriate commission.
Chapter 7: Using the Main Menu Point of Sale Professional Manual
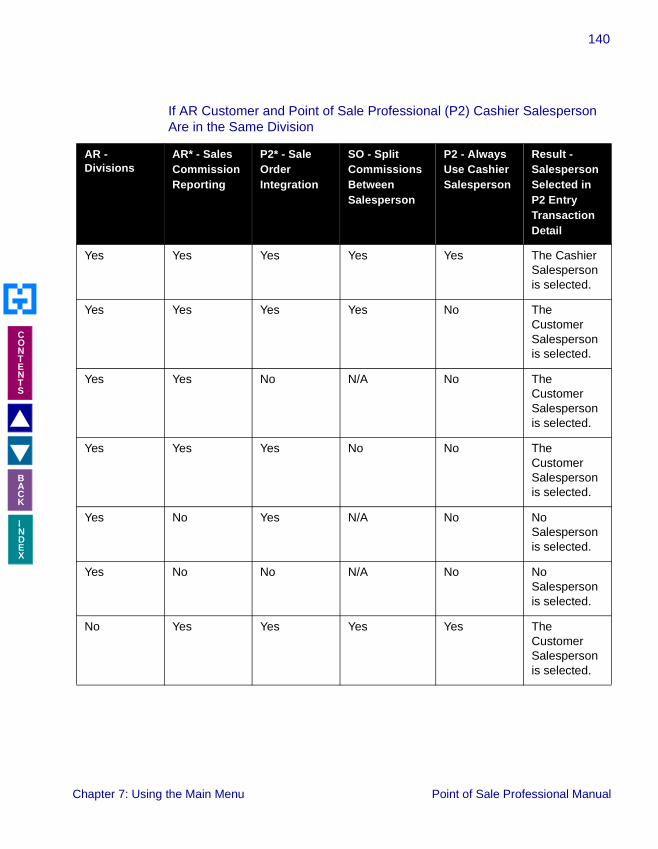
140
INDEX
�
�
CONTENTS
BACK
If AR Customer and Point of Sale Professional (P2) Cashier Salesperson Are in the Same Division
AR - Divisions
AR* - Sales Commission Reporting
P2* - Sale Order Integration
SO - Split Commissions Between Salesperson
P2 - Always Use Cashier Salesperson
Result - Salesperson Selected in P2 Entry Transaction Detail
Yes Yes Yes Yes Yes The Cashier Salesperson is selected.
Yes Yes Yes Yes No The Customer Salesperson is selected.
Yes Yes No N/A No The Customer Salesperson is selected.
Yes Yes Yes No No The Customer Salesperson is selected.
Yes No Yes N/A No No Salesperson is selected.
Yes No No N/A No No Salesperson is selected.
No Yes Yes Yes Yes The Customer Salesperson is selected.
Chapter 7: Using the Main Menu Point of Sale Professional Manual

141
INDEX
�
�
CONTENTS
BACK
* If this option is not selected, the Sales Order Split Commissions option is not available as dictated by MAS 90/MAS 200.
No Yes Yes Yes No The Customer Salesperson is selected.
No No No N/A No No Salesperson is selected.
AR - Divisions
AR* - Sales Commission Reporting
P2* - Sale Order Integration
SO - Split Commissions Between Salesperson
P2 - Always Use Cashier Salesperson
Result - Salesperson Selected in P2 Entry Transaction Detail
Chapter 7: Using the Main Menu Point of Sale Professional Manual
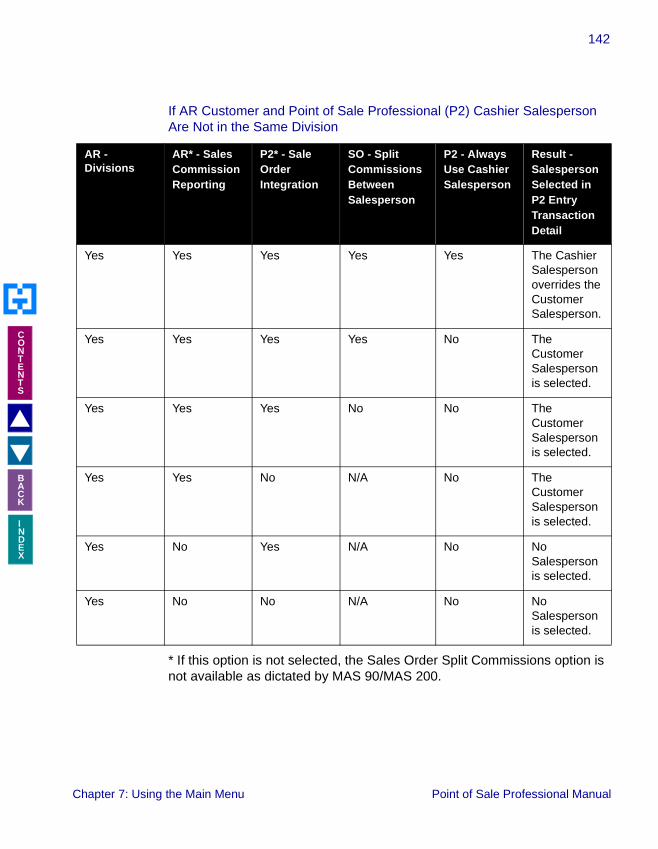
142
INDEX
�
�
CONTENTS
BACK
If AR Customer and Point of Sale Professional (P2) Cashier Salesperson Are Not in the Same Division
* If this option is not selected, the Sales Order Split Commissions option is not available as dictated by MAS 90/MAS 200.
AR - Divisions
AR* - Sales Commission Reporting
P2* - Sale Order Integration
SO - Split Commissions Between Salesperson
P2 - Always Use Cashier Salesperson
Result - Salesperson Selected in P2 Entry Transaction Detail
Yes Yes Yes Yes Yes The Cashier Salesperson overrides the Customer Salesperson.
Yes Yes Yes Yes No The Customer Salesperson is selected.
Yes Yes Yes No No The Customer Salesperson is selected.
Yes Yes No N/A No The Customer Salesperson is selected.
Yes No Yes N/A No No Salesperson is selected.
Yes No No N/A No No Salesperson is selected.
Chapter 7: Using the Main Menu Point of Sale Professional Manual

143
INDEX
�
�
CONTENTS
BACK
Point of Sale Entry Window During a Transaction
The Point of Sale Entry window can be divided into five sections during a transaction - Header, Customer Details, Line Item Details, Totals, and Active Receipt.
• The Header section contains the basic information about a transaction.
• The Customer Details section contains the information about the customer selected in a transaction.
• The Line Item Details section contains the items purchased in a transaction.
• The Totals section contains the total values for transactions.
• The Active Receipt section contains the information that will be printed on the customer’s receipt.
Sale Transactions
There are several types of sale transactions a cashier can enter using the Point of Sale Entry window.
Header
Customer
Line Item
Totals
ActiveDetails Receipt
Point of Sale Entry Window
Details
Chapter 7: Using the Main Menu Point of Sale Professional Manual

144
INDEX
�
�
CONTENTS
BACK
• Fast Sale Transaction - A sale transaction that does not require a customer.
• Customer Sale Transaction - A sale transaction that does require a customer.
• Layaway Transaction - A sale transaction with a balance is converted into a layaway.
• Rental Transaction - A sale transaction for rented items.
To convert a quote or order to a sale, see the Convert a Quote to a Sale or the Convert an Order to a Sale section.
Chapter 7: Using the Main Menu Point of Sale Professional Manual
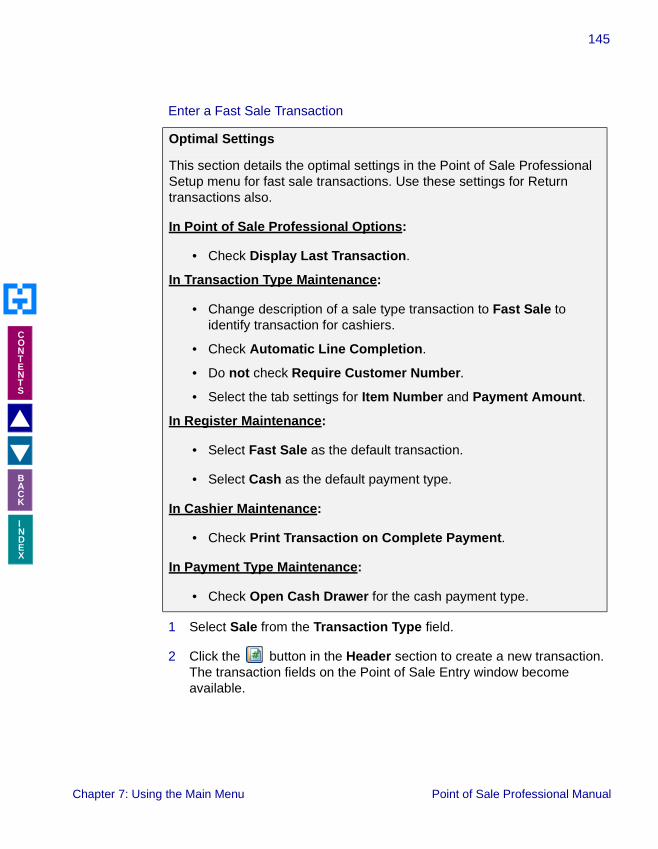
145
INDEX
�
�
CONTENTS
BACK
Enter a Fast Sale Transaction
1 Select Sale from the Transaction Type field.
2 Click the button in the Header section to create a new transaction. The transaction fields on the Point of Sale Entry window become available.
Optimal Settings
This section details the optimal settings in the Point of Sale Professional Setup menu for fast sale transactions. Use these settings for Return transactions also.
In Point of Sale Professional Options:
• Check Display Last Transaction.
In Transaction Type Maintenance:
• Change description of a sale type transaction to Fast Sale to identify transaction for cashiers.
• Check Automatic Line Completion.
• Do not check Require Customer Number.
• Select the tab settings for Item Number and Payment Amount.
In Register Maintenance:
• Select Fast Sale as the default transaction.
• Select Cash as the default payment type.
In Cashier Maintenance:
• Check Print Transaction on Complete Payment.
In Payment Type Maintenance:
• Check Open Cash Drawer for the cash payment type.
Chapter 7: Using the Main Menu Point of Sale Professional Manual

146
INDEX
�
�
CONTENTS
BACK
3 Select the item being purchased from the Item field. The item description appears in the Desc field. If using a bar code scanner, scan the UPC code of the item.
4 Repeat step 4 for each item being purchased.
5 Enter any discounts or charges in the Totals section of the Point of Sale Entry window. See Using Features in the Totals Section for more information.
6 Enter the payment in the Payment field. See the Using Different Payment Types section for more information.
7 Click the button in the Point of Sale Entry window. The system completes the transaction and displays the amount of the customer’s change.
�NOTE: When entering the quantity of an item, the status bar of the Point of Sale Entry window displays the quantity available.
Chapter 7: Using the Main Menu Point of Sale Professional Manual
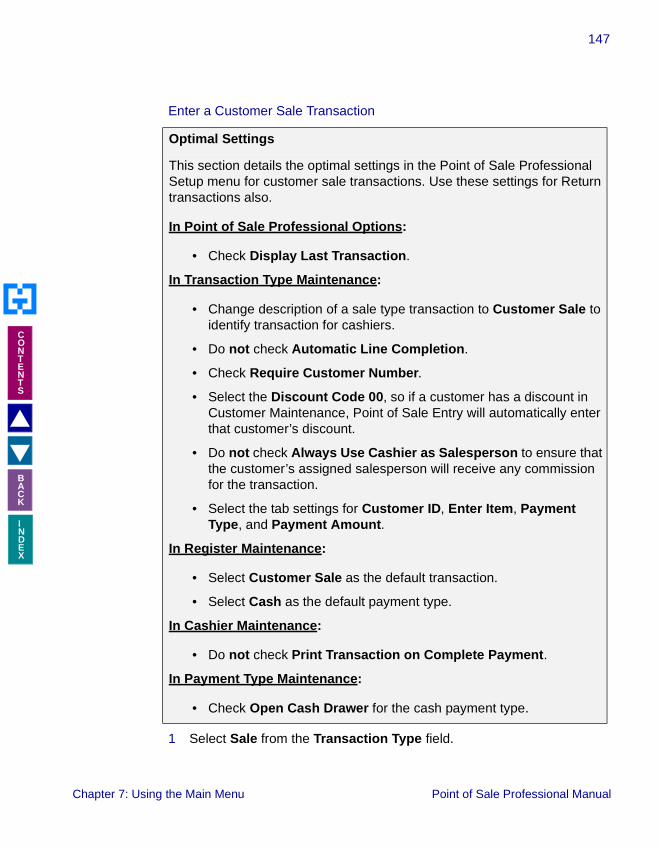
147
INDEX
�
�
CONTENTS
BACK
Enter a Customer Sale Transaction
1 Select Sale from the Transaction Type field.
Optimal Settings
This section details the optimal settings in the Point of Sale Professional Setup menu for customer sale transactions. Use these settings for Return transactions also.
In Point of Sale Professional Options:
• Check Display Last Transaction.
In Transaction Type Maintenance:
• Change description of a sale type transaction to Customer Sale to identify transaction for cashiers.
• Do not check Automatic Line Completion.
• Check Require Customer Number.
• Select the Discount Code 00, so if a customer has a discount in Customer Maintenance, Point of Sale Entry will automatically enter that customer’s discount.
• Do not check Always Use Cashier as Salesperson to ensure that the customer’s assigned salesperson will receive any commission for the transaction.
• Select the tab settings for Customer ID, Enter Item, Payment Type, and Payment Amount.
In Register Maintenance:
• Select Customer Sale as the default transaction.
• Select Cash as the default payment type.
In Cashier Maintenance:
• Do not check Print Transaction on Complete Payment.
In Payment Type Maintenance:
• Check Open Cash Drawer for the cash payment type.
Chapter 7: Using the Main Menu Point of Sale Professional Manual

148
INDEX
�
�
CONTENTS
BACK
2 Click the button in the Header section to create a new transaction. The transaction fields on the Point of Sale Entry window become available.
3 Select the customer from the Customer field.
4 Select the item being purchased from the Item field. The item description appears in the Desc field. If using a bar code scanner, scan the UPC code of the item.
5 Repeat step 4 for each item being purchased.
6 Enter any discounts or charges in the Totals section of the Point of Sale Entry window. See Using Features in the Totals Section for more information.
7 Enter the customer’s payment in the Payment field. See the Using Different Payment Types section for more information.
8 Click the button in the Point of Sale Entry window. The system completes the transaction and displays the amount of the customer’s change.
Enter a Layaway Sales Transaction
A layaway transaction is a sales transaction with balance due.
�NOTE: When entering the quantity of an item, the status bar of the Point of Sale Entry window displays the quantity available.
�NOTE: The Payment information defaults to the payment type selected in Customer Maintenance. See the Accounts Receivable Manual by Best Software for more information.
�NOTE: The Layaways Allowed at this Location option in Location Maintenance must be set to enable layaway transactions.
Chapter 7: Using the Main Menu Point of Sale Professional Manual

149
INDEX
�
�
CONTENTS
BACK
Optimal Settings
This section details the optimal settings in the Point of Sale Professional Setup menu for layaway sale transactions.
In Point of Sale Professional Options:
• Check Display Last Transaction.
In Location Maintenance:
• Check Layaways Allowed at this Location.
In Transaction Type Maintenance:
• Change description of a sale type transaction to Customer Sale to identify transaction for cashiers.
• Do not check Automatic Line Completion.
• Check Require Customer Number.
• Select the Discount Code 00, so if a customer has a discount in Customer Maintenance, Point of Sale Entry will automatically enter that customer’s discount.
• Do not check Always Use Cashier as Salesperson to ensure that the customer’s assigned salesperson will receive any commission for the transaction.
• Select the tab settings for Customer ID, Enter Item, Payment Type, and Payment Amount.
In Register Maintenance:
• Select Customer Sale as the default transaction.
• Select Cash as the default payment type.
In Cashier Maintenance:
• Do not check Print Transaction on Complete Payment.
In Payment Type Maintenance:
• Check Open Cash Drawer for the cash payment type.
Chapter 7: Using the Main Menu Point of Sale Professional Manual

150
INDEX
�
�
CONTENTS
BACK
1 Select Sale from the Transaction Type field. Layaways are entered as sales transactions.
2 Click the button in the Header section to create a new transaction. The transaction fields on the Point of Sale Entry window become available.
3 Select the customer from the Customer field.
4 Select the item being placed on layaway from the Item field. The item description appears in the Desc field. If using a bar code scanner, scan the UPC code of the item.
5 Repeat step 4 for each item being purchased.
6 Enter any discounts or charges in the Totals section of the Point of Sale Entry window. See Using Features in the Totals Section for more information.
7 If the customer is placing a partial payment, enter the customer’s payment in the Payment field. See the Using Different Payment Types section for more information.
8 Click the button in the Balance Due field. This option changes the sale into a layaway.
9 Click the button in the Point of Sale Entry window. The system completes the transaction and displays the amount the customer owes. See the Enter a Layaway Payment Transaction section for how to add a layaway payment.
Chapter 7: Using the Main Menu Point of Sale Professional Manual

151
INDEX
�
�
CONTENTS
BACK
Enter a Rental Transaction
Rental transactions are sales transactions. See the Enter a Rental Return section when a customer returns a rented item.
Optimal Settings
This section details the optimal settings in the Point of Sale Professional Setup menu for rental transactions.
In Point of Sale Professional Options:
• Check Display Last Transaction.
In Transaction Type Maintenance:
• Change description of a sale type transaction to Customer Sale to identify transaction for cashiers.
• Do not check Automatic Line Completion.
• Check Require Customer Number.
• Select the Discount Code 00, so if a customer has a discount in Customer Maintenance, Point of Sale Entry will automatically enter that customer’s discount.
• Do not check Always Use Cashier as Salesperson to ensure that the customer’s assigned salesperson will receive any commission for the transaction.
• Select the tab settings for Customer ID, Enter Item, Payment Type, and Payment Amount.
In Register Maintenance:
• Select Customer Sale as the default transaction.
• Select Cash as the default payment type.
In Cashier Maintenance:
• Do not check Print Transaction on Complete Payment.
In Payment Type Maintenance:
• Check Open Cash Drawer for the cash payment type.
Chapter 7: Using the Main Menu Point of Sale Professional Manual

152
INDEX
�
�
CONTENTS
BACK
1 Select Sale from the Transaction Type field. Rentals are entered as sales transactions.
2 Click the button in the Header section to create a new transaction. The transaction fields on the Point of Sale Entry window become available.
3 Select the rental customer from the Customer field. Rental transactions require customers.
4 Enter a forward slash (/) in the Item field and press F2. The Miscellaneous Charge Code File list appears.
�NOTE: The Enable Rental Charges option in Point of Sale Professional Options must be set to enable rental transactions.
Miscellaneous Charge Code File List
Chapter 7: Using the Main Menu Point of Sale Professional Manual
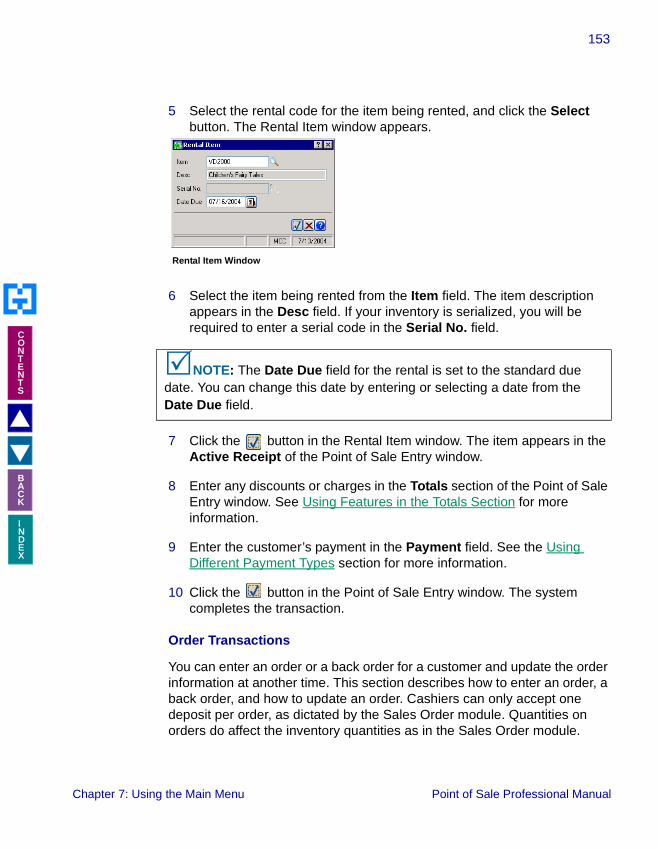
153
INDEX
�
�
CONTENTS
BACK
5 Select the rental code for the item being rented, and click the Select button. The Rental Item window appears.
6 Select the item being rented from the Item field. The item description appears in the Desc field. If your inventory is serialized, you will be required to enter a serial code in the Serial No. field.
7 Click the button in the Rental Item window. The item appears in the Active Receipt of the Point of Sale Entry window.
8 Enter any discounts or charges in the Totals section of the Point of Sale Entry window. See Using Features in the Totals Section for more information.
9 Enter the customer’s payment in the Payment field. See the Using Different Payment Types section for more information.
10 Click the button in the Point of Sale Entry window. The system completes the transaction.
Order Transactions
You can enter an order or a back order for a customer and update the order information at another time. This section describes how to enter an order, a back order, and how to update an order. Cashiers can only accept one deposit per order, as dictated by the Sales Order module. Quantities on orders do affect the inventory quantities as in the Sales Order module.
�NOTE: The Date Due field for the rental is set to the standard due date. You can change this date by entering or selecting a date from the Date Due field.
Rental Item Window
Chapter 7: Using the Main Menu Point of Sale Professional Manual

154
INDEX
�
�
CONTENTS
BACK
There are specific settings required for orders, for back orders, and for orders with or without deposits. The following settings are required for order transactions in general.
The following settings are to allow back orders with different transaction scenarios. For all back orders, the Create Back Orders option in Location Maintenance must be set to Yes, and the individual items must be set for back orders in the Inventory Management module. See the Inventory Management Manual by Best Software for more information.
Settings
This section details the settings in the Point of Sale Professional Setup menu to configure order transactions.
• Point of Sale Professional must be integrated with the Accounts Receivable module and the Sale Order module.
• User can enter order by either using Sale Order Entry, updating the order to the Sales Order module after it is completed, or updating the order to the Sales Order module after the drawer is updated (select the option in Transaction Type Maintenance).
Scenario Shipped Complete in P/2 Entry
Not Shipped Complete in P/2 Entry
Order contains an item enabled for back orders.
Will ship complete. Back order created for the quantity not shipped.
Chapter 7: Using the Main Menu Point of Sale Professional Manual

155
INDEX
�
�
CONTENTS
BACK
The following scenarios occur for orders with items that cannot be back ordered, and the orders have deposits entered.
Order contains an item not enabled for back orders.
Will ship complete. Cashier will receive the warning: "Back Orders are enabled but Not Allowed for this Item. This item will not be Back Ordered."
Order contains an item that cannot be back ordered and another item that can be back ordered.
Will ship complete. For the enabled item, back order is created for the quantity not shipped.For the item not enabled, cashier will receive the warning: "Back Orders are enabled but Not Allowed for this Item. This item will not be Back Ordered."
Scenario Shipped Complete in P/2 Entry
Not Shipped Complete in P/2 Entry
Order with an item not enabled for back orders with a deposit.
Will ship complete. Cashier will receive the warning: "Back Orders are enabled but Not Allowed for this Item. This item will not be Back Ordered."For cash deposits, the cashier will receive a prompt and have the option to apply the balance to terms or receive the cash.For non-cash deposits, the balance will be posted to terms.
Scenario Shipped Complete in P/2 Entry
Not Shipped Complete in P/2 Entry
Chapter 7: Using the Main Menu Point of Sale Professional Manual

156
INDEX
�
�
CONTENTS
BACK
The following scenarios occur for orders with deposits entered.
Scenario Shipped Complete in P/2 Entry
Not Shipped Complete in P/2 Entry
Order with deposit with an item enabled for back orders.
Will ship complete. Back order is created for the quantity not shipped.For cash deposits, the customer will have the option to apply the balance to terms or receive the cash.For non-cash deposits, the balance will be posted to terms.
Chapter 7: Using the Main Menu Point of Sale Professional Manual

157
INDEX
�
�
CONTENTS
BACK
Enter an Order Transaction
1 Select Order from the Transaction Type field.
Order with deposit with an item not enabled for back orders.
Will ship complete. Warned that a back order will not be created. For cash deposits, the customer will have the option to apply the balance to terms or receive the cash.For non-cash deposits, the balance will be posted to terms.
Order with an item enabled for back orders, and another item not enabled for back orders.
Will ship complete. For the enabled item, back order is created for the quantity not shipped. For the item not enabled, warning occurs but back order will not be created.For cash deposits, the customer will have the option to apply the balance to terms or receive the cash.For non-cash deposits, the balance will be posted to terms.
OR
If the order is not shipped complete and there is one item that can be back ordered and another item that cannot, for cash deposits the customer will have the option to apply the balance to terms or receive the cash, and for non-cash deposits the balance will be posted to terms.
Scenario Shipped Complete in P/2 Entry
Not Shipped Complete in P/2 Entry
Chapter 7: Using the Main Menu Point of Sale Professional Manual

158
INDEX
�
�
CONTENTS
BACK
2 Click the button in the Header section to create a new transaction. The transaction fields on the Point of Sale Entry window become available.
3 Select the customer from the Customer field. All orders require a customer.
4 Select the item being ordered from the Item field. The item description appears in the Desc field.
5 Repeat step 4 for each item being purchased.
6 Enter any discounts or charges in the Totals section of the Point of Sale Entry window. See Using Features in the Totals Section for more information.
7 If the customer is paying for the order, enter the customer’s payment in the Payment field. See the Using Different Payment Types section for more information.
8 Click the button in the Point of Sale Entry window. The system converts the order to a sale and displays the amount the customer owes. If the customer pays for an order at a later date, see the Enter a Customer Payment Transaction section.
Create a Back Order
Back orders are created from standard orders. First, you create the standard order transaction, which is converted into a sale transaction. On the sale transaction, if an item is not available, it is placed on back order.
Chapter 7: Using the Main Menu Point of Sale Professional Manual

159
INDEX
�
�
CONTENTS
BACK
1 Create the order. See the Enter an Order Transaction section for more information. For example, in the following picture a customer places an order for 100 pieces of candy, 100-20 oz. of cola, and 300-20 oz. of water.
2 When part of the order is ready to be shipped, create a sale transaction. Select Sale from the Transaction Type field and click the button in the Header section to create a new transaction. The sales transaction fields on the Point of Sale Entry window become available.
Point of Sale Entry Window
Chapter 7: Using the Main Menu Point of Sale Professional Manual

160
INDEX
�
�
CONTENTS
BACK
3 Click the button in the Header section to select the order from the Order Number list.
The order will contain an S in the Type field.
4 For the items available, click on the item name in the Active Receipt and enter the quantity being shipped in the Quantity field. Click the button when finished with each individual item.
5 For the items that need to be back ordered, click on the item name in the Active Receipt and enter the quantity currently available (if any) in the Quantity field. For example, in the following picture the candy and cola items are completely available, but the water item is not.
Order Number List
Chapter 7: Using the Main Menu Point of Sale Professional Manual
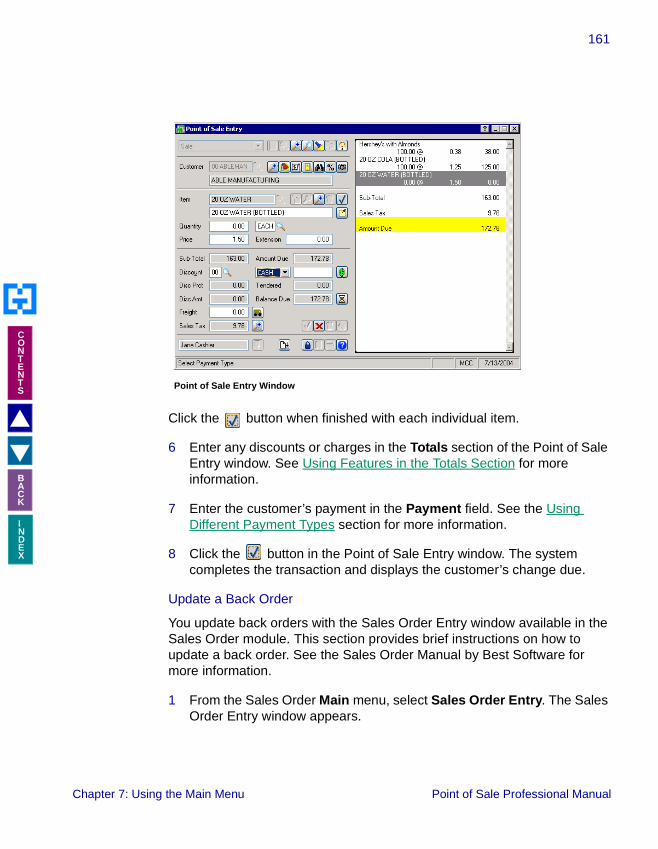
161
INDEX
�
�
CONTENTS
BACK
Click the button when finished with each individual item.
6 Enter any discounts or charges in the Totals section of the Point of Sale Entry window. See Using Features in the Totals Section for more information.
7 Enter the customer’s payment in the Payment field. See the Using Different Payment Types section for more information.
8 Click the button in the Point of Sale Entry window. The system completes the transaction and displays the customer’s change due.
Update a Back Order
You update back orders with the Sales Order Entry window available in the Sales Order module. This section provides brief instructions on how to update a back order. See the Sales Order Manual by Best Software for more information.
1 From the Sales Order Main menu, select Sales Order Entry. The Sales Order Entry window appears.
Point of Sale Entry Window
Chapter 7: Using the Main Menu Point of Sale Professional Manual
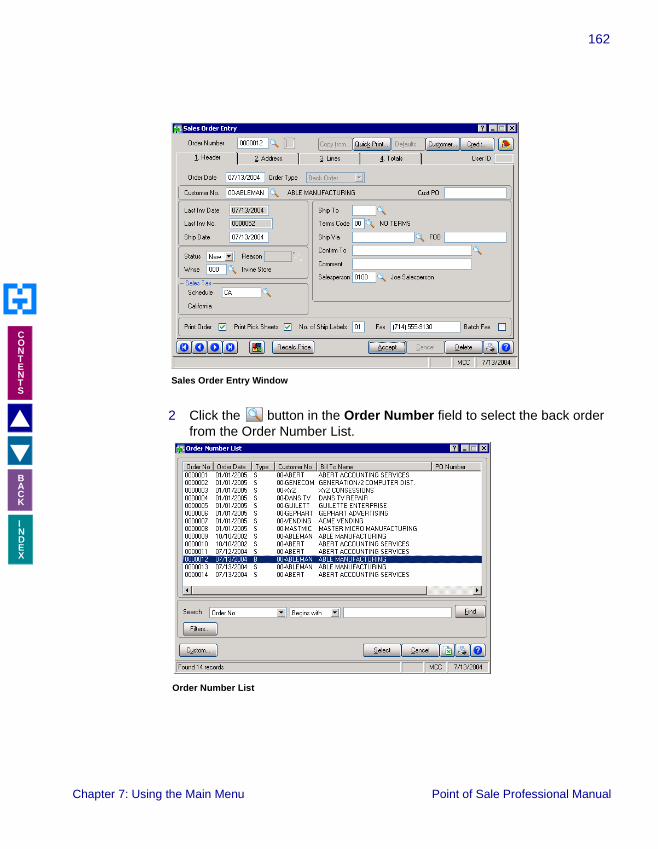
162
INDEX
�
�
CONTENTS
BACK
2 Click the button in the Order Number field to select the back order from the Order Number List.
Sales Order Entry Window
Order Number List
Chapter 7: Using the Main Menu Point of Sale Professional Manual

163
INDEX
�
�
CONTENTS
BACK
The back order will contain a B in the Type field. When you select the back order, the Sales Order Entry window displays Back Order in the Order Type field.
3 Click on the Lines tab to update the back ordered items.
4 Select the back order item and enter the amount currently available in the Shipped field. See the Sales Order Manual by Best Software for more information.
5 Click Accept when finished.
Convert an Order to a Sale
You can create a sales transaction from an order in the Point of Sale Entry window.
1 Select Sale from the Transaction Type field.
2 Click the button in the Header section to create the transaction. The transaction fields on the Point of Sale Entry window become available.
Sales Order Entry Window - Lines Tab
Chapter 7: Using the Main Menu Point of Sale Professional Manual

164
INDEX
�
�
CONTENTS
BACK
3 Click the button in the Header section to select the order from the Order Number list.
The order will contain an S in the Type field.
The system converts the order to a sale in the Point of Sale Entry window.
4 Enter the payment in the Payment field. See the Using Different Payment Types section for more information.
5 Click the button in the Point of Sale Entry window. The system completes the transaction and displays the amount of the customer’s change.
All deposits on orders will post to the location deposit account and the payment asset account, which may be cash if you are posting the payment to Bank Reconciliation. This posting is necessary to account for the money being received at the drawer and for the money being deposited into the bank:Debit - Payment type asset account.Credit - Customer deposit account (a liability at this point).
Order Number List
Chapter 7: Using the Main Menu Point of Sale Professional Manual

165
INDEX
�
�
CONTENTS
BACK
When the order is converted into a sale, the following Journal Entry is made:Debit - Payment type asset account, if there was a remaining balance paid.Debit - Customer deposit account, which offsets the original entry (the liability).Credit - Sales account with the full amount of invoice.
Quote Transactions
You can enter a quote for a customer and use the sale transaction to create a sale at another time. This section describes how to enter a quote transaction and how to create a sale transaction from a quote transaction. Cashiers cannot accept deposits on prices quotes, as dictated by the Sales Order module. Quantities on price quotes do not affect the inventory quantities as in the Sales Order module.
Enter a Quote Transaction
1 Select Quote from the Transaction Type field.
2 Click the button in the Header section to create a transaction. The transaction fields on the Point of Sale Entry window become available.
3 Select the customer from the Customer field. All quotes require an Accounts Receivable customer.
4 Select the item being quoted from the Item field. The item description appears in the Desc field.
Settings
This section details the settings in the Point of Sale Professional Setup menu to configure users for quote transactions.
• Point of Sale Professional must be integrated with the Sale Order module.
• User can enter quote by either using Sale Order Entry, updating the quote to the Sales Order module after it is completed, or updating the quote to the Sales Order module after the drawer is updated (configure the option in Transaction Type Maintenance).
Chapter 7: Using the Main Menu Point of Sale Professional Manual

166
INDEX
�
�
CONTENTS
BACK
5 Repeat step 4 for each item being quoted.
6 Enter any discounts or charges in the Totals section of the Point of Sale Entry window. See Using Features in the Totals Section for more information.
7 Click the button in the Point of Sale Entry window. The system completes the transaction and displays the amount the customer will owe if placing the order. See the Convert a Quote to a Sale section for how to add the quote as a transaction.
Convert a Quote to a Sale
You can create a sales transaction from a quote you gave to a customer. When you convert a quote, Point of Sale Professional first converts the quote to an order and then a sale.
1 Select Sale from the Transaction Type field.
2 Click the button in the Header section to create the transaction. The transaction fields on the Point of Sale Entry window become available.
3 Click the button in the Header section to select the order from the Order Number list.
Order Number List
Chapter 7: Using the Main Menu Point of Sale Professional Manual

167
INDEX
�
�
CONTENTS
BACK
The quote will contain a Q in the Type field. The following warning dialog appears.
4 Click the Yes button. The system internally converts the quote to an order and then converts the orders to a sale. The sale appears in the Point of Sale Entry window.
5 Enter the payment in the Payment field. See the Using Different Payment Types section for more information.
6 Click the button in the Point of Sale Entry window. The system completes the transaction and displays the amount of the customer’s change.
Warning Dialog
Chapter 7: Using the Main Menu Point of Sale Professional Manual

168
INDEX
�
�
CONTENTS
BACK
Customer Payment Transactions
Enter a Customer Payment Transaction
You can enter a payment received from an open item customer using the Customer Payment transaction. Invoices are created in the Accounts Receivable module by Best Software. See the Accounts Receivable Manual for more information.
1 Select Customer Payment from the Transaction Type field.
2 Click the button in the Header section to create the transaction. The transaction fields on the Point of Sale Entry window become available.
3 Select the customer from the Customer field. Customer payment transactions require customers.
Optimal Settings
This section details the optimal settings in the Point of Sale Professional Setup menu for customer payment and customer prepayment transactions.
In Point of Sale Professional Options:
• Check Display Last Transaction.
In Transaction Type Maintenance:
• Change description of a customer payment type transaction to Customer Payment to identify transaction for cashiers.
• Check Require Customer Number.
• Select the tab settings for (1) Customer ID, (2) Invoice Number, (3) Invoice Payment Amount, (4) Enter Invoice, (5) Payment Type, (6) Payment Amount, (7) Payment Button, and (8) Accept Transaction.
In Register Maintenance:
• The default payment type selected in Register Maintenance will be overwritten by the customer default payment type selected in Customer Maintenance.
Chapter 7: Using the Main Menu Point of Sale Professional Manual

169
INDEX
�
�
CONTENTS
BACK
4 Select the invoice being paid from the Invoice field.
5 Enter the payment amount in the Payment field of the Line Item Details section.
6 Enter the payment type in the Payment field of the Totals section. See the Using Different Payment Types section for more information.
7 Click the button in the Point of Sale Entry window. The system completes the transaction.
Enter a Prepayment Transaction
You can enter a prepayment by a customer using the customer payment transaction. Prepayments will appear in the Customer Maintenance records after the cash drawer has been updated to the system.
1 Select Customer Payment from the Transaction Type field.
2 Click the button in the Header section to create a transaction. The transaction fields on the Point of Sale Entry window become available.
3 Select the customer from the Customer field. Prepayment transactions require customers.
4 Enter a non-existent invoice in the Invoice field.
5 Press TAB and the system displays the following warning dialog.
6 Click the Yes button. The Payment field becomes available.
Invoice Field for Pre-payment
Warning Dialog
Chapter 7: Using the Main Menu Point of Sale Professional Manual
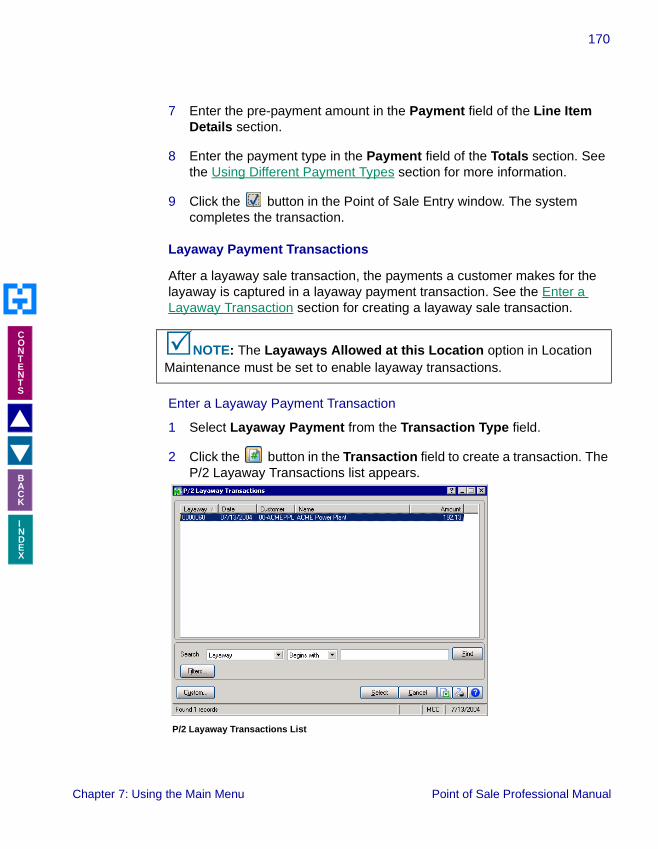
170
INDEX
�
�
CONTENTS
BACK
7 Enter the pre-payment amount in the Payment field of the Line Item Details section.
8 Enter the payment type in the Payment field of the Totals section. See the Using Different Payment Types section for more information.
9 Click the button in the Point of Sale Entry window. The system completes the transaction.
Layaway Payment Transactions
After a layaway sale transaction, the payments a customer makes for the layaway is captured in a layaway payment transaction. See the Enter a Layaway Transaction section for creating a layaway sale transaction.
Enter a Layaway Payment Transaction
1 Select Layaway Payment from the Transaction Type field.
2 Click the button in the Transaction field to create a transaction. The P/2 Layaway Transactions list appears.
�NOTE: The Layaways Allowed at this Location option in Location Maintenance must be set to enable layaway transactions.
P/2 Layaway Transactions List
Chapter 7: Using the Main Menu Point of Sale Professional Manual
171
INDEX
�
�
CONTENTS
BACK
Select the layaway transaction and click the Select button. The system displays the layaway in the Point of Sale Entry window.
3 Enter the customer’s payment in the Payment field. See the Using Different Payment Types section for more information.
4 Click the button in the Point of Sale Entry window. The system completes the transaction and displays the amount of the customer’s change or the amount the customer owes.
Return Transactions
For the Optimal Settings for a return transaction, set the same as fast sales or customer sales transactions.
Enter a Return Transaction
You can enter a return and refund money to a customer.
1 Select Return from the Transaction Type field.
2 Click the button in the Header section to create a transaction. The transaction fields on the Point of Sale Entry window become available.
3 Select the customer from the Customer field. This step may be optional.
4 Select the item being returned from the Item field. The item description appears in the Desc field. If using a bar code scanner, scan the UPC code of the item.
5 Enter any discounts or charges in the Totals section of the Point of Sale Entry window. See Using Features in the Totals Section for more information.
6 Select the payment type to return to the customer in the Payment field. See the Using Different Payment Types section for more information. Only certain payment types may be available for returns.
7 Click the button in the Point of Sale Entry window. The system completes the transaction and displays the amount of the customer’s change.
Chapter 7: Using the Main Menu Point of Sale Professional Manual

172
INDEX
�
�
CONTENTS
BACK
Suspending/Voiding Transactions
Some stores do not allow cashiers to suspend or void transactions without a manager. If you can complete these activities, you may have to select a reason why. If you cannot complete these activities, contact your manager.
Suspend a Transaction
Suspend a transaction when a customer will return to finish the transaction. You can use this feature if a customer steps out of line for more funds or for another item. You can continue with another transaction and return to the suspended transaction when the customer returns. You cannot close the cash drawer if a suspended transaction exists. You will have to void or complete the transaction.
• Click the button available in the Totals section. The system suspends the transaction.
• To open the transaction, click the button in the Header section to select the transaction from the POS Entry Header list.
The suspended transaction will contain an S in the Status field.
POS Entry Header List
Chapter 7: Using the Main Menu Point of Sale Professional Manual

173
INDEX
�
�
CONTENTS
BACK
Void a Transaction
If a customer decides during a transaction entry to cancel a transaction, you must void the transaction. When a transaction is voided, the cashier who voided it and the reason for the void are retained. You can also print voided transactions. When printing voids, the word VOID will appear on the bottom of the receipt.
1 Click the button available in the Totals section of the Point of Sale Entry window. The Void Transaction window will appear if your company requires a reason for voided transactions.
2 Select why the transaction is being voided from the Reason for Void field.
3 Click the button in the Void Transaction window. The system voids the transaction.
Void a Completed Transaction
Normally, you do not void completed transactions. An example of when you might void a transaction is when you void a quote transaction that was only available for a specific amount of time. When a transaction is voided, the cashier who voided it and the reason for the void are retained. You can also print voided transactions. When printing voids, the word VOID will appear on the bottom of the receipt.
1 Click the button in the Header section to select a transaction from the POS Entry Header list. The system displays the transaction in the Point of Sale Entry window.
Void Transaction Window
Chapter 7: Using the Main Menu Point of Sale Professional Manual

174
INDEX
�
�
CONTENTS
BACK
2 Click the button available in the Totals section of the Point of Sale Entry window. The system displays the following warning dialog.
3 Click the Yes button. The Void Transaction window will appear if your company requires a reason for deleted transactions.
4 Select why the transaction is being deleted from the Reason for Void field.
5 Click the button in the Void Transaction window. The system deletes the transaction.
Using Different Payment Types
Customers can pay with several different payment types, including cash, check, charge, and gift cards. You can also apply special terms to a transaction to allow customers to be billed for a transaction.
Customer Pays with Cash
1 Select CASH from the Payment Amount field.
2 Enter the amount the customer paid in the Payment Amount field and press TAB. The system displays the amount due or the balance still owed.
Warning Dialog
Void Transaction Window
Payment Amount Field
Chapter 7: Using the Main Menu Point of Sale Professional Manual

175
INDEX
�
�
CONTENTS
BACK
3 Click the button in the Point of Sale Entry window. The system completes the transaction.
Customer Charges Transaction
If your company integrates PCCharge™ with Point of Sale Professional, see the Customer Charges Transaction and PCCharge is Integrated with Point of Sale Professional section.
1 Select the name of the charge card from the Payment Amount field. This field must be set with the correct charge card or the cashier will receive an invalid swipe.
2 Enter the amount of the charge in the Payment Amount field and press TAB. The system displays the Point of Sale Payments window.
If your company uses a credit card reader, you can scan the information required on the Point of Sale Payments window with the credit card reader.
3 Enter the credit card number in the Card Number field.
4 Enter the card’s expiration date in the Expiration Date field.
5 Enter the card’s validation number (3-4 number code on the back of the card) in the Validation Number field.
Point of Sale Payments Window - Credit Tab
Chapter 7: Using the Main Menu Point of Sale Professional Manual

176
INDEX
�
�
CONTENTS
BACK
6 Enter the card’s last four numbers in the Confirm Last 4 Digits field.
7 Enter the customer’s name as it appears on the card in the Cardholder Name field.
8 Enter the customer’s address in the Street Address field.
9 Enter the customer’s zip code in the Zip Code field.
10 Enter the bank’s approval code in the Authorization Code field.
11 Click the button in the Point of Sale Payments window. The system displays the Point of Sale Entry window with the credit card information.
12 Click the button in the Point of Sale Entry window. The system completes the transaction.
Customer Charges Transaction and PCCharge is Integrated with Point of Sale Professional
Your company can integrate Point of Sale Professional with PCCharge™ by GO Software, Incorporated. PCCharge automatically provides authorization codes for credit card purchases.
1 Select the name of the charge card from the Payment Amount field. This field must be set with the correct charge card or the cashier will receive an invalid swipe.
Chapter 7: Using the Main Menu Point of Sale Professional Manual

177
INDEX
�
�
CONTENTS
BACK
2 Enter the amount of the charge in the Payment Amount field and press TAB. The system displays the Point of Sale Payments window.
If your company uses a credit card reader, you can scan the information required on the Point of Sale Payments window with the credit card reader.
3 Enter the credit card number in the Card Number field.
4 Enter the card’s expiration date in the Expiration Date field.
5 Enter the card’s validation number (3-4 number code on the back of the card) in the Validation Number field.
6 Enter the card’s last four numbers in the Confirm Last 4 Digits field.
7 Enter the customer’s name as it appears on the card in the Cardholder Name field.
8 Enter the customer’s address in the Street Address field.
9 Enter the customer’s zip code in the Zip Code field.
Point of Sale Payments Window - Credit Tab
Chapter 7: Using the Main Menu Point of Sale Professional Manual

178
INDEX
�
�
CONTENTS
BACK
10 Click the Authorize button to verify the charge with the PCCharge software. When you authorize a charge with PCCharge, the Authorization Code, Date Authorized, Time Authorized, and Reference fields are populated with the correct information. (The reference number comes from the Number table in the PCCharge database.) The Amount Authorized field will be disabled.
11 Click the button in the Point of Sale Payments window. The system displays the Point of Sale Entry window with the credit card information.
12 Click the button in the Point of Sale Entry window. The system completes the transaction.
Customer Pays with a Check
If your company integrates PCCharge™ with Point of Sale Professional, see the Customer Pays with a Check and PCCharge is Integrated with Point of Sale Professional section.
1 Select CHECK from the Payment Amount field.
�NOTE: If the Disable Verification option is selected Payment Type Maintenance, cashiers can choose to verify the charge or to bypass the authorization process. To bypass the authorization process, skip step 10 (do not click the Authorize button) and click the button to accept the charge.
Chapter 7: Using the Main Menu Point of Sale Professional Manual

179
INDEX
�
�
CONTENTS
BACK
2 Enter the amount of the check in the Payment Amount field and press TAB. The system displays the Point of Sale Payments window.
If your company uses a check reader, you can scan the information required on the Point of Sale Payments window with the check reader.
3 Enter the check number in the Check Number field.
4 Enter the customer’s name in the Name field.
5 Enter the customer’s address in the Address field.
6 Enter the customer’s zip code in the Zip Code field.
7 Enter the customer’s drivers license number in the Drivers License field.
8 Click the button in the Point of Sale Payments window. The system displays the Point of Sale Entry window with the check information.
9 Click the button in the Point of Sale Entry window. The system completes the transaction.
Point of Sale Payments Window - Check Tab
Chapter 7: Using the Main Menu Point of Sale Professional Manual

180
INDEX
�
�
CONTENTS
BACK
Customer Pays with a Check and PCCharge is Integrated with Point of Sale Professional
Your company can integrate Point of Sale Professional with PCCharge™ by GO Software, Incorporated. PCCharge verifies that the checking account exists and does not bounce checks.
1 Select CHECK from the Payment Amount field.
2 Enter the amount of the check in the Payment Amount field and press TAB. The system displays the Point of Sale Payments window.
If your company uses a check reader, you can scan the information required on the Point of Sale Payments window with the check reader.
3 Enter the check number in the Check Number field.
4 Enter the customer’s name in the Name field.
5 Enter the customer’s address in the Address field.
6 Enter the customer’s zip code in the Zip Code field.
7 Enter the customer’s drivers license number in the Drivers License field.
Point of Sale Payments Window - Check Tab
Chapter 7: Using the Main Menu Point of Sale Professional Manual
181
INDEX
�
�
CONTENTS
BACK
8 Click the Verify button to verify the check through the PCCharge software. When you verify a check with PCCharge, the Check Verified field is checked, and the Date Verified and Time Verified fields are populated with the correct information. The Transaction Number field will not be populated.
9 Click the button in the Point of Sale Payments window. The system displays the Point of Sale Entry window with the check information.
10 Click the button in the Point of Sale Entry window. The system completes the transaction.
Customer Pays with a Gift Certificate
1 Select Gift Certificate from the Payment Amount field.
2 Enter the amount of the gift certificate in the Payment Amount field and press TAB. The system displays the amount due or the balance still owed.
3 Click the button in the Point of Sale Entry window. The system completes the transaction.
�NOTE: If the Disable Verification option is selected Payment Type Maintenance, cashiers can choose to verify the check or to bypass the verification process. To bypass the verification process, skip step 8 (do not click the Verify button) and click the button to accept the check.
Chapter 7: Using the Main Menu Point of Sale Professional Manual

182
INDEX
�
�
CONTENTS
BACK
Apply a Term to a Transaction
You can apply a term to a transaction as a payment type. Terms allow customers to be billed for the transaction. Terms can only be applied to customers.
1 Select Terms from the Payment Amount field.
�NOTE - Gift Certificate Balances: If the Allow Overpayment option is selected Payment Type Maintenance, cashiers will be able to refund the remaining balance of the gift certificate to the customer.If the Allow Overpayment option is not selected in Payment Type Maintenance, then cashiers will not be able to refund the remaining balance of the gift certificate to the customer. More importantly, the gift certificate payment entered may not exceed the total balance due. To forward the balance of the gift certificate to the customer’s account, enter a negative (-) terms payment, and enter the full gift certificate amount. When the transaction is updated, a negative (-) invoice balance will post for the transaction, which can later be applied to another invoice.
�NOTE: If the customer is assigned a term code in Customer Maintenance from the Accounts Receivable module, that term code is automatically applied to the transaction. See the Accounts Receivable Manual by Best Software for more information.
Chapter 7: Using the Main Menu Point of Sale Professional Manual

183
INDEX
�
�
CONTENTS
BACK
2 Click the button in the Payment Amount field. The system displays the Point of Sale Payments window.
3 Select the term to apply to the transaction from the Terms Code field. The term codes are created in the Accounts Receivable module.
4 Click the button in the Point of Sale Payments window. The system completes the transaction.
If You Entered the Wrong Payment Information
If you entered the wrong payment information, such as you selected the wrong payment type or entered the wrong amount, you can correct the payment information. You must correct the payment information before finishing the transaction.
Point of Sale Payments Window - Terms Tab
Chapter 7: Using the Main Menu Point of Sale Professional Manual

184
INDEX
�
�
CONTENTS
BACK
1 Double-click on the payment type listed in the Active Receipt.
The system displays the Point of Sale Payments window.
2 Make any changes in the Point of Sale Payments window.
• If you selected the wrong payment type - Click the button to delete the wrong payment type. The system displays a warning dialog box. Click the Yes button and enter a new payment type.
• If you entered the wrong amount for a CASH payment type - Correct the amount in the Amount Tendered field in the Point of Sale Payments window. Click the button in the Point of Sale Payments window when finished.
• If you entered the wrong amount for a CHECK or CREDIT payment type - Click the button to delete the payment type. The system displays a warning dialog box. Click the Yes button and enter a new payment type with the correct amount.
• If you entered the wrong credit card or check information for the customer - Correct the data and click the button on the Point of Sale Payments window to save the changes.
3 Click the button in the Point of Sale Entry window. The system completes the transaction.
Payment Type Listed on Active Receipt
Chapter 7: Using the Main Menu Point of Sale Professional Manual

185
INDEX
�
�
CONTENTS
BACK
Using Additional Features of the Point of Sale Entry Window
There are additional features in the Point of Sale Entry window besides entering transactions. You can complete activities such as looking for specific customer information, searching for alternate line items, and adding discounts.
The Header section contains the basic information about the transaction. You select the type of transaction to create, view transaction details, and view orders in the Header section.
The Customer Details section contains the information about the customer selected in a transaction. You select the customer for the transaction, view other transactions for the customer, check the customer’s credit, launch customer maintenance, search for the customer’s last transaction, change the salesperson for the customer, and search for a specific contacts in the Customer Details section.
Header
Customer
Line Item
Totals
ActiveDetailsReceipt
Point of Sale Entry Window
Details
Chapter 7: Using the Main Menu Point of Sale Professional Manual

186
INDEX
�
�
CONTENTS
BACK
The Line Item Details section contains the items in a transaction. You select the item being purchased, search for alternate items, search for sale kits or bill of materials, view item details, add extended item comments, view individual items in a sales kit, view lot or serial numbers of an item, and view invoice details in the Line Items Details section.
The Totals section contains the total values for transactions. You select the payment type the customer uses, view the customer’s change or balance due, select discounts, add freight charges, and select the sales tax in the Totals section.
The Active Receipt section contains the information that will be printed on the customer’s receipt. You can select different information from the receipt to view the details in the other sections of the Point of Sale Entry window.
Using Features in the Header Section
View Details of a Transaction
You can view additional details about completed transactions using the Transaction Detail window. This window displays information such as the cash drawer number and the time of the transaction. The Transaction Detail window is view only.
1 Select a completed transaction. See the View Completed Transactions section.
Chapter 7: Using the Main Menu Point of Sale Professional Manual

187
INDEX
�
�
CONTENTS
BACK
2 After selecting a transaction, click the button. The Transaction Detail window appears.
The Transaction Detail window displays additional information about the transaction including the cashier, cash drawer, and exact time of the transaction. For current transactions, you can enter information in the Comment, Customer PO, Tax Schedule, and Salesperson fields.
Using Features in the Customer Details Section
After you select a customer for a transaction, you can access the features available in the Customer Details section of the Point of Sale Entry window.
View the Customer Details for a Transaction
You can view the details about a customer. The Transaction Customer Details feature allows you to view the customer address, contact, and shipping address.
Transaction Detail Window
Chapter 7: Using the Main Menu Point of Sale Professional Manual

188
INDEX
�
�
CONTENTS
BACK
• Click the button available in the Customer Details section of the Transaction History Inquiry window. The Transaction Customer Detail window appears.
You can access additional customer information by clicking on the Customer Memos, Customer Credit, or Customer Maintenance button.
View a Customer Memo
You can view a memo assigned to a customer through the Point of Sale Entry window.
1 Click the button available in the Customer Details section of the Transaction History Inquiry window. The Customer Memo Maintenance window appears.
Transaction Detail Window
Chapter 7: Using the Main Menu Point of Sale Professional Manual

189
INDEX
�
�
CONTENTS
BACK
2 Select a customer memo from the Memo Code field.
After selecting a memo, the Customer Memo Maintenance window displays the memo’s details. See the Account Receivable Manual by Best Software for more information about the Customer Memo Maintenance window.
Check a Customer’s Credit
You can view the details of a customer’s credit at the time of transaction entry. The Customer Credit feature allows you to view the customer’s credit limit, balance, and last statement date. The Customer Credit window is view only.
• After selecting the transaction, click the button available in the Customer Details section of the Point of Sale Entry window. The Customer Credit window appears.
Customer Memo Maintenance Window
Chapter 7: Using the Main Menu Point of Sale Professional Manual

190
INDEX
�
�
CONTENTS
BACK
The Customer Credit window contains brief details about the customer’s credit including the cost of open orders, the cost of the currently opened transaction, and past due information.
Launch Customer Maintenance
The Maintenance feature in the Point of Sale Professional module is a copy of the Customer Maintenance feature in the Accounts Receivable module by Best Software. Access the Customer Maintenance option directly from the Point of Sale Entry window to create, update, and delete customers without having to open the Accounts Receivable module.
�NOTE: The Customer Maintenance feature is available only if the Accounts Receivable module is integrated with the Point of Sale Professional module.
Customer Credit Window
Chapter 7: Using the Main Menu Point of Sale Professional Manual
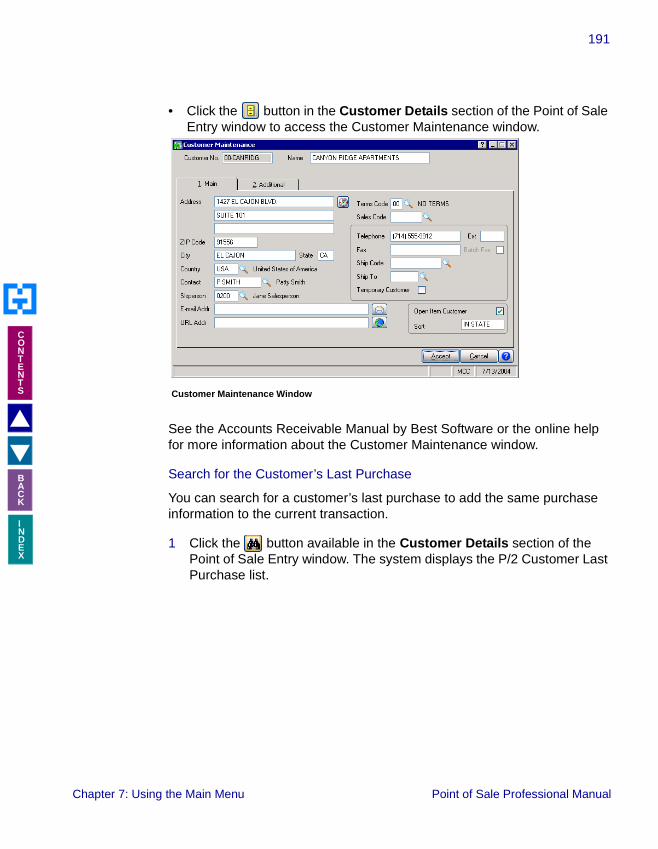
191
INDEX
�
�
CONTENTS
BACK
• Click the button in the Customer Details section of the Point of Sale Entry window to access the Customer Maintenance window.
See the Accounts Receivable Manual by Best Software or the online help for more information about the Customer Maintenance window.
Search for the Customer’s Last Purchase
You can search for a customer’s last purchase to add the same purchase information to the current transaction.
1 Click the button available in the Customer Details section of the Point of Sale Entry window. The system displays the P/2 Customer Last Purchase list.
Customer Maintenance Window
Chapter 7: Using the Main Menu Point of Sale Professional Manual

192
INDEX
�
�
CONTENTS
BACK
2 Select the item purchased, and click the Select button. The system adds the item to the current transaction.
Change the Salesperson for the Customer’s Transaction
1 Click the button available in the Customer Details section of the Point of Sale Entry window. The system displays the Salesperson list.
P/2 Customer Last Purchase Window
Chapter 7: Using the Main Menu Point of Sale Professional Manual

193
INDEX
�
�
CONTENTS
BACK
2 Select the salesperson, and click the Select button. The system changes the salesperson for the transaction.
Search for the Customer Contact
• Click the button available in the Customer Details section of the Point of Sale Entry window. The system displays the Contact Identification window if the customer has contact information.
You can access additional contact information by clicking on the or button available in the Contact field.
Salesperson List Window
Contact Identification Window
Chapter 7: Using the Main Menu Point of Sale Professional Manual

194
INDEX
�
�
CONTENTS
BACK
Using Features in the Line Item Details Section
Search for an Item by the Alias Item Number
You can search for an item by an alternate item number.
1 Click the button available in the Line Item Details section. The Alias Item list appears.
2 Select the alternate item number, and click the Select button. The system adds the item to the transaction.
Add a Sales Kit/Bill of Materials
If your company sells an item that is actually a combination of items or materials, select the package item to sell as one product.
1 Click the button available in the Line Item Details section. The Sales Kit list or the Bill of Materials list appears.
Alias Item List Window
Chapter 7: Using the Main Menu Point of Sale Professional Manual

195
INDEX
�
�
CONTENTS
BACK
2 Select the item, and click the Select button. The system adds the item to the transaction.
View the Details of an Item
You can view the details of an item during transaction entry. The Line Item Detail feature allows you to view the item’s price level and line details.
• Click the button available in the Line Item Details section. The Line Item Detail window appears.
Sales Kit List Window
Chapter 7: Using the Main Menu Point of Sale Professional Manual

196
INDEX
�
�
CONTENTS
BACK
You can make any changes to the Line Item Detail window. See the online help for more information.
Change or Delete an Item
You can change or delete an item from a transaction.
1 Click on the item listed in the Active Receipt.
Line Item Detail Window
Item Listed on Active Receipt
Chapter 7: Using the Main Menu Point of Sale Professional Manual
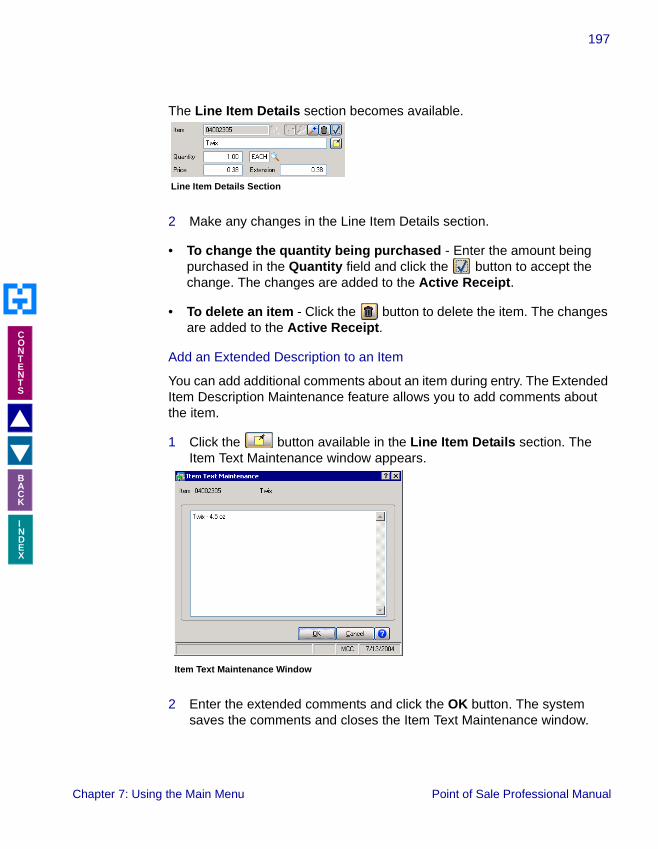
197
INDEX
�
�
CONTENTS
BACK
The Line Item Details section becomes available.
2 Make any changes in the Line Item Details section.
• To change the quantity being purchased - Enter the amount being purchased in the Quantity field and click the button to accept the change. The changes are added to the Active Receipt.
• To delete an item - Click the button to delete the item. The changes are added to the Active Receipt.
Add an Extended Description to an Item
You can add additional comments about an item during entry. The Extended Item Description Maintenance feature allows you to add comments about the item.
1 Click the button available in the Line Item Details section. The Item Text Maintenance window appears.
2 Enter the extended comments and click the OK button. The system saves the comments and closes the Item Text Maintenance window.
Line Item Details Section
Item Text Maintenance Window
Chapter 7: Using the Main Menu Point of Sale Professional Manual

198
INDEX
�
�
CONTENTS
BACK
View the Individual Items in a Sales Kit
If an item is actually a sales kit of several items packaged together, you can display the individual items on the sales receipt.
• Click the button available in the Line Item Details section. The following picture displays a sales kit item expanded to show the individual items.
Change the Price of an Item
Some companies allow cashiers to change the price of an item. This feature is useful is an item is on sale, but the new price was not entered into MAS 90/MAS 200.
1 Click on the item to change in the Active Receipt.
2 Enter the new price in the Price field. Any item changed will be flagged in the Gross Profit Journal during cash drawer reconciliation.
�NOTE: If you change the price to below the cost, you may be required to enter a password.
Candy Kit Candy Kit Expanded to Individual Items
Chapter 7: Using the Main Menu Point of Sale Professional Manual

199
INDEX
�
�
CONTENTS
BACK
3 Click the button to accept the change. The changes are added to the Active Receipt.
Add an Item with a Lot/Serial Number
If an item being purchased belongs to a specific lot or serial distribution, you must select the lot/serial number for the item.
1 Enter the quantity being purchased in the Quantity field.
2 Select the item from the Item field. For items that belong to a specific lot or serial distribution, the Lot/Serial No. Distribution History window appears.
3 Click the List button to list the lot/serial numbers. The List button changes to the Distrib button.
4 Select the lot number from the list. The system displays the lot information in the Lot Number and Available fields in the top section of the Lot/Serial No. - List Entry window.
5 Click the OK button to distribute the quantity from the selected lot. The quantity from the Distribute field is displayed in the list.
6 Click Accept to save the change. The item appears in the Active Receipt section.
Lot/Serial No. - List Entry Window
Chapter 7: Using the Main Menu Point of Sale Professional Manual

200
INDEX
�
�
CONTENTS
BACK
If you select the item from the Active Receipt, the button becomes available in the Line Item Details section. The Lot/Serial No. - List Entry window appears when you click the button. You can change the lot/serial information before completing the transaction.
View the Details of an Invoice
You can view the details of an invoice while entering a customer payment. Invoices are created in the Accounts Receivable module. The Invoice Detail button on the Point of Sale Entry window allows you to review the details of an invoice without opening the Account Receivable module.
• Click the button in the Line Item Details section of the Point of Sale Entry window to access the Invoice Drill Down window.
See the Accounts Receivable Manual by Best Software or the online help for more information about the Invoice Drill Down window.
�NOTE: The Invoice Detail feature is available only if the Accounts Receivable module is integrated with the Point of Sale Professional module.
Invoice Drill Down Window
Chapter 7: Using the Main Menu Point of Sale Professional Manual
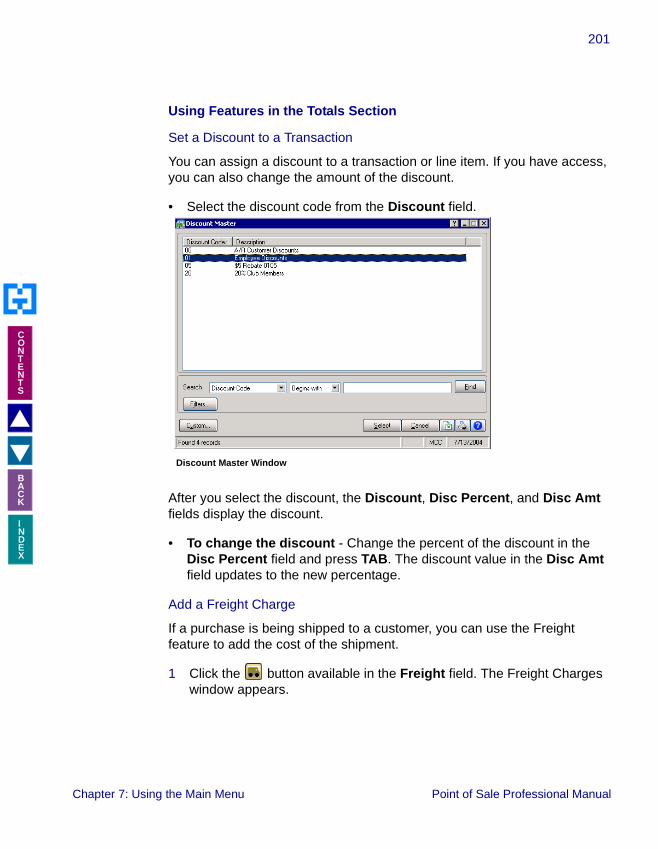
201
INDEX
�
�
CONTENTS
BACK
Using Features in the Totals Section
Set a Discount to a Transaction
You can assign a discount to a transaction or line item. If you have access, you can also change the amount of the discount.
• Select the discount code from the Discount field.
After you select the discount, the Discount, Disc Percent, and Disc Amt fields display the discount.
• To change the discount - Change the percent of the discount in the Disc Percent field and press TAB. The discount value in the Disc Amt field updates to the new percentage.
Add a Freight Charge
If a purchase is being shipped to a customer, you can use the Freight feature to add the cost of the shipment.
1 Click the button available in the Freight field. The Freight Charges window appears.
Discount Master Window
Chapter 7: Using the Main Menu Point of Sale Professional Manual
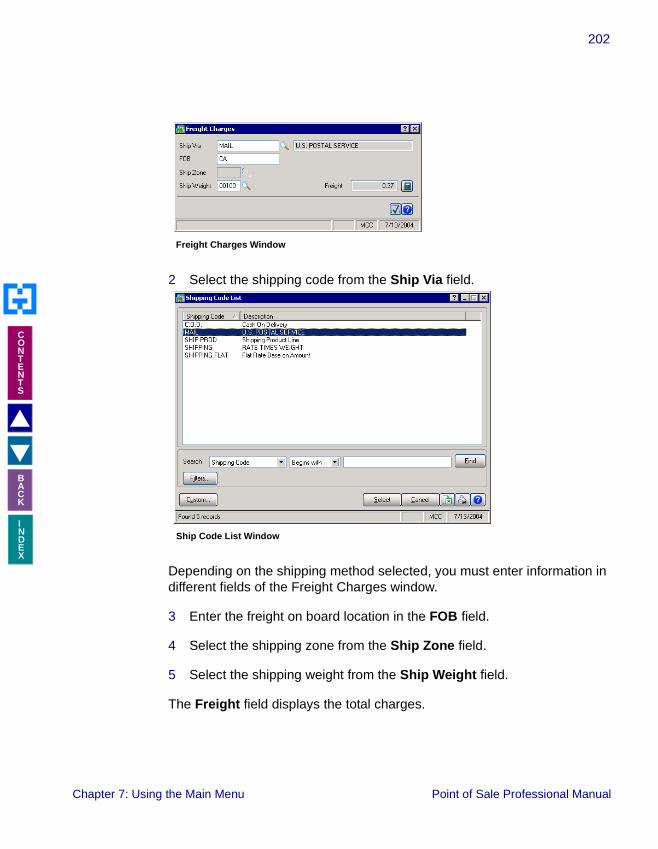
202
INDEX
�
�
CONTENTS
BACK
2 Select the shipping code from the Ship Via field.
Depending on the shipping method selected, you must enter information in different fields of the Freight Charges window.
3 Enter the freight on board location in the FOB field.
4 Select the shipping zone from the Ship Zone field.
5 Select the shipping weight from the Ship Weight field.
The Freight field displays the total charges.
Freight Charges Window
Ship Code List Window
Chapter 7: Using the Main Menu Point of Sale Professional Manual

203
INDEX
�
�
CONTENTS
BACK
6 Click the Accept button to save the changes. The Freight field on the Point of Sale Entry window displays the shipping charge.
Change Sales Tax
Sales tax is normally applied to the transaction if required. You can change the sales tax if needed. Sales taxes are created in the Library Master module by Best Software.
• After selecting the transaction, click the button available in the Sales Tax field. The Tax Detail window appears.
The Tax Detail window displays the taxable sales and freight, the non-taxable sales and freight, exempt tax information, and the total tax amount. You can change the sales tax in the Tax Amount field. See the Library Master Manual by Best Software for more information about the Tax Detail window, or use the online help.
Closing Point of Sale Entry
A cashier can logoff a register during the work day and must logoff the register at the end of the shift. All cash drawers should be reconciled at the end of the shift and the totals updated to the MAS 90/MAS 200 system. See the Reconcile a Cash Drawer section for cash drawer reconciliation procedures.
Tax Detail Window
Chapter 7: Using the Main Menu Point of Sale Professional Manual

204
INDEX
�
�
CONTENTS
BACK
Logoff Register
1 Click the button to logoff the register. The Register Logoff window appears.
At the end of the shift, check the Print Cash Drawer Reconciliation Worksheet and Launch Cash Drawer Reconciliation options.
2 Click Yes to log out of the cash drawer. The Point of Sale Entry window closes.
Manager Features
There are specific features that all managers can access that standard cashiers may not be able to. All the rights available in Cashier Maintenance are automatically assigned to the manager. The following rights are also automatically assigned to a manager entered in the Manager Maintenance window.
• Allowed to Void Transactions - See the Void a Transaction section for more information on how to void transactions.
• Allowed to Void a Completed Transaction - See the Void a Completed Transaction section for more information on how to void completed transactions.
• Allowed to Change the Discount Code - See the Set a Discount to a Transaction section for more information about adding a discount to a transaction.
• Allowed to Override the Item Price - See the Change the Price of an Item section for more information about changing an item price in a transaction.
Register Logoff Window
Chapter 7: Using the Main Menu Point of Sale Professional Manual
205
INDEX
�
�
CONTENTS
BACK
• Allowed to Create a Customer during Point of Sale Entry - See the Launch Customer Maintenance section for more information about how to enter a new customer.
• Allowed to Open the Cash Drawer without a Transaction - See the Open the Cash Drawer section for more information about opening the cash drawer.
• Allowed to Make Withdrawals and Payouts - See the Withdraw Funds from a Cash Drawer or Record a Payout with a Cash Drawer section for more information about withdrawing funds from a cash drawer.
The following manager features are available only to managers and cannot be assigned to standard cashiers.
• Logon into a Locked Cash Drawer - Managers can logon and unlock a cash drawer that has been locked by a user.
• Allow a Customer Transaction - Managers can override the customer credit warning and allow a customer transaction even if the Over Credit Limit Customers field is set to not continue the transaction in Location Maintenance.
• Select Payment Types - Managers can select certain payment types that are unavailable to the cashier if the Over Credit Limit Customers field is set to not continue the transaction in Location Maintenance. Managers can select the over credit payment type.
• Void a Transaction without a Reason Code - Managers can void transactions without a reason even if the Require Reasons for Void is selected in Point of Sale Professional Options.
• Allow items to be sold below cost - If a password is set in the Password to Sell Item Below Cost field in Location Maintenance, managers will be able to login at the Password to Sell Item Below Cost dialog and override the password set in Location Maintenance, allowing the item to be sold below cost. See the Change the Price of an Item section for more information about changing an item price in a transaction.
Chapter 7: Using the Main Menu Point of Sale Professional Manual

206
INDEX
�
�
CONTENTS
BACK
Log into Point of Sale Entry as a Manager
The Point of Sale Entry option in the Main menu of the Point of Sale Professional menu bar, features a Manager Function button . You can use the Manager Function button to logon to manager features available in Point of Sale Entry.
1 Click the button. This button is available in the MCC Register Logon window, Point of Sale Entry window, Customer Credit window, Point of Sale Payments window, and the Register Withdrawal window. The Manager Function Logon window appears.
2 Enter your logon name in the Manager field. You can also click the and select your name from the Manager Master list.
3 Enter your password in the Password field.
4 Press TAB and click the button. You will be able to log into the system as a manager.
Log into a Cash Drawer
Managers can log into cash drawers with the status of Closed or Ready. This option allows you to log into a cash drawer as a cashier. You can use this feature to access the Point of Sale Entry window and logon as a manager to complete a register withdrawal, or you can use this feature for cashiers that forget their passwords.
Manager Function Logon Window
Chapter 7: Using the Main Menu Point of Sale Professional Manual

207
INDEX
�
�
CONTENTS
BACK
1 From the Main menu of the Point of Sale Professional menu bar, select Point of Sale Entry. The MCC Register Logon window appears.
2 Click the button and logon as a manager. See the Log into Point of Sale Entry as a Manager section for more information. When you logon as a manager, the Manager Logon window appears.
3 Select a cashier from the Cashier field.
4 Select a cash drawer from the Cash Drawer field.
5 Click the button. The system re-displays the MCC Register Logon window with the logon information.
6 Click the button to log into the Point of Sale Entry window.
MCC Register Logon Window
Manager Logon Window
Chapter 7: Using the Main Menu Point of Sale Professional Manual

208
INDEX
�
�
CONTENTS
BACK
Allow Customer Transactions
Managers can allow transactions for customers that are marked as over the credit limit. When a customer selected in the Customer field is over the limit, the Customer Credit window appears with a warning.
1 Click the button and logon as a manager. See the Log into Point of Sale Entry as a Manager section for more information. When you logon as a manager, the button becomes available.
2 Click the button. The system continues the transaction for the customer.
Select Payment Types for Customers
Managers can allow customer payment types even if the type is over the limit (for example, a credit card) or otherwise marked as not acceptable. This feature is not available if the Cash payment type is selected in the Payment Type field. This feature is usually used for customers that are over the credit limit.
1 Select the payment type from the Payment Type field.
2 Click the button. The system displays the Point of Sale Payments window.
Customer Credit Window
Chapter 7: Using the Main Menu Point of Sale Professional Manual

209
INDEX
�
�
CONTENTS
BACK
3 Enter the payment information in the Point of Sale Payments window. See the Using Different Payment Types section for more information.
4 Click the button and logon as a manager. See the Log into Point of Sale Entry as a Manager section for more information. When you logon as a manager, the payment type is accepted and the transaction is completed.
Void Transaction without a Reason Code
Managers can void a current or completed transaction without entering a reason. When you void a transaction, the Void Transaction window appears.
Customer Credit Window
Void Transaction Window
Chapter 7: Using the Main Menu Point of Sale Professional Manual

210
INDEX
�
�
CONTENTS
BACK
1 Click the button and logon as a manager. See the Log into Point of Sale Entry as a Manager section for more information. When you logon as a manager, the button becomes available.
2 Click the button. The system continues the transaction for the customer.
Reconciling a Cash Drawer
For many companies, managers will close a cash drawer for a cashier and will count the total amount available in the drawer. Cash drawer reconciliation involves comparing the amount the Point of Sale Professional module tallied for the cash drawer with the amount actually available in the cash drawer. This feature is used to audit the activities of the cashier.
You reconcile the cash drawer with the Cash Drawer Reconciliation window. You can access this window from the Point of Sale Entry window, or through the Cash Drawer Reconciliation option in the Main menu.
Reconcile a Cash Drawer
1 Click the button to logoff the register. The Register Logoff window appears.
2 Check Print Cash Drawer Reconciliation Worksheet to print a worksheet for the cashier to use to count the cash available in the drawer.
3 Check Launch Cash Drawer Reconciliation to open the Cash Drawer Reconciliation window.
Register Logoff Window
Chapter 7: Using the Main Menu Point of Sale Professional Manual

211
INDEX
�
�
CONTENTS
BACK
4 Click Yes to log the cashier out of the cash drawer. The Cash Drawer Reconciliation Worksheet prints first. Have the cashier count the cash available in the cash drawer and fill out the worksheet.
After the Reconciliation Worksheet prints, the Cash Drawer Reconciliation window appears.
Reconciliation Worksheet
Chapter 7: Using the Main Menu Point of Sale Professional Manual

212
INDEX
�
�
CONTENTS
BACK
5 Count the amount available for each payment type and enter the total in the Verified field. If the total in the Verified field is the same as the value in the Amount field, click the button. If the total is different, press TAB. The Variance field displays the value difference between the Amount and Verified fields.
6 Click the button in the Next Drawer field to create the next cash drawer using some of the cash available in the reconciled cash drawer. Enter the amount to use for the next cash drawer’s opening cash amount and press TAB. The Deposit Amount field is updated with the latest value.
7 Click the Accept button to save the changes. The system displays the following warning dialog.
Cash Drawer Reconciliation Window
Warning Dialog
Chapter 7: Using the Main Menu Point of Sale Professional Manual

213
INDEX
�
�
CONTENTS
BACK
8 Click Yes to reconcile the drawer. You must print the Daily Sales Journal to update the Point of Sale Professional system with the cash drawer totals.
Performing Daily Sales Updates
After reconciling a cash drawer, you must use the Daily Sales Reports/Updates feature, and then the Daily Transaction Register feature. These features allow you to update the Point of Sale Professional system and MAS 90/MAS 200 with the latest transactions and amount available from the reconciled cash drawers.
Daily Sales Reports/Updates
Use the Daily Sales Reports/Update on a daily basis after the cash drawer reconciliation process. This option prints several reports and performs an update to the modules that are integrated with the Point of Sale Professional module. The Daily Sales Reports/Updates prints the Cash Drawer Reconciliation Report, Daily Sales Journal, Sales Tax Journal, Daily Payments Journal, Gross Profit Journal, and Layaway Sales Journal (only if the cash drawer performed layaway transactions).
The Daily Sales Reports allows you to review the daily sales information before updating the entire MAS 90/MAS 200 system with the information. This feature provides an opportunity to check for errors before posting the transactions to permanent data files.
�NOTE: The Daily Sales Reports/Update option is available in the Point of Sale Professional Main menu. The option is available after completing the Cash Drawer Reconciliation process.
Chapter 7: Using the Main Menu Point of Sale Professional Manual

214
INDEX
�
�
CONTENTS
BACK
Print the Daily Sales Reports
1 From the Main menu of the Point of Sale Professional menu bar, select Daily Sales Reports/Updates. The Cash Drawer Update Selection window appears.
2 Enter or select the location of the cash drawers from the Location field. Only reconciled cash drawers appear in the Cash Drawer Update Selection window. For all locations, check the All Locations field in the bottom left side of the window.
3 Click on the cash drawers to update and click the Select button. To update all cash drawers, click the All button. The Selected field changes from N to Y.
4 Click the Proceed button. The Point of Sale Daily Sales Journal window appears.
Cash Drawer Update Selection Window
Point of Sale Daily Sales Journal Window
Chapter 7: Using the Main Menu Point of Sale Professional Manual

215
INDEX
�
�
CONTENTS
BACK
5 Make sure the date in the Point of Sale Posting Date Is field is correct and click the Print button.
The first report printed is the Cash Drawer Reconciliation Report for each cash drawer. The Cash Drawer Reconciliation Report includes the cash drawer number, closing date, location, cashier, register, actions, transaction dates, transaction times, transaction numbers, and detailed cash flows.
Cash Drawer Reconciliation Report
Chapter 7: Using the Main Menu Point of Sale Professional Manual

216
INDEX
�
�
CONTENTS
BACK
The next report is the Daily Sales Journal. The Daily Sales Journal itemizes all transactions entered in point of sale entry. This report includes the transaction number, transaction type, customer, sales tax schedule, taxable and non-taxable amount, discount, freight charge, and total sales tax for each cash drawer.
Daily Sales Journal Report
Chapter 7: Using the Main Menu Point of Sale Professional Manual
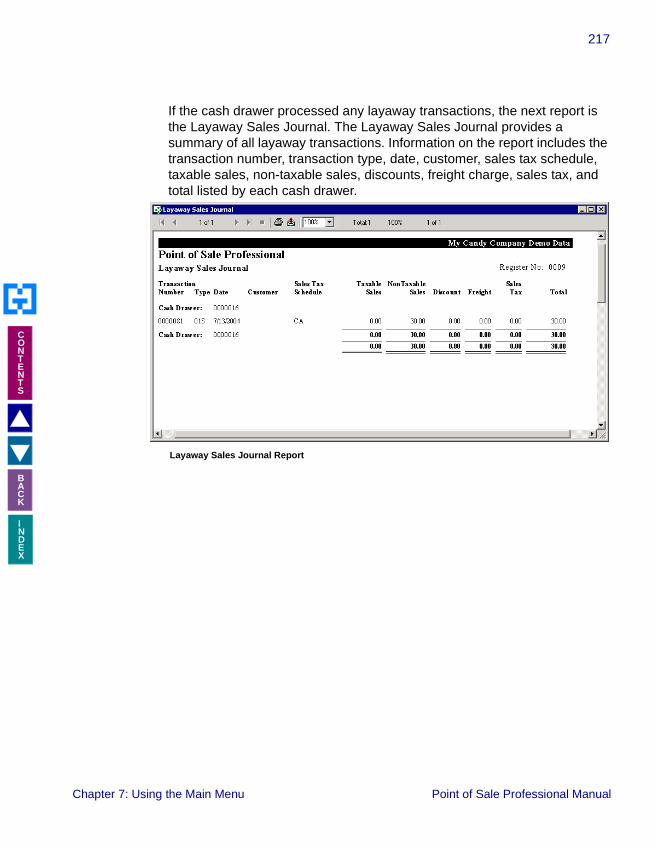
217
INDEX
�
�
CONTENTS
BACK
If the cash drawer processed any layaway transactions, the next report is the Layaway Sales Journal. The Layaway Sales Journal provides a summary of all layaway transactions. Information on the report includes the transaction number, transaction type, date, customer, sales tax schedule, taxable sales, non-taxable sales, discounts, freight charge, sales tax, and total listed by each cash drawer.
Layaway Sales Journal Report
Chapter 7: Using the Main Menu Point of Sale Professional Manual

218
INDEX
�
�
CONTENTS
BACK
The next report is the Sales Tax Journal. The Sales Tax Journal provides a summary of all tax information for all invoices by tax code. Information on the journal includes the tax class and description, sales amount, taxable sales, non-taxable sales, taxable freight, non-taxable freight, taxable tax, and exempt sales listed by each cash drawer.
Sales Tax Journal Report
Chapter 7: Using the Main Menu Point of Sale Professional Manual

219
INDEX
�
�
CONTENTS
BACK
The next report is the Daily Payments Journal. The Daily Payments Journal recaps all payments received detailed by payment type. Information on the journal includes the transaction number, transaction type, date, reference, whether or not the transaction was processed, and the payment type.
Daily Payments Journal Report
Chapter 7: Using the Main Menu Point of Sale Professional Manual

220
INDEX
�
�
CONTENTS
BACK
If the cash drawer processed any customer payments, the next report is the Customer Payments Journal. The Customer Payments Journal provides a summary of all customer payment transactions. Information on the report includes the transaction number, transaction type, date, invoice number, and total listed by each cash drawer.
Customer Payments Journal Report
Chapter 7: Using the Main Menu Point of Sale Professional Manual

221
INDEX
�
�
CONTENTS
BACK
The final report is the Gross Profit Journal. The Gross Profit Journal contains the total gross and net profits. Information on this report includes the transaction number, transaction type, date, salesperson, net sales amount, cost of goods amount, gross profit amount, gross profit percent, commission amount, and invoice total for each cash drawer.
If your company selected to print Daily Sales Recap Reports, you may also receive the following reports:
• Daily Sales Recap by Item - This report recaps sales by product line and item number. Information detailed for each item includes warehouse, unit price, quantity, total sale dollars, gross profit amount, and percentage of profit. The report can be printed by warehouse or in
Gross Profit Journal Report
Chapter 7: Using the Main Menu Point of Sale Professional Manual

222
INDEX
�
�
CONTENTS
BACK
summary format with totals for all locations for each item. This report may include warehouse details if the Include Warehouse Detail for Recap by Item field is selected in the Point of Sale Professional Options window.
Daily Sales Recap by Item
Chapter 7: Using the Main Menu Point of Sale Professional Manual
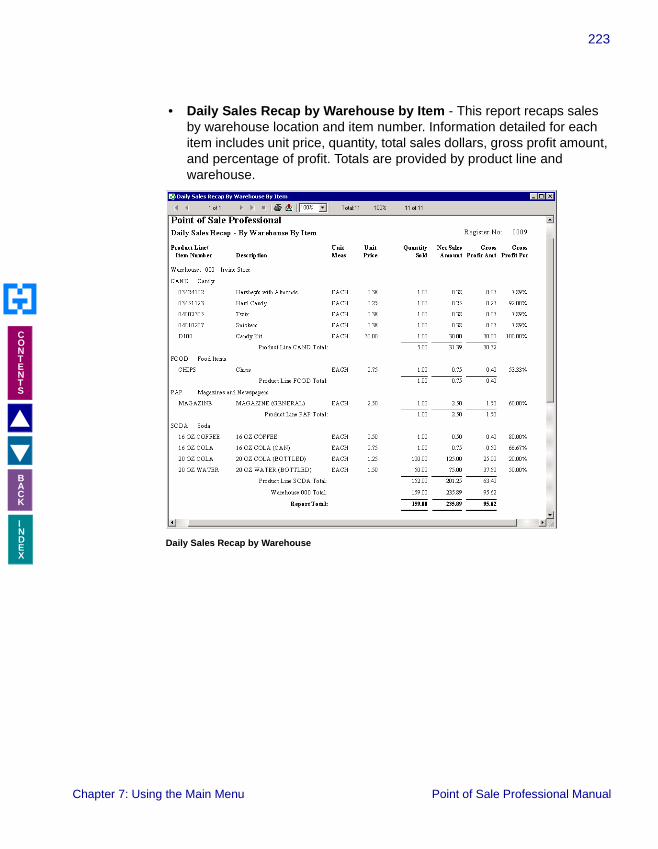
223
INDEX
�
�
CONTENTS
BACK
• Daily Sales Recap by Warehouse by Item - This report recaps sales by warehouse location and item number. Information detailed for each item includes unit price, quantity, total sales dollars, gross profit amount, and percentage of profit. Totals are provided by product line and warehouse.
Daily Sales Recap by Warehouse
Chapter 7: Using the Main Menu Point of Sale Professional Manual

224
INDEX
�
�
CONTENTS
BACK
• Daily Sales Recap by Product Line - This report recaps sales by product line. Information detailed for each product line’s warehouse includes quantity sold, daily, period-to-date, and year-to-date quantities sold, sales dollars, and percentage of profit.
Daily Sales Recap by Product Line
Chapter 7: Using the Main Menu Point of Sale Professional Manual

225
INDEX
�
�
CONTENTS
BACK
• Daily Sales Recap by Warehouse by Product Line - This report recaps sales by warehouse and product line. Information detailed for each warehouse includes daily, period-to-date, and year-to-date quantities sold, sales dollars, and percentage of profit.
Daily Sales Recap by Warehouse by Product Line
Chapter 7: Using the Main Menu Point of Sale Professional Manual
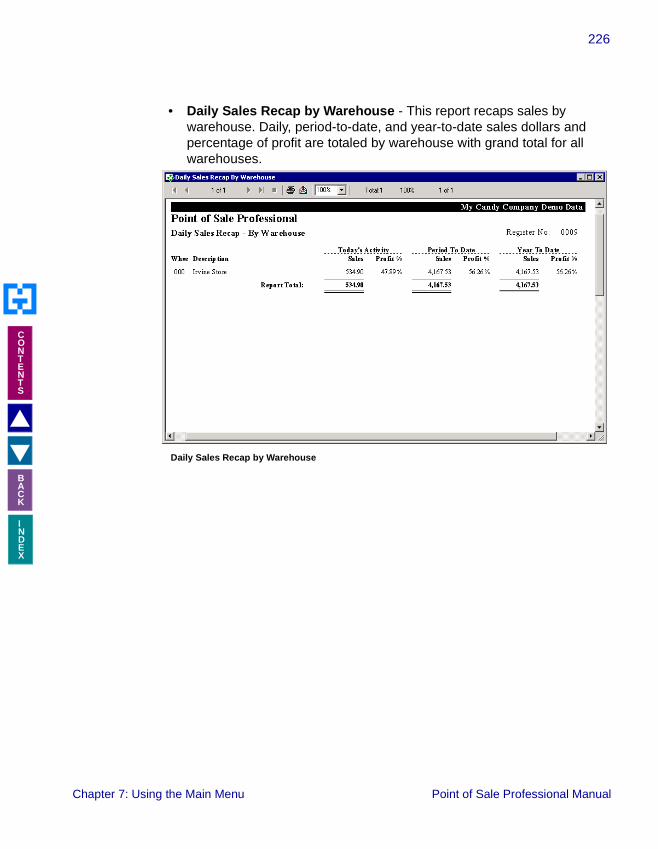
226
INDEX
�
�
CONTENTS
BACK
• Daily Sales Recap by Warehouse - This report recaps sales by warehouse. Daily, period-to-date, and year-to-date sales dollars and percentage of profit are totaled by warehouse with grand total for all warehouses.
Daily Sales Recap by Warehouse
Chapter 7: Using the Main Menu Point of Sale Professional Manual

227
INDEX
�
�
CONTENTS
BACK
• Daily Sales Recap by Customer - This report recaps sales by customer. Daily, period-to-date, and year-to-date sales dollars and percentage of profit are provided for each customer. If you are using divisions, divisional totals are provided.
Daily Sales Recap by Customer
Chapter 7: Using the Main Menu Point of Sale Professional Manual

228
INDEX
�
�
CONTENTS
BACK
• Daily Sales Recap by Division - This report recaps sales by division. Daily, period-to-date, and year-to-date sales dollars and percentage of profit are provided for each division.
Daily Sales Recap by Division
Chapter 7: Using the Main Menu Point of Sale Professional Manual

229
INDEX
�
�
CONTENTS
BACK
• Daily Sales Recap by Location - This report recaps sales by location. Daily, period-to-date, and year-to-date sales dollars and percentage of profit are provided for each location.
After the last report, the following dialog box appears.
When updating the Point of Sale Journal, the following updates occur:
• The Period-to-Date and Year-to-Date fields are updated in the Customer Master file with the invoice amounts.
• Each customer invoice entry is recorded in the Open Invoice file.
• Invoice and line detail information is updated in the Point of Sale Professional Invoice History file.
• Postings are made to the General Ledger Transaction file for future printing.
Daily Sales Recap by Location
MAS 90 Dialog Box
Chapter 7: Using the Main Menu Point of Sale Professional Manual

230
INDEX
�
�
CONTENTS
BACK
• The Accounts Receivable period-ending date is compared with the accounting date. If the accounting date is greater than the period-ending date, all data for the Accounts Receivable module is posted to a future period.
• The Sales Tax History file is updated with the tax invoiced for each tax code.
6 After ensuring the reports are accurate, click the Yes button to update MAS 90/MAS 200 with the information. The following dialog box appears.
7 Click Yes to print the Daily Transaction Register. If you click No, you can print the Daily Transaction Register at another time. See the Daily Transaction Register section.
Daily Transaction Register
Use the Daily Transaction Register option on a daily basis after the Daily Sales Reports/Updates process. The Daily Transaction Register is an audit report detailing all transactions posted through Point of Sale Entry.
The Daily Transaction Register allows you to review the daily transaction information before updating the entire MAS 90/MAS 200 system with the information. This feature provides an opportunity to check for errors.
MAS 90 Dialog Box
Chapter 7: Using the Main Menu Point of Sale Professional Manual

231
INDEX
�
�
CONTENTS
BACK
If your Point of Sale Professional module is integrated with the General Ledger module, the transaction data will be updated directly to General Ledger. If your Point of Sale Professional module is not integrated with the General Ledger module, the transactions are updated to the General Ledger Recap file.
Print the Daily Transaction Register
1 From the Main menu of the Point of Sale Professional menu bar, select Daily Transaction Register. The Daily Transaction Register window appears.
2 Click the Print button. The Daily Transaction Register prints.
�NOTE: You can print the Daily Transaction Register with the Daily Sales Reports/Updates option, or from the Daily Transaction Register option in the Main menu of the Point of Sale Professional menu bar. The option is available after completing the Daily Sales Reports/Updates process.
Daily Transaction Register Window
Chapter 7: Using the Main Menu Point of Sale Professional Manual

232
INDEX
�
�
CONTENTS
BACK
This register lists source journal data for the posting date. The information posted includes source journal, General Ledger account number and description, posting comments, debit and credit information, and totals for the journal, source, and posting date.
After the Daily Transaction Register, the following dialog box appears.
3 After ensuring the register is accurate, click the Yes button to update MAS 90/MAS 200 with the information.
Bank Deposit Maintenance
After reconciling a cash drawer and performing the daily sales update, you can create a bank deposit to the Bank Reconciliation module with the funds available from the reconciled cash drawers. Use the Bank Deposit Maintenance window to determine which cash drawers to use for a bank deposit to the Bank Reconciliation module.
Daily Transaction Register Report
MAS 90 Dialog Box
Chapter 7: Using the Main Menu Point of Sale Professional Manual
233
INDEX
�
�
CONTENTS
BACK
If multiple cash drawers are posted to the Bank Reconciliation module in one deposit (Post Deposits by Payment Type is set in Point of Sales Professional Options), the sum of each payment type is combined for all selected drawers and will be posted as one deposit for each payment type. For example:
• If cash drawer 00001 has - CASH=34.50, CHECK=75.00, VISA=123.45, AMEX=202.87
and
• Cash drawer 00002 has - CASH = 145.98, CHECK=0.00, VISA=98.33, AMEX=523.10
Point of Sale Professional will post to three deposit transaction to the Bank Reconciliation module:
• CASH=255.48
• VISA=221.78
• AMEX=725.97
�NOTE: The Bank Deposit feature is available only if the Bank Reconciliation module is integrated with the Point of Sale Professional module.
Chapter 7: Using the Main Menu Point of Sale Professional Manual

234
INDEX
�
�
CONTENTS
BACK
Create a Bank Deposit
1 Select the bank for the deposit from the Bank field.
2 Click the button in the Sequence field to create a deposit with the next available deposit number. The next deposit number appears in the Sequence field.
3 Enter a reference number in the Reference field. Enter any additional reference number such as the bank’s deposit slip number.
4 Enter any comments about the bank deposit in the Comment field.
5 Click on the cash drawer numbers to deposit and click the Select button. The Selected field displays a Y for the cash drawers selected.
6 Click the Accept button to save the changes. The system saves the bank deposit. You must print the bank deposit to update the Point of Sale Professional system with the deposit information.
Bank Deposit Register/Update
Use the Bank Deposit Register/Update after the Bank Deposit Maintenance process. This option prints a report of all the bank deposit transactions in the Point of Sale Professional module.
Bank Deposit Maintenance Window
Chapter 7: Using the Main Menu Point of Sale Professional Manual

235
INDEX
�
�
CONTENTS
BACK
The Bank Deposit Register allows you to review the deposit information before updating the entire MAS 90/MAS 200 system with the information.
Print the Bank Deposit Register
1 From the Main menu of the Point of Sale Professional menu bar, select Bank Deposit Register/Update. The Bank Deposit Register window appears.
2 Enter the number of copies to print in the Copies field.
3 Click the Print button. The Bank Deposit Register prints.
�NOTE: The Bank Deposit Register/Update option is available in the Point of Sale Professional Main menu. The option is available after completing the Bank Deposit Maintenance process.
Bank Deposit Register Window
Chapter 7: Using the Main Menu Point of Sale Professional Manual

236
INDEX
�
�
CONTENTS
BACK
This register lists the cash drawers that contributed to the amount deposited in the bank. The information in the report includes bank code, deposit sequence number, deposit date, reference, cash drawer number, withdraw date, location code, amount withdrawn, and the amount deposited.
After the Bank Deposit Register, the following dialog box appears.
4 After ensuring the register is accurate, click the Yes button to update MAS 90/MAS 200 with the information.
Bank Deposit Register Report
MAS 90 Dialog Box
Chapter 7: Using the Main Menu Point of Sale Professional Manual

237
INDEX
�
�
CONTENTS
BACK
Layaway Cancellations
When a customer cancels a layaway transaction or if the customer fails to make a layaway payment during the allotted time, you can cancel the layaway. Use the Layaway Cancellation Maintenance window to record layaway cancellations. After recording all the cancellations, update the MAS 90/MAS 200 system with the cancellations by printing the Layaway Cancellation Register.
Layaway Cancellation Maintenance
Use the Layaway Cancellation Maintenance window to enter cancelled layaway transactions.
Enter a Layaway Cancellation
1 Select the store location from the Location field. The layaway transactions for the location appear in the Layaway Cancellation Maintenance window.
2 Click on the layaway transactions to cancel and click the Select button. To cancel all layaways, click the All button. The Selected field changes from N to Y.
Layaway Cancellation Maintenance Window
Chapter 7: Using the Main Menu Point of Sale Professional Manual

238
INDEX
�
�
CONTENTS
BACK
3 Click the Proceed button to save the changes and to start the Layaway Cancellation Register/Update process. The Layaway Cancellation Register window appears.
You can print the register now, or cancel the register and create it through the Cancellation Register/Update option. See the Print the Layaway Cancellation Register for details on printing the register.
Cancel a Layaway with a Deposit
When you cancel a layaway with a deposit, there is no update to the General Ledger. You must manually enter the data in the General Ledger Journal Entry to record any amount of the deposit refunded to the customer. The journal entry will offset the original general ledger account used to recognize the deposit received. Generally, this general ledger account will be the account selected in the Layaway Deposit Account in Location Maintenance on Setup menu of Point of Sale Professional Setup.
For more information about using the General Ledger Journal Entry feature, see the General Ledger Manual by Best Software.
Layaway Cancellation Register/Update
Use the Cancellation Register/Update after the Layaway Cancellation Maintenance process. This option prints a list of all the layaway cancellations in the Point of Sale Professional module.
The Layaway Cancellation Register allows you to review the cancelled layaway transactions before updating the entire MAS 90/MAS 200 system with the information.
Chapter 7: Using the Main Menu Point of Sale Professional Manual

239
INDEX
�
�
CONTENTS
BACK
Print the Layaway Cancellation Register
1 From the Main menu of the Point of Sale Professional menu bar, select Cancellation Register/Update. The Layaway Cancellation Register window appears.
2 Enter the number of copies to print in the Copies field.
3 Click the Print button. The Layaway Cancellation Register prints.
This register lists the layaway cancellations. The information in the register includes the location code and description, transaction number, transaction/payment date, customer, amount on layaway, payments made, balance, and total amounts for transaction payment, location, and for the entire register.
Layaway Cancellation Register Window
Layaway Cancellation Register
Chapter 7: Using the Main Menu Point of Sale Professional Manual
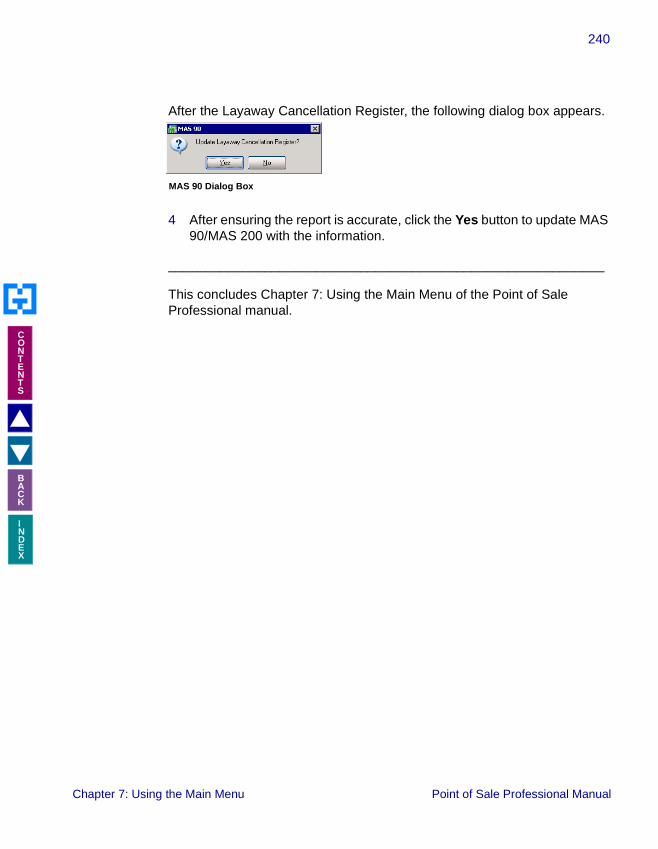
240
INDEX
�
�
CONTENTS
BACK
After the Layaway Cancellation Register, the following dialog box appears.
4 After ensuring the report is accurate, click the Yes button to update MAS 90/MAS 200 with the information.
___________________________________________________________
This concludes Chapter 7: Using the Main Menu of the Point of Sale Professional manual.
MAS 90 Dialog Box
Chapter 7: Using the Main Menu Point of Sale Professional Manual
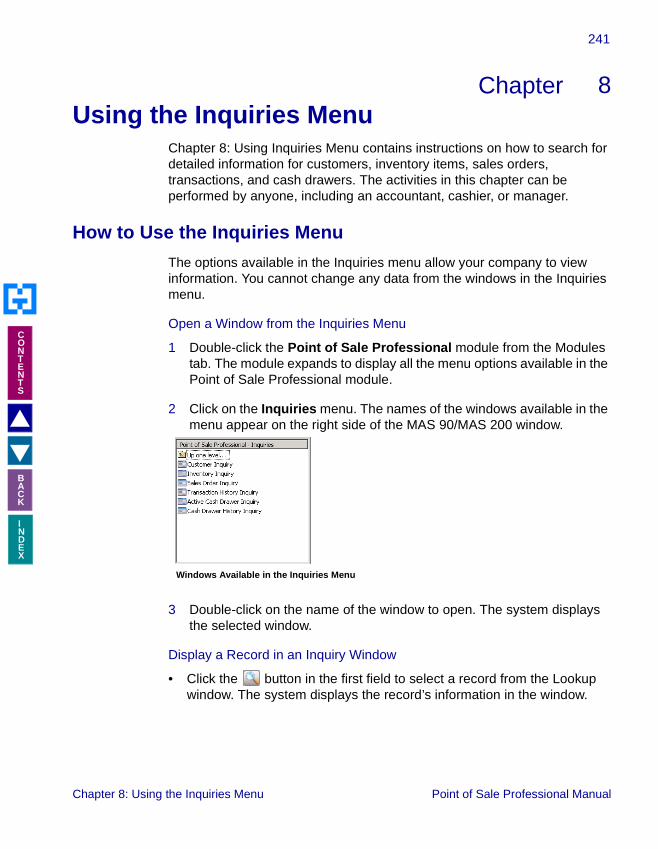
241
Chapter 8
INDEX
�
�
CONTENTS
BACK
Using the Inquiries MenuChapter 10
Chapter 8: Using Inquiries Menu contains instructions on how to search for detailed information for customers, inventory items, sales orders, transactions, and cash drawers. The activities in this chapter can be performed by anyone, including an accountant, cashier, or manager.
How to Use the Inquiries Menu
The options available in the Inquiries menu allow your company to view information. You cannot change any data from the windows in the Inquiries menu.
Open a Window from the Inquiries Menu
1 Double-click the Point of Sale Professional module from the Modules tab. The module expands to display all the menu options available in the Point of Sale Professional module.
2 Click on the Inquiries menu. The names of the windows available in the menu appear on the right side of the MAS 90/MAS 200 window.
3 Double-click on the name of the window to open. The system displays the selected window.
Display a Record in an Inquiry Window
• Click the button in the first field to select a record from the Lookup window. The system displays the record’s information in the window.
Windows Available in the Inquiries Menu
Chapter 8: Using the Inquiries Menu Point of Sale Professional Manual

242
INDEX
�
�
CONTENTS
BACK
Types of Inquires
The Inquiries menu includes six types of inquiries. The inquiries provide both general and detailed data, in view only display. You can use these inquiries when searching for more information about a customer, item, or transaction.
• Customer Inquiry - Displays general customer information including name, address, and spending history, as well as invoices and sales orders.
• Inventory Inquiry - Summarizes the status of each item such as warehouse location, and provides sales history information.
• Sales Order Inquiry - Displays general sales order information such as the customer on the sales order, the customer address, and details each item listed on the sales order and the total value.
• Transaction History Inquiry - Displays the details of a specific transaction.
• Active Cash Drawer Inquiry - Displays the details of a transaction on a currently active drawer. View the payment type totals and individual transaction details.
• Cash Drawer History Inquiry - Displays the details of a transaction on an updated cash drawer. View the payment type totals and individual transaction details.
Chapter 8: Using the Inquiries Menu Point of Sale Professional Manual

243
INDEX
�
�
CONTENTS
BACK
Customer Inquiry
The Customer Inquiry feature in the Point of Sale Professional module is a copy of the Customer Inquiry feature in the Accounts Receivable module by Best Software. Use Customer Inquiry to review vital information for a specified customer without having to open the Accounts Receivable module. The Customer Inquiry feature contains customer information, such as the address, sales history, and invoice history. The Customer Inquiry window is view only.
View Customer Information in Point of Sale Professional
• Select a customer from the Customer No. field. After selecting a customer, the Customer Inquiry window displays the customer’s data.
See the Accounts Receivable Manual by Best Software for more information about the Customer Inquiry window.
�NOTE: The Customer Inquiry option is available only if the Accounts Receivable module is integrated with the Point of Sale Professional module.
Customer Inquiry Window
Chapter 8: Using the Inquiries Menu Point of Sale Professional Manual
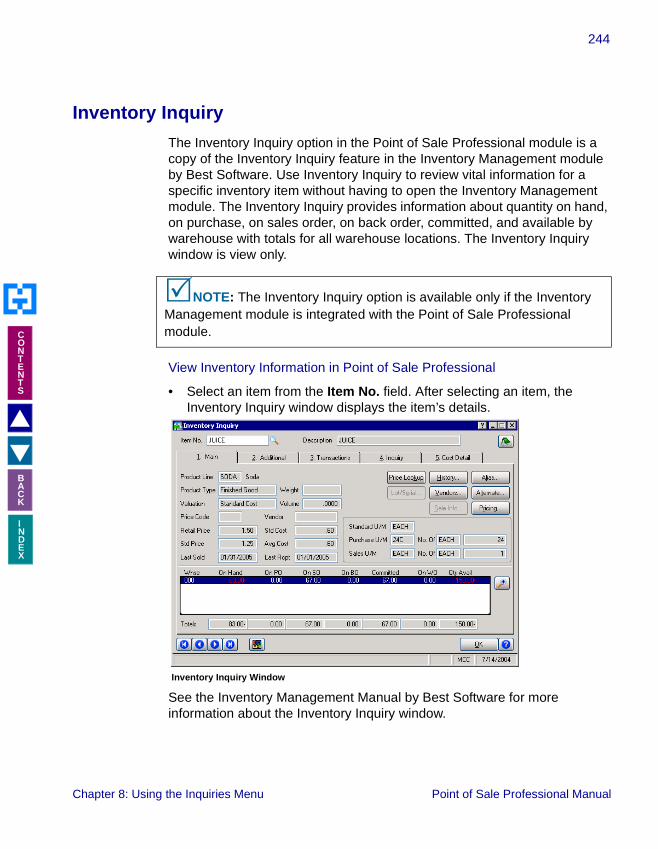
244
INDEX
�
�
CONTENTS
BACK
Inventory Inquiry
The Inventory Inquiry option in the Point of Sale Professional module is a copy of the Inventory Inquiry feature in the Inventory Management module by Best Software. Use Inventory Inquiry to review vital information for a specific inventory item without having to open the Inventory Management module. The Inventory Inquiry provides information about quantity on hand, on purchase, on sales order, on back order, committed, and available by warehouse with totals for all warehouse locations. The Inventory Inquiry window is view only.
View Inventory Information in Point of Sale Professional
• Select an item from the Item No. field. After selecting an item, the Inventory Inquiry window displays the item’s details.
See the Inventory Management Manual by Best Software for more information about the Inventory Inquiry window.
�NOTE: The Inventory Inquiry option is available only if the Inventory Management module is integrated with the Point of Sale Professional module.
Inventory Inquiry Window
Chapter 8: Using the Inquiries Menu Point of Sale Professional Manual

245
INDEX
�
�
CONTENTS
BACK
Sales Order Inquiry
The Sales Order Inquiry option in the Point of Sale Professional module is a copy of the Sales Order Inquiry feature in the Sales Order module by Best Software. Use Sales Order Inquiry to review sales order information without having to open the Sales Order module. The Sales Order Inquiry provides sales totals, sale order line details, credit information, and customer memos. The Sales Order Inquiry window is view only.
View Sales Order Information in Point of Sale Professional
• Select an order from the Order Number field. After selecting an order, the Sales Order Inquiry window displays the order’s details.
See the Sales Order Manual by Best Software for more information about the Sales Order Inquiry window.
�NOTE: The Sales Order Inquiry option is available only if the Sales Order module is integrated with the Point of Sale Professional module.
Sales Order Inquiry Window
Chapter 8: Using the Inquiries Menu Point of Sale Professional Manual

246
INDEX
�
�
CONTENTS
BACK
Transaction History Inquiry
Use Transaction History Inquiry window to view updated point of sale transactions. This feature allows you to view updated receipts and to access detailed information about the customer, the item purchased, freight charges, and sales taxes. You can also print duplicate copies of receipts. The Transaction History Inquiry window is view only.
Managers and customer service representatives can use the Transaction History Inquiry feature to view updated receipts to solve a problem with a past purchase. Cashiers can use this feature to view the cost of an item or an updated transaction.
View Transaction History Information
• Select a transaction from the Trans No. field. After selecting a transaction the Transaction History Inquiry window displays the details of the transaction, including the cashier and/or salesperson involved, the items purchased, the customer, the cost and payment of the transaction.
View Details for a Transaction
You can view additional details about a transaction in the Transaction Detail window, including the cash drawer number and the time of the transaction. The Transaction Detail window is view only.
Transaction History Inquiry Window
�HINT: Create a filter for the Transaction History list to search for a specific transaction. For example, set a filter to view transactions from a specific customer only.
Chapter 8: Using the Inquiries Menu Point of Sale Professional Manual

247
INDEX
�
�
CONTENTS
BACK
• After selecting the transaction, click the button available in the Trans No. field of the Transaction History Inquiry window. The Transaction Detail window appears.
The Transaction Detail window displays additional information about the transaction including the cashier, cash drawer, and exact time of the transaction.
View the Customer Details for a Transaction
You can view the details about a customer. The Transaction Customer Details feature allows you to view the customer address, contact, and shipping address. You can also view the cashier and/or salesperson that completed the transaction. The Transaction Customer Detail window is view only.
• After selecting the transaction, click the button available in the Customer section of the Transaction History Inquiry window. The Transaction Customer Detail window appears.
Transaction Detail Window
Chapter 8: Using the Inquiries Menu Point of Sale Professional Manual
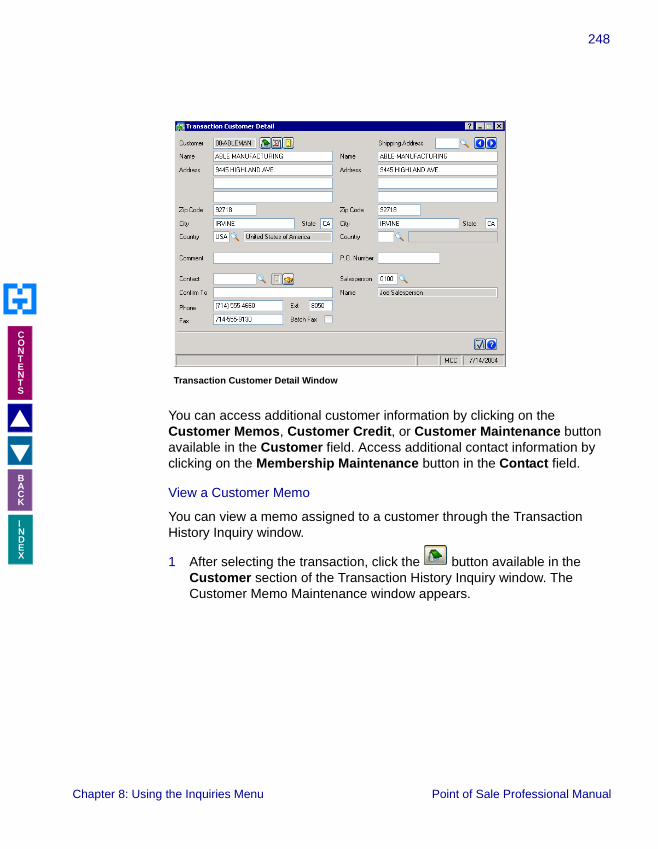
248
INDEX
�
�
CONTENTS
BACK
You can access additional customer information by clicking on the Customer Memos, Customer Credit, or Customer Maintenance button available in the Customer field. Access additional contact information by clicking on the Membership Maintenance button in the Contact field.
View a Customer Memo
You can view a memo assigned to a customer through the Transaction History Inquiry window.
1 After selecting the transaction, click the button available in the Customer section of the Transaction History Inquiry window. The Customer Memo Maintenance window appears.
Transaction Customer Detail Window
Chapter 8: Using the Inquiries Menu Point of Sale Professional Manual

249
INDEX
�
�
CONTENTS
BACK
2 Select a customer memo from the Memo Code field. After selecting a memo, the Customer Memo Maintenance window displays the memo’s details.
See the Account Receivable Manual by Best Software for more information about the Customer Memo Maintenance window.
View a Customer’s Credit
You can view the details of a customer’s credit at the time of an updated transaction. The Customer Credit feature allows you to view the customer’s credit limit, balance, and last statement date. The Customer Credit window is view only.
• After selecting the transaction, click the button available in the Customer section of the Transaction History Inquiry window. The Customer Credit window appears.
Customer Memo Maintenance Window
Chapter 8: Using the Inquiries Menu Point of Sale Professional Manual

250
INDEX
�
�
CONTENTS
BACK
The Customer Credit window contains brief details about the customer’s credit including the cost of open orders, the cost of the currently opened transaction, and past due information.
View the Details of an Item
You can view the details of an item at the time of the transaction. The Item Details feature allows you to view the item’s price level and product line details. The Line Item Detail window is view only.
1 After selecting the transaction, click on the item in the receipt (right side of window). The information about the item appears in the Item section of the Transaction History Inquiry window.
2 After selecting the item, click the button available in the Item section. The Line Item Detail window appears.
Customer Credit Window
Chapter 8: Using the Inquiries Menu Point of Sale Professional Manual

251
INDEX
�
�
CONTENTS
BACK
The Line Item Detail window contains brief details about the cost of the item and the product line of the item.
View the Extended Description of an Item
You can view additional comments added to an item at the time of a transaction. The Extended Item Description Maintenance feature allows you to view comments about the item.
1 After selecting the transaction, click on the item in the receipt (right side of window). The information about the item appears in the Item section of the Transaction History Inquiry window.
2 After selecting the item, click the button available in the Item frame. The Item Text History window appears.
Line Item Detail Window
Chapter 8: Using the Inquiries Menu Point of Sale Professional Manual

252
INDEX
�
�
CONTENTS
BACK
The Item Text History window is view only. It displays an extended description about the item.
View the Lot/Serial Number of an Item
If an item that was purchased belongs to a specific lot or serial distribution, you can view the lot/serial number for the item. The Lot/Serial No. Distribution History window is view only.
1 After selecting the transaction, click on the item in the receipt (right side of window). The information about the item appears in the Item section of the Transaction History Inquiry window.
2 After selecting the item, click the button available in the Item section. The Lot/Serial No. Distribution History window appears.
Item Text History Window
Chapter 8: Using the Inquiries Menu Point of Sale Professional Manual

253
INDEX
�
�
CONTENTS
BACK
The Lot/Serial No. Distribution History displays the lot/serial number, the amount distributed, and the distribution balance.
View the Individual Items in a Sales Kit
If an item that was purchased was actually a sales kit of several items packaged together, you can display the individual items on the sales receipt.
1 After selecting the transaction, click on the sales kit item in the receipt (right side of window). The information about the item appears in the Item section of the Transaction History Inquiry window.
2 After selecting the sales kit item, click the button available in the Item section. The following picture displays a sales kit item expanded to show the individual items.
Lot/Serial No. Distribution History Window
Chapter 8: Using the Inquiries Menu Point of Sale Professional Manual
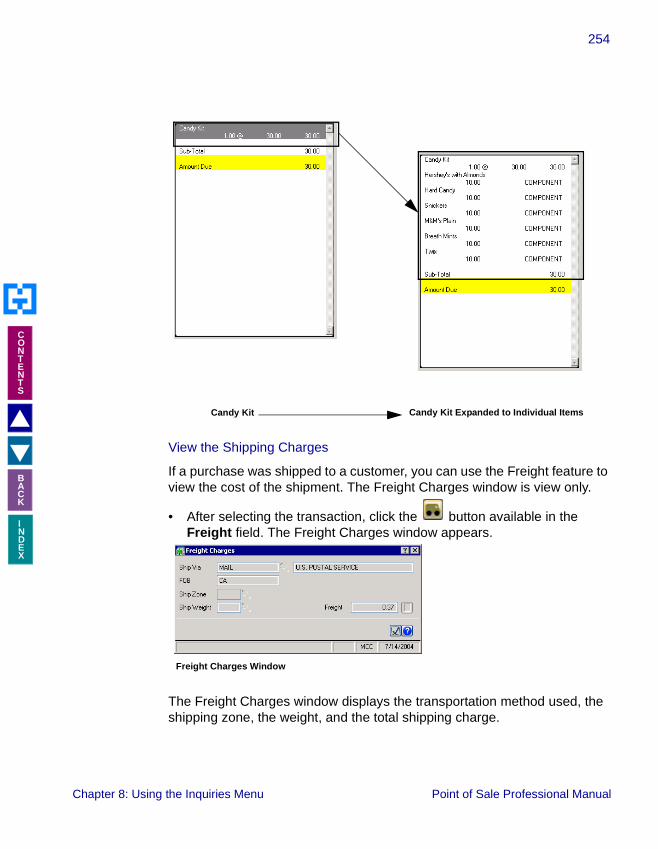
254
INDEX
�
�
CONTENTS
BACK
View the Shipping Charges
If a purchase was shipped to a customer, you can use the Freight feature to view the cost of the shipment. The Freight Charges window is view only.
• After selecting the transaction, click the button available in the Freight field. The Freight Charges window appears.
The Freight Charges window displays the transportation method used, the shipping zone, the weight, and the total shipping charge.
Candy Kit Candy Kit Expanded to Individual Items
Freight Charges Window
Chapter 8: Using the Inquiries Menu Point of Sale Professional Manual

255
INDEX
�
�
CONTENTS
BACK
View the Tax Details from an Updated Transaction
You can view the details for the tax applied to a transaction. You can view the tax code applied to the transaction, the amounts that are taxable, and the non-taxable amounts. The Tax Detail window is view only.
• After selecting the transaction, click the button available in the Sales Tax field. The Tax Detail window appears.
The Tax Detail window displays the taxable sales and freight, the non-taxable sales and freight, exempt tax information, and the total tax amount.
Print a Duplicate Receipt for an Updated Transaction
You can print a duplicate receipt from the Transaction History Inquiry window. Duplicate receipts are printed with Duplicate on the receipt for security purposes. You can also print voided transactions. When printing voids, the word VOID will appear on the bottom of the receipt.
• After selecting the transaction, click the button on the window to print the receipt.
Tax Detail Window
Chapter 8: Using the Inquiries Menu Point of Sale Professional Manual

256
INDEX
�
�
CONTENTS
BACK
Active Cash Drawer Inquiry
Use the Active Cash Drawer Inquiry to view detailed information for active cash drawers. This feature allows you to view current cash drawer totals, such as total number of sales, total number of voided transactions, and total amount in sales. You can also view payment details and find out how many transactions were paid using a specific payment type. You can also access the Point of Sale Inquiry feature from the Active Cash Drawer Inquiry window.
Managers will find the Active Cash Drawer Inquiry feature useful for current customer service purposes, or for determining which drawers require withdrawals based on the total amount available in the drawer.
View an Active Cash Drawer
1 Select the location of the cash drawer from the Location field. To view cash drawers from all locations, check the All Locations field in the bottom left part of the window.
2 Select a cash drawer from the Cash Drawer field. After selecting a cash drawer, the Active Cash Drawer Inquiry window displays the name of the cashier, all the transaction totals, and all the individual transactions.
Active Cash Drawer Inquiry Window
�HINT: Click the Refresh button to update the Active Cash Drawer Inquiry window with the latest information.
Chapter 8: Using the Inquiries Menu Point of Sale Professional Manual

257
INDEX
�
�
CONTENTS
BACK
View Totals for Each Payment Type in an Active Cash Drawer
View the total amounts and number of transactions paid with a specific type of payment.
• Click the button on the Active Cash Drawer Inquiry window. The Payment Detail window appears.
View Transaction History for a Transaction in an Active Cash Drawer
You can open the Transaction History Inquiry window through the Active Cash Drawer Inquiry.
• Click on the transaction and click the button on the Active Cash Drawer Inquiry window. The Point of Sale Inquiry window appears.
Cash Drawer History Inquiry
Use the Cash Drawer History Inquiry to view detailed information for updated cash drawers. This feature allows you to view cash drawer totals, such as total number of sales, total number of voided transactions, and total amount in sales. You can also view payment details and find out how many transactions were paid using a specific payment type. You can also access the Transaction History Inquiry feature from the Cash Drawer History Inquiry window.
Payment Detail Window
Chapter 8: Using the Inquiries Menu Point of Sale Professional Manual
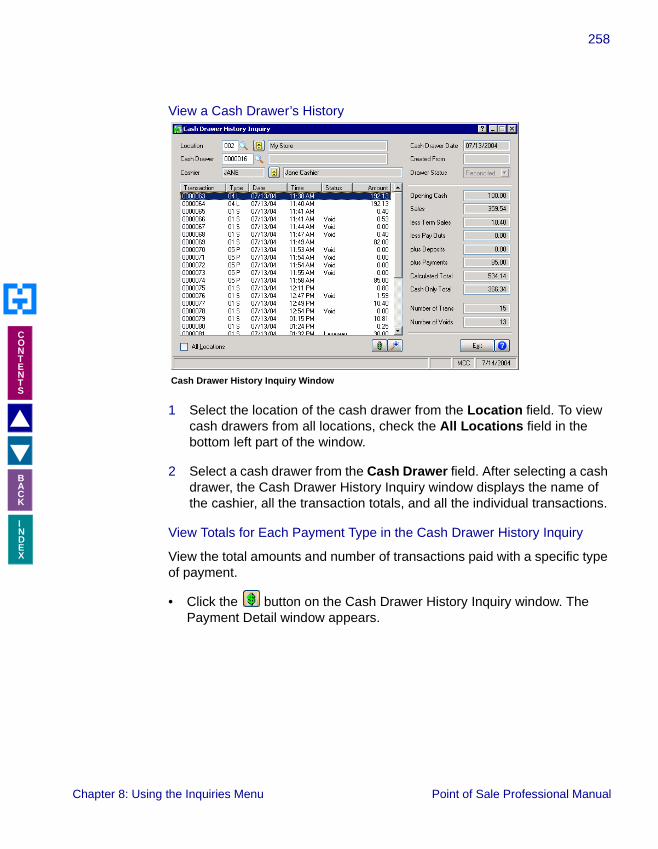
258
INDEX
�
�
CONTENTS
BACK
View a Cash Drawer’s History
1 Select the location of the cash drawer from the Location field. To view cash drawers from all locations, check the All Locations field in the bottom left part of the window.
2 Select a cash drawer from the Cash Drawer field. After selecting a cash drawer, the Cash Drawer History Inquiry window displays the name of the cashier, all the transaction totals, and all the individual transactions.
View Totals for Each Payment Type in the Cash Drawer History Inquiry
View the total amounts and number of transactions paid with a specific type of payment.
• Click the button on the Cash Drawer History Inquiry window. The Payment Detail window appears.
Cash Drawer History Inquiry Window
Chapter 8: Using the Inquiries Menu Point of Sale Professional Manual
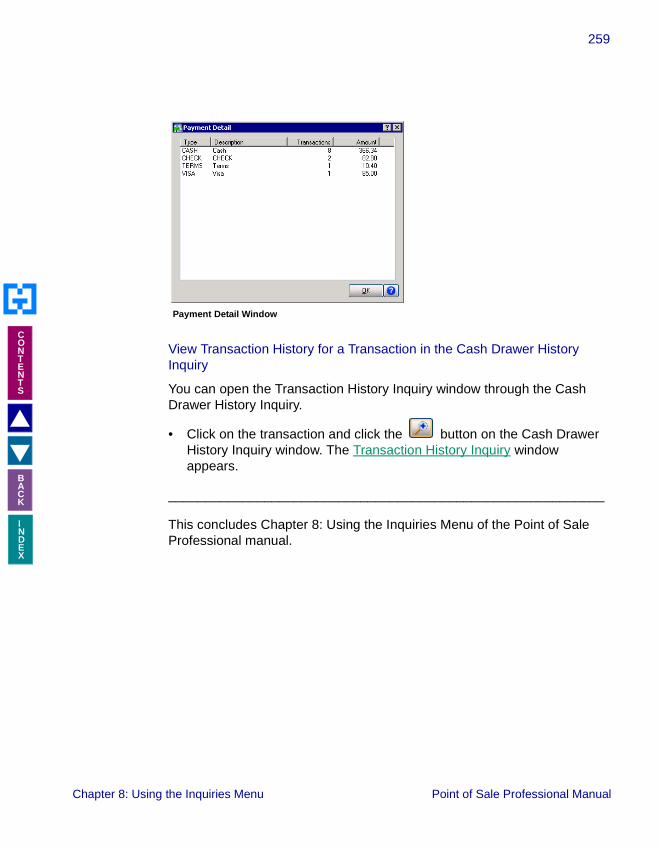
259
INDEX
�
�
CONTENTS
BACK
View Transaction History for a Transaction in the Cash Drawer History Inquiry
You can open the Transaction History Inquiry window through the Cash Drawer History Inquiry.
• Click on the transaction and click the button on the Cash Drawer History Inquiry window. The Transaction History Inquiry window appears.
___________________________________________________________
This concludes Chapter 8: Using the Inquiries Menu of the Point of Sale Professional manual.
Payment Detail Window
Chapter 8: Using the Inquiries Menu Point of Sale Professional Manual

260
Chapter 9
INDEX
�
�
CONTENTS
BACK
Using the Reports MenuChapter 11
Chapter 9: Using the Reports Menu contains instructions on how to print reports based on the information available in the Point of Sale Professional module. This module provides a variety of timely, informative reports that help you make effective and efficient decisions. The activities in this chapter are usually performed by an accountant or manager.
How to Use the Reports Menu
The options available in the Reports menu allow your company to print or preview different reports. You can select the type of data to include in a report and determine how to sort the report.
Open a Window from the Reports Menu
1 Double-click the Point of Sale Professional module from the Modules tab. The module expands to display all the menu options available in the Point of Sale Professional module.
2 Click on the Reports menu. The names of the windows available in the menu appear on the right side of the MAS 90/MAS 200 window.
3 Double-click on the name of the window to open. The system displays the selected window.
Windows Available in the Reports Menu
Chapter 9: Using the Reports Menu Point of Sale Professional Manual

261
INDEX
�
�
CONTENTS
BACK
Select Data for a Report
The sections in this manual detail the different types of information you can include in an individual report. The following steps teaches you how to select the information from the fields. When you open a Report window it contains fields similar to the following picture.
1 Select how to sort the report from the drop-down list in the Sort Options field.
2 Select the type of information to include in the report from the remaining fields on the Report window. For many fields you can select all records or a range of information. For example, in the previous picture you can check All to print all locations, or you can use the Lookup windows in the Starting and Ending fields and select specific locations. If there is a date field available in a Report window and you want to print information for a particular date, enter the same date in the Starting and Ending fields.
3 Click the Print button to print the list or the Preview button to preview the report.
Types of Reports
The Point of Sale Professional module contains reports to help you analyze and update gross profit and sales history. The following types of reports are available in this module:
• Transaction History Report - This report provides an audit trail of all transaction activities.
Outstanding Rental Report Window
Chapter 9: Using the Reports Menu Point of Sale Professional Manual

262
INDEX
�
�
CONTENTS
BACK
• Active Cash Drawer Report - This report provides a detailed listing of all current transactions on an active (open, closed, reconciled) cash drawer.
• Cash Drawer History Report - This report provides a detailed listing of transactions on an updated cash drawer.
• Open Layaway Report - This report includes a detailed listing of all open layaway transactions.
• Outstanding Rental Report - This report includes a detailed listing of all rental items that have not been returned.
• Sales Tax Report - This report includes a detailed recap of all sales tax information and includes taxable sales, nontaxable sales, taxable freight, nontaxable freight, taxable tax, exempt sales, and sales tax amount.
• Credit Card Report - This report includes a detailed listing of credit card payments for transactions.
• General Ledger Posting Recap - This report includes a detailed recap of all transactions by General Account Number.
• Monthly Recap by Product Line - This report summarizes the sales data for each product line sold during the current month.
• Monthly Recap by Warehouse/Product Line - This report summarizes the sales data for each warehouse and product line sold during the current month.
• Monthly Recap by Warehouse - This report summarizes the sales data for each warehouse during the current month.
• Monthly Recap by Division - This report summarizes the sales data for each company division during the current month.
• Monthly Recap by Location - This report summarizes the sales data for each store location during the current month.
• Voided Transaction Report - This report summarizes the voided transactions that occurred during Point of Sale Entry.
Chapter 9: Using the Reports Menu Point of Sale Professional Manual

263
INDEX
�
�
CONTENTS
BACK
Transaction History Report
Use the Transaction History Report option to obtain an audit trail of all transactions. Print the Transaction History Report before processing the period end. The period end process purges the transaction history information.
Print a Transaction History Report
1 Select how to sort the report from the Sort Options field. You can sort the report by Transaction Number, Transaction Date, Cash Drawer Number, Customer, or Salesperson.
2 Enter the number of copies to print in the Copies field.
3 Check the types of transactions to include from the Transaction Types to Print field. You can include All, Sale, Return, Quote, Order, Customer Payment, and Layaway Payment transactions. The default option is All. To select only specific transactions, uncheck All and check the types to include.
4 Enter the transaction numbers to include in the Transaction Number field.
5 Enter the transaction dates to include in the Transaction Date field.
Transaction History Report Window
�HINT: To include only one topic in the report (for example one date), enter the same information in the Starting and Ending fields.
Chapter 9: Using the Reports Menu Point of Sale Professional Manual
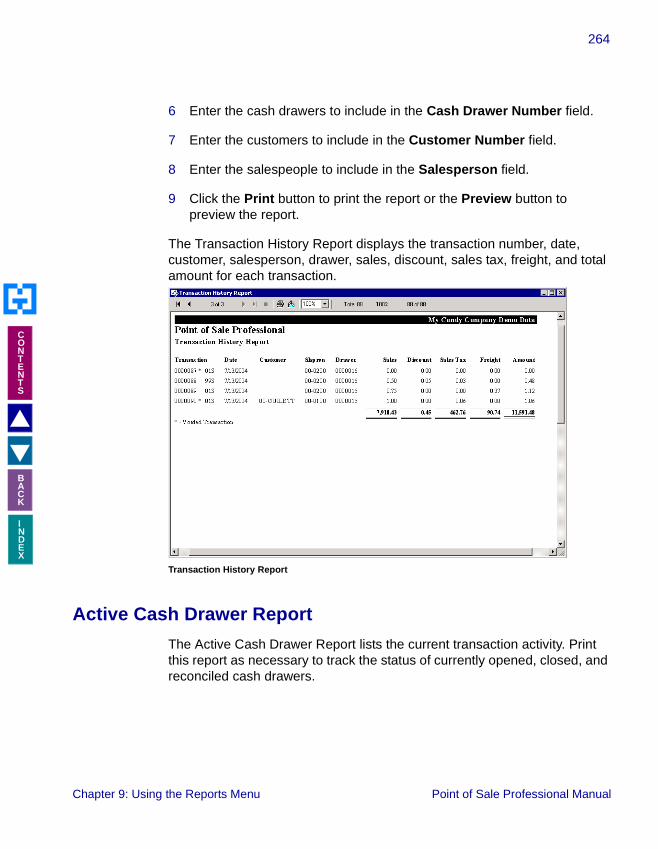
264
INDEX
�
�
CONTENTS
BACK
6 Enter the cash drawers to include in the Cash Drawer Number field.
7 Enter the customers to include in the Customer Number field.
8 Enter the salespeople to include in the Salesperson field.
9 Click the Print button to print the report or the Preview button to preview the report.
The Transaction History Report displays the transaction number, date, customer, salesperson, drawer, sales, discount, sales tax, freight, and total amount for each transaction.
Active Cash Drawer Report
The Active Cash Drawer Report lists the current transaction activity. Print this report as necessary to track the status of currently opened, closed, and reconciled cash drawers.
Transaction History Report
Chapter 9: Using the Reports Menu Point of Sale Professional Manual

265
INDEX
�
�
CONTENTS
BACK
Print an Active Cash Drawer Report
1 Select how to sort the report from the Sort Options field. You can sort the report by Cash Drawer Number, Creation Date, Location ID, Cashier, or Salesperson.
2 To include a listing of transaction information for each cash drawer, check Print Transaction Detail. The detailed report includes the transaction number, type, date, status, salesperson, total sales, other transactions, and amount received.
3 Check Print Voided Transactions to include voids on the report. This field is only available if you check the Print Transaction Detail field.
4 Enter the number of copies to print in the Copies field.
5 Check the types of cash drawers to include from the Cash Drawer Status field. You can include All, Ready, Open, Closed, and Reconciled cash drawers. The default option is All. To select only specific cash drawer types, uncheck All and check the types to include.
Active Cash Drawer Report Window
Chapter 9: Using the Reports Menu Point of Sale Professional Manual

266
INDEX
�
�
CONTENTS
BACK
6 Check the transaction types to include from the Transaction Type field. This field is only available if you check the Print Transaction Detail field. You can include All, Sale, Return, Order, and Quote transactions. The default option is All. To select only specific transaction types, uncheck All and check the types to include.
7 Enter the cash drawers to include in the Cash Drawer Number field.
8 Enter the cash drawer creation dates to include in the Creation Date field.
9 Enter the cash drawer locations to include in the Location ID field.
10 Enter the cashiers to include in the Cashier field.
11 Enter the salespeople to include in the Salesperson field.
12 Click the Print button to print the report or the Preview button to preview the report.
The Active Cash Drawer History Report displays the cash drawer number, location, name of cashier, drawer creation date, the drawer that it was created from, drawer status, whether or not there are multiple registers, opening cash amount, payment type and description, number of transactions, and total amount. The detailed report includes the transaction number, type, date, status, salesperson, total sales, other transactions, and amount received.
Chapter 9: Using the Reports Menu Point of Sale Professional Manual

267
INDEX
�
�
CONTENTS
BACK
Cash Drawer History Report
The Cash Drawer History Report lists the updated transaction activity for updated cash drawers.
Active Cash Drawer Report
Chapter 9: Using the Reports Menu Point of Sale Professional Manual

268
INDEX
�
�
CONTENTS
BACK
Print a Cash Drawer History Report
1 Select how to sort the report from the Sort Options field. You can sort the report by Cash Drawer Number, Creation Date, Location ID, Cashier, or Salesperson.
2 To include a listing of transaction information for each cash drawer, check Print Transaction Detail. The detailed report includes the transaction number, type, date, status, salesperson, total sales, other transactions, and amount received.
3 Check Print Voided Transactions to include voids on the report. This field is only available if you check the Print Transaction Detail field.
4 Enter the number of copies to print in the Copies field.
5 Check the types of cash drawers to include from the Cash Drawer Status field. You can include All, Ready, Open, Closed, and Reconciled cash drawers. The default option is All. To select only specific cash drawer types, uncheck All and check the types to include.
Cash Drawer History Report Window
Chapter 9: Using the Reports Menu Point of Sale Professional Manual

269
INDEX
�
�
CONTENTS
BACK
6 Check the transaction types to include from the Transaction Type field. This field is only available if you check the Print Transaction Detail field. You can include All, Sale, Return, Order, and Quote transactions. The default option is All. To select only specific transaction types, uncheck All and check the types to include.
7 Enter the cash drawers to include in the Cash Drawer Number field.
8 Enter the cash drawer creation dates to include in the Creation Date field.
9 Enter the cash drawer locations to include in the Location ID field.
10 Enter the cashiers to include in the Cashier field.
11 Enter the salespeople to include in the Salesperson field.
12 Click the Print button to print the report or the Preview button to preview the report.
The Cash Drawer History Report displays the cash drawer number, location, name of cashier, drawer creation date, the drawer that it was created from, drawer status, whether or not there are multiple registers, opening cash amount, payment type and description, number of transactions, and total amount. The detailed report includes the transaction number, type, date, status, salesperson, total sales, other transactions, and amount received.
Chapter 9: Using the Reports Menu Point of Sale Professional Manual

270
INDEX
�
�
CONTENTS
BACK
Open Layaway Report
The Open Layaway Report lists the currently open layaway transactions. Print this report as necessary to track the status of open layaways.
Cash Drawer History Report
Chapter 9: Using the Reports Menu Point of Sale Professional Manual

271
INDEX
�
�
CONTENTS
BACK
Print an Open Layaway Report
1 Select how to sort the report from the Sort Options field. You can sort the report by Transaction, Customer Number, or Customer Name.
2 To include a listing of payment transactions for each layaway, check Print Detailed Listing. The detailed report includes the payment transaction type and date.
3 Enter the number of copies to print in the Copies field.
4 Select the types of layaways to include from the Report Options field. You can include Open and Completed Layaways, Completed Layaways Only, or Open Layaways Only.
5 Enter the transaction numbers to include in the Transaction field.
6 Enter the customers to include in the Customer Number field.
7 Enter the customers to include in the Customer Name field.
8 Click the Print button to print the report or the Preview button to preview the report.
Open Layaway Report Window
Chapter 9: Using the Reports Menu Point of Sale Professional Manual
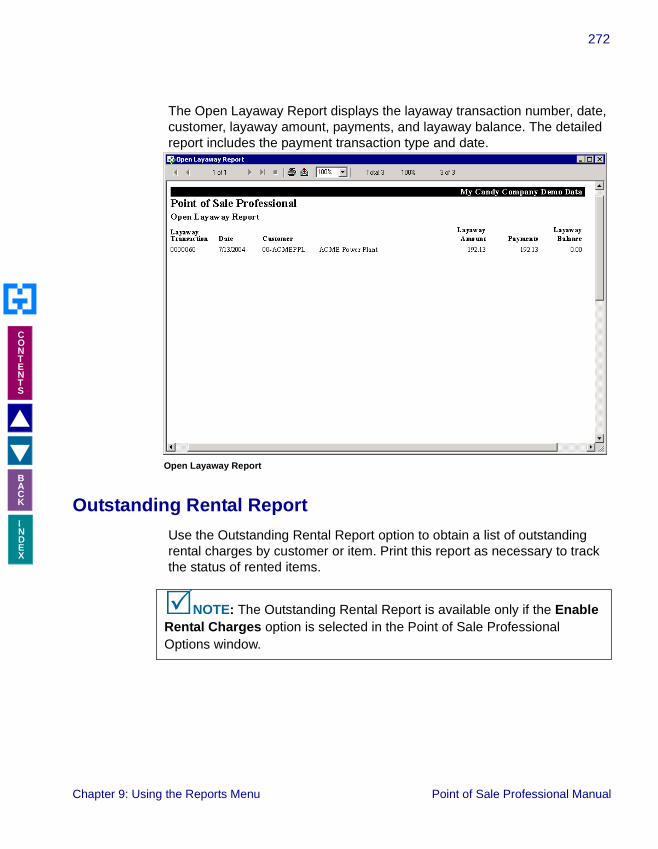
272
INDEX
�
�
CONTENTS
BACK
The Open Layaway Report displays the layaway transaction number, date, customer, layaway amount, payments, and layaway balance. The detailed report includes the payment transaction type and date.
Outstanding Rental Report
Use the Outstanding Rental Report option to obtain a list of outstanding rental charges by customer or item. Print this report as necessary to track the status of rented items.
�NOTE: The Outstanding Rental Report is available only if the Enable Rental Charges option is selected in the Point of Sale Professional Options window.
Open Layaway Report
Chapter 9: Using the Reports Menu Point of Sale Professional Manual
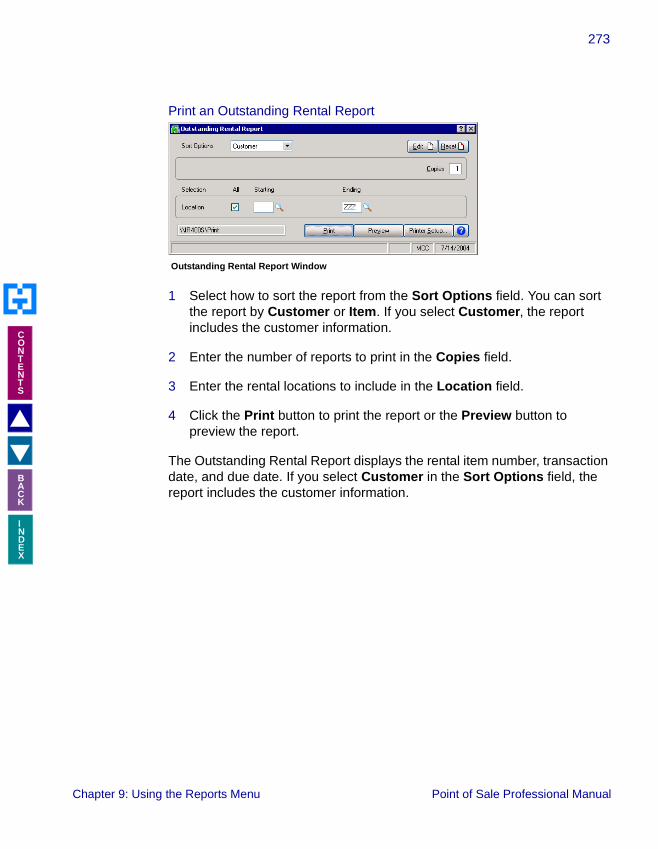
273
INDEX
�
�
CONTENTS
BACK
Print an Outstanding Rental Report
1 Select how to sort the report from the Sort Options field. You can sort the report by Customer or Item. If you select Customer, the report includes the customer information.
2 Enter the number of reports to print in the Copies field.
3 Enter the rental locations to include in the Location field.
4 Click the Print button to print the report or the Preview button to preview the report.
The Outstanding Rental Report displays the rental item number, transaction date, and due date. If you select Customer in the Sort Options field, the report includes the customer information.
Outstanding Rental Report Window
Chapter 9: Using the Reports Menu Point of Sale Professional Manual

274
INDEX
�
�
CONTENTS
BACK
Sales Tax Report
The Sales Tax Report provides a recap of all sales tax information by tax code. This report can be printed in summary or in detail format, and includes taxable sales, nontaxable sales, taxable freight, nontaxable freight, taxable tax, exempt sales, and sales tax amount for each tax code. The accumulated sales tax collected is printed for each tax code and primary tax code.
�NOTE: The Sales Tax Report option is available only if the Sales Tax Reporting option is selected in the Point of Sale Professional Options window.
Outstanding Rental Report
Chapter 9: Using the Reports Menu Point of Sale Professional Manual

275
INDEX
�
�
CONTENTS
BACK
Print a Sales Tax Report
1 Select how to sort the report from the Sort Options field. You can sort the report by Location or Primary Tax Code. If you select Location, the report includes the location information. If you select Primary Tax Code, the report includes the subtotals of all primary tax codes.
2 Select the format for the report from the Print Format field. You can select Summary, Date Detail, or Invoice Detail.
3 Enter the number of copies to print in the Copies field.
4 Enter the tax dates to include in the Date field.
5 Enter the tax codes to include in the Tax Code field.
6 Click the Print button to print the report or the Preview button to preview the report.
The Sales Tax Report displays the tax code and description, sales amount, taxable sales, non-taxable sales, taxable freight, non-taxable freight, taxable tax, exempt sales, sales tax amount, transaction amount total, location or primary tax code, and report totals.
Sales Tax Report Window
Chapter 9: Using the Reports Menu Point of Sale Professional Manual

276
INDEX
�
�
CONTENTS
BACK
Credit Card Report
The Credit Card Report provides a listing of credit card payments. This report can be printed as necessary to track transactions paid by credit cards.
�NOTE: The Credit Card Report option is available only if PCCharge is selected in the Credit Card Processing Software field in the Point of Sale Professional Options window.
Sales Tax Report
Chapter 9: Using the Reports Menu Point of Sale Professional Manual

277
INDEX
�
�
CONTENTS
BACK
Print a Credit Card Report
1 Select how to sort the report from the Sort Options field. You can sort the report by Location or Transaction Date.
2 Enter the number of copies to print in the Copies field.
3 Enter the locations to include in the Location field.
4 Enter the dates to include in the Date field.
5 Click the Print button to print the report or the Preview button to preview the report.
The Credit Card Report displays the credit card issuer, PCCharge number, transaction number, store location, date, card number, expiration date, authorization, transaction amounts, and the report totals.
Credit Card Report Window
Chapter 9: Using the Reports Menu Point of Sale Professional Manual

278
INDEX
�
�
CONTENTS
BACK
Troubleshooting the Credit Card Report
If you receive a conversion error when creating the credit card report, complete the following steps.
1 Click the Edit button from the Credit Card Report window. The Crystal Reports application starts.
2 Select Verify Database from the Database menu. The following window appears.
3 Select your company and enter your user name and password. Click OK when finished.
You will receive an error and a prompt to enter the correct location of the file.
Credit Card Report
MAS 90 and MAS 200 Database Signon Window
Chapter 9: Using the Reports Menu Point of Sale Professional Manual
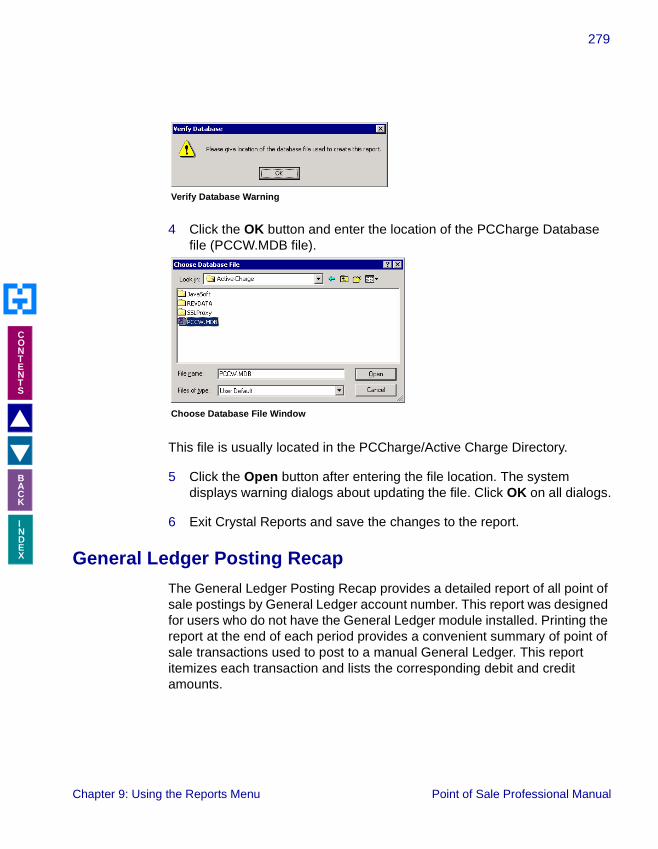
279
INDEX
�
�
CONTENTS
BACK
4 Click the OK button and enter the location of the PCCharge Database file (PCCW.MDB file).
This file is usually located in the PCCharge/Active Charge Directory.
5 Click the Open button after entering the file location. The system displays warning dialogs about updating the file. Click OK on all dialogs.
6 Exit Crystal Reports and save the changes to the report.
General Ledger Posting Recap
The General Ledger Posting Recap provides a detailed report of all point of sale postings by General Ledger account number. This report was designed for users who do not have the General Ledger module installed. Printing the report at the end of each period provides a convenient summary of point of sale transactions used to post to a manual General Ledger. This report itemizes each transaction and lists the corresponding debit and credit amounts.
Verify Database Warning
Choose Database File Window
Chapter 9: Using the Reports Menu Point of Sale Professional Manual
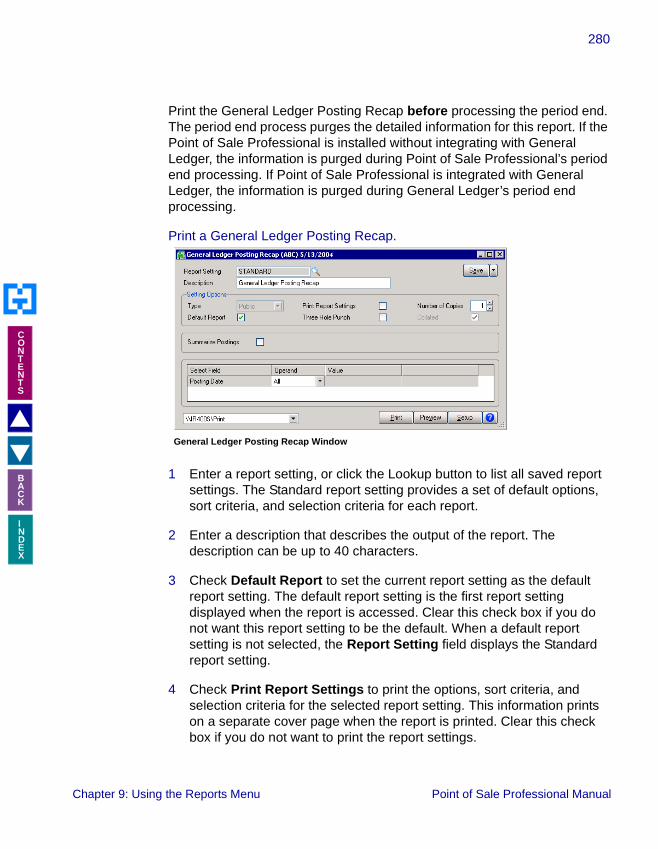
280
INDEX
�
�
CONTENTS
BACK
Print the General Ledger Posting Recap before processing the period end. The period end process purges the detailed information for this report. If the Point of Sale Professional is installed without integrating with General Ledger, the information is purged during Point of Sale Professional’s period end processing. If Point of Sale Professional is integrated with General Ledger, the information is purged during General Ledger’s period end processing.
Print a General Ledger Posting Recap.
1 Enter a report setting, or click the Lookup button to list all saved report settings. The Standard report setting provides a set of default options, sort criteria, and selection criteria for each report.
2 Enter a description that describes the output of the report. The description can be up to 40 characters.
3 Check Default Report to set the current report setting as the default report setting. The default report setting is the first report setting displayed when the report is accessed. Clear this check box if you do not want this report setting to be the default. When a default report setting is not selected, the Report Setting field displays the Standard report setting.
4 Check Print Report Settings to print the options, sort criteria, and selection criteria for the selected report setting. This information prints on a separate cover page when the report is printed. Clear this check box if you do not want to print the report settings.
General Ledger Posting Recap Window
Chapter 9: Using the Reports Menu Point of Sale Professional Manual

281
INDEX
�
�
CONTENTS
BACK
5 Check Three Hole Punch to print the report with a larger margin. This allows enough space for you to three-hole punch the report. Clear this check box if you do not want a larger margin for this purpose.
6 Select the number of report copies to print. This allows you to print multiple copies of the report without accessing Printer Setup.
7 Check the Summarize Postings to view a summary report. The summary includes the account number and description, debit, credit, and report total. Uncheck this field to include details about each posting such as the date, reference number, posting remarks, and posting totals.
8 Enter the posting dates to include in the Posting Date field.
9 Click the Print button to print the report or the Preview button to preview the report.
Chapter 9: Using the Reports Menu Point of Sale Professional Manual

282
INDEX
�
�
CONTENTS
BACK
The General Ledger Posting Recap displays the account number and description, debit, credit, and report total. Detailed reports also include the posting date, reference number, posting remarks, and posting totals.
Monthly Recap by Product Line
The Monthly Recap by Product Line Report summarizes the sales data for each product line sold during the current month. Use this report to track the product lines being sold, the number of sales, and the total company profits.
General Ledger Posting Recap Report (Summarize Posting field was selected)
Chapter 9: Using the Reports Menu Point of Sale Professional Manual
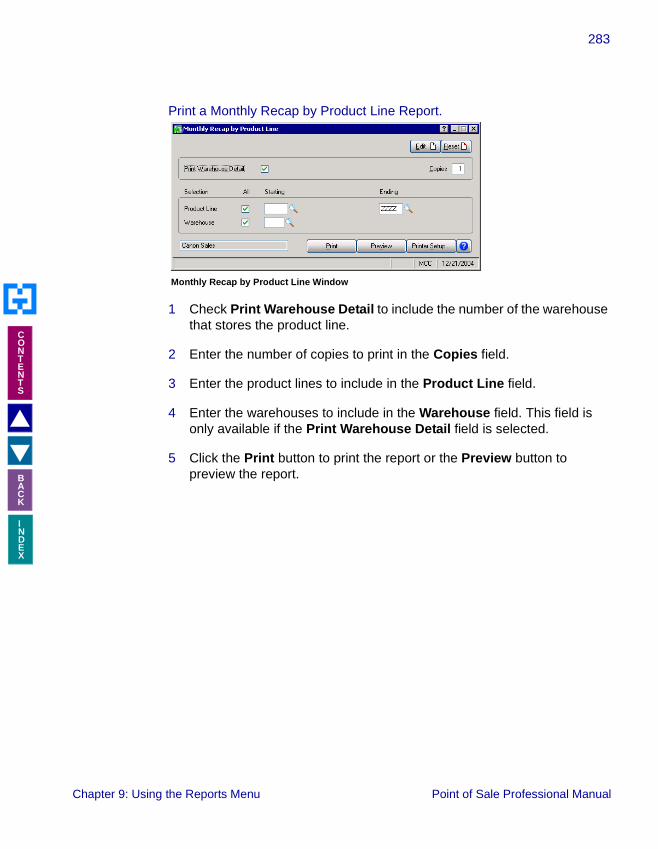
283
INDEX
�
�
CONTENTS
BACK
Print a Monthly Recap by Product Line Report.
1 Check Print Warehouse Detail to include the number of the warehouse that stores the product line.
2 Enter the number of copies to print in the Copies field.
3 Enter the product lines to include in the Product Line field.
4 Enter the warehouses to include in the Warehouse field. This field is only available if the Print Warehouse Detail field is selected.
5 Click the Print button to print the report or the Preview button to preview the report.
Monthly Recap by Product Line Window
Chapter 9: Using the Reports Menu Point of Sale Professional Manual

284
INDEX
�
�
CONTENTS
BACK
The Monthly Recap by Product Line Report displays the product line ID and description, warehouse number, the amount of items sold, the total dollars in sales, the cost of goods dollars, and the total percent of profits for the period and year.
Monthly Recap by Warehouse/Product Line
The Monthly Recap by Warehouse/Product Line Report summarizes the sales data for each warehouse and includes the product line sold during the current month. Use this report to track the profitability of each warehouse.
Monthly Recap by Product Line Report
Chapter 9: Using the Reports Menu Point of Sale Professional Manual

285
INDEX
�
�
CONTENTS
BACK
Print a Monthly Recap by Warehouse/Product Line Report.
1 Enter the number of copies to print in the Copies field.
2 Enter the warehouses to include in the Warehouse field.
3 Click the Print button to print the report or the Preview button to preview the report.
Monthly Recap by Warehouse/Product Line Window
Chapter 9: Using the Reports Menu Point of Sale Professional Manual

286
INDEX
�
�
CONTENTS
BACK
The Monthly Recap by Warehouse/Product Line Report displays the warehouse number, product line ID and description, the amount of items sold, the total dollars in sales, the cost of goods dollars, and the total percent of profits for the period and year.
Monthly Recap by Warehouse
The Monthly Recap by Warehouse Report summarizes the profitability of each warehouse during the current month. This report does not contain any product line information.
Monthly Recap by Warehouse/Product Line Report
Chapter 9: Using the Reports Menu Point of Sale Professional Manual

287
INDEX
�
�
CONTENTS
BACK
Print a Monthly Recap by Warehouse Report.
1 Enter the number of copies to print in the Copies field.
2 Click the Print button to print the report or the Preview button to preview the report.
The Monthly Recap by Warehouse Report displays the warehouse number and description, the total dollars in sales, the cost of goods dollars, and the total percent of profits for the period and year.
Monthly Recap by Warehouse Window
Monthly Recap by Warehouse Report
Chapter 9: Using the Reports Menu Point of Sale Professional Manual

288
INDEX
�
�
CONTENTS
BACK
Monthly Recap by Division
The Monthly Recap by Division Report summarizes the profitability of each company division during the current month.
Print a Monthly Recap by Division Report.
1 Enter the number of copies to print in the Copies field.
2 Click the Print button to print the report or the Preview button to preview the report.
Monthly Recap by Division Window
Chapter 9: Using the Reports Menu Point of Sale Professional Manual

289
INDEX
�
�
CONTENTS
BACK
The Monthly Recap by Division Report displays the division number and description, the total dollars in sales, the cost of goods dollars, and the total percent of profits for the period and year.
Monthly Recap by Location
The Monthly Recap by Location Report summarizes the profitability of each store location during the current month.
Print a Monthly Recap by Location Report.
1 Enter the number of copies to print in the Copies field.
Monthly Recap by Division Report
Monthly Recap by Location Window
Chapter 9: Using the Reports Menu Point of Sale Professional Manual

290
INDEX
�
�
CONTENTS
BACK
2 Click the Print button to print the report or the Preview button to preview the report.
The Monthly Recap by Location Report displays the location number and description, the total dollars in sales, the cost of goods dollars, and the total percent of profits for the period and year.
Voided Transaction Report
The Voided Transaction Report summarizes the voided transactions that occurred during Point of Sale Entry. This report details the voided transaction date and number, the cashier information, and the customer data.
Monthly Recap by Location Report
Chapter 9: Using the Reports Menu Point of Sale Professional Manual

291
INDEX
�
�
CONTENTS
BACK
Print a Voided Transaction Report.
1 Select how to sort the report from the Sort Options field. You can sort the report by Transaction Number, Transaction Date, Cash Drawer Number, or Customer Number.
2 Enter the number of copies to print in the Copies field.
3 Enter the transactions to include in the Transaction Number field.
4 Enter the dates to include in the Transaction Date field.
5 Enter the cash drawers to include in the Cash Drawer Number field.
6 Enter the customers to include in the Customer Number field.
7 Enter the cashiers to include in the Cashier field. The report will list the cashiers that entered the original transaction.
8 Enter the cashiers to include in the Void Cashier field. The report will list the cashiers that voided the transaction.
9 Enter the reasons a transaction can be voided in the Reason Code field. For example, if you have a reason code for insufficient funds, you can track the number of times transactions have been voided for that reason.
Voided Transaction Report Window
Chapter 9: Using the Reports Menu Point of Sale Professional Manual

292
INDEX
�
�
CONTENTS
BACK
10 Click the Print button to print the report or the Preview button to preview the report.
The Voided Transaction Report displays the transaction number, date, and time, the cash drawer number, the customer, the cashier that entered the transaction, the cashier that voided the transaction, the reason for the void, and the total value of the transaction.
___________________________________________________________
This concludes Chapter 9: Using the Reports Menu of the Point of Sale Professional manual.
Voided Transaction Report
Chapter 9: Using the Reports Menu Point of Sale Professional Manual

293
Chapter 10
INDEX
�
�
CONTENTS
BACK
Using the Period End MenuChapter 12
Chapter 10: Using the Period End Menu focuses on the accounting aspects of the Point of Sale Professional module and explains how to process the period end data. The activities in this chapter are usually performed by an accountant or financial administrator.
The features covered by this chapter are available in the Period End menu of the Point of Sale Professional module.
When to Run Period End Processing
Period end processing usually occurs at the end of each accounting period (usually the last business day of each month) to clear the previous period’s data files and prepare for the following period’s business. When performed at year end, the process also clears year-to-date balances accumulated in the Miscellaneous Charge, Payment Type, and Discount Type data files to prepare for the new year.
The Period End Processing feature also allows you to clear and purge history files. Use this feature to clear the history of transactions, and to purge sales tax and rental histories.
Prior to Processing the Period End
Before processing period end data, clearing files, or purging files, make a backup copy of the data. For more information on how to backup the data, see the Library Master Manual by Best Software.
�WARNING: Backing up your data is an important part of your daily, period end, and year end procedures.
Chapter 10: Using the Period End Menu Point of Sale Professional Manual

294
INDEX
�
�
CONTENTS
BACK
Using the Period End Processing Feature
Process period end data and clear history files with the P/2 Period End Processing window. The following types of period end processing options are available:
• Full Period End Processing
• Full Period End and Year End Processing
• Only Clear Transaction History File
• Only Purge Sales Tax History File
• Only Purge Rental History File
Open the P/2 Period End Processing Window
• From the Period End menu of the Point of Sale Professional menu bar, select Period End Processing. The P/2 Period End Processing window appears.
P/2 Period End Processing Window
Chapter 10: Using the Period End Menu Point of Sale Professional Manual
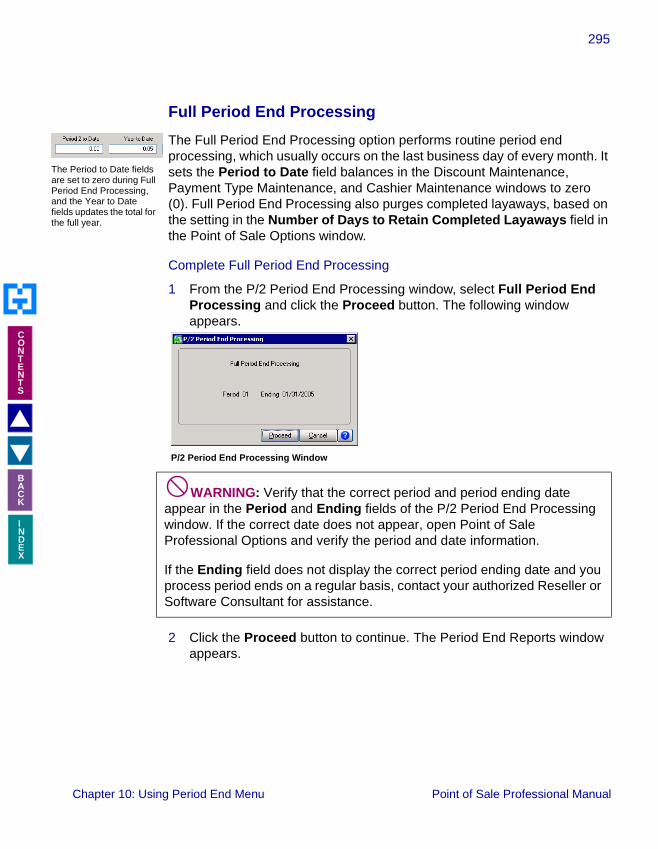
295
INDEX
�
�
CONTENTS
BACK
TharePeanfiethe
Full Period End Processing
The Full Period End Processing option performs routine period end processing, which usually occurs on the last business day of every month. It sets the Period to Date field balances in the Discount Maintenance, Payment Type Maintenance, and Cashier Maintenance windows to zero (0). Full Period End Processing also purges completed layaways, based on the setting in the Number of Days to Retain Completed Layaways field in the Point of Sale Options window.
Complete Full Period End Processing
1 From the P/2 Period End Processing window, select Full Period End Processing and click the Proceed button. The following window appears.
2 Click the Proceed button to continue. The Period End Reports window appears.
�WARNING: Verify that the correct period and period ending date appear in the Period and Ending fields of the P/2 Period End Processing window. If the correct date does not appear, open Point of Sale Professional Options and verify the period and date information.
If the Ending field does not display the correct period ending date and you process period ends on a regular basis, contact your authorized Reseller or Software Consultant for assistance.
P/2 Period End Processing Window
e Period to Date fields set to zero during Full riod End Processing, d the Year to Date lds updates the total for full year.
Chapter 10: Using Period End Menu Point of Sale Professional Manual

296
INDEX
�
�
CONTENTS
BACK
TharLaupPePr
3 Check each period end report to print and click the Print button. After the selected reports finish printing, the following dialog box appears.
4 Click the Yes button. The system completes the processing and advances to the next period.
The Current Point of Sale Period field in the Point of Sale Professional Options window increases to the next period.
Full Period End and Year End Processing
The Full Period End and Year End Processing option performs the same functions as Full Period End Processing, but it also sets the Year to Date field balances in the Discount Maintenance, Payment Type Maintenance, and Miscellaneous Charge windows to zero (0). This option also updates the balances in the Last Year fields to contain the correct balances. Select this option only at year end (your last fiscal accounting period).
Period End Reports Window
MAS 90 Dialog Box
e Year to Date fields e set to zero and the st Year fields are dated during Full riod End and Year End ocessing.
Chapter 10: Using the Period End Menu Point of Sale Professional Manual

297
INDEX
�
�
CONTENTS
BACK
Complete Full Period End and Year End Processing
1 From the P/2 Period End Processing window, select Full Period End and Year End Processing and click the Proceed button. The following window appears.
2 Click the Proceed button to continue. The Period End Reports window appears.
�WARNING: Verify that the correct period and period ending date appear in the Period and Ending fields of the P/2 Period End Processing window. If the correct date does not appear, open Point of Sale Professional Options and verify the period and date information.
If the Ending field does not display the correct period ending date and you process period ends on a regular basis, contact your authorized Reseller or Software Consultant for assistance.
P/2 Period End Processing Window
Period End Reports Window
Chapter 10: Using Period End Menu Point of Sale Professional Manual

298
INDEX
�
�
CONTENTS
BACK
3 Check each period end report to print and click the Print button. After the selected reports finish printing, the following dialog box appears.
4 Click the Yes button. The system completes the processing and resets the period and advances to the next year.
The Current Point of Sale Fiscal Year and Current Point of Sale Period fields in the Point of Sale Professional Options window resets the period and advances to the next year.
Only Clear Transaction History File
The Only Clear Transaction History File option purges the Transaction History files based on the accounting date. This feature purges the history file up to the current accounting date set in the Point of Sale Professional module. Use this feature when your company needs to clear old transactions.
Clear Transaction History
1 From the P/2 Period End Processing window, select Only Clear Transaction History File and click the Proceed button. The following window appears.
MAS 90 Dialog Box
Chapter 10: Using the Period End Menu Point of Sale Professional Manual

299
INDEX
�
�
CONTENTS
BACK
2 Click the Proceed button to continue. The system clears old transactions from Point of Sale Professional.
Only Purge Sales Tax History File
The Only Purge Sales Tax History File option purges all sales tax history dated on and before the date you specify in the P/2 Period End Processing window. Use this feature when your company needs to clear old sales tax files.
Clear Sales Tax History
1 From the P/2 Period End Processing window, select Only Purge Sales Tax History File. The Sales Tax History Date field appears on the window.
�WARNING: Enter the last date to use for clearing the transaction history in the system. From the File menu on the MAS 90/MAS 200 menu bar, select Change Date to change the date. That date will appear in the P/2 Period End Processing window.
�NOTE: The Only Purge Sales Tax History File option is available only if the Sales Tax Reporting option is selected in the Point of Sale Professional Options window.
P/2 Period End Processing Window
Chapter 10: Using Period End Menu Point of Sale Professional Manual
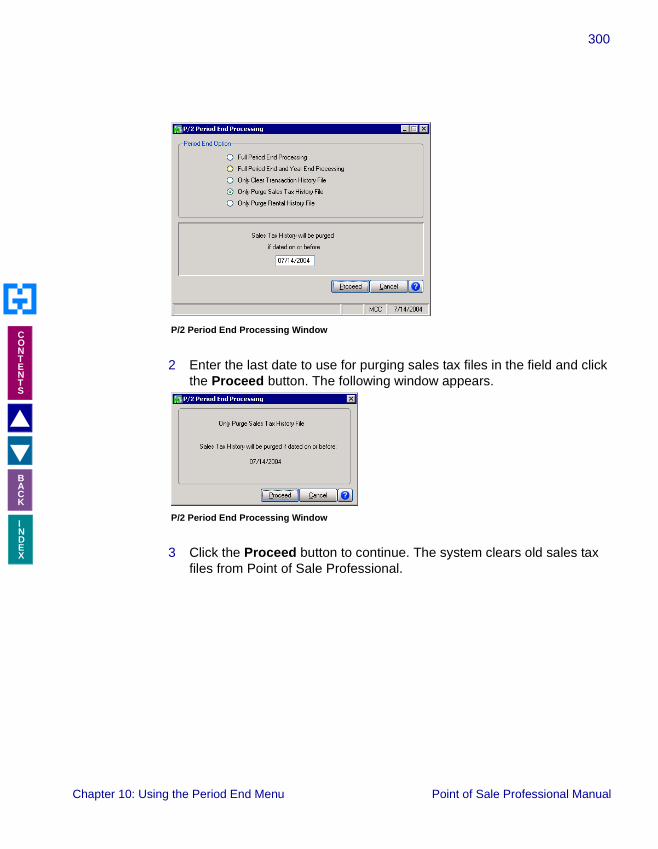
300
INDEX
�
�
CONTENTS
BACK
2 Enter the last date to use for purging sales tax files in the field and click the Proceed button. The following window appears.
3 Click the Proceed button to continue. The system clears old sales tax files from Point of Sale Professional.
P/2 Period End Processing Window
P/2 Period End Processing Window
Chapter 10: Using the Period End Menu Point of Sale Professional Manual

301
INDEX
�
�
CONTENTS
BACK
Only Purge Rental History File
The Only Purge Rental History File option purges all rental item history dated on and before the date you specify in the P/2 Period End Processing window. Use this feature when your company needs to clear old rental files.
Clear Rental History
1 From the P/2 Period End Processing window, select Only Purge Rental History File. The Rental History Date field appears on the window.
2 Enter the last date to use for purging rental history files in the field and click the Proceed button. The following window appears.
�NOTE: The Only Purge Rental History File option is available only if the Enable Rental Charges option is selected in the Point of Sale Professional Options window.
P/2 Period End Processing Window
P/2 Period End Processing Window
Chapter 10: Using Period End Menu Point of Sale Professional Manual
302
INDEX
�
�
CONTENTS
BACK
3 Click the Proceed button to continue. The system clears old rental files from Point of Sale Professional.
___________________________________________________________
This concludes Chapter 10: Using the Period End Menu of the Point of Sale Professional manual.
Chapter 10: Using the Period End Menu Point of Sale Professional Manual

303
Chapter 11
INDEX
�
�
CONTENTS
BACK
Using the Optional MenuChapter 13
Chapter 11: Using the Optional Menu teaches you how to create members for rentals, how to create rental charge codes, how to process rental returns, and how to view a customer’s last purchase information. For instructions on how to create a rental transaction, see Enter a Rental Transaction.
How to Use the Optional Menu
The options available in the Optional menu allow your company to setup company-wide standards and use optional features like rental returns. You might not need to use every feature available in the Optional menu. Select only the features your company requires.
This chapter does not describe every procedure that can be completed on an Optional window. This chapter describes each option so you can setup your Point of Sale Professional system quickly and start using the module. Details instructions about adding information, changing information, deleting information, and printing from the Optional windows are available in the online help. The following instructions provide a quick overview of how to complete these procedures.
Open a Window from the Optional Menu
1 Double-click the Point of Sale Professional module from the Modules tab. The module expands to display all the menu options available in the Point of Sale Professional module.
2 Click on the Optional menu. The names of the windows available in the menu appear on the right side of the MAS 90/MAS 200 window.
Windows Available in the Optional Menu
Chapter 11: Using the Optional Menu Point of Sale Professional Manual
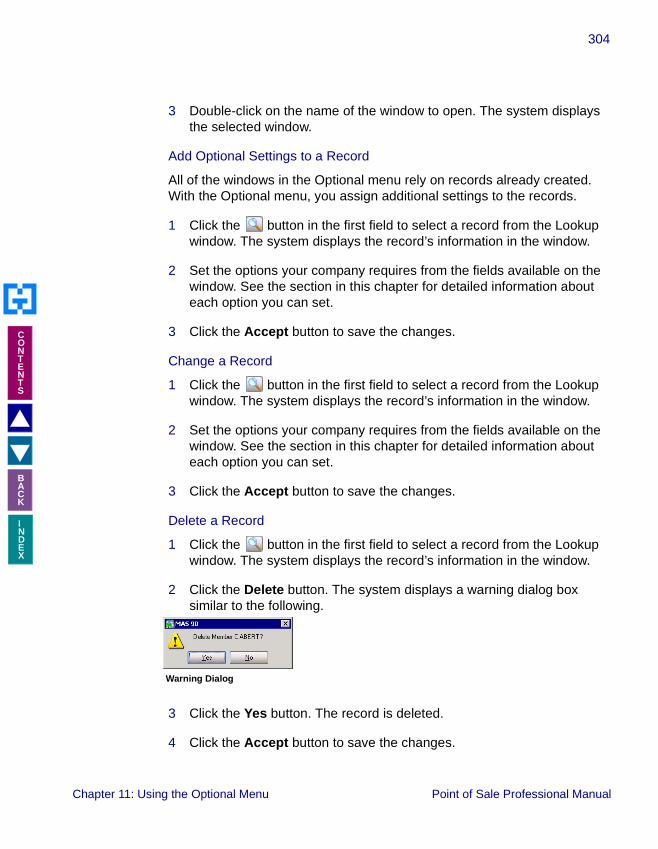
304
INDEX
�
�
CONTENTS
BACK
3 Double-click on the name of the window to open. The system displays the selected window.
Add Optional Settings to a Record
All of the windows in the Optional menu rely on records already created. With the Optional menu, you assign additional settings to the records.
1 Click the button in the first field to select a record from the Lookup window. The system displays the record’s information in the window.
2 Set the options your company requires from the fields available on the window. See the section in this chapter for detailed information about each option you can set.
3 Click the Accept button to save the changes.
Change a Record
1 Click the button in the first field to select a record from the Lookup window. The system displays the record’s information in the window.
2 Set the options your company requires from the fields available on the window. See the section in this chapter for detailed information about each option you can set.
3 Click the Accept button to save the changes.
Delete a Record
1 Click the button in the first field to select a record from the Lookup window. The system displays the record’s information in the window.
2 Click the Delete button. The system displays a warning dialog box similar to the following.
3 Click the Yes button. The record is deleted.
4 Click the Accept button to save the changes.
Warning Dialog
Chapter 11: Using the Optional Menu Point of Sale Professional Manual

305
INDEX
�
�
CONTENTS
BACK
Print an Optional Listing
You can print information from any of the windows available in the Optional menu. These windows provide a listing of the options set or the records available. For many of the windows you can select the type of information to include in the listing. For detailed information about each type of listing, see the online help.
1 Click the button on the window. A Listing window similar to the following appears.
2 Select how to sort the list from the Sort Options field.
3 Select the type of information to include in the list from the remaining fields on the Listing window. For many fields you can select all records or a range of information. For example, in the previous picture you can check All to print all customer numbers, or you can use the Lookup windows in the Starting and Ending fields and select specific customers. If there is a date field available in a Listing window and you want to print information for a particular date, enter the same date in the Starting and Ending fields.
4 Click the Print button to print the list or the Preview button to preview the list.
Customer Last Purchase Listing Window
Chapter 11: Using the Optional Menu Point of Sale Professional Manual

306
INDEX
�
�
CONTENTS
BACK
Membership Maintenance
Use the Membership Maintenance window to create members for the Point of Sale Professional module. Members must already exist as customer contacts in the MAS 90/MAS 200 system. You link a Point of Sale Professional membership ID to the customer contact with the Membership Maintenance window.
Usually a "customer service" type of cashier will complete the activities in this section.
Create a Member
1 Select an existing customer from the Customer field. The window displays the customer information.
2 Select an existing customer contact from the Contact field. The window displays the contact information.
�NOTE: The Membership Maintenance option is available only if the Accounts Receivable module is integrated with the Point of Sale Professional module.
Membership Maintenance Window - Main Tab
Chapter 11: Using the Optional Menu Point of Sale Professional Manual

307
INDEX
�
�
CONTENTS
BACK
3 Make any changes to the customer contact information in the Main tab. For more information, access the online help available in the Main tab. This information is available from the Accounts Receivable module developed by Best Software.
4 Click the Membership tab to access the membership details for the contact.
5 Enter a membership number in the Membership ID field. This ID may be up to 20 alpha-numeric characters.
6 Enter additional, unique information about the member in the Identification field. For example, you can enter the customer’s drivers license number or enter the customer’s mother’s maiden name for security purposes.
7 Select a customer’s license picture from the Picture ID field.
�NOTE: The Point of Sale Professional module updates the Attendance fields in the Membership tab if the Track Member Attendance option is selected in the Transaction Type Maintenance window for each transaction type.
Membership Maintenance Window - Membership Tab
Chapter 11: Using the Optional Menu Point of Sale Professional Manual

308
INDEX
�
�
CONTENTS
BACK
View a Member’s Rentals
• Click on the Rentals tab from the Membership Maintenance window to access a member’s rental history. The window displays the rentals.
Rental Charge Code Maintenance
Use the Rental Charge Code Maintenance window to define rental charge code information. You do not create rental charge codes with the Rental Charge Code Maintenance window. You link rental charge data to existing miscellaneous charge codes created in the P/2 Miscellaneous Charge Maintenance window. See the Create a Miscellaneous Charge Code section for details on creating miscellaneous charge codes. Rented items are not removed from the Inventory Master file, since your company owns the item.
This window is available in the Optional menu if the Enable Rental Charges field is selected in the Point of Sale Professional Options window.
�NOTE: The rented item is listed as an On Sales Order quantity in Inventory Inquiry. When the rented item is returned, the quantity is removed from the On Sales Order quantity.
Membership Maintenance Window - Rentals Tab
Chapter 11: Using the Optional Menu Point of Sale Professional Manual
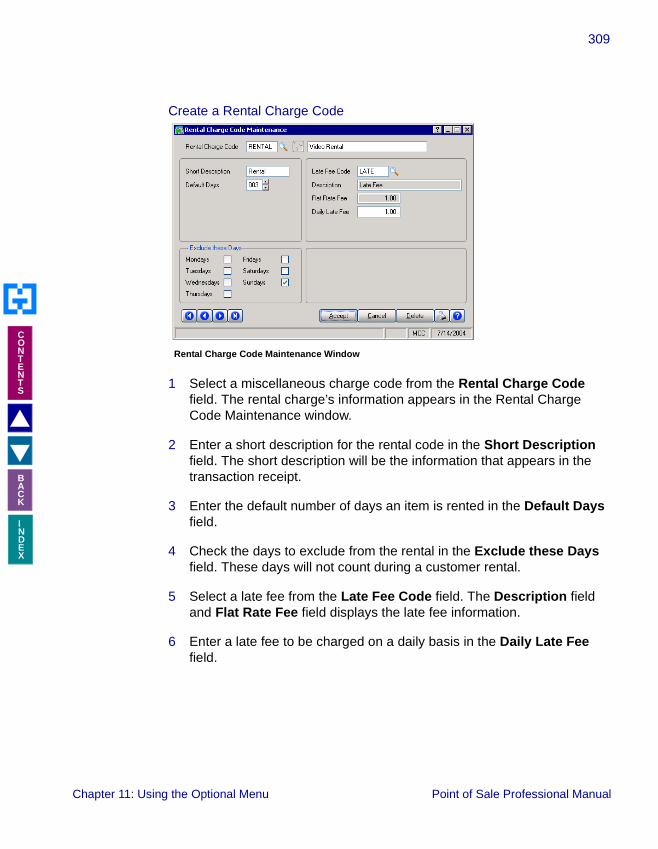
309
INDEX
�
�
CONTENTS
BACK
Create a Rental Charge Code
1 Select a miscellaneous charge code from the Rental Charge Code field. The rental charge’s information appears in the Rental Charge Code Maintenance window.
2 Enter a short description for the rental code in the Short Description field. The short description will be the information that appears in the transaction receipt.
3 Enter the default number of days an item is rented in the Default Days field.
4 Check the days to exclude from the rental in the Exclude these Days field. These days will not count during a customer rental.
5 Select a late fee from the Late Fee Code field. The Description field and Flat Rate Fee field displays the late fee information.
6 Enter a late fee to be charged on a daily basis in the Daily Late Fee field.
Rental Charge Code Maintenance Window
Chapter 11: Using the Optional Menu Point of Sale Professional Manual

310
INDEX
�
�
CONTENTS
BACK
Rental Returns
When a customer rents an item, you record the rental as a sales transaction in the Point of Sale Entry window. When a customer returns a rented item, use the Rental Return Entry window to record the return. After recording all rental returns for the day, you must update the MAS 90/MAS 200 system with the returns by printing the Rental Return Report.
Rental Return Entry
Use the Rental Return Entry window to enter rental return information.
Enter a Rental Return
1 Select the store location from the Location field. The rental items for the location appear in the Rental Return Entry window.
�NOTE: The Rental Return Entry and Rental Return Report/Update options are available in the Point of Sale Professional Optional menu, if your company enabled the rental feature in the Point of Sale Professional Options window.
Rental Return Entry Window
Chapter 11: Using the Optional Menu Point of Sale Professional Manual

311
INDEX
�
�
CONTENTS
BACK
2 Select the item being returned from the list and click the OK button. The system defaults the return date to the current accounting date. You can change this information in the Date Returned field.
3 Click the Proceed button to save the changes and to start the Rental Return Report/Update process. The Rental Return Report window appears.
You can create the report now, or cancel the report and create it through the Rental Return Report/Update option. See the Print the Rental Return Report for details on creating the report.
Rental Return Report/Update
Use the Rental Return Report/Update after the Rental Return Entry process. This option prints a list of all the rental returns in the Point of Sale Professional module.
The Rental Return Report allows you to review the rental returns information before updating the entire MAS 90/MAS 200 system with the information.
Print the Rental Return Report
1 Select how to sort the report from the Sort Options field. You can sort the report by Customer or Item.
2 Enter the number of copies to print in the Copies field.
3 Enter the cash drawer locations to include in the Location field.
Rental Return Report Window
Chapter 11: Using the Optional Menu Point of Sale Professional Manual

312
INDEX
�
�
CONTENTS
BACK
4 Click the Print button to print the report or the Preview button to preview the report.
This report lists the rental returns. The information in the report includes the location code and description, rental item, customer, transaction number, rental date, due date, return date, and late fees.
After the Rental Return Report, the following dialog box appears.
5 After ensuring the report is accurate, click the Yes button to update MAS 90/MAS 200 with the information.
Rental Return Report
MAS 90 Dialog Box
Chapter 11: Using the Optional Menu Point of Sale Professional Manual
313
INDEX
�
�
CONTENTS
BACK
Customer Last Purchase Maintenance
Use the Customer Last Purchase Maintenance window to view a customer’s last purchase, clear purchase history, and print a list of last purchases made by customers. You can use this information to review items and prices a customer has requested in the past.
If the Point of Sale Professional module is integrated with the Inventory Management module, the customer last purchase information is tracked for standard inventory items only. If the Point of Sale Professional module is not integrated with the Inventory Management module, the customer last purchase information is tracked for miscellaneous items created in Point of Sale Professional only.
Usually a "customer service" type of cashier will complete the activities in this section.
Create the Customer’s Last Purchase File
The first time you access the Customer Last Purchase Maintenance window, you need to create the customer last purchase list. By rebuilding the list, you create the Customer Last Purchase History file from the Point of Sale Transaction History files.
�NOTE: The Customer Last Purchase Maintenance option is available only if the Track Customers Last Purchase option has been selected in the Point of Sale Professional Options window.
Chapter 11: Using the Optional Menu Point of Sale Professional Manual

314
INDEX
�
�
CONTENTS
BACK
1 Click the Rebuild button. The following warning dialog box appears.
2 Click the Yes button. The Point of Sale Professional module rebuilds the file.
View a Customer’s Last Purchase
1 Select an existing customer from the Customer Number field. You can also click the button and select a customer and purchased item from the P/2 Customer Last Purchase list. If you select an item from this list, all of the fields in the Customer Last Purchase Maintenance window displays the purchase information.
2 Select an item from the Item Number field. You can also click the button and select from only items the customer purchased from the P/2 Customer Last Purchase list.
The system displays the details about the purchase in the Transaction Type, Transaction Number, Last Purchase Date, Last Purchase Quantity, and Last Purchase Price fields.
Customer Last Purchase Maintenance Window
Warning Dialog
Chapter 11: Using the Optional Menu Point of Sale Professional Manual

315
INDEX
�
�
CONTENTS
BACK
Delete a Customer’s Last Purchase Information
You can delete an outdated purchase history record from the Customer Last Purchase History file.
1 Select an existing customer from the Customer Number field. You can also click the button and select a customer and purchased item from the P/2 Customer Last Purchase list. If you select an item from this list, all of the fields in the Customer Last Purchase Maintenance window displays the purchase information.
2 Select an item from the Item Number field. You can also click the button and select from only items the customer purchased from the P/2 Customer Last Purchase list.
3 Click the Delete button. The following warning dialog box appears.
4 Click the Yes button. The record is deleted.
Clear the Customer Last Purchase Information
Use the Clear Customer Last Purchase File utility to delete outdated item pricing information, or to remove numerous purchase history records for customers or items that have been deleted from the system.
1 Click the Clear button. The Clear Customer Last Purchase File window appears.
2 Enter the customer numbers to include in the Customer Number field.
Warning Dialog
Clear Customer Last Purchase File Window
Chapter 11: Using the Optional Menu Point of Sale Professional Manual

316
INDEX
�
�
CONTENTS
BACK
3 Enter the item numbers to include in the Item Number field.
4 Enter the purchase dates to include in the Purchase Date field.
5 Click the Proceed button. The records are deleted and the Clear Customer Last Purchase File window closes.
___________________________________________________________
This concludes Chapter 11: Using the Optional Menu of the Point of Sale Professional manual.
Chapter 11: Using the Optional Menu Point of Sale Professional Manual

317
A
B
C
D
E
F
G
H
I
J
K
L
M
N
O
P
Q
R
S
T
U
V
W
X
Y
Z
�
�
CONTENTS
BACK
Index
AAccounts Receivable Module 17, 42,43, 130, 190, 200, 243How to Integrate 61Integrating with Point of Sale 18
Active Cash Drawer Inquiry 242Active Cash Drawer Report 262, 264
Printing 265Address Labels 80
Bill to Address 80Ship to Address 80
Automatic Line Completion 81
BBack Orders 158
Allowed at a Location 99Updating 161
Bank Depositby Payment Types 85Creating 234Definition 30
Bank Deposit Maintenance 232Bank Deposit Register Report
Printing 235Bank Deposit Register/Update 234Bank Maintenance 83Bank Reconciliation Module 17, 19
How to Integrate 61Banks
Address 83Bank ID Number 83Cash Accounts 83Codes 83Contacts 84
Bar Code Scanners 17Best Software 16Bill of Materials
Adding to Transaction 194Button Fields 49
CCash Drawer History Inquiry 242, 257Cash Drawer History Report 262, 267
Index
Printing 268Cash Drawer Maintenance 124Cash Drawer Reconciliation Report 215Cash Drawers 17
Allow Multiple Registers to Open 125
Changing Status of 125Creating 124Definition 29Opening Amount Set by
Location 99Print Sales Journals by 69Reconciliation
by Cashiers 98Include Transactions 69Launched by Default 99
Register Maintenance 108Setting Default Opening Cash 63Setting the Next Cash Drawer
Number 63Status
Closed 125Open 125Ready 125Reconciled 125
Viewing Totals for Each Payment Type in Updated Cash Drawer 258
Cash On Delivery 85Cash Receipts
Setting How to Update Monthly Cash Receipts 63
Cashier Maintenance 110Allowed to Add a Customer in POS
Entry 112Allowed to Add New Line Items 112Allowed to Add New Reason
Codes 112Allowed to Change the Discount
Code 112Allowed to Make Withdrawals and
Payouts 112Allowed to Open Drawer without
Transaction 111
Point of Sale Professional Manual

318
A
B
C
D
E
F
G
H
I
J
K
L
M
N
O
P
Q
R
S
T
U
V
W
X
Y
Z
�
�
CONTENTS
BACK
Allowed to Override the Item Price 112
Allowed to Suspend Transactions 111
Allowed to Void a Completed Transaction 112
Allowed to Void Transactions 112Customer Memo Access 113Details Tab 114History Tab 113Main Tab 110POS Entry Tab 111Print Transaction on Complete
Payment 112Salesperson 111Summary Tab 113Transaction History Access 112
CashiersAllowed to Add a Customer 112Allowed to Add New Line Items 112Allowed to Add New Reason
Codes 112Allowed to Make Withdrawals and
Payouts 112Allowed to Suspend
Transactions 111Allowed to Void Transactions 112Being Allowed to Open Drawers
without Transactions 111Creating 110Customer Memo Access 113Definition 29Displaying Name during Point of
Sale Entry 68Logging into Point of Sale
Entry 127Overriding Item Prices 112Password 110Printing Transactions on Complete
Payment 112Salesperson 111Setting as Salesperson 82User Code 110
Charges 175, 176
Index
Check Readers 17Check Verification
Setting 64Checks 85
Address 88Disable Verification 87Drivers Licenses 88Number Required 87Requiring Name 88
CommissionsReporting for a Salesperson 139Split Commissions Between
Salespersons 139Contacts
Confirmation 82Pictures for 68Searching for 193
CreditChecking for a Customer 189
Credit Card Processors 17Credit Card Report 262, 276
Printing 276Credit Cards 85
Address 88Authorization Term 90Confirm Last Four Digits 88Discount Percent 90Expiration
Number of Days to Notify Employee 64
Fees Accrual Account 90Merchant ID 90Per Transaction Fee 90Processing Software 64
Setting 64Processor Code 90, 92Requiring Name 88Requiring Numbers 88Selecting Card Company 89Validation Number 88
Crystal Reports 70, 72Current Fiscal Year
Selecting 62Current Period
Point of Sale Professional Manual

319
A
B
C
D
E
F
G
H
I
J
K
L
M
N
O
P
Q
R
S
T
U
V
W
X
Y
Z
�
�
CONTENTS
BACK
Setting 62Current Point of Sale Fiscal Year 298Current Point of Sale Period 296, 298Customer Details 247Customer Inquiry 242, 243
Opening 243Customer Last Purchase
Maintenance 313Customer Listing 270Customer Maintenance
Accessing 130, 190Customer Number
Requiring 81Customer Payment Transactions 168Customer Payments Journal 220Customer Section
Using Features in 187Customers
Assigning Memos to 188Assigning Memos to
Transactions 247Changing Salesperson for 192Checking Credit for 189Last Purchase
Clearing 315Creating File for 313Deleting 315Viewing 314
Last Purchases 313Searching for Contacts 193Viewing Credit 249Viewing Last Purchase 191
Customers Last PurchasesTracking 64
DDaily Payments Journal 219Daily Sales Journal 216Daily Sales Reports/Updates 213Daily Sales Updates
Performing 213Daily Transaction Register 230Daily Transaction Report 231
Index
Data MigrationRecreate Customers 42Recreate Layaways with
Deposits 45Recreate Layaways without
Deposits 44Recreate Orders with Deposits 44Recreate Orders without
Deposits 43Recreate Payment Types 43Recreate Quotes 45Recreate Salespeople 43
Department Maintenance 105Creating 106
DepositsPosting by Payment Types 68
Devices 108Discount Codes
Adding 73Allow Cashiers to Override 74Allowing Cashiers to Change 112Dollar Amount 73for Transactions 80Percentage Amount 73Types 73
Discount Debit Account 73Discount Maintenance 72
Allow Override in Point of Sale Entry 74
Creating a New Code 73Disc. Debit Account 73Discount Taken 74Dollar Amount 73Maximum Allowed 74Minimum Allowed 74Percentage Amount 73
Discount Taken 74Discounts 201
Allow by Line Item 67Debit Account 73
Drop ShipDefaulting Items to 66Item 77
Point of Sale Professional Manual

320
A
B
C
D
E
F
G
H
I
J
K
L
M
N
O
P
Q
R
S
T
U
V
W
X
Y
Z
�
�
CONTENTS
BACK
EEnable Rental Charges 301Enable Touch Screen Keypad 108
FFreight Charges
Adding 201Full Period End and Year End
Processing 294, 296Completing 297
Full Period End Processing 294, 295Completing 295
GGeneral Ledger
Integrating with Point of Sale Professional Module 17
General Ledger Module 17, 20General Ledger Posting Recap 262,
279Printing 280
Getting Started 46Gift Certificates 85, 181Gift Receipts 80
by Line Item 80by Line Quantity 80by Transaction 80
Graphical Forms 100Changing 101Creating 101Resetting 102Selecting 101
Gross Profit Journal 221Print Details 70
HHardware Devices
Bar Code Scanners 17Cash Drawers 17Check Readers 17Credit Card Processors 17Pole Displays 17
Index
Receipt Printers 17Help 23
Context-Sensitive 26HighTower 16
Support Services 27
IInquiries 241
Active Cash Drawer Inquiry 242Cash Drawer History Inquiry 242Customer Inquiry 242Inventory Inquiry 242Sales Order Inquiry 242Transaction History Inquiry 242Types of 242
InstallationFor MAS 200 or MAS 200 for
SQL 39Patch Installation System 16
Introduction 16Inventory Inquiry 242, 244Inventory Item Costs
Posting to General Ledger 65Inventory Management Module 17, 18,
244How to Integrate 62Integrating with Point of Sale
Professional 18Invoices
Viewing Details of 200Item Codes
Creating Miscellaneous Item Codes 76
Item CostPosting to General Ledger 66
ItemsAdding Extended Descriptions
to 197Adding Items with Lot/Serial
Numbers 199Allow Discount Rates for 67Allowing Point of Sale Entry of 66Changing or Deleting from
Point of Sale Professional Manual
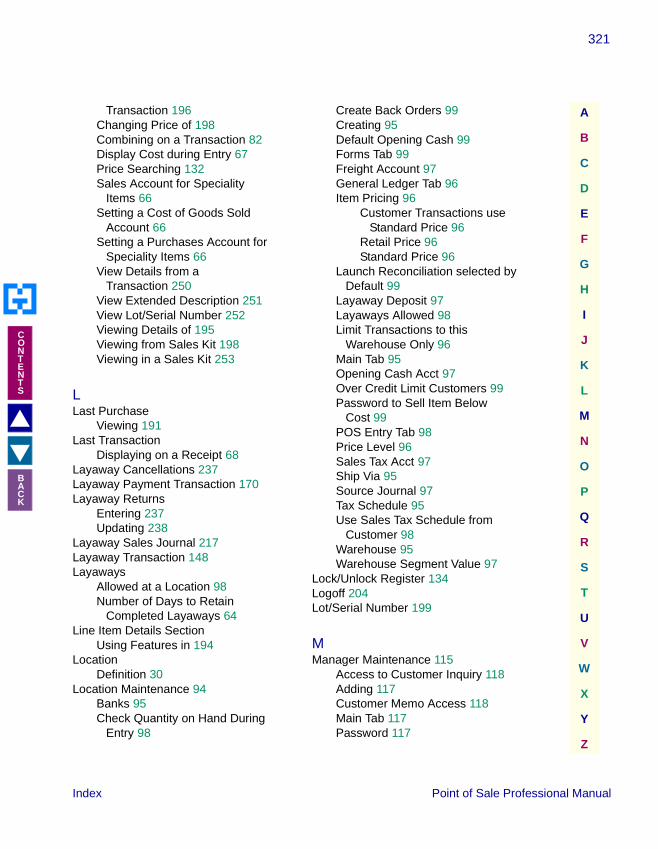
321
A
B
C
D
E
F
G
H
I
J
K
L
M
N
O
P
Q
R
S
T
U
V
W
X
Y
Z
�
�
CONTENTS
BACK
Transaction 196Changing Price of 198Combining on a Transaction 82Display Cost during Entry 67Price Searching 132Sales Account for Speciality
Items 66Setting a Cost of Goods Sold
Account 66Setting a Purchases Account for
Speciality Items 66View Details from a
Transaction 250View Extended Description 251View Lot/Serial Number 252Viewing Details of 195Viewing from Sales Kit 198Viewing in a Sales Kit 253
LLast Purchase
Viewing 191Last Transaction
Displaying on a Receipt 68Layaway Cancellations 237Layaway Payment Transaction 170Layaway Returns
Entering 237Updating 238
Layaway Sales Journal 217Layaway Transaction 148Layaways
Allowed at a Location 98Number of Days to Retain
Completed Layaways 64Line Item Details Section
Using Features in 194Location
Definition 30Location Maintenance 94
Banks 95Check Quantity on Hand During
Entry 98
Index
Create Back Orders 99Creating 95Default Opening Cash 99Forms Tab 99Freight Account 97General Ledger Tab 96Item Pricing 96
Customer Transactions use Standard Price 96
Retail Price 96Standard Price 96
Launch Reconciliation selected by Default 99
Layaway Deposit 97Layaways Allowed 98Limit Transactions to this
Warehouse Only 96Main Tab 95Opening Cash Acct 97Over Credit Limit Customers 99Password to Sell Item Below
Cost 99POS Entry Tab 98Price Level 96Sales Tax Acct 97Ship Via 95Source Journal 97Tax Schedule 95Use Sales Tax Schedule from
Customer 98Warehouse 95Warehouse Segment Value 97
Lock/Unlock Register 134Logoff 204Lot/Serial Number 199
MManager Maintenance 115
Access to Customer Inquiry 118Adding 117Customer Memo Access 118Main Tab 117Password 117
Point of Sale Professional Manual

322
A
B
C
D
E
F
G
H
I
J
K
L
M
N
O
P
Q
R
S
T
U
V
W
X
Y
Z
�
�
CONTENTS
BACK
POS Entry Tab 117View Unencrypted Credit Card
Number 118Managers
Access to Customer Inquiry 118Adding 117Features 204Password 117
ManualGraphic Conventions 22Online 23Sections In 21Text Conventions 23Using 21
MAS 200 or MAS 200 for SQL Installations 39
MembersCreating 306Tracking Attendance 82Viewing Rentals for 308
Membership Maintenance 306Memos
Viewing 188Menu Bar
Using 48Merchant Numbers 90Miscellaneous Charge Code
Maintenance 74Creating a Miscellaneous Charge
Code 75Creating a Miscellaneous Item
Code 76Length of Codes 75Miscellaneous Comment Codes 77
Miscellaneous Charge CodesPeriod Fields 76Sales Accounts 75Standard Charges 75Tax Class 76Types 75
Miscellaneous ChargesAllowing Entry during Point of Sale
Entry 65for Transaction Types 80
Index
Select Sales Account for 66Miscellaneous Comment Codes
Charge Code 77Creating 77
Miscellaneous Item CodesCalculate Commission 77Charge Code 76Cost of Goods Account 77Creating 76Drop Ship Defaults 77Inventory Account 77Period Fields 77Sales Account 76Standard Unit Cost 77Standard Unit Price 77Tax Class 77Trade Discounts 77Types 76Unit of Measure 77
Module IntegrationAccounts Receivable 17Bank Reconciliation 17Inventory Management 17
Modules TreeUsing 46
Monthly Recap by Division ReportPrinting 288
Monthly Recap by Location ReportPrinting 289
Monthly Recap by Product Line ReportPrinting 283
Monthly Recap by Warehouse ReportPrinting 287
Monthly Recap by Warehouse/Product Line Report
Printing 285
NNegative Extensions 81Negative Prices 81Negative Quantities 81Non-Graphical Forms 102
Changing 105
Point of Sale Professional Manual

323
A
B
C
D
E
F
G
H
I
J
K
L
M
N
O
P
Q
R
S
T
U
V
W
X
Y
Z
�
�
CONTENTS
BACK
Creating 103Selecting 102
Number of Days to Retain Completed Layaways 295
OOnly Clear Transaction History File 294,
298Clearing Transaction History 298
Only Purge Rental History File 294, 301Clearing Rental History 301
Only Purge Sales Tax History File 294, 299
Clearing Sales Tax History 299Open Cash Drawer 87Open Layaway Report 262, 270
Printing 271Opening Cash
Set by Location 99Setting Default 63
Order Transactions 153, 157Converting to Sales
Transactions 163Outstanding Rental Report 262, 272
Printing 273Over Credit Limit 99
PPassword
for Cashiers 110to Sell Item Below Cost 99
Patch Installation 16Pay Out Codes
Creating 120G/L Accounts for 120
Payment Type Maintenance 84Address 88Authorization Term 90Check Number Entry Required 87Confirm Last 4 Digits 88Creating 85Credit Card Company 89Credit Card Number 88
Index
Credit Card Tab 88, 91Disable Verification 87Discount Percent 90Drivers License Required 88Fees Accrual Account 90Main Tab 85Merchant ID 90Name Required 88Payments Received Fields 86Payments Refunded Fields 86Per Transaction Fee 90POS Entry Tab 86Print a Signature Line on the
Receipt 87Processor Code 90, 92Validation Number 88
Payment TypesA/R Asset Account 86A/R Category 86Asset Account 85Cash 174Cash On Delivery 85Charge 175Check 85, 178, 180Creating 85Credit Card 85Gift Certificates 85, 181Include in Location Bank
Deposit 85Open Cash Drawer 87Over/Short Account 86Posting Deposits by 68Print a Second Copy of the
Receipt 87Terms 85, 182Viewing Totals in Updated Cash
Drawers 258PCCharge 64, 176, 180
Processor Code 90, 92Period End
Before Processing 293Opening P/2 Period End
Processing Window 294Processing 293
Point of Sale Professional Manual

324
A
B
C
D
E
F
G
H
I
J
K
L
M
N
O
P
Q
R
S
T
U
V
W
X
Y
Z
�
�
CONTENTS
BACK
When to Process 293Period End Processing
Performing 294Point of Sale Entry
Active Receipt 143, 186Changing Tab Sequences 82Closing 203Customer 143, 185Header 143, 185Line Item Details 143, 186Logging into 127Totals 143, 186Window 143
Point of Sale Equipment 108Bar Code Scanners 17Cash Drawers 17Check Readers 17Credit Card Processors 17Pole Displays 17Receipt Printers 17
Point of Sale ModuleMigrating Data From 42
Point of Sale ProfessionalCheck Verification 64Credit Card Software Selection 64Current Fiscal Year 62Current Period 62Days before Credit Card
Expiration 64Default Opening Cash 63Installation 31Integrating with Other Modules 17Integration to MAS 90/MAS 200
Accounts Receivable Module 17
Bank Reconciliation Module 17
General Ledger Module 17Inventory Management
Module 17Sales Order Module 17
Menu Bar 48Migrating Data from Point of
Sale 42
Index
Next Transaction Number 63Number of Days to Retain
Completed Layaways 64Registering 38Rentals 64Requiring Membership for
Rentals 64Sales Tax Reporting 63Setting the Cash Drawer
Number 63Support 23System Requirements 31System Startup 37Tracking Customers Last
Purchase 64Transaction Types Available 16Updating Monthly Cash
Receipts 63User Interface 46Using the Manual 21Welcome To 16
Point of Sale Professional ModuleRole Maintenance 37
Point of Sale Professional Options 59Adding Pictures to Contacts 68Allow Discount Rate by Detail
Line 67Allowing Special Items 66Cost of Goods Sold Account 66Credit Card Processing
Software 64Default Special Items to Drop
Ship 66Display Item Cost in Line Item
Details during Entry 67Display Last Transaction 68Enabling Miscellaneous
Charges 65General Ledger Tab 65Integrating with Accounts
Receivable 61Integrating with Bank
Reconciliation 61Integrating with Inventory
Point of Sale Professional Manual

325
A
B
C
D
E
F
G
H
I
J
K
L
M
N
O
P
Q
R
S
T
U
V
W
X
Y
Z
�
�
CONTENTS
BACK
Management 62Integrating with Sales Order 62Main Tab 60Name Displayed in Point of Sale
Entry 68POS Entry Tab 66Post Deposits by Payment Type 68Post Inventory Item Costs to
General Ledger 65Post Special Item Costs to General
Ledger 66Posting to General Ledger 65Print Gross Profit Journal 70Print Sales Journals by Cash
Drawer 69Print Sales Journals by Cash
Drawers 69Print Sales Tax Journal in Detail 69Purchase Account 66Require Reasons for Return
Transactions 67Require Reasons for Voided
Transactions 67Setting Receipt Fonts 68
Pole Displays 17, 108Posting
Deposits by Payment Types 68Details to General Ledger 65Inventory Item Costs to General
Ledger 65Special Item Costs to General
Ledger 66Prepayment Transaction 169Price Levels 96Prices
Search for 132Print
Gross Profit Journal 70Sales Journals by Cash Drawer 69Sales Tax Journal in Detail 69
PrintersSelecting for Register 109
ProcessingPeriod End 294
Index
Processor Code 90, 92Product Scale 108
QQuantity
Check on Hand for Location 98Quote Transactions 165
Converting to Sales Transactions 166
RReason Code Maintenance 119
Creating 119Reason Codes
Allowing Cashiers to Add 112Creating 119Types 119
Receipt Printers 17Receipts
Automatic Line Completion 81Displaying Last Transaction 68Fonts 68Print a Signature Line 87Print Second Copy for Specific
Payment Types 87Printing Duplicate Copies 255Printing Sales Tax 81Printing Second Copies for Specific
Transaction Types 81Reconciliation
Include Transaction Details 69Launched by Default 99Performed by Cashiers 98
Register ID 107Register Maintenance 106
Cash Drawers 108Department 107Devices Tab 108Enable Touch Screen Keypad 108Location 107Main Tab 106Payment Type 107Pole Display 108
Point of Sale Professional Manual

326
A
B
C
D
E
F
G
H
I
J
K
L
M
N
O
P
Q
R
S
T
U
V
W
X
Y
Z
�
�
CONTENTS
BACK
Printing Tab 109Product Scale 108Register ID 107Transaction Type 107
Register Pay OutDefinition 30
Register Pay Out Maintenance 119Pay Out Codes 120
Register WithdrawalDefinition 30
RegistersDefinition 30Lock/Unlock 134Logoff 204Opening 138Unlocking 134Withdrawing Funds From 134
Registration 38Rental Returns
Entry 310Printing 311Report/Update 311
Rental Transaction 151Rentals
Enabling in Point of Sale Professional 64
Requiring Membership 64Returns 204
Reports 260Active Cash Drawer Report 262Cash Drawer History Report 262Credit Card Report 262General Ledger Posting Recap 262Open Layaway Report 262Outstanding Rental Report 262Sales Tax Report 262Transaction History Report 261Types of 261
Reseller Demo 68Return Transactions 171
Requiring Reasons for 67
Index
SSale Journals
Print by Cash Drawer 69Sales Kit
Adding to Transaction 194Sales Kits
Viewing Individual Items 198Sales Order Inquiry 242, 245Sales Order Module 20, 43, 245
How to Integrate 62Sales Orders
Creating Records after Point of Sale Entry Transaction 79
Entering with Sales Order Entry Window 80
Sales TaxChanging in a Transaction 203
Sales Tax Account Maintenance 92A/P Sales Tax Account 94A/P Use Tax Account 94Creating 93Exemption Number 93Non-Recoverable Tax Account 94P/S Sales Tax Account 94Registration Number 93Tax Code 93
Sales Tax Journal 218Print in Detail 69
Sales Tax Report 262, 274Printing 275
Sales TaxesPrinting on Receipts 81Schedule for Location 98Setting Sales Tax Reporting 63
Sales Transaction 145, 147Salesperson 111
Changing for a Customer 192Displaying Name during Point of
Sale Entry 68Setting Cashier as Salesperson 82
Shipping Charges 201Viewing 254
Store LocationsCreating 95
Point of Sale Professional Manual

327
A
B
C
D
E
F
G
H
I
J
K
L
M
N
O
P
Q
R
S
T
U
V
W
X
Y
Z
�
�
CONTENTS
BACK
Support 23HighTower Support Services 27
Suspend a Transaction 172System Requirements 31System Startup 37
TTab Sequences 82Tax Details
Viewing from a Transaction 255Technical Support 23Terms 85, 182Totals Section
Using Features in 201Touch Screen Keypad 108Tracking Customers Purchases 64Transaction History Inquiry 242, 246
Opening 246Transaction History Report 261, 263
Printing 263Transaction Number
Setting the Next Transaction Number 63
Transaction Type Maintenance 78Address Labels 80Allow Negative Quantities, Prices,
or Extensions 81Always Use Cashier
Salesperson 82Automatic Contact Confirmation 82Automatic Line Completion 81Create S/O Records after
Completed Transaction 79Gift Receipts 80Main Tab 79Miscellaneous Charges 80POS Entry Tab 80Print Sales Tax Detail on
Receipt 81Print Second Copy of the
Receipt 81Require Customer Number 81Setting Discount Codes for 80
Index
Track Member Attendance 82Use Sales Order Entry for the
Transaction 80Transaction Types
Creating 79Selecting 79
TransactionsAdding Discounts 201Adding Freight Charges 201Allowing Cashiers to Void 112Allowing Cashiers to Void
Completed Transaction 112Assigning Customer Memo to 248Changing Sales Tax 203Customer Payment
Transactions 168Prepayment Transactions 169
Layaway Payment Transactions 170
Layaway Transaction 148Order Transaction 157Order Transactions
Back Order 158Converting to Sales
Transactions 163Prepayment Transactions 169Printing Duplicate Copies of a
Receipt 255Printing on Complete Payment 112Quote Transaction 165Quote Transactions
Converting to a Sales Transaction 166
Rental Transaction 151Return Transactions 171Sales Transaction 145, 147Sales Transactions 143
Customer Sale 144, 147Fast Sale 144, 145Layaway Sale 144, 148Rental Sale 151
Stopping Transactions 172Suspend a Transaction 172Suspending 111, 172
Point of Sale Professional Manual

328
A
B
C
D
E
F
G
H
I
J
K
L
M
N
O
P
Q
R
S
T
U
V
W
X
Y
Z
�
�
CONTENTS
BACK
Suspending or Voiding 172View Details of an Item 250View Extended Item
Description 251View Lot/Serial Number of an
Item 252Viewing Completed
Transactions 129Viewing Customer Credit 249Viewing Customer Details for 187Viewing Customer Details of 247Viewing Details of 186, 246Viewing History for Updated Cash
Drawers 259Viewing Sales Kit Items 253Viewing Shipping Charges 254Viewing Tax Details 255Viewing Updated Transactions 131Void a Transaction 173Voiding 173Voiding Completed
Transactions 129, 173
UUpgrading from Point of Sale 42
VVoid a Transaction 173Voided Transaction Report
Printing 291Voided Transactions
Requiring Reasons for 67
WWarehouse 96
for a Specific Location 95Segment Value 97
Welcome to Point of Sale Professional 16
www.bestsoftware.com 31
Index
Point of Sale Professional Manual
Related Documents
![Sub 2[1].2 FORM5](https://static.cupdf.com/doc/110x72/54633e4db1af9fba388b52c9/sub-212-form5.jpg)