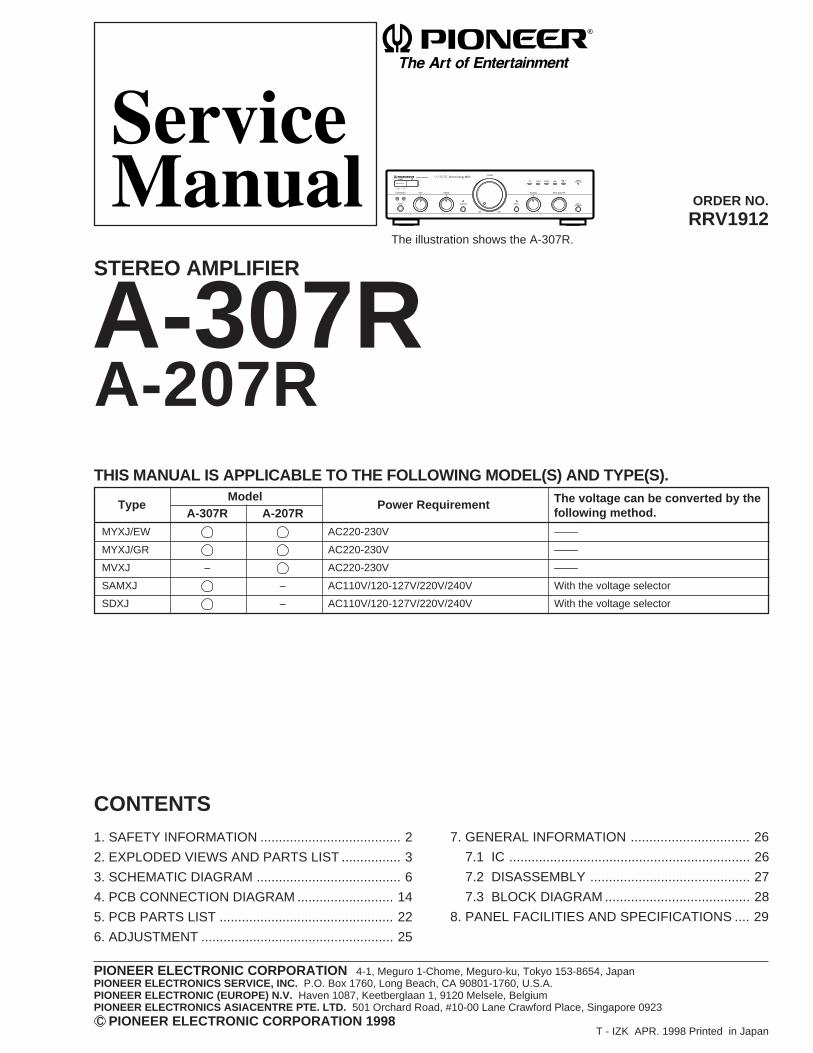
ORDER NO. RRV1912 T - IZK APR. 1998 Printed in Japan PIONEER ELECTRONIC CORPORATION 4-1, Meguro 1-Chome, Meguro-ku, Tokyo 153-8654, Japan PIONEER ELECTRONICS SERVICE, INC. P.O. Box 1760, Long Beach, CA 90801-1760, U.S.A. PIONEER ELECTRONIC (EUROPE) N.V. Haven 1087, Keetberglaan 1, 9120 Melsele, Belgium PIONEER ELECTRONICS ASIACENTRE PTE. LTD. 501 Orchard Road, #10-00 Lane Crawford Place, Singapore 0923 PIONEER ELECTRONIC CORPORATION 1998 c 1. SAFETY INFORMATION ...................................... 2 2. EXPLODED VIEWS AND PARTS LIST ................ 3 3. SCHEMATIC DIAGRAM ....................................... 6 4. PCB CONNECTION DIAGRAM .......................... 14 5. PCB PARTS LIST ............................................... 22 6. ADJUSTMENT .................................................... 25 CONTENTS 7. GENERAL INFORMATION ................................ 26 7.1 IC ................................................................. 26 7.2 DISASSEMBLY ........................................... 27 7.3 BLOCK DIAGRAM ....................................... 28 8. PANEL FACILITIES AND SPECIFICATIONS .... 29 A-307R STEREO AMPLIFIER A-207R THIS MANUAL IS APPLICABLE TO THE FOLLOWING MODEL(S) AND TYPE(S). PHONES A SPEAKERS B Direct Energy MOS TAPE 1 /MD TAPE 2 MONITOR LINE TUNER PHONO CD BASS + – TREBLE + – VOLUME MIN MAX LOUDNESS DIRECT BALANCE R L INPUT SELECTOR TAPE 2 MONITOR POWER Type Model Power Requirement A-307R A-207R MYXJ/EW AC220-230V –––– MYXJ/GR AC220-230V –––– MVXJ – AC220-230V –––– SAMXJ – AC110V/120-127V/220V/240V With the voltage selector SDXJ – AC110V/120-127V/220V/240V With the voltage selector The voltage can be converted by the following method. The illustration shows the A-307R.

Welcome message from author
This document is posted to help you gain knowledge. Please leave a comment to let me know what you think about it! Share it to your friends and learn new things together.
Transcript
ORDER NO.
RRV1912
T - IZK APR. 1998 Printed in Japan
PIONEER ELECTRONIC CORPORATION 4-1, Meguro 1-Chome, Meguro-ku, Tokyo 153-8654, JapanPIONEER ELECTRONICS SERVICE, INC. P.O. Box 1760, Long Beach, CA 90801-1760, U.S.A.PIONEER ELECTRONIC (EUROPE) N.V. Haven 1087, Keetberglaan 1, 9120 Melsele, BelgiumPIONEER ELECTRONICS ASIACENTRE PTE. LTD. 501 Orchard Road, #10-00 Lane Crawford Place, Singapore 0923 PIONEER ELECTRONIC CORPORATION 1998c
1. SAFETY INFORMATION ...................................... 2
2. EXPLODED VIEWS AND PARTS LIST ................ 3
3. SCHEMATIC DIAGRAM ....................................... 6
4. PCB CONNECTION DIAGRAM .......................... 14
5. PCB PARTS LIST ............................................... 22
6. ADJUSTMENT .................................................... 25
CONTENTS7. GENERAL INFORMATION ................................ 26
7.1 IC ................................................................. 26
7.2 DISASSEMBLY ........................................... 27
7.3 BLOCK DIAGRAM ....................................... 28
8. PANEL FACILITIES AND SPECIFICATIONS .... 29
A-307RSTEREO AMPLIFIER
A-207RTHIS MANUAL IS APPLICABLE TO THE FOLLOWING MODEL(S) AND TYPE(S).
PHONES
A SPEAKERS B
OFF ON
STEREO AMPLIFIER Direct Energy MOSTAPE 1
/MDTAPE 2
MONITORLINETUNER PHONOCD
BASS
+–
TREBLE
+–
VOLUME
MIN MAX
LOUDNESS DIRECT
BALANCE
RL
INPUT SELECTOR
TAPE 2MONITOR
POWER
TypeModel
Power RequirementA-307R A-207R
MYXJ/EW AC220-230V ––––
MYXJ/GR AC220-230V ––––
MVXJ – AC220-230V ––––
SAMXJ – AC110V/120-127V/220V/240V With the voltage selector
SDXJ – AC110V/120-127V/220V/240V With the voltage selector
The voltage can be converted by thefollowing method.
The illustration shows the A-307R.
2
A-307R, A-207R
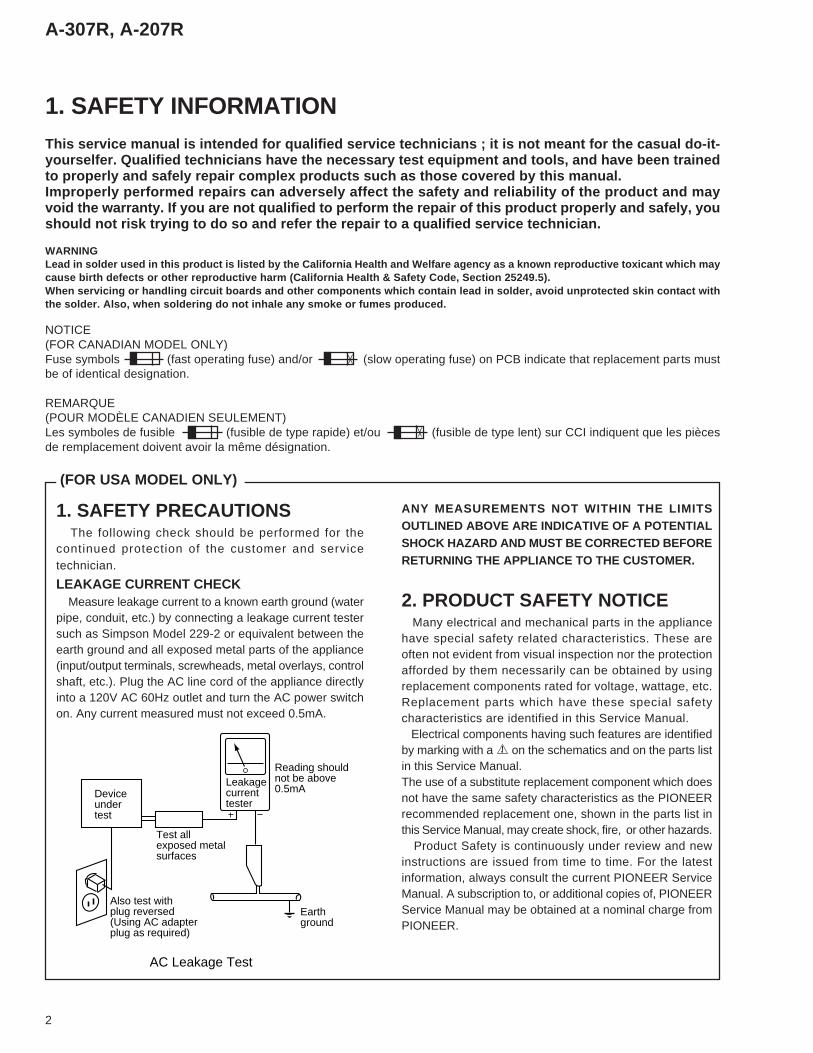
1. SAFETY INFORMATIONThis service manual is intended for qualified service technicians ; it is not meant for the casual do-it-yourselfer. Qualified technicians have the necessary test equipment and tools, and have been trainedto properly and safely repair complex products such as those covered by this manual.Improperly performed repairs can adversely affect the safety and reliability of the product and mayvoid the warranty. If you are not qualified to perform the repair of this product properly and safely, youshould not risk trying to do so and refer the repair to a qualified service technician.
WARNINGLead in solder used in this product is listed by the California Health and Welfare agency as a known reproductive toxicant whic h maycause birth defects or other reproductive harm (California Health & Safety Code, Section 25249.5).When servicing or handling circuit boards and other components which contain lead in solder, avoid unprotected skin contact wit hthe solder. Also, when soldering do not inhale any smoke or fumes produced.
NOTICE(FOR CANADIAN MODEL ONLY)Fuse symbols (fast operating fuse) and/or (slow operating fuse) on PCB indicate that replacement parts mustbe of identical designation.
REMARQUE(POUR MODÈLE CANADIEN SEULEMENT)Les symboles de fusible (fusible de type rapide) et/ou (fusible de type lent) sur CCI indiquent que les piècesde remplacement doivent avoir la même désignation.
ANY MEASUREMENTS NOT WITHIN THE LIMITSOUTLINED ABOVE ARE INDICATIVE OF A POTENTIALSHOCK HAZARD AND MUST BE CORRECTED BEFORERETURNING THE APPLIANCE TO THE CUSTOMER.
2. PRODUCT SAFETY NOTICE Many electrical and mechanical parts in the appliancehave special safety related characteristics. These areoften not evident from visual inspection nor the protectionafforded by them necessarily can be obtained by usingreplacement components rated for voltage, wattage, etc.Replacement parts which have these special safetycharacteristics are identified in this Service Manual. Electrical components having such features are identifiedby marking with a on the schematics and on the parts listin this Service Manual.The use of a substitute replacement component which doesnot have the same safety characteristics as the PIONEERrecommended replacement one, shown in the parts list inthis Service Manual, may create shock, fire, or other hazards. Product Safety is continuously under review and newinstructions are issued from time to time. For the latestinformation, always consult the current PIONEER ServiceManual. A subscription to, or additional copies of, PIONEERService Manual may be obtained at a nominal charge fromPIONEER.
1. SAFETY PRECAUTIONS The following check should be performed for thecontinued protection of the customer and servicetechnician.
LEAKAGE CURRENT CHECK Measure leakage current to a known earth ground (waterpipe, conduit, etc.) by connecting a leakage current testersuch as Simpson Model 229-2 or equivalent between theearth ground and all exposed metal parts of the appliance(input/output terminals, screwheads, metal overlays, controlshaft, etc.). Plug the AC line cord of the appliance directlyinto a 120V AC 60Hz outlet and turn the AC power switchon. Any current measured must not exceed 0.5mA.
(FOR USA MODEL ONLY)
Leakagecurrenttester
Reading shouldnot be above0.5mADevice
undertest
Test allexposed metalsurfaces
Also test withplug reversed(Using AC adapterplug as required)
Earthground
AC Leakage Test

3
A-307R, A-207R
2.1 PACKING
Mark No. Description Part No.
2. EXPLODED VIEWS AND PARTS LISTNOTES: • Parts marked by "NSP" are generally unavailable because they are not in our Master Spare Parts List.
• The mark found on some component parts indicates the importance of the safety factor of the part. Therefore, when replacing, be sure to use parts of identical designation.
• Screws adjacent to mark on the product are used for disassembly.
1 Operating Instructions See Contrast table(2)(English)
2 Operating Instructions See Contrast table(2)(German)
3 Operating Instructions See Contrast table(2) (French/Italian/Dutch/Swedish/Spanish/Portugese)
NSP 4 Warranty Card See Contrast table(2)5 Remote Control Unit (CU-A014) AXD71636 Battery Cover AZN2249
NSP 7 Dry Cell Battery (R6P,AA) VEM-0138 Side Pad L AHA7205
9 Side Pad R AHA720610 Sub Pad AHA721811 Packing Case See Contrast table(2)
NSP 12 Literature Bag AHG118013 Packing Sheet AHG7015
14 Operating Instructions See Contrast table(2)(Chinese)
15 Caution Label 220V See Contrast table(2)16 Case Label See Contrast table(2)
NSP 17 Air Cap See Contrast table(2)
18 Power Cord See Contrast table(2) 19 Power Cord with Fuse See Contrast table(2) 20 Fuse (T5A) See Contrast table(2)
21 Operating Instructions See Contrast table(2)(Spanish/Chinese)
(1) PACKING PARTS LIST
(2) CONTRAST TABLEA-307R/MYXJ/EW, MYXJ/GR, SAMXJ, SDXJ, A-207R/MYXJ/EW, MYXJ/GR and MVXJ are constructed the sameexcept for the following :
kraM .oN noitpircseDdnalobmyS
.oNtraP
skrameRR703-A R702-A
WE/JXYM RG/JXYM JXMAS JXDS WE/JXYM RG/JXYM JXVM
PSN
PSN
123
4
1141516171
81910212
)hsilgnE(snoitcurtsnIgnitarepO)namreG(snoitcurtsnIgnitarepO
/nailatI/hcnerF(snoitcurtsnIgnitarepO)eseugutroP/hsinapS/hsidewS/hctuD
draCytnarraW
esaCgnikcaP)esenihC(snoitcurtsnIgnitarepO
V022lebaLnoituaClebaLesaC
paCriA
droCrewoPesuFhtiwdroCrewoP
)A5T(esuFsnoitcurtsnIgnitarepO)esenihC/hsinapS(
8317BRA3817CRA4817CRA
9007YRA
3657DHAdesutoNdesutoNdesutoNdesutoN
4511GDAdesutoNdesutoNdesutoN
desutoN3817CRAdesutoN
9007YRA
3657DHAdesutoNdesutoNdesutoNdesutoN
4511GDAdesutoNdesutoNdesutoN
2417BRAdesutoNdesutoN
desutoN
1857DHA6817CRA3001RRA2307WRAdesutoN
8107GDAdesutoNdesutoNdesutoN
2417BRAdesutoNdesutoN
desutoN
4657DHAdesutoNdesutoNdesutoNdesutoN
8511GDAdesutoNdesutoN5817CRA
8317BRA3817CRA4817CRA
9007YRA
1657DHAdesutoNdesutoNdesutoNdesutoN
4511GDAdesutoNdesutoNdesutoN
desutoN3817CRAdesutoN
9007YRA
1657DHAdesutoNdesutoNdesutoNdesutoN
4511GDAdesutoNdesutoNdesutoN
8317BRAdesutoNdesutoN
9007YRA
1657DHAdesutoNdesutoNdesutoN7801GHA
desutoN6511GDA6401KEAdesutoN
612
172019
13
8
10
11
9
5
7
18
MVXJ type Only
ExceptMVXJ type
1 (Except MYXJ/GR type)
15(SAMXJ type Only)
3 (MYXJ/EW type Only)
14 (SAMXJ type Only)
21 (SDXJ type Only)
16 (SAMXJ type Only)
2 (MYXJ/EW and MYXJ/GR types Only)
4 (MYXJ/EW, MYXJ/GR and MVXJ types Only)
FRONT

4
A-307R, A-207R
2.2 EXTERIOR
25
41
18
28
37
39
34
35
5
3
41
16
1
2
9
30 or 45
31
33
3132
38
27
27 29 or 44
14
39
21
2139
14
20
17
12
22
19
1923
23
23
20
13
39
A-307R/SAMXJ and SDXJ Types Only
A-307R/SAMXJType Only
A-307R Only
42
39
40
46
39
39
7
15
39
4
43
8
15
15
15
6
39
11
17
39
24
39
26
26
39
39
39
39
36
A-307R Only
A-307R/SAMXJ andSDXJ TypesOnly
A-307ROnly

5
A-307R, A-207R
1 FRONT L Assy AWX71232 FRONT R Assy AWX71243 OPT Assy AWX71254 AC PRIMARY Assy See Contrast table(2)
NSP 5 HEADPHONE Assy AWX7114
6 VOLUME Assy AWX71187 AF Assy See Contrast table(2)
8 Fuse (FU1) See Contrast table(2)9 Flexible Cable (19P) ADD7032
(AF CN202-FRONT R CN601)10 • • • • •
11 Power Transformer (T1) See Contrast table(2)NSP 12 Chassis ANA7064
13 Rear Panel See Contrast table(2)14 Insulator PNW276615 Screw ABA1018
16 Screw ABA102717 Screw (4 × 10) ABA704718 Nut ABN-06519 PCB Support AEC700620 Rubber Spacer See Contrast table(2)
NSP 21 PCB Holder AEC7057NSP 22 Cord Clamp F AEC7134
23 PCB Mold AMR2533NSP 24 Damping Plate See Contrast table(2)NSP 25 Shield Plate ANK7043
Mark No. Description Part No. Mark No. Description Part No.
(1) EXTERIOR PARTS LIST
26 Screw PBA109627 LED Lens AAK245928 IR Filter AAK753229 LED Lens T See Contrast table(2)30 Name Plate See Contrast table(2)
31 Rotary Knob A AAB714832 Rotary Knob B AAB714933 Volume Knob AAB715034 Speaker Button AAD743535 Power Joint AAD7439
36 Bonnet Case ANE718337 Panel Base AMB748938 Front Panel See Contrast table(2)39 Screw BBZ30P080FZK40 Screw BCZ30P060FCC
41 Nut NK90FUC 42 Voltage Selector (S2) See Contrast table(2) 43 Fuse (FU2, FU3 : 2A) See Contrast table(2)
44 LED Lens A See Contrast table(2)45 PIONEER Badge See Contrast table(2)
46 Label (Rear Base) See Contrast table(2)
(2) CONTRAST TABLEA-307R/MYXJ/EW, MYXJ/GR, SAMXJ, SDXJ, A-207R/MYXJ/EW, MYXJ/GR and MVXJ are constructed the sameexcept for the following :
kraM .oN noitpircseDdnalobmyS
.oNtraP
skrameRR703-A R702-A
WE/JXYM RG/JXYM JXMAS JXDS WE/JXYM RG/JXYM JXVM
PSN
478888
1111
3102
4292038324
34445464
yssAYRAMIRPCAyssAFA
)A2:1UF(esuF)A5.2:1UF(esuF)A3.6:1UF(esuF
)A52.1:1UF(esuF
)V032-022CA:1T(remrofsnarTrewoPremrofsnarTrewoP
)V042/V022/V721-021/V011CA:1T(lenaPraeR
recapSrebbuR
etalPgnipmaDTsneLDELetalPemaNlenaPtnorF
)2S(rotceleSegatloV
)A2:3UF,2UF(esuFAsneLDEL
egdaBREENOIP)esaBraeR(lebaL
3117XWA9117XWA5201KERdesutoNdesutoNdesutoN
8817STAdesutoN
3467CNA4307CEA
6127RMA4457KAA4007MAA4117BNAdesutoN
desutoNdesutoNdesutoNdesutoN
3117XWA9117XWA5201KERdesutoNdesutoNdesutoN
8817STAdesutoN
3467CNA4307CEA
6127RMA4457KAA4007MAA4117BNAdesutoN
desutoNdesutoNdesutoNdesutoN
5117XWA9117XWAdesutoN6201KERdesutoNdesutoN
desutoN9817STA
5467CNA4307CEA
6127RMA4457KAA4007MAA4117BNA705-XKA
5201KERdesutoNdesutoN9941WRP
5117XWA9117XWAdesutoNdesutoN0301KERdesutoN
desutoN9817STA
4467CNA4307CEA
6127RMA4457KAA4007MAA4117BNA705-XKA
5201KERdesutoNdesutoNdesutoN
3117XWA7117XWAdesutoNdesutoNdesutoN3201KER
0917STAdesutoN
9367CNAdesutoN
desutoNdesutoNdesutoN3947BMAdesutoN
desutoN7357KAA5571MAPdesutoN
3117XWA7117XWAdesutoNdesutoNdesutoN3201KER
0917STAdesutoN
9367CNAdesutoN
desutoNdesutoNdesutoN3947BMAdesutoN
desutoN7357KAA5571MAPdesutoN
3117XWA7117XWAdesutoNdesutoNdesutoN3201KER
0917STAdesutoN
9367CNAdesutoN
desutoNdesutoNdesutoN3947BMAdesutoN
desutoN7357KAA5571MAPdesutoN

A-307R, A-207R
6
A
B
C
D
1 2 3 4
1 2 3 4
3. SCHEMATIC DIAGRAM3.1 OVERALL CONNECTION DIAGRAM
BHEADPHONE ASSY
AWX7114
FFRONT R ASSY
AWX7124
DAF ASSY
AWX7119(A-307R)AWX7117(A-207R)
AVOLUME ASSY
AWX7118
451

A-307R, A-207R
7
A
B
C
D
5 6 7 8
5 6 7 8
Note : When ordering service parts, be sure to refer to "EXPLODED VIEWS and PARTS LIST" or "PCB PARTS LIST".
GOPT ASSYAWX7125
EFRONT L ASSY
AWX7123
CAC PRIMARY ASSYAWX7113(MYXJ/EW, MYXJ/GR, MVXJ)AWX7115(SDXJ, SAMXJ)
ATS7188 : A-307R/MYXJ/EW, MYXJ/GR ( )ATS7190 : A-207R/MYXJ/EW, MYXJ/GR and NVXJ
POWER TRANSFORMERATS7189
(13)A-307R
SDXJ type
SAMXJ type
MYXJ/EW, MYXJ/GR typesMYXJ/EW, MYXJ/GR, MVXJ types
ADG1154 : MYXJ/EW, MYXJ/GR types
ADG1156 : MVXJ type
ADG1158 : SDXJ type
ADG7018 : SAMXJ type
(15)
(17)
S2 : AKX-507VOLTAGESELECTOR
A-307R/SDXJ, SAMXJ
POWER TRANSFORMER
AC POWER CORD

A-307R, A-207R
8
A
B
C
D
1 2 3 4
1 2 3 4
A B
D J551A
BHEADPHONE ASSY
AWX7114
EJ3
A VOLUME ASSY
AWX7118
D CN203
: AUDIO SIGNAL ROUTE
3.2 VOLUME AND HEADPHONE ASSEMBLIES

A-307R, A-207R
9
A
B
C
D
1 2 3 4
1 2 3 4
C
3.3 AC PRIMARY ASSY
C AC PRIMARY ASSYAWX7113 (MYXJ/EW, MYXJ/GR, MVXJ)AWX7115 (SDXJ, SAMXJ)
SDXJ, SAMXJ types
MYXJ/EW, MYXJ/GR, MVXJ types
SDXJ type
SAMXJ type
MYXJ/EW, MYXJ/GR, MVXJ types
MYXJ/EW, MYXJ/GR, types
REK1025T2AL250V
REK1025T2AL250V
S801ASG1035
LIVE
NEUTRAL
TO POWERTRANSFORMER
TOAC POWERCORD
TO S2VOLTAGESELECTOR
A-307RSDXJ, SAMXJ
• NOTE FOR FUSE REPLACEMENTFOR CONTINUED PROTECTION AGAINST RISK OF FIRE.REPLACE WITH SAME TYPE AND RATINGS ONLY.
CAUTION -
POWER

A-307R, A-207R
10
A
B
C
D
1 2 3 4
1 2 3 4
3.4 AF ASSY
D
IDLE ADJ.(L CH)
IDLE ADJ.(R CH)
C314,C338 :
C313,C337 :
D
A CN501
: AUDIO SIGNAL ROUTE
AF ASSYAWX7119 (A-307R)AWX7117 (A-207R)

A-307R, A-207R
11
A
B
C
D
5 6 7 8
5 6 7 8
D
CAUTION : FOR CONTINUED PROTECTION AGAINST RISK OF FIRE. REPLACE ONLY WITH SAME TYPE NO. 491001 MFD, BY LITTELFUSE INK. FOR IC454 (AEK7009).
C32
1–C
324:
R36
1–R
366:
Q333–Q336:
F CN601
B J551
TO
PO
WE
RT
RA
NS
FO
RM
ER
C451
A-307R A-207RACH7048(10000/42)
ACH7080(6800/42)
C452 ACH7049(10000/42)
ACH7081(6800/42)
A-307R, A-207R
12
A
B
C
D
1 2 3 4
1 2 3 4
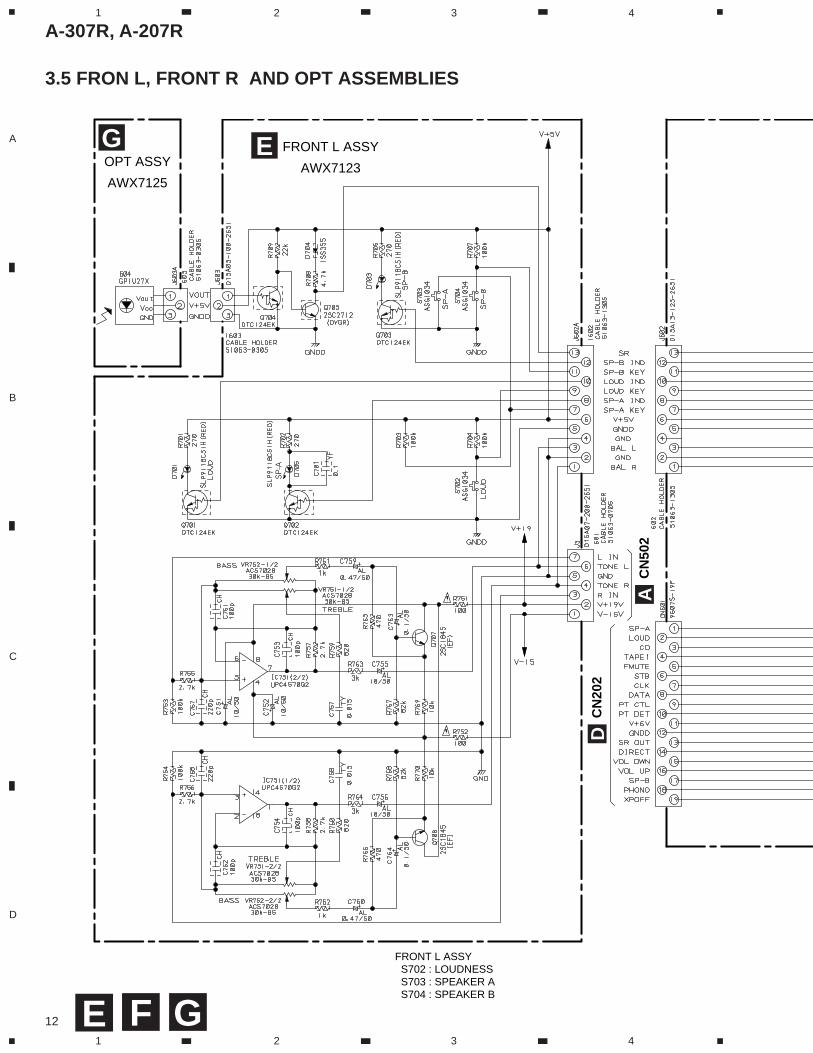
E FRONT L ASSY
AWX7123
GOPT ASSY
AWX7125
DC
N20
2
AC
N50
2
FRONT L ASSY S702 : LOUDNESS S703 : SPEAKER A S704 : SPEAKER B
3.5 FRON L, FRONT R AND OPT ASSEMBLIES
E GF

A-307R, A-207R
13
A
B
C
D
5 6 7 8
5 6 7 8
F
F FRONT R ASSY
AWX7124
FRONT R ASSY S601 : INPUT SELECTOR
CDTUNERPHONELINETAPE1/MD
S602 : DIRECT S603 : TAPE2 MONITOR
INPUT SELECTOR

A-307R, A-207R
14
A
B
C
D
1 2 3 4
1 2 3 4
A
4. PCB CONNECTION DIAGRAM
NOTE FOR PCB DIAGRAMS :1. Part numbers in PCB diagrams match those in the schematic diagrams.2. A comparison between the main parts of PCB and schematic diagrams is shown below.
3. The parts mounted on this PCB include all necessary parts for several destinations. For further information for respective destinations, be sure to check with the schematic diagram.4. View point of PCB diagrams.Symbol In PCB
DiagramsSymbol In SchematicDiagrams
Part Name
B C E
D
D
G
G
S
S
B C E
B C E
D G S
B C E B C E
B C E
Transistor
Transistorwith resistor
Field effecttransistor
Resistor array
3-terminalregulator
CapacitorConnector
P.C.Board Chip Part
SIDE A
SIDE B
SIDE A
SIDE B
VOLUME ASSYA
E J3
D CN203(ANP7232-A)
Q513,Q514
VR501
VOLUME ASSYA
(ANP7232-A)
Q504,Q501
Q502,Q503
Q506,Q505
Q508,Q507
Q510,Q509
4.1 VOLUME ASSY
A-307R, A-207R
15
A
B
C
D
1 2 3 4
1 2 3 4
4.2 HEADPHONE AND AC PRIMARY ASSEMBLIES
B C
(ANP7232-A)
HEADPHONE ASSYB
J551AD (ANP7232-A)
HEADPHONE ASSYB
(ANP7232-A)
POWERTRANSFORMER
AC POWERCORD
VOLTAGESELECTOR(SDXJ and SAMXJ Types)
AC PRIMARY ASSYC
(ANP7232-A)
AC PRIMARY ASSYC
SIDE A
SIDE B
SIDE A SIDE B
A-307R, A-207R
16
A
B
C
D
1 2 3 4
1 2 3 4
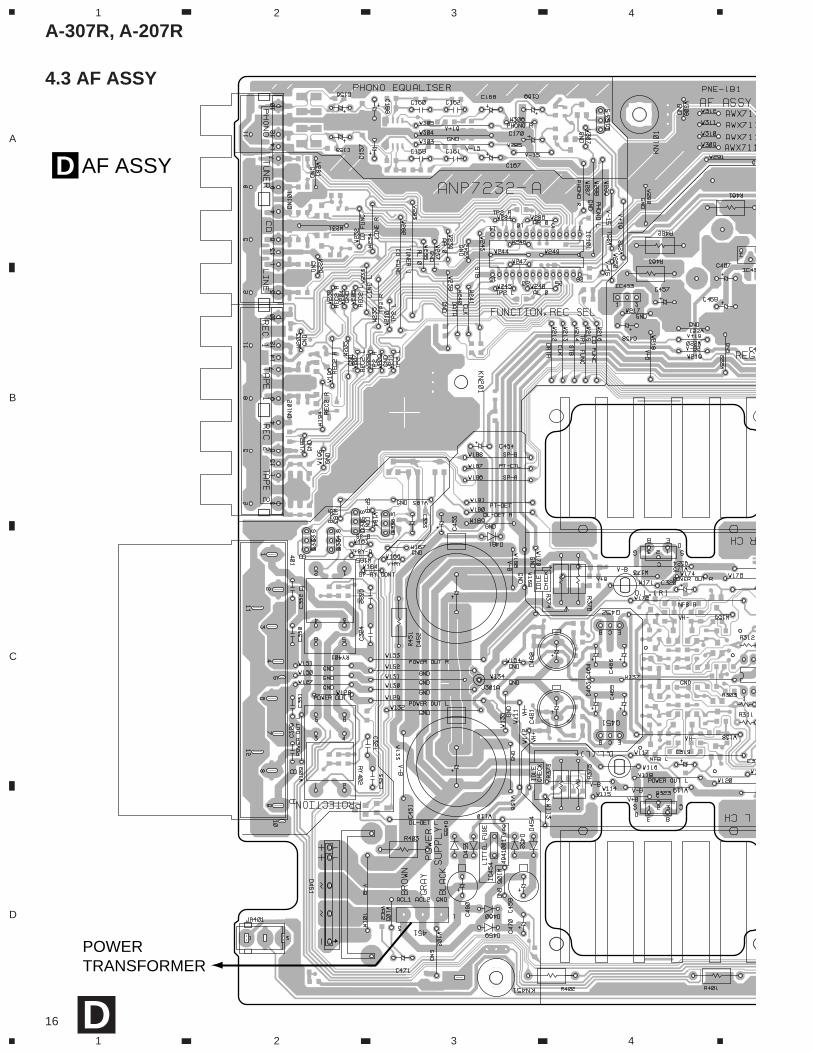
4.3 AF ASSY
D
AF ASSYD
POWERTRANSFORMER
A-307R, A-207R
17
A
B
C
D
5 6 7 8
5 6 7 8
D
SIDE A
F CN601
A CN501
B J551
(ANP7232-A)
Q153
Q341
IC101
IC451-IC453
Q333-Q336
Q324,Q326
Q452
IC301
Q451
Q323,Q325
IC454
VR301
VR302

A-307R, A-207R
18
A
B
C
D
1 2 3 4
1 2 3 4
D
AF ASSYD

A-307R, A-207R
19
A
B
C
D
5 6 7 8
5 6 7 8
D
SIDE B
(ANP7232-A)
Q151IC151Q152Q338,Q337
Q340,Q339
Q102
Q101
Q104
Q103
Q332Q328,Q327
Q318,Q330
Q322,Q320
Q316,Q314
Q312,Q310
Q304,Q303Q311,Q309Q315,Q313
Q321,Q319
Q317,Q329
Q331,Q343

A-307R, A-207R
20
A
B
C
D
1 2 3 4
1 2 3 4
4.4 FRONT L ASSY
E
(ANP7231-A)
FRONT L ASSYE
Q702,Q703
Q704,Q705
Q708Q707
VR751VR752
Q701,IC751
(ANP7231-A)
J602FCN502AJ603AGFRONT L ASSYE
SIDE A
SIDE B

A-307R, A-207R
21
A
B
C
D
1 2 3 4
1 2 3 4
4.5 FRONT R AND OPT ASSEMBLIES
GF(ANP7231-A)
OPT ASSYG
J603E(ANP7231-A)
OPT ASSYG
FRONT R ASSYF
(ANP7231-A)CN202DJ602AE
IC601
VR601
FRONT R ASSYF
(ANP7231-A)
Q601-Q606
Q614-Q616
Q608-Q613
SIDE A
SIDE B
SIDE A SIDE B
22
A-307R, A-207R
Mark No. Description Part No. Mark No. Description Part No.
Mark No. Description Part No. Mark No. Description Part No.
5. PCB PARTS LISTNOTES:•Parts marked by "NSP" are generally unavailable because they are not in our Master Spare Parts List.
•The mark found on some component parts indicates the importance of the safety factor of the part.Therefore, when replacing, be sure to use parts of identical designation.
•When ordering resistors, first convert resistance values into code form as shown in the following examples. Ex.1 When there are 2 effective digits (any digit apart from 0), such as 560 ohm and 47k ohm (tolerance is shown by J=5%, and K=10%).
560 Ω → 56 × 101 → 561 ........................................................ RD1/4PU 5 6 1 J47k Ω → 47 × 103 → 473 ........................................................ RD1/4PU 4 7 3 J0.5 Ω → R50 ..................................................................................... RN2H R 5 0 K1 Ω → 1R0 ..................................................................................... RS1P 1 R 0 K
Ex.2 When there are 3 effective digits (such as in high precision metal film resistors).5.62k Ω → 562 × 101 → 5621 ...................................................... RN1/4PC 5 6 2 1 F
kraM noitpircseDdnalobmyS
.oNtraP
skrameRR703-A R702-A
WE/JXYM RG/JXYM JXMAS JXDS WE/JXYM RG/JXYM JXVM
PSN
PSN
PSN
YSSAXELPMOCFAYSSAEMULOV
YSSAENOHPDAEHYSSAYRAMIRPCA
YSSAFA
YSSALORTNOCYSSALTNORFYSSARTNORF
YSSATPO
8537MWA8117XWA4117XWA3117XWA9117XWA
3107GWA3217XWA4217XWA5217XWA
8537MWA8117XWA4117XWA3117XWA9117XWA
3107GWA3217XWA4217XWA5217XWA
9537MWA8117XWA4117XWA5117XWA9117XWA
3107GWA3217XWA4217XWA5217XWA
9537MWA8117XWA4117XWA5117XWA9117XWA
3107GWA3217XWA4217XWA5217XWA
7537MWA8117XWA4117XWA3117XWA7117XWA
3107GWA3217XWA4217XWA5217XWA
7537MWA8117XWA4117XWA3117XWA7117XWA
3107GWA3217XWA4217XWA5217XWA
7537MWA8117XWA4117XWA3117XWA7117XWA
3107GWA3217XWA4217XWA5217XWA
LIST OF WHOLE PCB ASSEMBLIES
VOLUME ASSYSEMICONDUCTORS
Q513,Q514 2SK246Q501-Q510 2SK303Q511 DTC124EKD505,D506,D509,D510 1SS352D501-D504,D507,D508 1SS355
CAPACITORSC501,C502 CCSQCH271J50C513,C514 CEAT100M50C516 CEAT330M25C503,C504 CFTYA473J50
C515 CKCYF103Z50
C511 CKSQYF473Z50
RESISTORS R530 RS1/10S100J
VR501 ACX7021Other Resistors RS1/10S J
OTHERSCN501 16P SOCKET KP200TA16LCN502 CONNECTOR 7P KPE7
PCB BINDER VEF1040
A HEADPHONE ASSYCAPACITORS
C551,C552 CKSQYB392K50
OTHERS3P CABLE HOLDER 51063-0305
J552 CORD WITH PLUG DE005WE0JA501 HEADPHONE JACK RKN1002J551 JUMPER WIRE D15A03-150-2651
AC PRIMARY ASSY(1) CONTRAST TABLEAWX7113 and AWX7115 are constructed the same exceptfor the following :
(2) PARTS LIST FOR AWX7113
SWITCH S801 ASG1035
CAPACITORS C801,C802 (0.01µF/AC250V) ACG7020
OTHERS CN801 AC INLET AKP7005
H1,H2 FUSE CLIP AKR7001
B
C
Mark Symbol and DescriptionPart No.
RemarksAWX7113 AWX7115
H3-H6 FUSE CLIP Not used AKR7001 3P OUTLET Not used AKP1053

23
A-307R, A-207R
Mark No. Description Part No. Mark No. Description Part No.
AF ASSY(1) CONTRAST TABLEAWX7119 and AWX7117 are constructed the same exceptfor the following :
(2) PARTS LIST FOR AWX7119
SEMICONDUCTORS IC454 (1A) AEK7009 IC453 BA178M06T IC451 BA178M15T IC452 NJM79M15FA
IC101 TC9163AN
IC301 UPC4570CIC151 UPC4570G2Q311,Q312,Q329,Q330 2SA1162Q337,Q338 2SA1162Q313,Q314,Q321,Q322 2SA1255
Q452 2SA1837Q309,Q310,Q327,Q328 2SC2712Q339,Q340 2SC2712Q315,Q316,Q319,Q320 2SC3138Q303,Q304 2SC3326
Q451 2SC4793Q341 2SC5174PQ101-Q104 2SK303Q151 DTA124EKQ152 DTC124EK
Q153 DTC124ESQ331,Q332,Q343 DTC143EKQ333-Q336 DTC143ESQ317,Q318 IMX1
Q323,Q324 IRF530
Q325,Q326 IRF9530D101-D104,D151,D301-D310 1SS355D401-D404 1SS355
D451 D5SBA20 D452-D455,D459,D460 S5566G(TPB2)
D461 S5566G(TPB2)D311,D312 UDZ15BD457,D458 UDZ36BD456 UDZ4.7BD341 UDZS5.1B
D462 UDZS5.6B
COILSL151-L154 LCTA221J3225
RELAYSRY401-RY403 ASR7014
CAPACITORSC451 (10000µF/42V) ACH7048C452 (10000µF/42V) ACH7049
C329,C331 CCCSL101K2HC313-C316,C337-C340 CCSQCH121J50
C153,C154 CCSQCH151J50
C303,C304 CCSQCH221J50 C163,C164 CCSQCH390J50 C101-C110 CCSQCH470J50
C334 CEANP100M16C471 CEANP1R0M2A
C172 CEANP1R0M50C333 CEANP470M10C155,C156,C167,C168 CEAT100M50C317-C320,C335,C336 CEAT100M50C453-C458,C465,C466,C469 CEAT100M50
C461,C462 CEAT101M2AC467,C468 CEAT1R0M50C470 CEAT3R3M50C169,C170 CEAT470M25C459,C460,C463,C464 CEAT470M50
C157,C158 CEAT471M6R3C301,C302,C305,C306 CEBA100M50C307,C308 CEBA221M25C321-C324 CFTYA224J50C173 CFTYA564J50
C330,C332 CKCYB331K2HC165,C166 CKSQYB222K50C111-C113,C171,C341 CKSQYF473Z50
C472 CKSQYF473Z50C159,C160 CQMA243J50
C161,C162 CQMBA823J50
RESISTORSR311,R312 RDR1/4VM152JR301,R302 RDR1/4VM240JR303,R304 RDR1/4VM561J
R143 RS1/10S100J R133,R134,R171,R172 RS1/10S101J
R351-R354,R452 RS1/10S101J R317,R318,R331,R332 RS1/10S122J R357-R360 RS1/10S151J R377,R378,R453 RS1/10S153J R465-R470 RS1/10S161J
R361-R366 RS1/10S1R5J R339-R346 RS1/10S221J R454 RS1/10S273J R460 RS1/10S2R2J R355,R356 RS1/10S432J
R459 RS1/10S470J R464 RS1/10S4R7J R379,R380 RS1/10S682J R451 RS1LMF270J R401,R402 RS1LMF331J
R461-R463 RS1LMF390J R403 RS1LMF821J R373-R376 RS1LMFR22J
VR301,VR302 (2.2kΩ) VCP1123Other Resistors RS1/10S J
D
Mark Symbol and DescriptionPart No.
RemarksAWX7119 AWX7117
C451 (10000µF/42V) ACH7048 Not usedC451 (6800µF/42V) Not used ACH7080C452 (10000µF/42V) ACH7049 Not usedC452 (6800µF/42V) Not used ACH7081

24
A-307R, A-207R
Mark No. Description Part No. Mark No. Description Part No.
OTHERS3P CABLE HOLDER 51063-0305SCREW ABA1007SCREW ABA1052
CN101,CN102 8P PIN JACK AKB70238P SPEAKER TERMINAL AKE1011
HEAT SINK M ANH-813HEAT SINK B ANH1021
CN202 FFC CONNECTOR 19P HLEM19S-1CN203 16P PLUG KM200TA16JA401 REMOTE CONTROL JACK RKN1004
PCB BINDER VEF1040KN101,KN201,KN301,KN451 VNF1084
EARTH METAL FITTING
FRONT L ASSYSEMICONDUCTORS
IC751 UPC4570G2Q707,Q708 2SC1845Q705 2SC2712Q701-Q704 DTC124EKD704 1SS355
D701,D703,D705 SLP9118C51H
SWITCHESS702-S704 ASG1034
CAPACITORSC753,C754,C761,C762 CCSQCH101J50C767,C768 CCSQCH221J50C751,C752,C755,C756 CEAL100M50C763,C764 CEALR10M50C759,C760 CEALR47M50
C757,C758 CFTYA153J50C701 CKSQYF104Z25
RESISTORS R751,R752 RS1/10S101J
VR751,VR752 (30kΩ) ACS7028Other Resistors RS1/10S J
OTHERS3P CABLE HOLDER 51063-03057P CABLE HOLDER 51063-070513P CABLE HOLDER 51063-1305
J603 JUMPER WIRE D15A03-100-2651J3 JUMPER WIRE D15A07-200-2651
FRONT R ASSYSEMICONDUCTORS
IC601 PD5443AQ609 2SA1162Q610 2SC2712Q611-Q613,Q615,Q616 DTA124EKQ601-Q606,Q608,Q614 DTC124EK
D608-D612,D614-D621 1SS355D607 SLP6118C51HD601-D606 SLP9118C51H
SWITCHESS602,S603 ASG1034S601 ASX7008
CAPACITORSC602 CEAT102M6R3C604 CEJA2R2M50C603,C611 CKSQYF103Z50C607,C608 CKSQYF104Z25C605,C606,C610 CKSQYF473Z50
RESISTORSVR601 (500kΩ) ACS7029Other Resistors RS1/10S J
OTHERSX601 CERAMIC RESONATOR VSS1014
(4.19MHz)13P CABLE HOLDER 51063-1305
CN601 19P FFC CONNECTOR 9607S-19FJ602 JUMPER WIRE D15A13-125-2651
OPT ASSYOTHERS
3P CABLE HOLDER 51063-0305REMOTE RECEIVER UNIT GP1U27X
E
F
G

A-307R, A-207R
25
6. ADJUSTMENT6.1 IDLE CURRENT ADJUSTMENT¶ CAUTION : Heatsinks’ (Q323–Q326) DC level is equal to +B or -B.
Don’t touch them or you will be electric shocked.
1. Connect the measuring instrument as shown in Fig.6-1. (R373 or R374)
2. Turn the POWER switch to ON.
3. Adjust VR301 (VR302) so that the voltage between both sides of R373 (R374) becomes 10mV ± 1mV.
4. Ages for 5 minutes.
5. Adjust VR301 (VR302) so that the voltage between both sides of R373 (R374) becomes 11mV ± 1mV.
VR301 VR302
R375 R376
R373 R374Heat Sink
CN202
AF ASSY
DC Voltmeter DC Voltmeter
SIDE A
Heat Sink
Heat Sink
Heat Sink
Fig.6-1 Adjustment Method

A-307R, A-207R
26
No. Pin name I/O Function24 P51/XCOUT I SPEAKER-A KEY input.25 RESET I Reset pin.26 P30/INT0 I BACK UP detection pin. interrupt specification.27 P31/INT1 I Not used.28 P32/CNTR0 I REC selector input 1.29 P33/CNTR1 I REC selector input 2. interrupt specification.30 P40 O Volume DOWN data output.31 P41 O Volume UP data output.32 P42 I FUNCTION selector input 1.33 P43 I FUNCTION selector input 2.
34 P00 IWAKE UP input.Key on wake up specification.
35 P01 O Not used.
36 P02 IDIRECT KEY input.Key on wake up specification.
37 P03 O Protection control pin.38 P04 I Output error detection pin39 P05 O MUTING control pin.
40 P06 ILOUDNESS KEY input.Key on wake up specification.
41 P07 O Not used.42 P52 I TAPE2 KEY input.
No. Pin name I/O Function1 P53 I Remote control signal input pin.2 P17/SRDY O STB for TC9163N.3 P16/CLK O CLOCK for TC9163N.4 P15/SOUT O DATA for TC9163N.5 P14/SIN O CD INDICATOR.6 P13/T1 O TUNER INDICATOR.7 P12/T0 O PHONO INDICATOR.8 P11 O LINE INDICATOR.9 P10 O TAPE1 INDICATOR.10 P27/IN7 O SPEAKER-A INDICATOR.11 P26/IN6 O SPEAKER-B INDICATOR.12 P25/IN5 O LOUDNESS INDICATOR.13 P24/IN4 O Not used.14 P23/IN3 O Not used.15 P22/IN2 O DIRECT INDICATOR.16 P21/IN1 O TAPE2 INDICATOR.17 P20/IN0 O FUNCTION switch MUTE.18 VREF I Pulls up to 5V.19 XIN I 4.19MHz .20 XOUT O Ceramic vibrating and connecting terminal.21 VSS - Digatal GND.22 VCC - Power supply +5V.23 P50/XCIN I SPEAKER-B KEY input.
7. GENERAL INFORMATION7.1 IC7 PD5443A (FRONT R ASSY : IC601)¶¶¶¶¶ REMOTE CONTROL AMP MICROCOMPUTER¶¶¶¶¶ Pin Assignment (Top view)
• The information shown in the list is basic information andmay not correspond exactly to that shown in the schematicdiagrams.
¶¶¶¶¶ Pin Function
1
2
3
4
5
6
7
8
9
10
11
12
13
14
15
16
17
18
19
20
21 22
23
24
25
26
27
28
29
30
31
32
33
34
35
36
37
38
39
40
41
42SR
STB
CLK
DATA
CD-IND
TU-IND
PH-IND
LI-IND
T1-IND
SPA-IND
SPB-IND
LOU-IND
NC
NC
DIR-IND
T2-IND
VREF
XIN
XOUT
VSS
F-MUTE
P53
P17/SRDY
P16/CLK
P15/SOUT
P14/SIN
P13/T1
P12/T0
P11
P10
P27/IN7
P26/IN6
P25/IN5
P24/IN4
P23/IN3
P22/IN2
P21/IN1
P20/IN0
VREF
XIN
XOUT
VSS
T2
NC
LOUD
M-CTRL
P-DET
P-CTRL
DIRECT
NC
WAKE UP
FUNC2
FUNC1
V-UP
V-DOWN
RSEL2
RSEL1
NC
VCC
P52
P07
P06
P05
P04
P03
P02
P01
P00
P43
P42
P41
P40
P33/CNTR1
P32/CNTR0
P31/INT1
P30/INT0
RESET
P51/XCOUT
P50/XCIN
VCC
BACK UP
RST
SPA
SPB

27
A-307R, A-207R
2
111 1
1
5
1
5
×2 ×2
3 4 ×25 ×5
×3
×2
8
7
7
79
Screw for Rear Panel
Rear Panel
Rear Panel
Front Panel
Diagnose the AF Assy.
Chassis
Chassis6 6 6
Cutting Pliers
PCB Support
×3
Unhook lead wires.
1 3
2
ForService
10
13
11
12
∗ : Be careful not to injurethe Front Panel.
7.2 DISASSEMBLY
28
A-307R, A-207R
+B
L
SP
-A
SP
-B
H.P
PO
WE
R A
MP
WR
LC39
dB
FU
NC
MU
TE
DIR
EC
TO
N/O
FF
RIA
A
37dB
TO
NE
AN
DB
ALA
NC
E
DIR
EC
T E
NE
RG
Y M
OS
PH
ON
O
RE
C
TU
NE
R
LIN
E
CD
TA
PE
1/M
D
RE
C
TA
PE
2M
ON
ITO
R
PR
OT
EC
TIO
N R
Y
FU
NC
TIO
N
2.8m
V/5
0kΩ
200m
V/5
0kΩ
200m
V/1
kΩ
200m
V/5
0kΩ
200m
V/1
kΩ
CN
101
CN
102
UN
US
UA
LO
UT
PU
TD
ET
EC
TIO
N
–BL
+B
H
+19
–15
TO
PO
WE
R S
TA
GE
TO
FU
NC
TIO
N S
W
DIR
EC
T, L
OU
DN
ES
S O
N/O
FF
VO
LUM
E U
P/D
OW
N
FU
NC
MU
TE
ON
/OF
F
TO
PR
OT
EC
TIO
N R
YS
R IN
PU
T
FR
OM
FU
NC
TIO
N S
EL
KE
Y IN
PU
TS
µ-C
OM
FR
OM
UN
US
UA
LO
UT
PU
T D
ET
EC
TIO
N
TO
VO
LTA
GE
ST
AG
E
TO
µ-C
OM TO
OP
AM
PR
Y
LED
+ 6
–BH
D
IC10
1D
IC60
1F
Q50
7A
Q50
9A
Q30
3
RY
401
RY
402
RY
403
D
D45
1D
401D
JA50
1B
S80
1C
FU
1T
1C
D45
4D
455
IC45
3 IC45
1
IC45
2
D
D
D
D
IC75
1V
R75
1V
R75
2E
VR
601
F
Q50
5A
IC15
1D
ON
/OF
F
LOU
DN
ES
S
VO
LUM
E
UP
/DO
WN
M
Q50
1Q
503
A
Q33
7-Q
340
DVR
501
A
RE
GU
LAT
OR
7.3 BLOCK DIAGRAM
29
A-307R, A-207R
REAR PANEL
1 GND (Turntable ground) terminal
2 PHONO terminals
3 TUNER terminals
4 CD terminals
5 LINE terminals
6 TAPE 1/MD REC (OUT) terminals
7 TAPE 1/MD PLAY (IN) terminals
8 TAPE 2 MONITOR REC (OUT) terminals
9 TAPE 2 MONITOR PLAY (IN) terminals
0 SPEAKERS B terminals (Right channel)
- SPEAKERS B terminals (Left channel)
= SPEAKERS A terminals (Right channel)
~ SPEAKERS A terminals (Left channel)
! CONTROL OUT jackThis jack is for output of control signals when operating othercomponents bearing the Î mark with the attached remotecontrol unit.
@ AC INLET jackConnect power cord to here and an AC wall socket, or the ACoutlet of an audio timer.If you are going to be away from home for a long period of time,disconnect the unit from the wall socket.
NOTES:If you use an other power cord than provided, we cannotassume the liabilities in what may occur as a result of it.(The provided power cord has a current capacity of 2.5 A.)
SIGNALGND
L
R
PHONO
IN
TUNER
IN
CD
IN
LINE
IN
TAPE 1/MD
REC PLAY REC PLAY
TAPE 2 MONITOR
OUT INOUT IN
L
R
SPEAKERS
AC INLET
CONTROL
OUT
R L
R A
B
L
8. PANEL FACILITIES AND SPECIFICATIONS8.1 PANEL FACILITIES

30
A-307R, A-207R
1 POWER (— OFF/_ ON) switchPress to turn power to the unit ON and OFF.This unit cannot be turned ON and OFF using the remotecontrol unit.
2 REMOTE CONTROL SENSOR window
3 VOLUME controlUse to adjust the volume level.
4 INPUT SELECTOR knob/indicatorsTurn the knob clockwise or counterclockwise so that theindicator lights for your desired input source. Turning the knobclockwise causes the lit indicator to right. Turning counter-clockwise causes it to left.CD : For compact disc playback with a CD player.TUNER : For AM or FM broadcast reception with a tuner.PHONO : For record playback with a turntable.LINE : Set to this position when listening to the
program from a component connected to theLINE terminals.
TAPE 1/MD : For playback with a cassette deck or MDrecorder connected to TAPE 1/MD terminals.
5 TAPE 2 MONITOR button/indicatorUse when there is an adaptor component (graphic equalizer,etc.) or cassette deck connected to the TAPE 2 MONITORterminals.On : Indicator lights when using the adaptor component or
listening to the cassette deck.Off : Indicator goes off when not in use.
NOTES:÷ When no connections are made to the TAPE 2 MONITOR
terminals, or when they are not in use, be sure to set thisswitch to the off position. (No sound will be heard if it is setto the on position.)
÷ When the TAPE 2 MONITOR indicator is on and the INPUTSELECTOR knob is not set to TAPE 1/MD, the signalswhich are input through TAPE 2 MONITOR are then outputat TAPE 1/MD REC OUT.
6 BALANCE controlShould normally be left in the center position. Adjust balanceif the sound is louder from one of the speakers. If the right sideis louder, turn toward the L (left) position and if the left side islouder, turn toward the R (right) position.
NOTE:This control does not operate when the DIRECT button is in theon position.
The illustration shows the A-307R.
PHONES
A SPEAKERS B
STEREO AMPLIFIER
TAPE 1/MD
TAPE 2MONITORLINETUNER PHONOCD
BASS
+–
TREBLE
+–
VOLUME
MIN MAX
LOUDNESS DIRECT
BALANCE
RL
INPUT SELECTOR
TAPE 2MONITOR
POWER
FRONT PANEL

31
A-307R, A-207R
7 DIRECT button/indicatorUse this button when you do not wish to pass the output frominput terminal equipment through the various frequencyadjusting circuits (BASS, TREBLE, BALANCE, LOUDNESS).On : The indicator lights: The signals passing through the
input terminals are reproduced without passing throughthe various frequency adjusting circuits. This results inflat, pure sound which is a more faithful reproduction ofthe input source.
Off : The indicator goes off: The signal passes through thevarious frequency adjusting circuits.
8 LOUDNESS button/indicatorUse when listening at low volume levels.On : The indicator lights: Boosts low and high frequencies to
give added punch to playback even at a low volumelevel.
Off : The indicator goes off: Should normally be left in thisposition.
NOTE:This button does not operate when the DIRECT button is in theon position.
9 TREBLE tone controlUse to adjust the high-frequency tone. The center position isthe flat (normal) position. When turned to the right, high-frequency tones are emphasized; when turned to the left, high-frequency tones are de-emphasized.
NOTE:This control does not operate when the DIRECT button is in theon position.
0 BASS tone controlUse to adjust the low-frequency tone. The center position is theflat (normal) position. When turned to the right, low-frequencytones are emphasized; when turned to the left, low-frequencytones are de-emphasized.
NOTE:This control does not operate when the DIRECT button is in theon position.
- SPEAKERS B (ON/OFF) button/indicatorUse this button to listen to the speaker system connected toSPEAKERS B terminals.ON : The indicator lights. Sound is heard from the speaker
system.OFF : The indicator goes off. No sound is heard from the
speaker system. Set to this position when listening withheadphones.
= PHONES jackWhen using headphones, insert the plug into this jack.
NOTE:The speakers continue to output sound even when headphonesare plugged into this jack.To mute the sound from the speakers, press the SPEAKERSbutton to OFF.
~ SPEAKERS A (ON/OFF) button/indicatorUse this button to listen to the speaker system connected toSPEAKERS A terminals.ON : The indicator lights. Sound is heard from the speaker
system.OFF : The indicator goes off. No sound is heard from the
speaker system. Set to this position when listening withheadphones.

32
A-307R, A-207R
1 CD POWER buttonSwitches CD player power STANDBY/ON.
2 TAPE SELECT buttonSelects the cassette No. (1 to 6) for multi-cassette changer.
3 DECK II buttonTo operate Deck II, press this button before pressing theoperating buttons. Also, when using a single deck, press thisbutton before pressing the operating buttons.
4 DECK I buttonTo operate Deck I, press this button before pressing theoperating buttons.
5 DISC SELECT buttonPress this to select discs on a multi or twin tray compact discplayer.
6 Input selector buttonUse to select the playback source.CD : For compact disc playback with a CD player.TUNER : For AM or FM broadcast reception with a tuner.PHONO : For record playback with a turntable.TAPE 1 : For playback with a cassette deck or MD deck
recorder connected to TAPE 1/MD terminals.TAPE 2 : For playback with a cassette deck or adaptor
connected to TAPE 2 MONITOR terminals.LINE : For playback with a component connected to the
LINE terminal.
7 TUNER POWER buttonSwitches TUNER power STANDBY/ON.
8 TAPE POWER buttonSwitches the cassette deck power STANDBY/ON.(Can not turn ON/OFF some cassette decks.)
9 TAPE operation buttons2, 3 : Playback in the direction of the arrows.7 : Stop1, ¡ : Tape fast forward/reverse.
0 CD player operation buttons4 : Returns you to the start of the current track.
(Track search)¢ : Takes you to the start of the next track.
(Track search)7 : Stop3 : Play
- STATION + (up), – (down) buttonsCalls each station number in sequence.
= VOLUME + (up), – (down) buttons+ ........................................................ Increases the volume.– ...................................................... Decreases the volume.
NOTE:When the accessory remote control unit is used to operateother Pioneer components with the Î mark, it cannot be usedto operate functions which do not correspond to the functionslisted on the remote control unit.
STEREO AMPLIFIERREMOTE CONTROL UNIT
CD TUNER TAPE
TAPESELECT
DECK Ι DECK ΙΙTAPE
CD
DISCSELECT STATION
TUNER
STANDBY/ON
CD TUNER PHONO
VOLUMETAPE 1 TAPE 2 LINE
+
–
– +
REMOTE CONTROL

33
A-307R, A-207R
Amplifier SectionContinuous power output(both channels driven at 20 Hz to 20 kHz)∗∗[A-307R]
T.H.D. 0.1 %, 8 Ω ..................................... 45 W + 45 W∗T.H.D. 0.15 %, 4 Ω ................................... 65 W + 65 W∗
[A-207R]T.H.D. 0.1 %, 8 Ω ..................................... 35 W + 35 W∗T.H.D. 0.15 %, 4 Ω ................................... 45 W + 45 W∗
DIN Continuous power output(both channels driven at 1 kHz)[A-307R]
T.H.D. 1.0 %, 8 Ω ...................................... 55 W + 55 WT.H.D. 1.0 %, 4 Ω ...................................... 80 W + 80 W
[A-207R]T.H.D. 1.0 %, 8 Ω ...................................... 45 W + 45 WT.H.D. 1.0 %, 4 Ω ...................................... 60 W + 60 W
Total harmonic distortion∗∗[A-307R]
20 Hz to 20 kHz, 22.5 W, 8 Ω ............................ 0.08 %∗[A-207R]
20 Hz to 20 kHz, 17.5 W, 8 Ω ............................ 0.08 %∗÷ Power output specification is for when power supply is
230V.
Input sensitivity/impedancePHONO (MM) ........................................... 2.8 mV/50 kΩCD, TUNER, LINE, TAPE 1/MD, TAPE 2 MONITOR.................................................................. 200 mV/50 kΩ
PHONO (MM) overload level1 kHz, T.H.D. 0.1 % ............................................ 150 mV
Output level/impedanceTAPE 1 REC, TAPE 2 MONITOR REC..... 200 mV/1 kΩ
Frequency responsePHONO (MM) ......................... 20 Hz to 20 kHz, ±0.5 dBCD, TUNER, LINE, TAPE 1/MD, TAPE 2 MONITOR.................................................... 5 Hz to 100 kHz, +0
–3 dB∗Tone control
BASS ....................................................... ±8 dB (100 Hz)TREBLE................................................... ±8 dB (10 kHz)
Loudness contour (volume control set at –30 dB position)........................................ +6 dB (100 Hz)/+4 dB (10 kHz)
Signal-to-Noise ratio (IHF short circuit, A network)PHONO (MM, 5 mV input) ................................... 85 dB∗
CD, TUNER, LINE, TAPE 1/MD, TAPE 2 MONITOR............................................................................ 106 dB∗
Signal-to-Noise ratio (DIN, continuous power/50 mW)PHONO (MM) ............................................. 71 dB/67 dB∗CD, TUNER, LINE, TAPE 1/MD, TAPE 2 MONITOR................................................................... 91 dB/71 dB∗
Power Supply/MiscellaneousPower requirements ................... AC 220 – 230 V, 50/60 HzPower consumption
[A-307R] ................................................................ 140 W[A-207R] ................................................................ 130 W
Dimensions (including knobs and other protruding parts)...................................... 420 (W) x 114 (H) x 307 (D) mm
Weight (without package)[A-307R] .................................................................5.9 kg[A-207R] .................................................................4.7 kg
AccessoriesRemote control unit ............................................................. 1Batteries (AA/R6P) .............................................................. 2Power cord (Rated current 2.5 A) ....................................... 1Operating instructions ......................................................... 1Warranty card ..................................................................... 1
NOTE:Specifications and design are subject to possible modifica-tions without notice, due to improvements.
∗ Measured with DIRECT button set to on.∗∗ Measured by Audio Spectrum Analyzer.
8.2 SPECIFICATIONS
Related Documents