VCS Smart Email Inbox for salesforce.com Customizing Tips Join the new email Generation By Virtual Company Services With VCS Email Inbox for Salesforce.com it´s easier than ever to have your email inside salesforce.com. Integrated email has finally arrived for all salesforce.com customers http://www.vcs.com.ar/v-smart-overview.html [email protected]

Welcome message from author
This document is posted to help you gain knowledge. Please leave a comment to let me know what you think about it! Share it to your friends and learn new things together.
Transcript

VCS Smart Email Inbox
for salesforce.com Customizing Tips
Join the new email Generation By Virtual Company Services
With VCS Email Inbox for Salesforce.com it´s easier than ever to have your email inside salesforce.com. Integrated email has finally arrived for all salesforce.com customers
http://www.vcs.com.ar/v-smart-overview.html [email protected]

Join the new email generation Tips & install
Tips
• Installing the VCS Email Inbox for salesforce.com from the appexchange.
• Setting up.
o Creating an Email Service
o Don `t have the “mailbox” option
• Add the VCS Email related list to the different page layouts
• How to put visible buttons in the related Lists
• How to deploy in other users if I am the admin
o Enable profiles
o Enable Visualforce pages
• Some frequent/common troubles
Join the new email generation Tips & install
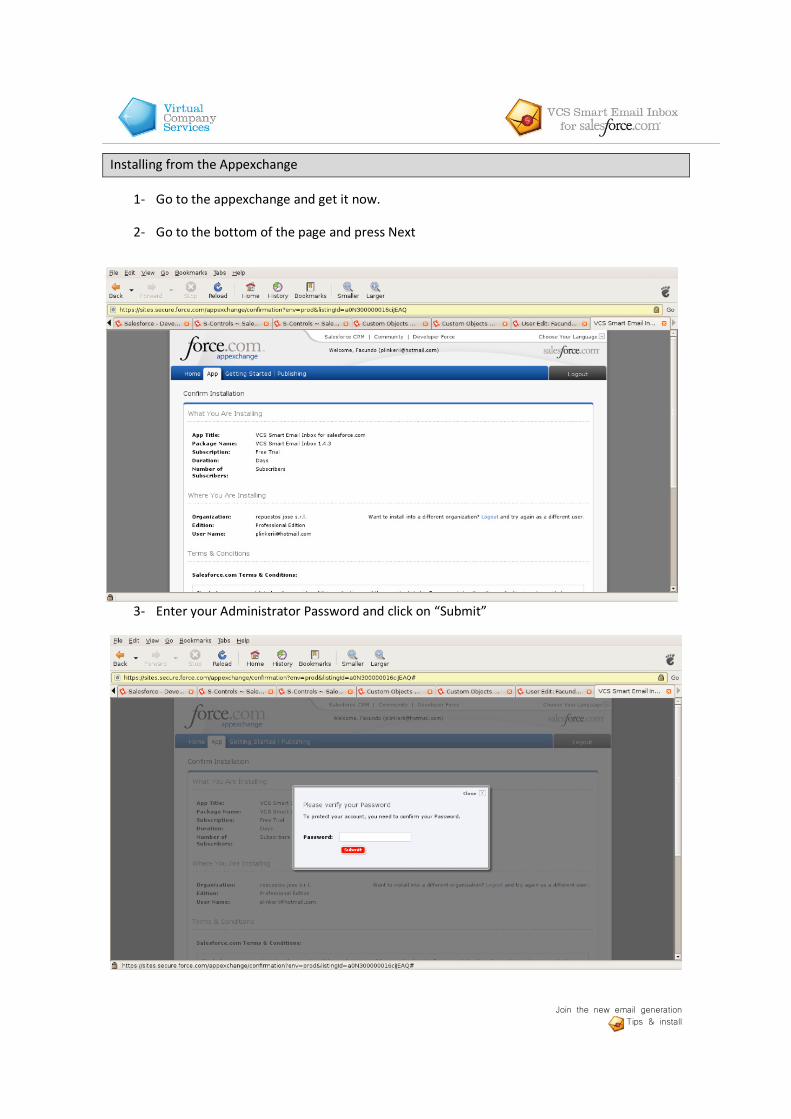
Installing from the Appexchange
1- Go to the appexchange and get it now.
2- Go to the bottom of the page and press Next
3- Enter your Administrator Password and click on “Submit”
Join the new email generation Tips & install
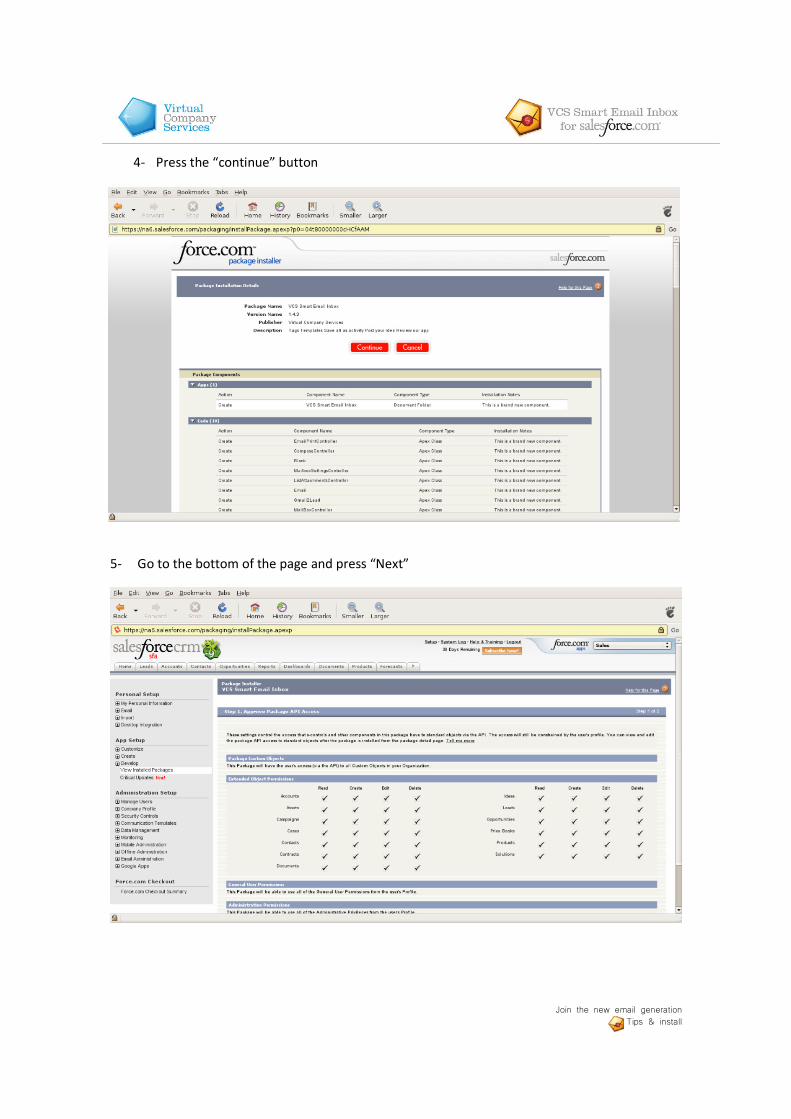
4- Press the “continue” button
5- Go to the bottom of the page and press “Next”
Join the new email generation Tips & install
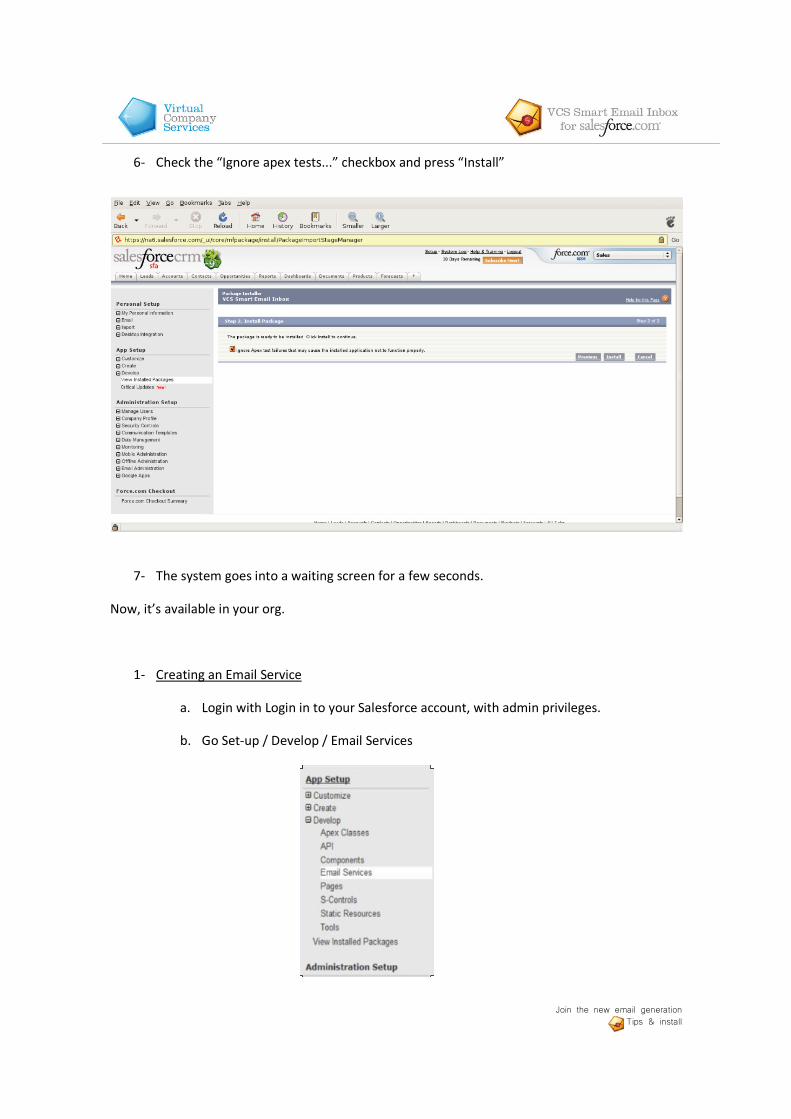
6- Check the “Ignore apex tests...” checkbox and press “Install”
7- The system goes into a waiting screen for a few seconds.
Now, it’s available in your org.
1- Creating an Email Service
a. Login with Login in to your Salesforce account, with admin privileges.
b. Go Set-up / Develop / Email Services

Join the new email generation Tips & install
c. Click on "New Email Service" button
d. Choose a Email Service Name (i.e smart.inbox)
e. Apex Class: Mailbox (if you don’t find Mailbox apex class see below)
f. Accept Attachments: All
g. Check the Active check box
h. Click on "Save and new Email Address" button
i. Set the picklists all to "Bounce message" in the Failure Response Settings
j. Choose an Email Adress, this will be before an @in.salesforce.com domain
k. Check the Active check box
l. Select a context user, to the email service to save the incoming emails.
m. Leave blank the accept emails from text area
n. Click on the "Save" button
Join the new email generation Tips & install
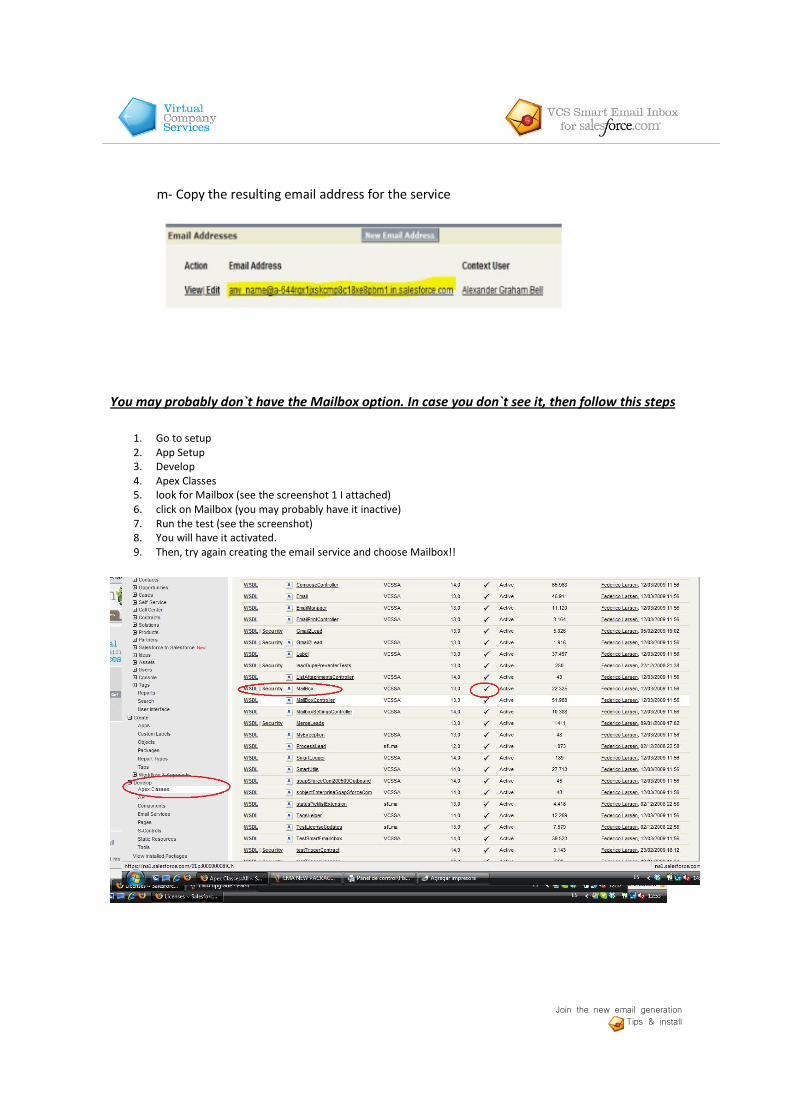
m- Copy the resulting email address for the service
You may probably don`t have the Mailbox option. In case you don`t see it, then follow this steps
1. Go to setup
2. App Setup
3. Develop
4. Apex Classes
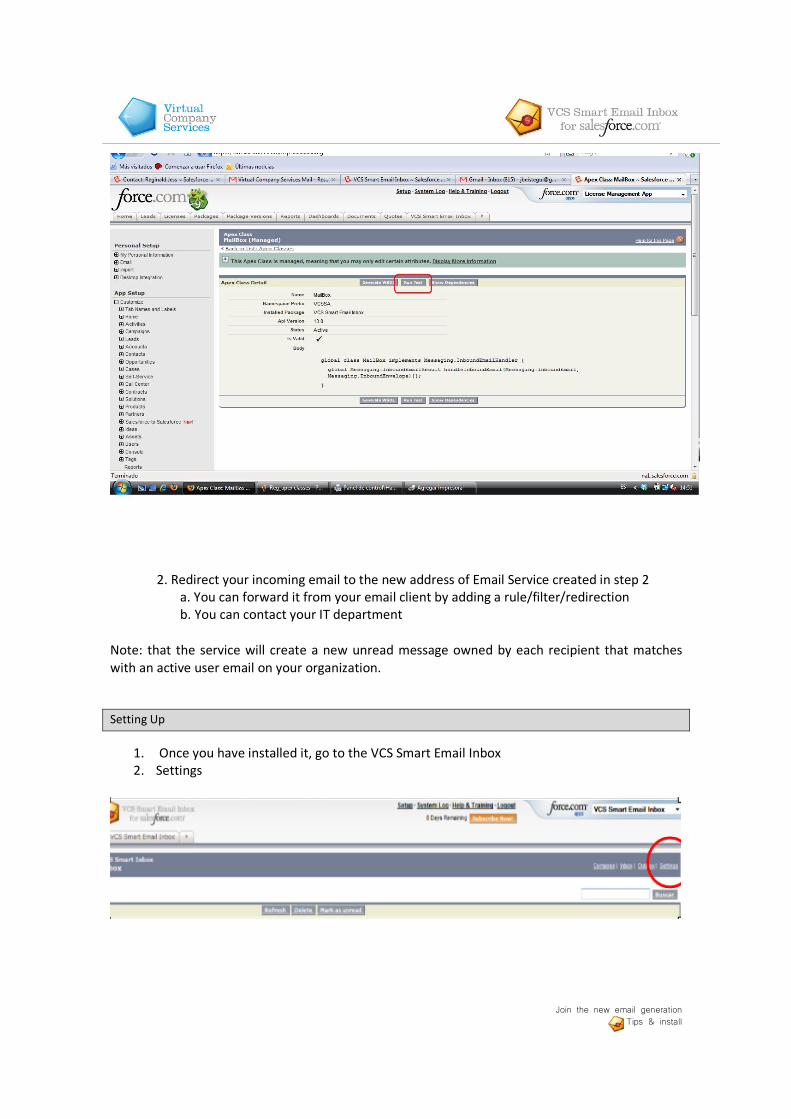
5. look for Mailbox (see the screenshot 1 I attached)
6. click on Mailbox (you may probably have it inactive)
7. Run the test (see the screenshot)
8. You will have it activated.
9. Then, try again creating the email service and choose Mailbox!!
Join the new email generation Tips & install
2. Redirect your incoming email to the new address of Email Service created in step 2
a. You can forward it from your email client by adding a rule/filter/redirection
b. You can contact your IT department
Note: that the service will create a new unread message owned by each recipient that matches
with an active user email on your organization.
Setting Up
1. Once you have installed it, go to the VCS Smart Email Inbox
2. Settings
Join the new email generation Tips & install
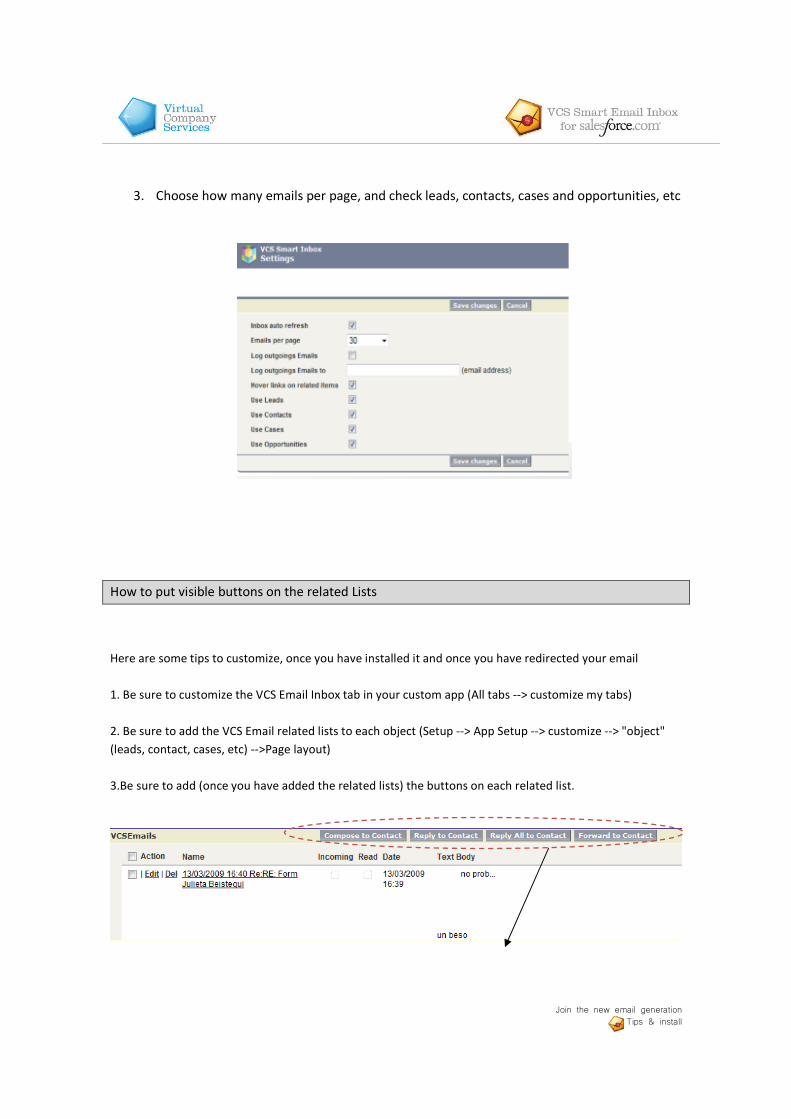
3. Choose how many emails per page, and check leads, contacts, cases and opportunities, etc
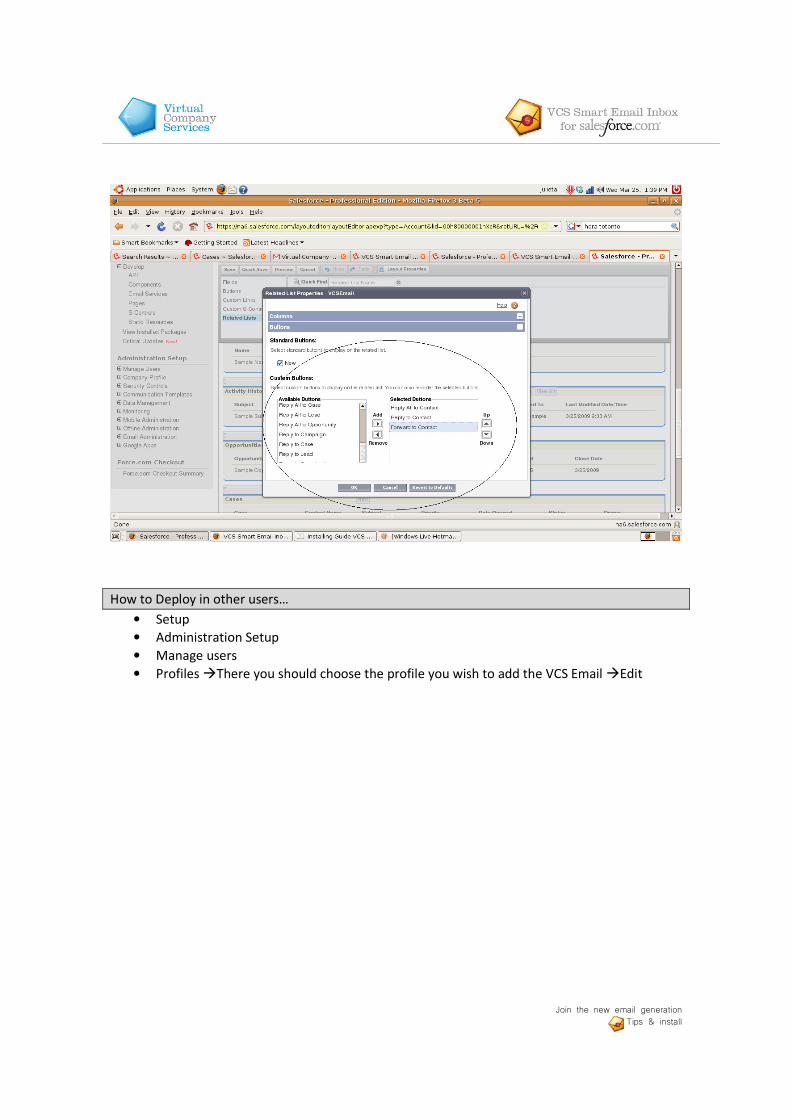
How to put visible buttons on the related Lists
Here are some tips to customize, once you have installed it and once you have redirected your email
1. Be sure to customize the VCS Email Inbox tab in your custom app (All tabs --> customize my tabs)
2. Be sure to add the VCS Email related lists to each object (Setup --> App Setup --> customize --> "object"
(leads, contact, cases, etc) -->Page layout)
3.Be sure to add (once you have added the related lists) the buttons on each related list.
Join the new email generation Tips & install
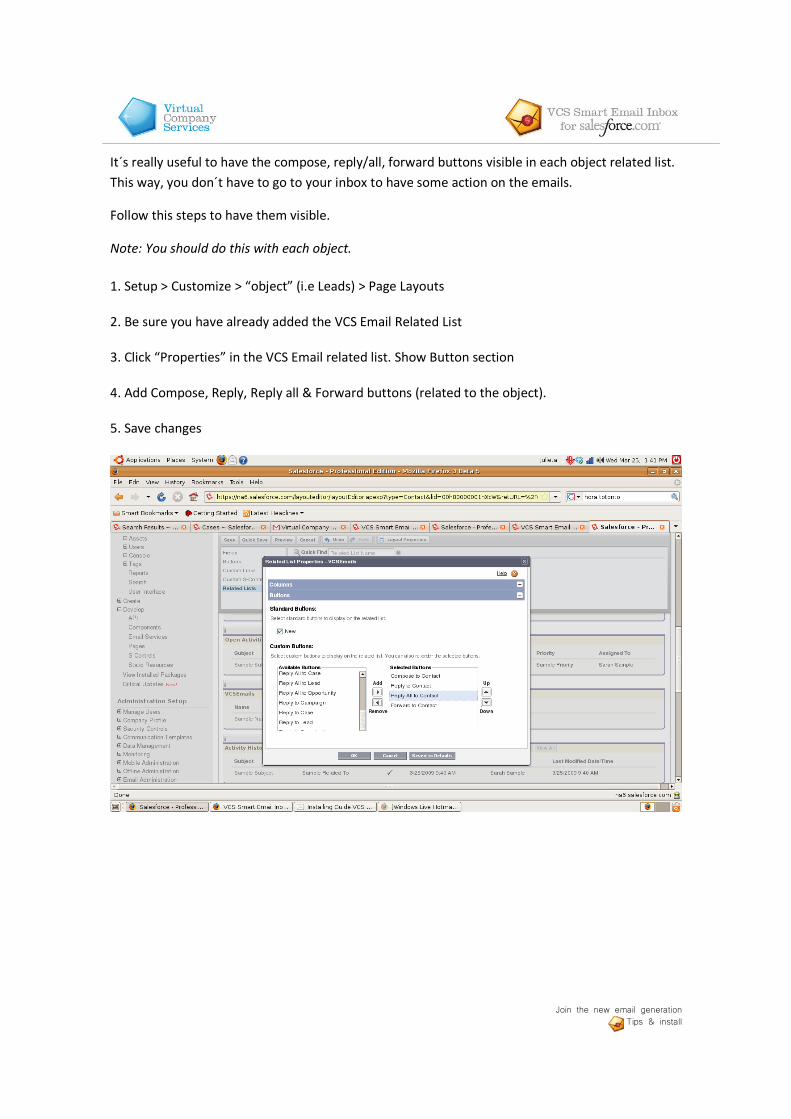
It´s really useful to have the compose, reply/all, forward buttons visible in each object related list.
This way, you don´t have to go to your inbox to have some action on the emails.
Follow this steps to have them visible.
Note: You should do this with each object.
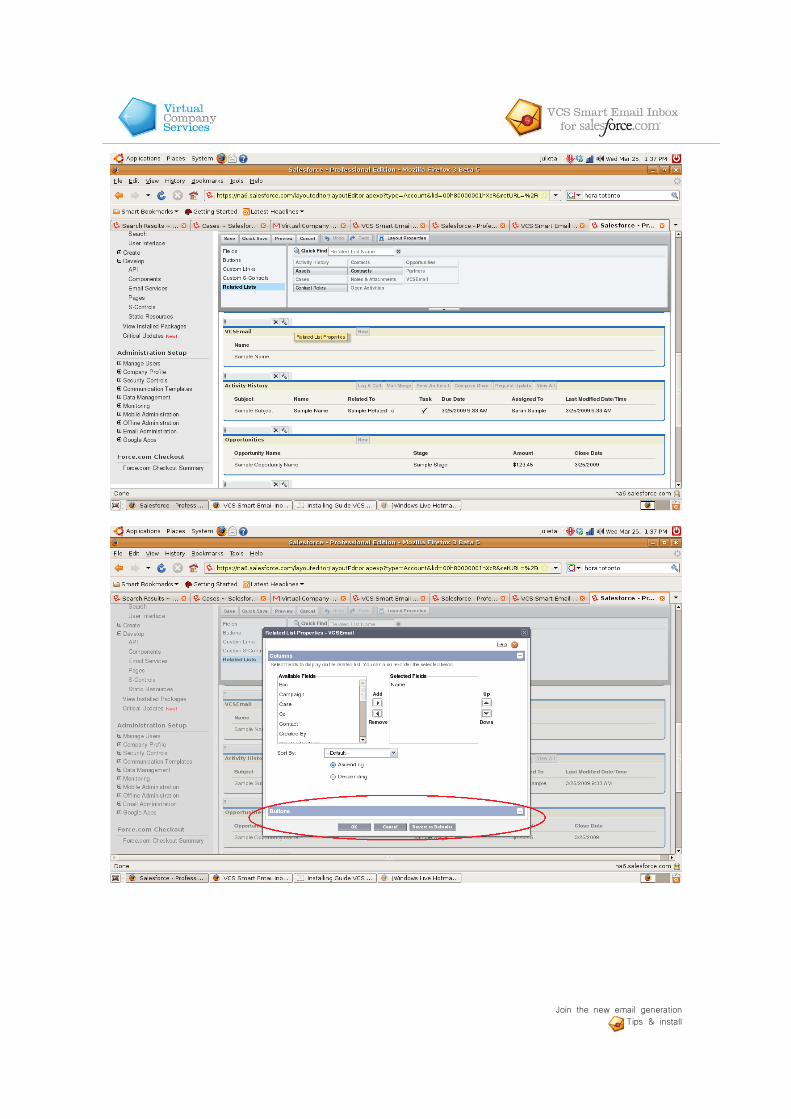
1. Setup > Customize > “object” (i.e Leads) > Page Layouts
2. Be sure you have already added the VCS Email Related List
3. Click “Properties” in the VCS Email related list. Show Button section
4. Add Compose, Reply, Reply all & Forward buttons (related to the object).
5. Save changes
Join the new email generation Tips & install
Join the new email generation Tips & install
How to Deploy in other users…
• Setup
• Administration Setup
• Manage users
• Profiles �There you should choose the profile you wish to add the VCS Email �Edit

Join the new email generation Tips & install
• Ensure that VCS Smart Inbox is visible (custom settings apps) and the VCS Smart tab
setting “default on”.
• Then, send the same email you created (the same the admin used) and make the other
users to do the same redirection.
Join the new email generation Tips & install
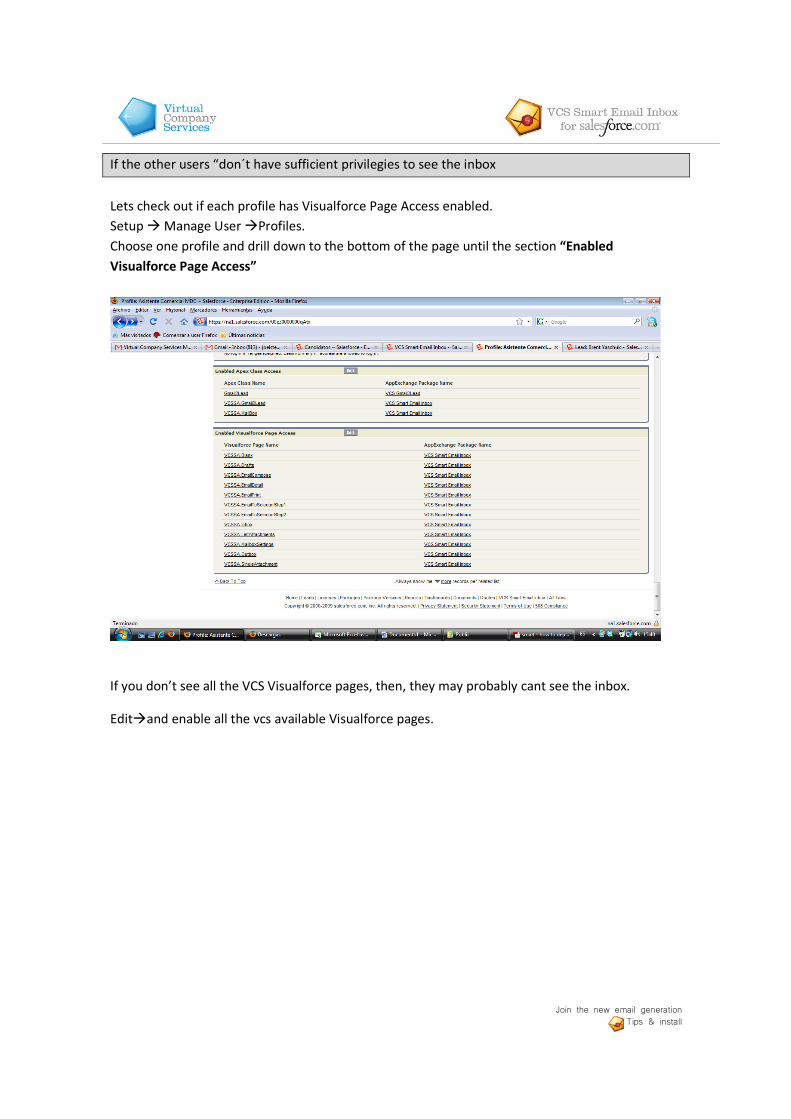
If the other users “don´t have sufficient privilegies to see the inbox
Lets check out if each profile has Visualforce Page Access enabled.
Setup � Manage User �Profiles.
Choose one profile and drill down to the bottom of the page until the section “Enabled
Visualforce Page Access”
If you don’t see all the VCS Visualforce pages, then, they may probably cant see the inbox.
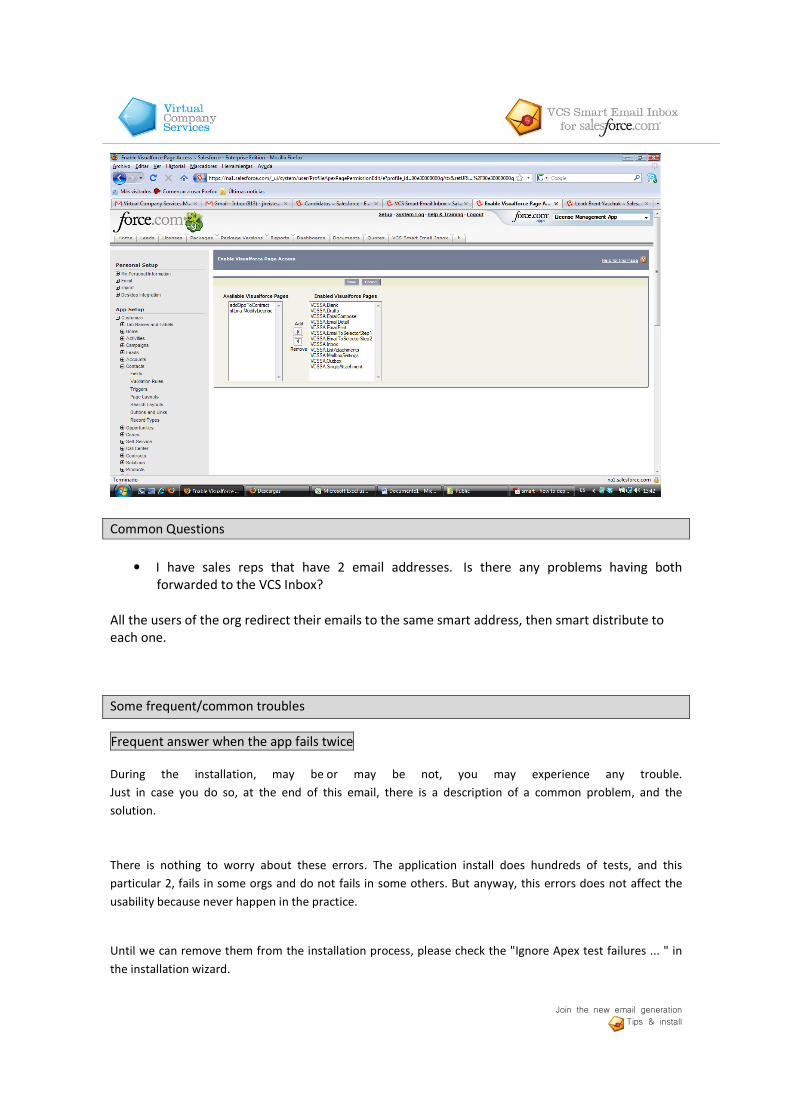
Edit�and enable all the vcs available Visualforce pages.
Join the new email generation Tips & install
Common Questions
• I have sales reps that have 2 email addresses. Is there any problems having both
forwarded to the VCS Inbox?
All the users of the org redirect their emails to the same smart address, then smart distribute to
each one.
Some frequent/common troubles
Frequent answer when the app fails twice
During the installation, may be or may be not, you may experience any trouble.
Just in case you do so, at the end of this email, there is a description of a common problem, and the
solution.
There is nothing to worry about these errors. The application install does hundreds of tests, and this
particular 2, fails in some orgs and do not fails in some others. But anyway, this errors does not affect the
usability because never happen in the practice.
Until we can remove them from the installation process, please check the "Ignore Apex test failures ... " in
the installation wizard.
Join the new email generation Tips & install
Problem - I sent an email to the service and does not appears in the inbox
If you send an email only to the email service address, I will not associate that email to any salesforce user,
therefore it will be discarded.
The service will try to match recipients (TO and CC) to active salesforce users by their email address, as well
as senders to Leads and Contacts.
So when you do a redirection, you need to preserve the original senders and recipients of the email. Gmail
does it right and most of server-side redirections. In outlook you have to add yourself in the redirection rule.
If you want to make a quick test, send an email to you as the recipient (the email address of your salesforce
user) and bcc the email service address. Then you will have it right inside the vcs inbox.
Howto Outlook Redirection rules
In order to redirect your email to salesforce.com in case you use Outlook, you need to create 2 rules.
1) Redirect incoming email sent to "You" to: "You" and "Email Service Address"
2) Email sent to "Email Service Address", delete it.
The second rule, is a work around because of how outlooks does the redirection, it will create you an extra
copy of the message so this rule is to delete it.
You may also want to mark as read or move the email in outlook because it is already in salesforce.com as a
new unread message. In that case, add the second action to the first rule.
How to create a Redirect rule?
Please use this guide
http://office.microsoft.com/en-us/outlook/HA011502011033.aspx
Common troubles
During the installation, may be or may be not, you may experience any trouble.
Just in case you do so, at the end of this email, there is a description of a common problem, and the
solution.
There is nothing to worry about these errors. The application install does hundreds of tests, and this
Join the new email generation Tips & install
particular 2, fails in some orgs and do not fails in some others. But anyway, this errors does not affect the
usability because never happen in the practice.
Until we can remove them from the installation process, please check the "Ignore Apex test
failures ... " in the installation wizard.
-------------------------------------------------------------------------------------------------------------------------
Description of the Problem:
1. Apex Classes(01p800000009BYt) mailboxcontroller.
testControllerV();
mailboxcontroller.testControllerIV();
mailboxcontroller.testControllerII();
mailboxcontroller.testControllerIII()
System.Exception: Assertion Failed: Expected: 0, Actual: 2 (VCSSA);
System.Exception: Assertion Failed: Expected: 0, Actual: 1 (VCSSA);
System.Exception: Assertion Failed: Expected: false, Actual: true (VCSSA);
System.NullPointerException: Argument 1 cannot be null (VCSSA)
2. Apex Classes(01p800000009BYv) testsmartemailinbox.
testCompose();
testsmartemailinbox.testViewEmail();
testsmartemailinbox.testSelectorIII();
testsmartemailinbox.testMarkAsUnread();
testsmartemailinbox.testCRMMethods();
testsmartemailinbox.testSelectorII()
Join the new email generation Tips & install
System.NullPointerException: Argument 1 cannot be null (VCSSA);
System.Exception: Assertion Failed: Same value: null (VCSSA);
System.Exception: Assertion Failed: Same value: null (VCSSA);
System.Exception: Assertion Failed: Expected: false, Actual: true (VCSSA);
System.Exception: Assertion Failed: Expected: 0, Actual: 1 (VCSSA);
System.Exception: Assertion Failed: Expected: 0, Actual: 2 (VCSSA)
Related Documents