Leica BLK3D User Manual Version 2.1 English

Welcome message from author
This document is posted to help you gain knowledge. Please leave a comment to let me know what you think about it! Share it to your friends and learn new things together.
Transcript
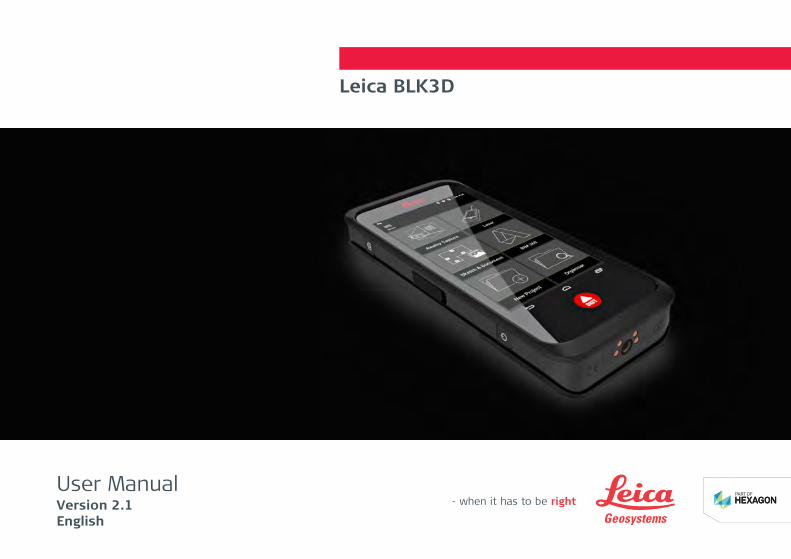
Leica BLK3D
User ManualVersion 2.1English

IntroductionCongratulations on the purchase of the Leica BLK3D.
The symbols used in this manual have the following meanings:
Type Description
☞ Important paragraphs which must be adhered to in practice as theyenable the product to be used in a technically correct and efficientmanner.
This manual contains important safety directions as well as instructions for setting upthe product and operating it. Refer to 20 Safety Directions for further information.
Read carefully through the User Manual before you switch on the product.
The content of this document is subject to change without prior notice. Ensure that theproduct is used in accordance with the latest version of this document.
Updated versions are available for download at the following Internet address:
https://myworld.leica-geosystems.com > myDownloads.
The model and serial number of your product are indicated on the type plate.
Always refer to this information when you need to contact your agency or LeicaGeosystems authorised service centre.
Purchase
Symbols
☞
Product identification
2
This manual applies to the Leica Geosystems AG BLK3D.
On the last page of this manual, you can find the address of Leica Geosystemsheadquarters. For a list of regional contacts, please visit http://leica-geosystems.com/contact-us/sales_support.
Validity of this manual
Leica Geosystemsaddress book
3
Table of Contents1 Instrument Components 7
2 Home Screen 8
3 Batteries 93.1 Operating Principles 93.2 Charging the Battery 10
3.2.1 Charging the Battery by USB Port on Device 103.2.2 Charging the Battery by USB Charger (Optional) 11
4 Power Functions 14
5 Update 15
6 Using the touchscreen 16
7 Activation 18
8 Settings 22
9 Measurement Principle 26
10 Reality Capture 3310.1 Take a Picture 3310.2 Measure Distances in Picture 3610.3 Measure Areas in Picture 40
4 Table of Contents
11 Laser 4411.1 Distance 4411.2 Smart Horizontal 4711.3 Tracking 4811.4 Area 4911.5 Volume 50
12 Sketch & Document (Optional) 5212.1 Import Plan (Optional) 5212.2 Sketch Plan (Optional) 5912.3 Smart Room (Optional) 6512.4 Measure Plan (Optional) 6812.5 Measure Facade (Optional) 70
13 BIM 360 (Optional) 74
14 Publisher (Optional) 83
15 Organiser 87
16 Check & Adjust 90
17 Care and Transport 9717.1 Transport 9717.2 Storage 9817.3 Cleaning and Drying 99
18 Technical Data 10118.1 Conformity to National Regulations 101
18.1.1 BLK3D 101
5 Table of Contents

18.1.2 Dangerous Goods Regulations 10218.2 General Technical Data of the Product 102
19 Warranty 109
20 Safety Directions 11020.1 General 11020.2 Definition of Use 11120.3 Limits of Use 11320.4 Responsibilities 11320.5 Hazards of Use 11420.6 Laser Classification 117
20.6.1 General 11720.6.2 BLK3D 118
20.7 Electromagnetic Compatibility (EMC) 12020.8 FCC Statement, Applicable in U.S. 12220.9 ISED Statements (EN/FR), Applicable in Canada 125
6 Table of Contents
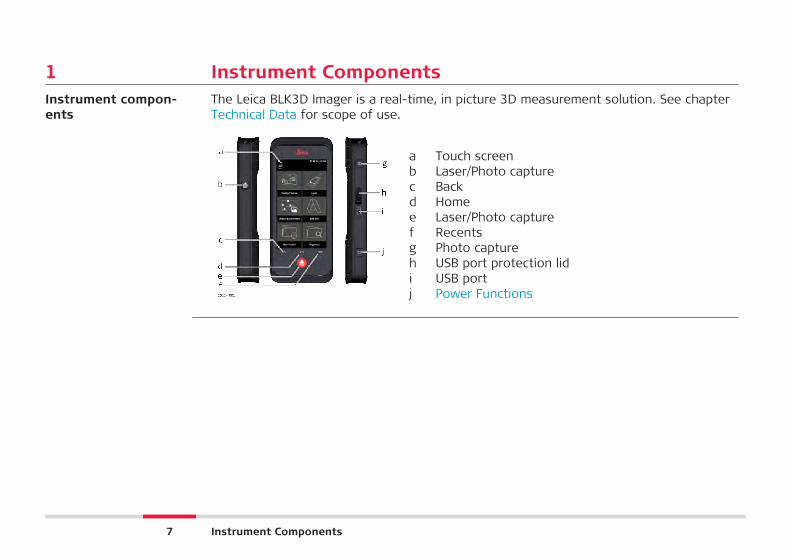
1 Instrument ComponentsThe Leica BLK3D Imager is a real-time, in picture 3D measurement solution. See chapterTechnical Data for scope of use.
a Touch screenb Laser/Photo capturec Backd Homee Laser/Photo capturef Recentsg Photo captureh USB port protection lidi USB portj Power Functions
Instrument compon-ents
7 Instrument Components

2 Home Screen
a Status barb Side menuc Reality Captured Sketch & Document (Optional)e New Projectf Laserg BIM 360 (Optional)h Organiser
Home screen
8 Home Screen
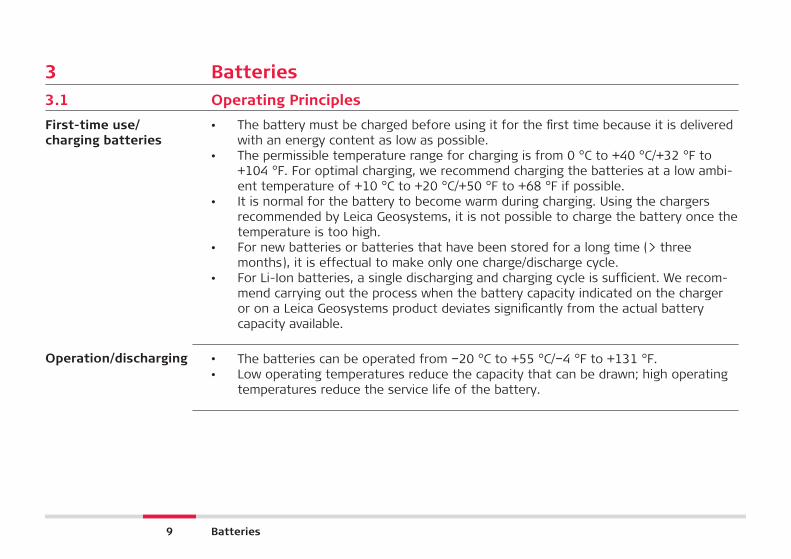
3 Batteries3.1 Operating Principles
• The battery must be charged before using it for the first time because it is deliveredwith an energy content as low as possible.
• The permissible temperature range for charging is from 0 °C to +40 °C/+32 °F to+104 °F. For optimal charging, we recommend charging the batteries at a low ambi-ent temperature of +10 °C to +20 °C/+50 °F to +68 °F if possible.
• It is normal for the battery to become warm during charging. Using the chargersrecommended by Leica Geosystems, it is not possible to charge the battery once thetemperature is too high.
• For new batteries or batteries that have been stored for a long time (> threemonths), it is effectual to make only one charge/discharge cycle.
• For Li-Ion batteries, a single discharging and charging cycle is sufficient. We recom-mend carrying out the process when the battery capacity indicated on the chargeror on a Leica Geosystems product deviates significantly from the actual batterycapacity available.
• The batteries can be operated from −20 °C to +55 °C/−4 °F to +131 °F.• Low operating temperatures reduce the capacity that can be drawn; high operating
temperatures reduce the service life of the battery.
First-time use/charging batteries
Operation/discharging
9 Batteries
CAUTIONConnecting the charger improperly may cause serious damage to the device. Any damagecaused by misuse is not covered by the warranty. Use only Leica-approved chargers, bat-teries, and cables. Unapproved chargers or cables can cause the battery to explode ordamage the device.
3.2 Charging the Battery
3.2.1 Charging the Battery by USB Port on Device
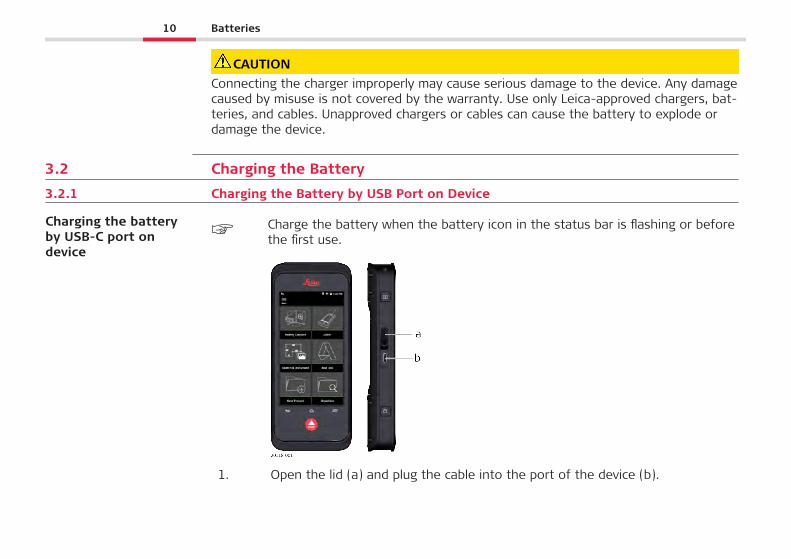
☞ Charge the battery when the battery icon in the status bar is flashing or beforethe first use.
1. Open the lid (a) and plug the cable into the port of the device (b).
Charging the batteryby USB-C port ondevice
10 Batteries
2. Plug the end of the USB-C cable into one of the provided adaptors. Select theappropriate adapter for your country.
☞ The device can also be charged connecting the USB-C cable to the computer,but takes more time. If the device is connected to the computer through USBcable, you can download and upload data.
3.2.2 Charging the Battery by USB Charger (Optional)
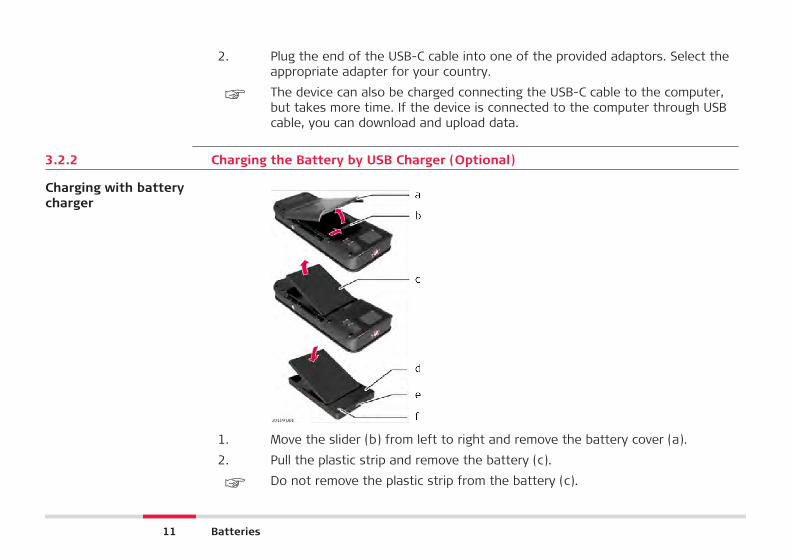
1. Move the slider (b) from left to right and remove the battery cover (a).
2. Pull the plastic strip and remove the battery (c).
☞ Do not remove the plastic strip from the battery (c).
Charging with batterycharger
11 Batteries
3. Place the battery (c) in the charger (d).
4. Plug the USB cable into the port (e) of the charger (d).
5. Plug the USB cable into a power source.
☞ Charging is finished when the indicator light (f) turns green.
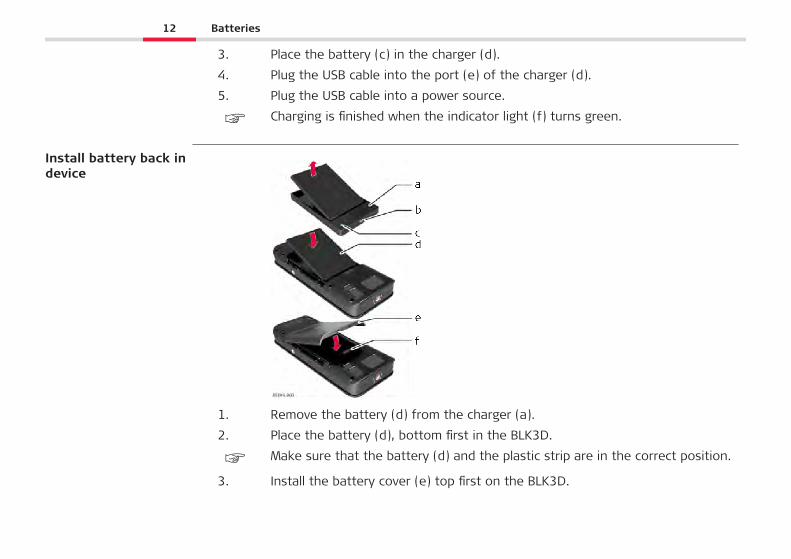
1. Remove the battery (d) from the charger (a).
2. Place the battery (d), bottom first in the BLK3D.
☞ Make sure that the battery (d) and the plastic strip are in the correct position.
3. Install the battery cover (e) top first on the BLK3D.
Install battery back indevice
12 Batteries
☞ Make sure that the battery cover (e) and the slider (f) are in the correct posi-tion.
13 Batteries
4 Power Functions
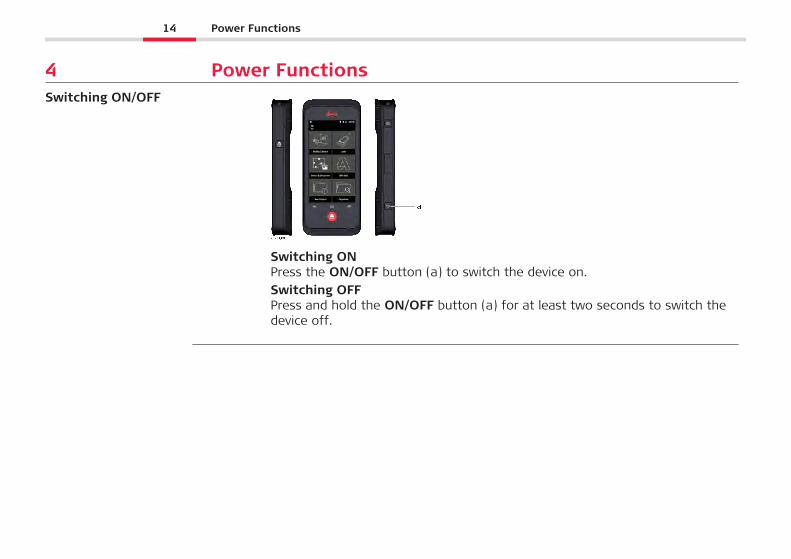
Switching ONPress the ON/OFF button (a) to switch the device on.Switching OFFPress and hold the ON/OFF button (a) for at least two seconds to switch thedevice off.
Switching ON/OFF
14 Power Functions
5 Update
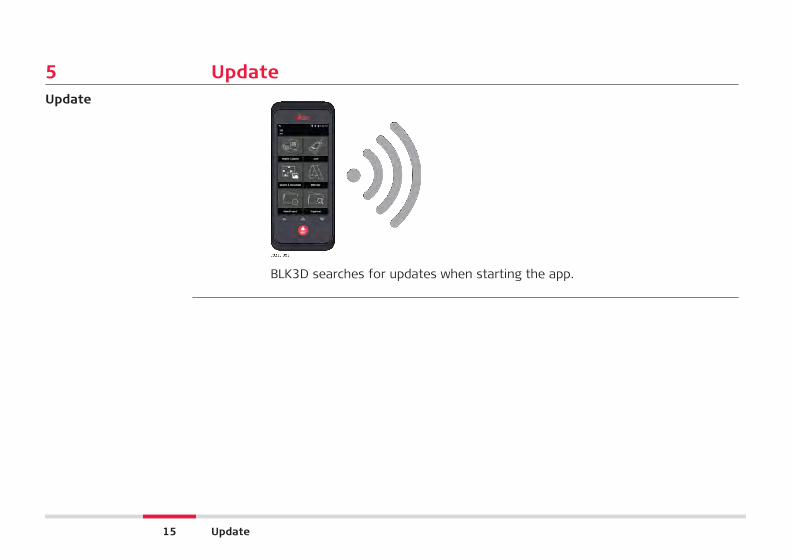
BLK3D searches for updates when starting the app.
Update
15 Update
6 Using the touchscreen
☞ It is recommended to use fingers on the touch screen. To avoid damage to thetouch screen, do not apply excessive pressure or tap the touch screen withanything sharp.
☞ Do not allow the touch screen to come into contact with other electricaldevices. Electrostatic discharge can cause the touch screen to malfunction.
☞ Do not allow the touch screen to come into contact with water. The touchscreen may malfunction in humid conditions or when exposed to water.
Using the touch screen
16 Using the touchscreen
20218_001
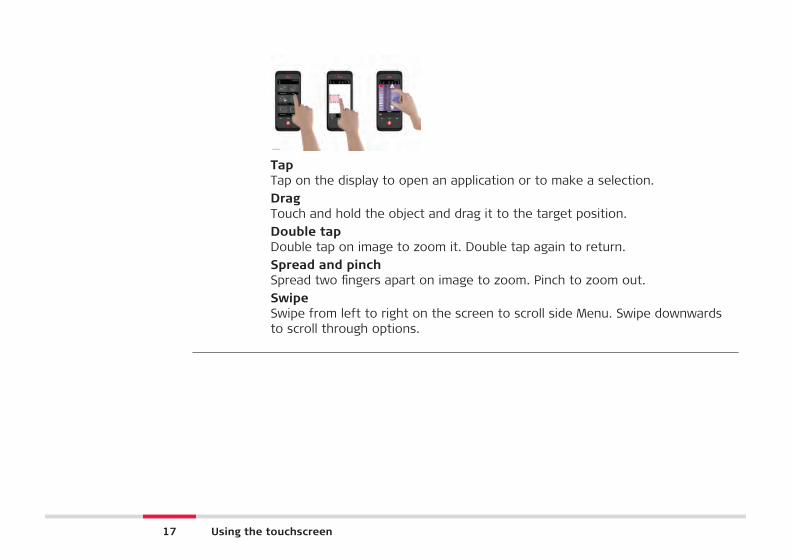
TapTap on the display to open an application or to make a selection.DragTouch and hold the object and drag it to the target position.Double tapDouble tap on image to zoom it. Double tap again to return.Spread and pinchSpread two fingers apart on image to zoom. Pinch to zoom out.SwipeSwipe from left to right on the screen to scroll side Menu. Swipe downwardsto scroll through options.
17 Using the touchscreen
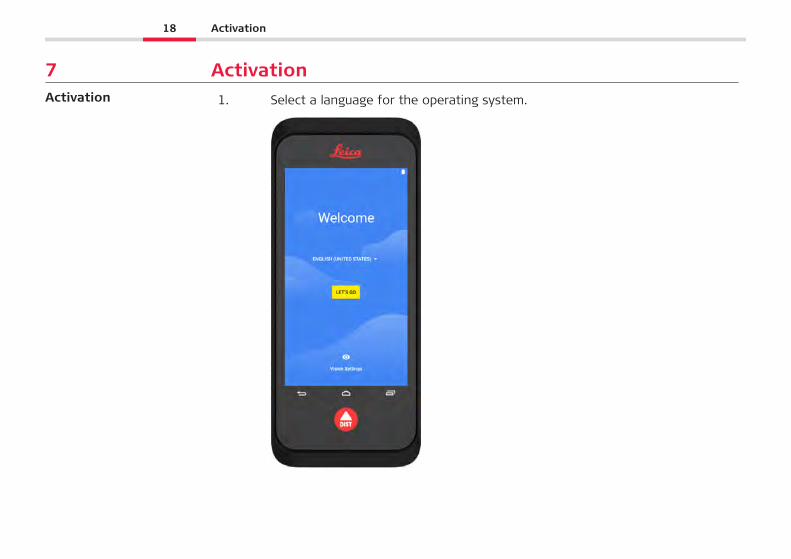
7 Activation1. Select a language for the operating system.Activation
18 Activation
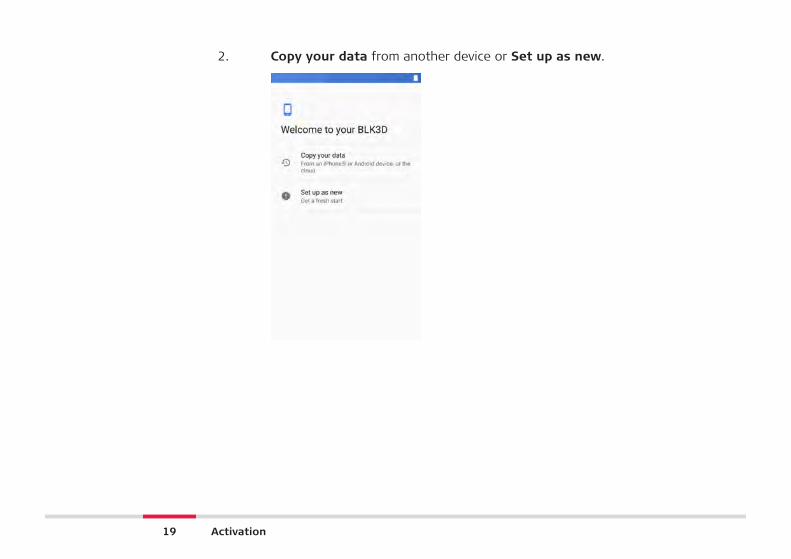
2. Copy your data from another device or Set up as new.
19 Activation
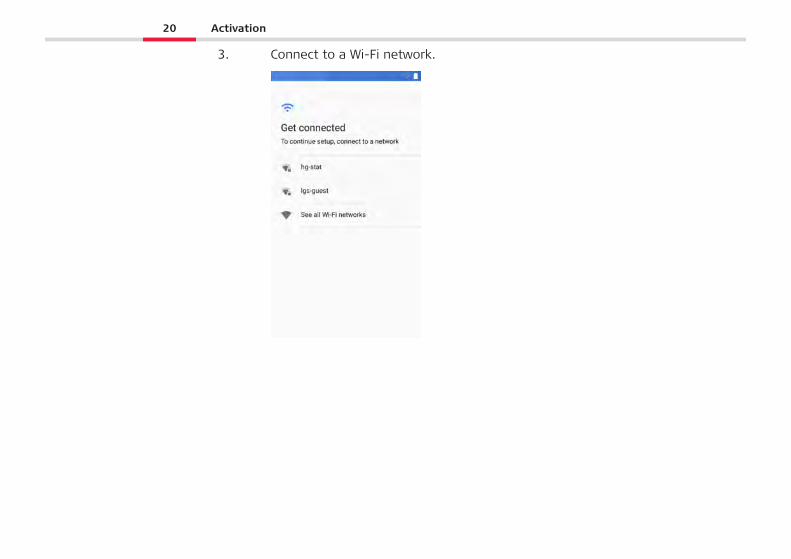
3. Connect to a Wi-Fi network.
20 Activation
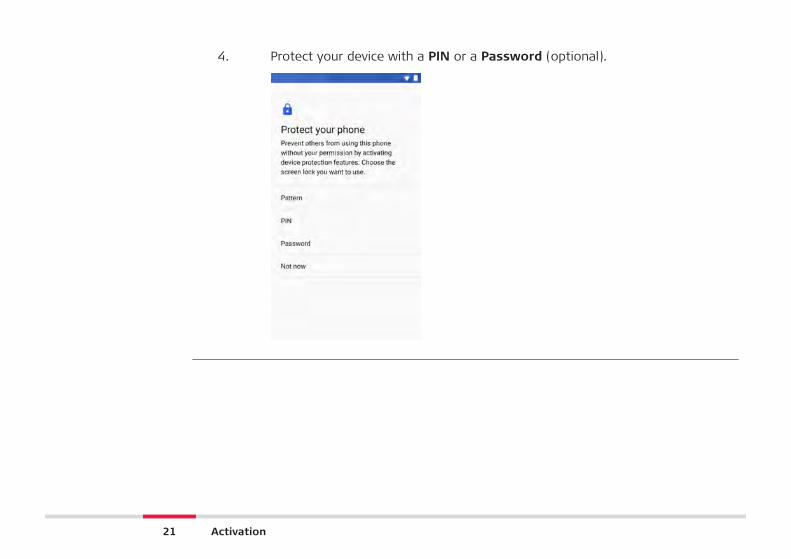
4. Protect your device with a PIN or a Password (optional).
21 Activation

8 Settings1. Select the Settings menu.Settings
22 Settings
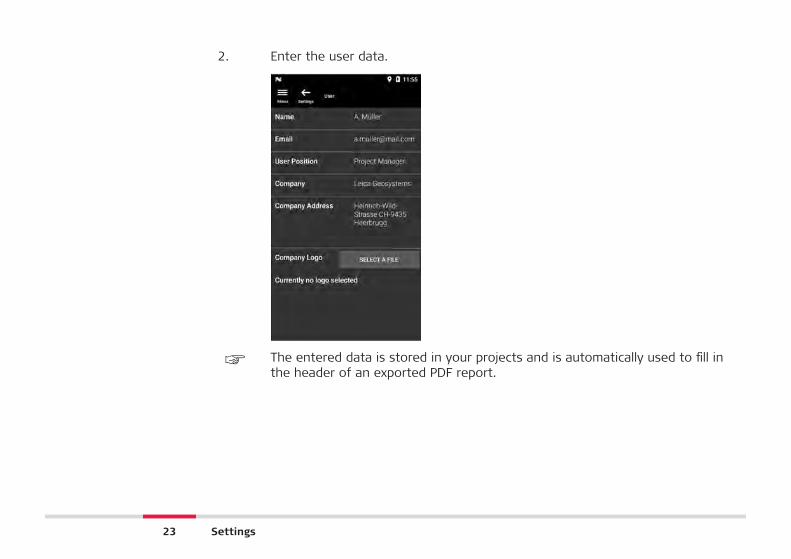
2. Enter the user data.
☞ The entered data is stored in your projects and is automatically used to fill inthe header of an exported PDF report.
23 Settings
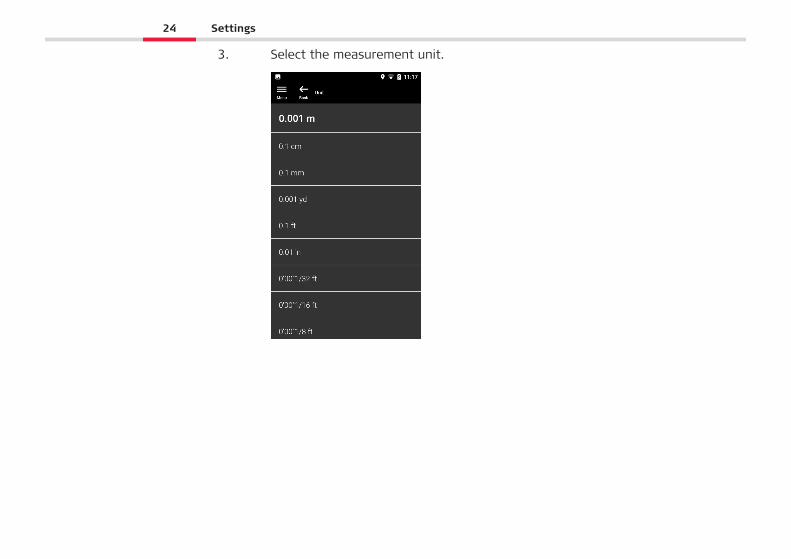
3. Select the measurement unit.
24 Settings
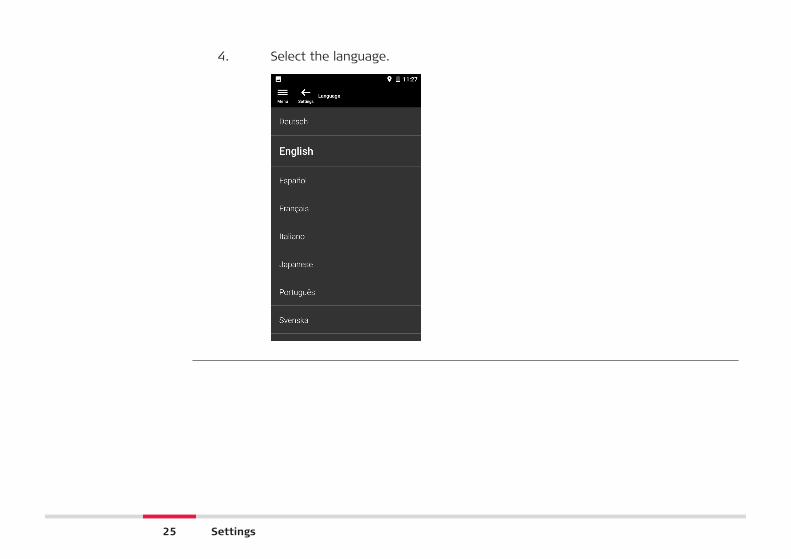
4. Select the language.
25 Settings

9 Measurement Principle1. The BLK3D Imager has a calibrated stereo camera, which takes two
simultaneous 3D images of the same scene from two different posi-tions. This is analogue to the left and right eye in human 3D stereovision.• Reality Capture: Picture capture process using the BLK3D
Imager.• Single-Shot: Capture of a single stereo picture.• Multi-Shot: Capture of multiple stereo pictures of the same 3D
image from slightly different positions.• Baseline: Maximum distance between the cameras during Real-
ity Capture. This distance can be increased by using Multi-Shotfrom slightly different positions.
Measurement principle
26 Measurement Principle
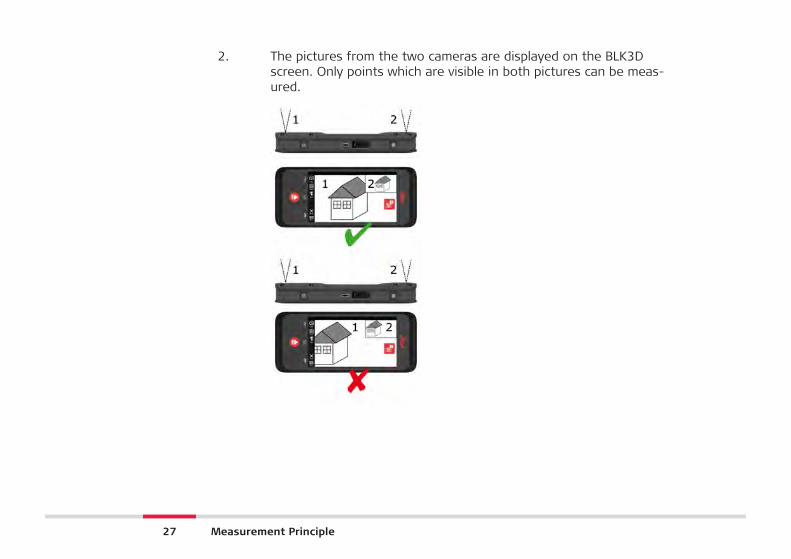
2. The pictures from the two cameras are displayed on the BLK3Dscreen. Only points which are visible in both pictures can be meas-ured.
27 Measurement Principle
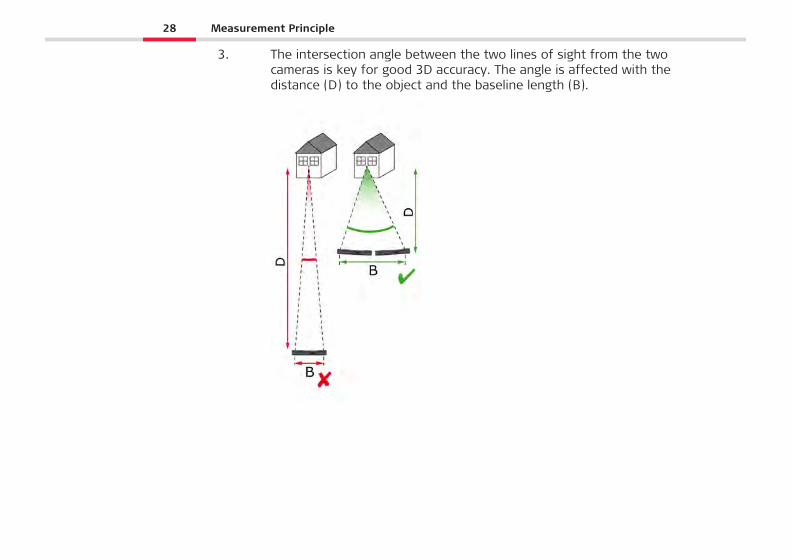
3. The intersection angle between the two lines of sight from the twocameras is key for good 3D accuracy. The angle is affected with thedistance (D) to the object and the baseline length (B).
28 Measurement Principle
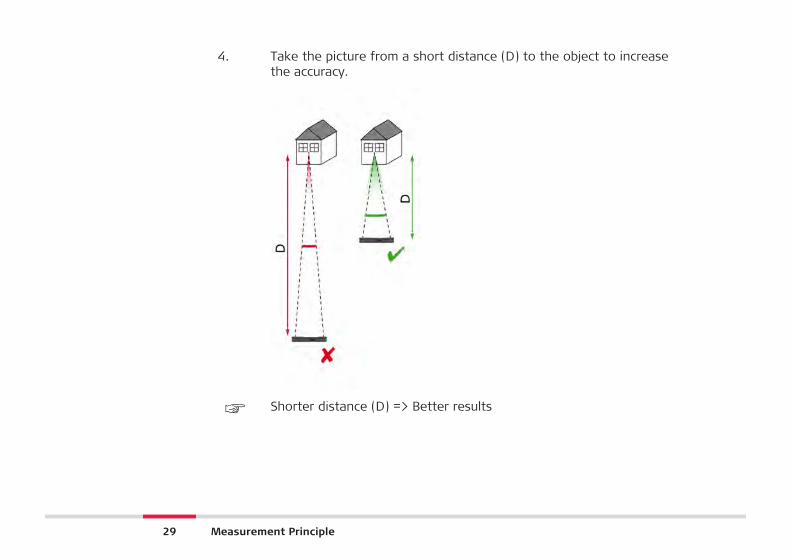
4. Take the picture from a short distance (D) to the object to increasethe accuracy.
☞ Shorter distance (D) => Better results
29 Measurement Principle
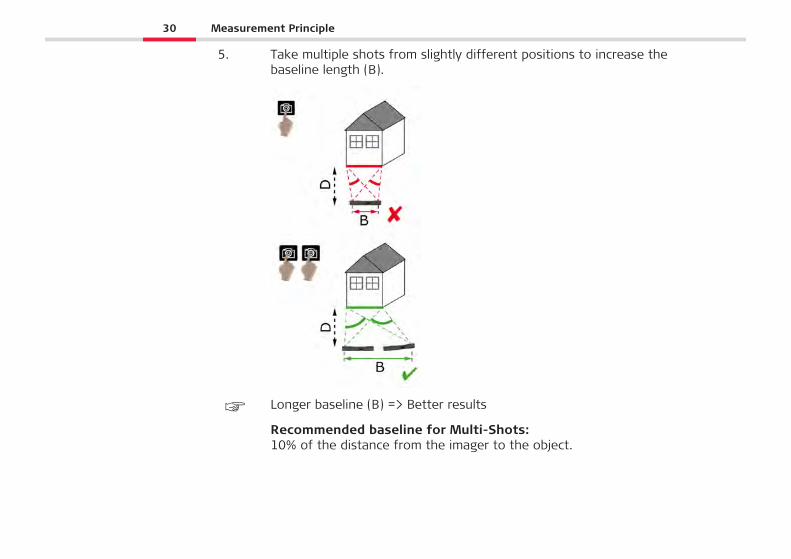
5. Take multiple shots from slightly different positions to increase thebaseline length (B).
☞ Longer baseline (B) => Better results
Recommended baseline for Multi-Shots:10% of the distance from the imager to the object.
30 Measurement Principle
Distance1 m/3.3 ft2 m/6.6 ft3 m/9.8 ft5 m/16.4 ft7 m/23.0 ft
Baseline0.1 m/0.3 ft0.2 m/0.7 ft0.3 m/1 ft0.5 m/1.6 ft0.7 m/2.3 ft
☞ Multi-Shot computation can fail when you move too far. The resultsare then calculated based on the first Single-Shot.
31 Measurement Principle
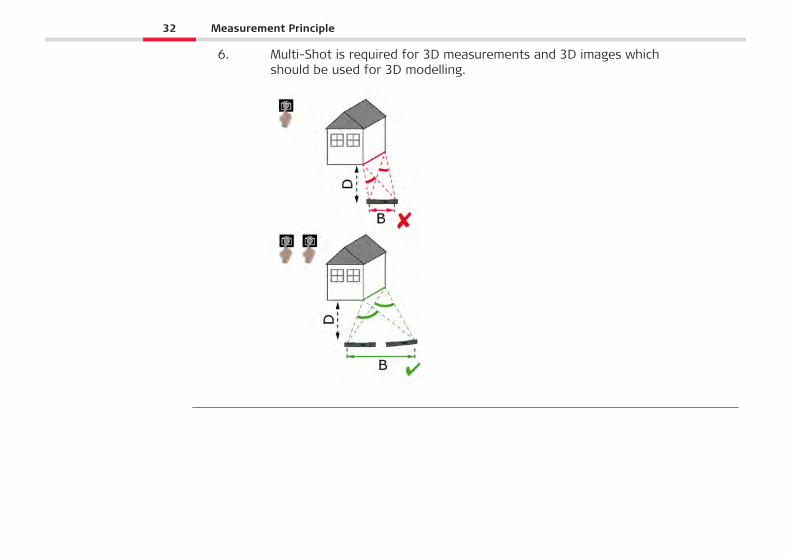
6. Multi-Shot is required for 3D measurements and 3D images whichshould be used for 3D modelling.
32 Measurement Principle
10 Reality Capture10.1 Take a Picture
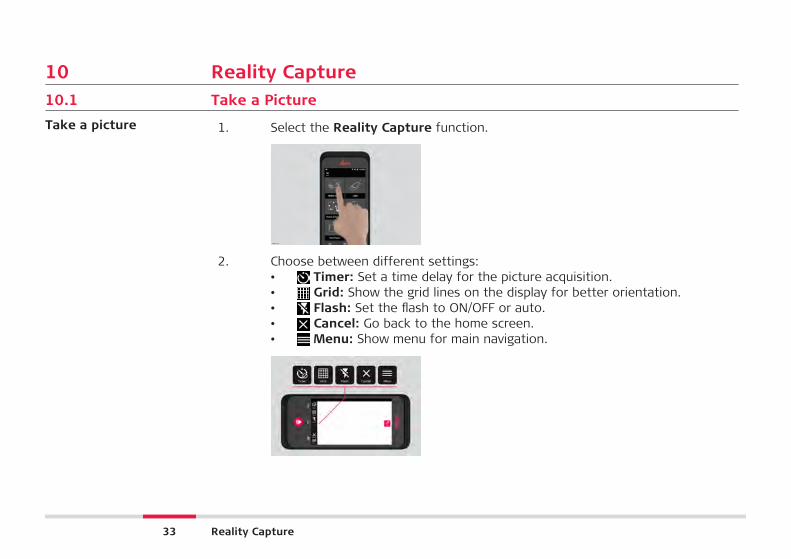
1. Select the Reality Capture function.
19985_001
2. Choose between different settings:• Timer: Set a time delay for the picture acquisition.• Grid: Show the grid lines on the display for better orientation.• Flash: Set the flash to ON/OFF or auto.• Cancel: Go back to the home screen.• Menu: Show menu for main navigation.
Take a picture
33 Reality Capture
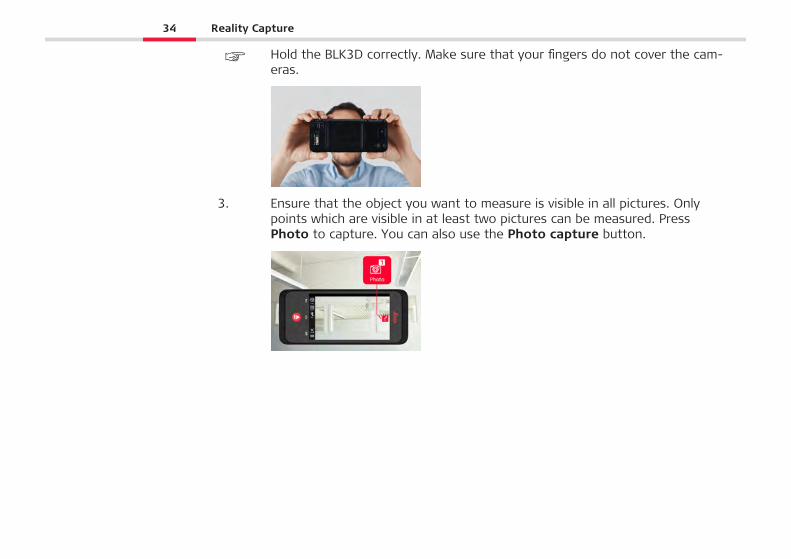
☞ Hold the BLK3D correctly. Make sure that your fingers do not cover the cam-eras.
3. Ensure that the object you want to measure is visible in all pictures. Onlypoints which are visible in at least two pictures can be measured. PressPhoto to capture. You can also use the Photo capture button.
34 Reality Capture
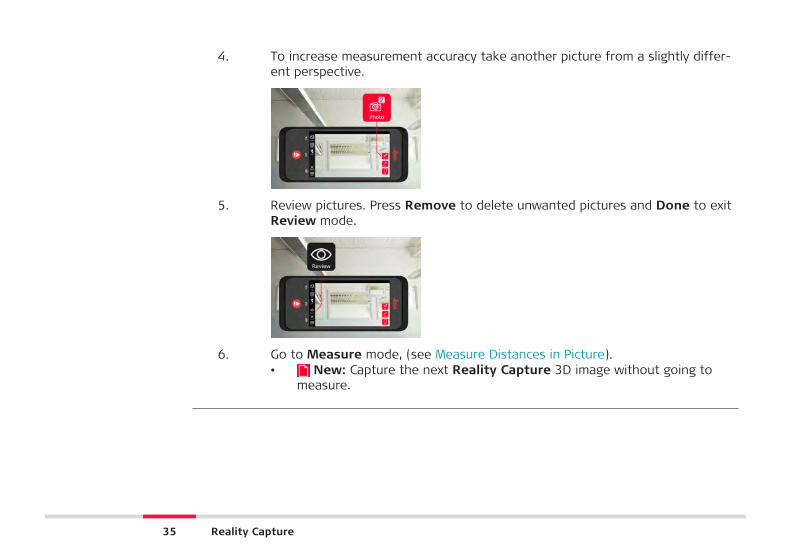
4. To increase measurement accuracy take another picture from a slightly differ-ent perspective.
5. Review pictures. Press Remove to delete unwanted pictures and Done to exitReview mode.
6. Go to Measure mode, (see Measure Distances in Picture).• New: Capture the next Reality Capture 3D image without going to
measure.
35 Reality Capture
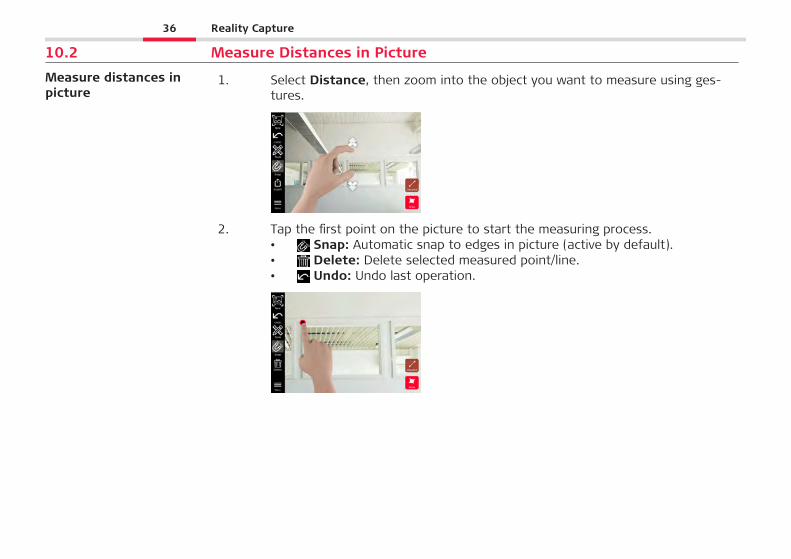
10.2 Measure Distances in Picture
1. Select Distance, then zoom into the object you want to measure using ges-tures.
2. Tap the first point on the picture to start the measuring process.• Snap: Automatic snap to edges in picture (active by default).• Delete: Delete selected measured point/line.• Undo: Undo last operation.
Measure distances inpicture
36 Reality Capture
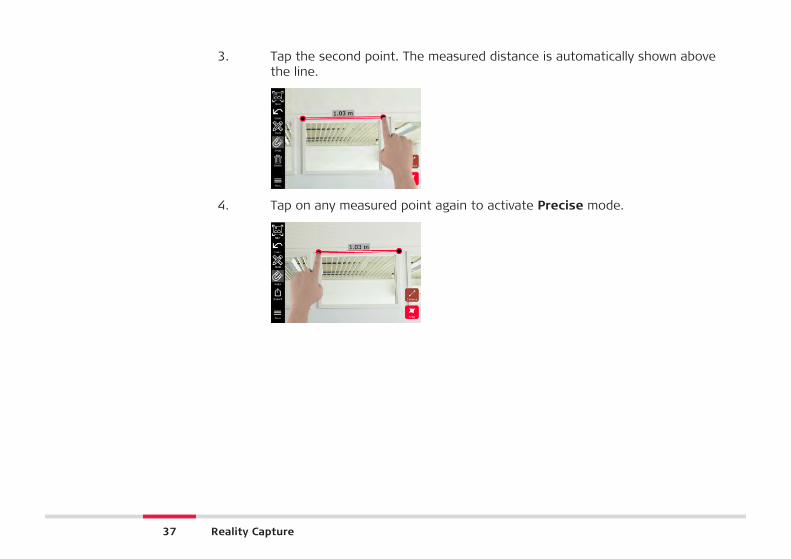
3. Tap the second point. The measured distance is automatically shown abovethe line.
4. Tap on any measured point again to activate Precise mode.
37 Reality Capture

5. Drag and spread to precisely centre of the point you want to measure in thecrosshairs.• Done: Confirm point position.• Next: Jump to the next point for Precise mode selection.
6. Select Tools to add Tags, Rename or delete the 3D image (Delete Scene),move 3D image to a project (Move to Project), (see Organiser) and measuredistances with laser (Laser measurement), (see Laser).
38 Reality Capture
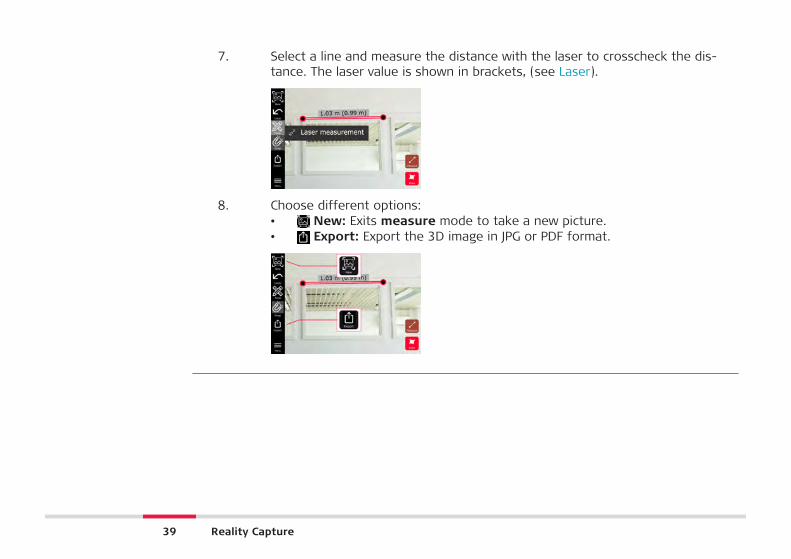
7. Select a line and measure the distance with the laser to crosscheck the dis-tance. The laser value is shown in brackets, (see Laser).
8. Choose different options:• New: Exits measure mode to take a new picture.• Export: Export the 3D image in JPG or PDF format.
39 Reality Capture
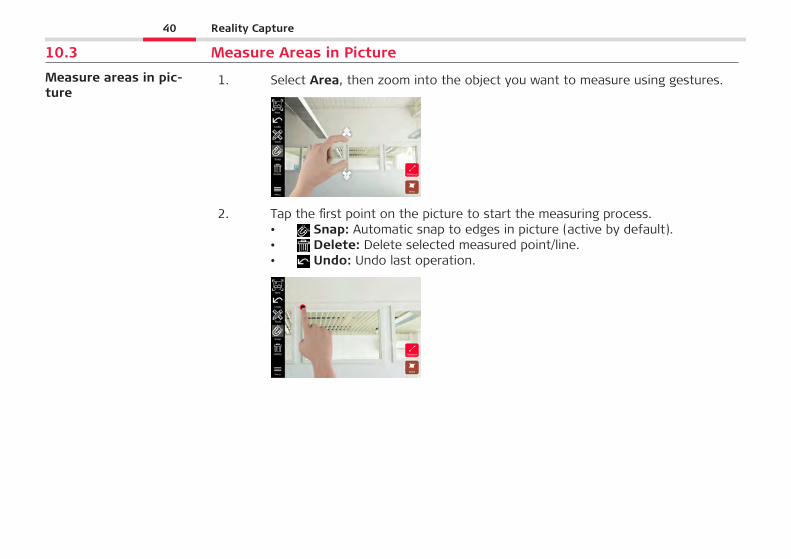
10.3 Measure Areas in Picture
1. Select Area, then zoom into the object you want to measure using gestures.
2. Tap the first point on the picture to start the measuring process.• Snap: Automatic snap to edges in picture (active by default).• Delete: Delete selected measured point/line.• Undo: Undo last operation.
Measure areas in pic-ture
40 Reality Capture
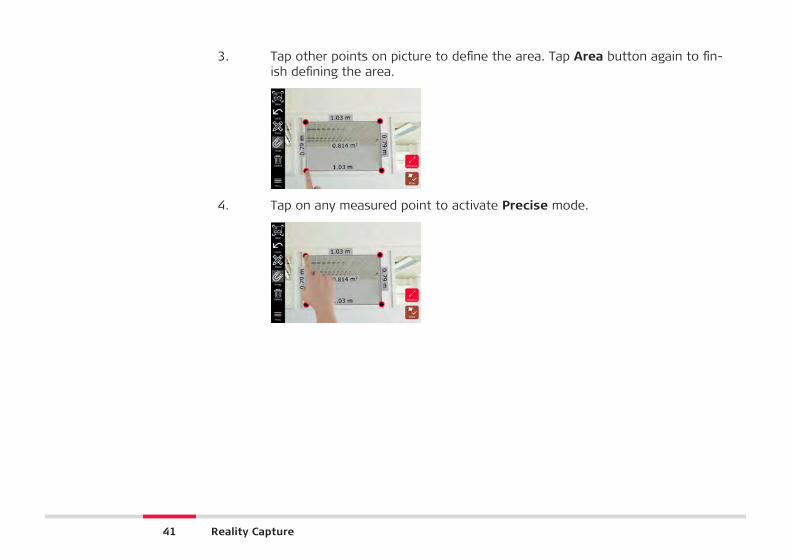
3. Tap other points on picture to define the area. Tap Area button again to fin-ish defining the area.
4. Tap on any measured point to activate Precise mode.
41 Reality Capture
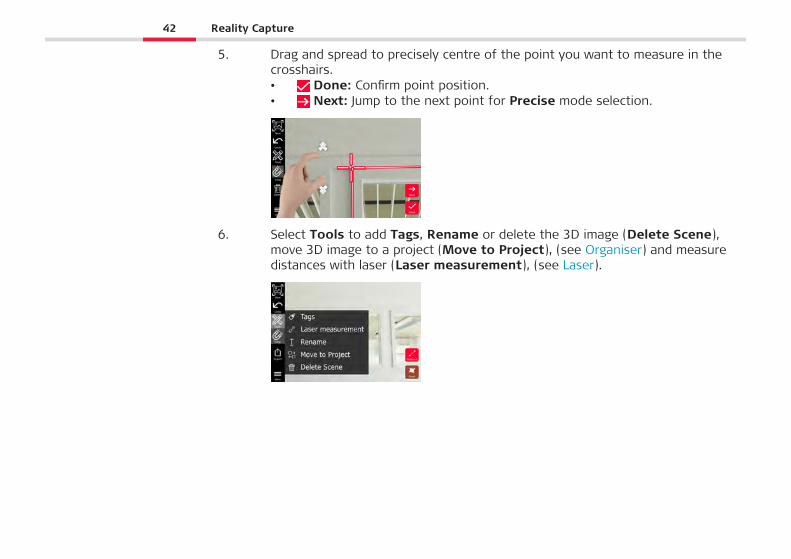
5. Drag and spread to precisely centre of the point you want to measure in thecrosshairs.• Done: Confirm point position.• Next: Jump to the next point for Precise mode selection.
6. Select Tools to add Tags, Rename or delete the 3D image (Delete Scene),move 3D image to a project (Move to Project), (see Organiser) and measuredistances with laser (Laser measurement), (see Laser).
42 Reality Capture
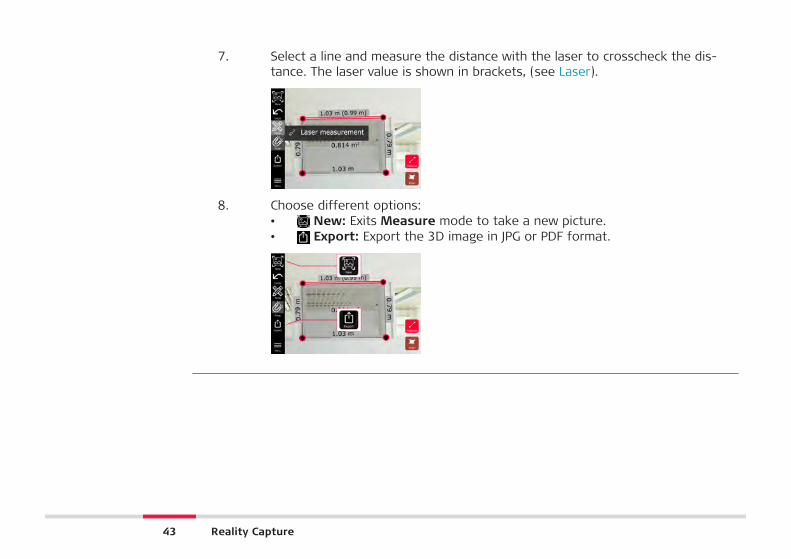
7. Select a line and measure the distance with the laser to crosscheck the dis-tance. The laser value is shown in brackets, (see Laser).
8. Choose different options:• New: Exits Measure mode to take a new picture.• Export: Export the 3D image in JPG or PDF format.
43 Reality Capture
11 Laser11.1 Distance
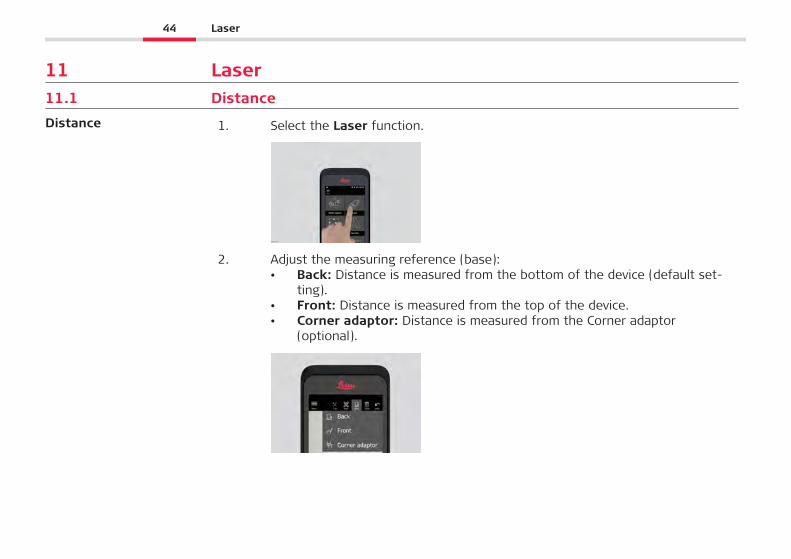
1. Select the Laser function.
20013_001
2. Adjust the measuring reference (base):• Back: Distance is measured from the bottom of the device (default set-
ting).• Front: Distance is measured from the top of the device.• Corner adaptor: Distance is measured from the Corner adaptor
(optional).
Distance
44 Laser
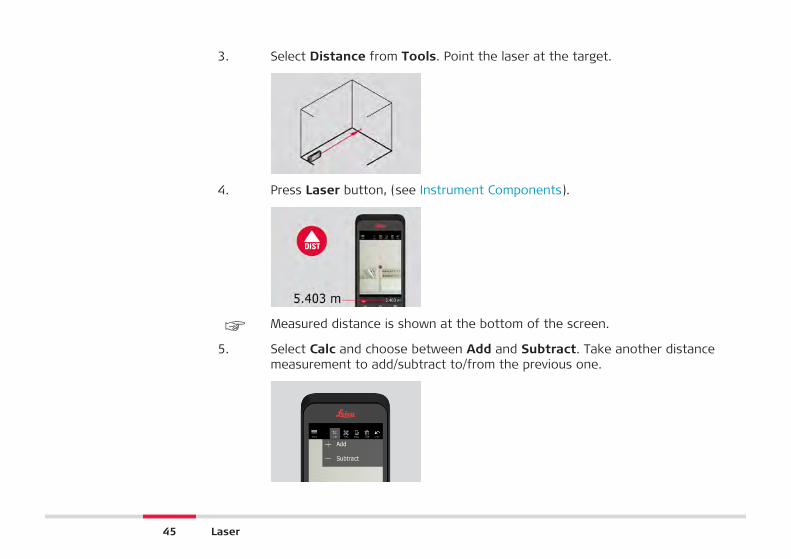
3. Select Distance from Tools. Point the laser at the target.
4. Press Laser button, (see Instrument Components).
☞ Measured distance is shown at the bottom of the screen.
5. Select Calc and choose between Add and Subtract. Take another distancemeasurement to add/subtract to/from the previous one.
45 Laser
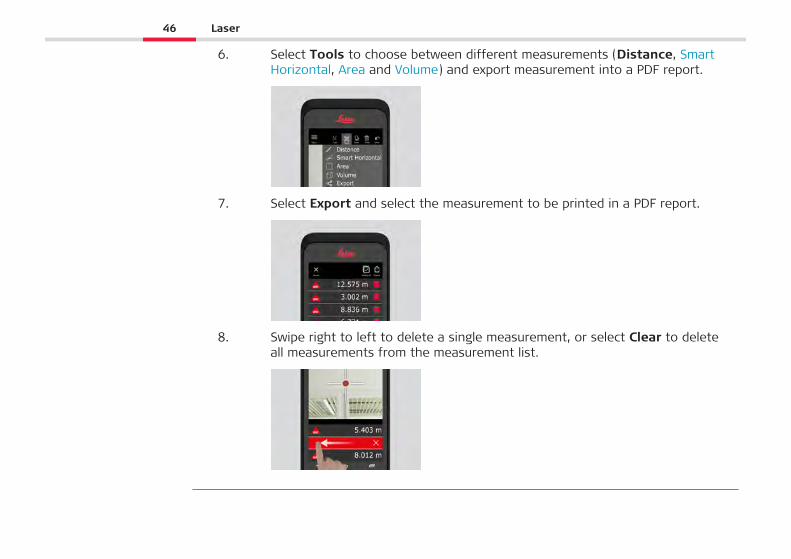
6. Select Tools to choose between different measurements (Distance, Smart Horizontal, Area and Volume) and export measurement into a PDF report.
7. Select Export and select the measurement to be printed in a PDF report.
8. Swipe right to left to delete a single measurement, or select Clear to deleteall measurements from the measurement list.
46 Laser
11.2 Smart Horizontal
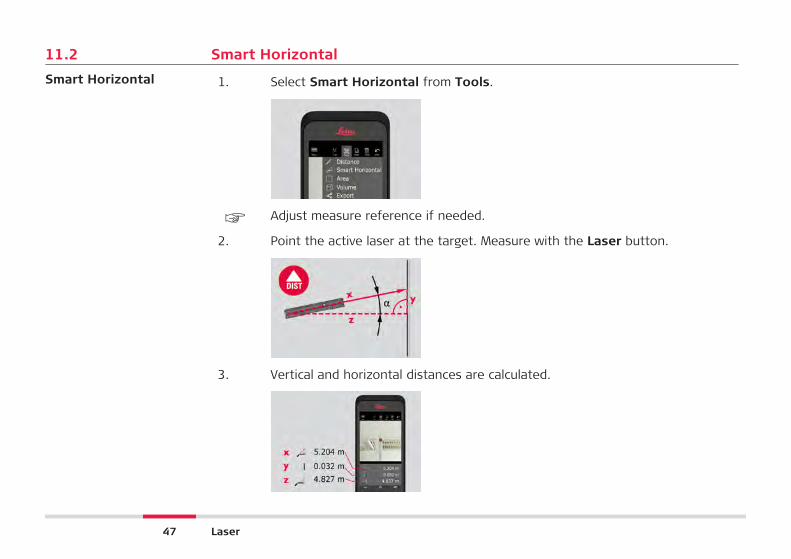
1. Select Smart Horizontal from Tools.
☞ Adjust measure reference if needed.
2. Point the active laser at the target. Measure with the Laser button.
3. Vertical and horizontal distances are calculated.
Smart Horizontal
47 Laser
11.3 Tracking
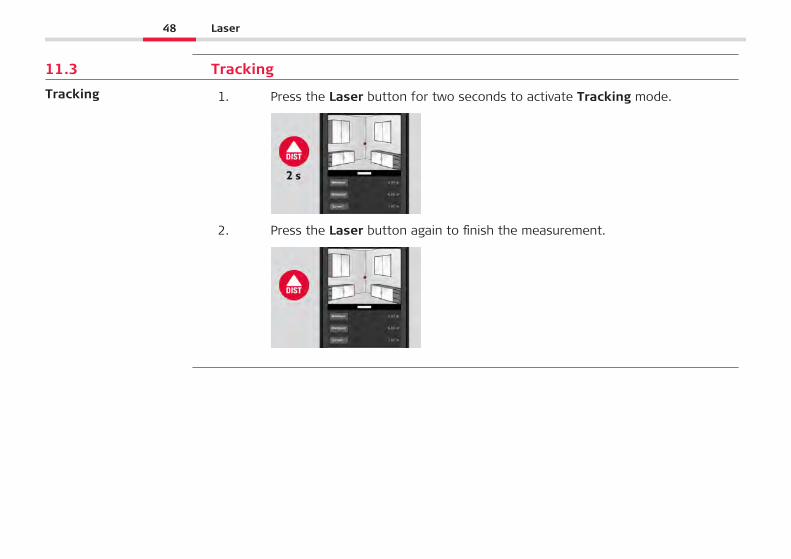
1. Press the Laser button for two seconds to activate Tracking mode.
2. Press the Laser button again to finish the measurement.
Tracking
48 Laser
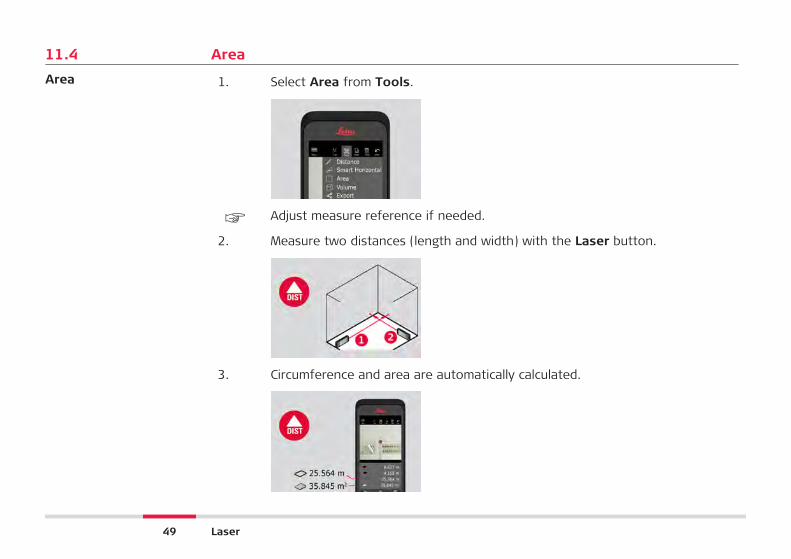
11.4 Area
1. Select Area from Tools.
☞ Adjust measure reference if needed.
2. Measure two distances (length and width) with the Laser button.
3. Circumference and area are automatically calculated.
Area
49 Laser
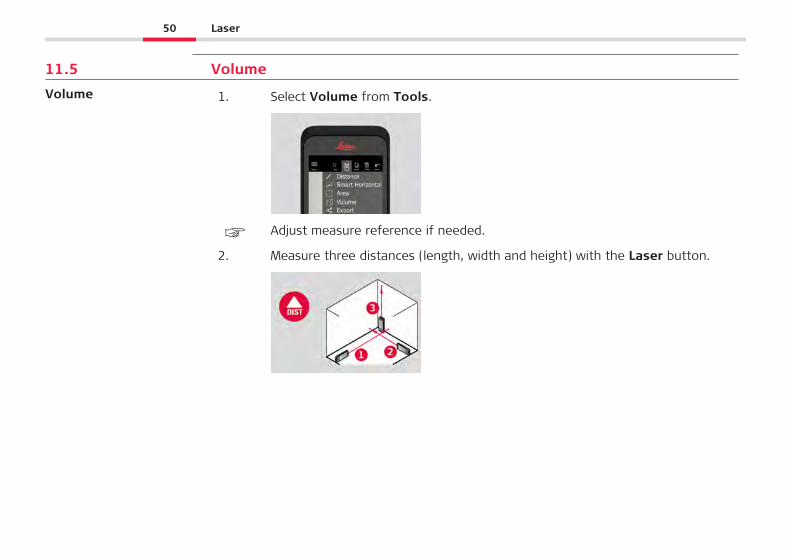
11.5 Volume
1. Select Volume from Tools.
☞ Adjust measure reference if needed.
2. Measure three distances (length, width and height) with the Laser button.
Volume
50 Laser
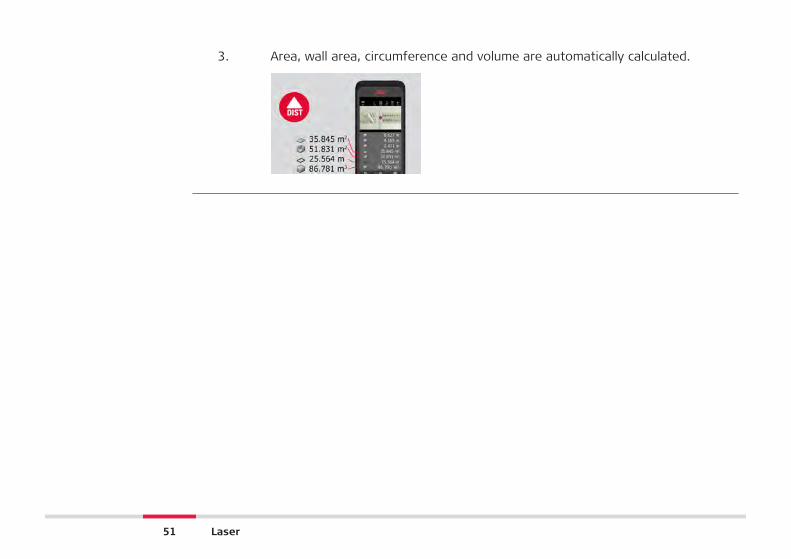
3. Area, wall area, circumference and volume are automatically calculated.
51 Laser
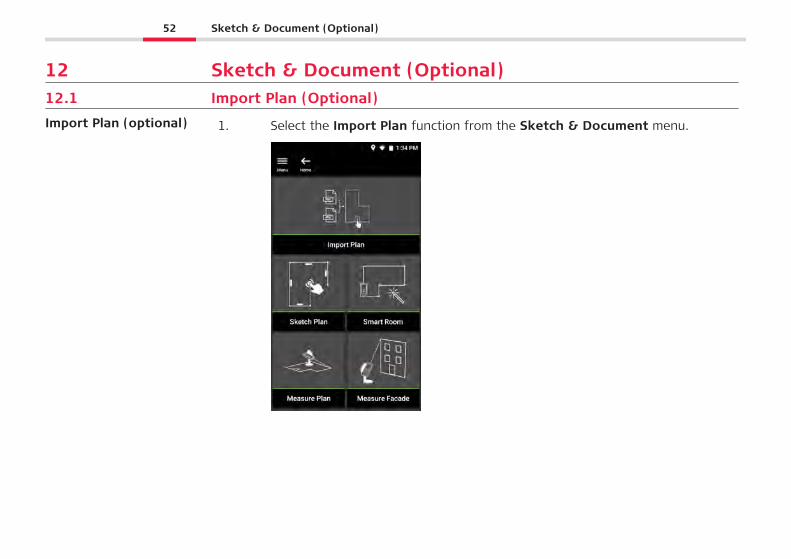
12 Sketch & Document (Optional)12.1 Import Plan (Optional)
1. Select the Import Plan function from the Sketch & Document menu.Import Plan (optional)
52 Sketch & Document (Optional)
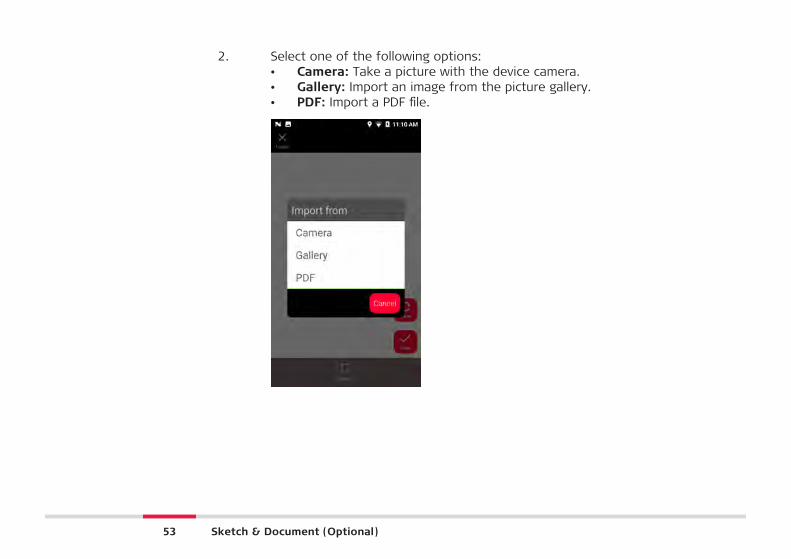
2. Select one of the following options:• Camera: Take a picture with the device camera.• Gallery: Import an image from the picture gallery.• PDF: Import a PDF file.
53 Sketch & Document (Optional)
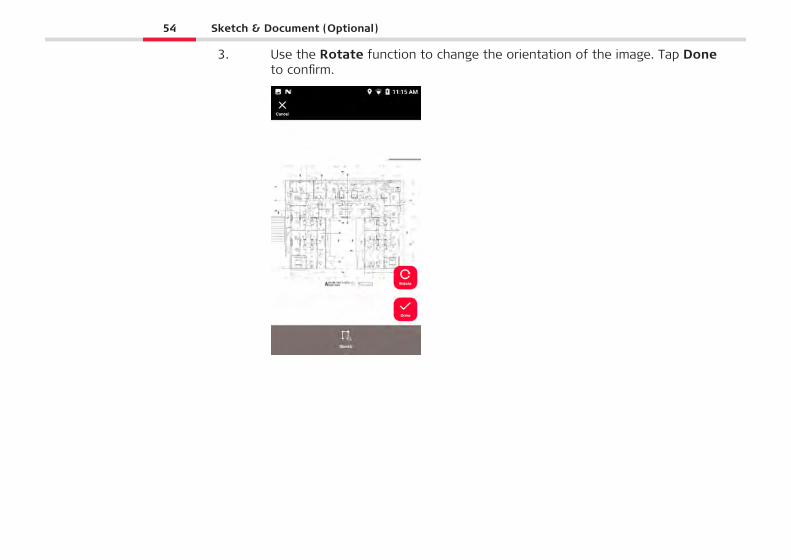
3. Use the Rotate function to change the orientation of the image. Tap Doneto confirm.
54 Sketch & Document (Optional)
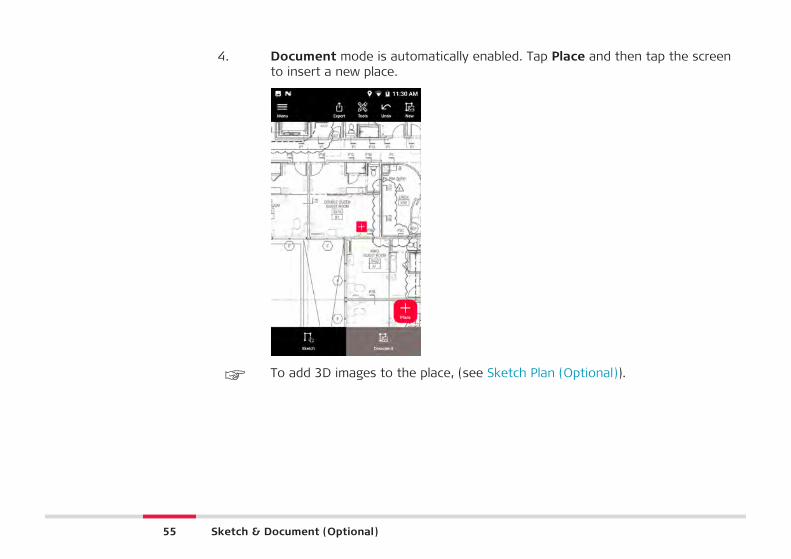
4. Document mode is automatically enabled. Tap Place and then tap the screento insert a new place.
☞ To add 3D images to the place, (see Sketch Plan (Optional)).
55 Sketch & Document (Optional)
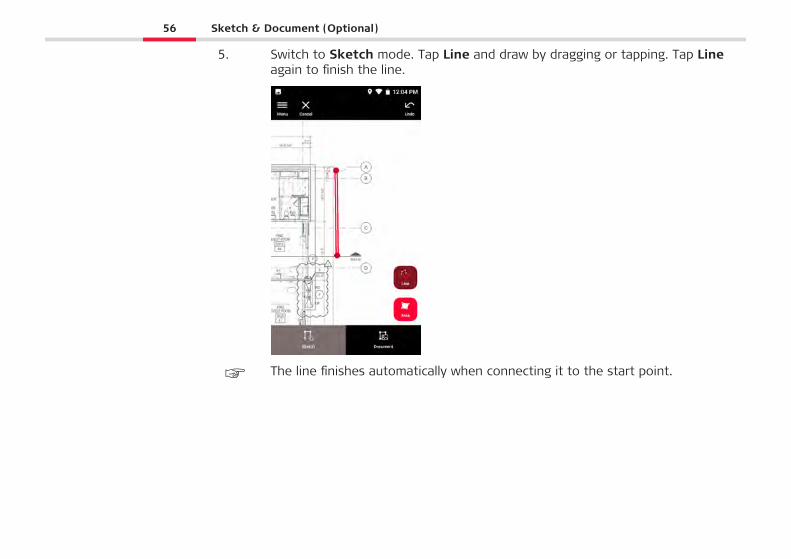
5. Switch to Sketch mode. Tap Line and draw by dragging or tapping. Tap Lineagain to finish the line.
☞ The line finishes automatically when connecting it to the start point.
56 Sketch & Document (Optional)
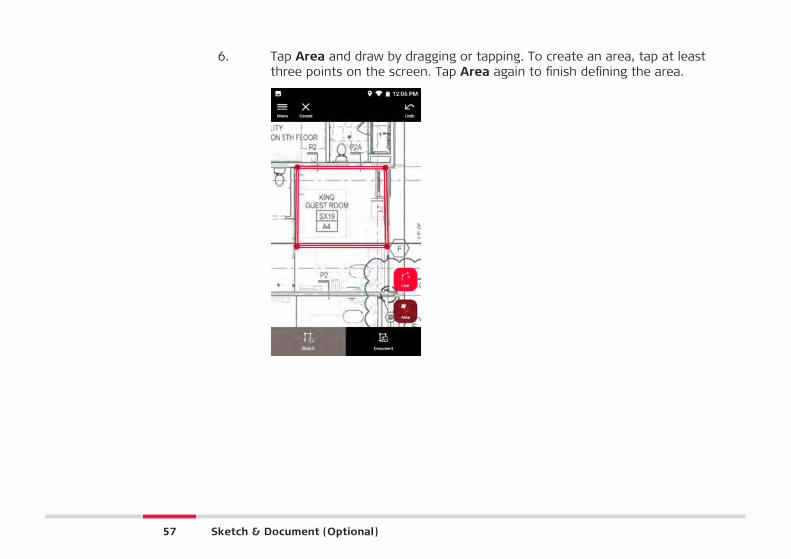
6. Tap Area and draw by dragging or tapping. To create an area, tap at leastthree points on the screen. Tap Area again to finish defining the area.
57 Sketch & Document (Optional)
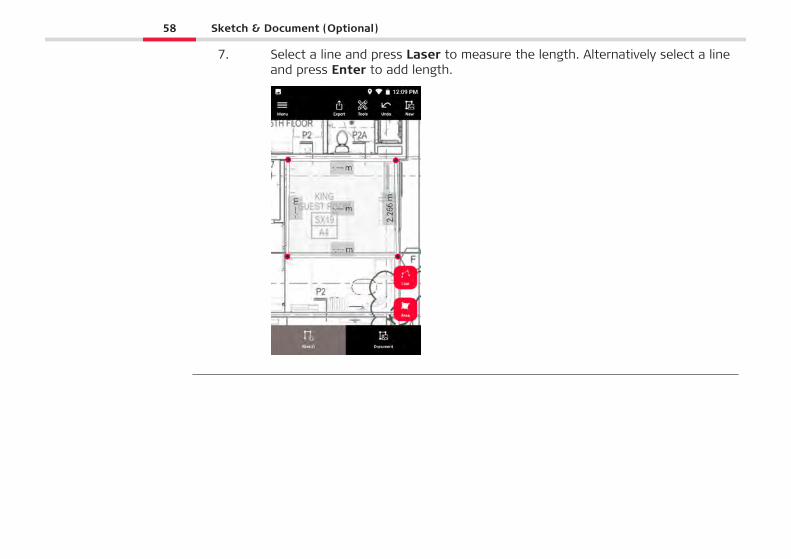
7. Select a line and press Laser to measure the length. Alternatively select a lineand press Enter to add length.
58 Sketch & Document (Optional)
12.2 Sketch Plan (Optional)
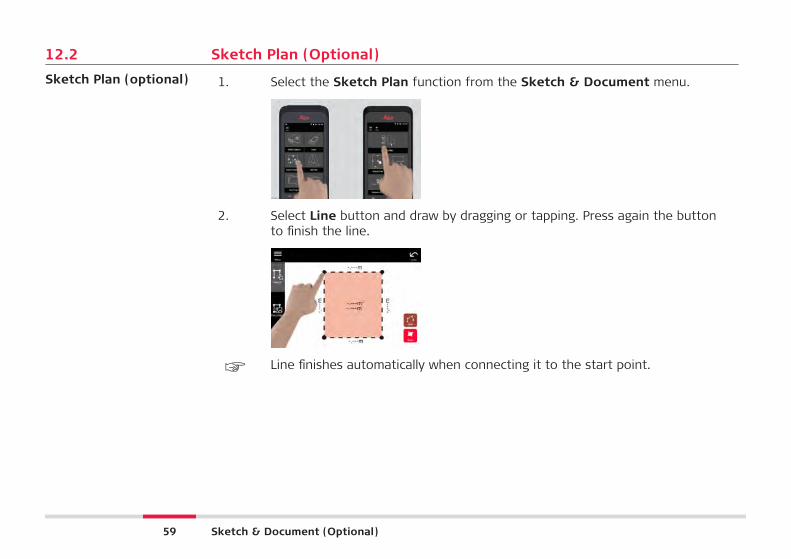
1. Select the Sketch Plan function from the Sketch & Document menu.
20048_001
2. Select Line button and draw by dragging or tapping. Press again the buttonto finish the line.
☞ Line finishes automatically when connecting it to the start point.
Sketch Plan (optional)
59 Sketch & Document (Optional)
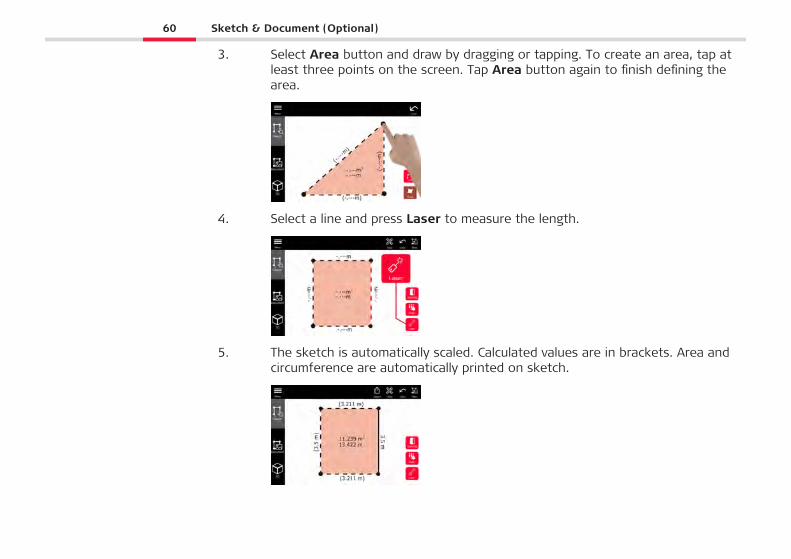
3. Select Area button and draw by dragging or tapping. To create an area, tap atleast three points on the screen. Tap Area button again to finish defining thearea.
4. Select a line and press Laser to measure the length.
5. The sketch is automatically scaled. Calculated values are in brackets. Area andcircumference are automatically printed on sketch.
60 Sketch & Document (Optional)
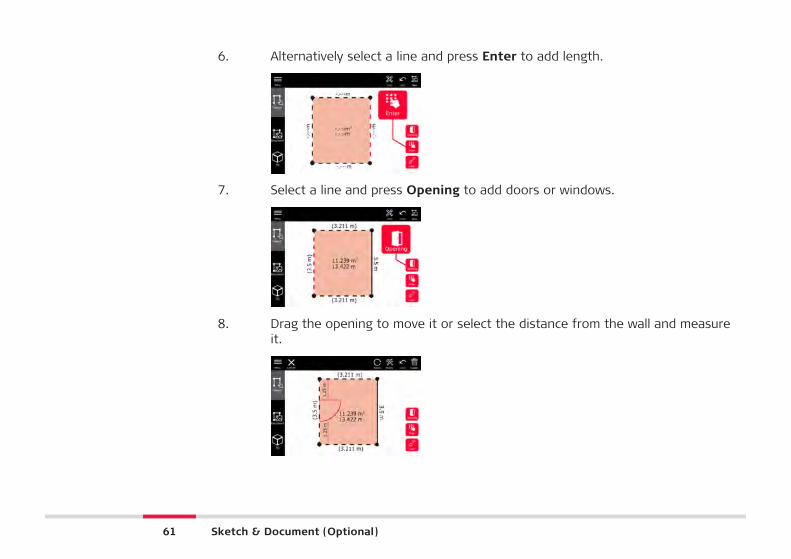
6. Alternatively select a line and press Enter to add length.
7. Select a line and press Opening to add doors or windows.
8. Drag the opening to move it or select the distance from the wall and measureit.
61 Sketch & Document (Optional)
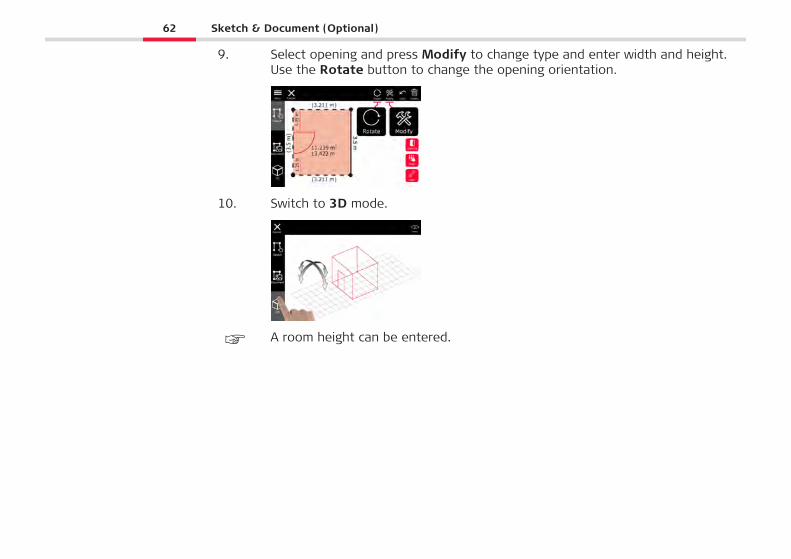
9. Select opening and press Modify to change type and enter width and height.Use the Rotate button to change the opening orientation.
10. Switch to 3D mode.
☞ A room height can be entered.
62 Sketch & Document (Optional)
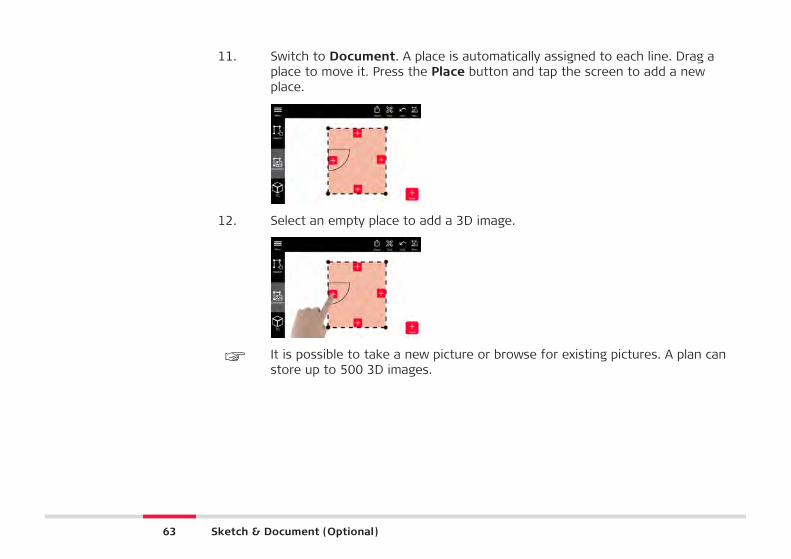
11. Switch to Document. A place is automatically assigned to each line. Drag aplace to move it. Press the Place button and tap the screen to add a newplace.
12. Select an empty place to add a 3D image.
☞ It is possible to take a new picture or browse for existing pictures. A plan canstore up to 500 3D images.
63 Sketch & Document (Optional)
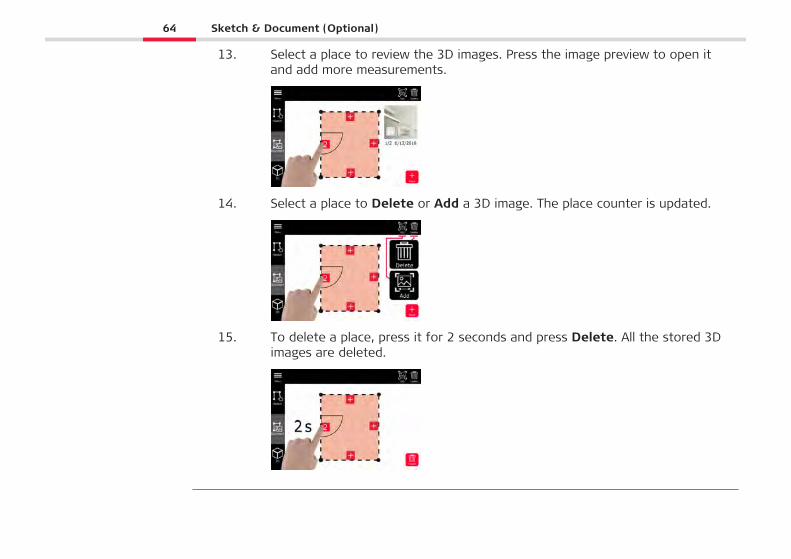
13. Select a place to review the 3D images. Press the image preview to open itand add more measurements.
14. Select a place to Delete or Add a 3D image. The place counter is updated.
15. To delete a place, press it for 2 seconds and press Delete. All the stored 3Dimages are deleted.
64 Sketch & Document (Optional)
12.3 Smart Room (Optional)
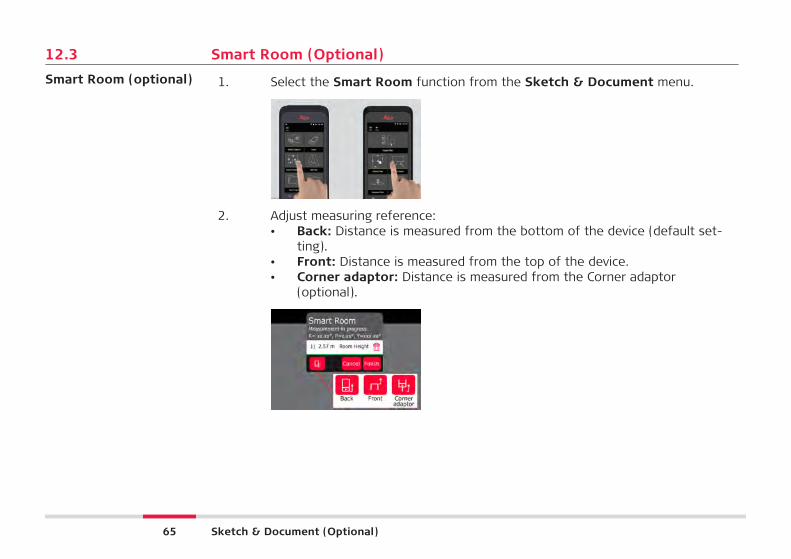
1. Select the Smart Room function from the Sketch & Document menu.
20068_001
2. Adjust measuring reference:• Back: Distance is measured from the bottom of the device (default set-
ting).• Front: Distance is measured from the top of the device.• Corner adaptor: Distance is measured from the Corner adaptor
(optional).
Smart Room (optional)
65 Sketch & Document (Optional)
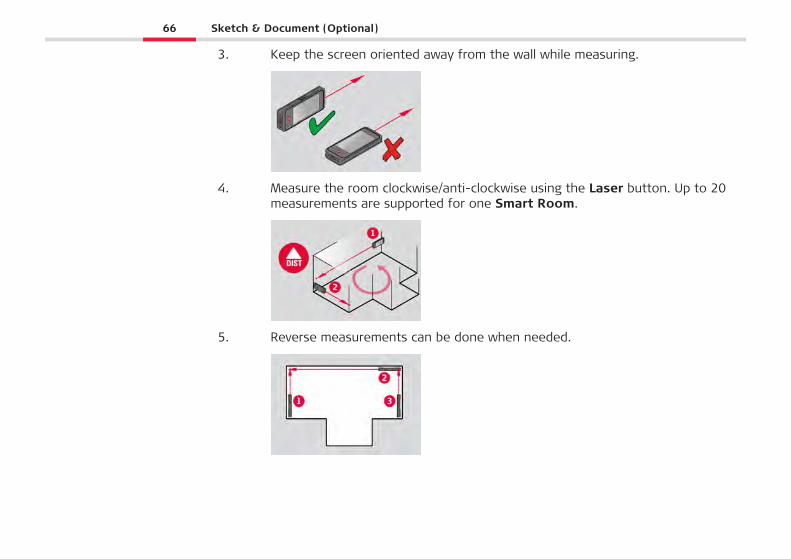
3. Keep the screen oriented away from the wall while measuring.
4. Measure the room clockwise/anti-clockwise using the Laser button. Up to 20measurements are supported for one Smart Room.
5. Reverse measurements can be done when needed.
66 Sketch & Document (Optional)

6. Room Height can be measured anytime.
7. All measured values are displayed. After the last measurement press Finish.
8. The floorplan can be modified in Sketch mode, (see Sketch Plan (Optional)).
67 Sketch & Document (Optional)
12.4 Measure Plan (Optional)
1. Connect the BLK3D to the Leica DST 360 adapter.
2. Select the Measure Plan function from the Sketch & Document menu.
20087_001
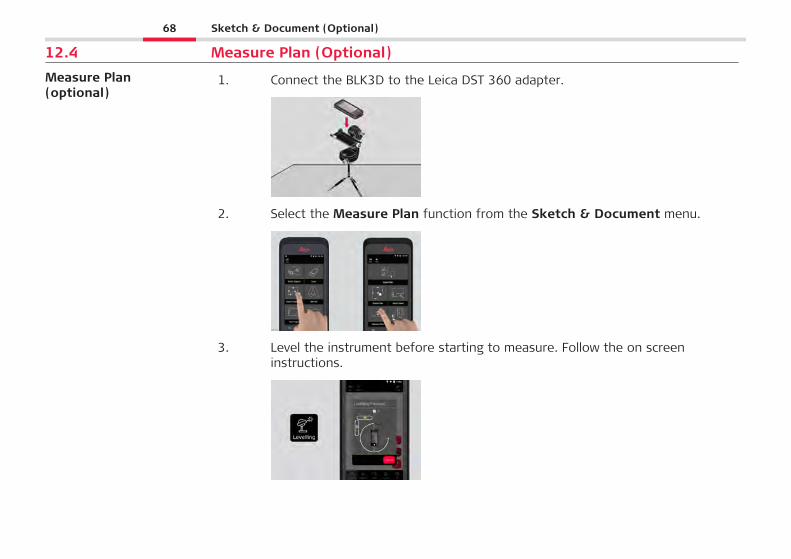
3. Level the instrument before starting to measure. Follow the on screeninstructions.
Measure Plan(optional)
68 Sketch & Document (Optional)
4. Select Point, Line or Area in the P2P Measure Tab.
5. Point the laser at the target and measure with the Measure button. Meas-ured points are projected onto the floorplan and are automatically shown onscreen.
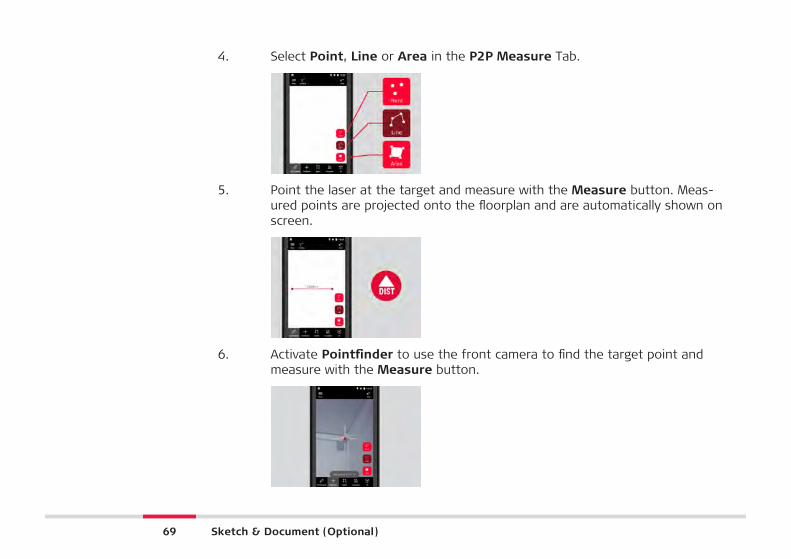
6. Activate Pointfinder to use the front camera to find the target point andmeasure with the Measure button.
69 Sketch & Document (Optional)
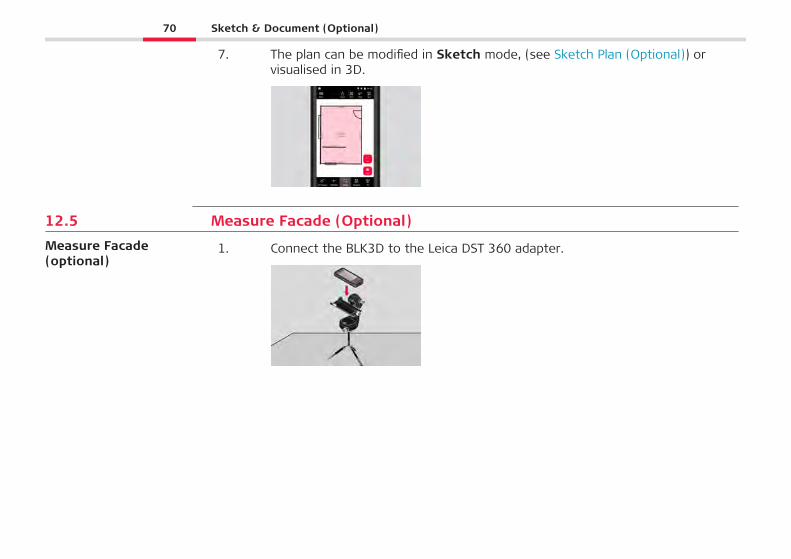
7. The plan can be modified in Sketch mode, (see Sketch Plan (Optional)) orvisualised in 3D.
12.5 Measure Facade (Optional)
1. Connect the BLK3D to the Leica DST 360 adapter.Measure Facade(optional)
70 Sketch & Document (Optional)
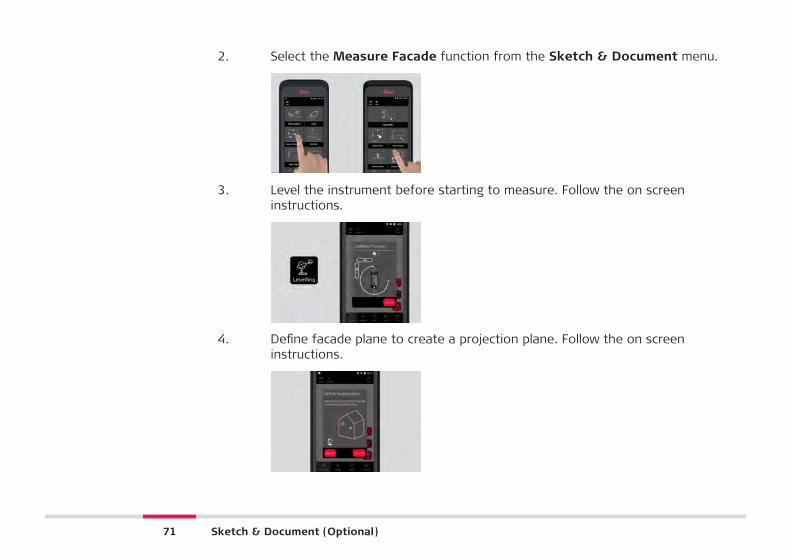
2. Select the Measure Facade function from the Sketch & Document menu.
20093_001
3. Level the instrument before starting to measure. Follow the on screeninstructions.
4. Define facade plane to create a projection plane. Follow the on screeninstructions.
71 Sketch & Document (Optional)
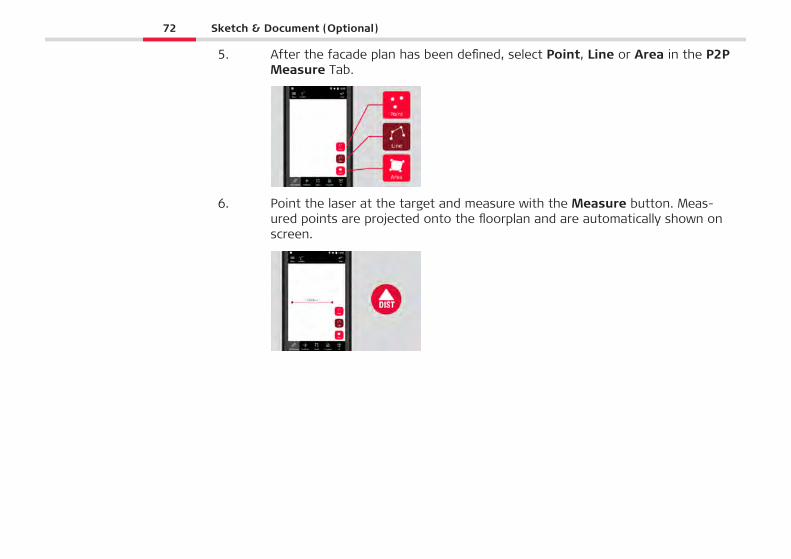
5. After the facade plan has been defined, select Point, Line or Area in the P2PMeasure Tab.
6. Point the laser at the target and measure with the Measure button. Meas-ured points are projected onto the floorplan and are automatically shown onscreen.
72 Sketch & Document (Optional)
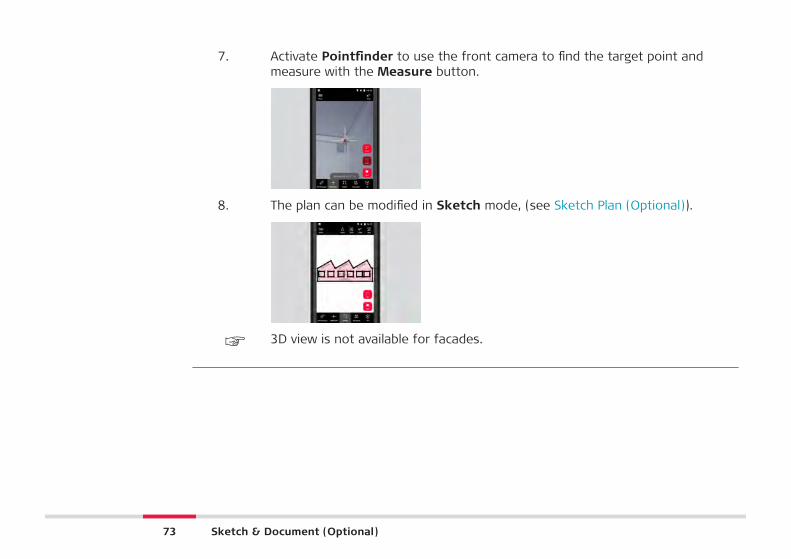
7. Activate Pointfinder to use the front camera to find the target point andmeasure with the Measure button.
8. The plan can be modified in Sketch mode, (see Sketch Plan (Optional)).
☞ 3D view is not available for facades.
73 Sketch & Document (Optional)
13 BIM 360 (Optional)Overview
Autodesk BIM 360 Docs integration with BLK3D, allows the sharing of 3D images into theBIM 360 environment.
☞ 3D images captured with the BLK3D can be stored in Autodesk BIM 360 issues.
☞ 3D images stored in BIM 360 issues can be viewed and measured on the BLK3DWeb.
Connect the BIM 360 account.
In order to start using files from BIM 360 Docs, you first must establish a connectionbetween the BLK3D and your Autodesk BIM 360 account.
1. Log in to your BIM 360 account.2. Go to Account Admin.3. Select the Apps Tab.4. Find the BLK3D app and select it.5. Click Add to BIM 360.
☞ If you do not yet have access to an Autodesk account, ask an admin to add youas a member.
☞ After any members are added to the account by the account admin, they canbe added to different projects.
BIM 360 (optional)
74 BIM 360 (Optional)
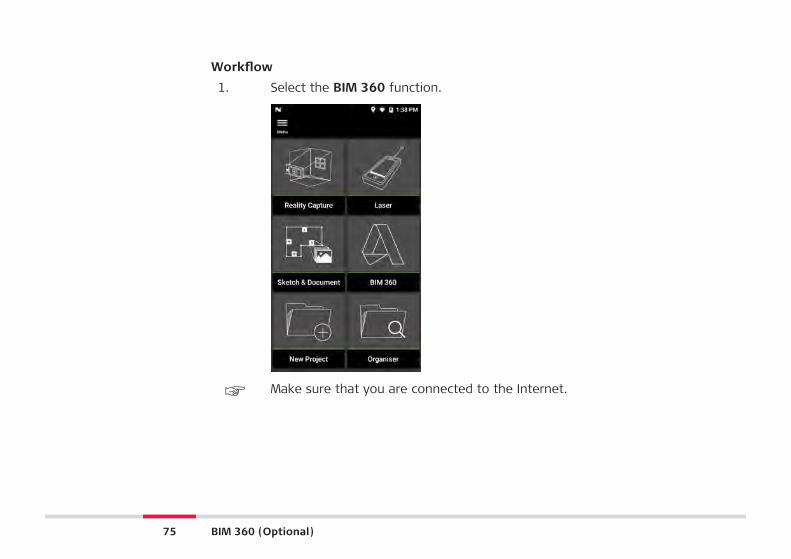
Workflow
1. Select the BIM 360 function.
☞ Make sure that you are connected to the Internet.
75 BIM 360 (Optional)
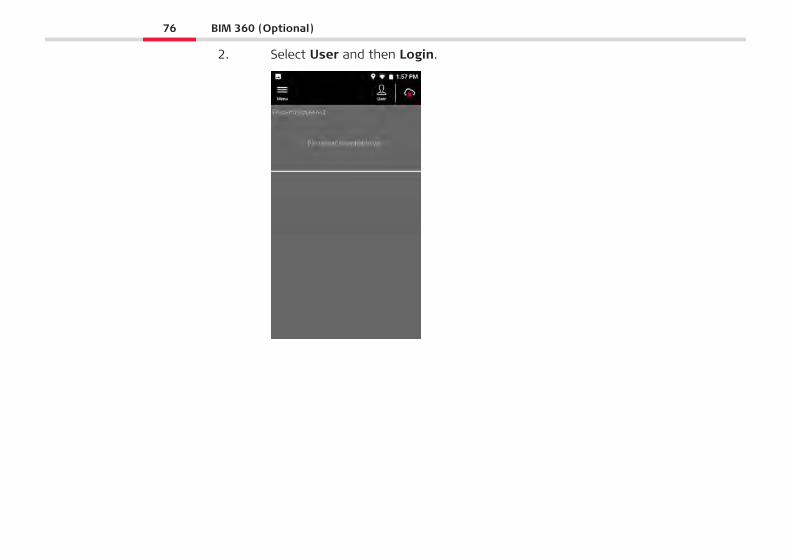
2. Select User and then Login.
76 BIM 360 (Optional)
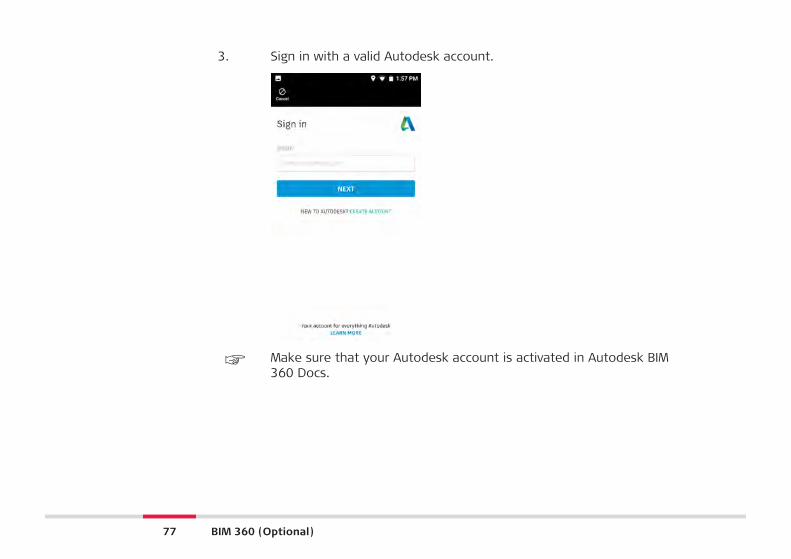
3. Sign in with a valid Autodesk account.
☞ Make sure that your Autodesk account is activated in Autodesk BIM360 Docs.
77 BIM 360 (Optional)
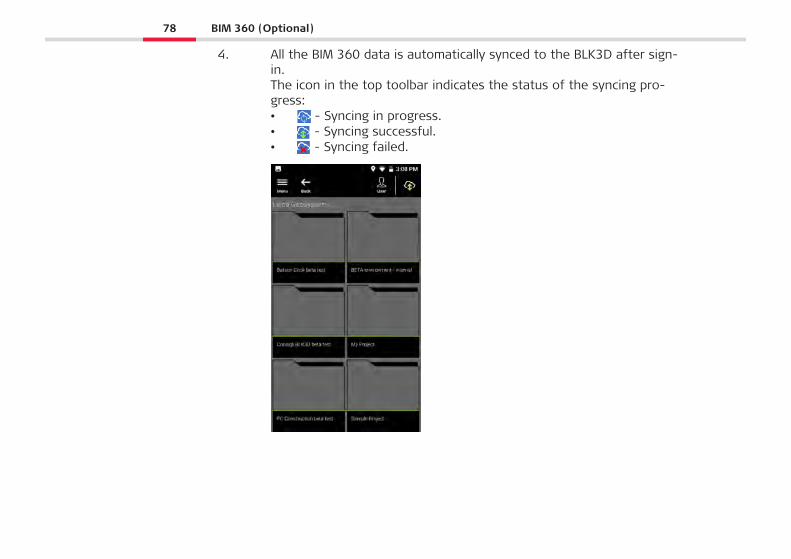
4. All the BIM 360 data is automatically synced to the BLK3D after sign-in.The icon in the top toolbar indicates the status of the syncing pro-gress:• - Syncing in progress.• - Syncing successful.• - Syncing failed.
78 BIM 360 (Optional)
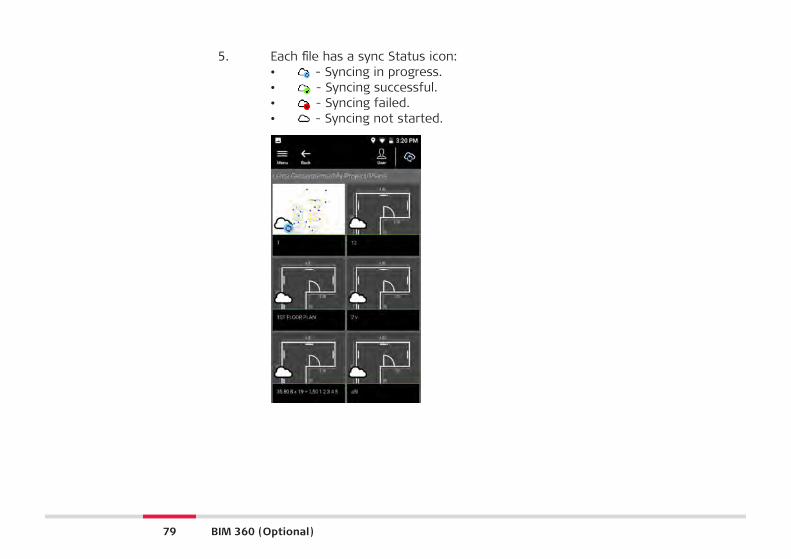
5. Each file has a sync Status icon:• - Syncing in progress.• - Syncing successful.• - Syncing failed.• - Syncing not started.
79 BIM 360 (Optional)
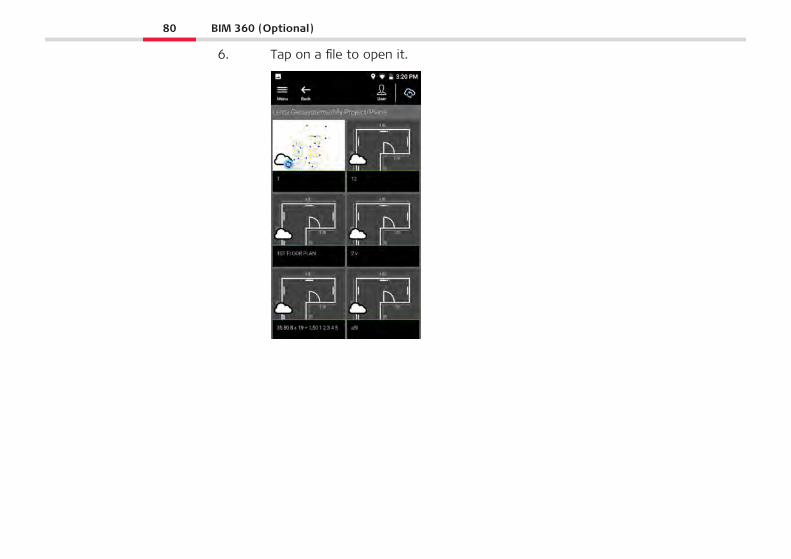
6. Tap on a file to open it.
80 BIM 360 (Optional)
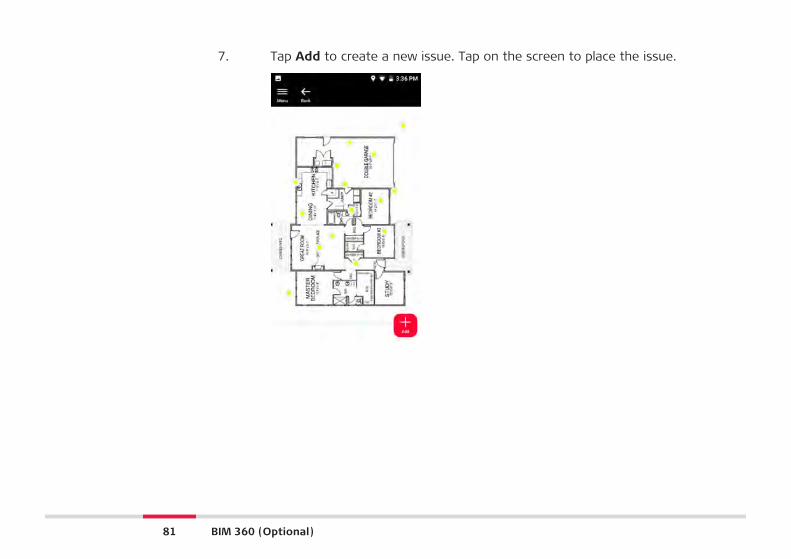
7. Tap Add to create a new issue. Tap on the screen to place the issue.
81 BIM 360 (Optional)
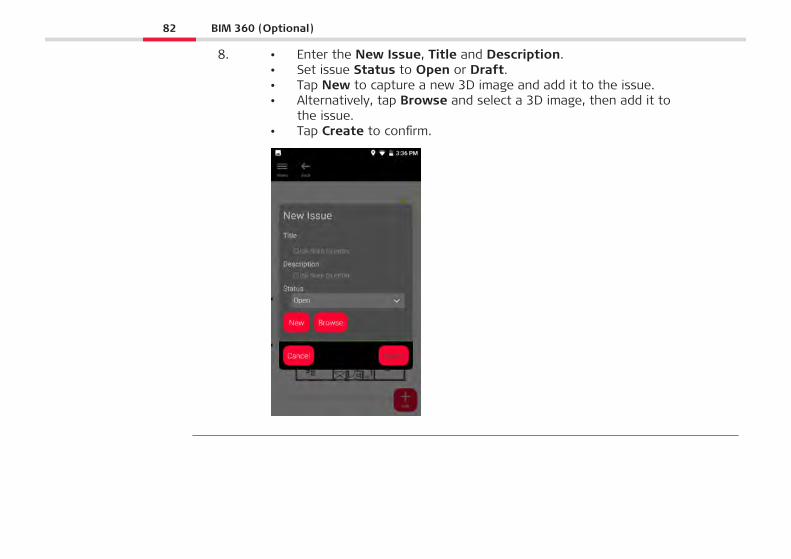
8. • Enter the New Issue, Title and Description.• Set issue Status to Open or Draft.• Tap New to capture a new 3D image and add it to the issue.• Alternatively, tap Browse and select a 3D image, then add it to
the issue.• Tap Create to confirm.
82 BIM 360 (Optional)
14 Publisher (Optional)Overview
Select a 3D image and use the Publish function to save the 3D image into the cloud.
☞ Internet connection is required to publish a link.
☞ The published 3D image is available to be viewed and measured by anyone onBLK3D Web.
☞ Any changes done later on the original 3D image are not merged to the file inthe cloud.
Workflow
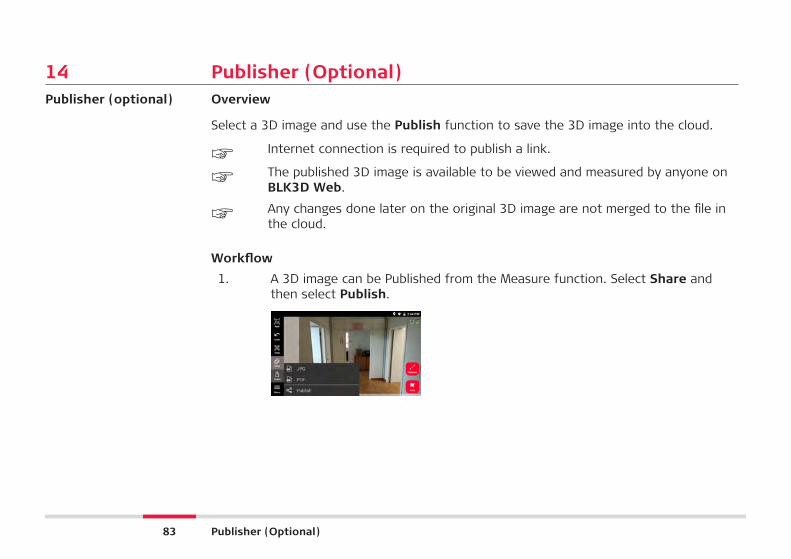
1. A 3D image can be Published from the Measure function. Select Share andthen select Publish.
Publisher (optional)
83 Publisher (Optional)
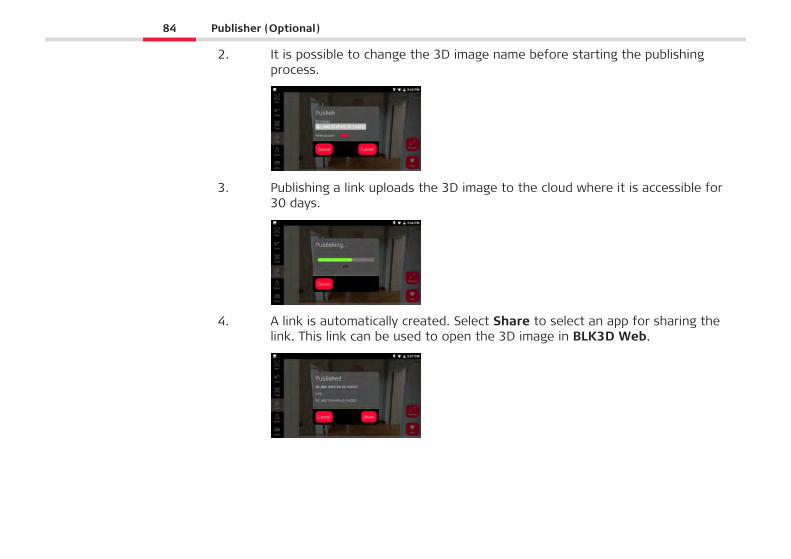
2. It is possible to change the 3D image name before starting the publishingprocess.
3. Publishing a link uploads the 3D image to the cloud where it is accessible for30 days.
4. A link is automatically created. Select Share to select an app for sharing thelink. This link can be used to open the 3D image in BLK3D Web.
84 Publisher (Optional)
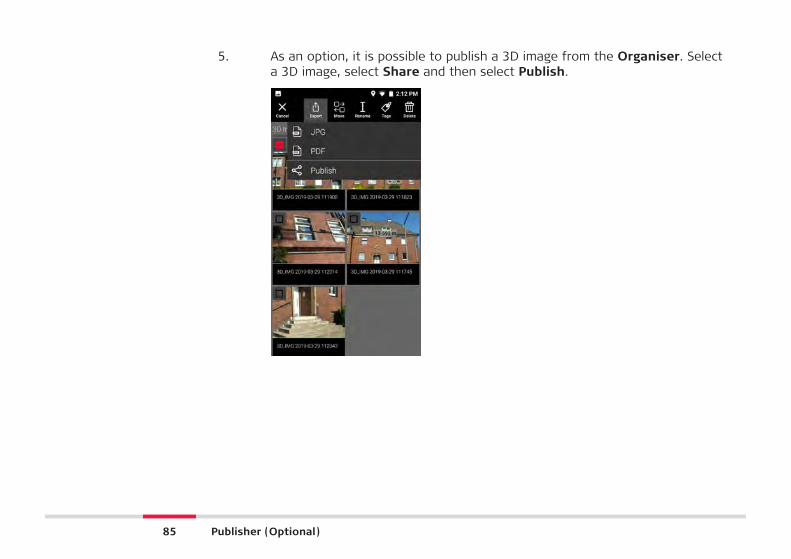
5. As an option, it is possible to publish a 3D image from the Organiser. Selecta 3D image, select Share and then select Publish.
85 Publisher (Optional)
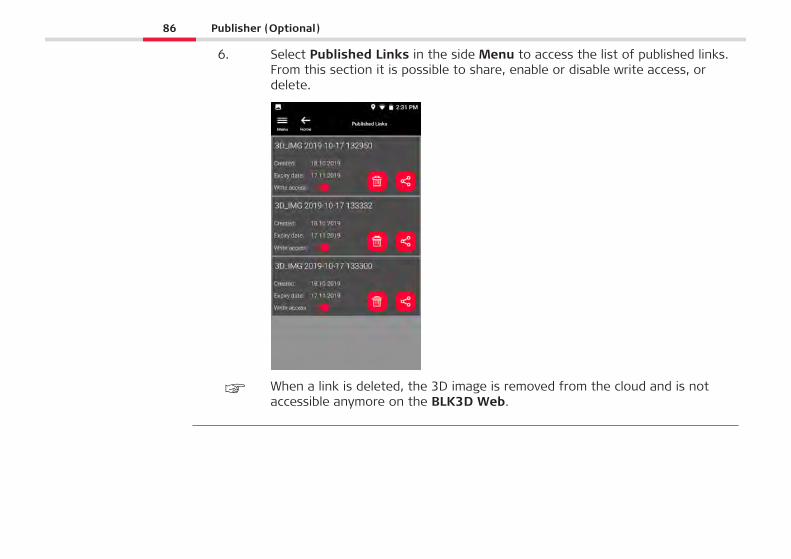
6. Select Published Links in the side Menu to access the list of published links.From this section it is possible to share, enable or disable write access, ordelete.
☞ When a link is deleted, the 3D image is removed from the cloud and is notaccessible anymore on the BLK3D Web.
86 Publisher (Optional)
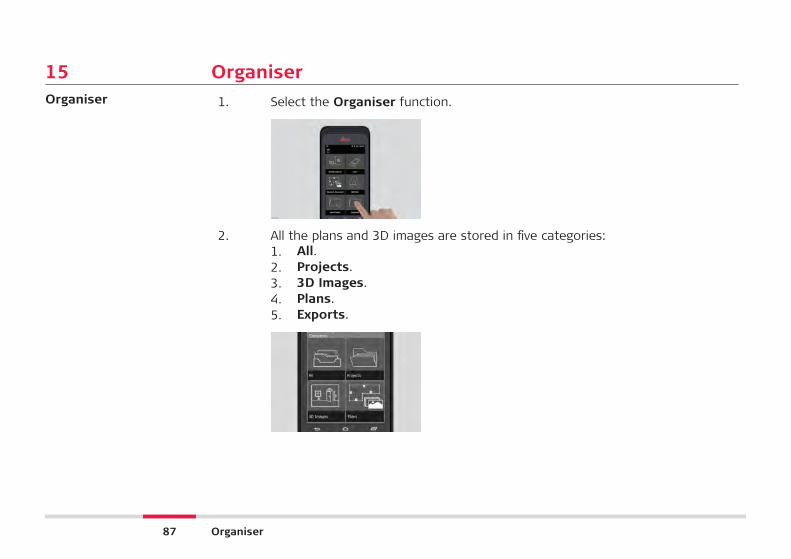
15 Organiser1. Select the Organiser function.
20076_001
2. All the plans and 3D images are stored in five categories:1. All.2. Projects.3. 3D Images.4. Plans.5. Exports.
Organiser
87 Organiser
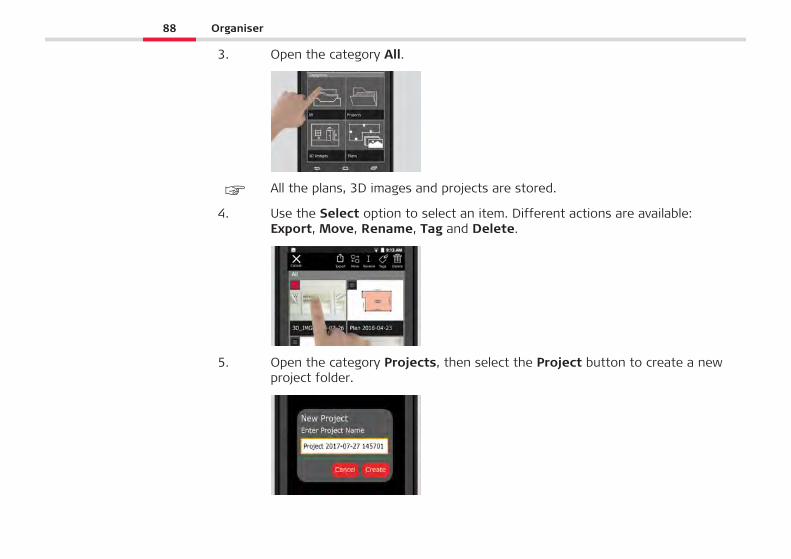
3. Open the category All.
☞ All the plans, 3D images and projects are stored.
4. Use the Select option to select an item. Different actions are available:Export, Move, Rename, Tag and Delete.
5. Open the category Projects, then select the Project button to create a newproject folder.
88 Organiser
☞ Plans and 3D images can be moved into project folders.
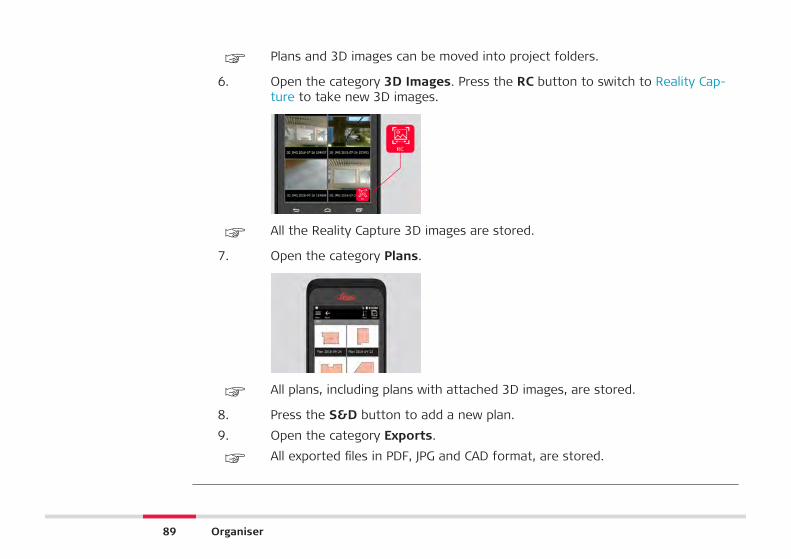
6. Open the category 3D Images. Press the RC button to switch to Reality Cap-ture to take new 3D images.
☞ All the Reality Capture 3D images are stored.
7. Open the category Plans.
☞ All plans, including plans with attached 3D images, are stored.
8. Press the S&D button to add a new plan.
9. Open the category Exports.
☞ All exported files in PDF, JPG and CAD format, are stored.
89 Organiser
16 Check & AdjustThe check and adjustment of the BLK3D is possible thanks to the Check & Adjust func-tion.
Check - Is the process of verifying the accuracy of the device with the Initial AccuracyTest.
☞ Can be done hand-held.
☞ Requires the BLK3D calibration plate.
☞ Is recommended after a fall.
Adjust - Is the process of adjusting the accuracy of the device.
☞ Requires the BLK3D calibration plate, tripod and tripod adapter.
From the menu it is possible to:• See when the last check was done.• See when the last adjustment was done.• Check the accuracy.• Reset the adjustment status back to default settings.
Check & adjust
90 Check & Adjust
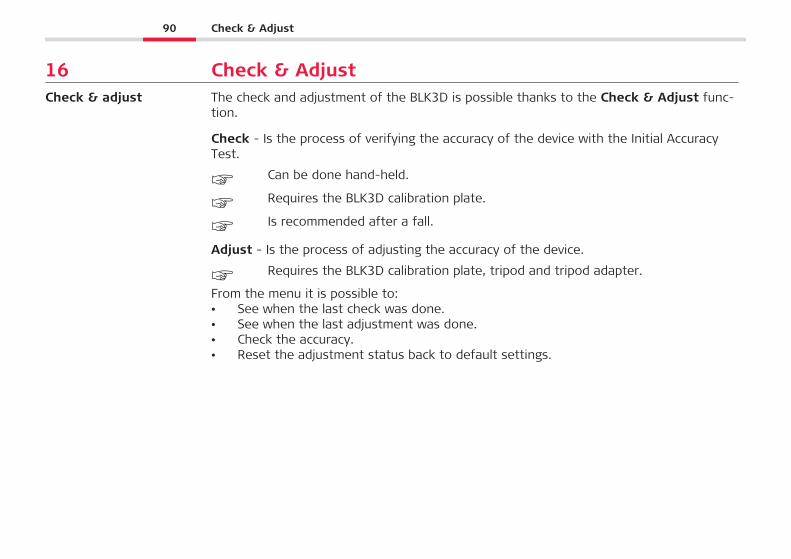
To perform the Initial Accuracy Check
1. Place the BLK3D calibration plate on the floor or against the wall andpoint the laser at the centre of the calibration plate.
91 Check & Adjust
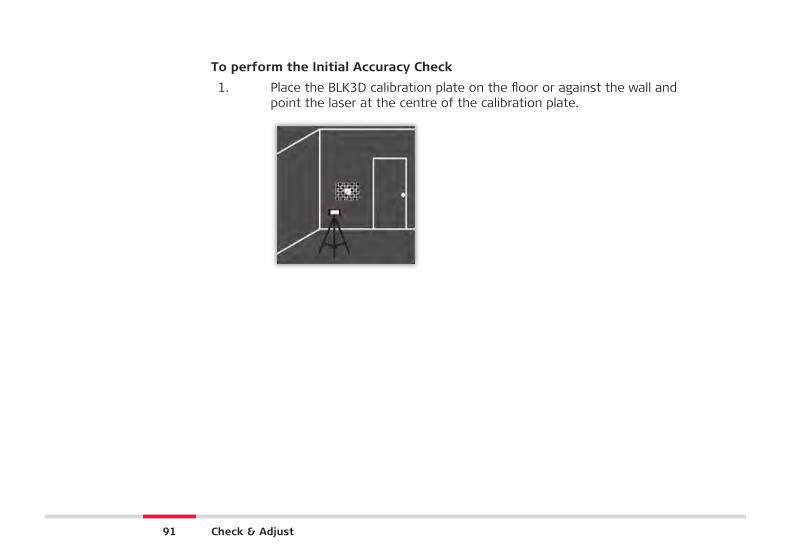
2. Fit the calibration plate into the red frame shown on screen. Use theguidelines on the screen to adjust the distance of the camera fromthe calibration plate (1.2 m/3.9 ft). Trigger the picture using thePhoto button on screen.
3. After the check is complete, feedback is provided to the user:
Device is calibrated. No need to adjust. Select Done to finish.
92 Check & Adjust

The check failed. Device is not calibrated. Select Calibrate to startadjustment process. Select Later to postpone.
To perform the adjustment
1. Mount the BLK3D horizontally on the tripod.
☞ Adjustment is not possible without the tripod.
93 Check & Adjust
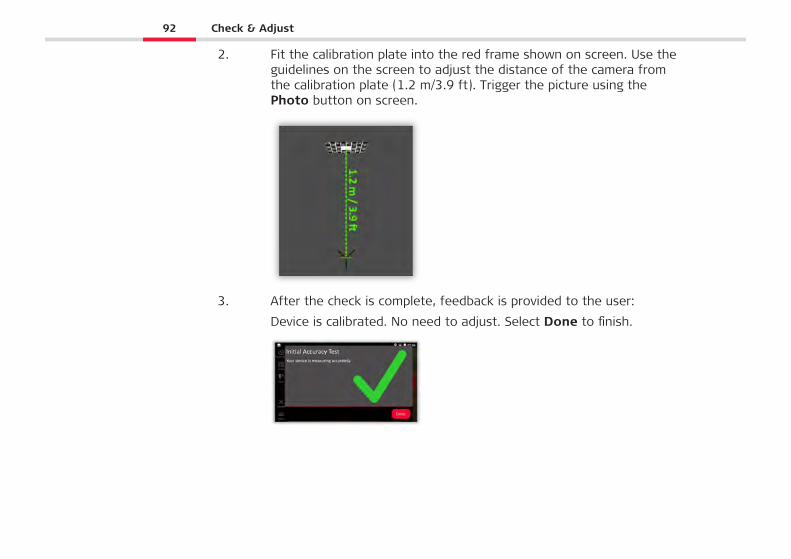
2. Place or hang the calibration plate on the wall.
3. Use the laser to adjust the tripod height to the centre of the calibra-tion plate.
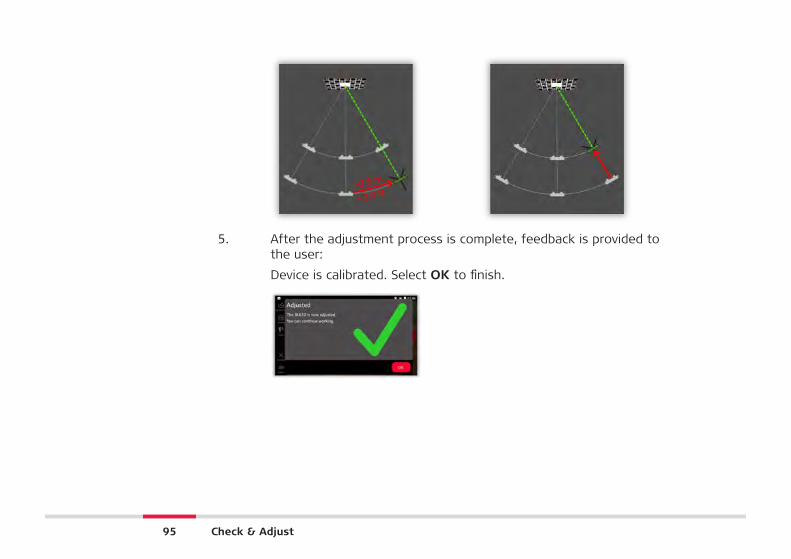
4. The adjustment process is done in the following steps:1. Adjust the distance of the camera from the calibration target.2. Move left or right following the on screen instructions.3. Fit the calibration target into the red frame shown on screen.4. Trigger the picture using the on screen Laser/Photo capture
option.5. Follow the on screen instructions to complete the procedure.
94 Check & Adjust
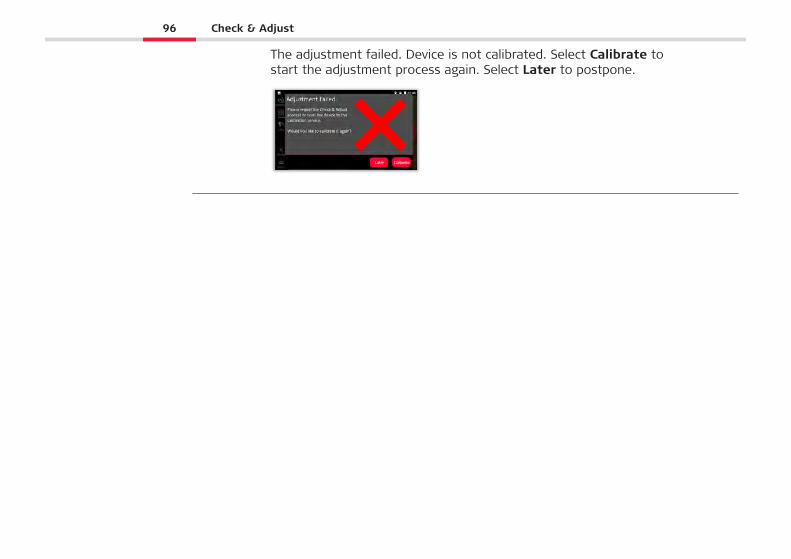
5. After the adjustment process is complete, feedback is provided tothe user:
Device is calibrated. Select OK to finish.
95 Check & Adjust
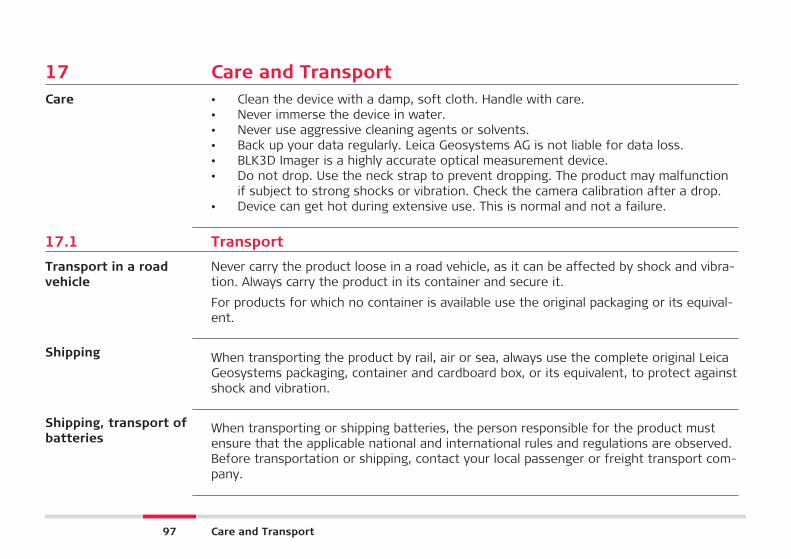
The adjustment failed. Device is not calibrated. Select Calibrate tostart the adjustment process again. Select Later to postpone.
96 Check & Adjust
17 Care and Transport• Clean the device with a damp, soft cloth. Handle with care.• Never immerse the device in water.• Never use aggressive cleaning agents or solvents.• Back up your data regularly. Leica Geosystems AG is not liable for data loss.• BLK3D Imager is a highly accurate optical measurement device.• Do not drop. Use the neck strap to prevent dropping. The product may malfunction
if subject to strong shocks or vibration. Check the camera calibration after a drop.• Device can get hot during extensive use. This is normal and not a failure.
17.1 Transport
Never carry the product loose in a road vehicle, as it can be affected by shock and vibra-tion. Always carry the product in its container and secure it.
For products for which no container is available use the original packaging or its equival-ent.
When transporting the product by rail, air or sea, always use the complete original LeicaGeosystems packaging, container and cardboard box, or its equivalent, to protect againstshock and vibration.
When transporting or shipping batteries, the person responsible for the product mustensure that the applicable national and international rules and regulations are observed.Before transportation or shipping, contact your local passenger or freight transport com-pany.
Care
Transport in a roadvehicle
Shipping
Shipping, transport ofbatteries
97 Care and Transport
Exposing the product to high mechanical forces, for example through frequent transportor rough handling, or storing the product for a long time may cause deviations and adecrease in the measurement accuracy. Periodically carry out test measurements andperform the field adjustments indicated in the User Manual before using the product.
17.2 Storage
Respect the temperature limits when storing the equipment, particularly in summer if theequipment is inside a vehicle. Refer to 18 Technical Data for information about temper-ature limits.
• Refer to 18 Technical Data for information about storage temperature range.• Remove batteries from the product and the charger before storing.• After storage recharge batteries before using.• Protect batteries from damp and wetness. Wet or damp batteries must be dried
before storing or use.• A storage temperature range of 0 °C to +30 °C / +32 °F to +86 °F in a dry environ-
ment is recommended to minimize self-discharging of the battery.• At the recommended storage temperature range, batteries containing a 40% to 50%
charge can be stored for up to one year. After this storage period the batteries mustbe recharged.
Field adjustment
Product
Li-Ion batteries
98 Care and Transport
17.3 Cleaning and Drying
• Blow dust off lenses and prisms.• Never touch the glass with your fingers.• Use only a clean, soft, lint-free cloth for cleaning. If necessary, moisten the cloth
with water or pure alcohol. Do not use other liquids; these may attack the polymercomponents.
As applicable dry the device and the accessories at a temperature not greater than40 °C/104 °F. Remove the battery cover and dry the battery compartment.
Product and accessor-ies
Damp products
99 Care and Transport
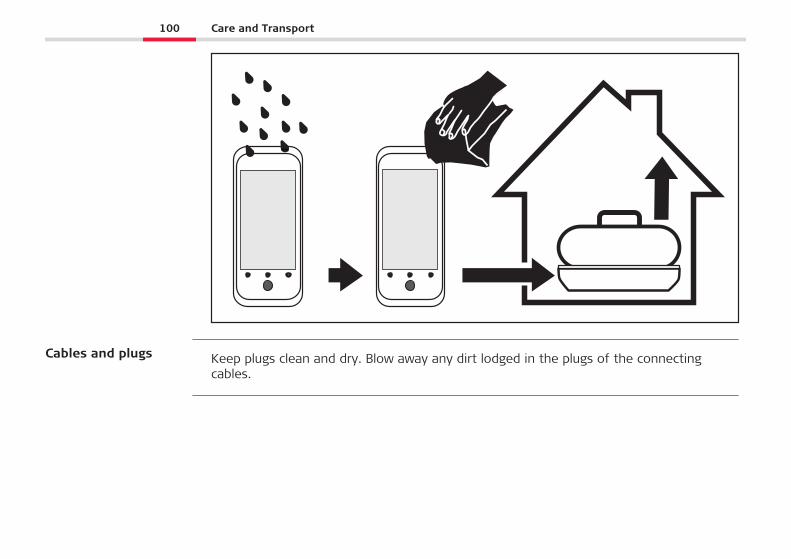
Keep plugs clean and dry. Blow away any dirt lodged in the plugs of the connectingcables.
Cables and plugs
100 Care and Transport
18 Technical Data18.1 Conformity to National Regulations
Regulatory information, certification, and compliance marks are available on the BLK3D.Go to Android Settings > About phone > Regulatory labels.
18.1.1 BLK3D
• FCC Part 15 (applicable in US)• Hereby, Leica Geosystems AG declares that the radio equipment type BLK3D is in
compliance with Directive 2014/53/EU and other applicable European Directives.The full text of the EU declaration of conformity is available at the following Inter-net address: http://www.leica-geosystems.com/ce.
Class 1 equipment according to European Directive 2014/53/EU (RED) canbe placed on the market and be put into service without restrictions inany EEA member state.
• The conformity for countries with other national regulations not covered by theFCC part 15 or European Directive 2014/53/EU has to be approved prior to useand operation.
• Japanese Radio Law and Japanese Telecommunications Business Law Compliance.• This device is granted pursuant to the Japanese Radio Law (電波法) and the
Japanese Telecommunications Business Law (電気通信事業法).• This device should not be modified (otherwise the granted designation num-
ber will become invalid).
Regulatory information
Conformity to nationalregulations
101 Technical Data
18.1.2 Dangerous Goods Regulations
Many products of Leica Geosystems are powered by Lithium batteries.
Lithium batteries can be dangerous under certain conditions and can pose a safety haz-ard. In certain conditions, Lithium batteries can overheat and ignite.
☞ When carrying or shipping your Leica product with Lithium batteries onboard acommercial aircraft, you must do so in accordance with the IATA Danger-ous Goods Regulations.
☞ Leica Geosystems has developed Guidelines on “How to carry Leica products”and “How to ship Leica products” with Lithium batteries. Before any transport-ation of a Leica product, we ask you to consult these guidelines on our webpage (http://www.leica-geosystems.com/dgr) to ensure that you are in accordancewith the IATA Dangerous Goods Regulations and that the Leica products can betransported correctly.
☞ Damaged or defective batteries are prohibited from being carried or transpor-ted onboard any aircraft. Therefore, ensure that the condition of any battery issafe for transportation.
18.2 General Technical Data of the Product
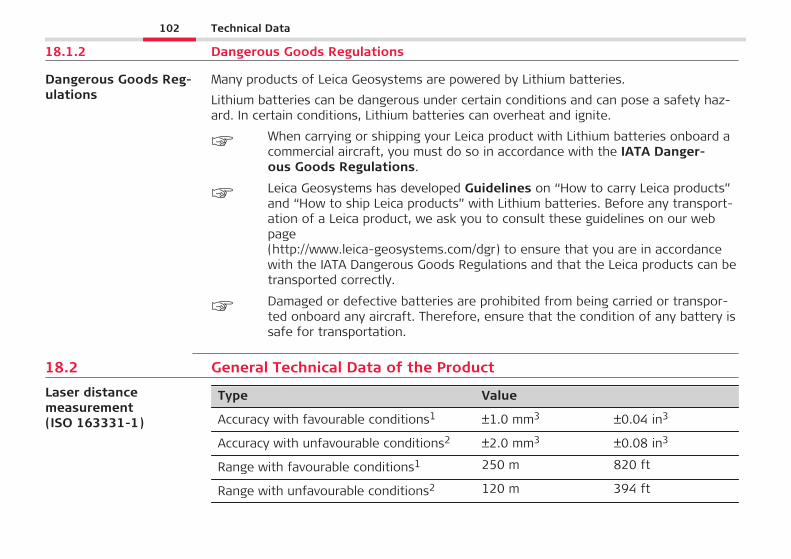
Type Value
Accuracy with favourable conditions1 ±1.0 mm3 ±0.04 in3
Accuracy with unfavourable conditions2 ±2.0 mm3 ±0.08 in3
Range with favourable conditions1 250 m 820 ft
Range with unfavourable conditions2 120 m 394 ft
Dangerous Goods Reg-ulations
Laser distancemeasurement(ISO 163331-1)
102 Technical Data
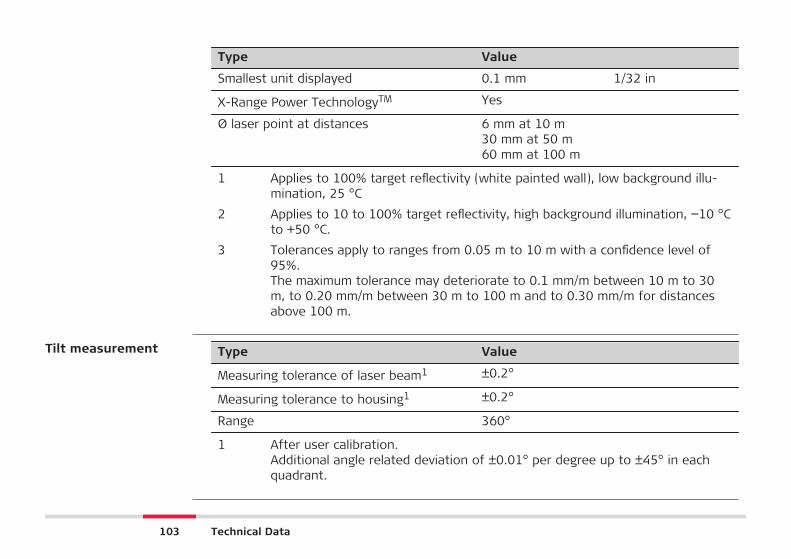
Type Value
Smallest unit displayed 0.1 mm 1/32 in
X-Range Power TechnologyTM Yes
Ø laser point at distances 6 mm at 10 m30 mm at 50 m60 mm at 100 m
1 Applies to 100% target reflectivity (white painted wall), low background illu-mination, 25 °C
2 Applies to 10 to 100% target reflectivity, high background illumination, −10 °Cto +50 °C.
3 Tolerances apply to ranges from 0.05 m to 10 m with a confidence level of95%.The maximum tolerance may deteriorate to 0.1 mm/m between 10 m to 30m, to 0.20 mm/m between 30 m to 100 m and to 0.30 mm/m for distancesabove 100 m.
Type Value
Measuring tolerance of laser beam1 ±0.2°
Measuring tolerance to housing1 ±0.2°
Range 360°
1 After user calibration.Additional angle related deviation of ±0.01° per degree up to ±45° in eachquadrant.
Tilt measurement
103 Technical Data
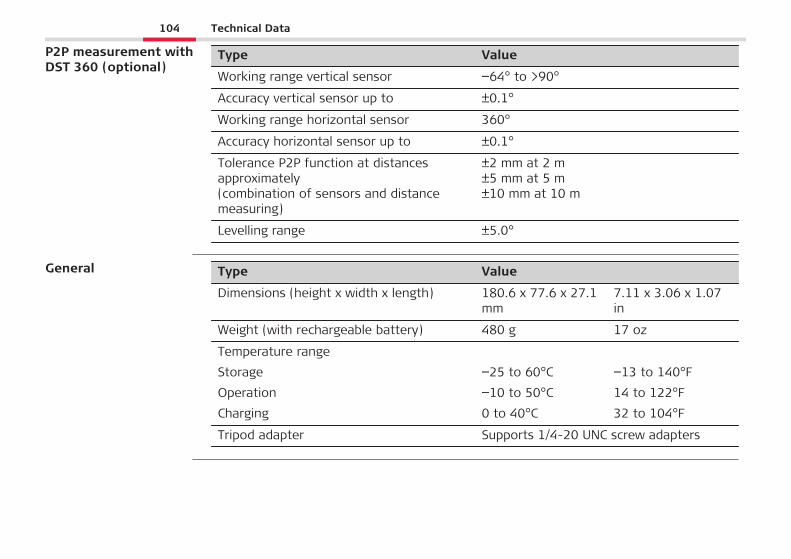
Type Value
Working range vertical sensor −64° to >90°
Accuracy vertical sensor up to ±0.1°
Working range horizontal sensor 360°
Accuracy horizontal sensor up to ±0.1°
Tolerance P2P function at distancesapproximately(combination of sensors and distancemeasuring)
±2 mm at 2 m±5 mm at 5 m±10 mm at 10 m
Levelling range ±5.0°
Type Value
Dimensions (height x width x length) 180.6 x 77.6 x 27.1mm
7.11 x 3.06 x 1.07in
Weight (with rechargeable battery) 480 g 17 oz
Temperature range
Storage −25 to 60°C −13 to 140°F
Operation −10 to 50°C 14 to 122°F
Charging 0 to 40°C 32 to 104°F
Tripod adapter Supports 1/4-20 UNC screw adapters
P2P measurement withDST 360 (optional)
General
104 Technical Data
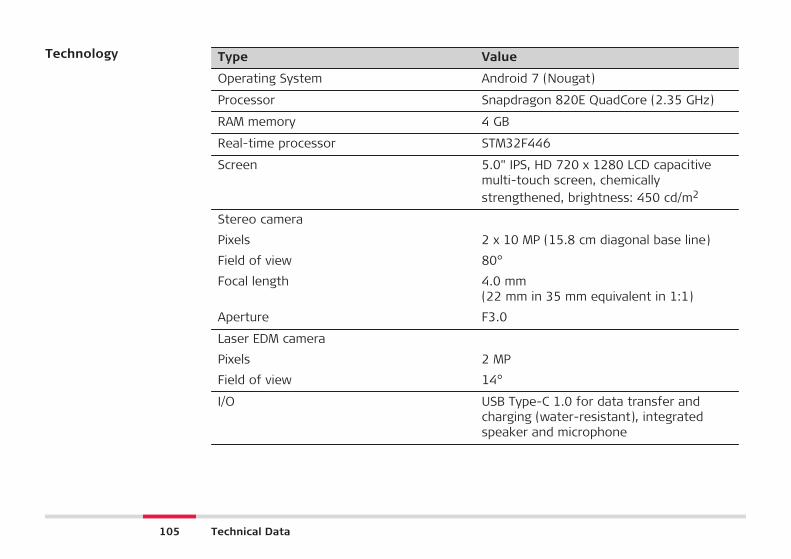
Type Value
Operating System Android 7 (Nougat)
Processor Snapdragon 820E QuadCore (2.35 GHz)
RAM memory 4 GB
Real-time processor STM32F446
Screen 5.0" IPS, HD 720 x 1280 LCD capacitivemulti-touch screen, chemicallystrengthened, brightness: 450 cd/m2
Stereo camera
Pixels 2 x 10 MP (15.8 cm diagonal base line)
Field of view 80°
Focal length 4.0 mm(22 mm in 35 mm equivalent in 1:1)
Aperture F3.0
Laser EDM camera
Pixels 2 MP
Field of view 14°
I/O USB Type-C 1.0 for data transfer andcharging (water-resistant), integratedspeaker and microphone
Technology
105 Technical Data
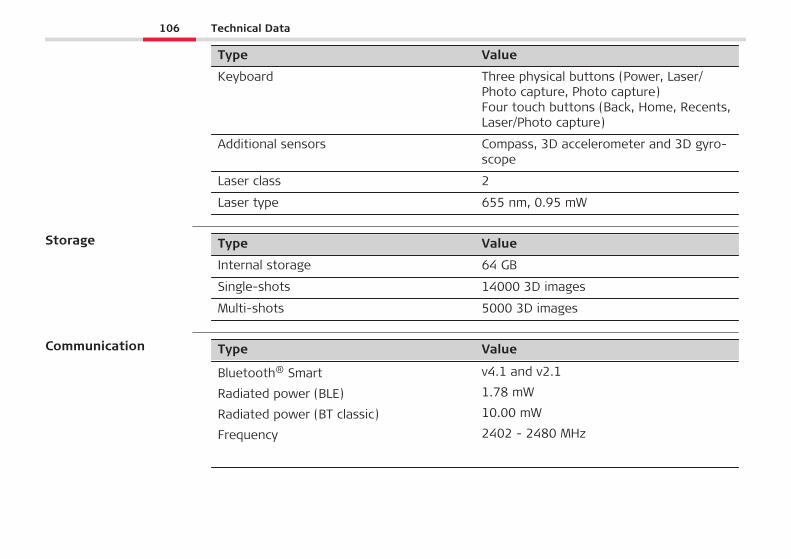
Type Value
Keyboard Three physical buttons (Power, Laser/Photo capture, Photo capture)Four touch buttons (Back, Home, Recents,Laser/Photo capture)
Additional sensors Compass, 3D accelerometer and 3D gyro-scope
Laser class 2
Laser type 655 nm, 0.95 mW
Type Value
Internal storage 64 GB
Single-shots 14000 3D images
Multi-shots 5000 3D images
Type Value
Bluetooth® Smart
Radiated power (BLE)
Radiated power (BT classic)
Frequency
v4.1 and v2.1
1.78 mW
10.00 mW
2402 - 2480 MHz
Storage
Communication
106 Technical Data
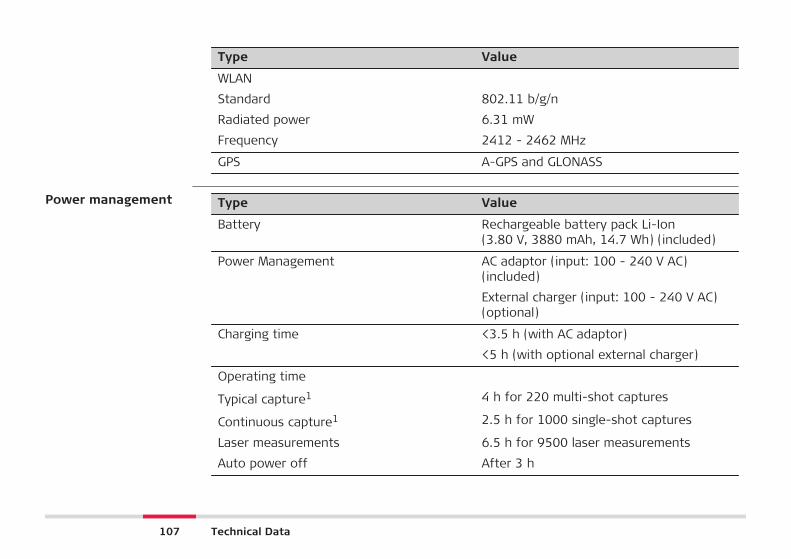
Type Value
WLAN
Standard 802.11 b/g/n
Radiated power 6.31 mW
Frequency 2412 - 2462 MHz
GPS A-GPS and GLONASS
Type Value
Battery Rechargeable battery pack Li-Ion(3.80 V, 3880 mAh, 14.7 Wh) (included)
Power Management AC adaptor (input: 100 - 240 V AC)(included)
External charger (input: 100 - 240 V AC)(optional)
Charging time <3.5 h (with AC adaptor)
<5 h (with optional external charger)
Operating time
Typical capture1 4 h for 220 multi-shot captures
Continuous capture1 2.5 h for 1000 single-shot captures
Laser measurements 6.5 h for 9500 laser measurements
Auto power off After 3 h
Power management
107 Technical Data
1 Wi-Fi®, Bluetooth® off, flash off, screen brightness 50%
108 Technical Data
19 WarrantyThe Leica BLK3D comes with a one year warranty from Leica Geosystems AG.
More detailed information about the International Limited Warranty can be found on theinternet at:
https://leica-geosystems.com/-/media/files/leicageosystems/about_us/legal%20document/internationallimitedwarranty_english_2013.ashx?la=en
Description
109 Warranty
20 Safety Directions20.1 General
The following directions enable the person responsible for the product, and the personwho actually uses the equipment, to anticipate and avoid operational hazards.
The person responsible for the product must ensure that all users understand these dir-ections and adhere to them.
Warning messages are an essential part of the safety concept of the instrument. Theyappear wherever hazards or hazardous situations can occur.
Warning messages...• make the user alert about direct and indirect hazards concerning the use of the
product.• contain general rules of behaviour.
For the users‘ safety, all safety instructions and safety messages shall be strictlyobserved and followed! Therefore, the manual must always be available to all personsperforming any tasks described here.
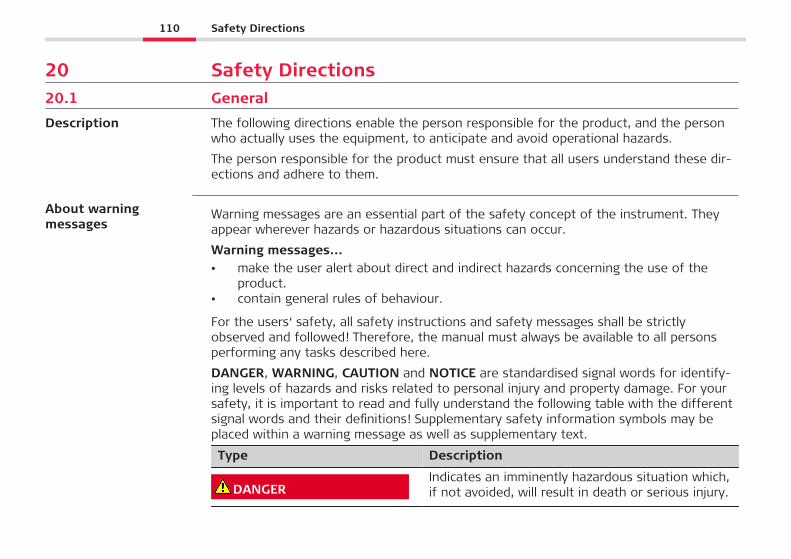
DANGER, WARNING, CAUTION and NOTICE are standardised signal words for identify-ing levels of hazards and risks related to personal injury and property damage. For yoursafety, it is important to read and fully understand the following table with the differentsignal words and their definitions! Supplementary safety information symbols may beplaced within a warning message as well as supplementary text.
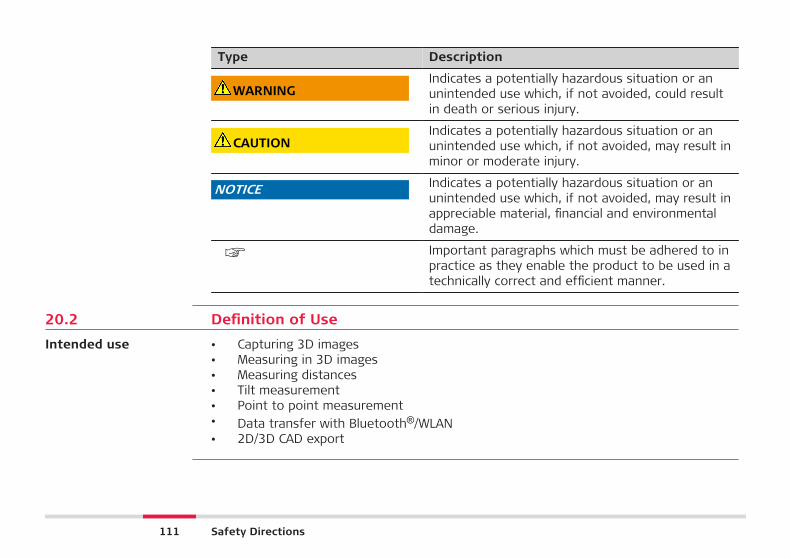
Type Description
DANGERIndicates an imminently hazardous situation which,if not avoided, will result in death or serious injury.
Description
About warningmessages
110 Safety Directions
Type Description
WARNINGIndicates a potentially hazardous situation or anunintended use which, if not avoided, could resultin death or serious injury.
CAUTIONIndicates a potentially hazardous situation or anunintended use which, if not avoided, may result inminor or moderate injury.
NOTICE Indicates a potentially hazardous situation or anunintended use which, if not avoided, may result inappreciable material, financial and environmentaldamage.
☞ Important paragraphs which must be adhered to inpractice as they enable the product to be used in atechnically correct and efficient manner.
20.2 Definition of Use
• Capturing 3D images• Measuring in 3D images• Measuring distances• Tilt measurement• Point to point measurement• Data transfer with Bluetooth®/WLAN• 2D/3D CAD export
Intended use
111 Safety Directions
• Use of the product without instruction• Use outside of the intended use and limits• Disabling safety systems• Removal of hazard notices• Opening the product using tools, for example screwdriver, unless this is permitted
for certain functions• Modification or conversion of the product• Use after misappropriation• Use of products with recognisable damage or defects• Use with accessories from other manufacturers without the prior explicit approval of
Leica Geosystems• Deliberate dazzling of third parties• Controlling of machines, moving objects or similar monitoring application without
additional control and safety installations• Aiming directly into the sun• Inadequate safeguards at the working site
WARNING
Reasonably foreseeable misuse can lead to injury, malfunction and damageIt is the task of the person responsible for the equipment to inform the user about haz-ards and how to counteract them.▶ The product is not to be operated until the user has been instructed on how to work
with it.
Reasonably forseeablemisuse
112 Safety Directions
20.3 Limits of Use
Suitable for use in an atmosphere appropriate for permanent human habitation: not suit-able for use in aggressive or explosive environments.
WARNING
Working in hazardous areas, or close to electrical installations or similar situ-ationsLife Risk.Precautions:▶ Local safety authorities and safety experts must be contacted by the person
responsible for the product before working in such conditions.
20.4 Responsibilities
Leica Geosystems AG, CH-9435 Heerbrugg, hereinafter referred to as Leica Geosystems,is responsible for supplying the product, including the User Manual and original accessor-ies, in a safe condition.
Environment
Manufacturer of theproduct
113 Safety Directions
The person responsible for the product has the following duties:• To understand the safety instructions on the product and the instructions in the
User Manual• To ensure that it is used in accordance with the instructions• To be familiar with local regulations relating to safety and accident prevention• To inform Leica Geosystems immediately if the product and the application become
unsafe• To ensure that the national laws, regulations and conditions for the operation of the
product are respected
20.5 Hazards of Use
NOTICEDropping, misusing, modifying, storing the product for long periods or transport-ing the productWatch out for erroneous measurement results.Precautions:▶ Periodically carry out test measurements and perform the field adjustments indic-
ated in the User Manual, particularly after the product has been subjected to abnor-mal use as well as before and after important measurements.
We recommend using the Check & Adjust function with the BLK3D calibration targetplate to check the accuracy.
Person responsible forthe product
☞
114 Safety Directions
WARNING
Inappropriate mechanical influences to batteriesDuring the transport, shipping or disposal of batteries it is possible for inappropriatemechanical influences to constitute a fire hazard.Precautions:▶ Before shipping the product or disposing it, discharge the batteries by the product
until they are flat.▶ When transporting or shipping batteries, the person in charge of the product must
ensure that the applicable national and international rules and regulations areobserved.
▶ Before transportation or shipping, contact your local passenger or freight transportcompany.
WARNING
Exposure of batteries to high mechanical stress, high ambient temperatures orimmersion into fluidsThis can cause leakage, fire or explosion of the batteries.Precautions:▶ Protect the batteries from mechanical influences and high ambient temperatures. Do
not drop or immerse batteries into fluids.
115 Safety Directions
WARNING
Short circuit of battery terminalsIf battery terminals are short circuited e.g. by coming in contact with jewellery, keys,metallised paper or other metals, the battery can overheat and cause injury or fire, forexample by storing or transporting in pockets.Precautions:▶ Make sure that the battery terminals do not come into contact with metallic objects.
WARNING
Improperly dispose of productIf the product is improperly disposed of, the following can happen:• If polymer parts are burnt, poisonous gases are produced which may impair health.• If batteries are damaged or are heated strongly, they can explode and cause poison-
ing, burning, corrosion or environmental contamination.• By disposing of the product irresponsibly you may enable unauthorised persons to
use it in contravention of the regulations, exposing themselves and third parties tothe risk of severe injury and rendering the environment liable to contamination.
Precautions:▶ The product must not be disposed with household waste.
Dispose of the product appropriately in accordance with thenational regulations in force in your country.Always prevent access to the product by unauthorised personnel.
116 Safety Directions
WARNING
Improperly repaired equipmentRisk of injuries to users and equipment destruction due to lack of repair knowledge.Precautions:▶ Only authorised Leica Geosystems Service Centres are entitled to repair these
products.
CAUTIONChanges or modifications not expressly approved by Leica Geosystems for compliancecould void the user's authority to operate the equipment.
CAUTIONOnly use chargers recommended by the manufacturer to charge the batteries.
20.6 Laser Classification
20.6.1 General
The following chapters provide instructions and training information about laser safetyaccording to international standard IEC 60825-1 (2014-05) and technical reportIEC TR 60825-14 (2004-02). The information enables the person responsible for theproduct and the person who actually uses the equipment, to anticipate and avoid opera-tional hazards.
General
117 Safety Directions
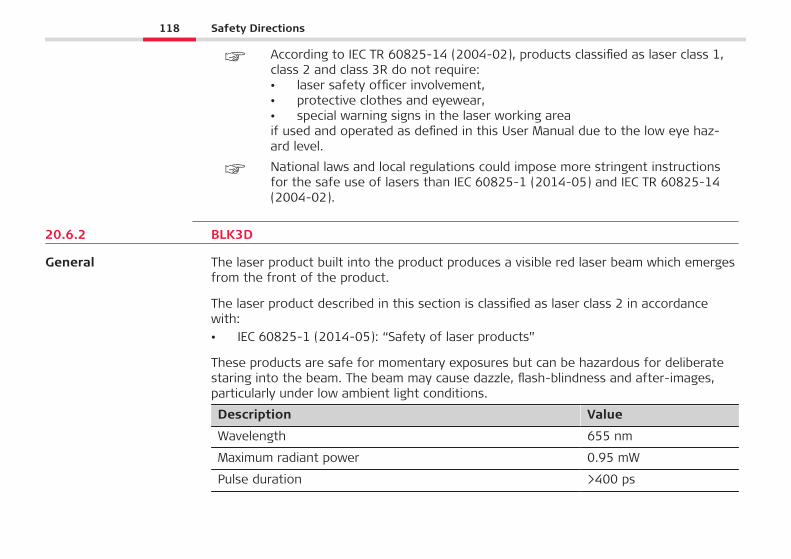
☞ According to IEC TR 60825-14 (2004-02), products classified as laser class 1,class 2 and class 3R do not require:• laser safety officer involvement,• protective clothes and eyewear,• special warning signs in the laser working areaif used and operated as defined in this User Manual due to the low eye haz-ard level.
☞ National laws and local regulations could impose more stringent instructionsfor the safe use of lasers than IEC 60825-1 (2014-05) and IEC TR 60825-14(2004-02).
20.6.2 BLK3D
The laser product built into the product produces a visible red laser beam which emergesfrom the front of the product.
The laser product described in this section is classified as laser class 2 in accordancewith:• IEC 60825-1 (2014-05): “Safety of laser products”
These products are safe for momentary exposures but can be hazardous for deliberatestaring into the beam. The beam may cause dazzle, flash-blindness and after-images,particularly under low ambient light conditions.
Description Value
Wavelength 655 nm
Maximum radiant power 0.95 mW
Pulse duration >400 ps
General
118 Safety Directions
Description Value
Pulse repetition frequency (PRF) 320 MHz
Beam divergence 0.16 x 0.6 mrad
CAUTION
Class 2 laser productFrom a safety perspective, class 2 laser products are not inherently safe for the eyes.Precautions:▶ Avoid staring into the beam or viewing it through optical instruments.▶ Avoid pointing the beam at other people or at animals.
119 Safety Directions
20.7 Electromagnetic Compatibility (EMC)
The term Electromagnetic Compatibility is taken to mean the capability of the product tofunction smoothly in an environment where electromagnetic radiation and electrostaticdischarges are present, and without causing electromagnetic disturbances to otherequipment.
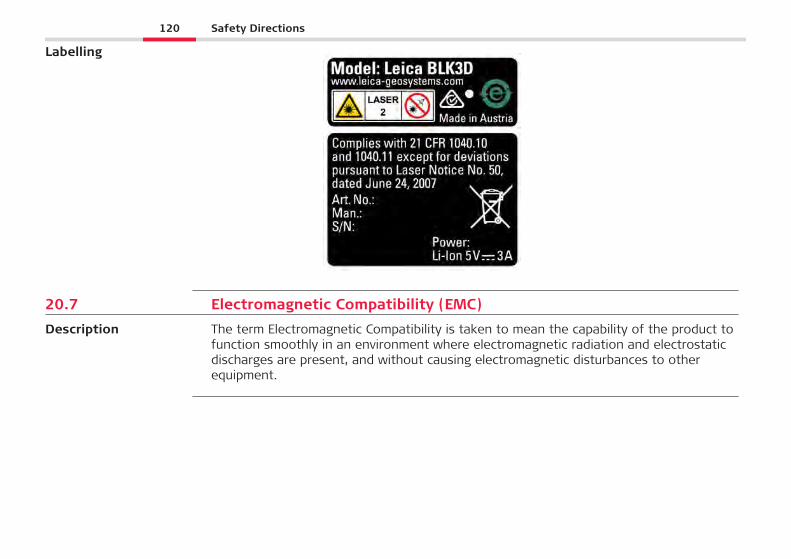
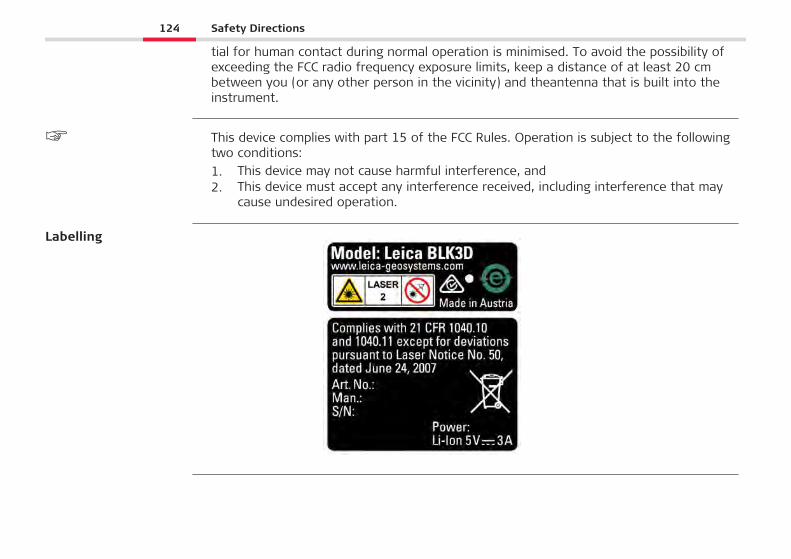
Labelling
Description
120 Safety Directions
WARNING
Electromagnetic radiationElectromagnetic radiation can cause disturbances in other equipment.Precautions:▶ Although the product meets the strict regulations and standards which are in
force in this respect, Leica Geosystems cannot completely exclude the possibilitythat other equipment may be disturbed.
CAUTION
Use of the product with accessories from other manufacturers. For example fieldcomputers, personal computers or other electronic equipment, non-standardcables or external batteriesThis may cause disturbances in other equipment.Precautions:▶ Use only the equipment and accessories recommended by Leica Geosystems.▶ When combined with the product, they meet the strict requirements stipulated by
the guidelines and standards.▶ When using computers, two-way radios or other electronic equipment, pay attention
to the information about electromagnetic compatibility provided by the manufac-turer.
121 Safety Directions
CAUTION
Intense electromagnetic radiation. For example, near radio transmitters,transponders, two-way radios or diesel generatorsAlthough the product meets the strict regulations and standards which are in force inthis respect, Leica Geosystems cannot completely exclude the possibility that function ofthe product may be disturbed in such an electromagnetic environment.Precautions:▶ Check the plausibility of results obtained under these conditions.
20.8 FCC Statement, Applicable in U.S.
☞ The greyed paragraph below is only applicable for products without radio.
122 Safety Directions
WARNING
This equipment has been tested and found to comply with the limits for a Class Bdigital device, pursuant to part 15 of the FCC rules.
These limits are designed to provide reasonable protection against harmful interfer-ence in a residential installation.
This equipment generates, uses and can radiate radio frequency energy and, if notinstalled and used in accordance with the instructions, may cause harmful interferenceto radio communications. However, there is no guarantee that interference will notoccur in a particular installation.
If this equipment does cause harmful interference to radio or television reception,which can be determined by turning the equipment off and on, the user is encouragedto try to correct the interference by one or more of the following measures:
• Reorient or relocate the receiving antenna.• Increase the separation between the equipment and the receiver.• Connect the equipment into an outlet on a circuit different from that to which the
receiver is connected.• Consult the dealer or an experienced radio/TV technician for help.
CAUTIONChanges or modifications not expressly approved by Leica Geosystems for compliancecould void the user's authority to operate the equipment.
The radiated output power of the instrument is far below the FCC radio frequency expos-ure limits. Nevertheless, the instrument should be used in such a manner that the poten-
FCC Radiation ExposureStatement
123 Safety Directions
tial for human contact during normal operation is minimised. To avoid the possibility ofexceeding the FCC radio frequency exposure limits, keep a distance of at least 20 cmbetween you (or any other person in the vicinity) and theantenna that is built into theinstrument.
This device complies with part 15 of the FCC Rules. Operation is subject to the followingtwo conditions:1. This device may not cause harmful interference, and2. This device must accept any interference received, including interference that may
cause undesired operation.
☞
Labelling
124 Safety Directions
20.9 ISED Statements (EN/FR), Applicable in Canada
WARNINGThis Class (B) digital apparatus complies with Canadian ICES-003.Cet appareil numérique de la classe (B) est conforme à la norme NMB-003 du Canada.
Canada Compliance StatementThis device contains licence-exempt transmitter(s)/receiver(s) that comply with Innova-tion, Science and Economic Development Canada’s licence-exempt RSS(s). Operation issubject to the following two conditions:
1. This device may not cause interference.2. This device must accept any interference, including interference that may cause
undesired operation of the device.Canada Déclaration de ConformitéL’émetteur/récepteur exempt de licence contenu dans le présent appareil est conformeaux CNR d’Innovation, Sciences et Développement économique Canada applicables auxappareils radio exempts de licence. L’exploitation est autorisée aux deux conditionssuivantes:
1. L’appareil ne doit pas produire de brouillage;2. L’appareil doit accepter tout brouillage radioélectrique subi, même si le brouil-
lage est susceptible d’en compromettre le fonctionnement.
125 Safety Directions

905446-2.1.0enOriginal text (905446-2.1.0en)Published in Switzerland© 2020 Leica Geosystems AG, Heerbrugg, Switzerlandwww.leica-geosystems.com
Related Documents