User Guide mylife ™ App More freedom. More confidence. With mylife ™ .

Welcome message from author
This document is posted to help you gain knowledge. Please leave a comment to let me know what you think about it! Share it to your friends and learn new things together.
Transcript
User Guidemylife™ App
More freedom. More confidence. With mylife™.
2
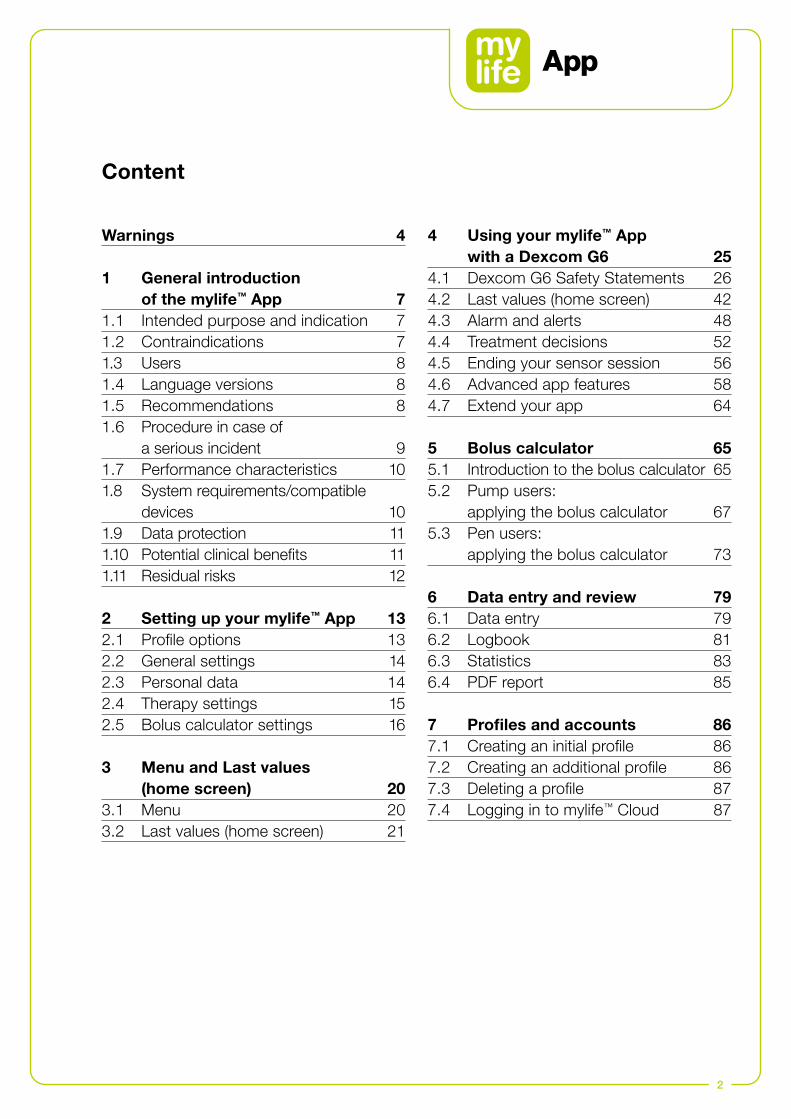
Warnings 4 1 General introduction of the mylife™ App 71.1 Intended purpose and indication 71.2 Contraindications 71.3 Users 81.4 Language versions 81.5 Recommendations 81.6 Procedure in case of a serious incident 91.7 Performance characteristics 101.8 System requirements/compatible devices 101.9 Data protection 111.10 Potentialclinicalbenefits 111.11 Residual risks 12 2 Setting up your mylife™ App 132.1 Profileoptions 132.2 General settings 142.3 Personal data 142.4 Therapy settings 152.5 Bolus calculator settings 16 3 Menu and Last values
(home screen) 203.1 Menu 203.2 Last values (home screen) 21
4 Using your mylife™ App with a Dexcom G6 254.1 Dexcom G6 Safety Statements 264.2 Last values (home screen) 424.3 Alarm and alerts 484.4 Treatment decisions 524.5 Ending your sensor session 564.6 Advanced app features 584.7 Extend your app 64 5 Bolus calculator 655.1 Introduction to the bolus calculator 655.2 Pump users: applying the bolus calculator 675.3 Pen users: applying the bolus calculator 73 6 Data entry and review 796.1 Data entry 796.2 Logbook 81 6.3 Statistics 836.4 PDF report 85 7 Profilesandaccounts 867.1 Creatinganinitialprofile 867.2 Creatinganadditionalprofile 867.3 Deletingaprofile 877.4 Logging in to mylife™ Cloud 87
Content
3
SINOVO health solutions GmbH Casimirstrasse 2-460388 Frankfurt/Main Germany
8 Devicemanagement 888.1 Bluetooth®-pairing of your mylife™ YpsoPump® 888.2 Bluetooth®-pairing of your mylife™ blood glucose meters 898.3 Setting up your Dexcom G6 90 9 Troubleshooting 939.1 mylife™ App in general 939.2 mylife™ App and Dexcom G6 94
10 Notes to HCPs 10110.1 Calculation of insulin on board 10110.2 Bolus calculator details for method 1 10210.3 Bolus calculator details for method 2 105 11 About mylife™ App 109 12 Customer service 110
4
Warnings
Not following the instructions in the User Guide of the mylife™ App or not following warnings can lead to severe hypoglycemia or raised blood glucose levels (read the warnings carefully).
Never use the bolus calculator in the mylife™ App without prior training by your physician or diabetes counsellor. Using the bolus calculator without professional training can lead to misinterpretation of the suggested bolus dose and subsequently to incorrect dosage of insulin on your mylife™ YpsoPump® or via your insulin pen. The bolus calculator in the mylife™ App only provides suggestions for insulin dosing. You are fully responsible for interpreting the suggestions and deciding on the actual insulin dose to be delivered, depending on your individual situation at the time of calcula-tion and dosing. Pay attention to IOB and the bolus suggestion before delivering large or multiple boluses. If you are unsure how to use the bolus calculator, contact your physician or diabetes counsellor.
The mylife™ App is designed for retrieving and displaying data from the mylife™ YpsoPump®. The mylife™ App is not designed to program the mylife™ YpsoPump®. The mylife™ App cannot initiate insulin dosing on the mylife™ YpsoPump®. Insulin delivery control must be done directly on the mylife™ YpsoPump® or via your insulin pen.
5
When changing the time or time zones manually or automatically on smartphones and thereby causing a time difference between smartphone and mylife™ YpsoPump®, the mylife™ App cannot calculate Insulin on Board. In this case, calculate the Insulin on Board manually and take this into account for the bolus dosage until you change the time on the mylife™ YpsoPump®.
If you are currently using the mylife™ App without Dexcom G6 Continuous Glucose Monitoring (CGM) System (Dexcom G6 or G6), or if you are currently using Dexcom G6 with the G6 App, it is still very important that you review all instructions in this user guide before you start to use the mylife™ App with a connected Dexcom G6.
For users with a connected Dexcom G6: Do not start to use your CGM readings for bolus calculations before consulting with your healthcare professional. Only your healthcare professional can determine your CGM settings and how you should use your sensor trend information to help you manage your diabetes. Incorrect settings can result in overdelivery or underdelivery of insulin. This can cause hypoglycaemia (low blood glucose) or hyperglycaemia (high blood glucose).
WARNING indicates a hazardous situation which, if not avoided, could result in death or serious injury.
6
There are places where the general use of smartphones is not permitted and the mylife™ App can therefore not be used for synchronisation or bolus calculation (for example, certain areas in hospitals or on an aircraft). Make sure that you are always capable of calculating your bolus dosage by hand.
CAUTION indicates a hazardous situation which, if not avoided, could result in minor or moderate injury.
Important informationIf you are using a Dexcom G6 Continuous Glucose Monitoring (CGM) system that is connected via Bluetooth® with the mylife™ App, please refer to Section 4.1, to read about Dexcom G6 respective warnings, cautions, intended purpose, indications and contraindications.
You may also refer to the available Dexcom G6 product instructions on dexcom.com/downloadsandguides.
7
1 General introduction of the mylife™ App
1.1 Intended purpose and indication The mylife™ App is an application for smartphones that allows you to log therapy data and calculate bolus suggestions for delivery. In addition, data can be read from the mylife™ YpsoPump® as well as from the connectable devices such as the mylife™ Unio™ Neva / mylife™ Unio™ Cara / mylife Aveo™ blood glucose meters and the Dexcom G6 CGM system via their Bluetooth® interfaces. Logged therapy data like carbohydrate estimates, blood glucose measurements and real-time Dexcom G6 CGM data may be used for therapy decisions supported by the mylife™ App. If used with a connected Dexcom G6, the mylife™ App may be used to support therapy decisions without fingerstick blood glucose testing (as per design of the Dexcom G6). The app offers the option of manual input for a logbook, statistical evaluations, graphical representations, report functions and the management of multiple user profiles. The mylife™ App allows the synchronisation of the data with the mylife™ Cloud, provided an online account has been created. It further allows for CGM data upload to Dexcom Clarity when using a connected Dexcom G6.
The mylife™ App is indicated for all types of diabetes and the following therapy forms: pump therapy (continuous subcutaneous insulin infusion CSII) and pen therapy with multiple daily injections (intensified conventional therapy ICT/MDI). Persons with diabetes or their caregivers must be able to interpret the information of the mylife™ App and be able to act accordingly. The bolus suggestion calculator is only for use with short-acting insulin.
1.2 ContraindicationsContraindications describe medical situations where the use of the mylife™ App as a medical device is not admitted. Discuss those situations with your healthcare professional if you feel insecure about them.
The bolus suggestion calculator must not be used in case of: All therapies with mixed insulin or NPH insulin Basal-assisted oral therapy (BOT) with or without GLP-1 receptor agonists Supplementary insulin therapy with pre-prandial injections without basal insulin Using the app with a connected Dexcom G6 when on dialysis or critically ill
as well as when taking hydroxyurea
There is no contraindication for the logbook, data entry, statistics and PDF report functions of the app.
8
1.3 UsersThe mylife™ App is intended to be used by persons with diabetes (PwD) and/or their caregivers. Minors from the age of 14 years should discuss the independent use of the mylife™ App with their legal guardian as well as the attending physician. Minors below the age of 14 years should have a caregiver supporting them with the use of the mylife™ App. The same applies to supervised persons. Caregivers must be at least 18 years of age.
1.4 Language versionsThe mylife™ App is available in various languages. These can be defined in the page menu in Settings ➔ General Settings.
1.5 RecommendationsUsers are advised to ensure that their mylife™ App installation is always up-to-date and corresponds to the latest available release on the Apple App Store or Google Play Store. The app notifies the user with a pop-up whenever there is an update available. Users may then download and install the update from their respective app store.
In case of technical malfunctions, it is often advisable to shut down and restart the app and/or shut down and restart your smartphone. When removing the app from the smartphone with the intention of re-installing it, always ensure that your therapy data is backed up (e.g. in the mylife™ Cloud).
9
1.6 Procedure in case of a serious incident
Important notice for use for health-related purposesThe mylife™ App is a medical device and was developed according to EU Medical Device Regulation 2017/745. The mylife™ App can however not be a substitute for medical advice and treatment in any manner. Every change to your therapeutic factors (e.g. IC ratio, correction factor or duration of insulin action) must be agreed upon with your physician. Sinovo is not liable for health complications of any type that may result from improper treatment or incorrect therapy settings in the app (e.g. improper insulin dosage). If the mylife™ App provides you with therapeutic suggestions (e.g. bolus sugges-tions), then these are non-binding and should always be checked for suitability. When used for medical purposes, in particular for diagnostic or health-monitoring purposes, it is recommended that in addition to the evaluation by the app, additional documentation or data back-ups in the mylife™ Cloud should be performed to prevent data from being inadvertently lost and to ensure that monitoring can be ensured by other means.
Inform Sinovo GmbH, your local Ypsomed distributor and your local health authority in case of serious health effects (such as serious injury or hospitalisation) and/or malfunction of the mylife™ App. Additionally, inform your local Dexcom representative in case of serious health effects and/or malfunction of parts of the Dexcom G6 CGM system.
10
1.7 Performance characteristics Please refer to Section 2.5 Bolus calculator settings and Sections 5.1, 5.2. and 5.3 Introduction and Applying the bolus calculator as well as Section 10 Notes to HCPs for the performance characteristics of the mylife™ App’s bolus calculator.
1.8Systemrequirements/compatibledevices The mylife™ App can be used on different smartphones. You can find supported devices and operating system versions from the descriptions given in the Google Play Store and the Apple App Store. Compatibility with mobile operating systems:
Android Version 7.1–11.0 Bluetooth® Low Energy (V4.0) for Android devices iOS Version 11.0–14.0
If you are using the mylife™ App with a connected Dexcom G6, note that additional com-patibility restrictions apply. Find details on www.mylife-diabetescare.com/compatibility.
The mylife™ App shall not be used on smartphones with a jailbreak or a rooted device. Such conditions might compromise the encrypted Bluetooth® communication.
Bluetooth®: Bluetooth® connection is required for pairing and connecting with the mylife™ YpsoPump® or any of the compatible mylife™ Diabetescare blood glucose meters mylife™ Unio™ Neva, mylife™ Unio™ Cara, mylife Aveo™ as well as for the Dexcom G6. One or both of the mobile platforms (Android or iOS) may require certain general and/or app-specific permissions in order to allow for Bluetooth® communication, e.g. activated “Location services”.
Wifi/GSM: Wifi or GSM connection is needed if a synchronisation with the mylife™ Cloud is desired and/or for the upload of glucose data to Dexcom Clarity. Note that you need a Dexcom account to be able to use a connected G6.
11
1.9 Data protection The safety of your data is of utmost importance to us. The mylife™ App is a medical device and meets high security and reliability requirements. The storage and transmission of all medical data to and from the mylife™ Cloud is encrypted and stored exclusively on certified servers in Ireland. For the cloud-based storage of your Dexcom G6 data in Dexcom Clarity, please refer to respective Dexcom information.
1.10 Potential clinical benefits Dedicated mobile apps, such as the mylife™ App, can support persons with diabetes with their day-to-day therapy management. Studies with such apps show that they may help users achieve some or all of the following benefits if the apps are used according to their intended purpose:
Reduction of HbA1c
Prompt insulin dose suggestion through bolus calculator Improvement of medication adherence Improvement of self-management and monitoring of blood glucose Avoidance of dosing calculation errors Reduced fear of hypoglycaemia and improved well-being
12
The mylife™ App can be used with or without a connected Dexcom G6 Continuous Glucose Monitoring (CGM) system. Follow below references and, depending on your individual situation, read about how to set up and use the mylife™ App.
Setting up the mylife™ App (for all users) ➔ go to page 13. Using the mylife™ App without a connected Dexcom G6 ➔ go to page 20. Using the mylife™ App with a connected Dexcom G6 ➔ go to page 25.
1.11 Residual risks As with any medical device, there are risks associated with using the mylife™ App. Many of the risks are common to insulin therapy in general. Reading your User Guide and following the Instructions for Use are essential for the safe operation of your mylife™ App. Consult your healthcare professional about how these risks may affect you.
Risks that could result from using the mylife™ App and its bolus suggestion calculator include the following:
Low blood glucose (possible severe hypoglycaemia) from using too much insulin, e.g. due to overestimating carbohydrate content, due to entry errors, wrong settings, ignoring influence factors (e.g. illness, CGM trend information) and from use errors (misinterpretation or ignoring the bolus suggestion results).
High blood glucose (possible hyperglycaemia) from using too little insulin, e.g. due to underestimating carbohydrate content, due to entry errors, wrong settings, ignoring influence factors (e.g. illness, CGM trend information) and from use errors (misinterpretation or ignoring the bolus suggestion results).
Consult your healthcare professional before setting up and using the mylife™ App’s bolus suggestion calculator. Only your healthcare professional can determine and help you determine and/or adjust your insulin-to-carbohydrate ratio(s), correction factor(s), (blood) glucose target(s), CGM trend information, handling of insulin on board and your duration of insulin action.
13
2 Setting up your mylife™ App
When starting the mylife™ App and when creating a new profile, you will be guided through the settings with a setup wizard. If you wish to amend or adapt these settings later, you can do this via the page menu under Settings . Changes are only updated when you confirm via the Save symbol . Note that settings marked with an asterisk* are mandatory to be filled in.
In order to learn about pairing and setting up devices such as a mylife™ YpsoPump®, a Dexcom G6 or connectable blood glucose meters, please refer to Section 8 Device management.
2.1 Profile optionsTo use the mylife™ App, you must set up a profile. A mylife™ App profile can be set up with or without a mylife™ Cloud account. The mylife™ Cloud is used for data storage and data exchange, it does not support calculation of bolus suggestions. If you choose to connect your mylife™ Cloud account, your data from your mylife™ App will synchronise with your mylife™ Cloud account. If you choose to use the mylife™ App without connecting to a mylife™ Cloud account, your data will be stored locally on your smartphone and you will not be able to access your data from elsewhere.
Continue without account Follow the mylife™ App setup wizard without creating a mylife™ Cloud account. If you change your mind, you can log in to a mylife™ Cloud account later through Settings ➔ Personal Data.
Create account Create a new mylife™ Cloud account and start your mylife™ App with your new mylife™ Cloud account.
Log in to existing account Set up your mylife™ App with your existing mylife™ Cloud account.
See Section 7. Profiles and accounts for more information.
14
2.2 General settingsSet the desired language. You can also configure the unit to display your (blood) glucose. You can choose between the units mg/dL and mmol/L.
2.3 Personal data Enter or adapt your personal data: first and last name, avatar (profile picture), email address, sex, date of birth, country of residence and language of the User Guide. Note that your country selection cannot be changed anymore if you choose to connect to a mylife™ Cloud account.
You can also create a new mylife™ App user profile or delete an existing one. Additionally, you can connect to your mylife™ Cloud account or create a new mylife™ Cloud account.
The mylife™ App can be used with or without a connected Dexcom G6 Continuous Glucose Monitoring system and alongside blood glucose meters. While the Dexcom G6 sensor measures glucose in the interstitial fluid, blood glucose meters measure in the capillary blood. The term “glucose” is used when only refering to the G6, the term “(blood) glucose” is used when refering to either G6 or blood glucose meters and the term “blood glucose” is used when only refering to spot measurements with blood glucose meters.
15
2.4 Therapy settingsConfigure here your therapy form (pump or pen mode). Set your (blood) glucose target range (“target range”) and your thresholds for hyperglycaemia and hypoglycaemia. You can also choose to share your therapy data with selected health apps here.
Default values: Target range lower limit: 70 mg/dL (3.9 mmol/L) Target range upper limit: 180 mg/dL (10.0 mmol/L) Hyper above: 180 mg/dL (10.0 mmol/L) Hypo below: 70 mg/dL (3.9 mmol/L)
Accepted ranges: Target range limits: 60 – 300 mg/dL (3.3 – 16.6 mmol/L) Hyper: 160 – 300 mg/dL (8.9 – 16.6 mmol/L) Hypo: 50 – 90 mg/dL (2.8 – 5.0 mmol/L)
During the setup wizard and after saving your therapy settings, the app will prompt you to pair your mylife™ YpsoPump®, supported blood glucose meters and/or your Dexcom G6 via Bluetooth®. See Section 8 Device management for more information on the Bluetooth® pairing of compatible devices.
Target range and hyper-/hypoglycaemia thresholds are used to establish and interpret your (blood) glucose and insulin statistics. We recommend to establish and periodically review these settings with your physician.
For users with a connected Dexcom G6: note that the settings for your “G6 target zone” are separate from the aforementioned “target range” settings. Your G6 target zone is defined by the High and Low glucose alert levels of your G6. See Sections 4.2 and 4.3 for details.
Last but not least, note that there are separate settings for your target (blood) glucose in the bolus calculator settings (see Section 2.5).
16
These settings determine how the bolus calculator calculates your suggested bolus. It is therefore very important that these settings are correct. Do not make any settings without discussing these previously with your physician or diabetes counsellor. Please make sure that a trained healthcare professional with experience in diabetes management supervises the initiation and programming of the bolus calculator. Please also ensure that you only use the bolus calculator with short-acting insulin. Under no circumstances should the calculator be used for long-acting insulin or mixed insulin.
For pump users, it is required that users have successfully paired their mylife™ YpsoPump® with the mylife™ App to be able to use the bolus calculator. There is no such restriction for pen users.
You can enable and disable the bolus calculator in the bolus calculator settings. To use the bolus calculator, it is mandatory to define all settings as outlined below:
Minimum (blood) glucose value for calculationHere you can define the minimum limit of the (blood) glucose value for bolus calculation. If you enter a lower current (blood) glucose value, the bolus calculator will alert you that your current (blood) glucose is too low to calculate a bolus suggestion.
Increments: 1 mg/dL (0.1 mmol/L) Accepted range: 50 mg/dL – 80 mg/dL (2.8 mmol/L – 4.4 mmol/L) Default value: none
Maximum bolus suggestionHere you can define how high the maximum bolus suggestion of the calculation may be in insulin units. When the calculated suggestion is higher than this setting, the user is notified respectively and the notification needs to be acknowledged by pressing OK.
Increments: 0.5 U Accepted range: 0.5 U – 30.0 U Default value: 10.0 U
2.5 Bolus calculator settings
17
(Blood) glucose target valueHere you can define your target value for the (blood) glucose correction. The bolus calculator will correct high or low (blood) glucose measurements to this value. (Blood) glucose measurements above this value result in a (positive) correction dose. A (blood) glucose measurement below the target value results in a negative correction dose which will always be used to reduce the suggested dose.
If you have different target values throughout the day, you can define those in the corre-sponding time segments in 30 min increments. You can set up a maximum of 8 different (blood) glucose target values.
Increments: 1 mg/dL (0.1 mmol/L) Accepted range: 70 mg/dL – 200 mg/dL (3.9 mmol/L – 11.1 mmol/L) Default value: none
After you have added all of your (blood) glucose targets, confirm your targets by pressing the Save symbol .
Correction factorEnter your correction factor here (example: if 1 unit of insulin lowers your (blood) glucose by 36 mg/dL or 2 mmol/L respectively, your correction factor is 36 or 2 respectively). The bolus calculator will calculate a correction dose based on the (blood) glucose target value and the correction factor.
If you have different correction factors throughout the day, you can define those in the corresponding time segments in 30 min increments. You can set up a maximum of 8 different correction factors.
Increments: 1 mg/dL/U ( 0.1 mmol/L/U) Accepted range: 2 mg/dL/U – 400 mg/dL/U (0.1 mmol/L/U – 22.2 mmol/L/U) Default value: none
After you have added all of your correction factors, confirm your correction factors by pressing the Save symbol .
18
Insulin-to-carb ratioThe insulin-to-carb ratio (IC ratio) describes the number of grams of carbohydrates covered by one unit of insulin. If you have different IC ratios over the course of the day, you can define those in the corresponding time segments in 30 min increments. You can set up a maximum of 8 different IC ratios.
Increments: – For 1 – 9.9 g carbs/U: increments of 0.1 g – For 10 – 20 g carbs/U: increments of 0.5 g – For 21 – 99 g carbs/U: increments of 1 g – For 100 – 150 g carbs/U: increments of 10 g
Accepted range: 1 g carbs/U – 150 g carbs/U Default value: none
After you have added all of your insulin-to-carb ratios, confirm your ratios by pressing the Save symbol .
Handling of insulin on boardThis setting determines the handling of insulin on board when calculating bolus suggestions. There are two methods available for this. This setting has no default value. For in-depth details about the two methods, please refer to Section 10 Notes to HCPs.
Method 1: Insulin on board subtracted from correction bolus and meal bolusInsulin on board is subtracted from the correction bolus and meal bolus.
Formula: Correction bolus + Meal bolus – Insulin on board = Suggested bolus
This method will tend to calculate a lower suggested bolus than method 2. In selected everyday situations, you may possibly require more insulin.

19
Method 2: Insulin on board only subtracted from correction bolusInsulin on board is subtracted only from the correction bolus. It is never subtracted from the meal bolus.
Formula: [Correction insulin – Adjustment Insulin on board] + Meal bolus = Correction bolus + Meal bolus = Suggested bolus
This method will tend to calculate a higher suggested bolus than method 1. Additional carbohydrates are fully covered. In selected everyday situations, this approach is associated with a higher risk of hypoglycaemic events.
Duration of insulin actionThis setting defines how long your injected insulin remains active in your body to lower your (blood) glucose. This setting is used for Insulin on Board calculation.
Increments: 30 min Accepted range: 2 h – 8 h Default value: none
Finalising and saving all bolus calculator settingsAfter you have defined all of the above bolus calculator settings, please finally confirm your settings by pressing the Save symbol in the header of the mylife™ App. The mylife™ App will confirm the saving of the settings.
20
3 Menu and Last values (home screen)
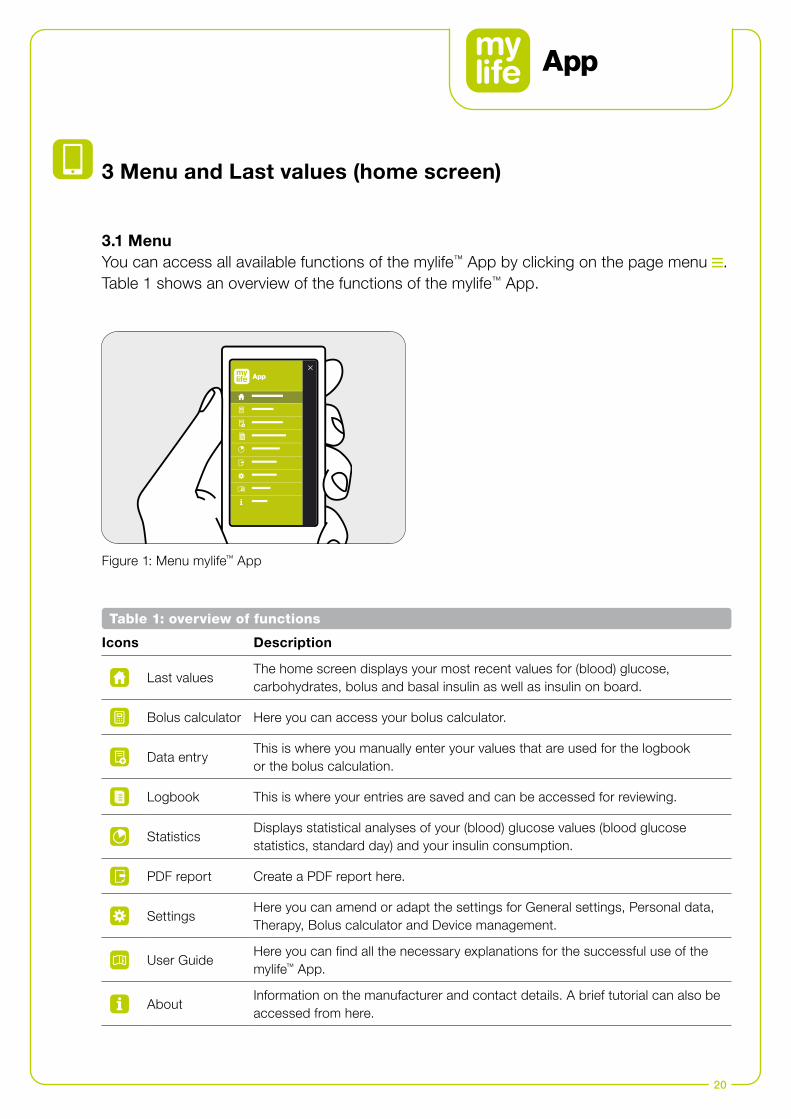
3.1 MenuYou can access all available functions of the mylife™ App by clicking on the page menu . Table 1 shows an overview of the functions of the mylife™ App.
Icons Description
Last valuesThe home screen displays your most recent values for (blood) glucose, carbohydrates, bolus and basal insulin as well as insulin on board.
Bolus calculator Here you can access your bolus calculator.
Data entryThis is where you manually enter your values that are used for the logbook or the bolus calculation.
Logbook This is where your entries are saved and can be accessed for reviewing.
StatisticsDisplays statistical analyses of your (blood) glucose values (blood glucose statistics, standard day) and your insulin consumption.
PDF report Create a PDF report here.
SettingsHere you can amend or adapt the settings for General settings, Personal data, Therapy, Bolus calculator and Device management.
User GuideHere you can find all the necessary explanations for the successful use of the mylife™ App.
AboutInformation on the manufacturer and contact details. A brief tutorial can also be accessed from here.
Table 1: overview of functions
Figure 1: Menu mylife™ App
21
Laura
Last bolus22.06.20 11:47
Current basal rate13:00 – 14:00
Last blood glucose22.06.20 13:32
Last values
Ypsomed 13:34 100%
Last carbohydrates22.06.20 11:45
mylife Cloud 22.06.20 13:30
mylife Unio Nevaconnected
mylife YpsoPump connected
Insulin on board
55 g U6.0
0.90 U/h 4.1 U
172 mg/dL
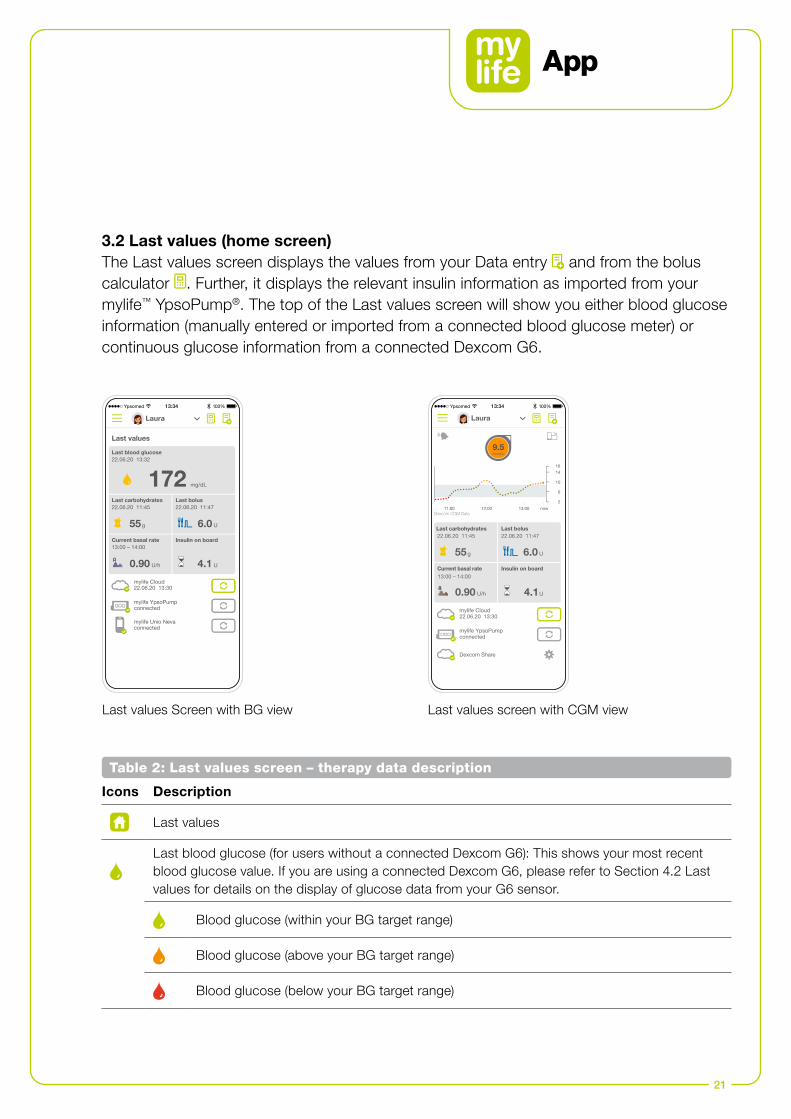
3.2 Last values (home screen)The Last values screen displays the values from your Data entry and from the bolus calculator . Further, it displays the relevant insulin information as imported from your mylife™ YpsoPump®. The top of the Last values screen will show you either blood glucose information (manually entered or imported from a connected blood glucose meter) or continuous glucose information from a connected Dexcom G6.
Icons Description
Last values
Last blood glucose (for users without a connected Dexcom G6): This shows your most recent blood glucose value. If you are using a connected Dexcom G6, please refer to Section 4.2 Last values for details on the display of glucose data from your G6 sensor.
Blood glucose (within your BG target range)
Blood glucose (above your BG target range)
Blood glucose (below your BG target range)
Table 2: Last values screen – therapy data description
Laura
mylife Cloud
mylife YpsoPump
55 g U6.0
0.90 U/h U
Last bolusLast carbohydrates
Current basal rate Insulin on board13:00 – 14:00
connected
22.06.20 13:30
Dexcom Share
22.06.20 11:4722.06.20 11:45
4.1
now
9.5mmol/L
Dexcom CGM Data
16
2
14
6
10
13:34
11:00 12:00 13:00
Laura
Last bolus22.06.20 11:47
Current basal rate13:00 – 14:00
Last blood glucose22.06.20 13:32
Last values
Ypsomed 13:34 100%
Last carbohydrates22.06.20 11:45
mylife Cloud 22.06.20 13:30
mylife Unio Nevaconnected
mylife YpsoPump connected
Insulin on board
55 g U6.0
0.90 U/h 4.1 U
172 mg/dL
Last values screen with CGM viewLast values Screen with BG view
22
Icons Description
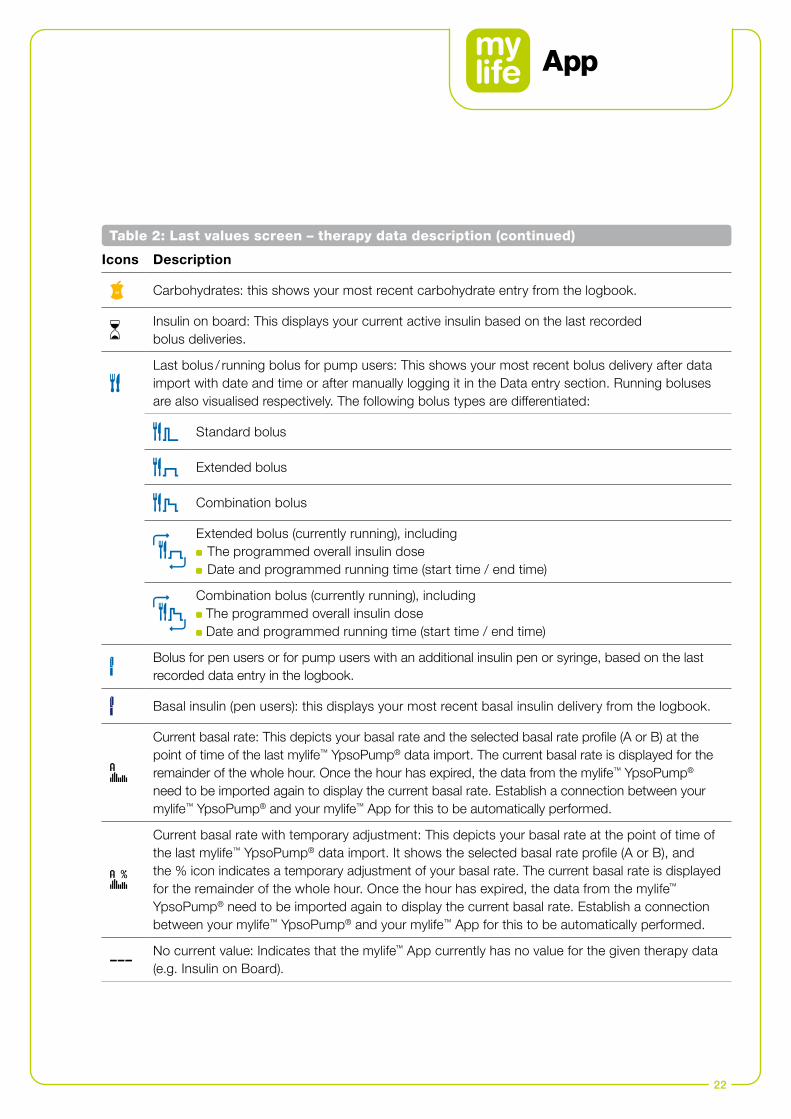
Carbohydrates: this shows your most recent carbohydrate entry from the logbook.
Insulin on board: This displays your current active insulin based on the last recorded bolus deliveries.
Last bolus / running bolus for pump users: This shows your most recent bolus delivery after data import with date and time or after manually logging it in the Data entry section. Running boluses are also visualised respectively. The following bolus types are differentiated:
Standard bolus
Extended bolus
Combination bolus
Extended bolus (currently running), including The programmed overall insulin dose Date and programmed running time (start time / end time)
Combination bolus (currently running), including The programmed overall insulin dose Date and programmed running time (start time / end time)
Bolus for pen users or for pump users with an additional insulin pen or syringe, based on the last recorded data entry in the logbook.
Basal insulin (pen users): this displays your most recent basal insulin delivery from the logbook.
Current basal rate: This depicts your basal rate and the selected basal rate profile (A or B) at the point of time of the last mylife™ YpsoPump® data import. The current basal rate is displayed for the remainder of the whole hour. Once the hour has expired, the data from the mylife™ YpsoPump® need to be imported again to display the current basal rate. Establish a connection between your mylife™ YpsoPump® and your mylife™ App for this to be automatically performed.
Current basal rate with temporary adjustment: This depicts your basal rate at the point of time of the last mylife™ YpsoPump® data import. It shows the selected basal rate profile (A or B), and the % icon indicates a temporary adjustment of your basal rate. The current basal rate is displayed for the remainder of the whole hour. Once the hour has expired, the data from the mylife™ YpsoPump® need to be imported again to display the current basal rate. Establish a connection between your mylife™ YpsoPump® and your mylife™ App for this to be automatically performed.
–––No current value: Indicates that the mylife™ App currently has no value for the given therapy data (e.g. Insulin on Board).
Table 2: Last values screen – therapy data description (continued)

23
On the bottom of the Last values screen, the mylife™ App displays the connection status of the mylife™ Cloud and of connected blood glucose meters. If you are using a connected Dexcom G6, the status of the Dexcom Share function is displayed, too.
Table 3: Last values screen – status indication of connected devices
Icons Description
Last values
mylife™ CloudThis shows the status of your connection and synchronisation between your mylife™ App and the mylife™ Cloud. The following status types are differentiated:
If you have a connected cloud account, a green checkmark icon is shown. The last successful synchronisation is displayed with date and time.
If you don’t have a connected cloud account, an orange question mark icon is shown.
This button allows for a manually triggered synchronisation.
mylife™ YpsoPump®
This shows the status of the connection and synchronisation between your mylife™ App and your mylife™ YpsoPump®. If you have not yet paired a mylife™ YpsoPump®, you will not see any of below icons. The following status types are differentiated:
If your mylife™ YpsoPump® has an active Bluetooth® connection to your mylife™ App, the green checkmark icon is displayed.
If your mylife™ YpsoPump® has an inactive Bluetooth® connection to your mylife™ App, the orange question mark icon is displayed.
In case of an inactive connection, this button allows for a manually triggered Bluetooth® search for your mylife™ YpsoPump®. If found and connected, your mylife™ App will import the latest data from your mylife™ YpsoPump®.
If your mylife™ YpsoPump® has an active Bluetooth® connection to your mylife™ App, this button is displayed in grey and inactivated.
24
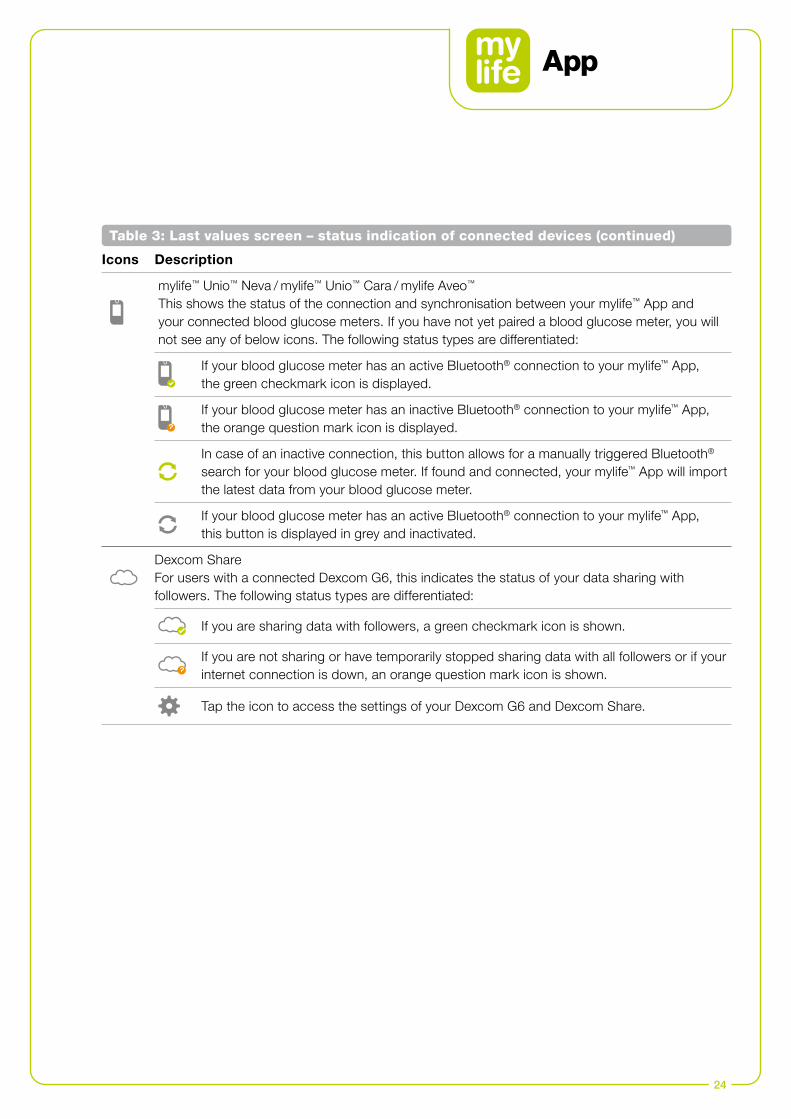
Table 3: Last values screen – status indication of connected devices (continued)
Icons Description
mylife™ Unio™ Neva / mylife™ Unio™ Cara / mylife Aveo™
This shows the status of the connection and synchronisation between your mylife™ App and your connected blood glucose meters. If you have not yet paired a blood glucose meter, you will not see any of below icons. The following status types are differentiated:
If your blood glucose meter has an active Bluetooth® connection to your mylife™ App, the green checkmark icon is displayed.
If your blood glucose meter has an inactive Bluetooth® connection to your mylife™ App, the orange question mark icon is displayed.
In case of an inactive connection, this button allows for a manually triggered Bluetooth® search for your blood glucose meter. If found and connected, your mylife™ App will import the latest data from your blood glucose meter.
If your blood glucose meter has an active Bluetooth® connection to your mylife™ App, this button is displayed in grey and inactivated.
Dexcom ShareFor users with a connected Dexcom G6, this indicates the status of your data sharing with followers. The following status types are differentiated:
If you are sharing data with followers, a green checkmark icon is shown.
If you are not sharing or have temporarily stopped sharing data with all followers or if your internet connection is down, an orange question mark icon is shown.
Tap the icon to access the settings of your Dexcom G6 and Dexcom Share.
25
4 Using your mylife™ App with a Dexcom G6
To set up your G6, use the instructions in Section 8.3 Setting up your Dexcom G6.
For detailed instructions and safe use regarding the Dexcom G6 applicator, sensor insertion, transmitter attachment and the receiver, please refer to aforementioned Dexcom G6 product instructions on dexcom.com/downloadsandguides.
The following instructions for use in Section 4 are based to a large extent on available Dexcom G6 product instructions in the Dexcom “Start Here” guide and in the “Using Your G6” instructions.
26
4.1 Dexcom G6 Safety Statements
Indications for UseThe Dexcom G6 Continuous Glucose Monitoring System (Dexcom G6 System or G6) is a glucose monitoring system indicated for persons age 2 years and older, including pregnant women. The Dexcom G6 System is designed to replace fingerstick blood glucose (BG) testing for treatment decisions.
Interpretation of the Dexcom G6 System results should be based on the glucose trends and several sequential readings over time. The Dexcom G6 System also aids in the detection of episodes of hyperglycemia and hypoglycemia, facilitating both acute and long-term therapy adjustments.
The Dexcom G6 System is intended for use by patients at home and in healthcare facilities.
Important User InformationPlease review the product instructions before using the G6. Indications, contraindications, warnings, precautions, and other important user information can be found in the product instructions that are included with the G6. Discuss with your healthcare professional how you should use the information displayed on the G6 to help manage your diabetes. The product instructions contain important information on troubleshooting the G6 and on the performance characteristics of the system.

27
Contraindication No MRI/CT/Diathermy – MR Unsafe:
Do not wear your CGM (sensor, transmitter, receiver, or smart device) for magnetic resonance imaging (MRI), computed tomography (CT) scan, or high-frequency electrical heat (diathermy) treatment. The G6 has not been tested in those situations. The magnetic fields and heat could damage the components of the G6, which may cause it to display inaccurate G6 sensor glucose readings (G6 readings) or may prevent alerts. Without G6 readings or alarm/alert notifications, you might miss a severe low or high glucose event.
Read User Materials Before you use your G6, carefully read the materials included with it. If you do not, you might: – Not use the G6 correctly – Not understand G6 information – Affect how well it works
Do Not Ignore Low/High Symptoms Do not ignore how you feel. If your glucose alerts and G6 readings do not match what you are feeling, use your blood glucose meter (meter) to make diabetes treatment decisions or, if needed, seek immediate medical attention. When in doubt, get your meter out.
No Number, No Arrow, No CGM Treatment Decision If your G6 does not show a number or arrow, or your G6 readings do not match your symptoms, use your meter to make diabetes treatment decisions. No number, no arrow, no treatment decision. When in doubt, get your meter out.
Do Not Use If… Do not use the G6 if you are on dialysis or critically ill. It is not known how different conditions or medications common to these populations may affect performance of the system. G6 readings may be inaccurate in these populations.
MR

28
Avoid Sunscreen and Insect Repellent Some skin care products, such as sunscreens and insect repellents, can make the plastic used in your G6 crack. Before using your G6, make sure there are no cracks in your receiver, transmitter, and transmitter holder. If you find a crack, please contact your local Dexcom representative. Do not allow these skin care products to contact your G6. After using skin care products, wash your hands before touching your G6. If any skin care products get on your G6, immediately wipe with a clean cloth.
Hydroxyurea Precaution If you are taking hydroxyurea, your G6 readings may be falsely elevated and result in missed hypoglycemia alerts or errors in diabetes management decisions. The level of inaccuracy depends on the amount of hydroxyurea in your body. Use your meter.
Start Up Safety Statements
Use Meter During Startup When you start a new sensor, you will not get any G6 readings or alarm/alerts until you enter your sensor code or two calibrations. Use your meter to make treatment decisions during the 2-hour sensor warmup period.
Use Correct Sensor Code When you start a new sensor, you must enter a code into your mylife™ App to use the G6 without fingerstick calibrations. Each sensor has its own code printed on the back of the adhesive patch. Do not use a code from a different sensor or make up a code. If you do not enter the correct code, your sensor will not work as well and could be inaccurate. If you lost the sensor code, you may calibrate the G6 using fingersticks.
29
Calibration Safety StatementsCalibration is not required if users enter a sensor code. If users do not enter a sensorcode, the following warnings and cautions apply.
Do Not Wait – Calibrate! If you have not used the calibration code, you must manually calibrate your G6 daily, using values obtained from a blood glucose meter and fingersticks. You must calibrate immediately when the G6 notifies you. If you have not calibrated when notified, your G6 may not be accurate, so use your blood glucose meter to make treatment decisions until you calibrate your G6.
Use Fingertips Use fingertips to calibrate from your BG meter. Blood from other places may be less accurate and not as timely.
Be Accurate, Be Quick. Enter the exact blood glucose value displayed on your meter within five minutes of using your meter. Do not enter the G6 reading as a calibration.
30
System/Hardware/Software Safety Statements
Sensor Wire Breaks Off Do not ignore broken or detached sensor wires. A sensor wire could remain under your skin. If this happens, please contact your local Dexcom representative. If a sensor wire breaks off under your skin and you cannot see it, do not try to remove it. Contact your Healthcare Professional. Also seek professional medical help if you have symptoms of infection or inflammation – redness, swelling, or pain – at the insertion site.
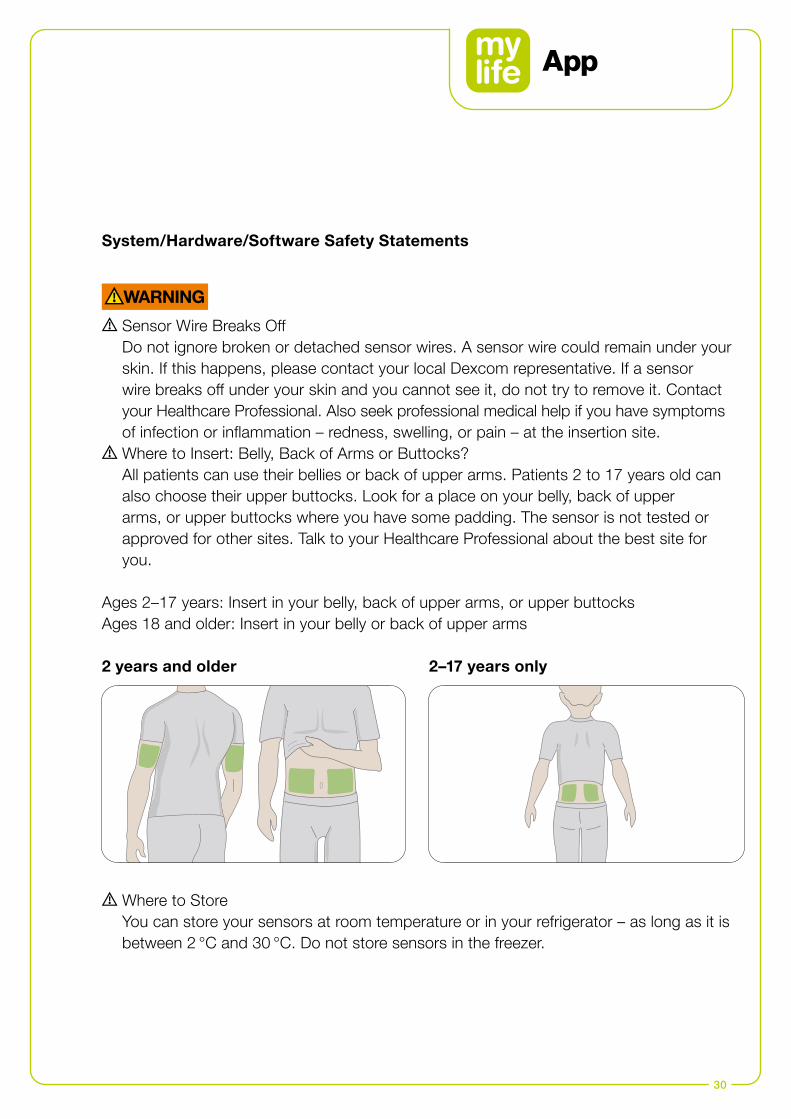
Where to Insert: Belly, Back of Arms or Buttocks? All patients can use their bellies or back of upper arms. Patients 2 to 17 years old can also choose their upper buttocks. Look for a place on your belly, back of upper arms, or upper buttocks where you have some padding. The sensor is not tested or approved for other sites. Talk to your Healthcare Professional about the best site for you.
Ages 2–17 years: Insert in your belly, back of upper arms, or upper buttocksAges 18 and older: Insert in your belly or back of upper arms
2 years and older 2–17 years only
Where to Store You can store your sensors at room temperature or in your refrigerator – as long as it is between 2 °C and 30 °C. Do not store sensors in the freezer.
31
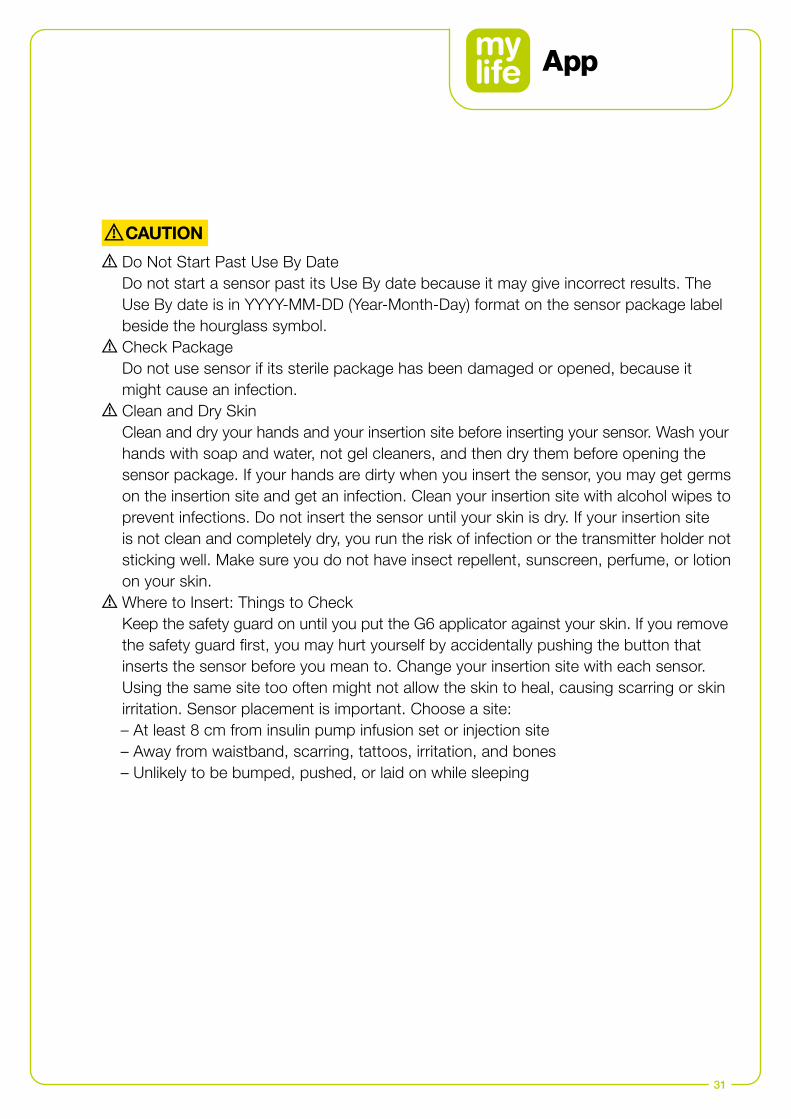
Do Not Start Past Use By Date Do not start a sensor past its Use By date because it may give incorrect results. The Use By date is in YYYY-MM-DD (Year-Month-Day) format on the sensor package label beside the hourglass symbol.
Check Package Do not use sensor if its sterile package has been damaged or opened, because it might cause an infection.
Clean and Dry Skin Clean and dry your hands and your insertion site before inserting your sensor. Wash your hands with soap and water, not gel cleaners, and then dry them before opening the sensor package. If your hands are dirty when you insert the sensor, you may get germs on the insertion site and get an infection. Clean your insertion site with alcohol wipes to prevent infections. Do not insert the sensor until your skin is dry. If your insertion site is not clean and completely dry, you run the risk of infection or the transmitter holder not sticking well. Make sure you do not have insect repellent, sunscreen, perfume, or lotion on your skin.
Where to Insert: Things to Check Keep the safety guard on until you put the G6 applicator against your skin. If you remove the safety guard first, you may hurt yourself by accidentally pushing the button that inserts the sensor before you mean to. Change your insertion site with each sensor. Using the same site too often might not allow the skin to heal, causing scarring or skin irritation. Sensor placement is important. Choose a site:
– At least 8 cm from insulin pump infusion set or injection site – Away from waistband, scarring, tattoos, irritation, and bones – Unlikely to be bumped, pushed, or laid on while sleeping
32
Transmitter Safety Statements
Inspect Do not use a damaged or cracked transmitter. A damaged transmitter could cause injuries from electrical shocks and may make the G6 not work correctly.
Use as Directed The transmitter is small and may pose a choking hazard. Do not put it in your mouth or let children hold it without adult supervision.
Reuse – Do Not Throw Away When ending a session, do not throw away the transmitter. The transmitter is reusable until the G6 notifies you that the transmitter battery is about to expire.
33
System Safety Statements
Treatment Decisions Use your G6 reading and trend arrow to make treatment decisions.
Use Correct Transmitter, Receiver, and Sensor G6 components are not compatible with any previous Dexcom products. Do not mix transmitters, receivers, and sensors from different generations.
Going Through Security Check Point When wearing your G6, ask for hand-wanding or full-body pat-down and visual inspection instead of going through the Advanced Imaging Technology (AIT) body scanner (also called a millimeter wave scanner) or putting any part of the G6 in the baggage x-ray machine. You can wear the G6 for the walk-through metal detector. If you do, use your meter for treatment decisions until you leave the security area. Because we have not tested every x-ray and scanner, we do not know if they damage the G6. Not sure what kind of machine it is? Be safe – request either hand-wanding or full-body pat-down.
34
Receiver and Smart Device Safety Statements
Keep Transmitter Close to Display Device Keep your transmitter and Display Device within 6 meters with no obstacles (like walls or metal) between them. Otherwise, they might not be able to communicate. If water is between your transmitter and the Display Device – for example, if you are showering or swimming – keep them closer to each other. The range is reduced because Bluetooth® does not work as well through water.
Get Alarm/Alerts on Display Device You Use To get your alarm/alerts, set them on the display device you use. Your receiver will not get the alarm/alerts you set on your app. Likewise, your app will not get the alarm/alerts you set on your receiver.
Is It On? If the receiver or smart device is turned off (shut down), it will not show G6 readings or alarm/alerts. Make sure your display device is turned on.
If you are concerned with missing alerts on your smart device due to smart device settings or if your own smart device is broken or lost: note that Dexcom offers the option of using a dedicated display device called "Receiver" in addition to your own display device (e.g. your smartphone). Contact your local Dexcom representative if you want to know more.
For specific instructions and safe use of the Dexcom Receiver (e.g. for calibration or alarm/alert settings), please refer to respective Dexcom product instructions on dexcom.com/downloadsandguides.
35
Smart Device Safety Statements
Bluetooth® active You will not receive glucose data or alarm/alerts on your smart device unless Bluetooth® is active on your smart device.
Check Settings Your alarm and important alerts sound and display information even when your volume is low or muted. Specifically, if your smart device is on mute and you have the Always Sound setting turned on (the default setting), only these notifications make a sound:
Glucose Alarm/Alerts: – Urgent Low – Urgent Low Soon – Low Glucose – High Glucose – Rise Rate – Fall Rate – No Readings Alert
System Alerts: – Calibration Required (after 2-hour sensor warmup, only appears when a sensor
code is not used) – Calibration Error (only appears when a user enters a calibration; calibration is not
required) – Sensor Expired
– Replace sensor – Transmitter (not working) – No Storage Error – App Stopped
36
Exceptions: – Apple: If the smart device is set to Silent/Do Not Disturb, you will not get the Signal
Loss Alert. – Android: If the smart device sound setting is on the most restrictive Do Not Disturb
setting, alarm/alerts may not sound. While the smart device is on a telephone call, alarm/alerts may not sound.
– Repeats: Some notifications are silent during the first visual and vibrate notification and then make a sound on the second notification. If you do not clear the alert, it repeats at half volume after 5 minutes and at full volume after 10 minutes.
– Bluetooth®: When using Bluetooth® headphones, speakers, etc., your alarm/alerts may sound on your primary smart device or on the accessory. Each accessory is different. Test yours so you know where you will hear your alarm/alerts.

37
Notifications: – Make sure your smart device settings allow mylife™ App notifications to show on your
lock screen. This will allow you to see notifications without unlocking your phone. – Apple: During G6 setup, enable mylife™ App notifications or you will not get alarm/
alerts. Battery:
– The app must always be running in the background and may drain your smart device battery. Keep the battery charged.
Compatibility: – Before upgrading your smart device or its operating system, check
www.mylife-diabetescare.com/compatibility. Automatic updates of the app or your device operating system can change settings or shut down the app. Always update manually and verify correct device settings afterward.
Time: – Let the date and time on your smart device automatically update when you travel
across time zones or switch between standard and daylight-saving times. Do not manually change your smart device time, because it can make the time on the trend screen wrong and the app may stop displaying data.
Check Accessory Devices Do you use headphones with your smart device? What about Bluetooth® speakers or a smart watch? When using accessories, keep in mind you may get your alarm/alerts on only one device or accessory, not all. After connecting any accessory devices, make sure that your smart device settings allow you to continue receiving alarms or alerts.
38
Receiver Safety Statements
Do Not Use if Damaged Do not use a receiver that is damaged or cracked. A damaged receiver could cause injuries from electrical shocks and may make the G6 not work correctly.
Use Cable as Directed Use USB cable only as directed, and store safely. Misuse of the USB cable can be a strangulation risk.
Test Speaker and Vibrations You have to hear or feel alarm/alerts to react to them, so test your receiver speaker and vibrations regularly. To make sure the speaker and vibrations work, plug in the receiver to charge. The Speaker Test screen appears for a few seconds. Follow the directions on the screen to test the speaker and vibrations. If you hear and feel them, great! But if it does not beep and vibrate – perhaps it got wet or was dropped – contact your local Dexcom representative.
Keep Clean and Dry Do not submerge your receiver in water and do not get dirt or water in the USB port. That could damage it.
39
Dexcom Share App Safety Statements
Important User InformationDexcom Share (Share) lets you send your sensor information from your mylife™ App to your Followers’ smart devices! Read the indications, warnings, and cautions below tofind out how you can safely use this app feature.
Share and Managing Your Diabetes Safety Statements
Indications for Use Keep Followers Informed
Use Share to send your sensor information from your smart device to your Followers’ smart devices.
Use as Secondary Notice The information on your smart device is sent directly from your G6 transmitter. After it is on your device, Share sends it to your Followers. So your Followers’ information is always older than yours. Use your current information to manage your diabetes, not your Followers’ possibly outdated information. Your Followers can use the information they get to reach out to you and support you in managing your diabetes. The infor-mation they get is not meant to be used for treatment decisions, analysis, or teaching. Followers cannot change your information.
Use Your G6 to Make Treatment Decisions Do not use Share information for treatment decisions, like treating for a low or dosing for a high. Use the sensor information on your G6 instead.
Take Healthcare Professional Advice Has your Healthcare Professional given you self-monitoring tasks? Keep doing them. Having Followers does not replace them.
40
Share Setup and Settings Safety Statements
Followers Must Follow and You Must Share You have to turn Share on to make it send your sensor information to your Followers. Followers have to download the Dexcom Follow app to see what you send.
Followers Do Not Manage Your Diabetes, You Do Do not rely on your Followers to let you know you need to make a treatment decision. Stay on top of your diabetes management. Look at your mylife™ App often. Respond to alarm/alerts. Do not wait for a Follower to reach out – they may not be getting your sensor information because of a technical issue.
Check Your Smart Device and Your Followers’ Smart Devices – Internet access required: Both smart devices need to be connected to the Internet to
use Share. Try sending your Follower an email from your device. If your Follower gets it on their device, both smart devices are connected.
– Batteries charged: Make sure the smart device batteries are charged. If either your or your Followers’ smart device batteries are not charged, Share will not work.
Check Your Smart Device App on: Whenever you power on your smart device, tap the mylife™ App to open it. If the app is not open, Share will not work.
41
Check Followers’ Smart Devices – Sounds on: Followers must keep their smart device volume on, or at least keep the
vibration on, so they can hear and/or feel alarm/alerts. Smart device settings trump Follow app settings.
– Sharing gaps: Followers will not get your sensor information when their smart device is off, not connected to the Internet, or in Do Not Disturb or Airplane mode. When the Followers fix those issues, they will start getting the current information but they will not get the information they missed.
– Cell carrier supports simultaneous voice and data: Most cell service carriers sup-port using voice and data at the same time. Check yours and have Followers check theirs. If it is not supported, Share will not work during phone calls. Share will restart when the call is over and send any waiting notifications.
Customize Share So Followers Can Support You – Customize Share to make sure your Followers have the information they need to help
you manage your diabetes. – Delay feature: Your Follower will not get notified until after the delay time you set. – Not Share feature: You can stop sharing with a Follower any time by choosing Not
Share. That Follower will stop getting any of your sensor information until you choose to share again.
42
4.2 Last values (home screen)
The Last values screen gives you your G6 sensor glucose readings (G6 readings) and trend information and gets you to other G6 functions.
The following section focuses entirely on the G6 functions as represented on the Last values screen (home screen) of the mylife™ App.
If you want to learn more about the remaining information available on the Last values screen (e.g. your last bolus, basal insulin or insulin on board as well as the status of your cloud and device connections), please refer to Section 3.2 Last values.
43
Laura
mylife Cloud
mylife YpsoPump
55 g U6.0
0.90 U/h U
Last bolusLast carbohydrates
Current basal rate Insulin on board13:00 – 14:00
connected
22.06.20 13:30
Dexcom Share
22.06.20 11:4722.06.20 11:45
4.1
now
9.5mmol/L
Dexcom CGM Data
16
2
14
6
10
13:34
11:00 12:00 13:00
Laura
Last bolus22.06.20 11:47
Current basal rate13:00 – 14:00
Last blood glucose22.06.20 13:32
Last values
Ypsomed 13:34 100%
Last carbohydrates22.06.20 11:45
mylife Cloud 22.06.20 13:30
mylife Unio Nevaconnected
mylife YpsoPump connected
Insulin on board
55 g U6.0
0.90 U/h 4.1 U
172 mg/dL
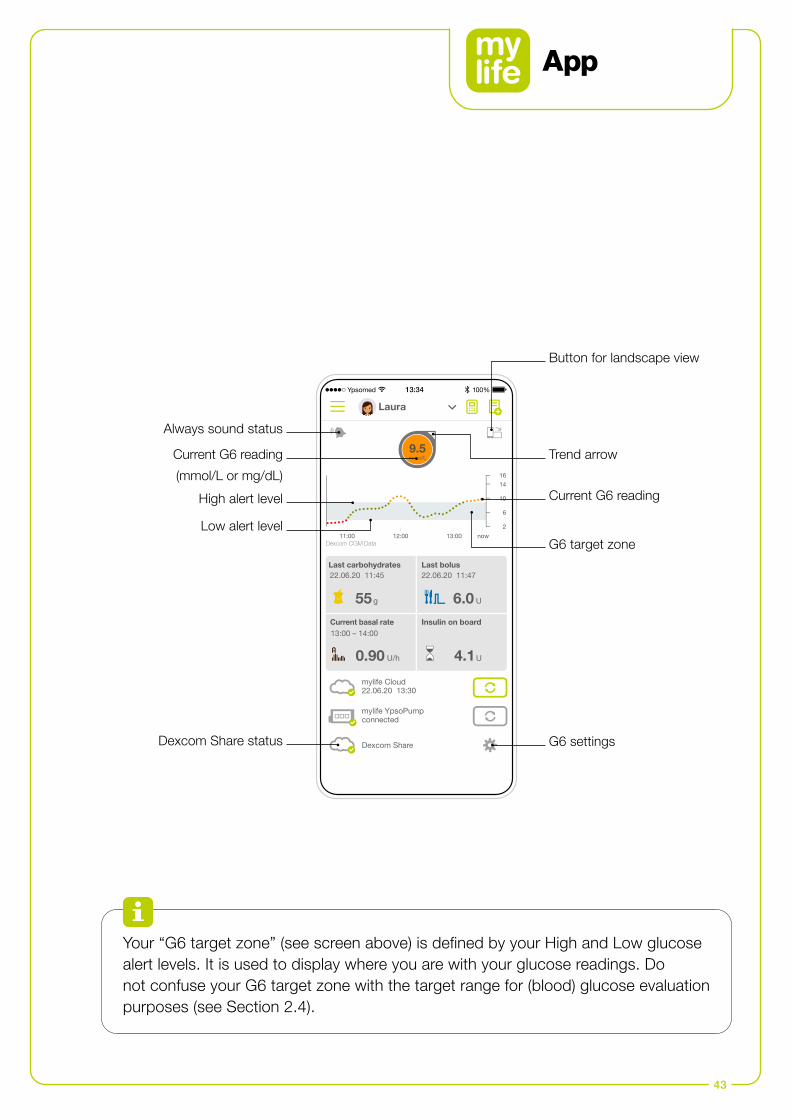
Your “G6 target zone” (see screen above) is defined by your High and Low glucose alert levels. It is used to display where you are with your glucose readings. Do not confuse your G6 target zone with the target range for (blood) glucose evaluation purposes (see Section 2.4).
Trend arrow
Current G6 reading
G6 target zone
G6 settings
Current G6 reading
(mmol/L or mg/dL)
High alert level
Dexcom Share status
Low alert level
Always sound status
Button for landscape view
44
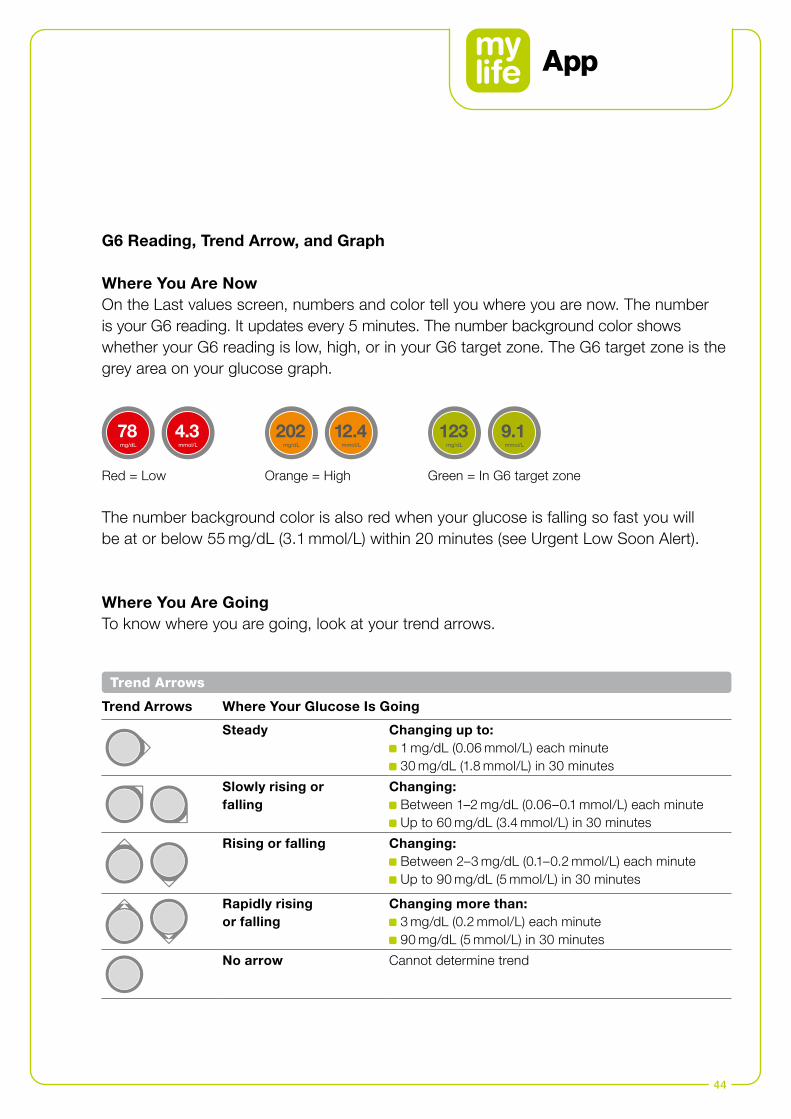
G6 Reading, Trend Arrow, and Graph
Where You Are NowOn the Last values screen, numbers and color tell you where you are now. The number is your G6 reading. It updates every 5 minutes. The number background color shows whether your G6 reading is low, high, or in your G6 target zone. The G6 target zone is the grey area on your glucose graph.
The number background color is also red when your glucose is falling so fast you willbe at or below 55 mg/dL (3.1 mmol/L) within 20 minutes (see Urgent Low Soon Alert).
Where You Are GoingTo know where you are going, look at your trend arrows.
Trend Arrows Where Your Glucose Is Going
Steady Changing up to: 1 mg/dL (0.06 mmol/L) each minute 30 mg/dL (1.8 mmol/L) in 30 minutes
Slowly rising or falling
Changing: Between 1–2 mg/dL (0.06–0.1 mmol/L) each minute Up to 60 mg/dL (3.4 mmol/L) in 30 minutes
Rising or falling Changing: Between 2–3 mg/dL (0.1–0.2 mmol/L) each minute Up to 90 mg/dL (5 mmol/L) in 30 minutes
Rapidly rising or falling
Changing more than: 3 mg/dL (0.2 mmol/L) each minute 90 mg/dL (5 mmol/L) in 30 minutes
No arrow Cannot determine trend
Trend Arrows
Red = Low Orange = High Green = In G6 target zone
202mg/dL
123mg/dL
78mg/dL
12.4mmol/L
9.1mmol/L
4.3mmol/L
45
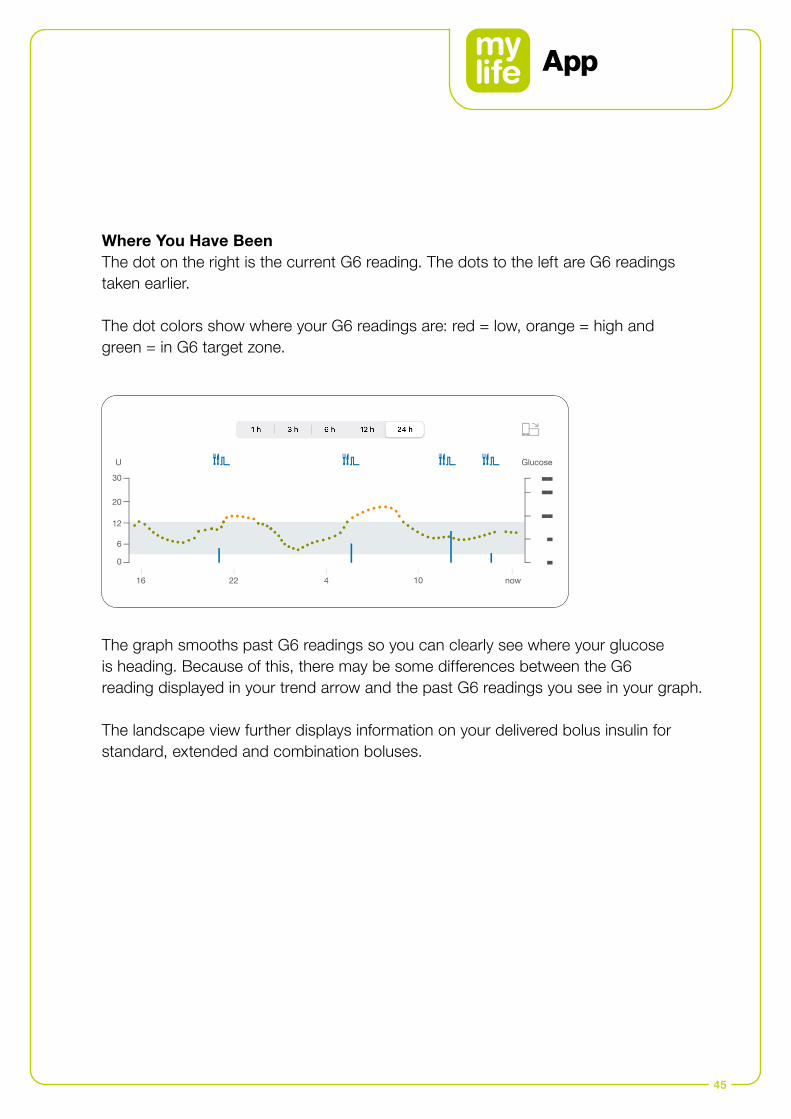
Where You Have BeenThe dot on the right is the current G6 reading. The dots to the left are G6 readingstaken earlier.
The dot colors show where your G6 readings are: red = low, orange = high and green = in G6 target zone.
The graph smooths past G6 readings so you can clearly see where your glucose is heading. Because of this, there may be some differences between the G6 reading displayed in your trend arrow and the past G6 readings you see in your graph.
The landscape view further displays information on your delivered bolus insulin for standard, extended and combination boluses.
1630
GlucoseU
14
20
10
12
6
6
20
42216 10 now
46
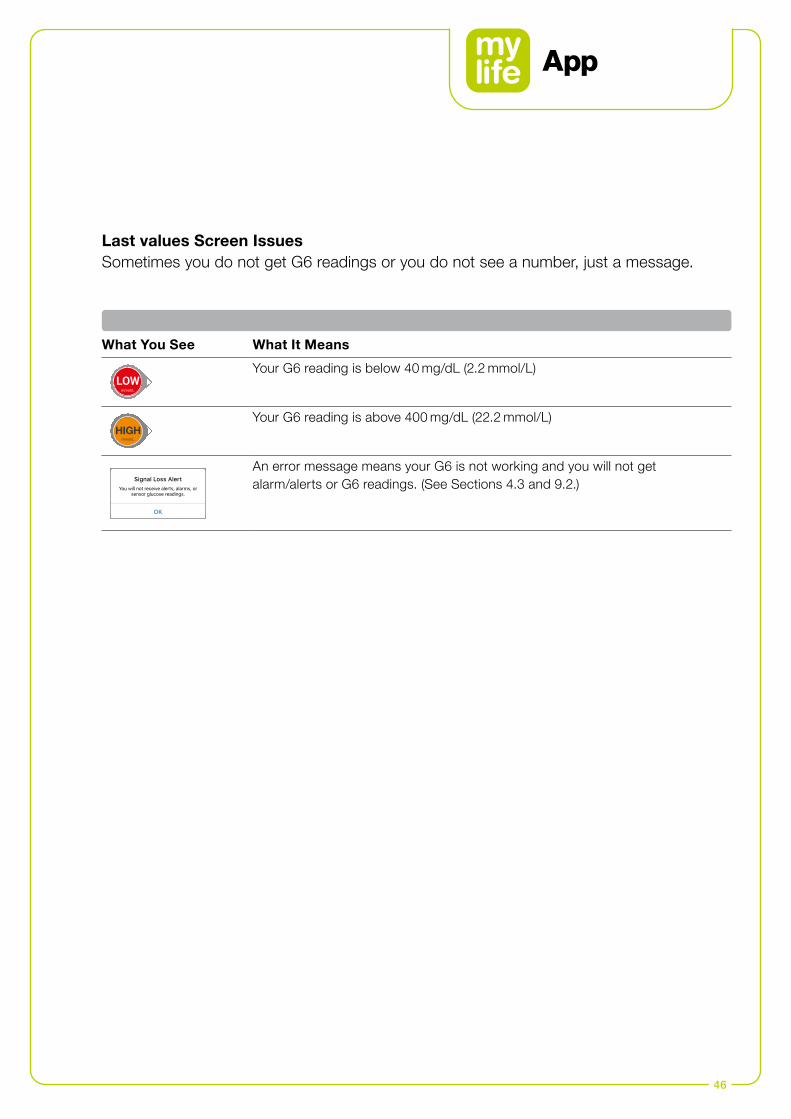
Last values Screen IssuesSometimes you do not get G6 readings or you do not see a number, just a message.
What You See What It Means
51 mg/
dLLOWmmol/L
Your G6 reading is below 40 mg/dL (2.2 mmol/L)
51mg/dLHIGH
mmol/L
Your G6 reading is above 400 mg/dL (22.2 mmol/L)
Signal Loss AlertYou will not receive alerts, alarms, or
sensor glucose readings.
OK
An error message means your G6 is not working and you will not get alarm/alerts or G6 readings. (See Sections 4.3 and 9.2.)
47
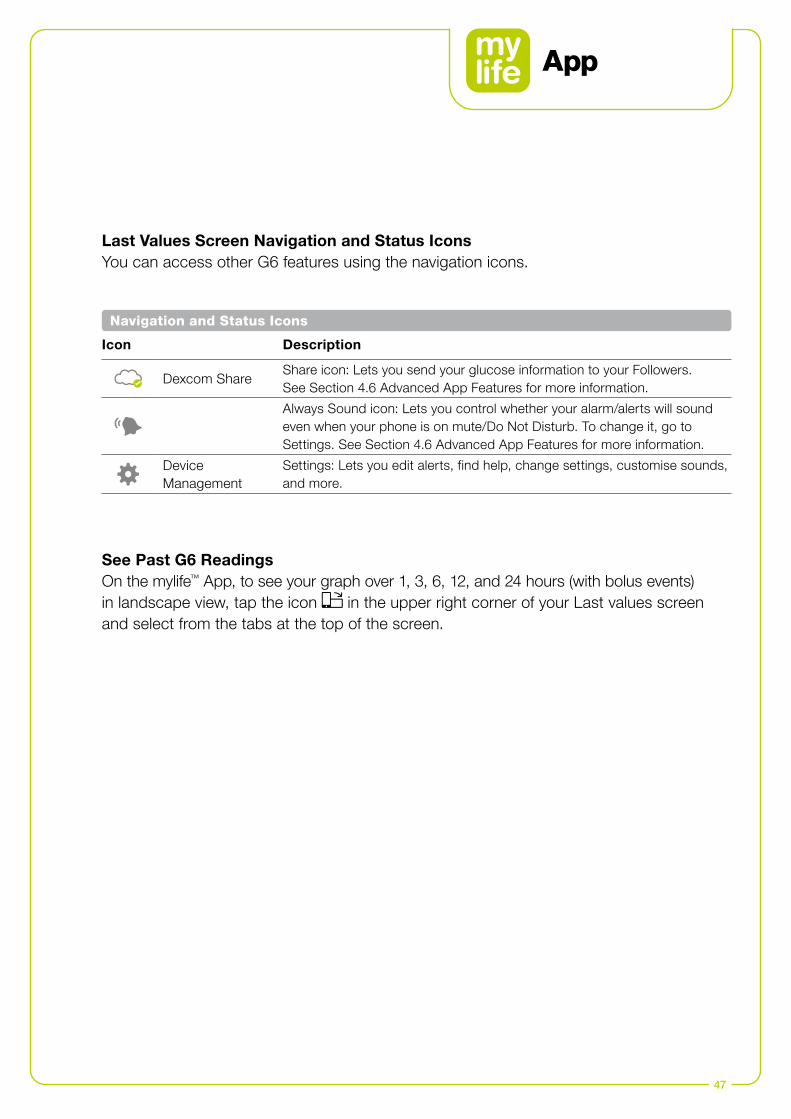
Last Values Screen Navigation and Status IconsYou can access other G6 features using the navigation icons.
See Past G6 ReadingsOn the mylife™ App, to see your graph over 1, 3, 6, 12, and 24 hours (with bolus events) in landscape view, tap the icon in the upper right corner of your Last values screen and select from the tabs at the top of the screen.
Icon Description
Dexcom ShareShare icon: Lets you send your glucose information to your Followers. See Section 4.6 Advanced App Features for more information.
Always Sound icon: Lets you control whether your alarm/alerts will sound even when your phone is on mute/Do Not Disturb. To change it, go to Settings. See Section 4.6 Advanced App Features for more information.
Device Management
Settings: Lets you edit alerts, find help, change settings, customise sounds, and more.
Navigation and Status Icons

48
4.3 Alarm and AlertsYour alarm and alerts help you stay in your G6 target zone. They sound and/or vibrate when you:
Are above your High alert setting or below your Low alert setting Are at or below 55 mg/dL (3.1 mmol/L) Will be at or below 55 mg/dL (3.1 mmol/L) within 20 minutes
The alarm/alert vibrations feel the same as notifications you get from other apps on your smart device. The only way to know if it is from your G6 is to look at your smart device.
Keep your alerts on: They are an important part of making G6 treatment decisions. Talk to your healthcare professional about the best Low and High Alert settings for you.
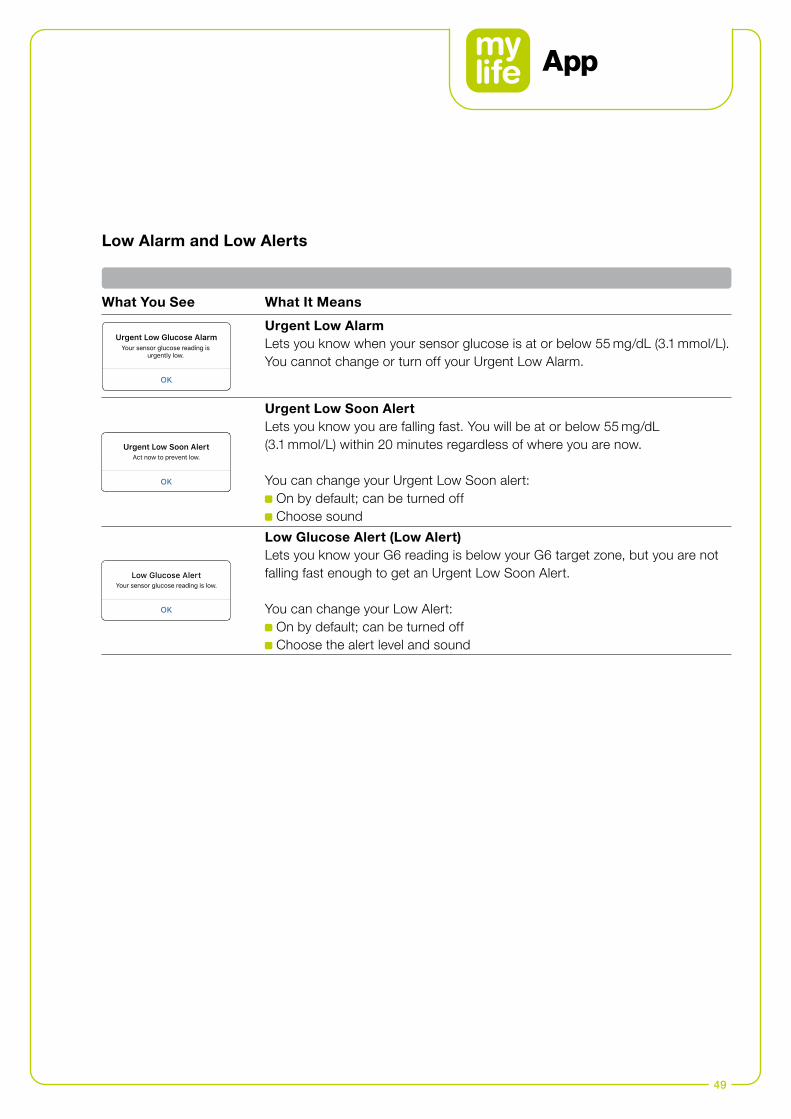
49
What You See What It Means
Urgent Low Glucose AlarmYour sensor glucose reading is
urgently low.
OK
Urgent Low AlarmLets you know when your sensor glucose is at or below 55 mg/dL (3.1 mmol/L). You cannot change or turn off your Urgent Low Alarm.
Urgent Low Soon AlertAct now to prevent low.
OK
Urgent Low Soon AlertLets you know you are falling fast. You will be at or below 55 mg/dL (3.1 mmol/L) within 20 minutes regardless of where you are now.
You can change your Urgent Low Soon alert: On by default; can be turned off Choose sound
Low Glucose AlertYour sensor glucose reading is low.
OK
Low Glucose Alert (Low Alert)Lets you know your G6 reading is below your G6 target zone, but you are not falling fast enough to get an Urgent Low Soon Alert.
You can change your Low Alert: On by default; can be turned off Choose the alert level and sound
Low Alarm and Low Alerts

50
What You See What It Means
High Glucose AlertYour sensor glucose reading is high.
OK
High Glucose Alert (High Alert)Lets you know when your G6 sensor reading is above your G6 target zone. You can change your High Alert:
On by default; can be turned off Choose the alert level and sound
Changing AlertsTalk to your healthcare professional before changing your alert settings. They can help you find the best settings to manage your diabetes without getting too many alerts.
Go to Settings ➔ Device Management and tap your connected G6 device. In the settings menu, tap “Alerts” to change your alert settings.
High Alert
51
Customising Alert SoundsYou can pick alert sounds that work best for you. In the app, tap Sound from thealert to pick a different sound for that alert.
Use Alerts to Achieve GoalsWork with your healthcare professional to customise your alerts to help you achieve your goals. For example, are you worried about insulin stacking – taking doses too close together?
To use your G6 as a tool for watching and waiting – and avoiding insulin stacking – your healthcare professional may advise you to turn on the Repeat feature in your High Alert setting. That way, when you get a High Alert and confirm it, you will be re-alerted after the time you set in Repeat until your G6 readings go back in your G6 target zone. That reminds you to check your G6 readings later to make sure you come down.
Let’s assume you set a High Alert Repeat at 2 hours. After you get your High Alert, 2 hours later, if you never get back into your G6 target zone, your High Alert repeats to let you know you are still high and might want to take more insulin. On the other hand, if the 2 hours pass and you are back in your G6 target zone, your High Alert will not repeat.
52
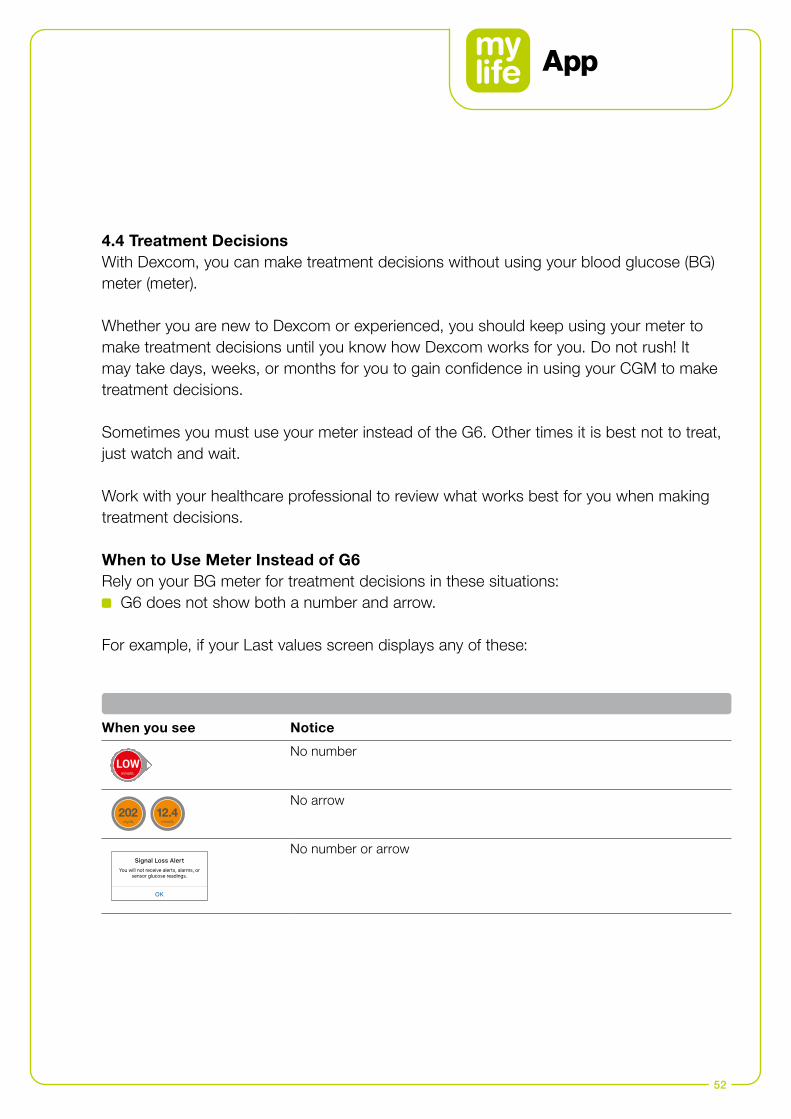
4.4 Treatment DecisionsWith Dexcom, you can make treatment decisions without using your blood glucose (BG) meter (meter).
Whether you are new to Dexcom or experienced, you should keep using your meter to make treatment decisions until you know how Dexcom works for you. Do not rush! It may take days, weeks, or months for you to gain confidence in using your CGM to make treatment decisions.
Sometimes you must use your meter instead of the G6. Other times it is best not to treat, just watch and wait.
Work with your healthcare professional to review what works best for you when making treatment decisions.
When to Use Meter Instead of G6Rely on your BG meter for treatment decisions in these situations:
G6 does not show both a number and arrow.
For example, if your Last values screen displays any of these:
When you see Notice
51 mg/
dLLOWmmol/L
No number
202mg/dL
12.4mmol/L
No arrow
No number or arrowSignal Loss Alert
You will not receive alerts, alarms, or sensor glucose readings.
OK

53
In other words, no number, no arrow, no CGM treatment decision. Your G6 readings do not match your symptoms.
For example, you do not feel right but your G6 readings show you in your G6 target zone. Wash your hands thoroughly and use your meter. If the meter value matches your symptoms, use the meter value to treat. Then, if you want to align your G6 with your meter, calibrate. You do not have to calibrate, but you can. In other words, when in doubt, get your meter out.
When to Watch and WaitThere are times when you should not treat at all, just watch and wait.
Stacking insulin: Do not stack insulin by taking doses too close together. Wait at least 2 hours between doses so you do not accidentally force your glucose down too low. Sometimes, it is best to watch and wait.
How to Use the Trend ArrowsThe trend arrows help you decide how much to dose.
Up arrow: Take a little more insulin
Down arrow: Take a little less insulin
When G6 glucose readings are transferred to the bolus calculator, only the current glucose value is used to calculate the correction bolus. The trend arrow is not taken into account in the suggestion calculation. Speak with your healthcare professional for recommendations on how best to utilise the trend arrows for your correction bolus calculation.

54
Practice Making Treatment DecisionsUse the examples below to practice making treatment decisions.
Discuss them with your healthcare professional and review: When you need to use your meter How you can use your G6 When to watch and wait instead of treat
Situation You see Solution
Early morning:Your Low Alert wakes you up.
4.4mmol/L
80mg/dL
Think about: Number and Arrow: You have both. Number: Your glucose is low – 80 mg/dL (4.4 mmol/L). Slowly Falling Arrow: Glucose is falling up to 60 mg/dL (3.4 mmol/L) in 30 minutes.
What you should do: Use your G6 to treat as you normally would.
Breakfast time:Ninety minutes later you are sitting down for breakfast.
132mg/dL
7.3mmol/L
Think about: Number and Arrow: You have both. Up Arrow: Glucose is rising up to 90 mg/dL (5 mmol/L) in 30 minutes.
What you should do: Use your G6 to treat. Take your normal dose and, because of the up arrow, a little more.
After Breakfast:Thirty minutes after dosing to cover breakfast, you get a High Alert. 51
mg/dL
12.4mmol/L
51mg/dL
207mg/dL
Think about: Insulin: You took insulin less than an hour ago. It takes time to work.
What you should do: Nothing. Watch and wait to avoid stacking insulin. Do not treat for at least another hour and a half.
An hour later:You watched and waited. 179
mg/dL
9.1mmol/L
Think about: Insulin: The insulin you took with breakfast has you back in your G6 target zone.
What you should do: Nothing. No treatment needed.
55
To receive additional treatment help, talk to your healthcare professional and/or watch available Dexcom videos on various related topics via dexcom.com/downloadsandguides.
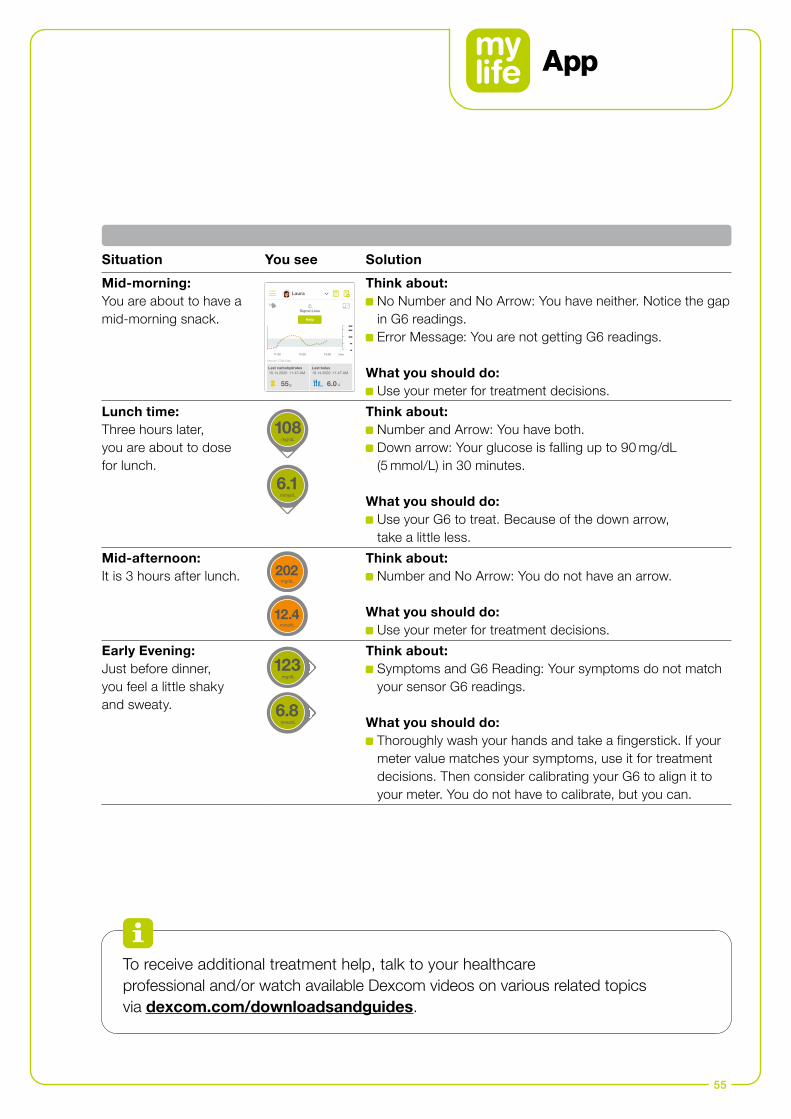
Situation You see Solution
Mid-morning:You are about to have amid-morning snack.
Laura
mylife Cloud
mylife YpsoPump
55 g U6.0
0.90 U/h U
Last bolusLast carbohydrates
Current basal rate Insulin on board1:00 PM – 2:00 PM
connected
10.14.2020 1:30 PM
Dexcom Share
10.14.2020 11:47 AM10.14.2020 11:43 AM
4.1
Dexcom CGM Data
Signal Loss
Help
now
16
2
14
6
10
11:00 12:00 13:00
Think about: No Number and No Arrow: You have neither. Notice the gap in G6 readings.
Error Message: You are not getting G6 readings.
What you should do: Use your meter for treatment decisions.
Lunch time:Three hours later, you are about to dose for lunch.
108mg/dL
6.1mmol/L
Think about: Number and Arrow: You have both. Down arrow: Your glucose is falling up to 90 mg/dL (5 mmol/L) in 30 minutes.
What you should do: Use your G6 to treat. Because of the down arrow, take a little less.
Mid-afternoon:It is 3 hours after lunch. 202
mg/dL
12.4mmol/L
Think about: Number and No Arrow: You do not have an arrow.
What you should do: Use your meter for treatment decisions.
Early Evening:Just before dinner, you feel a little shaky and sweaty.
123mg/dL
6.8mmol/L
Think about: Symptoms and G6 Reading: Your symptoms do not match your sensor G6 readings.
What you should do: Thoroughly wash your hands and take a fingerstick. If your meter value matches your symptoms, use it for treatment decisions. Then consider calibrating your G6 to align it to your meter. You do not have to calibrate, but you can.
Sensor Expired
Replace sensor now
OK
You will not receive alerts, alarms, or sensor glucose readings until you replace your sensor.
Sensor Removal Instructions
56
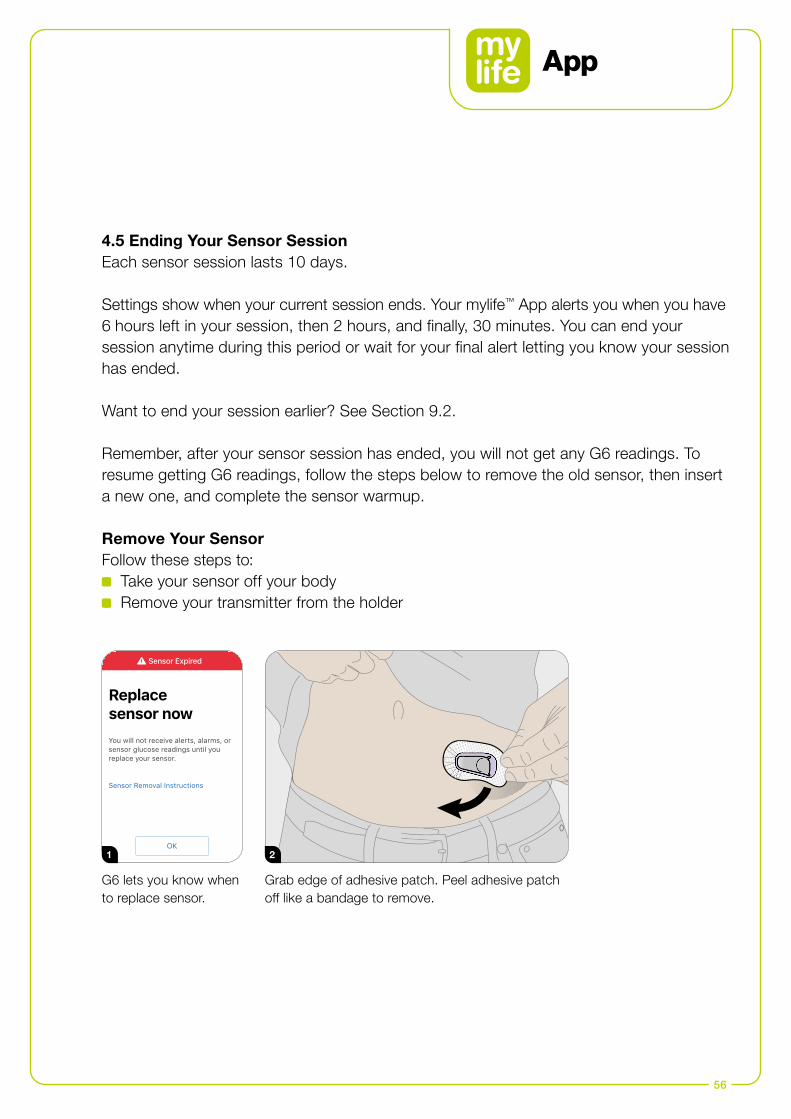
4.5 Ending Your Sensor SessionEach sensor session lasts 10 days.
Settings show when your current session ends. Your mylife™ App alerts you when you have 6 hours left in your session, then 2 hours, and finally, 30 minutes. You can end your session anytime during this period or wait for your final alert letting you know your session has ended.
Want to end your session earlier? See Section 9.2.
Remember, after your sensor session has ended, you will not get any G6 readings. To resume getting G6 readings, follow the steps below to remove the old sensor, then insert a new one, and complete the sensor warmup.
Remove Your SensorFollow these steps to:
Take your sensor off your body Remove your transmitter from the holder
G6 lets you know when to replace sensor.
Grab edge of adhesive patch. Peel adhesive patch off like a bandage to remove.
1 2
57
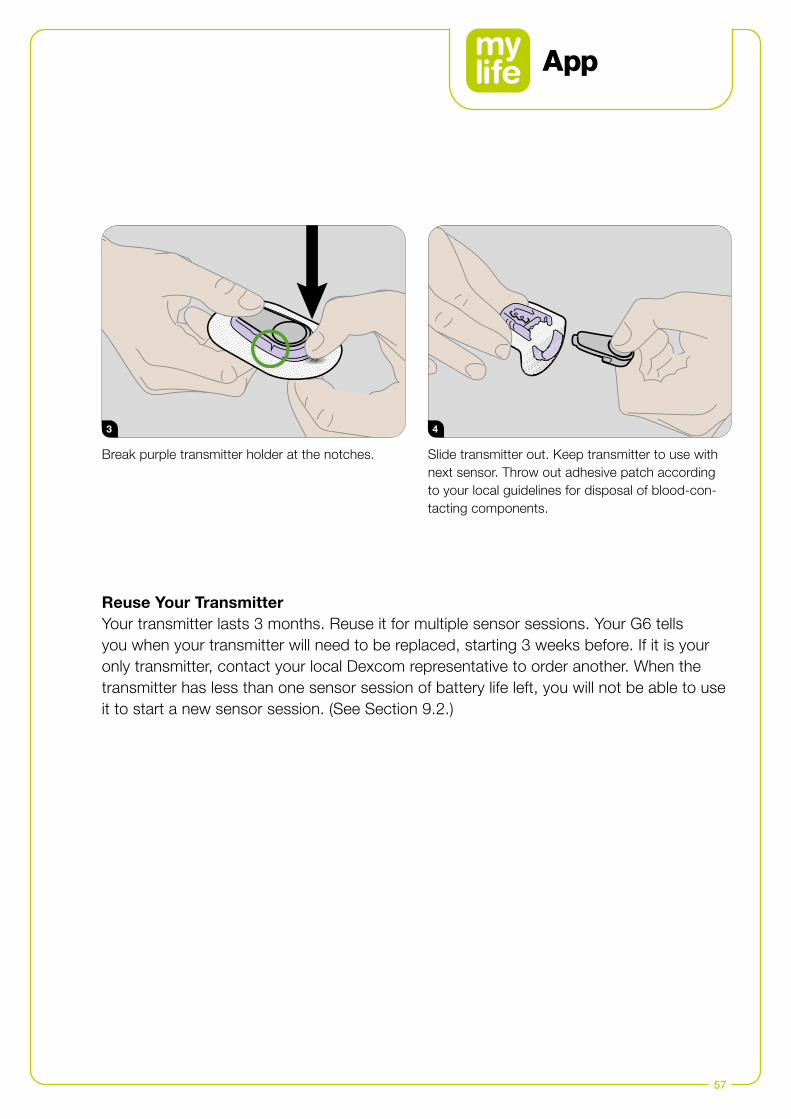
Break purple transmitter holder at the notches. Slide transmitter out. Keep transmitter to use with next sensor. Throw out adhesive patch according to your local guidelines for disposal of blood-con-tacting components.
Reuse Your TransmitterYour transmitter lasts 3 months. Reuse it for multiple sensor sessions. Your G6 tells you when your transmitter will need to be replaced, starting 3 weeks before. If it is your only transmitter, contact your local Dexcom representative to order another. When the transmitter has less than one sensor session of battery life left, you will not be able to use it to start a new sensor session. (See Section 9.2.)
3 4
58
4.6 Advanced App Features
Dexcom Share and FollowYou can use Share to invite people (your Followers) to view your current G6 readings and trends on their smart device. (For a list of compatible devices, go to: dexcom.com/compatibility.) Share helps your Followers support you.
Share and Follow SettingsWhen using Share or Follow, remember:
You must keep your mylife™ App open to share glucose information and alerts with your Followers
Battery: Keep display devices charged Internet:
– Connect smart devices to the internet – Airplane Mode is off
Voice and data at the same time: Do the cellular service carriers support voice and data at the same time (simultaneous voice and data)? If not, Share will not send data during phone calls. When your phone call is over, Share will fill in any missing glucose information.
Share and Follow will not work if there is something wrong with the smart device(s). Refer to your smart device instructions for troubleshooting.
59
Set Up Share and Invite FollowersTo set up Share, go to Settings ➔ Device Management and tap your connected Dexcom G6. Then follow the instructions on the screens.
Once you are set up, invite someone to become your Follower by tapping Invite Followers.
You pick what your Follower can see in the Follower Settings screen, however, they can customise their settings in the Follow app.
When your Follower settings meet your needs, tap Back and then tap Send Invitation. Share sends your Follower an invitation email.

60
Follower StatusThe Followers List shows the status of your Followers and lets you invite new ones. Below are the statuses and what they mean:
Dexcom FollowYour Followers may feel more secure if they get your G6 information almost as soon as you do.
Additional Follow Recommended SettingsTo set up and run Follow, set the Follower’s smart device volume:
Mute/Do Not Disturb is off Sound is on
Status Description
Add Follower Invite new Follower.
Invited You invited a Follower. They have not accepted yet.
Invitation Expired Follower did not accept invitation within 7 days. To re-invite, tap Add Follower.
Follower gets notification(s).
Follower sees trend graph.
Removed Follower stopped following you.
Statuses
61
Follow Setup1. Follower gets and opens your email invitation on the smart device they will use to
follow you.2. They install and set up the Dexcom Follow app on their smart device. The email
includes a link to download the app or they can get it from the app store.
Now your Follower sees your G6 information!
To find out more about Dexcom Share/Follow, please refer to the respective instructions for use from Dexcom.
62
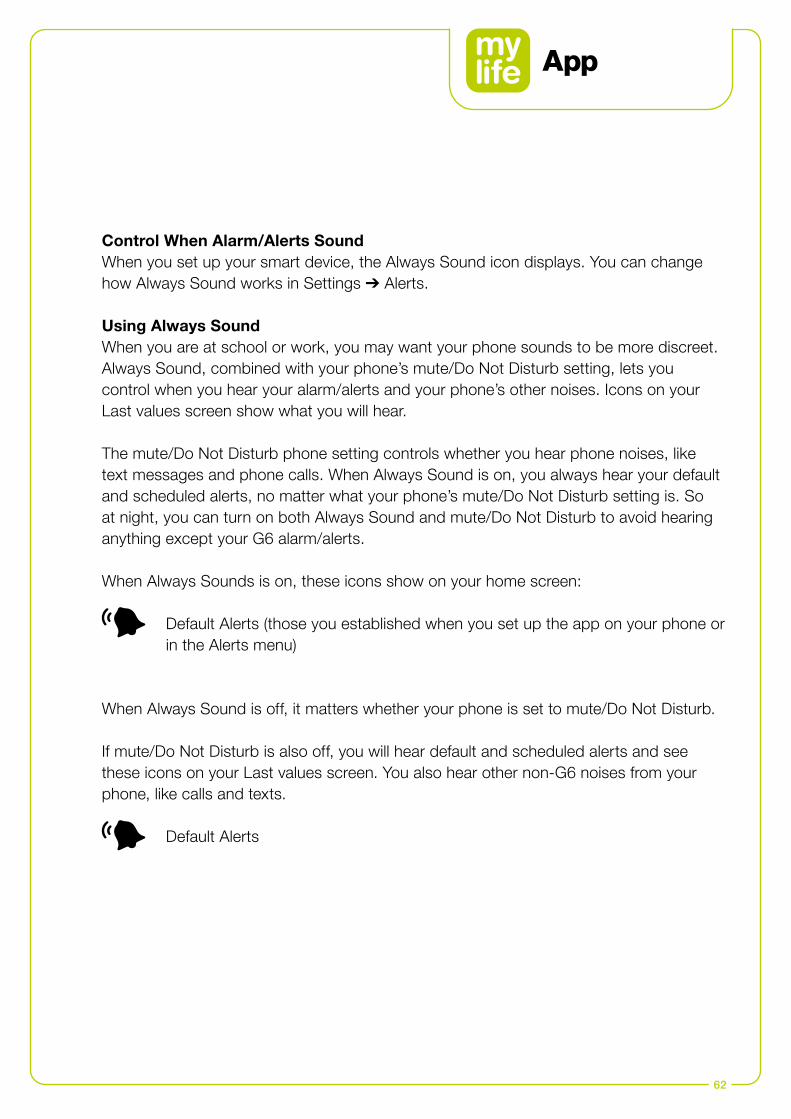
Control When Alarm/Alerts SoundWhen you set up your smart device, the Always Sound icon displays. You can change how Always Sound works in Settings ➔ Alerts.
Using Always SoundWhen you are at school or work, you may want your phone sounds to be more discreet. Always Sound, combined with your phone’s mute/Do Not Disturb setting, lets you control when you hear your alarm/alerts and your phone’s other noises. Icons on your Last values screen show what you will hear.
The mute/Do Not Disturb phone setting controls whether you hear phone noises, like text messages and phone calls. When Always Sound is on, you always hear your default and scheduled alerts, no matter what your phone’s mute/Do Not Disturb setting is. So at night, you can turn on both Always Sound and mute/Do Not Disturb to avoid hearing anything except your G6 alarm/alerts.
When Always Sounds is on, these icons show on your home screen:
Default Alerts (those you established when you set up the app on your phone or in the Alerts menu)
When Always Sound is off, it matters whether your phone is set to mute/Do Not Disturb.
If mute/Do Not Disturb is also off, you will hear default and scheduled alerts and see these icons on your Last values screen. You also hear other non-G6 noises from your phone, like calls and texts.
Default Alerts
63
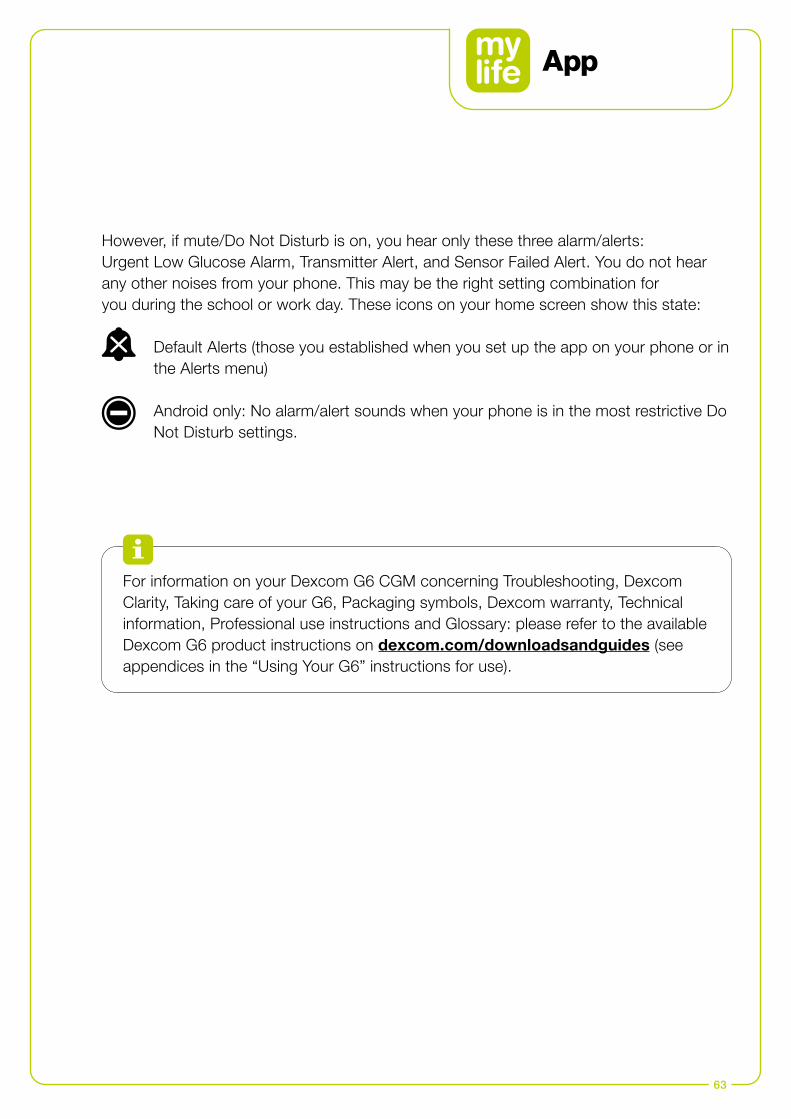
However, if mute/Do Not Disturb is on, you hear only these three alarm/alerts:Urgent Low Glucose Alarm, Transmitter Alert, and Sensor Failed Alert. You do not hear any other noises from your phone. This may be the right setting combination for you during the school or work day. These icons on your home screen show this state:
Default Alerts (those you established when you set up the app on your phone or in the Alerts menu) Android only: No alarm/alert sounds when your phone is in the most restrictive Do Not Disturb settings.
For information on your Dexcom G6 CGM concerning Troubleshooting, Dexcom Clarity, Taking care of your G6, Packaging symbols, Dexcom warranty, Technical information, Professional use instructions and Glossary: please refer to the available Dexcom G6 product instructions on dexcom.com/downloadsandguides (see appendices in the “Using Your G6” instructions for use).
64
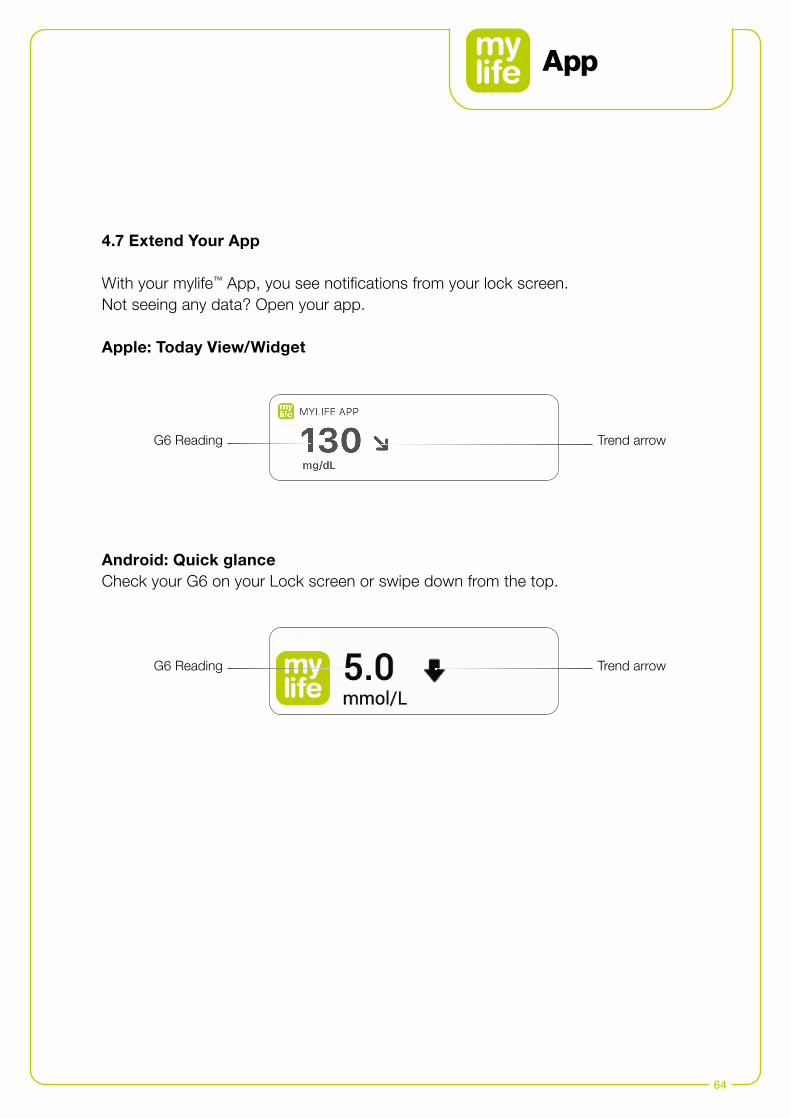
4.7 Extend Your App
With your mylife™ App, you see notifications from your lock screen. Not seeing any data? Open your app.
Apple: Today View/Widget
Android: Quick glanceCheck your G6 on your Lock screen or swipe down from the top.
Trend arrow
Trend arrow
G6 Reading
G6 Reading
65
5.1 Introduction to the bolus calculator
The bolus calculator helps you to determine the bolus for a meal or a (blood) glucose correction by performing the calculations for you. However, the bolus calculator cannot help you in assessing your individual situation and cannot, for example, consider influences such as stress, activity or illness. Such situations may also have an impact on the correct insulin dose and must be taken into account by yourself. The bolus cal-culator cannot compensate for incorrectly defined carbohydrate quantities, entry errors or incorrectly entered therapeutic factors in the bolus calculator settings. If you are unsure how to use the bolus calculator, contact your physician or diabetes counsellor.
For users with a connected Dexcom G6: Do not start to use your CGM readings for bolus calculations before consulting with your healthcare professional. Only your healthcare professional can determine your CGM settings and how you should use your sensor trend information to help you manage your diabetes. Incorrect settings can result in overdelivery or underdelivery of insulin. This can cause hypoglycemia (low glucose) or hyperglycemia (high glucose).
For users with a connected Dexcom G6: The Low and High Alert should be activated when using CGM readings for bolus calculation to help prevent episodes of severe hypoglycaemia (low glucose) or hyperglycaemia (high glucose).
For pump users, it is required that you have successfully paired your mylife™ YpsoPump® with the mylife™ App via Bluetooth® prior to be able to use the bolus calculator (see Section 8.1 Bluetooth® pairing the mylife™ YpsoPump®). Before using the bolus calculator, pump and pen users need to set up the bolus calculator (see Section 2.5 Bolus calculator settings).
5 Bolus calculator
66
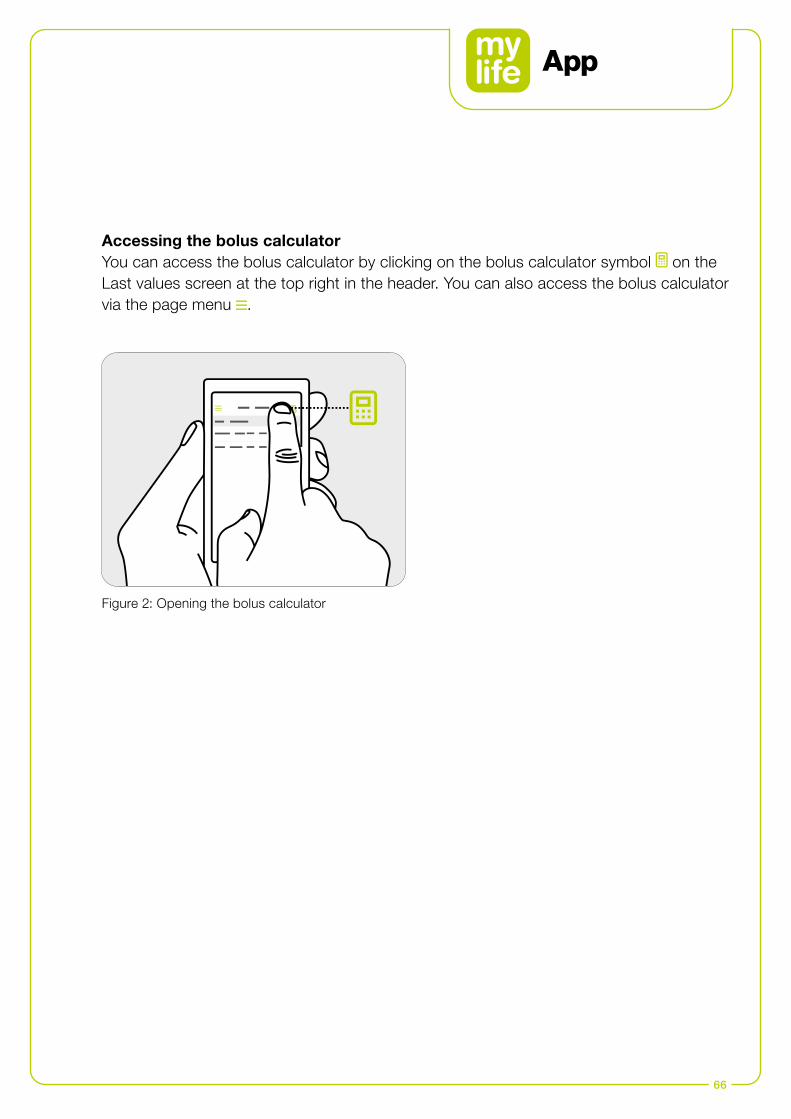
Figure 2: Opening the bolus calculator
Accessing the bolus calculatorYou can access the bolus calculator by clicking on the bolus calculator symbol on the Last values screen at the top right in the header. You can also access the bolus calculator via the page menu .
67
5.2 Pump users: applying the bolus calculator
The bolus calculator can only calculate the suggested insulin dose based on your entered information. If this information is incorrect or incomplete, the suggested amount of insulin may not be correct! Please also be aware that factors such as stress, activity, illness or other events which can impact the necessary amount of insulin, are not taken into account for the calculation. If the current data are not imported from your mylife™ YpsoPump®, the bolus calculator will not take Insulin on Board into account. This may lead to incorrect bolus suggestions. You are responsible for ensuring that Insulin on Board is adequately taken into account before dosing insulin on your mylife™ YpsoPump®. We recommend importing your data from your mylife™ YpsoPump® under all circumstances.
In case of a missing (blood) glucose value or missing Insulin on Board, the bolus suggestion is displayed with a warning statement. Please ensure that the entered values are sufficient for the calculation of the bolus suggestion in this situation.
Once you have calculated the suggested bolus, you must program and deliver the bolus on your mylife™ YpsoPump®. The mylife™ App cannot initiate dosing on the mylife™ YpsoPump®.
If your measured (blood) glucose is below your set value for ’Min. BG for calculation’, a pop-up stating “The entered BG value is too low for a bolus calculation. Take fast- acting carbs!” will appear and the mylife™ App will not calculate a suggested bolus. Important: If your entered (blood) glucose is too low for a bolus calculation, you might be at risk of hypoglycemia.
Always check the entries for their current validity. You should use the bolus calculator within 15 minutes after measuring (blood) glucose and usually directly before a meal.
68
To calculate a bolus, you must enter a (blood) glucose value and/or a value for carbohydrates. As soon as you have entered one value, the “Calculate” button changes from disabled (grey) to enabled (green).
Carbohydrate values recorded in Data entry (see Section 6.1) will automatically be transferred to the carbohydrates input field of the bolus calculator, as long as they are less than 15 minutes old.
For users without a connected Dexcom G6 Blood glucose values recorded in Data entry (see Section 6.1) or imported from a connected blood glucose meter will automatically be transferred to the (blood) glucose input fields of the bolus calculator, as long as they are less than 15 minutes old.
For users with a connected Dexcom G6 Glucose values are transferred to the glucose input field only if a trend arrow and a sensor reading are available. The mylife™ App will inform you in a pop-up of the current trend and reading and let you choose between accepting the current reading or manually entering a value yourself.
When G6 glucose readings are transferred to the bolus calculator, only the current glucose value is used to calculate the correction bolus. The trend arrow is not taken into account in the suggestion calculation. Speak with your healthcare professional for recommendations on how best to utilise the trend arrows for your correction bolus calculation.
When using a connected G6, the bolus calculator will only use G6 glucose values or manually entered blood glucose values as input. Any previously logged blood glucose values in Data entry or values imported from a connected blood glucose meter will not be transferred to the bolus calculator. Current blood glucose values need to be entered manually by the user.
For users with a connected Dexcom G6: Mind that the value displayed in the glucose input field in the bolus calculator may automatically update with a more recent CGM reading from your G6, even while you are using the bolus calculator.
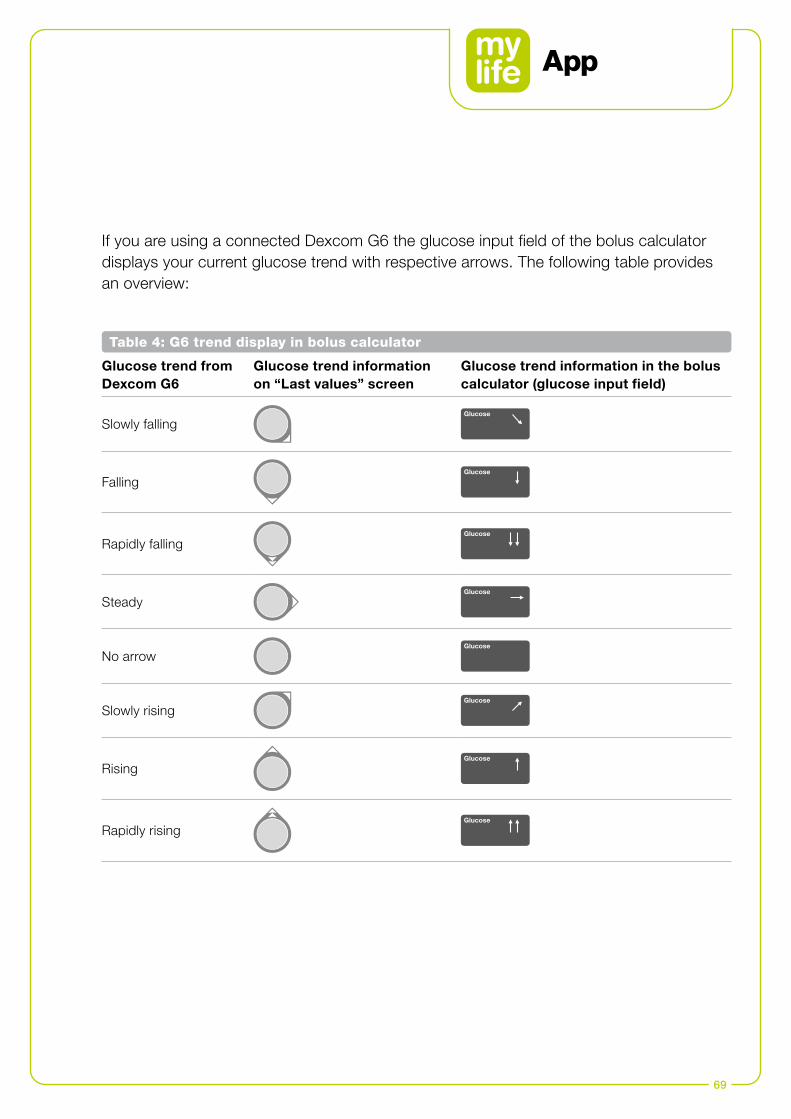
69
If you are using a connected Dexcom G6 the glucose input field of the bolus calculator displays your current glucose trend with respective arrows. The following table provides an overview:
Table 4: G6 trend display in bolus calculator
Glucose trend from Dexcom G6
Glucose trend information on “Last values” screen
Glucose trend information in the bolus calculator (glucose input field)
Slowly fallingGlucose
FallingGlucose
Rapidly fallingGlucose
SteadyGlucose
No arrowGlucose
Slowly risingGlucose
RisingGlucose
Rapidly risingGlucose
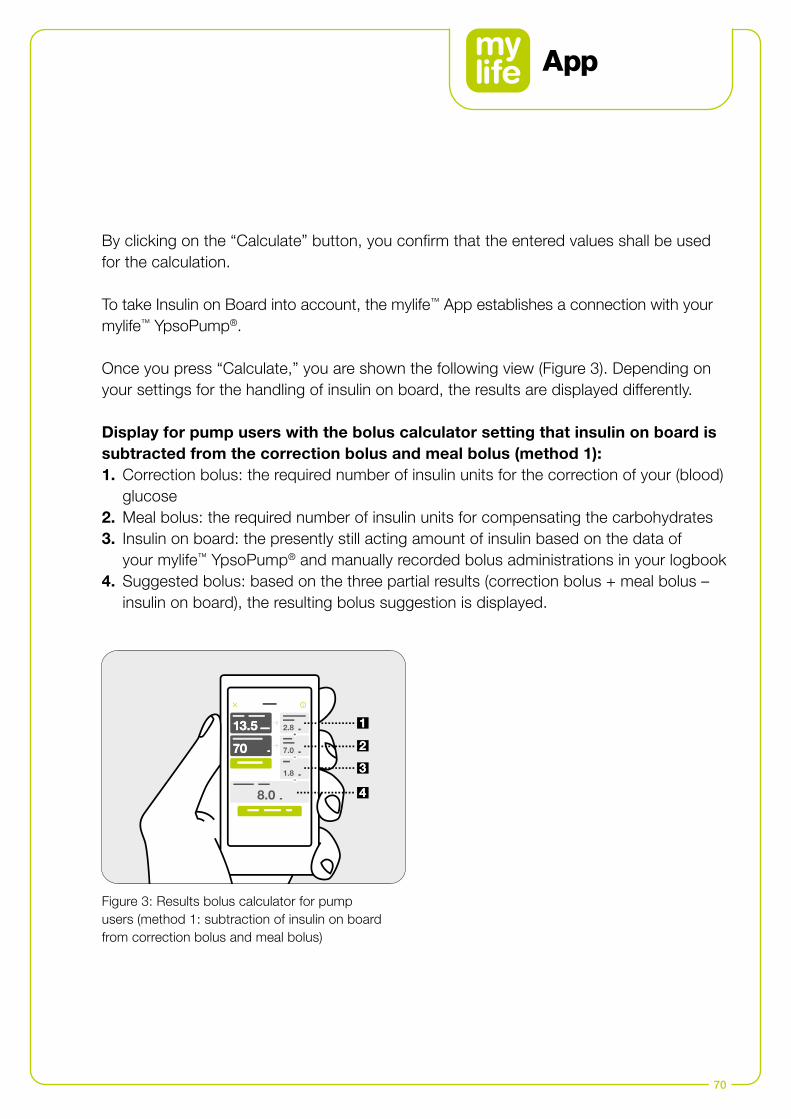
70
By clicking on the “Calculate” button, you confirm that the entered values shall be used for the calculation.
To take Insulin on Board into account, the mylife™ App establishes a connection with your mylife™ YpsoPump®.
Once you press “Calculate,” you are shown the following view (Figure 3). Depending on your settings for the handling of insulin on board, the results are displayed differently.
Display for pump users with the bolus calculator setting that insulin on board is subtracted from the correction bolus and meal bolus (method 1):1. Correction bolus: the required number of insulin units for the correction of your (blood)
glucose2. Meal bolus: the required number of insulin units for compensating the carbohydrates3. Insulin on board: the presently still acting amount of insulin based on the data of
your mylife™ YpsoPump® and manually recorded bolus administrations in your logbook4. Suggested bolus: based on the three partial results (correction bolus + meal bolus –
insulin on board), the resulting bolus suggestion is displayed.
Figure 3: Results bolus calculator for pump users (method 1: subtraction of insulin on board from correction bolus and meal bolus)
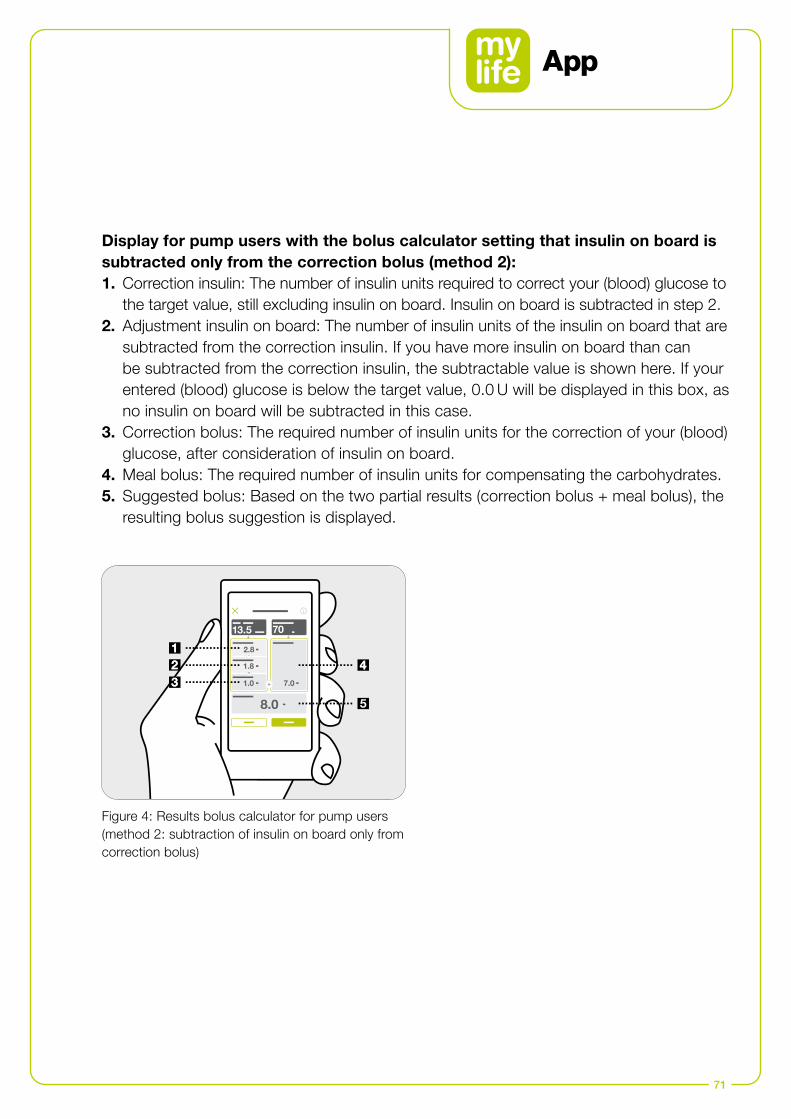
71
Display for pump users with the bolus calculator setting that insulin on board is subtracted only from the correction bolus (method 2):1. Correction insulin: The number of insulin units required to correct your (blood) glucose to
the target value, still excluding insulin on board. Insulin on board is subtracted in step 2.2. Adjustment insulin on board: The number of insulin units of the insulin on board that are
subtracted from the correction insulin. If you have more insulin on board than can be subtracted from the correction insulin, the subtractable value is shown here. If your entered (blood) glucose is below the target value, 0.0 U will be displayed in this box, as no insulin on board will be subtracted in this case.
3. Correction bolus: The required number of insulin units for the correction of your (blood) glucose, after consideration of insulin on board.
4. Meal bolus: The required number of insulin units for compensating the carbohydrates.5. Suggested bolus: Based on the two partial results (correction bolus + meal bolus), the
resulting bolus suggestion is displayed.
Figure 4: Results bolus calculator for pump users (method 2: subtraction of insulin on board only from correction bolus)
72
Bolus calculation and rounding of values:The suggested bolus, correction bolus and meal bolus are rounded down to the next 0.1 U (e.g. 2.29 U becomes 2.2 U). The bolus calculator uses the rounded values for calculations. The calculated insulin on board is rounded up to the next 0.1 U (e.g. 3.204 U becomes 3.3 U).
If the result of the bolus calculation is less than 0 U, the suggested bolus will be 0 U.
To see additional information on the bolus calculation (e.g. your current correction factor setting or your BG target value) click on the information symbol in the header of the bolus calculator screen.
By saving, your entries for (blood) glucose and/or carbohydrates are logged in the logbook. In addition, the results of the bolus suggestion calculation are saved in the background. They will be matched with these data and jointly saved with bolus delivery information at the next data import from your mylife™ YpsoPump®.
The bolus suggestion results are displayed in the logbook only if you deliver a bolus on your mylife™ YpsoPump® within 30 minutes after saving the suggestion. If a bolus is adminis-tered after these 30 minutes the bolus suggestion results are omitted. The administered bolus is displayed without bolus suggestion results due to those results being treated as expired information at the time of bolusing.
You can reset a calculation by pressing the “Reset” button. The reset button only appears after having calculated a bolus suggestion. You can leave the bolus calculator at any time via the Cancel symbol in the header.
For information on bolus dose history, please consult the insulin statistics section (see Section 6.3) and the report section (see Section 6.4) of the mylife™ App.
73
5.3 Pen users: applying the bolus calculator
The bolus calculator can only calculate the suggested insulin dose based on your entered information. If this information is incorrect or incomplete, the suggested amount of insulin may not be correct! Please also be aware that factors such as stress, activity, illness or other events which can impact the necessary amount of insulin, are not taken into account for the calculation. For your insulin on board to be included correctly into the calculation, a query is estab-lished with regard to your last bolus entry in the logbook. If the displayed bolus is in fact not your last bolus, you will be asked to enter this first via data entry. If you do not take your last bolus into account, the calculator cannot include your insulin on board. Only confirm that you would wish to calculate without insulin on board if you are abso-lutely sure that you have not delivered a bolus within the duration of insulin action. In case of a missing (blood) glucose value or missing information about previous bolus doses, the bolus suggestion is displayed with a warning statement. Please ensure that the entered values are sufficient for the calculation of the bolus suggestion in this situation.
Once you have saved the suggested bolus, you must deliver the exact same quantity with your insulin pen or syringe to ensure that the logbook entry corresponds to the actually delivered quantity of insulin.
If your measured (blood) glucose is below your set value for “Min. BG for calculation” a pop-up stating “The entered BG value is too low for a bolus calculation. Take fast- acting carbs!” will appear and the mylife™ App will not calculate a suggested bolus. Important: If your entered (blood) glucose is too low for a bolus calculation, you might be at risk of hypoglycemia.
Always check the entries for their current validity. You should use the bolus calculator within 15 minutes after measuring (blood) glucose and usually directly before a meal.
74
To calculate a bolus, you must enter a (blood) glucose value and/or a value for carbo-hydrates. As soon as you have entered one value, the “Calculate” button changes from disabled (grey) to enabled (green).
Carbohydrate values recorded in Data entry (see Section 6.1) will automatically be transferred to the carbohydrates input fields of the bolus calculator, as long as they are less than 15 minutes old.
For users without a connected Dexcom G6 Blood glucose values recorded in Data entry (see Section 6.1) or imported from a connected blood glucose meter will automatically be transferred to the (blood) glucose input fields of the bolus calculator, as long as they are less than 15 minutes old.
For users with a connected Dexcom G6 Glucose values are transferred to the glucose input field only if a trend arrow and a sensor reading are available. The mylife™ App will inform you in a pop-up of the current trend and reading and let you choose between accepting the current reading or manually entering a value yourself.
When G6 glucose readings are transferred to the bolus calculator, only the current glucose value is used to calculate the correction bolus. The trend arrow is not taken into account in the suggestion calculation. Speak with your healthcare professional for recommendations on how best to utilise the trend arrows for your correction bolus calculation.
When using a connected G6, the bolus calculator will only use G6 glucose values or manually entered blood glucose values as input. Any previously logged glucose values in Data entry or values imported from a connected blood glucose meter will not be transferred to the bolus calculator. Current blood glucose values need to be entered manually by the user.
For users with a connected Dexcom G6: Mind that the value displayed in the glucose input field in the bolus calculator may automatically update with a more recent CGM reading from your G6, even while you are using the bolus calculator.

75
If you are using a connected Dexcom G6 the glucose input field of the bolus calculator displays your current glucose trend with respective arrows. The following table provides an overview:
Table 5: G6 trend display in bolus calculator
Glucose trend from Dexcom G6
Glucose trend information on “Last values” screen
Glucose trend information in the bolus calculator (glucose input field)
Slowly fallingGlucose
FallingGlucose
Rapidly fallingGlucose
SteadyGlucose
No arrowGlucose
Slowly risingGlucose
RisingGlucose
Rapidly risingGlucose
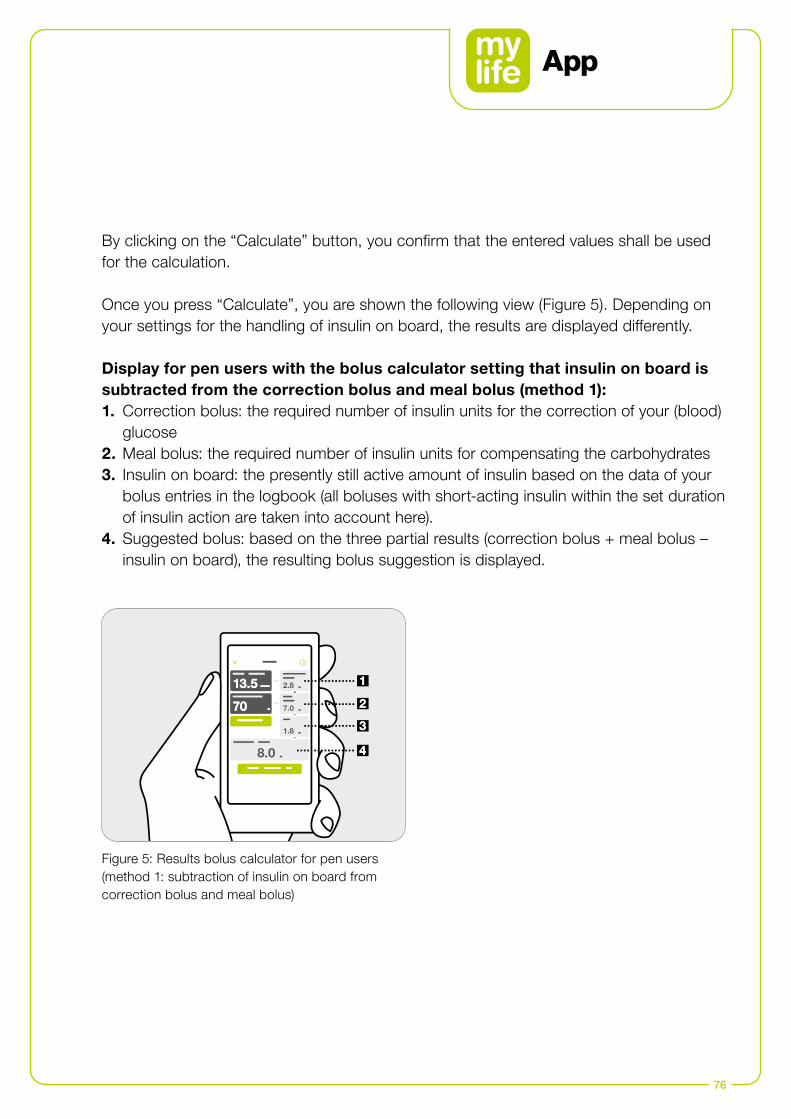
76
By clicking on the “Calculate” button, you confirm that the entered values shall be used for the calculation.
Once you press “Calculate”, you are shown the following view (Figure 5). Depending on your settings for the handling of insulin on board, the results are displayed differently.
Display for pen users with the bolus calculator setting that insulin on board is subtracted from the correction bolus and meal bolus (method 1):1. Correction bolus: the required number of insulin units for the correction of your (blood)
glucose2. Meal bolus: the required number of insulin units for compensating the carbohydrates3. Insulin on board: the presently still active amount of insulin based on the data of your
bolus entries in the logbook (all boluses with short-acting insulin within the set duration of insulin action are taken into account here).
4. Suggested bolus: based on the three partial results (correction bolus + meal bolus – insulin on board), the resulting bolus suggestion is displayed.
Figure 5: Results bolus calculator for pen users (method 1: subtraction of insulin on board from correction bolus and meal bolus)

77
Once you press “Calculate”, you are shown the following view (Figure 6). Depending on your settings for the handling of insulin on board, the results are displayed differently.
Display for pen users with the bolus calculator setting that insulin on board is subtracted only from the correction bolus (method 2):1. Correction insulin: The number of insulin units required to correct your (blood) glucose to
the target value, still excluding insulin on board. Insulin on board is subtracted in step 2.2. Adjustment insulin on board: The number of insulin units of the insulin on board that are
subtracted from the correction insulin. If you have more insulin on board than can be subtracted from the correction insulin, the subtractable value is shown here. If your entered (blood) glucose is below the target value, 0.0 U will be displayed in this box, as no insulin on board will be subtracted in this case.
3. Correction bolus: The required number of insulin units for the correction of your (blood) glucose, after consideration of insulin on board.
4. Meal bolus: The required number of insulin units for compensating the carbohydrates.5. Suggested bolus: Based on the two partial results (correction bolus + meal bolus), the
resulting bolus suggestion is displayed.
Figure 6: Results bolus calculator for pen users (method 2: subtraction of insulin on board only from correction bolus)
78
Bolus calculation and rounding of values:Adjust the suggested dose to the exact dose that you intend to administer by tapping down ( ) or up ( ). This is important for insulin on board calculation and record-keeping in your logbook.
The suggested bolus, correction bolus and meal bolus are rounded down to the next 0.1 U (e.g. 2.29 U becomes 2.2 U). The bolus calculator uses the rounded values for calculations. The calculated insulin on board is rounded up to the next 0.1 U (e.g. 3.204 U becomes 3.3 U).
If the result of the bolus calculation is less than 0 U, the suggested bolus will be 0 U.
To see additional information on the bolus calculation (e.g. your current correction factor setting or your BG target value) click on the information symbol in the header of the bolus calculator screen.
By saving, your entries (blood) glucose and/or carbohydrates are logged in the logbook. In addition, the results of the bolus suggestion calculation are saved in the background. There is also a choice to save only the (blood) glucose and/or carbohydrates if at this moment no bolus shall be administered.
You can reset a calculation by pressing the “Reset” button. The reset button only appears after having calculated a bolus suggestion. You can leave the bolus calculator at any time via the Cancel symbol in the header.
For information on bolus dose history, please consult the insulin statistics section (see Section 6.3) and the report section (see Section 6.4) of the mylife™ App.
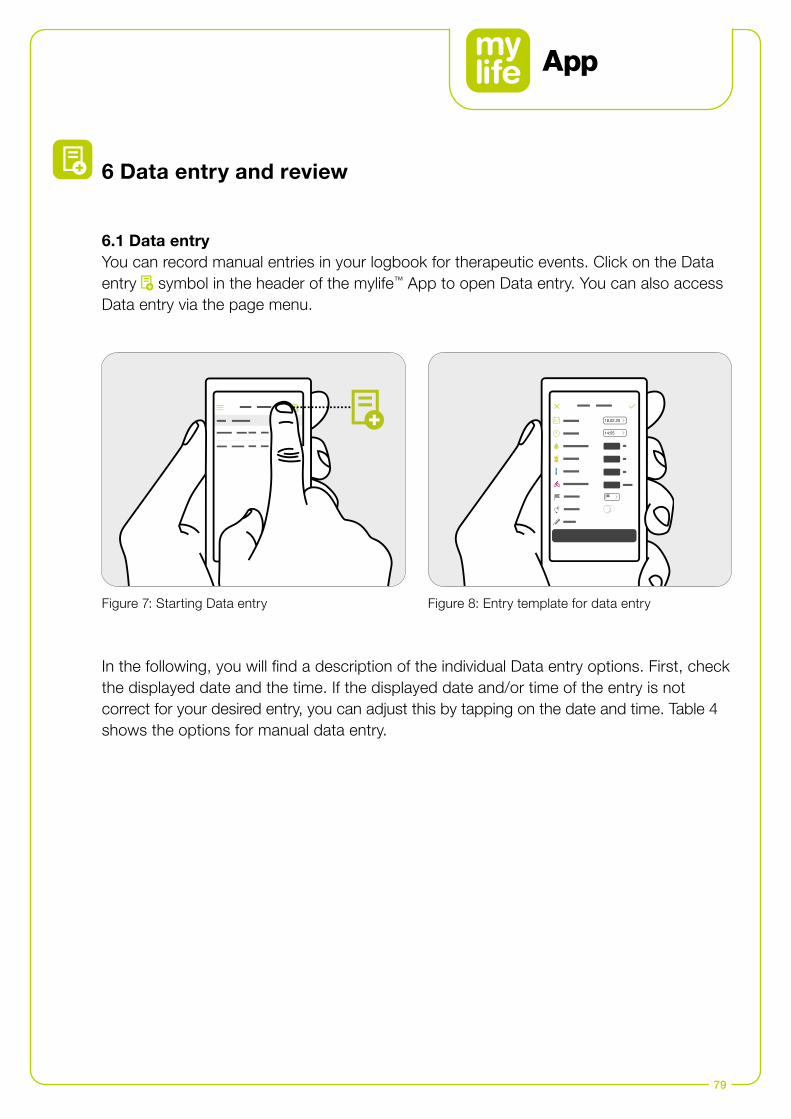
14:55
18.02.20
79
6.1 Data entryYou can record manual entries in your logbook for therapeutic events. Click on the Data entry symbol in the header of the mylife™ App to open Data entry. You can also access Data entry via the page menu.
In the following, you will find a description of the individual Data entry options. First, check the displayed date and the time. If the displayed date and/or time of the entry is not correct for your desired entry, you can adjust this by tapping on the date and time. Table 4 shows the options for manual data entry.
Figure 7: Starting Data entry Figure 8: Entry template for data entry
6 Data entry and review
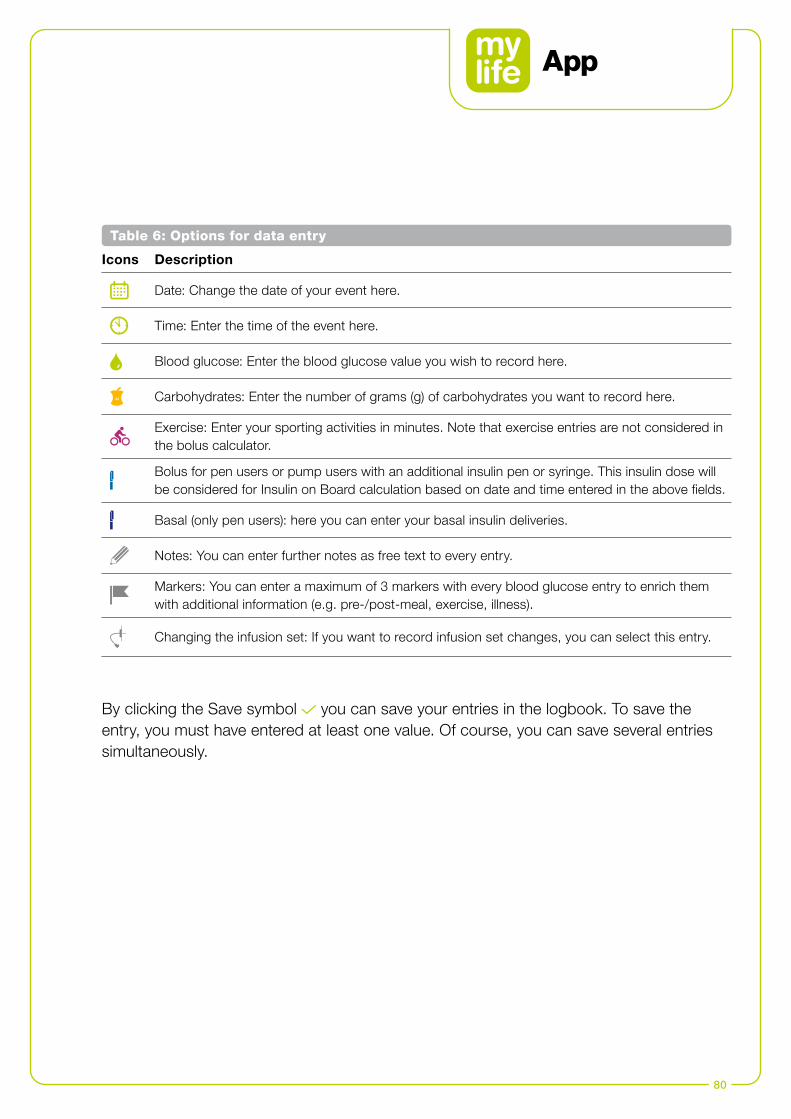
80
Icons Description
Date: Change the date of your event here.
Time: Enter the time of the event here.
Blood glucose: Enter the blood glucose value you wish to record here.
Carbohydrates: Enter the number of grams (g) of carbohydrates you want to record here.
Exercise: Enter your sporting activities in minutes. Note that exercise entries are not considered in the bolus calculator.
Bolus for pen users or pump users with an additional insulin pen or syringe. This insulin dose will be considered for Insulin on Board calculation based on date and time entered in the above fields.
Basal (only pen users): here you can enter your basal insulin deliveries.
Notes: You can enter further notes as free text to every entry.
Markers: You can enter a maximum of 3 markers with every blood glucose entry to enrich them with additional information (e.g. pre-/post-meal, exercise, illness).
Changing the infusion set: If you want to record infusion set changes, you can select this entry.
Table 6: Options for data entry
By clicking the Save symbol you can save your entries in the logbook. To save the entry, you must have entered at least one value. Of course, you can save several entries simultaneously.
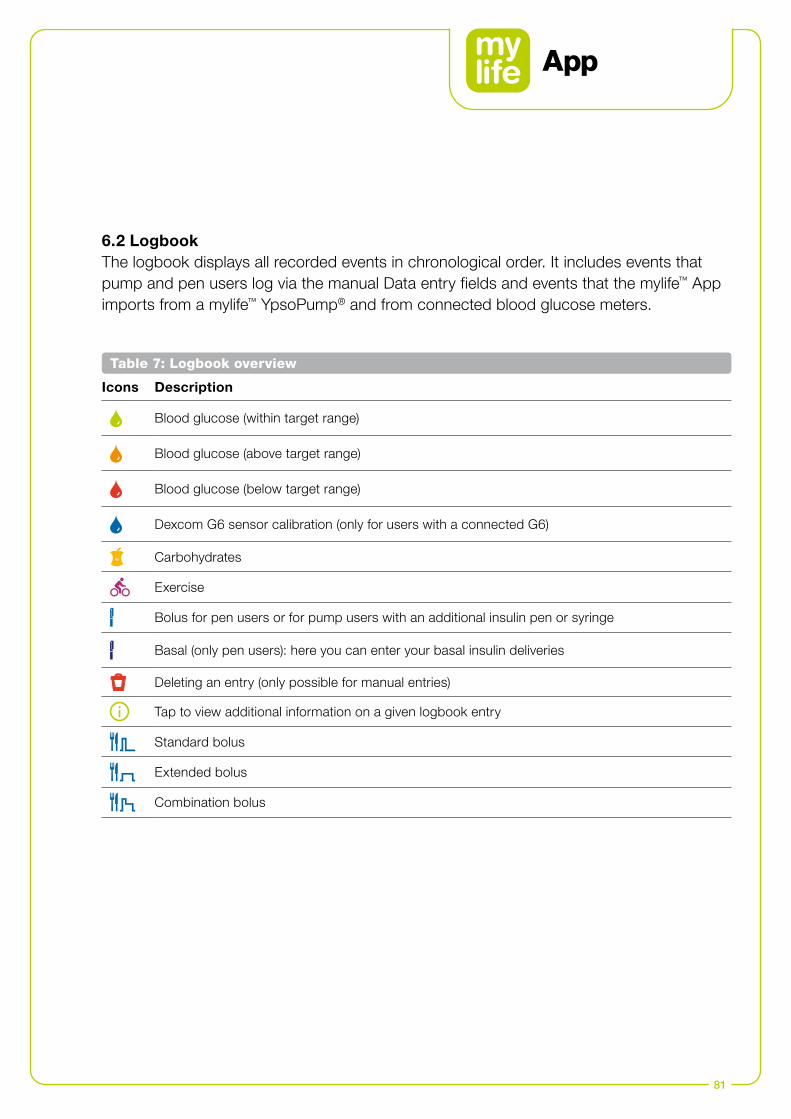
81
Icons Description
Blood glucose (within target range)
Blood glucose (above target range)
Blood glucose (below target range)
Dexcom G6 sensor calibration (only for users with a connected G6)
Carbohydrates
Exercise
Bolus for pen users or for pump users with an additional insulin pen or syringe
Basal (only pen users): here you can enter your basal insulin deliveries
Deleting an entry (only possible for manual entries)
Tap to view additional information on a given logbook entry
Standard bolus
Extended bolus
Combination bolus
Table 7: Logbook overview
6.2 LogbookThe logbook displays all recorded events in chronological order. It includes events that pump and pen users log via the manual Data entry fields and events that the mylife™ App imports from a mylife™ YpsoPump® and from connected blood glucose meters.
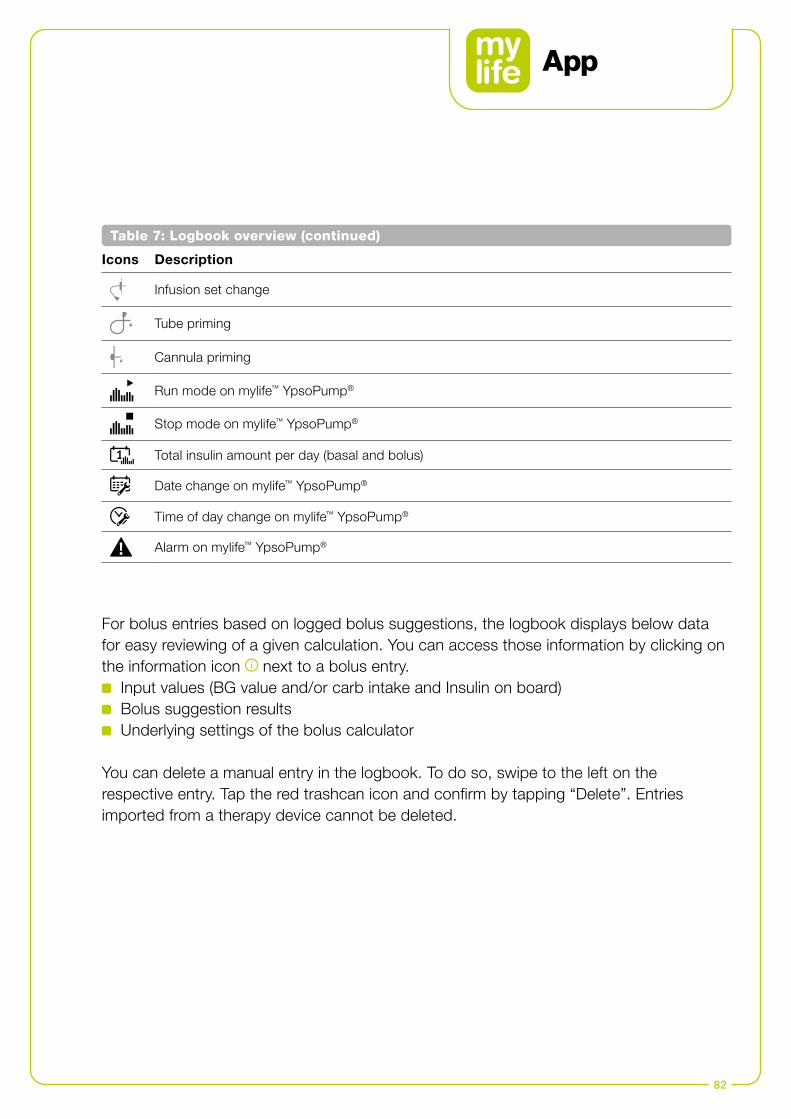
82
Icons Description
Infusion set change
Tube priming
Cannula priming
Run mode on mylife™ YpsoPump®
Stop mode on mylife™ YpsoPump®
Total insulin amount per day (basal and bolus)
Date change on mylife™ YpsoPump®
Time of day change on mylife™ YpsoPump®
Alarm on mylife™ YpsoPump®
Table 7: Logbook overview (continued)
For bolus entries based on logged bolus suggestions, the logbook displays below data for easy reviewing of a given calculation. You can access those information by clicking on the information icon next to a bolus entry.
Input values (BG value and/or carb intake and Insulin on board) Bolus suggestion results Underlying settings of the bolus calculator
You can delete a manual entry in the logbook. To do so, swipe to the left on the respective entry. Tap the red trashcan icon and confirm by tapping “Delete”. Entries imported from a therapy device cannot be deleted.
83
6.3 Statistics
(Blood) glucose statisticsHere you can see your (blood) glucose readings displayed as a percentage distribution in a ring diagram (within your target range, above your target range or below your target range, as defined in the Therapy settings of the mylife™ App).
For users with a connected Dexcom G6: Your CGM values are evaluated acc. to the target range as set in the therapy
settings of the mylife™ App. The target range may differ from your G6 target zone. In the mylife™ App CGM statistics are available for a maximum of 3 months data
history.
Insulin statisticsThis shows the amount of insulin you have delivered in different colour codes for Bolus (blue) and Basal (purple) as percentage distribution in a ring diagram and in absolute units for the selected time frame.
84
Standard dayThe standard day displays the course of the blood glucose values measured in a 24-hour period as a graph. To this end, all blood glucose values from the selected time period are plotted on a 24-hour day axis. The white area is your target blood glucose range.
All values within the target range are shown in green. All values higher than the target range are shown in orange. Values lower than the target range are shown in red. Values above the dotted line are in the hyperglycemia range. Values below the dotted line are in the hypoglycemia range.
All statistics can be shown for the following time frames: Today Yesterday Last 7 days Last month Last 3 months Last 6 months Custom time frame
For users with a connected Dexcom G6: standard day statistics are not provided.
85
6.4 PDF reportThe mylife™ App allows you to create standardised reports in PDF format. The reporting tool covers the following:
(Blood) glucose statistics Insulin statistics Bolus calculator settings. Additionally for pump users: bolus and basal rate
settings of your mylife™ YpsoPump®
Weekly overview with logged events
To create a report, first select your desired time frame. The following time frames are available:
Today Yesterday Last 7 days Last month Last 3 months Last 6 months Custom time frame
Then, press the Export button in order to create the report. Once it is created, you may use the standard operating system functionalities of your smartphone to save or share the report.
For users with a connected Dexcom G6: Your CGM values are evaluated acc. to the target range set in the therapy
settings of the mylife™ App. The target range may differ from your G6 target zone. In the mylife™ App CGM statistics are available for a maximum of 3 months data
history.
86
7 Profiles and accounts
7.1 Creating an initial user profile in the mylife™ App The mylife™ App can be used with or without a mylife™ Cloud account. The mylife™ Cloud is used for data storage and data exchange, it does not support calculation of bolus suggestions. If you choose to connect your mylife™ Cloud account, your data from your mylife™ App will synchronise with your mylife™ Cloud account. If you choose to use the mylife™ App without connecting to a mylife™ Cloud account, your data will be stored locally on your smartphone and you will not be able to access your data from elsewhere.
Continue without account Follow the mylife™ App setup wizard without creating a mylife™ Cloud account. If you change your mind, you can log in to a mylife™ Cloud account later through Settings ➔ Personal Data.
Create account Create a new mylife™ Cloud account and start your mylife™ App with your new mylife™ Cloud account.
Log in to existing account Set up your mylife™ App with your existing mylife™ Cloud account.
7.2 Creating an additional profile
Make sure the desired user profile is active for every use. The unintended use of an incorrect user profile can lead to falsified therapeutic data and to an incorrect bolus suggestion.
To create an additional profile go to: Settings ➔ Personal data ➔ Create new profileYou can create a maximum of 10 profiles.
87
7.3 Deleting a profileTo delete a profile go to: Settings ➔ Personal data ➔ Delete profile.
Note that deleting a profile will remove all of the information and therapy data stored locally in the mylife™ App on the smartphone. If you have a mylife™ Cloud account to which you synchronise those data, you may download and re-synchronise those data later after re-installation of the mylife™ App. If you also want to delete your account and therapy data in the mylife™ Cloud, you must separately delete your cloud account there.
7.4 Logging in to mylife™ CloudTo log in to a mylife™ Cloud account go to: Settings ➔ Personal data ➔ Sign in.
Email address: The email address associated with your mylife™ Cloud account Password: Your mylife™ Cloud account passwordKeep me logged in: Activate this if you would like to stay logged in.
88
8Devicemanagement
Please note: the Bluetooth® pairing with compatible devices should always be made in a private, non-public place in order to minimise the possibility of third-parties surveilling the Bluetooth® encryption of the connection.
8.1Bluetooth®-pairing of your mylife™ YpsoPump®
Please refer to the mylife™ YpsoPump® user guide for information on how to switch on the Bluetooth® function and how to activate the Bluetooth® pairing in the mylife™ YpsoPump®.
The following options exist for pairing a mylife™ YpsoPump® with the mylife™ App: You can pair the mylife™ YpsoPump® in the setup wizard after saving your Therapy
settings. Ensure that the Bluetooth® on the smartphone is switched on, and that the Bluetooth® connection and the Bluetooth® pairing in the mylife™ YpsoPump® are active.
You can also pair the mylife™ YpsoPump® at a later stage via the Device management section in the settings of the mylife™ App. Here too, the Bluetooth® on the smartphone must be switched on and the Bluetooth® connection and Bluetooth® pairing in the mylife™ YpsoPump® are to be active.
During this process the mylife™ App will prompt you to select your mylife™ YpsoPump® by its serial number. You can find this on the bottom of the pump with the designation “SN”. Once you have selected the pump, the display of the pump will show a 6-digit combination of numbers (Bluetooth® pairing code). You must enter and confirm this combination in the mylife™ App. Once you have confirmed the combination, the pump will vibrate once to indicate that the pump is paired with the app. You will now see your mylife™ YpsoPump® listed in the Device Management section of the mylife™ App.
The mylife™ YpsoPump® and the mylife™ App are now paired and connected with each other.
89
8.2Bluetooth®-pairing of your compatible mylife™ blood glucose metersPlease refer to the user guides of your mylife™ Unio™ Neva, mylife™ Unio™ Cara or mylife Aveo™ for information on how to switch on the Bluetooth® function and how to activate the Bluetooth® pairing on those devices.
The following options exist for pairing a mylife™ blood glucose meter with the mylife™ App:
In the setup wizard of the mylife™ App you can set up the blood glucose meter. Make sure that Bluetooth® is activated on the smartphone and that the Bluetooth® pairing in the blood glucose meter is switched on.
You can also pair the blood glucose meter later via the Device management section in the mylife™ App settings. Here too, Bluetooth® must be activated on the smartphone and the Bluetooth® pairing in the blood glucose meter must be switched on.
During the process, you will be prompted to select the serial number of the blood glucose meter. You can find it in the meter’s battery compartment or on its device label. After you have selected the meter, a 6-digit number combination will appear on the blood glucose meter display. This must be entered and confirmed in the mylife™ App.
The blood glucose meter and the mylife™ App are now connected to each other.
In the next step, the time and date are automatically written from your smartphone to the blood glucose meter. In addition, the blood glucose target range between your mylife™ App and the blood glucose meter will also be synchronised. For the blood glucose target range, you have the choice of either synchronising from the blood glucose meter to the mylife™ App or vice versa. Follow the corresponding instructions in the mylife™ App.
Note on market availability: mylife™ Unio™ Neva, mylife™ Unio™ Cara and mylife Aveo™ are available depending on country. Please inquire with your local mylife™ Diabetescare customer service if you are interested in knowing more.
90
8.3SettingupyourDexcomG6
To start the process of setting up your mylife™ App with a Dexcom G6, go to Settings ➔ Device Management and tap “Add Dexcom G6”.
Now follow the on-screen instructions. The setup wizard will guide you through the process step by step.
The following chapter provides instructions on how to set up and connect your mylife™ App with your Dexcom G6.
Please refer to the “Start Here” guide of the Dexcom G6 CGM System to learn more about sensor applicator, transmitter and the Dexcom display device called “Receiver” and how to insert the sensor and attach the transmitter.
Refer to dexcom.com/downloadsandguides.
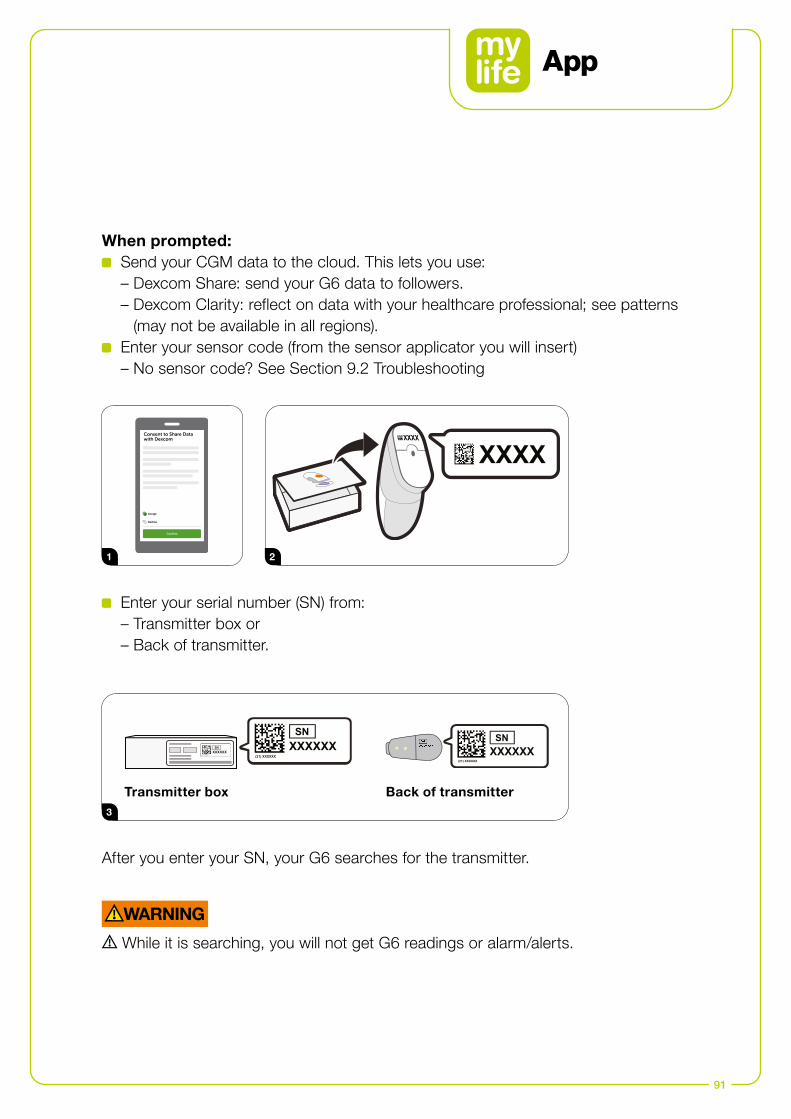
91
When prompted: Send your CGM data to the cloud. This lets you use:
– Dexcom Share: send your G6 data to followers. – Dexcom Clarity: reflect on data with your healthcare professional; see patterns
(may not be available in all regions). Enter your sensor code (from the sensor applicator you will insert)
– No sensor code? See Section 9.2 Troubleshooting
Accept
Decline
Consent to Share Data with Dexcom
Confirm
Transmitter box Back of transmitter
1
3
2
After you enter your SN, your G6 searches for the transmitter.
While it is searching, you will not get G6 readings or alarm/alerts.
Enter your serial number (SN) from: – Transmitter box or – Back of transmitter.
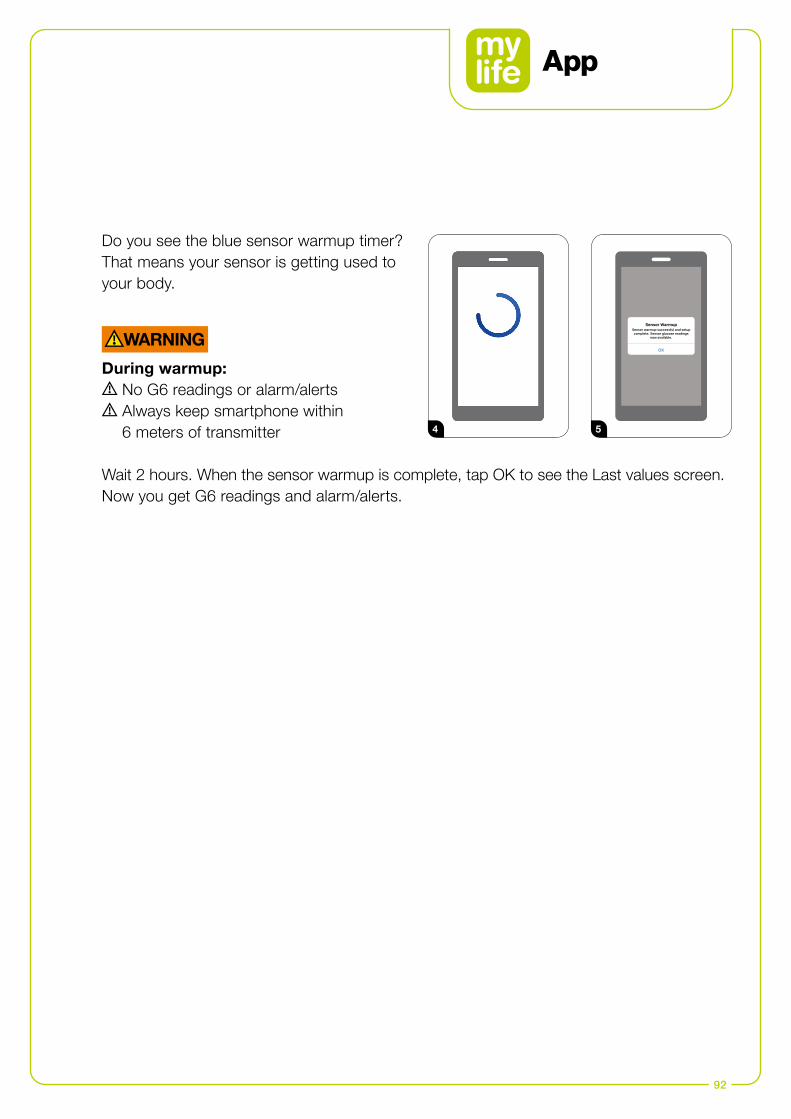
92
Do you see the blue sensor warmup timer? That means your sensor is getting used to your body.
During warmup: No G6 readings or alarm/alerts Always keep smartphone within 6 meters of transmitter
Wait 2 hours. When the sensor warmup is complete, tap OK to see the Last values screen. Now you get G6 readings and alarm/alerts.
Sensor WarmupSensor warmup successful and setup complete. Sensor glucose readings
now available.
OK
4 5
93
9 Troubleshooting
9.1 mylife™ App in generalIf you have questions regarding the mylife™ App, if an error occurs when using the mylife™ App or if something does not work, please contact your local Ypsomed distributor. You can also contact your distributor for a printed version of this User Guide or download it from our website. A printed version will be delivered within 7 workdays after receiving your request. The contact information can be found in the mylife™ App menu under “About” and in section 12 of this User Guide.
Should you experience technical issues with the mylife™ App, you may send an anonymised log report with condensated information from the mylife™ App’s About menu to our support organisation. To do so, please go to the About menu and press “Send support info” on the bottom of the page. The system will generate and display a support ticket number. Please note down your support ticket number, contact your local Ypsomed distributor and let them know about your issue and the ticket number.
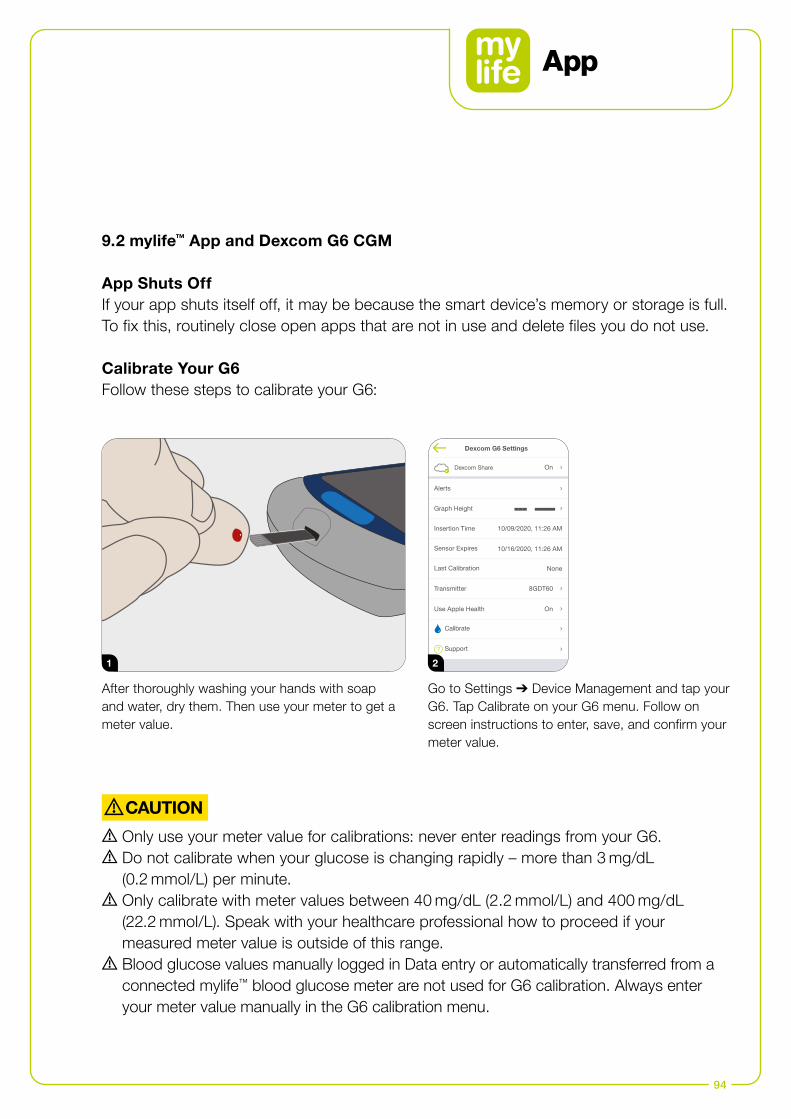
94
9.2 mylife™ App and Dexcom G6 CGM
App Shuts OffIf your app shuts itself off, it may be because the smart device’s memory or storage is full. To fix this, routinely close open apps that are not in use and delete files you do not use.
Calibrate Your G6Follow these steps to calibrate your G6:
Only use your meter value for calibrations: never enter readings from your G6. Do not calibrate when your glucose is changing rapidly – more than 3 mg/dL (0.2 mmol/L) per minute.
Only calibrate with meter values between 40 mg/dL (2.2 mmol/L) and 400 mg/dL (22.2 mmol/L). Speak with your healthcare professional how to proceed if your measured meter value is outside of this range.
Blood glucose values manually logged in Data entry or automatically transferred from a connected mylife™ blood glucose meter are not used for G6 calibration. Always enter your meter value manually in the G6 calibration menu.
After thoroughly washing your hands with soap and water, dry them. Then use your meter to get a meter value.
Dexcom G6 Settings
Dexcom Share
Alerts
Graph Height
Insertion Time
Sensor Expires
Last Calibration
Transmitter
Use Apple Health
Stop Sensor
300 mg/dL
On
10/09/2020, 11:26 AM
10/16/2020, 11:26 AM
None
8GDT60
On
Calibrate
Support
Go to Settings ➔ Device Management and tap your G6. Tap Calibrate on your G6 menu. Follow on screen instructions to enter, save, and confirm your meter value.
1 2
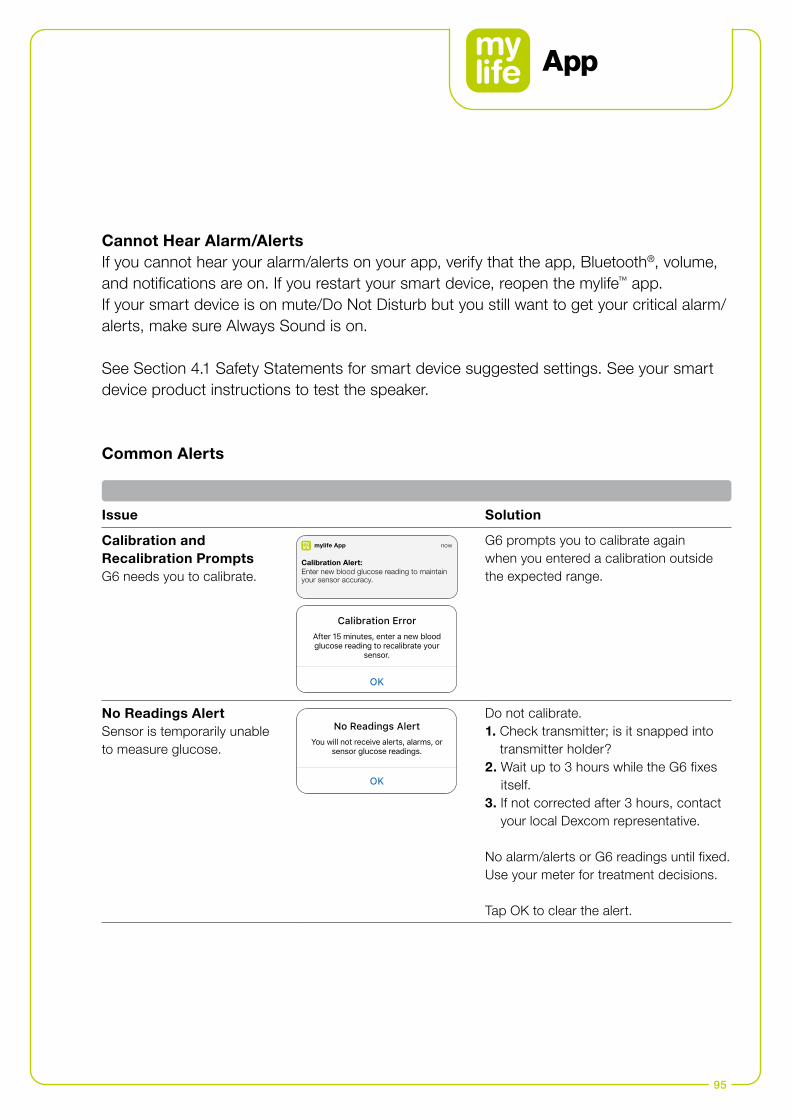
95
Cannot Hear Alarm/AlertsIf you cannot hear your alarm/alerts on your app, verify that the app, Bluetooth®, volume, and notifications are on. If you restart your smart device, reopen the mylife™ app. If your smart device is on mute/Do Not Disturb but you still want to get your critical alarm/alerts, make sure Always Sound is on.
See Section 4.1 Safety Statements for smart device suggested settings. See your smart device product instructions to test the speaker.
Issue Solution
Calibration and Recalibration PromptsG6 needs you to calibrate.
Calibration Alert:Enter new blood glucose reading to maintain your sensor accuracy.
mylife App now
Calibration ErrorAfter 15 minutes, enter a new blood glucose reading to recalibrate your
sensor.
OK
G6 prompts you to calibrate again when you entered a calibration outside the expected range.
No Readings AlertSensor is temporarily unable to measure glucose.
No Readings AlertYou will not receive alerts, alarms, or
sensor glucose readings.
OK
Do not calibrate.1. Check transmitter; is it snapped into
transmitter holder?2. Wait up to 3 hours while the G6 fixes
itself.3. If not corrected after 3 hours, contact
your local Dexcom representative.
No alarm/alerts or G6 readings until fixed. Use your meter for treatment decisions.
Tap OK to clear the alert.
Common Alerts
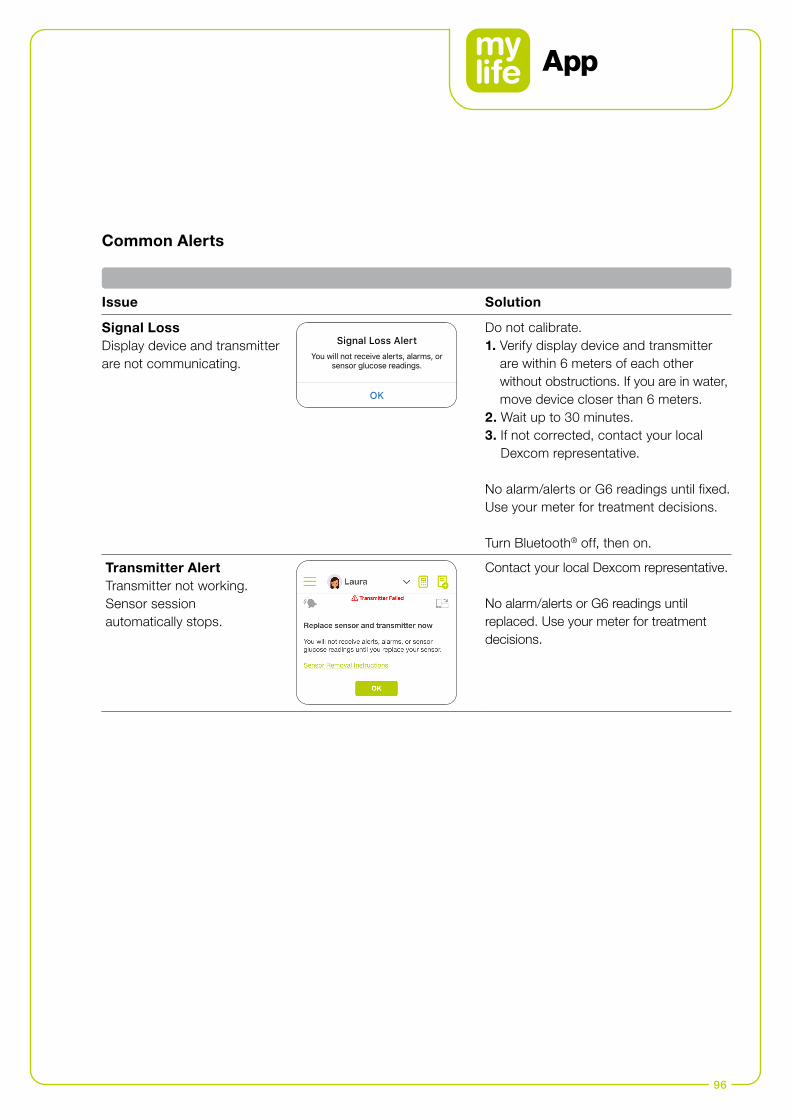
96
Issue Solution
Signal LossDisplay device and transmitter are not communicating.
Signal Loss AlertYou will not receive alerts, alarms, or
sensor glucose readings.
OK
Do not calibrate.1. Verify display device and transmitter
are within 6 meters of each other without obstructions. If you are in water, move device closer than 6 meters.
2. Wait up to 30 minutes.3. If not corrected, contact your local
Dexcom representative.
No alarm/alerts or G6 readings until fixed. Use your meter for treatment decisions.
Turn Bluetooth® off, then on.
Transmitter AlertTransmitter not working. Sensor session automatically stops.
Contact your local Dexcom representative.
No alarm/alerts or G6 readings until replaced. Use your meter for treatment decisions.
Common Alerts
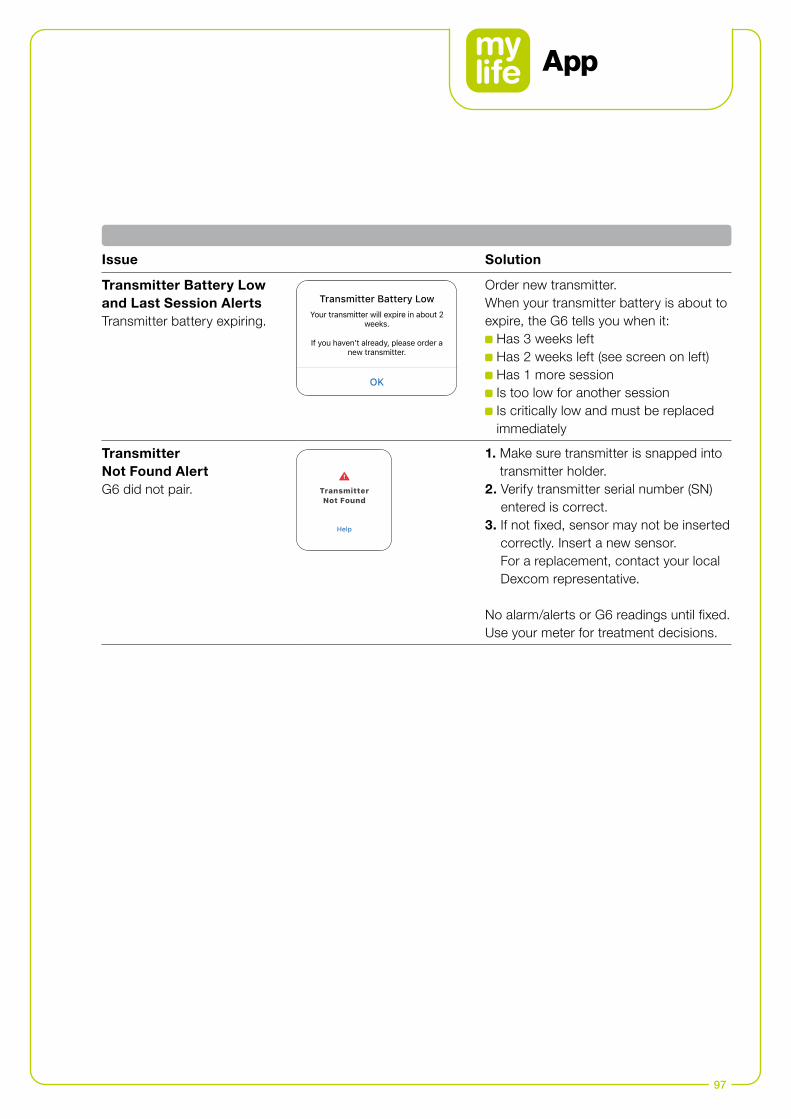
97
Issue Solution
Transmitter Battery Low and Last Session AlertsTransmitter battery expiring.
Transmitter Battery LowYour transmitter will expire in about 2
weeks.
If you haven’t already, please order a new transmitter.
OK
Order new transmitter.When your transmitter battery is about to expire, the G6 tells you when it:
Has 3 weeks left Has 2 weeks left (see screen on left) Has 1 more session Is too low for another session Is critically low and must be replaced immediately
Transmitter Not Found AlertG6 did not pair.
Help
Transmitter Not Found
1. Make sure transmitter is snapped into transmitter holder.
2. Verify transmitter serial number (SN) entered is correct.
3. If not fixed, sensor may not be inserted correctly. Insert a new sensor. For a replacement, contact your local Dexcom representative.
No alarm/alerts or G6 readings until fixed. Use your meter for treatment decisions.
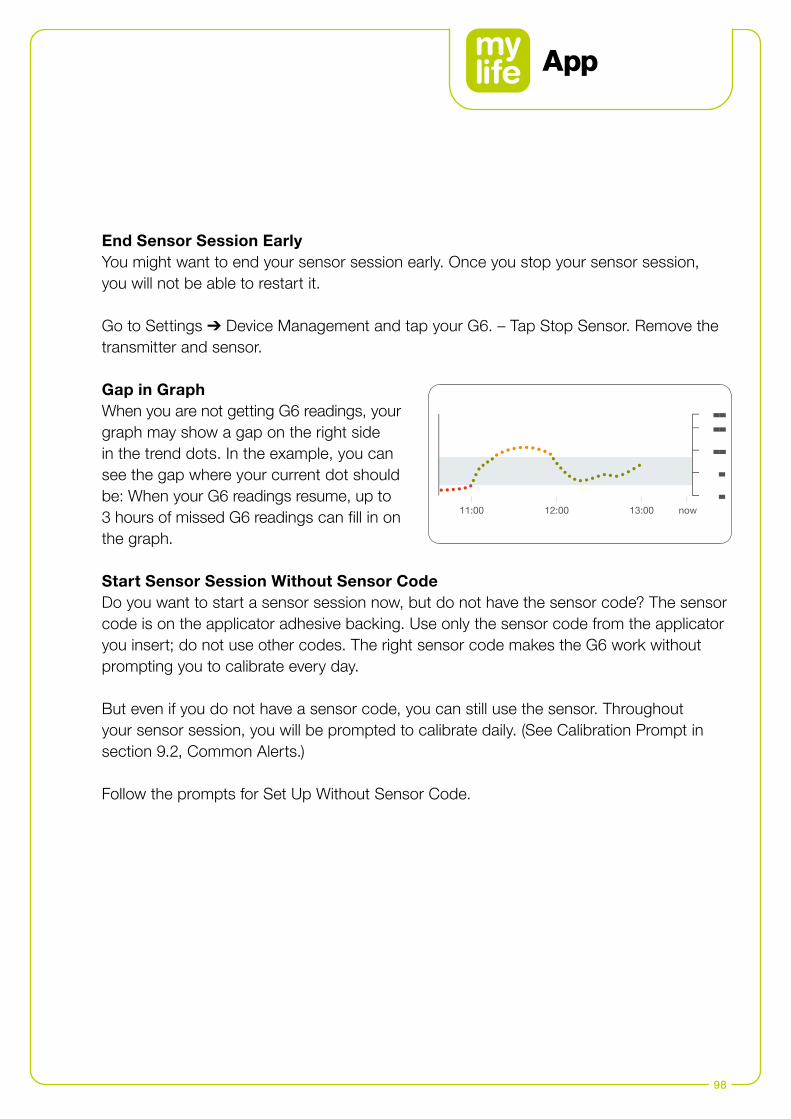
98
End Sensor Session EarlyYou might want to end your sensor session early. Once you stop your sensor session, you will not be able to restart it.
Go to Settings ➔ Device Management and tap your G6. – Tap Stop Sensor. Remove the transmitter and sensor.
Gap in GraphWhen you are not getting G6 readings, your graph may show a gap on the right side in the trend dots. In the example, you can see the gap where your current dot should be: When your G6 readings resume, up to 3 hours of missed G6 readings can fill in on the graph.
Start Sensor Session Without Sensor CodeDo you want to start a sensor session now, but do not have the sensor code? The sensor code is on the applicator adhesive backing. Use only the sensor code from the applicator you insert; do not use other codes. The right sensor code makes the G6 work without prompting you to calibrate every day.
But even if you do not have a sensor code, you can still use the sensor. Throughout your sensor session, you will be prompted to calibrate daily. (See Calibration Prompt in section 9.2, Common Alerts.)
Follow the prompts for Set Up Without Sensor Code.
Laura
mylife Cloud
mylife YpsoPump
55 g U6.0
0.90 U/h U
Last bolusLast carbohydrates
Current basal rate Insulin on board1:00 PM – 2:00 PM
connected
10.14.2020 1:30 PM
Dexcom Share
10.14.2020 11:47 AM10.14.2020 11:43 AM
4.1
Dexcom CGM Data
Signal Loss
Help
now
16
2
14
6
10
11:00 12:00 13:00
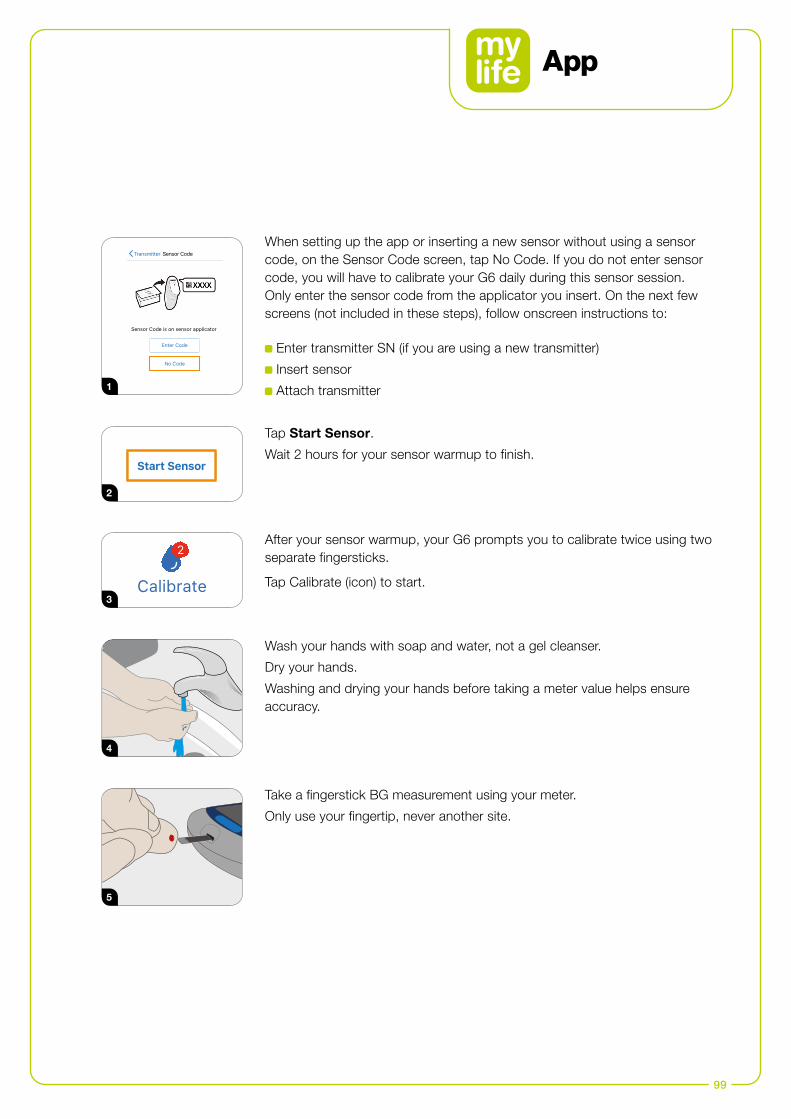
99
Transmitter
Enter Code
No Code
Sensor Code
Sensor Code is on sensor applicator
Start Sensor
Calibrate
2
1
2
3
4
When setting up the app or inserting a new sensor without using a sensor code, on the Sensor Code screen, tap No Code. If you do not enter sensor code, you will have to calibrate your G6 daily during this sensor session. Only enter the sensor code from the applicator you insert. On the next few screens (not included in these steps), follow onscreen instructions to:
Enter transmitter SN (if you are using a new transmitter)
Insert sensor
Attach transmitter
Tap Start Sensor.
Wait 2 hours for your sensor warmup to finish.
After your sensor warmup, your G6 prompts you to calibrate twice using two separate fingersticks.
Tap Calibrate (icon) to start.
Wash your hands with soap and water, not a gel cleanser.
Dry your hands.
Washing and drying your hands before taking a meter value helps ensure accuracy.
5
Take a fingerstick BG measurement using your meter.
Only use your fingertip, never another site.
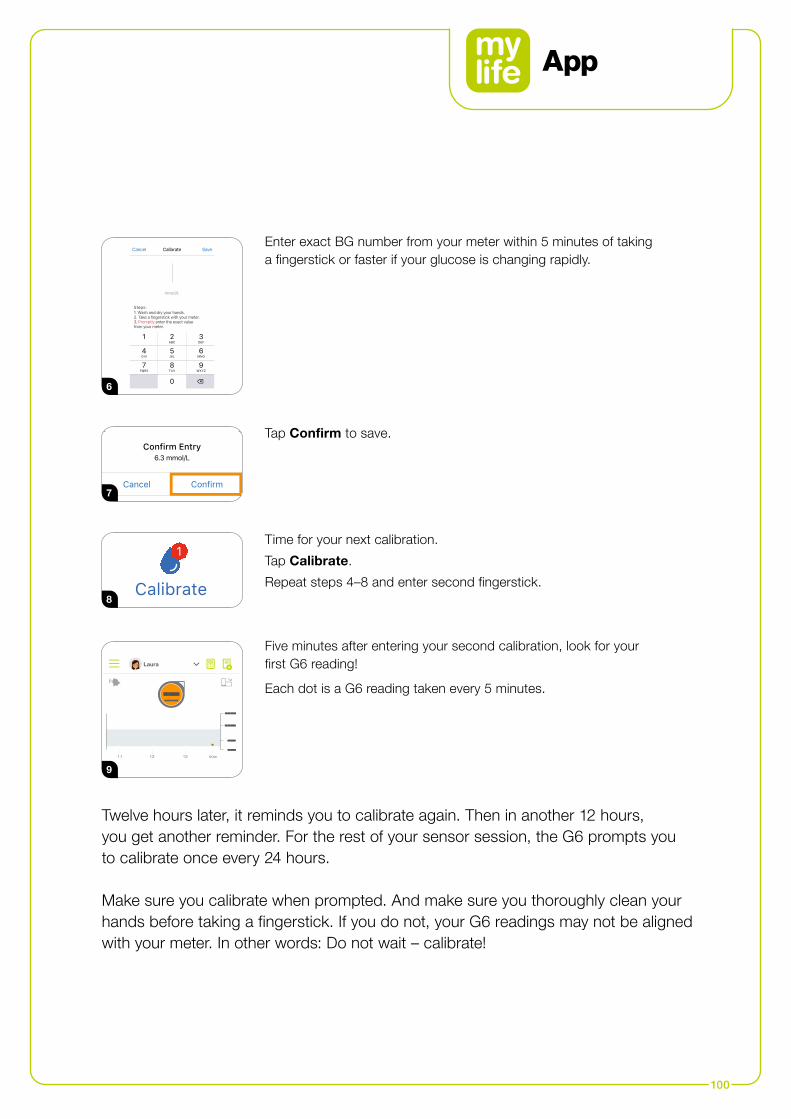
100
Enter exact BG number from your meter within 5 minutes of taking a fingerstick or faster if your glucose is changing rapidly.
Five minutes after entering your second calibration, look for your first G6 reading!
Each dot is a G6 reading taken every 5 minutes.
mmol/L
Steps:1. Wash and dry your hands.2. Take a fingerstick with your meter.3. Promptly enter the exact value from your meter.
7PQRS
9WXYZ
8TUV
0
4GHI
6MNO
5JKL
1 3DEF
2ABC
Cancel SaveCalibrate
Laura
9.5
mmol/L
mylife Cloud
mylife YpsoPump
55 g U6.0
0.90 U/h U
Last bolusLast carbohydrates
Current basal rate Insulin on board13:00 – 14:00
connected
10.14.2020 13:30
Dexcom Share
10.14.2020 11:4710.14.2020 11:43
4.1
11
Dexcom CGM Data
16.6
11.0
12 13 now
7.0
2.0
6
9
Cancel Confirm
Confirm Entry6.3 mmol/L
Calibrate
1
7
8
Tap Confirm to save.
Time for your next calibration.
Tap Calibrate.
Repeat steps 4–8 and enter second fingerstick.
Twelve hours later, it reminds you to calibrate again. Then in another 12 hours, you get another reminder. For the rest of your sensor session, the G6 prompts you to calibrate once every 24 hours.
Make sure you calibrate when prompted. And make sure you thoroughly clean your hands before taking a fingerstick. If you do not, your G6 readings may not be aligned with your meter. In other words: Do not wait – calibrate!
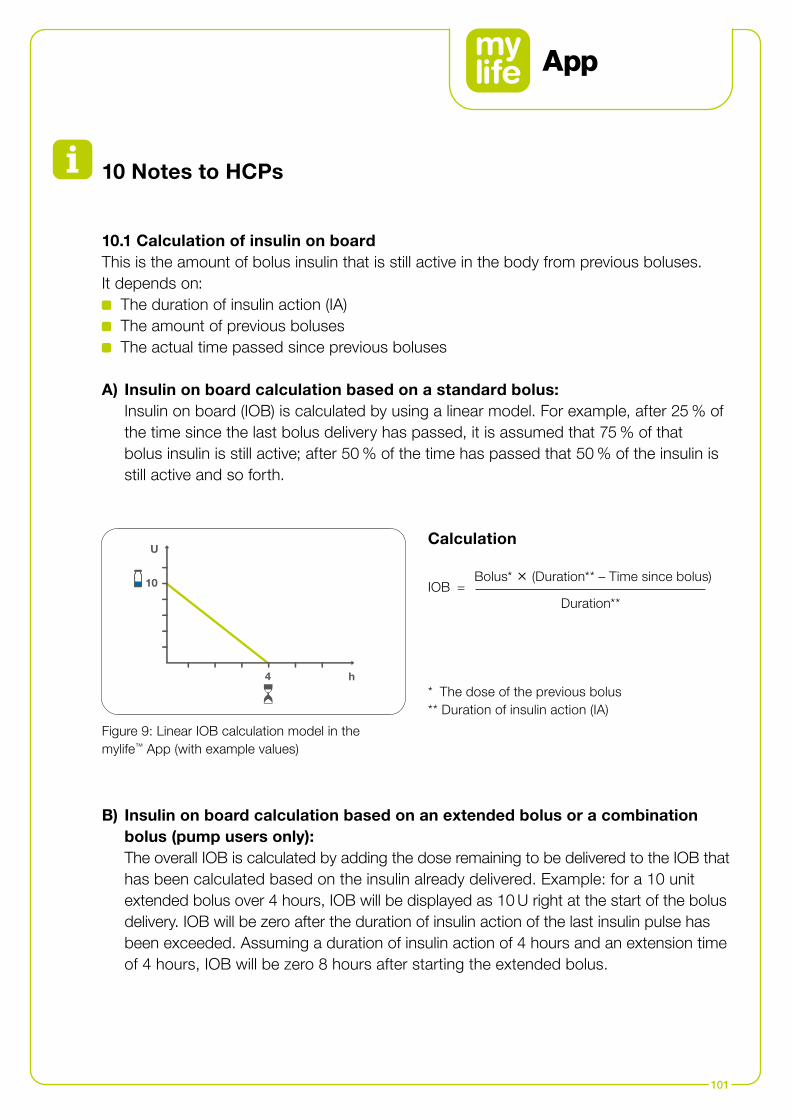
h
10
4
U
101
10 Notes to HCPs
10.1 Calculation of insulin on boardThis is the amount of bolus insulin that is still active in the body from previous boluses. It depends on:
The duration of insulin action (IA) The amount of previous boluses The actual time passed since previous boluses
A) Insulin on board calculation based on a standard bolus: Insulin on board (IOB) is calculated by using a linear model. For example, after 25 % of the time since the last bolus delivery has passed, it is assumed that 75 % of that bolus insulin is still active; after 50 % of the time has passed that 50 % of the insulin is still active and so forth.
IOB = Bolus* Î (Duration** – Time since bolus)
Duration**
Calculation
Figure 9: Linear IOB calculation model in the mylife™ App (with example values)
* The dose of the previous bolus ** Duration of insulin action (IA)
B) Insulin on board calculation based on an extended bolus or a combination bolus (pump users only): The overall IOB is calculated by adding the dose remaining to be delivered to the IOB that has been calculated based on the insulin already delivered. Example: for a 10 unit extended bolus over 4 hours, IOB will be displayed as 10 U right at the start of the bolus delivery. IOB will be zero after the duration of insulin action of the last insulin pulse has been exceeded. Assuming a duration of insulin action of 4 hours and an extension time of 4 hours, IOB will be zero 8 hours after starting the extended bolus.
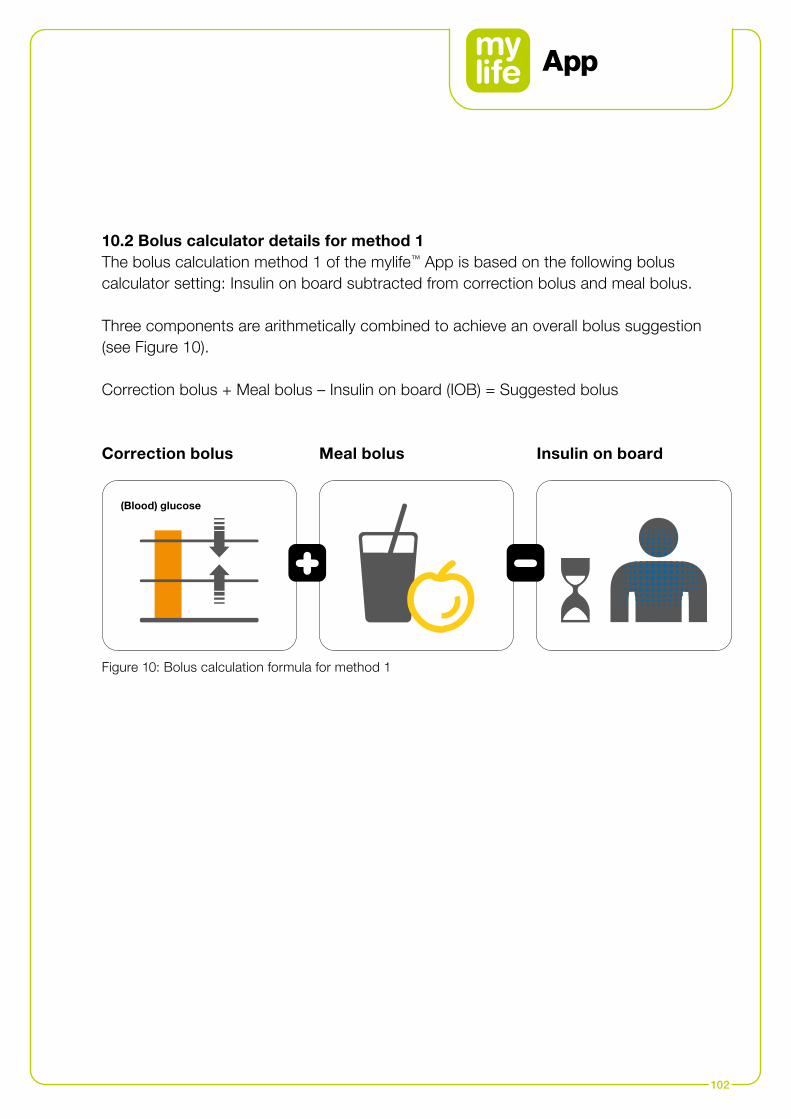
(Blood) glucose
102
10.2 Bolus calculator details for method 1The bolus calculation method 1 of the mylife™ App is based on the following bolus calculator setting: Insulin on board subtracted from correction bolus and meal bolus.
Three components are arithmetically combined to achieve an overall bolus suggestion (see Figure 10).
Correction bolus + Meal bolus – Insulin on board (IOB) = Suggested bolus
Correction bolus Meal bolus Insulin on board
Figure 10: Bolus calculation formula for method 1
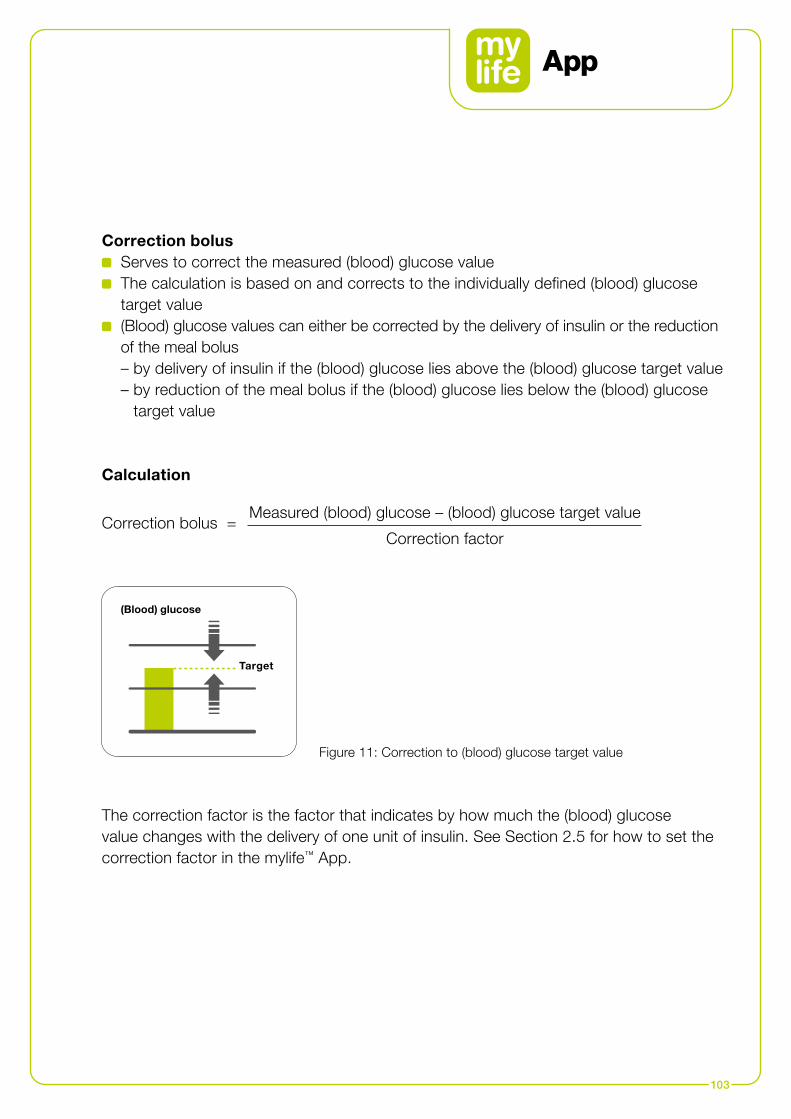
(Blood) glucose
Target
103
Correction bolus Serves to correct the measured (blood) glucose value The calculation is based on and corrects to the individually defined (blood) glucose
target value (Blood) glucose values can either be corrected by the delivery of insulin or the reduction
of the meal bolus – by delivery of insulin if the (blood) glucose lies above the (blood) glucose target value – by reduction of the meal bolus if the (blood) glucose lies below the (blood) glucose
target value
The correction factor is the factor that indicates by how much the (blood) glucose value changes with the delivery of one unit of insulin. See Section 2.5 for how to set the correction factor in the mylife™ App.
Correction bolus = Measured (blood) glucose – (blood) glucose target value
Correction factor
Calculation
Figure 11: Correction to (blood) glucose target value

104
Meal bolus Compensates for food intake Covers the carbs in any consumed food
The Insulin-to-carb ratio is the factor that indicates how many grams of carbs are covered by one unit of insulin. See Section 2.5 for how to set the insulin-to-carb ratio in the mylife™ App.
Meal bolus = Carbs in food
Insulin-to-carb (IC) ratio
Calculation
Figure 12: Correction for carbs intake
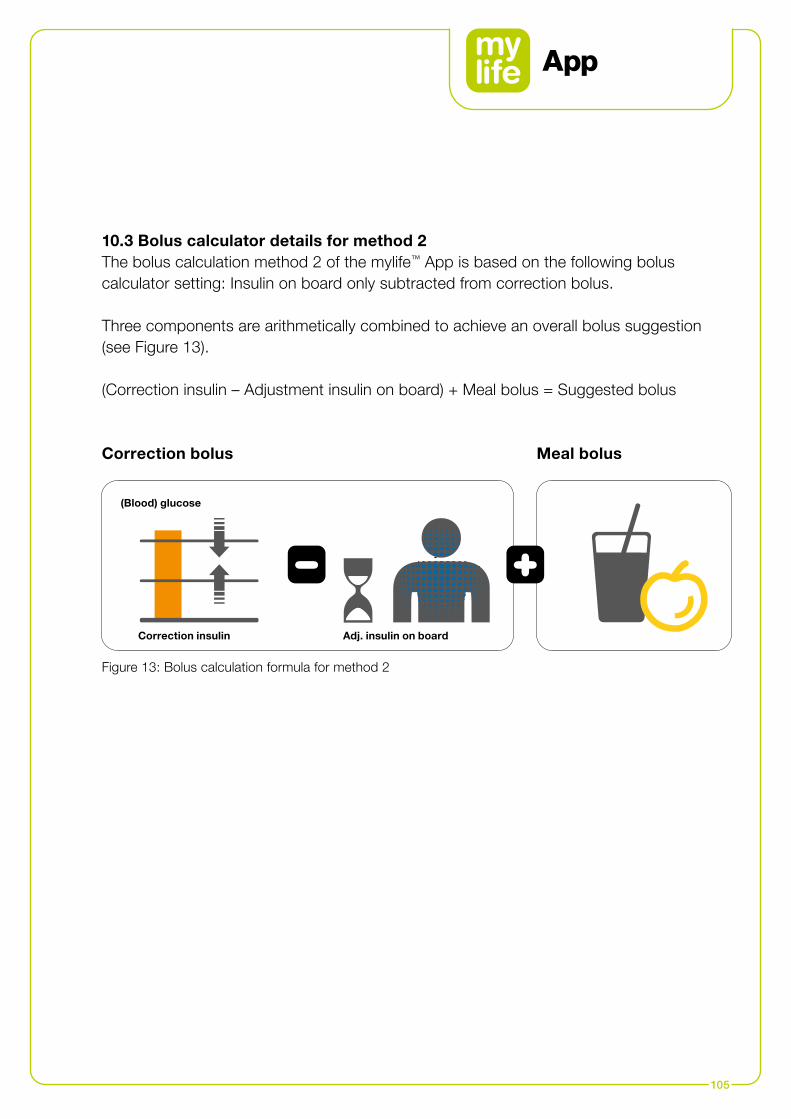
(Blood) glucose
Correction insulin Adj. insulin on board
105
10.3 Bolus calculator details for method 2The bolus calculation method 2 of the mylife™ App is based on the following bolus calculator setting: Insulin on board only subtracted from correction bolus.
Three components are arithmetically combined to achieve an overall bolus suggestion (see Figure 13).
(Correction insulin – Adjustment insulin on board) + Meal bolus = Suggested bolus
Correction bolus Meal bolus
Figure 13: Bolus calculation formula for method 2
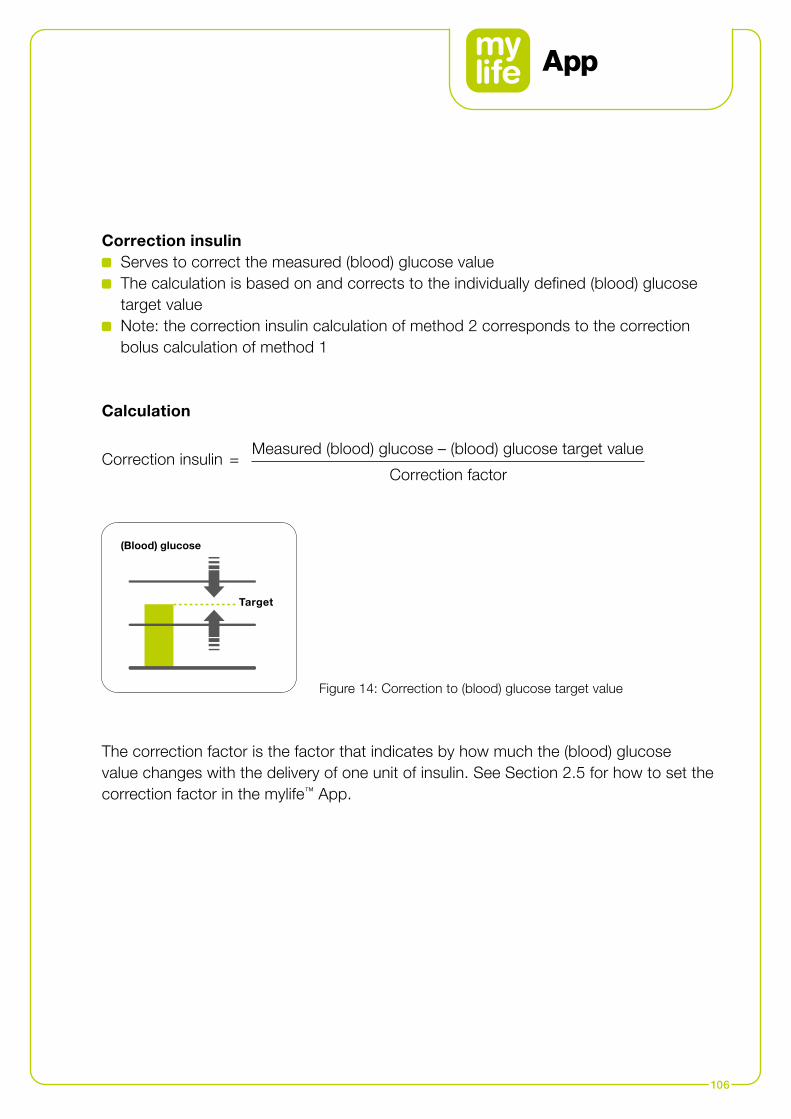
(Blood) glucose
Target
106
The correction factor is the factor that indicates by how much the (blood) glucose value changes with the delivery of one unit of insulin. See Section 2.5 for how to set the correction factor in the mylife™ App.
Correction insulin Serves to correct the measured (blood) glucose value The calculation is based on and corrects to the individually defined (blood) glucose
target value Note: the correction insulin calculation of method 2 corresponds to the correction
bolus calculation of method 1
Figure 14: Correction to (blood) glucose target value
Correction insulin = Measured (blood) glucose – (blood) glucose target value
Correction factor
Calculation

Correction insulin0[U] Insulin on board
(given value)Adj. insulin on board
(calculated value)
107
Adjustment insulin on board The number of insulin units of the insulin on board that are subtracted from the
correction insulin. The value of this parameter depends on the magnitude of the correction insulin relative
to the insulin on board in the patient’s body, see rules below In case that there is no (blood) glucose value entered, the bolus calculator will ignore
insulin on board. The suggested meal bolus will fully cover the entered carbohydrates. There are three rules applying to how this parameter is used in the bolus suggestion
calculation:
If correction insulin ≥ insulin on board, then Adj. insulin on board = insulin on board
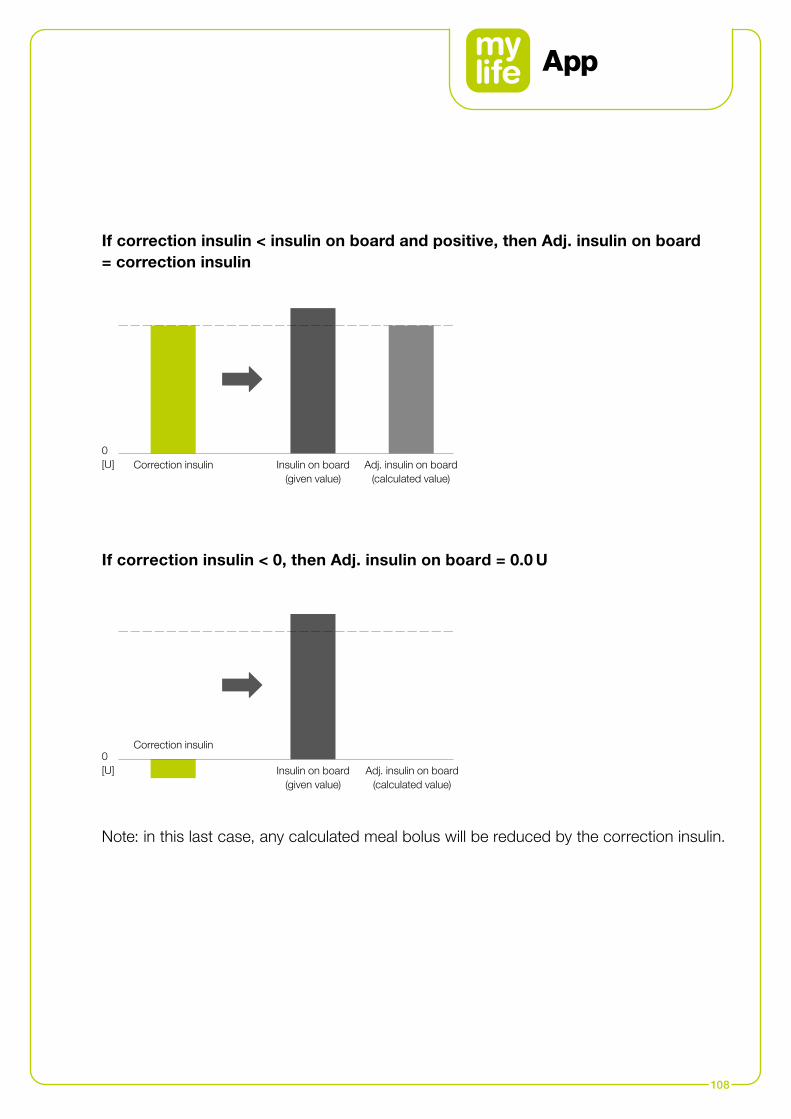
Correction insulin
Correction insulin
0[U]
0[U]
Insulin on board(given value)
Insulin on board(given value)
Adj. insulin on board(calculated value)
Adj. insulin on board(calculated value)
108
If correction insulin < insulin on board and positive, then Adj. insulin on board = correction insulin
If correction insulin < 0, then Adj. insulin on board = 0.0 U
Note: in this last case, any calculated meal bolus will be reduced by the correction insulin.
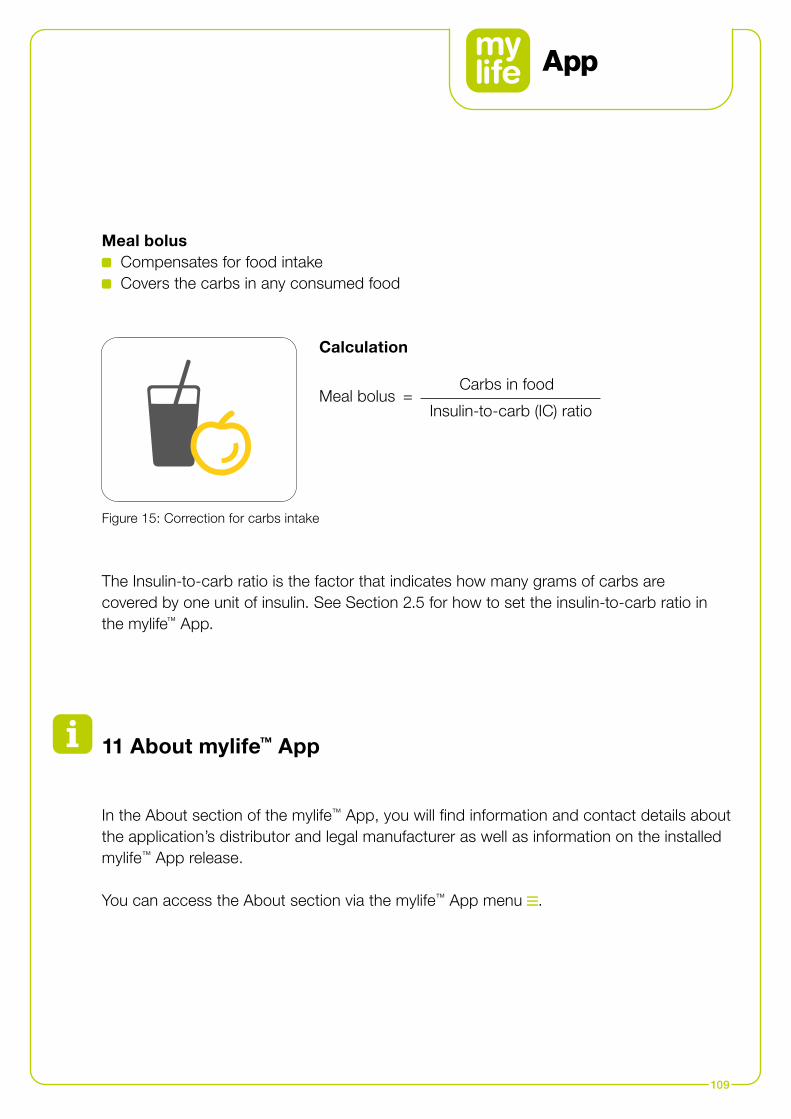
109
11 About mylife™ App
In the About section of the mylife™ App, you will find information and contact details about the application’s distributor and legal manufacturer as well as information on the installed mylife™ App release.
You can access the About section via the mylife™ App menu .
Meal bolus Compensates for food intake Covers the carbs in any consumed food
The Insulin-to-carb ratio is the factor that indicates how many grams of carbs are covered by one unit of insulin. See Section 2.5 for how to set the insulin-to-carb ratio in the mylife™ App.
Meal bolus = Carbs in food
Insulin-to-carb (IC) ratio
Calculation
Figure 15: Correction for carbs intake
110
12 Customer service
Australia Ypsomed Australia PTY Limited // 602/20 Bungan St // Mona Vale NSW 2103 // [email protected] // www.mylife-diabetescare.com.au // Customer Care Free Call: 1800 447 042
België Ypsomed BVBA // Researchdreef 12 // 1070 Brussel // [email protected] // www.mylife-diabetescare.be // Klantenservice: 0800 -294 15
Belgique Ypsomed SPRL // Allée de la Recherche 12 // 1070 Bruxelles // [email protected] // www.mylife-diabetescare.be // Service clientèle: 0800 -294 15
България Аргос-98 ООД - официален дистрибутор за България // гр. София // 1619 ул.“Тис”1 // [email protected] // 24/7 връзка с клиенти: +359 885645559 // +359 882364404
Bosna i Laboratorija DMC d.o.o. Beograd // Beogradska 186 // 11224 Vrčin // Hercegovina Srbija // [email protected] // www.laboratorijadmc.rs // Customer Care: +381 64 6688436
Czechia Ypsomed s.r.o. // Vinohradská 1597/174 // 130 00 Praha 3 // [email protected] // www.mylife-diabetescare.cz // Bezplatná zákaznická linka: 800 140 440
Danmark Ypsomed ApS // Smedeland 7 // 2600 Glostrup // [email protected] // www.mylife-diabetescare.dk // +45 48 24 00 45
Deutschland Ypsomed GmbH // Höchster Straße 70 // 65835 Liederbach // [email protected] // www.mylife-diabetescare.de // kostenlose Service-Hotline: 0800 9776633
España Ypsomed Diabetes, SLU // Avda. Madrid, 95, 5º 1ª // 08.028 Barcelona // [email protected] // www.mylife-diabetescare.es // Tlf +(34) 937077003 // Atención al Cliente: 900373955
111
France Ypsomed S.A.S // 44 rue Lafayette // 75009 Paris // [email protected] // http://gamme.mylife-diabetescare.fr // Service clientèle: 0800 883058
Hrvatska Salvus d.o.o. // Toplicka cesta 100 // 49240 Donja Stubica // [email protected] // www.salvushealth.com // Korisnička podrška: 0800 1947
India Ypsomed India Private Ltd. // 10/61/1-F, Kirti Nagar Industrial Area // New Delhi-110015 // [email protected] // www.mylife-diabetescare.co.in // Customer Care: 099999 75157
Ireland Ypsomed Ltd. // 1 Park Court // Riccall Road // Escrick // (Republic of) North Yorkshire // YO19 6ED // United Kingdom // [email protected] // www.mylife-diabetescare.co.uk // Customer Care: 1800 911 522 (Calls to this number are free of charge from mobile phones and landlines, plus your phone company’s access charge.)
Italia Ypsomed Italia S.r.l. // Via Santa Croce, 7 // 21100 Varese (VA) // [email protected] // www.mylife-diabetescare.it // +39 0332 189 0607
Luxembourg Ypsomed GmbH // Höchster Straße 70 // 65835 Liederbach // Deutschland // [email protected] // www.mylife-diabetescare.de // kostenlose Service-Hotline: 0800 9776633
أغنتك // يكوم، يورو بارك، الطابق األرضي ، يورو بارك، // مبنى إيطاليا // // iيكوم الهاتف: 6493111 03 // 6097200 // ،
www.agentek.co.il :موقع الويبi // البريد االلكتروني: [email protected]
إسرائيل
אגנטק // יורו פארק יקום, בניין איטליה // 6097200 יקום // ישראלwww.agentek.co.il // [email protected] // טלפון: 6493111 03
112
Nederland Ypsomed BV // Einsteinbaan 14 // 3439 NJ Nieuwegein // [email protected] // www.mylife-diabetescare.nl // Klantenservice: 0800-9776633
New Zealand Pharmaco (N.Z.) Ltd // 4 Fisher Crescent, Mt Wellington // Auckland 1060 // [email protected] // www.PharmacoDiabetes.co.nz // Customer Care: 0800 GLUCOSE (0800 45 82 67)
Norge Ypsomed AS // Papirbredden // Grønland 58 // 3045 Drammen // [email protected] // www.mylife-diabetescare.no // +47 22 20 93 00 // Brukerstøtte: 800 74 750
Österreich Ypsomed GmbH // Am Euro Platz 2 // 1120 Wien // [email protected] // www.mylife-diabetescare.at // kostenlose Service-Hotline: 00800 55 00 00 00
Polska Ypsomed Polska Sp. z o.o. // Dziekońskiego 1 // 00-728 Warszawa // [email protected] // www.mylife-diabetescare.pl // Bezpłatna infolinia: 800101621
Schweiz Ypsomed AG // Markt Schweiz // Weissensteinstrasse 26 // 4503 Solothurn // [email protected] // www.mylife-diabetescare.ch // kostenlose Service-Hotline: 0800 44 11 44
Suisse Ypsomed AG // Marché suisse // Weissensteinstrasse 26 // 4503 Soleure // [email protected] // www.mylife-diabetescare.ch // Numéro gratuit: 0800 44 11 44
Svizzera Ypsomed AG // Mercato svizzero // Weissensteinstrasse 26 // 4503 Soletta // [email protected] // www.mylife-diabetescare.ch // Numero verde: 0800 44 11 44
113
Disclaimer: The Bluetooth® word mark and logos are registered trademarks owned by Bluetooth SIG, Inc., and any use of such marks by Ypsomed is under license. Other trademarks and trade names are those of their respective owners.
Dexcom, Dexcom G6, Dexcom Follow, Dexcom CLARITY and Dexcom Share are registered trademarks of Dexcom, Inc. in the U.S., and may be registered in other countries.
Srbija Laboratorija DMC d.o.o. Beograd // Beogradska 186 // 11224 Vrčin // [email protected] // www.laboratorijadmc.rs //
Customer Care: +381 64 6688436
Suomi Ypsomed Oy // Eteläinen Salmitie 1 // 02430 Masala // [email protected] // www.mylife-diabetescare.fi // Asiakaspalvelu: +358 (0)9 250 1350
Sverige Ypsomed AB // Elektrogatan 10, 7 tr // 171 54 Solna // [email protected] // www.mylife-diabetescare.se // Kundtjänst: 08 601 25 50
United Ypsomed Ltd. // 1 Park Court // Riccall Road // Escrick // Kingdom North Yorkshire // YO19 6ED // [email protected] // www.mylife-diabetescare.co.uk // Customer Care: 0344 856 7820 (Calls to this number are free of charge from mobile phones and landlines, plus your phone company’s access charge.)
More freedom.More confi dence.With mylife™.
Infusion systems Blood glucose monitoring systems
Therapy management
Pen needles
With its mylife™ Diabetescare brand, Ypsomed offers a comprehensive portfolio of products and services for people with diabetes. This allows users easy, discreet and reliable self-treatment. With mylife™ Diabetescare, self-treatment becomes simpler and easier.
1018
5998
-MS
TR
-en/
V02
(lo
ng) /
/ E
diti
on:
202
0-1
2 (fr
om
Ap
p Ve
rsio
n 1.
8; D
exco
m G
6 p
arts
bas
ed o
n LB
L015
871
Rev
005
MT2
5142
, 201
9/10
)
Related Documents