USER GUIDE MANUEL DE L'UTILISATEUR Wireless Keypad and Optical Mouse Combo Combo Pavé Numérique sans fil et Souris Optique

Welcome message from author
This document is posted to help you gain knowledge. Please leave a comment to let me know what you think about it! Share it to your friends and learn new things together.
Transcript

USER GUIDE
MANUEL DE L'UTILISATEUR
WirelessKeypad andOptical MouseCombo
Combo Pavé Numérique sans fil et Souris Optique

Table of Contents
English ................................................. 2
Français ............................................... 16
1
TARGUS WIRELESSKEYPAD AND
OPTICAL MOUSECOMBO
Introduction
Congratulations on your purchase of the Targus Wireless Keypad and Optical Mouse Combo. This combo set offers the latest technology for interference free operation with 2.4 GHz wireless connection. Both keypad and mouse feature on/off switch and power saving management for effective power conservation.
ContentsIn addition to this user’s guide, this package contains:• Targus Wireless Keypad• Targus Wireless Optical Mouse• USB Receiver• 2 AAA batteries (for mouse)• 1 AA battery (for keypad)
System Requirements
Hardware• PC with an Intel® Pentium® processor or equivalent• USB 1.1 or 2.0 interface
2
Targus Wireless Keypad and Optical Mouse Combo
Operating System• Windows® 2000• Windows® XP• Windows Vista®
Installing the Batteries
Optical Mouse
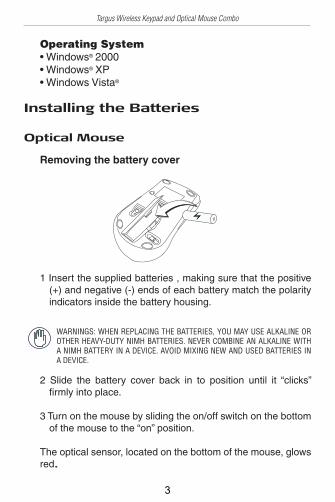
Removing the battery cover
1 Insert the supplied batteries , making sure that the positive (+) and negative (-) ends of each battery match the polarity indicators inside the battery housing.
WARNINGS: WHEN REPLACING THE BATTERIES, YOU MAY USE ALKALINE OR OTHER HEAVY-DUTY NIMH BATTERIES. NEVER COMBINE AN ALKALINE WITH A NIMH BATTERY IN A DEVICE. AVOID MIXING NEW AND USED BATTERIES IN A DEVICE.
2 Slide the battery cover back in to position until it “clicks” fi rmly into place.
3 Turn on the mouse by sliding the on/off switch on the bottom of the mouse to the “on” position.
The optical sensor, located on the bottom of the mouse, glows red.
3

Targus Wireless Keypad and Optical Mouse Combo
Wireless Keypad
1 Remove the battery cover located on the bottom of the keypad.
2 Insert the supplied batteries , making sure that the positive (+) and negative (-) ends of each battery match the polarity indicators inside the battery housing.
3 Turn on the keypad by sliding the Power switch on the back side of the keypad to the “on” position.
Connecting the Receiver
Plug the USB receiver into an available USB port on your computer.
You are now ready to set the identifi cation code to establish a communication link with the receiver.
PowerSwitch
Setup Key
4

Targus Wireless Keypad and Optical Mouse Combo
Setting the Identifi cation Code
After your computer detects the USB receiver you must set the ID code between the receiver and the mouse as well as between the receiver and the keypad BEFORE you can use them. To do this, do the following:
NOTE: MAKE SURE THAT YOUR COMPUTER IS TURNED ON AND HAS DETECTED THE USB RECEIVER BEFORE YOU SET THE ID CODE.
Optical Mouse
1 Plug the USB receiver into an available USB port on your computer. The LED on the receiver will fl ash for 60 seconds to indicate ID search mode.
2 Press the setup key on the bottom of the mouse.
Setup Key
Power switch
When the LED on the receiver is lit, the mouse is set up with an ID and the receiver is locked.
You are now ready to use the mouse.
Proceed to setting the ID code with the keypad.
5

Targus Wireless Keypad and Optical Mouse Combo
Setup Key
Power switch
Wireless Keypad
1 The LED on the receiver will fl ash for 60 seconds to indicate ID search mode. During this time, press and release the connection button on the back of the keypad.
2 When the light emitter diode (LED) on the receiver is lit, the keypad is set up with an ID and the receiver is locked.
You are now ready to use the keypad.
6

Targus Wireless Keypad and Optical Mouse Combo
Using the Keypad
Defi nition of the Keypad Keys:
.Del
NumLock on - inserts a decimal pointNumLock off - deletes a number
0Ins
NumLock on - enters “0” on the displayNumLock off - emulates the Insert key
00,
NumLock on - enters “00”NumLock off - inserts a comma ( , )
1End
NumLock on - enters “1” on the displayNumLock off - emulates the End key
2 NumLock on - enters “2” on the displayNumLock off - moves the cursor down oneline of text
3PgDn
NumLock on - enters “3” on the displayNumLock off - emulates the Page Down key
4 NumLock on - enters “4” on the displayNumLock off - moves one character to theleft of the cursor position
5NumLock on - enters “5” on the displayNumLock off - No function
6 NumLock on - enters “6” on the displayNumLock off - moves one character to theright of the cursor position
7
Targus Wireless Keypad and Optical Mouse Combo
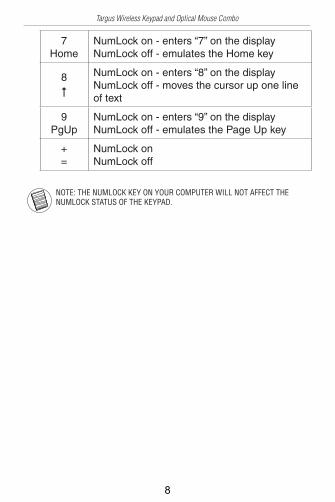
7Home
NumLock on - enters “7” on the displayNumLock off - emulates the Home key
8 NumLock on - enters “8” on the displayNumLock off - moves the cursor up one lineof text
9PgUp
NumLock on - enters “9” on the displayNumLock off - emulates the Page Up key
+=
NumLock onNumLock off
NOTE: THE NUMLOCK KEY ON YOUR COMPUTER WILL NOT AFFECT THE NUMLOCK STATUS OF THE KEYPAD.
8

Targus Wireless Keypad and Optical Mouse Combo
Using the multimedia/internet controls
Media keys
Key Function
Previous Track
Next Track
Play / Pause
Mute
Volume Up
Volume Down
Stop
Default E-mail Program
Default Internet browser
Internet page forward
Internet page backward
Refresh page
Stop page
Favorite
Internet keys
To switch between the two modes, press the Mode key.
9
Targus Wireless Keypad and Optical Mouse Combo
Power Management
To power the keypad and mouse on and off, slide the on/off switch to the desired position.
When power is on, the mouse goes into “power saving mode” after 4 minutes of inactivity. To activate the mouse, move the mouse or press any button.
To save battery power, turn off the keypad and mouse while traveling or when you’re not using them.
Operating Hints
For optimal performance and RF reception:
• Place the receiver at least 20 cm away from all electrical devices, such as your monitor, speakers or external storage devices.
• Avoid using the optical mouse on a metal surface. Metals, such as iron, aluminum or copper, shield the radio frequency transmission and may slow down the mouse’s response time or cause the mouse to fail temporarily.
• The mouse will enter a suspend mode at the same time your computer does. To activate the mouse, press any of the buttons.
10

Targus Wireless Keypad and Optical Mouse Combo
• If your computer has a metal case that contains aluminum or magnesium, use the optical mouse to the side. The display panel may interfere with the radio frequency signal if you use the mouse directly in front of the computer.
• Never use the optical mouse on a glass or mirrored surface as these surfaces will cause the mouse to fail temporarily.
• To maximize battery life, use the optical mouse on a white, or light colored surface. Dark surfaces cause the mouse’s LED to glow brighter, which causes the battery to discharge more rapidly.
Troubleshooting
What do I do if the mouse does not work?
• Make sure that the polarity of the batteries is correct. The positive (+) and negative (- ) ends of each battery must match the positive (+) and nega tive (-) connections in the battery housing.
• Check that the receiver’s USB connector is fi rmly attached to the USB port on your computer.
• Verify that the device drivers are installed.
• Make sure you have established a communication link between the mouse and its receiver. See “Setting the Identifi cation Code”.
11

Targus Wireless Keypad and Optical Mouse Combo
When I use the mouse, other wireless devices work more slowly or fail temporarily – what should I do?
• The mouse may cause interference with any cordless, radio-based device that operates at 2.4 GHz, such as a telephone, baby monitor, or toy. To reduce interference, move the mouse’s receiver and the base unit of the affected device as far away from each other as possible.
• You can also reset the mouse’s identifi cation code. The mouse has identifi cation codes that allow the mouse and its receiver to operate without interference from other radio frequency devices. To do this, see “Setting the Identifi cation Code”.
What do I do if the response time of the mouse is slow or the mouse intermittently stops working?
Try one or more of the following:
• Increase the distance between the mouse’s receiver and the rest of your computer equipment.
• Increase the distance between the mouse’s receiver and the base units of other wireless devices.
• Turn off any wireless devices and their base units that are near the mouse’s receiver.
• If you are using the mouse on a metal surface, move it and the receiver to a non-metal surface. Metals, such as iron, aluminum or copper, shield the radio frequency transmission and may slow down the mouse’s response time or cause the mouse to fail temporarily.
• Replace the batteries.
12

Targus Wireless Keypad and Optical Mouse Combo
Specifi cationsOperation Frequency 2.4 GHz
Operating Distance Up to 10m
Operating Voltage Keypad: 2.4V
Receiver: 5V
Mouse: 3V
Operating Current Keypad: 10mA maximum
Receiver: 16mA maximum
Mouse: 11mA maximum
Suspend Mode Keypad: Below 300 uA
Mouse: Below 1 mA
Dimensions Keypad: 155 x 92 x 27 mm
Receiver: 58 x 16 x 10 mm
Mouse: 98 x 60 x 33.5mm
Weight Keypad: 111g
Receiver: 14g
Mouse: 80g
13

Targus Wireless Keypad and Optical Mouse Combo
Technical Support
For technical questions, please visit:Internet: www.targus.com/support.aspEmail: [email protected]
Product Registration
Targus recommends that you register your Targus accessory shortly after purchasing it. To register your Targus accessory, go to: www.targus.com/registration.asp
You will need to provide your full name, email address, country of residence and product information.
Warranty
Targus warrants this product to be free from defects in materials and workmanship for one year. If your Targus accessory is found to be defective within that time, we will promptly repair or replace it. This warranty does not cover accidental damage, wear and tear, or consequential or incidental loss. Under no conditions is Targus liable for loss of, or damage to a computer; nor loss of, or damage to, programs, records, or data; nor any consequential or incidental damages, even if Targus has been informed of their possibility. This warranty does not affect your statutory rights.
14

Targus Wireless Keypad and Optical Mouse Combo
Regulatory ComplianceThis device complies with Part 15 of the FCC Rules. Operation is subject to the following two conditions: (1) This device may not cause harmful interference, and (2) This device must accept any interference received, including interference that may cause undesired operation.
This Class B digital apparatus complies with Canadian ICES-003.
FCC StatementTested to Comply
limits of a Class B digital device, pursuant to Part 15 of the FCC Rules. These limits are designed to provide reasonable protection against harmful interference in a residential installation. This equipment generates, uses, and can radiate radio frequency energy and if not installed and used in accordance with the instructions, may cause harmful interference to radio communications. However, there is no guarantee that interference will not occur in a particular installation. If this equipment does cause harmful interference to radio or television reception, which can be determined by turning the equipment off and on, the user is encouraged to try to correct the interference by one or more of the following measures: • Reorient or relocate the receiving antenna;• Increase the separation between the equipment and receiver;• Connect the equipment into an outlet on a circuit different from
that to which the receiver is connected;• Consult the dealer or an experienced radio/TV technician for
help.Changes or modifi cations not authorized by the party responsible for compliance could void the user’s authority to operate this product.
Microsoft, Windows, and Windows Vista are either registered trademarks or trademarks of Microsoft Corporation in the United States and/or other countries. All trademarks and egistered trademarks are the properties of their respective owners. All rights reserved.
15

COMBO PAVÉNUMÉRIQUE SANS FIL ET
SOURIS OPTIQUE
Introduction
Nous vous remercions d’avoir acheté un combo pavé numérique sans fi l et souris optique. Cet assortiment vous offre le dernier cri en matière de technologie antiparasite de connexion sans fi l à 2.4 GHz. Le clavier numérique et la souris sont dotés d’interrupteurs marche-arrêt et d’un système effi cace de gestion automatique de la consommation d’énergie.
Contenu
En plus du mode d’emploi, vous trouverez dans ceconditionnement:• Clavier numérique sans fi l Targus• Mini souris optique sans fi l Targus• Récepteur USB• 2 piles AAA (pour la souris)• 1 pile AA (pour le clavier numérique)
Confi guration requise
Matériel• PC muni d’un processeur Intel® Pentium® ou équivalent• Port USB version 1.1
16

Combo Pavé Numérique sans fi l et Souris Optique
Système d’exploitation• Windows® 2000• Windows® XP• Windows Vista®
Installation des piles
Souris OptiqueManière de retirer le couvercle du compartiment àpiles
1 Introduisez la pile fournie en vous assurant que les extrémités positive (+) et négative (-) de la pile correspondent à la polarité indiquée dans le boîtier de la pile.
ATTENTION: VOUS POUVEZ REMPLACER LES PILES PAR DES PILES ALCALINES OU PAR DES ACCUMULATEURS NIMH DE GRANDE CAPACITÉ. NE METTEZ JA MAIS UNE PILE ALCALINE ET UN ACCUMULATEUR NIMH ENSEMBLE DANS LE MÊME APPAREIL.ÉVITEZ DE MÉLANGER LES PILES NEUVES ET CELLES QUI SONT USÉES DANS UN APPAREIL.
2 Remettez le couvercle du compartiment à piles en place en le glissant jusqu’à ce qu’un clic indique qu’il est verrouillé.
3 Mettez la souris sous tension en glissant l’interrupteur de marche-arrêt qui se trouve en dessous de la souris (position de “marche”).
Le capteur optique, situé en dessous de la souris, émet une lueur rouge.
17

Combo Pavé Numérique sans fi l et Souris Optique
Clavier numérique sans fi l
1 Retirez le couvercle du compartiment à piles qui se trouve en dessous du clavier numérique.
2 Introduisez la pile fournie en vous assurant que les extrémités positive (+) et négative (-) de la pile correspondent à la polarité indiquée dans le boîtier de la pile.
3 Mettez le clavier numérique en marche en glissant l’interrupteur d’alimentation qui se trouve à la droite de celui-ci (position “marche”).
Branchement du récepteurBranchez le récepteur USB sur un port USB disponible devotre ordinateur. La DEL de verrouillage s’allume.
Le système est alors prêt pour le réglage du code d’identifi cation permettant d’établir la liaison radio avec le récepteur.
Interrupteurmarche-arrêt
Touche de connexion
18

Combo Pavé Numérique sans fi l et Souris Optique
Réglage du code d’identifi cation
Après la détection du récept eur USB par l’ordinateur vous devez régler le code d’identifi cation pour la liaison entre la souris et le récepteur, ainsi que celui de la liaison entre le clavier numérique et le récepteur AVANT de pouvoir commencer à les utiliser. À cette fi n, faites ce qui suit :
REMARQUE : VÉRIFIEZ QUE L’ORDINATEUR EST EN MARCHE ET QUE LE RÉCEPTEUR USB A ÉTÉ DÉTECTÉ AVANT DE RÉGLER LE CODE D’IDENTIFICATION.
Souris Optique
1 Branchez le récepteur USB sur un port USB disponible devotre ordinateur. La DEL du récepteur clignotera 60 secondes pour indiquer la mise en mode de recherche ID.
2 Appuyez sur la touche de réglage qui se trouve en dessous de la souris.
Touche de connexion
Interrupteurmarche-arrêt
Dès que la DEL du récepteur s’allume, le réglage du code d’identifi cation de la sour is est fait et la liaison avec le récepteur est verrouillée.
Vous êtes maintenant prêt à utiliser la souris.
19
Combo Pavé Numérique sans fi l et Souris Optique
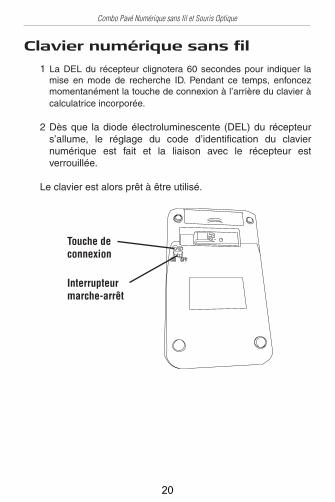
Touche de connexion
Interrupteurmarche-arrêt
Clavier numérique sans fi l
1 La DEL du récepteur clignotera 60 secondes pour indiquer la mise en mode de recherche ID. Pendant ce temps, enfoncez momentanément la touche de connexion à l’arrière du clavier à calculatrice incorporée.
2 Dès que la diode électroluminescente (DEL) du récepteur s’allume, le réglage du code d’identifi cation du clavier numérique est fait et la liaison avec le récepteur est verrouillée.
Le clavier est alors prêt à être utilisé.
20

Combo Pavé Numérique sans fi l et Souris Optique
Utilisation du clavier
Défi nition des touches du clavier :
.Del
NumLock allumé - insertion du signe décimalNumLock éteint - supprime un chiffre
0Ins
NumLock allumé - insère un « 0 » sur l’affi cheurNumLock éteint - émule la touche Insertion
00,
NumLock allumé - insère « 00 »NumLock éteint - insère une virgule ( , )
1End
NumLock allumé - insère un « 1 » sur l’affi cheurNumLock éteint - émule la touche Fin (End)
2 NumLock allumé - insère « 2 » sur l’affi cheurNumLock éteint - déplace le curseur sur laligne inférieure
3PgDn
NumLock allumé - insère un « 3 » sur l’affi cheurNumLock éteint - émule la touche Page suivante
4 NumLock allumé - insère un « 4 » sur l’affi cheurNumLock éteint - déplace le curseur un caractère à gauche
5 NumLock allumé - insère « 5 » sur l’affi cheurNumLock éteint - aucune fonction
6 NumLock allumé - insère « 6 » sur l’affi cheurNumLock éteint - déplace le curseur un caractère à droite
21

Combo Pavé Numérique sans fi l et Souris Optique
7Home
NumLock allumé - insère « 7 » sur l’affi cheurNumLock éteint - émule la touche Début
8 NumLock allumé - insère « 8 » sur l’affi cheurNumLock éteint - déplace le curseur sur la ligne supérieure
9PgUp
NumLock allumé - insère « 9 » sur l’affi cheurNumLock éteint - émule la touche Page précédente
+=
NumLock alluméNumLock éteint
REMARQUE : LA TOUCHE NUMLOCK (VERRUILLAGE NUMÉRIQUE) DE VOTRE ORDINATEUR N’AURA AUCUN EFFET SUR L’ÉTAT DE LA TOUCHE NUMLOCK DU CLAVIER.
22
Combo Pavé Numérique sans fi l et Souris Optique
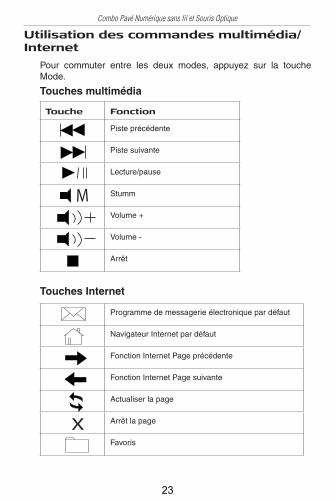
Utilisation des commandes multimédia/Internet
Touches multimédia
Touche Fonction
Piste précédente
Piste suivante
Lecture/pause
Stumm
Volume +
Volume -
Arrêt
Programme de messagerie électronique par défaut
Navigateur Internet par défaut
Fonction Internet Page précédente
Fonction Internet Page suivante
Actualiser la page
Arrêt la page
Favoris
Touches Internet
Pour commuter entre les deux modes, appuyez sur la touche Mode.
23

Combo Pavé Numérique sans fi l et Souris Optique
Gestion du courantPour mettre le clavier et la souris en marche et pour les arrêter, glissez l’interrupteur d’alimentation dans la position qui convient (marche ou arrêt).
Une fois en marche, la souris se met en “mode d’économie d’énergie” après 4 minutes d’ inaction. Pour réactiver la souris, déplacez-la ou appuyez sur l’un de ses boutons.
Pour économiser l’énergie des piles, éteignez le clavier numérique et la souris pendant vos déplacements ou toute période durant laquelle vous ne les utilisez pas.
Conseils d’utilisation
Pour obtenir une performance et une réception RFoptimales :
• Placez le récepteur à un minimum de 20 cm de tous les périphériques électriques, tels que votre moniteur, les haut-parleurs ou les périphériques de stockage externes.
• Évitez d’utiliser la souris sur une surface métallique. Les métaux, tels que le fer, l’aluminium ou le cuivre, protègent la transmission par radiofréquence et peuvent ralentir le temps de réaction de la souris ou entraîner une panne temporaire de la souris.
24
Combo Pavé Numérique sans fi l et Souris Optique
• La souris passera au mode pause en même temps que votre ordinateur. Pour activer la souris, appuyez sur n’importe quel bouton.
• Si votre ordinateur est do té d’un boîtier en métal contenant de l’aluminium ou du magnésium, utilisez la souris sur le côté. Le panneau d’affi chage peut affecter le signal de radiofréquence si vous utilisez la souris juste en face de l’ordinateur.
• N’utilisez jamais la souris sur une surface en verre ou en miroir car ces surfaces entraînent une panne temporaire de la souris.
• Pour maximiser la durée de vie des piles, utilisez la souris sur une surface blanche ou de couleur pâle. Les surfaces foncées forcent la lumière de la diode électroluminescente (DEL) de la souris à être plus vive, ce qui décharge la pile plus rapidement.
DépannageQue dois-je faire si la so uris ne fonctionne pas ?
• Assurez-vous que la polarité des piles est correcte. Les extrémités positives (+) et négatives (-) de chaque pile doivent correspondre aux connexions positives (+) et négatives (-) du boîtier des piles.
• Assurez-vous que le connecteur USB standard du récepteur est fermement relié au port USB de votre ordinateur.
• Assurez-vous que les pilotes de périphérique sont installés.
• Assurez-vous d’avoir établi un lien radio entre la souris et son récepteur. Consultez la rubrique “Réglage du code d’identifi cation”
25
Combo Pavé Numérique sans fi l et Souris Optique
Quand j’utilise la souris RF, d’autres appareils sans fi l fonctionnent plus lentement ou sont en panne temporairement ; que dois-je faire ?
• La souris peut affecter un appareil à transmission radio sans fi l qui opère à 2.4 GH z, tel qu’un téléphone, un interphone de surveillance ou un jouet. Pour réduire les perturbations, éloignez le récepteur de la souris et l’unité de base de l’appareil affecté aussi loin que possible l’un de l’autre.
Que dois-je faire si le temps de réaction de la souris RF est lent ou si la souris ne fonctionne pas tout le temps ?
• Augmentez la distance entre le récepteur de la souris et le reste de l’équipement informatique.
• Augmentez la distance entre le récepteur de la souris et les unités de base des autres appareils sans fi l.
• Éteignez les appareils sans fi l et leurs unités de base qui se trouvent à proximité du récepteur de la souris.
• Si vous utilisez la souris RF sur une surface en métal, déplacez-la ainsi que le récepteur sur une surface non métallique. Les métaux, tels que le fer, l’aluminium ou le cuivre, protègent la transmission par radiofréquence et peuvent ralentir le temps de réaction de la souris ou entraîner une panne temporaire de la souris.
Je ne peux pas utiliser la souris RF lorsqu’une autre souris RF est en cours d’utilisation ; que dois-je faire ?
• Il faut régler à nouveau le code d’identifi cation. Consultez la rubrique “Réglage du code d’identifi cation”
• Replace the batteries.
26
Combo Pavé Numérique sans fi l et Souris Optique
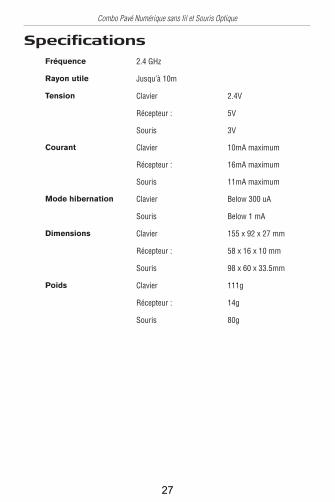
Specifi cationsFréquence 2.4 GHz
Rayon utile Jusqu’à 10m
Tension Clavier 2.4V
Récepteur : 5V
Souris 3V
Courant Clavier 10mA maximum
Récepteur : 16mA maximum
Souris 11mA maximum
Mode hibernation Clavier Below 300 uA
Souris Below 1 mA
Dimensions Clavier 155 x 92 x 27 mm
Récepteur : 58 x 16 x 10 mm
Souris 98 x 60 x 33.5mm
Poids Clavier 111g
Récepteur : 14g
Souris 80g
27

Combo Pavé Numérique sans fi l et Souris Optique
Support technique
Pour des questions techniques, veuillez visiter le :
Internet : http://www.targus.com/supportCourriel : [email protected]
Enregistrement du produit
Targus vous recommande d’enregistrer votre accessoire Targus tout de suite après son achat. Enregistrement de votre accessoire Targus à l’adresse suivante :
http://www.targus.com/registration.asp
Vous devrez préciser votre nom complet, votre adresse courriel,pays de résidence et information sur le produit.
Garantie
Targus garantit ce produit contre tout défaut de matériel ou de fabrication pour durée d’un an. Si votre accessoire Targus s’avère défectueux sous cette garantie, nous veillerons à le remplacer ou à le réparer au plus vite. Cette garantie ne couvre pas les dommages résultant d’accidents, l’usure normale ou les pertes consécutives ou accessoires. En aucun cas, Targus ne pourra être tenu responsable de la perte matérielle ou de l’endommagement d’un ordinateur, ni de la perte de programmes, d’enregistrements ou de données ou de leur endommagement, ni de tous autres dommages conséquentiel ou accidentel, même si Targus a été préalablement informé de cette possibilité. Cette garantie n’a aucun effet sur vos droits statutaires.
28

Combo Pavé Numérique sans fi l et Souris Optique
Respect de la réglementationCet appareil est conforme à la section 15 des règlements de la FCC (Federal Communication Commission). Son utilisation est soumise aux deux conditions suivantes : (1) Cet appareil ne peut provoquer de brouillage préjudiciable. (2) Cet appareil doit absorber toute interférence réceptionnée, même si cela provoque des effets indésirables sur son fonctionnement.
Cet appareil numbérique de la classe B est conforme à la norme NMB-003 du Canada.
Déclaration de la FCCTesté et conforme
Cet appareil a été testé et déclaré conforme aux limites des appareils numériques de Classe B, selon la section 15 des règlements de la FCC (Federal Communication Commission). Ces limites sont conçues pour assurer une protection raisonnable contre un brouillage préjudiciable lorsque l’appareil est utilisé dans un milieu résidentiel. L’appareil génère, utilise et peut diffuser de l’énergie sur les fréquences radio et, s’il n’est pas installé et utilisé conformément au mode d’emploi, il peut brouiller les communications radio. Il n’y a aucune garantie qu’un brouillage ne se produira pas dans un milieu particulier.Si cet appareil brouille les communications radio ou télévision, comme cela peut être confi rmé en éteignant puis en allumant l’appareil, l’utilisateur peut tenter de corriger toute interférence en essayant une ou plusieurs des méthodes suivantes :• Réorienter l’antenne réceptrice ou la placer à un autre endroit ;• Éloigner davantage l’appareil du récepteur ;• Brancher l’appareil sur une autre prise de courant ou un circuit élec-trique différent de celui auquel le récepteur est connecté; • Pour toute aide, consulter le distributeur ou un technicien expérimenté radio/TV.Toute modifi cation non autorisée par les autorités responsables de la conformité peut entraîner la révocation du droit d’utilisation de ce produit.
Microsoft, Windows, et Windows Vista sont soit des marques ou des marques déposées de la Corporation Microsoft aux Etats-Unis et/ou d’autres pays. Toutes les marques et les marques déposées sont les propriétés de leurs propriétaires respectifs. Tous droits réservés.
29

AKM10CA / 410-1449-002B
Visitez notre site: www.targus.com/ca Caractéristiques et spécifications sujettes à modification sanspréavis. ©2008 Targus Group International, Inc. et Targus, Inc.
Visit our website at www.targus.com/caFeatures and specifications are subject to change without notice. ©2008 Targus Group International, Inc. and Targus, Inc.
Related Documents


![1449 MAT_Kertas 2 [Www.mystudyguide.net]](https://static.cupdf.com/doc/110x72/55cf9747550346d03390b944/1449-matkertas-2-wwwmystudyguidenet.jpg)

![002b Rotateur Déphaseurs [Mode de Compatibilité]](https://static.cupdf.com/doc/110x72/563dbb75550346aa9aad5776/002b-rotateur-dephaseurs-mode-de-compatibilite.jpg)