PANDA VENDING LIMITED WWW.PANDAVENDING.COM 1 Manual of Toy Crane Machines (TR1550, TR1850, TR1950, TR2050 ) Dated: 2010-4-13 Scheme-1

Welcome message from author
This document is posted to help you gain knowledge. Please leave a comment to let me know what you think about it! Share it to your friends and learn new things together.
Transcript

PANDA VENDING LIMITED WWW.PANDAVENDING.COM
1
Manual of Toy Crane Machines (TR1550, TR1850, TR1950, TR2050)
Dated: 2010-4-13
Scheme-1

PANDA VENDING LIMITED WWW.PANDAVENDING.COM
2
Scheme-2
WARNING
Please Read This Manual Carefully Before You Turn On The Machine, And Beware Of Following Things: 1. The machines are not waterproof or moistureproof 2. Before turning on the power, you must cut off the nylon cord as shown on the below photos:

PANDA VENDING LIMITED WWW.PANDAVENDING.COM
3
HOW TO MOUNT THE CONSOLE
(In order to save space, the console is normally demounted from machine before packing)
1. Open the coin acceptor door on the console.
2. Use the 8*20 and 4*16 screws to fix the console on machine.
3. Connect the wiring harness

PANDA VENDING LIMITED WWW.PANDAVENDING.COM
4
HOW TO SET UP THE COIN ACCEPTOR
(Only Apply To the Comparative Style Coin Acceptor)
1. Open the coin acceptor door on the console.
2. Insert a proof coin into the coin accepter according to the below photo with instruction
3. There is a "Sensitivity Switch" on the coin acceptor, by which you can adjust the sensitivity between
SLACK and STRICT.
Please take out the plastic token and put in a coin which you want the coin acceptor to recognize.
PANDA VENDING LIMITED WWW.PANDAVENDING.COM
5
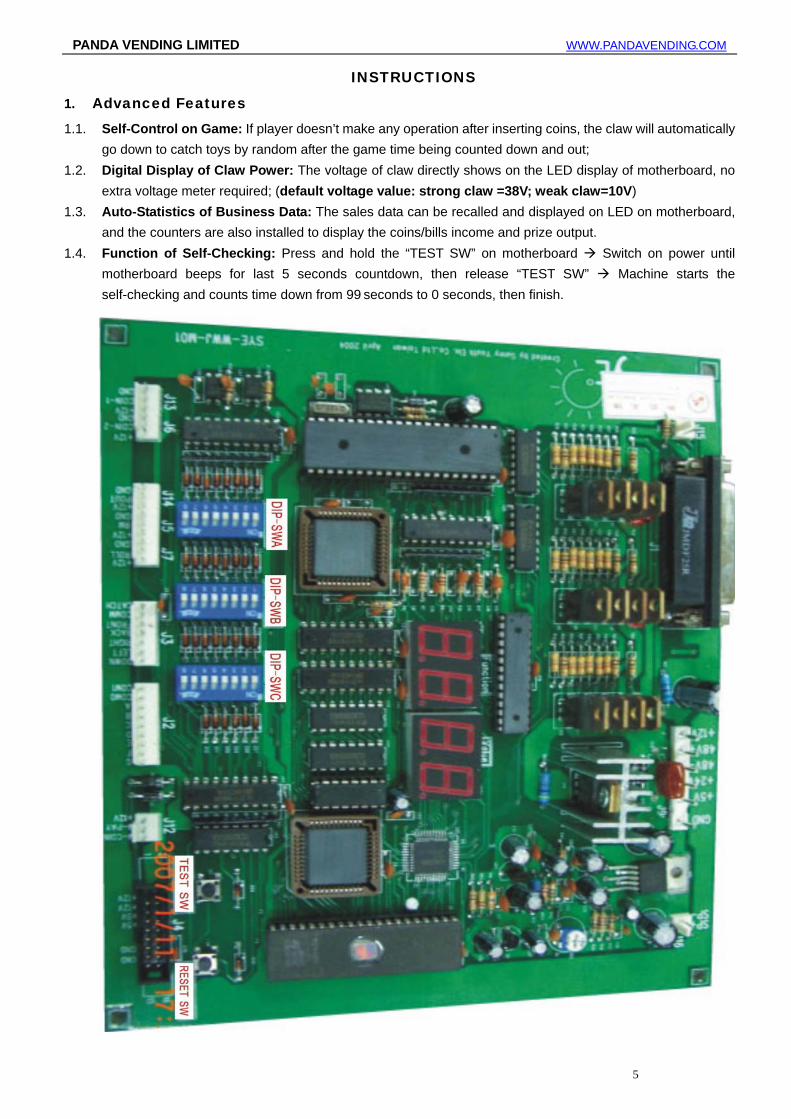
INSTRUCTIONS
1. Advanced Features 1.1. Self-Control on Game: If player doesn’t make any operation after inserting coins, the claw will automatically
go down to catch toys by random after the game time being counted down and out; 1.2. Digital Display of Claw Power: The voltage of claw directly shows on the LED display of motherboard, no
extra voltage meter required; (default voltage value: strong claw =38V; weak claw=10V) 1.3. Auto-Statistics of Business Data: The sales data can be recalled and displayed on LED on motherboard,
and the counters are also installed to display the coins/bills income and prize output. 1.4. Function of Self-Checking: Press and hold the “TEST SW” on motherboard Switch on power until
motherboard beeps for last 5 seconds countdown, then release “TEST SW” Machine starts the self-checking and counts time down from 99 seconds to 0 seconds, then finish.

PANDA VENDING LIMITED WWW.PANDAVENDING.COM
6
2. Adjusting Tables 2.1. DIPSW-A (Settings of Grabbing Delay, Automatic Grabbing & the Timing of Strong Claw Power) Settings Table Of DIPSW-A 8 7 6 5 4 3 2 1 Delay 0.5 seconds to grab toy when the claw reaches the bottom
OFF
Delay 3.0 seconds to grab toy when the claw reaches the bottom
ON
No Free Games Available OFF One or Two Free Games Available By Random ON Claw automatically descends after waiting for 15s OFF Claw automatically descends after waiting for 30s ON Normal Mode- strong claw timing mode 1 (strong claw lasts 2s after grabbing toy)
OFF OFF OFF OFF OFF
Normal Mode- strong claw timing mode 1 (strong claw lasts 2.5s after grabbing toy)
OFF OFF OFF OFF ON
Normal Mode- strong claw timing mode 1 (strong claw lasts 3s after grabbing toy)
OFF OFF OFF ON OFF
Normal Mode- strong claw timing mode 1 (strong claw lasts 3.5s after grabbing toy)
OFF OFF OFF ON ON
Normal Mode- strong claw timing mode 1 (strong claw lasts 4s after grabbing toy)
OFF OFF ON OFF OFF
Normal Mode- strong claw timing mode 1 (strong claw lasts 4.5s after grabbing toy)
OFF OFF ON OFF ON
Normal Mode- strong claw timing mode 1 (strong claw lasts 5s after grabbing toy)
OFF OFF ON ON OFF
Normal Mode- strong claw timing mode 1 (strong claw lasts 5.5s after grabbing toy)
OFF OFF ON ON ON
Normal Mode- strong claw timing mode 1 (strong claw lasts 6s after grabbing toy)
OFF ON OFF OFF OFF
Normal Mode- strong claw timing mode 1 (strong claw lasts 6.5s after grabbing toy)
OFF ON OFF OFF ON
Normal Mode- strong claw timing mode 1 (strong claw lasts 7s after grabbing toy)
OFF ON OFF ON OFF
Normal Mode- strong claw timing mode 1 (strong claw lasts 7.5s after grabbing toy)
OFF ON OFF ON ON
Normal Mode- strong claw timing mode 1 (strong claw lasts 8s after grabbing toy)
OFF ON ON OFF OFF
Normal Mode- strong claw timing mode 1 (strong claw lasts 8.5s after grabbing toy)
OFF ON ON OFF ON
Normal Mode- strong claw timing mode 1 (strong claw lasts 9s after grabbing toy)
OFF ON ON ON OFF
Normal Mode- strong claw timing mode 1 (strong claw lasts 9.5s after grabbing toy)
OFF ON ON ON ON
Normal Mode- strong claw timing mode 2 (strong claw lasts 10s after coin in)
ON OFF OFF OFF OFF
Normal Mode- strong claw timing mode 2 (strong claw lasts 11s after coin in)
ON OFF OFF OFF ON
Normal Mode- strong claw timing mode 2 (strong claw lasts 12s after coin in)
ON OFF OFF ON OFF
Normal Mode- strong claw timing mode 2 (strong claw lasts 13s after coin in)
ON OFF OFF ON ON

PANDA VENDING LIMITED WWW.PANDAVENDING.COM
7
Grabbing before claw reaches bottom ON OFF ON OFF OFF Normal Mode- strong claw timing mode 2 (strong claw lasts 15s after coin in)
ON OFF ON OFF ON
Normal Mode- strong claw timing mode 2 (strong claw lasts 16s after coin in)
ON OFF ON ON OFF
Normal Mode- strong claw timing mode 2 (strong claw lasts 17s after coin in)
ON OFF ON ON ON
Normal Mode- strong claw timing mode 2 (strong claw lasts 18s after coin in)
ON ON OFF OFF OFF
Normal Mode- strong claw timing mode 2 (strong claw lasts 19s after coin in)
ON ON OFF OFF ON
Normal Mode- strong claw timing mode 2 (strong claw lasts 20s after coin in)
ON OF OFF ON OFF
Normal Mode- strong claw timing mode 2 (strong claw lasts 21s after coin in)
ON ON OFF ON ON
Normal Mode- strong claw timing mode 2 (strong claw lasts 22s after coin in)
ON ON ON OFF OFF
Normal Mode- strong claw timing mode 2 (strong claw lasts 23s after coin in)
ON ON ON OFF ON
Normal Mode- strong claw timing mode 2 (strong claw lasts 24s after coin in)
ON ON ON ON OFF
Normal Mode- strong claw timing mode 2 (strong claw lasts 25s after coin in)
ON ON ON ON ON
2.2. DIPSW-B (Settings of Vending Mode, Pricing, Demonstration and other special function ) Settings Table Of DIPSW-B 8 7 6 5 4 3 2 1 Re-grabbing function off, when claw goes up OFF Re-grabbing function on, when claw goes up ON No agitating toys after game starts OFF Agitating toys after game starts (mixing device should be installed with surcharge)
ON
No auto-demonstrating OFF Auto-demonstrating after standing by for 20 minutes ON Vending Mode A (No.7,8 of DIPSW-C = ON) OFF OFF Vending Mode B (No.7,8 of DIPSW-C = ON) OFF ON Vending Mode C (No.7,8 of DIPSW-C = ON) ON OFF Vending Mode D (No.7,8 of DIPSW-C = ON) ON ON Normal Mode - no free game available even after inserting 5 coins at one time
OFF
Normal Mode - 1 free game available after inserting 5 coins at one time
ON
One coin (i.e. - one pulse output from coin acceptor), 2 games
OFF OFF
One coin (i.e. - one pulse output from coin acceptor), 1 game
OFF ON
Two coins (i.e. - 2 pulses output from coin acceptor), 1 game
ON OFF
3 coins (i.e. - 3 pulses output from coin acceptor), 1 game
ON ON

PANDA VENDING LIMITED WWW.PANDAVENDING.COM
8
2.3. DIPSW-C (Settings Of Winning Ratio) Settings Table of DIPSW-C 8 7 6 5 4 3 2 1 Normal Mode - no odds control OFF OFF Normal Mode - weak claw control OFF ON Normal Mode - strong claw control ON OFF Vending Mode ON ON Strong/Weak Claw [Controlled Times] = 1 time OFF OFF Strong/Weak Claw [Controlled Times] = 3 times OFF ON Strong/Weak Claw [Controlled Times] = 5 times ON OFF Strong/Weak Claw [Controlled Times] = 7 times ON ON Strong/Weak Claw [Controlled Base] = 5 times OFF OFF OFF OFF Strong/Weak Claw [Controlled Base] = 10 times OFF OFF OFF ON Strong/Weak Claw [Controlled Base] = 15 times OFF OFF ON OFF Strong/Weak Claw [Controlled Base] = 20 times OFF OFF ON ON Strong/Weak Claw [Controlled Base] = 25 times OFF ON OFF OFF Strong/Weak Claw [Controlled Base] = 30 times OFF ON OFF ON Strong/Weak Claw [Controlled Base] = 35 times OFF ON ON OFF Strong/Weak Claw [Controlled Base] = 40 times OFF ON ON ON Strong/Weak Claw [Controlled Base] = 45 times ON OFF OFF OFF Strong/Weak Claw [Controlled Base] = 50 times ON OFF OFF ON Strong/Weak Claw [Controlled Base] = 55 times ON OFF ON OFF Strong/Weak Claw [Controlled Base] = 60 times ON OFF ON ON Strong/Weak Claw [Controlled Base] = 65 times ON ON OFF OFF Strong/Weak Claw [Controlled Base] = 70 times ON ON OFF ON Strong/Weak Claw [Controlled Base] = 75 times ON ON ON OFF Strong/Weak Claw [Controlled Base] = 80 times ON ON ON ON Important Remarks: 1. Vending Mode A: The “N” = [Controlled Base]; 2. Vending Mode B & C: [Vending Price] = [Controlled Base]; 3. Vending Mode D: besides prize detecting sensor, it needs to install a set of bonus lamp with surcharge;
3. Troubleshooting, Testing & Claw Power Adjusting 3.1. Error Codes (show on LED display on console) Error Information Trouble Shooting 02 Claw doesn’t go down to designated position timely, and Down-stop Limit Switch reacted.
1. Restart the machine after 10 seconds to see if the claw will be reposited. If not, go to next step.
2. Check the cable/string on the gantry, then press Down-Stop SW. If the switch doesn’t react, replace it with a new one to try.

PANDA VENDING LIMITED WWW.PANDAVENDING.COM
9
03 Claw doesn’t go up to designated position timely, and Up-stop Limit Switch reacted.
1. Restart the machine after 10 seconds to see if the claw will be reposited. If not, go to check the cable/string and the Up-Stop SW.
2. Check the gasket if it’s there, and make sure it’s turnup.
04 Gantry fails to return home position in required time, and Left-stop Limit Switch reacted.
1. Restart the machine after 10 seconds to see if the claw will be reposited. If not, go to next step.
2. Check the plastic wheel/pulley on gantry is stuck or not, and then check the Left-Stop SW.
05 Gantry fails to return home position in required time, and Forth-stop Limit Switch reacted.
1. Restart the machine after 10 seconds to see if the claw will be reposited. If not, go to next step.
2. Check the plastic wheel/pulley on gantry is stuck or not, and then check the Forth-Stop SW.
Attention: When the LED shows 02/03/04/05, it also may be caused by the poor contact of the connector to gantry, so please try to re-plug it before restarting the machine.

PANDA VENDING LIMITED WWW.PANDAVENDING.COM
10
30 Bill/Coin Acceptor failure 1. Check the bill/coin acceptor was stuck by slug or other objects. 2. Replace the bill/coin acceptor with new one.
32 Prize Sensor failure. Check if the LED on sensor board is light always, and continue with : 1. Check if there are something blocking the optical sensor.
2. Adjust the VR knob counter-clockwise on the sensor until the LED does light. (Attention: After doing this, put a toy into the exit to see if the LED flashes or not. If not, means the VR knob has been excessively adjusted. Please adjust it again.)
46 Error from IC 93C46 on motherboard
Check the IC93C46, or send motherboard to us for maintenance.
Other Troubles Without Code Trouble Shooting The machine doesn’t work after turning on the power.
1. Check if the FUSE/ Socket is broken or not. 2. Check if the Electric Shock Defender was burn
The coin accepter rejects any coins.
1. Make sure the coin acceptor is correctly connected with machine. 2. If it’s comparative coin acceptor, make sure a proof-coin has been well
posited in advance. After inserting coins, LED displays nothing, and machine doesn’t start.
1. Replace the coin acceptor to see if it will be OK. 2. Replace the mainboard to see if it will be OK.
The flash lights do not work. Check if the flash light control PCB is well connected or if it’s broken. 3.2. Machine Testing & Claw Power Adjusting
Menu Codes (show on mainboard)
Press the TEST SW on mainboard to enter into testing mode, and press it again to enter into the menu.
10 Switches & Buttons Manually shifting or pressing the switches or buttons which you want to test, then their codes will display on LED on console, if they works correctly.
20 Forth/Back Moving Checking forth/back motor, control circuit, forth/back limit switch, forth/back switch of joystick, press “Enter” key on console to return normal operation.
30 Left/Right Moving Checking left/right motor, control circuit, left/right limit switch, left/right SW of joystick, press “Enter” key on console to return normal operation.
40 Up/Down Moving Check (Test)
Checking up/down motor, control circuit, up/down limit switch, up/down SW of joystick, press “Enter” key on console to return normal operation.
50 Adjust Strong Claw Power
Adjust voltage of strong claw by operating joystick forth and back, and press “Enter” key on console to close claw by strong claw power (default strong claw =38V)
60 Adjust Weak Claw Power
Adjust voltage of strong claw by operating joystick forth and back, and press “Enter” key on console to close claw by strong claw power (default weak claw =10V)

PANDA VENDING LIMITED WWW.PANDAVENDING.COM
11
Code Table of Switches & Buttons to be tested under Item “10”.
SW Code Switch Name SW Code SW Name 1 Forward SW 9 Forth-stop SW 2 Backward SW 10 Back-stop SW 3 Leftward SW 11 Ring-stop SW 4 Rightward SW 12 Left-stop SW 5 Grabbing SW 13 Up-stop SW 6 Confirm SW (Enter Key) 14 Down-stop SW 7 Coin Acceptor 15 RESET SW 8 Prize Detecting Sensor 16 TEST SW
4. Important Specifications 4.1. RESET SW & TEST SW on motherboard 4.1.1. Data Reset: Power on machine and press RESET SW All sales data will be cleared; meanwhile, LED
display shows 00-99, and the music sounds repeatedly. Press confirm button (Enter key) on console to return normal operation.
4.1.2. Self-Checking: Press and hold the “TEST SW” on motherboard Switch on power until motherboard beeps for last 5 seconds countdown, then release “TEST SW” Machine begins self-checking and counting time down from 99 seconds to 0 seconds Operate the joystick or machine will automatically simulate grabbing toys by random.
4.1.3. Data Recall: Press and hold the TEST SW & RESET SW at same time Switch on machine until motherboard beeps, then release the two switches Business data is recalled. The “Function” LED display on motherboard shows ‘hundred thousand’ and ‘ten thousand’ digits; The “Value” LED display on motherboard shows ‘thousand’ and ‘hundred’ digits; The LED display on console shows second and first digits. Flashing number indicates total times of prize out, and non-flashing number indicates total times coin in. Press “Enter” key on console to make shift between flashing number and non-flashing.
4.2. Description of Main Functions 4.2.1. Non Odds Control – Provided strong claw time is set as 2s, the claw will always change to weak power 2s
later after grabbing the toy, no odds control. 4.2.2. Weak Claw Control – If the Rate of Weak Claw Happening = Controlled Times/Controlled Base = 1/5,
there is one chance of weak claw happening in every five times game. When it's controlled by weak claw power, the claw has not enough power to grab toy, and the players can't catch it. In the other four times, the claw will grab up the toy firstly by strong power, then change to weak power according to the set time and the toy will fall unconsciously, thus to tempt the players to try more times.
4.2.3. Strong Claw Control – If the Rate of winning prize (i.e. - strong claw power) = controlled times/ controlled base = times of winning prize/ times of play = 1/5. There is one chance of strong claw power in every five times game. When it's controlled by strong claw power, the claw has enough power to grab toy, and the player will get the toy if he/she can aim at toy correctly. In the other four times, the claw will grab up the toy firstly by strong power, then change to weak power according to the set time and the toy will fall unconsciously, thus to tempt the players to try more times.
4.3. Description of Vending Mode ( No.7th & 8th of DIPSW-C should be ON) 4.3.1. Vending Mode A (“N” Times Strong Claw) – Under this mode, if the players doesn’t win prize for N*N times,
they can continue to play without inserting coins until getting one prize. “N” = [Controlled Base]. 4.3.2. Vending Mode B – Under this mode, players only can operate joystick after putting in money with total
amount equal to [Vending Price]. The [Vending Price] = [Controlled Base] of Strong/Weak Claw. 4.3.3. Vending Mode C – Under this mode, players can operate machine as usual. While the players put in
money with total amount equal to [Vending Price] at one time, the claw changes to strong power mode until the players get a prize. The [Vending Price] = [Controlled Base] of Strong/Weak Claw.
4.3.4. Vending Mode D (need to install the extra bonus lamp plate with surcharge) – Under this mode, the players insert 5 coins continuously to get a prize, and 0-5 free games will be presented up to your luck.

PANDA VENDING LIMITED WWW.PANDAVENDING.COM
12
5. Wiring Diagram
J1 (Gantry Wiring) J4 (extra bonus lamps) J6=J13 (coin acceptor) J9 (Power Supply Box)
1 Forth/Back Motor + 1 12V 1 12V 1 GND
2 Left/Right Motor + 2 12V 2 Pulse Signal (NO) 2 5V
3 Un/Down Motor + 3 12V 3 GND 3 24V (for mainboard)
4 Claw Power Supply+ 4 12V 4 48- (GND)
5 Back-stop SW (NO) 5 5V J4 (prize out sensor) 5 48V+
6 Forth-stop SW (NO) 6 5V 1 12V 6 12V
7 Right-stop SW (NO) 7 5V 2 Signal from sensor
8 Left-stop SW (NO) 8 5V 3 GND J2 (display CKT)
9 Up-stop SW (NO) 9 SB-STR 1 G
10 Down-stop SW (NO) 10 SB-DAT J5 (extended function) 2 F
11 Blank 11 SB-CLK 1 12V 3 E
12 Blank 12 SB-OE 2 Right-stop SW (NO) 4 D
13 Blank 13 GND 3 GND 5 C
14 Forth/Back Motor- 14 GND 6 B
15 Left/Right Motor- 15 GND J7 (Agitator under toys) 7 A
16 Up/Down Motor- 16 GND 1 12V 8 DS4
17 Claw Power Supply- 2 SSR signal 9 DS5
18 GND (Back-stop SW) J3 (Console, NO points) 3 GND
19 GND (Forth…) 1 Enter Key (confirm) J15 (Voltage Meter, optional)20 GND (Right…) 2 Joystick Left SW J12
(for counter) 21 GND (Left…) 3 Joystick Right SW 1 Voltage Meter +
22 GND (Up…) 4 Joystick Right SW 1 Coin Income Data 2 Voltage Meter -
23 GND (Down…) 5 Joystick Right SW 2 Prize Output Data J16 (Speaker)
24 Blank 6 Common Wire 3 12V 1 Speaker +
25 Blank 7 Grabbing SW 2 Speaker -
*******************************************************
OVER *******************************************************
Related Documents