© SAP AG <Course Number> Course Overview - 1 THE BEST-RUN BUSINESSES RUN SAP © SAP AG 2004 TJA311 Web Dynpro 2004/Q4 Material number: 50070503

Welcome message from author
This document is posted to help you gain knowledge. Please leave a comment to let me know what you think about it! Share it to your friends and learn new things together.
Transcript
© SAP AG <Course Number> Course Overview - 1
© SAP AG 2004
TADMBO Implementation&Operation II
THE BEST-RUN BUSINESSES RUN SAP
© SAP AG 2004
TJA311Web Dynpro
2004/Q4
Material number: 50070503
© SAP AG 1 Positioning
© 2003 SAP AG, TNW040 Page 1
SAP Web AS Positioning
Contents:
SAP Web Application Server
© SAP AG 2 Positioning
© 2003 SAP AG, TNW040 Page 2
After completing this unit, you will be able to:
Understand the history of SAP WEB Application Server
Understand the Unique Key Differentiators of SAP WEB AS
SAP Web AS Positioning: Unit Objectives
© SAP AG 3 Positioning
© 2003 SAP AG, TNW040 Page 3
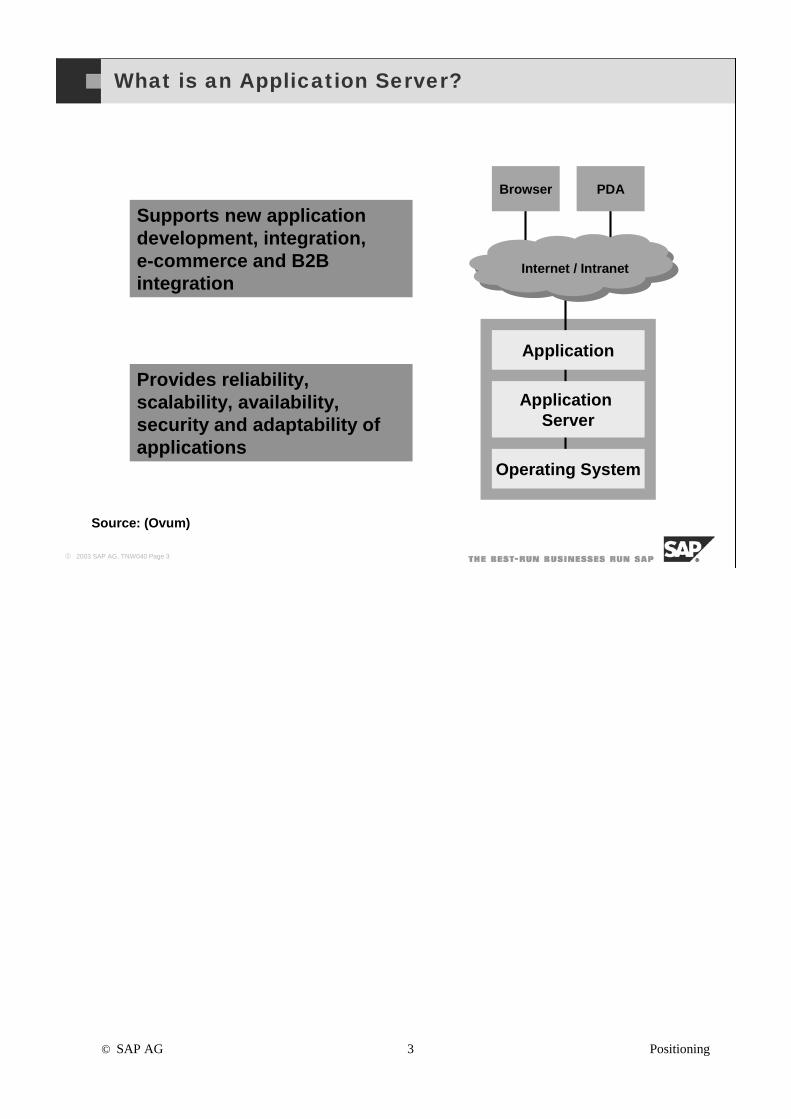
Browser PDA
Internet / Intranet
Supports new application development, integration, e-commerce and B2B integration
Provides reliability, scalability, availability, security and adaptability of applications
Source: (Ovum)
What is an Application Server?
Application
Application Server
Operating System
© SAP AG 4 Positioning
© 2003 SAP AG, TNW040 Page 4
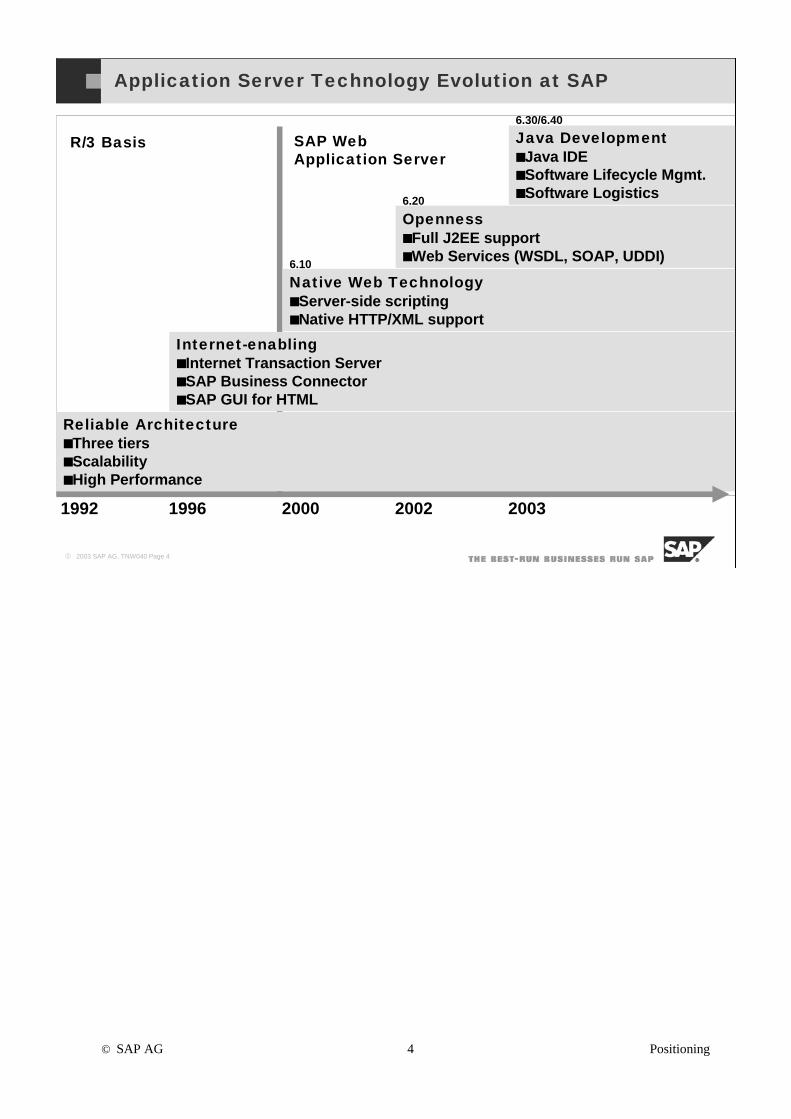
R/3 Basis SAP Web Application Server
1992 1996 2000 2002 2003
Reliable Architecture■Three tiers■Scalability■High Performance
Internet-enabling■Internet Transaction Server■SAP Business Connector■SAP GUI for HTML
Native Web Technology■Server-side scripting■Native HTTP/XML support
Openness■Full J2EE support■Web Services (WSDL, SOAP, UDDI)
6.10
6.20
Java Development■Java IDE■Software Lifecycle Mgmt.■Software Logistics
6.30/6.40
Application Server Technology Evolution at SAP
© SAP AG 5 Positioning
© 2003 SAP AG, TNW040 Page 5
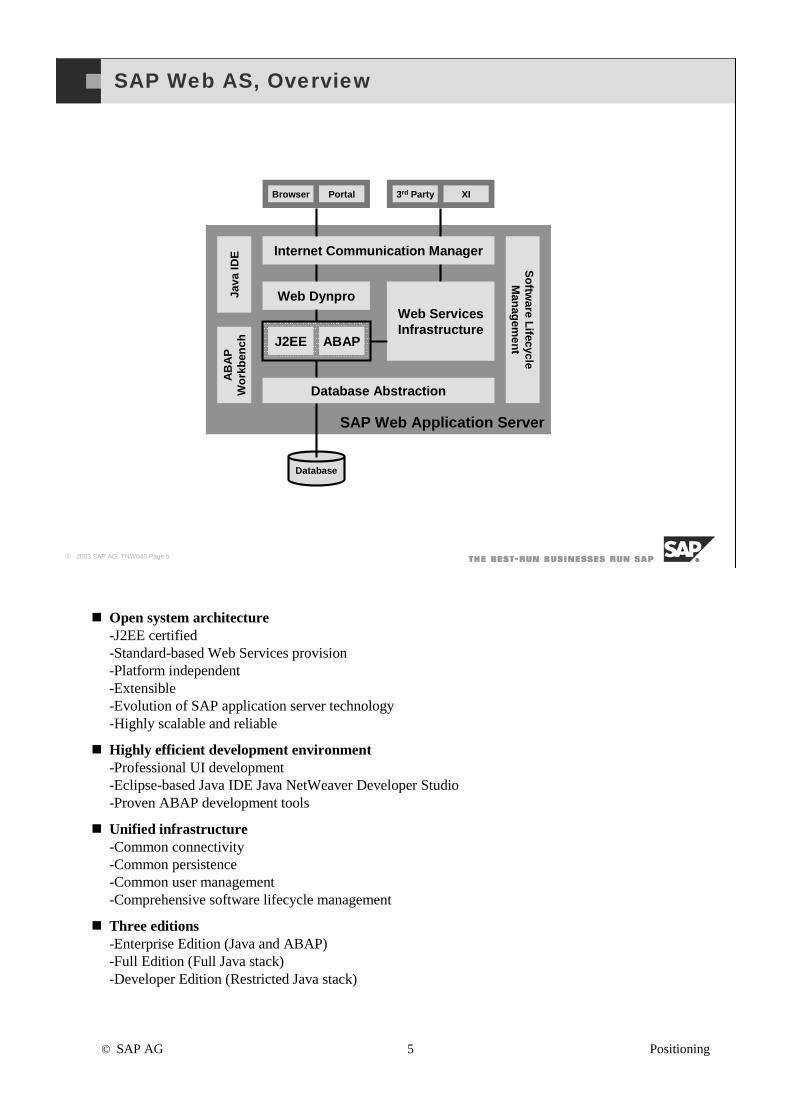
SAP Web AS, Overview
SAP Web Application Server
Database Abstraction
Web DynproWeb Services Infrastructure
Internet Communication Manager
Browser Portal 3rd Party XI
So
ftware L
ifecycleM
anag
emen
t
AB
AP
W
ork
ben
chJa
va ID
E
Database
J2EE ABAP
Open system architecture-J2EE certified-Standard-based Web Services provision -Platform independent-Extensible-Evolution of SAP application server technology-Highly scalable and reliable
Highly efficient development environment-Professional UI development-Eclipse-based Java IDE Java NetWeaver Developer Studio-Proven ABAP development tools
Unified infrastructure-Common connectivity-Common persistence-Common user management-Comprehensive software lifecycle management
Three editions-Enterprise Edition (Java and ABAP)-Full Edition (Full Java stack)-Developer Edition (Restricted Java stack)
© SAP AG 6 Positioning
© 2003 SAP AG, TNW040 Page 6
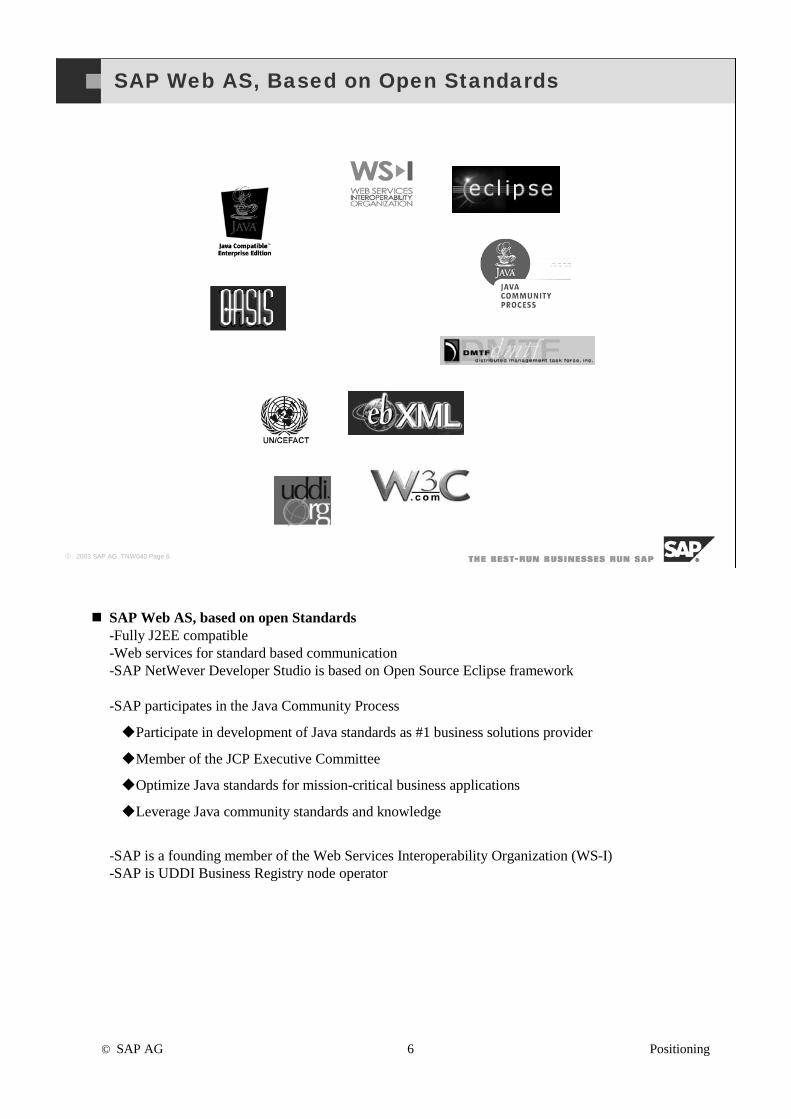
SAP Web AS, Based on Open Standards
SAP Web AS, based on open Standards-Fully J2EE compatible -Web services for standard based communication-SAP NetWever Developer Studio is based on Open Source Eclipse framework
-SAP participates in the Java Community Process
Participate in development of Java standards as #1 business solutions provider
Member of the JCP Executive Committee
Optimize Java standards for mission-critical business applications
Leverage Java community standards and knowledge
-SAP is a founding member of the Web Services Interoperability Organization (WS-I)-SAP is UDDI Business Registry node operator
© SAP AG 7 Positioning
© 2003 SAP AG, TNW040 Page 7
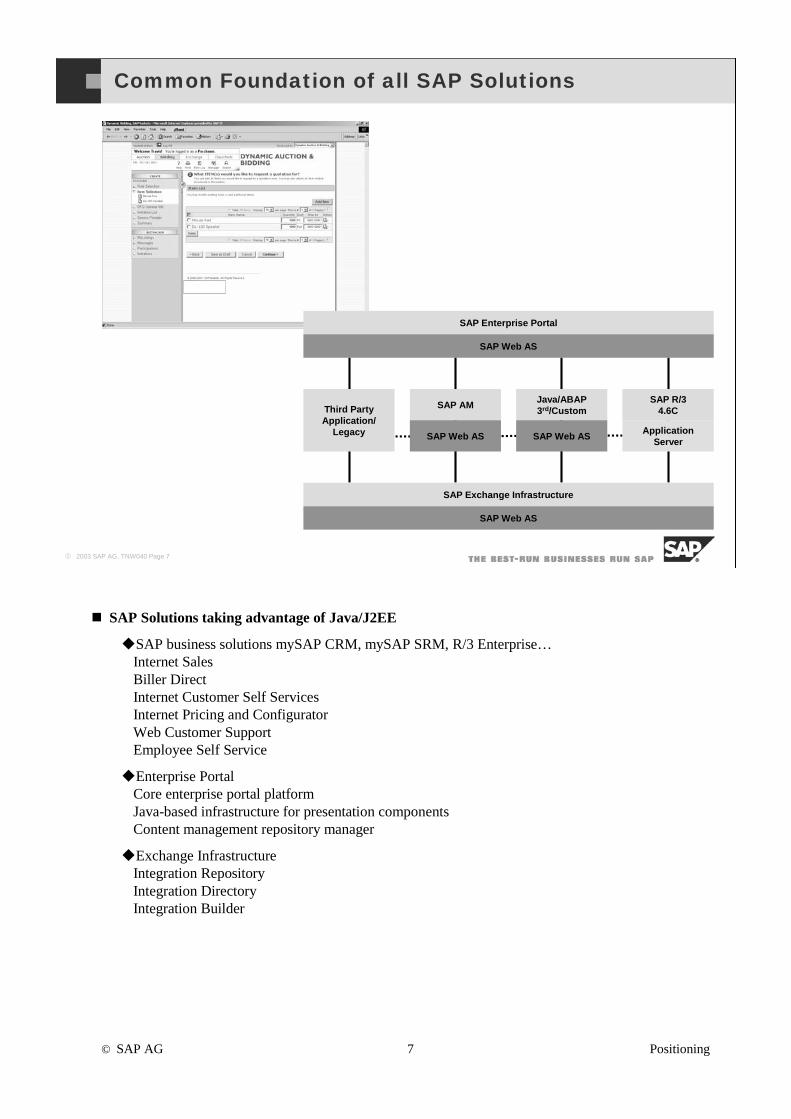
Common Foundation of all SAP Solutions
SAP Web AS SAP Web ASApplication
Server
SAP AM Java/ABAP 3rd/Custom
SAP R/34.6CThird Party
Application/Legacy
SAP Exchange Infrastructure
SAP Web AS
SAP Enterprise Portal
SAP Web AS
SAP Solutions taking advantage of Java/J2EE
SAP business solutions mySAP CRM, mySAP SRM, R/3 Enterprise…Internet SalesBiller DirectInternet Customer Self ServicesInternet Pricing and ConfiguratorWeb Customer SupportEmployee Self Service
Enterprise PortalCore enterprise portal platformJava-based infrastructure for presentation componentsContent management repository manager
Exchange InfrastructureIntegration Repository Integration DirectoryIntegration Builder
© SAP AG 8 Positioning
© 2003 SAP AG, TNW040 Page 8
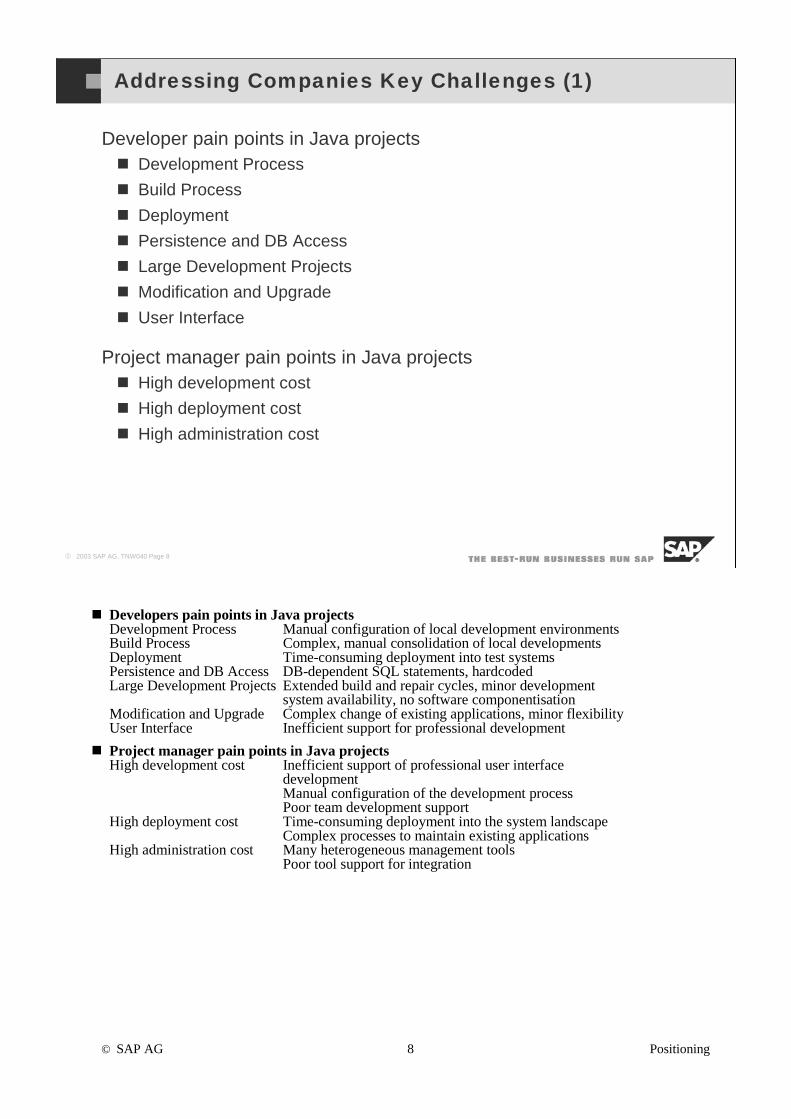
Addressing Companies Key Challenges (1)
Developer pain points in Java projectsDevelopment Process
Build Process
Deployment
Persistence and DB Access
Large Development Projects
Modification and Upgrade
User Interface
Project manager pain points in Java projectsHigh development cost
High deployment cost
High administration cost
Developers pain points in Java projectsDevelopment Process Manual configuration of local development environmentsBuild Process Complex, manual consolidation of local developmentsDeployment Time-consuming deployment into test systemsPersistence and DB Access DB-dependent SQL statements, hardcodedLarge Development Projects Extended build and repair cycles, minor development
system availability, no software componentisationModification and Upgrade Complex change of existing applications, minor flexibilityUser Interface Inefficient support for professional development
Project manager pain points in Java projectsHigh development cost Inefficient support of professional user interface
developmentManual configuration of the development processPoor team development support
High deployment cost Time-consuming deployment into the system landscapeComplex processes to maintain existing applications
High administration cost Many heterogeneous management toolsPoor tool support for integration
© SAP AG 9 Positioning
© 2003 SAP AG, TNW040 Page 9
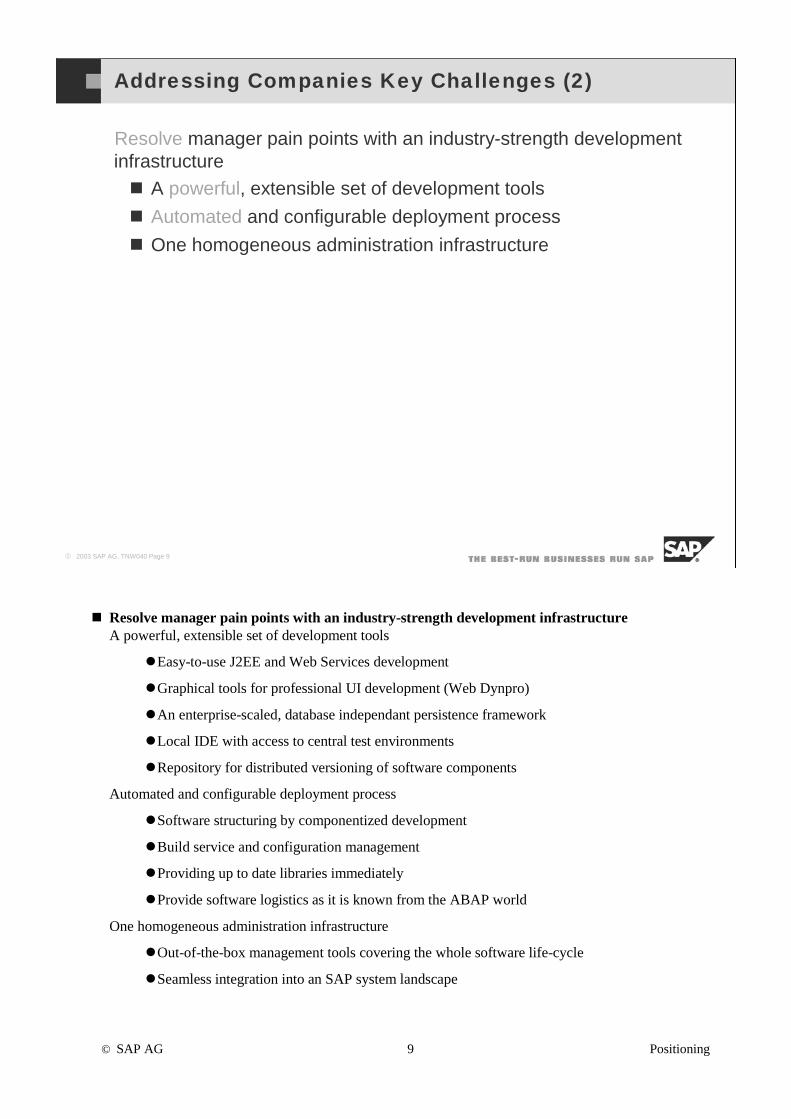
Addressing Companies Key Challenges (2)
Resolve manager pain points with an industry-strength developmentinfrastructure
A powerful, extensible set of development tools
Automated and configurable deployment process
One homogeneous administration infrastructure
Resolve manager pain points with an industry-strength development infrastructureA powerful, extensible set of development tools
Easy-to-use J2EE and Web Services development
Graphical tools for professional UI development (Web Dynpro)
An enterprise-scaled, database independant persistence framework
Local IDE with access to central test environments
Repository for distributed versioning of software components
Automated and configurable deployment process
Software structuring by componentized development
Build service and configuration management
Providing up to date libraries immediately
Provide software logistics as it is known from the ABAP world
One homogeneous administration infrastructure
Out-of-the-box management tools covering the whole software life-cycle
Seamless integration into an SAP system landscape
© SAP AG 10 Positioning
© 2003 SAP AG, TNW040 Page 10
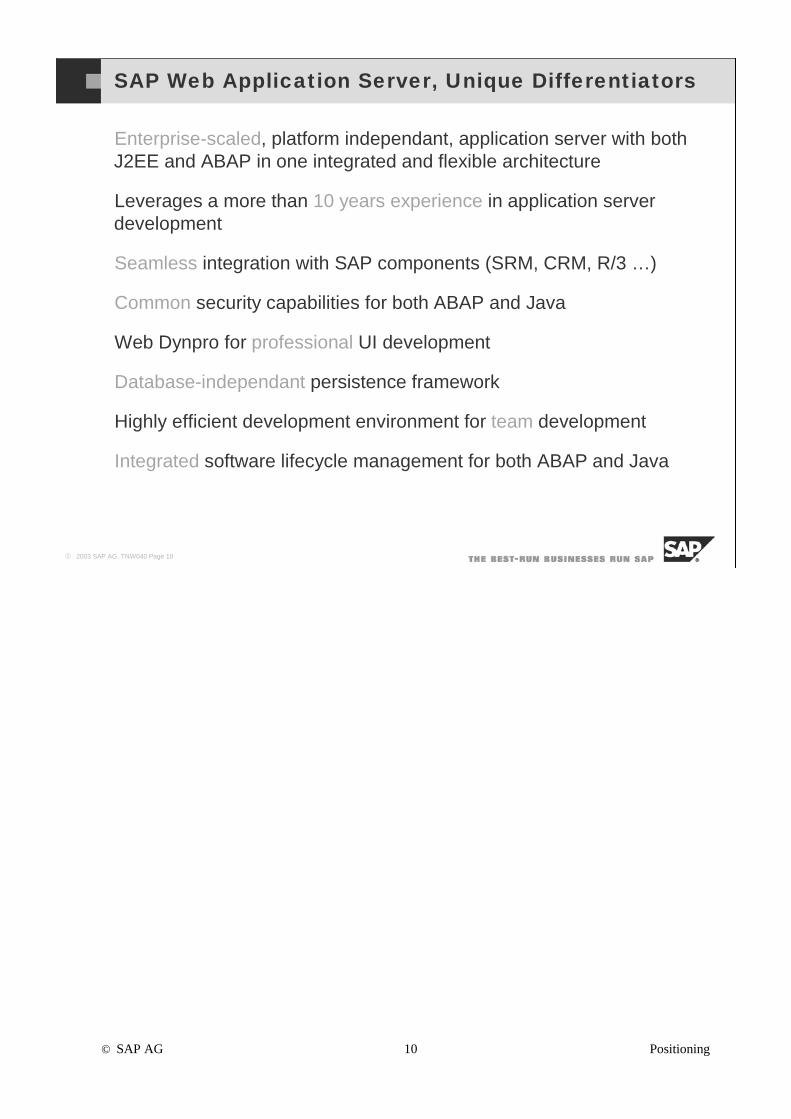
SAP Web Application Server, Unique Differentiators
Enterprise-scaled, platform independant, application server with bothJ2EE and ABAP in one integrated and flexible architecture
Leverages a more than 10 years experience in application serverdevelopment
Seamless integration with SAP components (SRM, CRM, R/3 …)
Common security capabilities for both ABAP and Java
Web Dynpro for professional UI development
Database-independant persistence framework
Highly efficient development environment for team development
Integrated software lifecycle management for both ABAP and Java

© SAP AG 11 Positioning
© 2003 SAP AG, TNW040 Page 11
You should now be able to:
Understand the history of SAP WEB Application Server
Understand the Unique Key Differentiators of SAP WEB AS
SAP Web AS Positioning: Unit Summary
© SAP AG <Course Number> Unit Title - 1
© SAP AG 2003, Title of Presentation, Speaker Name / 1
SAP NetWeaver Developer Studio
SAP Web Application Server, Administration Tools
SAP Java Development Infrastructure
SAP Java Development Process
Contents:
SAP Java Development Environment
© SAP AG <Course Number> Unit Title - 2
© SAP AG 2003, Title of Presentation, Speaker Name / 2
After completing this unit, you will be able to:
Use SAP NetWeaver Developer Studio.
Use Administration Tools of the Web ApplicationServer.
Understand the SAP Java DevelopmentInfrastructure.
Understand the SAP Java Development Process.
SAP Java Development Environment: Unit Objectives
© SAP AG <Course Number> Unit Title - 3
© SAP AG 2003, Title of Presentation, Speaker Name / 3
After completing this unit, you will be able to:
Describe the development environment for the SAP NetWeaver Developer Studio.
SAP NetWeaver Developer Studio: Topic Objectives
© SAP AG <Course Number> Unit Title - 4
© SAP AG 2003, Title of Presentation, Speaker Name / 4
Plug-In
Plug-In
Plug-In
Java development tools (JDT)
Plug-Indevelopmentenvironment(PDE)
Workbench
SWT
JFace Help
Workspace VCM
Platform runtimeenvironment
Eclipse SDK
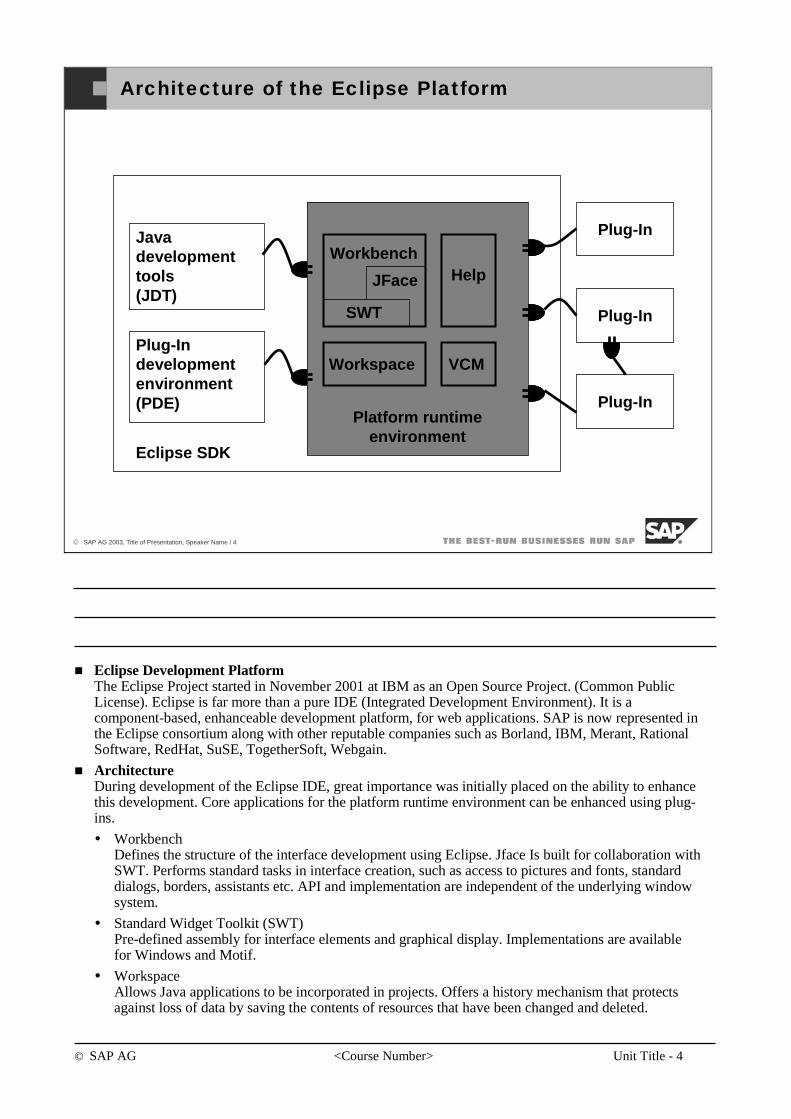
Architecture of the Eclipse Platform
Eclipse Development PlatformThe Eclipse Project started in November 2001 at IBM as an Open Source Project. (Common Public License). Eclipse is far more than a pure IDE (Integrated Development Environment). It is a component-based, enhanceable development platform, for web applications. SAP is now represented in the Eclipse consortium along with other reputable companies such as Borland, IBM, Merant, Rational Software, RedHat, SuSE, TogetherSoft, Webgain.
ArchitectureDuring development of the Eclipse IDE, great importance was initially placed on the ability to enhance this development. Core applications for the platform runtime environment can be enhanced using plug-ins.
WorkbenchDefines the structure of the interface development using Eclipse. Jface Is built for collaboration with SWT. Performs standard tasks in interface creation, such as access to pictures and fonts, standard dialogs, borders, assistants etc. API and implementation are independent of the underlying window system.
Standard Widget Toolkit (SWT) Pre-defined assembly for interface elements and graphical display. Implementations are available for Windows and Motif.
WorkspaceAllows Java applications to be incorporated in projects. Offers a history mechanism that protects against loss of data by saving the contents of resources that have been changed and deleted.
© SAP AG <Course Number> Unit Title - 5
© SAP AG 2003, Title of Presentation, Speaker Name / 5
Plug-Ins
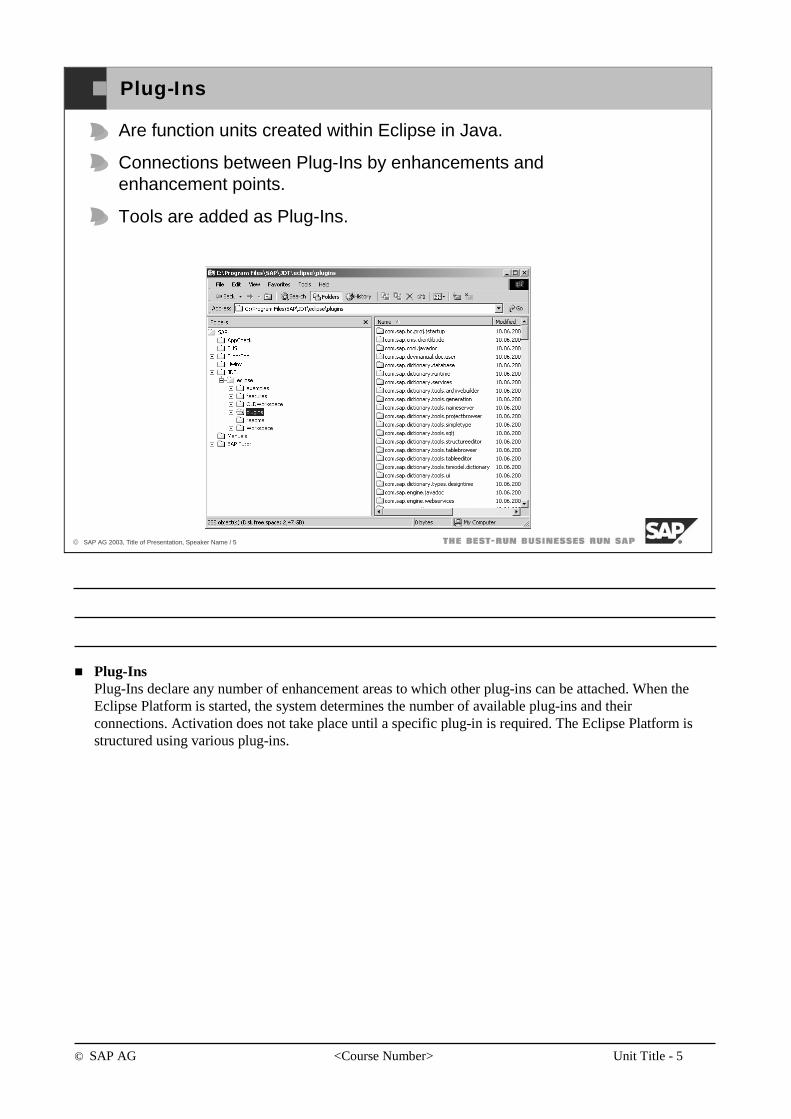
Are function units created within Eclipse in Java.
Connections between Plug-Ins by enhancements and enhancement points.
Tools are added as Plug-Ins.
Plug-InsPlug-Ins declare any number of enhancement areas to which other plug-ins can be attached. When the Eclipse Platform is started, the system determines the number of available plug-ins and their connections. Activation does not take place until a specific plug-in is required. The Eclipse Platform is structured using various plug-ins.
© SAP AG <Course Number> Unit Title - 6
© SAP AG 2003, Title of Presentation, Speaker Name / 6
Eclipse UI
Outline View
Editor
Task View
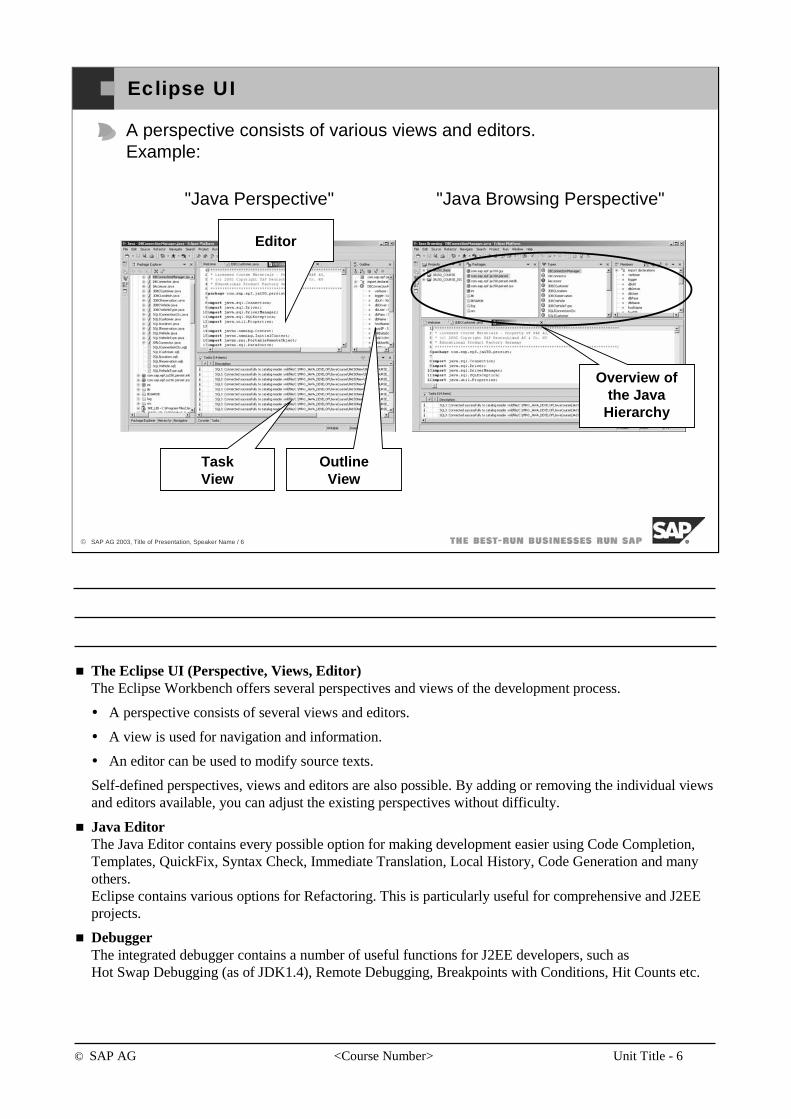
A perspective consists of various views and editors.Example:
Overview of the Java
Hierarchy
"Java Perspective" "Java Browsing Perspective"
The Eclipse UI (Perspective, Views, Editor)The Eclipse Workbench offers several perspectives and views of the development process.
A perspective consists of several views and editors.
A view is used for navigation and information.
An editor can be used to modify source texts.
Self-defined perspectives, views and editors are also possible. By adding or removing the individual views and editors available, you can adjust the existing perspectives without difficulty.
Java EditorThe Java Editor contains every possible option for making development easier using Code Completion, Templates, QuickFix, Syntax Check, Immediate Translation, Local History, Code Generation and many others.Eclipse contains various options for Refactoring. This is particularly useful for comprehensive and J2EE projects.
DebuggerThe integrated debugger contains a number of useful functions for J2EE developers, such asHot Swap Debugging (as of JDK1.4), Remote Debugging, Breakpoints with Conditions, Hit Counts etc.
© SAP AG <Course Number> Unit Title - 7
© SAP AG 2003, Title of Presentation, Speaker Name / 7
SAP Integration Framework
Eclipse Plug-In Framework
UMLModeleror other3rd PartyTools
JavaDictio-naryTools
Infra-structure
Tools
Web DynproTools
J2EETools
Web Services
Tools
J2SETools
Persis-tenceTools
SAP NetWeaver Developer Studio
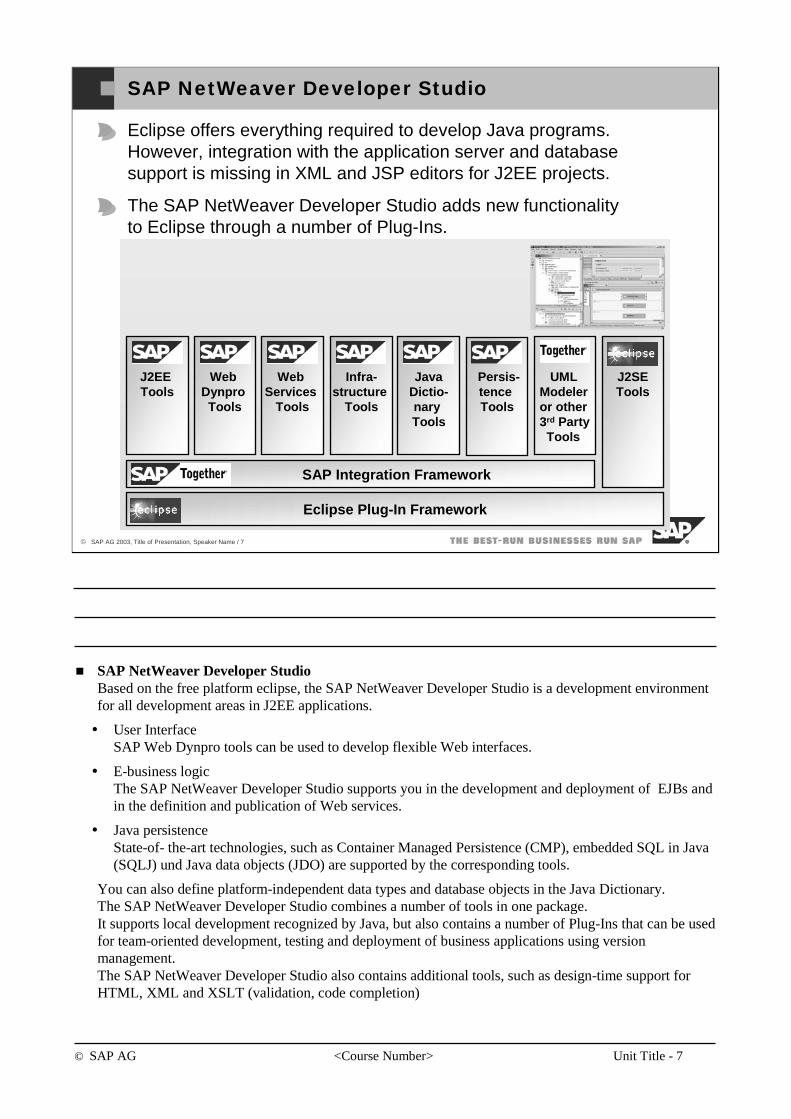
Eclipse offers everything required to develop Java programs.However, integration with the application server and database support is missing in XML and JSP editors for J2EE projects.
The SAP NetWeaver Developer Studio adds new functionality to Eclipse through a number of Plug-Ins.
SAP NetWeaver Developer StudioBased on the free platform eclipse, the SAP NetWeaver Developer Studio is a development environment for all development areas in J2EE applications.
User InterfaceSAP Web Dynpro tools can be used to develop flexible Web interfaces.
E-business logicThe SAP NetWeaver Developer Studio supports you in the development and deployment of EJBs and in the definition and publication of Web services.
Java persistence State-of- the-art technologies, such as Container Managed Persistence (CMP), embedded SQL in Java (SQLJ) und Java data objects (JDO) are supported by the corresponding tools.
You can also define platform-independent data types and database objects in the Java Dictionary.The SAP NetWeaver Developer Studio combines a number of tools in one package. It supports local development recognized by Java, but also contains a number of Plug-Ins that can be used for team-oriented development, testing and deployment of business applications using version management. The SAP NetWeaver Developer Studio also contains additional tools, such as design-time support for HTML, XML and XSLT (validation, code completion)
© SAP AG <Course Number> Unit Title - 8
© SAP AG 2003, Title of Presentation, Speaker Name / 8
SAP NetWeaver Developer Studio: Basics
Based on open source Eclipse development framework
Incremental build, ant-based build support, support for building archives, state-of-the-art debugger (local and remote)
Functionality enhanced by SAP with Plug-Ins
Support for SAP-specific development (for example, Web Dynpro) Creation wizards, Deployment, Local test and debug environment
File and folder-based component storage
Fully integrated IDE-support for component development
Flexible use of the PC + reliable server-based Infrastructure
By seamlessly integrating the Java Development Infrastructure the SAP NetWeaver Developer Studio combines the advantages of the ABAP Workbench with the advantages of a local IDE
Why you should use a separate Java IDELocal development of Java applications with commonly used tools revealed the following weaknesses:
No support for development in large teams
Inconsistencies on local developer PCs
Long correction cycles
Manual deployment
Integration problems in large development projects
This led to the request for a development platform in the format currently available with the ABAP Workbench but with the additional benefit of a local development environment.
© SAP AG <Course Number> Unit Title - 9
© SAP AG 2003, Title of Presentation, Speaker Name / 9
SAP NetWeaver Developer Studio: Installation
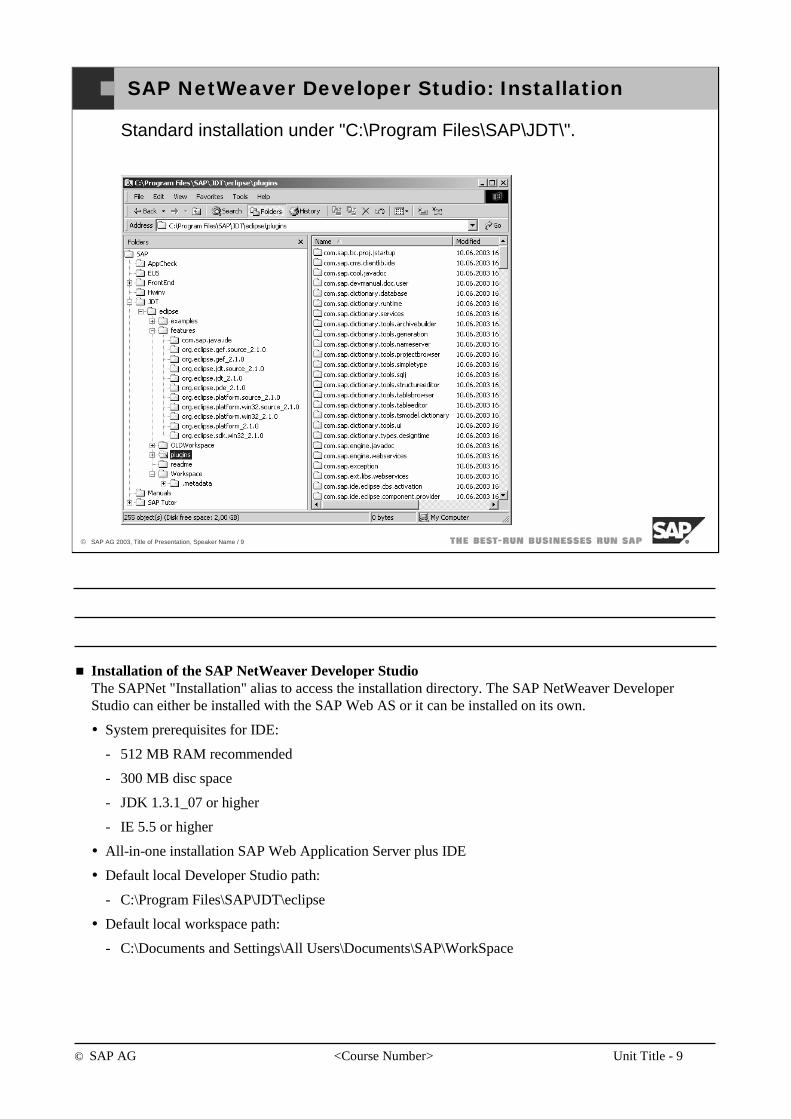
Standard installation under "C:\Program Files\SAP\JDT\".
Installation of the SAP NetWeaver Developer StudioThe SAPNet "Installation" alias to access the installation directory. The SAP NetWeaver Developer Studio can either be installed with the SAP Web AS or it can be installed on its own.
System prerequisites for IDE:
- 512 MB RAM recommended
- 300 MB disc space
- JDK 1.3.1_07 or higher
- IE 5.5 or higher
All-in-one installation SAP Web Application Server plus IDE
Default local Developer Studio path:
- C:\Program Files\SAP\JDT\eclipse
Default local workspace path:
- C:\Documents and Settings\All Users\Documents\SAP\WorkSpace
© SAP AG <Course Number> Unit Title - 10
© SAP AG 2003, Title of Presentation, Speaker Name / 10
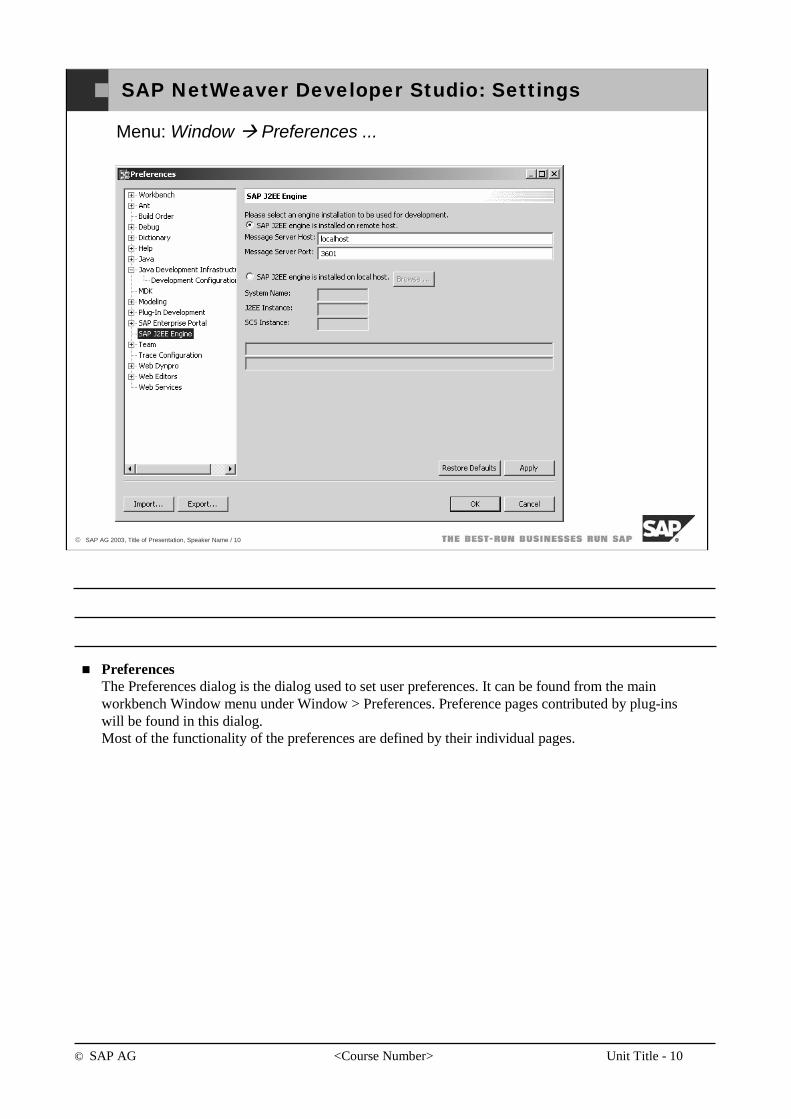
SAP NetWeaver Developer Studio: Settings
Menu: Window Preferences ...
PreferencesThe Preferences dialog is the dialog used to set user preferences. It can be found from the main workbench Window menu under Window > Preferences. Preference pages contributed by plug-ins will be found in this dialog. Most of the functionality of the preferences are defined by their individual pages.
© SAP AG <Course Number> Unit Title - 11
© SAP AG 2003, Title of Presentation, Speaker Name / 11
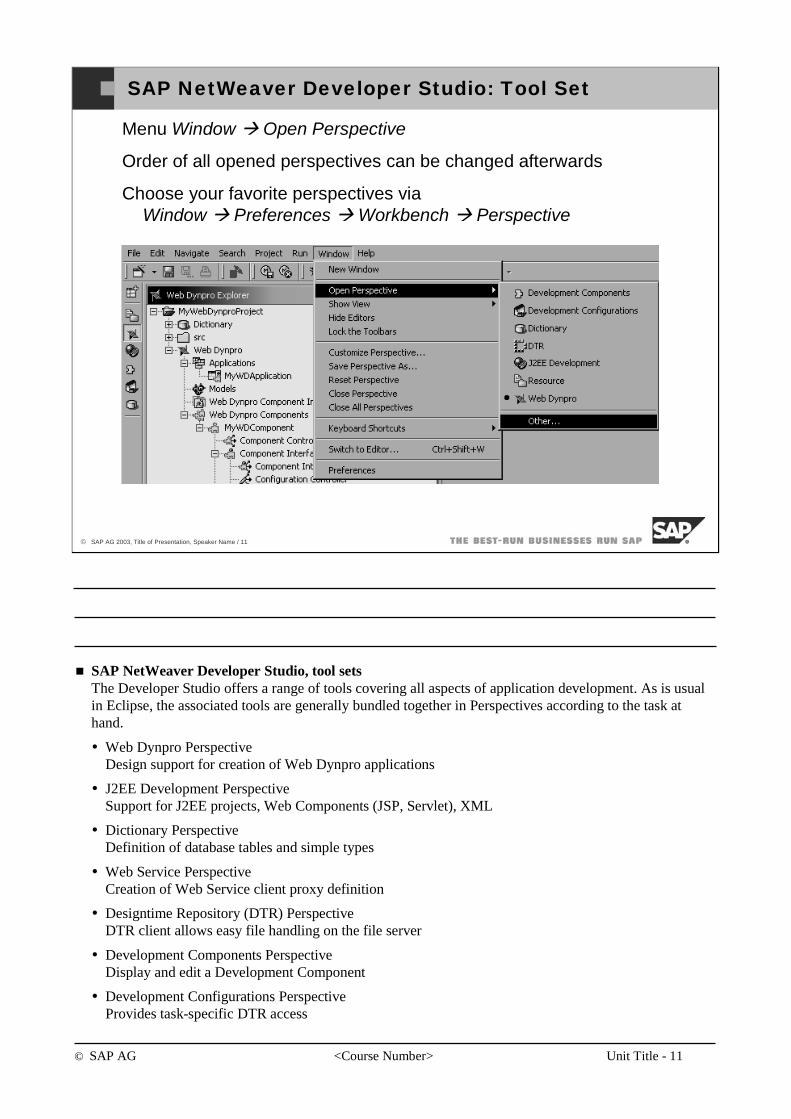
SAP NetWeaver Developer Studio: Tool Set
Menu Window Open Perspective
Order of all opened perspectives can be changed afterwards
Choose your favorite perspectives via Window Preferences Workbench Perspective
SAP NetWeaver Developer Studio, tool setsThe Developer Studio offers a range of tools covering all aspects of application development. As is usual in Eclipse, the associated tools are generally bundled together in Perspectives according to the task at hand.
Web Dynpro PerspectiveDesign support for creation of Web Dynpro applications
J2EE Development PerspectiveSupport for J2EE projects, Web Components (JSP, Servlet), XML
Dictionary PerspectiveDefinition of database tables and simple types
Web Service PerspectiveCreation of Web Service client proxy definition
Designtime Repository (DTR) PerspectiveDTR client allows easy file handling on the file server
Development Components PerspectiveDisplay and edit a Development Component
Development Configurations PerspectiveProvides task-specific DTR access
© SAP AG <Course Number> Unit Title - 12
© SAP AG 2003, Title of Presentation, Speaker Name / 12
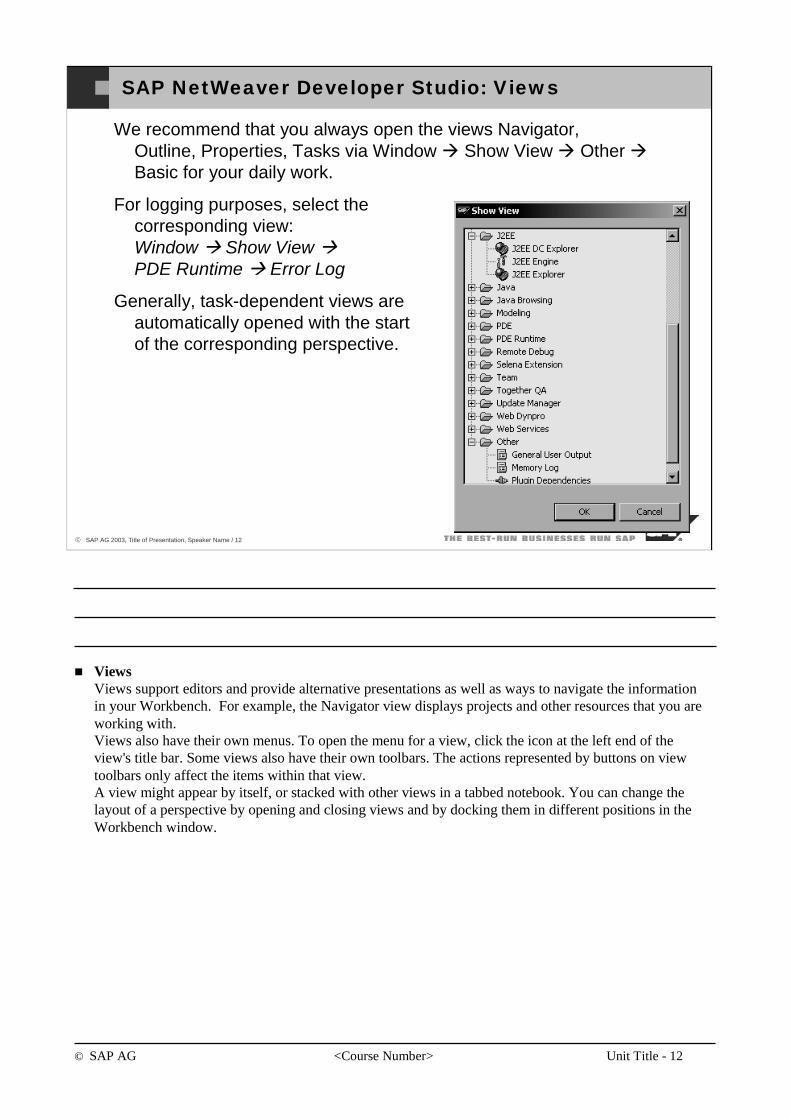
SAP NetWeaver Developer Studio: Views
We recommend that you always open the views Navigator, Outline, Properties, Tasks via Window Show View OtherBasic for your daily work.
For logging purposes, select thecorresponding view:Window Show ViewPDE Runtime Error Log
Generally, task-dependent views areautomatically opened with the start of the corresponding perspective.
ViewsViews support editors and provide alternative presentations as well as ways to navigate the information in your Workbench. For example, the Navigator view displays projects and other resources that you are working with.Views also have their own menus. To open the menu for a view, click the icon at the left end of the view's title bar. Some views also have their own toolbars. The actions represented by buttons on view toolbars only affect the items within that view.A view might appear by itself, or stacked with other views in a tabbed notebook. You can change the layout of a perspective by opening and closing views and by docking them in different positions in the Workbench window.
© SAP AG <Course Number> Unit Title - 13
© SAP AG 2003, Title of Presentation, Speaker Name / 13
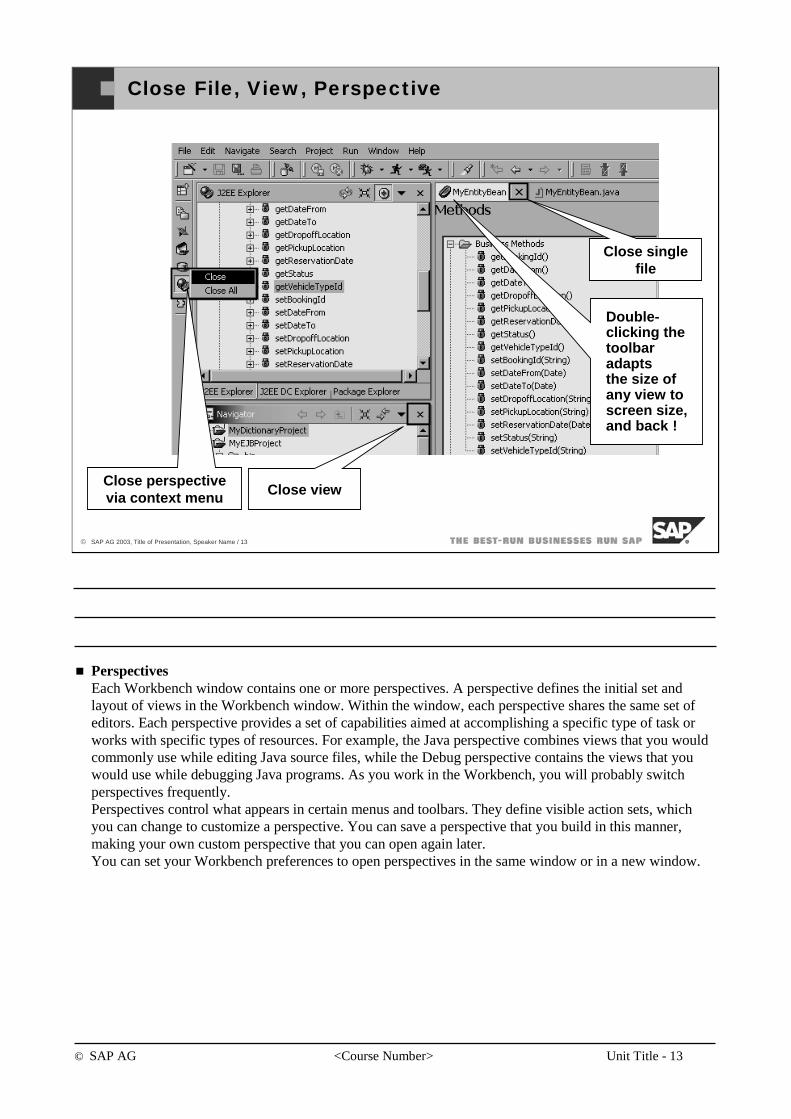
Close File, View, Perspective
Close perspective via context menu Close view
Close single file
Double-clicking thetoolbaradaptsthe size of any view to screen size, and back !
PerspectivesEach Workbench window contains one or more perspectives. A perspective defines the initial set and layout of views in the Workbench window. Within the window, each perspective shares the same set of editors. Each perspective provides a set of capabilities aimed at accomplishing a specific type of task or works with specific types of resources. For example, the Java perspective combines views that you would commonly use while editing Java source files, while the Debug perspective contains the views that you would use while debugging Java programs. As you work in the Workbench, you will probably switch perspectives frequently.Perspectives control what appears in certain menus and toolbars. They define visible action sets, which you can change to customize a perspective. You can save a perspective that you build in this manner, making your own custom perspective that you can open again later.You can set your Workbench preferences to open perspectives in the same window or in a new window.
© SAP AG <Course Number> Unit Title - 14
© SAP AG 2003, Title of Presentation, Speaker Name / 14
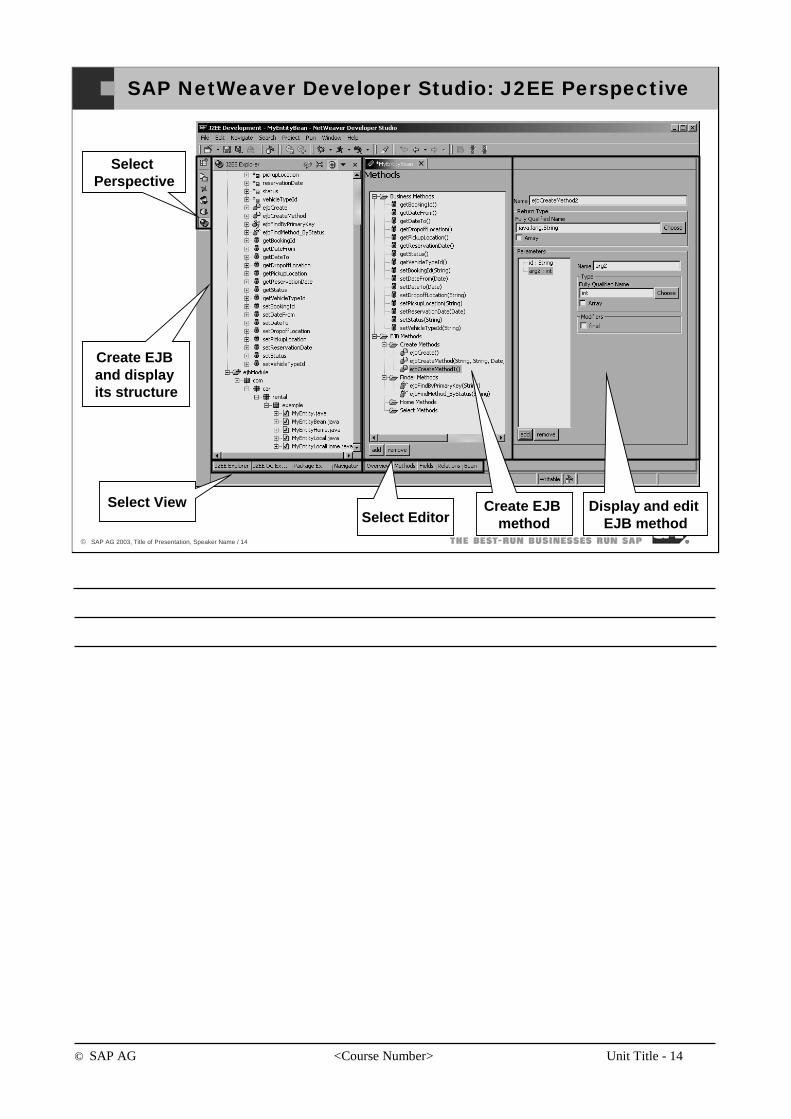
SAP NetWeaver Developer Studio: J2EE Perspective
Select Perspective
Create EJB and display its structure
Select ViewSelect Editor
Display and edit EJB method
Create EJB method
© SAP AG <Course Number> Unit Title - 15
© SAP AG 2003, Title of Presentation, Speaker Name / 15
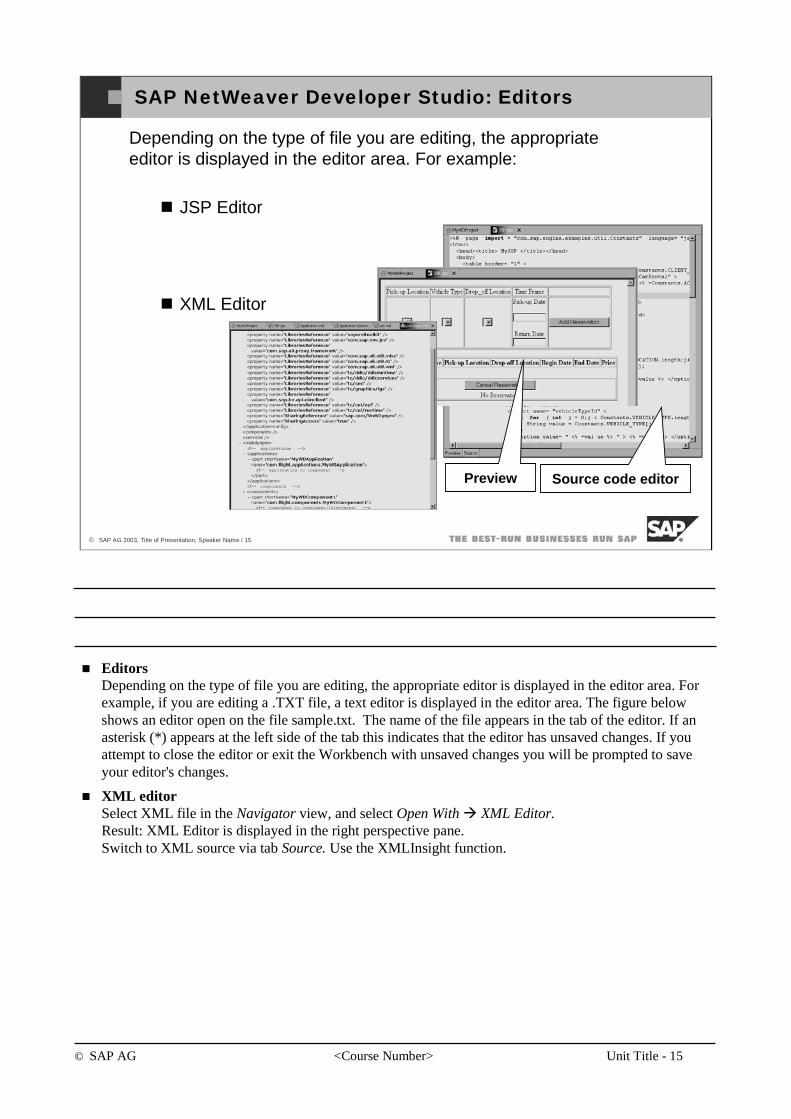
SAP NetWeaver Developer Studio: Editors
Source code editorPreview
Depending on the type of file you are editing, the appropriate editor is displayed in the editor area. For example:
JSP Editor
XML Editor
EditorsDepending on the type of file you are editing, the appropriate editor is displayed in the editor area. For example, if you are editing a .TXT file, a text editor is displayed in the editor area. The figure below shows an editor open on the file sample.txt. The name of the file appears in the tab of the editor. If an asterisk (*) appears at the left side of the tab this indicates that the editor has unsaved changes. If you attempt to close the editor or exit the Workbench with unsaved changes you will be prompted to save your editor's changes.
XML editorSelect XML file in the Navigator view, and select Open With XML Editor.Result: XML Editor is displayed in the right perspective pane.Switch to XML source via tab Source. Use the XMLInsight function.
© SAP AG <Course Number> Unit Title - 16
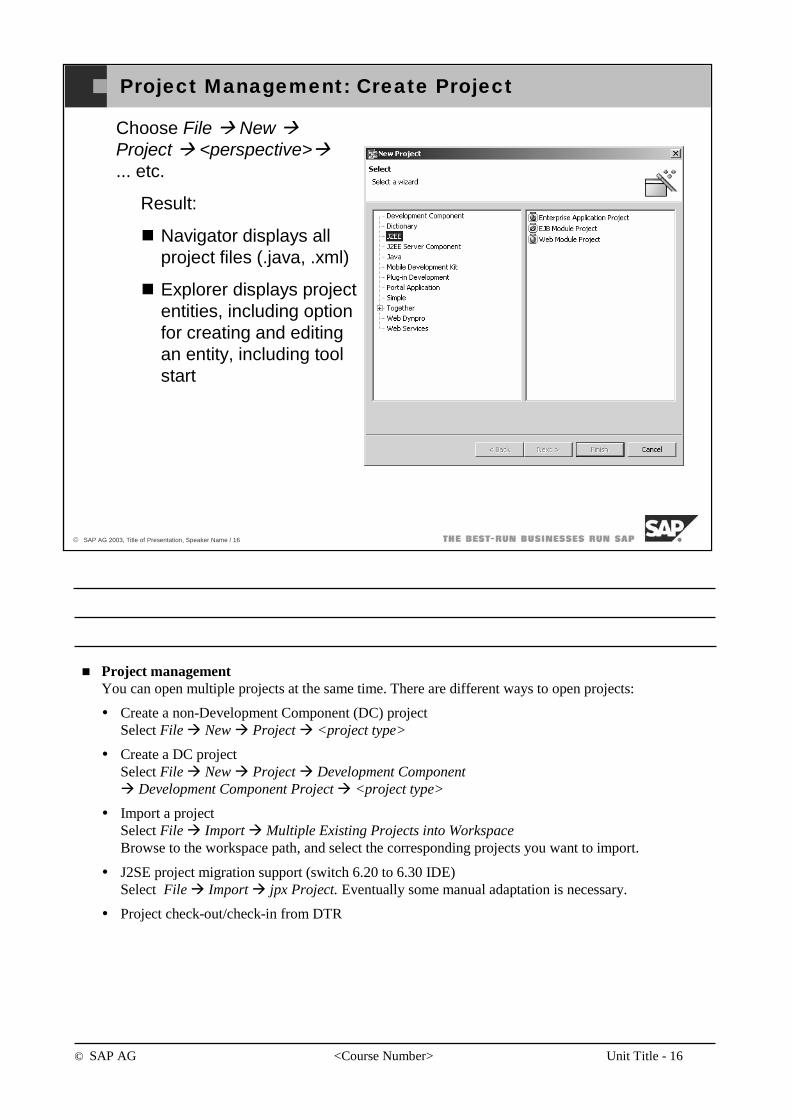
Project managementYou can open multiple projects at the same time. There are different ways to open projects:
Create a non-Development Component (DC) projectSelect File New Project <project type>
Create a DC projectSelect File New Project Development Component
Development Component Project <project type>
Import a projectSelect File Import Multiple Existing Projects into WorkspaceBrowse to the workspace path, and select the corresponding projects you want to import.
J2SE project migration support (switch 6.20 to 6.30 IDE) Select File Import jpx Project. Eventually some manual adaptation is necessary.
Project check-out/check-in from DTR
© SAP AG 2003, Title of Presentation, Speaker Name / 16
Project Management: Create Project
Choose File New Project <perspective>... etc.
Result:
Navigator displays all project files (.java, .xml)
Explorer displays project entities, including option for creating and editing an entity, including tool start
© SAP AG <Course Number> Unit Title - 17
© SAP AG 2003, Title of Presentation, Speaker Name / 17
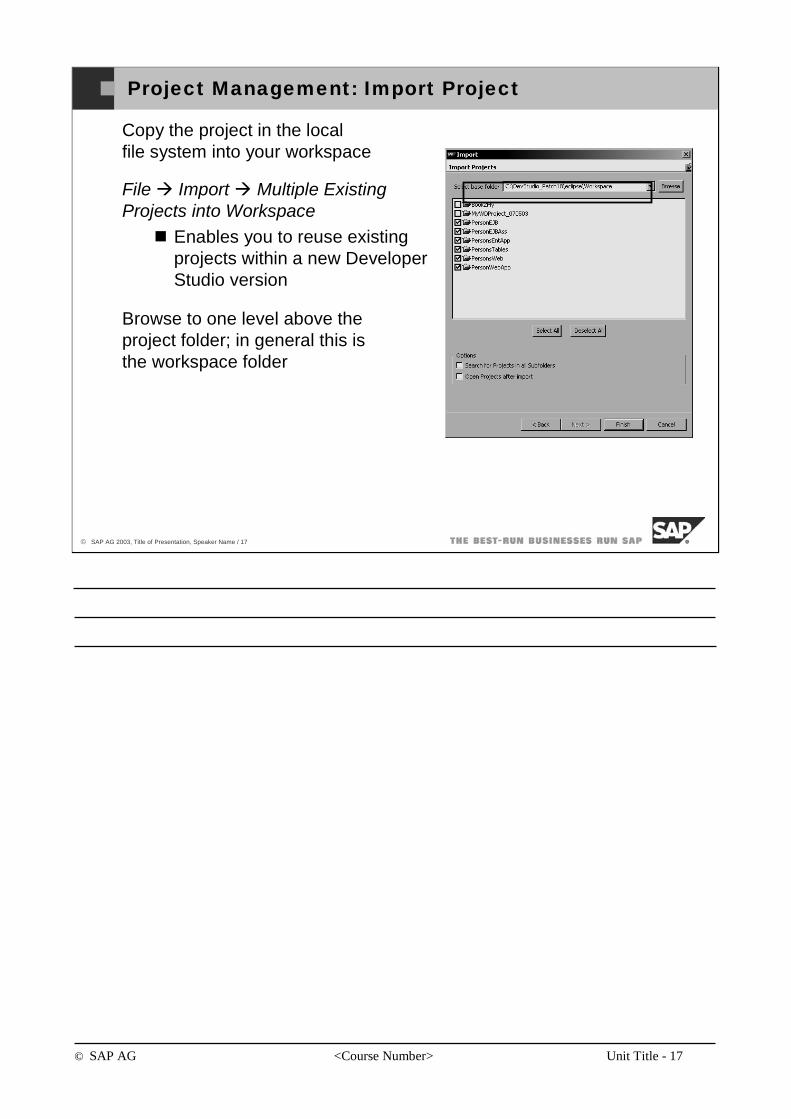
Project Management: Import Project
Copy the project in the localfile system into your workspace
File Import Multiple ExistingProjects into Workspace
Enables you to reuse existingprojects within a new DeveloperStudio version
Browse to one level above theproject folder; in general this isthe workspace folder
© SAP AG <Course Number> Unit Title - 18
© SAP AG 2003, Title of Presentation, Speaker Name / 18
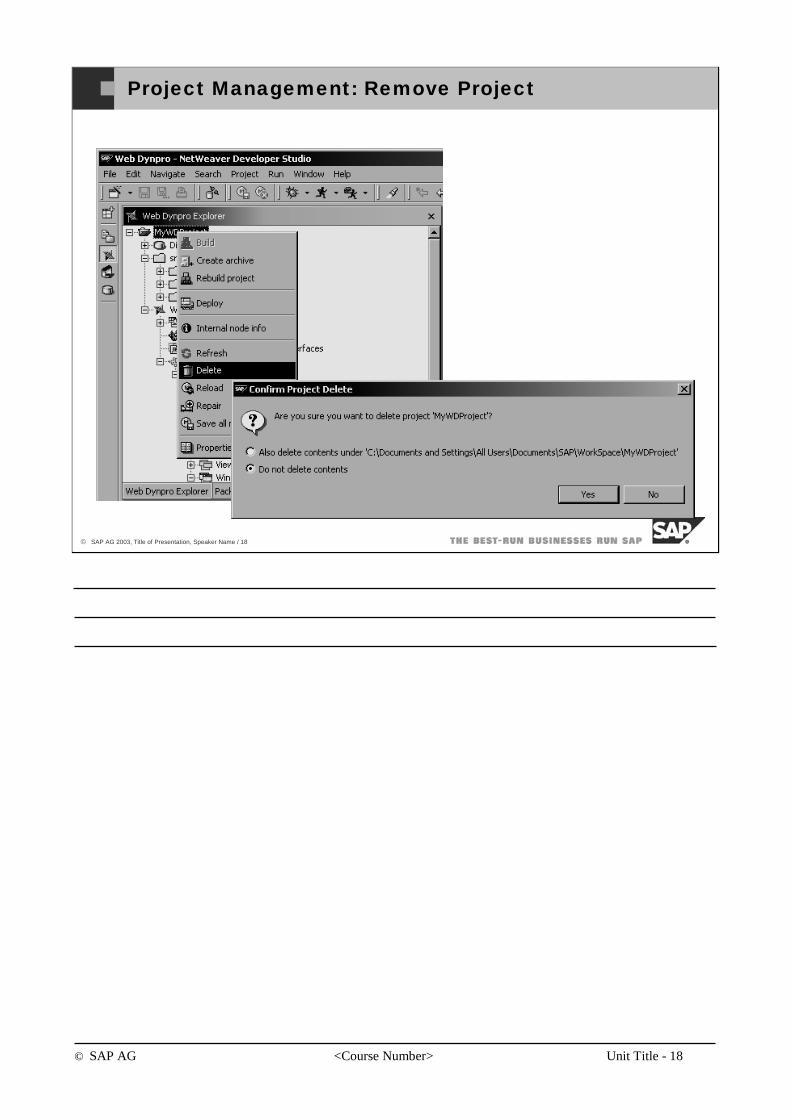
Project Management: Remove Project
© SAP AG <Course Number> Unit Title - 19
© SAP AG 2003, Title of Presentation, Speaker Name / 19
You should now be able to:
Describe the development environment for the SAP NetWeaver Developer Studio.
SAP NetWeaver Developer Studio: Topic Summary
© SAP AG <Course Number> Unit Title - 20
© SAP AG 2003, Title of Presentation, Speaker Name / 20
After completing this unit, you will be able to:
Use a selection of integrated tools for Web Dynproprogramming.
SAP NetWeaver Developer Studio: Topic Objectives
SAP Web Dynpro Development ToolsSeveral development tools were provided as an integral element in the SAP NetWeaver Developer Studio to support application development during the implementation and design phases.

© SAP AG <Course Number> Unit Title - 21
© SAP AG 2003, Title of Presentation, Speaker Name / 21
Web Dynpro Explorer
Web Dynpro ExplorerIn the Web Dynpro perspective, the Web Dynpro Explorer displays the default view of the logical structure of the entire Web Dynpro application. The nodes and subnodes automatically created by the Web DynproGenerator are the starting point for the creation of new application elements.
Opening the Web Dynpro ExplorerYou open the Web Dynpro Explorer by choosing Windows → Show View → Web Dynpro Explorer from the menu. If you want to activate the Web Dynpro Explorer after working with another tool, choose the Web Dynpro Explorer tab:
© SAP AG <Course Number> Unit Title - 22
© SAP AG 2003, Title of Presentation, Speaker Name / 22
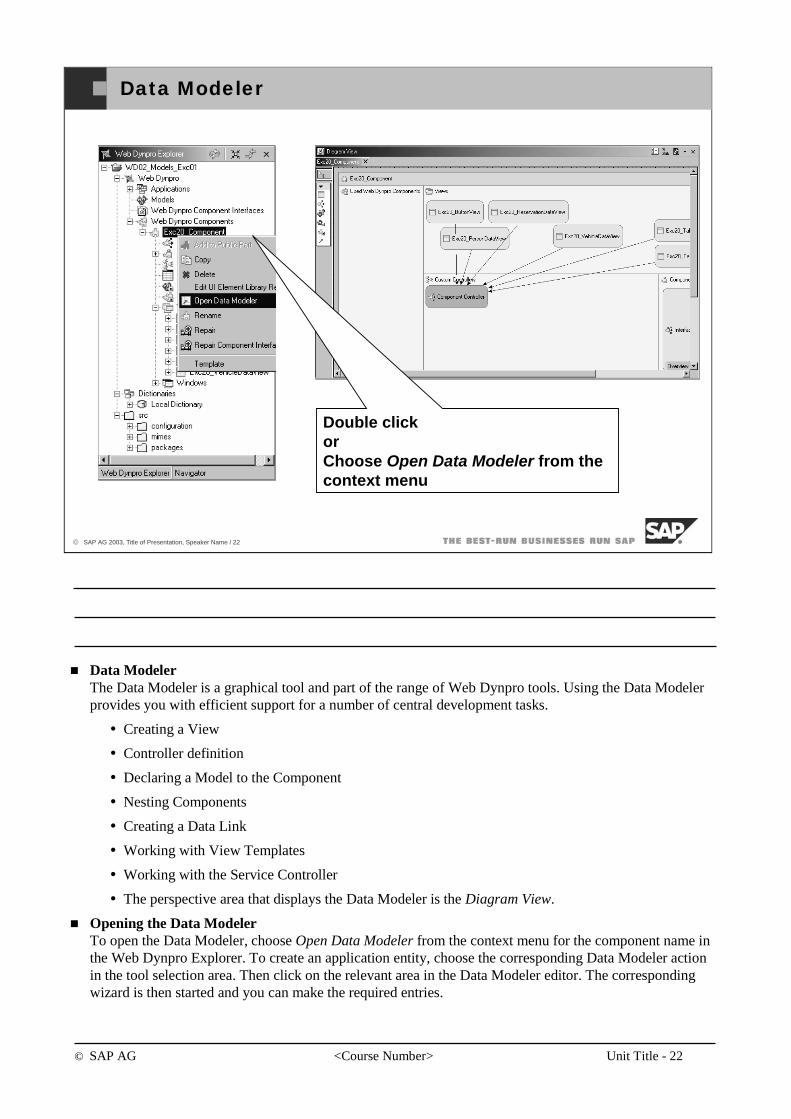
Data Modeler
Double click orChoose Open Data Modeler from the context menu
Data ModelerThe Data Modeler is a graphical tool and part of the range of Web Dynpro tools. Using the Data Modeler provides you with efficient support for a number of central development tasks.
Creating a View
Controller definition
Declaring a Model to the Component
Nesting Components
Creating a Data Link
Working with View Templates
Working with the Service Controller
The perspective area that displays the Data Modeler is the Diagram View.
Opening the Data ModelerTo open the Data Modeler, choose Open Data Modeler from the context menu for the component name in the Web Dynpro Explorer. To create an application entity, choose the corresponding Data Modeler action in the tool selection area. Then click on the relevant area in the Data Modeler editor. The corresponding wizard is then started and you can make the required entries.
© SAP AG <Course Number> Unit Title - 23
© SAP AG 2003, Title of Presentation, Speaker Name / 23
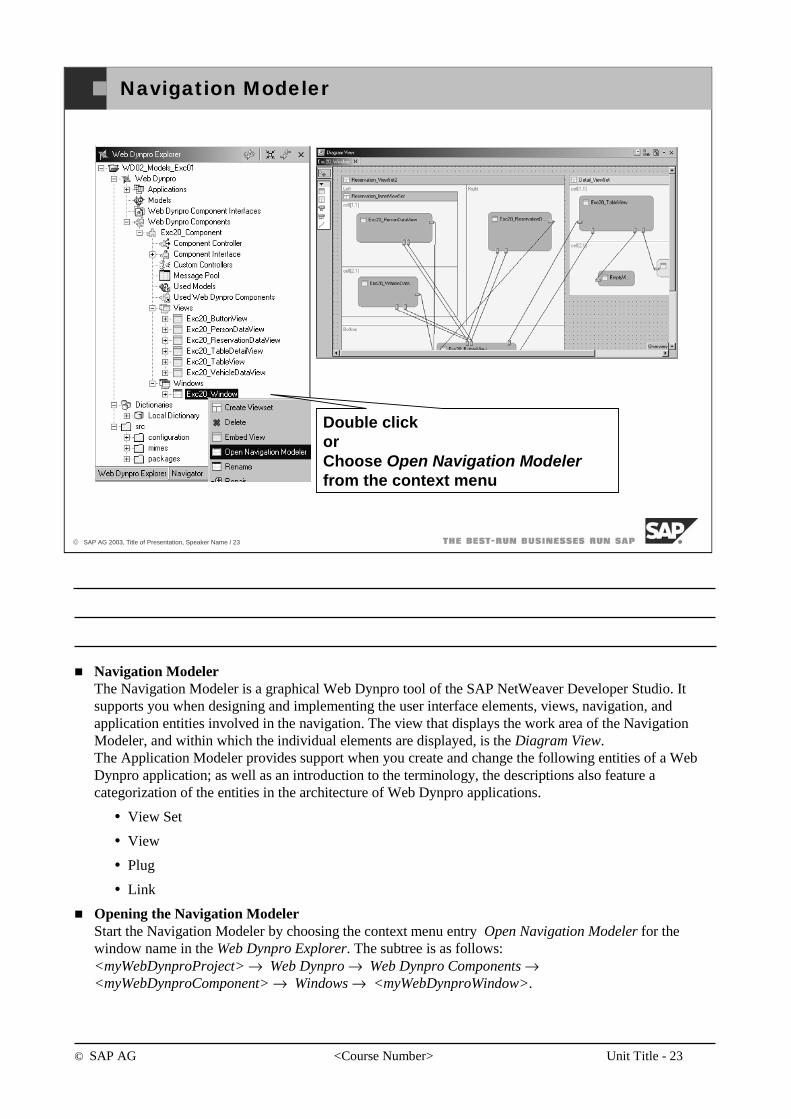
Navigation Modeler
Double click orChoose Open Navigation Modelerfrom the context menu
Navigation ModelerThe Navigation Modeler is a graphical Web Dynpro tool of the SAP NetWeaver Developer Studio. It supports you when designing and implementing the user interface elements, views, navigation, and application entities involved in the navigation. The view that displays the work area of the Navigation Modeler, and within which the individual elements are displayed, is the Diagram View.The Application Modeler provides support when you create and change the following entities of a Web Dynpro application; as well as an introduction to the terminology, the descriptions also feature a categorization of the entities in the architecture of Web Dynpro applications.
View Set
View
Plug
Link
Opening the Navigation ModelerStart the Navigation Modeler by choosing the context menu entry Open Navigation Modeler for the window name in the Web Dynpro Explorer. The subtree is as follows:<myWebDynproProject> → Web Dynpro → Web Dynpro Components →<myWebDynproComponent> → Windows → <myWebDynproWindow>.
© SAP AG <Course Number> Unit Title - 24
© SAP AG 2003, Title of Presentation, Speaker Name / 24
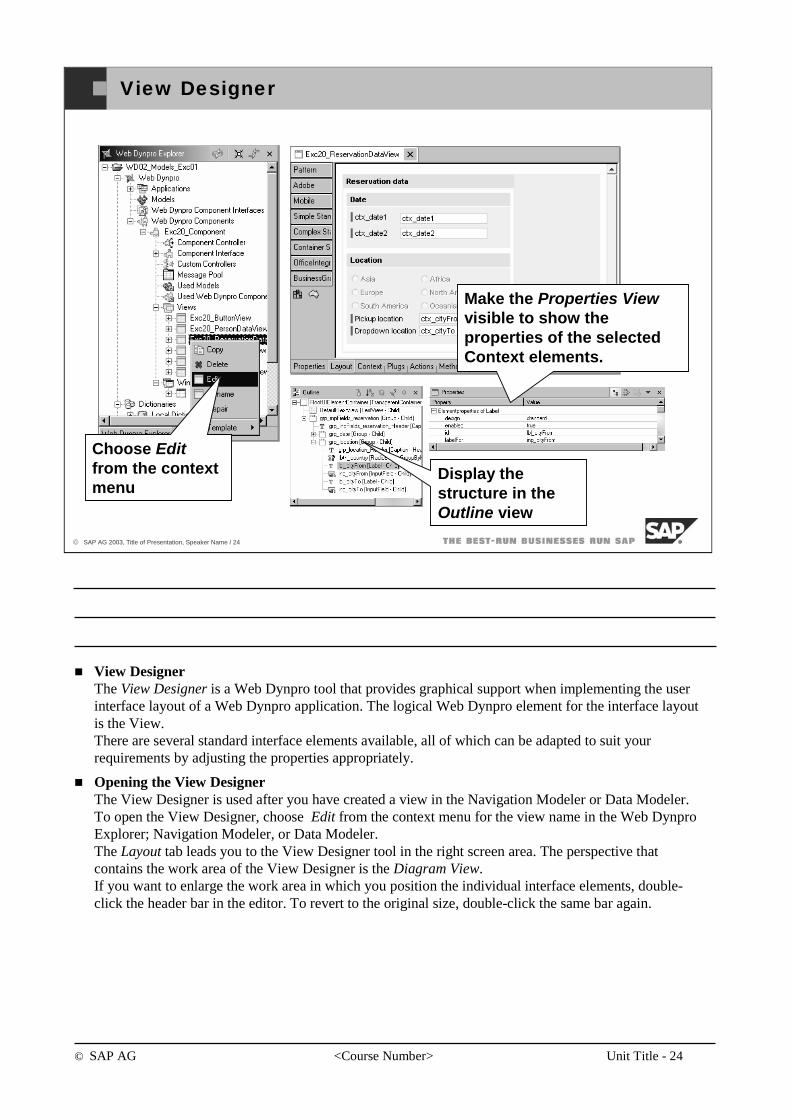
View Designer
Make the Properties Viewvisible to show the properties of the selected Context elements.
Choose Edit from the context menu
Display the structure in the Outline view
View DesignerThe View Designer is a Web Dynpro tool that provides graphical support when implementing the userinterface layout of a Web Dynpro application. The logical Web Dynpro element for the interface layout is the View.There are several standard interface elements available, all of which can be adapted to suit your requirements by adjusting the properties appropriately.
Opening the View DesignerThe View Designer is used after you have created a view in the Navigation Modeler or Data Modeler.To open the View Designer, choose Edit from the context menu for the view name in the Web DynproExplorer; Navigation Modeler, or Data Modeler. The Layout tab leads you to the View Designer tool in the right screen area. The perspective that contains the work area of the View Designer is the Diagram View.If you want to enlarge the work area in which you position the individual interface elements, double-click the header bar in the editor. To revert to the original size, double-click the same bar again.
© SAP AG <Course Number> Unit Title - 25
© SAP AG 2003, Title of Presentation, Speaker Name / 25
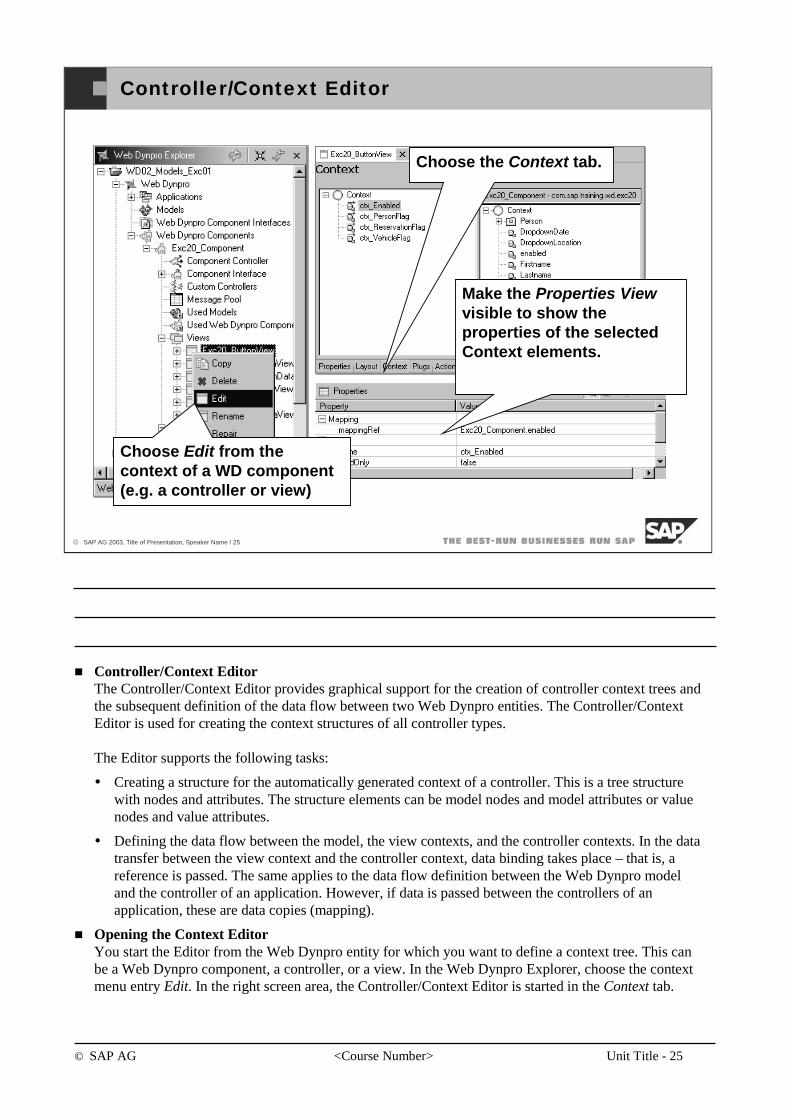
Controller/Context Editor
Choose Edit from the context of a WD component (e.g. a controller or view)
Choose the Context tab.
Make the Properties Viewvisible to show the properties of the selected Context elements.
Controller/Context Editor The Controller/Context Editor provides graphical support for the creation of controller context trees and the subsequent definition of the data flow between two Web Dynpro entities. The Controller/Context Editor is used for creating the context structures of all controller types.
The Editor supports the following tasks:
Creating a structure for the automatically generated context of a controller. This is a tree structure with nodes and attributes. The structure elements can be model nodes and model attributes or value nodes and value attributes.
Defining the data flow between the model, the view contexts, and the controller contexts. In the data transfer between the view context and the controller context, data binding takes place – that is, a reference is passed. The same applies to the data flow definition between the Web Dynpro model and the controller of an application. However, if data is passed between the controllers of an application, these are data copies (mapping).
Opening the Context EditorYou start the Editor from the Web Dynpro entity for which you want to define a context tree. This can be a Web Dynpro component, a controller, or a view. In the Web Dynpro Explorer, choose the context menu entry Edit. In the right screen area, the Controller/Context Editor is started in the Context tab.
© SAP AG <Course Number> Unit Title - 26
© SAP AG 2003, Title of Presentation, Speaker Name / 26
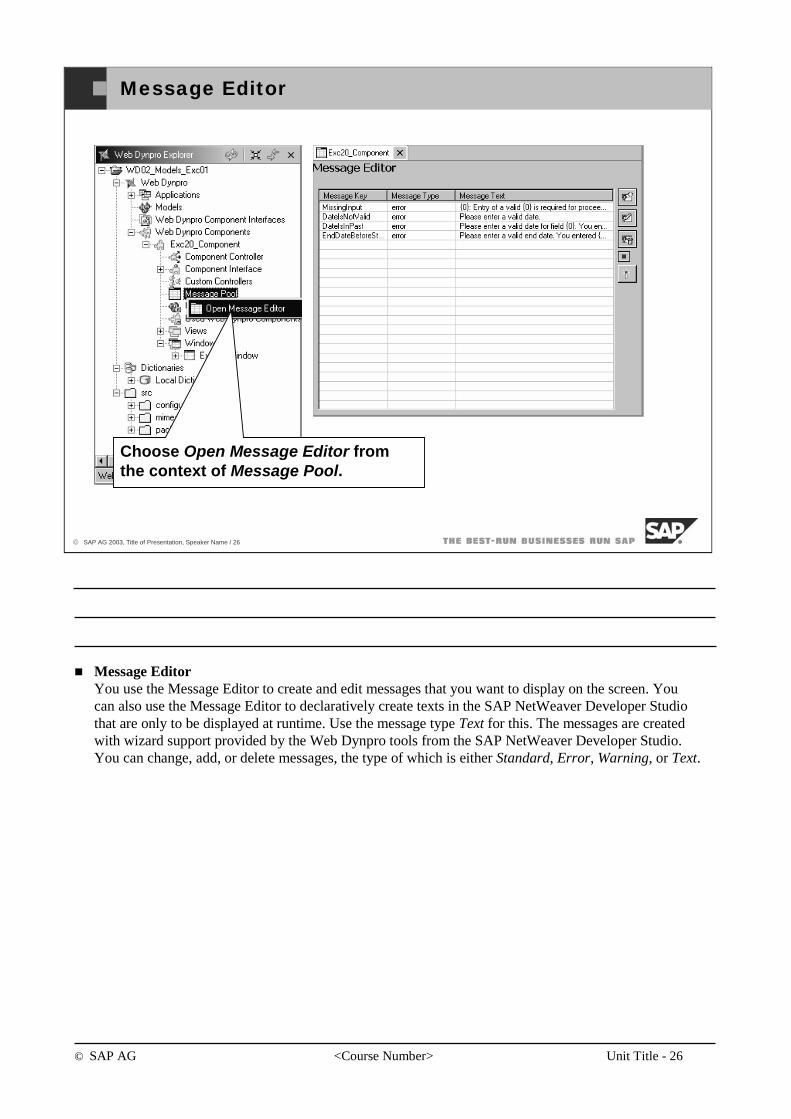
Message Editor
Choose Open Message Editor from the context of Message Pool.
Message EditorYou use the Message Editor to create and edit messages that you want to display on the screen. You can also use the Message Editor to declaratively create texts in the SAP NetWeaver Developer Studio that are only to be displayed at runtime. Use the message type Text for this. The messages are created with wizard support provided by the Web Dynpro tools from the SAP NetWeaver Developer Studio. You can change, add, or delete messages, the type of which is either Standard, Error, Warning, or Text.
© SAP AG <Course Number> Unit Title - 27
© SAP AG 2003, Title of Presentation, Speaker Name / 27
You should now be able to:
Use a selection of integrated tools for Web Dynproprogramming.
SAP NetWeaver Developer Studio: Topic Summary
© SAP AG <Course Number> Unit Title - 28
© SAP AG 2003, Title of Presentation, Speaker Name / 28
After completing this unit, you will be able to:
Describe the technical system landscape and installation options of SAP Web Application Server.
Use a selection of Administration tools of SAP Web Application Server.
SAP Web AS, Administration Tools: Topic Objectives
© SAP AG <Course Number> Unit Title - 29
© SAP AG 2003, Title of Presentation, Speaker Name / 29
Technical System Landscape
Deploy
File System
Local J2EE Engine
Save / load
J2EE Server
Web Container
EJB Container
ServiceServiceService
Deploy
File System
Local J2EE Engine
Save / load
J2EE Server
Web Container
EJB Container
ServiceServiceService
Deploy
File System
Save / load Deploy
File System
Save / load
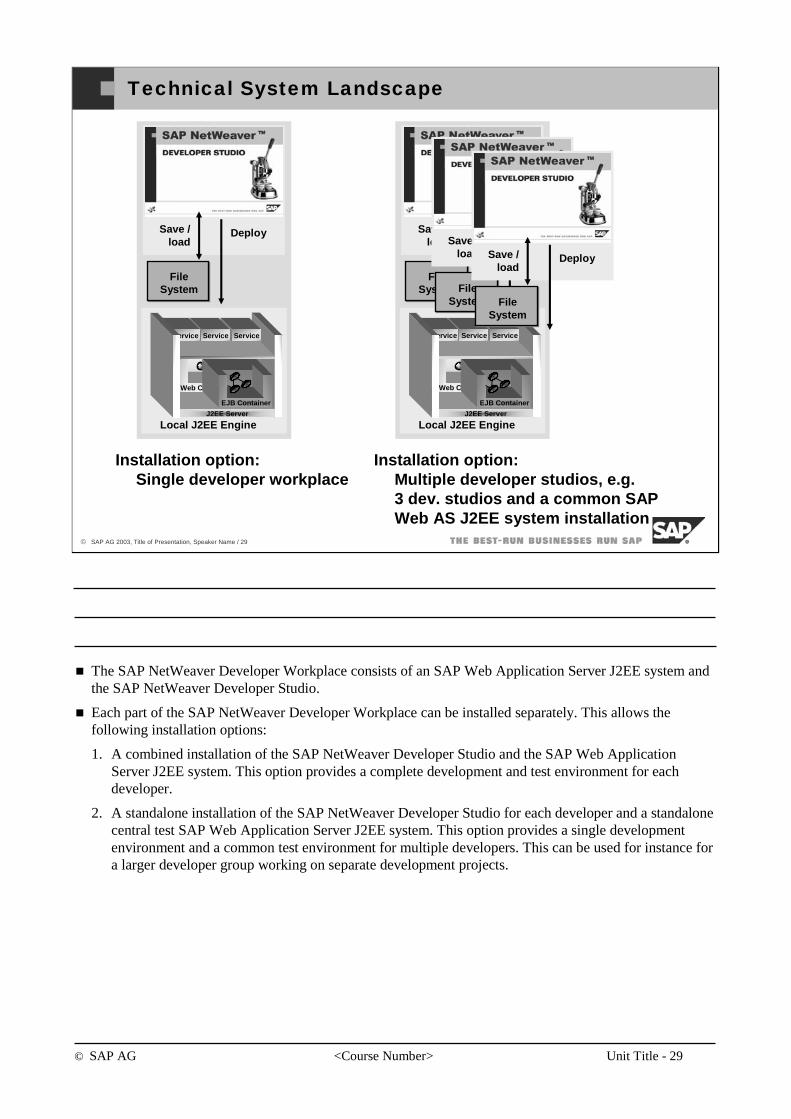
Installation option:Single developer workplace
Installation option:Multiple developer studios, e.g. 3 dev. studios and a common SAP Web AS J2EE system installation
The SAP NetWeaver Developer Workplace consists of an SAP Web Application Server J2EE system and the SAP NetWeaver Developer Studio.
Each part of the SAP NetWeaver Developer Workplace can be installed separately. This allows the following installation options:
1. A combined installation of the SAP NetWeaver Developer Studio and the SAP Web Application Server J2EE system. This option provides a complete development and test environment for each developer.
2. A standalone installation of the SAP NetWeaver Developer Studio for each developer and a standalone central test SAP Web Application Server J2EE system. This option provides a single development environment and a common test environment for multiple developers. This can be used for instance for a larger developer group working on separate development projects.

© SAP AG <Course Number> Unit Title - 30
© SAP AG 2003, Title of Presentation, Speaker Name / 30
SAP Web AS Administration Tools
Deploy
File System
Local J2EE Engine
Save / load
J2EE Server
Web Container
EJB Container
ServiceServiceService
SAP Management Console
Telnet
Visual Administrator
© SAP AG <Course Number> Unit Title - 31
© SAP AG 2003, Title of Presentation, Speaker Name / 31
SAP Management Console
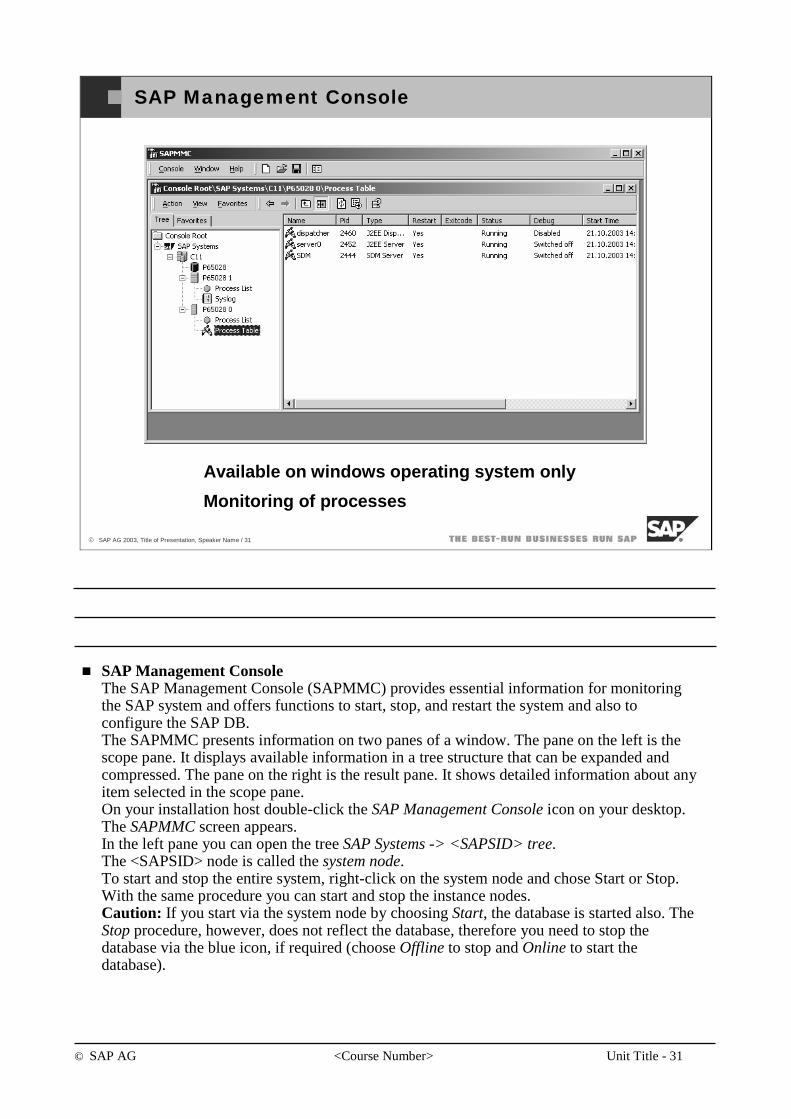
Available on windows operating system only
Monitoring of processes
SAP Management ConsoleThe SAP Management Console (SAPMMC) provides essential information for monitoringthe SAP system and offers functions to start, stop, and restart the system and also to configure the SAP DB.The SAPMMC presents information on two panes of a window. The pane on the left is thescope pane. It displays available information in a tree structure that can be expanded and compressed. The pane on the right is the result pane. It shows detailed information about anyitem selected in the scope pane. On your installation host double-click the SAP Management Console icon on your desktop.The SAPMMC screen appears.In the left pane you can open the tree SAP Systems -> <SAPSID> tree.The <SAPSID> node is called the system node.To start and stop the entire system, right-click on the system node and chose Start or Stop.With the same procedure you can start and stop the instance nodes. Caution: If you start via the system node by choosing Start, the database is started also. TheStop procedure, however, does not reflect the database, therefore you need to stop thedatabase via the blue icon, if required (choose Offline to stop and Online to start thedatabase).
© SAP AG <Course Number> Unit Title - 32
© SAP AG 2003, Title of Presentation, Speaker Name / 32
Telnet
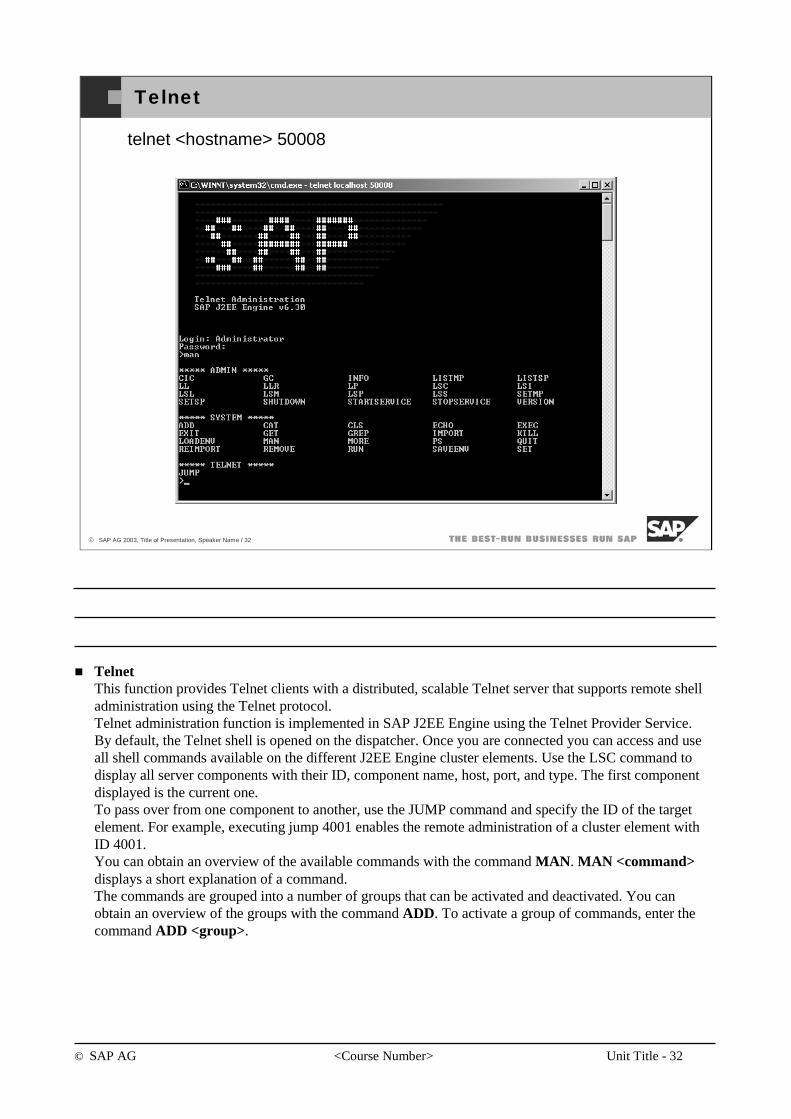
telnet <hostname> 50008
TelnetThis function provides Telnet clients with a distributed, scalable Telnet server that supports remote shell administration using the Telnet protocol. Telnet administration function is implemented in SAP J2EE Engine using the Telnet Provider Service. By default, the Telnet shell is opened on the dispatcher. Once you are connected you can access and use all shell commands available on the different J2EE Engine cluster elements. Use the LSC command to display all server components with their ID, component name, host, port, and type. The first component displayed is the current one.To pass over from one component to another, use the JUMP command and specify the ID of the target element. For example, executing jump 4001 enables the remote administration of a cluster element with ID 4001.You can obtain an overview of the available commands with the command MAN. MAN <command>displays a short explanation of a command.The commands are grouped into a number of groups that can be activated and deactivated. You can obtain an overview of the groups with the command ADD. To activate a group of commands, enter the command ADD <group>.
© SAP AG <Course Number> Unit Title - 33
© SAP AG 2003, Title of Presentation, Speaker Name / 33
Visual Administrator
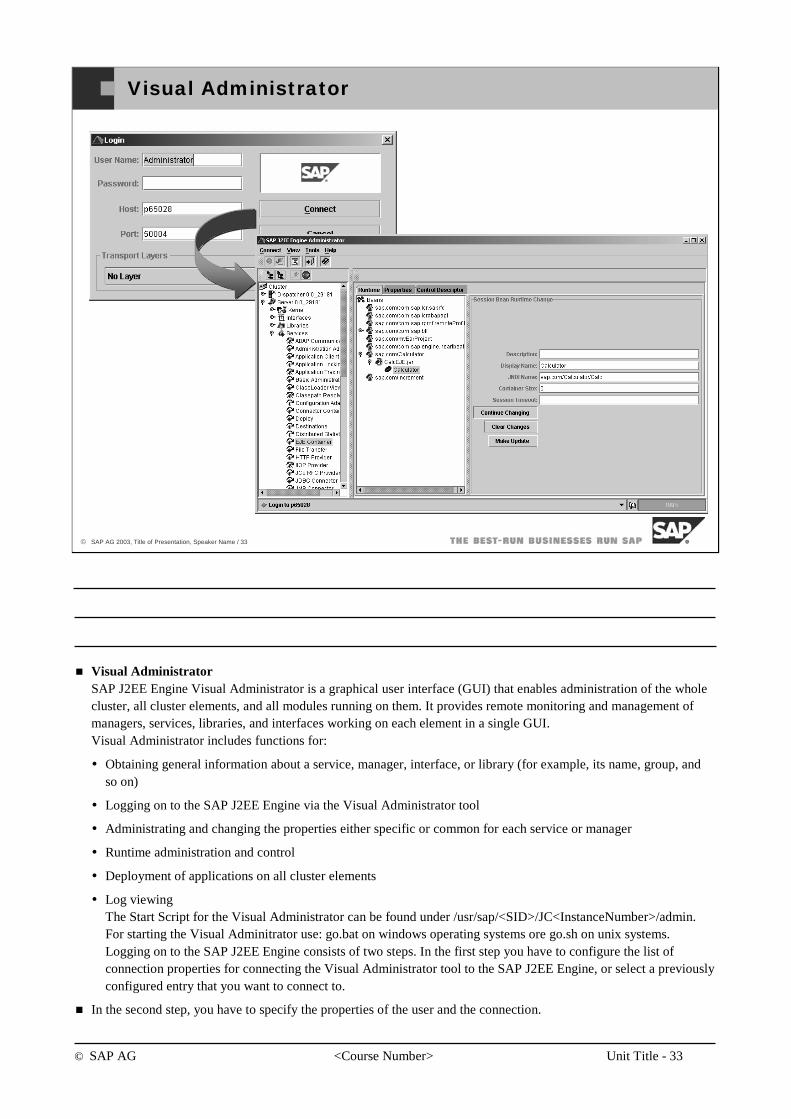
Visual AdministratorSAP J2EE Engine Visual Administrator is a graphical user interface (GUI) that enables administration of the whole cluster, all cluster elements, and all modules running on them. It provides remote monitoring and management of managers, services, libraries, and interfaces working on each element in a single GUI.Visual Administrator includes functions for:
Obtaining general information about a service, manager, interface, or library (for example, its name, group, and so on)
Logging on to the SAP J2EE Engine via the Visual Administrator tool
Administrating and changing the properties either specific or common for each service or manager
Runtime administration and control
Deployment of applications on all cluster elements
Log viewingThe Start Script for the Visual Administrator can be found under /usr/sap/<SID>/JC<InstanceNumber>/admin. For starting the Visual Adminitrator use: go.bat on windows operating systems ore go.sh on unix systems.Logging on to the SAP J2EE Engine consists of two steps. In the first step you have to configure the list of connection properties for connecting the Visual Administrator tool to the SAP J2EE Engine, or select a previously configured entry that you want to connect to.
In the second step, you have to specify the properties of the user and the connection.
© SAP AG <Course Number> Unit Title - 34
© SAP AG 2003, Title of Presentation, Speaker Name / 34
Config Tool GUI
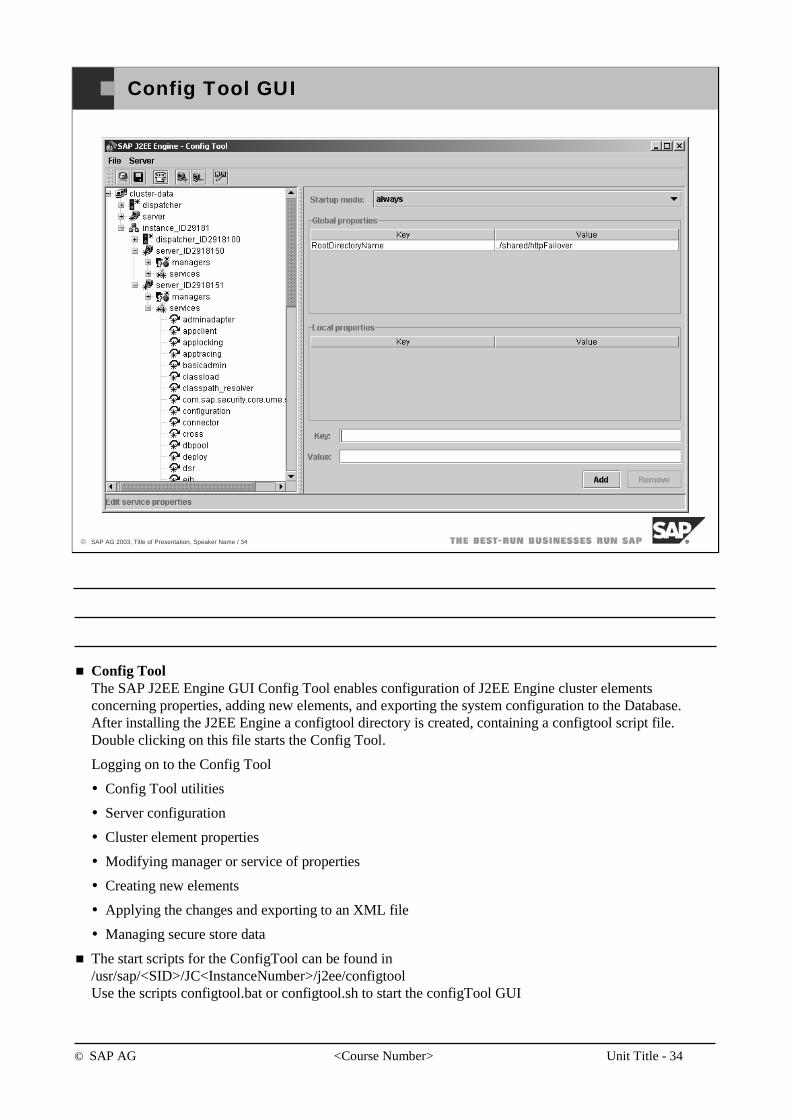
Config ToolThe SAP J2EE Engine GUI Config Tool enables configuration of J2EE Engine cluster elements concerning properties, adding new elements, and exporting the system configuration to the Database.After installing the J2EE Engine a configtool directory is created, containing a configtool script file. Double clicking on this file starts the Config Tool.
Logging on to the Config Tool
Config Tool utilities
Server configuration
Cluster element properties
Modifying manager or service of properties
Creating new elements
Applying the changes and exporting to an XML file
Managing secure store data
The start scripts for the ConfigTool can be found in/usr/sap/<SID>/JC<InstanceNumber>/j2ee/configtoolUse the scripts configtool.bat or configtool.sh to start the configTool GUI

© SAP AG <Course Number> Unit Title - 35
© SAP AG 2003, Title of Presentation, Speaker Name / 35
You should now be able to:
Describe the technical system landscape and installation options of SAP Web Application Server.
Use a selection of Administration tools of SAP Web Application Server.
SAP Web AS, Administration Tools: Topic Summary
© SAP AG <Course Number> Unit Title - 36
© SAP AG 2003, Title of Presentation, Speaker Name / 36
After completing this unit, you will be able to:
Describe the main benefits of SAP Java Development Infrastructure.
Java Development Infrastructure: Topic Objectives
Java Development InfrastructureThe Java Development Infrastructure supports you during the organization of your Java development processes.
Division into individual components means working with large software projects is easier.
The Design Time Repository versions the source codes in a central location.
The Build Service creates components that can be run.
The Change Management Service supports you in the delivery of software.

© SAP AG <Course Number> Unit Title - 37
© SAP AG 2003, Title of Presentation, Speaker Name / 37
Overview: Java Development Environment
To implement large business applications with J2EE, SAP must:
Provide new features (SAP Web Dynpro, database-independent)
Integrate open non-J2EE standards
Enhance the existing programming model
Support a highly productive development environment
Development environment
Presentation Layer
Business Layer
Components in a J2EE Application
IntegrationLayer
Servlet JSP
EJB
Persistence
JDBC Open SQL
Web Dynpro
Web Services
SQLJ
Java Development InfrastructureThe Java Development Infrastructure provided by SAP consists of several components and services.
SAP NetWeaver Developer StudioThe SAP NetWeaver Developer Studio is a development tool based on the free Eclipse platform that SAP provides to develop business applications. It combines the advantages of local development with the strength of a central resource repository and supports development teams with numerous tools for development of complex applications such as build processes.
Design Time Repository (DTR)The DTR can be used to store development components centrally within a distributed development and is responsible for version management.
Component Build Service (CBS)The DTR is closely associated with the CBS. The CBS is responsible for creating software components on the basis of the SAP "Component Model" as a central build process.
Change Management Service (CMS)Once make processes have been completed successfully, the CBS forwards the results to the CMS. The CMS is responsible for software logistics. This is the controlled distribution of software components between defined targets within the development landscape.
© SAP AG <Course Number> Unit Title - 38
© SAP AG 2003, Title of Presentation, Speaker Name / 38
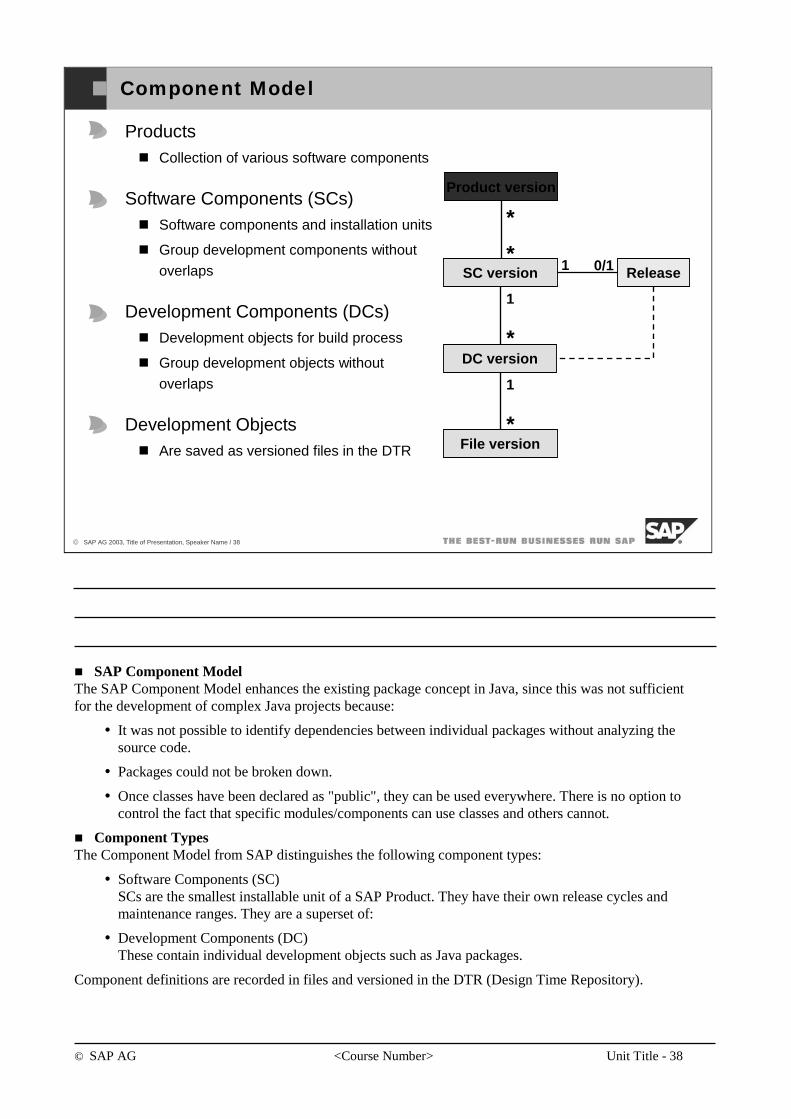
Component Model
ProductsCollection of various software components
Software Components (SCs)Software components and installation units
Group development components without
overlaps
Development Components (DCs)Development objects for build process
Group development objects without
overlaps
Development ObjectsAre saved as versioned files in the DTR
DC version
SC version
File version
*
1
1
*
Release1 0/1
Product version
*
*
SAP Component ModelThe SAP Component Model enhances the existing package concept in Java, since this was not sufficient for the development of complex Java projects because:
It was not possible to identify dependencies between individual packages without analyzing the source code.
Packages could not be broken down.
Once classes have been declared as "public", they can be used everywhere. There is no option to control the fact that specific modules/components can use classes and others cannot.
Component TypesThe Component Model from SAP distinguishes the following component types:
Software Components (SC)SCs are the smallest installable unit of a SAP Product. They have their own release cycles and maintenance ranges. They are a superset of:
Development Components (DC)These contain individual development objects such as Java packages.
Component definitions are recorded in files and versioned in the DTR (Design Time Repository).
© SAP AG <Course Number> Unit Title - 39
© SAP AG 2003, Title of Presentation, Speaker Name / 39
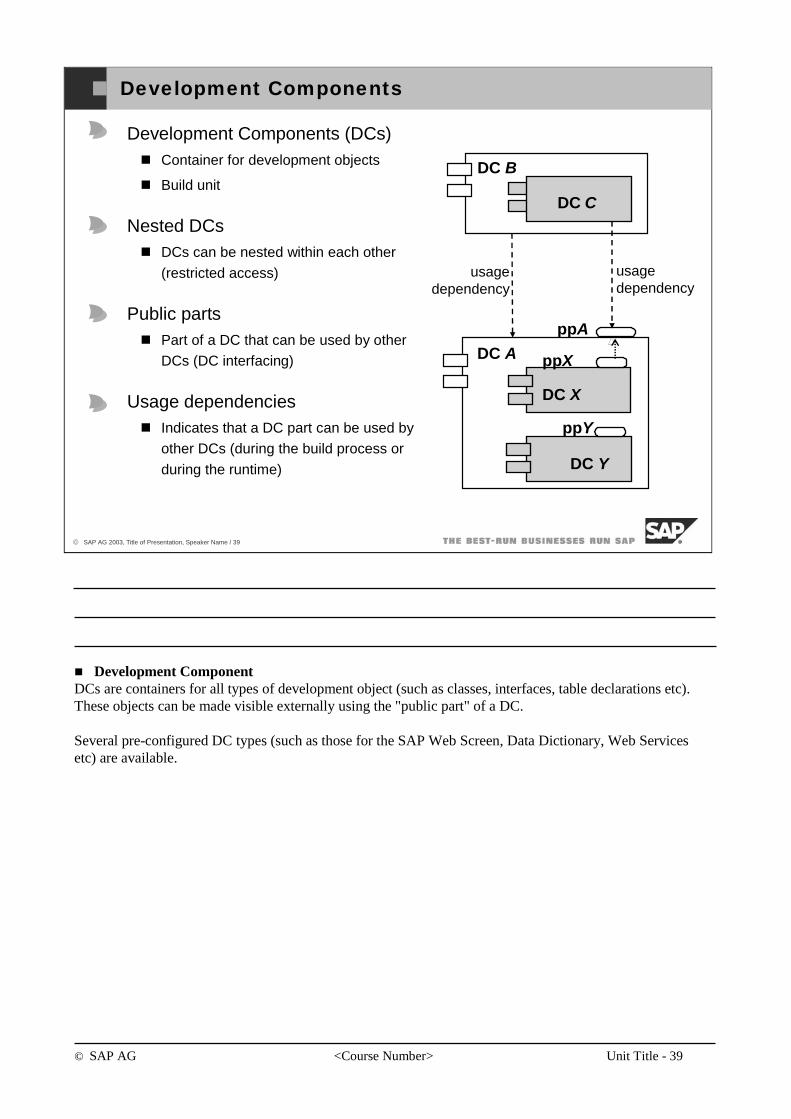
Development Components
DC A
DC B
DC Y
ppY
DC X
ppX
DC C
ppA
usage dependency
usage dependency
Development Components (DCs)Container for development objects
Build unit
Nested DCsDCs can be nested within each other
(restricted access)
Public partsPart of a DC that can be used by other DCs (DC interfacing)
Usage dependenciesIndicates that a DC part can be used by other DCs (during the build process or
during the runtime)
Development ComponentDCs are containers for all types of development object (such as classes, interfaces, table declarations etc).These objects can be made visible externally using the "public part" of a DC.
Several pre-configured DC types (such as those for the SAP Web Screen, Data Dictionary, Web Services etc) are available.
© SAP AG <Course Number> Unit Title - 40
© SAP AG 2003, Title of Presentation, Speaker Name / 40
J2EE Server
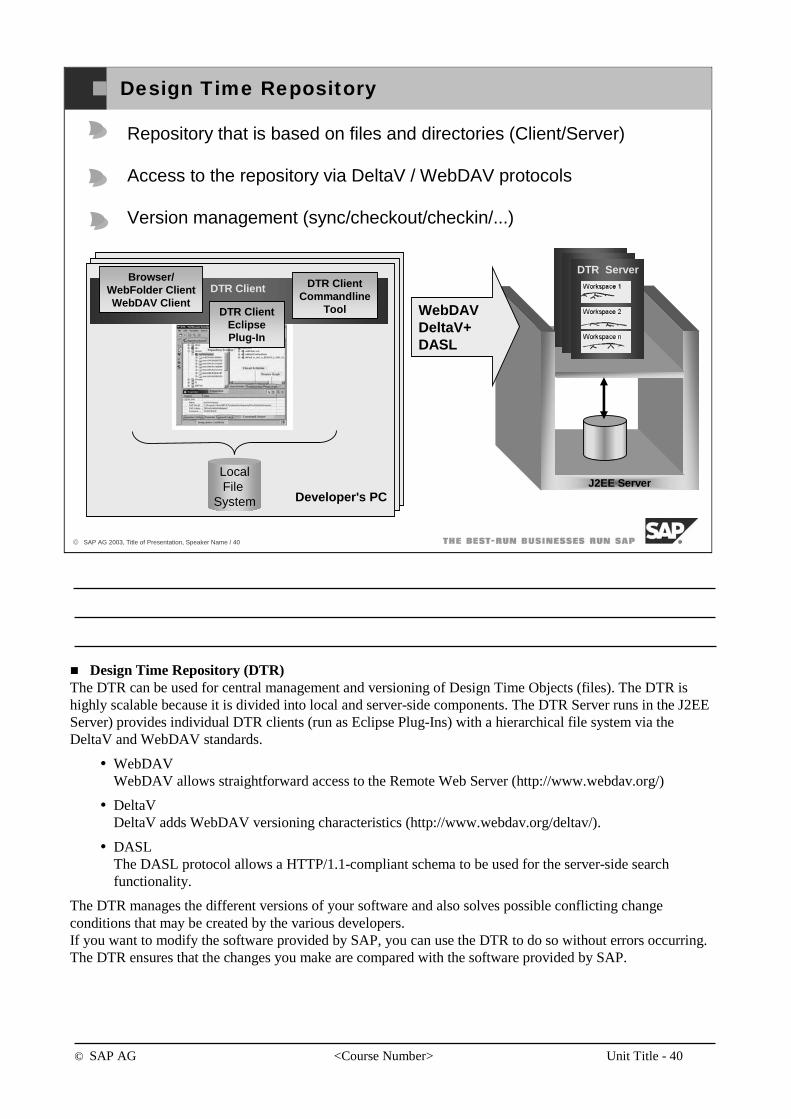
Design Time Repository
LocalFile
System
DTR Client
Repository that is based on files and directories (Client/Server)
Access to the repository via DeltaV / WebDAV protocols
Version management (sync/checkout/checkin/...)
DTR Server
WebDAVDeltaV+DASL
Browser/WebFolder ClientWebDAV Client
DTR ClientEclipsePlug-In
DTR ClientCommandline
Tool
Developer's PC
Design Time Repository (DTR)The DTR can be used for central management and versioning of Design Time Objects (files). The DTR is highly scalable because it is divided into local and server-side components. The DTR Server runs in the J2EE Server) provides individual DTR clients (run as Eclipse Plug-Ins) with a hierarchical file system via the DeltaV and WebDAV standards.
WebDAVWebDAV allows straightforward access to the Remote Web Server (http://www.webdav.org/)
DeltaVDeltaV adds WebDAV versioning characteristics (http://www.webdav.org/deltav/).
DASLThe DASL protocol allows a HTTP/1.1-compliant schema to be used for the server-side search functionality.
The DTR manages the different versions of your software and also solves possible conflicting change conditions that may be created by the various developers. If you want to modify the software provided by SAP, you can use the DTR to do so without errors occurring. The DTR ensures that the changes you make are compared with the software provided by SAP.
© SAP AG <Course Number> Unit Title - 41
© SAP AG 2003, Title of Presentation, Speaker Name / 41
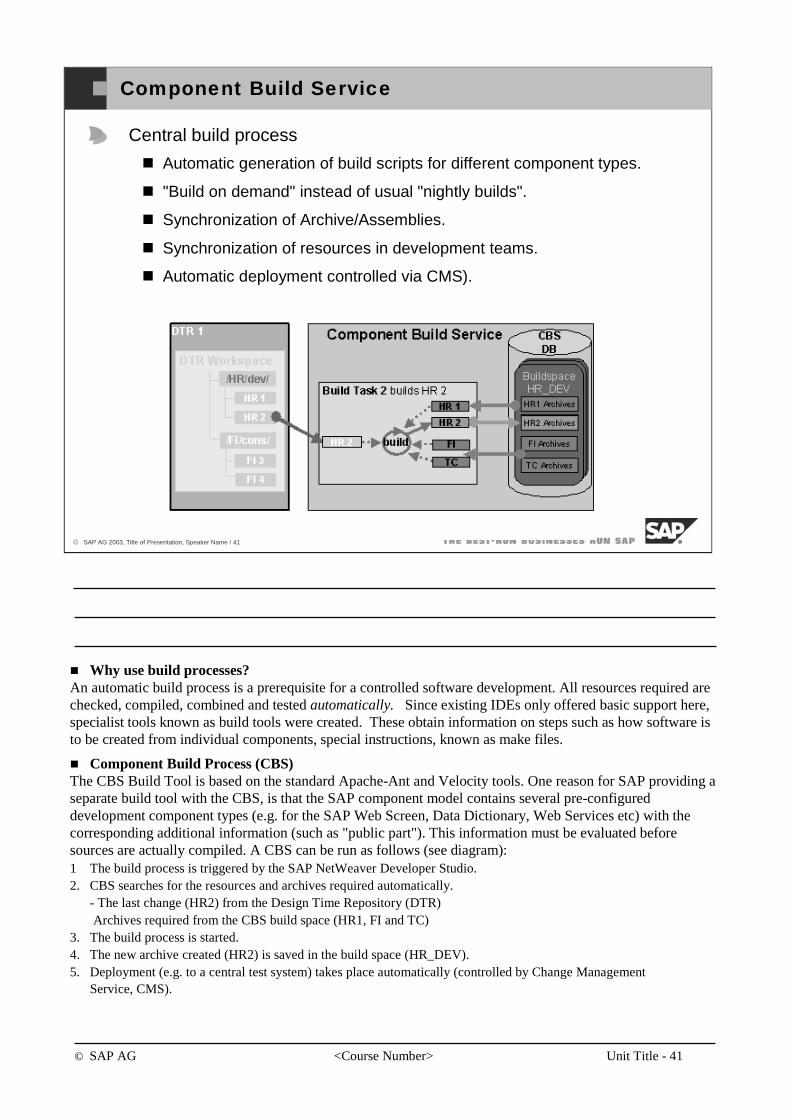
Component Build Service
Central build process
Automatic generation of build scripts for different component types.
"Build on demand" instead of usual "nightly builds".
Synchronization of Archive/Assemblies.
Synchronization of resources in development teams.
Automatic deployment controlled via CMS).
Why use build processes?An automatic build process is a prerequisite for a controlled software development. All resources required are checked, compiled, combined and tested automatically. Since existing IDEs only offered basic support here, specialist tools known as build tools were created. These obtain information on steps such as how software is to be created from individual components, special instructions, known as make files.
Component Build Process (CBS)The CBS Build Tool is based on the standard Apache-Ant and Velocity tools. One reason for SAP providing a separate build tool with the CBS, is that the SAP component model contains several pre-configured development component types (e.g. for the SAP Web Screen, Data Dictionary, Web Services etc) with the corresponding additional information (such as "public part"). This information must be evaluated before sources are actually compiled. A CBS can be run as follows (see diagram):1 The build process is triggered by the SAP NetWeaver Developer Studio.2. CBS searches for the resources and archives required automatically.
- The last change (HR2) from the Design Time Repository (DTR)Archives required from the CBS build space (HR1, FI and TC)
3. The build process is started.4. The new archive created (HR2) is saved in the build space (HR_DEV).5. Deployment (e.g. to a central test system) takes place automatically (controlled by Change Management
Service, CMS).
© SAP AG <Course Number> Unit Title - 42
© SAP AG 2003, Title of Presentation, Speaker Name / 42
Change Management Service
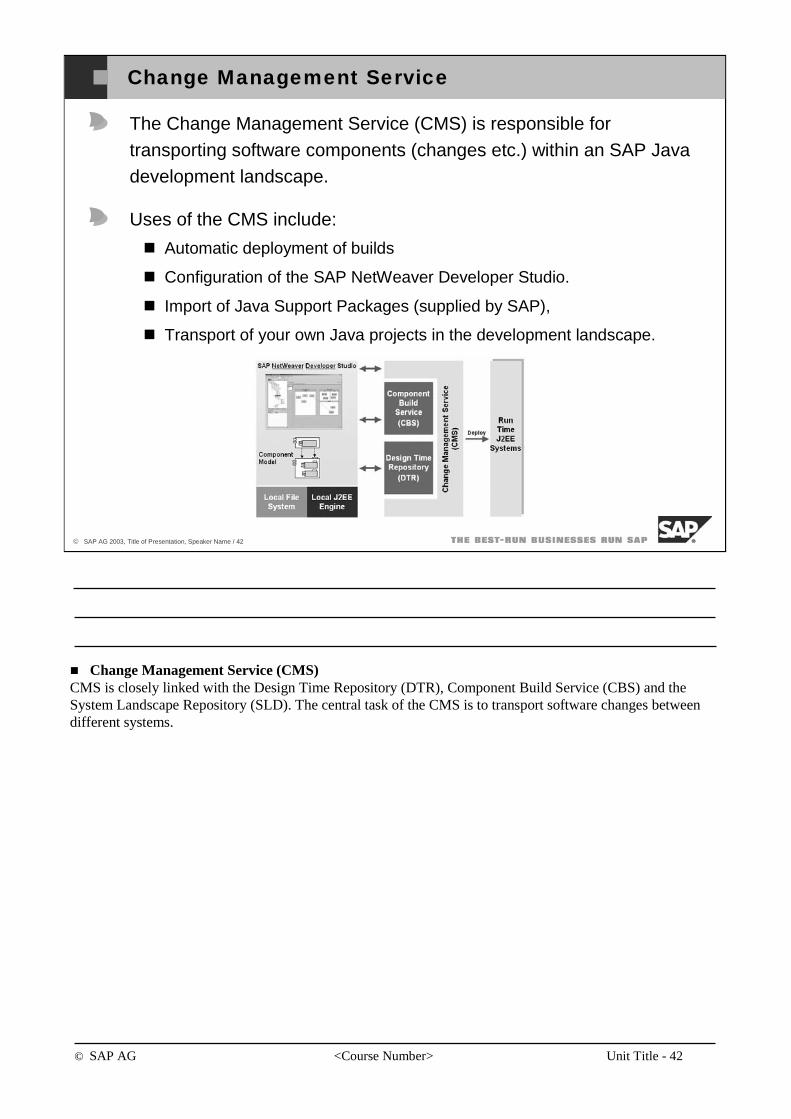
The Change Management Service (CMS) is responsible for transporting software components (changes etc.) within an SAP Java development landscape.
Uses of the CMS include:
Automatic deployment of builds
Configuration of the SAP NetWeaver Developer Studio.
Import of Java Support Packages (supplied by SAP),
Transport of your own Java projects in the development landscape.
Change Management Service (CMS)CMS is closely linked with the Design Time Repository (DTR), Component Build Service (CBS) and the System Landscape Repository (SLD). The central task of the CMS is to transport software changes between different systems.
© SAP AG <Course Number> Unit Title - 43
© SAP AG 2003, Title of Presentation, Speaker Name / 43
You should now be able to:
Describe the main benefits of SAP Java Development Infrastructure.
Java Development Infrastructure: Topic Summary

© SAP AG <Course Number> Unit Title - 44
© SAP AG 2003, Title of Presentation, Speaker Name / 44
After completing this unit, you will be able to:
Describe the of SAP Java Development Process.
SAP Java Development Process: Topic Objectives
Java Development InfrastructureThe Java Development Infrastructure supports you during the organization of your Java development processes.
Division into individual components means working with large software projects is easier.
The Design Time Repository versions the source codes in a central location.
The Build Service creates components that can be run.
The Change Management Service supports you in the delivery of software.
© SAP AG <Course Number> Unit Title - 45
© SAP AG 2003, Title of Presentation, Speaker Name / 45
CentralJ2EE server
Local development environment
ComponentBuild Service
ArchivePool
Deployarchives
Design Time Repository
ComponentBuild
OK?
Deploy
File system
Local J2EE engine
Save / load
Develop, build, and test locally
Check-inchanges
CreateDevelopmentComponent
Activate
Java sources
J2EE Server
Web Container
EJB Container
NamingServiceService
NamingServiceService
NamingServiceService
J2EE Server
Web Container
EJB Container
NamingServiceService
NamingServiceService
NamingServiceService
SAP Java Development Process
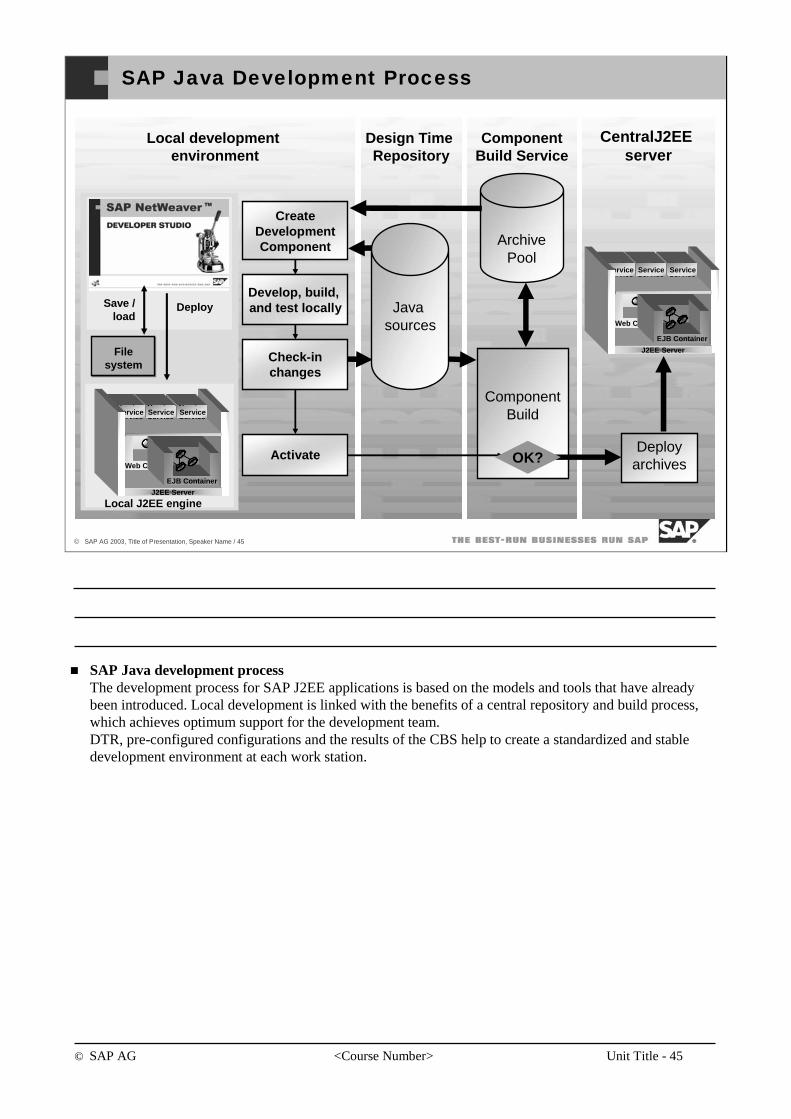
SAP Java development processThe development process for SAP J2EE applications is based on the models and tools that have already been introduced. Local development is linked with the benefits of a central repository and build process, which achieves optimum support for the development team.DTR, pre-configured configurations and the results of the CBS help to create a standardized and stable development environment at each work station.

© SAP AG <Course Number> Unit Title - 46
© SAP AG 2003, Title of Presentation, Speaker Name / 46
You should now be able to:
Describe the of SAP Java Development Process.
SAP Java Development Process: Topic Summary

© SAP AG <Course Number> Unit Title - 47
© SAP AG 2003, Title of Presentation, Speaker Name / 47
You should now be able to:
Use SAP NetWeaver Developer Studio.
Use Administraion Tools of the Web ApplicationServer.
Understand the SAP Java DevelopmentInfrastructure.
Understand the SAP Java Development Process.
SAP Java Development Environment: Unit Summary
SAP NetWeaver Developer Studio Exercise and Solution
Chapter: SAP NetWeaver Developer Studio
Theme: Launch the SAP NetWeaver Developer Studio
At the end of this Exercise, you are able to:
• Launch the SAP NetWeaver Developer Studio via a batch file.
• Start Web Dynpro applications
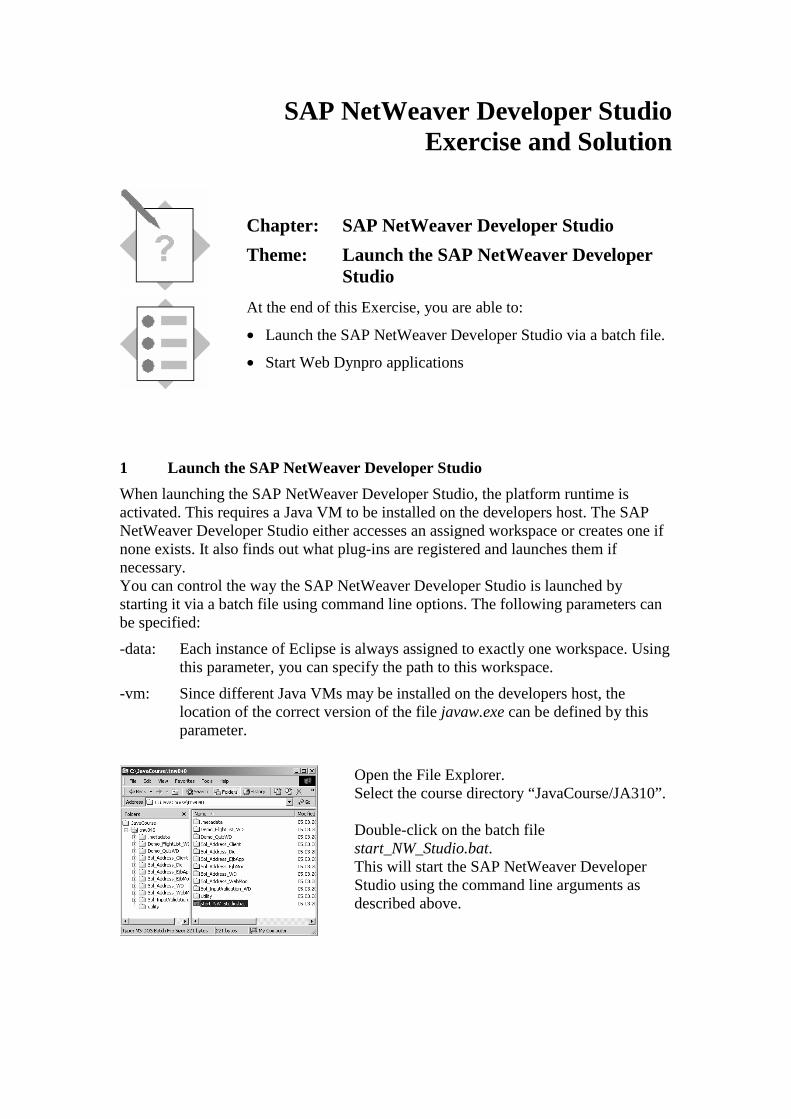
1 Launch the SAP NetWeaver Developer Studio
When launching the SAP NetWeaver Developer Studio, the platform runtime is activated. This requires a Java VM to be installed on the developers host. The SAP NetWeaver Developer Studio either accesses an assigned workspace or creates one if none exists. It also finds out what plug-ins are registered and launches them if necessary. You can control the way the SAP NetWeaver Developer Studio is launched by starting it via a batch file using command line options. The following parameters can be specified:
-data: Each instance of Eclipse is always assigned to exactly one workspace. Using this parameter, you can specify the path to this workspace.
-vm: Since different Java VMs may be installed on the developers host, the location of the correct version of the file javaw.exe can be defined by this parameter.
Open the File Explorer. Select the course directory “JavaCourse/JA310”. Double-click on the batch file start_NW_Studio.bat. This will start the SAP NetWeaver Developer Studio using the command line arguments as described above.
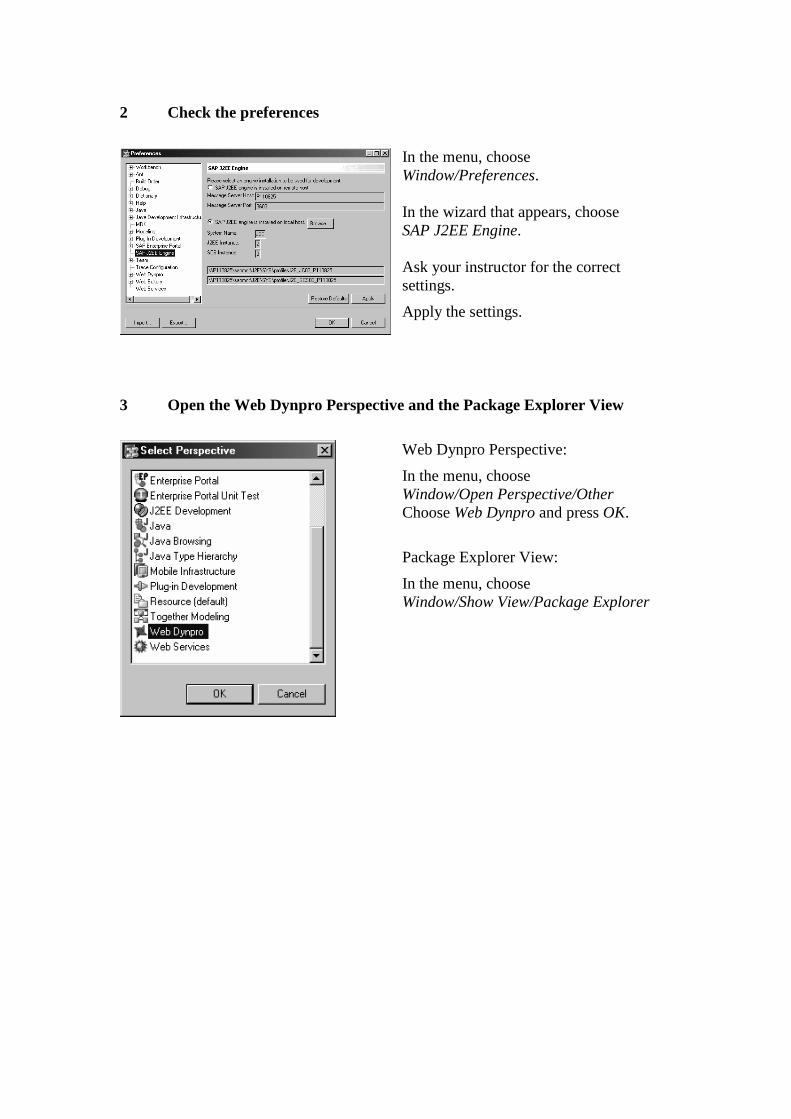
2 Check the preferences
In the menu, choose Window/Preferences. In the wizard that appears, choose SAP J2EE Engine. Ask your instructor for the correct settings.
Apply the settings.
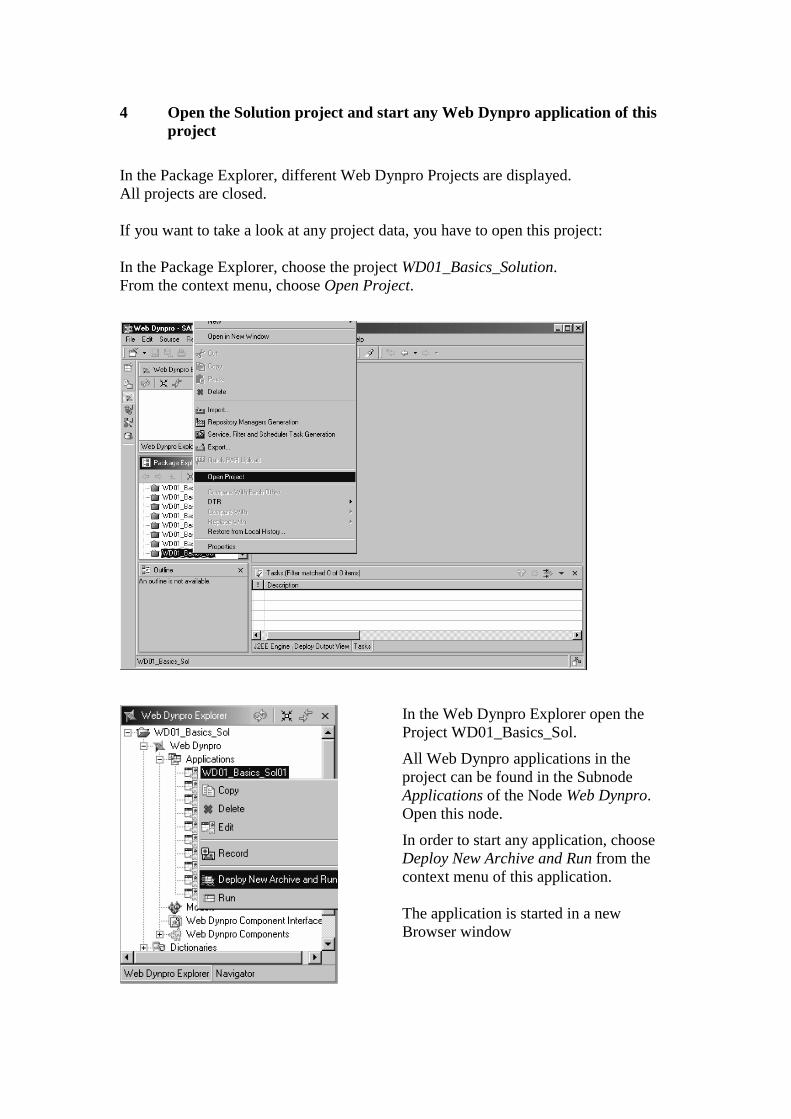
3 Open the Web Dynpro Perspective and the Package Explorer View
Web Dynpro Perspective:
In the menu, choose Window/Open Perspective/Other Choose Web Dynpro and press OK.
Package Explorer View:
In the menu, choose Window/Show View/Package Explorer
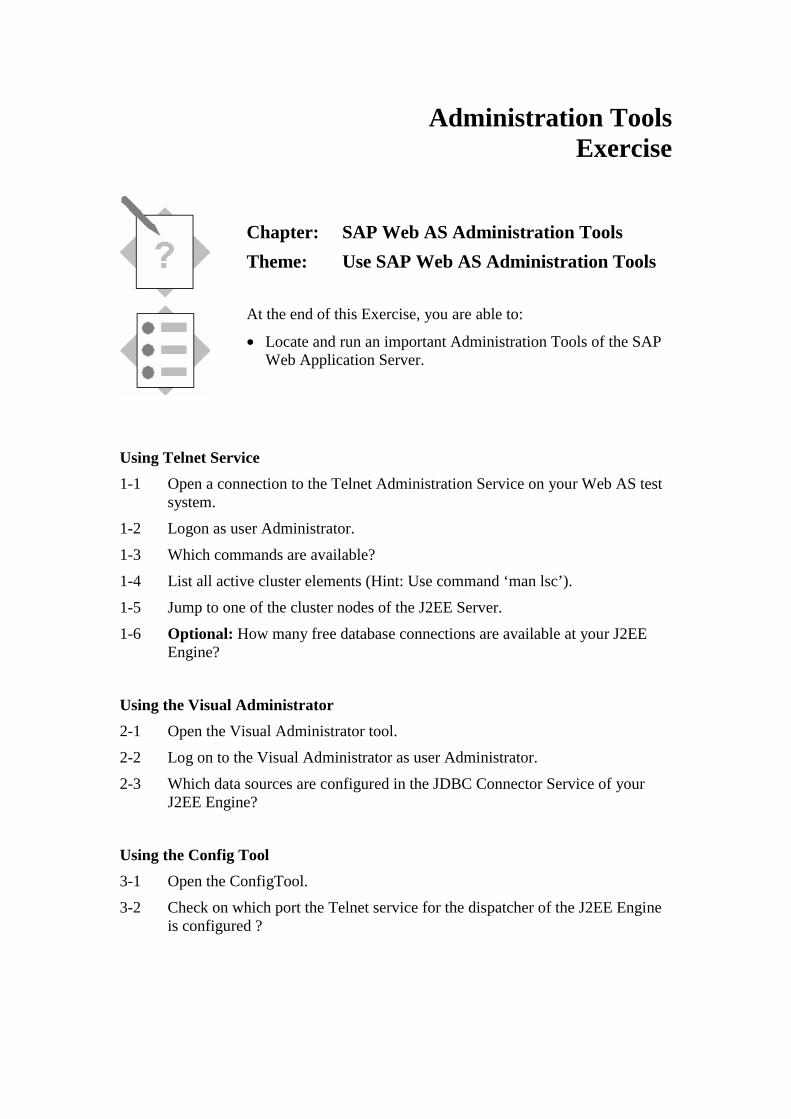
4 Open the Solution project and start any Web Dynpro application of this project
In the Package Explorer, different Web Dynpro Projects are displayed. All projects are closed. If you want to take a look at any project data, you have to open this project: In the Package Explorer, choose the project WD01_Basics_Solution. From the context menu, choose Open Project.
In the Web Dynpro Explorer open the Project WD01_Basics_Sol.
All Web Dynpro applications in the project can be found in the Subnode Applications of the Node Web Dynpro. Open this node.
In order to start any application, choose Deploy New Archive and Run from the context menu of this application. The application is started in a new Browser window
Installation and Administration Tool Administration Tools
Exercise
Chapter: SAP Web AS Administration Tools
Theme: Use SAP Web AS Administration Tools
At the end of this Exercise, you are able to:
• Locate and run an important Administration Tools of the SAP Web Application Server.
Using Telnet Service
1-1 Open a connection to the Telnet Administration Service on your Web AS test system.
1-2 Logon as user Administrator.
1-3 Which commands are available?
1-4 List all active cluster elements (Hint: Use command ‘man lsc’).
1-5 Jump to one of the cluster nodes of the J2EE Server.
1-6 Optional: How many free database connections are available at your J2EE Engine?
Using the Visual Administrator
2-1 Open the Visual Administrator tool.
2-2 Log on to the Visual Administrator as user Administrator.
2-3 Which data sources are configured in the JDBC Connector Service of your J2EE Engine?
Using the Config Tool
3-1 Open the ConfigTool.
3-2 Check on which port the Telnet service for the dispatcher of the J2EE Engine is configured ?

Administration Tools Solution
Chapter: SAP Web AS Administration Tools
Theme: Use SAP Web AS Administration Tools
At the end of this Exercise, you are able to:
• Locate and run an important Administration Tools of the SAP Web Application Server..
1 Using Telnet Service 1-1 Open a connection to the Telnet Administration Service on your Web AS test
system
telnet <hostname> 50008
1-2 Logon as Admin user
Logon to telnet administration
Please ask your instructor for user and password
1-3 List available commands.
Type command
man
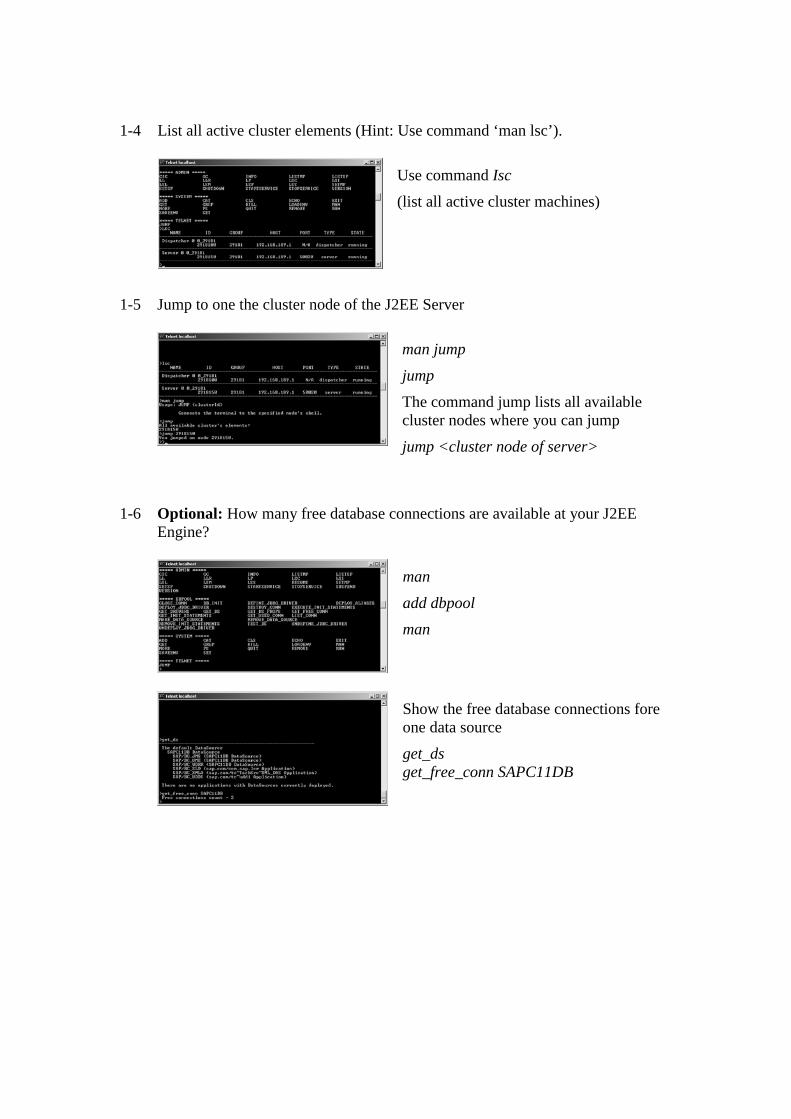
1-4 List all active cluster elements (Hint: Use command ‘man lsc’).
Use command Isc
(list all active cluster machines)
1-5 Jump to one the cluster node of the J2EE Server
man jump
jump
The command jump lists all available cluster nodes where you can jump
jump <cluster node of server>
1-6 Optional: How many free database connections are available at your J2EE
Engine?
man
add dbpool
man
Show the free database connections fore one data source
get_ds get_free_conn SAPC11DB
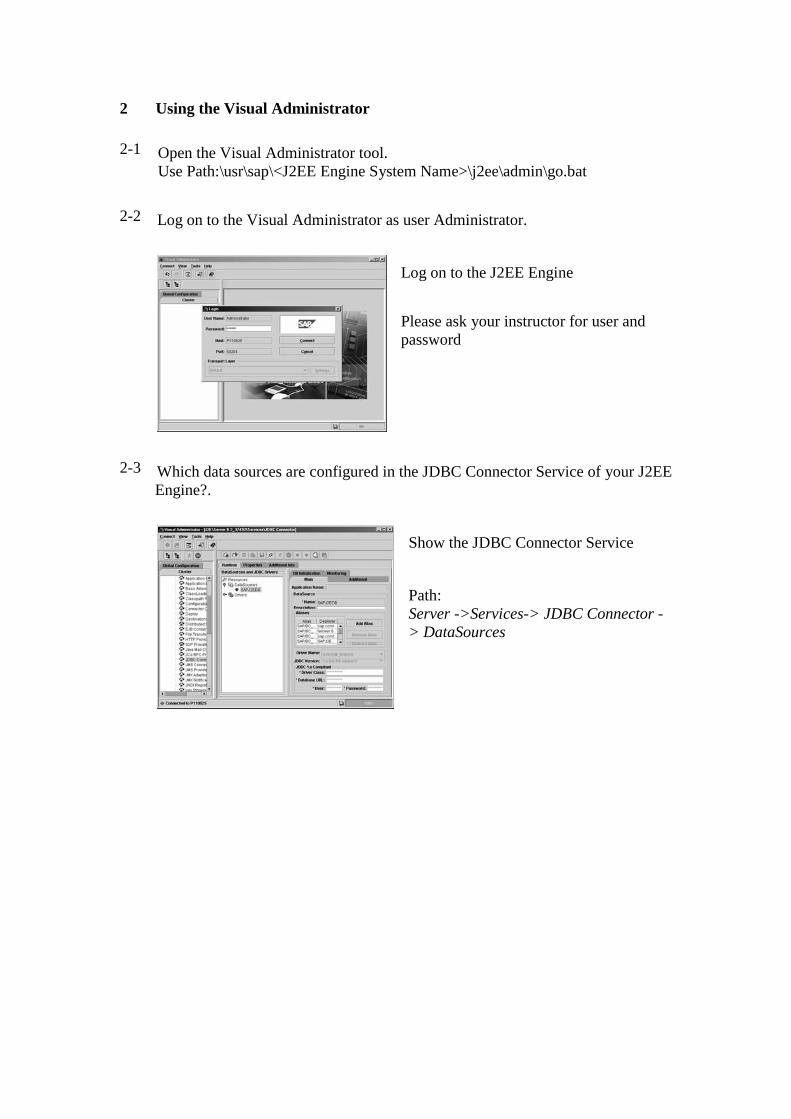
2 Using the Visual Administrator 2-1 Open the Visual Administrator tool.
Use Path:\usr\sap\<J2EE Engine System Name>\j2ee\admin\go.bat
2-2 Log on to the Visual Administrator as user Administrator.
Log on to the J2EE Engine
Please ask your instructor for user and password
2-3 Which data sources are configured in the JDBC Connector Service of your J2EE
Engine?.
Show the JDBC Connector Service
Path: Server ->Services-> JDBC Connector -> DataSources

3 Using the Config Tool 2-1 Open the ConfigTool.
Open the ConfigTool
\usr\sap\<J2EE Engine System Name>\j2ee\configtool\configtool.bat
2-2 Check on which port the Telnet service of the dispatcher of the J2EE Engine is
configured.
Check the configuration for Telnet service
Dispatcher -> Services -> telnet
© SAP AG <Course Number> Unit Title - 1
© SAP AG 2003, Title of Presentation, Speaker Name / 1
Introduction
Contents:
Web Dynpro Introduction
© SAP AG <Course Number> Unit Title - 2
© SAP AG 2003, Title of Presentation, Speaker Name / 2
After completing this unit, you will be able to:
Understand the basic idea behind Web Dynpro.
Explain basic features of Web Dynpro.
Understand basic concepts of Web Dynpro.
Web Dynpro Introduction: Unit Objectives
© SAP AG <Course Number> Unit Title - 3
© SAP AG 2003, Title of Presentation, Speaker Name / 3
After completing this topic, you will be able to:
Understand the basic idea behind Web Dynpro.
Overview: Topic Objectives
This is a lesson
© SAP AG <Course Number> Unit Title - 4
© SAP AG 2003, Title of Presentation, Speaker Name / 4
What is Web Dynpro ?
Platform-independent (Java, ABAP, ...)Defines a standard structure for user interface applications
Derived from the MVC (“model-view-controller”) design pattern
Focus on graphical modelingCode is generated from the meta-model declarations
Integrated in SAP NetWeaver Developer Workbench
Framework running on J2EE server offers common servicesClient-side technology for browser-based user interfaces
XML-based protocol makes alternative clients possible
Components help structure projects and support pattern-based UIs
A Programming Model for User Interfaces
A Set of Tools for User Interface Design
A Runtime Environment for Applications
A Technology for Software Modularization
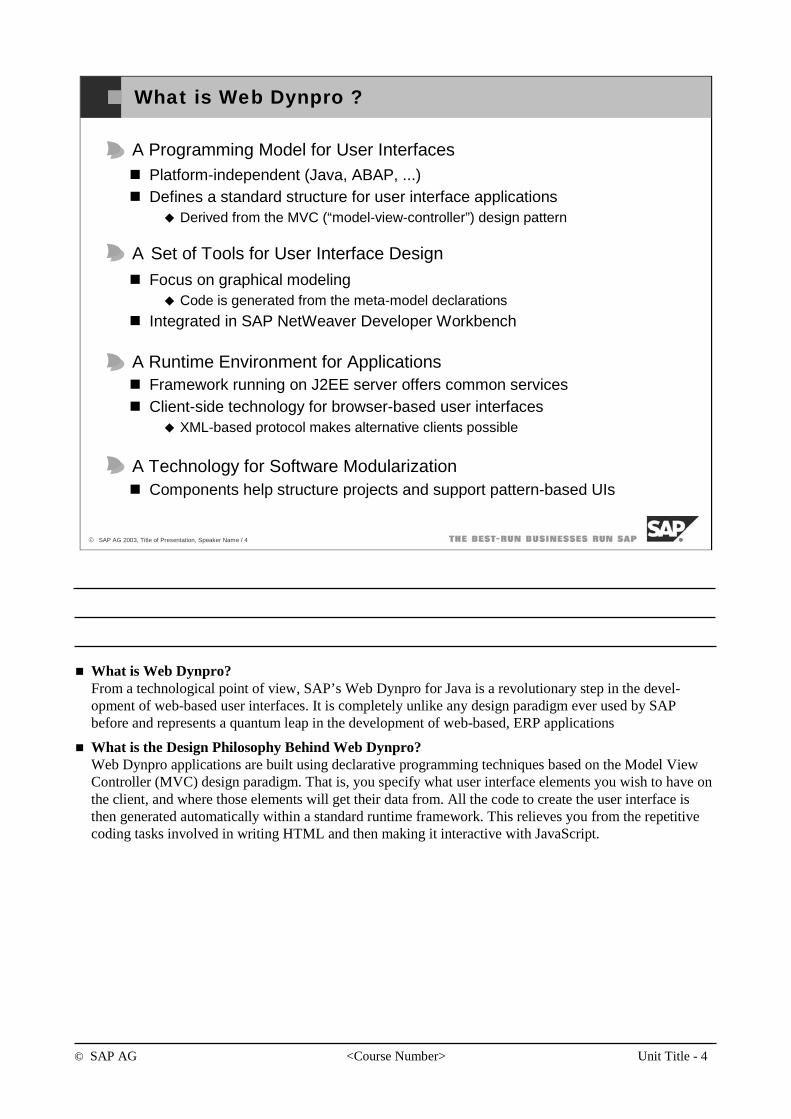
What is Web Dynpro? From a technological point of view, SAP’s Web Dynpro for Java is a revolutionary step in the devel-opment of web-based user interfaces. It is completely unlike any design paradigm ever used by SAP before and represents a quantum leap in the development of web-based, ERP applications
What is the Design Philosophy Behind Web Dynpro? Web Dynpro applications are built using declarative programming techniques based on the Model ViewController (MVC) design paradigm. That is, you specify what user interface elements you wish to have on the client, and where those elements will get their data from. All the code to create the user interface isthen generated automatically within a standard runtime framework. This relieves you from the repetitivecoding tasks involved in writing HTML and then making it interactive with JavaScript.
© SAP AG <Course Number> Unit Title - 5
© SAP AG 2003, Title of Presentation, Speaker Name / 5
Web Dynpro Main Benefits
Web DynproMeta-Data
Web DynproTools
Web Dynpro Runtime
J2EE.NET ABAP
Deliver an Enterprise Quality Web Development Environment
minimize coding, maximize design
separate layout and logic
support arbitrary backends
support reuse of components
configuration of UI patterns
support web services and data-binding
Achieve Independencerun on multiple platforms
Improve User Experience through a "High Fidelity Web UI"
browser based, zero footprint
screen updates w/o page reloads
client-side dynamics
performance through caching
508 accessibility support
flicker-free screen, minimal refreshs
Multi Channel Access
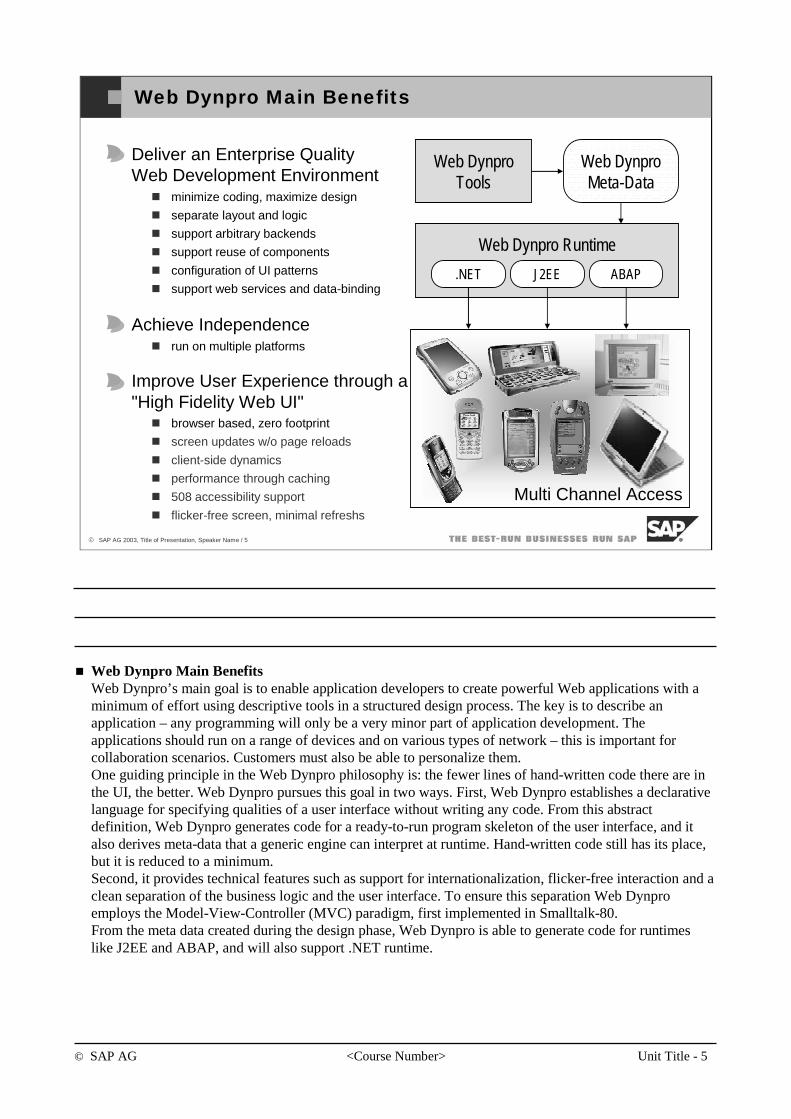
Web Dynpro Main Benefits Web Dynpro’s main goal is to enable application developers to create powerful Web applications with a minimum of effort using descriptive tools in a structured design process. The key is to describe an application – any programming will only be a very minor part of application development. The applications should run on a range of devices and on various types of network – this is important for collaboration scenarios. Customers must also be able to personalize them.One guiding principle in the Web Dynpro philosophy is: the fewer lines of hand-written code there are in the UI, the better. Web Dynpro pursues this goal in two ways. First, Web Dynpro establishes a declarative language for specifying qualities of a user interface without writing any code. From this abstract definition, Web Dynpro generates code for a ready-to-run program skeleton of the user interface, and it also derives meta-data that a generic engine can interpret at runtime. Hand-written code still has its place, but it is reduced to a minimum.Second, it provides technical features such as support for internationalization, flicker-free interaction and a clean separation of the business logic and the user interface. To ensure this separation Web Dynproemploys the Model-View-Controller (MVC) paradigm, first implemented in Smalltalk-80.From the meta data created during the design phase, Web Dynpro is able to generate code for runtimeslike J2EE and ABAP, and will also support .NET runtime.
© SAP AG <Course Number> Unit Title - 6
© SAP AG 2003, Title of Presentation, Speaker Name / 6
Meta-model Declarations vs. Custom Coding
Meta-model Declarations
Guarantees common app design
Good for graphical tool support
Screen Layout and NestingNavigation and Error HandlingData FlowComponentization...
Custom Coding
Guarantees universality
Good for data-driven, dynamic apps
Implementation of business rulesDynamic screen modificationsAccess to services (files etc.)Portal eventing...
Web DynproTools
GeneratedCode
Generator
Meta-data
Com
piler
Deployable
App
CustomCode
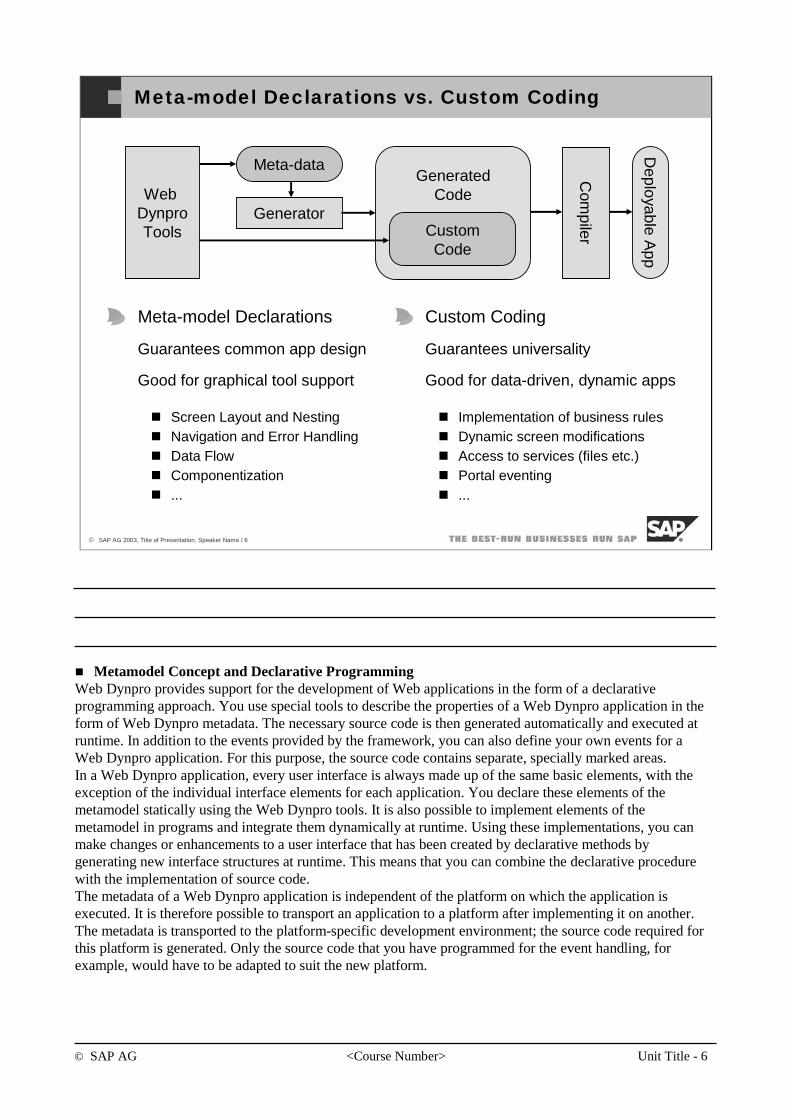
Metamodel Concept and Declarative ProgrammingWeb Dynpro provides support for the development of Web applications in the form of a declarative programming approach. You use special tools to describe the properties of a Web Dynpro application in the form of Web Dynpro metadata. The necessary source code is then generated automatically and executed at runtime. In addition to the events provided by the framework, you can also define your own events for a Web Dynpro application. For this purpose, the source code contains separate, specially marked areas.In a Web Dynpro application, every user interface is always made up of the same basic elements, with the exception of the individual interface elements for each application. You declare these elements of the metamodel statically using the Web Dynpro tools. It is also possible to implement elements of the metamodel in programs and integrate them dynamically at runtime. Using these implementations, you can make changes or enhancements to a user interface that has been created by declarative methods by generating new interface structures at runtime. This means that you can combine the declarative procedure with the implementation of source code.The metadata of a Web Dynpro application is independent of the platform on which the application is executed. It is therefore possible to transport an application to a platform after implementing it on another. The metadata is transported to the platform-specific development environment; the source code required for this platform is generated. Only the source code that you have programmed for the event handling, for example, would have to be adapted to suit the new platform.
© SAP AG <Course Number> Unit Title - 7
© SAP AG 2003, Title of Presentation, Speaker Name / 7
Application Scenarios with Web Dynpro
J2EE Web Dynpro
Runtime
Web Dynpro AppWeb Dynpro
App
SAP Enterprise Portal
Web DynproApplication
XML
SAP NetWeaver Developer
Studio
ABAP Web DynproRuntime
Web DynproAppWeb Dynpro
App
ABAP Workbench
Conversion of existing dynpros
J2EE Backend Server
Backend Application
ABAP Backend Server
Web Service Provider
Web Service
RMI SOAPRFC
BusinessData
BusinessData
BusinessData
BusinessAPI (BAPI)
EJB (e.a.)
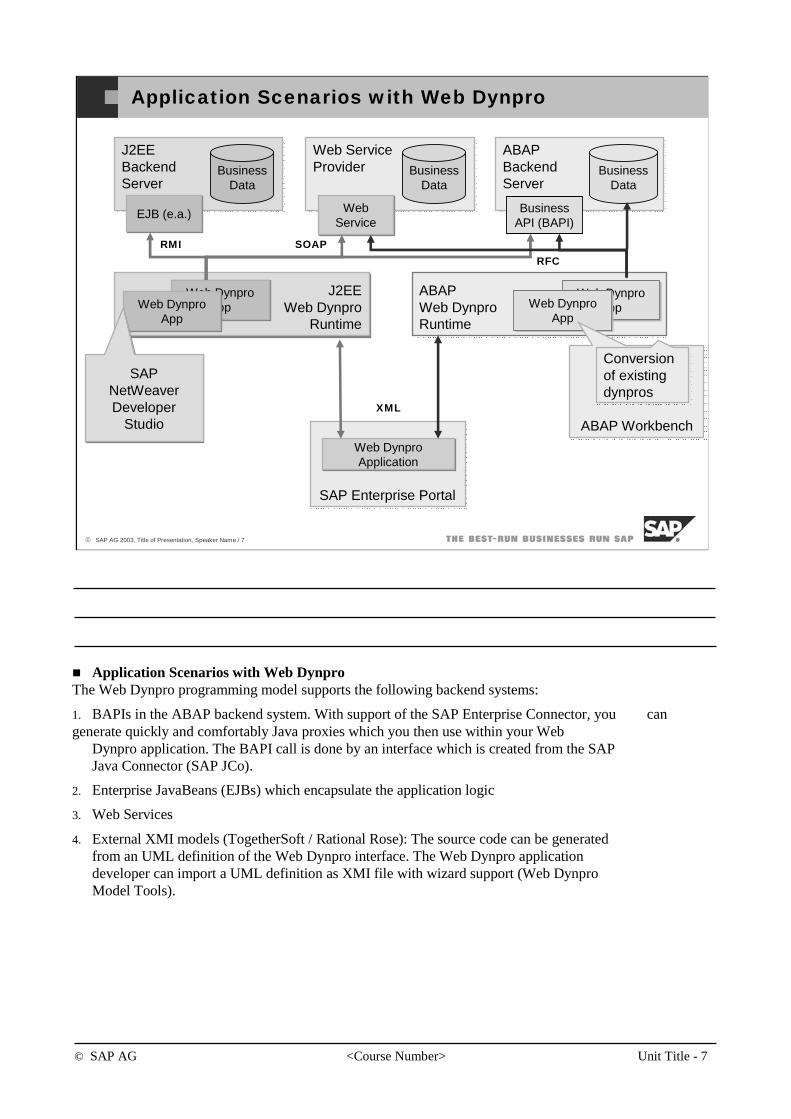
Application Scenarios with Web DynproThe Web Dynpro programming model supports the following backend systems:
1. BAPIs in the ABAP backend system. With support of the SAP Enterprise Connector, you cangenerate quickly and comfortably Java proxies which you then use within your Web
Dynpro application. The BAPI call is done by an interface which is created from the SAP Java Connector (SAP JCo).
2. Enterprise JavaBeans (EJBs) which encapsulate the application logic
3. Web Services
4. External XMI models (TogetherSoft / Rational Rose): The source code can be generatedfrom an UML definition of the Web Dynpro interface. The Web Dynpro applicationdeveloper can import a UML definition as XMI file with wizard support (Web DynproModel Tools).
© SAP AG <Course Number> Unit Title - 8
© SAP AG 2003, Title of Presentation, Speaker Name / 8
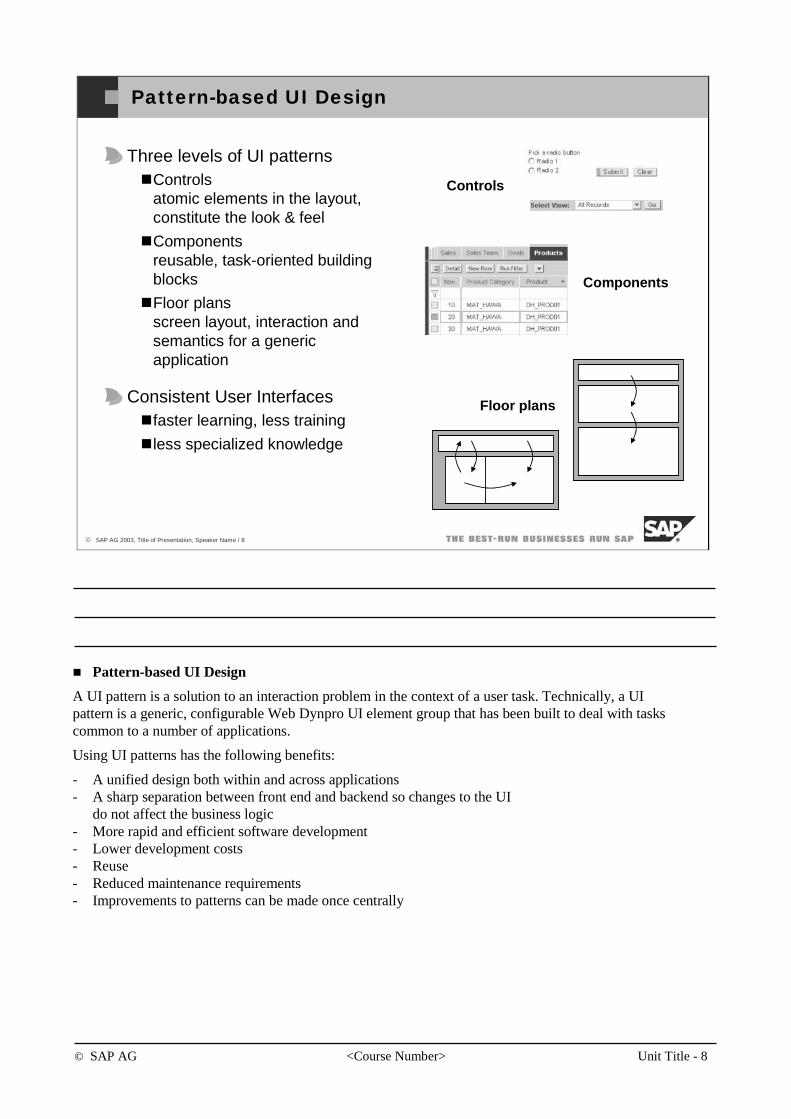
Pattern-based UI Design
Three levels of UI patternsControlsatomic elements in the layout, constitute the look & feel
Componentsreusable, task-oriented buildingblocks
Floor plansscreen layout, interaction and semantics for a genericapplication
Consistent User Interfacesfaster learning, less training
less specialized knowledge
Floor plans
Components
Controls
Pattern-based UI Design
A UI pattern is a solution to an interaction problem in the context of a user task. Technically, a UI pattern is a generic, configurable Web Dynpro UI element group that has been built to deal with tasks common to a number of applications.
Using UI patterns has the following benefits:
- A unified design both within and across applications- A sharp separation between front end and backend so changes to the UI
do not affect the business logic- More rapid and efficient software development- Lower development costs- Reuse - Reduced maintenance requirements- Improvements to patterns can be made once centrally
© SAP AG <Course Number> Unit Title - 9
© SAP AG 2003, Title of Presentation, Speaker Name / 9
You should now be able to:
Understand the basic idea behind Web Dynpro.
Overview: Topic Summary
© SAP AG <Course Number> Unit Title - 10
© SAP AG 2003, Title of Presentation, Speaker Name / 10
After completing this topic, you will be able to:
Explain basic Features of Web Dynpro.
Features: Topic Objectives
This is a lesson
© SAP AG <Course Number> Unit Title - 11
© SAP AG 2003, Title of Presentation, Speaker Name / 11
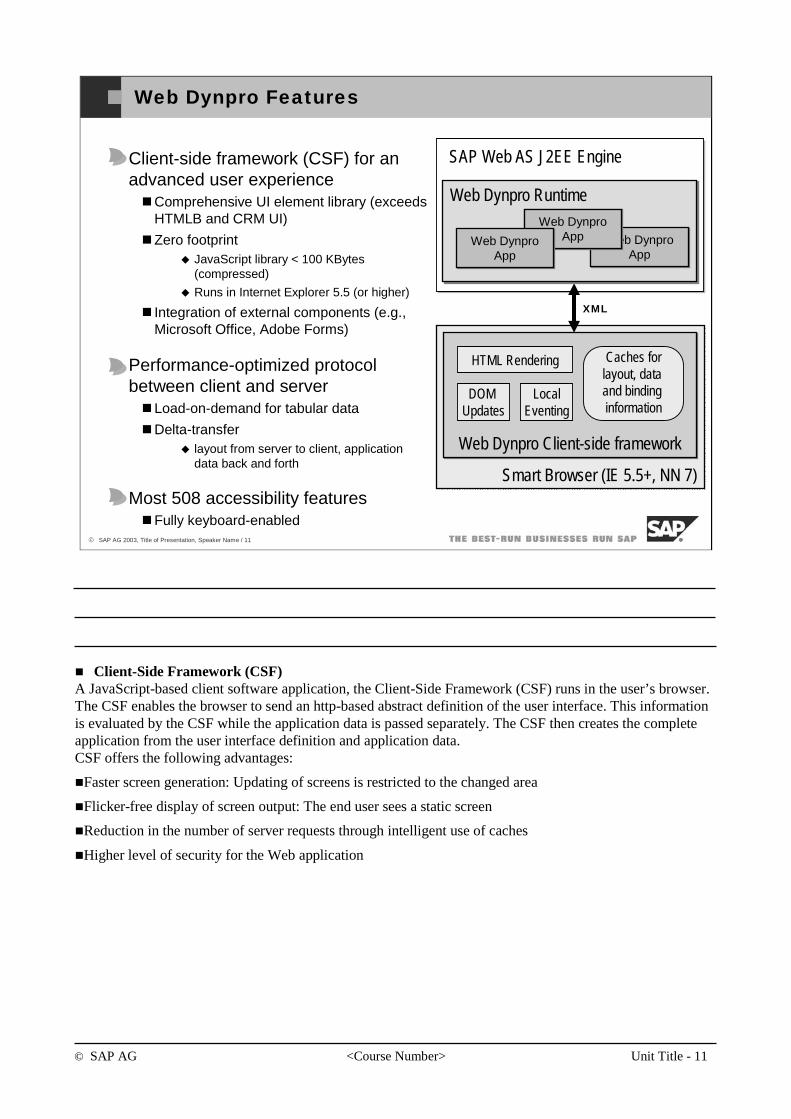
Web Dynpro Features
Client-side framework (CSF) for an advanced user experience
Comprehensive UI element library (exceeds HTMLB and CRM UI)
Zero footprintJavaScript library < 100 KBytes(compressed)
Runs in Internet Explorer 5.5 (or higher)
Integration of external components (e.g., Microsoft Office, Adobe Forms)
Performance-optimized protocol between client and server
Load-on-demand for tabular data
Delta-transferlayout from server to client, application data back and forth
Most 508 accessibility featuresFully keyboard-enabled
SAP Web AS J2EE Engine
Smart Browser (IE 5.5+, NN 7)
Web Dynpro Client-side framework
HTML Rendering
DOM Updates
Caches forlayout, dataand bindinginformation
LocalEventing
Web Dynpro Runtime
XML
Web Dynpro App
Web Dynpro AppWeb Dynpro
App
Client-Side Framework (CSF)A JavaScript-based client software application, the Client-Side Framework (CSF) runs in the user’s browser. The CSF enables the browser to send an http-based abstract definition of the user interface. This information is evaluated by the CSF while the application data is passed separately. The CSF then creates the complete application from the user interface definition and application data.CSF offers the following advantages:
Faster screen generation: Updating of screens is restricted to the changed area
Flicker-free display of screen output: The end user sees a static screen
Reduction in the number of server requests through intelligent use of caches
Higher level of security for the Web application

© SAP AG <Course Number> Unit Title - 12
© SAP AG 2003, Title of Presentation, Speaker Name / 12
Web Dynpro Features (2)
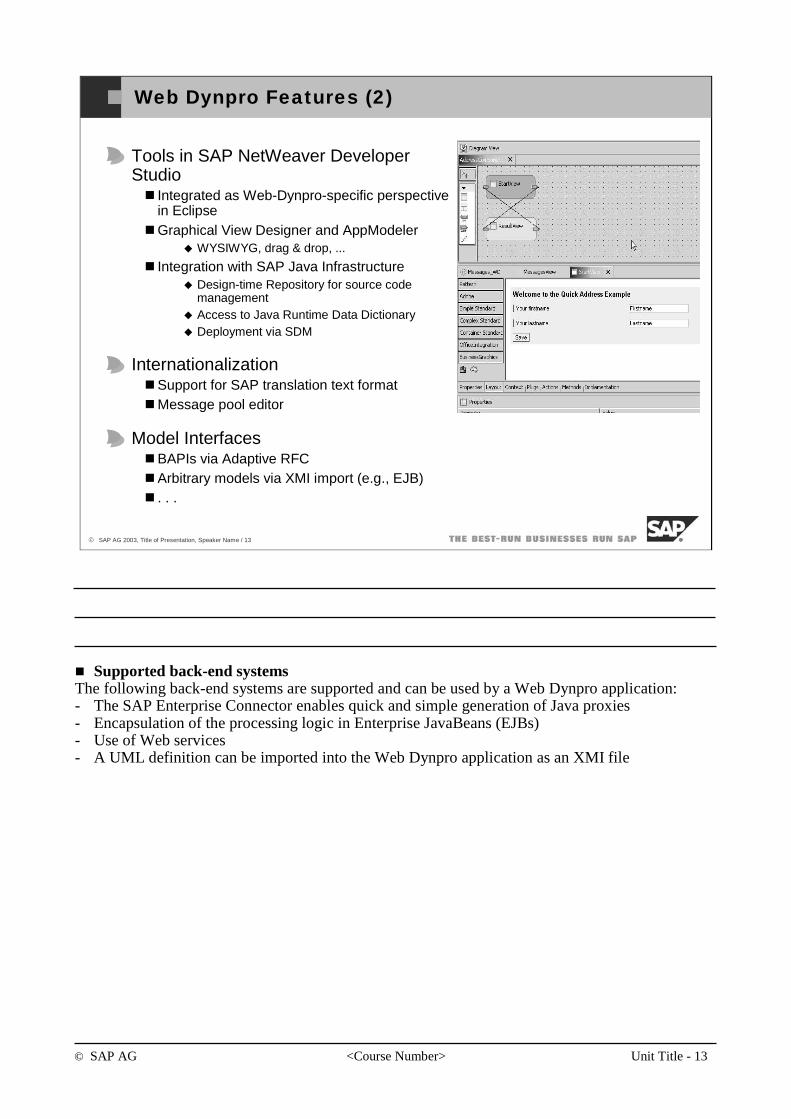
Tools in SAP NetWeaver DeveloperStudio
Integrated as Web-Dynpro-specific perspectivein EclipseGraphical View Designer and AppModeler
WYSIWYG, drag & drop, ...
Integration with SAP Java InfrastructureDesign-time Repository for source codemanagementAccess to Java Runtime Data DictionaryDeployment via SDM
InternationalizationSupport for SAP translation text formatMessage pool editor
Model InterfacesBAPIs via Adaptive RFCArbitrary models via XMI import (e.g., EJB). . .
Web Dynpro toolsTo support the declarative programming concept, the SAP NetWeaver Developer Studio contains a range of Web Dynpro tools. - In a tree structure, the Web Dynpro Explorer provides a logical overview of the Web Dynpro
application.- The navigation modeler provides comprehensive graphical support for application design,
implementation of interface elements and their alignment on the screen, and navigation definition for the flow sequence of the interface elements.
- The biew designer is a graphical tool that provides support when designing Web Dynprolayouts, including a WYSIWYG function.
- Model tools: The data for a Web Dynpro application is provided using models. There are specific model types for all the different back-end scenarios.
- The data modeler provides support both for the definition of models and custom controllers and their usage, and for the creation of data links for mapping definitions. You can also use this tool to create views.
- The controller/context editor provides graphical support for the implementation of the data flow.
- Message editor: A message wizard provides support for the quick definition of user outputs.
© SAP AG <Course Number> Unit Title - 13
© SAP AG 2003, Title of Presentation, Speaker Name / 13
Web Dynpro Features (2)
Tools in SAP NetWeaver DeveloperStudio
Integrated as Web-Dynpro-specific perspectivein EclipseGraphical View Designer and AppModeler
WYSIWYG, drag & drop, ...
Integration with SAP Java InfrastructureDesign-time Repository for source codemanagementAccess to Java Runtime Data DictionaryDeployment via SDM
InternationalizationSupport for SAP translation text formatMessage pool editor
Model InterfacesBAPIs via Adaptive RFCArbitrary models via XMI import (e.g., EJB). . .
Supported back-end systemsThe following back-end systems are supported and can be used by a Web Dynpro application:- The SAP Enterprise Connector enables quick and simple generation of Java proxies - Encapsulation of the processing logic in Enterprise JavaBeans (EJBs)- Use of Web services- A UML definition can be imported into the Web Dynpro application as an XMI file
© SAP AG <Course Number> Unit Title - 14
© SAP AG 2003, Title of Presentation, Speaker Name / 14
Web Dynpro Features (3)
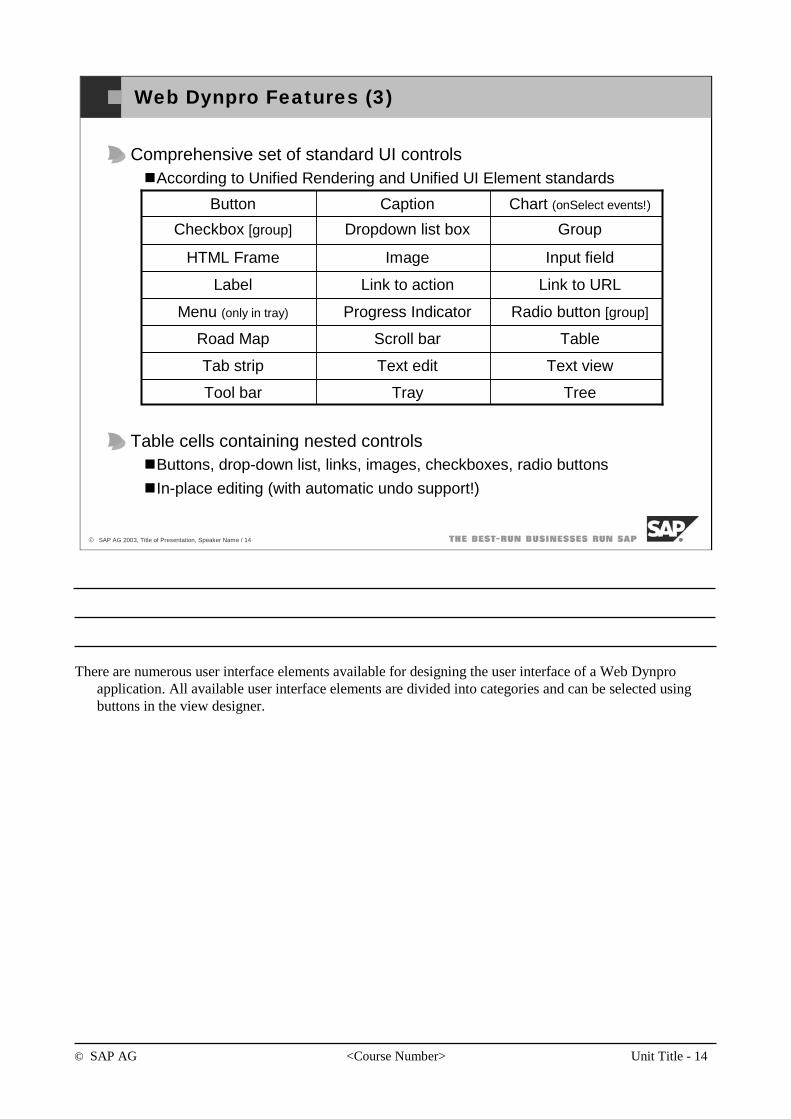
Comprehensive set of standard UI controlsAccording to Unified Rendering and Unified UI Element standards
Table cells containing nested controlsButtons, drop-down list, links, images, checkboxes, radio buttons
In-place editing (with automatic undo support!)
TableScroll barRoad Map
Radio button [group]Progress IndicatorMenu (only in tray)
TreeTrayTool bar
Text viewText editTab strip
Link to URLLink to actionLabel
Input fieldImageHTML Frame
GroupDropdown list boxCheckbox [group]
Chart (onSelect events!)CaptionButton
There are numerous user interface elements available for designing the user interface of a Web Dynproapplication. All available user interface elements are divided into categories and can be selected using buttons in the view designer.
© SAP AG <Course Number> Unit Title - 15
© SAP AG 2003, Title of Presentation, Speaker Name / 15
Web Dynpro Features (4)
Declarative screen managementNavigation graphs
Nested views and pop-up windows
Layout managers (Grid, flow, matrix, row) with arbitrary nesting
Generic UI Services based on meta-dataExtended Value Selector (‘F4’)
Metadata for value selection from dictionary or defined dynamically
Automatic conversion / checks / error handling for basic types
Comprehensive application error handling
Dynamic creation / modification of meta-model elementsViews and layout elements
Context element ( local variables) and data types
© SAP AG <Course Number> Unit Title - 16
© SAP AG 2003, Title of Presentation, Speaker Name / 16
Web Dynpro Features (5)
Component concept for encapsulation and reuseStand-alone component interfaces
Create multiple instances of embedded components dynamically
APIs for using server interfacesAccess to the System Landscape Directory
Setting the session time-out
Access to URL parameters
UME integrationIncludes Single Sign-On (SSO2)
Portal integrationSupport for client-side portal eventing
Pick up themes and style sheets
© SAP AG <Course Number> Unit Title - 17
© SAP AG 2003, Title of Presentation, Speaker Name / 17
You should now be able to:
Explain basic Features of Web Dynpro.
Features: Topic Summary
© SAP AG <Course Number> Unit Title - 18
© SAP AG 2003, Title of Presentation, Speaker Name / 18
After completing this topic, you will be able to:
Understand the basic concepts of Web Dynpro.
Basic Concepts: Topic Objectives
© SAP AG <Course Number> Unit Title - 19
© SAP AG 2003, Title of Presentation, Speaker Name / 19
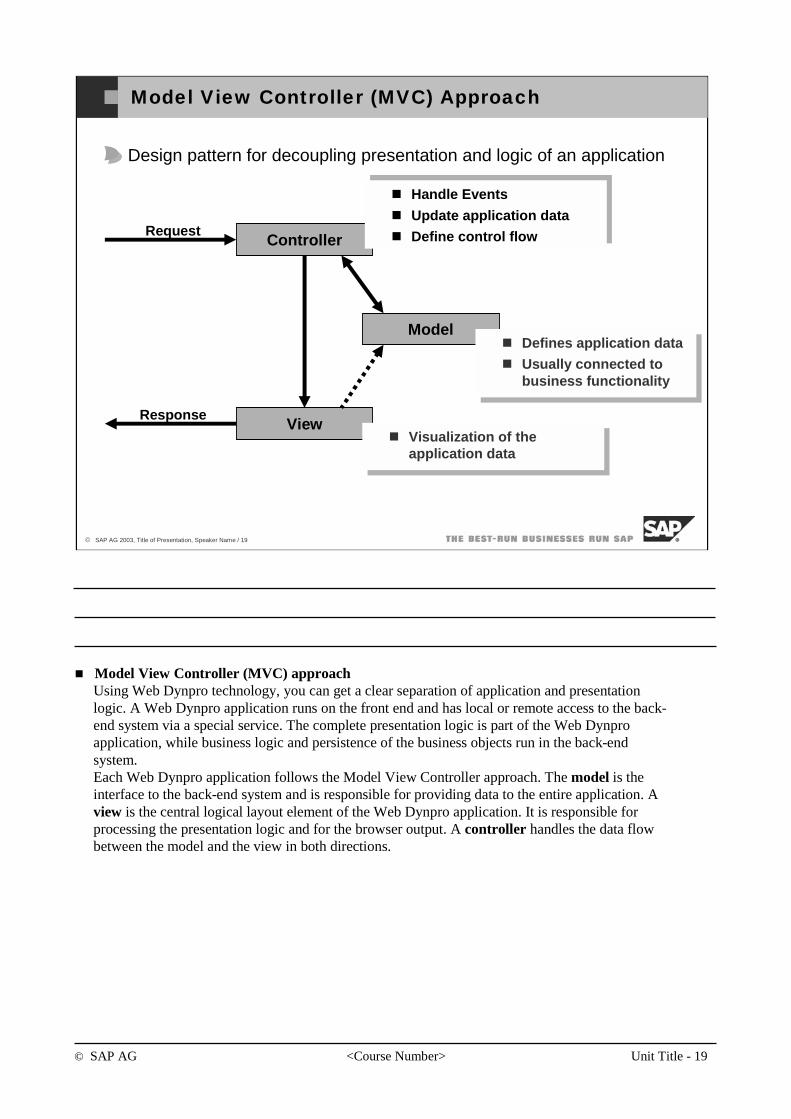
Model View Controller (MVC) Approach
Design pattern for decoupling presentation and logic of an application
ControllerRequest
ViewResponse
Model
Handle Events
Update application data
Define control flow
Defines application data
Usually connected to business functionality
Visualization of the application data
Model View Controller (MVC) approachUsing Web Dynpro technology, you can get a clear separation of application and presentation logic. A Web Dynpro application runs on the front end and has local or remote access to the back-end system via a special service. The complete presentation logic is part of the Web Dynproapplication, while business logic and persistence of the business objects run in the back-end system.Each Web Dynpro application follows the Model View Controller approach. The model is the interface to the back-end system and is responsible for providing data to the entire application. A view is the central logical layout element of the Web Dynpro application. It is responsible for processing the presentation logic and for the browser output. A controller handles the data flow between the model and the view in both directions.
© SAP AG <Course Number> Unit Title - 20
© SAP AG 2003, Title of Presentation, Speaker Name / 20
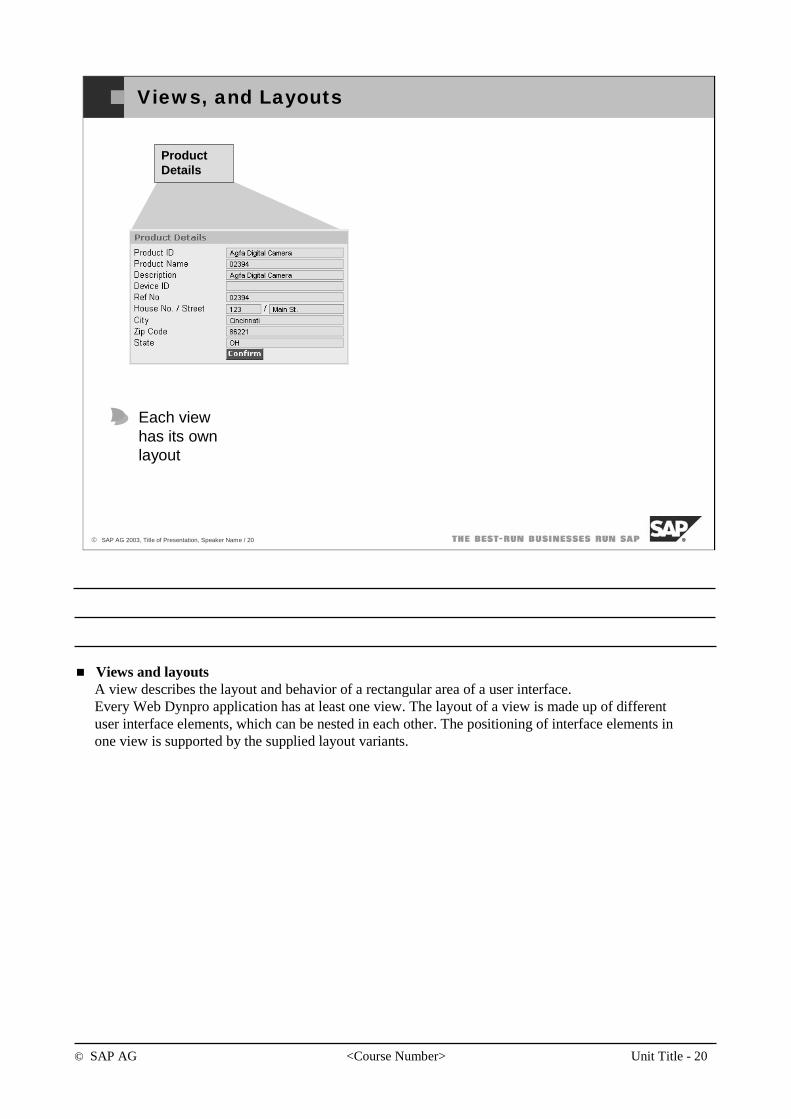
Views, and Layouts
Each viewhas its ownlayout
ProductDetails
Views and layouts A view describes the layout and behavior of a rectangular area of a user interface.Every Web Dynpro application has at least one view. The layout of a view is made up of different user interface elements, which can be nested in each other. The positioning of interface elements in one view is supported by the supplied layout variants.
© SAP AG <Course Number> Unit Title - 21
© SAP AG 2003, Title of Presentation, Speaker Name / 21
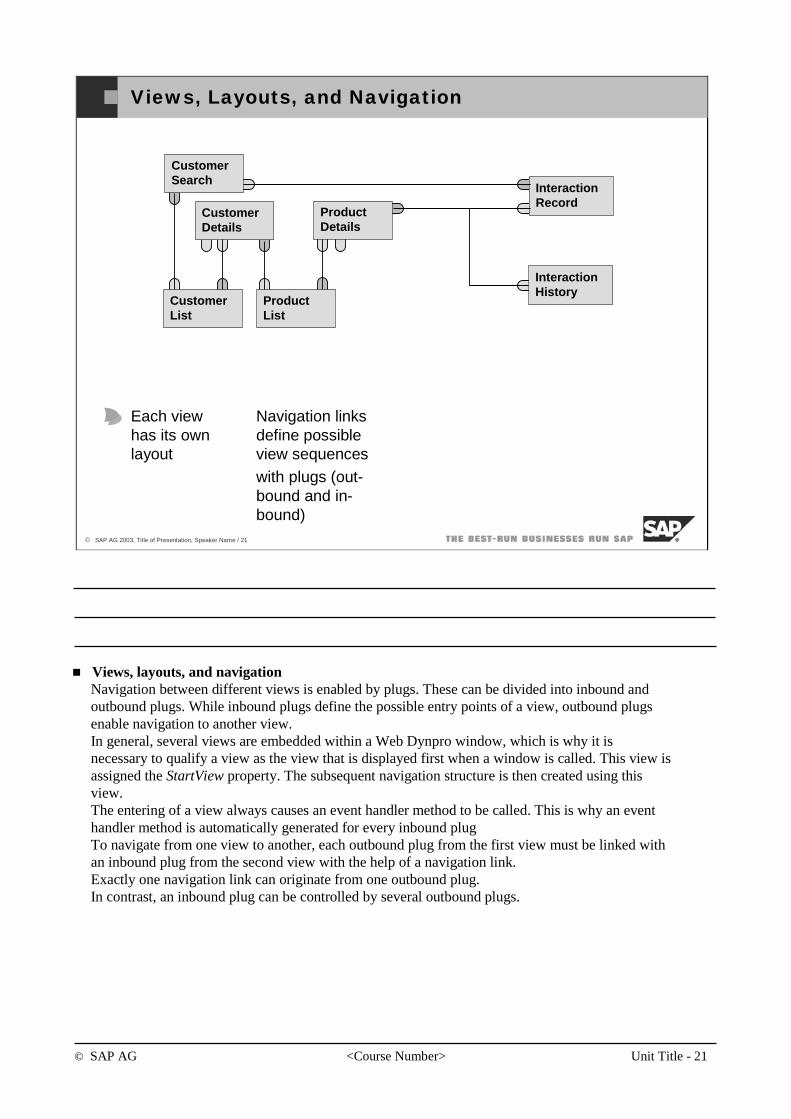
Views, Layouts, and Navigation
Navigation linksdefine possibleview sequenceswith plugs (out-bound and in-bound)
Each viewhas its ownlayout
CustomerList
ProductList
CustomerSearch
CustomerDetails
InteractionRecord
InteractionHistory
ProductDetails
Views, layouts, and navigation Navigation between different views is enabled by plugs. These can be divided into inbound and outbound plugs. While inbound plugs define the possible entry points of a view, outbound plugs enable navigation to another view. In general, several views are embedded within a Web Dynpro window, which is why it is necessary to qualify a view as the view that is displayed first when a window is called. This view is assigned the StartView property. The subsequent navigation structure is then created using this view. The entering of a view always causes an event handler method to be called. This is why an event handler method is automatically generated for every inbound plugTo navigate from one view to another, each outbound plug from the first view must be linked with an inbound plug from the second view with the help of a navigation link. Exactly one navigation link can originate from one outbound plug. In contrast, an inbound plug can be controlled by several outbound plugs.
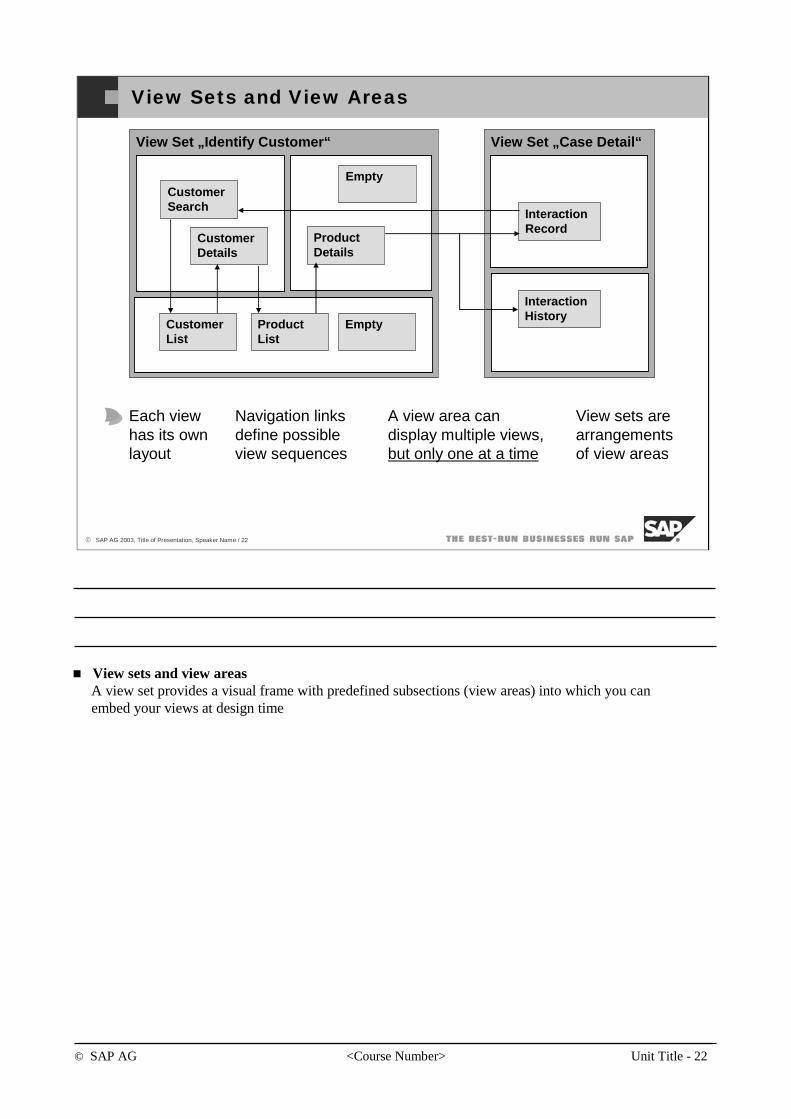
© SAP AG <Course Number> Unit Title - 22
© SAP AG 2003, Title of Presentation, Speaker Name / 22
View Sets and View Areas
View sets arearrangementsof view areas
A view area candisplay multiple views, but only one at a time
Navigation linksdefine possibleview sequences
View Set „Identify Customer“ View Set „Case Detail“
Empty
EmptyCustomerList
ProductList
CustomerSearch
CustomerDetails
ProductDetails
InteractionRecord
InteractionHistory
Each viewhas its ownlayout
View sets and view areasA view set provides a visual frame with predefined subsections (view areas) into which you can embed your views at design time
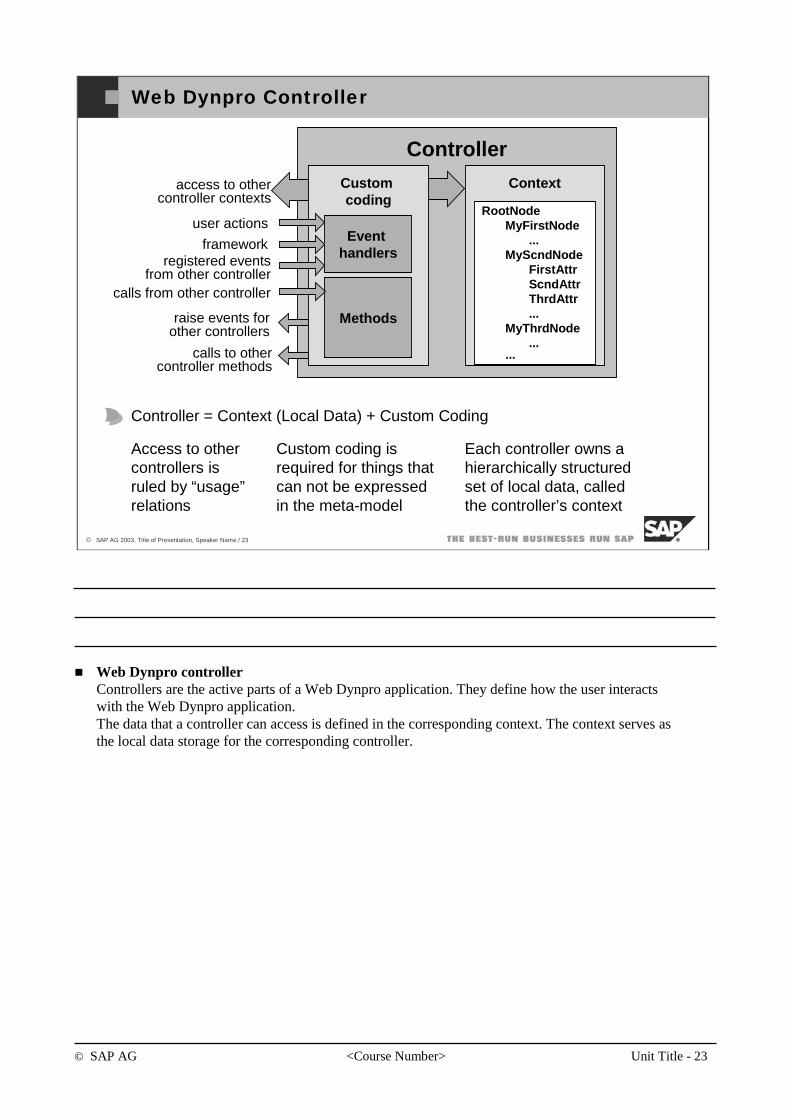
© SAP AG <Course Number> Unit Title - 23
© SAP AG 2003, Title of Presentation, Speaker Name / 23
Web Dynpro Controller
Access to othercontrollers is ruled by “usage”relations
Custom coding isrequired for things thatcan not be expressed in the meta-model
Controller
Context
RootNodeMyFirstNode
...MyScndNode
FirstAttrScndAttrThrdAttr...
MyThrdNode...
...
Customcoding
Methods
Event handlers
user actions
registered events from other controller
framework
access to other controller contexts
calls from other controller
raise events for other controllers
calls to other controller methods
Each controller owns ahierarchically structuredset of local data, called the controller’s context
Controller = Context (Local Data) + Custom Coding
Web Dynpro controllerControllers are the active parts of a Web Dynpro application. They define how the user interacts with the Web Dynpro application. The data that a controller can access is defined in the corresponding context. The context serves as the local data storage for the corresponding controller.
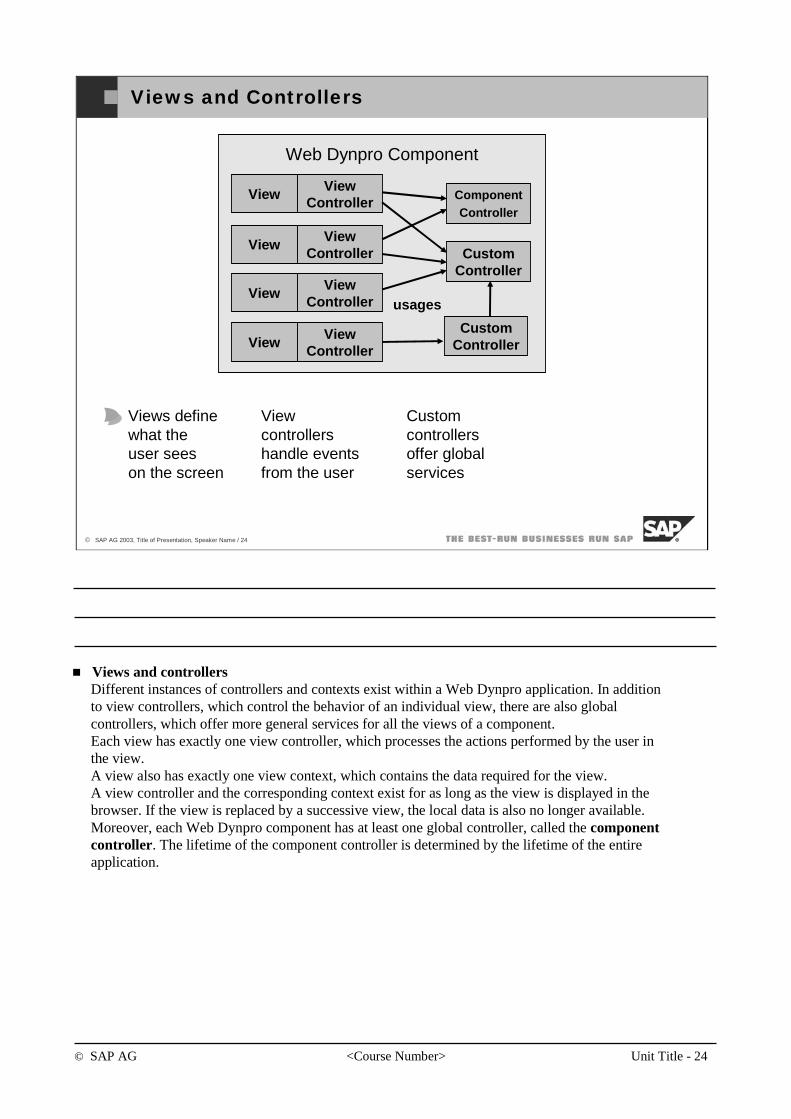
© SAP AG <Course Number> Unit Title - 24
© SAP AG 2003, Title of Presentation, Speaker Name / 24
Views and Controllers
Web Dynpro Component
View
View
View
View
ViewController
ViewController
ViewController
ViewController
CustomController
CustomController
ComponentController
usages
Views definewhat the user seeson the screen
Viewcontrollershandle eventsfrom the user
Customcontrollersoffer globalservices
Views and controllersDifferent instances of controllers and contexts exist within a Web Dynpro application. In addition to view controllers, which control the behavior of an individual view, there are also global controllers, which offer more general services for all the views of a component.Each view has exactly one view controller, which processes the actions performed by the user in the view.A view also has exactly one view context, which contains the data required for the view. A view controller and the corresponding context exist for as long as the view is displayed in the browser. If the view is replaced by a successive view, the local data is also no longer available.Moreover, each Web Dynpro component has at least one global controller, called the component controller. The lifetime of the component controller is determined by the lifetime of the entire application.
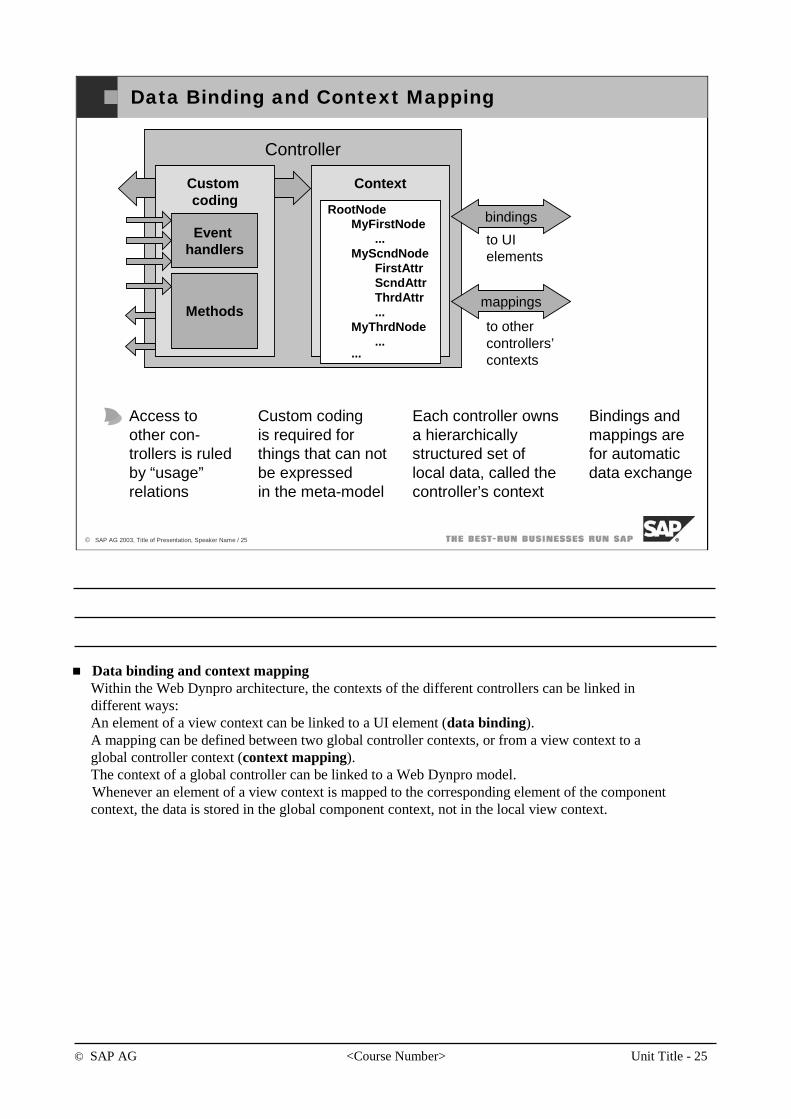
© SAP AG <Course Number> Unit Title - 25
© SAP AG 2003, Title of Presentation, Speaker Name / 25
Data Binding and Context Mapping
Bindings andmappings are for automaticdata exchange
Access to other con-trollers is ruled by “usage”relations
Custom coding is required for things that can not be expressed in the meta-model
Each controller owns a hierarchically structured set of local data, called the controller’s context
Controller
Context
RootNodeMyFirstNode
...MyScndNode
FirstAttrScndAttrThrdAttr...
MyThrdNode...
...
Customcoding
Methods
Event handlers
bindings
mappings
to other controllers’contexts
to UIelements
Data binding and context mapping Within the Web Dynpro architecture, the contexts of the different controllers can be linked in different ways:An element of a view context can be linked to a UI element (data binding).A mapping can be defined between two global controller contexts, or from a view context to a global controller context (context mapping).The context of a global controller can be linked to a Web Dynpro model.Whenever an element of a view context is mapped to the corresponding element of the component context, the data is stored in the global component context, not in the local view context.
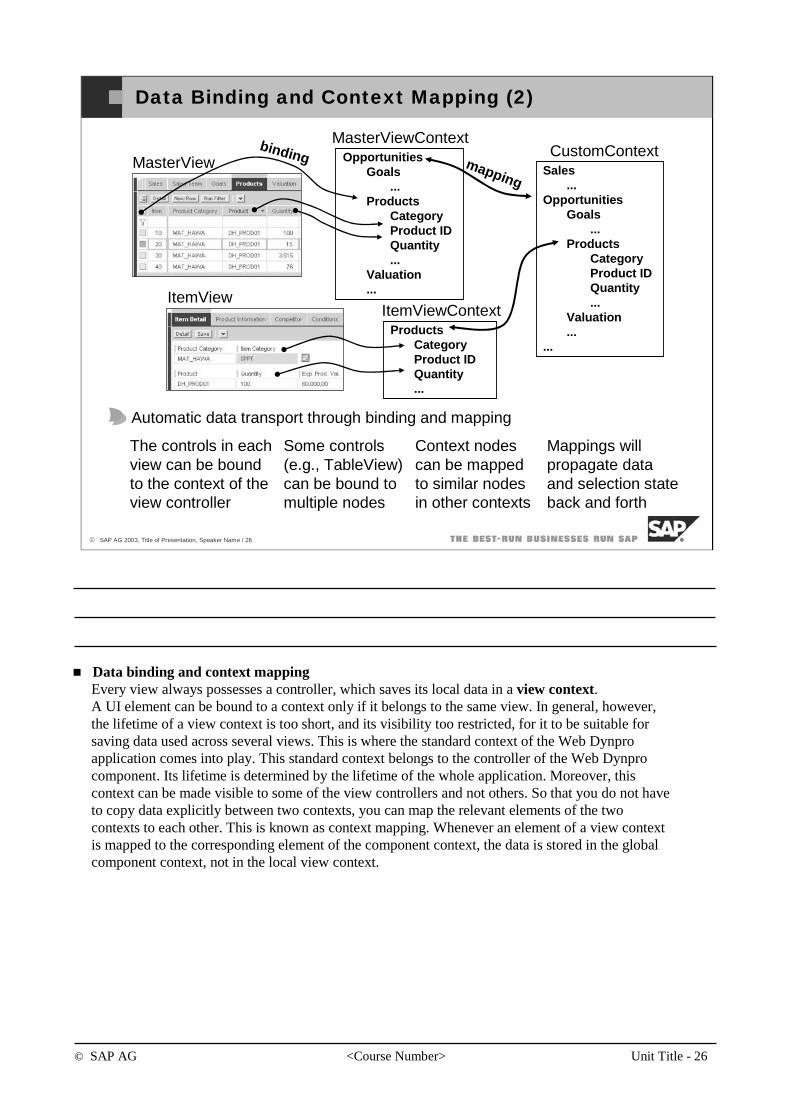
© SAP AG <Course Number> Unit Title - 26
© SAP AG 2003, Title of Presentation, Speaker Name / 26
Data Binding and Context Mapping (2)
ItemView
MasterView OpportunitiesGoals
...Products
CategoryProduct IDQuantity...
Valuation...
MasterViewContext
ProductsCategoryProduct IDQuantity...
ItemViewContext
bindingSales
...Opportunities
Goals...
ProductsCategoryProduct IDQuantity...
Valuation...
...
CustomContextmapping
The controls in each view can be boundto the context of theview controller
Some controls(e.g., TableView)can be bound tomultiple nodes
Context nodescan be mappedto similar nodesin other contexts
Mappings willpropagate data and selection stateback and forth
Automatic data transport through binding and mapping
Data binding and context mapping Every view always possesses a controller, which saves its local data in a view context. A UI element can be bound to a context only if it belongs to the same view. In general, however, the lifetime of a view context is too short, and its visibility too restricted, for it to be suitable for saving data used across several views. This is where the standard context of the Web Dynproapplication comes into play. This standard context belongs to the controller of the Web Dynprocomponent. Its lifetime is determined by the lifetime of the whole application. Moreover, this context can be made visible to some of the view controllers and not others. So that you do not have to copy data explicitly between two contexts, you can map the relevant elements of the two contexts to each other. This is known as context mapping. Whenever an element of a view context is mapped to the corresponding element of the component context, the data is stored in the global component context, not in the local view context.
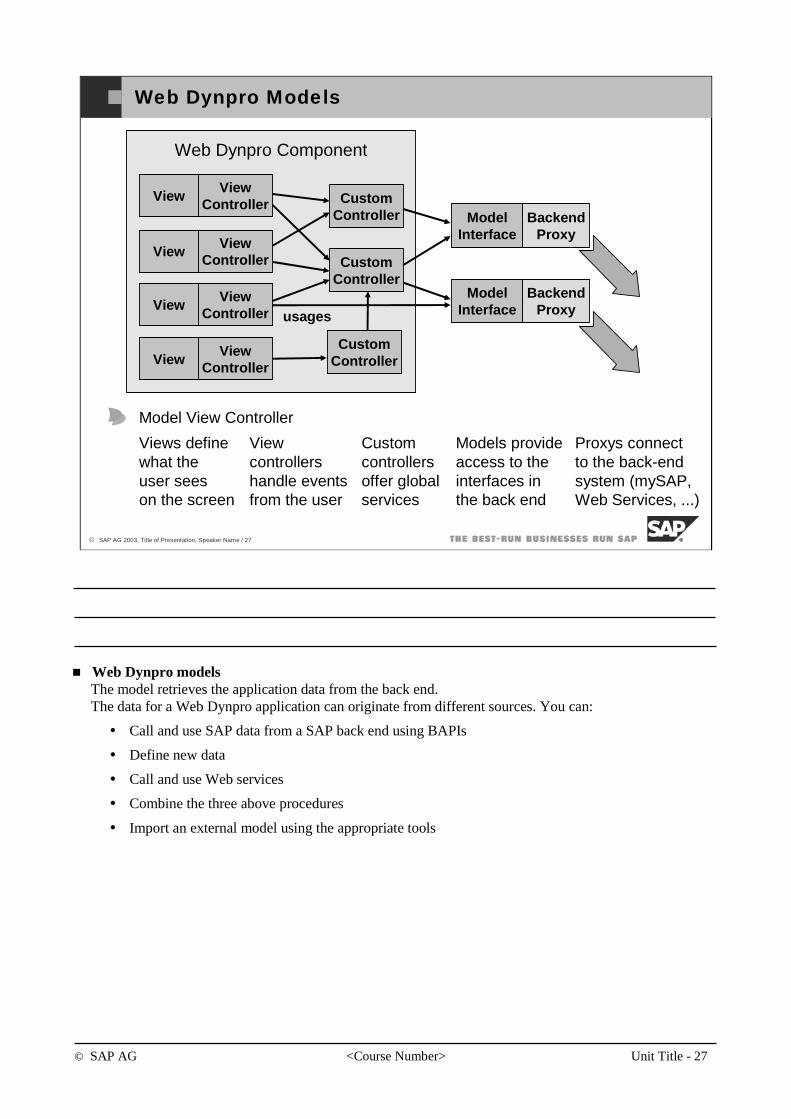
© SAP AG <Course Number> Unit Title - 27
© SAP AG 2003, Title of Presentation, Speaker Name / 27
Web Dynpro Models
Proxys connectto the back-end system (mySAP, Web Services, ...)
Web Dynpro Component
ViewView
Controller
CustomController
CustomController
View ViewController
ViewView
Controller
CustomController
ViewView
Controller
ModelInterface
ModelInterface
BackendProxy
BackendProxy
usages
Views definewhat the user seeson the screen
Viewcontrollershandle eventsfrom the user
Customcontrollersoffer globalservices
Models provide access to theinterfaces in the back end
Model View Controller
Web Dynpro modelsThe model retrieves the application data from the back end.The data for a Web Dynpro application can originate from different sources. You can:
Call and use SAP data from a SAP back end using BAPIs
Define new data
Call and use Web services
Combine the three above procedures
Import an external model using the appropriate tools
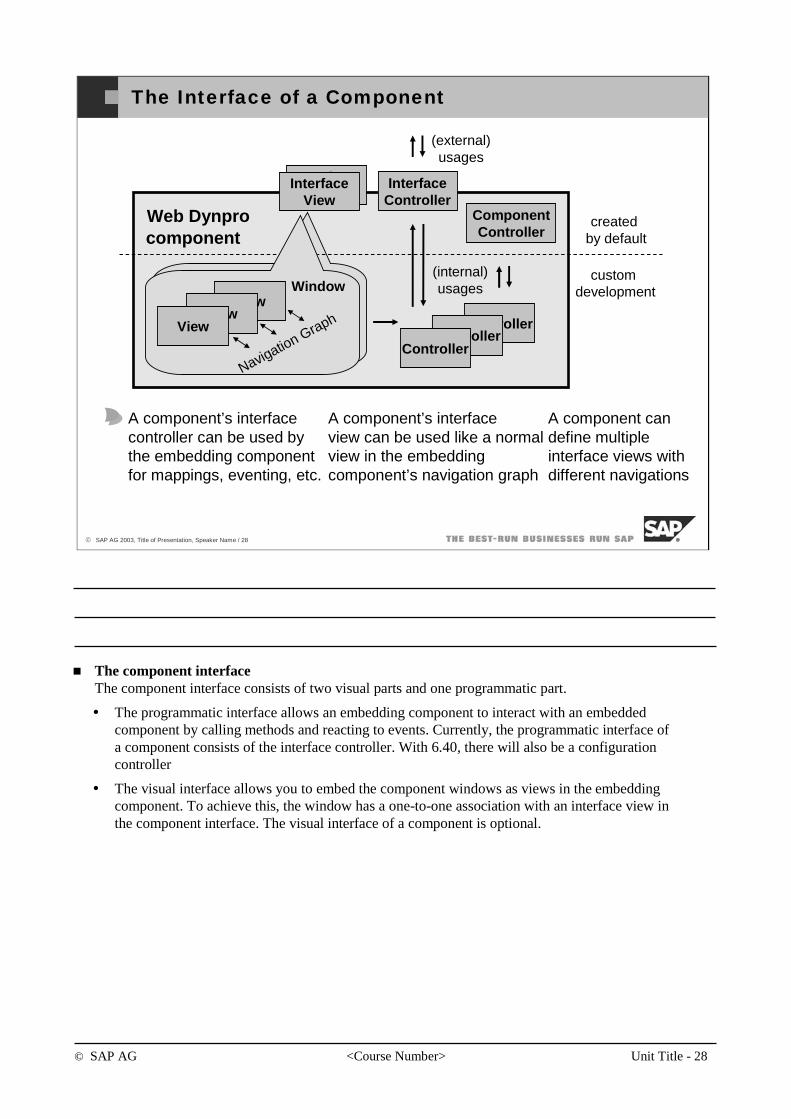
© SAP AG <Course Number> Unit Title - 28
© SAP AG 2003, Title of Presentation, Speaker Name / 28
The Interface of a Component
A component’s interfaceview can be used like a normal view in the embedding component’s navigation graph
A component’s interface controller can be used by the embedding component for mappings, eventing, etc.
Web Dynprocomponent
Window
InterfaceView
InterfaceView
InterfaceController
ComponentController
created by default
custom development
(external)usages
Window
ControllerController
Controller
ViewView
View
Navigation Graph
(internal)usages
A component can define multipleinterface views withdifferent navigations
The component interface The component interface consists of two visual parts and one programmatic part.
The programmatic interface allows an embedding component to interact with an embedded component by calling methods and reacting to events. Currently, the programmatic interface of a component consists of the interface controller. With 6.40, there will also be a configuration controller
The visual interface allows you to embed the component windows as views in the embedding component. To achieve this, the window has a one-to-one association with an interface view in the component interface. The visual interface of a component is optional.
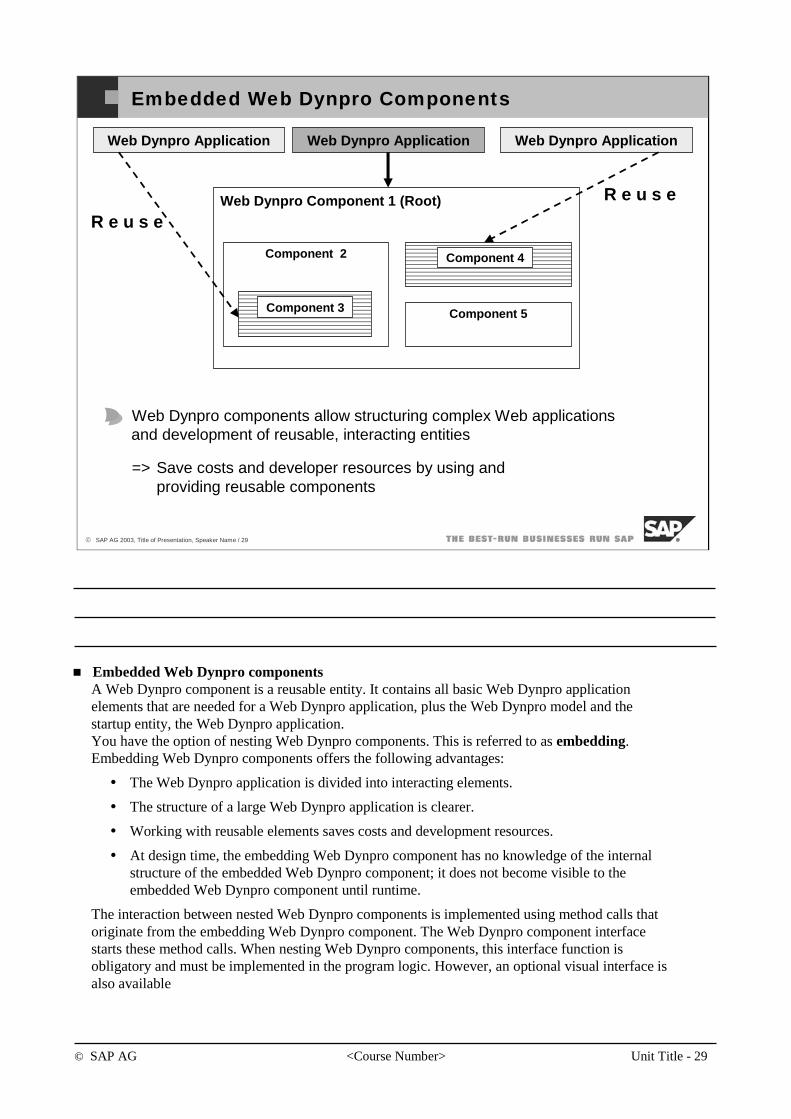
© SAP AG <Course Number> Unit Title - 29
© SAP AG 2003, Title of Presentation, Speaker Name / 29
Embedded Web Dynpro Components
Component 2
Component 3
Component 4
Web Dynpro components allow structuring complex Web applications and development of reusable, interacting entities
=> Save costs and developer resources by using andproviding reusable components
Component 5
Web Dynpro Component 1 (Root)
Web Dynpro ApplicationWeb Dynpro Application
Component 3
Web Dynpro Application
R e u s e
Component 4
R e u s e
Embedded Web Dynpro components A Web Dynpro component is a reusable entity. It contains all basic Web Dynpro application elements that are needed for a Web Dynpro application, plus the Web Dynpro model and the startup entity, the Web Dynpro application.You have the option of nesting Web Dynpro components. This is referred to as embedding. Embedding Web Dynpro components offers the following advantages:
The Web Dynpro application is divided into interacting elements.
The structure of a large Web Dynpro application is clearer.
Working with reusable elements saves costs and development resources.
At design time, the embedding Web Dynpro component has no knowledge of the internal structure of the embedded Web Dynpro component; it does not become visible to the embedded Web Dynpro component until runtime.
The interaction between nested Web Dynpro components is implemented using method calls that originate from the embedding Web Dynpro component. The Web Dynpro component interface starts these method calls. When nesting Web Dynpro components, this interface function is obligatory and must be implemented in the program logic. However, an optional visual interface is also available
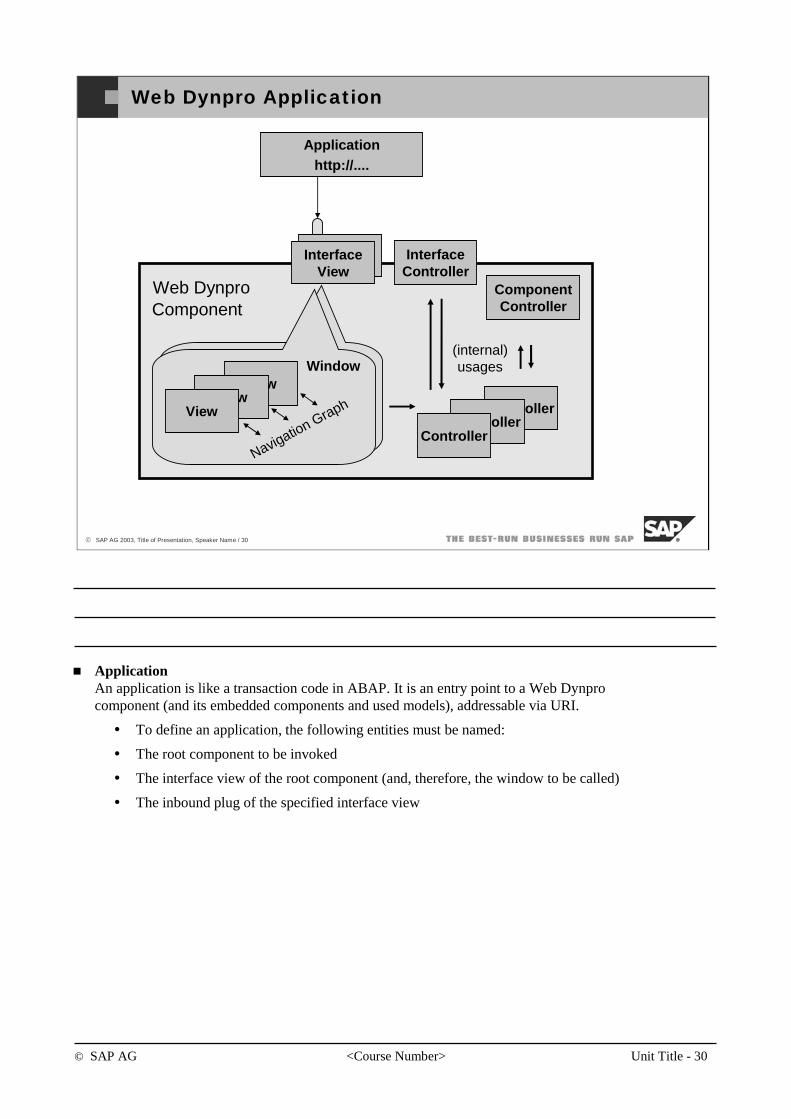
© SAP AG <Course Number> Unit Title - 30
© SAP AG 2003, Title of Presentation, Speaker Name / 30
Web Dynpro Application
Web DynproComponent
Window
InterfaceView
InterfaceView
InterfaceController
ComponentController
Window
ControllerController
Controller
ViewView
View
Navigation Graph
(internal)usages
Applicationhttp://....
Application An application is like a transaction code in ABAP. It is an entry point to a Web Dynprocomponent (and its embedded components and used models), addressable via URI.
To define an application, the following entities must be named:
The root component to be invoked
The interface view of the root component (and, therefore, the window to be called)
The inbound plug of the specified interface view
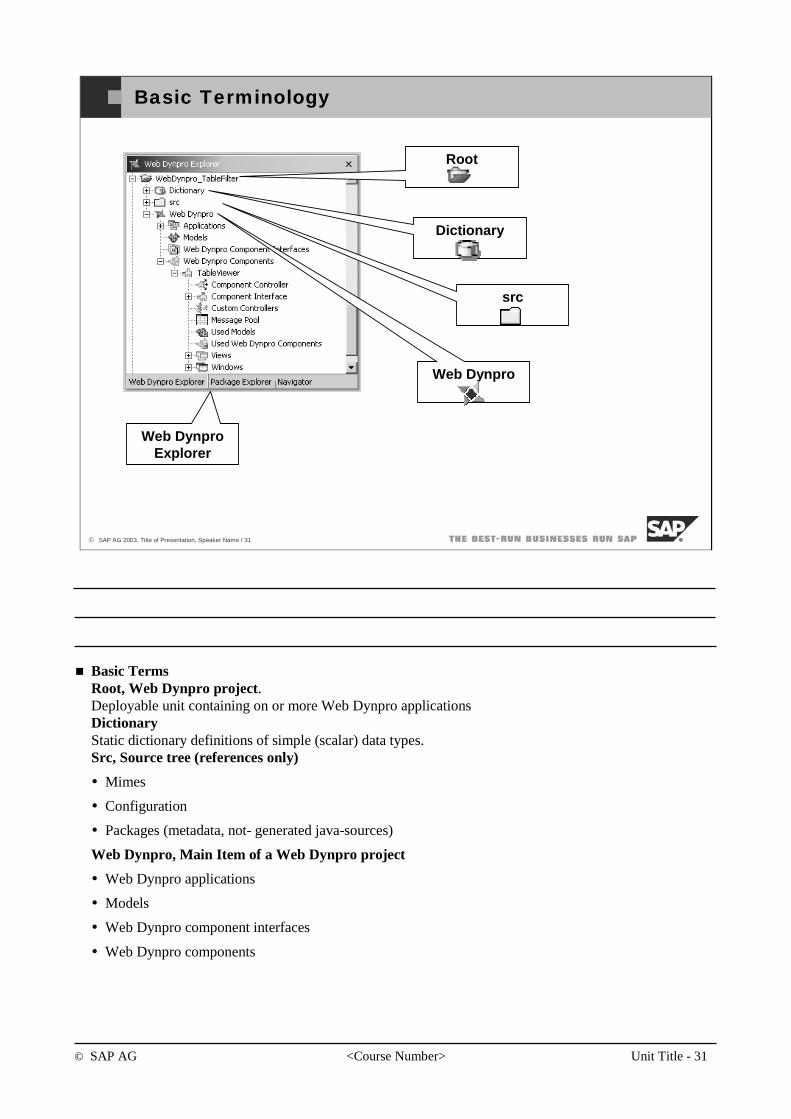
© SAP AG <Course Number> Unit Title - 31
© SAP AG 2003, Title of Presentation, Speaker Name / 31
Web Dynpro
src
Dictionary
Root
Basic Terminology
Web DynproExplorer
Basic TermsRoot, Web Dynpro project. Deployable unit containing on or more Web Dynpro applicationsDictionaryStatic dictionary definitions of simple (scalar) data types.Src, Source tree (references only)
Mimes
Configuration
Packages (metadata, not- generated java-sources)
Web Dynpro, Main Item of a Web Dynpro project
Web Dynpro applications
Models
Web Dynpro component interfaces
Web Dynpro components
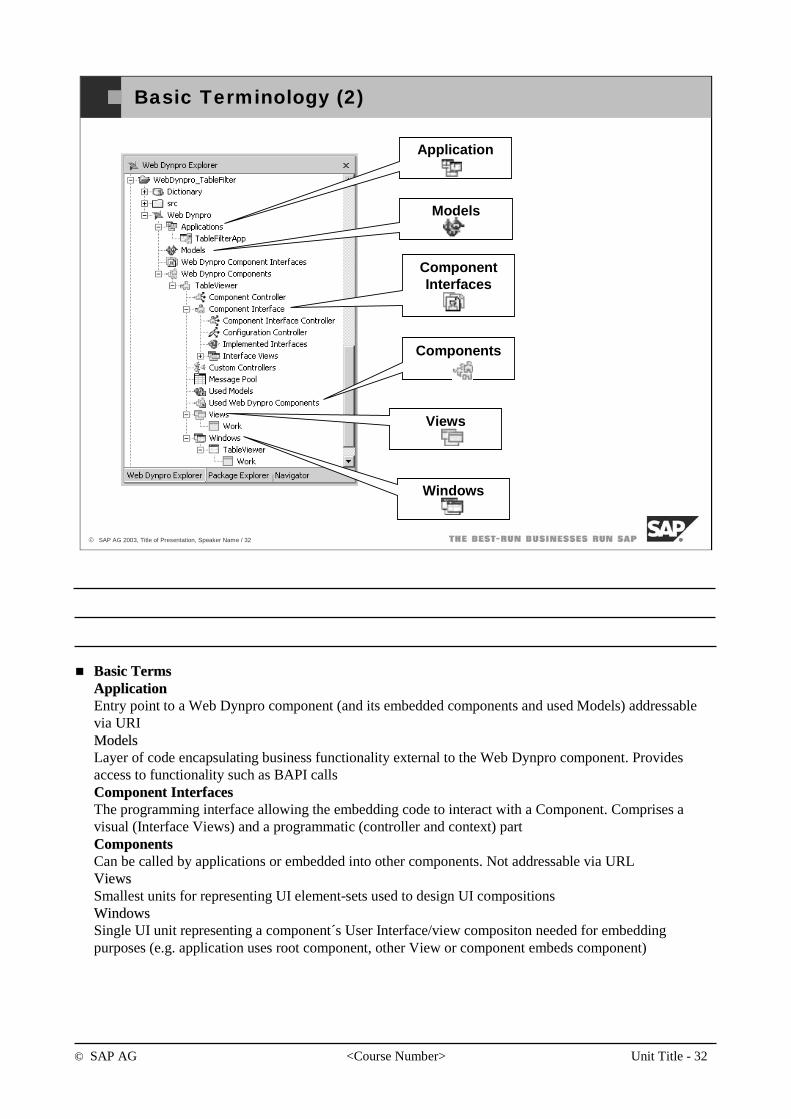
© SAP AG <Course Number> Unit Title - 32
© SAP AG 2003, Title of Presentation, Speaker Name / 32
Basic Terminology (2)
Application
Models
Component Interfaces
Components
Views
Windows
Basic TermsBasic TermsApplicationApplicationEntry point to a Web Dynpro component (and its embedded components and used Models) addressable via URIModelsModelsLayer of code encapsulating business functionality external to the Web Dynpro component. Providesaccess to functionality such as BAPI callsComponentComponent InterfacesInterfacesThe programming interface allowing the embedding code to interact with a Component. Comprises a visual (Interface Views) and a programmatic (controller and context) partComponentsComponentsCan be called by applications or embedded into other components. Not addressable via URLViewsViewsSmallest units for representing UI element-sets used to design UI compositionsWindowsWindowsSingle UI unit representing a component´s User Interface/view compositon needed for embeddingpurposes (e.g. application uses root component, other View or component embeds component)
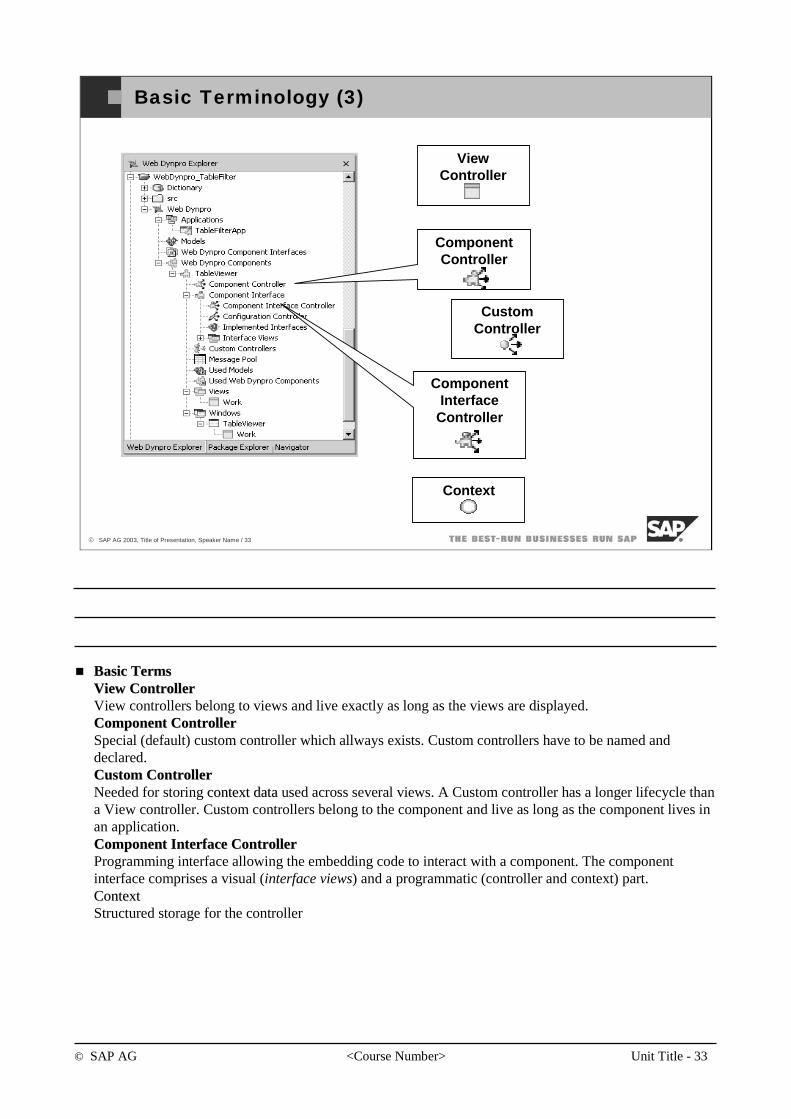
© SAP AG <Course Number> Unit Title - 33
© SAP AG 2003, Title of Presentation, Speaker Name / 33
Basic Terminology (3)
Component Controller
View Controller
CustomController
ComponentInterface
Controller
Context
Basic TermsBasic TermsViewView ControllerControllerView controllers belong to views and live exactly as long as the views are displayed.ComponentComponent ControllerControllerSpecial (default) custom controller which allways exists. Custom controllers have to be named and declared.CustomCustom ControllerControllerNeeded for storing contextcontext datadata used across several views. A Custom controller has a longer lifecycle thana View controller. Custom controllers belong to the component and live as long as the component lives in an application.ComponentComponent Interface ControllerInterface ControllerProgramming interface allowing the embedding code to interact with a component. The component interface comprises a visual (interface views) and a programmatic (controller and context) part.ContextContextStructured storage for the controller
© SAP AG <Course Number> Unit Title - 34
© SAP AG 2003, Title of Presentation, Speaker Name / 34
You should now be able to:
Understand the basic concepts of Web Dynpro.
Features: Topic Summary
© SAP AG <Course Number> Unit Title - 35
© SAP AG 2003, Title of Presentation, Speaker Name / 35
You should now be able to:
Understand the basic idea behind Web Dynpro.
Explain basic Features of Web Dynpro.
Understand basic concepts of Web Dynpro.
Web Dynpro Dynamic Programming: Unit Summary
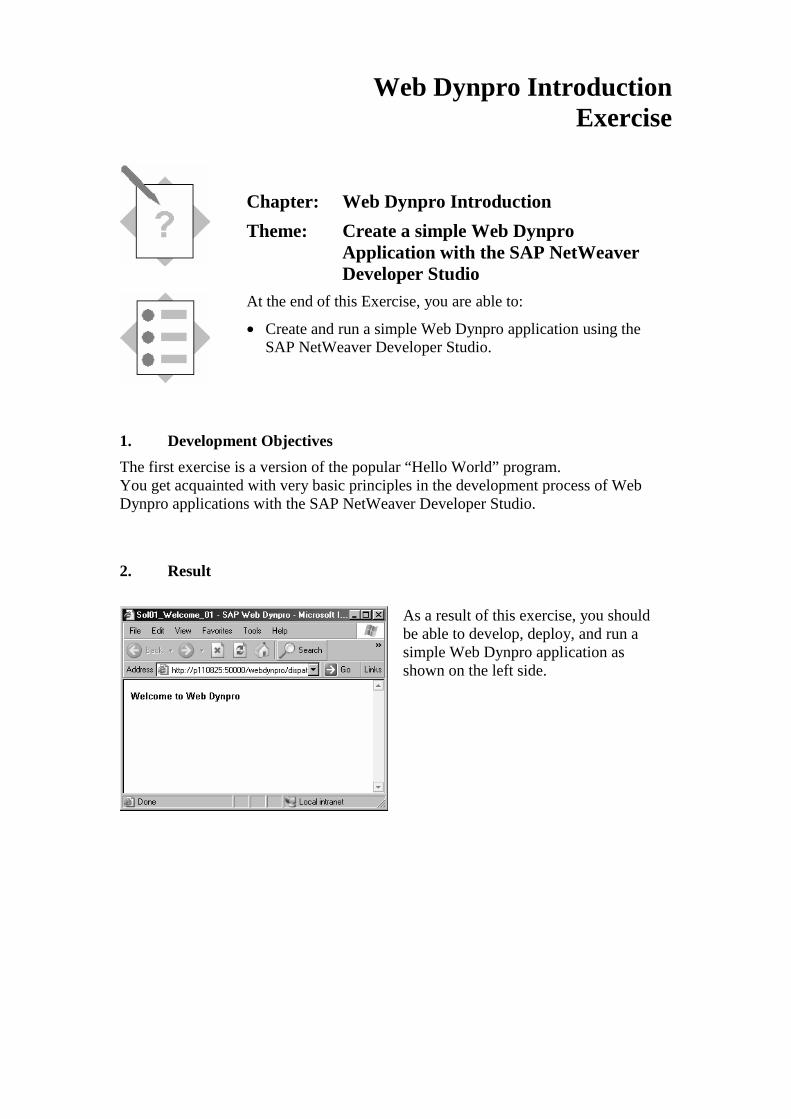
Web Dynpro Introduction Exercise
Chapter: Web Dynpro Introduction
Theme: Create a simple Web Dynpro Application with the SAP NetWeaver Developer Studio
At the end of this Exercise, you are able to:
• Create and run a simple Web Dynpro application using the SAP NetWeaver Developer Studio.
1. Development Objectives
The first exercise is a version of the popular “Hello World” program. You get acquainted with very basic principles in the development process of Web Dynpro applications with the SAP NetWeaver Developer Studio.
2. Result
As a result of this exercise, you should be able to develop, deploy, and run a simple Web Dynpro application as shown on the left side.
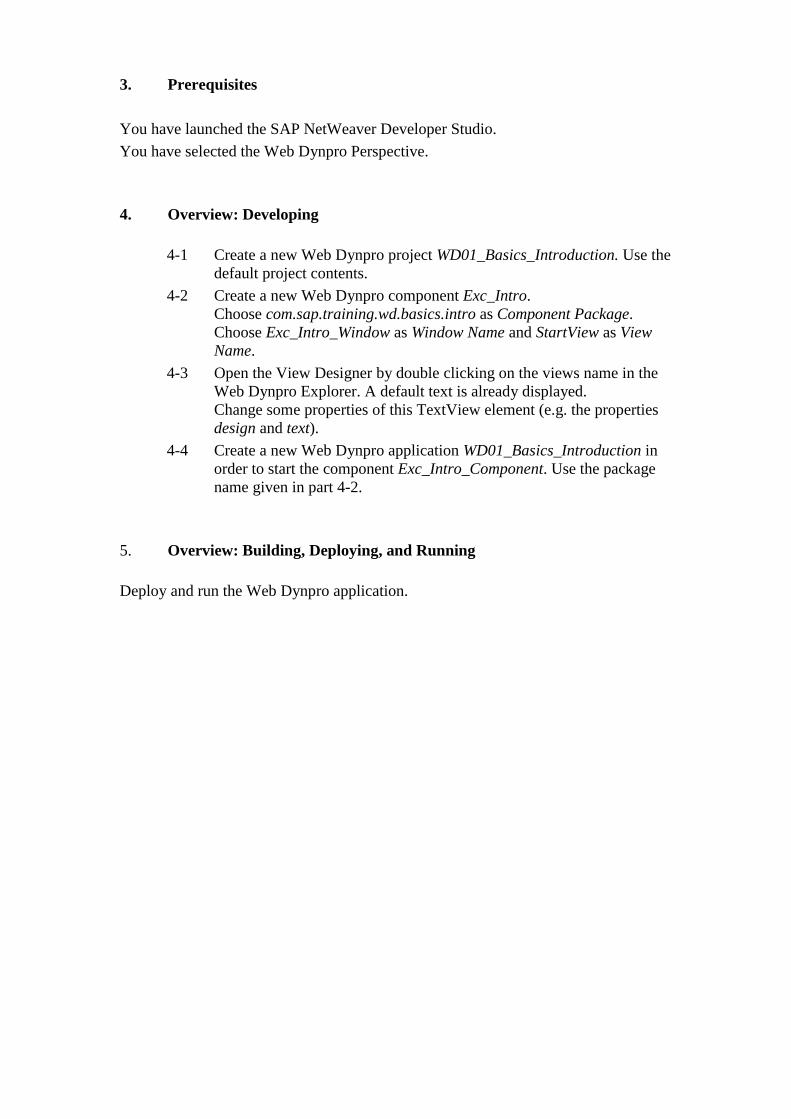
3. Prerequisites
You have launched the SAP NetWeaver Developer Studio.
You have selected the Web Dynpro Perspective. 4. Overview: Developing
4-1 Create a new Web Dynpro project WD01_Basics_Introduction. Use the
default project contents.
4-2 Create a new Web Dynpro component Exc_Intro. Choose com.sap.training.wd.basics.intro as Component Package. Choose Exc_Intro_Window as Window Name and StartView as View Name.
4-3 Open the View Designer by double clicking on the views name in the Web Dynpro Explorer. A default text is already displayed. Change some properties of this TextView element (e.g. the properties design and text).
4-4 Create a new Web Dynpro application WD01_Basics_Introduction in order to start the component Exc_Intro_Component. Use the package name given in part 4-2.
5. Overview: Building, Deploying, and Running
Deploy and run the Web Dynpro application.
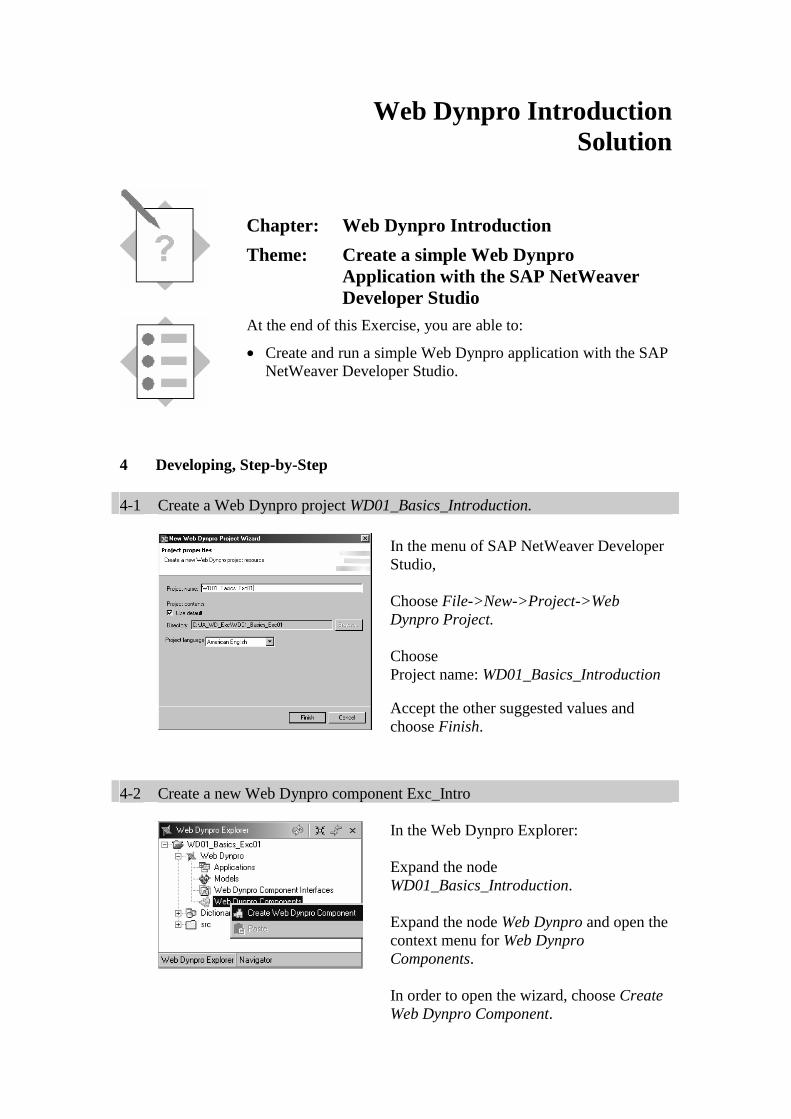
Web Dynpro Introduction Solution
Chapter: Web Dynpro Introduction
Theme: Create a simple Web Dynpro Application with the SAP NetWeaver Developer Studio
At the end of this Exercise, you are able to:
• Create and run a simple Web Dynpro application with the SAP NetWeaver Developer Studio.
4 Developing, Step-by-Step 4-1 Create a Web Dynpro project WD01_Basics_Introduction.
In the menu of SAP NetWeaver Developer Studio, Choose File->New->Project->Web Dynpro Project. Choose Project name: WD01_Basics_Introduction Accept the other suggested values and choose Finish.
4-2 Create a new Web Dynpro component Exc_Intro
In the Web Dynpro Explorer: Expand the node WD01_Basics_Introduction. Expand the node Web Dynpro and open the context menu for Web Dynpro Components. In order to open the wizard, choose Create Web Dynpro Component.
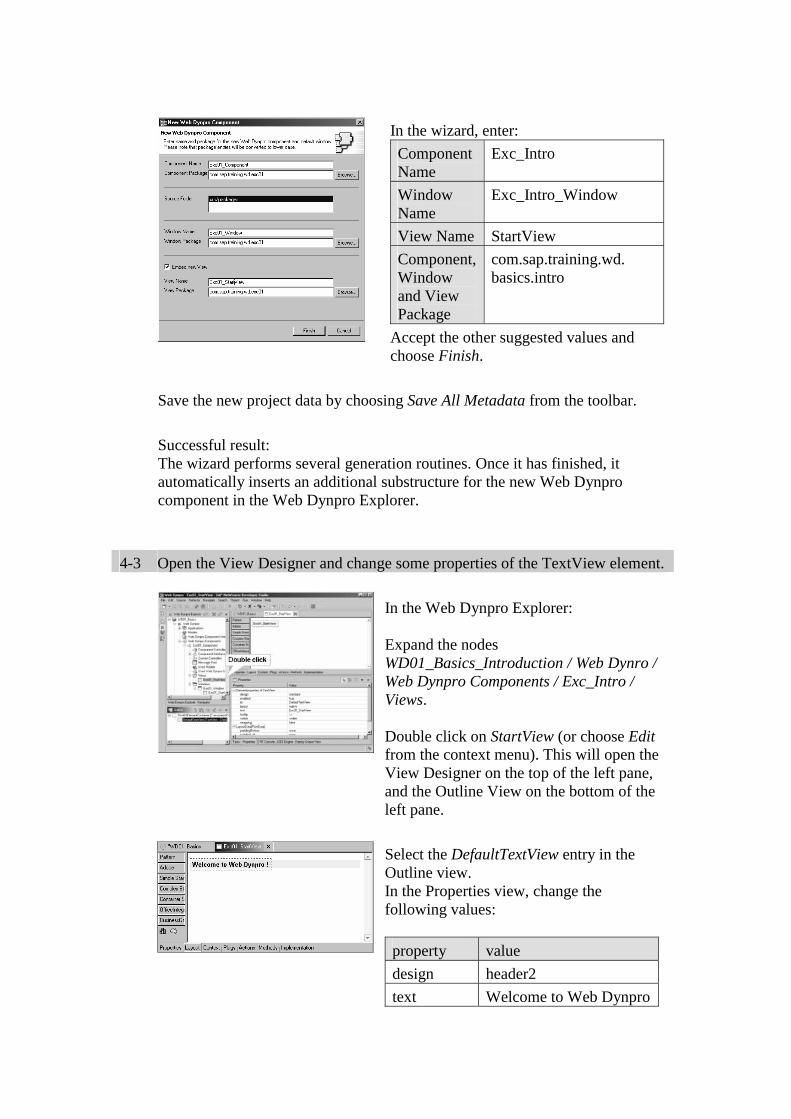
In the wizard, enter:
Component Name
Exc_Intro
Window Name
Exc_Intro_Window
View Name StartView
Component, Window and View Package
com.sap.training.wd. basics.intro
Accept the other suggested values and choose Finish.
Save the new project data by choosing Save All Metadata from the toolbar.
Successful result: The wizard performs several generation routines. Once it has finished, it automatically inserts an additional substructure for the new Web Dynpro component in the Web Dynpro Explorer.
4-3 Open the View Designer and change some properties of the TextView element.
In the Web Dynpro Explorer: Expand the nodes WD01_Basics_Introduction / Web Dynro / Web Dynpro Components / Exc_Intro / Views. Double click on StartView (or choose Edit from the context menu). This will open the View Designer on the top of the left pane, and the Outline View on the bottom of the left pane.
Select the DefaultTextView entry in the Outline view. In the Properties view, change the following values:
property value
design header2
text Welcome to Web Dynpro
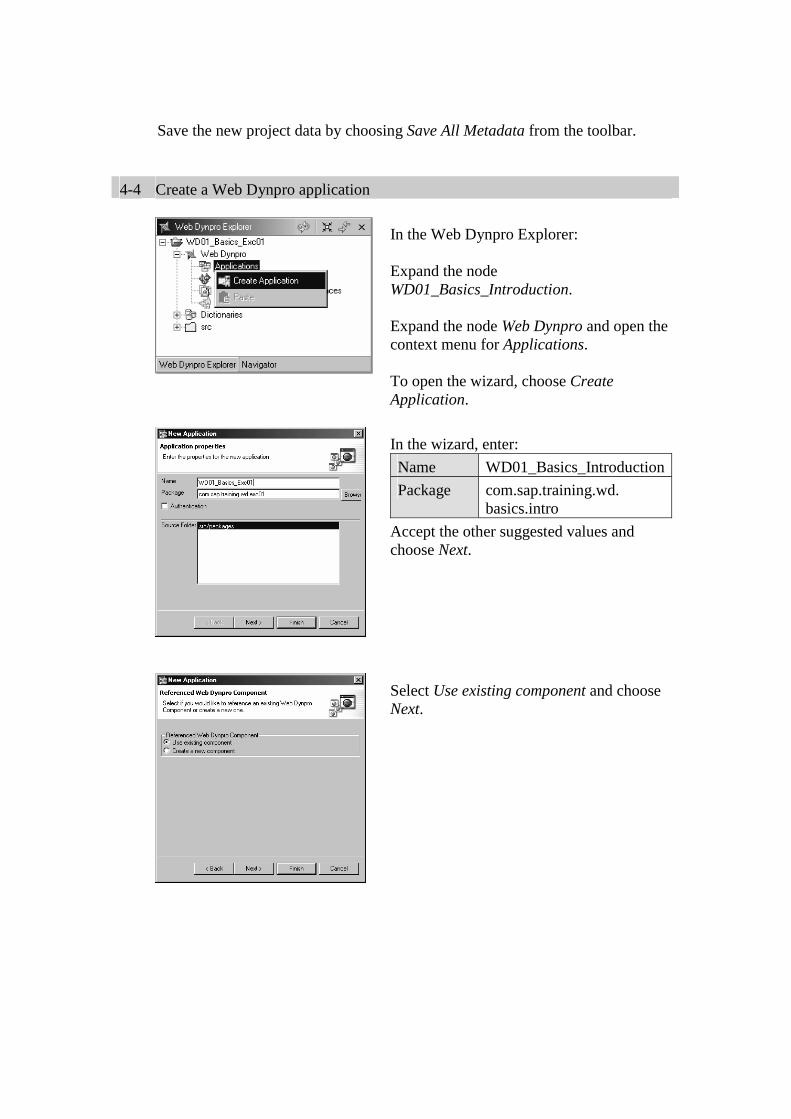
Save the new project data by choosing Save All Metadata from the toolbar.
4-4 Create a Web Dynpro application
In the Web Dynpro Explorer: Expand the node WD01_Basics_Introduction. Expand the node Web Dynpro and open the context menu for Applications. To open the wizard, choose Create Application.
In the wizard, enter:
Name WD01_Basics_Introduction
Package com.sap.training.wd. basics.intro
Accept the other suggested values and choose Next.
Select Use existing component and choose Next.
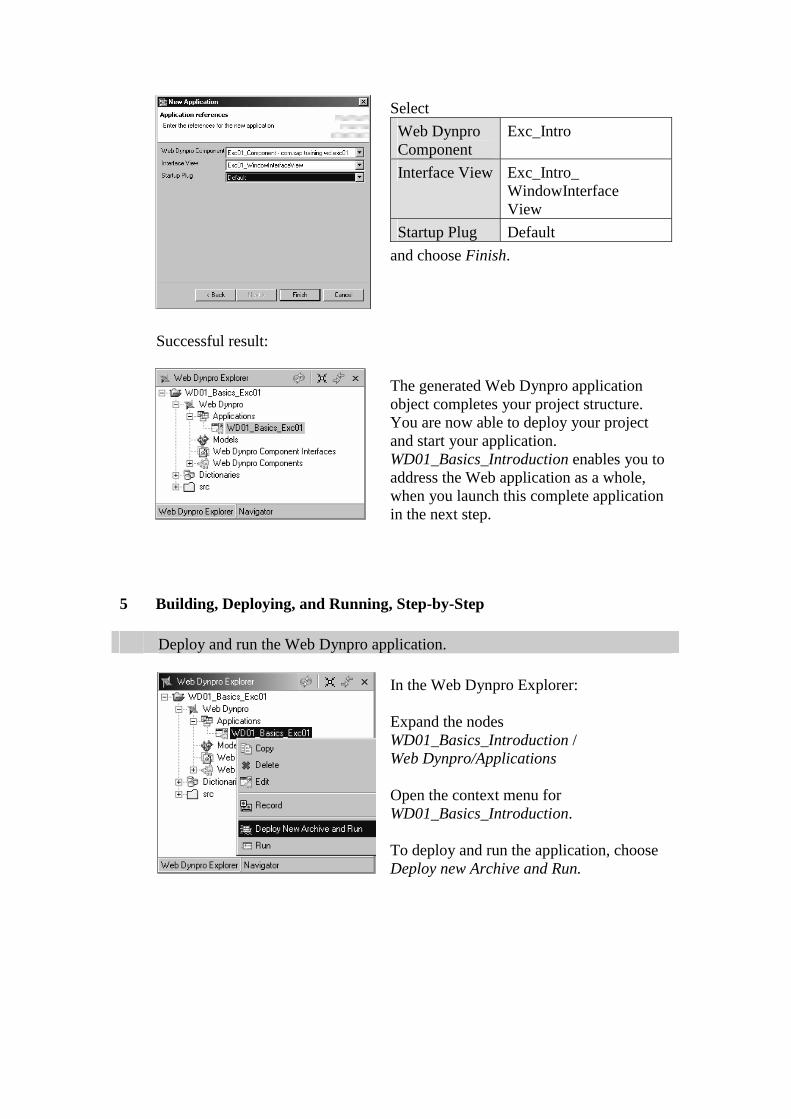
Select
Web Dynpro Component
Exc_Intro
Interface View Exc_Intro_ WindowInterface View
Startup Plug Default
and choose Finish.
Successful result:
The generated Web Dynpro application object completes your project structure. You are now able to deploy your project and start your application. WD01_Basics_Introduction enables you to address the Web application as a whole, when you launch this complete application in the next step.
5 Building, Deploying, and Running, Step-by-Step Deploy and run the Web Dynpro application.
In the Web Dynpro Explorer: Expand the nodes WD01_Basics_Introduction / Web Dynpro/Applications Open the context menu for WD01_Basics_Introduction. To deploy and run the application, choose Deploy new Archive and Run.

Successful result:
The Developer Studio launches the Web browser and chooses the active view StartView.
© SAP AG <Course Number> Unit Title - 1
© SAP AG 2003, Title of Presentation, Speaker Name / 1
Navigation
Contents:
Navigation
© SAP AG <Course Number> Unit Title - 2
© SAP AG 2003, Title of Presentation, Speaker Name / 2
After completing this unit, you will be able to:
Specify a Navigation Schema.
Explain the usage of Plugs.
Create navigation between two views.
Navigation: Unit Objectives
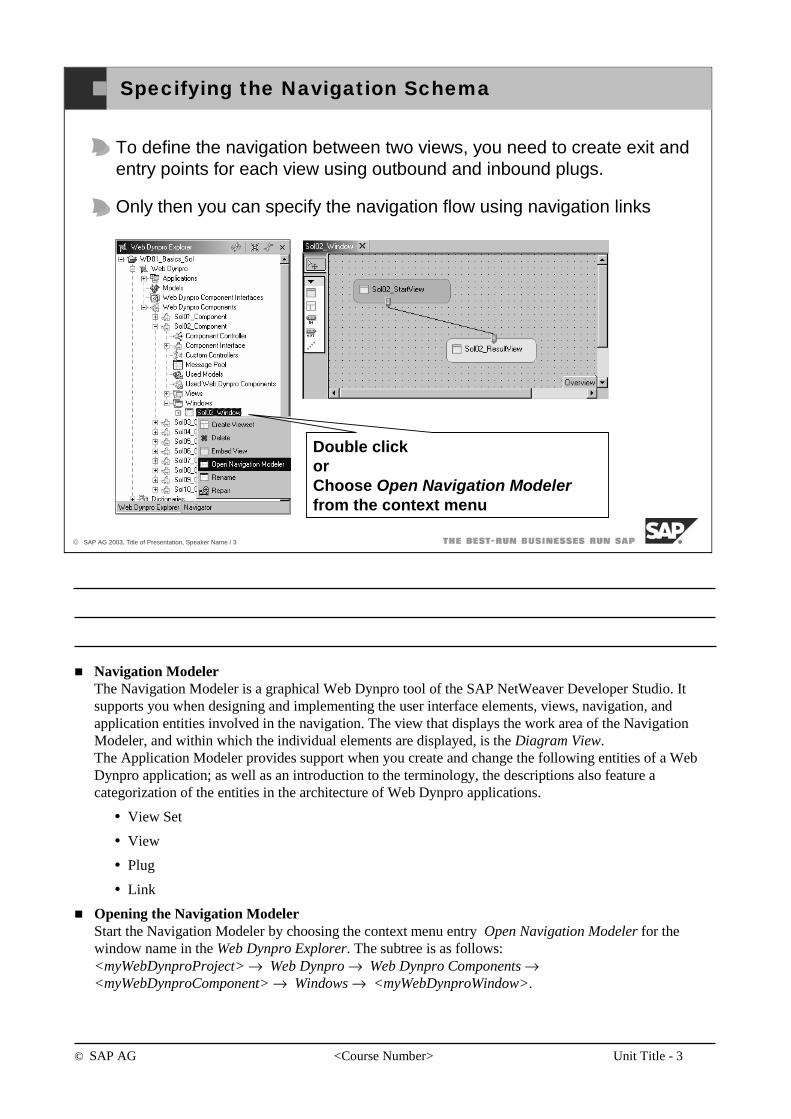
© SAP AG <Course Number> Unit Title - 3
© SAP AG 2003, Title of Presentation, Speaker Name / 3
Specifying the Navigation Schema
Double click orChoose Open Navigation Modelerfrom the context menu
To define the navigation between two views, you need to create exit and entry points for each view using outbound and inbound plugs.
Only then you can specify the navigation flow using navigation links
Navigation ModelerThe Navigation Modeler is a graphical Web Dynpro tool of the SAP NetWeaver Developer Studio. It supports you when designing and implementing the user interface elements, views, navigation, and application entities involved in the navigation. The view that displays the work area of the Navigation Modeler, and within which the individual elements are displayed, is the Diagram View.The Application Modeler provides support when you create and change the following entities of a Web Dynpro application; as well as an introduction to the terminology, the descriptions also feature a categorization of the entities in the architecture of Web Dynpro applications.
View Set
View
Plug
Link
Opening the Navigation ModelerStart the Navigation Modeler by choosing the context menu entry Open Navigation Modeler for the window name in the Web Dynpro Explorer. The subtree is as follows:<myWebDynproProject> → Web Dynpro → Web Dynpro Components →<myWebDynproComponent> → Windows → <myWebDynproWindow>.
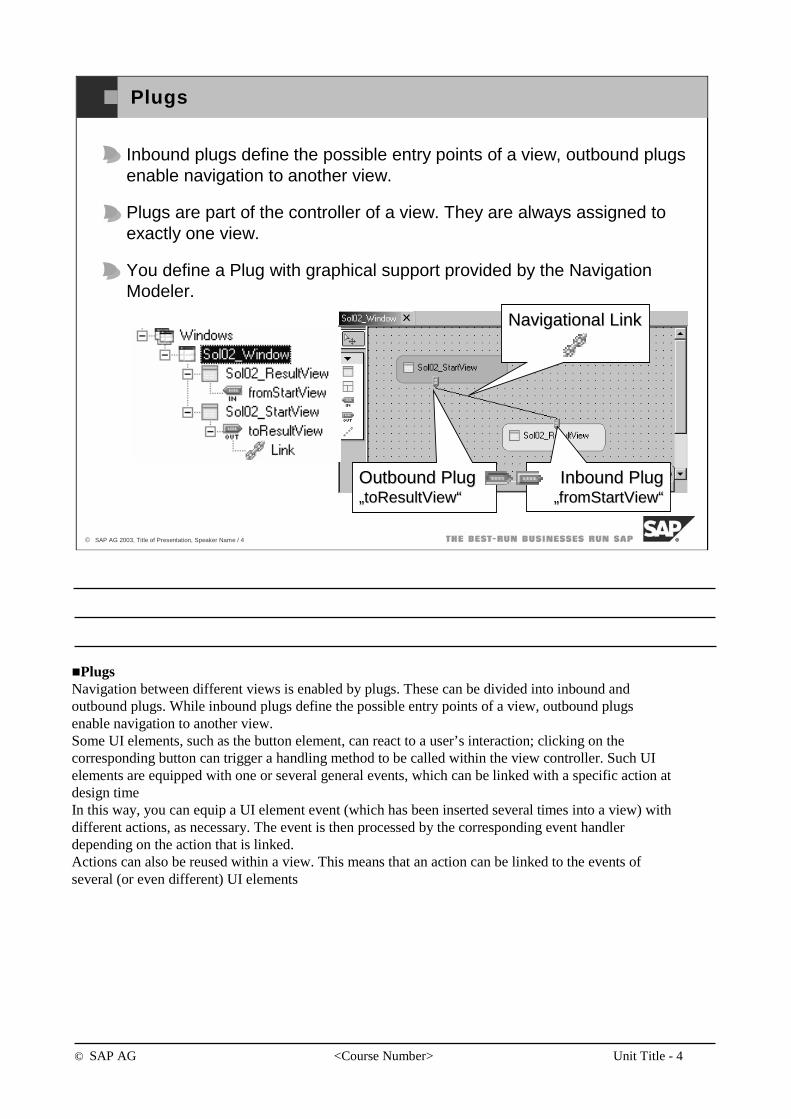
© SAP AG <Course Number> Unit Title - 4
© SAP AG 2003, Title of Presentation, Speaker Name / 4
InboundInbound PlugPlug„„fromStartViewfromStartView““
OutboundOutbound PlugPlug„„toResultViewtoResultView““
Inbound plugs define the possible entry points of a view, outbound plugs enable navigation to another view.
Plugs are part of the controller of a view. They are always assigned to exactly one view.
You define a Plug with graphical support provided by the Navigation Modeler.
Plugs
NavigationalNavigational LinkLink
PlugsNavigation between different views is enabled by plugs. These can be divided into inbound and outbound plugs. While inbound plugs define the possible entry points of a view, outbound plugs enable navigation to another view. Some UI elements, such as the button element, can react to a user’s interaction; clicking on the corresponding button can trigger a handling method to be called within the view controller. Such UI elements are equipped with one or several general events, which can be linked with a specific action at design time In this way, you can equip a UI element event (which has been inserted several times into a view) with different actions, as necessary. The event is then processed by the corresponding event handler depending on the action that is linked. Actions can also be reused within a view. This means that an action can be linked to the events of several (or even different) UI elements
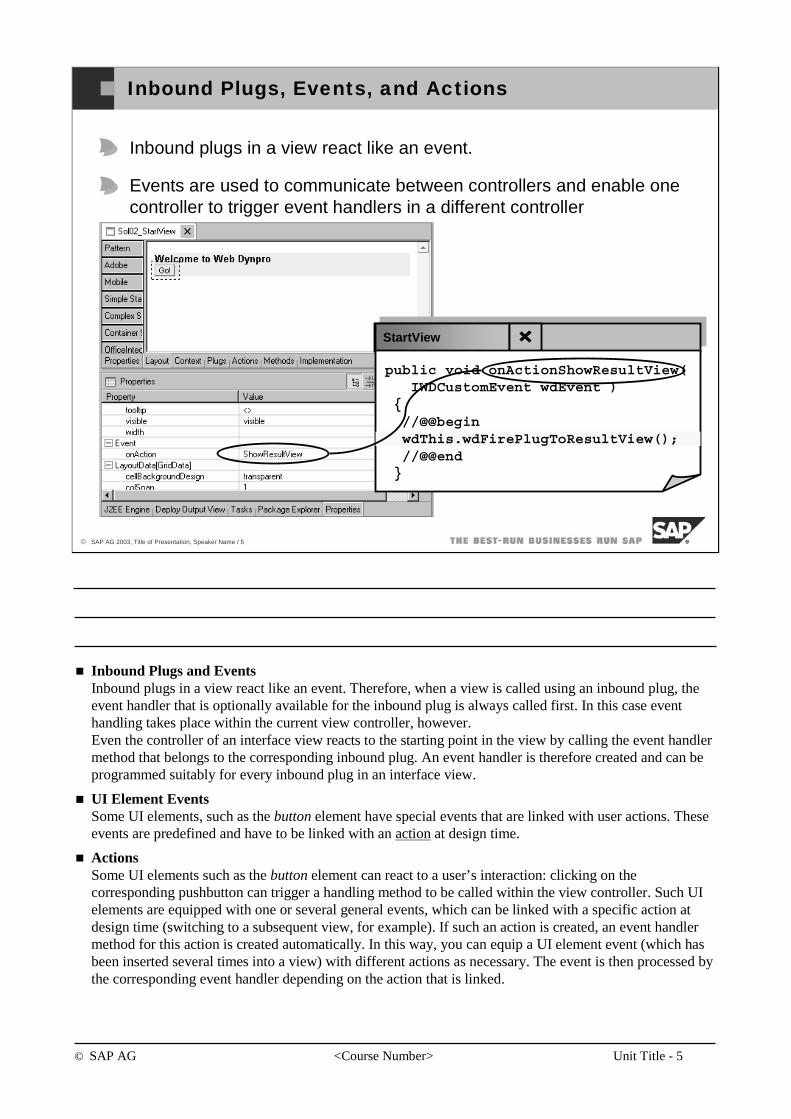
© SAP AG <Course Number> Unit Title - 5
© SAP AG 2003, Title of Presentation, Speaker Name / 5
Inbound Plugs, Events, and Actions
Inbound plugs in a view react like an event.
Events are used to communicate between controllers and enable one controller to trigger event handlers in a different controller
StartView
public void onActionShowResultView(IWDCustomEvent wdEvent )
{//@@beginwdThis.wdFirePlugToResultView();//@@end
}
Inbound Plugs and EventsInbound plugs in a view react like an event. Therefore, when a view is called using an inbound plug, theevent handler that is optionally available for the inbound plug is always called first. In this case eventhandling takes place within the current view controller, however.Even the controller of an interface view reacts to the starting point in the view by calling the event handlermethod that belongs to the corresponding inbound plug. An event handler is therefore created and can beprogrammed suitably for every inbound plug in an interface view.
UI Element EventsSome UI elements, such as the button element have special events that are linked with user actions. These events are predefined and have to be linked with an action at design time.
ActionsSome UI elements such as the button element can react to a user’s interaction: clicking on thecorresponding pushbutton can trigger a handling method to be called within the view controller. Such UI elements are equipped with one or several general events, which can be linked with a specific action at design time (switching to a subsequent view, for example). If such an action is created, an event handlermethod for this action is created automatically. In this way, you can equip a UI element event (which has been inserted several times into a view) with different actions as necessary. The event is then processed bythe corresponding event handler depending on the action that is linked.
© SAP AG <Course Number> Unit Title - 6
© SAP AG 2003, Title of Presentation, Speaker Name / 6
You should now be able to:
Specify a Navigation Schema.
Explain the usage of Plugs.
Create navigation between two views.
Navigation: Unit Summary
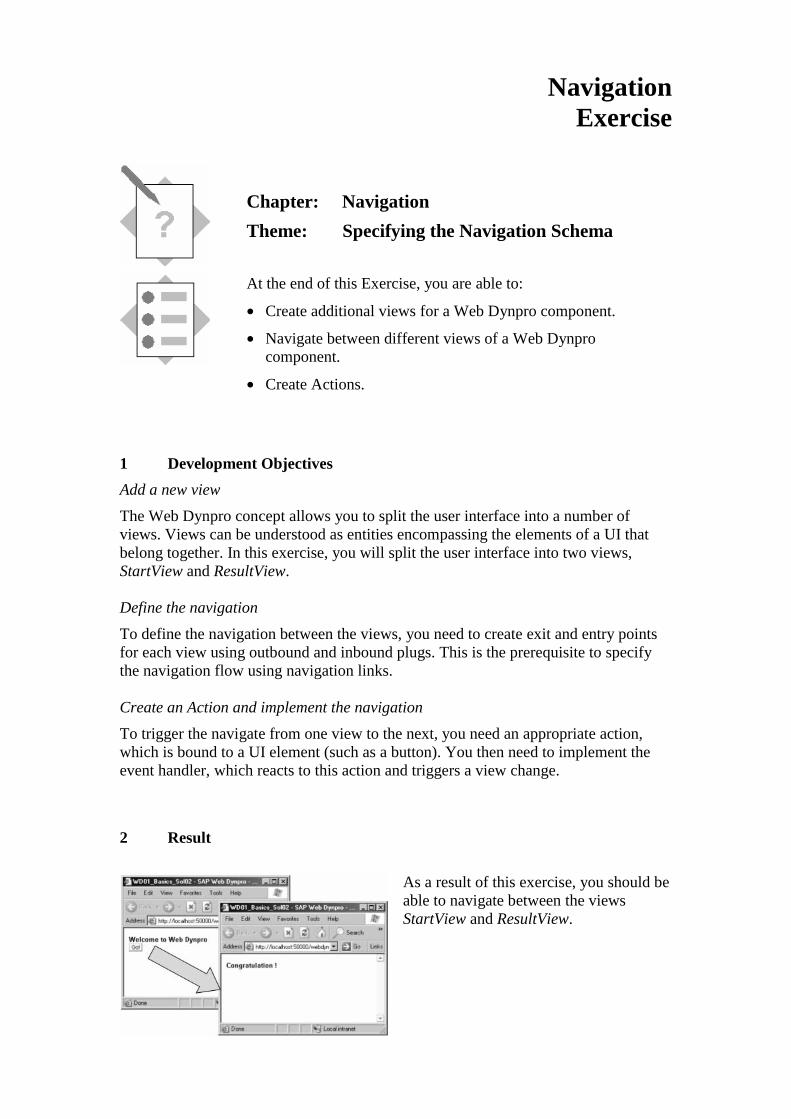
Navigation Exercise
Chapter: Navigation
Theme: Specifying the Navigation Schema
At the end of this Exercise, you are able to:
• Create additional views for a Web Dynpro component.
• Navigate between different views of a Web Dynpro component.
• Create Actions.
1 Development Objectives
Add a new view
The Web Dynpro concept allows you to split the user interface into a number of views. Views can be understood as entities encompassing the elements of a UI that belong together. In this exercise, you will split the user interface into two views, StartView and ResultView. Define the navigation
To define the navigation between the views, you need to create exit and entry points for each view using outbound and inbound plugs. This is the prerequisite to specify the navigation flow using navigation links. Create an Action and implement the navigation
To trigger the navigate from one view to the next, you need an appropriate action, which is bound to a UI element (such as a button). You then need to implement the event handler, which reacts to this action and triggers a view change.
2 Result
As a result of this exercise, you should be able to navigate between the views StartView and ResultView.
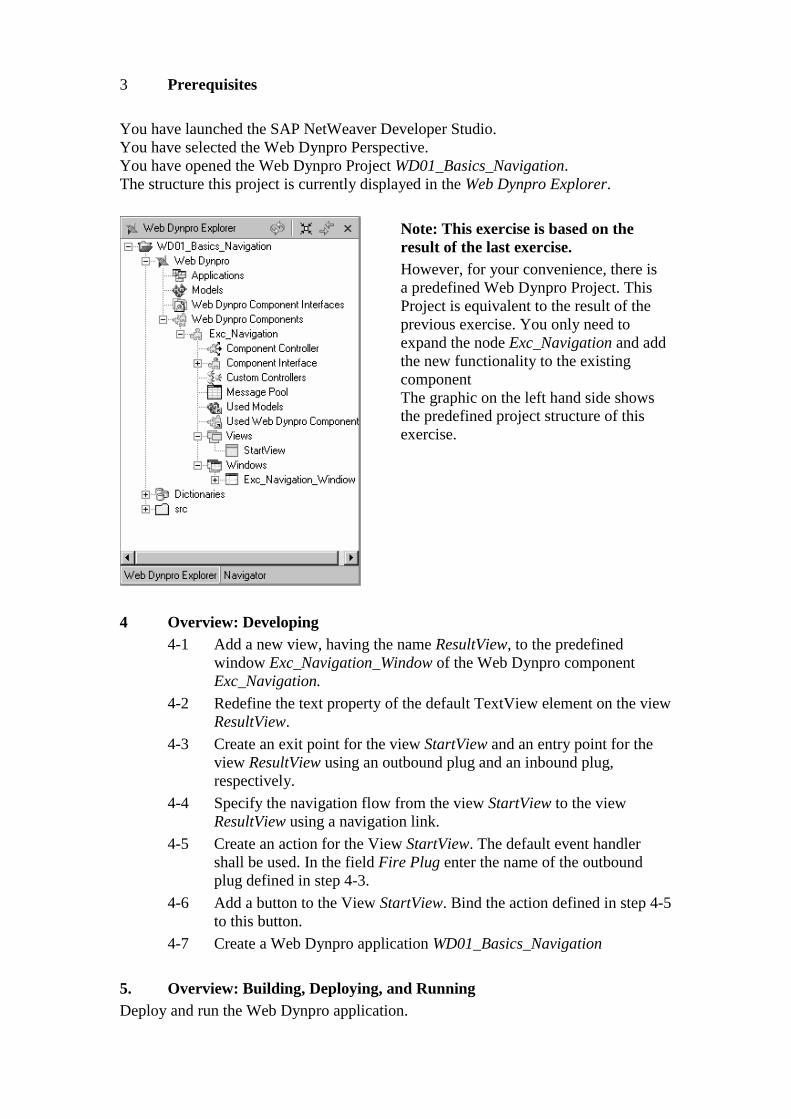
3 Prerequisites
You have launched the SAP NetWeaver Developer Studio. You have selected the Web Dynpro Perspective. You have opened the Web Dynpro Project WD01_Basics_Navigation. The structure this project is currently displayed in the Web Dynpro Explorer.
Note: This exercise is based on the result of the last exercise. However, for your convenience, there is a predefined Web Dynpro Project. This Project is equivalent to the result of the previous exercise. You only need to expand the node Exc_Navigation and add the new functionality to the existing component The graphic on the left hand side shows the predefined project structure of this exercise.
4 Overview: Developing
4-1 Add a new view, having the name ResultView, to the predefined window Exc_Navigation_Window of the Web Dynpro component Exc_Navigation.
4-2 Redefine the text property of the default TextView element on the view ResultView.
4-3 Create an exit point for the view StartView and an entry point for the view ResultView using an outbound plug and an inbound plug, respectively.
4-4 Specify the navigation flow from the view StartView to the view ResultView using a navigation link.
4-5 Create an action for the View StartView. The default event handler shall be used. In the field Fire Plug enter the name of the outbound plug defined in step 4-3.
4-6 Add a button to the View StartView. Bind the action defined in step 4-5 to this button.
4-7 Create a Web Dynpro application WD01_Basics_Navigation
5. Overview: Building, Deploying, and Running Deploy and run the Web Dynpro application.
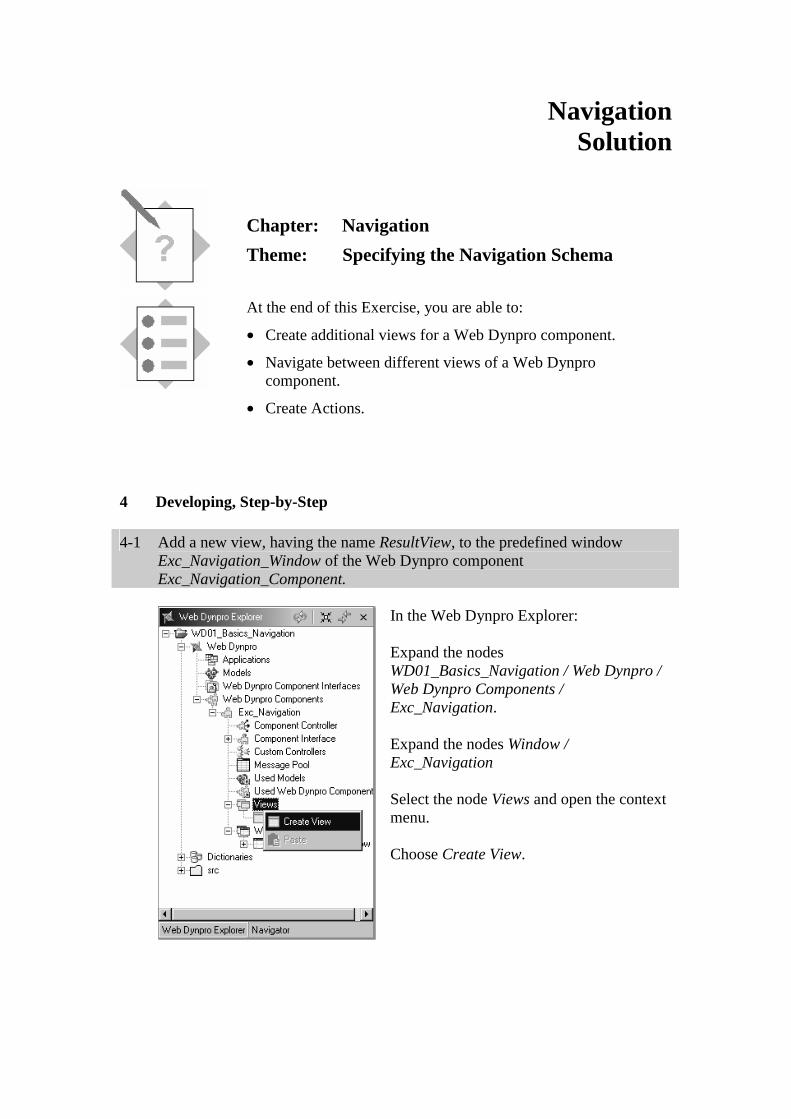
Navigation Solution
Chapter: Navigation
Theme: Specifying the Navigation Schema
At the end of this Exercise, you are able to:
• Create additional views for a Web Dynpro component.
• Navigate between different views of a Web Dynpro component.
• Create Actions.
4 Developing, Step-by-Step 4-1 Add a new view, having the name ResultView, to the predefined window
Exc_Navigation_Window of the Web Dynpro component Exc_Navigation_Component.
In the Web Dynpro Explorer: Expand the nodes WD01_Basics_Navigation / Web Dynpro / Web Dynpro Components / Exc_Navigation. Expand the nodes Window / Exc_Navigation Select the node Views and open the context menu. Choose Create View.
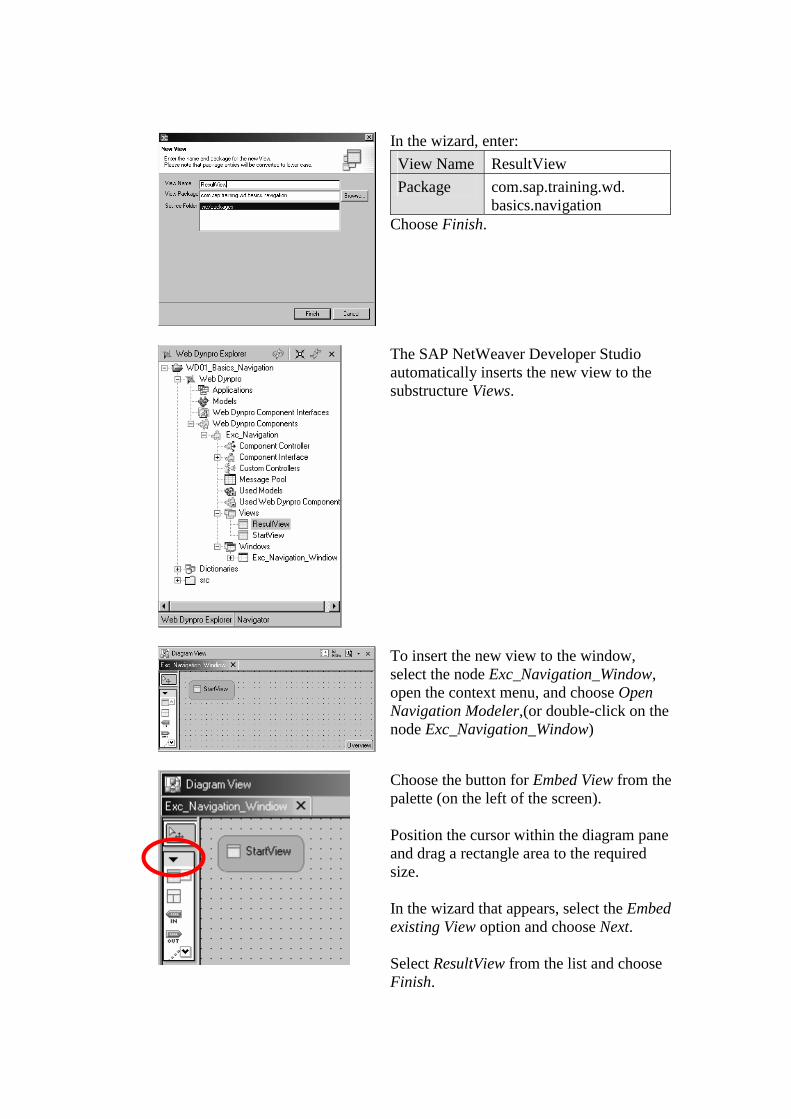
In the wizard, enter:
View Name ResultView
Package com.sap.training.wd. basics.navigation
Choose Finish.
The SAP NetWeaver Developer Studio automatically inserts the new view to the substructure Views.
To insert the new view to the window, select the node Exc_Navigation_Window, open the context menu, and choose Open Navigation Modeler,(or double-click on the node Exc_Navigation_Window)
Choose the button for Embed View from the palette (on the left of the screen). Position the cursor within the diagram pane and drag a rectangle area to the required size. In the wizard that appears, select the Embed existing View option and choose Next. Select ResultView from the list and choose Finish.
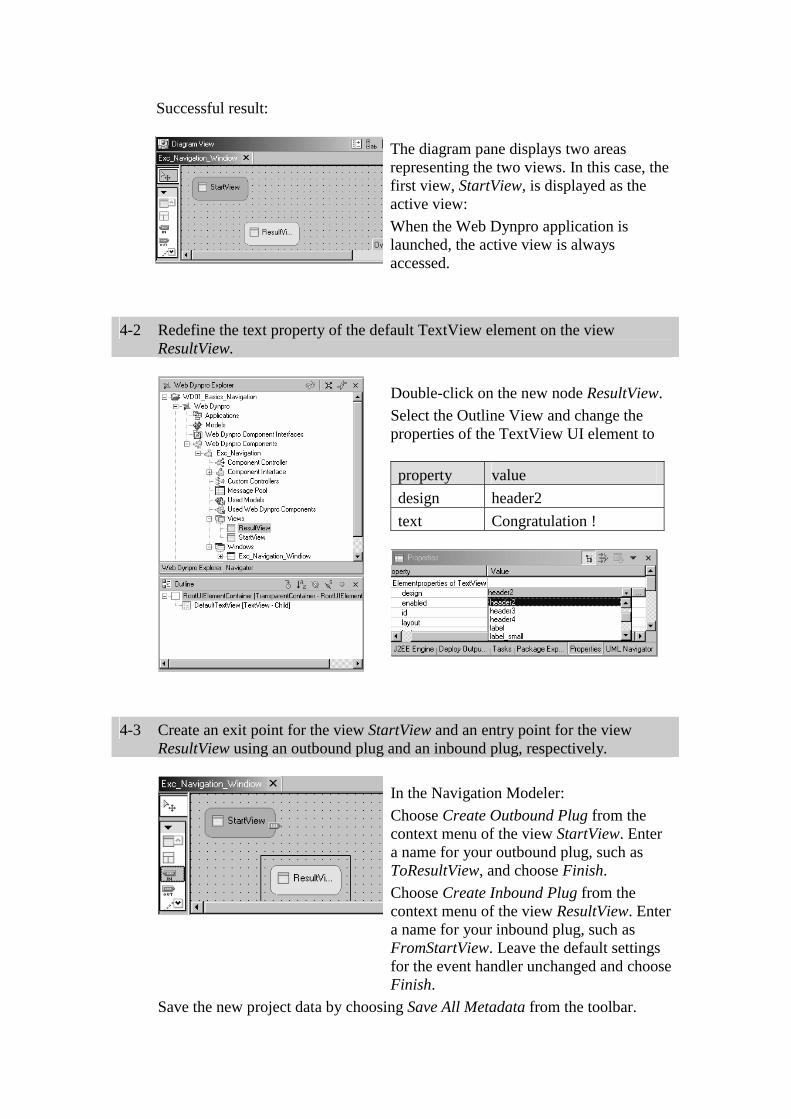
Successful result:
The diagram pane displays two areas representing the two views. In this case, the first view, StartView, is displayed as the active view:
When the Web Dynpro application is launched, the active view is always accessed.
4-2 Redefine the text property of the default TextView element on the view
ResultView.
Double-click on the new node ResultView.
Select the Outline View and change the properties of the TextView UI element to
property value
design header2
text Congratulation !
4-3 Create an exit point for the view StartView and an entry point for the view
ResultView using an outbound plug and an inbound plug, respectively.
In the Navigation Modeler:
Choose Create Outbound Plug from the context menu of the view StartView. Enter a name for your outbound plug, such as ToResultView, and choose Finish.
Choose Create Inbound Plug from the context menu of the view ResultView. Enter a name for your inbound plug, such as FromStartView. Leave the default settings for the event handler unchanged and choose Finish.
Save the new project data by choosing Save All Metadata from the toolbar.
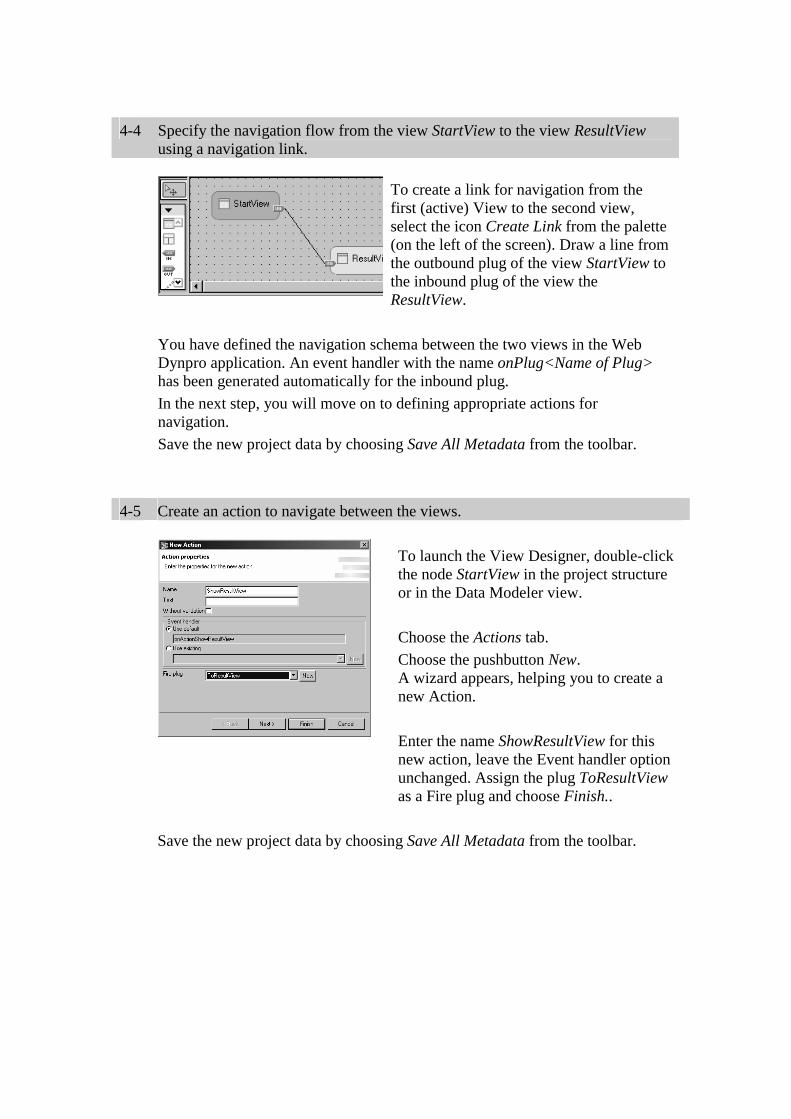
4-4 Specify the navigation flow from the view StartView to the view ResultView
using a navigation link.
To create a link for navigation from the first (active) View to the second view, select the icon Create Link from the palette (on the left of the screen). Draw a line from the outbound plug of the view StartView to the inbound plug of the view the ResultView.
You have defined the navigation schema between the two views in the Web Dynpro application. An event handler with the name onPlug<Name of Plug> has been generated automatically for the inbound plug.
In the next step, you will move on to defining appropriate actions for navigation.
Save the new project data by choosing Save All Metadata from the toolbar. 4-5 Create an action to navigate between the views.
To launch the View Designer, double-click the node StartView in the project structure or in the Data Modeler view.
Choose the Actions tab.
Choose the pushbutton New. A wizard appears, helping you to create a new Action.
Enter the name ShowResultView for this new action, leave the Event handler option unchanged. Assign the plug ToResultView as a Fire plug and choose Finish..
Save the new project data by choosing Save All Metadata from the toolbar.
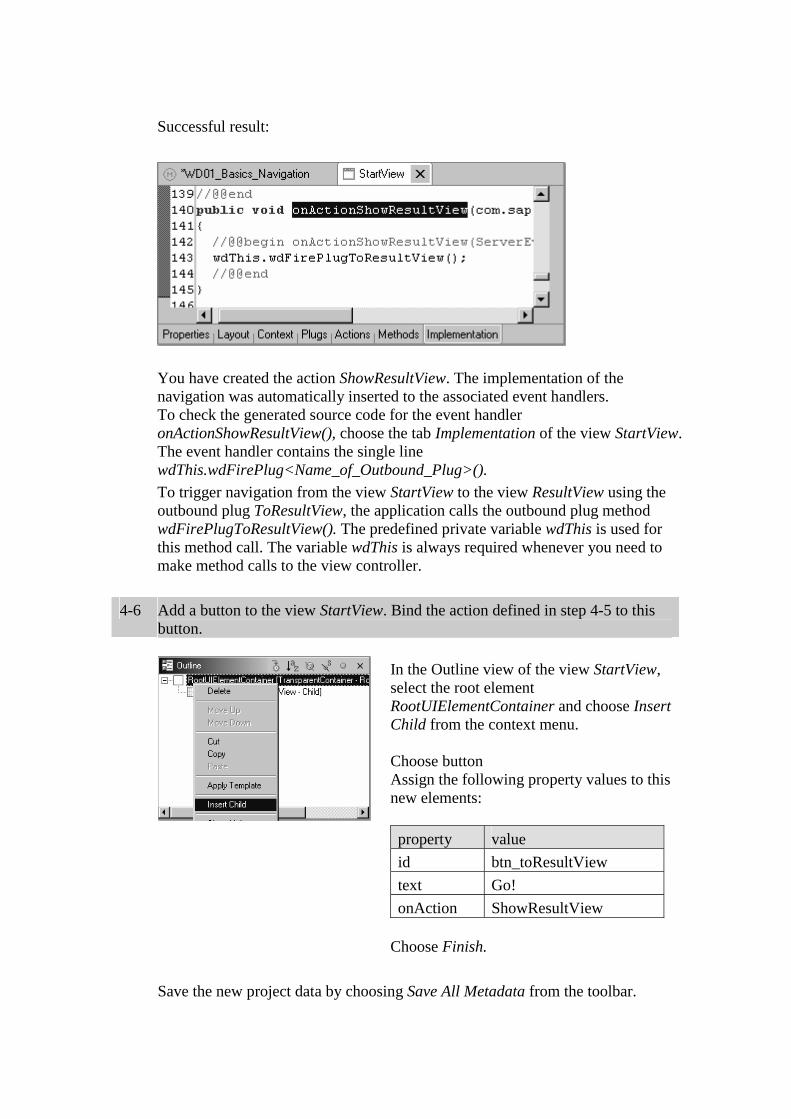
Successful result:
You have created the action ShowResultView. The implementation of the navigation was automatically inserted to the associated event handlers. To check the generated source code for the event handler onActionShowResultView(), choose the tab Implementation of the view StartView. The event handler contains the single line wdThis.wdFirePlug<Name_of_Outbound_Plug>().
To trigger navigation from the view StartView to the view ResultView using the outbound plug ToResultView, the application calls the outbound plug method wdFirePlugToResultView(). The predefined private variable wdThis is used for this method call. The variable wdThis is always required whenever you need to make method calls to the view controller.
4-6 Add a button to the view StartView. Bind the action defined in step 4-5 to this
button.
In the Outline view of the view StartView, select the root element RootUIElementContainer and choose Insert Child from the context menu. Choose button Assign the following property values to this new elements:
property value
id btn_toResultView
text Go!
onAction ShowResultView
Choose Finish.
Save the new project data by choosing Save All Metadata from the toolbar.
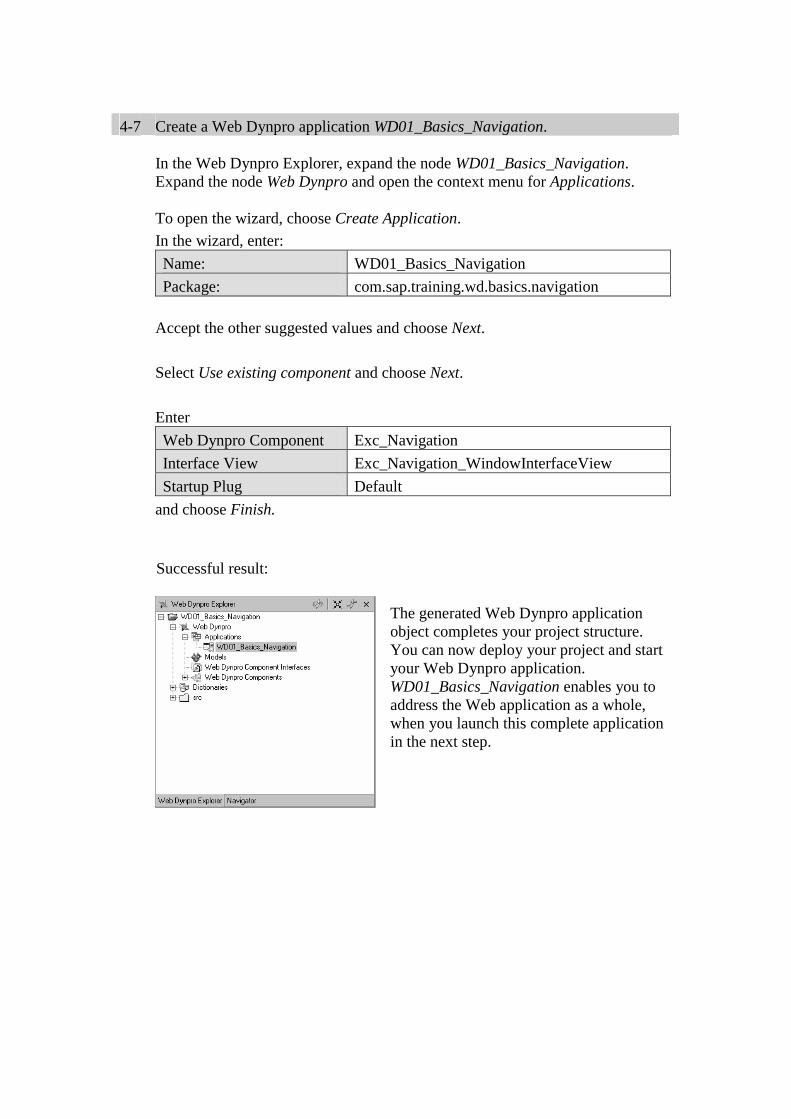
4-7 Create a Web Dynpro application WD01_Basics_Navigation.
In the Web Dynpro Explorer, expand the node WD01_Basics_Navigation. Expand the node Web Dynpro and open the context menu for Applications. To open the wizard, choose Create Application.
In the wizard, enter:
Name: WD01_Basics_Navigation
Package: com.sap.training.wd.basics.navigation
Accept the other suggested values and choose Next.
Select Use existing component and choose Next.
Enter
Web Dynpro Component Exc_Navigation
Interface View Exc_Navigation_WindowInterfaceView
Startup Plug Default
and choose Finish.
Successful result:
The generated Web Dynpro application object completes your project structure. You can now deploy your project and start your Web Dynpro application. WD01_Basics_Navigation enables you to address the Web application as a whole, when you launch this complete application in the next step.
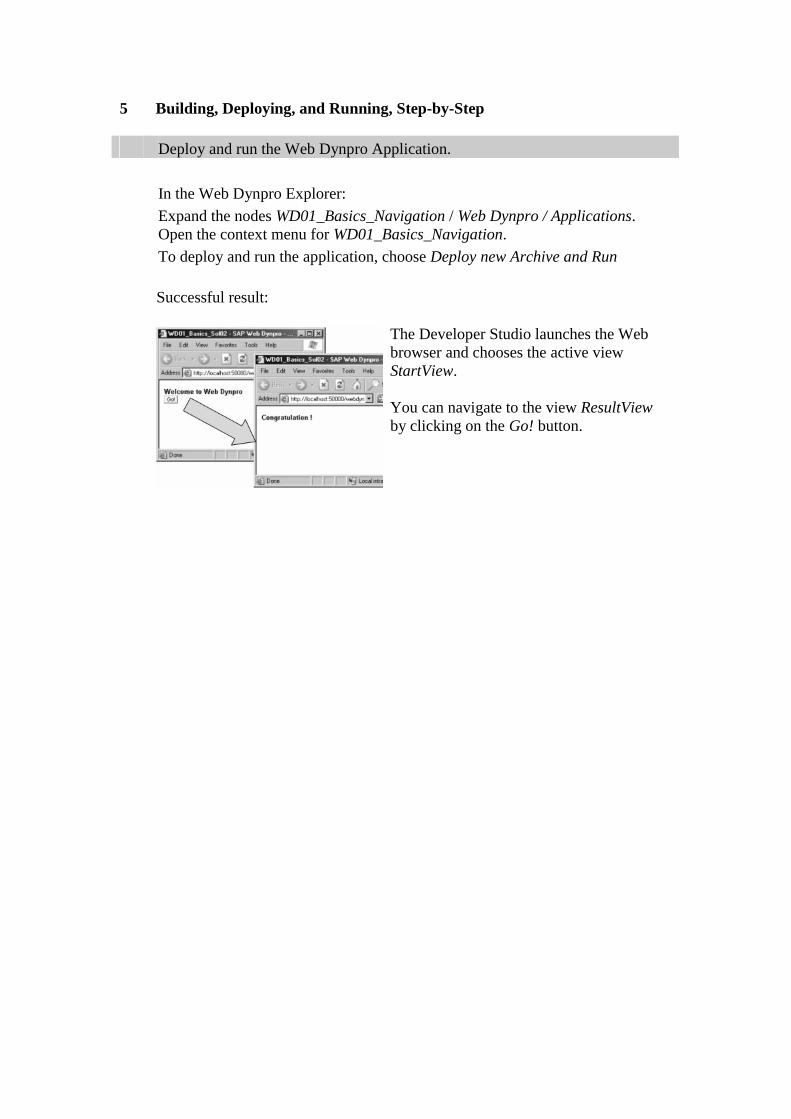
5 Building, Deploying, and Running, Step-by-Step Deploy and run the Web Dynpro Application.
In the Web Dynpro Explorer:
Expand the nodes WD01_Basics_Navigation / Web Dynpro / Applications. Open the context menu for WD01_Basics_Navigation.
To deploy and run the application, choose Deploy new Archive and Run
Successful result:
The Developer Studio launches the Web browser and chooses the active view StartView. You can navigate to the view ResultView by clicking on the Go! button.
© SAP AG <Course Number> Unit Title - 1
© SAP AG 2003, Title of Presentation, Speaker Name / 1
Zoom into Web Dynpro
Context
Data binding
Context mapping
Contents:
Providing Data from Context to UI
© SAP AG <Course Number> Unit Title - 2
© SAP AG 2003, Title of Presentation, Speaker Name / 2
After completing this unit, you will be able to:
Understand basic components of a Web Dynproapplication.
Explain the term context.
Explain data binding.
Explain context mapping.
Providing Data from Context: Unit Objectives
© SAP AG <Course Number> Unit Title - 3
© SAP AG 2003, Title of Presentation, Speaker Name / 3
After completing this topic, you will be able to:
Understand basic components of a Web Dynproapplication.
Web Dynpro Zoom-In: Topic Objectives
This is a lesson
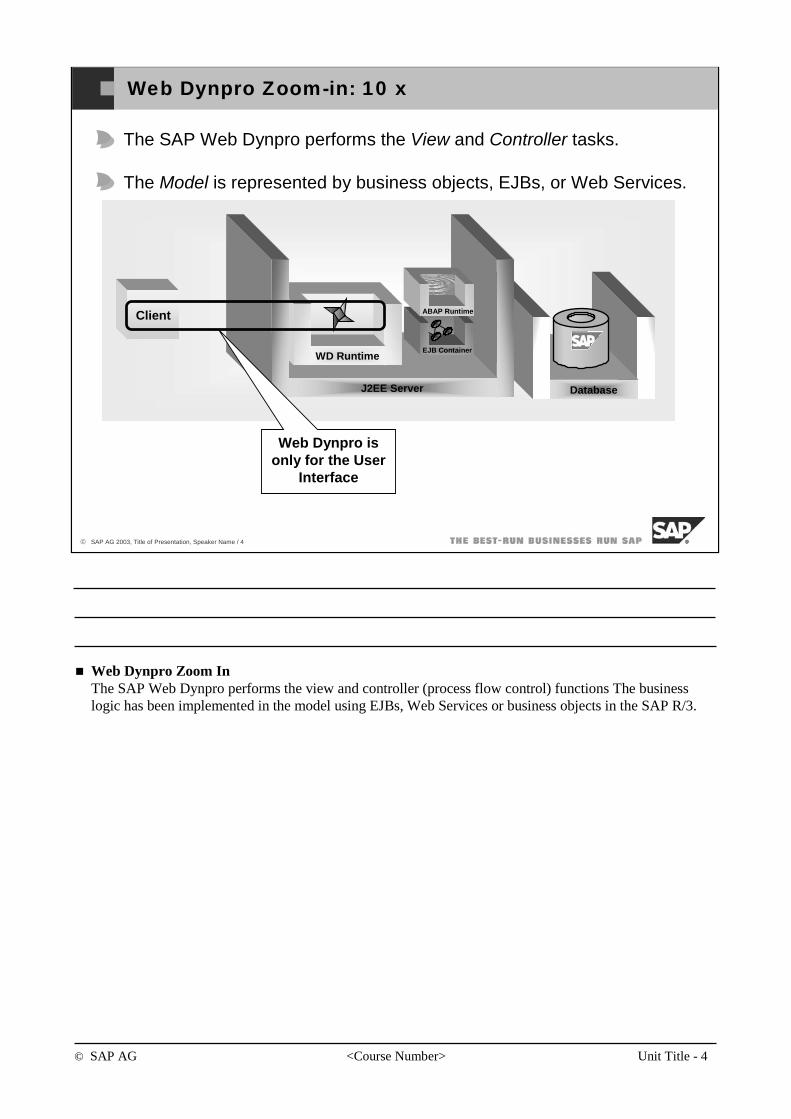
© SAP AG <Course Number> Unit Title - 4
© SAP AG 2003, Title of Presentation, Speaker Name / 4
Web Dynpro Zoom-in: 10 x
Database
Client
J2EE Server
EJB Container
ABAP Runtime
WD Runtime
Web Dynpro is only for the User
Interface
The SAP Web Dynpro performs the View and Controller tasks.
The Model is represented by business objects, EJBs, or Web Services.
Web Dynpro Zoom InThe SAP Web Dynpro performs the view and controller (process flow control) functions The business logic has been implemented in the model using EJBs, Web Services or business objects in the SAP R/3.
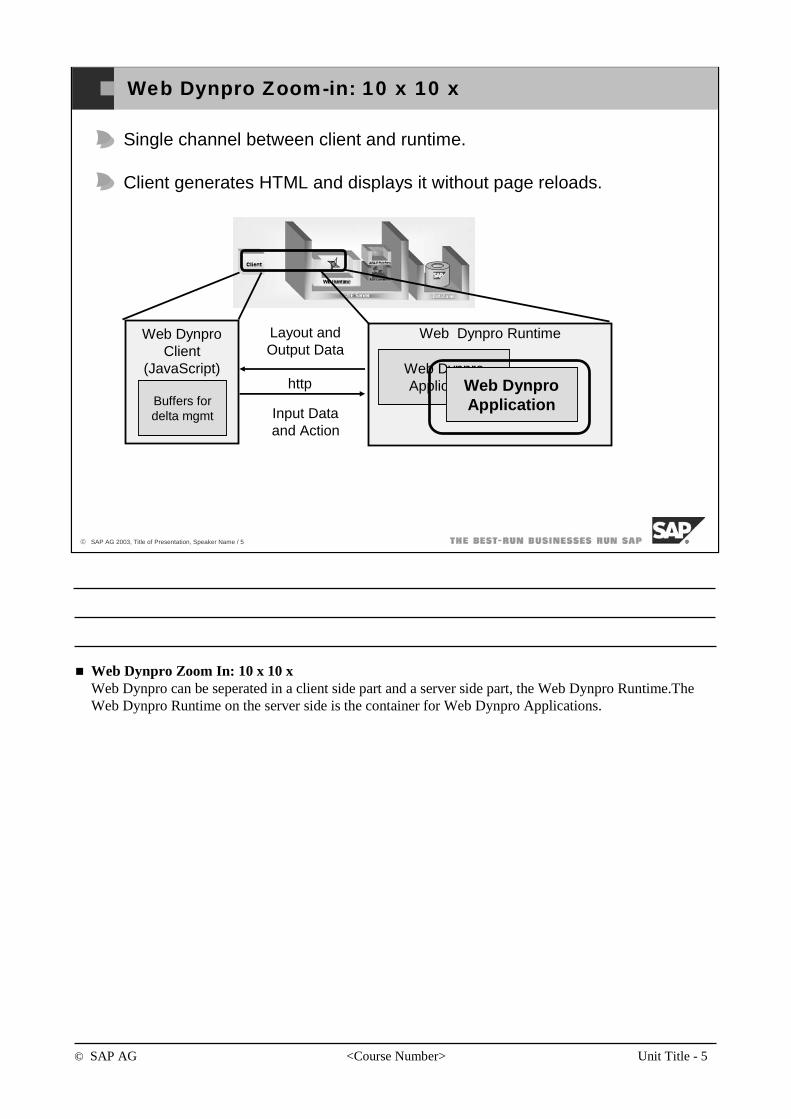
© SAP AG <Course Number> Unit Title - 5
© SAP AG 2003, Title of Presentation, Speaker Name / 5
Web Dynpro Zoom-in: 10 x 10 x
Single channel between client and runtime.
Client generates HTML and displays it without page reloads.
Web DynproClient
(JavaScript)
Buffers fordelta mgmt
Web Dynpro Runtime
Web DynproApplicationWeb Dynpro
Application
Layout andOutput Data
Input Dataand Action
http
Web Dynpro Zoom In: 10 x 10 xWeb Dynpro can be seperated in a client side part and a server side part, the Web Dynpro Runtime.TheWeb Dynpro Runtime on the server side is the container for Web Dynpro Applications.
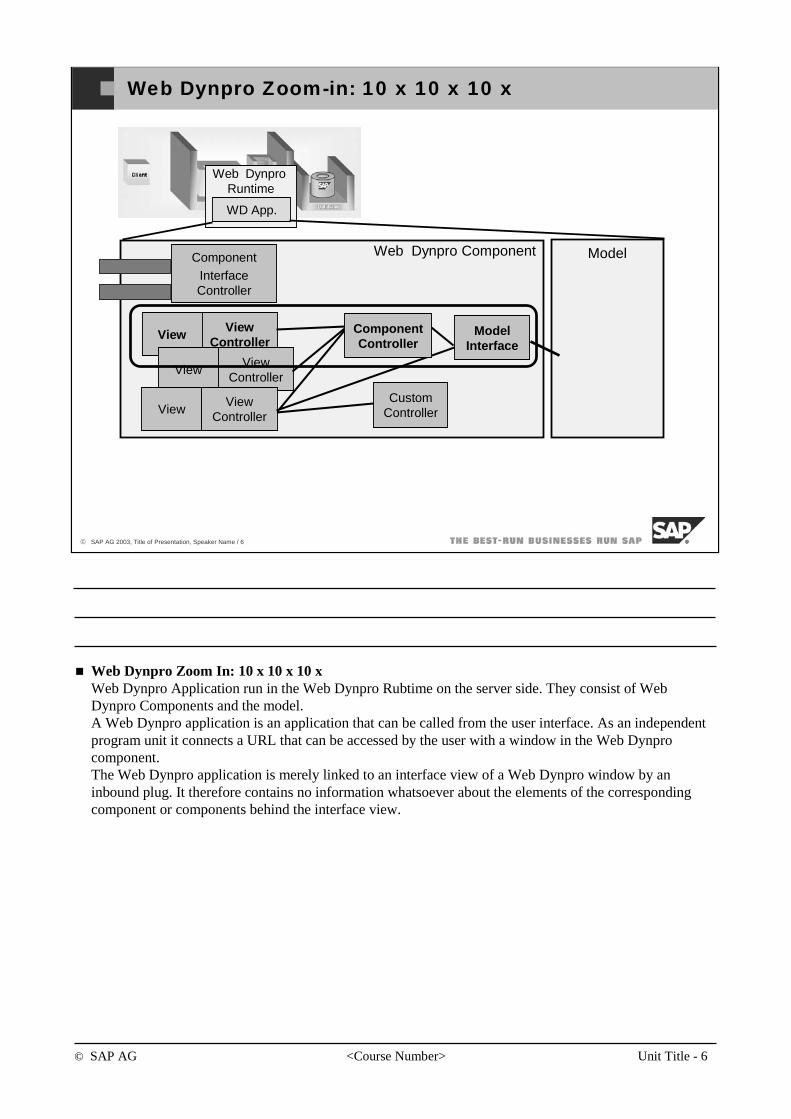
© SAP AG <Course Number> Unit Title - 6
© SAP AG 2003, Title of Presentation, Speaker Name / 6
Web Dynpro Zoom-in: 10 x 10 x 10 x
Web DynproRuntime
WD App.
Web Dynpro ComponentComponentInterfaceController
View ViewController
ViewView
Controller
ModelInterface
CustomControllerView
ViewController
Model
ComponentController
Web Dynpro Zoom In: 10 x 10 x 10 xWeb Dynpro Application run in the Web Dynpro Rubtime on the server side. They consist of Web Dynpro Components and the model.A Web Dynpro application is an application that can be called from the user interface. As an independent program unit it connects a URL that can be accessed by the user with a window in the Web Dynprocomponent.The Web Dynpro application is merely linked to an interface view of a Web Dynpro window by an inbound plug. It therefore contains no information whatsoever about the elements of the correspondingcomponent or components behind the interface view.

© SAP AG <Course Number> Unit Title - 7
© SAP AG 2003, Title of Presentation, Speaker Name / 7
Web DynproRuntime
WD App.
Web Dynpro Zoom-in: 10 x 10 x 10 x 10 x
Component. Model
ComponentController
ModelInterface
View View Controller
Layout
NestedViews
NavigationLinks
Context
ModelData
GlobalData
LocalData
Context
ModelData
GlobalData
ModelData
UI-Elements
CodingCoding
Web Dynpro Zoom In: 10 x 10 x 10 x 10 xWeb Dynpro component is a reusable entity. It summarizes all components that are required as part of this programming unit for an executable Web Dynpro application.The Web Dynpro component concept offers a number of advantages:
Structuring of the programming
Creation of easily manageable application blocks
Reusability of whole components
Decoupling of software projects in both time and space
The Web Dynpro component contains any number of windows and views and their corresponding controllers. Additional Web Dynpro components can also be referenced.The creation of a Web Dynpro component is always mandatory, since the existence of the Web Dynprowindow and the views and controllers that it contains is linked to the existence of the component itself. Communication between the elements of two Web Dynpro components and their call by a user is implemented using the component interfaces, so it does not make sense to consider the individual parts of the component separately.A Web Dynpro component can embed other Web Dynpro components, and correspondingly a Web Dynpro component can be embedded in any other Web Dynpro components.
© SAP AG <Course Number> Unit Title - 8
© SAP AG 2003, Title of Presentation, Speaker Name / 8
You should now be able to:
Understand basic components of a Web Dynproapplication.
Web Dynpro Zoom-In: Topic Summary

© SAP AG <Course Number> Unit Title - 9
© SAP AG 2003, Title of Presentation, Speaker Name / 9
After completing this topic, you will be able to:
Explain the term context.
Use the context editor.
Context: Topic Objectives
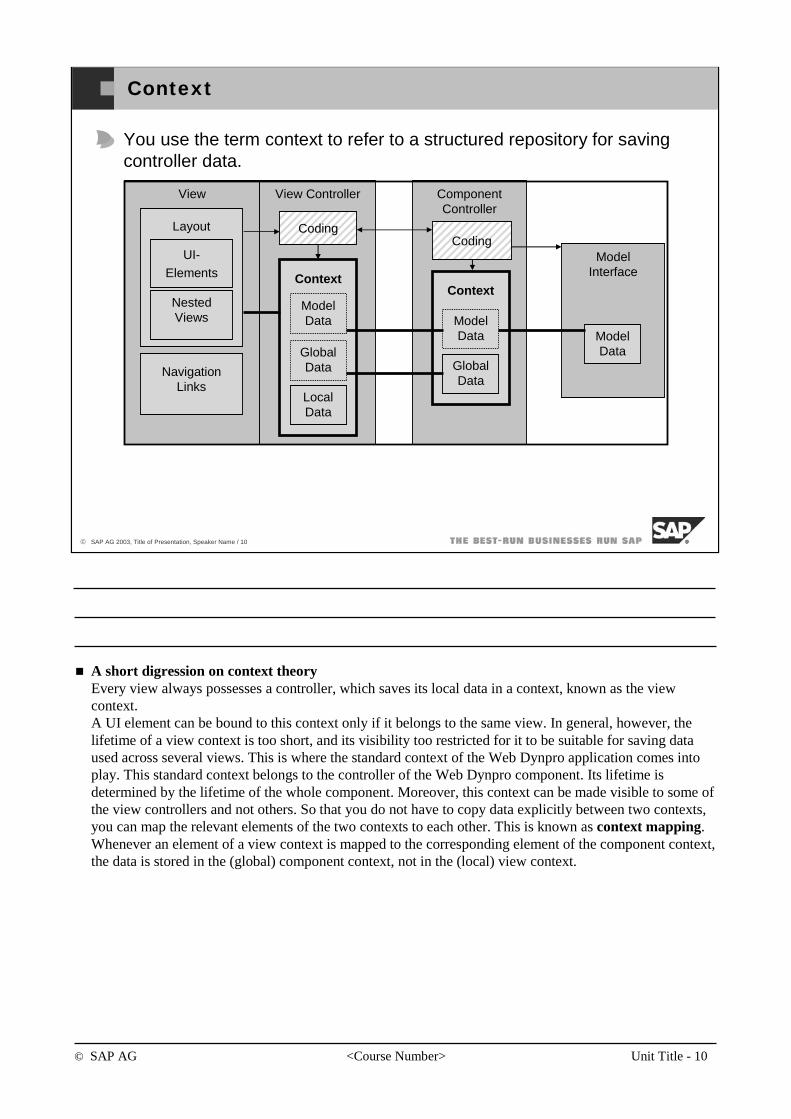
© SAP AG <Course Number> Unit Title - 10
© SAP AG 2003, Title of Presentation, Speaker Name / 10
Context
ComponentController
ModelInterface
View View Controller
Layout
NestedViews
NavigationLinks
Context
GlobalData
LocalData
Context
ModelData
GlobalData
ModelData
CodingCoding
You use the term context to refer to a structured repository for saving controller data.
UI-Elements
ModelData
A short digression on context theoryEvery view always possesses a controller, which saves its local data in a context, known as the view context. A UI element can be bound to this context only if it belongs to the same view. In general, however, the lifetime of a view context is too short, and its visibility too restricted for it to be suitable for saving data used across several views. This is where the standard context of the Web Dynpro application comes into play. This standard context belongs to the controller of the Web Dynpro component. Its lifetime is determined by the lifetime of the whole component. Moreover, this context can be made visible to some of the view controllers and not others. So that you do not have to copy data explicitly between two contexts, you can map the relevant elements of the two contexts to each other. This is known as context mapping. Whenever an element of a view context is mapped to the corresponding element of the component context, the data is stored in the (global) component context, not in the (local) view context.
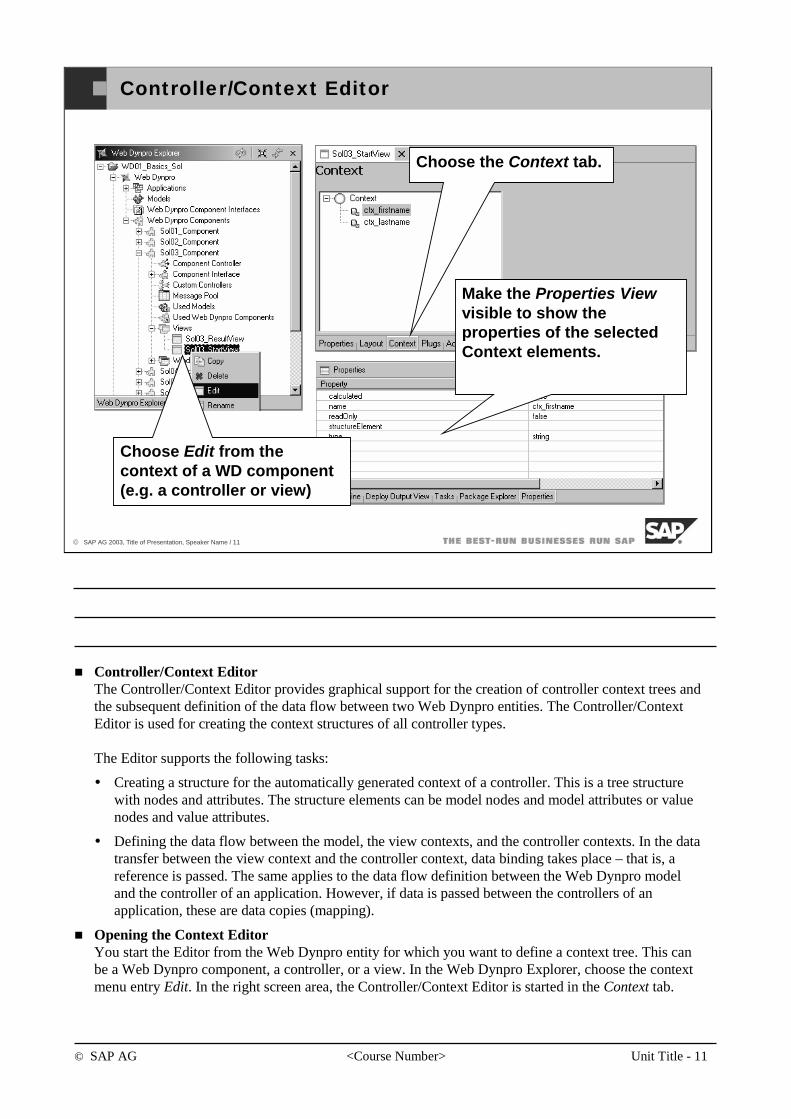
© SAP AG <Course Number> Unit Title - 11
© SAP AG 2003, Title of Presentation, Speaker Name / 11
Controller/Context Editor
Choose the Context tab.
Make the Properties Viewvisible to show the properties of the selected Context elements.
Choose Edit from the context of a WD component (e.g. a controller or view)
Controller/Context Editor The Controller/Context Editor provides graphical support for the creation of controller context trees and the subsequent definition of the data flow between two Web Dynpro entities. The Controller/Context Editor is used for creating the context structures of all controller types.
The Editor supports the following tasks:
Creating a structure for the automatically generated context of a controller. This is a tree structure with nodes and attributes. The structure elements can be model nodes and model attributes or value nodes and value attributes.
Defining the data flow between the model, the view contexts, and the controller contexts. In the data transfer between the view context and the controller context, data binding takes place – that is, a reference is passed. The same applies to the data flow definition between the Web Dynpro model and the controller of an application. However, if data is passed between the controllers of an application, these are data copies (mapping).
Opening the Context EditorYou start the Editor from the Web Dynpro entity for which you want to define a context tree. This can be a Web Dynpro component, a controller, or a view. In the Web Dynpro Explorer, choose the context menu entry Edit. In the right screen area, the Controller/Context Editor is started in the Context tab.
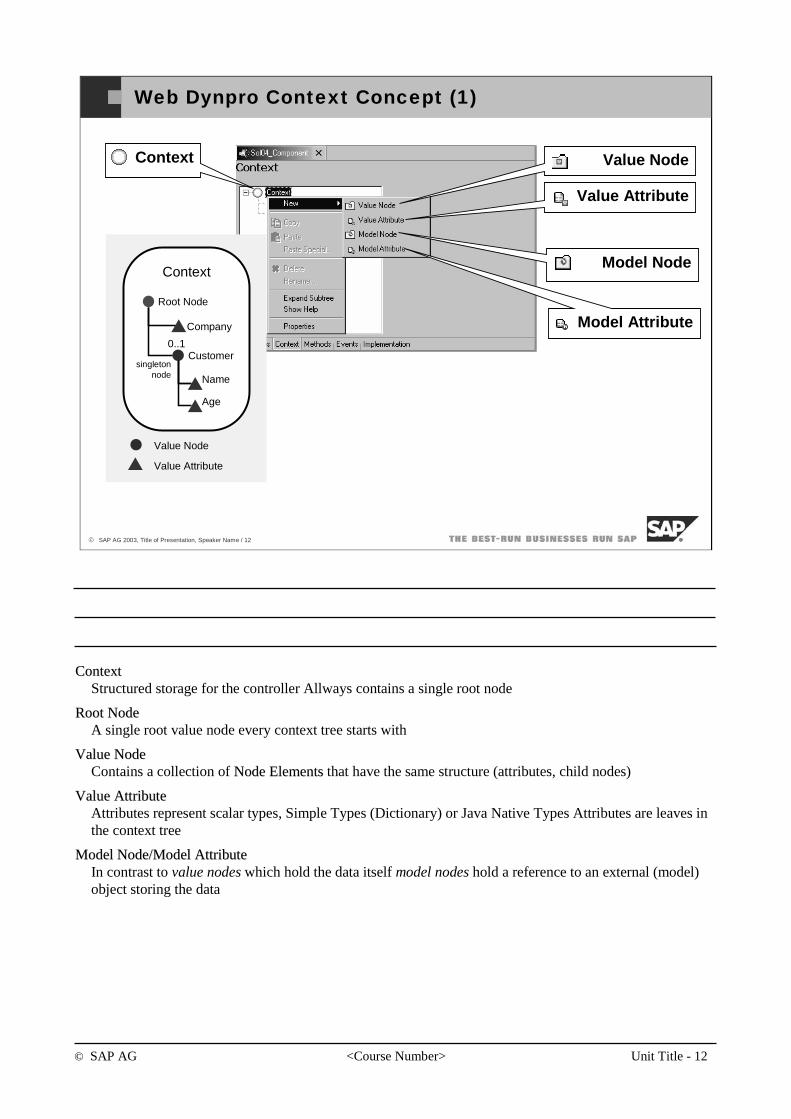
© SAP AG <Course Number> Unit Title - 12
© SAP AG 2003, Title of Presentation, Speaker Name / 12
Web Dynpro Context Concept (1)
Context Value Node
Value Attribute
Model Node
Model Attribute
Context
Root Node
Value Attribute
Value Node
Customer
Company
Name
Age
0..1
singletonnode
ContextContextStructured storage for the controller Allways contains a single root node
RootRoot NodeNodeA single root value node every context tree starts with
ValueValue NodeNodeContains a collection of Node ElementsNode Elements that have the same structure (attributes, child nodes)
ValueValue AttributeAttributeAttributes represent scalar types, Simple Types (Dictionary) or Java Native Types Attributes are leaves in the context tree
Model Model NodeNode/Model Attribute/Model AttributeIn contrast to value nodes which hold the data itself model nodes hold a reference to an external (model) object storing the data
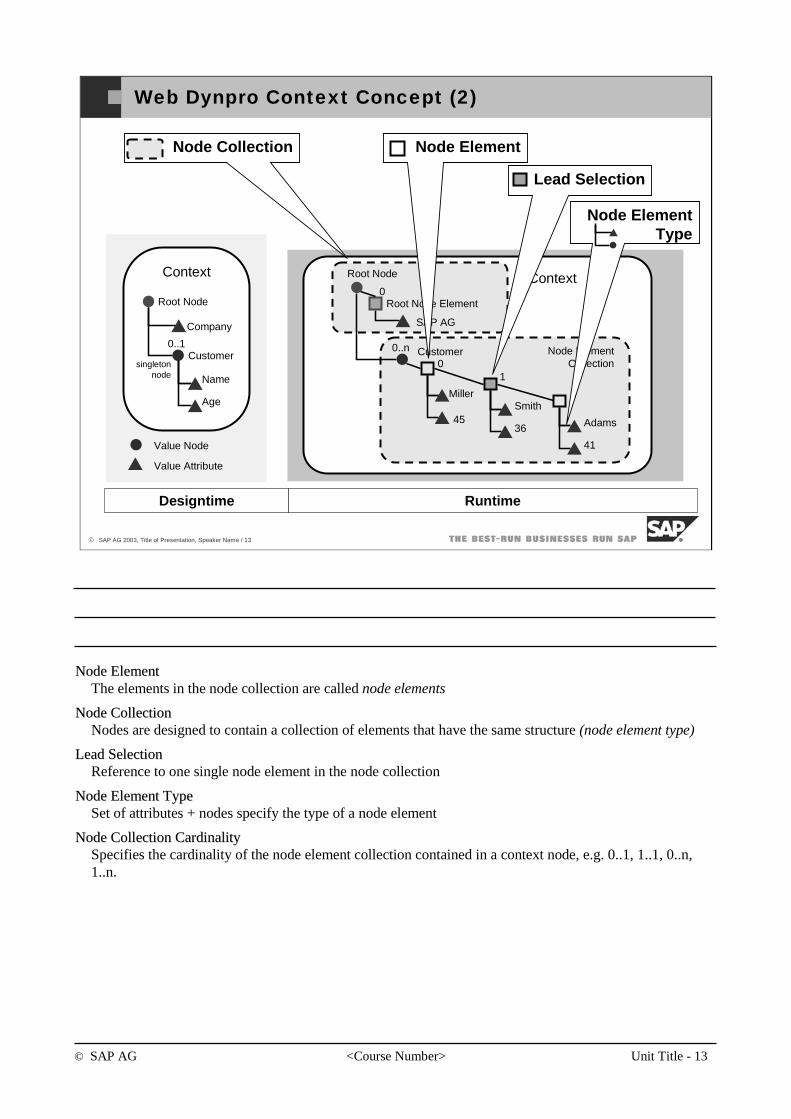
© SAP AG <Course Number> Unit Title - 13
© SAP AG 2003, Title of Presentation, Speaker Name / 13
Web Dynpro Context Concept (2)
Context
Root Node
Value Attribute
Value Node
Customer
Company
Name
Age
0..1
singletonnode
Root Node
SAP AG
45
0..n
Miller
Customer
Smith
36 Adams
41
Node Element Collection0
1
n
Root Node Element0
Context
Node Collection Node Element
Lead Selection
Node Element Type
Designtime Runtime
NodeNode ElementElementThe elements in the node collection are called node elements
NodeNode CollectionCollectionNodes are designed to contain a collection of elements that have the same structure (node element type)
LeadLead SelectionSelectionReference to one single node element in the node collection
NodeNode Element TypeElement TypeSet of attributes + nodes specify the type of a node element
NodeNode CollectionCollection CardinalityCardinalitySpecifies the cardinality of the node element collection contained in a context node, e.g. 0..1, 1..1, 0..n, 1..n.
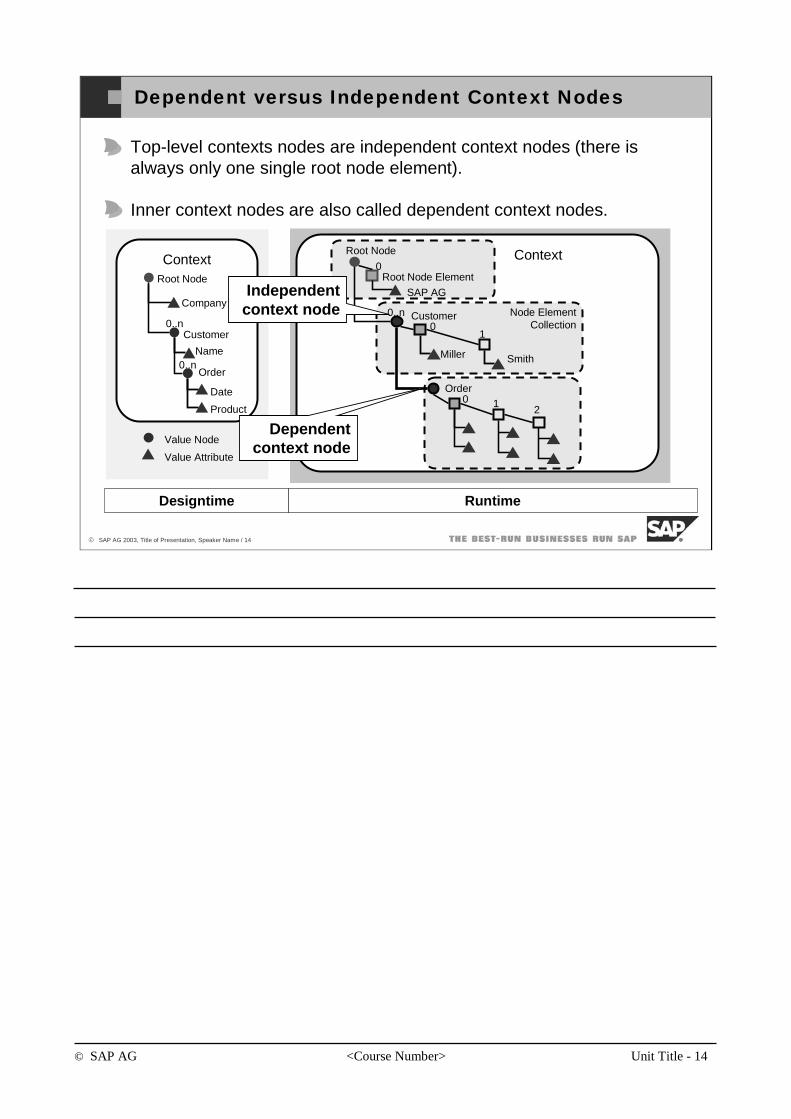
© SAP AG <Course Number> Unit Title - 14
© SAP AG 2003, Title of Presentation, Speaker Name / 14
Dependent versus Independent Context Nodes
Designtime Runtime
Top-level contexts nodes are independent context nodes (there is always only one single root node element).
Inner context nodes are also called dependent context nodes.
Root Node
0..n
Miller
Customer
Smith
Node Element Collection0
1
Root Node Element0
Context
Order0 1
2
ContextRoot Node
Value Attribute
Value Node
Customer
Name
0..n
Date
Product
Order0..n
CompanySAP AGIndependent
context node
Dependentcontext node
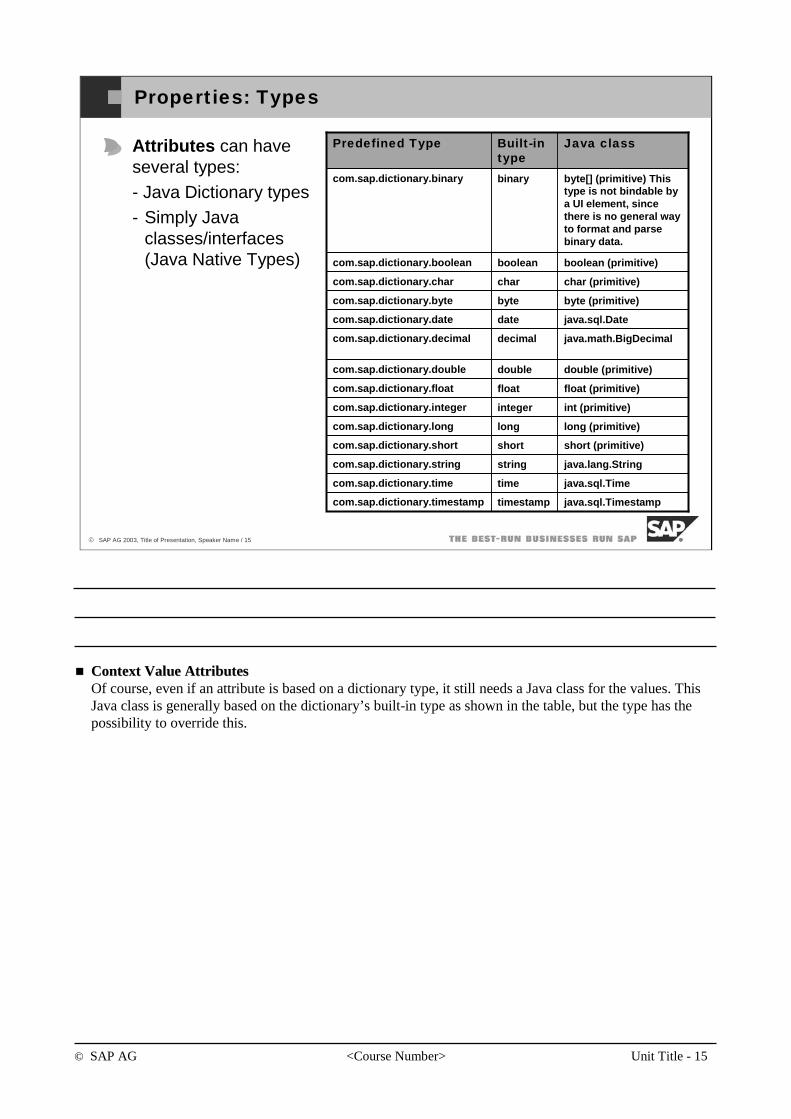
© SAP AG <Course Number> Unit Title - 15
© SAP AG 2003, Title of Presentation, Speaker Name / 15
Properties: Types
Attributes can have several types:- Java Dictionary types- Simply Java
classes/interfaces (Java Native Types)
java.sql.Timestamptimestampcom.sap.dictionary.timestamp
java.sql.Timetimecom.sap.dictionary.time
java.lang.Stringstringcom.sap.dictionary.string
short (primitive)shortcom.sap.dictionary.short
long (primitive)longcom.sap.dictionary.long
int (primitive)integercom.sap.dictionary.integer
float (primitive)floatcom.sap.dictionary.float
double (primitive)doublecom.sap.dictionary.double
java.math.BigDecimaldecimalcom.sap.dictionary.decimal
java.sql.Datedatecom.sap.dictionary.date
byte (primitive)bytecom.sap.dictionary.byte
char (primitive)charcom.sap.dictionary.char
boolean (primitive)booleancom.sap.dictionary.boolean
byte[] (primitive) Thistype is not bindable bya UI element, sincethere is no general way to format and parse binary data.
binarycom.sap.dictionary.binary
Java classBuilt-intype
Predefined Type
ContextContext ValueValue AttributesAttributesOf course, even if an attribute is based on a dictionary type, it still needs a Java class for the values. This Java class is generally based on the dictionary’s built-in type as shown in the table, but the type has the possibility to override this.
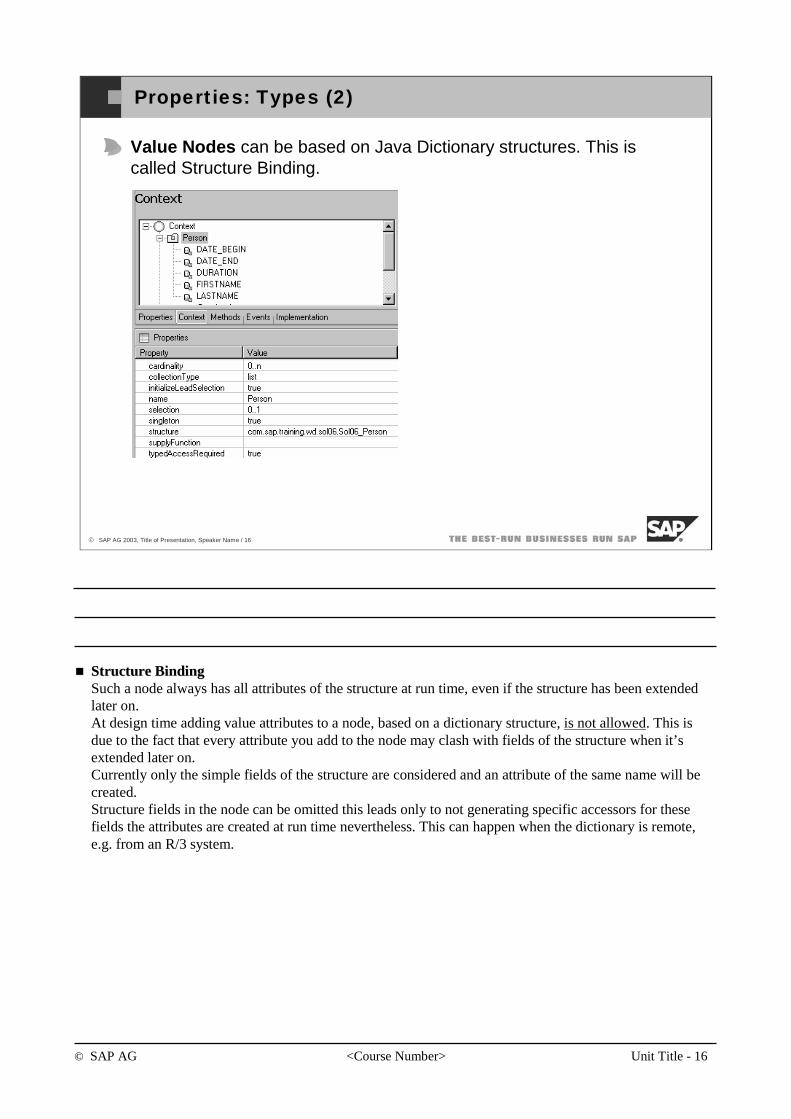
© SAP AG <Course Number> Unit Title - 16
© SAP AG 2003, Title of Presentation, Speaker Name / 16
Properties: Types (2)
Value Nodes can be based on Java Dictionary structures. This is called Structure Binding.
StructureStructure BindingBindingSuch a node always has all attributes of the structure at run time, even if the structure has been extended later on.At design time adding value attributes to a node, based on a dictionary structure, is not allowed. This is due to the fact that every attribute you add to the node may clash with fields of the structure when it’s extended later on. Currently only the simple fields of the structure are considered and an attribute of the same name will be created.Structure fields in the node can be omitted this leads only to not generating specific accessors for these fields the attributes are created at run time nevertheless. This can happen when the dictionary is remote, e.g. from an R/3 system.
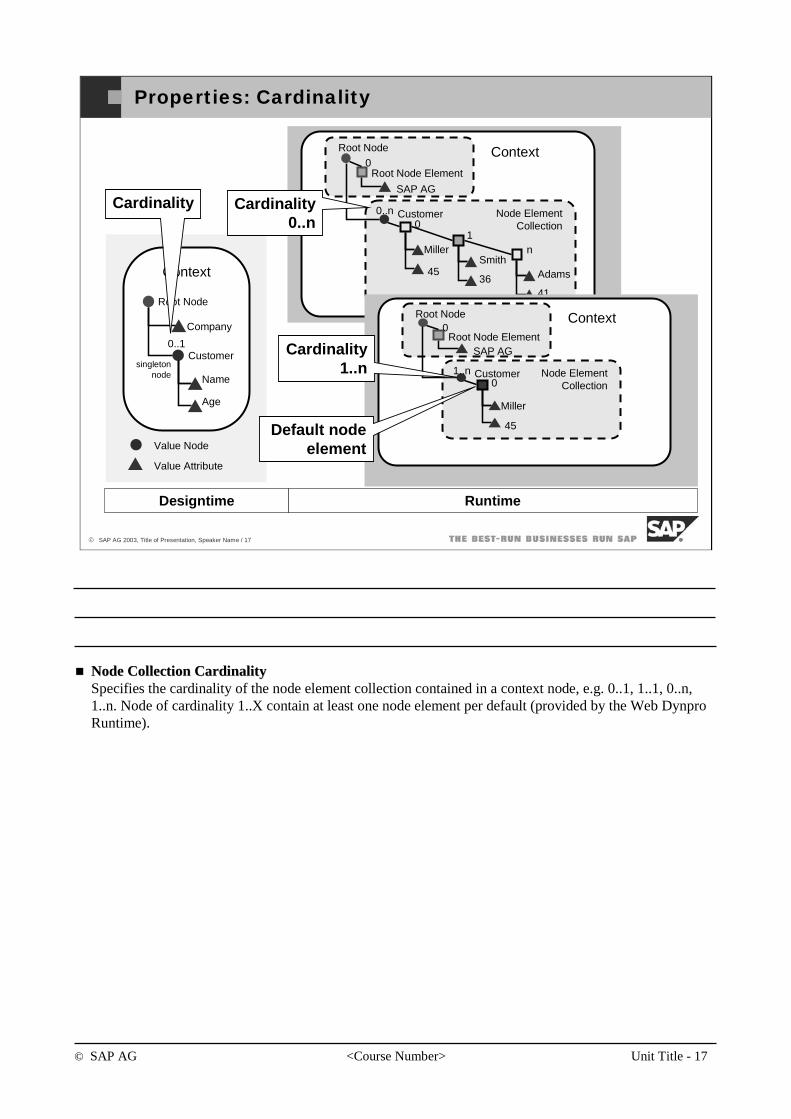
© SAP AG <Course Number> Unit Title - 17
© SAP AG 2003, Title of Presentation, Speaker Name / 17
Designtime Runtime
Properties: Cardinality
Context
Root Node
Value Attribute
Value Node
Customer
Company
Name
Age
0..1
singletonnode
Root Node
SAP AG
45
0..n
Miller
Customer
Smith
36 Adams
41
Node Element Collection0
1n
Root Node Element0
Context
Cardinality Cardinality0..n
Root Node
SAP AG
45
1..n
Miller
Customer Node Element Collection0
Root Node Element0
Context
Cardinality1..n
Default node element
NodeNode CollectionCollection CardinalityCardinalitySpecifies the cardinality of the node element collection contained in a context node, e.g. 0..1, 1..1, 0..n, 1..n. Node of cardinality 1..X contain at least one node element per default (provided by the Web DynproRuntime).
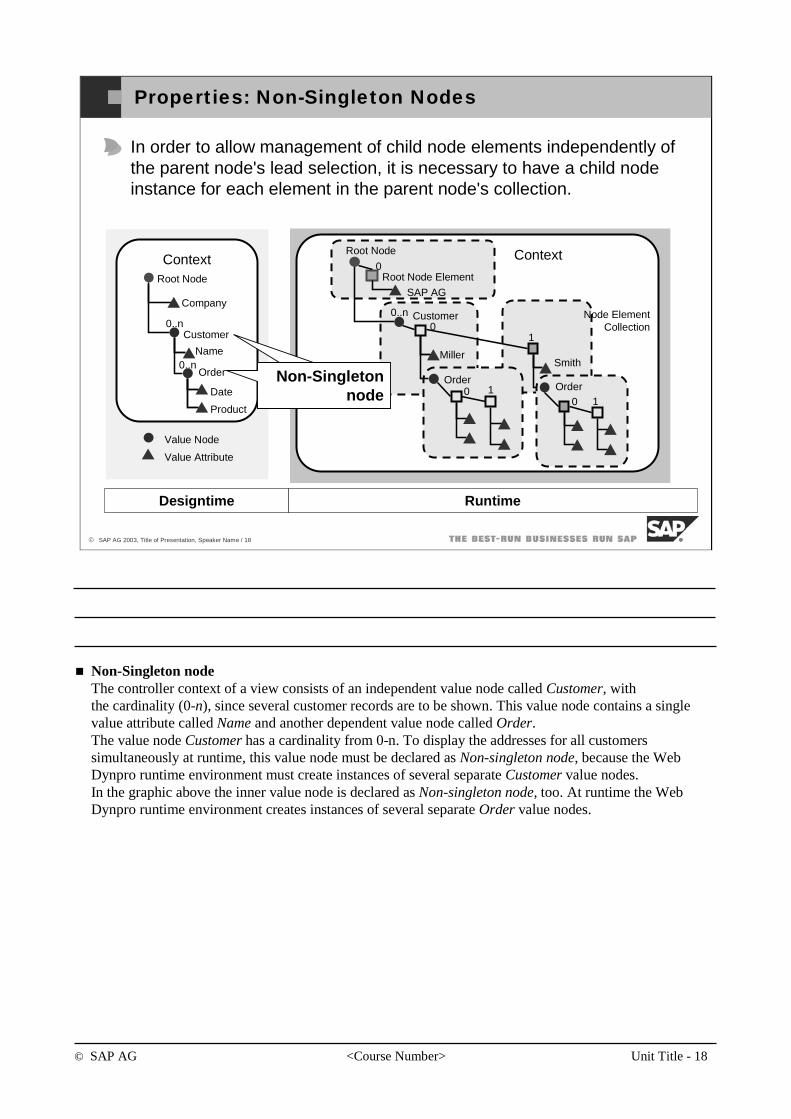
© SAP AG <Course Number> Unit Title - 18
© SAP AG 2003, Title of Presentation, Speaker Name / 18
ContextRoot Node
Value Attribute
Value Node
Customer
Name
0..n
Date
Product
Order0..n
Company
Properties: Non-Singleton Nodes
In order to allow management of child node elements independently of the parent node's lead selection, it is necessary to have a child node instance for each element in the parent node's collection.
Designtime Runtime
Root Node
Root Node Element0
Context
Smith
Node Element Collection
1
Order0 1
0..n
Miller
Customer0
0 1OrderNon-Singleton
nodeNon-Singleton
node
SAP AG
Non-Singleton nodeThe controller context of a view consists of an independent value node called Customer, withthe cardinality (0-n), since several customer records are to be shown. This value node contains a single value attribute called Name and another dependent value node called Order.The value node Customer has a cardinality from 0-n. To display the addresses for all customers simultaneously at runtime, this value node must be declared as Non-singleton node, because the Web Dynpro runtime environment must create instances of several separate Customer value nodes.In the graphic above the inner value node is declared as Non-singleton node, too. At runtime the Web Dynpro runtime environment creates instances of several separate Order value nodes.
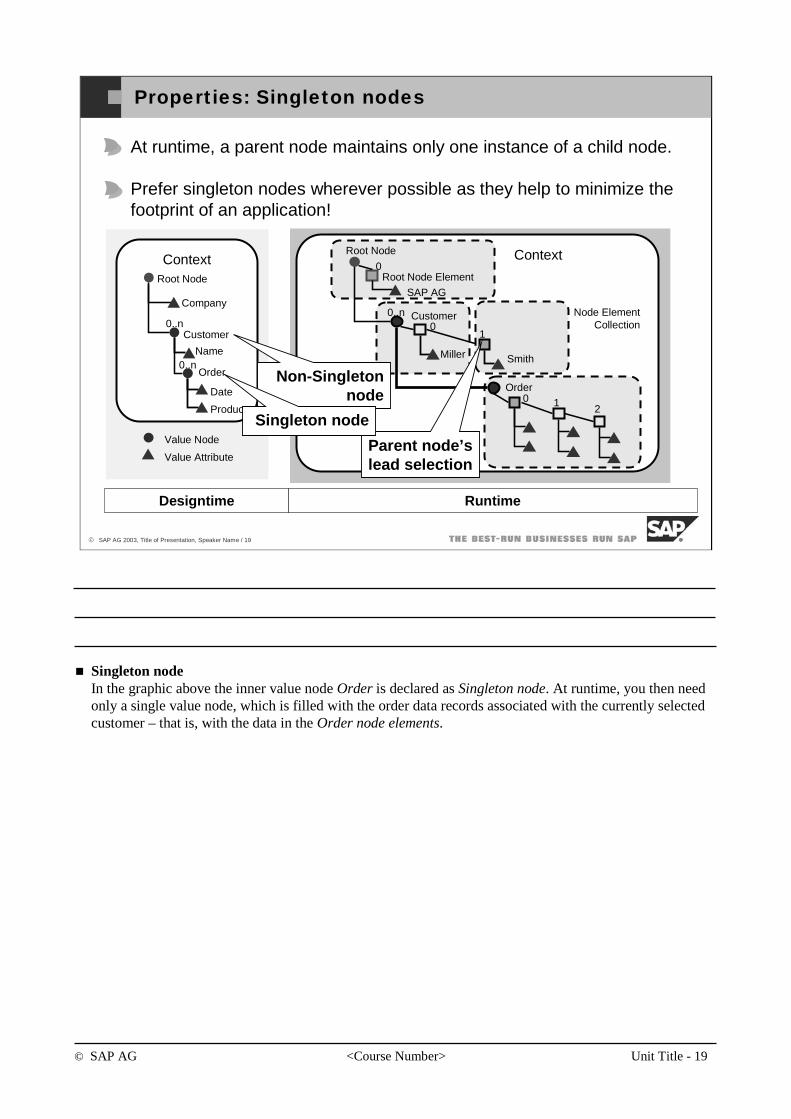
© SAP AG <Course Number> Unit Title - 19
© SAP AG 2003, Title of Presentation, Speaker Name / 19
ContextRoot Node
Value Attribute
Value Node
Customer
Name
0..n
Date
Product
Order0..n
Company
Properties: Singleton nodes
At runtime, a parent node maintains only one instance of a child node.
Prefer singleton nodes wherever possible as they help to minimize the footprint of an application!
Designtime Runtime
Root Node
0..n
Miller
Customer0
Root Node Element0
Context
Order0 1
2
Smith
Node Element Collection
1
Parent node’s lead selection
Non-Singleton node
Singleton node
SAP AG
Singleton nodeIn the graphic above the inner value node Order is declared as Singleton node. At runtime, you then need only a single value node, which is filled with the order data records associated with the currently selected customer – that is, with the data in the Order node elements.
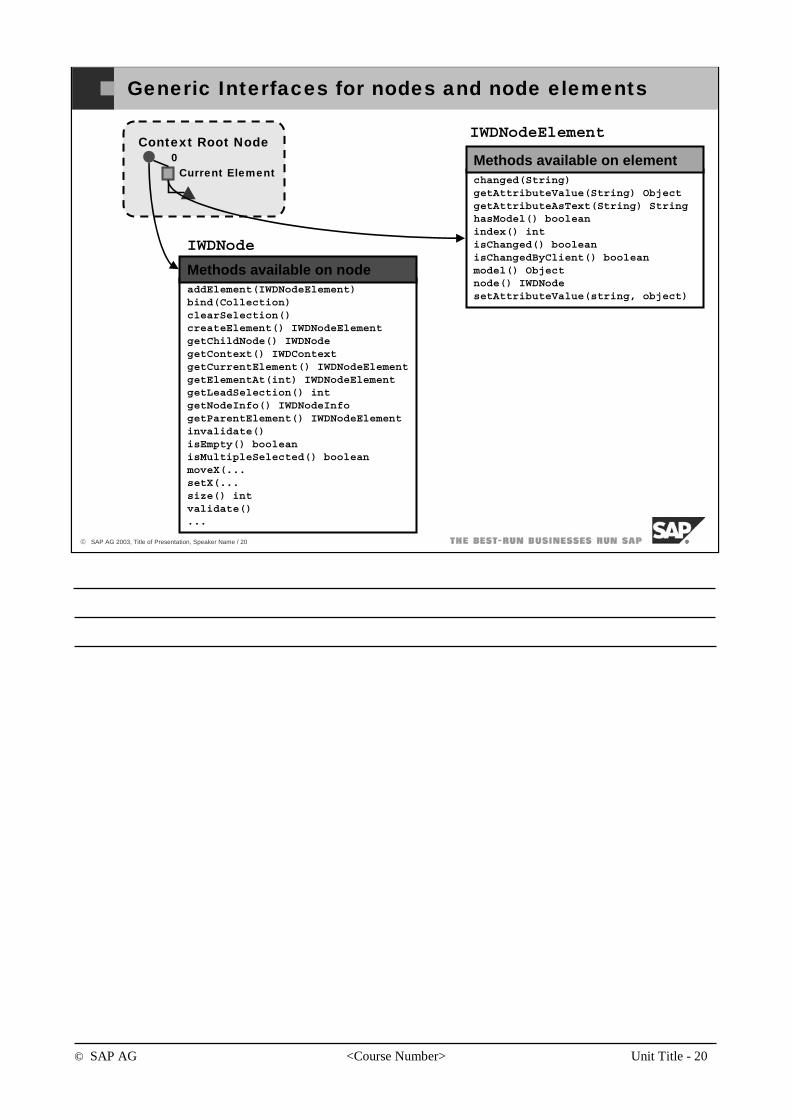
© SAP AG <Course Number> Unit Title - 20
© SAP AG 2003, Title of Presentation, Speaker Name / 20
changed(String)getAttributeValue(String) ObjectgetAttributeAsText(String) StringhasModel() booleanindex() intisChanged() booleanisChangedByClient() booleanmodel() Objectnode() IWDNodesetAttributeValue(string, object)
Methods available on element
Generic Interfaces for nodes and node elements
0Context Root Node
Current Element
addElement(IWDNodeElement)bind(Collection)clearSelection() createElement() IWDNodeElementgetChildNode() IWDNodegetContext() IWDContextgetCurrentElement() IWDNodeElementgetElementAt(int) IWDNodeElementgetLeadSelection() intgetNodeInfo() IWDNodeInfogetParentElement() IWDNodeElementinvalidate() isEmpty() booleanisMultipleSelected() booleanmoveX(...setX(...size() intvalidate()...
Methods available on node
IWDNodeElement
IWDNode
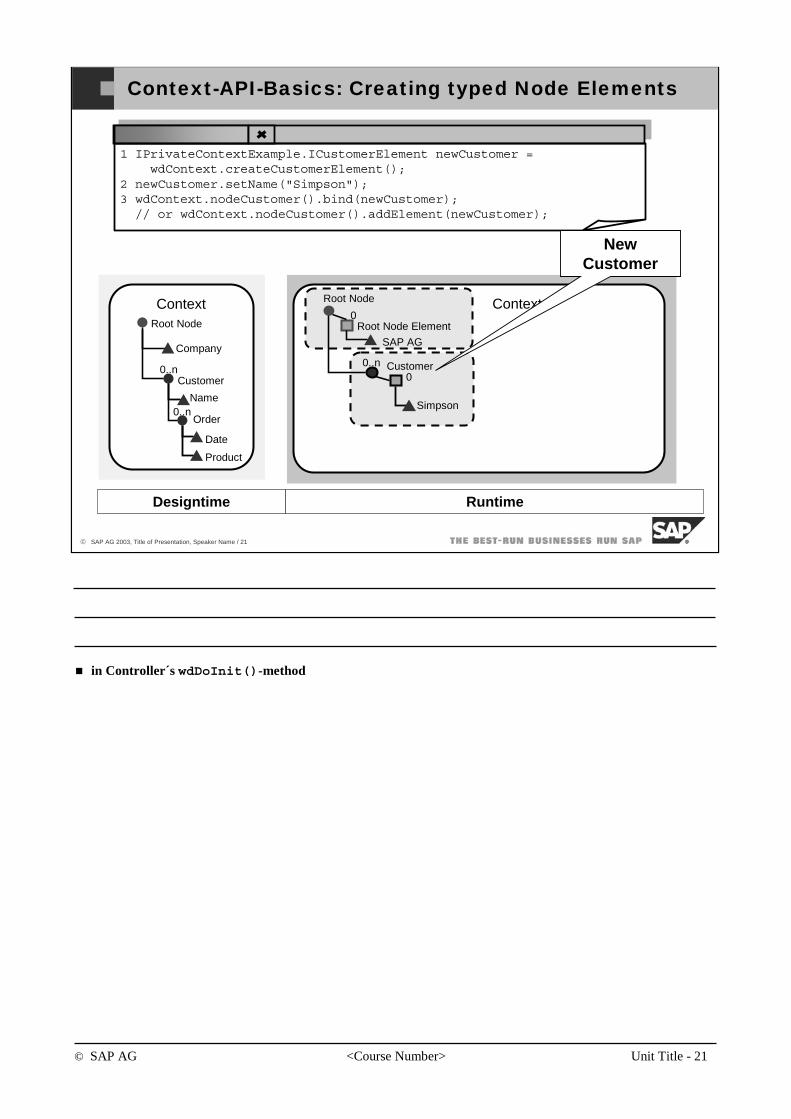
© SAP AG <Course Number> Unit Title - 21
© SAP AG 2003, Title of Presentation, Speaker Name / 21
Context-API-Basics: Creating typed Node Elements
ContextRoot Node
Customer
Name
0..n
Date
Product
Order0..n
Company
Designtime
Root Node
0..n
Simpson
Customer0
Root Node Element0
Context
SAP AG
1 IPrivateContextExample.ICustomerElement newCustomer =wdContext.createCustomerElement();
2 newCustomer.setName("Simpson");3 wdContext.nodeCustomer().bind(newCustomer);// or wdContext.nodeCustomer().addElement(newCustomer);
New Customer
Runtime
in Controller´s wdDoInit()-method
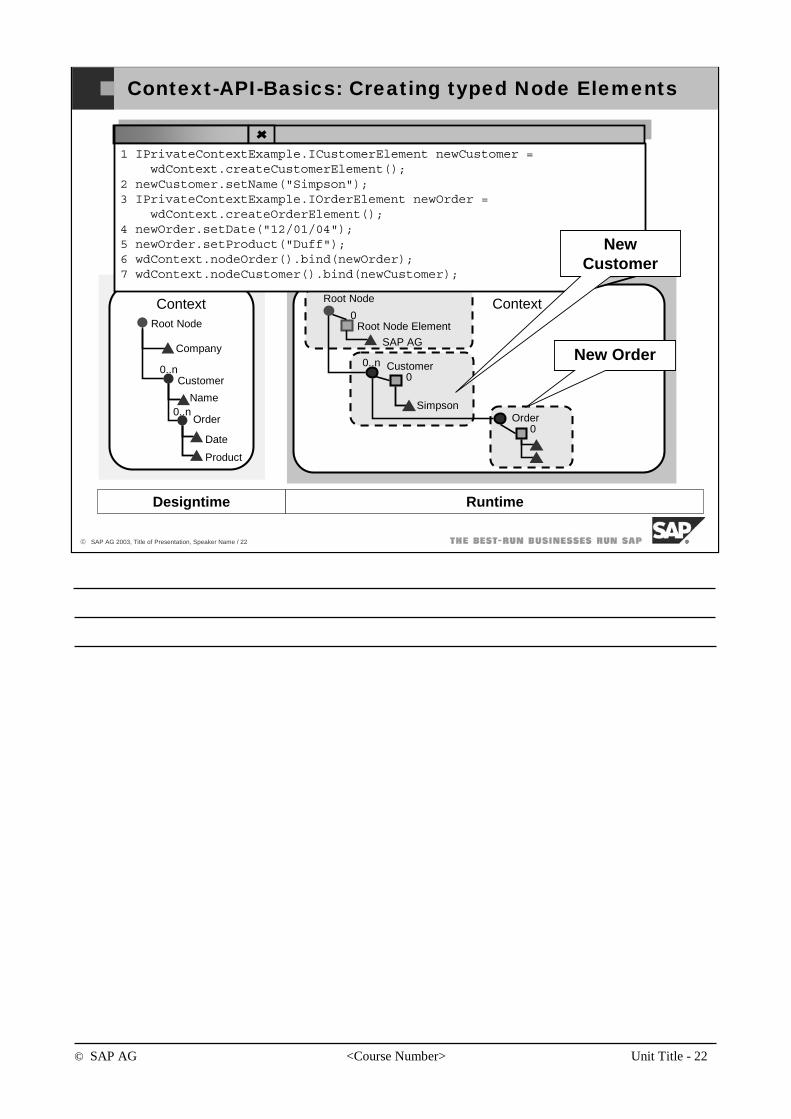
© SAP AG <Course Number> Unit Title - 22
© SAP AG 2003, Title of Presentation, Speaker Name / 22
Root Node
0..n
Simpson
Customer0
Root Node Element0
Context
SAP AG
Order0
Context-API-Basics: Creating typed Node Elements
ContextRoot Node
Customer
Name
0..n
Date
Product
Order0..n
Company
Designtime Runtime
New Order
1 IPrivateContextExample.ICustomerElement newCustomer =wdContext.createCustomerElement();
2 newCustomer.setName("Simpson");3 IPrivateContextExample.IOrderElement newOrder =
wdContext.createOrderElement();4 newOrder.setDate("12/01/04");5 newOrder.setProduct("Duff");6 wdContext.nodeOrder().bind(newOrder);7 wdContext.nodeCustomer().bind(newCustomer);
New Customer
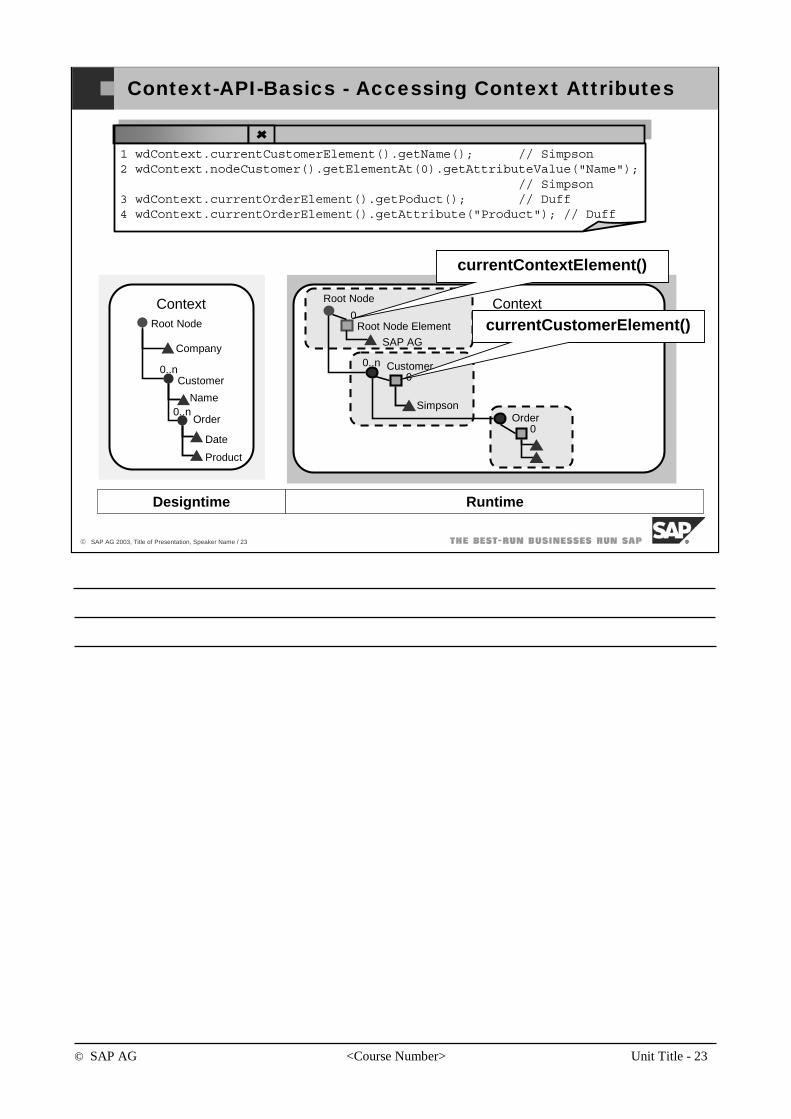
© SAP AG <Course Number> Unit Title - 23
© SAP AG 2003, Title of Presentation, Speaker Name / 23
Context-API-Basics - Accessing Context Attributes
Root Node
0..n
Simpson
Customer0
Root Node Element0
Context
SAP AG
Order0
ContextRoot Node
Customer
Name
0..n
Date
Product
Order0..n
Company
Designtime Runtime
1 wdContext.currentCustomerElement().getName(); // Simpson2 wdContext.nodeCustomer().getElementAt(0).getAttributeValue("Name");
// Simpson3 wdContext.currentOrderElement().getPoduct(); // Duff4 wdContext.currentOrderElement().getAttribute("Product"); // Duff
currentCustomerElement()
currentContextElement()
© SAP AG <Course Number> Unit Title - 24
© SAP AG 2003, Title of Presentation, Speaker Name / 24
You should now be able to:
Explain the term context.
Use the context editor.
Context: Topic Summary
© SAP AG <Course Number> Unit Title - 25
© SAP AG 2003, Title of Presentation, Speaker Name / 25
After completing this topic, you will be able to:
Explain data binding.
Data binding: Topic Objectives
This is a lesson
© SAP AG <Course Number> Unit Title - 26
© SAP AG 2003, Title of Presentation, Speaker Name / 26
Data Binding
MMain ain contextcontext advantageadvantage: ability to declaratively bind UI element-attributes to context elements called DataData BindingBinding.
Data Binding generically manages the population of UI elements with state information provided by the controllercontext.
Generally all UI element properties (except the ID property) can be bound to the context.
Declarative data flow: Data bindingData binding stands for the connection of a UI element property as a data drain with a data source that is stored in the controller context. A context path must be declared for this connection.
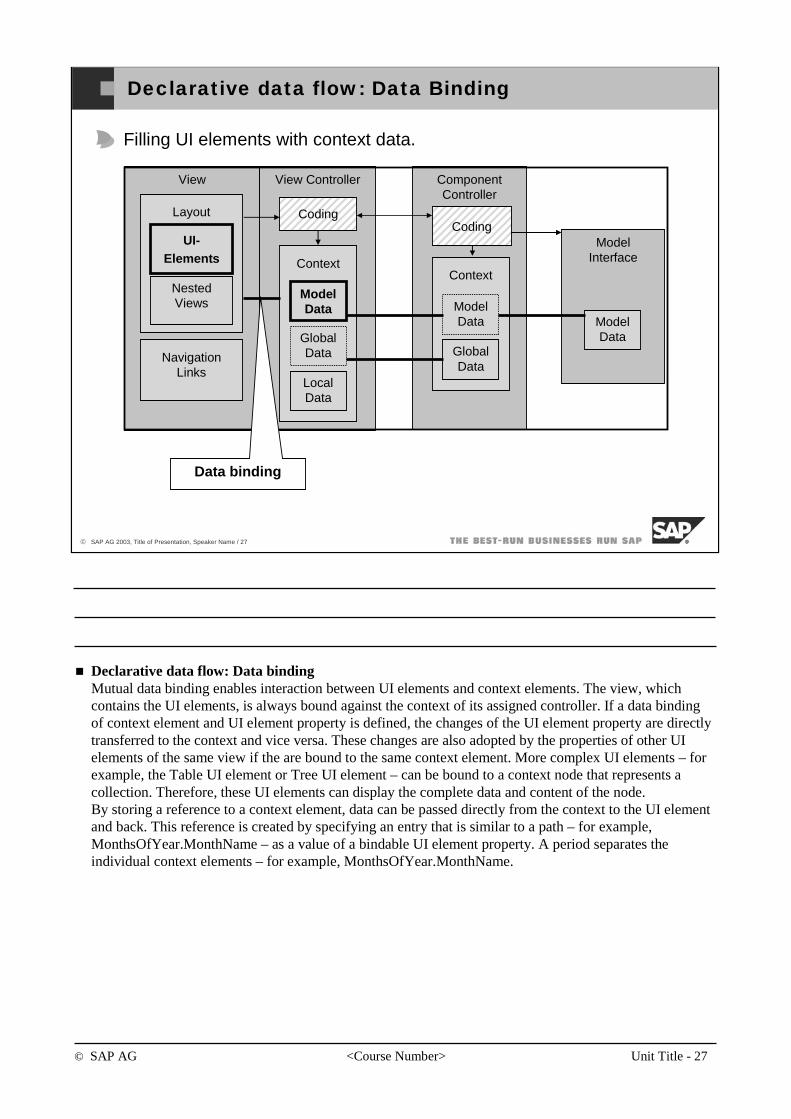
© SAP AG <Course Number> Unit Title - 27
© SAP AG 2003, Title of Presentation, Speaker Name / 27
Declarative data flow: Data Binding
ComponentController
ModelInterface
View View Controller
Layout
NestedViews
NavigationLinks
Context
ModelData
GlobalData
LocalData
Context
ModelData
GlobalData
ModelData
UI-Elements
CodingCoding
Filling UI elements with context data.
Data binding
Declarative data flow: Data bindingMutual data binding enables interaction between UI elements and context elements. The view, which contains the UI elements, is always bound against the context of its assigned controller. If a data binding of context element and UI element property is defined, the changes of the UI element property are directly transferred to the context and vice versa. These changes are also adopted by the properties of other UI elements of the same view if the are bound to the same context element. More complex UI elements – for example, the Table UI element or Tree UI element – can be bound to a context node that represents a collection. Therefore, these UI elements can display the complete data and content of the node. By storing a reference to a context element, data can be passed directly from the context to the UI element and back. This reference is created by specifying an entry that is similar to a path – for example, MonthsOfYear.MonthName – as a value of a bindable UI element property. A period separates the individual context elements – for example, MonthsOfYear.MonthName.

© SAP AG <Course Number> Unit Title - 28
© SAP AG 2003, Title of Presentation, Speaker Name / 28
Declarative data flow: Data Binding (2)
Layouttab Context tab
Declarative data flow: Data binding (2)The SAP NetWeaver Developer Studio provides graphical support of the context elements and allows application developers to assign the context nodes and context attributes to the corresponding UI element properties. This means that the data transport between the context element and the UI element does not require an explicit implementation.
© SAP AG <Course Number> Unit Title - 29
© SAP AG 2003, Title of Presentation, Speaker Name / 29
You should now be able to:
Explain data binding.
Data Binding: Topic Summary
© SAP AG <Course Number> Unit Title - 30
© SAP AG 2003, Title of Presentation, Speaker Name / 30
After completing this topic, you will be able to:
Explain context mapping.
Use the Data Modeler.
Context Mapping: Topic Objectives
This is a lesson
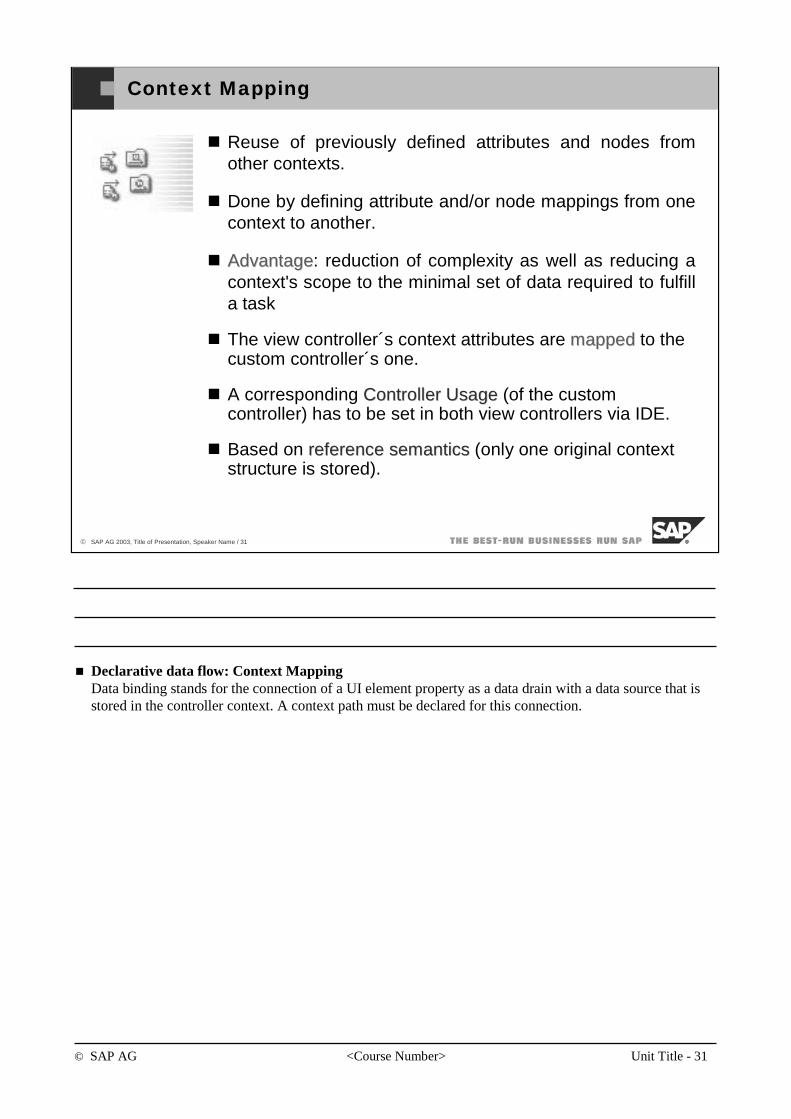
© SAP AG <Course Number> Unit Title - 31
© SAP AG 2003, Title of Presentation, Speaker Name / 31
Context Mapping
Reuse of previously defined attributes and nodes from other contexts.
Done by defining attribute and/or node mappings from one context to another.
AdvantageAdvantage: reduction of complexity as well as reducing a context's scope to the minimal set of data required to fulfilla task
The view controller´s context attributes are mappedmapped to thecustom controller´s one.
A corresponding Controller Controller UsageUsage (of the customcontroller) has to be set in both view controllers via IDE.
Based on referencereference semanticssemantics (only one original contextstructure is stored).
Declarative data flow: Context MappingData binding stands for the connection of a UI element property as a data drain with a data source that is stored in the controller context. A context path must be declared for this connection.
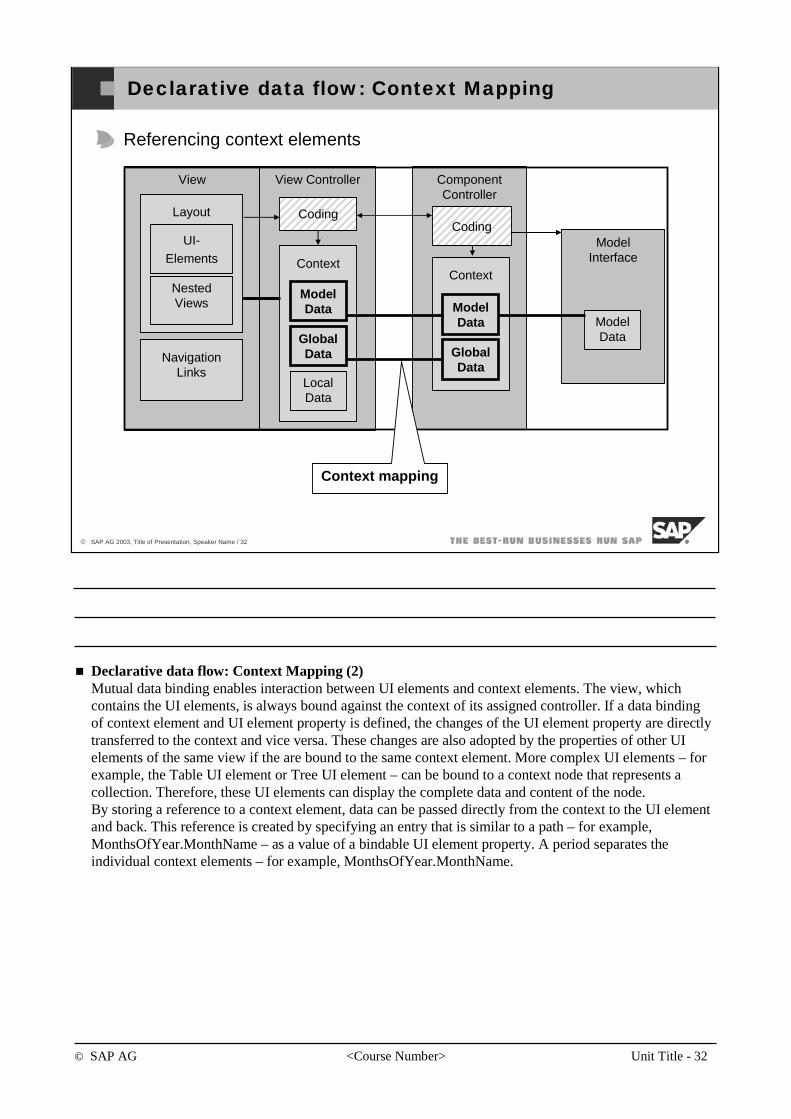
© SAP AG <Course Number> Unit Title - 32
© SAP AG 2003, Title of Presentation, Speaker Name / 32
Declarative data flow: Context Mapping
ComponentController
ModelInterface
View View Controller
Layout
NestedViews
NavigationLinks
Context
ModelData
GlobalData
LocalData
Context
ModelData
GlobalData
ModelData
CodingCoding
Referencing context elements
Context mapping
UI-Elements
Declarative data flow: Context Mapping (2)Mutual data binding enables interaction between UI elements and context elements. The view, which contains the UI elements, is always bound against the context of its assigned controller. If a data binding of context element and UI element property is defined, the changes of the UI element property are directly transferred to the context and vice versa. These changes are also adopted by the properties of other UI elements of the same view if the are bound to the same context element. More complex UI elements – for example, the Table UI element or Tree UI element – can be bound to a context node that represents a collection. Therefore, these UI elements can display the complete data and content of the node. By storing a reference to a context element, data can be passed directly from the context to the UI element and back. This reference is created by specifying an entry that is similar to a path – for example, MonthsOfYear.MonthName – as a value of a bindable UI element property. A period separates the individual context elements – for example, MonthsOfYear.MonthName.
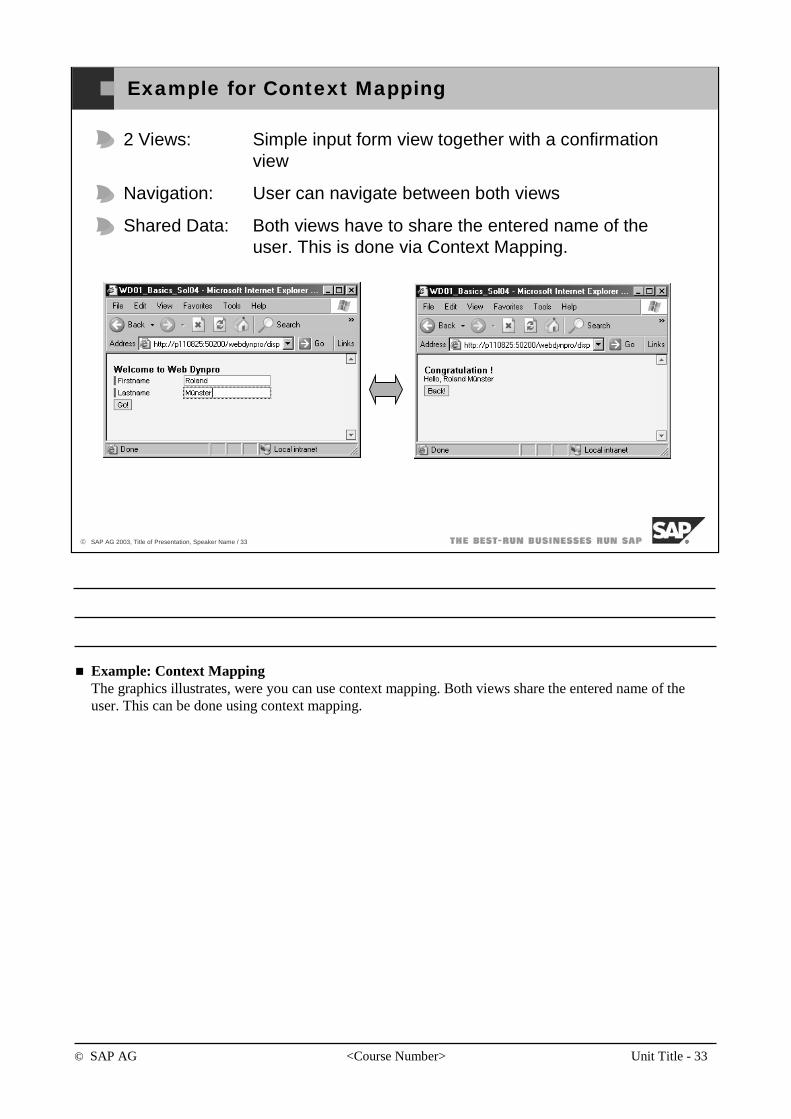
© SAP AG <Course Number> Unit Title - 33
© SAP AG 2003, Title of Presentation, Speaker Name / 33
Example for Context Mapping
2 Views: Simple input form view together with a confirmationview
Navigation: User can navigate between both views
Shared Data: Both views have to share the entered name of theuser. This is done via Context Mapping.
Example: Context MappingThe graphics illustrates, were you can use context mapping. Both views share the entered name of the user. This can be done using context mapping.
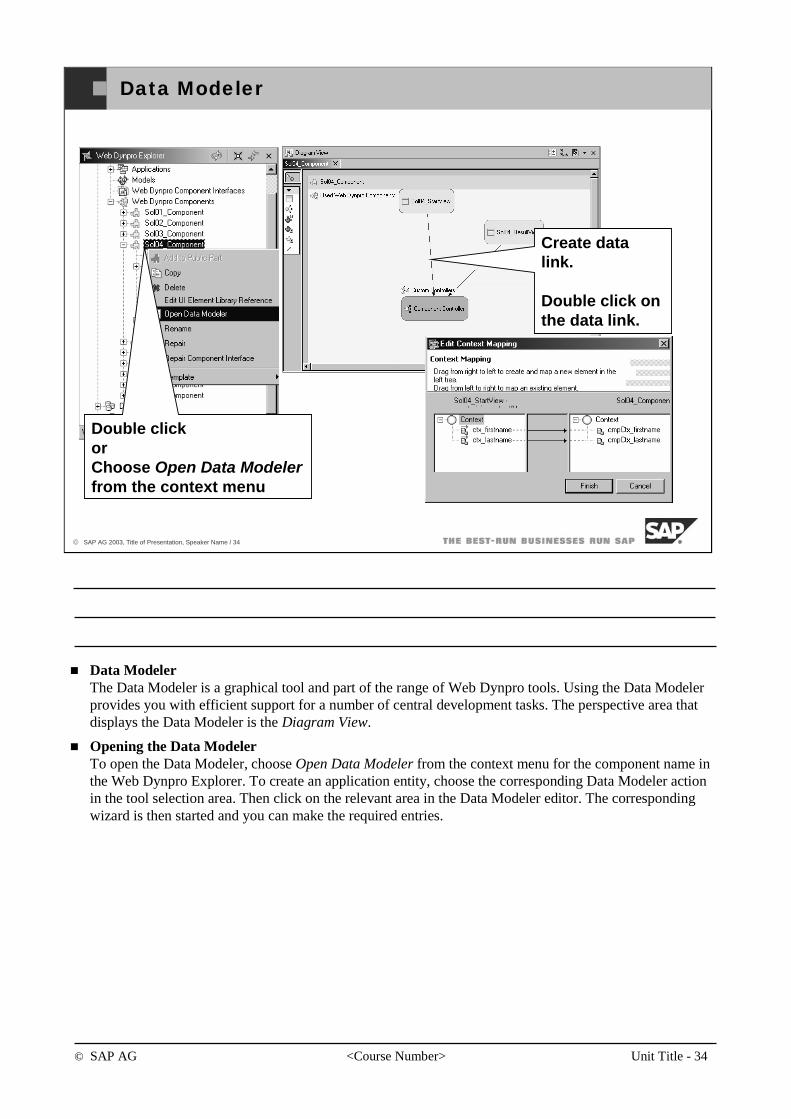
© SAP AG <Course Number> Unit Title - 34
© SAP AG 2003, Title of Presentation, Speaker Name / 34
Data Modeler
Double click orChoose Open Data Modelerfrom the context menu
Create data link.
Double click on the data link.
Data ModelerThe Data Modeler is a graphical tool and part of the range of Web Dynpro tools. Using the Data Modeler provides you with efficient support for a number of central development tasks. The perspective area that displays the Data Modeler is the Diagram View.
Opening the Data ModelerTo open the Data Modeler, choose Open Data Modeler from the context menu for the component name in the Web Dynpro Explorer. To create an application entity, choose the corresponding Data Modeler action in the tool selection area. Then click on the relevant area in the Data Modeler editor. The corresponding wizard is then started and you can make the required entries.
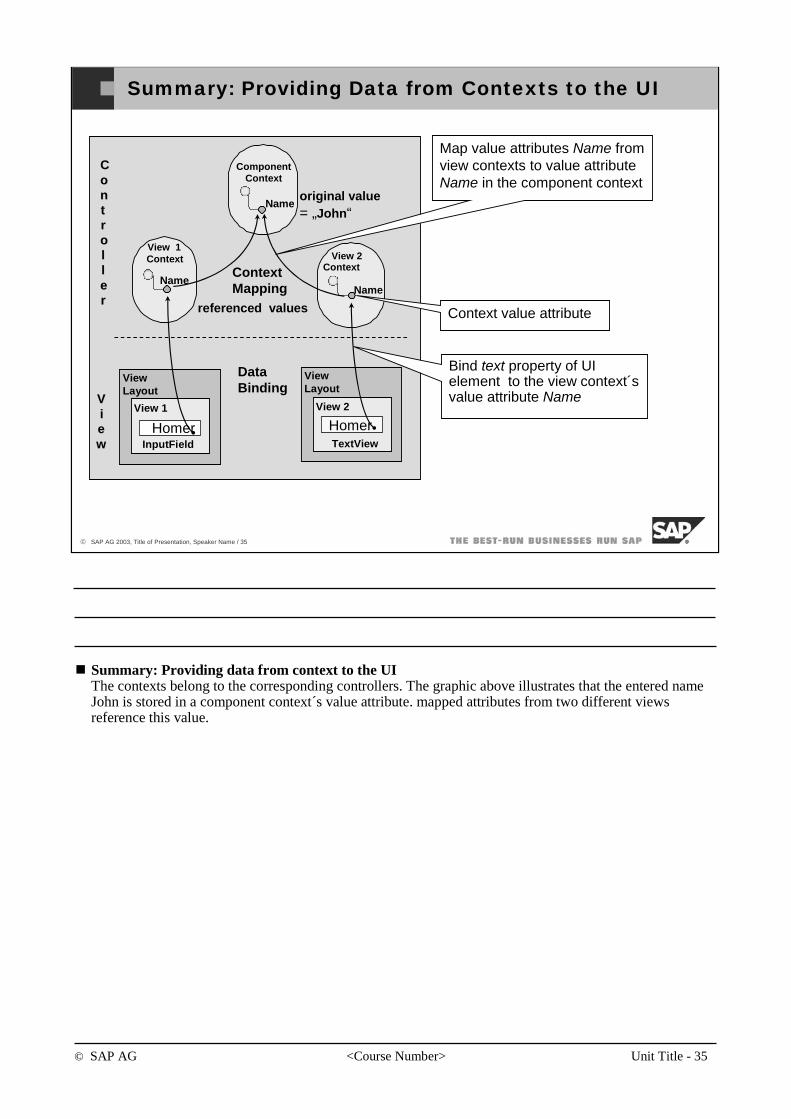
© SAP AG <Course Number> Unit Title - 35
© SAP AG 2003, Title of Presentation, Speaker Name / 35
Summary: Providing Data from Contexts to the UI
View Layout
View 1Context View 2
Context
View Layout
View 1
InputField
View 2
TextView
DataBinding
ComponentContext
Name
ContextMapping
original value= „John“
referenced values
NameName
Homer Homer
CCoonnttrroolllleerr
VViieeww
Map value attributes Name fromview contexts to value attributeName in the component context
Bind text property of UI element to the view context´svalue attribute Name
Context value attribute
Summary: Providing data from context to the UIThe contexts belong to the corresponding controllers. The graphic above illustrates that the entered nameJohn is stored in a component context´s value attribute. mapped attributes from two different viewsreference this value.
© SAP AG <Course Number> Unit Title - 36
© SAP AG 2003, Title of Presentation, Speaker Name / 36
You should now be able to:
Explain context mapping.
Use the Data Modeler.
Context Mapping: Topic Summary
© SAP AG <Course Number> Unit Title - 37
© SAP AG 2003, Title of Presentation, Speaker Name / 37
You should now be able to:
Understand basic components of a Web Dynproapplication.
Explain the term context.
Explain data binding.
Explain context mapping.
Providing Data from Context: Unit Summary
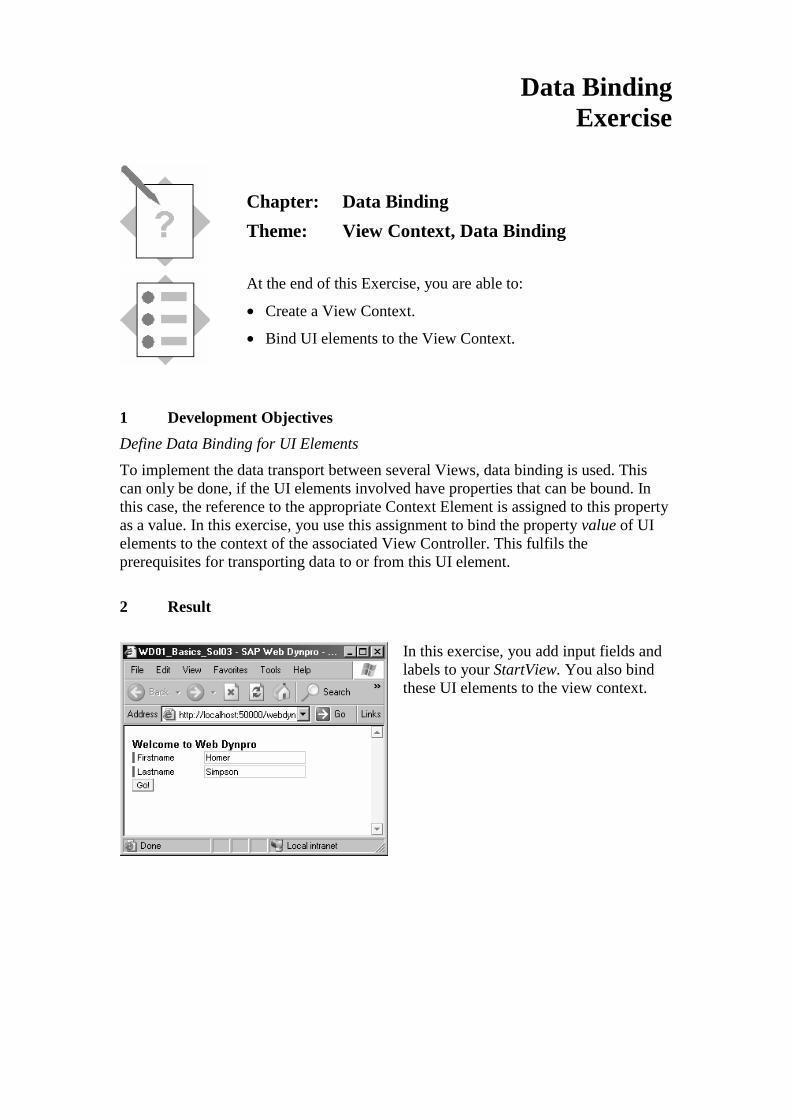
Data Binding Exercise
Chapter: Data Binding
Theme: View Context, Data Binding
At the end of this Exercise, you are able to:
• Create a View Context.
• Bind UI elements to the View Context.
1 Development Objectives
Define Data Binding for UI Elements
To implement the data transport between several Views, data binding is used. This can only be done, if the UI elements involved have properties that can be bound. In this case, the reference to the appropriate Context Element is assigned to this property as a value. In this exercise, you use this assignment to bind the property value of UI elements to the context of the associated View Controller. This fulfils the prerequisites for transporting data to or from this UI element.
2 Result
In this exercise, you add input fields and labels to your StartView. You also bind these UI elements to the view context.
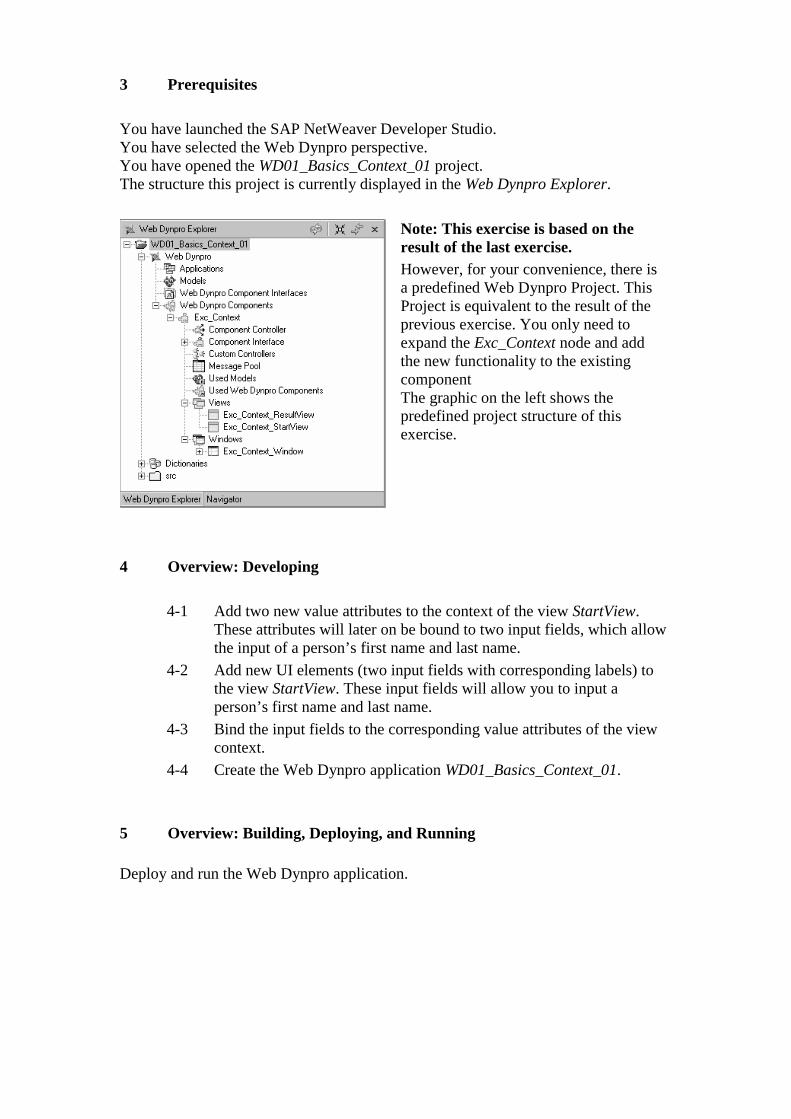
3 Prerequisites
You have launched the SAP NetWeaver Developer Studio. You have selected the Web Dynpro perspective. You have opened the WD01_Basics_Context_01 project. The structure this project is currently displayed in the Web Dynpro Explorer.
Note: This exercise is based on the result of the last exercise. However, for your convenience, there is a predefined Web Dynpro Project. This Project is equivalent to the result of the previous exercise. You only need to expand the Exc_Context node and add the new functionality to the existing component The graphic on the left shows the predefined project structure of this exercise.
4 Overview: Developing
4-1 Add two new value attributes to the context of the view StartView. These attributes will later on be bound to two input fields, which allow the input of a person’s first name and last name.
4-2 Add new UI elements (two input fields with corresponding labels) to the view StartView. These input fields will allow you to input a person’s first name and last name.
4-3 Bind the input fields to the corresponding value attributes of the view context.
4-4 Create the Web Dynpro application WD01_Basics_Context_01.
5 Overview: Building, Deploying, and Running Deploy and run the Web Dynpro application.
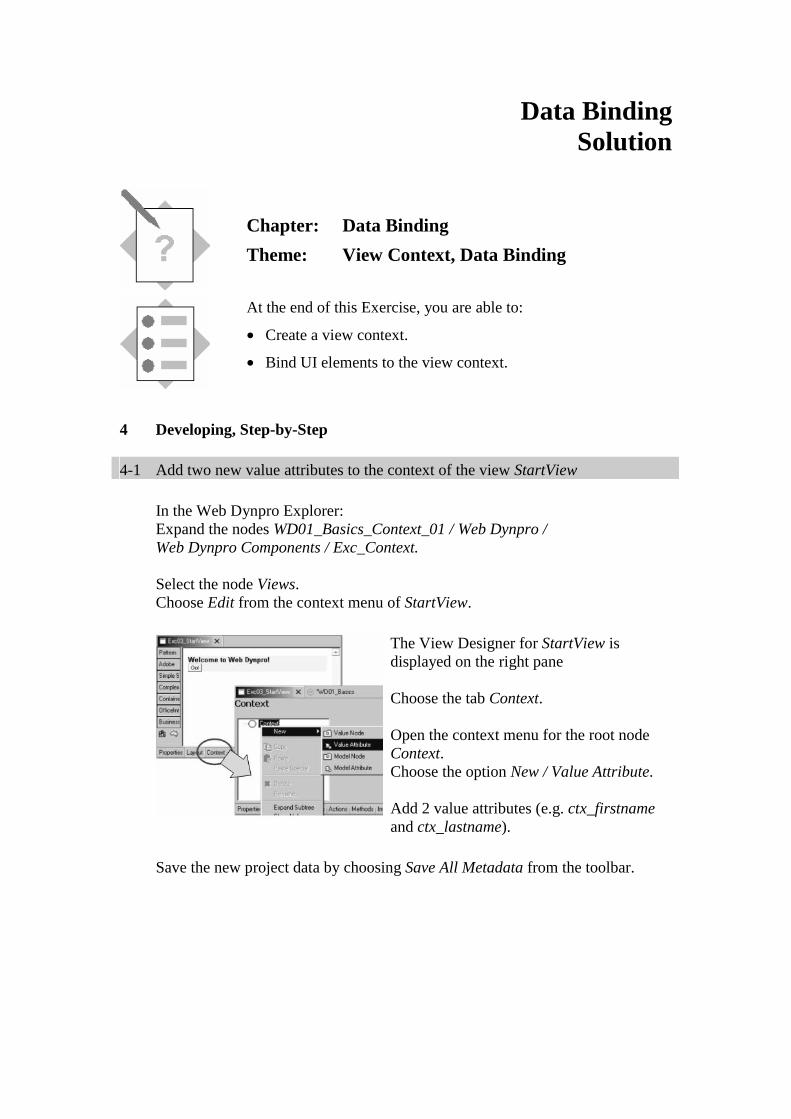
Data Binding Solution
Chapter: Data Binding
Theme: View Context, Data Binding
At the end of this Exercise, you are able to:
• Create a view context.
• Bind UI elements to the view context.
4 Developing, Step-by-Step 4-1 Add two new value attributes to the context of the view StartView
In the Web Dynpro Explorer: Expand the nodes WD01_Basics_Context_01 / Web Dynpro / Web Dynpro Components / Exc_Context. Select the node Views. Choose Edit from the context menu of StartView.
The View Designer for StartView is displayed on the right pane Choose the tab Context. Open the context menu for the root node Context. Choose the option New / Value Attribute. Add 2 value attributes (e.g. ctx_firstname and ctx_lastname).
Save the new project data by choosing Save All Metadata from the toolbar.
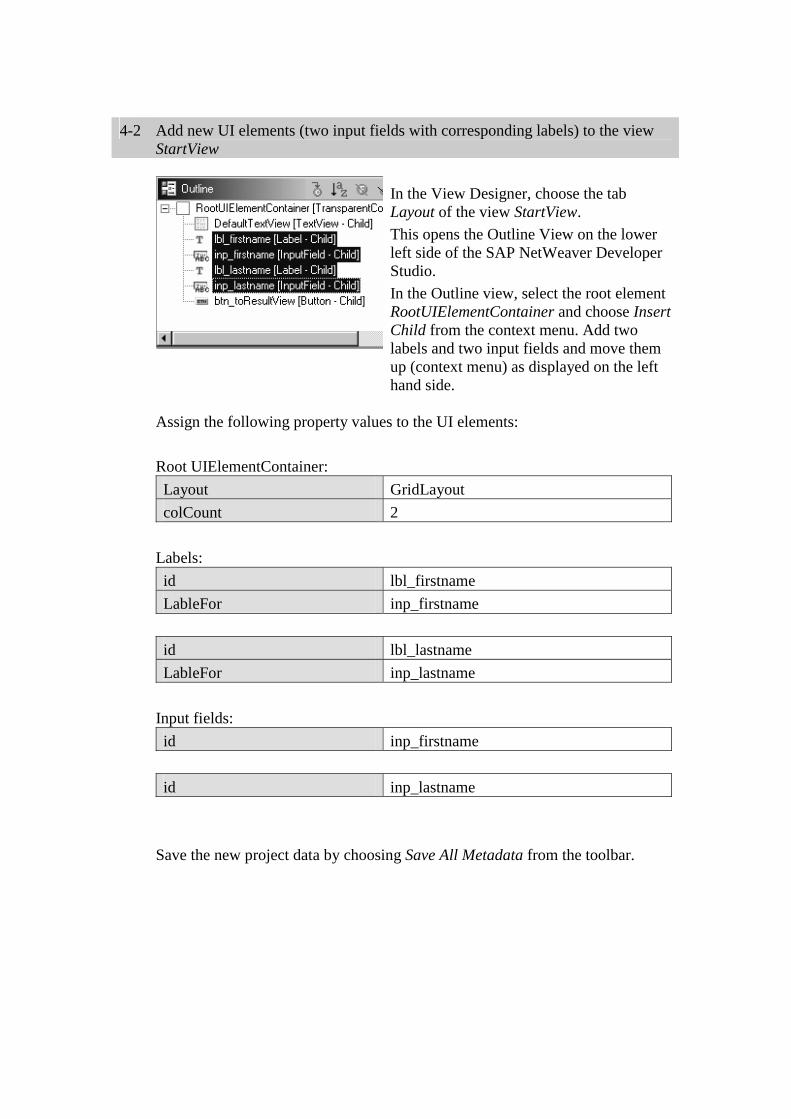
4-2 Add new UI elements (two input fields with corresponding labels) to the view
StartView
In the View Designer, choose the tab Layout of the view StartView.
This opens the Outline View on the lower left side of the SAP NetWeaver Developer Studio.
In the Outline view, select the root element RootUIElementContainer and choose Insert Child from the context menu. Add two labels and two input fields and move them up (context menu) as displayed on the left hand side.
Assign the following property values to the UI elements:
Root UIElementContainer:
Layout GridLayout
colCount 2
Labels:
id lbl_firstname
LableFor inp_firstname
id lbl_lastname
LableFor inp_lastname
Input fields:
id inp_firstname
id inp_lastname
Save the new project data by choosing Save All Metadata from the toolbar.
4-3 Bind the input fields to the value attributes of the view context. Assign the following property values to these new elements:
Input fields:
id inp_firstname
value ctx_firstname
id inp_lastname
value ctx_lastname Here you have to assign the value property to the appropriate context attribute. Click on the button on the right side of the value field. In the dialog box that appears, choose the context attribute ctx_firstname for the input field inp_firstname and confirm by choosing OK. Repeat this step with the input field inp_lastname and the context attribute ctx_lastname.
Save the new project data by choosing Save All Metadata from the toolbar. 4-4 Create the Web Dynpro application WD01_Basics_Context
In the Web Dynpro Explorer, expand the node WD01_Basics_Context. Expand the node Web Dynpro and open the context menu for Applications. To open the wizard, choose Create Application.
In the wizard, enter:
Name WD01_Basics_Context_01
Package com.sap.training.wd.basics.context
Accept the other suggested values and choose Next.
Select Use existing component and choose Next.
Select
Web Dynpro Component Exc_Context
Interface View Exc_Context_WindowInterfaceView
StartupPlug Default
and choose Finish.
Successful result:
The generated Web Dynpro application object completes your project structure. You can now deploy your project and start your Web Dynpro application. WD01_Basics_Context enables you to address the Web application as a whole, when you launch this complete application in the next step.
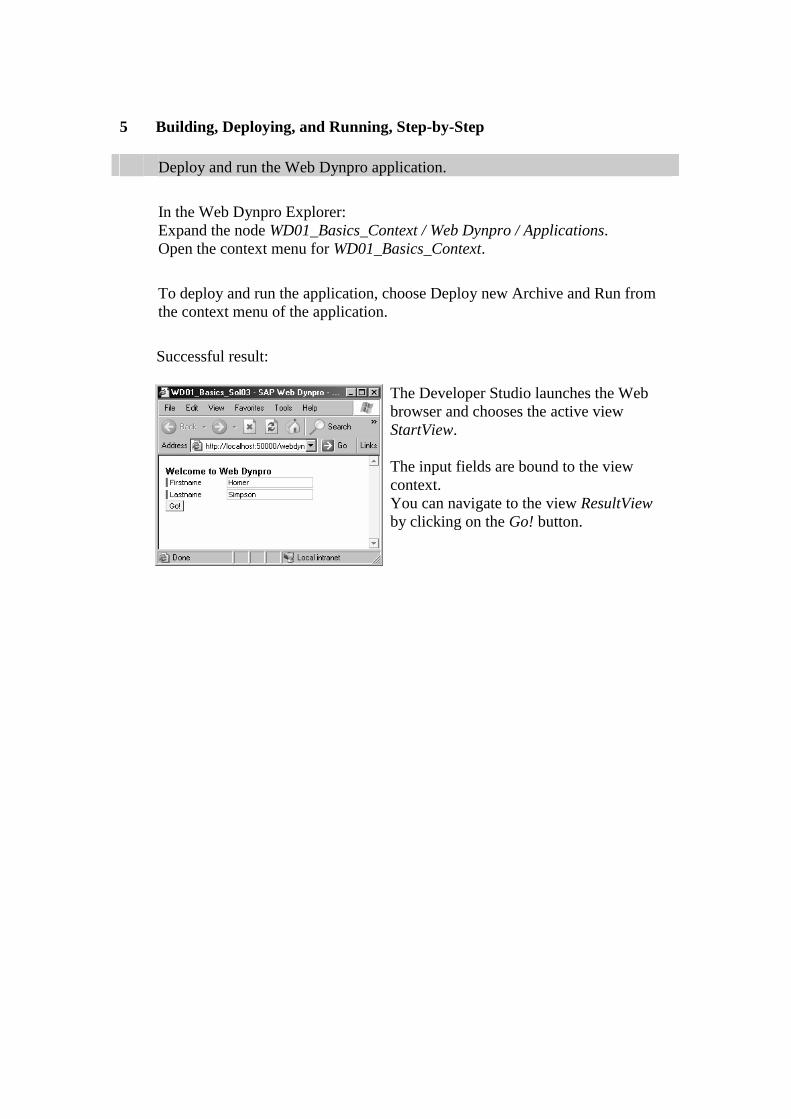
5 Building, Deploying, and Running, Step-by-Step Deploy and run the Web Dynpro application.
In the Web Dynpro Explorer: Expand the node WD01_Basics_Context / Web Dynpro / Applications. Open the context menu for WD01_Basics_Context.
To deploy and run the application, choose Deploy new Archive and Run from the context menu of the application.
Successful result:
The Developer Studio launches the Web browser and chooses the active view StartView. The input fields are bound to the view context. You can navigate to the view ResultView by clicking on the Go! button.
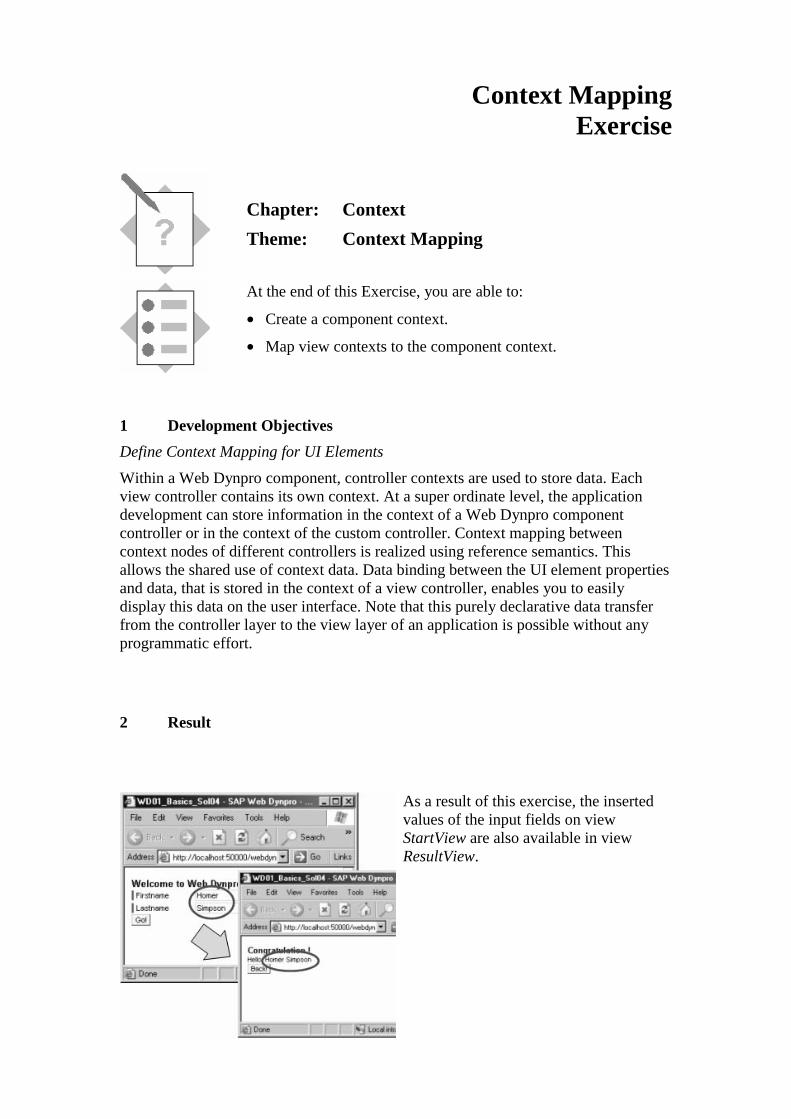
Context Mapping Exercise
Chapter: Context
Theme: Context Mapping
At the end of this Exercise, you are able to:
• Create a component context.
• Map view contexts to the component context.
1 Development Objectives
Define Context Mapping for UI Elements
Within a Web Dynpro component, controller contexts are used to store data. Each view controller contains its own context. At a super ordinate level, the application development can store information in the context of a Web Dynpro component controller or in the context of the custom controller. Context mapping between context nodes of different controllers is realized using reference semantics. This allows the shared use of context data. Data binding between the UI element properties and data, that is stored in the context of a view controller, enables you to easily display this data on the user interface. Note that this purely declarative data transfer from the controller layer to the view layer of an application is possible without any programmatic effort.
2 Result
As a result of this exercise, the inserted values of the input fields on view StartView are also available in view ResultView.
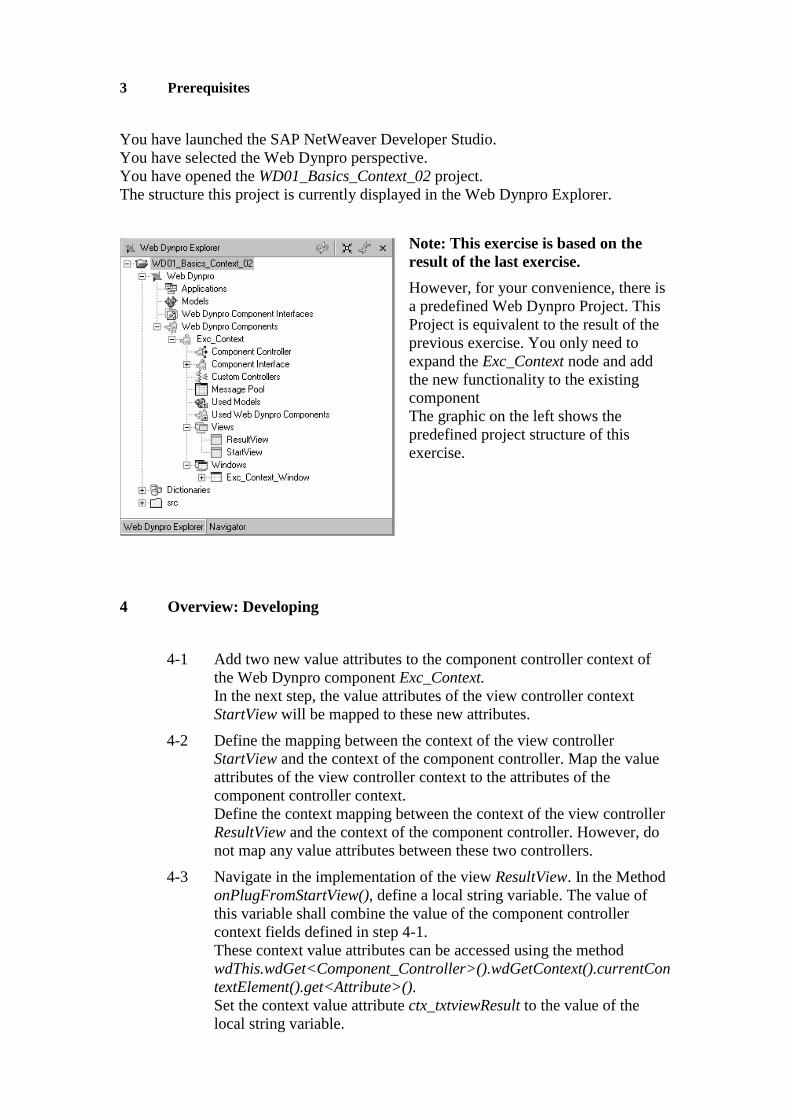
3 Prerequisites
You have launched the SAP NetWeaver Developer Studio. You have selected the Web Dynpro perspective. You have opened the WD01_Basics_Context_02 project. The structure this project is currently displayed in the Web Dynpro Explorer.
Note: This exercise is based on the result of the last exercise.
However, for your convenience, there is a predefined Web Dynpro Project. This Project is equivalent to the result of the previous exercise. You only need to expand the Exc_Context node and add the new functionality to the existing component The graphic on the left shows the predefined project structure of this exercise.
4 Overview: Developing
4-1 Add two new value attributes to the component controller context of the Web Dynpro component Exc_Context. In the next step, the value attributes of the view controller context StartView will be mapped to these new attributes.
4-2 Define the mapping between the context of the view controller StartView and the context of the component controller. Map the value attributes of the view controller context to the attributes of the component controller context. Define the context mapping between the context of the view controller ResultView and the context of the component controller. However, do not map any value attributes between these two controllers.
4-3 Navigate in the implementation of the view ResultView. In the Method onPlugFromStartView(), define a local string variable. The value of this variable shall combine the value of the component controller context fields defined in step 4-1. These context value attributes can be accessed using the method wdThis.wdGet<Component_Controller>().wdGetContext().currentContextElement().get<Attribute>(). Set the context value attribute ctx_txtviewResult to the value of the local string variable.
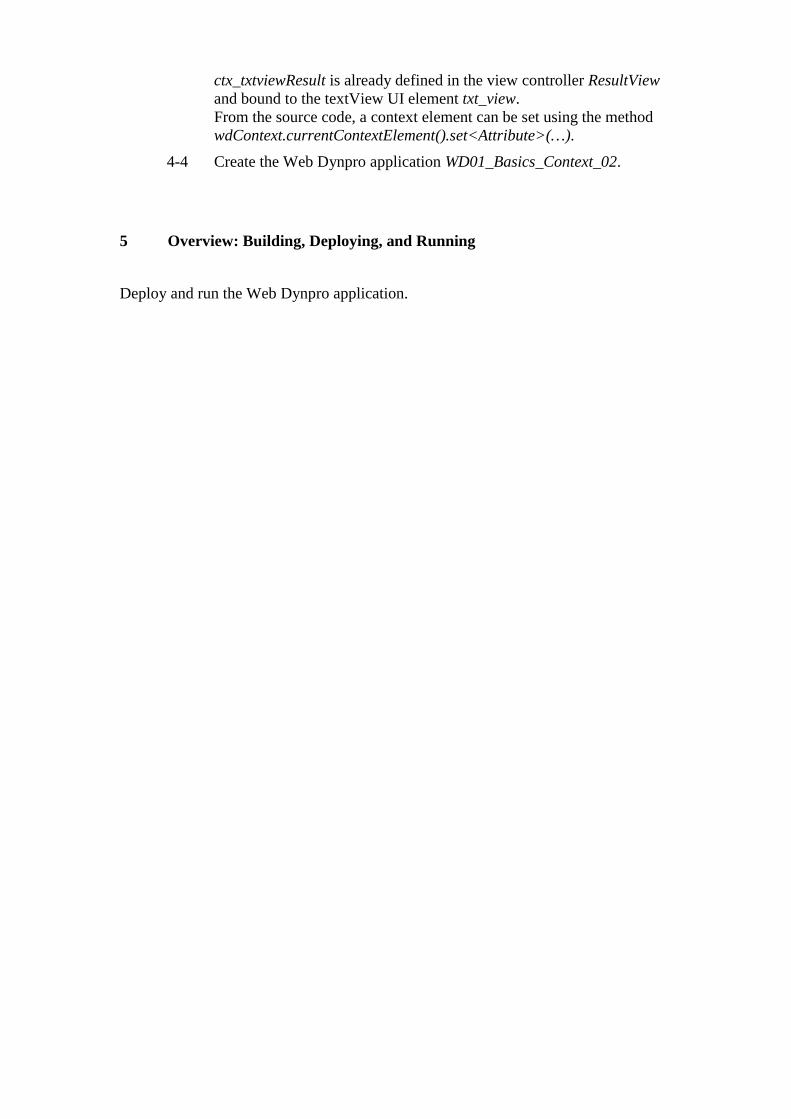
ctx_txtviewResult is already defined in the view controller ResultView and bound to the textView UI element txt_view. From the source code, a context element can be set using the method wdContext.currentContextElement().set<Attribute>(…).
4-4 Create the Web Dynpro application WD01_Basics_Context_02.
5 Overview: Building, Deploying, and Running
Deploy and run the Web Dynpro application.
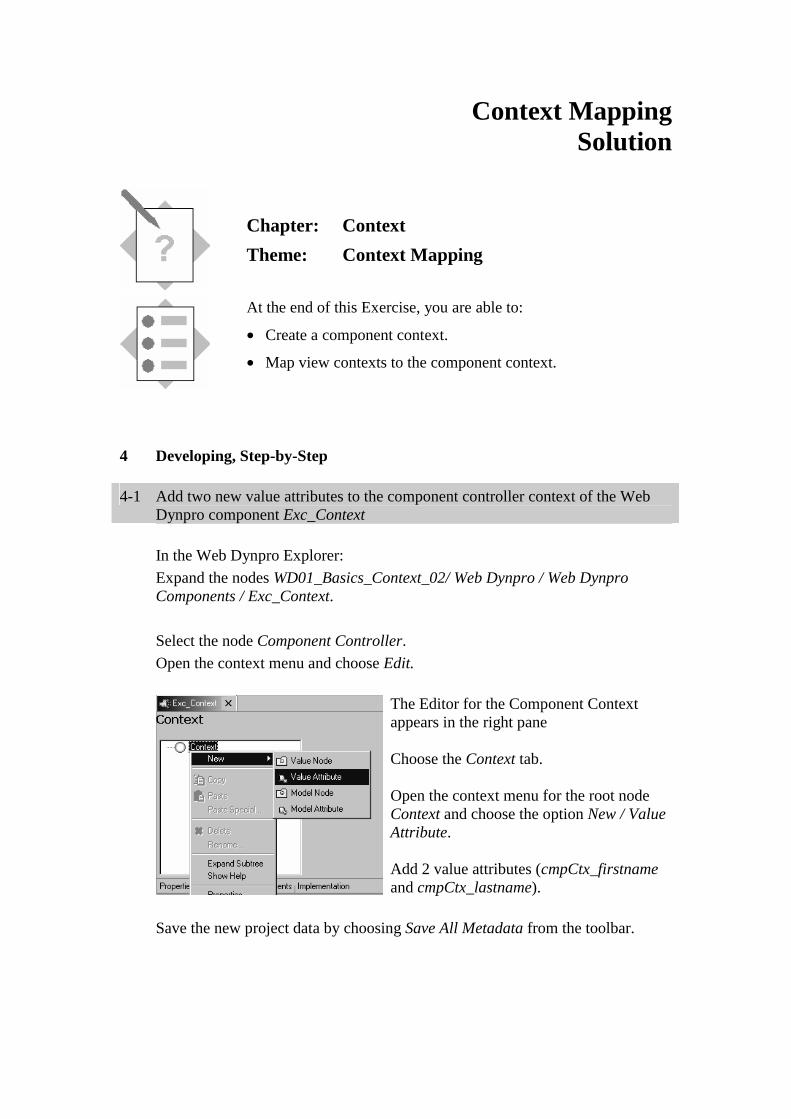
Context Mapping Solution
Chapter: Context
Theme: Context Mapping
At the end of this Exercise, you are able to:
• Create a component context.
• Map view contexts to the component context.
4 Developing, Step-by-Step 4-1 Add two new value attributes to the component controller context of the Web
Dynpro component Exc_Context
In the Web Dynpro Explorer:
Expand the nodes WD01_Basics_Context_02/ Web Dynpro / Web Dynpro Components / Exc_Context.
Select the node Component Controller.
Open the context menu and choose Edit.
The Editor for the Component Context appears in the right pane Choose the Context tab. Open the context menu for the root node Context and choose the option New / Value Attribute. Add 2 value attributes (cmpCtx_firstname and cmpCtx_lastname).
Save the new project data by choosing Save All Metadata from the toolbar.
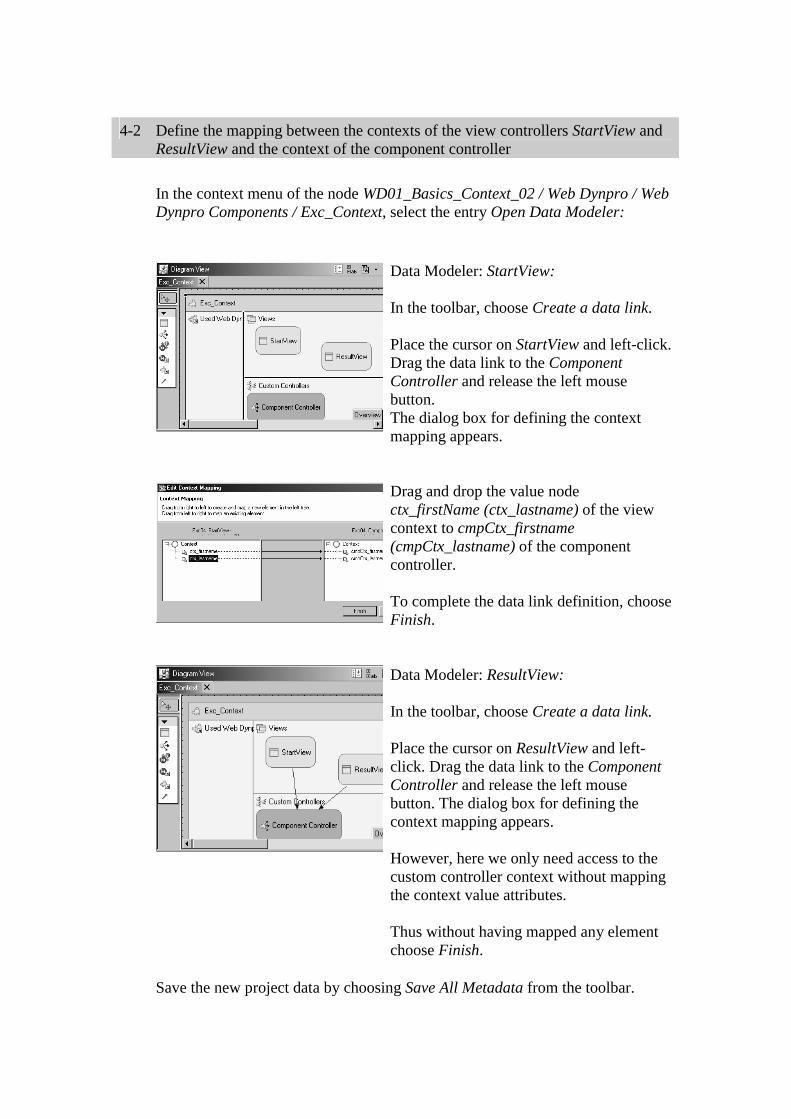
4-2 Define the mapping between the contexts of the view controllers StartView and
ResultView and the context of the component controller
In the context menu of the node WD01_Basics_Context_02 / Web Dynpro / Web Dynpro Components / Exc_Context, select the entry Open Data Modeler:
Data Modeler: StartView: In the toolbar, choose Create a data link. Place the cursor on StartView and left-click. Drag the data link to the Component Controller and release the left mouse button. The dialog box for defining the context mapping appears.
Drag and drop the value node ctx_firstName (ctx_lastname) of the view context to cmpCtx_firstname (cmpCtx_lastname) of the component controller. To complete the data link definition, choose Finish.
Data Modeler: ResultView: In the toolbar, choose Create a data link. Place the cursor on ResultView and left-click. Drag the data link to the Component Controller and release the left mouse button. The dialog box for defining the context mapping appears. However, here we only need access to the custom controller context without mapping the context value attributes. Thus without having mapped any element choose Finish.
Save the new project data by choosing Save All Metadata from the toolbar.
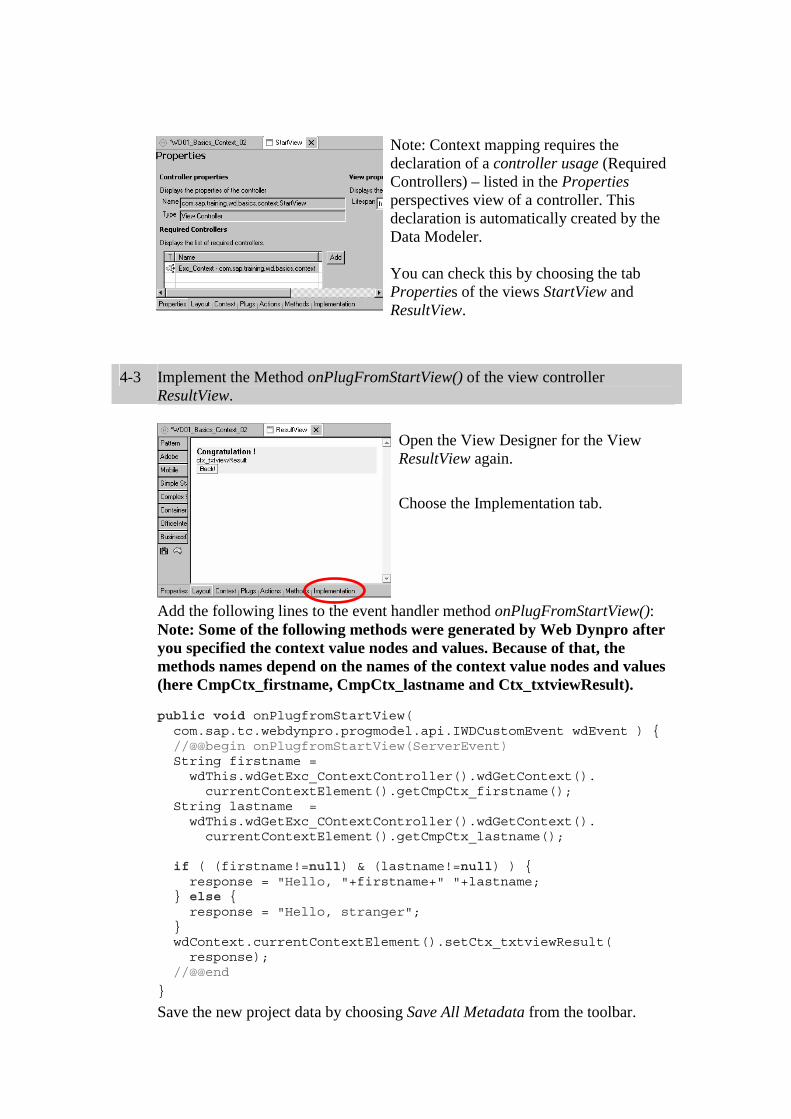
Note: Context mapping requires the declaration of a controller usage (Required Controllers) – listed in the Properties perspectives view of a controller. This declaration is automatically created by the Data Modeler. You can check this by choosing the tab Properties of the views StartView and ResultView.
4-3 Implement the Method onPlugFromStartView() of the view controller
ResultView.
Open the View Designer for the View ResultView again.
Choose the Implementation tab.
Add the following lines to the event handler method onPlugFromStartView(): Note: Some of the following methods were generated by Web Dynpro after you specified the context value nodes and values. Because of that, the methods names depend on the names of the context value nodes and values (here CmpCtx_firstname, CmpCtx_lastname and Ctx_txtviewResult). public void onPlugfromStartView( com.sap.tc.webdynpro.progmodel.api.IWDCustomEvent wdEvent ) { //@@begin onPlugfromStartView(ServerEvent) String firstname = wdThis.wdGetExc_ContextController().wdGetContext(). currentContextElement().getCmpCtx_firstname(); String lastname = wdThis.wdGetExc_COntextController().wdGetContext(). currentContextElement().getCmpCtx_lastname(); if ( (firstname!=null) & (lastname!=null) ) { response = "Hello, "+firstname+" "+lastname; } else { response = "Hello, stranger"; } wdContext.currentContextElement().setCtx_txtviewResult( response); //@@end
} Save the new project data by choosing Save All Metadata from the toolbar.
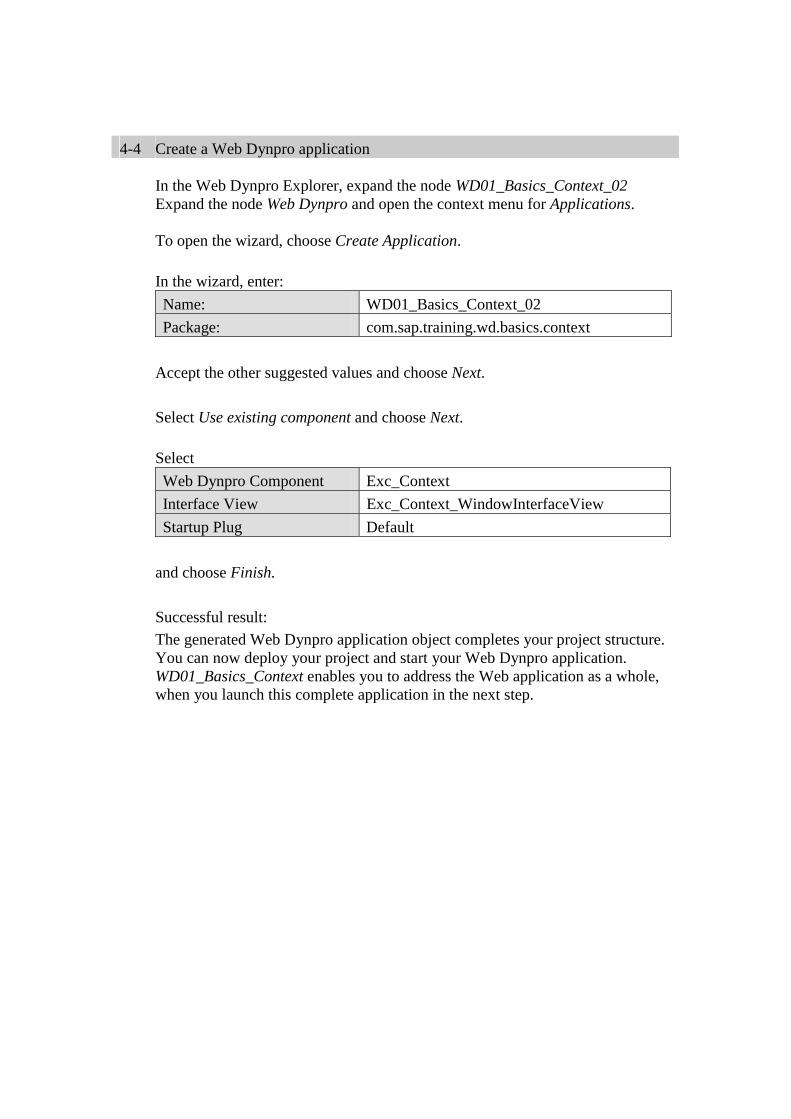
4-4 Create a Web Dynpro application
In the Web Dynpro Explorer, expand the node WD01_Basics_Context_02 Expand the node Web Dynpro and open the context menu for Applications. To open the wizard, choose Create Application.
In the wizard, enter:
Name: WD01_Basics_Context_02
Package: com.sap.training.wd.basics.context
Accept the other suggested values and choose Next.
Select Use existing component and choose Next.
Select
Web Dynpro Component Exc_Context
Interface View Exc_Context_WindowInterfaceView
Startup Plug Default
and choose Finish.
Successful result:
The generated Web Dynpro application object completes your project structure. You can now deploy your project and start your Web Dynpro application. WD01_Basics_Context enables you to address the Web application as a whole, when you launch this complete application in the next step.
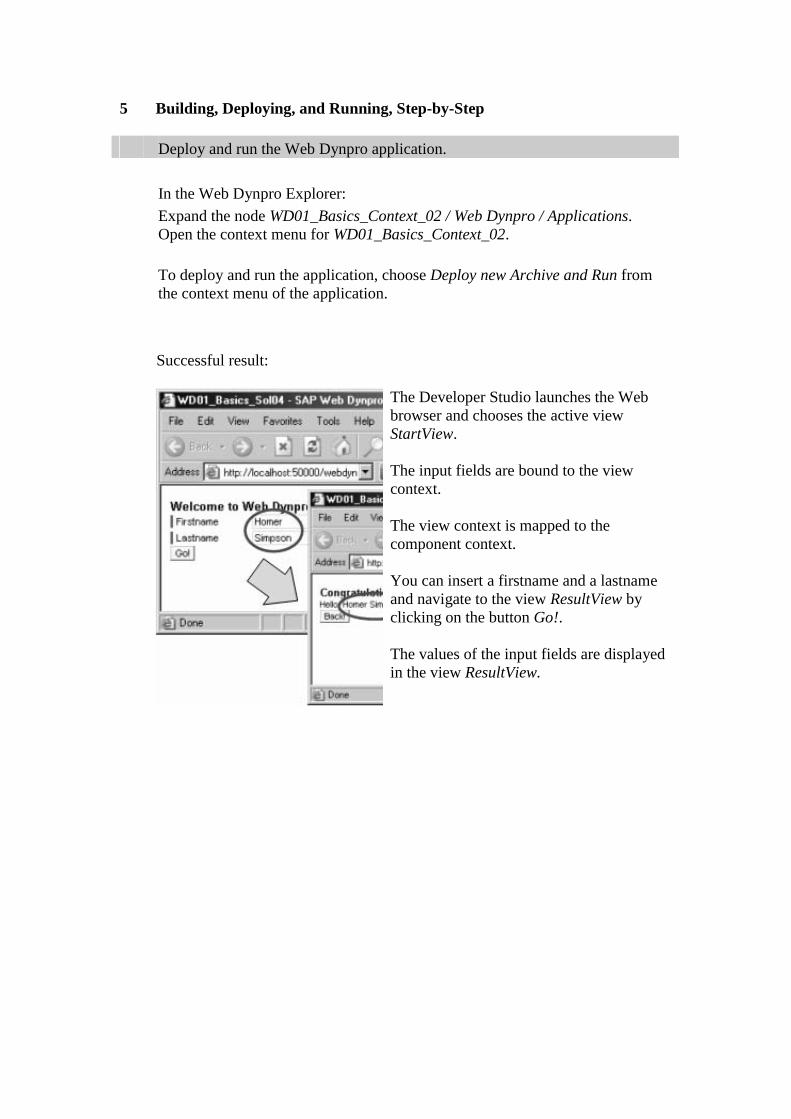
5 Building, Deploying, and Running, Step-by-Step Deploy and run the Web Dynpro application.
In the Web Dynpro Explorer:
Expand the node WD01_Basics_Context_02 / Web Dynpro / Applications. Open the context menu for WD01_Basics_Context_02.
To deploy and run the application, choose Deploy new Archive and Run from the context menu of the application.
Successful result:
The Developer Studio launches the Web browser and chooses the active view StartView. The input fields are bound to the view context. The view context is mapped to the component context. You can insert a firstname and a lastname and navigate to the view ResultView by clicking on the button Go!. The values of the input fields are displayed in the view ResultView.
© SAP AG <Course Number> Unit Title - 1
© SAP AG 2003, Title of Presentation, Speaker Name / 1
Contents:
Web Dynpro Controllers
Model View Controller Overview
Web Dynpro Controllers
Web Dynpro Classes and Interfaces
© SAP AG <Course Number> Unit Title - 2
© SAP AG 2003, Title of Presentation, Speaker Name / 2
After completing this unit, you will be able to:
Gain further understanding of Model View Controller (MVC) paradigm.
Understand the different kinds of Web Dynpro controllers and what they are used for.
Understand the controller methods that areavailable to you.
Understand the structure of Web Dynpro controllerclasses and interfaces.
Web Dynpro Controllers: Unit Objectives

© SAP AG <Course Number> Unit Title - 3
© SAP AG 2003, Title of Presentation, Speaker Name / 3
<Insert unit business scenario>
Web Dynpro Controllers: Business Scenario
© SAP AG <Course Number> Unit Title - 4
© SAP AG 2003, Title of Presentation, Speaker Name / 4
After completing this topic, you will be able to:
Gain further understanding of Model View Controller (MVC) paradigm.
Understand what makes up a Web Dynpro component.
Web Dynpro Overview: Topic Objectives
© SAP AG <Course Number> Unit Title - 5
© SAP AG 2003, Title of Presentation, Speaker Name / 5
After completing this topic, you will be able to:
Gain further understanding of Model View Controller (MVC) paradigm.
Understand what makes up a Web Dynpro component.
Model View Controller Overview: Topic Objectives
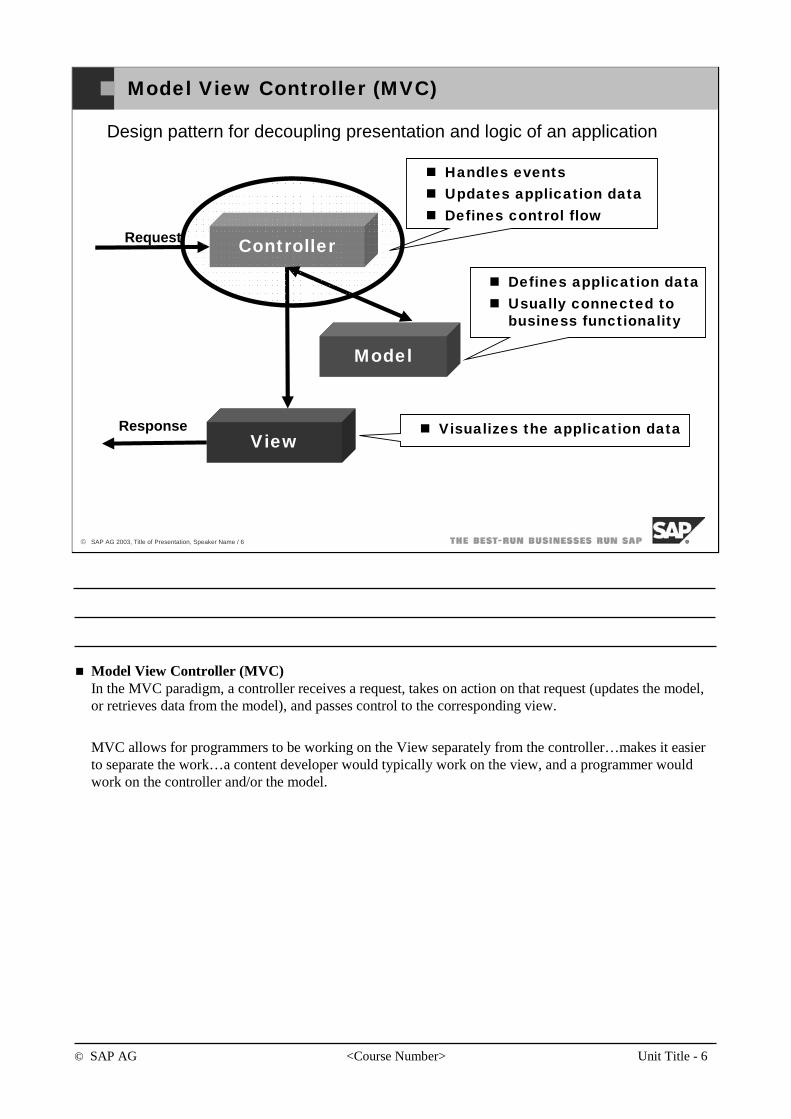
© SAP AG <Course Number> Unit Title - 6
© SAP AG 2003, Title of Presentation, Speaker Name / 6
Design pattern for decoupling presentation and logic of an application
Request
Response
Handles eventsUpdates application dataDefines control flow
Model View Controller (MVC)
Controller
Model
View
Defines application dataUsually connected to business functionality
Visualizes the application data
Model View Controller (MVC)In the MVC paradigm, a controller receives a request, takes on action on that request (updates the model, or retrieves data from the model), and passes control to the corresponding view.
MVC allows for programmers to be working on the View separately from the controller…makes it easier to separate the work…a content developer would typically work on the view, and a programmer would work on the controller and/or the model.
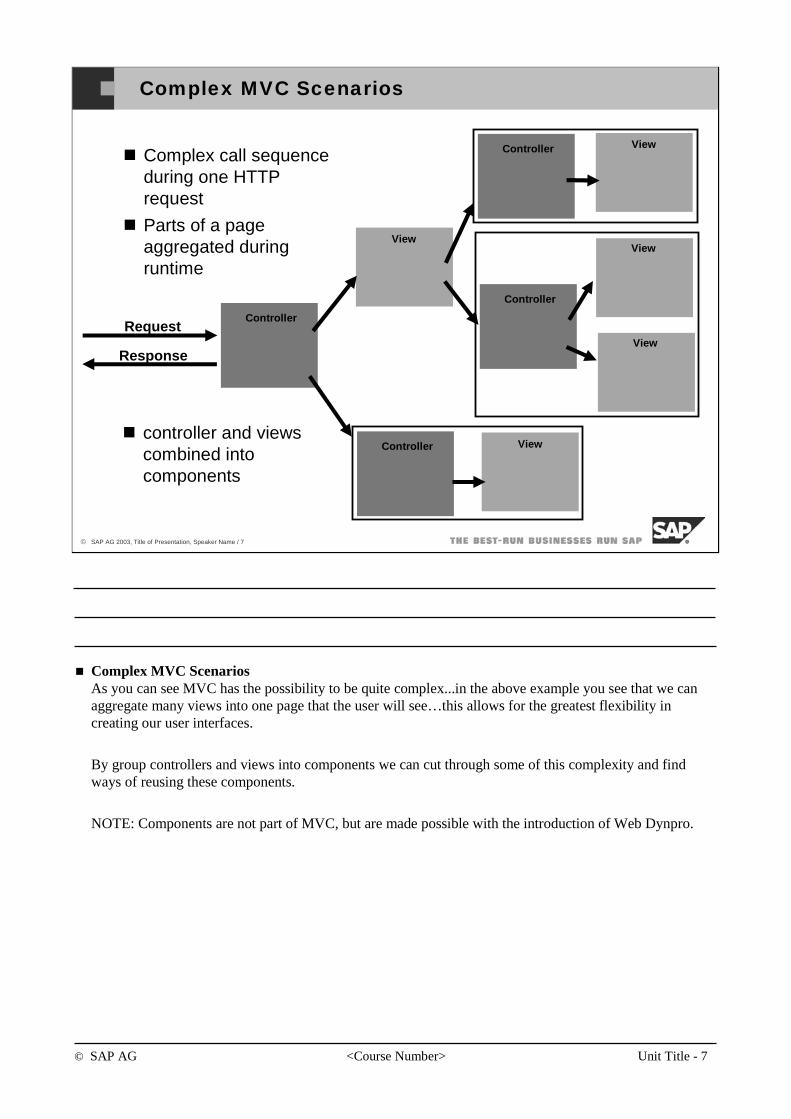
© SAP AG <Course Number> Unit Title - 7
© SAP AG 2003, Title of Presentation, Speaker Name / 7
Request
Response
View
Controller
Controller View
Controller
View
View
Controller View
Complex call sequence during one HTTP request
Parts of a page aggregated during runtime
Complex MVC Scenarios
controller and views combined into components
Complex MVC ScenariosAs you can see MVC has the possibility to be quite complex...in the above example you see that we can aggregate many views into one page that the user will see…this allows for the greatest flexibility in creating our user interfaces.
By group controllers and views into components we can cut through some of this complexity and find ways of reusing these components.
NOTE: Components are not part of MVC, but are made possible with the introduction of Web Dynpro.
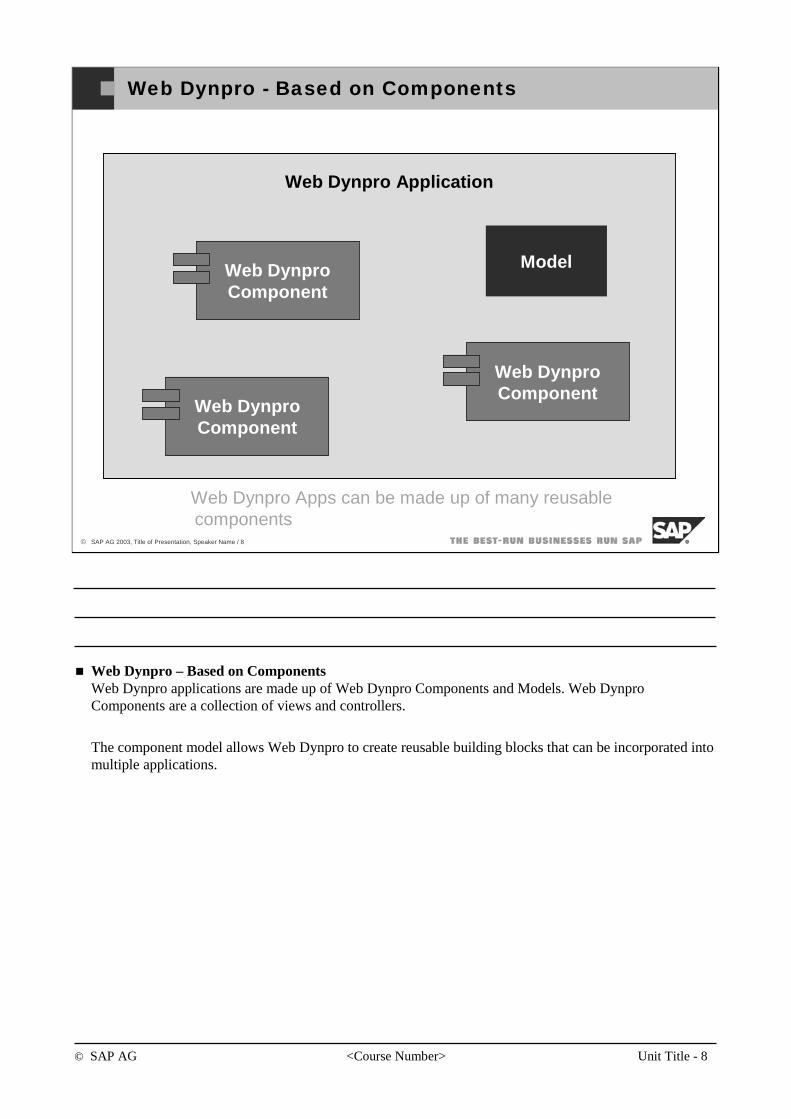
© SAP AG <Course Number> Unit Title - 8
© SAP AG 2003, Title of Presentation, Speaker Name / 8
Web Dynpro - Based on Components
Web Dynpro Application
Web DynproComponent
Web DynproComponent
Web DynproComponent
Model
Web Dynpro Apps can be made up of many reusable components
Web Dynpro – Based on ComponentsWeb Dynpro applications are made up of Web Dynpro Components and Models. Web Dynpro Components are a collection of views and controllers.
The component model allows Web Dynpro to create reusable building blocks that can be incorporated into multiple applications.
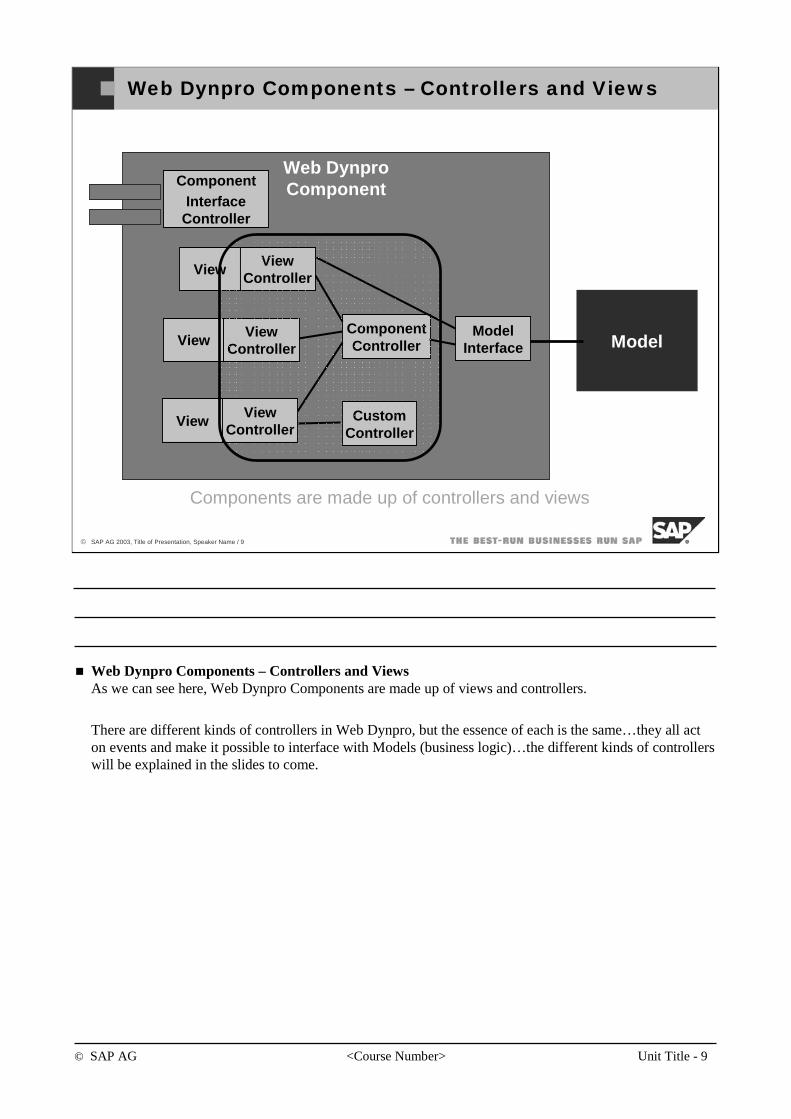
© SAP AG <Course Number> Unit Title - 9
© SAP AG 2003, Title of Presentation, Speaker Name / 9
Web Dynpro Components – Controllers and Views
Web DynproComponent
ComponentController
CustomController
ModelInterfaceView
ViewController
ViewView
Controller
ViewView
Controller
ComponentInterface
Controller
Model
Components are made up of controllers and views
Web Dynpro Components – Controllers and Views As we can see here, Web Dynpro Components are made up of views and controllers.
There are different kinds of controllers in Web Dynpro, but the essence of each is the same…they all act on events and make it possible to interface with Models (business logic)…the different kinds of controllers will be explained in the slides to come.
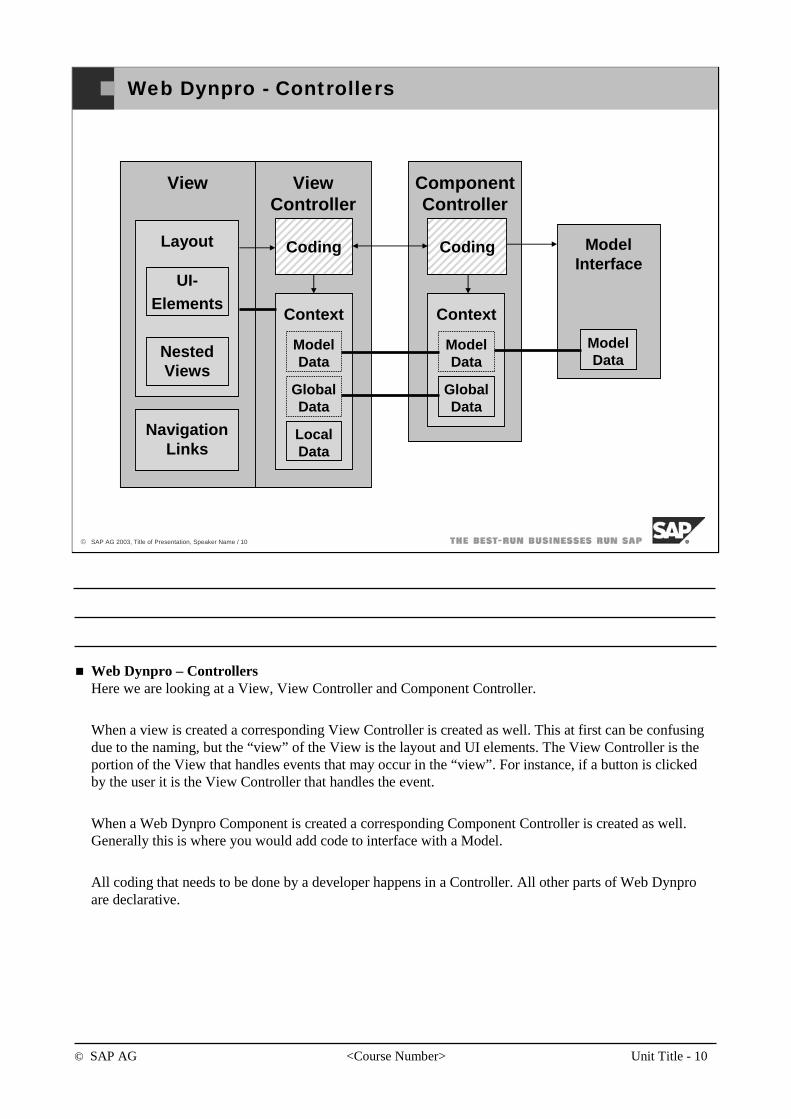
© SAP AG <Course Number> Unit Title - 10
© SAP AG 2003, Title of Presentation, Speaker Name / 10
Web Dynpro - Controllers
ComponentController
ModelInterface
View ViewController
Coding CodingLayout
NestedViews
NavigationLinks
Context
ModelData
GlobalData
LocalData
Context
ModelData
GlobalData
ModelData
UI-Elements
Web Dynpro – ControllersHere we are looking at a View, View Controller and Component Controller.
When a view is created a corresponding View Controller is created as well. This at first can be confusing due to the naming, but the “view” of the View is the layout and UI elements. The View Controller is the portion of the View that handles events that may occur in the “view”. For instance, if a button is clicked by the user it is the View Controller that handles the event.
When a Web Dynpro Component is created a corresponding Component Controller is created as well. Generally this is where you would add code to interface with a Model.
All coding that needs to be done by a developer happens in a Controller. All other parts of Web Dynpro are declarative.
© SAP AG <Course Number> Unit Title - 11
© SAP AG 2003, Title of Presentation, Speaker Name / 11
You should now be able to:
Gain further understanding of Model View Controller (MVC) paradigm.
Understand what makes up a Web Dynpro component.
Model View Controller Overview: Topic Summary
© SAP AG <Course Number> Unit Title - 12
© SAP AG 2003, Title of Presentation, Speaker Name / 12
After completing this topic, you will be able to:
Understand the different kinds of Web Dynpro controllers and what they are used for.
Understand the controller methods that are available to you.
Understand the life-cycle of the different Web Dynpro controllers.
Use the “shortcut” member variables provided by Web Dynpro controllers.
Web Dynpro Controllers: Topic Objectives
© SAP AG <Course Number> Unit Title - 13
© SAP AG 2003, Title of Presentation, Speaker Name / 13
Web Dynpro Controller Types
Component Interface Controllers
Interface for external users of a component: data transfer, eventing.
Component Interface View Controllers
Controller for the visual representation of a Component. Handle startup-plug, handle exit/outbound-plug of a component interface view.
Component Controllers
Default controller inside every Web Dynpro Component: own context, events, public methods
Custom Controllers
Additional controller for encapsulating separate logic. A Component Controller is essentially the same as the default Custom Controller.
View Controllers
Controller for every view with own context, public methods, plug-event handlers, action-event handlers managing user interaction.
Web Dynpro has different Controller Types
Con
trol
ler
Web Dynpro Controller TypesAll controllers are similar to one another…and you will see this in the slides to come...but some do special things
Component Interface View Controllers as stated are only used access the visual representation of a component. When you create a Web Dynpro application, it asks for the Interface View of the startup component…this is the Component Interface View Controller…and you can add code here in the startup plug to do some initialization.
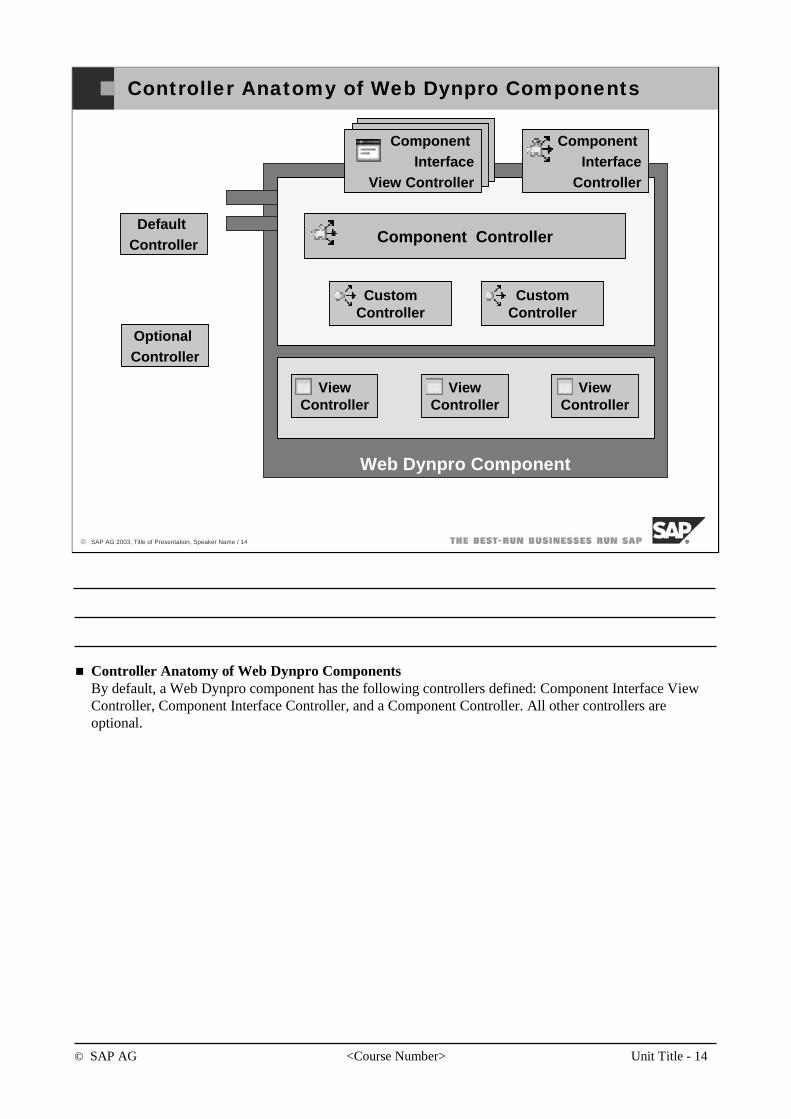
© SAP AG <Course Number> Unit Title - 14
© SAP AG 2003, Title of Presentation, Speaker Name / 14
Controller Anatomy of Web Dynpro Components
Web Dynpro Component
CustomController
CustomController
Component Interface
Controller
ViewController
ViewController
ViewController
Component Controller
OptionalController
DefaultController
Component Interface
View Controller
Controller Anatomy of Web Dynpro Components By default, a Web Dynpro component has the following controllers defined: Component Interface View Controller, Component Interface Controller, and a Component Controller. All other controllers are optional.
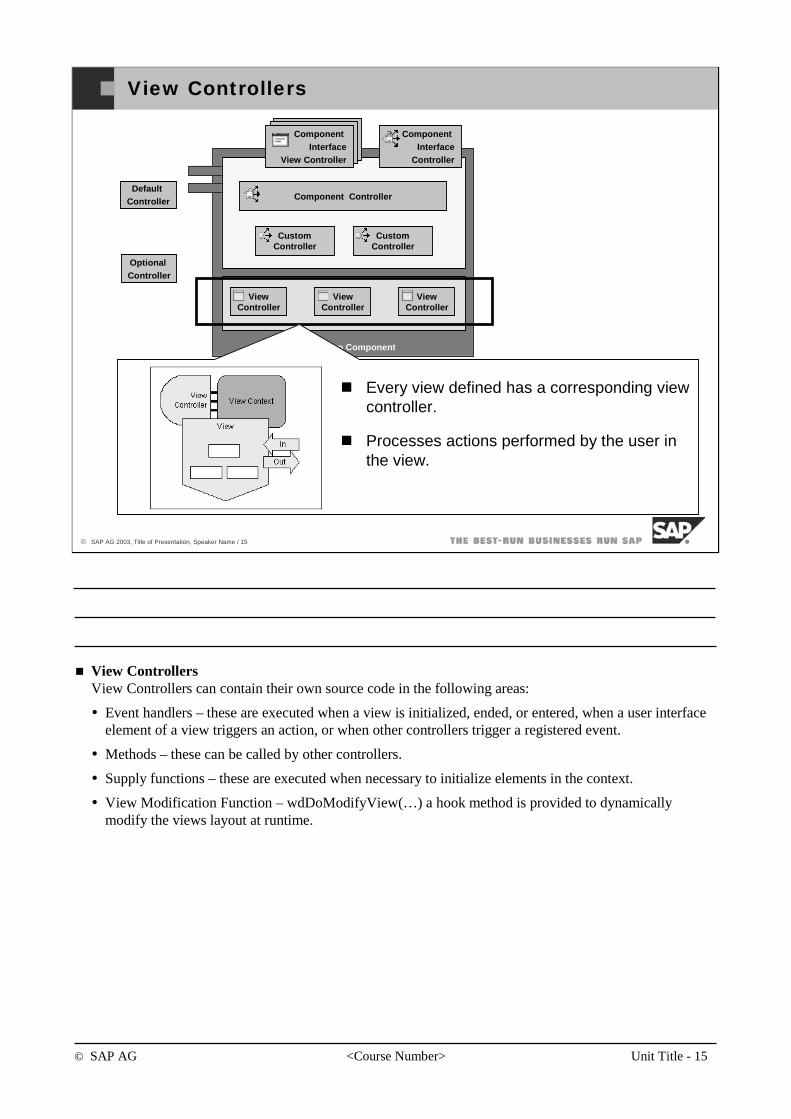
© SAP AG <Course Number> Unit Title - 15
© SAP AG 2003, Title of Presentation, Speaker Name / 15
View Controllers
Web Dynpro Component
CustomController
CustomController
Component Interface
Controller
ViewController
ViewController
ViewController
Component Controller
OptionalController
DefaultController
Component Interface
View Controller
Every view defined has a corresponding view controller.
Processes actions performed by the user in the view.
View ControllersView Controllers can contain their own source code in the following areas:
Event handlers – these are executed when a view is initialized, ended, or entered, when a user interface element of a view triggers an action, or when other controllers trigger a registered event.
Methods – these can be called by other controllers.
Supply functions – these are executed when necessary to initialize elements in the context.
View Modification Function – wdDoModifyView(…) a hook method is provided to dynamically modify the views layout at runtime.
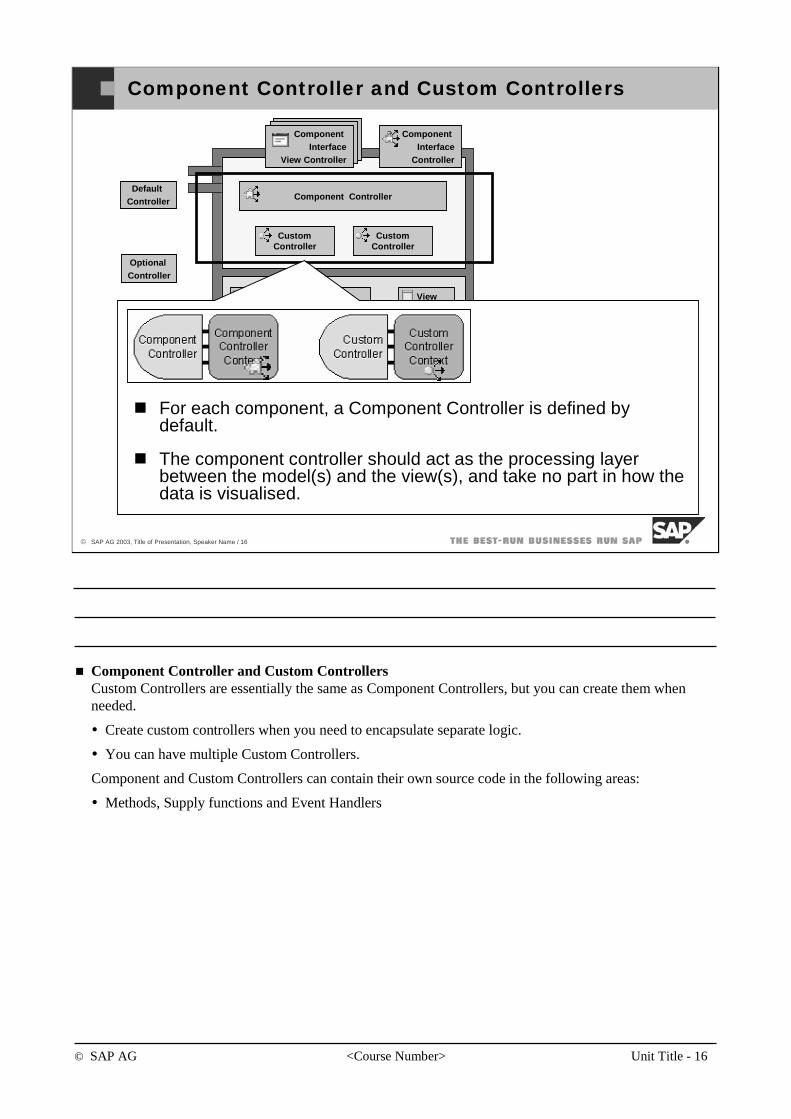
© SAP AG <Course Number> Unit Title - 16
© SAP AG 2003, Title of Presentation, Speaker Name / 16
Component Controller and Custom Controllers
Web Dynpro Component
CustomController
CustomController
Component Interface
Controller
ViewController
ViewController
ViewController
Component Controller
OptionalController
DefaultController
Component Interface
View Controller
For each component, a Component Controller is defined by default.
The component controller should act as the processing layer between the model(s) and the view(s), and take no part in how the data is visualised.
Component Controller and Custom ControllersCustom Controllers are essentially the same as Component Controllers, but you can create them when needed.
Create custom controllers when you need to encapsulate separate logic.
You can have multiple Custom Controllers.
Component and Custom Controllers can contain their own source code in the following areas:
Methods, Supply functions and Event Handlers
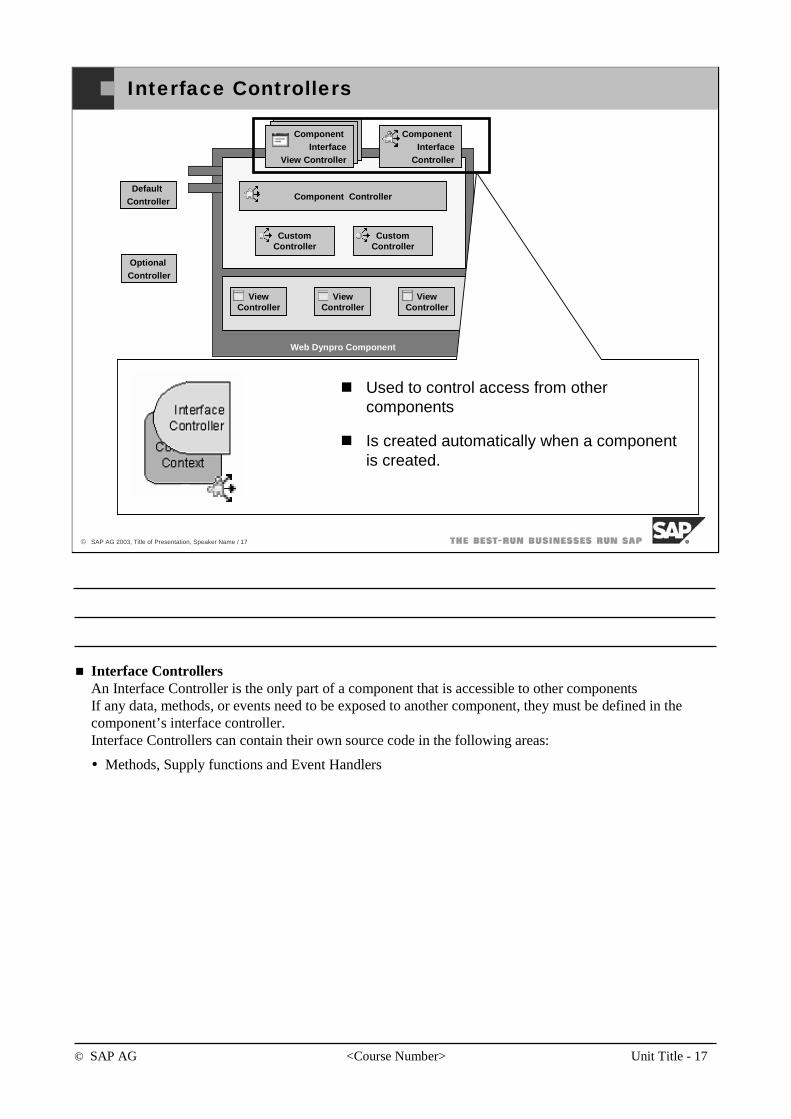
© SAP AG <Course Number> Unit Title - 17
© SAP AG 2003, Title of Presentation, Speaker Name / 17
Interface Controllers
Web Dynpro Component
CustomController
CustomController
Component Interface
Controller
ViewController
ViewController
ViewController
Component Controller
OptionalController
DefaultController
Component Interface
View Controller
Used to control access from other components
Is created automatically when a component is created.
Interface ControllersAn Interface Controller is the only part of a component that is accessible to other componentsIf any data, methods, or events need to be exposed to another component, they must be defined in the component’s interface controller.Interface Controllers can contain their own source code in the following areas:
Methods, Supply functions and Event Handlers
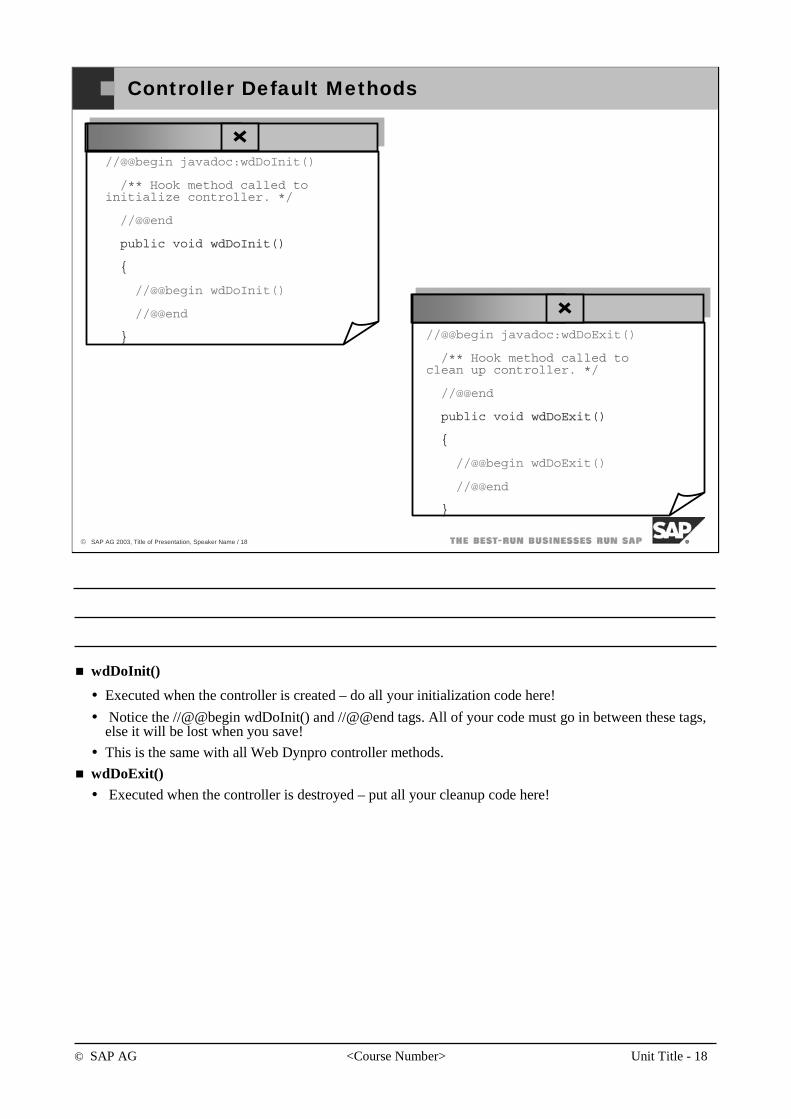
© SAP AG <Course Number> Unit Title - 18
© SAP AG 2003, Title of Presentation, Speaker Name / 18
Controller Default Methods
//@@begin javadoc:wdDoInit()
/** Hook method called toinitialize controller. */
//@@end
public void wdDoInitwdDoInit()
{
//@@begin wdDoInit()
//@@end
} //@@begin javadoc:wdDoExit()
/** Hook method called toclean up controller. */
//@@end
public void wdDoExitwdDoExit()
{
//@@begin wdDoExit()
//@@end
}
wdDoInit()
Executed when the controller is created – do all your initialization code here!
Notice the //@@begin wdDoInit() and //@@end tags. All of your code must go in between these tags, else it will be lost when you save!
This is the same with all Web Dynpro controller methods.
wdDoExit()Executed when the controller is destroyed – put all your cleanup code here!

© SAP AG <Course Number> Unit Title - 19
© SAP AG 2003, Title of Presentation, Speaker Name / 19
Controller Variables and Helper Functions
/*
* The following code section can be used for any Java code that is* not to be visible to other controllers/views or that contains* constructs currently not supported directly by Web Dynpro (such * as inner classes or member variables etc.). </p>** Note: The content of this section is in no way managed/controlled* by the Web Dynpro Designtime or the Web Dynpro Runtime. */
//@@begin others
//@@end
Controller Variables and Helper Functions
At the bottom of all controller implementations.
Put all your member variables and private helper functions here.
Code entered here will not be visible to other controllers!
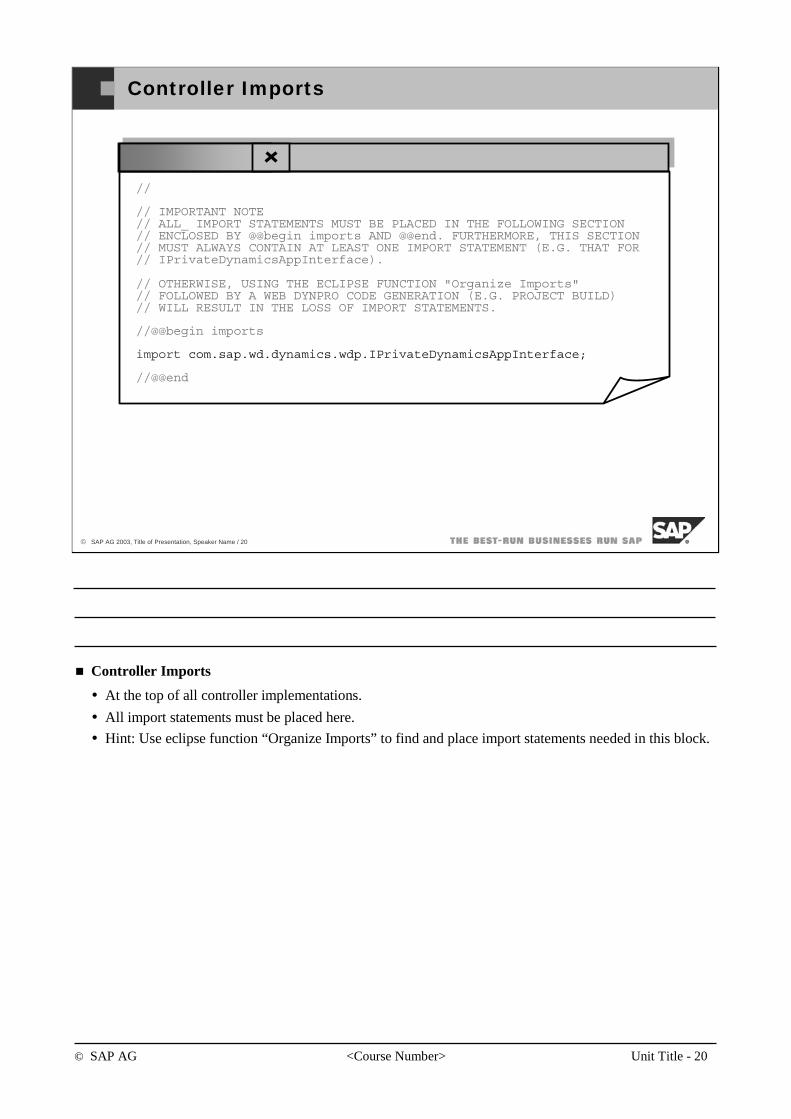
© SAP AG <Course Number> Unit Title - 20
© SAP AG 2003, Title of Presentation, Speaker Name / 20
Controller Imports
//
// IMPORTANT NOTE// ALL_ IMPORT STATEMENTS MUST BE PLACED IN THE FOLLOWING SECTION // ENCLOSED BY @@begin imports AND @@end. FURTHERMORE, THIS SECTION // MUST ALWAYS CONTAIN AT LEAST ONE IMPORT STATEMENT (E.G. THAT FOR// IPrivateDynamicsAppInterface).
// OTHERWISE, USING THE ECLIPSE FUNCTION "Organize Imports" // FOLLOWED BY A WEB DYNPRO CODE GENERATION (E.G. PROJECT BUILD)// WILL RESULT IN THE LOSS OF IMPORT STATEMENTS.
//@@begin imports
import com.sap.wd.dynamics.wdp.IPrivateDynamicsAppInterface;
//@@end
Controller Imports
At the top of all controller implementations.
All import statements must be placed here.
Hint: Use eclipse function “Organize Imports” to find and place import statements needed in this block.
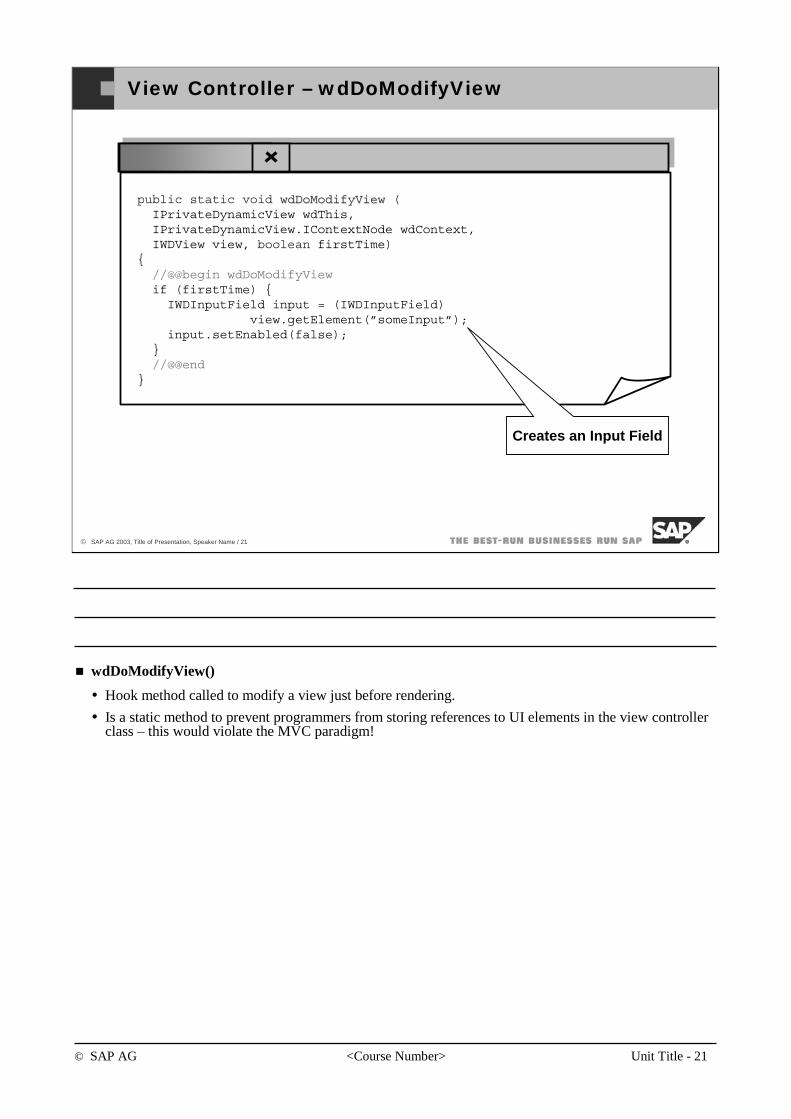
© SAP AG <Course Number> Unit Title - 21
© SAP AG 2003, Title of Presentation, Speaker Name / 21
View Controller – wdDoModifyView
public static void wdDoModifyView wdDoModifyView (IPrivateDynamicView wdThis,IPrivateDynamicView.IContextNode wdContext,IWDView view, boolean firstTime)
{//@@begin wdDoModifyViewif (firstTime) {IWDInputField input = (IWDInputField)
view.getElement(”someInput”);input.setEnabled(false);
}//@@end
}
Creates an Input Field
wdDoModifyView()
Hook method called to modify a view just before rendering.
Is a static method to prevent programmers from storing references to UI elements in the view controller class – this would violate the MVC paradigm!
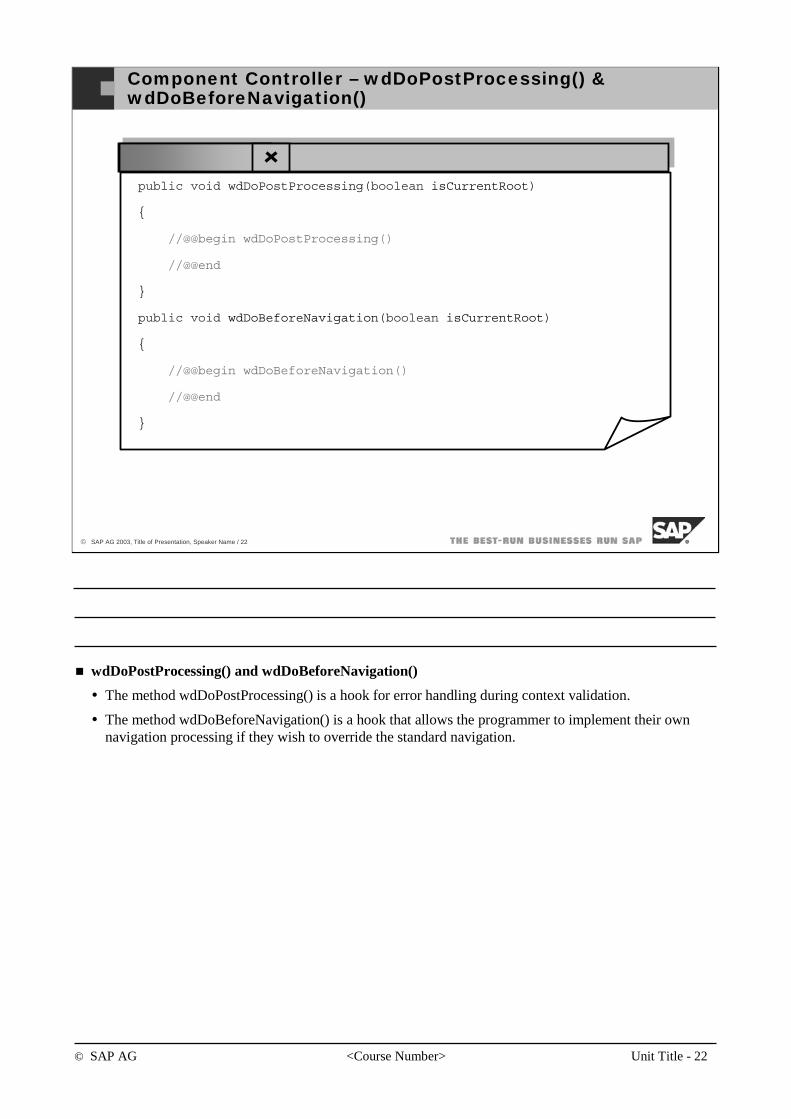
© SAP AG <Course Number> Unit Title - 22
© SAP AG 2003, Title of Presentation, Speaker Name / 22
Component Controller – wdDoPostProcessing() & wdDoBeforeNavigation()
public void wdDoPostProcessing(boolean isCurrentRoot)
{
//@@begin wdDoPostProcessing()
//@@end
}
public void wdDoBeforeNavigation(boolean isCurrentRoot)
{
//@@begin wdDoBeforeNavigation()
//@@end
}
wdDoPostProcessing() and wdDoBeforeNavigation()
The method wdDoPostProcessing() is a hook for error handling during context validation.
The method wdDoBeforeNavigation() is a hook that allows the programmer to implement their own navigation processing if they wish to override the standard navigation.
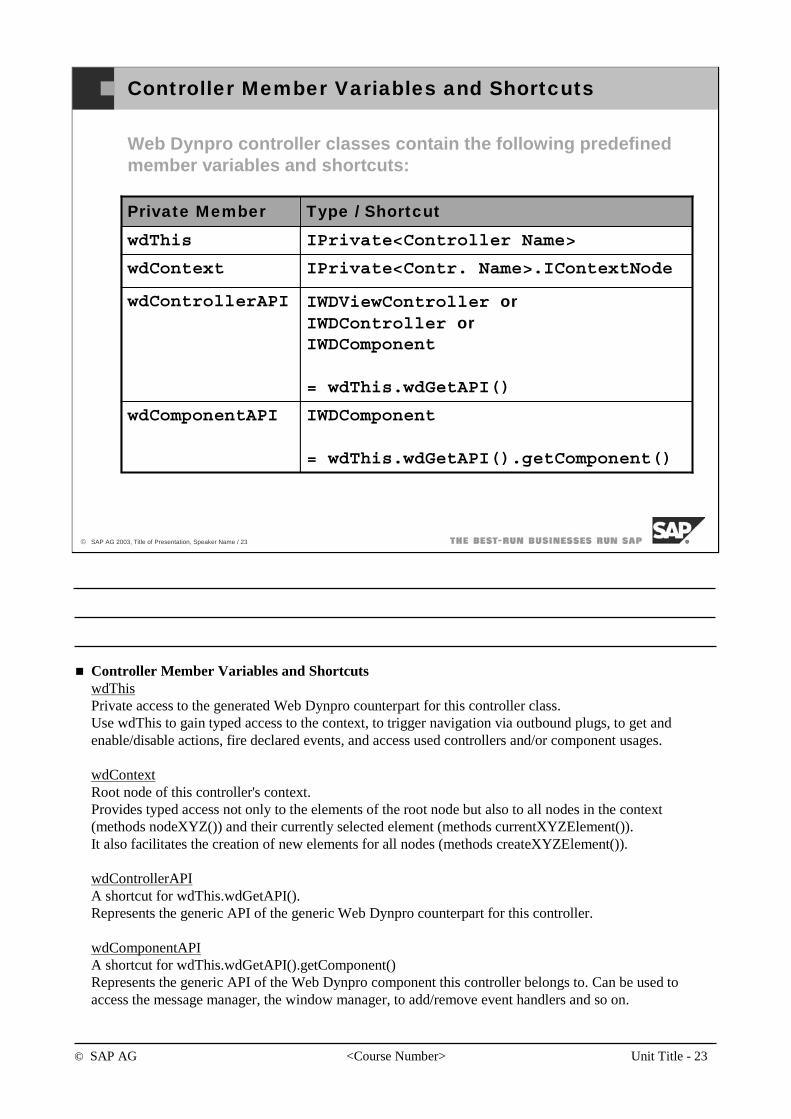
© SAP AG <Course Number> Unit Title - 23
© SAP AG 2003, Title of Presentation, Speaker Name / 23
Controller Member Variables and Shortcuts
Web Dynpro controller classes contain the following predefinedmember variables and shortcuts:
IWDComponent
= wdThis.wdGetAPI().getComponent()
wdComponentAPI
IWDViewController orIWDController orIWDComponent
= wdThis.wdGetAPI()
wdControllerAPI
IPrivate<Contr. Name>.IContextNodewdContext
IPrivate<Controller Name>wdThis
Type / ShortcutPrivate Member
Controller Member Variables and ShortcutswdThisPrivate access to the generated Web Dynpro counterpart for this controller class.Use wdThis to gain typed access to the context, to trigger navigation via outbound plugs, to get and enable/disable actions, fire declared events, and access used controllers and/or component usages.
wdContextRoot node of this controller's context.Provides typed access not only to the elements of the root node but also to all nodes in the context (methods nodeXYZ()) and their currently selected element (methods currentXYZElement()). It also facilitates the creation of new elements for all nodes (methods createXYZElement()).
wdControllerAPIA shortcut for wdThis.wdGetAPI().Represents the generic API of the generic Web Dynpro counterpart for this controller.
wdComponentAPIA shortcut for wdThis.wdGetAPI().getComponent() Represents the generic API of the Web Dynpro component this controller belongs to. Can be used to access the message manager, the window manager, to add/remove event handlers and so on.
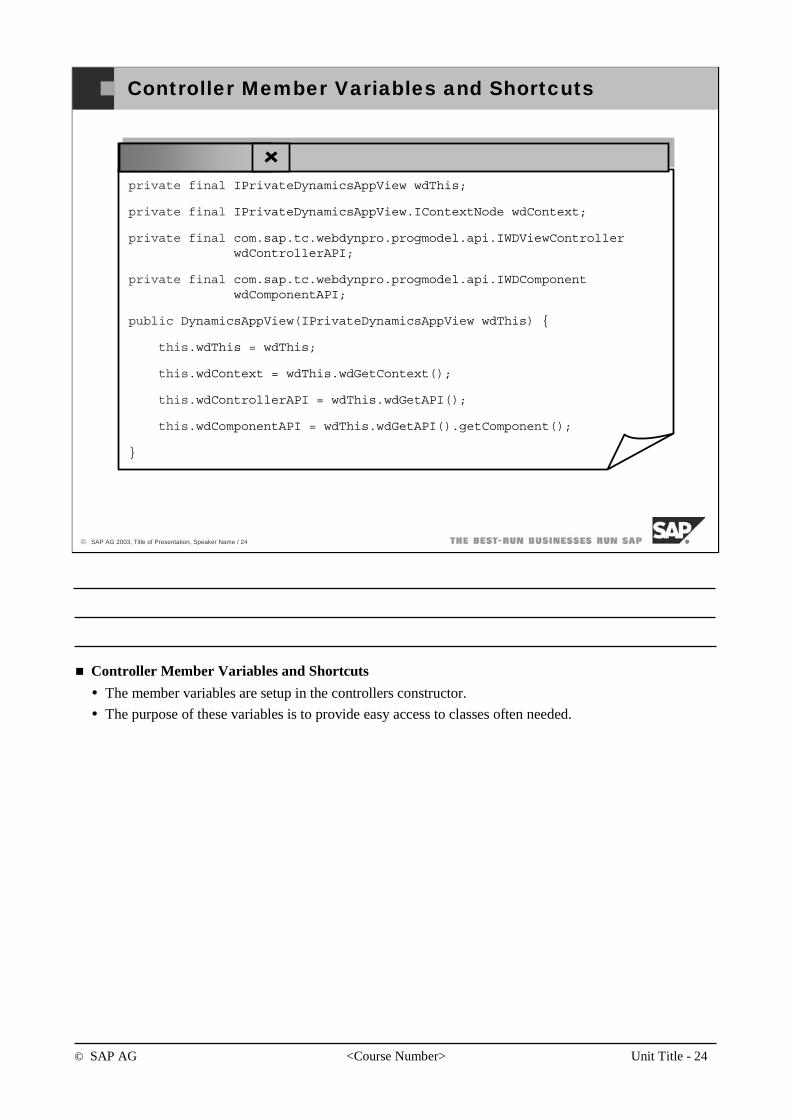
© SAP AG <Course Number> Unit Title - 24
© SAP AG 2003, Title of Presentation, Speaker Name / 24
Controller Member Variables and Shortcuts
private final IPrivateDynamicsAppView wdThis;
private final IPrivateDynamicsAppView.IContextNode wdContext;
private final com.sap.tc.webdynpro.progmodel.api.IWDViewControllerwdControllerAPI;
private final com.sap.tc.webdynpro.progmodel.api.IWDComponentwdComponentAPI;
public DynamicsAppView(IPrivateDynamicsAppView wdThis) {
this.wdThis = wdThis;
this.wdContext = wdThis.wdGetContext();
this.wdControllerAPI = wdThis.wdGetAPI();
this.wdComponentAPI = wdThis.wdGetAPI().getComponent();
}
Controller Member Variables and Shortcuts
The member variables are setup in the controllers constructor.
The purpose of these variables is to provide easy access to classes often needed.
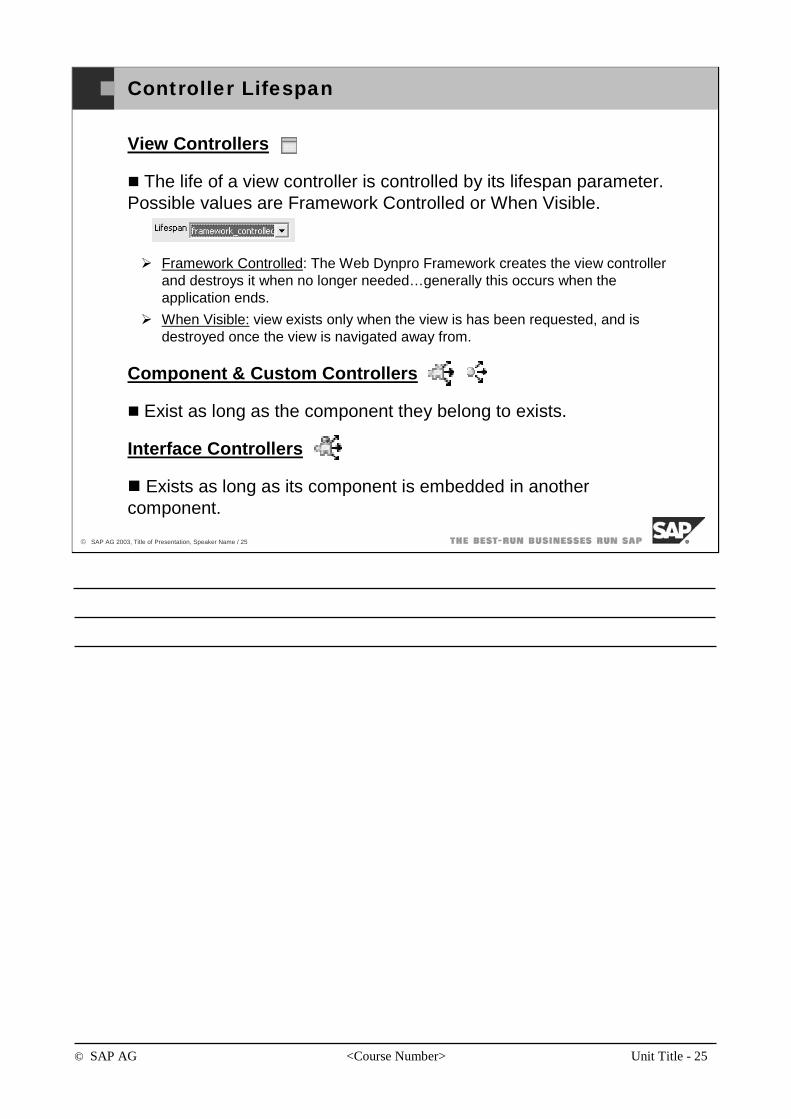
© SAP AG <Course Number> Unit Title - 25
© SAP AG 2003, Title of Presentation, Speaker Name / 25
Controller Lifespan
View Controllers
The life of a view controller is controlled by its lifespan parameter.Possible values are Framework Controlled or When Visible.
Framework Controlled: The Web Dynpro Framework creates the view controller and destroys it when no longer needed…generally this occurs when the application ends.
When Visible: view exists only when the view is has been requested, and is destroyed once the view is navigated away from.
Component & Custom Controllers
Exist as long as the component they belong to exists.
Interface Controllers
Exists as long as its component is embedded in another component.
© SAP AG <Course Number> Unit Title - 26
© SAP AG 2003, Title of Presentation, Speaker Name / 26
You should now be able to:
Understand the different kinds of Web Dynpro controllers and what they are used for.
Understand the controller methods that are available to you.
Understand the life-cycle of the different Web Dynpro controllers.
Use the “short cut” member variables provided by Web Dynpro controllers.
Web Dynpro Controllers: Topic Summary
© SAP AG <Course Number> Unit Title - 27
© SAP AG 2003, Title of Presentation, Speaker Name / 27
You should now be able to:
Understand the structure of Web Dynpro classes and interfaces.
Understand how to access important services that can be used in your controllers.
Web Dynpro Classes & Interfaces: Topic Summary
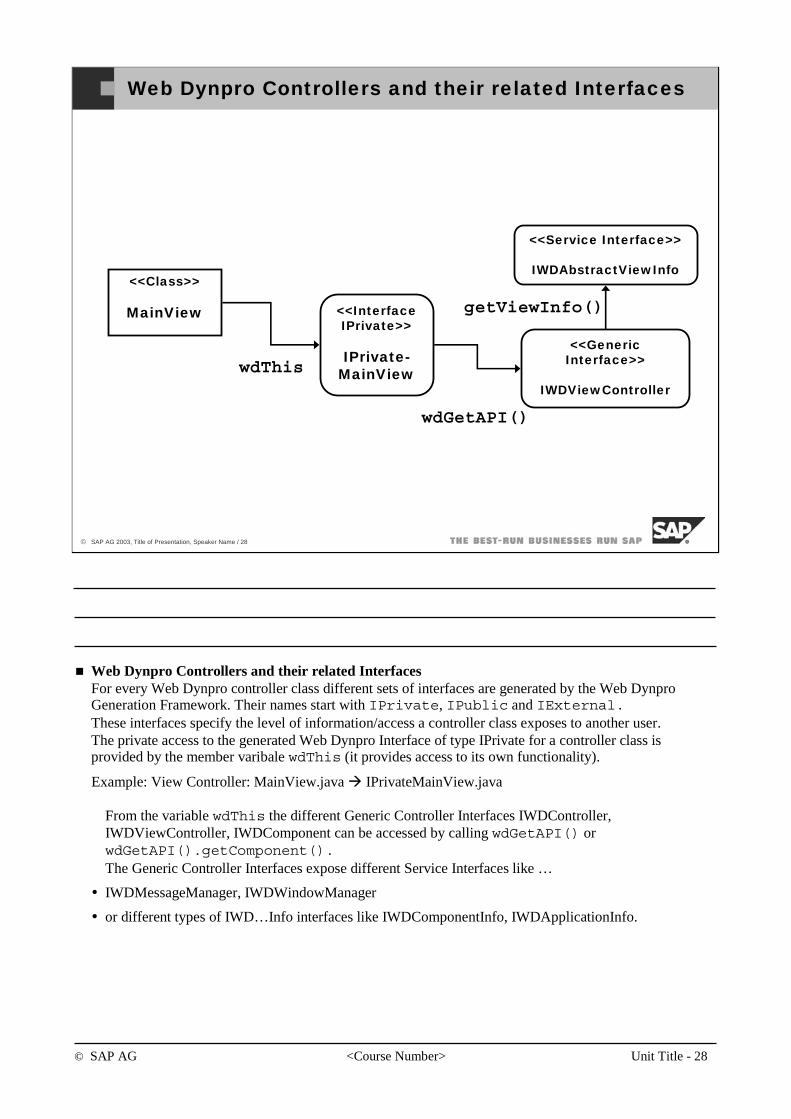
© SAP AG <Course Number> Unit Title - 28
© SAP AG 2003, Title of Presentation, Speaker Name / 28
Web Dynpro Controllers and their related Interfaces
<<Class>>
MainView <<Interface IPrivate>>
IPrivate-MainView
<<GenericInterface>>
IWDViewController
wdGetAPI()
wdThis
<<Service Interface>>
IWDAbstractViewInfo
getViewInfo()
Web Dynpro Controllers and their related InterfacesFor every Web Dynpro controller class different sets of interfaces are generated by the Web DynproGeneration Framework. Their names start with IPrivate, IPublic and IExternal.These interfaces specify the level of information/access a controller class exposes to another user.The private access to the generated Web Dynpro Interface of type IPrivate for a controller class isprovided by the member varibale wdThis (it provides access to its own functionality).
Example: View Controller: MainView.java IPrivateMainView.java
From the variable wdThis the different Generic Controller Interfaces IWDController, IWDViewController, IWDComponent can be accessed by calling wdGetAPI() orwdGetAPI().getComponent().The Generic Controller Interfaces expose different Service Interfaces like …
IWDMessageManager, IWDWindowManager
or different types of IWD…Info interfaces like IWDComponentInfo, IWDApplicationInfo.
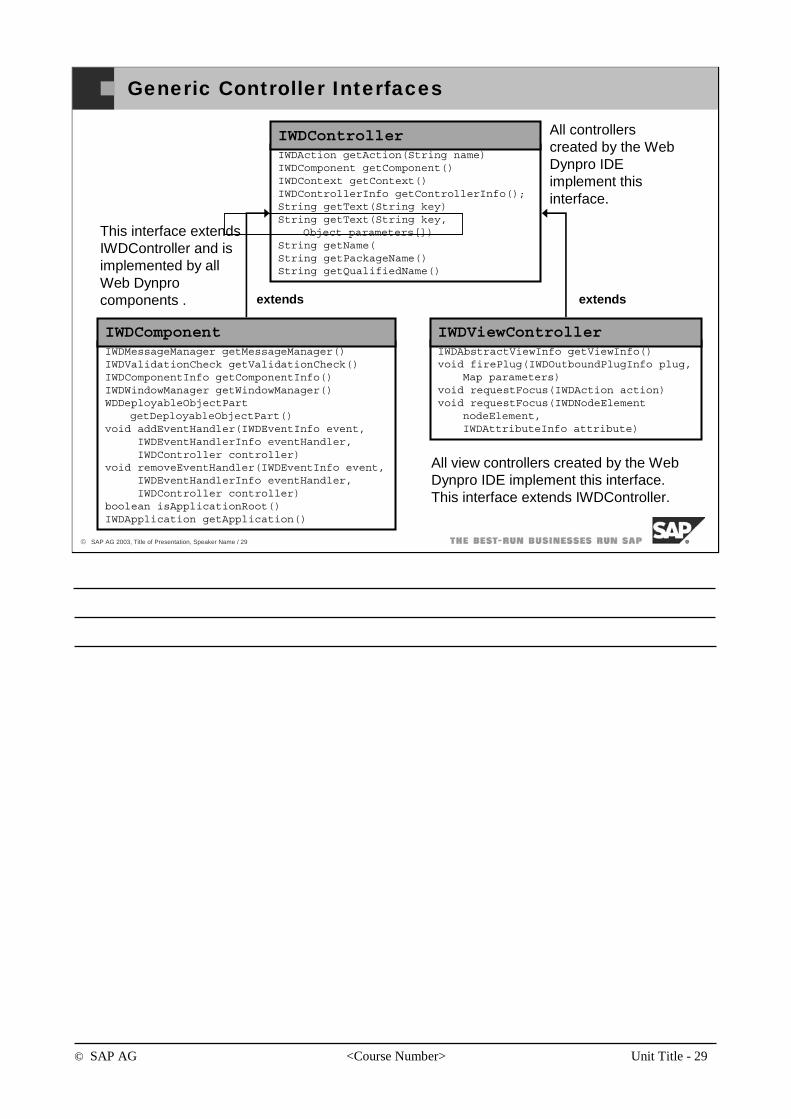
© SAP AG <Course Number> Unit Title - 29
© SAP AG 2003, Title of Presentation, Speaker Name / 29
Generic Controller Interfaces
IWDAbstractViewInfo getViewInfo()void firePlug(IWDOutboundPlugInfo plug,
Map parameters)void requestFocus(IWDAction action)void requestFocus(IWDNodeElement
nodeElement,IWDAttributeInfo attribute)
IWDViewController
IWDAction getAction(String name)IWDComponent getComponent()IWDContext getContext()IWDControllerInfo getControllerInfo();String getText(String key)String getText(String key,
Object parameters[])String getName(String getPackageName()String getQualifiedName()
IWDController
IWDMessageManager getMessageManager()IWDValidationCheck getValidationCheck()IWDComponentInfo getComponentInfo()IWDWindowManager getWindowManager()WDDeployableObjectPart
getDeployableObjectPart()void addEventHandler(IWDEventInfo event,
IWDEventHandlerInfo eventHandler,IWDController controller)
void removeEventHandler(IWDEventInfo event,IWDEventHandlerInfo eventHandler,IWDController controller)
boolean isApplicationRoot()IWDApplication getApplication()
IWDComponent
extends extends
All view controllers created by the Web Dynpro IDE implement this interface. This interface extends IWDController.
All controllers created by the Web Dynpro IDE implement this interface.
This interface extends IWDController and is implemented by all Web Dynpro components .
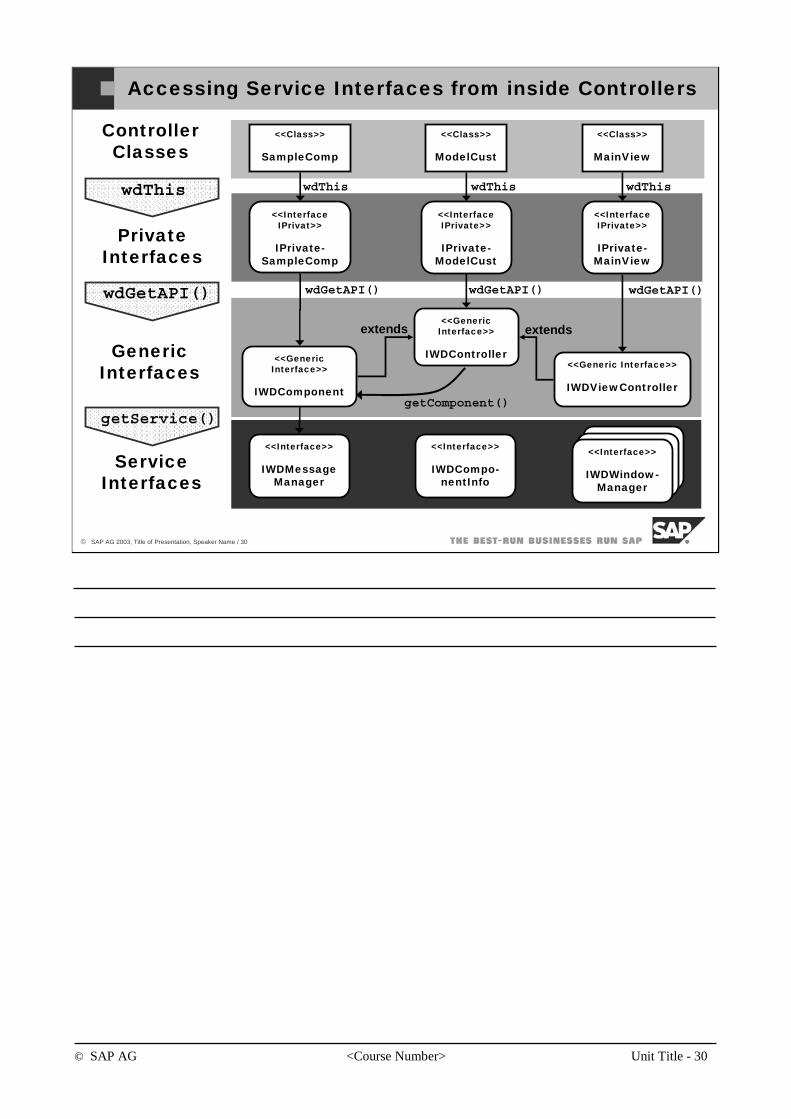
© SAP AG <Course Number> Unit Title - 30
© SAP AG 2003, Title of Presentation, Speaker Name / 30
Accessing Service Interfaces from inside Controllers
<<Interface>>
IWDWindow-Manager
<<Interface>>
IWDWindow-Manager
<<Class>>
SampleComp
<<Class>>
ModelCust
<<Class>>
MainView
<<GenericInterface>>
IWDController<<GenericInterface>>
IWDComponent
<<Generic Interface>>
IWDViewController
<<Interface>>
IWDMessageManager
<<Interface IPrivat>>
IPrivate-SampleComp
<<Interface IPrivate>>
IPrivate-ModelCust
<<Interface IPrivate>>
IPrivate-MainView
Controller Classes
Private Interfaces
Generic Interfaces
Service Interfaces
<<Interface>>
IWDCompo-nentInfo
<<Interface>>
IWDWindow-Manager
wdThis wdThis wdThis
wdGetAPI() wdGetAPI() wdGetAPI()
wdThis
wdGetAPI()
getService()getComponent()
extends extends
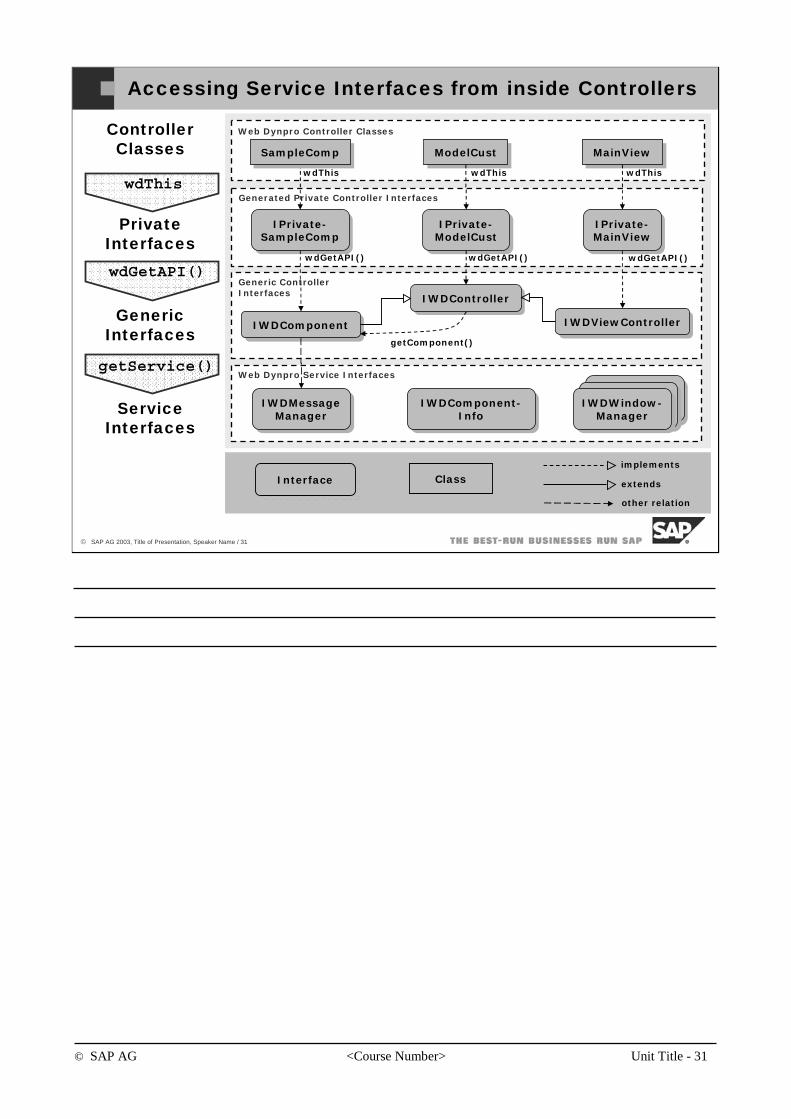
© SAP AG <Course Number> Unit Title - 31
© SAP AG 2003, Title of Presentation, Speaker Name / 31
Accessing Service Interfaces from inside Controllers
Web Dynpro Controller Classes
Generated Private Controller Interfaces
Generic ControllerInterfaces
Web Dynpro Service Interfaces
ModelCust MainView
IWDController
IWDComponent IWDViewController
IWDMessageManager
IPrivate-SampleComp
IPrivate-ModelCust
IPrivate-MainView
Controller Classes
Private Interfaces
Generic Interfaces
IWDWindow-ManagerService
Interfaces
IWDWindow-Manager
IWDComponent-Info
IWDWindow-Manager
wdThis wdThis wdThis
wdGetAPI() wdGetAPI() wdGetAPI()
wdThis
wdGetAPI()
getService()
getComponent()
SampleComp
ClassInterface extends
implements
other relation

© SAP AG <Course Number> Unit Title - 32
© SAP AG 2003, Title of Presentation, Speaker Name / 32
Accessing the Message Manager from inside a View
<<Interface>>
IWDWindow-Manager
<<Interface>>
IWDWindow-Manager
<<Class>>
SampleComp
<<Class>>
ModelCust
<<Class>>
MainView
<<GenericInterface>>
IWDController<<GenericInterface>>
IWDComponent
<<Generic Interface>>
IWDViewController
<<Interface>>
IWDMessageManager
<<Interface IPrivat>>
IPrivate-SampleComp
<<Interface IPrivate>>
IPrivate-ModelCust
<<Interface IPrivate>>
IPrivate-MainView
Controller Classes
Private Interfaces
Generic Interfaces
Service Interfaces
<<Interface>>
IWDCompo-nentInfo
<<Interface>>
IWDWindow-Manager
wdThis wdThis wdThis
wdGetAPI() wdGetAPI() wdGetAPI()
wdThis
wdGetAPI()
getService()getComponent()
extends extends
getMessageManager()
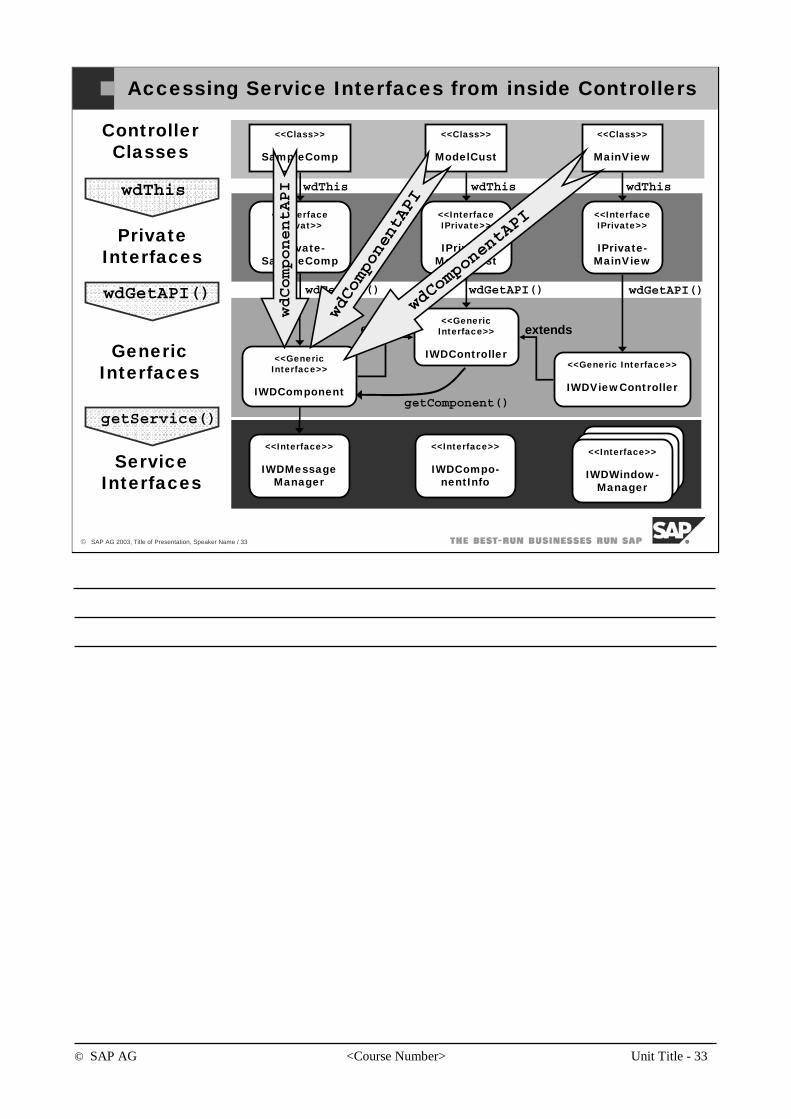
© SAP AG <Course Number> Unit Title - 33
© SAP AG 2003, Title of Presentation, Speaker Name / 33
Accessing Service Interfaces from inside Controllers
<<Interface>>
IWDWindow-Manager
<<Interface>>
IWDWindow-Manager
<<Class>>
SampleComp
<<Class>>
ModelCust
<<Class>>
MainView
<<GenericInterface>>
IWDController<<GenericInterface>>
IWDComponent
<<Generic Interface>>
IWDViewController
<<Interface>>
IWDMessageManager
<<Interface IPrivat>>
IPrivate-SampleComp
<<Interface IPrivate>>
IPrivate-ModelCust
<<Interface IPrivate>>
IPrivate-MainView
Controller Classes
Private Interfaces
Generic Interfaces
Service Interfaces
<<Interface>>
IWDCompo-nentInfo
<<Interface>>
IWDWindow-Manager
wdThis wdThis wdThis
wdGetAPI() wdGetAPI() wdGetAPI()
wdThis
wdGetAPI()
getService()getComponent()
extends extends
wdComponentAPI
wdComponentAPI
wdComponentAPI

© SAP AG <Course Number> Unit Title - 34
© SAP AG 2003, Title of Presentation, Speaker Name / 34
Accessing Service Interfaces from inside Controllers
<<Interface>>
IWDWindow-Manager
<<Interface>>
IWDWindow-Manager
<<Class>>
SampleComp
<<Class>>
ModelCust
<<Class>>
MainView
<<GenericInterface>>
IWDController<<GenericInterface>>
IWDComponent
<<Generic Interface>>
IWDViewController
<<Interface>>
IWDMessageManager
<<Interface IPrivat>>
IPrivate-SampleComp
<<Interface IPrivate>>
IPrivate-ModelCust
<<Interface IPrivate>>
IPrivate-MainView
Controller Classes
Private Interfaces
Generic Interfaces
Service Interfaces
<<Interface>>
IWDCompo-nentInfo
<<Interface>>
IWDWindow-Manager
wdThis wdThis wdThis
wdGetAPI() wdGetAPI() wdGetAPI()
wdThis
wdGetAPI()
getService()getComponent()
extends extends wdCotnrollerAPI

© SAP AG <Course Number> Unit Title - 35
© SAP AG 2003, Title of Presentation, Speaker Name / 35
Accessing Service Interfaces from inside Controllers
<<Interface>>
IWDWindow-Manager
<<Interface>>
IWDWindow-Manager
<<Class>>
SampleComp
<<Class>>
ModelCust
<<Class>>
MainView
<<GenericInterface>>
IWDController<<GenericInterface>>
IWDComponent
<<Generic Interface>>
IWDViewController
<<Interface>>
IWDMessageManager
<<Interface IPrivat>>
IPrivate-SampleComp
<<Interface IPrivate>>
IPrivate-ModelCust
<<Interface IPrivate>>
IPrivate-MainView
Controller Classes
Private Interfaces
Generic Interfaces
Service Interfaces
<<Interface>>
IWDCompo-nentInfo
<<Interface>>
IWDWindow-Manager
wdThis wdThis wdThis
wdGetAPI() wdGetAPI() wdGetAPI()
wdThis
wdGetAPI()
getService()getComponent()
extends extends
wdCotnrol-
lerAPI
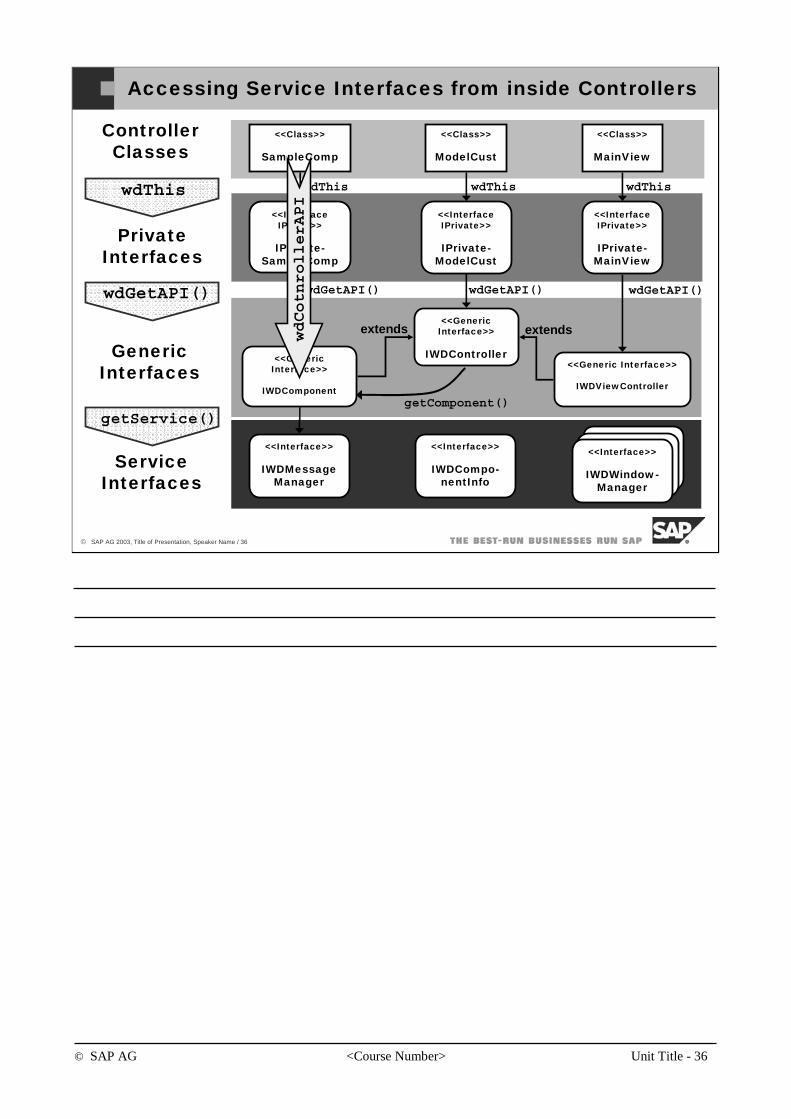
© SAP AG <Course Number> Unit Title - 36
© SAP AG 2003, Title of Presentation, Speaker Name / 36
Accessing Service Interfaces from inside Controllers
<<Interface>>
IWDWindow-Manager
<<Interface>>
IWDWindow-Manager
<<Class>>
SampleComp
<<Class>>
ModelCust
<<Class>>
MainView
<<GenericInterface>>
IWDController<<GenericInterface>>
IWDComponent
<<Generic Interface>>
IWDViewController
<<Interface>>
IWDMessageManager
<<Interface IPrivat>>
IPrivate-SampleComp
<<Interface IPrivate>>
IPrivate-ModelCust
<<Interface IPrivate>>
IPrivate-MainView
Controller Classes
Private Interfaces
Generic Interfaces
Service Interfaces
<<Interface>>
IWDCompo-nentInfo
<<Interface>>
IWDWindow-Manager
wdThis wdThis wdThis
wdGetAPI() wdGetAPI() wdGetAPI()
wdThis
wdGetAPI()
getService()getComponent()
extends extendswdCotnrollerAPI

© SAP AG <Course Number> Unit Title - 37
© SAP AG 2003, Title of Presentation, Speaker Name / 37
You should now be able to:
Understand the structure of Web Dynpro classes and interfaces.
Understand how to access important services that can be used in your controllers.
Web Dynpro Classes & Interfaces: Topic Summary
© SAP AG <Course Number> Unit Title - 38
© SAP AG 2003, Title of Presentation, Speaker Name / 38
You should now be able to:
Gain further understanding of Model View Controller (MVC) paradigm.
Understand the different kinds of Web Dynpro controllers and what they are used for.
Understand the controller methods that are availableto you.
Understand the structure of Web Dynpro controllerclasses and interfaces.
Web Dynpro Controllers: Unit Summary

Controllers Exercises
Chapter: Web Dynpro Controllers
Theme: Web Dynpro Controllers
At the end of this Exercise, you are able to:
• Understand the life-cycle of Web Dynpro controllers.
1 Overview
This exercise will guide you through a simple application with 2 views. You will learn the effects of the Lifespan property on the lifetime of view controllers. The view LifeSpanView contains an input field that is bound to the view controller’s context. The Lifespan property has a great effect on the LifeSpanView’s context lifetime.
2 Result
As a result of this exercise, you know how to influence the life time of a view controller’s context.
3 Prerequisites
You have launched the SAP NetWeaver Developer Studio. You have selected the Web Dynpro perspective. You have opened the WD01_Basics_Controllers project. The structure this project is currently displayed in the Web Dynpro Explorer.
4 Overview
4-1 In the view LifeSpanView check, that the Lifespan property is set to framework controlled.
4-2 Deploy and Run the application. Enter some data in the input field of the view LifeSpanView. Verify, that this information is still available, after having navigated to the first view of the application.
4-3 In the view LifeSpanView change the Lifespan property to when_visible.
4-4 Deploy and Run the application. Enter some data in the input field of the view LifeSpanView. Verify, that this information is lost, after having navigated to the first view of the application.
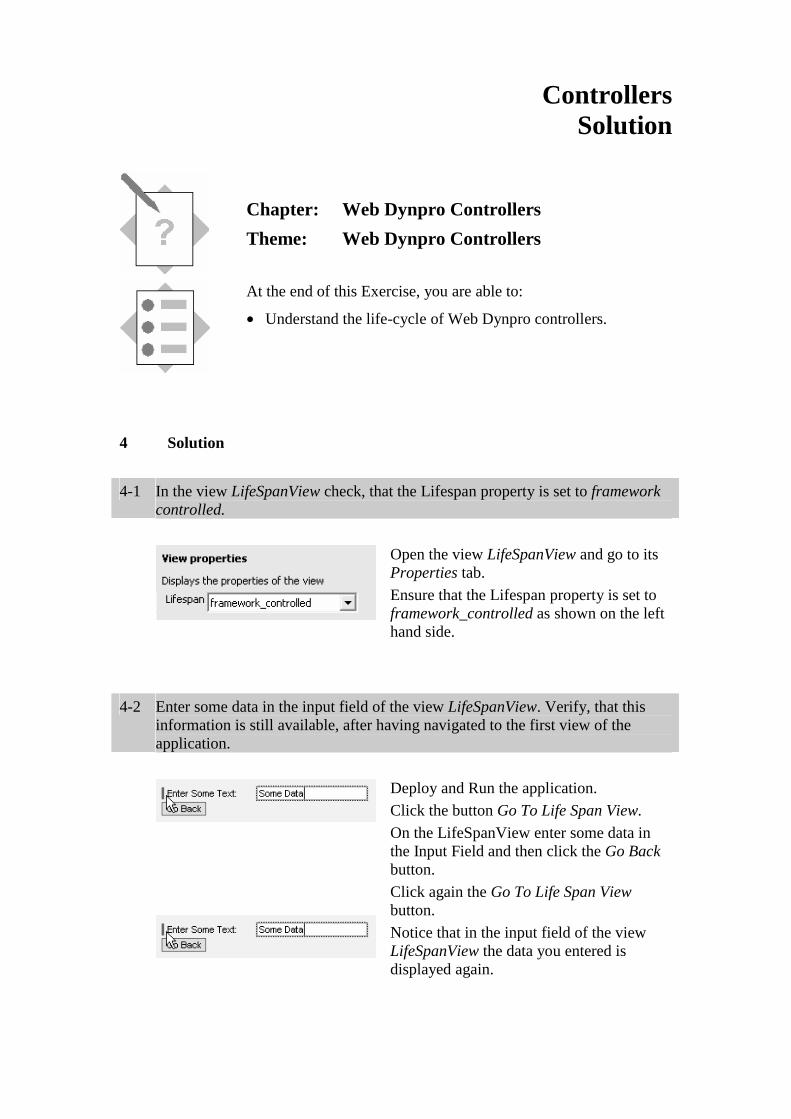
Controllers Solution
Chapter: Web Dynpro Controllers
Theme: Web Dynpro Controllers
At the end of this Exercise, you are able to:
• Understand the life-cycle of Web Dynpro controllers.
4 Solution
4-1 In the view LifeSpanView check, that the Lifespan property is set to framework
controlled.
Open the view LifeSpanView and go to its Properties tab.
Ensure that the Lifespan property is set to framework_controlled as shown on the left hand side.
4-2 Enter some data in the input field of the view LifeSpanView. Verify, that this
information is still available, after having navigated to the first view of the application.
Deploy and Run the application.
Click the button Go To Life Span View.
On the LifeSpanView enter some data in the Input Field and then click the Go Back button.
Click again the Go To Life Span View button.
Notice that in the input field of the view LifeSpanView the data you entered is displayed again.
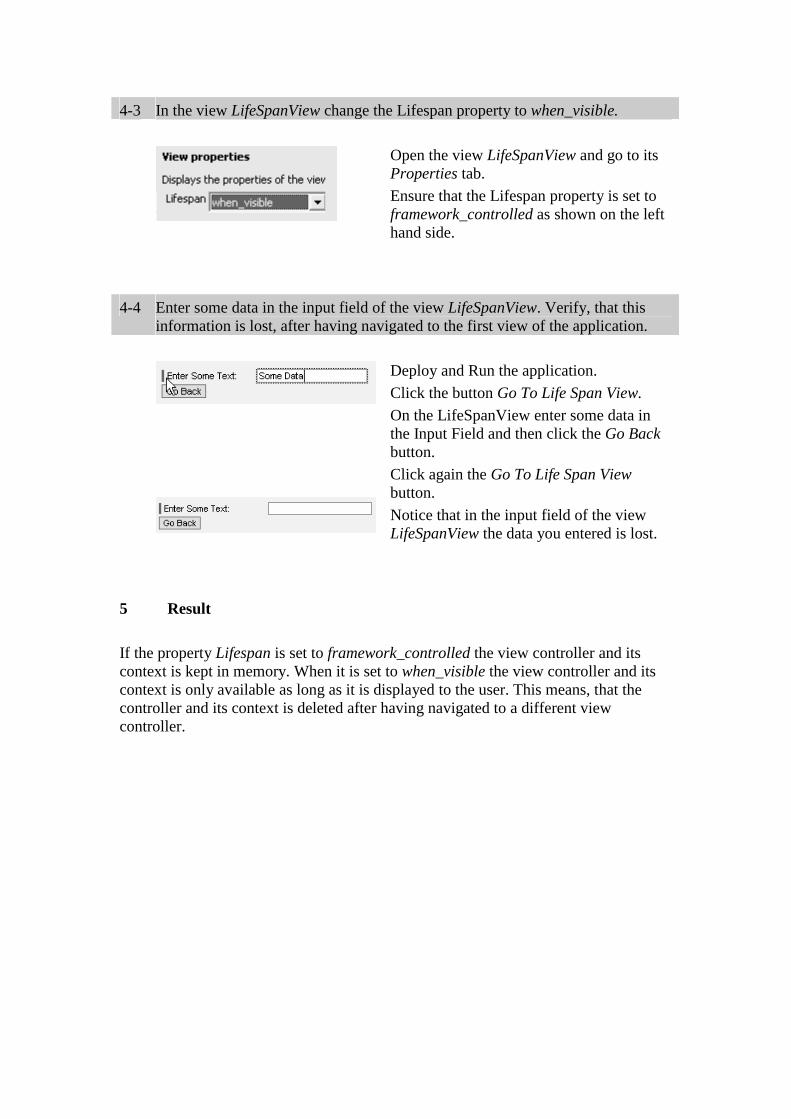
4-3 In the view LifeSpanView change the Lifespan property to when_visible.
Open the view LifeSpanView and go to its Properties tab.
Ensure that the Lifespan property is set to framework_controlled as shown on the left hand side.
4-4 Enter some data in the input field of the view LifeSpanView. Verify, that this
information is lost, after having navigated to the first view of the application.
Deploy and Run the application.
Click the button Go To Life Span View.
On the LifeSpanView enter some data in the Input Field and then click the Go Back button.
Click again the Go To Life Span View button.
Notice that in the input field of the view LifeSpanView the data you entered is lost.
5 Result If the property Lifespan is set to framework_controlled the view controller and its context is kept in memory. When it is set to when_visible the view controller and its context is only available as long as it is displayed to the user. This means, that the controller and its context is deleted after having navigated to a different view controller.
© SAP AG <Course Number> Unit Title - 1
© SAP AG 2003, Title of Presentation, Speaker Name / 1
Overview
Table UI element
Tree UI element (Optional)
Contents:
UI Elements
© SAP AG <Course Number> Unit Title - 2
© SAP AG 2003, Title of Presentation, Speaker Name / 2
After completing this unit, you will be able to:
Modify and create UI elements.
Create table UI elements.
Create a tree UI element.
UI Elements: Unit Objectives
© SAP AG <Course Number> Unit Title - 3
© SAP AG 2003, Title of Presentation, Speaker Name / 3
After completing this topic, you will be able to:
Explain which UI elements are available.
Use the View Designer to create UI elements.
UI Elements Overview: Topic Objectives
This is a lesson
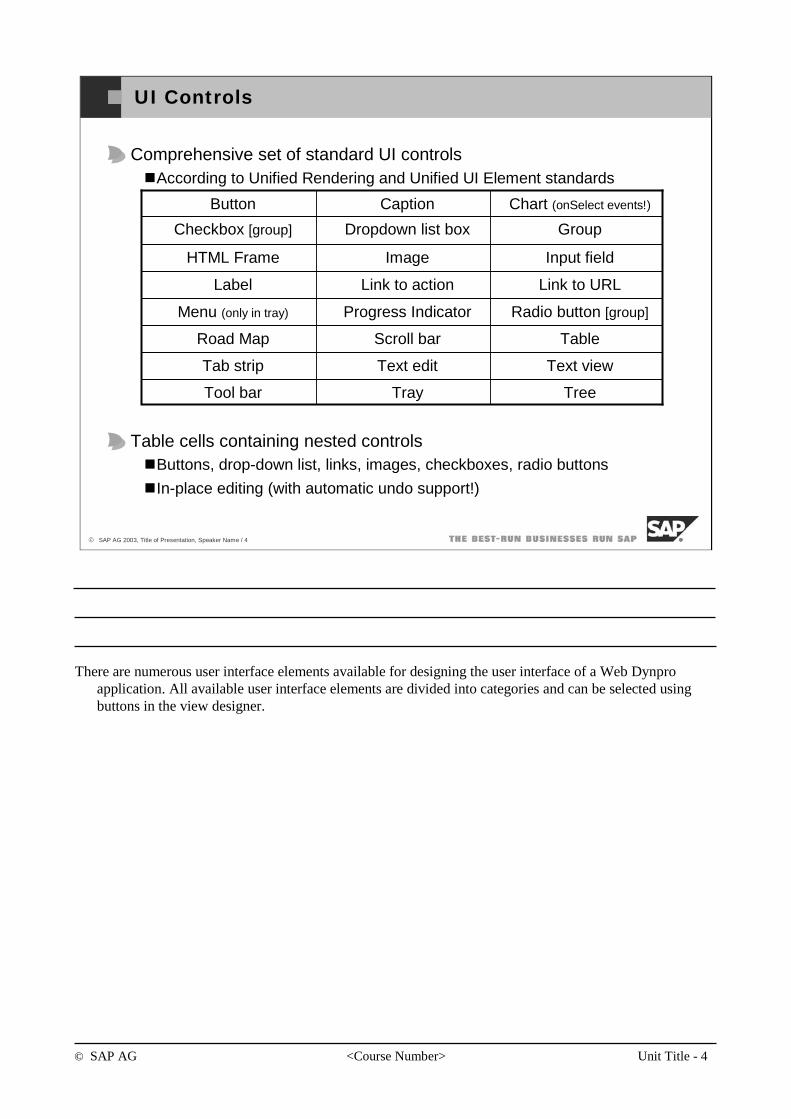
© SAP AG <Course Number> Unit Title - 4
© SAP AG 2003, Title of Presentation, Speaker Name / 4
UI Controls
Comprehensive set of standard UI controlsAccording to Unified Rendering and Unified UI Element standards
Table cells containing nested controlsButtons, drop-down list, links, images, checkboxes, radio buttons
In-place editing (with automatic undo support!)
TableScroll barRoad Map
Radio button [group]Progress IndicatorMenu (only in tray)
TreeTrayTool bar
Text viewText editTab strip
Link to URLLink to actionLabel
Input fieldImageHTML Frame
GroupDropdown list boxCheckbox [group]
Chart (onSelect events!)CaptionButton
There are numerous user interface elements available for designing the user interface of a Web Dynproapplication. All available user interface elements are divided into categories and can be selected using buttons in the view designer.
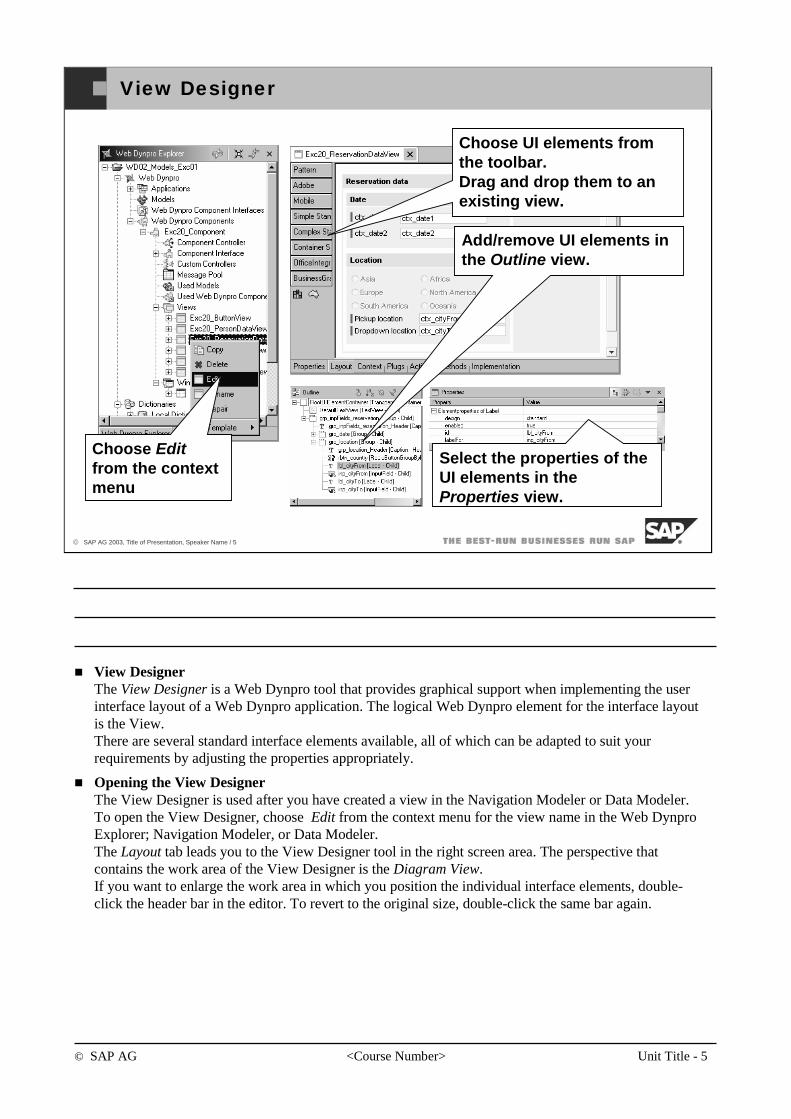
© SAP AG <Course Number> Unit Title - 5
© SAP AG 2003, Title of Presentation, Speaker Name / 5
View Designer
Choose UI elements from the toolbar.Drag and drop them to an existing view.
Choose Edit from the context menu
Add/remove UI elements in the Outline view.
Select the properties of the UI elements in the Properties view.
View DesignerThe View Designer is a Web Dynpro tool that provides graphical support when implementing the userinterface layout of a Web Dynpro application. The logical Web Dynpro element for the interface layout is the View.There are several standard interface elements available, all of which can be adapted to suit your requirements by adjusting the properties appropriately.
Opening the View DesignerThe View Designer is used after you have created a view in the Navigation Modeler or Data Modeler.To open the View Designer, choose Edit from the context menu for the view name in the Web DynproExplorer; Navigation Modeler, or Data Modeler. The Layout tab leads you to the View Designer tool in the right screen area. The perspective that contains the work area of the View Designer is the Diagram View.If you want to enlarge the work area in which you position the individual interface elements, double-click the header bar in the editor. To revert to the original size, double-click the same bar again.
© SAP AG <Course Number> Unit Title - 6
© SAP AG 2003, Title of Presentation, Speaker Name / 6
You should now be able to:
Explain which UI elements are available.
Use the View Designer to create UI elements.
UI Elements Overview: Topic Summary
© SAP AG <Course Number> Unit Title - 7
© SAP AG 2003, Title of Presentation, Speaker Name / 7
After completing this topic, you will be able to:
Create tables and fill them with data from the context..
Tables: Topic Objectives
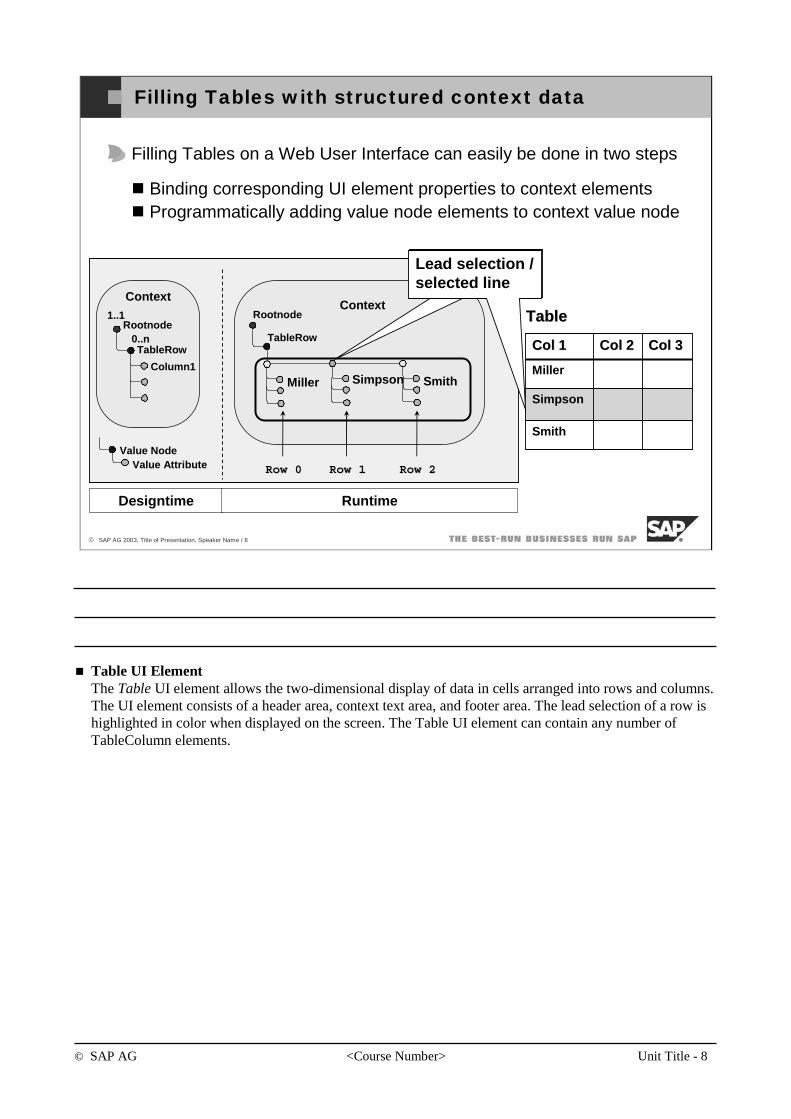
© SAP AG <Course Number> Unit Title - 8
© SAP AG 2003, Title of Presentation, Speaker Name / 8
Filling Tables with structured context data
Filling Tables on a Web User Interface can easily be done in two steps
Binding corresponding UI element properties to context elementsProgrammatically adding value node elements to context value node
Context
Rootnode1..1
TableRow
Column1
0..n
ContextRootnode
TableRow
Miller Simpson Smith
Value NodeValue Attribute RowRow 00 RowRow 11 RowRow 22
Col 2Col 2
Smith
Simpson
Miller
Col 3Col 3Col 1Col 1
TableTable
Designtime Runtime
Lead selection / selected lineLead selection / selected line
Table UI ElementThe Table UI element allows the two-dimensional display of data in cells arranged into rows and columns. The UI element consists of a header area, context text area, and footer area. The lead selection of a row is highlighted in color when displayed on the screen. The Table UI element can contain any number of TableColumn elements.
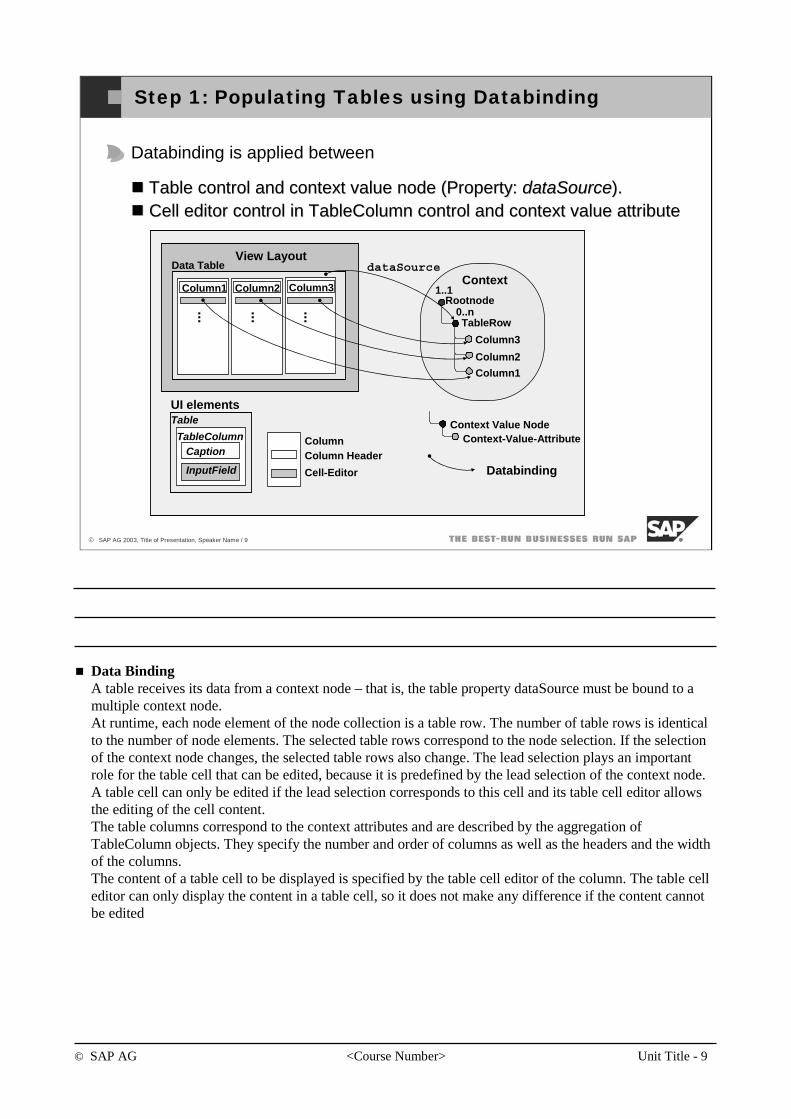
© SAP AG <Course Number> Unit Title - 9
© SAP AG 2003, Title of Presentation, Speaker Name / 9
Step 1: Populating Tables using Databinding
Databinding is applied between
Table control and context value node (Property: Table control and context value node (Property: dataSourcedataSource).).Cell editor control in Cell editor control in TableColumnTableColumn control and context value attributecontrol and context value attribute
Context Value NodeContext-Value-Attribute
Context
Rootnode1..1
TableRow
Column3
0..n
View Layout
Column3Column2
Data Table
Column1
Column2
Column1
Cell-Editor
dataSource
Column HeaderDatabinding
TableUI elements
TableColumnCaption
InputField
Column
... ... ...
Data BindingA table receives its data from a context node – that is, the table property dataSource must be bound to a multiple context node.At runtime, each node element of the node collection is a table row. The number of table rows is identical to the number of node elements. The selected table rows correspond to the node selection. If the selection of the context node changes, the selected table rows also change. The lead selection plays an important role for the table cell that can be edited, because it is predefined by the lead selection of the context node. A table cell can only be edited if the lead selection corresponds to this cell and its table cell editor allows the editing of the cell content.The table columns correspond to the context attributes and are described by the aggregation of TableColumn objects. They specify the number and order of columns as well as the headers and the width of the columns. The content of a table cell to be displayed is specified by the table cell editor of the column. The table cell editor can only display the content in a table cell, so it does not make any difference if the content cannot be edited
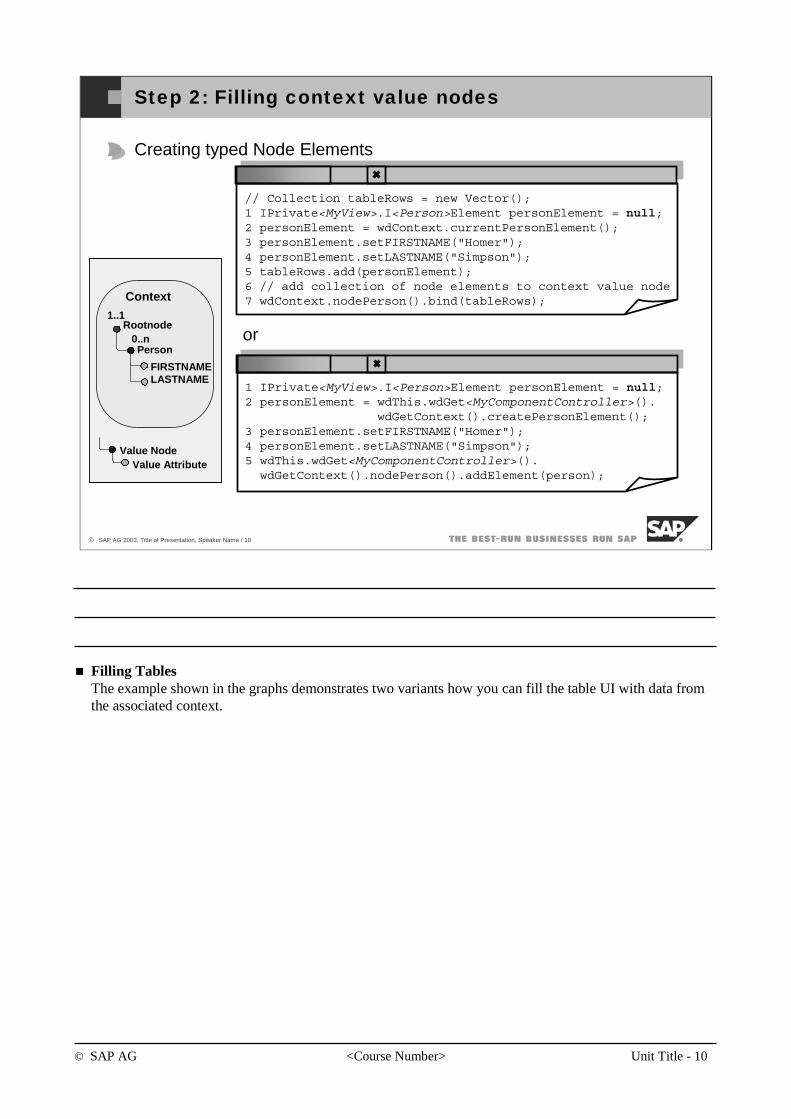
© SAP AG <Course Number> Unit Title - 10
© SAP AG 2003, Title of Presentation, Speaker Name / 10
Step 2: Filling context value nodes
Creating typed Node Elements
// Collection tableRows = new Vector();1 IPrivate<MyView>.I<Person>Element personElement = null;2 personElement = wdContext.currentPersonElement();3 personElement.setFIRSTNAME("Homer");4 personElement.setLASTNAME("Simpson");5 tableRows.add(personElement);6 // add collection of node elements to context value node7 wdContext.nodePerson().bind(tableRows);Context
Rootnode1..1
Person
FIRSTNAMELASTNAME
0..n
Value NodeValue Attribute
1 IPrivate<MyView>.I<Person>Element personElement = null;2 personElement = wdThis.wdGet<MyComponentController>().
wdGetContext().createPersonElement();3 personElement.setFIRSTNAME("Homer");4 personElement.setLASTNAME("Simpson");5 wdThis.wdGet<MyComponentController>(). wdGetContext().nodePerson().addElement(person);
or
Filling TablesThe example shown in the graphs demonstrates two variants how you can fill the table UI with data from the associated context.
© SAP AG <Course Number> Unit Title - 11
© SAP AG 2003, Title of Presentation, Speaker Name / 11
You should now be able to:
Create tables and fill them with data from the context
Table: Topic Summary
© SAP AG <Course Number> Unit Title - 12
© SAP AG 2003, Title of Presentation, Speaker Name / 12
After completing this topic, you will be able to:
Create trees and fill them with data from the context..
Trees: Topic Objectives

© SAP AG <Course Number> Unit Title - 13
© SAP AG 2003, Title of Presentation, Speaker Name / 13
Example
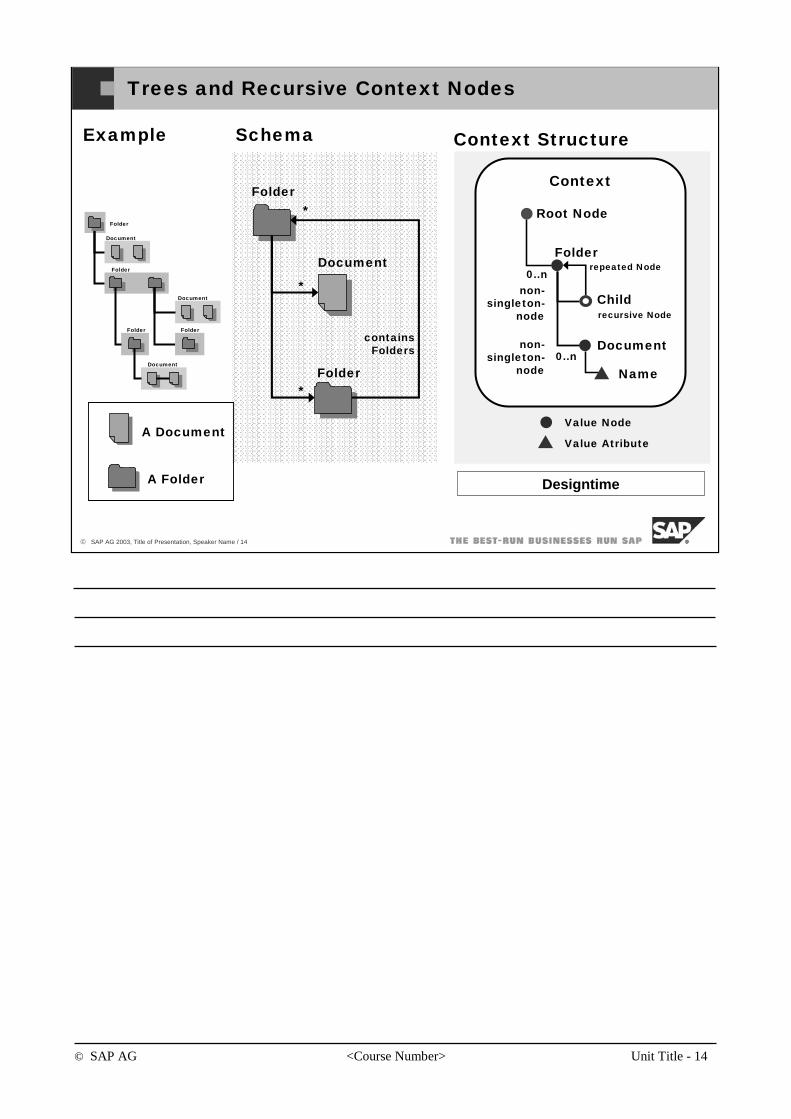
© SAP AG <Course Number> Unit Title - 14
© SAP AG 2003, Title of Presentation, Speaker Name / 14
Trees and Recursive Context Nodes
Example
Context
Root Node
Value Atribute
Value Node
Folder
Name
0..n
Context Structure
recursive Node
repeated Node
Childnon-
singleton-node
Document0..n
non-singleton-
node
Document
Folder
Folder
Folder
Document
Folder
Document
containsFolders
Schema
Folder
Folder
Document
*
*
*
DesigntimeA Folder
A Document
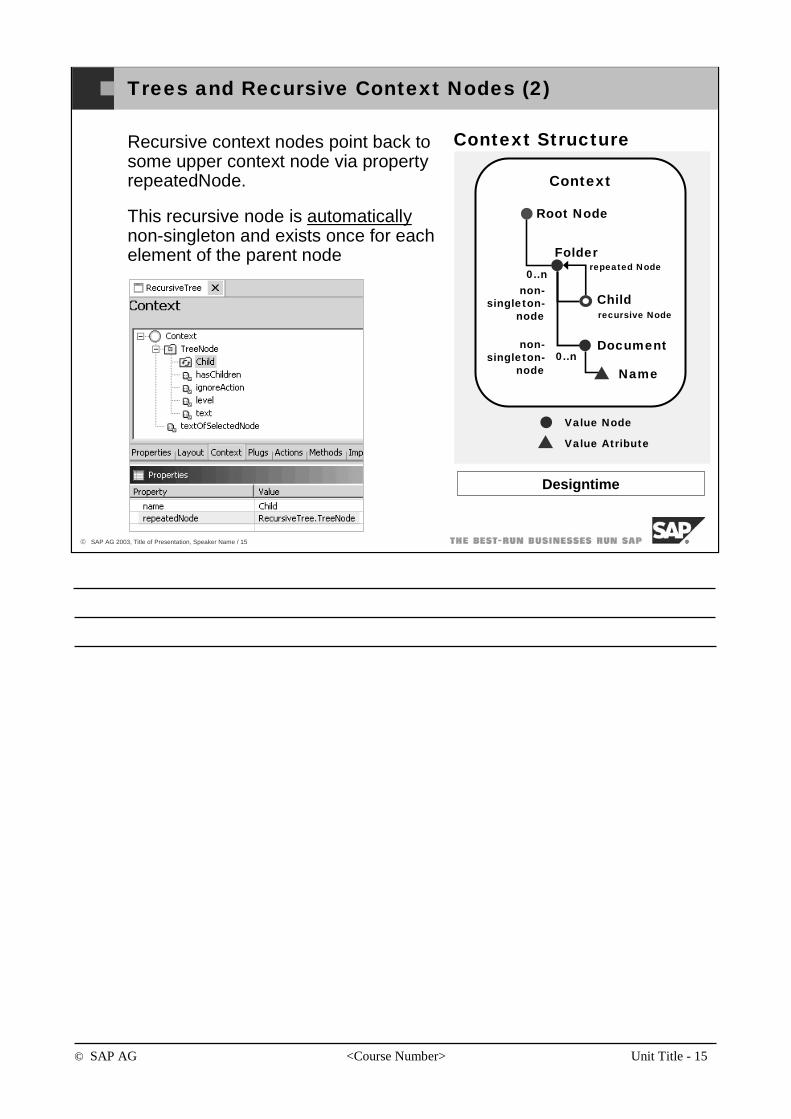
© SAP AG <Course Number> Unit Title - 15
© SAP AG 2003, Title of Presentation, Speaker Name / 15
Trees and Recursive Context Nodes (2)
Context
Root Node
Value Atribute
Value Node
Folder
Name
0..n
Context Structure
recursive Node
repeated Node
Childnon-
singleton-node
Document0..n
non-singleton-
node
Recursive context nodes point back to some upper context node via propertyrepeatedNode.
This recursive node is automaticallynon-singleton and exists once for each element of the parent node
Designtime

© SAP AG <Course Number> Unit Title - 16
© SAP AG 2003, Title of Presentation, Speaker Name / 16
You should now be able to:
Create trees and fill them with data from the context
Trees: Topic Summary
© SAP AG <Course Number> Unit Title - 17
© SAP AG 2003, Title of Presentation, Speaker Name / 17
You should now be able to:
Modify and create UI elements.
Create table UI elements.
Create tree UI elements
UI Elements: Unit Summary
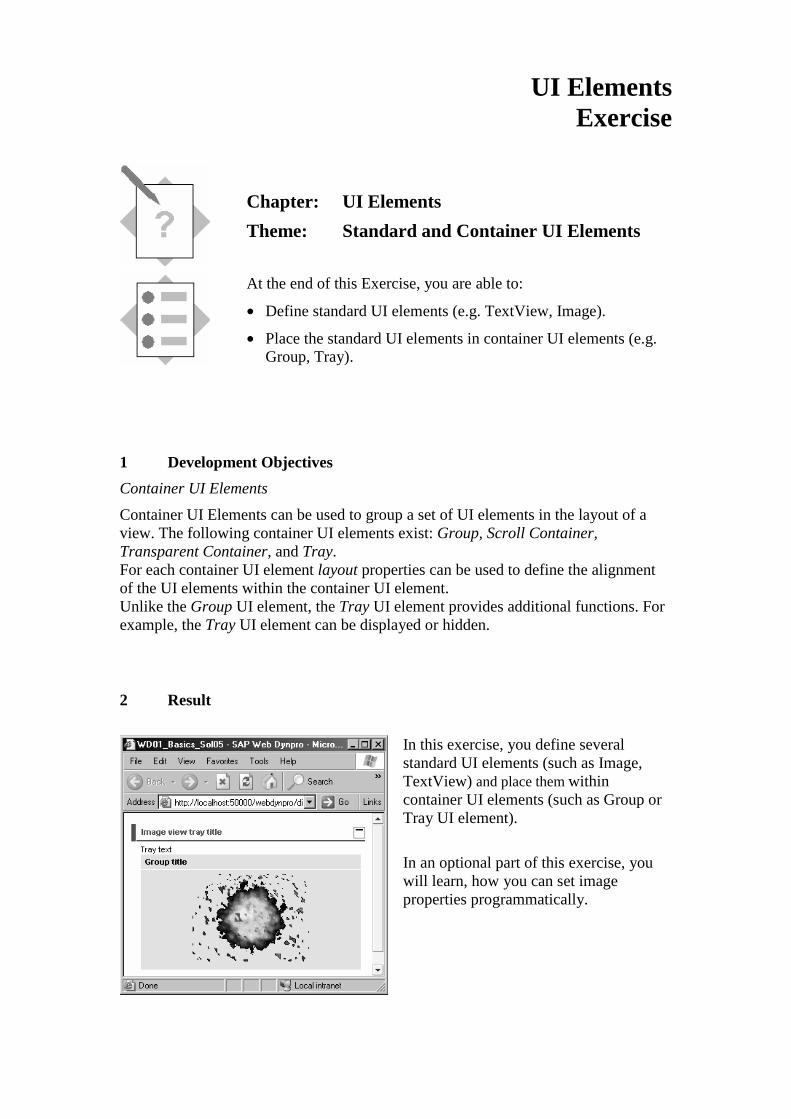
UI Elements Exercise
Chapter: UI Elements
Theme: Standard and Container UI Elements
At the end of this Exercise, you are able to:
• Define standard UI elements (e.g. TextView, Image).
• Place the standard UI elements in container UI elements (e.g. Group, Tray).
1 Development Objectives
Container UI Elements
Container UI Elements can be used to group a set of UI elements in the layout of a view. The following container UI elements exist: Group, Scroll Container, Transparent Container, and Tray. For each container UI element layout properties can be used to define the alignment of the UI elements within the container UI element. Unlike the Group UI element, the Tray UI element provides additional functions. For example, the Tray UI element can be displayed or hidden.
2 Result
In this exercise, you define several standard UI elements (such as Image, TextView) and place them within container UI elements (such as Group or Tray UI element).
In an optional part of this exercise, you will learn, how you can set image properties programmatically.
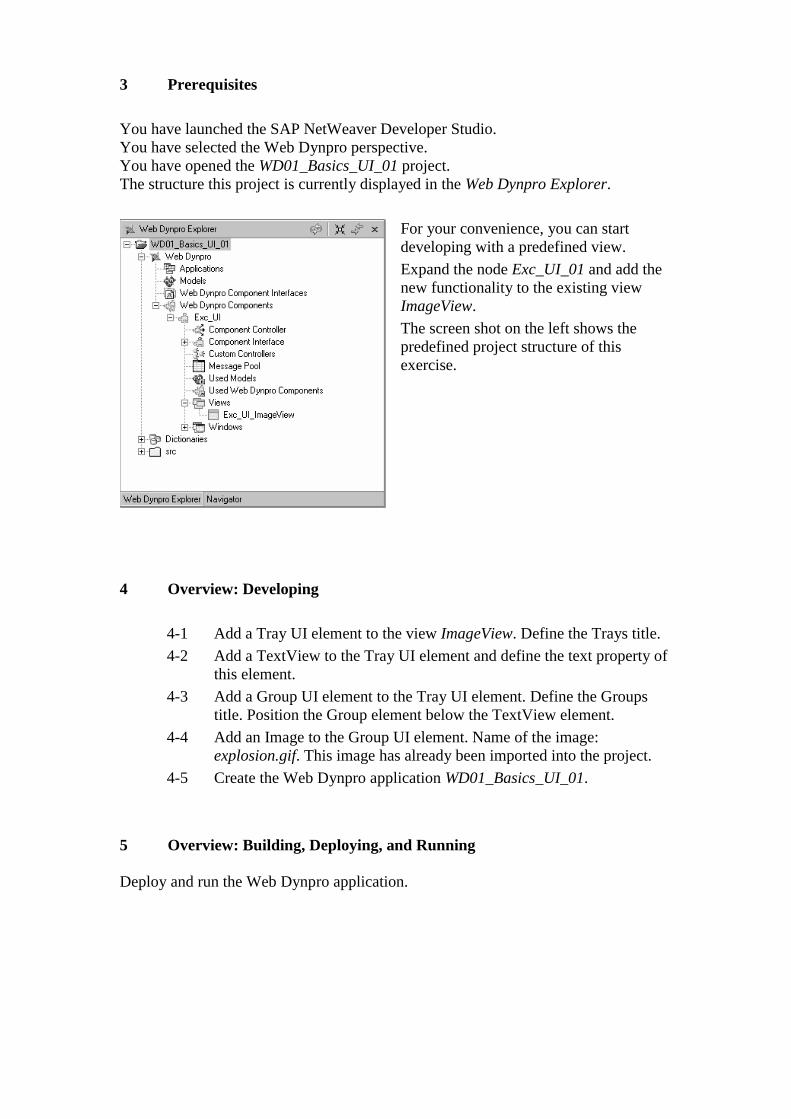
3 Prerequisites
You have launched the SAP NetWeaver Developer Studio. You have selected the Web Dynpro perspective. You have opened the WD01_Basics_UI_01 project. The structure this project is currently displayed in the Web Dynpro Explorer.
For your convenience, you can start developing with a predefined view.
Expand the node Exc_UI_01 and add the new functionality to the existing view ImageView.
The screen shot on the left shows the predefined project structure of this exercise.
4 Overview: Developing
4-1 Add a Tray UI element to the view ImageView. Define the Trays title.
4-2 Add a TextView to the Tray UI element and define the text property of this element.
4-3 Add a Group UI element to the Tray UI element. Define the Groups title. Position the Group element below the TextView element.
4-4 Add an Image to the Group UI element. Name of the image: explosion.gif. This image has already been imported into the project.
4-5 Create the Web Dynpro application WD01_Basics_UI_01.
5 Overview: Building, Deploying, and Running Deploy and run the Web Dynpro application.

6 Optional: Setting image properties programmatically
6-1 Bind the image properties alt and source to the context of the view container: Add two new value attributes to the view controller. Edit the properties of the context value attributes. Set the property calculated to true. This will result in the automatic generation of getter methods for these context value attributes. Bind the properties alt and source of the Image UI element to these context elements.
6-2 Set the image properties source and alt programmatically: Edit the getter methods for the two context value attributes.
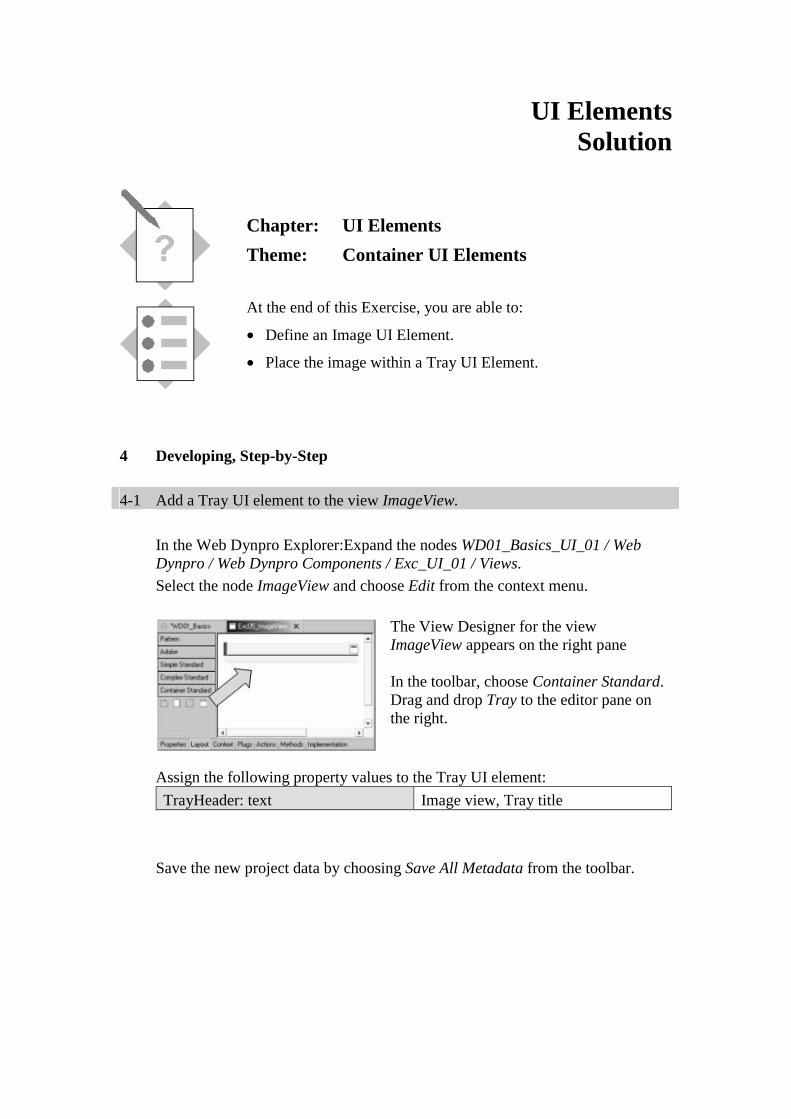
UI Elements Solution
Chapter: UI Elements
Theme: Container UI Elements
At the end of this Exercise, you are able to:
• Define an Image UI Element.
• Place the image within a Tray UI Element.
4 Developing, Step-by-Step 4-1 Add a Tray UI element to the view ImageView.
In the Web Dynpro Explorer:Expand the nodes WD01_Basics_UI_01 / Web Dynpro / Web Dynpro Components / Exc_UI_01 / Views.
Select the node ImageView and choose Edit from the context menu.
The View Designer for the view ImageView appears on the right pane In the toolbar, choose Container Standard. Drag and drop Tray to the editor pane on the right.
Assign the following property values to the Tray UI element:
TrayHeader: text Image view, Tray title
Save the new project data by choosing Save All Metadata from the toolbar.
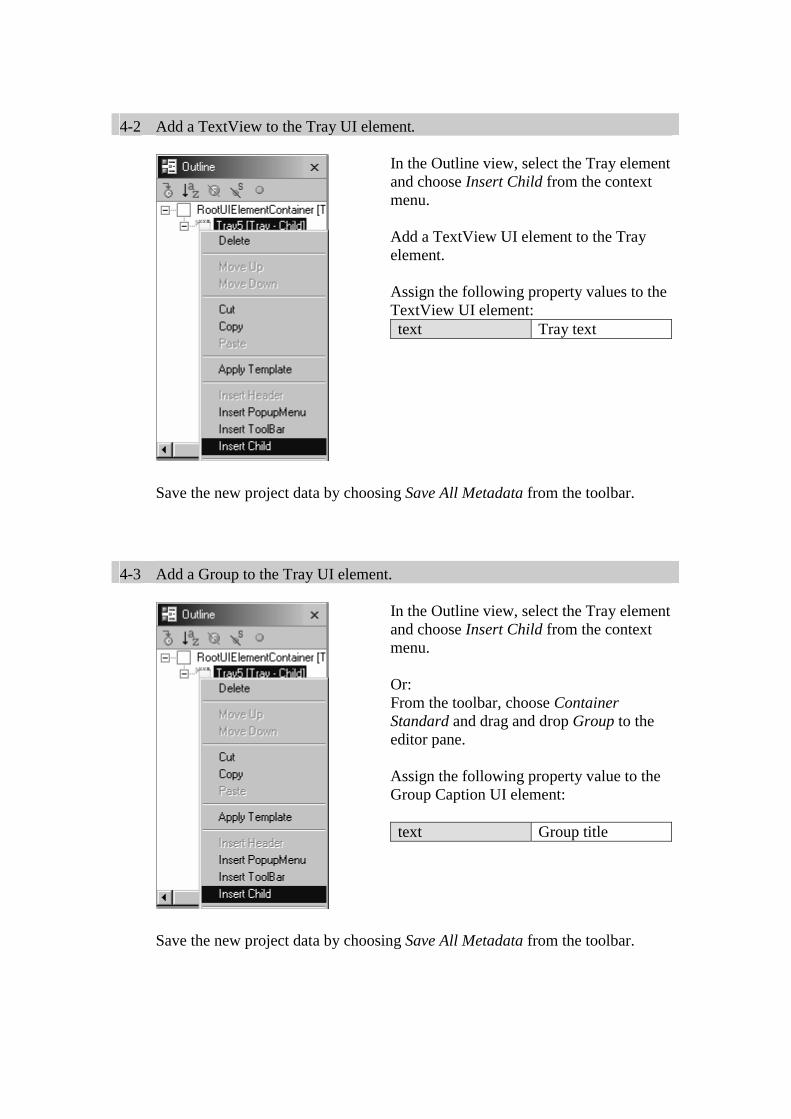
4-2 Add a TextView to the Tray UI element.
In the Outline view, select the Tray element and choose Insert Child from the context menu. Add a TextView UI element to the Tray element. Assign the following property values to the TextView UI element: text Tray text
Save the new project data by choosing Save All Metadata from the toolbar.
4-3 Add a Group to the Tray UI element.
In the Outline view, select the Tray element and choose Insert Child from the context menu. Or: From the toolbar, choose Container Standard and drag and drop Group to the editor pane. Assign the following property value to the Group Caption UI element: text Group title
Save the new project data by choosing Save All Metadata from the toolbar.
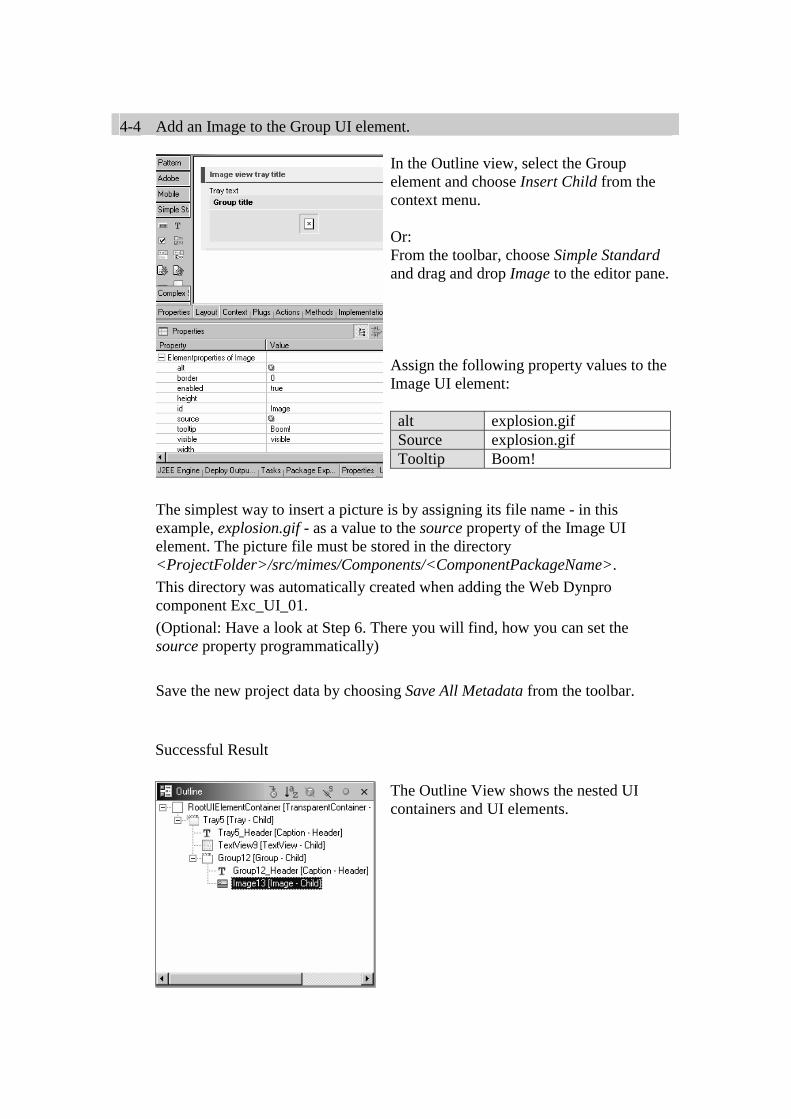
4-4 Add an Image to the Group UI element.
In the Outline view, select the Group element and choose Insert Child from the context menu. Or: From the toolbar, choose Simple Standard and drag and drop Image to the editor pane. Assign the following property values to the Image UI element: alt explosion.gif Source explosion.gif Tooltip Boom!
The simplest way to insert a picture is by assigning its file name - in this example, explosion.gif - as a value to the source property of the Image UI element. The picture file must be stored in the directory <ProjectFolder>/src/mimes/Components/<ComponentPackageName>.
This directory was automatically created when adding the Web Dynpro component Exc_UI_01.
(Optional: Have a look at Step 6. There you will find, how you can set the source property programmatically)
Save the new project data by choosing Save All Metadata from the toolbar.
Successful Result
The Outline View shows the nested UI containers and UI elements.
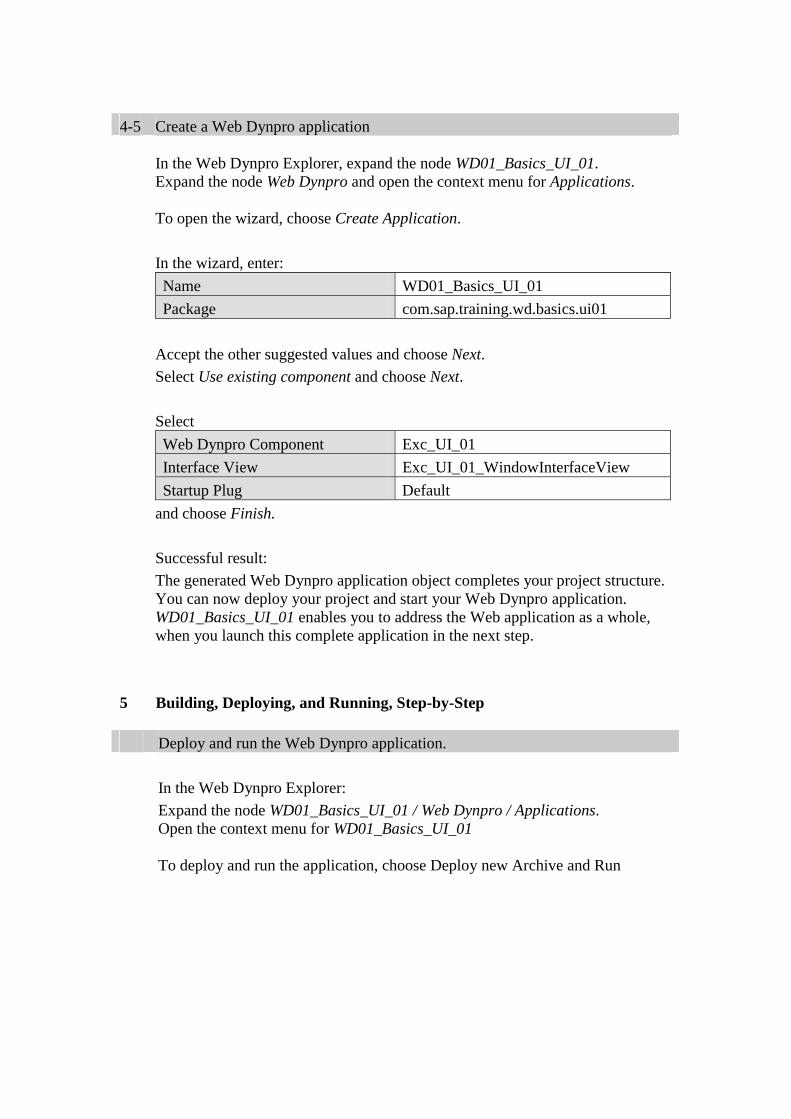
4-5 Create a Web Dynpro application
In the Web Dynpro Explorer, expand the node WD01_Basics_UI_01. Expand the node Web Dynpro and open the context menu for Applications. To open the wizard, choose Create Application.
In the wizard, enter:
Name WD01_Basics_UI_01
Package com.sap.training.wd.basics.ui01
Accept the other suggested values and choose Next.
Select Use existing component and choose Next.
Select
Web Dynpro Component Exc_UI_01
Interface View Exc_UI_01_WindowInterfaceView
Startup Plug Default
and choose Finish.
Successful result:
The generated Web Dynpro application object completes your project structure. You can now deploy your project and start your Web Dynpro application. WD01_Basics_UI_01 enables you to address the Web application as a whole, when you launch this complete application in the next step.
5 Building, Deploying, and Running, Step-by-Step Deploy and run the Web Dynpro application.
In the Web Dynpro Explorer:
Expand the node WD01_Basics_UI_01 / Web Dynpro / Applications. Open the context menu for WD01_Basics_UI_01 To deploy and run the application, choose Deploy new Archive and Run
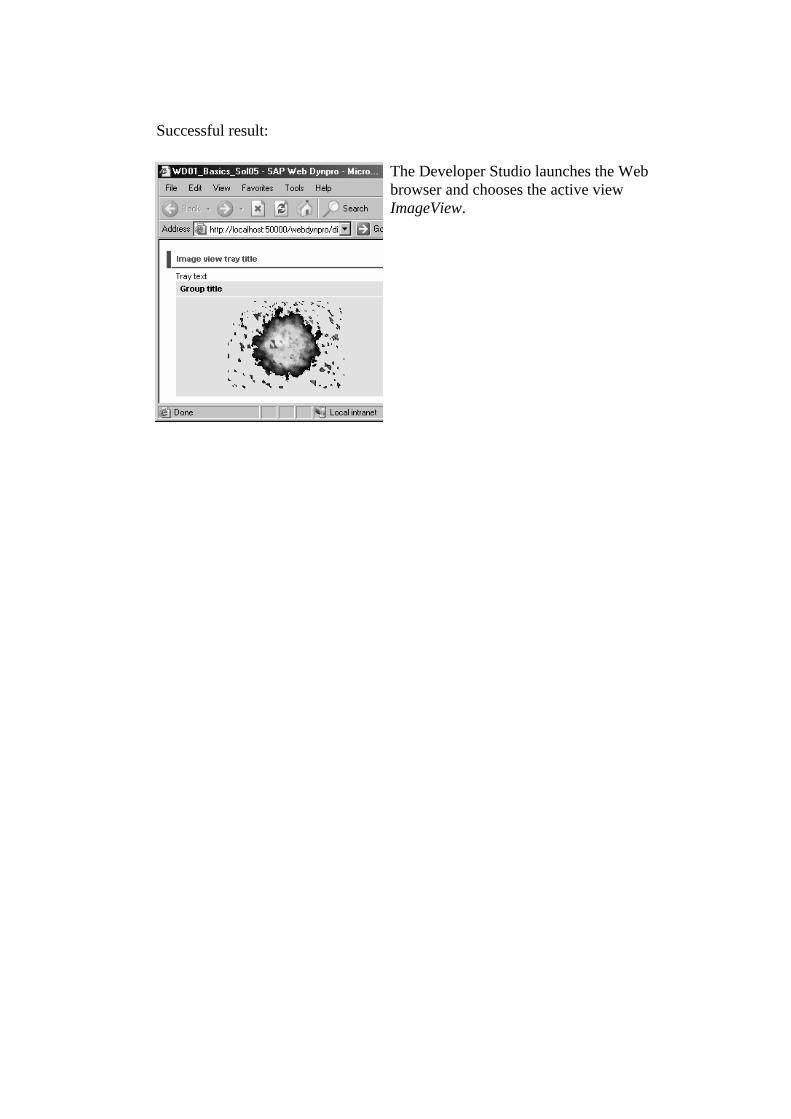
Successful result:
The Developer Studio launches the Web browser and chooses the active view ImageView.
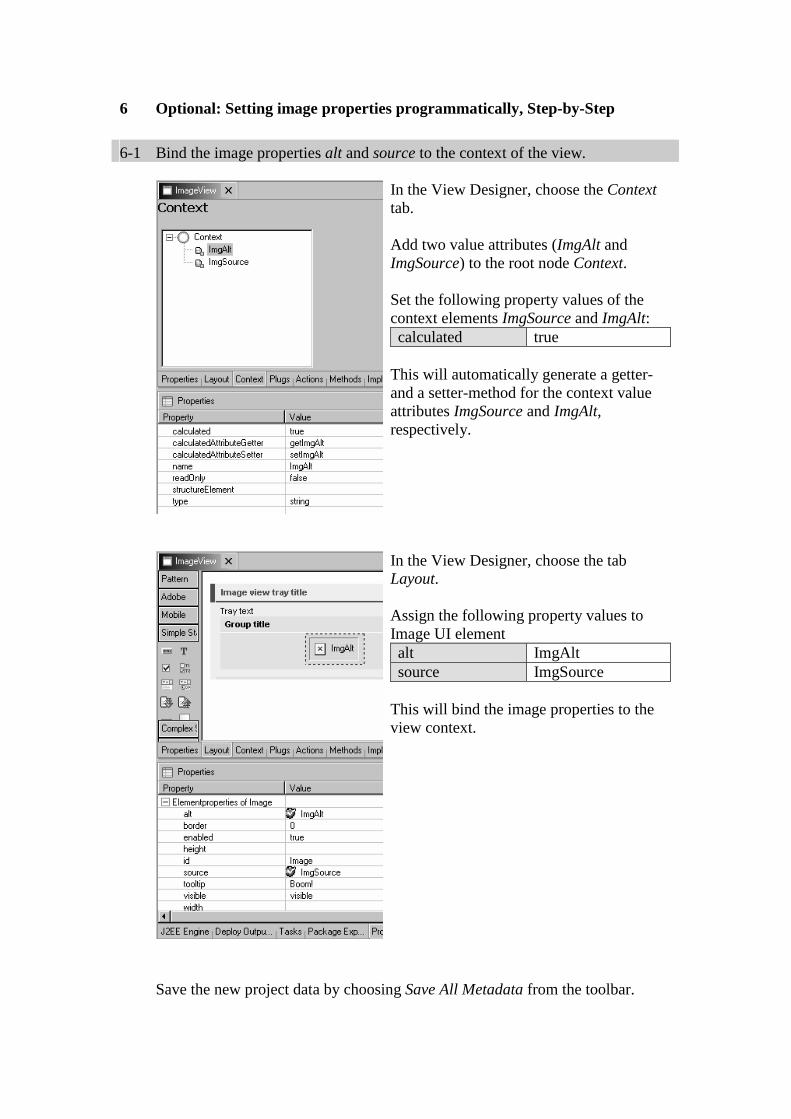
6 Optional: Setting image properties programmatically, Step-by-Step
6-1 Bind the image properties alt and source to the context of the view.
In the View Designer, choose the Context tab. Add two value attributes (ImgAlt and ImgSource) to the root node Context. Set the following property values of the context elements ImgSource and ImgAlt: calculated true
This will automatically generate a getter- and a setter-method for the context value attributes ImgSource and ImgAlt, respectively.
In the View Designer, choose the tab Layout. Assign the following property values to Image UI element alt ImgAlt source ImgSource
This will bind the image properties to the view context.
Save the new project data by choosing Save All Metadata from the toolbar.
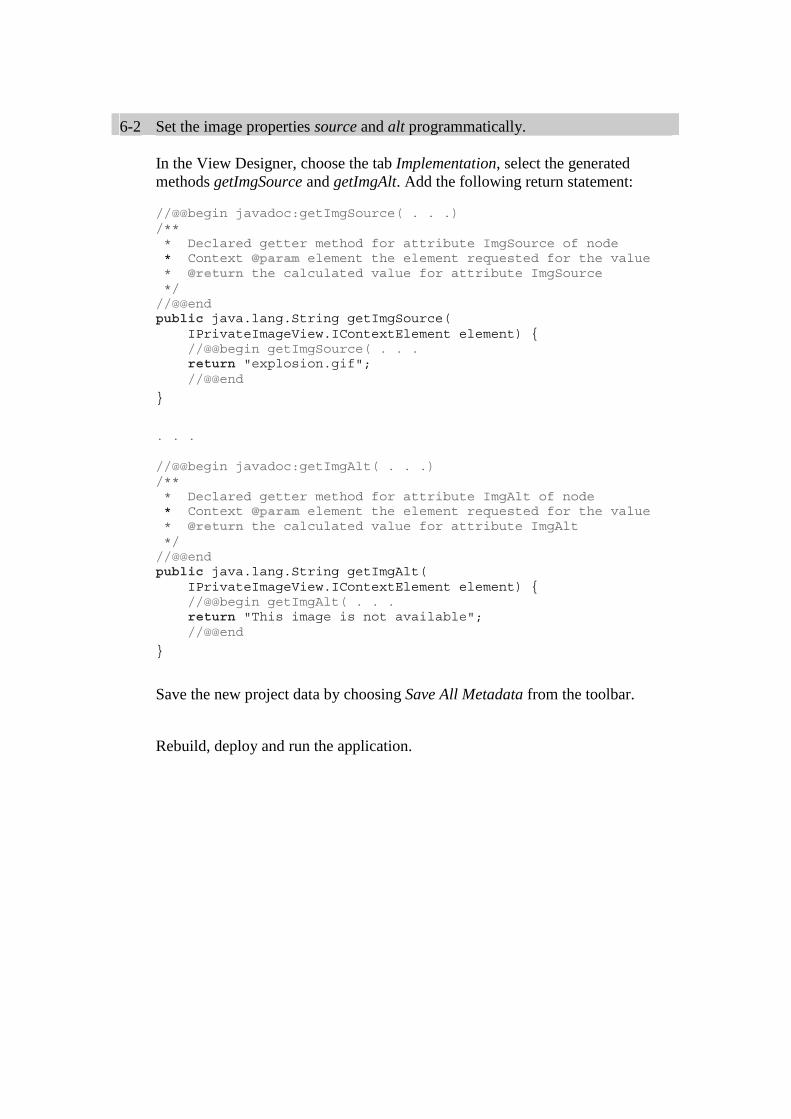
6-2 Set the image properties source and alt programmatically.
In the View Designer, choose the tab Implementation, select the generated methods getImgSource and getImgAlt. Add the following return statement: //@@begin javadoc:getImgSource( . . .) /** * Declared getter method for attribute ImgSource of node * Context @param element the element requested for the value * @return the calculated value for attribute ImgSource */ //@@end public java.lang.String getImgSource( IPrivateImageView.IContextElement element) { //@@begin getImgSource( . . . return "explosion.gif"; //@@end
}
. . . //@@begin javadoc:getImgAlt( . . .) /** * Declared getter method for attribute ImgAlt of node * Context @param element the element requested for the value * @return the calculated value for attribute ImgAlt */ //@@end public java.lang.String getImgAlt( IPrivateImageView.IContextElement element) { //@@begin getImgAlt( . . . return "This image is not available"; //@@end
}
Save the new project data by choosing Save All Metadata from the toolbar.
Rebuild, deploy and run the application.
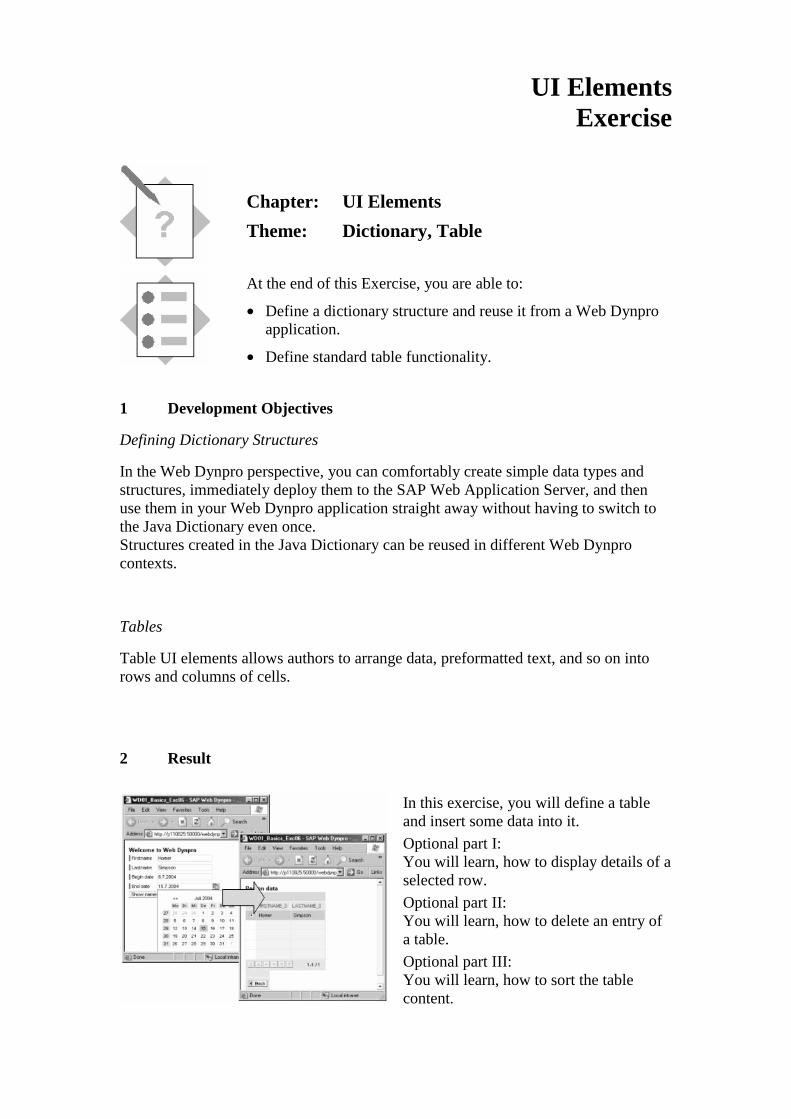
UI Elements Exercise
Chapter: UI Elements
Theme: Dictionary, Table
At the end of this Exercise, you are able to:
• Define a dictionary structure and reuse it from a Web Dynpro application.
• Define standard table functionality.
1 Development Objectives
Defining Dictionary Structures
In the Web Dynpro perspective, you can comfortably create simple data types and structures, immediately deploy them to the SAP Web Application Server, and then use them in your Web Dynpro application straight away without having to switch to the Java Dictionary even once. Structures created in the Java Dictionary can be reused in different Web Dynpro contexts.
Tables
Table UI elements allows authors to arrange data, preformatted text, and so on into rows and columns of cells.
2 Result
In this exercise, you will define a table and insert some data into it.
Optional part I: You will learn, how to display details of a selected row.
Optional part II: You will learn, how to delete an entry of a table.
Optional part III: You will learn, how to sort the table content.
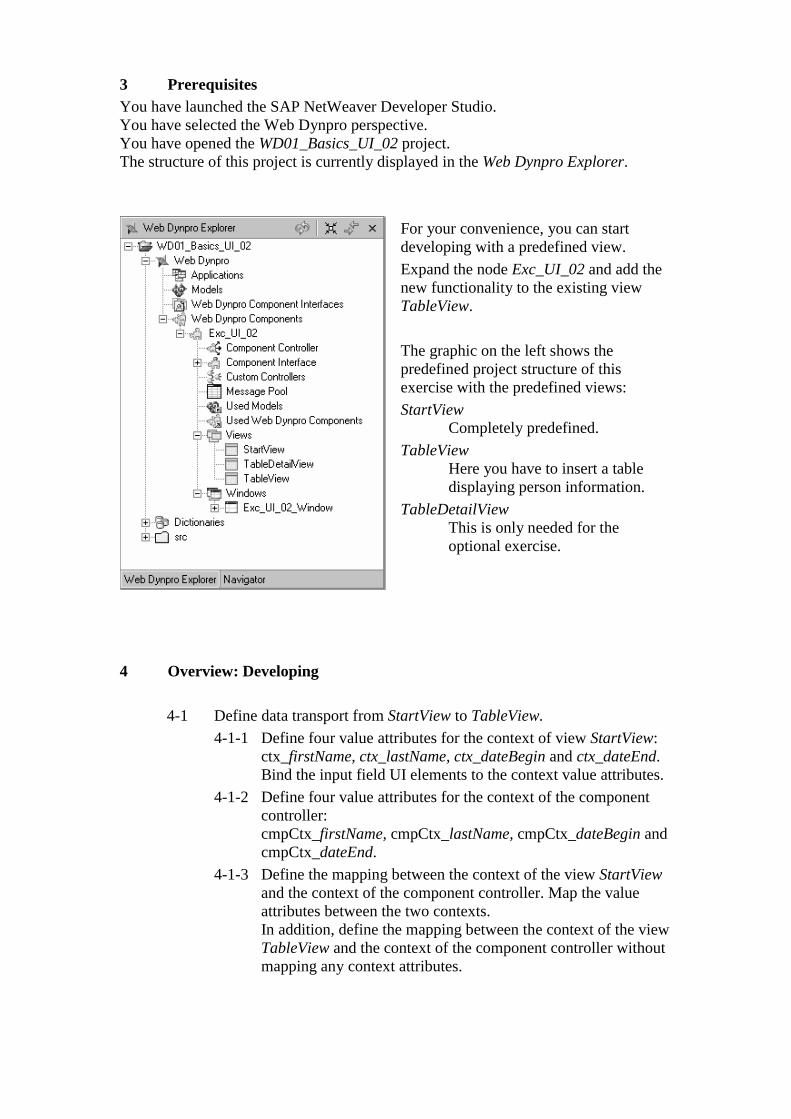
3 Prerequisites You have launched the SAP NetWeaver Developer Studio. You have selected the Web Dynpro perspective. You have opened the WD01_Basics_UI_02 project. The structure of this project is currently displayed in the Web Dynpro Explorer.
For your convenience, you can start developing with a predefined view.
Expand the node Exc_UI_02 and add the new functionality to the existing view TableView.
The graphic on the left shows the predefined project structure of this exercise with the predefined views:
StartView Completely predefined.
TableView Here you have to insert a table displaying person information.
TableDetailView This is only needed for the optional exercise.
4 Overview: Developing
4-1 Define data transport from StartView to TableView.
4-1-1 Define four value attributes for the context of view StartView: ctx_firstName, ctx_lastName, ctx_dateBegin and ctx_dateEnd. Bind the input field UI elements to the context value attributes.
4-1-2 Define four value attributes for the context of the component controller: cmpCtx_firstName, cmpCtx_lastName, cmpCtx_dateBegin and cmpCtx_dateEnd.
4-1-3 Define the mapping between the context of the view StartView and the context of the component controller. Map the value attributes between the two contexts. In addition, define the mapping between the context of the view TableView and the context of the component controller without mapping any context attributes.
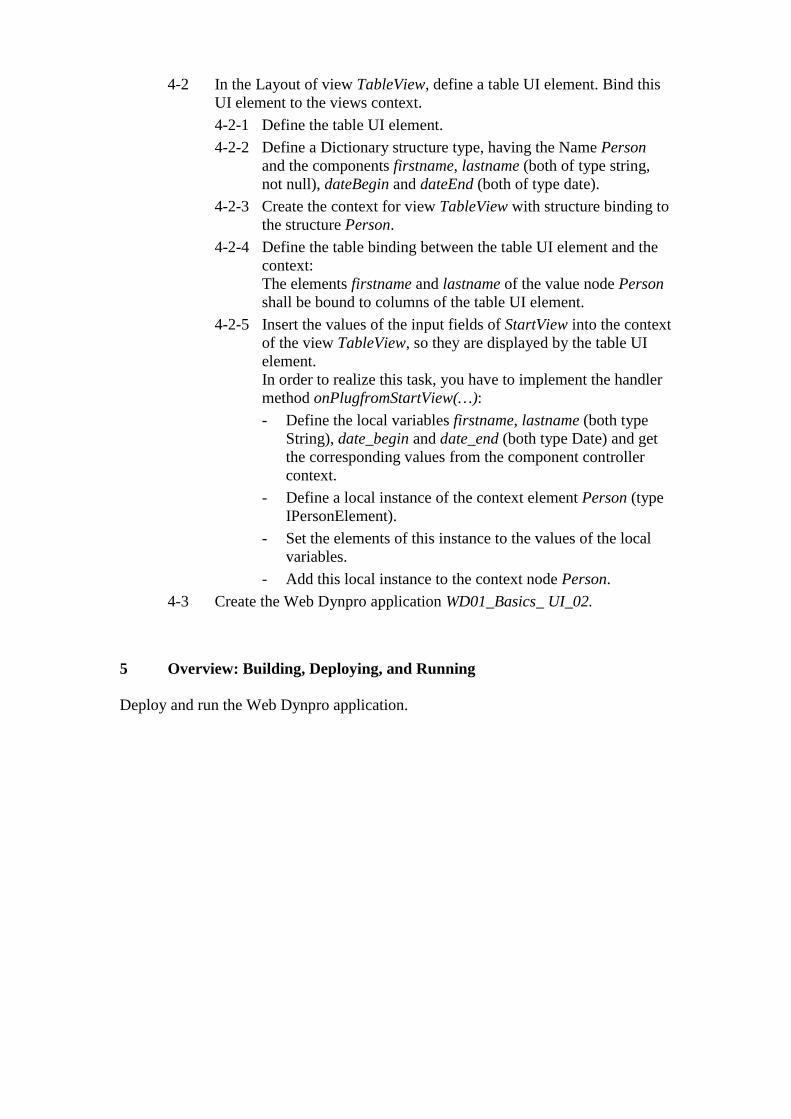
4-2 In the Layout of view TableView, define a table UI element. Bind this UI element to the views context.
4-2-1 Define the table UI element.
4-2-2 Define a Dictionary structure type, having the Name Person and the components firstname, lastname (both of type string, not null), dateBegin and dateEnd (both of type date).
4-2-3 Create the context for view TableView with structure binding to the structure Person.
4-2-4 Define the table binding between the table UI element and the context: The elements firstname and lastname of the value node Person shall be bound to columns of the table UI element.
4-2-5 Insert the values of the input fields of StartView into the context of the view TableView, so they are displayed by the table UI element. In order to realize this task, you have to implement the handler method onPlugfromStartView(…):
- Define the local variables firstname, lastname (both type String), date_begin and date_end (both type Date) and get the corresponding values from the component controller context.
- Define a local instance of the context element Person (type IPersonElement).
- Set the elements of this instance to the values of the local variables.
- Add this local instance to the context node Person.
4-3 Create the Web Dynpro application WD01_Basics_ UI_02. 5 Overview: Building, Deploying, and Running Deploy and run the Web Dynpro application.

6 Optional: Additional table features.
6-1 Show Details of a selected table row in a separate view.
In this exercise, you add an additional view TableDetailView to the component. When you select a table row and choose the Details button, the TableDetailView appears and the details of the selected person are displayed.
6-1-1 Define data transport from TableView to TableDetailView.
6-1-1-1 Define the component context value node Person for the component controller.
6-1-1-2 Define the view context value node Person for the view TableDetailView.
6-1-1-3 Define the context mapping between the view context of TableView and the component context. Define the mapping between the value nodes of the two contexts.
6-1-1-4 Define the context mapping between the context of the view TableDetailView and the context of the component controller. Define the mapping between the value nodes of the two contexts.
6-1-2 Add input fields for all context elements to the detail view TableDetailView. Apply the template Form to define input fields and labels.
6-1-3 Define the navigation between the views TableView and TableDetailView.
6-1-4 Create the Web Dynpro application WD01_Basics_UI_02.
6-1-5 Build, deploy and run the application.
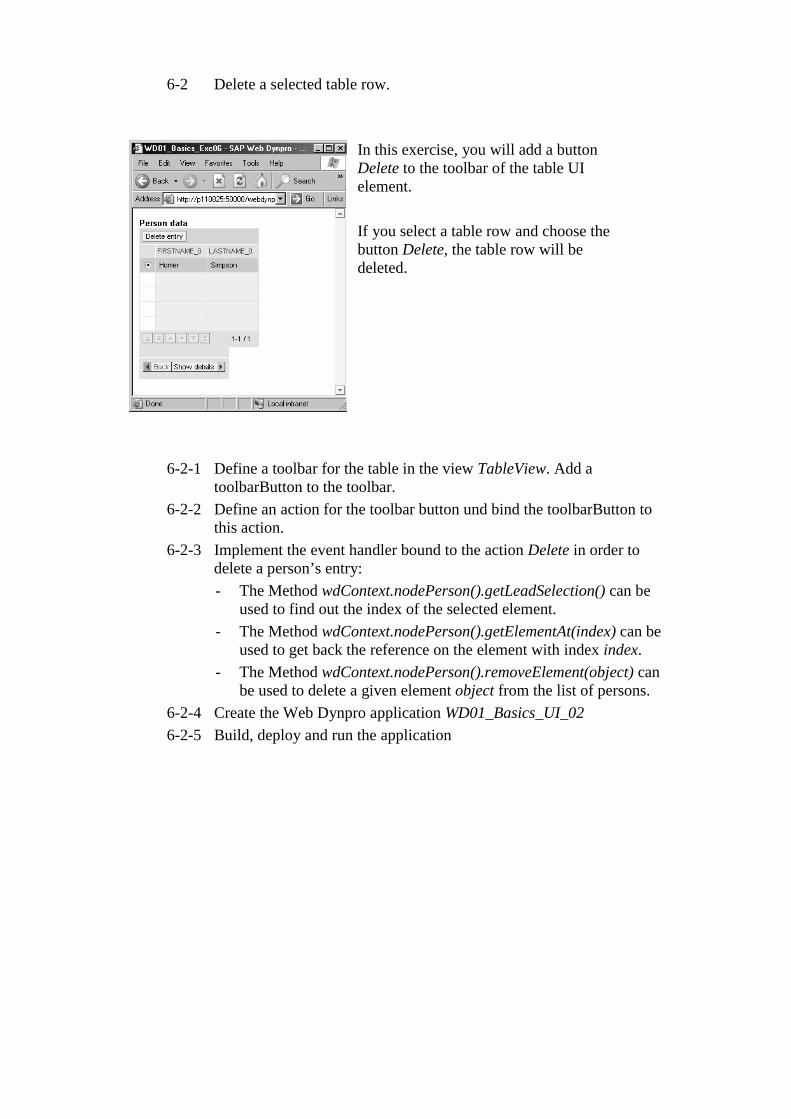
6-2 Delete a selected table row.
In this exercise, you will add a button Delete to the toolbar of the table UI element.
If you select a table row and choose the button Delete, the table row will be deleted.
6-2-1 Define a toolbar for the table in the view TableView. Add a toolbarButton to the toolbar.
6-2-2 Define an action for the toolbar button und bind the toolbarButton to this action.
6-2-3 Implement the event handler bound to the action Delete in order to delete a person’s entry:
- The Method wdContext.nodePerson().getLeadSelection() can be used to find out the index of the selected element.
- The Method wdContext.nodePerson().getElementAt(index) can be used to get back the reference on the element with index index.
- The Method wdContext.nodePerson().removeElement(object) can be used to delete a given element object from the list of persons.
6-2-4 Create the Web Dynpro application WD01_Basics_UI_02
6-2-5 Build, deploy and run the application
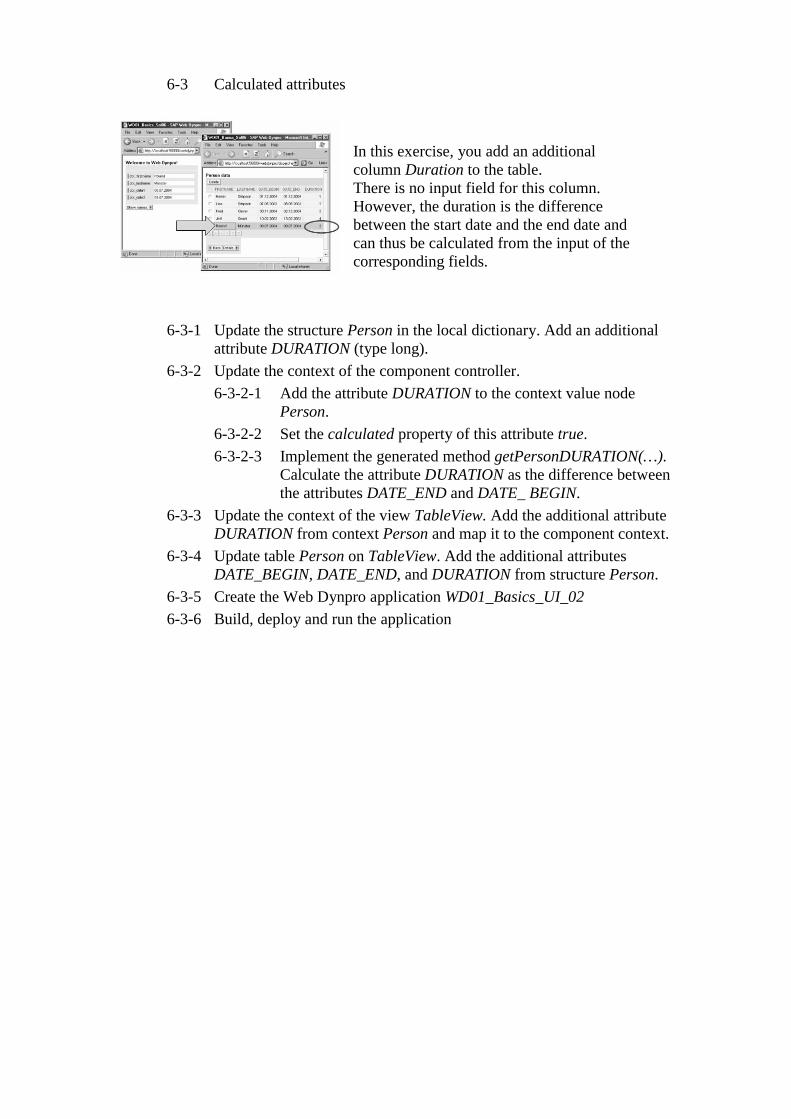
6-3 Calculated attributes
In this exercise, you add an additional column Duration to the table. There is no input field for this column. However, the duration is the difference between the start date and the end date and can thus be calculated from the input of the corresponding fields.
6-3-1 Update the structure Person in the local dictionary. Add an additional attribute DURATION (type long).
6-3-2 Update the context of the component controller.
6-3-2-1 Add the attribute DURATION to the context value node Person.
6-3-2-2 Set the calculated property of this attribute true.
6-3-2-3 Implement the generated method getPersonDURATION(…). Calculate the attribute DURATION as the difference between the attributes DATE_END and DATE_ BEGIN.
6-3-3 Update the context of the view TableView. Add the additional attribute DURATION from context Person and map it to the component context.
6-3-4 Update table Person on TableView. Add the additional attributes DATE_BEGIN, DATE_END, and DURATION from structure Person.
6-3-5 Create the Web Dynpro application WD01_Basics_UI_02
6-3-6 Build, deploy and run the application
UI Elements Solution
Chapter: UI Elements
Theme: Dictionary, Table
At the end of this Exercise, you are able to:
• Define a dictionary structure and reuse it from a Web Dynpro application.
• Define standard table functionality.
4 Developing, Step-by-Step Note: In this exercise you have to type in some lines of java code. For your convenience, you can cut and paste the code from the corresponding solution project. But keep in mind: Some of the methods are automatically generated by Web Dynpro .Because of that, the methods names you have to choose can differ from the method names of the solution. 4-1 Define data transport from StartView to TableView. 4-1-1 Define view attributes for the context of the view StartView.
In the Web Dynpro Explorer:
Expand the nodes WD01_Basics_UI_02 / Web Dynpro / Web Dynpro Components / Exc_UI_02.
Select the node Views and open the context menu of StartView.
Choose Edit.
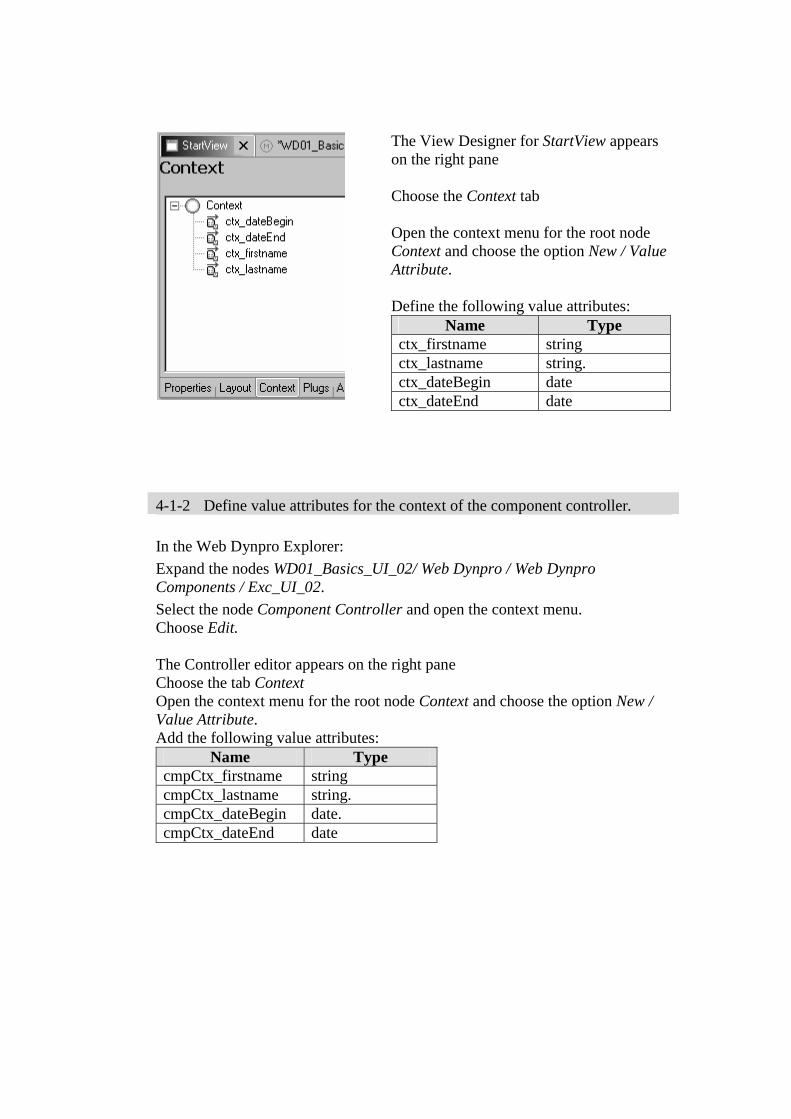
The View Designer for StartView appears on the right pane Choose the Context tab Open the context menu for the root node Context and choose the option New / Value Attribute. Define the following value attributes:
Name Type ctx_firstname string ctx_lastname string. ctx_dateBegin date ctx_dateEnd date
4-1-2 Define value attributes for the context of the component controller.
In the Web Dynpro Explorer:
Expand the nodes WD01_Basics_UI_02/ Web Dynpro / Web Dynpro Components / Exc_UI_02.
Select the node Component Controller and open the context menu. Choose Edit. The Controller editor appears on the right pane Choose the tab Context Open the context menu for the root node Context and choose the option New / Value Attribute. Add the following value attributes:
Name Type cmpCtx_firstname string cmpCtx_lastname string. cmpCtx_dateBegin date. cmpCtx_dateEnd date
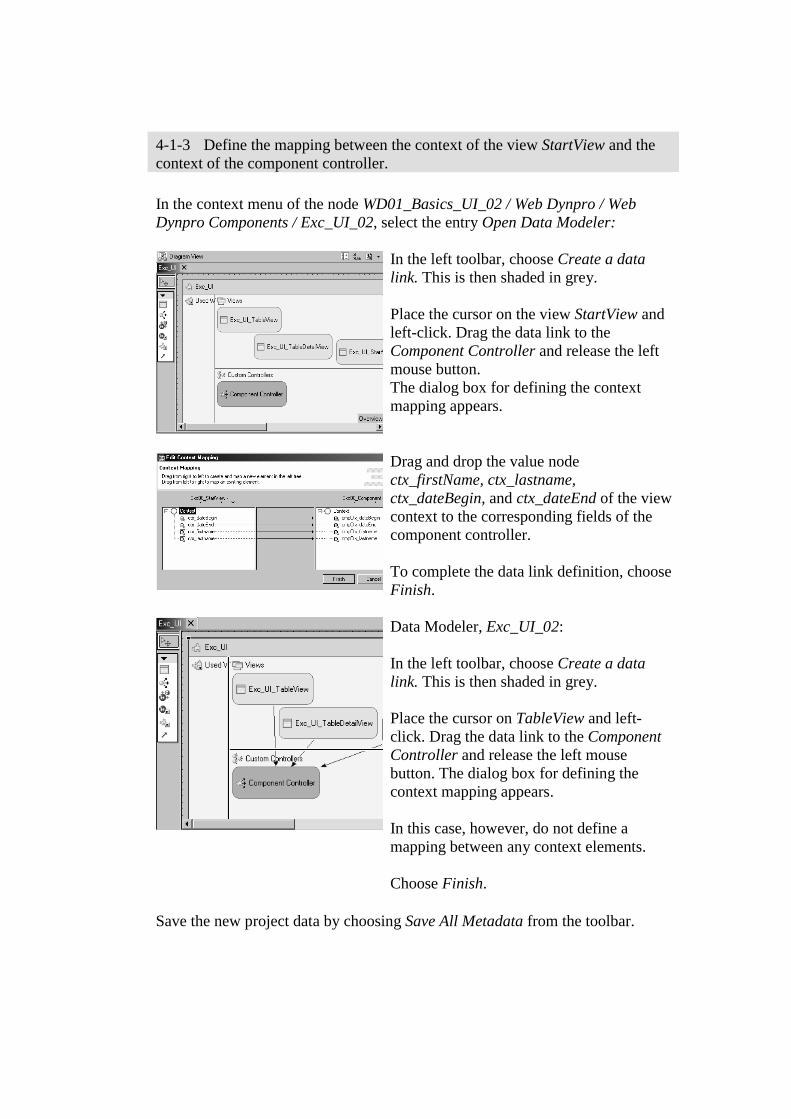
4-1-3 Define the mapping between the context of the view StartView and the context of the component controller.
In the context menu of the node WD01_Basics_UI_02 / Web Dynpro / Web Dynpro Components / Exc_UI_02, select the entry Open Data Modeler:
In the left toolbar, choose Create a data link. This is then shaded in grey. Place the cursor on the view StartView and left-click. Drag the data link to the Component Controller and release the left mouse button. The dialog box for defining the context mapping appears.
Drag and drop the value node ctx_firstName, ctx_lastname, ctx_dateBegin, and ctx_dateEnd of the view context to the corresponding fields of the component controller. To complete the data link definition, choose Finish.
Data Modeler, Exc_UI_02: In the left toolbar, choose Create a data link. This is then shaded in grey. Place the cursor on TableView and left-click. Drag the data link to the Component Controller and release the left mouse button. The dialog box for defining the context mapping appears. In this case, however, do not define a mapping between any context elements. Choose Finish.
Save the new project data by choosing Save All Metadata from the toolbar.
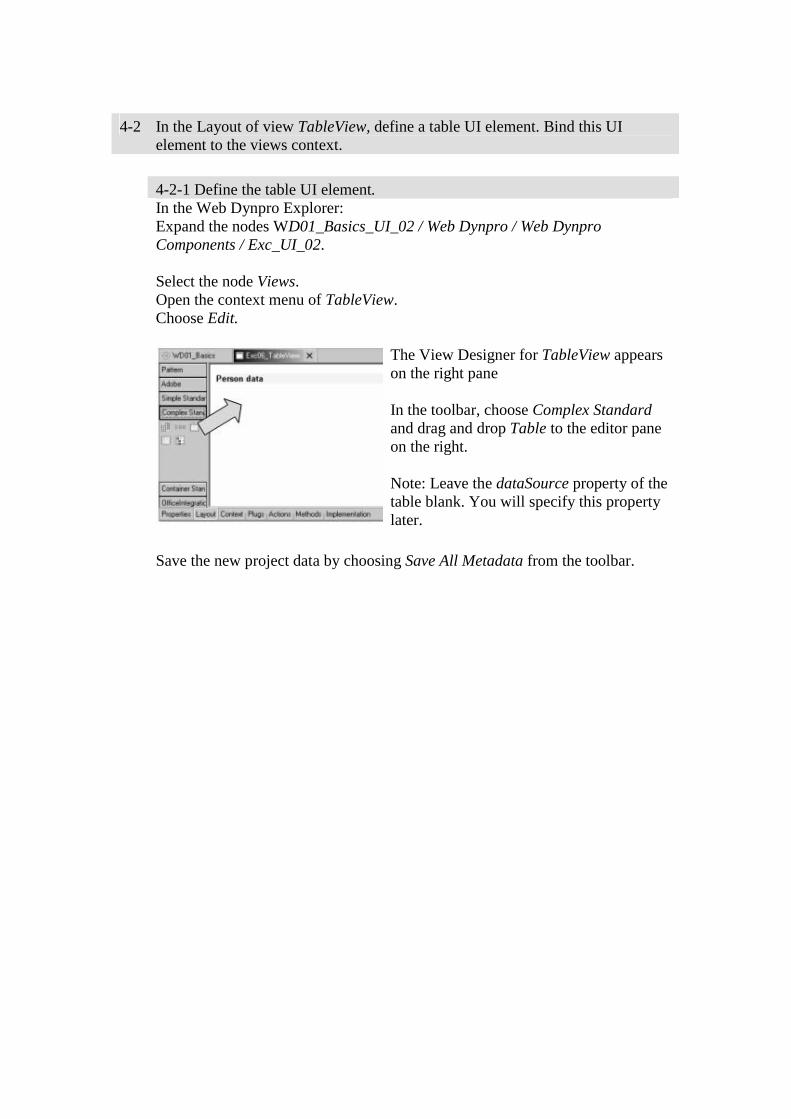
4-2 In the Layout of view TableView, define a table UI element. Bind this UI element to the views context.
4-2-1 Define the table UI element. In the Web Dynpro Explorer:
Expand the nodes WD01_Basics_UI_02 / Web Dynpro / Web Dynpro Components / Exc_UI_02. Select the node Views. Open the context menu of TableView. Choose Edit.
The View Designer for TableView appears on the right pane In the toolbar, choose Complex Standard and drag and drop Table to the editor pane on the right. Note: Leave the dataSource property of the table blank. You will specify this property later.
Save the new project data by choosing Save All Metadata from the toolbar.
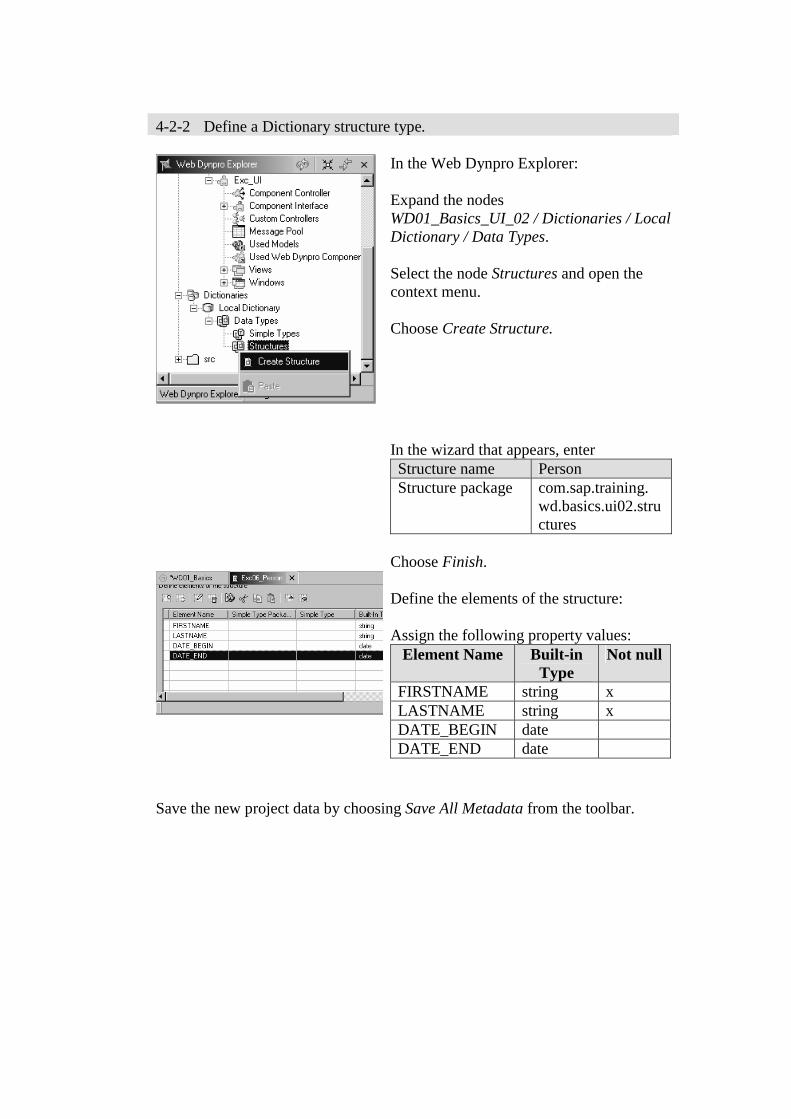
4-2-2 Define a Dictionary structure type.
In the Web Dynpro Explorer: Expand the nodes WD01_Basics_UI_02 / Dictionaries / Local Dictionary / Data Types. Select the node Structures and open the context menu. Choose Create Structure.
In the wizard that appears, enter Structure name Person Structure package com.sap.training.
wd.basics.ui02.structures
Choose Finish.
Define the elements of the structure: Assign the following property values:
Element Name Built-in Type
Not null
FIRSTNAME string x LASTNAME string x DATE_BEGIN date DATE_END date
Save the new project data by choosing Save All Metadata from the toolbar.
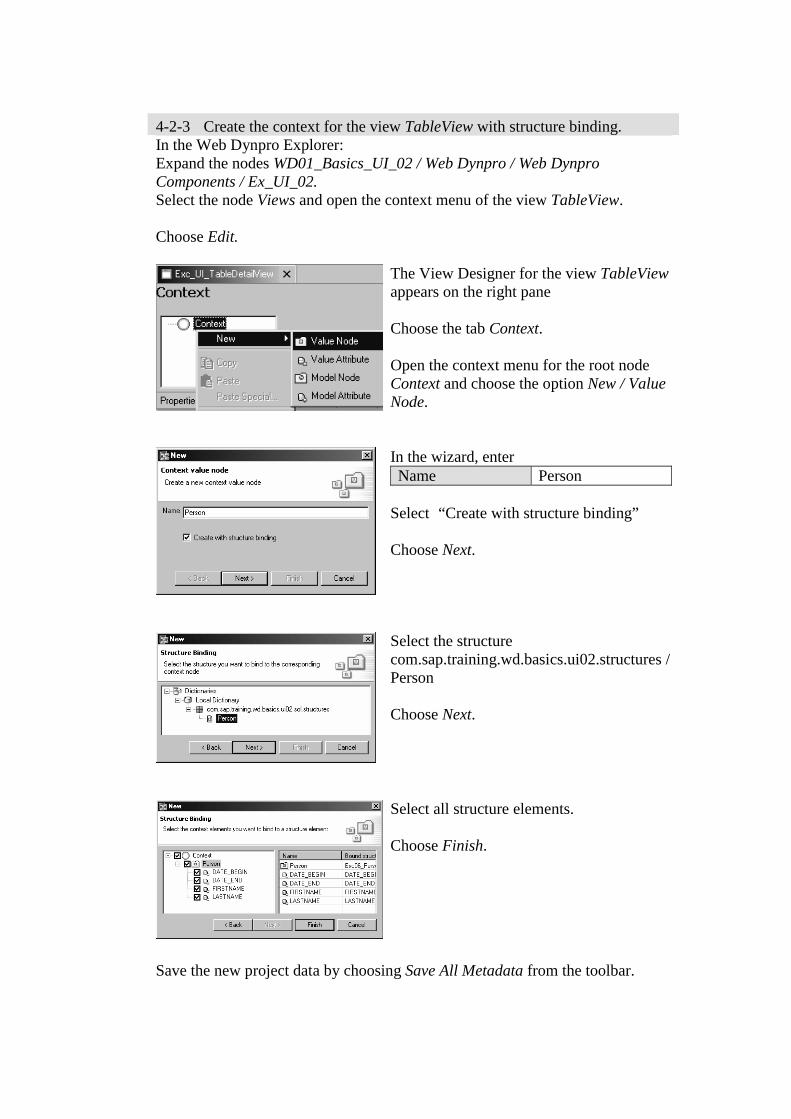
4-2-3 Create the context for the view TableView with structure binding. In the Web Dynpro Explorer:
Expand the nodes WD01_Basics_UI_02 / Web Dynpro / Web Dynpro Components / Ex_UI_02. Select the node Views and open the context menu of the view TableView. Choose Edit.
The View Designer for the view TableView appears on the right pane Choose the tab Context. Open the context menu for the root node Context and choose the option New / Value Node.
In the wizard, enter Name Person
Select “Create with structure binding” Choose Next.
Select the structure com.sap.training.wd.basics.ui02.structures / Person Choose Next.
Select all structure elements. Choose Finish.
Save the new project data by choosing Save All Metadata from the toolbar.
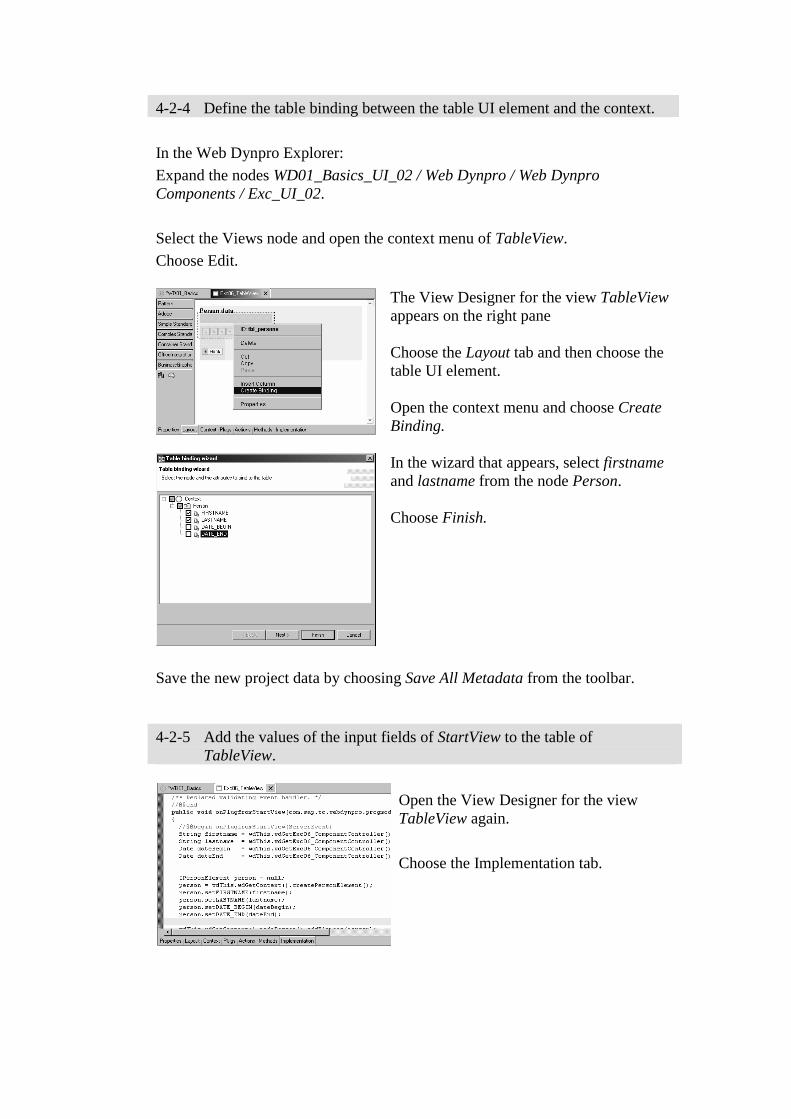
4-2-4 Define the table binding between the table UI element and the context.
In the Web Dynpro Explorer:
Expand the nodes WD01_Basics_UI_02 / Web Dynpro / Web Dynpro Components / Exc_UI_02.
Select the Views node and open the context menu of TableView.
Choose Edit.
The View Designer for the view TableView appears on the right pane Choose the Layout tab and then choose the table UI element. Open the context menu and choose Create Binding.
In the wizard that appears, select firstname and lastname from the node Person. Choose Finish.
Save the new project data by choosing Save All Metadata from the toolbar. 4-2-5 Add the values of the input fields of StartView to the table of
TableView.
Open the View Designer for the view TableView again.
Choose the Implementation tab.
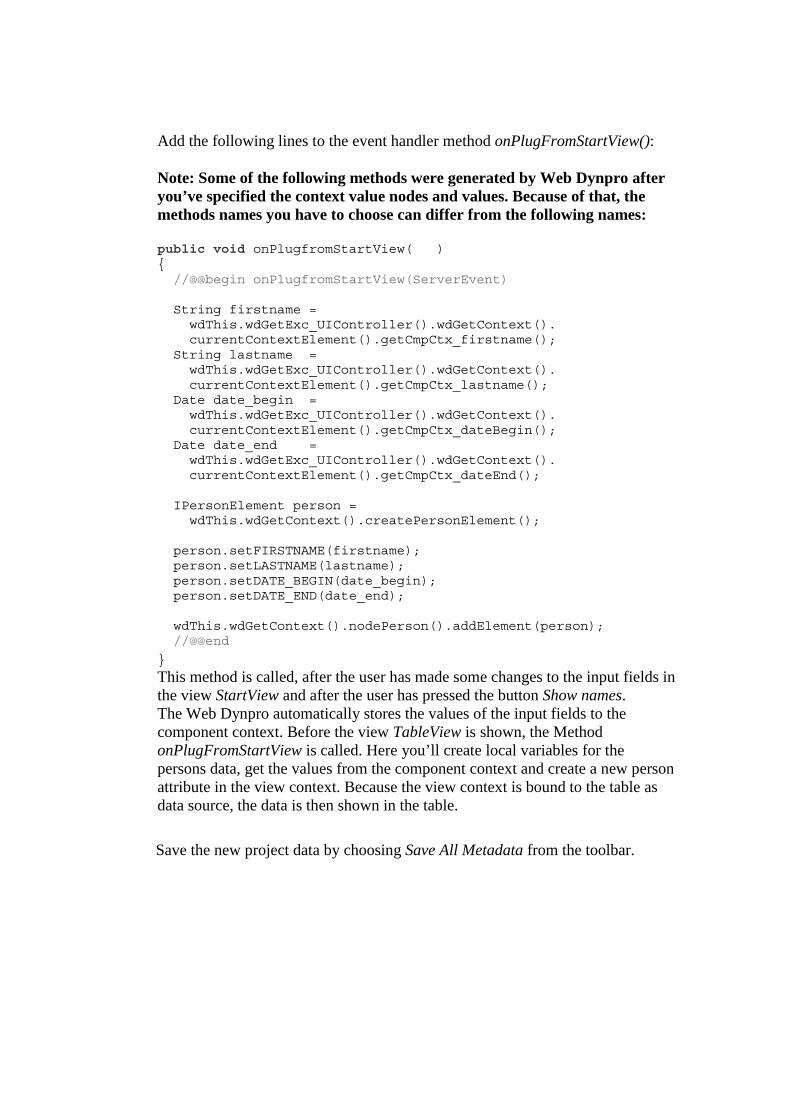
Add the following lines to the event handler method onPlugFromStartView(): Note: Some of the following methods were generated by Web Dynpro after you’ve specified the context value nodes and values. Because of that, the methods names you have to choose can differ from the following names: public void onPlugfromStartView( ) { //@@begin onPlugfromStartView(ServerEvent) String firstname = wdThis.wdGetExc_UIController().wdGetContext(). currentContextElement().getCmpCtx_firstname(); String lastname = wdThis.wdGetExc_UIController().wdGetContext(). currentContextElement().getCmpCtx_lastname(); Date date_begin = wdThis.wdGetExc_UIController().wdGetContext(). currentContextElement().getCmpCtx_dateBegin(); Date date_end = wdThis.wdGetExc_UIController().wdGetContext(). currentContextElement().getCmpCtx_dateEnd(); IPersonElement person = wdThis.wdGetContext().createPersonElement(); person.setFIRSTNAME(firstname); person.setLASTNAME(lastname); person.setDATE_BEGIN(date_begin); person.setDATE_END(date_end); wdThis.wdGetContext().nodePerson().addElement(person); //@@end
}
This method is called, after the user has made some changes to the input fields in the view StartView and after the user has pressed the button Show names. The Web Dynpro automatically stores the values of the input fields to the component context. Before the view TableView is shown, the Method onPlugFromStartView is called. Here you’ll create local variables for the persons data, get the values from the component context and create a new person attribute in the view context. Because the view context is bound to the table as data source, the data is then shown in the table.
Save the new project data by choosing Save All Metadata from the toolbar.
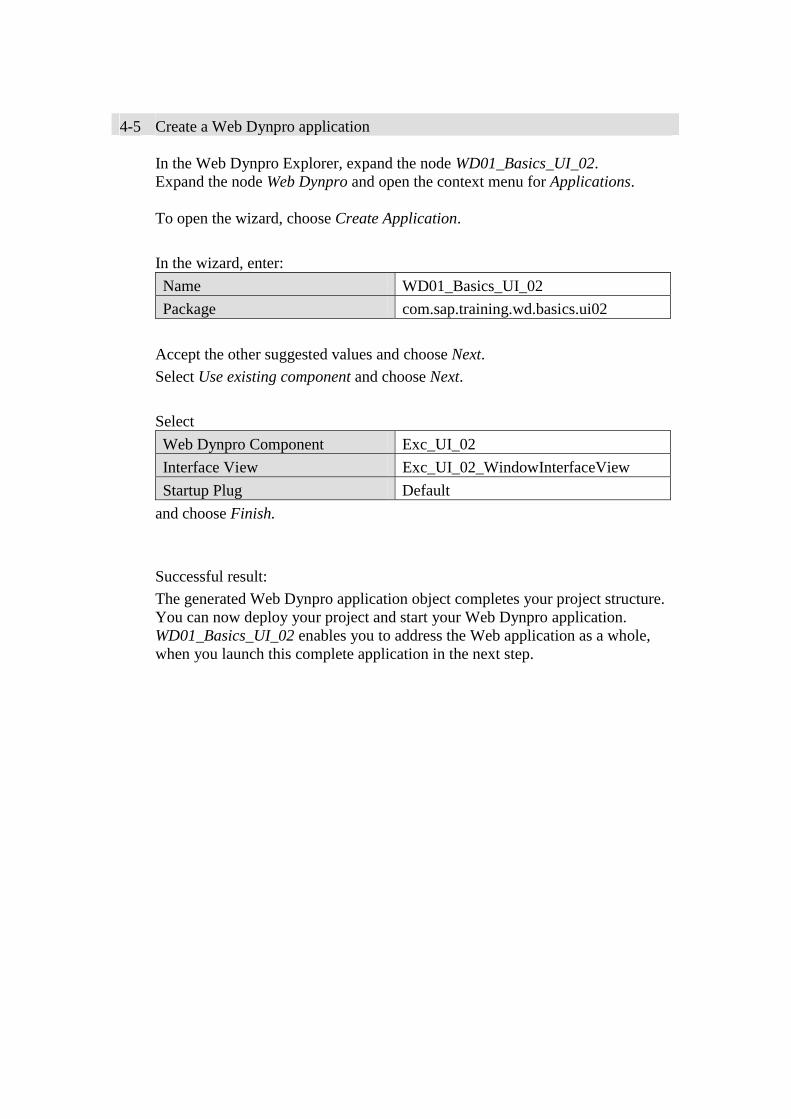
4-5 Create a Web Dynpro application
In the Web Dynpro Explorer, expand the node WD01_Basics_UI_02. Expand the node Web Dynpro and open the context menu for Applications. To open the wizard, choose Create Application.
In the wizard, enter:
Name WD01_Basics_UI_02
Package com.sap.training.wd.basics.ui02
Accept the other suggested values and choose Next.
Select Use existing component and choose Next.
Select
Web Dynpro Component Exc_UI_02
Interface View Exc_UI_02_WindowInterfaceView
Startup Plug Default
and choose Finish.
Successful result:
The generated Web Dynpro application object completes your project structure. You can now deploy your project and start your Web Dynpro application. WD01_Basics_UI_02 enables you to address the Web application as a whole, when you launch this complete application in the next step.
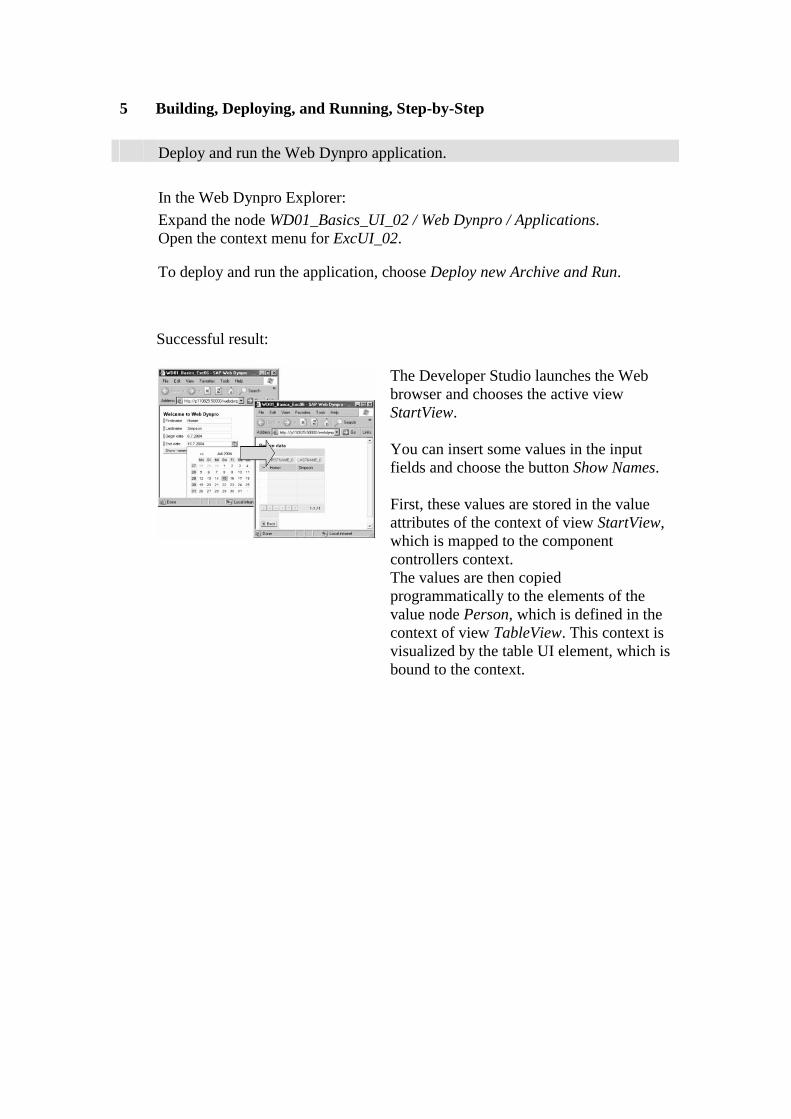
5 Building, Deploying, and Running, Step-by-Step Deploy and run the Web Dynpro application.
In the Web Dynpro Explorer:
Expand the node WD01_Basics_UI_02 / Web Dynpro / Applications. Open the context menu for ExcUI_02. To deploy and run the application, choose Deploy new Archive and Run.
Successful result:
The Developer Studio launches the Web browser and chooses the active view StartView. You can insert some values in the input fields and choose the button Show Names. First, these values are stored in the value attributes of the context of view StartView, which is mapped to the component controllers context. The values are then copied programmatically to the elements of the value node Person, which is defined in the context of view TableView. This context is visualized by the table UI element, which is bound to the context.
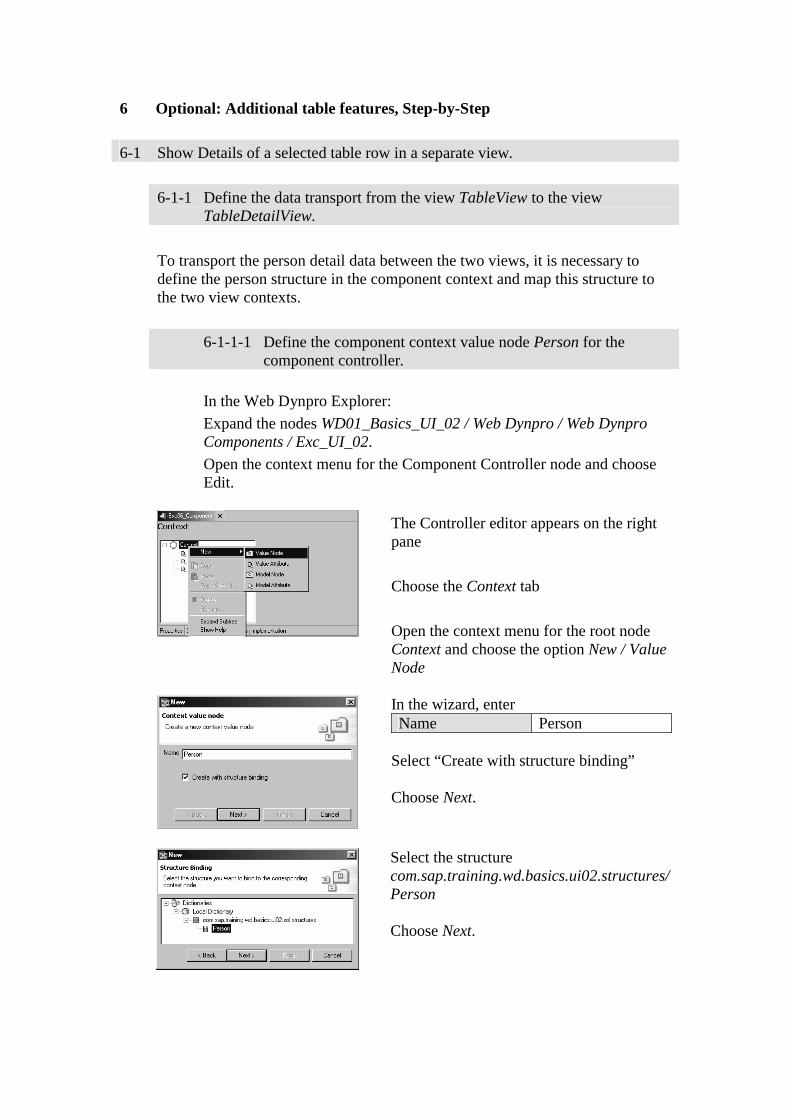
6 Optional: Additional table features, Step-by-Step
6-1 Show Details of a selected table row in a separate view.
6-1-1 Define the data transport from the view TableView to the view TableDetailView.
To transport the person detail data between the two views, it is necessary to define the person structure in the component context and map this structure to the two view contexts.
6-1-1-1 Define the component context value node Person for the component controller.
In the Web Dynpro Explorer:
Expand the nodes WD01_Basics_UI_02 / Web Dynpro / Web Dynpro Components / Exc_UI_02.
Open the context menu for the Component Controller node and choose Edit.
The Controller editor appears on the right pane
Choose the Context tab
Open the context menu for the root node Context and choose the option New / Value Node
In the wizard, enter Name Person
Select “Create with structure binding” Choose Next.
Select the structure com.sap.training.wd.basics.ui02.structures/Person Choose Next.
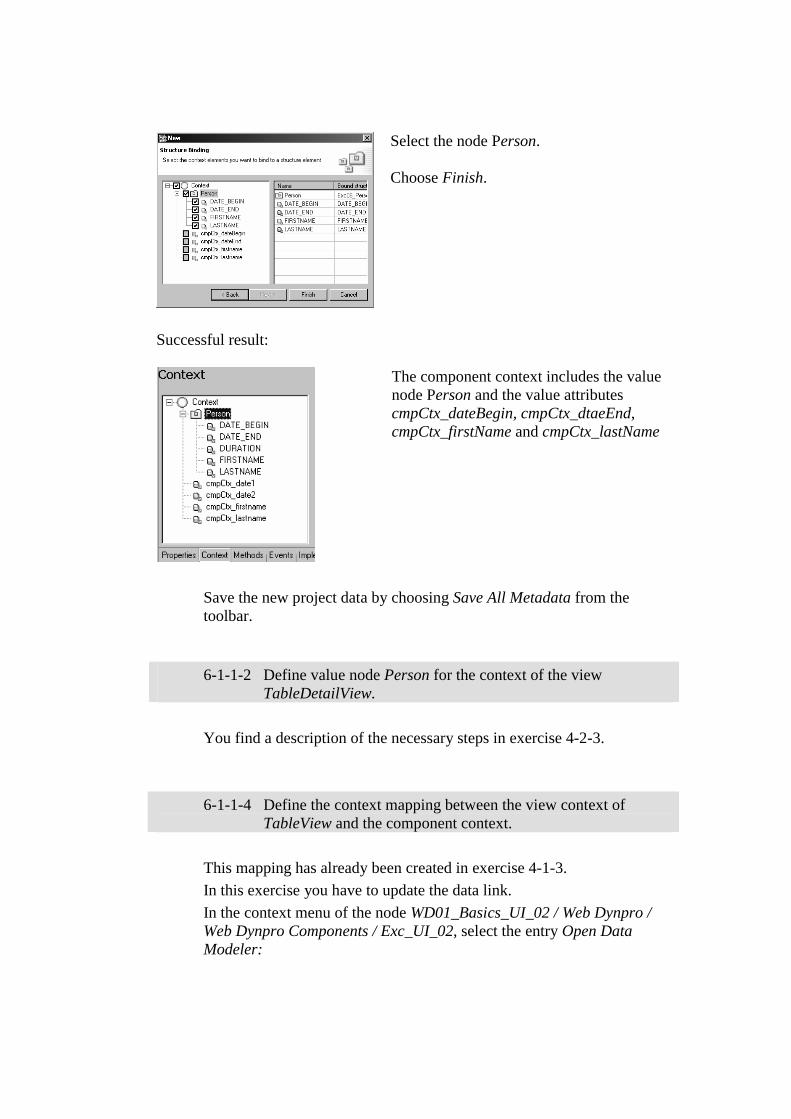
Select the node Person. Choose Finish.
Successful result:
The component context includes the value node Person and the value attributes cmpCtx_dateBegin, cmpCtx_dtaeEnd, cmpCtx_firstName and cmpCtx_lastName
Save the new project data by choosing Save All Metadata from the toolbar.
6-1-1-2 Define value node Person for the context of the view
TableDetailView.
You find a description of the necessary steps in exercise 4-2-3.
6-1-1-4 Define the context mapping between the view context of TableView and the component context.
This mapping has already been created in exercise 4-1-3.
In this exercise you have to update the data link.
In the context menu of the node WD01_Basics_UI_02 / Web Dynpro / Web Dynpro Components / Exc_UI_02, select the entry Open Data Modeler:
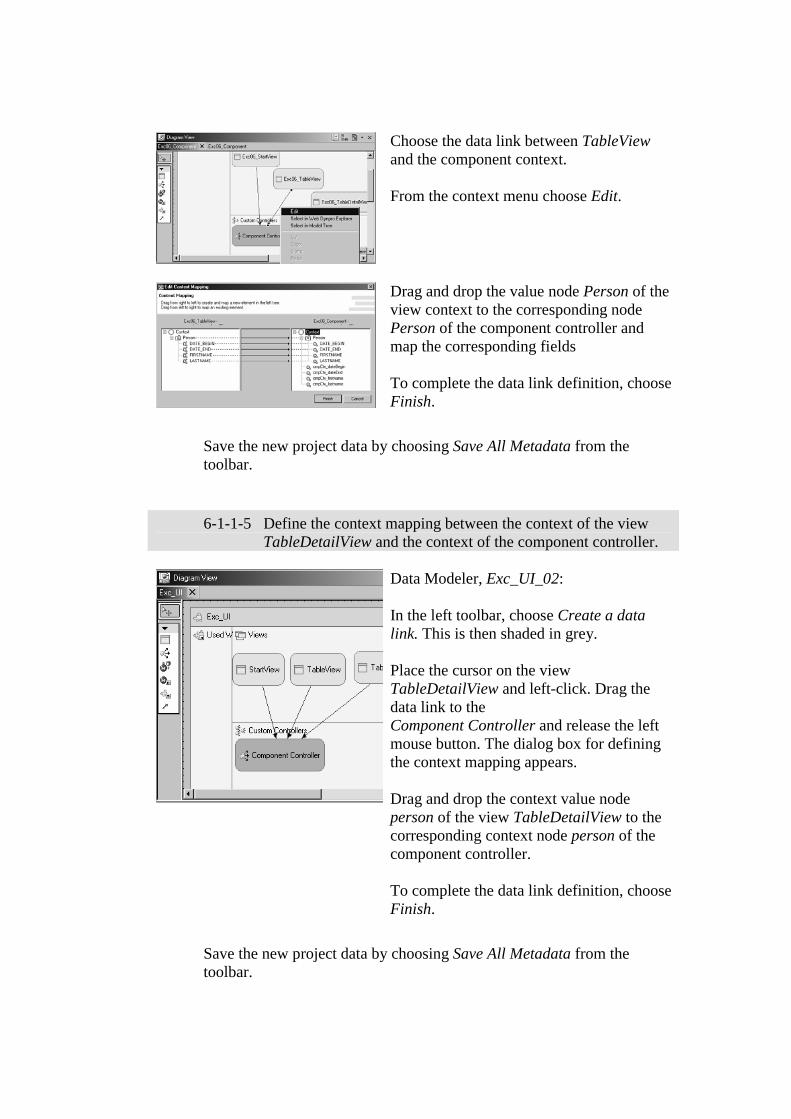
Choose the data link between TableView and the component context. From the context menu choose Edit.
Drag and drop the value node Person of the view context to the corresponding node Person of the component controller and map the corresponding fields To complete the data link definition, choose Finish.
Save the new project data by choosing Save All Metadata from the toolbar.
6-1-1-5 Define the context mapping between the context of the view TableDetailView and the context of the component controller.
Data Modeler, Exc_UI_02: In the left toolbar, choose Create a data link. This is then shaded in grey. Place the cursor on the view TableDetailView and left-click. Drag the data link to the Component Controller and release the left mouse button. The dialog box for defining the context mapping appears. Drag and drop the context value node person of the view TableDetailView to the corresponding context node person of the component controller. To complete the data link definition, choose Finish.
Save the new project data by choosing Save All Metadata from the toolbar.
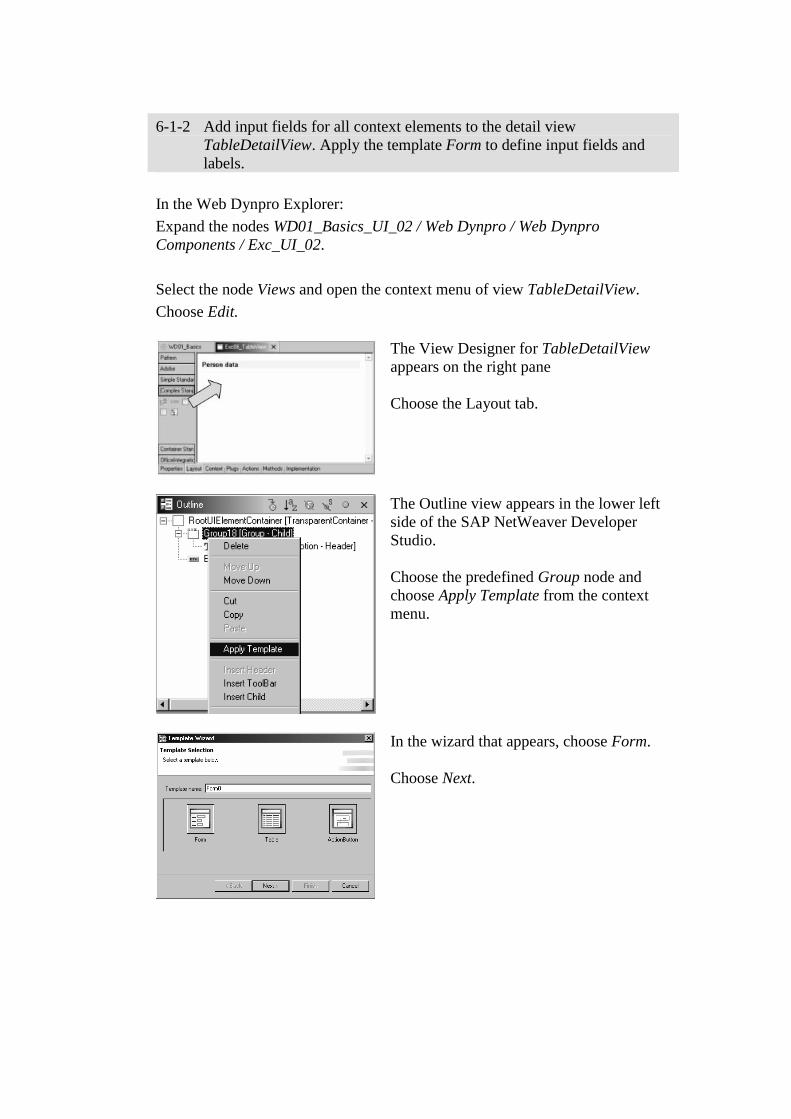
6-1-2 Add input fields for all context elements to the detail view TableDetailView. Apply the template Form to define input fields and labels.
In the Web Dynpro Explorer:
Expand the nodes WD01_Basics_UI_02 / Web Dynpro / Web Dynpro Components / Exc_UI_02.
Select the node Views and open the context menu of view TableDetailView.
Choose Edit.
The View Designer for TableDetailView appears on the right pane Choose the Layout tab.
The Outline view appears in the lower left side of the SAP NetWeaver Developer Studio. Choose the predefined Group node and choose Apply Template from the context menu.
In the wizard that appears, choose Form. Choose Next.
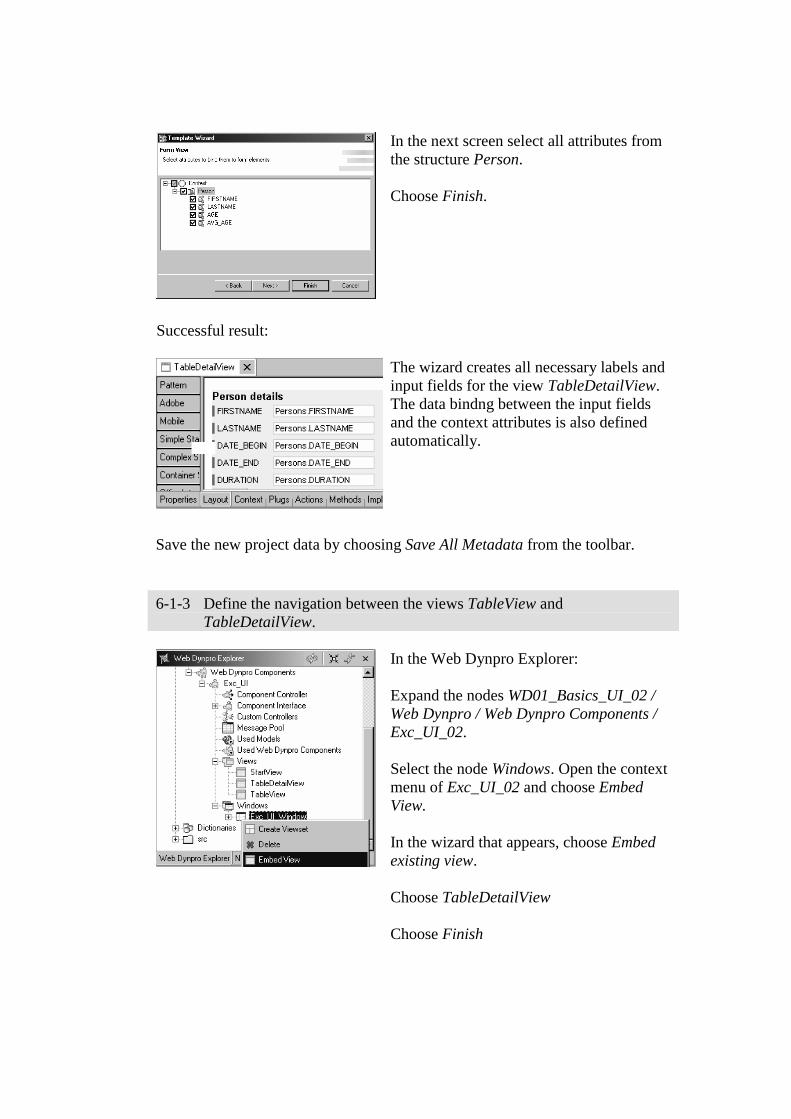
In the next screen select all attributes from the structure Person. Choose Finish.
Successful result:
The wizard creates all necessary labels and input fields for the view TableDetailView. The data bindng between the input fields and the context attributes is also defined automatically.
Save the new project data by choosing Save All Metadata from the toolbar.
6-1-3 Define the navigation between the views TableView and TableDetailView.
In the Web Dynpro Explorer: Expand the nodes WD01_Basics_UI_02 / Web Dynpro / Web Dynpro Components / Exc_UI_02. Select the node Windows. Open the context menu of Exc_UI_02 and choose Embed View. In the wizard that appears, choose Embed existing view. Choose TableDetailView Choose Finish
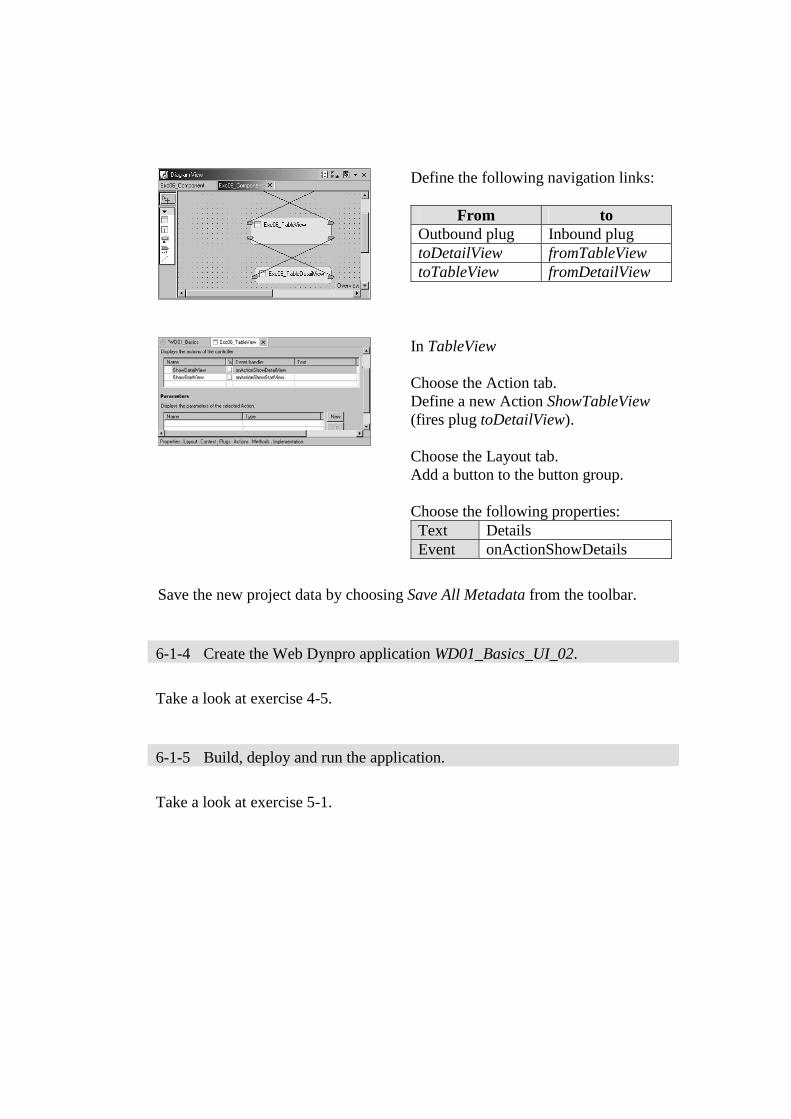
Define the following navigation links:
From to Outbound plug Inbound plug toDetailView fromTableView toTableView fromDetailView
In TableView Choose the Action tab. Define a new Action ShowTableView (fires plug toDetailView). Choose the Layout tab. Add a button to the button group. Choose the following properties: Text Details Event onActionShowDetails
Save the new project data by choosing Save All Metadata from the toolbar.
6-1-4 Create the Web Dynpro application WD01_Basics_UI_02.
Take a look at exercise 4-5.
6-1-5 Build, deploy and run the application.
Take a look at exercise 5-1.
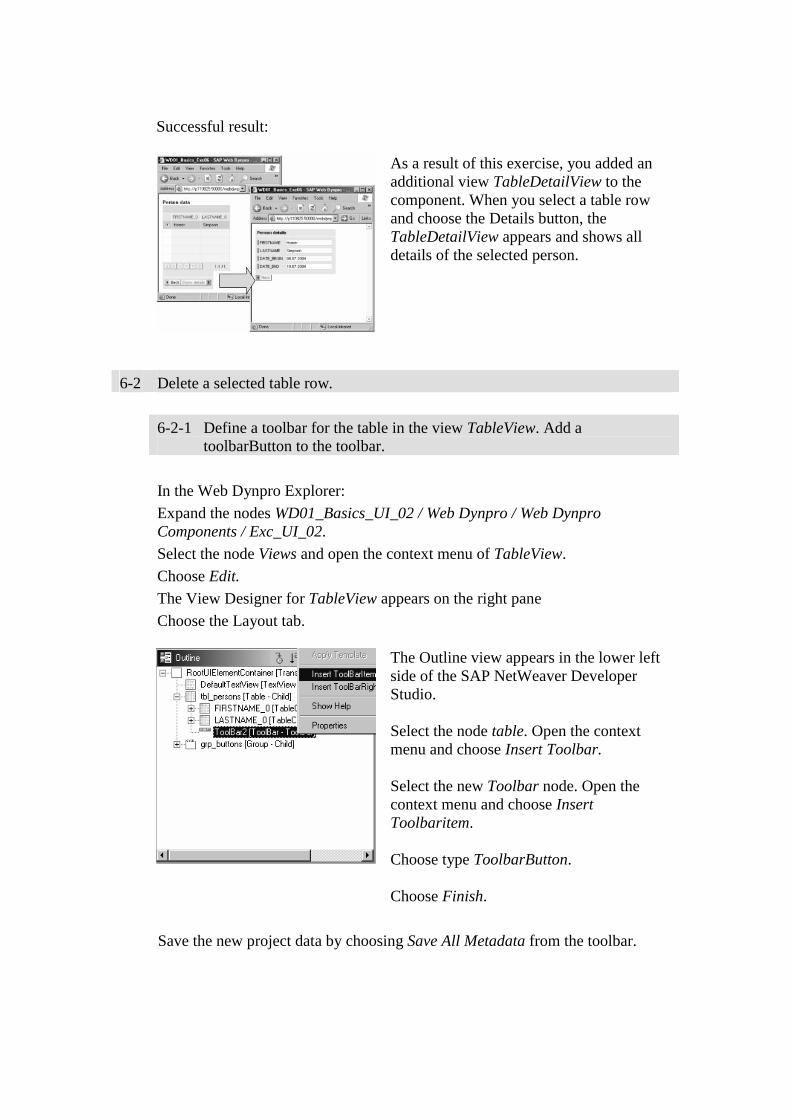
Successful result:
As a result of this exercise, you added an additional view TableDetailView to the component. When you select a table row and choose the Details button, the TableDetailView appears and shows all details of the selected person.
6-2 Delete a selected table row.
6-2-1 Define a toolbar for the table in the view TableView. Add a toolbarButton to the toolbar.
In the Web Dynpro Explorer:
Expand the nodes WD01_Basics_UI_02 / Web Dynpro / Web Dynpro Components / Exc_UI_02.
Select the node Views and open the context menu of TableView.
Choose Edit.
The View Designer for TableView appears on the right pane
Choose the Layout tab.
The Outline view appears in the lower left side of the SAP NetWeaver Developer Studio. Select the node table. Open the context menu and choose Insert Toolbar. Select the new Toolbar node. Open the context menu and choose Insert Toolbaritem. Choose type ToolbarButton. Choose Finish.
Save the new project data by choosing Save All Metadata from the toolbar.
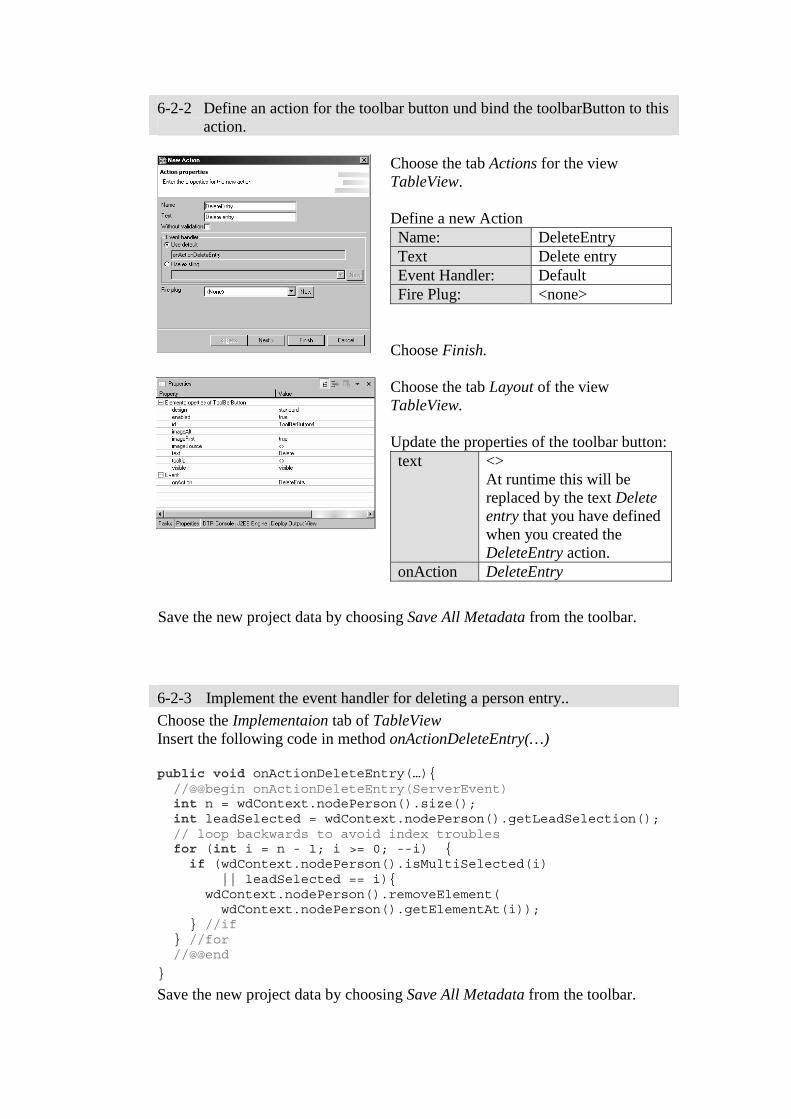
6-2-2 Define an action for the toolbar button und bind the toolbarButton to this action.
Choose the tab Actions for the view TableView. Define a new Action Name: DeleteEntry Text Delete entry Event Handler: Default Fire Plug: <none>
Choose Finish.
Choose the tab Layout of the view TableView. Update the properties of the toolbar button: text <>
At runtime this will be replaced by the text Delete entry that you have defined when you created the DeleteEntry action.
onAction DeleteEntry
Save the new project data by choosing Save All Metadata from the toolbar.
6-2-3 Implement the event handler for deleting a person entry.. Choose the Implementaion tab of TableView
Insert the following code in method onActionDeleteEntry(…) public void onActionDeleteEntry(…){ //@@begin onActionDeleteEntry(ServerEvent) int n = wdContext.nodePerson().size(); int leadSelected = wdContext.nodePerson().getLeadSelection(); // loop backwards to avoid index troubles for (int i = n - 1; i >= 0; --i) { if (wdContext.nodePerson().isMultiSelected(i) || leadSelected == i){ wdContext.nodePerson().removeElement( wdContext.nodePerson().getElementAt(i)); } //if } //for //@@end
}
Save the new project data by choosing Save All Metadata from the toolbar.
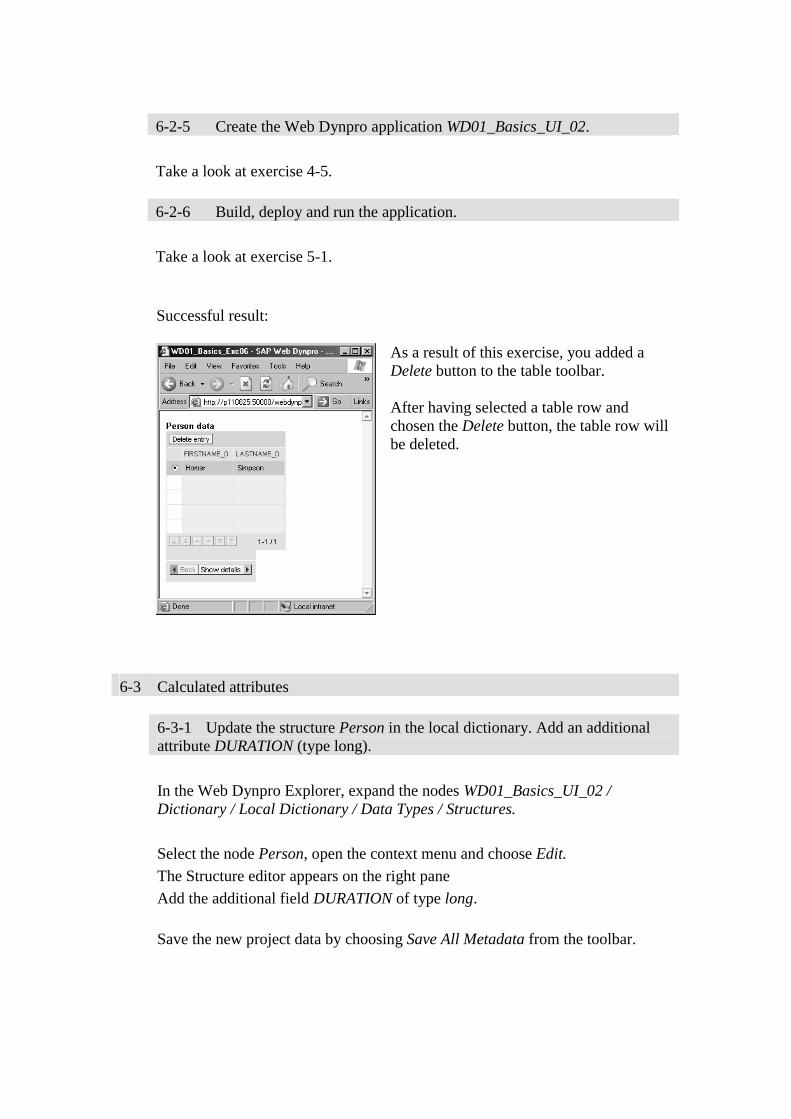
6-2-5 Create the Web Dynpro application WD01_Basics_UI_02.
Take a look at exercise 4-5.
6-2-6 Build, deploy and run the application.
Take a look at exercise 5-1.
Successful result:
As a result of this exercise, you added a Delete button to the table toolbar. After having selected a table row and chosen the Delete button, the table row will be deleted.
6-3 Calculated attributes
6-3-1 Update the structure Person in the local dictionary. Add an additional attribute DURATION (type long).
In the Web Dynpro Explorer, expand the nodes WD01_Basics_UI_02 / Dictionary / Local Dictionary / Data Types / Structures.
Select the node Person, open the context menu and choose Edit.
The Structure editor appears on the right pane
Add the additional field DURATION of type long.
Save the new project data by choosing Save All Metadata from the toolbar.
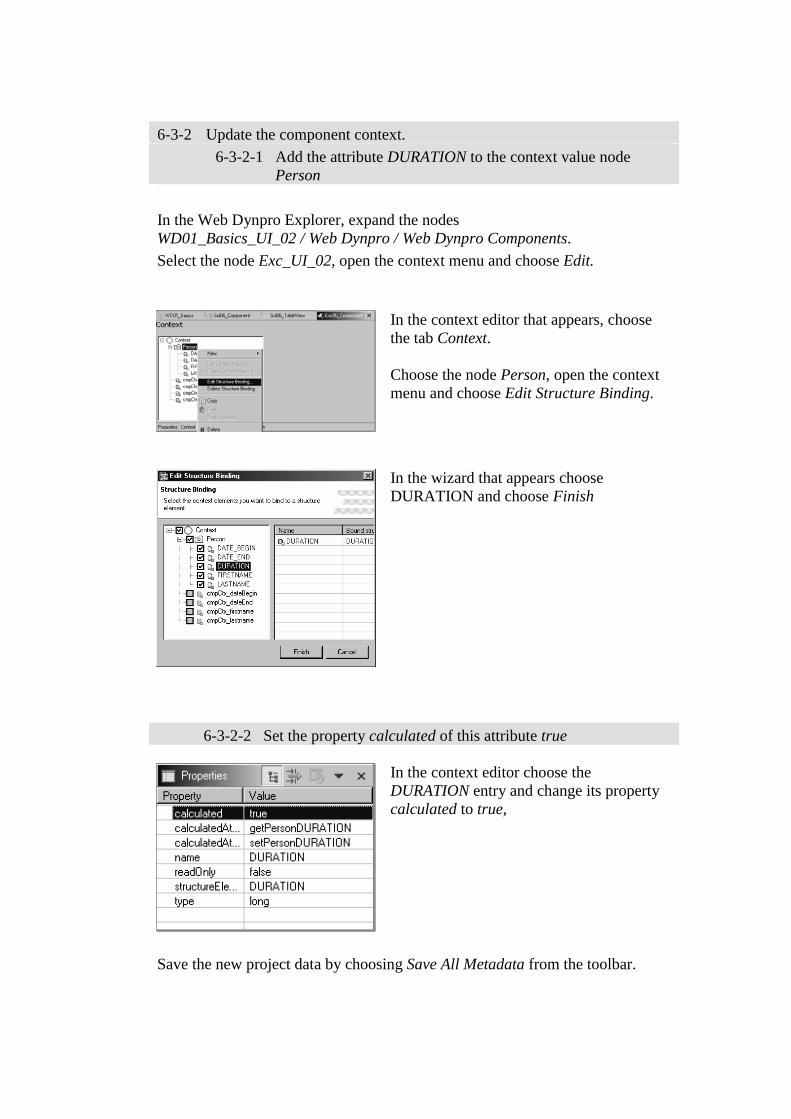
6-3-2 Update the component context. 6-3-2-1 Add the attribute DURATION to the context value node
Person
In the Web Dynpro Explorer, expand the nodes WD01_Basics_UI_02 / Web Dynpro / Web Dynpro Components.
Select the node Exc_UI_02, open the context menu and choose Edit.
In the context editor that appears, choose the tab Context. Choose the node Person, open the context menu and choose Edit Structure Binding.
In the wizard that appears choose DURATION and choose Finish
6-3-2-2 Set the property calculated of this attribute true
In the context editor choose the DURATION entry and change its property calculated to true,
Save the new project data by choosing Save All Metadata from the toolbar.

6-3-2-3 Implement the generated method getPersonDURATION(…).
In the context editor choose the IMPLEMENTATION tab and navigate to the method getPersonDURATION(…): package com.sap.training.wd.basics.ui02; //@@begin imports import java.sql.Date; import java.util.Calendar; import java.util.GregorianCalendar; //@@end . . . public long getPersonDURATION(…) { //@@begin Date dateBegin = element.getDATE_BEGIN(); Date dateEnd = element.getDATE_END(); Calendar calBegin = new GregorianCalendar(); calBegin.setTime(dateBegin); long dt1 = calBegin.getTimeInMillis(); Calendar calEnd = new GregorianCalendar(); calEnd.setTime(dateEnd); long dt2 = calEnd.getTimeInMillis(); long days = (dt2 - dt1) / 86400000; return ++days; //@@end
}
Save the new project data by choosing Save All Metadata from the toolbar.
6-3-3 Update the context of view TableView. Add the additional attribute DURATION from context Person and map it to the component context.
Note: The context of the view TableView has already been mapped to the context of the component controller (that is bound to the dictionary structure Person). Thus, you can not directly update the context of the view TableView using the tab Context of the view editor.
In the Web Dynpro Explorer, expand the nodes WD01_Basics_UI_02 / Web Dynpro /Web Dynpro Components.
Open the context of Exc_UI_02 and choose Open Data Modeler.
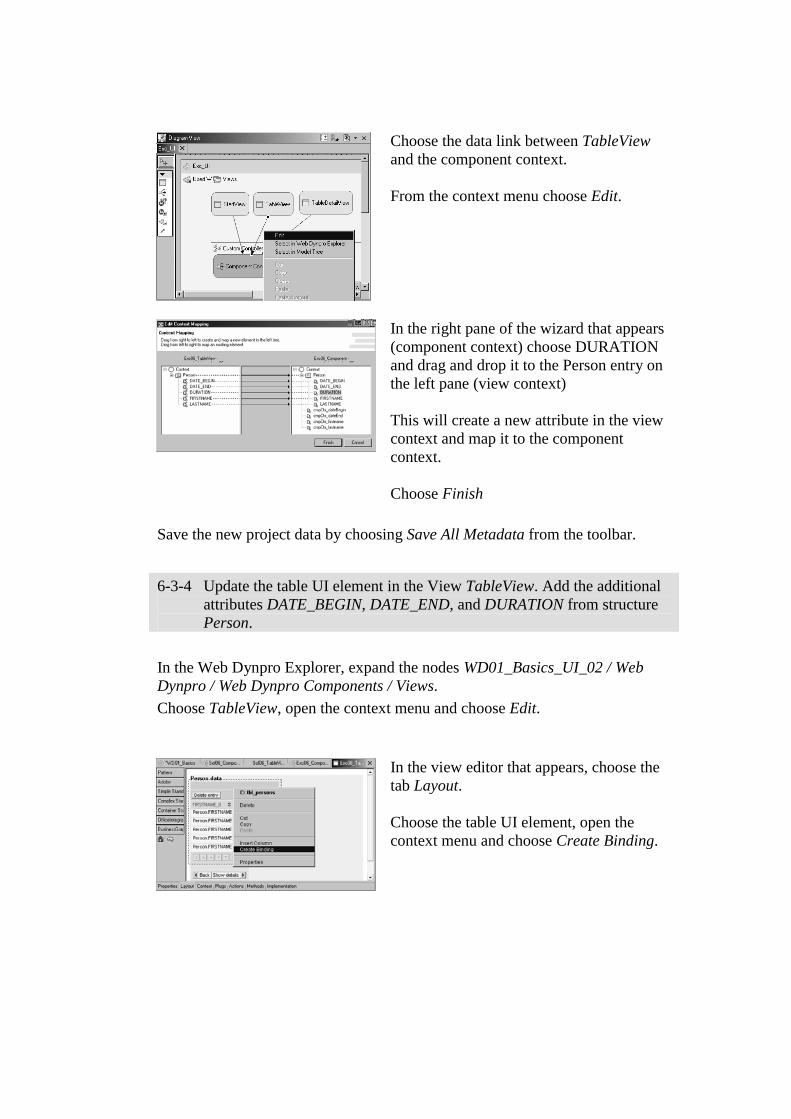
Choose the data link between TableView and the component context. From the context menu choose Edit.
In the right pane of the wizard that appears (component context) choose DURATION and drag and drop it to the Person entry on the left pane (view context) This will create a new attribute in the view context and map it to the component context. Choose Finish
Save the new project data by choosing Save All Metadata from the toolbar.
6-3-4 Update the table UI element in the View TableView. Add the additional
attributes DATE_BEGIN, DATE_END, and DURATION from structure Person.
In the Web Dynpro Explorer, expand the nodes WD01_Basics_UI_02 / Web Dynpro / Web Dynpro Components / Views.
Choose TableView, open the context menu and choose Edit.
In the view editor that appears, choose the tab Layout. Choose the table UI element, open the context menu and choose Create Binding.
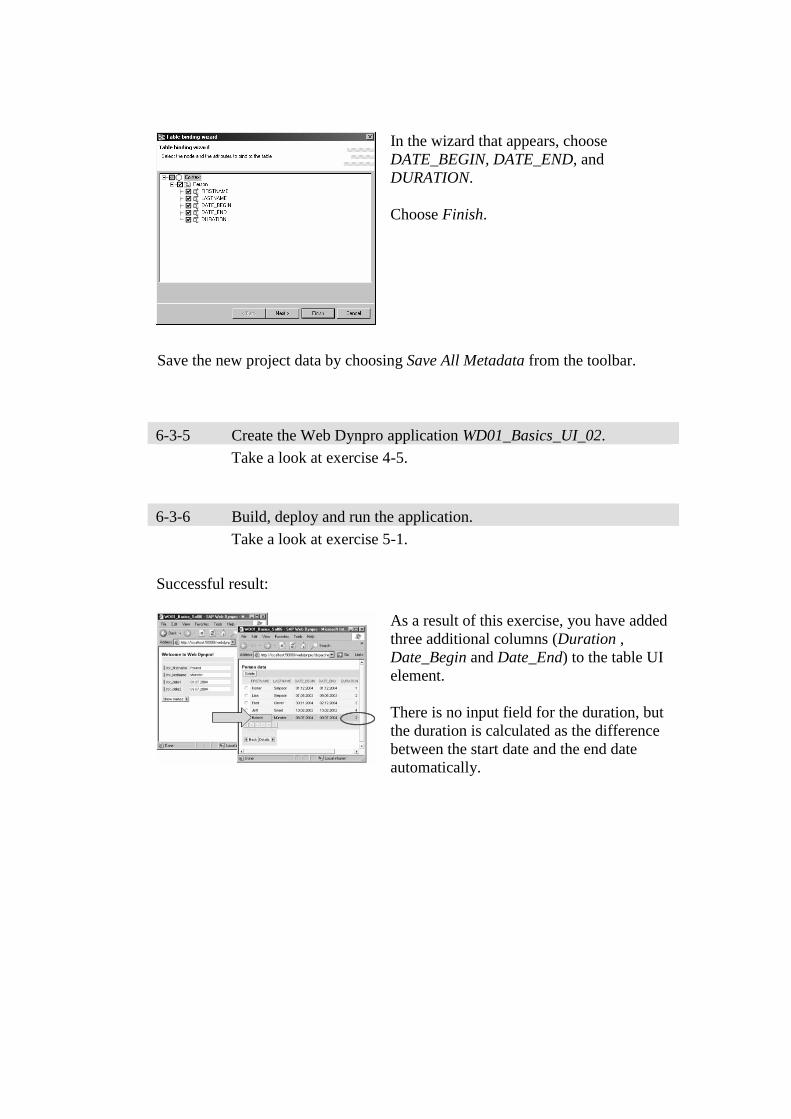
In the wizard that appears, choose DATE_BEGIN, DATE_END, and DURATION. Choose Finish.
Save the new project data by choosing Save All Metadata from the toolbar.
6-3-5 Create the Web Dynpro application WD01_Basics_UI_02. Take a look at exercise 4-5.
6-3-6 Build, deploy and run the application. Take a look at exercise 5-1.
Successful result:
As a result of this exercise, you have added three additional columns (Duration , Date_Begin and Date_End) to the table UI element. There is no input field for the duration, but the duration is calculated as the difference between the start date and the end date automatically.
© SAP AG <Course Number> Unit Title - 1
© SAP AG 2003, Title of Presentation, Speaker Name / 1
Basic terminology
Modelling User Interfaces
Contents:
Modelling User Interfaces
© SAP AG <Course Number> Unit Title - 2
© SAP AG 2003, Title of Presentation, Speaker Name / 2
After completing this unit, you will be able to:
Understand the basic terminology.
Model User Interfaces.
Modelling User Interfaces: Unit Objectives
© SAP AG <Course Number> Unit Title - 3
© SAP AG 2003, Title of Presentation, Speaker Name / 3
After completing this topic, you will be able to:
Understand the basic terminology..
Basic Terminology: Topic Objectives
This is a lesson
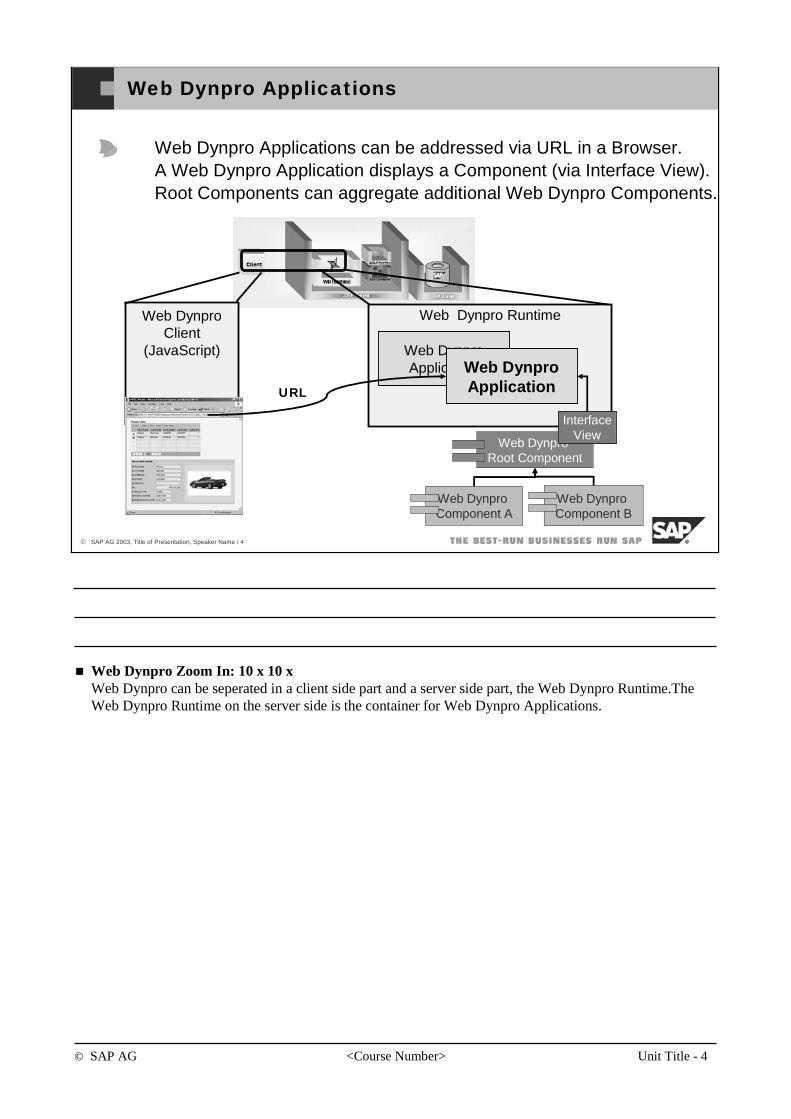
© SAP AG <Course Number> Unit Title - 4
© SAP AG 2003, Title of Presentation, Speaker Name / 4
Web Dynpro Applications
Web DynproClient
(JavaScript)
Web Dynpro Runtime
Web DynproApplicationWeb Dynpro
Application
Web Dynpro Applications can be addressed via URL in a Browser.A Web Dynpro Application displays a Component (via Interface View).Root Components can aggregate additional Web Dynpro Components.
Web DynproRoot Component
Web DynproComponent A
InterfaceView
Web DynproComponent B
URL
Web Dynpro Zoom In: 10 x 10 xWeb Dynpro can be seperated in a client side part and a server side part, the Web Dynpro Runtime.TheWeb Dynpro Runtime on the server side is the container for Web Dynpro Applications.
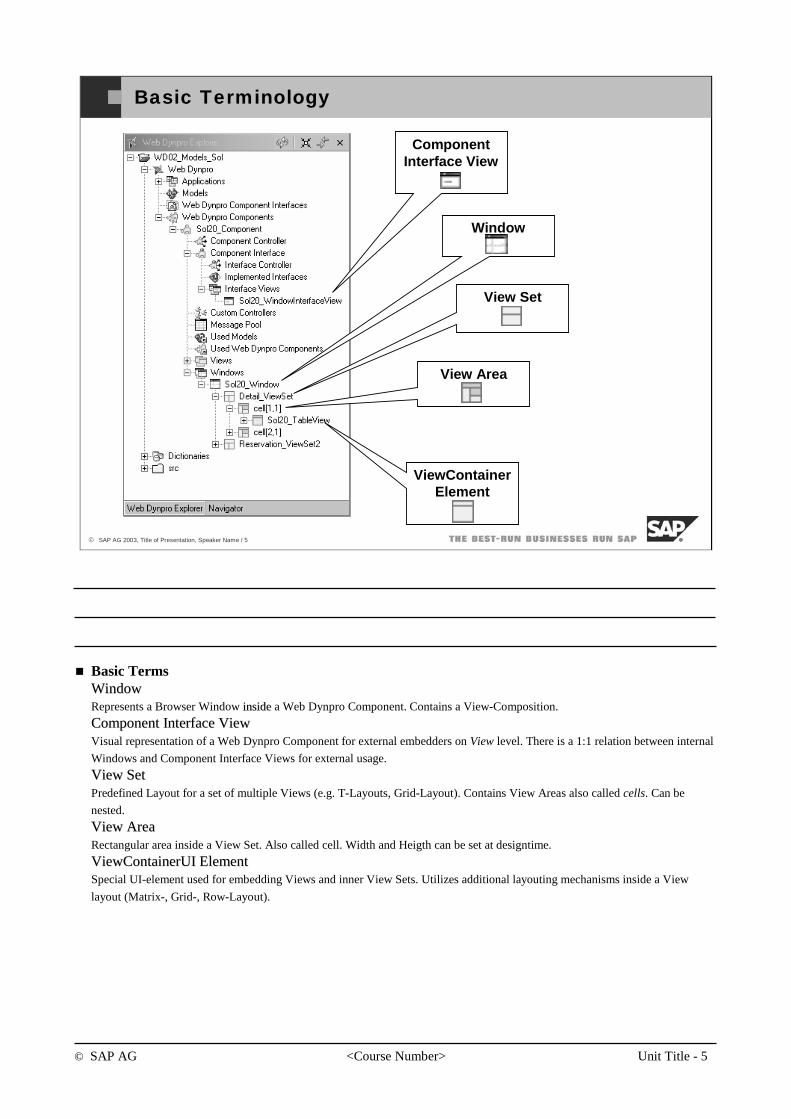
© SAP AG <Course Number> Unit Title - 5
© SAP AG 2003, Title of Presentation, Speaker Name / 5
View Area
View Set
Component Interface View
Window
Basic Terminology
ViewContainerElement
Basic TermsWindowWindowRepresents a Browser Window insideinside a Web Dynpro Component. Contains a View-Composition.
ComponentComponent Interface Interface ViewViewVisual representation of a Web Dynpro Component for external embedders on View level. There is a 1:1 relation between internal
Windows and Component Interface Views for external usage.
ViewView SetSetPredefined Layout for a set of multiple Views (e.g. T-Layouts, Grid-Layout). Contains View Areas also called cells. Can be
nested.
ViewView AreaAreaRectangular area inside a View Set. Also called cell. Width and Heigth can be set at designtime.
ViewContainerUIViewContainerUI ElementElementSpecial UI-element used for embedding Views and inner View Sets. Utilizes additional layouting mechanisms inside a View
layout (Matrix-, Grid-, Row-Layout).
© SAP AG <Course Number> Unit Title - 6
© SAP AG 2003, Title of Presentation, Speaker Name / 6
You should now be able to:
Understand the basic terminology.
Basic Terminology: Topic Summary
© SAP AG <Course Number> Unit Title - 7
© SAP AG 2003, Title of Presentation, Speaker Name / 7
After completing this topic, you will be able to:
Model User Interfaces..
Modelling User Interfaces: Topic Objectives
This is a lesson
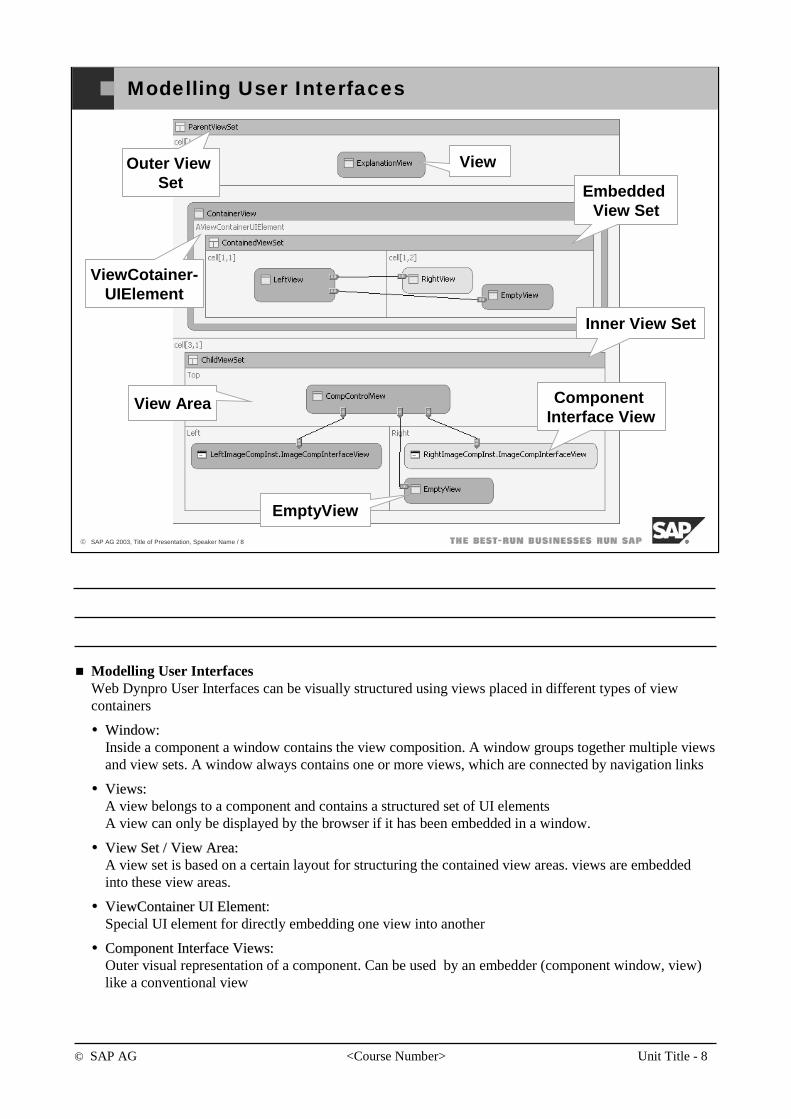
© SAP AG <Course Number> Unit Title - 8
© SAP AG 2003, Title of Presentation, Speaker Name / 8
Modelling User Interfaces
EmbeddedView Set
ViewCotainer-UIElement
ComponentInterface View
Inner View Set
EmptyView
Outer ViewSet
View Area
View
Modelling User InterfacesWeb Dynpro User Interfaces can be visually structured using views placed in different types of viewcontainers
WindowWindow: : Inside a component a window contains the view composition. A window groups together multiple views and view sets. A window always contains one or more views, which are connected by navigation links
ViewsViews: : A view belongs to a component and contains a structured set of UI elementsA view can only be displayed by the browser if it has been embedded in a window.
ViewView Set / Set / ViewView AreaArea::A view set is based on a certain layout for structuring the contained view areas. views are embeddedinto these view areas.
ViewContainerViewContainer UI ElementUI Element: Special UI element for directly embedding one view into another
ComponentComponent Interface Interface ViewsViews: : Outer visual representation of a component. Can be used by an embedder (component window, view) like a conventional view
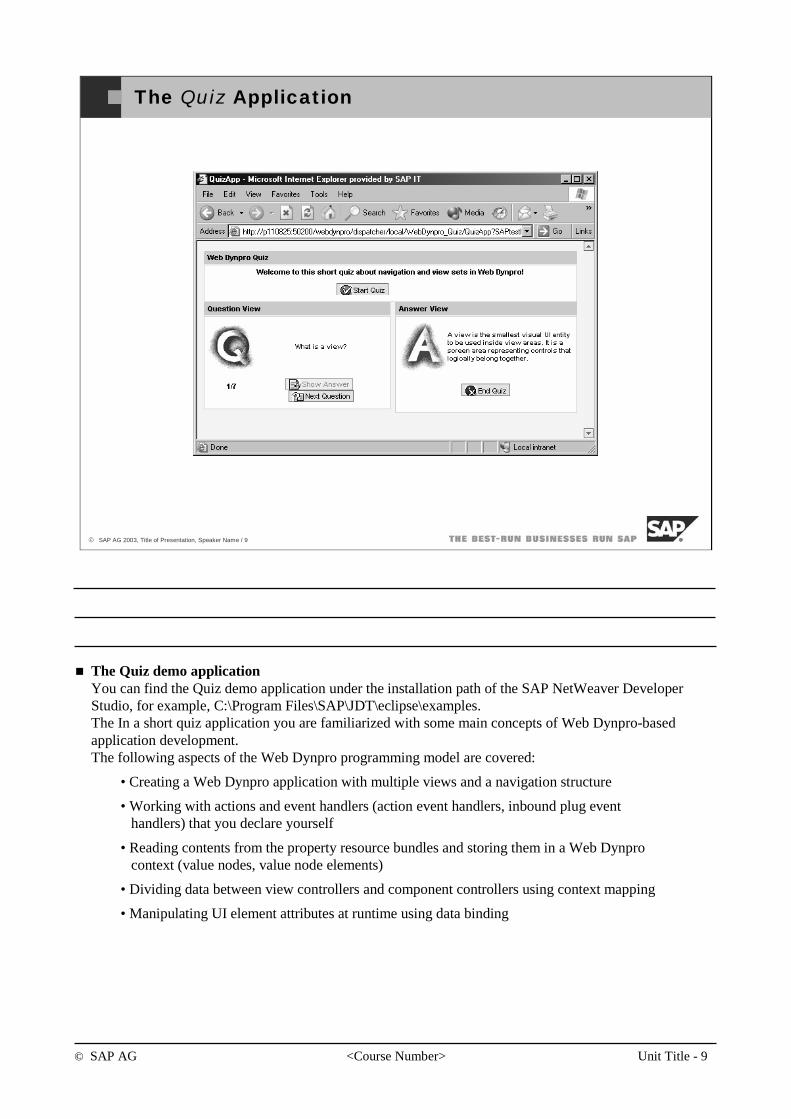
© SAP AG <Course Number> Unit Title - 9
© SAP AG 2003, Title of Presentation, Speaker Name / 9
The Quiz Application
The Quiz demo applicationYou can find the Quiz demo application under the installation path of the SAP NetWeaver DeveloperStudio, for example, C:\Program Files\SAP\JDT\eclipse\examples.The In a short quiz application you are familiarized with some main concepts of Web Dynpro-basedapplication development.The following aspects of the Web Dynpro programming model are covered:
• Creating a Web Dynpro application with multiple views and a navigation structure
• Working with actions and event handlers (action event handlers, inbound plug eventhandlers) that you declare yourself
• Reading contents from the property resource bundles and storing them in a Web Dynprocontext (value nodes, value node elements)
• Dividing data between view controllers and component controllers using context mapping
• Manipulating UI element attributes at runtime using data binding
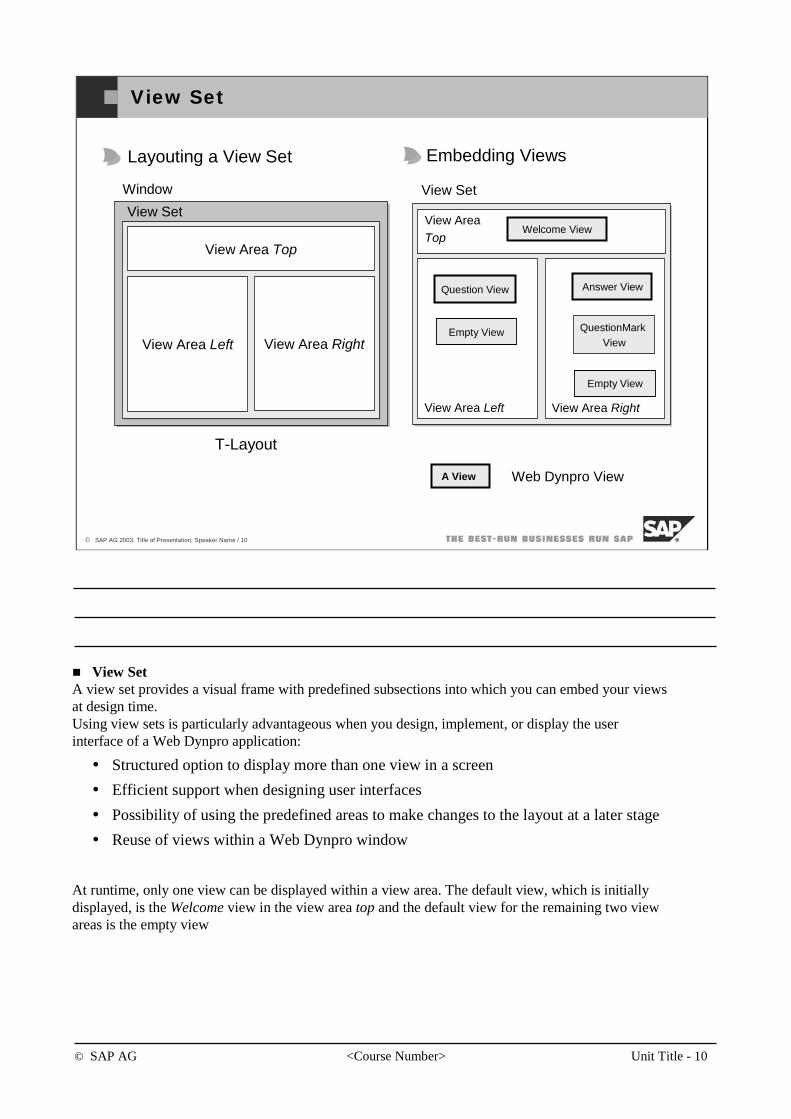
© SAP AG <Course Number> Unit Title - 10
© SAP AG 2003, Title of Presentation, Speaker Name / 10
View Set
View Area Left
View Area Top
View Area Right
View Set
View Area Left
View AreaTop
Welcome View
Question View
View Area Right
QuestionMarkView
Answer View
Empty View
Empty View
Layouting a View Set Embedding Views
Window View Set
A View Web Dynpro View
T-Layout
View SetA view set provides a visual frame with predefined subsections into which you can embed your views at design time.Using view sets is particularly advantageous when you design, implement, or display the user interface of a Web Dynpro application:
Structured option to display more than one view in a screen
Efficient support when designing user interfaces
Possibility of using the predefined areas to make changes to the layout at a later stage
Reuse of views within a Web Dynpro window
At runtime, only one view can be displayed within a view area. The default view, which is initially displayed, is the Welcome view in the view area top and the default view for the remaining two view areas is the empty view

© SAP AG <Course Number> Unit Title - 11
© SAP AG 2003, Title of Presentation, Speaker Name / 11
View Assemblies
Left
Top
Right
Empty View
Empty View
Left
Top Welcome View
Right
Question View QuestionMark
View
Left
Top
Right
AnswerView
3 - Display Answer1 - Start/End Application 2 - Display Question
Question View
Welcome ViewWelcome View
View Assemblies are different combinations of viewsinside a view set
View AssembliesThe assignment of views and empty views to the three view areas top, left, and right specifies all possible view assemblies – that is, the possible combinations of views that can be displayed in the window at the same time. In this example, the following view assembly is the default view assembly:View area top: Welcome, View area left: Empty view, View area right: Empty viewBy specifying the possible views in a view area, you determine in this example that there is a maximum of six different view assemblies at runtime
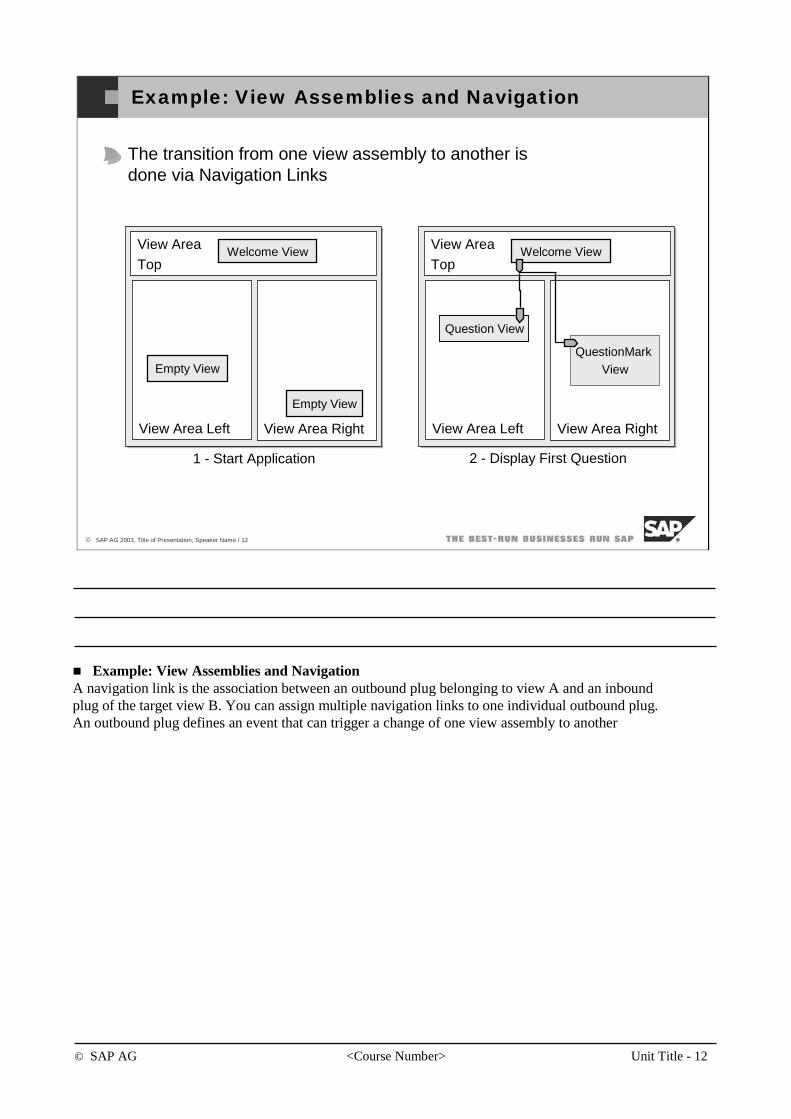
© SAP AG <Course Number> Unit Title - 12
© SAP AG 2003, Title of Presentation, Speaker Name / 12
Example: View Assemblies and Navigation
View Area Left
View AreaTop
View Area Right
Welcome View
Empty View
Empty View
View Area Left
View AreaTop
Welcome View
View Area Right
Question View
QuestionMarkView
1 - Start Application 2 - Display First Question
The transition from one view assembly to another isdone via Navigation Links
Example: View Assemblies and NavigationA navigation link is the association between an outbound plug belonging to view A and an inbound plug of the target view B. You can assign multiple navigation links to one individual outbound plug. An outbound plug defines an event that can trigger a change of one view assembly to another
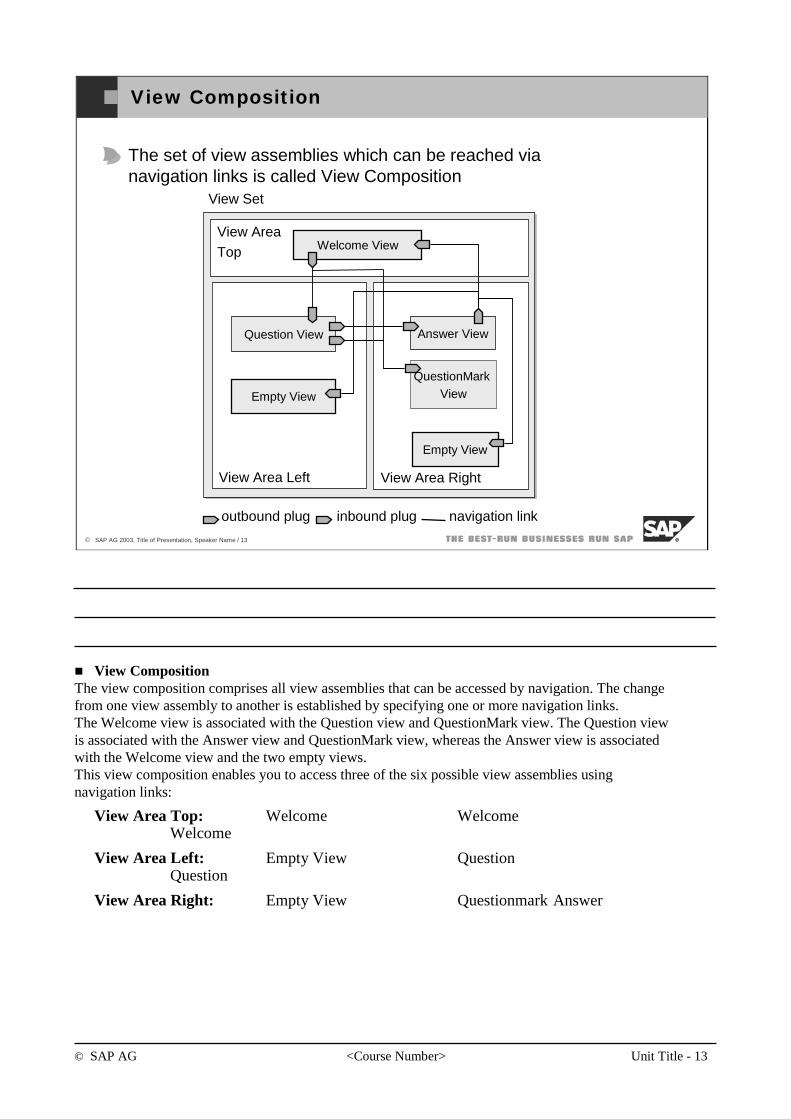
© SAP AG <Course Number> Unit Title - 13
© SAP AG 2003, Title of Presentation, Speaker Name / 13
View Composition
The set of view assemblies which can be reached via navigation links is called View Composition
View Area Left
View AreaTop Welcome View
Question View
View Area Right
QuestionMarkView
Answer View
Empty View
Empty View
outbound plug inbound plug navigation link
View Set
View CompositionThe view composition comprises all view assemblies that can be accessed by navigation. The change from one view assembly to another is established by specifying one or more navigation links.The Welcome view is associated with the Question view and QuestionMark view. The Question view is associated with the Answer view and QuestionMark view, whereas the Answer view is associated with the Welcome view and the two empty views.This view composition enables you to access three of the six possible view assemblies using navigation links:
View Area Top: Welcome WelcomeWelcome
View Area Left: Empty View QuestionQuestion
View Area Right: Empty View Questionmark Answer
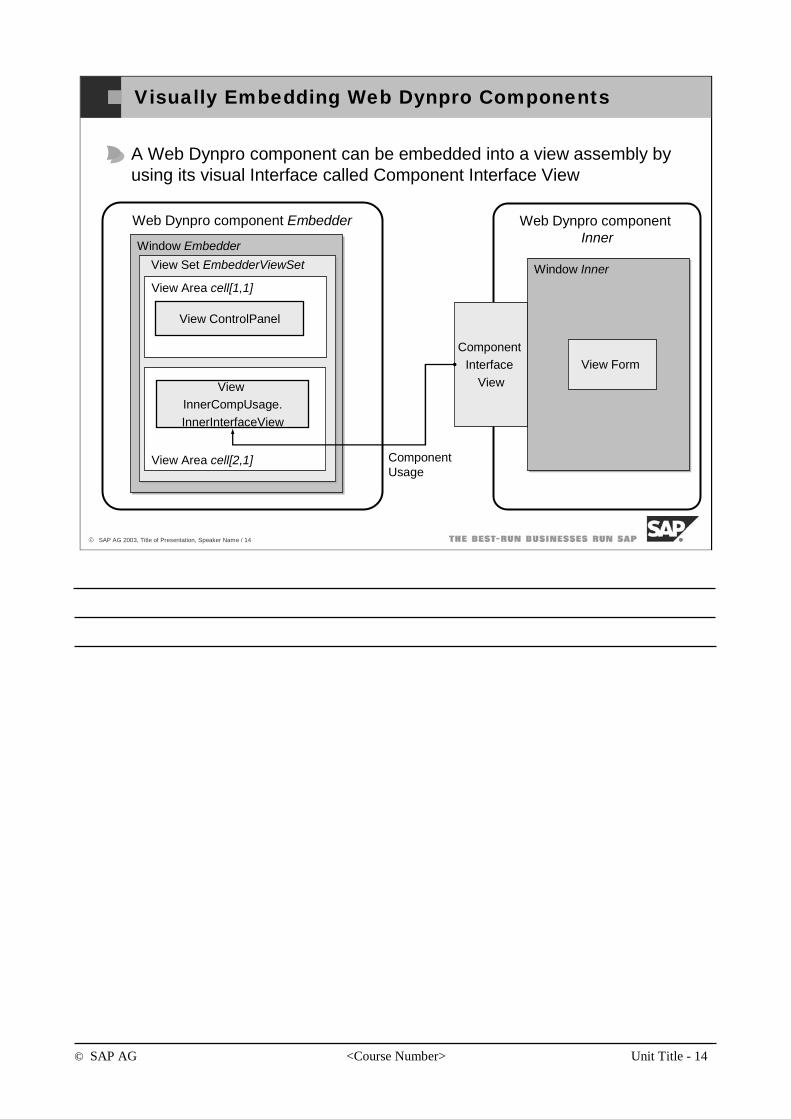
© SAP AG <Course Number> Unit Title - 14
© SAP AG 2003, Title of Presentation, Speaker Name / 14
Visually Embedding Web Dynpro Components
Web Dynpro component Embedder
Window Embedder
View Area cell[2,1]
View Area cell[1,1]
View Set EmbedderViewSet
View InnerCompUsage.InnerInterfaceView
Web Dynpro componentInner
Window Inner
View Form Component
Interface View
ComponentUsage
View ControlPanel
A Web Dynpro component can be embedded into a view assembly byusing its visual Interface called Component Interface View
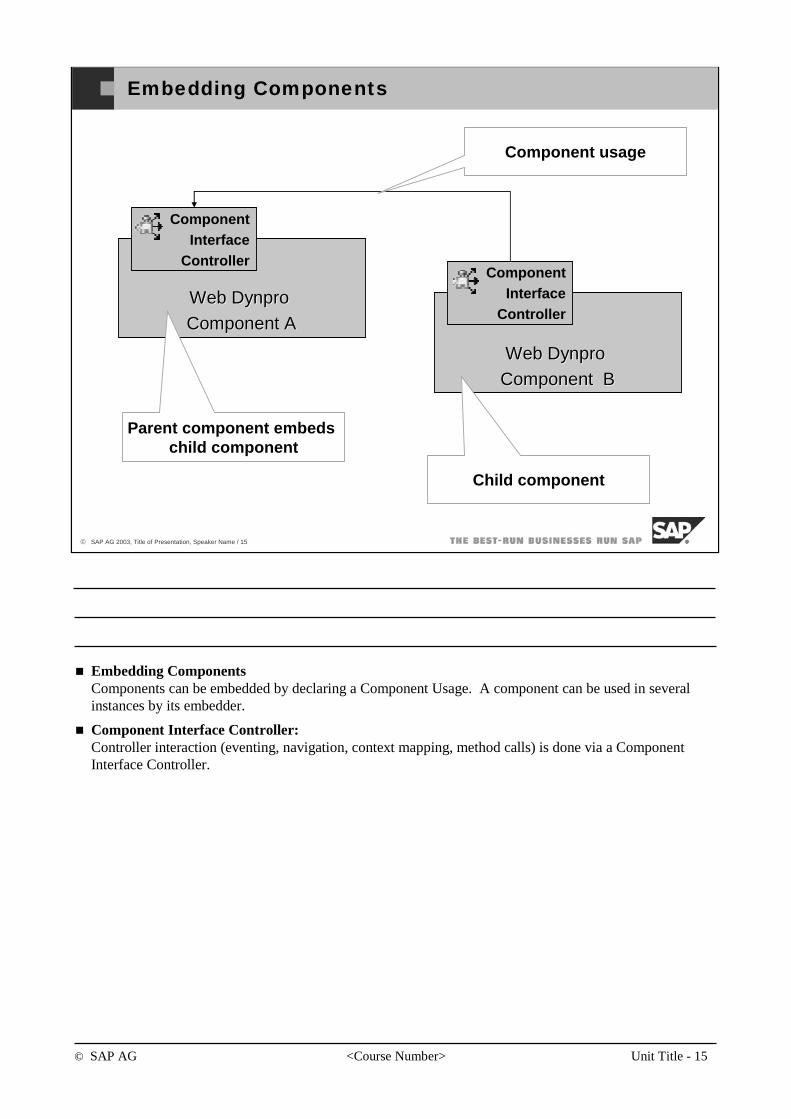
© SAP AG <Course Number> Unit Title - 15
© SAP AG 2003, Title of Presentation, Speaker Name / 15
Embedding Components
Web Web DynproDynpro
ComponentComponent BB
ComponentInterface
ControllerWeb Web DynproDynpro
ComponentComponent AA
ComponentInterface
Controller
Parent component embedschild component
Child component
Component usage
Embedding ComponentsComponents can be embedded by declaring a Component Usage. A component can be used in severalinstances by its embedder.
Component Interface Controller:Controller interaction (eventing, navigation, context mapping, method calls) is done via a ComponentInterface Controller.
© SAP AG <Course Number> Unit Title - 16
© SAP AG 2003, Title of Presentation, Speaker Name / 16
You should now be able to:
Model User Interfaces.
Modelling User Interfaces: Topic Summary
© SAP AG <Course Number> Unit Title - 17
© SAP AG 2003, Title of Presentation, Speaker Name / 17
You should now be able to:
Understand the basic terminology.
Model User Interfaces.
Modelling User Interfaces: Unit Summary
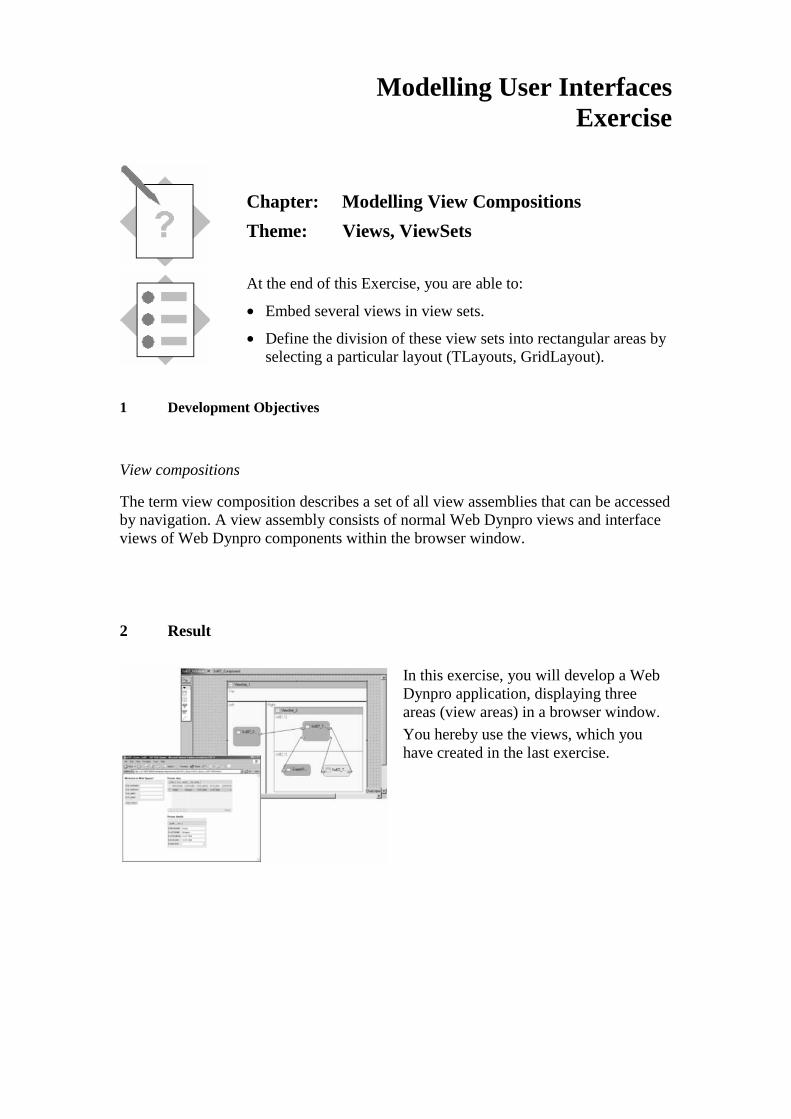
Modelling User Interfaces Exercise
Chapter: Modelling View Compositions
Theme: Views, ViewSets
At the end of this Exercise, you are able to:
• Embed several views in view sets.
• Define the division of these view sets into rectangular areas by selecting a particular layout (TLayouts, GridLayout).
1 Development Objectives
View compositions
The term view composition describes a set of all view assemblies that can be accessed by navigation. A view assembly consists of normal Web Dynpro views and interface views of Web Dynpro components within the browser window.
2 Result
In this exercise, you will develop a Web Dynpro application, displaying three areas (view areas) in a browser window.
You hereby use the views, which you have created in the last exercise.
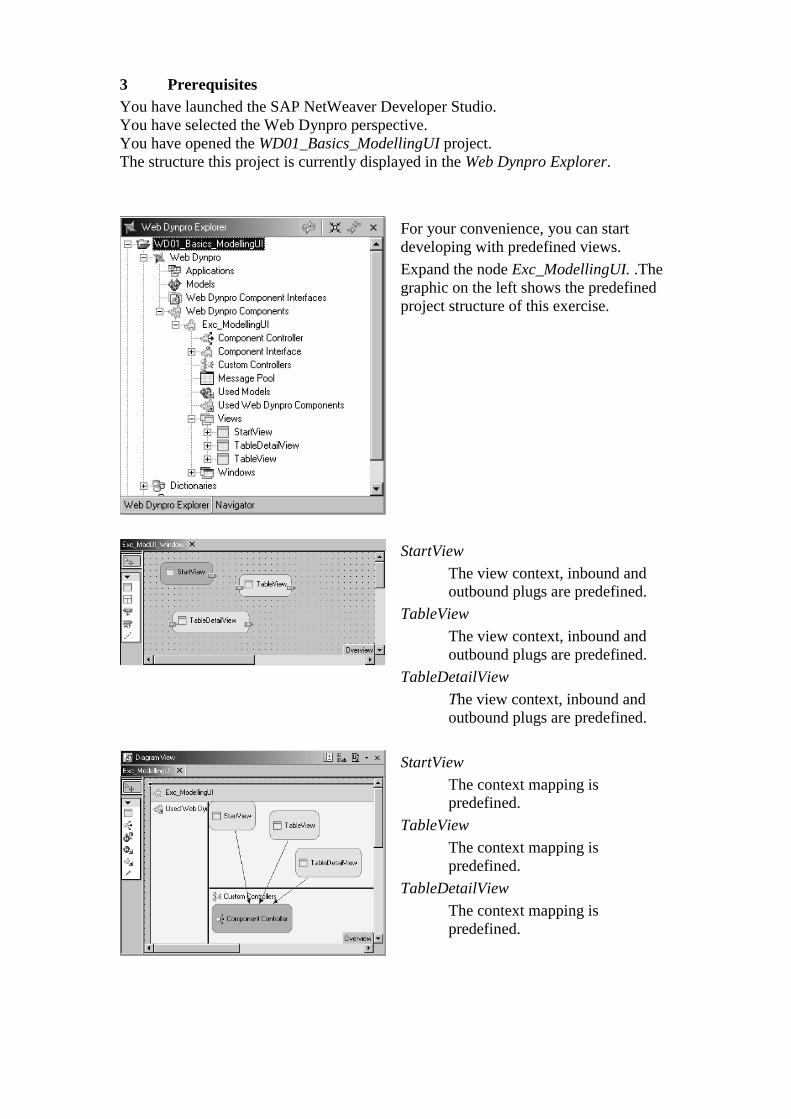
3 Prerequisites You have launched the SAP NetWeaver Developer Studio. You have selected the Web Dynpro perspective. You have opened the WD01_Basics_ModellingUI project. The structure this project is currently displayed in the Web Dynpro Explorer.
For your convenience, you can start developing with predefined views.
Expand the node Exc_ModellingUI. .The graphic on the left shows the predefined project structure of this exercise.
StartView
The view context, inbound and outbound plugs are predefined.
TableView
The view context, inbound and outbound plugs are predefined.
TableDetailView
The view context, inbound and outbound plugs are predefined.
StartView
The context mapping is predefined.
TableView
The context mapping is predefined.
TableDetailView
The context mapping is predefined.
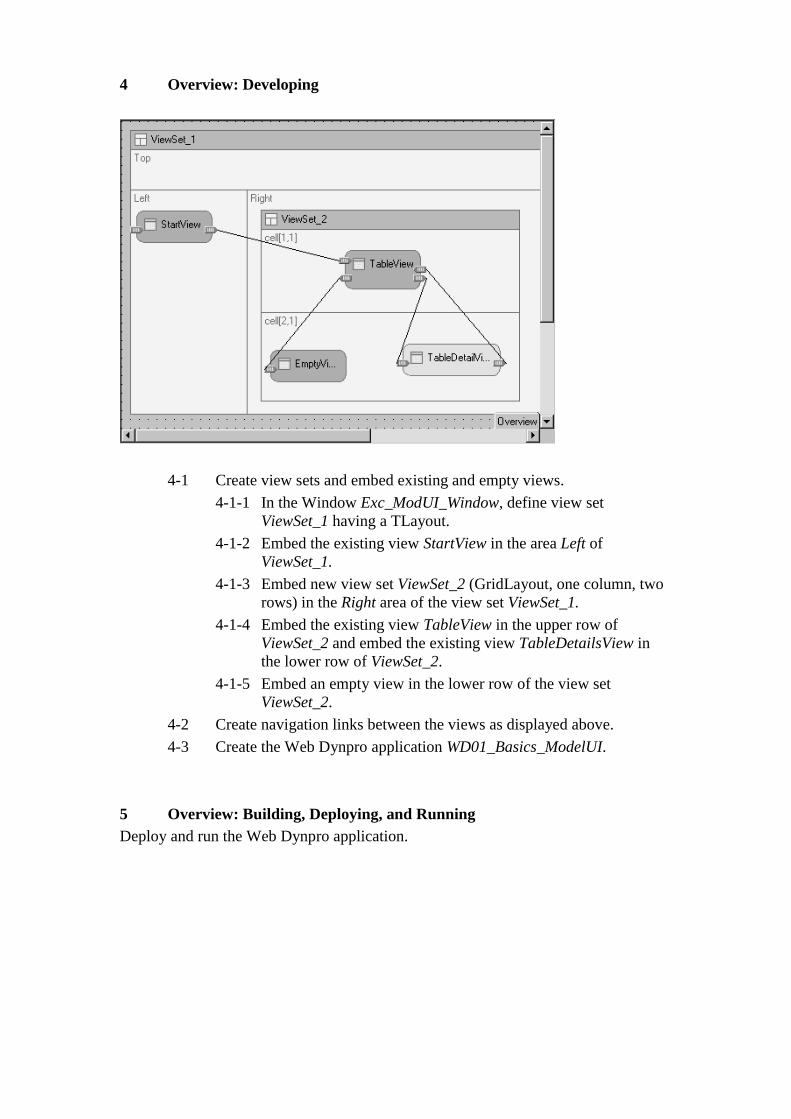
4 Overview: Developing
4-1 Create view sets and embed existing and empty views.
4-1-1 In the Window Exc_ModUI_Window, define view set ViewSet_1 having a TLayout.
4-1-2 Embed the existing view StartView in the area Left of ViewSet_1.
4-1-3 Embed new view set ViewSet_2 (GridLayout, one column, two rows) in the Right area of the view set ViewSet_1.
4-1-4 Embed the existing view TableView in the upper row of ViewSet_2 and embed the existing view TableDetailsView in the lower row of ViewSet_2.
4-1-5 Embed an empty view in the lower row of the view set ViewSet_2.
4-2 Create navigation links between the views as displayed above.
4-3 Create the Web Dynpro application WD01_Basics_ModelUI.
5 Overview: Building, Deploying, and Running Deploy and run the Web Dynpro application.
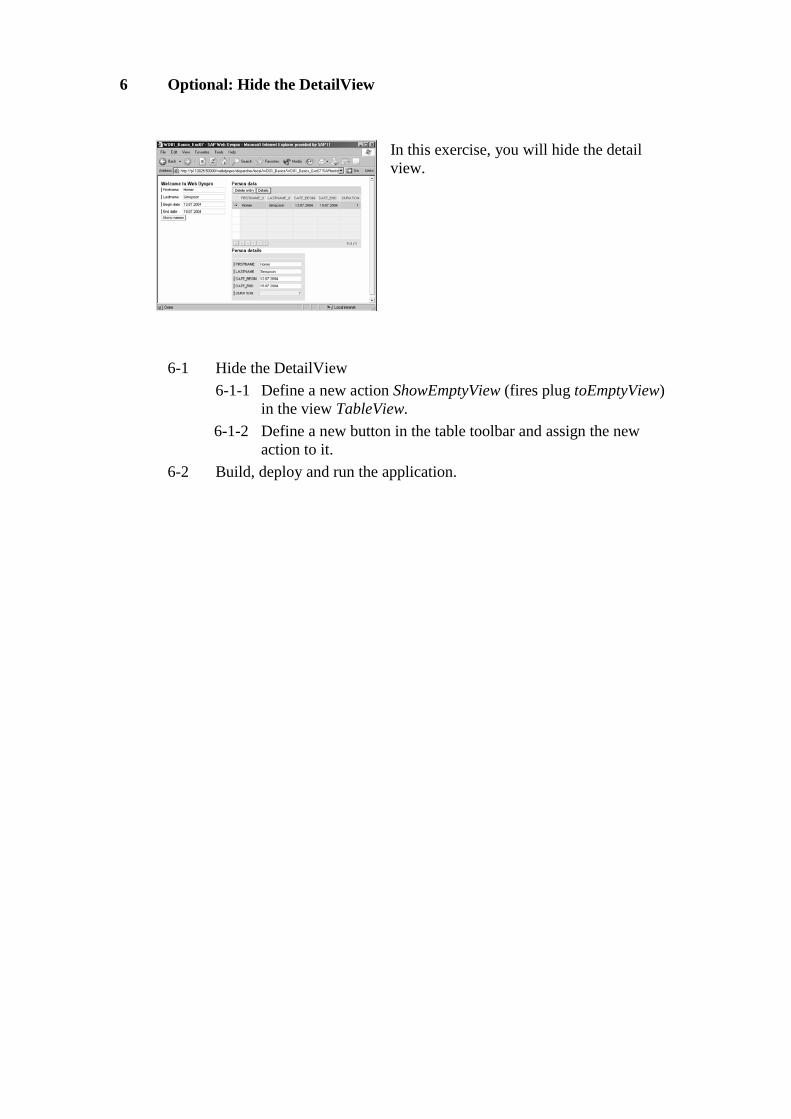
6 Optional: Hide the DetailView
In this exercise, you will hide the detail view.
6-1 Hide the DetailView
6-1-1 Define a new action ShowEmptyView (fires plug toEmptyView) in the view TableView.
6-1-2 Define a new button in the table toolbar and assign the new action to it.
6-2 Build, deploy and run the application.
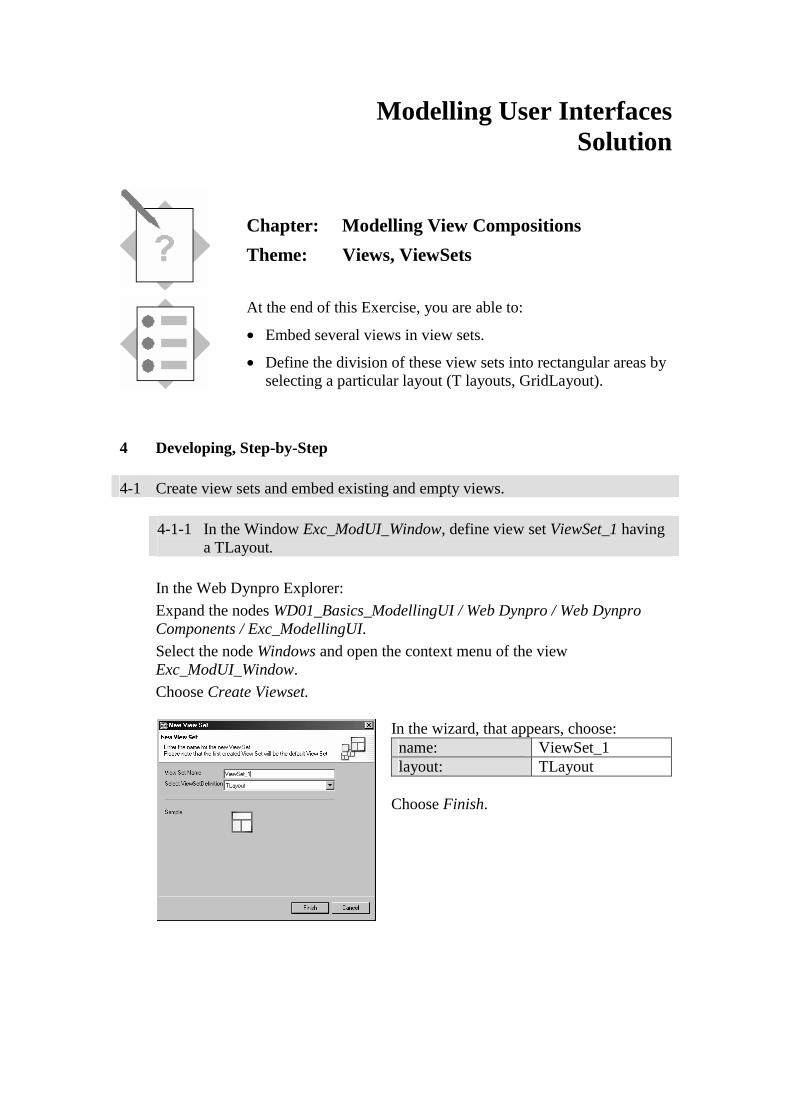
Modelling User Interfaces Solution
Chapter: Modelling View Compositions
Theme: Views, ViewSets
At the end of this Exercise, you are able to:
• Embed several views in view sets.
• Define the division of these view sets into rectangular areas by selecting a particular layout (T layouts, GridLayout).
4 Developing, Step-by-Step 4-1 Create view sets and embed existing and empty views. 4-1-1 In the Window Exc_ModUI_Window, define view set ViewSet_1 having
a TLayout.
In the Web Dynpro Explorer:
Expand the nodes WD01_Basics_ModellingUI / Web Dynpro / Web Dynpro Components / Exc_ModellingUI.
Select the node Windows and open the context menu of the view Exc_ModUI_Window.
Choose Create Viewset.
In the wizard, that appears, choose: name: ViewSet_1 layout: TLayout
Choose Finish.
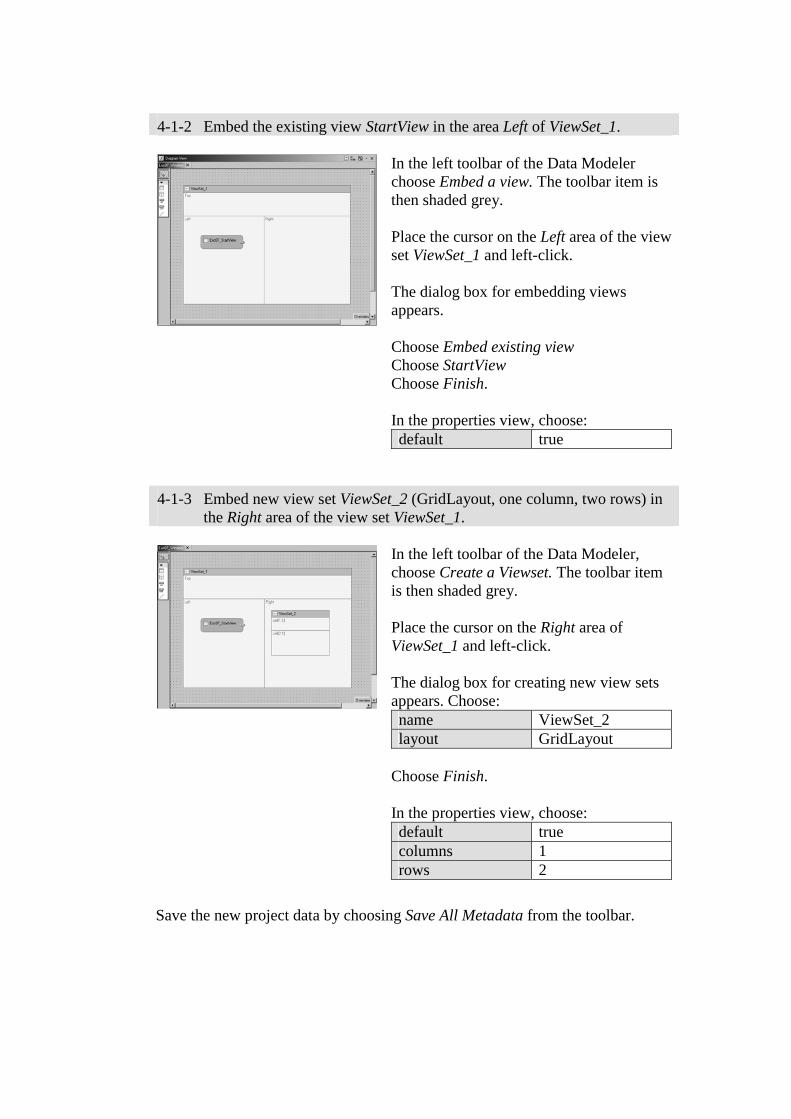
4-1-2 Embed the existing view StartView in the area Left of ViewSet_1.
In the left toolbar of the Data Modeler choose Embed a view. The toolbar item is then shaded grey. Place the cursor on the Left area of the view set ViewSet_1 and left-click. The dialog box for embedding views appears. Choose Embed existing view Choose StartView Choose Finish. In the properties view, choose: default true
4-1-3 Embed new view set ViewSet_2 (GridLayout, one column, two rows) in
the Right area of the view set ViewSet_1.
In the left toolbar of the Data Modeler, choose Create a Viewset. The toolbar item is then shaded grey. Place the cursor on the Right area of ViewSet_1 and left-click. The dialog box for creating new view sets appears. Choose: name ViewSet_2 layout GridLayout
Choose Finish. In the properties view, choose: default true columns 1 rows 2
Save the new project data by choosing Save All Metadata from the toolbar.
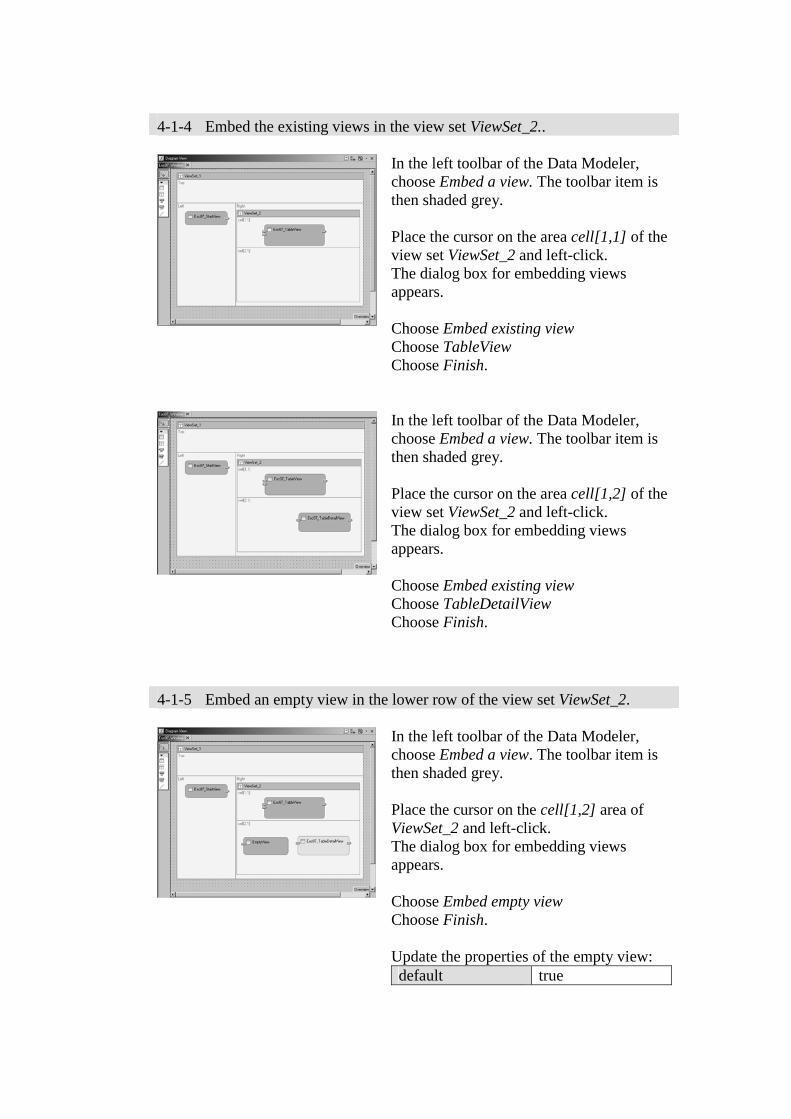
4-1-4 Embed the existing views in the view set ViewSet_2..
In the left toolbar of the Data Modeler, choose Embed a view. The toolbar item is then shaded grey. Place the cursor on the area cell[1,1] of the view set ViewSet_2 and left-click. The dialog box for embedding views appears. Choose Embed existing view Choose TableView Choose Finish.
In the left toolbar of the Data Modeler, choose Embed a view. The toolbar item is then shaded grey. Place the cursor on the area cell[1,2] of the view set ViewSet_2 and left-click. The dialog box for embedding views appears. Choose Embed existing view Choose TableDetailView Choose Finish.
4-1-5 Embed an empty view in the lower row of the view set ViewSet_2.
In the left toolbar of the Data Modeler, choose Embed a view. The toolbar item is then shaded grey. Place the cursor on the cell[1,2] area of ViewSet_2 and left-click. The dialog box for embedding views appears. Choose Embed empty view Choose Finish. Update the properties of the empty view: default true

Save the new project data by choosing Save All Metadata from the toolbar.
Successful result: When you expand the node Windows in the Web Dynpro Explorer, you should see the following sub structure:
4-2 Create navigation links between the views. To create a link for navigation from one view to another, open the Data
Modeler, select the icon Create Link from the palette (on the left of the screen) and draw the line from the outbound plug of one view to the corresponding inbound plug of the other view.
Use the following navigation schema:
Start View Outbound plug Target View Inbound plug StartView toTableView TableView fromStartView
TableView toEmptyView EmptyView ShowEmptyView
TableView toDetailView TableDetailView fromTableView
TableDetailView toTableView TableView fromTableDetailView
Save the new project data by choosing Save All Metadata from the toolbar.
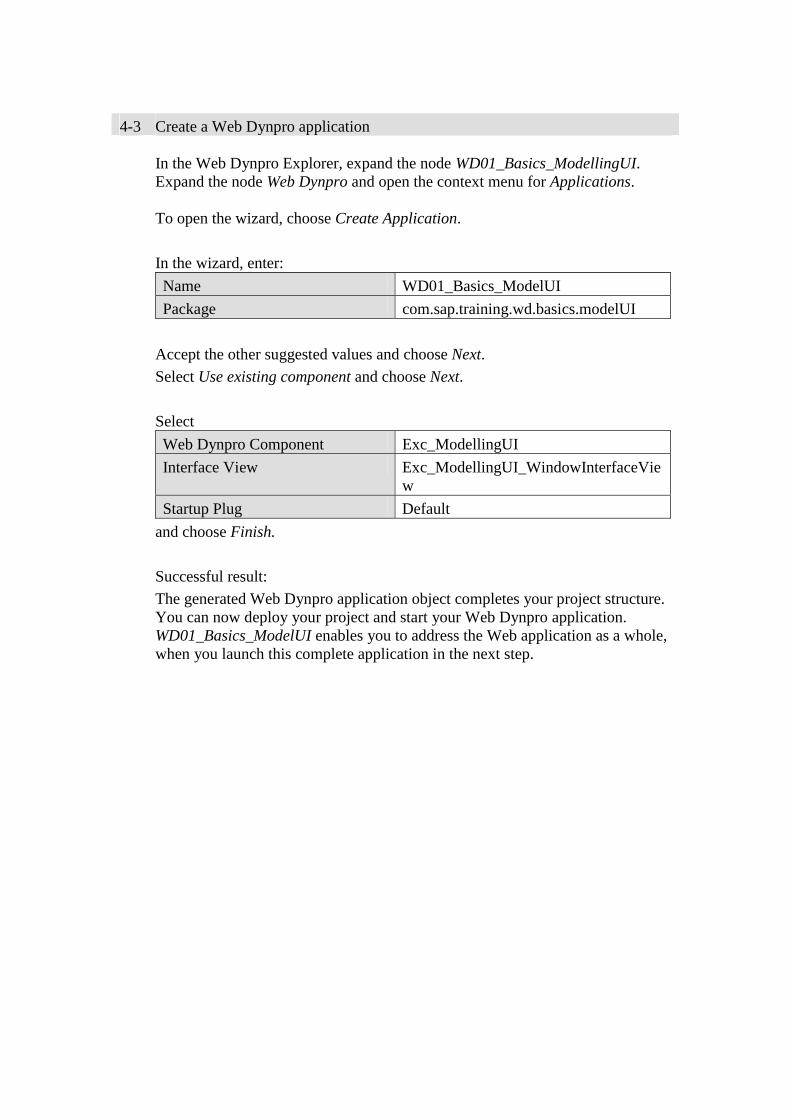
4-3 Create a Web Dynpro application
In the Web Dynpro Explorer, expand the node WD01_Basics_ModellingUI. Expand the node Web Dynpro and open the context menu for Applications. To open the wizard, choose Create Application.
In the wizard, enter:
Name WD01_Basics_ModelUI
Package com.sap.training.wd.basics.modelUI
Accept the other suggested values and choose Next.
Select Use existing component and choose Next.
Select
Web Dynpro Component Exc_ModellingUI
Interface View Exc_ModellingUI_WindowInterfaceView
Startup Plug Default
and choose Finish.
Successful result:
The generated Web Dynpro application object completes your project structure. You can now deploy your project and start your Web Dynpro application. WD01_Basics_ModelUI enables you to address the Web application as a whole, when you launch this complete application in the next step.
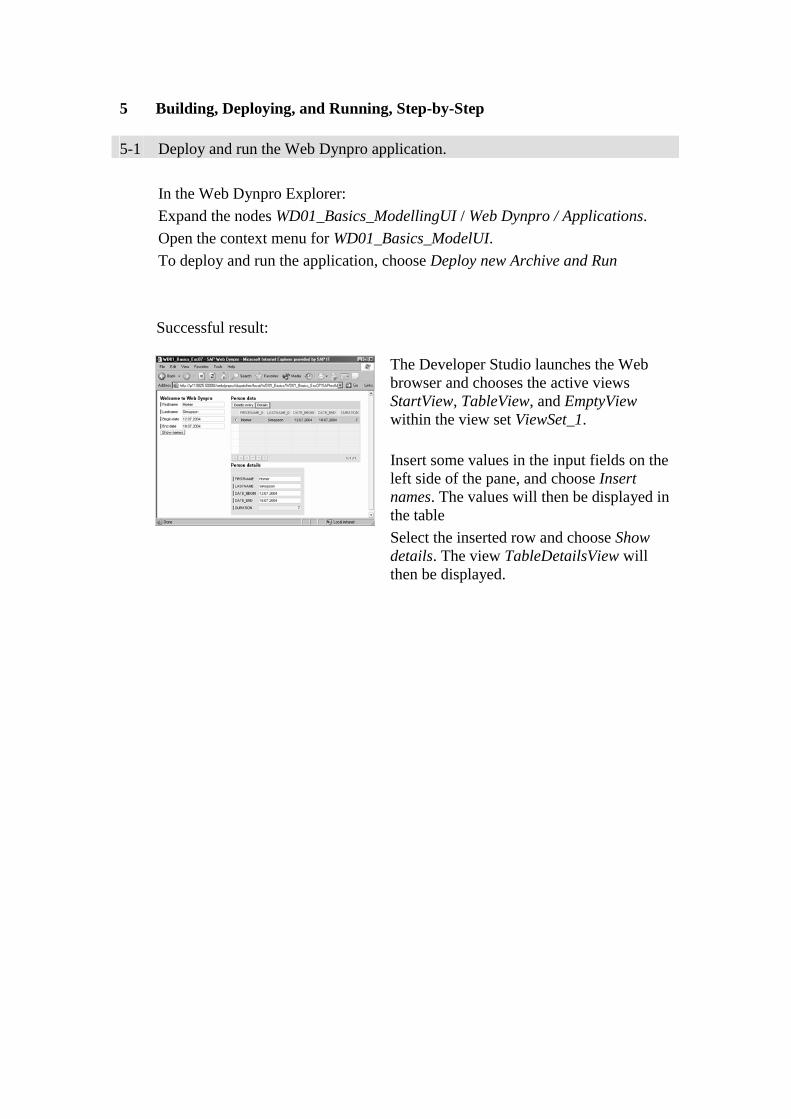
5 Building, Deploying, and Running, Step-by-Step 5-1 Deploy and run the Web Dynpro application.
In the Web Dynpro Explorer:
Expand the nodes WD01_Basics_ModellingUI / Web Dynpro / Applications.
Open the context menu for WD01_Basics_ModelUI.
To deploy and run the application, choose Deploy new Archive and Run
Successful result:
The Developer Studio launches the Web browser and chooses the active views StartView, TableView, and EmptyView within the view set ViewSet_1.
Insert some values in the input fields on the left side of the pane, and choose Insert names. The values will then be displayed in the table
Select the inserted row and choose Show details. The view TableDetailsView will then be displayed.
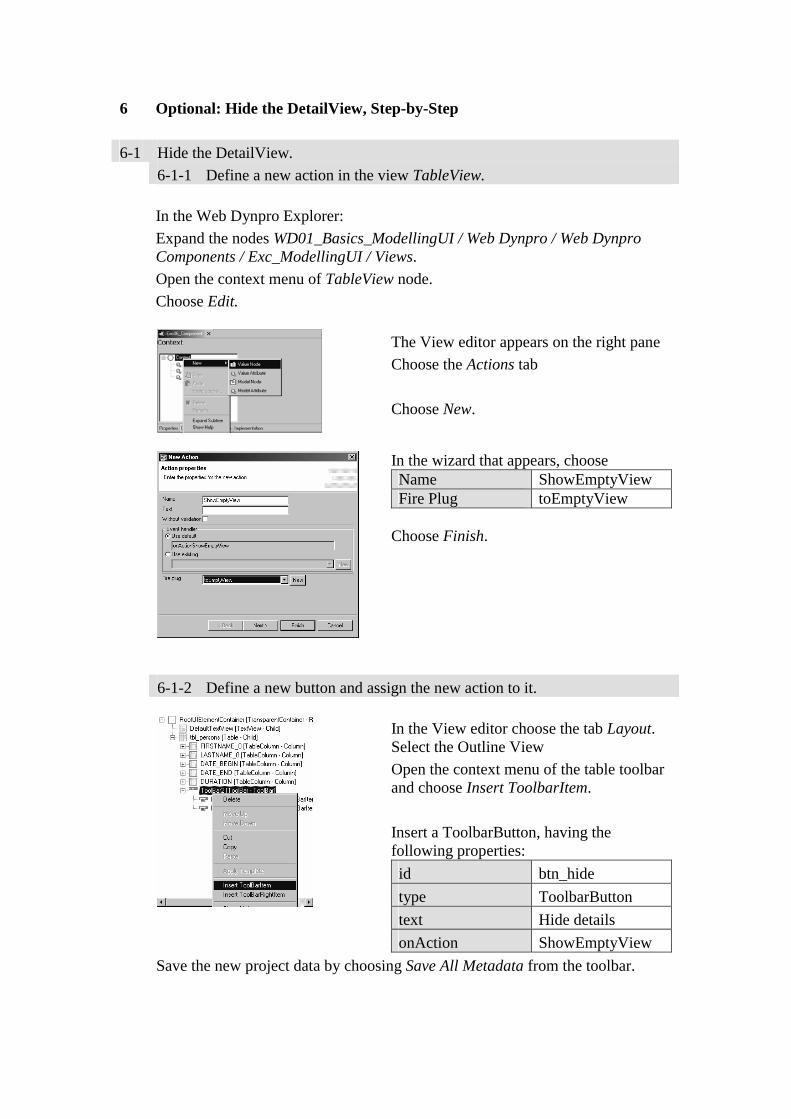
6 Optional: Hide the DetailView, Step-by-Step
6-1 Hide the DetailView. 6-1-1 Define a new action in the view TableView.
In the Web Dynpro Explorer:
Expand the nodes WD01_Basics_ModellingUI / Web Dynpro / Web Dynpro Components / Exc_ModellingUI / Views.
Open the context menu of TableView node.
Choose Edit.
The View editor appears on the right pane
Choose the Actions tab
Choose New.
In the wizard that appears, choose Name ShowEmptyView Fire Plug toEmptyView
Choose Finish.
6-1-2 Define a new button and assign the new action to it.
In the View editor choose the tab Layout. Select the Outline View
Open the context menu of the table toolbar and choose Insert ToolbarItem.
Insert a ToolbarButton, having the following properties:
id btn_hide
type ToolbarButton
text Hide details
onAction ShowEmptyView Save the new project data by choosing Save All Metadata from the toolbar.
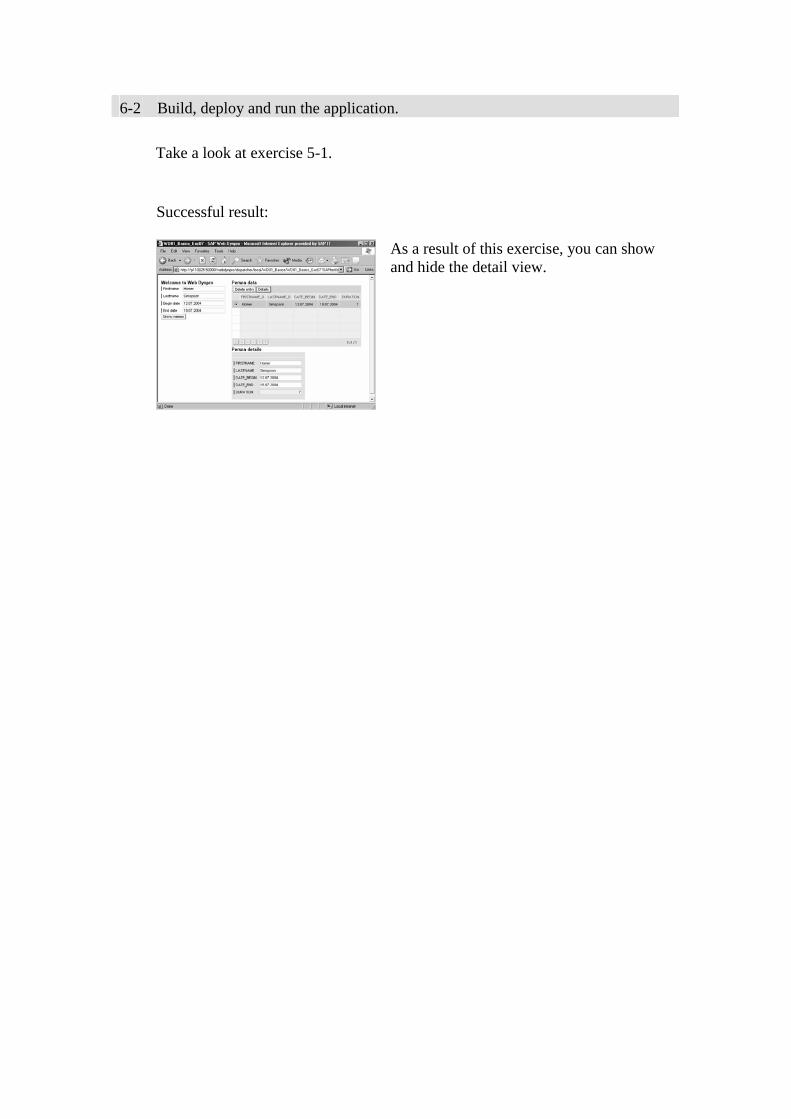
6-2 Build, deploy and run the application.
Take a look at exercise 5-1.
Successful result:
As a result of this exercise, you can show and hide the detail view.
© SAP AG <Course Number> Unit Title - 1
© SAP AG 2003, Title of Presentation, Speaker Name / 1
Messege Editor
IWDMessageManager-API
Contents:
Messages and Error Handling
© SAP AG <Course Number> Unit Title - 2
© SAP AG 2003, Title of Presentation, Speaker Name / 2
After completing this unit, you will be able to:
Defining message texts using the SAP Web DynproTools.
Report messages to the user by applying theIWDMessageManager-API.
Messages and Error Handling: Unit Objectives
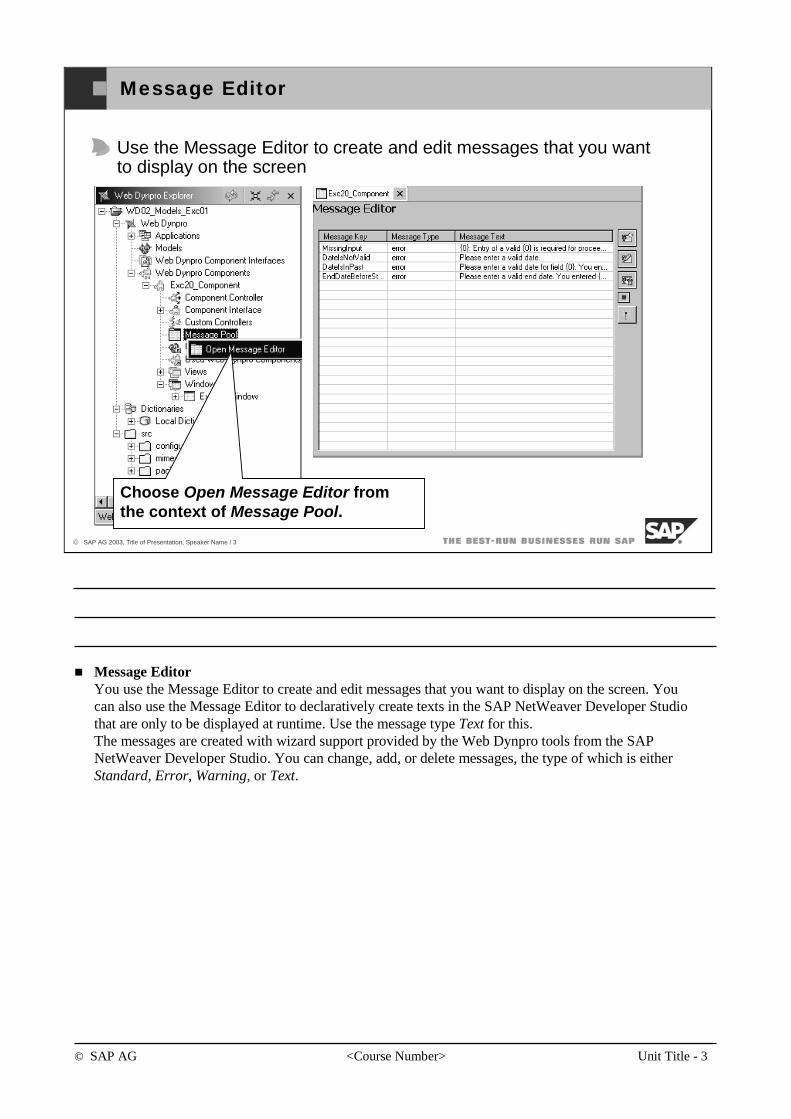
© SAP AG <Course Number> Unit Title - 3
© SAP AG 2003, Title of Presentation, Speaker Name / 3
Message Editor
Choose Open Message Editor from the context of Message Pool.
Use the Message Editor to create and edit messages that you wantto display on the screen
Message EditorYou use the Message Editor to create and edit messages that you want to display on the screen. You can also use the Message Editor to declaratively create texts in the SAP NetWeaver Developer Studio that are only to be displayed at runtime. Use the message type Text for this. The messages are created with wizard support provided by the Web Dynpro tools from the SAP NetWeaver Developer Studio. You can change, add, or delete messages, the type of which is either Standard, Error, Warning, or Text.
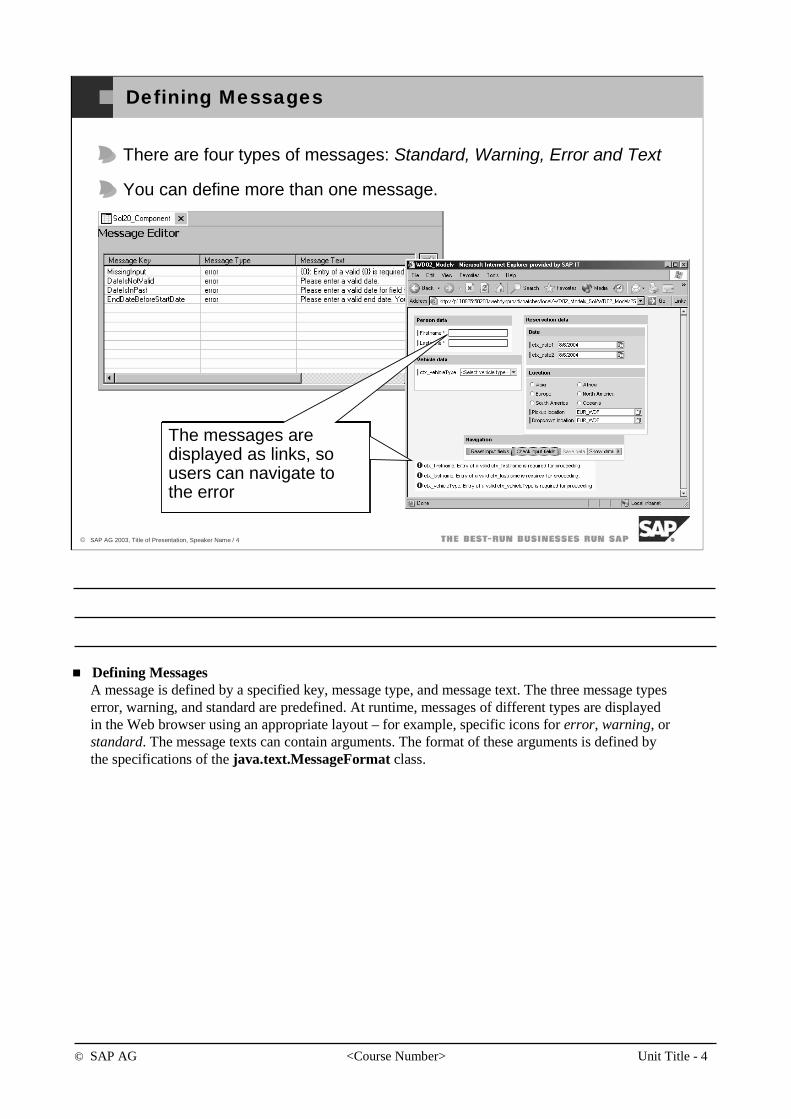
© SAP AG <Course Number> Unit Title - 4
© SAP AG 2003, Title of Presentation, Speaker Name / 4
Defining Messages
There are four types of messages: Standard, Warning, Error and Text
You can define more than one message.
The messages aredisplayed as links, so users can navigate to the error
The messages aredisplayed as links, so users can navigate to the error
Defining MessagesA message is defined by a specified key, message type, and message text. The three message types error, warning, and standard are predefined. At runtime, messages of different types are displayed in the Web browser using an appropriate layout – for example, specific icons for error, warning, or standard. The message texts can contain arguments. The format of these arguments is defined by the specifications of the java.text.MessageFormat class.
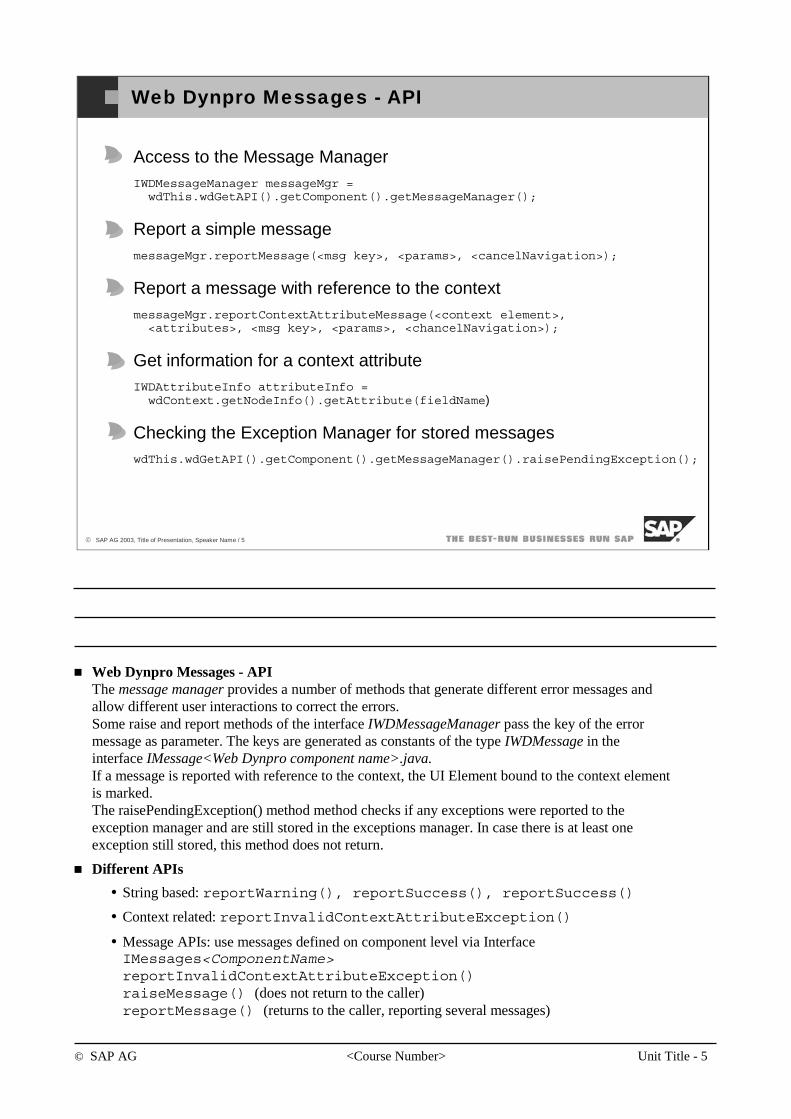
© SAP AG <Course Number> Unit Title - 5
© SAP AG 2003, Title of Presentation, Speaker Name / 5
Web Dynpro Messages - API
Access to the Message ManagerIWDMessageManager messageMgr = wdThis.wdGetAPI().getComponent().getMessageManager();
Report a simple messagemessageMgr.reportMessage(<msg key>, <params>, <cancelNavigation>);
Report a message with reference to the contextmessageMgr.reportContextAttributeMessage(<context element>,<attributes>, <msg key>, <params>, <chancelNavigation>);
Get information for a context attributeIWDAttributeInfo attributeInfo = wdContext.getNodeInfo().getAttribute(fieldName)
Checking the Exception Manager for stored messageswdThis.wdGetAPI().getComponent().getMessageManager().raisePendingException();
Web Dynpro Messages - APIThe message manager provides a number of methods that generate different error messages and allow different user interactions to correct the errors.Some raise and report methods of the interface IWDMessageManager pass the key of the errormessage as parameter. The keys are generated as constants of the type IWDMessage in theinterface IMessage<Web Dynpro component name>.java.If a message is reported with reference to the context, the UI Element bound to the context elementis marked.The raisePendingException() method method checks if any exceptions were reported to theexception manager and are still stored in the exceptions manager. In case there is at least oneexception still stored, this method does not return.
Different APIs
String based: reportWarning(), reportSuccess(), reportSuccess()
Context related: reportInvalidContextAttributeException()
Message APIs: use messages defined on component level via Interface IMessages<ComponentName>reportInvalidContextAttributeException()raiseMessage() (does not return to the caller)reportMessage() (returns to the caller, reporting several messages)
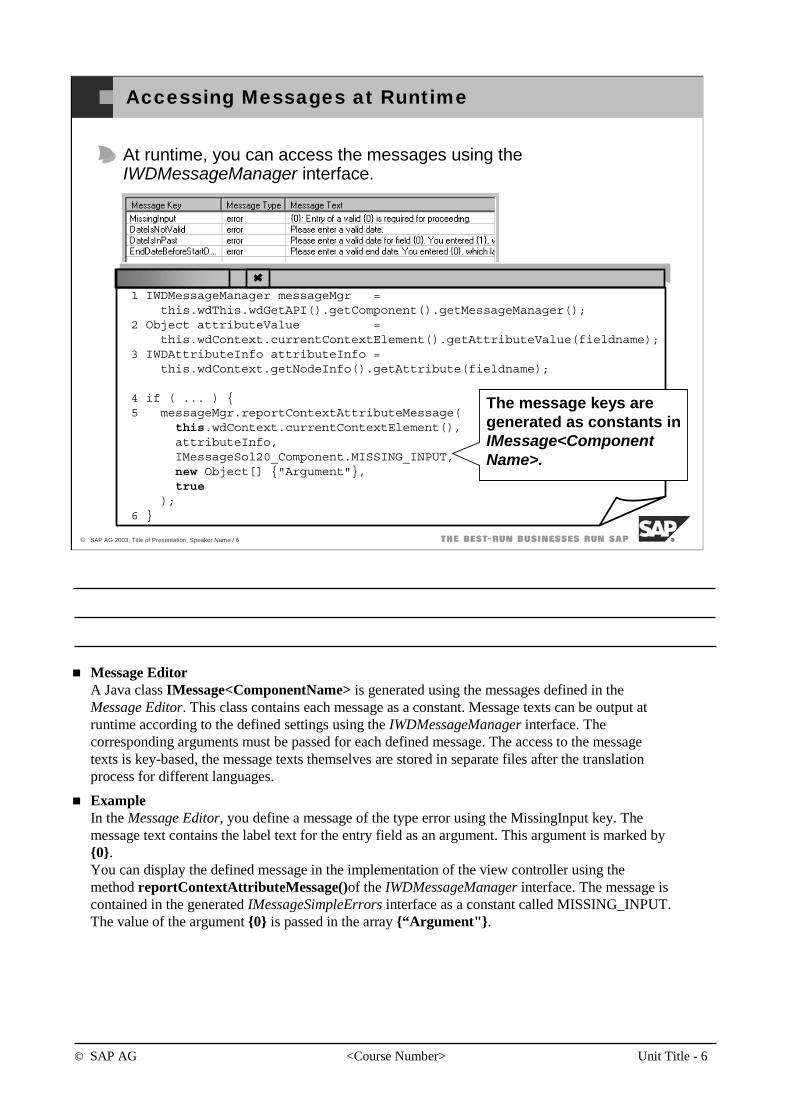
© SAP AG <Course Number> Unit Title - 6
© SAP AG 2003, Title of Presentation, Speaker Name / 6
Accessing Messages at Runtime
At runtime, you can access the messages using the IWDMessageManager interface.
1 IWDMessageManager messageMgr =this.wdThis.wdGetAPI().getComponent().getMessageManager();
2 Object attributeValue =this.wdContext.currentContextElement().getAttributeValue(fieldname);
3 IWDAttributeInfo attributeInfo =this.wdContext.getNodeInfo().getAttribute(fieldname);
4 if ( ... ) {5 messageMgr.reportContextAttributeMessage(
this.wdContext.currentContextElement(),attributeInfo,IMessageSol20_Component.MISSING_INPUT,new Object[] {"Argument"},true
);6 }
The message keys are generated as constants in IMessage<Component Name>.
Message EditorA Java class IMessage<ComponentName> is generated using the messages defined in theMessage Editor. This class contains each message as a constant. Message texts can be output at runtime according to the defined settings using the IWDMessageManager interface. The corresponding arguments must be passed for each defined message. The access to the message texts is key-based, the message texts themselves are stored in separate files after the translation process for different languages.
ExampleIn the Message Editor, you define a message of the type error using the MissingInput key. The message text contains the label text for the entry field as an argument. This argument is marked by {0}. You can display the defined message in the implementation of the view controller using the method reportContextAttributeMessage()of the IWDMessageManager interface. The message is contained in the generated IMessageSimpleErrors interface as a constant called MISSING_INPUT. The value of the argument {0} is passed in the array {“Argument"}.
© SAP AG <Course Number> Unit Title - 7
© SAP AG 2003, Title of Presentation, Speaker Name / 7
You should now be able to:
Defining message texts using the SAP Web DynproTools.
Report messages to the user by applying theIWDMessageManager-API.
Messages and Error Handling: Unit Summary
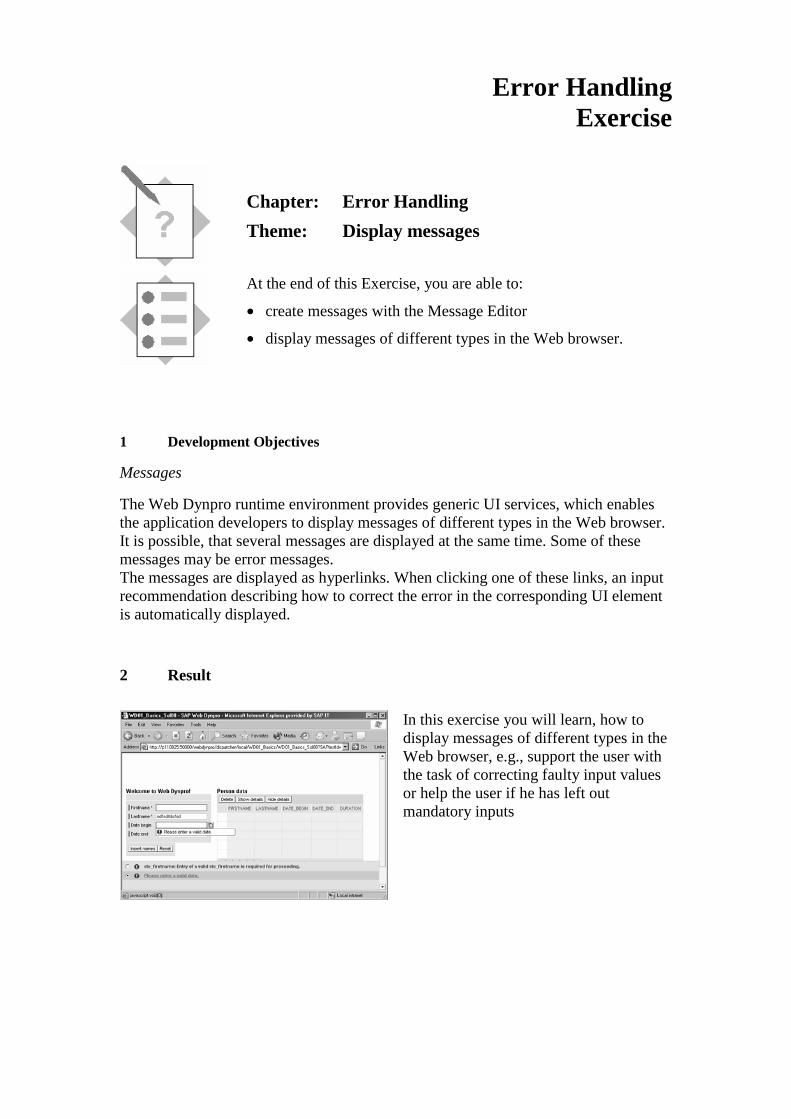
Error Handling Exercise
Chapter: Error Handling
Theme: Display messages
At the end of this Exercise, you are able to:
• create messages with the Message Editor
• display messages of different types in the Web browser.
1 Development Objectives
Messages
The Web Dynpro runtime environment provides generic UI services, which enables the application developers to display messages of different types in the Web browser. It is possible, that several messages are displayed at the same time. Some of these messages may be error messages. The messages are displayed as hyperlinks. When clicking one of these links, an input recommendation describing how to correct the error in the corresponding UI element is automatically displayed.
2 Result
In this exercise you will learn, how to display messages of different types in the Web browser, e.g., support the user with the task of correcting faulty input values or help the user if he has left out mandatory inputs
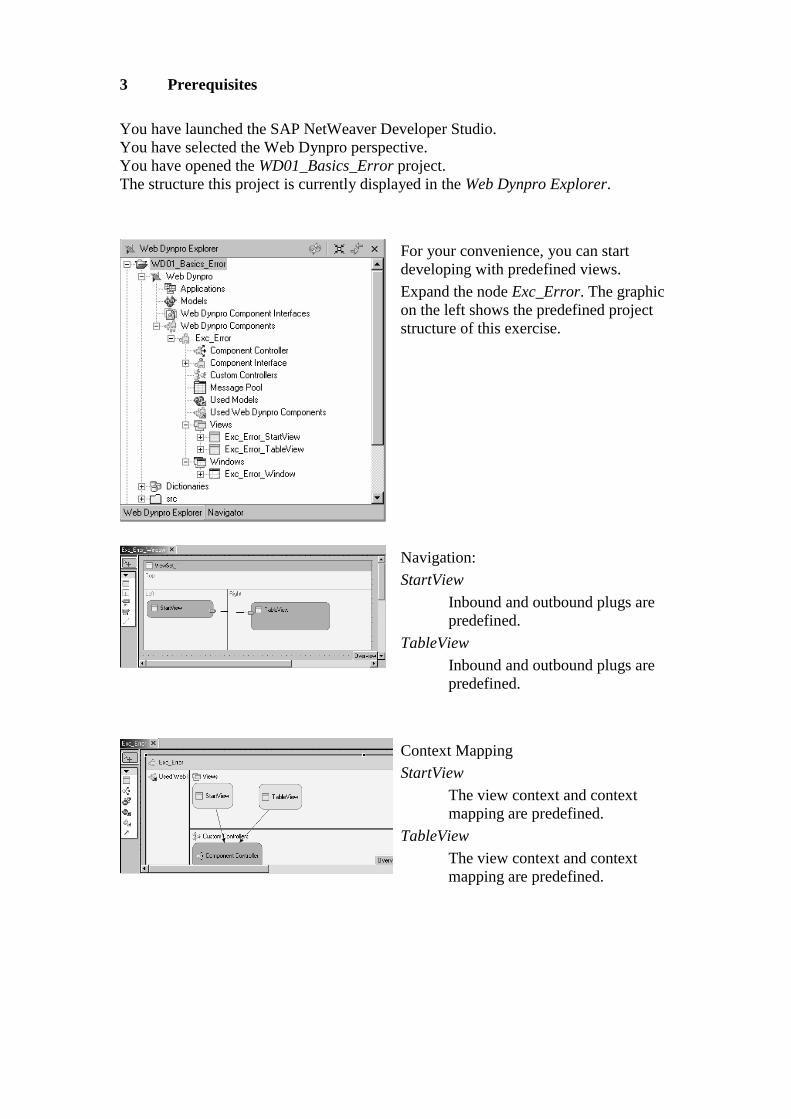
3 Prerequisites
You have launched the SAP NetWeaver Developer Studio. You have selected the Web Dynpro perspective. You have opened the WD01_Basics_Error project. The structure this project is currently displayed in the Web Dynpro Explorer.
For your convenience, you can start developing with predefined views.
Expand the node Exc_Error. The graphic on the left shows the predefined project structure of this exercise.
Navigation:
StartView
Inbound and outbound plugs are predefined.
TableView
Inbound and outbound plugs are predefined.
Context Mapping
StartView
The view context and context mapping are predefined.
TableView
The view context and context mapping are predefined.
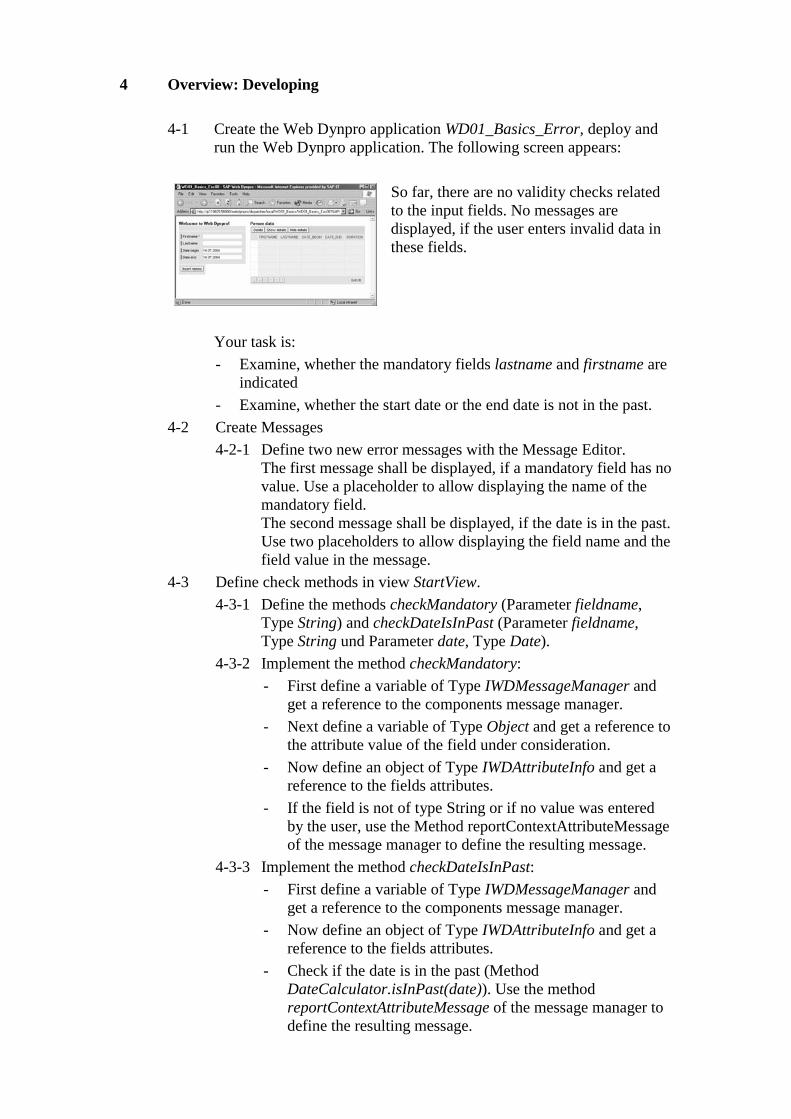
4 Overview: Developing
4-1 Create the Web Dynpro application WD01_Basics_Error, deploy and run the Web Dynpro application. The following screen appears:
So far, there are no validity checks related to the input fields. No messages are displayed, if the user enters invalid data in these fields.
Your task is:
- Examine, whether the mandatory fields lastname and firstname are indicated
- Examine, whether the start date or the end date is not in the past. 4-2 Create Messages
4-2-1 Define two new error messages with the Message Editor. The first message shall be displayed, if a mandatory field has no value. Use a placeholder to allow displaying the name of the mandatory field. The second message shall be displayed, if the date is in the past. Use two placeholders to allow displaying the field name and the field value in the message.
4-3 Define check methods in view StartView.
4-3-1 Define the methods checkMandatory (Parameter fieldname, Type String) and checkDateIsInPast (Parameter fieldname, Type String und Parameter date, Type Date).
4-3-2 Implement the method checkMandatory:
- First define a variable of Type IWDMessageManager and get a reference to the components message manager.
- Next define a variable of Type Object and get a reference to the attribute value of the field under consideration.
- Now define an object of Type IWDAttributeInfo and get a reference to the fields attributes.
- If the field is not of type String or if no value was entered by the user, use the Method reportContextAttributeMessage of the message manager to define the resulting message.
4-3-3 Implement the method checkDateIsInPast:
- First define a variable of Type IWDMessageManager and get a reference to the components message manager.
- Now define an object of Type IWDAttributeInfo and get a reference to the fields attributes.
- Check if the date is in the past (Method DateCalculator.isInPast(date)). Use the method reportContextAttributeMessage of the message manager to define the resulting message.
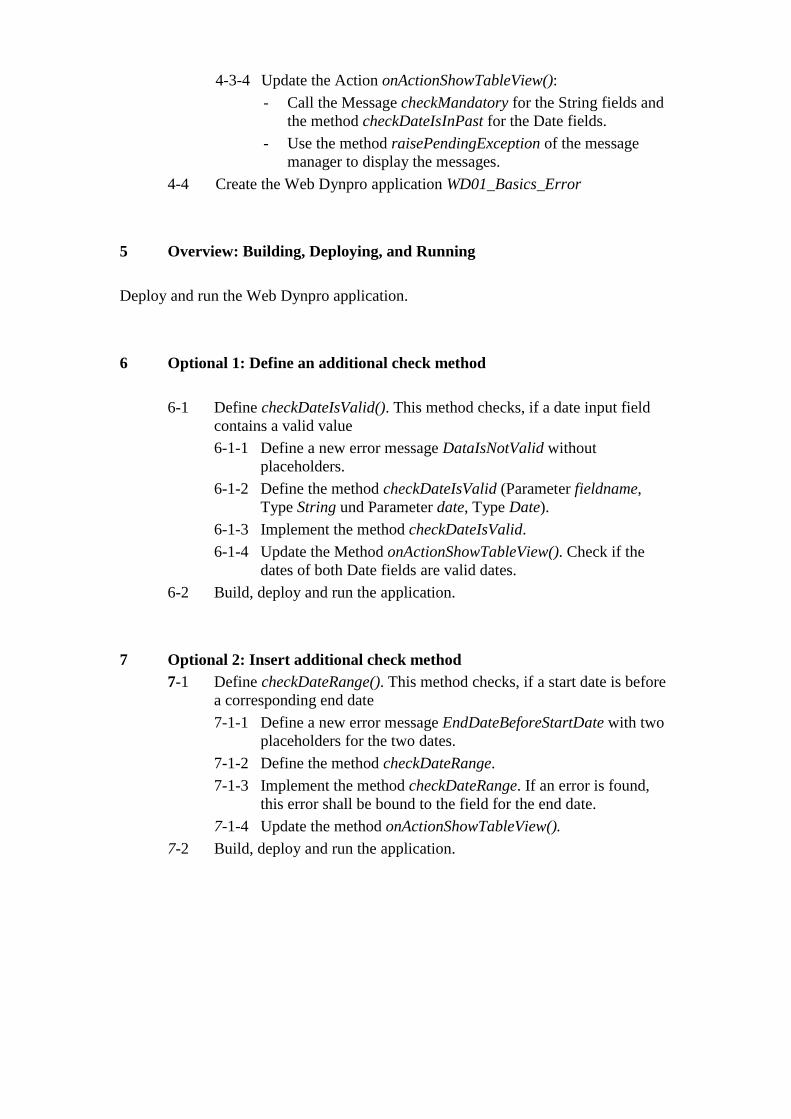
4-3-4 Update the Action onActionShowTableView():
- Call the Message checkMandatory for the String fields and the method checkDateIsInPast for the Date fields.
- Use the method raisePendingException of the message manager to display the messages.
4-4 Create the Web Dynpro application WD01_Basics_Error
5 Overview: Building, Deploying, and Running Deploy and run the Web Dynpro application.
6 Optional 1: Define an additional check method
6-1 Define checkDateIsValid(). This method checks, if a date input field contains a valid value 6-1-1 Define a new error message DataIsNotValid without
placeholders.
6-1-2 Define the method checkDateIsValid (Parameter fieldname, Type String und Parameter date, Type Date).
6-1-3 Implement the method checkDateIsValid.
6-1-4 Update the Method onActionShowTableView(). Check if the dates of both Date fields are valid dates.
6-2 Build, deploy and run the application.
7 Optional 2: Insert additional check method 7-1 Define checkDateRange(). This method checks, if a start date is before
a corresponding end date
7-1-1 Define a new error message EndDateBeforeStartDate with two placeholders for the two dates.
7-1-2 Define the method checkDateRange.
7-1-3 Implement the method checkDateRange. If an error is found, this error shall be bound to the field for the end date.
7-1-4 Update the method onActionShowTableView().
7-2 Build, deploy and run the application.
Error Handling Solution
Chapter: Error Handling
Theme: Display messages
At the end of this Exercise, you are able to:
• create messages with the Message Editor.
• display messages of different types in the Web browser.
4 Developing, Step-by-Step Note: In this exercise you have to type in some lines of java code. For your convenience, you can cut and paste the code from the corresponding solution project. But keep in mind: Some of the methods are automatically generated by Web Dynpro . For this reason, the methods names you have to choose can differ from the method names of the solution. 4-2 Create Messages. 4-2-1 Define two new error messages with the Message Editor.
In the Web Dynpro Explorer:
Expand the nodes WD01_Basics_Error / Web Dynpro / Web Dynpro Components / Exc_Error
Open the context menu of Message Pool.
Choose Open Message Editor.
In the Message Editor, create two new messages
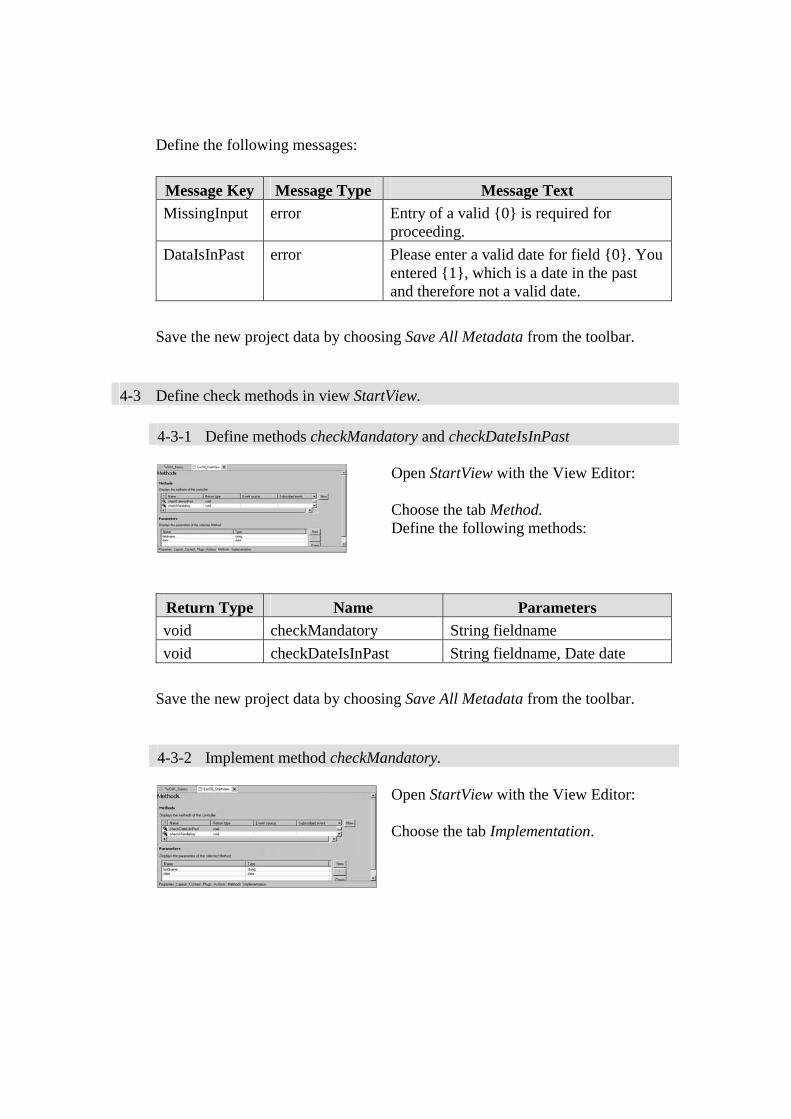
Define the following messages:
Message Key Message Type Message Text MissingInput error Entry of a valid {0} is required for
proceeding.
DataIsInPast error Please enter a valid date for field {0}. You entered {1}, which is a date in the past and therefore not a valid date.
Save the new project data by choosing Save All Metadata from the toolbar.
4-3 Define check methods in view StartView. 4-3-1 Define methods checkMandatory and checkDateIsInPast
Open StartView with the View Editor: Choose the tab Method. Define the following methods:
Return Type Name Parameters void checkMandatory String fieldname
void checkDateIsInPast String fieldname, Date date
Save the new project data by choosing Save All Metadata from the toolbar. 4-3-2 Implement method checkMandatory.
Open StartView with the View Editor: Choose the tab Implementation.
Choose the method checkMandatory(…). Error messages, which may be contained in the event handler, are first stored internally and are displayed by calling the interface method raisePendingException() of the IWDMessageManager interface.
public void checkMandatory( java.lang.String fieldname ) { //@@begin checkMandatory() IWDMessageManager messageMgr = this.wdThis.wdGetAPI().getComponent().getMessageManager(); Object attributeValue = this.wdContext.currentContextElement(). getAttributeValue(fieldname); IWDAttributeInfo attributeInfo = this.wdContext.getNodeInfo().getAttribute(fieldname); if (attributeValue instanceof String) { if (((String) attributeValue).length() == 0) { messageMgr.reportContextAttributeMessage( this.wdContext.currentContextElement(), attributeInfo, IMessageExc_Error.MISSING_INPUT, new Object[] { fieldname }, true ); } // if } // if
//@@end
}. 4-3-3 Implement the method checkDateIsInPast
You can implement the code to check the date on your own or you can use the Helper class com.sap.training.wd.basics.error.util.DateCalculator.
This predefined class contains some static methods to check a calculate dates. public void checkDateIsInPast( java.lang.String fieldname, java.sql.Date date ) { //@@begin checkDateIsInPast() IWDMessageManager msgMgr = this.wdThis.wdGetAPI().getComponent().getMessageManager(); IWDAttributeInfo attributeInfo = this.wdContext.getNodeInfo().getAttribute(fieldname); if( DateCalculator.isInPast(date) ) { msgMgr.reportContextAttributeMessage ( this.wdContext.currentContextElement(), attributeInfo, IMessageExc_Error.DATE_IS_IN_PAST,
new Object[] { fieldname, date }, true ); } // if
//@@end }
4-4 Update Action onActionShowTableView(). The input checks are run in the onActionShowTableView() event handler using
the previously implemented methods checkDateIsInPast(), and checkMandatory(). public void onActionShowTableView( . . . ) { //@@begin onActionShowTableView(ServerEvent) String fieldname0 = "ctx_date1"; String fieldname1 = "ctx_date2"; String fieldname2 = "ctx_firstname"; String fieldname3 = "ctx_lastname"; // check mandatory fields this.checkMandatory(fieldname2); this.checkMandatory(fieldname3); wdThis.wdGetAPI().getComponent().getMessageManager(). raisePendingException(); // check date fields Date inpDate0 = (Date)this.wdContext.currentContextElement(). getAttributeValue(fieldname0); Date inpDate1 = (Date) this.wdContext.currentContextElement(). getAttributeValue(fieldname1); this.checkDateIsInPast(fieldname0, inpDate0); this.checkDateIsInPast(fieldname1, inpDate1); wdThis.wdGetAPI().getComponent().getMessageManager(). raisePendingException(); wdThis.wdFirePlugToTableView(); //@@end }
4-4 Create a Web Dynpro application
In the Web Dynpro Explorer, expand the node WD01_Basics_Error. Expand the node Web Dynpro and open the context menu for Applications. To open the wizard, choose Create Application.
In the wizard, enter:
Name WD01_Basics_Error
Package com.sap.training.wd.basics.error
Accept the other suggested values and choose Next.
Select Use existing component and choose Next.
Select
Web Dynpro Component Exc_Error
Interface View Exc_Error_WindowInterfaceView
Startup Plug Default
and choose Finish.
Successful result:
The generated Web Dynpro application object completes your project structure. You can now deploy your project and start your Web Dynpro application. WD01_Basics_Error enables you to address the Web application as a whole, when you launch this complete application in the next step.
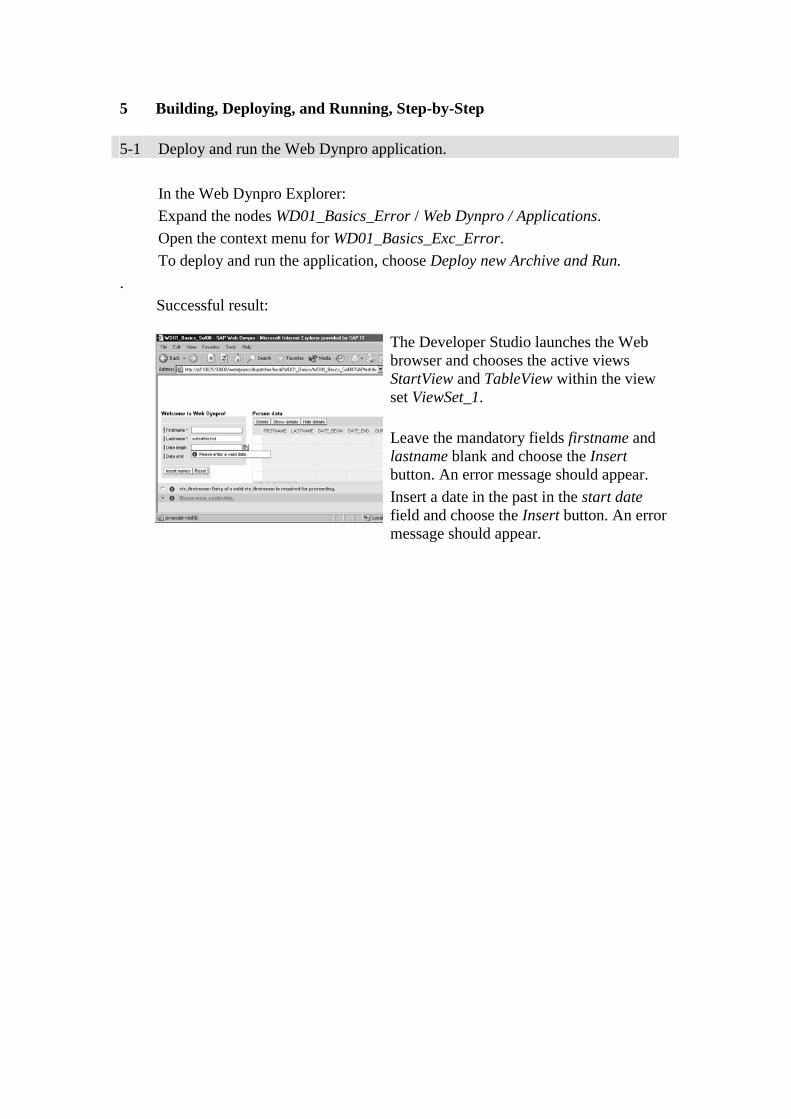
5 Building, Deploying, and Running, Step-by-Step 5-1 Deploy and run the Web Dynpro application.
In the Web Dynpro Explorer:
Expand the nodes WD01_Basics_Error / Web Dynpro / Applications.
Open the context menu for WD01_Basics_Exc_Error.
To deploy and run the application, choose Deploy new Archive and Run.
. Successful result:
The Developer Studio launches the Web browser and chooses the active views StartView and TableView within the view set ViewSet_1.
Leave the mandatory fields firstname and lastname blank and choose the Insert button. An error message should appear.
Insert a date in the past in the start date field and choose the Insert button. An error message should appear.
6 Optional 1: Define an additional check method, Step-by-Step
6-1 Define checkDateIsValid() This method checks, if a date input field contains a valid value 6-1-1 Define a new error message. For detailed information about the necessary steps take a look at exercise 4-2-1. Message Key Message Type Message Text
DataIsNotValid error Please enter a valid date 6-1-2 Define the method checkDateIsValid. For detailed information about the necessary steps take a look at exercise 4-3-1. Return Type Name Parameters
void checkDateIsValid String fieldname, Date date
Save the new project data by choosing Save All Metadata from the toolbar. 6-1-3 Implement the method checkDateIsValid. For detailed information about the necessary steps have a look at exercise 4-3-2.
public void checkDateIsValid(…) { //@@begin checkDateIsValid() IWDMessageManager messageMgr = this.wdThis.wdGetAPI().getComponent().getMessageManager(); Object attributeValue = this.wdContext.currentContextElement().getAttributeValue( fieldname); IWDAttributeInfo attributeInfo = this.wdContext.getNodeInfo().getAttribute(fieldname); if( !DateCalculator.isValid(date) ) { messageMgr.reportContextAttributeMessage ( this.wdContext.currentContextElement(), attributeInfo, IMessageExc_Error.DATE_IS_NOT_VALID, new Object[] { date }, true ); } // if //@@end
}
Save the new project data by choosing Save All Metadata from the toolbar.
6-1-4 Update Action onActionShowTableView().
public void onActionShowTableView( . . . ) { //@@begin onActionShowTableView(ServerEvent) String fieldname0 = "ctx_date1"; String fieldname1 = "ctx_date2"; String fieldname2 = "ctx_firstname"; String fieldname3 = "ctx_lastname"; // check mandatory fields … // check date fields Date inpDate0 = (Date)this.wdContext.currentContextElement(). getAttributeValue(fieldname0); Date inpDate1 = (Date)this.wdContext.currentContextElement(). getAttributeValue(fieldname1); this.checkDateIsValid(fieldname0, inpDate0); this.checkDateIsValid(fieldname1, inpDate1); wdThis.wdGetAPI().getComponent().getMessageManager(). raisePendingException(); this.checkDateIsInPast(fieldname0, inpDate0); this.checkDateIsInPast(fieldname1, inpDate1); wdThis.wdGetAPI().getComponent().getMessageManager(). raisePendingException(); wdThis.wdFirePlugToTableView(); //@@end }
6-2 Build, deploy and run the application Take a look at exercise 5-1.
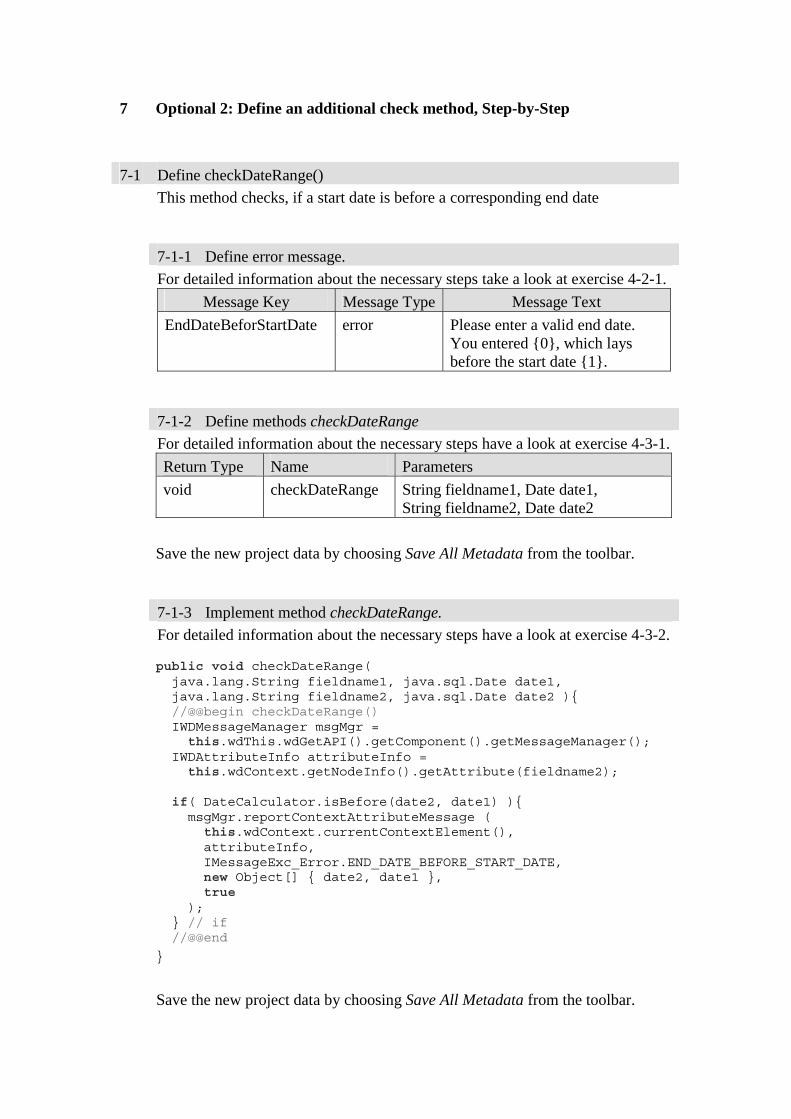
7 Optional 2: Define an additional check method, Step-by-Step
7-1 Define checkDateRange() This method checks, if a start date is before a corresponding end date 7-1-1 Define error message. For detailed information about the necessary steps take a look at exercise 4-2-1. Message Key Message Type Message Text
EndDateBeforStartDate error Please enter a valid end date. You entered {0}, which lays before the start date {1}.
7-1-2 Define methods checkDateRange For detailed information about the necessary steps have a look at exercise 4-3-1. Return Type Name Parameters
void checkDateRange String fieldname1, Date date1, String fieldname2, Date date2
Save the new project data by choosing Save All Metadata from the toolbar. 7-1-3 Implement method checkDateRange. For detailed information about the necessary steps have a look at exercise 4-3-2.
public void checkDateRange( java.lang.String fieldname1, java.sql.Date date1, java.lang.String fieldname2, java.sql.Date date2 ){ //@@begin checkDateRange() IWDMessageManager msgMgr = this.wdThis.wdGetAPI().getComponent().getMessageManager(); IWDAttributeInfo attributeInfo = this.wdContext.getNodeInfo().getAttribute(fieldname2); if( DateCalculator.isBefore(date2, date1) ){ msgMgr.reportContextAttributeMessage ( this.wdContext.currentContextElement(), attributeInfo, IMessageExc_Error.END_DATE_BEFORE_START_DATE, new Object[] { date2, date1 }, true ); } // if //@@end
}
Save the new project data by choosing Save All Metadata from the toolbar.
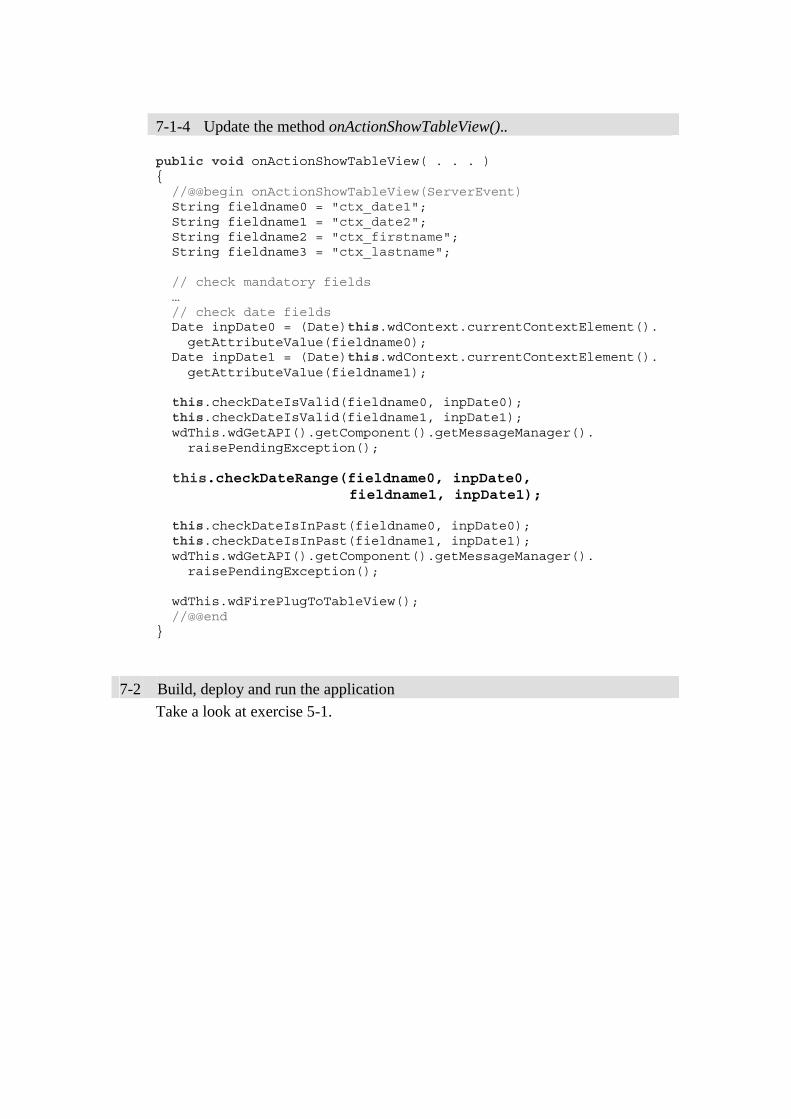
7-1-4 Update the method onActionShowTableView()..
public void onActionShowTableView( . . . ) { //@@begin onActionShowTableView(ServerEvent) String fieldname0 = "ctx_date1"; String fieldname1 = "ctx_date2"; String fieldname2 = "ctx_firstname"; String fieldname3 = "ctx_lastname"; // check mandatory fields … // check date fields Date inpDate0 = (Date)this.wdContext.currentContextElement(). getAttributeValue(fieldname0); Date inpDate1 = (Date)this.wdContext.currentContextElement(). getAttributeValue(fieldname1); this.checkDateIsValid(fieldname0, inpDate0); this.checkDateIsValid(fieldname1, inpDate1); wdThis.wdGetAPI().getComponent().getMessageManager(). raisePendingException(); this.checkDateRange(fieldname0, inpDate0, fieldname1, inpDate1); this.checkDateIsInPast(fieldname0, inpDate0); this.checkDateIsInPast(fieldname1, inpDate1); wdThis.wdGetAPI().getComponent().getMessageManager(). raisePendingException(); wdThis.wdFirePlugToTableView(); //@@end }
7-2 Build, deploy and run the application Take a look at exercise 5-1.
© SAP AG <Course Number> Unit Title - 1
© SAP AG 2003, Title of Presentation, Speaker Name / 1
Three Types of Value Help.
Defining a static Simple Type containing a valueset.
Simple Value Selector: Populating a DropDownByKeylistbox with displaytexts.
Extended Value Selector: Valuehelp for larger valuesets.
Dynamic Type Modification: Modifying a value attribute´sdatatype programmatically.
Contents:
Generic UI Services
© SAP AG <Course Number> Unit Title - 2
© SAP AG 2003, Title of Presentation, Speaker Name / 2
After completing this unit, you will be able to:
Explain the three types of value help.
Use Static Valuesets.
Use Dynamic Valuesets.
Generic UI Services: Unit Objectives
© SAP AG <Course Number> Unit Title - 3
© SAP AG 2003, Title of Presentation, Speaker Name / 3
After completing this topic, you will be able to:
Explain the three types of value help.
Three Types of Value Help: Topic Objectives
This is a lesson

© SAP AG <Course Number> Unit Title - 4
© SAP AG 2003, Title of Presentation, Speaker Name / 4
Three types of Valuehelp
Simple Value Selector
Based on a DropDownByKey UI Element bound to a context value attribute of type "Simple Type" containing a valueset
Used for small valuesets (less than 30 values)
Extended Value Selector
Based on an Input Field UI Element boundto a context value attribute of type "Simple Type" containing a valueset
Both types of valuehelp can be based on dynamically modified datatypes
Generic UI ServicesThe Web Dynpro runtime environment provides generic UI services for the application development. They enable you to easily create a value help for constants – for example, for countries or zip codes.
Simple Value Selector (SVS)You can use the simple value selector as a dropdown list box to display a set of constants when you bind a DropdownByKey UI element to a value attribute of the type Simple Type. The simple value selector is especially useful for small sets of constant values (up to 30 entries).
Extended Value Selector (EVS)If the dropdown list box is too long due to the large number of constant values in a simple data type Simple Type, you should use the extended value selector. This value selector can display a large set of constants in a special dialog box below a regular input field. The extended value selector also provides a sort function and search function. The main concept of this value help is to bind constants to an input field or a DropdownByKey UI element. The constants are contained in a simple data type Simple Type and the value attributes have the same type. With the exception of the possible dynamic data type modifications of a value attribute at runtime, the application developer must only implement the declarations involved.
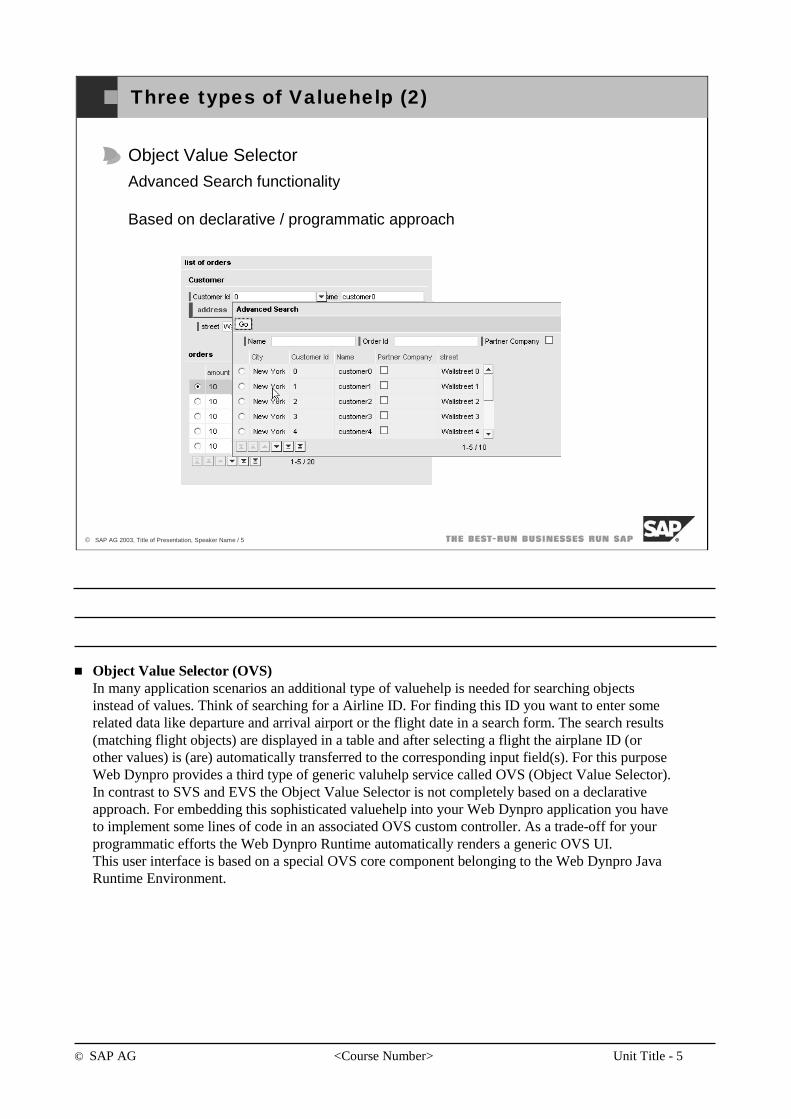
© SAP AG <Course Number> Unit Title - 5
© SAP AG 2003, Title of Presentation, Speaker Name / 5
Three types of Valuehelp (2)
Object Value Selector
Advanced Search functionality
Based on declarative / programmatic approach
Object Value Selector (OVS)In many application scenarios an additional type of valuehelp is needed for searching objectsinstead of values. Think of searching for a Airline ID. For finding this ID you want to enter somerelated data like departure and arrival airport or the flight date in a search form. The search results(matching flight objects) are displayed in a table and after selecting a flight the airplane ID (orother values) is (are) automatically transferred to the corresponding input field(s). For this purposeWeb Dynpro provides a third type of generic valuhelp service called OVS (Object Value Selector). In contrast to SVS and EVS the Object Value Selector is not completely based on a declarativeapproach. For embedding this sophisticated valuehelp into your Web Dynpro application you haveto implement some lines of code in an associated OVS custom controller. As a trade-off for yourprogrammatic efforts the Web Dynpro Runtime automatically renders a generic OVS UI.This user interface is based on a special OVS core component belonging to the Web Dynpro Java Runtime Environment.
© SAP AG <Course Number> Unit Title - 6
© SAP AG 2003, Title of Presentation, Speaker Name / 6
You should now be able to:
Explain the three types of value help.
Three Types of Value Help: Topic Summary
© SAP AG <Course Number> Unit Title - 7
© SAP AG 2003, Title of Presentation, Speaker Name / 7
After completing this topic, you will be able to:
Use Static Valuesets.
Use Dynamic Valuesets.
Static versue Dynamic Valuesets: Topic Objectives
This is a lesson
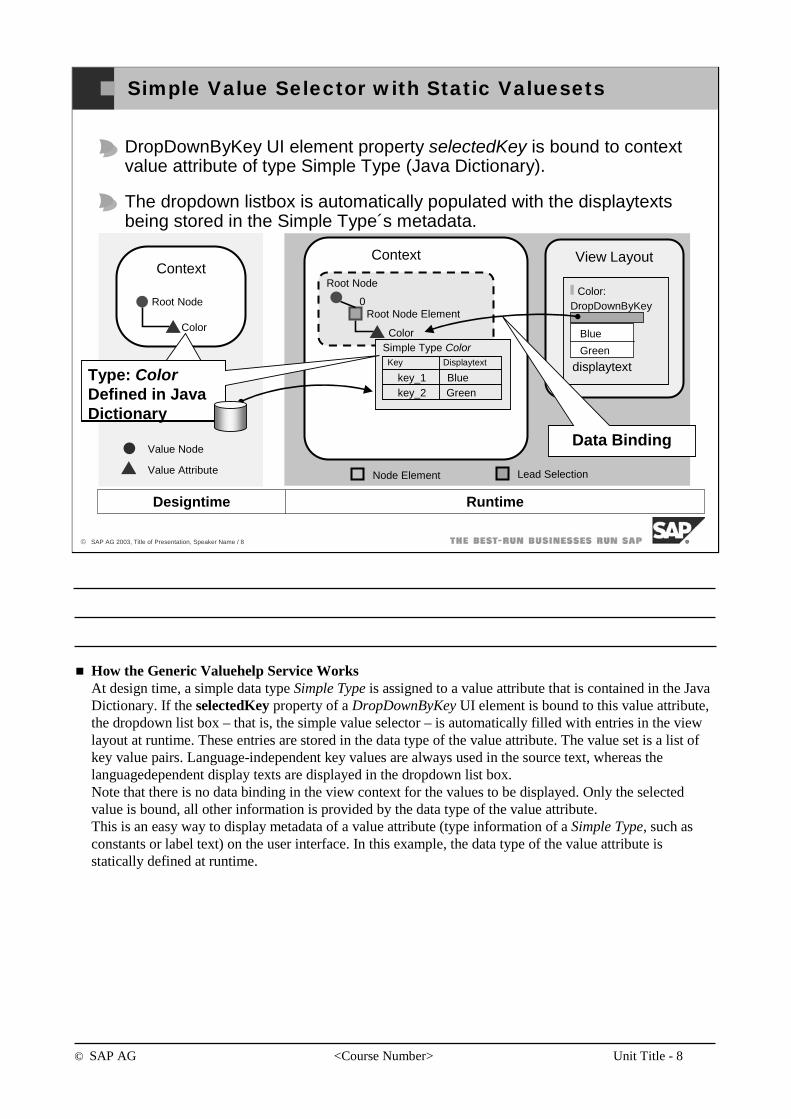
© SAP AG <Course Number> Unit Title - 8
© SAP AG 2003, Title of Presentation, Speaker Name / 8
Runtime
Simple Value Selector with Static Valuesets
Root Node
Color
Root Node Element0
Context
Node Element Lead Selection
View Layout
displaytext
DropDownByKey
Blue
Green
Color:
key_1
Key Displaytext
key_2BlueGreen
Simple Type Color
Context
Root Node
Value Attribute
Value Node
Color
Designtime
Data Binding
DropDownByKey UI element property selectedKey is bound to context value attribute of type Simple Type (Java Dictionary).
The dropdown listbox is automatically populated with the displaytextsbeing stored in the Simple Type´s metadata.
Type: ColorDefined in Java Dictionary
Type: ColorDefined in Java Dictionary
How the Generic Valuehelp Service WorksAt design time, a simple data type Simple Type is assigned to a value attribute that is contained in the Java Dictionary. If the selectedKey property of a DropDownByKey UI element is bound to this value attribute, the dropdown list box – that is, the simple value selector – is automatically filled with entries in the viewlayout at runtime. These entries are stored in the data type of the value attribute. The value set is a list of key value pairs. Language-independent key values are always used in the source text, whereas thelanguagedependent display texts are displayed in the dropdown list box. Note that there is no data binding in the view context for the values to be displayed. Only the selectedvalue is bound, all other information is provided by the data type of the value attribute.This is an easy way to display metadata of a value attribute (type information of a Simple Type, such as constants or label text) on the user interface. In this example, the data type of the value attribute isstatically defined at runtime.
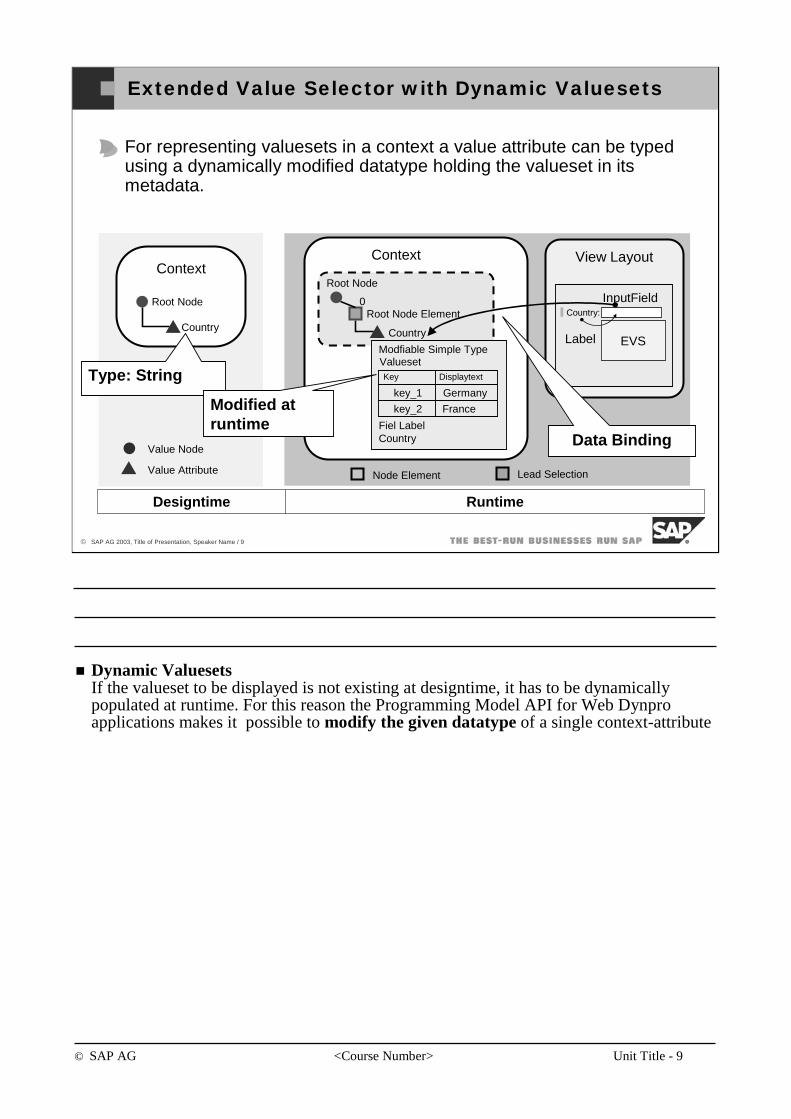
© SAP AG <Course Number> Unit Title - 9
© SAP AG 2003, Title of Presentation, Speaker Name / 9
Runtime
Extended Value Selector with Dynamic Valuesets
Root Node
Country
Root Node Element0
Context
Node Element Lead Selection
View LayoutContext
Root Node
Value Attribute
Value Node
Country
Designtime
For representing valuesets in a context a value attribute can be typed using a dynamically modified datatype holding the valueset in its metadata.
key_1
Key Displaytext
key_2
Germany
France
Modfiable Simple TypeValueset
Fiel LabelCountry
InputFieldCountry:
EVSLabel
Data Binding
Type: String
Modified at runtime
Dynamic ValuesetsIf the valueset to be displayed is not existing at designtime, it has to be dynamically populated at runtime. For this reason the Programming Model API for Web Dynproapplications makes it possible to modify the given datatype of a single context-attribute
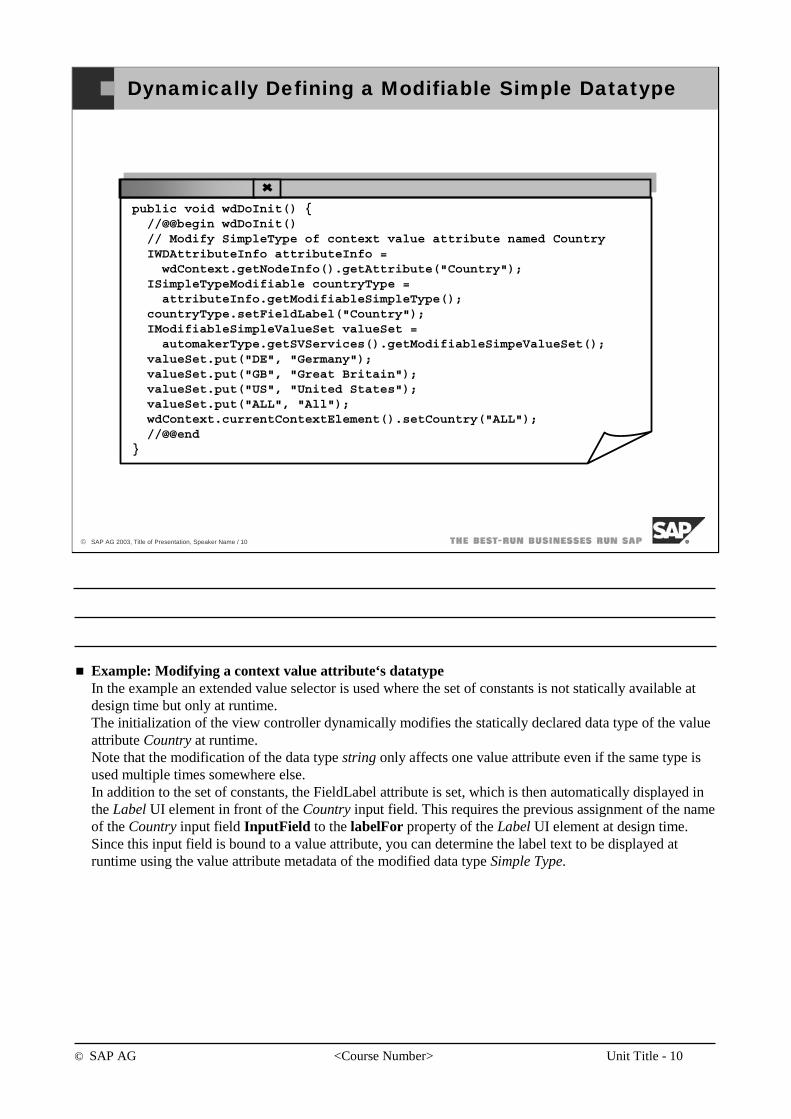
© SAP AG <Course Number> Unit Title - 10
© SAP AG 2003, Title of Presentation, Speaker Name / 10
Dynamically Defining a Modifiable Simple Datatype
public void wdDoInit() {//@@begin wdDoInit()// Modify SimpleType of context value attribute named CountryIWDAttributeInfo attributeInfo =wdContext.getNodeInfo().getAttribute("Country");
ISimpleTypeModifiable countryType =attributeInfo.getModifiableSimpleType();
countryType.setFieldLabel("Country");IModifiableSimpleValueSet valueSet =automakerType.getSVServices().getModifiableSimpeValueSet();
valueSet.put("DE", "Germany");valueSet.put("GB", "Great Britain");valueSet.put("US", "United States");valueSet.put("ALL", "All");wdContext.currentContextElement().setCountry("ALL");//@@end
}
Example: Modifying a context value attribute‘s datatypeIn the example an extended value selector is used where the set of constants is not statically available at design time but only at runtime. The initialization of the view controller dynamically modifies the statically declared data type of the valueattribute Country at runtime.Note that the modification of the data type string only affects one value attribute even if the same type isused multiple times somewhere else.In addition to the set of constants, the FieldLabel attribute is set, which is then automatically displayed in the Label UI element in front of the Country input field. This requires the previous assignment of the nameof the Country input field InputField to the labelFor property of the Label UI element at design time. Since this input field is bound to a value attribute, you can determine the label text to be displayed at runtime using the value attribute metadata of the modified data type Simple Type.
© SAP AG <Course Number> Unit Title - 11
© SAP AG 2003, Title of Presentation, Speaker Name / 11
You should now be able to:
Use Static Valuesets.
Use Dynamic Valuesets.
Static versue Dynamic Valuesets: Topic Summary
© SAP AG <Course Number> Unit Title - 12
© SAP AG 2003, Title of Presentation, Speaker Name / 12
You should now be able to:
Explain the three types of value help.
Use Static Valuesets.
Use Dynamic Valuesets.
Generic UI Services: Unit Summary
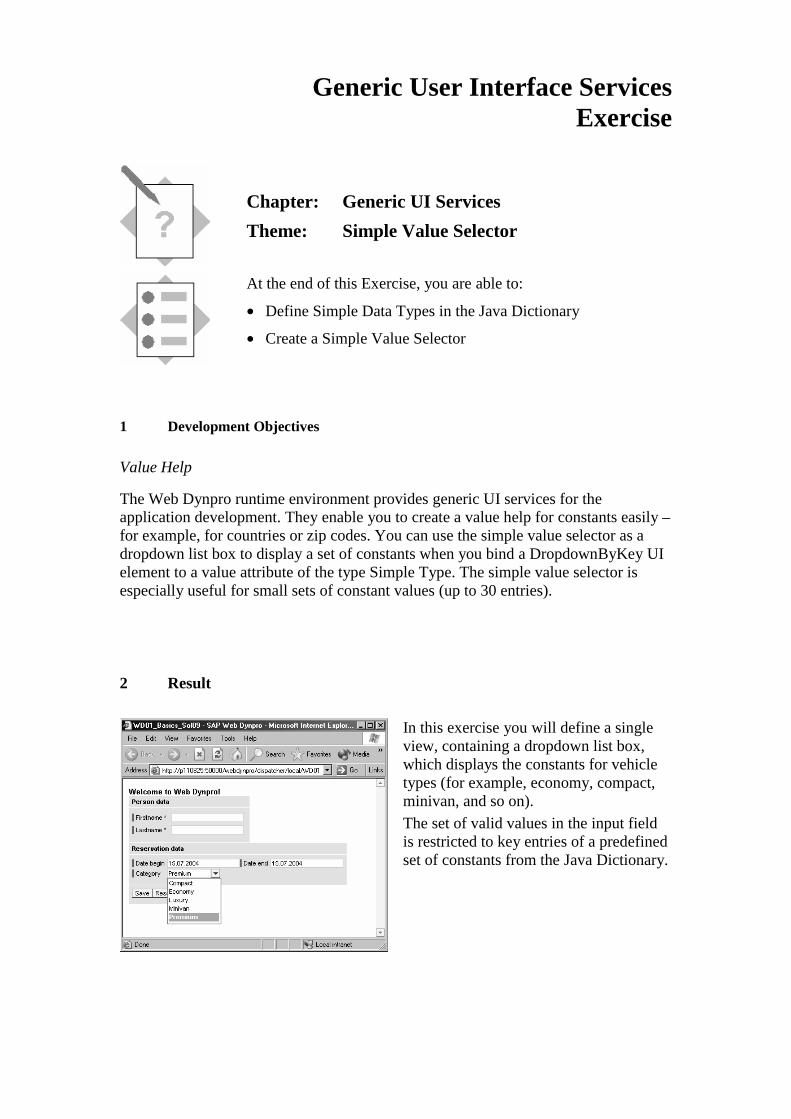
Generic User Interface Services Exercise
Chapter: Generic UI Services
Theme: Simple Value Selector
At the end of this Exercise, you are able to:
• Define Simple Data Types in the Java Dictionary
• Create a Simple Value Selector
1 Development Objectives
Value Help
The Web Dynpro runtime environment provides generic UI services for the application development. They enable you to create a value help for constants easily – for example, for countries or zip codes. You can use the simple value selector as a dropdown list box to display a set of constants when you bind a DropdownByKey UI element to a value attribute of the type Simple Type. The simple value selector is especially useful for small sets of constant values (up to 30 entries).
2 Result
In this exercise you will define a single view, containing a dropdown list box, which displays the constants for vehicle types (for example, economy, compact, minivan, and so on). The set of valid values in the input field is restricted to key entries of a predefined set of constants from the Java Dictionary.
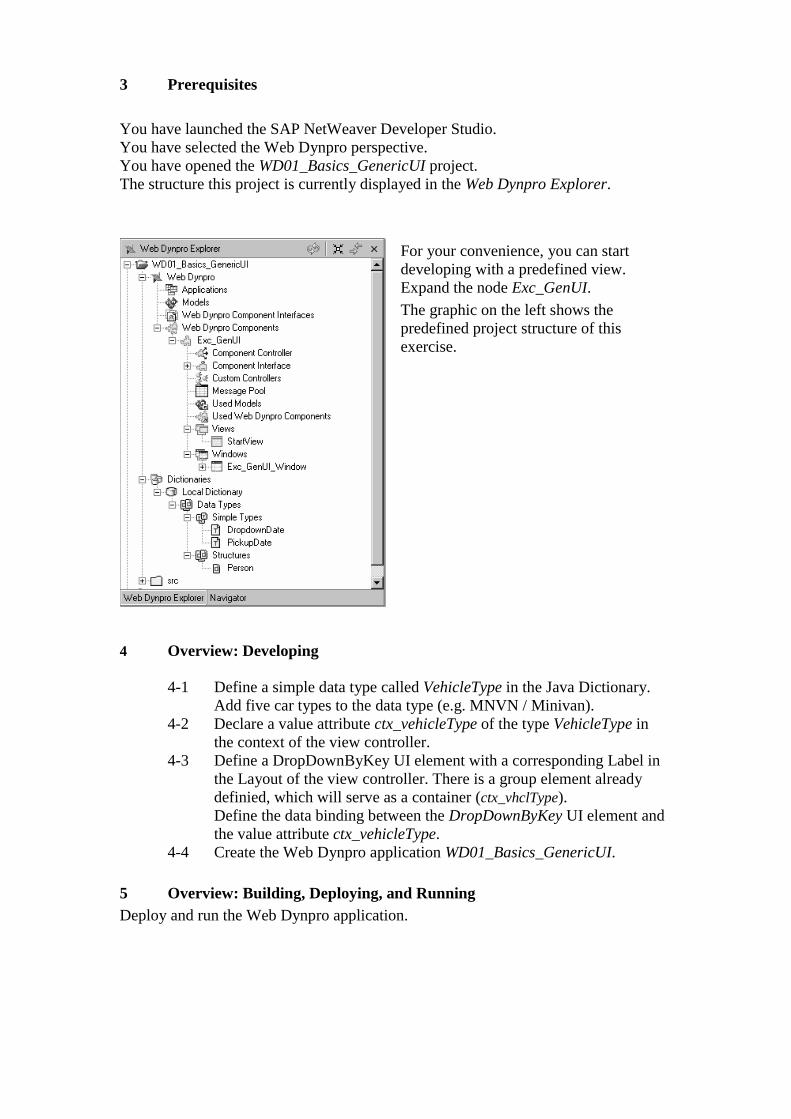
3 Prerequisites You have launched the SAP NetWeaver Developer Studio. You have selected the Web Dynpro perspective. You have opened the WD01_Basics_GenericUI project. The structure this project is currently displayed in the Web Dynpro Explorer.
For your convenience, you can start developing with a predefined view. Expand the node Exc_GenUI.
The graphic on the left shows the predefined project structure of this exercise.
4 Overview: Developing
4-1 Define a simple data type called VehicleType in the Java Dictionary. Add five car types to the data type (e.g. MNVN / Minivan).
4-2 Declare a value attribute ctx_vehicleType of the type VehicleType in the context of the view controller.
4-3 Define a DropDownByKey UI element with a corresponding Label in the Layout of the view controller. There is a group element already definied, which will serve as a container (ctx_vhclType). Define the data binding between the DropDownByKey UI element and the value attribute ctx_vehicleType.
4-4 Create the Web Dynpro application WD01_Basics_GenericUI.
5 Overview: Building, Deploying, and Running Deploy and run the Web Dynpro application.
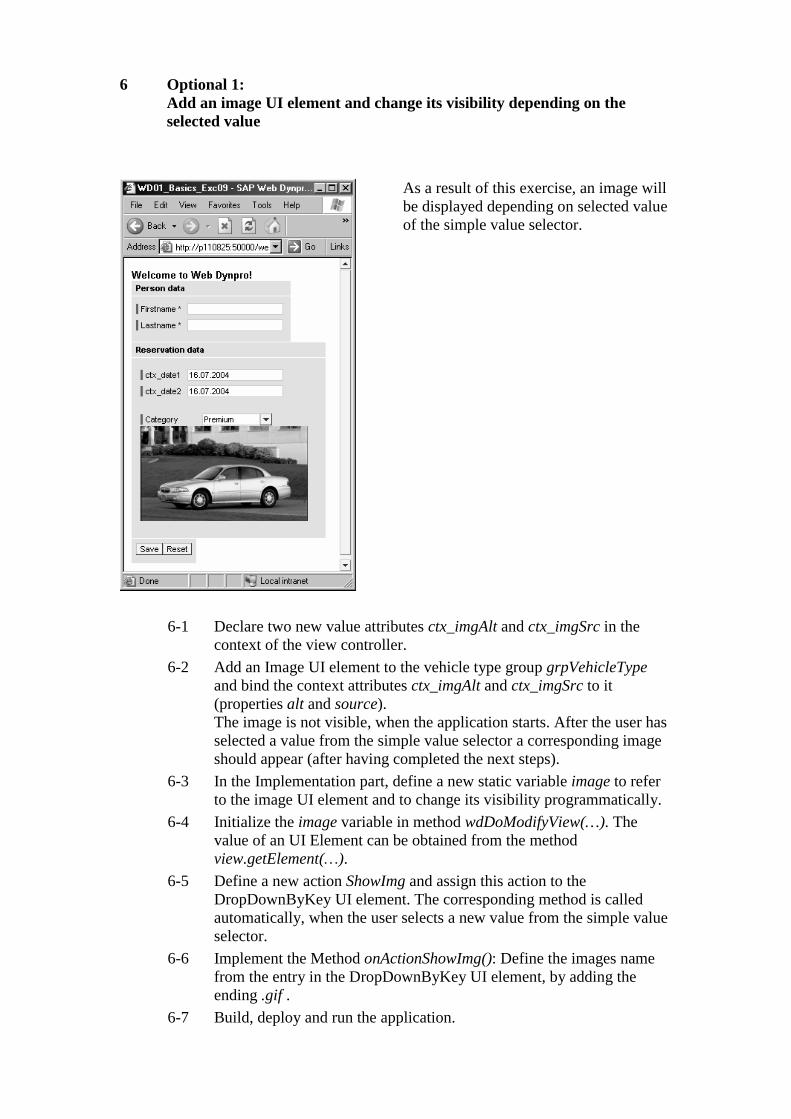
6 Optional 1: Add an image UI element and change its visibility depending on the selected value
As a result of this exercise, an image will be displayed depending on selected value of the simple value selector.
6-1 Declare two new value attributes ctx_imgAlt and ctx_imgSrc in the context of the view controller.
6-2 Add an Image UI element to the vehicle type group grpVehicleType and bind the context attributes ctx_imgAlt and ctx_imgSrc to it (properties alt and source). The image is not visible, when the application starts. After the user has selected a value from the simple value selector a corresponding image should appear (after having completed the next steps).
6-3 In the Implementation part, define a new static variable image to refer to the image UI element and to change its visibility programmatically.
6-4 Initialize the image variable in method wdDoModifyView(…). The value of an UI Element can be obtained from the method view.getElement(…).
6-5 Define a new action ShowImg and assign this action to the DropDownByKey UI element. The corresponding method is called automatically, when the user selects a new value from the simple value selector.
6-6 Implement the Method onActionShowImg(): Define the images name from the entry in the DropDownByKey UI element, by adding the ending .gif .
6-7 Build, deploy and run the application.
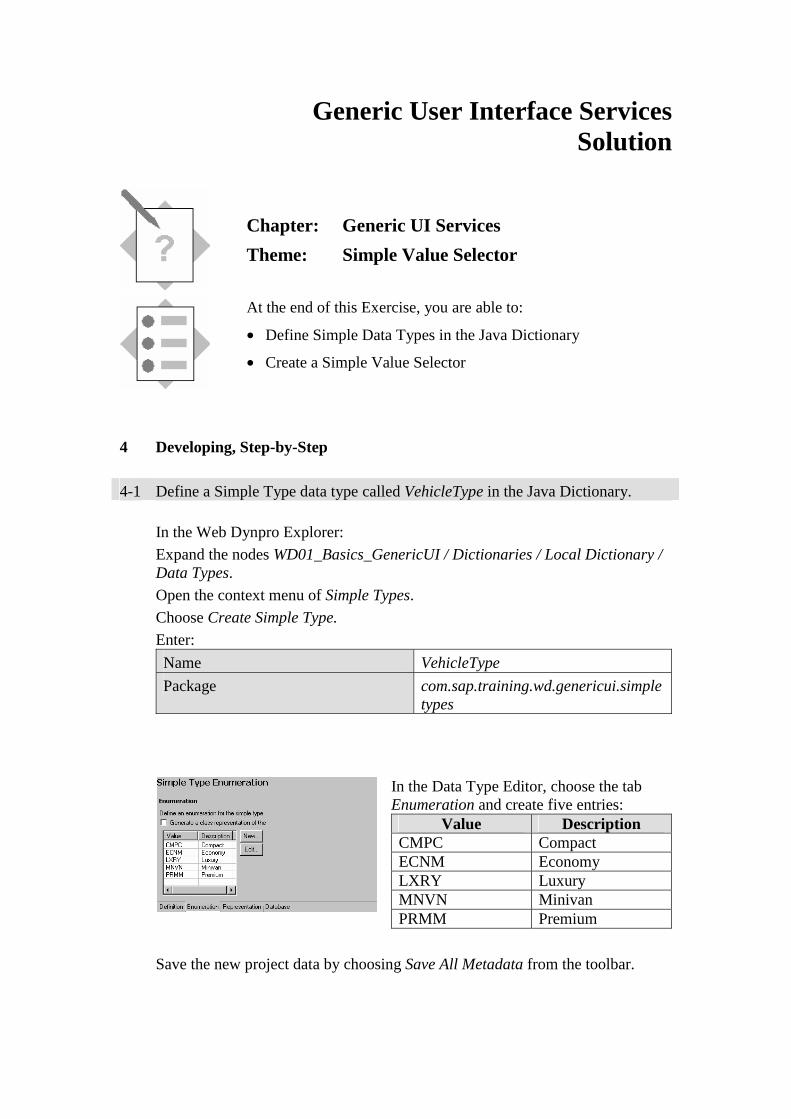
Generic User Interface Services Solution
Chapter: Generic UI Services
Theme: Simple Value Selector
At the end of this Exercise, you are able to:
• Define Simple Data Types in the Java Dictionary
• Create a Simple Value Selector
4 Developing, Step-by-Step
4-1 Define a Simple Type data type called VehicleType in the Java Dictionary.
In the Web Dynpro Explorer:
Expand the nodes WD01_Basics_GenericUI / Dictionaries / Local Dictionary / Data Types.
Open the context menu of Simple Types.
Choose Create Simple Type.
Enter:
Name VehicleType
Package com.sap.training.wd.genericui.simpletypes
In the Data Type Editor, choose the tab Enumeration and create five entries:
Value Description CMPC Compact ECNM Economy LXRY Luxury MNVN Minivan PRMM Premium
Save the new project data by choosing Save All Metadata from the toolbar.
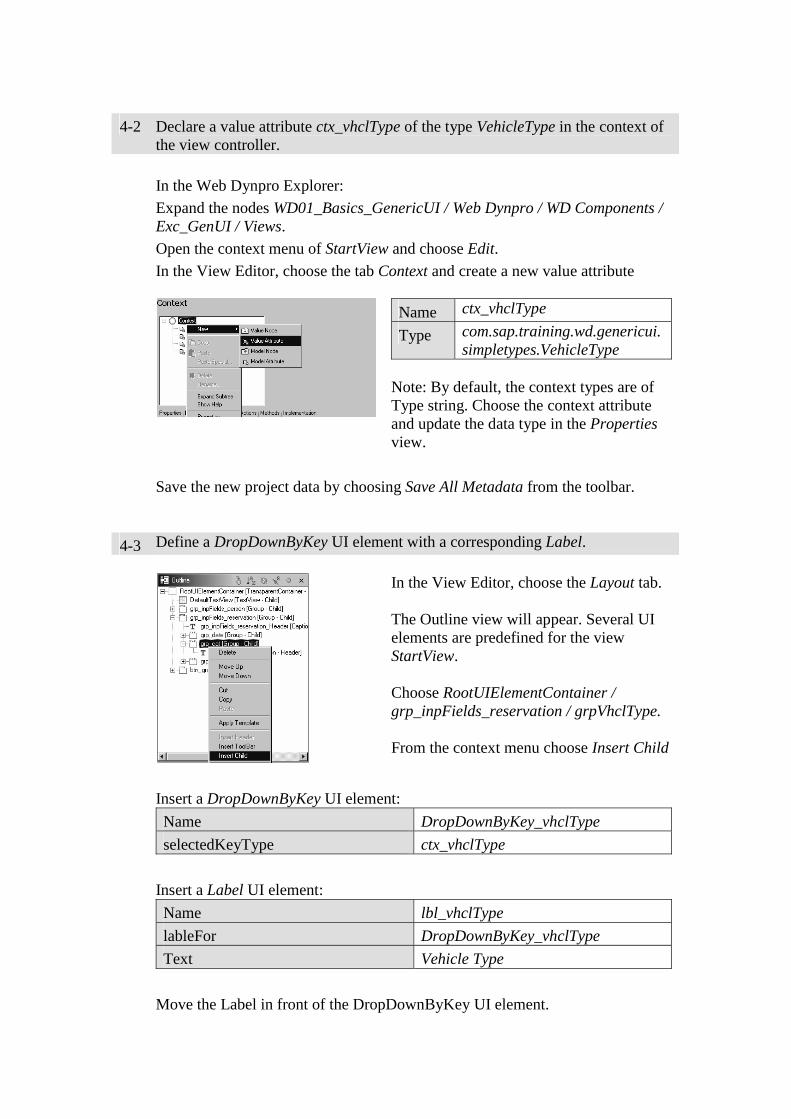
4-2 Declare a value attribute ctx_vhclType of the type VehicleType in the context of the view controller.
In the Web Dynpro Explorer:
Expand the nodes WD01_Basics_GenericUI / Web Dynpro / WD Components / Exc_GenUI / Views.
Open the context menu of StartView and choose Edit.
In the View Editor, choose the tab Context and create a new value attribute
Name ctx_vhclType
Type com.sap.training.wd.genericui. simpletypes.VehicleType
Note: By default, the context types are of Type string. Choose the context attribute and update the data type in the Properties view.
Save the new project data by choosing Save All Metadata from the toolbar.
4-3 Define a DropDownByKey UI element with a corresponding Label.
In the View Editor, choose the Layout tab. The Outline view will appear. Several UI elements are predefined for the view StartView. Choose RootUIElementContainer / grp_inpFields_reservation / grpVhclType. From the context menu choose Insert Child
Insert a DropDownByKey UI element:
Name DropDownByKey_vhclType
selectedKeyType ctx_vhclType
Insert a Label UI element:
Name lbl_vhclType
lableFor DropDownByKey_vhclType
Text Vehicle Type
Move the Label in front of the DropDownByKey UI element.
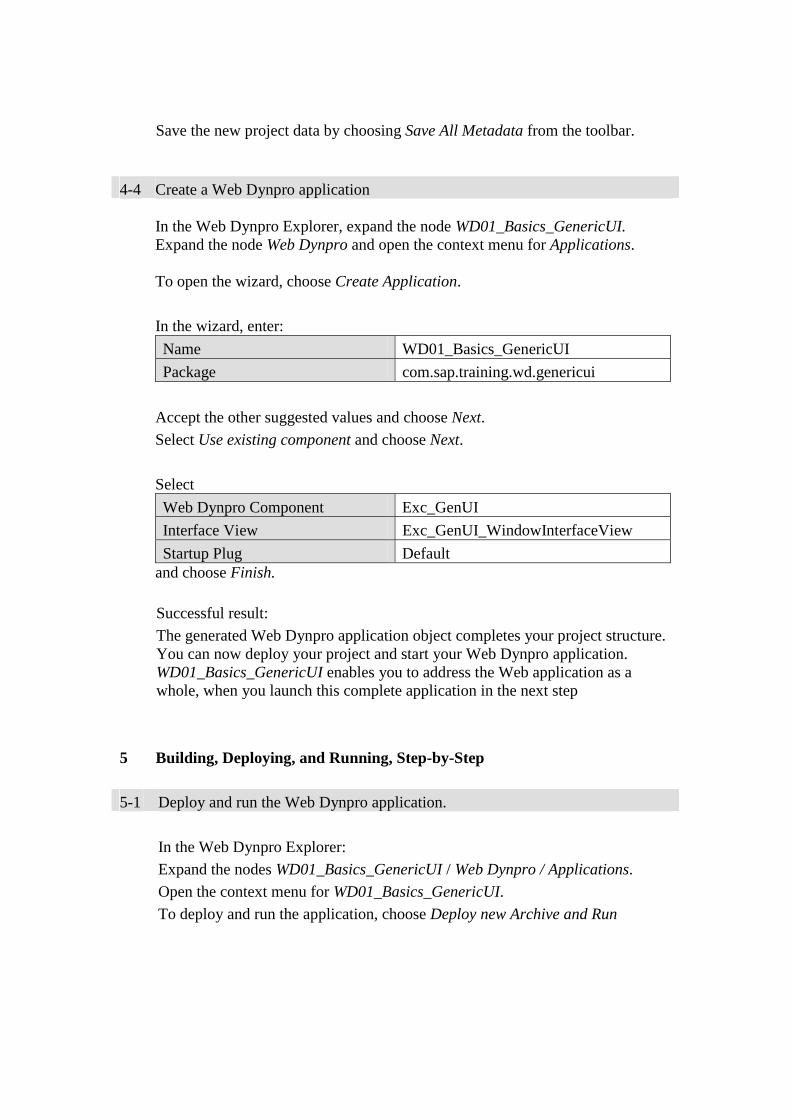
Save the new project data by choosing Save All Metadata from the toolbar.
4-4 Create a Web Dynpro application
In the Web Dynpro Explorer, expand the node WD01_Basics_GenericUI. Expand the node Web Dynpro and open the context menu for Applications. To open the wizard, choose Create Application.
In the wizard, enter:
Name WD01_Basics_GenericUI
Package com.sap.training.wd.genericui
Accept the other suggested values and choose Next.
Select Use existing component and choose Next.
Select
Web Dynpro Component Exc_GenUI
Interface View Exc_GenUI_WindowInterfaceView
Startup Plug Default and choose Finish.
Successful result:
The generated Web Dynpro application object completes your project structure. You can now deploy your project and start your Web Dynpro application. WD01_Basics_GenericUI enables you to address the Web application as a whole, when you launch this complete application in the next step
5 Building, Deploying, and Running, Step-by-Step 5-1 Deploy and run the Web Dynpro application.
In the Web Dynpro Explorer:
Expand the nodes WD01_Basics_GenericUI / Web Dynpro / Applications.
Open the context menu for WD01_Basics_GenericUI.
To deploy and run the application, choose Deploy new Archive and Run
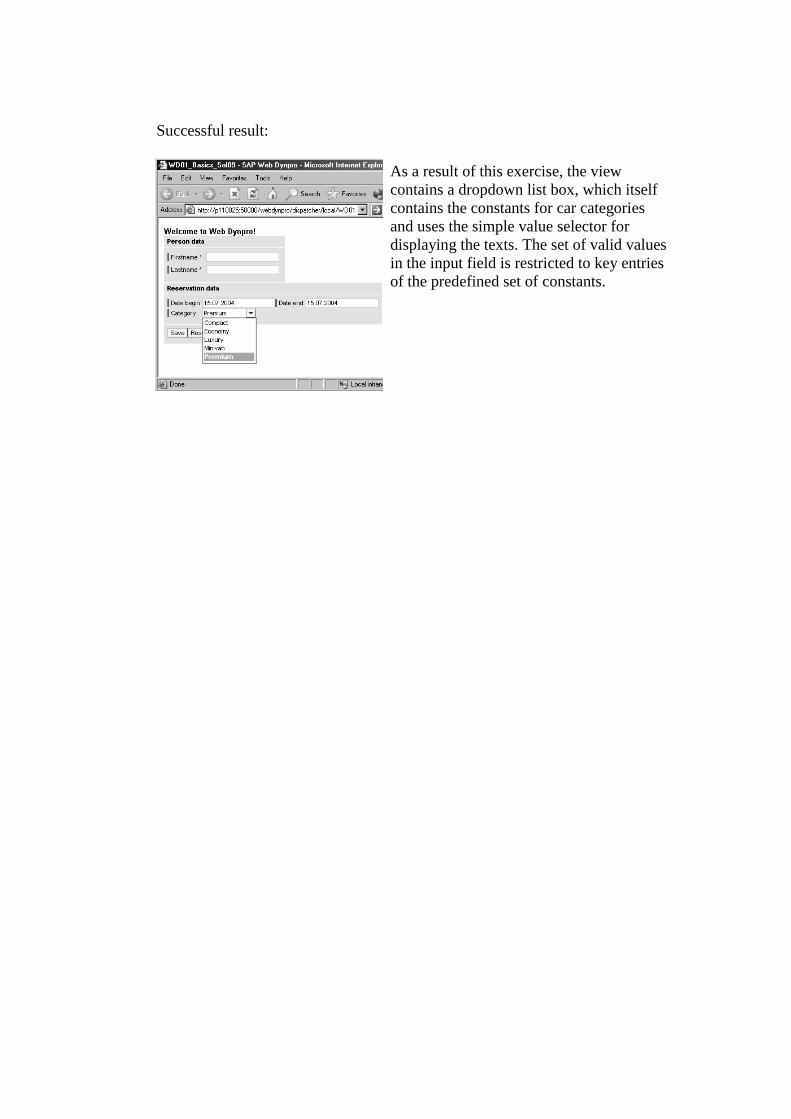
Successful result:
As a result of this exercise, the view contains a dropdown list box, which itself contains the constants for car categories and uses the simple value selector for displaying the texts. The set of valid values in the input field is restricted to key entries of the predefined set of constants.
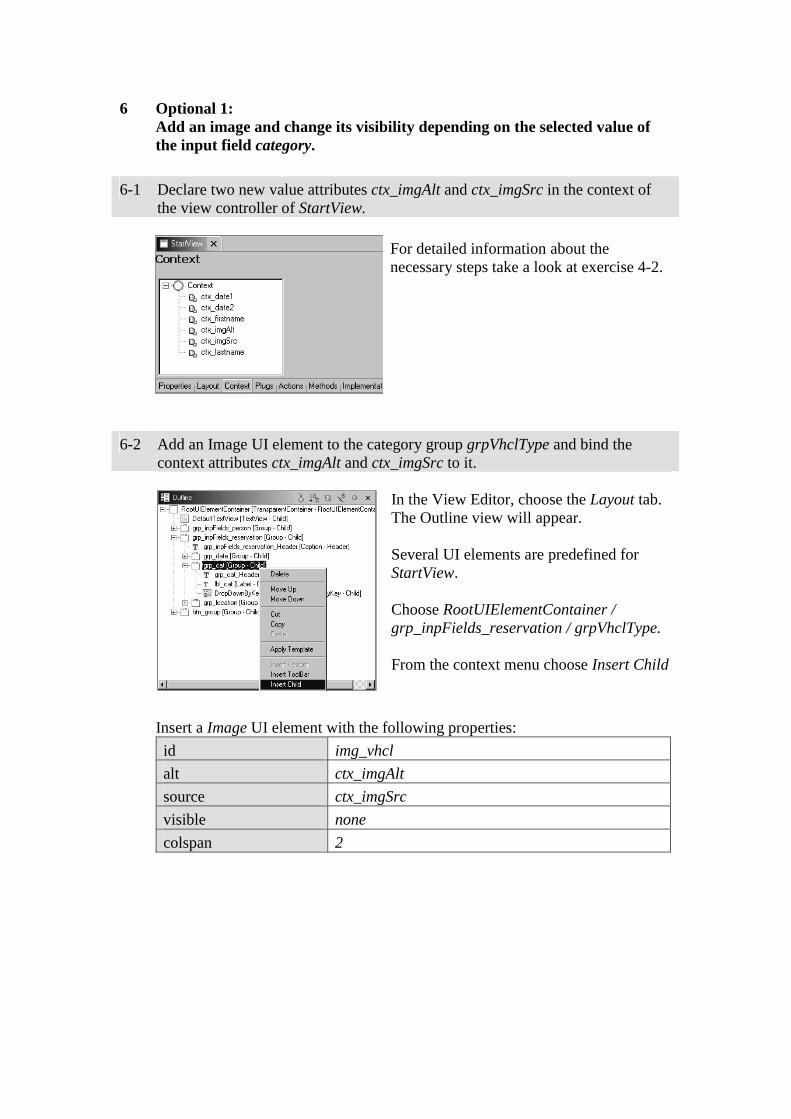
6 Optional 1: Add an image and change its visibility depending on the selected value of the input field category.
6-1 Declare two new value attributes ctx_imgAlt and ctx_imgSrc in the context of
the view controller of StartView.
For detailed information about the necessary steps take a look at exercise 4-2.
6-2 Add an Image UI element to the category group grpVhclType and bind the context attributes ctx_imgAlt and ctx_imgSrc to it.
In the View Editor, choose the Layout tab. The Outline view will appear. Several UI elements are predefined for StartView. Choose RootUIElementContainer / grp_inpFields_reservation / grpVhclType. From the context menu choose Insert Child
Insert a Image UI element with the following properties:
id img_vhcl
alt ctx_imgAlt
source ctx_imgSrc
visible none
colspan 2
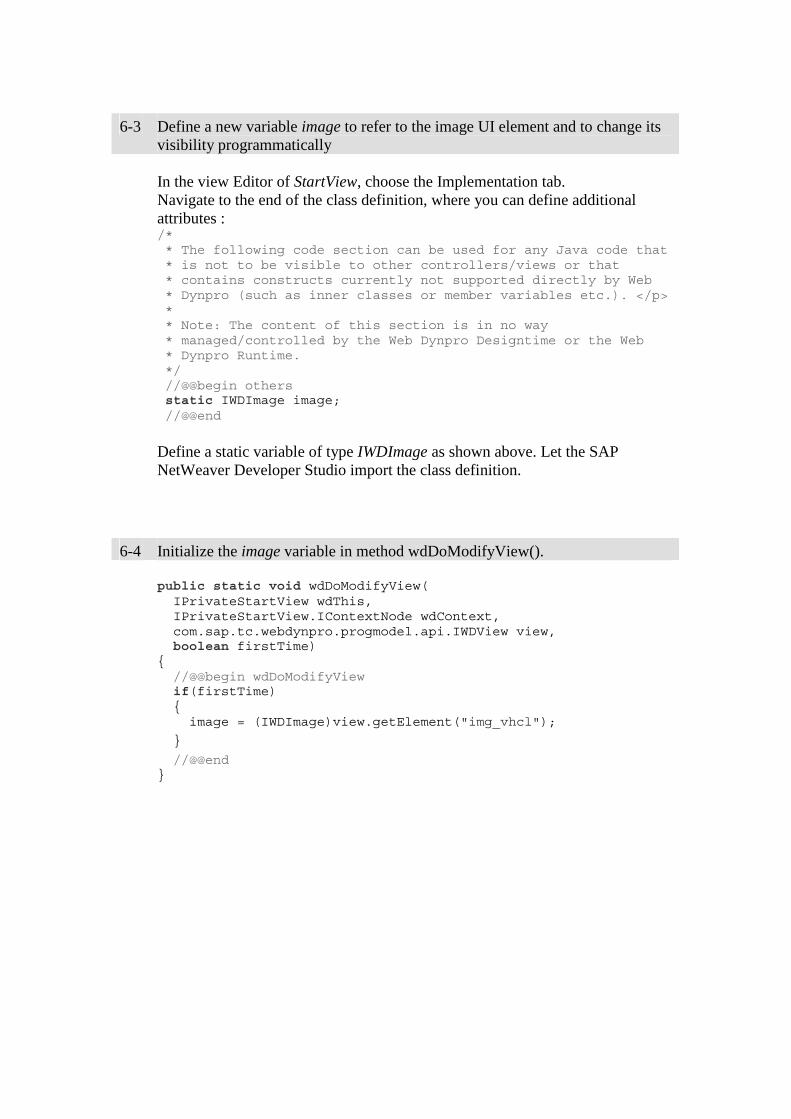
6-3 Define a new variable image to refer to the image UI element and to change its visibility programmatically
In the view Editor of StartView, choose the Implementation tab. Navigate to the end of the class definition, where you can define additional attributes : /* * The following code section can be used for any Java code that * is not to be visible to other controllers/views or that * contains constructs currently not supported directly by Web * Dynpro (such as inner classes or member variables etc.). </p> * * Note: The content of this section is in no way * managed/controlled by the Web Dynpro Designtime or the Web * Dynpro Runtime. */ //@@begin others static IWDImage image; //@@end
Define a static variable of type IWDImage as shown above. Let the SAP NetWeaver Developer Studio import the class definition.
6-4 Initialize the image variable in method wdDoModifyView().
public static void wdDoModifyView( IPrivateStartView wdThis, IPrivateStartView.IContextNode wdContext, com.sap.tc.webdynpro.progmodel.api.IWDView view, boolean firstTime) { //@@begin wdDoModifyView if(firstTime) { image = (IWDImage)view.getElement("img_vhcl");
}
//@@end }
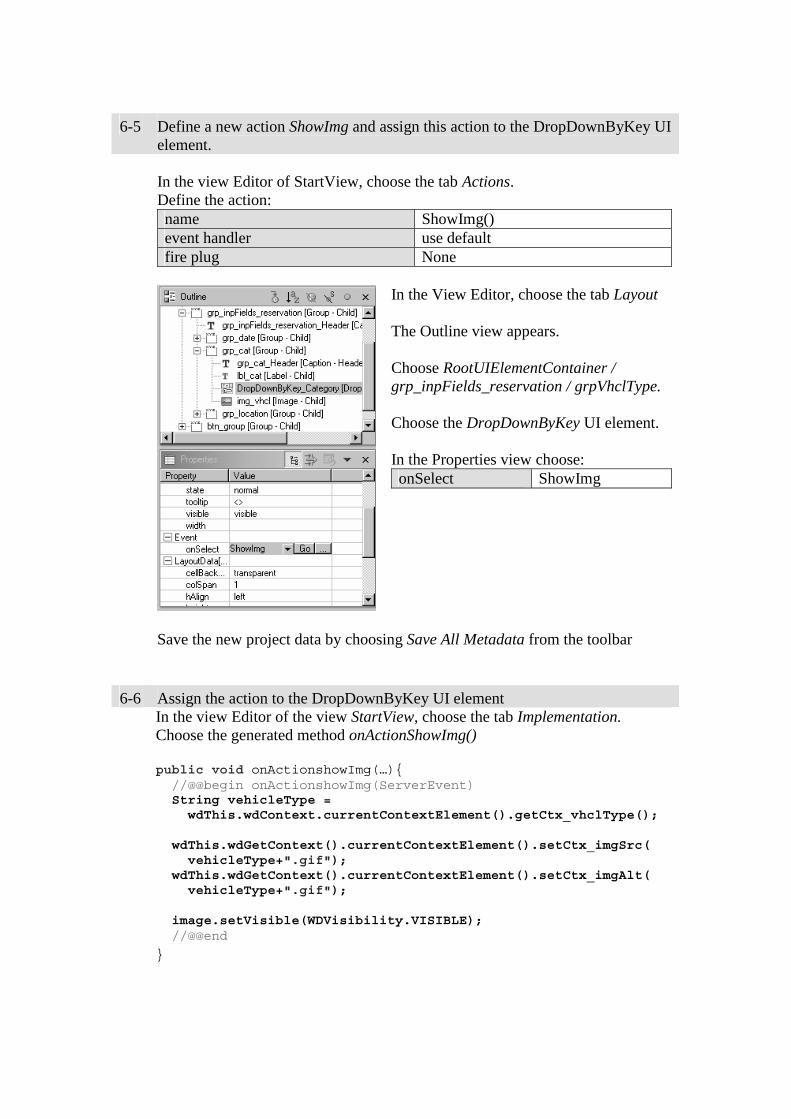
6-5 Define a new action ShowImg and assign this action to the DropDownByKey UI element.
In the view Editor of StartView, choose the tab Actions. Define the action: name ShowImg() event handler use default fire plug None
In the View Editor, choose the tab Layout The Outline view appears. Choose RootUIElementContainer / grp_inpFields_reservation / grpVhclType. Choose the DropDownByKey UI element. In the Properties view choose: onSelect ShowImg
Save the new project data by choosing Save All Metadata from the toolbar
6-6 Assign the action to the DropDownByKey UI element In the view Editor of the view StartView, choose the tab Implementation.
Choose the generated method onActionShowImg() public void onActionshowImg(…){ //@@begin onActionshowImg(ServerEvent) String vehicleType = wdThis.wdContext.currentContextElement().getCtx_vhclType(); wdThis.wdGetContext().currentContextElement().setCtx_imgSrc( vehicleType+".gif"); wdThis.wdGetContext().currentContextElement().setCtx_imgAlt( vehicleType+".gif"); image.setVisible(WDVisibility.VISIBLE); //@@end
}
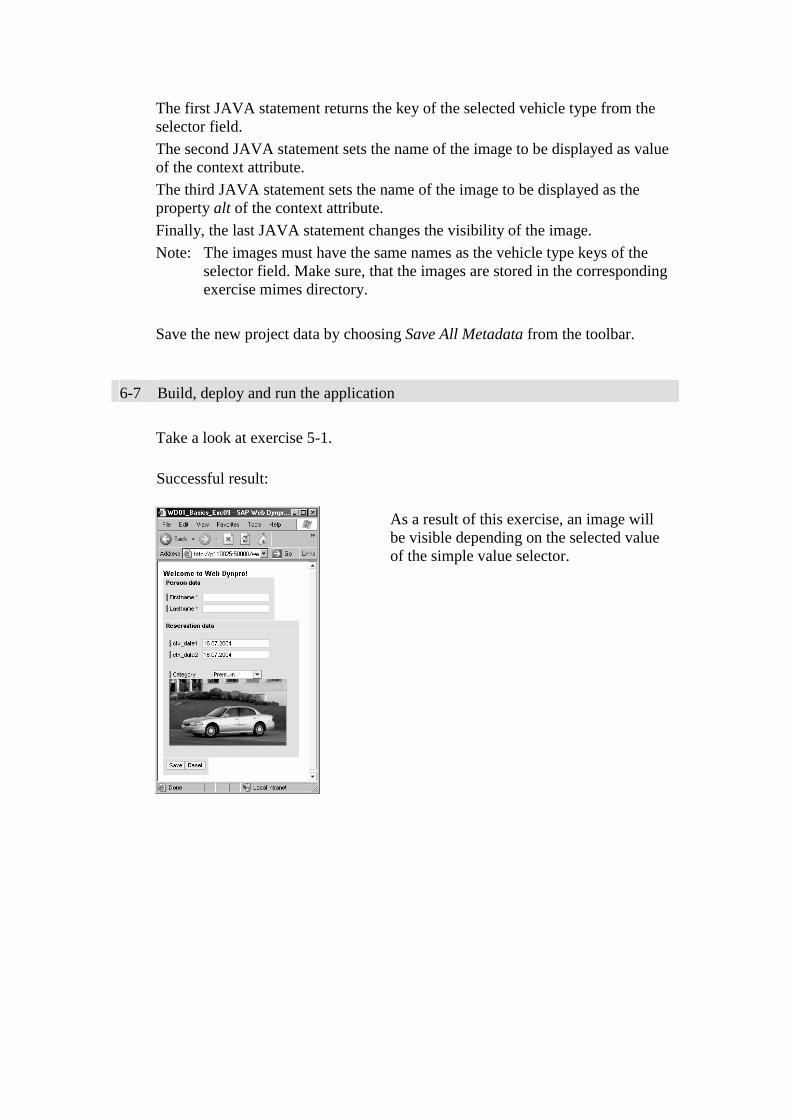
The first JAVA statement returns the key of the selected vehicle type from the selector field.
The second JAVA statement sets the name of the image to be displayed as value of the context attribute.
The third JAVA statement sets the name of the image to be displayed as the property alt of the context attribute.
Finally, the last JAVA statement changes the visibility of the image.
Note: The images must have the same names as the vehicle type keys of the selector field. Make sure, that the images are stored in the corresponding exercise mimes directory.
Save the new project data by choosing Save All Metadata from the toolbar.
6-7 Build, deploy and run the application
Take a look at exercise 5-1.
Successful result:
As a result of this exercise, an image will be visible depending on the selected value of the simple value selector.
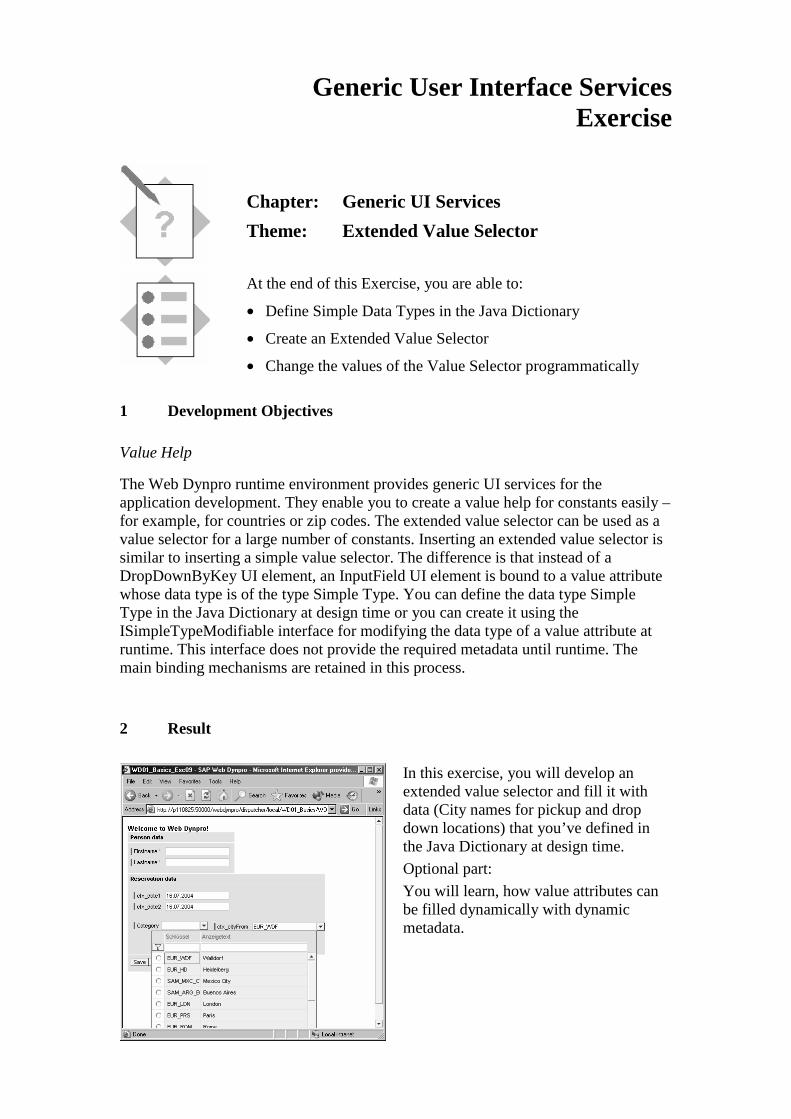
Generic User Interface Services Exercise
Chapter: Generic UI Services
Theme: Extended Value Selector
At the end of this Exercise, you are able to:
• Define Simple Data Types in the Java Dictionary
• Create an Extended Value Selector
• Change the values of the Value Selector programmatically
1 Development Objectives
Value Help
The Web Dynpro runtime environment provides generic UI services for the application development. They enable you to create a value help for constants easily – for example, for countries or zip codes. The extended value selector can be used as a value selector for a large number of constants. Inserting an extended value selector is similar to inserting a simple value selector. The difference is that instead of a DropDownByKey UI element, an InputField UI element is bound to a value attribute whose data type is of the type Simple Type. You can define the data type Simple Type in the Java Dictionary at design time or you can create it using the ISimpleTypeModifiable interface for modifying the data type of a value attribute at runtime. This interface does not provide the required metadata until runtime. The main binding mechanisms are retained in this process.
2 Result
In this exercise, you will develop an extended value selector and fill it with data (City names for pickup and drop down locations) that you’ve defined in the Java Dictionary at design time.
Optional part:
You will learn, how value attributes can be filled dynamically with dynamic metadata.
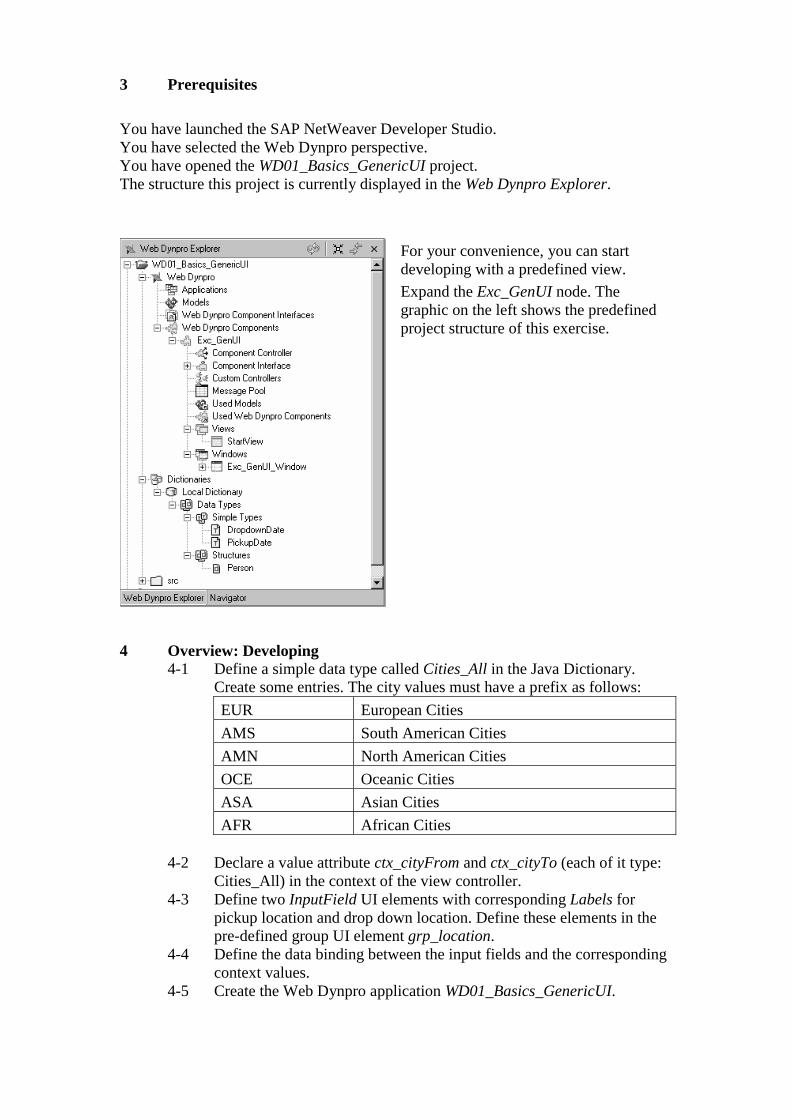
3 Prerequisites
You have launched the SAP NetWeaver Developer Studio. You have selected the Web Dynpro perspective. You have opened the WD01_Basics_GenericUI project. The structure this project is currently displayed in the Web Dynpro Explorer.
For your convenience, you can start developing with a predefined view.
Expand the Exc_GenUI node. The graphic on the left shows the predefined project structure of this exercise.
4 Overview: Developing
4-1 Define a simple data type called Cities_All in the Java Dictionary. Create some entries. The city values must have a prefix as follows:
EUR European Cities
AMS South American Cities
AMN North American Cities
OCE Oceanic Cities
ASA Asian Cities
AFR African Cities 4-2 Declare a value attribute ctx_cityFrom and ctx_cityTo (each of it type:
Cities_All) in the context of the view controller. 4-3 Define two InputField UI elements with corresponding Labels for
pickup location and drop down location. Define these elements in the pre-defined group UI element grp_location.
4-4 Define the data binding between the input fields and the corresponding context values.
4-5 Create the Web Dynpro application WD01_Basics_GenericUI.
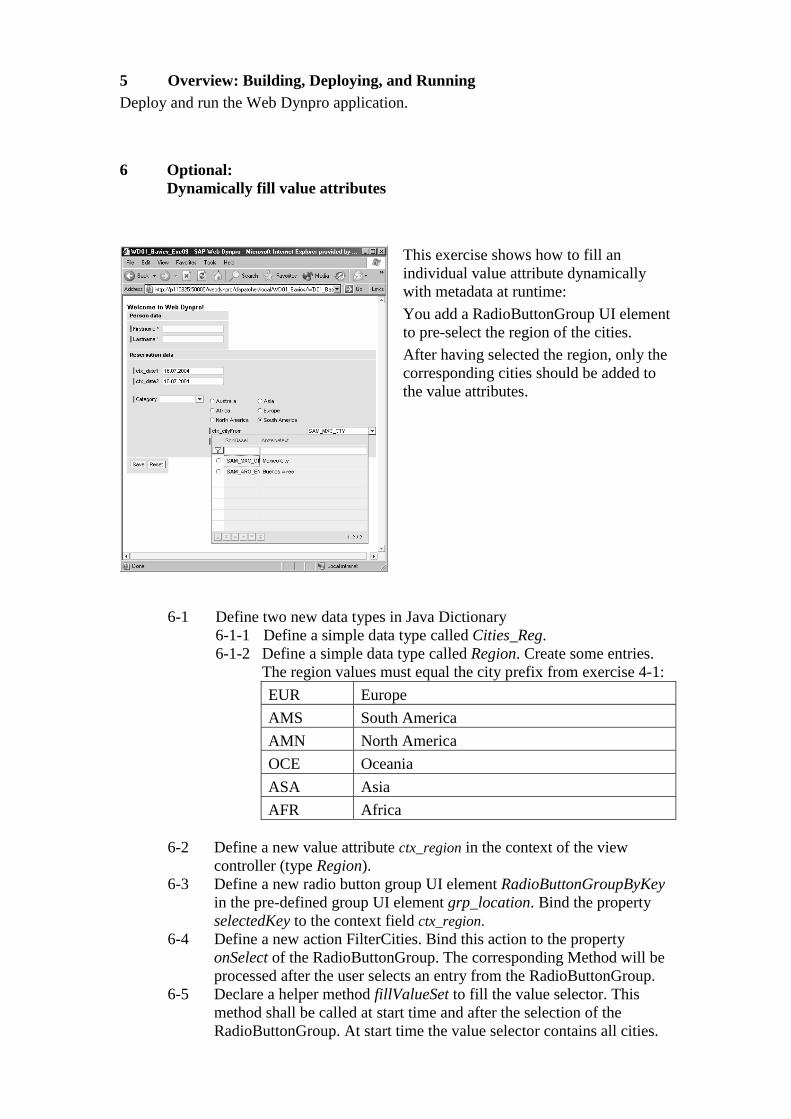
5 Overview: Building, Deploying, and Running Deploy and run the Web Dynpro application.
6 Optional:
Dynamically fill value attributes
This exercise shows how to fill an individual value attribute dynamically with metadata at runtime:
You add a RadioButtonGroup UI element to pre-select the region of the cities.
After having selected the region, only the corresponding cities should be added to the value attributes.
6-1 Define two new data types in Java Dictionary 6-1-1 Define a simple data type called Cities_Reg. 6-1-2 Define a simple data type called Region. Create some entries.
The region values must equal the city prefix from exercise 4-1:
EUR Europe
AMS South America
AMN North America
OCE Oceania
ASA Asia
AFR Africa
6-2 Define a new value attribute ctx_region in the context of the view controller (type Region).
6-3 Define a new radio button group UI element RadioButtonGroupByKey in the pre-defined group UI element grp_location. Bind the property selectedKey to the context field ctx_region.
6-4 Define a new action FilterCities. Bind this action to the property onSelect of the RadioButtonGroup. The corresponding Method will be processed after the user selects an entry from the RadioButtonGroup.
6-5 Declare a helper method fillValueSet to fill the value selector. This method shall be called at start time and after the selection of the RadioButtonGroup. At start time the value selector contains all cities.
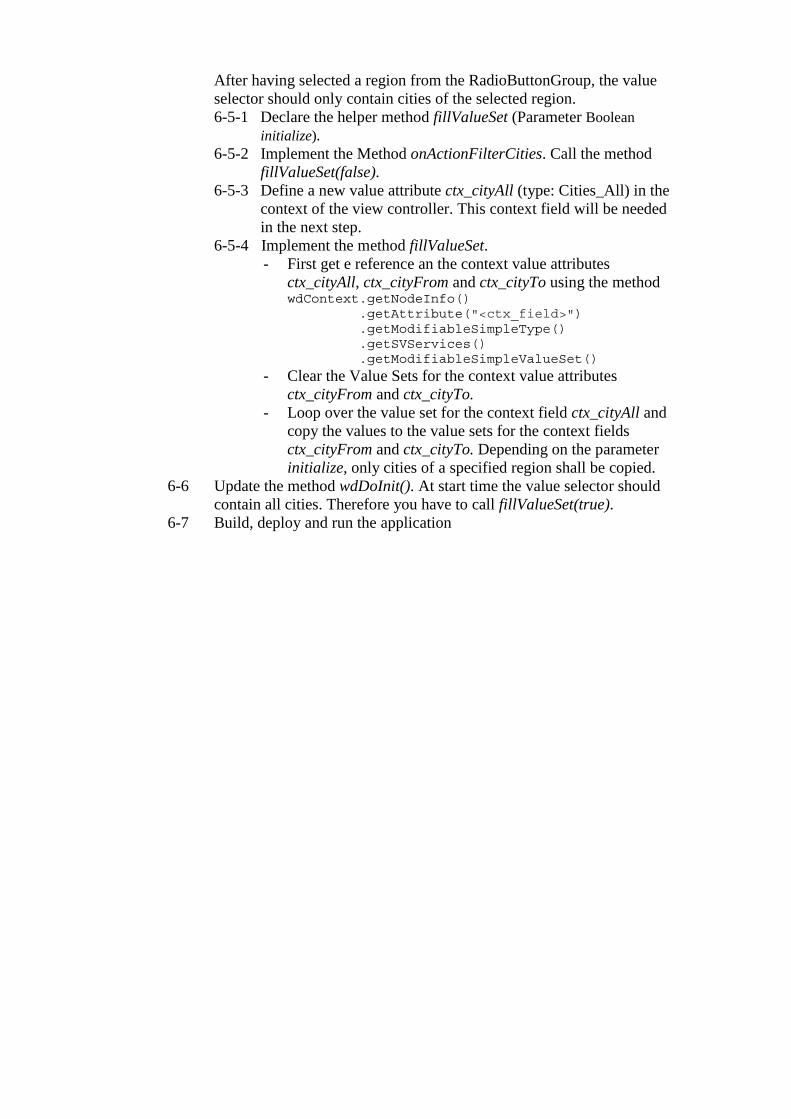
After having selected a region from the RadioButtonGroup, the value selector should only contain cities of the selected region. 6-5-1 Declare the helper method fillValueSet (Parameter Boolean
initialize). 6-5-2 Implement the Method onActionFilterCities. Call the method
fillValueSet(false). 6-5-3 Define a new value attribute ctx_cityAll (type: Cities_All) in the
context of the view controller. This context field will be needed in the next step.
6-5-4 Implement the method fillValueSet. - First get e reference an the context value attributes
ctx_cityAll, ctx_cityFrom and ctx_cityTo using the method wdContext.getNodeInfo() .getAttribute("<ctx_field>") .getModifiableSimpleType() .getSVServices() .getModifiableSimpleValueSet()
- Clear the Value Sets for the context value attributes ctx_cityFrom and ctx_cityTo.
- Loop over the value set for the context field ctx_cityAll and copy the values to the value sets for the context fields ctx_cityFrom and ctx_cityTo. Depending on the parameter initialize, only cities of a specified region shall be copied.
6-6 Update the method wdDoInit(). At start time the value selector should contain all cities. Therefore you have to call fillValueSet(true).
6-7 Build, deploy and run the application
Generic User Interface Services Solution
Chapter: Generic UI Services
Theme: Extended Value Selector
At the end of this Exercise, you are able to:
• Define Simple Data Types in the Java Dictionary
• Create an Extended Value Selector
• Change the values of the Value Selector programmatically
4 Developing, Step-by-Step Note: In this exercise you have to type in some lines of java code. For your convenience, you can cut and paste the code from the corresponding solution project. But keep in mind: Some of the methods are automatically generated by Web Dynpro. For this reason the methods names you have to choose can differ from the method names of the solution. 4-1 Define a simple data type called Cities_All in the Java Dictionary.
In the Web Dynpro Explorer:
Expand the nodes WD01_Basics_GenericUI / Dictionaries / Local Dictionary / Data Types.
Open the context menu of Simple Types.
Choose Create Simple Type.
Name Cities_All
Package com.sap.training.wd.genericui.simpletypes

In the Data Type Editor, choose the tab Enumeration and create some entries as displayed in the graphic. Use the following prefixes for the values: EUR Europe AMS South America AMN North America OCE Oceania ASA Asia AFR Africa
Save the new project data by choosing Save All Metadata from the toolbar.
4-2 Declare the value attributes ctx_cityFrom and ctx_cityTo in the context of the view controller
In the Web Dynpro Explorer:
Expand the nodes WD01_Basics_GenericUI / Web Dynpro / WD Components / Exc_GenUI / Views.
Open the context menu of StartView and choose Edit.
In the View Editor, choose the tab Context and create a new value attribute
Define the following value attributes:
Name Type ctx_cityFrom com.sap.training.wd.
genericui.simpletypes. Cities_All
ctx_cityTo com.sap.training.wd. henericui.simpletypes. Cities_All
Save the new project data by choosing Save All Metadata from the toolbar.
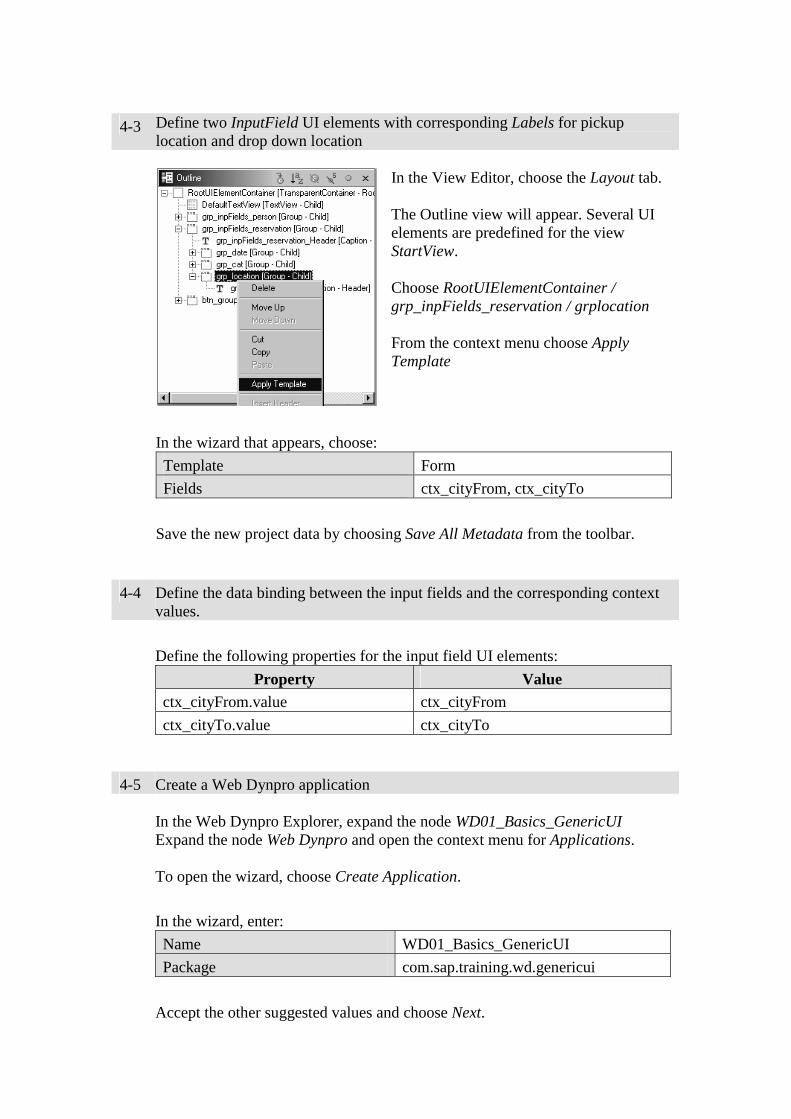
4-3 Define two InputField UI elements with corresponding Labels for pickup location and drop down location
In the View Editor, choose the Layout tab. The Outline view will appear. Several UI elements are predefined for the view StartView. Choose RootUIElementContainer / grp_inpFields_reservation / grplocation From the context menu choose Apply Template
In the wizard that appears, choose:
Template Form
Fields ctx_cityFrom, ctx_cityTo
Save the new project data by choosing Save All Metadata from the toolbar.
4-4 Define the data binding between the input fields and the corresponding context values.
Define the following properties for the input field UI elements:
Property Value ctx_cityFrom.value ctx_cityFrom
ctx_cityTo.value ctx_cityTo
4-5 Create a Web Dynpro application
In the Web Dynpro Explorer, expand the node WD01_Basics_GenericUI Expand the node Web Dynpro and open the context menu for Applications. To open the wizard, choose Create Application.
In the wizard, enter:
Name WD01_Basics_GenericUI
Package com.sap.training.wd.genericui
Accept the other suggested values and choose Next.
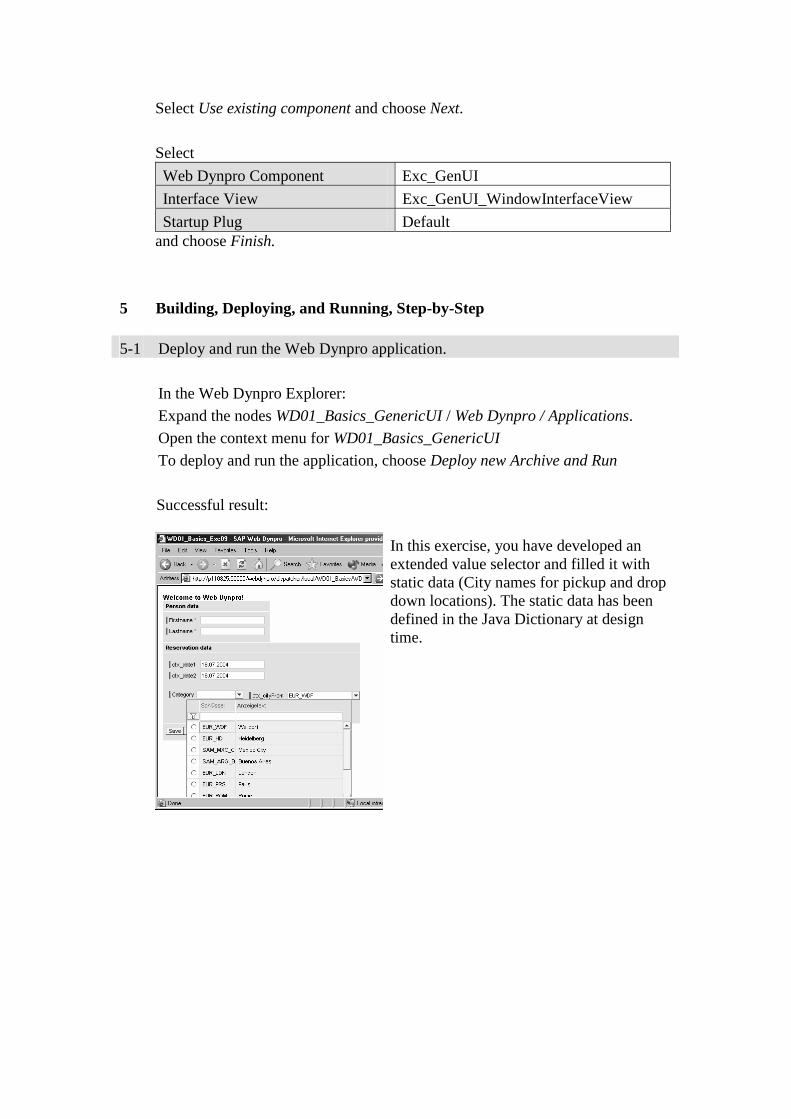
Select Use existing component and choose Next.
Select
Web Dynpro Component Exc_GenUI
Interface View Exc_GenUI_WindowInterfaceView
Startup Plug Default and choose Finish.
5 Building, Deploying, and Running, Step-by-Step 5-1 Deploy and run the Web Dynpro application.
In the Web Dynpro Explorer:
Expand the nodes WD01_Basics_GenericUI / Web Dynpro / Applications.
Open the context menu for WD01_Basics_GenericUI
To deploy and run the application, choose Deploy new Archive and Run
Successful result:
In this exercise, you have developed an extended value selector and filled it with static data (City names for pickup and drop down locations). The static data has been defined in the Java Dictionary at design time.
6 Optional: Fill the extended value selector dynamically at runtime.
6-1 Define two new data types in Java Dictionary.
6-1-1 Define a data type called Cities_Reg.
Name Cities_Reg
Package com.sap.training.wd.genericui.simpletypes
Leave the enumeration blank. This type will be filled dynamically and contains the cities of the selected region.
6-1-2 Define a data type called Region.
This type is needed for the RadioButtonGroup to select a region.
Name Region
Package com.sap.training.wd.genericui.simpletypes
In the Data Type Editor, choose the Enumeration tab and create some entries:
Value Description OCE Oceania
ASA Asia
AFR Africa
EUR Europe
AMB North America
AMS South America
Note: Use the same abbreviations as key as you have used as prefix for the cities data type (see exercise 4-1).
Save the new project data by choosing Save All Metadata from the toolbar.
6-2 Define a new value attribute ctx_region in the context of the view controller
(type Region)
Take a look at exercise 4-2.
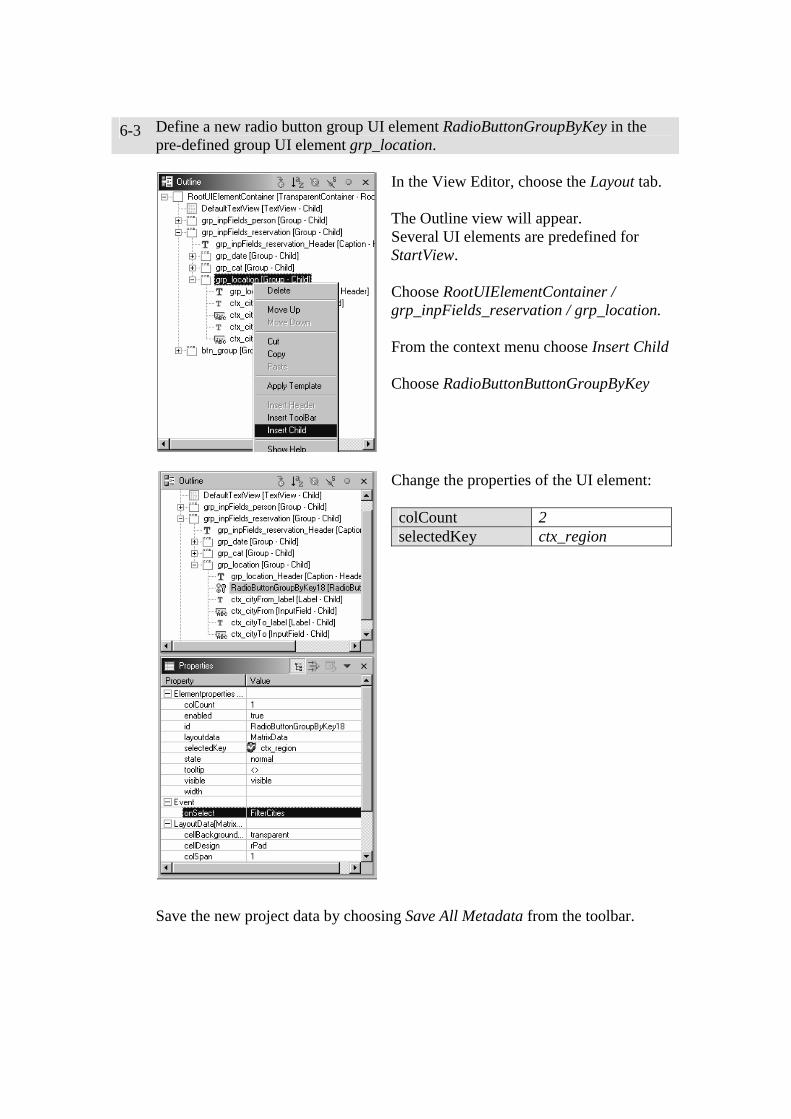
6-3 Define a new radio button group UI element RadioButtonGroupByKey in the
pre-defined group UI element grp_location.
In the View Editor, choose the Layout tab. The Outline view will appear. Several UI elements are predefined for StartView. Choose RootUIElementContainer / grp_inpFields_reservation / grp_location. From the context menu choose Insert Child Choose RadioButtonButtonGroupByKey
Change the properties of the UI element: colCount 2 selectedKey ctx_region
Save the new project data by choosing Save All Metadata from the toolbar.

6-4 Define a new action FilterCities. Bind this action to the property onSelect of the
RadioButtonGroup.
In the view Editor of StartView, choose the tab Actions. Define the action: name FilterCities event handler use default fire plug none
Change the properties of the RadioButtonButtonGroupByKey UI element: onSelect FilterCities
Save the new project data by choosing Save All Metadata from the toolbar
6-5 Declare a helper method fillValueSet to fill the value selector.
6-5-1 Declare the helper method fillValueSet (Parameter Boolean initialize).
In the view Editor of the view StartView, choose the tab Methods and add the method public void fillValueSet(Boolean initialize).
6-5-2 Implement the Method onActionFilterCities.
In the view Editor of StartView, choose the tab Implementation. Choose the generated method onActionFilterCities() and add the following source code: public void onActionFilterCities( com.sap.tc.webdynpro.progmodel.api.IWDCustomEvent wdEvent ) { //@@begin onActionFilterCities(ServerEvent) fillValueSet( false ); //@@end }
6-5-3 Define a new value attribute ctx_cityAll in the context of the view controller (type Region).
Take a look at exercise 4-2.
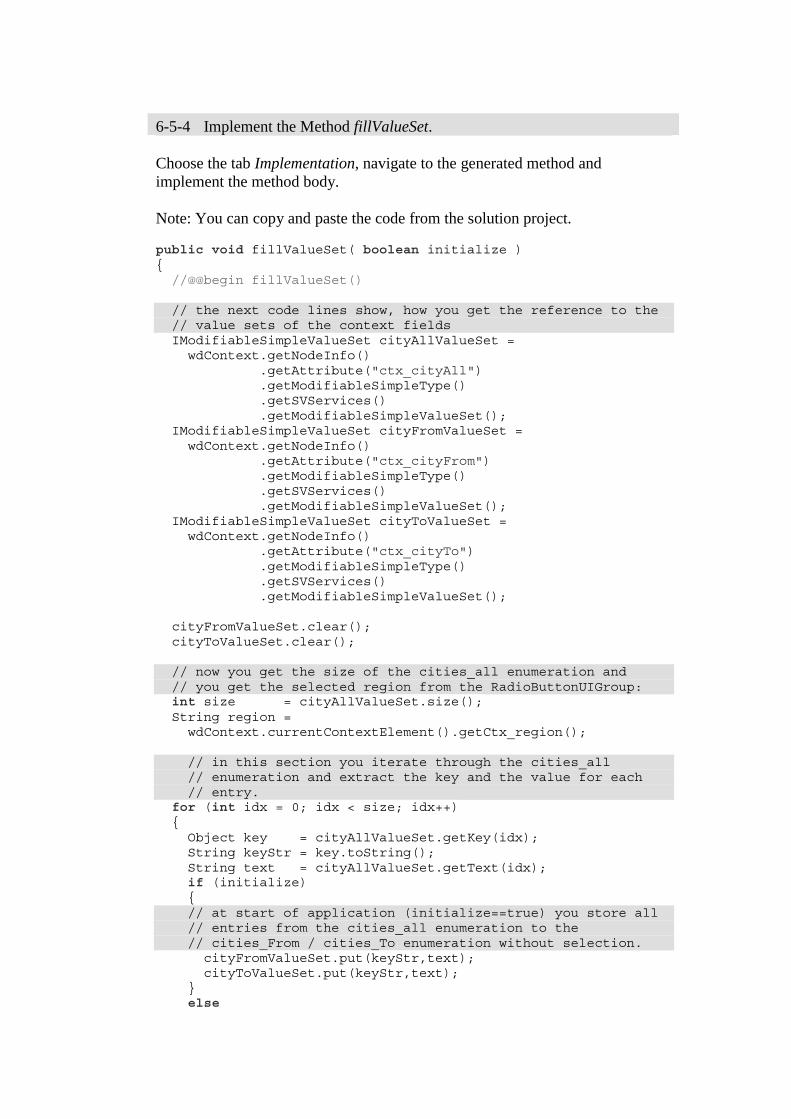
6-5-4 Implement the Method fillValueSet.
Choose the tab Implementation, navigate to the generated method and implement the method body. Note: You can copy and paste the code from the solution project. public void fillValueSet( boolean initialize ) { //@@begin fillValueSet() // the next code lines show, how you get the reference to the // value sets of the context fields IModifiableSimpleValueSet cityAllValueSet = wdContext.getNodeInfo() .getAttribute("ctx_cityAll") .getModifiableSimpleType() .getSVServices() .getModifiableSimpleValueSet(); IModifiableSimpleValueSet cityFromValueSet = wdContext.getNodeInfo() .getAttribute("ctx_cityFrom") .getModifiableSimpleType() .getSVServices() .getModifiableSimpleValueSet(); IModifiableSimpleValueSet cityToValueSet = wdContext.getNodeInfo() .getAttribute("ctx_cityTo") .getModifiableSimpleType() .getSVServices() .getModifiableSimpleValueSet(); cityFromValueSet.clear(); cityToValueSet.clear(); // now you get the size of the cities_all enumeration and // you get the selected region from the RadioButtonUIGroup: int size = cityAllValueSet.size(); String region = wdContext.currentContextElement().getCtx_region(); // in this section you iterate through the cities_all // enumeration and extract the key and the value for each // entry. for (int idx = 0; idx < size; idx++) { Object key = cityAllValueSet.getKey(idx); String keyStr = key.toString(); String text = cityAllValueSet.getText(idx); if (initialize) { // at start of application (initialize==true) you store all // entries from the cities_all enumeration to the // cities_From / cities_To enumeration without selection. cityFromValueSet.put(keyStr,text); cityToValueSet.put(keyStr,text); } else
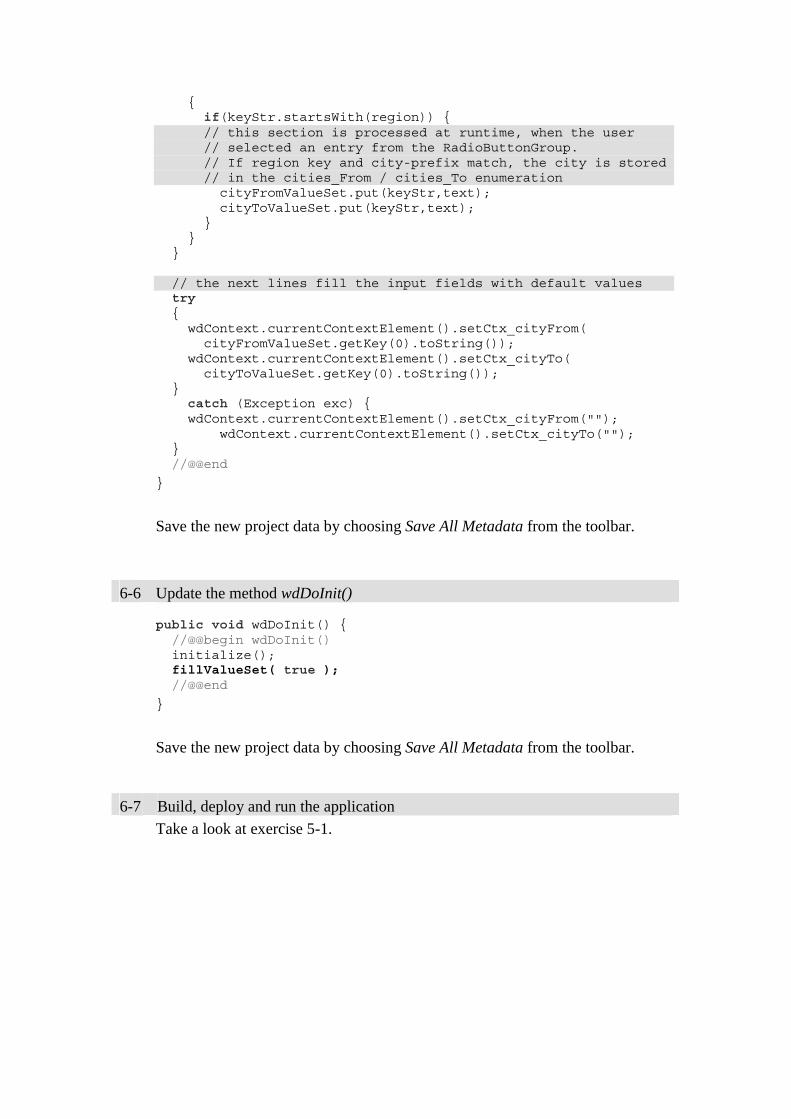
{ if(keyStr.startsWith(region)) { // this section is processed at runtime, when the user // selected an entry from the RadioButtonGroup. // If region key and city-prefix match, the city is stored // in the cities_From / cities_To enumeration cityFromValueSet.put(keyStr,text); cityToValueSet.put(keyStr,text); } } } // the next lines fill the input fields with default values try { wdContext.currentContextElement().setCtx_cityFrom( cityFromValueSet.getKey(0).toString()); wdContext.currentContextElement().setCtx_cityTo( cityToValueSet.getKey(0).toString()); } catch (Exception exc) { wdContext.currentContextElement().setCtx_cityFrom(""); wdContext.currentContextElement().setCtx_cityTo(""); } //@@end
}
Save the new project data by choosing Save All Metadata from the toolbar. 6-6 Update the method wdDoInit()
public void wdDoInit() { //@@begin wdDoInit() initialize(); fillValueSet( true ); //@@end
}
Save the new project data by choosing Save All Metadata from the toolbar.
6-7 Build, deploy and run the application Take a look at exercise 5-1.
© SAP AG <Course Number> Unit Title - 1
© SAP AG 2003, Title of Presentation, Speaker Name / 1
Develop International Web Dynpro Applications
Contents:
Internationalization
© SAP AG <Course Number> Unit Title - 2
© SAP AG 2003, Title of Presentation, Speaker Name / 2
After completing this unit, you will be able to:
Internationalize Web Dynpro applications.
Create simple types that contain the interface texts.
Internationalization: Unit Objectives
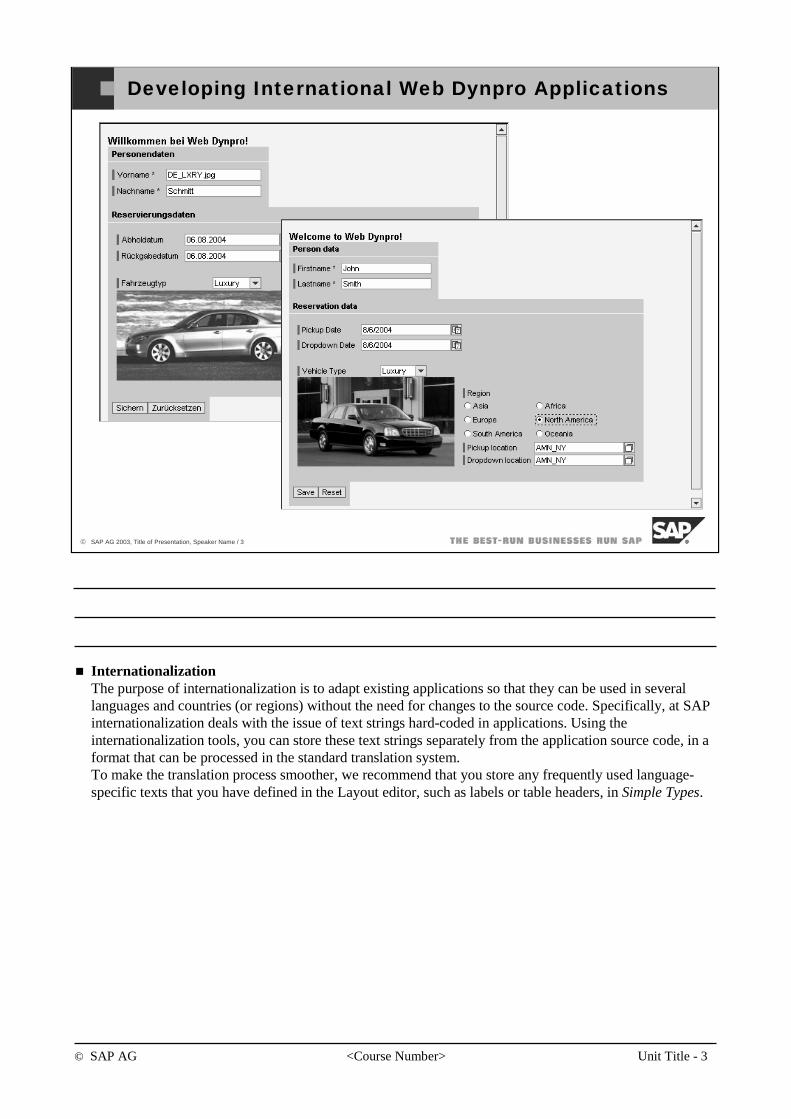
© SAP AG <Course Number> Unit Title - 3
© SAP AG 2003, Title of Presentation, Speaker Name / 3
Developing International Web Dynpro Applications
InternationalizationThe purpose of internationalization is to adapt existing applications so that they can be used in several languages and countries (or regions) without the need for changes to the source code. Specifically, at SAP internationalization deals with the issue of text strings hard-coded in applications. Using the internationalization tools, you can store these text strings separately from the application source code, in a format that can be processed in the standard translation system.To make the translation process smoother, we recommend that you store any frequently used language-specific texts that you have defined in the Layout editor, such as labels or table headers, in Simple Types.
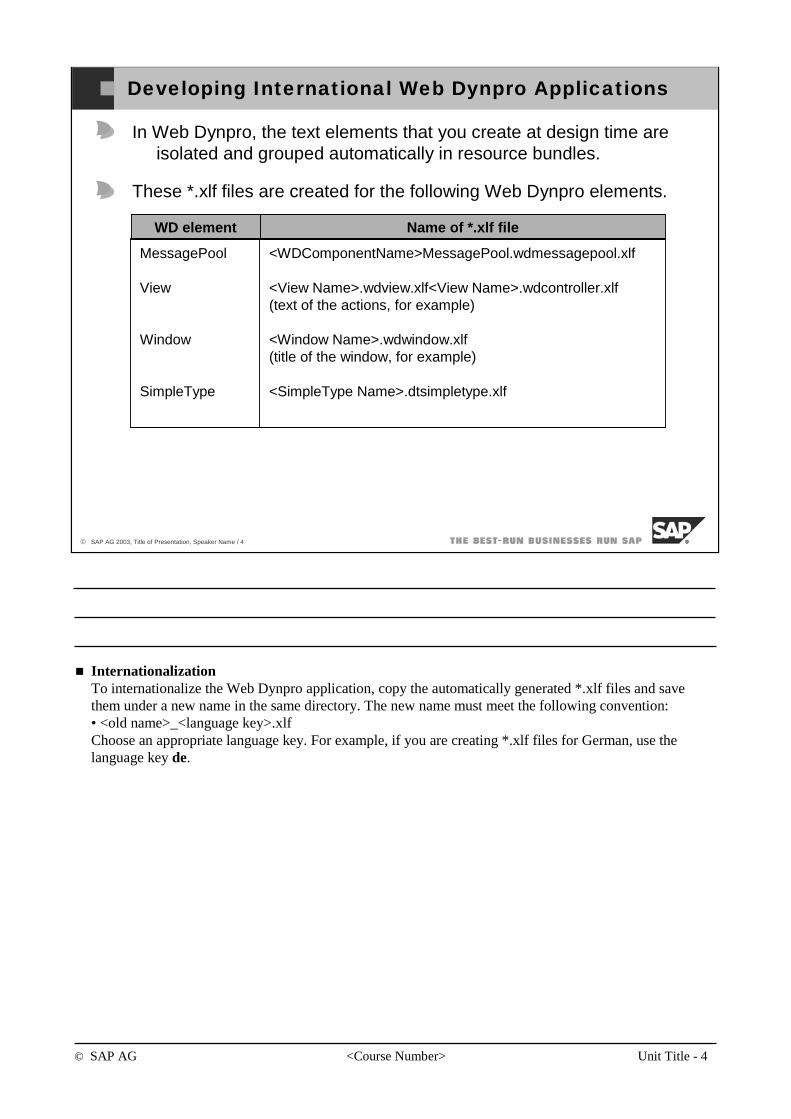
© SAP AG <Course Number> Unit Title - 4
© SAP AG 2003, Title of Presentation, Speaker Name / 4
Developing International Web Dynpro Applications
In Web Dynpro, the text elements that you create at design time are isolated and grouped automatically in resource bundles.
These *.xlf files are created for the following Web Dynpro elements.
MessagePool <WDComponentName>MessagePool.wdmessagepool.xlf
View <View Name>.wdview.xlf<View Name>.wdcontroller.xlf(text of the actions, for example)
Window <Window Name>.wdwindow.xlf(title of the window, for example)
SimpleType <SimpleType Name>.dtsimpletype.xlf
WD element Name of *.xlf file
InternationalizationTo internationalize the Web Dynpro application, copy the automatically generated *.xlf files and save them under a new name in the same directory. The new name must meet the following convention:• <old name>_<language key>.xlfChoose an appropriate language key. For example, if you are creating *.xlf files for German, use the language key de.
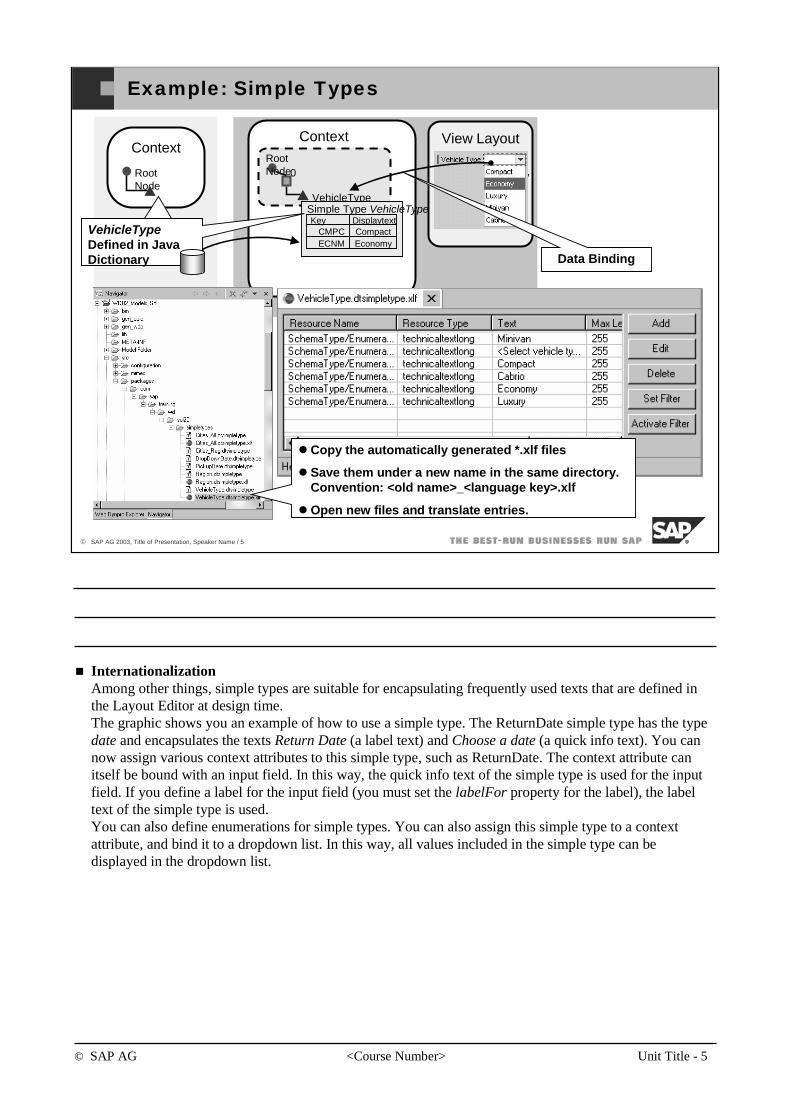
© SAP AG <Course Number> Unit Title - 5
© SAP AG 2003, Title of Presentation, Speaker Name / 5
Example: Simple Types
RootNode
VehicleType
0
Context View Layout
DropDownByKey
Blue
Color:
CMPCKey Displaytext
ECNMCompactEconomy
Simple Type VehicleType
Context
RootNode
Type: ColorDefined in Java Dictionary
VehicleTypeDefined in Java Dictionary Data Binding
Copy the automatically generated *.xlf files
Save them under a new name in the same directory.Convention: <old name>_<language key>.xlf
Open new files and translate entries.
InternationalizationAmong other things, simple types are suitable for encapsulating frequently used texts that are defined in the Layout Editor at design time.The graphic shows you an example of how to use a simple type. The ReturnDate simple type has the type date and encapsulates the texts Return Date (a label text) and Choose a date (a quick info text). You can now assign various context attributes to this simple type, such as ReturnDate. The context attribute can itself be bound with an input field. In this way, the quick info text of the simple type is used for the input field. If you define a label for the input field (you must set the labelFor property for the label), the label text of the simple type is used.You can also define enumerations for simple types. You can also assign this simple type to a context attribute, and bind it to a dropdown list. In this way, all values included in the simple type can be displayed in the dropdown list.
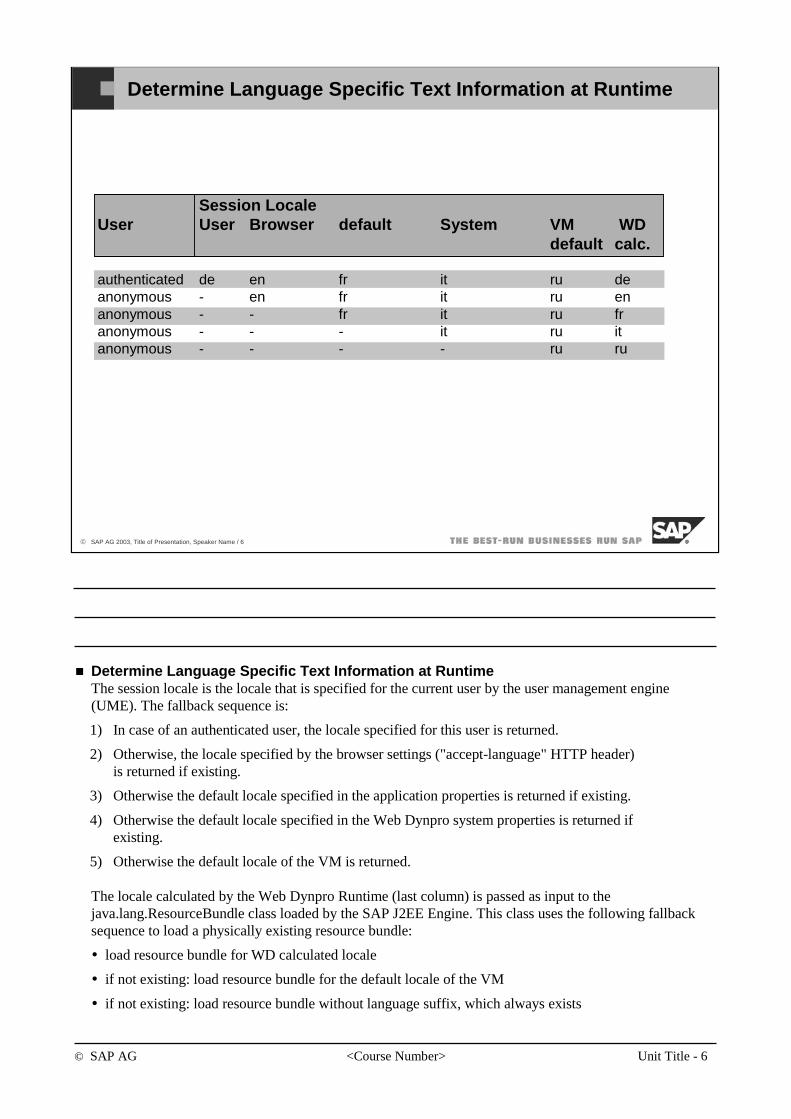
© SAP AG <Course Number> Unit Title - 6
© SAP AG 2003, Title of Presentation, Speaker Name / 6
Determine Language Specific Text Information at Runtime
Session LocaleUser User Browser default System VM WD
default calc.
authenticated de en fr it ru deanonymous - en fr it ru enanonymous - - fr it ru franonymous - - - it ru itanonymous - - - - ru ru
Determine Language Specific Text Information at RuntimeThe session locale is the locale that is specified for the current user by the user management engine (UME). The fallback sequence is:
1) In case of an authenticated user, the locale specified for this user is returned.
2) Otherwise, the locale specified by the browser settings ("accept-language" HTTP header) is returned if existing.
3) Otherwise the default locale specified in the application properties is returned if existing.
4) Otherwise the default locale specified in the Web Dynpro system properties is returned if existing.
5) Otherwise the default locale of the VM is returned.
The locale calculated by the Web Dynpro Runtime (last column) is passed as input to the java.lang.ResourceBundle class loaded by the SAP J2EE Engine. This class uses the following fallback sequence to load a physically existing resource bundle:
load resource bundle for WD calculated locale
if not existing: load resource bundle for the default locale of the VM
if not existing: load resource bundle without language suffix, which always exists
© SAP AG <Course Number> Unit Title - 7
© SAP AG 2003, Title of Presentation, Speaker Name / 7
You should now be able to:
Internationalize Web Dynpro applications.
Create simple types that contain the interface texts.
Internationalization: Unit Summary
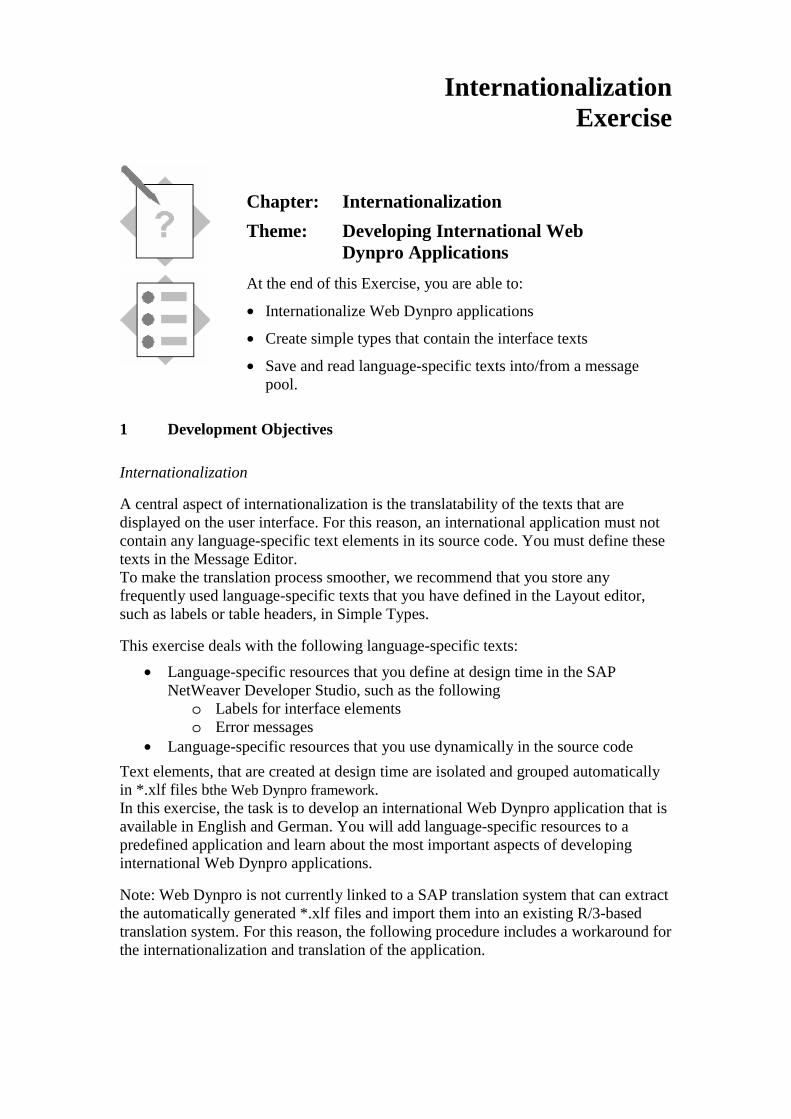
Internationalization Exercise
Chapter: Internationalization
Theme: Developing International Web Dynpro Applications
At the end of this Exercise, you are able to:
• Internationalize Web Dynpro applications
• Create simple types that contain the interface texts
• Save and read language-specific texts into/from a message pool.
1 Development Objectives
Internationalization
A central aspect of internationalization is the translatability of the texts that are displayed on the user interface. For this reason, an international application must not contain any language-specific text elements in its source code. You must define these texts in the Message Editor. To make the translation process smoother, we recommend that you store any frequently used language-specific texts that you have defined in the Layout editor, such as labels or table headers, in Simple Types.
This exercise deals with the following language-specific texts:
• Language-specific resources that you define at design time in the SAP NetWeaver Developer Studio, such as the following
o Labels for interface elements o Error messages
• Language-specific resources that you use dynamically in the source code
Text elements, that are created at design time are isolated and grouped automatically in *.xlf files bthe Web Dynpro framework. In this exercise, the task is to develop an international Web Dynpro application that is available in English and German. You will add language-specific resources to a predefined application and learn about the most important aspects of developing international Web Dynpro applications.
Note: Web Dynpro is not currently linked to a SAP translation system that can extract the automatically generated *.xlf files and import them into an existing R/3-based translation system. For this reason, the following procedure includes a workaround for the internationalization and translation of the application.
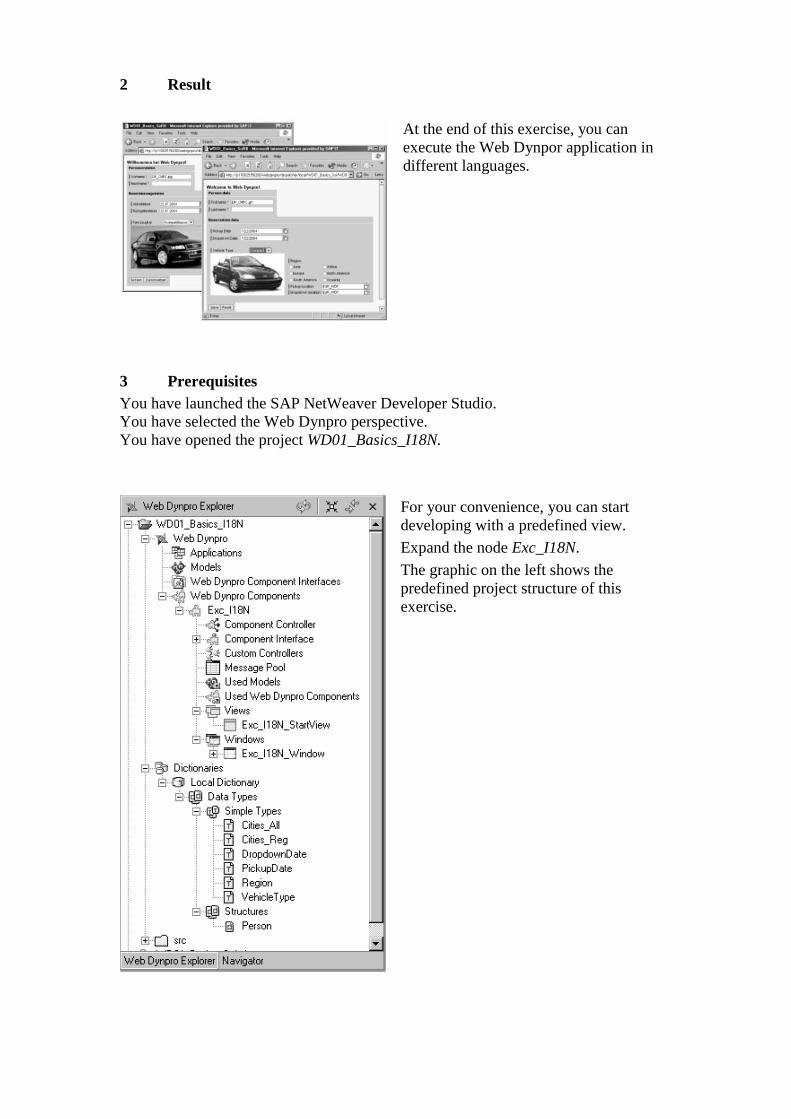
2 Result
At the end of this exercise, you can execute the Web Dynpor application in different languages.
3 Prerequisites You have launched the SAP NetWeaver Developer Studio. You have selected the Web Dynpro perspective. You have opened the project WD01_Basics_I18N.
For your convenience, you can start developing with a predefined view.
Expand the node Exc_I18N.
The graphic on the left shows the predefined project structure of this exercise.
4 Overview: Developing
4-1 Translate the default Text Resources into German (or other Languages). 4-1-1 Copy the .xlf files and rename them (add “_de” (ISO Code for
Germany) before “.xlf”) 4-1-2 Translate the “_de.xlf” files.
4-2 Reload the project in SAP NetWeaver Developer Studio and recreate the archive.
4-3 Create the Web Dynpro application WD01_Basics_I18N. 4-4 Define language-specific application properties
5 Overview: Building, Deploying, and Running
5-1 Deploy and run the Web Dynpro application
5-2 Make language settings in the web browser.
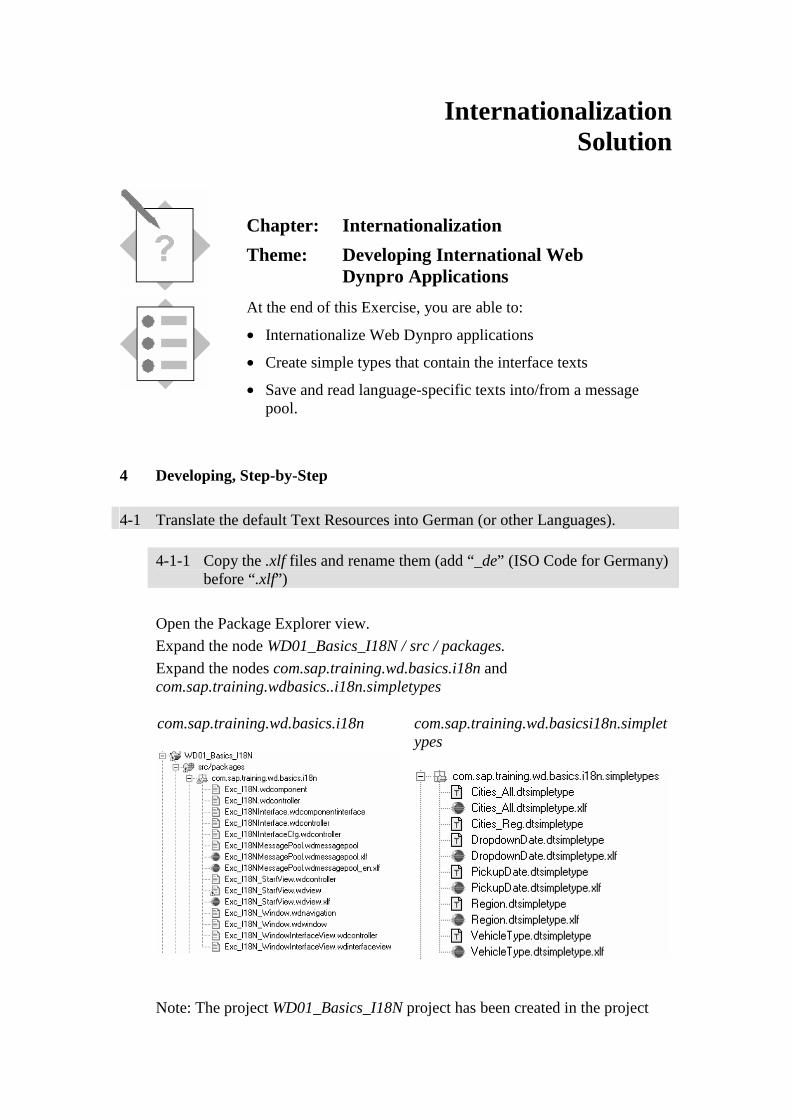
Internationalization Solution
Chapter: Internationalization
Theme: Developing International Web Dynpro Applications
At the end of this Exercise, you are able to:
• Internationalize Web Dynpro applications
• Create simple types that contain the interface texts
• Save and read language-specific texts into/from a message pool.
4 Developing, Step-by-Step 4-1 Translate the default Text Resources into German (or other Languages).
4-1-1 Copy the .xlf files and rename them (add “_de” (ISO Code for Germany) before “.xlf”)
Open the Package Explorer view.
Expand the node WD01_Basics_I18N / src / packages.
Expand the nodes com.sap.training.wd.basics.i18n and com.sap.training.wdbasics..i18n.simpletypes
com.sap.training.wd.basics.i18n
com.sap.training.wd.basicsi18n.simpletypes
Note: The project WD01_Basics_I18N project has been created in the project
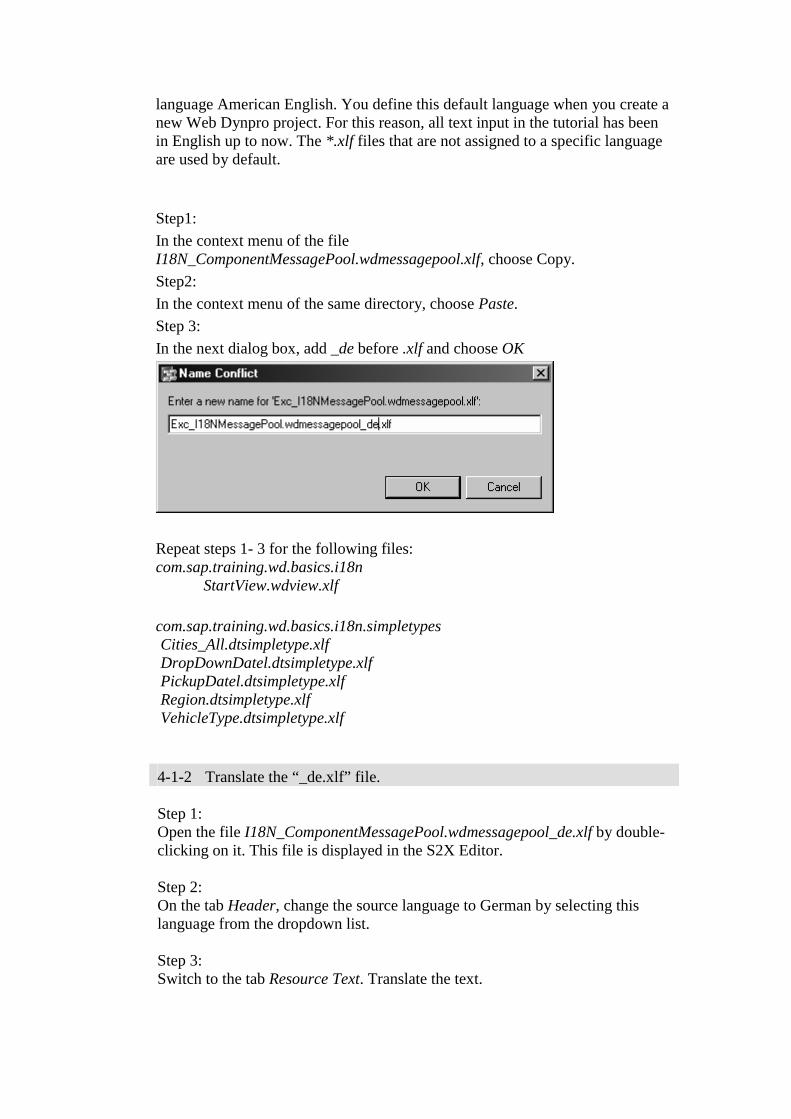
language American English. You define this default language when you create a new Web Dynpro project. For this reason, all text input in the tutorial has been in English up to now. The *.xlf files that are not assigned to a specific language are used by default.
Step1:
In the context menu of the file I18N_ComponentMessagePool.wdmessagepool.xlf, choose Copy.
Step2:
In the context menu of the same directory, choose Paste.
Step 3:
In the next dialog box, add _de before .xlf and choose OK
Repeat steps 1- 3 for the following files: com.sap.training.wd.basics.i18n StartView.wdview.xlf
com.sap.training.wd.basics.i18n.simpletypes Cities_All.dtsimpletype.xlf DropDownDatel.dtsimpletype.xlf PickupDatel.dtsimpletype.xlf Region.dtsimpletype.xlf VehicleType.dtsimpletype.xlf
4-1-2 Translate the “_de.xlf” file.
Step 1: Open the file I18N_ComponentMessagePool.wdmessagepool_de.xlf by double-clicking on it. This file is displayed in the S2X Editor. Step 2: On the tab Header, change the source language to German by selecting this language from the dropdown list. Step 3: Switch to the tab Resource Text. Translate the text.

Repeat the steps 1- 3 for the other “_de.xlf” files:
Use the following translations:
StartView.wdview_de.xlf
English German Please enter a valid date for field {0}.
You entered {1}, which is a date in the past and therefore not a valid date .
Bitte geben Sie für Feld {0} einen gültigen Wert ein.
{0}: Entry of a valid {0} is required for proceeding.
Eingabe in {0} erforderlich
Please enter a valid end date. You entered {0}, which lays before the start date {1}.
Bitte geben Sie ein gültiges Datum ein
Please enter a valid date. Bitte geben Sie einen gültigen Wert ein
ComponentMessagePool.wdmessagepool_de.xlf
English German Person data Personen Daten Save Sichern Reset Zurücksetzen Welcome to Web Dynpro Willkommen bei Web Dynpro Lastname Nachname Dropdown location Rückgabeort Region Region Pickup location Abholort Firstname Vorname
Cities_All.dtsimpletype_de.xlf
English German Rome Rom San Francisco San Francisco Walldorf Walldorf New York New York Heidelberg Heidelberg London London
DropdownDate.dtsimpletype_de.xlf
English German Dropdown date Rückgabedatum
PickupDate.dtsimpletype_de.xlf
English German Pickup date Abholdatum
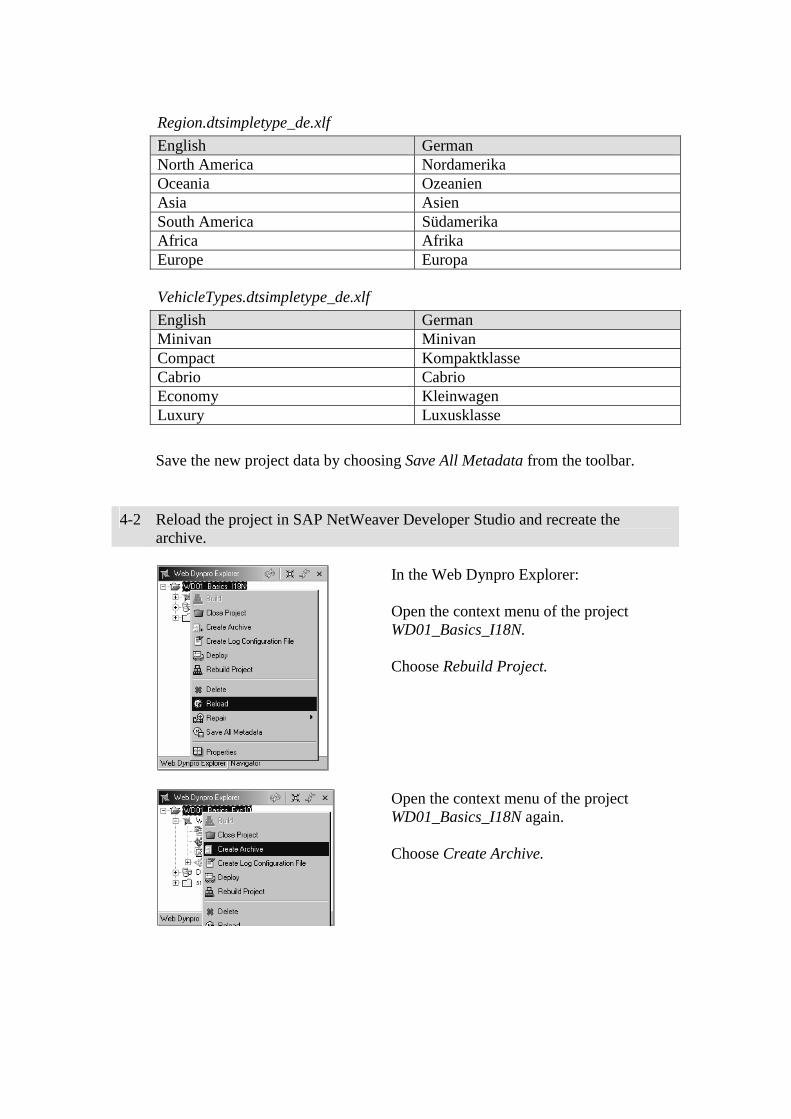
Region.dtsimpletype_de.xlf
English German North America Nordamerika Oceania Ozeanien Asia Asien South America Südamerika Africa Afrika Europe Europa
VehicleTypes.dtsimpletype_de.xlf
English German Minivan Minivan Compact Kompaktklasse Cabrio Cabrio Economy Kleinwagen Luxury Luxusklasse
Save the new project data by choosing Save All Metadata from the toolbar.
4-2 Reload the project in SAP NetWeaver Developer Studio and recreate the archive.
In the Web Dynpro Explorer: Open the context menu of the project WD01_Basics_I18N. Choose Rebuild Project.
Open the context menu of the project WD01_Basics_I18N again. Choose Create Archive.
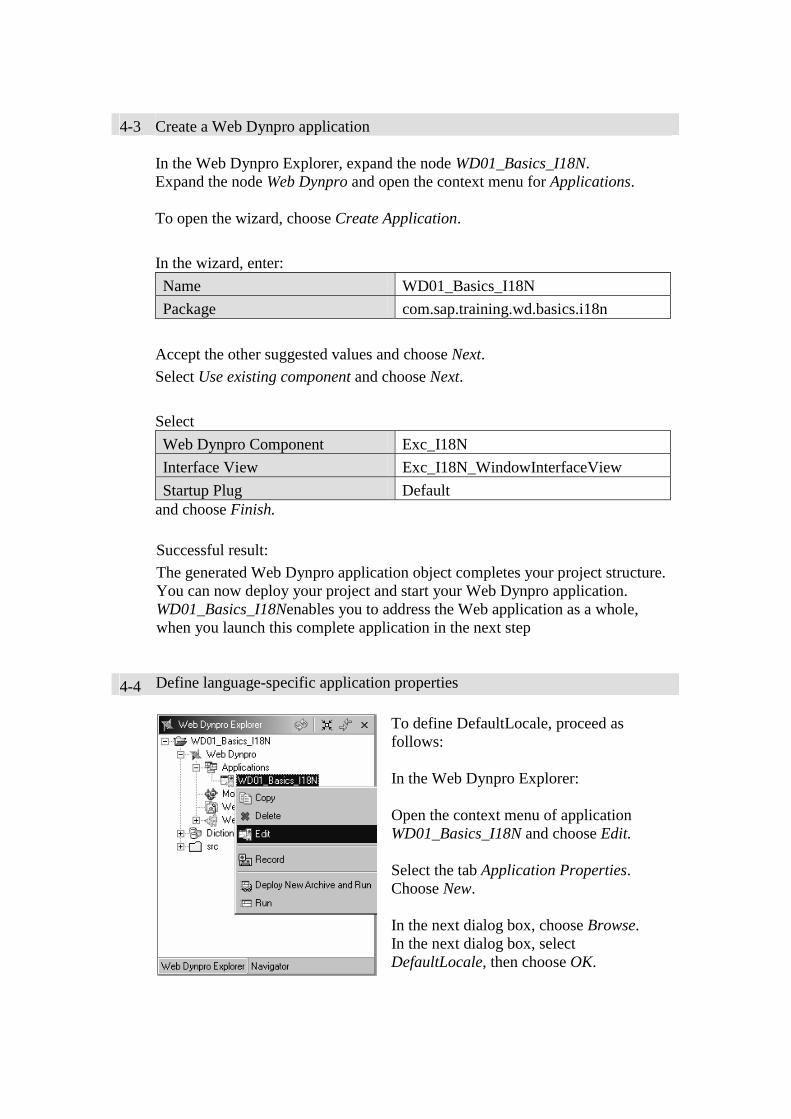
4-3 Create a Web Dynpro application
In the Web Dynpro Explorer, expand the node WD01_Basics_I18N. Expand the node Web Dynpro and open the context menu for Applications. To open the wizard, choose Create Application.
In the wizard, enter:
Name WD01_Basics_I18N
Package com.sap.training.wd.basics.i18n
Accept the other suggested values and choose Next.
Select Use existing component and choose Next.
Select
Web Dynpro Component Exc_I18N
Interface View Exc_I18N_WindowInterfaceView
Startup Plug Default and choose Finish.
Successful result:
The generated Web Dynpro application object completes your project structure. You can now deploy your project and start your Web Dynpro application. WD01_Basics_I18Nenables you to address the Web application as a whole, when you launch this complete application in the next step
4-4 Define language-specific application properties
To define DefaultLocale, proceed as follows: In the Web Dynpro Explorer: Open the context menu of application WD01_Basics_I18N and choose Edit. Select the tab Application Properties. Choose New. In the next dialog box, choose Browse. In the next dialog box, select DefaultLocale, then choose OK.
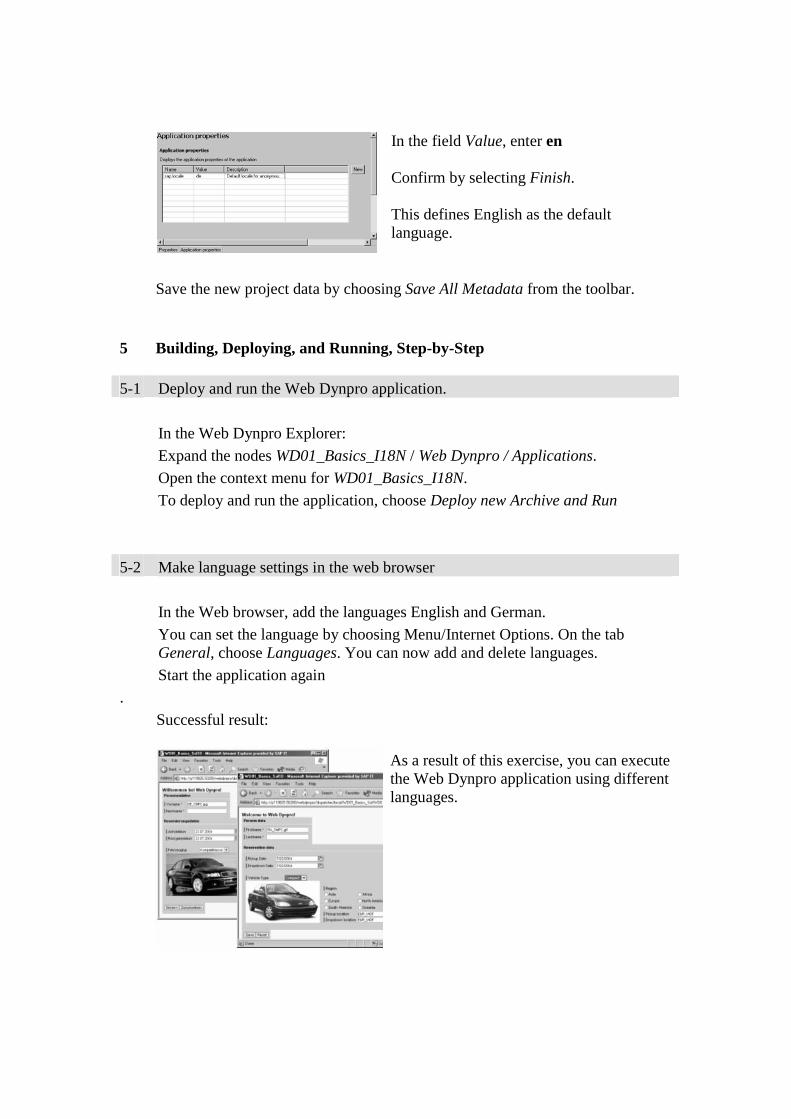
In the field Value, enter en Confirm by selecting Finish. This defines English as the default language.
Save the new project data by choosing Save All Metadata from the toolbar.
5 Building, Deploying, and Running, Step-by-Step 5-1 Deploy and run the Web Dynpro application.
In the Web Dynpro Explorer:
Expand the nodes WD01_Basics_I18N / Web Dynpro / Applications.
Open the context menu for WD01_Basics_I18N.
To deploy and run the application, choose Deploy new Archive and Run
5-2 Make language settings in the web browser
In the Web browser, add the languages English and German.
You can set the language by choosing Menu/Internet Options. On the tab General, choose Languages. You can now add and delete languages.
Start the application again
. Successful result:
As a result of this exercise, you can execute the Web Dynpro application using different languages.
© SAP AG <Course Number> Unit Title - 1
© SAP AG 2003, Title of Presentation, Speaker Name / 1
Dynamic Programming Overview
Dynamic User Interfaces
Dynamic Contexts
Dynamic Actions
Contents:
Web Dynpro Dynamic Programming
© SAP AG <Course Number> Unit Title - 2
© SAP AG 2003, Title of Presentation, Speaker Name / 2
After completing this unit, you will be able to:
Understand what is dynamic programming.
Dynamically modify and create UI elements.
Dynamically create context elements.
Dynamically bind UI element values to context elements.
Dynamically create actions.
Understand and create parameter mappings.
Web Dynpro Dynamic Programming: Unit Objectives

© SAP AG <Course Number> Unit Title - 3
© SAP AG 2003, Title of Presentation, Speaker Name / 3
<Insert unit business scenario>
Web Dynpro Dynamic Programming: Business Scenario
© SAP AG <Course Number> Unit Title - 4
© SAP AG 2003, Title of Presentation, Speaker Name / 4
After completing this topic, you will be able to:
Understand what dynamic programming is all about.
Dynamic Programming Overview: Topic Objectives
Dynamic Programming Overview: Topic ObjecitvesThis is a lesson
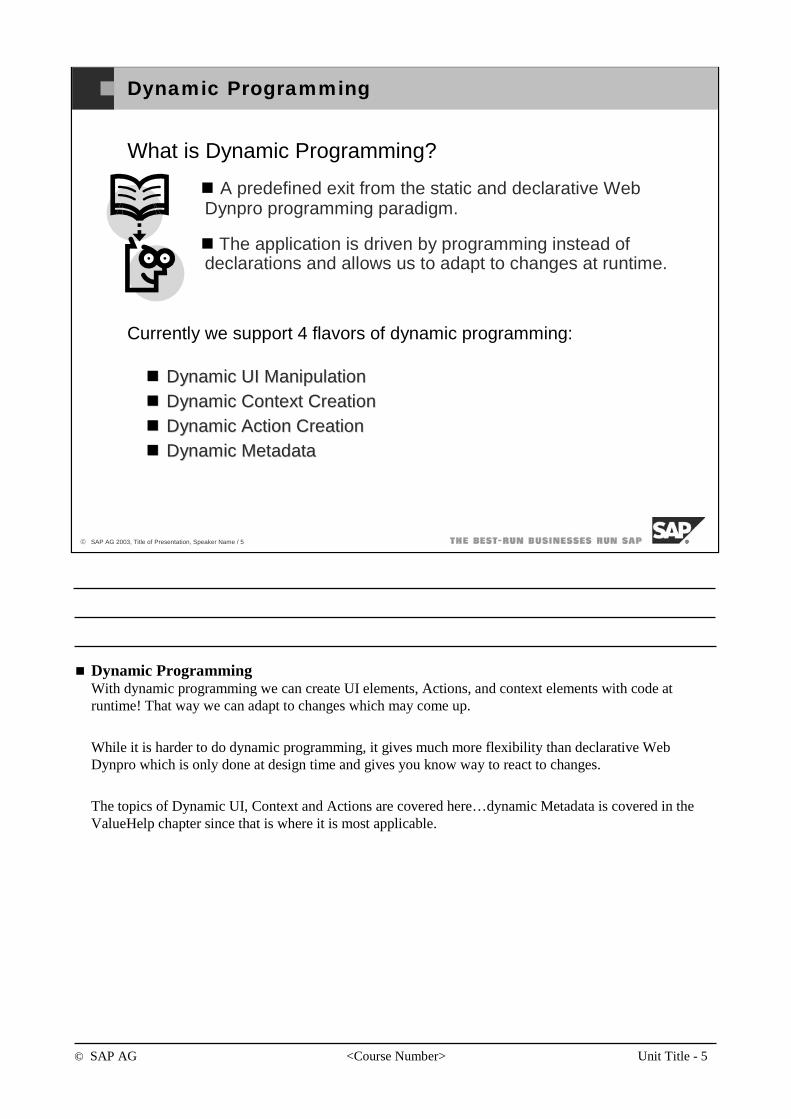
© SAP AG <Course Number> Unit Title - 5
© SAP AG 2003, Title of Presentation, Speaker Name / 5
Dynamic Programming
What is Dynamic Programming?
A predefined exit from the static and declarative Web Dynpro programming paradigm.
The application is driven by programming instead of declarations and allows us to adapt to changes at runtime.
Currently we support 4 flavors of dynamic programming:
Dynamic UI ManipulationDynamic UI ManipulationDynamic Context CreationDynamic Context CreationDynamic Action CreationDynamic Action CreationDynamic MetadataDynamic Metadata
Dynamic ProgrammingWith dynamic programming we can create UI elements, Actions, and context elements with code at runtime! That way we can adapt to changes which may come up.
While it is harder to do dynamic programming, it gives much more flexibility than declarative Web Dynpro which is only done at design time and gives you know way to react to changes.
The topics of Dynamic UI, Context and Actions are covered here…dynamic Metadata is covered in the ValueHelp chapter since that is where it is most applicable.
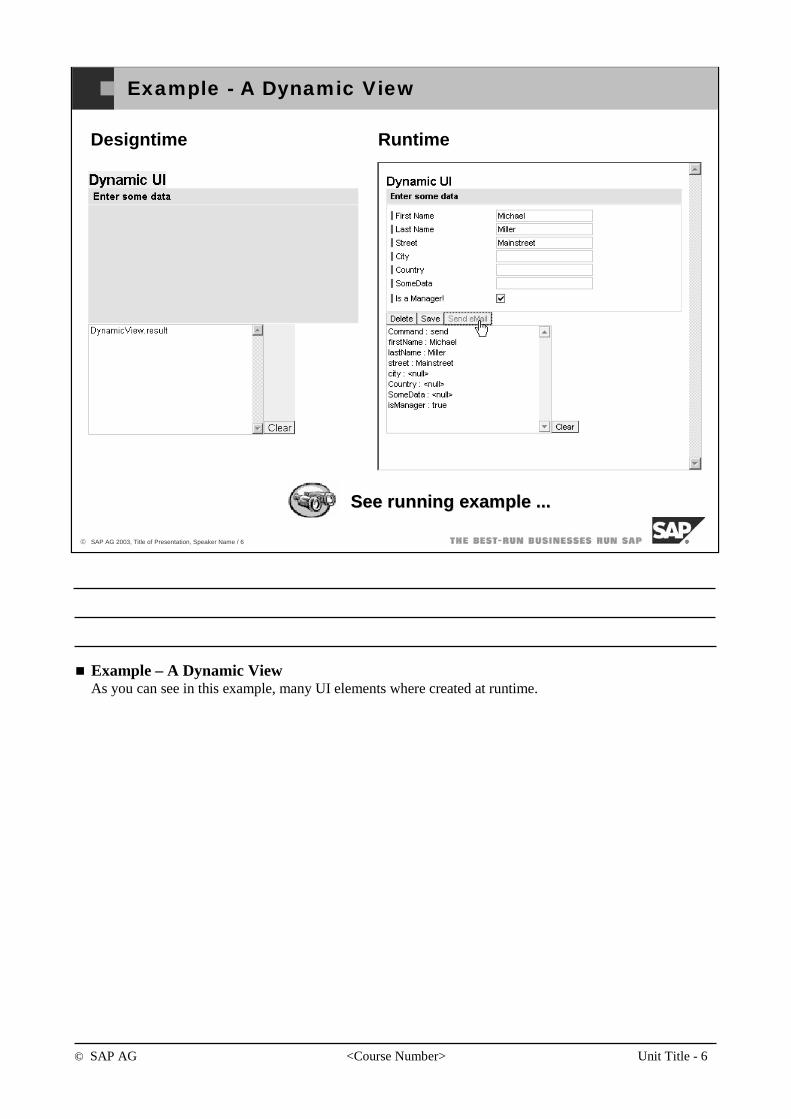
© SAP AG <Course Number> Unit Title - 6
© SAP AG 2003, Title of Presentation, Speaker Name / 6
Example - A Dynamic View
See running example ... See running example ...
Designtime Runtime
Example – A Dynamic ViewAs you can see in this example, many UI elements where created at runtime.
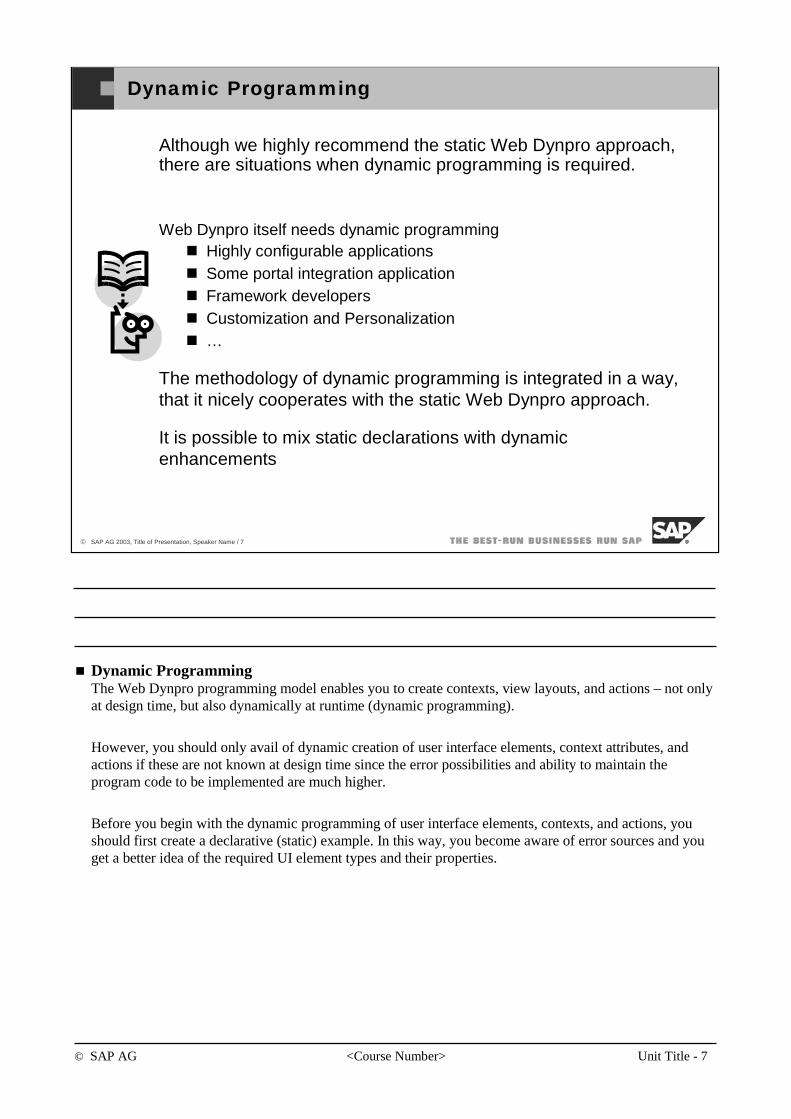
© SAP AG <Course Number> Unit Title - 7
© SAP AG 2003, Title of Presentation, Speaker Name / 7
Dynamic Programming
Although we highly recommend the static Web Dynpro approach, there are situations when dynamic programming is required.
Web Dynpro itself needs dynamic programmingHighly configurable applicationsSome portal integration application Framework developersCustomization and Personalization…
The methodology of dynamic programming is integrated in a way, that it nicely cooperates with the static Web Dynpro approach.
It is possible to mix static declarations with dynamic enhancements
Dynamic ProgrammingThe Web Dynpro programming model enables you to create contexts, view layouts, and actions – not only at design time, but also dynamically at runtime (dynamic programming).
However, you should only avail of dynamic creation of user interface elements, context attributes, and actions if these are not known at design time since the error possibilities and ability to maintain the program code to be implemented are much higher.
Before you begin with the dynamic programming of user interface elements, contexts, and actions, you should first create a declarative (static) example. In this way, you become aware of error sources and you get a better idea of the required UI element types and their properties.
© SAP AG <Course Number> Unit Title - 8
© SAP AG 2003, Title of Presentation, Speaker Name / 8
You should now be able to:
Understand what dynamic programming is all about.
Dynamic Programming Overview: Topic Summary
© SAP AG <Course Number> Unit Title - 9
© SAP AG 2003, Title of Presentation, Speaker Name / 9
After completing this topic, you will be able to:
Understand the framework provided for dynamic UI manipulation.
Use the APIs provided to dynamically create and modify UI elements.
Dynamic User Interfaces: Topic Objectives
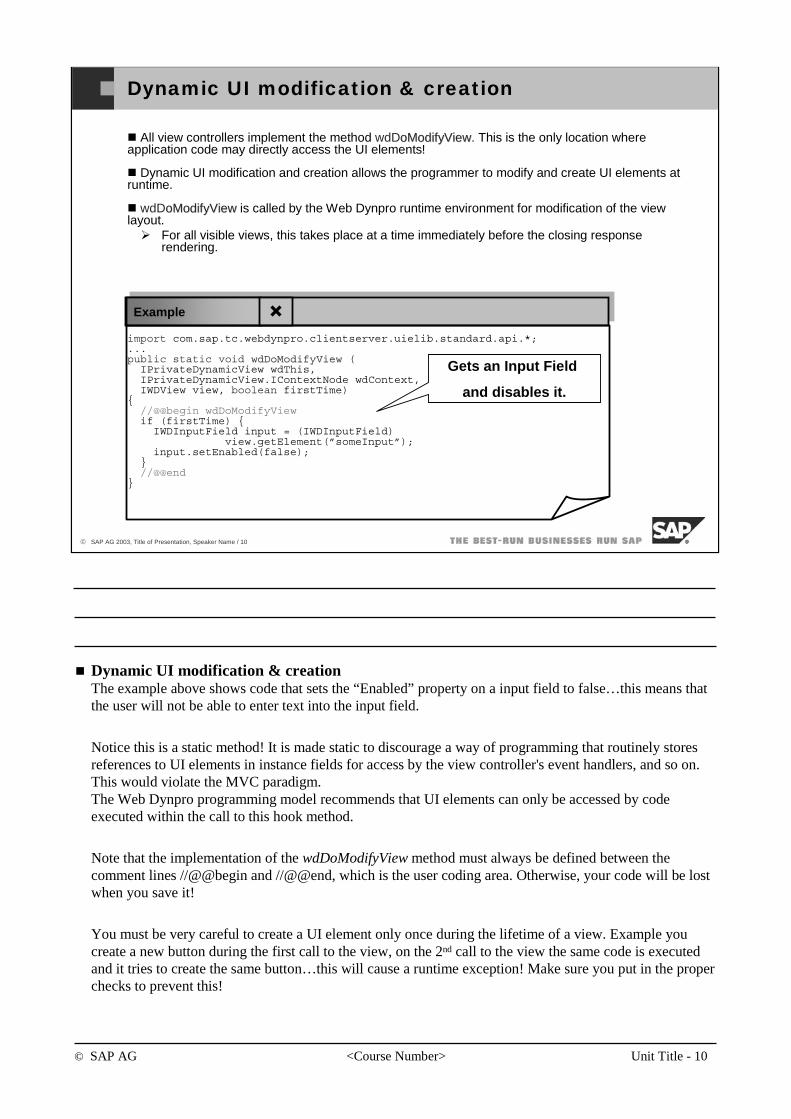
© SAP AG <Course Number> Unit Title - 10
© SAP AG 2003, Title of Presentation, Speaker Name / 10
Dynamic UI modification & creation
All view controllers implement the method wdDoModifyViewoModifyView. This is the only location where application code may directly access the UI elements!
Dynamic UI modification and creation allows the programmer to modify and create UI elements at runtime.
wdDoModifyViewoModifyView is called by the Web Dynpro runtime environment for modification of the view layout.
For all visible views, this takes place at a time immediately before the closing response rendering.
import com.sap.tc.webdynpro.clientserver.uielib.standard.api.*;...public static void wdDoModifyView wdDoModifyView (
IPrivateDynamicView wdThis,IPrivateDynamicView.IContextNode wdContext,IWDView view, boolean firstTime)
{//@@begin wdDoModifyViewif (firstTime) {
IWDInputField input = (IWDInputField) view.getElement(”someInput”);
input.setEnabled(false);}//@@end
}
Gets an Input Field
and disables it.
Example
Dynamic UI modification & creationThe example above shows code that sets the “Enabled” property on a input field to false…this means that the user will not be able to enter text into the input field.
Notice this is a static method! It is made static to discourage a way of programming that routinely stores references to UI elements in instance fields for access by the view controller's event handlers, and so on. This would violate the MVC paradigm.The Web Dynpro programming model recommends that UI elements can only be accessed by code executed within the call to this hook method.
Note that the implementation of the wdDoModifyView method must always be defined between the comment lines //@@begin and //@@end, which is the user coding area. Otherwise, your code will be lost when you save it!
You must be very careful to create a UI element only once during the lifetime of a view. Example you create a new button during the first call to the view, on the 2nd call to the view the same code is executed and it tries to create the same button…this will cause a runtime exception! Make sure you put in the proper checks to prevent this!
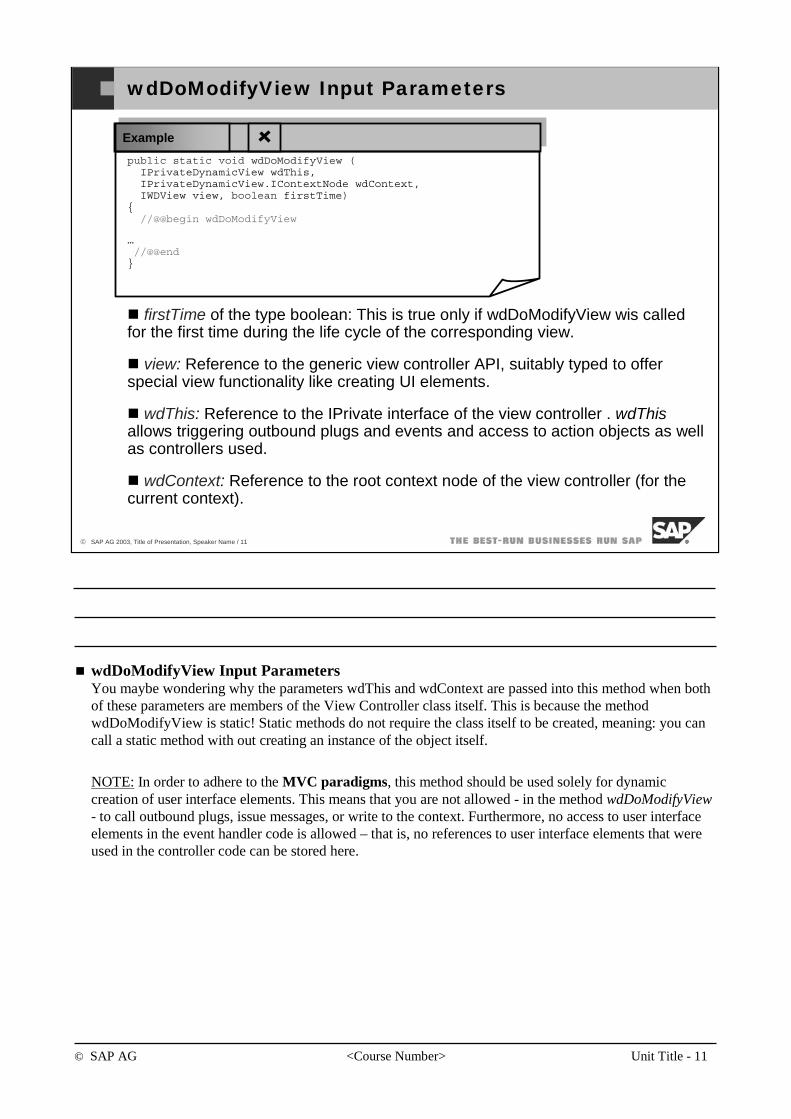
© SAP AG <Course Number> Unit Title - 11
© SAP AG 2003, Title of Presentation, Speaker Name / 11
wdDoModifyView Input Parameters
public static void wdDoModifyView wdDoModifyView (IPrivateDynamicView wdThis,IPrivateDynamicView.IContextNode wdContext,IWDView view, boolean firstTime)
{//@@begin wdDoModifyView
…//@@end
}
firstTime of the type boolean: This is true only if wdDoModifyView wis called for the first time during the life cycle of the corresponding view.
view: Reference to the generic view controller API, suitably typed to offer special view functionality like creating UI elements.
wdThis: Reference to the IPrivate interface of the view controller . wdThis allows triggering outbound plugs and events and access to action objects as well as controllers used.
wdContext: Reference to the root context node of the view controller (for the current context).
Example
wdDoModifyView Input ParametersYou maybe wondering why the parameters wdThis and wdContext are passed into this method when both of these parameters are members of the View Controller class itself. This is because the method wdDoModifyView is static! Static methods do not require the class itself to be created, meaning: you can call a static method with out creating an instance of the object itself.
NOTE: In order to adhere to the MVC paradigms, this method should be used solely for dynamic creation of user interface elements. This means that you are not allowed - in the method wdDoModifyView - to call outbound plugs, issue messages, or write to the context. Furthermore, no access to user interface elements in the event handler code is allowed – that is, no references to user interface elements that were used in the controller code can be stored here.
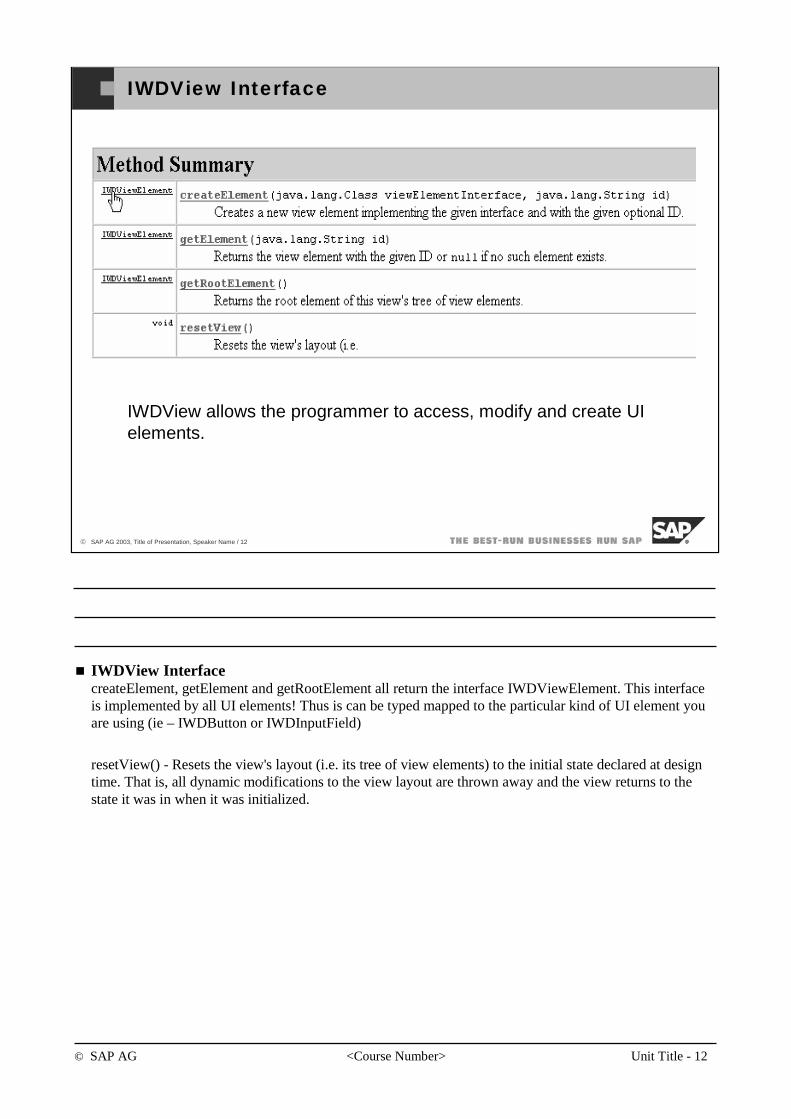
© SAP AG <Course Number> Unit Title - 12
© SAP AG 2003, Title of Presentation, Speaker Name / 12
IWDView Interface
IWDView allows the programmer to access, modify and create UI elements.
IWDView InterfacecreateElement, getElement and getRootElement all return the interface IWDViewElement. This interface is implemented by all UI elements! Thus is can be typed mapped to the particular kind of UI element you are using (ie – IWDButton or IWDInputField)
resetView() - Resets the view's layout (i.e. its tree of view elements) to the initial state declared at design time. That is, all dynamic modifications to the view layout are thrown away and the view returns to the state it was in when it was initialized.

© SAP AG <Course Number> Unit Title - 13
© SAP AG 2003, Title of Presentation, Speaker Name / 13
Modifying View UI Elements
IWDInputField input =
(IWDInputField)view.getElement("someInput");
input.setEnabled(false);
The view parameter of wdDoModifyView method allows you to access a views UI Elements.
To get a reference to your view’s UI element you use the getElement(Stringid) method where the id is the name you gave the UI element.
Once you have obtained a reference to a UI Element you can change its properties.
Example
Modifying View UI ElementsAs you can see, it is good to remember the names of the UI elements you have created. Always give your UI Elements meaningful names (instead of the defaults, such as button1, etc.) …this will help you remember them!
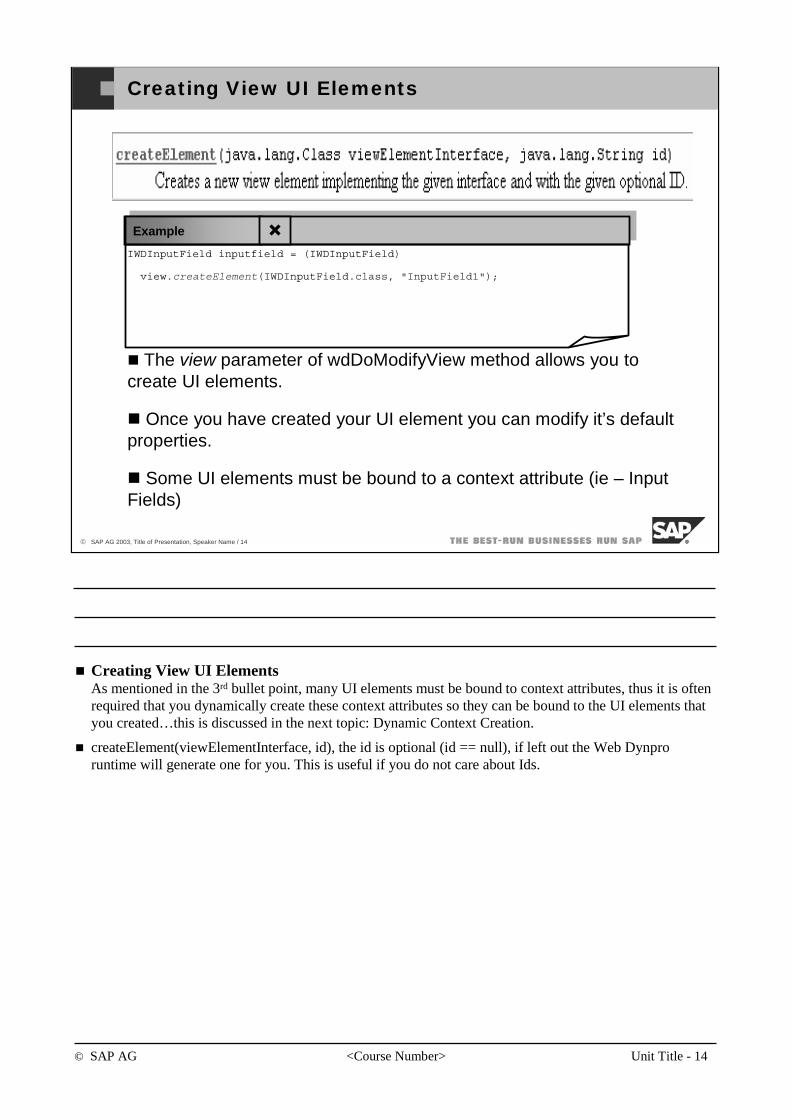
© SAP AG <Course Number> Unit Title - 14
© SAP AG 2003, Title of Presentation, Speaker Name / 14
Creating View UI Elements
IWDInputField inputfield = (IWDInputField)
view.createElement(IWDInputField.class, "InputField1");
The view parameter of wdDoModifyView method allows you to create UI elements.
Once you have created your UI element you can modify it’s default properties.
Some UI elements must be bound to a context attribute (ie – Input Fields)
Example
Creating View UI ElementsAs mentioned in the 3rd bullet point, many UI elements must be bound to context attributes, thus it is often required that you dynamically create these context attributes so they can be bound to the UI elements that you created…this is discussed in the next topic: Dynamic Context Creation.
createElement(viewElementInterface, id), the id is optional (id == null), if left out the Web Dynpro runtime will generate one for you. This is useful if you do not care about Ids.
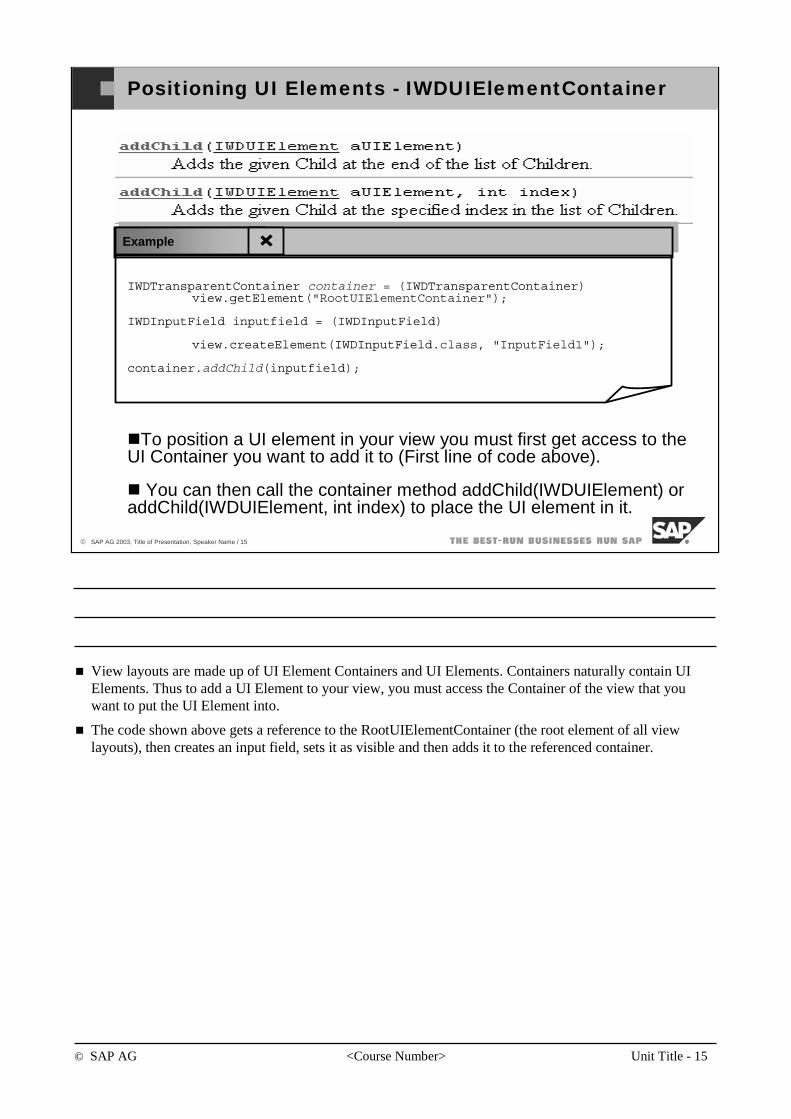
© SAP AG <Course Number> Unit Title - 15
© SAP AG 2003, Title of Presentation, Speaker Name / 15
Positioning UI Elements - IWDUIElementContainer
IWDTransparentContainer container = (IWDTransparentContainer) view.getElement("RootUIElementContainer");
IWDInputField inputfield = (IWDInputField)
view.createElement(IWDInputField.class, "InputField1");
container.addChild(inputfield);
To position a UI element in your view you must first get access to the UI Container you want to add it to (First line of code above).
You can then call the container method addChild(IWDUIElement) or addChild(IWDUIElement, int index) to place the UI element in it.
Example
View layouts are made up of UI Element Containers and UI Elements. Containers naturally contain UI Elements. Thus to add a UI Element to your view, you must access the Container of the view that you want to put the UI Element into.
The code shown above gets a reference to the RootUIElementContainer (the root element of all view layouts), then creates an input field, sets it as visible and then adds it to the referenced container.
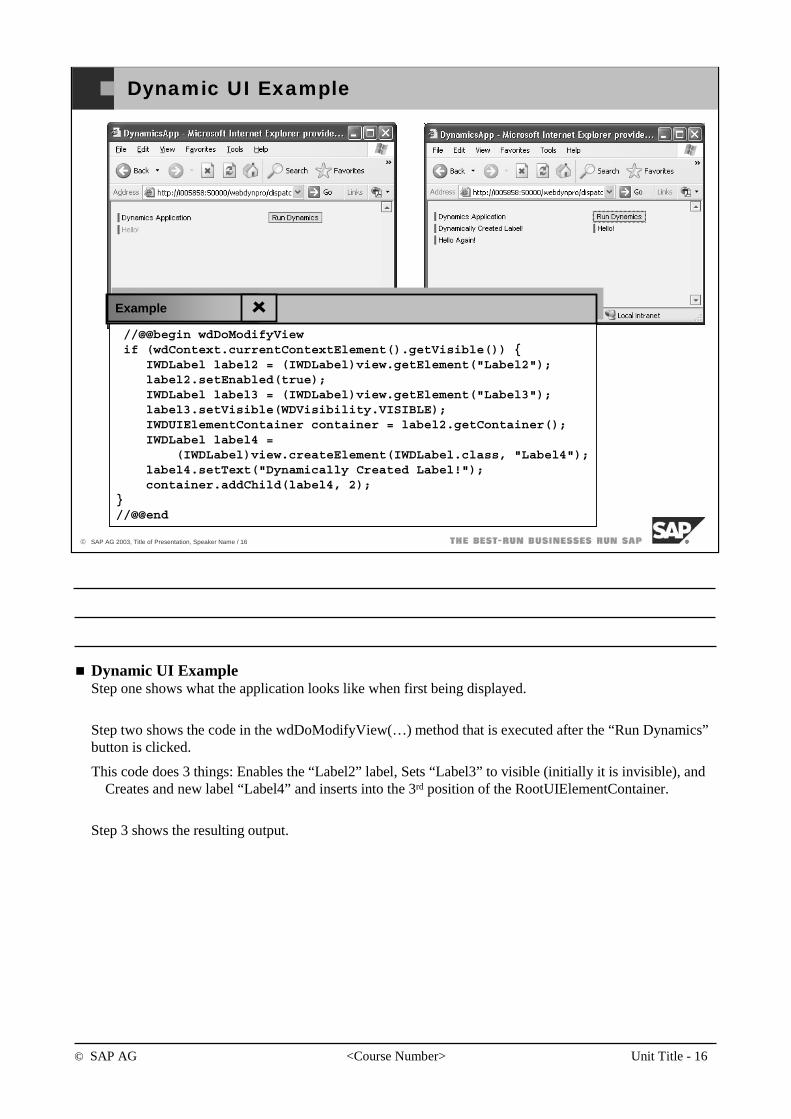
© SAP AG <Course Number> Unit Title - 16
© SAP AG 2003, Title of Presentation, Speaker Name / 16
Dynamic UI Example
//@@begin wdDoModifyViewif (wdContext.currentContextElement().getVisible()) {
IWDLabel label2 = (IWDLabel)view.getElement("Label2");label2.setEnabled(true);IWDLabel label3 = (IWDLabel)view.getElement("Label3");label3.setVisible(WDVisibility.VISIBLE);IWDUIElementContainer container = label2.getContainer();IWDLabel label4 =
(IWDLabel)view.createElement(IWDLabel.class, "Label4");label4.setText("Dynamically Created Label!");container.addChild(label4, 2);
}//@@end
Example
Dynamic UI ExampleStep one shows what the application looks like when first being displayed.
Step two shows the code in the wdDoModifyView(…) method that is executed after the “Run Dynamics” button is clicked.
This code does 3 things: Enables the “Label2” label, Sets “Label3” to visible (initially it is invisible), and Creates and new label “Label4” and inserts into the 3rd position of the RootUIElementContainer.
Step 3 shows the resulting output.
© SAP AG <Course Number> Unit Title - 17
© SAP AG 2003, Title of Presentation, Speaker Name / 17
You should now be able to:
Understand the framework provided for dynamic UI manipulation.
Use the APIs provided to dynamically create and modify UI elements.
Dynamic User Interfaces: Topic Summary
© SAP AG <Course Number> Unit Title - 18
© SAP AG 2003, Title of Presentation, Speaker Name / 18
After completing this topic, you will be able to:
Understand the framework provided for dynamic context creation.
Use the APIs provided to dynamically create context elements.
Know how to bind a UI element property to a context attribute (or node).
Dynamic Contexts: Topic Objectives
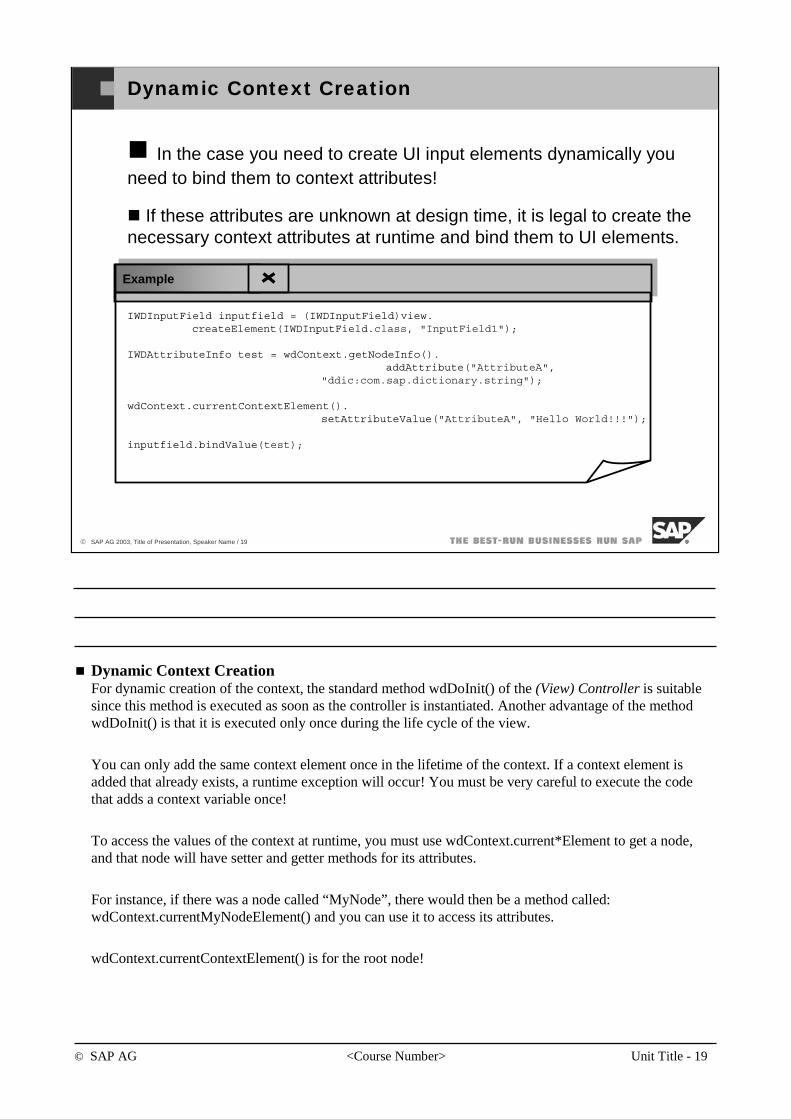
© SAP AG <Course Number> Unit Title - 19
© SAP AG 2003, Title of Presentation, Speaker Name / 19
Dynamic Context Creation
In the case you need to create UI input elements dynamically youneed to bind them to context attributes!
If these attributes are unknown at design time, it is legal to create the necessary context attributes at runtime and bind them to UI elements.
IWDInputField inputfield = (IWDInputField)view. createElement(IWDInputField.class, "InputField1");
IWDAttributeInfo test = wdContext.getNodeInfo().addAttribute("AttributeA",
"ddic:com.sap.dictionary.string");
wdContext.currentContextElement().setAttributeValue("AttributeA", "Hello World!!!");
inputfield.bindValue(test);
Example
Dynamic Context CreationFor dynamic creation of the context, the standard method wdDoInit() of the (View) Controller is suitable since this method is executed as soon as the controller is instantiated. Another advantage of the method wdDoInit() is that it is executed only once during the life cycle of the view.
You can only add the same context element once in the lifetime of the context. If a context element is added that already exists, a runtime exception will occur! You must be very careful to execute the code that adds a context variable once!
To access the values of the context at runtime, you must use wdContext.current*Element to get a node, and that node will have setter and getter methods for its attributes.
For instance, if there was a node called “MyNode”, there would then be a method called: wdContext.currentMyNodeElement() and you can use it to access its attributes.
wdContext.currentContextElement() is for the root node!
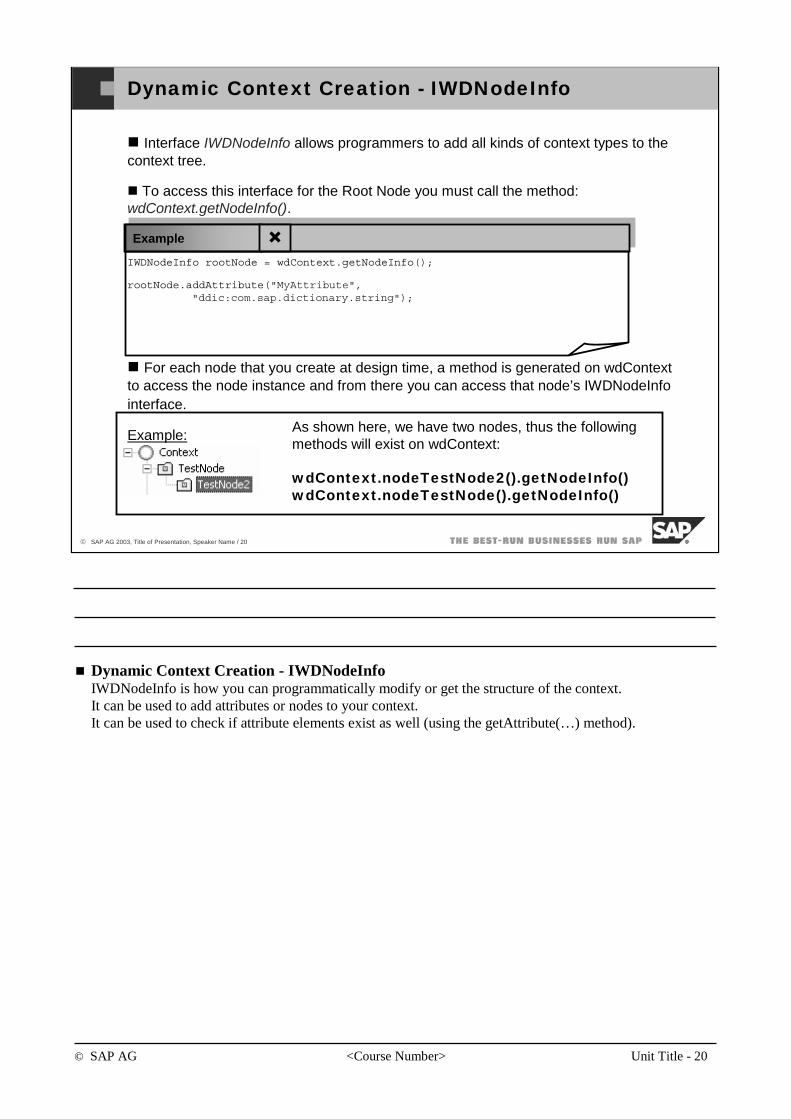
© SAP AG <Course Number> Unit Title - 20
© SAP AG 2003, Title of Presentation, Speaker Name / 20
Dynamic Context Creation - IWDNodeInfo
Interface IWDNodeInfo allows programmers to add all kinds of context types to the context tree.
To access this interface for the Root Node you must call the method: wdContext.getNodeInfo().
IWDNodeInfo rootNode = wdContext.getNodeInfo();
rootNode.addAttribute("MyAttribute", "ddic:com.sap.dictionary.string");
For each node that you create at design time, a method is generated on wdContext to access the node instance and from there you can access that node’s IWDNodeInfointerface.
Example: As shown here, we have two nodes, thus the following methods will exist on wdContext:
wdContext.nodeTestNode2().getNodeInfo()wdContext.nodeTestNode().getNodeInfo()
Example
Dynamic Context Creation - IWDNodeInfoIWDNodeInfo is how you can programmatically modify or get the structure of the context.It can be used to add attributes or nodes to your context.It can be used to check if attribute elements exist as well (using the getAttribute(…) method).

© SAP AG <Course Number> Unit Title - 21
© SAP AG 2003, Title of Presentation, Speaker Name / 21
Dynamic Context Creation Types
Interface IWDNodeInfo contains APIs to create all kinds of contexts elements:
Mapped Attributes – values that are mapped back to the context of another controller.
addMappedAttribute(… )
Attribute Values – values that are not mapped to other controller’s contexts.
addAttribute(… )
Mapped Nodes – nodes that are mapped back to the context of another controller.
addMappedChild(… )
Nodes – nodes that are not mapped to another controller’s context.addChild(…)
Recursive Nodes – nodes that are used for representing Trees.addRecursiveChild(… )
Dynamic Context Creation TypesIWDNodeInfo also contains methods such as getAttribute(String), which will return null, if the attribute doesn’t exist. This is important if you want to test if an attribute has already been created or not.
Essentially, IWDNodeInfo is used to check and modify the structure of your context nodes.You may notice that there is no method for adding a Model attribute or Node. The reason is because you when you add a node/attribute it checks to see if the parent is a Value or Model Node…if it is a Value Node, the added Node/Attribute will be of type value, if it is a Model node then the added Model/Attribute will be of type Model.
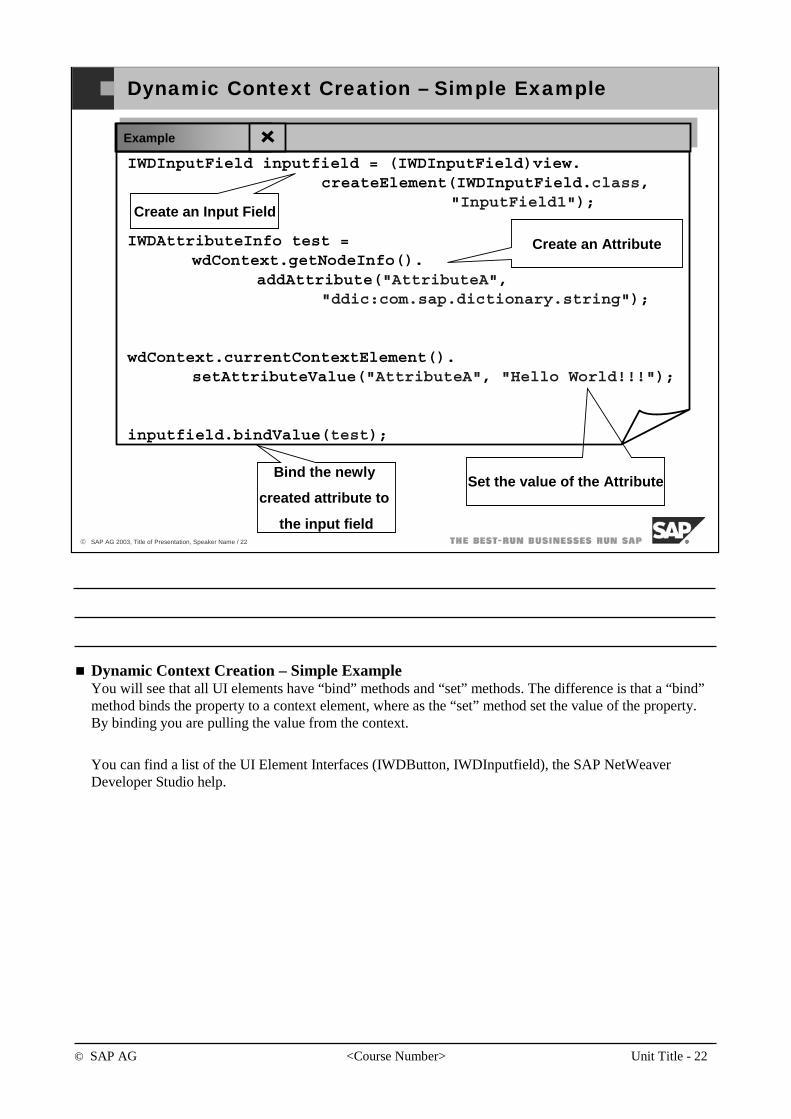
© SAP AG <Course Number> Unit Title - 22
© SAP AG 2003, Title of Presentation, Speaker Name / 22
Set the value of the Attribute
IWDInputField inputfield = (IWDInputField)view. createElement(IWDInputField.class,
"InputField1");
IWDAttributeInfo test =wdContext.getNodeInfo().
addAttribute("AttributeA","ddic:com.sap.dictionary.string");
wdContext.currentContextElement().setAttributeValue("AttributeA", "Hello World!!!");
inputfield.bindValue(test);
Dynamic Context Creation – Simple Example
Create an Attribute
Create an Input Field
Bind the newly
created attribute to
the input field
Example
Dynamic Context Creation – Simple Example You will see that all UI elements have “bind” methods and “set” methods. The difference is that a “bind” method binds the property to a context element, where as the “set” method set the value of the property. By binding you are pulling the value from the context.
You can find a list of the UI Element Interfaces (IWDButton, IWDInputfield), the SAP NetWeaver Developer Studio help.
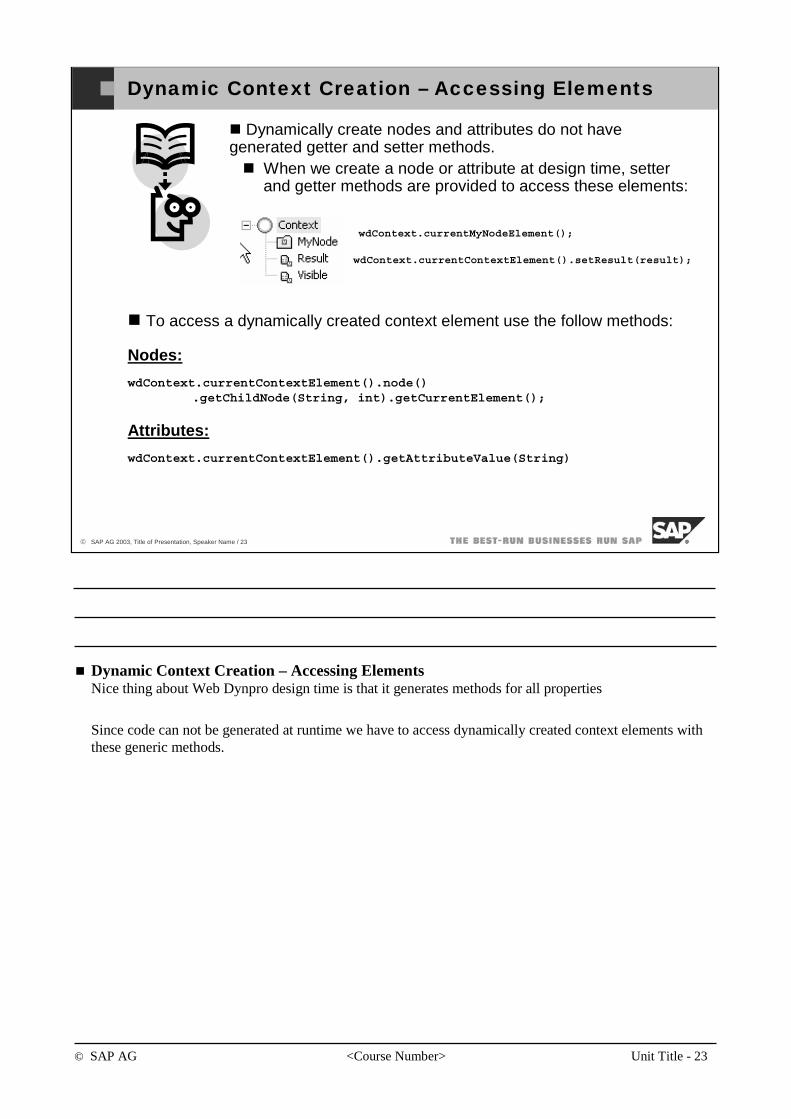
© SAP AG <Course Number> Unit Title - 23
© SAP AG 2003, Title of Presentation, Speaker Name / 23
Dynamic Context Creation – Accessing Elements
Dynamically create nodes and attributes do not have generated getter and setter methods.
When we create a node or attribute at design time, setter and getter methods are provided to access these elements:
wdContext.currentMyNodeElement();
wdContext.currentContextElement().setResult(result);
To access a dynamically created context element use the follow methods:
Nodes:
wdContext.currentContextElement().node() .getChildNode(String, int).getCurrentElement();
Attributes:
wdContext.currentContextElement().getAttributeValue(String)
Dynamic Context Creation – Accessing Elements Nice thing about Web Dynpro design time is that it generates methods for all properties
Since code can not be generated at runtime we have to access dynamically created context elements with these generic methods.
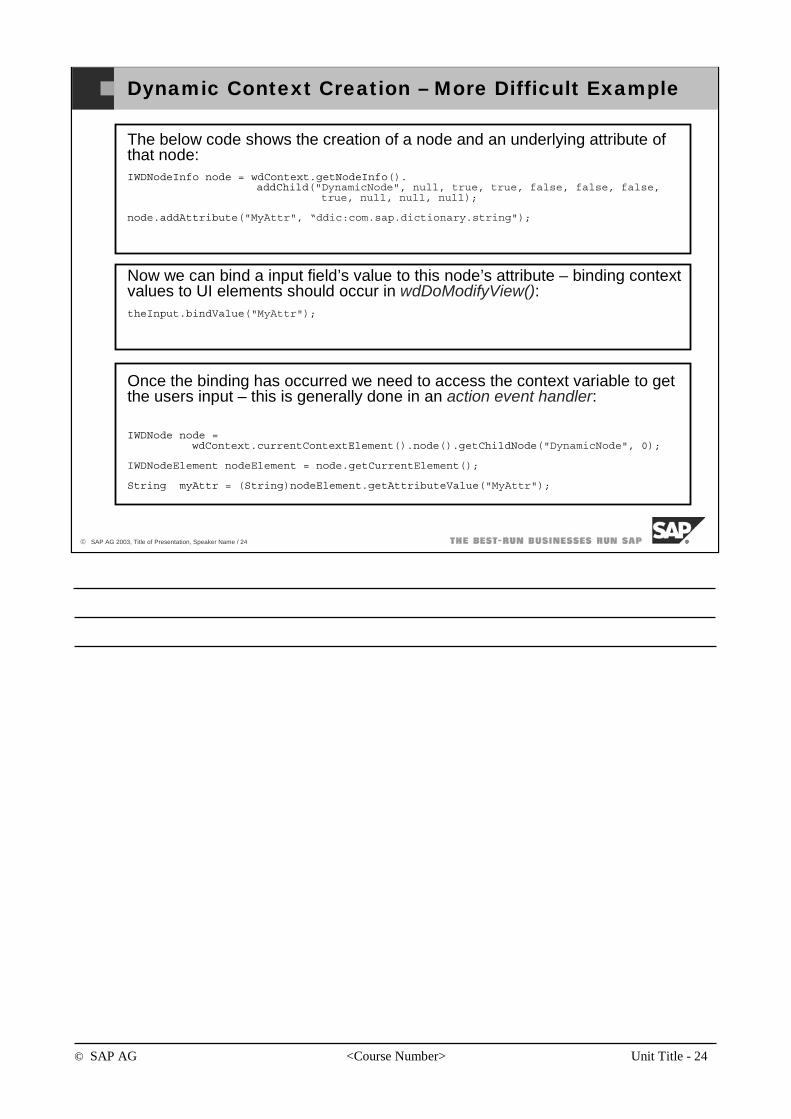
© SAP AG <Course Number> Unit Title - 24
© SAP AG 2003, Title of Presentation, Speaker Name / 24
Dynamic Context Creation – More Difficult Example
The below code shows the creation of a node and an underlying attribute of that node:IWDNodeInfo node = wdContext.getNodeInfo().
addChild("DynamicNode", null, true, true, false, false, false,true, null, null, null);
node.addAttribute("MyAttr", “ddic:com.sap.dictionary.string");
Now we can bind a input field’s value to this node’s attribute – binding context values to UI elements should occur in wdDoModifyView():theInput.bindValue("MyAttr");
Once the binding has occurred we need to access the context variable to get the users input – this is generally done in an action event handler:
IWDNode node = wdContext.currentContextElement().node().getChildNode("DynamicNode", 0);
IWDNodeElement nodeElement = node.getCurrentElement();
String myAttr = (String)nodeElement.getAttributeValue("MyAttr");
© SAP AG <Course Number> Unit Title - 25
© SAP AG 2003, Title of Presentation, Speaker Name / 25
You should now be able to:
Understand the framework provided for dynamic context creation.
Use the APIs provided to dynamically create context elements.
Know how to bind context elements to UI elements values dynamically.
Dynamic Contexts: Topic Objectives

© SAP AG <Course Number> Unit Title - 26
© SAP AG 2003, Title of Presentation, Speaker Name / 26
After completing this topic, you will be able to:
Create dynamic actions.
Understand what parameter mapping is and how to use it.
Dynamic Actions: Topic Objectives
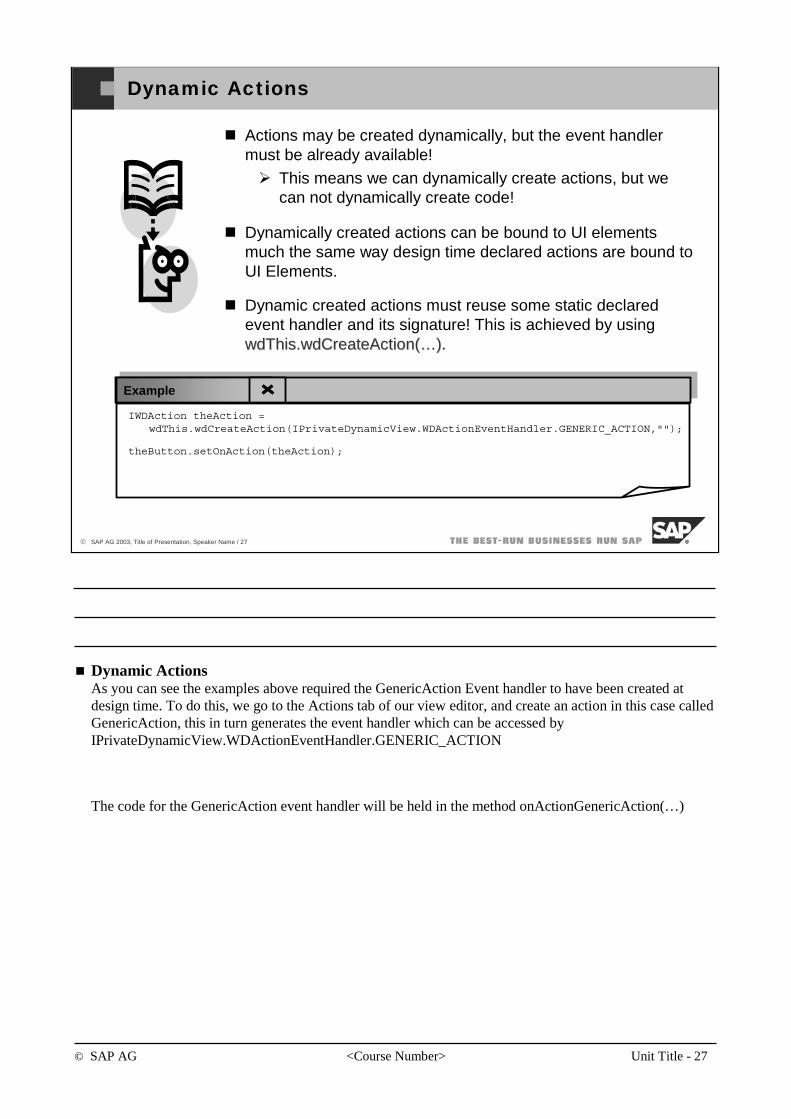
© SAP AG <Course Number> Unit Title - 27
© SAP AG 2003, Title of Presentation, Speaker Name / 27
Dynamic Actions
IWDAction theAction =wdThis.wdCreateAction(IPrivateDynamicView.WDActionEventHandler.GENERIC_ACTION,"");
theButton.setOnAction(theAction);
Actions may be created dynamically, but the event handler must be already available!
This means we can dynamically create actions, but we can not dynamically create code!
Dynamically created actions can be bound to UI elements much the same way design time declared actions are bound to UI Elements.
Dynamic created actions must reuse some static declared event handler and its signature! This is achieved by using wdThis.wdCreateActionwdThis.wdCreateAction(…)(…).
Example
Dynamic ActionsAs you can see the examples above required the GenericAction Event handler to have been created at design time. To do this, we go to the Actions tab of our view editor, and create an action in this case called GenericAction, this in turn generates the event handler which can be accessed by IPrivateDynamicView.WDActionEventHandler.GENERIC_ACTION
The code for the GenericAction event handler will be held in the method onActionGenericAction(…)
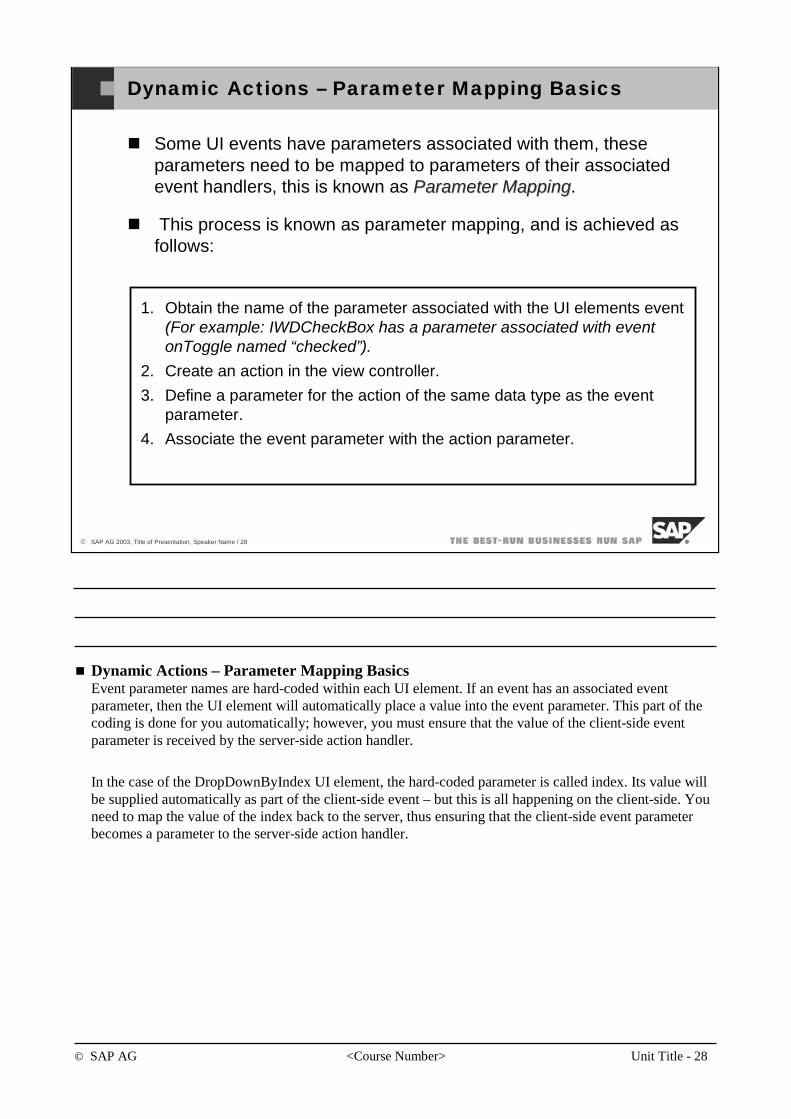
© SAP AG <Course Number> Unit Title - 28
© SAP AG 2003, Title of Presentation, Speaker Name / 28
Dynamic Actions – Parameter Mapping Basics
Some UI events have parameters associated with them, these parameters need to be mapped to parameters of their associated event handlers, this is known as Parameter MappingParameter Mapping.
This process is known as parameter mapping, and is achieved as follows:
1. Obtain the name of the parameter associated with the UI elements event (For example: IWDCheckBox has a parameter associated with event onToggle named “checked”).
2. Create an action in the view controller.
3. Define a parameter for the action of the same data type as the event parameter.
4. Associate the event parameter with the action parameter.
Dynamic Actions – Parameter Mapping Basics Event parameter names are hard-coded within each UI element. If an event has an associated event parameter, then the UI element will automatically place a value into the event parameter. This part of the coding is done for you automatically; however, you must ensure that the value of the client-side event parameter is received by the server-side action handler.
In the case of the DropDownByIndex UI element, the hard-coded parameter is called index. Its value will be supplied automatically as part of the client-side event – but this is all happening on the client-side. You need to map the value of the index back to the server, thus ensuring that the client-side event parameter becomes a parameter to the server-side action handler.
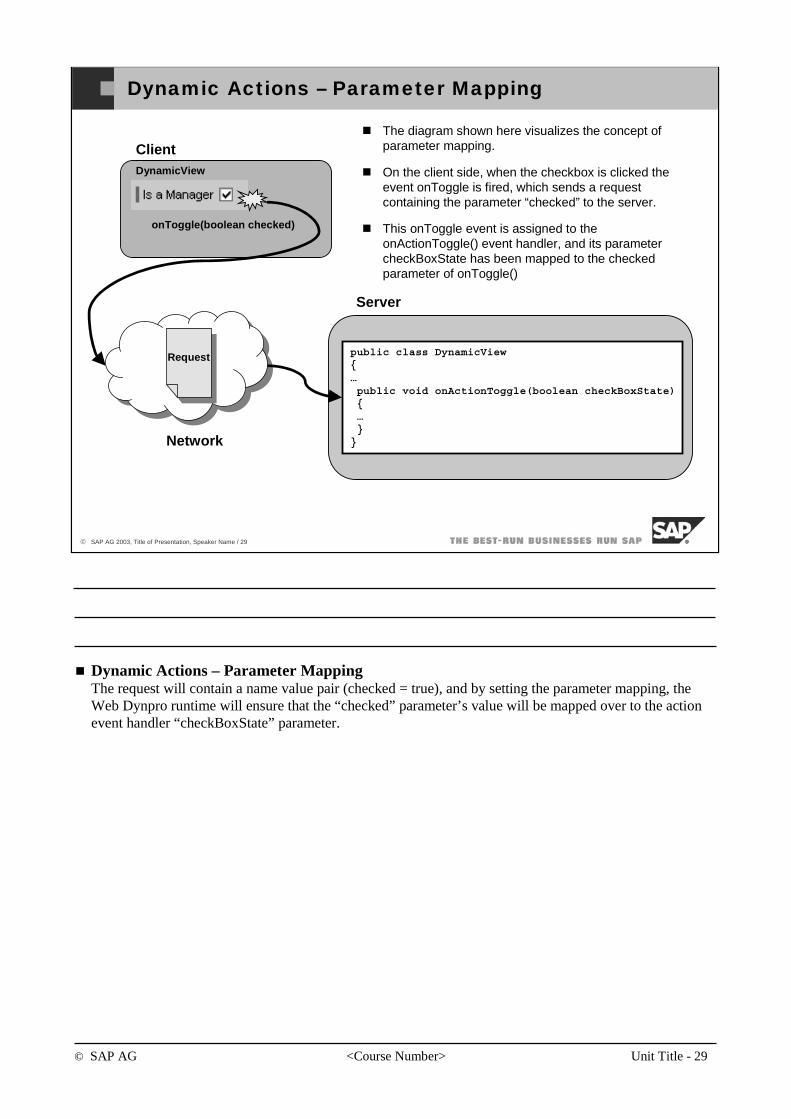
© SAP AG <Course Number> Unit Title - 29
© SAP AG 2003, Title of Presentation, Speaker Name / 29
Dynamic Actions – Parameter Mapping
Client
onToggle(boolean checked)
Server
public class DynamicView{…public void onActionToggle(boolean checkBoxState){…}
}
Request
Network
The diagram shown here visualizes the concept of parameter mapping.
On the client side, when the checkbox is clicked the event onToggle is fired, which sends a request containing the parameter “checked” to the server.
This onToggle event is assigned to the onActionToggle() event handler, and its parameter checkBoxState has been mapped to the checked parameter of onToggle()
DynamicView
Dynamic Actions – Parameter Mapping The request will contain a name value pair (checked = true), and by setting the parameter mapping, the Web Dynpro runtime will ensure that the “checked” parameter’s value will be mapped over to the action event handler “checkBoxState” parameter.
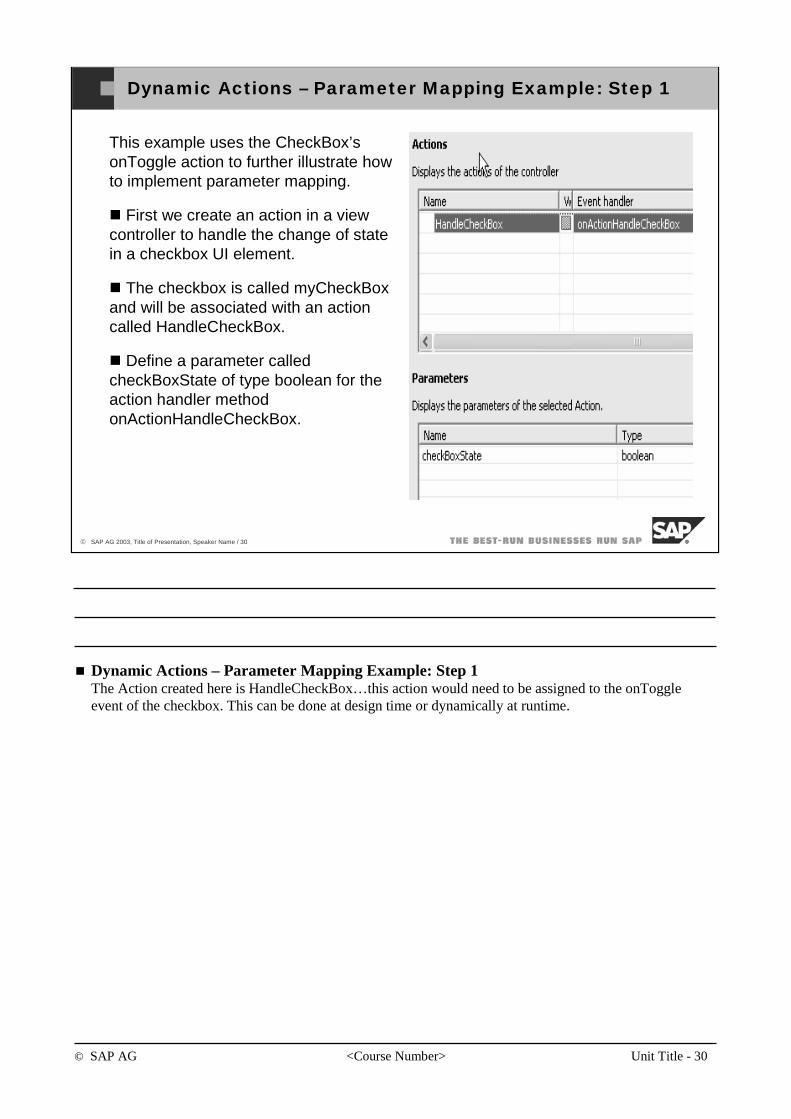
© SAP AG <Course Number> Unit Title - 30
© SAP AG 2003, Title of Presentation, Speaker Name / 30
Dynamic Actions – Parameter Mapping Example: Step 1
This example uses the CheckBox’sonToggle action to further illustrate how to implement parameter mapping.
First we create an action in a view controller to handle the change of state in a checkbox UI element.
The checkbox is called myCheckBoxand will be associated with an action called HandleCheckBox.
Define a parameter called checkBoxState of type boolean for the action handler method onActionHandleCheckBox.
Dynamic Actions – Parameter Mapping Example: Step 1 The Action created here is HandleCheckBox…this action would need to be assigned to the onToggleevent of the checkbox. This can be done at design time or dynamically at runtime.
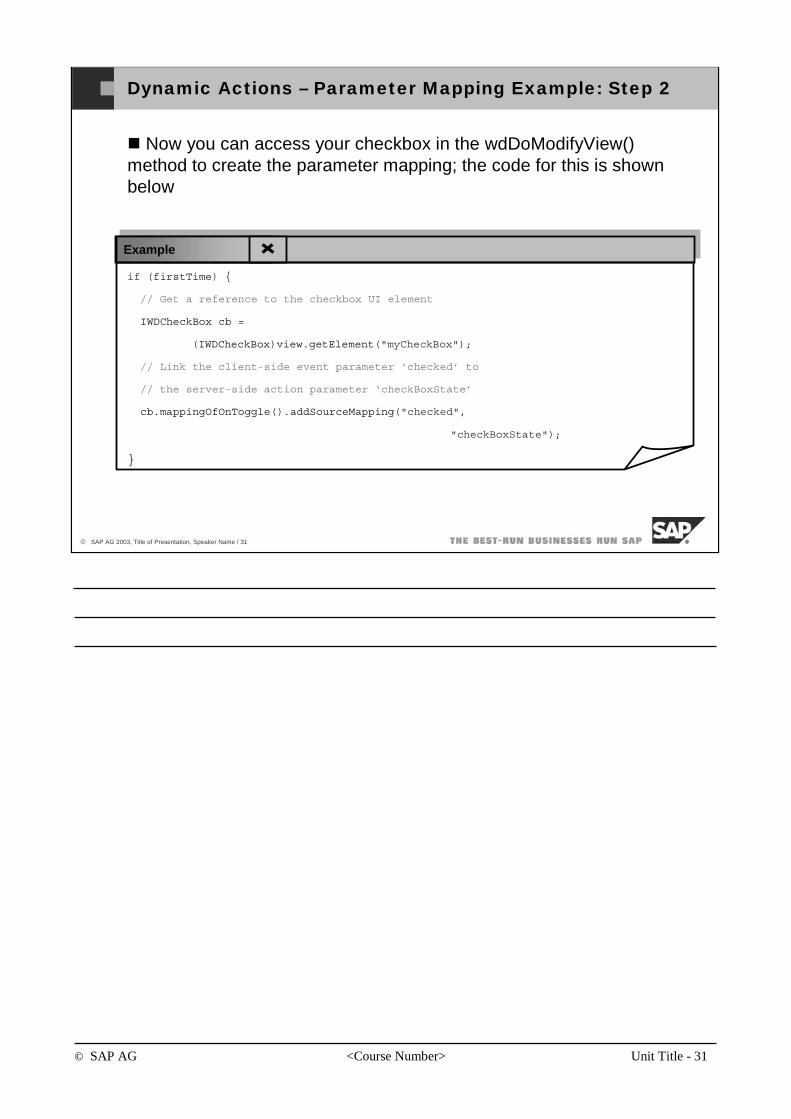
© SAP AG <Course Number> Unit Title - 31
© SAP AG 2003, Title of Presentation, Speaker Name / 31
Dynamic Actions – Parameter Mapping Example: Step 2
Now you can access your checkbox in the wdDoModifyView() method to create the parameter mapping; the code for this is shown below
if (firstTime) {
// Get a reference to the checkbox UI element
IWDCheckBox cb =
(IWDCheckBox)view.getElement("myCheckBox");
// Link the client-side event parameter ‘checked’ to
// the server-side action parameter ‘checkBoxState’
cb.mappingOfOnToggle().addSourceMapping("checked",
"checkBoxState");
}
Example
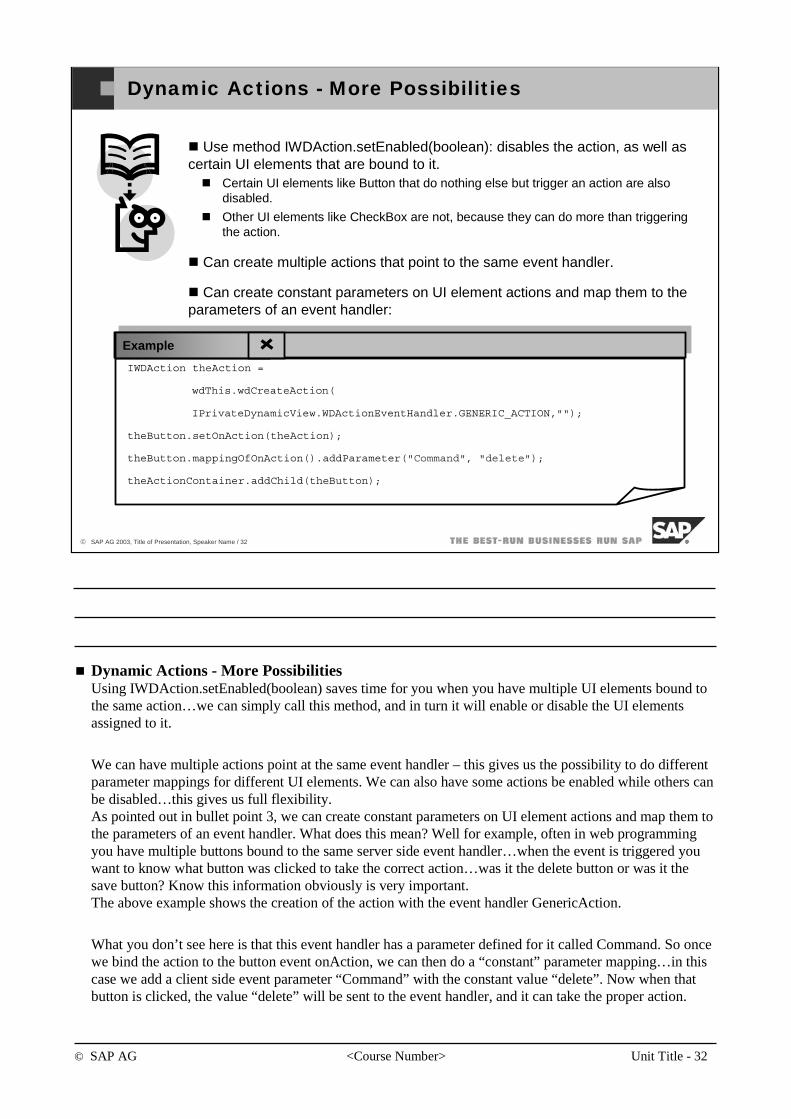
© SAP AG <Course Number> Unit Title - 32
© SAP AG 2003, Title of Presentation, Speaker Name / 32
Dynamic Actions - More Possibilities
IWDAction theAction =
wdThis.wdCreateAction(
IPrivateDynamicView.WDActionEventHandler.GENERIC_ACTION,"");
theButton.setOnAction(theAction);
theButton.mappingOfOnAction().addParameter("Command", "delete");
theActionContainer.addChild(theButton);
Use method IWDAction.setEnabled(boolean): disables the action, as well as certain UI elements that are bound to it.
Certain UI elements like Button that do nothing else but trigger an action are also disabled.
Other UI elements like CheckBox are not, because they can do more than triggering the action.
Can create multiple actions that point to the same event handler.
Can create constant parameters on UI element actions and map them to the parameters of an event handler:
Example
Dynamic Actions - More Possibilities Using IWDAction.setEnabled(boolean) saves time for you when you have multiple UI elements bound tothe same action…we can simply call this method, and in turn it will enable or disable the UI elements assigned to it.
We can have multiple actions point at the same event handler – this gives us the possibility to do different parameter mappings for different UI elements. We can also have some actions be enabled while others can be disabled…this gives us full flexibility.As pointed out in bullet point 3, we can create constant parameters on UI element actions and map them to the parameters of an event handler. What does this mean? Well for example, often in web programming you have multiple buttons bound to the same server side event handler…when the event is triggered you want to know what button was clicked to take the correct action…was it the delete button or was it the save button? Know this information obviously is very important.The above example shows the creation of the action with the event handler GenericAction.
What you don’t see here is that this event handler has a parameter defined for it called Command. So once we bind the action to the button event onAction, we can then do a “constant” parameter mapping…in this case we add a client side event parameter “Command” with the constant value “delete”. Now when that button is clicked, the value “delete” will be sent to the event handler, and it can take the proper action.
© SAP AG <Course Number> Unit Title - 33
© SAP AG 2003, Title of Presentation, Speaker Name / 33
You should now be able to:
Create dynamic actions.
Understand what parameter mapping is and how to use it.
Dynamic Actions: Topic Summary

© SAP AG <Course Number> Unit Title - 34
© SAP AG 2003, Title of Presentation, Speaker Name / 34
You should now be able to:
Understand what is dynamic programming.
Dynamically modify and create UI elements.
Dynamically create context elements.
Dynamically bind UI element values to context elements.
Dynamically create actions.
Understand and create parameter mappings.
Web Dynpro Dynamic Programming: Unit Summary

Dynamic Programming Exercises
Unit: Dynamic Programming
Topic: Dynamic User Interfaces
At the conclusion of this exercise, you will be able to:
• Understand the framework provided for dynamic UI manipulation.
• Use the APIs provided to dynamically create and modify UI elements.
Exercise 1 – Dynamically Add a Label UI Element to a View
1 Overview
In this exercise you will dynamically create a simple Label UI element and add it to a view. Note: The following exercises build on this one!
2 Prerequisites
2-1 The SAP NetWeaver Developer Studio is installed on your computer.
2-2 You have access to the SAP J2EE Engine (Release 6.40).
3 Exercise Guide
3-1 Open the project template in the exercise directory called WD01_Basics_DynamicProgramming.
3-2 Open the view called DynamicsView.
3-2-1 You will see that there is already a button defined for the view, as well as an invisible element, and the action “RunDynamics” has been defined and assigned to the buttons onAction event.
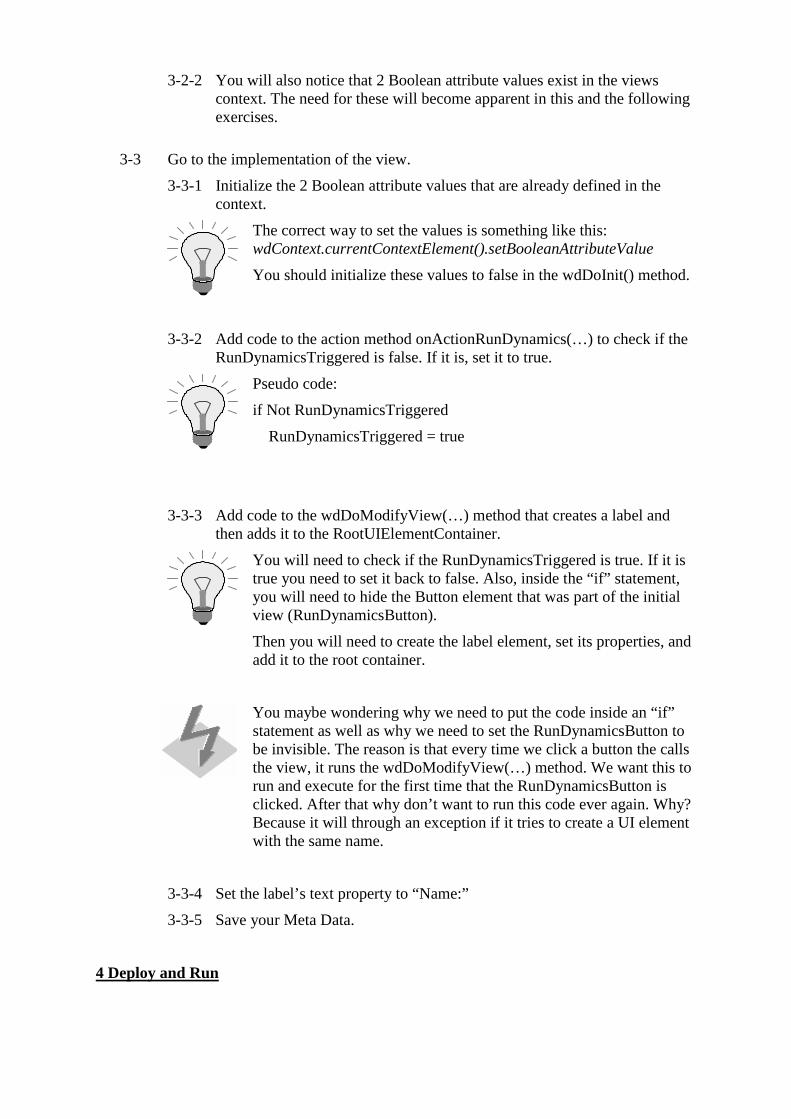
3-2-2 You will also notice that 2 Boolean attribute values exist in the views context. The need for these will become apparent in this and the following exercises.
3-3 Go to the implementation of the view.
3-3-1 Initialize the 2 Boolean attribute values that are already defined in the context.
The correct way to set the values is something like this: wdContext.currentContextElement().setBooleanAttributeValue
You should initialize these values to false in the wdDoInit() method.
3-3-2 Add code to the action method onActionRunDynamics(…) to check if the RunDynamicsTriggered is false. If it is, set it to true.
Pseudo code:
if Not RunDynamicsTriggered
RunDynamicsTriggered = true
3-3-3 Add code to the wdDoModifyView(…) method that creates a label and then adds it to the RootUIElementContainer.
You will need to check if the RunDynamicsTriggered is true. If it is true you need to set it back to false. Also, inside the “if” statement, you will need to hide the Button element that was part of the initial view (RunDynamicsButton).
Then you will need to create the label element, set its properties, and add it to the root container.
You maybe wondering why we need to put the code inside an “if” statement as well as why we need to set the RunDynamicsButton to be invisible. The reason is that every time we click a button the calls the view, it runs the wdDoModifyView(…) method. We want this to run and execute for the first time that the RunDynamicsButton is clicked. After that why don’t want to run this code ever again. Why? Because it will through an exception if it tries to create a UI element with the same name.
3-3-4 Set the label’s text property to “Name:”
3-3-5 Save your Meta Data.
4 Deploy and Run
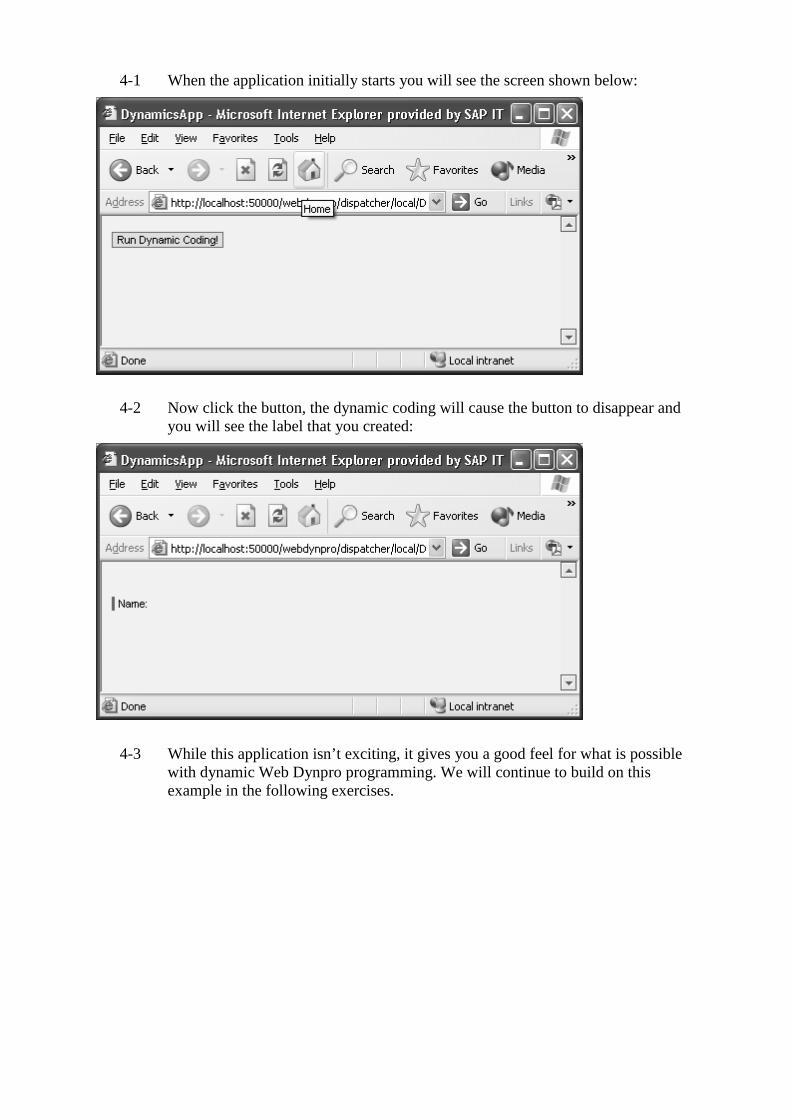
4-1 When the application initially starts you will see the screen shown below:
4-2 Now click the button, the dynamic coding will cause the button to disappear and you will see the label that you created:
4-3 While this application isn’t exciting, it gives you a good feel for what is possible with dynamic Web Dynpro programming. We will continue to build on this example in the following exercises.
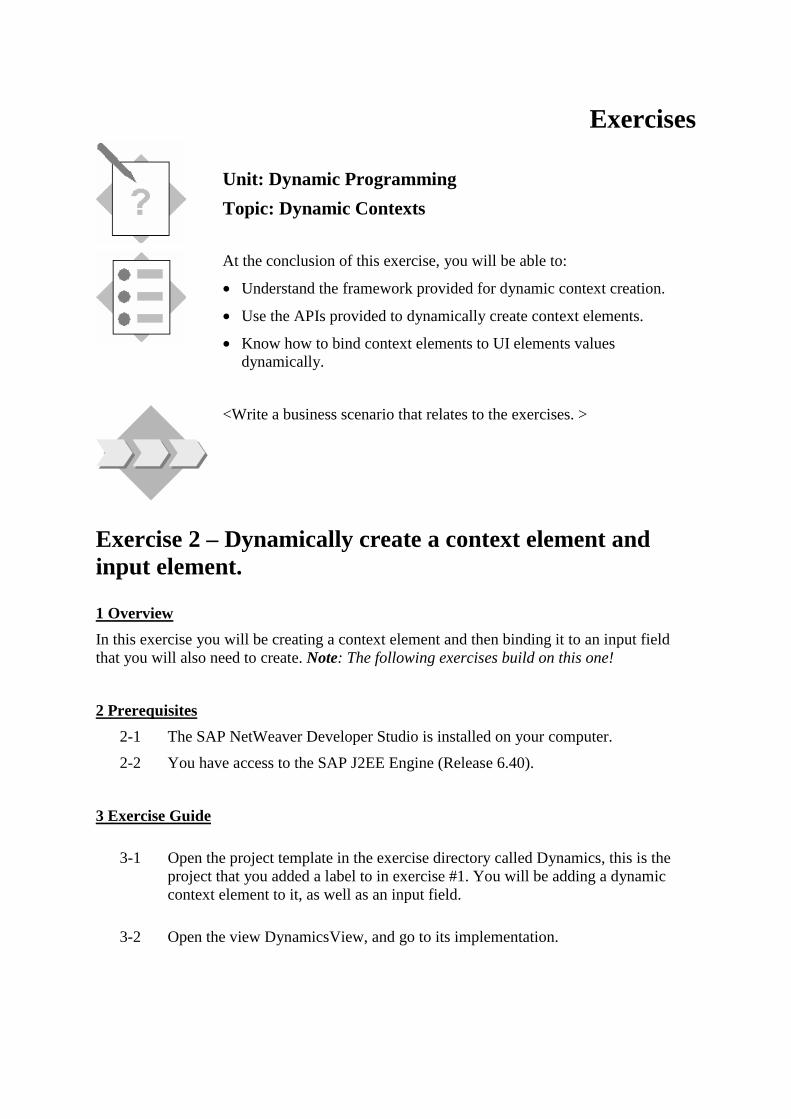
Exercises
Unit: Dynamic Programming
Topic: Dynamic Contexts
At the conclusion of this exercise, you will be able to:
• Understand the framework provided for dynamic context creation.
• Use the APIs provided to dynamically create context elements.
• Know how to bind context elements to UI elements values dynamically.
<Write a business scenario that relates to the exercises. >
Exercise 2 – Dynamically create a context element and input element.
1 Overview
In this exercise you will be creating a context element and then binding it to an input field that you will also need to create. Note: The following exercises build on this one!
2 Prerequisites
2-1 The SAP NetWeaver Developer Studio is installed on your computer.
2-2 You have access to the SAP J2EE Engine (Release 6.40).
3 Exercise Guide
3-1 Open the project template in the exercise directory called Dynamics, this is the project that you added a label to in exercise #1. You will be adding a dynamic context element to it, as well as an input field.
3-2 Open the view DynamicsView, and go to its implementation.
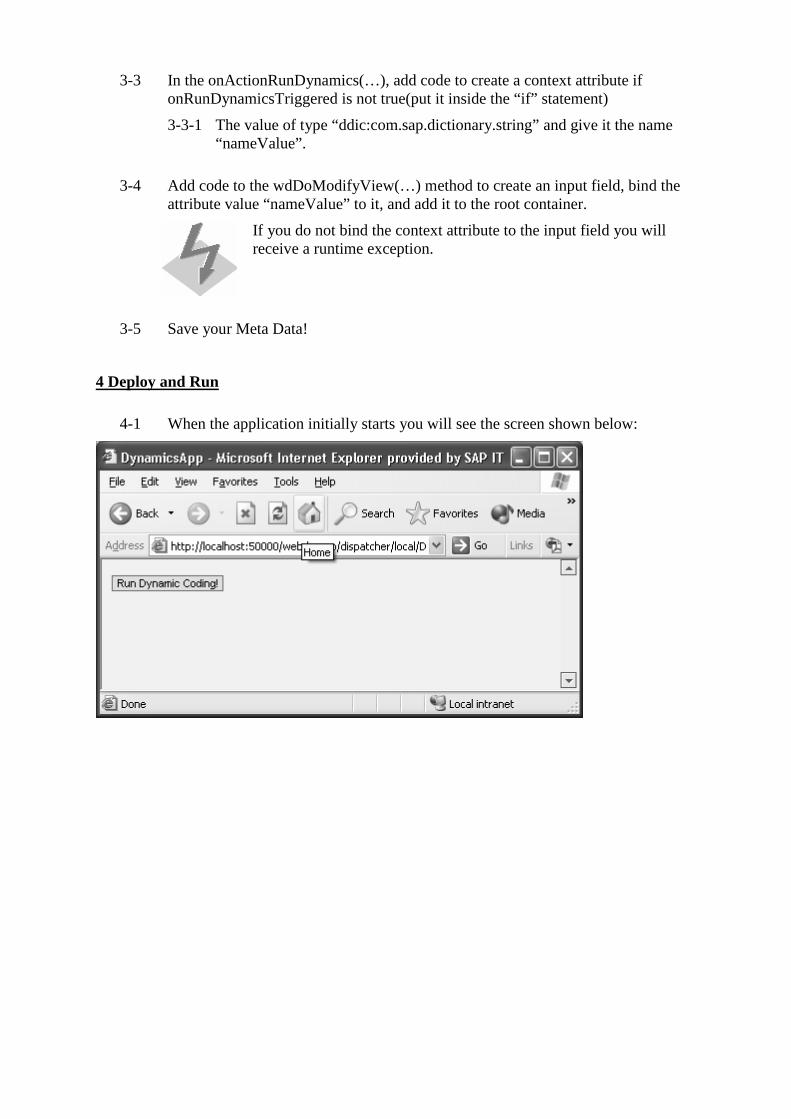
3-3 In the onActionRunDynamics(…), add code to create a context attribute if onRunDynamicsTriggered is not true(put it inside the “if” statement)
3-3-1 The value of type “ddic:com.sap.dictionary.string” and give it the name “nameValue”.
3-4 Add code to the wdDoModifyView(…) method to create an input field, bind the attribute value “nameValue” to it, and add it to the root container.
If you do not bind the context attribute to the input field you will receive a runtime exception.
3-5 Save your Meta Data!
4 Deploy and Run
4-1 When the application initially starts you will see the screen shown below:
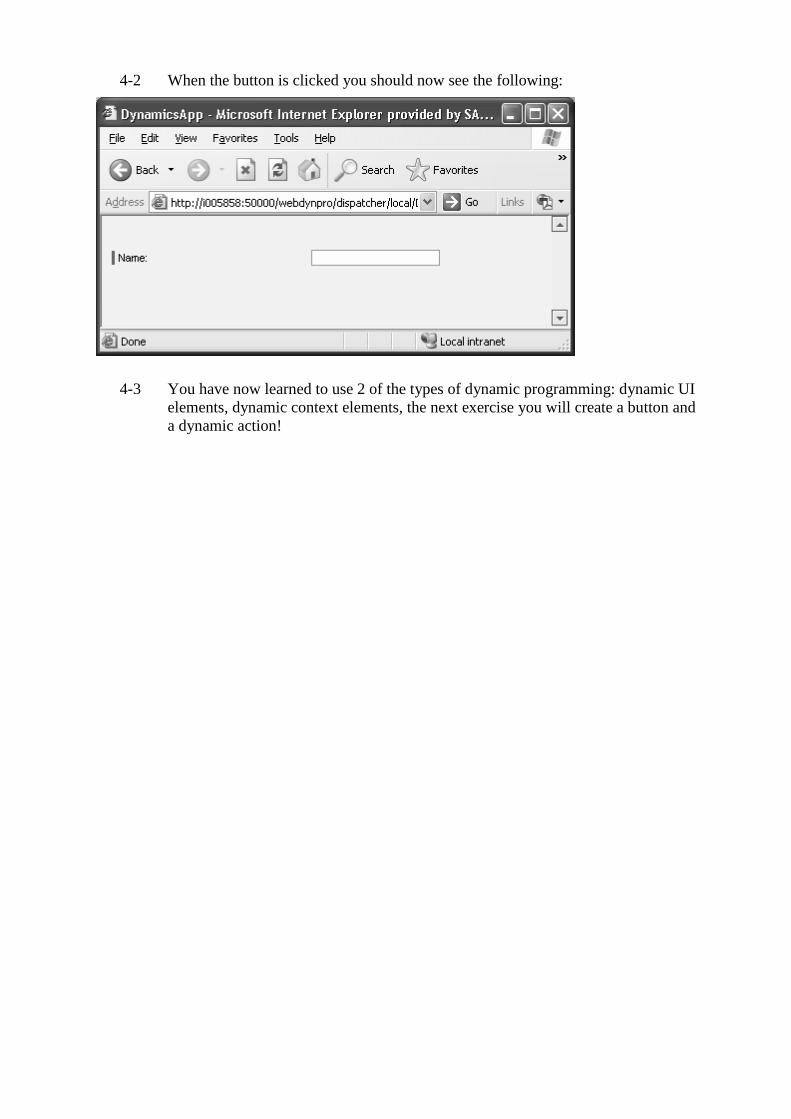
4-2 When the button is clicked you should now see the following:
4-3 You have now learned to use 2 of the types of dynamic programming: dynamic UI elements, dynamic context elements, the next exercise you will create a button and a dynamic action!
Exercises
Unit: Dynamic Programming
Topic: Dynamic Actions
At the conclusion of this exercise, you will be able to:
• Create dynamic actions.
<Write a business scenario that relates to the exercises. >
Exercise 3 – Dynamically create an Action and Button.
1 Overview
In this exercise you will be creating an action and a button, once created you will set the onAction button event to be the action that you created. Then you will create a text view that will contain respond to what you entered in the input field. Note: The following exercises build on this one!
2 Prerequisites
2-1 The SAP NetWeaver Developer Studio is installed on your computer.
2-2 You have access to the SAP J2EE Engine (Release 6.40).
3 Exercise Guide
3-1 Open the project template in the exercise directory called Dynamics, this is the project that you added an input field and context attribute to in exercise #2.
3-2 Open the view DynamicsView, and go to its “Actions” tab.
3-3 Create a new Action called “SaySomething”.
3-4 In the wdDoModifyView(…) method create a button called “helloButton”, it should be created at the same time the label and input field UI elements are created. Set the “text” property to be “Say Hello!”. Add it to the root container.
Create the button in the same “if” statement that you created the other UI elements in.
3-5 Create a new action, and bind it to the SaySomething action method that you created earlier. Then set the onAction event property to be this new action.
See page 27 of the presentation.
Use when creating the action: IPrivateDynamicsView.WDActionEventHandler.SAY_SOMTHING
3-6 In the onActionSaySomething(…), create the context attribute called “somethingText” of type “ddic:com.sap.dictionary.string”.
3-7 Set the “somthingText” attribute value to be:
“Hello ” + nameValue + “I hope you are doing well today!”
You will need to use the setAttributeValue(…) to set the somethingText (use wdContext.currentContextElement()).
You will also need to use getAttributeValue(“nameValue”) to get the value of the nameValue context element. (use wdContext.currentContextElement()).
3-8 Now for the conceptually tough part. We only want to add the “somethingText” attribute the first time the “onActionSaySomething” method is called! We can do this by checking to see if the “somethingText” attribute doesn’t exist yet. If it doesn’t then we should create it. Next time the method is called the check will see that that attribute already exists and thus won’t create it again (if it did, there would be a runtime exception!).
Wrap the code that creates the attribute in a check to see if it exists.
Use: wdContext.getNodeInfo().getAttribute(), and check if it returns null, if it does then you should create the attribute!
3-9 In the same if statement, we need to set the context variable “SaySomethingTriggered” to true.
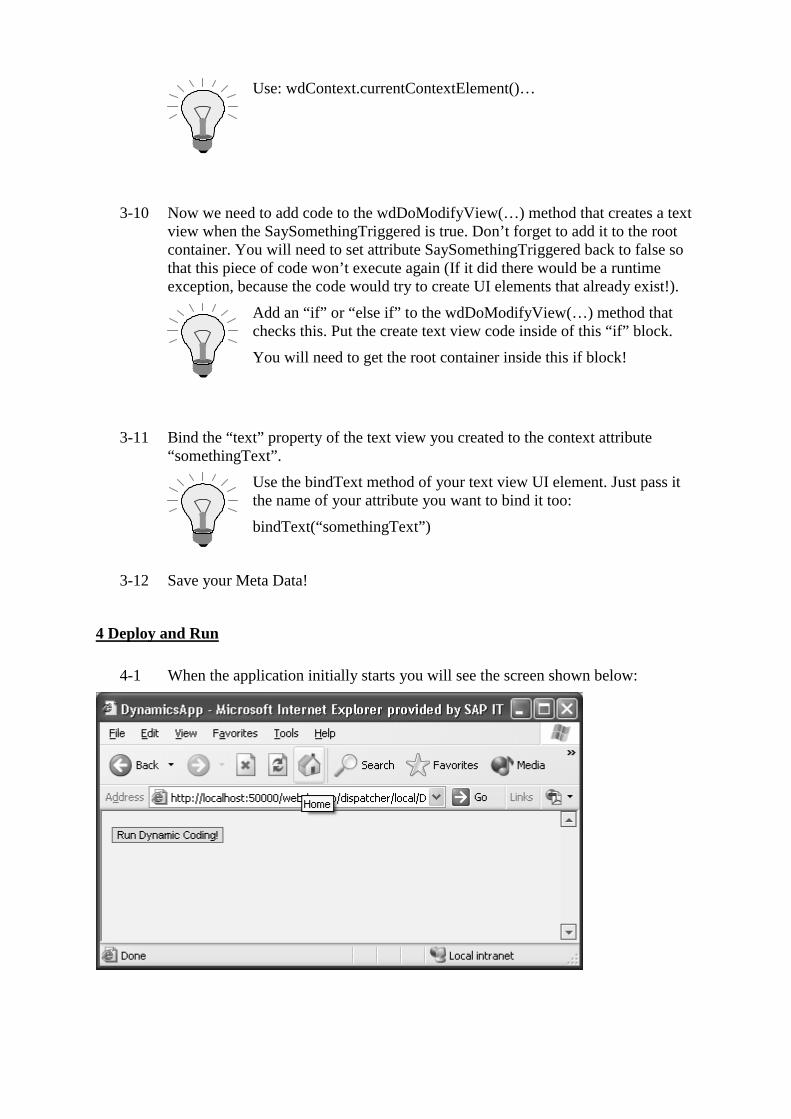
Use: wdContext.currentContextElement()…
3-10 Now we need to add code to the wdDoModifyView(…) method that creates a text view when the SaySomethingTriggered is true. Don’t forget to add it to the root container. You will need to set attribute SaySomethingTriggered back to false so that this piece of code won’t execute again (If it did there would be a runtime exception, because the code would try to create UI elements that already exist!).
Add an “if” or “else if” to the wdDoModifyView(…) method that checks this. Put the create text view code inside of this “if” block.
You will need to get the root container inside this if block!
3-11 Bind the “text” property of the text view you created to the context attribute “somethingText”.
Use the bindText method of your text view UI element. Just pass it the name of your attribute you want to bind it too:
bindText(“somethingText”)
3-12 Save your Meta Data!
4 Deploy and Run
4-1 When the application initially starts you will see the screen shown below:
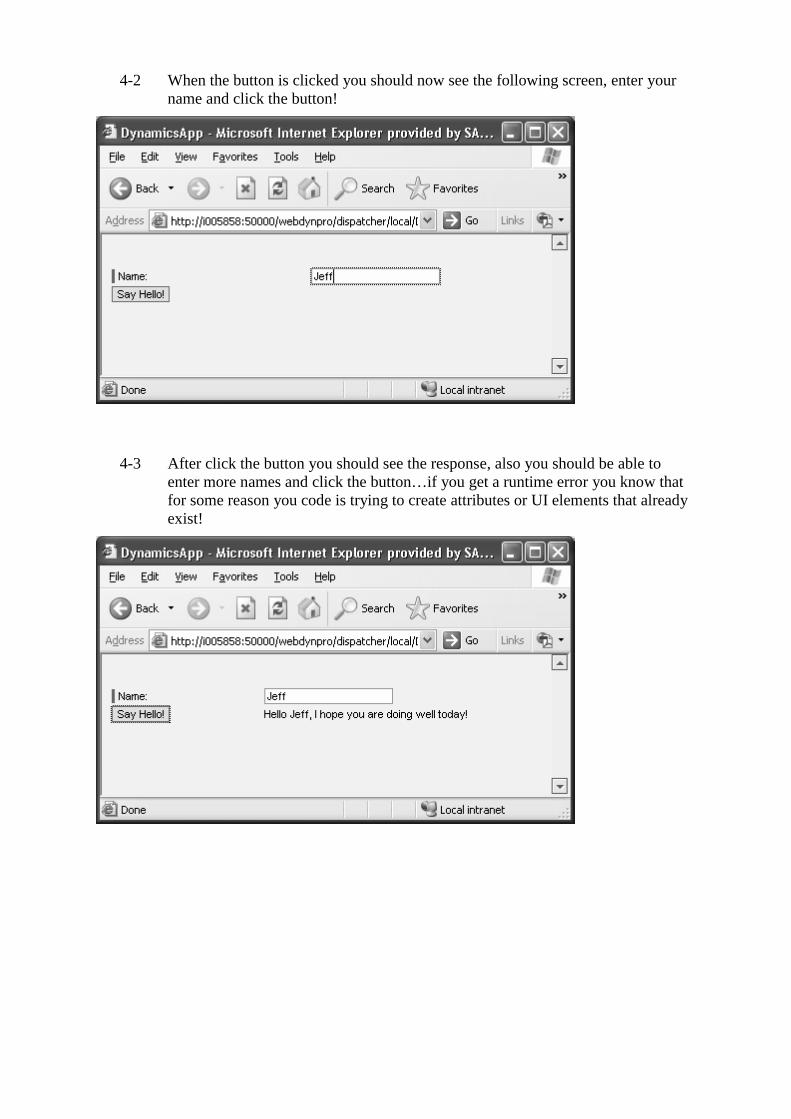
4-2 When the button is clicked you should now see the following screen, enter your name and click the button!
4-3 After click the button you should see the response, also you should be able to enter more names and click the button…if you get a runtime error you know that for some reason you code is trying to create attributes or UI elements that already exist!
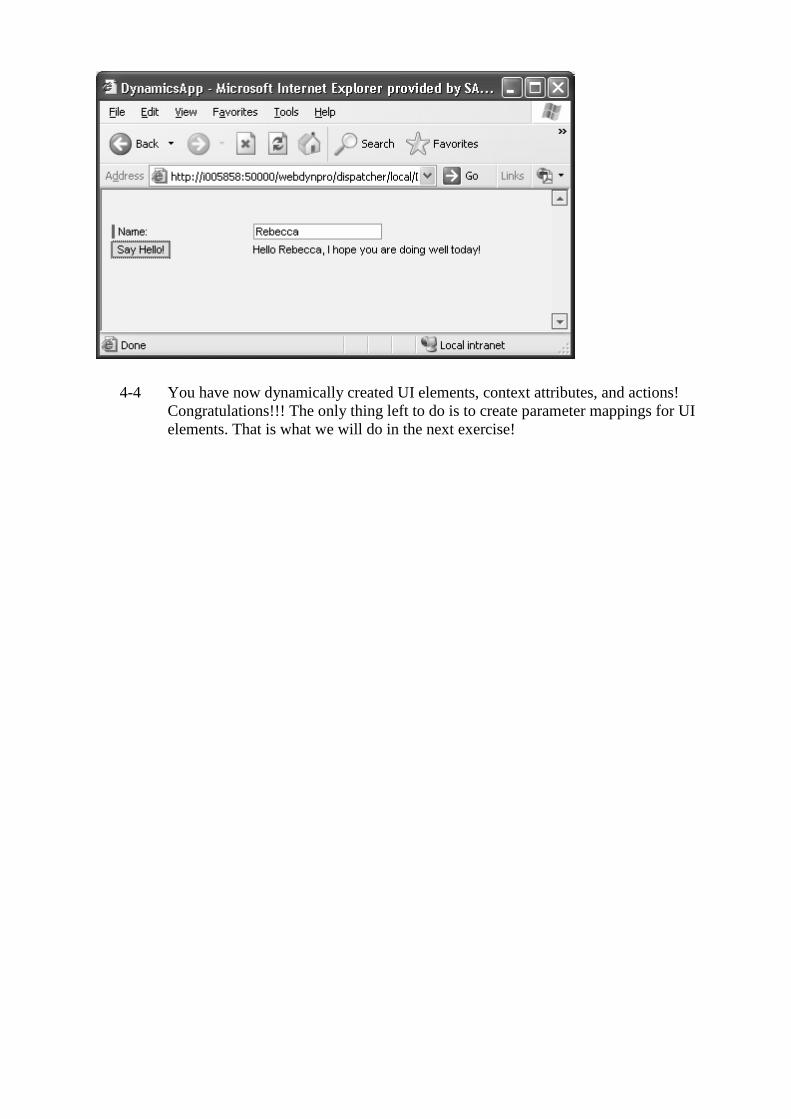
4-4 You have now dynamically created UI elements, context attributes, and actions! Congratulations!!! The only thing left to do is to create parameter mappings for UI elements. That is what we will do in the next exercise!
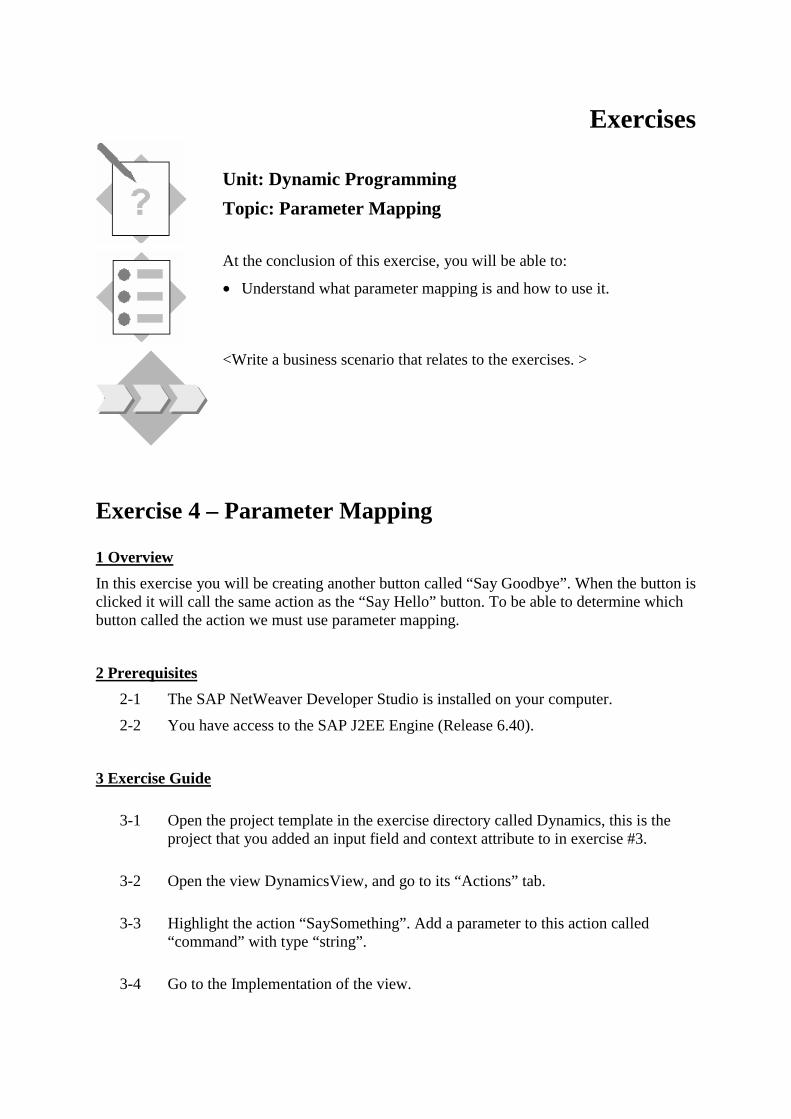
Exercises
Unit: Dynamic Programming
Topic: Parameter Mapping
At the conclusion of this exercise, you will be able to:
• Understand what parameter mapping is and how to use it.
<Write a business scenario that relates to the exercises. >
Exercise 4 – Parameter Mapping
1 Overview
In this exercise you will be creating another button called “Say Goodbye”. When the button is clicked it will call the same action as the “Say Hello” button. To be able to determine which button called the action we must use parameter mapping.
2 Prerequisites
2-1 The SAP NetWeaver Developer Studio is installed on your computer.
2-2 You have access to the SAP J2EE Engine (Release 6.40).
3 Exercise Guide
3-1 Open the project template in the exercise directory called Dynamics, this is the project that you added an input field and context attribute to in exercise #3.
3-2 Open the view DynamicsView, and go to its “Actions” tab.
3-3 Highlight the action “SaySomething”. Add a parameter to this action called “command” with type “string”.
3-4 Go to the Implementation of the view.
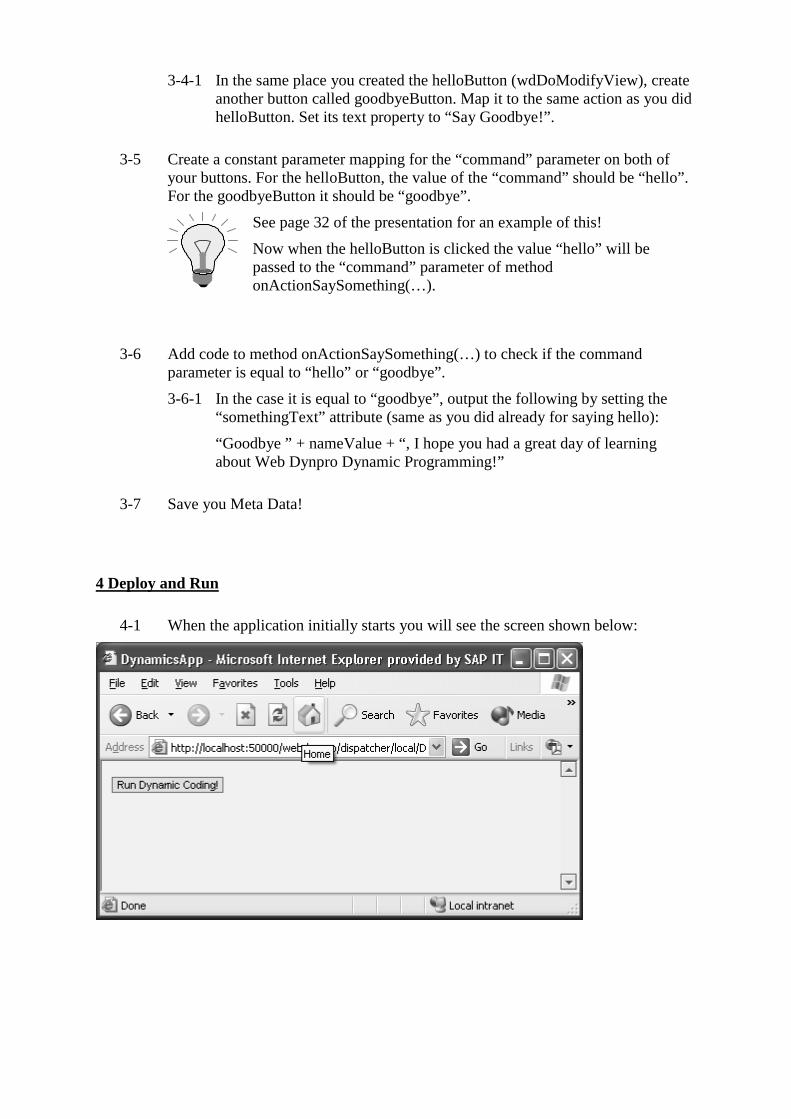
3-4-1 In the same place you created the helloButton (wdDoModifyView), create another button called goodbyeButton. Map it to the same action as you did helloButton. Set its text property to “Say Goodbye!”.
3-5 Create a constant parameter mapping for the “command” parameter on both of your buttons. For the helloButton, the value of the “command” should be “hello”. For the goodbyeButton it should be “goodbye”.
See page 32 of the presentation for an example of this!
Now when the helloButton is clicked the value “hello” will be passed to the “command” parameter of method onActionSaySomething(…).
3-6 Add code to method onActionSaySomething(…) to check if the command parameter is equal to “hello” or “goodbye”.
3-6-1 In the case it is equal to “goodbye”, output the following by setting the “somethingText” attribute (same as you did already for saying hello):
“Goodbye ” + nameValue + “, I hope you had a great day of learning about Web Dynpro Dynamic Programming!”
3-7 Save you Meta Data!
4 Deploy and Run
4-1 When the application initially starts you will see the screen shown below:
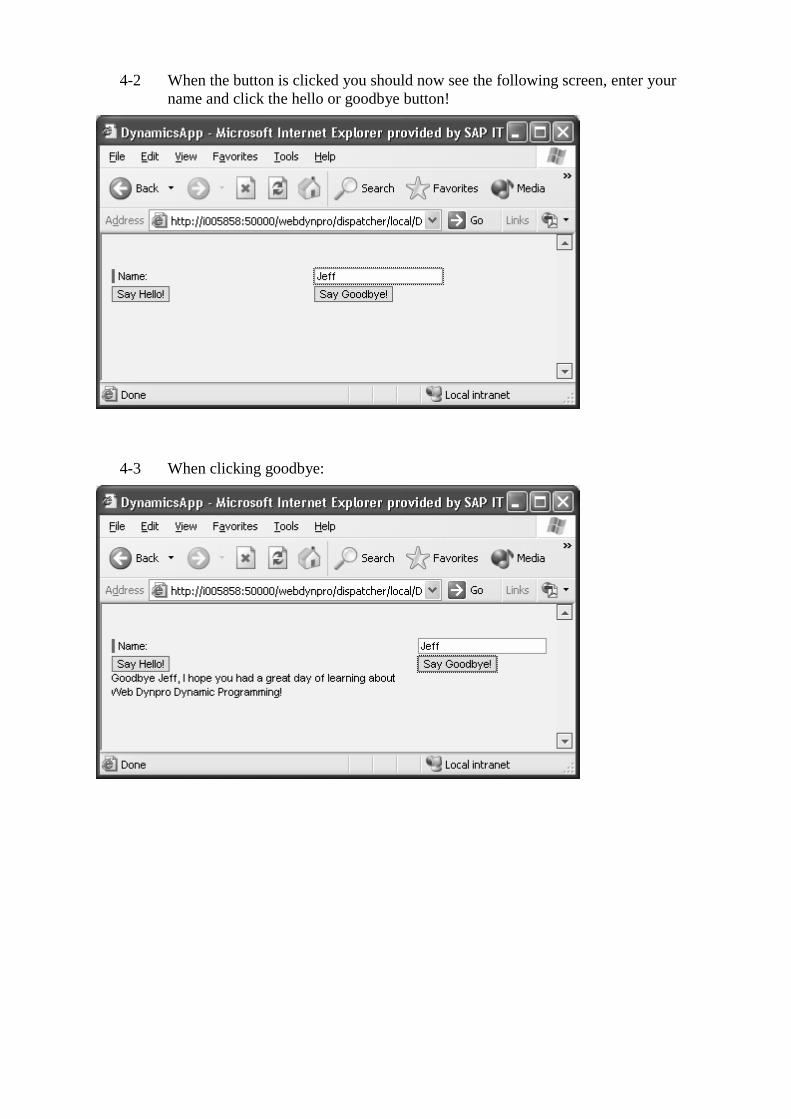
4-2 When the button is clicked you should now see the following screen, enter your name and click the hello or goodbye button!
4-3 When clicking goodbye:
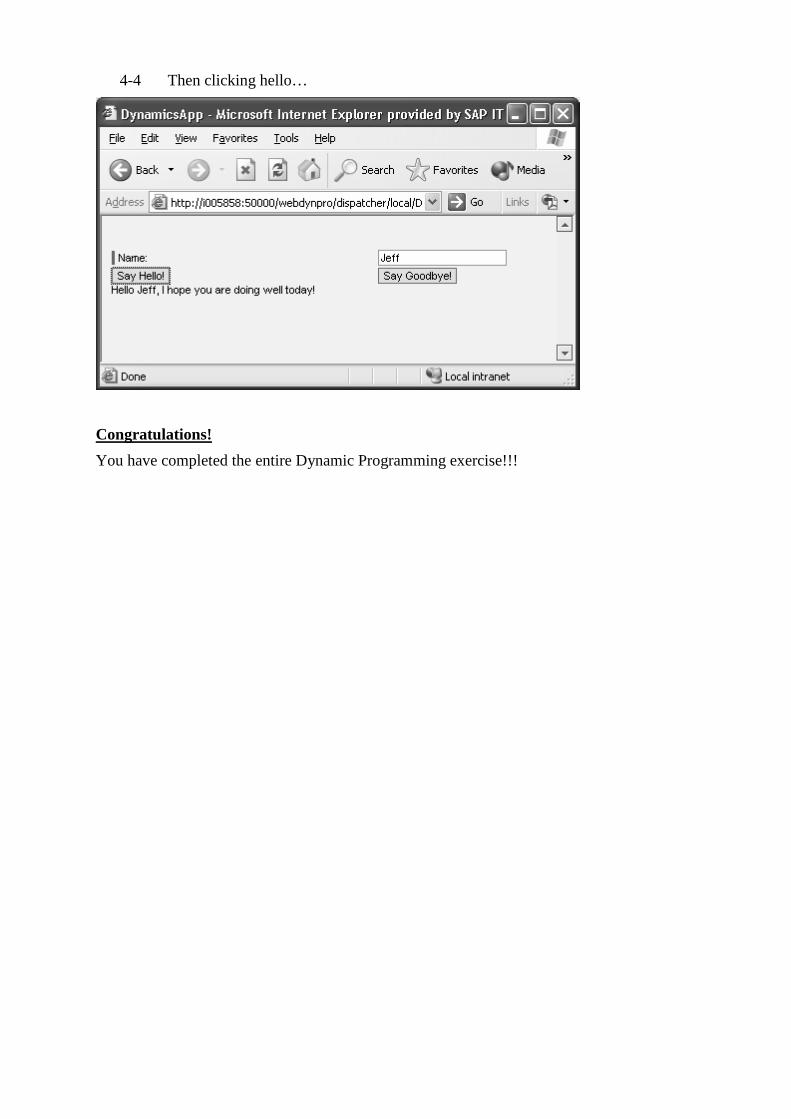
4-4 Then clicking hello…
Congratulations!
You have completed the entire Dynamic Programming exercise!!!
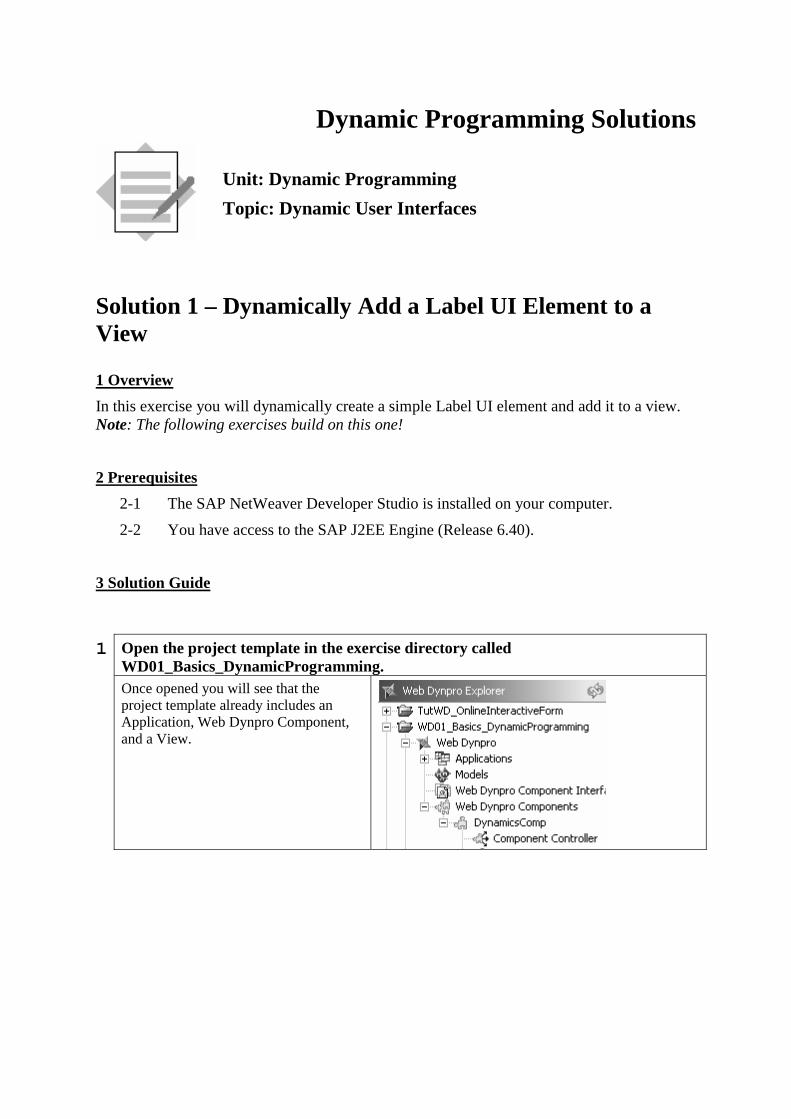
Dynamic Programming Solutions
Unit: Dynamic Programming
Topic: Dynamic User Interfaces
Solution 1 – Dynamically Add a Label UI Element to a View
1 Overview
In this exercise you will dynamically create a simple Label UI element and add it to a view. Note: The following exercises build on this one!
2 Prerequisites
2-1 The SAP NetWeaver Developer Studio is installed on your computer.
2-2 You have access to the SAP J2EE Engine (Release 6.40).
3 Solution Guide
1 Open the project template in the exercise directory called WD01_Basics_DynamicProgramming.
Once opened you will see that the project template already includes an Application, Web Dynpro Component, and a View.
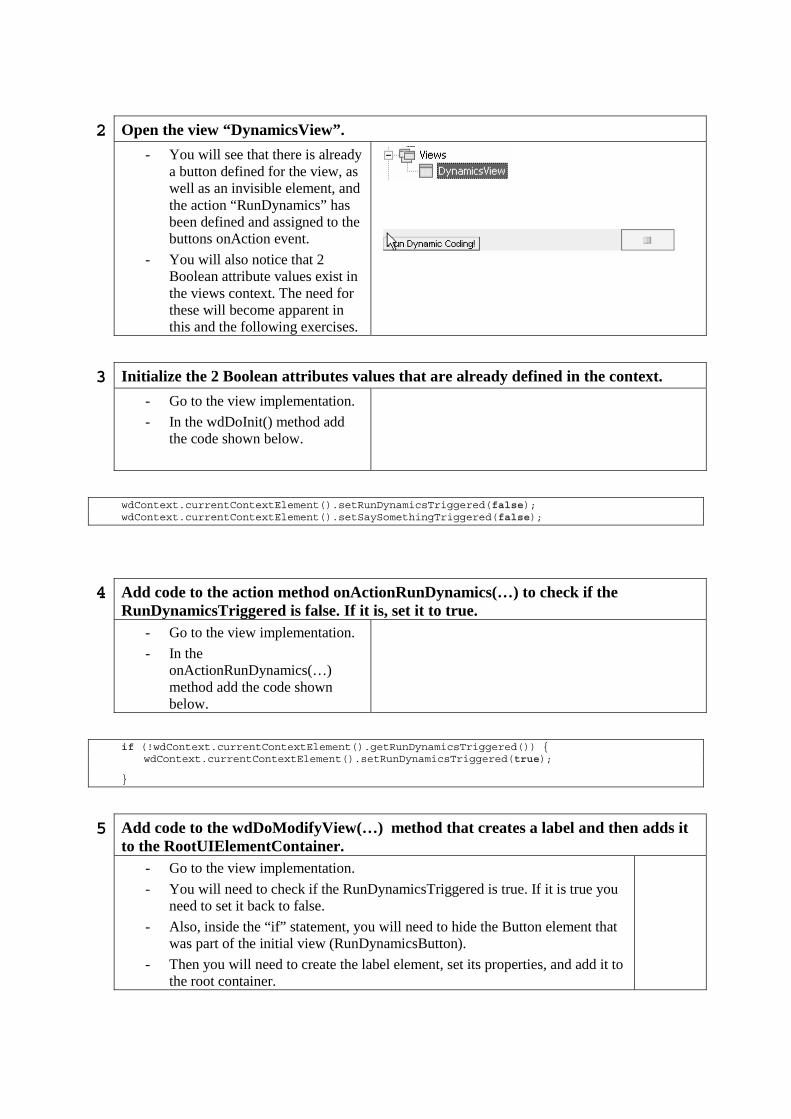
2 Open the view “DynamicsView”.
- You will see that there is already a button defined for the view, as well as an invisible element, and the action “RunDynamics” has been defined and assigned to the buttons onAction event.
- You will also notice that 2 Boolean attribute values exist in the views context. The need for these will become apparent in this and the following exercises.
3 Initialize the 2 Boolean attributes values that are already defined in the context.
- Go to the view implementation.
- In the wdDoInit() method add the code shown below.
wdContext.currentContextElement().setRunDynamicsTriggered(false); wdContext.currentContextElement().setSaySomethingTriggered(false);
4 Add code to the action method onActionRunDynamics(…) to check if the RunDynamicsTriggered is false. If it is, set it to true.
- Go to the view implementation.
- In the onActionRunDynamics(…) method add the code shown below.
if (!wdContext.currentContextElement().getRunDynamicsTriggered()) { wdContext.currentContextElement().setRunDynamicsTriggered(true);
}
5 Add code to the wdDoModifyView(…) method that creates a label and then adds it to the RootUIElementContainer.
- Go to the view implementation.
- You will need to check if the RunDynamicsTriggered is true. If it is true you need to set it back to false.
- Also, inside the “if” statement, you will need to hide the Button element that was part of the initial view (RunDynamicsButton).
- Then you will need to create the label element, set its properties, and add it to the root container.
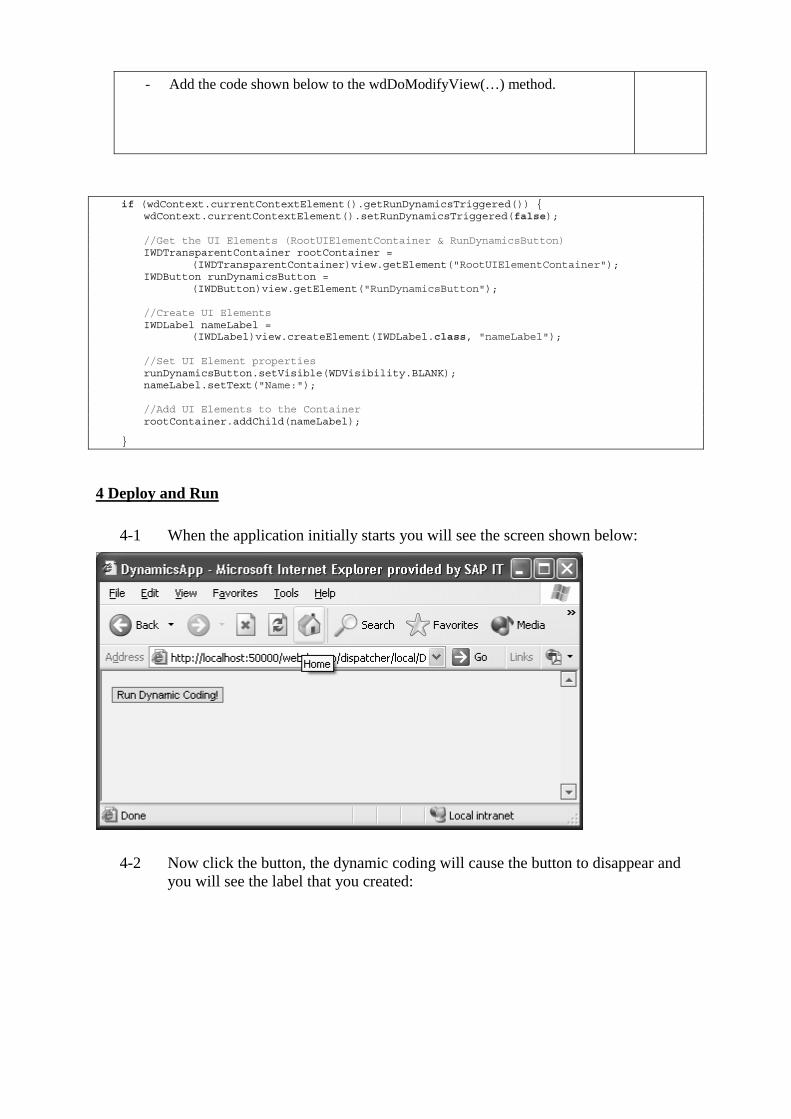
- Add the code shown below to the wdDoModifyView(…) method.
if (wdContext.currentContextElement().getRunDynamicsTriggered()) { wdContext.currentContextElement().setRunDynamicsTriggered(false); //Get the UI Elements (RootUIElementContainer & RunDynamicsButton) IWDTransparentContainer rootContainer = (IWDTransparentContainer)view.getElement("RootUIElementContainer"); IWDButton runDynamicsButton = (IWDButton)view.getElement("RunDynamicsButton"); //Create UI Elements IWDLabel nameLabel = (IWDLabel)view.createElement(IWDLabel.class, "nameLabel"); //Set UI Element properties runDynamicsButton.setVisible(WDVisibility.BLANK); nameLabel.setText("Name:"); //Add UI Elements to the Container rootContainer.addChild(nameLabel);
}
4 Deploy and Run
4-1 When the application initially starts you will see the screen shown below:
4-2 Now click the button, the dynamic coding will cause the button to disappear and you will see the label that you created:
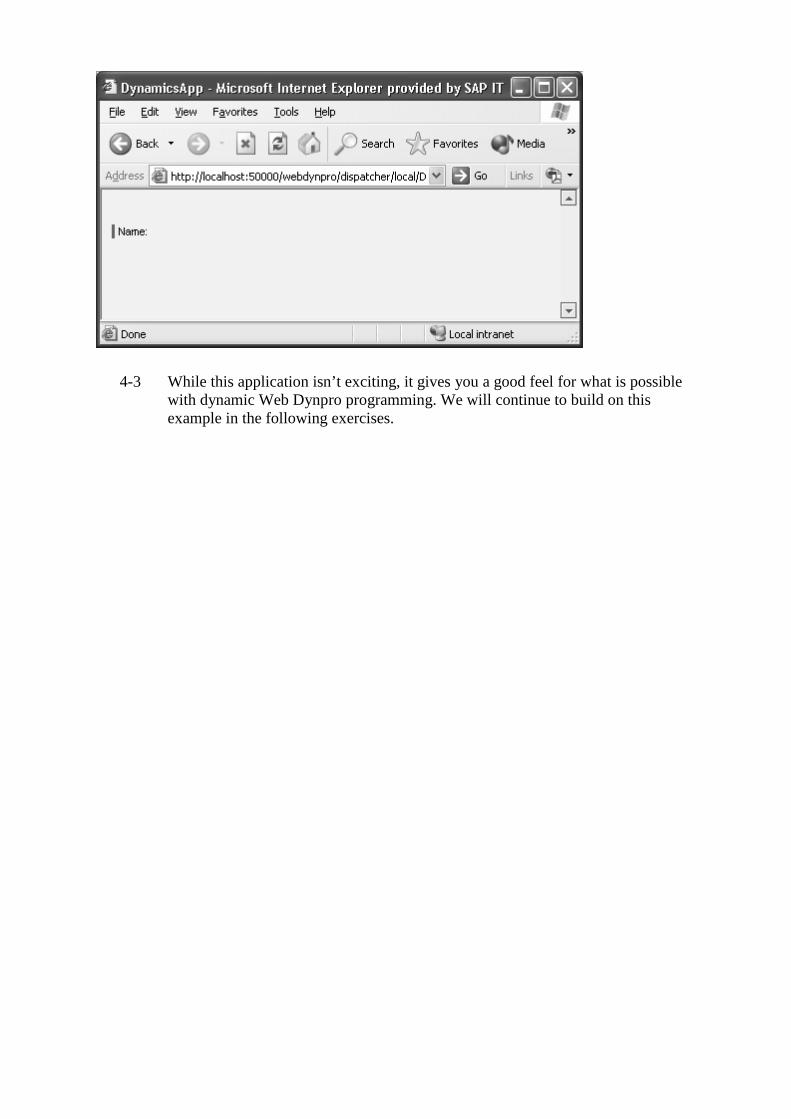
4-3 While this application isn’t exciting, it gives you a good feel for what is possible with dynamic Web Dynpro programming. We will continue to build on this example in the following exercises.
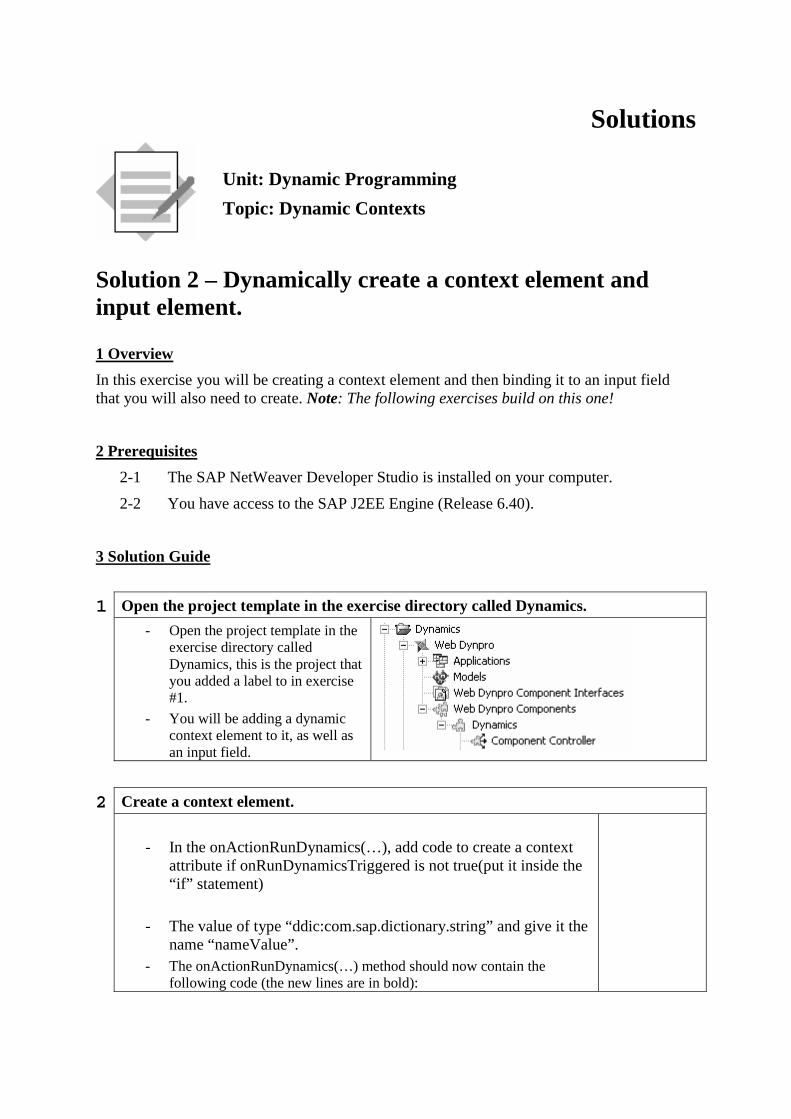
Solutions
Unit: Dynamic Programming
Topic: Dynamic Contexts
Solution 2 – Dynamically create a context element and input element.
1 Overview
In this exercise you will be creating a context element and then binding it to an input field that you will also need to create. Note: The following exercises build on this one!
2 Prerequisites
2-1 The SAP NetWeaver Developer Studio is installed on your computer.
2-2 You have access to the SAP J2EE Engine (Release 6.40).
3 Solution Guide
1 Open the project template in the exercise directory called Dynamics.
- Open the project template in the exercise directory called Dynamics, this is the project that you added a label to in exercise #1.
- You will be adding a dynamic context element to it, as well as an input field.
2 Create a context element.
- In the onActionRunDynamics(…), add code to create a context
attribute if onRunDynamicsTriggered is not true(put it inside the “if” statement)
- The value of type “ddic:com.sap.dictionary.string” and give it the name “nameValue”.
- The onActionRunDynamics(…) method should now contain the following code (the new lines are in bold):

if (!wdContext.currentContextElement().getRunDynamicsTriggered()) { wdContext.currentContextElement().setRunDynamicsTriggered(true); wdContext.getNodeInfo().addAttribute("nameValue", "ddic:com.sap.dictionary.string");
}
2 Create an input field and bind it to the context element.
- Add code to the wdDoModifyView(…) method to create an input field, bind the attribute value “nameValue” to it, and add it to the root container.
if (wdContext.currentContextElement().getRunDynamicsTriggered()) { wdContext.currentContextElement().setRunDynamicsTriggered(false); //Get the UI Elements (RootUIElementContainer & RunDynamicsButton) IWDTransparentContainer rootContainer = (IWDTransparentContainer)view.getElement("RootUIElementContainer"); IWDButton runDynamicsButton = (IWDButton)view.getElement("RunDynamicsButton"); //Create UI Elements IWDLabel nameLabel = (IWDLabel)view.createElement(IWDLabel.class, "nameLabel"); IWDInputField nameField = (IWDInputField)view.createElement(IWDInputField.class, "nameField"); //Set UI Element properties runDynamicsButton.setVisible(WDVisibility.BLANK); nameLabel.setText("Name:"); nameField.bindValue("nameValue"); //Add UI Elements to the Container rootContainer.addChild(nameLabel); rootContainer.addChild(nameField);
}
4 Deploy and Run
4-1 When the application initially starts you will see the screen shown below:

4-2 When the button is clicked you should now see the following:
4-3 You have now learned to use 2 of the types of dynamic programming: dynamic UI elements, dynamic context elements, the next exercise you will create a button and a dynamic action!

Solutions
Unit: Dynamic Programming
Topic: Dynamic Actions
Solution 3 – Dynamically create an Action and Button.
1 Overview
In this exercise you will be creating an action and a button, once created you will set the onAction button event to be the action that you created. Then you will create a text view that will contain respond to what you entered in the input field. Note: The following exercises build on this one!
2 Prerequisites
2-1 The SAP NetWeaver Developer Studio is installed on your computer.
2-2 You have access to the SAP J2EE Engine (Release 6.40).
3 Solution Guide
1 Open the project template in the exercise directory called Dynamics.
- Open the project template in the exercise directory called Dynamics, this is the project that you added an input field and context attribute to in exercise #2.
2 Create a new action.
- Open the view DynamicsView, and go to its “Actions” tab.
- Create a new Action called “SaySomething”.
- Click the new button, in the popup box set the name to “SaySomething”.
- Click finish. You should now see the actions as shown here to the right.
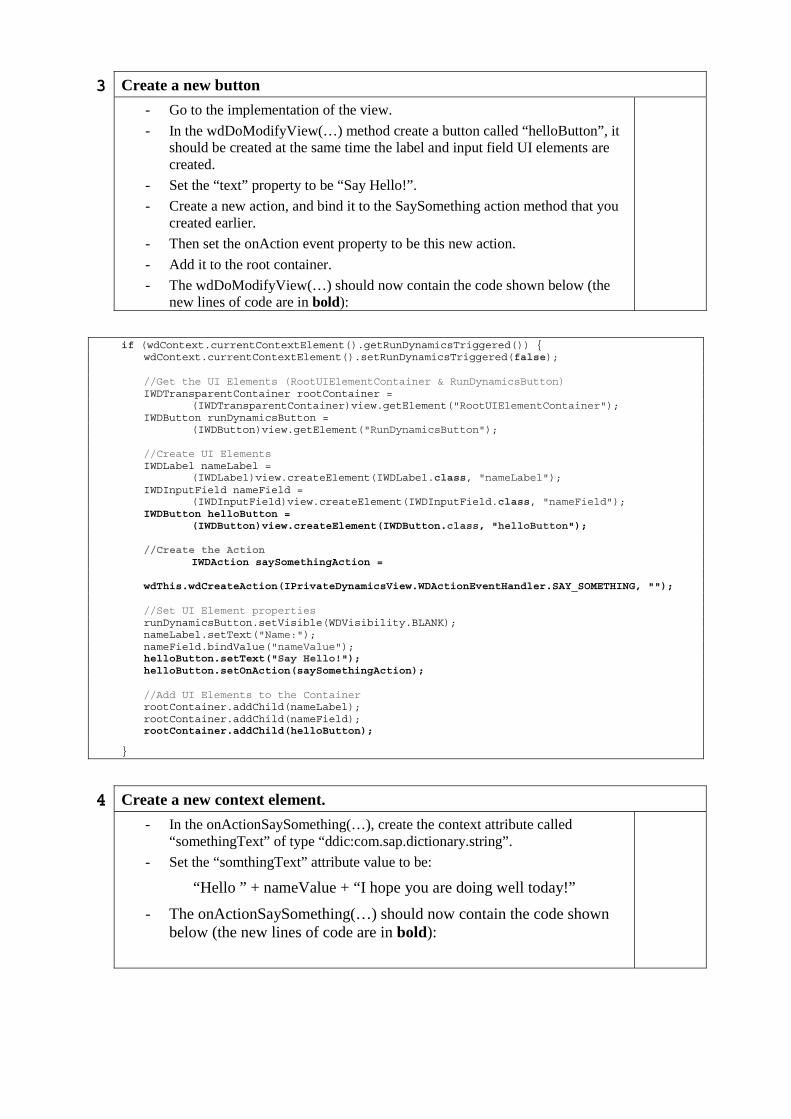
3 Create a new button
- Go to the implementation of the view.
- In the wdDoModifyView(…) method create a button called “helloButton”, it should be created at the same time the label and input field UI elements are created.
- Set the “text” property to be “Say Hello!”.
- Create a new action, and bind it to the SaySomething action method that you created earlier.
- Then set the onAction event property to be this new action.
- Add it to the root container.
- The wdDoModifyView(…) should now contain the code shown below (the new lines of code are in bold):
if (wdContext.currentContextElement().getRunDynamicsTriggered()) { wdContext.currentContextElement().setRunDynamicsTriggered(false); //Get the UI Elements (RootUIElementContainer & RunDynamicsButton) IWDTransparentContainer rootContainer = (IWDTransparentContainer)view.getElement("RootUIElementContainer"); IWDButton runDynamicsButton = (IWDButton)view.getElement("RunDynamicsButton"); //Create UI Elements IWDLabel nameLabel = (IWDLabel)view.createElement(IWDLabel.class, "nameLabel"); IWDInputField nameField = (IWDInputField)view.createElement(IWDInputField.class, "nameField"); IWDButton helloButton = (IWDButton)view.createElement(IWDButton.class, "helloButton"); //Create the Action IWDAction saySomethingAction = wdThis.wdCreateAction(IPrivateDynamicsView.WDActionEventHandler.SAY_SOMETHING, ""); //Set UI Element properties runDynamicsButton.setVisible(WDVisibility.BLANK); nameLabel.setText("Name:"); nameField.bindValue("nameValue"); helloButton.setText("Say Hello!"); helloButton.setOnAction(saySomethingAction); //Add UI Elements to the Container rootContainer.addChild(nameLabel); rootContainer.addChild(nameField); rootContainer.addChild(helloButton);
}
4 Create a new context element.
- In the onActionSaySomething(…), create the context attribute called “somethingText” of type “ddic:com.sap.dictionary.string”.
- Set the “somthingText” attribute value to be:
“Hello ” + nameValue + “I hope you are doing well today!”
- The onActionSaySomething(…) should now contain the code shown below (the new lines of code are in bold):
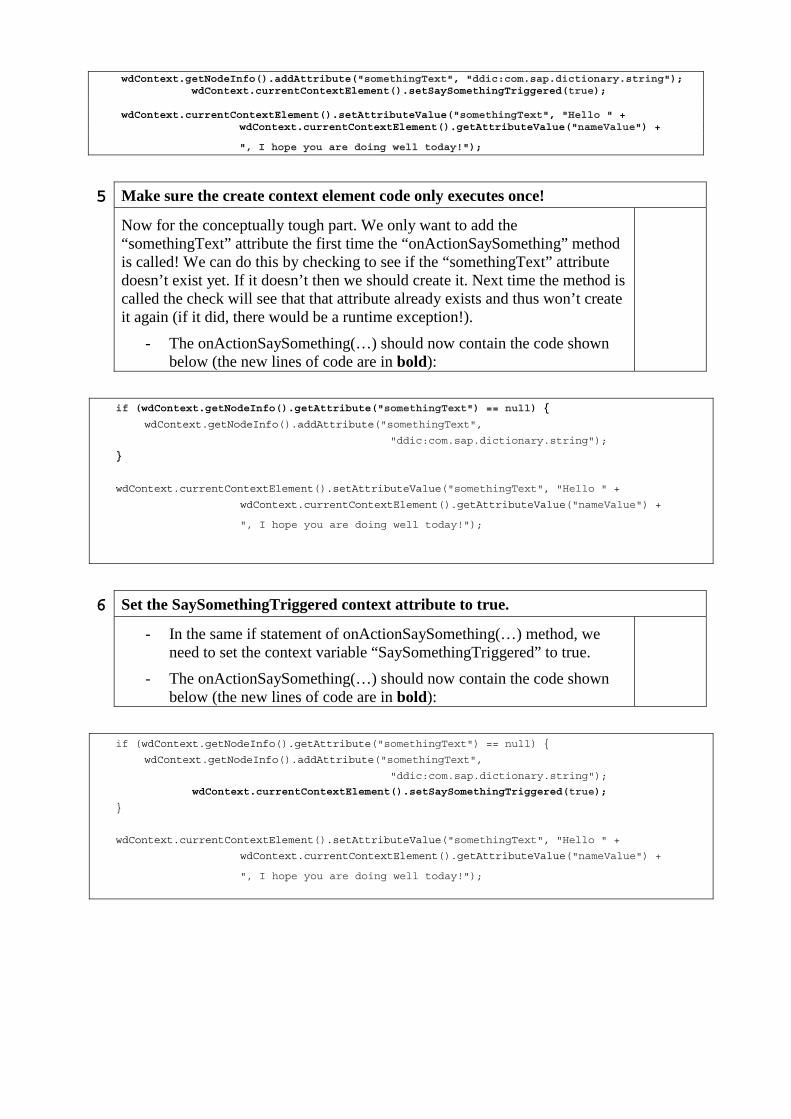
wdContext.getNodeInfo().addAttribute("somethingText", "ddic:com.sap.dictionary.string"); wdContext.currentContextElement().setSaySomethingTriggered(true); wdContext.currentContextElement().setAttributeValue("somethingText", "Hello " + wdContext.currentContextElement().getAttributeValue("nameValue") +
", I hope you are doing well today!");
5 Make sure the create context element code only executes once!
Now for the conceptually tough part. We only want to add the “somethingText” attribute the first time the “onActionSaySomething” method is called! We can do this by checking to see if the “somethingText” attribute doesn’t exist yet. If it doesn’t then we should create it. Next time the method is called the check will see that that attribute already exists and thus won’t create it again (if it did, there would be a runtime exception!).
- The onActionSaySomething(…) should now contain the code shown below (the new lines of code are in bold):
if (wdContext.getNodeInfo().getAttribute("somethingText") == null) {
wdContext.getNodeInfo().addAttribute("somethingText",
"ddic:com.sap.dictionary.string");
}
wdContext.currentContextElement().setAttributeValue("somethingText", "Hello " +
wdContext.currentContextElement().getAttributeValue("nameValue") +
", I hope you are doing well today!");
6 Set the SaySomethingTriggered context attribute to true.
- In the same if statement of onActionSaySomething(…) method, we need to set the context variable “SaySomethingTriggered” to true.
- The onActionSaySomething(…) should now contain the code shown below (the new lines of code are in bold):
if (wdContext.getNodeInfo().getAttribute("somethingText") == null) {
wdContext.getNodeInfo().addAttribute("somethingText",
"ddic:com.sap.dictionary.string");
wdContext.currentContextElement().setSaySomethingTriggered(true);
}
wdContext.currentContextElement().setAttributeValue("somethingText", "Hello " +
wdContext.currentContextElement().getAttributeValue("nameValue") +
", I hope you are doing well today!");
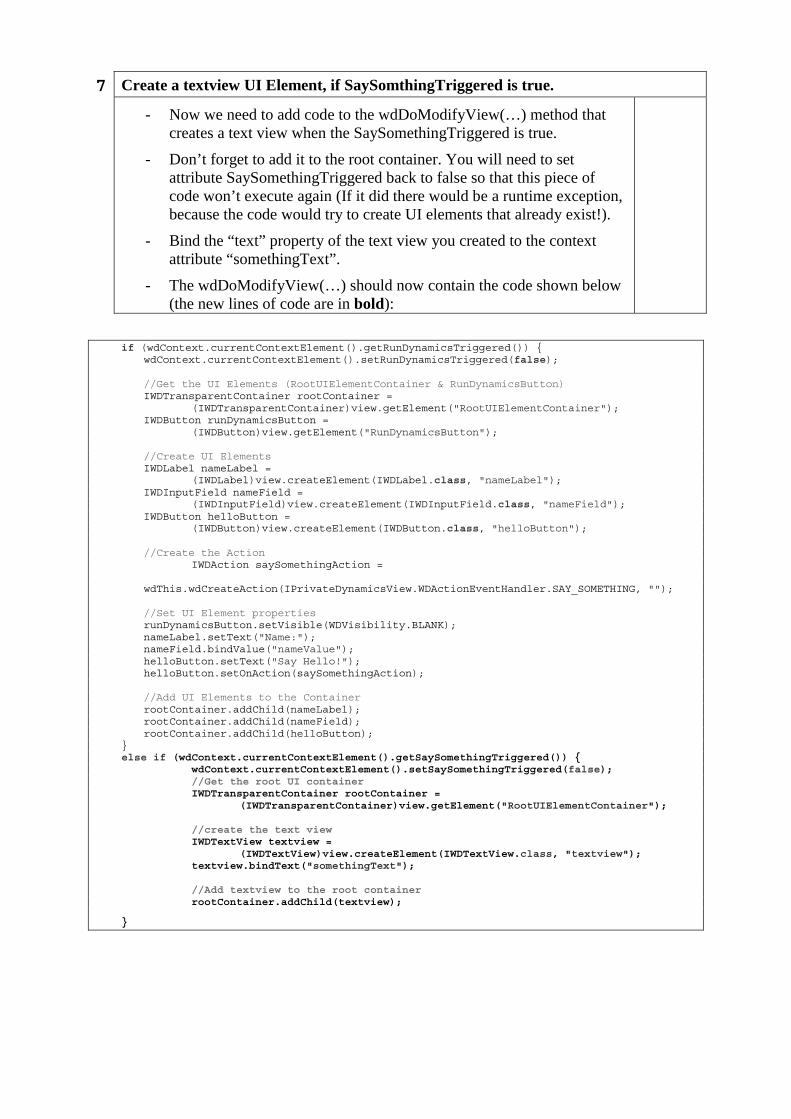
7 Create a textview UI Element, if SaySomthingTriggered is true.
- Now we need to add code to the wdDoModifyView(…) method that creates a text view when the SaySomethingTriggered is true.
- Don’t forget to add it to the root container. You will need to set attribute SaySomethingTriggered back to false so that this piece of code won’t execute again (If it did there would be a runtime exception, because the code would try to create UI elements that already exist!).
- Bind the “text” property of the text view you created to the context attribute “somethingText”.
- The wdDoModifyView(…) should now contain the code shown below (the new lines of code are in bold):
if (wdContext.currentContextElement().getRunDynamicsTriggered()) { wdContext.currentContextElement().setRunDynamicsTriggered(false); //Get the UI Elements (RootUIElementContainer & RunDynamicsButton) IWDTransparentContainer rootContainer = (IWDTransparentContainer)view.getElement("RootUIElementContainer"); IWDButton runDynamicsButton = (IWDButton)view.getElement("RunDynamicsButton"); //Create UI Elements IWDLabel nameLabel = (IWDLabel)view.createElement(IWDLabel.class, "nameLabel"); IWDInputField nameField = (IWDInputField)view.createElement(IWDInputField.class, "nameField"); IWDButton helloButton = (IWDButton)view.createElement(IWDButton.class, "helloButton"); //Create the Action IWDAction saySomethingAction = wdThis.wdCreateAction(IPrivateDynamicsView.WDActionEventHandler.SAY_SOMETHING, ""); //Set UI Element properties runDynamicsButton.setVisible(WDVisibility.BLANK); nameLabel.setText("Name:"); nameField.bindValue("nameValue"); helloButton.setText("Say Hello!"); helloButton.setOnAction(saySomethingAction); //Add UI Elements to the Container rootContainer.addChild(nameLabel); rootContainer.addChild(nameField); rootContainer.addChild(helloButton); } else if (wdContext.currentContextElement().getSaySomethingTriggered()) { wdContext.currentContextElement().setSaySomethingTriggered(false); //Get the root UI container IWDTransparentContainer rootContainer = (IWDTransparentContainer)view.getElement("RootUIElementContainer"); //create the text view IWDTextView textview = (IWDTextView)view.createElement(IWDTextView.class, "textview"); textview.bindText("somethingText"); //Add textview to the root container rootContainer.addChild(textview);
}

4 Deploy and Run
4-1 When the application initially starts you will see the screen shown below:
4-2 When the button is clicked you should now see the following screen, enter your name and click the button!
4-3 After click the button you should see the response, also you should be able to enter more names and click the button…if you get a runtime error you know that for some reason you code is trying to create attributes or UI elements that already exist!
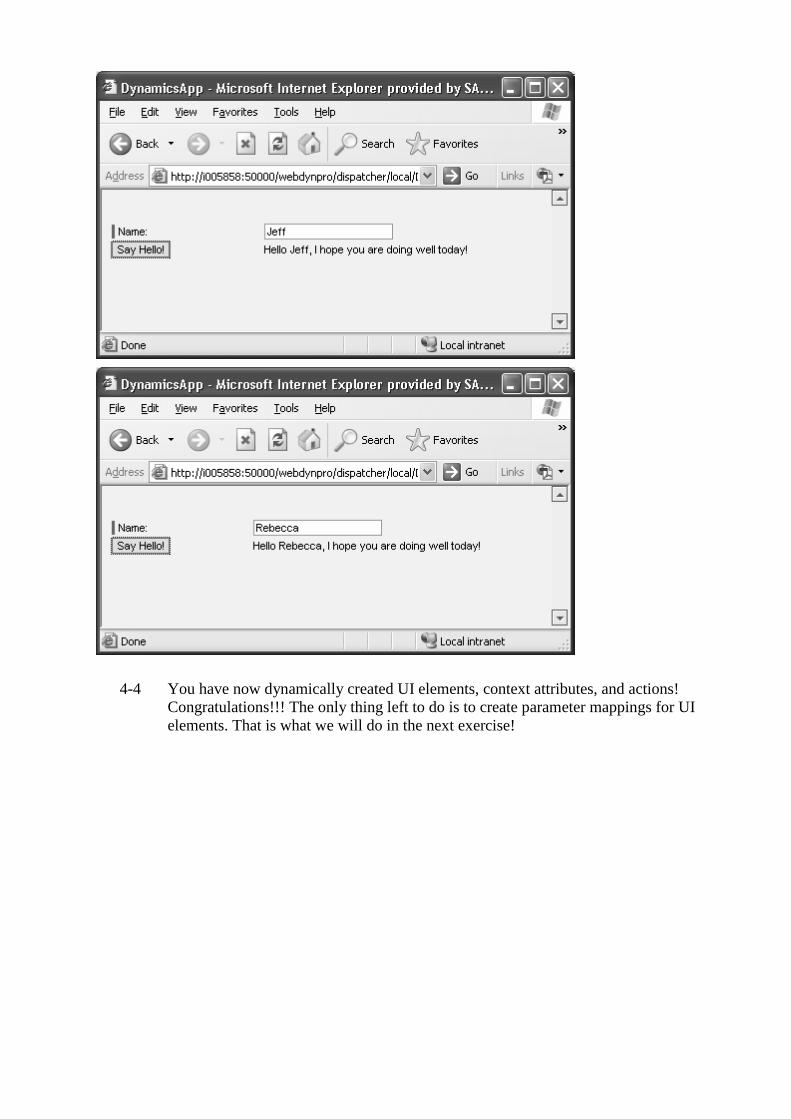
4-4 You have now dynamically created UI elements, context attributes, and actions! Congratulations!!! The only thing left to do is to create parameter mappings for UI elements. That is what we will do in the next exercise!
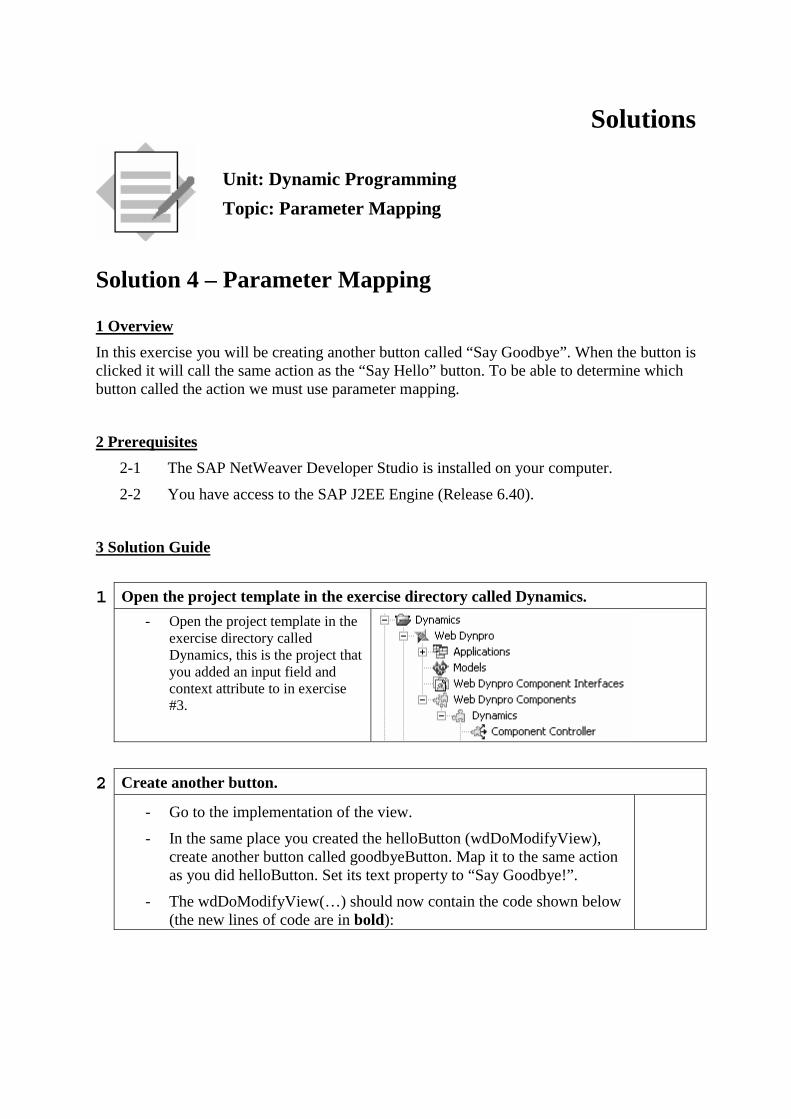
Solutions
Unit: Dynamic Programming
Topic: Parameter Mapping
Solution 4 – Parameter Mapping
1 Overview
In this exercise you will be creating another button called “Say Goodbye”. When the button is clicked it will call the same action as the “Say Hello” button. To be able to determine which button called the action we must use parameter mapping.
2 Prerequisites
2-1 The SAP NetWeaver Developer Studio is installed on your computer.
2-2 You have access to the SAP J2EE Engine (Release 6.40).
3 Solution Guide
1 Open the project template in the exercise directory called Dynamics.
- Open the project template in the exercise directory called Dynamics, this is the project that you added an input field and context attribute to in exercise #3.
2 Create another button.
- Go to the implementation of the view.
- In the same place you created the helloButton (wdDoModifyView), create another button called goodbyeButton. Map it to the same action as you did helloButton. Set its text property to “Say Goodbye!”.
- The wdDoModifyView(…) should now contain the code shown below (the new lines of code are in bold):
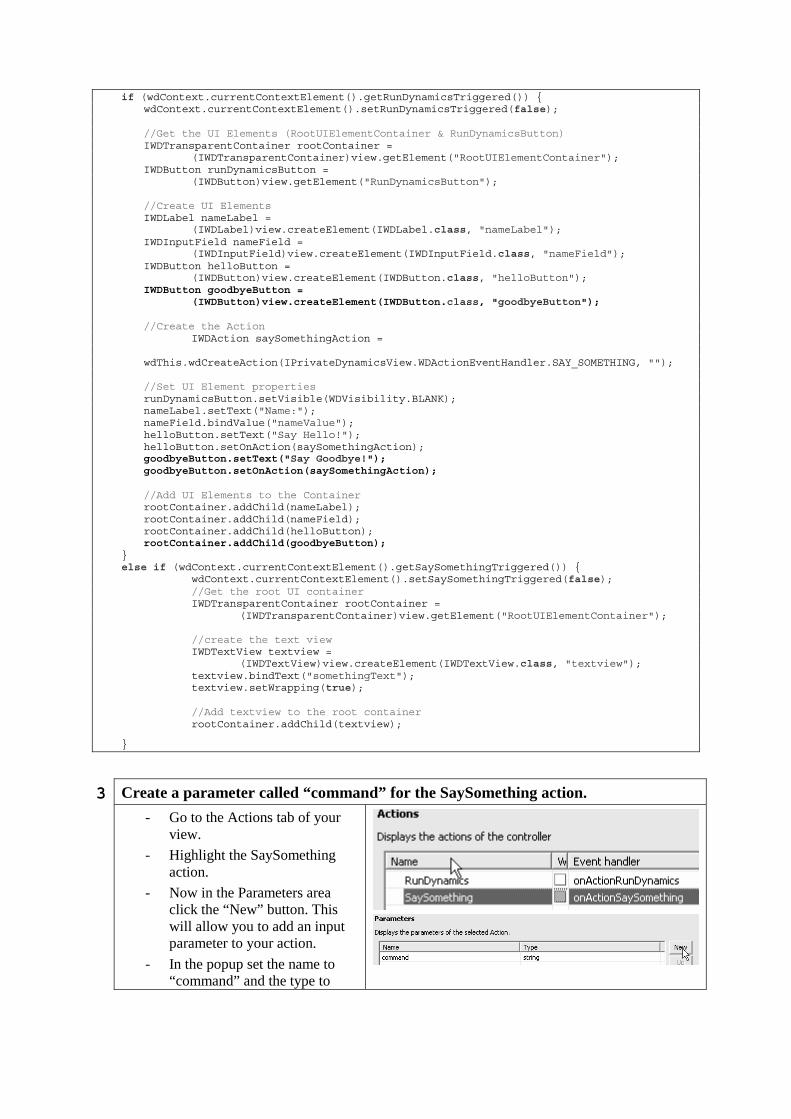
if (wdContext.currentContextElement().getRunDynamicsTriggered()) { wdContext.currentContextElement().setRunDynamicsTriggered(false); //Get the UI Elements (RootUIElementContainer & RunDynamicsButton) IWDTransparentContainer rootContainer = (IWDTransparentContainer)view.getElement("RootUIElementContainer"); IWDButton runDynamicsButton = (IWDButton)view.getElement("RunDynamicsButton"); //Create UI Elements IWDLabel nameLabel = (IWDLabel)view.createElement(IWDLabel.class, "nameLabel"); IWDInputField nameField = (IWDInputField)view.createElement(IWDInputField.class, "nameField"); IWDButton helloButton = (IWDButton)view.createElement(IWDButton.class, "helloButton"); IWDButton goodbyeButton = (IWDButton)view.createElement(IWDButton.class, "goodbyeButton"); //Create the Action IWDAction saySomethingAction = wdThis.wdCreateAction(IPrivateDynamicsView.WDActionEventHandler.SAY_SOMETHING, ""); //Set UI Element properties runDynamicsButton.setVisible(WDVisibility.BLANK); nameLabel.setText("Name:"); nameField.bindValue("nameValue"); helloButton.setText("Say Hello!"); helloButton.setOnAction(saySomethingAction); goodbyeButton.setText("Say Goodbye!"); goodbyeButton.setOnAction(saySomethingAction); //Add UI Elements to the Container rootContainer.addChild(nameLabel); rootContainer.addChild(nameField); rootContainer.addChild(helloButton); rootContainer.addChild(goodbyeButton); } else if (wdContext.currentContextElement().getSaySomethingTriggered()) { wdContext.currentContextElement().setSaySomethingTriggered(false); //Get the root UI container IWDTransparentContainer rootContainer = (IWDTransparentContainer)view.getElement("RootUIElementContainer"); //create the text view IWDTextView textview = (IWDTextView)view.createElement(IWDTextView.class, "textview"); textview.bindText("somethingText"); textview.setWrapping(true); //Add textview to the root container rootContainer.addChild(textview);
}
3 Create a parameter called “command” for the SaySomething action.
- Go to the Actions tab of your view.
- Highlight the SaySomething action.
- Now in the Parameters area click the “New” button. This will allow you to add an input parameter to your action.
- In the popup set the name to “command” and the type to
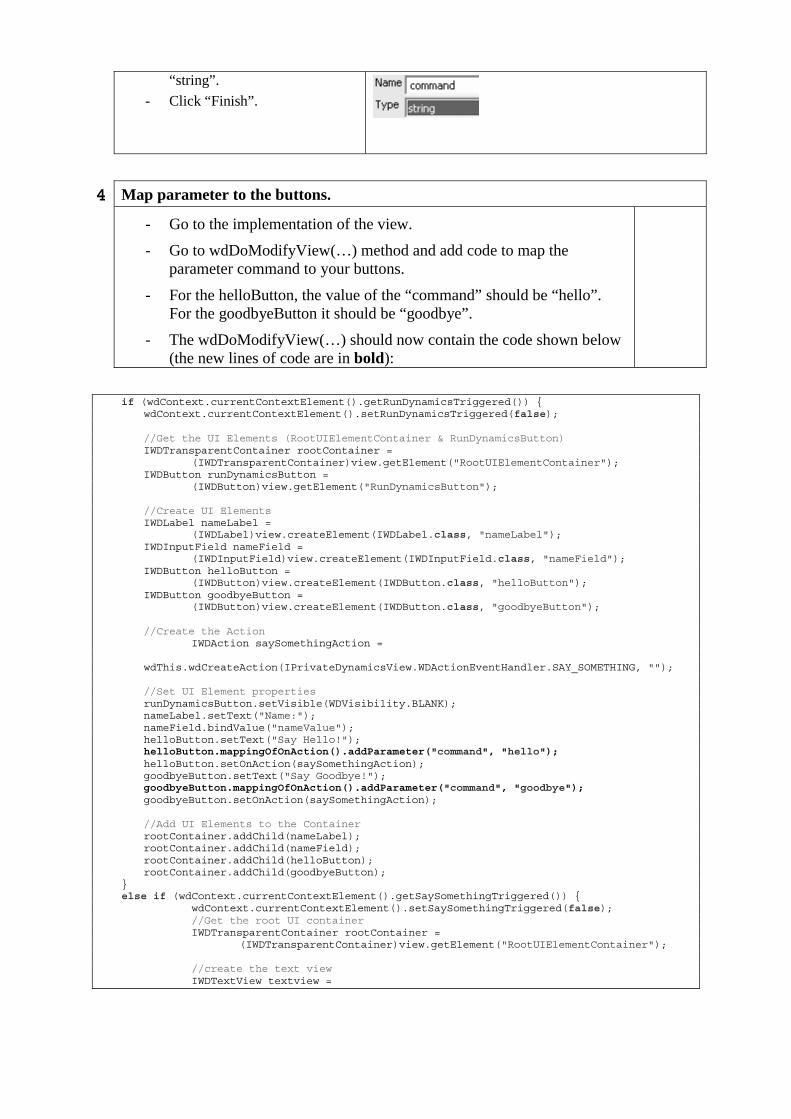
“string”.
- Click “Finish”.
4 Map parameter to the buttons.
- Go to the implementation of the view.
- Go to wdDoModifyView(…) method and add code to map the parameter command to your buttons.
- For the helloButton, the value of the “command” should be “hello”. For the goodbyeButton it should be “goodbye”.
- The wdDoModifyView(…) should now contain the code shown below (the new lines of code are in bold):
if (wdContext.currentContextElement().getRunDynamicsTriggered()) { wdContext.currentContextElement().setRunDynamicsTriggered(false); //Get the UI Elements (RootUIElementContainer & RunDynamicsButton) IWDTransparentContainer rootContainer = (IWDTransparentContainer)view.getElement("RootUIElementContainer"); IWDButton runDynamicsButton = (IWDButton)view.getElement("RunDynamicsButton"); //Create UI Elements IWDLabel nameLabel = (IWDLabel)view.createElement(IWDLabel.class, "nameLabel"); IWDInputField nameField = (IWDInputField)view.createElement(IWDInputField.class, "nameField"); IWDButton helloButton = (IWDButton)view.createElement(IWDButton.class, "helloButton"); IWDButton goodbyeButton = (IWDButton)view.createElement(IWDButton.class, "goodbyeButton"); //Create the Action IWDAction saySomethingAction = wdThis.wdCreateAction(IPrivateDynamicsView.WDActionEventHandler.SAY_SOMETHING, ""); //Set UI Element properties runDynamicsButton.setVisible(WDVisibility.BLANK); nameLabel.setText("Name:"); nameField.bindValue("nameValue"); helloButton.setText("Say Hello!"); helloButton.mappingOfOnAction().addParameter("command", "hello"); helloButton.setOnAction(saySomethingAction); goodbyeButton.setText("Say Goodbye!"); goodbyeButton.mappingOfOnAction().addParameter("command", "goodbye"); goodbyeButton.setOnAction(saySomethingAction); //Add UI Elements to the Container rootContainer.addChild(nameLabel); rootContainer.addChild(nameField); rootContainer.addChild(helloButton); rootContainer.addChild(goodbyeButton); } else if (wdContext.currentContextElement().getSaySomethingTriggered()) { wdContext.currentContextElement().setSaySomethingTriggered(false); //Get the root UI container IWDTransparentContainer rootContainer = (IWDTransparentContainer)view.getElement("RootUIElementContainer"); //create the text view IWDTextView textview =
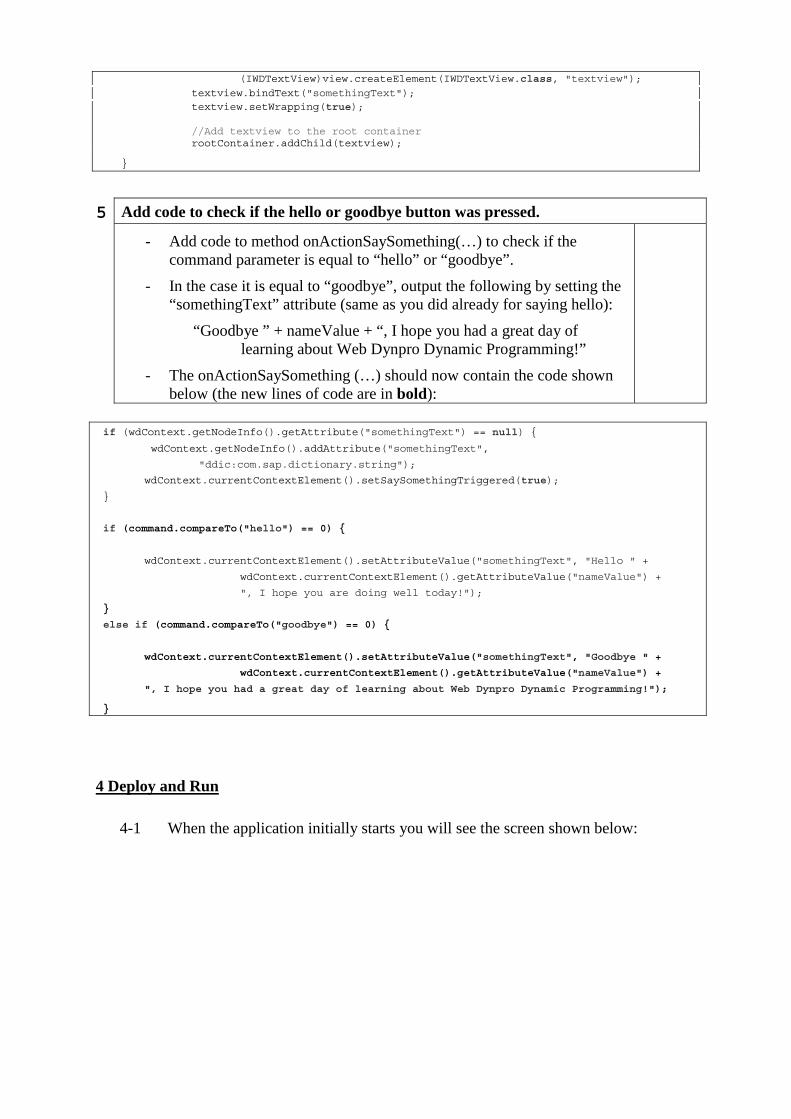
(IWDTextView)view.createElement(IWDTextView.class, "textview");
textview.bindText("somethingText"); textview.setWrapping(true); //Add textview to the root container rootContainer.addChild(textview);
}
5 Add code to check if the hello or goodbye button was pressed.
- Add code to method onActionSaySomething(…) to check if the command parameter is equal to “hello” or “goodbye”.
- In the case it is equal to “goodbye”, output the following by setting the “somethingText” attribute (same as you did already for saying hello):
“Goodbye ” + nameValue + “, I hope you had a great day of learning about Web Dynpro Dynamic Programming!”
- The onActionSaySomething (…) should now contain the code shown below (the new lines of code are in bold):
if (wdContext.getNodeInfo().getAttribute("somethingText") == null) {
wdContext.getNodeInfo().addAttribute("somethingText",
"ddic:com.sap.dictionary.string");
wdContext.currentContextElement().setSaySomethingTriggered(true);
}
if (command.compareTo("hello") == 0) {
wdContext.currentContextElement().setAttributeValue("somethingText", "Hello " +
wdContext.currentContextElement().getAttributeValue("nameValue") +
", I hope you are doing well today!");
}
else if (command.compareTo("goodbye") == 0) {
wdContext.currentContextElement().setAttributeValue("somethingText", "Goodbye " +
wdContext.currentContextElement().getAttributeValue("nameValue") +
", I hope you had a great day of learning about Web Dynpro Dynamic Programming!");
}
4 Deploy and Run
4-1 When the application initially starts you will see the screen shown below:
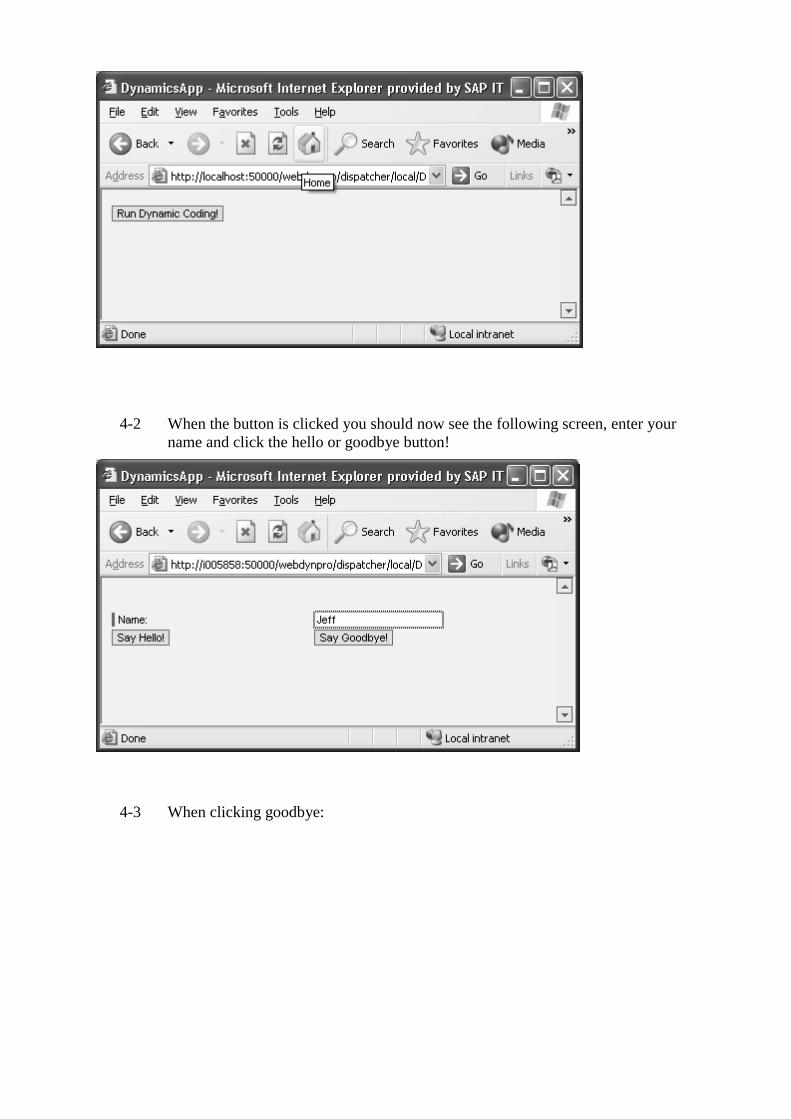
4-2 When the button is clicked you should now see the following screen, enter your name and click the hello or goodbye button!
4-3 When clicking goodbye:

4-4 Then clicking hello…
© SAP AG <Course Number> Unit Title - 1
© SAP AG 2003, Title of Presentation, Speaker Name / 1
Overview Enterprise Java Beans
Using EJBs as Web Dynpro Model
Contents:
Using EJBs as Web Dynpro Model
© SAP AG <Course Number> Unit Title - 2
© SAP AG 2003, Title of Presentation, Speaker Name / 2
After completing this unit, you will be able to:
Understand what EJBs are.
Use EJBs as Model for Web Dynpro applications.
Using EJBs as Web Dynpro Model: Unit Objectives
© SAP AG <Course Number> Unit Title - 3
© SAP AG 2003, Title of Presentation, Speaker Name / 3
After completing this topic, you will be able to:
Understand what EJBs are.
Enterprise Java Beans: Topic Objectives
This is a lesson
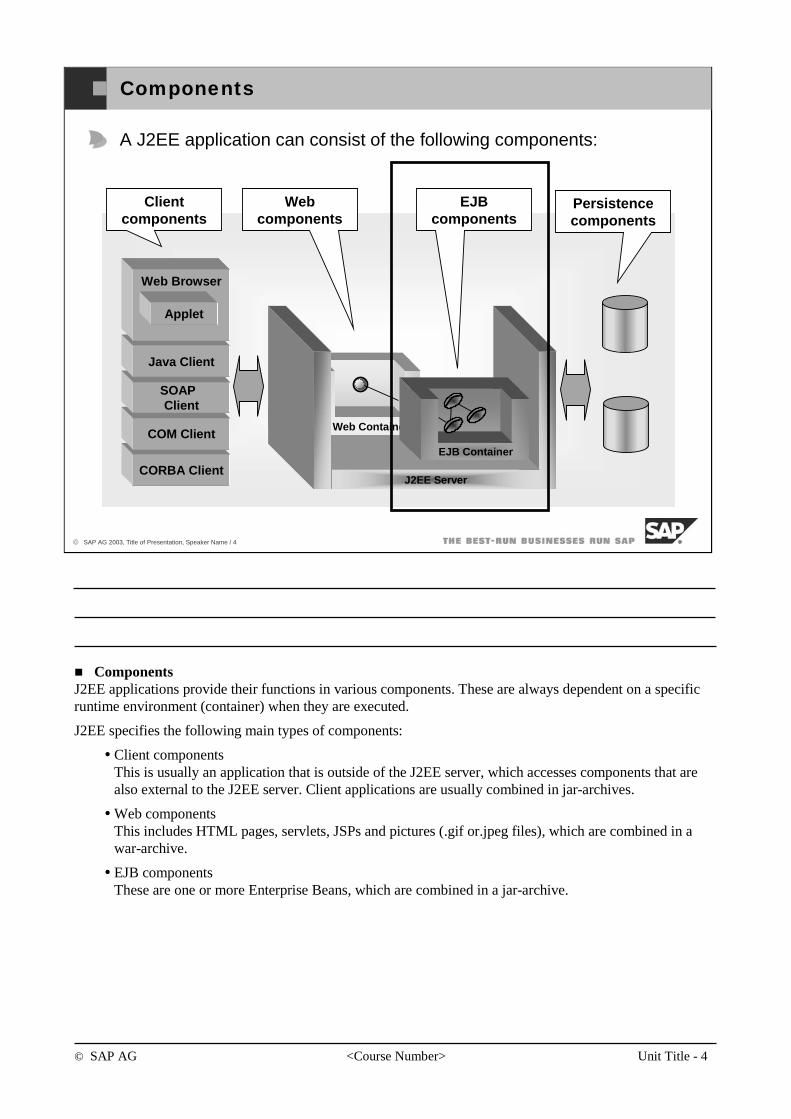
© SAP AG <Course Number> Unit Title - 4
© SAP AG 2003, Title of Presentation, Speaker Name / 4
Components
A J2EE application can consist of the following components:
CORBA Client
COM Client
SOAP Client
Java Client
Web Browser
Applet
EJB components
Web components
Client components
Persistence components
J2EE Server
Web Container
EJB Container
ComponentsJ2EE applications provide their functions in various components. These are always dependent on a specific runtime environment (container) when they are executed.
J2EE specifies the following main types of components:
Client componentsThis is usually an application that is outside of the J2EE server, which accesses components that are also external to the J2EE server. Client applications are usually combined in jar-archives.
Web componentsThis includes HTML pages, servlets, JSPs and pictures (.gif or.jpeg files), which are combined in a war-archive.
EJB componentsThese are one or more Enterprise Beans, which are combined in a jar-archive.
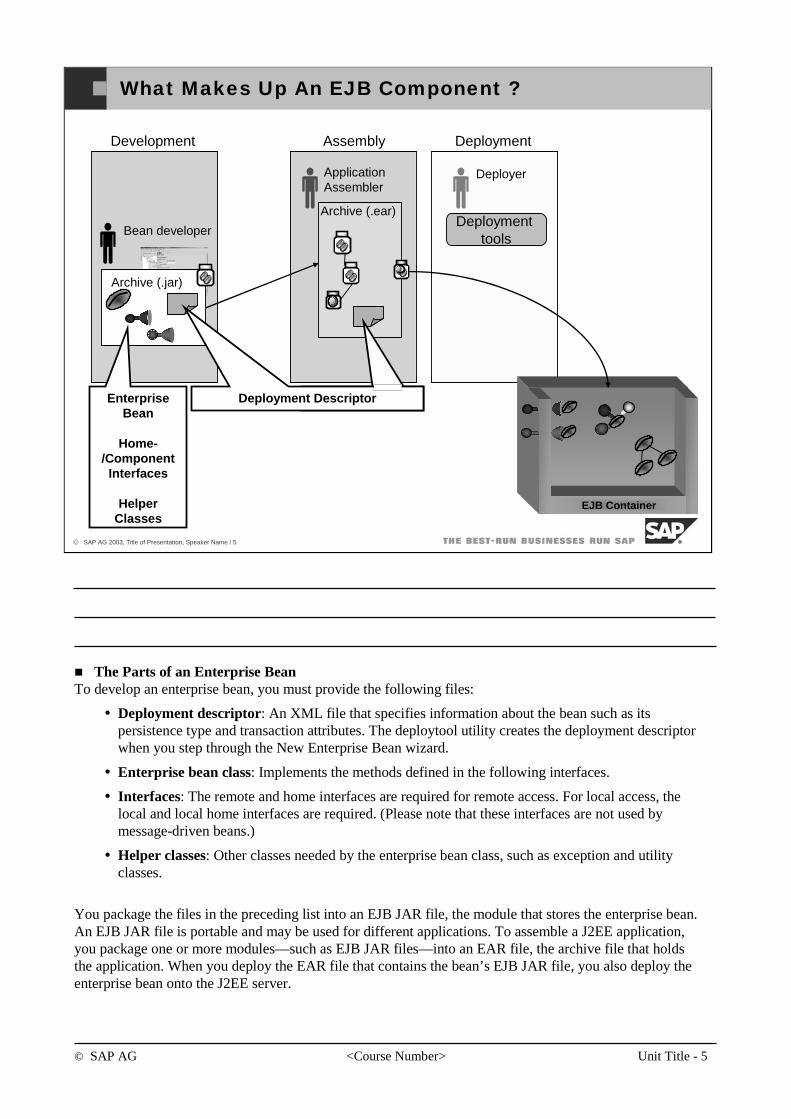
© SAP AG <Course Number> Unit Title - 5
© SAP AG 2003, Title of Presentation, Speaker Name / 5
What Makes Up An EJB Component ?
Assembly
Archive (.ear)
ApplicationAssembler
Deployment
Deployer
Deployment tools
EJB Container
Bean developer
Development
Archive (.jar)
Deployment DescriptorEnterprise Bean
Home-/Component
Interfaces
Helper Classes
The Parts of an Enterprise BeanTo develop an enterprise bean, you must provide the following files:
Deployment descriptor: An XML file that specifies information about the bean such as itspersistence type and transaction attributes. The deploytool utility creates the deployment descriptorwhen you step through the New Enterprise Bean wizard.
Enterprise bean class: Implements the methods defined in the following interfaces.
Interfaces: The remote and home interfaces are required for remote access. For local access, thelocal and local home interfaces are required. (Please note that these interfaces are not used bymessage-driven beans.)
Helper classes: Other classes needed by the enterprise bean class, such as exception and utilityclasses.
You package the files in the preceding list into an EJB JAR file, the module that stores the enterprise bean. An EJB JAR file is portable and may be used for different applications. To assemble a J2EE application, you package one or more modules—such as EJB JAR files—into an EAR file, the archive file that holdsthe application. When you deploy the EAR file that contains the bean’s EJB JAR file, you also deploy theenterprise bean onto the J2EE server.
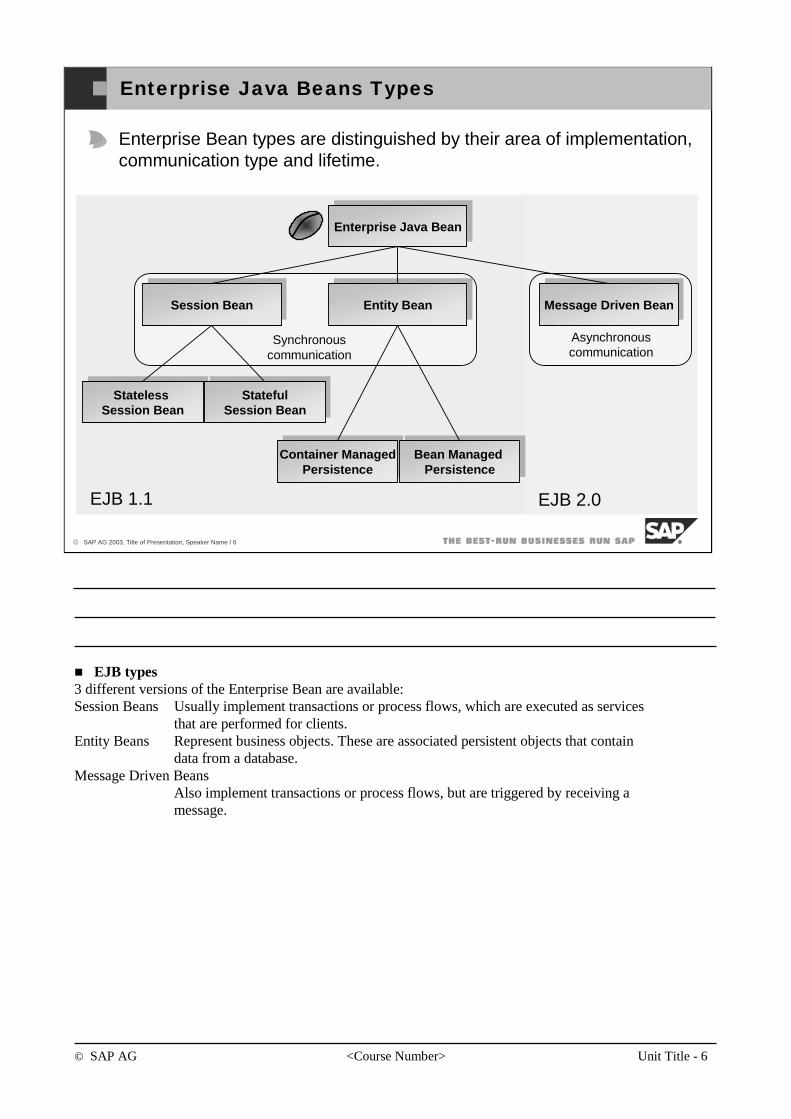
© SAP AG <Course Number> Unit Title - 6
© SAP AG 2003, Title of Presentation, Speaker Name / 6
Enterprise Java Beans Types
Enterprise Bean types are distinguished by their area of implementation, communication type and lifetime.
Enterprise Java Bean
Session Bean Entity Bean Message Driven Bean
StatelessSession Bean
StatefulSession Bean
Container ManagedPersistence
Bean ManagedPersistence
EJB 1.1 EJB 2.0
Asynchronouscommunication
Synchronouscommunication
EJB types3 different versions of the Enterprise Bean are available:Session Beans Usually implement transactions or process flows, which are executed as services
that are performed for clients.Entity Beans Represent business objects. These are associated persistent objects that contain
data from a database. Message Driven Beans
Also implement transactions or process flows, but are triggered by receiving amessage.
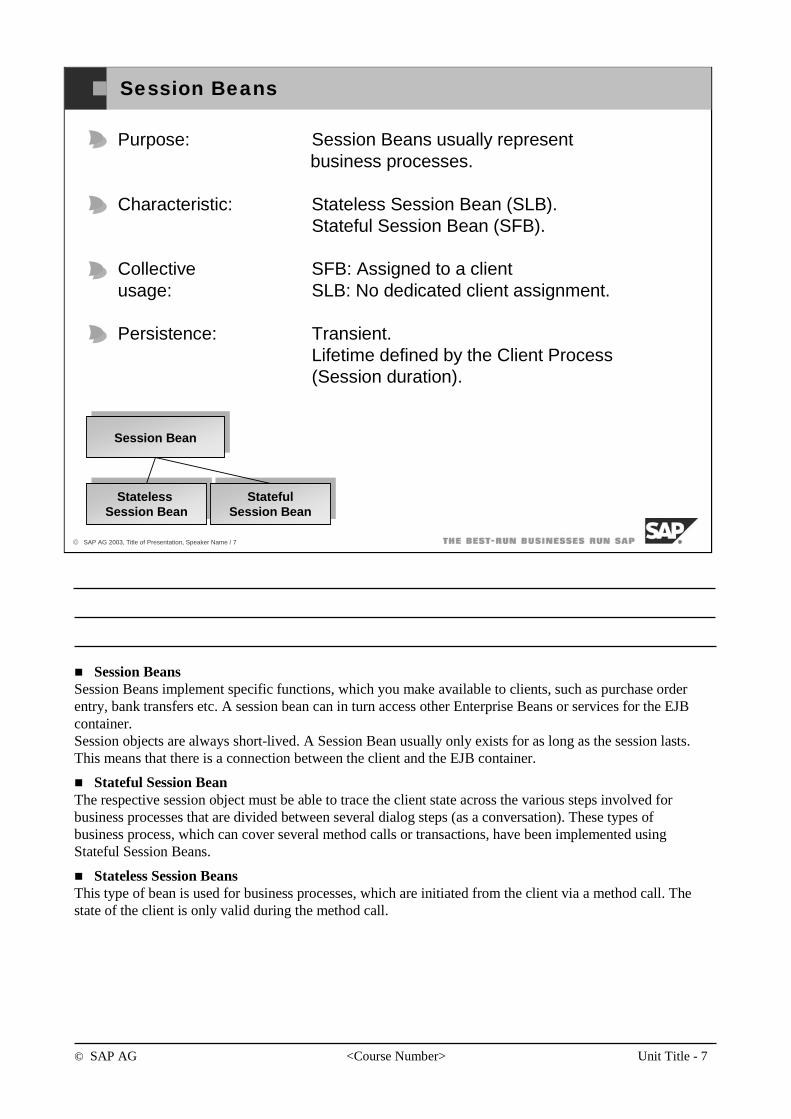
© SAP AG <Course Number> Unit Title - 7
© SAP AG 2003, Title of Presentation, Speaker Name / 7
Session Beans
Purpose: Session Beans usually representbusiness processes.
Characteristic: Stateless Session Bean (SLB).Stateful Session Bean (SFB).
Collective SFB: Assigned to a clientusage: SLB: No dedicated client assignment.
Persistence: Transient.Lifetime defined by the Client Process(Session duration).
Session Bean
Stateless Session Bean
StatefulSession Bean
Session BeansSession Beans implement specific functions, which you make available to clients, such as purchase order entry, bank transfers etc. A session bean can in turn access other Enterprise Beans or services for the EJB container.Session objects are always short-lived. A Session Bean usually only exists for as long as the session lasts. This means that there is a connection between the client and the EJB container.
Stateful Session BeanThe respective session object must be able to trace the client state across the various steps involved for business processes that are divided between several dialog steps (as a conversation). These types of business process, which can cover several method calls or transactions, have been implemented using Stateful Session Beans.
Stateless Session BeansThis type of bean is used for business processes, which are initiated from the client via a method call. The state of the client is only valid during the method call.
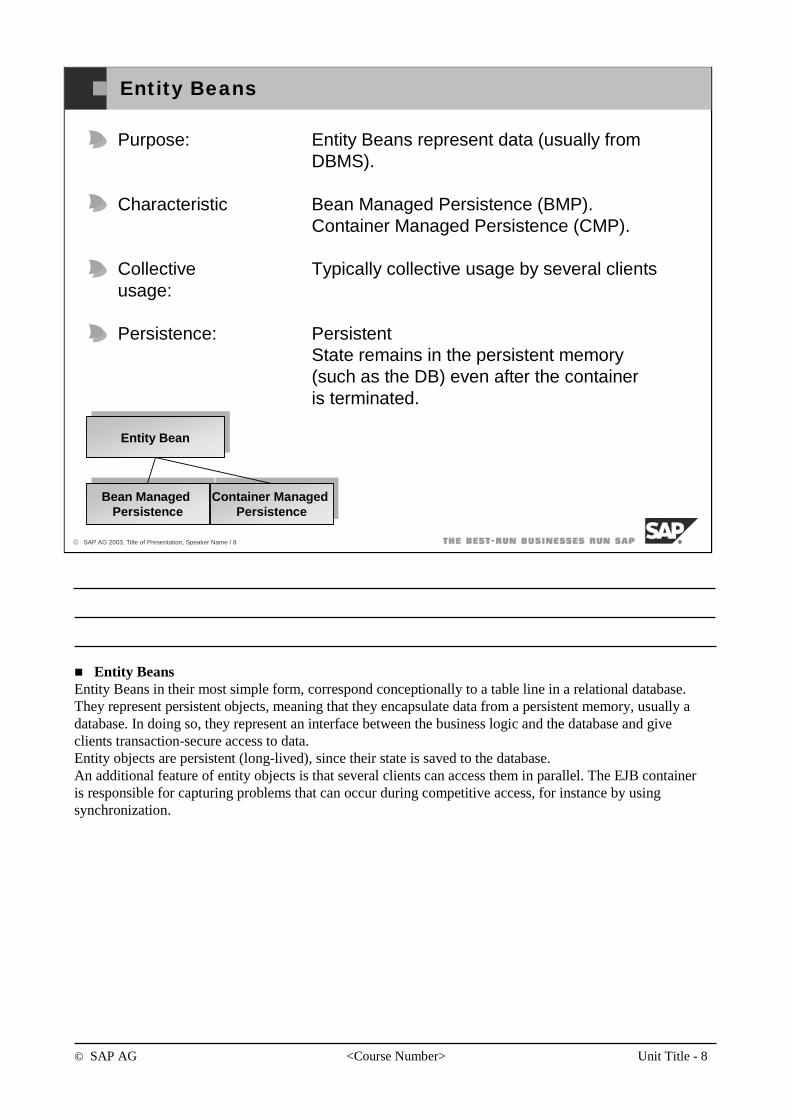
© SAP AG <Course Number> Unit Title - 8
© SAP AG 2003, Title of Presentation, Speaker Name / 8
Entity Beans
Purpose: Entity Beans represent data (usually from DBMS).
Characteristic Bean Managed Persistence (BMP).Container Managed Persistence (CMP).
Collective Typically collective usage by several clientsusage:
Persistence: PersistentState remains in the persistent memory(such as the DB) even after the container is terminated.
Entity Bean
Bean Managed Persistence
Container Managed Persistence
Entity BeansEntity Beans in their most simple form, correspond conceptionally to a table line in a relational database.They represent persistent objects, meaning that they encapsulate data from a persistent memory, usually a database. In doing so, they represent an interface between the business logic and the database and give clients transaction-secure access to data.Entity objects are persistent (long-lived), since their state is saved to the database.An additional feature of entity objects is that several clients can access them in parallel. The EJB container is responsible for capturing problems that can occur during competitive access, for instance by using synchronization.

© SAP AG <Course Number> Unit Title - 9
© SAP AG 2003, Title of Presentation, Speaker Name / 9
EJB, Big Picture
J2EE Server
Database
EJB Client
EJB Container
ProductEntity Bean
CustomerEntity Bean
OrderEntity Bean
CreateOrderSession Bean
Session BeanIs thought to represent business process Provides state management
Entity BeanIs thought to represent business objectMemory representation of persistent object
Bean Managed PersistencePersistence management to be coded by EJB developer, thus allowing higher flexibility
Container Managed PersistencePersistence management automatically done by EJB containerDeclarative mapping of container-managed fields to table columns outside Java code (XML)
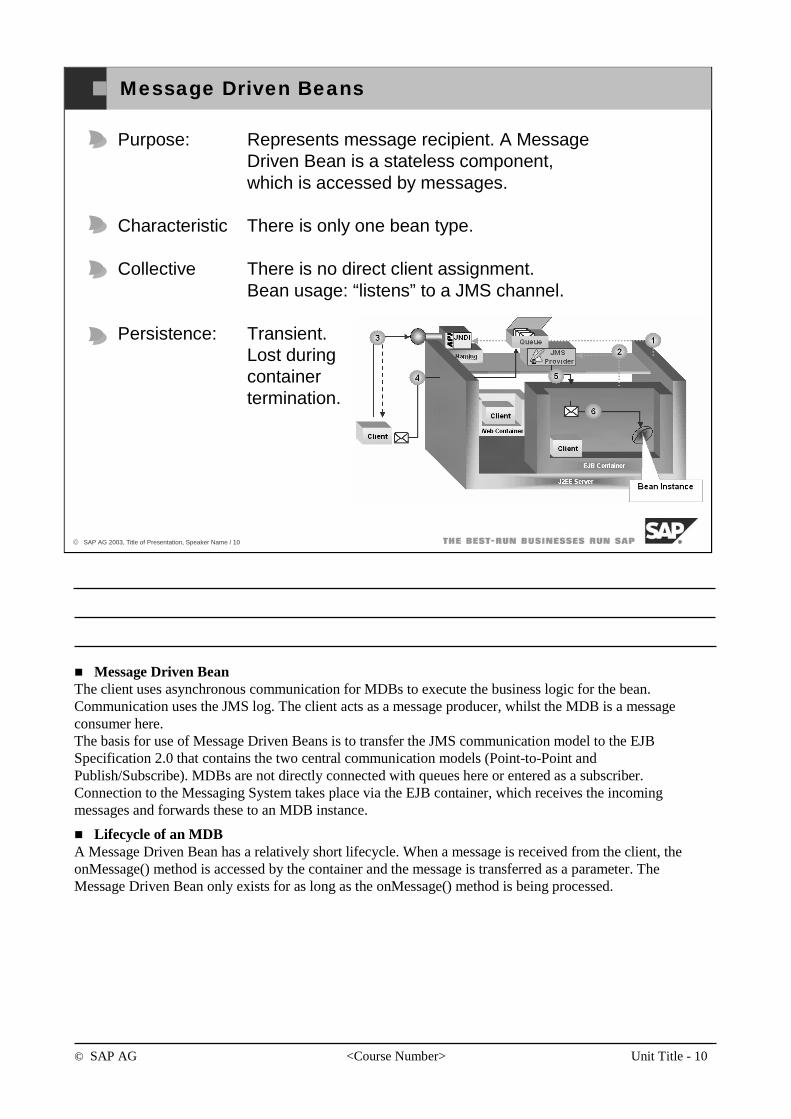
© SAP AG <Course Number> Unit Title - 10
© SAP AG 2003, Title of Presentation, Speaker Name / 10
Message Driven Beans
Purpose: Represents message recipient. A Message Driven Bean is a stateless component, which is accessed by messages.
Characteristic There is only one bean type.
Collective There is no direct client assignment.Bean usage: “listens” to a JMS channel.
Persistence: Transient.Lost during containertermination.
Message Driven BeanThe client uses asynchronous communication for MDBs to execute the business logic for the bean.Communication uses the JMS log. The client acts as a message producer, whilst the MDB is a message consumer here.The basis for use of Message Driven Beans is to transfer the JMS communication model to the EJB Specification 2.0 that contains the two central communication models (Point-to-Point and Publish/Subscribe). MDBs are not directly connected with queues here or entered as a subscriber.Connection to the Messaging System takes place via the EJB container, which receives the incoming messages and forwards these to an MDB instance.
Lifecycle of an MDBA Message Driven Bean has a relatively short lifecycle. When a message is received from the client, the onMessage() method is accessed by the container and the message is transferred as a parameter. The Message Driven Bean only exists for as long as the onMessage() method is being processed.
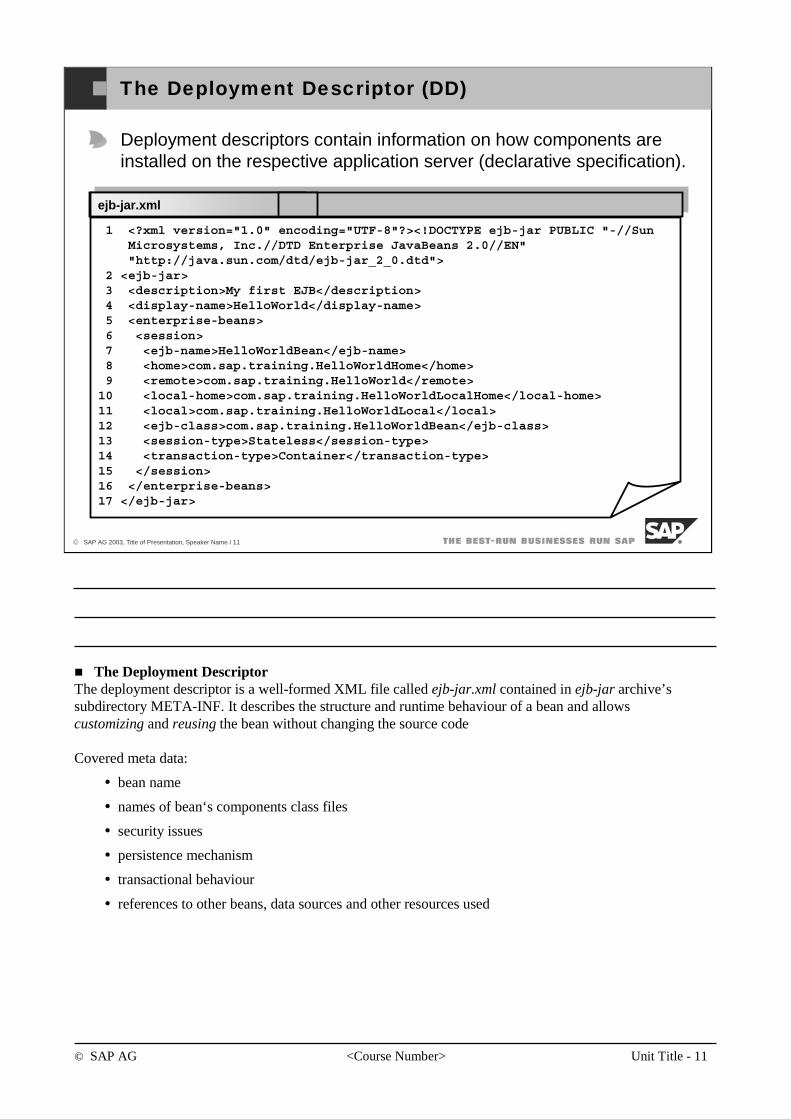
© SAP AG <Course Number> Unit Title - 11
© SAP AG 2003, Title of Presentation, Speaker Name / 11
The Deployment Descriptor (DD)
ejb-jar.xml
1 <?xml version="1.0" encoding="UTF-8"?><!DOCTYPE ejb-jar PUBLIC "-//Sun Microsystems, Inc.//DTD Enterprise JavaBeans 2.0//EN""http://java.sun.com/dtd/ejb-jar_2_0.dtd">
2 <ejb-jar>3 <description>My first EJB</description>4 <display-name>HelloWorld</display-name>5 <enterprise-beans>6 <session>7 <ejb-name>HelloWorldBean</ejb-name>8 <home>com.sap.training.HelloWorldHome</home>9 <remote>com.sap.training.HelloWorld</remote>10 <local-home>com.sap.training.HelloWorldLocalHome</local-home>11 <local>com.sap.training.HelloWorldLocal</local>12 <ejb-class>com.sap.training.HelloWorldBean</ejb-class>13 <session-type>Stateless</session-type>14 <transaction-type>Container</transaction-type>15 </session>16 </enterprise-beans>17 </ejb-jar>
Deployment descriptors contain information on how components areinstalled on the respective application server (declarative specification).
The Deployment DescriptorThe deployment descriptor is a well-formed XML file called ejb-jar.xml contained in ejb-jar archive’s subdirectory META-INF. It describes the structure and runtime behaviour of a bean and allows customizing and reusing the bean without changing the source code
Covered meta data:
bean name
names of bean‘s components class files
security issues
persistence mechanism
transactional behaviour
references to other beans, data sources and other resources used
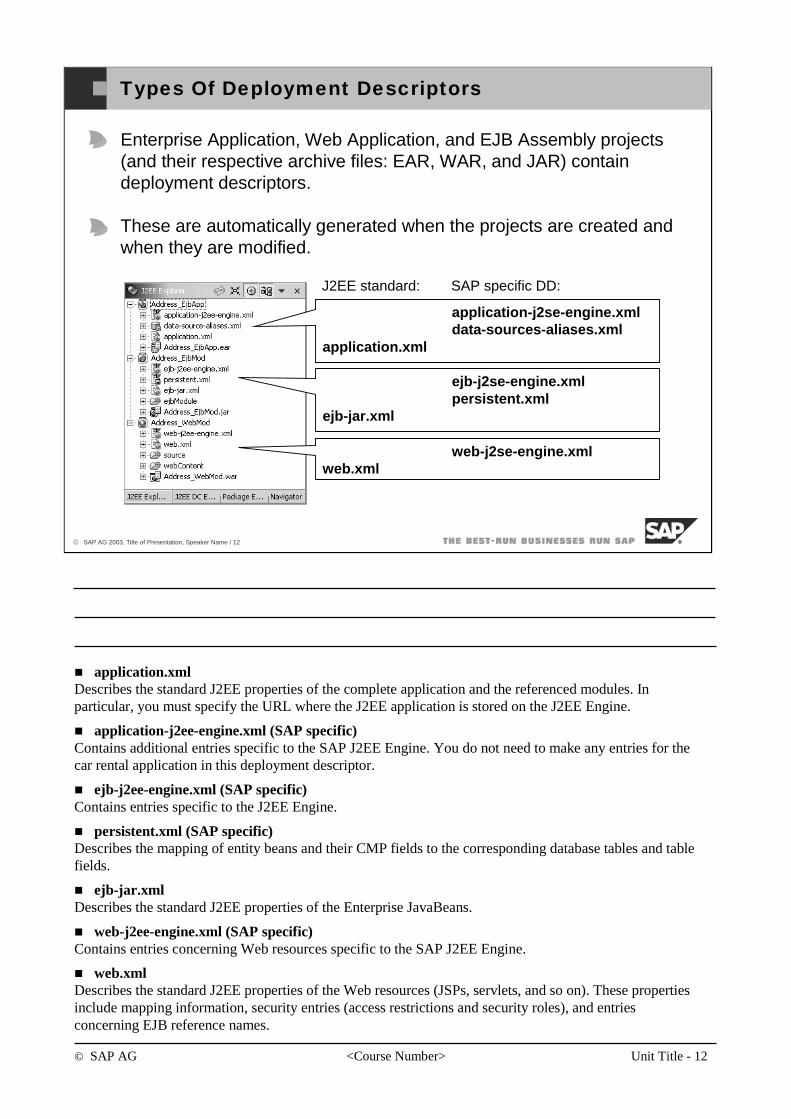
© SAP AG <Course Number> Unit Title - 12
© SAP AG 2003, Title of Presentation, Speaker Name / 12
Types Of Deployment Descriptors
Enterprise Application, Web Application, and EJB Assembly projects (and their respective archive files: EAR, WAR, and JAR) contain deployment descriptors.
These are automatically generated when the projects are created and when they are modified.
application-j2se-engine.xmldata-sources-aliases.xml
application.xml
ejb-j2se-engine.xmlpersistent.xml
ejb-jar.xml
web-j2se-engine.xmlweb.xml
J2EE standard: SAP specific DD:
application.xmlDescribes the standard J2EE properties of the complete application and the referenced modules. In particular, you must specify the URL where the J2EE application is stored on the J2EE Engine.
application-j2ee-engine.xml (SAP specific)Contains additional entries specific to the SAP J2EE Engine. You do not need to make any entries for the car rental application in this deployment descriptor.
ejb-j2ee-engine.xml (SAP specific) Contains entries specific to the J2EE Engine.
persistent.xml (SAP specific) Describes the mapping of entity beans and their CMP fields to the corresponding database tables and table fields.
ejb-jar.xmlDescribes the standard J2EE properties of the Enterprise JavaBeans.
web-j2ee-engine.xml (SAP specific) Contains entries concerning Web resources specific to the SAP J2EE Engine.
web.xmlDescribes the standard J2EE properties of the Web resources (JSPs, servlets, and so on). These properties include mapping information, security entries (access restrictions and security roles), and entries concerning EJB reference names.
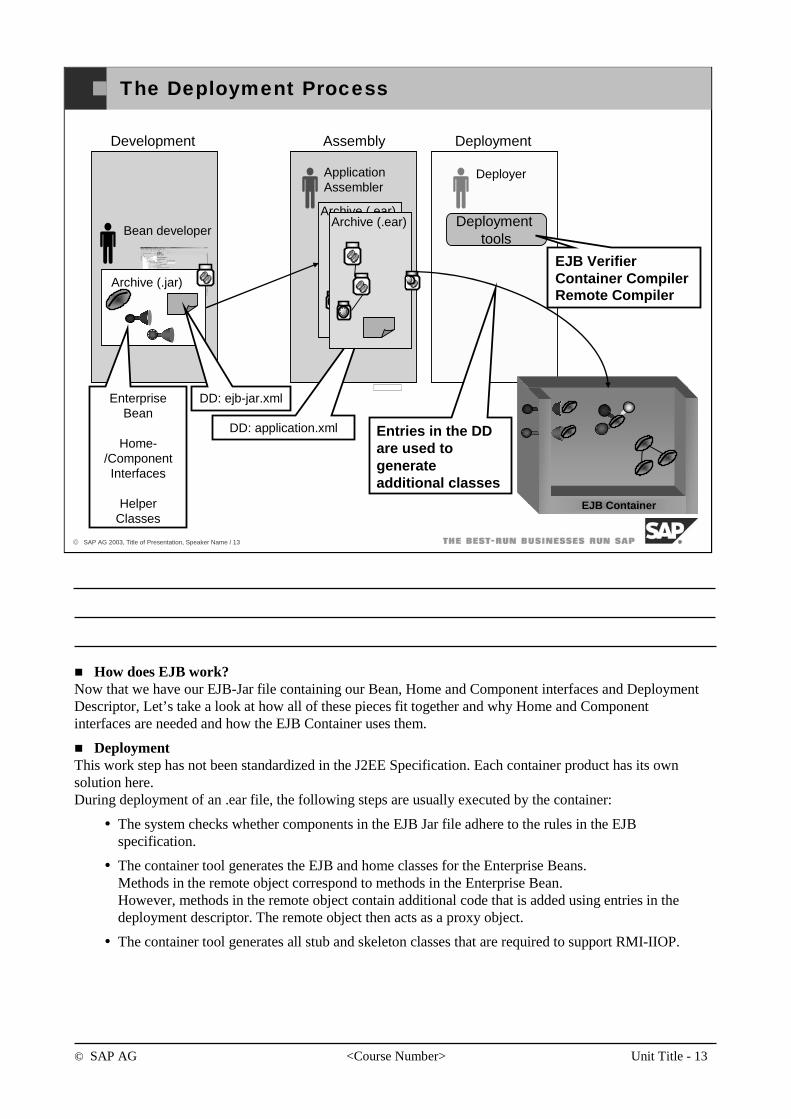
© SAP AG <Course Number> Unit Title - 13
© SAP AG 2003, Title of Presentation, Speaker Name / 13
The Deployment Process
Assembly
Archive (.ear)
ApplicationAssembler
Deployment
Deployer
Deployment tools
DD: application.xml
EJB Container
Bean developer
Development
Archive (.jar)
DD: ejb-jar.xmlEnterprise Bean
Home-/Component Interfaces
Helper Classes
Entries in the DD are used to generate additional classes
EJB VerifierContainer CompilerRemote Compiler
Archive (.ear)
How does EJB work?Now that we have our EJB-Jar file containing our Bean, Home and Component interfaces and Deployment Descriptor, Let’s take a look at how all of these pieces fit together and why Home and Componentinterfaces are needed and how the EJB Container uses them.
DeploymentThis work step has not been standardized in the J2EE Specification. Each container product has its own solution here.During deployment of an .ear file, the following steps are usually executed by the container:
The system checks whether components in the EJB Jar file adhere to the rules in the EJB specification.
The container tool generates the EJB and home classes for the Enterprise Beans.Methods in the remote object correspond to methods in the Enterprise Bean.However, methods in the remote object contain additional code that is added using entries in the deployment descriptor. The remote object then acts as a proxy object.
The container tool generates all stub and skeleton classes that are required to support RMI-IIOP.
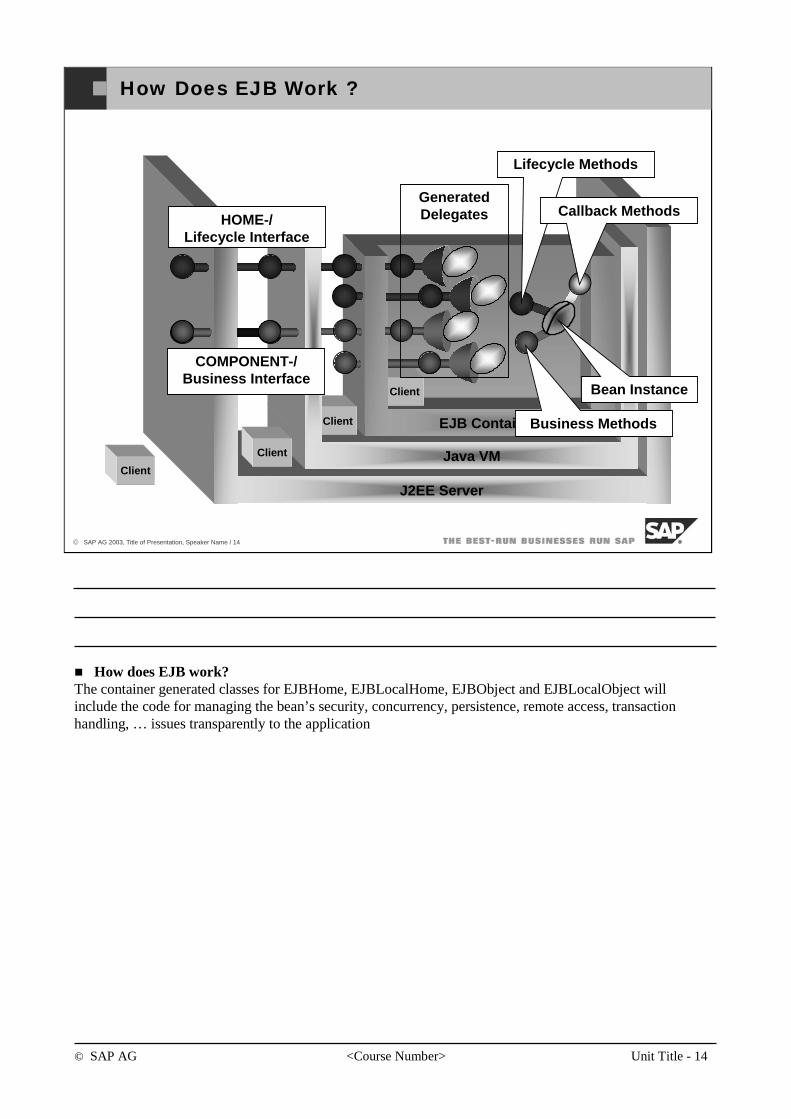
© SAP AG <Course Number> Unit Title - 14
© SAP AG 2003, Title of Presentation, Speaker Name / 14
How Does EJB Work ?
J2EE Server
Java VM
EJB Container
Client
Client
Client
Client
HOME-/Lifecycle Interface
COMPONENT-/Business Interface
Lifecycle Methods
Business Methods
Callback Methods
Bean Instance
Generated Delegates
How does EJB work?The container generated classes for EJBHome, EJBLocalHome, EJBObject and EJBLocalObject will include the code for managing the bean’s security, concurrency, persistence, remote access, transaction handling, … issues transparently to the application
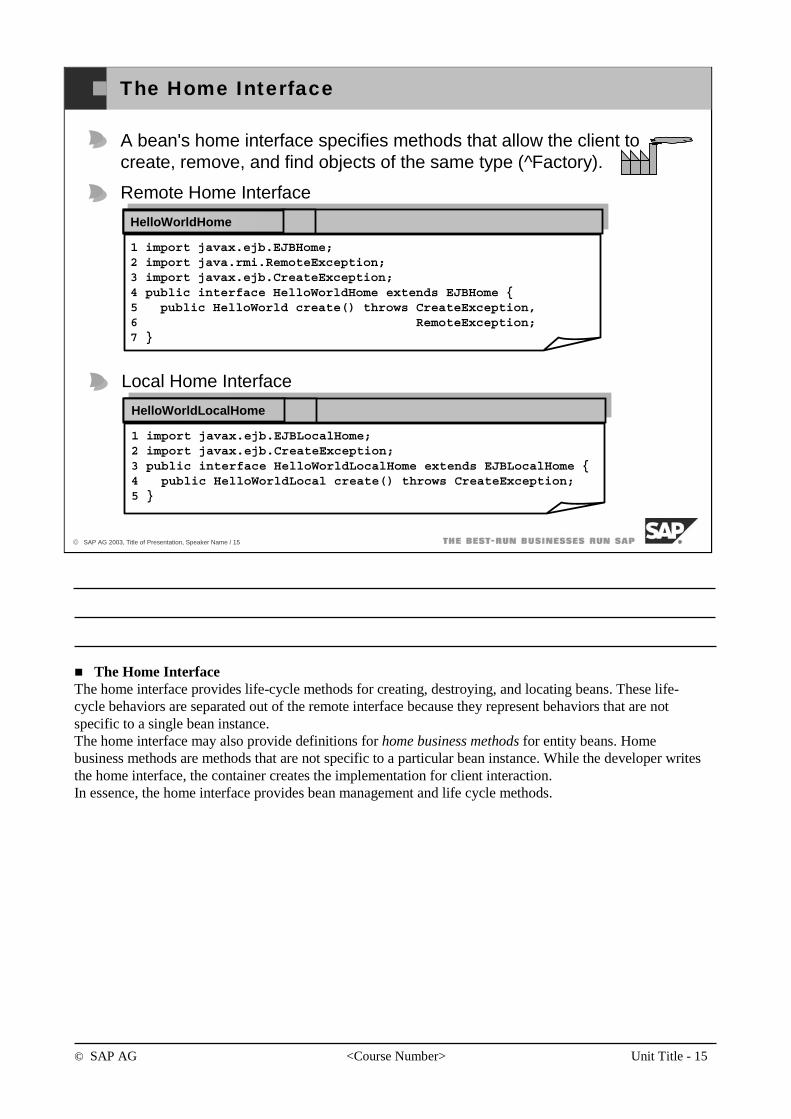
© SAP AG <Course Number> Unit Title - 15
© SAP AG 2003, Title of Presentation, Speaker Name / 15
The Home Interface
A bean's home interface specifies methods that allow the client to create, remove, and find objects of the same type (^Factory).
Remote Home Interface
1 import javax.ejb.EJBHome;2 import java.rmi.RemoteException;3 import javax.ejb.CreateException;4 public interface HelloWorldHome extends EJBHome {5 public HelloWorld create() throws CreateException, 6 RemoteException;7 }
MyHelloWorldBean.javaHelloWorldHome
Local Home Interface
1 import javax.ejb.EJBLocalHome;2 import javax.ejb.CreateException;3 public interface HelloWorldLocalHome extends EJBLocalHome {4 public HelloWorldLocal create() throws CreateException;5 }
MyHelloWorldBean.javaHelloWorldLocalHome
The Home InterfaceThe home interface provides life-cycle methods for creating, destroying, and locating beans. These life-cycle behaviors are separated out of the remote interface because they represent behaviors that are not specific to a single bean instance.The home interface may also provide definitions for home business methods for entity beans. Home business methods are methods that are not specific to a particular bean instance. While the developer writes the home interface, the container creates the implementation for client interaction. In essence, the home interface provides bean management and life cycle methods.
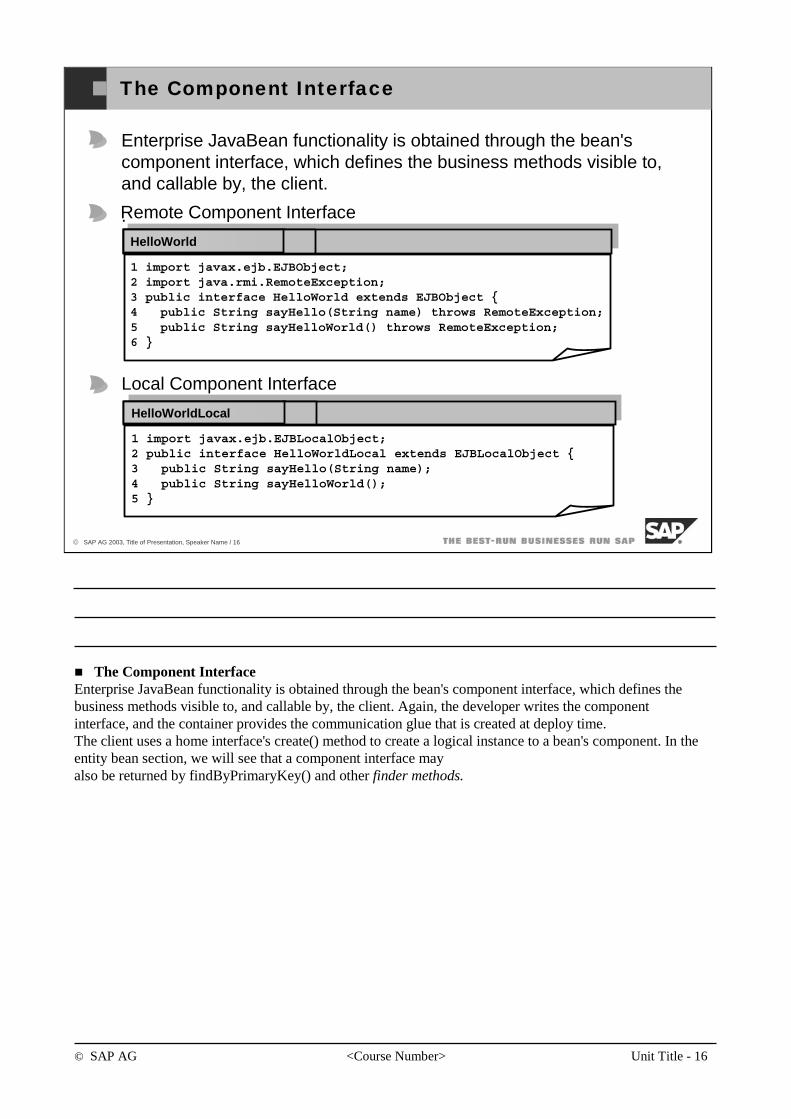
© SAP AG <Course Number> Unit Title - 16
© SAP AG 2003, Title of Presentation, Speaker Name / 16
The Component Interface
Enterprise JavaBean functionality is obtained through the bean'scomponent interface, which defines the business methods visible to, and callable by, the client.
.Remote Component Interface
1 import javax.ejb.EJBObject;2 import java.rmi.RemoteException;3 public interface HelloWorld extends EJBObject {4 public String sayHello(String name) throws RemoteException;5 public String sayHelloWorld() throws RemoteException;6 }
MyHelloWorldBean.javaHelloWorld
Local Component Interface
1 import javax.ejb.EJBLocalObject;2 public interface HelloWorldLocal extends EJBLocalObject {3 public String sayHello(String name);4 public String sayHelloWorld();5 }
MyHelloWorldBean.javaHelloWorldLocal
The Component InterfaceEnterprise JavaBean functionality is obtained through the bean's component interface, which defines the business methods visible to, and callable by, the client. Again, the developer writes the component interface, and the container provides the communication glue that is created at deploy time. The client uses a home interface's create() method to create a logical instance to a bean's component. In the entity bean section, we will see that a component interface mayalso be returned by findByPrimaryKey() and other finder methods.
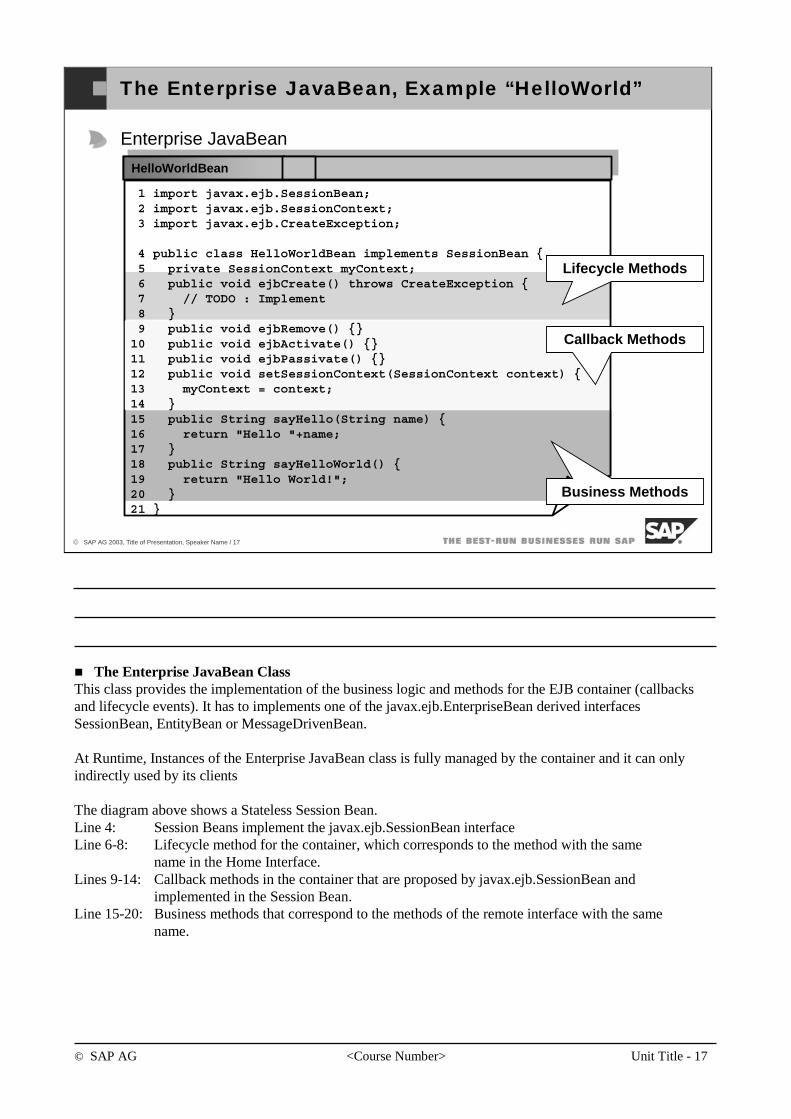
© SAP AG <Course Number> Unit Title - 17
© SAP AG 2003, Title of Presentation, Speaker Name / 17
The Enterprise JavaBean, Example “HelloWorld”
HelloWorldBean
Enterprise JavaBean
1 import javax.ejb.SessionBean;2 import javax.ejb.SessionContext;3 import javax.ejb.CreateException;
4 public class HelloWorldBean implements SessionBean {5 private SessionContext myContext;6 public void ejbCreate() throws CreateException {7 // TODO : Implement8 }9 public void ejbRemove() {}10 public void ejbActivate() {}11 public void ejbPassivate() {}12 public void setSessionContext(SessionContext context) {13 myContext = context;14 } 15 public String sayHello(String name) {16 return "Hello "+name;17 }18 public String sayHelloWorld() {19 return "Hello World!";20 }21 }
Lifecycle Methods
Business Methods
Callback Methods
The Enterprise JavaBean ClassThis class provides the implementation of the business logic and methods for the EJB container (callbacks and lifecycle events). It has to implements one of the javax.ejb.EnterpriseBean derived interfaces SessionBean, EntityBean or MessageDrivenBean.
At Runtime, Instances of the Enterprise JavaBean class is fully managed by the container and it can only indirectly used by its clients
The diagram above shows a Stateless Session Bean.Line 4: Session Beans implement the javax.ejb.SessionBean interfaceLine 6-8: Lifecycle method for the container, which corresponds to the method with the same
name in the Home Interface.Lines 9-14: Callback methods in the container that are proposed by javax.ejb.SessionBean and
implemented in the Session Bean.Line 15-20: Business methods that correspond to the methods of the remote interface with the same
name.
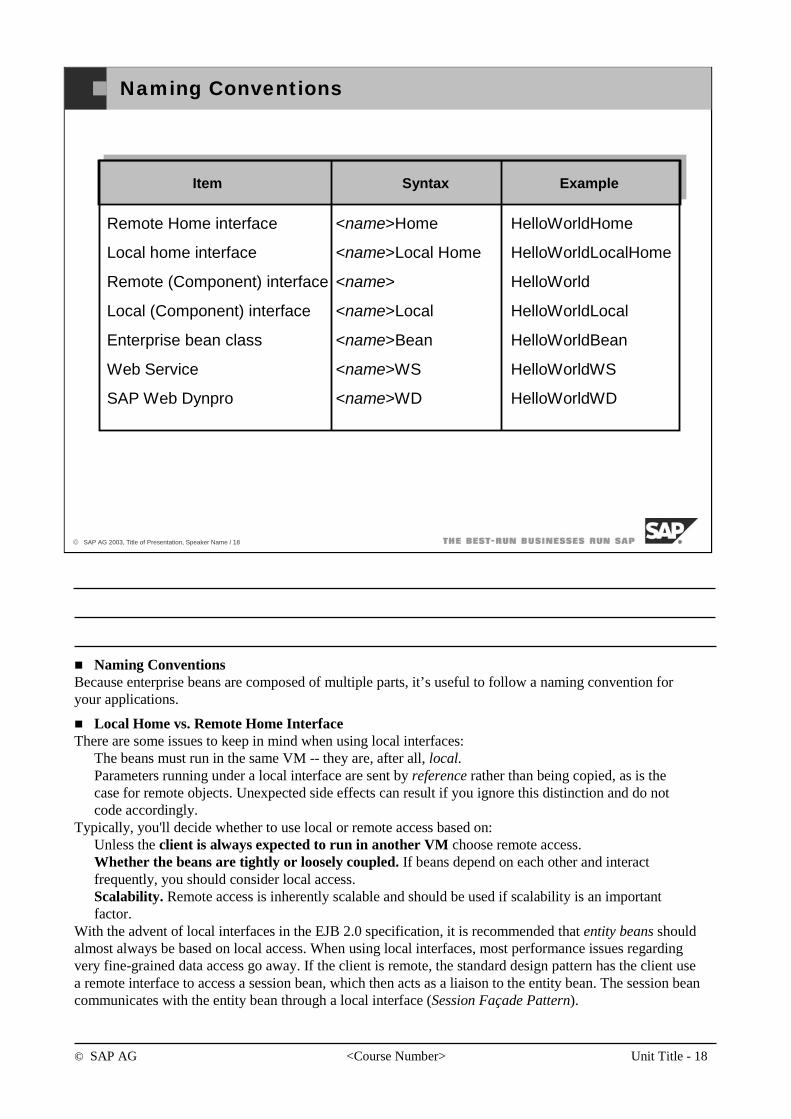
© SAP AG <Course Number> Unit Title - 18
© SAP AG 2003, Title of Presentation, Speaker Name / 18
Remote Home interface <name>Home HelloWorldHome
Local home interface <name>Local Home HelloWorldLocalHome
Remote (Component) interface <name> HelloWorld
Local (Component) interface <name>Local HelloWorldLocal
Enterprise bean class <name>Bean HelloWorldBean
Web Service <name>WS HelloWorldWS
SAP Web Dynpro <name>WD HelloWorldWD
Naming Conventions
Item Syntax Example
Naming ConventionsBecause enterprise beans are composed of multiple parts, it’s useful to follow a naming convention for your applications.
Local Home vs. Remote Home InterfaceThere are some issues to keep in mind when using local interfaces:
The beans must run in the same VM -- they are, after all, local.Parameters running under a local interface are sent by reference rather than being copied, as is the case for remote objects. Unexpected side effects can result if you ignore this distinction and do not code accordingly.
Typically, you'll decide whether to use local or remote access based on:Unless the client is always expected to run in another VM choose remote access.Whether the beans are tightly or loosely coupled. If beans depend on each other and interact frequently, you should consider local access.Scalability. Remote access is inherently scalable and should be used if scalability is an important factor.
With the advent of local interfaces in the EJB 2.0 specification, it is recommended that entity beans should almost always be based on local access. When using local interfaces, most performance issues regarding very fine-grained data access go away. If the client is remote, the standard design pattern has the client use a remote interface to access a session bean, which then acts as a liaison to the entity bean. The session bean communicates with the entity bean through a local interface (Session Façade Pattern).
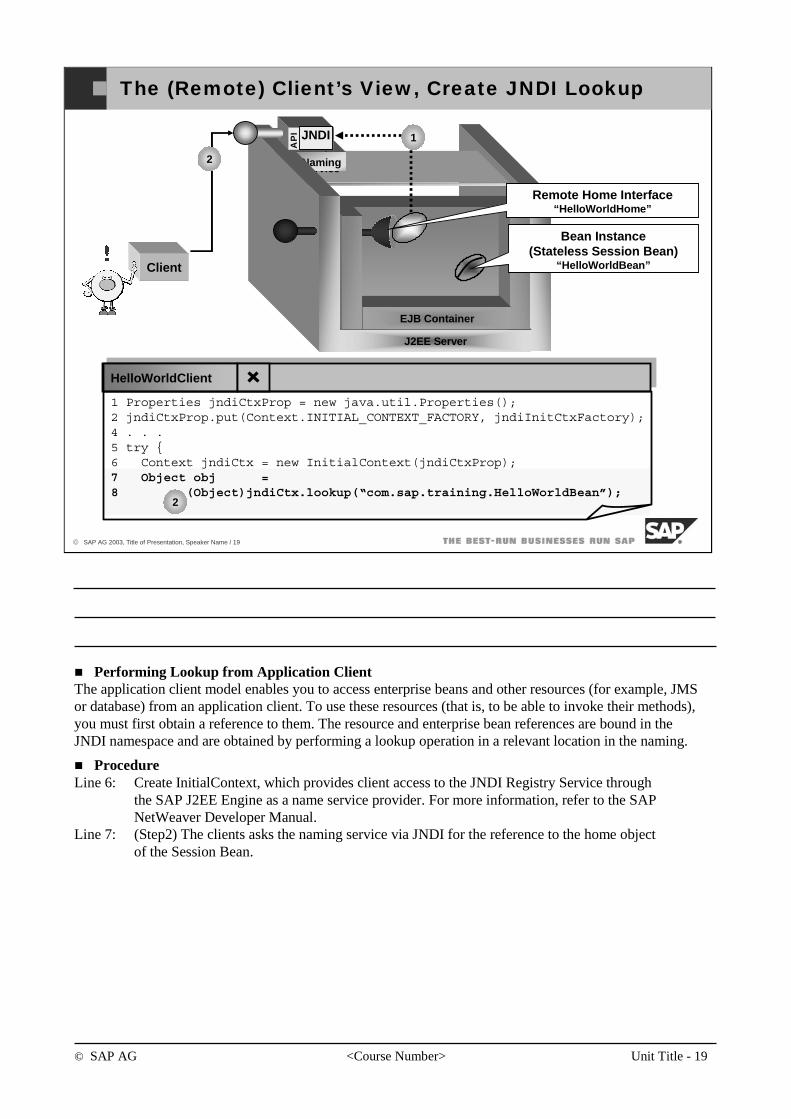
© SAP AG <Course Number> Unit Title - 19
© SAP AG 2003, Title of Presentation, Speaker Name / 19
HelloWorldClient
2
2
J2EE Server
EJB Container
NamingServiceNaming
AP
I JNDI
Client
1
Bean Instance(Stateless Session Bean)
“HelloWorldBean”
The (Remote) Client’s View, Create JNDI Lookup
1 Properties jndiCtxProp = new java.util.Properties();2 jndiCtxProp.put(Context.INITIAL_CONTEXT_FACTORY, jndiInitCtxFactory);4 . . .5 try {6 Context jndiCtx = new InitialContext(jndiCtxProp);7 Object obj = 8 (Object)jndiCtx.lookup(“com.sap.training.HelloWorldBean”);
Remote Home Interface“HelloWorldHome”
Performing Lookup from Application ClientThe application client model enables you to access enterprise beans and other resources (for example, JMS or database) from an application client. To use these resources (that is, to be able to invoke their methods), you must first obtain a reference to them. The resource and enterprise bean references are bound in the JNDI namespace and are obtained by performing a lookup operation in a relevant location in the naming.
ProcedureLine 6: Create InitialContext, which provides client access to the JNDI Registry Service through
the SAP J2EE Engine as a name service provider. For more information, refer to the SAP NetWeaver Developer Manual.
Line 7: (Step2) The clients asks the naming service via JNDI for the reference to the home objectof the Session Bean.
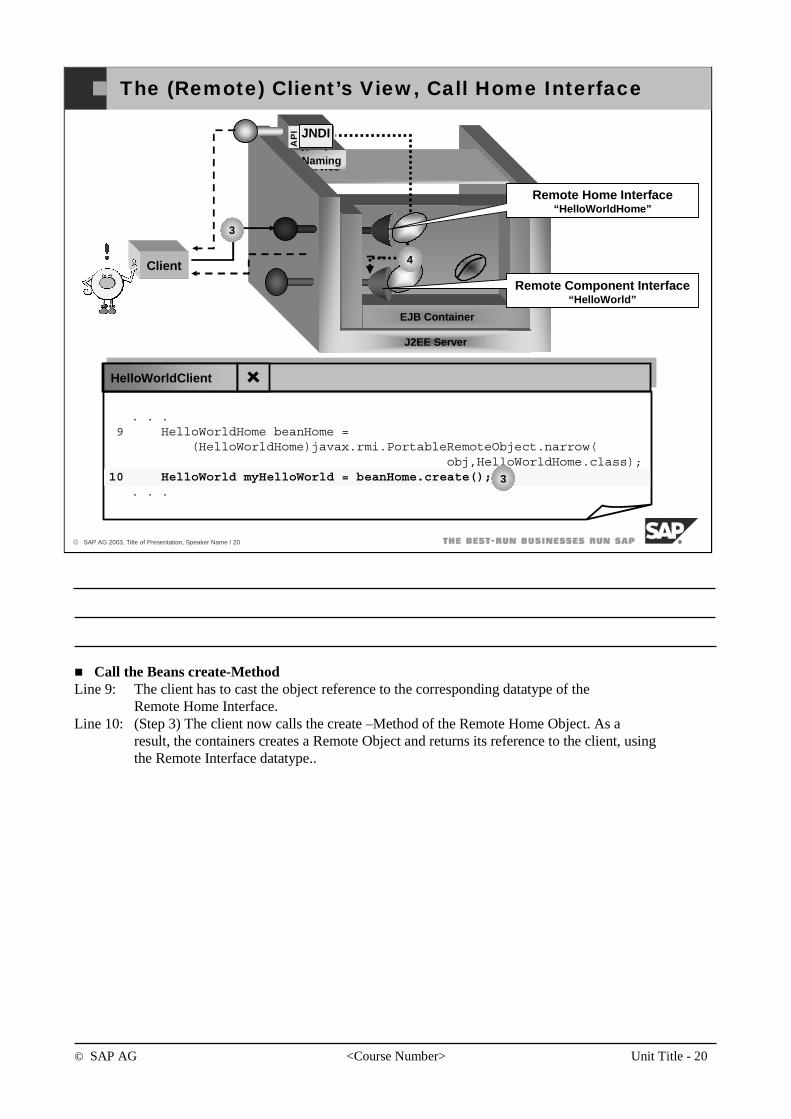
© SAP AG <Course Number> Unit Title - 20
© SAP AG 2003, Title of Presentation, Speaker Name / 20
J2EE Server
EJB Container
NamingServiceNaming
AP
I JNDI
Client
3
The (Remote) Client’s View, Call Home Interface
HelloWorldClient
. . .9 HelloWorldHome beanHome =
(HelloWorldHome)javax.rmi.PortableRemoteObject.narrow(obj,HelloWorldHome.class);
10 HelloWorld myHelloWorld = beanHome.create();. . .
3
4
Remote Component Interface“HelloWorld”
Remote Home Interface“HelloWorldHome”
Call the Beans create-MethodLine 9: The client has to cast the object reference to the corresponding datatype of the
Remote Home Interface.Line 10: (Step 3) The client now calls the create –Method of the Remote Home Object. As a
result, the containers creates a Remote Object and returns its reference to the client, usingthe Remote Interface datatype..
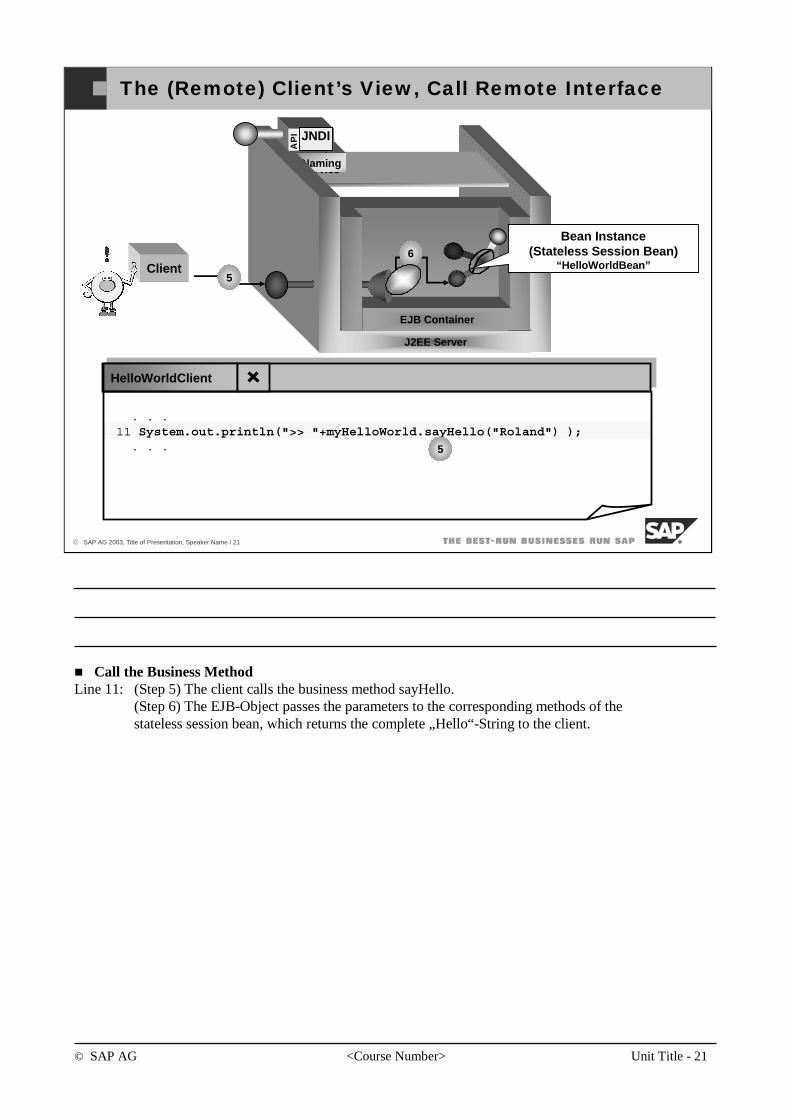
© SAP AG <Course Number> Unit Title - 21
© SAP AG 2003, Title of Presentation, Speaker Name / 21
. . .11 System.out.println(">> "+myHelloWorld.sayHello("Roland") );. . .
J2EE Server
EJB Container
NamingServiceNaming
AP
I JNDI
Client5
6
The (Remote) Client’s View, Call Remote Interface
HelloWorldClient
5
Bean Instance(Stateless Session Bean)
“HelloWorldBean”
Call the Business MethodLine 11: (Step 5) The client calls the business method sayHello.
(Step 6) The EJB-Object passes the parameters to the corresponding methods of thestateless session bean, which returns the complete „Hello“-String to the client.
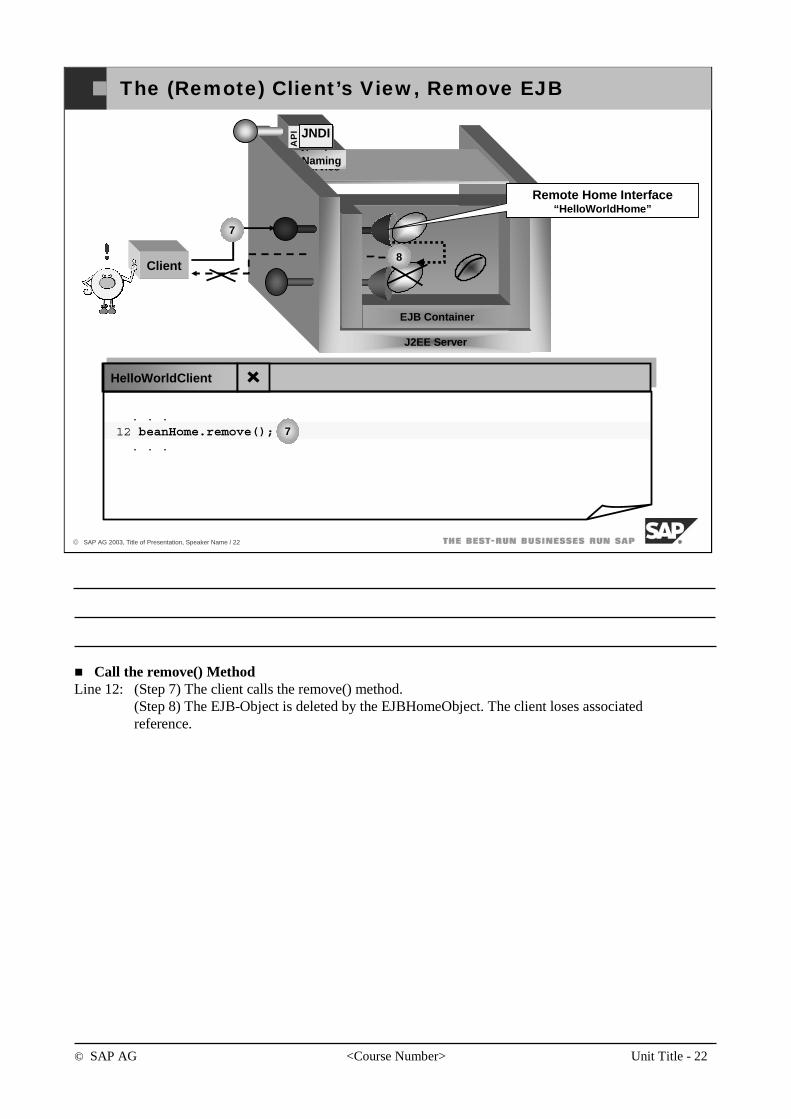
© SAP AG <Course Number> Unit Title - 22
© SAP AG 2003, Title of Presentation, Speaker Name / 22
. . .12 beanHome.remove();. . .
The (Remote) Client’s View, Remove EJB
HelloWorldClient
7
J2EE Server
EJB Container
NamingServiceNaming
AP
I JNDI
Client
7
8
Remote Home Interface“HelloWorldHome”
Call the remove() MethodLine 12: (Step 7) The client calls the remove() method.
(Step 8) The EJB-Object is deleted by the EJBHomeObject. The client loses associatedreference.
© SAP AG <Course Number> Unit Title - 23
© SAP AG 2003, Title of Presentation, Speaker Name / 23
You should now be able to:
Understand what EJBs are.
Enterprise Java Beans: Topic Summary
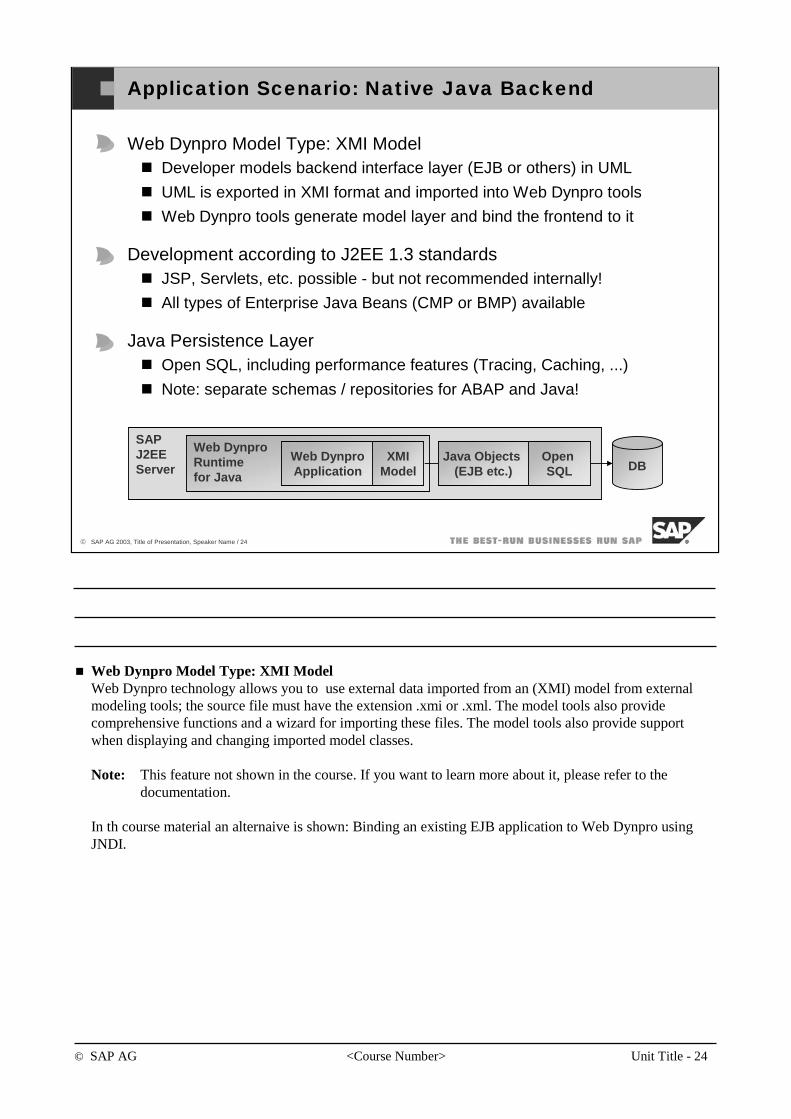
© SAP AG <Course Number> Unit Title - 24
© SAP AG 2003, Title of Presentation, Speaker Name / 24
Application Scenario: Native Java Backend
Web Dynpro Model Type: XMI ModelDeveloper models backend interface layer (EJB or others) in UML
UML is exported in XMI format and imported into Web Dynpro tools
Web Dynpro tools generate model layer and bind the frontend to it
Development according to J2EE 1.3 standardsJSP, Servlets, etc. possible - but not recommended internally!
All types of Enterprise Java Beans (CMP or BMP) available
Java Persistence LayerOpen SQL, including performance features (Tracing, Caching, ...)
Note: separate schemas / repositories for ABAP and Java!
SAPJ2EEServer
Web DynproRuntimefor Java
Web DynproApplication
XMIModel DB
Java Objects (EJB etc.)
Open SQL
Web Dynpro Model Type: XMI ModelWeb Dynpro technology allows you to use external data imported from an (XMI) model from externalmodeling tools; the source file must have the extension .xmi or .xml. The model tools also providecomprehensive functions and a wizard for importing these files. The model tools also provide supportwhen displaying and changing imported model classes.
Note: This feature not shown in the course. If you want to learn more about it, please refer to thedocumentation.
In th course material an alternaive is shown: Binding an existing EJB application to Web Dynpro usingJNDI.
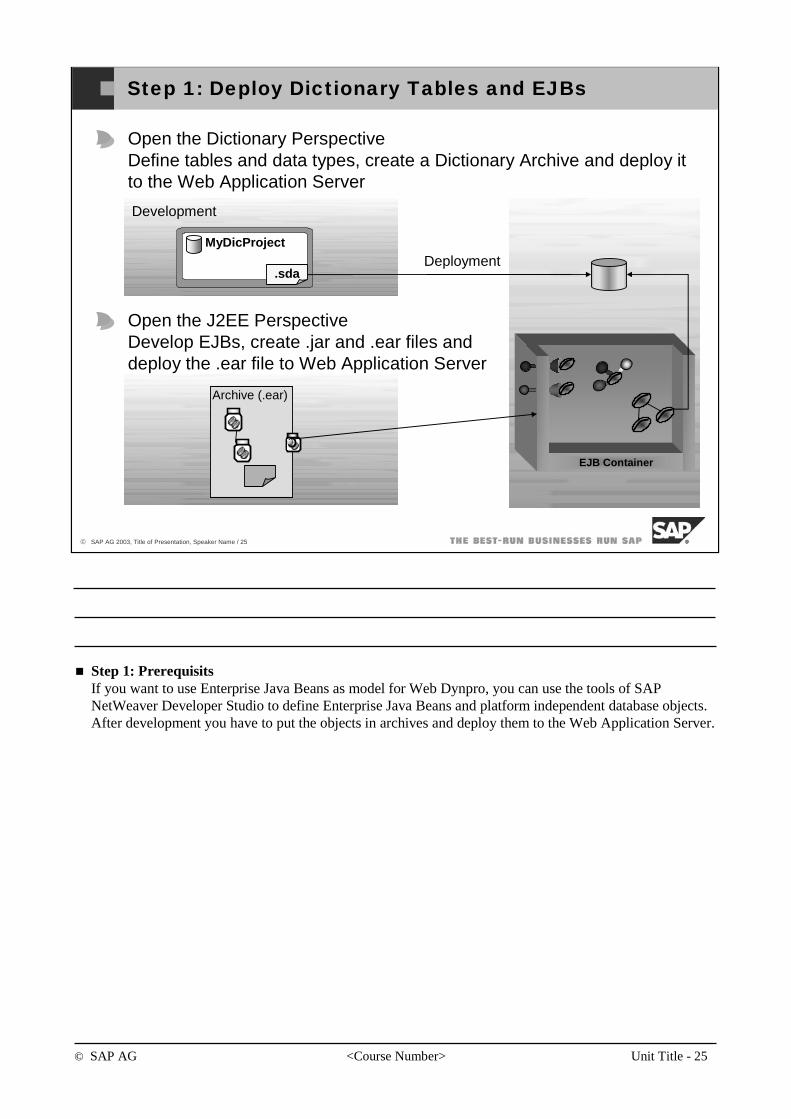
© SAP AG <Course Number> Unit Title - 25
© SAP AG 2003, Title of Presentation, Speaker Name / 25
Step 1: Deploy Dictionary Tables and EJBs
Open the Dictionary PerspectiveDefine tables and data types, create a Dictionary Archive and deploy it to the Web Application Server
Open the J2EE PerspectiveDevelop EJBs, create .jar and .ear files anddeploy the .ear file to Web Application Server
MyDicProject
Development
.sdaDeployment
Archive (.ear)
EJB Container
Step 1: PrerequisitsIf you want to use Enterprise Java Beans as model for Web Dynpro, you can use the tools of SAP NetWeaver Developer Studio to define Enterprise Java Beans and platform independent database objects. After development you have to put the objects in archives and deploy them to the Web Application Server.
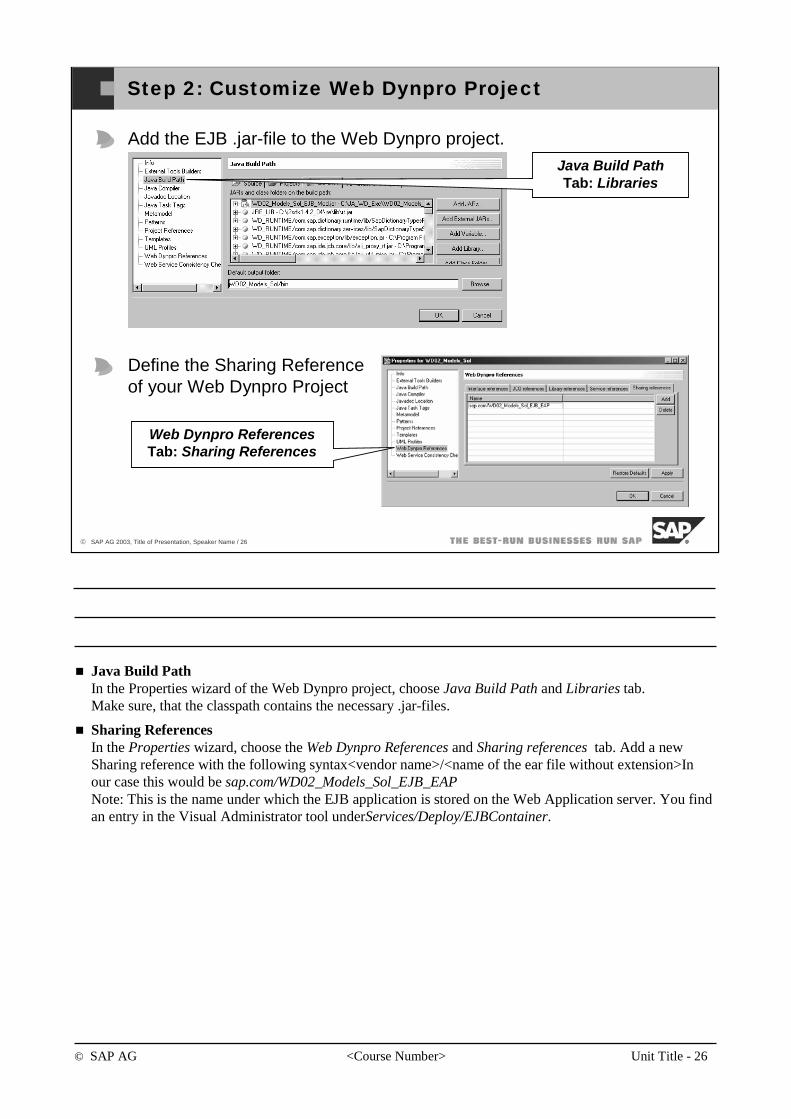
© SAP AG <Course Number> Unit Title - 26
© SAP AG 2003, Title of Presentation, Speaker Name / 26
Step 2: Customize Web Dynpro Project
Add the EJB .jar-file to the Web Dynpro project.
Define the Sharing Reference of your Web Dynpro Project
Web Dynpro ReferencesTab: Sharing References
Java Build PathTab: Libraries
Java Build PathIn the Properties wizard of the Web Dynpro project, choose Java Build Path and Libraries tab.Make sure, that the classpath contains the necessary .jar-files.
Sharing ReferencesIn the Properties wizard, choose the Web Dynpro References and Sharing references tab. Add a new Sharing reference with the following syntax<vendor name>/<name of the ear file without extension>In our case this would be sap.com/WD02_Models_Sol_EJB_EAPNote: This is the name under which the EJB application is stored on the Web Application server. You find an entry in the Visual Administrator tool underServices/Deploy/EJBContainer.

© SAP AG <Course Number> Unit Title - 27
© SAP AG 2003, Title of Presentation, Speaker Name / 27
You should now be able to:
Customize a Web Dynpro project to use EJBs..
Use Enterprise Java Beans: Topic Summary
© SAP AG <Course Number> Unit Title - 28
© SAP AG 2003, Title of Presentation, Speaker Name / 28
You should now be able to:
Explain Enterprise Java Beans.
Use EJBs as Web Dynpro Model.
Using EJBs as Web Dynpro Model: Unit Summary

Models Exercise
Chapter: Models. EJB
Theme: Using Web Dynpro to access EJBs
At the end of this Exercise, you are able to:
• Access EJB functionality from Web Dynpro
1 Development Objectives Accessing EJBs The following exercise shows, how to design, implement, deploy, and run a basic Web Dynpro application that accesses persistent data from an EJB application. 2 Result
As a result of this exercise, you complete a simple, structured Web application, which will add/display car reservations to/from a relational database You should be able to enter some reservation data. When pressing the SAVE button, the data is stored on the DB using a predefined stateless session bean. You should also be able to select the content of the database table and remove entries from the database.
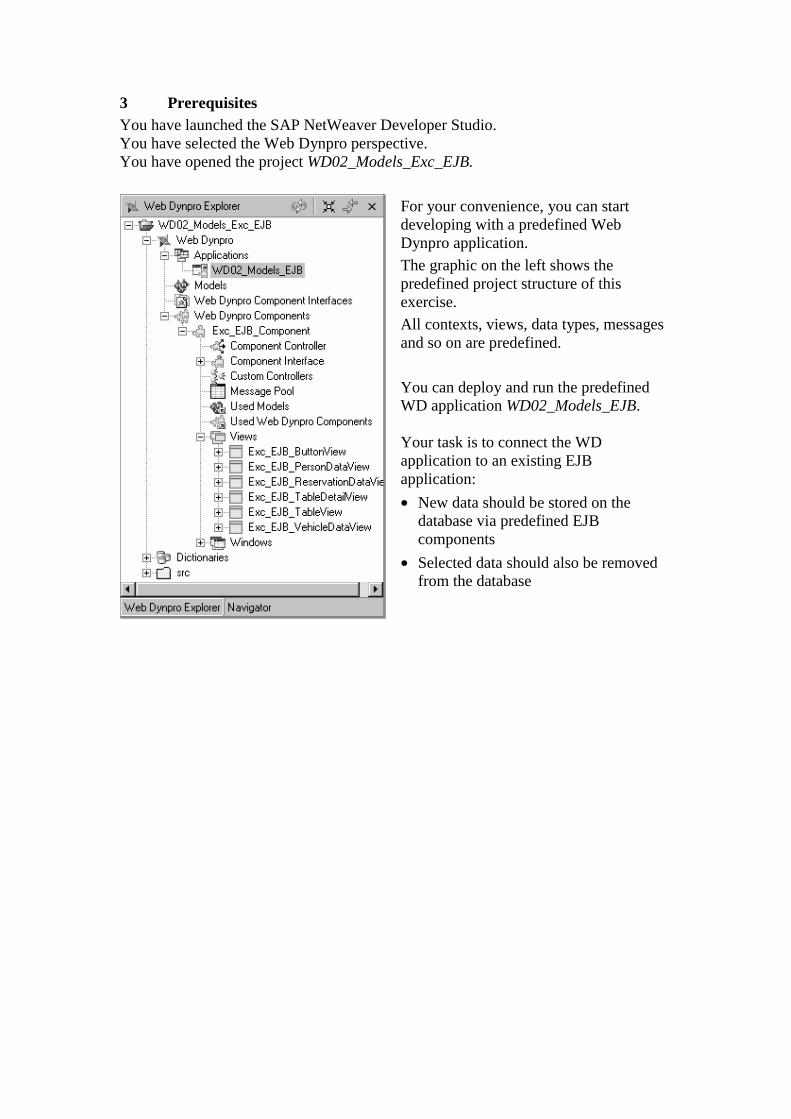
3 Prerequisites You have launched the SAP NetWeaver Developer Studio. You have selected the Web Dynpro perspective. You have opened the project WD02_Models_Exc_EJB.
For your convenience, you can start developing with a predefined Web Dynpro application.
The graphic on the left shows the predefined project structure of this exercise.
All contexts, views, data types, messages and so on are predefined.
You can deploy and run the predefined WD application WD02_Models_EJB. Your task is to connect the WD application to an existing EJB application:
• New data should be stored on the database via predefined EJB components
• Selected data should also be removed from the database
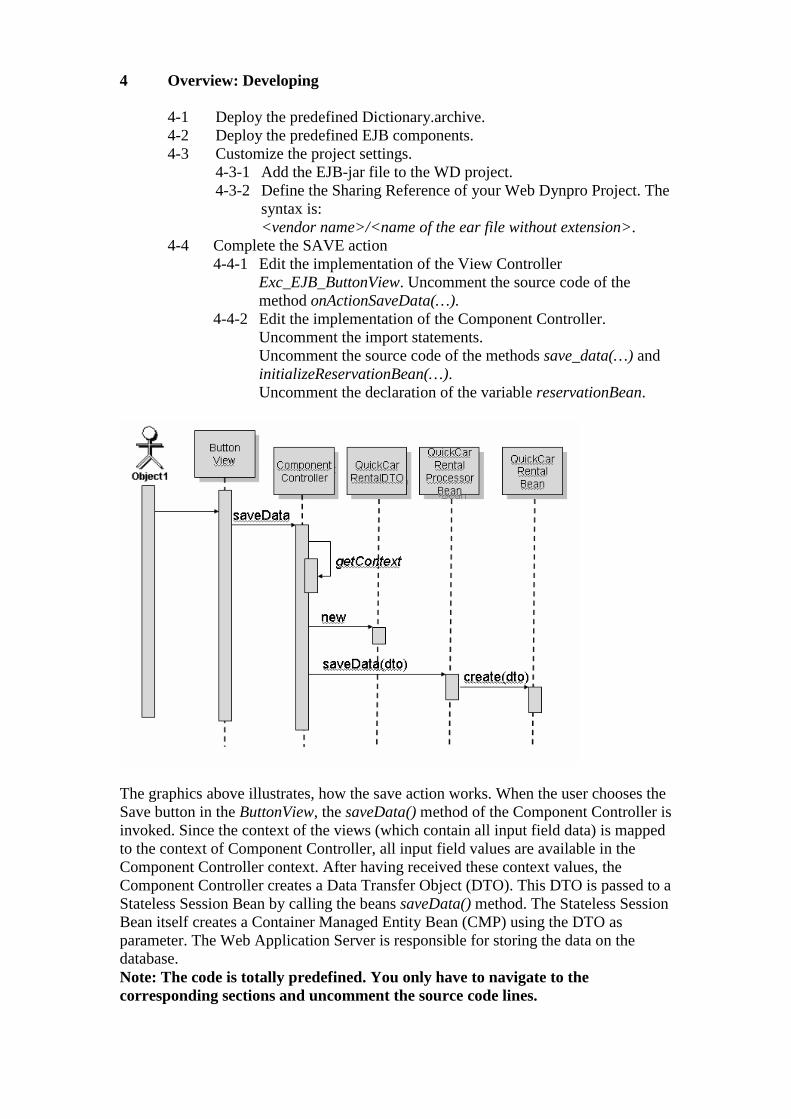
4 Overview: Developing
4-1 Deploy the predefined Dictionary.archive. 4-2 Deploy the predefined EJB components. 4-3 Customize the project settings.
4-3-1 Add the EJB-jar file to the WD project. 4-3-2 Define the Sharing Reference of your Web Dynpro Project. The
syntax is: <vendor name>/<name of the ear file without extension>.
4-4 Complete the SAVE action 4-4-1 Edit the implementation of the View Controller
Exc_EJB_ButtonView. Uncomment the source code of the method onActionSaveData(…).
4-4-2 Edit the implementation of the Component Controller. Uncomment the import statements. Uncomment the source code of the methods save_data(…) and initializeReservationBean(…). Uncomment the declaration of the variable reservationBean.
The graphics above illustrates, how the save action works. When the user chooses the Save button in the ButtonView, the saveData() method of the Component Controller is invoked. Since the context of the views (which contain all input field data) is mapped to the context of Component Controller, all input field values are available in the Component Controller context. After having received these context values, the Component Controller creates a Data Transfer Object (DTO). This DTO is passed to a Stateless Session Bean by calling the beans saveData() method. The Stateless Session Bean itself creates a Container Managed Entity Bean (CMP) using the DTO as parameter. The Web Application Server is responsible for storing the data on the database. Note: The code is totally predefined. You only have to navigate to the corresponding sections and uncomment the source code lines.
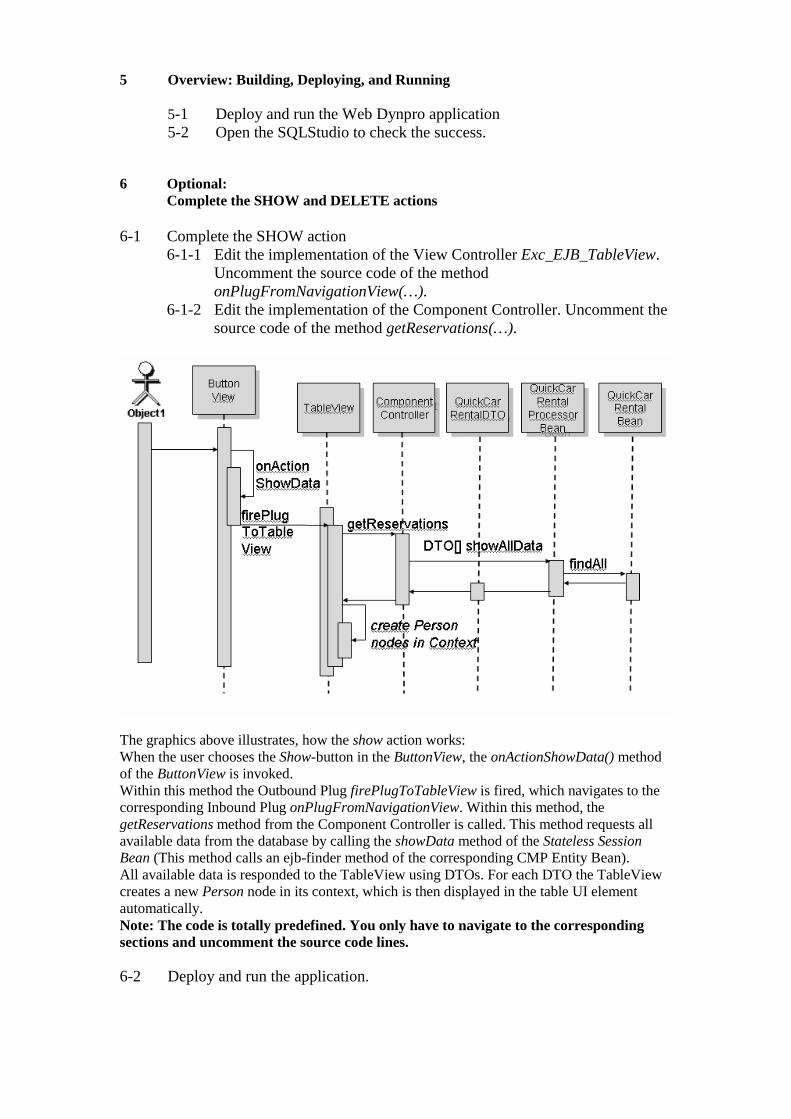
5 Overview: Building, Deploying, and Running
5-1 Deploy and run the Web Dynpro application 5-2 Open the SQLStudio to check the success.
6 Optional:
Complete the SHOW and DELETE actions 6-1 Complete the SHOW action
6-1-1 Edit the implementation of the View Controller Exc_EJB_TableView. Uncomment the source code of the method onPlugFromNavigationView(…).
6-1-2 Edit the implementation of the Component Controller. Uncomment the source code of the method getReservations(…).
The graphics above illustrates, how the show action works: When the user chooses the Show-button in the ButtonView, the onActionShowData() method of the ButtonView is invoked. Within this method the Outbound Plug firePlugToTableView is fired, which navigates to the corresponding Inbound Plug onPlugFromNavigationView. Within this method, the getReservations method from the Component Controller is called. This method requests all available data from the database by calling the showData method of the Stateless Session Bean (This method calls an ejb-finder method of the corresponding CMP Entity Bean). All available data is responded to the TableView using DTOs. For each DTO the TableView creates a new Person node in its context, which is then displayed in the table UI element automatically. Note: The code is totally predefined. You only have to navigate to the corresponding sections and uncomment the source code lines. 6-2 Deploy and run the application.
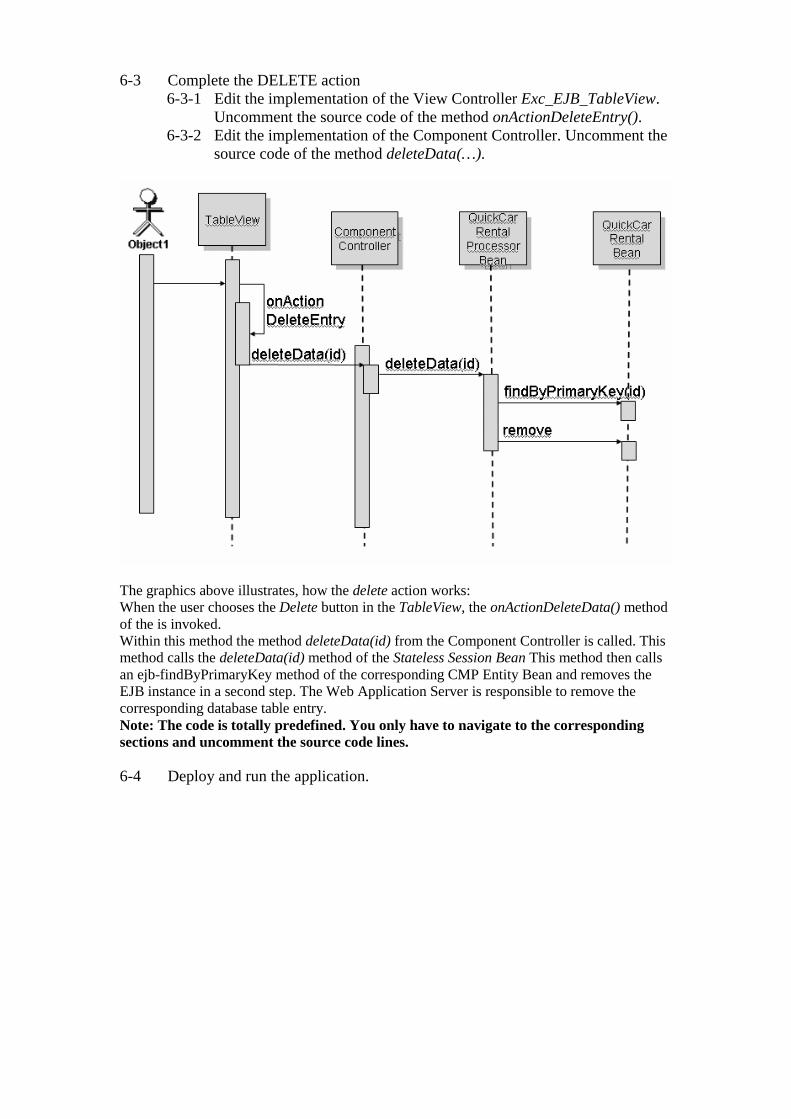
6-3 Complete the DELETE action 6-3-1 Edit the implementation of the View Controller Exc_EJB_TableView.
Uncomment the source code of the method onActionDeleteEntry(). 6-3-2 Edit the implementation of the Component Controller. Uncomment the
source code of the method deleteData(…).
The graphics above illustrates, how the delete action works: When the user chooses the Delete button in the TableView, the onActionDeleteData() method of the is invoked. Within this method the method deleteData(id) from the Component Controller is called. This method calls the deleteData(id) method of the Stateless Session Bean This method then calls an ejb-findByPrimaryKey method of the corresponding CMP Entity Bean and removes the EJB instance in a second step. The Web Application Server is responsible to remove the corresponding database table entry. Note: The code is totally predefined. You only have to navigate to the corresponding sections and uncomment the source code lines. 6-4 Deploy and run the application.
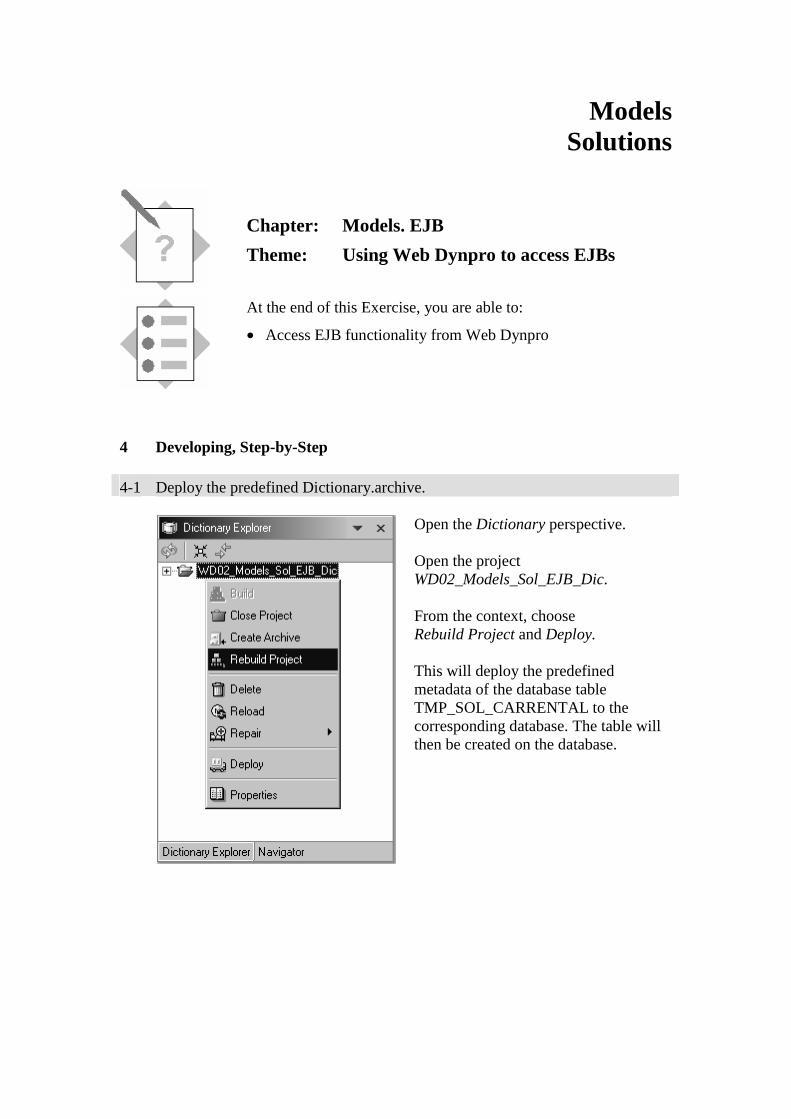
Models Solutions
Chapter: Models. EJB
Theme: Using Web Dynpro to access EJBs
At the end of this Exercise, you are able to:
• Access EJB functionality from Web Dynpro
4 Developing, Step-by-Step 4-1 Deploy the predefined Dictionary.archive.
Open the Dictionary perspective. Open the project WD02_Models_Sol_EJB_Dic. From the context, choose Rebuild Project and Deploy. This will deploy the predefined metadata of the database table TMP_SOL_CARRENTAL to the corresponding database. The table will then be created on the database.
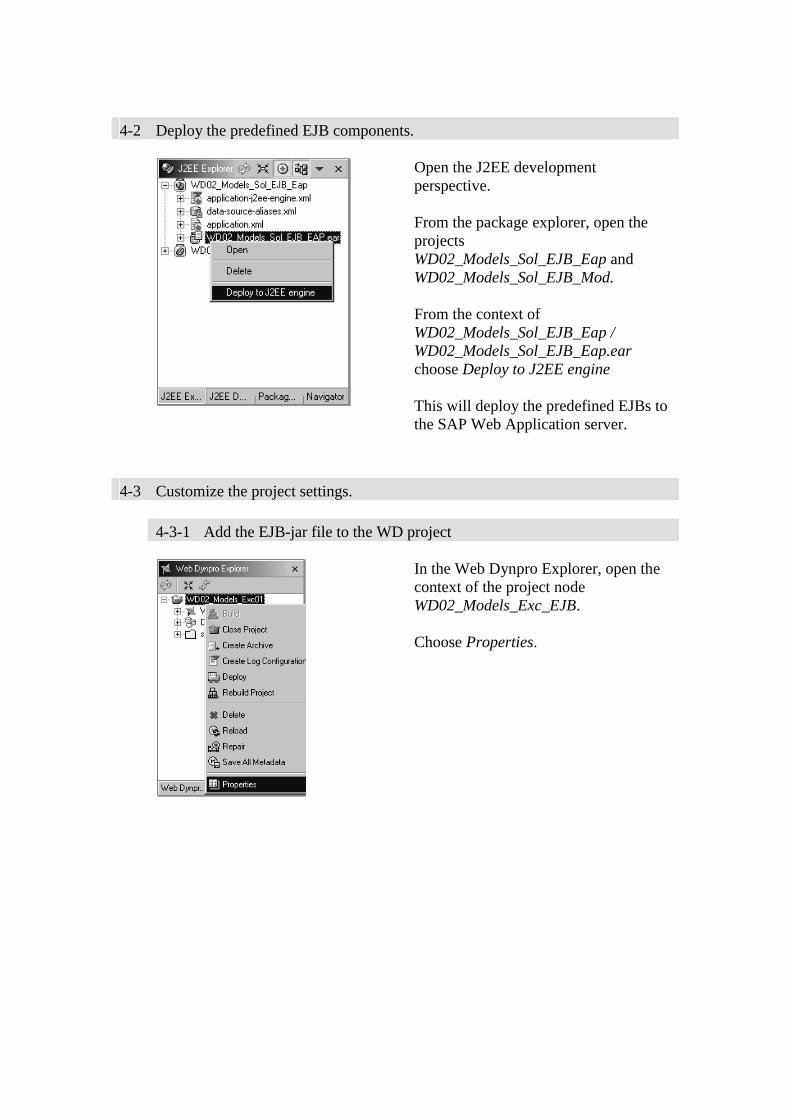
4-2 Deploy the predefined EJB components.
Open the J2EE development perspective. From the package explorer, open the projects WD02_Models_Sol_EJB_Eap and WD02_Models_Sol_EJB_Mod. From the context of WD02_Models_Sol_EJB_Eap / WD02_Models_Sol_EJB_Eap.ear choose Deploy to J2EE engine This will deploy the predefined EJBs to the SAP Web Application server.
4-3 Customize the project settings.
4-3-1 Add the EJB-jar file to the WD project
In the Web Dynpro Explorer, open the context of the project node WD02_Models_Exc_EJB. Choose Properties.
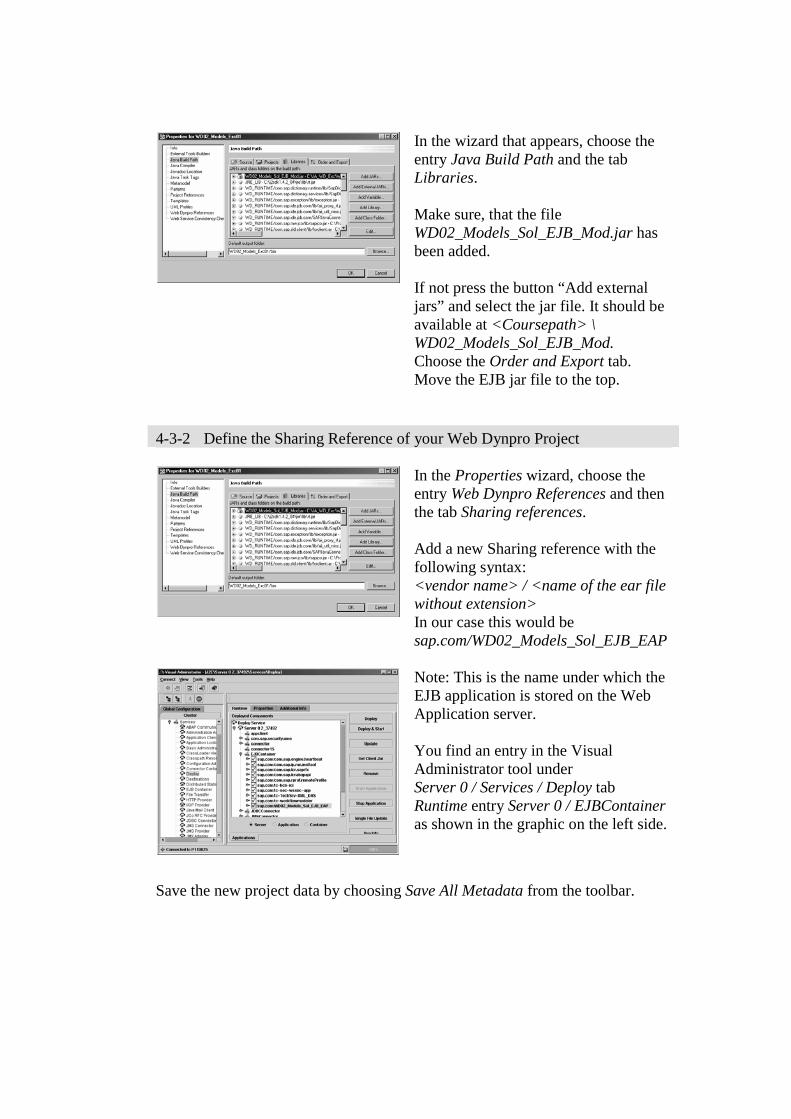
In the wizard that appears, choose the entry Java Build Path and the tab Libraries. Make sure, that the file WD02_Models_Sol_EJB_Mod.jar has been added. If not press the button “Add external jars” and select the jar file. It should be available at <Coursepath> \ WD02_Models_Sol_EJB_Mod. Choose the Order and Export tab. Move the EJB jar file to the top.
4-3-2 Define the Sharing Reference of your Web Dynpro Project
In the Properties wizard, choose the entry Web Dynpro References and then the tab Sharing references. Add a new Sharing reference with the following syntax: <vendor name> / <name of the ear file without extension> In our case this would be sap.com/WD02_Models_Sol_EJB_EAP
Note: This is the name under which the EJB application is stored on the Web Application server. You find an entry in the Visual Administrator tool under Server 0 / Services / Deploy tab Runtime entry Server 0 / EJBContainer as shown in the graphic on the left side.
Save the new project data by choosing Save All Metadata from the toolbar.
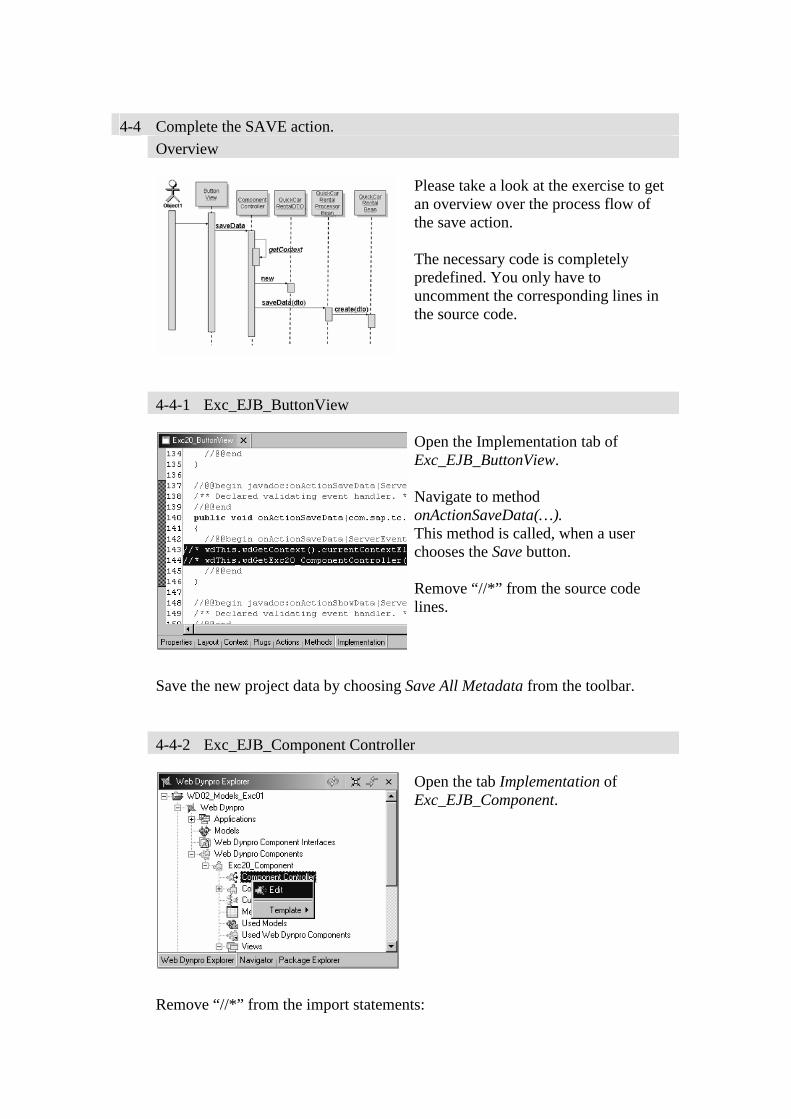
4-4 Complete the SAVE action.
Overview
Please take a look at the exercise to get an overview over the process flow of the save action. The necessary code is completely predefined. You only have to uncomment the corresponding lines in the source code.
4-4-1 Exc_EJB_ButtonView
Open the Implementation tab of Exc_EJB_ButtonView. Navigate to method onActionSaveData(…). This method is called, when a user chooses the Save button. Remove “//*” from the source code lines.
Save the new project data by choosing Save All Metadata from the toolbar.
4-4-2 Exc_EJB_Component Controller
Open the tab Implementation of Exc_EJB_Component.
Remove “//*” from the import statements:
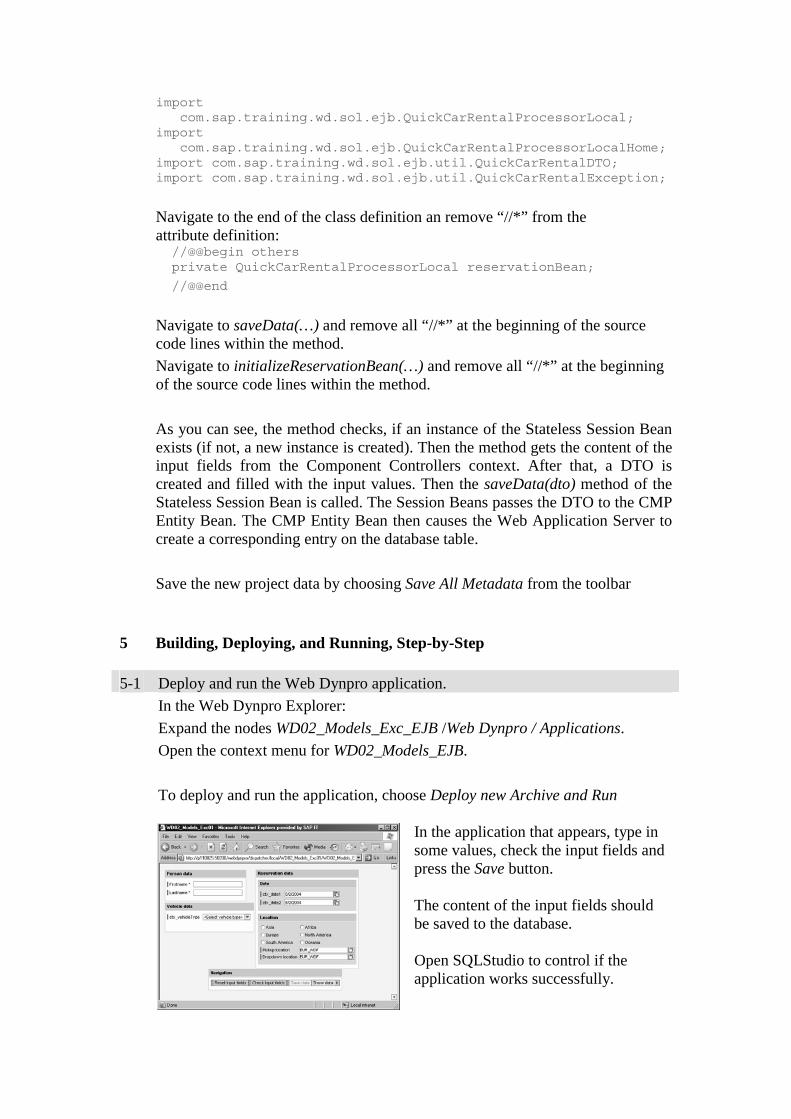
import com.sap.training.wd.sol.ejb.QuickCarRentalProcessorLocal; import com.sap.training.wd.sol.ejb.QuickCarRentalProcessorLocalHome; import com.sap.training.wd.sol.ejb.util.QuickCarRentalDTO; import com.sap.training.wd.sol.ejb.util.QuickCarRentalException;
Navigate to the end of the class definition an remove “//*” from the attribute definition: //@@begin others private QuickCarRentalProcessorLocal reservationBean;
//@@end Navigate to saveData(…) and remove all “//*” at the beginning of the source
code lines within the method.
Navigate to initializeReservationBean(…) and remove all “//*” at the beginning of the source code lines within the method.
As you can see, the method checks, if an instance of the Stateless Session Bean exists (if not, a new instance is created). Then the method gets the content of the input fields from the Component Controllers context. After that, a DTO is created and filled with the input values. Then the saveData(dto) method of the Stateless Session Bean is called. The Session Beans passes the DTO to the CMP Entity Bean. The CMP Entity Bean then causes the Web Application Server to create a corresponding entry on the database table.
Save the new project data by choosing Save All Metadata from the toolbar
5 Building, Deploying, and Running, Step-by-Step 5-1 Deploy and run the Web Dynpro application. In the Web Dynpro Explorer:
Expand the nodes WD02_Models_Exc_EJB /Web Dynpro / Applications.
Open the context menu for WD02_Models_EJB.
To deploy and run the application, choose Deploy new Archive and Run
In the application that appears, type in some values, check the input fields and press the Save button. The content of the input fields should be saved to the database. Open SQLStudio to control if the application works successfully.

Open the SQL Studio and insert the following SQL statement to see all data records: select * from tmp_sol_carrental Press F8 to start the selection.
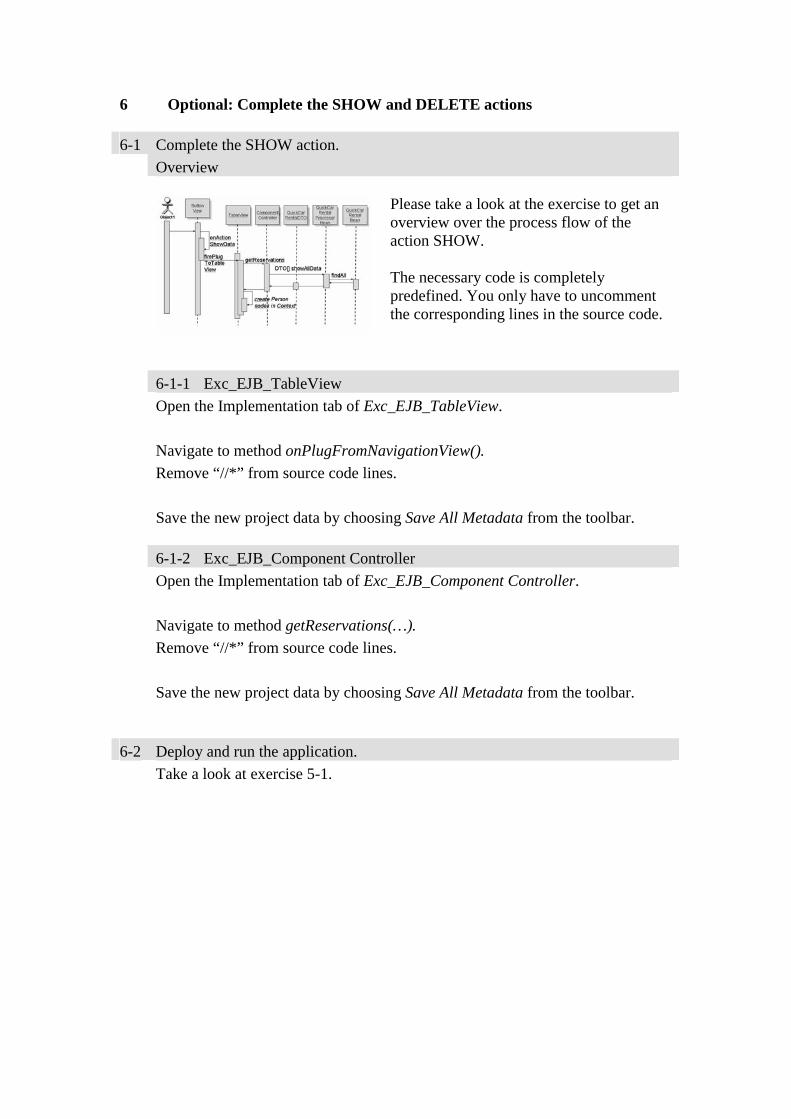
6 Optional: Complete the SHOW and DELETE actions
6-1 Complete the SHOW action.
Overview
Please take a look at the exercise to get an overview over the process flow of the action SHOW. The necessary code is completely predefined. You only have to uncomment the corresponding lines in the source code.
6-1-1 Exc_EJB_TableView Open the Implementation tab of Exc_EJB_TableView.
Navigate to method onPlugFromNavigationView().
Remove “//*” from source code lines.
Save the new project data by choosing Save All Metadata from the toolbar.
6-1-2 Exc_EJB_Component Controller Open the Implementation tab of Exc_EJB_Component Controller.
Navigate to method getReservations(…).
Remove “//*” from source code lines.
Save the new project data by choosing Save All Metadata from the toolbar.
6-2 Deploy and run the application.
Take a look at exercise 5-1.
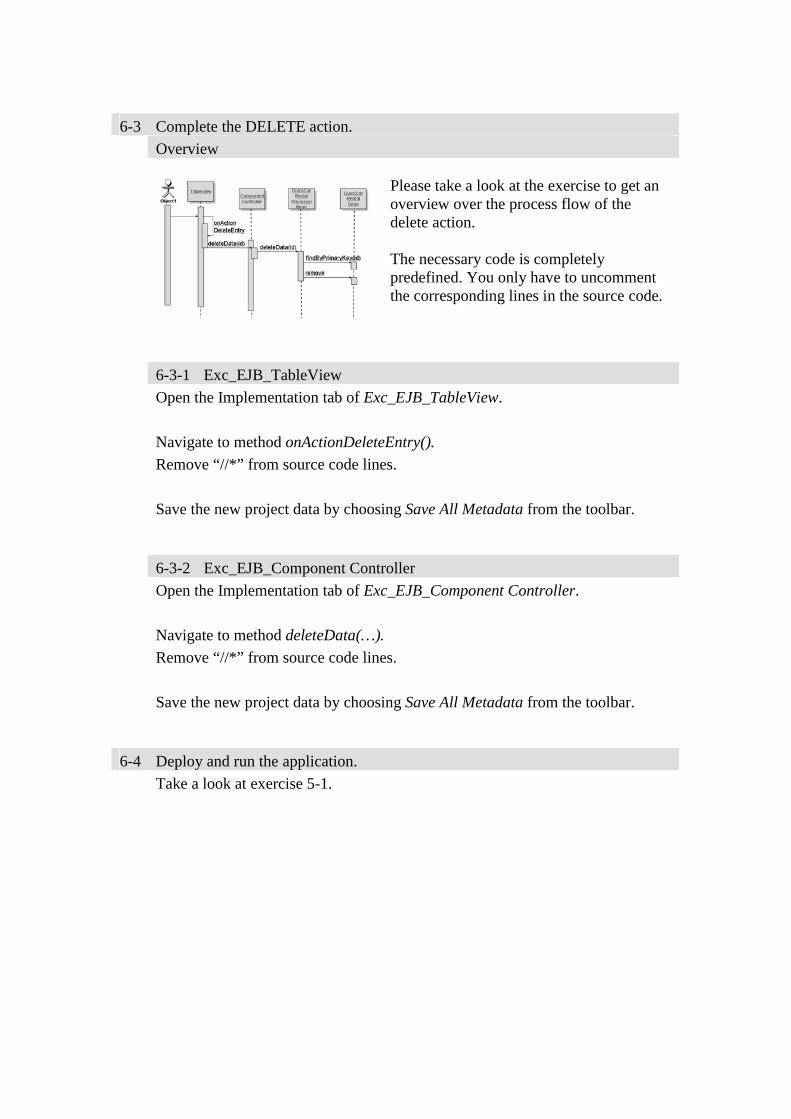
6-3 Complete the DELETE action.
Overview
Please take a look at the exercise to get an overview over the process flow of the delete action. The necessary code is completely predefined. You only have to uncomment the corresponding lines in the source code.
6-3-1 Exc_EJB_TableView Open the Implementation tab of Exc_EJB_TableView.
Navigate to method onActionDeleteEntry().
Remove “//*” from source code lines.
Save the new project data by choosing Save All Metadata from the toolbar.
6-3-2 Exc_EJB_Component Controller Open the Implementation tab of Exc_EJB_Component Controller.
Navigate to method deleteData(…).
Remove “//*” from source code lines.
Save the new project data by choosing Save All Metadata from the toolbar.
6-4 Deploy and run the application.
Take a look at exercise 5-1.
© SAP AG <Course Number> Unit Title - 1
© SAP AG 2003, Title of Presentation, Speaker Name / 1
Web Services overview
Implementing a Web Service Client
Contents:
Using Web Services as Web Dynpro Model
© SAP AG <Course Number> Unit Title - 2
© SAP AG 2003, Title of Presentation, Speaker Name / 2
After completing this unit, you will be able to:
Explain what Web Services are.
Implement a simple Web Dynpro application using a Web Service.
Using Web Services as Web Dynpro Model: Unit Objectives

© SAP AG <Course Number> Unit Title - 3
© SAP AG 2003, Title of Presentation, Speaker Name / 3
After completing this topic, you will be able to:
Explain what Web Services are.
Web Services Overview: Topic Objectives
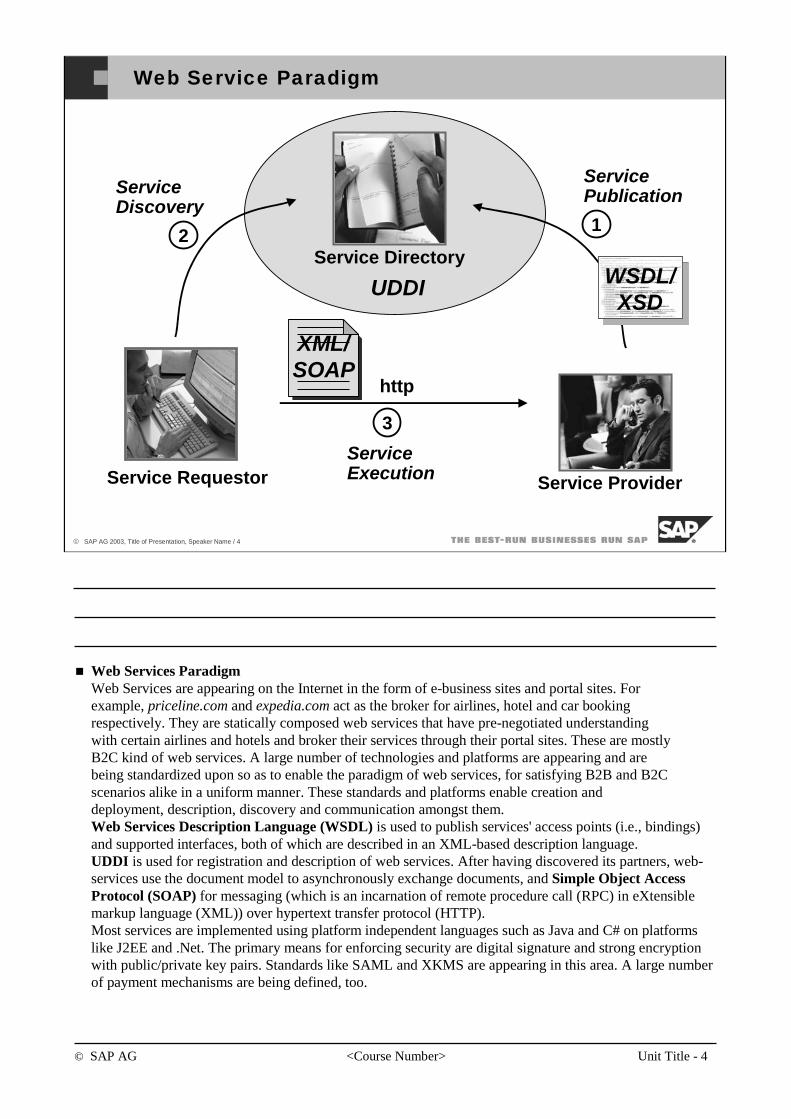
© SAP AG <Course Number> Unit Title - 4
© SAP AG 2003, Title of Presentation, Speaker Name / 4
UDDI
Web Service Paradigm
3
ServiceExecution
2
Service Requestor
ServiceDiscovery
Service Provider
Service Directory
1
ServicePublication
WSDL/XSD
XML/SOAP
http
Web Services ParadigmWeb Services are appearing on the Internet in the form of e-business sites and portal sites. Forexample, priceline.com and expedia.com act as the broker for airlines, hotel and car bookingrespectively. They are statically composed web services that have pre-negotiated understandingwith certain airlines and hotels and broker their services through their portal sites. These are mostlyB2C kind of web services. A large number of technologies and platforms are appearing and arebeing standardized upon so as to enable the paradigm of web services, for satisfying B2B and B2Cscenarios alike in a uniform manner. These standards and platforms enable creation anddeployment, description, discovery and communication amongst them. Web Services Description Language (WSDL) is used to publish services' access points (i.e., bindings) and supported interfaces, both of which are described in an XML-based description language. UDDI is used for registration and description of web services. After having discovered its partners, web-services use the document model to asynchronously exchange documents, and Simple Object Access Protocol (SOAP) for messaging (which is an incarnation of remote procedure call (RPC) in eXtensiblemarkup language (XML)) over hypertext transfer protocol (HTTP). Most services are implemented using platform independent languages such as Java and C# on platformslike J2EE and .Net. The primary means for enforcing security are digital signature and strong encryptionwith public/private key pairs. Standards like SAML and XKMS are appearing in this area. A large numberof payment mechanisms are being defined, too.
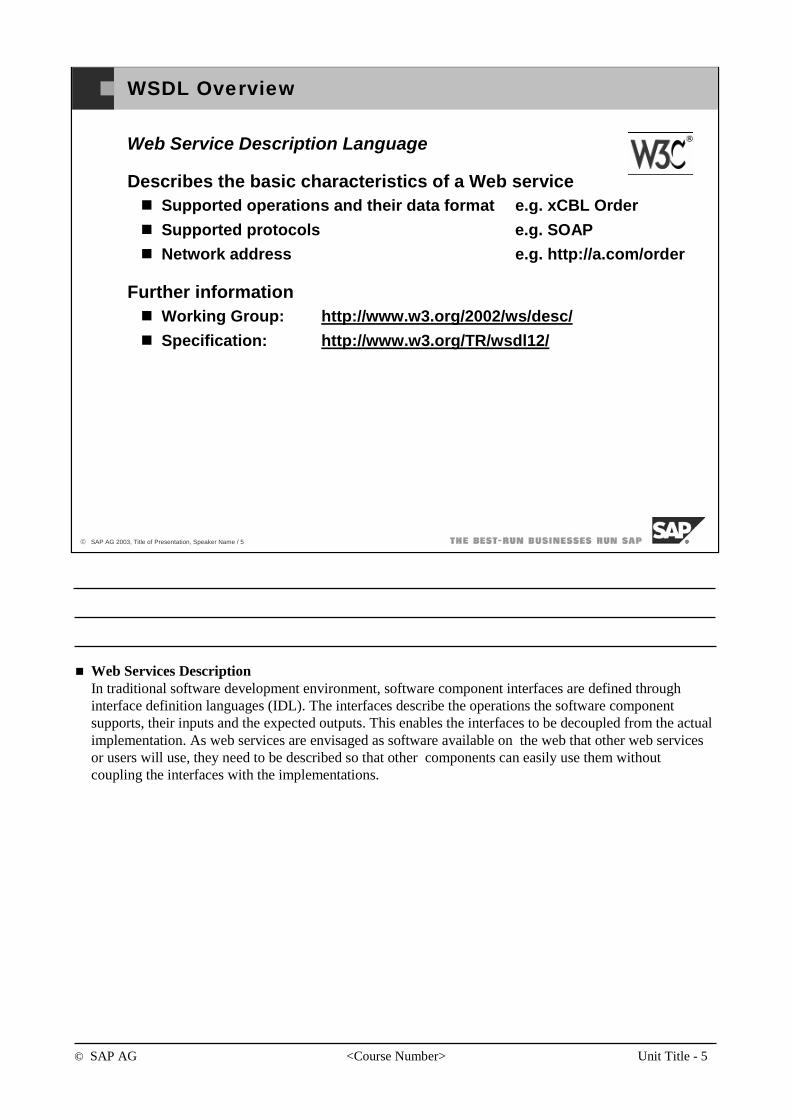
© SAP AG <Course Number> Unit Title - 5
© SAP AG 2003, Title of Presentation, Speaker Name / 5
WSDL Overview
Describes the basic characteristics of a Web serviceSupported operations and their data format e.g. xCBL Order
Supported protocols e.g. SOAP
Network address e.g. http://a.com/order
Further informationWorking Group: http://www.w3.org/2002/ws/desc/
Specification: http://www.w3.org/TR/wsdl12/
Web Service Description Language
Web Services DescriptionIn traditional software development environment, software component interfaces are defined throughinterface definition languages (IDL). The interfaces describe the operations the software componentsupports, their inputs and the expected outputs. This enables the interfaces to be decoupled from the actualimplementation. As web services are envisaged as software available on the web that other web servicesor users will use, they need to be described so that other components can easily use them withoutcoupling the interfaces with the implementations.
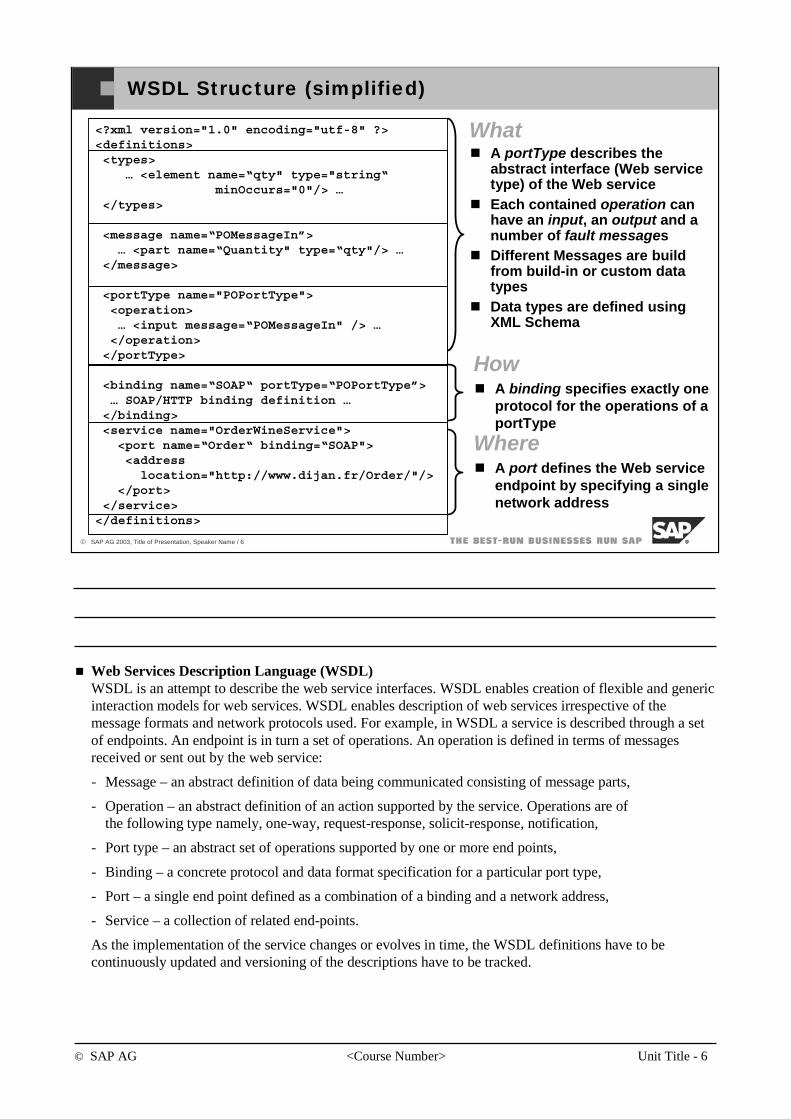
© SAP AG <Course Number> Unit Title - 6
© SAP AG 2003, Title of Presentation, Speaker Name / 6
WSDL Structure (simplified)
WhatA portType describes the abstract interface (Web service type) of the Web serviceEach contained operation can have an input, an output and a number of fault messagesDifferent Messages are build from build-in or custom data typesData types are defined using XML Schema
HowA binding specifies exactly one protocol for the operations of a portType
WhereA port defines the Web service endpoint by specifying a single network address
<?xml version="1.0" encoding="utf-8" ?> <definitions><types>
… <element name=“qty" type="string“minOccurs="0"/> …
</types>
<message name=“POMessageIn”>… <part name=“Quantity" type=“qty"/> …
</message>
<portType name="POPortType"><operation>… <input message=“POMessageIn" /> …</operation></portType>
<binding name=“SOAP“ portType=“POPortType”>… SOAP/HTTP binding definition …</binding><service name="OrderWineService"><port name=“Order“ binding=“SOAP"><addresslocation="http://www.dijan.fr/Order/"/>
</port></service></definitions>
Web Services Description Language (WSDL) WSDL is an attempt to describe the web service interfaces. WSDL enables creation of flexible and genericinteraction models for web services. WSDL enables description of web services irrespective of themessage formats and network protocols used. For example, in WSDL a service is described through a setof endpoints. An endpoint is in turn a set of operations. An operation is defined in terms of messagesreceived or sent out by the web service:
- Message – an abstract definition of data being communicated consisting of message parts,
- Operation – an abstract definition of an action supported by the service. Operations are ofthe following type namely, one-way, request-response, solicit-response, notification,
- Port type – an abstract set of operations supported by one or more end points,
- Binding – a concrete protocol and data format specification for a particular port type,
- Port – a single end point defined as a combination of a binding and a network address,
- Service – a collection of related end-points.
As the implementation of the service changes or evolves in time, the WSDL definitions have to becontinuously updated and versioning of the descriptions have to be tracked.
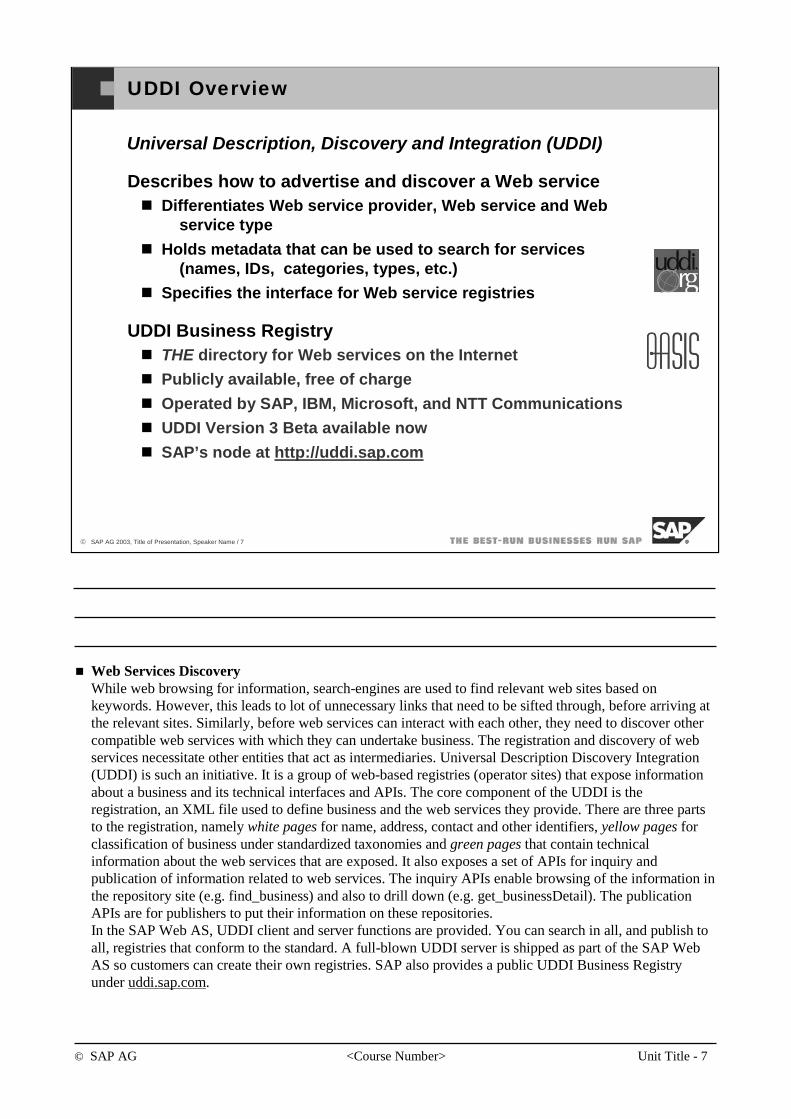
© SAP AG <Course Number> Unit Title - 7
© SAP AG 2003, Title of Presentation, Speaker Name / 7
UDDI Overview
Describes how to advertise and discover a Web serviceDifferentiates Web service provider, Web service and Web
service type
Holds metadata that can be used to search for services(names, IDs, categories, types, etc.)
Specifies the interface for Web service registries
UDDI Business RegistryTHE directory for Web services on the Internet
Publicly available, free of charge
Operated by SAP, IBM, Microsoft, and NTT Communications
UDDI Version 3 Beta available now
SAP’s node at http://uddi.sap.com
Universal Description, Discovery and Integration (UDDI)
Web Services DiscoveryWhile web browsing for information, search-engines are used to find relevant web sites based on keywords. However, this leads to lot of unnecessary links that need to be sifted through, before arriving at the relevant sites. Similarly, before web services can interact with each other, they need to discover othercompatible web services with which they can undertake business. The registration and discovery of web services necessitate other entities that act as intermediaries. Universal Description Discovery Integration (UDDI) is such an initiative. It is a group of web-based registries (operator sites) that expose informationabout a business and its technical interfaces and APIs. The core component of the UDDI is theregistration, an XML file used to define business and the web services they provide. There are three partsto the registration, namely white pages for name, address, contact and other identifiers, yellow pages forclassification of business under standardized taxonomies and green pages that contain technicalinformation about the web services that are exposed. It also exposes a set of APIs for inquiry and publication of information related to web services. The inquiry APIs enable browsing of the information in the repository site (e.g. find_business) and also to drill down (e.g. get_businessDetail). The publicationAPIs are for publishers to put their information on these repositories.In the SAP Web AS, UDDI client and server functions are provided. You can search in all, and publish to all, registries that conform to the standard. A full-blown UDDI server is shipped as part of the SAP Web AS so customers can create their own registries. SAP also provides a public UDDI Business Registry under uddi.sap.com.
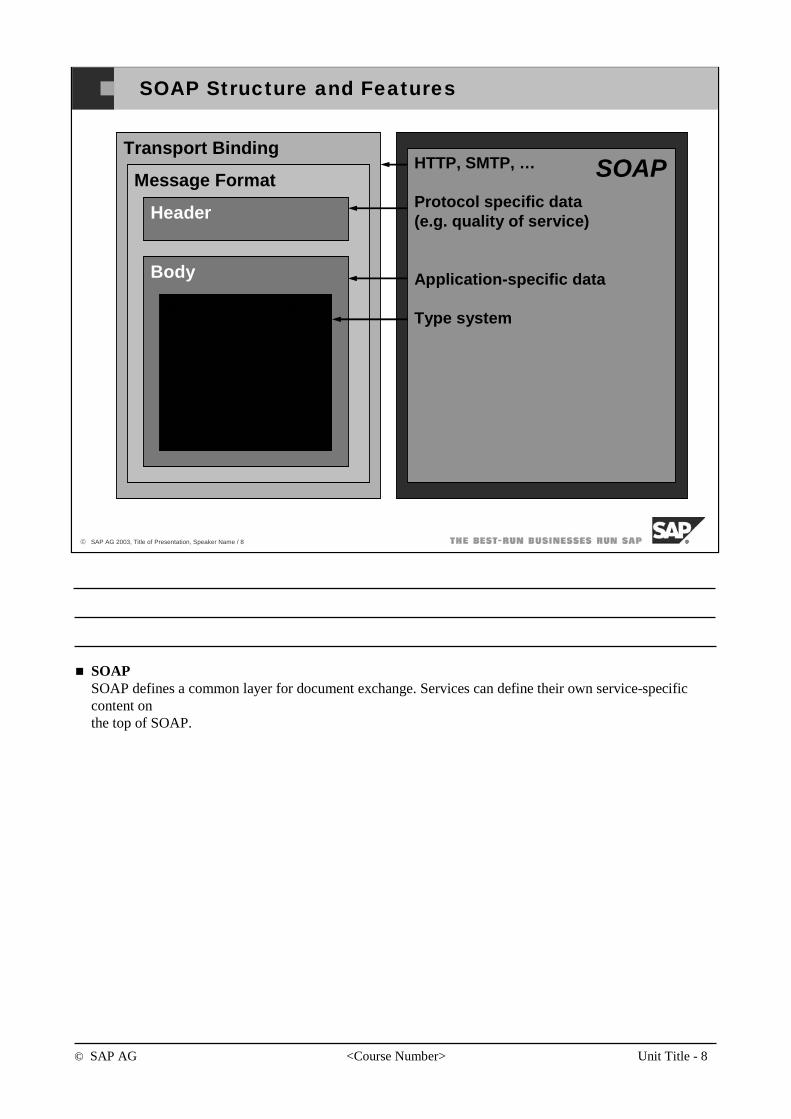
© SAP AG <Course Number> Unit Title - 8
© SAP AG 2003, Title of Presentation, Speaker Name / 8
HTTP, SMTP, …
Protocol specific data(e.g. quality of service)
Application-specific data
Type system
SOAPTransport Binding
SOAP Structure and Features
Message Format
Header
Body
Application Data
SOAPSOAP defines a common layer for document exchange. Services can define their own service-specificcontent onthe top of SOAP.

© SAP AG <Course Number> Unit Title - 9
© SAP AG 2003, Title of Presentation, Speaker Name / 9
You should now be able to:
Explain what Web Services are.
Web Services Overview: Topic Summary
© SAP AG <Course Number> Unit Title - 10
© SAP AG 2003, Title of Presentation, Speaker Name / 10
After completing this topic, you will be able to:
Implement a Web Service client.
Implementing a Web Service Client: Topic Objectives
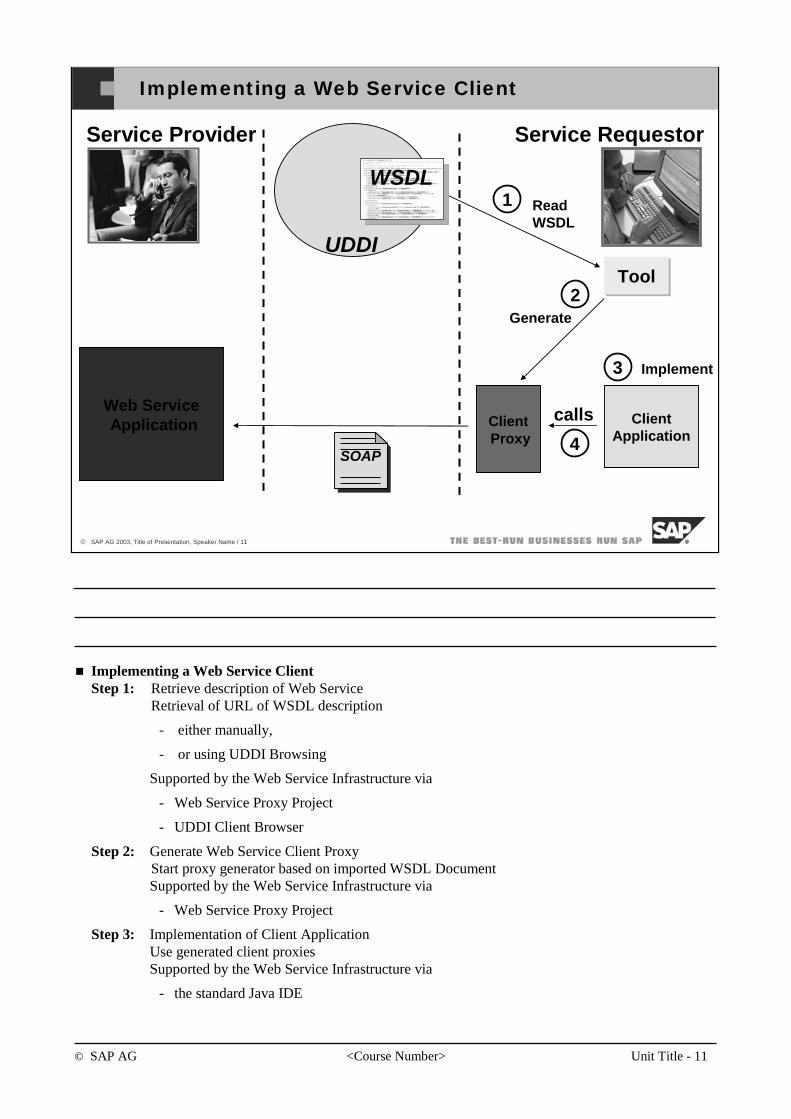
© SAP AG <Course Number> Unit Title - 11
© SAP AG 2003, Title of Presentation, Speaker Name / 11
Implementing a Web Service Client
Service Provider Service Requestor
Tool
ReadWSDL
calls
UDDI
WSDL
Client Application
ClientProxy
1
2Generate
3
Web ServiceApplication
Implement
4SOAP
Implementing a Web Service ClientStep 1: Retrieve description of Web Service
Retrieval of URL of WSDL description
- either manually,
- or using UDDI Browsing
Supported by the Web Service Infrastructure via
- Web Service Proxy Project
- UDDI Client Browser
Step 2: Generate Web Service Client ProxyStart proxy generator based on imported WSDL DocumentSupported by the Web Service Infrastructure via
- Web Service Proxy Project
Step 3: Implementation of Client ApplicationUse generated client proxiesSupported by the Web Service Infrastructure via
- the standard Java IDE

© SAP AG <Course Number> Unit Title - 12
© SAP AG 2003, Title of Presentation, Speaker Name / 12
Web Dynpro and Web Services
Web Dynpro and Web ServicesWith the introduction of Web service as a possible model type, Web Dynpro now offers a much more comprehensive set of choices for connecting a Web Dynpro front end to an existing backend system. The developer can now point the model wizard to any Web Service on the Internet and have the code for accessing this Web Service generated automatically.

© SAP AG <Course Number> Unit Title - 13
© SAP AG 2003, Title of Presentation, Speaker Name / 13
You should now be able to:
Implement a Web Service client.
Implementing a Web Service Client: Topic Summary
© SAP AG <Course Number> Unit Title - 14
© SAP AG 2003, Title of Presentation, Speaker Name / 14
You should now be able to:
Explain what Web Services are.
Implement a simple Web Dynpro application using a Web Service.
Using Web Services as Web Dynpro Model: Unit Summary
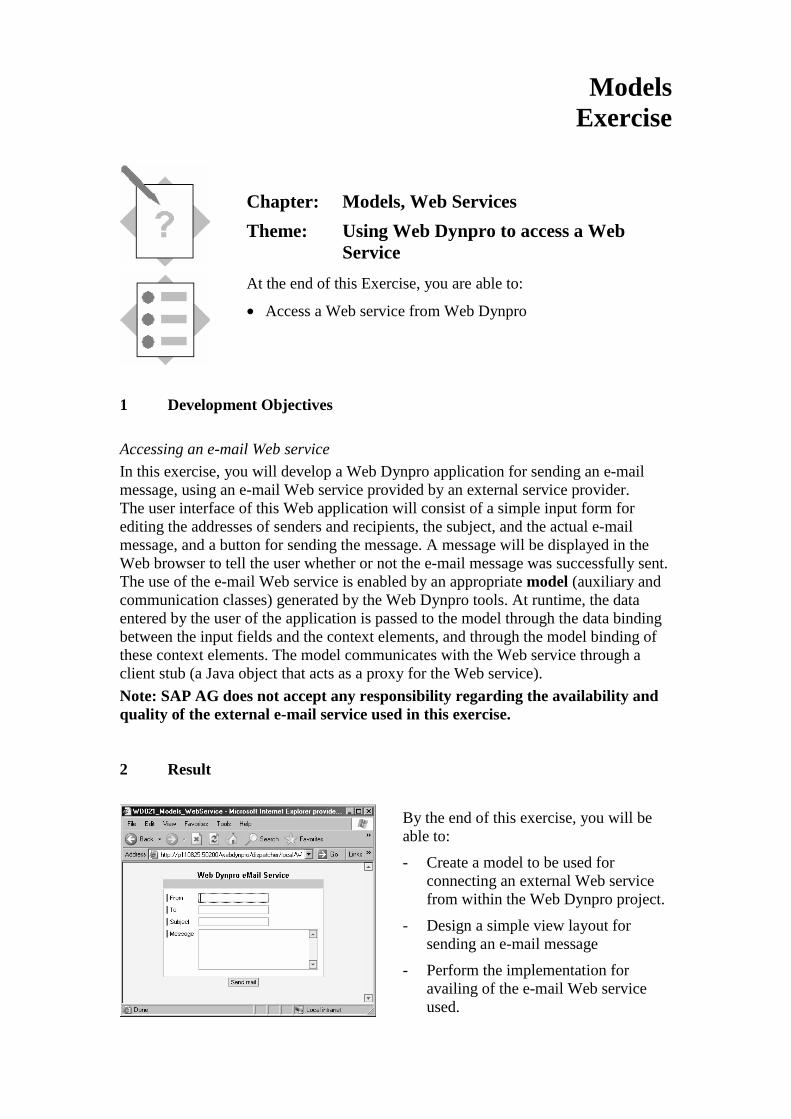
Models Exercise
Chapter: Models, Web Services
Theme: Using Web Dynpro to access a Web Service
At the end of this Exercise, you are able to:
• Access a Web service from Web Dynpro
1 Development Objectives Accessing an e-mail Web service
In this exercise, you will develop a Web Dynpro application for sending an e-mail message, using an e-mail Web service provided by an external service provider. The user interface of this Web application will consist of a simple input form for editing the addresses of senders and recipients, the subject, and the actual e-mail message, and a button for sending the message. A message will be displayed in the Web browser to tell the user whether or not the e-mail message was successfully sent. The use of the e-mail Web service is enabled by an appropriate model (auxiliary and communication classes) generated by the Web Dynpro tools. At runtime, the data entered by the user of the application is passed to the model through the data binding between the input fields and the context elements, and through the model binding of these context elements. The model communicates with the Web service through a client stub (a Java object that acts as a proxy for the Web service).
Note: SAP AG does not accept any responsibility regarding the availability and quality of the external e-mail service used in this exercise. 2 Result
By the end of this exercise, you will be able to:
- Create a model to be used for connecting an external Web service from within the Web Dynpro project.
- Design a simple view layout for sending an e-mail message
- Perform the implementation for availing of the e-mail Web service used.
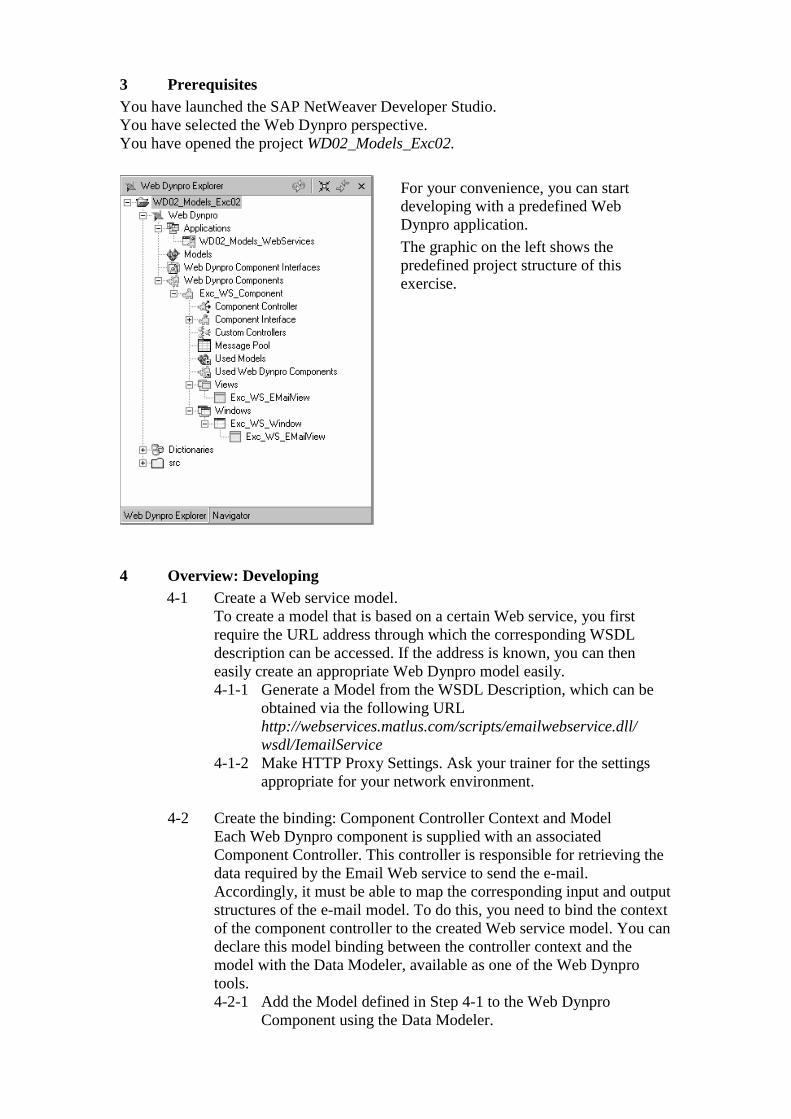
3 Prerequisites You have launched the SAP NetWeaver Developer Studio. You have selected the Web Dynpro perspective. You have opened the project WD02_Models_Exc02.
For your convenience, you can start developing with a predefined Web Dynpro application.
The graphic on the left shows the predefined project structure of this exercise.
4 Overview: Developing
4-1 Create a Web service model. To create a model that is based on a certain Web service, you first require the URL address through which the corresponding WSDL description can be accessed. If the address is known, you can then easily create an appropriate Web Dynpro model easily. 4-1-1 Generate a Model from the WSDL Description, which can be
obtained via the following URL http://webservices.matlus.com/scripts/emailwebservice.dll/ wsdl/IemailService
4-1-2 Make HTTP Proxy Settings. Ask your trainer for the settings appropriate for your network environment.
4-2 Create the binding: Component Controller Context and Model
Each Web Dynpro component is supplied with an associated Component Controller. This controller is responsible for retrieving the data required by the Email Web service to send the e-mail. Accordingly, it must be able to map the corresponding input and output structures of the e-mail model. To do this, you need to bind the context of the component controller to the created Web service model. You can declare this model binding between the controller context and the model with the Data Modeler, available as one of the Web Dynpro tools. 4-2-1 Add the Model defined in Step 4-1 to the Web Dynpro
Component using the Data Modeler.
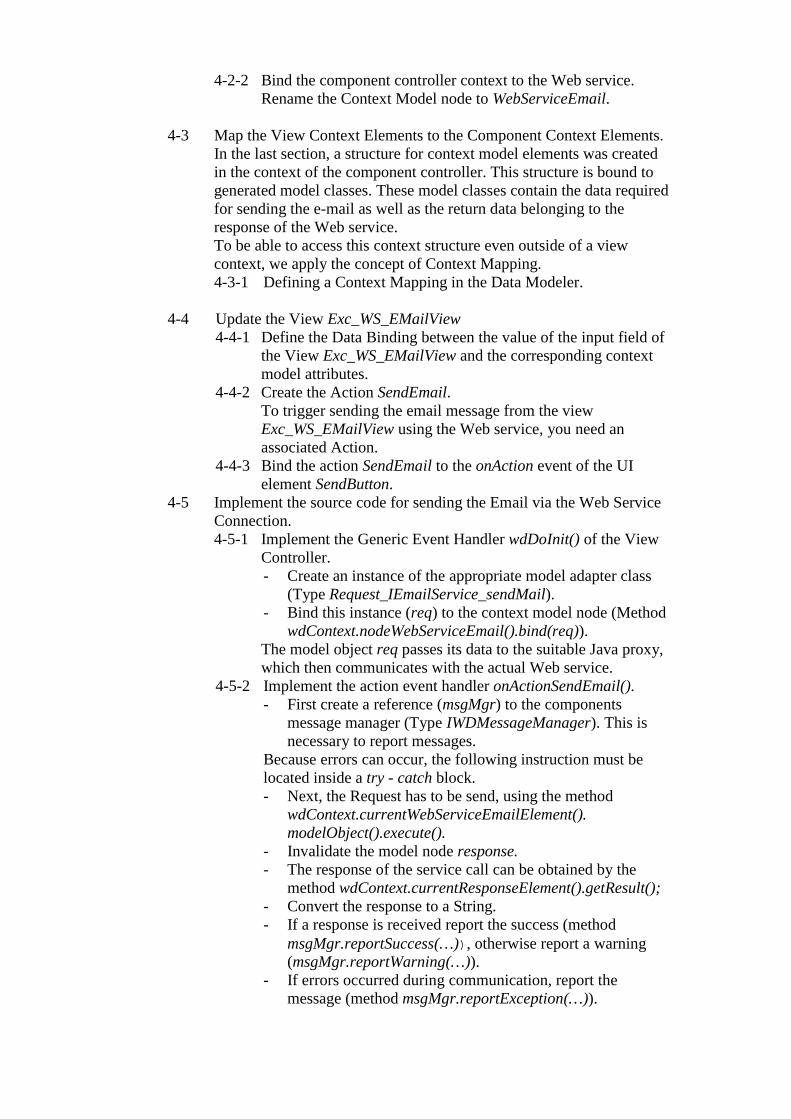
4-2-2 Bind the component controller context to the Web service. Rename the Context Model node to WebServiceEmail.
4-3 Map the View Context Elements to the Component Context Elements.
In the last section, a structure for context model elements was created in the context of the component controller. This structure is bound to generated model classes. These model classes contain the data required for sending the e-mail as well as the return data belonging to the response of the Web service. To be able to access this context structure even outside of a view context, we apply the concept of Context Mapping. 4-3-1 Defining a Context Mapping in the Data Modeler.
4-4 Update the View Exc_WS_EMailView
4-4-1 Define the Data Binding between the value of the input field of the View Exc_WS_EMailView and the corresponding context model attributes.
4-4-2 Create the Action SendEmail. To trigger sending the email message from the view Exc_WS_EMailView using the Web service, you need an associated Action.
4-4-3 Bind the action SendEmail to the onAction event of the UI element SendButton.
4-5 Implement the source code for sending the Email via the Web Service Connection. 4-5-1 Implement the Generic Event Handler wdDoInit() of the View
Controller. - Create an instance of the appropriate model adapter class
(Type Request_IEmailService_sendMail). - Bind this instance (req) to the context model node (Method
wdContext.nodeWebServiceEmail().bind(req)). The model object req passes its data to the suitable Java proxy, which then communicates with the actual Web service.
4-5-2 Implement the action event handler onActionSendEmail(). - First create a reference (msgMgr) to the components
message manager (Type IWDMessageManager). This is necessary to report messages.
Because errors can occur, the following instruction must be located inside a try - catch block. - Next, the Request has to be send, using the method
wdContext.currentWebServiceEmailElement(). modelObject().execute().
- Invalidate the model node response. - The response of the service call can be obtained by the
method wdContext.currentResponseElement().getResult(); - Convert the response to a String. - If a response is received report the success (method
msgMgr.reportSuccess(…)), otherwise report a warning (msgMgr.reportWarning(…)).
- If errors occurred during communication, report the message (method msgMgr.reportException(…)).

The actual Web service is now called using the execute() method of the model object currently stored in the context model node. This already contains the reservation data entered by the user (through data binding and context mapping). The data stored in the component controller context is a copy of the data stored in the model, that is, the one does not directly reference the other. Therefore, the view context bound through context mapping also does not yet contain the returned results of the Web service call executed previously and stored in the model. As an application developer, you therefore need to explicitly invalidate the model node response. The response data most recently stored in the model is then transmitted to the corresponding context node element. The returned result (in the example application this is just a single integer value) is then displayed in an appropriate message text in the message bar of the Web Dynpro application.
5 Overview: Building, Deploying, and Running Deploy and run the Web Dynpro application.
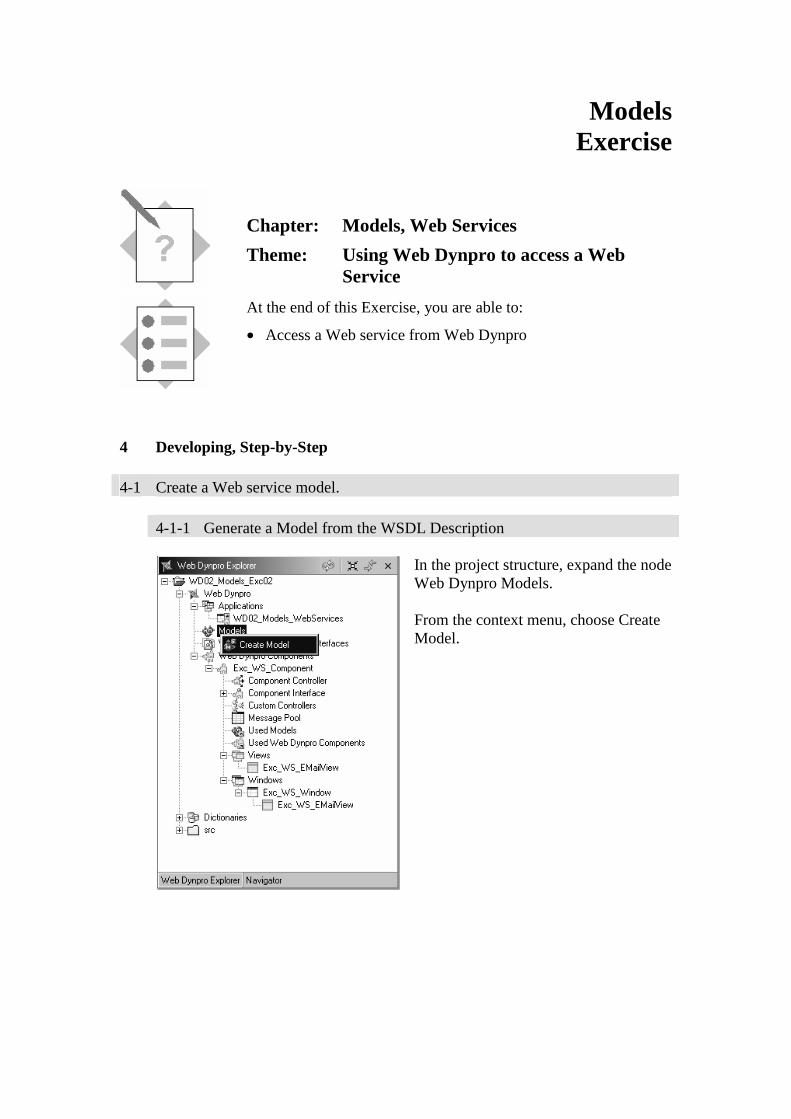
Models Exercise
Chapter: Models, Web Services
Theme: Using Web Dynpro to access a Web Service
At the end of this Exercise, you are able to:
• Access a Web service from Web Dynpro
4 Developing, Step-by-Step 4-1 Create a Web service model.
4-1-1 Generate a Model from the WSDL Description
In the project structure, expand the node Web Dynpro Models. From the context menu, choose Create Model.
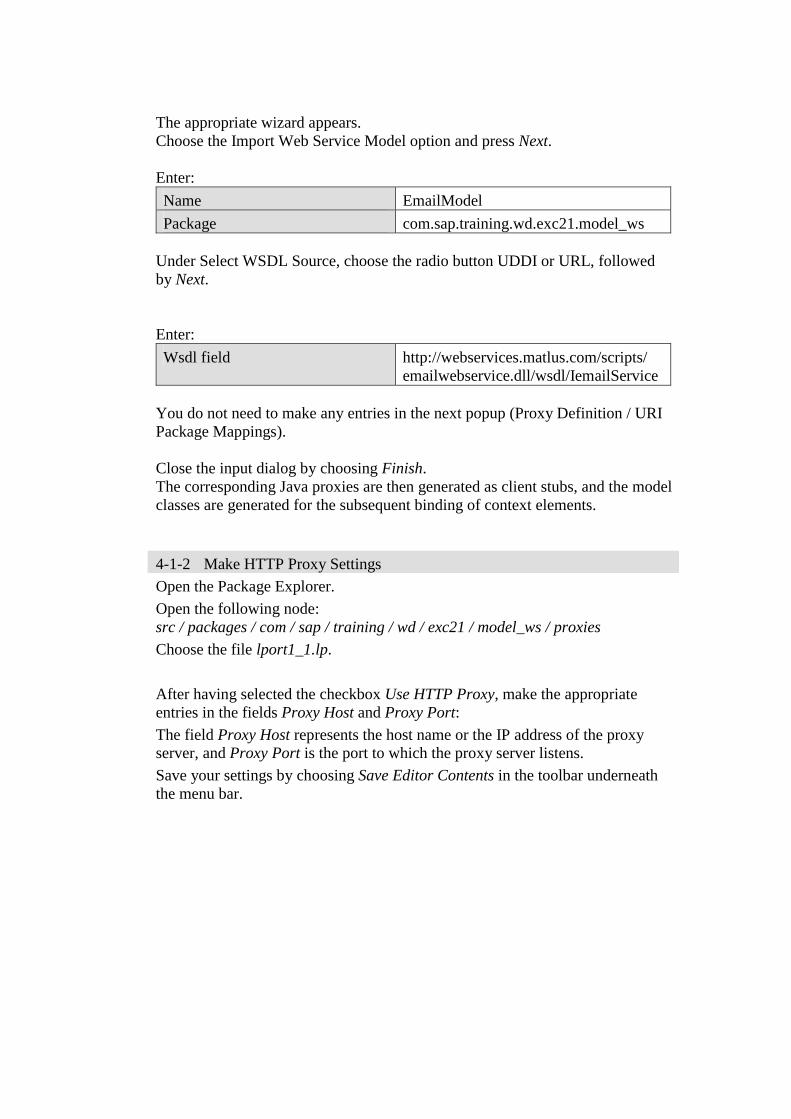
The appropriate wizard appears. Choose the Import Web Service Model option and press Next. Enter:
Name EmailModel
Package com.sap.training.wd.exc21.model_ws Under Select WSDL Source, choose the radio button UDDI or URL, followed by Next.
Enter:
Wsdl field http://webservices.matlus.com/scripts/ emailwebservice.dll/wsdl/IemailService
You do not need to make any entries in the next popup (Proxy Definition / URI Package Mappings). Close the input dialog by choosing Finish. The corresponding Java proxies are then generated as client stubs, and the model classes are generated for the subsequent binding of context elements.
4-1-2 Make HTTP Proxy Settings
Open the Package Explorer.
Open the following node: src / packages / com / sap / training / wd / exc21 / model_ws / proxies
Choose the file lport1_1.lp.
After having selected the checkbox Use HTTP Proxy, make the appropriate entries in the fields Proxy Host and Proxy Port:
The field Proxy Host represents the host name or the IP address of the proxy server, and Proxy Port is the port to which the proxy server listens.
Save your settings by choosing Save Editor Contents in the toolbar underneath the menu bar.
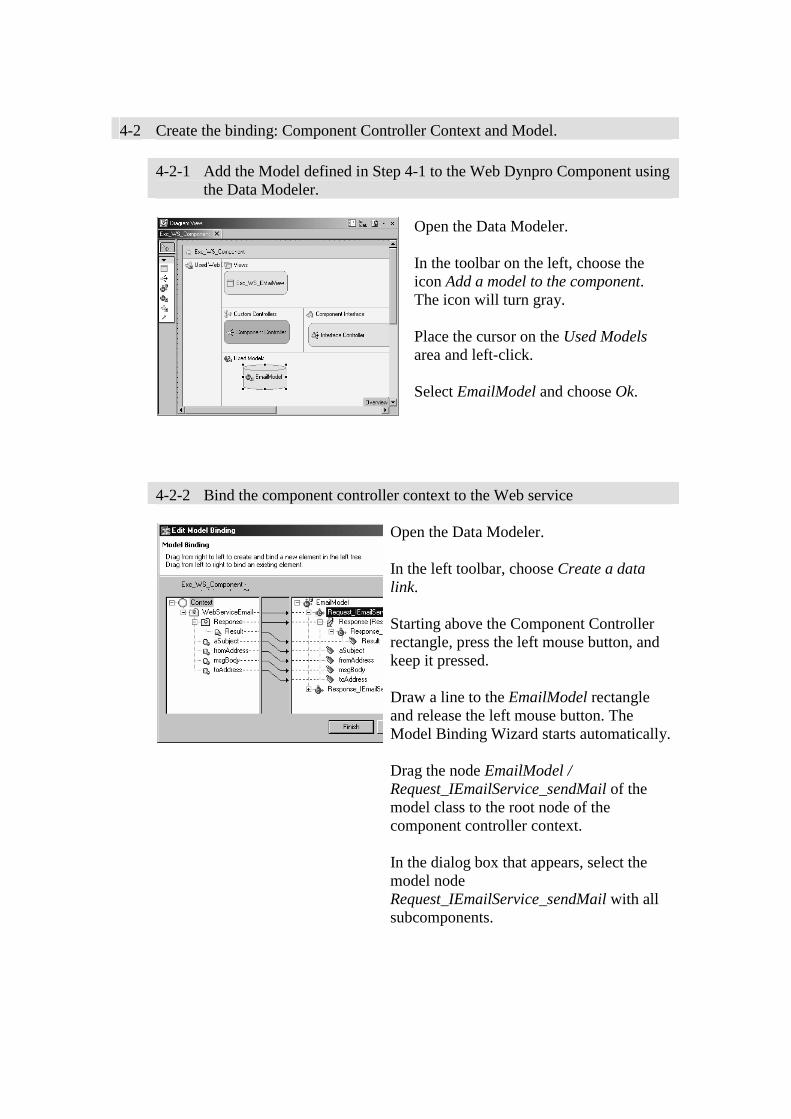
4-2 Create the binding: Component Controller Context and Model.
4-2-1 Add the Model defined in Step 4-1 to the Web Dynpro Component using the Data Modeler.
Open the Data Modeler. In the toolbar on the left, choose the icon Add a model to the component. The icon will turn gray. Place the cursor on the Used Models area and left-click. Select EmailModel and choose Ok.
4-2-2 Bind the component controller context to the Web service
Open the Data Modeler. In the left toolbar, choose Create a data link. Starting above the Component Controller rectangle, press the left mouse button, and keep it pressed. Draw a line to the EmailModel rectangle and release the left mouse button. The Model Binding Wizard starts automatically. Drag the node EmailModel / Request_IEmailService_sendMail of the model class to the root node of the component controller context. In the dialog box that appears, select the model node Request_IEmailService_sendMail with all subcomponents.
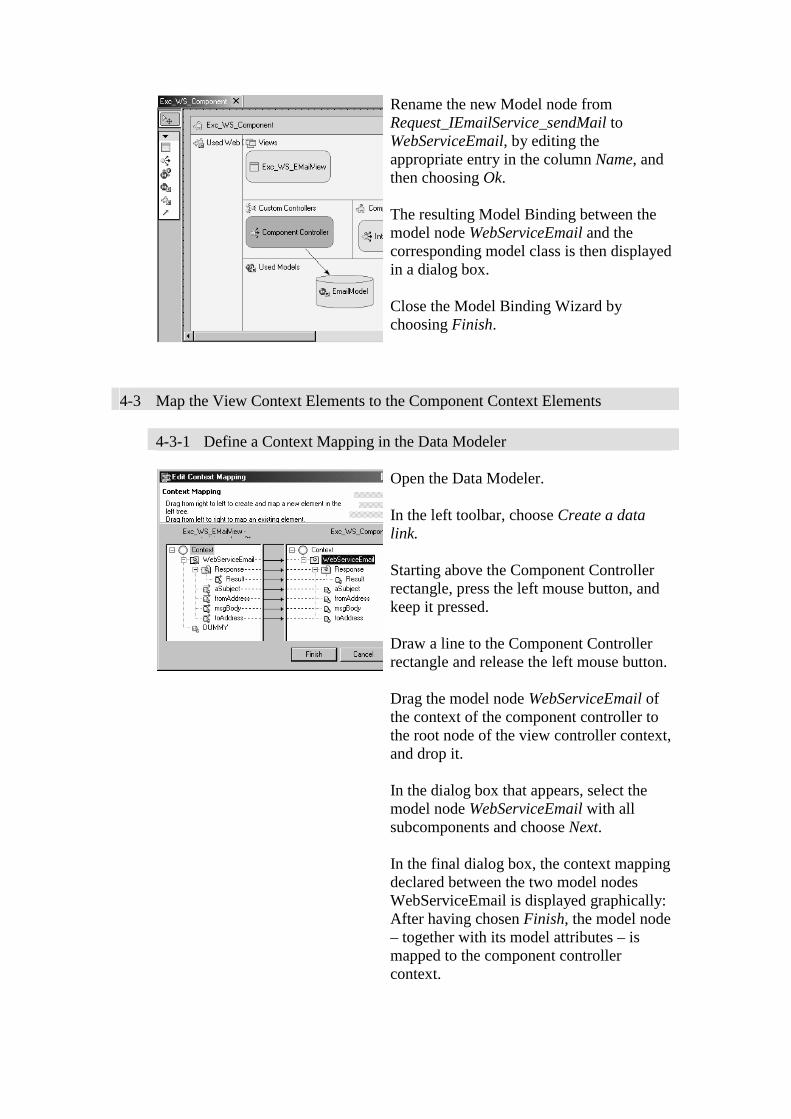
Rename the new Model node from Request_IEmailService_sendMail to WebServiceEmail, by editing the appropriate entry in the column Name, and then choosing Ok. The resulting Model Binding between the model node WebServiceEmail and the corresponding model class is then displayed in a dialog box. Close the Model Binding Wizard by choosing Finish.
4-3 Map the View Context Elements to the Component Context Elements
4-3-1 Define a Context Mapping in the Data Modeler
Open the Data Modeler. In the left toolbar, choose Create a data link. Starting above the Component Controller rectangle, press the left mouse button, and keep it pressed. Draw a line to the Component Controller rectangle and release the left mouse button. Drag the model node WebServiceEmail of the context of the component controller to the root node of the view controller context, and drop it. In the dialog box that appears, select the model node WebServiceEmail with all subcomponents and choose Next. In the final dialog box, the context mapping declared between the two model nodes WebServiceEmail is displayed graphically: After having chosen Finish, the model node – together with its model attributes – is mapped to the component controller context.
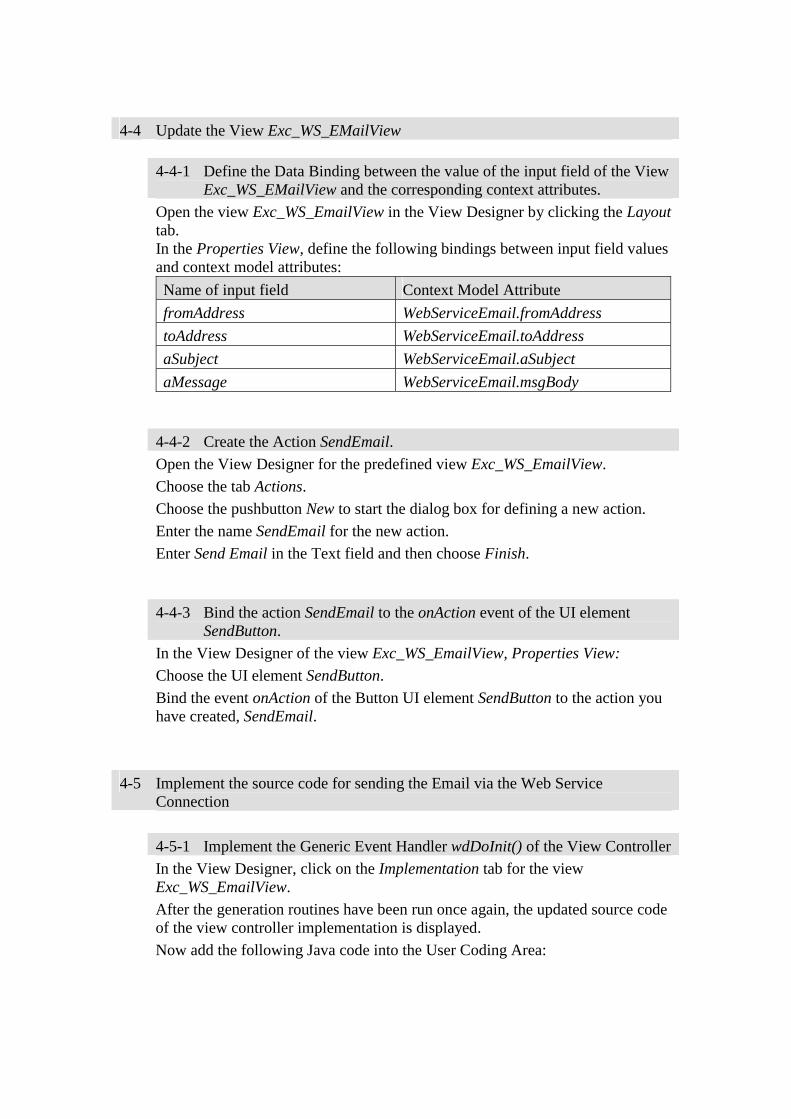
4-4 Update the View Exc_WS_EMailView
4-4-1 Define the Data Binding between the value of the input field of the View Exc_WS_EMailView and the corresponding context attributes.
Open the view Exc_WS_EmailView in the View Designer by clicking the Layout tab. In the Properties View, define the following bindings between input field values and context model attributes:
Name of input field Context Model Attribute
fromAddress WebServiceEmail.fromAddress
toAddress WebServiceEmail.toAddress
aSubject WebServiceEmail.aSubject
aMessage WebServiceEmail.msgBody
4-4-2 Create the Action SendEmail.
Open the View Designer for the predefined view Exc_WS_EmailView.
Choose the tab Actions.
Choose the pushbutton New to start the dialog box for defining a new action.
Enter the name SendEmail for the new action.
Enter Send Email in the Text field and then choose Finish.
4-4-3 Bind the action SendEmail to the onAction event of the UI element SendButton.
In the View Designer of the view Exc_WS_EmailView, Properties View:
Choose the UI element SendButton.
Bind the event onAction of the Button UI element SendButton to the action you have created, SendEmail.
4-5 Implement the source code for sending the Email via the Web Service Connection
4-5-1 Implement the Generic Event Handler wdDoInit() of the View Controller
In the View Designer, click on the Implementation tab for the view Exc_WS_EmailView.
After the generation routines have been run once again, the updated source code of the view controller implementation is displayed.
Now add the following Java code into the User Coding Area:
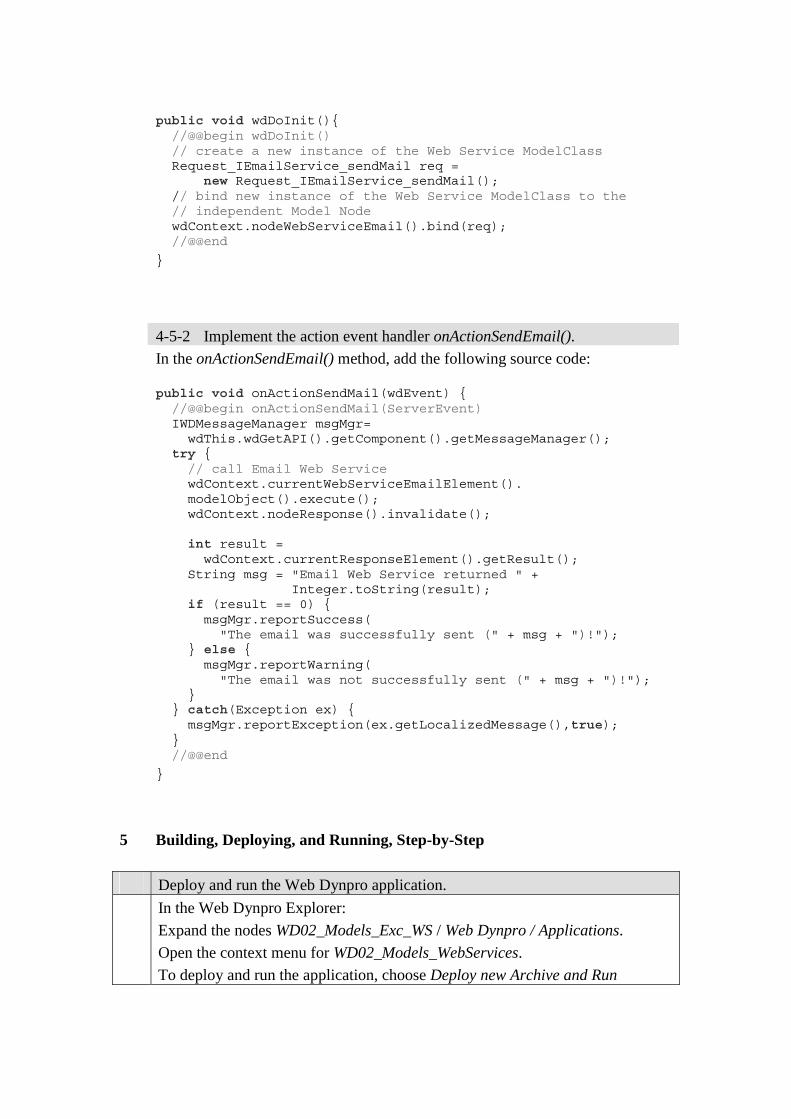
public void wdDoInit(){ //@@begin wdDoInit() // create a new instance of the Web Service ModelClass Request_IEmailService_sendMail req = new Request_IEmailService_sendMail(); // bind new instance of the Web Service ModelClass to the // independent Model Node wdContext.nodeWebServiceEmail().bind(req); //@@end
}
4-5-2 Implement the action event handler onActionSendEmail().
In the onActionSendEmail() method, add the following source code: public void onActionSendMail(wdEvent) { //@@begin onActionSendMail(ServerEvent) IWDMessageManager msgMgr= wdThis.wdGetAPI().getComponent().getMessageManager(); try { // call Email Web Service wdContext.currentWebServiceEmailElement(). modelObject().execute(); wdContext.nodeResponse().invalidate(); int result = wdContext.currentResponseElement().getResult(); String msg = "Email Web Service returned " + Integer.toString(result); if (result == 0) { msgMgr.reportSuccess( "The email was successfully sent (" + msg + ")!"); } else { msgMgr.reportWarning( "The email was not successfully sent (" + msg + ")!"); } } catch(Exception ex) { msgMgr.reportException(ex.getLocalizedMessage(),true); } //@@end
}
5 Building, Deploying, and Running, Step-by-Step Deploy and run the Web Dynpro application. In the Web Dynpro Explorer:
Expand the nodes WD02_Models_Exc_WS / Web Dynpro / Applications.
Open the context menu for WD02_Models_WebServices.
To deploy and run the application, choose Deploy new Archive and Run
© SAP AG <Course Number> Unit Title - 1
© SAP AG 2003, Title of Presentation, Speaker Name / 1
Introduction into Adaptive RFC
Bind Web Dynpro context to adaptive RFC based model.
Contents:
Web Dynpro Models, Adaptive RFC
© SAP AG <Course Number> Unit Title - 2
© SAP AG 2003, Title of Presentation, Speaker Name / 2
After completing this unit, you will be able to:
Understand what is Adaptive RFC.
Bind Web Dynpro context to adaptive RFC based model.
Web Dynpro Models, Adaptive RFC: Unit Objectives
© SAP AG <Course Number> Unit Title - 3
© SAP AG 2003, Title of Presentation, Speaker Name / 3
After completing this topic, you will be able to:
Understand what Adaptive RFC is all about.
Introduction into Adaptive RFC: Topic Objectives
This is a lesson
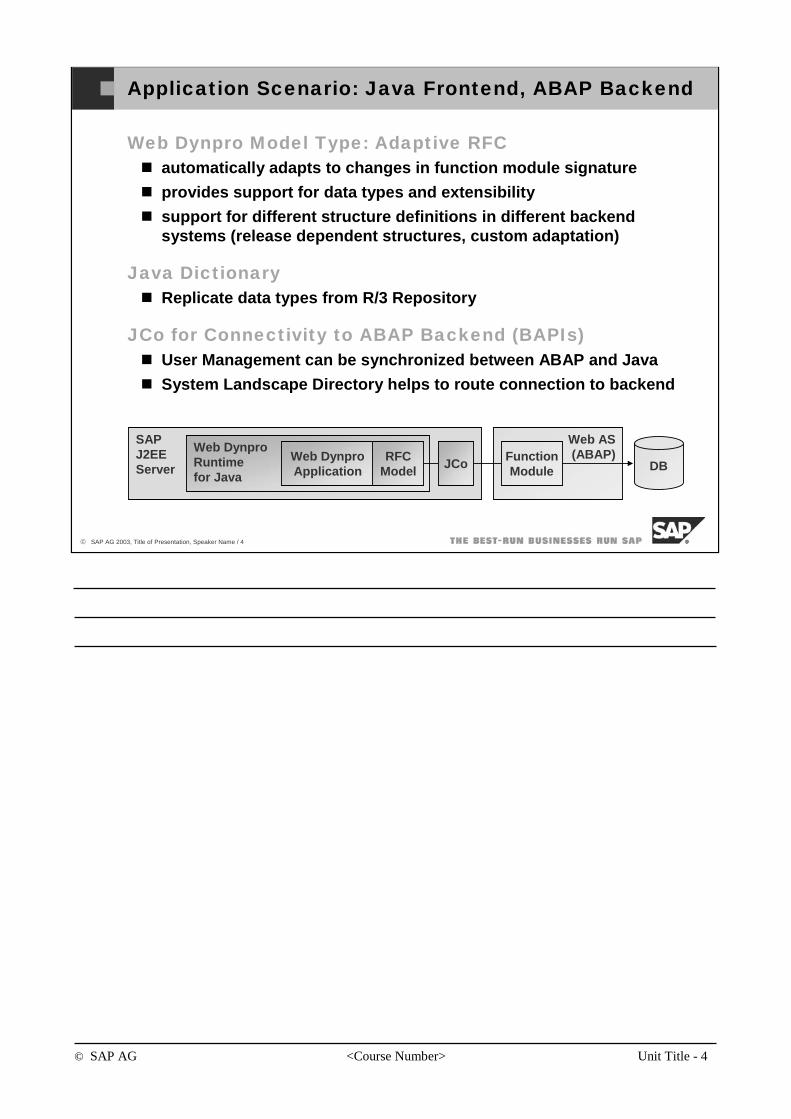
© SAP AG <Course Number> Unit Title - 4
© SAP AG 2003, Title of Presentation, Speaker Name / 4
Application Scenario: Java Frontend, ABAP Backend
Web Dynpro Model Type: Adaptive RFCautomatically adapts to changes in function module signature
provides support for data types and extensibility
support for different structure definitions in different backendsystems (release dependent structures, custom adaptation)
Java DictionaryReplicate data types from R/3 Repository
JCo for Connectivity to ABAP Backend (BAPIs)User Management can be synchronized between ABAP and Java
System Landscape Directory helps to route connection to backend
Web AS(ABAP)
SAPJ2EEServer
Web DynproRuntimefor Java
Web DynproApplication
RFCModel JCo DB
FunctionModule
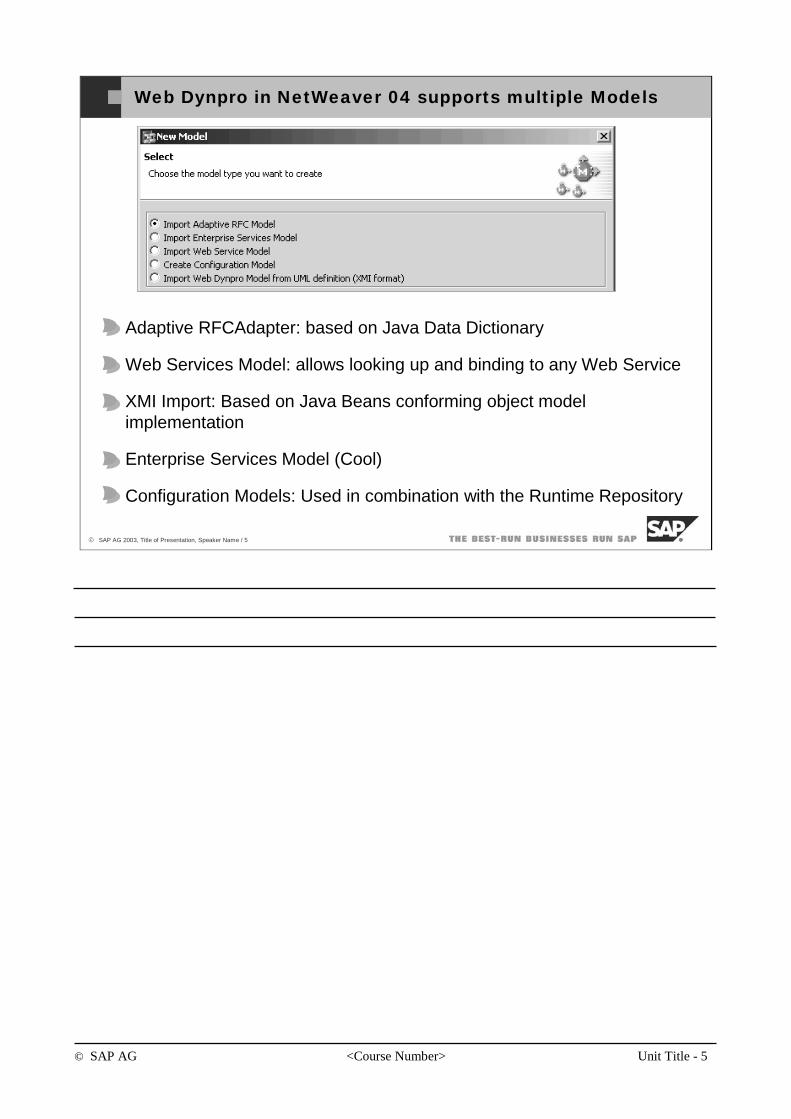
© SAP AG <Course Number> Unit Title - 5
© SAP AG 2003, Title of Presentation, Speaker Name / 5
Web Dynpro in NetWeaver 04 supports multiple Models
Adaptive RFCAdapter: based on Java Data Dictionary
Web Services Model: allows looking up and binding to any Web Service
XMI Import: Based on Java Beans conforming object model implementation
Enterprise Services Model (Cool)
Configuration Models: Used in combination with the Runtime Repository
© SAP AG <Course Number> Unit Title - 6
© SAP AG 2003, Title of Presentation, Speaker Name / 6
Adaptive RFC Adapter, Basic Ideas
Allows calling any RFC from within Web Dynpro with minimal hand written code.
Allows declarative data binding of RFC based data to UI (via context).
Value-add features, such as:Automated data transport
Integration with Java DDIC allowing front-end type system support(e.g. value sets, localized label texts, lengths, type based validation, etc.)
The RFC proxies do not use the original design time structure definition at runtime. Instead, this Web Dynpro model automatically adapts the data of the structure passed in the Java proxy generation to thecurrent data – that is, a structure definition in the back-end system that may have been modified
The following modification scenarios show the support offered by the Adaptive RFC in detail:
If a data type is edited in the back-end system, the structure used for the Web Dynpro application remains valid and no runtime error occurs.
If a field length is changed in the back-end system or a customer enhancement field is created, the field values are still valid at runtime. The enhancement field remains visible even without a subsequent manual adjustment of the structure at design time.
If a structure changes in the back-end system due to a new release – for example, if the application developer adds a new field – no runtime error occurs in the Web Dynpro application
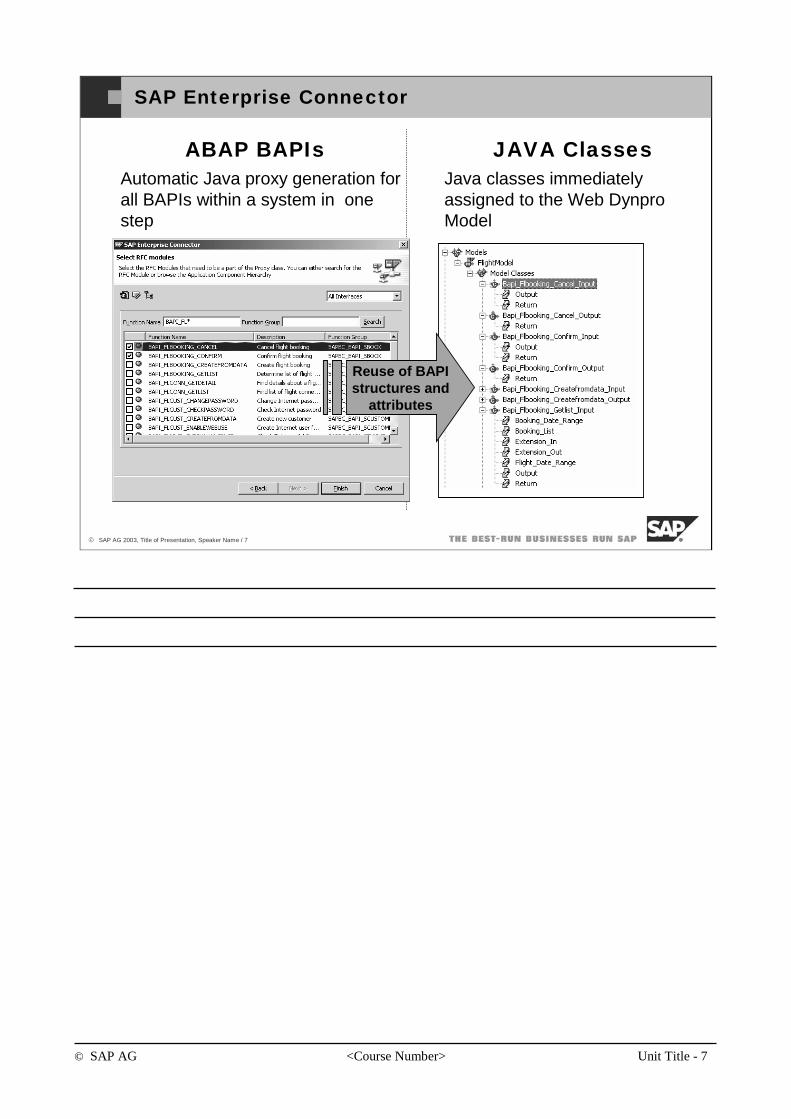
© SAP AG <Course Number> Unit Title - 7
© SAP AG 2003, Title of Presentation, Speaker Name / 7
SAP Enterprise Connector
ABAP BAPIs JAVA ClassesAutomatic Java proxy generation forall BAPIs within a system in onestep
Reuse of BAPI structures and
attributes
Java classes immediatelyassigned to the Web DynproModel
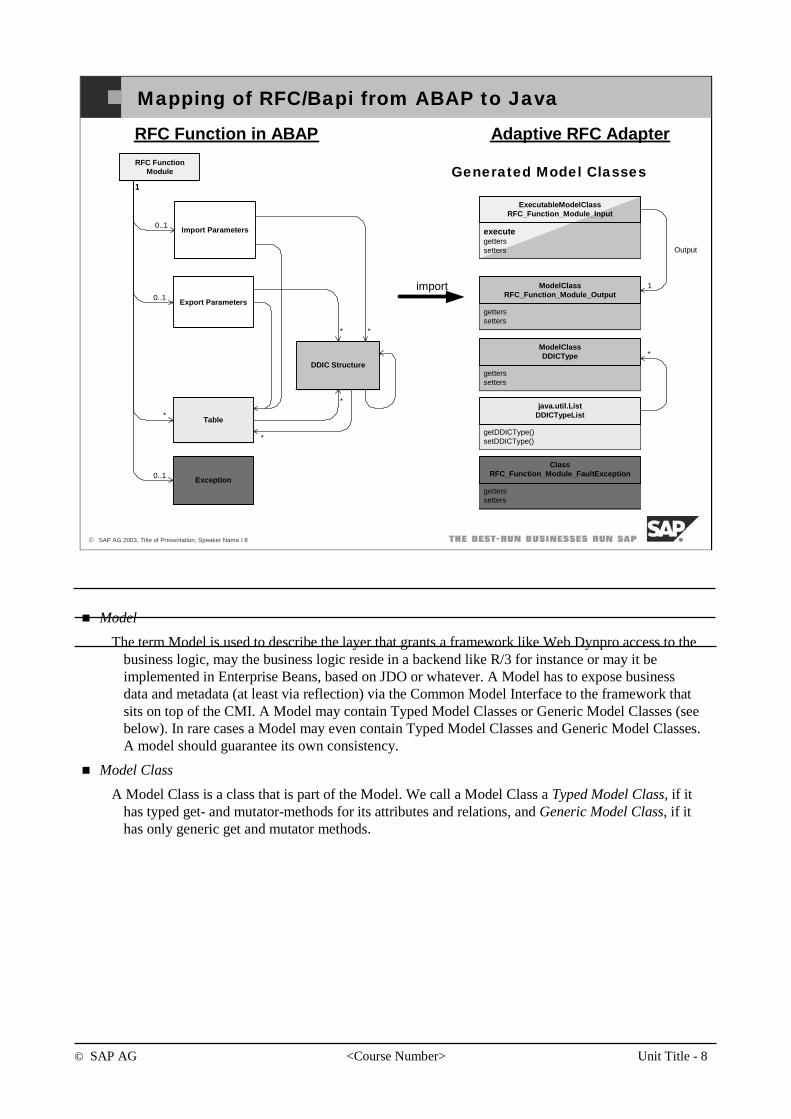
© SAP AG <Course Number> Unit Title - 8
© SAP AG 2003, Title of Presentation, Speaker Name / 8
Mapping of RFC/Bapi from ABAP to Java
RFC FunctionModule
Import Parameters
Export Parameters
Table
Exception
1
0..1
*
DDIC Structure
1
0..1
1
*
0..1
*
import
getterssetters
ClassRFC_Function_Module_FaultException
executegetterssetters
ExecutableModelClassRFC_Function_Module_Input
getterssetters
ModelClassRFC_Function_Module_Output
getDDICType()setDDICType()
java.util.ListDDICTypeList
getterssetters
ModelClassDDICType
*
*
RFC Function in ABAP Adaptive RFC Adapter
*
1
Output
Generated Model Classes
Model
The term Model is used to describe the layer that grants a framework like Web Dynpro access to the business logic, may the business logic reside in a backend like R/3 for instance or may it be implemented in Enterprise Beans, based on JDO or whatever. A Model has to expose business data and metadata (at least via reflection) via the Common Model Interface to the framework that sits on top of the CMI. A Model may contain Typed Model Classes or Generic Model Classes (see below). In rare cases a Model may even contain Typed Model Classes and Generic Model Classes.A model should guarantee its own consistency.
Model Class
A Model Class is a class that is part of the Model. We call a Model Class a Typed Model Class, if it has typed get- and mutator-methods for its attributes and relations, and Generic Model Class, if it has only generic get and mutator methods.
© SAP AG <Course Number> Unit Title - 9
© SAP AG 2003, Title of Presentation, Speaker Name / 9
You should now be able to:
Understand what Adaptive RFC is all about.
Introduction into Adaptive RFC: Topic Summary

© SAP AG <Course Number> Unit Title - 10
© SAP AG 2003, Title of Presentation, Speaker Name / 10
After completing this topic, you will be able to:
Bind Web Dynpro context to a BAPI based model.
Context to Model Binding: Topic Objectives
This is a lesson
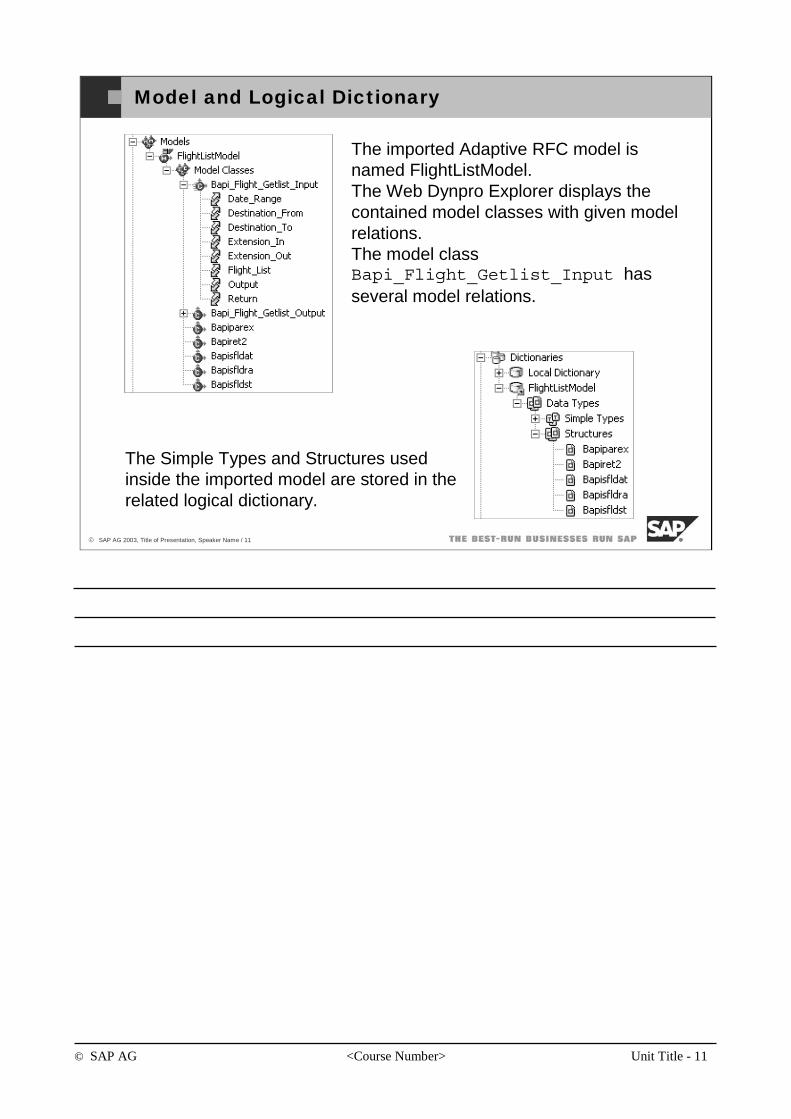
© SAP AG <Course Number> Unit Title - 11
© SAP AG 2003, Title of Presentation, Speaker Name / 11
Model and Logical Dictionary
The imported Adaptive RFC model is named FlightListModel. The Web Dynpro Explorer displays the contained model classes with given model relations. The model class Bapi_Flight_Getlist_Input has several model relations.
The Simple Types and Structures used inside the imported model are stored in the related logical dictionary.
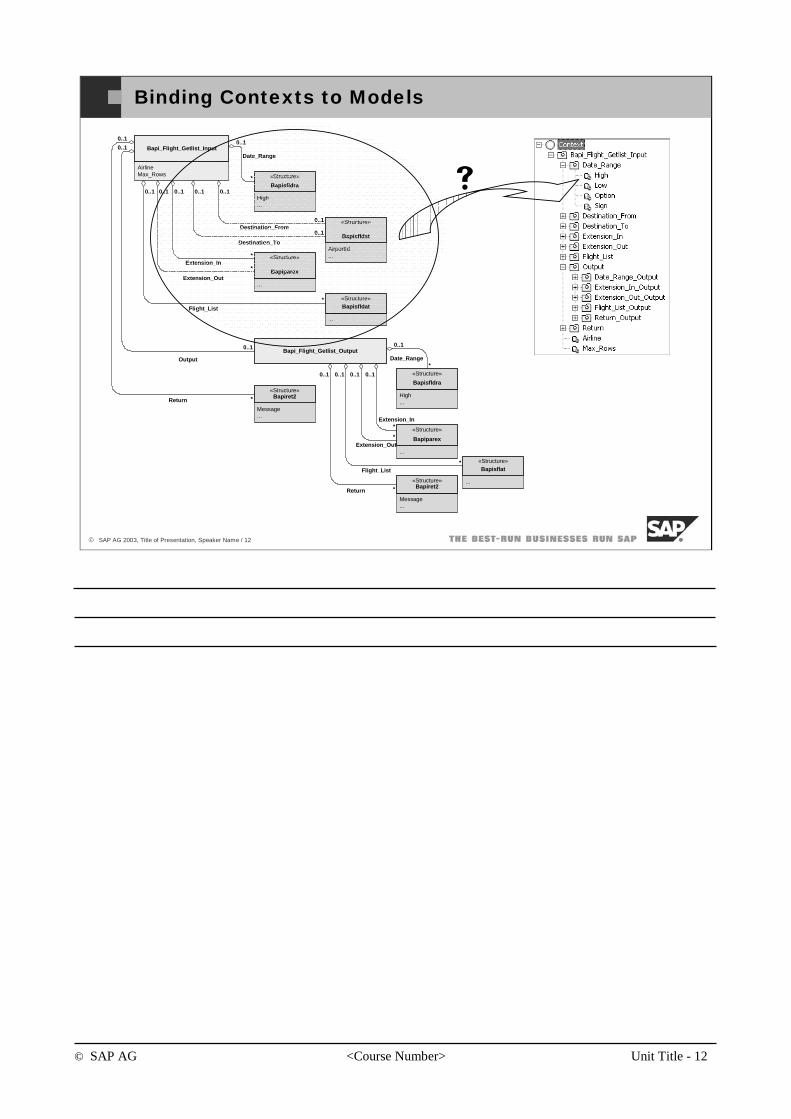
© SAP AG <Course Number> Unit Title - 12
© SAP AG 2003, Title of Presentation, Speaker Name / 12
Binding Contexts to Models
AirlineMax_Rows
Bapi_Flight_Getlist_Input
High...
«Structure»
Bapisfldra
0..1
*
Date_Range
0..1
0..1Destination_From
0..1
*Extension_In
0..1
*
Extension_Out...
«Structure»
Bapiparex
...
«Structure»Bapisfldat
0..1
*
Flight_List
Message...
«Structure»Bapiret2
0..1
*Return
AirportId...
«Structure»
Bapisfldst
0..1
0..1
Destination_To
Bapi_Flight_Getlist_Output
0..1
0..1
Output
High...
«Structure»
Bapisfldra
...
«Structure»
Bapiparex
...
«Structure»Bapisflat
Message...
«Structure»Bapiret2
0..1
*Return
0..1
*Flight_List
0..1
*Extension_Out
0..1
*Extension_In
0..1
*Date_Range
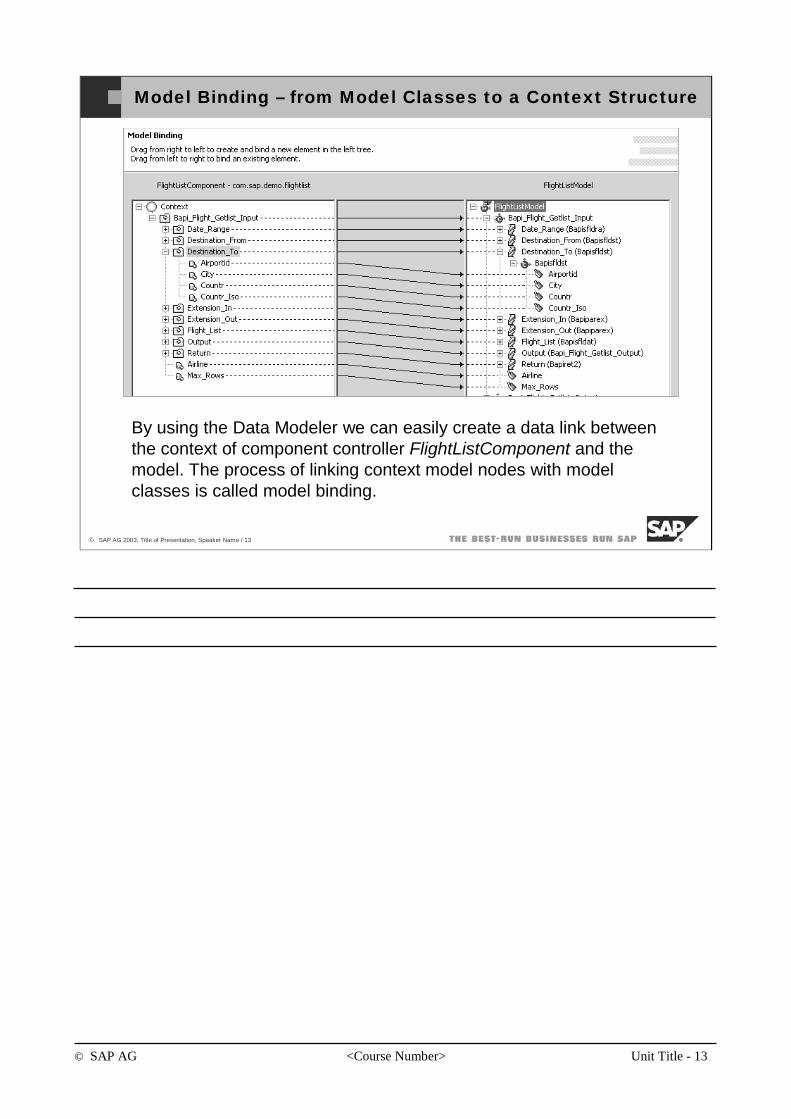
© SAP AG <Course Number> Unit Title - 13
© SAP AG 2003, Title of Presentation, Speaker Name / 13
Model Binding – from Model Classes to a Context Structure
By using the Data Modeler we can easily create a data link between the context of component controller FlightListComponent and the model. The process of linking context model nodes with model classes is called model binding.
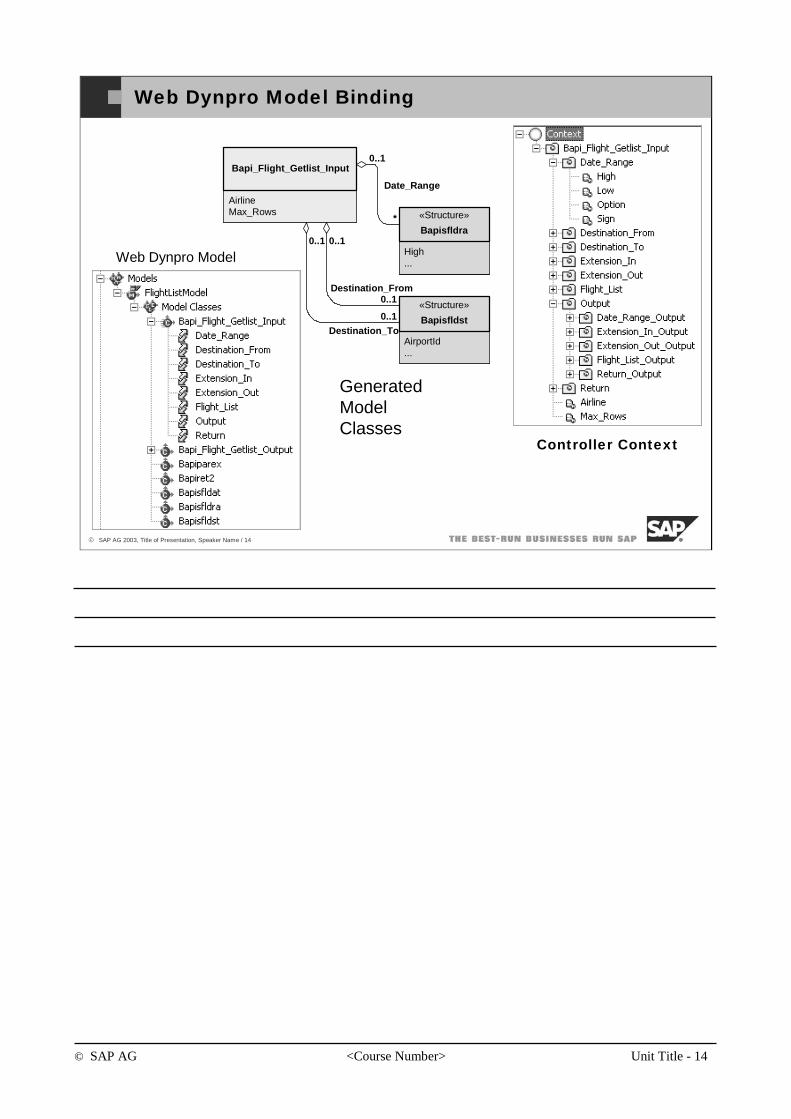
© SAP AG <Course Number> Unit Title - 14
© SAP AG 2003, Title of Presentation, Speaker Name / 14
Web Dynpro Model Binding
Web Dynpro Model
Controller Context
GeneratedModel Classes
AirlineMax_Rows
Bapi_Flight_Getlist_Input
High...
«Structure»
Bapisfldra
0..1
*
Date_Range
AirportId...
«Structure»
Bapisfldst
0..1
0..1Destination_From
0..1
0..1Destination_To
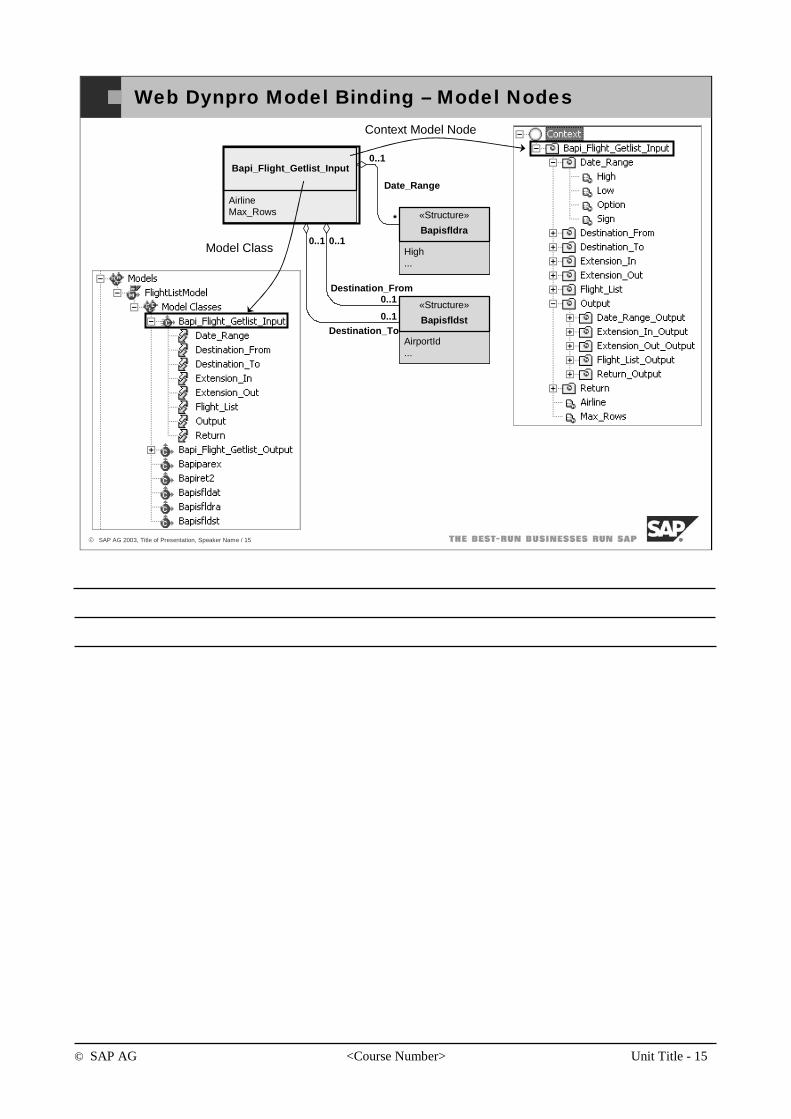
© SAP AG <Course Number> Unit Title - 15
© SAP AG 2003, Title of Presentation, Speaker Name / 15
Web Dynpro Model Binding – Model Nodes
AirlineMax_Rows
Bapi_Flight_Getlist_Input
High...
«Structure»
Bapisfldra
0..1
*
Date_Range
AirportId...
«Structure»
Bapisfldst
0..1
0..1Destination_From
0..1
0..1Destination_To
Model Class
Context Model Node
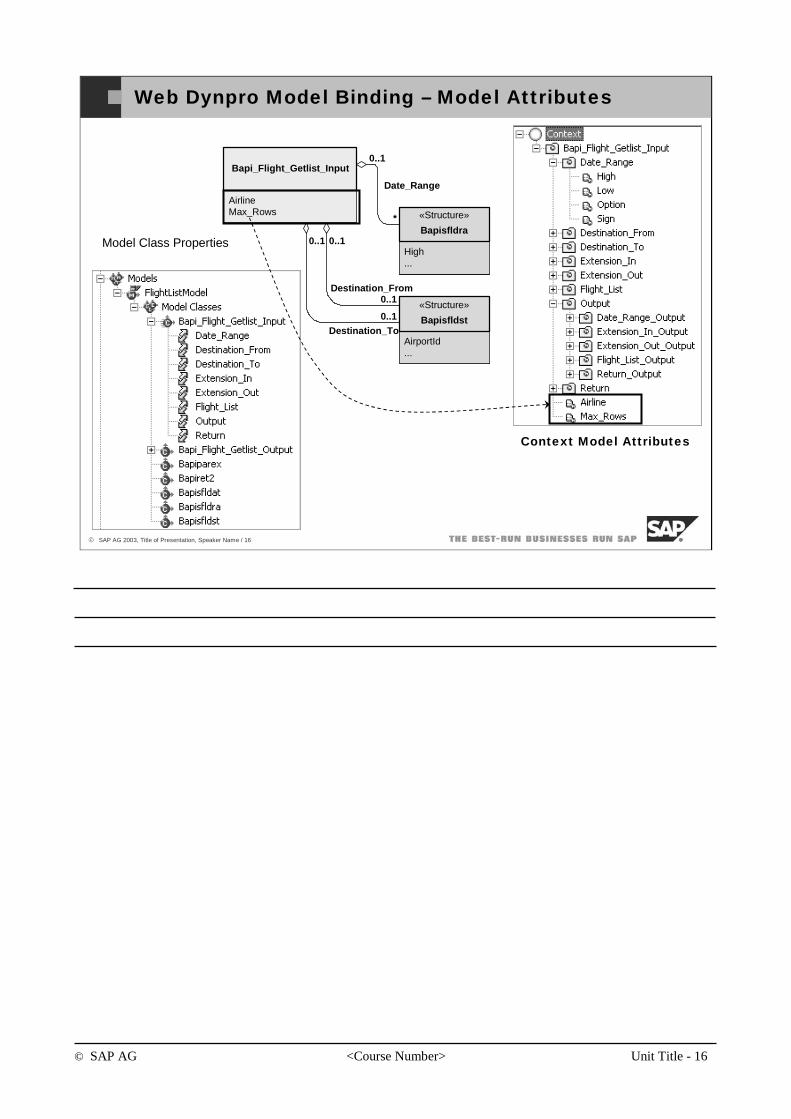
© SAP AG <Course Number> Unit Title - 16
© SAP AG 2003, Title of Presentation, Speaker Name / 16
Web Dynpro Model Binding – Model Attributes
AirlineMax_Rows
Bapi_Flight_Getlist_Input
High...
«Structure»
Bapisfldra
0..1
*
Date_Range
AirportId...
«Structure»
Bapisfldst
0..1
0..1Destination_From
0..1
0..1Destination_To
Model Class Properties
Context Model Attributes
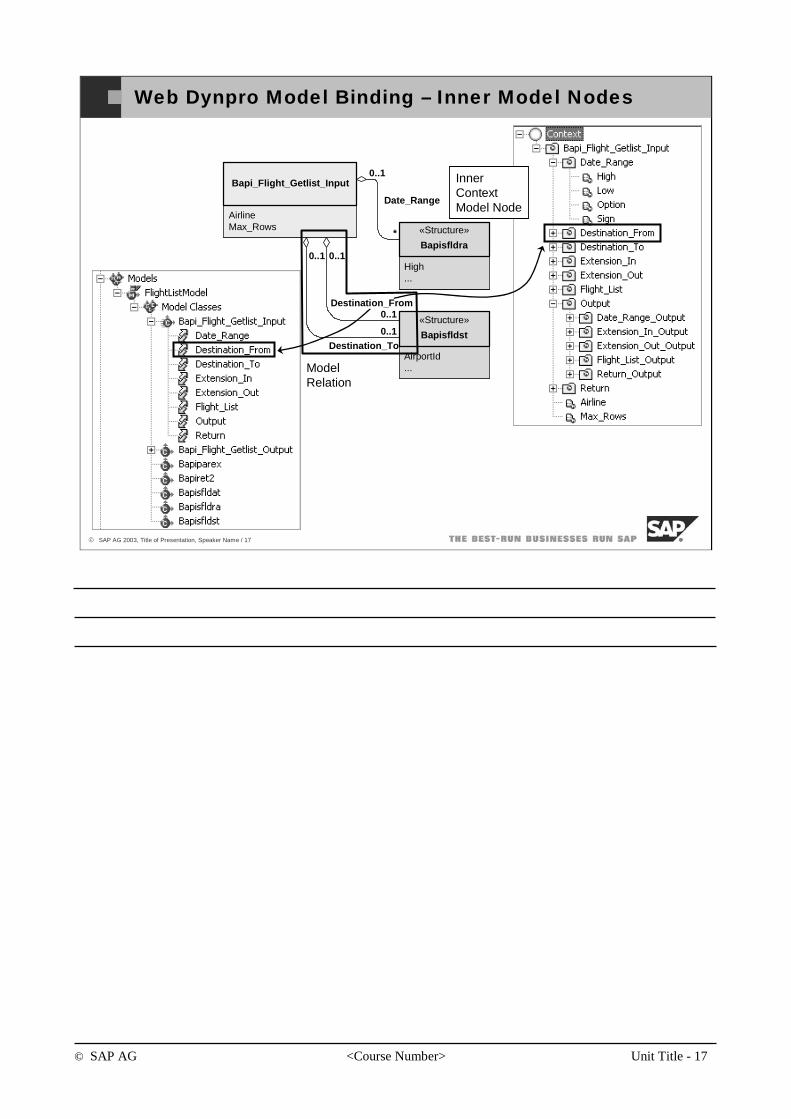
© SAP AG <Course Number> Unit Title - 17
© SAP AG 2003, Title of Presentation, Speaker Name / 17
Web Dynpro Model Binding – Inner Model Nodes
AirlineMax_Rows
Bapi_Flight_Getlist_Input
High...
«Structure»
Bapisfldra
0..1
*
Date_Range
AirportId...
«Structure»
Bapisfldst
0..1
0..1Destination_From
0..1
0..1Destination_To
Model Relation
Inner ContextModel Node
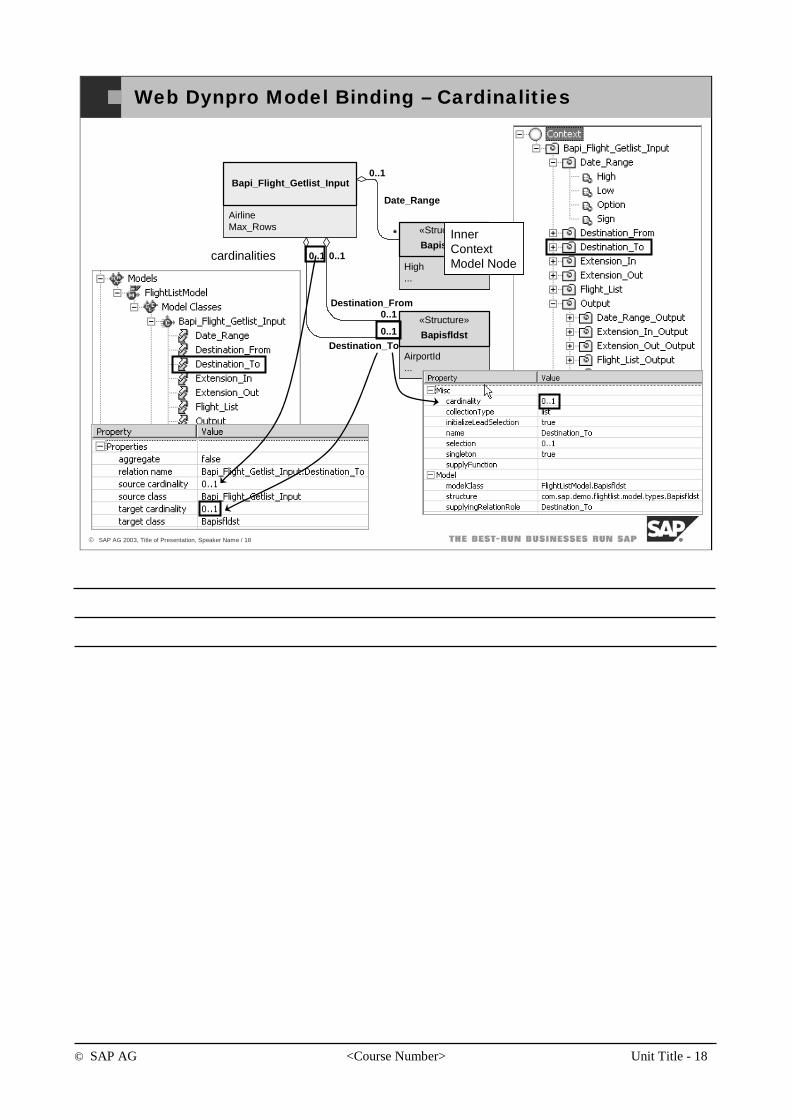
© SAP AG <Course Number> Unit Title - 18
© SAP AG 2003, Title of Presentation, Speaker Name / 18
Web Dynpro Model Binding – Cardinalities
AirlineMax_Rows
Bapi_Flight_Getlist_Input
High...
«Structure»
Bapisfldra
0..1
*
Date_Range
AirportId...
«Structure»
Bapisfldst
0..1
0..1Destination_From
0..1
0..1Destination_To
cardinalities
Inner ContextModel Node

© SAP AG <Course Number> Unit Title - 19
© SAP AG 2003, Title of Presentation, Speaker Name / 19
Structure Binding and Logical Dicitonary
AirlineMax_Rows
Bapi_Flight_Getlist_Input
High...
«Structure»
Bapisfldra
0..1
*
Date_Range
AirportId...
«Structure»
Bapisfldst
0..1
0..1Destination_From
0..1
0..1Destination_To
Structures in the LogicalDictionary
Structure Binding: A Context Model Node is bound to a structure inside the Logical Dictionary. Model Attributes correspond tostructureelements.
© SAP AG <Course Number> Unit Title - 20
© SAP AG 2003, Title of Presentation, Speaker Name / 20
You should now be able to:
Bind Web Dynpro context to a BAPI based model.
Context to Model Binding : Topic Summary
© SAP AG <Course Number> Unit Title - 21
© SAP AG 2003, Title of Presentation, Speaker Name / 21
You should now be able to:
Understand what is Adaptive RFC
Bind Web Dynpro context to adaptive RFC based model
Web Dynpro Models, Adaptive RFC: Unit Summary
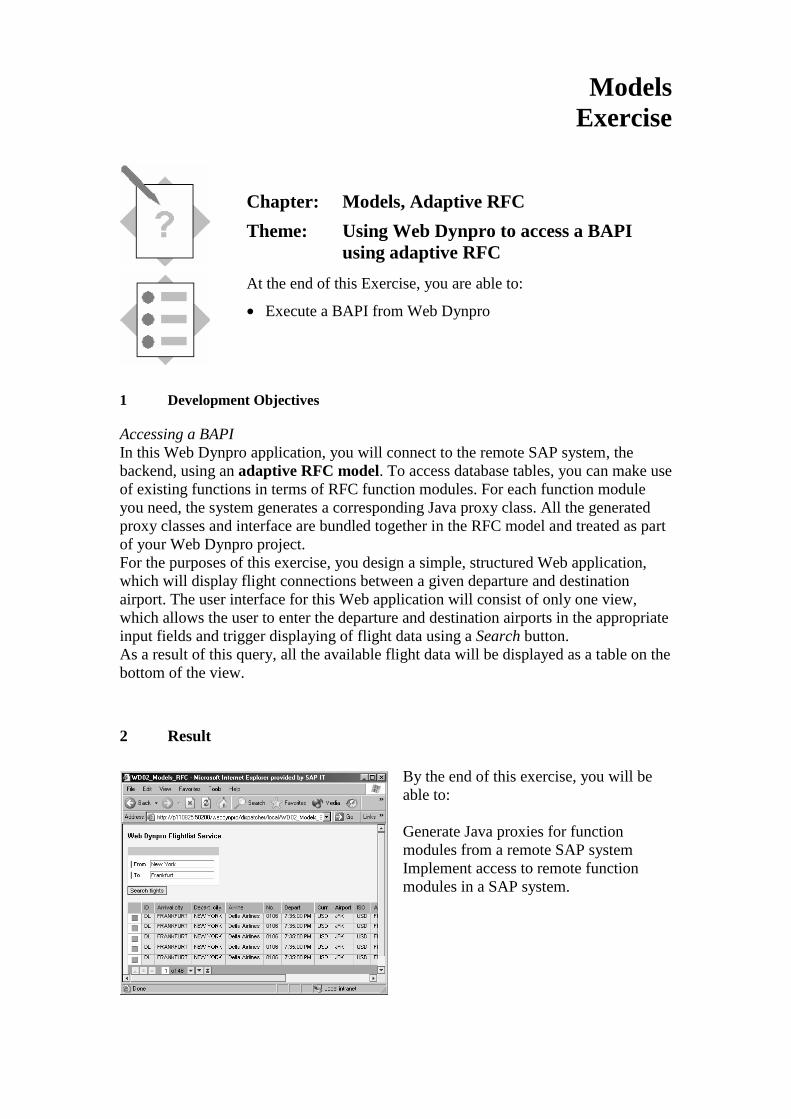
Models Exercise
Chapter: Models, Adaptive RFC
Theme: Using Web Dynpro to access a BAPI using adaptive RFC
At the end of this Exercise, you are able to:
• Execute a BAPI from Web Dynpro
1 Development Objectives Accessing a BAPI In this Web Dynpro application, you will connect to the remote SAP system, the backend, using an adaptive RFC model. To access database tables, you can make use of existing functions in terms of RFC function modules. For each function module you need, the system generates a corresponding Java proxy class. All the generated proxy classes and interface are bundled together in the RFC model and treated as part of your Web Dynpro project. For the purposes of this exercise, you design a simple, structured Web application, which will display flight connections between a given departure and destination airport. The user interface for this Web application will consist of only one view, which allows the user to enter the departure and destination airports in the appropriate input fields and trigger displaying of flight data using a Search button. As a result of this query, all the available flight data will be displayed as a table on the bottom of the view.
2 Result
By the end of this exercise, you will be able to: Generate Java proxies for function modules from a remote SAP system Implement access to remote function modules in a SAP system.
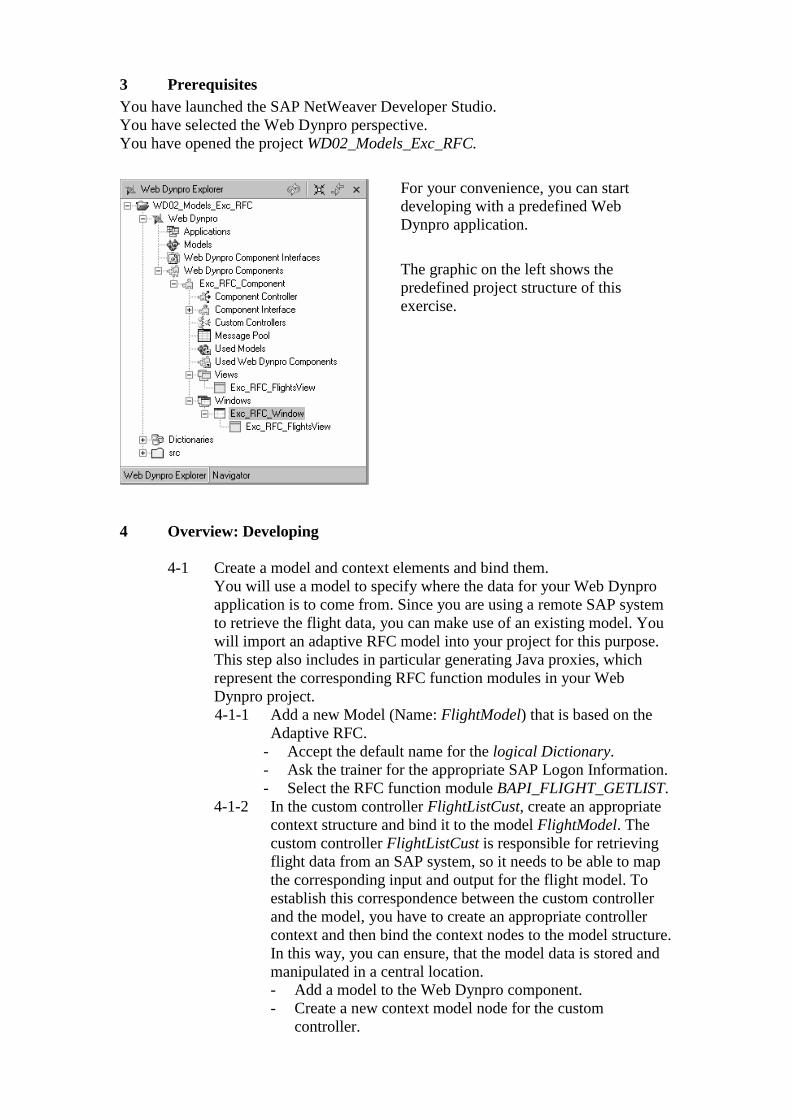
3 Prerequisites You have launched the SAP NetWeaver Developer Studio. You have selected the Web Dynpro perspective. You have opened the project WD02_Models_Exc_RFC.
For your convenience, you can start developing with a predefined Web Dynpro application.
The graphic on the left shows the predefined project structure of this exercise.
4 Overview: Developing
4-1 Create a model and context elements and bind them. You will use a model to specify where the data for your Web Dynpro application is to come from. Since you are using a remote SAP system to retrieve the flight data, you can make use of an existing model. You will import an adaptive RFC model into your project for this purpose. This step also includes in particular generating Java proxies, which represent the corresponding RFC function modules in your Web Dynpro project. 4-1-1 Add a new Model (Name: FlightModel) that is based on the
Adaptive RFC. - Accept the default name for the logical Dictionary. - Ask the trainer for the appropriate SAP Logon Information. - Select the RFC function module BAPI_FLIGHT_GETLIST.
4-1-2 In the custom controller FlightListCust, create an appropriate context structure and bind it to the model FlightModel. The custom controller FlightListCust is responsible for retrieving flight data from an SAP system, so it needs to be able to map the corresponding input and output for the flight model. To establish this correspondence between the custom controller and the model, you have to create an appropriate controller context and then bind the context nodes to the model structure. In this way, you can ensure, that the model data is stored and manipulated in a central location. - Add a model to the Web Dynpro component. - Create a new context model node for the custom
controller.
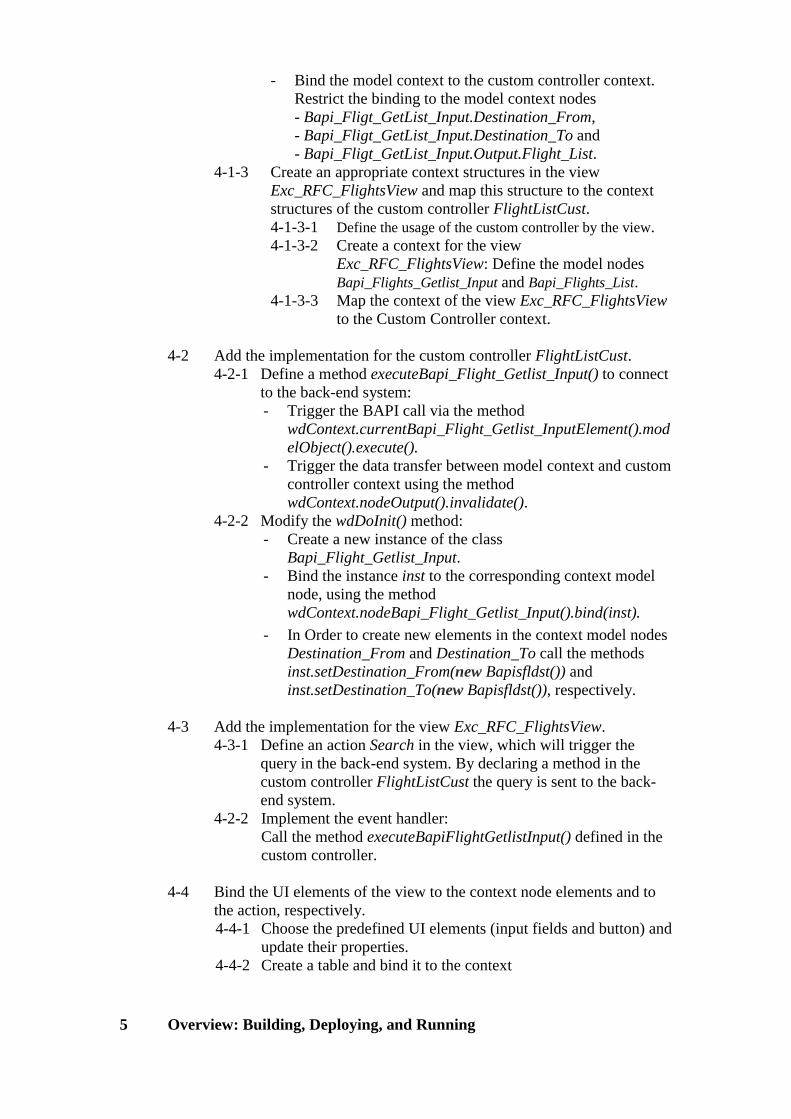
- Bind the model context to the custom controller context. Restrict the binding to the model context nodes - Bapi_Fligt_GetList_Input.Destination_From, - Bapi_Fligt_GetList_Input.Destination_To and - Bapi_Fligt_GetList_Input.Output.Flight_List.
4-1-3 Create an appropriate context structures in the view Exc_RFC_FlightsView and map this structure to the context structures of the custom controller FlightListCust. 4-1-3-1 Define the usage of the custom controller by the view. 4-1-3-2 Create a context for the view
Exc_RFC_FlightsView: Define the model nodes Bapi_Flights_Getlist_Input and Bapi_Flights_List.
4-1-3-3 Map the context of the view Exc_RFC_FlightsView to the Custom Controller context.
4-2 Add the implementation for the custom controller FlightListCust.
4-2-1 Define a method executeBapi_Flight_Getlist_Input() to connect to the back-end system: - Trigger the BAPI call via the method
wdContext.currentBapi_Flight_Getlist_InputElement().modelObject().execute().
- Trigger the data transfer between model context and custom controller context using the method wdContext.nodeOutput().invalidate().
4-2-2 Modify the wdDoInit() method: - Create a new instance of the class
Bapi_Flight_Getlist_Input. - Bind the instance inst to the corresponding context model
node, using the method wdContext.nodeBapi_Flight_Getlist_Input().bind(inst).
- In Order to create new elements in the context model nodes Destination_From and Destination_To call the methods inst.setDestination_From(new Bapisfldst()) and inst.setDestination_To(new Bapisfldst()), respectively.
4-3 Add the implementation for the view Exc_RFC_FlightsView.
4-3-1 Define an action Search in the view, which will trigger the query in the back-end system. By declaring a method in the custom controller FlightListCust the query is sent to the back-end system.
4-2-2 Implement the event handler: Call the method executeBapiFlightGetlistInput() defined in the custom controller.
4-4 Bind the UI elements of the view to the context node elements and to
the action, respectively. 4-4-1 Choose the predefined UI elements (input fields and button) and
update their properties. 4-4-2 Create a table and bind it to the context
5 Overview: Building, Deploying, and Running

5-1 Build and deploy Web Dynpro application
5-2 Create the JCO connections in the Content Administrator.
The logical system names used in the model declaration must be associated with an actual SAP system defined in the SLD before this application can be executed. For this reason you need to create JCO connections in the Web Dynpro Content Administrator. To use an adaptive RFC model in your Web Dynpro application you will define two connections: A connection to get the needed (dictionary) meta data information and a connection to get the read the application data:
- Start the Content Administrator http://<host>:<port>/webdynpro/welcome
5-3 Launch the application.
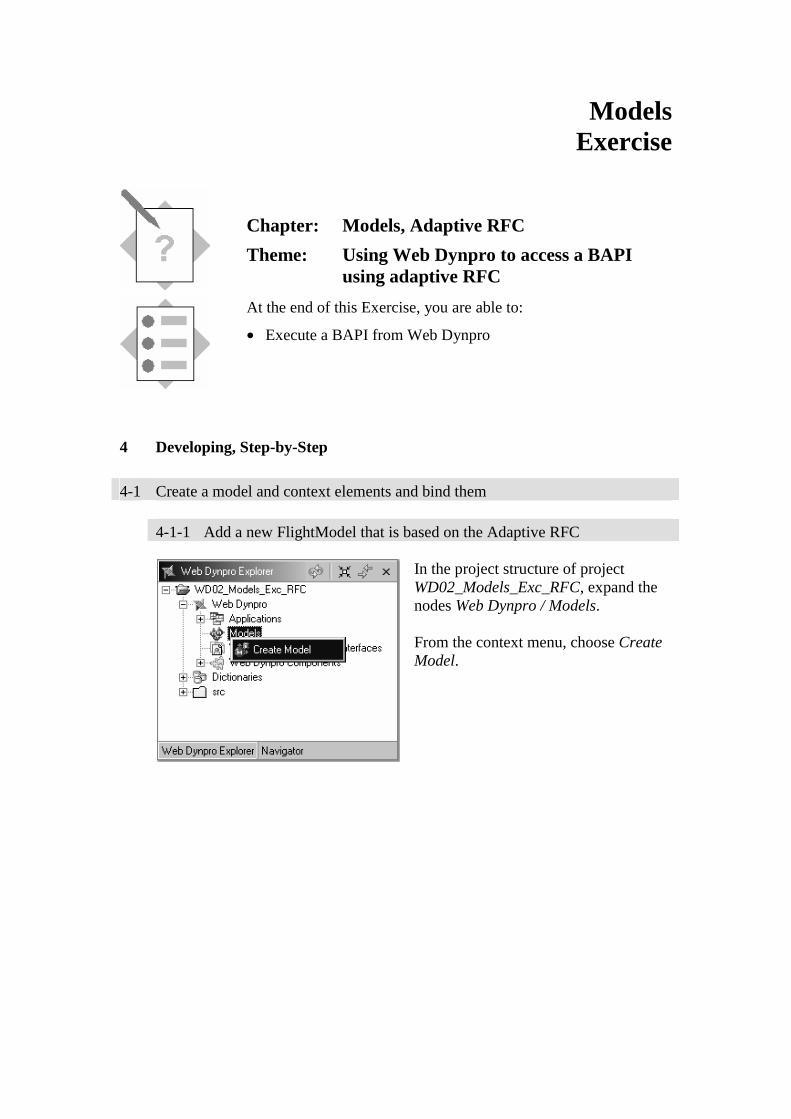
Models Exercise
Chapter: Models, Adaptive RFC
Theme: Using Web Dynpro to access a BAPI using adaptive RFC
At the end of this Exercise, you are able to:
• Execute a BAPI from Web Dynpro
4 Developing, Step-by-Step 4-1 Create a model and context elements and bind them
4-1-1 Add a new FlightModel that is based on the Adaptive RFC
In the project structure of project WD02_Models_Exc_RFC, expand the nodes Web Dynpro / Models. From the context menu, choose Create Model.

The appropriate wizard appears. Choose the Import Adaptive RFC Model option, followed by Next. Enter:
Name FlightModel
Package com.sap.training.wd.exc22.model When importing an adaptive RFC Model you have to specify the logical system names for model instances and RFC metadata: Enter:
Default logical system name for model instances
WD_MODELDATA_DEST change it to WD_FLIGHTLIST_MODELDATA_DEST
Default logical system name for RFC metadata
WD_RFC_METADATA_DEST
change it to WD_FLIGHTLIST_RFC_METADATA_DEST
The logical systems will later be separately configured using the JCO Connections screen of the J2EE Engine Web Dynpro Content Administrator (see section Building, Deploying, Configuring, and Running Your Application). Accept the suggested values and choose Next.
Enter the appropriate data for logging on to the SAP system and choose Next. When logging on, you can choose one of two options: Either choose a single application server or address the system and log on using Load Balancing. Choose Next.
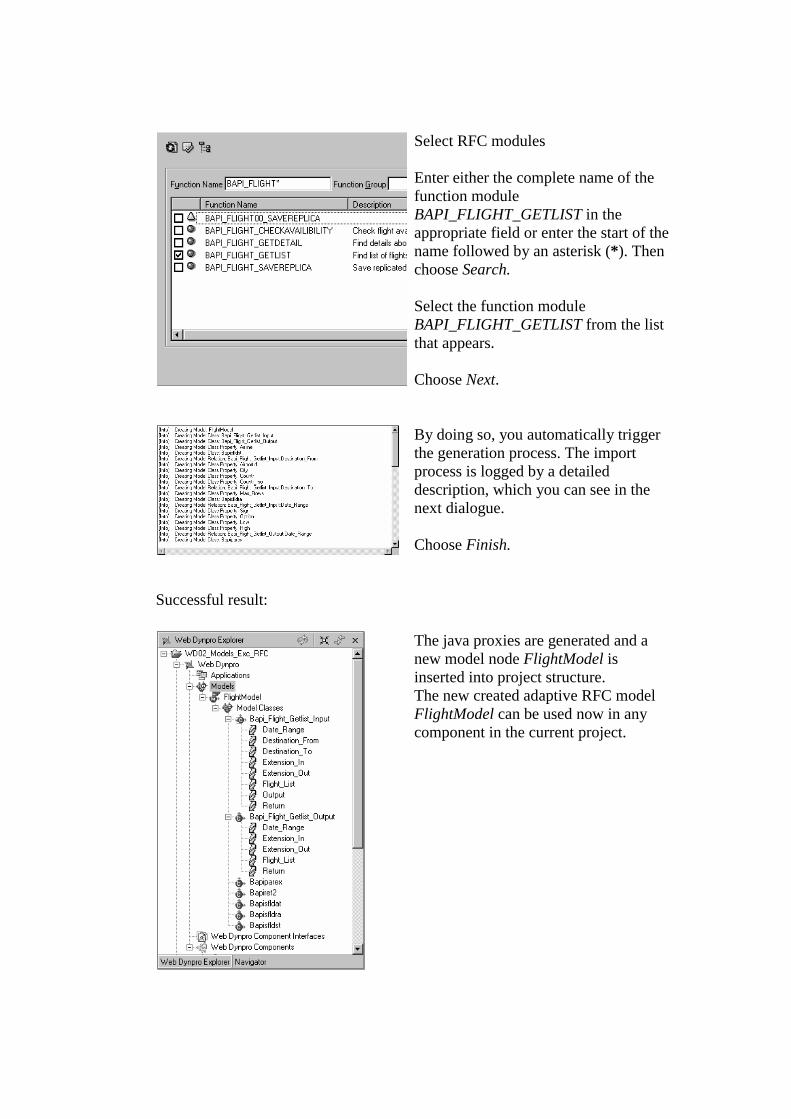
Select RFC modules Enter either the complete name of the function module BAPI_FLIGHT_GETLIST in the appropriate field or enter the start of the name followed by an asterisk (*). Then choose Search. Select the function module BAPI_FLIGHT_GETLIST from the list that appears. Choose Next.
By doing so, you automatically trigger the generation process. The import process is logged by a detailed description, which you can see in the next dialogue. Choose Finish.
Successful result:
The java proxies are generated and a new model node FlightModel is inserted into project structure. The new created adaptive RFC model FlightModel can be used now in any component in the current project.
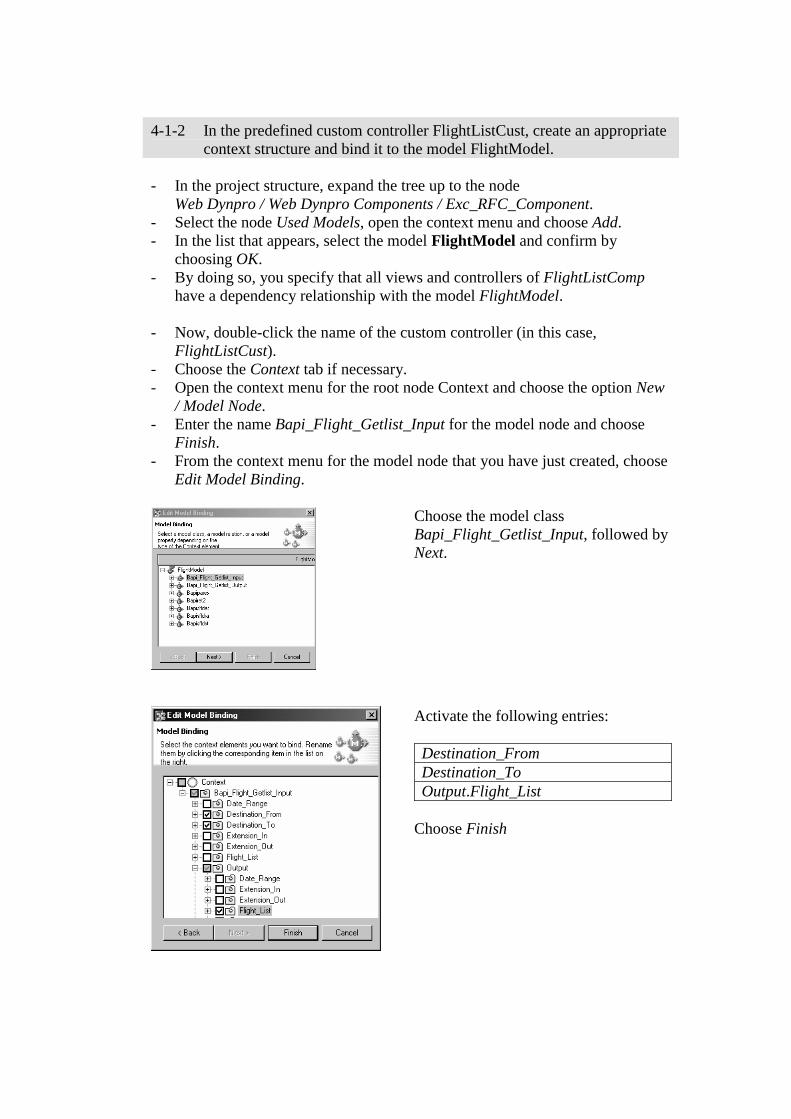
4-1-2 In the predefined custom controller FlightListCust, create an appropriate
context structure and bind it to the model FlightModel.
- In the project structure, expand the tree up to the node Web Dynpro / Web Dynpro Components / Exc_RFC_Component.
- Select the node Used Models, open the context menu and choose Add. - In the list that appears, select the model FlightModel and confirm by
choosing OK. - By doing so, you specify that all views and controllers of FlightListComp
have a dependency relationship with the model FlightModel. - Now, double-click the name of the custom controller (in this case,
FlightListCust). - Choose the Context tab if necessary. - Open the context menu for the root node Context and choose the option New
/ Model Node. - Enter the name Bapi_Flight_Getlist_Input for the model node and choose
Finish. - From the context menu for the model node that you have just created, choose
Edit Model Binding.
Choose the model class Bapi_Flight_Getlist_Input, followed by Next.
Activate the following entries: Destination_From Destination_To Output.Flight_List
Choose Finish
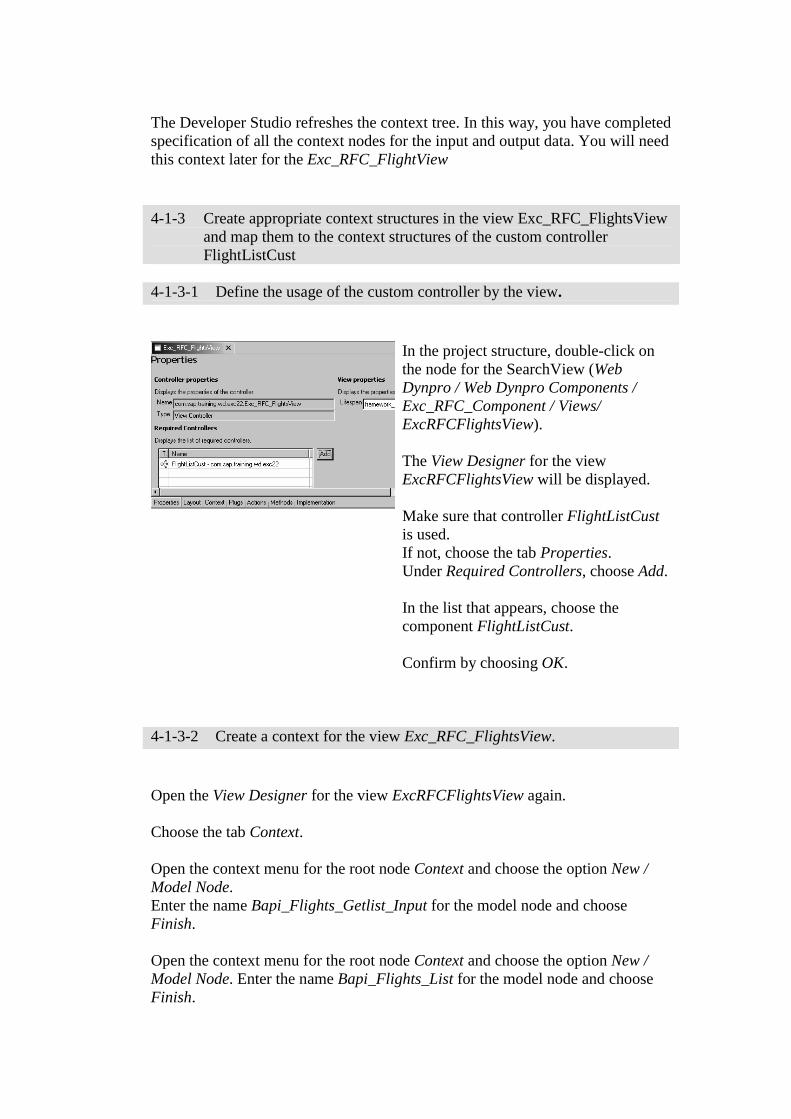
The Developer Studio refreshes the context tree. In this way, you have completed
specification of all the context nodes for the input and output data. You will need this context later for the Exc_RFC_FlightView
4-1-3 Create appropriate context structures in the view Exc_RFC_FlightsView and map them to the context structures of the custom controller FlightListCust
4-1-3-1 Define the usage of the custom controller by the view.
In the project structure, double-click on the node for the SearchView (Web Dynpro / Web Dynpro Components / Exc_RFC_Component / Views/ ExcRFCFlightsView). The View Designer for the view ExcRFCFlightsView will be displayed. Make sure that controller FlightListCust is used. If not, choose the tab Properties. Under Required Controllers, choose Add. In the list that appears, choose the component FlightListCust. Confirm by choosing OK.
4-1-3-2 Create a context for the view Exc_RFC_FlightsView.
Open the View Designer for the view ExcRFCFlightsView again. Choose the tab Context. Open the context menu for the root node Context and choose the option New / Model Node. Enter the name Bapi_Flights_Getlist_Input for the model node and choose Finish. Open the context menu for the root node Context and choose the option New / Model Node. Enter the name Bapi_Flights_List for the model node and choose Finish.
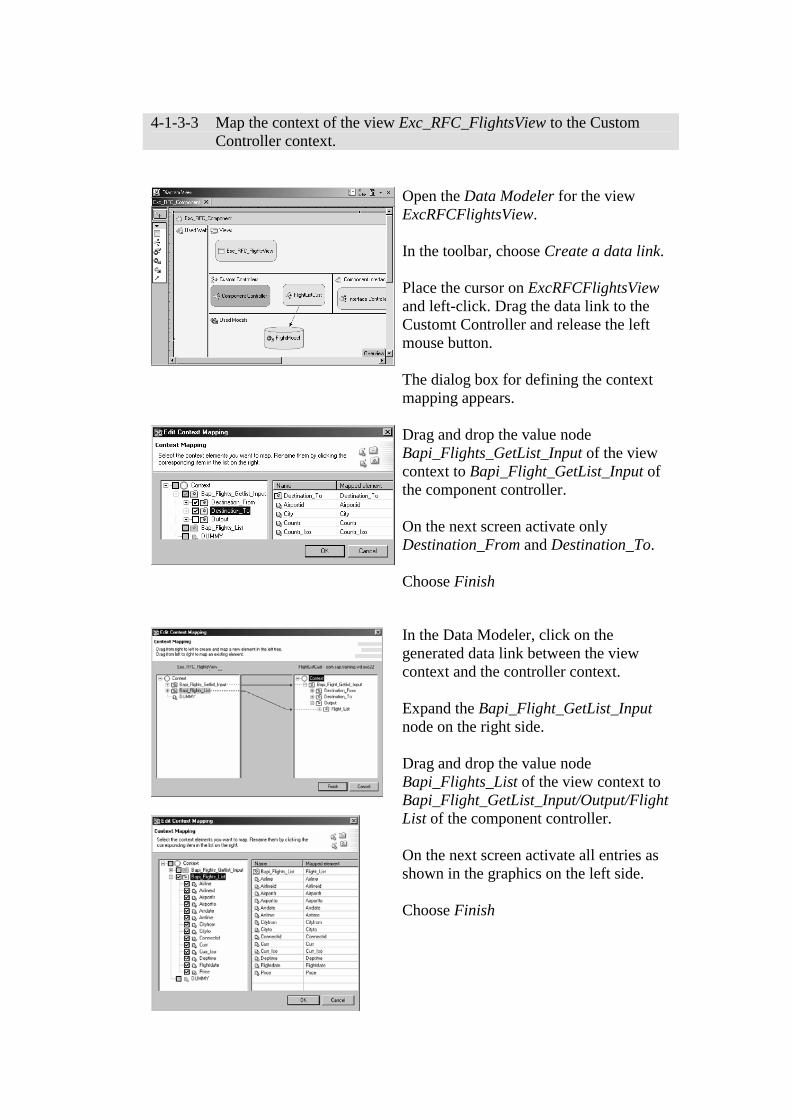
4-1-3-3 Map the context of the view Exc_RFC_FlightsView to the Custom Controller context.
Open the Data Modeler for the view ExcRFCFlightsView. In the toolbar, choose Create a data link. Place the cursor on ExcRFCFlightsView and left-click. Drag the data link to the Customt Controller and release the left mouse button. The dialog box for defining the context mapping appears.
Drag and drop the value node Bapi_Flights_GetList_Input of the view context to Bapi_Flight_GetList_Input of the component controller. On the next screen activate only Destination_From and Destination_To. Choose Finish
In the Data Modeler, click on the generated data link between the view context and the controller context. Expand the Bapi_Flight_GetList_Input node on the right side. Drag and drop the value node Bapi_Flights_List of the view context to Bapi_Flight_GetList_Input/Output/FlightList of the component controller. On the next screen activate all entries as shown in the graphics on the left side. Choose Finish

Save the new project data by choosing Save All Metadata from the toolbar.
You have created the necessary view context and mapped it to the component context you created previously. You are now in a position to bind UI controls in the two views to the corresponding view context elements.
4-2 Add the implementation for the custom controller FlightListCust.
4-2-1 Open the editor for the custom controller FlightListCust Choose the Methods tab.
Choose New. Select the Method option and choose Next. In the wizard screen that appears, enter the name executeBapi_Flight_Getlist_Input for this new method and assign it the return type void. Choose Finish. The method executeBapi_Flight_Getlist_Input is added to the custom controller. Choose the Implementation tab. Navigate to the generated method. Insert the following lines of code: public void executeBapiFlightGetlistInput( ) { //@@begin executeBapiFlightGetlistInput() try { wdContext.currentBapi_Flight_Getlist_InputElement(). modelObject().execute(); } catch(Exception ex){ ex.printStackTrace(); } // Resynchronise the data in the context with the // data in the model wdContext.nodeOutput().invalidate(); //@@end }
4-2-2 Modify the wdDoInit() method. Choose the Implementation tab and navigate to wdDoInit() method.
Insert the following lines of code: public void wdDoInit() { //@@begin wdDoInit() // Create a new element in the // Bapi_Flight_Getlist_Input node Bapi_Flight_Getlist_Input bapiInput = new Bapi_Flight_Getlist_Input(); wdContext.nodeBapi_Flight_Getlist_Input(). bind(bapiInput);
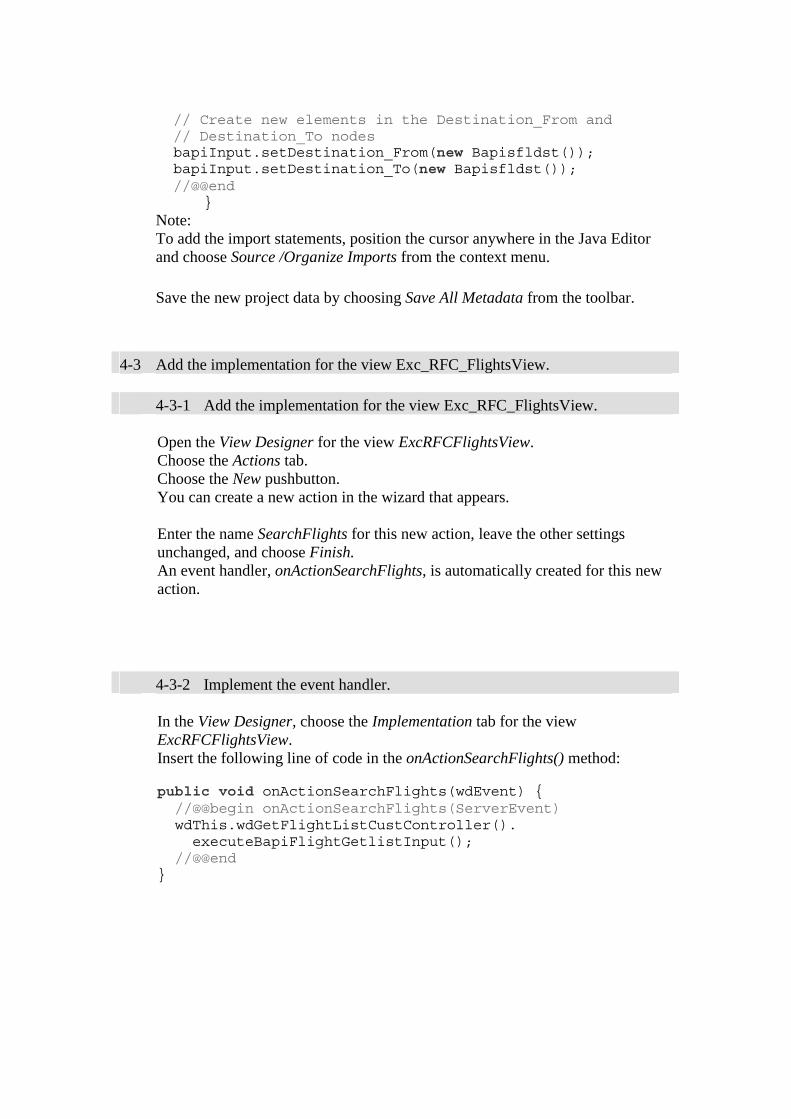
// Create new elements in the Destination_From and // Destination_To nodes bapiInput.setDestination_From(new Bapisfldst()); bapiInput.setDestination_To(new Bapisfldst()); //@@end } Note: To add the import statements, position the cursor anywhere in the Java Editor and choose Source /Organize Imports from the context menu.
Save the new project data by choosing Save All Metadata from the toolbar. 4-3 Add the implementation for the view Exc_RFC_FlightsView.
4-3-1 Add the implementation for the view Exc_RFC_FlightsView.
Open the View Designer for the view ExcRFCFlightsView. Choose the Actions tab. Choose the New pushbutton. You can create a new action in the wizard that appears. Enter the name SearchFlights for this new action, leave the other settings unchanged, and choose Finish. An event handler, onActionSearchFlights, is automatically created for this new action.
4-3-2 Implement the event handler.
In the View Designer, choose the Implementation tab for the view ExcRFCFlightsView. Insert the following line of code in the onActionSearchFlights() method: public void onActionSearchFlights(wdEvent) { //@@begin onActionSearchFlights(ServerEvent) wdThis.wdGetFlightListCustController(). executeBapiFlightGetlistInput(); //@@end }
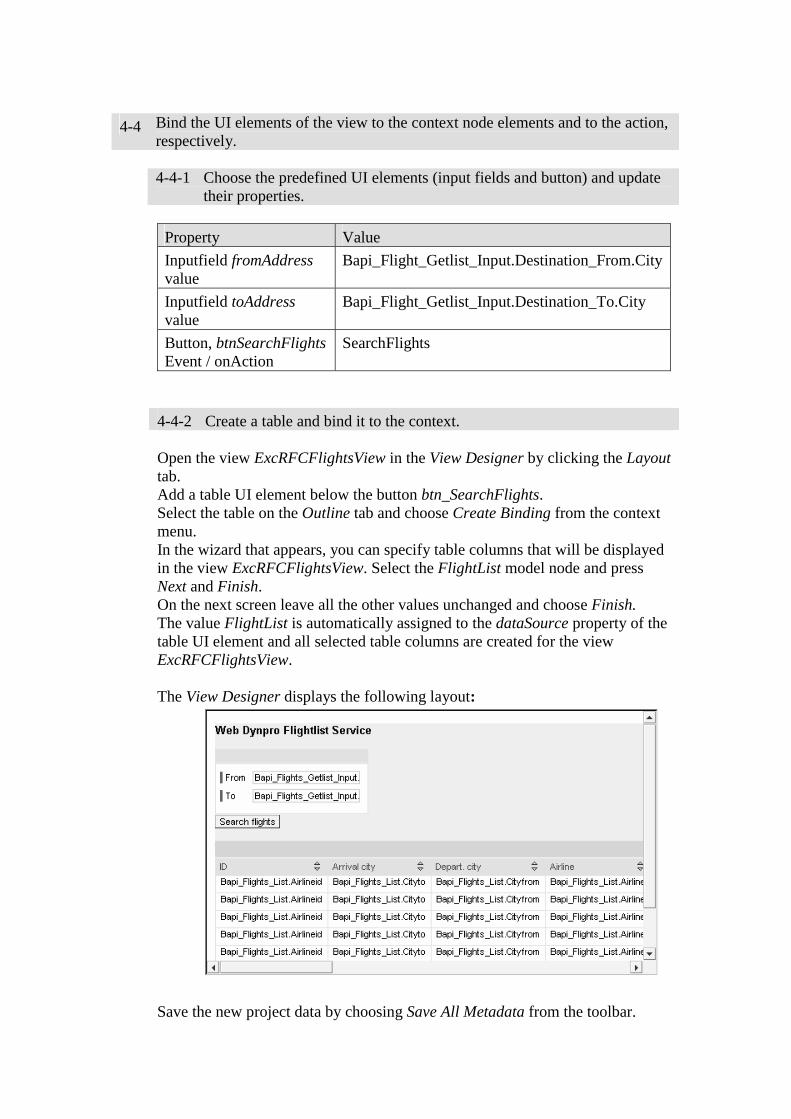
4-4 Bind the UI elements of the view to the context node elements and to the action, respectively.
4-4-1 Choose the predefined UI elements (input fields and button) and update their properties.
Property Value
Inputfield fromAddress value
Bapi_Flight_Getlist_Input.Destination_From.City
Inputfield toAddress value
Bapi_Flight_Getlist_Input.Destination_To.City
Button, btnSearchFlights Event / onAction
SearchFlights
4-4-2 Create a table and bind it to the context.
Open the view ExcRFCFlightsView in the View Designer by clicking the Layout tab. Add a table UI element below the button btn_SearchFlights. Select the table on the Outline tab and choose Create Binding from the context menu. In the wizard that appears, you can specify table columns that will be displayed in the view ExcRFCFlightsView. Select the FlightList model node and press Next and Finish. On the next screen leave all the other values unchanged and choose Finish. The value FlightList is automatically assigned to the dataSource property of the table UI element and all selected table columns are created for the view ExcRFCFlightsView. The View Designer displays the following layout:
Save the new project data by choosing Save All Metadata from the toolbar.
5 Building, Deploying, and Running, Step-by-Step 5-1 Build and deploy Web Dynpro application.
5-1-1 Build the project.
If you have not already done so, save the metadata for your project. In the Web Dynpro Explorer, from the context menu of the project node WD02_Models_RFC, choose Rebuild Project. Make sure that the Tasks view does not display any errors for your project.
5-1-2 Deploy the project.
In the Web Dynpro Explorer, select the project node WD02_Models_RFC and choose Create Archive from the context menu. Choose Deploy Project from the context menu of the project node.
5-2 Create the JCO connections in the Content Administrator. To create the new JCO connections proceed as follows:
Open the Web Dynpro Content Administrator on your J2EE Engine using the URL: http://<host>:<port>/webdynpro/welcome. If you are using the Content Administrator for the first time, you need to perform the self registration. Select the Browse tab and navigate to the node local / WD02_Models_Exc_RFC. On the right side, choose the JCO Connections tab. Two destinations named WD_FLIGHTLIST_MODELDATA_DEST and WD_FLIGHTLIST_RFC_METADATA_DEST are shown in this view and both of them have the status red. This means that the JCO connection is not yet maintained in the assigned SLD. If the status is undefined, the SLD has net be defined yet! At the end of this exercise, you find a cook book, how to set up the SLD. Select WD_FLIGHTLIST_MODELDATA_DEST and choose Create to configure a new JCO connection.
a) Go though the steps of the JCO connection creation wizard and specify the connection data. Note: In step 3, choose Application Data
b) After making the required entries, press Finish. c) Test your configuration data by pressing the Test button.
Repeat this procedure for the entry WD_FLIGHTLIST_RFC_METADATA_DEST. Note: in step 3, choose Dictionary Meta Data If the tests were successful, you can close the Content Adminstrator. Otherwise correct your connection entries.
5-3 Launch the application.
In the Web Dynpro Explorer, open the context menu for the application object WD02_Models_RFC.
Choose Run.
Defining the SLD: Cook Book The SLD is used for defining the connection information for ABAP servers of SAP systems. In the Web Dynpro application this connection information is not maintained. The following steps have to be performed, in order to set up the SLD: 1. Control the heap size of the J2EE engine 2. Define the SLD server settings 3. Import the CIM model 4. Define the system settings of the SAP systems 5. Maintain the SLD used in the J2EE configuration parameters 1. Control the Heap size of the J2EE engine
- Start the J2EE Engine Config Tool via the predefined batch file: C:\usr\sap\J2E\JC00\j2ee\configtool\configtool.bat
- Change the heap size setting to 512 MB for the following nodes: - cluster-data -> instance_ID… - cluster-data -> instance_ID… -> dispatcher - cluster-data -> instance_ID… -> server_ID…
- Restart J2EE Engine 2. Define the SLD server settings
- Start the SLD via http://<server>:<port>/sld/index.jsp
The default user / password is administrator / sap. - Choose the Link Administration. - Choose the Link Server Settings. - In the field Server Parameters -> Objekt Server enter the name of the
J2EE host. Press Set.
- In the field Server Parameters -> Working Directory enter the directory path C:\usr\sap\J2E\SYS\global\sld. Press Set.
- Check the radio button Persistence -> Database. Press Set.
- Click on the Hyperlink Back to Administration. 3. Import CIM Model
- In the SLD, select Administration. - Select Content Import. - Select the file
C:\usr\sap\J2E\SYS\global\sld\model\CR_Content.zip - Start Import (can take 10 – 20 mins).
4. Define the system settings of the SAP systems
- In the SLD, select Administration. - Check, whether the Server is running. If not, start the Server. - Select the Hyperlink Home. - Select the Hyperlink Technical Landscape. - Select Web AS ABAP in the drop down box Technical System Type. - Press the Button New Technical System. - Check Web AS ABAP and the button Next. - Enter the System ID, the Installation Number (Transaction SLICENSE)
and the database host name and press Next. - Enter the information for message server and central application server and
press Next. - If the SAP system contains more than one application server, add the
server information on the next dialog screen and press Next. - Enter a valid client for the SAP system and the logical system name, press
Add and then press Next. - Next, select all software components available on the SAP system. After
having selected an entry, press Add. - Press Finish.
5. Maintain the SLD used in the J2EE configuration parameters
- Start the Visual Administrator: C:\usr\sap\J2E\JC00\j2ee\admin\go.bat
- Open the following node: Server 0 0_... -> Services -> SLD Data Suplier
- On the tab Runtime open the tab CIM Client Generation Settings. - Enter the J2EE Engine host name, the port number, the user name
administrator and the administrator’s password. Press Save.
© SAP AG <Course Number> Unit Title - 1
© SAP AG 2003, Title of Presentation, Speaker Name / 1
Default Windows
Popup Windows, External Windows, Confirmation Dialog Windows.
Create Windows.
Web Dynpro Windows API.
Contents:
Web Dynpro Windows
© SAP AG <Course Number> Unit Title - 2
© SAP AG 2003, Title of Presentation, Speaker Name / 2
After completing this unit, you will be able to:
Understand the different windows you can create in your Web Dynpro applications.
Create new windows using the SAP NetWeaver Developer Studio.
Create different kinds of popup windows using the Web Dynpro Windows API.
Web Dynpro Windows: Unit Objectives
© SAP AG <Course Number> Unit Title - 3
© SAP AG 2003, Title of Presentation, Speaker Name / 3
<To be taken from the Course Overview unit. Change the highlight to show which unit is now covered.>
Web Dynpro Windows: Course Overview Diagram <with unit highlighted>
© SAP AG <Course Number> Unit Title - 4
© SAP AG 2003, Title of Presentation, Speaker Name / 4
<Insert unit business scenario>
<Unit Title>: Business Scenario
© SAP AG <Course Number> Unit Title - 5
© SAP AG 2003, Title of Presentation, Speaker Name / 5
Web Dynpro Windows
Web Dynpro is a very robust programming environment that has support for multiple window types:
Default Windows – the main window of your application.
Popup Windows – windows that you can programmatically “popup” and display to your users.
External Windows – windows that show up in a separate browser.
Confirmation Dialog Windows – windows that ask a question or give information that your users must respond to.
Web Dynpro WindowsThe different kinds of Web Dynpro windows.
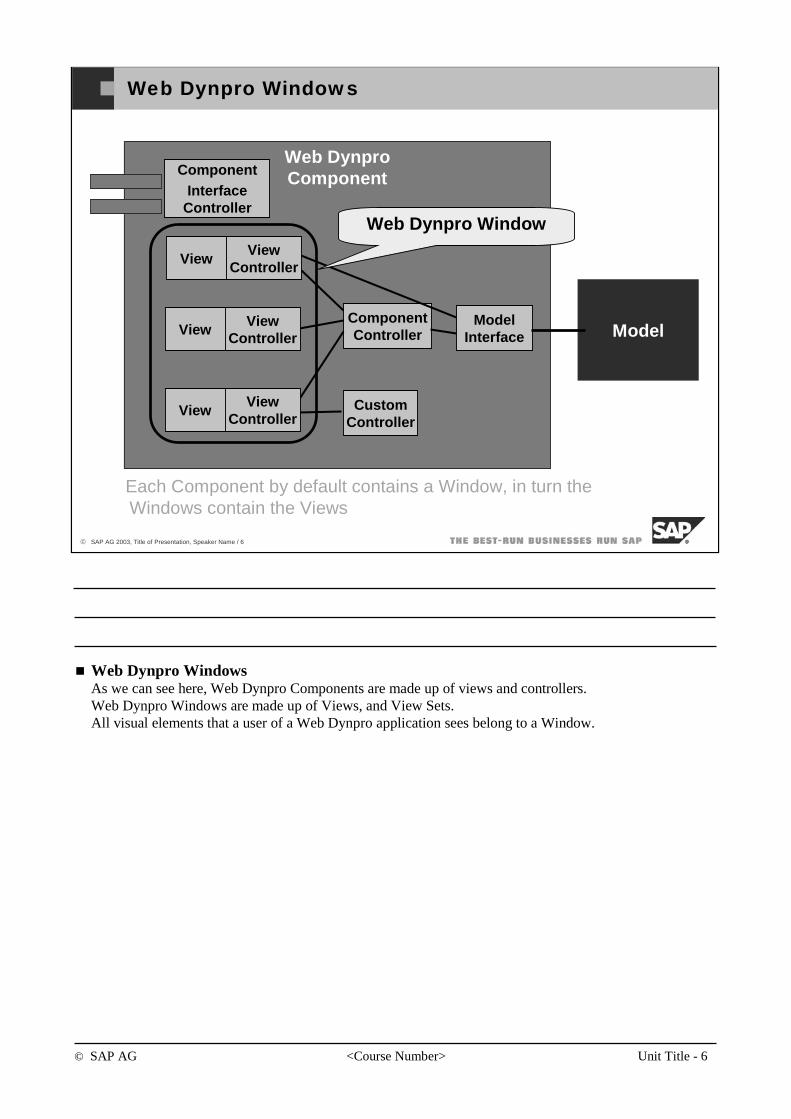
© SAP AG <Course Number> Unit Title - 6
© SAP AG 2003, Title of Presentation, Speaker Name / 6
Web Dynpro Windows
Web DynproComponent
ComponentController
CustomController
ModelInterfaceView
ViewController
ViewView
Controller
ViewView
Controller
ComponentInterface
Controller
Model
Each Component by default contains a Window, in turn the Windows contain the Views
Web Dynpro Window
Web Dynpro WindowsAs we can see here, Web Dynpro Components are made up of views and controllers.Web Dynpro Windows are made up of Views, and View Sets.All visual elements that a user of a Web Dynpro application sees belong to a Window.
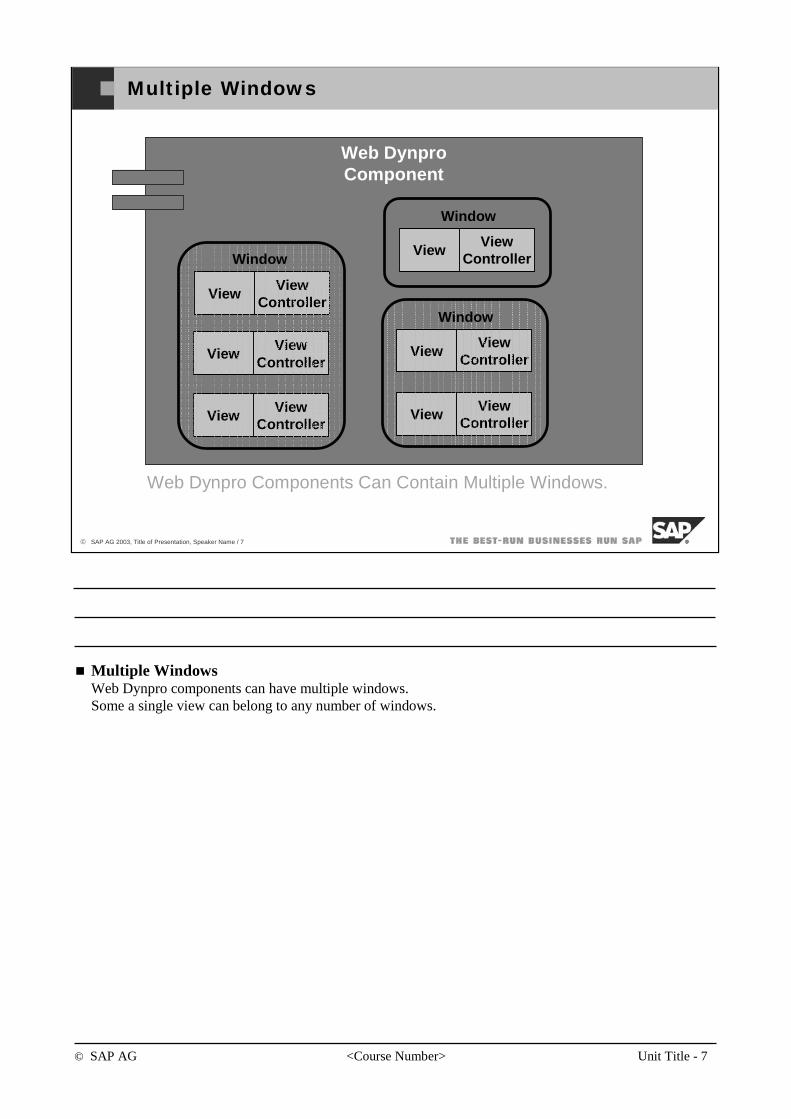
© SAP AG <Course Number> Unit Title - 7
© SAP AG 2003, Title of Presentation, Speaker Name / 7
Multiple Windows
Web DynproComponent
ViewView
Controller
ViewView
Controller
ViewView
Controller
Web Dynpro Components Can Contain Multiple Windows.
ViewView
Controller
ViewView
Controller
Window
Window
ViewView
Controller
Window
Multiple WindowsWeb Dynpro components can have multiple windows.Some a single view can belong to any number of windows.
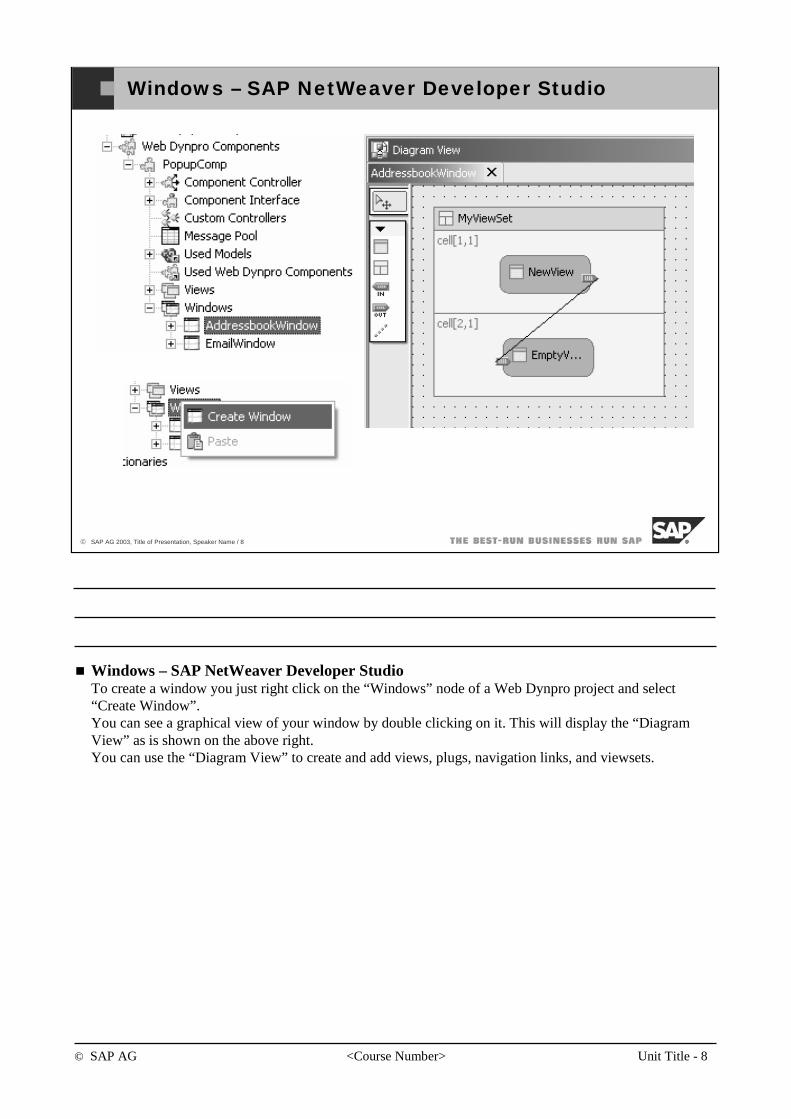
© SAP AG <Course Number> Unit Title - 8
© SAP AG 2003, Title of Presentation, Speaker Name / 8
Windows – SAP NetWeaver Developer Studio
Windows – SAP NetWeaver Developer StudioTo create a window you just right click on the “Windows” node of a Web Dynpro project and select “Create Window”.You can see a graphical view of your window by double clicking on it. This will display the “Diagram View” as is shown on the above right.You can use the “Diagram View” to create and add views, plugs, navigation links, and viewsets.

© SAP AG <Course Number> Unit Title - 9
© SAP AG 2003, Title of Presentation, Speaker Name / 9
Default Window
Web Dynpro Default Windows
The Window that exists in the Browser at application startup
The application selects its default window Interface View:
For each window a Interface View is created
Default WindowWhen creating an application you must select a default window. This is done by setting the “Interface View” property of a Web Dynpro application.Each Window has an associated Interface View as shown above.
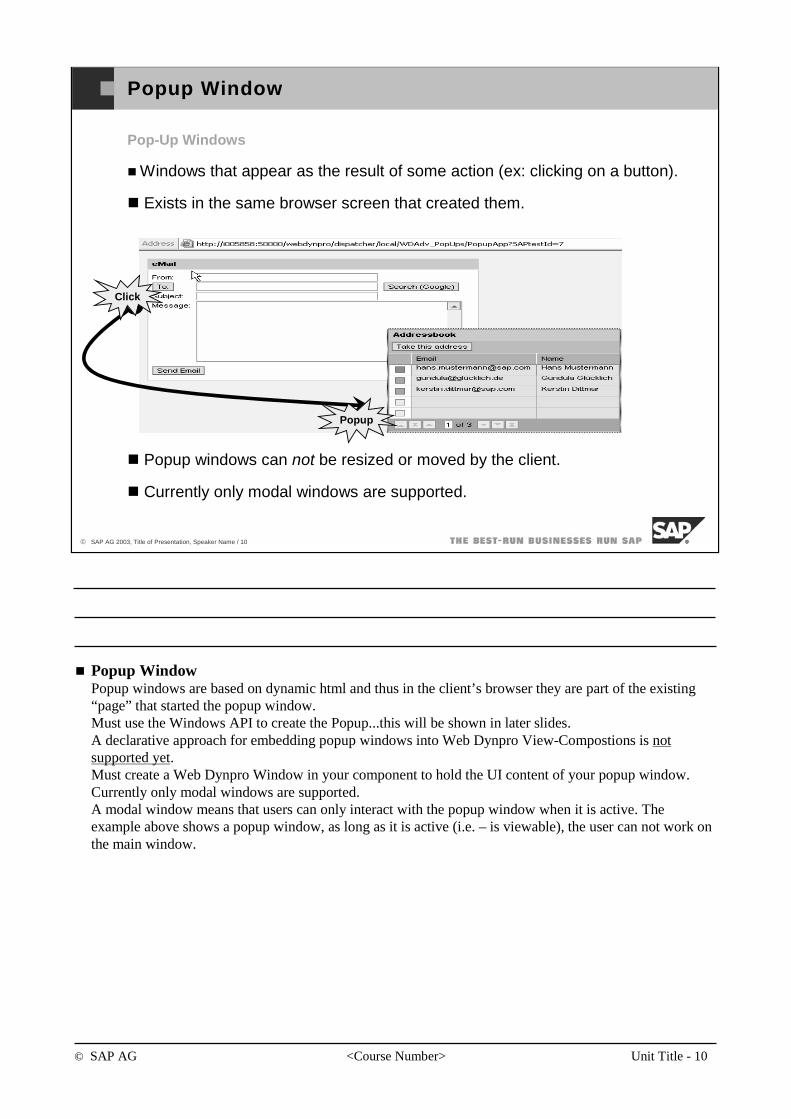
© SAP AG <Course Number> Unit Title - 10
© SAP AG 2003, Title of Presentation, Speaker Name / 10
Popup Window
Pop-Up Windows
Windows that appear as the result of some action (ex: clicking on a button).
Exists in the same browser screen that created them.
Popup windows can not be resized or moved by the client.
Currently only modal windows are supported.
Click
Popup
Popup WindowPopup windows are based on dynamic html and thus in the client’s browser they are part of the existing “page” that started the popup window.Must use the Windows API to create the Popup...this will be shown in later slides.A declarative approach for embedding popup windows into Web Dynpro View-Compostions is not supported yet.Must create a Web Dynpro Window in your component to hold the UI content of your popup window.Currently only modal windows are supported.A modal window means that users can only interact with the popup window when it is active. The example above shows a popup window, as long as it is active (i.e. – is viewable), the user can not work on the main window.
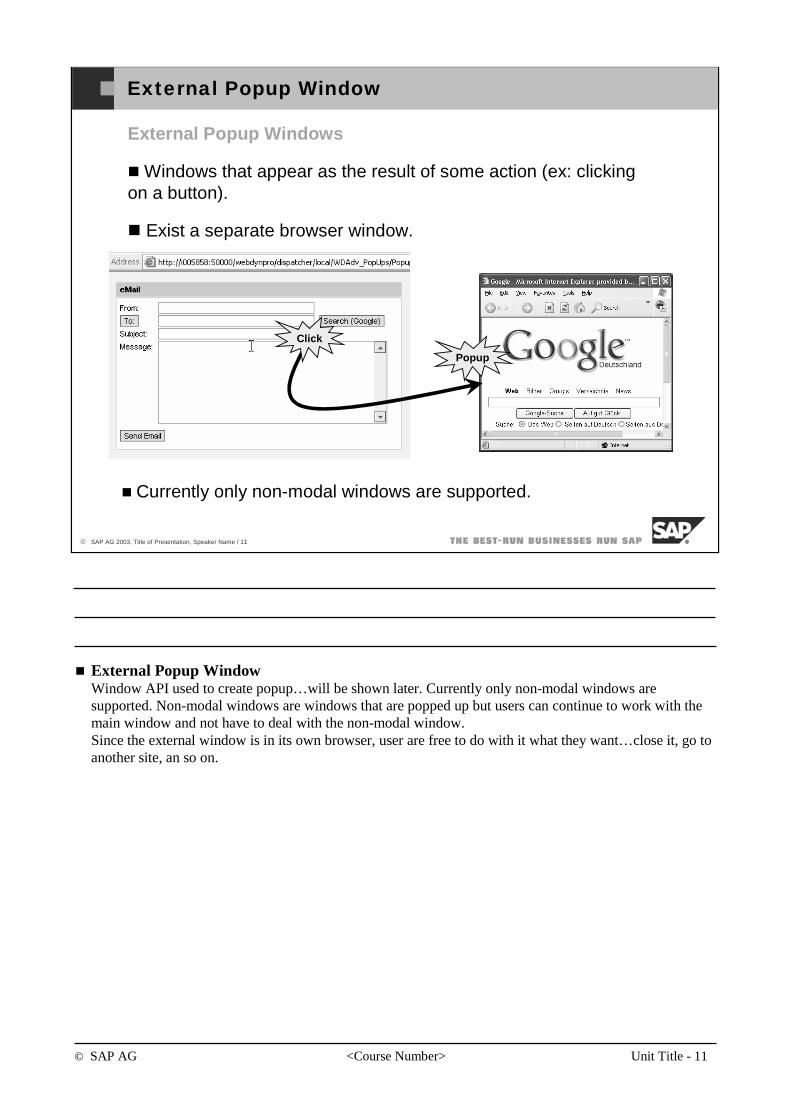
© SAP AG <Course Number> Unit Title - 11
© SAP AG 2003, Title of Presentation, Speaker Name / 11
External Popup Window
External Popup Windows
Windows that appear as the result of some action (ex: clickingon a button).
Exist a separate browser window.
Click
Popup
Currently only non-modal windows are supported.
External Popup Window Window API used to create popup…will be shown later. Currently only non-modal windows are supported. Non-modal windows are windows that are popped up but users can continue to work with the main window and not have to deal with the non-modal window.Since the external window is in its own browser, user are free to do with it what they want…close it, go to another site, an so on.
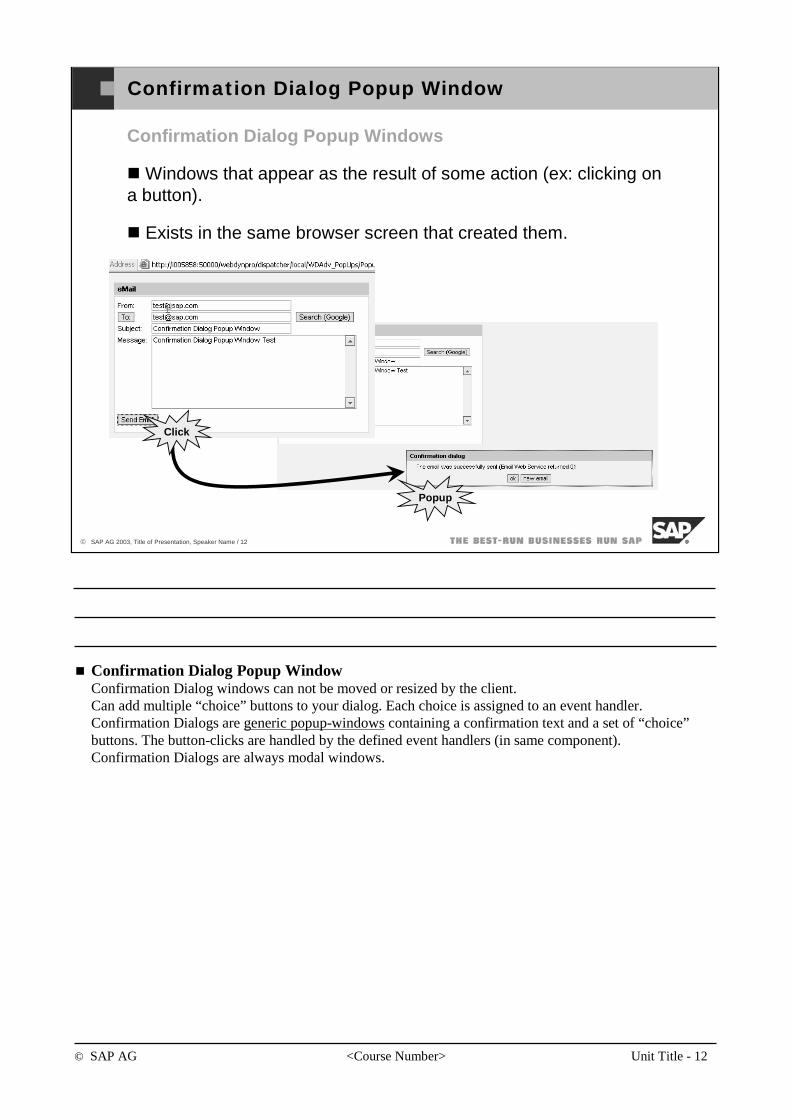
© SAP AG <Course Number> Unit Title - 12
© SAP AG 2003, Title of Presentation, Speaker Name / 12
Confirmation Dialog Popup Window
Confirmation Dialog Popup Windows
Windows that appear as the result of some action (ex: clicking on a button).
Exists in the same browser screen that created them.
Popup
Click
Confirmation Dialog Popup WindowConfirmation Dialog windows can not be moved or resized by the client.Can add multiple “choice” buttons to your dialog. Each choice is assigned to an event handler.Confirmation Dialogs are generic popup-windows containing a confirmation text and a set of “choice” buttons. The button-clicks are handled by the defined event handlers (in same component).Confirmation Dialogs are always modal windows.

© SAP AG <Course Number> Unit Title - 13
© SAP AG 2003, Title of Presentation, Speaker Name / 13
Web Dynpro Foundation Framework Window API
Web Dynpro Foundation Framework Window API
The Web Dynpro Foundation Framework provides the following Interfaces for programmatically embedding popup windows inside view-compositions.
IWDWindowManager – Used to create windows.
Methods: createWindow(…), createConfirmationWindow(…), createExternalWindow(…).
IWDWindowInfo – Definition of a window. Needed when creating a Popup window.
IWDWindow – Interface of a created window that can be displayed to the client as a popup.
IWDConfirmationDialog (extends IWDWindow) – Interface of a created Confirmation Dialog that can be displayed to the client as a popup.
Web Dynpro Foundation Framework Window APIAbove are the Window Interfaces of the Web Dynpro Foundation Framework…if working with window popups, you will need to learn these Interfaces very will. The following slides go into the use of these interfaces.
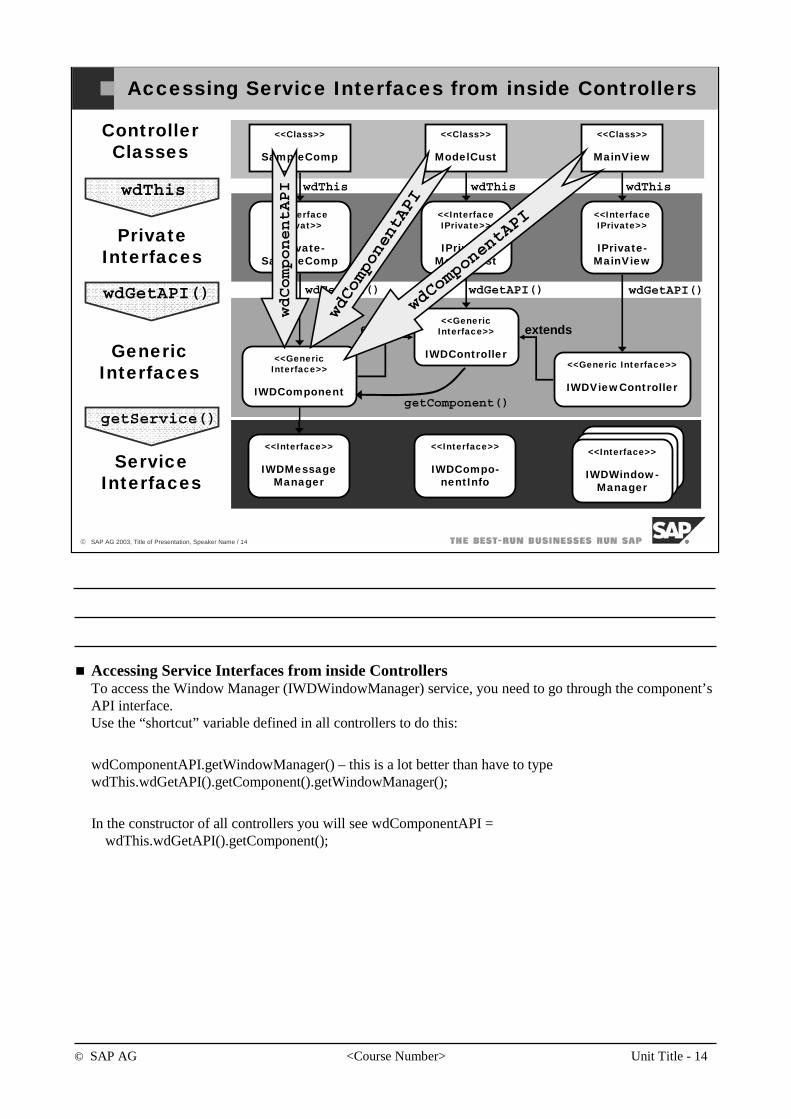
© SAP AG <Course Number> Unit Title - 14
© SAP AG 2003, Title of Presentation, Speaker Name / 14
Accessing Service Interfaces from inside Controllers
<<Interface>>
IWDWindow-Manager
<<Interface>>
IWDWindow-Manager
<<Class>>
SampleComp
<<Class>>
ModelCust
<<Class>>
MainView
<<GenericInterface>>
IWDController<<GenericInterface>>
IWDComponent
<<Generic Interface>>
IWDViewController
<<Interface>>
IWDMessageManager
<<Interface IPrivat>>
IPrivate-SampleComp
<<Interface IPrivate>>
IPrivate-ModelCust
<<Interface IPrivate>>
IPrivate-MainView
Controller Classes
Private Interfaces
Generic Interfaces
Service Interfaces
<<Interface>>
IWDCompo-nentInfo
<<Interface>>
IWDWindow-Manager
wdThis wdThis wdThis
wdGetAPI() wdGetAPI() wdGetAPI()
wdThis
wdGetAPI()
getService()getComponent()
extends extends
wdComponentAPI
wdComponentAPI
wdComponentAPI
Accessing Service Interfaces from inside ControllersTo access the Window Manager (IWDWindowManager) service, you need to go through the component’s API interface.Use the “shortcut” variable defined in all controllers to do this:
wdComponentAPI.getWindowManager() – this is a lot better than have to type wdThis.wdGetAPI().getComponent().getWindowManager();
In the constructor of all controllers you will see wdComponentAPI = wdThis.wdGetAPI().getComponent();
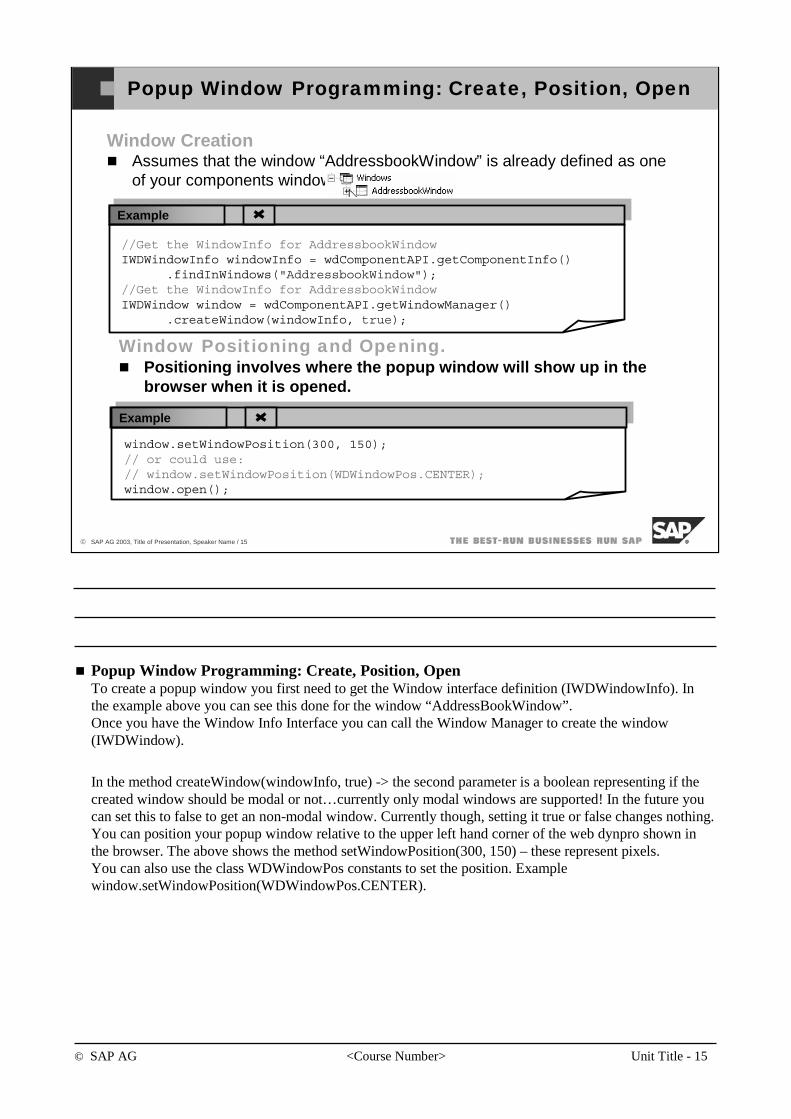
© SAP AG <Course Number> Unit Title - 15
© SAP AG 2003, Title of Presentation, Speaker Name / 15
Popup Window Programming: Create, Position, Open
//Get the WindowInfo for AddressbookWindowIWDWindowInfo windowInfo = wdComponentAPI.getComponentInfo()
.findInWindows("AddressbookWindow");//Get the WindowInfo for AddressbookWindowIWDWindow window = wdComponentAPI.getWindowManager()
.createWindow(windowInfo, true);
Window CreationAssumes that the window “AddressbookWindow” is already defined as one of your components windows.
Window Positioning and Opening.Positioning involves where the popup window will show up in the browser when it is opened.
window.setWindowPosition(300, 150);// or could use: // window.setWindowPosition(WDWindowPos.CENTER);window.open();
Example
Example
Popup Window Programming: Create, Position, OpenTo create a popup window you first need to get the Window interface definition (IWDWindowInfo). In the example above you can see this done for the window “AddressBookWindow”.Once you have the Window Info Interface you can call the Window Manager to create the window (IWDWindow).
In the method createWindow(windowInfo, true) -> the second parameter is a boolean representing if the created window should be modal or not…currently only modal windows are supported! In the future you can set this to false to get an non-modal window. Currently though, setting it true or false changes nothing.You can position your popup window relative to the upper left hand corner of the web dynpro shown in the browser. The above shows the method setWindowPosition(300, 150) – these represent pixels.You can also use the class WDWindowPos constants to set the position. Example window.setWindowPosition(WDWindowPos.CENTER).
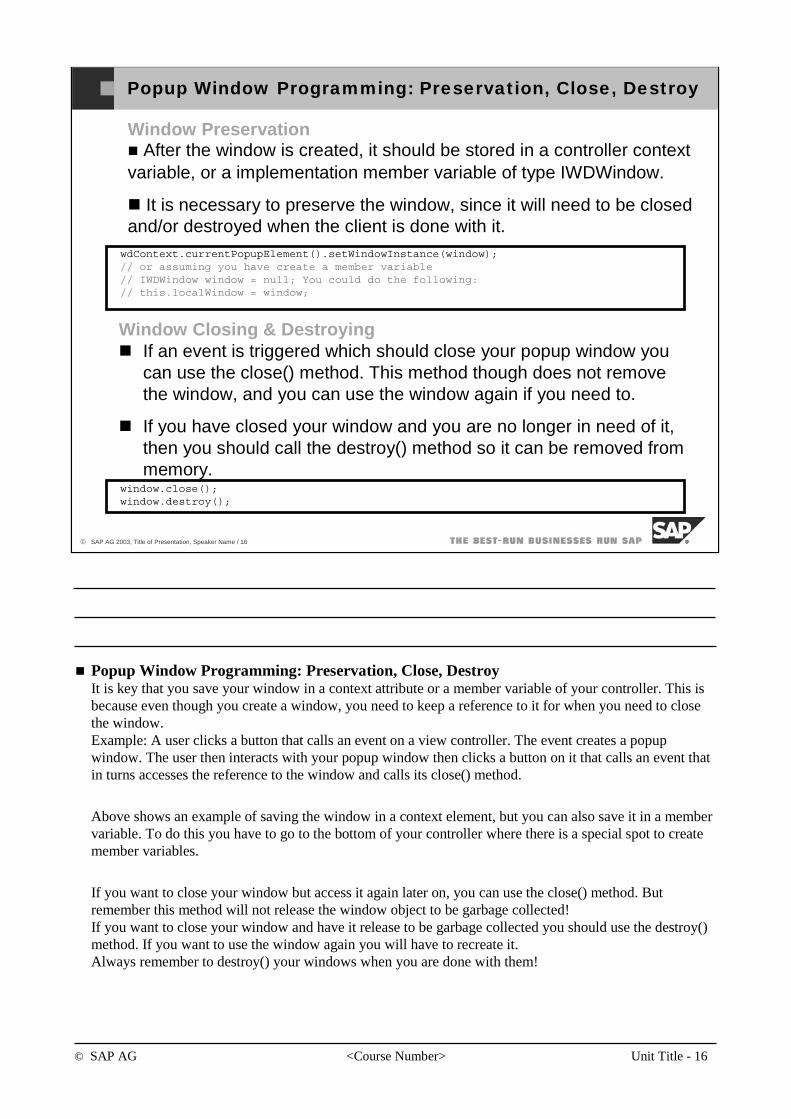
© SAP AG <Course Number> Unit Title - 16
© SAP AG 2003, Title of Presentation, Speaker Name / 16
Popup Window Programming: Preservation, Close, Destroy
Window PreservationAfter the window is created, it should be stored in a controller context
variable, or a implementation member variable of type IWDWindow.
It is necessary to preserve the window, since it will need to be closed and/or destroyed when the client is done with it.
wdContext.currentPopupElement().setWindowInstance(window);// or assuming you have create a member variable// IWDWindow window = null; You could do the following:// this.localWindow = window;
Window Closing & DestroyingIf an event is triggered which should close your popup window you can use the close() method. This method though does not remove the window, and you can use the window again if you need to.
If you have closed your window and you are no longer in need of it, then you should call the destroy() method so it can be removed from memory.
window.close();window.destroy();
Popup Window Programming: Preservation, Close, DestroyIt is key that you save your window in a context attribute or a member variable of your controller. This is because even though you create a window, you need to keep a reference to it for when you need to close the window.Example: A user clicks a button that calls an event on a view controller. The event creates a popup window. The user then interacts with your popup window then clicks a button on it that calls an event that in turns accesses the reference to the window and calls its close() method.
Above shows an example of saving the window in a context element, but you can also save it in a member variable. To do this you have to go to the bottom of your controller where there is a special spot to create member variables.
If you want to close your window but access it again later on, you can use the close() method. But remember this method will not release the window object to be garbage collected!If you want to close your window and have it release to be garbage collected you should use the destroy() method. If you want to use the window again you will have to recreate it.Always remember to destroy() your windows when you are done with them!
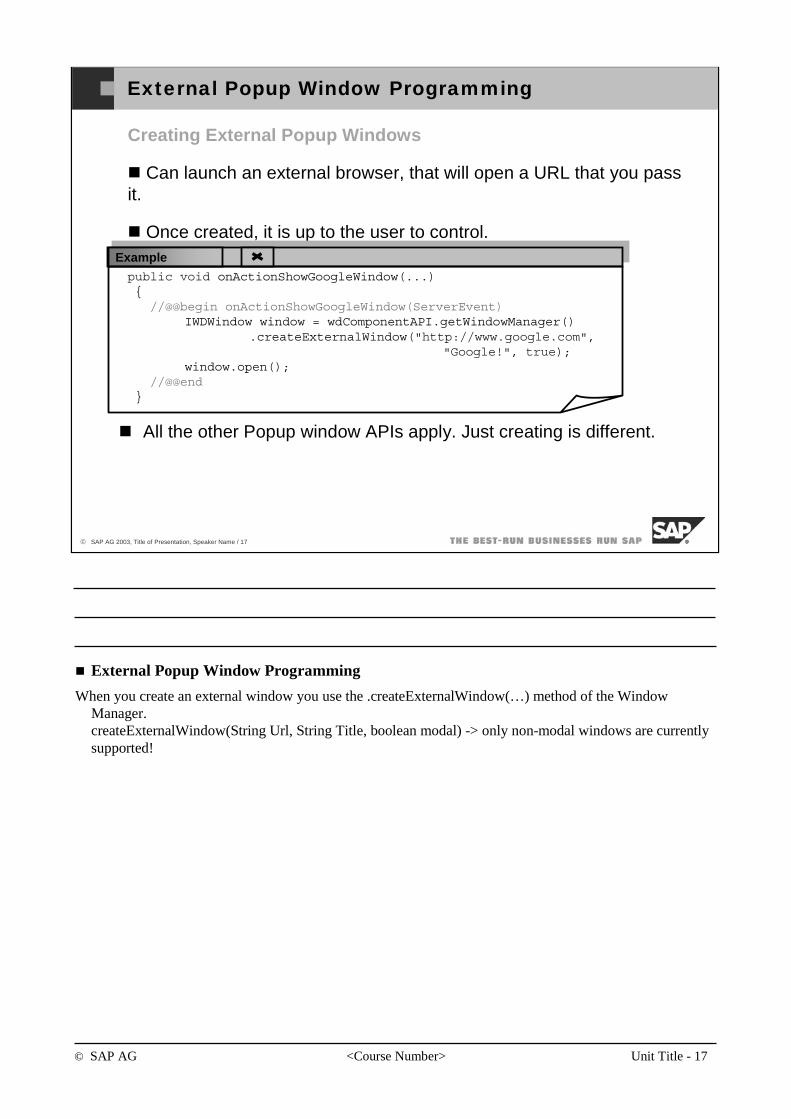
© SAP AG <Course Number> Unit Title - 17
© SAP AG 2003, Title of Presentation, Speaker Name / 17
External Popup Window Programming
Creating External Popup Windows
Can launch an external browser, that will open a URL that you pass it.
Once created, it is up to the user to control.
public void onActionShowGoogleWindow(...){//@@begin onActionShowGoogleWindow(ServerEvent)
IWDWindow window = wdComponentAPI.getWindowManager().createExternalWindow("http://www.google.com",
"Google!", true);window.open();
//@@end}
All the other Popup window APIs apply. Just creating is different.
Example
External Popup Window Programming
When you create an external window you use the .createExternalWindow(…) method of the Window Manager.createExternalWindow(String Url, String Title, boolean modal) -> only non-modal windows are currently supported!
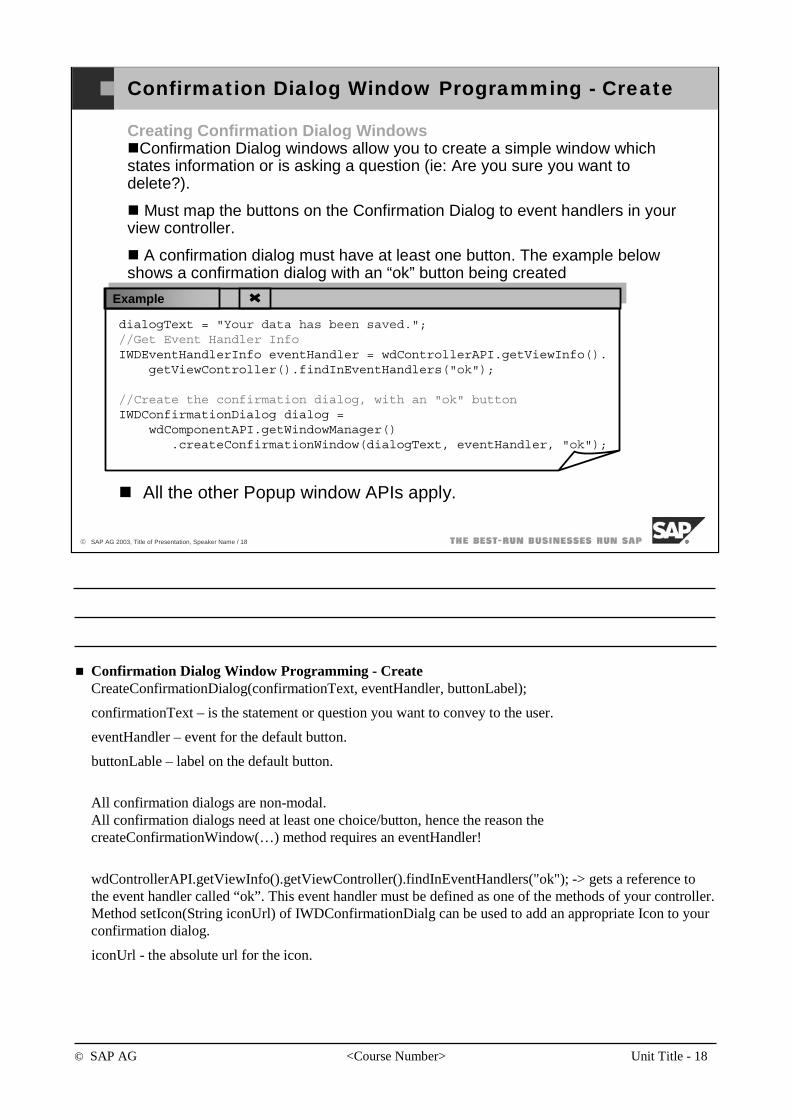
© SAP AG <Course Number> Unit Title - 18
© SAP AG 2003, Title of Presentation, Speaker Name / 18
Confirmation Dialog Window Programming - Create
Creating Confirmation Dialog WindowsConfirmation Dialog windows allow you to create a simple window which
states information or is asking a question (ie: Are you sure you want to delete?).
Must map the buttons on the Confirmation Dialog to event handlers in your view controller.
A confirmation dialog must have at least one button. The example below shows a confirmation dialog with an “ok” button being created
dialogText = "Your data has been saved.";//Get Event Handler InfoIWDEventHandlerInfo eventHandler = wdControllerAPI.getViewInfo().
getViewController().findInEventHandlers("ok");
//Create the confirmation dialog, with an "ok" buttonIWDConfirmationDialog dialog =
wdComponentAPI.getWindowManager().createConfirmationWindow(dialogText, eventHandler, "ok");
All the other Popup window APIs apply.
Example
Confirmation Dialog Window Programming - CreateCreateConfirmationDialog(confirmationText, eventHandler, buttonLabel);
confirmationText – is the statement or question you want to convey to the user.
eventHandler – event for the default button.
buttonLable – label on the default button.
All confirmation dialogs are non-modal.All confirmation dialogs need at least one choice/button, hence the reason the createConfirmationWindow(…) method requires an eventHandler!
wdControllerAPI.getViewInfo().getViewController().findInEventHandlers("ok"); -> gets a reference to the event handler called “ok”. This event handler must be defined as one of the methods of your controller.Method setIcon(String iconUrl) of IWDConfirmationDialg can be used to add an appropriate Icon to your confirmation dialog.
iconUrl - the absolute url for the icon.
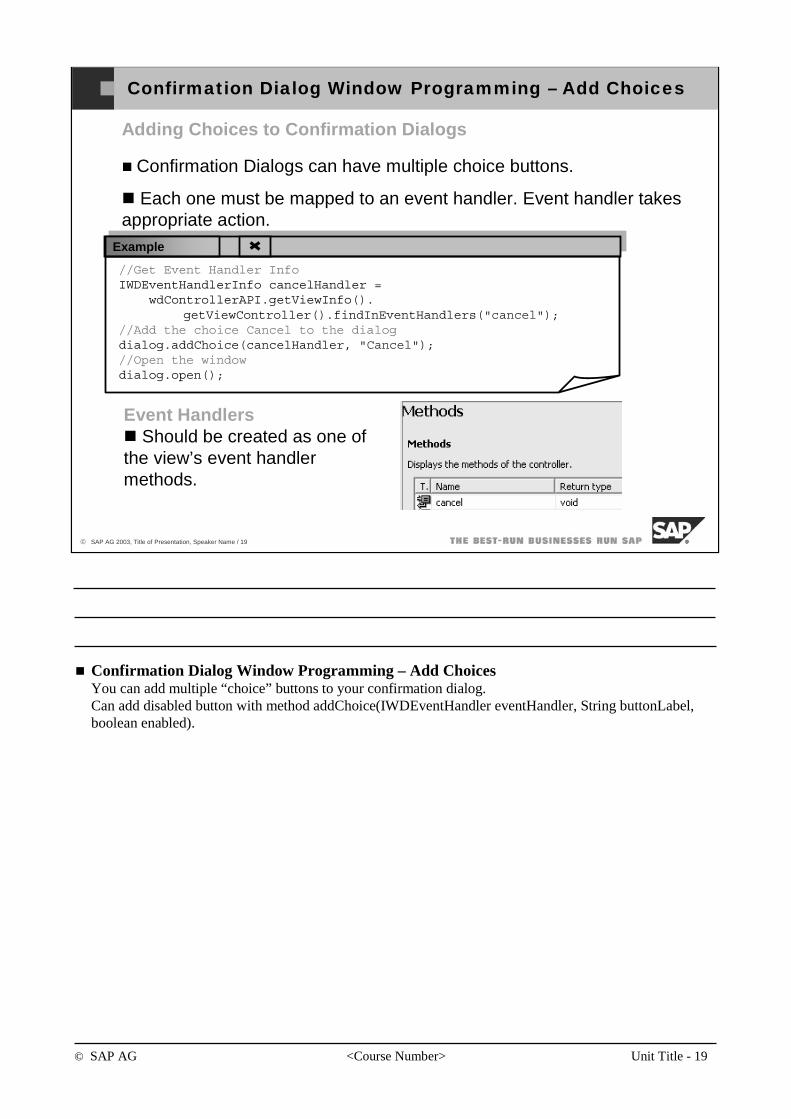
© SAP AG <Course Number> Unit Title - 19
© SAP AG 2003, Title of Presentation, Speaker Name / 19
Confirmation Dialog Window Programming – Add Choices
Adding Choices to Confirmation Dialogs
Confirmation Dialogs can have multiple choice buttons.
Each one must be mapped to an event handler. Event handler takes appropriate action.
//Get Event Handler InfoIWDEventHandlerInfo cancelHandler =
wdControllerAPI.getViewInfo().getViewController().findInEventHandlers("cancel");
//Add the choice Cancel to the dialogdialog.addChoice(cancelHandler, "Cancel"); //Open the windowdialog.open();
Event HandlersShould be created as one of
the view’s event handler methods.
Example
Confirmation Dialog Window Programming – Add ChoicesYou can add multiple “choice” buttons to your confirmation dialog.Can add disabled button with method addChoice(IWDEventHandler eventHandler, String buttonLabel, boolean enabled).

© SAP AG <Course Number> Unit Title - 20
© SAP AG 2003, Title of Presentation, Speaker Name / 20
Example: Popup Windows
See running example ... See running example ...
© SAP AG <Course Number> Unit Title - 21
© SAP AG 2003, Title of Presentation, Speaker Name / 21
You should now be able to:
Understand the different windows you can create in your Web Dynpro applications.
Create new windows using the SAP NetWeaver Developer Studio.
Create different kinds of popup windows using the Web Dynpro Windows API.
<Unit Title>: Unit Summary
Popup Windows Exercises
Unit: Web Dynpro Windows
At the conclusion of this exercise, you will be able to:
• Understand the different windows you can create in your Web Dynpro applications.
• Create new windows using the SAP NetWeaver Developer Studio.
• Create different kinds of popup windows using the Web Dynpro Windows API.
Exercise 1 – Create a popup window.
1 Overview
This exercise will step you through create a popup window. The project you will work with already has 2 Web Dynpro windows defined. You will need to use the Web Dynpro window API to create a new window and open it up for the user.
2 Prerequisites
2-1 The SAP NetWeaver Developer Studio is installed on your computer.
2-2 You have access to the SAP J2EE Engine (Release 6.40).
3 Exercise Guide
3-1 Open the project called WD03_Advanced_Windows.
3-1-1 Notice that the project has to windows defined: EmailWindow & AddressbookWindow. EmailWindow is the main window of the application. You will be using AddressbookWindow as a popup window.
3-2 Open the view “EmailView”.
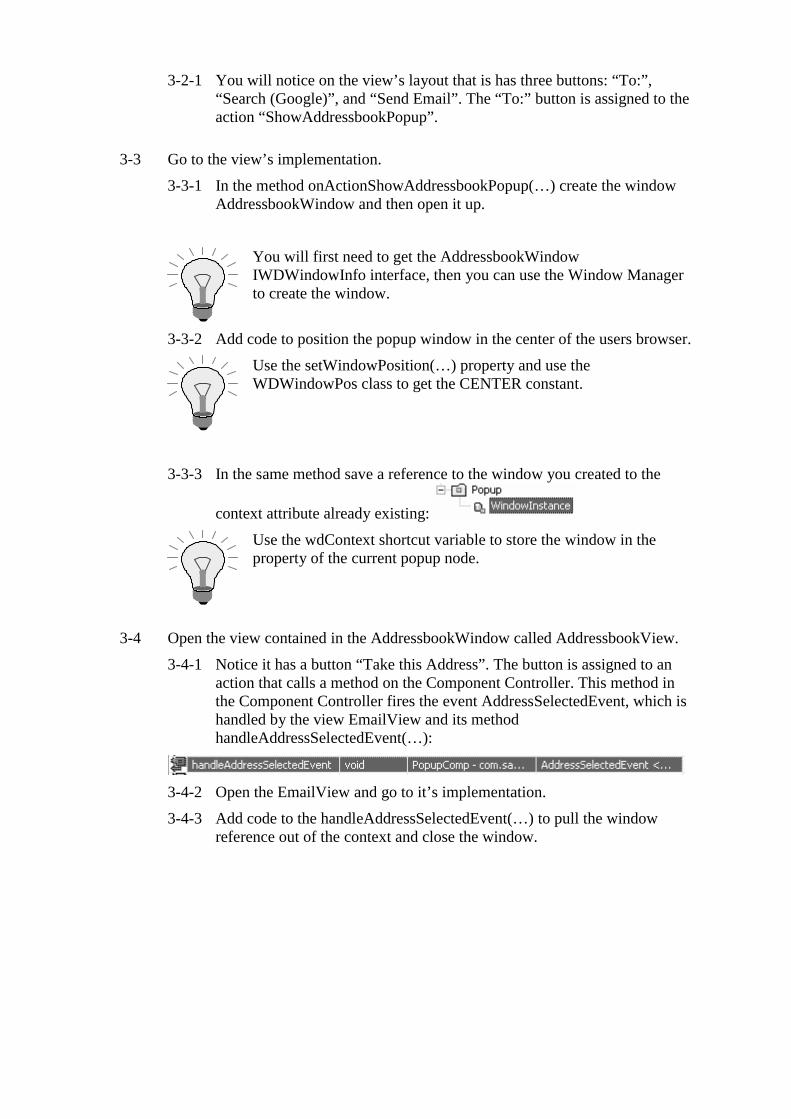
3-2-1 You will notice on the view’s layout that is has three buttons: “To:”, “Search (Google)”, and “Send Email”. The “To:” button is assigned to the action “ShowAddressbookPopup”.
3-3 Go to the view’s implementation.
3-3-1 In the method onActionShowAddressbookPopup(…) create the window AddressbookWindow and then open it up.
You will first need to get the AddressbookWindow IWDWindowInfo interface, then you can use the Window Manager to create the window.
3-3-2 Add code to position the popup window in the center of the users browser.
Use the setWindowPosition(…) property and use the WDWindowPos class to get the CENTER constant.
3-3-3 In the same method save a reference to the window you created to the
context attribute already existing:
Use the wdContext shortcut variable to store the window in the property of the current popup node.
3-4 Open the view contained in the AddressbookWindow called AddressbookView.
3-4-1 Notice it has a button “Take this Address”. The button is assigned to an action that calls a method on the Component Controller. This method in the Component Controller fires the event AddressSelectedEvent, which is handled by the view EmailView and its method handleAddressSelectedEvent(…):
3-4-2 Open the EmailView and go to it’s implementation.
3-4-3 Add code to the handleAddressSelectedEvent(…) to pull the window reference out of the context and close the window.
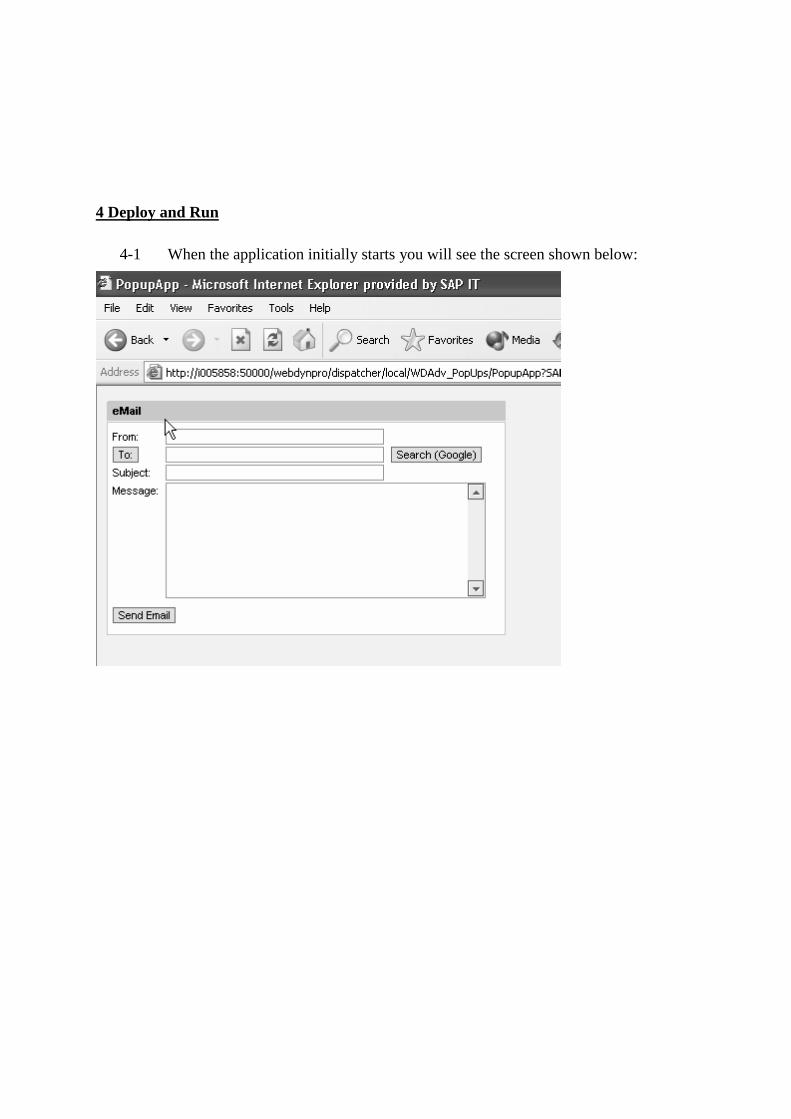
4 Deploy and Run
4-1 When the application initially starts you will see the screen shown below:
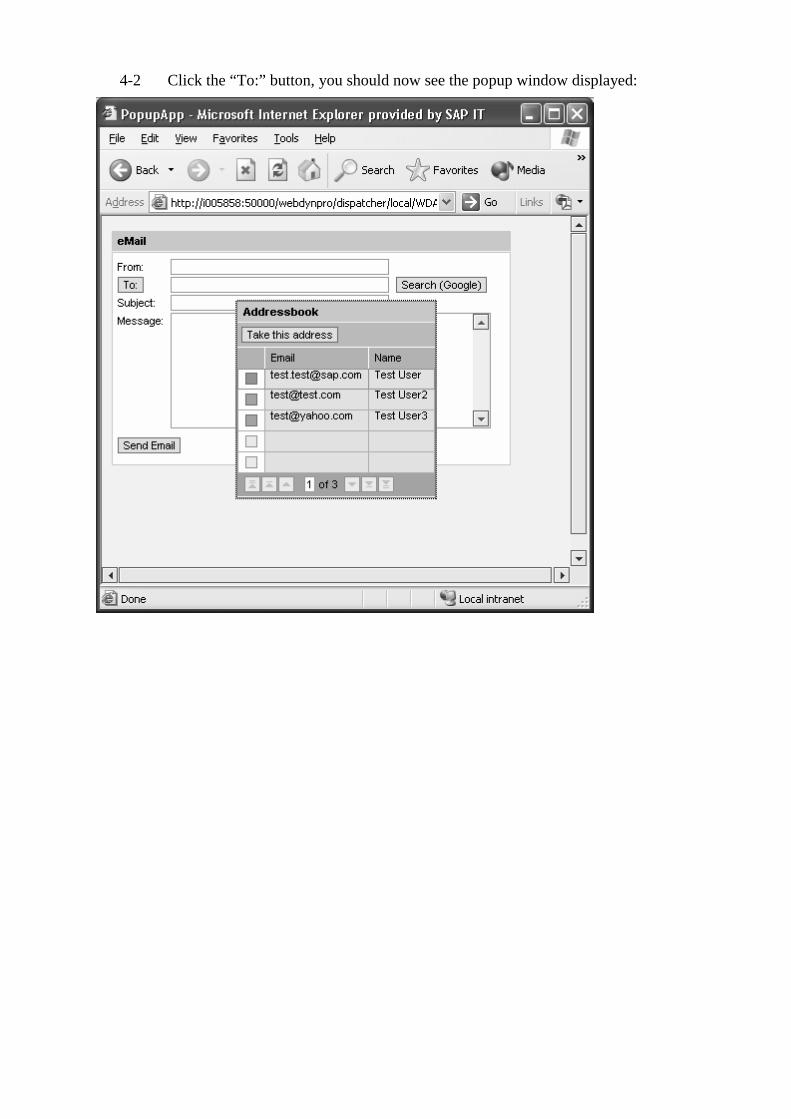
4-2 Click the “To:” button, you should now see the popup window displayed:
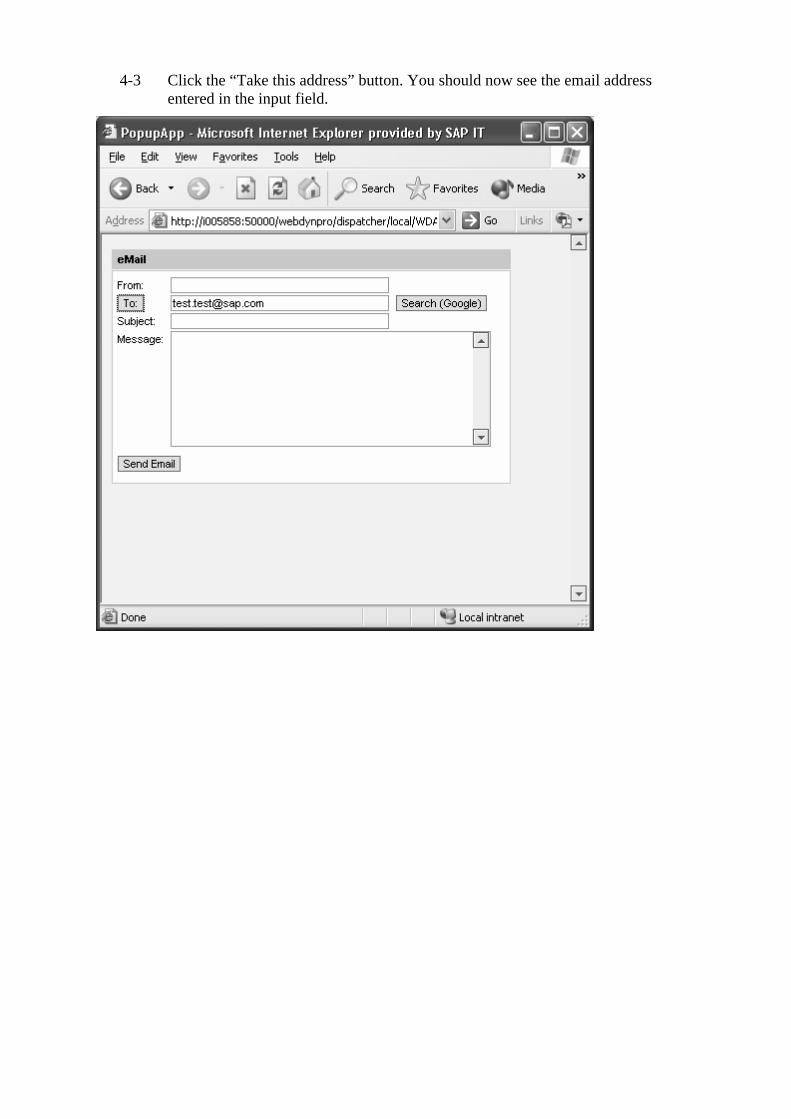
4-3 Click the “Take this address” button. You should now see the email address entered in the input field.
Popup Windows Exercises
Unit: Web Dynpro Windows
At the conclusion of this exercise, you will be able to:
• Understand the different windows you can create in your Web Dynpro applications.
• Create new windows using the SAP NetWeaver Developer Studio.
• Create different kinds of popup windows using the Web Dynpro Windows API.
Exercise 2 – Create a confirmation dialog window.
1 Overview
This exercise will step you through creating a confirmation dialog window. You will be doing this to the project you finished in exercise #1. All the methods needed already exist, all you need to do is work with the Windows API to create the confirmation dialog window.
2 Prerequisites
2-1 The SAP NetWeaver Developer Studio is installed on your computer.
2-2 You have access to the SAP J2EE Engine (Release 6.40).
3 Exercise Guide
3-1 Open the project called WDAdv_Popups…you should have already finished exercise #1.
3-2 Open the view “EmailView” and go to its Implementation.
3-3 In the method onActionSendEmail(…) you will see a //Todo comment. Add code here to create a confirmation dialog.
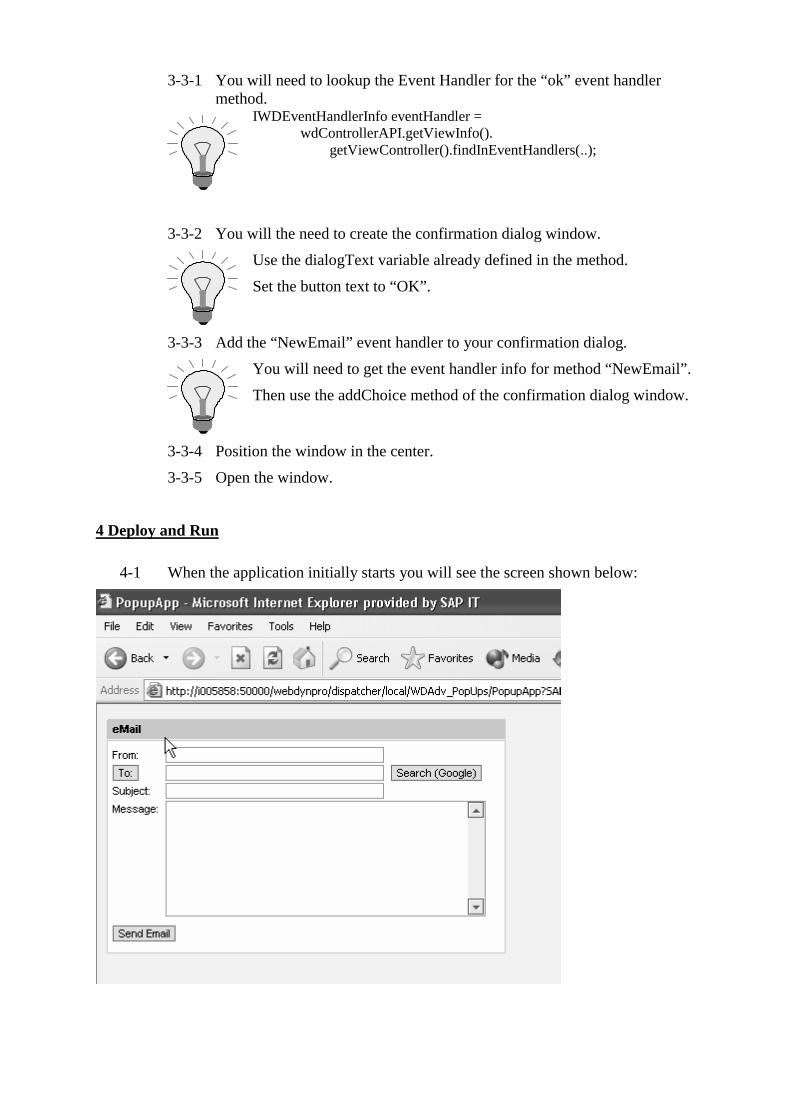
3-3-1 You will need to lookup the Event Handler for the “ok” event handler method.
IWDEventHandlerInfo eventHandler = wdControllerAPI.getViewInfo(). getViewController().findInEventHandlers(..);
3-3-2 You will the need to create the confirmation dialog window.
Use the dialogText variable already defined in the method.
Set the button text to “OK”.
3-3-3 Add the “NewEmail” event handler to your confirmation dialog.
You will need to get the event handler info for method “NewEmail”.
Then use the addChoice method of the confirmation dialog window.
3-3-4 Position the window in the center.
3-3-5 Open the window.
4 Deploy and Run
4-1 When the application initially starts you will see the screen shown below:
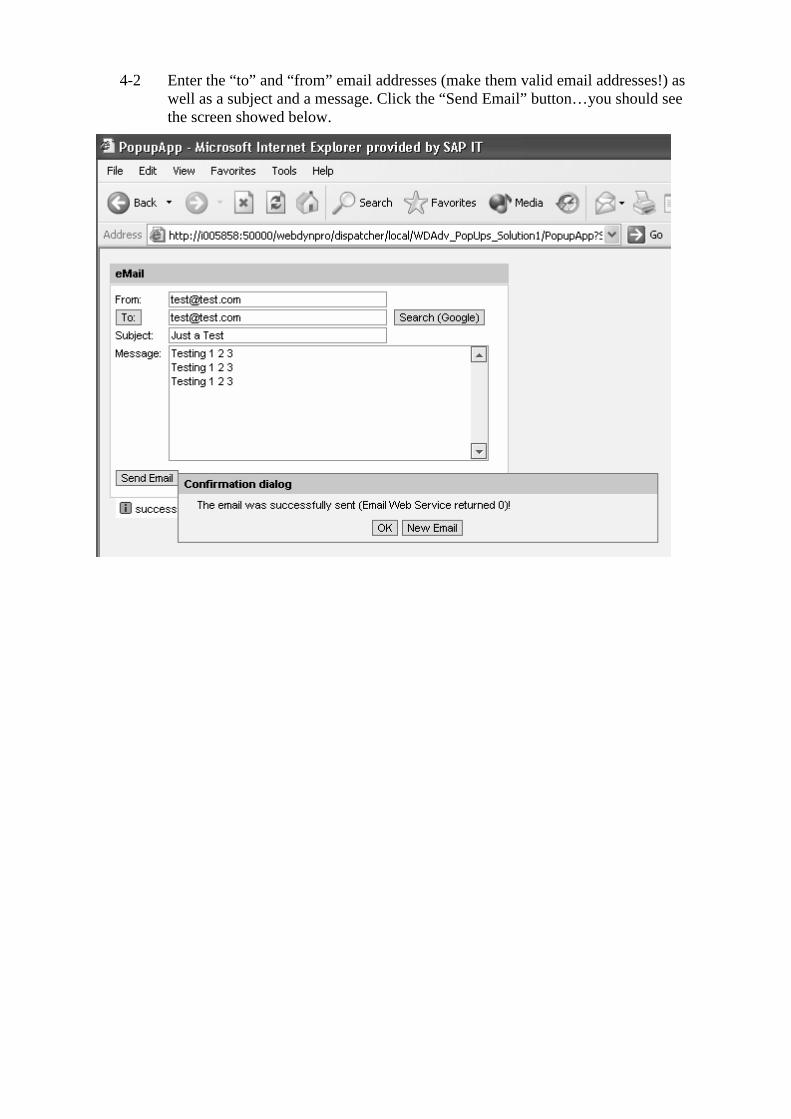
4-2 Enter the “to” and “from” email addresses (make them valid email addresses!) as well as a subject and a message. Click the “Send Email” button…you should see the screen showed below.
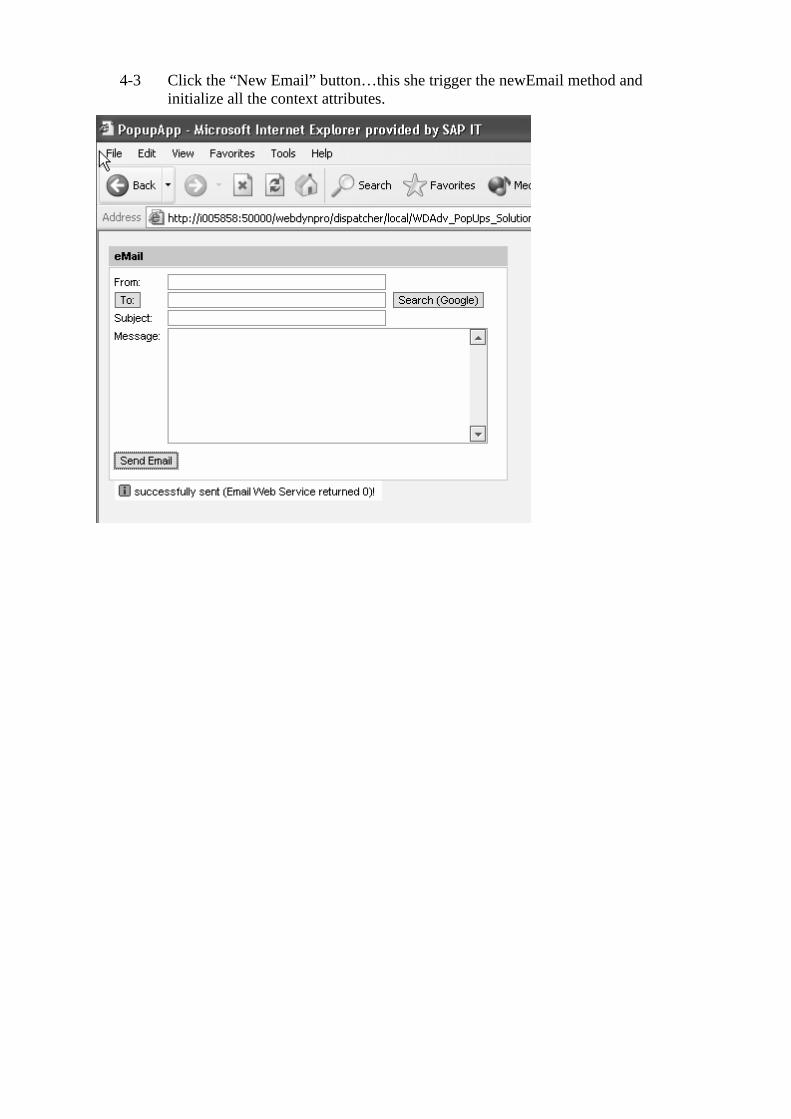
4-3 Click the “New Email” button…this she trigger the newEmail method and initialize all the context attributes.
Popup Windows Exercises
Unit: Web Dynpro Windows
At the conclusion of this exercise, you will be able to:
• Understand the different windows you can create in your Web Dynpro applications.
• Create new windows using the SAP NetWeaver Developer Studio.
• Create different kinds of popup windows using the Web Dynpro Windows API.
Exercise 3 – Create a confirmation dialog window.
1 Overview
This exercise will step you through creating a confirmation dialog window. You will be doing this to the project you finished in exercise #1. All the methods needed already exist, all you need to do is work with the Windows API to create the confirmation dialog window.
2 Prerequisites
2-1 The SAP NetWeaver Developer Studio is installed on your computer.
2-2 You have access to the SAP J2EE Engine (Release 6.40).
3 Exercise Guide
3-1 Open the project called WDAdv_Popups…you should have already finished exercise #2.
3-2 Open the view “EmailView” and go to its Implementation.
3-3 In the method onActionShowGoogleWindow(…) add code to create and open an external window.
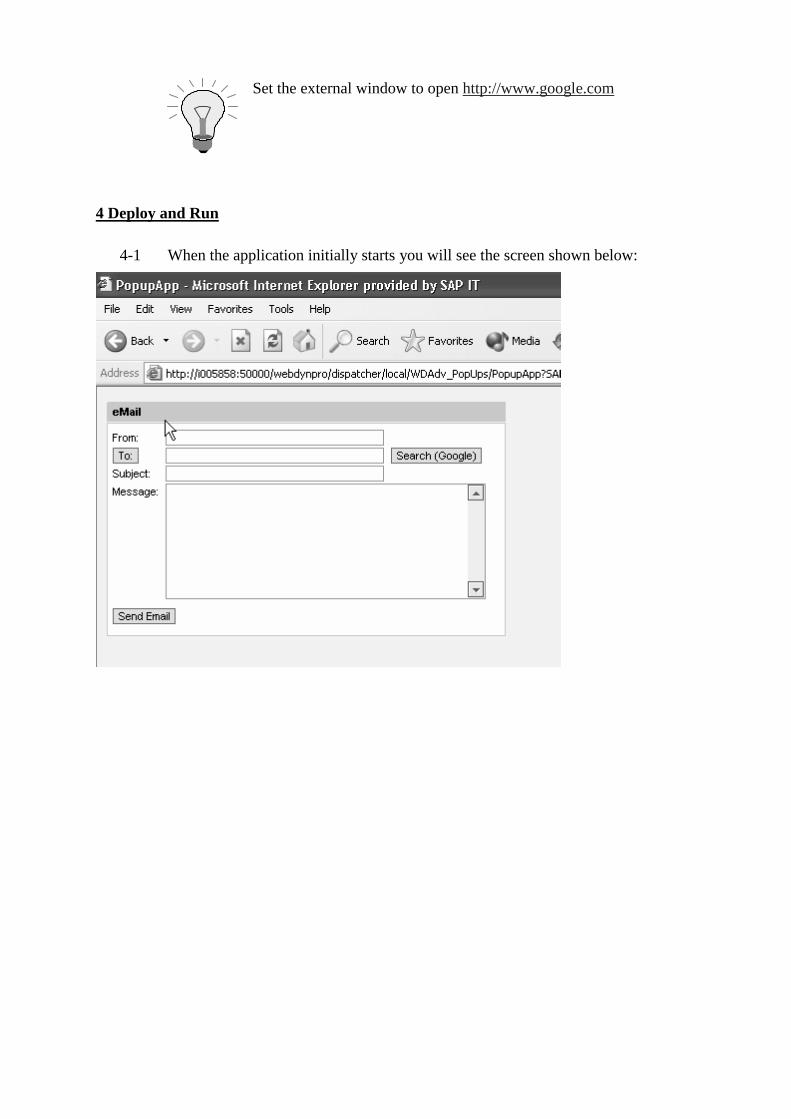
Set the external window to open http://www.google.com
4 Deploy and Run
4-1 When the application initially starts you will see the screen shown below:
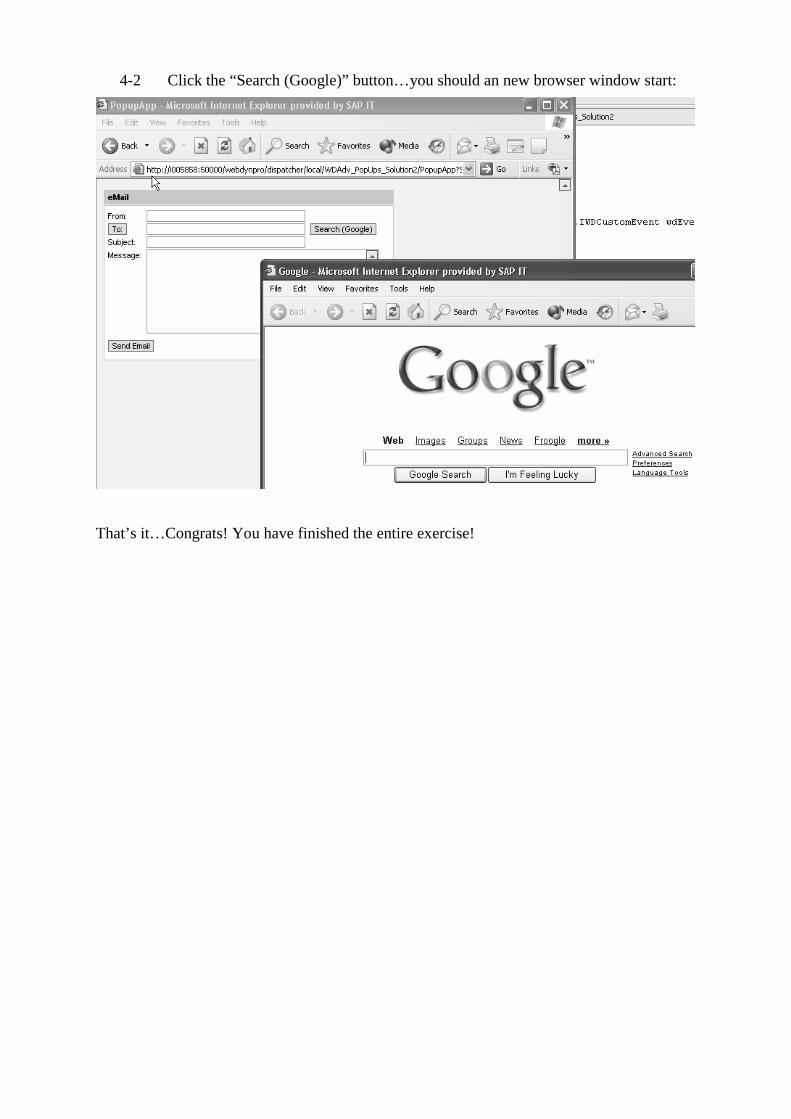
4-2 Click the “Search (Google)” button…you should an new browser window start:
That’s it…Congrats! You have finished the entire exercise!

Popup Windows Solutions
Unit: Web Dynpro Windows
Solution 1 – Create a popup window.
1 Overview
This solution will step you through create a popup window. The project you will work with already has 2 Web Dynpro windows defined. You will need to use the Web Dynpro window API to create a new window and open it up for the user.
2 Prerequisites
2-1 The SAP NetWeaver Developer Studio is installed on your computer.
2-2 You have access to the SAP J2EE Engine (Release 6.40).
3 Solution Guide
1 Open the project template in the exercise directory called WD03_Advanced_Windows.
Once opened you will see that the project template already includes an Application, Web Dynpro Component, with 2 windows and 2 views.
2 Open the view “EmailView”.
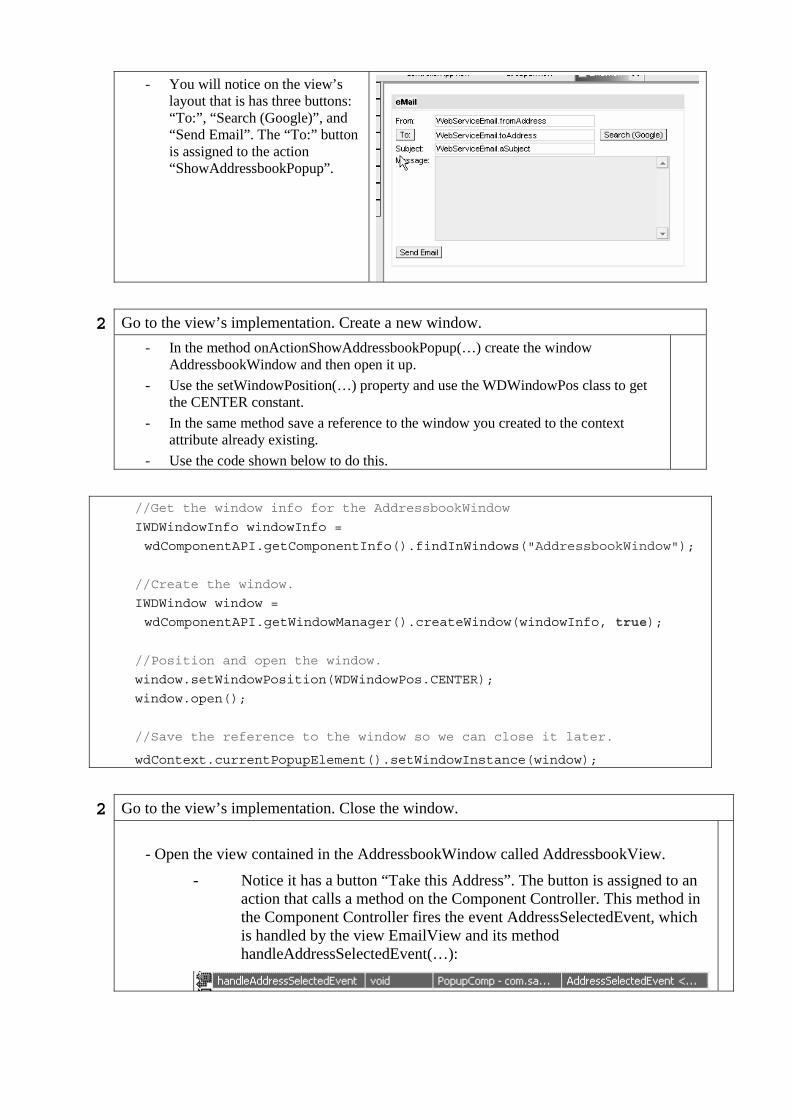
- You will notice on the view’s layout that is has three buttons: “To:”, “Search (Google)”, and “Send Email”. The “To:” button is assigned to the action “ShowAddressbookPopup”.
2 Go to the view’s implementation. Create a new window.
- In the method onActionShowAddressbookPopup(…) create the window AddressbookWindow and then open it up.
- Use the setWindowPosition(…) property and use the WDWindowPos class to get the CENTER constant.
- In the same method save a reference to the window you created to the context attribute already existing.
- Use the code shown below to do this.
//Get the window info for the AddressbookWindow
IWDWindowInfo windowInfo =
wdComponentAPI.getComponentInfo().findInWindows("AddressbookWindow");
//Create the window.
IWDWindow window =
wdComponentAPI.getWindowManager().createWindow(windowInfo, true);
//Position and open the window.
window.setWindowPosition(WDWindowPos.CENTER);
window.open();
//Save the reference to the window so we can close it later.
wdContext.currentPopupElement().setWindowInstance(window);
2 Go to the view’s implementation. Close the window.
- Open the view contained in the AddressbookWindow called AddressbookView.
- Notice it has a button “Take this Address”. The button is assigned to an action that calls a method on the Component Controller. This method in the Component Controller fires the event AddressSelectedEvent, which is handled by the view EmailView and its method handleAddressSelectedEvent(…):
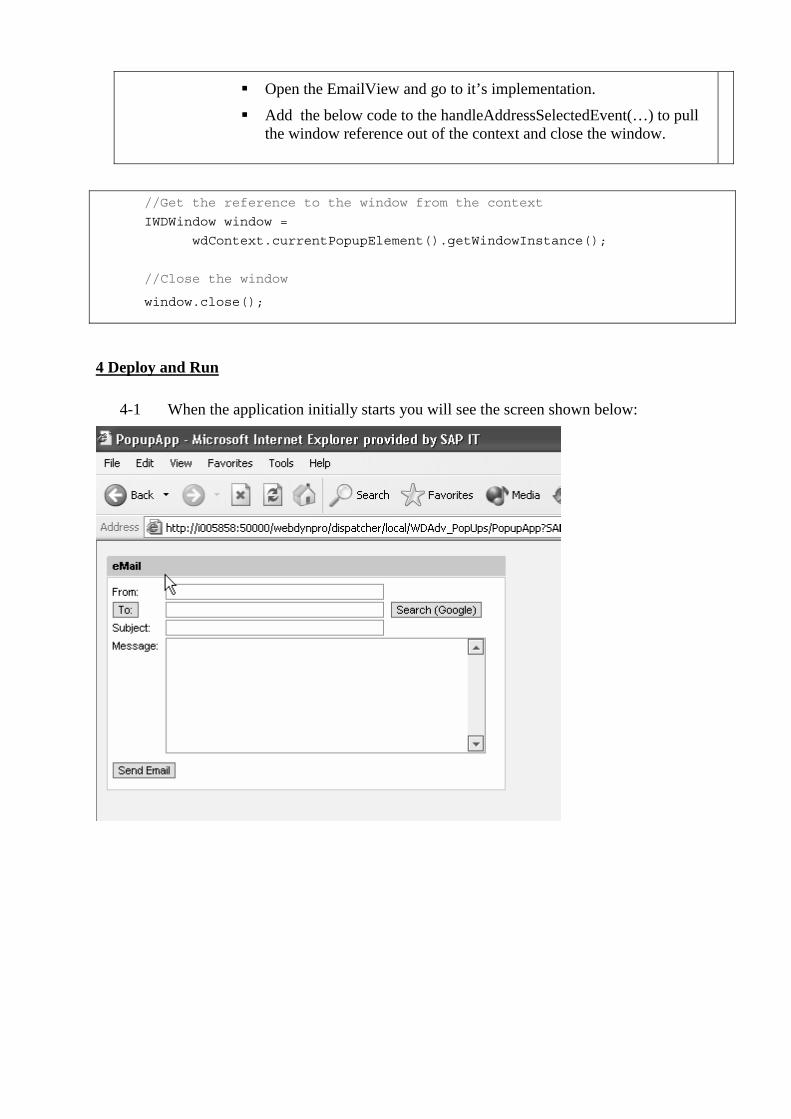
Open the EmailView and go to it’s implementation.
Add the below code to the handleAddressSelectedEvent(…) to pull the window reference out of the context and close the window.
//Get the reference to the window from the context
IWDWindow window =
wdContext.currentPopupElement().getWindowInstance();
//Close the window
window.close();
4 Deploy and Run
4-1 When the application initially starts you will see the screen shown below:
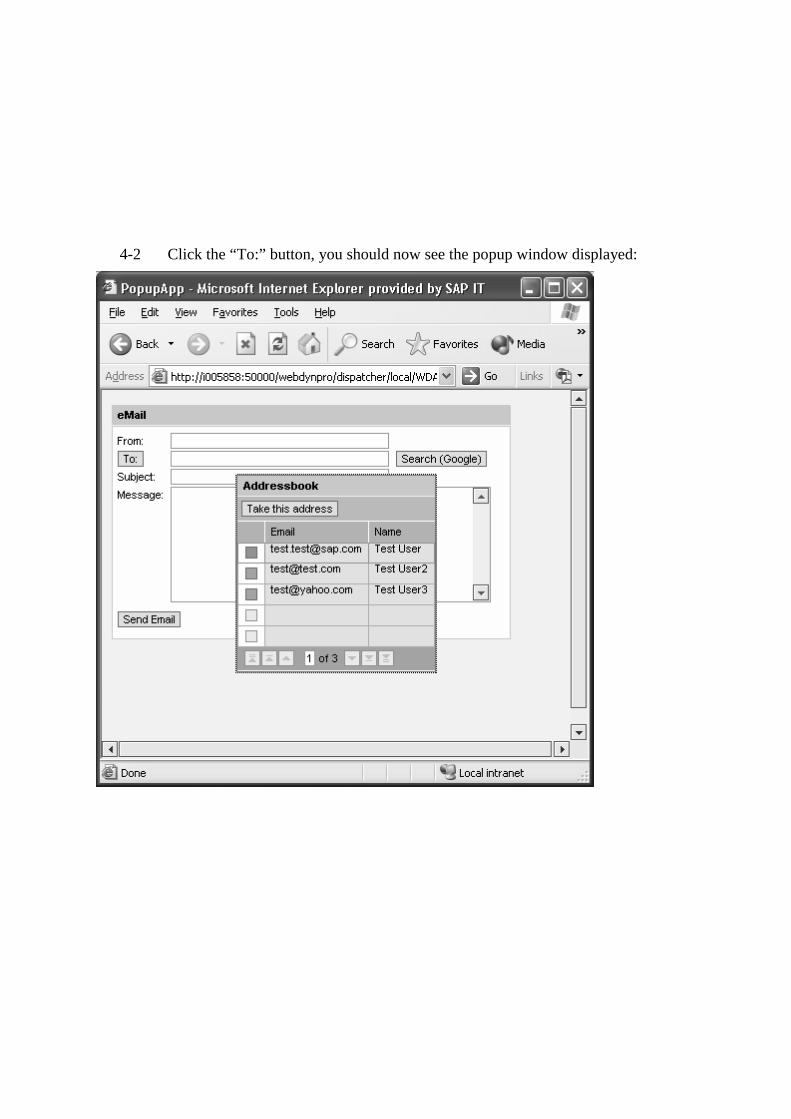
4-2 Click the “To:” button, you should now see the popup window displayed:
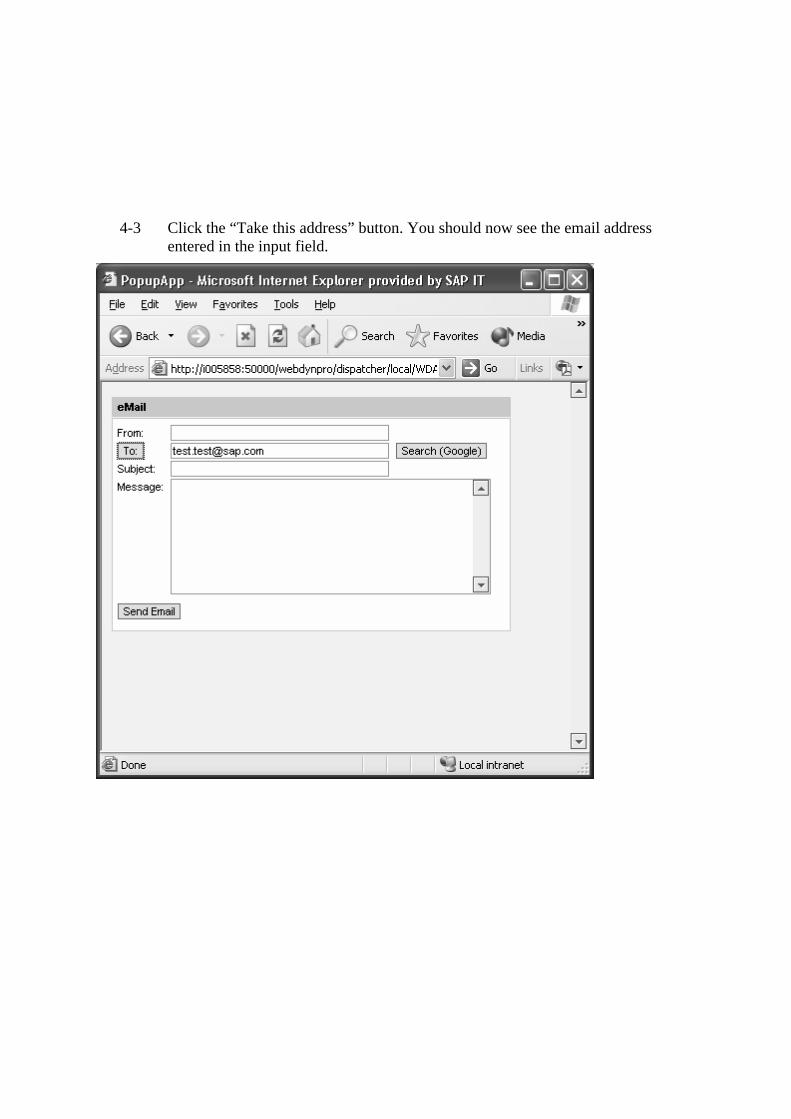
4-3 Click the “Take this address” button. You should now see the email address entered in the input field.
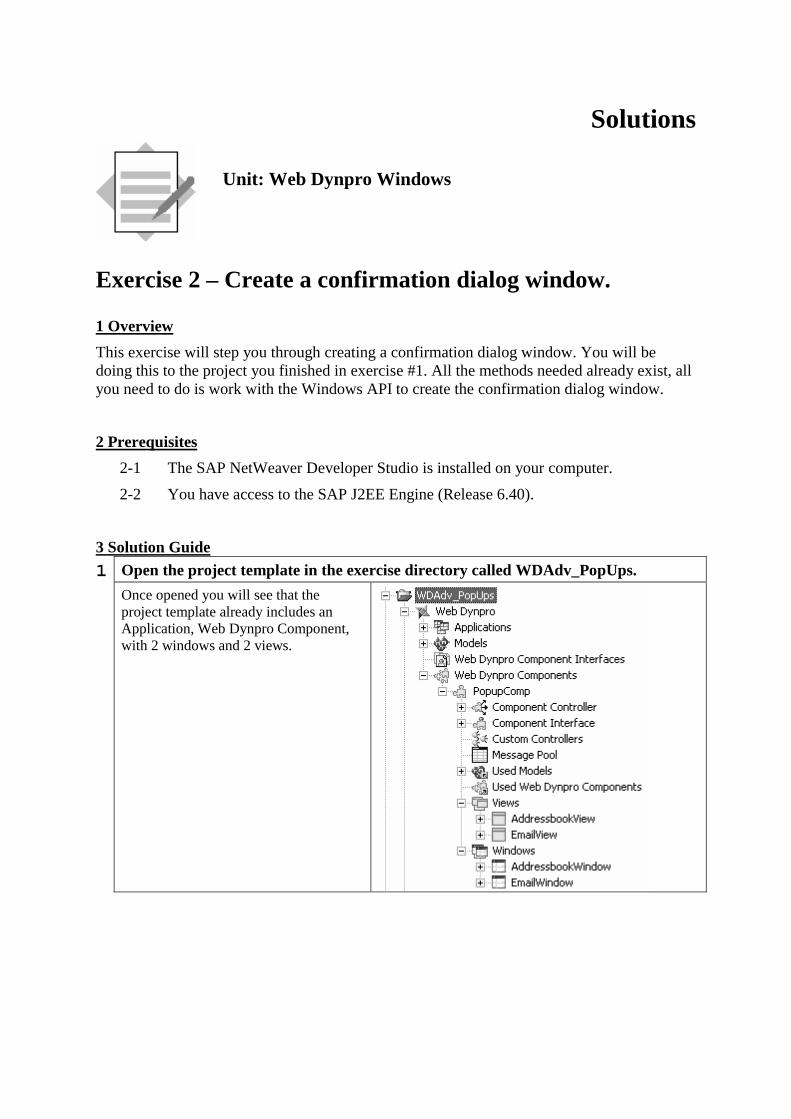
Solutions
Unit: Web Dynpro Windows
Exercise 2 – Create a confirmation dialog window.
1 Overview
This exercise will step you through creating a confirmation dialog window. You will be doing this to the project you finished in exercise #1. All the methods needed already exist, all you need to do is work with the Windows API to create the confirmation dialog window.
2 Prerequisites
2-1 The SAP NetWeaver Developer Studio is installed on your computer.
2-2 You have access to the SAP J2EE Engine (Release 6.40).
3 Solution Guide
1 Open the project template in the exercise directory called WDAdv_PopUps.
Once opened you will see that the project template already includes an Application, Web Dynpro Component, with 2 windows and 2 views.
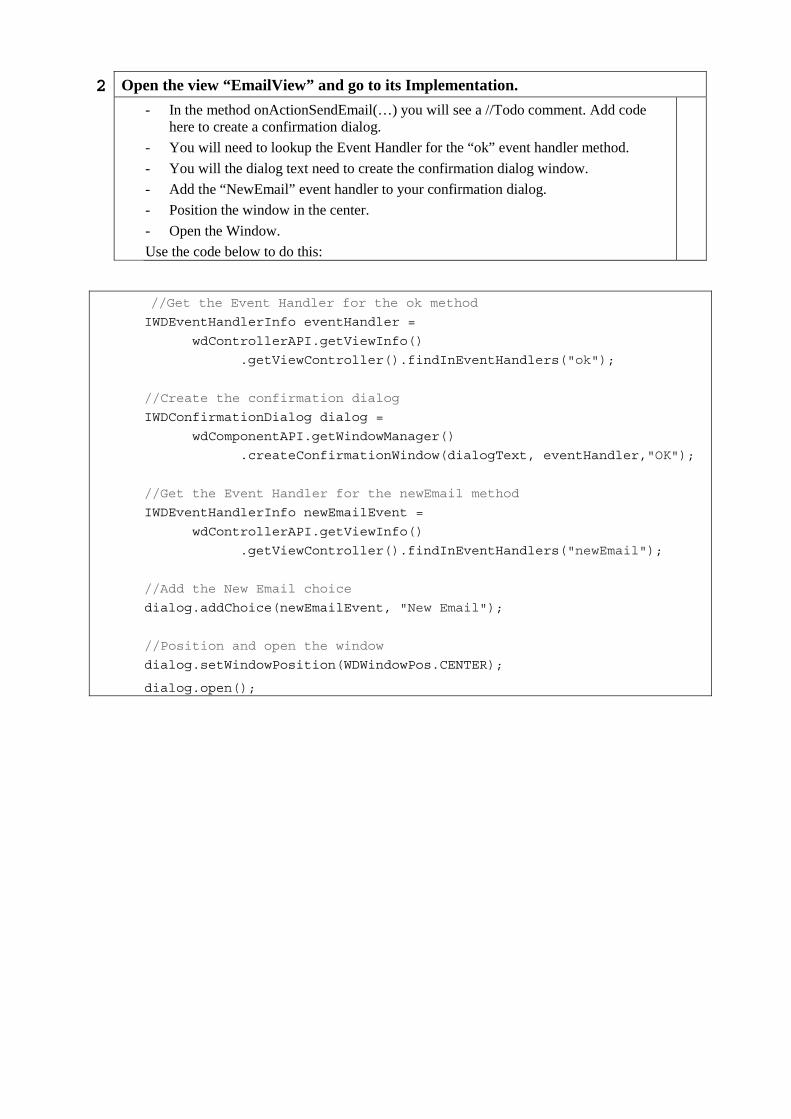
2 Open the view “EmailView” and go to its Implementation.
- In the method onActionSendEmail(…) you will see a //Todo comment. Add code here to create a confirmation dialog.
- You will need to lookup the Event Handler for the “ok” event handler method.
- You will the dialog text need to create the confirmation dialog window.
- Add the “NewEmail” event handler to your confirmation dialog.
- Position the window in the center.
- Open the Window.
Use the code below to do this:
//Get the Event Handler for the ok method
IWDEventHandlerInfo eventHandler =
wdControllerAPI.getViewInfo()
.getViewController().findInEventHandlers("ok");
//Create the confirmation dialog
IWDConfirmationDialog dialog =
wdComponentAPI.getWindowManager()
.createConfirmationWindow(dialogText, eventHandler,"OK");
//Get the Event Handler for the newEmail method
IWDEventHandlerInfo newEmailEvent =
wdControllerAPI.getViewInfo()
.getViewController().findInEventHandlers("newEmail");
//Add the New Email choice
dialog.addChoice(newEmailEvent, "New Email");
//Position and open the window
dialog.setWindowPosition(WDWindowPos.CENTER);
dialog.open();
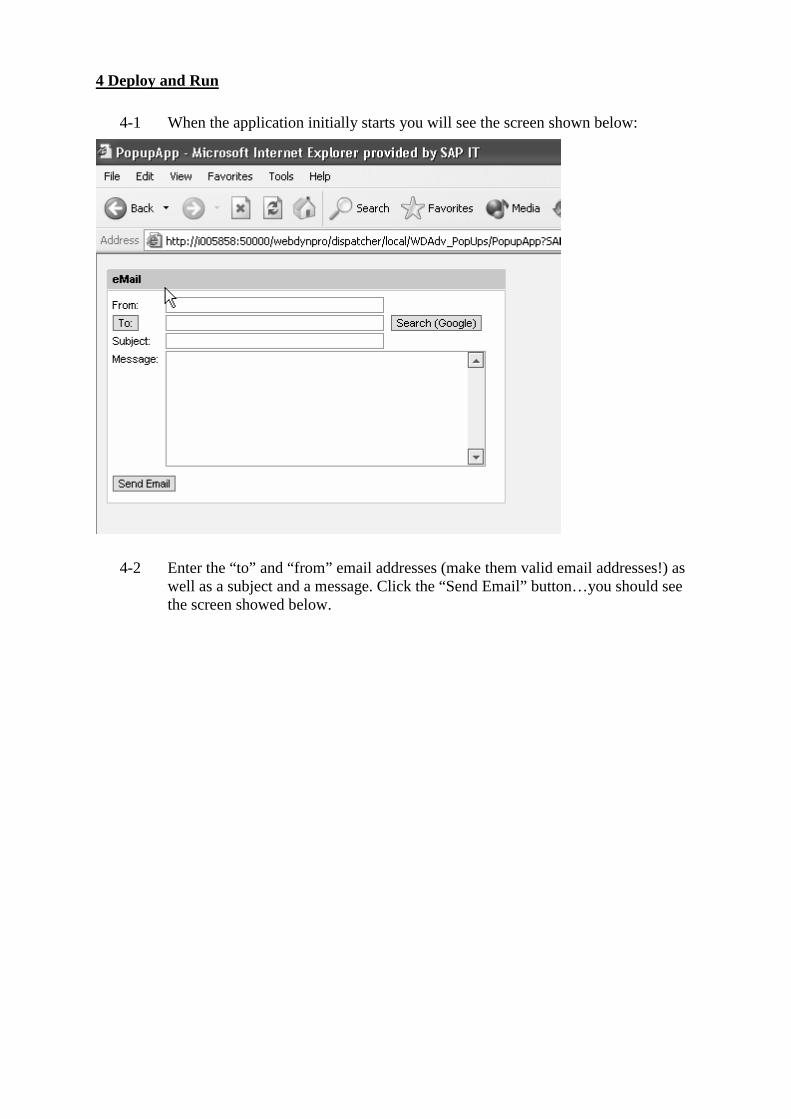
4 Deploy and Run
4-1 When the application initially starts you will see the screen shown below:
4-2 Enter the “to” and “from” email addresses (make them valid email addresses!) as well as a subject and a message. Click the “Send Email” button…you should see the screen showed below.
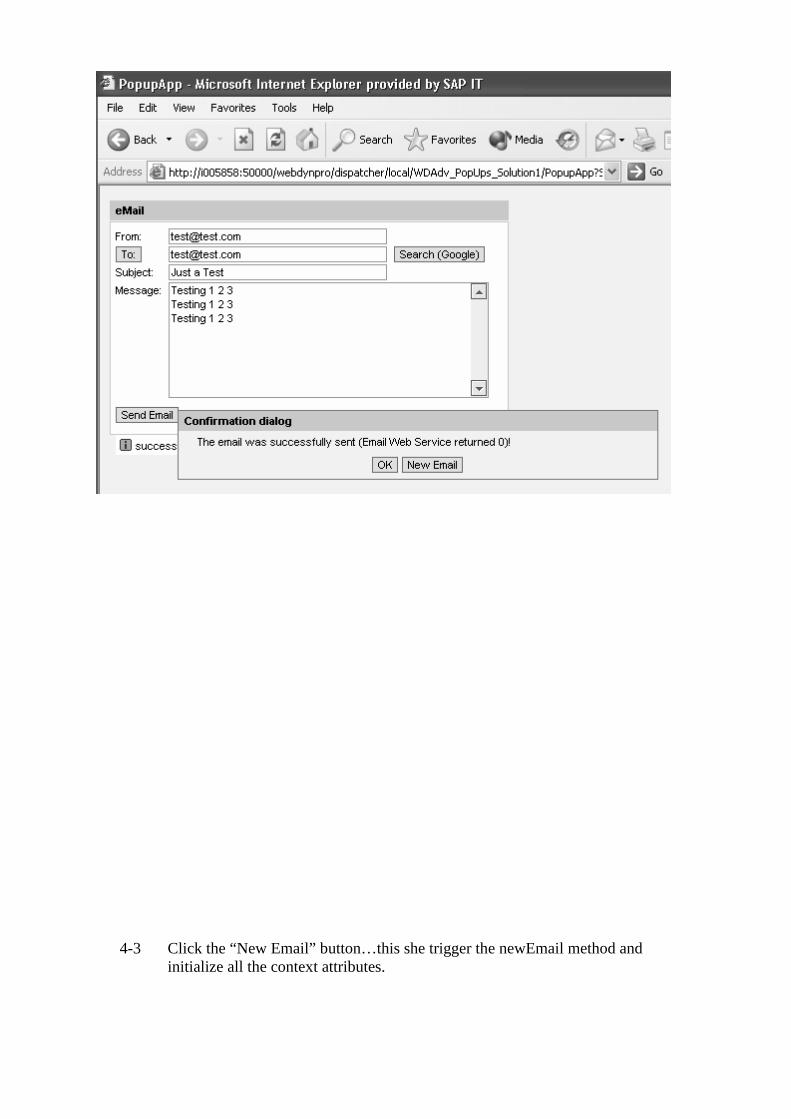
4-3 Click the “New Email” button…this she trigger the newEmail method and initialize all the context attributes.
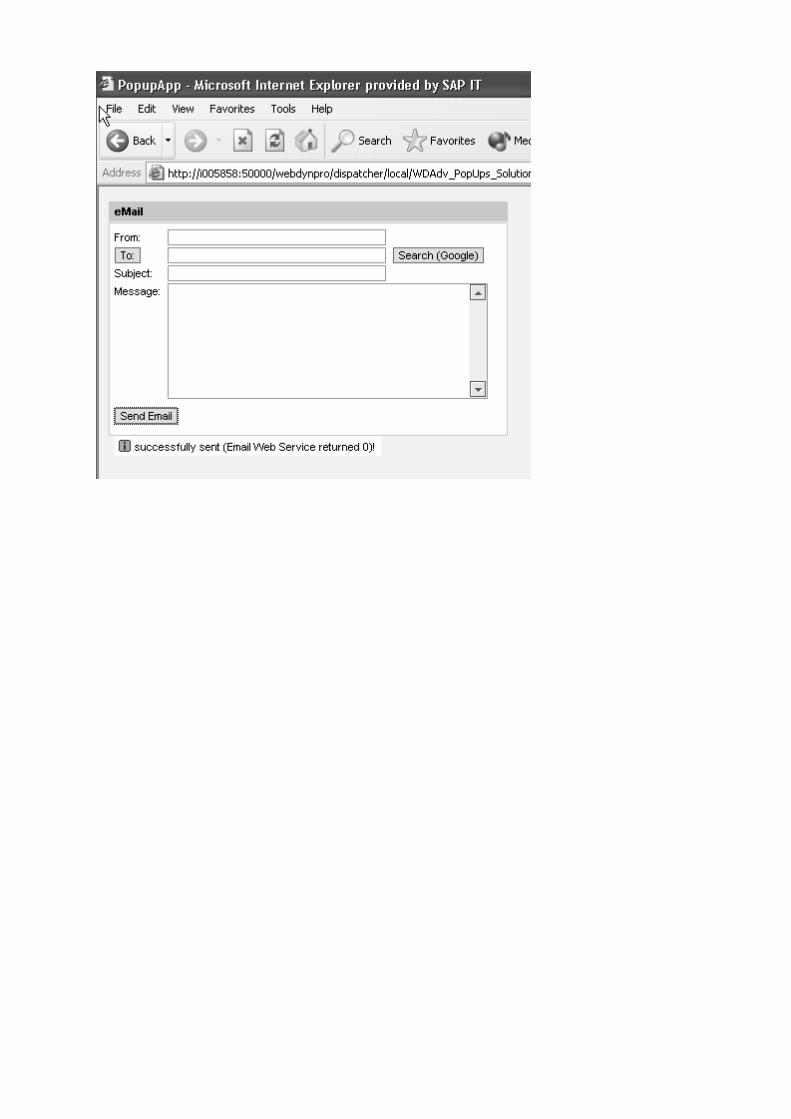
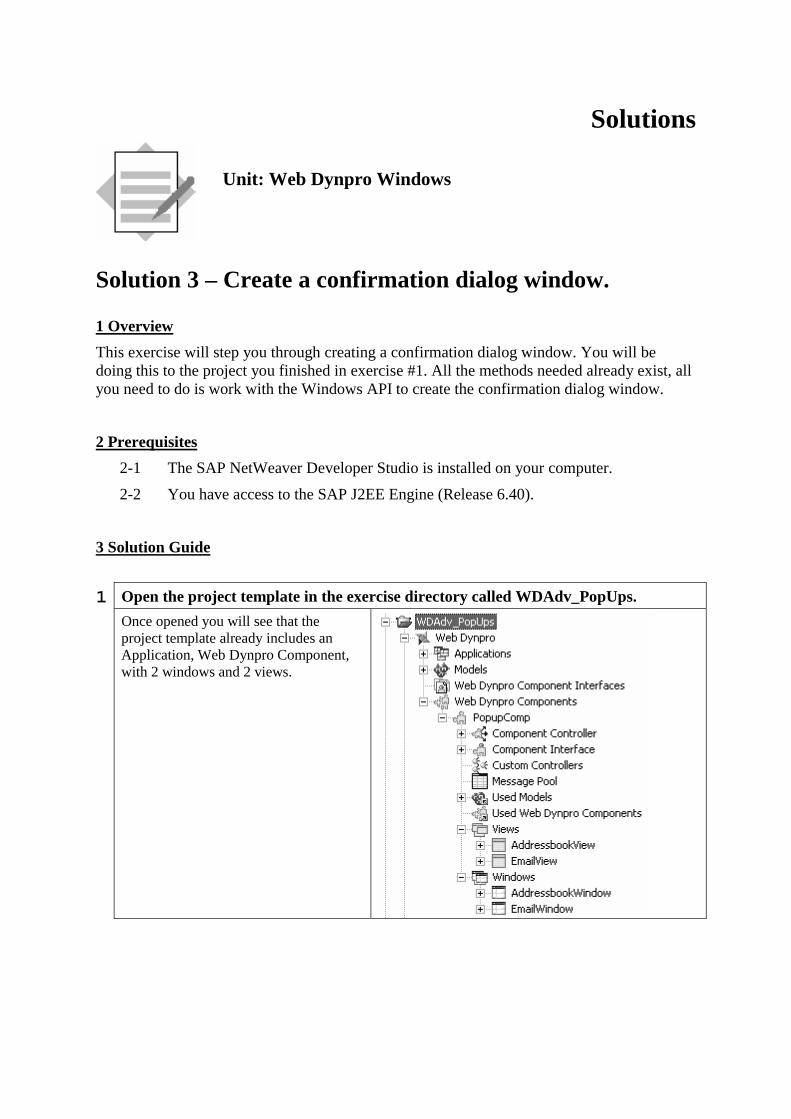
Solutions
Unit: Web Dynpro Windows
Solution 3 – Create a confirmation dialog window.
1 Overview
This exercise will step you through creating a confirmation dialog window. You will be doing this to the project you finished in exercise #1. All the methods needed already exist, all you need to do is work with the Windows API to create the confirmation dialog window.
2 Prerequisites
2-1 The SAP NetWeaver Developer Studio is installed on your computer.
2-2 You have access to the SAP J2EE Engine (Release 6.40).
3 Solution Guide
1 Open the project template in the exercise directory called WDAdv_PopUps.
Once opened you will see that the project template already includes an Application, Web Dynpro Component, with 2 windows and 2 views.
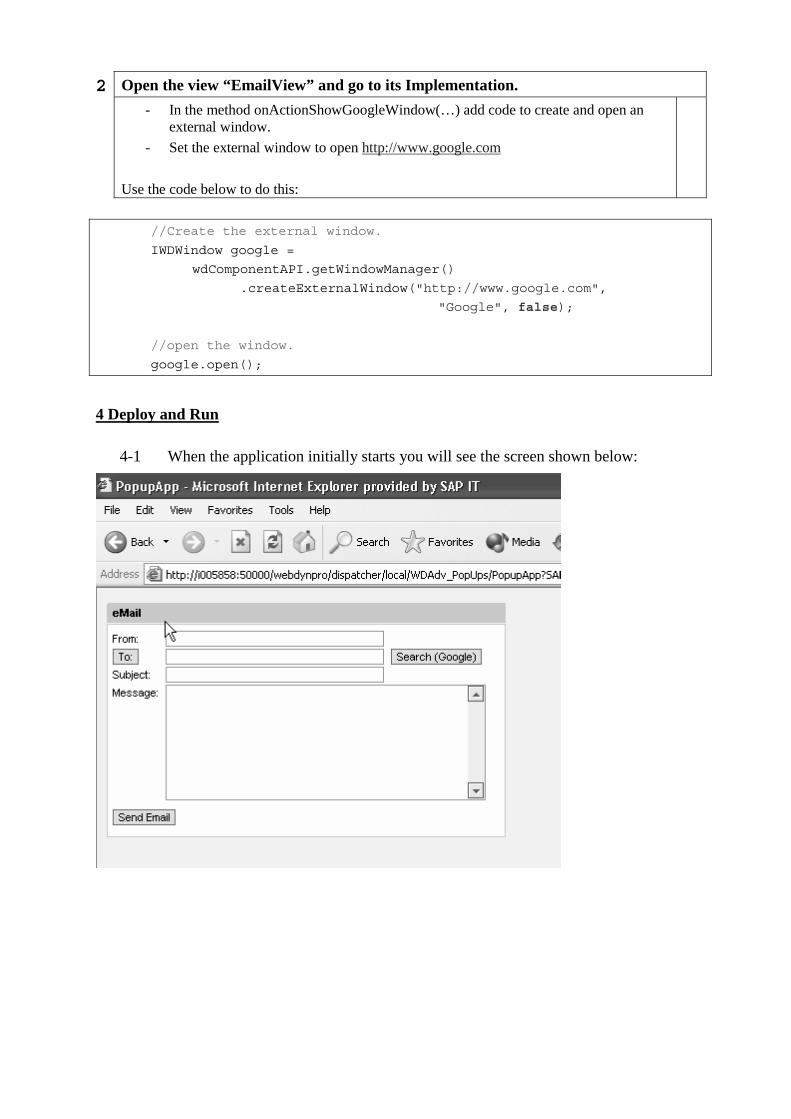
2 Open the view “EmailView” and go to its Implementation.
- In the method onActionShowGoogleWindow(…) add code to create and open an external window.
- Set the external window to open http://www.google.com
Use the code below to do this:
//Create the external window.
IWDWindow google =
wdComponentAPI.getWindowManager()
.createExternalWindow("http://www.google.com",
"Google", false);
//open the window.
google.open();
4 Deploy and Run
4-1 When the application initially starts you will see the screen shown below:
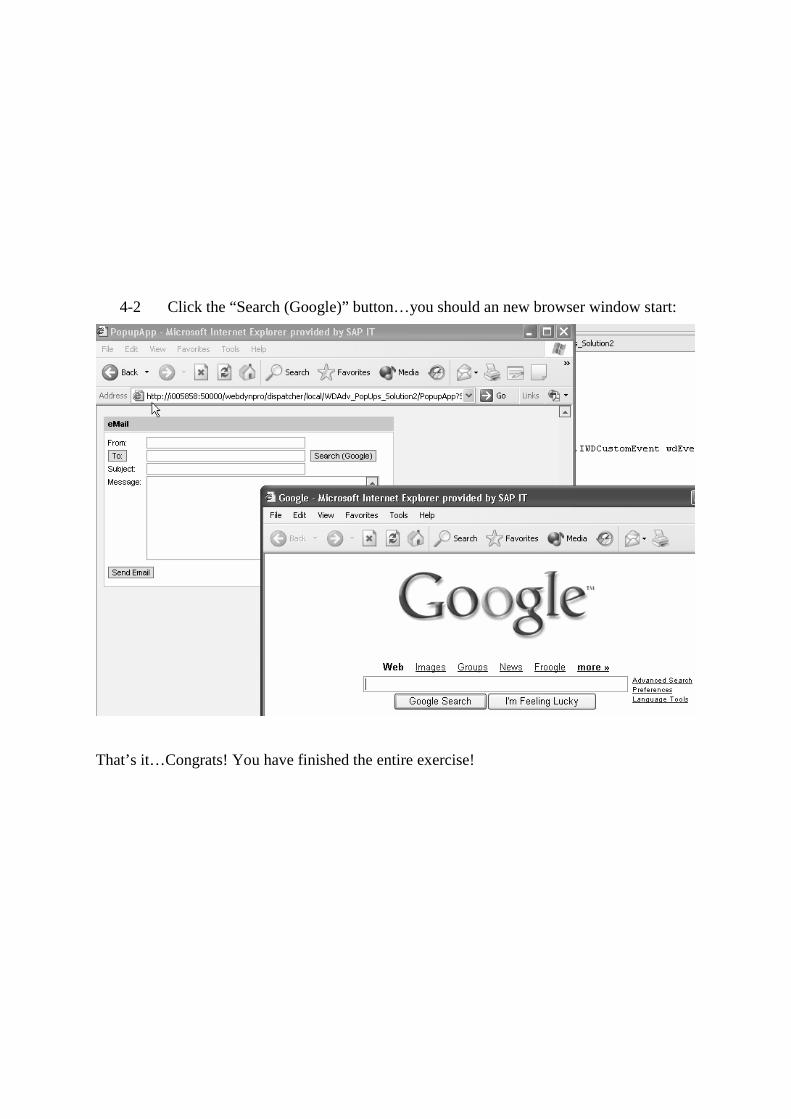
4-2 Click the “Search (Google)” button…you should an new browser window start:
That’s it…Congrats! You have finished the entire exercise!
© SAP AG <Course Number> Unit Title - 1
© SAP AG 2003, Title of Presentation, Speaker Name / 1
Internet Graphics Services Overview
Configuring Web Dynpro for Business Graphics
Simple Business Graphics
Introduction to the Chart Designer
Advanced Business Graphics and Geo Maps
Contents:
Introduction to Business Graphics
© SAP AG <Course Number> Unit Title - 2
© SAP AG 2003, Title of Presentation, Speaker Name / 2
After completing this unit, you will be able to:
Have an understanding of the IGS architecture.
Add charts to your Web Dynpro applications.
Use Web Dynpro IGS integration to create simple Business Graphics.
Understand the purpose of the Chart Designer.
Understand what Geo Maps are and how they can be integrated into Web Dynpro.
Understand how to configure the IGS for Web Dynpro Applications.
Configure your Java Engine to create Business Graphics
Introduction to Business Graphics: Unit Objectives
© SAP AG <Course Number> Unit Title - 3
© SAP AG 2003, Title of Presentation, Speaker Name / 3
<Insert unit business scenario>
Introduction to Business Graphics: Business Scenario
© SAP AG <Course Number> Unit Title - 4
© SAP AG 2003, Title of Presentation, Speaker Name / 4
After completing this topic, you will be able to:
Have an understand of what the IGS can be used for.
Have an understanding of the architecture of the IGS.
Internet Graphics Services Overview: Topic Objectives
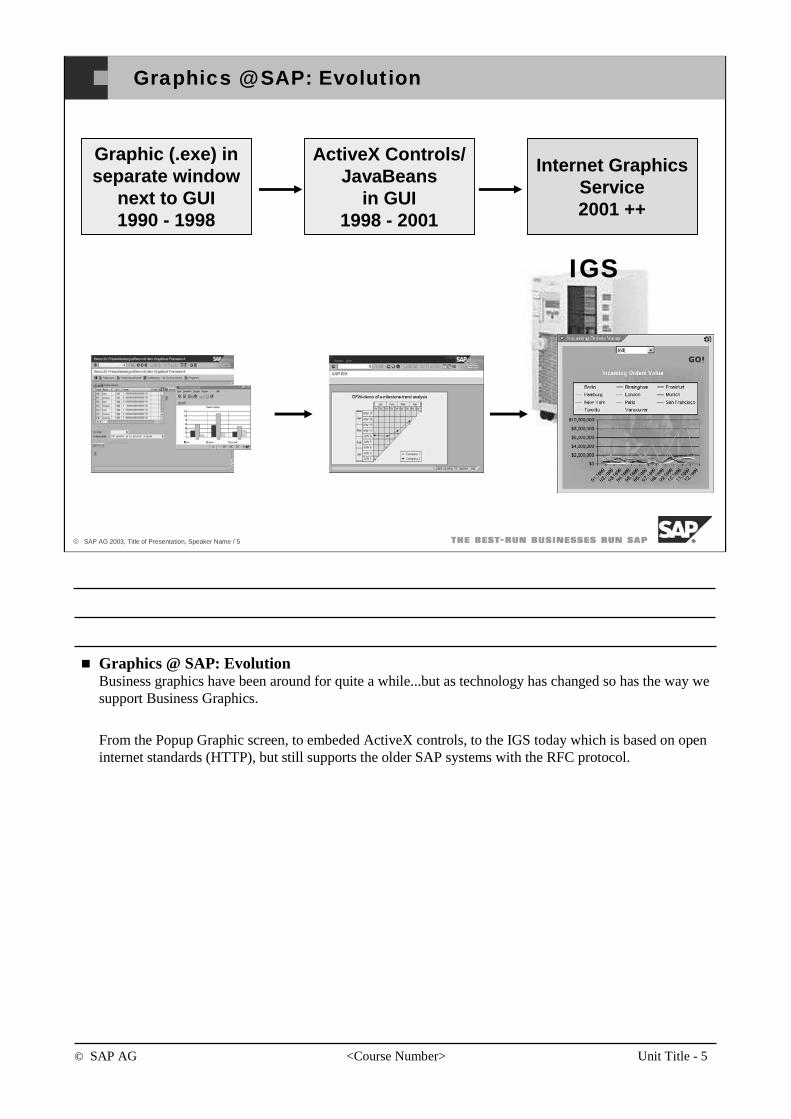
© SAP AG <Course Number> Unit Title - 5
© SAP AG 2003, Title of Presentation, Speaker Name / 5
Graphic (.exe) in separate window
next to GUI1990 - 1998
Internet GraphicsService 2001 ++
IGS
Graphics @ SAP: Evolution
ActiveX Controls/ JavaBeans
in GUI1998 - 2001
Graphics @ SAP: EvolutionBusiness graphics have been around for quite a while...but as technology has changed so has the way wesupport Business Graphics.
From the Popup Graphic screen, to embeded ActiveX controls, to the IGS today which is based on openinternet standards (HTTP), but still supports the older SAP systems with the RFC protocol.

© SAP AG <Course Number> Unit Title - 6
© SAP AG 2003, Title of Presentation, Speaker Name / 6
What is the Internet Graphics Service (IGS) ?
What is it / what is it for?A server-based engine forgenerating content
How can you access the IGS?RFC or HTTPData from SAP/external system
What front end can I use?Front end-independent- SAP GUI for Windows, Java- SAP GUI for HTML- BSP applications- Web Dynpro applications- potentially ANY Web application
What is the internet Graphics Service (IGS)?As of 6.40 Web AS the IGS is now part of the Web Applicaiton Server...when you install the 6.40 Web AS the IGS will also be installed.
By using the IGS Business Graphics can be displayed in our Web Dynpro applications.
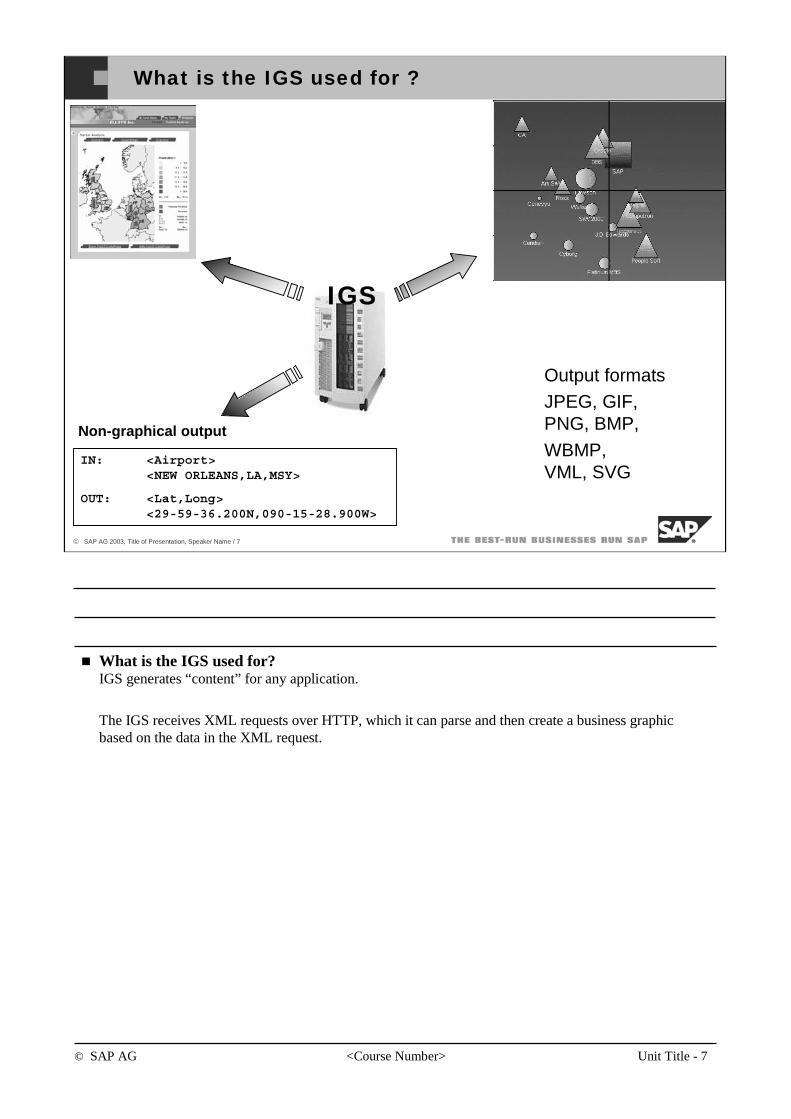
© SAP AG <Course Number> Unit Title - 7
© SAP AG 2003, Title of Presentation, Speaker Name / 7
IGS
What is the IGS used for ?
Non-graphical output
Output formatsJPEG, GIF,PNG, BMP,WBMP,VML, SVG
IN: <Airport><NEW ORLEANS,LA,MSY>
OUT: <Lat,Long><29-59-36.200N,090-15-28.900W>
What is the IGS used for?IGS generates “content” for any application.
The IGS receives XML requests over HTTP, which it can parse and then create a business graphic based on the data in the XML request.
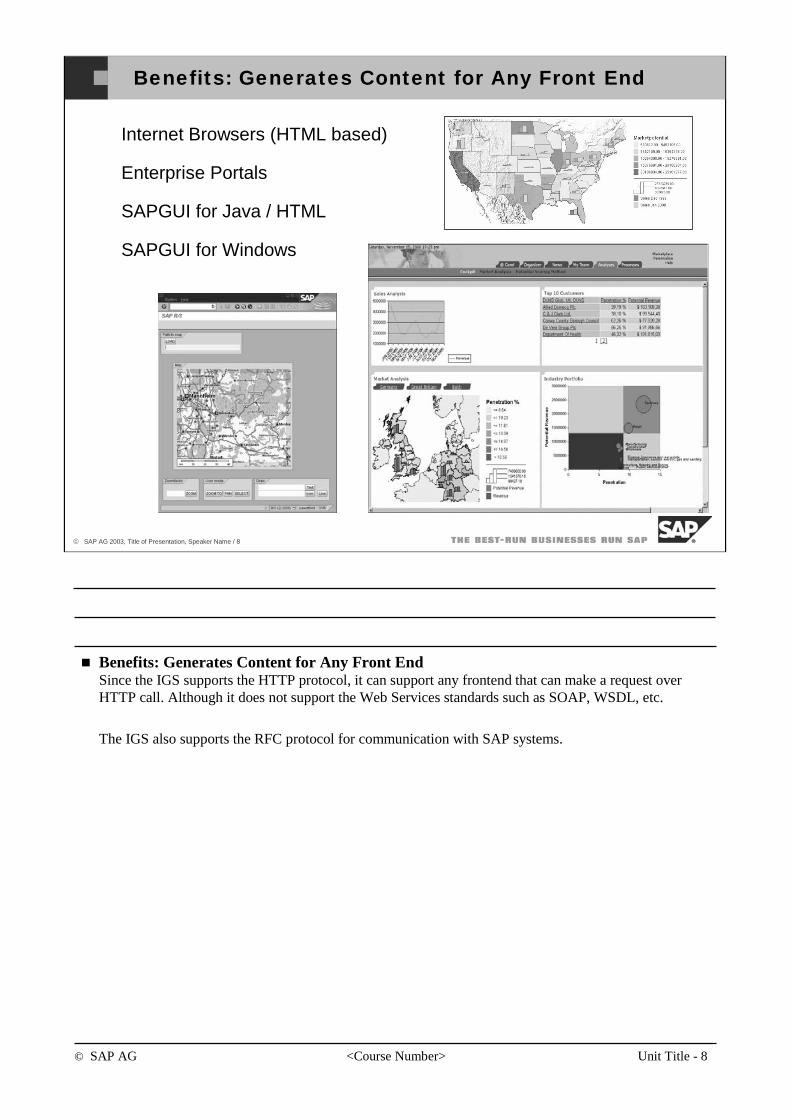
© SAP AG <Course Number> Unit Title - 8
© SAP AG 2003, Title of Presentation, Speaker Name / 8
Benefits: Generates Content for Any Front End
Internet Browsers (HTML based)
Enterprise Portals
SAPGUI for Java / HTML
SAPGUI for Windows
Benefits: Generates Content for Any Front EndSince the IGS supports the HTTP protocol, it can support any frontend that can make a request overHTTP call. Although it does not support the Web Services standards such as SOAP, WSDL, etc.
The IGS also supports the RFC protocol for communication with SAP systems.
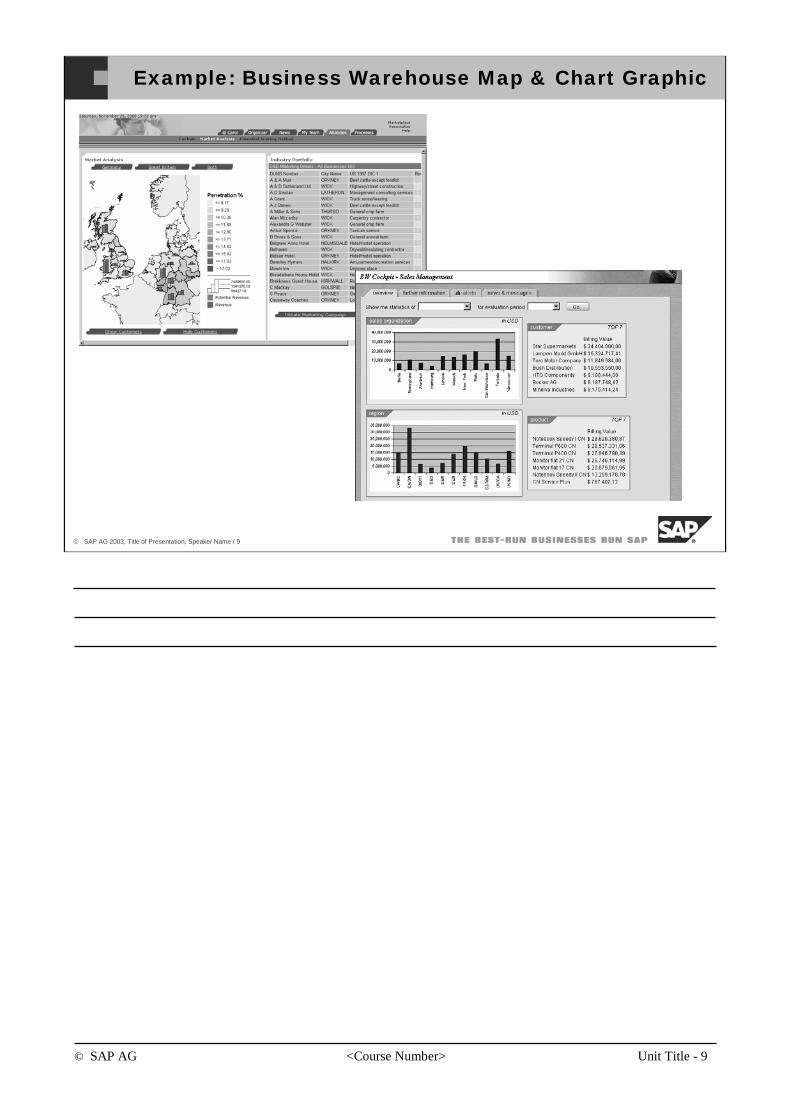
© SAP AG <Course Number> Unit Title - 9
© SAP AG 2003, Title of Presentation, Speaker Name / 9
Example: Business Warehouse Map & Chart Graphic
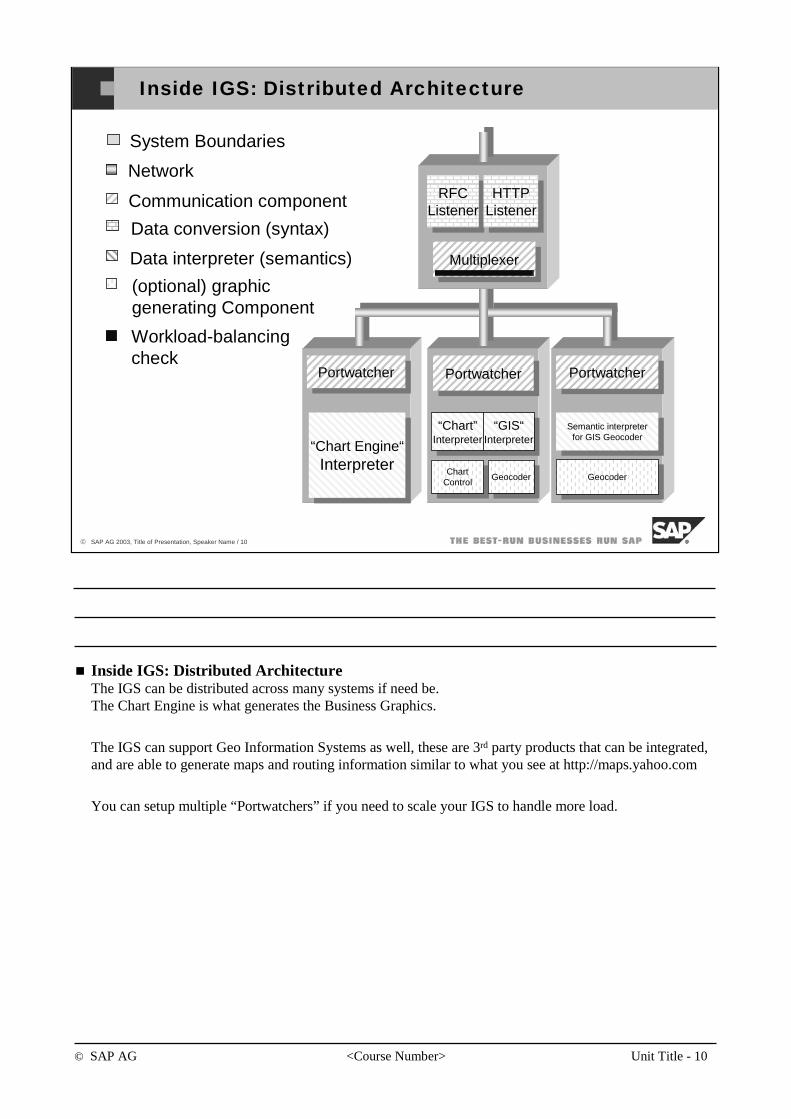
© SAP AG <Course Number> Unit Title - 10
© SAP AG 2003, Title of Presentation, Speaker Name / 10
Inside IGS: Distributed Architecture
System Boundaries
Network
Communication component
Data conversion (syntax)
Data interpreter (semantics)
(optional) graphic generating Component
Workload-balancing check
Portwatcher
Geocoder
Portwatcher
Semantic interpreterfor GIS Geocoder
“Chart Engine“Interpreter
Portwatcher
ChartControl
“Chart”Interpreter
Geocoder
“GIS“Interpreter
RFCListener
HTTPListener
Multiplexer
Inside IGS: Distributed ArchitectureThe IGS can be distributed across many systems if need be.The Chart Engine is what generates the Business Graphics.
The IGS can support Geo Information Systems as well, these are 3rd party products that can be integrated, and are able to generate maps and routing information similar to what you see at http://maps.yahoo.com
You can setup multiple “Portwatchers” if you need to scale your IGS to handle more load.
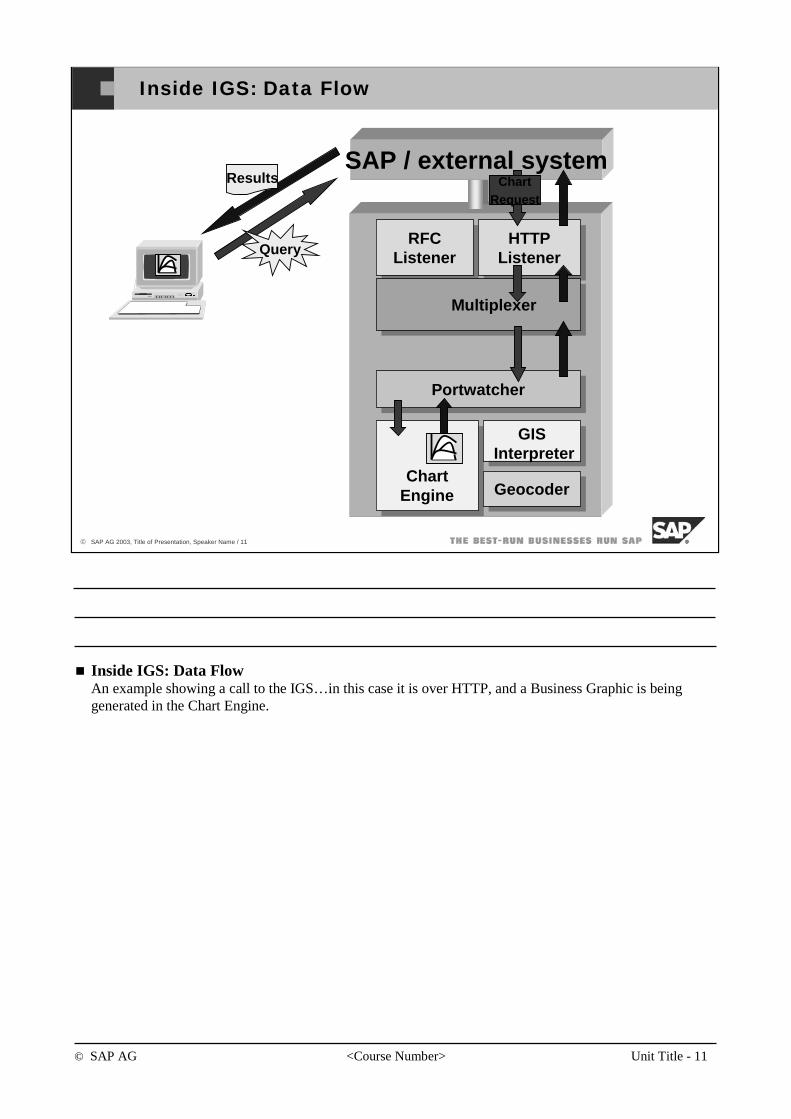
© SAP AG <Course Number> Unit Title - 11
© SAP AG 2003, Title of Presentation, Speaker Name / 11
Inside IGS: Data Flow
RFCListener
HTTPListener
Multiplexer
SAP / external system
Portwatcher
ChartEngine Geocoder
GISInterpreter
Query
ChartRequest
Results
Inside IGS: Data FlowAn example showing a call to the IGS…in this case it is over HTTP, and a Business Graphic is being generated in the Chart Engine.
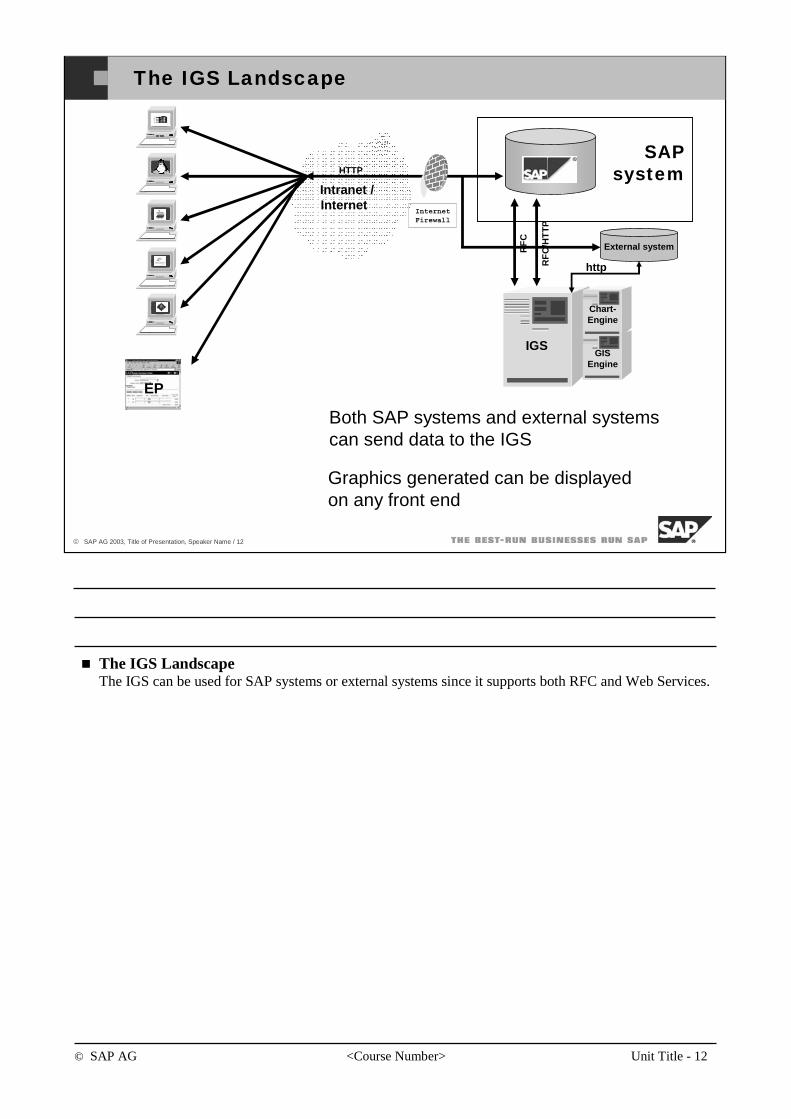
© SAP AG <Course Number> Unit Title - 12
© SAP AG 2003, Title of Presentation, Speaker Name / 12
SAP system
The IGS Landscape
IGSGIS
Engine
Chart-Engine
Intranet /Internet
External system
RF
C/H
TT
P
RF
C
HTTP
EP
Both SAP systems and external systems can send data to the IGS
Graphics generated can be displayedon any front end
http
InternetFirewall
The IGS LandscapeThe IGS can be used for SAP systems or external systems since it supports both RFC and Web Services.
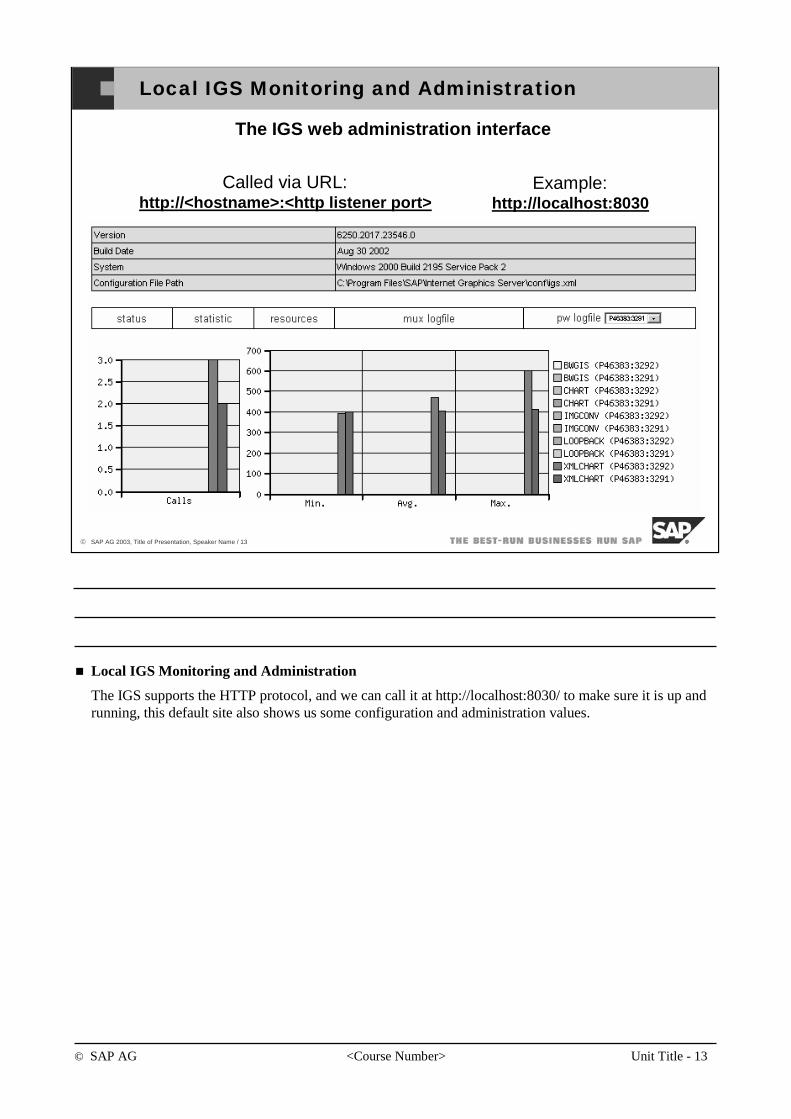
© SAP AG <Course Number> Unit Title - 13
© SAP AG 2003, Title of Presentation, Speaker Name / 13
Local IGS Monitoring and Administration
The IGS web administration interface
Called via URL:http://<hostname>:<http listener port>
Example:http://localhost:8030
Local IGS Monitoring and Administration
The IGS supports the HTTP protocol, and we can call it at http://localhost:8030/ to make sure it is up and running, this default site also shows us some configuration and administration values.
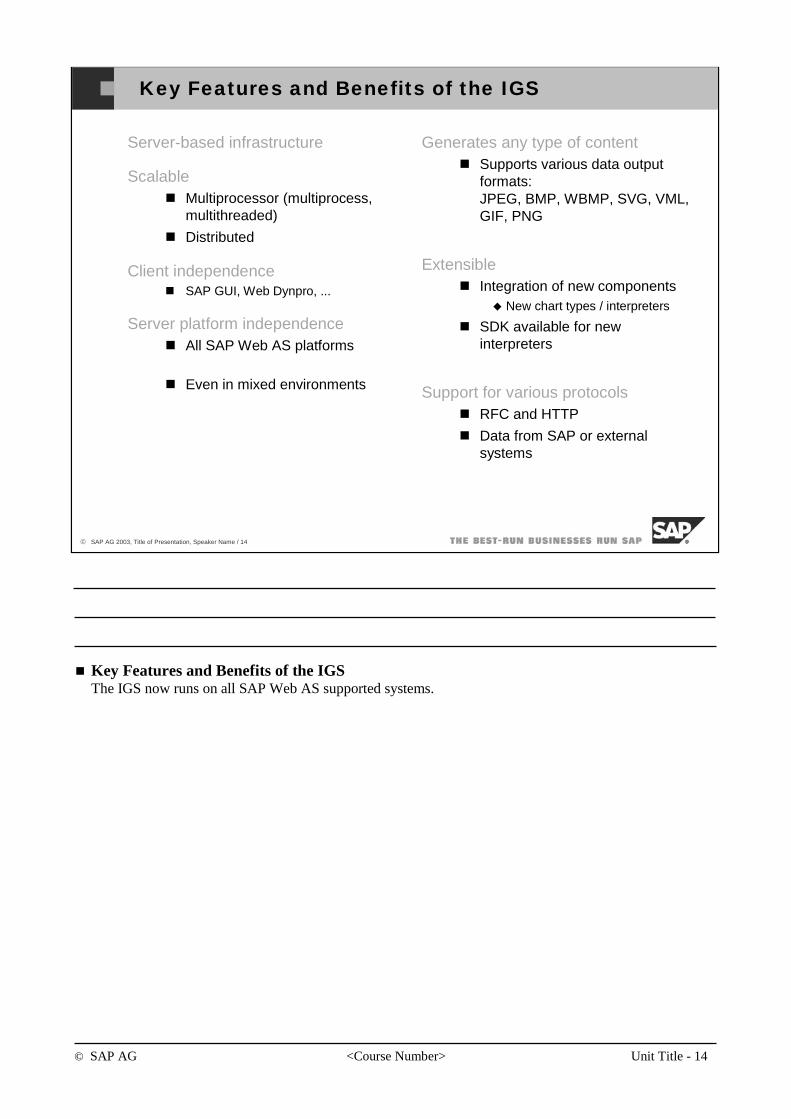
© SAP AG <Course Number> Unit Title - 14
© SAP AG 2003, Title of Presentation, Speaker Name / 14
Key Features and Benefits of the IGS
Server-based infrastructure
ScalableMultiprocessor (multiprocess, multithreaded)
Distributed
Client independenceSAP GUI, Web Dynpro, ...
Server platform independenceAll SAP Web AS platforms
Even in mixed environments
Generates any type of contentSupports various data outputformats: JPEG, BMP, WBMP, SVG, VML, GIF, PNG
ExtensibleIntegration of new components
New chart types / interpreters
SDK available for newinterpreters
Support for various protocolsRFC and HTTP
Data from SAP or externalsystems
Key Features and Benefits of the IGSThe IGS now runs on all SAP Web AS supported systems.
© SAP AG <Course Number> Unit Title - 15
© SAP AG 2003, Title of Presentation, Speaker Name / 15
You should now be able to:
Understand of what the IGS can be used for.
Understand the architecture of the IGS.
Internet Graphics Services Overview: Topic Summary
© SAP AG <Course Number> Unit Title - 16
© SAP AG 2003, Title of Presentation, Speaker Name / 16
After completing this topic, you will be able to:
Configure your Java Engine to create Business Graphics
Configuring Web Dynpro for Business Graphics: Topic Objectives
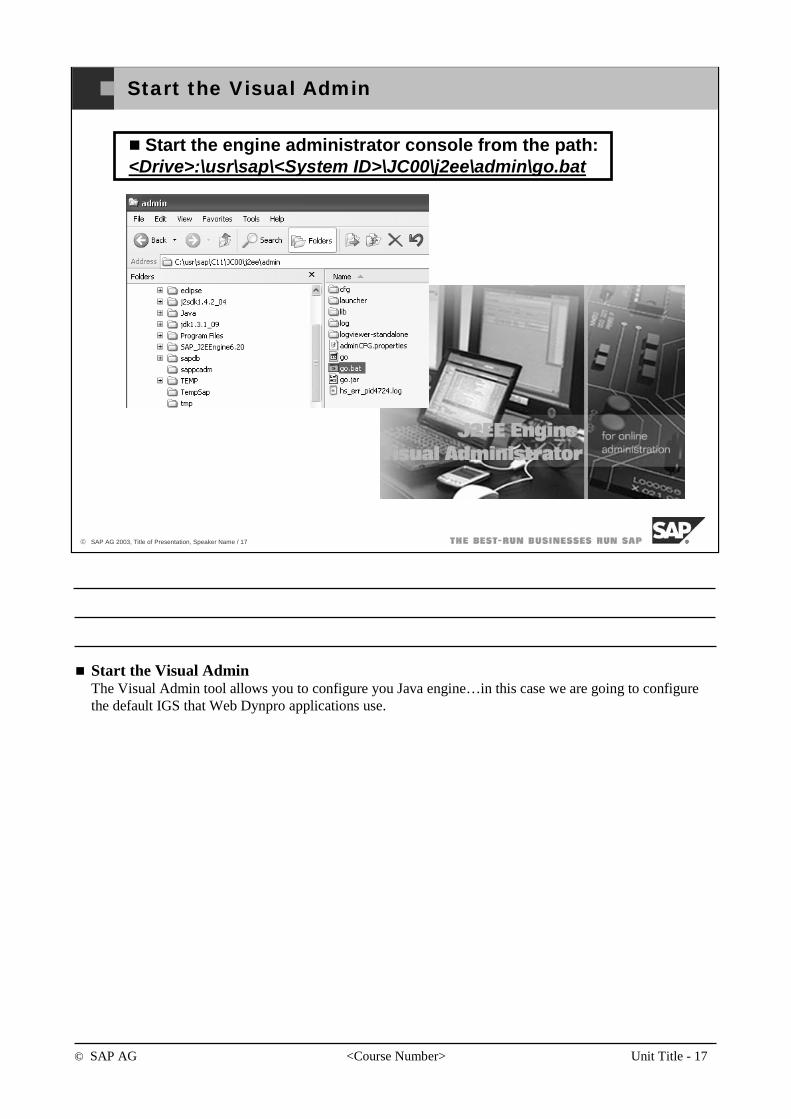
© SAP AG <Course Number> Unit Title - 17
© SAP AG 2003, Title of Presentation, Speaker Name / 17
Start the Visual Admin
Start the engine administrator console from the path:<Drive>:\usr\sap\<System ID>\JC00\j2ee\admin\go.bat
Start the Visual AdminThe Visual Admin tool allows you to configure you Java engine…in this case we are going to configure the default IGS that Web Dynpro applications use.
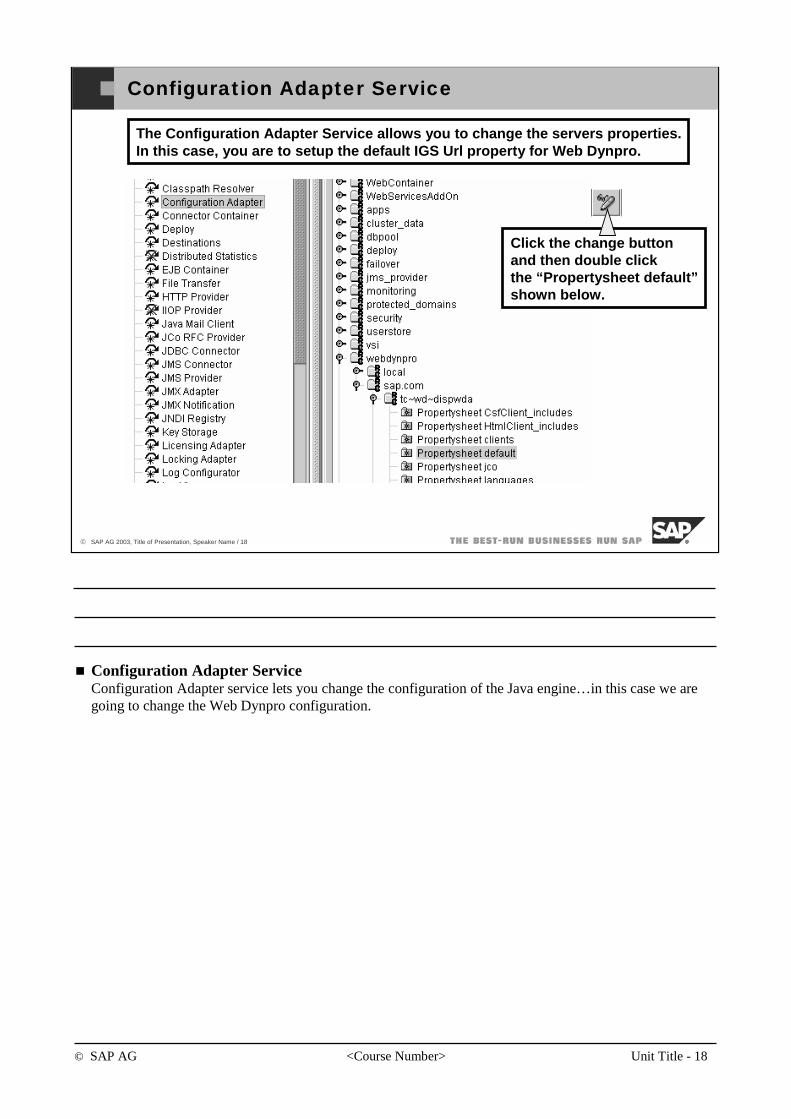
© SAP AG <Course Number> Unit Title - 18
© SAP AG 2003, Title of Presentation, Speaker Name / 18
Configuration Adapter Service
The Configuration Adapter Service allows you to change the servers properties.In this case, you are to setup the default IGS Url property for Web Dynpro.
Click the change buttonand then double clickthe “Propertysheet default”shown below.
Configuration Adapter ServiceConfiguration Adapter service lets you change the configuration of the Java engine…in this case we are going to change the Web Dynpro configuration.
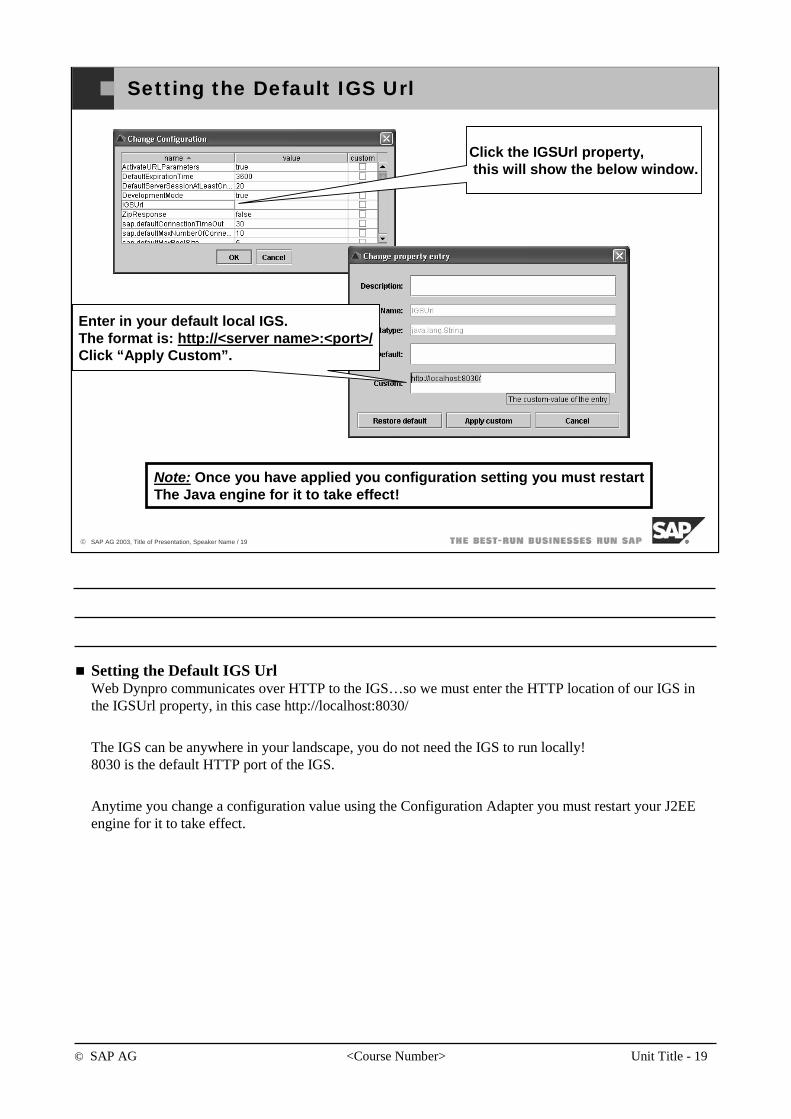
© SAP AG <Course Number> Unit Title - 19
© SAP AG 2003, Title of Presentation, Speaker Name / 19
Setting the Default IGS Url
Note: Once you have applied you configuration setting you must restartThe Java engine for it to take effect!
Enter in your default local IGS. The format is: http://<server name>:<port>/Click “Apply Custom”.
Click the IGSUrl property,this will show the below window.
Setting the Default IGS UrlWeb Dynpro communicates over HTTP to the IGS…so we must enter the HTTP location of our IGS in the IGSUrl property, in this case http://localhost:8030/
The IGS can be anywhere in your landscape, you do not need the IGS to run locally!8030 is the default HTTP port of the IGS.
Anytime you change a configuration value using the Configuration Adapter you must restart your J2EE engine for it to take effect.
© SAP AG <Course Number> Unit Title - 20
© SAP AG 2003, Title of Presentation, Speaker Name / 20
You should now be able to:
Configure your Java Engine to create Business Graphics
Configuring Web Dynpro for Business Graphics: Topic Summary
© SAP AG <Course Number> Unit Title - 21
© SAP AG 2003, Title of Presentation, Speaker Name / 21
After completing this topic, you will be able to:
Add a Simple Business Graphic to your Web Dynpro application
Use the important properties of Business Graphics.
How to pass data to your Business Graphic.
Simple Business Graphics : Topic Objectives

© SAP AG <Course Number> Unit Title - 22
© SAP AG 2003, Title of Presentation, Speaker Name / 22
Simple Business Graphics
A simple business graphic is a chart consisting of a category and one or more Simple Series.
Column charts, bar charts and pie charts are typical examples of simple business graphics.
Simple business graphics are to be distinguished from complex business graphics such as scatter charts and portfolio charts.
Column chart with 3 Simple Series
Simple Business Graphics
The example to the right shows a graphic with 3 Simple Series one each for Pfizer, Glaxo, Bayer.
Complex Business graphics rely on points and series, examples of this are Portfolio charts and Gantt charts.
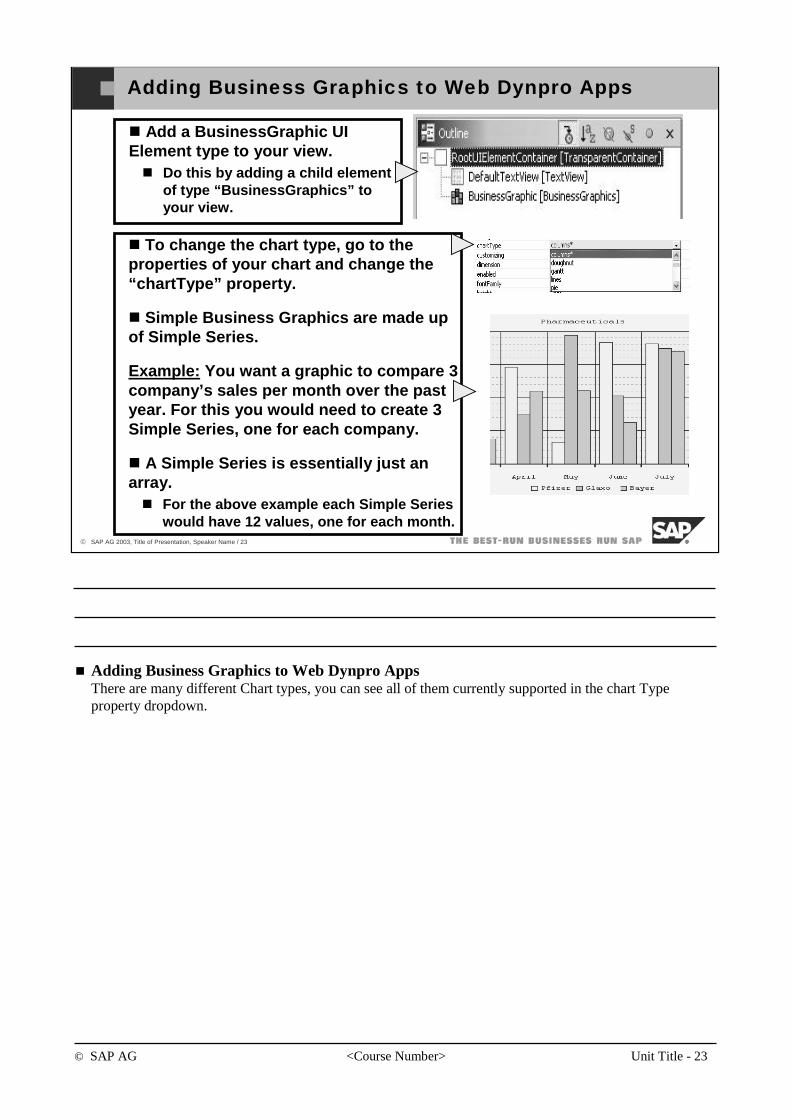
© SAP AG <Course Number> Unit Title - 23
© SAP AG 2003, Title of Presentation, Speaker Name / 23
Adding Business Graphics to Web Dynpro Apps
Add a BusinessGraphic UI Element type to your view.
Do this by adding a child element of type “BusinessGraphics” to your view.
To change the chart type, go to the properties of your chart and change the “chartType” property.
Simple Business Graphics are made up of Simple Series.
Example: You want a graphic to compare 3 company’s sales per month over the past year. For this you would need to create 3 Simple Series, one for each company.
A Simple Series is essentially just an array.
For the above example each Simple Series would have 12 values, one for each month.
Adding Business Graphics to Web Dynpro AppsThere are many different Chart types, you can see all of them currently supported in the chart Type property dropdown.
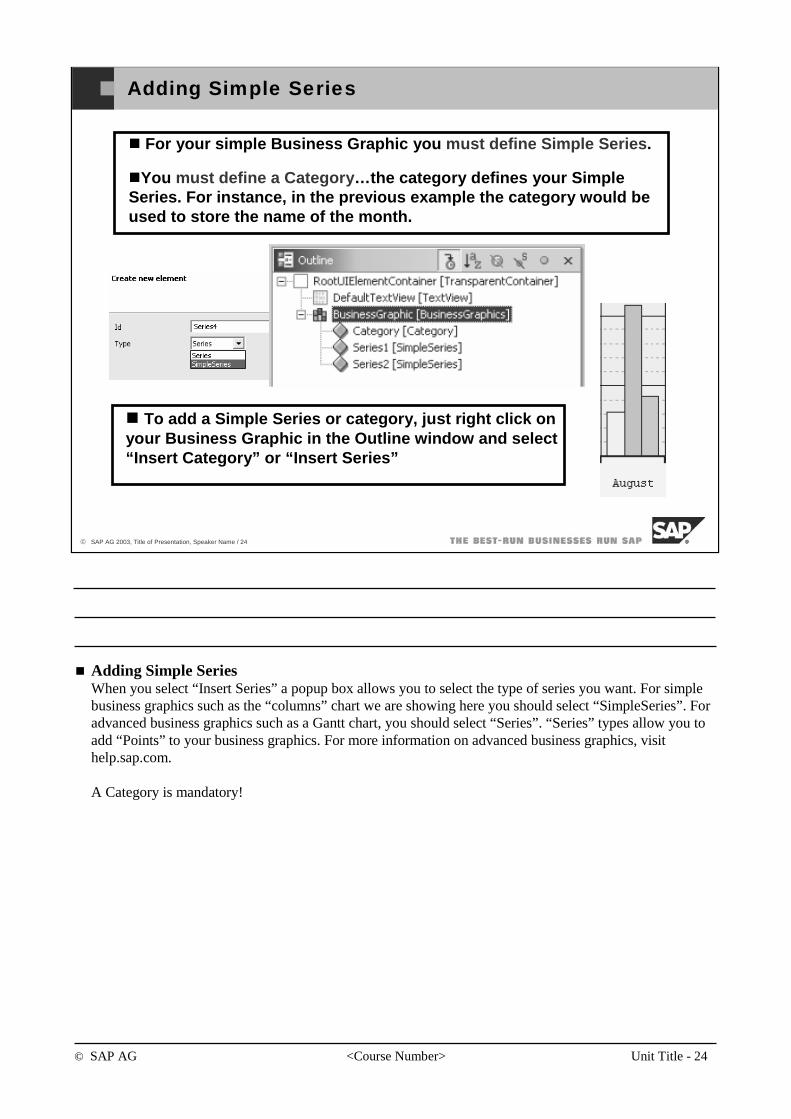
© SAP AG <Course Number> Unit Title - 24
© SAP AG 2003, Title of Presentation, Speaker Name / 24
Adding Simple Series
For your simple Business Graphic you must define Simple Series.
You must define a Category…the category defines your Simple Series. For instance, in the previous example the category would be used to store the name of the month.
To add a Simple Series or category, just right click on your Business Graphic in the Outline window and select “Insert Category” or “Insert Series”
Adding Simple SeriesWhen you select “Insert Series” a popup box allows you to select the type of series you want. For simple business graphics such as the “columns” chart we are showing here you should select “SimpleSeries”. For advanced business graphics such as a Gantt chart, you should select “Series”. “Series” types allow you to add “Points” to your business graphics. For more information on advanced business graphics, visit help.sap.com.
A Category is mandatory!
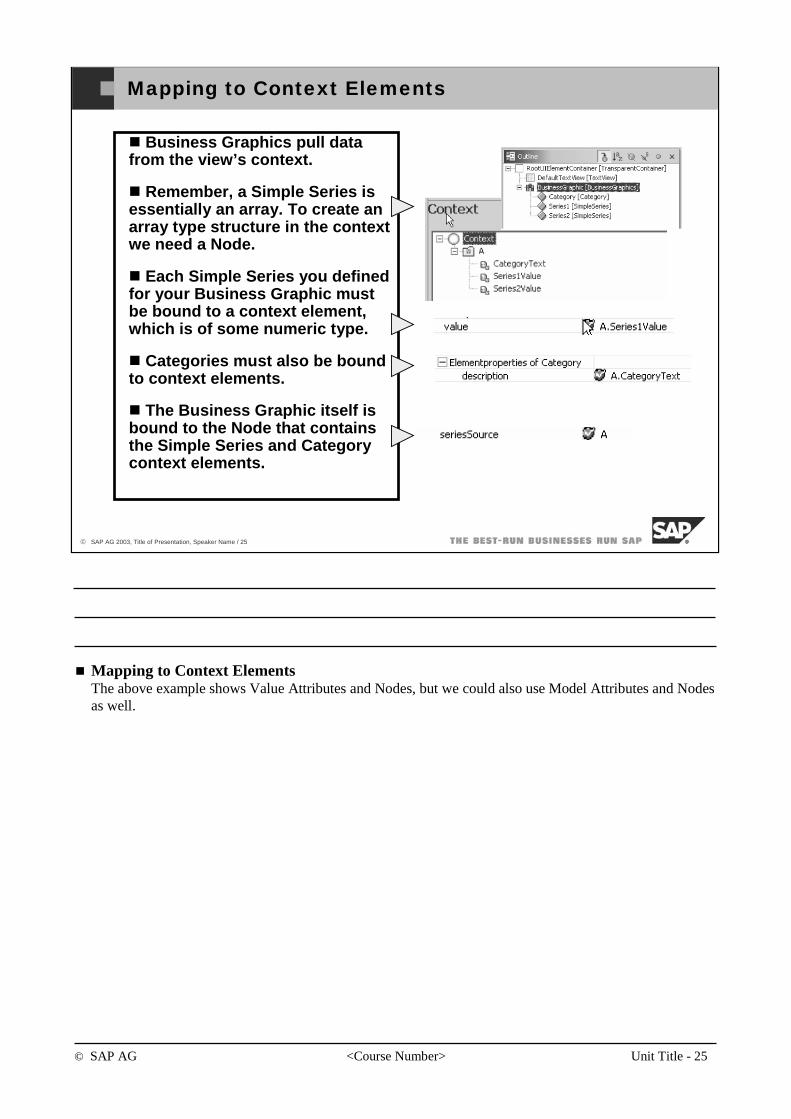
© SAP AG <Course Number> Unit Title - 25
© SAP AG 2003, Title of Presentation, Speaker Name / 25
Mapping to Context Elements
Business Graphics pull data from the view’s context.
Remember, a Simple Series is essentially an array. To create an array type structure in the context we need a Node.
Each Simple Series you defined for your Business Graphic must be bound to a context element, which is of some numeric type.
Categories must also be bound to context elements.
The Business Graphic itself is bound to the Node that contains the Simple Series and Category context elements.
Mapping to Context Elements The above example shows Value Attributes and Nodes, but we could also use Model Attributes and Nodes as well.
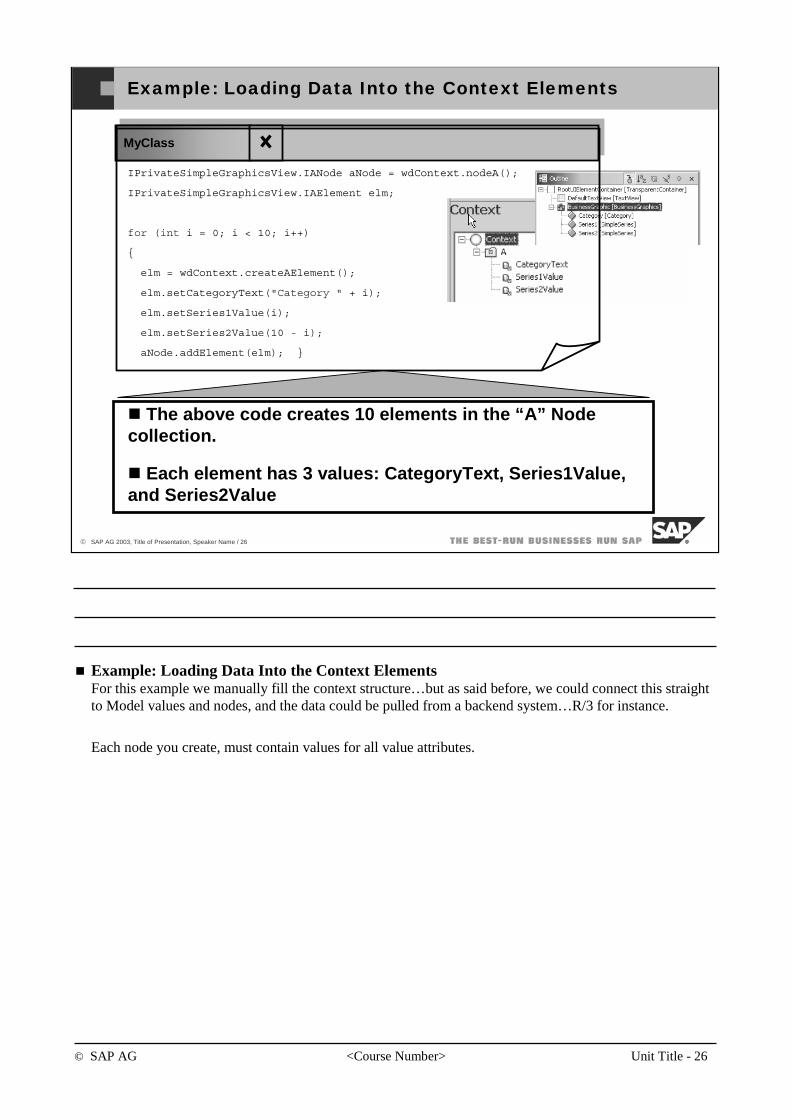
© SAP AG <Course Number> Unit Title - 26
© SAP AG 2003, Title of Presentation, Speaker Name / 26
Example: Loading Data Into the Context Elements
IPrivateSimpleGraphicsView.IANode aNode = wdContext.nodeA();
IPrivateSimpleGraphicsView.IAElement elm;
for (int i = 0; i < 10; i++)
{
elm = wdContext.createAElement();
elm.setCategoryText("Category " + i);
elm.setSeries1Value(i);
elm.setSeries2Value(10 - i);
aNode.addElement(elm); }
The above code creates 10 elements in the “A” Node collection.
Each element has 3 values: CategoryText, Series1Value, and Series2Value
MyClass
Example: Loading Data Into the Context Elements For this example we manually fill the context structure…but as said before, we could connect this straight to Model values and nodes, and the data could be pulled from a backend system…R/3 for instance.
Each node you create, must contain values for all value attributes.
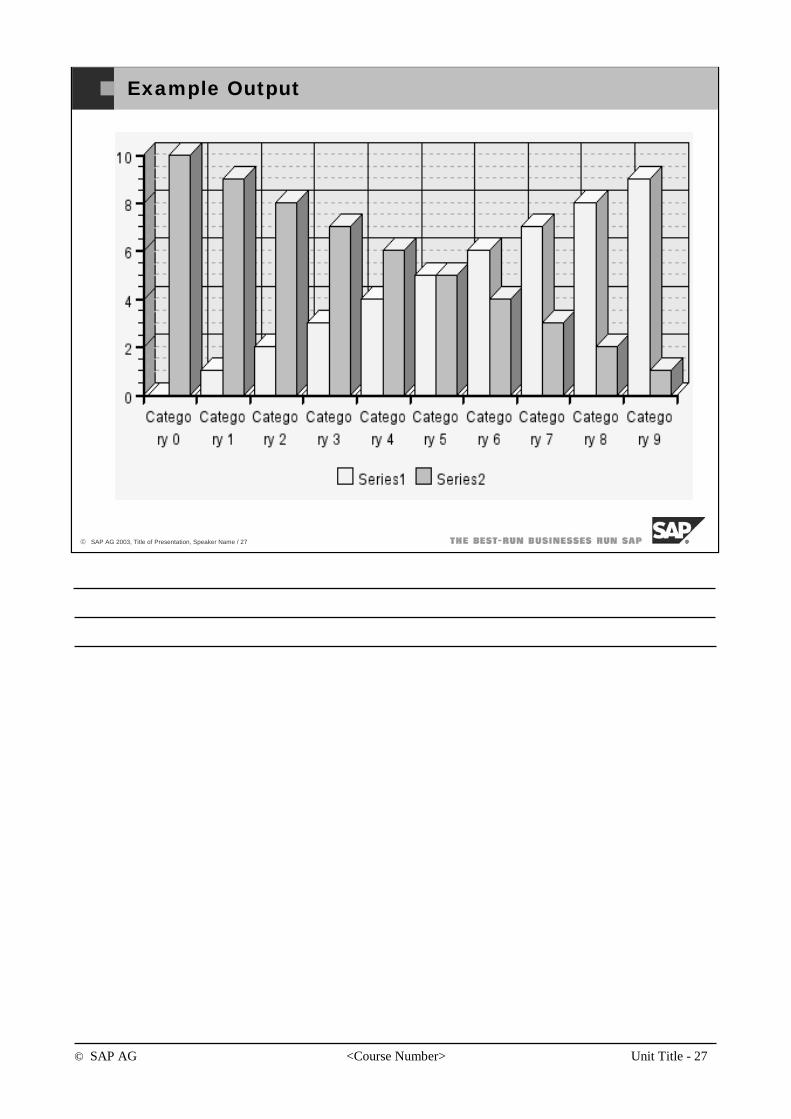
© SAP AG <Course Number> Unit Title - 27
© SAP AG 2003, Title of Presentation, Speaker Name / 27
Example Output
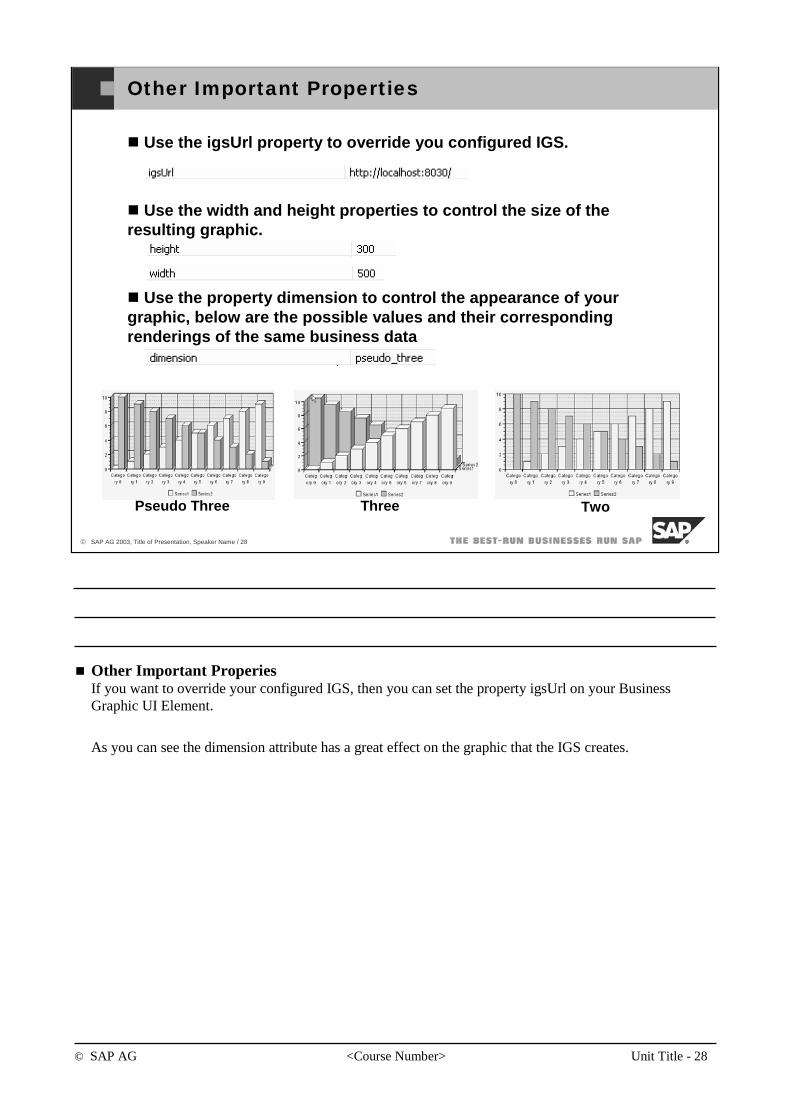
© SAP AG <Course Number> Unit Title - 28
© SAP AG 2003, Title of Presentation, Speaker Name / 28
Other Important Properties
Use the igsUrl property to override you configured IGS.
Use the width and height properties to control the size of the resulting graphic.
Use the property dimension to control the appearance of your graphic, below are the possible values and their corresponding renderings of the same business data
Pseudo Three Three Two
Other Important ProperiesIf you want to override your configured IGS, then you can set the property igsUrl on your Business Graphic UI Element.
As you can see the dimension attribute has a great effect on the graphic that the IGS creates.
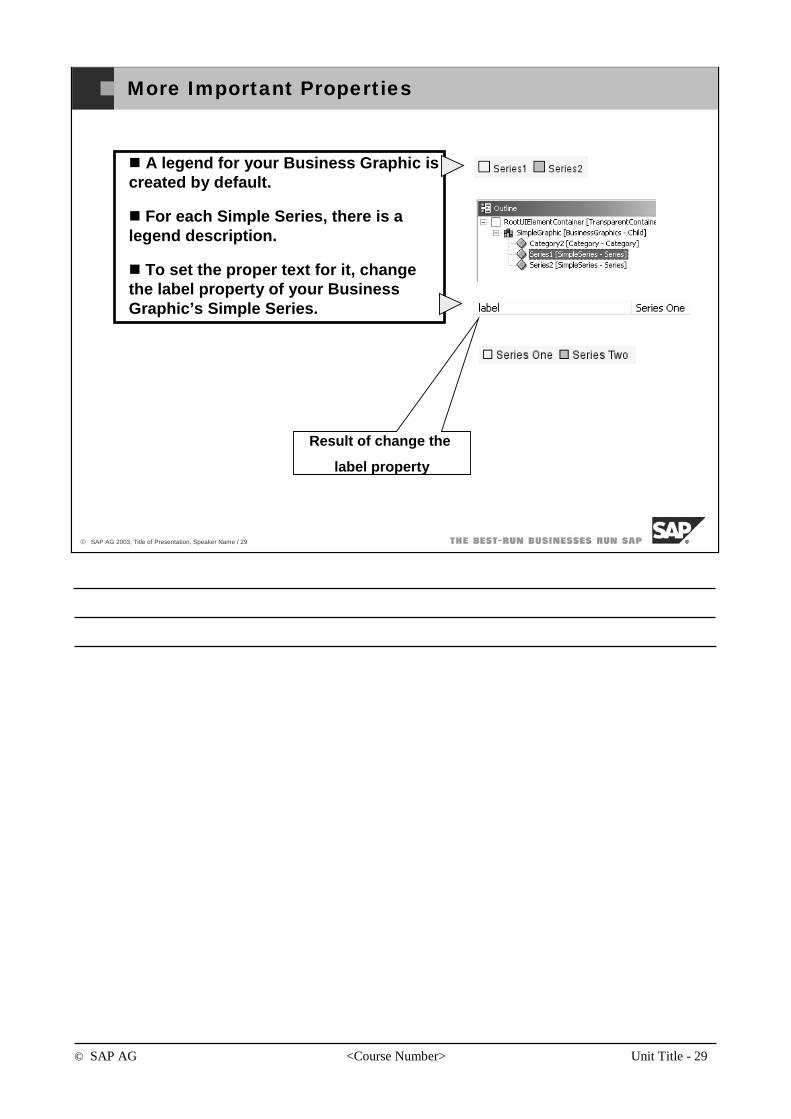
© SAP AG <Course Number> Unit Title - 29
© SAP AG 2003, Title of Presentation, Speaker Name / 29
More Important Properties
A legend for your Business Graphic is created by default.
For each Simple Series, there is a legend description.
To set the proper text for it, change the label property of your Business Graphic’s Simple Series.
Result of change the
label property
© SAP AG <Course Number> Unit Title - 30
© SAP AG 2003, Title of Presentation, Speaker Name / 30
You should now be able to:
Add a Simple Business Graphic to your Web Dynpro application
Use the important properties of Business Graphics.
How to pass data to your Business Graphic.
Simple Business Graphics: Topic Summary
© SAP AG <Course Number> Unit Title - 31
© SAP AG 2003, Title of Presentation, Speaker Name / 31
After completing this topic, you will be able to:
Learn how to start the Chart Designer.
Use the Chart Designer to make basic changes to your Business Graphic.
Introduction to the Chart Designer: Topic Objectives
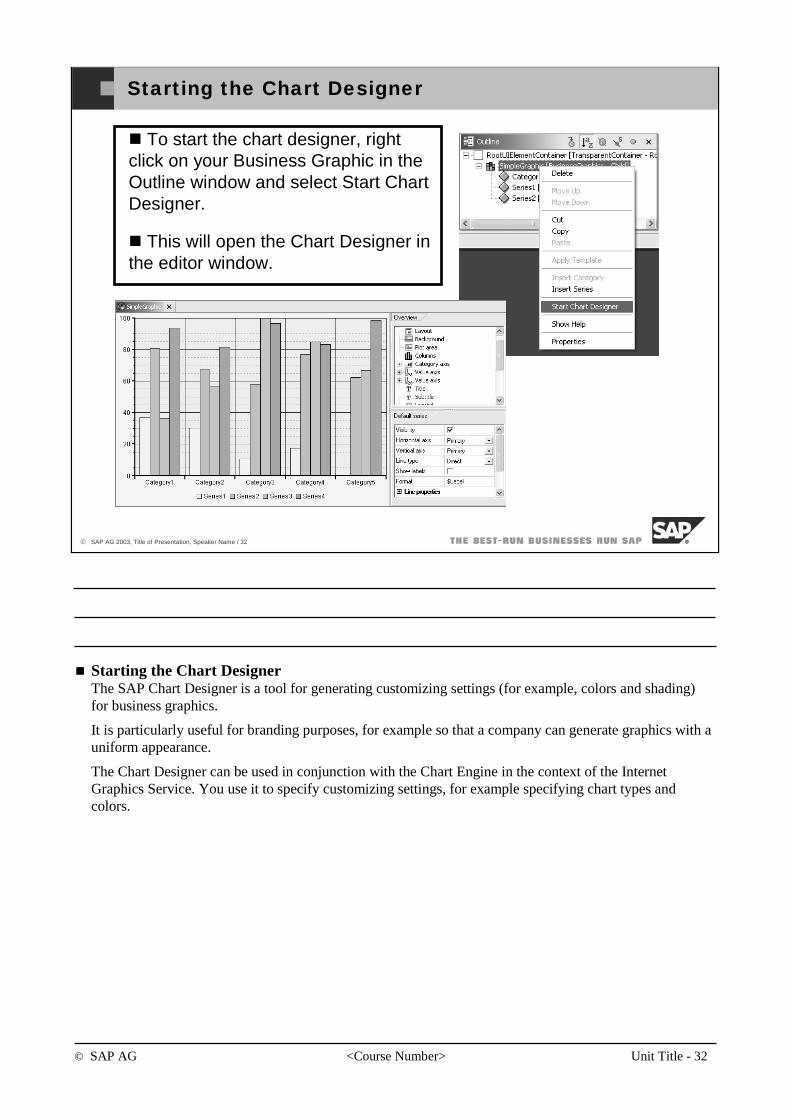
© SAP AG <Course Number> Unit Title - 32
© SAP AG 2003, Title of Presentation, Speaker Name / 32
Starting the Chart Designer
To start the chart designer, right click on your Business Graphic in the Outline window and select Start Chart Designer.
This will open the Chart Designer in the editor window.
Starting the Chart DesignerThe SAP Chart Designer is a tool for generating customizing settings (for example, colors and shading) for business graphics.
It is particularly useful for branding purposes, for example so that a company can generate graphics with a uniform appearance.
The Chart Designer can be used in conjunction with the Chart Engine in the context of the Internet Graphics Service. You use it to specify customizing settings, for example specifying chart types and colors.
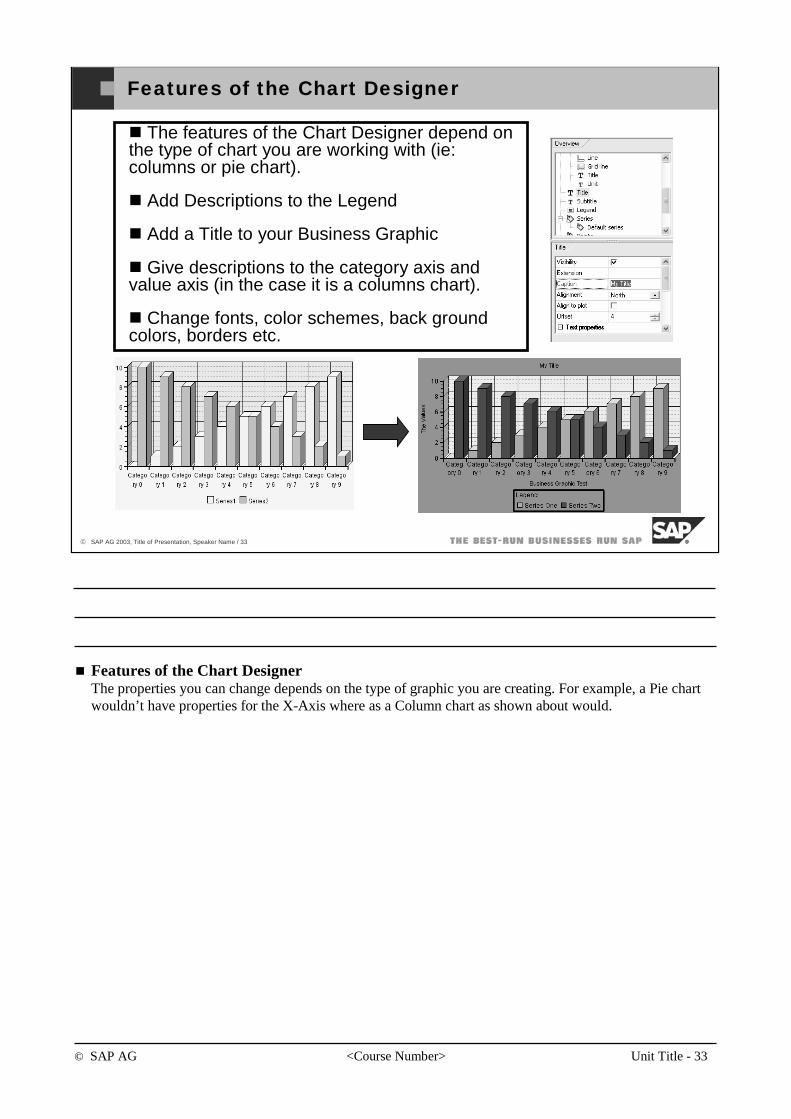
© SAP AG <Course Number> Unit Title - 33
© SAP AG 2003, Title of Presentation, Speaker Name / 33
Features of the Chart Designer
The features of the Chart Designer depend on the type of chart you are working with (ie: columns or pie chart).
Add Descriptions to the Legend
Add a Title to your Business Graphic
Give descriptions to the category axis and value axis (in the case it is a columns chart).
Change fonts, color schemes, back ground colors, borders etc.
Features of the Chart DesignerThe properties you can change depends on the type of graphic you are creating. For example, a Pie chart wouldn’t have properties for the X-Axis where as a Column chart as shown about would.
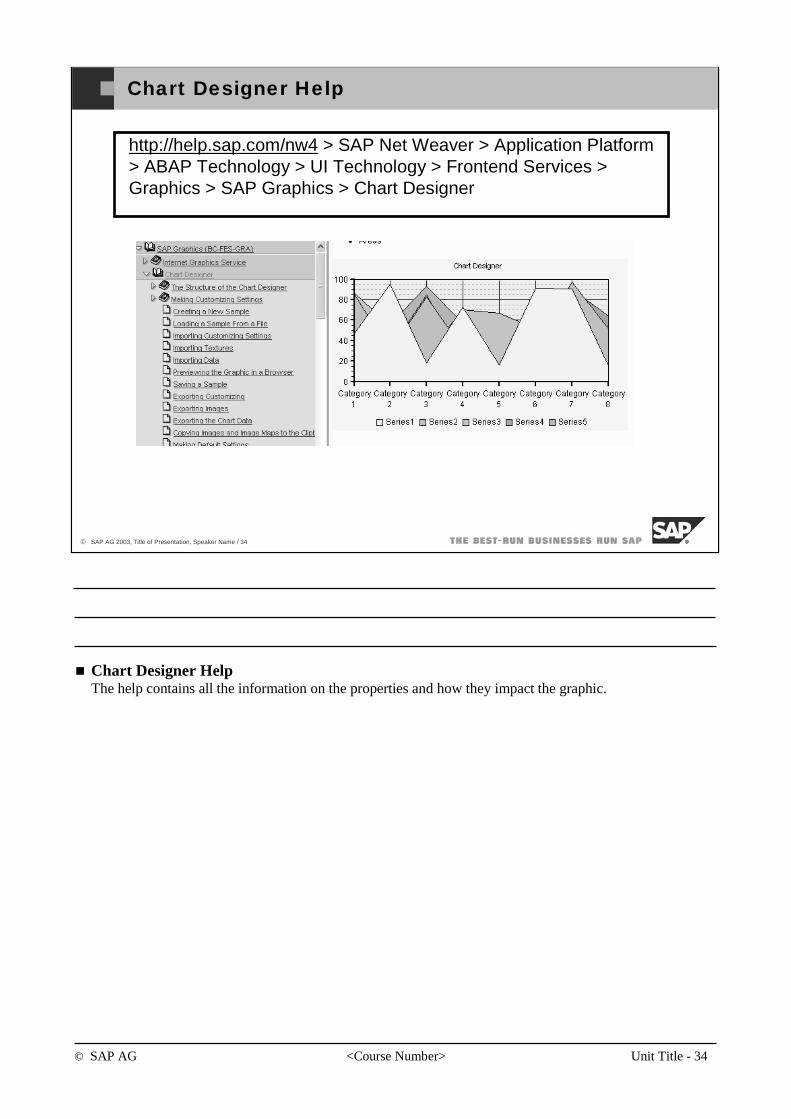
© SAP AG <Course Number> Unit Title - 34
© SAP AG 2003, Title of Presentation, Speaker Name / 34
Chart Designer Help
http://help.sap.com/nw4 > SAP Net Weaver > Application Platform > ABAP Technology > UI Technology > Frontend Services > Graphics > SAP Graphics > Chart Designer
Chart Designer HelpThe help contains all the information on the properties and how they impact the graphic.
© SAP AG <Course Number> Unit Title - 35
© SAP AG 2003, Title of Presentation, Speaker Name / 35
You should now be able to:
Start the Chart Designer.
Use the Chart Designer to make basic changes to your Business Graphic.
Introduction to the Chart Designer: Topic Summary
© SAP AG <Course Number> Unit Title - 36
© SAP AG 2003, Title of Presentation, Speaker Name / 36
After completing this topic, you will be able to:
Get an idea of the advanced Business Graphics that are possible
See what is possible with GeoMaps.
Advanced Business Graphics and Geo Services: Topic Objectives
© SAP AG <Course Number> Unit Title - 37
© SAP AG 2003, Title of Presentation, Speaker Name / 37
Simple Pie Chart
Simple Pie ChartThe Pie chart…a simple business graphic.
© SAP AG <Course Number> Unit Title - 38
© SAP AG 2003, Title of Presentation, Speaker Name / 38
Polar Chart
© SAP AG <Course Number> Unit Title - 39
© SAP AG 2003, Title of Presentation, Speaker Name / 39
Portfolio Chart
© SAP AG <Course Number> Unit Title - 40
© SAP AG 2003, Title of Presentation, Speaker Name / 40
Split Pie Chart
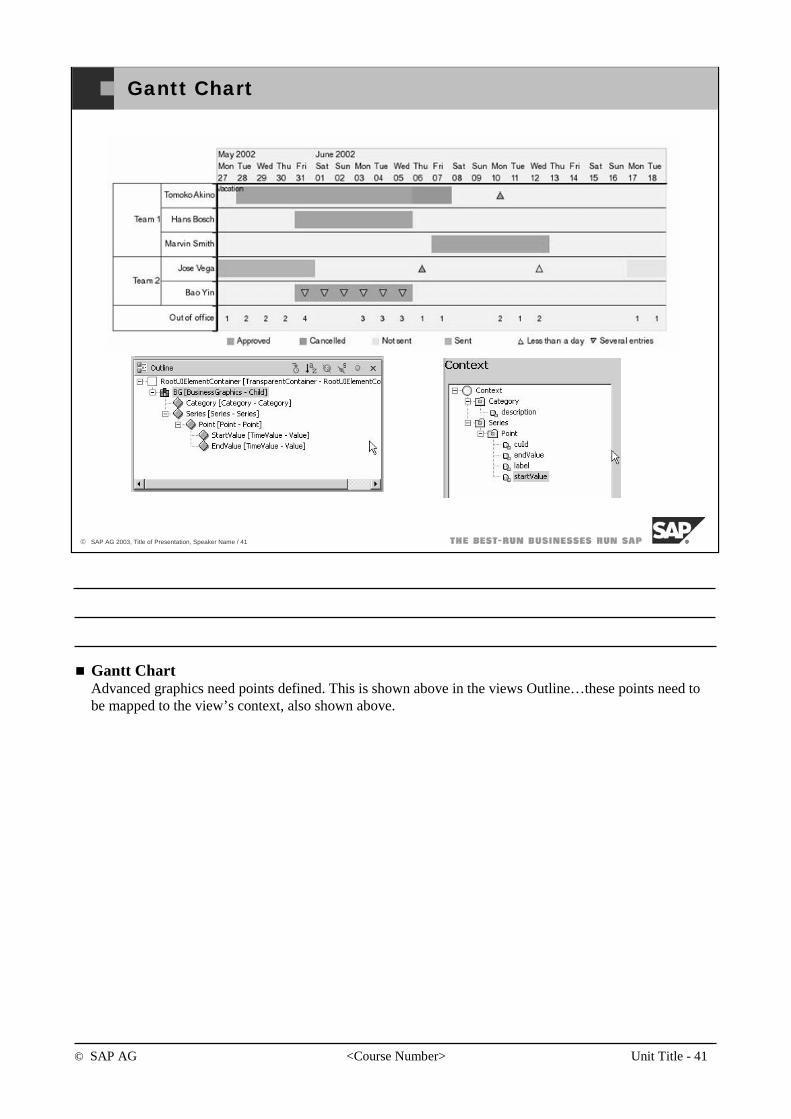
© SAP AG <Course Number> Unit Title - 41
© SAP AG 2003, Title of Presentation, Speaker Name / 41
Gantt Chart
Gantt ChartAdvanced graphics need points defined. This is shown above in the views Outline…these points need to be mapped to the view’s context, also shown above.
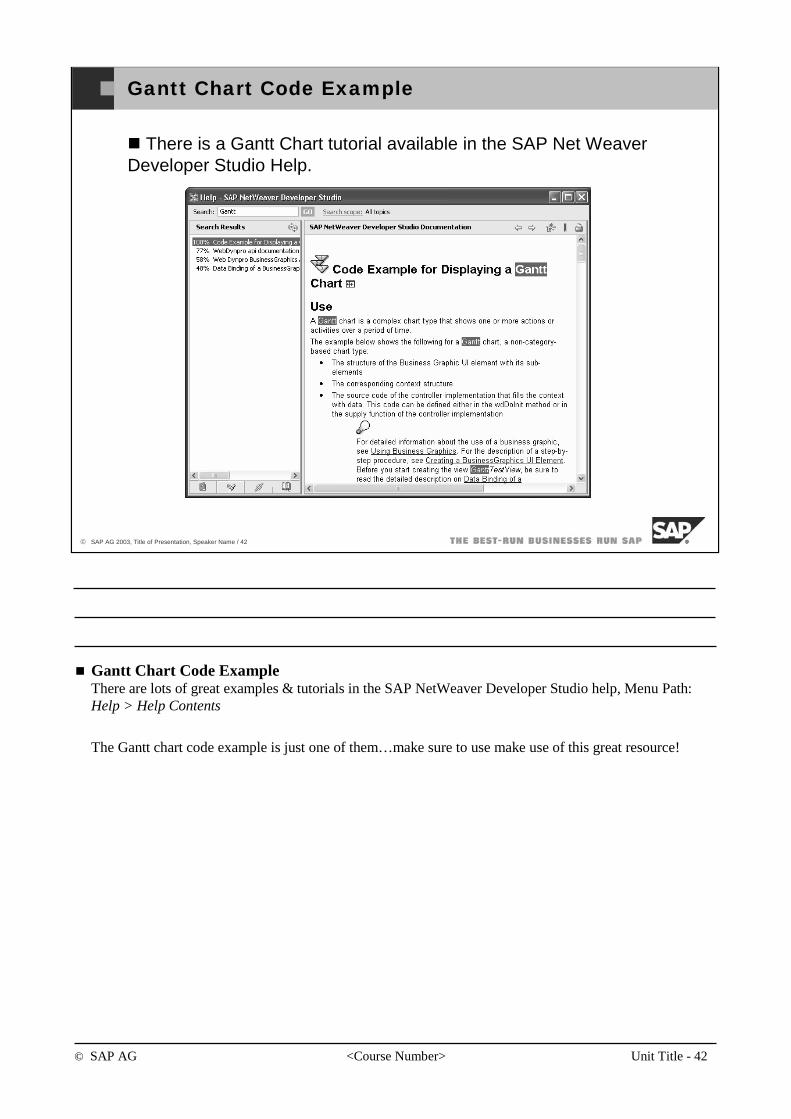
© SAP AG <Course Number> Unit Title - 42
© SAP AG 2003, Title of Presentation, Speaker Name / 42
Gantt Chart Code Example
There is a Gantt Chart tutorial available in the SAP Net WeaverDeveloper Studio Help.
Gantt Chart Code ExampleThere are lots of great examples & tutorials in the SAP NetWeaver Developer Studio help, Menu Path: Help > Help Contents
The Gantt chart code example is just one of them…make sure to use make use of this great resource!
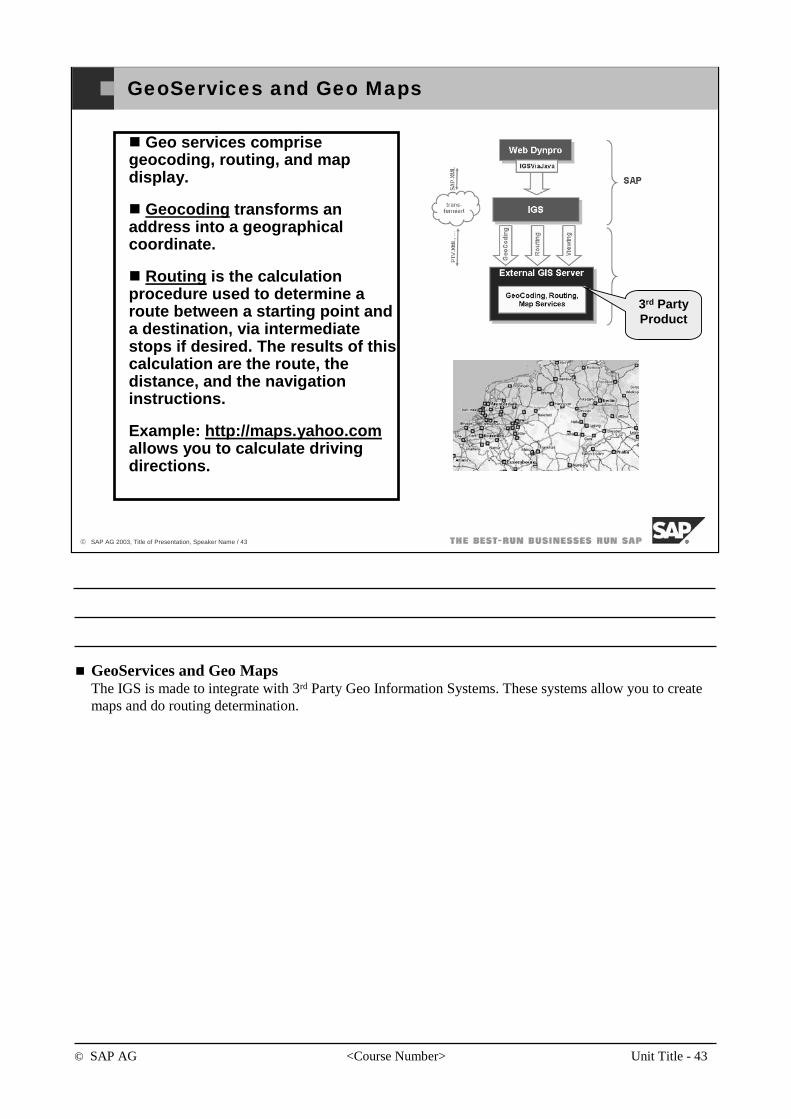
© SAP AG <Course Number> Unit Title - 43
© SAP AG 2003, Title of Presentation, Speaker Name / 43
GeoServices and Geo Maps
Geo services comprise geocoding, routing, and map display.
Geocoding transforms an address into a geographical coordinate.
Routing is the calculation procedure used to determine a route between a starting point and a destination, via intermediate stops if desired. The results of this calculation are the route, the distance, and the navigation instructions.
Example: http://maps.yahoo.comallows you to calculate driving directions.
3rd Party Product
GeoServices and Geo MapsThe IGS is made to integrate with 3rd Party Geo Information Systems. These systems allow you to create maps and do routing determination.
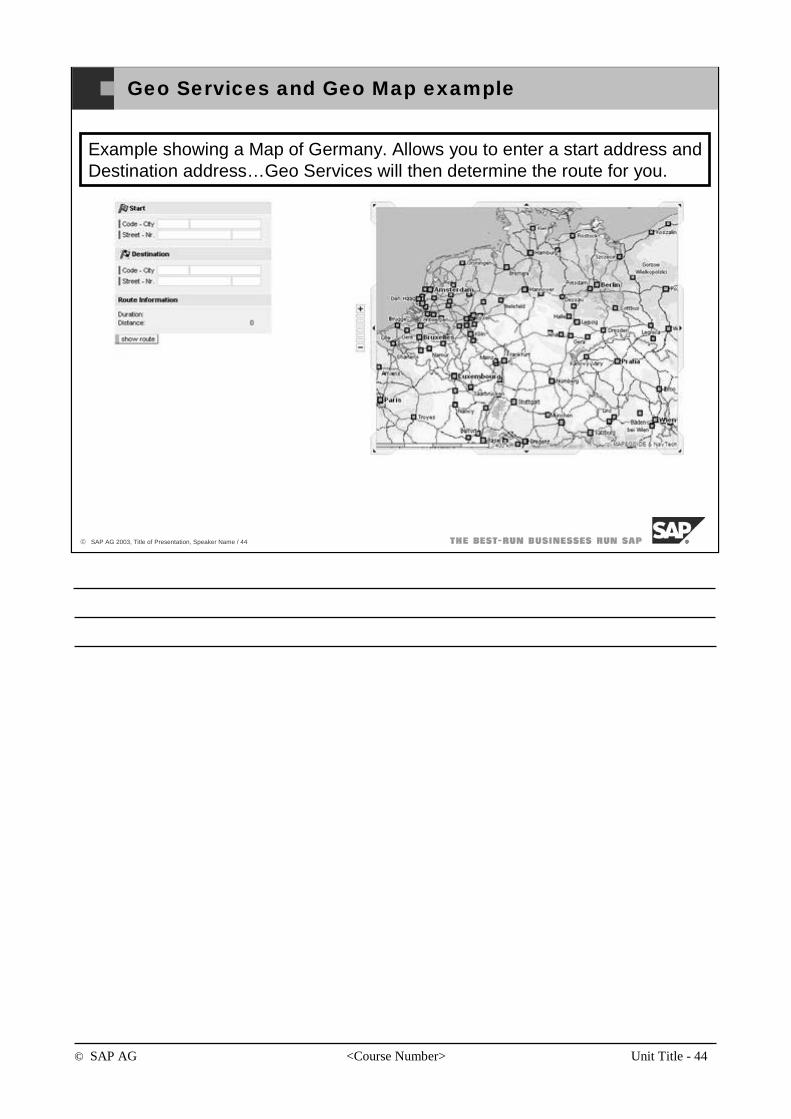
© SAP AG <Course Number> Unit Title - 44
© SAP AG 2003, Title of Presentation, Speaker Name / 44
Geo Services and Geo Map example
Example showing a Map of Germany. Allows you to enter a start address andDestination address…Geo Services will then determine the route for you.
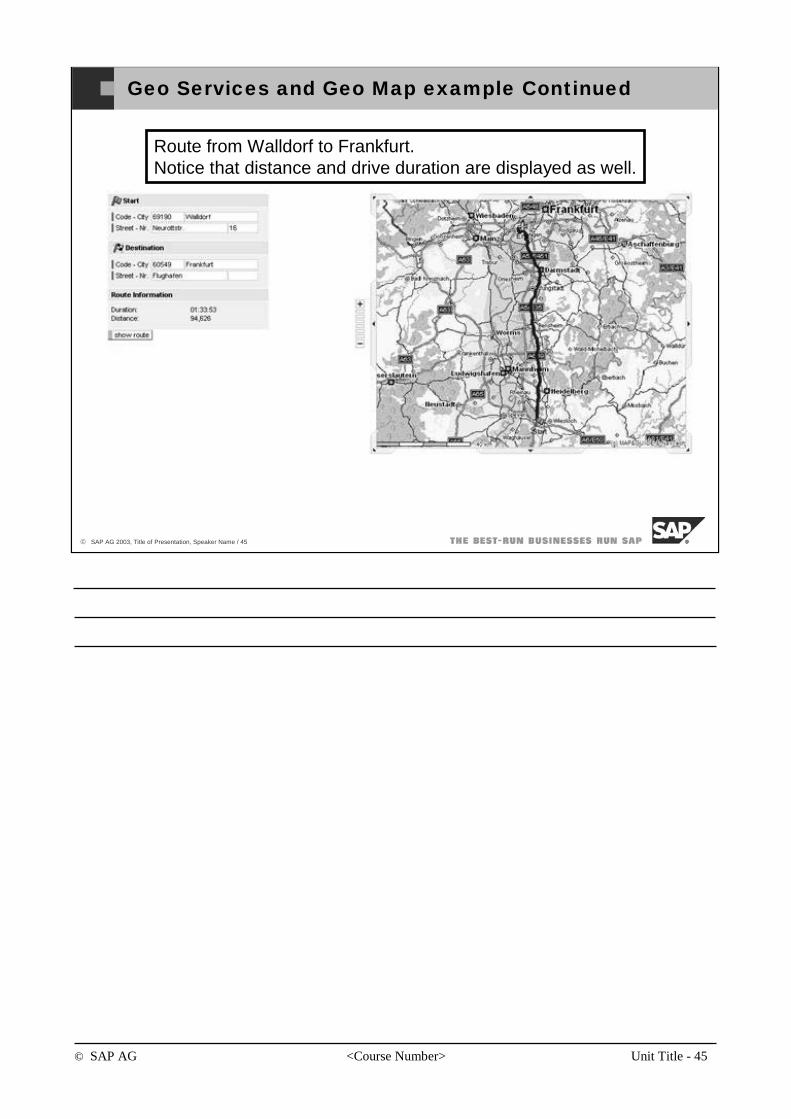
© SAP AG <Course Number> Unit Title - 45
© SAP AG 2003, Title of Presentation, Speaker Name / 45
Geo Services and Geo Map example Continued
Route from Walldorf to Frankfurt.Notice that distance and drive duration are displayed as well.
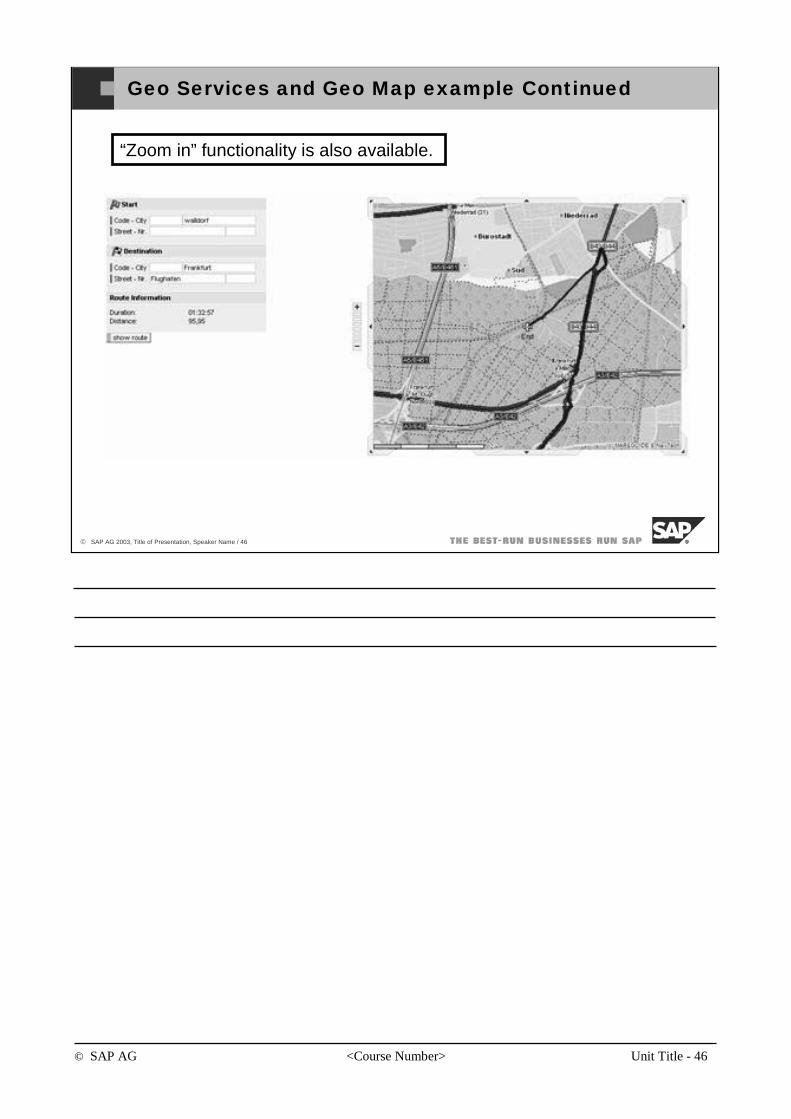
© SAP AG <Course Number> Unit Title - 46
© SAP AG 2003, Title of Presentation, Speaker Name / 46
Geo Services and Geo Map example Continued
“Zoom in” functionality is also available.
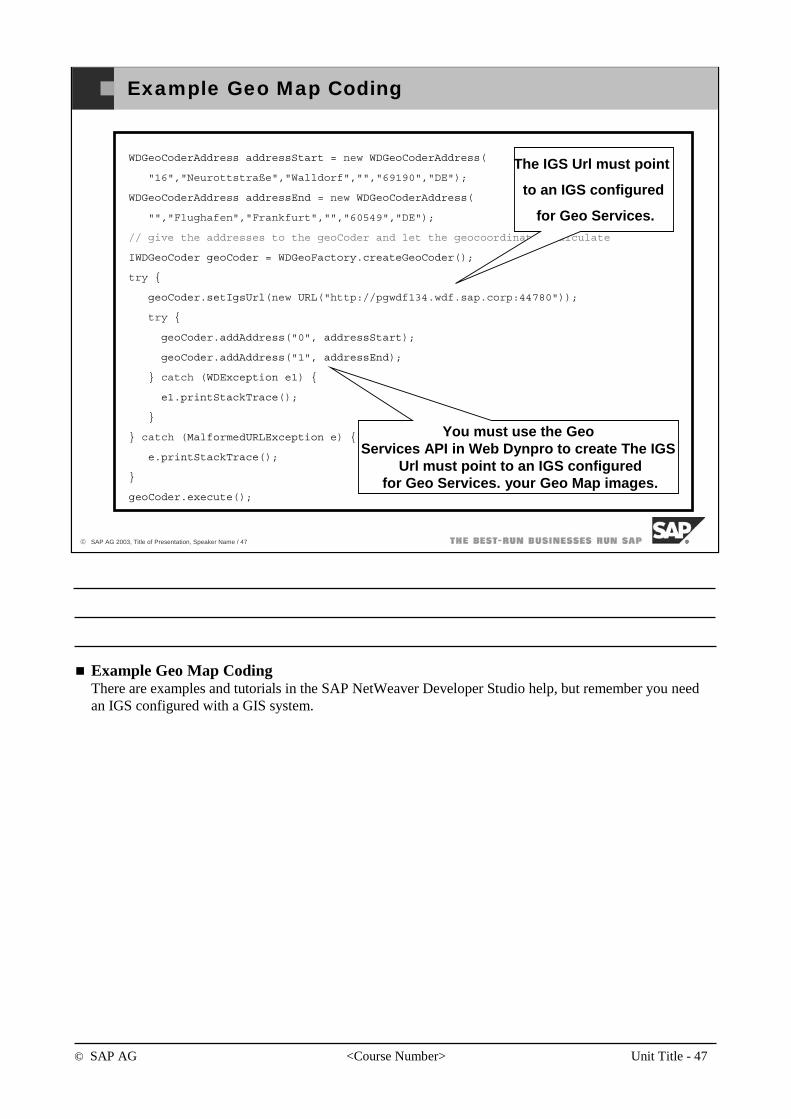
© SAP AG <Course Number> Unit Title - 47
© SAP AG 2003, Title of Presentation, Speaker Name / 47
Example Geo Map Coding
WDGeoCoderAddress addressStart = new WDGeoCoderAddress(
"16","Neurottstraße","Walldorf","","69190","DE");
WDGeoCoderAddress addressEnd = new WDGeoCoderAddress(
"","Flughafen","Frankfurt","","60549","DE");
// give the addresses to the geoCoder and let the geocoordinates calculate
IWDGeoCoder geoCoder = WDGeoFactory.createGeoCoder();
try {
geoCoder.setIgsUrl(new URL("http://pgwdf134.wdf.sap.corp:44780"));
try {
geoCoder.addAddress("0", addressStart);
geoCoder.addAddress("1", addressEnd);
} catch (WDException e1) {
e1.printStackTrace();
}
} catch (MalformedURLException e) {
e.printStackTrace();
}
geoCoder.execute();
The IGS Url must point
to an IGS configured
for Geo Services.
You must use the GeoServices API in Web Dynpro to create The IGS
Url must point to an IGS configuredfor Geo Services. your Geo Map images.
Example Geo Map CodingThere are examples and tutorials in the SAP NetWeaver Developer Studio help, but remember you need an IGS configured with a GIS system.
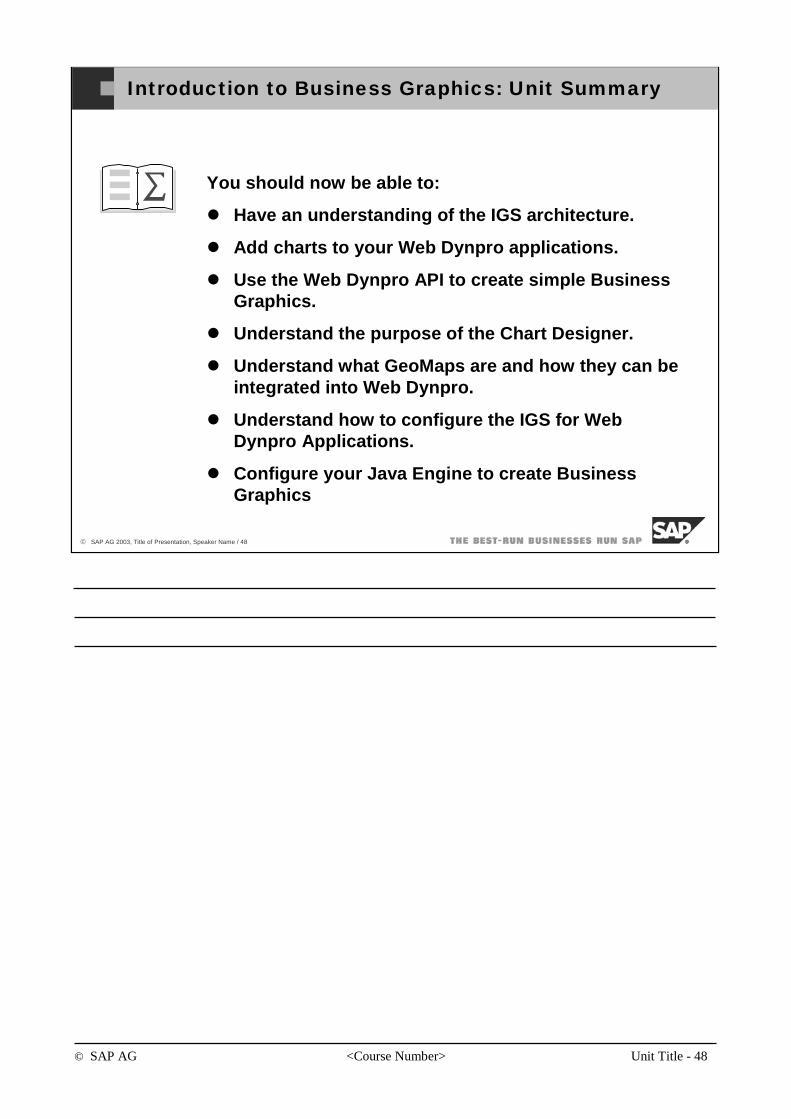
© SAP AG <Course Number> Unit Title - 48
© SAP AG 2003, Title of Presentation, Speaker Name / 48
You should now be able to:
Have an understanding of the IGS architecture.
Add charts to your Web Dynpro applications.
Use the Web Dynpro API to create simple Business Graphics.
Understand the purpose of the Chart Designer.
Understand what GeoMaps are and how they can be integrated into Web Dynpro.
Understand how to configure the IGS for Web Dynpro Applications.
Configure your Java Engine to create Business Graphics
Introduction to Business Graphics: Unit Summary
Business Graphic Exercises
Unit: Web Dynpro Business Graphics
Topic: Simple Business Graphics
At the conclusion of this exercise, you will be able to:
• Add a Simple Business Graphic to your Web Dynpro application
• Use the important properties of Business Graphics.
• How to pass data to your Business Graphic.
<Write a business scenario that relates to the exercises. >
Exercise 1 – Create a Simple Business Graphic
1 Overview
This solution will step you through step by step how to create a Web Dynpro application that contains a Business Graphic.
2 Prerequisites
2-1 The SAP NetWeaver Developer Studio is installed on your computer.
2-2 You have access to the SAP J2EE Engine (Release 6.40), and it has been configured for using the Internet Graphics Server (IGS).
3 Exercise Guide
3-1 Open the project template in the exercise directory called WD03_Advanced_BusinessGraphics.
3-2 Open the view called SimpleGraphicsView and add a Business Graphic to the layout.
3-2-1 Set the properties of the Business Graphic appropriately.
• The chartType should be “columns”.
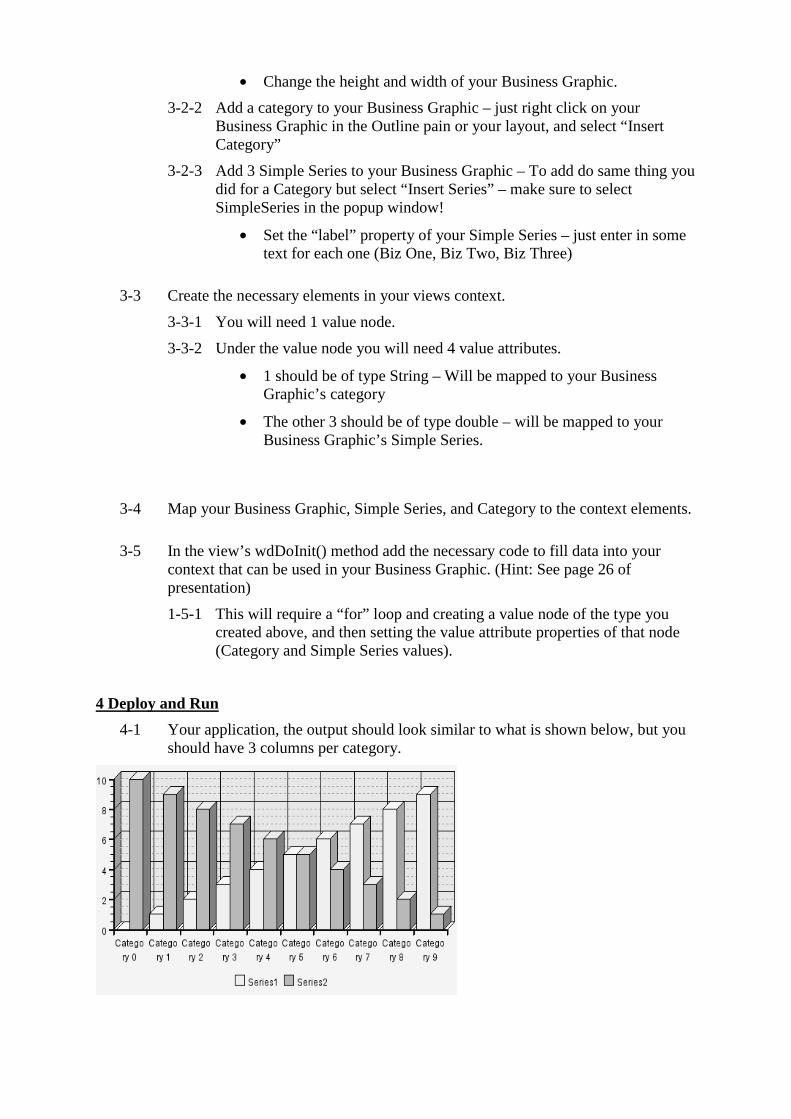
• Change the height and width of your Business Graphic.
3-2-2 Add a category to your Business Graphic – just right click on your Business Graphic in the Outline pain or your layout, and select “Insert Category”
3-2-3 Add 3 Simple Series to your Business Graphic – To add do same thing you did for a Category but select “Insert Series” – make sure to select SimpleSeries in the popup window!
• Set the “label” property of your Simple Series – just enter in some text for each one (Biz One, Biz Two, Biz Three)
3-3 Create the necessary elements in your views context.
3-3-1 You will need 1 value node.
3-3-2 Under the value node you will need 4 value attributes.
• 1 should be of type String – Will be mapped to your Business Graphic’s category
• The other 3 should be of type double – will be mapped to your Business Graphic’s Simple Series.
3-4 Map your Business Graphic, Simple Series, and Category to the context elements.
3-5 In the view’s wdDoInit() method add the necessary code to fill data into your context that can be used in your Business Graphic. (Hint: See page 26 of presentation)
1-5-1 This will require a “for” loop and creating a value node of the type you created above, and then setting the value attribute properties of that node (Category and Simple Series values).
4 Deploy and Run
4-1 Your application, the output should look similar to what is shown below, but you should have 3 columns per category.
Unit: Web Dynpro Business Graphics
Topic: Introduction to the Chart Designer
At the conclusion of this exercise, you will be able to:
• Learn how to start the Chart Designer.
• Use the Chart Designer to make basic changes to your Business Graphic.
<Write a business scenario that relates to the exercises. >
Exercise 2 – Use the Chart Designer to Customize Your Simple Business Graphic
1 Overview
This exercise will test your ability to customize simple business graphic. You will learn to start and use the Chart Designer to make modifications to your business graphic.
2 Prerequisites
2-1 The SAP NetWeaver Developer Studio is installed on your computer.
2-2 You have access to the SAP J2EE Engine (Release 6.40), and it has been configured for using the Internet Graphics Server (IGS).
2-3 You have successfully finished exercise 1 – Simple Business Graphics.
3 Exercise Guide
1-1 Open your project that you completed in Exercise 1 – Simple Business Graphics. The name of the project should be “SimpleGraphics”.
1-2 Start the Chart Designer.
1-2-1 Open the view “SimpleGraphicsView”.
1-2-2 Go to the “Layout” of the view.
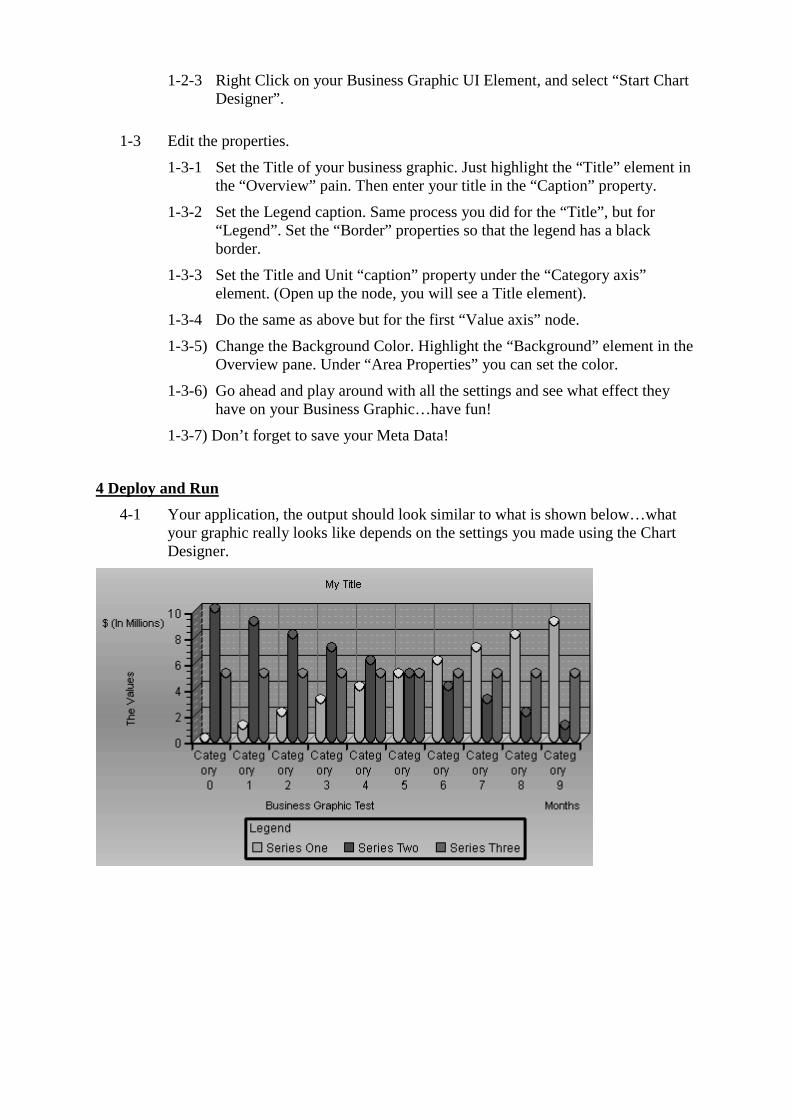
1-2-3 Right Click on your Business Graphic UI Element, and select “Start Chart Designer”.
1-3 Edit the properties.
1-3-1 Set the Title of your business graphic. Just highlight the “Title” element in the “Overview” pain. Then enter your title in the “Caption” property.
1-3-2 Set the Legend caption. Same process you did for the “Title”, but for “Legend”. Set the “Border” properties so that the legend has a black border.
1-3-3 Set the Title and Unit “caption” property under the “Category axis” element. (Open up the node, you will see a Title element).
1-3-4 Do the same as above but for the first “Value axis” node.
1-3-5) Change the Background Color. Highlight the “Background” element in the Overview pane. Under “Area Properties” you can set the color.
1-3-6) Go ahead and play around with all the settings and see what effect they have on your Business Graphic…have fun!
1-3-7) Don’t forget to save your Meta Data!
4 Deploy and Run
4-1 Your application, the output should look similar to what is shown below…what your graphic really looks like depends on the settings you made using the Chart Designer.
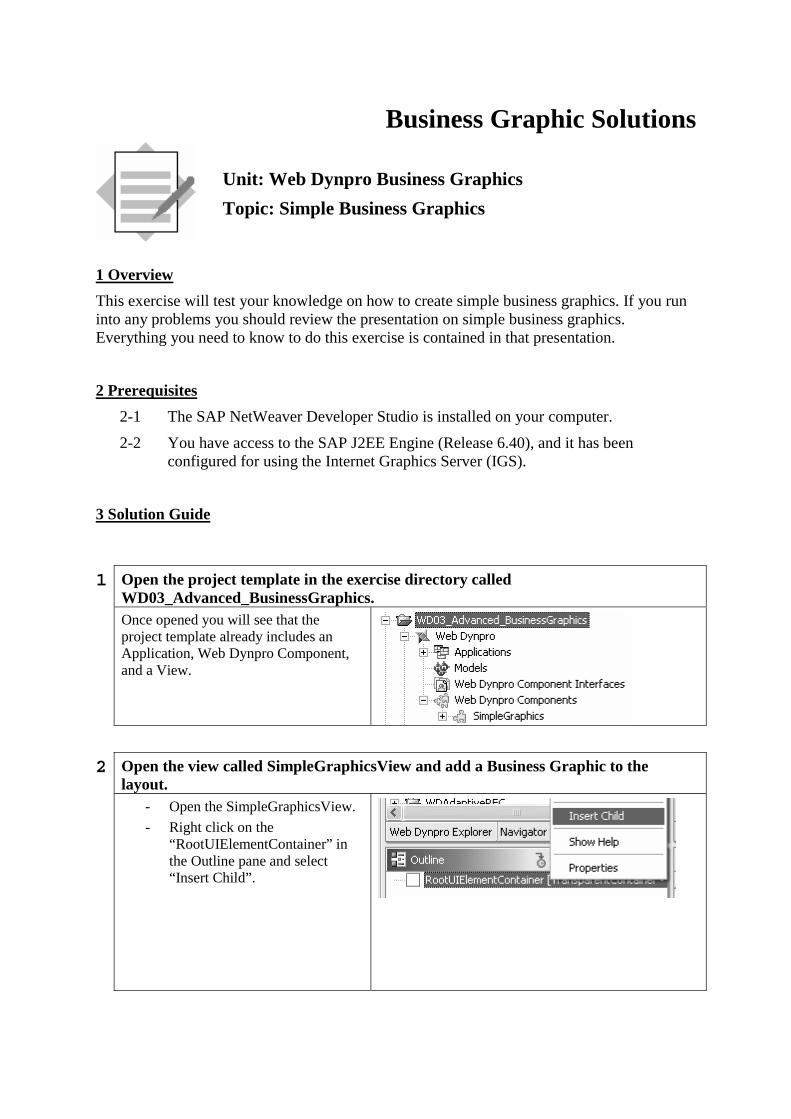
Business Graphic Solutions
Unit: Web Dynpro Business Graphics
Topic: Simple Business Graphics
1 Overview
This exercise will test your knowledge on how to create simple business graphics. If you run into any problems you should review the presentation on simple business graphics. Everything you need to know to do this exercise is contained in that presentation.
2 Prerequisites
2-1 The SAP NetWeaver Developer Studio is installed on your computer.
2-2 You have access to the SAP J2EE Engine (Release 6.40), and it has been configured for using the Internet Graphics Server (IGS).
3 Solution Guide
1 Open the project template in the exercise directory called WD03_Advanced_BusinessGraphics.
Once opened you will see that the project template already includes an Application, Web Dynpro Component, and a View.
2 Open the view called SimpleGraphicsView and add a Business Graphic to the layout.
- Open the SimpleGraphicsView.
- Right click on the “RootUIElementContainer” in the Outline pane and select “Insert Child”.

- In the “New Element” popup window, select the element “Type” of BusinessGraphics.
- Give your Element the name “SimpleGraphic”.
Result The Business Graphic element is placed in your view.
You can see it both in the Outline pane, and the Layout pane, both shown here.
3 Set the properties of the Business Graphic appropriately.
- Highlight “SimpleGraphic” element in your view. Then go to the “Property” view in the bottom right hand pane.
- Ensure that the property chartType is set to “columns”.
- Change the height property to 300
- Change the width property to 500
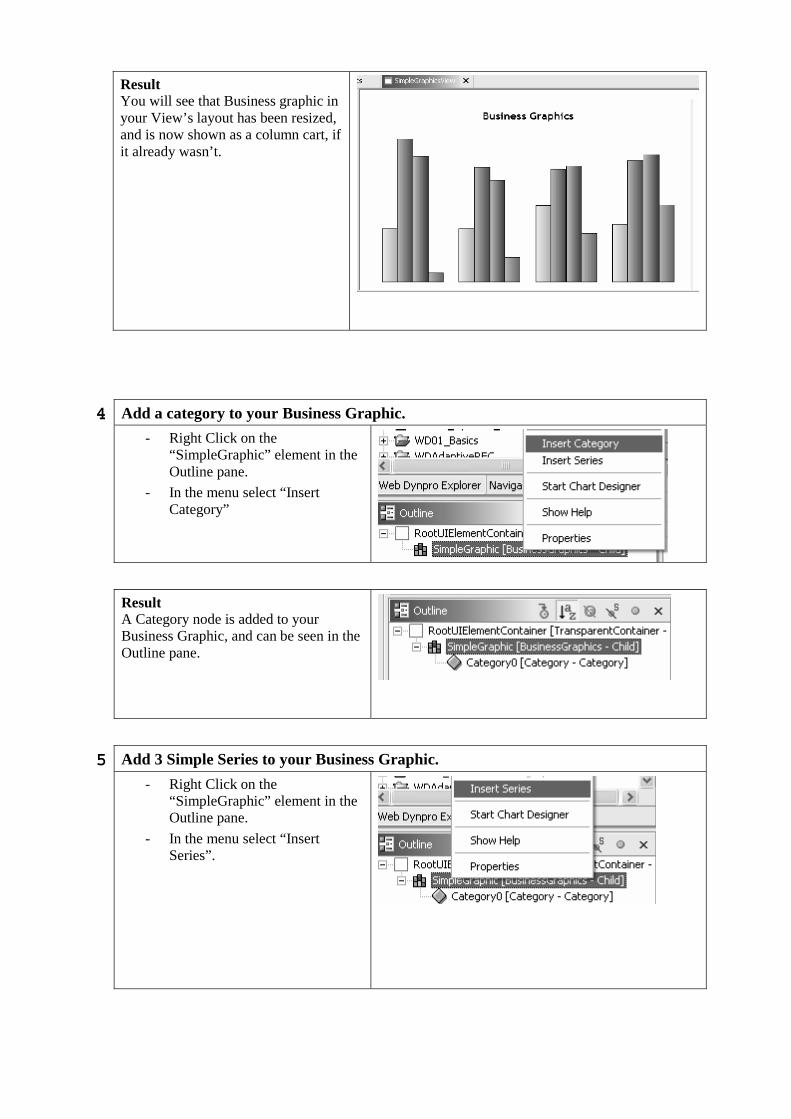
Result You will see that Business graphic in your View’s layout has been resized, and is now shown as a column cart, if it already wasn’t.
4 Add a category to your Business Graphic.
- Right Click on the “SimpleGraphic” element in the Outline pane.
- In the menu select “Insert Category”
Result A Category node is added to your Business Graphic, and can be seen in the Outline pane.
5 Add 3 Simple Series to your Business Graphic.
- Right Click on the “SimpleGraphic” element in the Outline pane.
- In the menu select “Insert Series”.
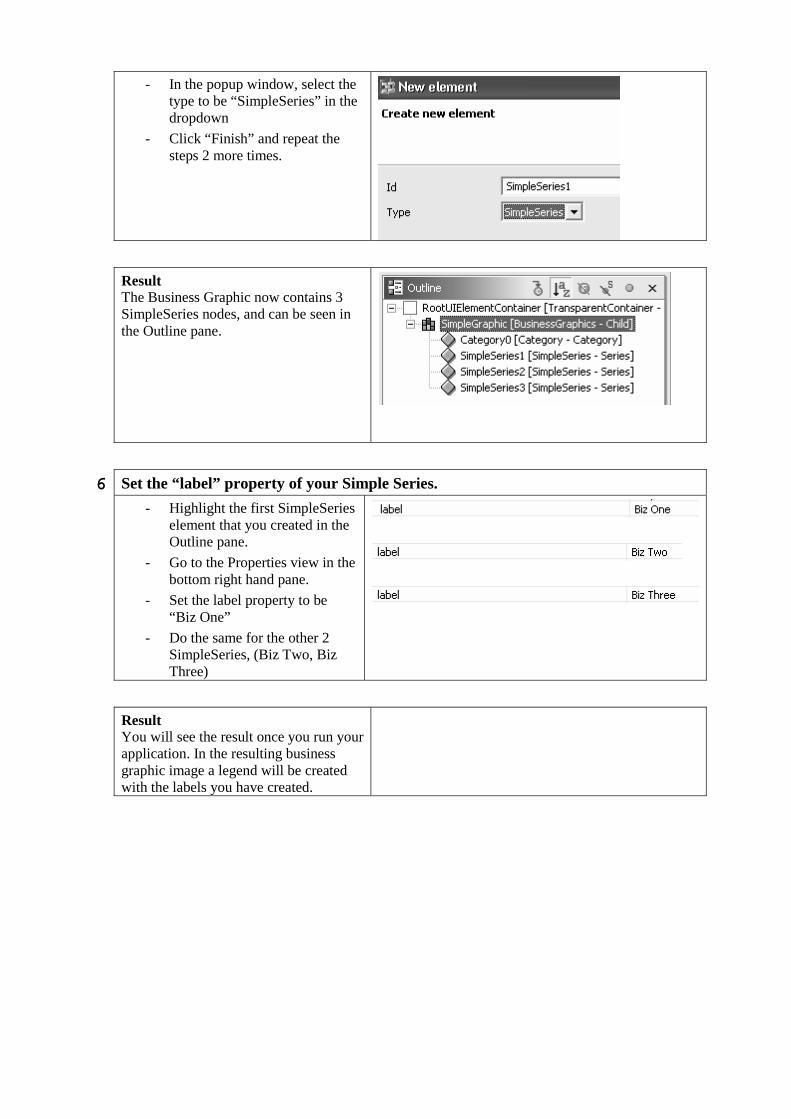
- In the popup window, select the type to be “SimpleSeries” in the dropdown
- Click “Finish” and repeat the steps 2 more times.
Result The Business Graphic now contains 3 SimpleSeries nodes, and can be seen in the Outline pane.
6 Set the “label” property of your Simple Series.
- Highlight the first SimpleSeries element that you created in the Outline pane.
- Go to the Properties view in the bottom right hand pane.
- Set the label property to be “Biz One”
- Do the same for the other 2 SimpleSeries, (Biz Two, Biz Three)
Result You will see the result once you run your application. In the resulting business graphic image a legend will be created with the labels you have created.
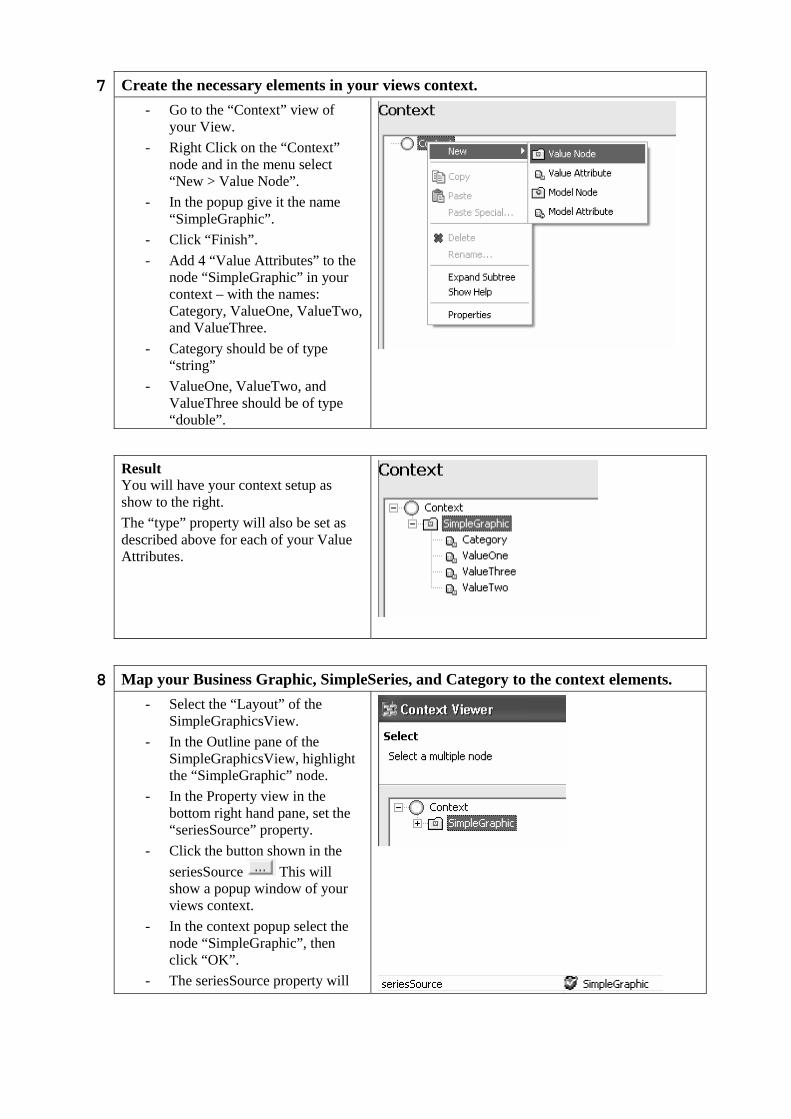
7 Create the necessary elements in your views context.
- Go to the “Context” view of your View.
- Right Click on the “Context” node and in the menu select “New > Value Node”.
- In the popup give it the name “SimpleGraphic”.
- Click “Finish”.
- Add 4 “Value Attributes” to the node “SimpleGraphic” in your context – with the names: Category, ValueOne, ValueTwo, and ValueThree.
- Category should be of type “string”
- ValueOne, ValueTwo, and ValueThree should be of type “double”.
Result You will have your context setup as show to the right.
The “type” property will also be set as described above for each of your Value Attributes.
8 Map your Business Graphic, SimpleSeries, and Category to the context elements.
- Select the “Layout” of the SimpleGraphicsView.
- In the Outline pane of the SimpleGraphicsView, highlight the “SimpleGraphic” node.
- In the Property view in the bottom right hand pane, set the “seriesSource” property.
- Click the button shown in the
seriesSource This will show a popup window of your views context.
- In the context popup select the node “SimpleGraphic”, then click “OK”.
- The seriesSource property will
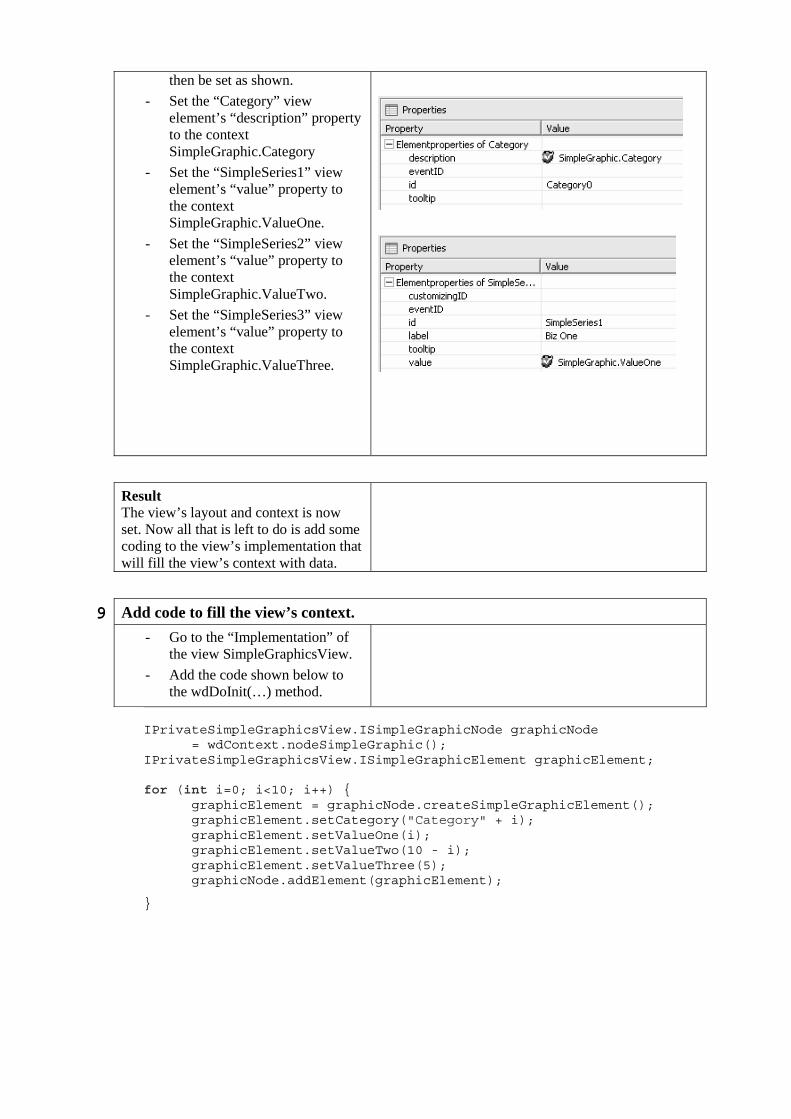
then be set as shown.
- Set the “Category” view element’s “description” property to the context SimpleGraphic.Category
- Set the “SimpleSeries1” view element’s “value” property to the context SimpleGraphic.ValueOne.
- Set the “SimpleSeries2” view element’s “value” property to the context SimpleGraphic.ValueTwo.
- Set the “SimpleSeries3” view element’s “value” property to the context SimpleGraphic.ValueThree.
Result The view’s layout and context is now set. Now all that is left to do is add some coding to the view’s implementation that will fill the view’s context with data.
9 Add code to fill the view’s context.
- Go to the “Implementation” of the view SimpleGraphicsView.
- Add the code shown below to the wdDoInit(…) method.
IPrivateSimpleGraphicsView.ISimpleGraphicNode graphicNode
= wdContext.nodeSimpleGraphic(); IPrivateSimpleGraphicsView.ISimpleGraphicElement graphicElement; for (int i=0; i<10; i++) { graphicElement = graphicNode.createSimpleGraphicElement(); graphicElement.setCategory("Category" + i); graphicElement.setValueOne(i); graphicElement.setValueTwo(10 - i); graphicElement.setValueThree(5); graphicNode.addElement(graphicElement);
}
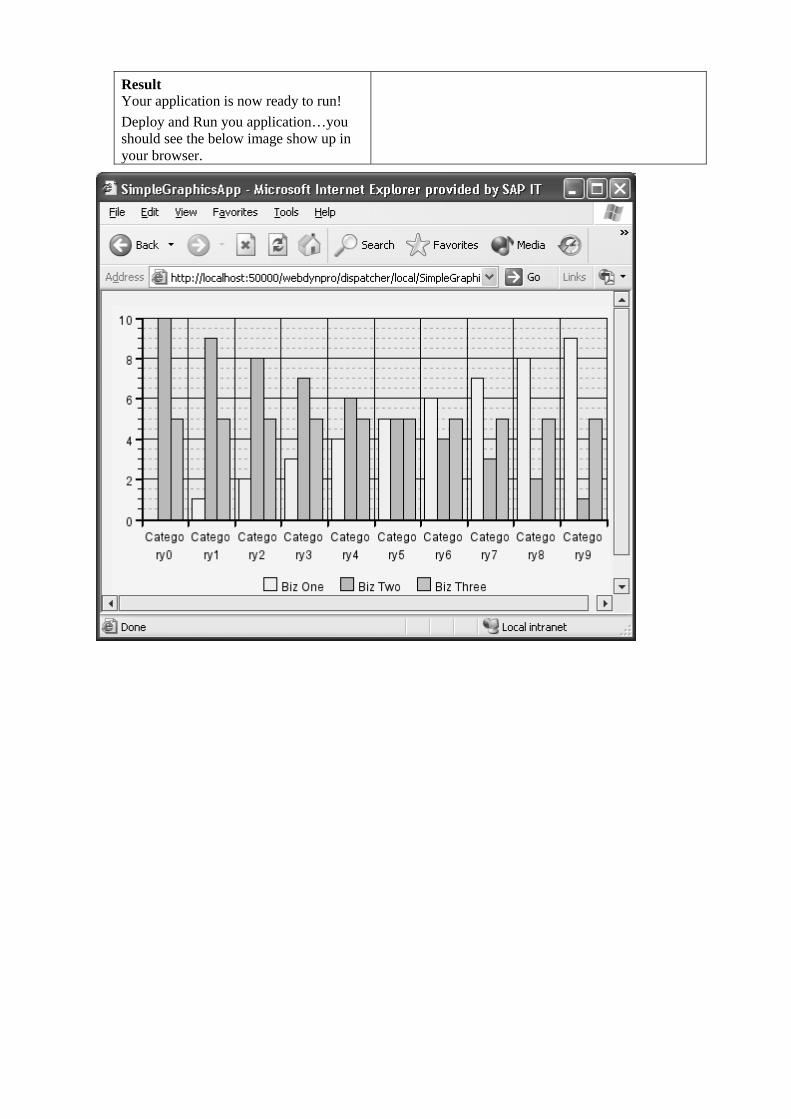
Result Your application is now ready to run!
Deploy and Run you application…you should see the below image show up in your browser.
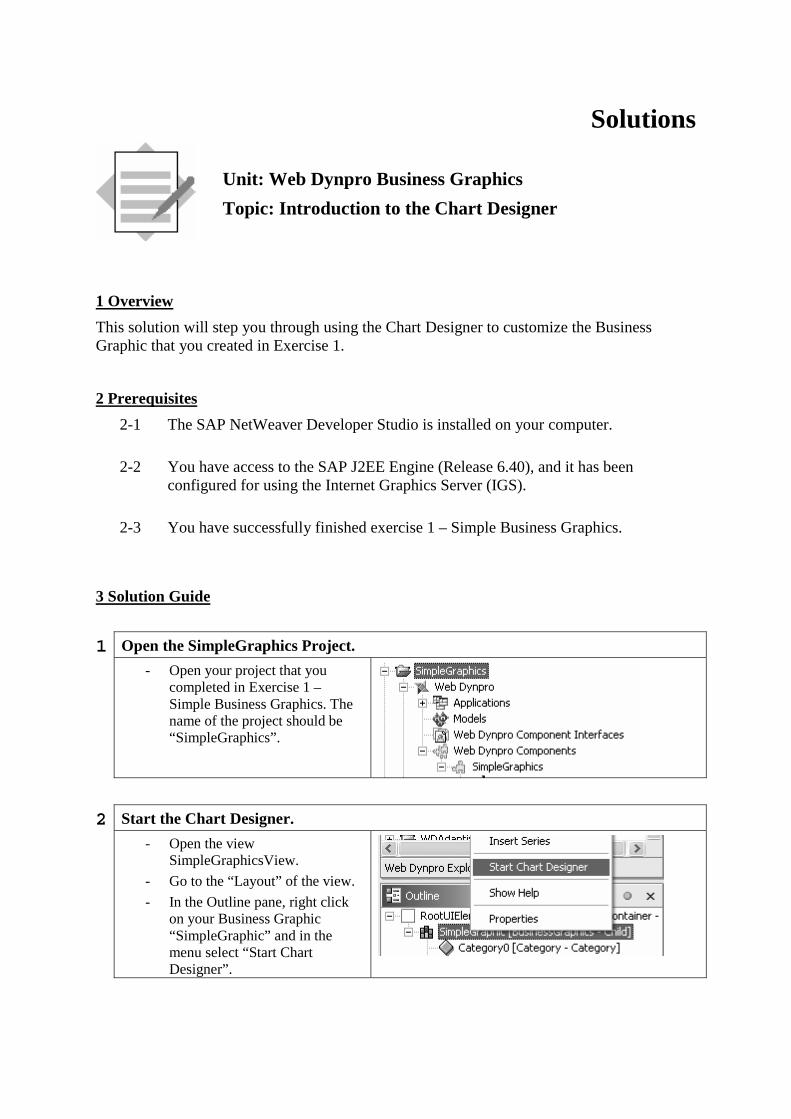
Solutions
Unit: Web Dynpro Business Graphics
Topic: Introduction to the Chart Designer
1 Overview
This solution will step you through using the Chart Designer to customize the Business Graphic that you created in Exercise 1.
2 Prerequisites
2-1 The SAP NetWeaver Developer Studio is installed on your computer.
2-2 You have access to the SAP J2EE Engine (Release 6.40), and it has been configured for using the Internet Graphics Server (IGS).
2-3 You have successfully finished exercise 1 – Simple Business Graphics.
3 Solution Guide
1 Open the SimpleGraphics Project.
- Open your project that you completed in Exercise 1 – Simple Business Graphics. The name of the project should be “SimpleGraphics”.
2 Start the Chart Designer.
- Open the view SimpleGraphicsView.
- Go to the “Layout” of the view.
- In the Outline pane, right click on your Business Graphic “SimpleGraphic” and in the menu select “Start Chart Designer”.
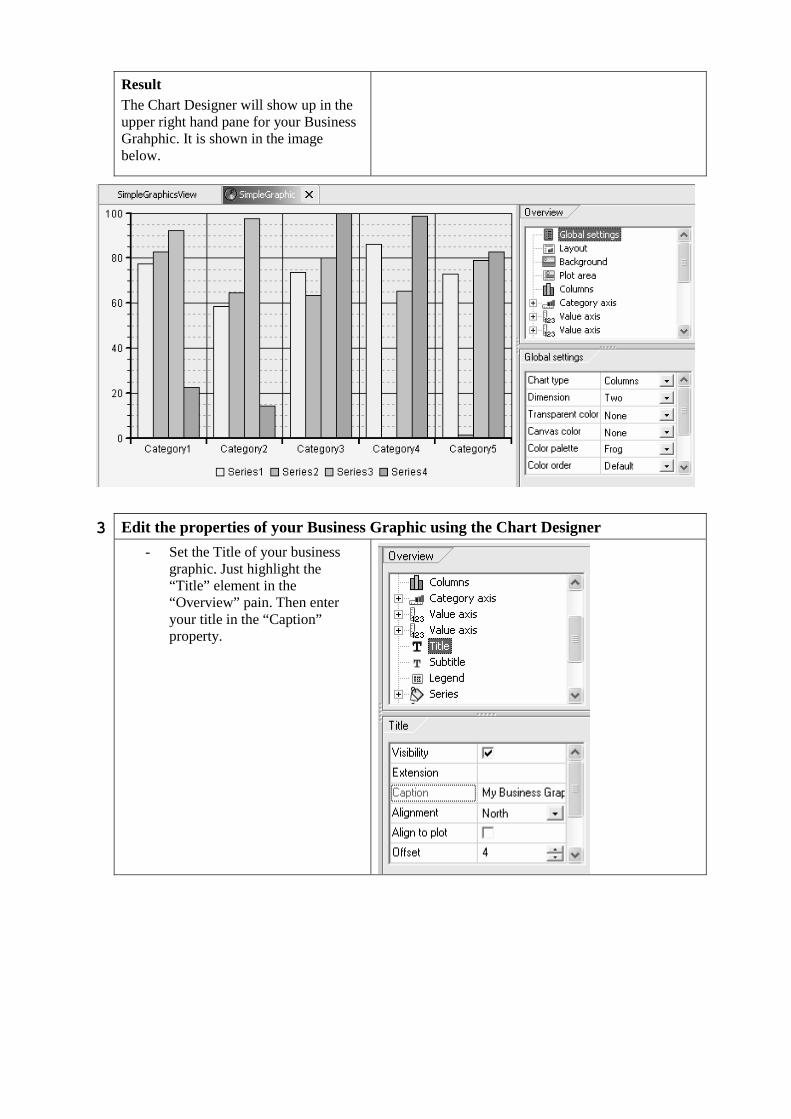
Result The Chart Designer will show up in the upper right hand pane for your Business Grahphic. It is shown in the image below.
3 Edit the properties of your Business Graphic using the Chart Designer
- Set the Title of your business graphic. Just highlight the “Title” element in the “Overview” pain. Then enter your title in the “Caption” property.
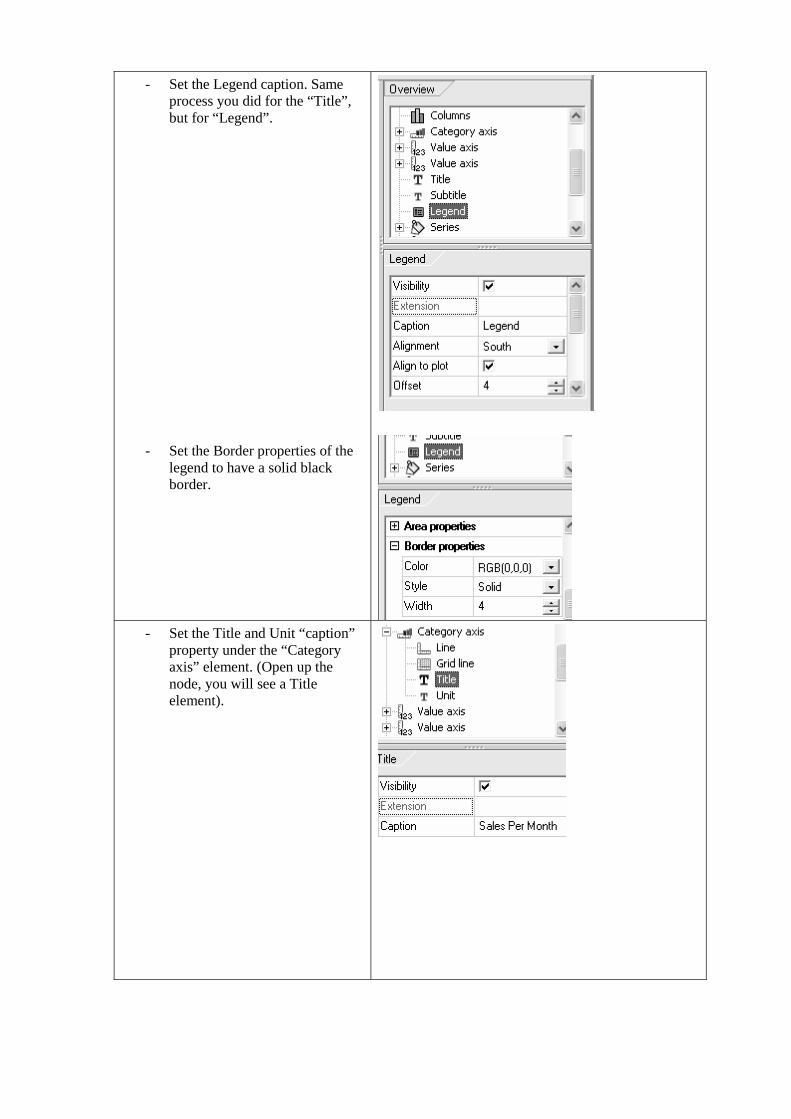
- Set the Legend caption. Same process you did for the “Title”, but for “Legend”.
- Set the Border properties of the legend to have a solid black border.
- Set the Title and Unit “caption” property under the “Category axis” element. (Open up the node, you will see a Title element).
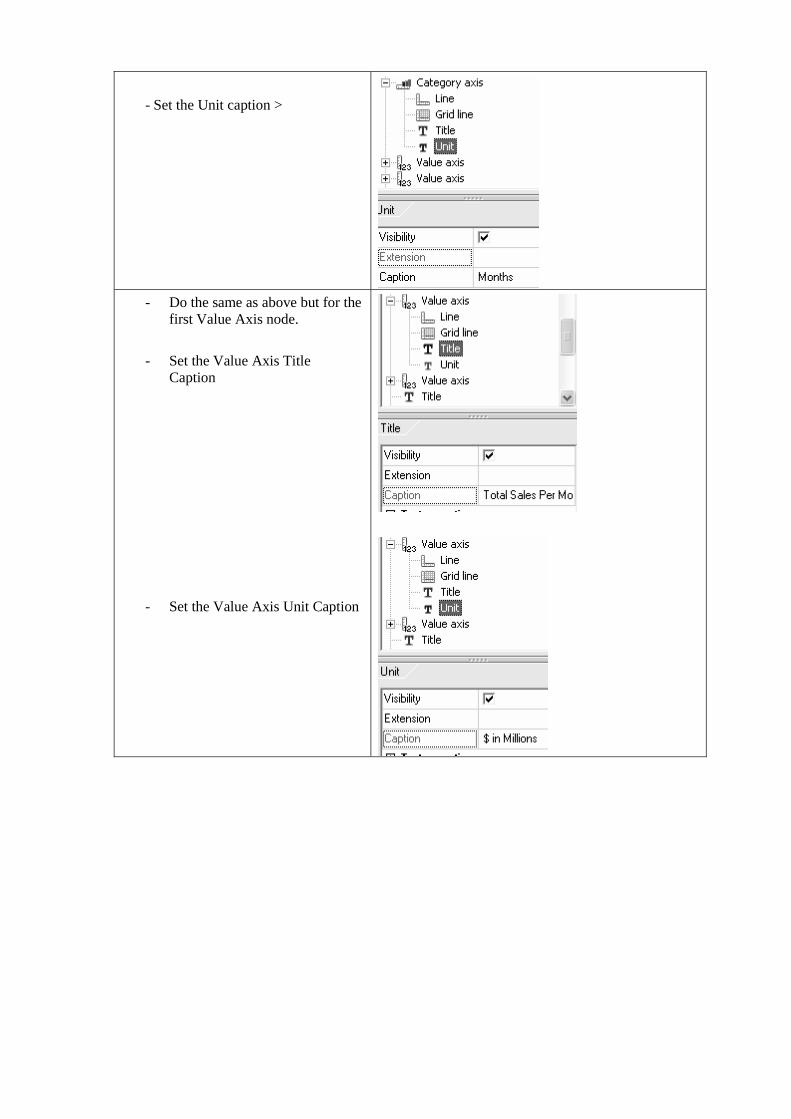
- Set the Unit caption >
- Do the same as above but for the first Value Axis node.
- Set the Value Axis Title Caption
- Set the Value Axis Unit Caption
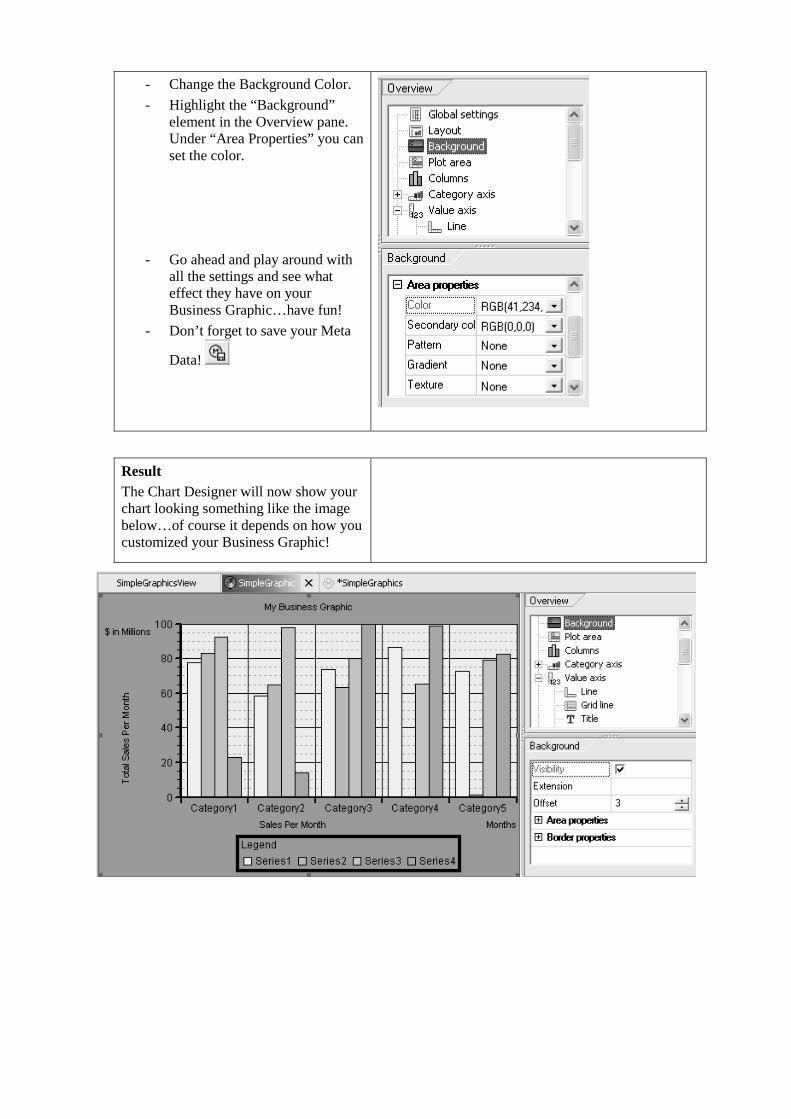
- Change the Background Color.
- Highlight the “Background” element in the Overview pane. Under “Area Properties” you can set the color.
- Go ahead and play around with all the settings and see what effect they have on your Business Graphic…have fun!
- Don’t forget to save your Meta
Data!
Result The Chart Designer will now show your chart looking something like the image below…of course it depends on how you customized your Business Graphic!
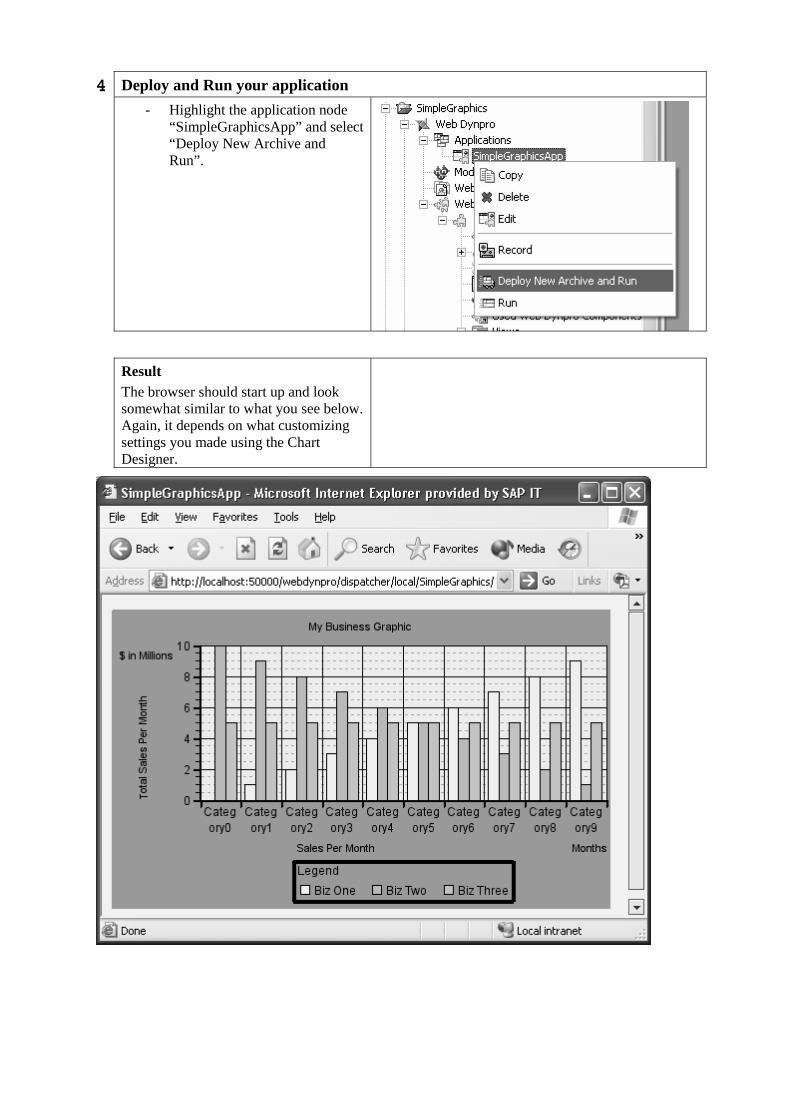
4 Deploy and Run your application
- Highlight the application node “SimpleGraphicsApp” and select “Deploy New Archive and Run”.
Result The browser should start up and look somewhat similar to what you see below. Again, it depends on what customizing settings you made using the Chart Designer.
© SAP AG <Course Number> Unit Title - 1
© SAP AG 2003, Title of Presentation, Speaker Name / 1
• Understand Debugging functionality.
• Activate Debugging
• Start a Debug Session
• Analyze the State of a Running Program
• Apply Debugging Techniques
• Terminate a Debug Session
Web Dynpro Debugging
Contents:
© SAP AG <Course Number> Unit Title - 2
© SAP AG 2003, Title of Presentation, Speaker Name / 2
After completing this topic, you will be able to:
Understand Debugging functionality.
Activate Debugging
Start a Debug Session
Analyze the State of a Running Program
Apply Debugging Techniques
Terminate a Debug Session
Web Dynpro Debugging: Unit Objectives
© SAP AG <Course Number> Unit Title - 3
© SAP AG 2003, Title of Presentation, Speaker Name / 3
An important part of your programming toolkit should be mastery of debugger. It will help you save time and frustration in locating and eliminating software bugs.
Web Dynpro Dynamic Programming: Business Scenario

© SAP AG <Course Number> Unit Title - 4
© SAP AG 2003, Title of Presentation, Speaker Name / 4
Switching Server Node to Debug ModeClick Refresh
Switching Server Nodes to Debug ModeTo be able to debug within a running Web Dynpro application, you must activate debugging for the server process of the J2EE Engine. You activate this in the J2EE Engine view.
1. If necessary, open the J2EE Engine view. To do so, choose Window → Show View → Other and then select J2EE → J2EE Engine. Choose OK to confirm your entries. The system displays a view containing status information about the running J2EE Engine.
2. Expand the tree display fully until you can see the actual server process (for example server0).3. Right-click the server node and then choose Enable debugging of process from the context menu.
Result:The server process is stopped and restarted in debugging mode. Only the ON value is shown for Debug Mode. To display the current status of the server, in the view toolbar, choose Refresh. Wait until the server has the status Running.
Note: • You can only debug in non-productive server nodes (Productive Use has the value NO)
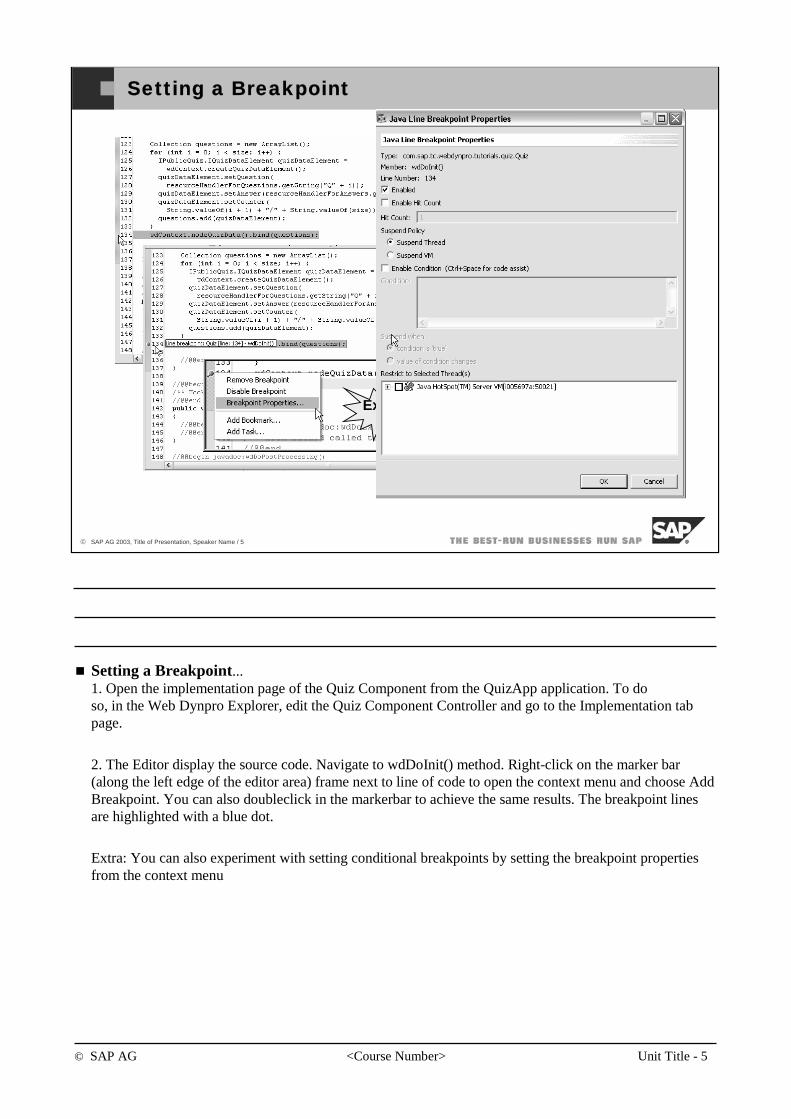
© SAP AG <Course Number> Unit Title - 5
© SAP AG 2003, Title of Presentation, Speaker Name / 5
Setting a Breakpoint
Extra
Setting a Breakpoint...1. Open the implementation page of the Quiz Component from the QuizApp application. To doso, in the Web Dynpro Explorer, edit the Quiz Component Controller and go to the Implementation tab page.
2. The Editor display the source code. Navigate to wdDoInit() method. Right-click on the marker bar (along the left edge of the editor area) frame next to line of code to open the context menu and choose Add Breakpoint. You can also doubleclick in the markerbar to achieve the same results. The breakpoint lines are highlighted with a blue dot.
Extra: You can also experiment with setting conditional breakpoints by setting the breakpoint properties from the context menu
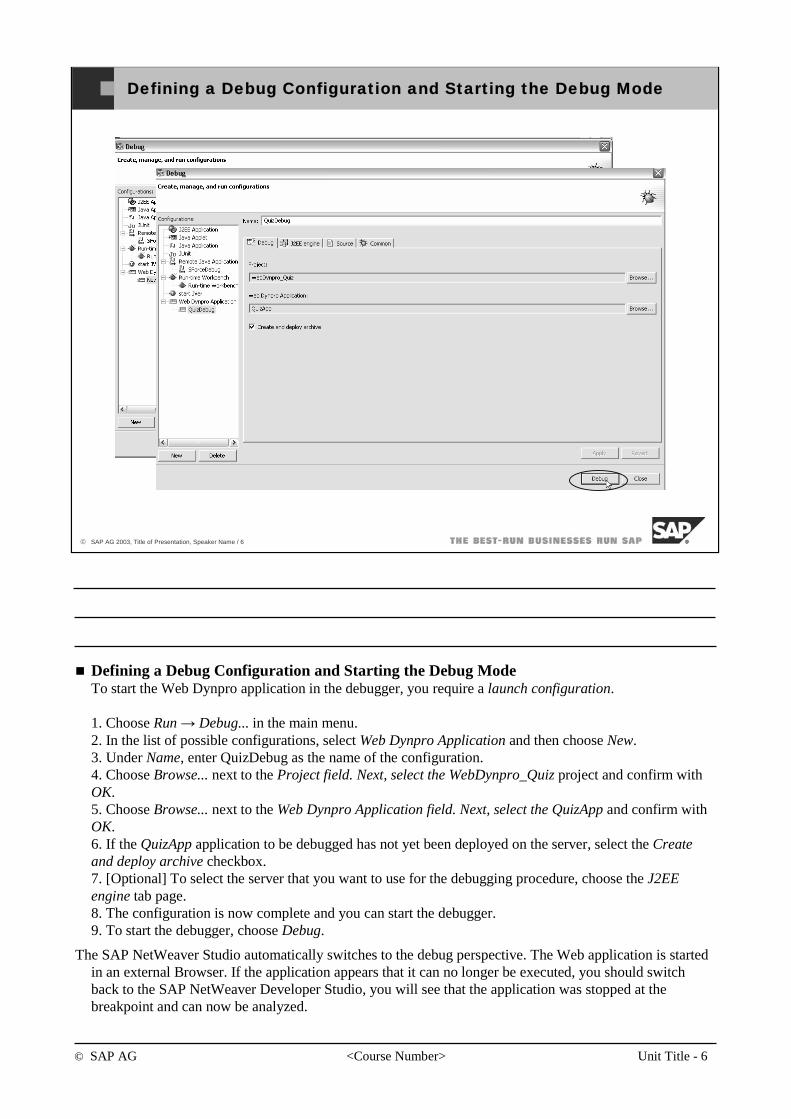
© SAP AG <Course Number> Unit Title - 6
© SAP AG 2003, Title of Presentation, Speaker Name / 6
Defining a Debug Configuration and Starting the Debug Mode
Defining a Debug Configuration and Starting the Debug ModeTo start the Web Dynpro application in the debugger, you require a launch configuration.
1. Choose Run → Debug... in the main menu.2. In the list of possible configurations, select Web Dynpro Application and then choose New.3. Under Name, enter QuizDebug as the name of the configuration.4. Choose Browse... next to the Project field. Next, select the WebDynpro_Quiz project and confirm with OK.5. Choose Browse... next to the Web Dynpro Application field. Next, select the QuizApp and confirm with OK.6. If the QuizApp application to be debugged has not yet been deployed on the server, select the Create and deploy archive checkbox.7. [Optional] To select the server that you want to use for the debugging procedure, choose the J2EE engine tab page.8. The configuration is now complete and you can start the debugger.9. To start the debugger, choose Debug.
The SAP NetWeaver Studio automatically switches to the debug perspective. The Web application is started in an external Browser. If the application appears that it can no longer be executed, you should switch back to the SAP NetWeaver Developer Studio, you will see that the application was stopped at the breakpoint and can now be analyzed.
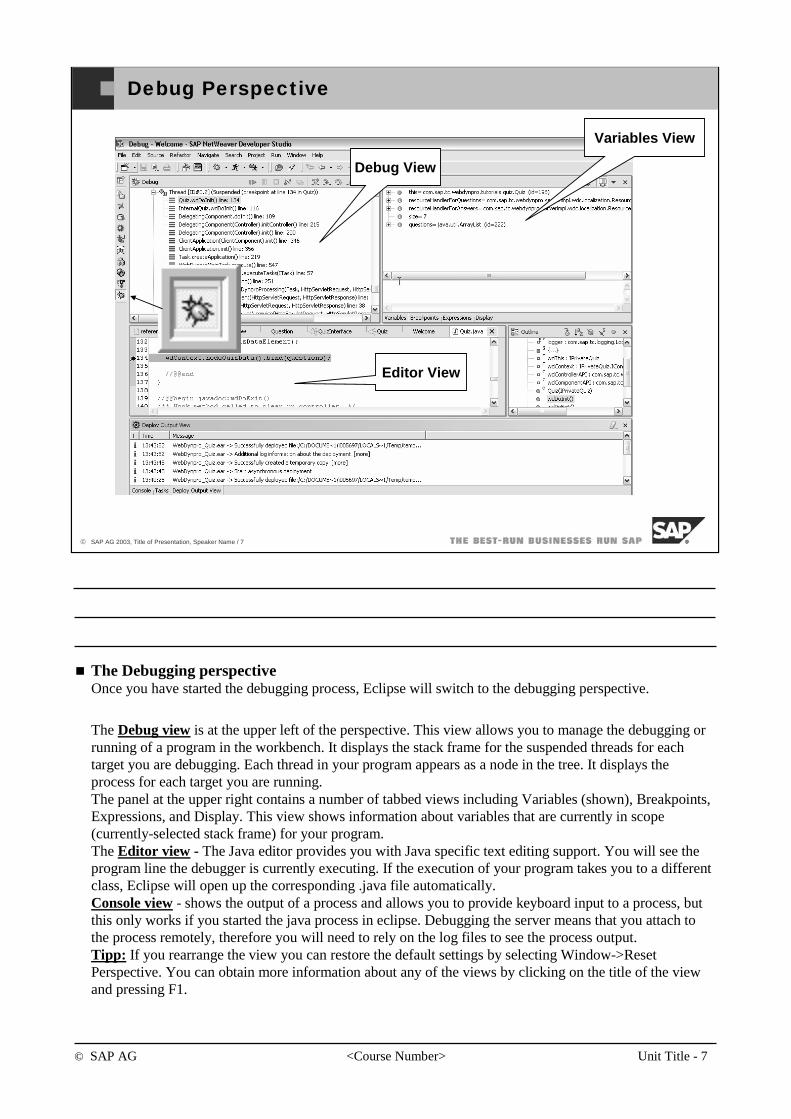
© SAP AG <Course Number> Unit Title - 7
© SAP AG 2003, Title of Presentation, Speaker Name / 7
Debug Perspective
Variables View
Editor View
Debug View
The Debugging perspectiveOnce you have started the debugging process, Eclipse will switch to the debugging perspective.
The Debug view is at the upper left of the perspective. This view allows you to manage the debugging or running of a program in the workbench. It displays the stack frame for the suspended threads for each target you are debugging. Each thread in your program appears as a node in the tree. It displays the process for each target you are running. The panel at the upper right contains a number of tabbed views including Variables (shown), Breakpoints, Expressions, and Display. This view shows information about variables that are currently in scope (currently-selected stack frame) for your program. The Editor view - The Java editor provides you with Java specific text editing support. You will see the program line the debugger is currently executing. If the execution of your program takes you to a different class, Eclipse will open up the corresponding .java file automatically.Console view - shows the output of a process and allows you to provide keyboard input to a process, but this only works if you started the java process in eclipse. Debugging the server means that you attach to the process remotely, therefore you will need to rely on the log files to see the process output. Tipp: If you rearrange the view you can restore the default settings by selecting Window->Reset Perspective. You can obtain more information about any of the views by clicking on the title of the view and pressing F1.
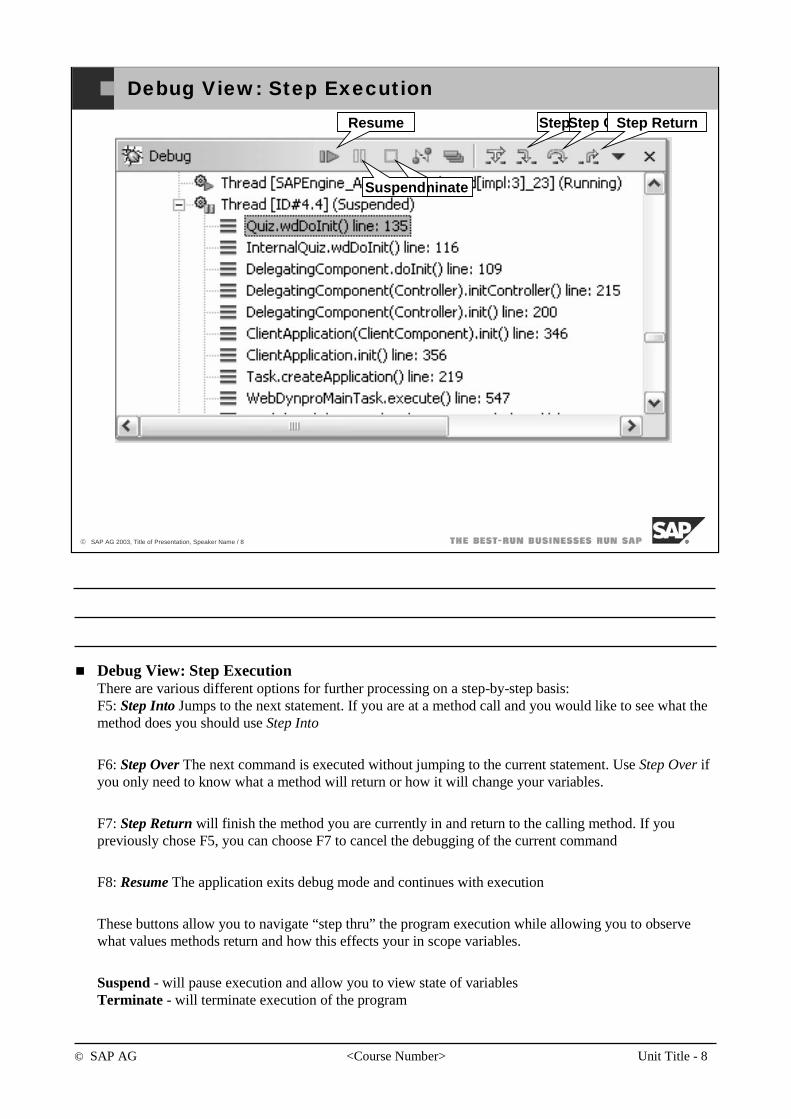
© SAP AG <Course Number> Unit Title - 8
© SAP AG 2003, Title of Presentation, Speaker Name / 8
Debug View: Step ExecutionResume Step IntoStep OverStep Return
TerminateSuspend
Debug View: Step ExecutionThere are various different options for further processing on a step-by-step basis:F5: Step Into Jumps to the next statement. If you are at a method call and you would like to see what the method does you should use Step Into
F6: Step Over The next command is executed without jumping to the current statement. Use Step Over if you only need to know what a method will return or how it will change your variables.
F7: Step Return will finish the method you are currently in and return to the calling method. If you previously chose F5, you can choose F7 to cancel the debugging of the current command
F8: Resume The application exits debug mode and continues with execution
These buttons allow you to navigate “step thru” the program execution while allowing you to observe what values methods return and how this effects your in scope variables.
Suspend - will pause execution and allow you to view state of variables Terminate - will terminate execution of the program
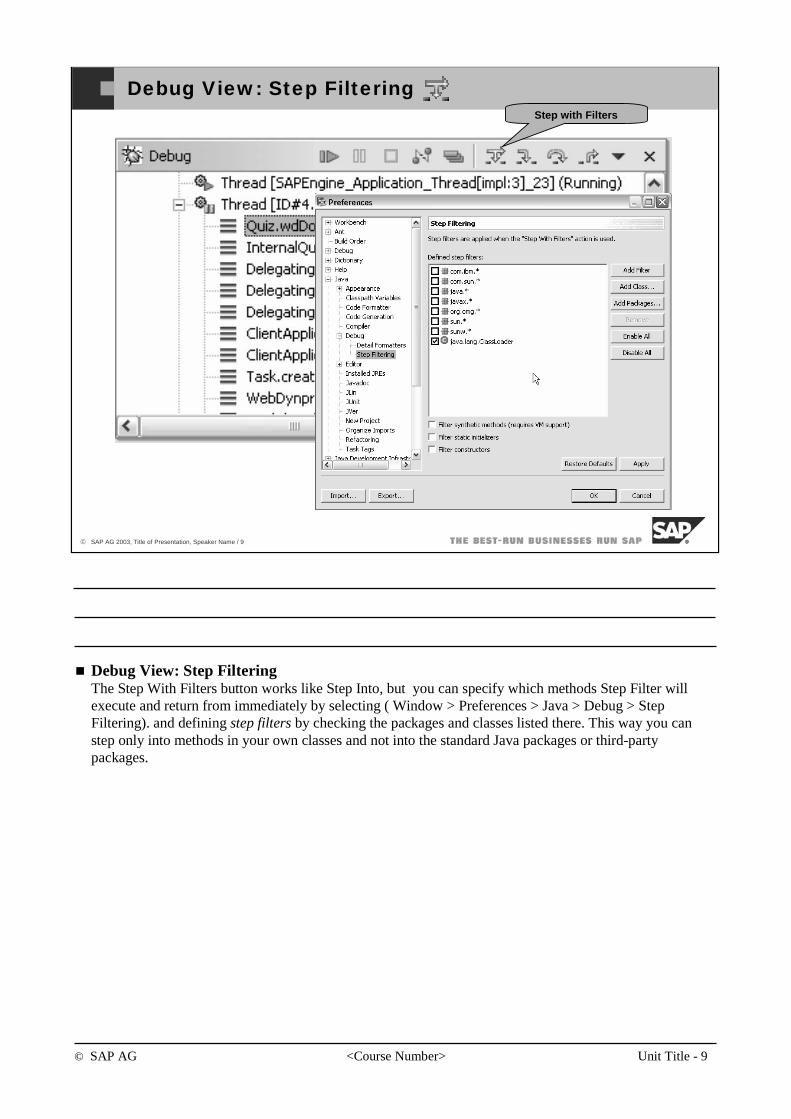
© SAP AG <Course Number> Unit Title - 9
© SAP AG 2003, Title of Presentation, Speaker Name / 9
Debug View: Step FilteringStep with Filters
Debug View: Step FilteringThe Step With Filters button works like Step Into, but you can specify which methods Step Filter will execute and return from immediately by selecting ( Window > Preferences > Java > Debug > Step Filtering). and defining step filters by checking the packages and classes listed there. This way you can step only into methods in your own classes and not into the standard Java packages or third-party packages.
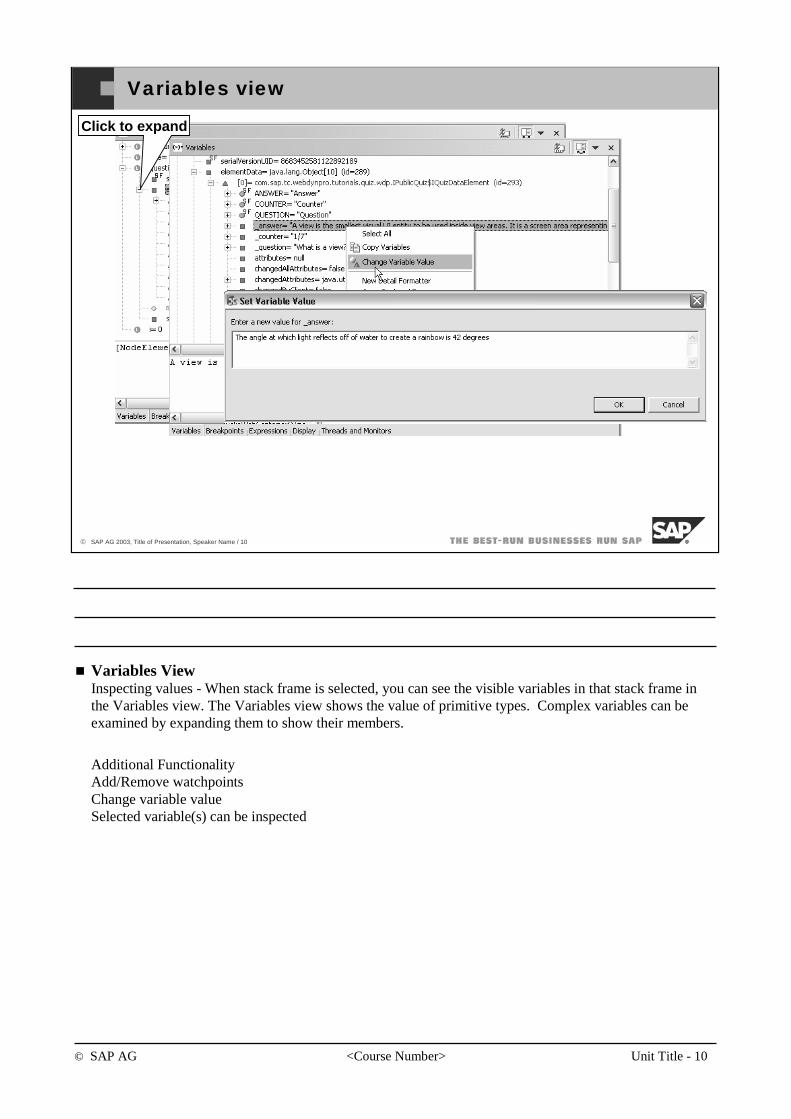
© SAP AG <Course Number> Unit Title - 10
© SAP AG 2003, Title of Presentation, Speaker Name / 10
Variables view
Click to expand
Variables ViewInspecting values - When stack frame is selected, you can see the visible variables in that stack frame in the Variables view. The Variables view shows the value of primitive types. Complex variables can be examined by expanding them to show their members.
Additional FunctionalityAdd/Remove watchpointsChange variable value Selected variable(s) can be inspected
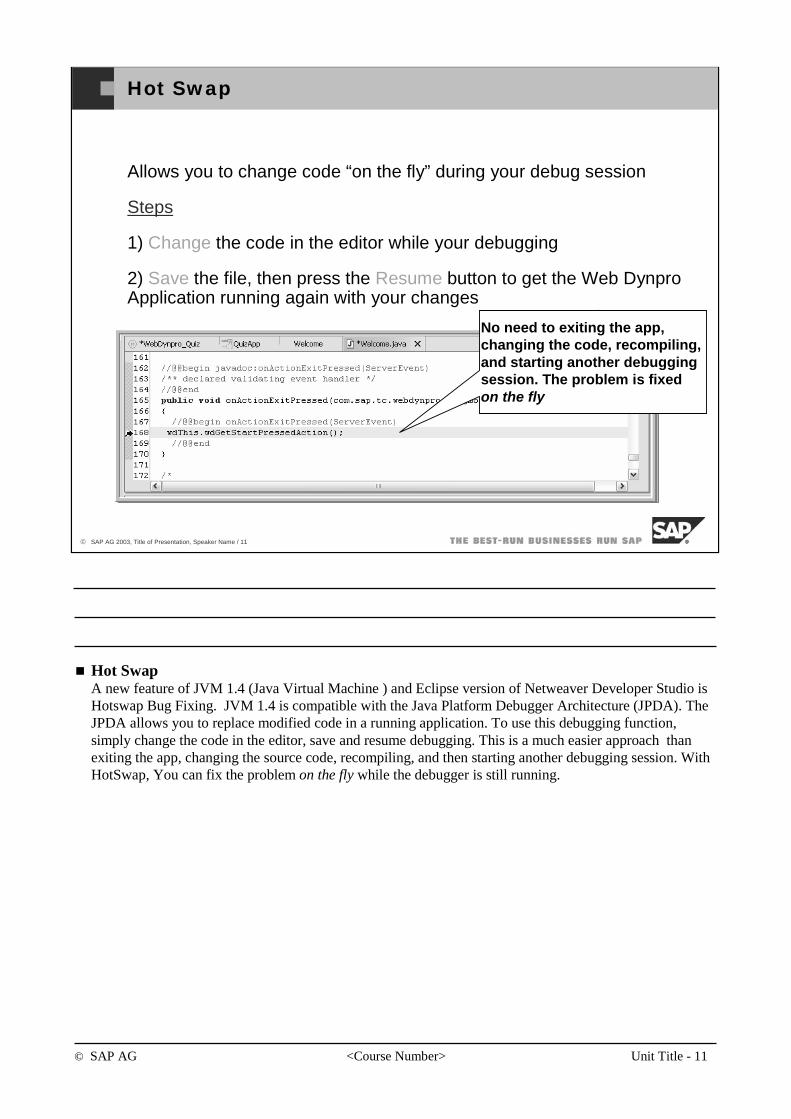
© SAP AG <Course Number> Unit Title - 11
© SAP AG 2003, Title of Presentation, Speaker Name / 11
Hot Swap
Allows you to change code “on the fly” during your debug session
Steps
1) Change the code in the editor while your debugging
2) Save the file, then press the Resume button to get the Web Dynpro Application running again with your changes
Change line 168
No need to exiting the app, changing the code, recompiling, and starting another debuggingsession. The problem is fixedon the fly
Hot SwapA new feature of JVM 1.4 (Java Virtual Machine ) and Eclipse version of Netweaver Developer Studio is Hotswap Bug Fixing. JVM 1.4 is compatible with the Java Platform Debugger Architecture (JPDA). The JPDA allows you to replace modified code in a running application. To use this debugging function, simply change the code in the editor, save and resume debugging. This is a much easier approach than exiting the app, changing the source code, recompiling, and then starting another debugging session. With HotSwap, You can fix the problem on the fly while the debugger is still running.
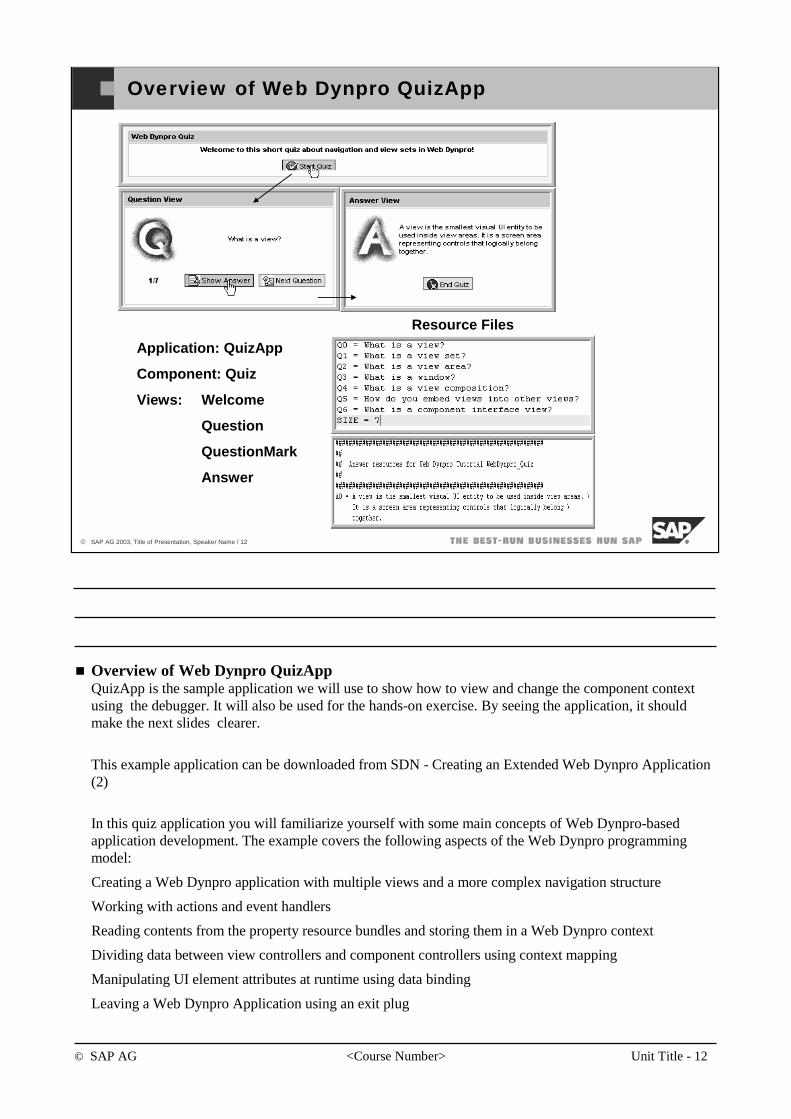
© SAP AG <Course Number> Unit Title - 12
© SAP AG 2003, Title of Presentation, Speaker Name / 12
Overview of Web Dynpro QuizApp
Application: QuizApp
Component: Quiz
Views: Welcome
Question
QuestionMark
Answer
Resource Files
Overview of Web Dynpro QuizAppQuizApp is the sample application we will use to show how to view and change the component context using the debugger. It will also be used for the hands-on exercise. By seeing the application, it should make the next slides clearer.
This example application can be downloaded from SDN - Creating an Extended Web Dynpro Application (2)
In this quiz application you will familiarize yourself with some main concepts of Web Dynpro-based application development. The example covers the following aspects of the Web Dynpro programming model:
Creating a Web Dynpro application with multiple views and a more complex navigation structure
Working with actions and event handlers
Reading contents from the property resource bundles and storing them in a Web Dynpro context
Dividing data between view controllers and component controllers using context mapping
Manipulating UI element attributes at runtime using data binding
Leaving a Web Dynpro Application using an exit plug
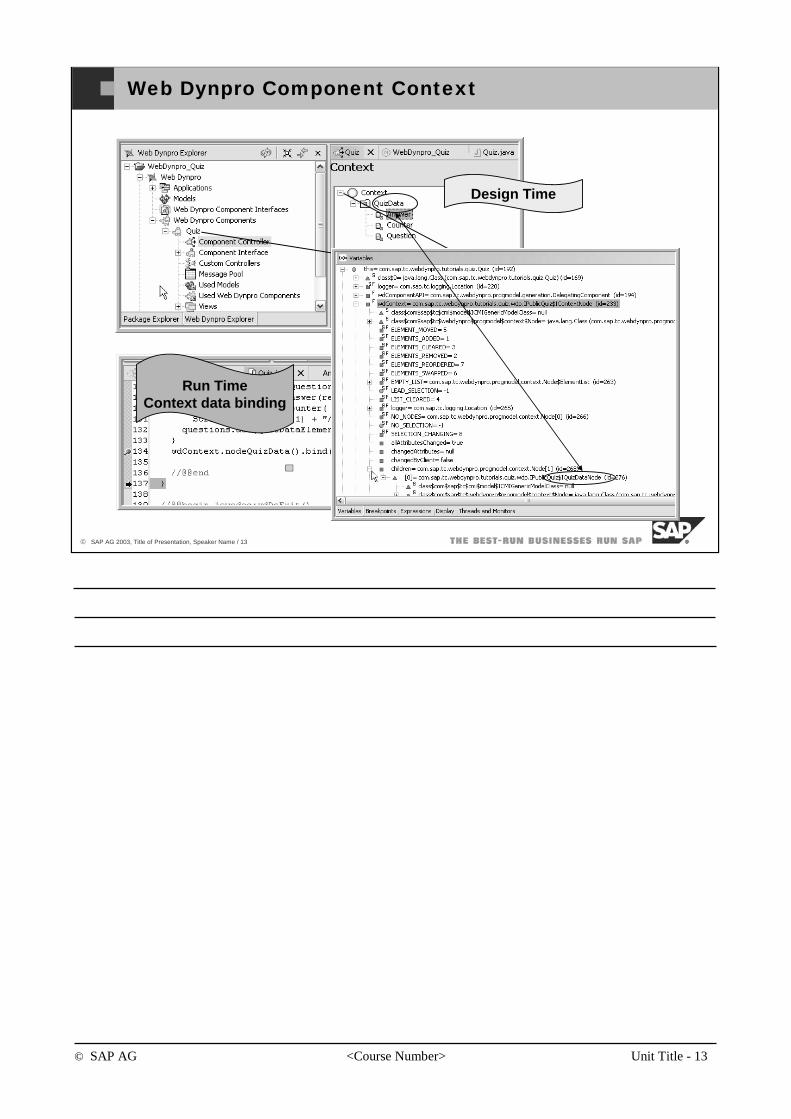
© SAP AG <Course Number> Unit Title - 13
© SAP AG 2003, Title of Presentation, Speaker Name / 13
Web Dynpro Component Context
Run TimeContext data binding
Design Time
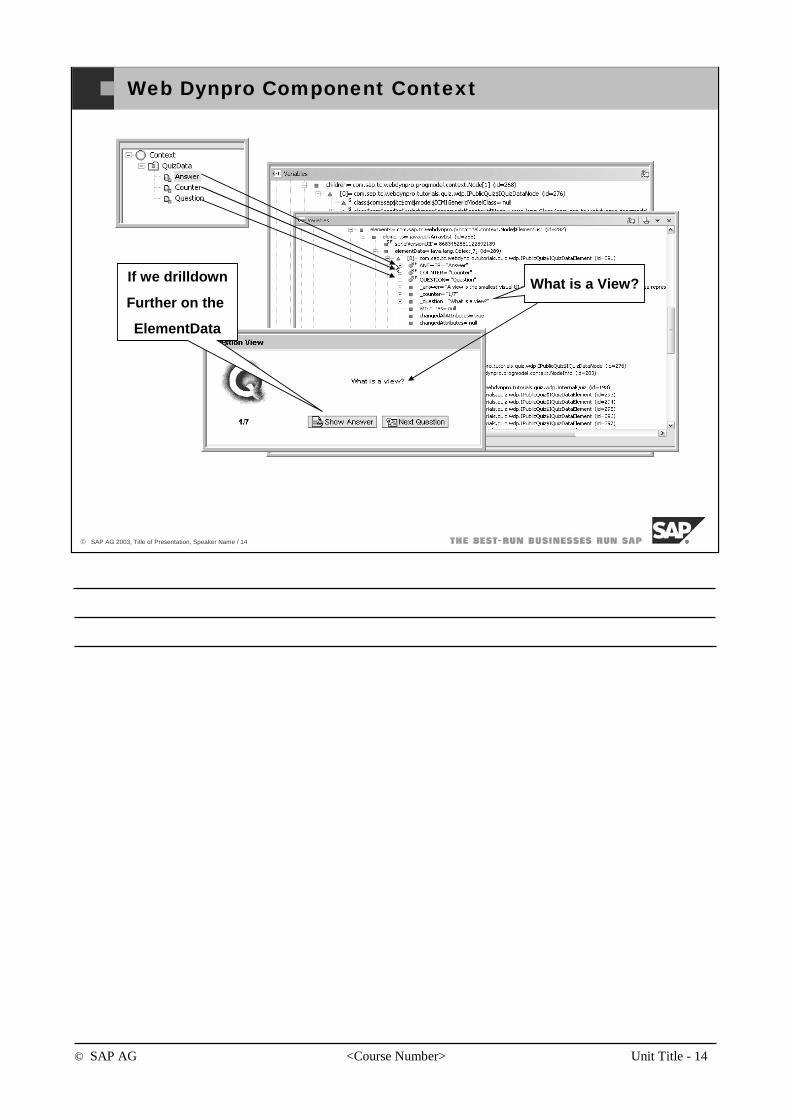
© SAP AG <Course Number> Unit Title - 14
© SAP AG 2003, Title of Presentation, Speaker Name / 14
Web Dynpro Component Context
What is a View?If we drilldown
Further on the
ElementData
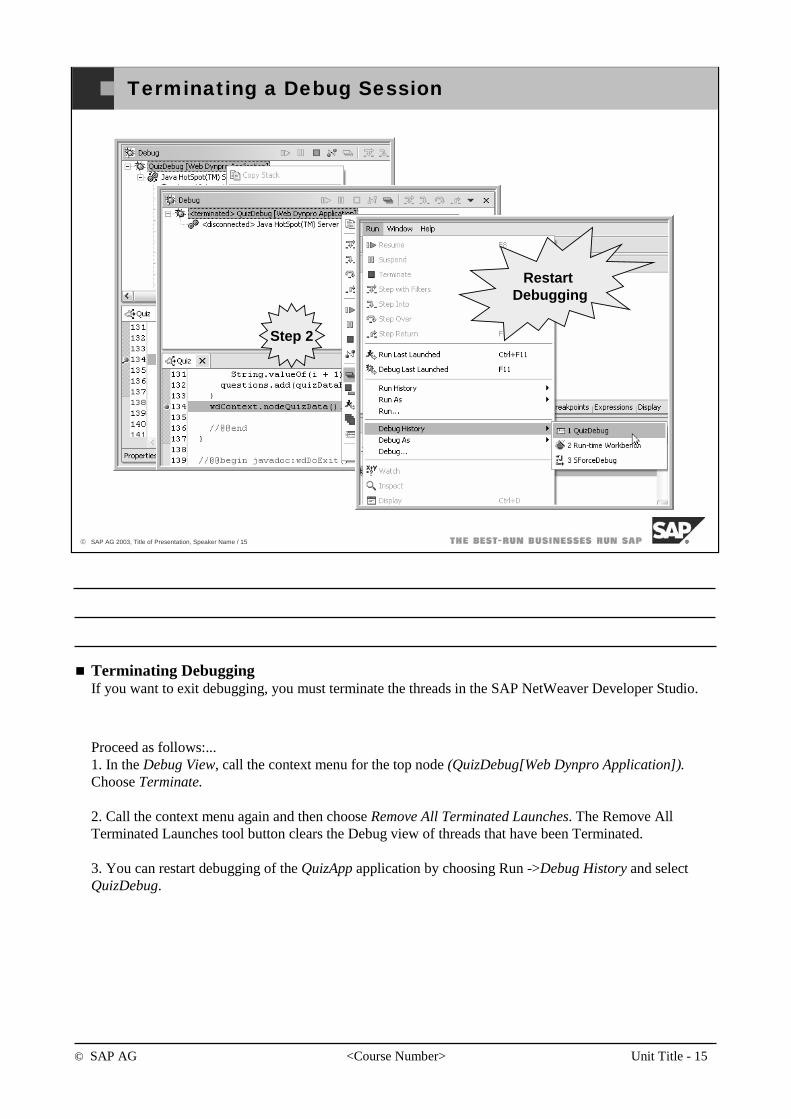
© SAP AG <Course Number> Unit Title - 15
© SAP AG 2003, Title of Presentation, Speaker Name / 15
Step 1
Terminating a Debug Session
Step 2
Restart Debugging
Terminating DebuggingIf you want to exit debugging, you must terminate the threads in the SAP NetWeaver Developer Studio.
Proceed as follows:...1. In the Debug View, call the context menu for the top node (QuizDebug[Web Dynpro Application]). Choose Terminate.
2. Call the context menu again and then choose Remove All Terminated Launches. The Remove All Terminated Launches tool button clears the Debug view of threads that have been Terminated.
3. You can restart debugging of the QuizApp application by choosing Run ->Debug History and selectQuizDebug.

© SAP AG <Course Number> Unit Title - 16
© SAP AG 2003, Title of Presentation, Speaker Name / 16
Java Cluster
Productive Node
Debug
00
07
03
Java Instance
Dispatcher
SDM
Server 0
Server 1
Dispatcher
Server 0
Server 1
Server N
...Productive Nodes
Process
Run
DebugRun
Debugging Scenarios
Standalone
LAN ScenarioSingle Server
Cluster
WAN Scenario
Debugging Scenarios(Standalone) developer workplace installation -The Web AS is installed on the same local developer PC as the Developer Studio. By default, the debugging mode is deactivated for this single server configuration. However, the (only) server node (server0) can be switched from run mode to debugging mode. In this way, the connection to the server is completely reserved for the debugging session. The server is then stopped.
LAN scenario - Web AS is installed at any location in the LAN.The simple developer workplace installation can also be in effect in the LAN scenario. However, the Developer Studio and the server (including the database) are installed on different hosts. In general, a LAN will feature a cluster configuration. It defines a group consisting of several instance nodes. In such a cluster configuration, one or more server nodes can be reserved for debugging. When debugging is activated the message server deactivates the relevant server node for the cluster communication. As a result, incoming requests are no longer passed on to the reserved node. A debugging session can be executed from within the Developer Studio via the debug port without affecting the other server nodes in the cluster.
WAN scenario - The Web AS runs on the customer side. Debugging takes place through firewalls using SAP Router technology.

© SAP AG <Course Number> Unit Title - 17
© SAP AG 2003, Title of Presentation, Speaker Name / 17
Debugging ABAP Code from within Web Dynpro
Prerequisites
Adaptive RFC
SAP GUI
Debugging Authorizations
Set the ABAP breakpoint in
Dedicated ABAP application server (no load balancing)
Steps1. Open SAP GUI2. Activate external debugging in ABAP3. Set HTTP (external) breakpoint in the ABAP4. Start J2EE engine – deploy your app5. Start your test application on the J2EE
ResultsThe ABAP Debugger will stop at the ABAP breakpoint
Debugging ABAP Code from within Web DynproYou can debug ABAP code from Web Dynpro application that use Adaptive RFC Prerequisites:SAP GUI is installed on your local machine. ABAP system is connected to via a dedicated server (no load balancing). You then only have to activate the relevant setting for external debugging in the ABAP Workbench. Set the breakpoint in the ABAP code before starting the Web Dynpro.
Since debugging in the ABAP system via load balancing is not supported, you must reconfigure your JCO destinations so that the calls take place on a dedicated ABAP application server. For Web Dynpro, this is done in the Web Dynpro Content Administrator. In the destination maintenance, specify Single Server Connection as the Destination Type. Step-by-Step ProcedureUse the SAP GUI to log on to the system or server to which the RFC call is to take place. You should log on with the same user with which the call will take place. Activate external debugging in the ABAP Workbench. Set an HTTP (external) breakpoint in the ABAP code. Start the J2EE Engine and – if you have not already done so – deploy your application. Start your test application on the J2EE Engine. Results:The J2EE Engine establishes a connection to the SAP GUI and starts the ABAP Debugger in a new GUI session. The Debugger is stopped at the line in the ABAP code at which the breakpoint is set.Hint: A detailed document - Remote Debugging in the Developer Studio is available in SDN.
© SAP AG <Course Number> Unit Title - 18
© SAP AG 2003, Title of Presentation, Speaker Name / 18
You should now be able to:
• Understand Debugging functionality
• Activate Debugging
• Start a Debug Session
• Analyze the State of a Running Program
• Apply Debugging Techniques
• Terminate a Debug Session
Web Dynpro Debugging Unit Summary
Web Dynpro Debugging Unit SummaryNo bugs have been harmed during the making of this presentation.
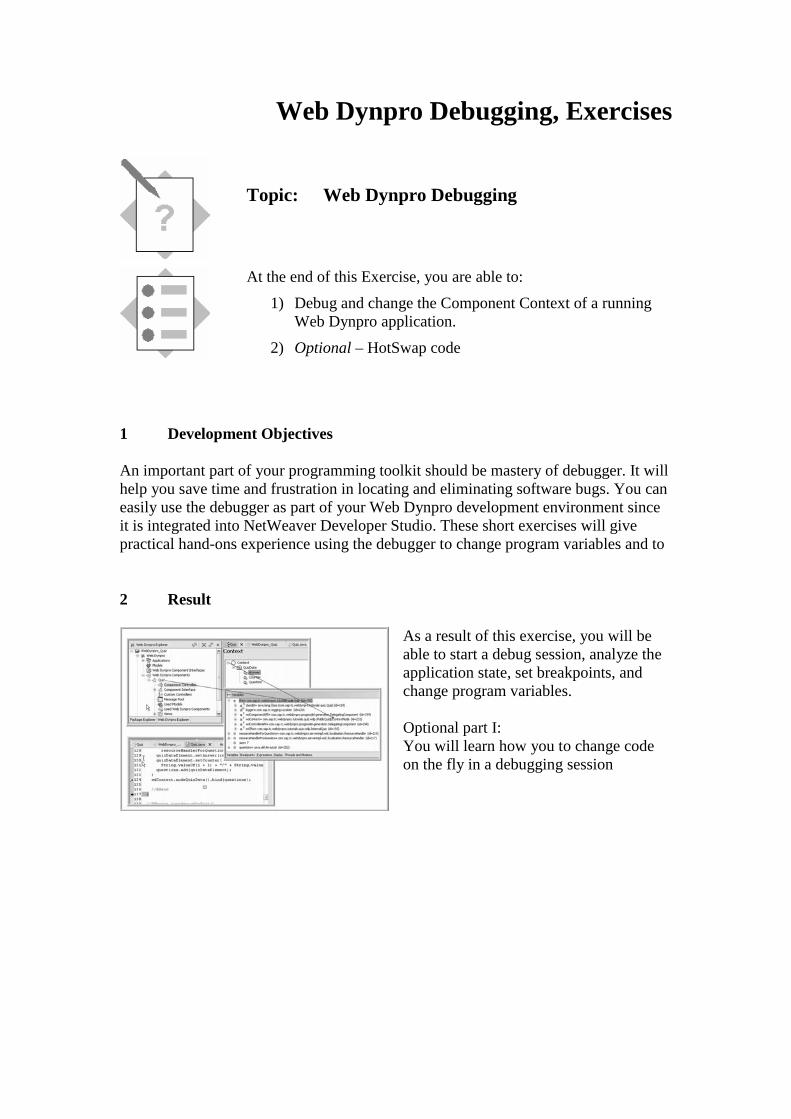
Web Dynpro Debugging, Exercises
Topic: Web Dynpro Debugging
At the end of this Exercise, you are able to:
1) Debug and change the Component Context of a running Web Dynpro application.
2) Optional – HotSwap code
1 Development Objectives
An important part of your programming toolkit should be mastery of debugger. It will help you save time and frustration in locating and eliminating software bugs. You can easily use the debugger as part of your Web Dynpro development environment since it is integrated into NetWeaver Developer Studio. These short exercises will give practical hand-ons experience using the debugger to change program variables and to
2 Result
As a result of this exercise, you will be able to start a debug session, analyze the application state, set breakpoints, and change program variables. Optional part I: You will learn how you to change code on the fly in a debugging session
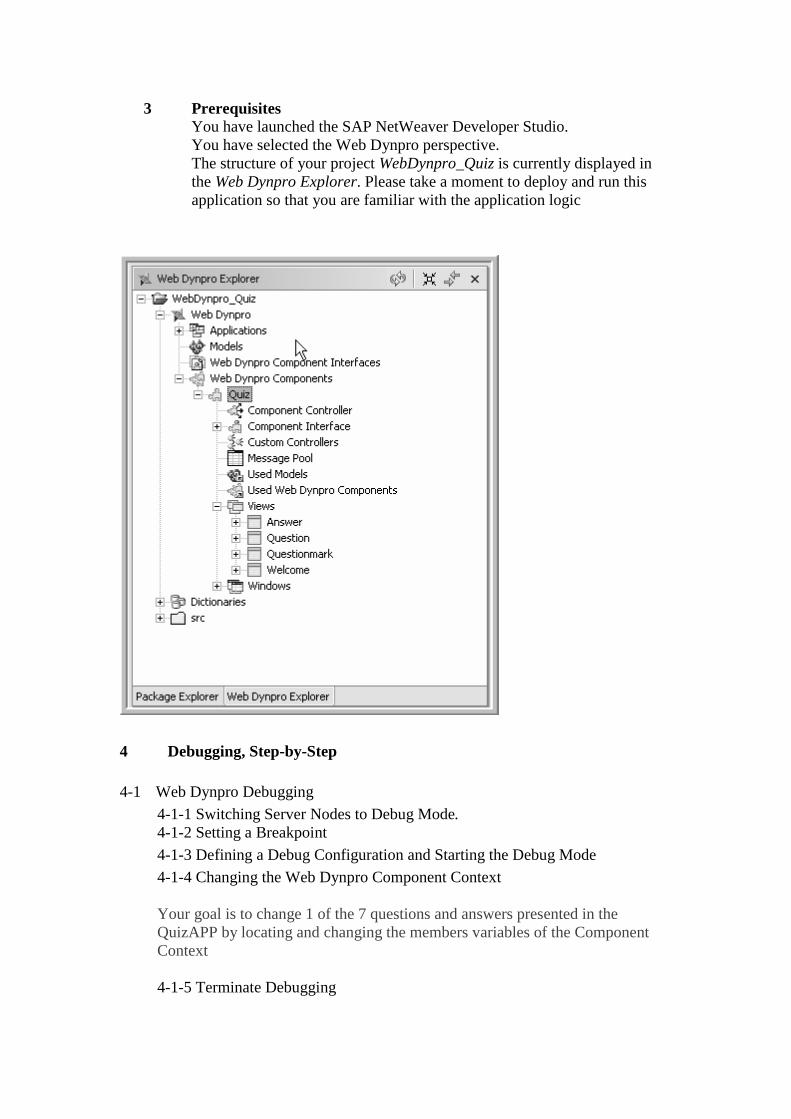
3 Prerequisites You have launched the SAP NetWeaver Developer Studio. You have selected the Web Dynpro perspective. The structure of your project WebDynpro_Quiz is currently displayed in the Web Dynpro Explorer. Please take a moment to deploy and run this application so that you are familiar with the application logic
4 Debugging, Step-by-Step 4-1 Web Dynpro Debugging 4-1-1 Switching Server Nodes to Debug Mode.
4-1-2 Setting a Breakpoint
4-1-3 Defining a Debug Configuration and Starting the Debug Mode
4-1-4 Changing the Web Dynpro Component Context Your goal is to change 1 of the 7 questions and answers presented in the QuizAPP by locating and changing the members variables of the Component Context
4-1-5 Terminate Debugging

4-2 HotSwap code (Optional Section)
4-2-1 Set a Breakpoint
4-2-2 Resume Debugging
4-2-3 HotSwap
You goal is to change the action of the QuizApp exit button
to go to a different URL by using the hotswap feature.

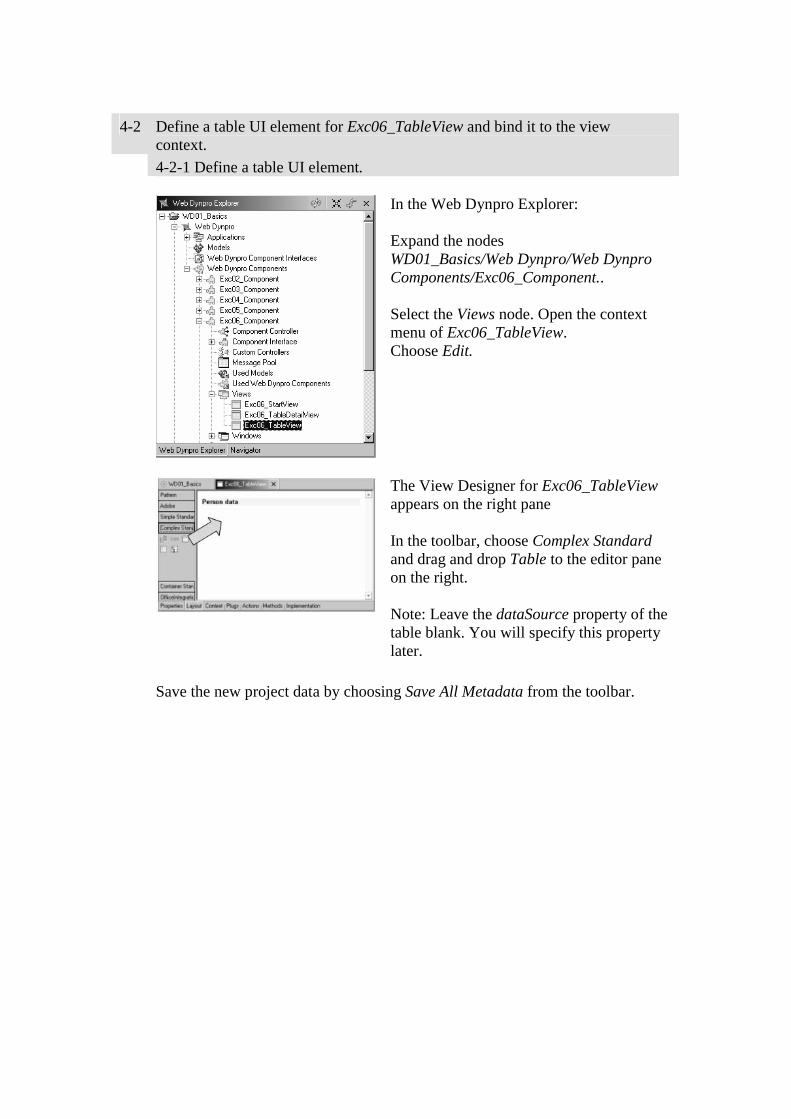
4-2 Define a table UI element for Exc06_TableView and bind it to the view context.
4-2-1 Define a table UI element.
In the Web Dynpro Explorer: Expand the nodes WD01_Basics/Web Dynpro/Web Dynpro Components/Exc06_Component.. Select the Views node. Open the context menu of Exc06_TableView. Choose Edit.
The View Designer for Exc06_TableView appears on the right pane In the toolbar, choose Complex Standard and drag and drop Table to the editor pane on the right. Note: Leave the dataSource property of the table blank. You will specify this property later.
Save the new project data by choosing Save All Metadata from the toolbar.
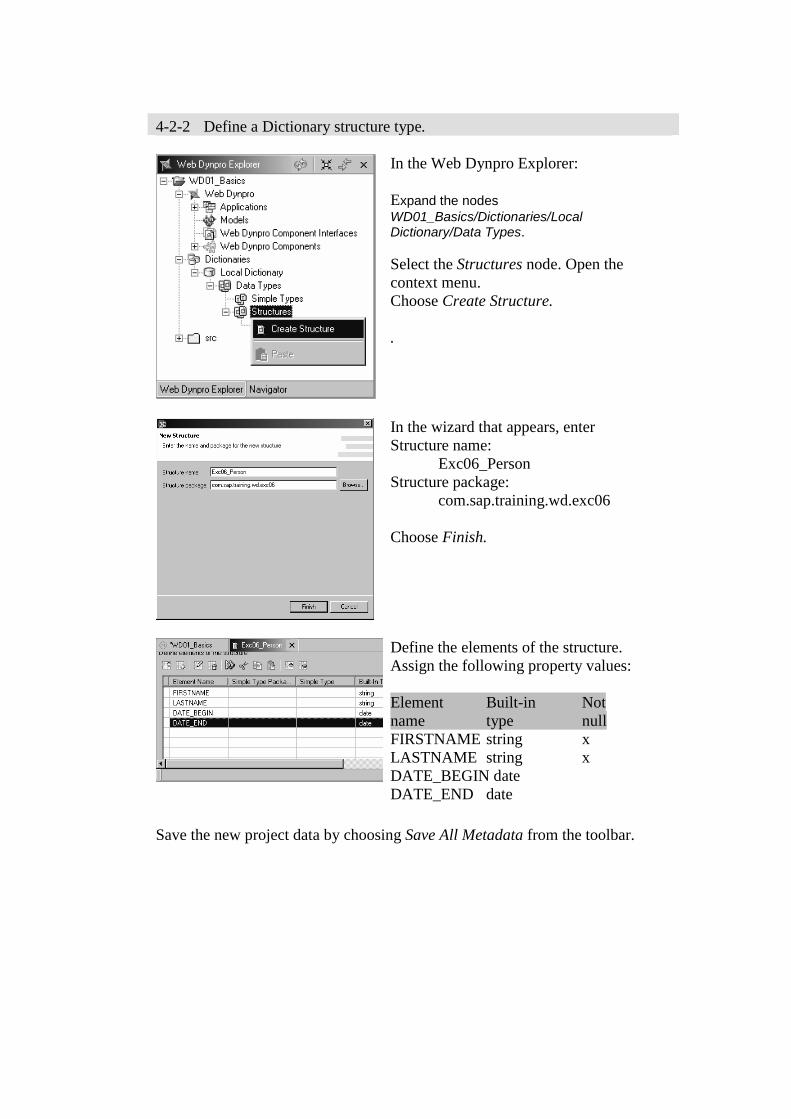
4-2-2 Define a Dictionary structure type.
In the Web Dynpro Explorer: Expand the nodes WD01_Basics/Dictionaries/Local Dictionary/Data Types. Select the Structures node. Open the context menu. Choose Create Structure. .
In the wizard that appears, enter Structure name: Exc06_Person Structure package: com.sap.training.wd.exc06 Choose Finish.
Define the elements of the structure. Assign the following property values: Element Built-in Not name type null FIRSTNAME string x LASTNAME string x DATE_BEGIN date DATE_END date
Save the new project data by choosing Save All Metadata from the toolbar.
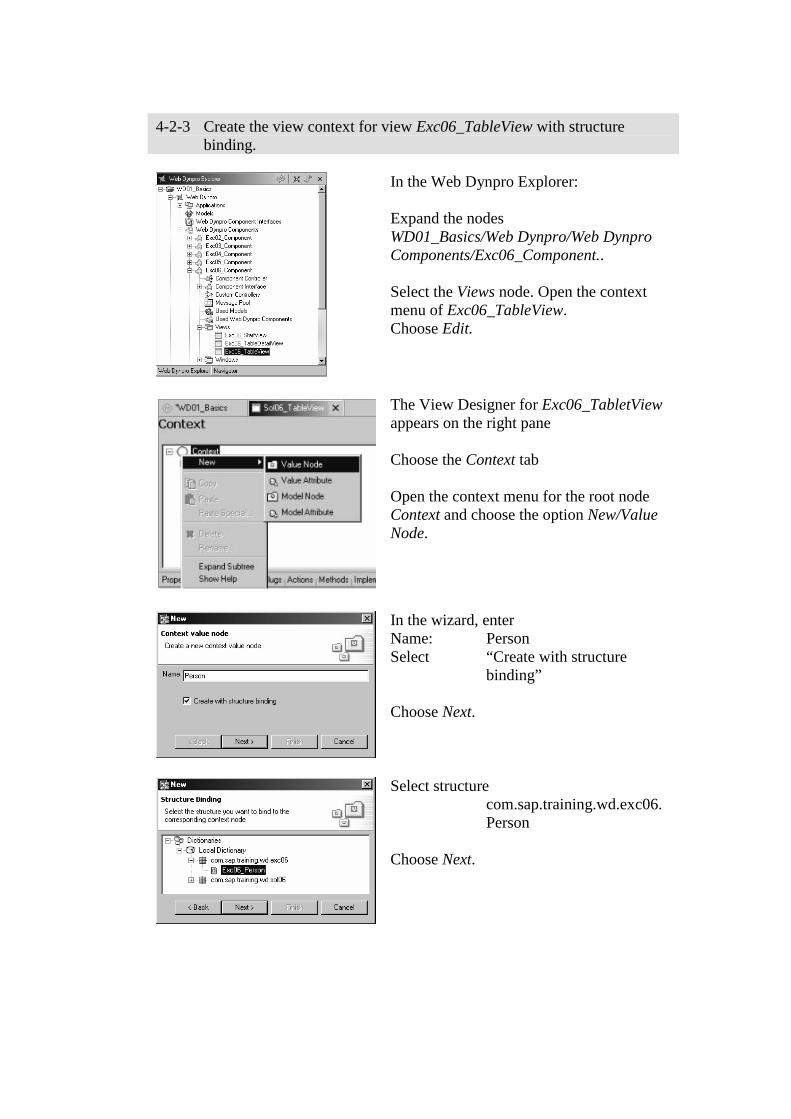
4-2-3 Create the view context for view Exc06_TableView with structure
binding.
In the Web Dynpro Explorer: Expand the nodes WD01_Basics/Web Dynpro/Web Dynpro Components/Exc06_Component.. Select the Views node. Open the context menu of Exc06_TableView. Choose Edit.
The View Designer for Exc06_TabletView appears on the right pane Choose the Context tab Open the context menu for the root node Context and choose the option New/Value Node.
In the wizard, enter Name: Person Select “Create with structure binding” Choose Next.
Select structure com.sap.training.wd.exc06. Person Choose Next.
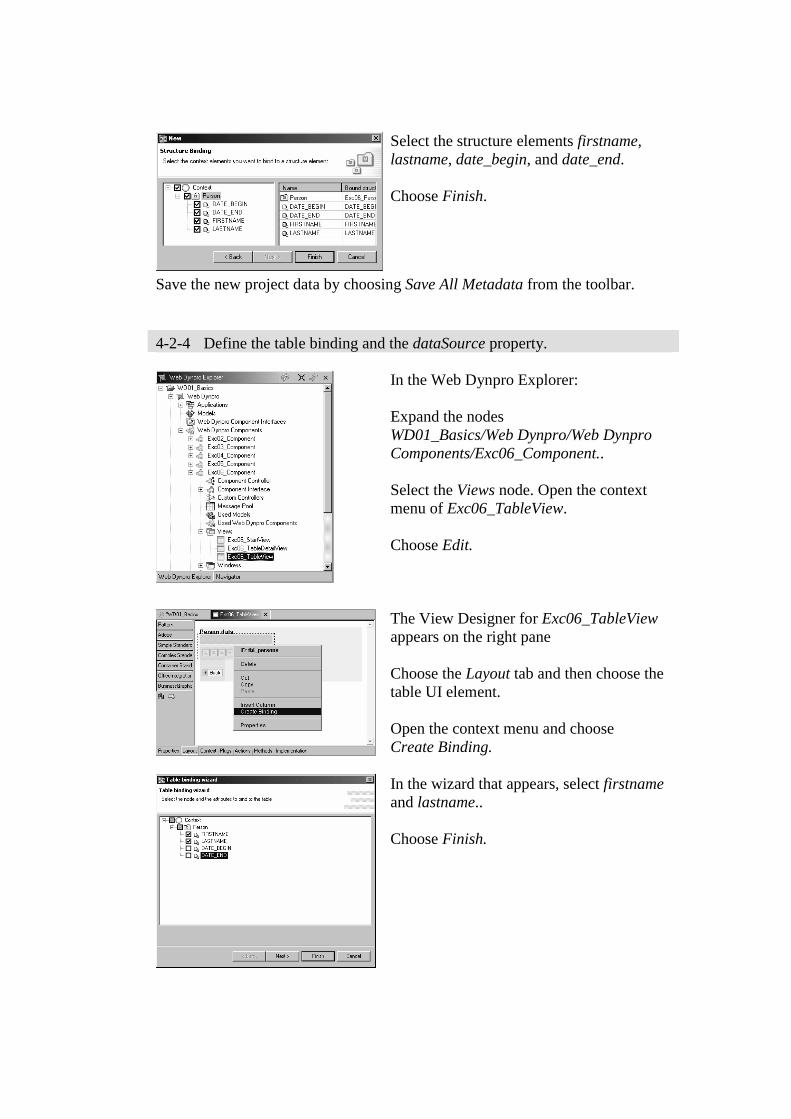
Select the structure elements firstname, lastname, date_begin, and date_end. Choose Finish.
Save the new project data by choosing Save All Metadata from the toolbar. 4-2-4 Define the table binding and the dataSource property.
In the Web Dynpro Explorer: Expand the nodes WD01_Basics/Web Dynpro/Web Dynpro Components/Exc06_Component.. Select the Views node. Open the context menu of Exc06_TableView. Choose Edit.
The View Designer for Exc06_TableView appears on the right pane Choose the Layout tab and then choose the table UI element. Open the context menu and choose Create Binding.
In the wizard that appears, select firstname and lastname.. Choose Finish.
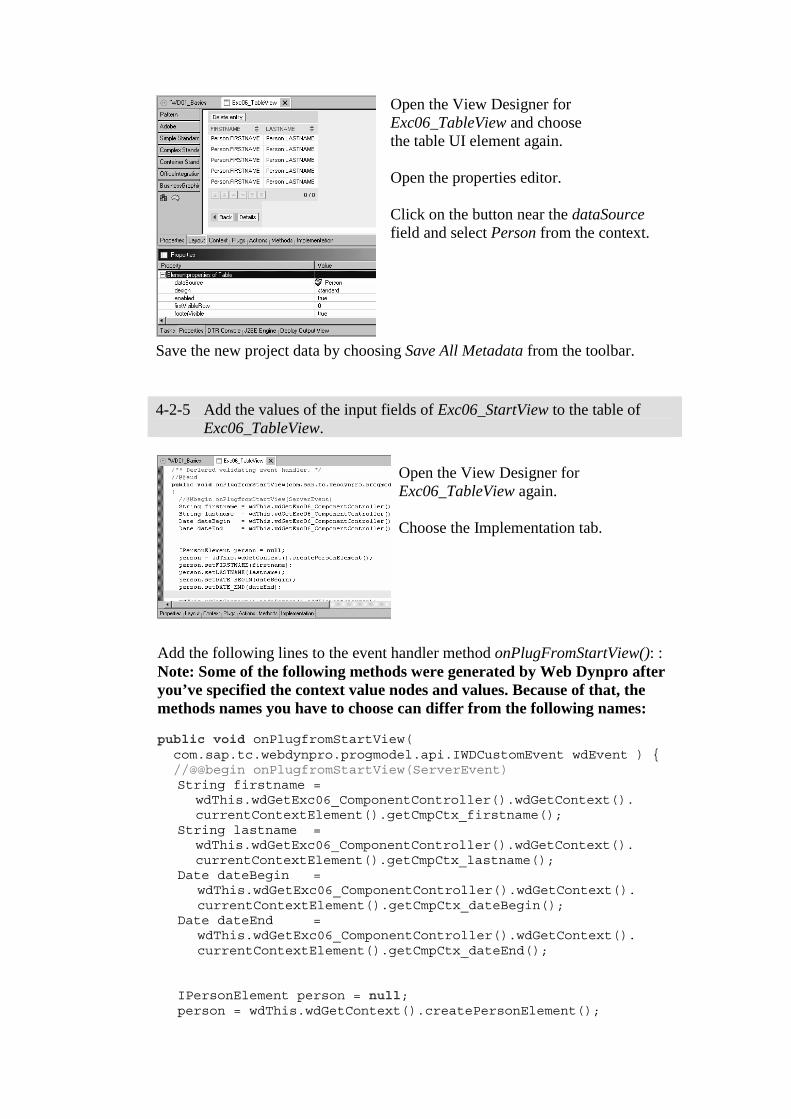
Open the View Designer for Exc06_TableView and choose the table UI element again. Open the properties editor. Click on the button near the dataSource field and select Person from the context.
Save the new project data by choosing Save All Metadata from the toolbar. 4-2-5 Add the values of the input fields of Exc06_StartView to the table of
Exc06_TableView.
Open the View Designer for Exc06_TableView again. Choose the Implementation tab.
Add the following lines to the event handler method onPlugFromStartView(): : Note: Some of the following methods were generated by Web Dynpro after you’ve specified the context value nodes and values. Because of that, the methods names you have to choose can differ from the following names: public void onPlugfromStartView( com.sap.tc.webdynpro.progmodel.api.IWDCustomEvent wdEvent ) { //@@begin onPlugfromStartView(ServerEvent) String firstname = wdThis.wdGetExc06_ComponentController().wdGetContext(). currentContextElement().getCmpCtx_firstname(); String lastname = wdThis.wdGetExc06_ComponentController().wdGetContext(). currentContextElement().getCmpCtx_lastname(); Date dateBegin = wdThis.wdGetExc06_ComponentController().wdGetContext(). currentContextElement().getCmpCtx_dateBegin(); Date dateEnd = wdThis.wdGetExc06_ComponentController().wdGetContext(). currentContextElement().getCmpCtx_dateEnd(); IPersonElement person = null; person = wdThis.wdGetContext().createPersonElement();
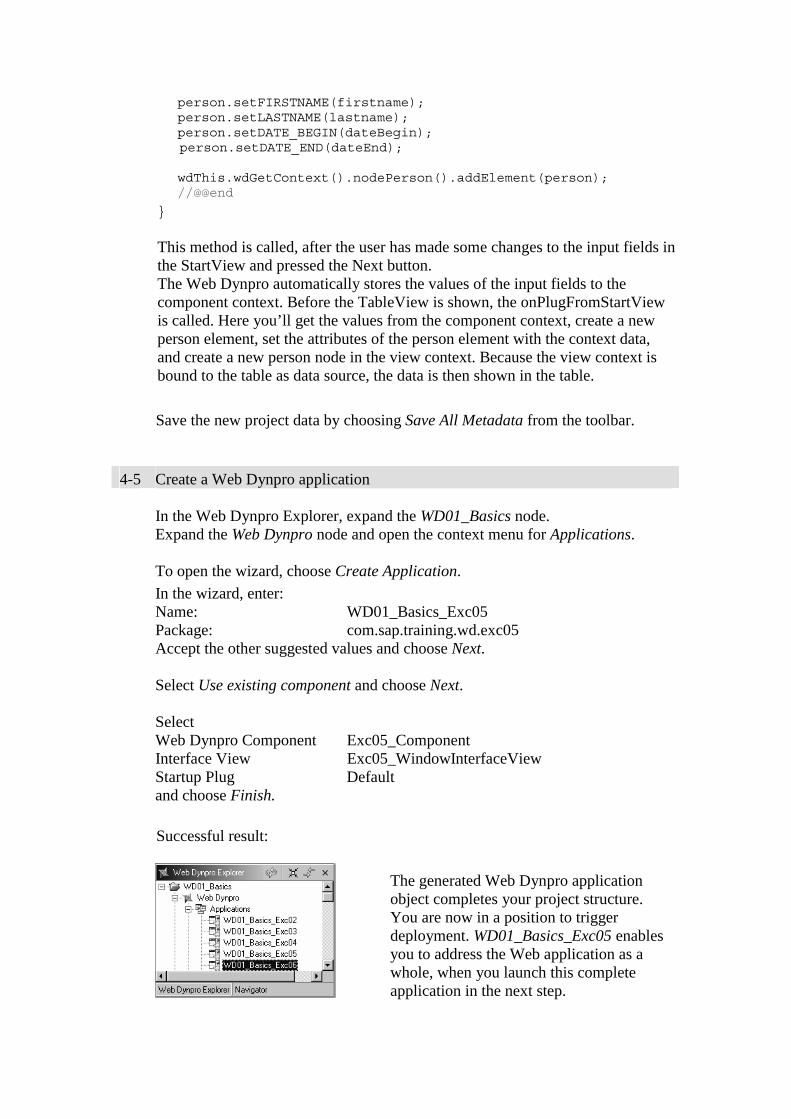
person.setFIRSTNAME(firstname); person.setLASTNAME(lastname); person.setDATE_BEGIN(dateBegin); person.setDATE_END(dateEnd); wdThis.wdGetContext().nodePerson().addElement(person); //@@end
}
This method is called, after the user has made some changes to the input fields in the StartView and pressed the Next button. The Web Dynpro automatically stores the values of the input fields to the component context. Before the TableView is shown, the onPlugFromStartView is called. Here you’ll get the values from the component context, create a new person element, set the attributes of the person element with the context data, and create a new person node in the view context. Because the view context is bound to the table as data source, the data is then shown in the table.
Save the new project data by choosing Save All Metadata from the toolbar.
4-5 Create a Web Dynpro application
In the Web Dynpro Explorer, expand the WD01_Basics node. Expand the Web Dynpro node and open the context menu for Applications. To open the wizard, choose Create Application.
In the wizard, enter: Name: WD01_Basics_Exc05 Package: com.sap.training.wd.exc05 Accept the other suggested values and choose Next. Select Use existing component and choose Next. Select Web Dynpro Component Exc05_Component Interface View Exc05_WindowInterfaceView Startup Plug Default and choose Finish.
Successful result:
The generated Web Dynpro application object completes your project structure. You are now in a position to trigger deployment. WD01_Basics_Exc05 enables you to address the Web application as a whole, when you launch this complete application in the next step.
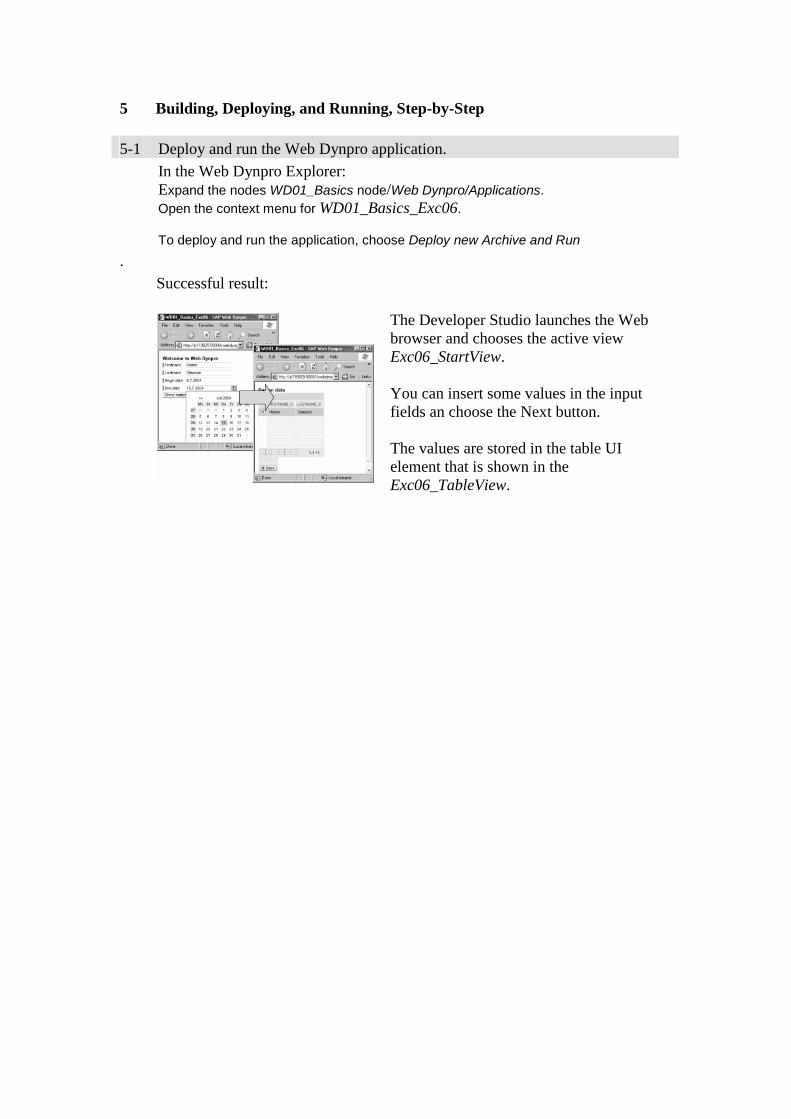
5 Building, Deploying, and Running, Step-by-Step 5-1 Deploy and run the Web Dynpro application. In the Web Dynpro Explorer:
Expand the nodes WD01_Basics node/Web Dynpro/Applications. Open the context menu for WD01_Basics_Exc06. To deploy and run the application, choose Deploy new Archive and Run
. Successful result:
The Developer Studio launches the Web browser and chooses the active view Exc06_StartView. You can insert some values in the input fields an choose the Next button. The values are stored in the table UI element that is shown in the Exc06_TableView.
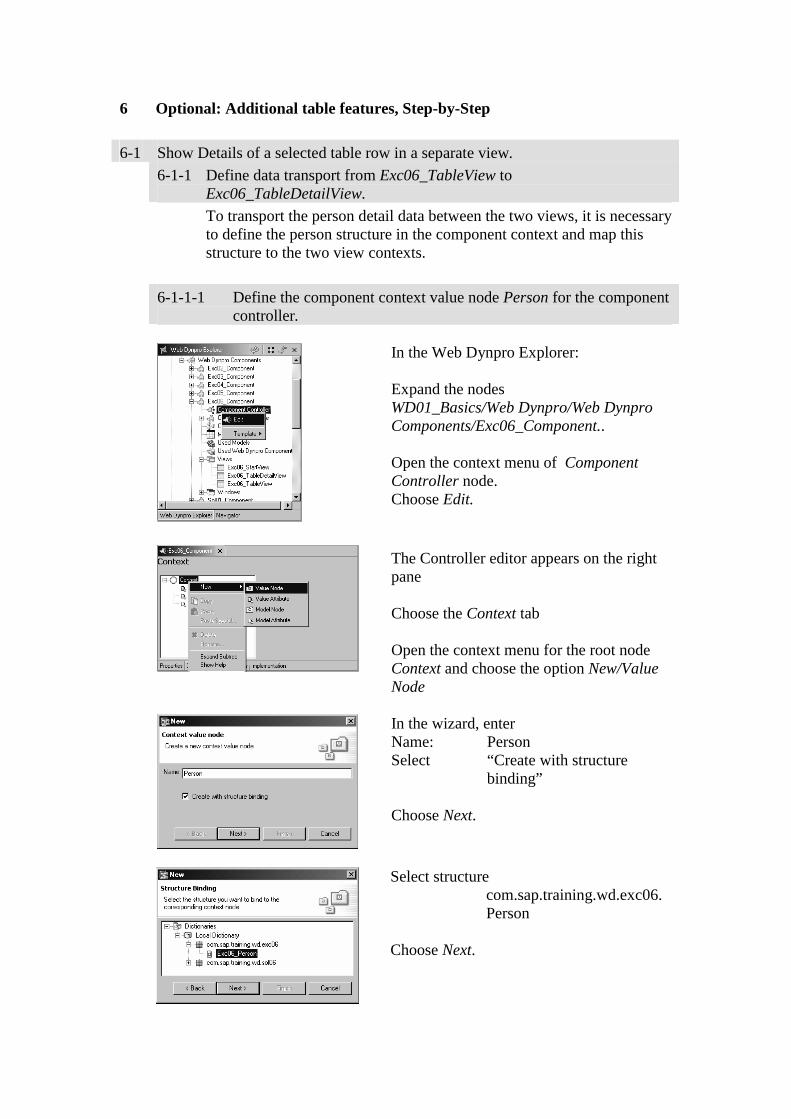
6 Optional: Additional table features, Step-by-Step
6-1 Show Details of a selected table row in a separate view. 6-1-1 Define data transport from Exc06_TableView to
Exc06_TableDetailView. To transport the person detail data between the two views, it is necessary
to define the person structure in the component context and map this structure to the two view contexts.
6-1-1-1 Define the component context value node Person for the component controller.
In the Web Dynpro Explorer: Expand the nodes WD01_Basics/Web Dynpro/Web Dynpro Components/Exc06_Component.. Open the context menu of Component Controller node. Choose Edit.
The Controller editor appears on the right pane Choose the Context tab Open the context menu for the root node Context and choose the option New/Value Node
In the wizard, enter Name: Person Select “Create with structure binding” Choose Next.
Select structure com.sap.training.wd.exc06. Person Choose Next.
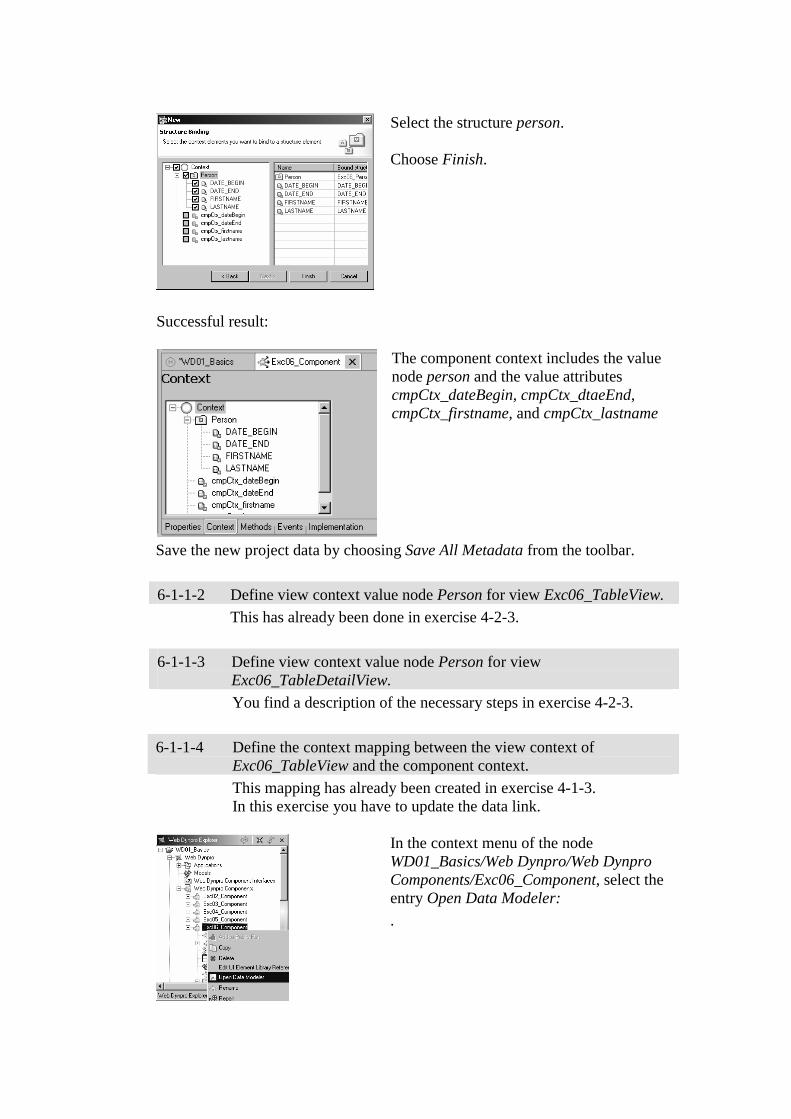
Select the structure person. Choose Finish.
Successful result:
The component context includes the value node person and the value attributes cmpCtx_dateBegin, cmpCtx_dtaeEnd, cmpCtx_firstname, and cmpCtx_lastname
Save the new project data by choosing Save All Metadata from the toolbar.
6-1-1-2 Define view context value node Person for view Exc06_TableView. This has already been done in exercise 4-2-3.
6-1-1-3 Define view context value node Person for view
Exc06_TableDetailView. You find a description of the necessary steps in exercise 4-2-3.
6-1-1-4 Define the context mapping between the view context of Exc06_TableView and the component context.
This mapping has already been created in exercise 4-1-3. In this exercise you have to update the data link.
In the context menu of the node WD01_Basics/Web Dynpro/Web Dynpro Components/Exc06_Component, select the entry Open Data Modeler:
.
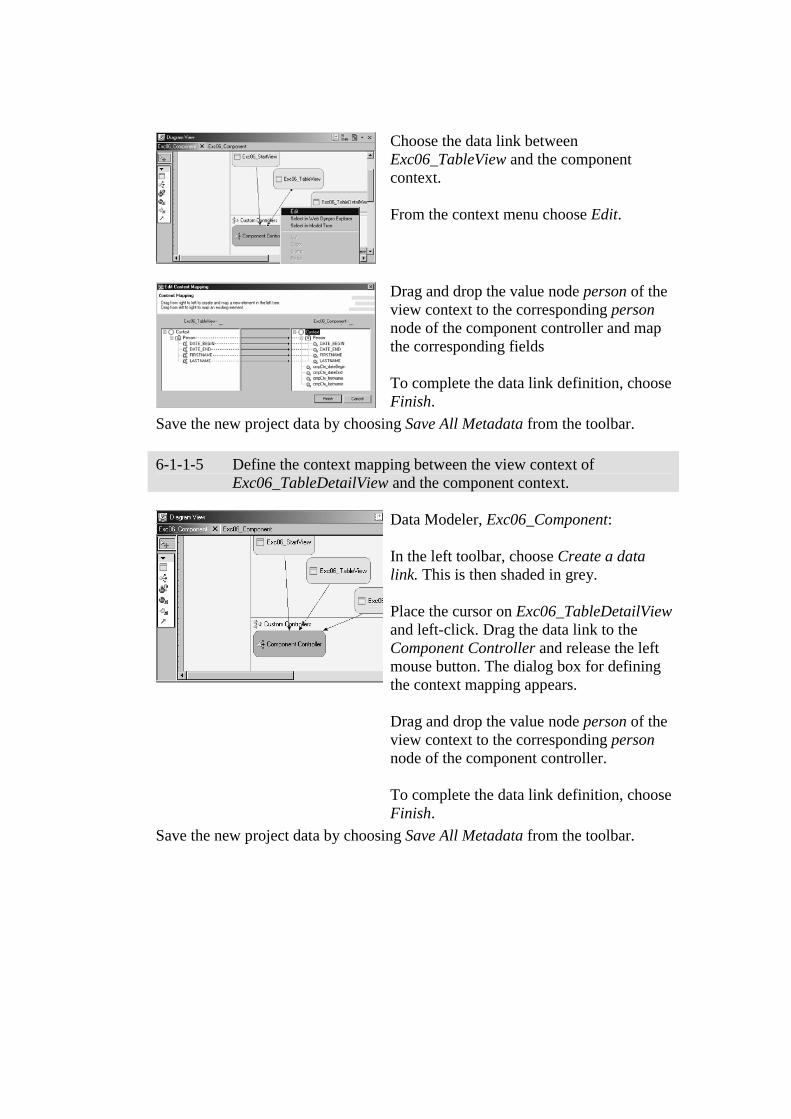
Choose the data link between Exc06_TableView and the component context. From the context menu choose Edit.
Drag and drop the value node person of the view context to the corresponding person node of the component controller and map the corresponding fields To complete the data link definition, choose Finish.
Save the new project data by choosing Save All Metadata from the toolbar.
6-1-1-5 Define the context mapping between the view context of Exc06_TableDetailView and the component context.
Data Modeler, Exc06_Component: In the left toolbar, choose Create a data link. This is then shaded in grey. Place the cursor on Exc06_TableDetailView and left-click. Drag the data link to the Component Controller and release the left mouse button. The dialog box for defining the context mapping appears. Drag and drop the value node person of the view context to the corresponding person node of the component controller. To complete the data link definition, choose Finish.
Save the new project data by choosing Save All Metadata from the toolbar.
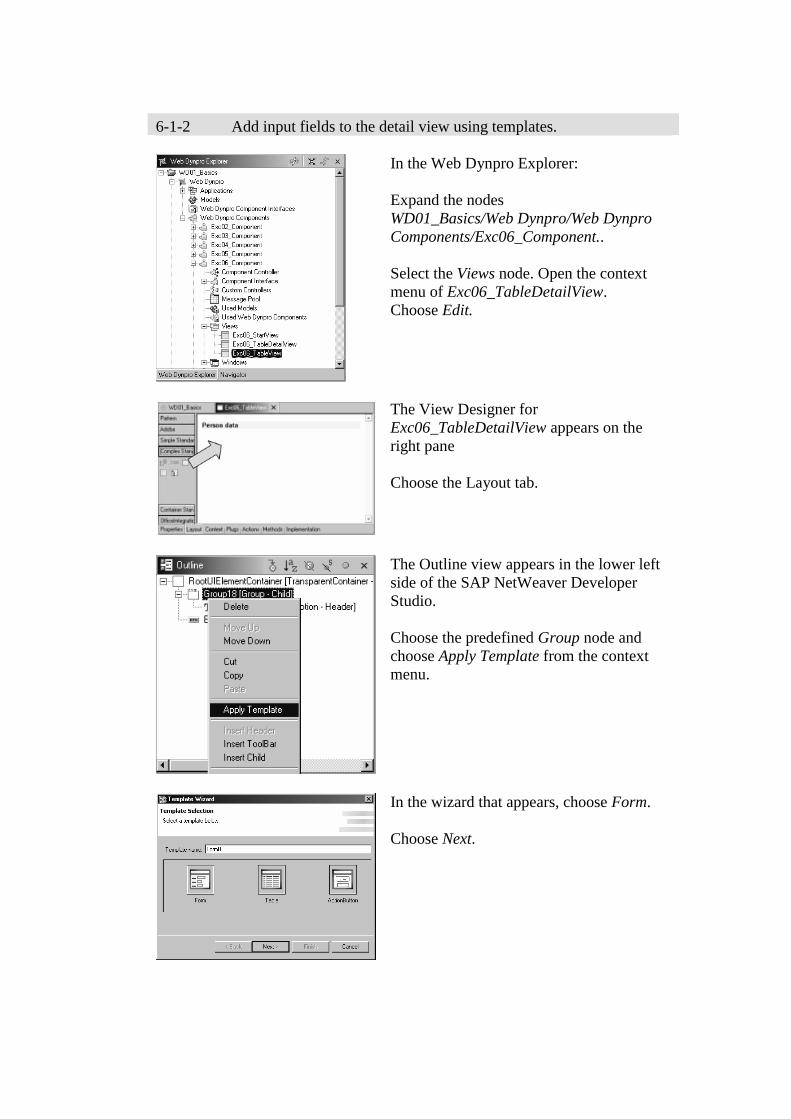
6-1-2 Add input fields to the detail view using templates.
In the Web Dynpro Explorer: Expand the nodes WD01_Basics/Web Dynpro/Web Dynpro Components/Exc06_Component.. Select the Views node. Open the context menu of Exc06_TableDetailView. Choose Edit.
The View Designer for Exc06_TableDetailView appears on the right pane Choose the Layout tab.
The Outline view appears in the lower left side of the SAP NetWeaver Developer Studio. Choose the predefined Group node and choose Apply Template from the context menu.
In the wizard that appears, choose Form. Choose Next.
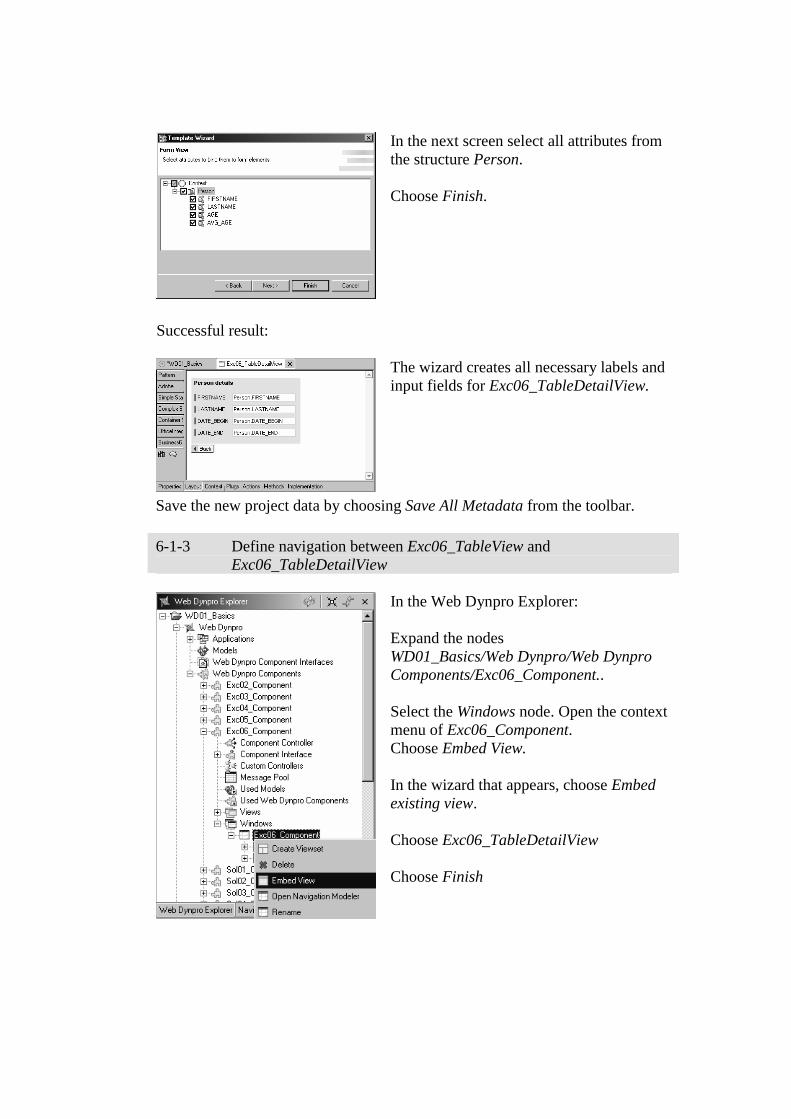
In the next screen select all attributes from the structure Person. Choose Finish.
Successful result:
The wizard creates all necessary labels and input fields for Exc06_TableDetailView.
Save the new project data by choosing Save All Metadata from the toolbar.
6-1-3 Define navigation between Exc06_TableView and Exc06_TableDetailView
In the Web Dynpro Explorer: Expand the nodes WD01_Basics/Web Dynpro/Web Dynpro Components/Exc06_Component.. Select the Windows node. Open the context menu of Exc06_Component. Choose Embed View. In the wizard that appears, choose Embed existing view. Choose Exc06_TableDetailView Choose Finish
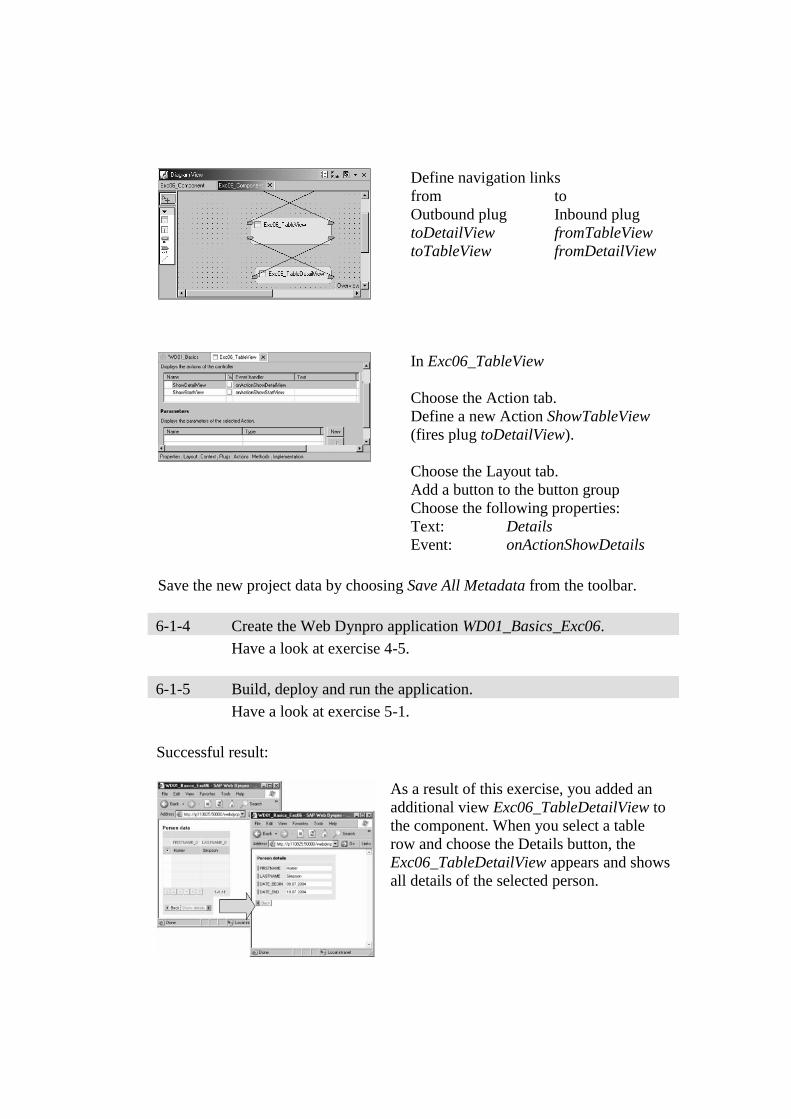
Define navigation links from to Outbound plug Inbound plug toDetailView fromTableView toTableView fromDetailView
In Exc06_TableView Choose the Action tab. Define a new Action ShowTableView (fires plug toDetailView). Choose the Layout tab. Add a button to the button group Choose the following properties: Text: Details Event: onActionShowDetails
Save the new project data by choosing Save All Metadata from the toolbar.
6-1-4 Create the Web Dynpro application WD01_Basics_Exc06. Have a look at exercise 4-5.
6-1-5 Build, deploy and run the application. Have a look at exercise 5-1.
Successful result:
As a result of this exercise, you added an additional view Exc06_TableDetailView to the component. When you select a table row and choose the Details button, the Exc06_TableDetailView appears and shows all details of the selected person.
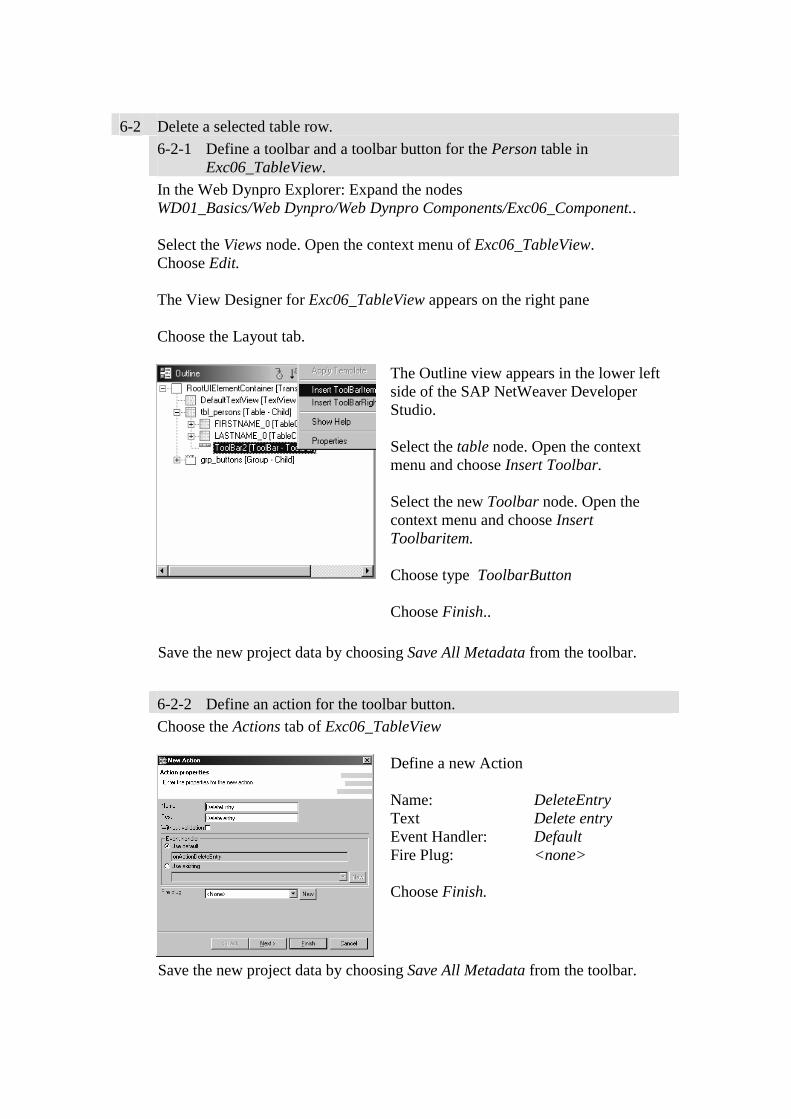
6-2 Delete a selected table row. 6-2-1 Define a toolbar and a toolbar button for the Person table in
Exc06_TableView. In the Web Dynpro Explorer: Expand the nodes
WD01_Basics/Web Dynpro/Web Dynpro Components/Exc06_Component.. Select the Views node. Open the context menu of Exc06_TableView. Choose Edit. The View Designer for Exc06_TableView appears on the right pane Choose the Layout tab.
The Outline view appears in the lower left side of the SAP NetWeaver Developer Studio. Select the table node. Open the context menu and choose Insert Toolbar. Select the new Toolbar node. Open the context menu and choose Insert Toolbaritem. Choose type ToolbarButton Choose Finish..
Save the new project data by choosing Save All Metadata from the toolbar.
6-2-2 Define an action for the toolbar button. Choose the Actions tab of Exc06_TableView
Define a new Action Name: DeleteEntry Text Delete entry Event Handler: Default Fire Plug: <none> Choose Finish.
Save the new project data by choosing Save All Metadata from the toolbar.

6-2-3 Implement the event handler for deleting a person entry.. Choose the Implementaion tab of Exc06_TableView
Insert the following code in method onActionDeletePerson(…) (For your convenience: You can cut and paste the code from the implementation of Sol06_TableView) public void onActionDeleteEntry(com.sap.tc.webdynpro. progmodel.api.IWDCustomEvent wdEvent ) { //@@begin onActionDeleteEntry(ServerEvent) int n = wdContext.nodePerson().size(); int leadSelected = wdContext.nodePerson().getLeadSelection(); // loop backwards to avoid index troubles for (int i = n - 1; i >= 0; --i) { if (wdContext.nodePerson().isMultiSelected(i) || leadSelected == i) { wdContext.nodePerson().removeElement( wdContext.nodePerson().getElementAt(i)); } //if } //for //@@end
}
Save the new project data by choosing Save All Metadata from the toolbar.
6-2-4 Assign the delete action to the delete button. Choose the Layout tab of Exc06_TableView
Update the properties of the toolbar button. text: <> At runtime this will be replaced by the text Delete entry that you have defined when you created the DeleteEntry action. onAction DeleteEntry
Save the new project data by choosing Save All Metadata from the toolbar.
6-2-5 Create the Web Dynpro application WD01_Basics_Exc06. Have a look at exercise 4-5. 6-2-6 Build, deploy and run the application. Have a look at exercise 5-1.
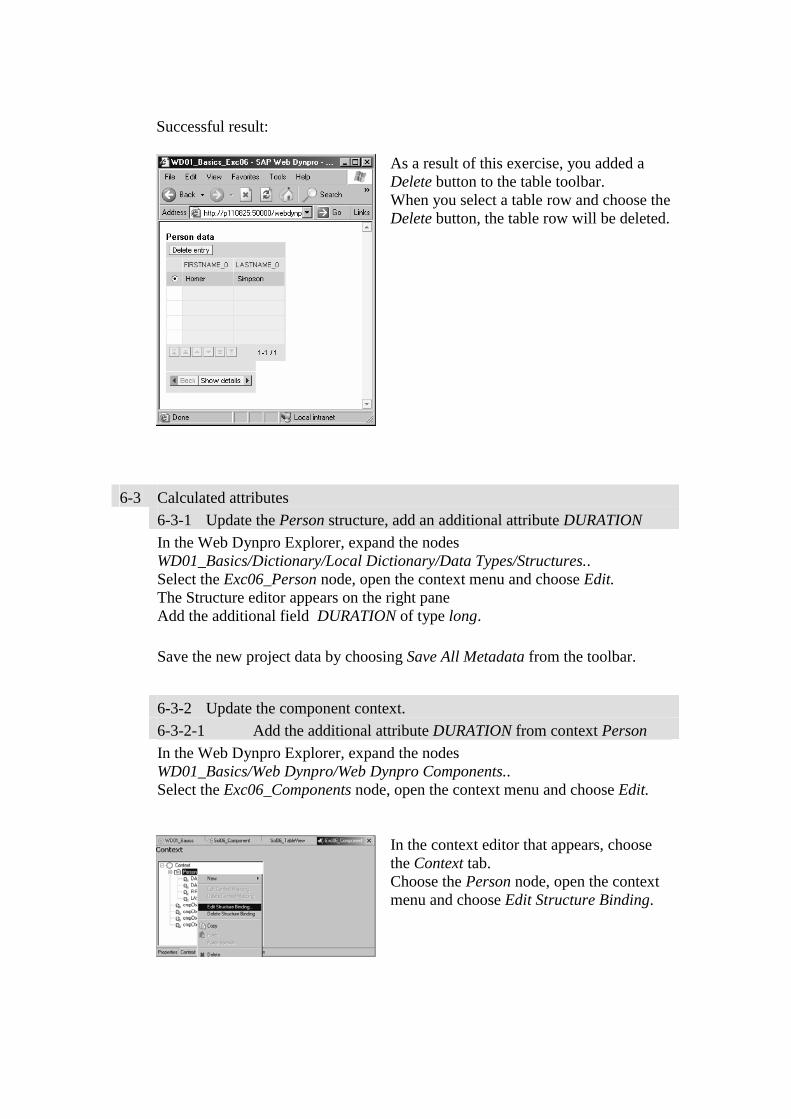
Successful result:
As a result of this exercise, you added a Delete button to the table toolbar. When you select a table row and choose the Delete button, the table row will be deleted.
6-3 Calculated attributes 6-3-1 Update the Person structure, add an additional attribute DURATION In the Web Dynpro Explorer, expand the nodes
WD01_Basics/Dictionary/Local Dictionary/Data Types/Structures.. Select the Exc06_Person node, open the context menu and choose Edit. The Structure editor appears on the right pane Add the additional field DURATION of type long.
Save the new project data by choosing Save All Metadata from the toolbar.
6-3-2 Update the component context. 6-3-2-1 Add the additional attribute DURATION from context Person
In the Web Dynpro Explorer, expand the nodes WD01_Basics/Web Dynpro/Web Dynpro Components.. Select the Exc06_Components node, open the context menu and choose Edit.
In the context editor that appears, choose the Context tab. Choose the Person node, open the context menu and choose Edit Structure Binding.
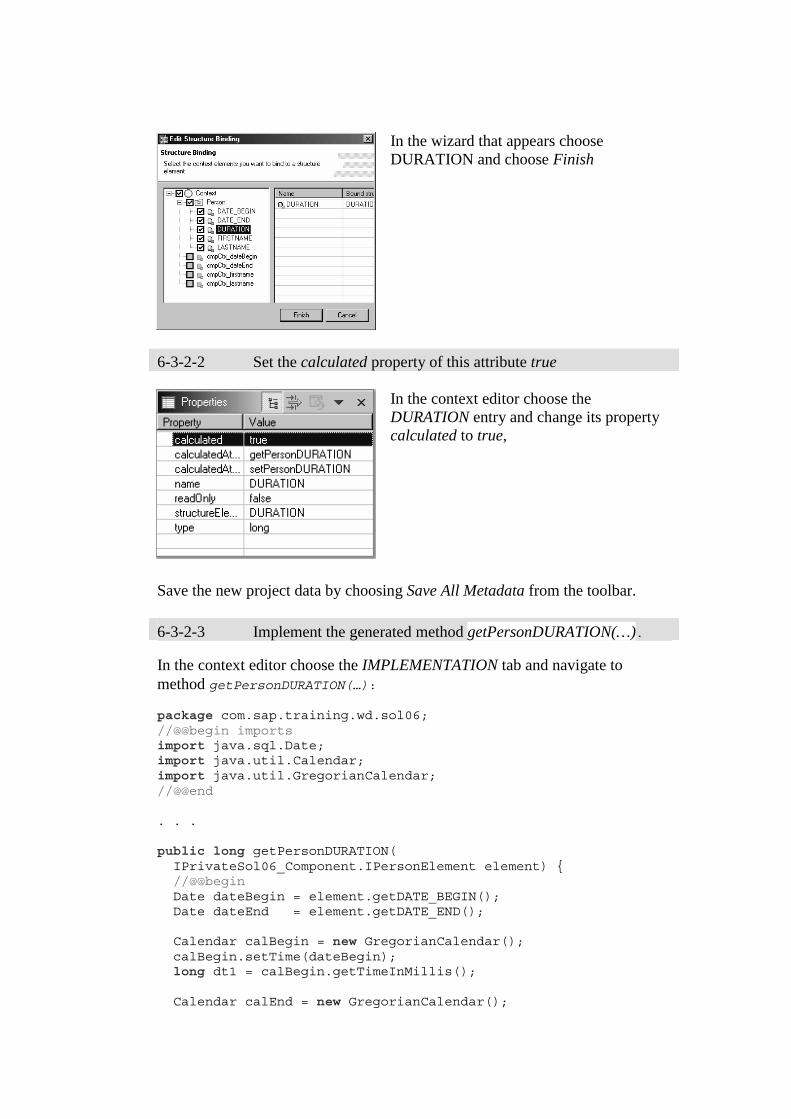
In the wizard that appears choose DURATION and choose Finish
6-3-2-2 Set the calculated property of this attribute true
In the context editor choose the DURATION entry and change its property calculated to true,
Save the new project data by choosing Save All Metadata from the toolbar.
6-3-2-3 Implement the generated method getPersonDURATION(…).
In the context editor choose the IMPLEMENTATION tab and navigate to method getPersonDURATION(…): package com.sap.training.wd.sol06; //@@begin imports import java.sql.Date; import java.util.Calendar; import java.util.GregorianCalendar; //@@end . . . public long getPersonDURATION( IPrivateSol06_Component.IPersonElement element) { //@@begin Date dateBegin = element.getDATE_BEGIN(); Date dateEnd = element.getDATE_END(); Calendar calBegin = new GregorianCalendar(); calBegin.setTime(dateBegin); long dt1 = calBegin.getTimeInMillis(); Calendar calEnd = new GregorianCalendar();
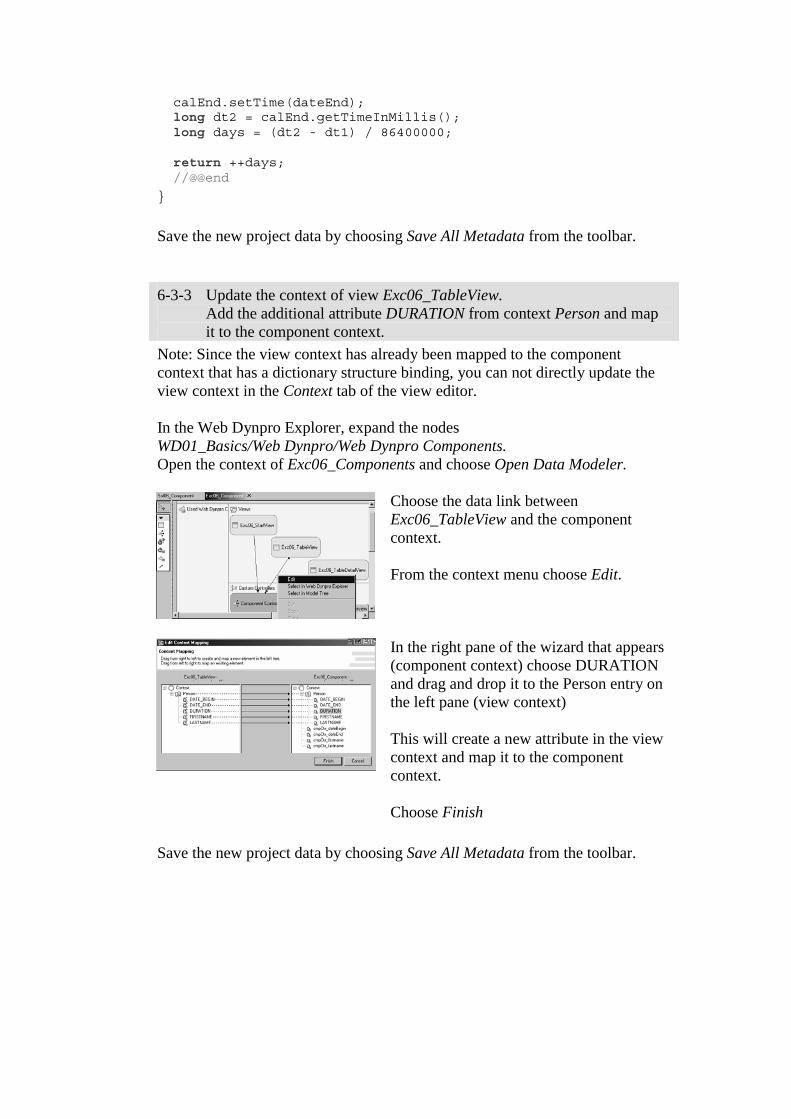
calEnd.setTime(dateEnd); long dt2 = calEnd.getTimeInMillis(); long days = (dt2 - dt1) / 86400000; return ++days; //@@end
}
Save the new project data by choosing Save All Metadata from the toolbar.
6-3-3 Update the context of view Exc06_TableView. Add the additional attribute DURATION from context Person and map it to the component context.
Note: Since the view context has already been mapped to the component context that has a dictionary structure binding, you can not directly update the view context in the Context tab of the view editor. In the Web Dynpro Explorer, expand the nodes WD01_Basics/Web Dynpro/Web Dynpro Components. Open the context of Exc06_Components and choose Open Data Modeler.
Choose the data link between Exc06_TableView and the component context. From the context menu choose Edit.
In the right pane of the wizard that appears (component context) choose DURATION and drag and drop it to the Person entry on the left pane (view context) This will create a new attribute in the view context and map it to the component context. Choose Finish
Save the new project data by choosing Save All Metadata from the toolbar.
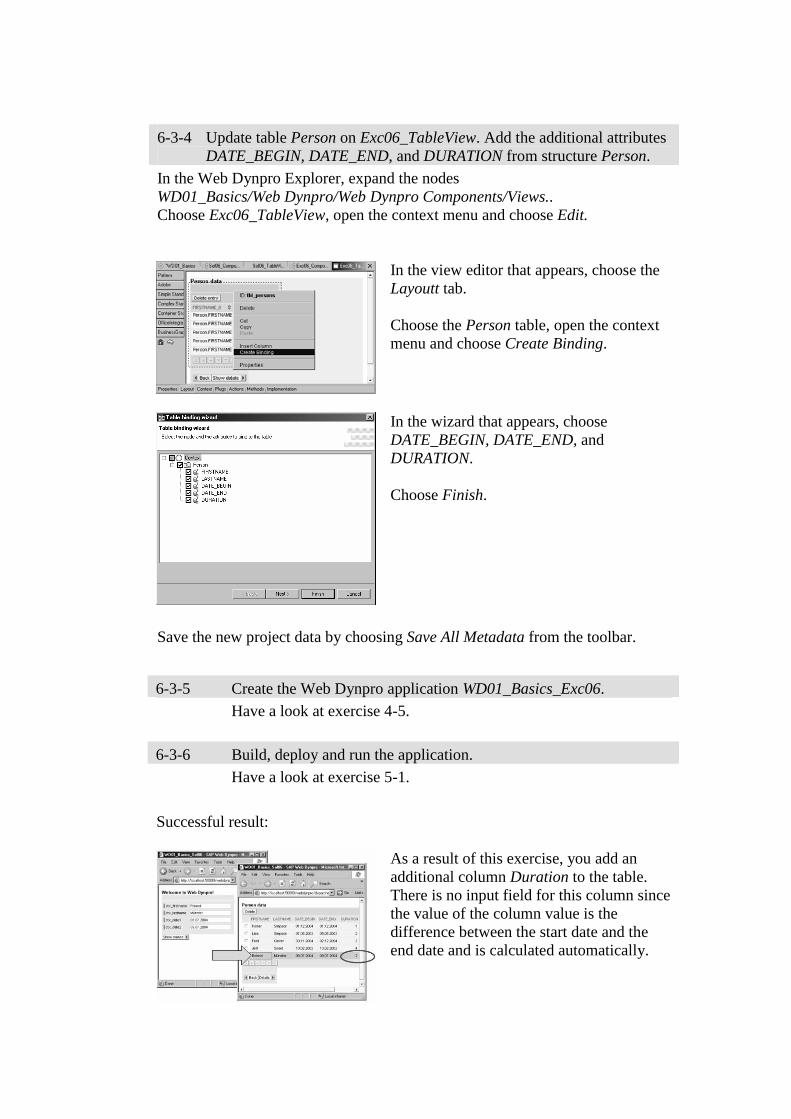
6-3-4 Update table Person on Exc06_TableView. Add the additional attributes
DATE_BEGIN, DATE_END, and DURATION from structure Person.
In the Web Dynpro Explorer, expand the nodes WD01_Basics/Web Dynpro/Web Dynpro Components/Views.. Choose Exc06_TableView, open the context menu and choose Edit.
In the view editor that appears, choose the Layoutt tab. Choose the Person table, open the context menu and choose Create Binding.
In the wizard that appears, choose DATE_BEGIN, DATE_END, and DURATION. Choose Finish.
Save the new project data by choosing Save All Metadata from the toolbar.
6-3-5 Create the Web Dynpro application WD01_Basics_Exc06. Have a look at exercise 4-5. 6-3-6 Build, deploy and run the application. Have a look at exercise 5-1.
Successful result:
As a result of this exercise, you add an additional column Duration to the table. There is no input field for this column since the value of the column value is the difference between the start date and the end date and is calculated automatically.


Web Dynpro Debugging, Solution
Topic: Web Dynpro Debugging
At the end of this Exercise, you are able to:
1) Debug and change the Component Context of a running Web Dynpro application.
2) Optional – HotSwap code
4 Debugging, Step-by-Step 4-1 Web Dynpro Debugging 4-1-1 Switching Server Nodes to Debug Mode.
From Web Dynpro Explorer Perspective: To be able to debug within a running Web Dynpro application, you must activate debugging for the server process of the J2EE Engine. You activate this in the J2EE Engine view. 1. If necessary, open the J2EE Engine view. To do so, choose Window → Show View → Other and then select J2EE → J2EE Engine. Choose OK to confirm your entries. The system displays a view containing status information about the running J2EE Engine. 2. Expand the tree display fully until you can see the actual server process (for example server0). 3. Right-click the server node and then choose Enable debugging of process from the context menu. Result The server process is stopped and restarted in debugging mode. Only the ON value is shown for Debug Mode. To display the current status of the server, in the view toolbar, choose Refresh. Wait until the server has the status Running
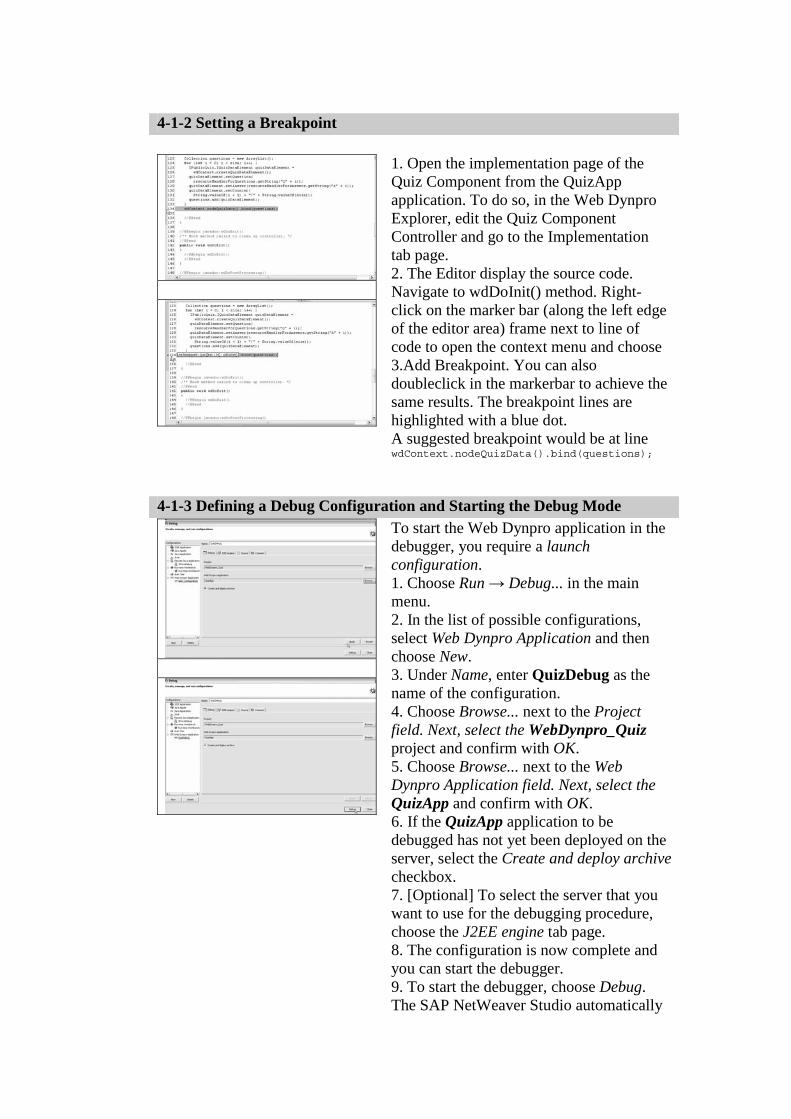
4-1-2 Setting a Breakpoint
1. Open the implementation page of the Quiz Component from the QuizApp application. To do so, in the Web Dynpro Explorer, edit the Quiz Component Controller and go to the Implementation tab page. 2. The Editor display the source code. Navigate to wdDoInit() method. Right-click on the marker bar (along the left edge of the editor area) frame next to line of code to open the context menu and choose 3.Add Breakpoint. You can also doubleclick in the markerbar to achieve the same results. The breakpoint lines are highlighted with a blue dot. A suggested breakpoint would be at line wdContext.nodeQuizData().bind(questions);
4-1-3 Defining a Debug Configuration and Starting the Debug Mode
To start the Web Dynpro application in the debugger, you require a launch configuration. 1. Choose Run → Debug... in the main menu. 2. In the list of possible configurations, select Web Dynpro Application and then choose New. 3. Under Name, enter QuizDebug as the name of the configuration. 4. Choose Browse... next to the Project field. Next, select the WebDynpro_Quiz project and confirm with OK. 5. Choose Browse... next to the Web Dynpro Application field. Next, select the QuizApp and confirm with OK. 6. If the QuizApp application to be debugged has not yet been deployed on the server, select the Create and deploy archive checkbox. 7. [Optional] To select the server that you want to use for the debugging procedure, choose the J2EE engine tab page. 8. The configuration is now complete and you can start the debugger. 9. To start the debugger, choose Debug. The SAP NetWeaver Studio automatically
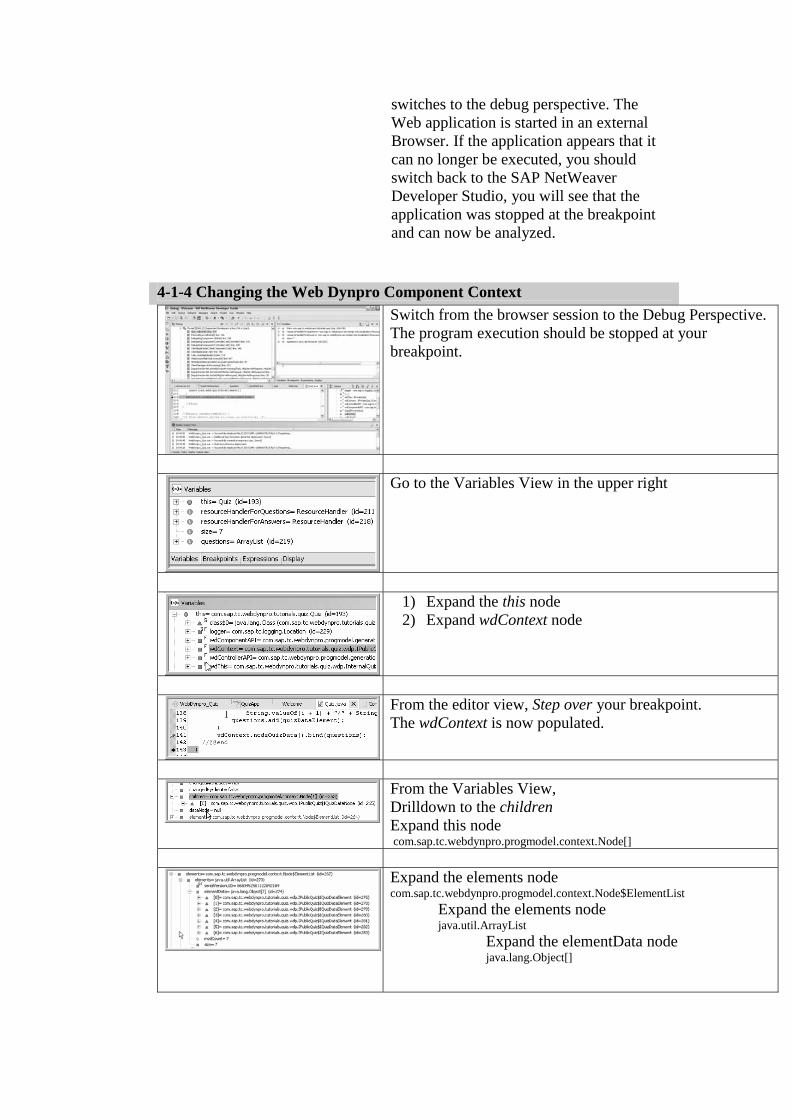
switches to the debug perspective. The Web application is started in an external Browser. If the application appears that it can no longer be executed, you should switch back to the SAP NetWeaver Developer Studio, you will see that the application was stopped at the breakpoint and can now be analyzed.
4-1-4 Changing the Web Dynpro Component Context
Switch from the browser session to the Debug Perspective. The program execution should be stopped at your breakpoint.
Go to the Variables View in the upper right
1) Expand the this node 2) Expand wdContext node
From the editor view, Step over your breakpoint. The wdContext is now populated.
From the Variables View, Drilldown to the children Expand this node com.sap.tc.webdynpro.progmodel.context.Node[]
Expand the elements node com.sap.tc.webdynpro.progmodel.context.Node$ElementList
Expand the elements node java.util.ArrayList
Expand the elementData node java.lang.Object[]
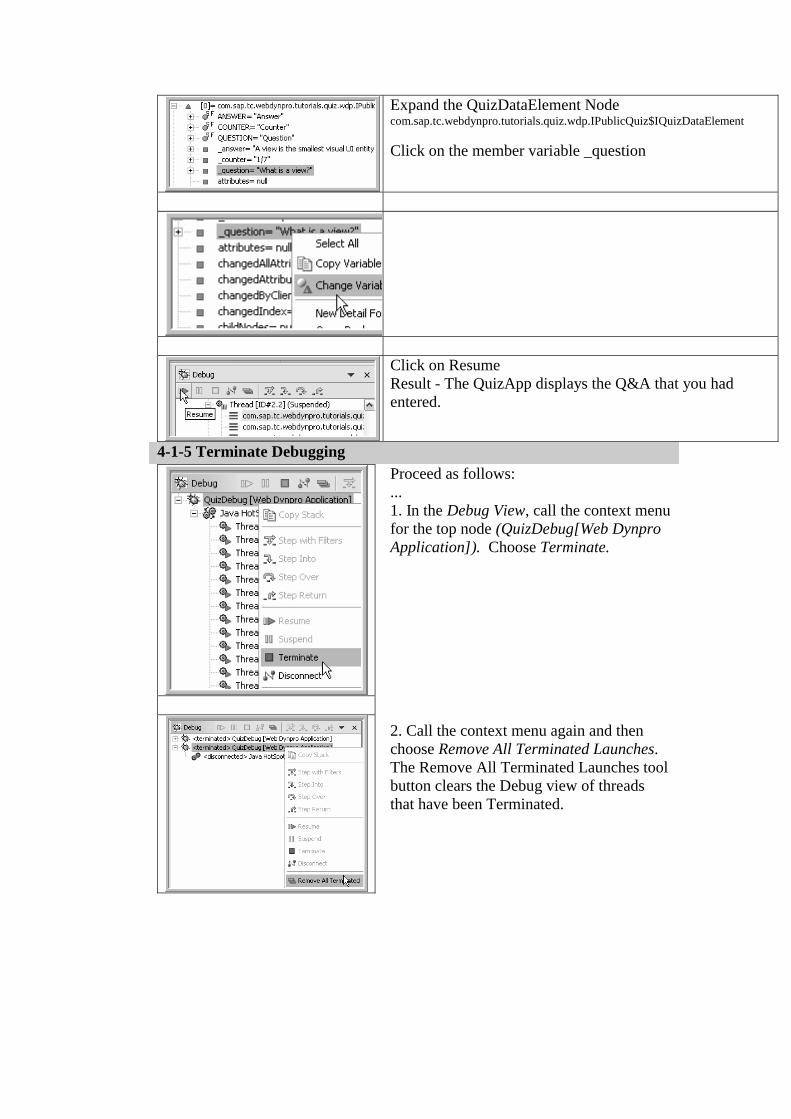
Expand the QuizDataElement Node com.sap.tc.webdynpro.tutorials.quiz.wdp.IPublicQuiz$IQuizDataElement
Click on the member variable _question
Click on Resume Result - The QuizApp displays the Q&A that you had entered.
4-1-5 Terminate Debugging
Proceed as follows: ... 1. In the Debug View, call the context menu for the top node (QuizDebug[Web Dynpro Application]). Choose Terminate. 2. Call the context menu again and then choose Remove All Terminated Launches. The Remove All Terminated Launches tool button clears the Debug view of threads that have been Terminated.
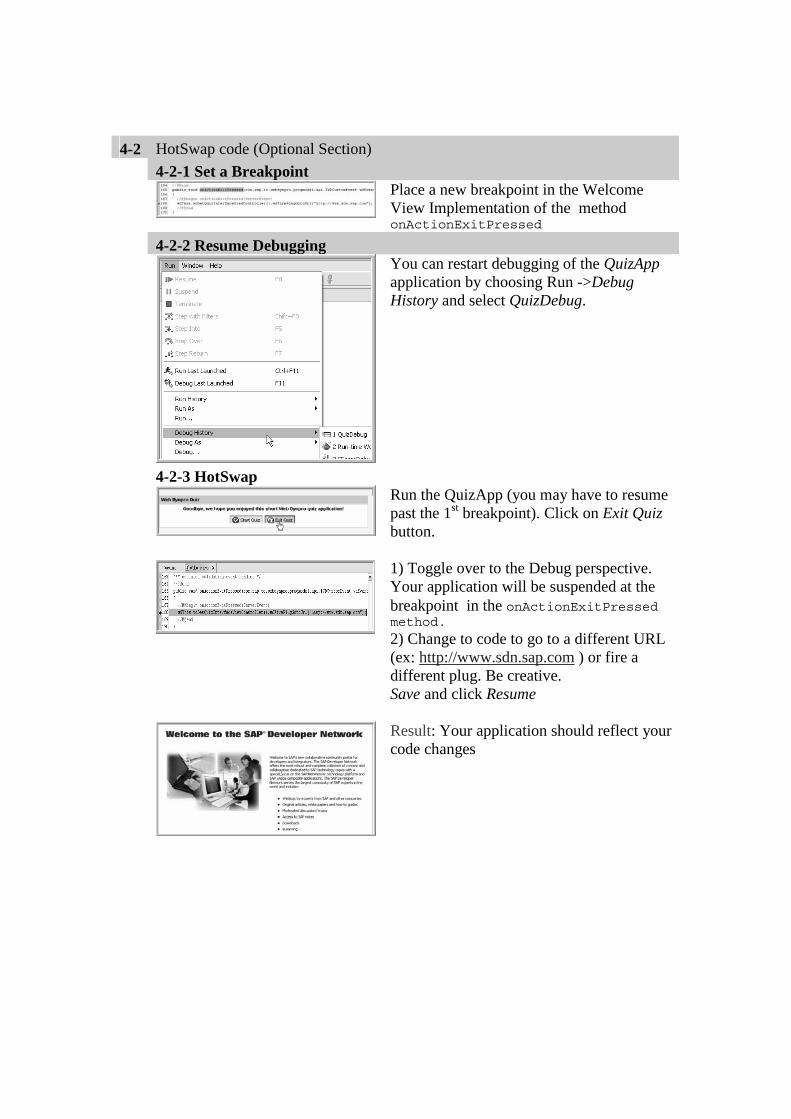
4-2 HotSwap code (Optional Section) 4-2-1 Set a Breakpoint
Place a new breakpoint in the Welcome View Implementation of the method onActionExitPressed
4-2-2 Resume Debugging
You can restart debugging of the QuizApp application by choosing Run ->Debug History and select QuizDebug.
4-2-3 HotSwap
Run the QuizApp (you may have to resume past the 1st breakpoint). Click on Exit Quiz button.
1) Toggle over to the Debug perspective. Your application will be suspended at the breakpoint in the onActionExitPressed method.
2) Change to code to go to a different URL (ex: http://www.sdn.sap.com ) or fire a different plug. Be creative. Save and click Resume
Result: Your application should reflect your code changes
© SAP AG <Course Number> Unit Title - 1
© SAP AG 2003, Title of Presentation, Speaker Name / 1
Prerequisites
Introduction
Basics of SAP User Management
Permissions and Actions
Declarative Control of Application Access
Roles, Users and Groups
Programmical Control of Application Access
Contents:
Web Dynpro Security
© SAP AG <Course Number> Unit Title - 2
© SAP AG 2003, Title of Presentation, Speaker Name / 2
After completing this unit, you will be able to:
See how Web Dynpro fits within Netweaver Security
Know the basics of UME authorization model
Understand how Web Dynpro leverages UME
Know the basics of UME administration
Understand declarative security configuration
Add authorization logic to your Web Dynpro applications
Web Dynpro Security: Unit Objectives

© SAP AG <Course Number> Unit Title - 3
© SAP AG 2003, Title of Presentation, Speaker Name / 3
An Employee Administration Web Dynpro application is available for viewing by HR Managers but only Engineering Managers have “create” and “update” permissions. If the configuration tools used by the system administrator can only limit access to the application as a whole (e.g., either the user has permission to access the application or not), then the application programmer will have to write code to provide finer granularity of access control.
Web Dynpro Security: Business Scenario
© SAP AG <Course Number> Unit Title - 4
© SAP AG 2003, Title of Presentation, Speaker Name / 4
Prerequisites
This unit is not intended to teach the basics of application security
Participants should have a basic understanding of the principles of user authorization and authentication
Web Dynpro Security - Prerequisites
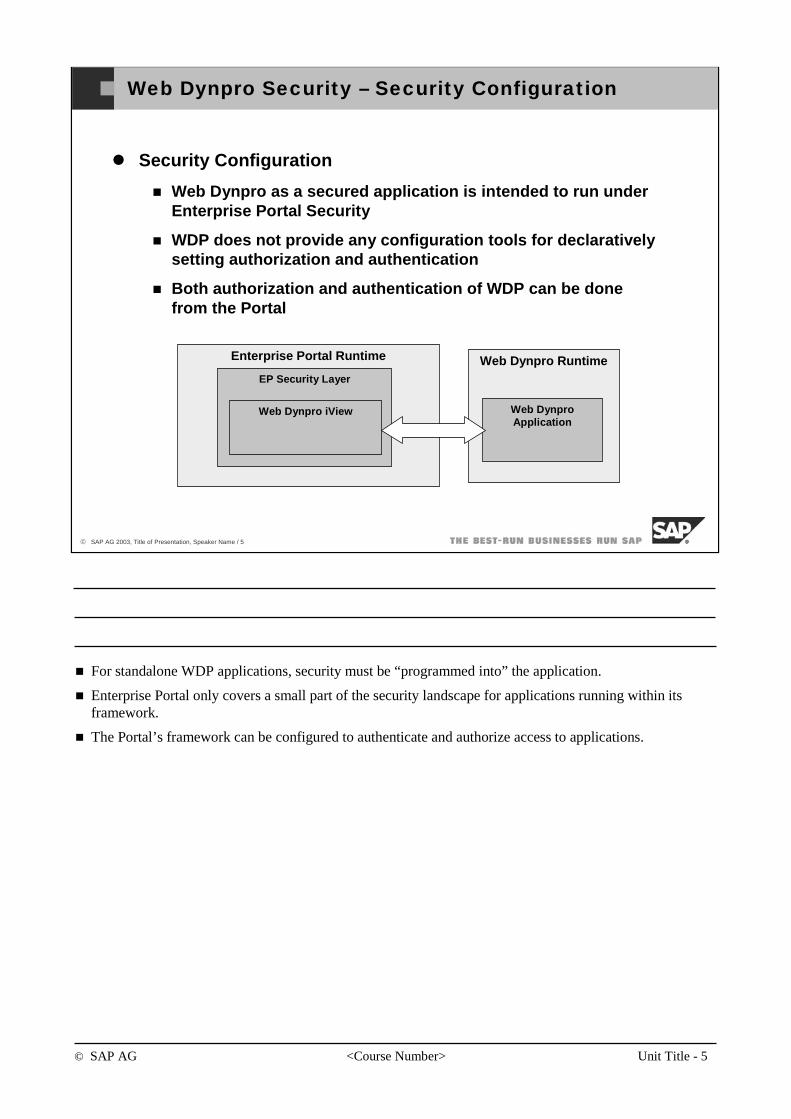
© SAP AG <Course Number> Unit Title - 5
© SAP AG 2003, Title of Presentation, Speaker Name / 5
Security Configuration
Web Dynpro as a secured application is intended to run under Enterprise Portal Security
WDP does not provide any configuration tools for declaratively setting authorization and authentication
Both authorization and authentication of WDP can be done from the Portal
Web Dynpro Security – Security Configuration
Enterprise Portal Runtime
EP Security Layer
Web Dynpro iView
Web Dynpro Runtime
Web Dynpro Application
For standalone WDP applications, security must be “programmed into” the application.
Enterprise Portal only covers a small part of the security landscape for applications running within its framework.
The Portal’s framework can be configured to authenticate and authorize access to applications.
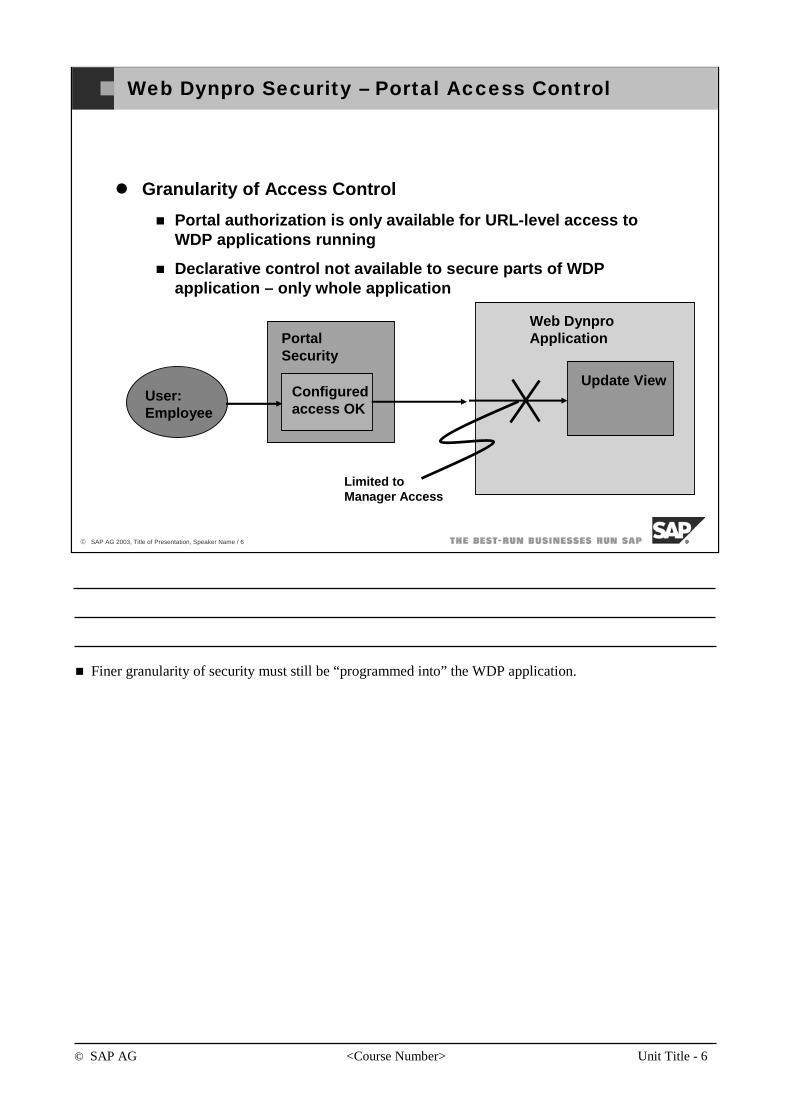
© SAP AG <Course Number> Unit Title - 6
© SAP AG 2003, Title of Presentation, Speaker Name / 6
Granularity of Access Control
Portal authorization is only available for URL-level access to WDP applications running
Declarative control not available to secure parts of WDP application – only whole application
Web Dynpro Security – Portal Access Control
User: Employee
Portal Security
Configured access OK
Web Dynpro Application
Update View
Limited to Manager Access
Finer granularity of security must still be “programmed into” the WDP application.
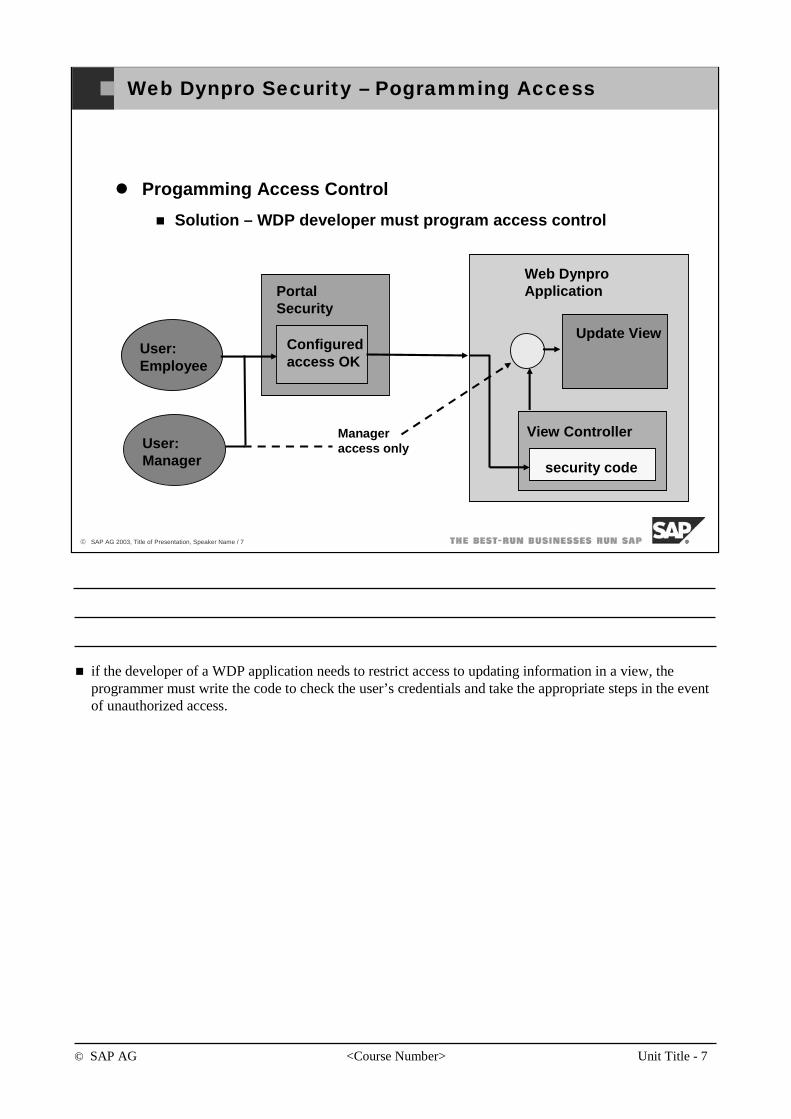
© SAP AG <Course Number> Unit Title - 7
© SAP AG 2003, Title of Presentation, Speaker Name / 7
Progamming Access Control
Solution – WDP developer must program access control
Web Dynpro Security – Pogramming Access
User: Employee
Portal Security
Configured access OK
Web Dynpro Application
Update View
User: Manager
View Controller
security code
Manager access only
if the developer of a WDP application needs to restrict access to updating information in a view, the programmer must write the code to check the user’s credentials and take the appropriate steps in the event of unauthorized access.
© SAP AG <Course Number> Unit Title - 8
© SAP AG 2003, Title of Presentation, Speaker Name / 8
User Management Engine
The UME runs as a service within the SAP J2EE Engine
Includes API for programming and GUI’s for administration
UME is the “glue” that ties together user management throughout the entire Netweaver Platform
Fully configurable and programmable interface for both the ABAP and J2EE runtime stacks
Basic categories of UME security are:
Authorization: What is this user allowed to do?
Authentication: Which user is logged in?
Profile: What’s the user’s name, address, …
Web Dynpro Security – Intro UME
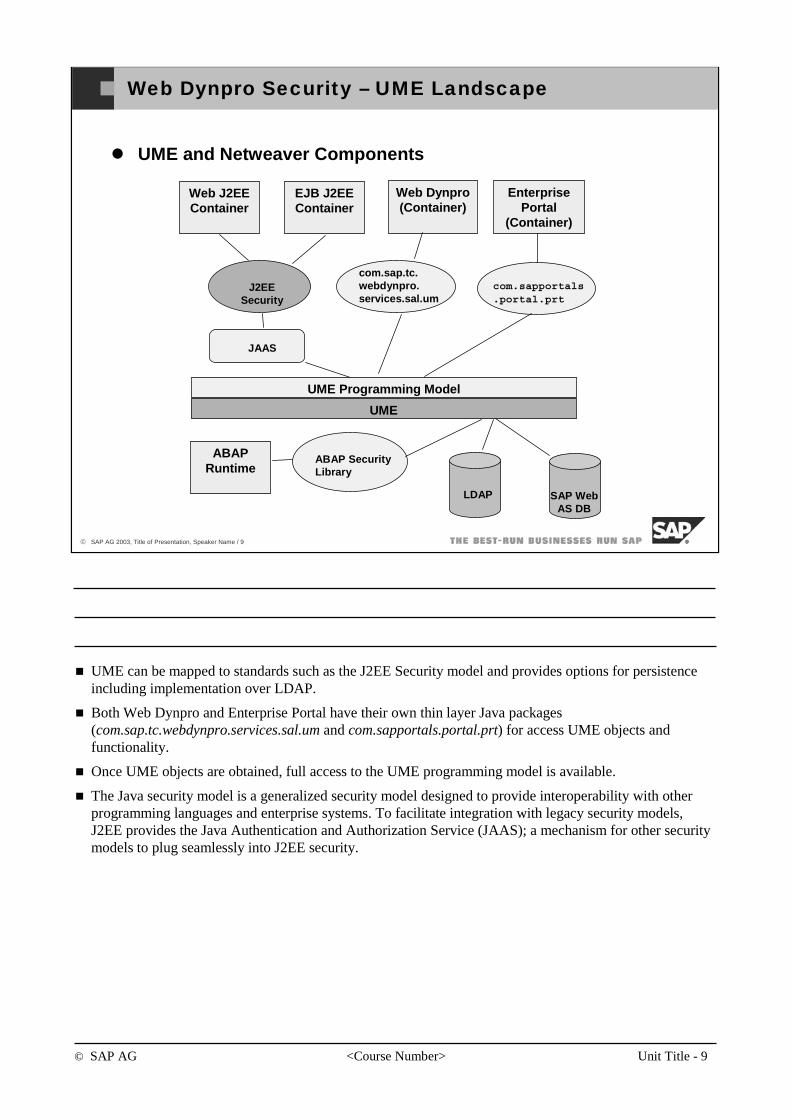
© SAP AG <Course Number> Unit Title - 9
© SAP AG 2003, Title of Presentation, Speaker Name / 9
UME and Netweaver Components
Web Dynpro Security – UME Landscape
Web J2EE Container
EJB J2EE Container
Web Dynpro (Container)
Enterprise Portal
(Container)
J2EE Security
com.sap.tc.webdynpro.services.sal.um
com.sapportals.portal.prt
JAAS
UME
LDAP SAP Web AS DB
ABAP Runtime
ABAP Security Library
UME Programming Model
UME can be mapped to standards such as the J2EE Security model and provides options for persistence including implementation over LDAP.
Both Web Dynpro and Enterprise Portal have their own thin layer Java packages (com.sap.tc.webdynpro.services.sal.um and com.sapportals.portal.prt) for access UME objects and functionality.
Once UME objects are obtained, full access to the UME programming model is available.
The Java security model is a generalized security model designed to provide interoperability with other programming languages and enterprise systems. To facilitate integration with legacy security models, J2EE provides the Java Authentication and Authorization Service (JAAS); a mechanism for other security models to plug seamlessly into J2EE security.
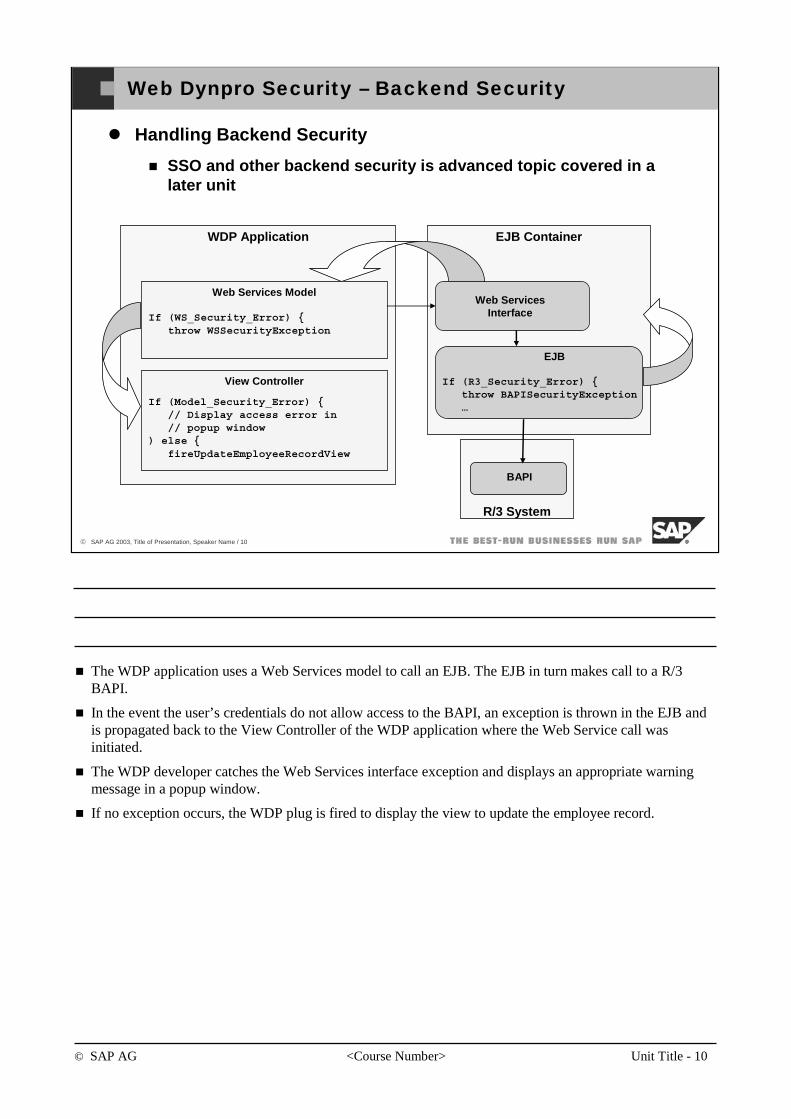
© SAP AG <Course Number> Unit Title - 10
© SAP AG 2003, Title of Presentation, Speaker Name / 10
Handling Backend Security
SSO and other backend security is advanced topic covered in a later unit
Web Dynpro Security – Backend Security
WDP Application EJB Container
R/3 System
Web Services Model
If (WS_Security_Error) {throw WSSecurityException
Web Services Interface
EJB
If (R3_Security_Error) {throw BAPISecurityException…
BAPI
View Controller
If (Model_Security_Error) {// Display access error in // popup window
) else {fireUpdateEmployeeRecordView
The WDP application uses a Web Services model to call an EJB. The EJB in turn makes call to a R/3 BAPI.
In the event the user’s credentials do not allow access to the BAPI, an exception is thrown in the EJB and is propagated back to the View Controller of the WDP application where the Web Service call was initiated.
The WDP developer catches the Web Services interface exception and displays an appropriate warning message in a popup window.
If no exception occurs, the WDP plug is fired to display the view to update the employee record.
© SAP AG <Course Number> Unit Title - 11
© SAP AG 2003, Title of Presentation, Speaker Name / 11
Definition of Permissions and Actions
Internally, UME uses Java Permissions for access control.
A permission object consists of a target ("On whom will the action controlled by this permission be performed?") and an action
Java Permissions are programmatic but are also referenced in the declarative part of UME.
A Permission is basically a software class that is programmed to provide various checks on declarative Actions.
Permission class may be used with multiple applications.
Web Dynpro Security – Definition Permissions and Actions
All Java Permissions inherit from the java.security.Permission base class.
There are many built-in permissions in the J2EE platform such as FilePermission, SocketPermission, etc.
Generally, WDP application developers will create their own permission class that inherits from a base UME permission class (that eventually inherits from the java.security.Permission base class.)
There is nothing within the framework that requires application developers to create unique permission classes for each application. These can be developed and reused for various applications that need a similar permissions structure.
For example, a general purpose DocumentPermission class may be useful for many applications.
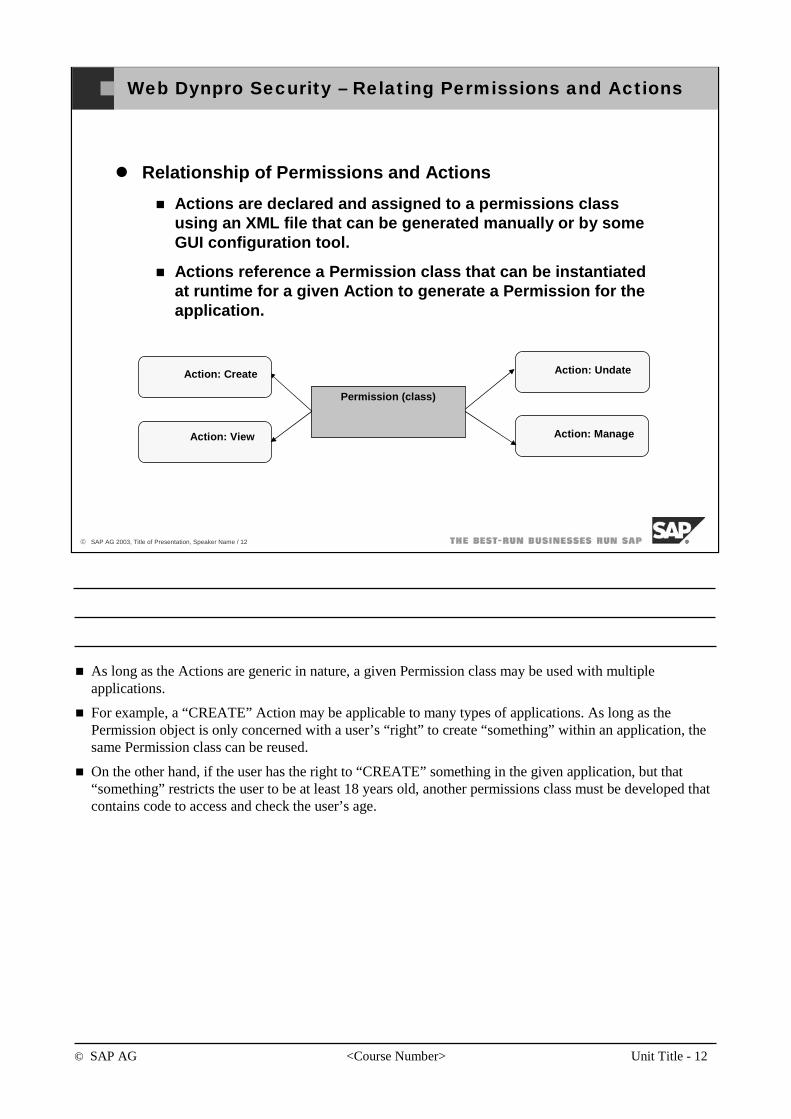
© SAP AG <Course Number> Unit Title - 12
© SAP AG 2003, Title of Presentation, Speaker Name / 12
Relationship of Permissions and Actions
Actions are declared and assigned to a permissions class using an XML file that can be generated manually or by some GUI configuration tool.
Actions reference a Permission class that can be instantiated at runtime for a given Action to generate a Permission for the application.
Web Dynpro Security – Relating Permissions and Actions
Permission (class)
Action: Undate
Action: ManageAction: View
Action: Create
As long as the Actions are generic in nature, a given Permission class may be used with multiple applications.
For example, a “CREATE” Action may be applicable to many types of applications. As long as the Permission object is only concerned with a user’s “right” to create “something” within an application, the same Permission class can be reused.
On the other hand, if the user has the right to “CREATE” something in the given application, but that “something” restricts the user to be at least 18 years old, another permissions class must be developed that contains code to access and check the user’s age.
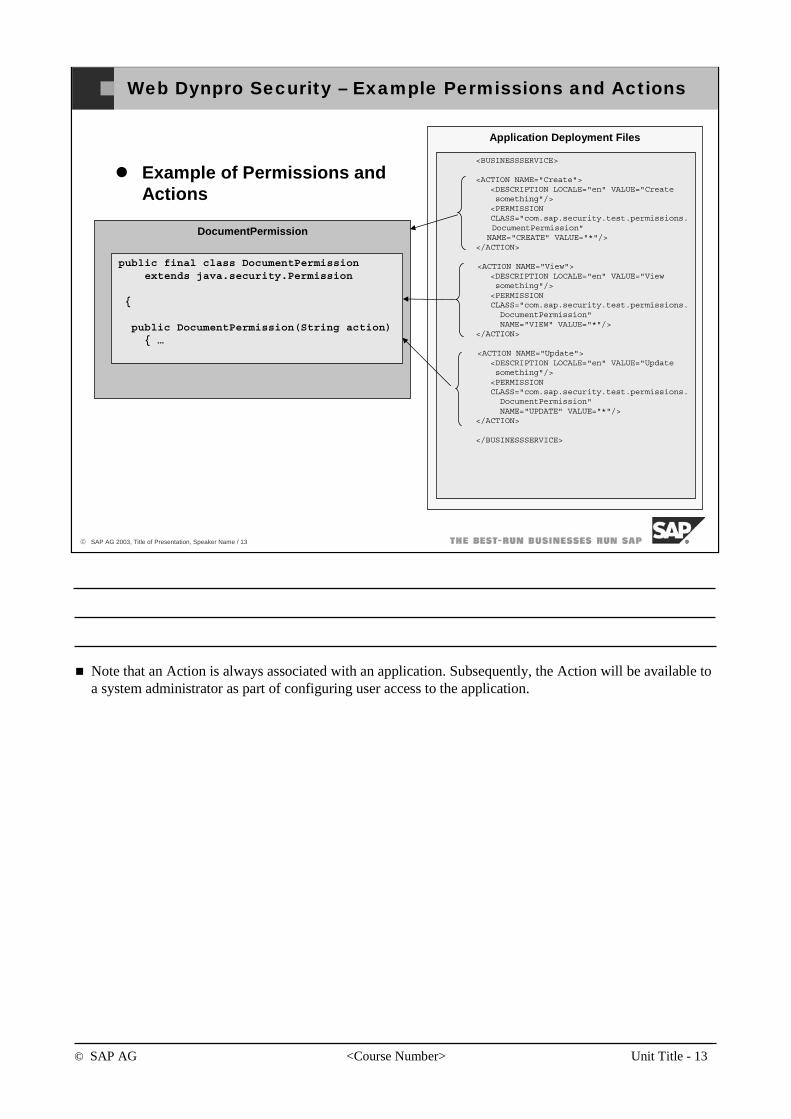
© SAP AG <Course Number> Unit Title - 13
© SAP AG 2003, Title of Presentation, Speaker Name / 13
Example of Permissions and Actions
Web Dynpro Security – Example Permissions and Actions
DocumentPermission
public final class DocumentPermission extends java.security.Permission
{
public DocumentPermission(String action){ …
Application Deployment Files
<BUSINESSSERVICE>
<ACTION NAME="Create"><DESCRIPTION LOCALE="en" VALUE="Create something"/><PERMISSION CLASS="com.sap.security.test.permissions.DocumentPermission"
NAME="CREATE" VALUE="*"/></ACTION>
<ACTION NAME="View"><DESCRIPTION LOCALE="en" VALUE="View something"/><PERMISSION CLASS="com.sap.security.test.permissions.DocumentPermission" NAME="VIEW" VALUE="*"/>
</ACTION>
<ACTION NAME="Update"><DESCRIPTION LOCALE="en" VALUE="Update something"/><PERMISSION CLASS="com.sap.security.test.permissions.DocumentPermission" NAME="UPDATE" VALUE="*"/>
</ACTION>
</BUSINESSSERVICE>
Note that an Action is always associated with an application. Subsequently, the Action will be available to a system administrator as part of configuring user access to the application.
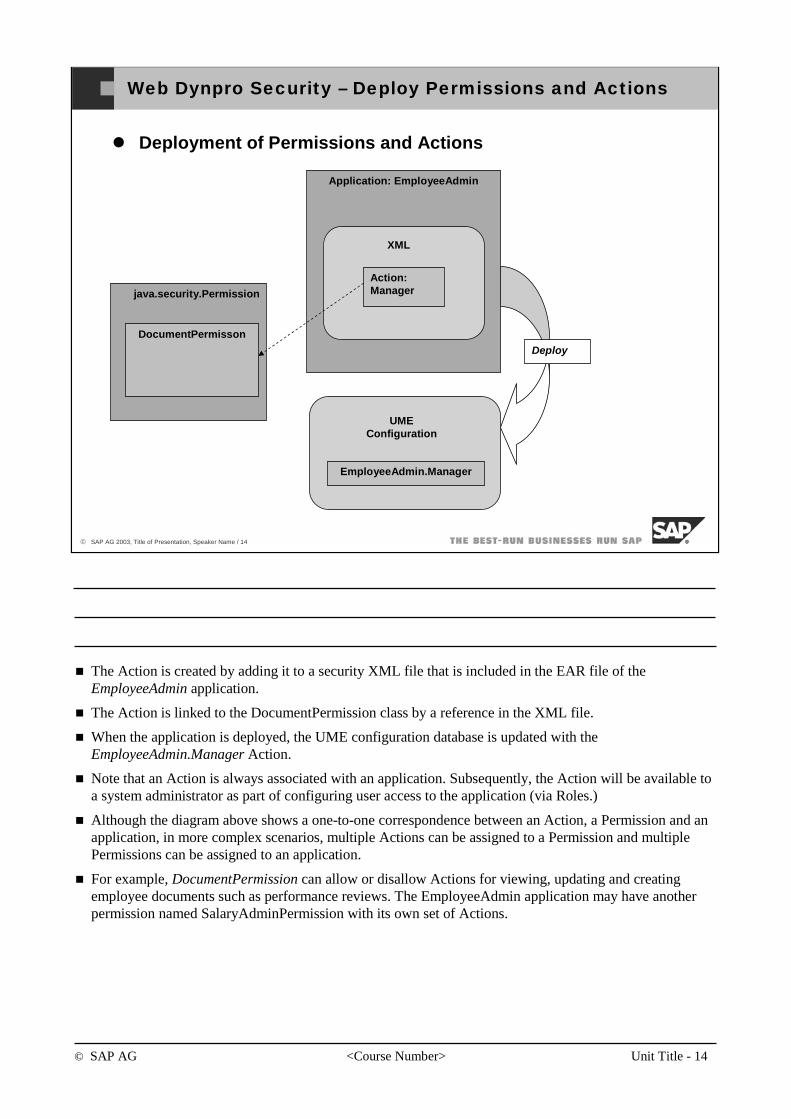
© SAP AG <Course Number> Unit Title - 14
© SAP AG 2003, Title of Presentation, Speaker Name / 14
Deployment of Permissions and Actions
Web Dynpro Security – Deploy Permissions and Actions
java.security.Permission
DocumentPermisson
Application: EmployeeAdmin
XML
Action: Manager
Deploy
UME Configuration
EmployeeAdmin.Manager
The Action is created by adding it to a security XML file that is included in the EAR file of the EmployeeAdmin application.
The Action is linked to the DocumentPermission class by a reference in the XML file.
When the application is deployed, the UME configuration database is updated with the EmployeeAdmin.Manager Action.
Note that an Action is always associated with an application. Subsequently, the Action will be available to a system administrator as part of configuring user access to the application (via Roles.)
Although the diagram above shows a one-to-one correspondence between an Action, a Permission and an application, in more complex scenarios, multiple Actions can be assigned to a Permission and multiple Permissions can be assigned to an application.
For example, DocumentPermission can allow or disallow Actions for viewing, updating and creating employee documents such as performance reviews. The EmployeeAdmin application may have another permission named SalaryAdminPermission with its own set of Actions.

© SAP AG <Course Number> Unit Title - 15
© SAP AG 2003, Title of Presentation, Speaker Name / 15
Declarative Access Control
Application must be configured to restrict access to users based on their allowed Permissions
Users that are allowed access to the application must be configured so they are assigned the required permissions to access the application
WDP applications running under the Enterprise Portal can be configured to control access based on only one user Permission
Standalone WDP applications must program all authorization checks in the application.
Web Dynpro Security – Declarative Access Control
In the simplest case, where access to an application is limited to a certain class of individuals such as managers, a single Action can be declared that effectively represents a class of users instead of a specific action by a user.
Using this approach, the security features of the Enterprise Portal can control application access declaratively
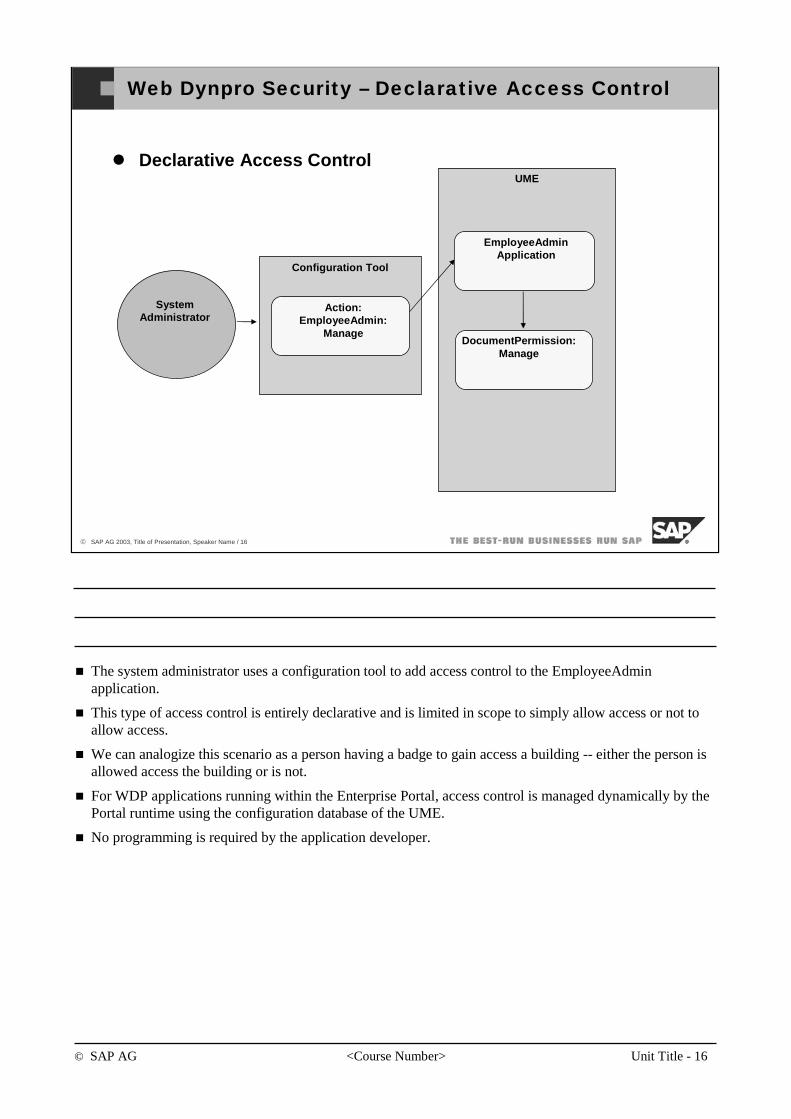
© SAP AG <Course Number> Unit Title - 16
© SAP AG 2003, Title of Presentation, Speaker Name / 16
Declarative Access Control
Web Dynpro Security – Declarative Access Control
Configuration Tool
UME
System Administrator
Action: EmployeeAdmin:
ManageDocumentPermission:
Manage
EmployeeAdmin Application
The system administrator uses a configuration tool to add access control to the EmployeeAdmin application.
This type of access control is entirely declarative and is limited in scope to simply allow access or not to allow access.
We can analogize this scenario as a person having a badge to gain access a building -- either the person is allowed access the building or is not.
For WDP applications running within the Enterprise Portal, access control is managed dynamically by the Portal runtime using the configuration database of the UME.
No programming is required by the application developer.
© SAP AG <Course Number> Unit Title - 17
© SAP AG 2003, Title of Presentation, Speaker Name / 17
Roles, Users and Groups
User access to applications is controlled using Role objects.
Role objects can be created declaratively or programmically
Roles have a name and description that should portray an obvious association between users and the applications they will be using
Roles often correspond to the actual classification of individuals within an organization (e.g., Manager Role.)
Web Dynpro Security – Roles, Users and Groups
Roles are usually created declaratively by a system administrator as part of system configuration.
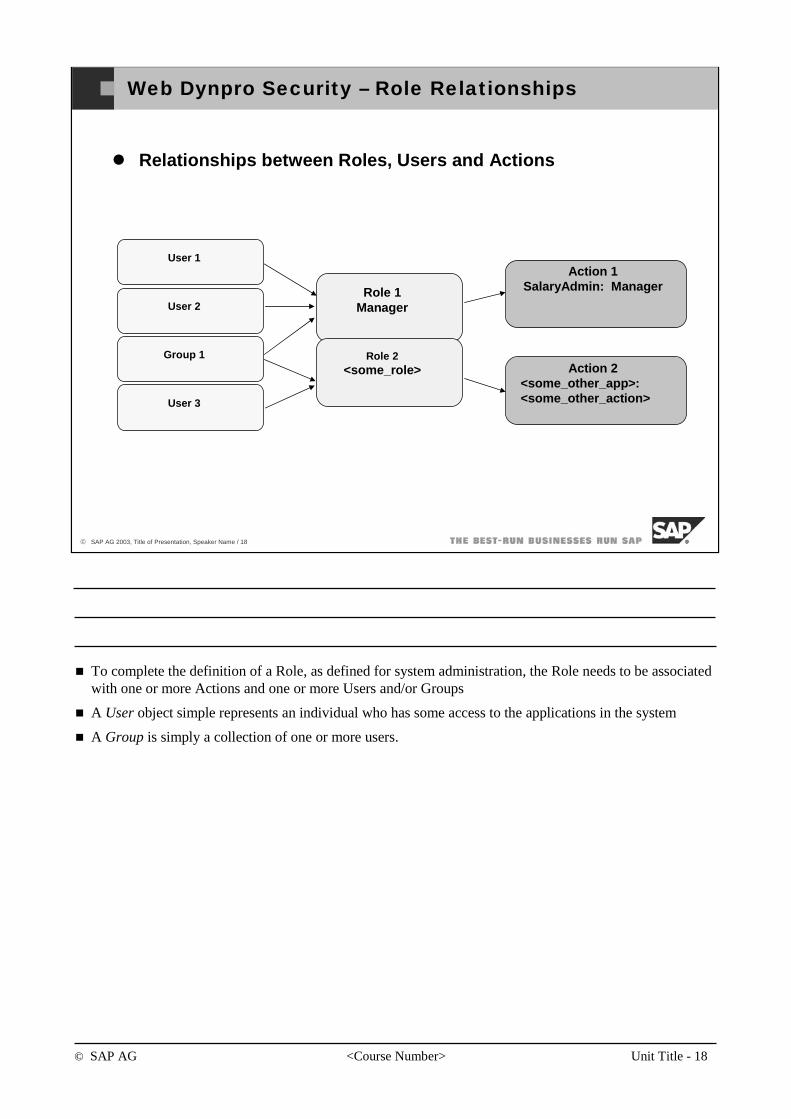
© SAP AG <Course Number> Unit Title - 18
© SAP AG 2003, Title of Presentation, Speaker Name / 18
Relationships between Roles, Users and Actions
Web Dynpro Security – Role Relationships
Role 1Manager
User 1
Role 2<some_role>
User 2
Group 1
User 3
Action 1SalaryAdmin: Manager
Action 2<some_other_app>:<some_other_action>
To complete the definition of a Role, as defined for system administration, the Role needs to be associated with one or more Actions and one or more Users and/or Groups
A User object simple represents an individual who has some access to the applications in the system
A Group is simply a collection of one or more users.
© SAP AG <Course Number> Unit Title - 19
© SAP AG 2003, Title of Presentation, Speaker Name / 19
Authorization Mechanism
Authorization is the process of matching user Permissions with application Permissions based on the Actions allowed by the application.
For WDP applications running in the Enterprise Portal, the administrator can restrict application access based on:
The user’s company object
The Permissions that are derived from the user
Web Dynpro Security – Authorization Mechanism
To determine if the user is allowed access, the security manager of the Container or runtime (e.g., Portal Container) will extract the list of Actions from the user’s Role for the given application
Because Actions reference Permission objects, Actions are used to generate the user’s allowed Permissions
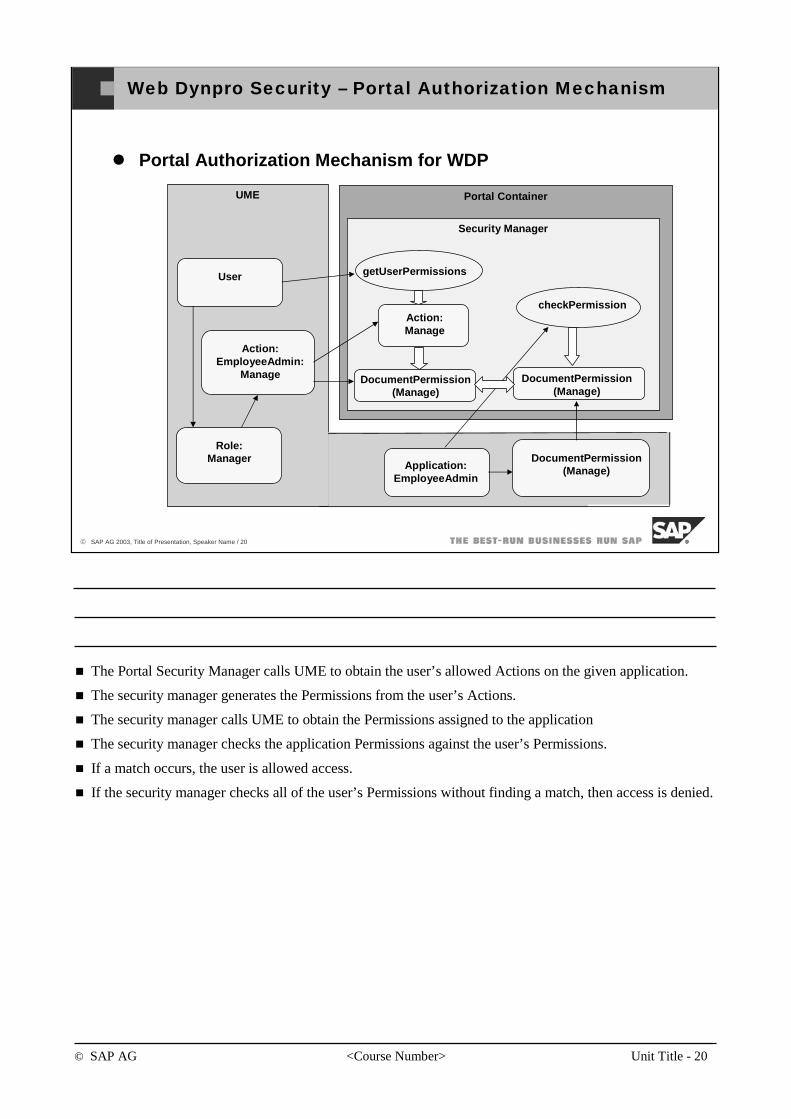
© SAP AG <Course Number> Unit Title - 20
© SAP AG 2003, Title of Presentation, Speaker Name / 20
Portal Authorization Mechanism for WDP
Web Dynpro Security – Portal Authorization Mechanism
Portal Container
Security Manager
getUserPermissions
Action: Manage
DocumentPermission (Manage)
checkPermission
UME
User
Role:Manager
Action: EmployeeAdmin:
Manage DocumentPermission (Manage)
Application: EmployeeAdmin
DocumentPermission (Manage)
The Portal Security Manager calls UME to obtain the user’s allowed Actions on the given application.
The security manager generates the Permissions from the user’s Actions.
The security manager calls UME to obtain the Permissions assigned to the application
The security manager checks the application Permissions against the user’s Permissions.
If a match occurs, the user is allowed access.
If the security manager checks all of the user’s Permissions without finding a match, then access is denied.
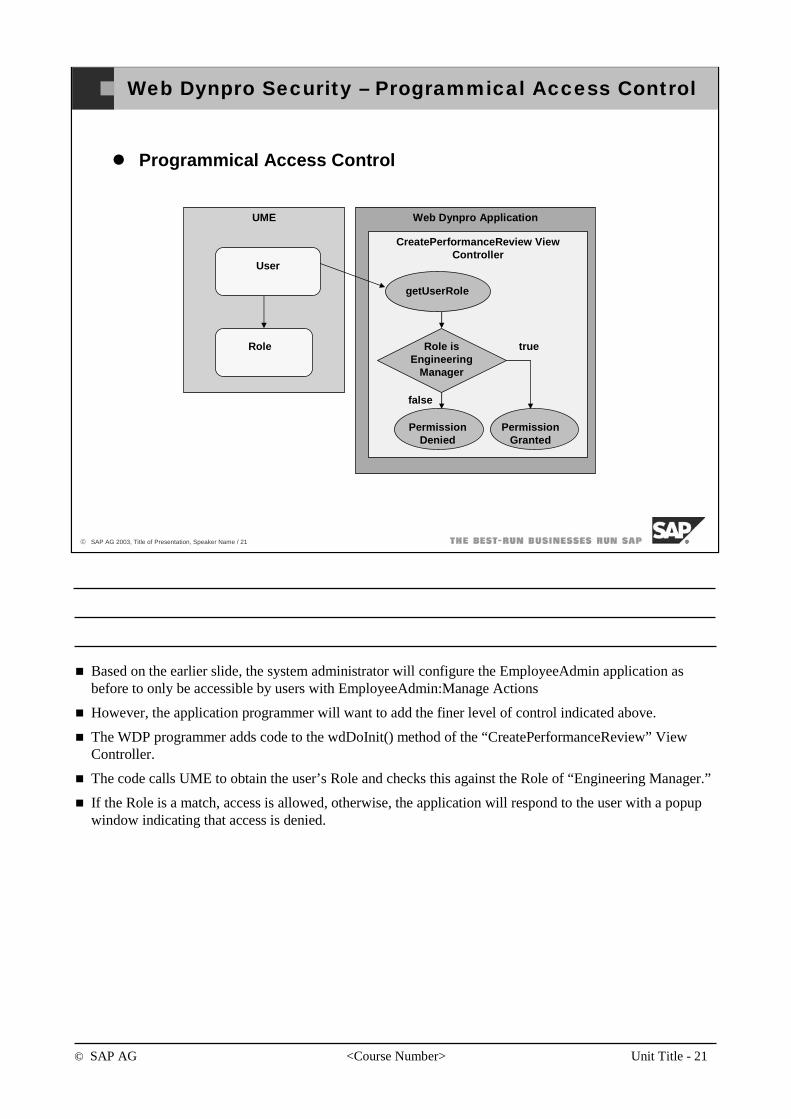
© SAP AG <Course Number> Unit Title - 21
© SAP AG 2003, Title of Presentation, Speaker Name / 21
Programmical Access Control
Web Dynpro Security – Programmical Access Control
Web Dynpro Application
Default Component Controller
Web Dynpro Application
CreatePerformanceReview View Controller
getUserRole
UME
User
Role Role is Engineering
Manager
Permission Granted
true
Permission Denied
false
Based on the earlier slide, the system administrator will configure the EmployeeAdmin application as before to only be accessible by users with EmployeeAdmin:Manage Actions
However, the application programmer will want to add the finer level of control indicated above.
The WDP programmer adds code to the wdDoInit() method of the “CreatePerformanceReview” View Controller.
The code calls UME to obtain the user’s Role and checks this against the Role of “Engineering Manager.”
If the Role is a match, access is allowed, otherwise, the application will respond to the user with a popup window indicating that access is denied.
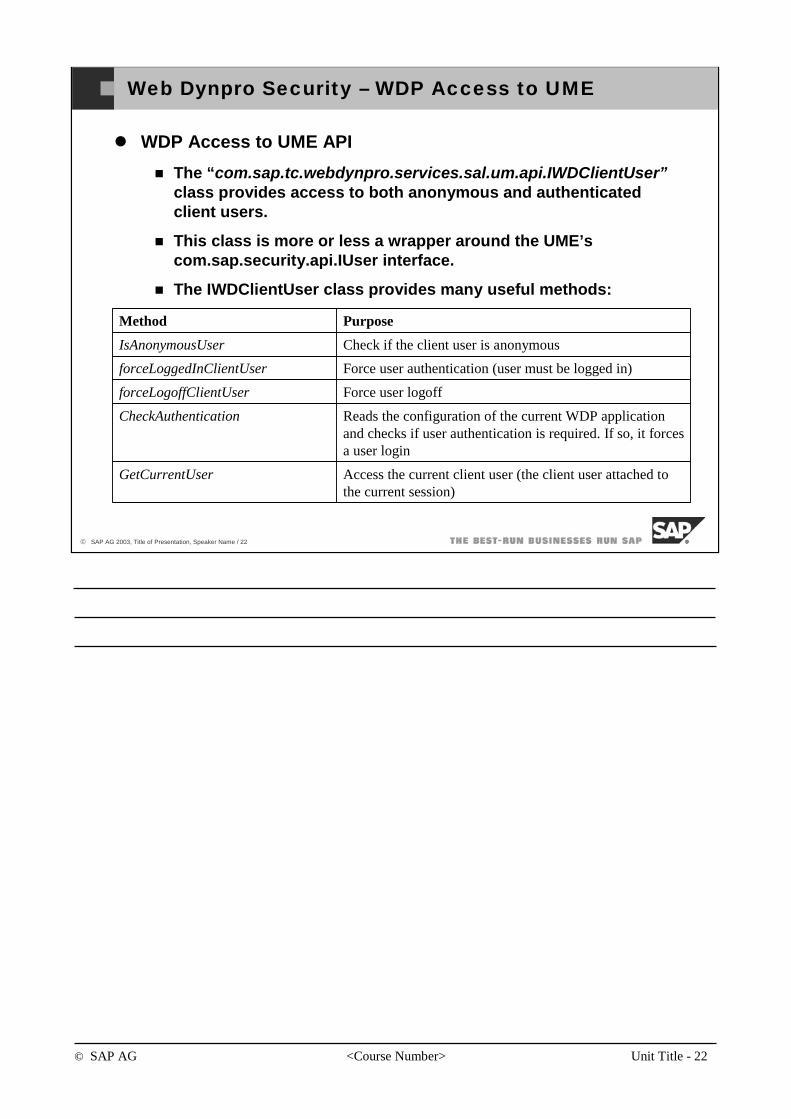
© SAP AG <Course Number> Unit Title - 22
© SAP AG 2003, Title of Presentation, Speaker Name / 22
WDP Access to UME API
The “com.sap.tc.webdynpro.services.sal.um.api.IWDClientUser”class provides access to both anonymous and authenticated client users.
This class is more or less a wrapper around the UME’s com.sap.security.api.IUser interface.
The IWDClientUser class provides many useful methods:
Web Dynpro Security – WDP Access to UME
Access the current client user (the client user attached to the current session)
GetCurrentUser
Reads the configuration of the current WDP application and checks if user authentication is required. If so, it forces a user login
CheckAuthentication
Force user logoffforceLogoffClientUser
Force user authentication (user must be logged in)forceLoggedInClientUser
Check if the client user is anonymousIsAnonymousUser
PurposeMethod
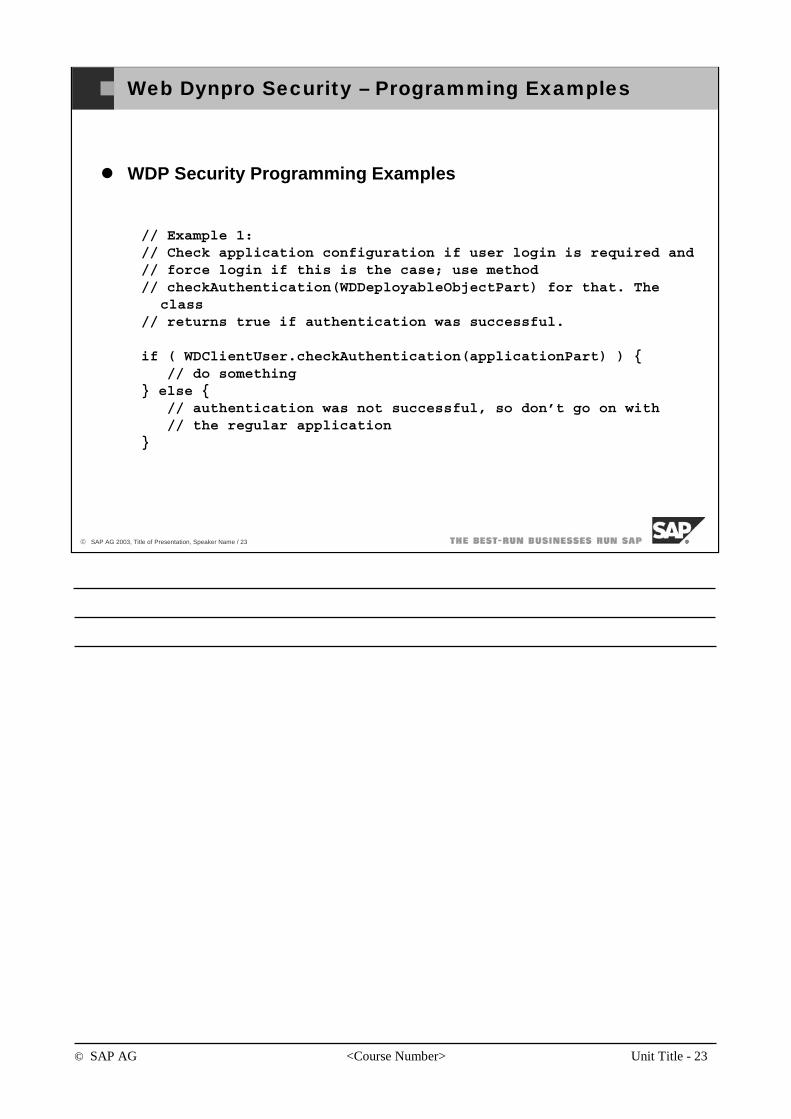
© SAP AG <Course Number> Unit Title - 23
© SAP AG 2003, Title of Presentation, Speaker Name / 23
WDP Security Programming Examples
// Example 1:// Check application configuration if user login is required and// force login if this is the case; use method// checkAuthentication(WDDeployableObjectPart) for that. The
class// returns true if authentication was successful.
if ( WDClientUser.checkAuthentication(applicationPart) ) {// do something
} else {// authentication was not successful, so don’t go on with// the regular application
}
Web Dynpro Security – Programming Examples
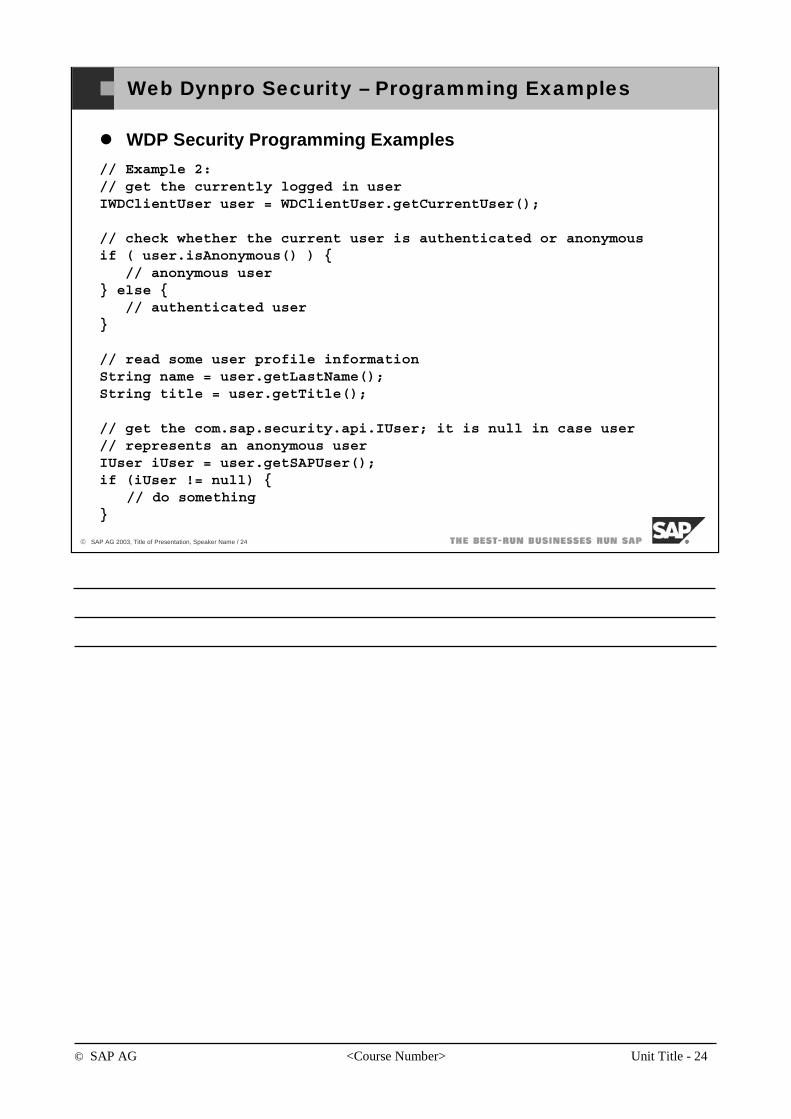
© SAP AG <Course Number> Unit Title - 24
© SAP AG 2003, Title of Presentation, Speaker Name / 24
WDP Security Programming Examples
// Example 2:// get the currently logged in userIWDClientUser user = WDClientUser.getCurrentUser();
// check whether the current user is authenticated or anonymousif ( user.isAnonymous() ) {
// anonymous user} else {
// authenticated user}
// read some user profile informationString name = user.getLastName();String title = user.getTitle();
// get the com.sap.security.api.IUser; it is null in case user// represents an anonymous userIUser iUser = user.getSAPUser();if (iUser != null) {
// do something}
Web Dynpro Security – Programming Examples
© SAP AG <Course Number> Unit Title - 25
© SAP AG 2003, Title of Presentation, Speaker Name / 25
You should now be able to:
See how Web Dynpro fits within NetWeaver Security.
Know the basics of UME authorization model.
Understand how Web Dynpro leverages UME.
Know the basics of UME administration.
Understand declarative security configuration.
Add authorization logic to your Web Dynpro applications.
<Unit Title>: Unit Summary

Web Dynpro Security - Narrative
Unit: Web Dynpro
Topic: Security
1-1 What is Web Dynpro Security
1-1-1 Prerequisites
This unit is not intended to teach the basics of application security. Participants should have a basic understanding of user authorization and authentication as applied to applications running within a middle tier application server.
1-1-2 Introduction
Web Dynpro (WDP) is a tool for developing the presentation layer of applications. As such, only the authorization side of security is really addressable. However, WDP applications are seldom built that do not access some backend system where authentication becomes an issue. For example, a WDP application that uses an Adaptive RFC model will have to deal with R/3 authentication and authorization. Although WDP can be used as a standalone application, it is intended to be used within the context of the Enterprise Portal. Therefore, in its current implementation, WDP does not provide any configuration tools for declaratively setting authorization and authentication. For WDP applications running within the Portal framework, Portal security features can be leveraged for this purpose as shown in the diagram below:
Enterprise Portal Runtime
EP Security Layer
Web Dynpro iView
Web Dynpro Runtime
Web Dynpro Application
For standalone WDP applications, security must be “programmed into” the application. However, the Enterprise Portal only covers a small part of the security landscape for applications running within its framework. The Portal’s framework can be configured to authenticate and authorize access to applications. The URL to access WDP applications running within an iView can be secured based on a user’s credentials. However, finer granularity of security must still be “programmed into” the WDP application. For example, if the developer of a WDP application needs to restrict access to updating
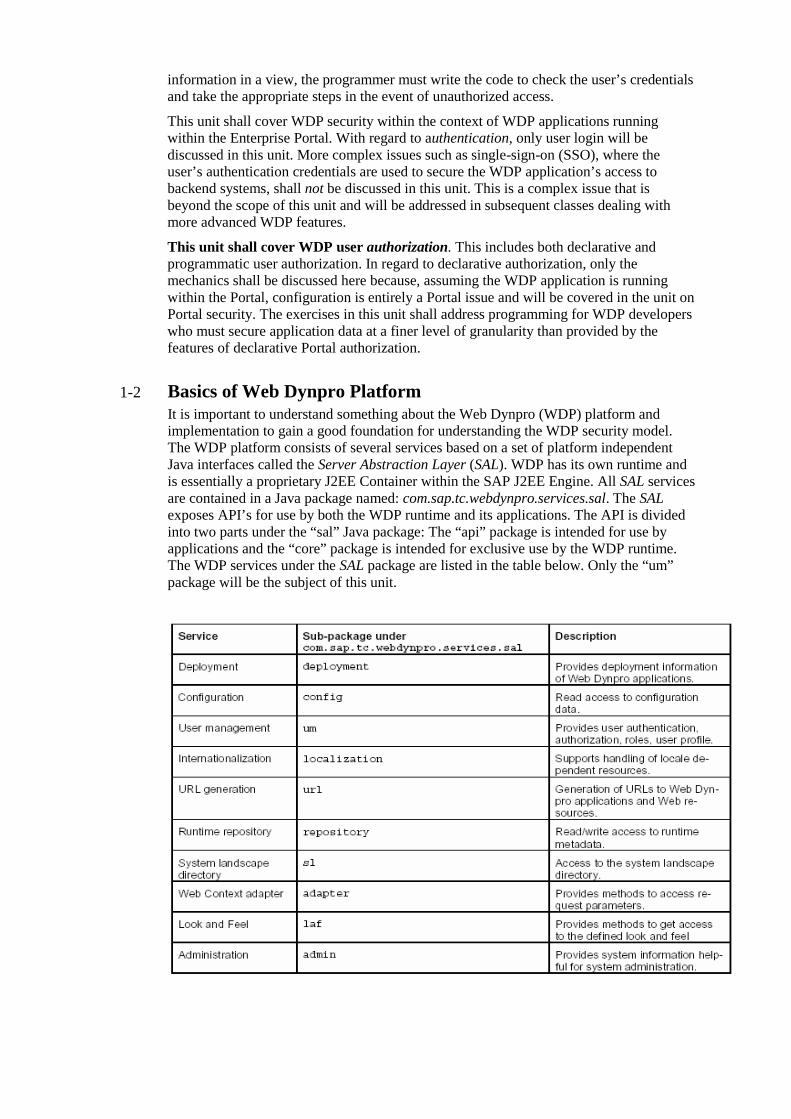
information in a view, the programmer must write the code to check the user’s credentials and take the appropriate steps in the event of unauthorized access.
This unit shall cover WDP security within the context of WDP applications running within the Enterprise Portal. With regard to authentication, only user login will be discussed in this unit. More complex issues such as single-sign-on (SSO), where the user’s authentication credentials are used to secure the WDP application’s access to backend systems, shall not be discussed in this unit. This is a complex issue that is beyond the scope of this unit and will be addressed in subsequent classes dealing with more advanced WDP features.
This unit shall cover WDP user authorization. This includes both declarative and programmatic user authorization. In regard to declarative authorization, only the mechanics shall be discussed here because, assuming the WDP application is running within the Portal, configuration is entirely a Portal issue and will be covered in the unit on Portal security. The exercises in this unit shall address programming for WDP developers who must secure application data at a finer level of granularity than provided by the features of declarative Portal authorization.
1-2 Basics of Web Dynpro Platform It is important to understand something about the Web Dynpro (WDP) platform and implementation to gain a good foundation for understanding the WDP security model. The WDP platform consists of several services based on a set of platform independent Java interfaces called the Server Abstraction Layer (SAL). WDP has its own runtime and is essentially a proprietary J2EE Container within the SAP J2EE Engine. All SAL services are contained in a Java package named: com.sap.tc.webdynpro.services.sal. The SAL exposes API’s for use by both the WDP runtime and its applications. The API is divided into two parts under the “sal” Java package: The “api” package is intended for use by applications and the “core” package is intended for exclusive use by the WDP runtime. The WDP services under the SAL package are listed in the table below. Only the “um” package will be the subject of this unit.
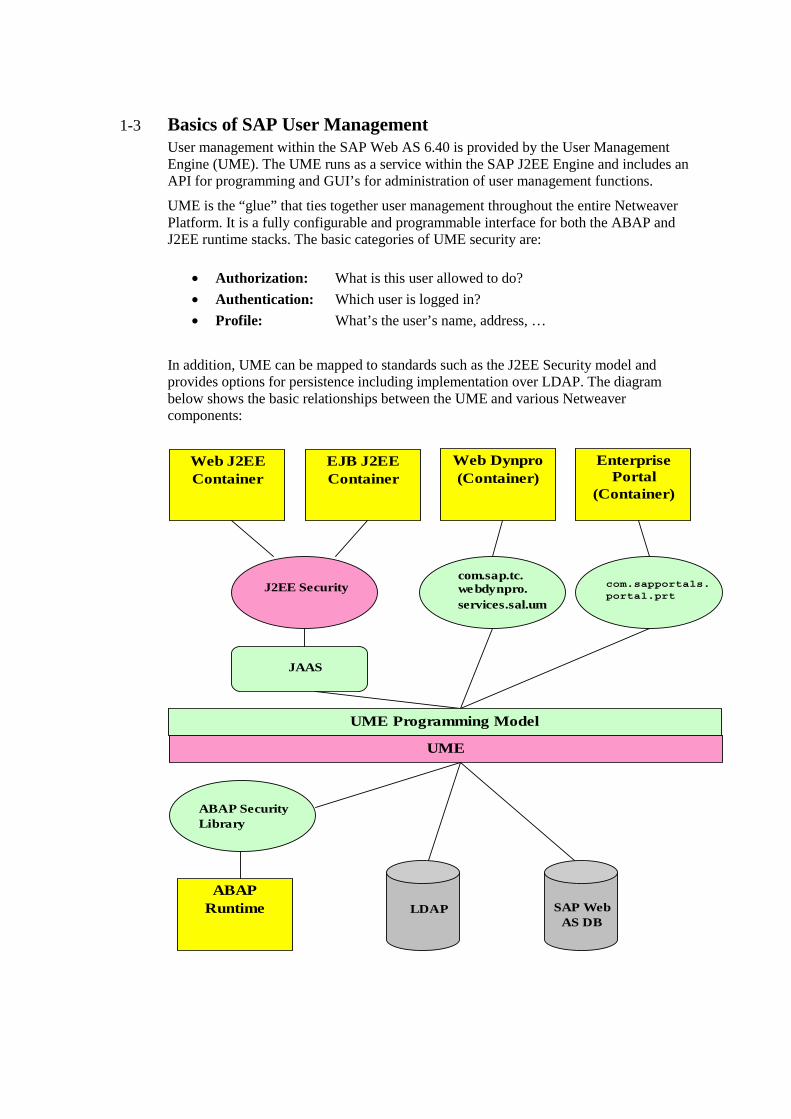
1-3 Basics of SAP User Management User management within the SAP Web AS 6.40 is provided by the User Management Engine (UME). The UME runs as a service within the SAP J2EE Engine and includes an API for programming and GUI’s for administration of user management functions.
UME is the “glue” that ties together user management throughout the entire Netweaver Platform. It is a fully configurable and programmable interface for both the ABAP and J2EE runtime stacks. The basic categories of UME security are:
• Authorization: What is this user allowed to do?
• Authentication: Which user is logged in?
• Profile: What’s the user’s name, address, …
In addition, UME can be mapped to standards such as the J2EE Security model and provides options for persistence including implementation over LDAP. The diagram below shows the basic relationships between the UME and various Netweaver components:
Web J2EE
Container EJB J2EE Container
Web Dynpro (Container)
Enterprise Portal
(Container)
J2EE Security com.sap.tc. webdynpro. services.sal.um
com.sapportals.portal.prt
JAAS
UME
LDAP SAP Web AS DB
ABAP Runtime
ABAP Security Library
UME Programming Model
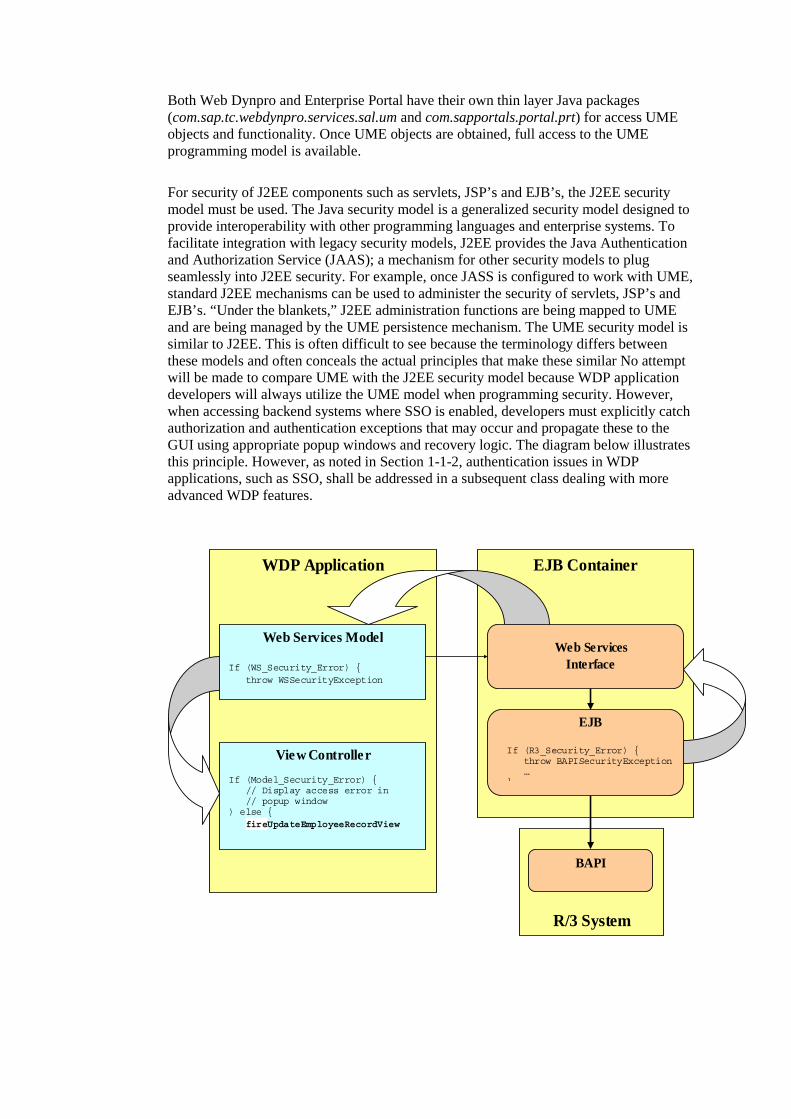
Both Web Dynpro and Enterprise Portal have their own thin layer Java packages (com.sap.tc.webdynpro.services.sal.um and com.sapportals.portal.prt) for access UME objects and functionality. Once UME objects are obtained, full access to the UME programming model is available.
For security of J2EE components such as servlets, JSP’s and EJB’s, the J2EE security model must be used. The Java security model is a generalized security model designed to provide interoperability with other programming languages and enterprise systems. To facilitate integration with legacy security models, J2EE provides the Java Authentication and Authorization Service (JAAS); a mechanism for other security models to plug seamlessly into J2EE security. For example, once JASS is configured to work with UME, standard J2EE mechanisms can be used to administer the security of servlets, JSP’s and EJB’s. “Under the blankets,” J2EE administration functions are being mapped to UME and are being managed by the UME persistence mechanism. The UME security model is similar to J2EE. This is often difficult to see because the terminology differs between these models and often conceals the actual principles that make these similar No attempt will be made to compare UME with the J2EE security model because WDP application developers will always utilize the UME model when programming security. However, when accessing backend systems where SSO is enabled, developers must explicitly catch authorization and authentication exceptions that may occur and propagate these to the GUI using appropriate popup windows and recovery logic. The diagram below illustrates this principle. However, as noted in Section 1-1-2, authentication issues in WDP applications, such as SSO, shall be addressed in a subsequent class dealing with more advanced WDP features.
WDP Application EJB Container
R/3 System
Web Services Model
If (WS_Security_Error) { throw WSSecurityException
Web Services Interface
EJB
If (R3_Security_Error) { throw BAPISecurityException … }
BAPI
View Controller If (Model_Security_Error) { // Display access error in // popup window ) else { fireUpdateEmployeeRecordView
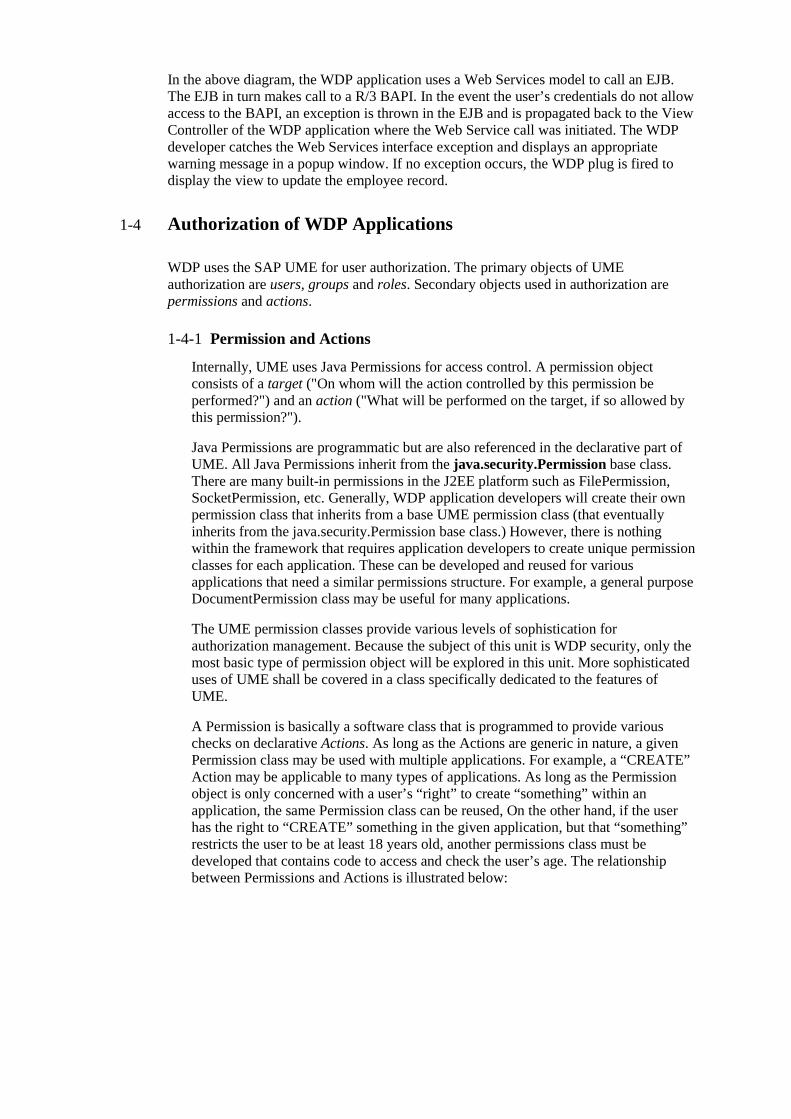
In the above diagram, the WDP application uses a Web Services model to call an EJB. The EJB in turn makes call to a R/3 BAPI. In the event the user’s credentials do not allow access to the BAPI, an exception is thrown in the EJB and is propagated back to the View Controller of the WDP application where the Web Service call was initiated. The WDP developer catches the Web Services interface exception and displays an appropriate warning message in a popup window. If no exception occurs, the WDP plug is fired to display the view to update the employee record.
1-4 Authorization of WDP Applications
WDP uses the SAP UME for user authorization. The primary objects of UME authorization are users, groups and roles. Secondary objects used in authorization are permissions and actions.
1-4-1 Permission and Actions
Internally, UME uses Java Permissions for access control. A permission object consists of a target ("On whom will the action controlled by this permission be performed?") and an action ("What will be performed on the target, if so allowed by this permission?").
Java Permissions are programmatic but are also referenced in the declarative part of UME. All Java Permissions inherit from the java.security.Permission base class. There are many built-in permissions in the J2EE platform such as FilePermission, SocketPermission, etc. Generally, WDP application developers will create their own permission class that inherits from a base UME permission class (that eventually inherits from the java.security.Permission base class.) However, there is nothing within the framework that requires application developers to create unique permission classes for each application. These can be developed and reused for various applications that need a similar permissions structure. For example, a general purpose DocumentPermission class may be useful for many applications.
The UME permission classes provide various levels of sophistication for authorization management. Because the subject of this unit is WDP security, only the most basic type of permission object will be explored in this unit. More sophisticated uses of UME shall be covered in a class specifically dedicated to the features of UME.
A Permission is basically a software class that is programmed to provide various checks on declarative Actions. As long as the Actions are generic in nature, a given Permission class may be used with multiple applications. For example, a “CREATE” Action may be applicable to many types of applications. As long as the Permission object is only concerned with a user’s “right” to create “something” within an application, the same Permission class can be reused, On the other hand, if the user has the right to “CREATE” something in the given application, but that “something” restricts the user to be at least 18 years old, another permissions class must be developed that contains code to access and check the user’s age. The relationship between Permissions and Actions is illustrated below:
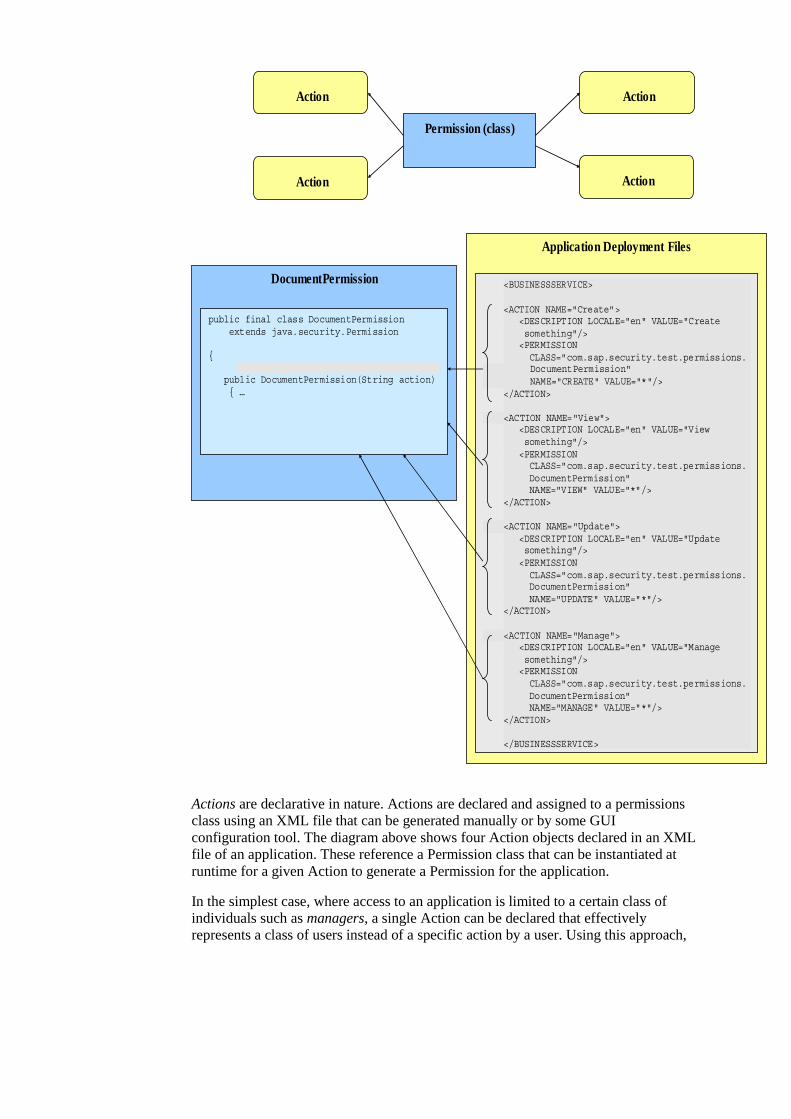
DocumentPermission
public final class DocumentPermission extends java.security.Permission {
public DocumentPermission(String action) { …
Application Deployment Files
<BUSINESSSERVICE> <ACTION NAME="Create"> <DESCRIPTION LOCALE="en" VALUE="Create something"/> <PERMISSION CLASS="com.sap.security.test.permissions.
DocumentPermission" NAME="CREATE" VALUE="*"/>
</ACTION>
<ACTION NAME="View"> <DESCRIPTION LOCALE="en" VALUE="View something"/> <PERMISSION CLASS="com.sap.security.test.permissions. DocumentPermission" NAME="VIEW" VALUE="*"/> </ACTION>
<ACTION NAME="Update"> <DESCRIPTION LOCALE="en" VALUE="Update something"/> <PERMISSION CLASS="com.sap.security.test.permissions. DocumentPermission" NAME="UPDATE" VALUE="*"/> </ACTION>
<ACTION NAME="Manage"> <DESCRIPTION LOCALE="en" VALUE="Manage something"/> <PERMISSION CLASS="com.sap.security.test.permissions. DocumentPermission" NAME="MANAGE" VALUE="*"/> </ACTION> </BUSINESSSERVICE>
Permission (class)
Action
Action Action
Action
Actions are declarative in nature. Actions are declared and assigned to a permissions class using an XML file that can be generated manually or by some GUI configuration tool. The diagram above shows four Action objects declared in an XML file of an application. These reference a Permission class that can be instantiated at runtime for a given Action to generate a Permission for the application.
In the simplest case, where access to an application is limited to a certain class of individuals such as managers, a single Action can be declared that effectively represents a class of users instead of a specific action by a user. Using this approach,

the security features of the Enterprise Portal1 can control application access declaratively (See the diagram below.)
java.security.Permission
DocumentPermisson
Application: EmployeeAdmin
XML
Action: Manager
Deploy
UME Configuration
EmployeeAdmin.Manager
In the diagram above, a simple DocumentPermission class and an Action named Manager are created. The Action is created by adding it to a security XML file that is included in the EAR file of the EmployeeAdmin application. The Action is linked to the DocumentPermission class by a reference in the XML file. When the application is deployed, the UME configuration database is updated with the EmployeeAdmin.Manager Action. Note that an Action is always associated with an application. Subsequently, the Action will be available to a system administrator as part of configuring user access to the application. Although the diagram above shows a one-to-one correspondence between an Action, a Permission and an application, in more complex scenarios, multiple Actions can be assigned to a Permission and multiple Permissions can be assigned to an application. For example, DocumentPermission can allow or disallow Actions for viewing, updating and creating employee documents such as performance reviews. The EmployeeAdmin application may have another permission named SalaryAdminPermission with its own set of Actions.
1 Note: As explained in section 1-1-2, standalone WDP applications must program all authorization checks in the application. For those running within the Enterprise Portal, basic authorization can be configured declaratively.
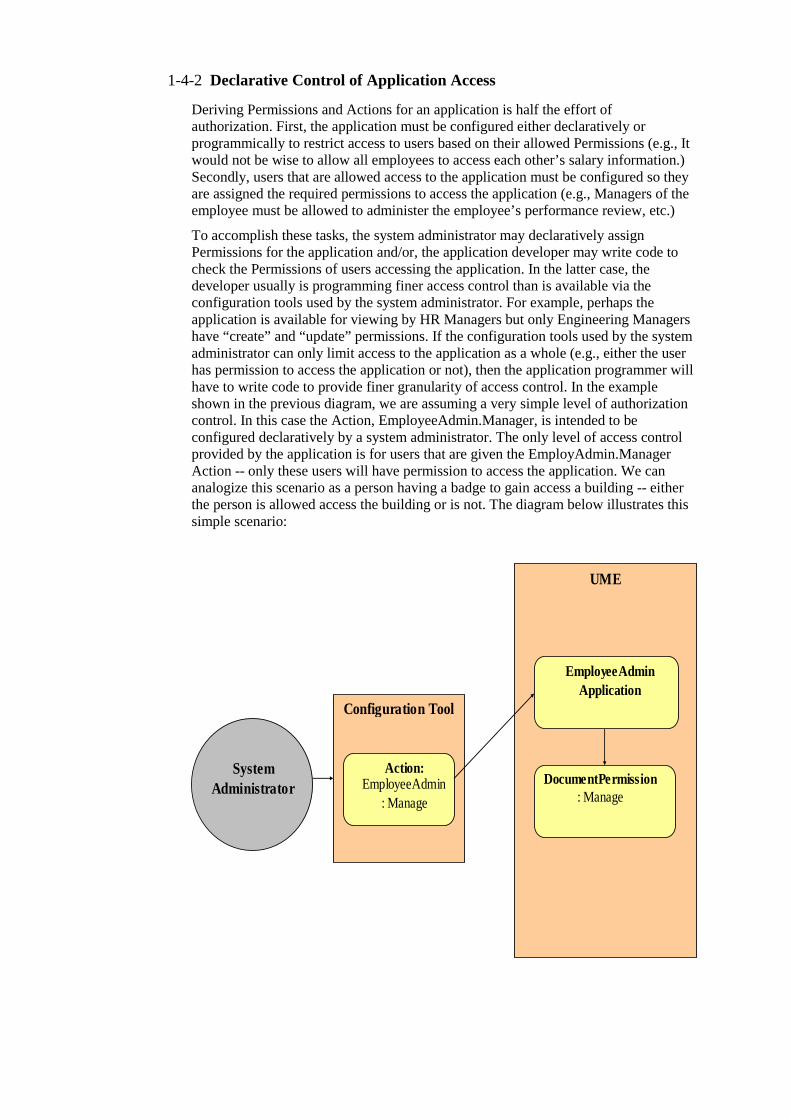
1-4-2 Declarative Control of Application Access
Deriving Permissions and Actions for an application is half the effort of authorization. First, the application must be configured either declaratively or programmically to restrict access to users based on their allowed Permissions (e.g., It would not be wise to allow all employees to access each other’s salary information.) Secondly, users that are allowed access to the application must be configured so they are assigned the required permissions to access the application (e.g., Managers of the employee must be allowed to administer the employee’s performance review, etc.)
To accomplish these tasks, the system administrator may declaratively assign Permissions for the application and/or, the application developer may write code to check the Permissions of users accessing the application. In the latter case, the developer usually is programming finer access control than is available via the configuration tools used by the system administrator. For example, perhaps the application is available for viewing by HR Managers but only Engineering Managers have “create” and “update” permissions. If the configuration tools used by the system administrator can only limit access to the application as a whole (e.g., either the user has permission to access the application or not), then the application programmer will have to write code to provide finer granularity of access control. In the example shown in the previous diagram, we are assuming a very simple level of authorization control. In this case the Action, EmployeeAdmin.Manager, is intended to be configured declaratively by a system administrator. The only level of access control provided by the application is for users that are given the EmployAdmin.Manager Action -- only these users will have permission to access the application. We can analogize this scenario as a person having a badge to gain access a building -- either the person is allowed access the building or is not. The diagram below illustrates this simple scenario:
Configuration Tool
UME
System Administrator
Action: EmployeeAdmin
: Manage
DocumentPermission: Manage
EmployeeAdmin Application
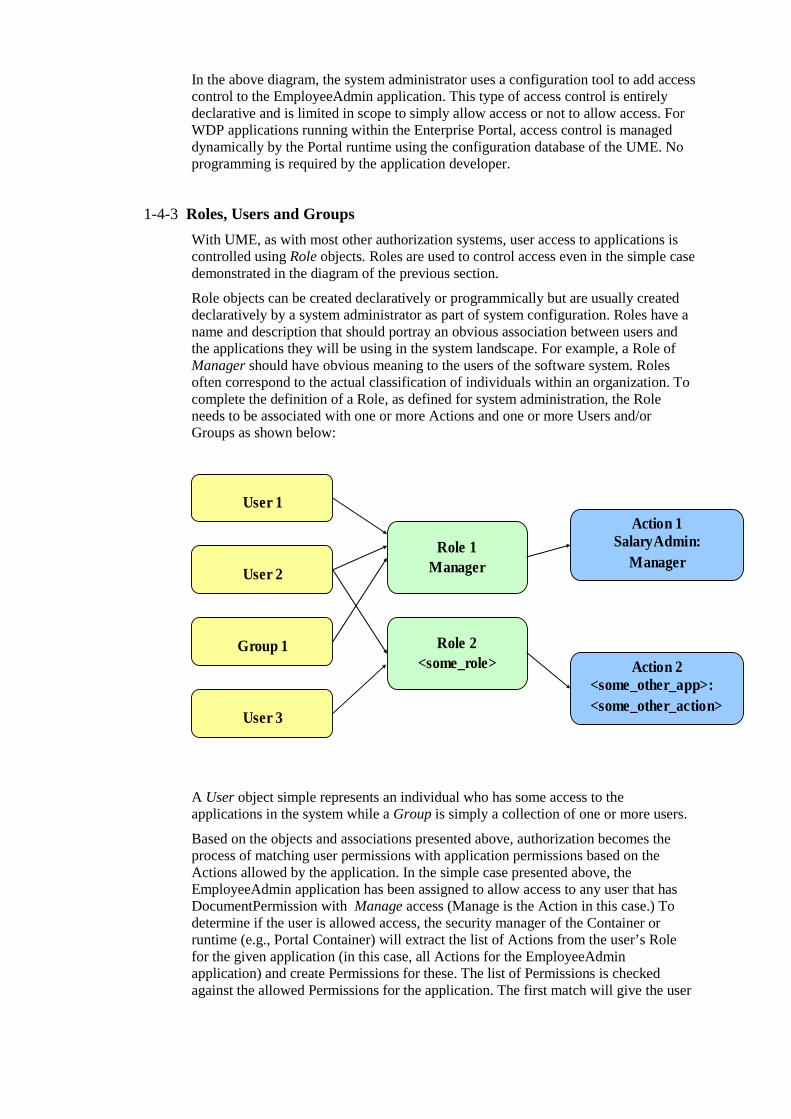
In the above diagram, the system administrator uses a configuration tool to add access control to the EmployeeAdmin application. This type of access control is entirely declarative and is limited in scope to simply allow access or not to allow access. For WDP applications running within the Enterprise Portal, access control is managed dynamically by the Portal runtime using the configuration database of the UME. No programming is required by the application developer.
1-4-3 Roles, Users and Groups
With UME, as with most other authorization systems, user access to applications is controlled using Role objects. Roles are used to control access even in the simple case demonstrated in the diagram of the previous section.
Role objects can be created declaratively or programmically but are usually created declaratively by a system administrator as part of system configuration. Roles have a name and description that should portray an obvious association between users and the applications they will be using in the system landscape. For example, a Role of Manager should have obvious meaning to the users of the software system. Roles often correspond to the actual classification of individuals within an organization. To complete the definition of a Role, as defined for system administration, the Role needs to be associated with one or more Actions and one or more Users and/or Groups as shown below:
Role 1 Manager
User 1
Role 2 <some_role>
User 2
Group 1
User 3
Action 1 SalaryAdmin:
Manager
Action 2 <some_other_app>: <some_other_action>
A User object simple represents an individual who has some access to the applications in the system while a Group is simply a collection of one or more users.
Based on the objects and associations presented above, authorization becomes the process of matching user permissions with application permissions based on the Actions allowed by the application. In the simple case presented above, the EmployeeAdmin application has been assigned to allow access to any user that has DocumentPermission with Manage access (Manage is the Action in this case.) To determine if the user is allowed access, the security manager of the Container or runtime (e.g., Portal Container) will extract the list of Actions from the user’s Role for the given application (in this case, all Actions for the EmployeeAdmin application) and create Permissions for these. The list of Permissions is checked against the allowed Permissions for the application. The first match will give the user
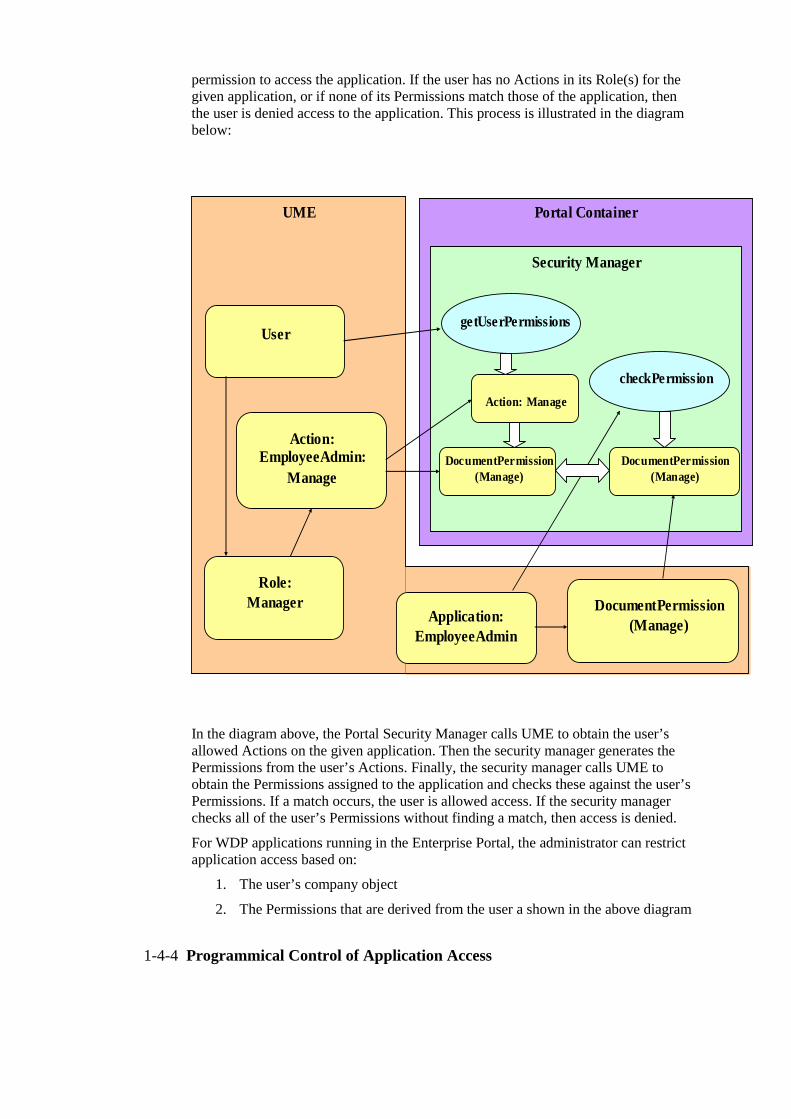
permission to access the application. If the user has no Actions in its Role(s) for the given application, or if none of its Permissions match those of the application, then the user is denied access to the application. This process is illustrated in the diagram below:
Portal Container
Security Manager
getUserPermissions
Action: Manage
DocumentPermission (Manage)
checkPermission
UME
User
Role: Manager
Action: EmployeeAdmin:
Manage DocumentPermission
(Manage)
Application: EmployeeAdmin
DocumentPermission (Manage)
In the diagram above, the Portal Security Manager calls UME to obtain the user’s allowed Actions on the given application. Then the security manager generates the Permissions from the user’s Actions. Finally, the security manager calls UME to obtain the Permissions assigned to the application and checks these against the user’s Permissions. If a match occurs, the user is allowed access. If the security manager checks all of the user’s Permissions without finding a match, then access is denied.
For WDP applications running in the Enterprise Portal, the administrator can restrict application access based on:
1. The user’s company object
2. The Permissions that are derived from the user a shown in the above diagram
1-4-4 Programmical Control of Application Access
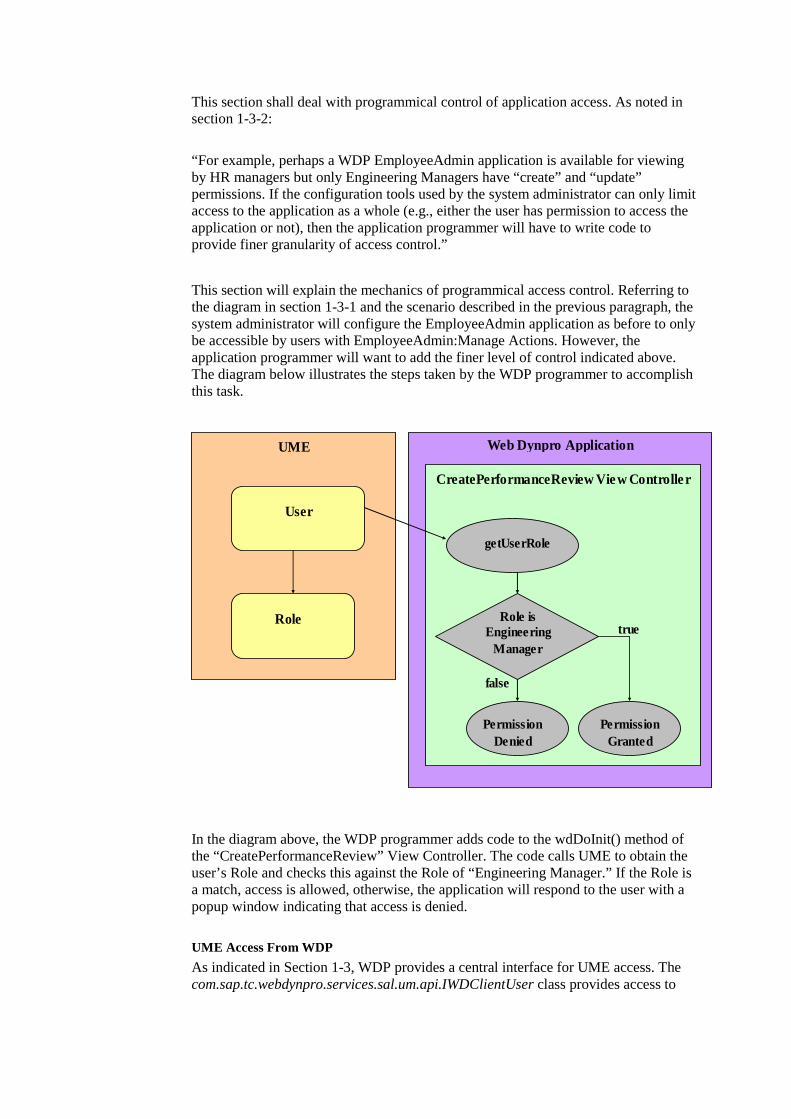
This section shall deal with programmical control of application access. As noted in section 1-3-2:
“For example, perhaps a WDP EmployeeAdmin application is available for viewing by HR managers but only Engineering Managers have “create” and “update” permissions. If the configuration tools used by the system administrator can only limit access to the application as a whole (e.g., either the user has permission to access the application or not), then the application programmer will have to write code to provide finer granularity of access control.”
This section will explain the mechanics of programmical access control. Referring to the diagram in section 1-3-1 and the scenario described in the previous paragraph, the system administrator will configure the EmployeeAdmin application as before to only be accessible by users with EmployeeAdmin:Manage Actions. However, the application programmer will want to add the finer level of control indicated above. The diagram below illustrates the steps taken by the WDP programmer to accomplish this task.
Web Dynpro Application
Default Component Controller
Web Dynpro Application CreatePerformanceReview View Controller
getUserRole
UME
User
Role Role is Engineering
Manager
Permission Granted
true
Permission Denied
false
In the diagram above, the WDP programmer adds code to the wdDoInit() method of the “CreatePerformanceReview” View Controller. The code calls UME to obtain the user’s Role and checks this against the Role of “Engineering Manager.” If the Role is a match, access is allowed, otherwise, the application will respond to the user with a popup window indicating that access is denied.
UME Access From WDP
As indicated in Section 1-3, WDP provides a central interface for UME access. The com.sap.tc.webdynpro.services.sal.um.api.IWDClientUser class provides access to
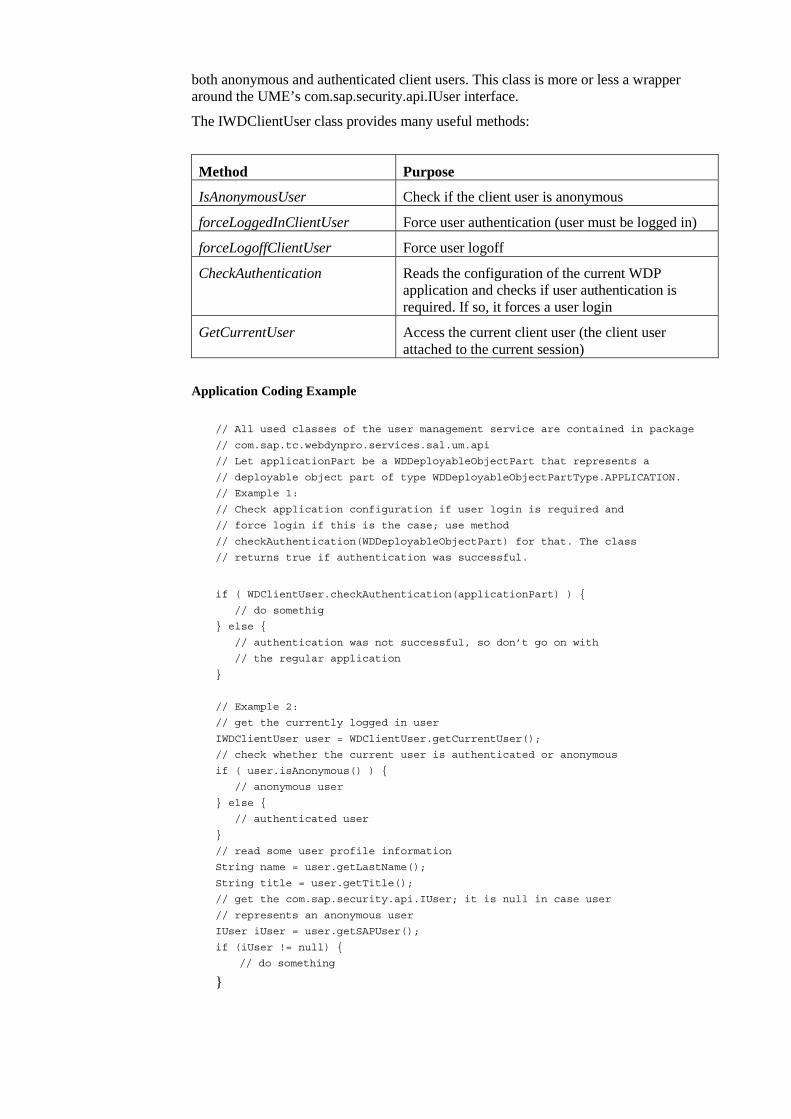
both anonymous and authenticated client users. This class is more or less a wrapper around the UME’s com.sap.security.api.IUser interface.
The IWDClientUser class provides many useful methods:
Method Purpose
IsAnonymousUser Check if the client user is anonymous
forceLoggedInClientUser Force user authentication (user must be logged in)
forceLogoffClientUser Force user logoff
CheckAuthentication Reads the configuration of the current WDP application and checks if user authentication is required. If so, it forces a user login
GetCurrentUser Access the current client user (the client user attached to the current session)
Application Coding Example
// All used classes of the user management service are contained in package
// com.sap.tc.webdynpro.services.sal.um.api
// Let applicationPart be a WDDeployableObjectPart that represents a
// deployable object part of type WDDeployableObjectPartType.APPLICATION.
// Example 1:
// Check application configuration if user login is required and
// force login if this is the case; use method
// checkAuthentication(WDDeployableObjectPart) for that. The class
// returns true if authentication was successful.
if ( WDClientUser.checkAuthentication(applicationPart) ) {
// do somethig
} else {
// authentication was not successful, so don’t go on with
// the regular application
}
// Example 2:
// get the currently logged in user
IWDClientUser user = WDClientUser.getCurrentUser();
// check whether the current user is authenticated or anonymous
if ( user.isAnonymous() ) {
// anonymous user
} else {
// authenticated user
}
// read some user profile information
String name = user.getLastName();
String title = user.getTitle();
// get the com.sap.security.api.IUser; it is null in case user
// represents an anonymous user
IUser iUser = user.getSAPUser();
if (iUser != null) {
// do something
}
© SAP AG TJA311 Adobe Integration - 1
© SAP AG 2004, TJA311, Adobe Integration
Business Scenarios
Introduction
Interactive Form Demo
Involved Software Components
Integration Steps
Workflow Solutions based on Adobe Forms
Feature Summary and Outlook
Getting Started
Contents:
Interactive Forms Based on Adobe® Software

© SAP AG TJA311 Adobe Integration - 2
© SAP AG 2004, TJA311, Adobe Integration
Interactive Forms In One Statement
The integration of Interactive Forms based on Adobe Software should be used as a replacement
of conventional paper-based forms.
Interactive Forms should be used as a replacement of conventional paper-based forms and not as a replacement of ordinary Web Dynpro user interfaces.
By using Adobe Interactive Forms integrated in business applications instead of conventional paper based forms onecan improve form-based business processes.
In the introduction section you will learn more about …
Why do we need Adobe forms?
What can Adobe forms do?
© SAP AG TJA311 Adobe Integration - 3
© SAP AG 2004, TJA311, Adobe Integration
After completing this unit, you will be able to:
describe possible business scenarios
give an overview into Adobe integration
explain the involved software components
apply the necessary steps for integrating Interactive Forms in Web Dynpro applications
describe migration process to Interactive Forms
list workflow solutions based on Adobe forms
give a summary of existing features and an outlookof upcoming features
Adobe Integration: Unit Objectives
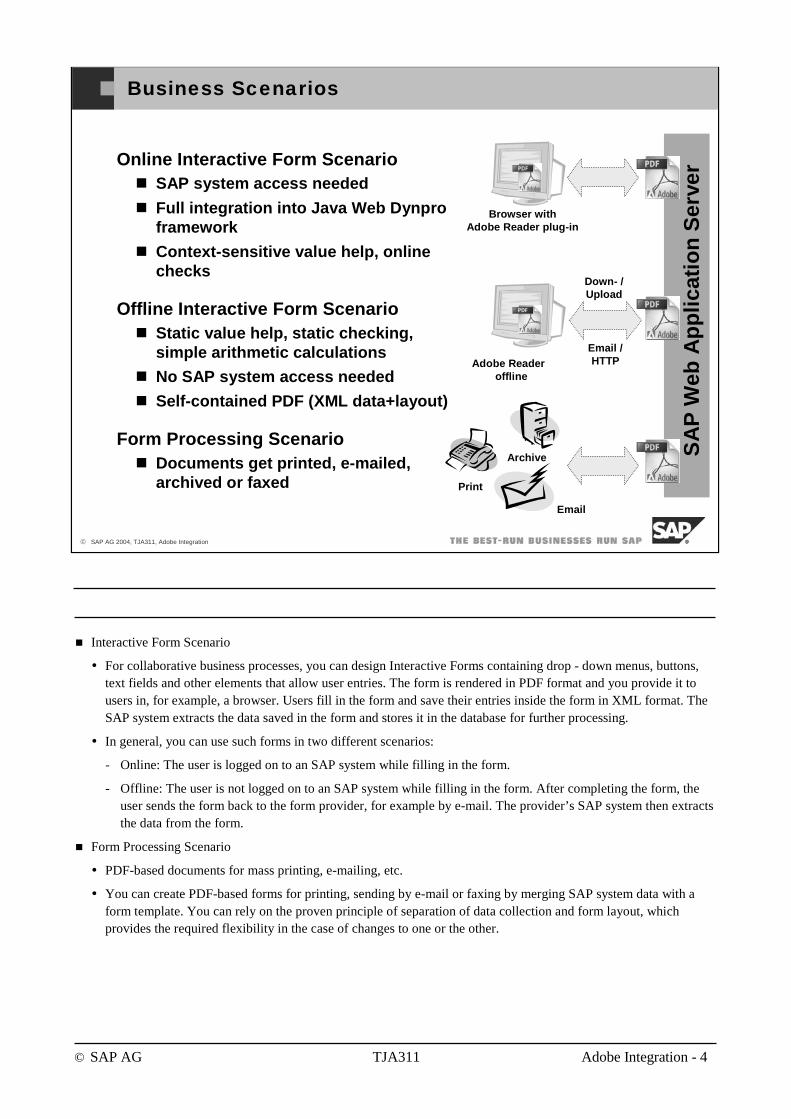
© SAP AG TJA311 Adobe Integration - 4
© SAP AG 2004, TJA311, Adobe Integration
Business Scenarios
Online Interactive Form ScenarioSAP system access needed
Full integration into Java Web Dynpro framework
Context-sensitive value help, online checks
Offline Interactive Form ScenarioStatic value help, static checking, simple arithmetic calculations
No SAP system access needed
Self-contained PDF (XML data+layout)
Form Processing ScenarioDocuments get printed, e-mailed,archived or faxed
Browser withAdobe Reader plug-in
SA
P W
eb A
pp
licat
ion
Ser
ver
Adobe Reader offline
Archive
Down- / Upload
Email / HTTP
Interactive Form Scenario
For collaborative business processes, you can design Interactive Forms containing drop - down menus, buttons, text fields and other elements that allow user entries. The form is rendered in PDF format and you provide it to users in, for example, a browser. Users fill in the form and save their entries inside the form in XML format. The SAP system extracts the data saved in the form and stores it in the database for further processing.
In general, you can use such forms in two different scenarios:
- Online: The user is logged on to an SAP system while filling in the form.
- Offline: The user is not logged on to an SAP system while filling in the form. After completing the form, the user sends the form back to the form provider, for example by e-mail. The provider’s SAP system then extracts the data from the form.
Form Processing Scenario
PDF-based documents for mass printing, e-mailing, etc.
You can create PDF-based forms for printing, sending by e-mail or faxing by merging SAP system data with a form template. You can rely on the proven principle of separation of data collection and form layout, which provides the required flexibility in the case of changes to one or the other.
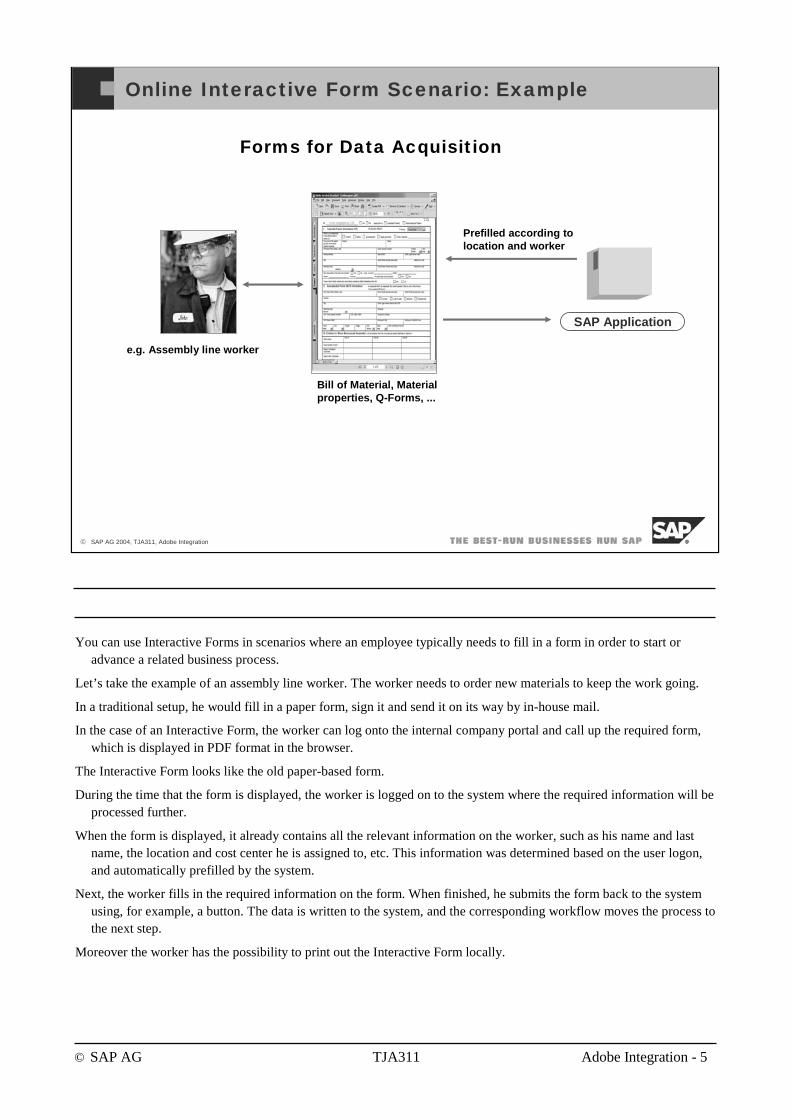
© SAP AG TJA311 Adobe Integration - 5
© SAP AG 2004, TJA311, Adobe Integration
Online Interactive Form Scenario: Example
SAP Application
e.g. Assembly line worker
Bill of Material, Material properties, Q-Forms, ...
Prefilled according to location and worker
Forms for Data Acquisition
You can use Interactive Forms in scenarios where an employee typically needs to fill in a form in order to start or advance a related business process.
Let’s take the example of an assembly line worker. The worker needs to order new materials to keep the work going.
In a traditional setup, he would fill in a paper form, sign it and send it on its way by in-house mail.
In the case of an Interactive Form, the worker can log onto the internal company portal and call up the required form, which is displayed in PDF format in the browser.
The Interactive Form looks like the old paper-based form.
During the time that the form is displayed, the worker is logged on to the system where the required information will be processed further.
When the form is displayed, it already contains all the relevant information on the worker, such as his name and last name, the location and cost center he is assigned to, etc. This information was determined based on the user logon, and automatically prefilled by the system.
Next, the worker fills in the required information on the form. When finished, he submits the form back to the system using, for example, a button. The data is written to the system, and the corresponding workflow moves the process to the next step.
Moreover the worker has the possibility to print out the Interactive Form locally.
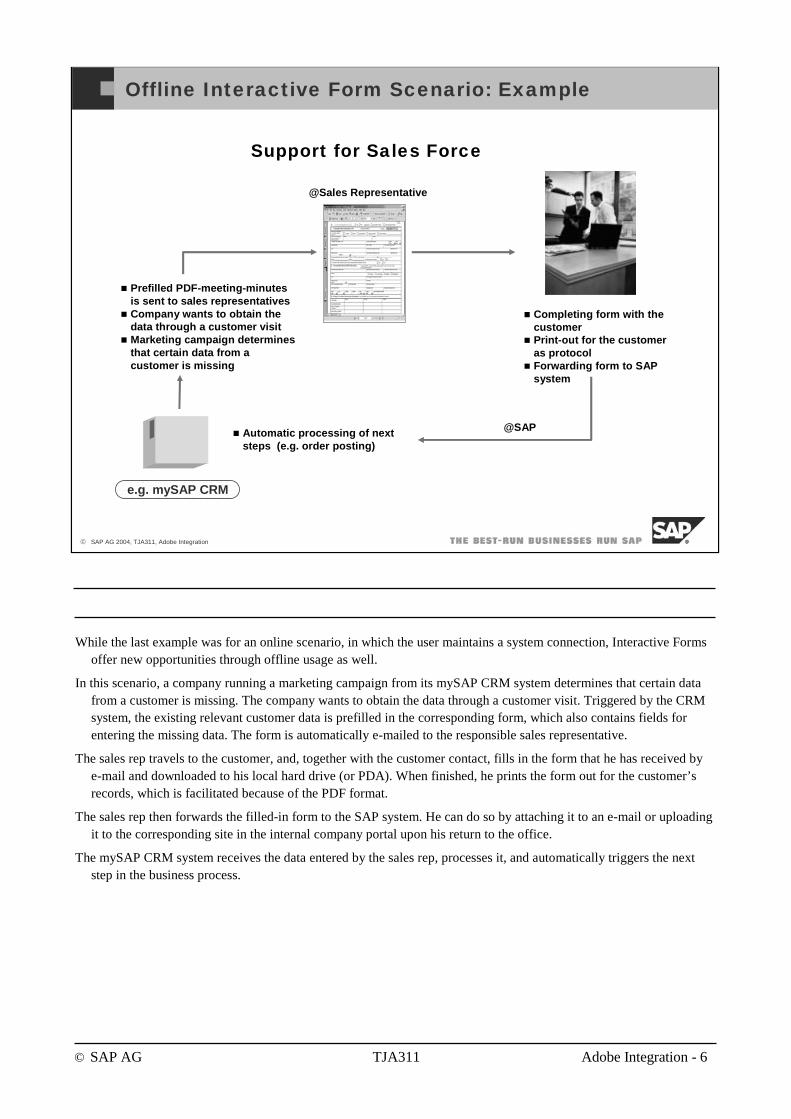
© SAP AG TJA311 Adobe Integration - 6
© SAP AG 2004, TJA311, Adobe Integration
Offline Interactive Form Scenario: Example
e.g. mySAP CRM
Completing form with thecustomerPrint-out for the customeras protocolForwarding form to SAP system
Prefilled PDF-meeting-minutes is sent to sales representativesCompany wants to obtain thedata through a customer visitMarketing campaign determinesthat certain data from a customer is missing
@Sales Representative
Automatic processing of nextsteps (e.g. order posting)
@SAP
Support for Sales Force
While the last example was for an online scenario, in which the user maintains a system connection, Interactive Forms offer new opportunities through offline usage as well.
In this scenario, a company running a marketing campaign from its mySAP CRM system determines that certain data from a customer is missing. The company wants to obtain the data through a customer visit. Triggered by the CRM system, the existing relevant customer data is prefilled in the corresponding form, which also contains fields for entering the missing data. The form is automatically e-mailed to the responsible sales representative.
The sales rep travels to the customer, and, together with the customer contact, fills in the form that he has received by e-mail and downloaded to his local hard drive (or PDA). When finished, he prints the form out for the customer’s records, which is facilitated because of the PDF format.
The sales rep then forwards the filled-in form to the SAP system. He can do so by attaching it to an e-mail or uploading it to the corresponding site in the internal company portal upon his return to the office.
The mySAP CRM system receives the data entered by the sales rep, processes it, and automatically triggers the next step in the business process.

© SAP AG TJA311 Adobe Integration - 7
© SAP AG 2004, TJA311, Adobe Integration
Form Processing Scenario: Example
SAP Application
Dispatching as PDF file
Prefill data
Processing of next stepsSelection of documentsor sets of documentsFilling correspondingfields
Fax
Printing
Archive data
Correspondence, Mass Printing
This example shows possible backend scenarios, which send, print, archive, or fax Interactive Forms. In contrast to the former examples there is no direct user interaction based on an Interactive Form. We call them form processingscenarios.
Think of an application, which collects data from a database in order to prefill Interactive Forms. After filling of corresponding fields the Interactive Forms are send to employees, partners or customers.
Or the other way round. You receive emails from employees, partners, or customers with an attached InteractiveForm and want to extract and archive the data.
And another big application area is mass printing. For instance payrolls of all employees.
© SAP AG TJA311 Adobe Integration - 8
© SAP AG 2004, TJA311, Adobe Integration
After completing this topic, you will be able to:
explain the business need and benefits
describe the look and feel
give a solution overview
Introduction: Topic Objectives
© SAP AG TJA311 Adobe Integration - 9
© SAP AG 2004, TJA311, Adobe Integration
Need to extend business processes to more usersIntegrate internal and external users (managers, employees, prospects, customers, business partners, …) into business processes
Need to improve forms-based business processesPaper is error-prone and easily outdated.
Paper-based business processes require manual data re-entry.
Status tracking for paper-based business processes is not possible. There is a need to let the sender monitor the status of his/her forms.
HTML, e-mail and fax documents are frequently redundant .
Customers want to avoid the high costs associated with paper-based processes (e.g. production, storage).
Customers who already use electronic forms see a need to make the creation of electronic forms easier and less time-consuming.
Adjustments of forms-based business processes should be easy.
Electronic forms, whose layout follows the one of the paper form, are familiar to the user for and thereby foster user acceptance.
Why do we need it?
What are the issues in forms-based processes today?
Paper forms provide much room for error: Users filling the forms in enter the required data incorrectly or illegibly. Other users need to re-enter the data into the systems. The form being used may already be outdated and has not been replaced by the current one.
The cost of producing paper forms, storing them and keeping them up to date can become prohibitive.
The person who filled in the form would normally like to be informed at any point in time of the current status of their application etc. If the form was filed on paper, this may be a difficult and time-consuming undertaking for the processors of the form.
Forms are sometimes sent back to the issuer via e-mail or fax, or using HTML format, for example on a website. Frequently, applicants use all available channels to ensure that their application is received.
Companies already using electronic forms have recognized that users want to keep working with the forms they know, that is they want to keep the familiar look and feel. They also have a need to quickly adapt the forms when processes change and thus the form content needs to be adapted. By using Adobe forms you can easily adapt the look and feel of paper-based forms or existing forms, when processes change. You can also import existing Adobe form templates and use them in Web Dynpro applications. Moreover you can start with your old SAPscript Forms migrate them to Smart Forms and Smart Forms to Adobe Forms, but keep aware of some restrictions and manual work, which is necessary (read more about it in the migration section). With SAP’s form solution based on Adobe software you can define your form layout once for different kinds of usages (e.g. for interactive or form processingscenarios).
© SAP AG TJA311 Adobe Integration - 10
© SAP AG 2004, TJA311, Adobe Integration
Interactive Forms based on Adobe softwareGenerate forms that contain data extracted from core systems
Use dynamic or static forms
Complete forms online or offline
Allow users to print forms
Accelerate forms-based business processes
Automate paper-based business processes
What does SAP’s solution offer?
Technology is already extensively used in mySAP ERP Human Capital Management and Financials (approx. 25 processes)
Based on the business process, PDF forms are prefilled with data from live systems, which in a paper-based process would need to be entered by the user. You avoid possible errors caused by conflicting information.
PDF forms can be static or dynamic. Some forms, such as airline tickets, do not change their layout, because the number of entries allowed on the form and their position on the form are predefined. For other forms, order confirmations, for example, you don’t know at design time how many entries from a certain system table will appear on the generated document. Interactive Forms fully supports the use of dynamic forms.
Interactive Forms can be used in online and offline business scenarios, i.e. those with and without a connection to the backend system.
Thanks to the PDF format, forms can easily be printed out.
You can automate and accelerate business processes based on paper forms, thus eliminating the risk of errors through manual filling of forms and data entry.
Examples processes within mySAP ERP Human Capital Management and Financials:
personal change request (e.g. position change, change employee group)
requisition request (e.g. request additional budget or head counts)
request equipment repair or report equipment loss
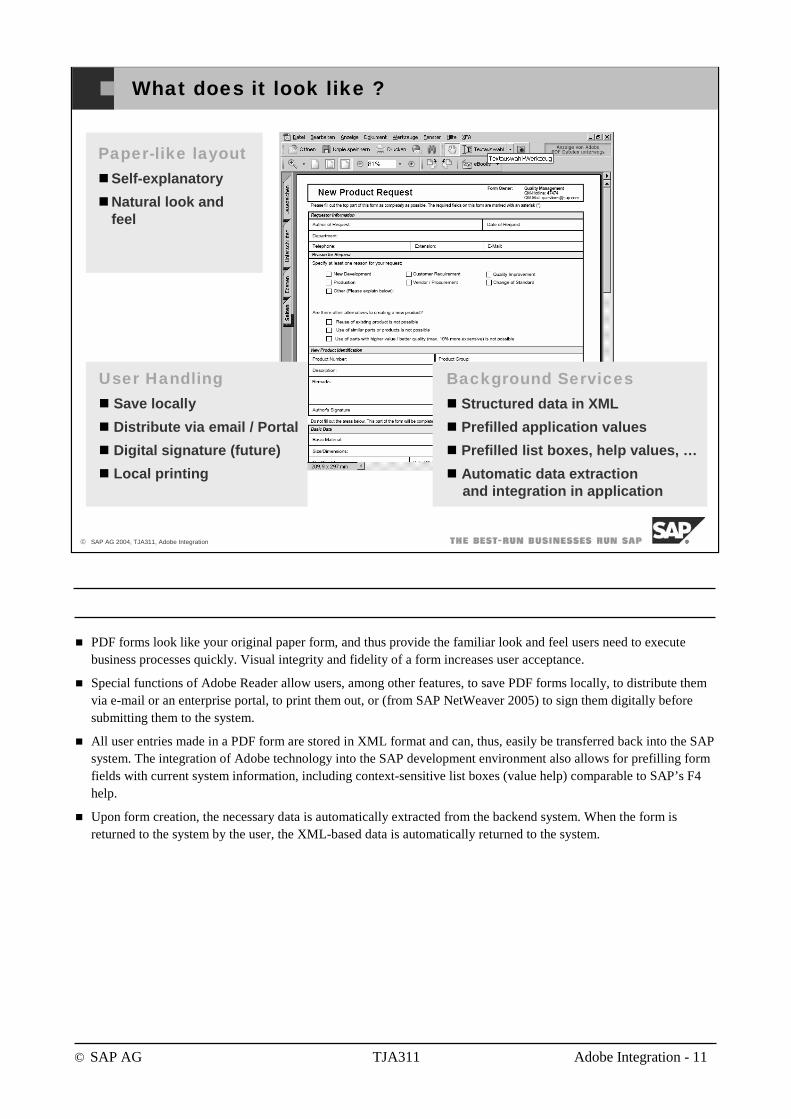
© SAP AG TJA311 Adobe Integration - 11
© SAP AG 2004, TJA311, Adobe Integration
What does it look like ?
Paper-like layoutSelf-explanatory
Natural look and feel
User HandlingSave locally
Distribute via email / Portal
Digital signature (future)
Local printing
Background ServicesStructured data in XML
Prefilled application values
Prefilled list boxes, help values, …
Automatic data extraction and integration in application
PDF forms look like your original paper form, and thus provide the familiar look and feel users need to execute business processes quickly. Visual integrity and fidelity of a form increases user acceptance.
Special functions of Adobe Reader allow users, among other features, to save PDF forms locally, to distribute them via e-mail or an enterprise portal, to print them out, or (from SAP NetWeaver 2005) to sign them digitally before submitting them to the system.
All user entries made in a PDF form are stored in XML format and can, thus, easily be transferred back into the SAP system. The integration of Adobe technology into the SAP development environment also allows for prefilling form fields with current system information, including context-sensitive list boxes (value help) comparable to SAP’s F4 help.
Upon form creation, the necessary data is automatically extracted from the backend system. When the form is returned to the system by the user, the XML-based data is automatically returned to the system.
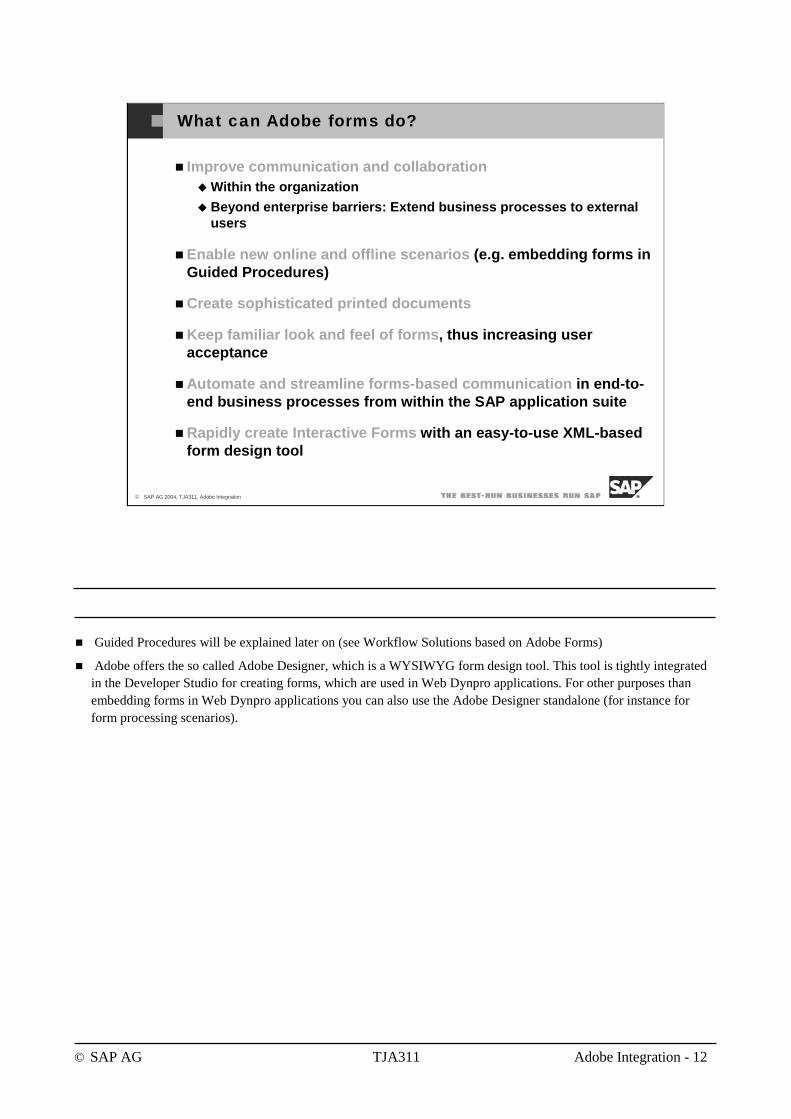
© SAP AG TJA311 Adobe Integration - 12
© SAP AG 2004, TJA311, Adobe Integration
What can Adobe forms do?
Improve communication and collaborationWithin the organization
Beyond enterprise barriers: Extend business processes to external users
Enable new online and offline scenarios (e.g. embedding forms in Guided Procedures)
Create sophisticated printed documents
Keep familiar look and feel of forms, thus increasing user acceptance
Automate and streamline forms-based communication in end-to-end business processes from within the SAP application suite
Rapidly create Interactive Forms with an easy-to-use XML-based form design tool
Guided Procedures will be explained later on (see Workflow Solutions based on Adobe Forms)
Adobe offers the so called Adobe Designer, which is a WYSIWYG form design tool. This tool is tightly integratedin the Developer Studio for creating forms, which are used in Web Dynpro applications. For other purposes thanembedding forms in Web Dynpro applications you can also use the Adobe Designer standalone (for instance forform processing scenarios).
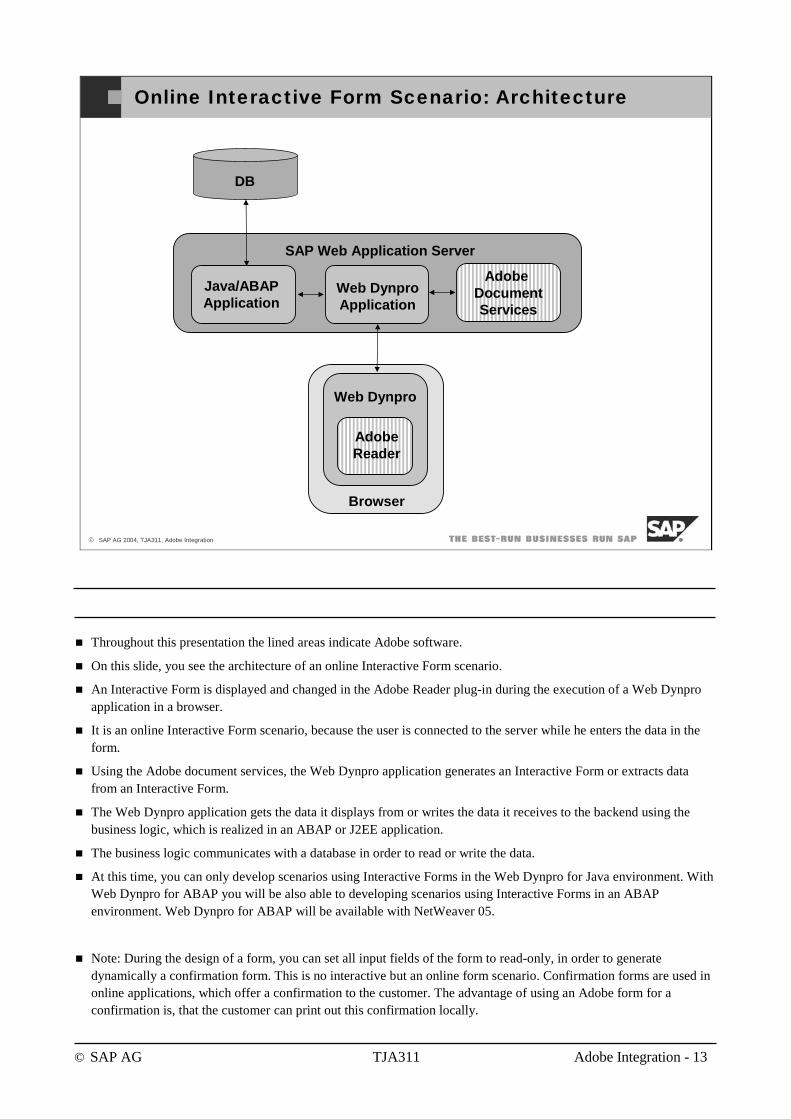
© SAP AG TJA311 Adobe Integration - 13
© SAP AG 2004, TJA311, Adobe Integration
Online Interactive Form Scenario: Architecture
Browser
Web Dynpro
AdobeReader
SAP Web Application Server
Java/ABAPApplication
Web DynproApplication
Adobe DocumentServices
DB
Throughout this presentation the lined areas indicate Adobe software.
On this slide, you see the architecture of an online Interactive Form scenario.
An Interactive Form is displayed and changed in the Adobe Reader plug-in during the execution of a Web Dynproapplication in a browser.
It is an online Interactive Form scenario, because the user is connected to the server while he enters the data in the form.
Using the Adobe document services, the Web Dynpro application generates an Interactive Form or extracts data from an Interactive Form.
The Web Dynpro application gets the data it displays from or writes the data it receives to the backend using the business logic, which is realized in an ABAP or J2EE application.
The business logic communicates with a database in order to read or write the data.
At this time, you can only develop scenarios using Interactive Forms in the Web Dynpro for Java environment. With Web Dynpro for ABAP you will be also able to developing scenarios using Interactive Forms in an ABAP environment. Web Dynpro for ABAP will be available with NetWeaver 05.
Note: During the design of a form, you can set all input fields of the form to read-only, in order to generatedynamically a confirmation form. This is no interactive but an online form scenario. Confirmation forms are used in online applications, which offer a confirmation to the customer. The advantage of using an Adobe form for a confirmation is, that the customer can print out this confirmation locally.

© SAP AG TJA311 Adobe Integration - 14
© SAP AG 2004, TJA311, Adobe Integration
Offline Interactive Form Scenario: Architecture
Download / Upload
AdobeReaderFilesystem
Browser
SAP Web Application Server
DB
Java/ABAPApplication
Web Dynpro
Web DynproApplication
Adobe DocumentServices
Download/Upload
On this slide, you see the architecture of an offline Interactive Form scenario based on down-/upload functionality.
You can download an Interactive Form to your local file system using a Web Dynpro application.
You can then display and change the Interactive Form locally in Adobe Reader.
It is an offline Interactive Form scenario, because the user is not connected to the server while he enters the data in the form.
After entering or changing the data, you upload the Interactive Form from your local file system using the Web Dynpro application.
Using the Adobe document services, the Web Dynpro application generates an Interactive Form or extracts data from an Interactive Form.
The Web Dynpro application gets the data it displays from or writes the data it receives to the backend using the business logic, which is realized in an ABAP or J2EE application.
The business logic communicates with a database in order to read or write the data.
At this time, you can develop scenarios using Interactive Forms in the Web Dynpro for Java environment.
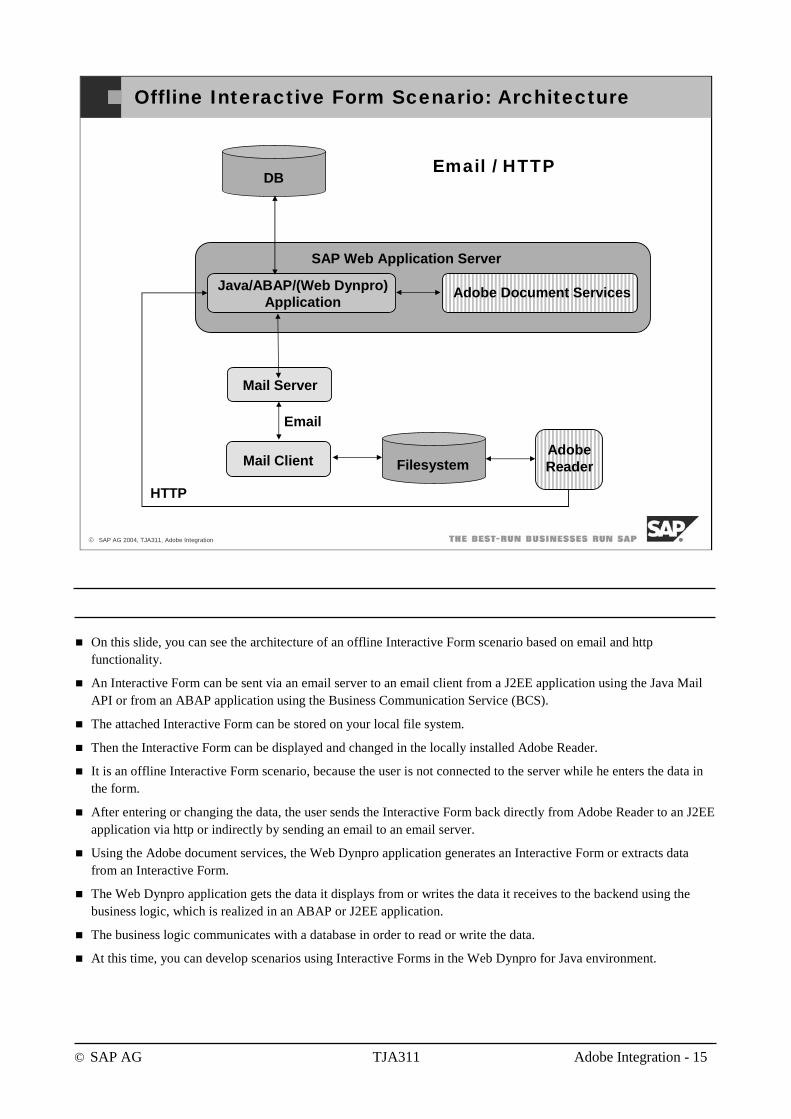
© SAP AG TJA311 Adobe Integration - 15
© SAP AG 2004, TJA311, Adobe Integration
Offline Interactive Form Scenario: Architecture
Email / HTTP
Mail Client
Mail Server
SAP Web Application Server
DB
Java/ABAP/(Web Dynpro)Application
Adobe Document Services
AdobeReaderFilesystem
HTTP
On this slide, you can see the architecture of an offline Interactive Form scenario based on email and http functionality.
An Interactive Form can be sent via an email server to an email client from a J2EE application using the Java Mail API or from an ABAP application using the Business Communication Service (BCS).
The attached Interactive Form can be stored on your local file system.
Then the Interactive Form can be displayed and changed in the locally installed Adobe Reader.
It is an offline Interactive Form scenario, because the user is not connected to the server while he enters the data in the form.
After entering or changing the data, the user sends the Interactive Form back directly from Adobe Reader to an J2EE application via http or indirectly by sending an email to an email server.
Using the Adobe document services, the Web Dynpro application generates an Interactive Form or extracts data from an Interactive Form.
The Web Dynpro application gets the data it displays from or writes the data it receives to the backend using the business logic, which is realized in an ABAP or J2EE application.
The business logic communicates with a database in order to read or write the data.
At this time, you can develop scenarios using Interactive Forms in the Web Dynpro for Java environment.
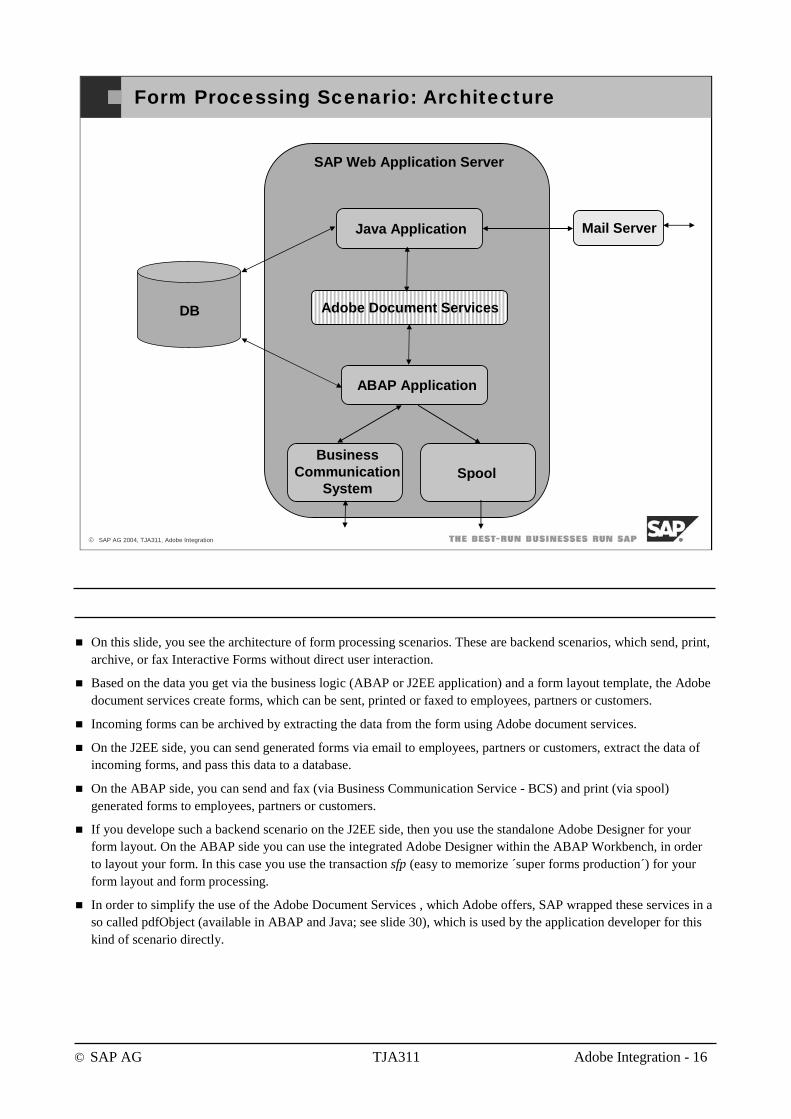
© SAP AG TJA311 Adobe Integration - 16
© SAP AG 2004, TJA311, Adobe Integration
Form Processing Scenario: Architecture
DB
Mail Server
SAP Web Application Server
Java Application
Adobe Document Services
ABAP Application
SpoolBusiness
CommunicationSystem
On this slide, you see the architecture of form processing scenarios. These are backend scenarios, which send, print, archive, or fax Interactive Forms without direct user interaction.
Based on the data you get via the business logic (ABAP or J2EE application) and a form layout template, the Adobe document services create forms, which can be sent, printed or faxed to employees, partners or customers.
Incoming forms can be archived by extracting the data from the form using Adobe document services.
On the J2EE side, you can send generated forms via email to employees, partners or customers, extract the data of incoming forms, and pass this data to a database.
On the ABAP side, you can send and fax (via Business Communication Service - BCS) and print (via spool) generated forms to employees, partners or customers.
If you develope such a backend scenario on the J2EE side, then you use the standalone Adobe Designer for yourform layout. On the ABAP side you can use the integrated Adobe Designer within the ABAP Workbench, in order to layout your form. In this case you use the transaction sfp (easy to memorize ´super forms production´) for yourform layout and form processing.
In order to simplify the use of the Adobe Document Services , which Adobe offers, SAP wrapped these services in a so called pdfObject (available in ABAP and Java; see slide 30), which is used by the application developer for thiskind of scenario directly.

© SAP AG TJA311 Adobe Integration - 17
© SAP AG 2004, TJA311, Adobe Integration
SAP/Adobe Partnership Overview
SAP/Adobe Strategic PartnershipPartnership signed in June 2002
Solution available with SAP NetWeaver ‘04
Adobe providesOpen technology, de-facto standard for forms
Benefits of combination of PDF with XML
Benefits of SAP/Adobe collaborationIntegration of Adobe’s PDF technology into SAP solutions
Adobe Reader delivered 500 million times worldwide
User-friendly design tool lowers cost of operations
Reuse of existing PDF forms
“Natural” look and feel of forms
Close linking of processes and forms (real integration)

© SAP AG TJA311 Adobe Integration - 18
© SAP AG 2004, TJA311, Adobe Integration
Interactive Forms based on Adobe software are fully integrated into SAP Web Application Server 6.40
Adobe document services are deployed on the SAP J2EE Engine
Adobe Designer is fully integrated into SAP NetWeaver Developer Studio and ABAP Workbench
Online and offline Interactive Forms (integrated into Web Dynpro for Java framework) support interactive business scenarios
Printing of documents
Interactive Forms in SAP NetWeaver 04: Technical View
To optimize forms-based business processes, the new release of SAP Web Application Server includes a new solution for Interactive Forms. This solution is based on the Portable Document Format (PDF) and software provided by Adobe Inc. You can create Interactive Forms that allow a user to fill in a form in PDF format and save the entries inside the form in XML format. The SAP system extracts the data saved in the form for further processing. You can also merge a form template with current system data to produce a PDF form for printing or e-mailing.
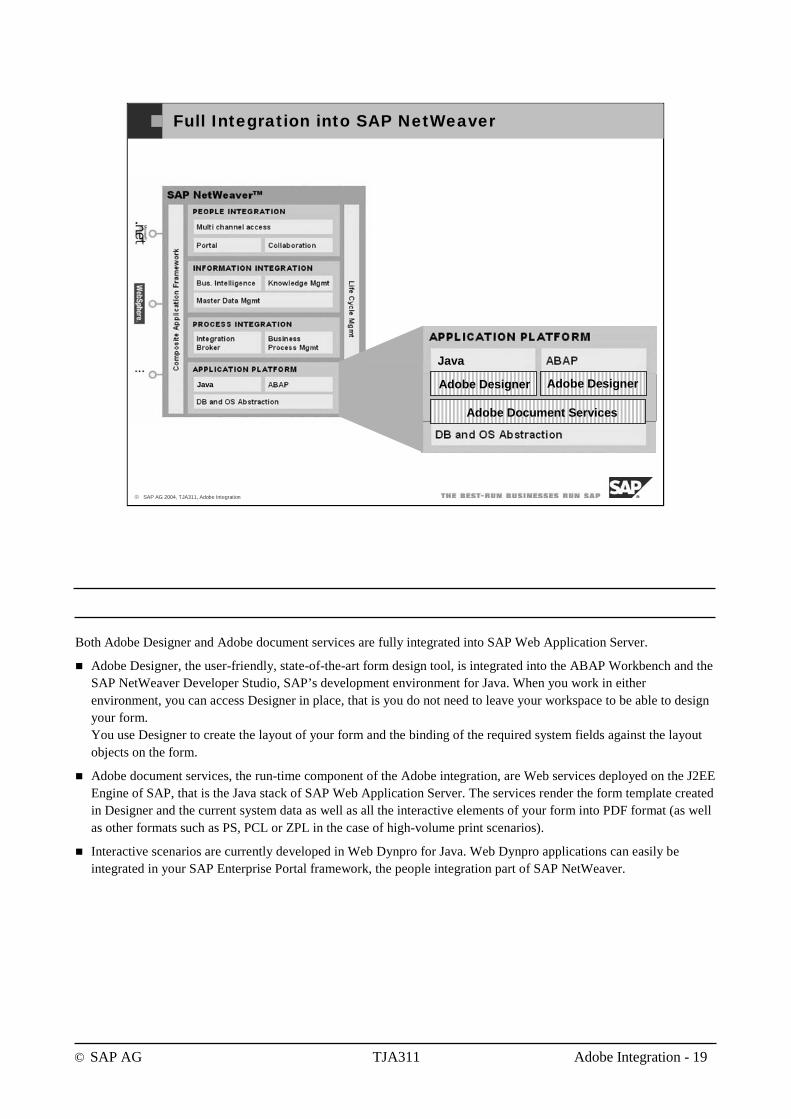
© SAP AG TJA311 Adobe Integration - 19
© SAP AG 2004, TJA311, Adobe Integration
Full Integration into SAP NetWeaver
Adobe Designer Adobe Designer
Adobe Document Services
Java
Java
Both Adobe Designer and Adobe document services are fully integrated into SAP Web Application Server.
Adobe Designer, the user-friendly, state-of-the-art form design tool, is integrated into the ABAP Workbench and the SAP NetWeaver Developer Studio, SAP’s development environment for Java. When you work in either environment, you can access Designer in place, that is you do not need to leave your workspace to be able to design your form.You use Designer to create the layout of your form and the binding of the required system fields against the layout objects on the form.
Adobe document services, the run-time component of the Adobe integration, are Web services deployed on the J2EE Engine of SAP, that is the Java stack of SAP Web Application Server. The services render the form template created in Designer and the current system data as well as all the interactive elements of your form into PDF format (as well as other formats such as PS, PCL or ZPL in the case of high-volume print scenarios).
Interactive scenarios are currently developed in Web Dynpro for Java. Web Dynpro applications can easily be integrated in your SAP Enterprise Portal framework, the people integration part of SAP NetWeaver.
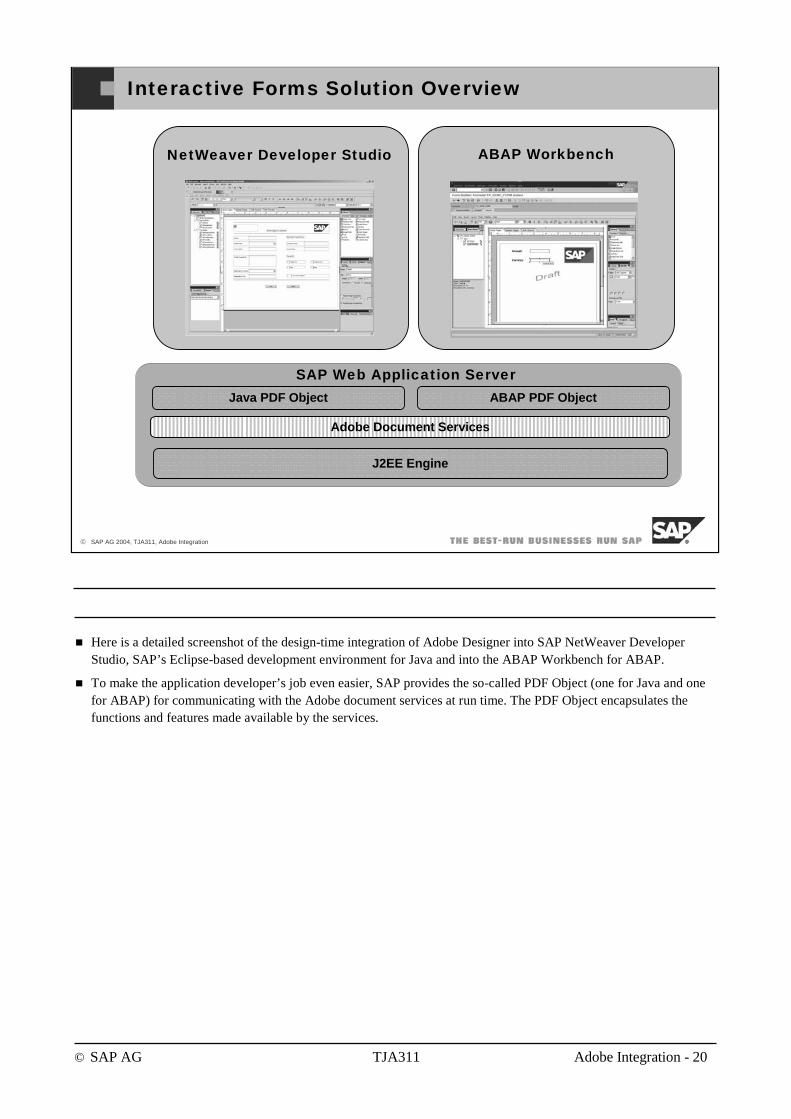
© SAP AG TJA311 Adobe Integration - 20
© SAP AG 2004, TJA311, Adobe Integration
Interactive Forms Solution Overview
Java PDF Object ABAP PDF Object
SAP Web Application Server
Adobe Document Services
J2EE Engine
NetWeaver Developer Studio ABAP Workbench
Here is a detailed screenshot of the design-time integration of Adobe Designer into SAP NetWeaver Developer Studio, SAP’s Eclipse-based development environment for Java and into the ABAP Workbench for ABAP.
To make the application developer’s job even easier, SAP provides the so-called PDF Object (one for Java and one for ABAP) for communicating with the Adobe document services at run time. The PDF Object encapsulates the functions and features made available by the services.
© SAP AG TJA311 Adobe Integration - 21
© SAP AG 2004, TJA311, Adobe Integration
You should now be able to:
explain the business need and benefits
describe the look and feel
give a solution overview
Introduction: Topic Summary
© SAP AG TJA311 Adobe Integration - 22
© SAP AG 2004, TJA311, Adobe Integration
After completing this topic, you will:
get a better understanding of Adobe forms integration by seeing a running demo
Interactive Form Demo: Topic Objectives
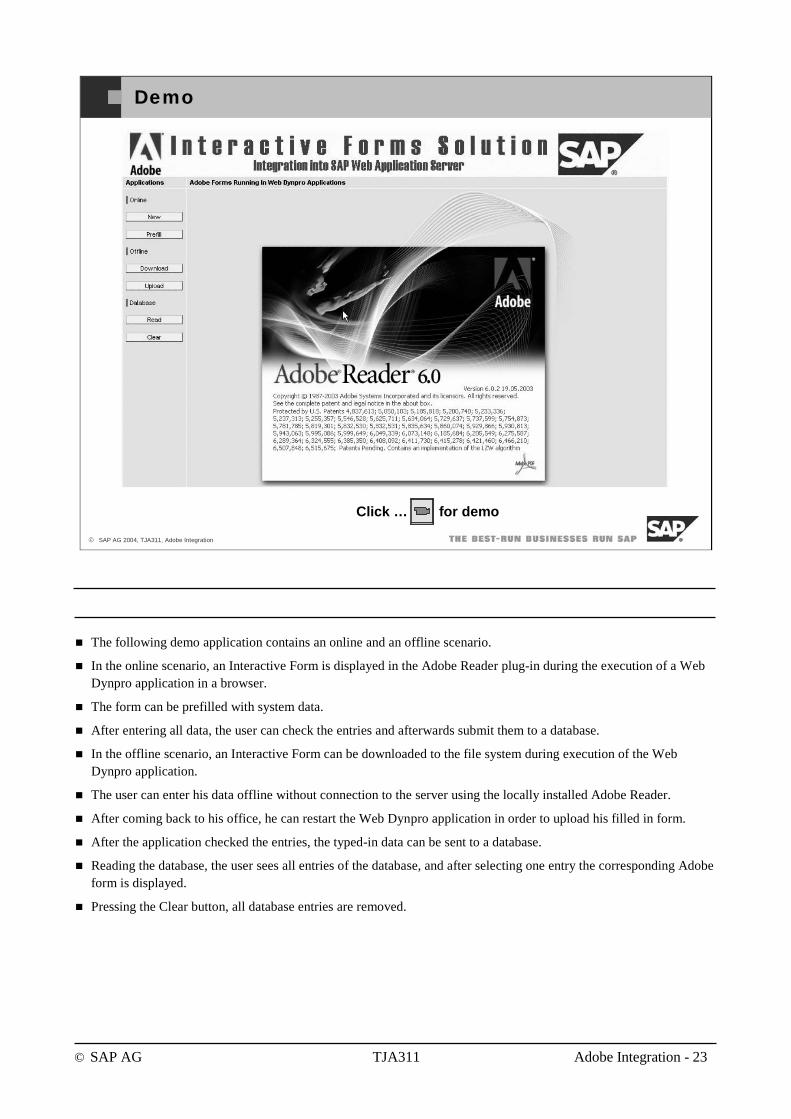
© SAP AG TJA311 Adobe Integration - 23
© SAP AG 2004, TJA311, Adobe Integration
Demo
Click … for demo
The following demo application contains an online and an offline scenario.
In the online scenario, an Interactive Form is displayed in the Adobe Reader plug-in during the execution of a Web Dynpro application in a browser.
The form can be prefilled with system data.
After entering all data, the user can check the entries and afterwards submit them to a database.
In the offline scenario, an Interactive Form can be downloaded to the file system during execution of the Web Dynpro application.
The user can enter his data offline without connection to the server using the locally installed Adobe Reader.
After coming back to his office, he can restart the Web Dynpro application in order to upload his filled in form.
After the application checked the entries, the typed-in data can be sent to a database.
Reading the database, the user sees all entries of the database, and after selecting one entry the corresponding Adobe form is displayed.
Pressing the Clear button, all database entries are removed.
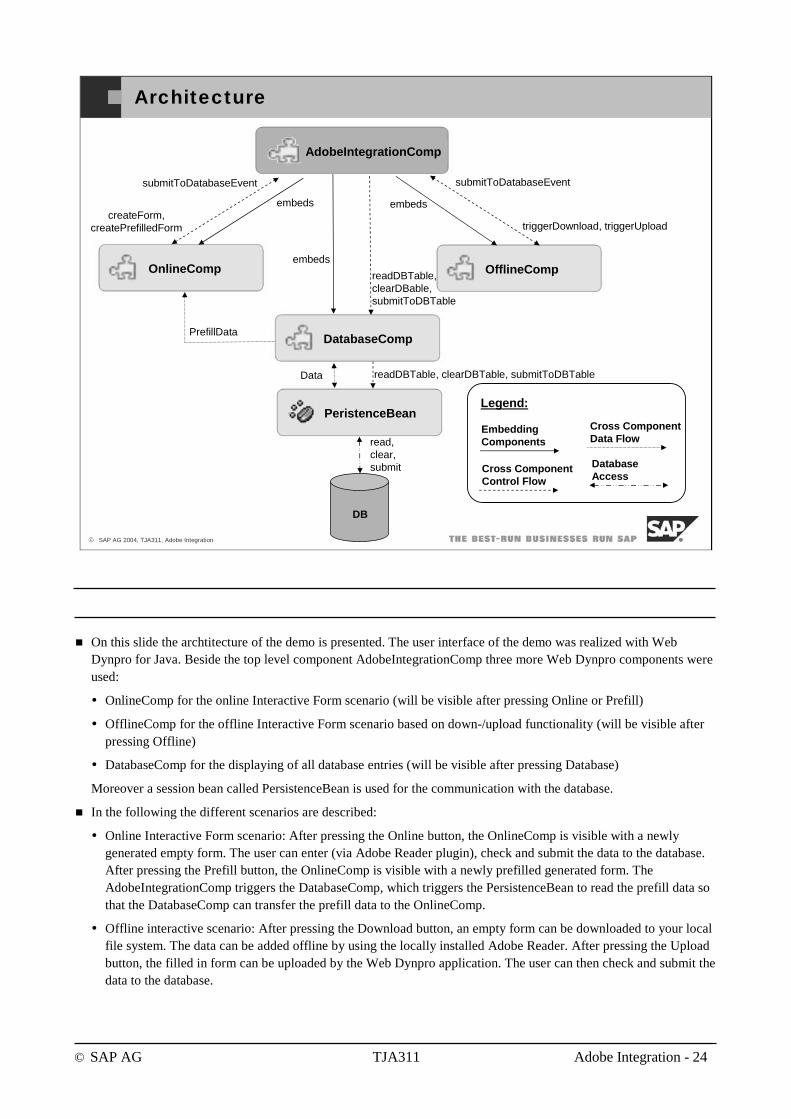
© SAP AG TJA311 Adobe Integration - 24
© SAP AG 2004, TJA311, Adobe Integration
Architecture
DatabaseAccess
Cross ComponentData Flow
EmbeddingComponents
Cross ComponentControl Flow
AdobeIntegrationComp
OfflineComp
embeds
embeds
embeds
DB
readDBTable,clearDBable,submitToDBTable
submitToDatabaseEvent submitToDatabaseEvent
PrefillData
OnlineComp
Legend:PeristenceBean
DatabaseComp
read,clear,submit
readDBTable, clearDBTable, submitToDBTableData
createForm,createPrefilledForm triggerDownload, triggerUpload
On this slide the archtitecture of the demo is presented. The user interface of the demo was realized with Web Dynpro for Java. Beside the top level component AdobeIntegrationComp three more Web Dynpro components were used:
OnlineComp for the online Interactive Form scenario (will be visible after pressing Online or Prefill)
OfflineComp for the offline Interactive Form scenario based on down-/upload functionality (will be visible after pressing Offline)
DatabaseComp for the displaying of all database entries (will be visible after pressing Database)
Moreover a session bean called PersistenceBean is used for the communication with the database.
In the following the different scenarios are described:
Online Interactive Form scenario: After pressing the Online button, the OnlineComp is visible with a newly generated empty form. The user can enter (via Adobe Reader plugin), check and submit the data to the database. After pressing the Prefill button, the OnlineComp is visible with a newly prefilled generated form. The AdobeIntegrationComp triggers the DatabaseComp, which triggers the PersistenceBean to read the prefill data so that the DatabaseComp can transfer the prefill data to the OnlineComp.
Offline interactive scenario: After pressing the Download button, an empty form can be downloaded to your local file system. The data can be added offline by using the locally installed Adobe Reader. After pressing the Upload button, the filled in form can be uploaded by the Web Dynpro application. The user can then check and submit the data to the database.
© SAP AG TJA311 Adobe Integration - 25
© SAP AG 2004, TJA311, Adobe Integration
You should now:
have a better understanding of the Adobe forms integration
Interactive Form Demo: Topic Summary
© SAP AG TJA311 Adobe Integration - 26
© SAP AG 2004, TJA311, Adobe Integration
After completing this topic, you will be able to:
explain key software components
Involved Software Components: Topic Objectives
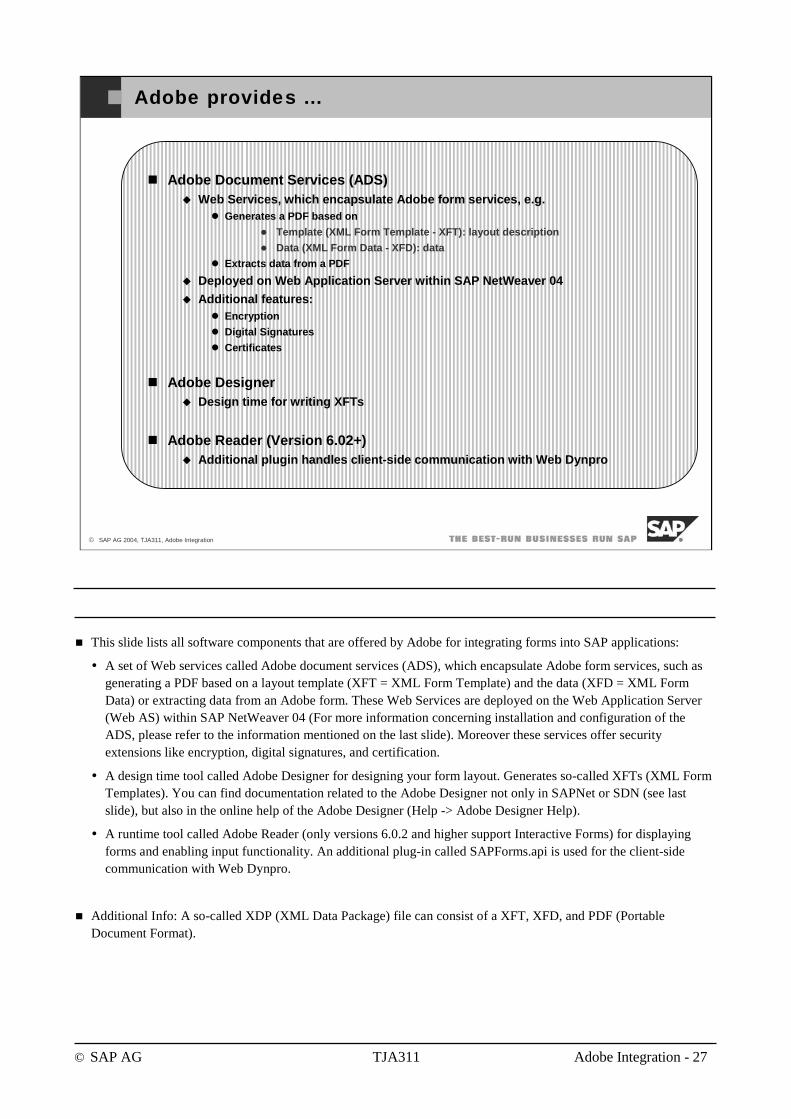
© SAP AG TJA311 Adobe Integration - 27
© SAP AG 2004, TJA311, Adobe Integration
Adobe provides …
Adobe Document Services (ADS)Web Services, which encapsulate Adobe form services, e.g.
Generates a PDF based on
Template (XML Form Template - XFT): layout description
Data (XML Form Data - XFD): data
Extracts data from a PDF
Deployed on Web Application Server within SAP NetWeaver 04
Additional features:Encryption
Digital Signatures
Certificates
Adobe DesignerDesign time for writing XFTs
Adobe Reader (Version 6.02+)Additional plugin handles client-side communication with Web Dynpro
This slide lists all software components that are offered by Adobe for integrating forms into SAP applications:
A set of Web services called Adobe document services (ADS), which encapsulate Adobe form services, such as generating a PDF based on a layout template (XFT = XML Form Template) and the data (XFD = XML Form Data) or extracting data from an Adobe form. These Web Services are deployed on the Web Application Server (Web AS) within SAP NetWeaver 04 (For more information concerning installation and configuration of the ADS, please refer to the information mentioned on the last slide). Moreover these services offer security extensions like encryption, digital signatures, and certification.
A design time tool called Adobe Designer for designing your form layout. Generates so-called XFTs (XML Form Templates). You can find documentation related to the Adobe Designer not only in SAPNet or SDN (see last slide), but also in the online help of the Adobe Designer (Help -> Adobe Designer Help).
A runtime tool called Adobe Reader (only versions 6.0.2 and higher support Interactive Forms) for displaying forms and enabling input functionality. An additional plug-in called SAPForms.api is used for the client-side communication with Web Dynpro.
Additional Info: A so-called XDP (XML Data Package) file can consist of a XFT, XFD, and PDF (Portable Document Format).
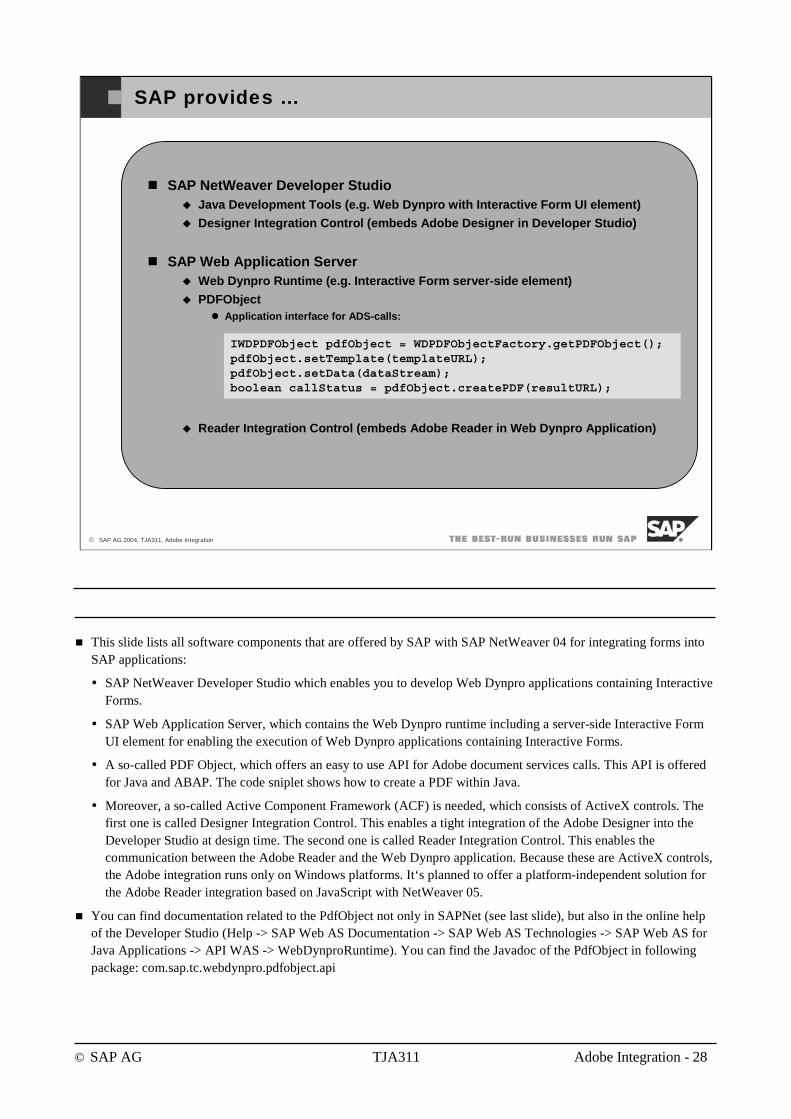
© SAP AG TJA311 Adobe Integration - 28
© SAP AG 2004, TJA311, Adobe Integration
SAP provides …
SAP NetWeaver Developer StudioJava Development Tools (e.g. Web Dynpro with Interactive Form UI element)
Designer Integration Control (embeds Adobe Designer in Developer Studio)
SAP Web Application ServerWeb Dynpro Runtime (e.g. Interactive Form server-side element)
PDFObjectApplication interface for ADS-calls:
Reader Integration Control (embeds Adobe Reader in Web Dynpro Application)
IWDPDFObject pdfObject = WDPDFObjectFactory.getPDFObject();pdfObject.setTemplate(templateURL);pdfObject.setData(dataStream);boolean callStatus = pdfObject.createPDF(resultURL);
This slide lists all software components that are offered by SAP with SAP NetWeaver 04 for integrating forms into SAP applications:
SAP NetWeaver Developer Studio which enables you to develop Web Dynpro applications containing Interactive Forms.
SAP Web Application Server, which contains the Web Dynpro runtime including a server-side Interactive Form UI element for enabling the execution of Web Dynpro applications containing Interactive Forms.
A so-called PDF Object, which offers an easy to use API for Adobe document services calls. This API is offered for Java and ABAP. The code sniplet shows how to create a PDF within Java.
Moreover, a so-called Active Component Framework (ACF) is needed, which consists of ActiveX controls. The first one is called Designer Integration Control. This enables a tight integration of the Adobe Designer into the Developer Studio at design time. The second one is called Reader Integration Control. This enables the communication between the Adobe Reader and the Web Dynpro application. Because these are ActiveX controls, the Adobe integration runs only on Windows platforms. It‘s planned to offer a platform-independent solution for the Adobe Reader integration based on JavaScript with NetWeaver 05.
You can find documentation related to the PdfObject not only in SAPNet (see last slide), but also in the online helpof the Developer Studio (Help -> SAP Web AS Documentation -> SAP Web AS Technologies -> SAP Web AS forJava Applications -> API WAS -> WebDynproRuntime). You can find the Javadoc of the PdfObject in followingpackage: com.sap.tc.webdynpro.pdfobject.api
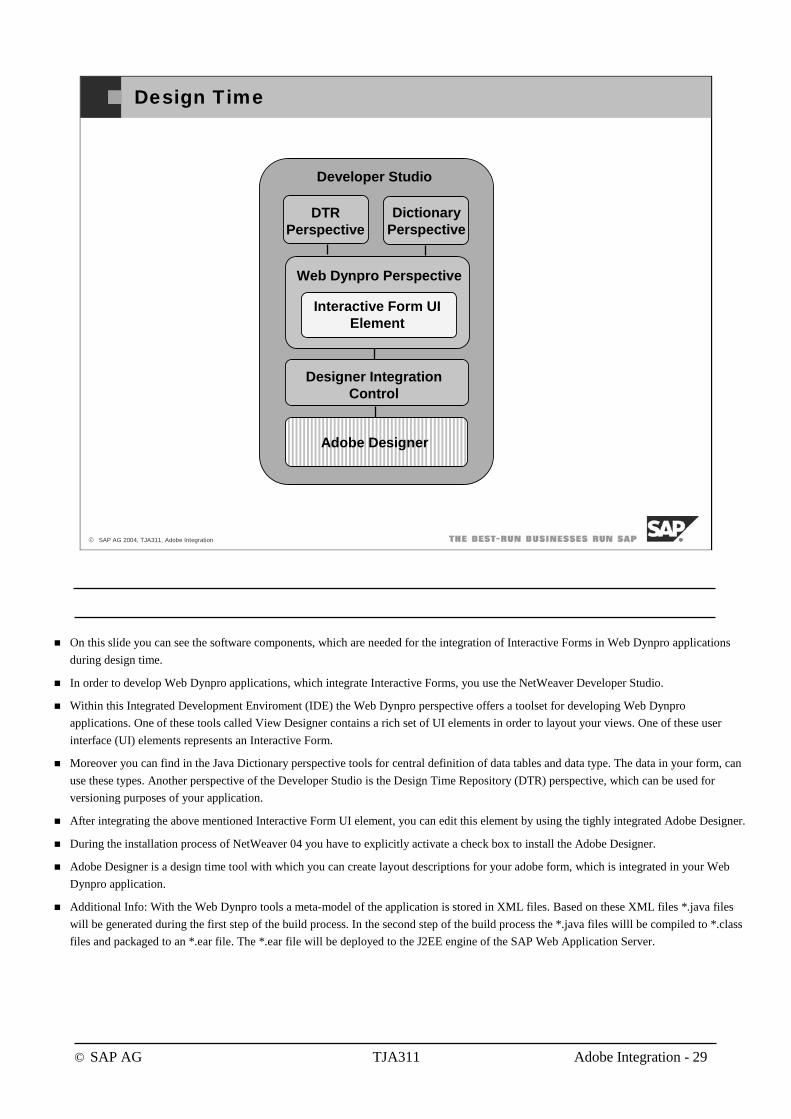
© SAP AG TJA311 Adobe Integration - 29
© SAP AG 2004, TJA311, Adobe Integration
Design Time
Developer Studio
DTRPerspective
DictionaryPerspective
Web Dynpro Perspective
Designer IntegrationControl
Adobe Designer
Interactive Form UI Element
On this slide you can see the software components, which are needed for the integration of Interactive Forms in Web Dynpro applications
during design time.
In order to develop Web Dynpro applications, which integrate Interactive Forms, you use the NetWeaver Developer Studio.
Within this Integrated Development Enviroment (IDE) the Web Dynpro perspective offers a toolset for developing Web Dynpro
applications. One of these tools called View Designer contains a rich set of UI elements in order to layout your views. One of these user
interface (UI) elements represents an Interactive Form.
Moreover you can find in the Java Dictionary perspective tools for central definition of data tables and data type. The data in your form, can
use these types. Another perspective of the Developer Studio is the Design Time Repository (DTR) perspective, which can be used for
versioning purposes of your application.
After integrating the above mentioned Interactive Form UI element, you can edit this element by using the tighly integrated Adobe Designer.
During the installation process of NetWeaver 04 you have to explicitly activate a check box to install the Adobe Designer.
Adobe Designer is a design time tool with which you can create layout descriptions for your adobe form, which is integrated in your Web
Dynpro application.
Additional Info: With the Web Dynpro tools a meta-model of the application is stored in XML files. Based on these XML files *.java files
will be generated during the first step of the build process. In the second step of the build process the *.java files willl be compiled to *.class
files and packaged to an *.ear file. The *.ear file will be deployed to the J2EE engine of the SAP Web Application Server.
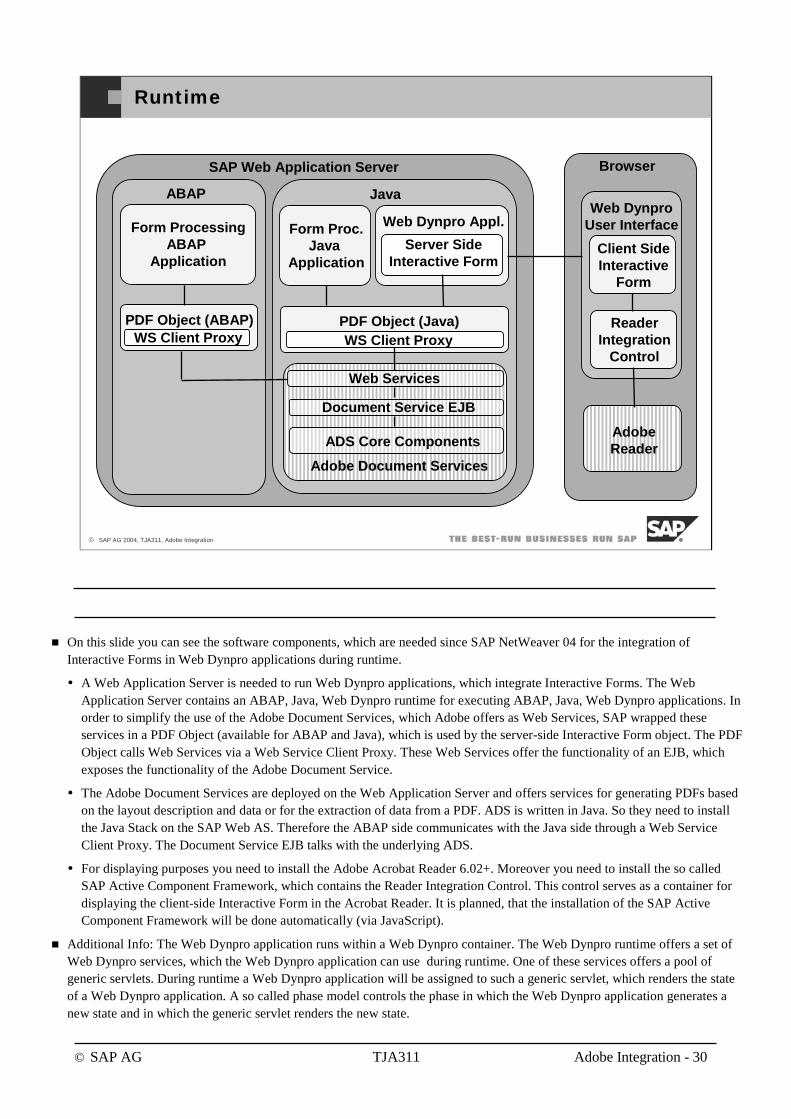
© SAP AG TJA311 Adobe Integration - 30
© SAP AG 2004, TJA311, Adobe Integration
Runtime
SAP Web Application Server Browser
AdobeReader
Web DynproUser Interface
Client SideInteractive
Form
ReaderIntegration
Control
ABAP Java
PDF Object (Java)
Web Dynpro Appl.
Server Side Interactive Form
Web Services
Document Service EJB
ADS Core Components
Form Proc.Java
Application
WS Client Proxy
Form ProcessingABAP
Application
PDF Object (ABAP)WS Client Proxy
Adobe Document Services
On this slide you can see the software components, which are needed since SAP NetWeaver 04 for the integration of Interactive Forms in Web Dynpro applications during runtime.
A Web Application Server is needed to run Web Dynpro applications, which integrate Interactive Forms. The Web Application Server contains an ABAP, Java, Web Dynpro runtime for executing ABAP, Java, Web Dynpro applications. In order to simplify the use of the Adobe Document Services, which Adobe offers as Web Services, SAP wrapped these services in a PDF Object (available for ABAP and Java), which is used by the server-side Interactive Form object. The PDF Object calls Web Services via a Web Service Client Proxy. These Web Services offer the functionality of an EJB, which exposes the functionality of the Adobe Document Service.
The Adobe Document Services are deployed on the Web Application Server and offers services for generating PDFs based on the layout description and data or for the extraction of data from a PDF. ADS is written in Java. So they need to install the Java Stack on the SAP Web AS. Therefore the ABAP side communicates with the Java side through a Web Service Client Proxy. The Document Service EJB talks with the underlying ADS.
For displaying purposes you need to install the Adobe Acrobat Reader 6.02+. Moreover you need to install the so called SAP Active Component Framework, which contains the Reader Integration Control. This control serves as a container for displaying the client-side Interactive Form in the Acrobat Reader. It is planned, that the installation of the SAP Active Component Framework will be done automatically (via JavaScript).
Additional Info: The Web Dynpro application runs within a Web Dynpro container. The Web Dynpro runtime offers a set of Web Dynpro services, which the Web Dynpro application can use during runtime. One of these services offers a pool of generic servlets. During runtime a Web Dynpro application will be assigned to such a generic servlet, which renders the stateof a Web Dynpro application. A so called phase model controls the phase in which the Web Dynpro application generates a new state and in which the generic servlet renders the new state.
© SAP AG TJA311 Adobe Integration - 31
© SAP AG 2004, TJA311, Adobe Integration
You should now be able to:
explain key software components
Involved Software Components: Topic Summary
© SAP AG TJA311 Adobe Integration - 32
© SAP AG 2004, TJA311, Adobe Integration
After completing this topic, you will be able to:
use the Interactive Form UI element
create the layout of a PDF form
integrate images into PDF forms
integrate drop-down lists in Interactive Forms
integrate date fields, radio buttons, and check boxes in Interactive Forms
integrate check and submit buttons in Interactive Forms
Integration Steps: Topic Objectives

© SAP AG TJA311 Adobe Integration - 33
© SAP AG 2004, TJA311, Adobe Integration
Usage of the Interactive Form UI element
1. Drag & drop InteractiveForm
2. SelectInteractiveForm 3. Set properties
1. Drag and drop in the Adobe Visual Designer of the Web Dynpro perspective the InteractiveForm element to thelayout pane of the view. Alternatively you can insert a child of type InteractiveForm in the Outline pane via thecontext menu.
2. Select the InteractiveForm element in the Outline pane.
3. Set the following properties:
The dataSource property is used to specify the data source. The data source encapsulates the data you can display in the form at runtime. For the dataSource property, you need to specify the path to the context node providing the data. The structure of the context node, which is referenced by the dataSource property, will also be displayed in the Data View tab of Adobe Designer. The corresponding context attributes of this node can be bound to the Designer layout elements defined in the form.
The updateDataInPdf value of the mode property is used to update a PDF document with the data provided by the data source or to create a new PDF document from the data source and the form template if no PDF document exists.
The pdfSource property specifies the path of the context element that contains the PDF document. You must bind this property to a context attribute of the type binary. This property allows an application developer to access the binary file and download it to the local hard disk or read and send the data to a backend.
The templateSource property specifies the unique name of the form template. The name is automatically generated when you insert the InteractiveForm UI element into the view.
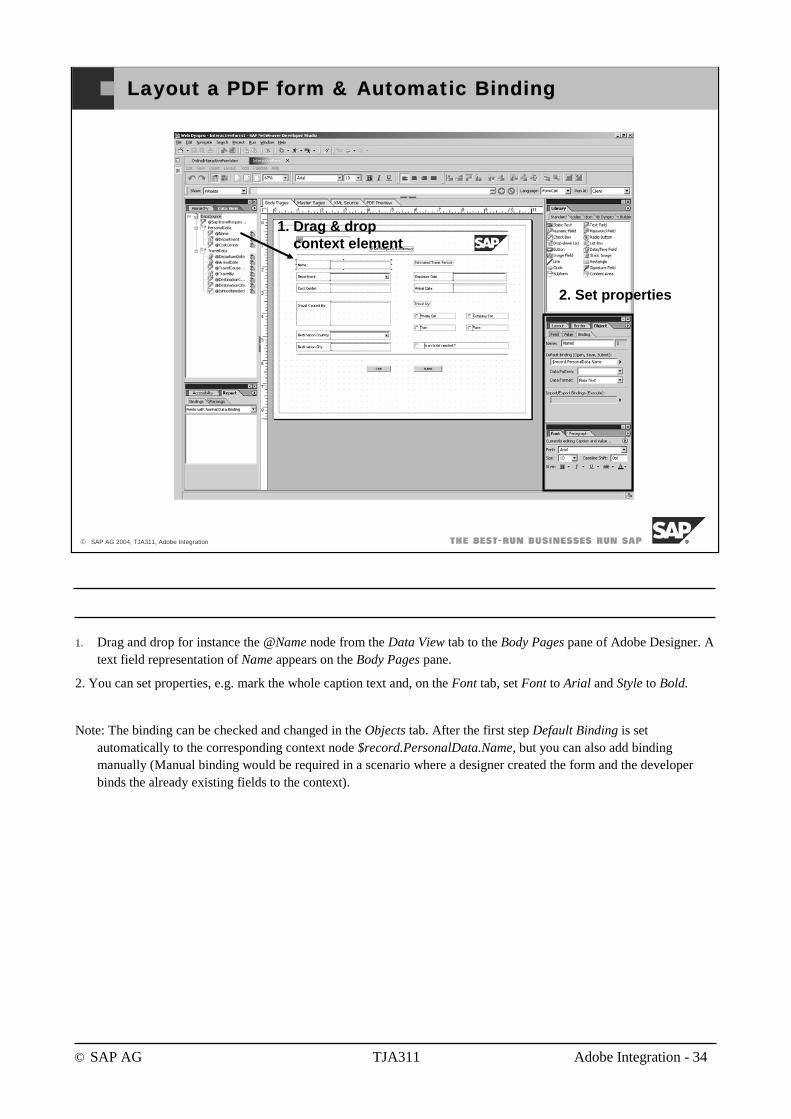
© SAP AG TJA311 Adobe Integration - 34
© SAP AG 2004, TJA311, Adobe Integration
Layout a PDF form & Automatic Binding
1. Drag & drop context element
2. Set properties
1. Drag and drop for instance the @Name node from the Data View tab to the Body Pages pane of Adobe Designer. A text field representation of Name appears on the Body Pages pane.
2. You can set properties, e.g. mark the whole caption text and, on the Font tab, set Font to Arial and Style to Bold.
Note: The binding can be checked and changed in the Objects tab. After the first step Default Binding is setautomatically to the corresponding context node $record.PersonalData.Name, but you can also add binding manually (Manual binding would be required in a scenario where a designer created the form and the developer binds the already existing fields to the context).

© SAP AG TJA311 Adobe Integration - 35
© SAP AG 2004, TJA311, Adobe Integration
Integrating Images
1. Drag & drop Static Image
2. Set URL entry
1. Drag and drop the Static Image element from the standard Library tab to the Body Pages pane.
2. Select the Static Image element on the Body Pages pane, click on the Object tab and select the image file for the URLentry under the component folder in the corresponding mimes folder of the project.
Optional: In addition you can activate Embed Image Data and select Use Image Size for the Sizing field.
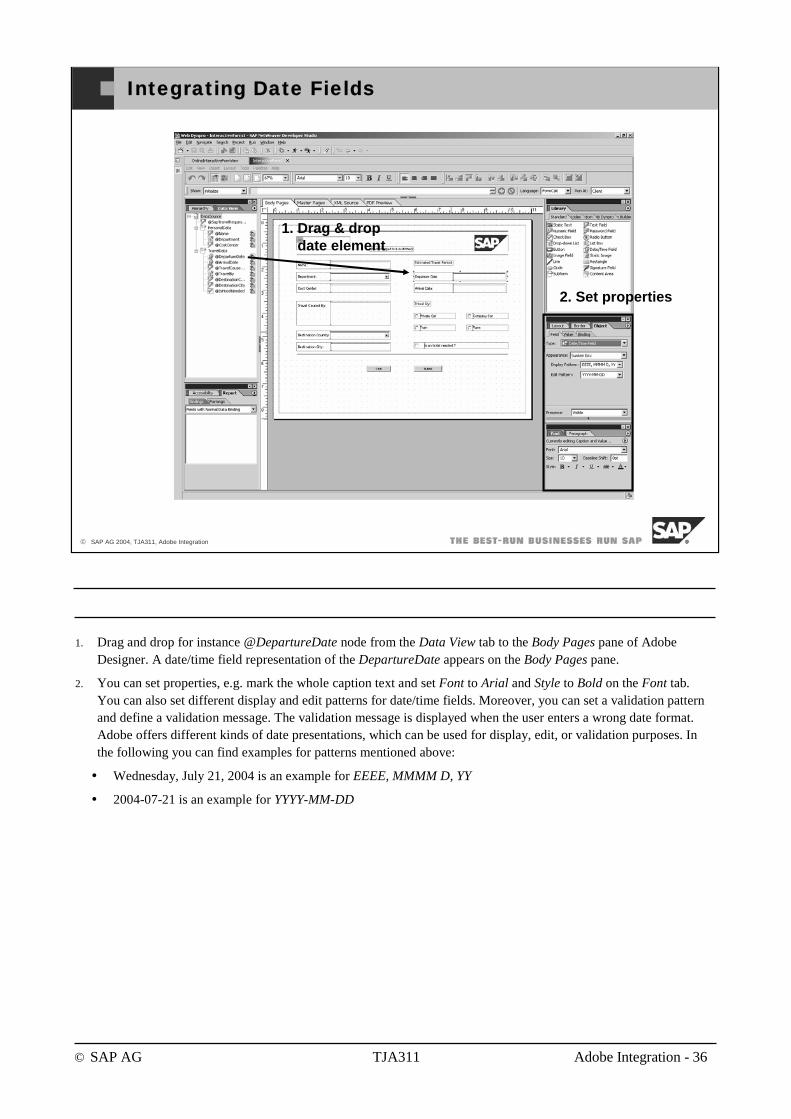
© SAP AG TJA311 Adobe Integration - 36
© SAP AG 2004, TJA311, Adobe Integration
Integrating Date Fields
1. Drag & drop date element
2. Set properties
1. Drag and drop for instance @DepartureDate node from the Data View tab to the Body Pages pane of Adobe Designer. A date/time field representation of the DepartureDate appears on the Body Pages pane.
2. You can set properties, e.g. mark the whole caption text and set Font to Arial and Style to Bold on the Font tab.You can also set different display and edit patterns for date/time fields. Moreover, you can set a validation pattern and define a validation message. The validation message is displayed when the user enters a wrong date format. Adobe offers different kinds of date presentations, which can be used for display, edit, or validation purposes. In the following you can find examples for patterns mentioned above:
Wednesday, July 21, 2004 is an example for EEEE, MMMM D, YY
2004-07-21 is an example for YYYY-MM-DD
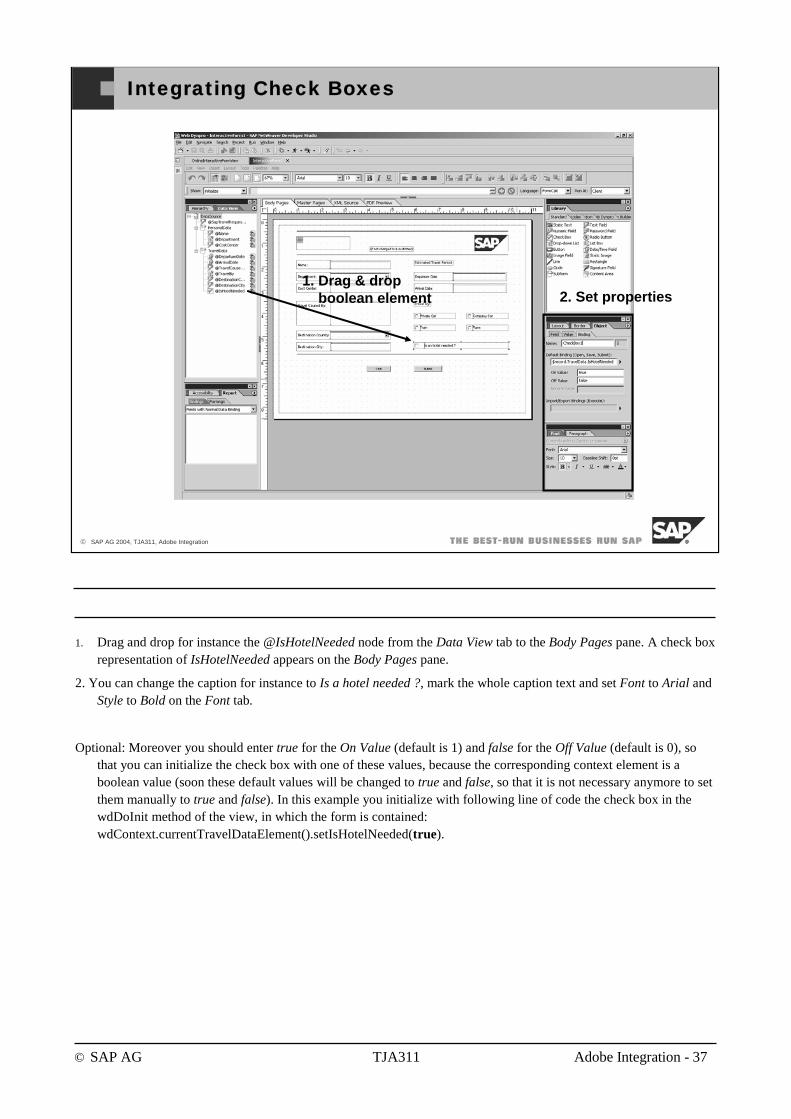
© SAP AG TJA311 Adobe Integration - 37
© SAP AG 2004, TJA311, Adobe Integration
Integrating Check Boxes
1. Drag & drop boolean element 2. Set properties
1. Drag and drop for instance the @IsHotelNeeded node from the Data View tab to the Body Pages pane. A check box representation of IsHotelNeeded appears on the Body Pages pane.
2. You can change the caption for instance to Is a hotel needed ?, mark the whole caption text and set Font to Arial and Style to Bold on the Font tab.
Optional: Moreover you should enter true for the On Value (default is 1) and false for the Off Value (default is 0), so that you can initialize the check box with one of these values, because the corresponding context element is a boolean value (soon these default values will be changed to true and false, so that it is not necessary anymore to set them manually to true and false). In this example you initialize with following line of code the check box in the wdDoInit method of the view, in which the form is contained: wdContext.currentTravelDataElement().setIsHotelNeeded(true).
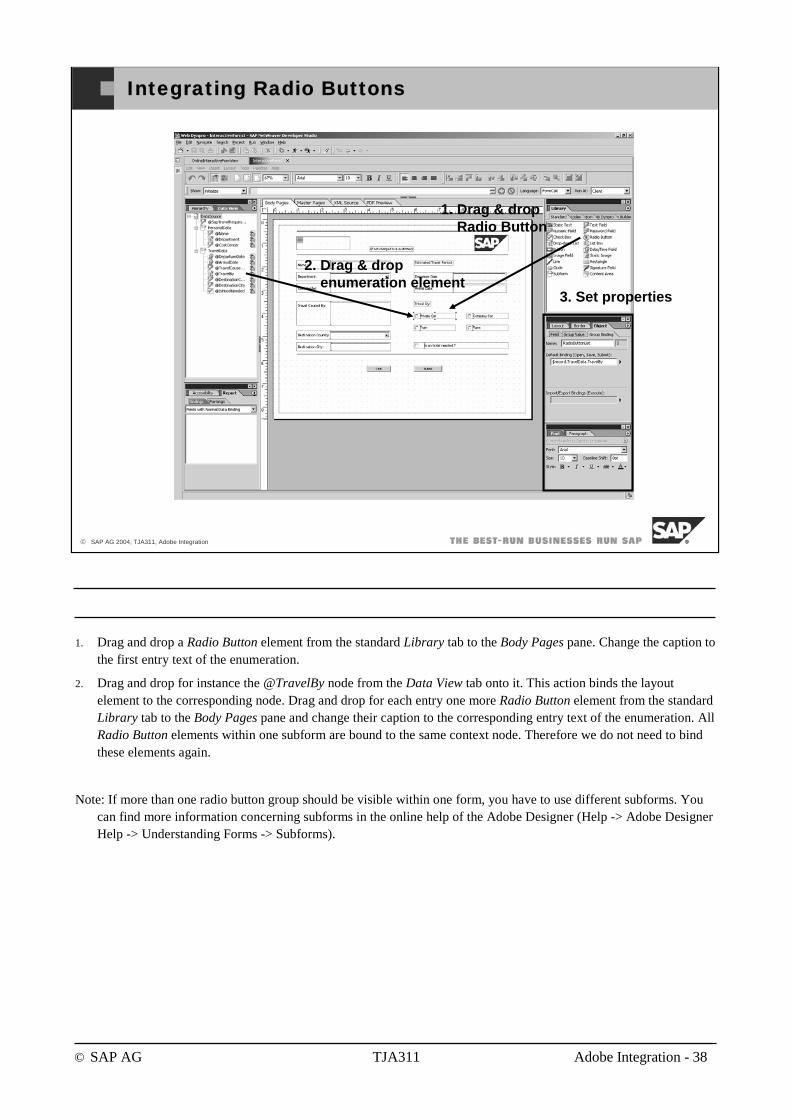
© SAP AG TJA311 Adobe Integration - 38
© SAP AG 2004, TJA311, Adobe Integration
Integrating Radio Buttons
1. Drag & drop Radio Button
2. Drag & drop enumeration element
3. Set properties
1. Drag and drop a Radio Button element from the standard Library tab to the Body Pages pane. Change the caption to the first entry text of the enumeration.
2. Drag and drop for instance the @TravelBy node from the Data View tab onto it. This action binds the layout element to the corresponding node. Drag and drop for each entry one more Radio Button element from the standard Library tab to the Body Pages pane and change their caption to the corresponding entry text of the enumeration. All Radio Button elements within one subform are bound to the same context node. Therefore we do not need to bind these elements again.
Note: If more than one radio button group should be visible within one form, you have to use different subforms. You can find more information concerning subforms in the online help of the Adobe Designer (Help -> Adobe Designer Help -> Understanding Forms -> Subforms).
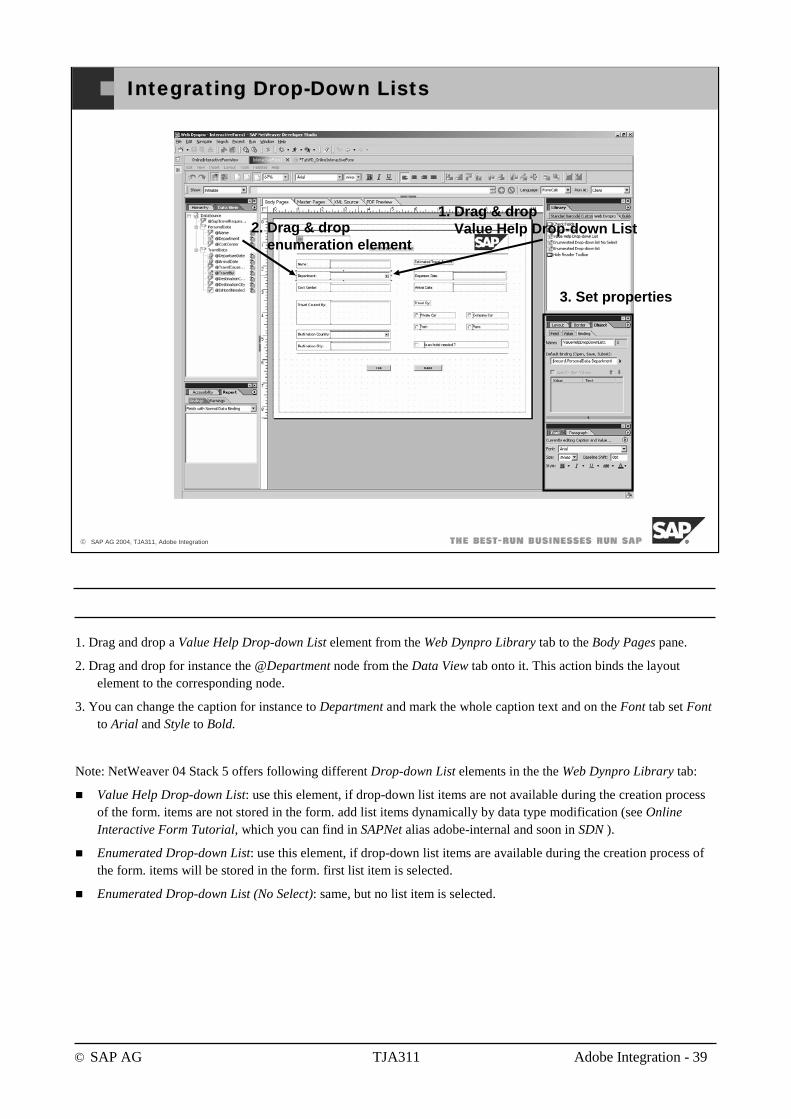
© SAP AG TJA311 Adobe Integration - 39
© SAP AG 2004, TJA311, Adobe Integration
Integrating Drop-Down Lists
1. Drag & drop Value Help Drop-down List2. Drag & drop
enumeration element
3. Set properties
1. Drag and drop a Value Help Drop-down List element from the Web Dynpro Library tab to the Body Pages pane.
2. Drag and drop for instance the @Department node from the Data View tab onto it. This action binds the layout element to the corresponding node.
3. You can change the caption for instance to Department and mark the whole caption text and on the Font tab set Font to Arial and Style to Bold.
Note: NetWeaver 04 Stack 5 offers following different Drop-down List elements in the the Web Dynpro Library tab:
Value Help Drop-down List: use this element, if drop-down list items are not available during the creation processof the form. items are not stored in the form. add list items dynamically by data type modification (see Online Interactive Form Tutorial, which you can find in SAPNet alias adobe-internal and soon in SDN ).
Enumerated Drop-down List: use this element, if drop-down list items are available during the creation process of the form. items will be stored in the form. first list item is selected.
Enumerated Drop-down List (No Select): same, but no list item is selected.

© SAP AG TJA311 Adobe Integration - 40
© SAP AG 2004, TJA311, Adobe Integration
Integrating Check and Submit Buttons (1)
1. Drag & drop Check Fieldsand Submit
1. Drag and drop the Check Fields and the Submit to SAP elements from the Web Dynpro Library tab to the Body Pages pane.
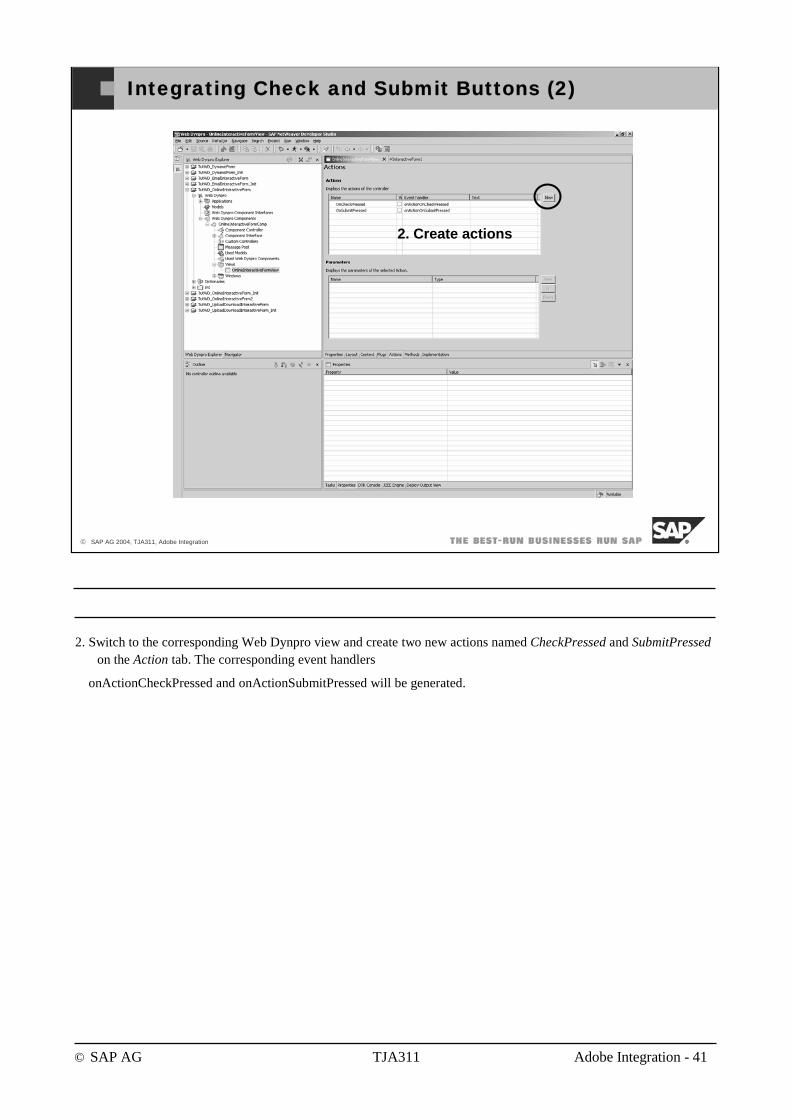
© SAP AG TJA311 Adobe Integration - 41
© SAP AG 2004, TJA311, Adobe Integration
Integrating Check and Submit Buttons (2)
2. Create actions
2. Switch to the corresponding Web Dynpro view and create two new actions named CheckPressed and SubmitPressedon the Action tab. The corresponding event handlers
onActionCheckPressed and onActionSubmitPressed will be generated.
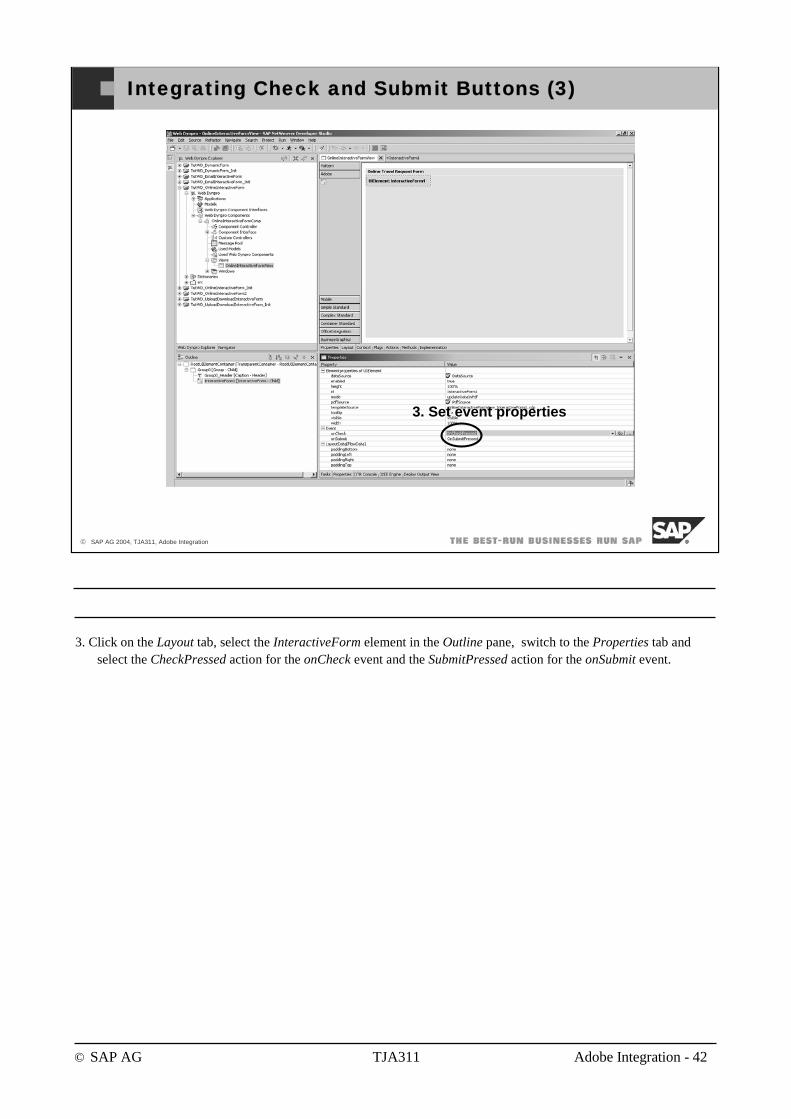
© SAP AG TJA311 Adobe Integration - 42
© SAP AG 2004, TJA311, Adobe Integration
Integrating Check and Submit Buttons (3)
3. Set event properties
3. Click on the Layout tab, select the InteractiveForm element in the Outline pane, switch to the Properties tab and select the CheckPressed action for the onCheck event and the SubmitPressed action for the onSubmit event.
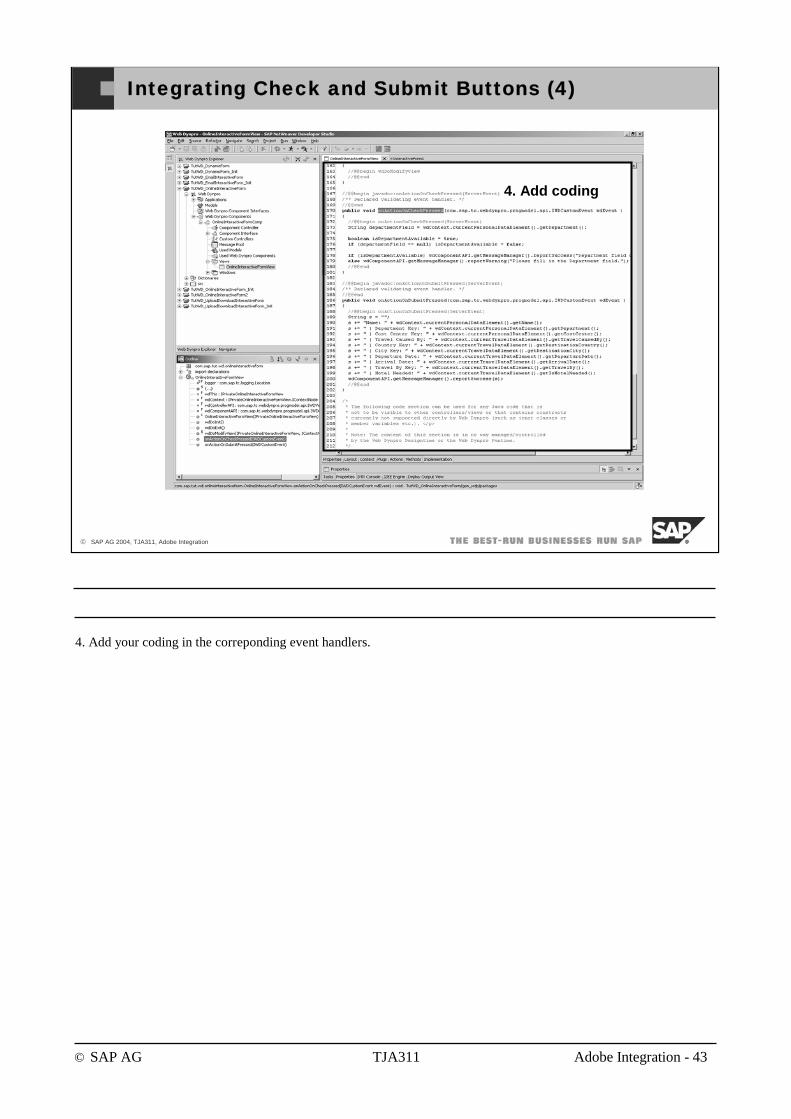
© SAP AG TJA311 Adobe Integration - 43
© SAP AG 2004, TJA311, Adobe Integration
Integrating Check and Submit Buttons (4)
4. Add coding
4. Add your coding in the correponding event handlers.
© SAP AG TJA311 Adobe Integration - 44
© SAP AG 2004, TJA311, Adobe Integration
You should now be able to:
use the Interactive Form UI element
create the layout of a PDF form
integrate images into PDF forms
integrate drop-down lists in Interactive Forms
integrate date fields, radio buttons, and check boxes in Interactive Forms
integrate check and submit buttons in Interactive Forms
Integration Steps: Topic Summary
© SAP AG TJA311 Adobe Integration - 45
© SAP AG 2004, TJA311, Adobe Integration
After completing this topic, you will be able to:
list workflow solutions based on Adobe forms
Workflow Solutions: Topic Objectives
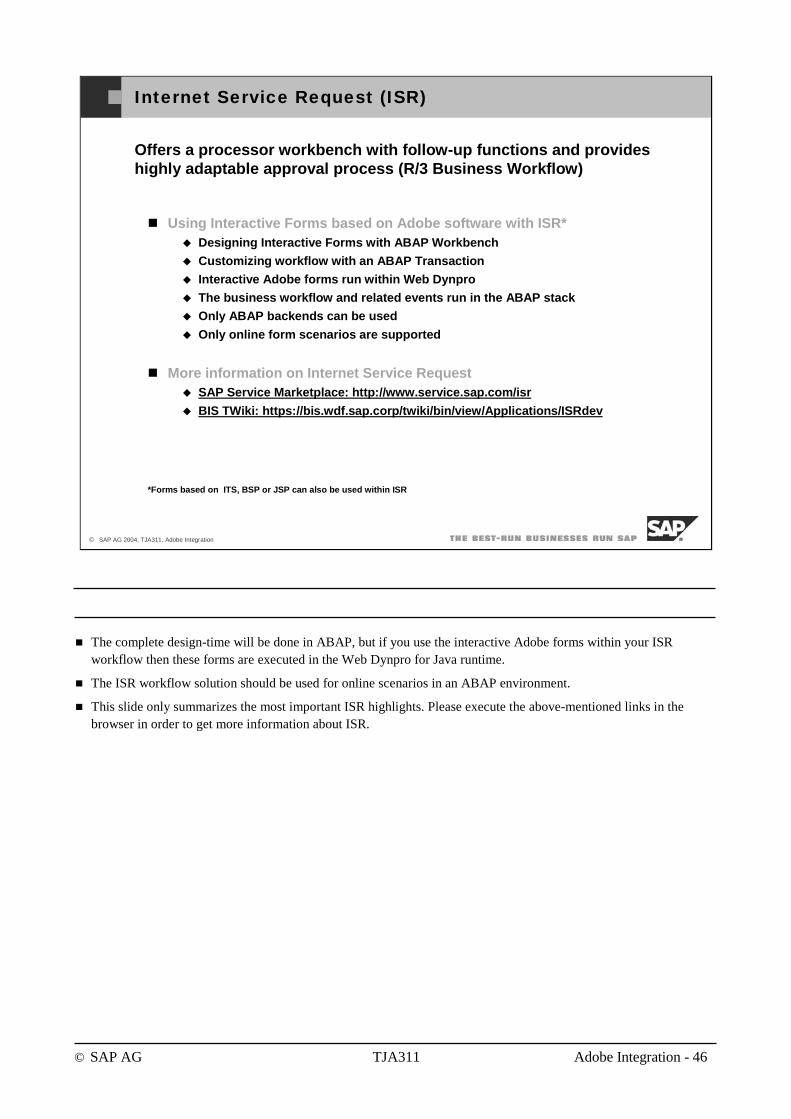
© SAP AG TJA311 Adobe Integration - 46
© SAP AG 2004, TJA311, Adobe Integration
Internet Service Request (ISR)
Offers a processor workbench with follow-up functions and provides highly adaptable approval process (R/3 Business Workflow)
Using Interactive Forms based on Adobe software with ISR*Designing Interactive Forms with ABAP Workbench
Customizing workflow with an ABAP Transaction
Interactive Adobe forms run within Web Dynpro
The business workflow and related events run in the ABAP stack
Only ABAP backends can be used
Only online form scenarios are supported
More information on Internet Service RequestSAP Service Marketplace: http://www.service.sap.com/isr
BIS TWiki: https://bis.wdf.sap.corp/twiki/bin/view/Applications/ISRdev
*Forms based on ITS, BSP or JSP can also be used within ISR
The complete design-time will be done in ABAP, but if you use the interactive Adobe forms within your ISR workflow then these forms are executed in the Web Dynpro for Java runtime.
The ISR workflow solution should be used for online scenarios in an ABAP environment.
This slide only summarizes the most important ISR highlights. Please execute the above-mentioned links in the browser in order to get more information about ISR.
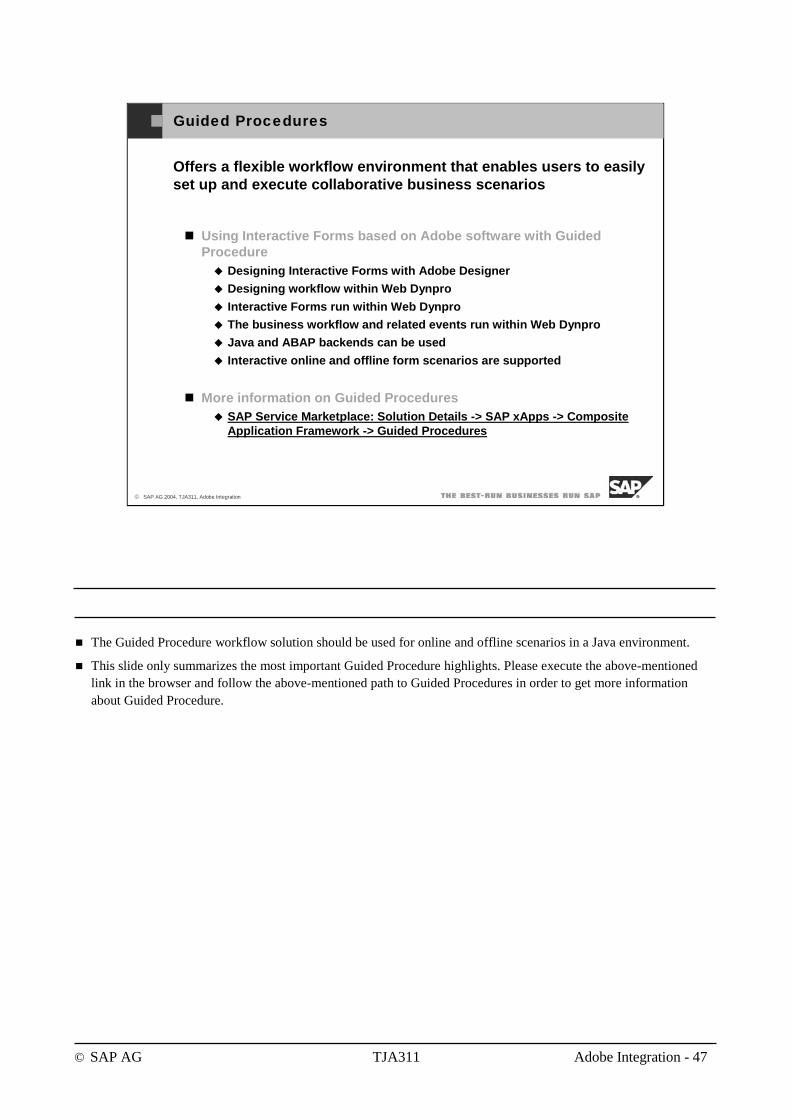
© SAP AG TJA311 Adobe Integration - 47
© SAP AG 2004, TJA311, Adobe Integration
Guided Procedures
Offers a flexible workflow environment that enables users to easilyset up and execute collaborative business scenarios
Using Interactive Forms based on Adobe software with Guided Procedure
Designing Interactive Forms with Adobe Designer
Designing workflow within Web Dynpro
Interactive Forms run within Web Dynpro
The business workflow and related events run within Web Dynpro
Java and ABAP backends can be used
Interactive online and offline form scenarios are supported
More information on Guided ProceduresSAP Service Marketplace: Solution Details -> SAP xApps -> CompositeApplication Framework -> Guided Procedures
The Guided Procedure workflow solution should be used for online and offline scenarios in a Java environment.
This slide only summarizes the most important Guided Procedure highlights. Please execute the above-mentioned link in the browser and follow the above-mentioned path to Guided Procedures in order to get more information about Guided Procedure.
© SAP AG TJA311 Adobe Integration - 48
© SAP AG 2004, TJA311, Adobe Integration
You should now be able to:
list workflow solutions based on Adobe forms
Workflow Solutions: Topic Summary
© SAP AG TJA311 Adobe Integration - 49
© SAP AG 2004, TJA311, Adobe Integration
Summary…
Tightly integrated Adobe Designer into Developer Studio and ABAPWorkbench
Tightly integrated Interactive Forms in Web Dynpro applications
Easy to use API for using Adobe Document Services within Java or ABAP applications
Rich set of UI elements which can be integrated in Interactive Forms
Automatic import of existing data models
Minimal coding effort
Predefined Interactive Forms
Script enabled Interactive Forms
…of existing features:
More existing features:
enable hiding of Adobe Reader toolbar
client side digital signatures (guarantee that the originally layout and data will be send from client to server)
place Check and Submit button inside and outside form
On the last slide you can find information concerning the easy to use API, which is realized by the PdfObject.
SAP delivers predefined Interactive Forms for business solutions (e.g. within mySAP ERP Human Capital Management and Financials), which can be used for the business processes of the customer:
personal change request (e.g. position change, change employee group)
requisition request (e.g. request additional budget or head counts)
request equipment repair or report equipment loss
Adobe forms can contain JavaScript or FormCalc (Adobe scripting language) expressions, in order to set some fieldsautomatically (e.g. calculate sums) or make some fields visible depending on the user input. For more informationconcerning scripting, please use the links mentioned on the last slide.
© SAP AG TJA311 Adobe Integration - 50
© SAP AG 2004, TJA311, Adobe Integration
Outlook…
Security extensions
server side digital signatures
certification
encryption
Integration into automated translation process
Platform independent Adobe Reader Integration
… of upcoming features:
Some notes to security extensions:
digital signatures identify persons who worked on the form and is a legally binding signature, because it guarantees that the original layout and data will be transfered. Server side digital signatures guarantee that theoriginal layout and data will be send from client to server.
certification ensures that the original form will be used
encryption enables reading only with a key
Workaround for international forms:
1. copy src/configuration/Components/<ComponentName>/<TemplateSource>.xdp under in the same folder and name it <TemplateSource>_en.xdp
2. translate all texts in the form with Adobe Designer
3. depending on the locale the corresponding xdp-file will be used
Platform independence will be archieved by using JavaScript instead of using an ActiveX control
© SAP AG TJA311 Adobe Integration - 51
© SAP AG 2004, TJA311, Adobe Integration
Adobe Integration: Unit Summary
You should now be able to:
describe possible business scenarios
give an introduction into Adobe integration
explain the involved software components
apply the necessary steps for integrating Interactive Forms in Web Dynpro applications
describe migration process to Interactive Forms
list workflow solutions based on Adobe forms
give a summary of existing features and an outlookof upcoming features
© SAP AG TJA311 Adobe Integration - 52
© SAP AG 2004, TJA311, Adobe Integration
If you want to get started with developing Interactive Forms with the Adobe solution in SAP, follow these steps:
install the Web Application Server 6.40 component of NetWeaver 04 including SAP NetWeaverDeveloper Studio and Adobe Designer
install Adobe Reader 6.02
install Active Components Framework (ACF)
reference an installed Adobe Document Service (ADS) in your J2EE Engine's Visual Administrator
Getting Started
Here are some more information concerning the installation process:
use the SAP NetWeaver 04 installation CD‘s for installing the Web Application Server 6.40 component
install Adobe Reader 6.01 and install patch to upgrade to Adobe Reader 6.02 (direct installation of Adobe Reader 6.02 is available in September 2004 on the Adobe homepage)
install the ACF by using the Presentation CD of the SAP NetWeaver 04 installation CD‘s
you have 2 possibilities for using an ADS:
- if you use a central ADS then you only have to reference this central ADS in your J2EE Engine‘s Visual Administrator
- if you use a local ADS then you have to install and configure this one on your J2EE engine.
More detailed information about the installation requirements and process you can find in SAPNet (alias: adobe-internal), Service Market (http://help.sap.com -> Documentation -> SAP NetWeaver -> Installation & Upgrade Guide -> SAP NetWeaver -> Release 04 -> Installation) and soon in SDN (see next slide).
Beside a Web Application Server licence you need an Adobe licence. More detailed information about sales and licensing you can find in SAPNet (see next slide).
You can use an already installed and centrally used ADS or you can install and configure your own ADS on the topof the J2EE engine, which is part of the Web Application Server. More detailed information concerning ADS installation and configuration you can find in SAPNet and soon in SDN (see next slide).
© SAP AG TJA311 Adobe Integration - 53
© SAP AG 2004, TJA311, Adobe Integration
If you want to get started with developing Interactive Forms with the Adobe solution in SAP, follow these steps:
install the Web Application Server 6.40 component of NetWeaver 04 including SAP NetWeaverDeveloper Studio and Adobe Designer
install Adobe Reader 6.02
install Active Components Framework (ACF)
reference an installed Adobe Document Service (ADS) in your J2EE Engine's Visual Administrator
Getting Started
For creating forms for printing, please follow the installation steps, which are published in SAPNet and soon in SDN (see next slide).
Note: At the moment there are 2 restrictions running in the server side rendering (SSR) mode:
update problem: form will not be updated after new data is available.
layer problem: Adobe Reader is always on top of your layout. also after switching to another tab rider.
With NetWeaver 04 Stack 9 these problems will be solved.
© SAP AG TJA311 Adobe Integration - 54
© SAP AG 2004, TJA311, Adobe Integration
Further Information About Adobe Integration
SAP Developer NetworkSDN: Web Application Server -> Quick Link -> Interactive Forms
Documentations, Presentations, Tutorials, Demos, FAQs
SAP Internal Newsgroupnews:sap.technology.adobe
Discussion forum for anyone working with Interactive Forms
SAP LibraryInteractive Forms Documentation (Java)PDF-Based Forms for printing, archiving, emailing, faxing (ABAP)
SAPNetAlias: /adobe-internal
Documentations, Presentations, Tutorials, Demos, FAQs
You can find documentation related to the ..
Adobe Designer not only in the SAPNet or SDN, but also in the online help of the Adobe Designer (Help -> Adobe Designer Help).
PdfObject not only in the SAPNet, but also in the online help of the Developer Studio (Help -> SAP Web AS Documentation -> SAP Web AS Technologies -> SAP Web AS for Java Applications -> API WAS -> WebDynproRuntime -> com.sap.tc.webdynpro.pdfobject.api).
installation requirements and process in SAPNet and soon in SDN.
Missing topics:
scripting example
new online shop demo, which offers an online and offline (via download and email) order request and whichsends back a dynamically generated Adobe form confirmation
© SAP AG <Course Number> Unit Title - 1
Structuring Web Dynpro Applications
© SAP AG <Course Number> Unit Title - 2
© SAP AG 2003, Title of Presentation, Speaker Name / 2
After completing this unit, you will be able to:
Understand how to properly structure a Web Dynpro application including the steps involved with, and considerations that need to be addressed during, the Architecture and Detail Design phases of developing a Web Dynpro Application
Describe the Component Reuse concepts associated with NetWeaver
Give an overview of some of the Web Dynpro Implementation Tips
Use the basic Web Dynpro Naming Conventions
Structuring Web Dynpro Applications: Unit Objectives

© SAP AG <Course Number> Unit Title - 3
© SAP AG 2003, Title of Presentation, Speaker Name / 3
Demonstration
Web Dynpro Design
Component Reuse
Component Reuse Exercise
Web Dynpro Implementation
Contents:
Structuring Web Dynpro Applications
© SAP AG <Course Number> Unit Title - 4
© SAP AG 2003, Title of Presentation, Speaker Name / 4
Demonstration
Web Dynpro Design
Component Reuse
Component Reuse Exercise
Web Dynpro Implementation
Contents:
Structuring Web Dynpro Applications
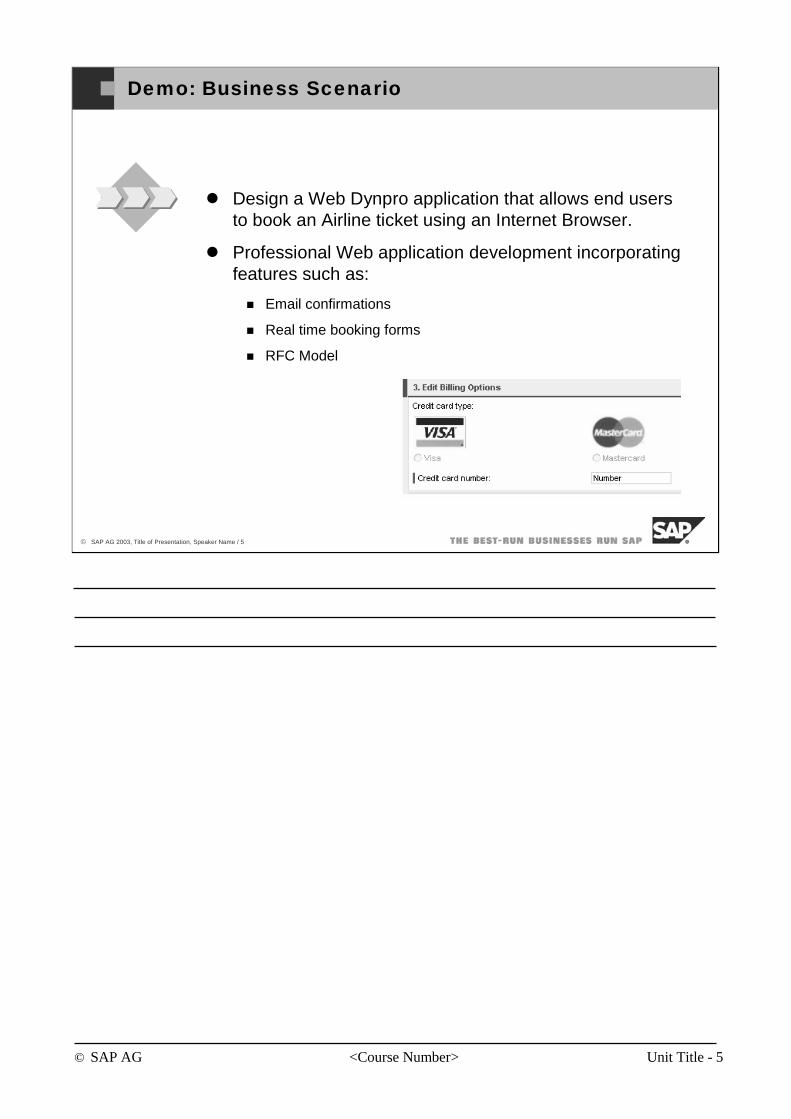
© SAP AG <Course Number> Unit Title - 5
© SAP AG 2003, Title of Presentation, Speaker Name / 5
Design a Web Dynpro application that allows end users to book an Airline ticket using an Internet Browser.
Professional Web application development incorporating features such as:
Email confirmations
Real time booking forms
RFC Model
Demo: Business Scenario
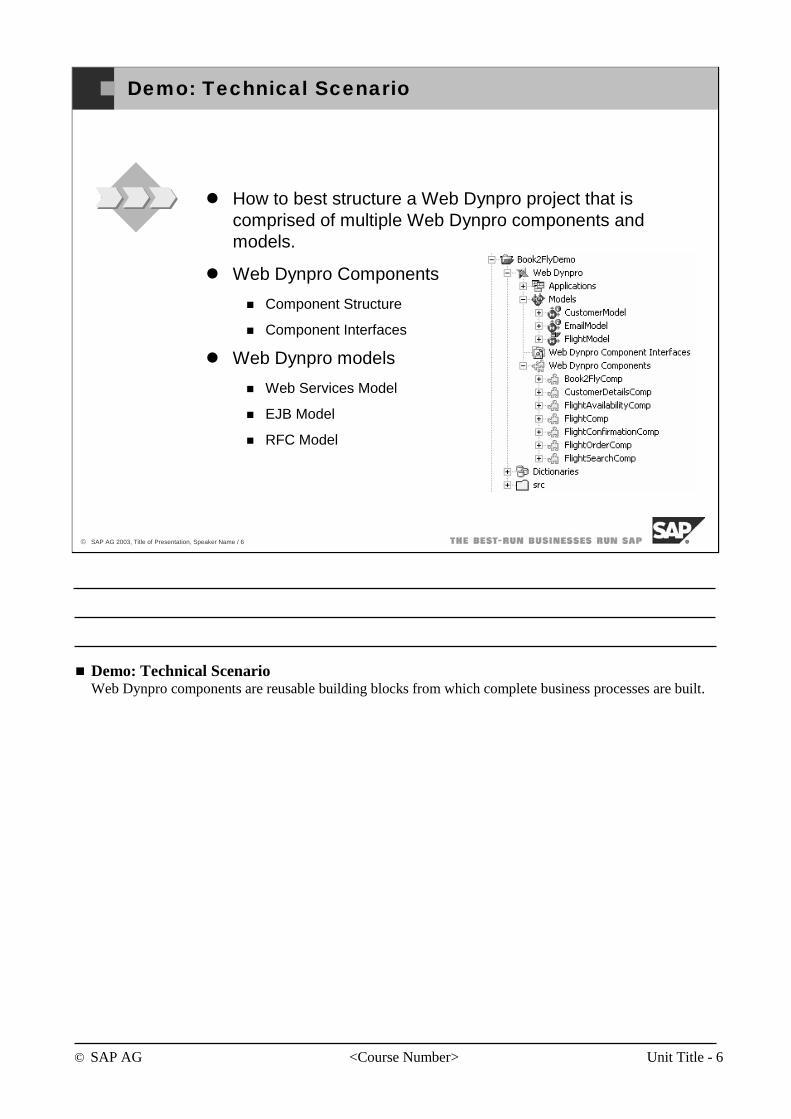
© SAP AG <Course Number> Unit Title - 6
© SAP AG 2003, Title of Presentation, Speaker Name / 6
How to best structure a Web Dynpro project that is comprised of multiple Web Dynpro components and models.
Web Dynpro Components
Component Structure
Component Interfaces
Web Dynpro models
Web Services Model
EJB Model
RFC Model
Demo: Technical Scenario
Demo: Technical ScenarioWeb Dynpro components are reusable building blocks from which complete business processes are built.
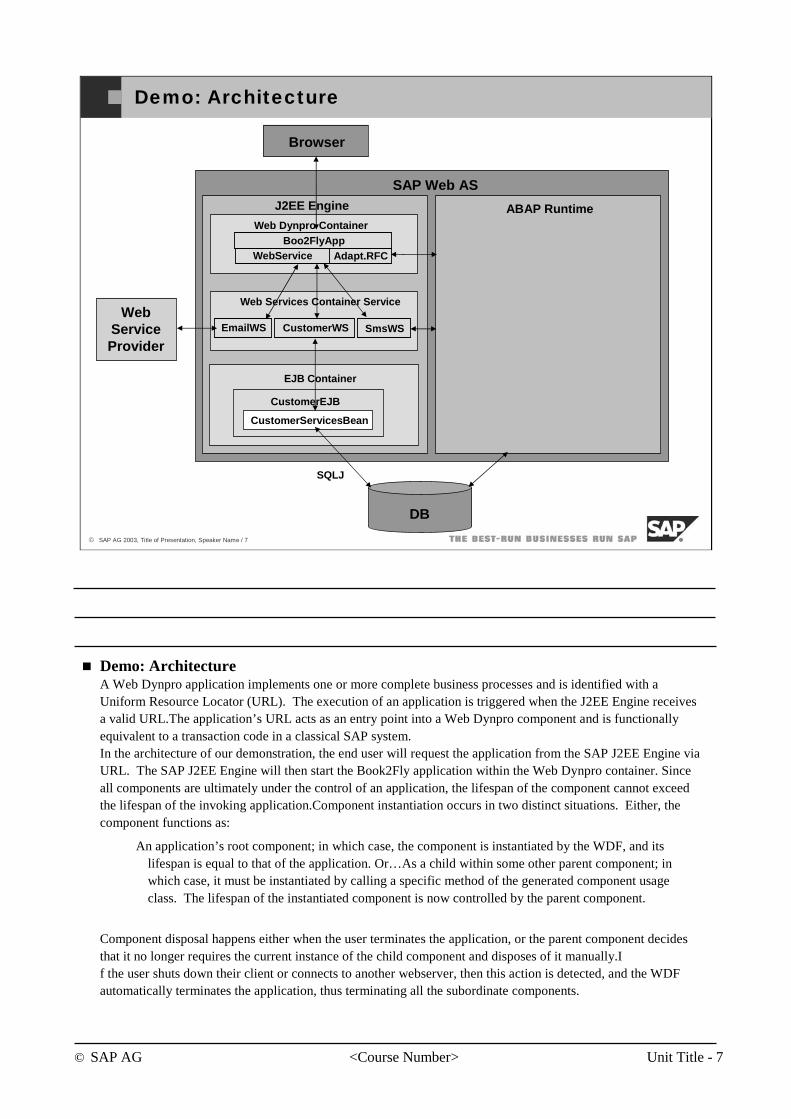
© SAP AG <Course Number> Unit Title - 7
© SAP AG 2003, Title of Presentation, Speaker Name / 7
Demo: Architecture
J2EE Engine
DB
Web Dynpro Container
Web Services Container Service
EJB Container
SAP Web AS
CustomerEJB
CustomerServicesBean
SQLJ
Browser
CustomerWS
Boo2FlyApp
ABAP Runtime
EmailWS SmsWS
WebService Adapt.RFC
WebServiceProvider
Demo: ArchitectureA Web Dynpro application implements one or more complete business processes and is identified with a Uniform Resource Locator (URL). The execution of an application is triggered when the J2EE Engine receives a valid URL.The application’s URL acts as an entry point into a Web Dynpro component and is functionally equivalent to a transaction code in a classical SAP system.In the architecture of our demonstration, the end user will request the application from the SAP J2EE Engine via URL. The SAP J2EE Engine will then start the Book2Fly application within the Web Dynpro container. Since all components are ultimately under the control of an application, the lifespan of the component cannot exceed the lifespan of the invoking application.Component instantiation occurs in two distinct situations. Either, the component functions as:
An application’s root component; in which case, the component is instantiated by the WDF, and its lifespan is equal to that of the application. Or…As a child within some other parent component; in which case, it must be instantiated by calling a specific method of the generated component usage class. The lifespan of the instantiated component is now controlled by the parent component.
Component disposal happens either when the user terminates the application, or the parent component decides that it no longer requires the current instance of the child component and disposes of it manually.If the user shuts down their client or connects to another webserver, then this action is detected, and the WDF automatically terminates the application, thus terminating all the subordinate components.
© SAP AG <Course Number> Unit Title - 8
© SAP AG 2003, Title of Presentation, Speaker Name / 8
Demo: Book2Fly
Demo: Book2FlyA Web Dynpro application implements one or more complete business processes and is identified with a Uniform Resource Locator (URL). The execution of an application is triggered when the J2EE Engine receives a valid URL – usually from a browser.
The application’s URL acts as an entry point into a Web Dynpro component and is functionally equivalent to a transaction code in a classical SAP system.

© SAP AG <Course Number> Unit Title - 9
© SAP AG 2003, Title of Presentation, Speaker Name / 9
Demonstration
Web Dynpro Design
Component Reuse
Component Reuse Exercise
Web Dynpro Implementation
Contents:
Structuring Web Dynpro Applications
© SAP AG <Course Number> Unit Title - 10
© SAP AG 2003, Title of Presentation, Speaker Name / 10
After completing this lesson, you will be able to:
Understand how to properly structure a Web Dynpro application
Describe the steps involved in the Architecture and Detail Design phases of designing a Web Dynpro Application
Understand the considerations that need to be addressed when designing a Web Dynpro Application
Describe the different tools that will assist you in the design phases
Web Dynpro Design: Lesson Objectives
© SAP AG <Course Number> Unit Title - 11
© SAP AG 2003, Title of Presentation, Speaker Name / 11
Understand how to properly design a Web Dynpro application and design it in such as way so we can:
Reduce ongoing maintenance costs
Reduce development costs
Design Web Dynpro applications to last as long as possible without a total rebuild.
Web Dynpro Design: Business Scenario
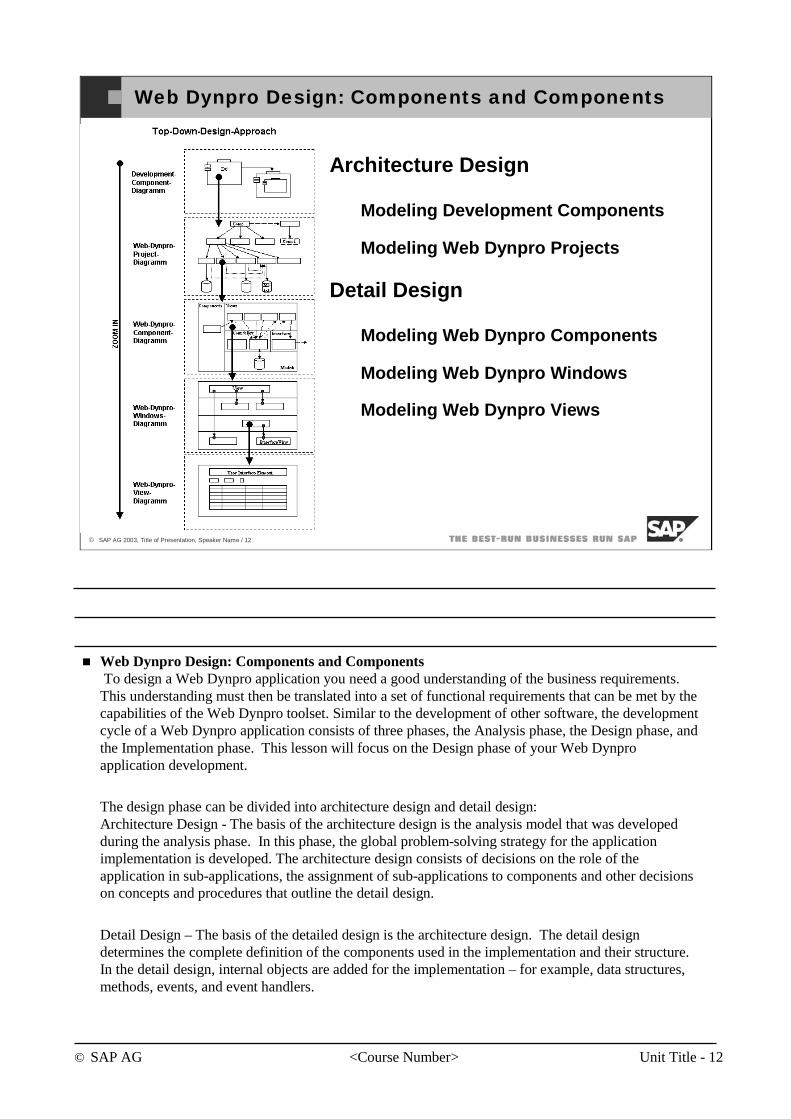
© SAP AG <Course Number> Unit Title - 12
© SAP AG 2003, Title of Presentation, Speaker Name / 12
Web Dynpro Design: Components and Components
Architecture Design
Modeling Development Components
Modeling Web Dynpro Projects
Detail Design
Modeling Web Dynpro Components
Modeling Web Dynpro Windows
Modeling Web Dynpro Views
Web Dynpro Design: Components and ComponentsTo design a Web Dynpro application you need a good understanding of the business requirements.
This understanding must then be translated into a set of functional requirements that can be met by the capabilities of the Web Dynpro toolset. Similar to the development of other software, the development cycle of a Web Dynpro application consists of three phases, the Analysis phase, the Design phase, and the Implementation phase. This lesson will focus on the Design phase of your Web Dynpro application development.
The design phase can be divided into architecture design and detail design:Architecture Design - The basis of the architecture design is the analysis model that was developed during the analysis phase. In this phase, the global problem-solving strategy for the application implementation is developed. The architecture design consists of decisions on the role of the application in sub-applications, the assignment of sub-applications to components and other decisions on concepts and procedures that outline the detail design.
Detail Design – The basis of the detailed design is the architecture design. The detail design determines the complete definition of the components used in the implementation and their structure. In the detail design, internal objects are added for the implementation – for example, data structures, methods, events, and event handlers.
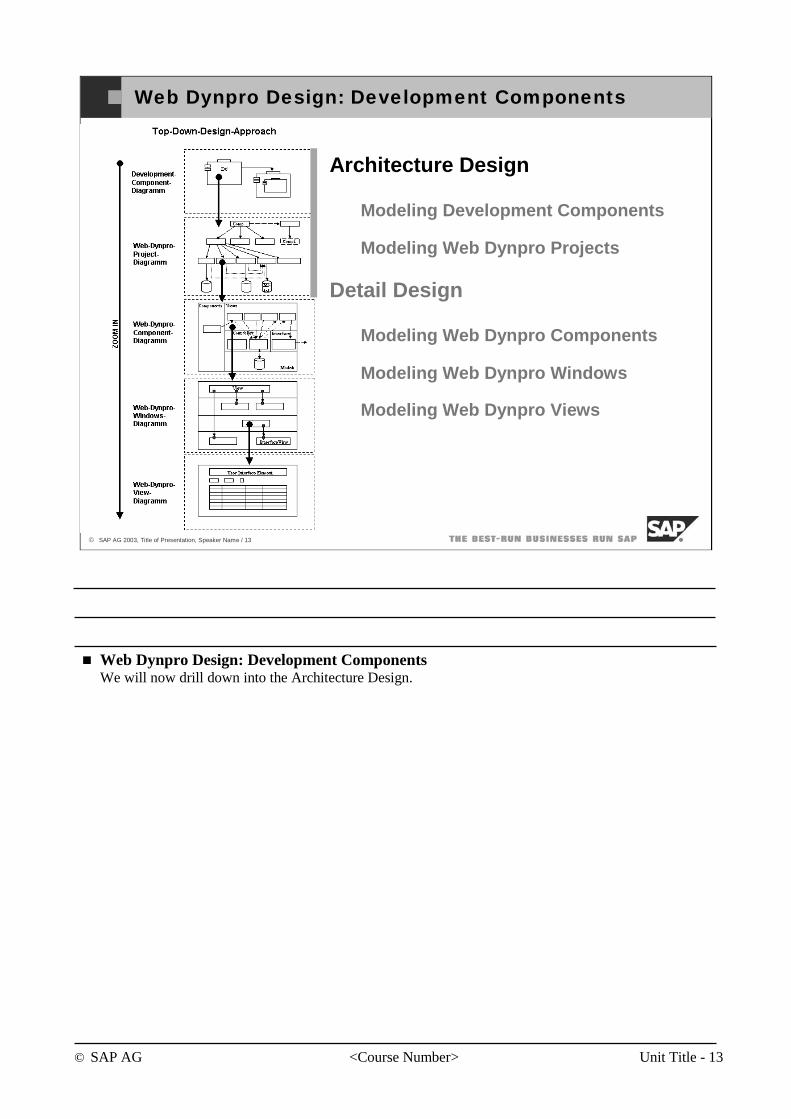
© SAP AG <Course Number> Unit Title - 13
© SAP AG 2003, Title of Presentation, Speaker Name / 13
Web Dynpro Design: Development Components
Architecture Design
Modeling Development Components
Modeling Web Dynpro Projects
Detail Design
Modeling Web Dynpro Components
Modeling Web Dynpro Windows
Modeling Web Dynpro Views
Web Dynpro Design: Development ComponentsWe will now drill down into the Architecture Design.
© SAP AG <Course Number> Unit Title - 14
© SAP AG 2003, Title of Presentation, Speaker Name / 14
Architecture Design in One Statement
The architecture design defines the overall structure of the application,
the identification of components and other decisions that outline
the detail design.
Architecture Design in One StatementThe architecture design defines the overall structure of the application, the identification of components and other decisions that outline the detail design.
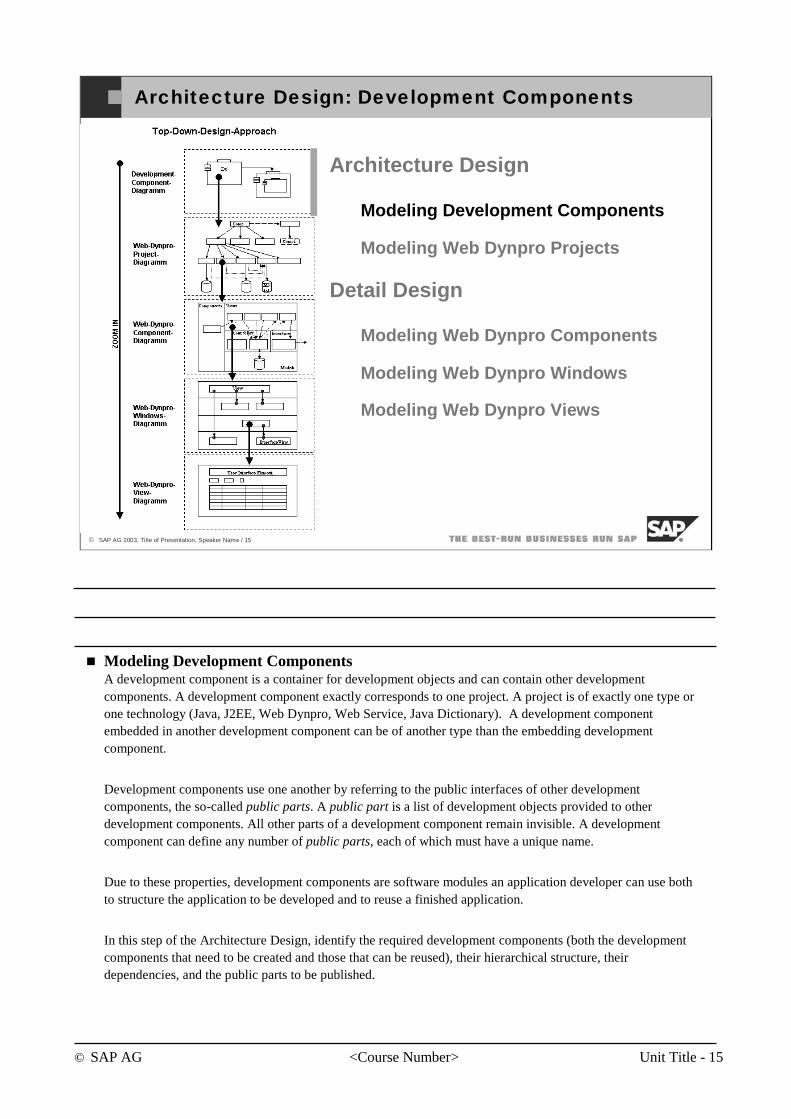
© SAP AG <Course Number> Unit Title - 15
© SAP AG 2003, Title of Presentation, Speaker Name / 15
Architecture Design: Development Components
Architecture Design
Modeling Development Components
Modeling Web Dynpro Projects
Detail Design
Modeling Web Dynpro Components
Modeling Web Dynpro Windows
Modeling Web Dynpro Views
Modeling Development ComponentsA development component is a container for development objects and can contain other development components. A development component exactly corresponds to one project. A project is of exactly one type or one technology (Java, J2EE, Web Dynpro, Web Service, Java Dictionary). A development component embedded in another development component can be of another type than the embedding development component.
Development components use one another by referring to the public interfaces of other development components, the so-called public parts. A public part is a list of development objects provided to other development components. All other parts of a development component remain invisible. A development component can define any number of public parts, each of which must have a unique name.
Due to these properties, development components are software modules an application developer can use both to structure the application to be developed and to reuse a finished application.
In this step of the Architecture Design, identify the required development components (both the development components that need to be created and those that can be reused), their hierarchical structure, their dependencies, and the public parts to be published.
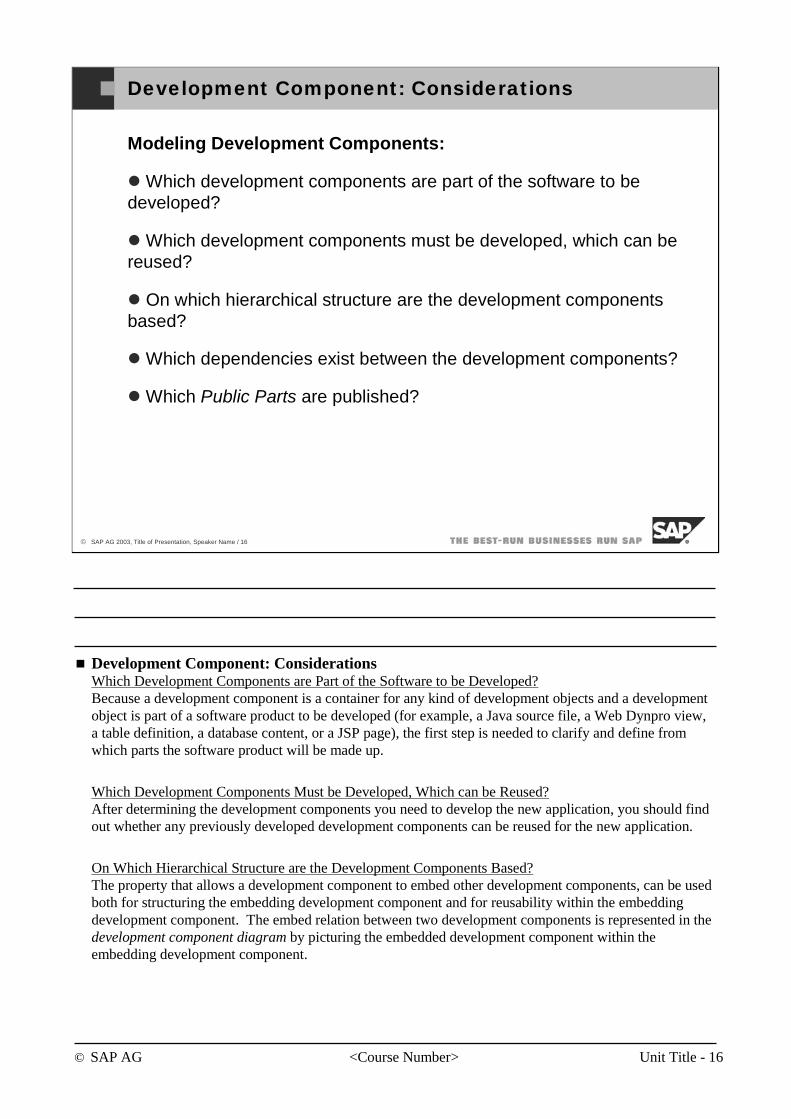
© SAP AG <Course Number> Unit Title - 16
© SAP AG 2003, Title of Presentation, Speaker Name / 16
Development Component: Considerations
Modeling Development Components:
Which development components are part of the software to be developed?
Which development components must be developed, which can be reused?
On which hierarchical structure are the development components based?
Which dependencies exist between the development components?
Which Public Parts are published?
Development Component: ConsiderationsWhich Development Components are Part of the Software to be Developed?Because a development component is a container for any kind of development objects and a development object is part of a software product to be developed (for example, a Java source file, a Web Dynpro view, a table definition, a database content, or a JSP page), the first step is needed to clarify and define from which parts the software product will be made up.
Which Development Components Must be Developed, Which can be Reused?After determining the development components you need to develop the new application, you should find out whether any previously developed development components can be reused for the new application.
On Which Hierarchical Structure are the Development Components Based?The property that allows a development component to embed other development components, can be used both for structuring the embedding development component and for reusability within the embedding development component. The embed relation between two development components is represented in the development component diagram by picturing the embedded development component within the embedding development component.
© SAP AG <Course Number> Unit Title - 17
© SAP AG 2003, Title of Presentation, Speaker Name / 17
Development Component: Considerations
Modeling Development Components:
Which development components are part of the software to be developed?
Which development components must be developed, which can be reused?
On which hierarchical structure are the development components based?
Which dependencies exist between the development components?
Which Public Parts are published?
Which Dependencies Exist Between the Development Components?The dependency between two development components is symbolized in the development component diagram by a ”depends” arrow giving a direction. The edge points to the public part of a development component, on which another development component depends.
Which Public Parts are Published?A development component can publish development objects from the public parts of an inner development component in its own public parts. This process is called propagation of the public parts. It makes the functions of inner development components available to the outer world. A development component can publish either the entire public part of an inner component or only certain parts of it. This enables the development component to reorganize, enhance, or limit the functions of its inner development component und to combine these functions with its own.Publishing one public part within another is symbolized in the development component diagram by an arrow that gives a direction; it contains the name of the part to be published. If the entire public part is published, the arrow contains the label ”propagate”. The arrow points from the public part to be published to the public part in which it is published fully or in parts.
More about public parts in the Component Reuse lesson of this unit.
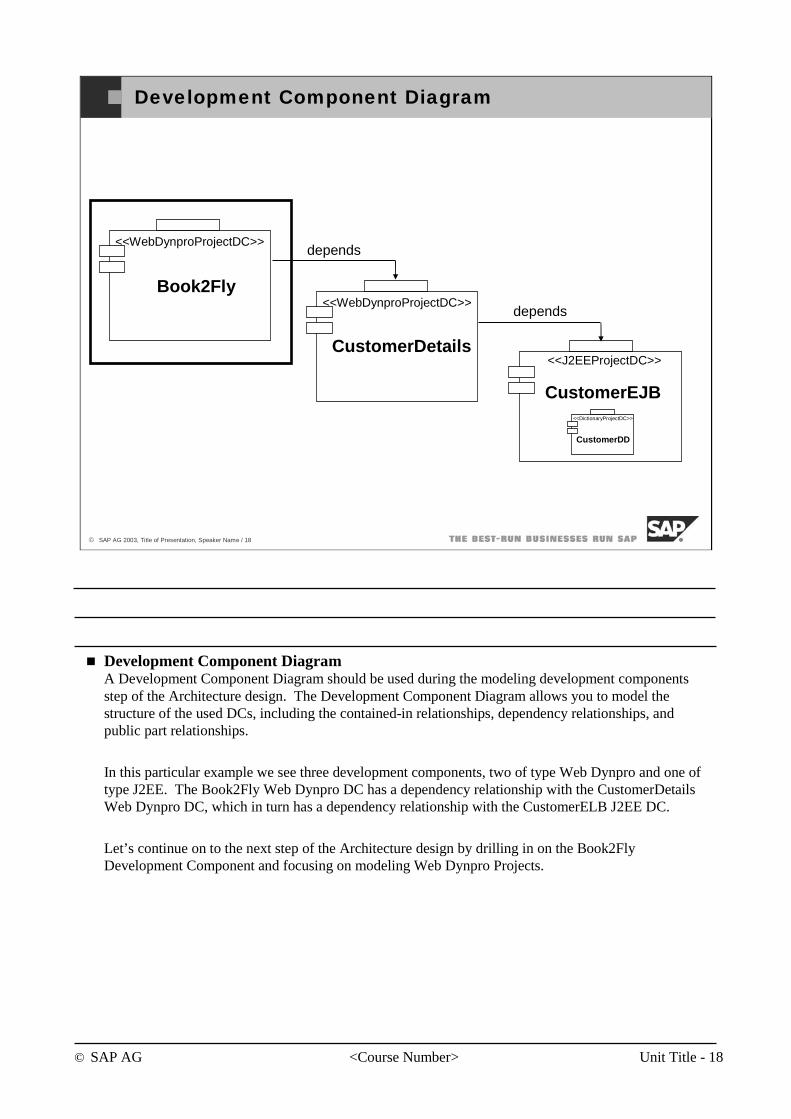
© SAP AG <Course Number> Unit Title - 18
© SAP AG 2003, Title of Presentation, Speaker Name / 18
Development Component Diagram
Book2Fly
depends<<WebDynproProjectDC>>
CustomerEJB
<<J2EEProjectDC>>CustomerDetails
<<WebDynproProjectDC>>depends
CustomerDD
<<DictionaryProjectDC>>
Development Component DiagramA Development Component Diagram should be used during the modeling development components step of the Architecture design. The Development Component Diagram allows you to model the structure of the used DCs, including the contained-in relationships, dependency relationships, and public part relationships.
In this particular example we see three development components, two of type Web Dynpro and one of type J2EE. The Book2Fly Web Dynpro DC has a dependency relationship with the CustomerDetailsWeb Dynpro DC, which in turn has a dependency relationship with the CustomerELB J2EE DC.
Let’s continue on to the next step of the Architecture design by drilling in on the Book2Fly Development Component and focusing on modeling Web Dynpro Projects.
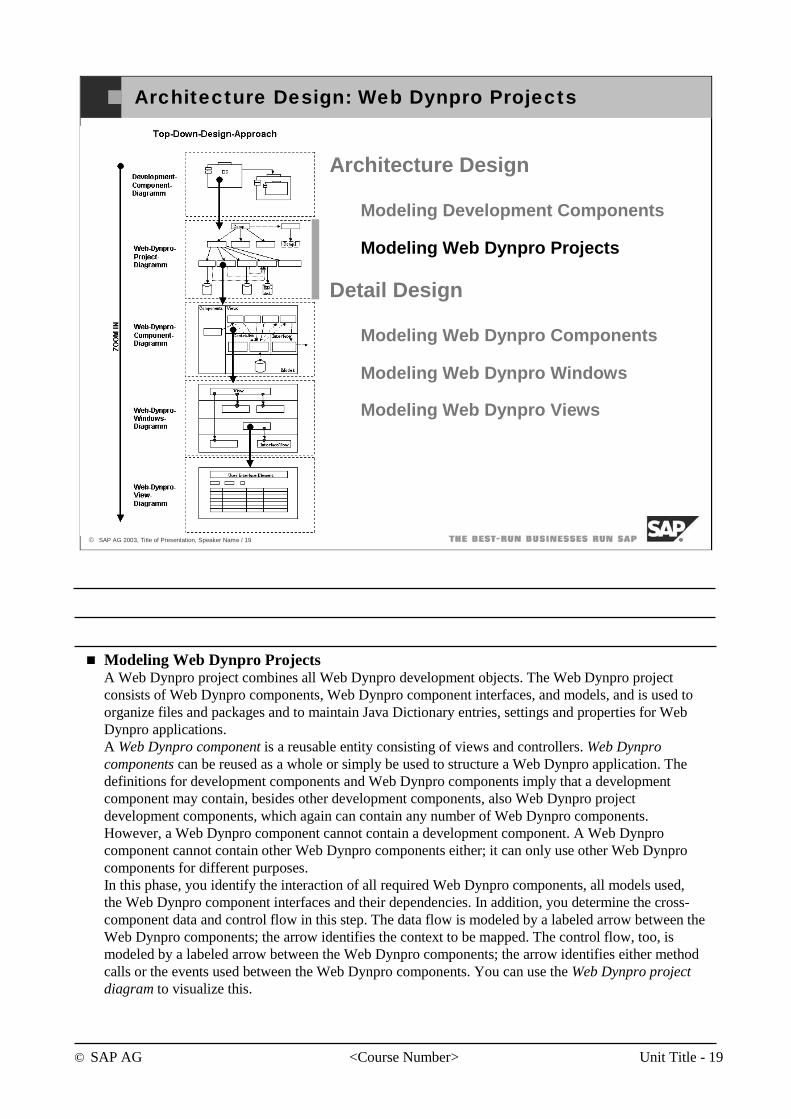
© SAP AG <Course Number> Unit Title - 19
© SAP AG 2003, Title of Presentation, Speaker Name / 19
Architecture Design: Web Dynpro Projects
Architecture Design
Modeling Development Components
Modeling Web Dynpro Projects
Detail Design
Modeling Web Dynpro Components
Modeling Web Dynpro Windows
Modeling Web Dynpro Views
Modeling Web Dynpro ProjectsA Web Dynpro project combines all Web Dynpro development objects. The Web Dynpro project consists of Web Dynpro components, Web Dynpro component interfaces, and models, and is used to organize files and packages and to maintain Java Dictionary entries, settings and properties for Web Dynpro applications. A Web Dynpro component is a reusable entity consisting of views and controllers. Web Dynpro components can be reused as a whole or simply be used to structure a Web Dynpro application. The definitions for development components and Web Dynpro components imply that a development component may contain, besides other development components, also Web Dynpro project development components, which again can contain any number of Web Dynpro components. However, a Web Dynpro component cannot contain a development component. A Web Dynpro component cannot contain other Web Dynpro components either; it can only use other Web Dynpro components for different purposes.In this phase, you identify the interaction of all required Web Dynpro components, all models used, the Web Dynpro component interfaces and their dependencies. In addition, you determine the cross-component data and control flow in this step. The data flow is modeled by a labeled arrow between the Web Dynpro components; the arrow identifies the context to be mapped. The control flow, too, is modeled by a labeled arrow between the Web Dynpro components; the arrow identifies either method calls or the events used between the Web Dynpro components. You can use the Web Dynpro project diagram to visualize this.
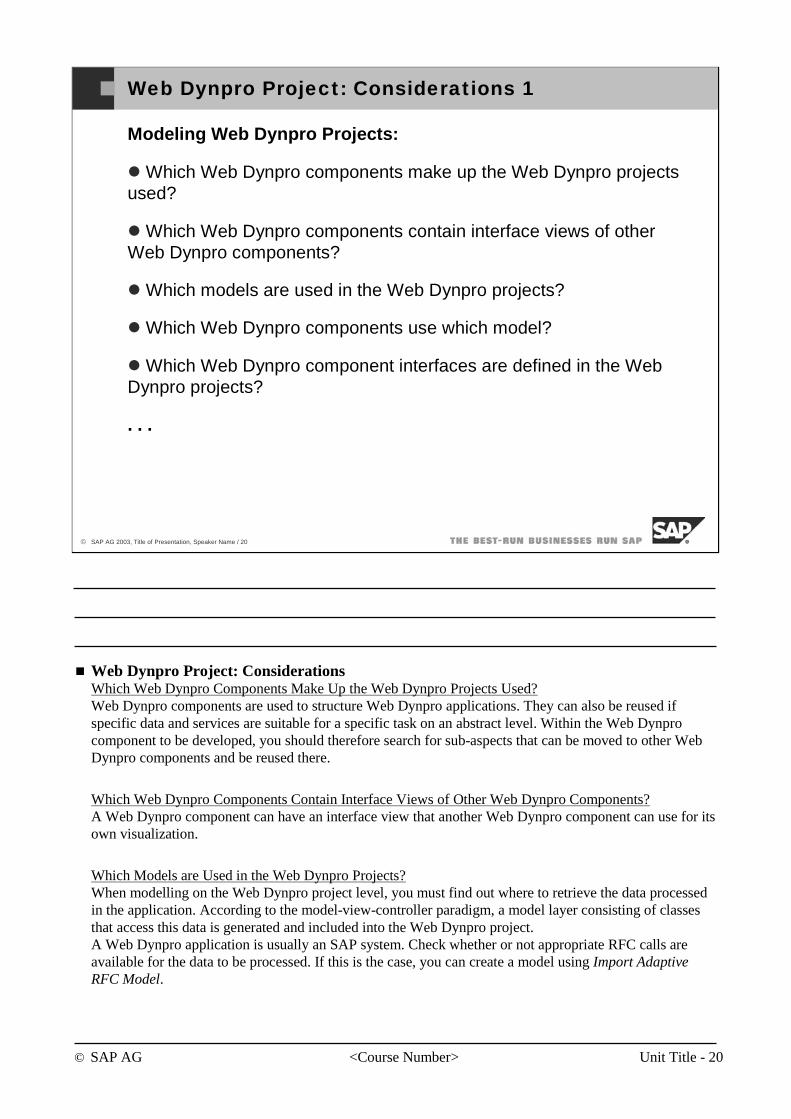
© SAP AG <Course Number> Unit Title - 20
© SAP AG 2003, Title of Presentation, Speaker Name / 20
Web Dynpro Project: Considerations 1
Modeling Web Dynpro Projects:
Which Web Dynpro components make up the Web Dynpro projects used?
Which Web Dynpro components contain interface views of other Web Dynpro components?
Which models are used in the Web Dynpro projects?
Which Web Dynpro components use which model?
Which Web Dynpro component interfaces are defined in the Web Dynpro projects?
. . .
Web Dynpro Project: ConsiderationsWhich Web Dynpro Components Make Up the Web Dynpro Projects Used?Web Dynpro components are used to structure Web Dynpro applications. They can also be reused if specific data and services are suitable for a specific task on an abstract level. Within the Web Dynpro component to be developed, you should therefore search for sub-aspects that can be moved to other Web Dynpro components and be reused there.
Which Web Dynpro Components Contain Interface Views of Other Web Dynpro Components?A Web Dynpro component can have an interface view that another Web Dynpro component can use for its own visualization.
Which Models are Used in the Web Dynpro Projects?When modelling on the Web Dynpro project level, you must find out where to retrieve the data processed in the application. According to the model-view-controller paradigm, a model layer consisting of classes that access this data is generated and included into the Web Dynpro project. A Web Dynpro application is usually an SAP system. Check whether or not appropriate RFC calls are available for the data to be processed. If this is the case, you can create a model using Import Adaptive RFC Model.
© SAP AG <Course Number> Unit Title - 21
© SAP AG 2003, Title of Presentation, Speaker Name / 21
Web Dynpro Project: Considerations 1
Modeling Web Dynpro Projects:
Which Web Dynpro components make up the Web Dynpro projects used?
Which Web Dynpro components contain interface views of other Web Dynpro components?
Which models are used in the Web Dynpro projects?
Which Web Dynpro components use which model?
Which Web Dynpro component interfaces are defined in the Web Dynpro projects?
. . .
If the data is retrieved from a Java backend, you should develop or, if existing, use Enterprise Java Beans (EJBs) to access the business data. In this case, you can use an external modeling tool to perform an XMI export based on the underlying UML model of the EJB. You can use Import Model from UML definition (XMI-format) to create a Web Dynpro model with the exported XMI file, which allows you to access the Java backend.In addition, you can generate a Web Dynpro model for a published Web service using Import Web Service Model.
Which Web Dynpro Components Use Which Model?Using a model, you can supply a Web Dynpro component with business data or use services in another system.
Which Web Dynpro Component Interfaces are Defined in the Web Dynpro Projects?A Web Dynpro component interface separates the description of properties of a Web Dynpro component from its implementation. A Web Dynpro interface can be implemented by more than one Web Dynpro component and a Web Dynpro component can implement more than one Web Dynpro component interface.
© SAP AG <Course Number> Unit Title - 22
© SAP AG 2003, Title of Presentation, Speaker Name / 22
Web Dynpro Project: Considerations 1
Modeling Web Dynpro Projects:
Which Web Dynpro components make up the Web Dynpro projects used?
Which Web Dynpro components contain interface views of other Web Dynpro components?
Which models are used in the Web Dynpro projects?
Which Web Dynpro components use which model?
Which Web Dynpro component interfaces are defined in the Web Dynpro projects?
. . .
A Web Dynpro component interface describes a component interface controller and any number of component interface views. The component interface controller contains both methods and events with their parameters and context elements. The component interface views define inbound and outbound plugs with their parameters. Web Dynpro component interfaces enable the operator of a Web Dynpro application to tailor the Web Dynpro application to individual needs. To do this, the Web Dynpro application uses Web Dynpro component interfaces to integrate one or more Web Dynpro components. The operator can then exchange these Web Dynpro components with others that implement the same interfaces.
© SAP AG <Course Number> Unit Title - 23
© SAP AG 2003, Title of Presentation, Speaker Name / 23
Web Dynpro Project: Considerations 2
. . .
Which Web Dynpro component interfaces are defined in the Web Dynpro projects?
Which Web Dynpro components implement which Web Dynpro component interfaces?
Which Web Dynpro components use which Web Dynpro component interfaces?
Which method calls exist between the Web Dynpro components and which results are used between the Web Dynpro components?
Which context mappings exist between the Web Dynpro components?
Web Dynpro Project: ConsiderationsWhich Web Dynpro Component Interfaces are Defined in the Web Dynpro Projects?A Web Dynpro component interface separates the description of properties of a Web Dynpro component from its implementation. A Web Dynpro interface can be implemented by more than one Web Dynpro component and a Web Dynpro component can implement more than one Web Dynpro component interface.A Web Dynpro component interface describes a component interface controller and any number of component interface views. The component interface controller contains both methods and events with their parameters and context elements. The component interface views define inbound and outbound plugs with their parameters. Web Dynpro component interfaces enable the operator of a Web Dynpro application to tailor the Web Dynpro application to individual needs. To do this, the Web Dynpro application uses Web Dynpro component interfaces to integrate one or more Web Dynpro components. The operator can then exchange these Web Dynpro components with others that implement the same interfaces.
Which Web Dynpro Components Implement Which Web Dynpro Component Interfaces?Because a Web Dynpro component interface only describes the properties of a Web Dynpro component without actually implementing them, you need Web Dynpro components that implement the defined Web Dynpro component interfaces.
© SAP AG <Course Number> Unit Title - 24
© SAP AG 2003, Title of Presentation, Speaker Name / 24
Web Dynpro Project: Considerations 2
. . .
Which Web Dynpro component interfaces are defined in the Web Dynpro projects?
Which Web Dynpro components implement which Web Dynpro component interfaces?
Which Web Dynpro components use which Web Dynpro component interfaces?
Which method calls exist between the Web Dynpro components and which results are used between the Web Dynpro components?
Which context mappings exist between the Web Dynpro components?
Which Web Dynpro Components Use Which Web Dynpro Component Interfaces?Web Dynpro components can not only use other Web Dynpro components but also Web Dynprocomponent interfaces. The Web Dynpro component can use the following properties of the Web Dynprocomponent interface: Context (for mappings), Methods (for calls), Events (for communication), and Interface views (for embedding)
Which Method Calls Exist Between the Web Dynpro Components and Which Results are Used Between the Web Dynpro Components?Communication between Web Dynpro components happens using method calls and events.
Which Context Mappings Exist Between the Web Dynpro Components?The context mapping between Web Dynpro components enables the participating Web Dynprocomponents to exchange data.
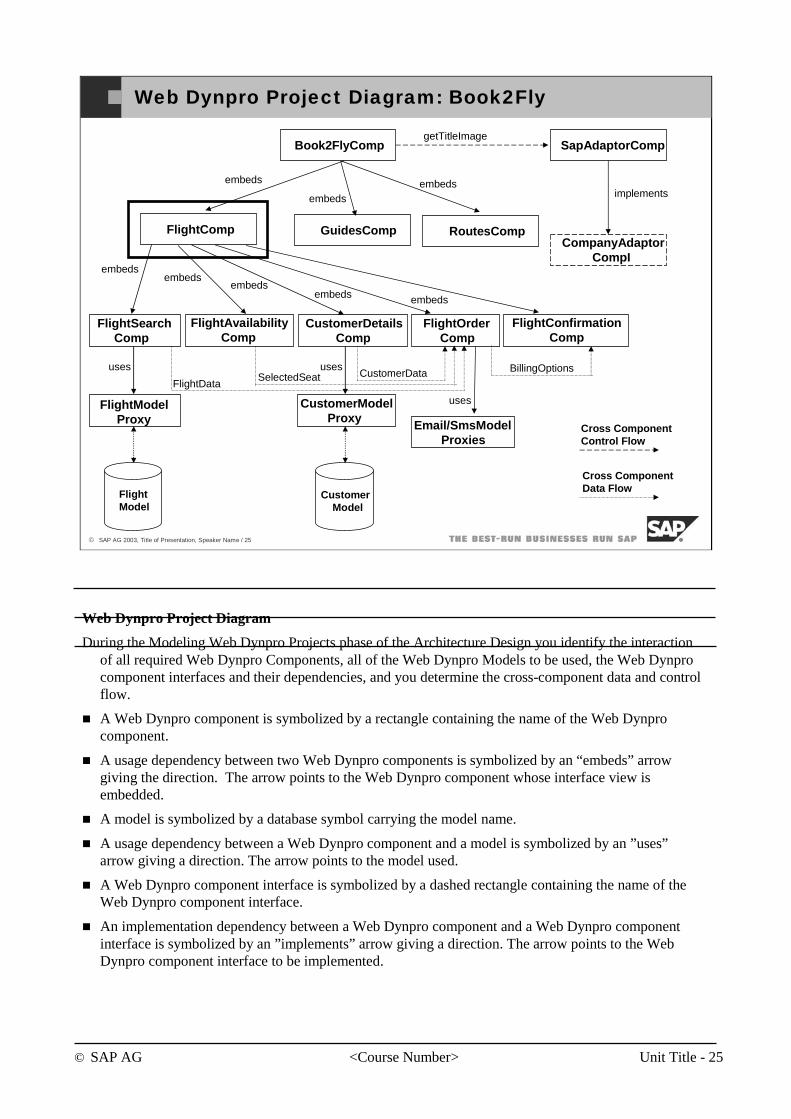
© SAP AG <Course Number> Unit Title - 25
© SAP AG 2003, Title of Presentation, Speaker Name / 25
Web Dynpro Project Diagram: Book2Fly
Book2FlyComp
FlightComp
FlightSearchComp
FlightAvailabilityComp
CustomerDetailsComp
FlightOrderComp
FlightConfirmationComp
SapAdaptorComp
CompanyAdaptorCompI
getTitleImage
implementsembeds
embedsembeds
embedsembeds embeds
uses
FlightDataSelectedSeat CustomerData
FlightModel
Cross ComponentControl Flow
Cross ComponentData Flow
FlightModelProxy
uses
CustomerModel
CustomerModelProxy
uses
Email/SmsModelProxies
BillingOptions
GuidesComp RoutesComp
embedsembeds
Web Dynpro Project Diagram
During the Modeling Web Dynpro Projects phase of the Architecture Design you identify the interaction of all required Web Dynpro Components, all of the Web Dynpro Models to be used, the Web Dynpro component interfaces and their dependencies, and you determine the cross-component data and control flow.
A Web Dynpro component is symbolized by a rectangle containing the name of the Web Dynpro component.
A usage dependency between two Web Dynpro components is symbolized by an “embeds” arrow giving the direction. The arrow points to the Web Dynpro component whose interface view is embedded.
A model is symbolized by a database symbol carrying the model name.
A usage dependency between a Web Dynpro component and a model is symbolized by an ”uses” arrow giving a direction. The arrow points to the model used.
A Web Dynpro component interface is symbolized by a dashed rectangle containing the name of the Web Dynpro component interface.
An implementation dependency between a Web Dynpro component and a Web Dynpro component interface is symbolized by an ”implements” arrow giving a direction. The arrow points to the Web Dynpro component interface to be implemented.
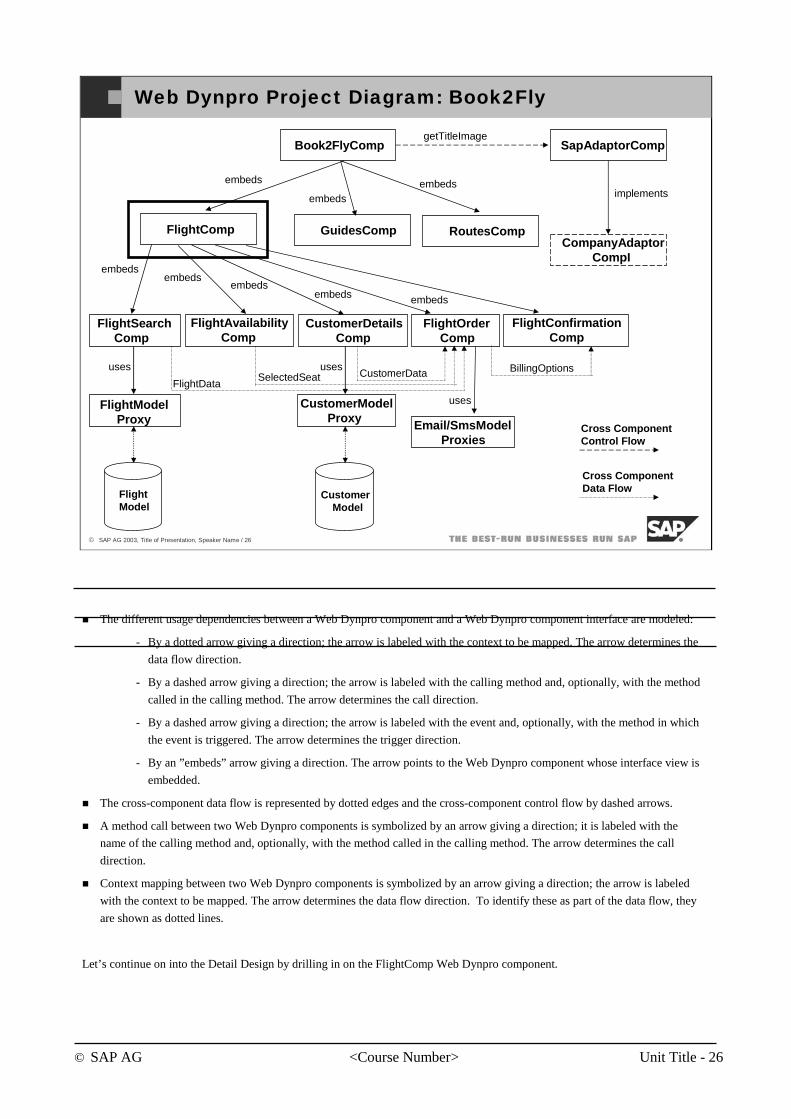
© SAP AG <Course Number> Unit Title - 26
© SAP AG 2003, Title of Presentation, Speaker Name / 26
Web Dynpro Project Diagram: Book2Fly
Book2FlyComp
FlightComp
FlightSearchComp
FlightAvailabilityComp
CustomerDetailsComp
FlightOrderComp
FlightConfirmationComp
SapAdaptorComp
CompanyAdaptorCompI
getTitleImage
implementsembeds
embedsembeds
embedsembeds embeds
uses
FlightDataSelectedSeat CustomerData
FlightModel
Cross ComponentControl Flow
Cross ComponentData Flow
FlightModelProxy
uses
CustomerModel
CustomerModelProxy
uses
Email/SmsModelProxies
BillingOptions
GuidesComp RoutesComp
embedsembeds
The different usage dependencies between a Web Dynpro component and a Web Dynpro component interface are modeled:
- By a dotted arrow giving a direction; the arrow is labeled with the context to be mapped. The arrow determines the
data flow direction.
- By a dashed arrow giving a direction; the arrow is labeled with the calling method and, optionally, with the method
called in the calling method. The arrow determines the call direction.
- By a dashed arrow giving a direction; the arrow is labeled with the event and, optionally, with the method in which
the event is triggered. The arrow determines the trigger direction.
- By an ”embeds” arrow giving a direction. The arrow points to the Web Dynpro component whose interface view is
embedded.
The cross-component data flow is represented by dotted edges and the cross-component control flow by dashed arrows.
A method call between two Web Dynpro components is symbolized by an arrow giving a direction; it is labeled with the
name of the calling method and, optionally, with the method called in the calling method. The arrow determines the call
direction.
Context mapping between two Web Dynpro components is symbolized by an arrow giving a direction; the arrow is labeled
with the context to be mapped. The arrow determines the data flow direction. To identify these as part of the data flow, they
are shown as dotted lines.
Let’s continue on into the Detail Design by drilling in on the FlightComp Web Dynpro component.
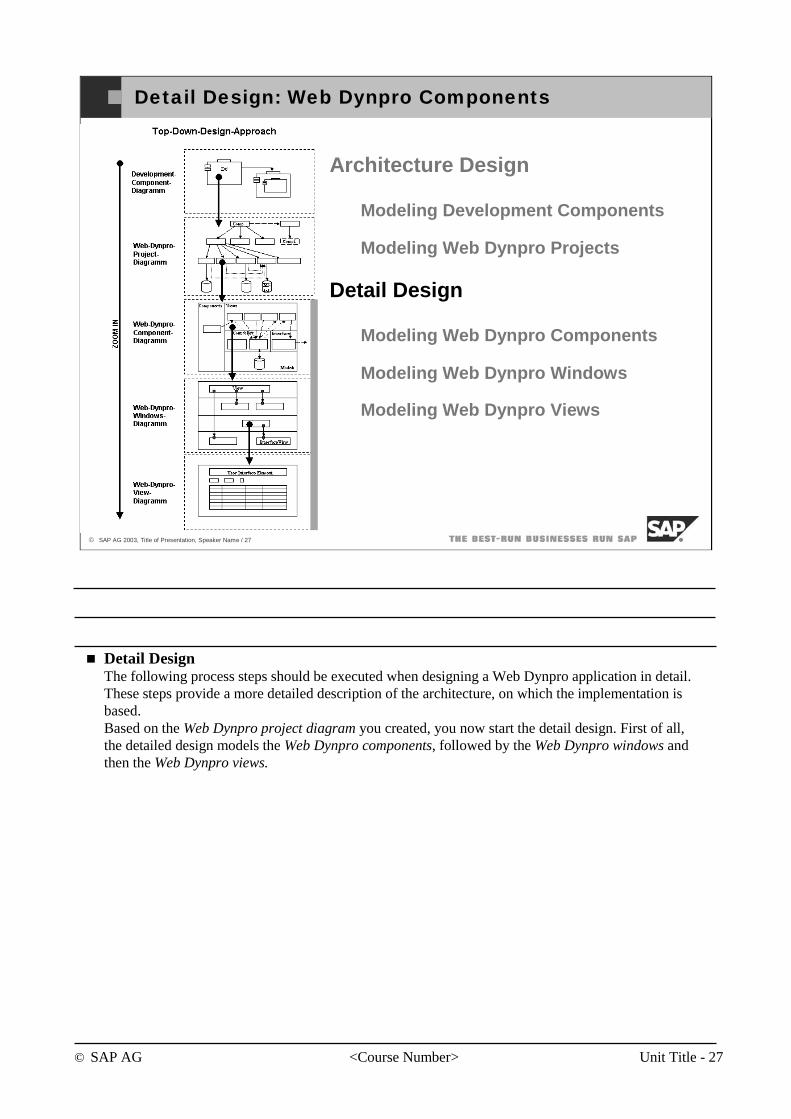
© SAP AG <Course Number> Unit Title - 27
© SAP AG 2003, Title of Presentation, Speaker Name / 27
Detail Design: Web Dynpro Components
Architecture Design
Modeling Development Components
Modeling Web Dynpro Projects
Detail Design
Modeling Web Dynpro Components
Modeling Web Dynpro Windows
Modeling Web Dynpro Views
Detail DesignThe following process steps should be executed when designing a Web Dynpro application in detail. These steps provide a more detailed description of the architecture, on which the implementation is based.Based on the Web Dynpro project diagram you created, you now start the detail design. First of all, the detailed design models the Web Dynpro components, followed by the Web Dynpro windows and then the Web Dynpro views.
© SAP AG <Course Number> Unit Title - 28
© SAP AG 2003, Title of Presentation, Speaker Name / 28
Detail Design In One Statement
In the detail design the complete internal component structure will be
added, which is used for the implementation of operations.
Detail DesignIn the detail design the complete internal component structure will be added, which is used for the implementation of operations.
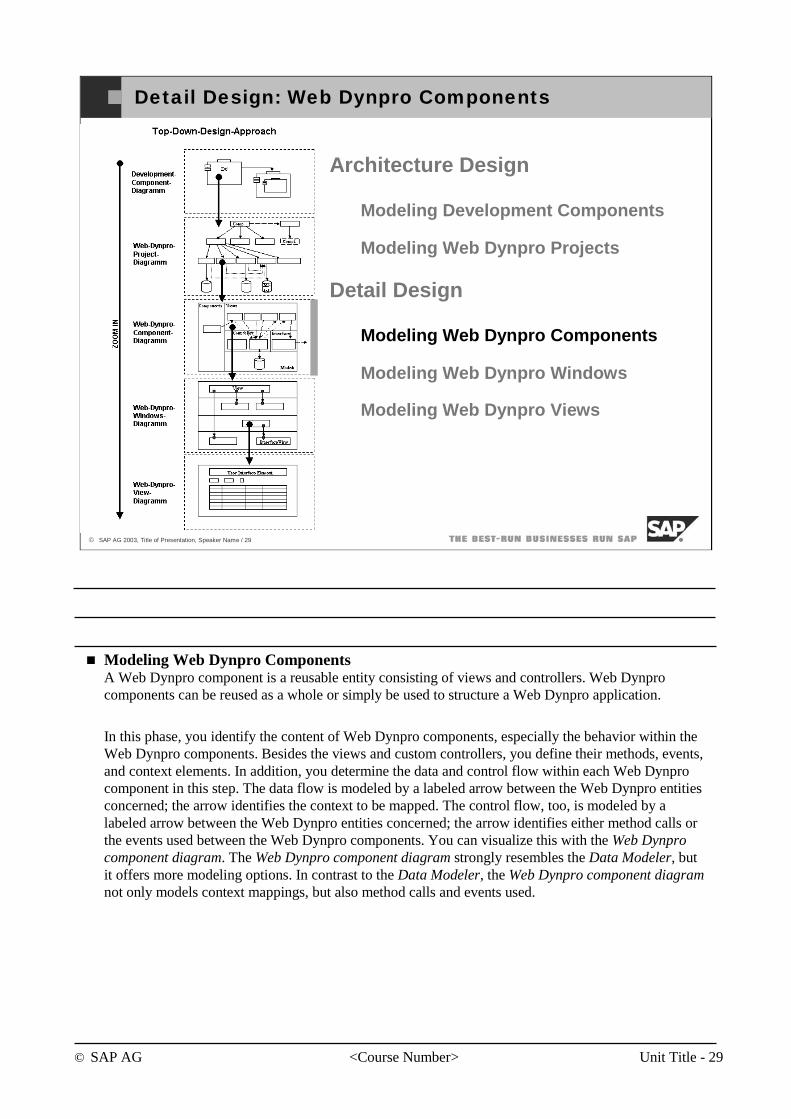
© SAP AG <Course Number> Unit Title - 29
© SAP AG 2003, Title of Presentation, Speaker Name / 29
Detail Design: Web Dynpro Components
Architecture Design
Modeling Development Components
Modeling Web Dynpro Projects
Detail Design
Modeling Web Dynpro Components
Modeling Web Dynpro Windows
Modeling Web Dynpro Views
Modeling Web Dynpro ComponentsA Web Dynpro component is a reusable entity consisting of views and controllers. Web Dynpro components can be reused as a whole or simply be used to structure a Web Dynpro application.
In this phase, you identify the content of Web Dynpro components, especially the behavior within the Web Dynpro components. Besides the views and custom controllers, you define their methods, events, and context elements. In addition, you determine the data and control flow within each Web Dynpro component in this step. The data flow is modeled by a labeled arrow between the Web Dynpro entities concerned; the arrow identifies the context to be mapped. The control flow, too, is modeled by a labeled arrow between the Web Dynpro entities concerned; the arrow identifies either method calls or the events used between the Web Dynpro components. You can visualize this with the Web Dynpro component diagram. The Web Dynpro component diagram strongly resembles the Data Modeler, but it offers more modeling options. In contrast to the Data Modeler, the Web Dynpro component diagramnot only models context mappings, but also method calls and events used.
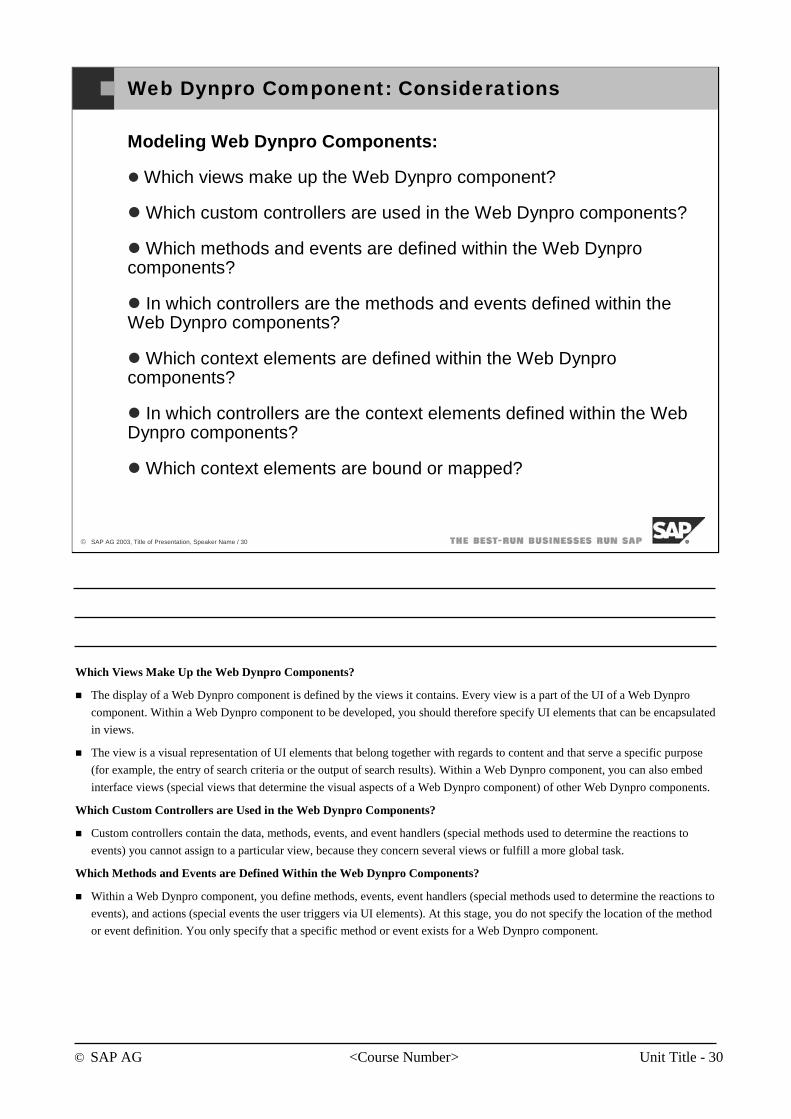
© SAP AG <Course Number> Unit Title - 30
© SAP AG 2003, Title of Presentation, Speaker Name / 30
Web Dynpro Component: Considerations
Modeling Web Dynpro Components:
Which views make up the Web Dynpro component?
Which custom controllers are used in the Web Dynpro components?
Which methods and events are defined within the Web Dynpro components?
In which controllers are the methods and events defined within the Web Dynpro components?
Which context elements are defined within the Web Dynpro components?
In which controllers are the context elements defined within the Web Dynpro components?
Which context elements are bound or mapped?
Which Views Make Up the Web Dynpro Components?
The display of a Web Dynpro component is defined by the views it contains. Every view is a part of the UI of a Web Dynpro
component. Within a Web Dynpro component to be developed, you should therefore specify UI elements that can be encapsulated
in views.
The view is a visual representation of UI elements that belong together with regards to content and that serve a specific purpose
(for example, the entry of search criteria or the output of search results). Within a Web Dynpro component, you can also embed
interface views (special views that determine the visual aspects of a Web Dynpro component) of other Web Dynpro components.
Which Custom Controllers are Used in the Web Dynpro Components?
Custom controllers contain the data, methods, events, and event handlers (special methods used to determine the reactions to
events) you cannot assign to a particular view, because they concern several views or fulfill a more global task.
Which Methods and Events are Defined Within the Web Dynpro Components?
Within a Web Dynpro component, you define methods, events, event handlers (special methods used to determine the reactions to
events), and actions (special events the user triggers via UI elements). At this stage, you do not specify the location of the method
or event definition. You only specify that a specific method or event exists for a Web Dynpro component.
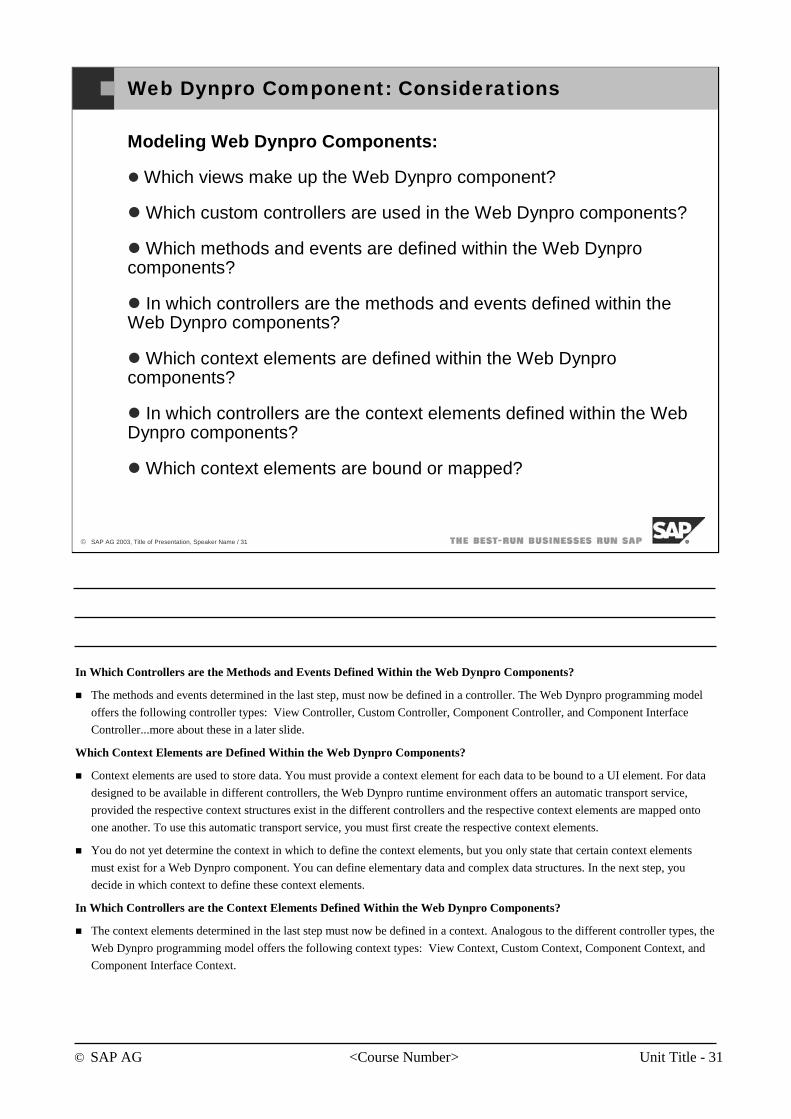
© SAP AG <Course Number> Unit Title - 31
© SAP AG 2003, Title of Presentation, Speaker Name / 31
Web Dynpro Component: Considerations
Modeling Web Dynpro Components:
Which views make up the Web Dynpro component?
Which custom controllers are used in the Web Dynpro components?
Which methods and events are defined within the Web Dynpro components?
In which controllers are the methods and events defined within the Web Dynpro components?
Which context elements are defined within the Web Dynpro components?
In which controllers are the context elements defined within the Web Dynpro components?
Which context elements are bound or mapped?
In Which Controllers are the Methods and Events Defined Within the Web Dynpro Components?
The methods and events determined in the last step, must now be defined in a controller. The Web Dynpro programming model
offers the following controller types: View Controller, Custom Controller, Component Controller, and Component Interface
Controller...more about these in a later slide.
Which Context Elements are Defined Within the Web Dynpro Components?
Context elements are used to store data. You must provide a context element for each data to be bound to a UI element. For data
designed to be available in different controllers, the Web Dynpro runtime environment offers an automatic transport service,
provided the respective context structures exist in the different controllers and the respective context elements are mapped onto
one another. To use this automatic transport service, you must first create the respective context elements.
You do not yet determine the context in which to define the context elements, but you only state that certain context elements
must exist for a Web Dynpro component. You can define elementary data and complex data structures. In the next step, you
decide in which context to define these context elements.
In Which Controllers are the Context Elements Defined Within the Web Dynpro Components?
The context elements determined in the last step must now be defined in a context. Analogous to the different controller types, the
Web Dynpro programming model offers the following context types: View Context, Custom Context, Component Context, and
Component Interface Context.
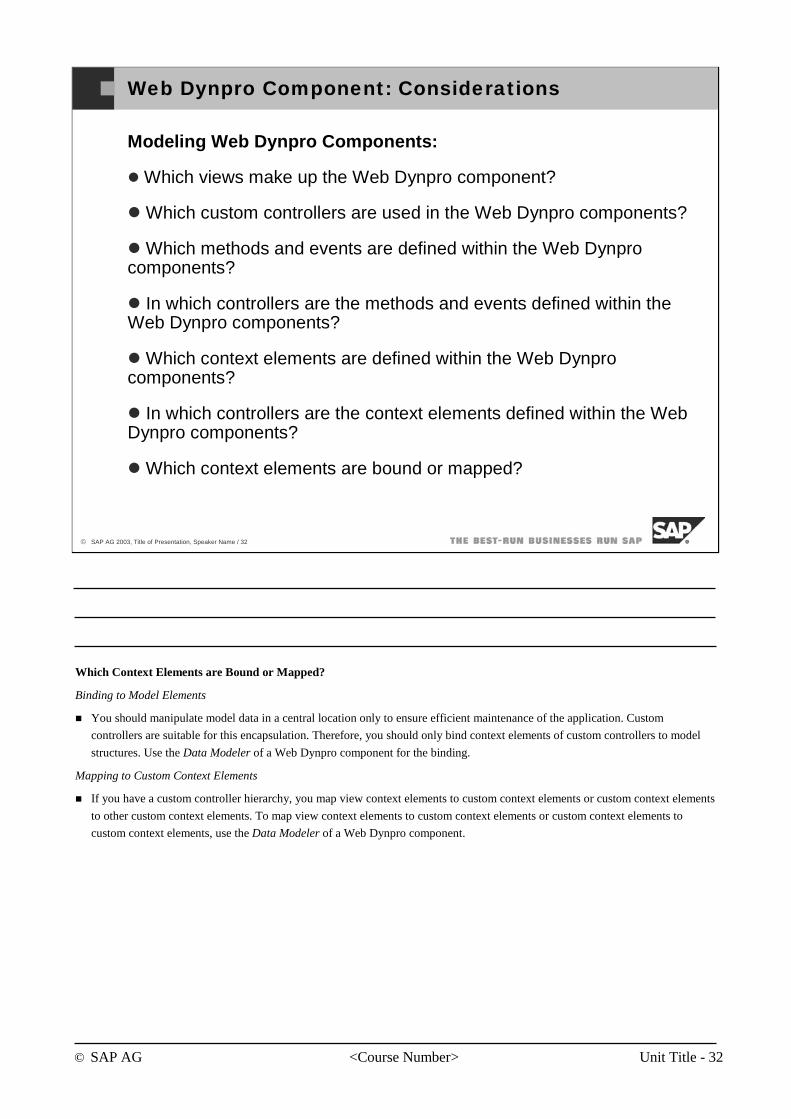
© SAP AG <Course Number> Unit Title - 32
© SAP AG 2003, Title of Presentation, Speaker Name / 32
Web Dynpro Component: Considerations
Modeling Web Dynpro Components:
Which views make up the Web Dynpro component?
Which custom controllers are used in the Web Dynpro components?
Which methods and events are defined within the Web Dynpro components?
In which controllers are the methods and events defined within the Web Dynpro components?
Which context elements are defined within the Web Dynpro components?
In which controllers are the context elements defined within the Web Dynpro components?
Which context elements are bound or mapped?
Which Context Elements are Bound or Mapped?
Binding to Model Elements
You should manipulate model data in a central location only to ensure efficient maintenance of the application. Custom
controllers are suitable for this encapsulation. Therefore, you should only bind context elements of custom controllers to model
structures. Use the Data Modeler of a Web Dynpro component for the binding.
Mapping to Custom Context Elements
If you have a custom controller hierarchy, you map view context elements to custom context elements or custom context elements
to other custom context elements. To map view context elements to custom context elements or custom context elements to
custom context elements, use the Data Modeler of a Web Dynpro component.
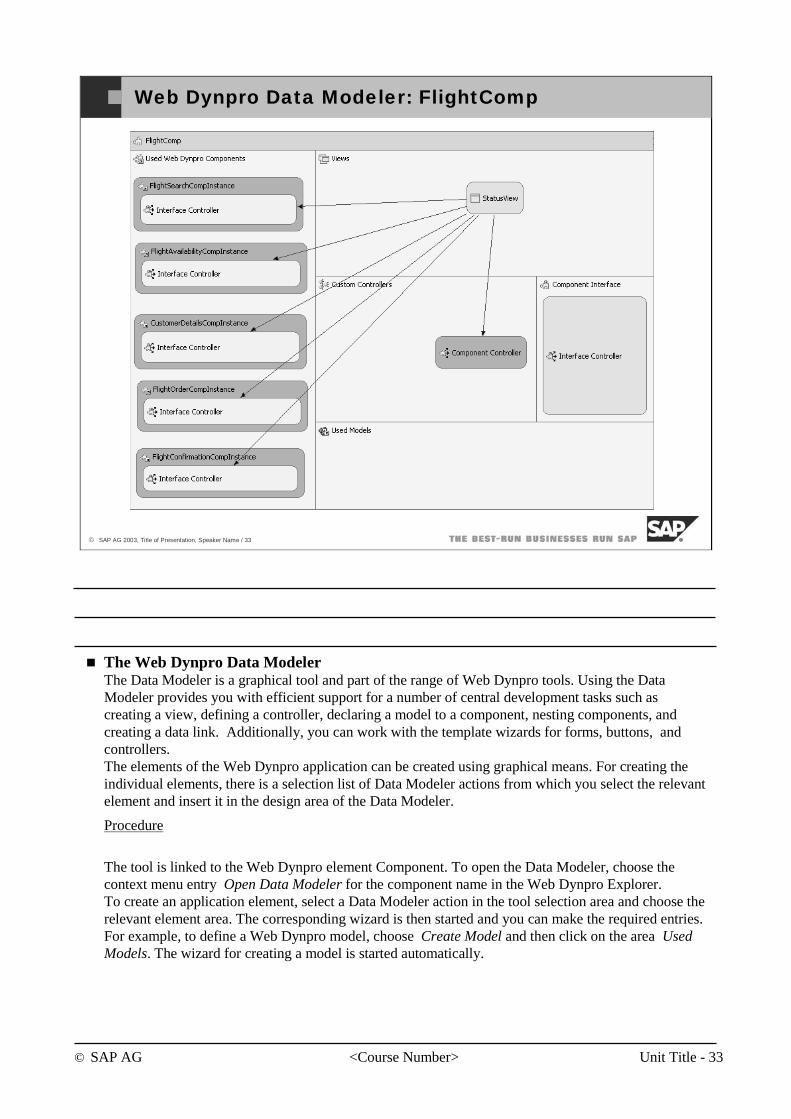
© SAP AG <Course Number> Unit Title - 33
© SAP AG 2003, Title of Presentation, Speaker Name / 33
Web Dynpro Data Modeler: FlightComp
The Web Dynpro Data ModelerThe Data Modeler is a graphical tool and part of the range of Web Dynpro tools. Using the Data Modeler provides you with efficient support for a number of central development tasks such as creating a view, defining a controller, declaring a model to a component, nesting components, and creating a data link. Additionally, you can work with the template wizards for forms, buttons, and controllers.The elements of the Web Dynpro application can be created using graphical means. For creating the individual elements, there is a selection list of Data Modeler actions from which you select the relevant element and insert it in the design area of the Data Modeler.
Procedure
The tool is linked to the Web Dynpro element Component. To open the Data Modeler, choose the context menu entry Open Data Modeler for the component name in the Web Dynpro Explorer.To create an application element, select a Data Modeler action in the tool selection area and choose the relevant element area. The corresponding wizard is then started and you can make the required entries.For example, to define a Web Dynpro model, choose Create Model and then click on the area Used Models. The wizard for creating a model is started automatically.
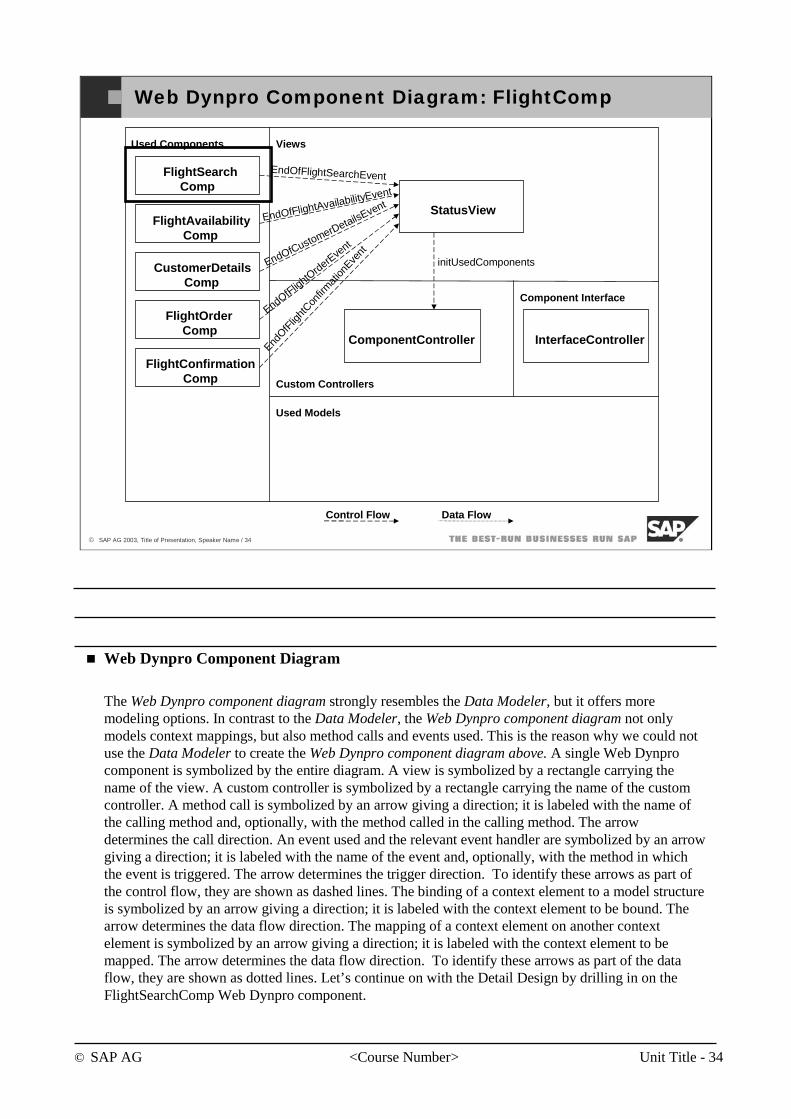
© SAP AG <Course Number> Unit Title - 34
© SAP AG 2003, Title of Presentation, Speaker Name / 34
Web Dynpro Component Diagram: FlightComp
Used Components
Used Models
Views
Custom Controllers
Component Interface
FlightSearchComp
FlightAvailabilityComp
CustomerDetailsComp
FlightOrderComp
FlightConfirmationComp
StatusView
ComponentController InterfaceController
initUsedComponents
EndOfFlightSearchEvent
EndOfFlightAvailabilityEvent
EndOfCustomerDetailsEvent
EndOfFlightO
rderEve
nt
EndOfF
light
Confir
mation
Event
Control Flow Data Flow
Web Dynpro Component Diagram
The Web Dynpro component diagram strongly resembles the Data Modeler, but it offers more modeling options. In contrast to the Data Modeler, the Web Dynpro component diagram not only models context mappings, but also method calls and events used. This is the reason why we could not use the Data Modeler to create the Web Dynpro component diagram above. A single Web Dynpro component is symbolized by the entire diagram. A view is symbolized by a rectangle carrying the name of the view. A custom controller is symbolized by a rectangle carrying the name of the custom controller. A method call is symbolized by an arrow giving a direction; it is labeled with the name of the calling method and, optionally, with the method called in the calling method. The arrow determines the call direction. An event used and the relevant event handler are symbolized by an arrow giving a direction; it is labeled with the name of the event and, optionally, with the method in which the event is triggered. The arrow determines the trigger direction. To identify these arrows as part of the control flow, they are shown as dashed lines. The binding of a context element to a model structure is symbolized by an arrow giving a direction; it is labeled with the context element to be bound. The arrow determines the data flow direction. The mapping of a context element on another context element is symbolized by an arrow giving a direction; it is labeled with the context element to be mapped. The arrow determines the data flow direction. To identify these arrows as part of the data flow, they are shown as dotted lines. Let’s continue on with the Detail Design by drilling in on the FlightSearchComp Web Dynpro component.
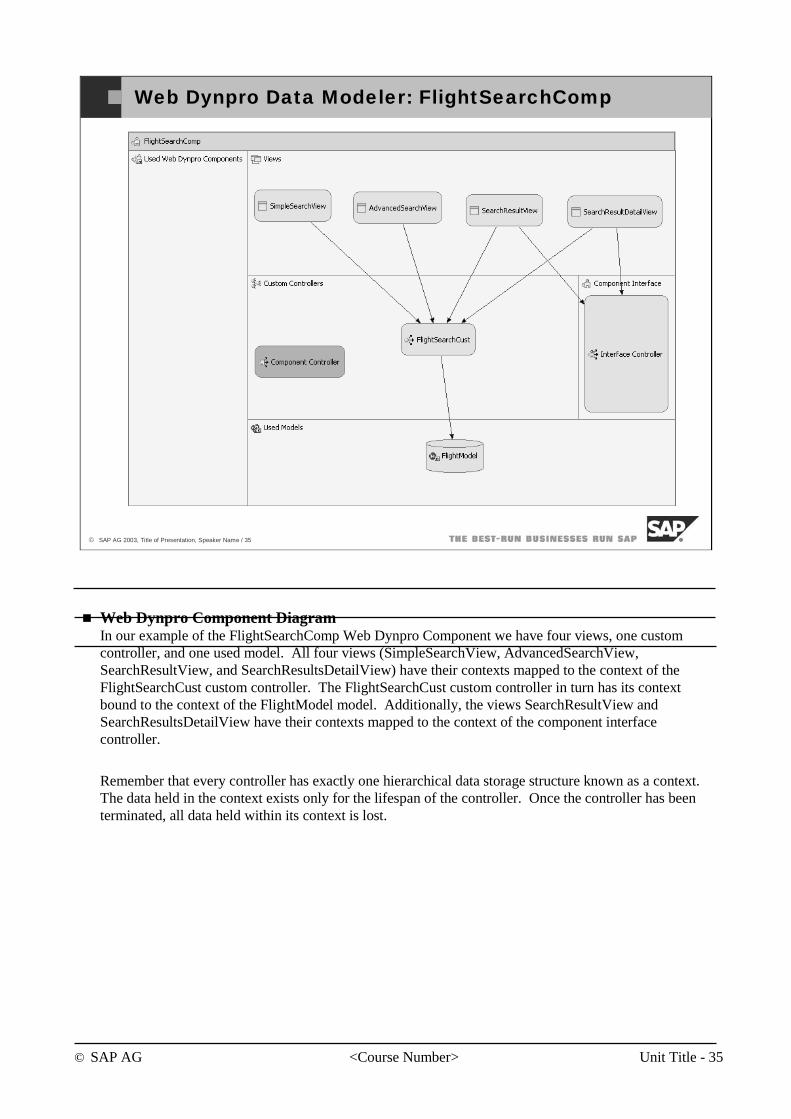
© SAP AG <Course Number> Unit Title - 35
© SAP AG 2003, Title of Presentation, Speaker Name / 35
Web Dynpro Data Modeler: FlightSearchComp
Web Dynpro Component DiagramIn our example of the FlightSearchComp Web Dynpro Component we have four views, one custom controller, and one used model. All four views (SimpleSearchView, AdvancedSearchView, SearchResultView, and SearchResultsDetailView) have their contexts mapped to the context of the FlightSearchCust custom controller. The FlightSearchCust custom controller in turn has its context bound to the context of the FlightModel model. Additionally, the views SearchResultView and SearchResultsDetailView have their contexts mapped to the context of the component interface controller.
Remember that every controller has exactly one hierarchical data storage structure known as a context. The data held in the context exists only for the lifespan of the controller. Once the controller has been terminated, all data held within its context is lost.
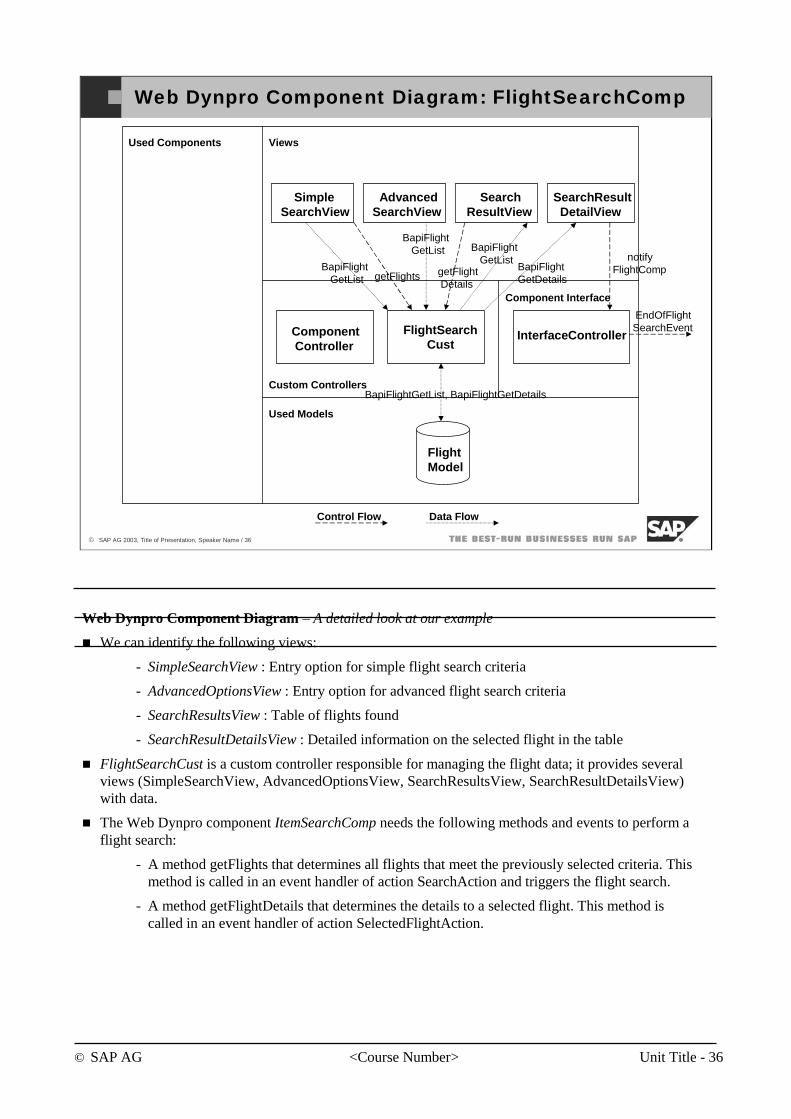
© SAP AG <Course Number> Unit Title - 36
© SAP AG 2003, Title of Presentation, Speaker Name / 36
Web Dynpro Component Diagram: FlightSearchComp
Used Components
Used Models
Views
Custom Controllers
Component Interface
InterfaceController
notifyFlightComp
Control Flow Data Flow
FlightModel
ComponentController
FlightSearchCust
SimpleSearchView
AdvancedSearchView
SearchResultView
SearchResultDetailView
EndOfFlightSearchEvent
BapiFlightGetList, BapiFlightGetDetails
BapiFlightGetList
BapiFlightGetList BapiFlight
GetListBapiFlightGetDetailsgetFlights getFlight
Details
Web Dynpro Component Diagram – A detailed look at our example
We can identify the following views:
- SimpleSearchView : Entry option for simple flight search criteria
- AdvancedOptionsView : Entry option for advanced flight search criteria
- SearchResultsView : Table of flights found
- SearchResultDetailsView : Detailed information on the selected flight in the table
FlightSearchCust is a custom controller responsible for managing the flight data; it provides several views (SimpleSearchView, AdvancedOptionsView, SearchResultsView, SearchResultDetailsView) with data.
The Web Dynpro component ItemSearchComp needs the following methods and events to perform a flight search:
- A method getFlights that determines all flights that meet the previously selected criteria. This method is called in an event handler of action SearchAction and triggers the flight search.
- A method getFlightDetails that determines the details to a selected flight. This method is called in an event handler of action SelectedFlightAction.
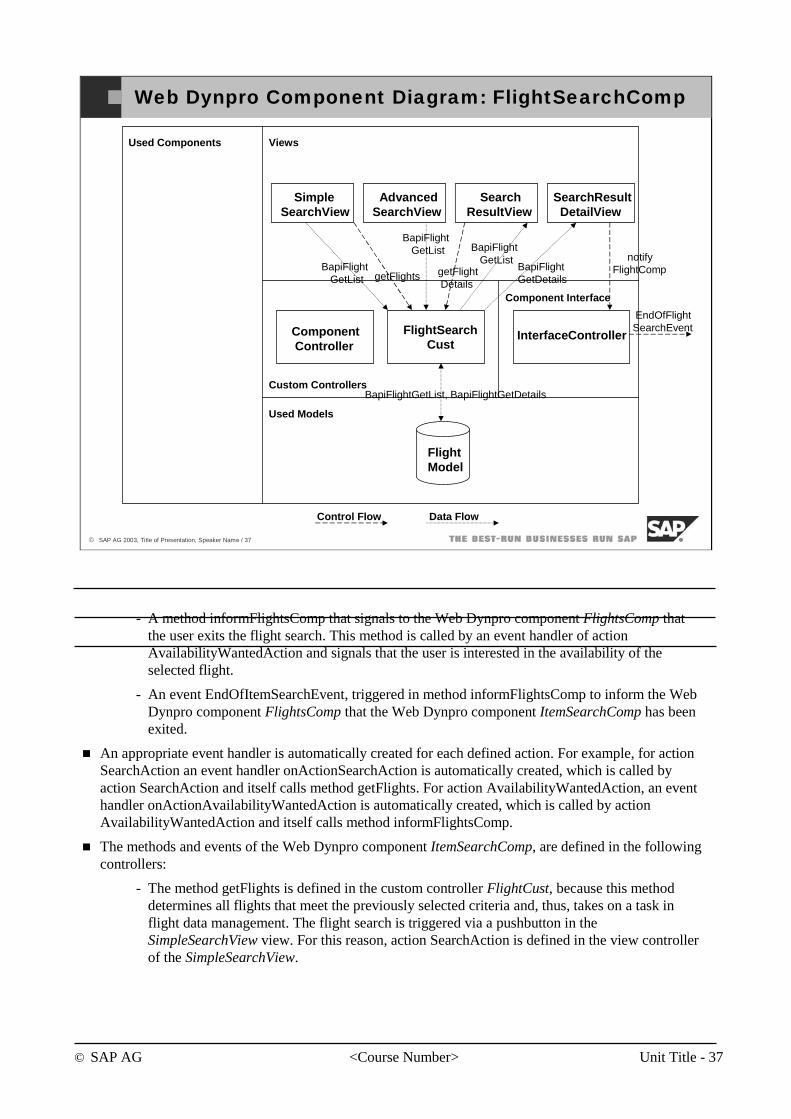
© SAP AG <Course Number> Unit Title - 37
© SAP AG 2003, Title of Presentation, Speaker Name / 37
Web Dynpro Component Diagram: FlightSearchComp
Used Components
Used Models
Views
Custom Controllers
Component Interface
InterfaceController
notifyFlightComp
Control Flow Data Flow
FlightModel
ComponentController
FlightSearchCust
SimpleSearchView
AdvancedSearchView
SearchResultView
SearchResultDetailView
EndOfFlightSearchEvent
BapiFlightGetList, BapiFlightGetDetails
BapiFlightGetList
BapiFlightGetList BapiFlight
GetListBapiFlightGetDetailsgetFlights getFlight
Details
- A method informFlightsComp that signals to the Web Dynpro component FlightsComp that the user exits the flight search. This method is called by an event handler of action AvailabilityWantedAction and signals that the user is interested in the availability of the selected flight.
- An event EndOfItemSearchEvent, triggered in method informFlightsComp to inform the Web Dynpro component FlightsComp that the Web Dynpro component ItemSearchComp has been exited.
An appropriate event handler is automatically created for each defined action. For example, for action SearchAction an event handler onActionSearchAction is automatically created, which is called by action SearchAction and itself calls method getFlights. For action AvailabilityWantedAction, an event handler onActionAvailabilityWantedAction is automatically created, which is called by action AvailabilityWantedAction and itself calls method informFlightsComp.
The methods and events of the Web Dynpro component ItemSearchComp, are defined in the following controllers:
- The method getFlights is defined in the custom controller FlightCust, because this method determines all flights that meet the previously selected criteria and, thus, takes on a task in flight data management. The flight search is triggered via a pushbutton in the SimpleSearchView view. For this reason, action SearchAction is defined in the view controller of the SimpleSearchView.
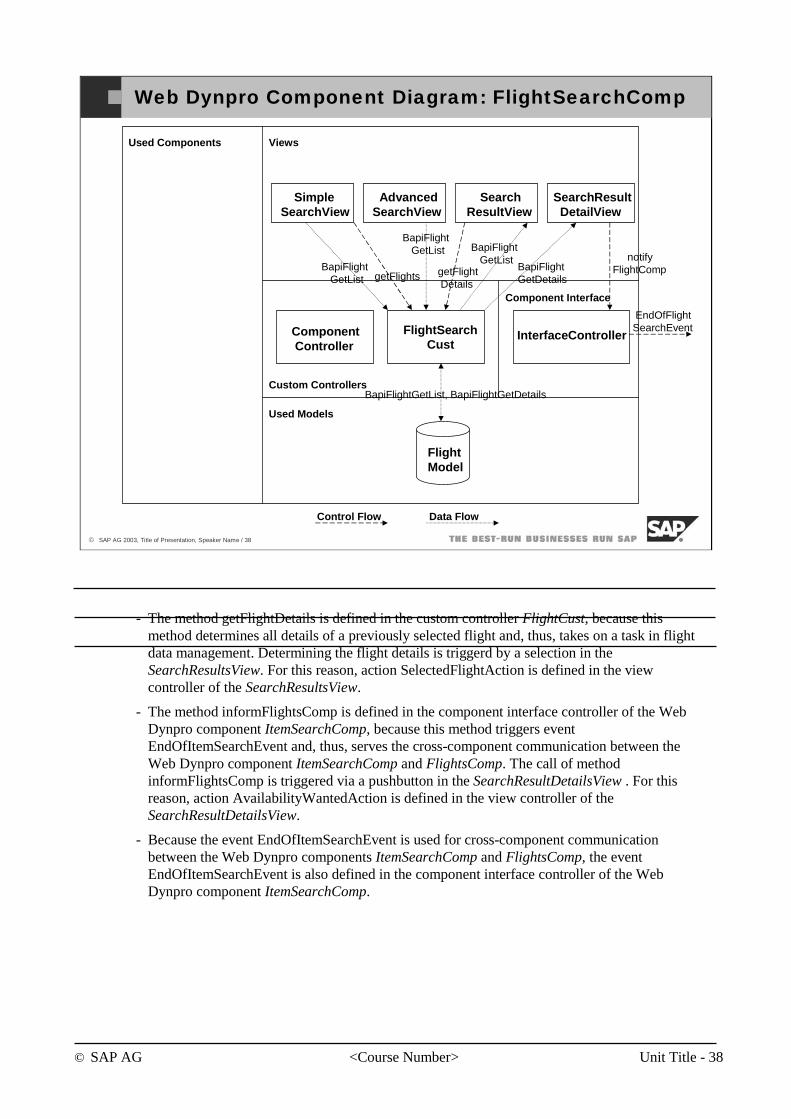
© SAP AG <Course Number> Unit Title - 38
© SAP AG 2003, Title of Presentation, Speaker Name / 38
Web Dynpro Component Diagram: FlightSearchComp
Used Components
Used Models
Views
Custom Controllers
Component Interface
InterfaceController
notifyFlightComp
Control Flow Data Flow
FlightModel
ComponentController
FlightSearchCust
SimpleSearchView
AdvancedSearchView
SearchResultView
SearchResultDetailView
EndOfFlightSearchEvent
BapiFlightGetList, BapiFlightGetDetails
BapiFlightGetList
BapiFlightGetList BapiFlight
GetListBapiFlightGetDetailsgetFlights getFlight
Details
- The method getFlightDetails is defined in the custom controller FlightCust, because this method determines all details of a previously selected flight and, thus, takes on a task in flight data management. Determining the flight details is triggerd by a selection in the SearchResultsView. For this reason, action SelectedFlightAction is defined in the view controller of the SearchResultsView.
- The method informFlightsComp is defined in the component interface controller of the Web Dynpro component ItemSearchComp, because this method triggers event EndOfItemSearchEvent and, thus, serves the cross-component communication between the Web Dynpro component ItemSearchComp and FlightsComp. The call of method informFlightsComp is triggered via a pushbutton in the SearchResultDetailsView . For this reason, action AvailabilityWantedAction is defined in the view controller of the SearchResultDetailsView.
- Because the event EndOfItemSearchEvent is used for cross-component communication between the Web Dynpro components ItemSearchComp and FlightsComp, the event EndOfItemSearchEvent is also defined in the component interface controller of the Web Dynpro component ItemSearchComp.
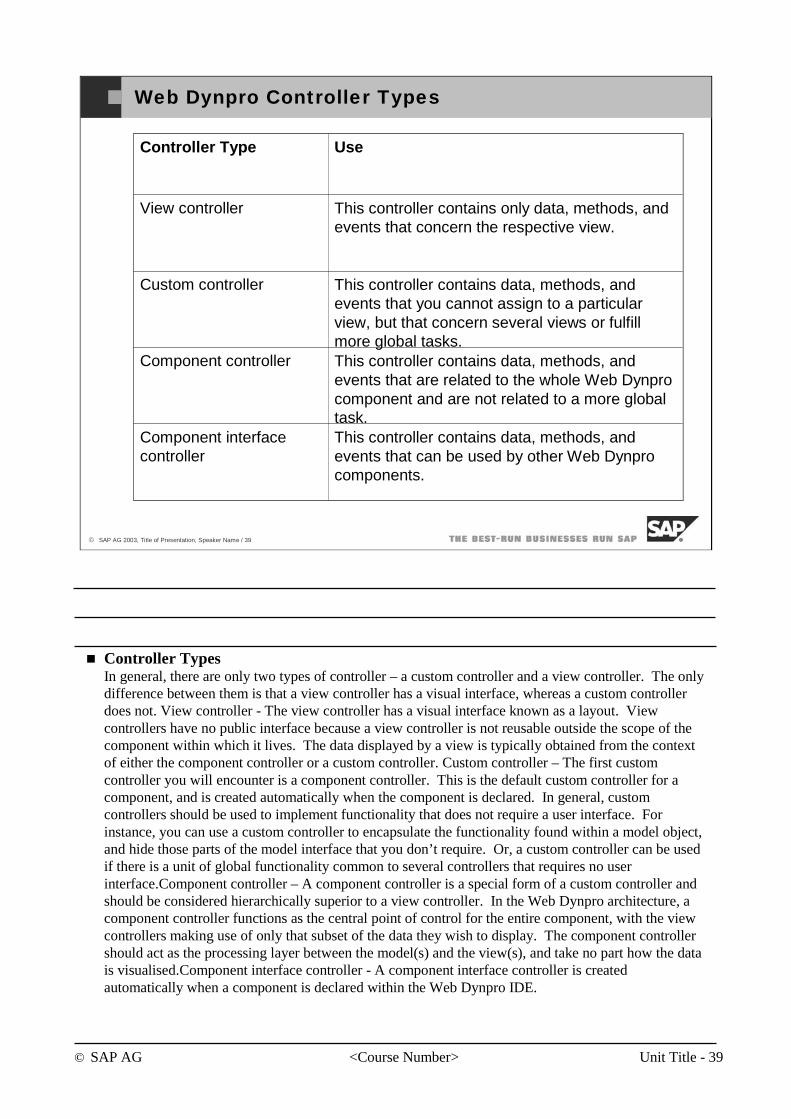
© SAP AG <Course Number> Unit Title - 39
© SAP AG 2003, Title of Presentation, Speaker Name / 39
Web Dynpro Controller Types
Controller Type Use
View controller This controller contains only data, methods, and events that concern the respective view.
Custom controller This controller contains data, methods, and events that you cannot assign to a particular view, but that concern several views or fulfill more global tasks.
Component controller This controller contains data, methods, and events that are related to the whole Web Dynpro component and are not related to a more global task.
Component interface controller
This controller contains data, methods, and events that can be used by other Web Dynpro components.
Controller TypesIn general, there are only two types of controller – a custom controller and a view controller. The only difference between them is that a view controller has a visual interface, whereas a custom controller does not. View controller - The view controller has a visual interface known as a layout. View controllers have no public interface because a view controller is not reusable outside the scope of the component within which it lives. The data displayed by a view is typically obtained from the context of either the component controller or a custom controller. Custom controller – The first custom controller you will encounter is a component controller. This is the default custom controller for a component, and is created automatically when the component is declared. In general, custom controllers should be used to implement functionality that does not require a user interface. For instance, you can use a custom controller to encapsulate the functionality found within a model object, and hide those parts of the model interface that you don’t require. Or, a custom controller can be used if there is a unit of global functionality common to several controllers that requires no user interface.Component controller – A component controller is a special form of a custom controller and should be considered hierarchically superior to a view controller. In the Web Dynpro architecture, a component controller functions as the central point of control for the entire component, with the view controllers making use of only that subset of the data they wish to display. The component controller should act as the processing layer between the model(s) and the view(s), and take no part how the data is visualised.Component interface controller - A component interface controller is created automatically when a component is declared within the Web Dynpro IDE.
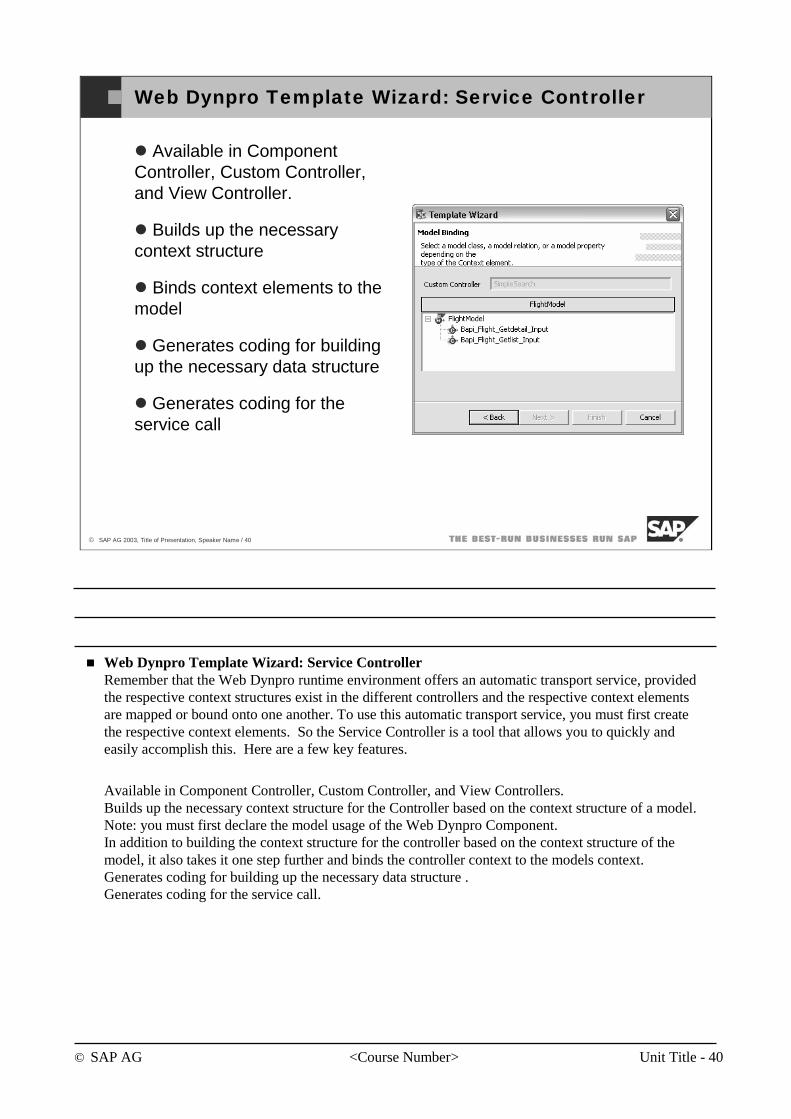
© SAP AG <Course Number> Unit Title - 40
© SAP AG 2003, Title of Presentation, Speaker Name / 40
Web Dynpro Template Wizard: Service Controller
Available in Component Controller, Custom Controller, and View Controller.
Builds up the necessary context structure
Binds context elements to the model
Generates coding for building up the necessary data structure
Generates coding for the service call
Web Dynpro Template Wizard: Service Controller Remember that the Web Dynpro runtime environment offers an automatic transport service, provided the respective context structures exist in the different controllers and the respective context elements are mapped or bound onto one another. To use this automatic transport service, you must first create the respective context elements. So the Service Controller is a tool that allows you to quickly and easily accomplish this. Here are a few key features.
Available in Component Controller, Custom Controller, and View Controllers.Builds up the necessary context structure for the Controller based on the context structure of a model. Note: you must first declare the model usage of the Web Dynpro Component.In addition to building the context structure for the controller based on the context structure of the model, it also takes it one step further and binds the controller context to the models context.Generates coding for building up the necessary data structure .Generates coding for the service call.
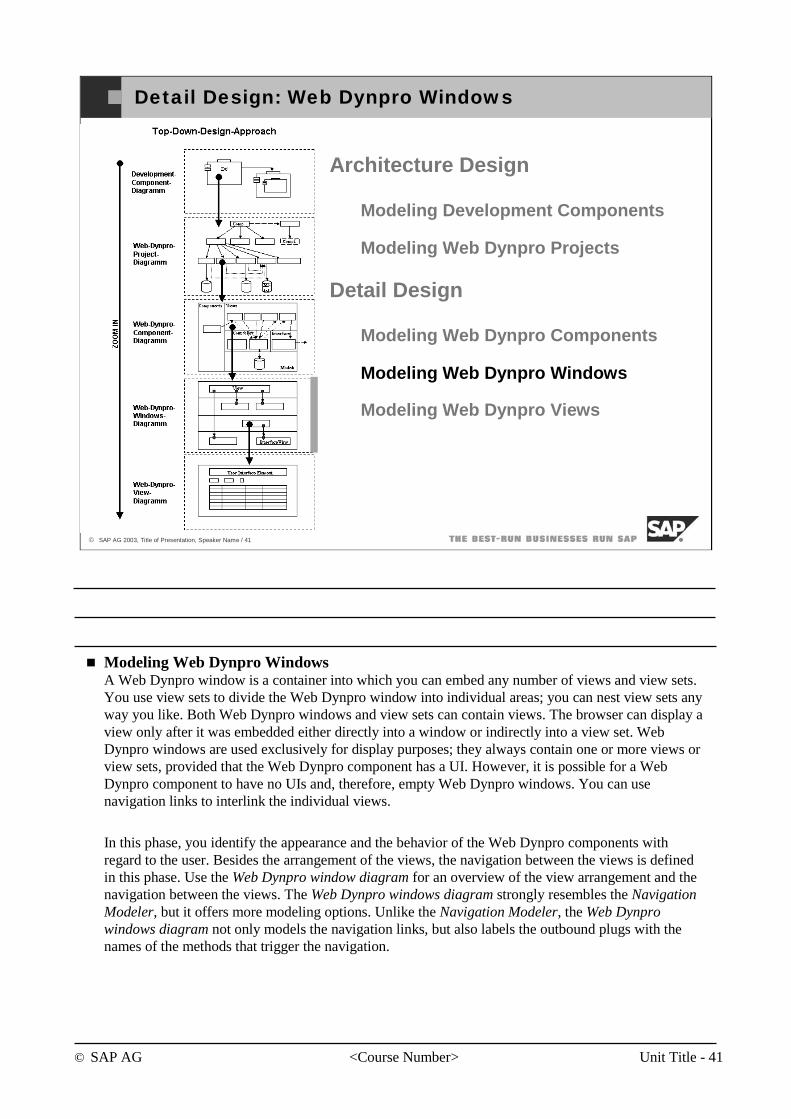
© SAP AG <Course Number> Unit Title - 41
© SAP AG 2003, Title of Presentation, Speaker Name / 41
Detail Design: Web Dynpro Windows
Architecture Design
Modeling Development Components
Modeling Web Dynpro Projects
Detail Design
Modeling Web Dynpro Components
Modeling Web Dynpro Windows
Modeling Web Dynpro Views
Modeling Web Dynpro WindowsA Web Dynpro window is a container into which you can embed any number of views and view sets. You use view sets to divide the Web Dynpro window into individual areas; you can nest view sets any way you like. Both Web Dynpro windows and view sets can contain views. The browser can display a view only after it was embedded either directly into a window or indirectly into a view set. Web Dynpro windows are used exclusively for display purposes; they always contain one or more views or view sets, provided that the Web Dynpro component has a UI. However, it is possible for a Web Dynpro component to have no UIs and, therefore, empty Web Dynpro windows. You can use navigation links to interlink the individual views.
In this phase, you identify the appearance and the behavior of the Web Dynpro components with regard to the user. Besides the arrangement of the views, the navigation between the views is defined in this phase. Use the Web Dynpro window diagram for an overview of the view arrangement and the navigation between the views. The Web Dynpro windows diagram strongly resembles the Navigation Modeler, but it offers more modeling options. Unlike the Navigation Modeler, the Web Dynpro windows diagram not only models the navigation links, but also labels the outbound plugs with the names of the methods that trigger the navigation.
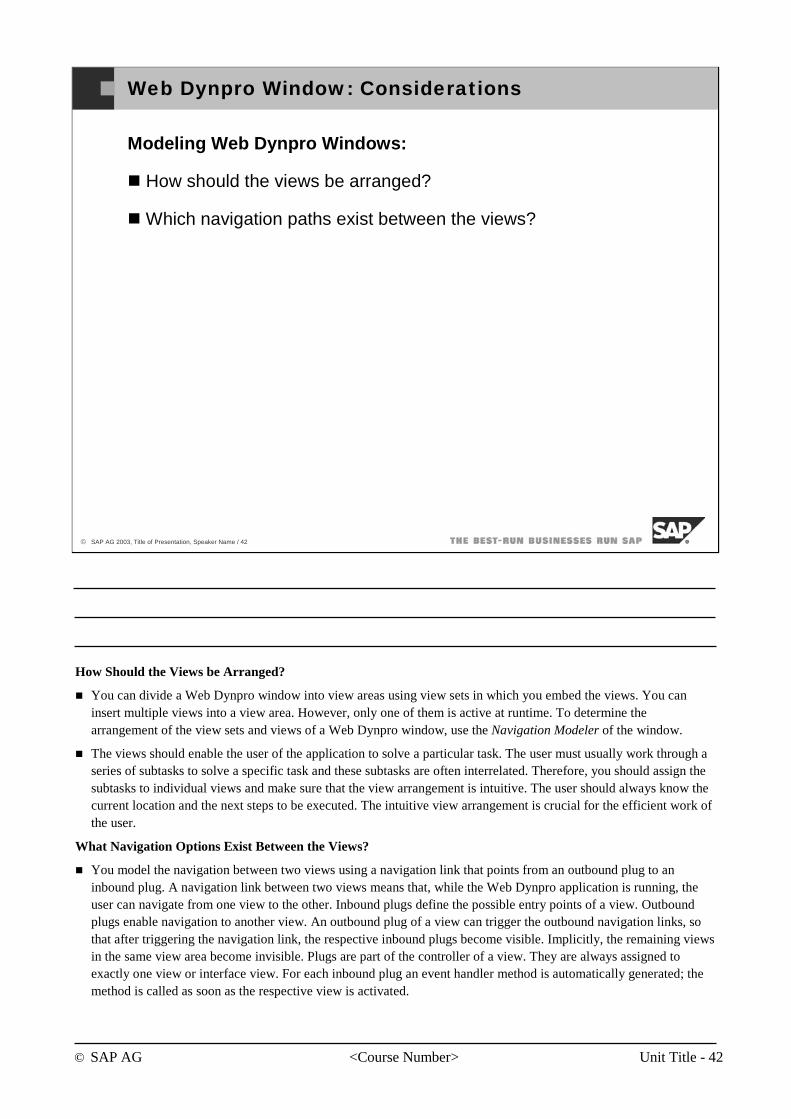
© SAP AG <Course Number> Unit Title - 42
© SAP AG 2003, Title of Presentation, Speaker Name / 42
Web Dynpro Window: Considerations
Modeling Web Dynpro Windows:
How should the views be arranged?
Which navigation paths exist between the views?
How Should the Views be Arranged?
You can divide a Web Dynpro window into view areas using view sets in which you embed the views. You can insert multiple views into a view area. However, only one of them is active at runtime. To determine the arrangement of the view sets and views of a Web Dynpro window, use the Navigation Modeler of the window.
The views should enable the user of the application to solve a particular task. The user must usually work through a series of subtasks to solve a specific task and these subtasks are often interrelated. Therefore, you should assign the subtasks to individual views and make sure that the view arrangement is intuitive. The user should always know the current location and the next steps to be executed. The intuitive view arrangement is crucial for the efficient work of the user.
What Navigation Options Exist Between the Views?
You model the navigation between two views using a navigation link that points from an outbound plug to an inbound plug. A navigation link between two views means that, while the Web Dynpro application is running, the user can navigate from one view to the other. Inbound plugs define the possible entry points of a view. Outbound plugs enable navigation to another view. An outbound plug of a view can trigger the outbound navigation links, so that after triggering the navigation link, the respective inbound plugs become visible. Implicitly, the remaining views in the same view area become invisible. Plugs are part of the controller of a view. They are always assigned to exactly one view or interface view. For each inbound plug an event handler method is automatically generated; the method is called as soon as the respective view is activated.
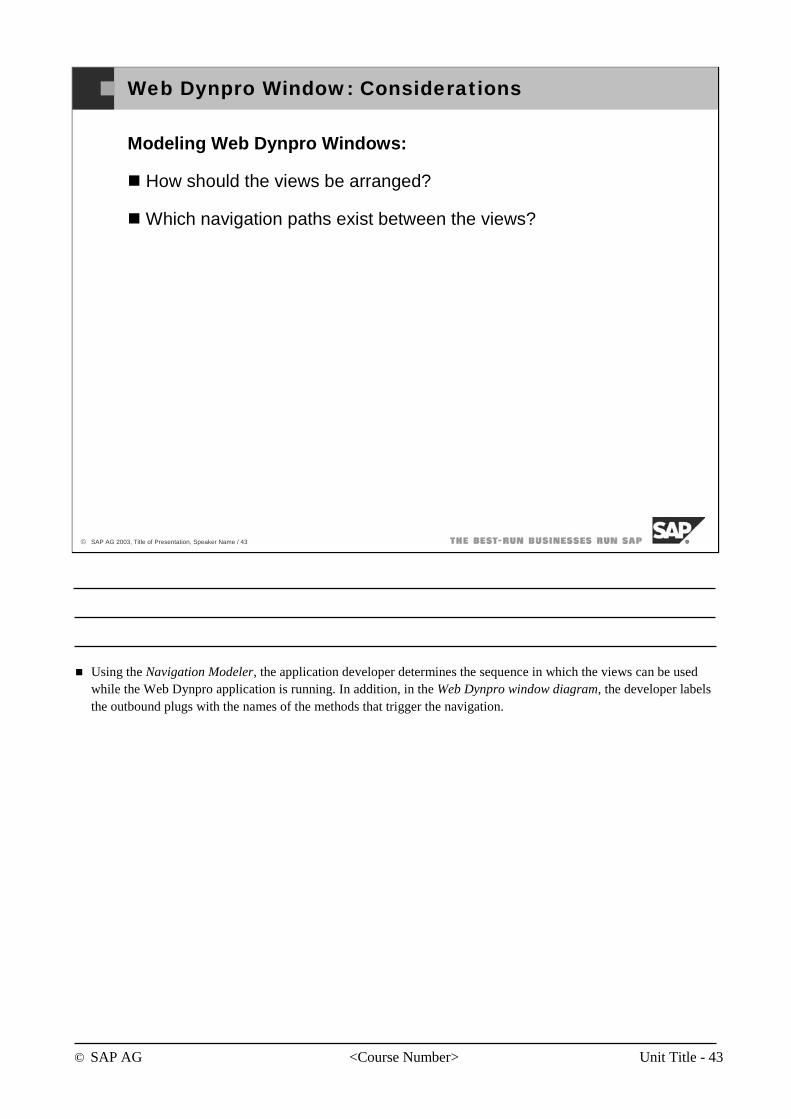
© SAP AG <Course Number> Unit Title - 43
© SAP AG 2003, Title of Presentation, Speaker Name / 43
Web Dynpro Window: Considerations
Modeling Web Dynpro Windows:
How should the views be arranged?
Which navigation paths exist between the views?
Using the Navigation Modeler, the application developer determines the sequence in which the views can be used while the Web Dynpro application is running. In addition, in the Web Dynpro window diagram, the developer labels the outbound plugs with the names of the methods that trigger the navigation.

© SAP AG <Course Number> Unit Title - 44
© SAP AG 2003, Title of Presentation, Speaker Name / 44
Web Dynpro Navigation Modeler: FlightComp
Web Dynpro Navigation ModelerIn our example, the Web Dynpro window for the Web Dynpro component FlightsComp consists of a view set with two vertically arranged cells. The upper cell contains the StatusView, which shows the status of the flight booking. The lower cell contains the interface views of the used Web Dynpro components needed for flight booking (ItemSearchInterfaceView, ItemAvailabilityInterfaceView, CustomerDetailsInterfaceView, PurchaseOrderInterfaceView, ContractConfirmationInterfaceView).
Notice the navigation links that define the navigation of the Web Dynpro applciation. The navigation links are attached to the views using plugs. There are both InBound and OutBound plugs that can be added to the views. Navigation is trigger by ‘firing’ the OutBound plug – more on these concepts in another section.We can now switch to the Web Dynpro Window Diagram to take a more detailed look at the event handlers and actions.

© SAP AG <Course Number> Unit Title - 45
© SAP AG 2003, Title of Presentation, Speaker Name / 45
Web Dynpro Window Diagram: FlightComp
FlightSearchInterfaceView
FlightAvailabilityInterfaceView
CustomerDetailsInterfaceView
FlightOrderInterfaceView
FlightConfirmationInterfaceView
StatusView
handleEndOfFlightConfirmationEvent
onActionAvailabilityWanted
onActionCustomerDetailsWanted
onActionFlightOrderWanted
onActionFlightConfirmationWanted
onActionFlightSearchWanted
onActionCustomerDetailsWanted
Web Dynpro Window DiagramIn our demonstration, the sequence of the views for the Web Dynpro component FlightsComp is defined as follows:
The StatusView is always visible within the Web Dynpro component FlightsComp. After launching the application, in the bottom cell the ItemSearchInterfaceView is initially visible.
The event handler of action AvailabilityWantedAction deactivates the ItemSearchInterfaceViewand activates the ItemAvalabilityView, so that after searching for flights and selecting the desired flight, the user now sees which seats are available and can select a free seat.
The same applies for the other navigation links. The handler of event EndOfContractConfirmationEvent, which is executed when exiting the Web Dynpro component ContractConfirmationComp, reactivates the ItemSearchInterfaceView to allow the user to start a new flight search.
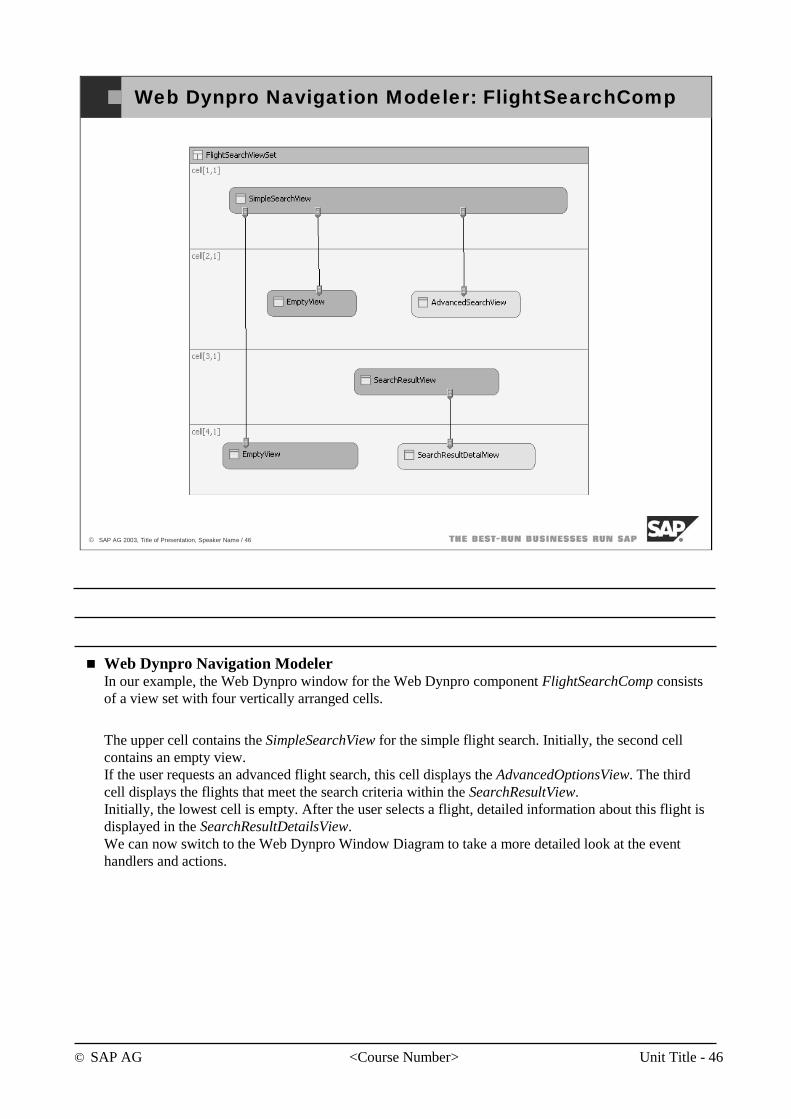
© SAP AG <Course Number> Unit Title - 46
© SAP AG 2003, Title of Presentation, Speaker Name / 46
Web Dynpro Navigation Modeler: FlightSearchComp
Web Dynpro Navigation ModelerIn our example, the Web Dynpro window for the Web Dynpro component FlightSearchComp consists of a view set with four vertically arranged cells.
The upper cell contains the SimpleSearchView for the simple flight search. Initially, the second cell contains an empty view. If the user requests an advanced flight search, this cell displays the AdvancedOptionsView. The third cell displays the flights that meet the search criteria within the SearchResultView.Initially, the lowest cell is empty. After the user selects a flight, detailed information about this flight is displayed in the SearchResultDetailsView.We can now switch to the Web Dynpro Window Diagram to take a more detailed look at the event handlers and actions.
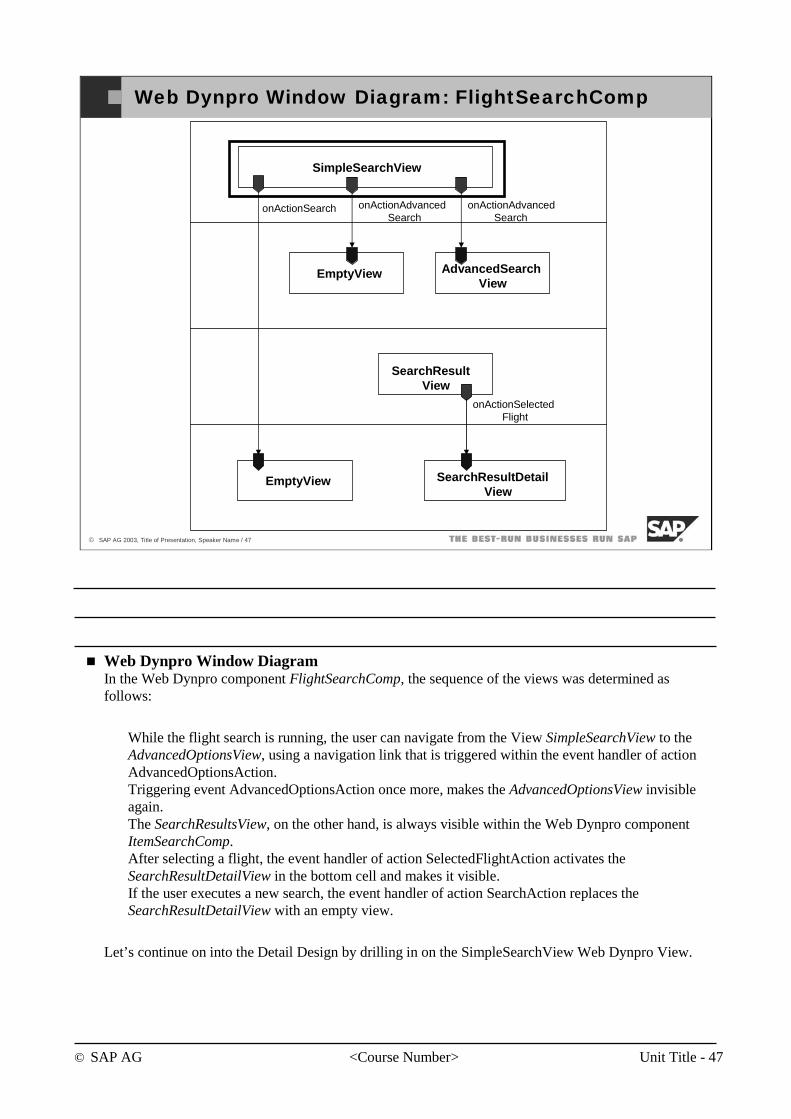
© SAP AG <Course Number> Unit Title - 47
© SAP AG 2003, Title of Presentation, Speaker Name / 47
Web Dynpro Window Diagram: FlightSearchComp
EmptyView AdvancedSearchView
SearchResultView
EmptyView SearchResultDetailView
SimpleSearchView
onActionAdvancedSearch
onActionAdvancedSearch
onActionSearch
onActionSelectedFlight
Web Dynpro Window DiagramIn the Web Dynpro component FlightSearchComp, the sequence of the views was determined as follows:
While the flight search is running, the user can navigate from the View SimpleSearchView to the AdvancedOptionsView, using a navigation link that is triggered within the event handler of action AdvancedOptionsAction.Triggering event AdvancedOptionsAction once more, makes the AdvancedOptionsView invisible again.The SearchResultsView, on the other hand, is always visible within the Web Dynpro component ItemSearchComp.After selecting a flight, the event handler of action SelectedFlightAction activates the SearchResultDetailView in the bottom cell and makes it visible.If the user executes a new search, the event handler of action SearchAction replaces the SearchResultDetailView with an empty view.
Let’s continue on into the Detail Design by drilling in on the SimpleSearchView Web Dynpro View.
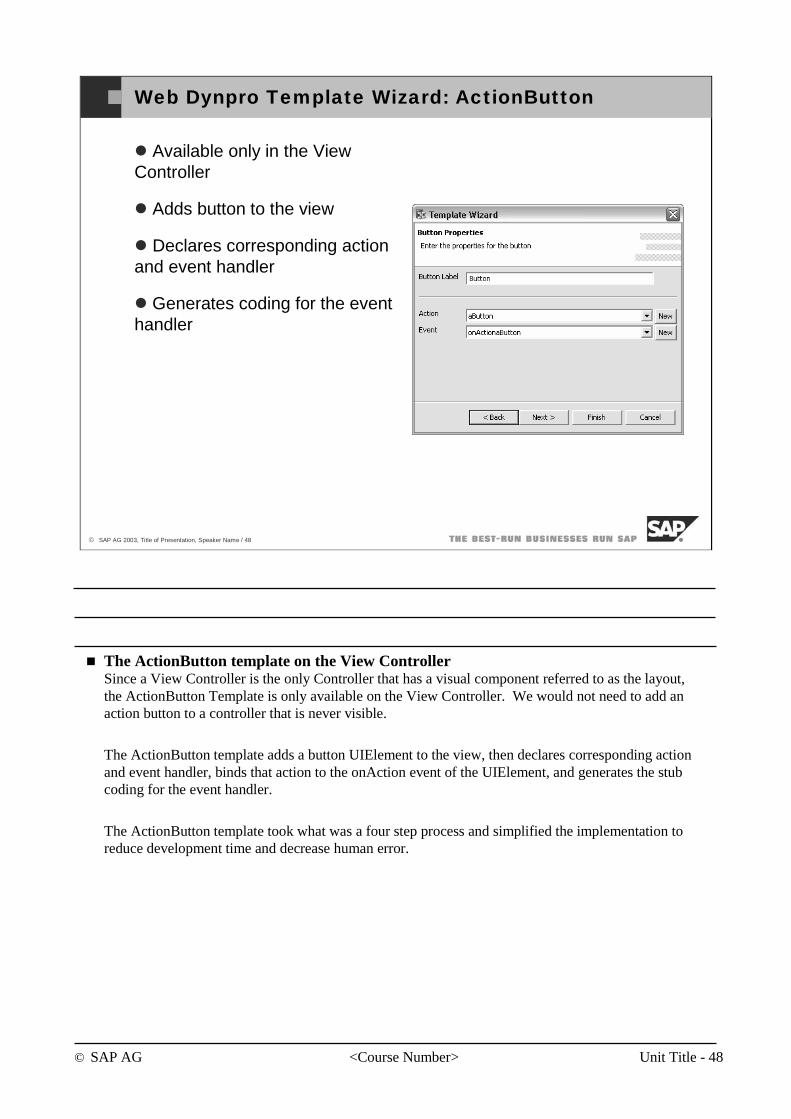
© SAP AG <Course Number> Unit Title - 48
© SAP AG 2003, Title of Presentation, Speaker Name / 48
Web Dynpro Template Wizard: ActionButton
Available only in the View Controller
Adds button to the view
Declares corresponding action and event handler
Generates coding for the event handler
The ActionButton template on the View Controller Since a View Controller is the only Controller that has a visual component referred to as the layout, the ActionButton Template is only available on the View Controller. We would not need to add an action button to a controller that is never visible.
The ActionButton template adds a button UIElement to the view, then declares corresponding action and event handler, binds that action to the onAction event of the UIElement, and generates the stub coding for the event handler.
The ActionButton template took what was a four step process and simplified the implementation to reduce development time and decrease human error.
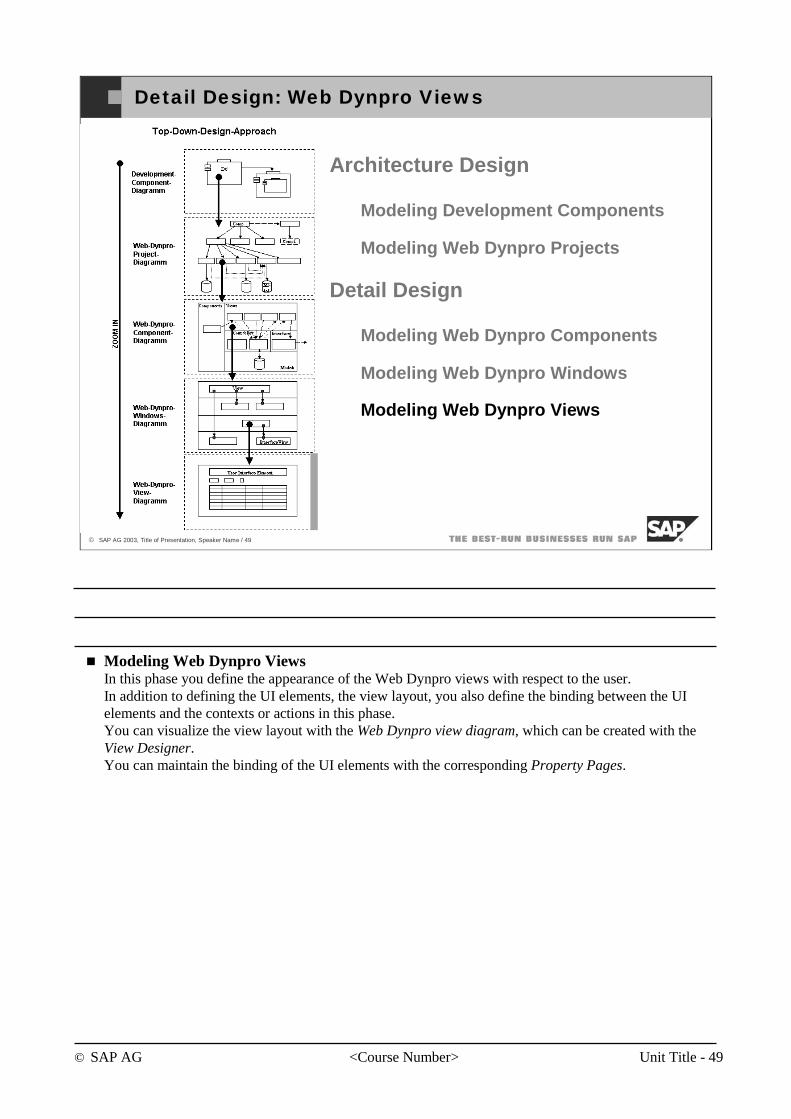
© SAP AG <Course Number> Unit Title - 49
© SAP AG 2003, Title of Presentation, Speaker Name / 49
Detail Design: Web Dynpro Views
Architecture Design
Modeling Development Components
Modeling Web Dynpro Projects
Detail Design
Modeling Web Dynpro Components
Modeling Web Dynpro Windows
Modeling Web Dynpro Views
Modeling Web Dynpro ViewsIn this phase you define the appearance of the Web Dynpro views with respect to the user. In addition to defining the UI elements, the view layout, you also define the binding between the UI elements and the contexts or actions in this phase. You can visualize the view layout with the Web Dynpro view diagram, which can be created with the View Designer.You can maintain the binding of the UI elements with the corresponding Property Pages.
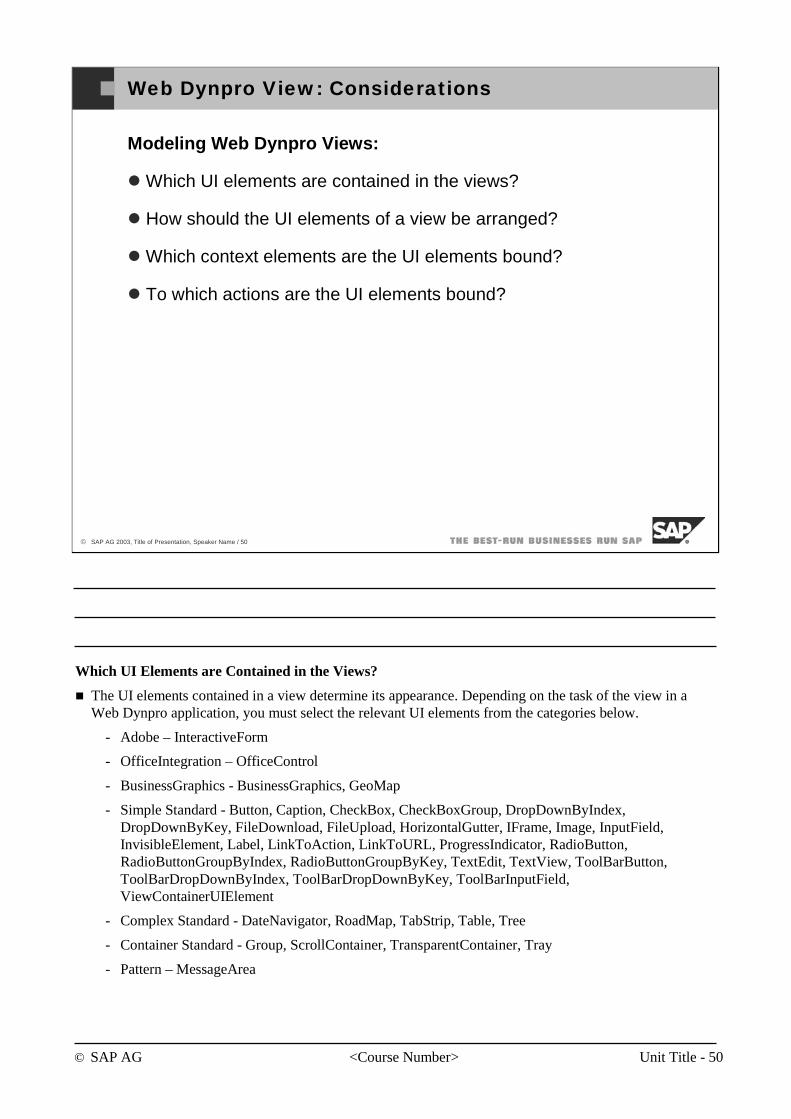
© SAP AG <Course Number> Unit Title - 50
© SAP AG 2003, Title of Presentation, Speaker Name / 50
Web Dynpro View: Considerations
Modeling Web Dynpro Views:
Which UI elements are contained in the views?
How should the UI elements of a view be arranged?
Which context elements are the UI elements bound?
To which actions are the UI elements bound?
Which UI Elements are Contained in the Views?
The UI elements contained in a view determine its appearance. Depending on the task of the view in a Web Dynpro application, you must select the relevant UI elements from the categories below.
- Adobe – InteractiveForm
- OfficeIntegration – OfficeControl
- BusinessGraphics - BusinessGraphics, GeoMap
- Simple Standard - Button, Caption, CheckBox, CheckBoxGroup, DropDownByIndex, DropDownByKey, FileDownload, FileUpload, HorizontalGutter, IFrame, Image, InputField, InvisibleElement, Label, LinkToAction, LinkToURL, ProgressIndicator, RadioButton, RadioButtonGroupByIndex, RadioButtonGroupByKey, TextEdit, TextView, ToolBarButton, ToolBarDropDownByIndex, ToolBarDropDownByKey, ToolBarInputField, ViewContainerUIElement
- Complex Standard - DateNavigator, RoadMap, TabStrip, Table, Tree
- Container Standard - Group, ScrollContainer, TransparentContainer, Tray
- Pattern – MessageArea

© SAP AG <Course Number> Unit Title - 51
© SAP AG 2003, Title of Presentation, Speaker Name / 51
Web Dynpro View: Considerations
Modeling Web Dynpro Views:
Which UI elements are contained in the views?
How should the UI elements of a view be arranged?
Which context elements are the UI elements bound?
To which actions are the UI elements bound?
How Should the UI Elements of a View be Arranged?
You use the View Designer to arrange the UI elements within a view. If you haven’t done so before, you should in this phase start to use the usability style guide. Therefore, at this point we only give an overview of a few important cirteria designed to help you with developing simple, supportive, and intuitive applications.
Simple applications:
Use the smallest possible number of UI elements that require input by the user
Only offer a small number of navigation options to avoid confusing the user
Have only a few or no dependencies between data and views
Supportive applications:
Support the user in executing his or her tasks without requiring much training
Allow the user to return to the previous page
Provide the user with input help
© SAP AG <Course Number> Unit Title - 52
© SAP AG 2003, Title of Presentation, Speaker Name / 52
Web Dynpro View: Considerations
Modeling Web Dynpro Views:
Which UI elements are contained in the views?
How should the UI elements of a view be arranged?
Which context elements are the UI elements bound?
To which actions are the UI elements bound?
Intuitive applications:
Are as self-explanatory and easy to handle as possible
Are easy to understand
Do not require extensive instructions or documentation
To Which Context Elements are the UI Elements Bound?
You can either set the bindable properties of the UI elements directly to a fixed value in the respective property window or you can bind them to a context element from the corresponding view context. If desired, you can use the Data Modeler to map the bound view context elements to other context elements or bind them to a model.
To Which Actions are the UI Elements Bound?
You must bind the actions of a view defined in the view controllers to the respective UI elements of this view. You can do this in the Properties window of the UI element.
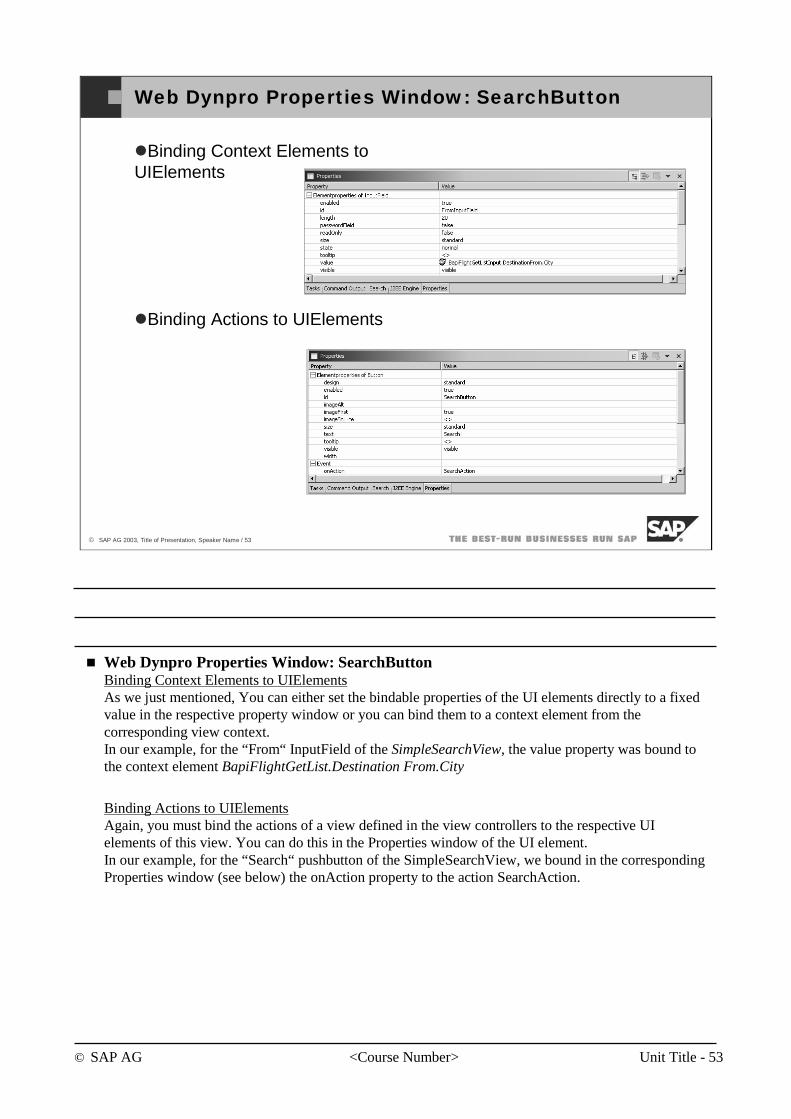
© SAP AG <Course Number> Unit Title - 53
© SAP AG 2003, Title of Presentation, Speaker Name / 53
Web Dynpro Properties Window: SearchButton
Binding Context Elements to UIElements
Binding Actions to UIElements
Web Dynpro Properties Window: SearchButtonBinding Context Elements to UIElementsAs we just mentioned, You can either set the bindable properties of the UI elements directly to a fixed value in the respective property window or you can bind them to a context element from the corresponding view context.In our example, for the “From“ InputField of the SimpleSearchView, the value property was bound to the context element BapiFlightGetList.Destination From.City
Binding Actions to UIElementsAgain, you must bind the actions of a view defined in the view controllers to the respective UI elements of this view. You can do this in the Properties window of the UI element.In our example, for the “Search“ pushbutton of the SimpleSearchView, we bound in the corresponding Properties window (see below) the onAction property to the action SearchAction.
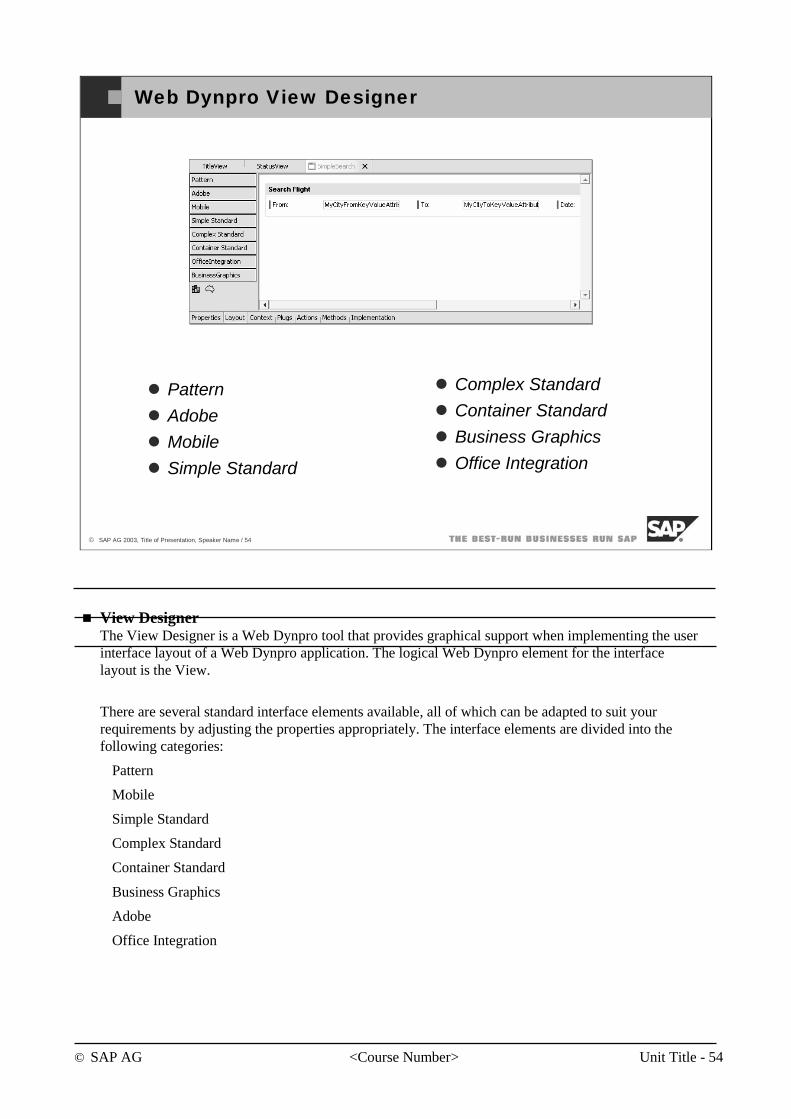
© SAP AG <Course Number> Unit Title - 54
© SAP AG 2003, Title of Presentation, Speaker Name / 54
Web Dynpro View Designer
Pattern
Adobe
Mobile
Simple Standard
Complex Standard
Container Standard
Business Graphics
Office Integration
View DesignerThe View Designer is a Web Dynpro tool that provides graphical support when implementing the user interface layout of a Web Dynpro application. The logical Web Dynpro element for the interface layout is the View.
There are several standard interface elements available, all of which can be adapted to suit your requirements by adjusting the properties appropriately. The interface elements are divided into the following categories:
Pattern
Mobile
Simple Standard
Complex Standard
Container Standard
Business Graphics
Adobe
Office Integration
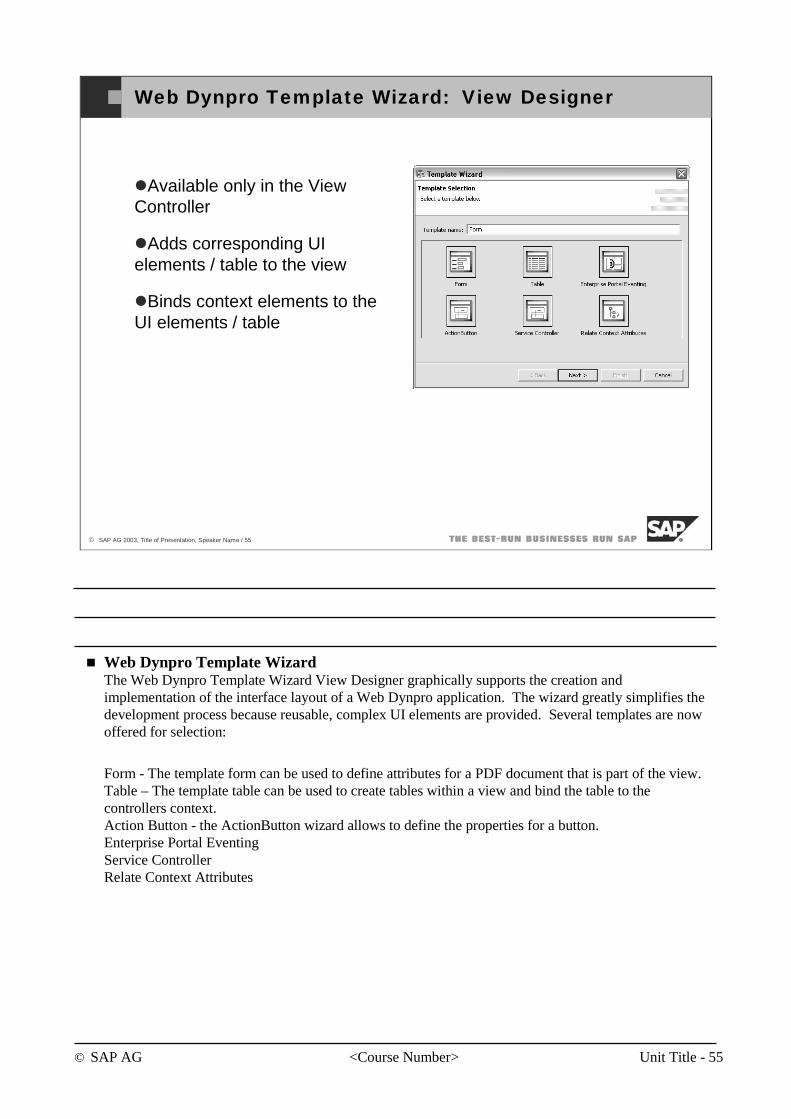
© SAP AG <Course Number> Unit Title - 55
© SAP AG 2003, Title of Presentation, Speaker Name / 55
Web Dynpro Template Wizard: View Designer
Available only in the View Controller
Adds corresponding UI elements / table to the view
Binds context elements to the UI elements / table
Web Dynpro Template WizardThe Web Dynpro Template Wizard View Designer graphically supports the creation and implementation of the interface layout of a Web Dynpro application. The wizard greatly simplifies the development process because reusable, complex UI elements are provided. Several templates are now offered for selection:
Form - The template form can be used to define attributes for a PDF document that is part of the view. Table – The template table can be used to create tables within a view and bind the table to the controllers context.Action Button - the ActionButton wizard allows to define the properties for a button.Enterprise Portal EventingService ControllerRelate Context Attributes

© SAP AG <Course Number> Unit Title - 56
© SAP AG 2003, Title of Presentation, Speaker Name / 56
Web Dynpro Design: Lesson Summary
You should now be able to:
Understand how to properly structure a Web Dynpro application
Describe the steps involved in the Architecture and Detail Design phases of designing a Web Dynpro Application
Understand the considerations that need to be addressed when designing a Web Dynpro Application
Describe the different tools that will assist you in the design phases

© SAP AG <Course Number> Unit Title - 57
© SAP AG 2003, Title of Presentation, Speaker Name / 57
Demonstration
Web Dynpro Design
Component Reuse
Component Reuse Exercise
Web Dynpro Implementation
Contents:
Structuring Web Dynpro Applications
© SAP AG <Course Number> Unit Title - 58
© SAP AG 2003, Title of Presentation, Speaker Name / 58
After completing this lesson, you will be able to:
Give an overview about the component concept
Understand how components can be reused
Be able to create a Web Dynpro application that reuses an existing development component
Component Reuse: Lesson Objectives
© SAP AG <Course Number> Unit Title - 59
© SAP AG 2003, Title of Presentation, Speaker Name / 59
The business case for reuse is typically overwhelming, with many benefits and few drawbacks. SAP NetWeaver achieves these benefits by standardizing on an architecture that incorporates a common set of components and services
Reduced development costs by eliminating duplications in effort
Reduced maintenance costs
Standard infrastructure to reduce the costs associated with developing reusable components
Component Reuse: Business Scenario
Component Reuse: Business ScenarioOften the reason reusable software components are not developed is the additional cost associated withdesigning „reusable“ components. SAP provides a standard infrasture reducing the costs associated withdeveloping reusable components. However; the reality is that just being mindful of component reuseablitycan add additional costs and increase development time, so one should outline component reuse during the high-level architectural design. For this reason, the Web Dynpro programming model does not attempt to make every coding entity globally reusable.
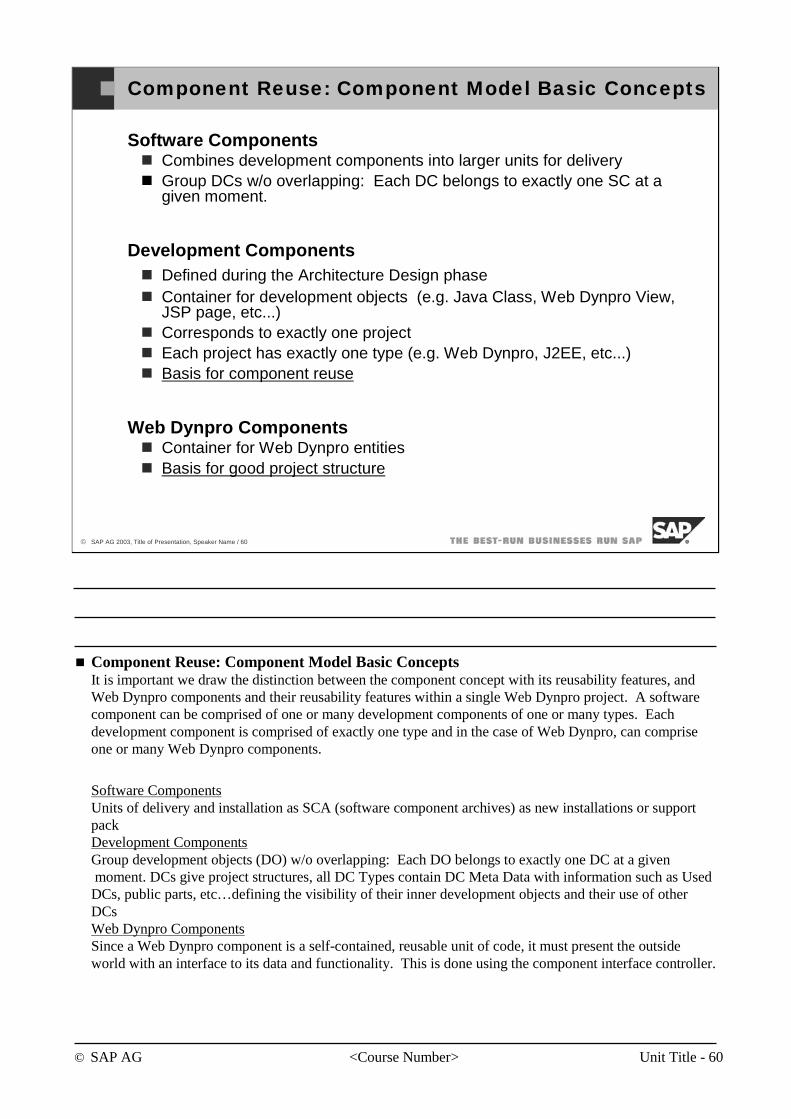
© SAP AG <Course Number> Unit Title - 60
© SAP AG 2003, Title of Presentation, Speaker Name / 60
Software ComponentsCombines development components into larger units for deliveryGroup DCs w/o overlapping: Each DC belongs to exactly one SC at a given moment.
Development ComponentsDefined during the Architecture Design phaseContainer for development objects (e.g. Java Class, Web Dynpro View, JSP page, etc...)Corresponds to exactly one projectEach project has exactly one type (e.g. Web Dynpro, J2EE, etc...)Basis for component reuse
Web Dynpro ComponentsContainer for Web Dynpro entitiesBasis for good project structure
Component Reuse: Component Model Basic Concepts
Component Reuse: Component Model Basic ConceptsIt is important we draw the distinction between the component concept with its reusability features, and Web Dynpro components and their reusability features within a single Web Dynpro project. A software component can be comprised of one or many development components of one or many types. Each development component is comprised of exactly one type and in the case of Web Dynpro, can comprise one or many Web Dynpro components.
Software Components Units of delivery and installation as SCA (software component archives) as new installations or support packDevelopment ComponentsGroup development objects (DO) w/o overlapping: Each DO belongs to exactly one DC at a givenmoment. DCs give project structures, all DC Types contain DC Meta Data with information such as Used
DCs, public parts, etc…defining the visibility of their inner development objects and their use of other DCsWeb Dynpro Components Since a Web Dynpro component is a self-contained, reusable unit of code, it must present the outsideworld with an interface to its data and functionality. This is done using the component interface controller.
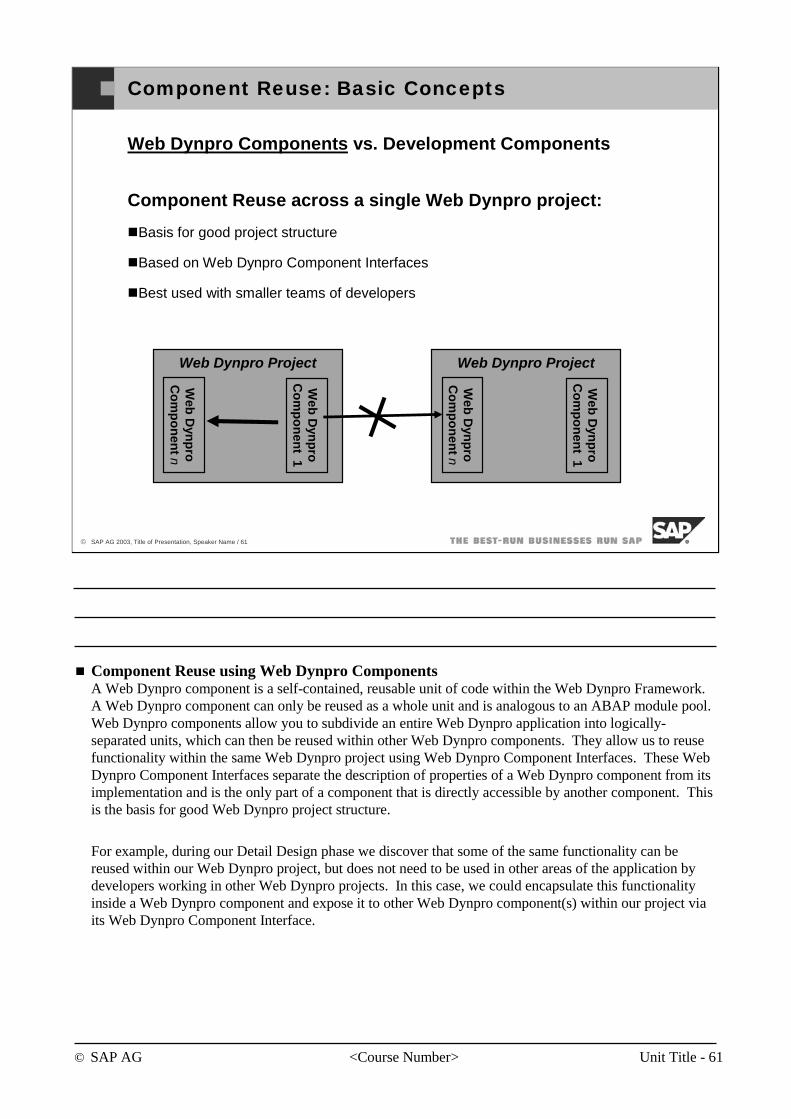
© SAP AG <Course Number> Unit Title - 61
© SAP AG 2003, Title of Presentation, Speaker Name / 61
Component Reuse: Basic Concepts
Web Dynpro Components vs. Development Components
Component Reuse across a single Web Dynpro project:
Basis for good project structure
Based on Web Dynpro Component Interfaces
Best used with smaller teams of developers
Web Dynpro Project
Web
Dyn
pro
C
om
po
nen
t n
Web
Dyn
pro
C
om
po
nen
t 1
Web Dynpro Project
Web
Dyn
pro
C
om
po
nen
t n
Web
Dyn
pro
C
om
po
nen
t 1
Component Reuse using Web Dynpro ComponentsA Web Dynpro component is a self-contained, reusable unit of code within the Web Dynpro Framework. A Web Dynpro component can only be reused as a whole unit and is analogous to an ABAP module pool. Web Dynpro components allow you to subdivide an entire Web Dynpro application into logically-separated units, which can then be reused within other Web Dynpro components. They allow us to reuse functionality within the same Web Dynpro project using Web Dynpro Component Interfaces. These Web Dynpro Component Interfaces separate the description of properties of a Web Dynpro component from its implementation and is the only part of a component that is directly accessible by another component. This is the basis for good Web Dynpro project structure.
For example, during our Detail Design phase we discover that some of the same functionality can be reused within our Web Dynpro project, but does not need to be used in other areas of the application by developers working in other Web Dynpro projects. In this case, we could encapsulate this functionality inside a Web Dynpro component and expose it to other Web Dynpro component(s) within our project via its Web Dynpro Component Interface.
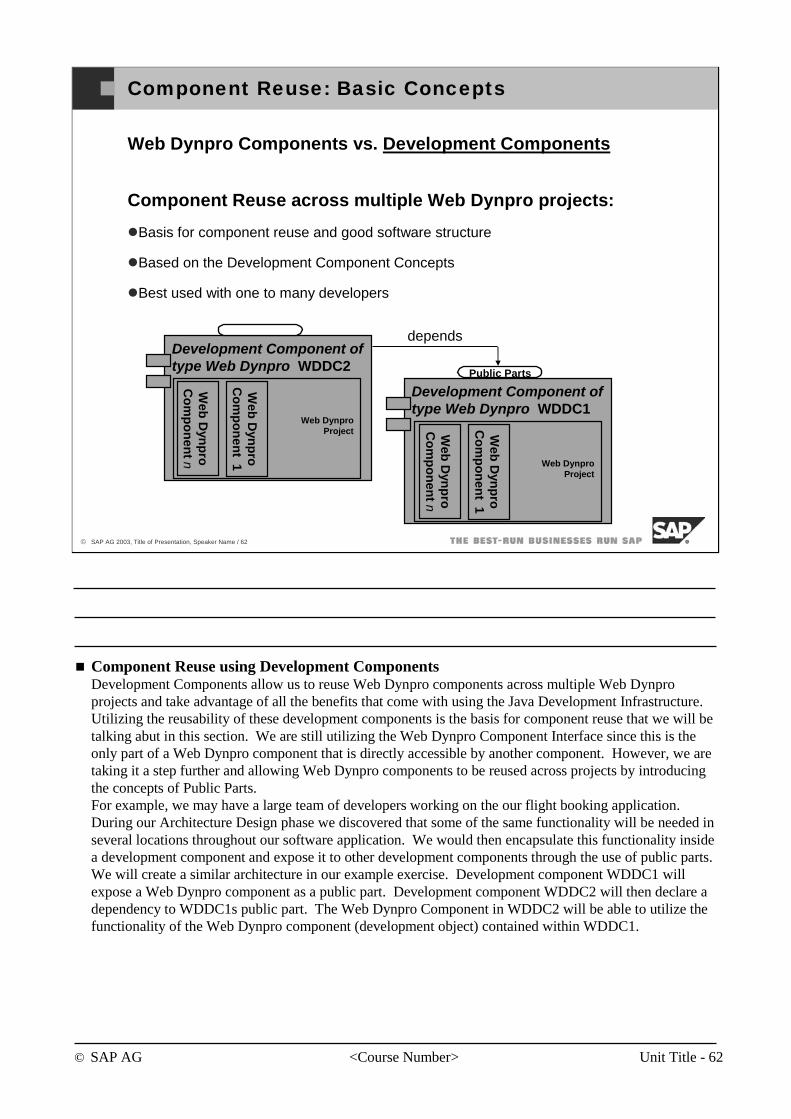
© SAP AG <Course Number> Unit Title - 62
© SAP AG 2003, Title of Presentation, Speaker Name / 62
Component Reuse: Basic Concepts
Web Dynpro Components vs. Development Components
Component Reuse across multiple Web Dynpro projects:
Basis for component reuse and good software structure
Based on the Development Component Concepts
Best used with one to many developers
depends
Public Parts
Development Component of type Web Dynpro WDDC2
Web
Dyn
pro
C
om
po
nen
t n
Web
Dyn
pro
C
om
po
nen
t 1
Development Component of type Web Dynpro WDDC1
Web
Dyn
pro
C
om
po
nen
t n
Web
Dyn
pro
C
om
po
nen
t 1
Web DynproProject
Web DynproProject
Component Reuse using Development ComponentsDevelopment Components allow us to reuse Web Dynpro components across multiple Web Dynpro projects and take advantage of all the benefits that come with using the Java Development Infrastructure. Utilizing the reusability of these development components is the basis for component reuse that we will be talking abut in this section. We are still utilizing the Web Dynpro Component Interface since this is the only part of a Web Dynpro component that is directly accessible by another component. However, we are taking it a step further and allowing Web Dynpro components to be reused across projects by introducing the concepts of Public Parts.For example, we may have a large team of developers working on the our flight booking application. During our Architecture Design phase we discovered that some of the same functionality will be needed in several locations throughout our software application. We would then encapsulate this functionality inside a development component and expose it to other development components through the use of public parts.We will create a similar architecture in our example exercise. Development component WDDC1 will expose a Web Dynpro component as a public part. Development component WDDC2 will then declare a dependency to WDDC1s public part. The Web Dynpro Component in WDDC2 will be able to utilize the functionality of the Web Dynpro component (development object) contained within WDDC1.

© SAP AG <Course Number> Unit Title - 63
© SAP AG 2003, Title of Presentation, Speaker Name / 63
Component Reuse: Component Model Basic Concepts
Classes, interfaces, objects (text files, icons)
Only ordered by packages for developers‘ editing access
Unidirectional relationships
Public Parts
Supports automated build
Pure Language Visibility Development Components
Comp 2Comp 3
PP2
PP3
Comp 4PP4_2
PP4_1
Comp 1
PP1
Java based visibility conceptCreation of classes, interfaces and objects ordered by package folders.Usage by other objects is defined only by public/private property of each object: If an object is public, everybody may use it.
SAP’s component model - visibility conceptCreation of all objects in “containers” (development components (DCs) and software components (SCs)).Each container defines the visibility of the contained objects by unidirectional relationships: definition of DC-Interfaces, definition of dependencies between components. Both concepts together give full control about relations between components for maintainable, well structured applications.Automated build: DCs are of a specific type so that, Automated Build Scripts and Wizards for the creation can be provided. Because of known dependencies a DC-build on the developer’s request instead of a nightly builds.
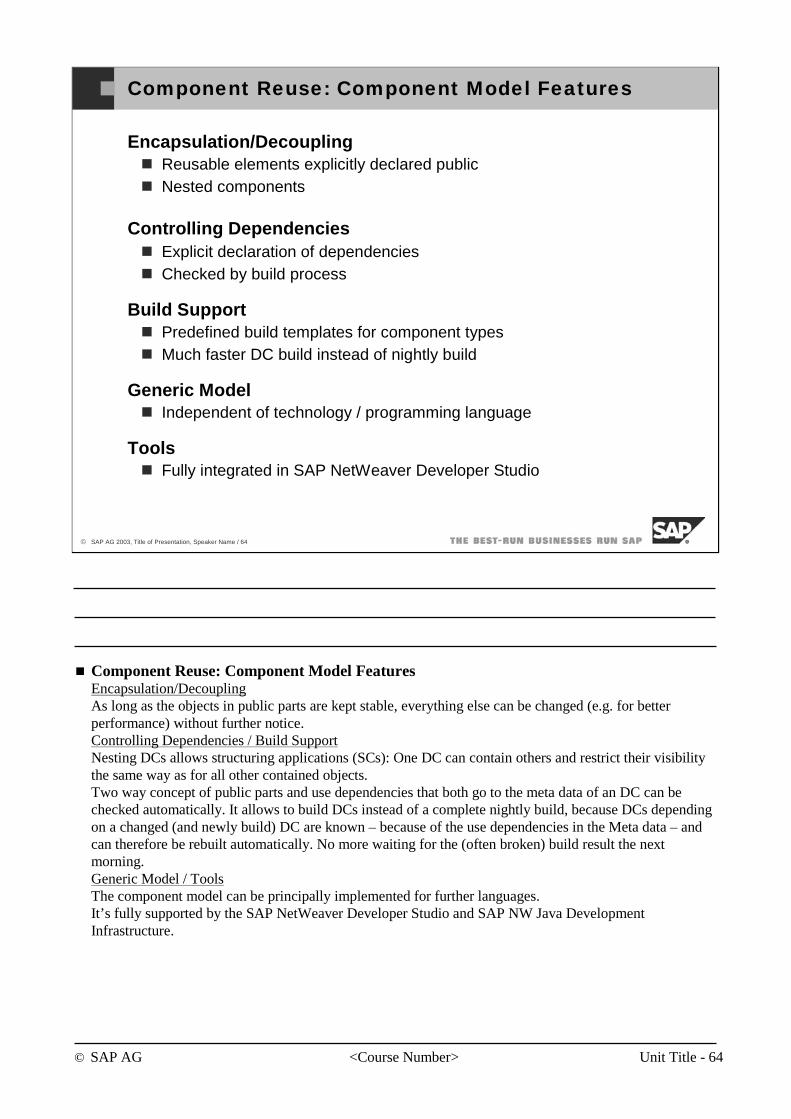
© SAP AG <Course Number> Unit Title - 64
© SAP AG 2003, Title of Presentation, Speaker Name / 64
Component Reuse: Component Model Features
Encapsulation/DecouplingReusable elements explicitly declared publicNested components
Controlling DependenciesExplicit declaration of dependenciesChecked by build process
Build SupportPredefined build templates for component typesMuch faster DC build instead of nightly build
Generic ModelIndependent of technology / programming language
ToolsFully integrated in SAP NetWeaver Developer Studio
Component Reuse: Component Model FeaturesEncapsulation/DecouplingAs long as the objects in public parts are kept stable, everything else can be changed (e.g. for better performance) without further notice.Controlling Dependencies / Build SupportNesting DCs allows structuring applications (SCs): One DC can contain others and restrict their visibility the same way as for all other contained objects.Two way concept of public parts and use dependencies that both go to the meta data of an DC can be checked automatically. It allows to build DCs instead of a complete nightly build, because DCs depending on a changed (and newly build) DC are known – because of the use dependencies in the Meta data – and can therefore be rebuilt automatically. No more waiting for the (often broken) build result the next morning.Generic Model / ToolsThe component model can be principally implemented for further languages.It’s fully supported by the SAP NetWeaver Developer Studio and SAP NW Java Development Infrastructure.
© SAP AG <Course Number> Unit Title - 65
© SAP AG 2003, Title of Presentation, Speaker Name / 65
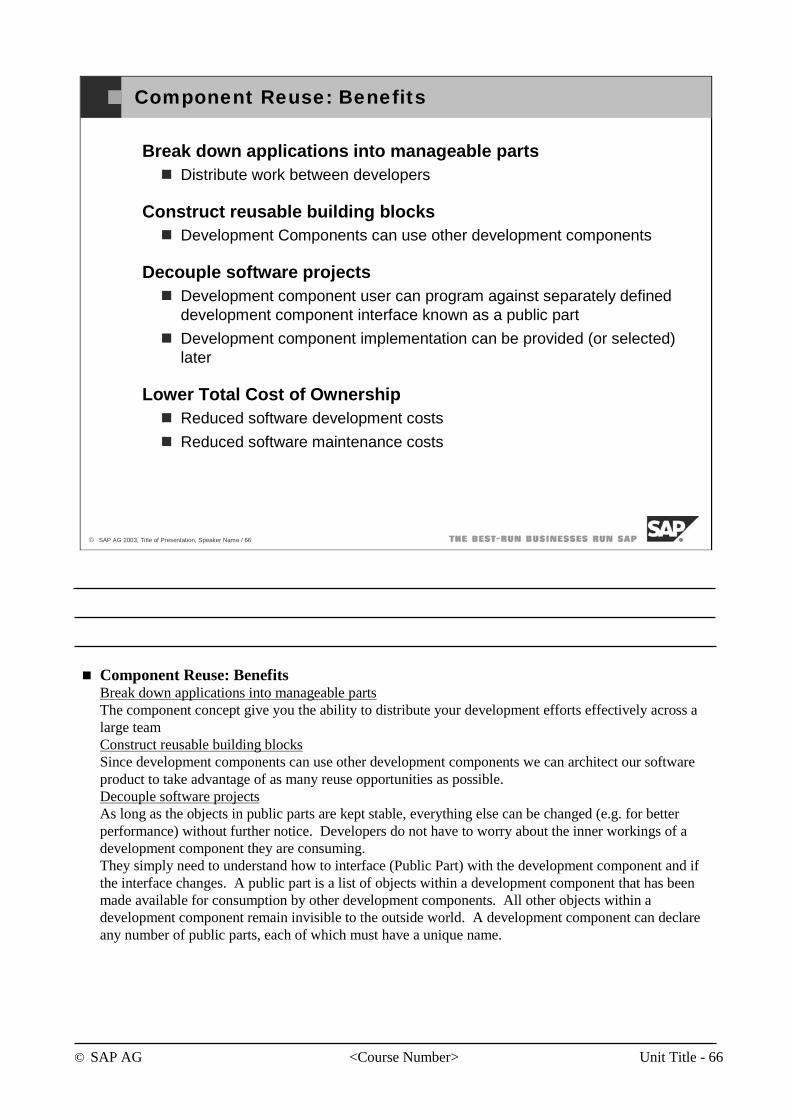
© SAP AG <Course Number> Unit Title - 66
© SAP AG 2003, Title of Presentation, Speaker Name / 66
Component Reuse: Benefits
Break down applications into manageable partsDistribute work between developers
Construct reusable building blocksDevelopment Components can use other development components
Decouple software projectsDevelopment component user can program against separately defined development component interface known as a public part
Development component implementation can be provided (or selected) later
Lower Total Cost of OwnershipReduced software development costs
Reduced software maintenance costs
Component Reuse: BenefitsBreak down applications into manageable partsThe component concept give you the ability to distribute your development efforts effectively across a large teamConstruct reusable building blocksSince development components can use other development components we can architect our software product to take advantage of as many reuse opportunities as possible.Decouple software projectsAs long as the objects in public parts are kept stable, everything else can be changed (e.g. for better performance) without further notice. Developers do not have to worry about the inner workings of a development component they are consuming.They simply need to understand how to interface (Public Part) with the development component and if the interface changes. A public part is a list of objects within a development component that has been made available for consumption by other development components. All other objects within a development component remain invisible to the outside world. A development component can declare any number of public parts, each of which must have a unique name.
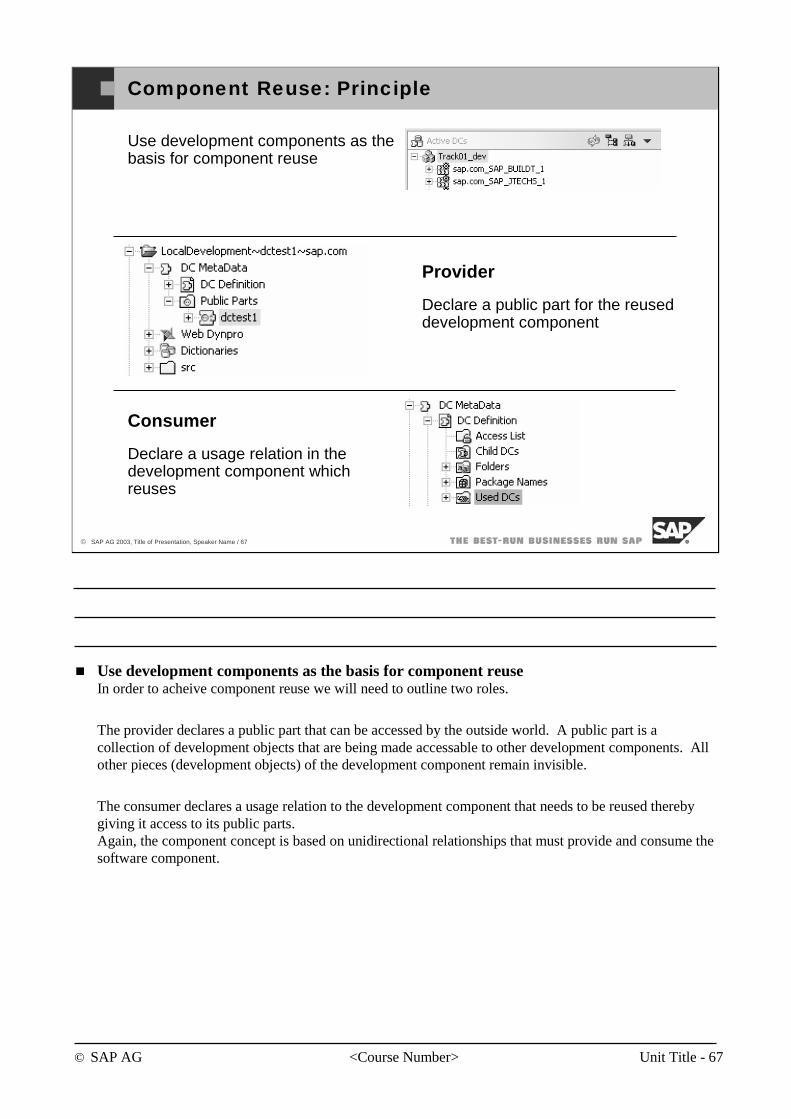
© SAP AG <Course Number> Unit Title - 67
© SAP AG 2003, Title of Presentation, Speaker Name / 67
Component Reuse: Principle
Use development components as the basis for component reuse
Consumer
Declare a usage relation in the development component whichreuses
Provider
Declare a public part for the reuseddevelopment component
Use development components as the basis for component reuseIn order to acheive component reuse we will need to outline two roles.
The provider declares a public part that can be accessed by the outside world. A public part is a collection of development objects that are being made accessable to other development components. All other pieces (development objects) of the development component remain invisible.
The consumer declares a usage relation to the development component that needs to be reused therebygiving it access to its public parts.Again, the component concept is based on unidirectional relationships that must provide and consume the software component.
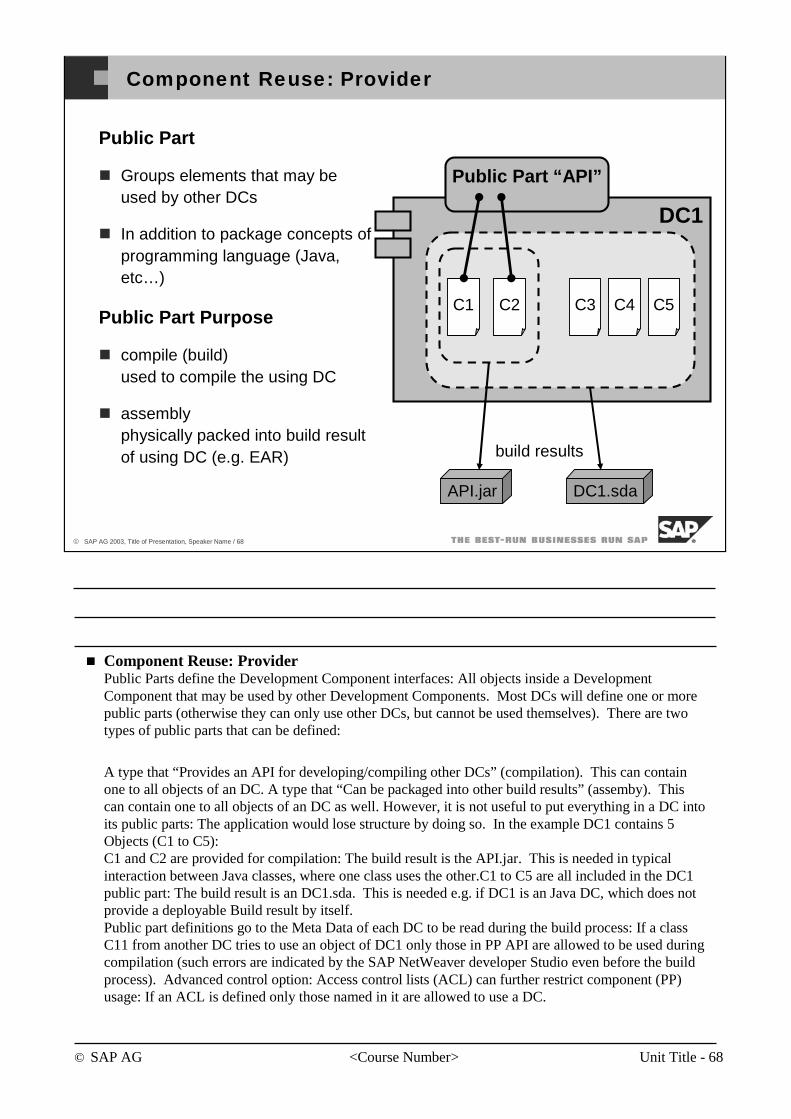
© SAP AG <Course Number> Unit Title - 68
© SAP AG 2003, Title of Presentation, Speaker Name / 68
DC1
Component Reuse: Provider
Public Part
Groups elements that may be used by other DCs
In addition to package concepts of programming language (Java, etc…)
Public Part Purpose
compile (build)used to compile the using DC
assemblyphysically packed into build result of using DC (e.g. EAR)
C1 C2 C3 C4 C5
API.jar DC1.sda
build results
Public Part “API”
Component Reuse: ProviderPublic Parts define the Development Component interfaces: All objects inside a Development Component that may be used by other Development Components. Most DCs will define one or more public parts (otherwise they can only use other DCs, but cannot be used themselves). There are two types of public parts that can be defined:
A type that “Provides an API for developing/compiling other DCs” (compilation). This can contain one to all objects of an DC. A type that “Can be packaged into other build results” (assemby). This can contain one to all objects of an DC as well. However, it is not useful to put everything in a DC into its public parts: The application would lose structure by doing so. In the example DC1 contains 5 Objects (C1 to C5):C1 and C2 are provided for compilation: The build result is the API.jar. This is needed in typical interaction between Java classes, where one class uses the other.C1 to C5 are all included in the DC1 public part: The build result is an DC1.sda. This is needed e.g. if DC1 is an Java DC, which does not provide a deployable Build result by itself.Public part definitions go to the Meta Data of each DC to be read during the build process: If a class C11 from another DC tries to use an object of DC1 only those in PP API are allowed to be used during compilation (such errors are indicated by the SAP NetWeaver developer Studio even before the build process). Advanced control option: Access control lists (ACL) can further restrict component (PP) usage: If an ACL is defined only those named in it are allowed to use a DC.
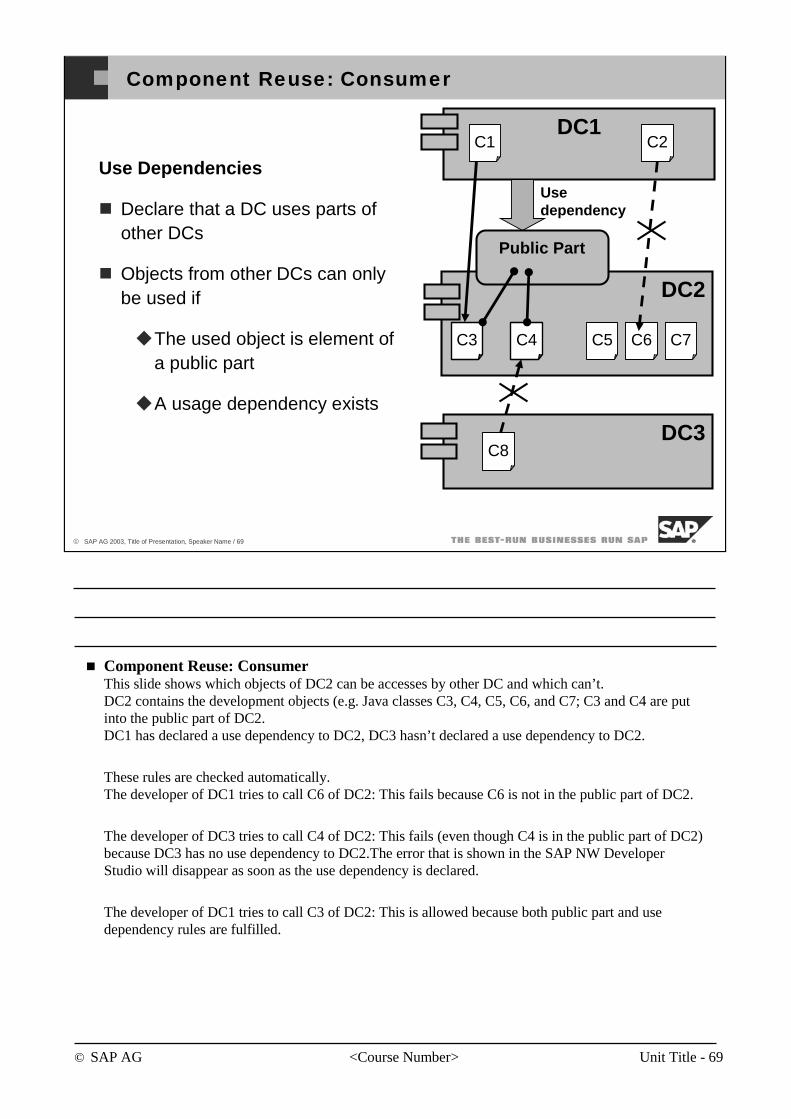
© SAP AG <Course Number> Unit Title - 69
© SAP AG 2003, Title of Presentation, Speaker Name / 69
Component Reuse: Consumer
Use Dependencies
Declare that a DC uses parts of other DCs
Objects from other DCs can only be used if
The used object is element of a public part
A usage dependency exists
DC2
C3 C4 C5 C6 C7
DC3C8
DC1C1 C2
Use dependency
Public Part
Component Reuse: ConsumerThis slide shows which objects of DC2 can be accesses by other DC and which can’t.DC2 contains the development objects (e.g. Java classes C3, C4, C5, C6, and C7; C3 and C4 are put into the public part of DC2.DC1 has declared a use dependency to DC2, DC3 hasn’t declared a use dependency to DC2.
These rules are checked automatically.The developer of DC1 tries to call C6 of DC2: This fails because C6 is not in the public part of DC2.
The developer of DC3 tries to call C4 of DC2: This fails (even though C4 is in the public part of DC2) because DC3 has no use dependency to DC2.The error that is shown in the SAP NW Developer Studio will disappear as soon as the use dependency is declared.
The developer of DC1 tries to call C3 of DC2: This is allowed because both public part and use dependency rules are fulfilled.
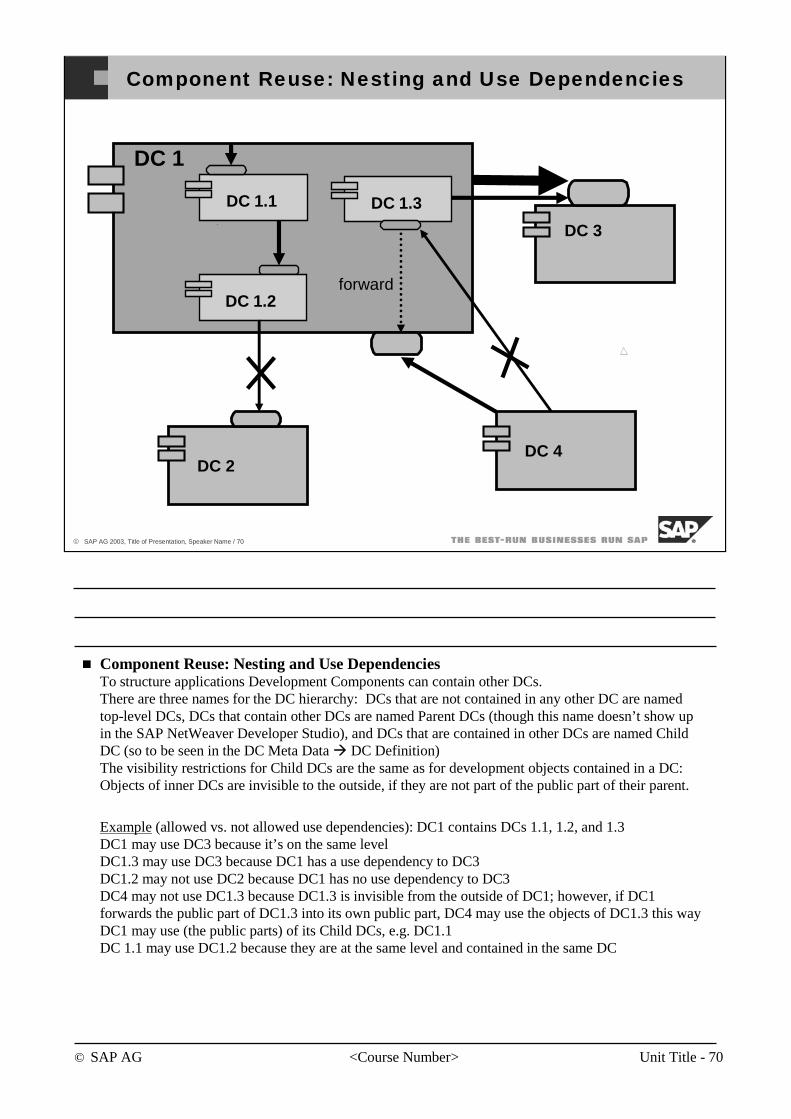
© SAP AG <Course Number> Unit Title - 70
© SAP AG 2003, Title of Presentation, Speaker Name / 70
Component Reuse: Nesting and Use Dependencies
DC 1
DC 2
DC 3
DC 4
forward
DC 1.1 DC 1.3
DC 1.2
Component Reuse: Nesting and Use DependenciesTo structure applications Development Components can contain other DCs.There are three names for the DC hierarchy: DCs that are not contained in any other DC are named top-level DCs, DCs that contain other DCs are named Parent DCs (though this name doesn’t show up in the SAP NetWeaver Developer Studio), and DCs that are contained in other DCs are named Child DC (so to be seen in the DC Meta Data DC Definition)The visibility restrictions for Child DCs are the same as for development objects contained in a DC: Objects of inner DCs are invisible to the outside, if they are not part of the public part of their parent.
Example (allowed vs. not allowed use dependencies): DC1 contains DCs 1.1, 1.2, and 1.3DC1 may use DC3 because it’s on the same levelDC1.3 may use DC3 because DC1 has a use dependency to DC3DC1.2 may not use DC2 because DC1 has no use dependency to DC3DC4 may not use DC1.3 because DC1.3 is invisible from the outside of DC1; however, if DC1 forwards the public part of DC1.3 into its own public part, DC4 may use the objects of DC1.3 this wayDC1 may use (the public parts) of its Child DCs, e.g. DC1.1DC 1.1 may use DC1.2 because they are at the same level and contained in the same DC
© SAP AG <Course Number> Unit Title - 71
© SAP AG 2003, Title of Presentation, Speaker Name / 71
Component Reuse: Exercise
You now have some time to complete the exercise that accompanies this unit:
JA311-ATP-ComponentReuse-EXERCISE.doc
A detailed solution to the exercise can be found in:
JA311-ATP-ComponentReuse-SOLUTION.doc
Component Reuse: Exercise Complete the exercise that accompanies this lesson.
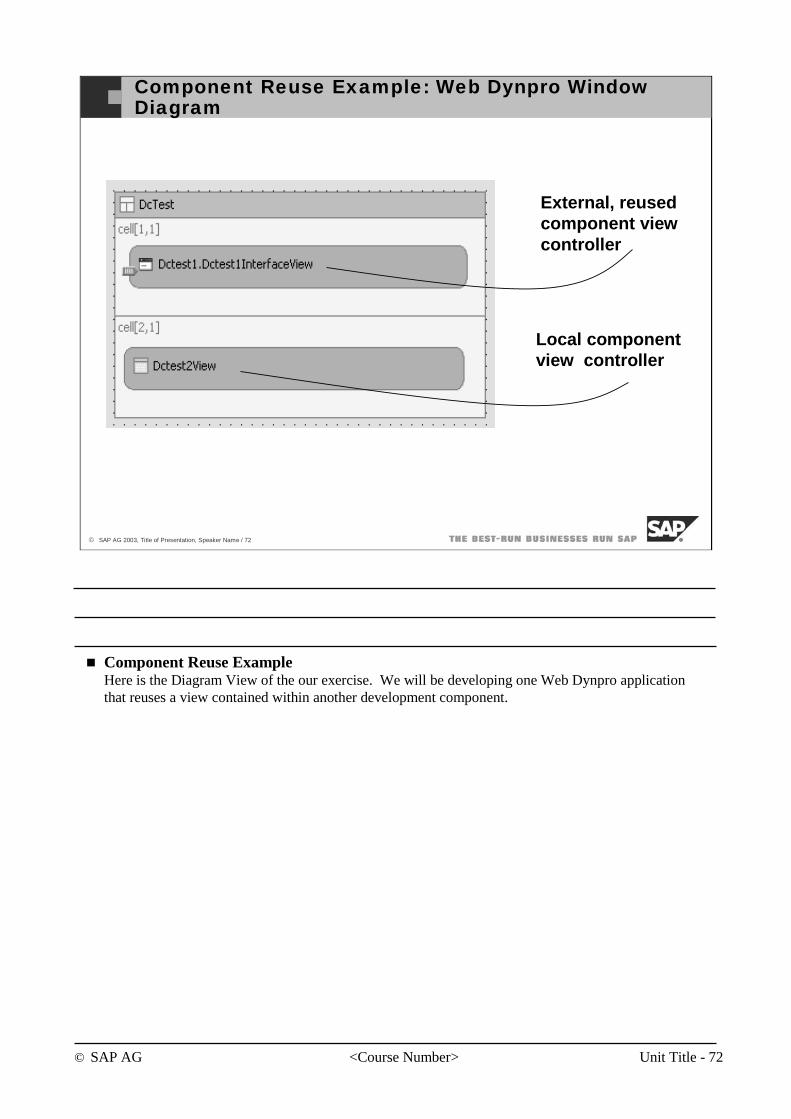
© SAP AG <Course Number> Unit Title - 72
© SAP AG 2003, Title of Presentation, Speaker Name / 72
Component Reuse Example: Web Dynpro Window Diagram
Local component view controller
External, reusedcomponent view controller
Component Reuse ExampleHere is the Diagram View of the our exercise. We will be developing one Web Dynpro application that reuses a view contained within another development component.
© SAP AG <Course Number> Unit Title - 73
© SAP AG 2003, Title of Presentation, Speaker Name / 73
You should now be able to:
Provide an overview about the component concepts
Understand how components can be reused
Create a Web Dynpro Application that reuses an existing development component
Component Reuse: Lesson Summary

© SAP AG <Course Number> Unit Title - 74
© SAP AG 2003, Title of Presentation, Speaker Name / 74
Demonstration
Web Dynpro Design
Component Reuse
Component Reuse Exercise
Web Dynpro Implementation
Contents:
Structuring Web Dynpro Applications
© SAP AG <Course Number> Unit Title - 75
© SAP AG 2003, Title of Presentation, Speaker Name / 75
After completing this lesson, you will be able to:
Give an overview of some of the Web Dynpro Implementation Tips
Use the basis Web Dynpro Naming Conventions
Web Dynpro Implementation: Lesson Objectives

© SAP AG <Course Number> Unit Title - 76
© SAP AG 2003, Title of Presentation, Speaker Name / 76
Understand how to properly design a Web Dynpro application and design it in such as way so we can:
Reduce ongoing maintenance costs
Reduce development costs
Design Web Dynpro applications to last as long as possible without a total rebuild.
Web Dynpro Implementation: Business Scenario
© SAP AG <Course Number> Unit Title - 77
© SAP AG 2003, Title of Presentation, Speaker Name / 77
Overview
Naming Conventions
Recommendations
Lesson Contents:
Web Dynpro Implementation
© SAP AG <Course Number> Unit Title - 78
© SAP AG 2003, Title of Presentation, Speaker Name / 78
Overview
Naming Conventions
Recommendations
Lesson Contents:
Web Dynpro Implementation: Overview
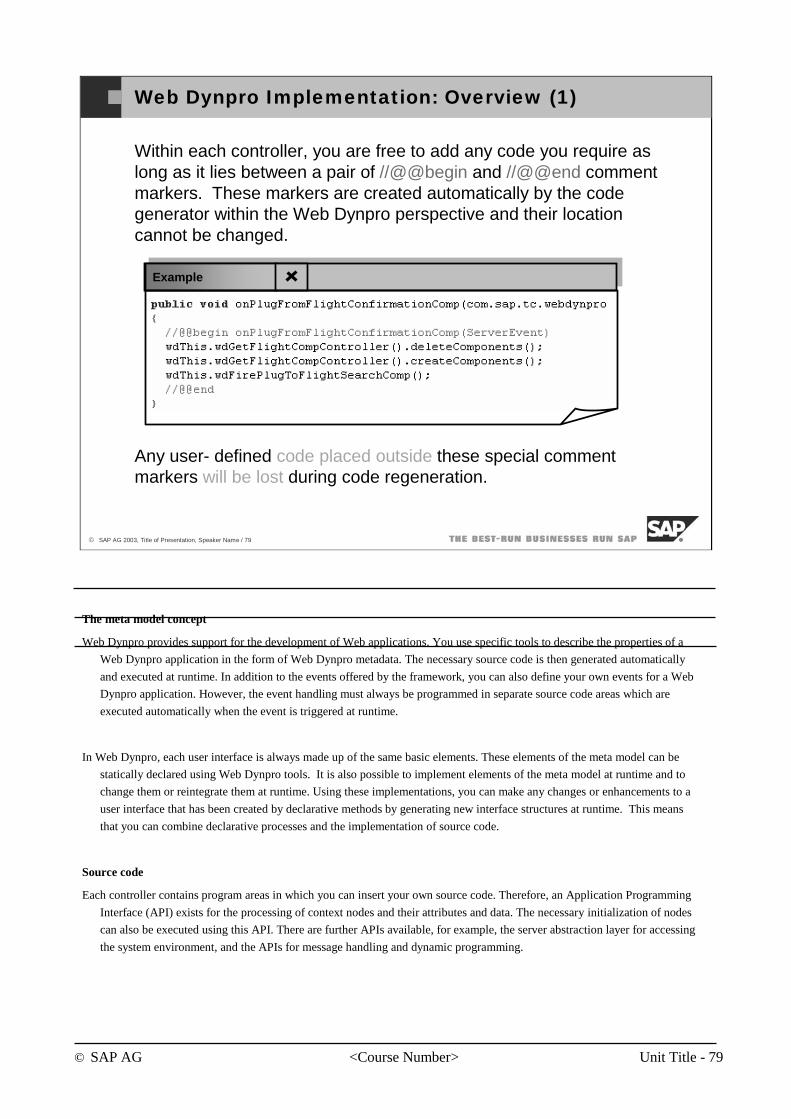
© SAP AG <Course Number> Unit Title - 79
© SAP AG 2003, Title of Presentation, Speaker Name / 79
Web Dynpro Implementation: Overview (1)
Within each controller, you are free to add any code you require as long as it lies between a pair of //@@begin and //@@end comment markers. These markers are created automatically by the code generator within the Web Dynpro perspective and their location cannot be changed.
Any user- defined code placed outside these special comment markers will be lost during code regeneration.
Example
The meta model concept
Web Dynpro provides support for the development of Web applications. You use specific tools to describe the properties of a
Web Dynpro application in the form of Web Dynpro metadata. The necessary source code is then generated automatically
and executed at runtime. In addition to the events offered by the framework, you can also define your own events for a Web
Dynpro application. However, the event handling must always be programmed in separate source code areas which are
executed automatically when the event is triggered at runtime.
In Web Dynpro, each user interface is always made up of the same basic elements. These elements of the meta model can be
statically declared using Web Dynpro tools. It is also possible to implement elements of the meta model at runtime and to
change them or reintegrate them at runtime. Using these implementations, you can make any changes or enhancements to a
user interface that has been created by declarative methods by generating new interface structures at runtime. This means
that you can combine declarative processes and the implementation of source code.
Source code
Each controller contains program areas in which you can insert your own source code. Therefore, an Application Programming
Interface (API) exists for the processing of context nodes and their attributes and data. The necessary initialization of nodes
can also be executed using this API. There are further APIs available, for example, the server abstraction layer for accessing
the system environment, and the APIs for message handling and dynamic programming.

© SAP AG <Course Number> Unit Title - 80
© SAP AG 2003, Title of Presentation, Speaker Name / 80
Web Dynpro Implementation: Overview (1)
Within each controller, you are free to add any code you require as long as it lies between a pair of //@@begin and //@@end comment markers. These markers are created automatically by the code generator within the Web Dynpro perspective and their location cannot be changed.
Any user- defined code placed outside these special comment markers will be lost during code regeneration.
Example
Controllers can contain their own source code in the following areas:
Event handlers - these are executed when a view is initialized, ended, or entered, when a user interface element of a view triggers an action, or when other controllers trigger a registered event
Methods – these can be called by other controllers
Supply functions – these are executed when necessary to initialize elements in the context
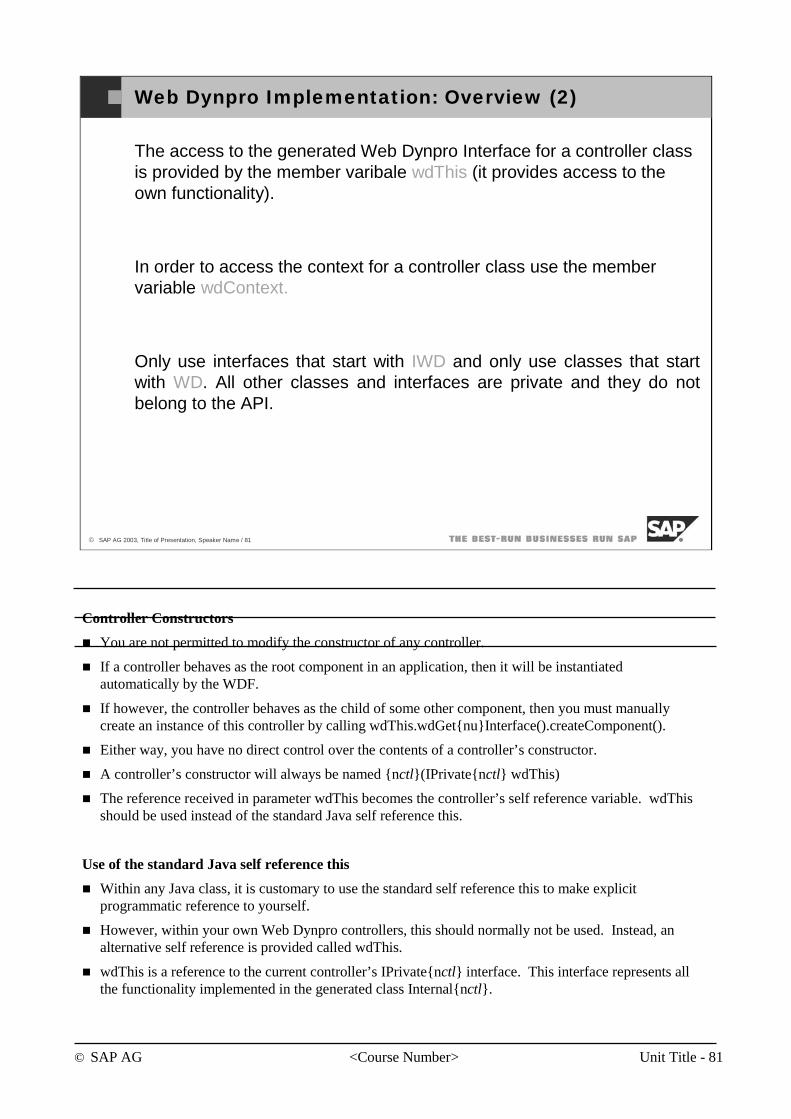
© SAP AG <Course Number> Unit Title - 81
© SAP AG 2003, Title of Presentation, Speaker Name / 81
Web Dynpro Implementation: Overview (2)
The access to the generated Web Dynpro Interface for a controller classis provided by the member varibale wdThis (it provides access to the own functionality).
In order to access the context for a controller class use the membervariable wdContext.
Only use interfaces that start with IWD and only use classes that start with WD. All other classes and interfaces are private and they do not belong to the API.
Controller Constructors
You are not permitted to modify the constructor of any controller.
If a controller behaves as the root component in an application, then it will be instantiated automatically by the WDF.
If however, the controller behaves as the child of some other component, then you must manually create an instance of this controller by calling wdThis.wdGet{nu}Interface().createComponent().
Either way, you have no direct control over the contents of a controller’s constructor.
A controller’s constructor will always be named {nctl}(IPrivate{nctl} wdThis)
The reference received in parameter wdThis becomes the controller’s self reference variable. wdThisshould be used instead of the standard Java self reference this.
Use of the standard Java self reference this
Within any Java class, it is customary to use the standard self reference this to make explicit programmatic reference to yourself.
However, within your own Web Dynpro controllers, this should normally not be used. Instead, an alternative self reference is provided called wdThis.
wdThis is a reference to the current controller’s IPrivate{nctl} interface. This interface represents all the functionality implemented in the generated class Internal{nctl}.
© SAP AG <Course Number> Unit Title - 82
© SAP AG 2003, Title of Presentation, Speaker Name / 82
Web Dynpro Implementation: Overview (2)
The access to the generated Web Dynpro Interface for a controller classis provided by the member varibale wdThis (it provides access to the own functionality).
In order to access the context for a controller class use the membervariable wdContext.
Only use interfaces that start with IWD and only use classes that start with WD. All other classes and interfaces are private and they do not belong to the API.
If you use the standard Java self reference this, you will bypass all the generated functionality found in the class Internal{nctl} because you are pointing only to the class {nctl}. Therefore, none of the logging, validation or parameter mapping that Web Dynpro does on your behalf will be executed.
SAP reserves the right to change the behaviour of the generated controller Internal{nctl} without warning. Therefore, for compatibility with future versions of Web Dynpro, you should always use wdThis in order to ensure that your controller has access to any new functionality SAP may add.
The only situation in which the use of the standard Java self reference this is appropriate, is when you wish to make explicit reference to declarations made between the comment markers //@@begin others and //@@end. Any variables or methods declared here are invisible to the WDF.
Properties
IPrivate{nc} wdThis
A reference to the private interface of the current component controller.
IPrivate{nc}.IContextNode wdContext
A reference to the private interface of the component controller’s context root node.
~~~~~~~~~~~~~~~~~~~~~~~~~~~~~~~~~~~~~~~~~~~~~~~~~~~~~~~~~~~~~
© SAP AG <Course Number> Unit Title - 83
© SAP AG 2003, Title of Presentation, Speaker Name / 83
Web Dynpro Implementation: Overview (2)
The access to the generated Web Dynpro Interface for a controller classis provided by the member varibale wdThis (it provides access to the own functionality).
In order to access the context for a controller class use the membervariable wdContext.
Only use interfaces that start with IWD and only use classes that start with WD. All other classes and interfaces are private and they do not belong to the API.
Context
Every controller has exactly one hierarchical data storage structure known as a context.[1] The data held in the context exists only for the lifespan of the controller. Once the controller has been terminated, all data held within its context is lost.
The hierarchical structure of a context will typically be defined at design time; however, at runtime, it is perfectly possible not only to modify the contents, but also extend the structure of the context.
Information held in the context of one controller can be made accessible to the context of another controller by a technique known as context mapping. Using this technique, two or more contexts can share a reference to the same data. This is the primary mechanism for sharing data between controllers.
[1] Except the interface view controller.
IPrivate{nc}.IContextNode wdContext
A reference to the private interface of the component controller’s context root node.
IWDContextBase interface for accessing context data in a controller
Synopsis
© SAP AG <Course Number> Unit Title - 84
© SAP AG 2003, Title of Presentation, Speaker Name / 84
Web Dynpro Implementation: Overview (2)
The access to the generated Web Dynpro Interface for a controller classis provided by the member varibale wdThis (it provides access to the own functionality).
In order to access the context for a controller class use the membervariable wdContext.
Only use interfaces that start with IWD and only use classes that start with WD. All other classes and interfaces are private and they do not belong to the API.
All data managed by a controller is stored within its context. This interface class provides a set of generic methods to access that data by exposing the root node, the metadata of the root node and the data type information of context attributes.
The Web Dynpro IDE will generate typed sub-interfaces for all context nodes and attributes declared at design time.
Typed accessor methods will not exist for any context nodes or attributes created dynamically (that is, at runtime). Therefore, they can only be accessed using the generic context API.
Package
{pkgsap}.progmodel.api
Methods
String getName()
Returns the name of this context. The context name is always the same as the name of the controller to which it belongs.
IWDNode getRootNode()
Returns the root node of this context. Since the context root node is created at component creation time, and always has a cardinality of 1..1, it is guaranteed that the context root node will always exist, and that it will always contain exactly one element.
IWDNodeInfo getRootNodeInfo()
© SAP AG <Course Number> Unit Title - 85
© SAP AG 2003, Title of Presentation, Speaker Name / 85
Web Dynpro Implementation: Overview (2)
The access to the generated Web Dynpro Interface for a controller classis provided by the member varibale wdThis (it provides access to the own functionality).
In order to access the context for a controller class use the membervariable wdContext.
Only use interfaces that start with IWD and only use classes that start with WD. All other classes and interfaces are private and they do not belong to the API.
Returns the static metadata describing the root node of this context.
ISimpleType getTypeOf(String path)
Returns the data type of the context attribute identified by the given dot delimited path.
A ContextException is thrown if the path does not identify an attribute or if the attribute's type is not IWDSimpleType.
ISimpleTypeModifiable getModifiableTypeOf(String path)
Returns a modifiable data type of the context attribute identified by the given dot delimited path. Subsequent calls to this method for the same value of path are guaranteed to return the same instance.
A ContextException is thrown if the path does not identify an attribute or the attribute's type is not IWDSimpleType.
void reset()
Arbitrarily resets the context to its initial state. All node collections are reset to the minimum number of elements specified by their cardinality, and all dynamically added nodes and attributes are destroyed from the metadata.
Warning: It is the responsibility of the application developer to ensure that all node and attribute mapping or binding dependencies are deactivated before this method is called.
© SAP AG <Course Number> Unit Title - 86
© SAP AG 2003, Title of Presentation, Speaker Name / 86
Web Dynpro Implementation: Overview (2)
The access to the generated Web Dynpro Interface for a controller classis provided by the member varibale wdThis (it provides access to the own functionality).
In order to access the context for a controller class use the membervariable wdContext.
Only use interfaces that start with IWD and only use classes that start with WD. All other classes and interfaces are private and they do not belong to the API.
Calling reset() when mapping or binding dependencies are still active will have unpredictable results and possibly lead to a fatal error in the WDF for your application.
void reset(boolean clear)
Calling reset(true) is functionally equivalent to calling reset().
Calling reset(false) causes all dynamically created nodes and attributes to be deleted, but any data held in static node elements is preserved.
For example if at design-time, you define a node {cn} that has two attributes {ca1} and {ca2}, and then at runtime you create {ca3}, after reset(false) has been called, all node elements in {cn} containing attribute {ca3} will have been deleted, but the data held in attributes {ca1} and {ca2} will remain.
The same warning given for method reset() about mapped or bound nodes and attributes also applies to reset(boolean clear).
void resetChangedByClient()
Global reset of all changedByClient flags in all context node elements.
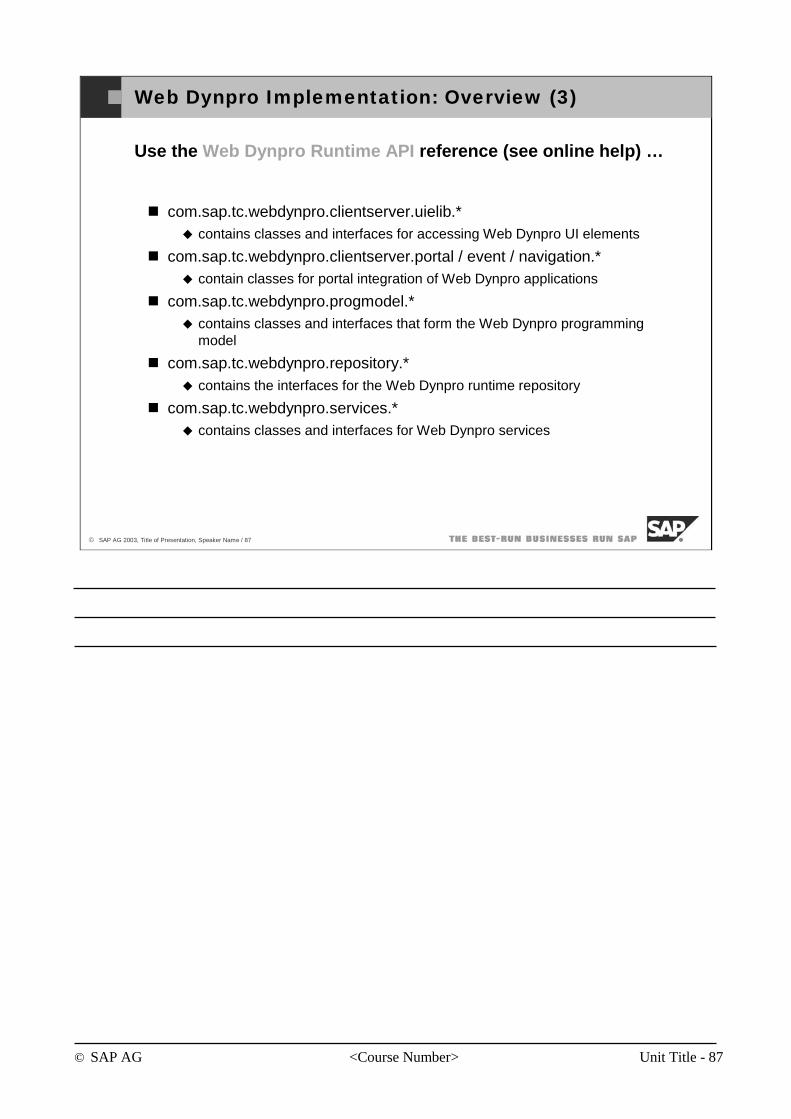
© SAP AG <Course Number> Unit Title - 87
© SAP AG 2003, Title of Presentation, Speaker Name / 87
Web Dynpro Implementation: Overview (3)
Use the Web Dynpro Runtime API reference (see online help) …
com.sap.tc.webdynpro.clientserver.uielib.*contains classes and interfaces for accessing Web Dynpro UI elements
com.sap.tc.webdynpro.clientserver.portal / event / navigation.*contain classes for portal integration of Web Dynpro applications
com.sap.tc.webdynpro.progmodel.*contains classes and interfaces that form the Web Dynpro programming model
com.sap.tc.webdynpro.repository.*contains the interfaces for the Web Dynpro runtime repository
com.sap.tc.webdynpro.services.*contains classes and interfaces for Web Dynpro services

© SAP AG <Course Number> Unit Title - 88
© SAP AG 2003, Title of Presentation, Speaker Name / 88
Overview
Naming Conventions
Recommendations
Lesson Contents:
Web Dynpro Implementation: Naming Conventions
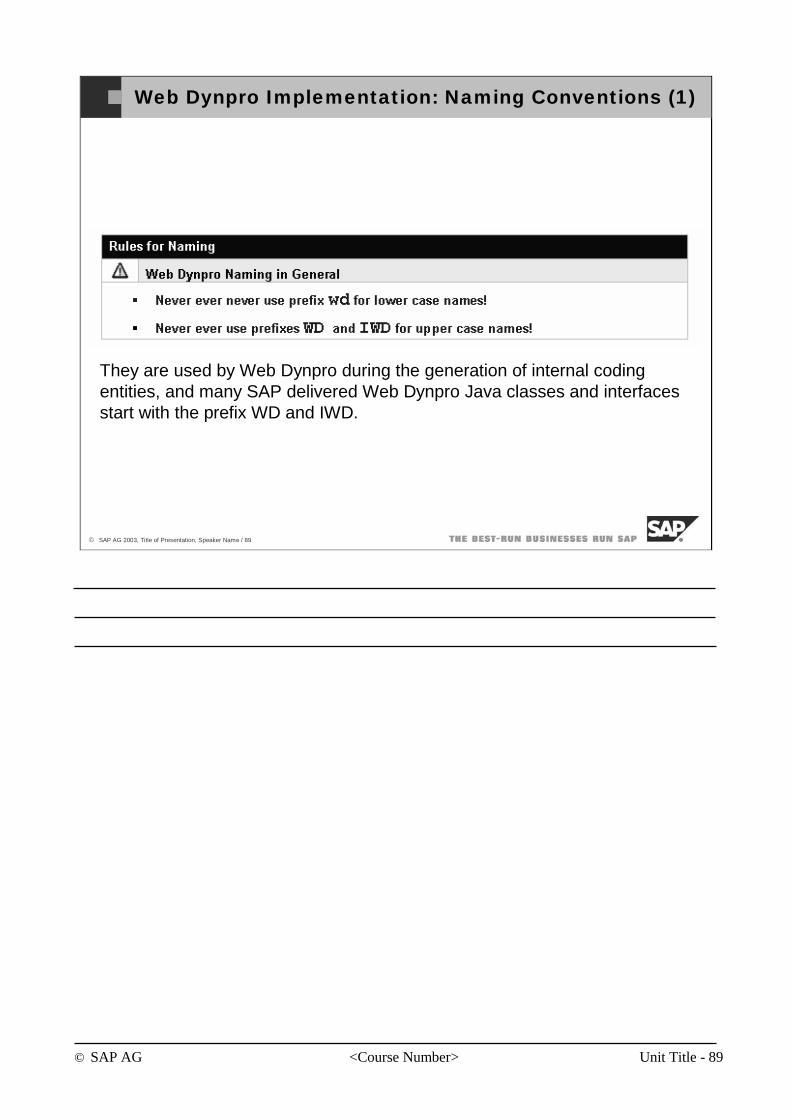
© SAP AG <Course Number> Unit Title - 89
© SAP AG 2003, Title of Presentation, Speaker Name / 89
Web Dynpro Implementation: Naming Conventions (1)
They are used by Web Dynpro during the generation of internal coding entities, and many SAP delivered Web Dynpro Java classes and interfaces start with the prefix WD and IWD.
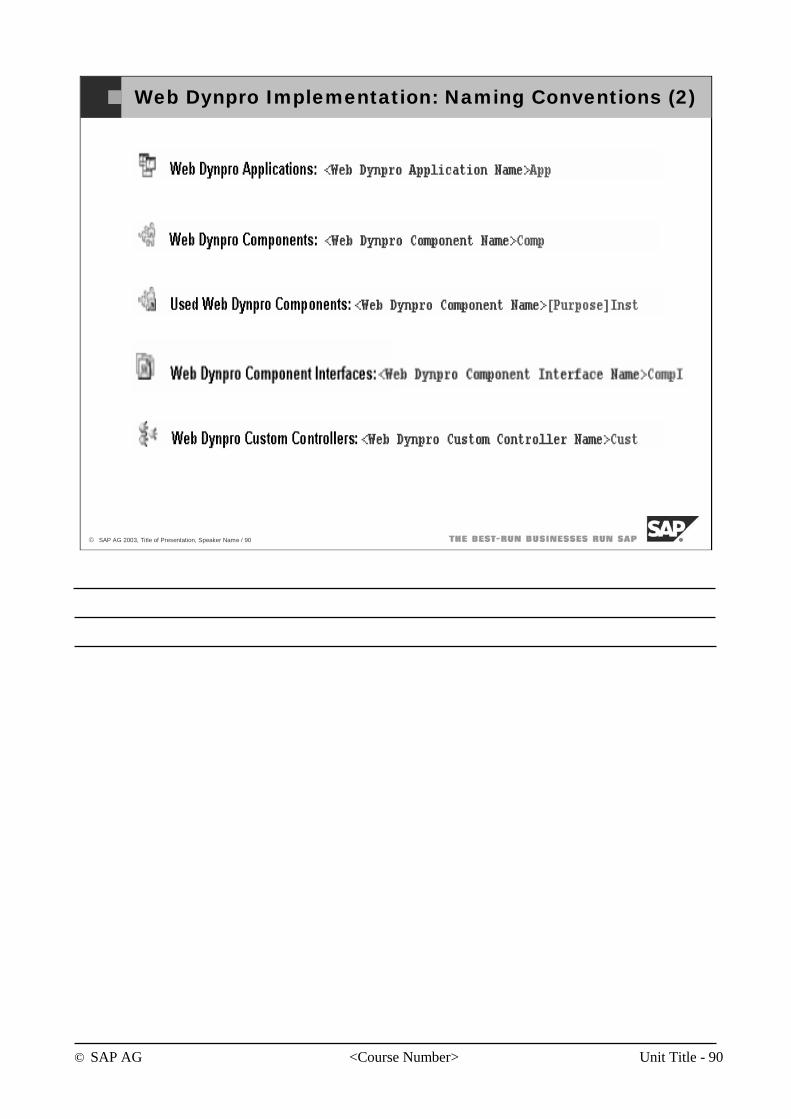
© SAP AG <Course Number> Unit Title - 90
© SAP AG 2003, Title of Presentation, Speaker Name / 90
Web Dynpro Implementation: Naming Conventions (2)
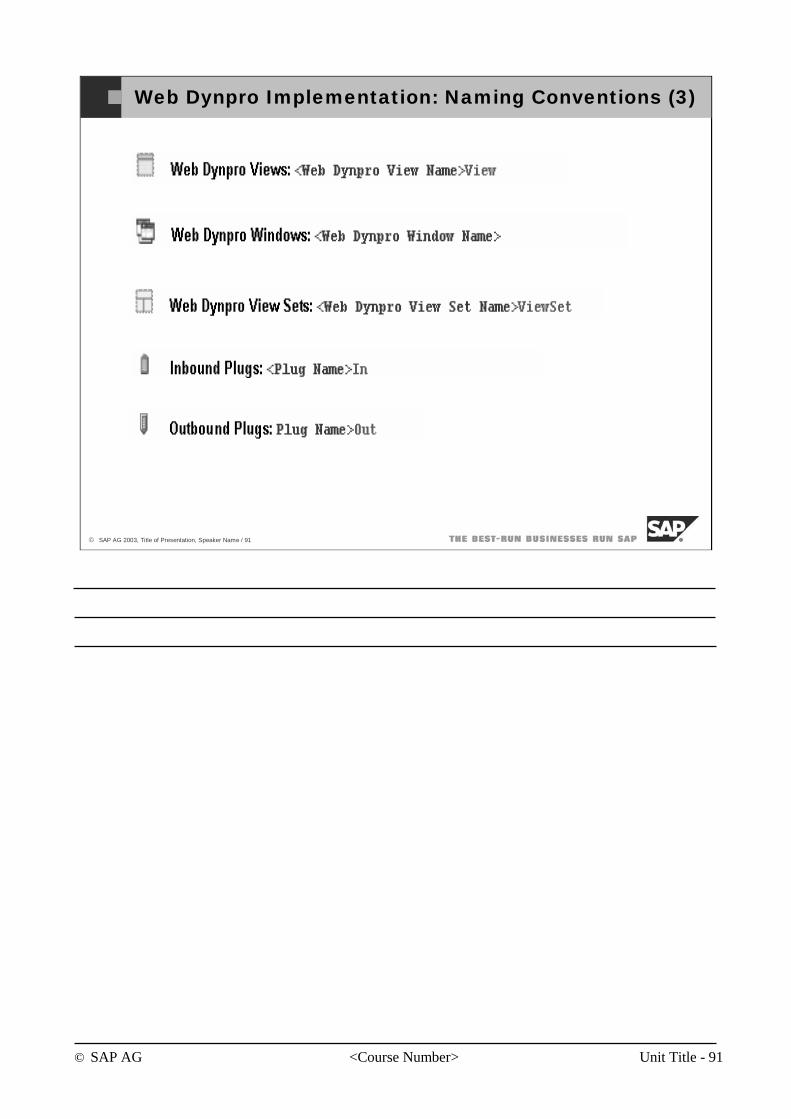
© SAP AG <Course Number> Unit Title - 91
© SAP AG 2003, Title of Presentation, Speaker Name / 91
Web Dynpro Implementation: Naming Conventions (3)
© SAP AG <Course Number> Unit Title - 92
© SAP AG 2003, Title of Presentation, Speaker Name / 92
Overview
Naming Conventions
Recommendations
Lesson Contents:
Web Dynpro Implementation: Recommendations
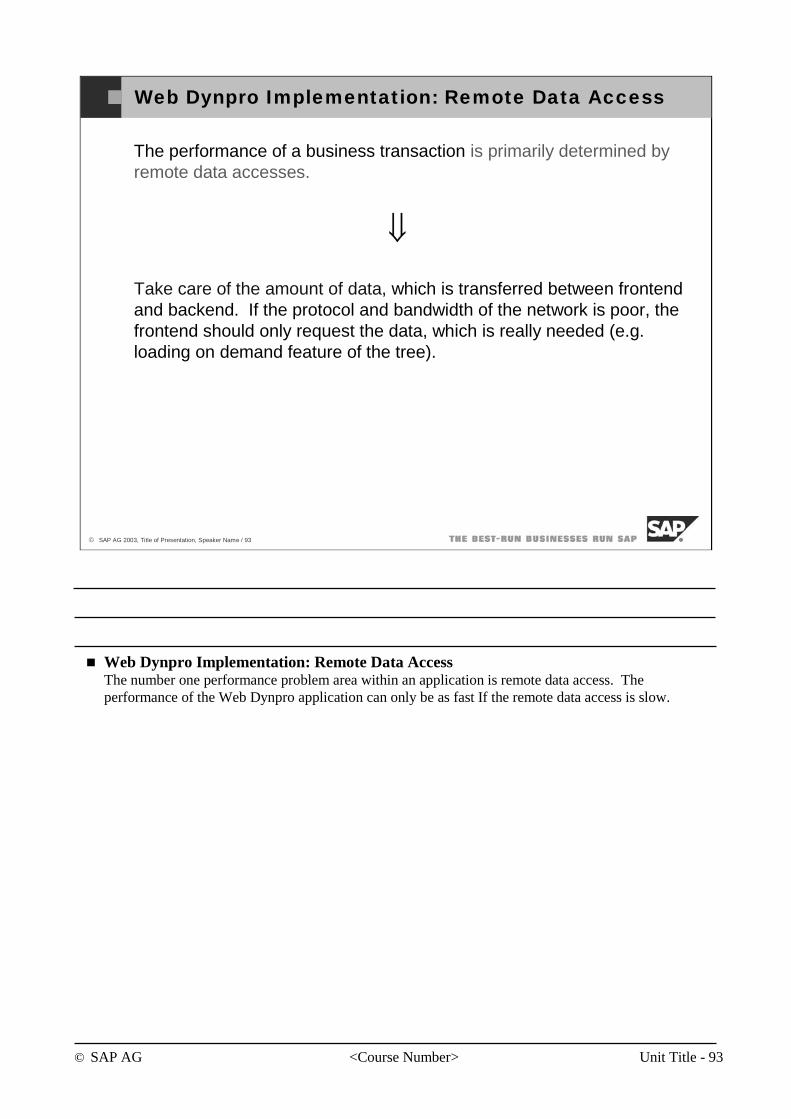
© SAP AG <Course Number> Unit Title - 93
© SAP AG 2003, Title of Presentation, Speaker Name / 93
Web Dynpro Implementation: Remote Data Access
The performance of a business transaction is primarily determined by remote data accesses.
⇓
Take care of the amount of data, which is transferred between frontendand backend. If the protocol and bandwidth of the network is poor, the frontend should only request the data, which is really needed (e.g. loading on demand feature of the tree).
Web Dynpro Implementation: Remote Data AccessThe number one performance problem area within an application is remote data access. The performance of the Web Dynpro application can only be as fast If the remote data access is slow.
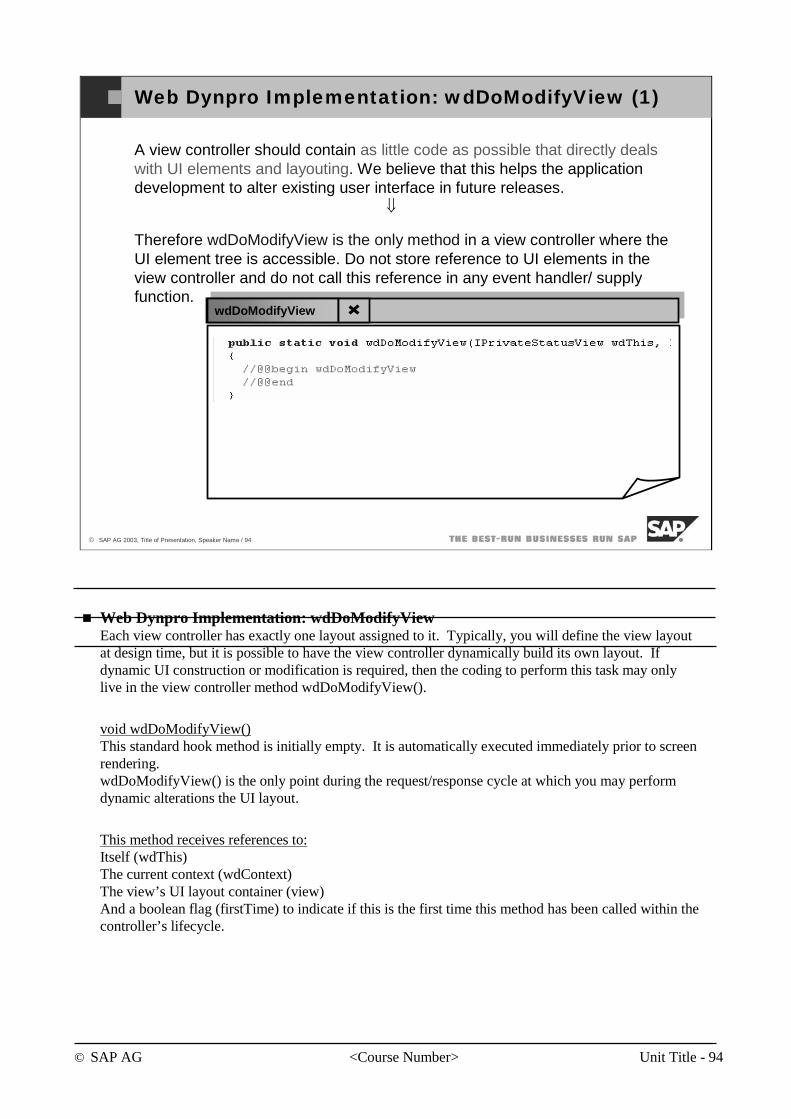
© SAP AG <Course Number> Unit Title - 94
© SAP AG 2003, Title of Presentation, Speaker Name / 94
Web Dynpro Implementation: wdDoModifyView (1)
A view controller should contain as little code as possible that directly deals with UI elements and layouting. We believe that this helps the application development to alter existing user interface in future releases.
⇓
Therefore wdDoModifyView is the only method in a view controller where the UI element tree is accessible. Do not store reference to UI elements in the view controller and do not call this reference in any event handler/ supply function.
wdDoModifyView
Web Dynpro Implementation: wdDoModifyViewEach view controller has exactly one layout assigned to it. Typically, you will define the view layout at design time, but it is possible to have the view controller dynamically build its own layout. If dynamic UI construction or modification is required, then the coding to perform this task may only live in the view controller method wdDoModifyView().
void wdDoModifyView()This standard hook method is initially empty. It is automatically executed immediately prior to screen rendering.wdDoModifyView() is the only point during the request/response cycle at which you may perform dynamic alterations the UI layout.
This method receives references to:Itself (wdThis)The current context (wdContext)The view’s UI layout container (view)And a boolean flag (firstTime) to indicate if this is the first time this method has been called within the controller’s lifecycle.
© SAP AG <Course Number> Unit Title - 95
© SAP AG 2003, Title of Presentation, Speaker Name / 95
Web Dynpro Implementation: wdDoModifyView (2)
wdDoModifyView is designed for the creation of a UI tree or UI sub-tree at runtime in case it is not possible to declare the UI at design time. Therefore the usage of wdDoModifyView in order to create a UI tree initially (firstTime equals true) is not performance critical, modifying an existing UI tree (firstTime equals false) is.
⇓
If you ever use wdDoModifyView in the case of firstTime equals false, think twice and check whether there is an alternative solution to this.
Web Dynpro Implementation: wdDoModifyViewUnfortunately, the name “wdDoModifyView” is somewhat misleading since the purpose of it is to create (and not to modify) a UI tree dynamically. Changing only a single attribute of a single control within wdDoModifyView flags the complete view containing the control as dirty and the complete view is sent again to the browser and is completely re-rendered there – depending on the size and complexity of the view this can result in significant performance hits.
© SAP AG <Course Number> Unit Title - 96
© SAP AG 2003, Title of Presentation, Speaker Name / 96
Web Dynpro Implementation: wdDoModifyView (3)
It is not guaranteed when and how often wdDoModifyView is called. E.g. it may happen that a view A is created and later a call to an inbound-plug directly triggers an outbound-plug. This outbound-plug may call a view B that replaces view A. In this case wdDoModifyView of view A would not be called.
⇓
Do not write any data to the context, create modifiable data types or create new context attributes/nodes in wdDoModifyView.
Web Dynpro Implementation: wdDoModifyViewA Web Dynpro view should be designed in such a way that by the time wdDoModifyView() is called, all manipulation of context data has been completed, leaving wdDoModifyView() simply with the task of assembling or modifying the UI layout. The execution of wdDoModifyView() should be considered a stateless activity.
For more information, see the Web Dynpro Dynamic Programming Unit of this course.
© SAP AG <Course Number> Unit Title - 97
© SAP AG 2003, Title of Presentation, Speaker Name / 97
Web Dynpro Implementation: View Context
Before SP4, all the nodes and attributes defined in the view context are sent to browser - independent whether there are actually controls bound against it or not .
⇓
Reduce the view context to those nodes and attributes in the view context that have actually controls bound against it. Don’t use the view context as data storage - for a better design use a custom context instead. For data, which only corresponds with a view, but which is not bound use the “others” section.
Web Dynpro Implementation: View Context
Reduce the view context to those nodes and attributes in the view context that have actually controls bound against it. Keep the nodes and attributes of the view controllers context limited to the ones that are actually bound to UIElements on the View Controller. It may be easier to simply select all, but this will hinder the performance of the application.
Don’t use the view context as data storage - for a better design use the context of a custom controller instead. And for data, which only corresponds with a view, but which is not bound use the “others”section.
© SAP AG <Course Number> Unit Title - 98
© SAP AG 2003, Title of Presentation, Speaker Name / 98
Web Dynpro Implementation: Layout (1)
Complex and nested layouts that includes transparent containers that includes more transparent containers and so on, result in a poorperformance.
⇓
From a performance point of view it is often better to have one large grid or matrix layout with column spans.
Layout Managers
The purpose of a layout manager is to provide a structure within which UI elements can be presented. All Web Dynpro view containers must implement a layout manager of some sort.
Flow Layout
The FlowLayout is the simplest of the layout managers in that it renders its child UI elements in a simple left-to-right, horizontal sequence. If more UI elements have been defined than will fit horizontally across the screen, then a new row is created.
Row Layout
The RowLayout layout manager has been implemented primarily to overcome a performance overhead incurred by browsers having to create nested HTML <tables>. If you wish to subdivide some area of the view into horizontal rows, but you do not require any vertical alignment between the resulting columns, then you should use a RowLayout layout manager.
Matrix Layout
The MatrixLayout layout manager is a further enhancement of the capabilities of the RowLayout layout manager. A RowLayout layout manager allows you to specify when new rows should start, but provides no facility for the vertical alignment of elements within the row. This capability is provided by the MatrixLayoutlayout manager.
© SAP AG <Course Number> Unit Title - 99
© SAP AG 2003, Title of Presentation, Speaker Name / 99
Web Dynpro Implementation: Layout (1)
Complex and nested layouts that includes transparent containers that includes more transparent containers and so on, result in a poorperformance.
⇓
From a performance point of view it is often better to have one large grid or matrix layout with column spans.
Grid Layout
The GridLayout layout manager divides the view area into a tabular grid with a fixed number of columns. As UI elements are added to a GridLayout container, they are positioned within the grid in a left-to-right, top-to-bottom manner. The number of columns in the grid is determined by the value of the colCount property, and the number of rows is dependent upon the number of UI elements added to the container. In order to achieve a uniform look and feel across all of your Web Dynpro applications, SAP recommends that the MatrixLayout be used in preference to the GridLayout.
© SAP AG <Course Number> Unit Title - 100
© SAP AG 2003, Title of Presentation, Speaker Name / 100
Web Dynpro Implementation: Layout (2)
The grid layout is not easy to handle for the application developer, because of the properties paddingTop, paddingButtom, paddingLeft and paddingRight, which lead to inconsistent layouting.
⇓
Choose the matrix layout over the grid layout. This won’t enhance the performance. Instead of the properties paddingTop, paddingButtom, paddingLeft and PaddingRight it only offers the property cellDesign.
Web Dynpro Implementation: LayoutMatrix layout is easier to handle with larger groups of developer and typically results in a more uniform application design. The fewer properties of the matrix layout are generally easier to handle.
© SAP AG <Course Number> Unit Title - 101
© SAP AG 2003, Title of Presentation, Speaker Name / 101
Web Dynpro Implementation: ViewContainerUIElement
Children of a group or a tray or any other control are sent to the browser and rendered independent of the fact whether their visibility is set to “visible” or not.
⇓
Views and their UI Elements that are embedded into a ViewContainerUIElement that has its visibility set to “none” are not sent to browser and are not rendered until the visibility is set to “visible”.
Web Dynpro Implementation: ViewContainerUIElementTo increase the performance of a Web Dynpro application consider using the ViewContainerUIElement on view controller that contain large numbers on UIElements and/or nested views. Views and their UI Elements that are embedded into a ViewContainerUIElement that has its visibility set to “none” are not sent to browser and are not rendered until the visibility is set to “visible”.

© SAP AG <Course Number> Unit Title - 102
© SAP AG 2003, Title of Presentation, Speaker Name / 102
You should now be able to:
Give an overview of some of the Web Dynpro Implementation Tips
Use the basic Web Dynpro Naming Conventions
Web Dynpro Implementation: Lesson Summary
© SAP AG <Course Number> Unit Title - 103
© SAP AG 2003, Title of Presentation, Speaker Name / 103
Q&A
Structuring Web Dynpro Applications: Questions?
Component Reuse, Exercise
Chapter: Structuring Web Dynpro Applications
Theme: Development Component Reuse
At the end of this Exercise, you are able to:
• Reuse a Web Dynpro development component.
1 Development Objectives
Explore the reuse concepts of the Development Components by developing, building, and deploy two Web Dynpro Development Components, each of which is called by a single Web Dynpro Application.
2 Results
Develop one Web Dynpro Application that has access to information contained in multiple Development Components. Once the Application has been deployed, the NetWeaver developer studio will launch the web browser and call the application. You should see a simple screen that has two views. The first from development component one and the second from the second one.
3 Prerequisites The SAP NetWeaver Developer Workspace installed, J2EE engine
running and familiarity with both the development component configuration perspective and the Web Dynpro Perspective.
4 Overview: Developing, Building, Deploying, and Running
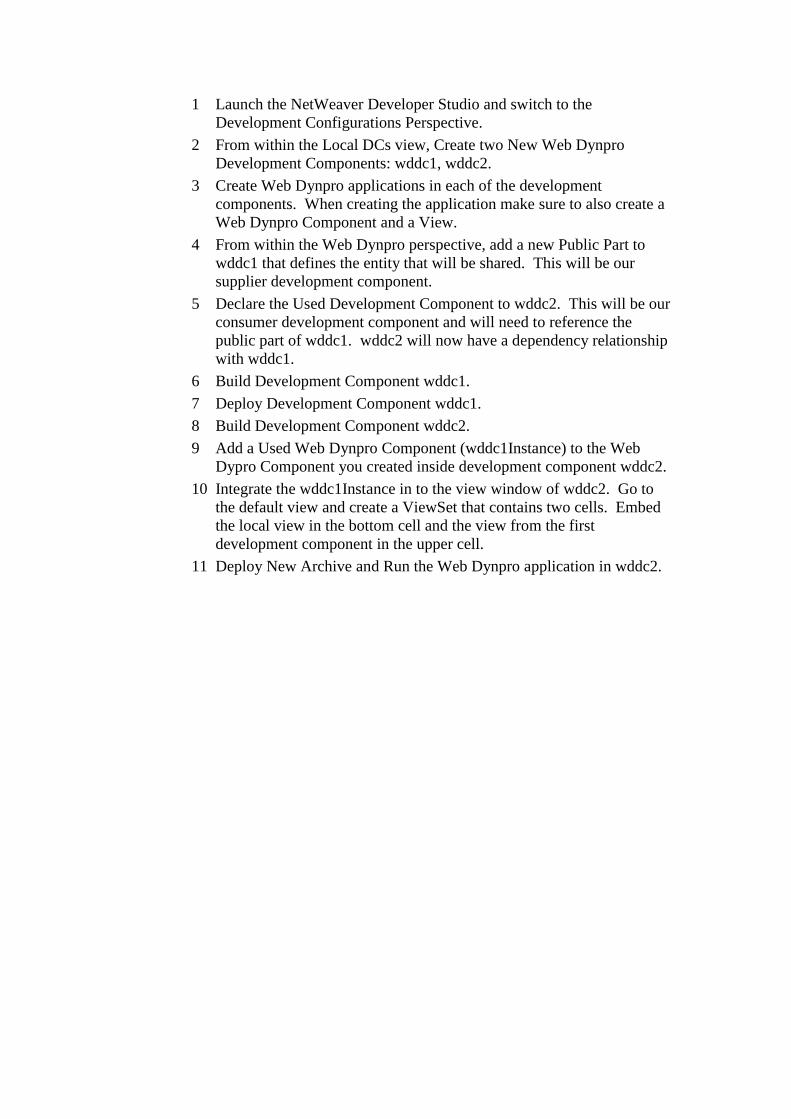
1 Launch the NetWeaver Developer Studio and switch to the Development Configurations Perspective.
2 From within the Local DCs view, Create two New Web Dynpro Development Components: wddc1, wddc2.
3 Create Web Dynpro applications in each of the development components. When creating the application make sure to also create a Web Dynpro Component and a View.
4 From within the Web Dynpro perspective, add a new Public Part to wddc1 that defines the entity that will be shared. This will be our supplier development component.
5 Declare the Used Development Component to wddc2. This will be our consumer development component and will need to reference the public part of wddc1. wddc2 will now have a dependency relationship with wddc1.
6 Build Development Component wddc1.
7 Deploy Development Component wddc1.
8 Build Development Component wddc2.
9 Add a Used Web Dynpro Component (wddc1Instance) to the Web Dypro Component you created inside development component wddc2.
10 Integrate the wddc1Instance in to the view window of wddc2. Go to the default view and create a ViewSet that contains two cells. Embed the local view in the bottom cell and the view from the first development component in the upper cell.
11 Deploy New Archive and Run the Web Dynpro application in wddc2.
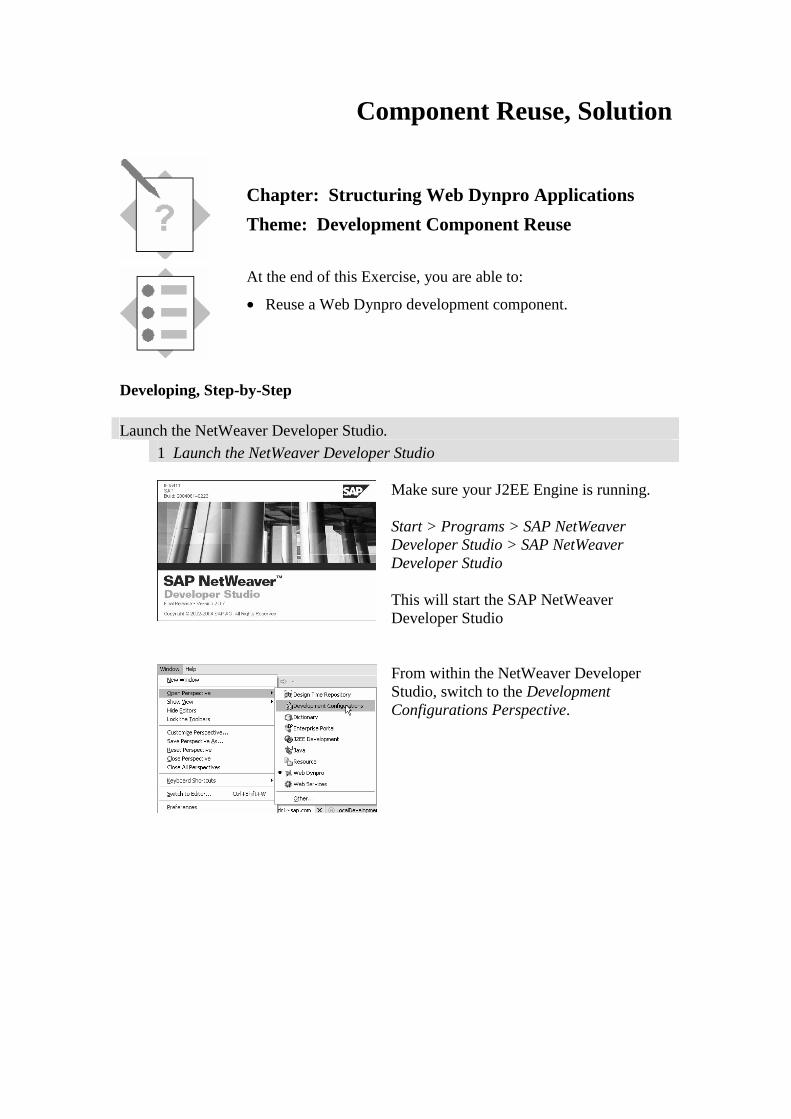
Component Reuse, Solution
Chapter: Structuring Web Dynpro Applications
Theme: Development Component Reuse
At the end of this Exercise, you are able to:
• Reuse a Web Dynpro development component.
Developing, Step-by-Step Launch the NetWeaver Developer Studio. 1 Launch the NetWeaver Developer Studio
Make sure your J2EE Engine is running. Start > Programs > SAP NetWeaver Developer Studio > SAP NetWeaver Developer Studio This will start the SAP NetWeaver Developer Studio
From within the NetWeaver Developer Studio, switch to the Development Configurations Perspective.
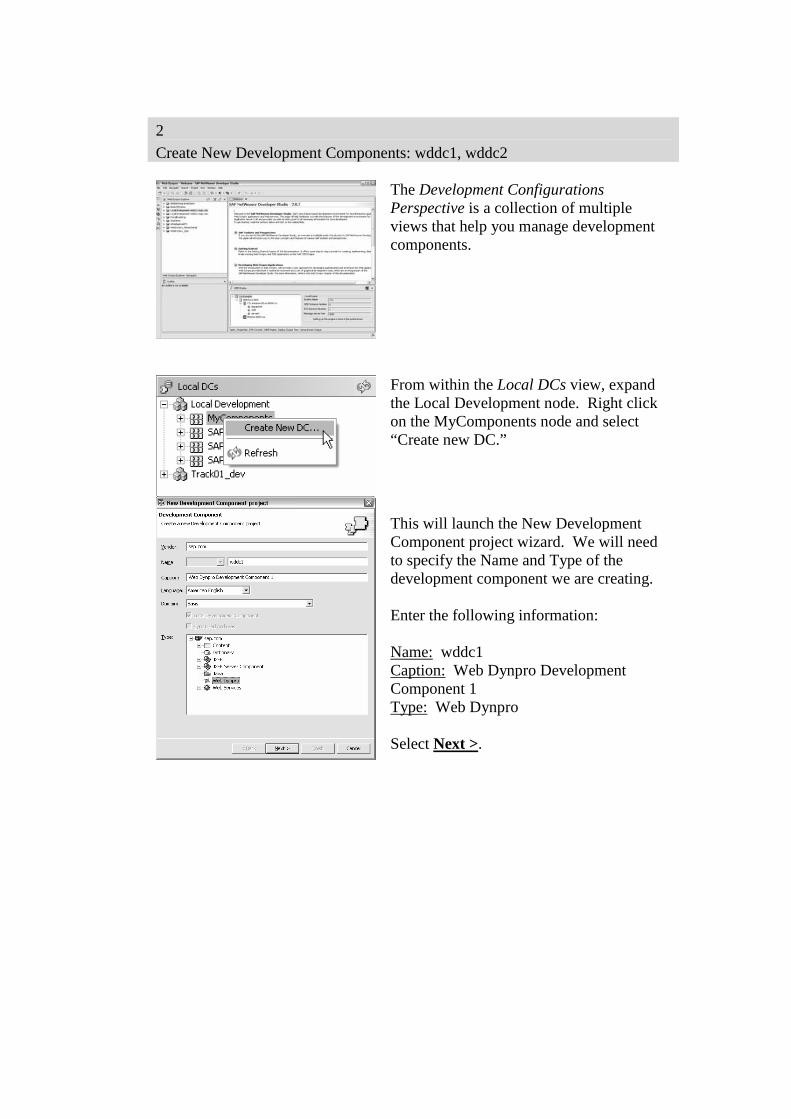
2
Create New Development Components: wddc1, wddc2
The Development Configurations Perspective is a collection of multiple views that help you manage development components.
From within the Local DCs view, expand the Local Development node. Right click on the MyComponents node and select “Create new DC.”
This will launch the New Development Component project wizard. We will need to specify the Name and Type of the development component we are creating. Enter the following information: Name: wddc1 Caption: Web Dynpro Development Component 1 Type: Web Dynpro Select Next >.
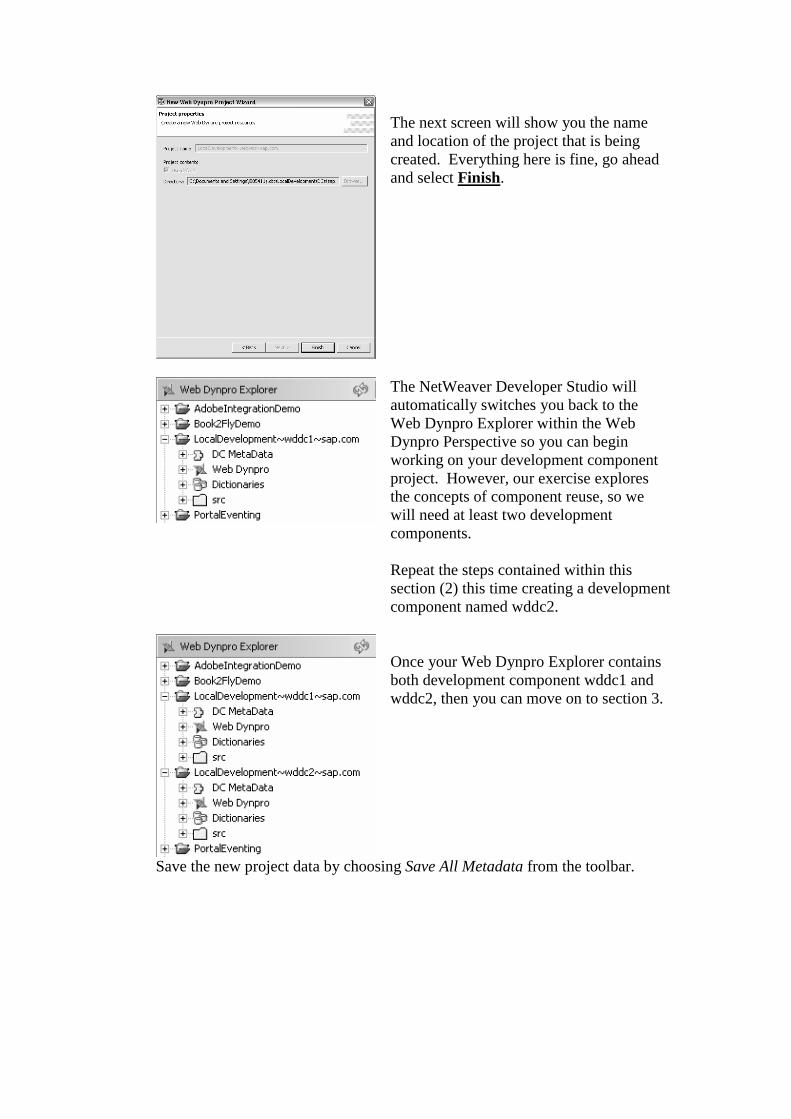
The next screen will show you the name and location of the project that is being created. Everything here is fine, go ahead and select Finish.
The NetWeaver Developer Studio will automatically switches you back to the Web Dynpro Explorer within the Web Dynpro Perspective so you can begin working on your development component project. However, our exercise explores the concepts of component reuse, so we will need at least two development components. Repeat the steps contained within this section (2) this time creating a development component named wddc2.
Once your Web Dynpro Explorer contains both development component wddc1 and wddc2, then you can move on to section 3.
Save the new project data by choosing Save All Metadata from the toolbar.
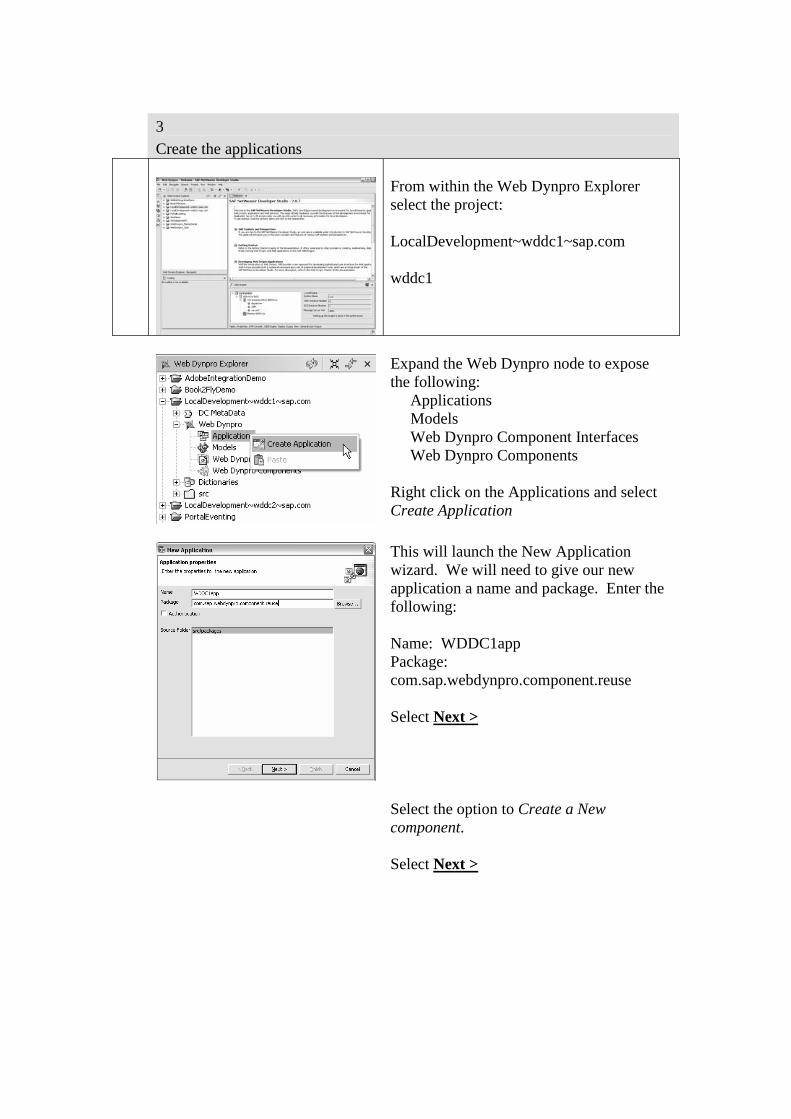
3
Create the applications
From within the Web Dynpro Explorer select the project: LocalDevelopment~wddc1~sap.com wddc1
Expand the Web Dynpro node to expose the following: Applications Models Web Dynpro Component Interfaces Web Dynpro Components Right click on the Applications and select Create Application
This will launch the New Application wizard. We will need to give our new application a name and package. Enter the following: Name: WDDC1app Package: com.sap.webdynpro.component.reuse Select Next >
Select the option to Create a New component. Select Next >
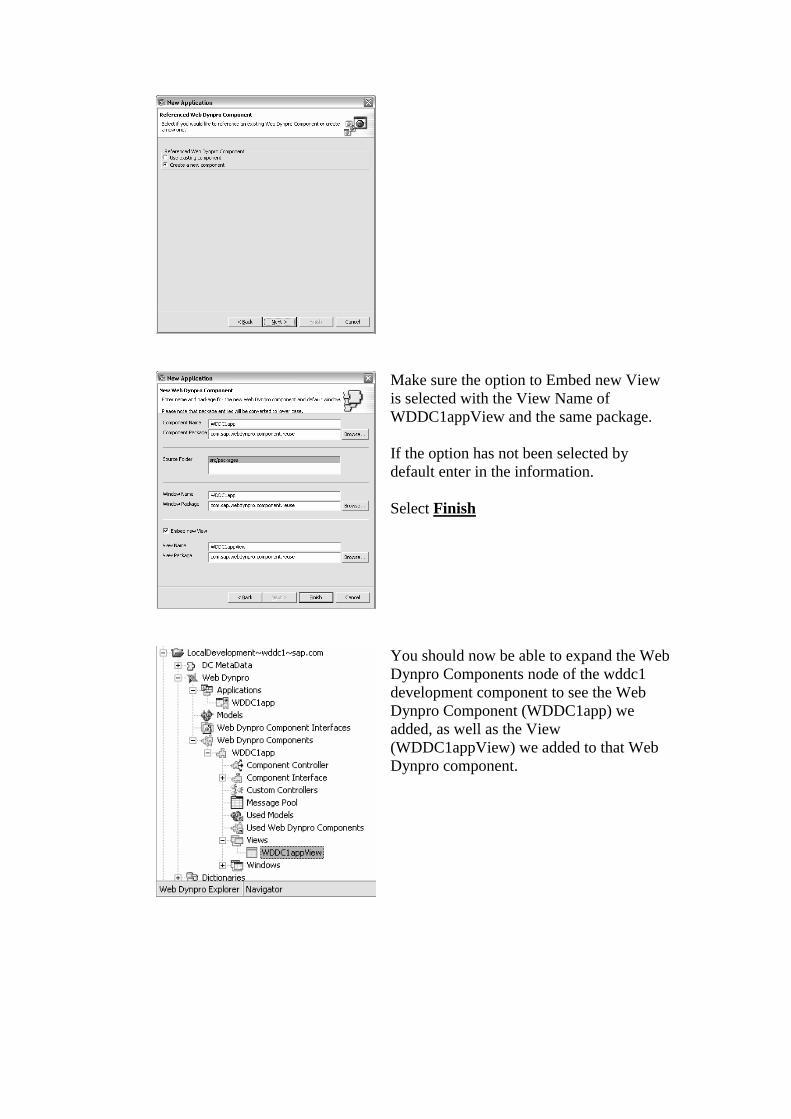
Make sure the option to Embed new View is selected with the View Name of WDDC1appView and the same package. If the option has not been selected by default enter in the information. Select Finish
You should now be able to expand the Web Dynpro Components node of the wddc1 development component to see the Web Dynpro Component (WDDC1app) we added, as well as the View (WDDC1appView) we added to that Web Dynpro component.
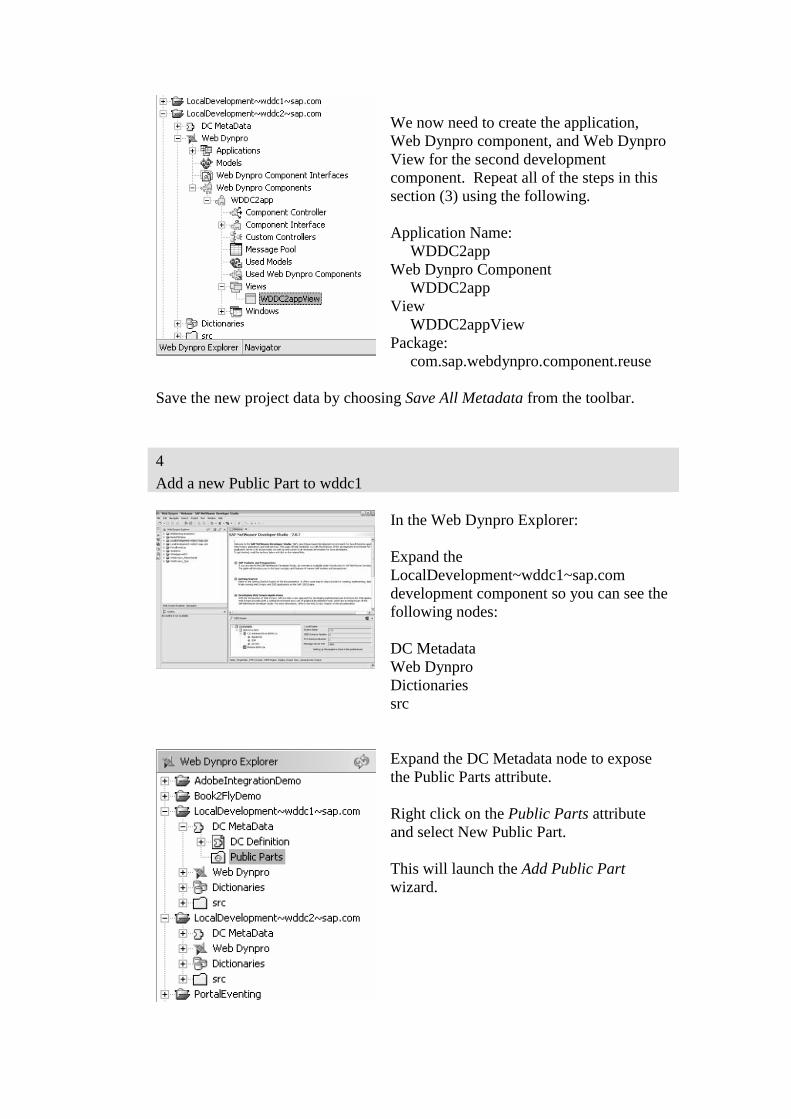
We now need to create the application, Web Dynpro component, and Web Dynpro View for the second development component. Repeat all of the steps in this section (3) using the following. Application Name: WDDC2app Web Dynpro Component WDDC2app View WDDC2appView Package: com.sap.webdynpro.component.reuse
Save the new project data by choosing Save All Metadata from the toolbar.
4
Add a new Public Part to wddc1
In the Web Dynpro Explorer: Expand the LocalDevelopment~wddc1~sap.com development component so you can see the following nodes: DC Metadata Web Dynpro Dictionaries src
Expand the DC Metadata node to expose the Public Parts attribute. Right click on the Public Parts attribute and select New Public Part. This will launch the Add Public Part wizard.
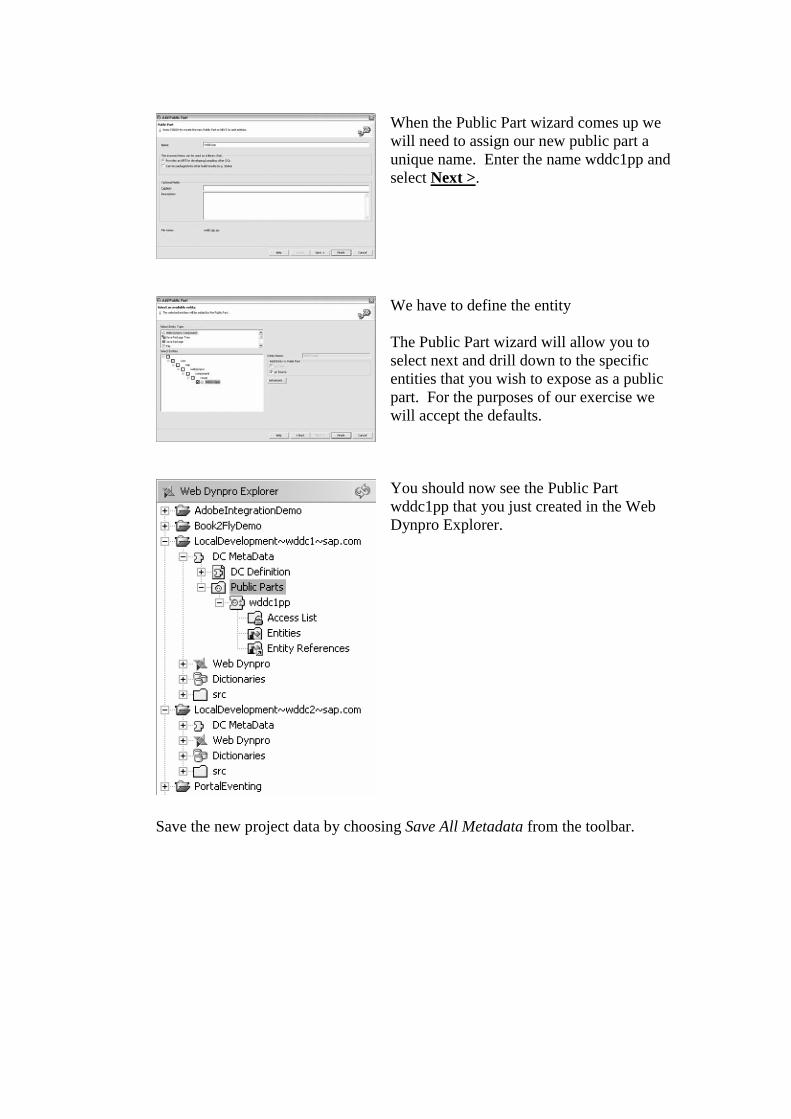
When the Public Part wizard comes up we will need to assign our new public part a unique name. Enter the name wddc1pp and select Next >.
We have to define the entity The Public Part wizard will allow you to select next and drill down to the specific entities that you wish to expose as a public part. For the purposes of our exercise we will accept the defaults.
You should now see the Public Part wddc1pp that you just created in the Web Dynpro Explorer.
Save the new project data by choosing Save All Metadata from the toolbar.
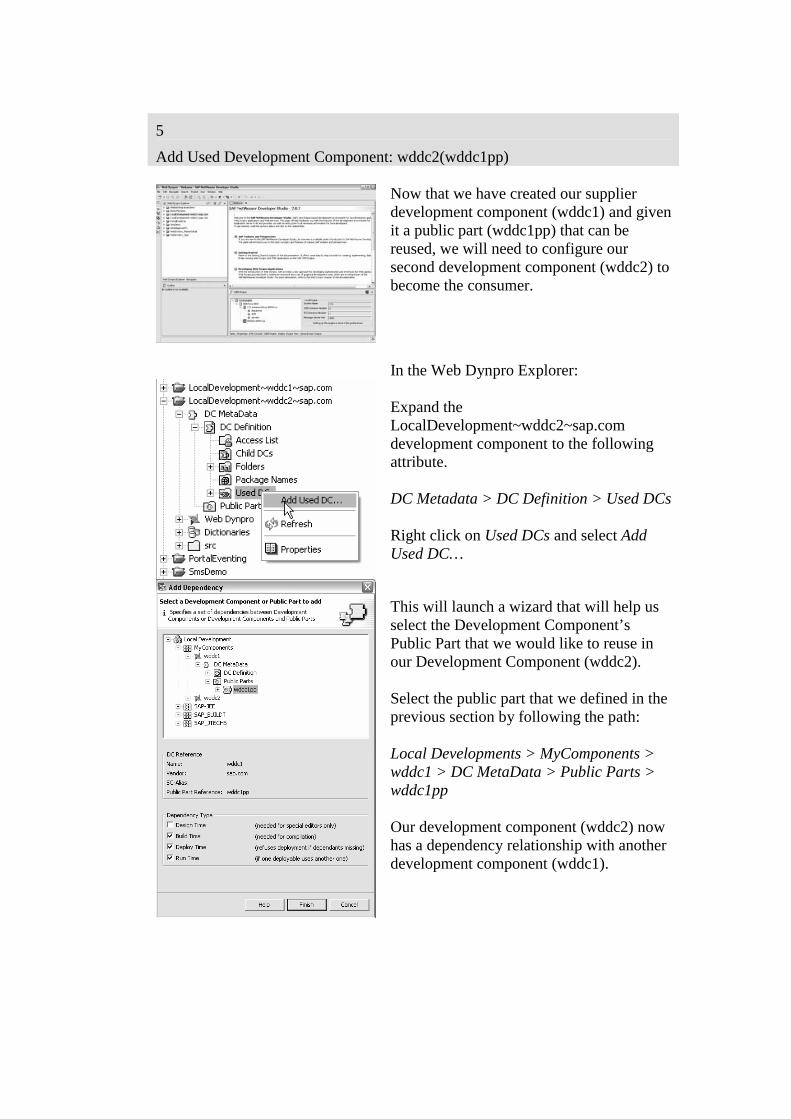
5
Add Used Development Component: wddc2(wddc1pp)
Now that we have created our supplier development component (wddc1) and given it a public part (wddc1pp) that can be reused, we will need to configure our second development component (wddc2) to become the consumer.
In the Web Dynpro Explorer: Expand the LocalDevelopment~wddc2~sap.com development component to the following attribute. DC Metadata > DC Definition > Used DCs Right click on Used DCs and select Add Used DC…
This will launch a wizard that will help us select the Development Component’s Public Part that we would like to reuse in our Development Component (wddc2). Select the public part that we defined in the previous section by following the path: Local Developments > MyComponents > wddc1 > DC MetaData > Public Parts > wddc1pp Our development component (wddc2) now has a dependency relationship with another development component (wddc1).
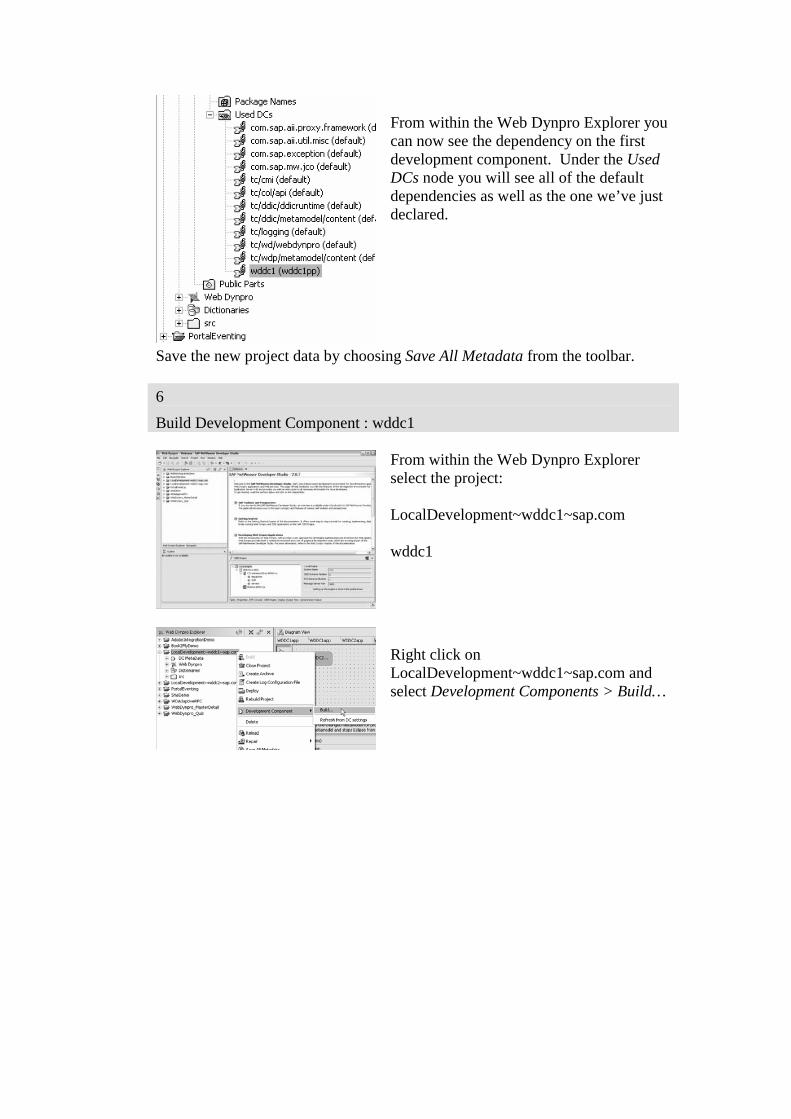
From within the Web Dynpro Explorer you can now see the dependency on the first development component. Under the Used DCs node you will see all of the default dependencies as well as the one we’ve just declared.
Save the new project data by choosing Save All Metadata from the toolbar. 6
Build Development Component : wddc1
From within the Web Dynpro Explorer select the project: LocalDevelopment~wddc1~sap.com wddc1
Right click on LocalDevelopment~wddc1~sap.com and select Development Components > Build…
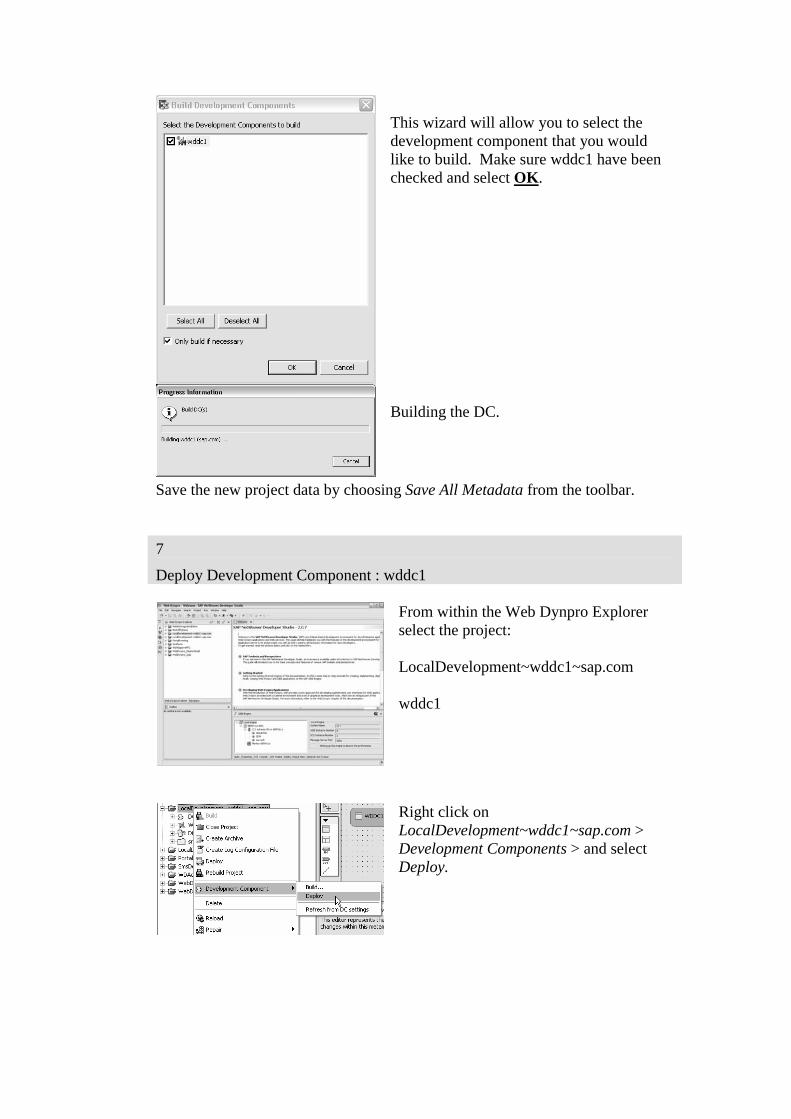
This wizard will allow you to select the development component that you would like to build. Make sure wddc1 have been checked and select OK.
Building the DC.
Save the new project data by choosing Save All Metadata from the toolbar. 7
Deploy Development Component : wddc1
From within the Web Dynpro Explorer select the project: LocalDevelopment~wddc1~sap.com wddc1
Right click on LocalDevelopment~wddc1~sap.com > Development Components > and select Deploy.
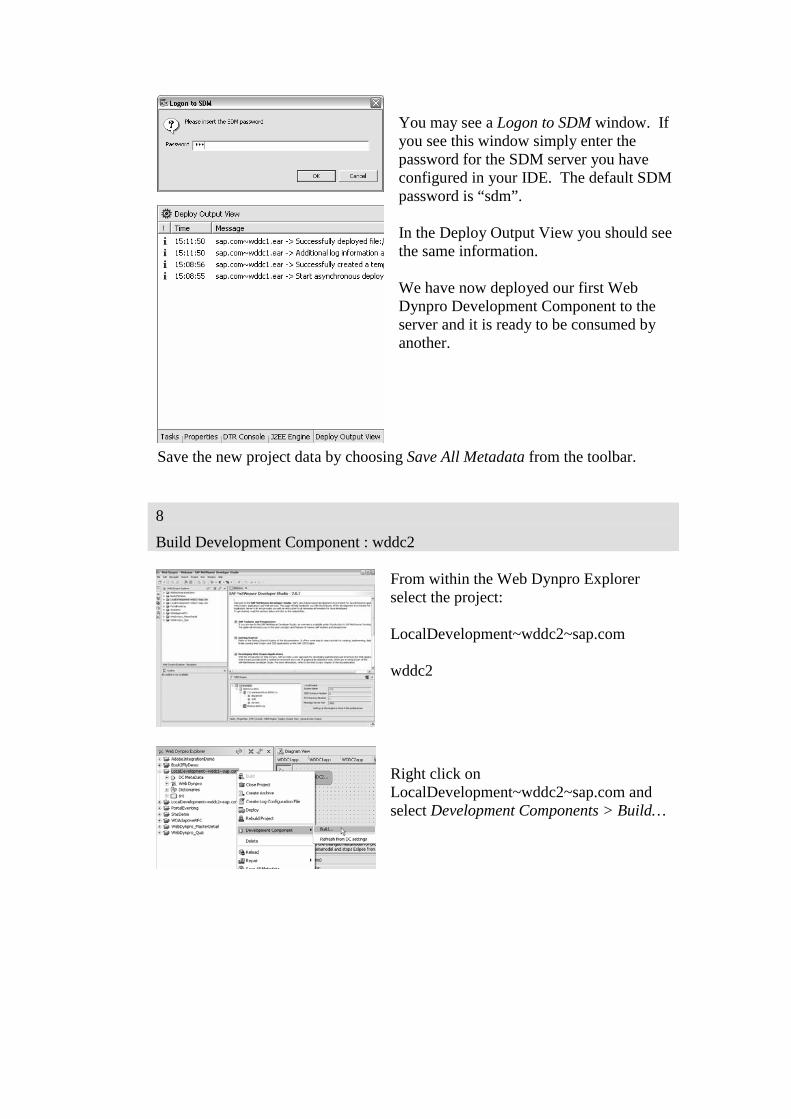
You may see a Logon to SDM window. If you see this window simply enter the password for the SDM server you have configured in your IDE. The default SDM password is “sdm”.
In the Deploy Output View you should see the same information. We have now deployed our first Web Dynpro Development Component to the server and it is ready to be consumed by another.
Save the new project data by choosing Save All Metadata from the toolbar. 8
Build Development Component : wddc2
From within the Web Dynpro Explorer select the project: LocalDevelopment~wddc2~sap.com wddc2
Right click on LocalDevelopment~wddc2~sap.com and select Development Components > Build…
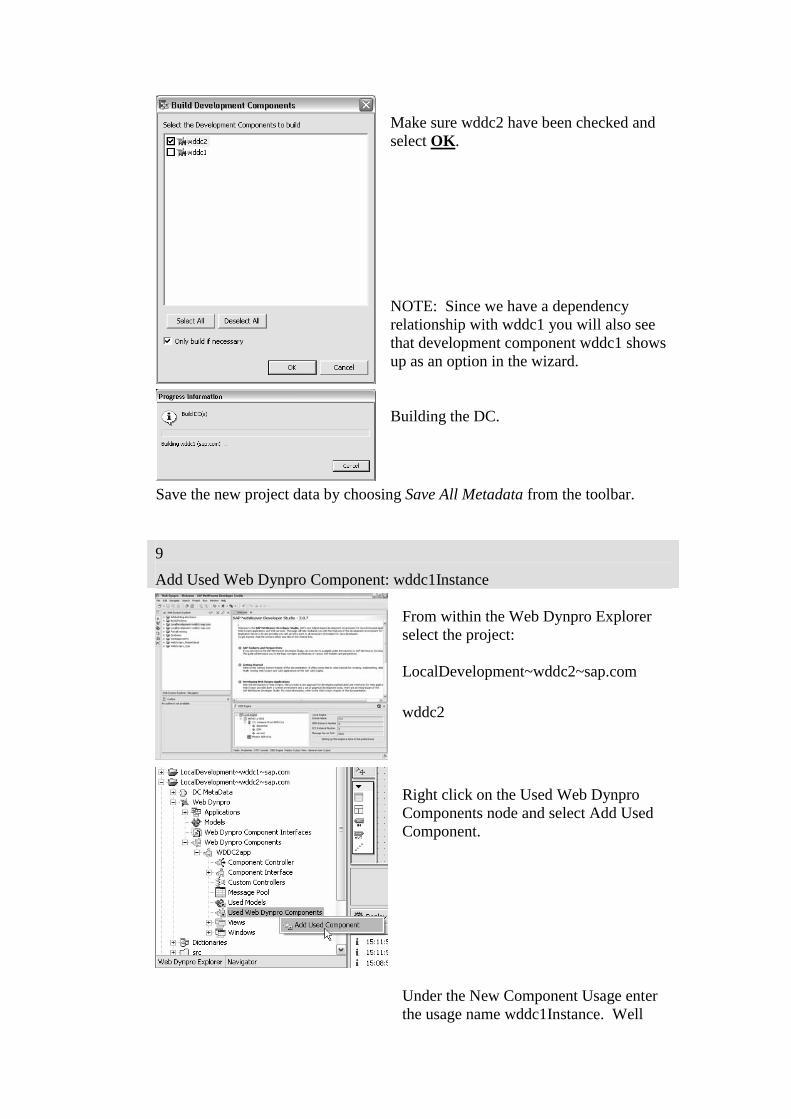
Make sure wddc2 have been checked and select OK. NOTE: Since we have a dependency relationship with wddc1 you will also see that development component wddc1 shows up as an option in the wizard.
Building the DC.
Save the new project data by choosing Save All Metadata from the toolbar.
9
Add Used Web Dynpro Component: wddc1Instance
From within the Web Dynpro Explorer select the project: LocalDevelopment~wddc2~sap.com
wddc2
Right click on the Used Web Dynpro Components node and select Add Used Component.
Under the New Component Usage enter the usage name wddc1Instance. Well
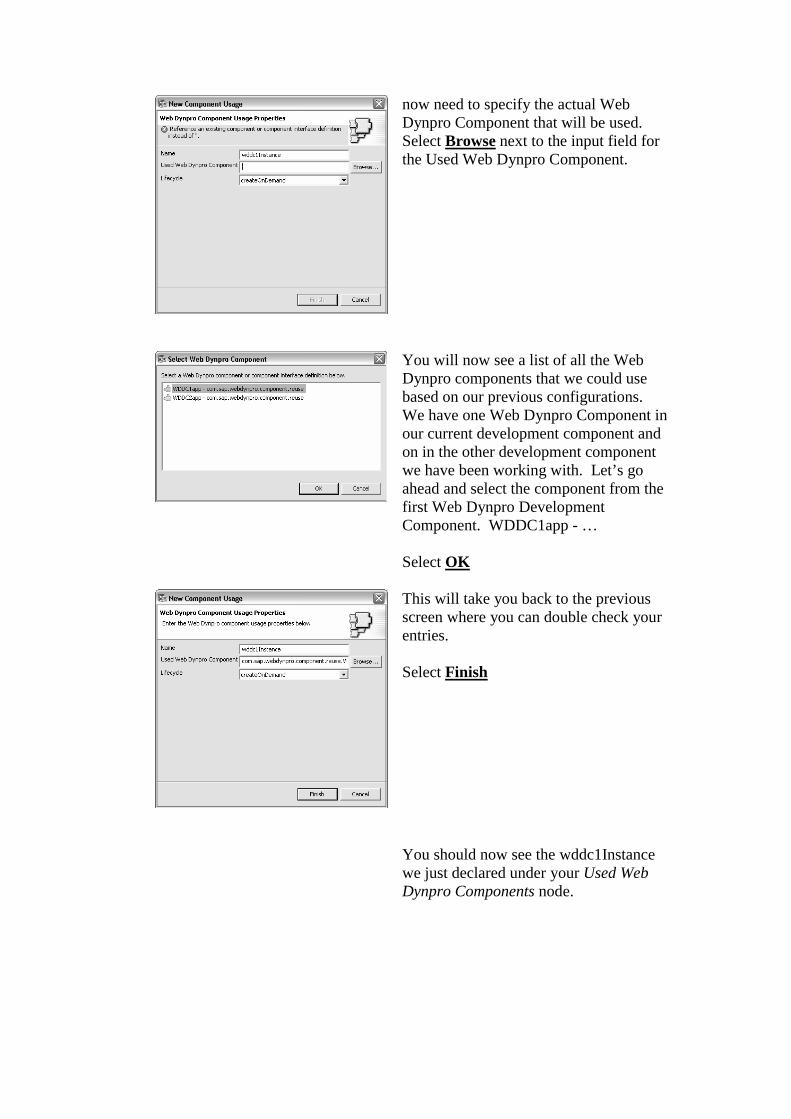
now need to specify the actual Web Dynpro Component that will be used. Select Browse next to the input field for the Used Web Dynpro Component.
You will now see a list of all the Web Dynpro components that we could use based on our previous configurations. We have one Web Dynpro Component in our current development component and on in the other development component we have been working with. Let’s go ahead and select the component from the first Web Dynpro Development Component. WDDC1app - … Select OK
This will take you back to the previous screen where you can double check your entries. Select Finish
You should now see the wddc1Instance we just declared under your Used Web Dynpro Components node.
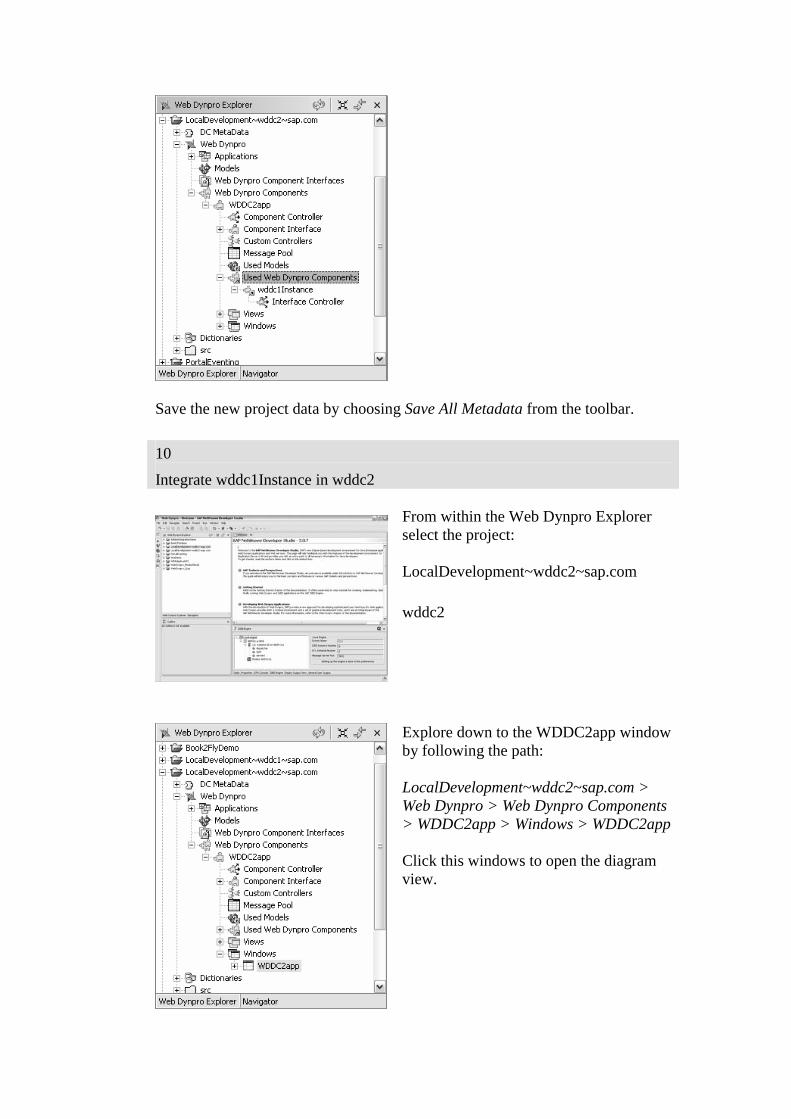
Save the new project data by choosing Save All Metadata from the toolbar.
10
Integrate wddc1Instance in wddc2
From within the Web Dynpro Explorer select the project: LocalDevelopment~wddc2~sap.com
wddc2
Explore down to the WDDC2app window by following the path: LocalDevelopment~wddc2~sap.com > Web Dynpro > Web Dynpro Components > WDDC2app > Windows > WDDC2app Click this windows to open the diagram view.
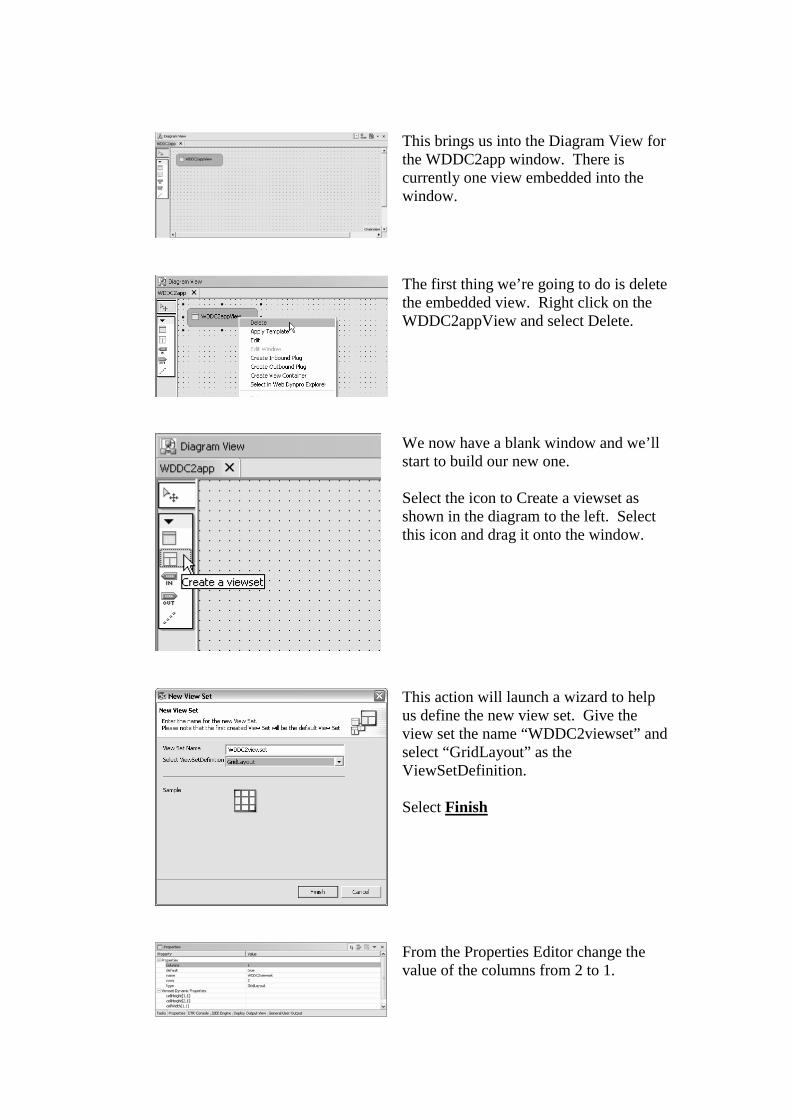
This brings us into the Diagram View for the WDDC2app window. There is currently one view embedded into the window.
The first thing we’re going to do is delete the embedded view. Right click on the WDDC2appView and select Delete.
We now have a blank window and we’ll start to build our new one. Select the icon to Create a viewset as shown in the diagram to the left. Select this icon and drag it onto the window.
This action will launch a wizard to help us define the new view set. Give the view set the name “WDDC2viewset” and select “GridLayout” as the ViewSetDefinition. Select Finish
From the Properties Editor change the value of the columns from 2 to 1.
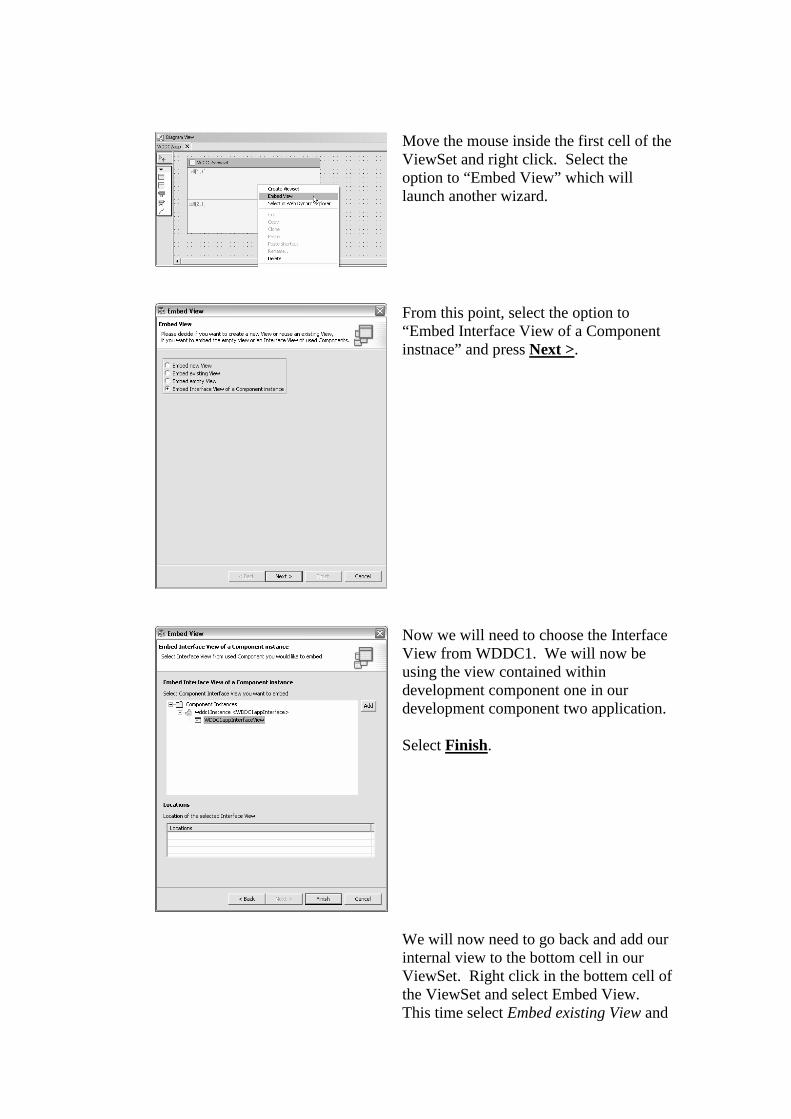
Move the mouse inside the first cell of the ViewSet and right click. Select the option to “Embed View” which will launch another wizard.
From this point, select the option to “Embed Interface View of a Component instnace” and press Next >.
Now we will need to choose the Interface View from WDDC1. We will now be using the view contained within development component one in our development component two application. Select Finish.
We will now need to go back and add our internal view to the bottom cell in our ViewSet. Right click in the bottem cell of the ViewSet and select Embed View. This time select Embed existing View and
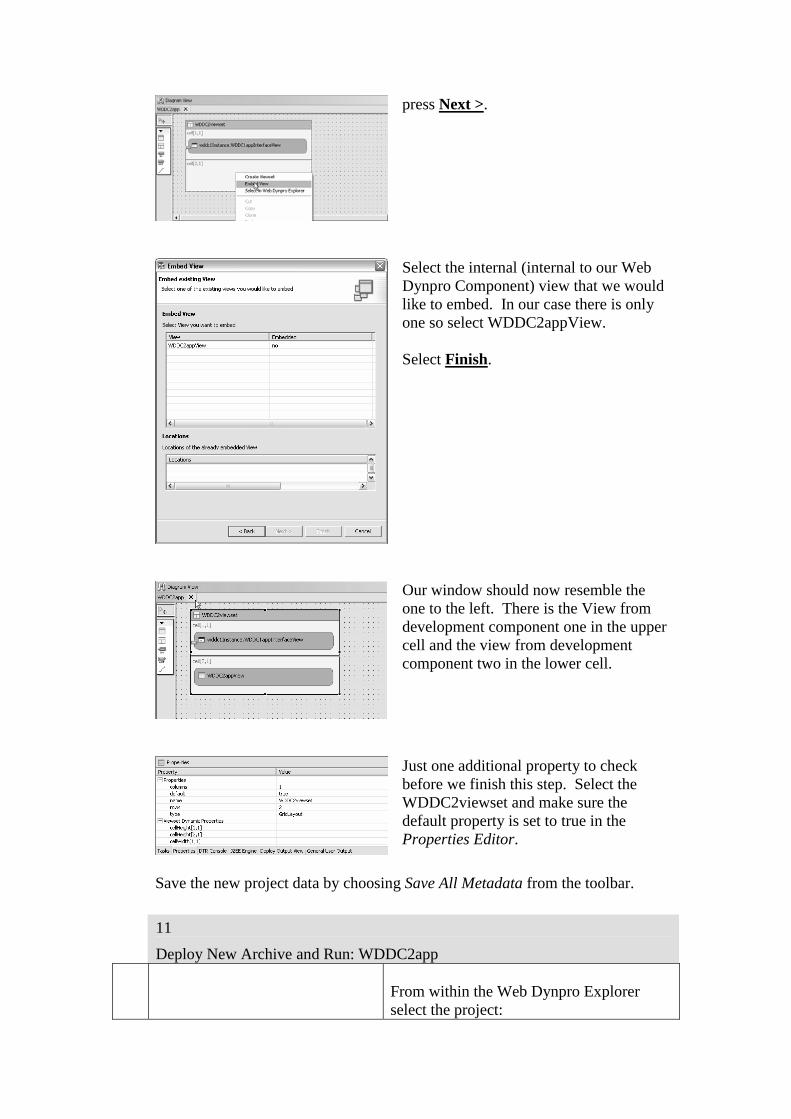
press Next >.
Select the internal (internal to our Web Dynpro Component) view that we would like to embed. In our case there is only one so select WDDC2appView. Select Finish.
Our window should now resemble the one to the left. There is the View from development component one in the upper cell and the view from development component two in the lower cell.
Just one additional property to check before we finish this step. Select the WDDC2viewset and make sure the default property is set to true in the Properties Editor.
Save the new project data by choosing Save All Metadata from the toolbar.
11
Deploy New Archive and Run: WDDC2app
From within the Web Dynpro Explorer select the project:
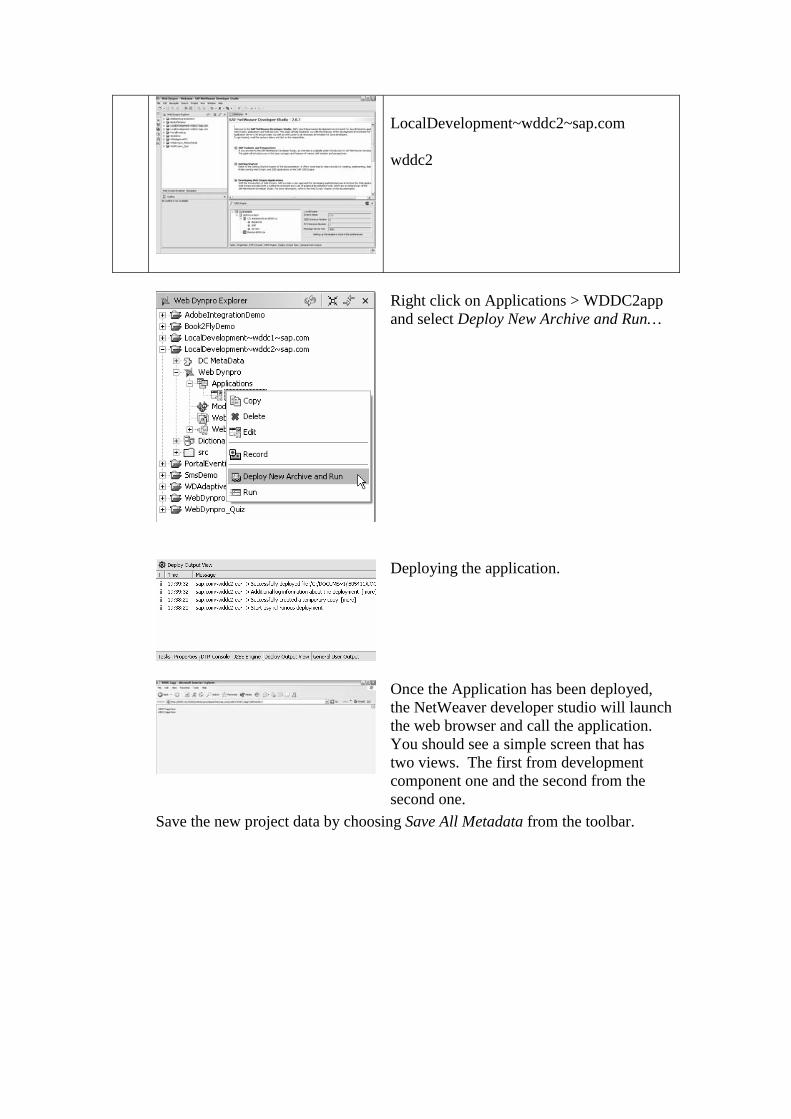
LocalDevelopment~wddc2~sap.com wddc2
Right click on Applications > WDDC2app and select Deploy New Archive and Run…
Deploying the application.
Once the Application has been deployed, the NetWeaver developer studio will launch the web browser and call the application. You should see a simple screen that has two views. The first from development component one and the second from the second one.
Save the new project data by choosing Save All Metadata from the toolbar.
Related Documents