Welcome message from author
This document is posted to help you gain knowledge. Please leave a comment to let me know what you think about it! Share it to your friends and learn new things together.
Transcript


This is the Portal-Lite ticket entry interface. Each field and feature are numbered. This document will explain each numbered item. Fields that are colored Red are required fields. Leaving a required field blank will result in an error when you try and Submit the ticket. Some of the contact fields will auto-populate with data based on your saved login information. The fields that will auto-populate are labeled with an *.
1. New Ticket - When first logging in, the main screen area will be blank. To file a ticket, you will need to click New and then click the Ticket option. That will open a new blank ticket in the main area to the right.
2. *Phone – This should be either the main phone number for your company, or your individual office phone number.

3. *Company Name – The name of the organization you work for.
4. *Address – Your company mailing address. Example would be 1234 N. Main St.
5. *City/State/Zip – These fields also pertain to your company mailing address.
6. Fax # - If you want to list a fax number for your company it can be entered here.
7. *Caller Name – This is your name as the person filing the ticket. If other people from your company file tickets with the same phone number, you may see their names as options in the drop-down menu. However, this field should always be the name of the person filing this specific ticket.
8. Caller Cell –You can change it to be your cell phone if you would like to.
9. *Caller Email – This will populate with the email address you used when signing up for the Portal.
10. *Field Representative Contact – This is the person responsible for the excavation at the work site.
11. *Field Representative Phone – Please provide a valid phone number where the Field Representative can be reached should members have any concerns or questions regarding the work site. A valid number that can be reached for after-hours emergency tickets is especially important. This phone number should typically be a cell phone and not an office phone. If the Field Representative phone number is the same as the other phone number above (Excavator Phone) you can leave the field blank or copy the other phone number into this field.
12. *Field Representative Email – If the Field Representative has an email address, please provide it here. This can be useful for members if they are having difficulties reaching the person by phone.
13. Best Time – If there is a good time to reach you or the Field Representative, you can specify it here.
14. Working For – Please identify who your company is doing the work for. If the work is being done for your company, you can copy your company name into this field.
15. Duration – You can identify how long your project will take if you think it is valuable to the member companies.
16. Checkboxes – Each of the checkboxes refer to questions. If you answer “YES” to any of the questions, or are unsure of your answer, you should check the checkbox. If you answer “NO” you should leave the checkboxes blank. The questions are:
• Explosives – Are you going to use explosives in your work?

• Overhead – Are you going to use equipment reaching 14 feet or higher in the air? If you are, will that equipment be within 25 feet of an overhead line? If you answer “YES” to both, check the checkbox.
• Directional Boring – Will you be using boring equipment in your work? • Premark – Will the area where you are digging be identified in some way by using white paint, flags, or stakes?
17. Address To – If you are filing a Stretch of Road ticket and are using addresses as the starting and ending points, you would put
the ending address in this field. The starting address would be identified in the Work Location Address field (item 25.)
18. Intersection 2 – If you are filing a Stretch of Road ticket and are using intersections as the starting and ending points, you would use this field to identify the ending intersecting street. Intersection 1 in the Work Location area would be where you enter the starting intersection street.
19. Side of Street – If your work is only going to be on one side of the street, please identify which side of the street the work will be on. If your work is going to be in the entire road or will be on both sides of the road, leave this field blank.
20. Ticket Type – You can choose from 3 types of tickets.
• Standard – This is a basic, 3 Working Day ticket. • Planning-Locate – This is a ticket type for pre-construction, design-stage work where excavation is not occurring at this
time but the location of the facilities is necessary for planning an excavation project. Utilities will respond to this ticket type by locating their facilities with paint and/or flags at the established work location. This ticket type will set your start date and time 10 calendar days from the current date and time.
• Planning-Prints – This is exactly the same as the Planning-Locate ticket type above, but instead of utilities marking their facilities with paint and/or flags at the work location, they will work with you to exchange prints of the where their facilities are located.
21. Type of Work – You can select from an appropriate option in the drop-down list or you can type what kind of excavation you will be doing. “Excavation,” “Digging,” and “Construction,” are not descriptive enough. Please be more specific if you enter a type of work.
22. Start Date and Time – The Start Date and Time will default based on the Ticket Type you choose. You can move out your Start Date and Time up to 30 calendar days from the current date and time. If you do so, do not set your start date on a weekend or legal holiday. If you change your start time, do not set that time outside the normal business hours of 6am to 6pm. You cannot set a Start Date and Time earlier than the legal waiting period.
23. County – This is where you will start to identify where your work will be taking place. The State field will always be gray and set for WI. Start typing the County where your work will take place in the County field and choose the correct option from the drop-

down list.
24. Place (Municipality) – Once you choose a County, the place field will have the municipality options for that county. Choose the actual municipality where your work is taking place.
25. Address – The Address is made up of 5 potential fields. The first is for the civic number of the work location (if your location has an address.) Address can be regular civic numbers (123), fire numbers (W1234) or coordinate/double-directional (N12W12345). If you do not have an address you can leave this first field blank. The 2nd field is for the directional modifier of the street. If your address is 123 N Main St. “N” would go in the 2nd field. The 3rd field is for the Street Name. The 4th field is for the type of road (ST, RD, BLVD, CT, etc.) The last field is if the road has a suffix (123 Main St W). “W” would go in that field in that example.
26. Intersection 1 – This should be the nearest intersecting street or the nearest main intersecting street to the address or work location on the Street provided.
27. Search Arrow – If you enter address information and want to search for the roads, you can click this arrow and street search results will appear in the Search Results window (item 33) in the bottom right of the screen. You can then choose from the results to identify your street and intersecting street accurately. This will be explained more later in this document.
28. Return Results Arrow – Once you find your street and intersecting street in the Search Results window, you can click this button and the system will populate the Address and Intersection 1 fields with the data from your selection.
29. Distance/Direction – You will need to identify how far and in what direction your address/work location is from Intersection 1. You can type it like this: Distance – Measurement Type – Direction. No other info should be entered into this field. Some examples would be:
• 100 Feet W • ½ Mile S • 3 Blocks E
30. Marking Instructions – This is where you identify the specific location of where you will be digging. Be as specific as you can
be and do not unnecessarily increase the area you want marked out. Marking Instructions can generally fit into a few categories.
AREA - An area is a portion of land to be marked with at least two fixed sides as reference points and two sides that can be defined by fixed points or footages. In this example the Marking Instructions would read: “MARK FROM THE S SIDE OF THE BUILDING TO THE S LOT LINE FOR THE WIDTH OF THE LOT.” RADIUS - A radius extends out in all directions from a fixed center-point for a specific distance. Radii are generally marked around single points/objects, like poles, stakes, flags, corners of homes/buildings, etc. In this example the Markings Instructions
would read: “MARK A (#) FOOT RADIUS OF THE SW CORNER OF THE HOME.” PATH - A path is a line with an equal distance marked on each side that travels between two fixed points. In this example the Marking Instructions would read: “STARTING AT THE NE CORNER OF THE GARAGE, MARK A (#) FOOT WIDE PATH GOING STRAIGHT E TO THE PEDESTAL.” RROW - The Road Right-of-way is the entire designated street area between the property lines along each side of the street. This often includes the shoulder and/or terrace and sidewalk areas. The Right-of-way can be split into halves from the centerline of the road. In this example the Marking Instructions would read: “MARK THE ENTIRE ROAD RIGHT-OF-WAY OF MAIN ST FROM 1ST ST GOING E TO 2ND ST.” PERIMETER – The perimeter is the length of the line that bounds an area. The word may also be used to refer to the boundary line itself. We consider a perimeter as the distance around all sides of an area. Perimeters are generally marked around homes, buildings, or other structures. In this example the Marking Instructions would read: “MARK A (#) FT PERIMETER OF THE HOME.” Marking Instructions can generally be formatted in one of three ways when referencing the beginning point for the instructions: (1) you can start with the beginning point first and then describe what needs to be marked and its ending point, (2) you can describe what needs to be marked, and then indicate where it will be starting from and ending at, or (3) you can describe what needs to be marked and then indicate distance/directions to end point, concluding from the beginning point. All are acceptable; find which method works best for you. Here are some examples of Marking Instructions: AREA:
• Starting at S side of Bldg, mark an area going S to the S lot line for the width of the lot. • Mark an area from the S side of the Bldg to the S lot line for the width of the lot. • Mark an area to the S lot line for the width of the lot from the S side of the bldg.
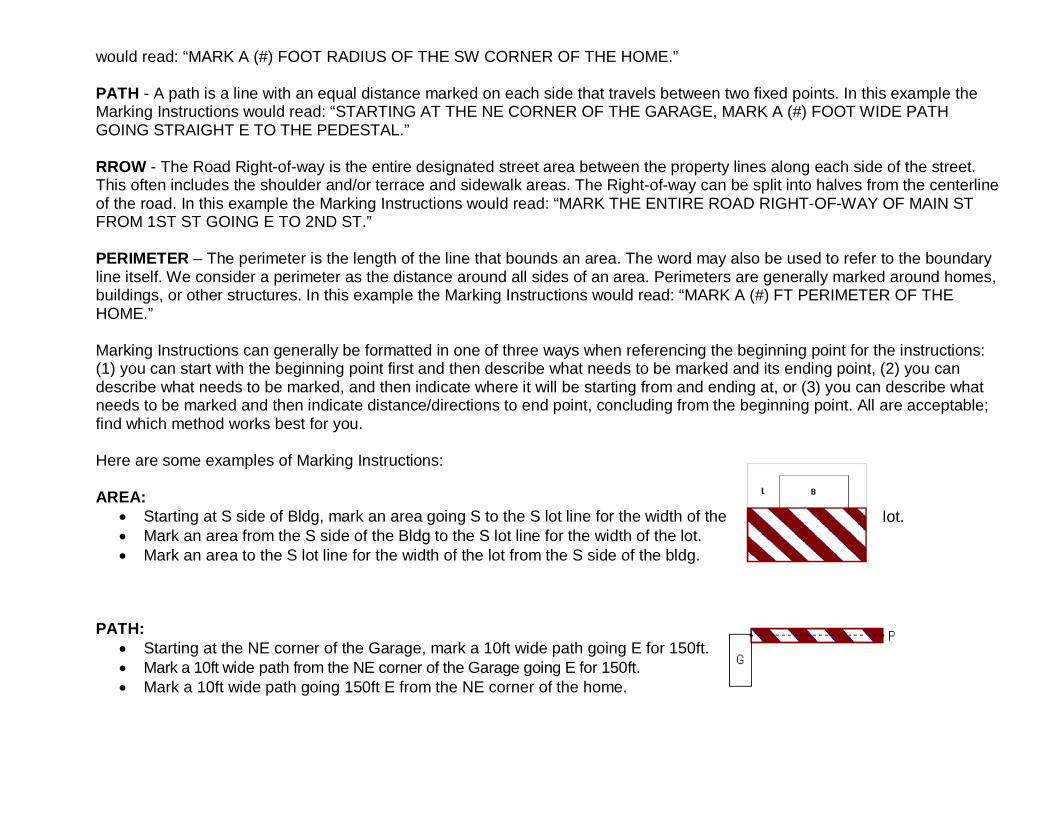
PATH:
• Starting at the NE corner of the Garage, mark a 10ft wide path going E for 150ft. • Mark a 10ft wide path from the NE corner of the Garage going E for 150ft. • Mark a 10ft wide path going 150ft E from the NE corner of the home.

RROW:
• Starting at the above intersection, mark the entire RROW of Main St going E to 2nd St. • Mark the entire RROW of Main St from 1st St going E to 2nd St. • Mark the entire RROW of Main St going E to 2nd St from 1st (or from the above
intersection). Radii and Perimeters are a little different. Because there are only two parts present in these types of Marking Instructions, there can be only two different ways of writing them. For example: RADIUS:
• At the SW corner of the home, mark a 20ft radius. • Mark a 20ft radius of the SW corner of the home.
PERIMETER:
• There is a house on the property. Mark a 100ft perimeter around it. • Mark a 100ft perimeter of the house.
31. Remarks – Remarks can be used for any other information you think is valuable for the locators.
32. Map Window – While the map does appear and will zoom in as you enter Work Location information, you will not be using the map in any way for Portal-Lite.
33. Search Results – As mentioned in items 27 and 28, you can search for streets and intersecting streets. When you enter full or partial address data in field 25, you can click the Search Arrow (Item 27) and results will appear in this window.

NOTE – Ignore the results for “Address Property Boundary” and “Bing Results.” These will not work properly with the Return Results Arrow. Scroll down to “Exact Match” or “Street Begins With” or “Similar Streets” to find the street you are working on. When you find that street select it from the list (as illustrated in the image to the right.) A list of intersecting streets will appear. Select the appropriate intersecting street from the list. When the intersecting street is selected, click the Return Results Arrow (Item 28) and the system will populate the Address and Intersection 1 fields with the streets you selected in the Search Results window. This actually has some benefits for you as a Portal-Lite user. If you take a moment to search and return your roads from the Search Results window, you will make it much easier for the Diggers Hotline representative to find your location and map it easily. It will result in less call-backs from Diggers Hotline on your Portal-Lite tickets.
34. Suspend/Action/View Buttons – Suspend is the button you will click when you are finished entering your information and want
to submit the ticket to Diggers Hotline. Action and View will not do anything if you click on them, so they can be ignored. Once successfully suspended, a pop-up message will appear indicating the ticket has been sent to us for review.
35. Links – These are just a few useful links if you need them.
36. Log Out – If you click on your email address at the bottom-left of the screen, it will log you out of the Portal-Lite.
Related Documents


![Ticket Template Word€¦ · Web view[your. event name] date. time. ticket. date. time. ticket. date. time. ticket. date. time. ticket. date. time. ticket. date. time. ticket. date.](https://static.cupdf.com/doc/110x72/5f0738fe7e708231d41beb46/ticket-template-word-web-view-your-event-name-date-time-ticket-date-time.jpg)


![CDJ3000 + Mixer Choice (2) - Final Entry List...CDJ3000 + Mixer Choice (2) - Final Entry List [05/02/2020] First Name Last Name Ticket Number Order Victor Aguilar 496 21333 Victor](https://static.cupdf.com/doc/110x72/60f050cad12d2f5a41286d18/cdj3000-mixer-choice-2-final-entry-list-cdj3000-mixer-choice-2-final.jpg)