HyperFile Administrator's Guide Version 3.7.3

Welcome message from author
This document is posted to help you gain knowledge. Please leave a comment to let me know what you think about it! Share it to your friends and learn new things together.
Transcript
HyperFile Administrator's GuideVersion 3.7.3

This page left intentionally blank
Confidentiality Notice
The information contained in this document is confidential to, and is the intellectual property of, Cloudian,Inc. Neither this document nor any information contained herein may be (1) used in any manner other thanto support the use of Cloudian software in accordance with a valid license obtained from Cloudian, Inc, or(2) reproduced, disclosed or otherwise provided to others under any circumstances, without the prior writtenpermission of Cloudian, Inc. Without limiting the foregoing, use of any information contained in this doc-ument in connection with the development of a product or service that may be competitive with Cloudian soft-ware is strictly prohibited. Any permitted reproduction of this document or any portion hereof must beaccompanied by this legend.

This page left intentionally blank

Contents
Chapter 1. Introduction to HyperFile 11.1. What's New in HyperFile 3.7 11.2. HyperFile Documentation 21.3. HyperFile Overview 61.4. Accessing the HyperFile GUI or CLI 7
1.4.1. Connecting to the HyperFile GUI 7
1.4.2. Connecting to the HyperFile CLI 8
1.5. HyperFile Licensing 8
1.5.1. Updating Your License via GUI 9
1.5.2. Updating Your License via CLI 9
Chapter 2. Upgrading Your HyperFile Software Version 112.1. Updating HyperFile Software Packages via GUI 11
2.1.1. Remote UpdateMethod 13
2.1.2. LocalUpdateMethod 14
2.2. Updating HyperFile Software Packages via CLI 16
Chapter 3. System Configuration 193.1. HyperFile Configuration Overview 193.2. Configuring Networking Settings 193.3. Configuring Active Directory Integration 203.4. SMB Configuration Tips 20
3.4.1. On the HyperFile Node 20
3.4.2. OnWindowsClients 21
Chapter 4. Working with HyperFile Major Features 234.1. Local Caching 23
4.1.1. HyperFile Storage TiersOverview 23
4.1.2. Introduction to ZFS for HyperFile 24
4.1.3. Adding a VirtualDiskDevice to the VM 27
4.2. Volumes 33
4.2.1. HyperFile VolumesOverview 33
4.2.2. Preparing to Create a Volume 34
4.2.3. Creating a Volume 34
4.2.4. Managing Volume Storage Devices 34
4.3. Clustering for High Availability 40
4.3.1. HyperFile Clustering Overview 40
4.3.2. Preparing to Create a Clustered Volume 41
4.3.3. Creating a Clustered Volume 46
4.3.4. Enabling Failover Between Clustered Nodes 46
4.4. Geo-Distribution 49
4.4.1. HyperFile Multi-Controller Overview 49
4.4.2. Creating aMulti-Controller Volume on a First Node 51
4.4.3. Importing aMulti-Controller Volume to AdditionalNodes 55
4.5. WORM 58
4.5.1. HyperFileWORMOverview 58
4.5.2. FromWORM to Compliance 61
4.5.3. Creating aWORMVolume 64
4.6. Snapshots 67
4.6.1. HyperFile SnapshotsOverview 67
4.6.2. Pre-Configured Daily andWeeklySnapshots 69
4.6.3. Creating or Scheduling Snapshots 70
4.6.4. Recovering a Corrupted or Lost Volume from a Snapshot 73
4.6.5. Mounting a Snapshot to Recover Selected Files 74
4.6.6. Restoring SystemSettings from a Snapshot 77
4.7. Data Migration 78
4.7.1. HyperFile DataMigration Overview 78
4.7.2. Preparing toMigrate fromNAS toObject Storage 78
4.7.3. Migrating fromNAS toObject Storage 84
Chapter 5. Using the HyperFile GUI 935.1. System: Status 93
5.1.1. Overview 93
5.1.2. Processes 96
5.1.3. Logs 98
5.1.4. Tasks 104
5.2. System: Settings 105
5.2.1. Snapshots 105
5.2.2. Network 106
5.2.3. Cluster 109
5.2.4. Zpool 110
1
5.2.5. NTP 117
5.2.6. Active Directory 119
5.2.7. System 125
5.2.8. NetworkStorage 126
5.2.9. Users 128
5.2.10. Certificates 130
5.2.11. Logging 132
5.2.12. Mail 135
5.2.13. FTP 136
5.2.14. GUI 139
5.3. System: Support 143
5.3.1. Software Information 143
5.3.2. License 143
5.3.3. Help 144
5.4. Volumes 146
5.4.1. VolumeCreate 146
5.4.2. VolumeOverview 160
5.4.3. Volume Properties 164
5.4.4. VolumeMaintenance 170
5.4.5. VolumeQuery 172
5.4.6. Volume Explore 178
5.4.7. Volume Performance 180
5.4.8. VolumeWORMCompliance 181
5.4.9. Volume Sharing 181
5.4.10. VolumeQuota 189
5.4.11. VolumeCache Tier 191
5.4.12. VolumeOSD Tier 201
5.4.13. VolumeCluster Tier 208
5.4.14. Add Volume Storage Tier 212
Chapter 6. Acknowledgments of Third Party Products 215
2

This page left intentionally blank
Chapter 1. Introduction to HyperFile
1.1. What's New in HyperFile 3.7This topic introduces the main new features and enhancements for Cloudian HyperFile version 3.7. Click anitem for a summary of the change and (if applicable) links to further information.
Note For more granular release details including bug fixes and configuration setting changes pleasesee the release notes.
Support for using Multi-Controller and Cluster (High Availability) features in combination
HyperFile now supports the creation of volumes that use both Multi-Controller functionality and Cluster (HighAvailability) functionality together, in combination. However this is an advanced configuration that requiresCloudian Support to assist you in setting up these features in combination. If you are interested in using Multi-Controller and Cluster (High Availability) features together, contact Cloudian Support.
Option for pass-through reads from the object storage tier
HyperFile now supports an option for configuring a volume such that files that are only in the object storage tier(and not in cache) can be read directly through the client applications without first being written into cache. Bydefault such files are written into cache first before data is read back to the client application.
More information:
l Volume Properties -> Advanced Settings -> "Read cache" (page 168)
Improved support for managing the winbind process
The HyperFile GUI now has improved support for managing the winbind process (which implementsID mapping for SMB services):
l In the Active Directory page you can see the current status of the winbind process
l In the System page you can restart the winbind process. You do not need to close volumes beforerestarting this process.
Option for forbidding upload of specified file types (3.7.1)
As part of each volume's configurable properties, HyperFile now supports forbidding the upload of certaintypes of files (based on file name extensions).
More information:
l Volume Properties -> Advanced Settings -> "Forbidden file extensions" (page 170)
Support for VMware vOSE as an object storage tier (3.7.1.3)
VMware vOSE is now a supported option when you create a volume and configure the volume's object storagetier.
More information:
l "Volume Create" (page 146)
S3 is no longer supported as a front-end sharing option for a volume (3.7.1.3)
1
Chapter 1. Introduction to HyperFile
S3 is no longer a supported option when configuring sharing for a HyperFile volume. This option has beenremoved from the HyperFile GUI.
SNMP is no longer supported as a system notification mechanism (3.7.1.3)
HyperFile no longer supports sending SNMP traps. This option has been removed from the HyperFile GUI.
Support for using an Object Lock bucket as the object storage tier for a Standard WORM volume (3.7.2)
When creating a Standard WORM volume, you can now choose as the object storage target a HyperStorebucket that is configured for Object Lock. The configuration of the bucket itself must first be done in HyperStore(through the HyperStore CMC or S3 API). Then in HyperFile you can select that bucket as the object storage tar-get when you create a Standard WORM volume.
More information:
l "Creating a WORM Volume" (page 64) (high level overview)
l "Data Director (create a volume with more customization options)" (page 150) (details)
Update to newer Samba version (3.7.3)
In implementing support for SMB based file sharing, HyperFile now uses Samba version 4.13. PreviouslyHyperFile used Samba 4.9.5, which had certain shortcomings that have been corrected by version 4.13.
1.2. HyperFile DocumentationThis HyperFile user documentation is for HyperFile version 3.7.3.
The HyperFile user documentation consists of:
l HyperFile Help (HTML5)
l HyperFile Administrator's Guide (PDF)
l HyperFile Installation Guide (PDF)
The Help and the Administrator's Guide are available through the HyperFile GUI (System -> Support -> Help -> Open HyperFile Help). Also, the Help (as a tarball), the Administrator's Guide, and the Installation Guide areavailable through the Cloudian Support portal.
The Help has the exact same content as the Installation Guide and Administrator's guide, just in HTML ratherthan PDF. Further, starting with section "1. Introduction to HyperFile", the Help uses the exact same sectionnumbering as is used in the Administrator's Guide -- so for example, section 5.2.1 in the Help is the same con-tent as section 5.2.1 in the Administrator's Guide.
The Help features a built-in search engine. The search box is in the upper right of the interface. As with anysearch engine, enclose your search phrase in quotes if you want to limit the results to exact match only.
In the Help, in most cases screen shots are presented initially as small thumbnail images. This allows for amore compact initial view of the content on a page and makes it easier for you to skim through the text on thepage. If you want to see the full size image simply hold your cursor over it.
2
1.2. HyperFile Documentation
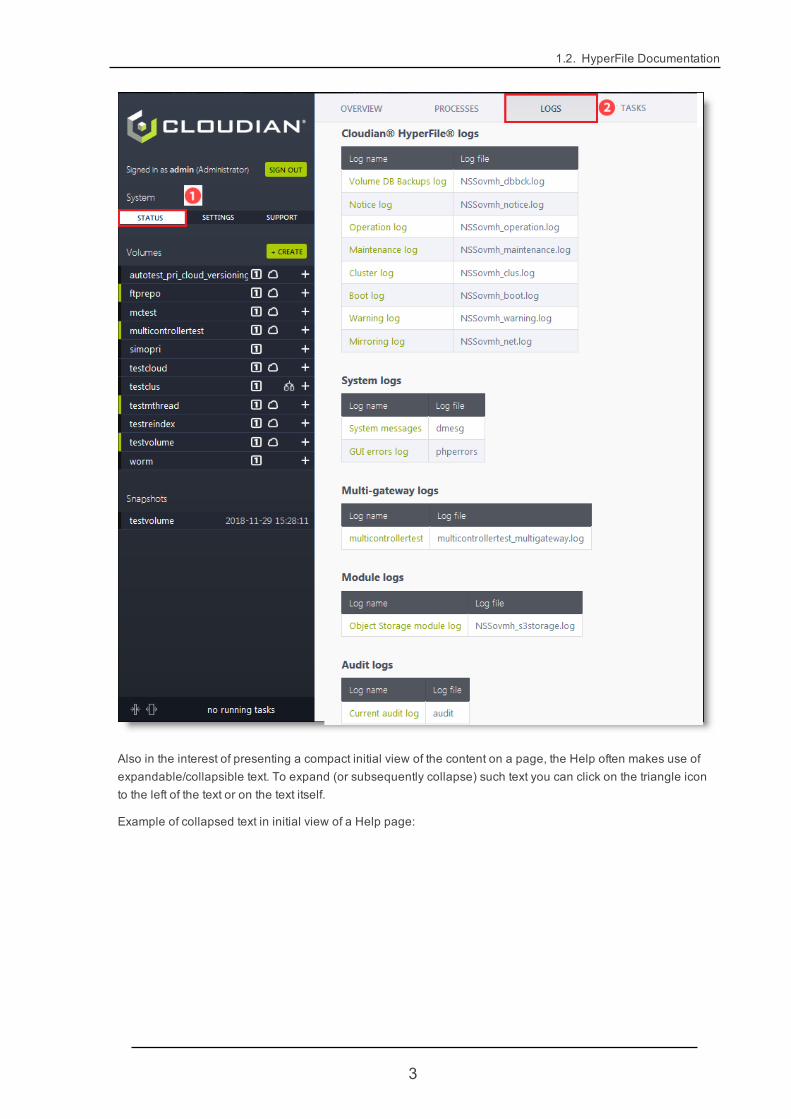
Also in the interest of presenting a compact initial view of the content on a page, the Help often makes use ofexpandable/collapsible text. To expand (or subsequently collapse) such text you can click on the triangle iconto the left of the text or on the text itself.
Example of collapsed text in initial view of a Help page:
3
Chapter 1. Introduction to HyperFile
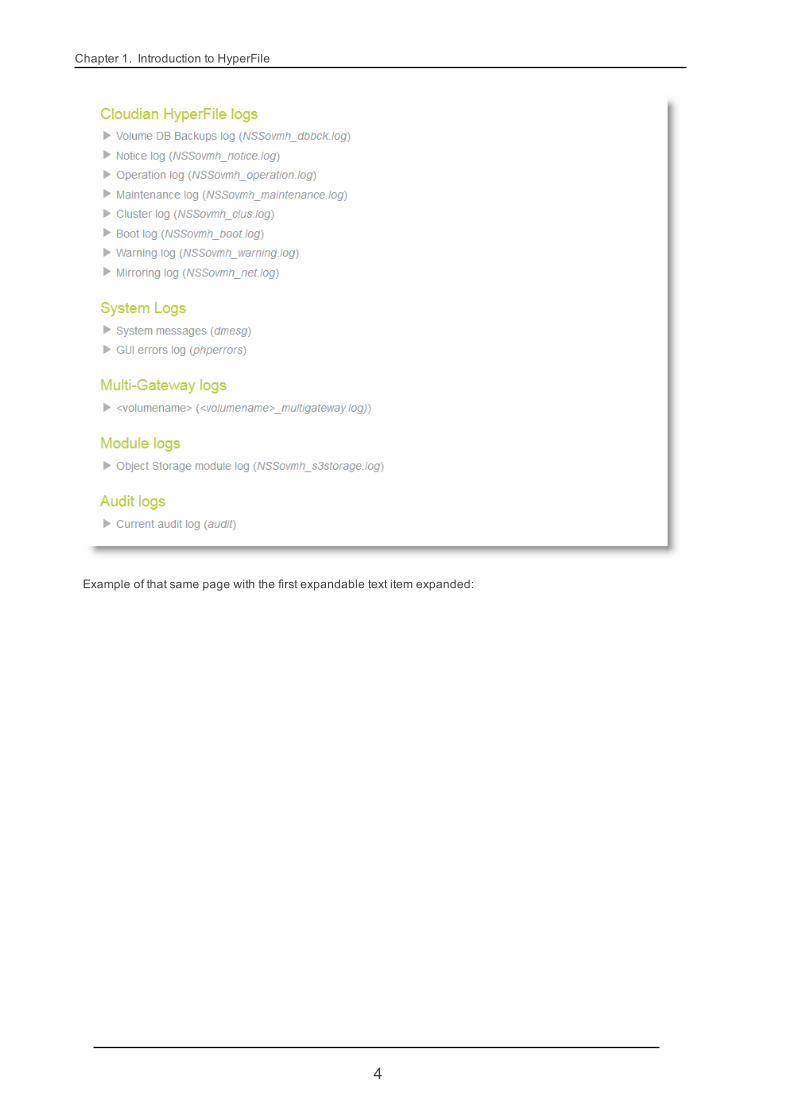
Example of that same page with the first expandable text item expanded:
4

1.2. HyperFile Documentation
To expand or collapse all of the expandable/collapsible text on a page, click this button in the upper left of theHelp interface:
If you have a comment or request regarding the HyperFile documentation, please send it to this email address:
You will not receive a reply, but the Cloudian Technical Publications team will review your comment and, ifappropriate, redress the issue in an upcoming HyperFile release. Thank you for your feedback.
5
Chapter 1. Introduction to HyperFile
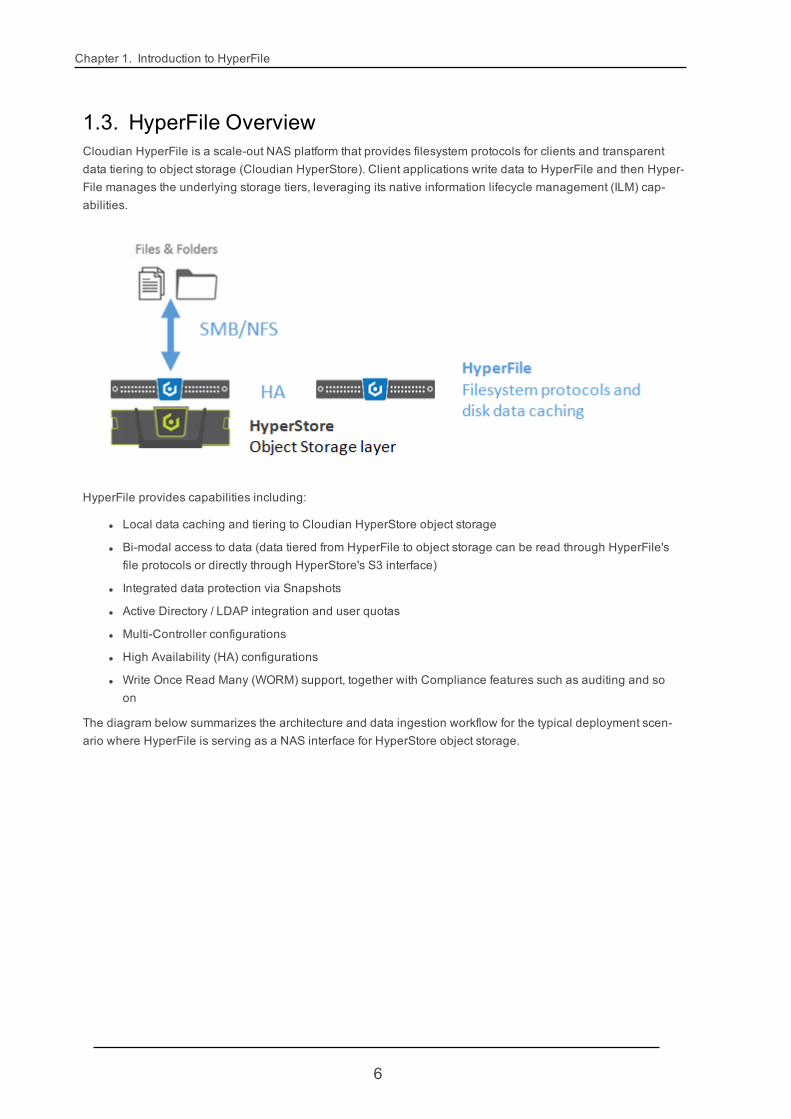
1.3. HyperFile OverviewCloudian HyperFile is a scale-out NAS platform that provides filesystem protocols for clients and transparentdata tiering to object storage (Cloudian HyperStore). Client applications write data to HyperFile and then Hyper-File manages the underlying storage tiers, leveraging its native information lifecycle management (ILM) cap-abilities.
HyperFile provides capabilities including:
l Local data caching and tiering to Cloudian HyperStore object storage
l Bi-modal access to data (data tiered from HyperFile to object storage can be read through HyperFile'sfile protocols or directly through HyperStore's S3 interface)
l Integrated data protection via Snapshots
l Active Directory / LDAP integration and user quotas
l Multi-Controller configurations
l High Availability (HA) configurations
l Write Once Read Many (WORM) support, together with Compliance features such as auditing and soon
The diagram below summarizes the architecture and data ingestion workflow for the typical deployment scen-ario where HyperFile is serving as a NAS interface for HyperStore object storage.
6

1.4. Accessing the HyperFile GUI or CLI
1.4. Accessing the HyperFile GUI or CLI
1.4.1. Connecting to the HyperFile GUIAfter you've installed and set up the HyperFile virtual machine you can connect to the HyperFile graphicaluser interface (GUI) to complete the configuration and then to perform more advanced tasks.
Point a web browser to the HyperFile virtual machine's IP address to open the web-based HyperFile GUI.
The default administrator login credentials for the GUI are:
l Username: admin
l Password: admin
You can change these credentials later from within the GUI if you wish to do so.
7
Chapter 1. Introduction to HyperFile
Note If you have multiple HyperFile nodes, each node has it own GUI instance accessible by pointinga browser the node's IP address.
1.4.1.1. Browser Support
The HyperFile administration GUI supports Firefox, Chrome, and Safari. The administration GUI also supportsInternet Explorer version 11.
HyperFile's Web S3 client (see System -> Settings -> S3 to activate) supports Firefox, Chrome, and Safari,and their mobile counterparts. The Web S3 client does not support Internet Explorer.
1.4.2. Connecting to the HyperFile CLIHyperFile also supports a command line interface (CLI). To access the CLI on a HyperFile node simply con-nect to the node via SSH, using the user account (normally root) and password that you set during the Hyper-File VM installation and set-up:
ssh <username>@<HyperFileIPaddress>
You will be prompted to provide the password, and after doing so you can use the HyperFile CLI. To confirmthat you're connected to the CLI you can run the command infistatus, which returns some basic status inform-ation for the HyperFile instance including the version number.
Note As with the GUI, with the CLI you are connecting to a particular HyperFile node, and acting onlyon that node.
Note In some sections of this HyperFile Administrator's Guide, the CLI commands for certain oper-ational tasks are provided as an alternative to using the GUI for those tasks. Additional CLI informationwill be made available in a future release of the HyperFile documentation.
1.5. HyperFile LicensingHyperFile requires a license in order to operate. The license must be applied to each HyperFile node in yoursystem. There are three license levels for HyperFile:
l Free: The Free license comes bundled with the HyperFile OVA and enables HyperFile standard fea-tures. There is no time limit on this free license, but the license restricts your HyperFile system to usinga maximum of 512GB of local cache storage and 512GB of tiered HyperStore object storage. Thislicense type is intended for tests and PoCs -- not for production systems.
l Basic: This license supports most HyperFile features including High Availability Cluster con-figurations. The Basic license does not support Multi-Controller Volumes or WORM Volumes. The Basiclicense also does not support mounting snapshots as independent volumes (with a Basic license youcan create snapshots and use them to recover lost or corrupted volumes, but you cannot notmountthem as independent volumes). The Basic license applies a 900TB limit on cache capacity utilization,and no limit on HyperStore object storage capacity utilization.
l Enterprise: The Enterprise license includes all the features of the Basic license plus support for Multi-Controller Volumes andWORM Volumes. The Enterprise license also supports mounting snapshots
8
1.5. HyperFile Licensing
as independent volumes. Like the Basic license, the Enterprise license applies a 900TB limit on cachecapacity utilization, and no limit on HyperStore object storage capacity utilization.
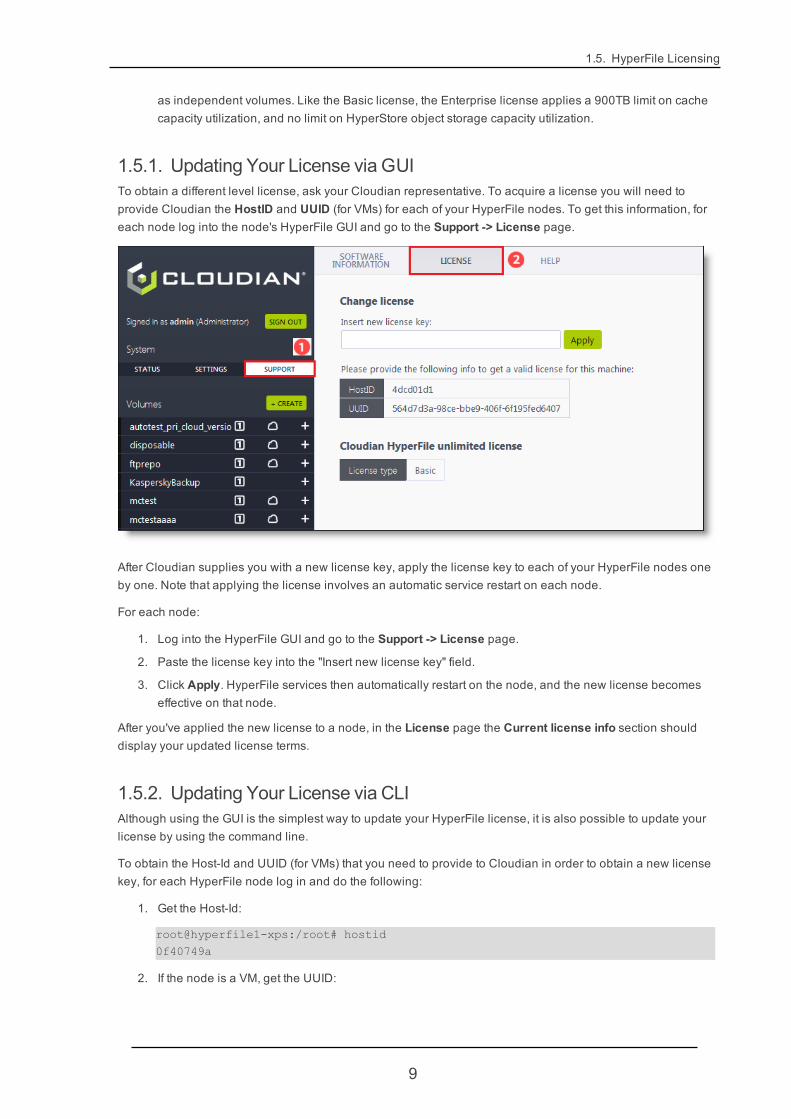
1.5.1. Updating Your License via GUITo obtain a different level license, ask your Cloudian representative. To acquire a license you will need toprovide Cloudian the HostID and UUID (for VMs) for each of your HyperFile nodes. To get this information, foreach node log into the node's HyperFile GUI and go to the Support -> License page.
After Cloudian supplies you with a new license key, apply the license key to each of your HyperFile nodes oneby one. Note that applying the license involves an automatic service restart on each node.
For each node:
1. Log into the HyperFile GUI and go to the Support -> License page.
2. Paste the license key into the "Insert new license key" field.
3. Click Apply. HyperFile services then automatically restart on the node, and the new license becomeseffective on that node.
After you've applied the new license to a node, in the License page the Current license info section shoulddisplay your updated license terms.
1.5.2. Updating Your License via CLIAlthough using the GUI is the simplest way to update your HyperFile license, it is also possible to update yourlicense by using the command line.
To obtain the Host-Id and UUID (for VMs) that you need to provide to Cloudian in order to obtain a new licensekey, for each HyperFile node log in and do the following:
1. Get the Host-Id:
root@hyperfile1-xps:/root# hostid0f40749a
2. If the node is a VM, get the UUID:
9

Chapter 1. Introduction to HyperFile
root@hyperfile1-xps:/root# smbios | grep UUIDUUID: 564dd065-130b-a75f-3f62-5d13e0506aa6
After acquiring a new license key from Cloudian, you can use the HyperFile CLI to apply the key to each node.For each HyperFile node one by one, first connect to the CLI and then run this command:
# infikey -i -s <license key>
HyperFile services then automatically restart on the node, and the new license becomes effective on that node.
After you've applied the license and services have restarted, if you wish you can then use either of these com-mands to verify your new license terms:
# infikey -c -p INFINITY to get summary information about the License Key# infikey -c -p INFINITY -V to get detailed information about the License Key
10
Chapter 2. Upgrading Your HyperFile Soft-ware VersionSubjects covered in this section:
l Introduction (immediately below)
l "Updating HyperFile Software Packages via GUI" (page 11)
l "Updating HyperFile Software Packages via CLI" (page 16)
To upgrade your HyperFile software version you will need to acquire from Cloudian Support a user name andpassword for accessing the HyperFile packages repository. If you do not already have these login credentials,get them from Cloudian Support before proceeding with the upgrade instructions below.
IMPORTANT: Make sure that all volumes are closed before you upgrade your HyperFile software.Any volume found open will cause the upgrade procedure to abort. Note that closing volumes makesthem inaccessible by clients. Upgrade usually takes a short time -- a minute or two -- and after suc-cessful upgrade you can re-open the volumes.
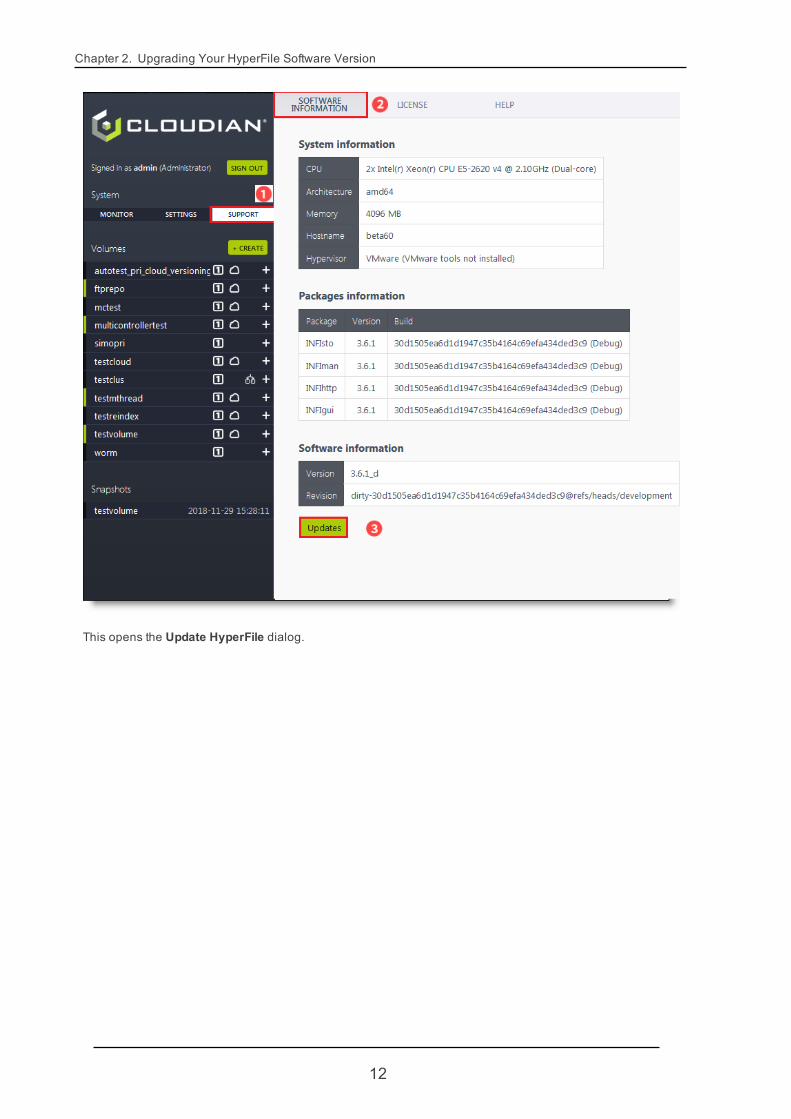
2.1. Updating HyperFile Software Packages via GUITo upgrade the installed version of HyperFile, select Support -> Software Information. Toward the bottom ofthe page click Updates.
11
Chapter 2. Upgrading Your HyperFile Software Version
This opens the Update HyperFile dialog.
12
2.1. Updating HyperFile Software Packages via GUI
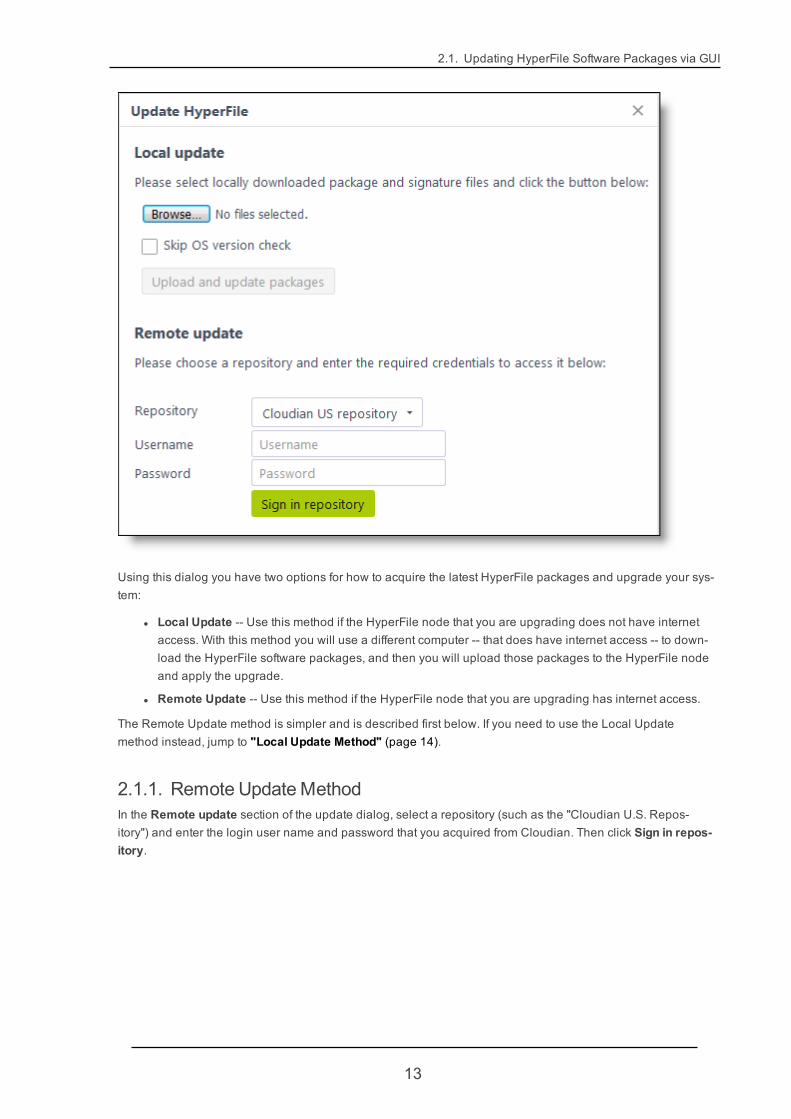
Using this dialog you have two options for how to acquire the latest HyperFile packages and upgrade your sys-tem:
l Local Update -- Use this method if the HyperFile node that you are upgrading does not have internetaccess. With this method you will use a different computer -- that does have internet access -- to down-load the HyperFile software packages, and then you will upload those packages to the HyperFile nodeand apply the upgrade.
l Remote Update -- Use this method if the HyperFile node that you are upgrading has internet access.
The Remote Update method is simpler and is described first below. If you need to use the Local Updatemethod instead, jump to "Local Update Method" (page 14).
2.1.1. Remote UpdateMethodIn the Remote update section of the update dialog, select a repository (such as the "Cloudian U.S. Repos-itory") and enter the login user name and password that you acquired from Cloudian. Then click Sign in repos-itory.
13
Chapter 2. Upgrading Your HyperFile Software Version
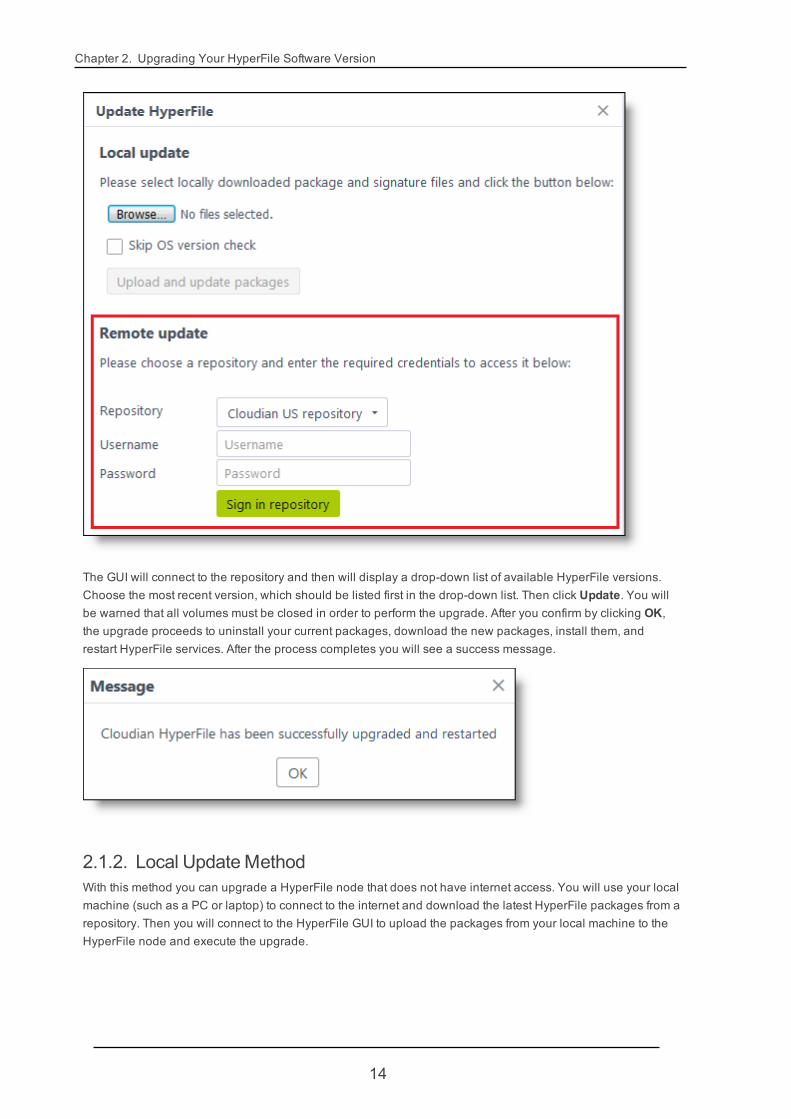
The GUI will connect to the repository and then will display a drop-down list of available HyperFile versions.Choose the most recent version, which should be listed first in the drop-down list. Then click Update. You willbe warned that all volumes must be closed in order to perform the upgrade. After you confirm by clicking OK,the upgrade proceeds to uninstall your current packages, download the new packages, install them, andrestart HyperFile services. After the process completes you will see a success message.
2.1.2. Local UpdateMethodWith this method you can upgrade a HyperFile node that does not have internet access. You will use your localmachine (such as a PC or laptop) to connect to the internet and download the latest HyperFile packages from arepository. Then you will connect to the HyperFile GUI to upload the packages from your local machine to theHyperFile node and execute the upgrade.
14

2.1. Updating HyperFile Software Packages via GUI
Note You will need to know the OS version of your HyperFile virtual appliance in order to select the cor-rect HyperFile upgrade packages. If you're not sure about the OS version, you can get this informationby running uname -a on the command line on your HyperFile node.
1. On your local machine, open a web browser to this site: ftp://66.109.98.210:8021/Infinity_Storage-i386/. Log in with the user name and password that you acquired from Cloudian Support.
2. Open the directory that corresponds to the OS version of your HyperFile virtual appliance. Then underthat, open the sub-directory for the latest available HyperFile package version. You will then see a list ofpackage files and signature files.
3. Download each file to your local machine, one by one.
4. If you are not already connected to the HyperFile GUI, connect and then go to Support -> SoftwareInformation, and toward the bottom of the page click Update. This opens the Update HyperFile dialog.
15
Chapter 2. Upgrading Your HyperFile Software Version
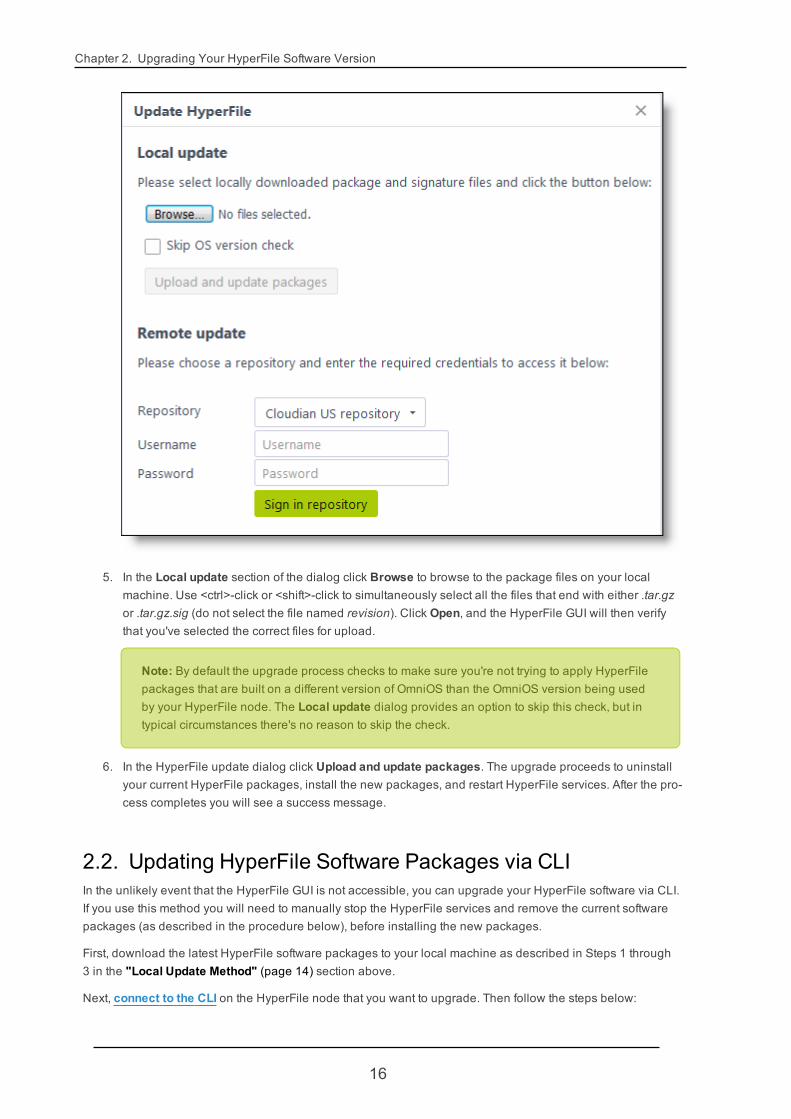
5. In the Local update section of the dialog click Browse to browse to the package files on your localmachine. Use <ctrl>-click or <shift>-click to simultaneously select all the files that end with either .tar.gzor .tar.gz.sig (do not select the file named revision). Click Open, and the HyperFile GUI will then verifythat you've selected the correct files for upload.
Note: By default the upgrade process checks to make sure you're not trying to apply HyperFilepackages that are built on a different version of OmniOS than the OmniOS version being usedby your HyperFile node. The Local update dialog provides an option to skip this check, but intypical circumstances there's no reason to skip the check.
6. In the HyperFile update dialog click Upload and update packages. The upgrade proceeds to uninstallyour current HyperFile packages, install the new packages, and restart HyperFile services. After the pro-cess completes you will see a success message.
2.2. Updating HyperFile Software Packages via CLIIn the unlikely event that the HyperFile GUI is not accessible, you can upgrade your HyperFile software via CLI.If you use this method you will need to manually stop the HyperFile services and remove the current softwarepackages (as described in the procedure below), before installing the new packages.
First, download the latest HyperFile software packages to your local machine as described in Steps 1 through3 in the "Local Update Method" (page 14) section above.
Next, connect to the CLI on the HyperFile node that you want to upgrade. Then follow the steps below:
16

2.2. Updating HyperFile Software Packages via CLI
1. Stop all HyperFile services
# svcadm disable infihmond# svcadm disable infisnmpd# infistop
2. Remove all old packages. The following command is combining a few commands into a single line. Itcan be executed as a pkgrm and then confirm removal per each package.
# yes | pkgrm INFIgui; yes | pkgrm INFIhttp; yes | pkgrm INFIman;yes | pkgrm INFIsto;
3. Transfer the HyperFile packages -- all the files that end with .tar.gz -- from your local machine to a tem-porary directory on your HyperFile node (use a tool like SCP or WinSCP). Then on the HyperFile nodemove the packages to /var/spool/pkg:
# cp <packages_path>/INFI*.tar.gz /var/spool/pkg
4. Decompress and untar the packages:
# cd /var/spool/pkg; tar xvf INFIsto.tar.gz; tar xvf INFIman.tar.gz;tar xvf INFIhttp.tar.gz; tar xvf INFIgui.tar.gz;
5. Install new packages using the pkgadd command:
# yes | pkgadd INFIsto; yes | pkgadd INFIman; yes | pkgadd INFIhttp; yes |pkgadd INFIgui;
6. Restart HyperFile services:
# infistart
17

This page left intentionally blank

Chapter 3. SystemConfiguration
3.1. HyperFile Configuration OverviewAt a high level, the steps to set up a HyperFile system include:
l Install the system. See the HyperFile installation documentation.
l Optionally, adjust your virtual hardware settings in ESXi:
o Make sure the VM is powered off then edit the VM settings in ESXi: for example, resize the alloc-ated CPU or RAM; add more disks if needed; add more NICs if needed.
o Power on the machine again
l Check your license attributes and update the license if needed. See "HyperFile Licensing" (page 8).
l Update your HyperFile software version if needed. See "Upgrading Your HyperFile Software Ver-sion" (page 11).
l Adjust HyperFile network settings if needed. See "Network" (page 106).
l Set up HyperFile / HyperStore storage tiers:
o Create one or more HyperStore storage buckets to be used by HyperStore, if you have notalready done so. See "Cloudian HyperStore Access" in the HyperFile Installation Guide.
o Create/import disk storage devices for HyperFile data caching (zpools). See "HyperFile Stor-age Tiers Overview" (page 23) and subsequent sections.
Note: The HyperFile VM has a default storage device set-up that may be sufficient forsimple tests or PoCs.
l Create and share one or more volumes. See "HyperFile Volumes Overview" (page 33) and sub-sequent sections.
l Optional advanced configurations:
o Enable and configure Data Protection Policies (Snapshots). See "HyperFile Snapshots Over-view" (page 67) and subsequent sections.
o Enable and configure High Availability. See "HyperFile Clustering Overview" (page 40) andsubsequent sections.
o Enable and configure WORM and Compliance. See "HyperFile WORM Overview" (page 58)and subsequent sections.
3.2. Configuring Networking SettingsYou can configure the HyperFile node's network interfaces settings and network environment settings in theHyperFile GUI's Network page. This includes DNS and gateway settings as well as settings for individual net-work interfaces. For more information see "Network" (page 106).
Note NTP settings are configured on a different GUI page. See "NTP" (page 117).
19
Chapter 3. System Configuration
3.3. Configuring Active Directory IntegrationIf appropriate for your environment, you can configure HyperFile integration with Active Directory (AD) so thatAD can be used for user authentication on the shares presented by HyperFile. You can do this in the HyperFileGUI's Active Directory Configuration page. For details see "Active Directory" (page 119).
3.4. SMB Configuration TipsSubjects covered in this section:
l "On the HyperFile Node" (page 20)
l "OnWindows Clients" (page 21)
3.4.1. On the HyperFile NodeHyperFile uses Samba technology to implement its SMB/CIFS service. On the HyperFile node, the mainSamba configuration file is:
/opt/samba/etc/smb.conf
In most circumstances you should not need to manually edit the smb.conf file. Instead, relevant configurationchoices that you make through the HyperFile GUI -- such as your Active Directory configuration -- will beapplied automatically to smb.conf. But there are a limited number of instances that require you to manually editsmb.conf.
3.4.1.1. HyperFile Hostname is Longer than 15 Characters
If the HyperFile hostname is longer than 15 characters you will not be able to join HyperFile to an Active Dir-ectory domain, and you will encounter an error if you try to do so ("The format of the specified computer nameis invalid"). To resolve this, do the following:
1. Choose a "short name" (shorter than 15 characters) for the HyperFile host, and add that short name toyour DNS configuration if it is not already there.
2. In the smb.conf file, in the [global] section, add this setting:
netbios name = <short name>
where <short name> is the short name of the HyperFile host.
3. Apply the configuration change to the SMB service. If there are no SMB clients currently connected, youcan reload the SMB configuration with the following command:
/opt/samba/bin/smbcontrol smbd reload-config
If there are SMB clients currently connected, the command above won't work to reload the configuration,and instead you can use the command below which will restart the SMB service. Note though that thiswill interrupt any in-progress operations.
pkill -1 smbd
4. Go to the HyperFile GUI's Active Directory page and try to join the AD domain, using the Active Dir-ectory configuration wizard on that page. If this is a repeat attempt, the wizard will remember some but
20

3.4. SMB Configuration Tips
not all of the information that you entered previously. Review the information in the wizard and makeany needed changes or additions.
3.4.2. OnWindows Clients
3.4.2.1. Increasing the Client Session Timeout
Increasing the session timeout on Windows SMB clients will reduce the likelihood of clients experiencingtimeout errors when working with large files that have been archived to the object storage tier and removedfrom the HyperFile cache tier. You can increase a Windows machine's SMB client session timeout -- which bydefault is 60 seconds -- by entering this command through the PowerShell:
Set-SmbClientConfiguration -SessionTimeout 600
This increases the session timeout to 10 minutes.
3.4.2.2. Refreshing the Share Connection for Users Experiencing Connection Prob-lems
When an Active Directory based user cannot access a share on HyperFile even though she has the correct per-missions, you can try deleting and then reestablishing the Windows machine's connection to the share. At theCommand Prompt on the Windows client machine, run the following commands:
1. Retrieve the list of mounted shares.
net use
In the list, check to see which drive the HyperFile based share is mapped to.
2. Delete the share mapping for that drive.
net use <drive>: /delete
where <drive> is the drive letter.
3. Mount the HyperFile based share again. For example:
net use <drive>: \\<HyperFile_hostname>\<share_name> /persistent:Yes
3.4.2.3. "Offline" File Attribute and Shadow Copy Service
HyperFile volumes shared via SMB will by default support the "Offline" file attribute, such that Windows usersin their file explorer will see the offline icon (an "X") for files that are not currently cached in the HyperFile cachetier, but are stored in HyperStore. Per Microsoft's definition of this attribute, an offline file is a file for which "Thedata of the file is not available immediately. This attribute indicates that the file data is physically moved to off-line storage." When users retrieve such files, HyperFile retrieves the file data from HyperStore and writes thatdata to the cache tier as well as returning it to the users.
Note For a Windows user with his or her file explorer open, a change in a file's online or offline statusdoes not automatically appear in the file explorer view. Instead the user must refresh their file explorerview to see the most current online/offline status of their files.
If the HyperStore bucket being used by the volume has versioning enabled, then a HyperFile volume sharedvia SMB supportsWindows VSS (Shadow Copy Service), such that Windows users in their file explorer can
21
Chapter 3. System Configuration
right-click on a file to either open or restore a previous version of the file. However, the Shadow Copy Servicefeature is not supported for files that have the "offline" attribute. In order to see previous versions of a filethat is marked as being offline, users must first retrieve the current version of the file so that it is recalled intothe HyperFile cache and its status is no longer offline. In this context, remember the Note above about the needto refresh the file explorer view in order to see files' most current online/offline status.
Note If you want users to be able to easily open or restore previous versions of any file -- includingfiles that are not in the HyperFile cache (but are in HyperStore) -- you can disable HyperFile's supportfor the "offline" file attribute. The option for doing this is in the Sharing page's SMB section, in the Othersettings dialog. If you disable support for the "offline" file attribute, then in their file explorers Windowsusers will see no distinction between online files (stored in the HyperFile cache) and offline files (inHyperStore but not in cache); and they will be able to open or restore a previous version of any file.
When Windows users open a previous version of a file, this has the effect of HyperFile retrieving that previousfile version from HyperStore and writing it into the HyperFile cache tier -- such that the cache now contains theprevious file version as well as the current file version. By contrast, when Windows users restore a previous ver-sion of a file, this has the effect of HyperFile retrieving that previous file version from HyperStore and over-writing the current file version in the HyperFile cache tier. HyperFile administrators should be aware that theability of users to open previous versions of files may result in additional capacity consumption in yourcache tier.
Neither the "Offline" file attribute feature nor the Shadow Copy Service feature is configurable in the currentrelease of HyperFile (neither feature can be disabled by configuration).
22
Chapter 4. Working with HyperFileMajorFeatures
4.1. Local Caching
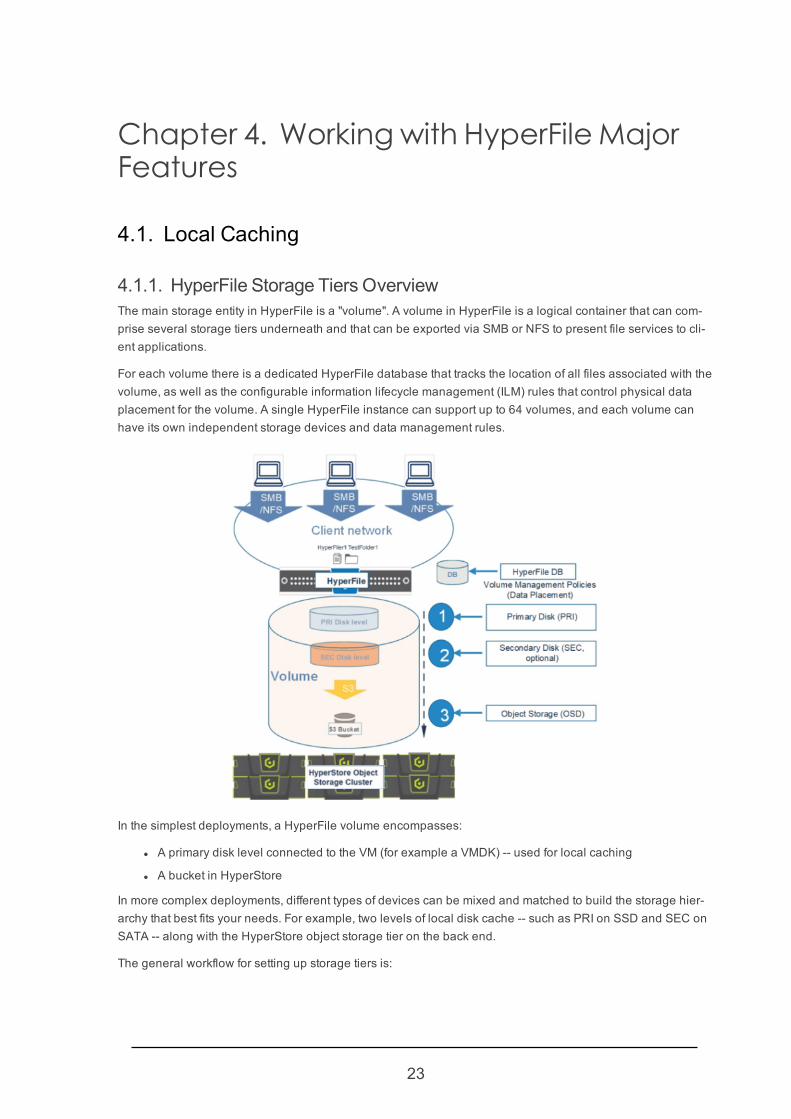
4.1.1. HyperFile Storage Tiers OverviewThe main storage entity in HyperFile is a "volume". A volume in HyperFile is a logical container that can com-prise several storage tiers underneath and that can be exported via SMB or NFS to present file services to cli-ent applications.
For each volume there is a dedicated HyperFile database that tracks the location of all files associated with thevolume, as well as the configurable information lifecycle management (ILM) rules that control physical dataplacement for the volume. A single HyperFile instance can support up to 64 volumes, and each volume canhave its own independent storage devices and data management rules.
In the simplest deployments, a HyperFile volume encompasses:
l A primary disk level connected to the VM (for example a VMDK) -- used for local caching
l A bucket in HyperStore
In more complex deployments, different types of devices can be mixed and matched to build the storage hier-archy that best fits your needs. For example, two levels of local disk cache -- such as PRI on SSD and SEC onSATA -- along with the HyperStore object storage tier on the back end.
The general workflow for setting up storage tiers is:
23

Chapter 4. Working with HyperFile Major Features
1. Create physical or logical storage devices and integrate them into HyperFile
2. Create a volume, and during volume creation:
l Specify one or more disk devices to be used by the volume for caching (one or two levels of diskare supported)
l Specify an object storage bucket to be used by the volume (typically you would create thisbucket in HyperStore before creating a volume in HyperFile; see "Creating a Volume" (page34))
3. Export the volume and make it accessible to client applications via any of the available protocols (SMB /NFS / FTP)
The procedure is pretty much the same in any deployment scenario except the first step that depends on theunderlying storage used. For example, in VM deployments, the HyperFile OVA comes with pre-configuredlogical storage devices that are ready to be used and are typically sufficient for test and PoC deployments.However, if you need additional storage devices it’s possible to add devices at any time and integrate theminto the HyperFile VM.
Note In the case of a HyperFile Appliance (HFA), devices are pre-configured and ready to be takeninto management by HyperFile.
4.1.2. Introduction to ZFS for HyperFileAs described in "HyperFile Storage Tiers Overview" (page 23), HyperFile volumes always use a "Primary"internal storage tier (PRI) to cache active data . A volume can optionally be configured to also use a "Sec-ondary" internal cache tier (SEC), although such a configuration is atypical. HyperFile's "internal" storage canbe in the form of:
l Local disks – SSD and/or magnetic drives presented to HyperFile and formatted with a ZFS file system
l External SAN Storage presenting storage via FC or iSCSI and formatted with a ZFS file system
l External NAS Storage presenting storage to HyperFile via NFS
Note: In the current HyperFile release, mounting an SMB/CIFS device for internal storage is notsupported.
For HyperFile, all of these forms of storage are considered "internal" storage in the sense that they are used forcaching to accelerate responsiveness to client applications, as versus the back-end high volume storage in theHyperStore object storage tier.
HyperFile normally uses ZFS to format the PRI storage devices and it's recommended to do so when pos-sible due to the many advantages of this powerful filesystem. However, HyperFile volumes also support usingNAS devices for the PRI storage tier (for example mounted directly to the HyperFile host from an external NASsystem).
Note In a HyperFile VM deployment, everything that is presented to HyperFile via ESXi as VMDK isconsidered a block device and formatted with ZFS regardless of where the underlying storage comesfrom (block, NAS, etc...).
The use of ZFS for HyperFile is the focus of the rest of this introductory section.
24
4.1. Local Caching
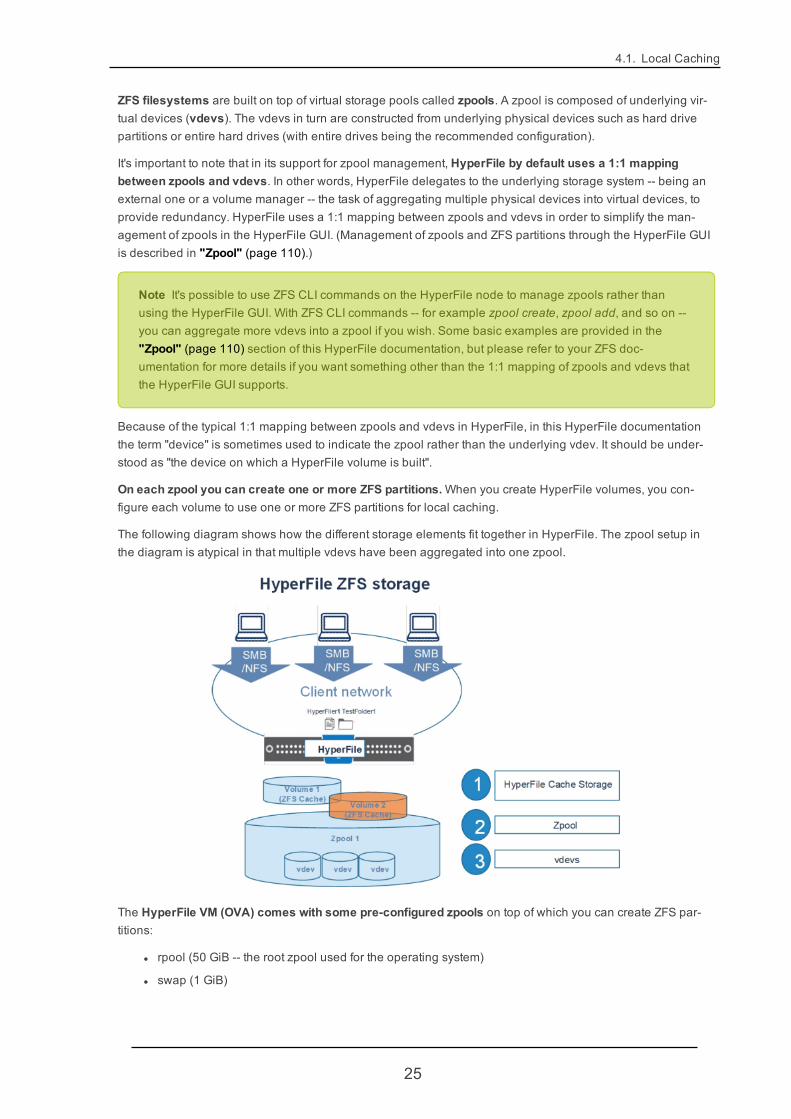
ZFS filesystems are built on top of virtual storage pools called zpools. A zpool is composed of underlying vir-tual devices (vdevs). The vdevs in turn are constructed from underlying physical devices such as hard drivepartitions or entire hard drives (with entire drives being the recommended configuration).
It's important to note that in its support for zpool management, HyperFile by default uses a 1:1 mappingbetween zpools and vdevs. In other words, HyperFile delegates to the underlying storage system -- being anexternal one or a volume manager -- the task of aggregating multiple physical devices into virtual devices, toprovide redundancy. HyperFile uses a 1:1 mapping between zpools and vdevs in order to simplify the man-agement of zpools in the HyperFile GUI. (Management of zpools and ZFS partitions through the HyperFile GUIis described in "Zpool" (page 110).)
Note It's possible to use ZFS CLI commands on the HyperFile node to manage zpools rather thanusing the HyperFile GUI. With ZFS CLI commands -- for example zpool create, zpool add, and so on --you can aggregate more vdevs into a zpool if you wish. Some basic examples are provided in the"Zpool" (page 110) section of this HyperFile documentation, but please refer to your ZFS doc-umentation for more details if you want something other than the 1:1 mapping of zpools and vdevs thatthe HyperFile GUI supports.
Because of the typical 1:1 mapping between zpools and vdevs in HyperFile, in this HyperFile documentationthe term "device" is sometimes used to indicate the zpool rather than the underlying vdev. It should be under-stood as "the device on which a HyperFile volume is built".
On each zpool you can create one or more ZFS partitions.When you create HyperFile volumes, you con-figure each volume to use one or more ZFS partitions for local caching.
The following diagram shows how the different storage elements fit together in HyperFile. The zpool setup inthe diagram is atypical in that multiple vdevs have been aggregated into one zpool.
The HyperFile VM (OVA) comes with some pre-configured zpools on top of which you can create ZFS par-titions:
l rpool (50 GiB -- the root zpool used for the operating system)
l swap (1 GiB)
25
Chapter 4. Working with HyperFile Major Features
l audit (20 GiB -- a dedicated zpool for audit log retention)
l db (21 GiB -- for volume databases)
l cache (22 GiB -- for ZFS partitions for caching)
These pre-configured devices are intended only for tests or PoCs. For production deployments you wouldneed to add more devices or expand the existing ones.
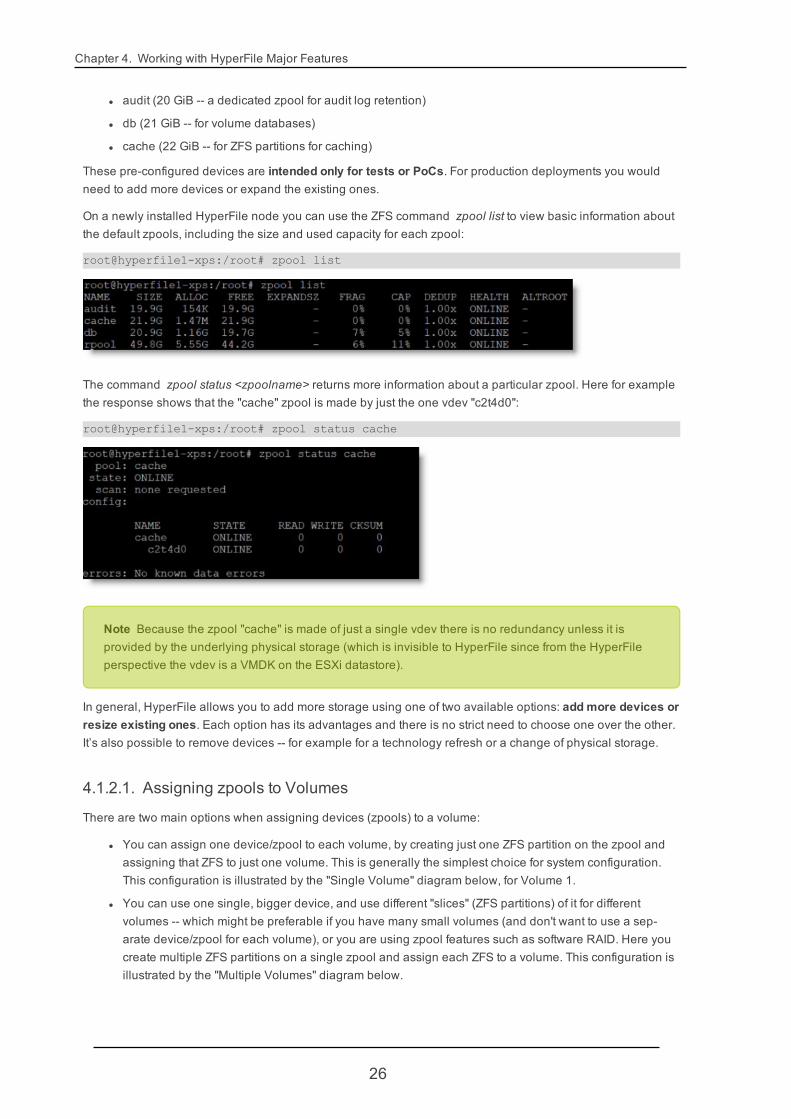
On a newly installed HyperFile node you can use the ZFS command zpool list to view basic information aboutthe default zpools, including the size and used capacity for each zpool:
root@hyperfile1-xps:/root# zpool list
The command zpool status <zpoolname> returns more information about a particular zpool. Here for examplethe response shows that the "cache" zpool is made by just the one vdev "c2t4d0":
root@hyperfile1-xps:/root# zpool status cache
Note Because the zpool "cache" is made of just a single vdev there is no redundancy unless it isprovided by the underlying physical storage (which is invisible to HyperFile since from the HyperFileperspective the vdev is a VMDK on the ESXi datastore).
In general, HyperFile allows you to add more storage using one of two available options: add more devices orresize existing ones. Each option has its advantages and there is no strict need to choose one over the other.It’s also possible to remove devices -- for example for a technology refresh or a change of physical storage.
4.1.2.1. Assigning zpools to Volumes
There are two main options when assigning devices (zpools) to a volume:
l You can assign one device/zpool to each volume, by creating just one ZFS partition on the zpool andassigning that ZFS to just one volume. This is generally the simplest choice for system configuration.This configuration is illustrated by the "Single Volume" diagram below, for Volume 1.
l You can use one single, bigger device, and use different "slices" (ZFS partitions) of it for differentvolumes -- which might be preferable if you have many small volumes (and don't want to use a sep-arate device/zpool for each volume), or you are using zpool features such as software RAID. Here youcreate multiple ZFS partitions on a single zpool and assign each ZFS to a volume. This configuration isillustrated by the "Multiple Volumes" diagram below.
26

4.1. Local Caching
l You also have the option of assigning multiple devices/zpools to a volume. This configuration is illus-trated by the "Single Volume" diagram below, for Volume 2.
Also consider that:
l Different devices can use different underlying physical hardware, thus balancing the load across dif-ferent physical resources (spreading the I/O across multiple spindles)
l You can perform a "hot" resize of devices, without any HyperFile service interruption
l Avoid expanding a device's size beyond 2TB, as devices larger than this are not well supported inmany hypervisors
l In general devices cannot be reduced in size
l It's always possible to adjust your storage layout as your needs change, but keep in mind that migratingdata across devices may take some time
4.1.3. Adding a Virtual Disk Device to the VM
Note The pre-configured devices that come with the HyperFile VM should be sufficient for most test orPoC scenarios. The section that follows describes how to add more devices to the VM, for productionenvironments or other circumstances where the pre-configured devices are insufficient.
To add a virtual disk device to the HyperFile VM, there are two phases: first you use the VMware GUI to add thedevice to the VM ; then you use the HyperFile GUI to import the device for use by a HyperFile volume. This sec-tion describes the first phase.
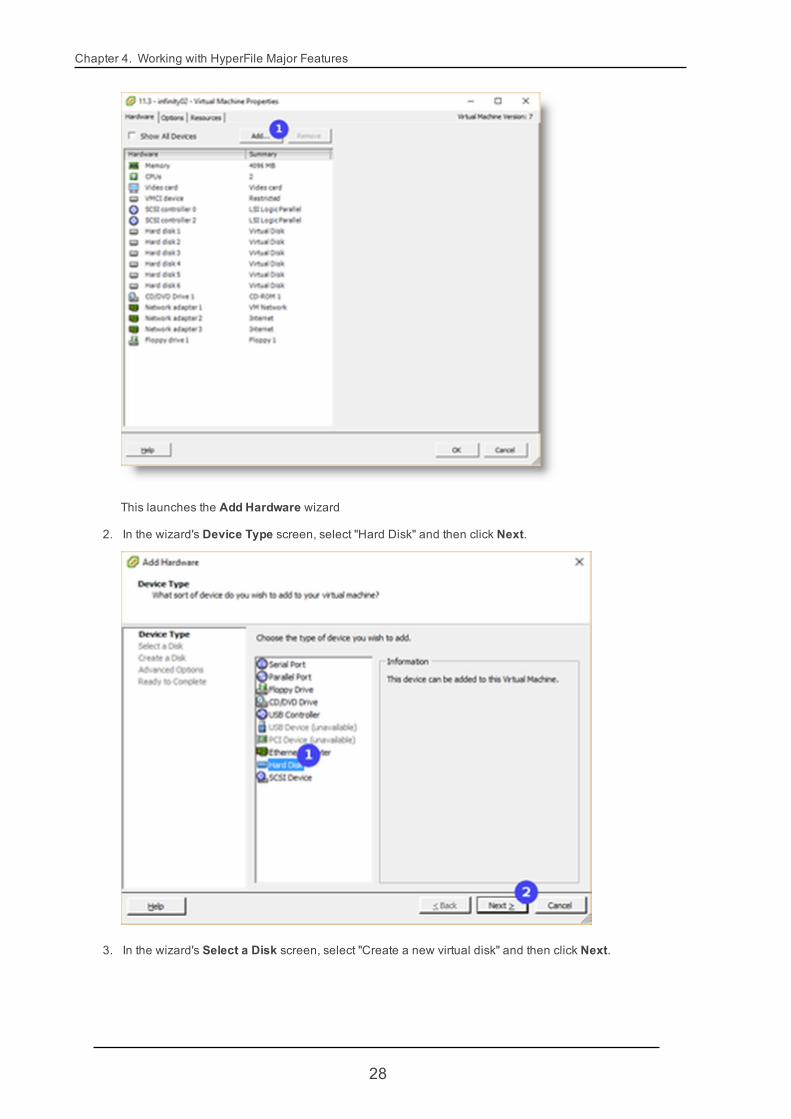
1. In the VMware GUI, in the Hardware tab for editing the virtual machine properties, click Add.
27
Chapter 4. Working with HyperFile Major Features
This launches the Add Hardware wizard
2. In the wizard's Device Type screen, select "Hard Disk" and then click Next.
3. In the wizard's Select a Disk screen, select "Create a new virtual disk" and then click Next.
28

4.1. Local Caching
4. In the wizard's Create a Disk screen, set an appropriate size for the device.
If the new device is to be used for an HyperFile HA pair (Cluster), then you must select "Thick ProvisionEager Zeroed" (as shown in the first screen shot below). Or if you are on an older version of VMware, ifthe device is to be used with a HyperFile HA pair you must select "Support clustering features such asFault Tolerance" (as shown in the second screen shot below).
29

Chapter 4. Working with HyperFile Major Features
If the new device is not to be used for an HyperFile HA pair, then any provisioning method is valid.
When you've completed your selections on this screen, click Next.
30
4.1. Local Caching
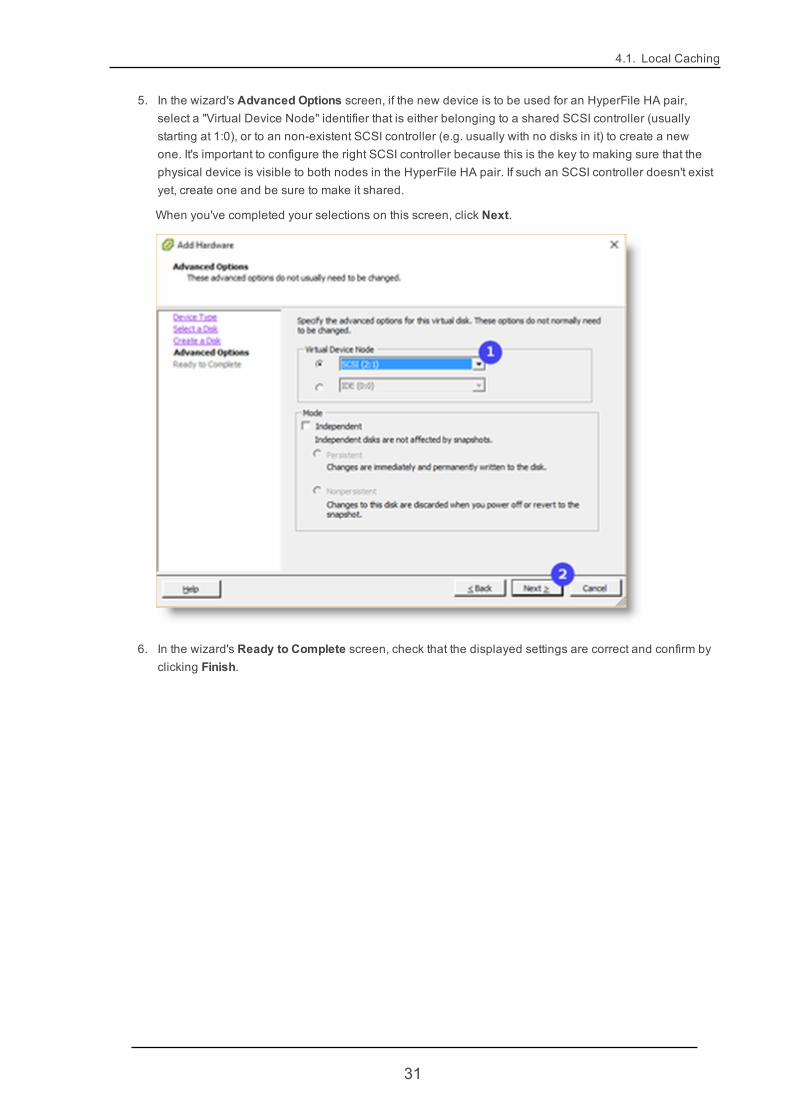
5. In the wizard's Advanced Options screen, if the new device is to be used for an HyperFile HA pair,select a "Virtual Device Node" identifier that is either belonging to a shared SCSI controller (usuallystarting at 1:0), or to an non-existent SCSI controller (e.g. usually with no disks in it) to create a newone. It's important to configure the right SCSI controller because this is the key to making sure that thephysical device is visible to both nodes in the HyperFile HA pair. If such an SCSI controller doesn't existyet, create one and be sure to make it shared.
When you've completed your selections on this screen, click Next.
6. In the wizard's Ready to Complete screen, check that the displayed settings are correct and confirm byclicking Finish.
31

Chapter 4. Working with HyperFile Major Features
7. If you added a new SCSI controller, make it "Virtual". When ready confirm the changes by clicking OK.
32

4.2. Volumes
At this point the new device is available to HyperFile. To use the device for HyperFile you will need to create azpool on the device, and then create one or more ZFS partitions in that zpool. For instructions on how to createa zpool and a ZFS partition, see "Zpool" (page 110).
4.2. Volumes
4.2.1. HyperFile VolumesOverviewA “volume” in HyperFile is a logical container that can be exported as SMB or NFS (and/or shared viaFTP/SFTP) and present file services to client applications, regardless of where the files are stored in the under-lying storage hierarchy. A HyperFile instance can support up to 64 volumes, each of them with its own storagedevices and data management rules. For each volume there is a dedicated HyperFile database that storesmetadata for that volume, including file location and data management rules specific to the volume.
A client writes files to a HyperFile volume using any of the supported front-end protocols (SMB, NFS,FTP/SFTP). Files are immediately saved to the primary disk storage tier (PRI) for caching. From there, depend-ing on the configured storage hierarchy, files start to be copied or moved to the other storage tiers. In thesimplest configuration the only tiers are the PRI cache tier and the back-end Cloudian HyperStore object stor-age tier.
Files successfully copied all the way down the storage tier chain become eligible for removal from HyperFilelocal cache storage, and are kept in local storage to accelerate reads for as long as is defined by removal rulesthat you configure for the volume.
33

Chapter 4. Working with HyperFile Major Features
Files will be removed from local disk storage only if they have been copied to all the target storage tiers. Option-ally, you can require an integrity check of the file copies in the object storage tier before the local disk copiesare removed.
You can create, configure, and manage volumes through the HyperFile GUI. The general workflow is:
1. Create a volume. While using the volume creation wizard you will define the basic attributes of a stor-age hierarchy for the volume.
2. Review and (if desired) customize configuration settings for the volume, including data lifecycle man-agement rules.
3. Open and share the volume with client applications via SMB/CIFS, NFS, and/or FTP.
4.2.2. Preparing to Create a VolumeBefore creating a new HyperFile volume you should create a bucket in Cloudian HyperStore that will serveas the object storage tiering target for the new volume.
If for the volume you are creating you want to be able to use HyperFile's snapshot feature (see "HyperFileSnapshots Overview" (page 67)) or its multi-controller feature (see "HyperFile Multi-Controller Overview"(page 49)), the HyperStore bucketmust have versioning enabled.
For simplicity of system layout, you could have a separate target bucket in HyperStore for each HyperFilevolume that you create. Alternatively, you can have multiple volumes use a single HyperStore bucket. Eachvolume will be automatically given its own 'folder' -- with the same name as the volume -- under the targetbucket.
To complete the HyperStore integration configuration during the HyperFile volume creation process you willneed the HyperStore S3 service endpoint URL, the port number, the bucket name, and the security credentialsfor accessing that bucket (access key and secret key).
Certain volume use cases require additional preparation before you create the volume:
l A high-availability Clustered volume. See "Preparing to Create a Clustered Volume" (page 41).
l A volume for migrating data from a NAS device to HyperStore. See "Preparing to Migrate from NAS toObject Storage" (page 78).
4.2.3. Creating a VolumeThe HyperFile GUI home page lists all existing volumes and their summary status information. For a new Hyper-File node that has been just installed, there will not yet be any volumes. You can easily create volumes throughthe GUI, using the volume creation wizards. For more information see "Volume Create" (page 146).
4.2.4. Managing Volume Storage DevicesSubjects covered in this section:
l Introduction (immediately below)
l "Resizing a Device for a Volume" (page 35)
l "Adding a Device to a Volume" (page 36)
l "Removing a Device from a Volume" (page 38)
34
4.2. Volumes
If desired, you can make changes to the underlying storage structure for an existing HyperFile volume. Suchchanges are mostly transparent to clients.
For any given volume you can perform operations like:
l Resize a device in a storage tier.
l Add a device to a storage tier.
l Remove or replace devices in a storage tier.
This section covers resizing, adding, removing, and replacing devices within an existing PRI or SEC storagetier.
Note Although it is not the focus of this section, you also have the option of adding a new storage tierfor a volume -- for example, if you want to add an OSD tier to a volume for which an OSD tier has notyet been specified; or if you want to add a SEC cache tier to a volume that currently has only a PRI tierand an OSD tier. To use the HyperFile GUI to add a storage tier to a volume, to the right of the volumename click the "+" sign and then follow the guidance in the GUI.
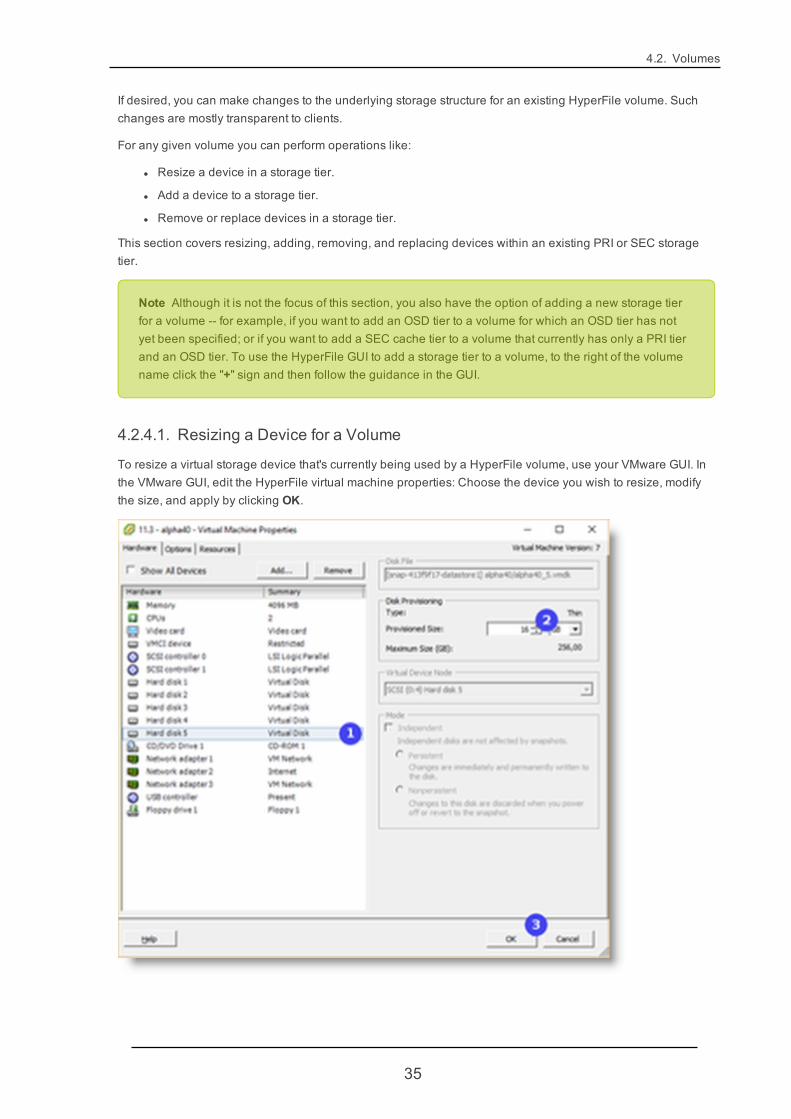
4.2.4.1. Resizing a Device for a Volume
To resize a virtual storage device that's currently being used by a HyperFile volume, use your VMware GUI. Inthe VMware GUI, edit the HyperFile virtual machine properties: Choose the device you wish to resize, modifythe size, and apply by clicking OK.
35

Chapter 4. Working with HyperFile Major Features
Note Do not expand a device's size to larger than 2TB.
The device will be automatically expanded for HyperFile to use it. You can confirm in the HyperFile GUI bygoing to the Settings -> Zpool page and checking the displayed size of the device. No further action should berequired.
4.2.4.2. Adding a Device to a Volume
Before you can add a virtual storage device to a volume's PRI or SEC cache tier you must add the device to theHyperFile VM and then create a zpool and ZFS on the device. These preliminary tasks are described else-where in this documentation, in these sections:
l "Adding a Virtual Disk Device to the VM" (page 27)
l "Zpool" (page 110)
In the procedure below it's assumed either that you've already completed those preliminary tasks and thatyou've got a ZFS partition ready to add to a volume's PRI cache tier; or that at least you've already added thenew virtual device to the VM. In the latter case, if you've not yet created a zpool and ZFS partition you can do sowithin the procedure below.
1. On the left side of the HyperFile GUI, beside the volume that you want to work with, click [1] for the PRItier and then select the Devices tab. Then click Add new device.
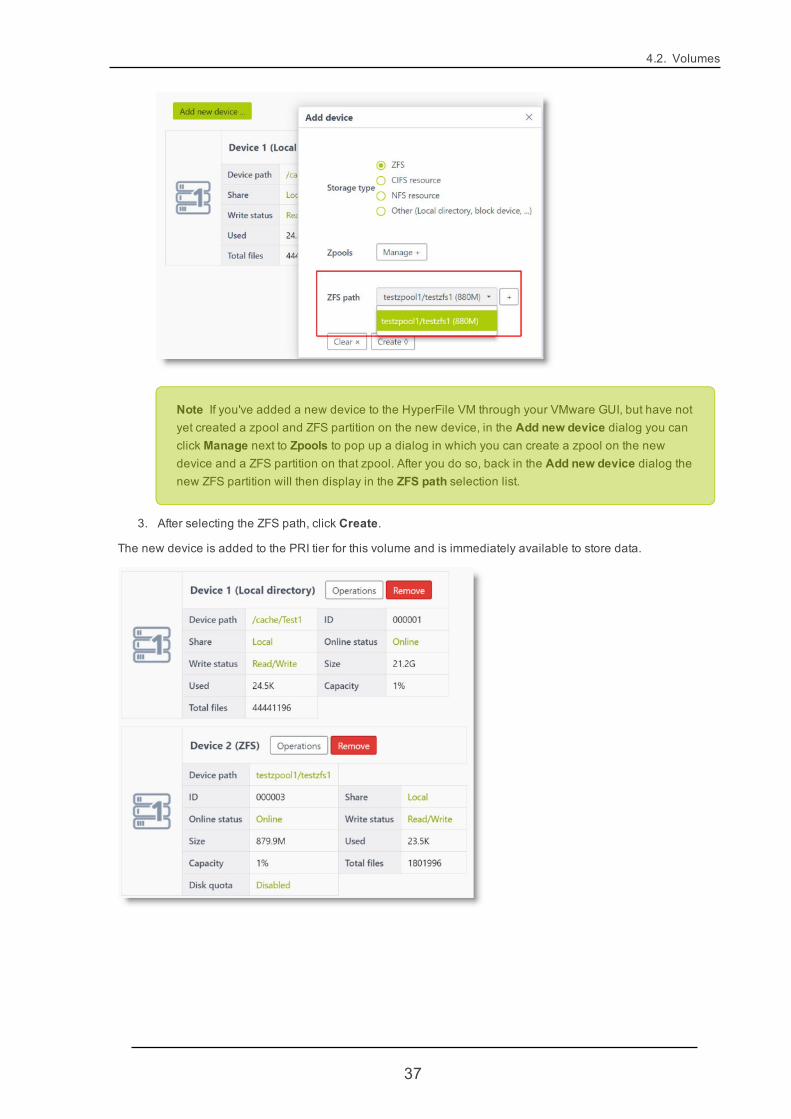
2. In the Add new device dialog, for the ZFS path select the ZFS partition that you want to add to thevolume's PRI tier.
36
4.2. Volumes
Note If you've added a new device to the HyperFile VM through your VMware GUI, but have notyet created a zpool and ZFS partition on the new device, in the Add new device dialog you canclick Manage next to Zpools to pop up a dialog in which you can create a zpool on the newdevice and a ZFS partition on that zpool. After you do so, back in the Add new device dialog thenew ZFS partition will then display in the ZFS path selection list.
3. After selecting the ZFS path, click Create.
The new device is added to the PRI tier for this volume and is immediately available to store data.
37

Chapter 4. Working with HyperFile Major Features
Note In the example above the two devices differ in size. Typically you should use devices that are sim-ilar in size and performance, so you don't have an imbalance within the storage tier. An exception is if anew device is meant to replace an old one.
4.2.4.3. Removing a Device from a Volume
Note To replace one device with a different device, first add the new device as described in "Adding aDevice to a Volume" (page 36), then remove the old device as described below.
To remove an unwanted device from a storage tier that has multiple devices you will first perform a depopulateoperation on the unwanted device. The depopulate operation will copy every file from the unwanted device tothe other device(s) in the storage tier.
1. On the left side of the HyperFile GUI, beside the volume that you want to work with, click [1] for the PRItier. Then select the Devices tab.
2. For the device(s) that you are not removing, check to make sure that theWrite status is "Read/Write".This is the default status.
3. For the device that you want to remove, click Operations. In the Device settings dialog that displays,do one of the following:
l If you just want to copy data from the device that you are removing to the other device(s) in thistier, without deleting data from the removed device, click Depopulate.
l If you want to copy data from the device that you are removing to the other device(s) in this tier,and also delete the data from the removed device, select the Clean checkbox and then clickDepopulate.
38
4.2. Volumes
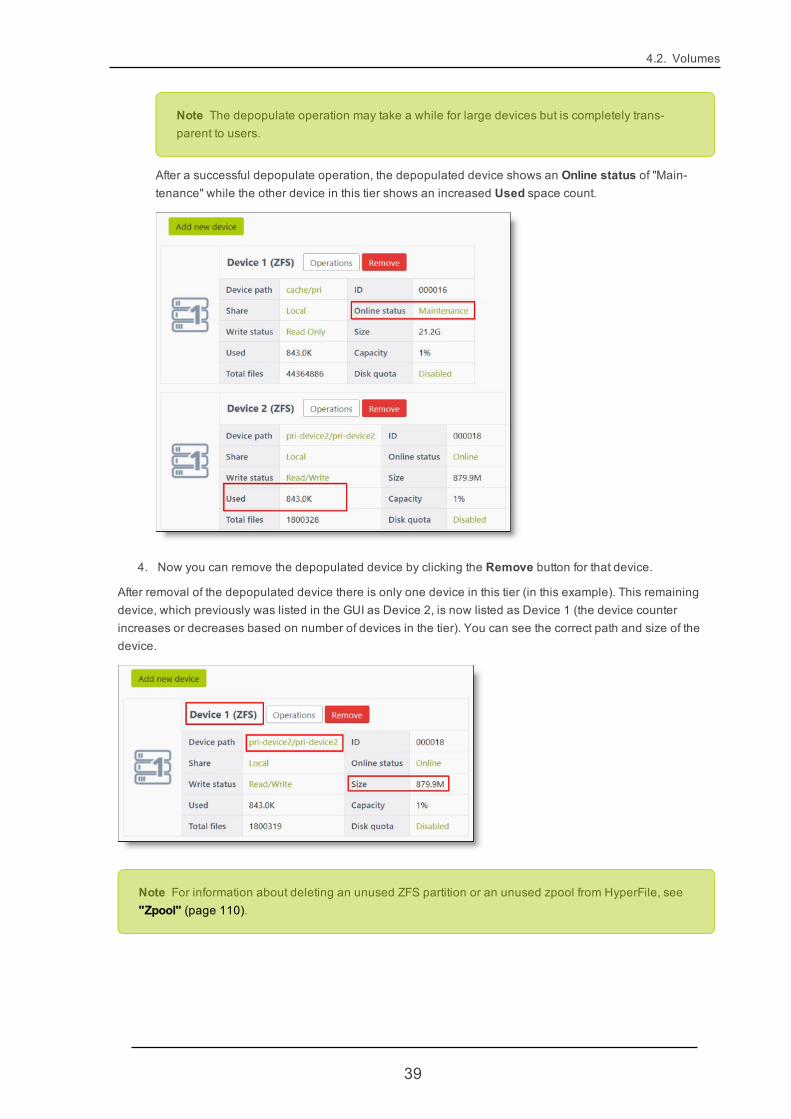
Note The depopulate operation may take a while for large devices but is completely trans-parent to users.
After a successful depopulate operation, the depopulated device shows an Online status of "Main-tenance" while the other device in this tier shows an increased Used space count.
4. Now you can remove the depopulated device by clicking the Remove button for that device.
After removal of the depopulated device there is only one device in this tier (in this example). This remainingdevice, which previously was listed in the GUI as Device 2, is now listed as Device 1 (the device counterincreases or decreases based on number of devices in the tier). You can see the correct path and size of thedevice.
Note For information about deleting an unused ZFS partition or an unused zpool from HyperFile, see"Zpool" (page 110).
39
Chapter 4. Working with HyperFile Major Features
4.3. Clustering for High Availability
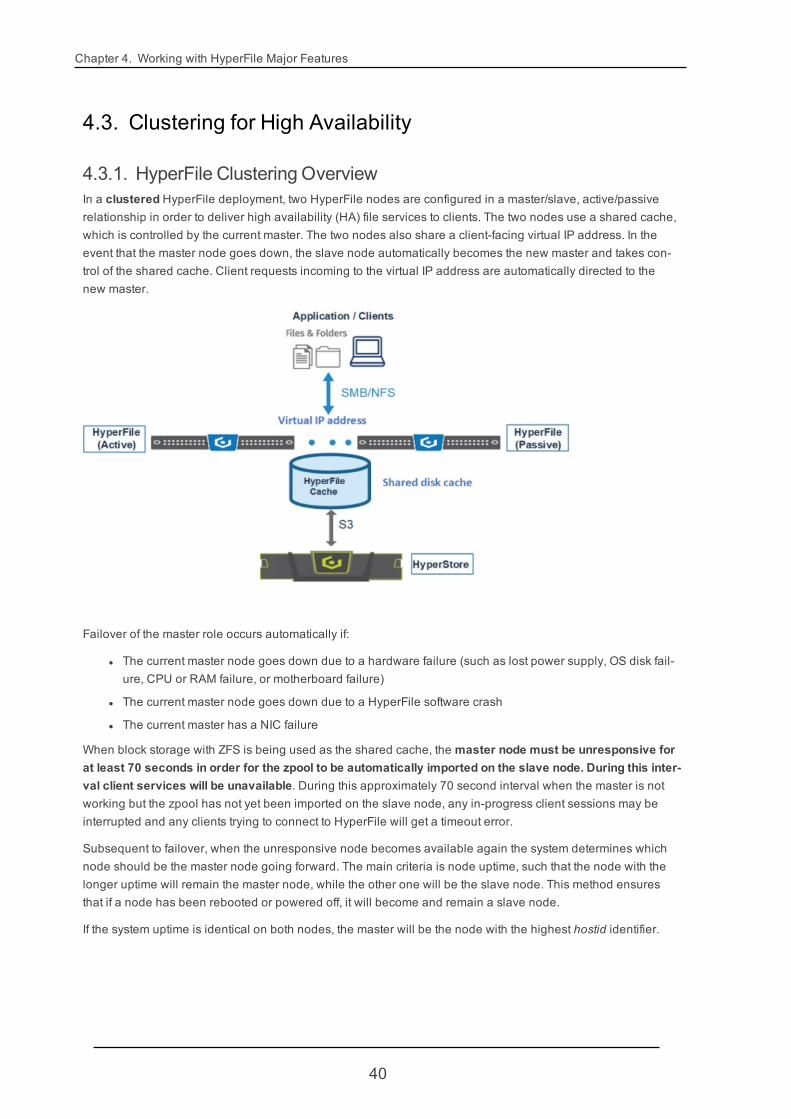
4.3.1. HyperFile Clustering OverviewIn a clustered HyperFile deployment, two HyperFile nodes are configured in a master/slave, active/passiverelationship in order to deliver high availability (HA) file services to clients. The two nodes use a shared cache,which is controlled by the current master. The two nodes also share a client-facing virtual IP address. In theevent that the master node goes down, the slave node automatically becomes the new master and takes con-trol of the shared cache. Client requests incoming to the virtual IP address are automatically directed to thenew master.
Failover of the master role occurs automatically if:
l The current master node goes down due to a hardware failure (such as lost power supply, OS disk fail-ure, CPU or RAM failure, or motherboard failure)
l The current master node goes down due to a HyperFile software crash
l The current master has a NIC failure
When block storage with ZFS is being used as the shared cache, the master node must be unresponsive forat least 70 seconds in order for the zpool to be automatically imported on the slave node. During this inter-val client services will be unavailable. During this approximately 70 second interval when the master is notworking but the zpool has not yet been imported on the slave node, any in-progress client sessions may beinterrupted and any clients trying to connect to HyperFile will get a timeout error.
Subsequent to failover, when the unresponsive node becomes available again the system determines whichnode should be the master node going forward. The main criteria is node uptime, such that the node with thelonger uptime will remain the master node, while the other one will be the slave node. This method ensuresthat if a node has been rebooted or powered off, it will become and remain a slave node.
If the system uptime is identical on both nodes, the master will be the node with the highest hostid identifier.
40
4.3. Clustering for High Availability
Note Manual failover from master node to slave node is not supported. If you want to trigger a failover,the best method is to shut down the master node (at least temporarily, such that failover is executed).
Note Combining Multi-Controller and High Availability (Cluster) functionality is an advanced con-figuration that requires assistance from Cloudian Support. If you are interested in using these featuresin combination, contact Cloudian Support.
4.3.2. Preparing to Create a Clustered VolumeSubjects covered in this section:
l "Clustering Requirements" (page 41)
l "Configuring Cluster Networking" (page 42)
l "Choosing the Correct Node onWhich to Create the Volume" (page 45)
4.3.2.1. Clustering Requirements
To deploy HyperFile in a clustered, high availability configuration requires:
l HyperFile installed on two nodes. The cluster configuration instructions in the next section ("Con-figuring Cluster Networking" (page 42)) presume that you've already installed HyperFile on twonodes.
l A total of seven IP addresses:
o One “shared” IP address for client access. This is the virtual, floating IP address that will beused by clients to access file data through SMB and/or NFS. This address should be on a ded-icated network interface.
o On each of the two nodes:
n One IPMP address. This address should be on the same subnet as the "share" IPaddress.
n One IPMP "probe" address. This address should be on a dedicated network interface,and on the same subnet as the "share" IP address.
n One node address, for node-to-node communication. This address should be on a ded-icated network interface.
Note: For information about how to add network devices to individual HyperFile nodes,assign IP addresses to them, and set up IPMP addresses, see "Network" (page 106).
l An external shared storage medium -- i.e. exported via NFS or a shared block device -- that can beused as PRI cache storage by both cluster nodes. Each machine must be able to reach the sharedcache, either by using a dedicated IP address or by using the node IP addresses used for com-munication. The IPMP probe addresses should not be used for anything other than IPMP probes.
41

Chapter 4. Working with HyperFile Major Features
4.3.2.2. Configuring Cluster Networking
Setting up a HyperFile cluster configuration requires both nodes to be communicating to each other and tohave a client-facing shared IP set-up so that the slave node can transparently take over the role of servicing cli-ent traffic if the master goes down. The HyperFile GUI provides a cluster wizard to simplify the configuration pro-cess.
Note For the GUI's cluster wizard to work, both HyperFile nodes must be reachable from your currentclient machine (the machine on which you are running your browser).
To configure a HyperFile clustered HA pair, access the GUI on either HyperFile node and follow these steps:
1. Go to Settings -> Cluster / Mirroring.
2. Click Run cluster wizard to open the cluster interface setup wizard.
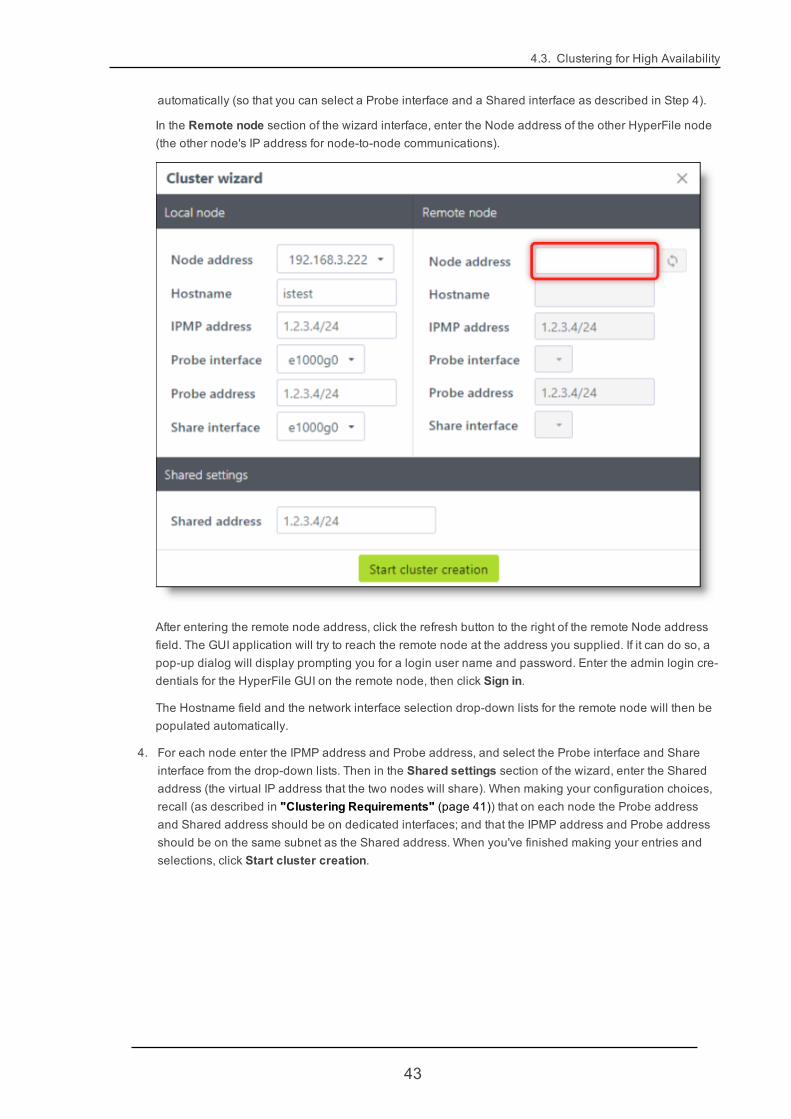
3. In the Local node section of the wizard interface, the Node address and Hostname fields will populateautomatically. For the local node the network interface selection drop-down lists will also populate
42
4.3. Clustering for High Availability
automatically (so that you can select a Probe interface and a Shared interface as described in Step 4).
In the Remote node section of the wizard interface, enter the Node address of the other HyperFile node(the other node's IP address for node-to-node communications).
After entering the remote node address, click the refresh button to the right of the remote Node addressfield. The GUI application will try to reach the remote node at the address you supplied. If it can do so, apop-up dialog will display prompting you for a login user name and password. Enter the admin login cre-dentials for the HyperFile GUI on the remote node, then click Sign in.
The Hostname field and the network interface selection drop-down lists for the remote node will then bepopulated automatically.
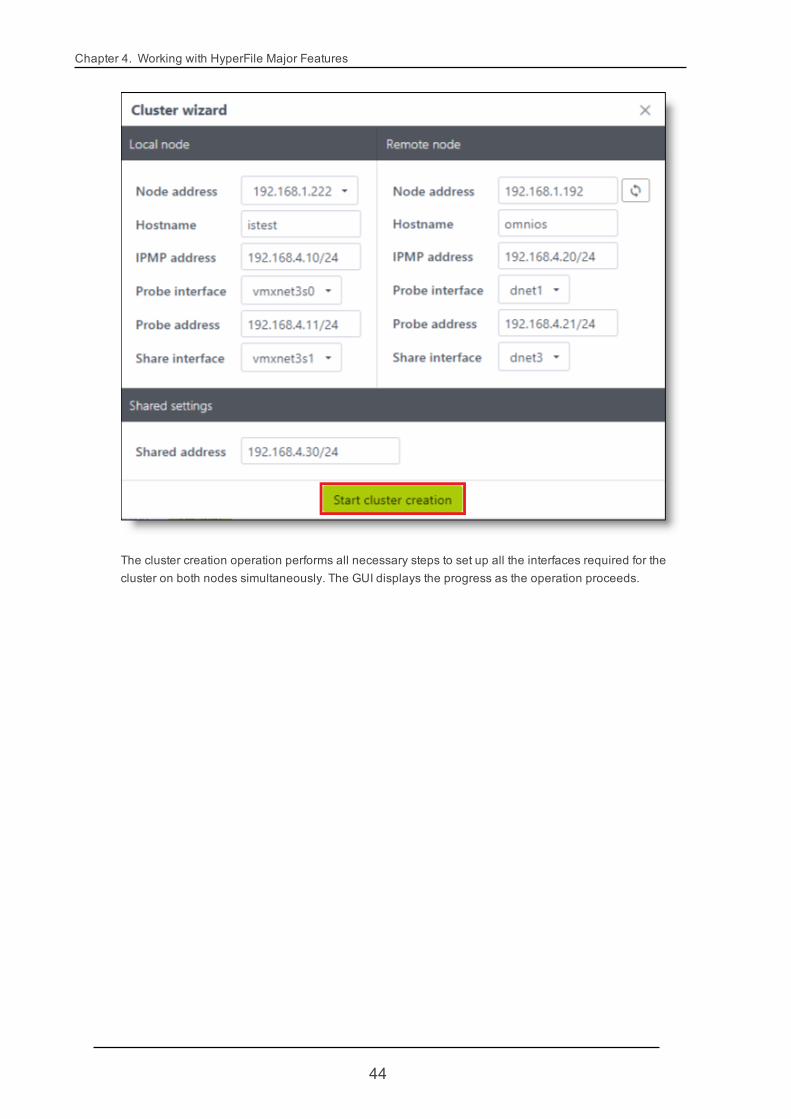
4. For each node enter the IPMP address and Probe address, and select the Probe interface and Shareinterface from the drop-down lists. Then in the Shared settings section of the wizard, enter the Sharedaddress (the virtual IP address that the two nodes will share). When making your configuration choices,recall (as described in "Clustering Requirements" (page 41)) that on each node the Probe addressand Shared address should be on dedicated interfaces; and that the IPMP address and Probe addressshould be on the same subnet as the Shared address. When you've finished making your entries andselections, click Start cluster creation.
43
Chapter 4. Working with HyperFile Major Features
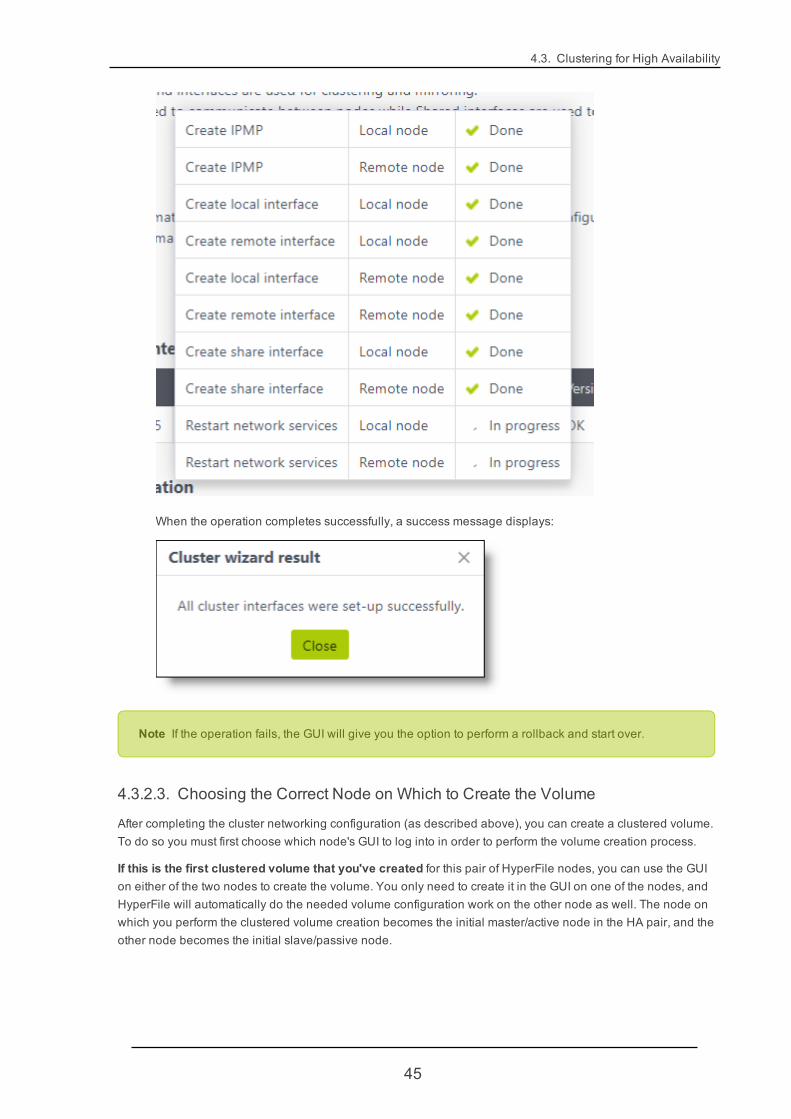
The cluster creation operation performs all necessary steps to set up all the interfaces required for thecluster on both nodes simultaneously. The GUI displays the progress as the operation proceeds.
44
4.3. Clustering for High Availability
When the operation completes successfully, a success message displays:
Note If the operation fails, the GUI will give you the option to perform a rollback and start over.
4.3.2.3. Choosing the Correct Node on Which to Create the Volume
After completing the cluster networking configuration (as described above), you can create a clustered volume.To do so you must first choose which node's GUI to log into in order to perform the volume creation process.
If this is the first clustered volume that you've created for this pair of HyperFile nodes, you can use the GUIon either of the two nodes to create the volume. You only need to create it in the GUI on one of the nodes, andHyperFile will automatically do the needed volume configuration work on the other node as well. The node onwhich you perform the clustered volume creation becomes the initial master/active node in the HA pair, and theother node becomes the initial slave/passive node.
45
Chapter 4. Working with HyperFile Major Features
If you have previously created a clustered volume for this pair of nodes and now you are creating anotherone, create the new clustered volume by using the GUI on the current master node of the existing clusteredvolume. To determine which node is currently the master node, log into the GUI on either node and in the list ofvolumes, to the right of the existing clustered volume name click the cluster icon. This displays the ClusterProperties page, which will show whether the node is the master or the slave. With this information, you knowwhich node is master, and you must use that node's GUI to create any additional clustered volumes.
IMPORTANT: If you mistakenly create a new clustered volume on a node that is the slave node for anexisting clustered volume, that node will be designated as the master for the new volume even thoughit's the slave for the existing volume. This would be an unstable configuration that would require inter-vention from Cloudian Support to repair. To avoid this, make sure that if you are going to create mul-tiple clustered volumes, always create the new clustered volume(s) on the node that is the currentmaster node for the existing cluster volume(s).
After logging into the GUI of the appropriate node, proceed to creating a clustered volume.
4.3.3. Creating a Clustered VolumeAfter completing the actions described in "Preparing to Create a Clustered Volume" (page 41) -- includingbeing sure to identify the correct node on which to create the volume -- you can use the HyperFile GUI on thatnode to create a Clustered volume. The GUI provides volume creation wizards, and you can use either the"Express Creation" wizard (faster and simpler) or the "Data Director" wizard (with more customization options).For instructions see "Volume Create" (page 146).
IMPORTANT: After creating the Clustered volume be sure to enable fail-over as described in"Enabling Failover Between Clustered Nodes" (page 46). That section also describes a configurationoption for achieving RPO 0, if desired.
4.3.4. Enabling Failover Between Clustered NodesAfter you've created a Clustered volume, enable automatic fail-over for the cluster. Using the HyperFile GUI onthe same node on which you created the Clustered volume, follow these steps:
1. Select Settings -> Cluster / Mirroring.
46
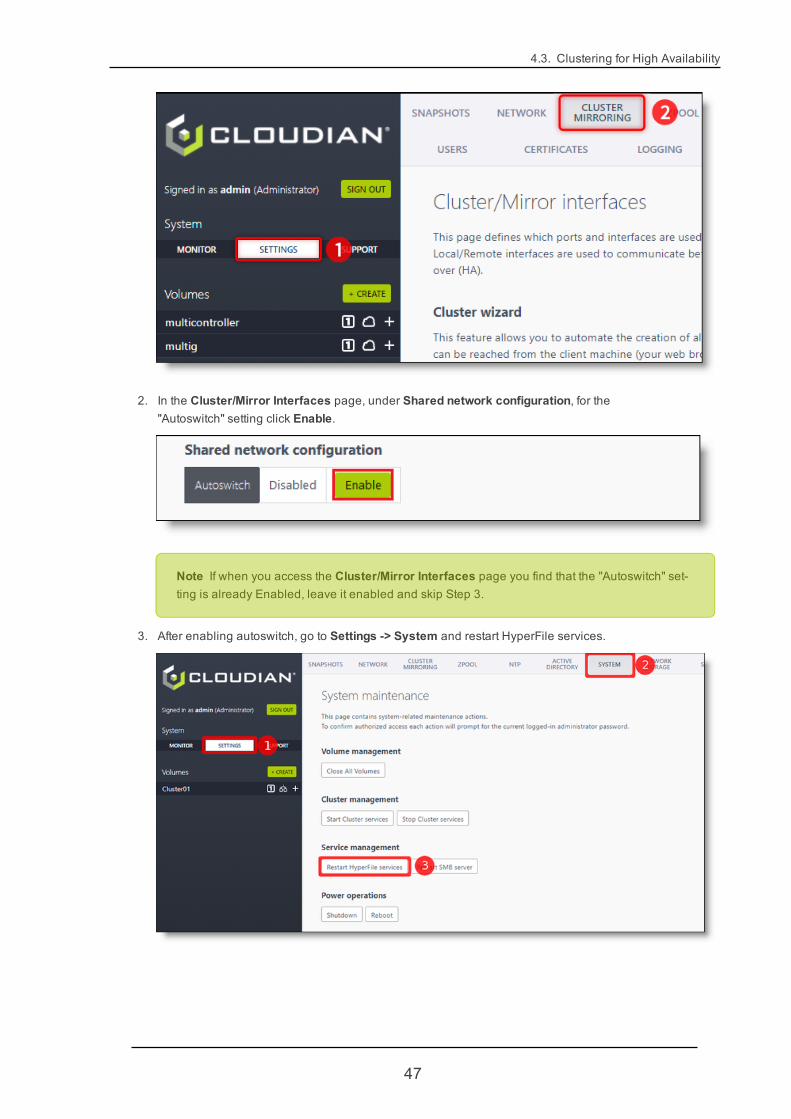
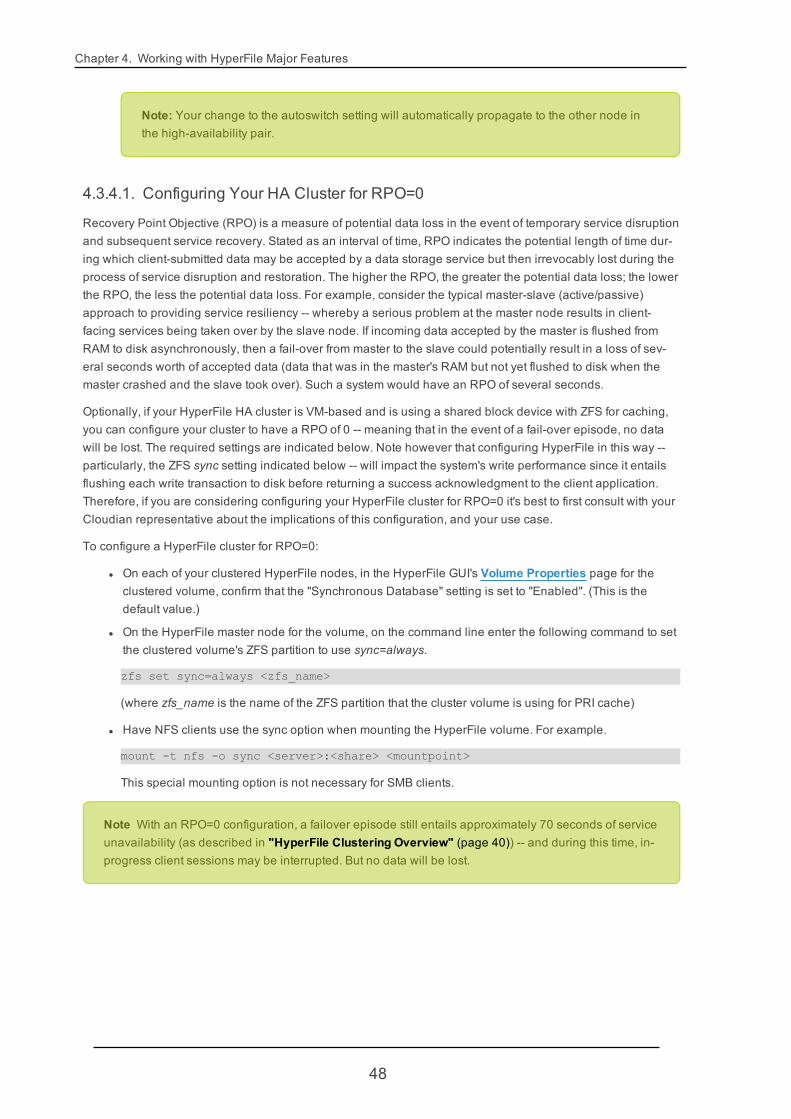
4.3. Clustering for High Availability
2. In the Cluster/Mirror Interfaces page, under Shared network configuration, for the"Autoswitch" setting click Enable.
Note If when you access the Cluster/Mirror Interfaces page you find that the "Autoswitch" set-ting is already Enabled, leave it enabled and skip Step 3.
3. After enabling autoswitch, go to Settings -> System and restart HyperFile services.
47
Chapter 4. Working with HyperFile Major Features
Note: Your change to the autoswitch setting will automatically propagate to the other node inthe high-availability pair.
4.3.4.1. Configuring Your HA Cluster for RPO=0
Recovery Point Objective (RPO) is a measure of potential data loss in the event of temporary service disruptionand subsequent service recovery. Stated as an interval of time, RPO indicates the potential length of time dur-ing which client-submitted data may be accepted by a data storage service but then irrevocably lost during theprocess of service disruption and restoration. The higher the RPO, the greater the potential data loss; the lowerthe RPO, the less the potential data loss. For example, consider the typical master-slave (active/passive)approach to providing service resiliency -- whereby a serious problem at the master node results in client-facing services being taken over by the slave node. If incoming data accepted by the master is flushed fromRAM to disk asynchronously, then a fail-over from master to the slave could potentially result in a loss of sev-eral seconds worth of accepted data (data that was in the master's RAM but not yet flushed to disk when themaster crashed and the slave took over). Such a system would have an RPO of several seconds.
Optionally, if your HyperFile HA cluster is VM-based and is using a shared block device with ZFS for caching,you can configure your cluster to have a RPO of 0 -- meaning that in the event of a fail-over episode, no datawill be lost. The required settings are indicated below. Note however that configuring HyperFile in this way --particularly, the ZFS sync setting indicated below -- will impact the system's write performance since it entailsflushing each write transaction to disk before returning a success acknowledgment to the client application.Therefore, if you are considering configuring your HyperFile cluster for RPO=0 it's best to first consult with yourCloudian representative about the implications of this configuration, and your use case.
To configure a HyperFile cluster for RPO=0:
l On each of your clustered HyperFile nodes, in the HyperFile GUI's Volume Properties page for theclustered volume, confirm that the "Synchronous Database" setting is set to "Enabled". (This is thedefault value.)
l On the HyperFile master node for the volume, on the command line enter the following command to setthe clustered volume's ZFS partition to use sync=always.
zfs set sync=always <zfs_name>
(where zfs_name is the name of the ZFS partition that the cluster volume is using for PRI cache)
l Have NFS clients use the sync option when mounting the HyperFile volume. For example.
mount -t nfs -o sync <server>:<share> <mountpoint>
This special mounting option is not necessary for SMB clients.
Note With an RPO=0 configuration, a failover episode still entails approximately 70 seconds of serviceunavailability (as described in "HyperFile Clustering Overview" (page 40)) -- and during this time, in-progress client sessions may be interrupted. But no data will be lost.
48

4.4. Geo-Distribution
4.4. Geo-Distribution
4.4.1. HyperFile Multi-Controller Overview
Note The Multi-Controller feature described here is available only if you have an Enterprise levellicense for your HyperFile system.
A HyperFile multi-controller volume -- also known as a multi-gateway or geo-distributed volume -- facilitatesthe sharing of files across multiple sites. A multi-controller volume is a logical volume that spans across phys-ical storage from multiple HyperFile instances. Volume content is automatically kept in sync across nodes, andall users can access the same data regardless of which node originally ingested the data.
Multi-controller volumes serve two primary use cases:
l Sharing data across multiple geographic locations
l Scaling up throughput within a single location by using multiple HyperFile nodes
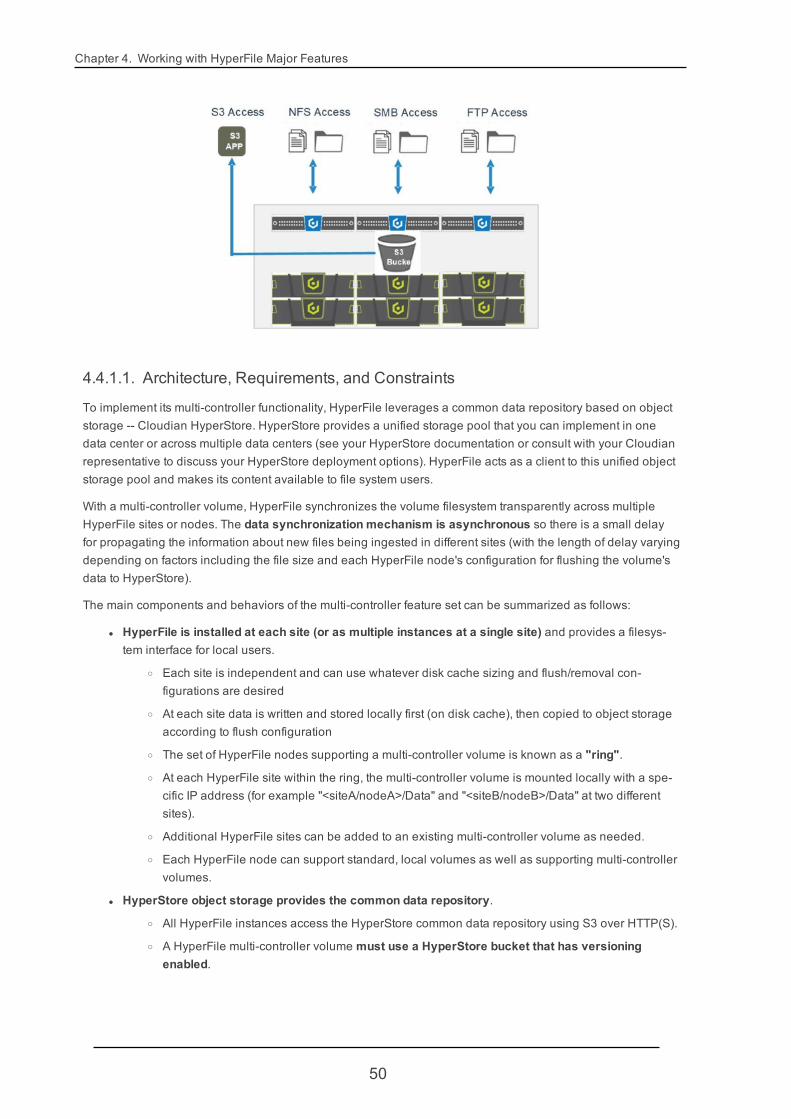
The first diagram below illustrates the case where users in multiple sites need to access the same data. Per-formance is not necessarily the main concern but it's imperative that all users in all sites can access the samedata regardless of where among those sites this data has been ingested. In this case every file ingested in siteA (for example in Europe) will be made available also to site B (US) and site C (Asia).
The next diagram below illustrates the case where there is no need for distributing data across multiple sitesbut rather a need to scale throughput beyond the limits of a single HyperFile instance. Since everything hap-pens within a single site, latency between nodes and data synchronization time is minimal -- providing a power-ful platform for massively parallel data ingest and reads.
49
Chapter 4. Working with HyperFile Major Features
4.4.1.1. Architecture, Requirements, and Constraints
To implement its multi-controller functionality, HyperFile leverages a common data repository based on objectstorage -- Cloudian HyperStore. HyperStore provides a unified storage pool that you can implement in onedata center or across multiple data centers (see your HyperStore documentation or consult with your Cloudianrepresentative to discuss your HyperStore deployment options). HyperFile acts as a client to this unified objectstorage pool and makes its content available to file system users.
With a multi-controller volume, HyperFile synchronizes the volume filesystem transparently across multipleHyperFile sites or nodes. The data synchronization mechanism is asynchronous so there is a small delayfor propagating the information about new files being ingested in different sites (with the length of delay varyingdepending on factors including the file size and each HyperFile node's configuration for flushing the volume'sdata to HyperStore).
The main components and behaviors of the multi-controller feature set can be summarized as follows:
l HyperFile is installed at each site (or as multiple instances at a single site) and provides a filesys-tem interface for local users.
o Each site is independent and can use whatever disk cache sizing and flush/removal con-figurations are desired
o At each site data is written and stored locally first (on disk cache), then copied to object storageaccording to flush configuration
o The set of HyperFile nodes supporting a multi-controller volume is known as a "ring".
o At each HyperFile site within the ring, the multi-controller volume is mounted locally with a spe-cific IP address (for example "<siteA/nodeA>/Data" and "<siteB/nodeB>/Data" at two differentsites).
o Additional HyperFile sites can be added to an existing multi-controller volume as needed.
o Each HyperFile node can support standard, local volumes as well as supporting multi-controllervolumes.
l HyperStore object storage provides the common data repository.
o All HyperFile instances access the HyperStore common data repository using S3 over HTTP(S).
o A HyperFile multi-controller volume must use a HyperStore bucket that has versioningenabled.
50

4.4. Geo-Distribution
o HyperStore itself provides various ways of protecting data in the repository, including replicationor erasure coding within and across data centers.
l When new data is generated at a HyperFile site, the workflow for a multi-controller volume is as fol-lows:
o Data is written to CIFS/NFS and stored on HyperFile's local disk (cache).
o Data is flushed to HyperStore object storage in accordance with the local HyperFile's flush con-figuration; by default files are queued for flushing to HyperStore approximately 20 seconds afteringestion by HyperFile.
o Volume metadata is automatically synchronized to the other HyperFile sites in the ring. Syn-chronizing only metadata -- rather than full file data -- allows for faster replication and more effi-cient utilization of bandwidth and cache storage resources. Transfer of full file data to disk cacheat other sites happens only on demand, such as when a user at those sites goes to retrieve afile from the volume contents list.
o Conflicts management and versioning mechanisms are used to ensure data consistency andprotection (for example to manage concurrent write access to the same file in multiple loc-ations).
Note Combining Multi-Controller and High Availability (Cluster) functionality is an advanced con-figuration that requires assistance from Cloudian Support. If you are interested in using these featuresin combination, contact Cloudian Support.
Note The HyperFile Multi-Controller feature does not work together with the WORM feature.
4.4.2. Creating aMulti-Controller Volume on a First Node
Note Creating a multi-controller volume is allowed only if you have an Enterprise level license foryour HyperFile system.
To create a multi-controller volume you first create the volume on a single HyperFile node, then import thevolume database to the other HyperFile nodes that you want to have support the volume. Before starting:
l Remember that the HyperStore bucket that you use as the common object storage tier for the multi-con-troller volume must have versioning enabled. You can use the HyperStore GUI (CMC) to enable ver-sioning on the bucket, if you have not already done so.
l Keep in mind that the multi-controller volume must have the same volume name on each of theHyperFile nodes that support it. So use a suitable volume name when you create the volume on thefirst node. For example, if you plan to have a multi-controller volume that spans multiple sites don't usea volume name that's specific to the first site.
To set up a multi-controller volume on the first HyperFile node:
1. Create a volume as described in "Volume Create" (page 146), using the either the "Express Creation"wizard (fastest and simplest) or the "Data Director" wizard (more customization control as you create the
51
Chapter 4. Working with HyperFile Major Features
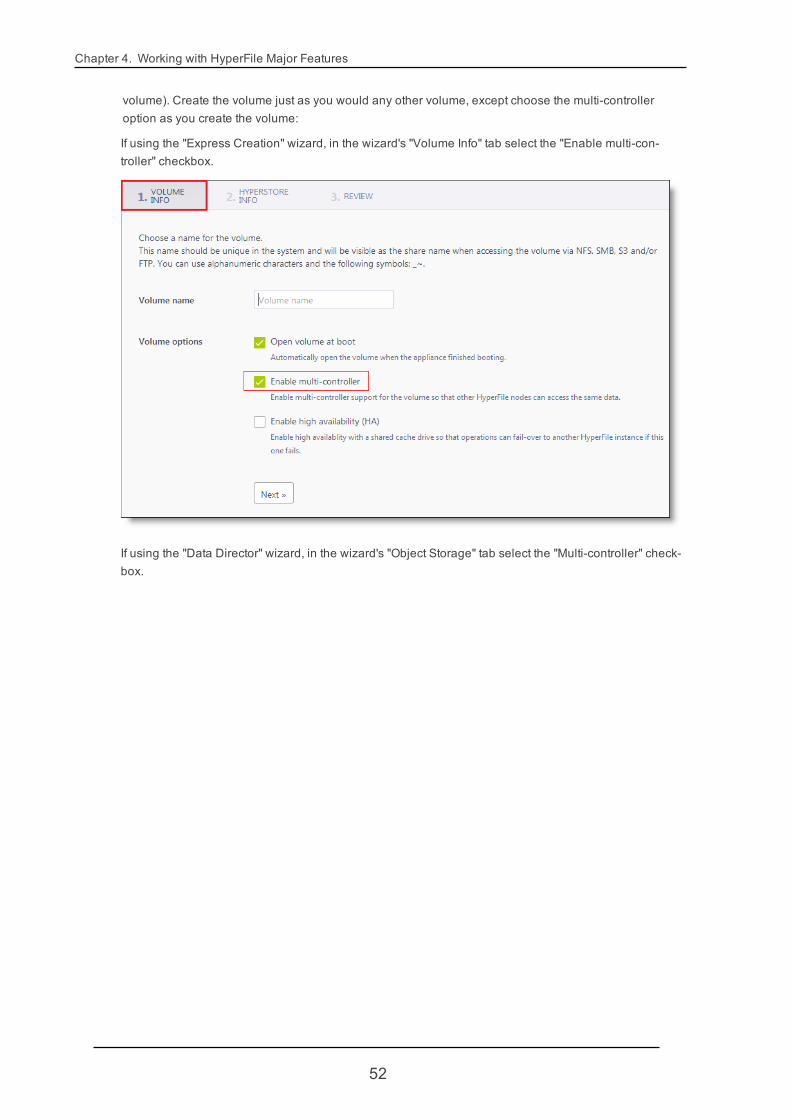
volume). Create the volume just as you would any other volume, except choose the multi-controlleroption as you create the volume:
If using the "Express Creation" wizard, in the wizard's "Volume Info" tab select the "Enable multi-con-troller" checkbox.
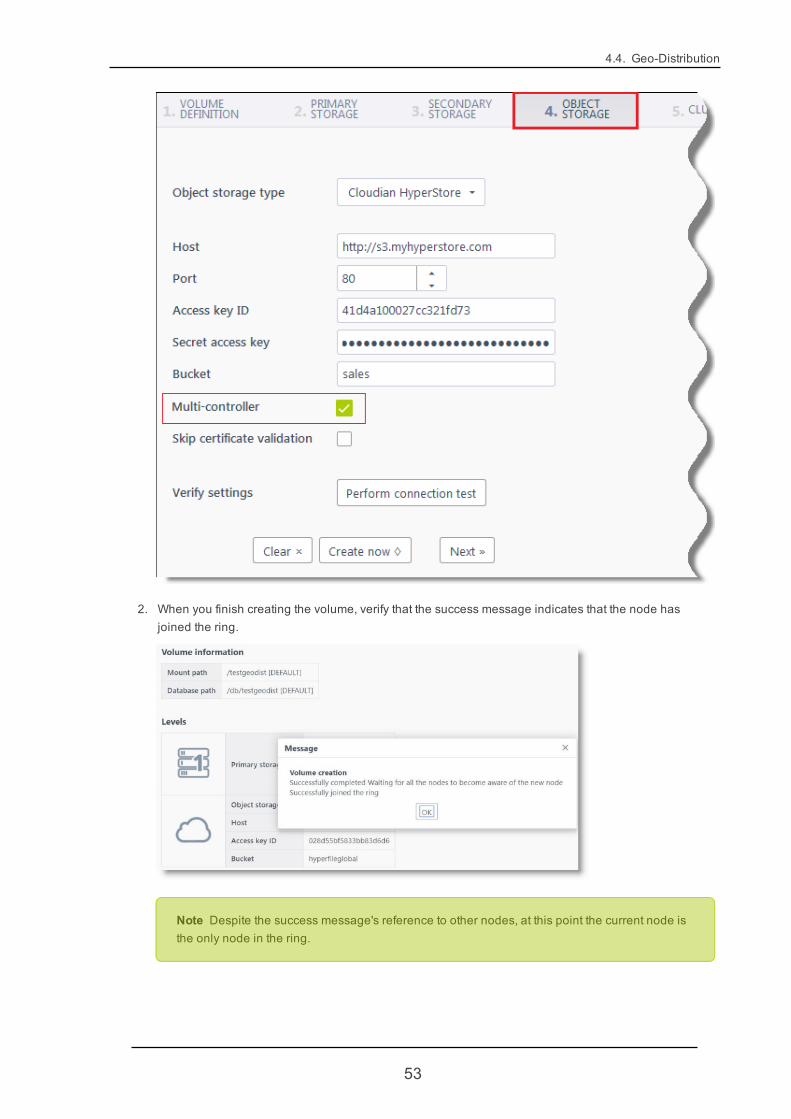
If using the "Data Director" wizard, in the wizard's "Object Storage" tab select the "Multi-controller" check-box.
52
4.4. Geo-Distribution
2. When you finish creating the volume, verify that the success message indicates that the node hasjoined the ring.
Note Despite the success message's reference to other nodes, at this point the current node isthe only node in the ring.
53

Chapter 4. Working with HyperFile Major Features
3. On the left side of the GUI, select the volume that you created, then select the Properties tab. Changethe volume's Status to "Open".
Note A volume must be Open in order to import it to other HyperFile nodes, as you will do in alater stage of this procedure. However, there cannot be client activity on the volume during theimport process. Therefore it's best not to implement Sharing on a multi-controller volume untilafter you have imported the volume to each of the HyperFile nodes that you want to include inthe multi-controller ring. So at this point on the first node, open the volume but do not yet shareit.
4. Create a snapshot of the volume that you just created (a back-up of the volume database). In the Sys-tem section on the left of the HyperFile GUI, select Settings. Then select the Snapshots tab. When cre-ating the snapshot:
l Choose to create the snapshot now (not on a schedule).
l Create the snapshot only for the volume that you want to deploy as a multi-controller volume(not for all volumes)
l Choose to Save snapshot image on HyperStore. This is mandatory, so that the other nodesthat you later add to the ring can access the snapshot.
Click Apply to create the snapshot.
5. Still in the Snapshots page, verify that the snapshot that you just created is listed in the Snapshots onHyperStore section (lower down in the page). Then in that snapshot's row click the Generate publicURL button.
54

4.4. Geo-Distribution
This generates and pops up a temporary URL for accessing the snapshot in HyperStore. This URL willonly be valid for 60 minutes (you can create another one later if you need to). Copy this URL -- you willneed it to import this volume to the other HyperFile nodes that you will add to the ring. Best is savinga soft copy that you can later paste into the GUIs for the other nodes. After copying the URL you canclose the pop-up message.
Next: "Importing a Multi-Controller Volume to Additional Nodes" (page 55)
4.4.3. Importing aMulti-Controller Volume to Additional NodesAfter creating a multi-controller volume on a first HyperFile node, taking a snapshot of the volume database,and obtaining a public URL for accessing the snapshot in HyperStore -- as described in "Creating a Multi-Con-troller Volume on a First Node" (page 51) -- you can import the volume into additional nodes.
Note Each HyperFile node on which you are importing the volume needs to be able to resolve theHyperStore S3 endpoint. The simplest approach is to configure the S3 endpoint for resolution in the/etc/hosts file on each HyperFile node. But, depending on your environment, you may need to resolve itat the DNS level. Please check with your network administrator.
To import a multi-controller volume to an additional HyperFile node, on the left panel of the HyperFile GUI clickCreate. Then choose the Import database wizard.
Use the wizard as follows:
55

Chapter 4. Working with HyperFile Major Features
1. In the wizard's Volume Info tab, enter the volume name. You must use the same volume name that youused when you created the volume on the first node. Leave the "Enable multi-controller" checkboxselected. (For the "Open volume at boot" option, leave it selected if you want the volume to open auto-matically each time the host boots up -- or deselect the option if you prefer to manually open the volumethrough the GUI each time the host boots up).
2. In the wizard's Import Database tab, in the Database URL field paste the public URL for the snapshotthat you took of the volume that you created on the first node (executing this snapshot and generating aURL was described in "Creating a Multi-Controller Volume on a First Node" (page 51)).
3. In the wizard's Review tab, confirm that all the information is correct and then click Create volume. Thesystem will create the volume on the node, download the database by using the URL, and join the ring.This may take a few minutes, depending on the volume database size and your connection speed.
56
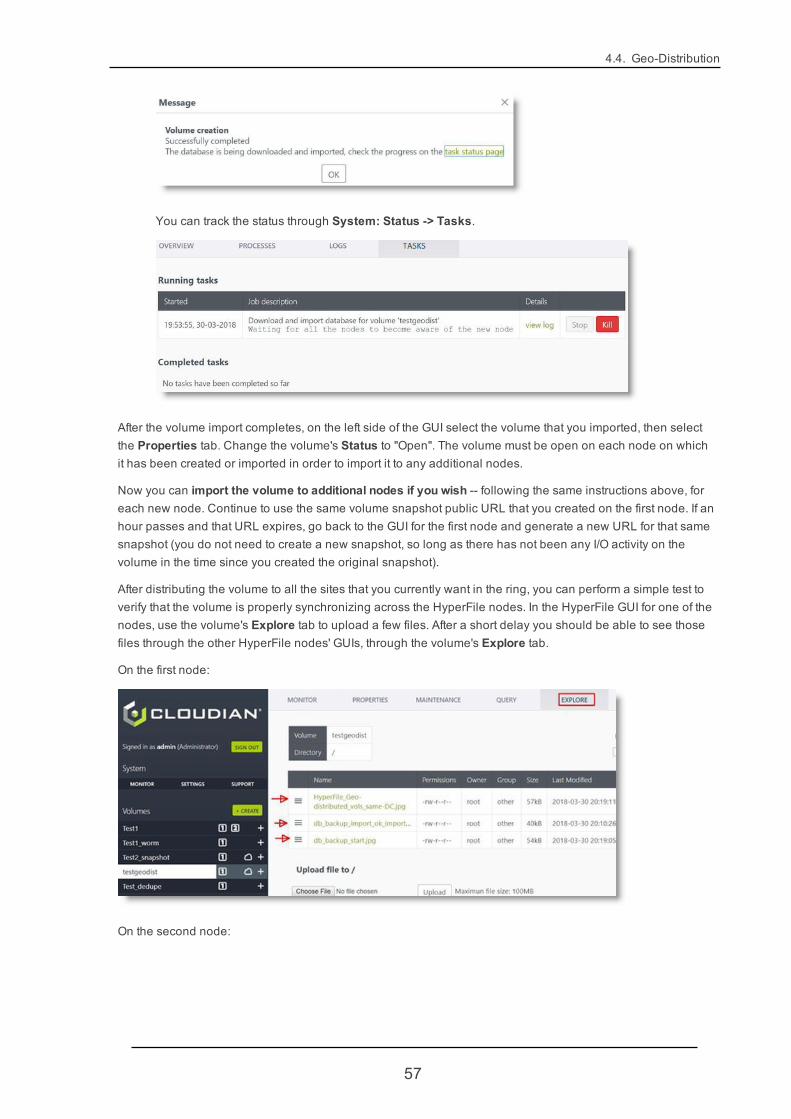
4.4. Geo-Distribution
You can track the status through System: Status -> Tasks.
After the volume import completes, on the left side of the GUI select the volume that you imported, then selectthe Properties tab. Change the volume's Status to "Open". The volume must be open on each node on whichit has been created or imported in order to import it to any additional nodes.
Now you can import the volume to additional nodes if you wish -- following the same instructions above, foreach new node. Continue to use the same volume snapshot public URL that you created on the first node. If anhour passes and that URL expires, go back to the GUI for the first node and generate a new URL for that samesnapshot (you do not need to create a new snapshot, so long as there has not been any I/O activity on thevolume in the time since you created the original snapshot).
After distributing the volume to all the sites that you currently want in the ring, you can perform a simple test toverify that the volume is properly synchronizing across the HyperFile nodes. In the HyperFile GUI for one of thenodes, use the volume's Explore tab to upload a few files. After a short delay you should be able to see thosefiles through the other HyperFile nodes' GUIs, through the volume's Explore tab.
On the first node:
On the second node:
57

Chapter 4. Working with HyperFile Major Features
After confirming that the nodes are synchronizing, you can configure volume sharing at each site, for local cli-ent access via SMB/CIFS, NFS, and/or FTP. You must configure this separately for each site (each site has itsown independent sharing configuration for the multi-controller volume). For more information on configuringsharing see "Volume Sharing" (page 181).
You can perform certain useful operations for multi-controller volumes -- such as checking to see which nodesare currently in the ring -- by using the volume's OSD tier Maintenance page.
Also, on each node you should review the volume's configuration properties, and make any customizationsthat you want. See particularly "Volume Properties" (page 164) and "Volume Cache Tier: Properties" (page193).
Note You can configure PRI Cache storage however you want for each node. The PRI Cache storagefor each node is independent of that for other nodes in the ring, and does not necessarily have to be ofthe same type or size as the PRI Cache storage implemented for the other nodes.
4.5. WORM
4.5.1. HyperFileWORM OverviewSubjects covered in this section:
l Introduction (immediately below)
l "WORM and Data Retention Strategies" (page 59)
l "HowWORMWorks" (page 59)
l "WORM" (page 58)
Note The WORM feature described here is available only if you have an Enterprise level license foryour HyperFile system.
HyperFile provides robust capabilities in support of data retention. Data retention is meant to ensure that oncewritten, data stays unmodified in the electronic storage archive. Data retention is a particular concern in reg-ulated environments where rules mandate that data cannot be altered or deleted for a certain period of time.
There are two main classes of data retention scenarios:
58
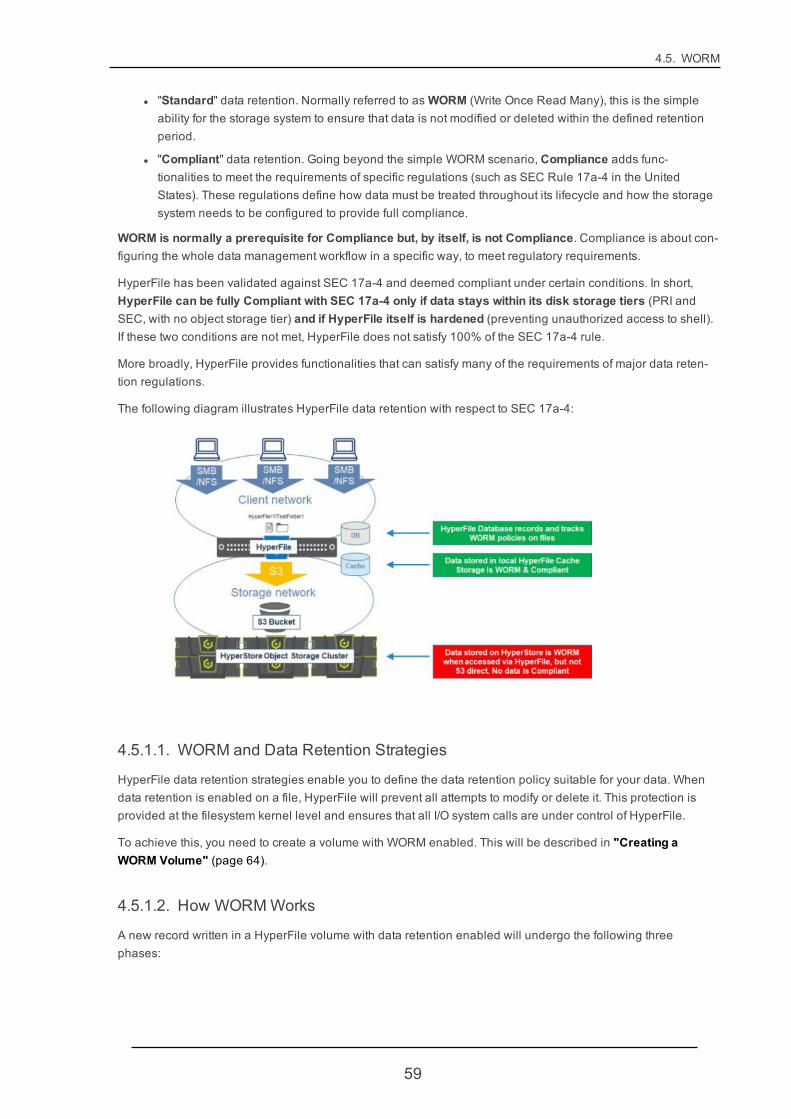
4.5. WORM
l "Standard" data retention. Normally referred to asWORM (Write Once Read Many), this is the simpleability for the storage system to ensure that data is not modified or deleted within the defined retentionperiod.
l "Compliant" data retention. Going beyond the simple WORM scenario, Compliance adds func-tionalities to meet the requirements of specific regulations (such as SEC Rule 17a-4 in the UnitedStates). These regulations define how data must be treated throughout its lifecycle and how the storagesystem needs to be configured to provide full compliance.
WORM is normally a prerequisite for Compliance but, by itself, is not Compliance. Compliance is about con-figuring the whole data management workflow in a specific way, to meet regulatory requirements.
HyperFile has been validated against SEC 17a-4 and deemed compliant under certain conditions. In short,HyperFile can be fully Compliant with SEC 17a-4 only if data stays within its disk storage tiers (PRI andSEC, with no object storage tier) and if HyperFile itself is hardened (preventing unauthorized access to shell).If these two conditions are not met, HyperFile does not satisfy 100% of the SEC 17a-4 rule.
More broadly, HyperFile provides functionalities that can satisfy many of the requirements of major data reten-tion regulations.
The following diagram illustrates HyperFile data retention with respect to SEC 17a-4:
4.5.1.1. WORM and Data Retention Strategies
HyperFile data retention strategies enable you to define the data retention policy suitable for your data. Whendata retention is enabled on a file, HyperFile will prevent all attempts to modify or delete it. This protection isprovided at the filesystem kernel level and ensures that all I/O system calls are under control of HyperFile.
To achieve this, you need to create a volume with WORM enabled. This will be described in "Creating aWORM Volume" (page 64).
4.5.1.2. How WORMWorks
A new record written in a HyperFile volume with data retention enabled will undergo the following threephases:
59
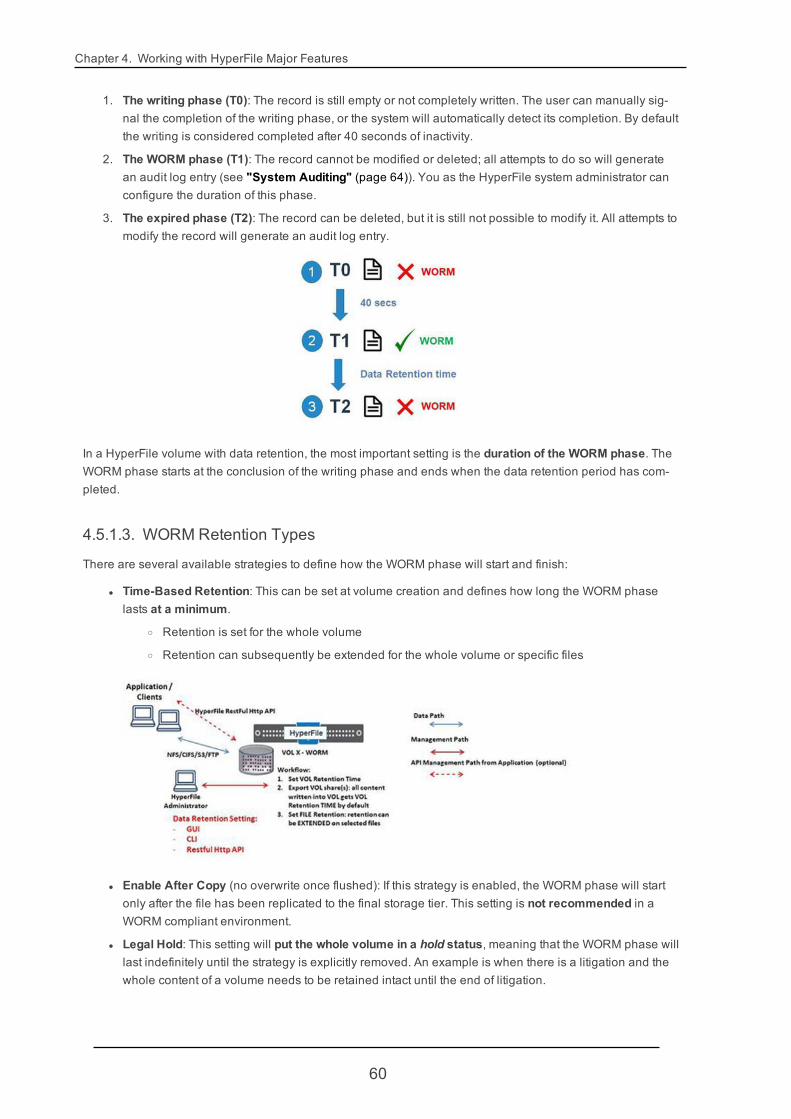
Chapter 4. Working with HyperFile Major Features
1. The writing phase (T0): The record is still empty or not completely written. The user can manually sig-nal the completion of the writing phase, or the system will automatically detect its completion. By defaultthe writing is considered completed after 40 seconds of inactivity.
2. The WORM phase (T1): The record cannot be modified or deleted; all attempts to do so will generatean audit log entry (see "System Auditing" (page 64)). You as the HyperFile system administrator canconfigure the duration of this phase.
3. The expired phase (T2): The record can be deleted, but it is still not possible to modify it. All attempts tomodify the record will generate an audit log entry.
In a HyperFile volume with data retention, the most important setting is the duration of the WORM phase. TheWORM phase starts at the conclusion of the writing phase and ends when the data retention period has com-pleted.
4.5.1.3. WORM Retention Types
There are several available strategies to define how the WORM phase will start and finish:
l Time-Based Retention: This can be set at volume creation and defines how long the WORM phaselasts at a minimum.
o Retention is set for the whole volume
o Retention can subsequently be extended for the whole volume or specific files
l Enable After Copy (no overwrite once flushed): If this strategy is enabled, the WORM phase will startonly after the file has been replicated to the final storage tier. This setting is not recommended in aWORM compliant environment.
l Legal Hold: This setting will put the whole volume in a hold status, meaning that the WORM phase willlast indefinitely until the strategy is explicitly removed. An example is when there is a litigation and thewhole content of a volume needs to be retained intact until the end of litigation.
60
4.5. WORM
Note At any time you can extend a WORM retention interval. However you cannot shorten aWORM retention interval, once the interval has been set as part of the volume configuration.
Next: "From WORM to Compliance" (page 61)
4.5.2. FromWORM to ComplianceSubjects covered in this section:
l Introduction (immediately below)
l "Data Replication (Redundant Data Copies)" (page 62)
l "Exclusive Storage Access" (page 62)
l "Metadata Replication" (page 63)
l "Integrity Verification" (page 63)
l "WORM Compliance Mode" (page 63)
As noted in "HyperFile WORM Overview" (page 58), compliance is an extension of WORM: a wider set of fea-tures is used, and a specific configuration must be implemented in order to meet regulatory requirements.
IMPORTANT: If you need to make your system compliant with regulatory requirements, please consultwith your Cloudian representative. The documentation in this section provides only general guidanceand is not meant to be an authoritative compliance check list.
The SEC Rule 17a-4 in the United States provides an example of compliance requirements.
To configure a WORM system compliant with SEC Rule 17a-4, the following conditions must be met:
l The volume must be configured with NO_OVERWRITE or NO_OVERWRITE_ON_RETENTION
l If using a finite retention period, the volume must be configured with a proper default retention periodthat is suitable for all the files that will be written in it
l If a set of files needs to be preserved for a period longer than the default retention time, the systemadministrator is responsible for extending the retention period on these files
l The volume must be configured with two or more storage tiers, and at least two storage tiers must bephysically separated
l The volume only uses storage devices that are accessed exclusively by HyperFile
l The volume is in a cluster or mirrored configuration, or other methods to ensure that replication of thevolume metadata is implemented
l Logs of unusual activities (e.g. audit logs) are kept for at least 18 months
l Each user account enabled for access on the HyperFile filesystem must be accountable to a specificperson
l If using removable media such as tape cartridges, media should not be removed from the system, or oth-erwise an appropriate facility for media location must be kept, and the system administrator must makesure that required records can be made promptly available
61
Chapter 4. Working with HyperFile Major Features
Additionally, still as an example, for compliance with Italian CNIPA rule n. 11, February 19, 2004:
l The filesystem contents must be checked against the hash at least once every 5 years
l The system administrator must make sure the digital signature is properly applied to the records
l The system must not use removable media, such as tape cartridges, or keep two additional duplicatecopies on other media
Clearly, compliance is not a single rule and not a one-click approach. Product features can provide the toolsbut then it's also about implementing the right data management workflow and configuration.
The sections that follow provide additional details around particular aspects of compliance. Again, this is not anauthoritative compliance procedure but is rather an introduction to some of the issues you must consider whenimplementing a compliance program.
4.5.2.1. Data Replication (Redundant Data Copies)
A common requirement for compliant protection of data is to provide redundant copies of the record, with thegoal of ensuring that the data is still available in case of failure of one or more storage device. Storage failuremight include unreachable devices (due to power outages, broken network links, and so on), hardware fail-ures, or intentional or accidental data corruption.
The legal requirements for sensitive data also require the system administrator to store records in at least twophysically separated locations. For HyperFile this translates to having at least two physical instances in sep-arate locations.
HyperFile has several features to handle data replication and offers the possibility to manage multiple replicason different disks and object storage devices.
However, a physically dislocated or geographically distributed storage node might pose a security concern incertain configurations; see "Exclusive Storage Access" (page 62). Also, the secondary storage node must beused in read-only mode so as to have no risk of modification of the replica data on the node.
HyperFile can automatically retrieve the record from the secondary storage device, ensuring that in case of anerror, such as device malfunction or data corruption, the system will try to access every replica of the record.For safety measures against data corruption, see "Integrity Verification" (page 63).
The delays introduced by a secondary copy might be another problem; the SEC Rule interpretation states thatrecords should be made available “immediately or within a few hours” from the request, while Italian CNIPAlaw states that records should be “made available at any time”. This poses problems with removable devicesfor example.
4.5.2.2. Exclusive Storage Access
As a security measure, it is necessary that the system is configured in such a way that direct access to the stor-age devices by a privileged or unprivileged user is impossible; the access to the storage devices must beexclusively by way of the HyperFile server. This is the main issue that creates non-compliance when data ismoved from HyperFile to HyperStore object storage (since HyperStore can be directly accessed by S3 applic-ations, by-passing HyperFile).
Protecting the connection with a username/password authentication system is usually considered not secureenough for WORM compliance purposes; it is advised to secure the connection either via a direct dedicatedhardware link, or with more secure authentication mechanisms such as security certificates.
62
4.5. WORM
4.5.2.3. Metadata Replication
Metadata replication is an important data protection feature to ensure redundancy of the storage indexes andthe retention metadata. HyperFile has multiple ways to ensure metadata replication:
l Database backups are a first way to perform a full metadata replica; the backup can be scheduled torun periodically, and a copy can be archived automatically in the back-end HyperStore object storagesystem (for more information see "HyperFile Snapshots Overview" (page 67) and subsequent topics).
l Metadata is also replicated along with the records in the storage devices; in case of a failure, the Hyper-File database can be rebuilt by rescanning the storage devices.
l HyperFile clustering (HA pairing) is a dedicated solution for metadata replication; it will ensure that allindexes are replicated in a secondary storage node (for more information see "HyperFile ClusteringOverview" (page 40) and subsequent topics).
4.5.2.4. Integrity Verification
After a file has been archived in HyperFile, it is possible to check its correct readability with a dedicated tool.
In volumes with data retention enabled, HyperFile automatically calculates a hash of the record data. The hashis calculated using Keccak, a cryptographically secure algorithm that became the standard in SHA-3. Hyper-File's 512-bit hash is meant to make an intentional hash collision practically infeasible. Later, when the data isaccessed, or when the user issues a check command, the hash can be computed again, and checked againstthe one that was computed at write time. This check is also automatically performed when the file is movedbetween storage tiers.
Should the hash comparison fail, the event is automatically logged in the system audit log (see "System Audit-ing" (page 64)). If another copy of the data is available on a different storage tier, the system will automaticallyattempt to read it and check the hash again, until no other copies are available.
For compliance with the Italian CNIPA law, the data integrity must be checked at least once every 5 years.
4.5.2.5. WORM Compliance Mode
For volumes that need to achieve compliance with the SEC Rule 17a-4 a special volume strategy, named"Data Compliance" mode, is available when you create volumes through the HyperFile GUI.
When in Data Compliance mode, some additional checks are performed on the system. Specifically, someoperations are forbidden and the system clock is protected against tampering.
If clock tampering is detected in the system, the relevant volumes are set in Lockdown mode, a setting meant toavoid compliance breaches. When in this mode, volumes are read-only, preventing any modification on them.To restore functionality of the system, a temporary OTP (one-time password) code must be obtained fromCloudian Support.
Clock Tampering Protection
In compliant mode HyperFile needs to automatically verify that the system clock is not drifting or is not mali-ciously altered, by checking for excessive modifications to it.
At system configuration time, the system must be configured with one or more clock sources compatible withNetwork Time Protocol (NTP). When the configuration is complete and the Data Compliance mode is enabled
63
Chapter 4. Working with HyperFile Major Features
on a volume, it is not possible to make changes to the NTP configuration without an OTP code provided byCloudian Support.
If the system detects a clock jump of more than 24 hours in a small time frame, the system and the Data Com-pliance volumes are automatically put in Lockdown mode. In this case you would need to contact CloudianSupport to obtain a one-time password to remove the Lockdown mode.
System Auditing
System auditing usually refers to one of:
l The possibility to query the system for record metadata
l The possibility to monitor the system history, user behavior, and “unusual” activity
HyperFile offers a variety of query tools to find and display the records metadata, such as the record hash, thedate at which the record has been written, the user who wrote it, the retention status (how long is the specifiedretention interval and how much time is left until the retention interval's expiration for that record), and wherethe record is physically located.
Moreover HyperFile can log various system events, both regarding the record -- such as user accesses,accesses failed due to permissions, data retention or data corruption -- and regarding system-wide eventssuch as changes in configuration or execution of administrative tasks.
The activity logs for unusual activities should be kept for a minimum of 18 months.
Note As noted earlier in this topic, for WORM compliance each user account in use in the system mustalways be accountable to a specific person.
Next: "Creating a WORM Volume" (page 64)
4.5.3. Creating aWORM Volume
Note Creating a WORM volume is allowed only if you have an Enterprise level license for your Hyper-File system.
To create a WORM volume, open the HyperFile GUI's volume creation wizard and select the "Data Director"option. For detailed instructions see "Volume Create" (page 146). At a high level, note that:
l In the Volume Definition tab of the wizard you can set retention behavior for the volume, includingselecting whether to create a Standard WORM volume or a WORM Compliance volume.
l When creating a Standard WORM volume:
o In configuring your retention settings in the Volume Definition tab of the wizard you can option-ally indicate that for your object storage tier you are using a HyperStore bucket that is pre-con-figured for Object Lock.
Note: If you are using an Object Lock bucket in HyperStore as the volume's object stor-age tier, the bucket must not only have Object Lock enabled but also the bucket musthave a default Object Lock configuration that uses "Compliance" mode, not
64
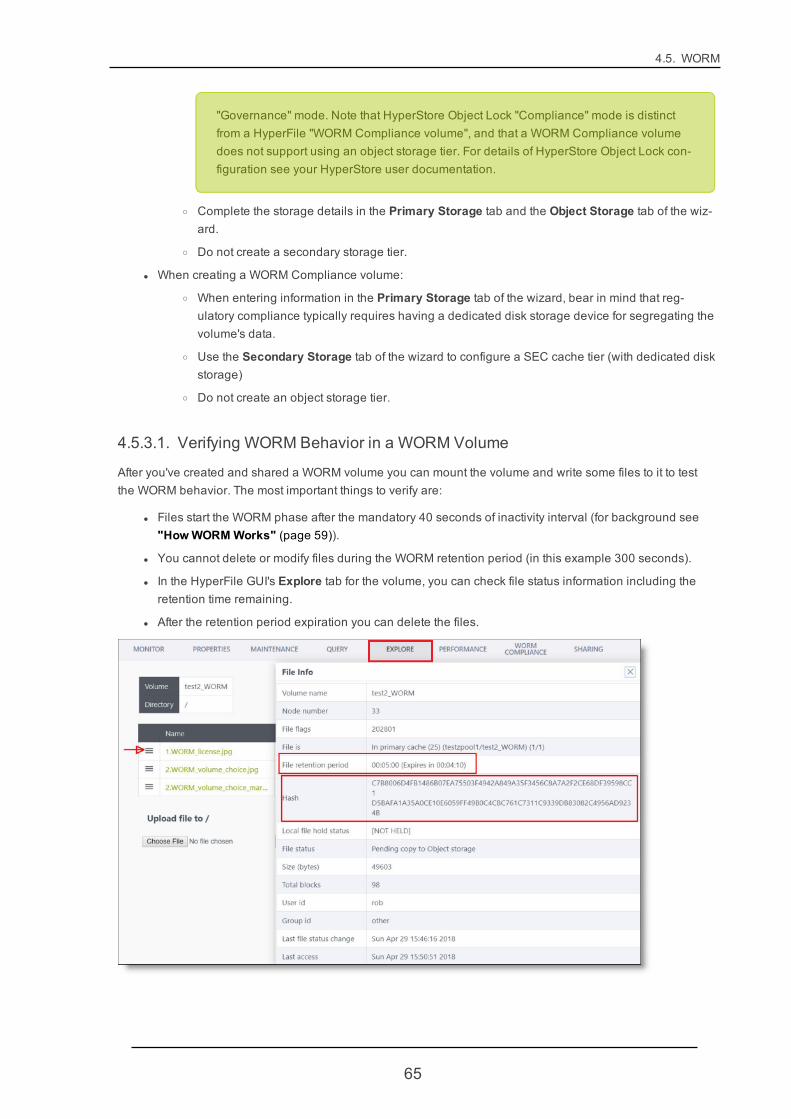
4.5. WORM
"Governance" mode. Note that HyperStore Object Lock "Compliance" mode is distinctfrom a HyperFile "WORM Compliance volume", and that a WORM Compliance volumedoes not support using an object storage tier. For details of HyperStore Object Lock con-figuration see your HyperStore user documentation.
o Complete the storage details in the Primary Storage tab and the Object Storage tab of the wiz-ard.
o Do not create a secondary storage tier.
l When creating a WORM Compliance volume:
o When entering information in the Primary Storage tab of the wizard, bear in mind that reg-ulatory compliance typically requires having a dedicated disk storage device for segregating thevolume's data.
o Use the Secondary Storage tab of the wizard to configure a SEC cache tier (with dedicated diskstorage)
o Do not create an object storage tier.
4.5.3.1. Verifying WORM Behavior in a WORM Volume
After you've created and shared a WORM volume you can mount the volume and write some files to it to testthe WORM behavior. The most important things to verify are:
l Files start the WORM phase after the mandatory 40 seconds of inactivity interval (for background see"HowWORMWorks" (page 59)).
l You cannot delete or modify files during the WORM retention period (in this example 300 seconds).
l In the HyperFile GUI's Explore tab for the volume, you can check file status information including theretention time remaining.
l After the retention period expiration you can delete the files.
65

Chapter 4. Working with HyperFile Major Features
4.5.3.2. Verifying That System Requirements Are Met for a WORM ComplianceVolume
If you've created a WORM Compliance volume, after completing the volume creation you should verify that thekey system configuration requirements are met (for example multiple copies, retention set, audit logs retention,and so on). You can check these conditions in the volume'sWorm Compliance page after you create thevolume. Below are two example volumes: the first volume is configured with only one copy of data (in PRIcache) and consequently the compliance check fails. The second volume is configured with two copies of data(in PRI cache and SEC cache) and the compliance check succeeds.
Example 1: Volume with only PRI level only is not compliant.
Example 2: Volume with PRI and SEC level is compliant.
In the volume's Maintenance page, you can also see from the example below that a compliant volume cannotbe removed. Prohibition against removal of the volume is another requirement for achieving compliance.
66
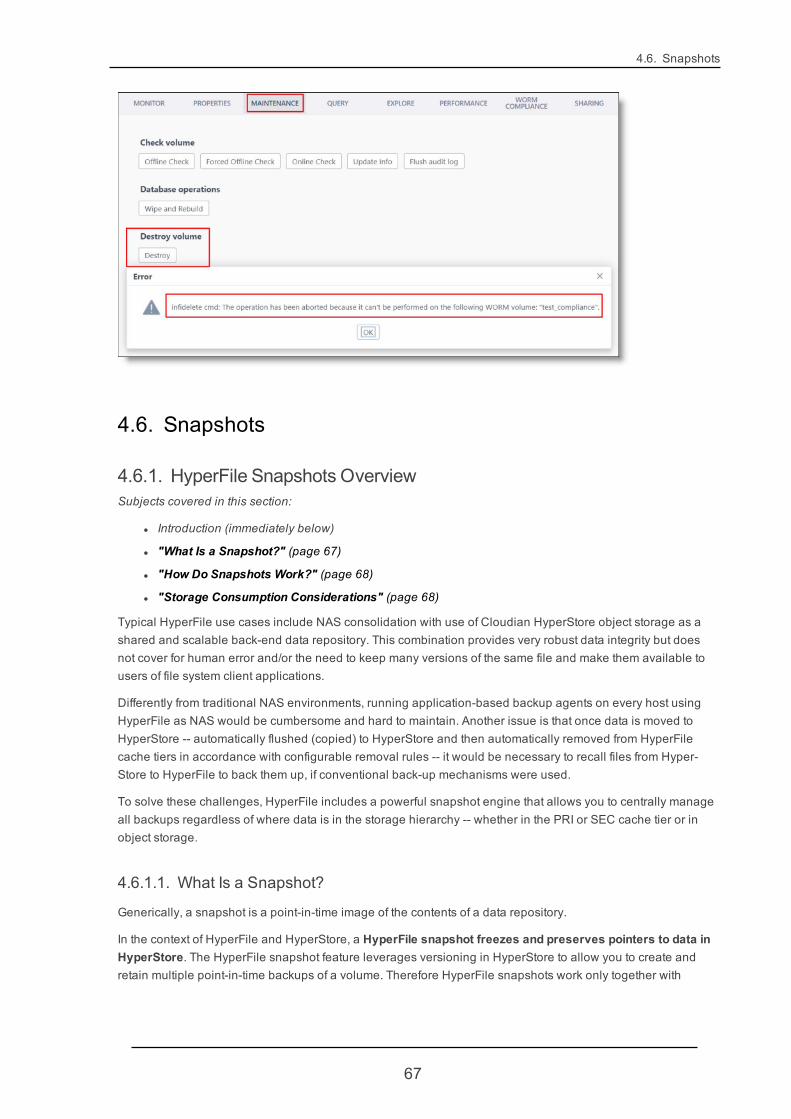
4.6. Snapshots
4.6. Snapshots
4.6.1. HyperFile Snapshots OverviewSubjects covered in this section:
l Introduction (immediately below)
l "What Is a Snapshot?" (page 67)
l "How Do Snapshots Work?" (page 68)
l "Storage Consumption Considerations" (page 68)
Typical HyperFile use cases include NAS consolidation with use of Cloudian HyperStore object storage as ashared and scalable back-end data repository. This combination provides very robust data integrity but doesnot cover for human error and/or the need to keep many versions of the same file and make them available tousers of file system client applications.
Differently from traditional NAS environments, running application-based backup agents on every host usingHyperFile as NAS would be cumbersome and hard to maintain. Another issue is that once data is moved toHyperStore -- automatically flushed (copied) to HyperStore and then automatically removed from HyperFilecache tiers in accordance with configurable removal rules -- it would be necessary to recall files from Hyper-Store to HyperFile to back them up, if conventional back-up mechanisms were used.
To solve these challenges, HyperFile includes a powerful snapshot engine that allows you to centrally manageall backups regardless of where data is in the storage hierarchy -- whether in the PRI or SEC cache tier or inobject storage.
4.6.1.1. What Is a Snapshot?
Generically, a snapshot is a point-in-time image of the contents of a data repository.
In the context of HyperFile and HyperStore, a HyperFile snapshot freezes and preserves pointers to data inHyperStore. The HyperFile snapshot feature leverages versioning in HyperStore to allow you to create andretain multiple point-in-time backups of a volume. Therefore HyperFile snapshots work only together with
67

Chapter 4. Working with HyperFile Major Features
HyperStore object storage and require that versioning is enabled on the HyperStore bucket(s) used byHyperFile.
Snapshots are sometimes referred as "volume backups" since they can be used to recover a volume in casethe volume database is lost or corrupted. This includes the volume configuration and all the file metadata. Notethough that snapshots do not contain copies of the data itself. Rather, they contain volume configuration andfile metadata including pointers to object version locations within HyperStore.
4.6.1.2. How Do Snapshots Work?
The HyperFile snapshot feature works as follows:
l Snapshots are based on backing up the HyperFile database, storing it, and preventing deletion of allcontent referenced by any saved snapshot.
l Snapshots are executed per volume. When you configure a snapshot schedule or trigger a snapshot ondemand, you can choose whether to apply your action to just one specified volume or all volumes atonce. In the latter case each volume gets its own snapshot.
l Snapshots work only for volumes that use HyperStore object storage buckets with versioning enabled(since snapshots leverage versioning to preserve the older instances of modified files).
l Snapshot retention is based on number of snapshots and not on a period of time. In other words, youcan preserve a certain number of snapshots but you cannot define a time-based retention scheme(such as keeping Snapshot X for 30 days and Snapshot Y for 1 year).
l It’s possible to revert the full current volume to a snapshot. In this case the whole current volume con-tent will be replaced with the content of the selected snapshot. Note that there is no undoing this oper-ation.
l A snapshot can also be mounted as a separate volume andmade accessible to users for browsing,for example in case of need to restore certain files. Mounting a snapshot as a volume does not in itselfrepopulate the disk cache -- rather, it just presents a filesystem of pointers and the data is in Hyper-Store. A file is recalled to cache only if a user retrieves the file.
Note: Mounting a snapshot as a volume is allowed only if you have an Enterprise level licensefor your HyperFile system.
4.6.1.3. Storage Consumption Considerations
The use of snapshots and versioning requires that you allow for extra storage space when sizing both Hyper-File and HyperStore:
l In HyperFile, plan to use some disk space to support mounting snapshot volumes. When first created, asnapshot volume is very small since it contains only pointers -- it’s essentially just a volume database.But if user actions on a mounted snapshot volume result in heavy file recall from HyperStore, this canconsume a considerable amount of disk space. Note that you can specify the device on which to restoresnapshots -- it does not necessarily have to be on your PRI or SEC cache device.
l In HyperStore, the use of versioning on a bucket -- which, again, is a prerequisite for using the Hyper-File snapshot feature -- results in extra storage space consumption since every version of each object isretained. (By contrast, in a HyperStore bucket that does not use versioning only the current version ofeach object is stored.)
68
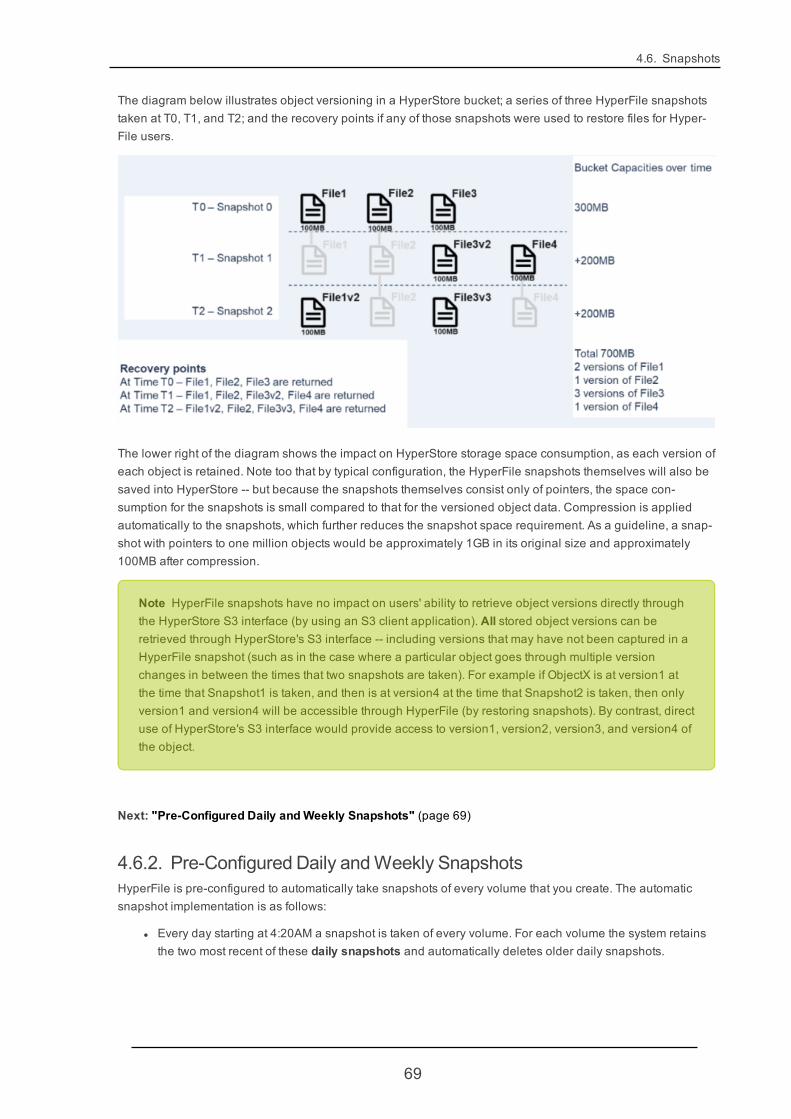
4.6. Snapshots
The diagram below illustrates object versioning in a HyperStore bucket; a series of three HyperFile snapshotstaken at T0, T1, and T2; and the recovery points if any of those snapshots were used to restore files for Hyper-File users.
The lower right of the diagram shows the impact on HyperStore storage space consumption, as each version ofeach object is retained. Note too that by typical configuration, the HyperFile snapshots themselves will also besaved into HyperStore -- but because the snapshots themselves consist only of pointers, the space con-sumption for the snapshots is small compared to that for the versioned object data. Compression is appliedautomatically to the snapshots, which further reduces the snapshot space requirement. As a guideline, a snap-shot with pointers to one million objects would be approximately 1GB in its original size and approximately100MB after compression.
Note HyperFile snapshots have no impact on users' ability to retrieve object versions directly throughthe HyperStore S3 interface (by using an S3 client application). All stored object versions can beretrieved through HyperStore's S3 interface -- including versions that may have not been captured in aHyperFile snapshot (such as in the case where a particular object goes through multiple versionchanges in between the times that two snapshots are taken). For example if ObjectX is at version1 atthe time that Snapshot1 is taken, and then is at version4 at the time that Snapshot2 is taken, then onlyversion1 and version4 will be accessible through HyperFile (by restoring snapshots). By contrast, directuse of HyperStore's S3 interface would provide access to version1, version2, version3, and version4 ofthe object.
Next: "Pre-Configured Daily andWeekly Snapshots" (page 69)
4.6.2. Pre-Configured Daily andWeekly SnapshotsHyperFile is pre-configured to automatically take snapshots of every volume that you create. The automaticsnapshot implementation is as follows:
l Every day starting at 4:20AM a snapshot is taken of every volume. For each volume the system retainsthe two most recent of these daily snapshots and automatically deletes older daily snapshots.
69
Chapter 4. Working with HyperFile Major Features
l Every Wednesday starting at 4:20AM a snapshot is taken of every volume. For each volume the systemretains the two most recent of these weekly snapshots and automatically deletes older weekly snap-shots.
So at any given time, for each volume you will have available the two most recent daily snapshots and the twomost recent weekly snapshots. For example, on a Monday afternoon you would have four snapshots availablefor each volume:
l The daily snapshot from Monday morning.
l The daily snapshot from Sunday morning.
l The weekly snapshot from the preceding Wednesday.
l The weekly snapshot from two Wednesdays ago (the snapshot from 12 days ago in this example).
Note that for a given volume, the scope of the weekly snapshots is the same as the scope of the daily snap-shots -- in each case it's a complete back-up of the current volume database. Weekly snapshots and daily snap-shots differ only in the frequency with which they are executed.
For both weekly and daily snapshots, the retained snapshots are stored both on local disk and in HyperStore.The retained snapshots are listed in the GUI's Snapshots page and you can also use the Snapshots page tomount a volume snapshot if you need to. For more information on mounting snapshots see "Mounting a Snap-shot to Recover Selected Files" (page 74) or "Recovering a Corrupted or Lost Volume from a Snapshot"(page 73).
The pre-configured daily and weekly snapshots are run as cron jobs. If you wish to modify the timing of thedaily or weekly snapshots you can do so in the HyperFile node's root crontab (under /var/spool/cron/crontabs),where you will find these two entries for the automatic snapshot execution:
20 4 * * * /ovmh/bin/infidbbck -t /cache/snapshots -a -X -p dailybackup -n 2 -N 2> /dev/console20 4 * * 3 /ovmh/bin/infidbbck -t /cache/snapshots -a -X -p weeklybackup -n 2 -N 2> /dev/console
The first five fields in each entry configure the timing of the cron job, using standard crontab syntax. Along withthe option of customizing the timing, if you wish you can modify the number of daily and weekly snapshots thatwill be retained for each volume: -n 2 saves two snapshots on local disk and -N 2 saves (the same) two snap-shots in the object storage tier.
For information about triggering a snapshot on-demand, or scheduling more snapshots -- in addition to the pre-configured daily and weekly snapshots -- see "Creating or Scheduling Snapshots" (page 70).
Note The pre-configured daily and weekly snapshot jobs will not display in the Scheduled jobs sec-tion of the Snapshots page. Only jobs that you schedule will appear there.
4.6.3. Creating or Scheduling SnapshotsBefore you create or schedule snapshots, review "Pre-Configured Daily andWeekly Snapshots" (page 69)to see what scheduled snapshots HyperFile implements automatically for every volume. Depending on yourneeds, the pre-configured scheduled snapshots may be sufficient.
To create or schedule HyperFile snapshots:
1. In the System section of the HyperFile GUI, select Settings -> Snapshots.
70
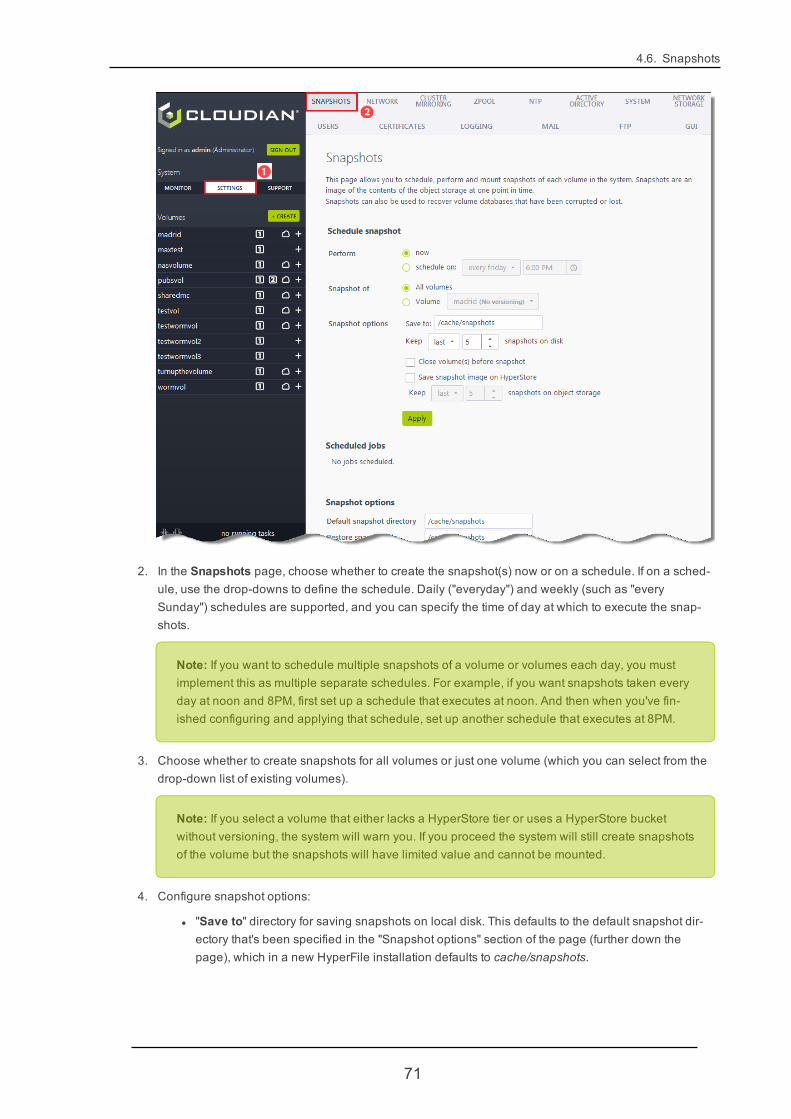
4.6. Snapshots
2. In the Snapshots page, choose whether to create the snapshot(s) now or on a schedule. If on a sched-ule, use the drop-downs to define the schedule. Daily ("everyday") and weekly (such as "everySunday") schedules are supported, and you can specify the time of day at which to execute the snap-shots.
Note: If you want to schedule multiple snapshots of a volume or volumes each day, you mustimplement this as multiple separate schedules. For example, if you want snapshots taken everyday at noon and 8PM, first set up a schedule that executes at noon. And then when you've fin-ished configuring and applying that schedule, set up another schedule that executes at 8PM.
3. Choose whether to create snapshots for all volumes or just one volume (which you can select from thedrop-down list of existing volumes).
Note: If you select a volume that either lacks a HyperStore tier or uses a HyperStore bucketwithout versioning, the system will warn you. If you proceed the system will still create snapshotsof the volume but the snapshots will have limited value and cannot be mounted.
4. Configure snapshot options:
l "Save to" directory for saving snapshots on local disk. This defaults to the default snapshot dir-ectory that's been specified in the "Snapshot options" section of the page (further down thepage), which in a new HyperFile installation defaults to cache/snapshots.
71

Chapter 4. Working with HyperFile Major Features
l Number of snapshots to keep on disk. This limit is applied per volume and per schedule. Sofor example:
o If you create a schedule that takes snapshots of all of your volumes every day at noonand you set the number of snapshots to keep on disk to 5, then the system will keep the 5most recent of those snapshots for each volume (and automatically delete older snap-shots)
o If you create a schedule that takes snapshots of the "accounting" volume every day atnoon and you create another schedule that takes snapshots of the "accounting" volumeevery day at 8PM, and for each of those schedules you set the number of snapshots tokeep on disk to 5, then the system will keep the 5 most recent of the "accounting" volumesnapshots that were taken at noon and also the 5 most recent of the "accounting" volumesnapshots taken at 8PM.
o Snapshots taken "Now" -- rather than on a schedule -- form their own category withinwhich the retention limit is applied per volume: If you take a snapshot of the "marketing"volume "Now" and you set the number of snapshots to keep on disk to 3, the system willretain up to 3 of the "Now" type snapshots of the "marketing" volume -- the one you justexecuted plus up to two prior such snapshots (if any exist).
l Whether to have the system close the volume(s) before executing the snapshot(s). If youchoose this option, the system will automatically close the volume(s) before executing the snap-shot(s) and automatically reopen the volume(s) after completing the snapshot(s).
l Whether to save a copy of the snapshot(s) in HyperStore object storage. If you select thisoption, snapshot copies for each volume will be saved in that volume's HyperStore bucket, atthis location:
<bucketname>/.InfinityStorageFiles/Backups/
l Number of snapshots to keep in HyperStore. This limit is applied per volume and per sched-ule..
5. Click Apply.
If you are creating a snapshot now, the system either will display a success status message (if you're only back-ing up one small volume and the snapshot can be completed quickly) or, more likely, will refer you to theTasks Status page if you want to track the status. Once a snapshot has completed, it will be listed in the Latestsnapshots section of the Snapshots page.
If you have set a schedule for creating backups, the schedule will display in the Scheduled jobs section of theSnapshots page.
You can use the Snapshot page to create additional snapshot schedules if you wish -- such as if you want tohave different schedules for different volumes; or if you want to have the same volume be scheduled for mul-tiple snapshots per day.
72

4.6. Snapshots
Note Once you create and save a snapshot schedule, you cannot edit that snapshot schedule. If youwant to change a schedule, delete it from the Scheduled jobs section and then create a new schedule.
4.6.4. Recovering a Corrupted or Lost Volume from a SnapshotIn the event that a volume database is corrupted or lost, the volume can be recovered from a snapshot. The cur-rent volume contents and configuration will be overwritten with the contents and configuration from thesnapshot. In essence the volume is rolled back to the state it was in when the snapshot was taken.
IMPORTANT: This operation cannot be undone, so proceed carefully. Also, to perform this operationyou will need to close the volume (as described in Step 1 below).
Note If you only need to recover a small number of files, following the procedure for "Mounting a Snap-shot to Recover Selected Files" (page 74) rather than the procedure below.
To recover a volume:
1. In the HyperFile GUI, select the volume name and then select the Properties tab. In the Propertiespage, change the volume's Status to "Closed".
2. In the System section of the GUI, select Settings -> Snapshots. In the Snapshots page find the snap-shot that you want to use for recovering the volume (typically this would be a snapshot in the Latestsnapshots section). Then to the right of that snapshot click Recover Volume.
When prompted click OK to confirm. After a short while you should see a success message.
73
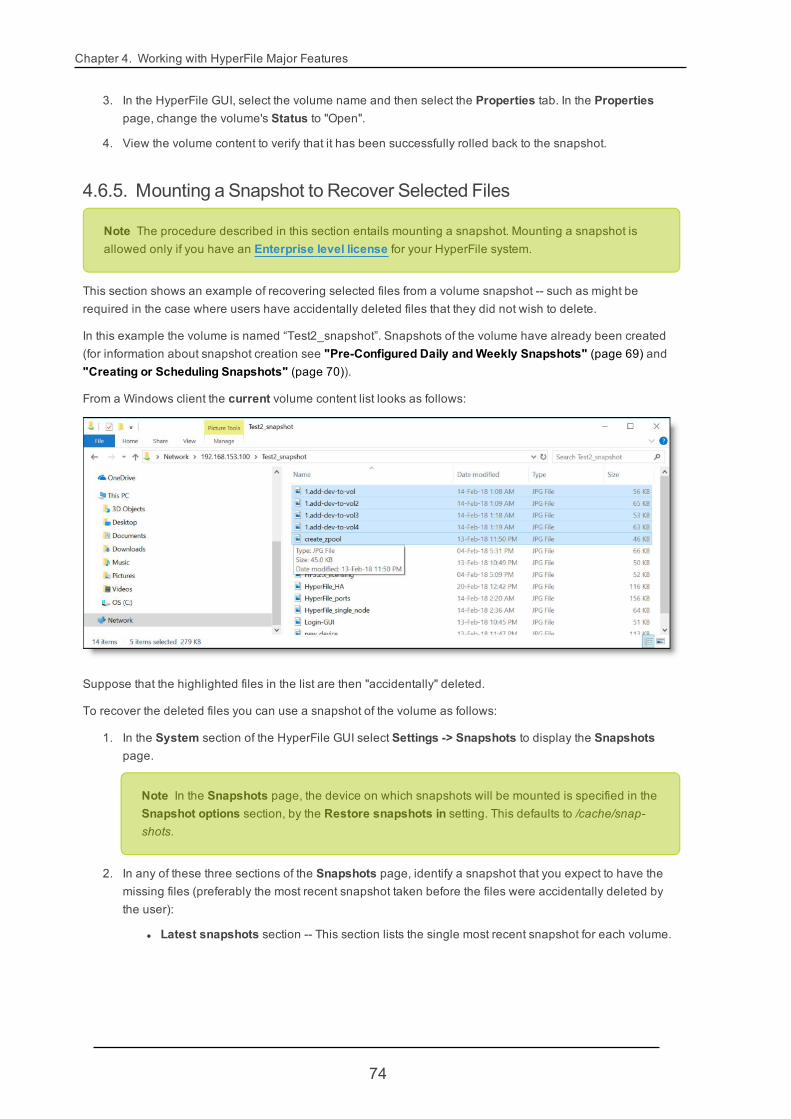
Chapter 4. Working with HyperFile Major Features
3. In the HyperFile GUI, select the volume name and then select the Properties tab. In the Propertiespage, change the volume's Status to "Open".
4. View the volume content to verify that it has been successfully rolled back to the snapshot.
4.6.5. Mounting a Snapshot to Recover Selected Files
Note The procedure described in this section entails mounting a snapshot. Mounting a snapshot isallowed only if you have an Enterprise level license for your HyperFile system.
This section shows an example of recovering selected files from a volume snapshot -- such as might berequired in the case where users have accidentally deleted files that they did not wish to delete.
In this example the volume is named “Test2_snapshot”. Snapshots of the volume have already been created(for information about snapshot creation see "Pre-Configured Daily andWeekly Snapshots" (page 69) and"Creating or Scheduling Snapshots" (page 70)).
From a Windows client the current volume content list looks as follows:
Suppose that the highlighted files in the list are then "accidentally" deleted.
To recover the deleted files you can use a snapshot of the volume as follows:
1. In the System section of the HyperFile GUI select Settings -> Snapshots to display the Snapshotspage.
Note In the Snapshots page, the device on which snapshots will be mounted is specified in theSnapshot options section, by the Restore snapshots in setting. This defaults to /cache/snap-shots.
2. In any of these three sections of the Snapshots page, identify a snapshot that you expect to have themissing files (preferably the most recent snapshot taken before the files were accidentally deleted bythe user):
l Latest snapshots section -- This section lists the single most recent snapshot for each volume.
74
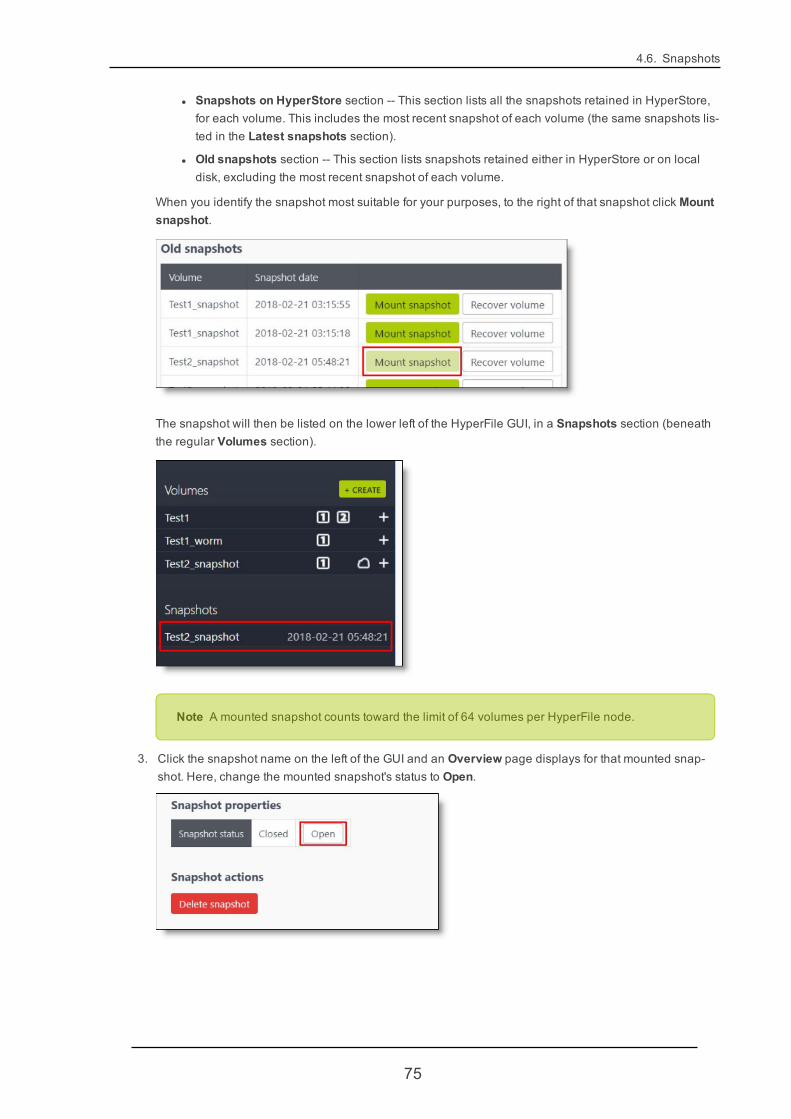
4.6. Snapshots
l Snapshots on HyperStore section -- This section lists all the snapshots retained in HyperStore,for each volume. This includes the most recent snapshot of each volume (the same snapshots lis-ted in the Latest snapshots section).
l Old snapshots section -- This section lists snapshots retained either in HyperStore or on localdisk, excluding the most recent snapshot of each volume.
When you identify the snapshot most suitable for your purposes, to the right of that snapshot click Mountsnapshot.
The snapshot will then be listed on the lower left of the HyperFile GUI, in a Snapshots section (beneaththe regular Volumes section).
Note A mounted snapshot counts toward the limit of 64 volumes per HyperFile node.
3. Click the snapshot name on the left of the GUI and an Overview page displays for that mounted snap-shot. Here, change the mounted snapshot's status to Open.
75

Chapter 4. Working with HyperFile Major Features
Note After opening the snapshot volume, if you wish you can use the Explore tab to view thesnapshot volume's content list and confirm that the desired files are there. If they are not you cantry mounting a different snapshot of the volume and opening and exploring it, until you find asnapshot that has the desired files.
4. With the snapshot still selected in the left side of the GUI, click the Sharing tab. The default sharing set-tings for the snapshot will be inherited from the original volume (except the exported name will be dif-ferent, as shown in the SMB Name field). Review the settings. If you make any adjustments, click Applysettings.
The snapshot can now be mounted on any client, using its own mount point. In the example below anSMB/CIFS client has mounted the snapshot as:
\\192.168.153.100\_SNAPSHOT_Test2_snapshot_20180221_054821
All the files that were accidentally deleted from the current volume are listed in the contents of this mountedsnapshot volume.
In this Windows example it's noteworthy that the file icons are slightly different. The reason is that the filespresented by this mounted snapshot are not on the disk cache -- instead, the files reside only in the Hyper-Store object storage tier. The mounting of the snapshot has just restored the pointers and metadata withoutrepopulating the whole disk cache. This avoids wasting cache disk space, as well as the long transfer timesthat might be entailed by repopulating the whole disk cache. A user can now access just the files that he or shereally needs.
At this point, to recover the files the user should download to their local machine the files that they need.Then later, when the user is once again mounted to the current volume, they can upload the files from theirlocal machine to the current volume. (Alternatively, you can do the download and subsequent upload of thosefiles on your user's behalf.) The files will then be available in the current volume.
Note Users cannot write to a mounted snapshot. They should only use the mounted snapshot toretrieve the files that they need.
When your user is done recovering files, select the mounted snapshot on the left side of the HyperFile GUI andthen in the snapshot's Overview page close the snapshot volume by clicking the Close button next to Snap-shot status.
76
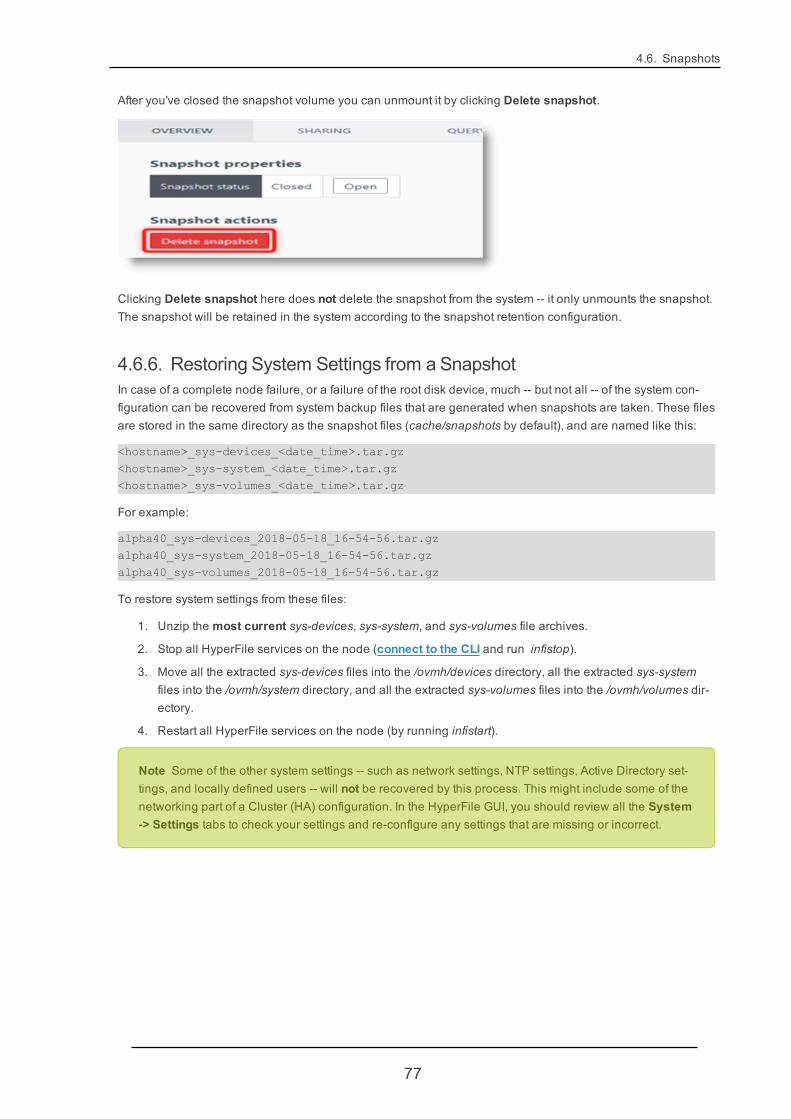
4.6. Snapshots
After you've closed the snapshot volume you can unmount it by clicking Delete snapshot.
Clicking Delete snapshot here does not delete the snapshot from the system -- it only unmounts the snapshot.The snapshot will be retained in the system according to the snapshot retention configuration.
4.6.6. Restoring System Settings from a SnapshotIn case of a complete node failure, or a failure of the root disk device, much -- but not all -- of the system con-figuration can be recovered from system backup files that are generated when snapshots are taken. These filesare stored in the same directory as the snapshot files (cache/snapshots by default), and are named like this:
<hostname>_sys-devices_<date_time>.tar.gz<hostname>_sys-system_<date_time>.tar.gz<hostname>_sys-volumes_<date_time>.tar.gz
For example:
alpha40_sys-devices_2018-05-18_16-54-56.tar.gzalpha40_sys-system_2018-05-18_16-54-56.tar.gzalpha40_sys-volumes_2018-05-18_16-54-56.tar.gz
To restore system settings from these files:
1. Unzip the most current sys-devices, sys-system, and sys-volumes file archives.
2. Stop all HyperFile services on the node (connect to the CLI and run infistop).
3. Move all the extracted sys-devices files into the /ovmh/devices directory, all the extracted sys-systemfiles into the /ovmh/system directory, and all the extracted sys-volumes files into the /ovmh/volumes dir-ectory.
4. Restart all HyperFile services on the node (by running infistart).
Note Some of the other system settings -- such as network settings, NTP settings, Active Directory set-tings, and locally defined users -- will not be recovered by this process. This might include some of thenetworking part of a Cluster (HA) configuration. In the HyperFile GUI, you should review all the System-> Settings tabs to check your settings and re-configure any settings that are missing or incorrect.
77
Chapter 4. Working with HyperFile Major Features
4.7. Data Migration
4.7.1. HyperFile DataMigration OverviewHyperFile supportsmigrating data from a NAS device to HyperStore object storage. By migrating or "import-ing" data from a NAS device to HyperStore with HyperFile serving as a file access controller, you benefit fromthe scalability and cost effectiveness of object storage while maintaining service to legacy client applicationsthat use file system protocols.
In a NAS-to-HyperStore migration operation, the NAS device is mounted by HyperFile as part of a new Hyper-File volume's PRI cache tier. The NAS data is indexed by HyperFile, and as it is indexed HyperFile flushes (cop-ies) data from the NAS to the HyperStore object storage tier. This HyperFile indexing of the NAS data occurs inthe background and does not impact service to clients. The indexing operation will by default index (and copyto HyperStore) the entire contents of the NAS device; or alternatively you can configure the indexing operationto only index (and copy to HyperStore) specified directories within the NAS device.
By having HyperFile take over the IP address of the NAS device at the outset of the indexing operation, Hyper-File can service client application requests as the migration progresses. The service downtime for client applic-ations can be limited to the brief time that it takes to implement the IP address switch-over. During migration theHyperFile volume is configured to treat the NAS device as read-only, so that HyperFile directs clients' readrequests to the NAS but directs clients' write requests to a second cache device that you configure to be part ofthe volume's PRI cache tier. Those writes after being cached locally are flushed (copied) to HyperStore in theusual manner.
When the migration completes you can optionally retire the NAS device. Then as HyperFile continues to ser-vice read and write requests from client applications, it uses your other configured cache device for local PRIcaching and HyperStore as the mass-scale object storage back-end.
4.7.2. Preparing toMigrate from NAS to Object StorageSubjects covered in this section:
l "Migration Planning Considerations" (page 78)
l "Assessing Source Device Usage" (page 79)
l "Preliminary System Configuration" (page 81)
This section addresses things to consider and do before using HyperFile to migrate data from a NAS device toyour HyperStore object storage system.
4.7.2.1. Migration Planning Considerations
During and after the migration, HyperFile will become the new mount point for the NAS shares that youmigrate. It's important therefore that your HyperFile set-up mimic your source NAS set-up in terms of layout andresources, so that HyperFile will be able to meet the client requirements that are currently met by your NAS sys-tem. Here are some important factors to consider when planning to migrate from a NAS system to HyperFileand HyperStore:
78
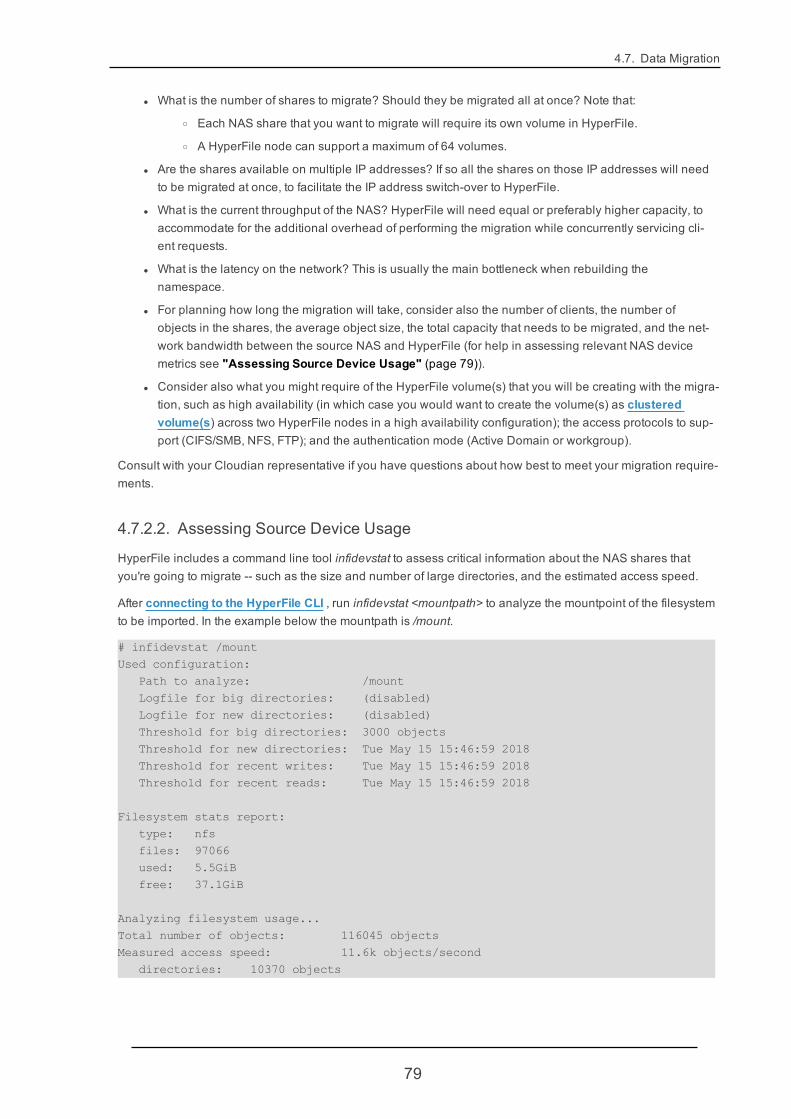
4.7. Data Migration
l What is the number of shares to migrate? Should they be migrated all at once? Note that:
o Each NAS share that you want to migrate will require its own volume in HyperFile.
o A HyperFile node can support a maximum of 64 volumes.
l Are the shares available on multiple IP addresses? If so all the shares on those IP addresses will needto be migrated at once, to facilitate the IP address switch-over to HyperFile.
l What is the current throughput of the NAS? HyperFile will need equal or preferably higher capacity, toaccommodate for the additional overhead of performing the migration while concurrently servicing cli-ent requests.
l What is the latency on the network? This is usually the main bottleneck when rebuilding thenamespace.
l For planning how long the migration will take, consider also the number of clients, the number ofobjects in the shares, the average object size, the total capacity that needs to be migrated, and the net-work bandwidth between the source NAS and HyperFile (for help in assessing relevant NAS devicemetrics see "Assessing Source Device Usage" (page 79)).
l Consider also what you might require of the HyperFile volume(s) that you will be creating with the migra-tion, such as high availability (in which case you would want to create the volume(s) as clusteredvolume(s) across two HyperFile nodes in a high availability configuration); the access protocols to sup-port (CIFS/SMB, NFS, FTP); and the authentication mode (Active Domain or workgroup).
Consult with your Cloudian representative if you have questions about how best to meet your migration require-ments.
4.7.2.2. Assessing Source Device Usage
HyperFile includes a command line tool infidevstat to assess critical information about the NAS shares thatyou're going to migrate -- such as the size and number of large directories, and the estimated access speed.
After connecting to the HyperFile CLI , run infidevstat <mountpath> to analyze the mountpoint of the filesystemto be imported. In the example below the mountpath is /mount.
# infidevstat /mountUsed configuration:
Path to analyze: /mountLogfile for big directories: (disabled)Logfile for new directories: (disabled)Threshold for big directories: 3000 objectsThreshold for new directories: Tue May 15 15:46:59 2018Threshold for recent writes: Tue May 15 15:46:59 2018Threshold for recent reads: Tue May 15 15:46:59 2018
Filesystem stats report:type: nfsfiles: 97066used: 5.5GiBfree: 37.1GiB
Analyzing filesystem usage...Total number of objects: 116045 objectsMeasured access speed: 11.6k objects/second
directories: 10370 objects
79

Chapter 4. Working with HyperFile Major Features
biggest directory: 2418 objectsaverage size: 9 objectsbig directories: 0 directoriesrecently modified: 855 directories
files: 97748 objectsamount of data: 8.6GiBaverage size: 92.1KiBrecently modified: 1.7GiBrecently accessed: 6.7GiBhot data set: 6.7GiB
symlinks: 7208 objectshardlinks: 2521 objectsother: 719 objectsinaccessible: 0 objects
Testing data access speed...Measured access speed: 89.5MiB/second
Useful information in the infidevstat analytics includes:
l The number of "big" directories (defined by default as directories with 3000 or more entries). To gen-erate a list of the big directories run infidevstat <mountpath> -B <path_to_output_file>. The output filecan be any file of your choosing.
l The number of "recently modified" directories (defined by default as directories modified within the last7 days). To generate a list of the recently modified directories run infidevstat <mountpath> -N <path_to_output_file>. The output file can be any file of your choosing.
l The number of files, together with the object access speed, is the main factor in the amount of timeneeded for reindexing.
l Data access speed (in MiB/s) is an approximation of the read speed (measured over a 10 seconds test)and is the main speed factor limiting the migration time.
l The "hot data set" (the sum of recently written and recently read) is a rough estimation of the amount ofHyperFile cache that should be used -- that is, the size of the internal cache device that you will con-figure (along with the NAS source device) as part of the HyperFile PRI cache tier. In the typical scenariowhere you retire the NAS device after completing the migration, this internal cache device will becomethe sole device in the PRI cache tier (at least initially -- you can add more devices to the PRI cache tiersubsequently, if you wish). Information about setting up this PRI cache tier is provided in "Migratingfrom NAS to Object Storage" (page 84), following this preparation section.
l Hardlinks and "other" objects (objects which aren't either files, directories, or symbolic links) should becarefully evaluated, as migration support for such objects is partial. Also, any objects with "inaccessible"metadata may cause errors during the indexing -- it's important that you fix such objects before per-forming the indexing. For questions about hardlinks or "other" objects or objects with inaccessiblemetadata in your source NAS device, contact Cloudian Support.
Note For information about additional command line options for infidevstat, run infidevstat --help.
80
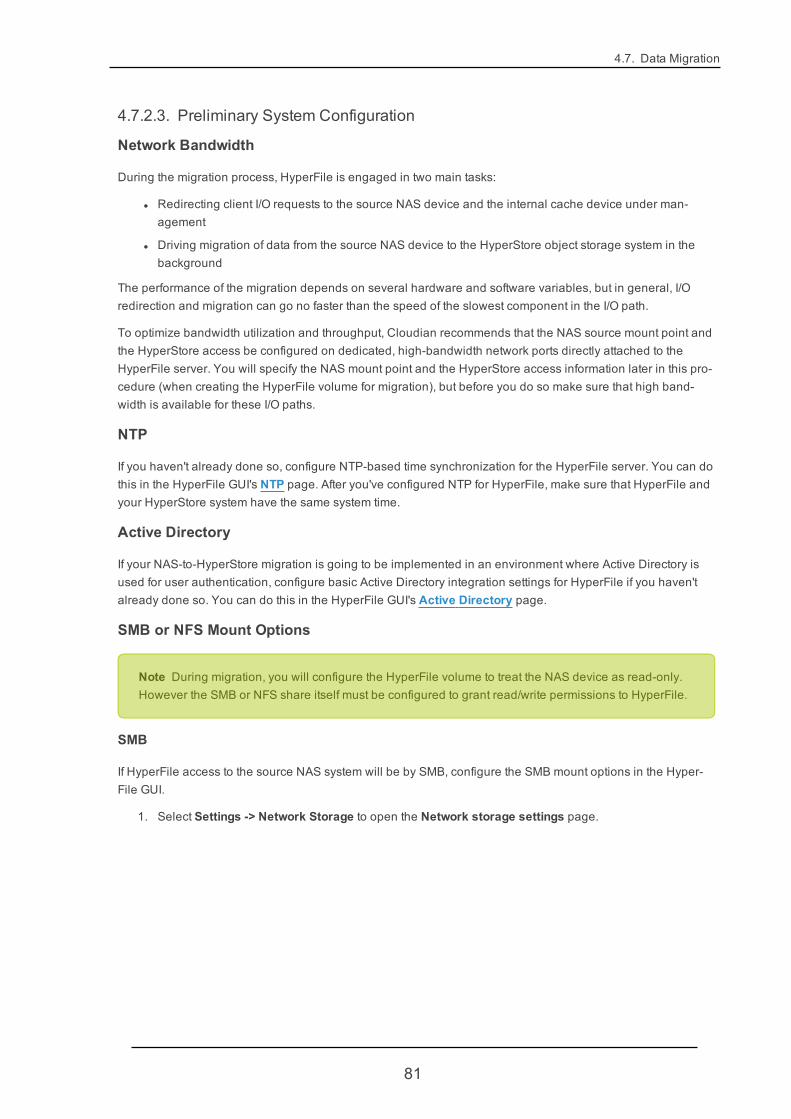
4.7. Data Migration
4.7.2.3. Preliminary System Configuration
Network Bandwidth
During the migration process, HyperFile is engaged in two main tasks:
l Redirecting client I/O requests to the source NAS device and the internal cache device under man-agement
l Driving migration of data from the source NAS device to the HyperStore object storage system in thebackground
The performance of the migration depends on several hardware and software variables, but in general, I/Oredirection and migration can go no faster than the speed of the slowest component in the I/O path.
To optimize bandwidth utilization and throughput, Cloudian recommends that the NAS source mount point andthe HyperStore access be configured on dedicated, high-bandwidth network ports directly attached to theHyperFile server. You will specify the NAS mount point and the HyperStore access information later in this pro-cedure (when creating the HyperFile volume for migration), but before you do so make sure that high band-width is available for these I/O paths.
NTP
If you haven't already done so, configure NTP-based time synchronization for the HyperFile server. You can dothis in the HyperFile GUI's NTP page. After you've configured NTP for HyperFile, make sure that HyperFile andyour HyperStore system have the same system time.
Active Directory
If your NAS-to-HyperStore migration is going to be implemented in an environment where Active Directory isused for user authentication, configure basic Active Directory integration settings for HyperFile if you haven'talready done so. You can do this in the HyperFile GUI's Active Directory page.
SMB or NFS Mount Options
Note During migration, you will configure the HyperFile volume to treat the NAS device as read-only.However the SMB or NFS share itself must be configured to grant read/write permissions to HyperFile.
SMB
If HyperFile access to the source NAS system will be by SMB, configure the SMB mount options in the Hyper-File GUI.
1. Select Settings -> Network Storage to open the Network storage settings page.
81

Chapter 4. Working with HyperFile Major Features
2. In the Global SMB rules section, click Edit so you can modify the pre-configured default SMB mountrule.
Note Cloudian recommends that you have only one SMB mount rule in the HyperFile system,and this one rule will be used for mounting any SMB device in your environment. So, edit thedefault rule rather than adding a new one.
3. Edit the rule parameters, then click OK.
l Host: Leave as *
l Domain: Enter the Active Directory domain.
l User: Enter the user name and password of a user that has read/write permissions for the SMBshare. This setting will be used by HyperFile to mount the SMB shares.
82
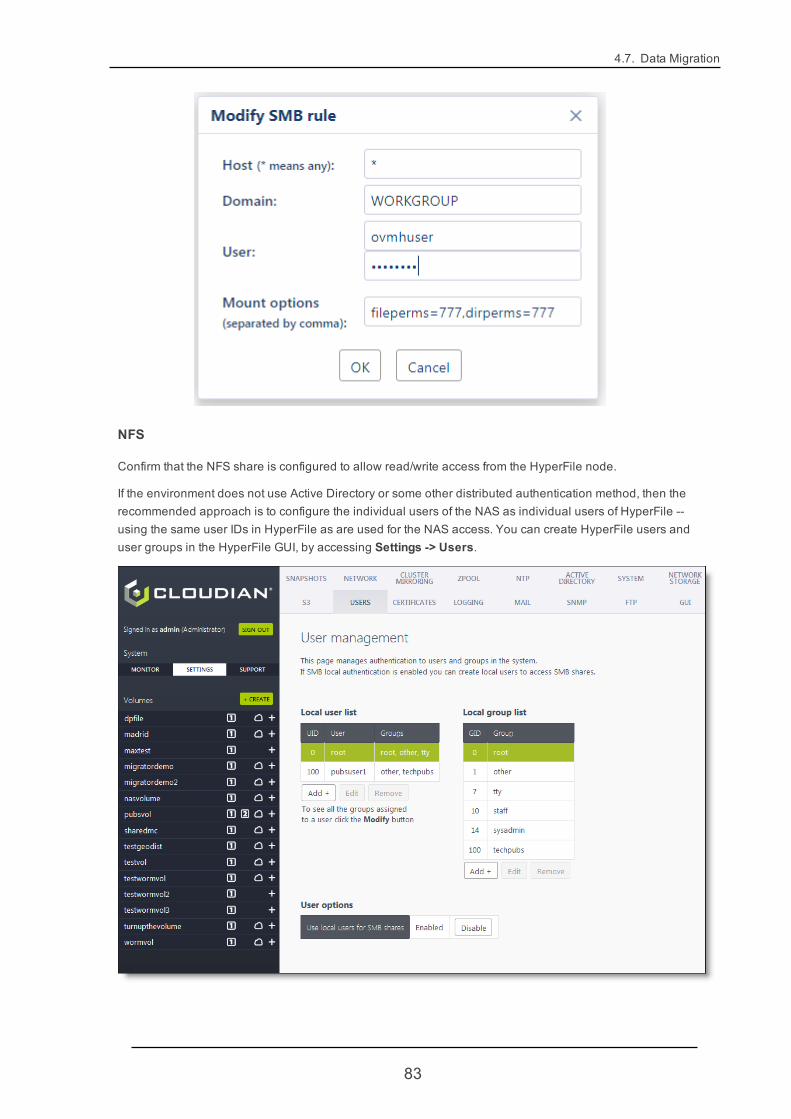
4.7. Data Migration
NFS
Confirm that the NFS share is configured to allow read/write access from the HyperFile node.
If the environment does not use Active Directory or some other distributed authentication method, then therecommended approach is to configure the individual users of the NAS as individual users of HyperFile --using the same user IDs in HyperFile as are used for the NAS access. You can create HyperFile users anduser groups in the HyperFile GUI, by accessing Settings -> Users.
83
Chapter 4. Working with HyperFile Major Features
4.7.3. Migrating from NAS to Object StorageSubjects covered in this section:
l "Creating the HyperFile Volume" (page 84)
l "Completing Configuration of the HyperFile Volume" (page 84)
l "Creating an IndexingWhitelist or Blacklist" (page 86)
l "Initiating and Monitoring the Migration" (page 87)
l "Retiring the NAS Device" (page 89)
4.7.3.1. Creating the HyperFile Volume
Note Before following these instructions see "HyperFile Data Migration Overview" (page 78) and"Preparing to Migrate from NAS to Object Storage" (page 78).
To use HyperFile to migrate data from a NAS share to HyperStore object storage you need to create and con-figure a volume in HyperFile. You will configure the volume such that it has:
l A PRI cache tier consisting of the NAS device configured to be read-only for the volume and a seconddevice (typically a ZFS device) that will support new writes
l An OSD tier (HyperStore object storage)
First, in the HyperFile GUI, use the volume creation wizard to create a new volume (for detailed instructions see"Volume Create" (page 146)). When creating the volume do the following:
l Choose the Data Director volume type, not the Data Migration volume type. The Data Migrationvolume type is specifically for NAS-to-NAS data migrations, an atypical use case that is not covered inthis documentation.
l Give the HyperFile volume the same name as the NAS share.
l Set the volume's PRI cache tier to be the NAS device (you will add a second device to the PRI tierlater, as described below).
l Configure the object storage (OSD) tier in the standard way.
IMPORTANT: If upon volume creation the GUI displays a message reminding you to reindex the PRIcache device (which is the NAS device), ignore the message for now. You will do the indexing later inthis migration procedure.
4.7.3.2. Completing Configuration of the HyperFile Volume
After creating the volume, take these additional steps to properly configure the volume for the NAS-to-OSDmigration:
1. Add a second cache device to the volume's PRI cache tier. This would typically be a ZFS device. Forthe NAS-to-OSD migration you will set the NAS device to be read-only by HyperFile (as described inStep 2 below), and during migration any new write requests that HyperFile processes from client applic-ations will be directed to this second PRI cache device rather than the NAS device. Also, after the
84

4.7. Data Migration
migration you will have the option to remove the NAS device from the PRI cache so that only thissecond device is used as PRI cache.
To add the second cache device to the PRI tier:
a. In the GUI's home page, to the right of the name of the volume that you created, click "[1]" to dis-play the control tabs for the volume's PRI cache. Then select the Devices tab.
b. On the Devices page, click Add new device, then in the Add new device dialog use the drop-down list to select the desired ZFS path for this new device. (If you need to you can use theZpools Manage option on this page to create a new ZFS partition on an existing zpool. The ZFSpartition will then appear as an option in the ZFS path drop-down list. For background inform-ation including how to create zpools, see "Zpool" (page 110).)
After selecting the ZFS path from the drop-down list click Create to create the new device. Twodevices should then display in the Devices page -- the source NAS device and the additionaldevice that you just added.
2. Still in the PRI tier Devices page, set the NAS device to read-only. To do this, for the device'sWriteStatus click "Read/Write" (the default setting) and then change it to "Read Only".
Note: You are setting just the NAS device to read-only, in the PRI tier's Devices page -- not set-ting the entire volume to read-only in the volume's Properties page. You want the volume to bewritable, but new writes will be directed to the other device that's in the PRI cache tier, not theNAS device.
85
Chapter 4. Working with HyperFile Major Features
3. Review the PRI cache tier's flush and removal properties. With the volume's PRI tier still selected (the"[1]") and the PRI tier control tabs displayed, select the Properties tab. In the PRI tier's Propertiespage:
l Confirm that "Flush" is Enabled (it's enabled by default, presuming that you configured an OSDtier when you created the volume). Flushing is the act of copying data from the PRI tier to a targettier.
l Confirm that the "Flush Target" is OSD.
l Leave the "Flush Strategy" at Default.
l Review the settings in the "Removal Settings" section to confirm that you're satisfied with thedefault removal behavior for the PRI cache tier, or else make desired changes. The default beha-vior is to start removing flushed files (files that have been successfully copied to the OSD tier)from a cache device if capacity usage for the PRI tier as a whole has reached 60%. For moreinformation see "Volume Properties" (page 164).
Note: Because you have the source NAS set to read-only for HyperFile, HyperFile willnot remove data from the NAS regardless of your removal settings. The removal set-tings will result only in data being removed from the second device that you added to thePRI cache tier. Your NAS content will remain intact, which will facilitate roll-back in theevent that problems occur during migration.
Note: The capacity usage level that triggers removal of flushed files -- 60% by default --is measured across the PRI tier as a whole, so in this instance HyperFile will gauge thecombined capacity usage level across your NAS and the other PRI cache device. If theNAS device is much larger than the other PRI cache device and if there is a lot of freespace in the NAS, this could result in the other PRI cache device getting filled up withoutthe aggregate 60% PRI tier usage level ever being reached. To prevent this, set a lowerPRI tier "Removal Threshold" if your NAS device is much larger than the other PRIdevice.
4. Open the volume. In the GUI's home page, click the volume name, then select the Properties tab.Change the volume's "Status" to Open.
5. Use the volume's Sharing tab to configure sharing of the volume via SMB/CIF, NFS, and/or FTP. Hereyou are preparing the volume to become the new mount point for client access, for clients that are cur-rently accessing the NAS device (you will execute the switch-over later in this procedure, as describedin "Initiating and Monitoring the Migration" (page 87)). Also in the Sharing tab you can manage anydesired ACL settings for the volume. For more information on configuring sharing see "Volume Shar-ing" (page 181).
4.7.3.3. Creating an Indexing Whitelist or Blacklist
By default, indexing (described in the next section below) will import the whole directory tree found in the NASshare. If instead you want to import only a specified part of it, you can create an indexing whitelist.
On the HyperFile node, create a file called /db/<volume-name>/volume_whitelist (or if you used a path otherthan /db/<volume-name>/ -- the default -- for the volume database location, create the volume_whitelist fileunder that path).
86
4.7. Data Migration
Then enter in the file a newline-separated list of prefixes (directories) that you want to include in the HyperFilevolume. For example:
directory1directory2/subdirectory3
With your whitelist file in place, when you run the indexing HyperFile will index only the directories specified inyour whitelist.
Alternatively, if you want to import all directories except for a particular one or few, you can specify an indexingblacklist by creating a file called /db/<volume-name>/volume_blacklist (if you're using a non-default volumedatabase location, create the file under the correct path) and entering in it a newline-separated list of prefixes(directories) that you do not want to include in the HyperFile volume. With your blacklist file in place, when yourun the indexing HyperFile will index all content in the NAS device except the directories specified in yourblacklist.
If you want all of the NAS share's content to be indexed and migrated, do not create a whitelist or blacklist.
4.7.3.4. Initiating and Monitoring the Migration
Initiating the Migration
Now you will kick off the data indexing and migration, and transfer the NAS source volume's mount point to theHyperFile volume so as to avoid the need for clients to reboot or remount. The "IP takeover" method describedhere -- in which you will have HyperFile take over the existing IP address of the NAS device -- also has thebenefit of ensuring that all clients will gain access to the HyperFile share at the same time.
Follow these steps in this order:
1. If possible, pause client activity.
2. Disable the client-facing IP address on the source NAS device.
3. Connect to the HyperFile CLI and run this command to start the indexing:
infidb -v <volumename> -l PRI -i
4. On the HyperFile node, enable the client-facing IP address that had been used by the NAS device.
Note: Step 4 presumes that your HyperFile node has been configured properly and is able touse the same network address that the source NAS device had been using. That configurationis outside the scope of this procedure.
5. Resume client activity.
The HyperFile volume is now the share mount point and ready to start serving client I/O requests by redirectingread requests to the NAS device and write requests to the other device that you configured as part of thePRI cache tier. Meanwhile, as the indexing proceeds and the HyperFile volume database is populating,indexed data starts being flushed (copied) to the HyperStore object storage tier.
IMPORTANT: Do not allow clients to have direct access to the NAS device during the migration. Hyper-File should be clients' only access point to the files in the NAS device.
87
Chapter 4. Working with HyperFile Major Features
Note HyperFile also imports the permissions associated with the files and directories that are beingimported from the NAS device.
Monitoring the Migration
When monitoring the progress of the migration, you can think in terms of two completion milestones:
1. All content in the NAS -- or, if you used a whitelist or blacklist, all your desired NAS content -- has beenindexed by HyperFile.
2. All NAS content indexed by HyperFile has been flushed (copied) to HyperStore object storage.
In a typical environment, the indexing may take hours to complete and the flushing may take days to complete.
When the indexing of NAS content has completed, the indexing command that you launched in the HyperFileCLI (in Step 3 under "Initiating the Migration" (page 87)) will exit.
To subsequently determine whether or not the flushing of indexed NAS content has completed yet, you canperiodically run this command in the HyperFile CLI:
infidb -v <volumename> -F 'DEVICE=<NASdevicepath>' -F NODIRS-F '!LEVEL=OSD' -O count
This command returns a count of indexed NAS files that are not yet flushed to the object storage tier. When thiscount is down to 0, then all indexed NAS files have been flushed to object storage.
While monitoring the flushing progress you also have the option of printing a list of indexed NAS files that arenot yet flushed to the object storage tier, by running this command in the HyperFile CLI:
infidb -v <volumename> -F 'DEVICE=<NASdevicepath>' -F NODIRS-F '!LEVEL=OSD' -O print > <file>
The output file can be any file of your choosing.
The HyperFile GUI also provides some support for monitoring the migration progress. First, in the GUI homepage click the volume name. Then choose one of these tabs:
l The Monitor tab (displays by default). This page will show the number of files in each tier (PRI tier andOSD tier).
l The Performance tab. This shows various performance metrics for the volume including the read andwrite throughput and the flush throughput.
l The Explore tab. In this page you can select specific files to check their tiering status.
Note If you continue service to clients during the migration, then during the migration the number ofindexed NAS files in HyperFile may fall below the number of files in the NAS device itself. This will hap-pen if:* Clients delete existing files. This will result in HyperFile deleting the entries for those files from theHyperFile database (the index), but the files will not be removed from the NAS device itself (sinceHyperFile is treating the NAS device as read-only).* Clients modify existing files. This will result in HyperFile writing the updated versions of the files to theother PRI cache device (not the NAS device, which is read-only). In the HyperFile volume index the loc-ation of the files is updated to be the other PRI cache device rather than the NAS device (though the ori-ginal versions of the files are still stored in the NAS device).
88
4.7. Data Migration
4.7.3.5. Retiring the NAS Device
Once all of the indexed NAS data is flushed to the HyperStore object storage tier, the migration is completed. Ifafter the migration completes you want to retire the NAS -- or just remove it from your HyperFile storage tierarchitecture -- you have two options:
l "Depopulate" the NAS device so that all of its data gets copied over to the other device that you've con-figured in the PRI cache tier; and then remove the NAS device from the PRI cache tier. The depopulateoperation does not impact service to users. Note that all the NAS data is already copied to HyperStore,and that by depopulating the NAS device you are copying the NAS data on to the other PRI cachedevice so that the data can still be read from cache after you remove the NAS (rather than needing tobe retrieved from HyperStore when read requests are received).
OR
l Without depopulating the NAS device, simply remove the NAS device from the PRI cache tier. With thisapproach, most files will then exist only in the HyperStore object storage tier (the exception is files thatwere newly written by clients during the migration process, which exist on the other PRI cache deviceas well as in the HyperStore tier). When clients request files that exist only in HyperStore, HyperFile willthen retrieve those files into that other PRI cache device as well as returning them to the client. SinceHyperFile has to retrieve the files from HyperStore, this makes for somewhat greater read latency fromthe client perspective.
The "remove the NAS from the PRI cache tier without depopulating it first" approach is appropriate if the otherdevice in the PRI cache tier has less capacity than the amount of data in the NAS device.
Note At any time -- including in advance of depopulating the NAS device, if desired-- you can add anadditional device to the PRI cache tier. To do so, in the PRI cache tier's Devices page use the Add newdevice option. For more information see "Managing Volume Storage Devices" (page 34).
Follow these steps to retire the NAS device:
1. (Optional) To depopulate the NAS device so that all of its data is copied to the other device(s) in yourPRI cache tier:
a. In the PRI tier's Devices page first check to confirm that for the device(s) other than theNAS device -- the device(s) that will be on the receiving end of the copy operations -- theWriteStatus is "Read/Write".
b. For the NAS device click Operations to open the Device Settings dialog.
89
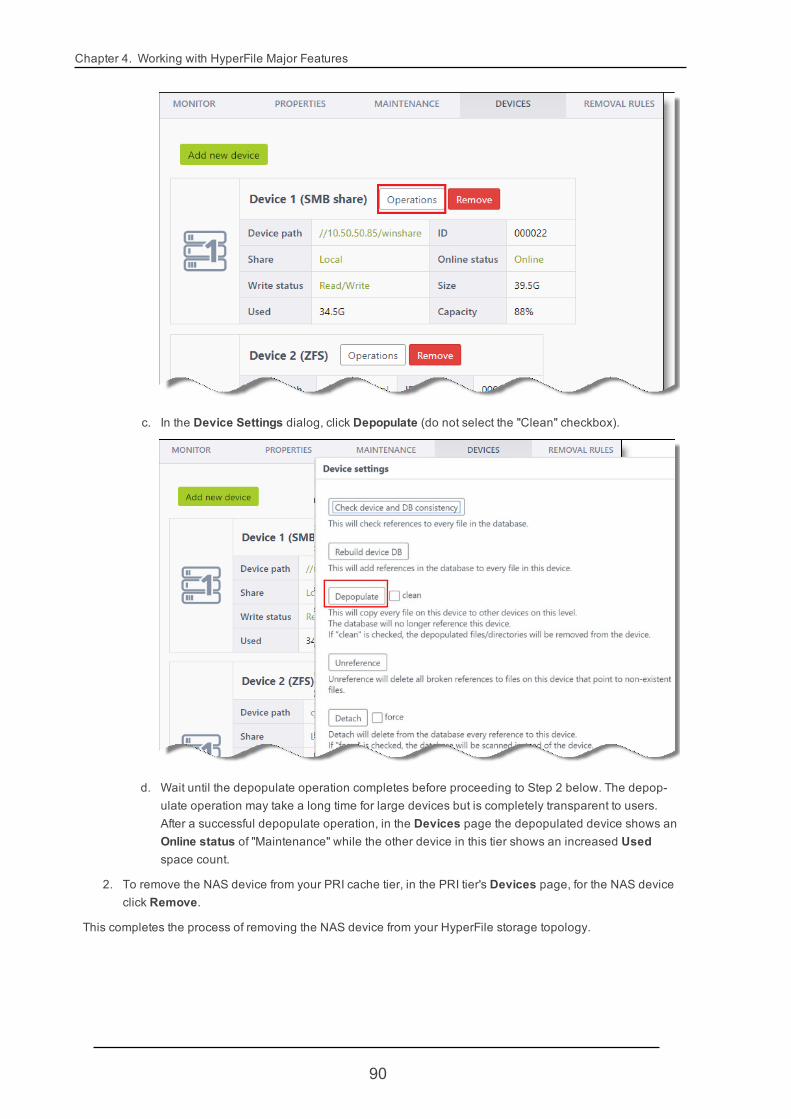
Chapter 4. Working with HyperFile Major Features
c. In the Device Settings dialog, click Depopulate (do not select the "Clean" checkbox).
d. Wait until the depopulate operation completes before proceeding to Step 2 below. The depop-ulate operation may take a long time for large devices but is completely transparent to users.After a successful depopulate operation, in the Devices page the depopulated device shows anOnline status of "Maintenance" while the other device in this tier shows an increased Usedspace count.
2. To remove the NAS device from your PRI cache tier, in the PRI tier's Devices page, for the NAS deviceclick Remove.
This completes the process of removing the NAS device from your HyperFile storage topology.
90

4.7. Data Migration
Note In this procedure HyperFile did not remove data from your NAS device. If you want to nowremove that data from the NAS, you can do so using the third party tools of your choice.
91

This page left intentionally blank
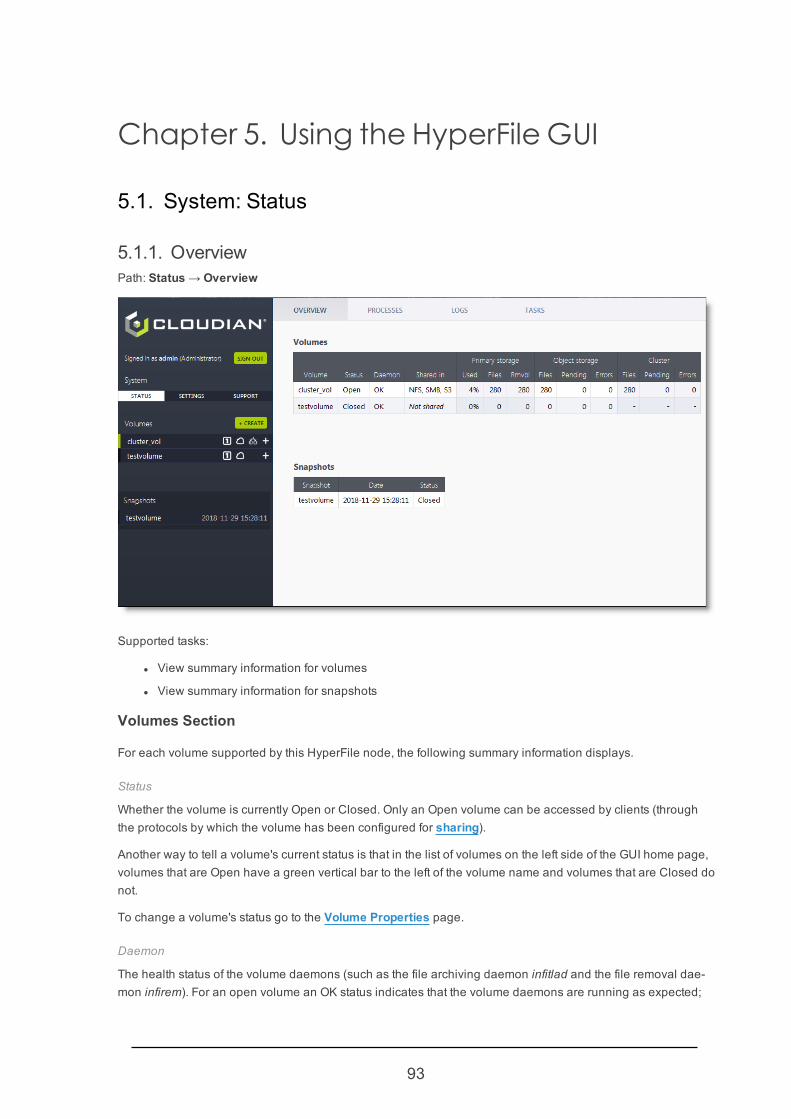
Chapter 5. Using the HyperFile GUI
5.1. System: Status
5.1.1. OverviewPath: Status → Overview
Supported tasks:
l View summary information for volumes
l View summary information for snapshots
Volumes Section
For each volume supported by this HyperFile node, the following summary information displays.
Status
Whether the volume is currently Open or Closed. Only an Open volume can be accessed by clients (throughthe protocols by which the volume has been configured for sharing).
Another way to tell a volume's current status is that in the list of volumes on the left side of the GUI home page,volumes that are Open have a green vertical bar to the left of the volume name and volumes that are Closed donot.
To change a volume's status go to the Volume Properties page.
Daemon
The health status of the volume daemons (such as the file archiving daemon infitlad and the file removal dae-mon infirem). For an open volume an OK status indicates that the volume daemons are running as expected;
93
Chapter 5. Using the HyperFile GUI
an Error status indicates that one or more volume daemons are not running as expected. For closed volumesthe status will show as OK.
In the event of an error state for an open volume, you can run infidisplay -v <volumename> -D on the commandline to see which volume daemon is not running.
Shared In
The file protocols by which the volume is being shared with clients, if any. For more information on sharing con-figuration see "Volume Sharing" (page 181).
Primary storage
Used
In the volume's PRI cache tier, the percentage of storage capacity that is currently used.
If the PRI cache tier employs multiple storage devices, this statistic indicates what percentage of the tier's totalaggregate capacity is used.
Files
Number of files currently in the volume's PRI cache tier.
Rmvbl
Of the files currently in the volume's PRI cache tier, the number of files that are eligible for removal from this tier.Being eligible for removal means that the files have been successfully flushed (copied) from this tier to therequired destination tier(s). In the most common configuration the required destination tier is the object storagesystem.
Once becoming eligible for removal, whether files in the PRI cache tier will be removed or not depends on yourconfigured removal triggers for the tier. By default eligible files start being removed if 60% of the tier's capacityis used.
To review or edit a volume's PRI tier file removal criteria, go to the Cache Tier Properties page and the CacheTier Removal Rules page.
Secondary storage
(Applicable only to volumes that use a SEC cache tier)
Used
In the volume's SEC cache tier, the percentage of storage capacity that is currently used.
If the SEC cache tier employs multiple storage devices, this statistic indicates what percentage of the tier's totalaggregate capacity is used.
Files
Number of files currently in the volume's SEC cache tier.
Note When viewing the "Files" statistics, keep in mind that a file can be in the SEC cache tier and alsoin the PRI cache tier at the same time, if the file has been flushed to SEC but has not been removedfrom PRI. In that case the file counts toward the PRI tier "Files" statistic and toward the SEC tier "Files"statistic.
Rmvbl
94
5.1. System: Status
Of the files currently in the volume's SEC cache tier, the number of files that are eligible for removal from thistier. Being eligible for removal means that the files have been successfully flushed (copied) from this tier to therequired destination tier(s). In the most common configuration the required destination tier is the object storagesystem, although other configurations are possible.
Once becoming eligible for removal, whether files in the SEC cache tier will be removed or not depends onyour configured removal triggers for the tier. By default eligible files start being removed if 60% of the tier's totalcapacity is used.
To review or edit a volume's SEC tier file removal criteria, go to the Cache Tier Properties page and theCache Tier Removal Rules page.
Pending
Number of files queued for flushing (copying) from the PRI cache tier to the SEC cache tier.
Typically a file will be in the flush queue for about 20 seconds, though it may be longer in the case of hightraffic or large files.
Object storage
Files
Number of files currently in the volume's object storage tier.
Note When viewing the "Files" statistics, keep in mind that a file can be in the object storage tier andalso in the PRI cache tier at the same time, if the file has been flushed to object storage but has notbeen removed from PRI. In that case the file counts toward the PRI tier "Files" statistic and toward theobject storage tier "Files" statistic. (The same file can be in the SEC cache tier if the volume has a SECtier.)
Pending
Number of files queued for flushing (copying) from the cache tier to the object storage tier.
Typically a file will be in the flush queue for about 20 seconds, though it may be longer in the case of hightraffic or large files.
Errors
Number of files that failed to be flushed (copied) from the cache tier to the object storage tier.
Cluster
(Applicable only to volumes deployed across a clustered HA pair of HyperFile nodes)
Files
Number of files for which metadata has been successfully copied from master node’s volume database to theslave node’s volume database.
Pending
Number of files queued for having their metadata copied from the local node's volume database to the otherclustered node's volume database.
Errors
Number of files for which an error occurred when trying to copy metadata from the master node’s volume
95

Chapter 5. Using the HyperFile GUI
database to the slave node’s volume database.
Snapshots Section
This section lists the mounted snapshots on this HyperFile node, if any. For each mounted snapshot the dis-play shows the date and time at which the snapshot was created, and whether the mounted snapshot is cur-rently Open or Closed. Only an Open snapshot can be accessed by clients (through the protocols by which themounted snapshot has been configured for sharing). For more information on mounted snapshots -- includinghow to unmount snapshots that you are no longer using -- see "Mounting a Snapshot to Recover SelectedFiles" (page 74).
5.1.2. ProcessesPath: Status → Processes
Supported task:
l View status information for running processes
This page shows a list of the HyperFile processes currently running on this node, together with the CPU con-sumption and memory consumption for each process. On any HyperFile node you will typically see these pro-cesses in the list:
infitlad
Process: HyperFile volume archive daemon.
Scope: One dedicated process per open volume. A volume's infitlad process starts when the volume is openedand stops when the volume is closed.
Purpose: For a volume, this process flushes (copies) files from the cache tier to the object storage tier.
96
5.1. System: Status
infirem
Process: HyperFile volume removal daemon.
Scope: One dedicated process per open volume cache tier. A volume's infirem process(es) start when thevolume is opened and stop when the volume is closed.
Purpose: For a volume, this process manages the removal of files from the cache tier, based on the volume'sconfigured removal settings. An open volume that has only a PRI cache tier will have just one running infiremprocess. An open volume that has both a PRI cache tier and a SEC cache tier will have two running infirem pro-cesses, one for each tier.
infitlrd
Process: HyperFile archive tier read daemon.
Scope: Ten per HyperFile node (by default). These infitlrd processes start when HyperFile starts up.
Purpose: These processes perform read operations on the object storage tier, such as when HyperFile clientsrequest files that have been archived and are not presently in the cache tier. These processes are not ded-icated to a particular volume but rather serve all of the open volumes.
infiserver
Process: HyperFile server daemon for slave operations.
Scope: One per local network interface. The infiserver process(es) start when HyperFile starts up.
Purpose: For local slave volumes in a Cluster or Mirror configuration, this process listens for requests from themaster node and implements those requests. This process starts on HyperFile start-up regardless of whetheror not you have any Cluster or Mirror volumes configured.
infilicd
Process: HyperFile license manager.
Scope: One per HyperFile node. This process starts when HyperFile starts up.
Purpose: Verifies that a valid license key is present and enables/disables HyperFile functionality based on thelicense key.
nginx
Process: HTTP server.
Scope: Two per HyperFile node. These processes start when HyperFile starts up.
Purpose: Supports the HyperFile GUI by listening for and processing HTTP requests.
php-fpm
Process: PHP daemon.
Scope: Four per HyperFile node. These processes start when HyperFile starts up.
Purpose: Supports the HyperFile GUI by executing PHP scripts.
smbd
Process: SMB daemon.
Scope: Four per HyperFile node. These processes start when HyperFile starts up.
97
Chapter 5. Using the HyperFile GUI
Purpose: Implements sharing of volumes by SMB/CIFS.
Depending on your system configuration you may also see additional processes such as:
infimgd
Process: Multi-gateway daemon.
Scope: One dedicated process per open multi-controller volume (multi-gateway volume). A multi-controllervolume's infimgd process starts when the volume is opened and stops when the volume is closed.
Purpose: Metadata synchronization; and support for multi-controller operations such as joining or leaving.
inficlustd
Process: Cluster daemon
Scope: One dedicated process per open Clustered (HA) volume. A Clustered volume's inficlustd process startswhen the volume is opened and stops when the volume is closed.
Purpose: Performs metadata replication from master to slave.
infinetd
Process: Mirror daemon
Scope: One dedicated process per open Mirrored volume. A Mirrored volume's infinetd process starts when thevolume is opened and stops when the volume is closed.
Purpose: Performs data replication from master to slave.
proftpd
Process: FTP server
Scope: One per HyperFile node. This process starts if you put the FTP front-end online (see "FTP" (page 136))and stops if you take the FTP front-end offline.
Purpose: Listens for and processes FTP requests from clients, for volumes for which you've configured sharingby FTP.
5.1.3. LogsPath: Status → Logs
98

5.1. System: Status
Supported task:
l View current HyperFile log files
In the Logs page you can view a variety of current HyperFile log files. In the "Log File" columns, click on a filename to view that log file. The file will open in your browser, in a separate tab.
Below is basic information for each log including the log entry format and the path to the log file on the Hyper-File node.
Cloudian HyperFile logs Section
Volume DB Backups log (NSSovmh_dbbck.log)
l Purpose: Logs messages pertaining to the execution of volume snapshots, for all volumes on the node.
l Path on HyperFile node:
99

Chapter 5. Using the HyperFile GUI
ovmh/log/NSSovmh_dbbck.log
l Log entry format:
DDD MMM DD HH:MM:SS YYYY Host [ProcessId]: Message
l Log entry example:
Wed Dec 26 04:22:45 2018 beta60 [4490]: The backup operation has been suc-cessfully completed
Notice log (NSSovmh_notice.log)
l Purpose: Aggregates log messages with severity level NOTICE and higher, from activity sources includ-ing running daemons, the CLI, and the GUI.
l Path on HyperFile node:
ovmh/log/NSSovmh_notice.log
l Log entry format:
MMM DD HH:MM:SS Host Process[ProcessId]: [MsgID Facility.Level] Message
l Log entry example:
Dec 26 12:16:28 beta60 ovmhtlrd[736]: [ID 285497 local0.notice]ovmhtlrd_cluster_check_remote (1496) autoreverse on interface 10.50.50.83failed, error 29
Operation log (NSSovmh_operation.log)
l Purpose: Logs messages pertaining to volume operations run by command or GUI, for all volumes onthe node.
l Path on HyperFile node:
ovmh/log/NSSovmh_operation.log
l Log entry format:
Month Date HH:MM:SS Host:<User>:[ProcessId]: Message
l Log entry example:
MMM DD HH:MM:SS beta60:<root>:[736]: Attempting autoreverse on interface10.50.50.83
Maintenance log (NSSovmh_maintenance.log)
l Purpose: Logs messages pertaining to the maintenance of disk storage devices in the cache tier(s), forall volumes on the node.
l Path on HyperFile node:
ovmh/log/NSSovmh_maintenance.log
l Log entry format:
DDD MMM DD HH:MM:SS YYYY Host LEVEL: Message
l Log entry example:
Tue Dec 18 11:16:46 2018 beta60 NOTICE: Device <cache/pubs1> added to volume<pubs> (PRI)
100
5.1. System: Status
Cluster log (NSSovmh_clus.log)
l Purpose: Logs messages pertaining to the syncing of metadata (volume database entries) from the mas-ter node to the slave node, for all clustered volumes.
l Path on HyperFile master node:
ovmh/log/NSSovmh_clus.log
Note: This log file is written only on the master node, not the slave node. In the event that themaster role fails over from one node to the other, this log file will then start to be written on thenew master node.
l Log entry format:
MMM DD HH:MM:SS Host Process[ProcessId]: [MsgID Facility.Level] Message
l Log entry example:
Feb 28 16:06:11 beta61 ovmhserver[664]: [ID 828132 local6.info] [155]clustest: ROK </test-10/1 Backup.png> was correctly updated from REMOTE
Boot log (NSSovmh_boot.log)
l Purpose: Logs messages pertaining to HyperFile start-up activities.
l Path on HyperFile node:
ovmh/log/NSSovmh_boot.log
l Log entry format:
MMM DD HH:MM:SS Host Message
l Log entry example:
Dec 21 16:44:54 beta60 INFINITY: retrieval daemons successfully started
Warning log (NSSovmh_warning.log)
l Purpose: Aggregates log messages with severity level WARNING and higher, from activity sourcesincluding running daemons, the CLI, and the GUI.
l Path on HyperFile node:
ovmh/log/NSSovmh_warning.log
l Log entry format:
MMM DD HH:MM:SS Host Process[ProcessId]: [MsgID Facility.Level] Message
l Log entry example:
Dec 26 12:25:54 beta60 ovmhtlrd[736]: [ID 909817 local0.warning]ovmhlnet_parse_and_check_ipmpstat(501): Failed to read the handle, error 29
Mirroring log (NSSovmh_net.log)
l Purpose: Logs messages pertaining to the syncing of metadata and data between nodes, for allmirrored volumes.
l Path on HyperFile node:
ovmh/log/NSSovmh_net.log
101
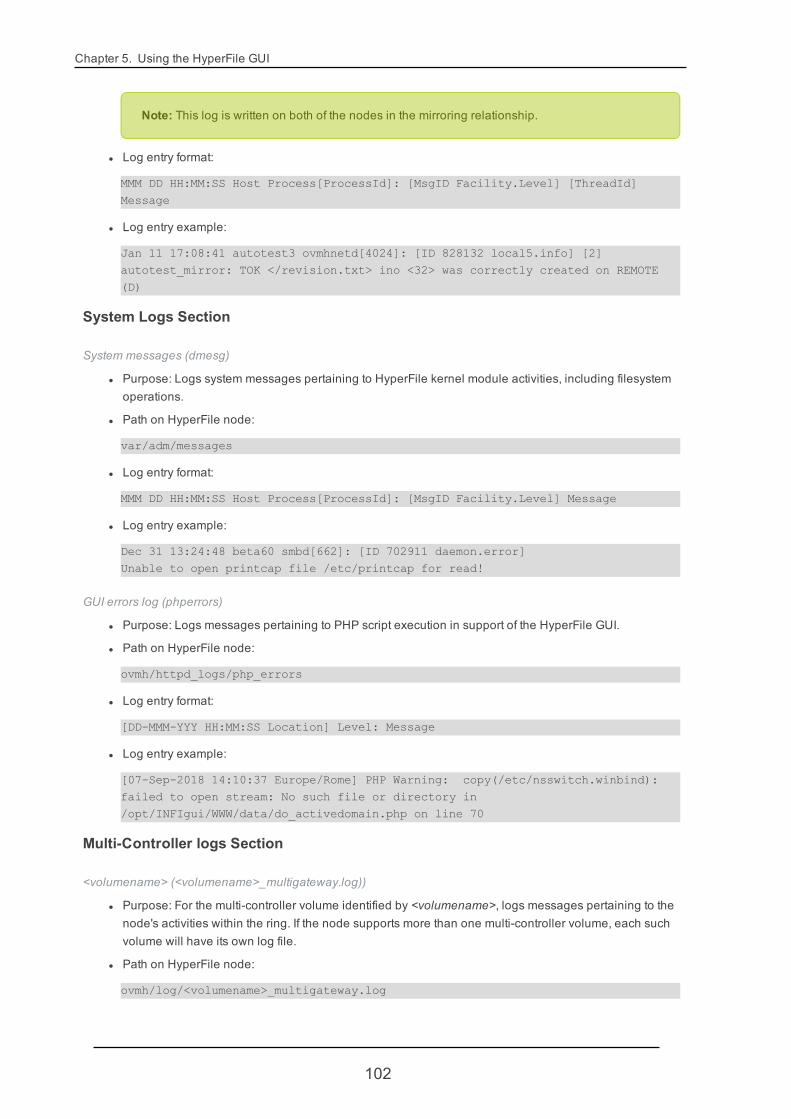
Chapter 5. Using the HyperFile GUI
Note: This log is written on both of the nodes in the mirroring relationship.
l Log entry format:
MMM DD HH:MM:SS Host Process[ProcessId]: [MsgID Facility.Level] [ThreadId]Message
l Log entry example:
Jan 11 17:08:41 autotest3 ovmhnetd[4024]: [ID 828132 local5.info] [2]autotest_mirror: TOK </revision.txt> ino <32> was correctly created on REMOTE(D)
System Logs Section
System messages (dmesg)
l Purpose: Logs system messages pertaining to HyperFile kernel module activities, including filesystemoperations.
l Path on HyperFile node:
var/adm/messages
l Log entry format:
MMM DD HH:MM:SS Host Process[ProcessId]: [MsgID Facility.Level] Message
l Log entry example:
Dec 31 13:24:48 beta60 smbd[662]: [ID 702911 daemon.error]Unable to open printcap file /etc/printcap for read!
GUI errors log (phperrors)
l Purpose: Logs messages pertaining to PHP script execution in support of the HyperFile GUI.
l Path on HyperFile node:
ovmh/httpd_logs/php_errors
l Log entry format:
[DD-MMM-YYY HH:MM:SS Location] Level: Message
l Log entry example:
[07-Sep-2018 14:10:37 Europe/Rome] PHP Warning: copy(/etc/nsswitch.winbind):failed to open stream: No such file or directory in/opt/INFIgui/WWW/data/do_activedomain.php on line 70
Multi-Controller logs Section
<volumename> (<volumename>_multigateway.log))
l Purpose: For the multi-controller volume identified by <volumename>, logs messages pertaining to thenode's activities within the ring. If the node supports more than one multi-controller volume, each suchvolume will have its own log file.
l Path on HyperFile node:
ovmh/log/<volumename>_multigateway.log
102
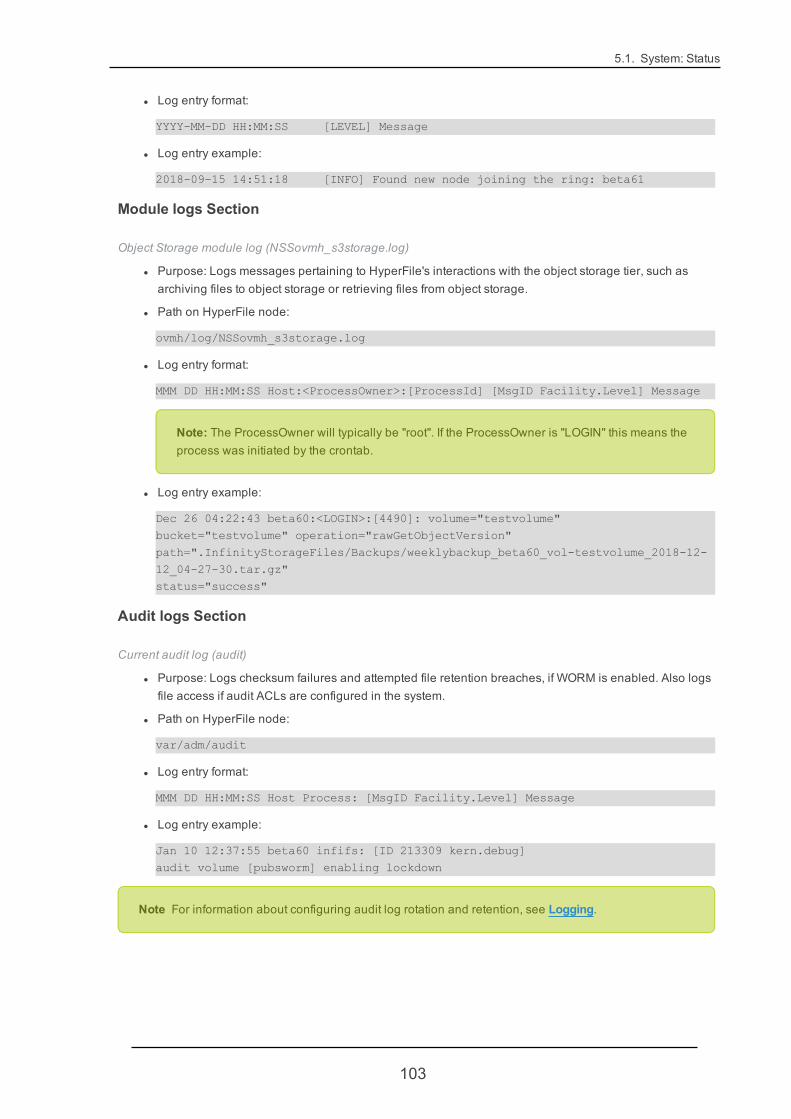
5.1. System: Status
l Log entry format:
YYYY-MM-DD HH:MM:SS [LEVEL] Message
l Log entry example:
2018-09-15 14:51:18 [INFO] Found new node joining the ring: beta61
Module logs Section
Object Storage module log (NSSovmh_s3storage.log)
l Purpose: Logs messages pertaining to HyperFile's interactions with the object storage tier, such asarchiving files to object storage or retrieving files from object storage.
l Path on HyperFile node:
ovmh/log/NSSovmh_s3storage.log
l Log entry format:
MMM DD HH:MM:SS Host:<ProcessOwner>:[ProcessId] [MsgID Facility.Level] Message
Note: The ProcessOwner will typically be "root". If the ProcessOwner is "LOGIN" this means theprocess was initiated by the crontab.
l Log entry example:
Dec 26 04:22:43 beta60:<LOGIN>:[4490]: volume="testvolume"bucket="testvolume" operation="rawGetObjectVersion"path=".InfinityStorageFiles/Backups/weeklybackup_beta60_vol-testvolume_2018-12-12_04-27-30.tar.gz"status="success"
Audit logs Section
Current audit log (audit)
l Purpose: Logs checksum failures and attempted file retention breaches, if WORM is enabled. Also logsfile access if audit ACLs are configured in the system.
l Path on HyperFile node:
var/adm/audit
l Log entry format:
MMM DD HH:MM:SS Host Process: [MsgID Facility.Level] Message
l Log entry example:
Jan 10 12:37:55 beta60 infifs: [ID 213309 kern.debug]audit volume [pubsworm] enabling lockdown
Note For information about configuring audit log rotation and retention, see Logging.
103
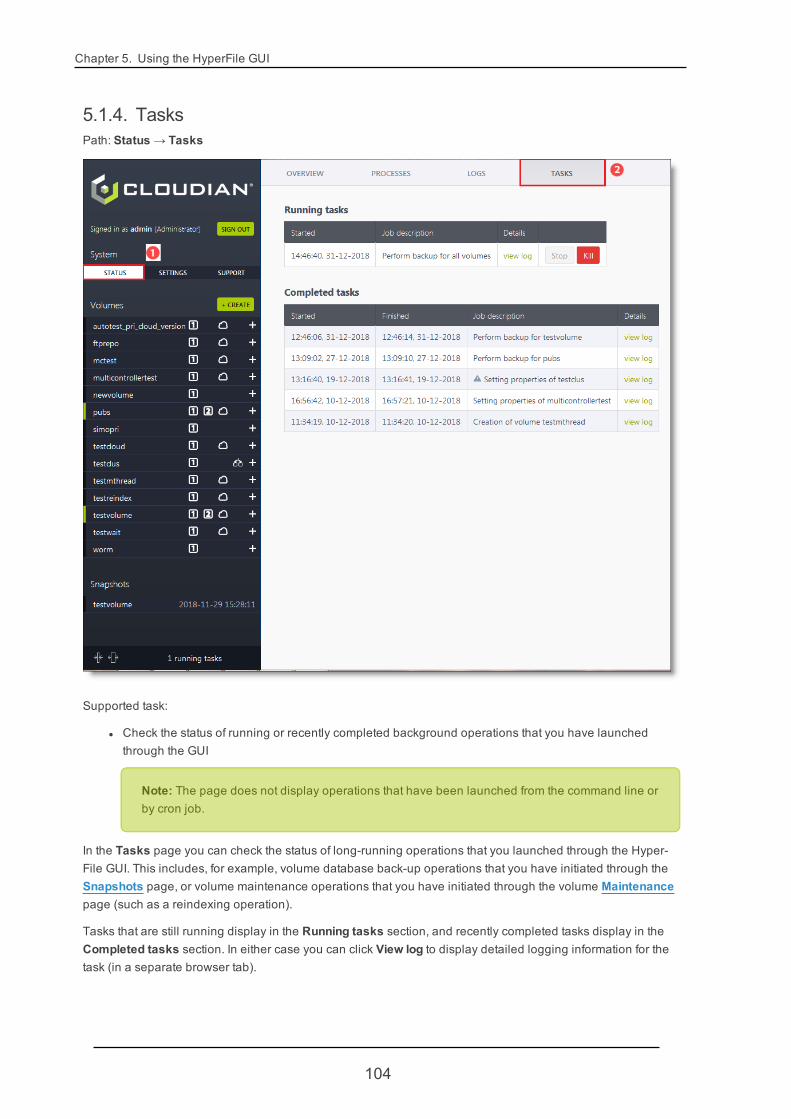
Chapter 5. Using the HyperFile GUI
5.1.4. TasksPath: Status → Tasks
Supported task:
l Check the status of running or recently completed background operations that you have launchedthrough the GUI
Note: The page does not display operations that have been launched from the command line orby cron job.
In the Tasks page you can check the status of long-running operations that you launched through the Hyper-File GUI. This includes, for example, volume database back-up operations that you have initiated through theSnapshots page, or volume maintenance operations that you have initiated through the volume Maintenancepage (such as a reindexing operation).
Tasks that are still running display in the Running tasks section, and recently completed tasks display in theCompleted tasks section. In either case you can click View log to display detailed logging information for thetask (in a separate browser tab).
104

5.2. System: Settings
In the case of a running task you also have the option to terminate the task by clicking either the Stop button(supported only for tasks associated with the infimgd process) or the Kill button (for any other type of task).
Note If you terminate an in-progress operation you will not be able to resume the operation.
In the event that an error has been encountered while executing a task, in the "Job description" column for thetask this icon will display:
Click View log to view information about the error.
5.2. System: Settings
5.2.1. SnapshotsPath: Settings → Snapshots
105
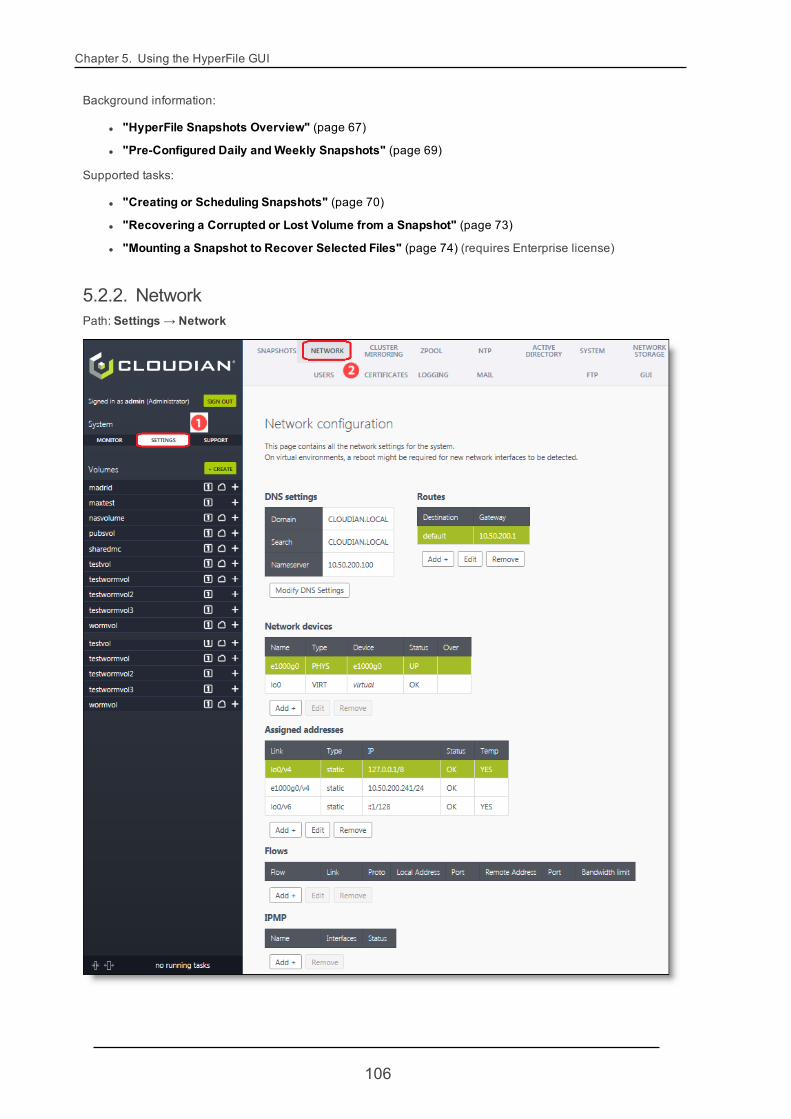
Chapter 5. Using the HyperFile GUI
Background information:
l "HyperFile Snapshots Overview" (page 67)
l "Pre-Configured Daily andWeekly Snapshots" (page 69)
Supported tasks:
l "Creating or Scheduling Snapshots" (page 70)
l "Recovering a Corrupted or Lost Volume from a Snapshot" (page 73)
l "Mounting a Snapshot to Recover Selected Files" (page 74) (requires Enterprise license)
5.2.2. NetworkPath: Settings → Network
106
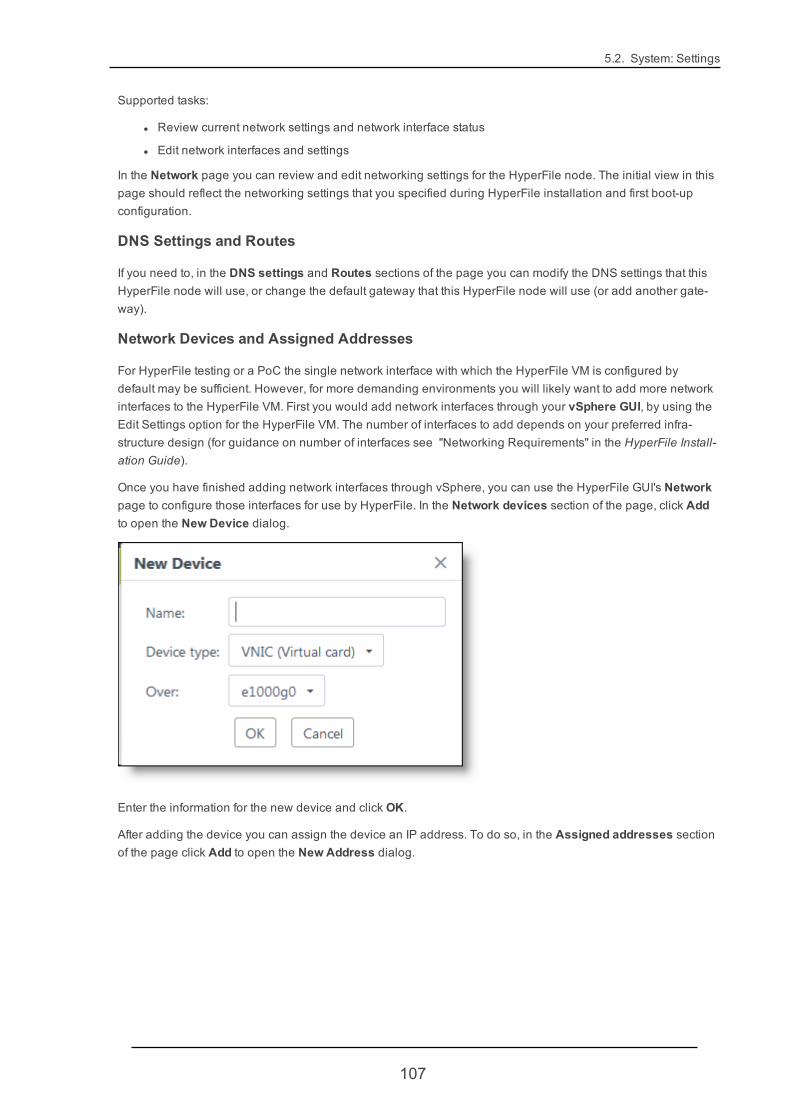
5.2. System: Settings
Supported tasks:
l Review current network settings and network interface status
l Edit network interfaces and settings
In the Network page you can review and edit networking settings for the HyperFile node. The initial view in thispage should reflect the networking settings that you specified during HyperFile installation and first boot-upconfiguration.
DNS Settings and Routes
If you need to, in the DNS settings and Routes sections of the page you can modify the DNS settings that thisHyperFile node will use, or change the default gateway that this HyperFile node will use (or add another gate-way).
Network Devices and Assigned Addresses
For HyperFile testing or a PoC the single network interface with which the HyperFile VM is configured bydefault may be sufficient. However, for more demanding environments you will likely want to add more networkinterfaces to the HyperFile VM. First you would add network interfaces through your vSphere GUI, by using theEdit Settings option for the HyperFile VM. The number of interfaces to add depends on your preferred infra-structure design (for guidance on number of interfaces see "Networking Requirements" in the HyperFile Install-ation Guide).
Once you have finished adding network interfaces through vSphere, you can use the HyperFile GUI's Networkpage to configure those interfaces for use by HyperFile. In the Network devices section of the page, click Addto open the New Device dialog.
Enter the information for the new device and click OK.
After adding the device you can assign the device an IP address. To do so, in the Assigned addresses sectionof the page click Add to open the New Address dialog.
107
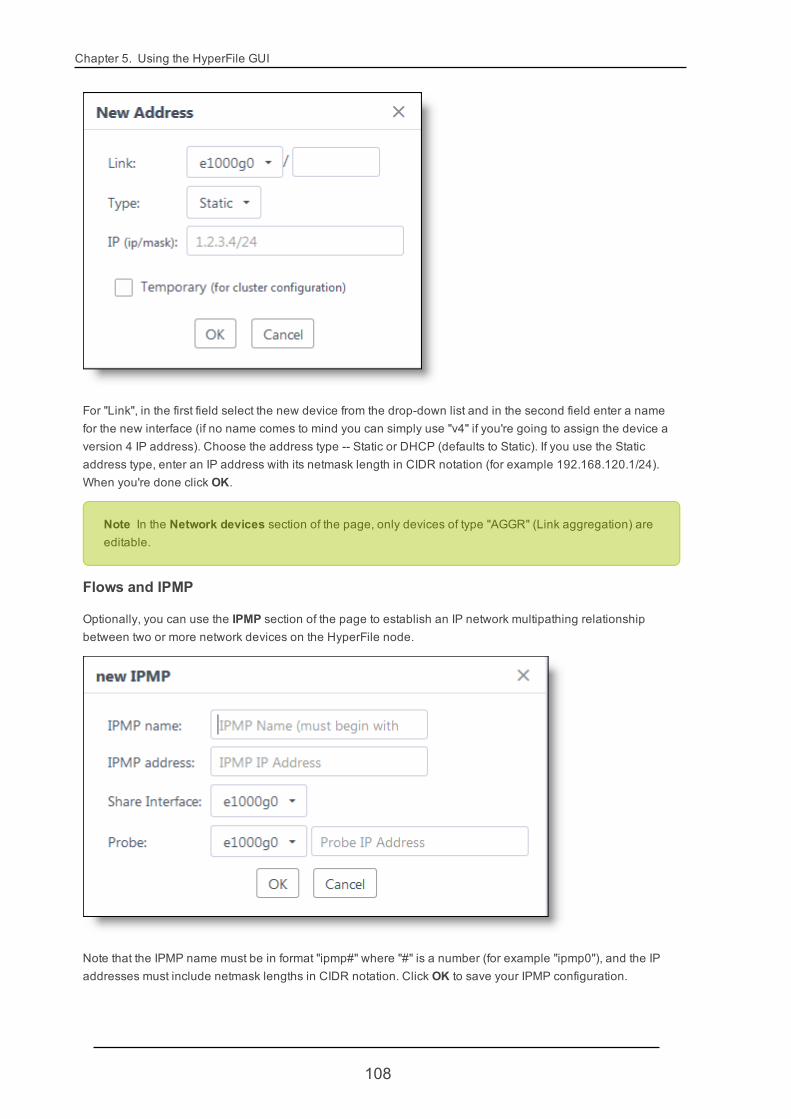
Chapter 5. Using the HyperFile GUI
For "Link", in the first field select the new device from the drop-down list and in the second field enter a namefor the new interface (if no name comes to mind you can simply use "v4" if you're going to assign the device aversion 4 IP address). Choose the address type -- Static or DHCP (defaults to Static). If you use the Staticaddress type, enter an IP address with its netmask length in CIDR notation (for example 192.168.120.1/24).When you're done click OK.
Note In the Network devices section of the page, only devices of type "AGGR" (Link aggregation) areeditable.
Flows and IPMP
Optionally, you can use the IPMP section of the page to establish an IP network multipathing relationshipbetween two or more network devices on the HyperFile node.
Note that the IPMP name must be in format "ipmp#" where "#" is a number (for example "ipmp0"), and the IPaddresses must include netmask lengths in CIDR notation. Click OK to save your IPMP configuration.
108
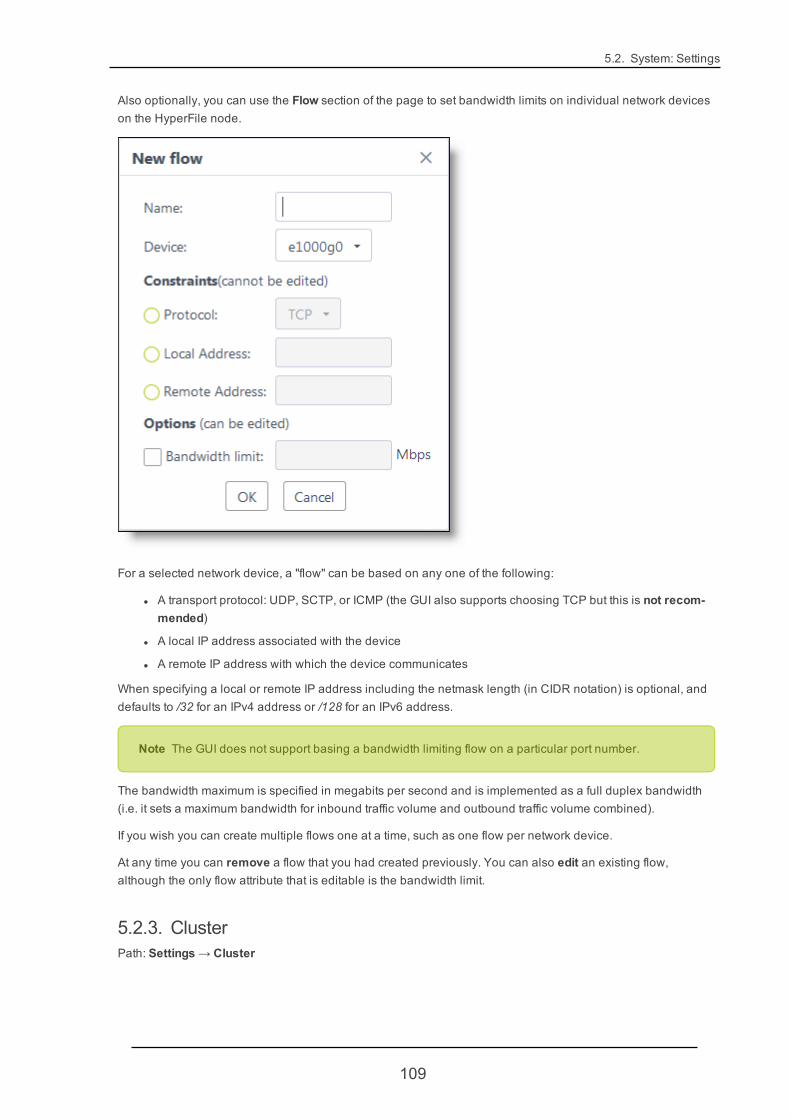
5.2. System: Settings
Also optionally, you can use the Flow section of the page to set bandwidth limits on individual network deviceson the HyperFile node.
For a selected network device, a "flow" can be based on any one of the following:
l A transport protocol: UDP, SCTP, or ICMP (the GUI also supports choosing TCP but this is not recom-mended)
l A local IP address associated with the device
l A remote IP address with which the device communicates
When specifying a local or remote IP address including the netmask length (in CIDR notation) is optional, anddefaults to /32 for an IPv4 address or /128 for an IPv6 address.
Note The GUI does not support basing a bandwidth limiting flow on a particular port number.
The bandwidth maximum is specified in megabits per second and is implemented as a full duplex bandwidth(i.e. it sets a maximum bandwidth for inbound traffic volume and outbound traffic volume combined).
If you wish you can create multiple flows one at a time, such as one flow per network device.
At any time you can remove a flow that you had created previously. You can also edit an existing flow,although the only flow attribute that is editable is the bandwidth limit.
5.2.3. ClusterPath: Settings → Cluster
109
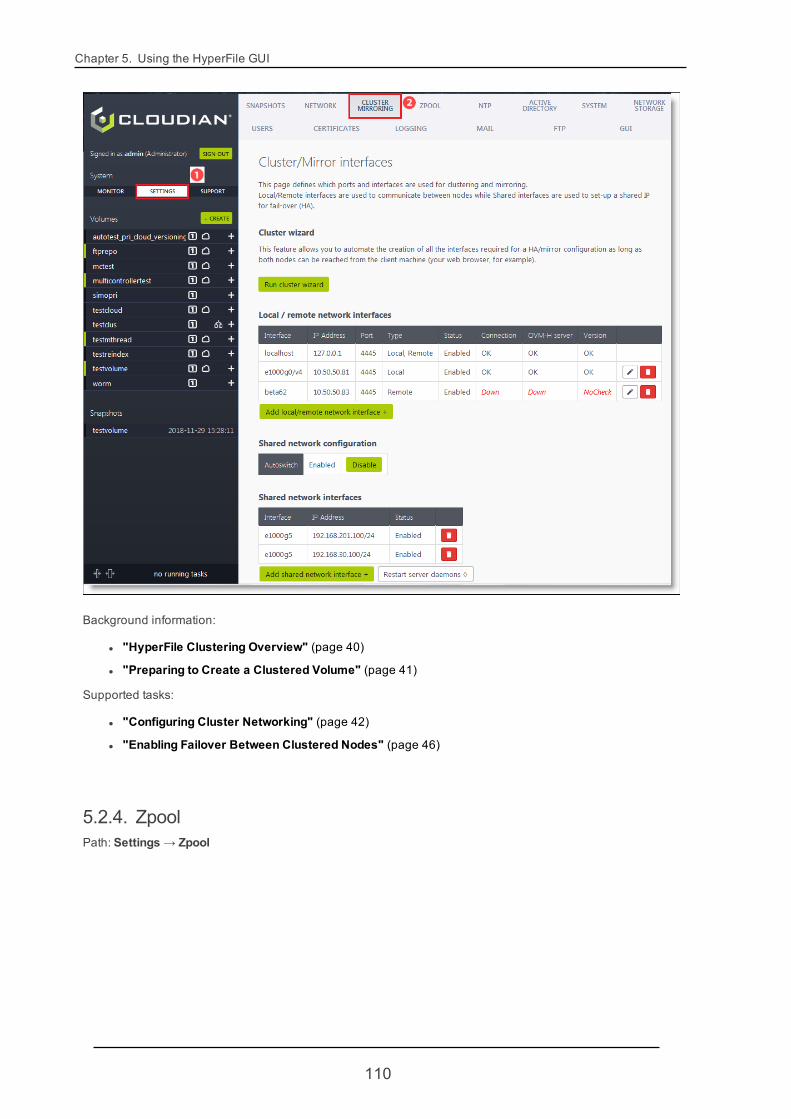
Chapter 5. Using the HyperFile GUI
Background information:
l "HyperFile Clustering Overview" (page 40)
l "Preparing to Create a Clustered Volume" (page 41)
Supported tasks:
l "Configuring Cluster Networking" (page 42)
l "Enabling Failover Between Clustered Nodes" (page 46)
5.2.4. ZpoolPath: Settings → Zpool
110
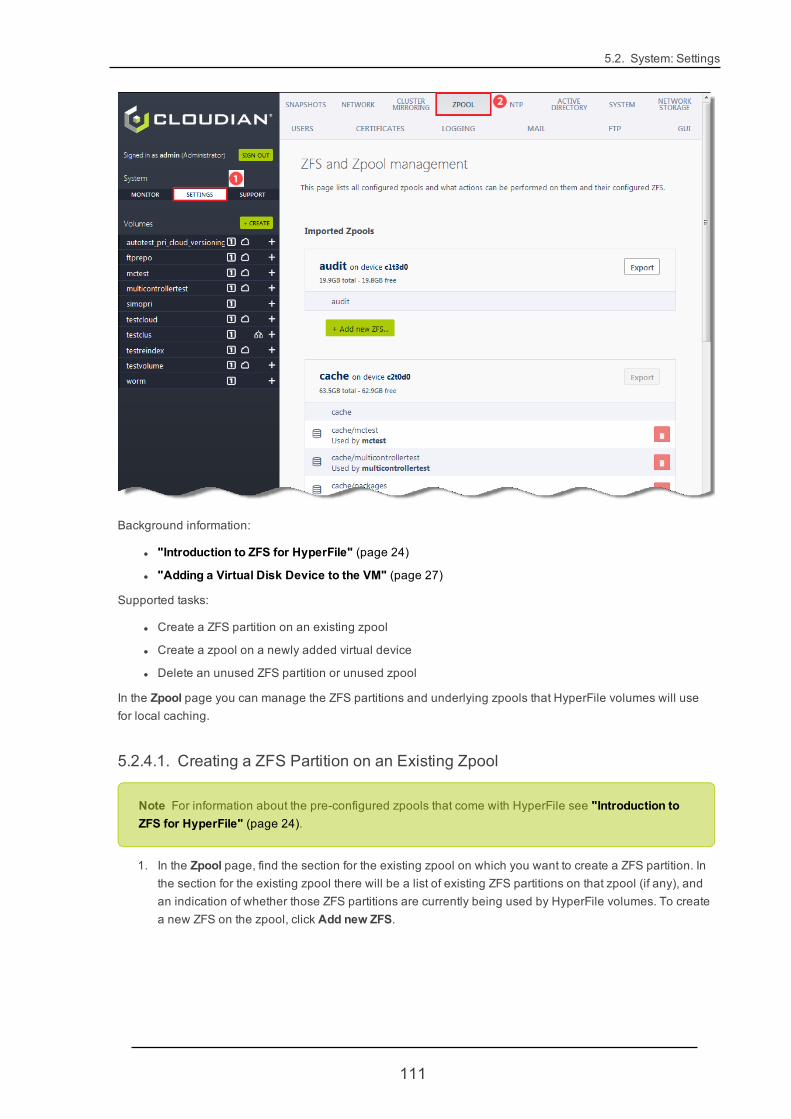
5.2. System: Settings
Background information:
l "Introduction to ZFS for HyperFile" (page 24)
l "Adding a Virtual Disk Device to the VM" (page 27)
Supported tasks:
l Create a ZFS partition on an existing zpool
l Create a zpool on a newly added virtual device
l Delete an unused ZFS partition or unused zpool
In the Zpool page you can manage the ZFS partitions and underlying zpools that HyperFile volumes will usefor local caching.
5.2.4.1. Creating a ZFS Partition on an Existing Zpool
Note For information about the pre-configured zpools that come with HyperFile see "Introduction toZFS for HyperFile" (page 24).
1. In the Zpool page, find the section for the existing zpool on which you want to create a ZFS partition. Inthe section for the existing zpool there will be a list of existing ZFS partitions on that zpool (if any), andan indication of whether those ZFS partitions are currently being used by HyperFile volumes. To createa new ZFS on the zpool, click Add new ZFS.
111
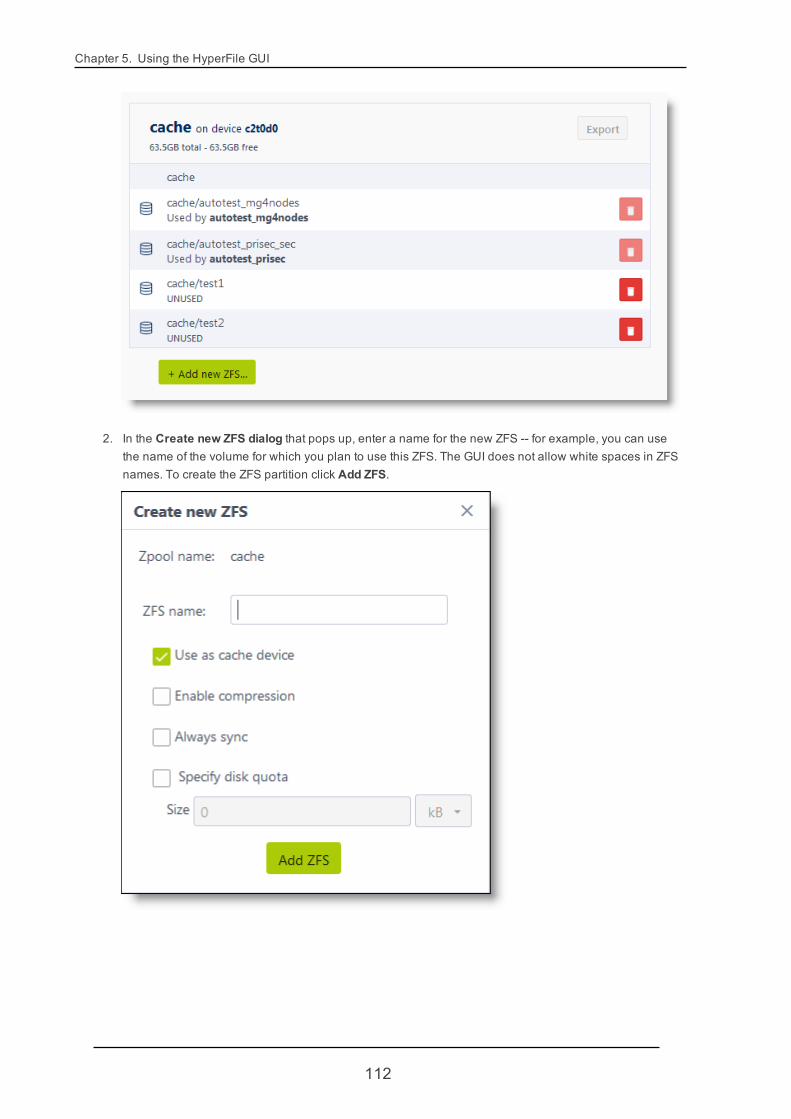
Chapter 5. Using the HyperFile GUI
2. In the Create new ZFS dialog that pops up, enter a name for the new ZFS -- for example, you can usethe name of the volume for which you plan to use this ZFS. The GUI does not allow white spaces in ZFSnames. To create the ZFS partition click Add ZFS.
112
5.2. System: Settings
Note The compression option can help reduce space consumption but keep in mind the fol-lowing things:* It has an impact on the required resources (i.e. RAM, CPU, etc…) and might not be suitable forhigh performance environments where I/O is the main consideration.* Its effects depend on the data profile (for example some data types are incompressible oralready compressed).
You can create as many ZFS partitions as you want on a zpool. Each ZFS can be used for PRI or SEC cachestorage for a volume. However,when having multiple ZFS partitions and volumes share a single zpool, becareful not to exceed the capacity of the virtual disk device that underlies the zpool.
In some cases if you plan to have multiple volumes on a HyperFile instance, it might make more sense to usedifferent pools of resources and build separate zpools for each volume. This is particularly true if you have tomeet any of the following requirements:
l Maintenance of a zpool associated with one volume will not impact other volumes
l Different volumes must meet different Quality of Service (QoS) requirements -- for example Volume Auses zpool A which uses SSD devices, whereas Volume B uses zpool B which uses SATA devices
l Data belonging to different customers or groups must be physically separated
Once you've created one or more ZFS partitions, those partitions can by used by HyperFile volumes for localdata caching. For information on assigning ZFS partitions to volumes see:
l "Creating a Volume" (page 34)
l "Managing Volume Storage Devices" (page 34)
5.2.4.2. Creating a Zpool on a Virtual Device
Having used the VMware GUI to add a virtual disk device to your HyperFile VM -- as described in "Adding aVirtual Disk Device to the VM" (page 27) -- you can then use the HyperFile GUI's Zpool page to create azpool that comprises only this device (note that since it's a VMDK it can have any physical device or group ofdevices underlying it).
Note As discussed in "Introduction to ZFS for HyperFile" (page 24), when you use the HyperFile GUIto create zpools each zpool will map to one and only one vdev (virtual device). This is normally OK ifyou use external storage that provides LUNs that are already an aggregation of multiple physicaldevices (with RAID protection for example). If you want to create a zpool that maps to more than onevdev, instead of using the HyperFile GUI to create the zpool you can use the ZFS command line asbriefly described in "Using ZFS Commands to Create a Zpool that Maps to Multiple Vdevs" (page114).
1. In the HyperFile GUI, scroll to the bottom of the Zpool page and you should see listed the virtual diskdevice that you added to the HyperFile VM. (If the new device is not in the list try refreshing the page).
113

Chapter 5. Using the HyperFile GUI
2. Click Create zpool to create a zpool on the new virtual disk device.
3. Enter a name for the new zpool and then click Add zpool.
4. The new zpool is created and is now listed among the zpools on the Zpool page. Now you can create aZFS partition on the new zpool as described in "Creating a ZFS Partition on an Existing Zpool" (page111).
Note: You must create a ZFS partition on the zpool in order for it to be usable by a HyperFilevolume.
Using ZFS Commands to Create a Zpool that Maps to Multiple Vdevs
When you create zpools through the HyperFile GUI, each zpool maps to just one virtual disk device (vdev). Ifyou want a single zpool to map to multiple vdevs, then rather than creating the zpool through the HyperFile GUIyou can create it by using native ZFS commands on your HyperFile node.
Before starting to create a zpool, you need to know what virtual devices are currently available on the Hyper-File node, and which of those devices you want to use for the zpool. If you're not sure what virtual devices areavailable on the HyperFile node you can use the format command at the terminal prompt to see the availabledevice list:
114

5.2. System: Settings
Once you determine which devices you want to use for the zpool you can use ZFS commands to create thedesired zpool type. Please refer to the ZFS documentation for details.
zpool type Command Example Notes
Zpool stripe group zpool create vol0 c2t6d0 c2t8d0
Createsa zpool(namedvol0 inthisexample)with Ndevicesin stripe
Zpool mirror group zpool create vol0 mirror c2t6d0 c2t8d0Mirror(>= 2devices)
Zpool raidz group zpool create vol0 raidz c2t6d0 c2t8d0 c2t5d0Similar toRAID5
Zpool raidz2 set zpool create vol0 raidz2 c2t6d0 c2t8d0 c2t9d0 c2t4d0
Similar toRAID5with dualparity
After you have created a zpool with native ZFS commands, the zpool will display in the HyperFile GUI (Zpoolpage) and you can proceed with using the GUI to create ZFS partitions on the zpool, as described in "Creatinga ZFS Partition on an Existing Zpool" (page 111).
5.2.4.3. Deleting an Unused ZFS Partition or Zpool
When a ZFS partition is no longer being used by a HyperFile volume, you can delete the ZFS partition if youwish. You then can also "export" -- remove from the system -- the underlying zpool if it no longer has any ZFSpartitions associated with it.
115

Chapter 5. Using the HyperFile GUI
1. In the Zpool page, scroll down to the zpool that you wish to work with. For the unused ZFS partition thatyou want to delete, click the trash can icon. When asked to confirm, click OK. Then, if there are noremaining ZFS partitions on the zpool you can delete the zpool if you wish, by clicking Export and thenconfirming.
2. After you have "exported" (removed) a zpool, if you wish you can use the VMware GUI to remove theunderlying virtual device from the HyperFile VM.
a. Select the device from the VM's hardware device list and then click Remove.
b. Choose whether or not to delete files from disk. Then click OK.
116
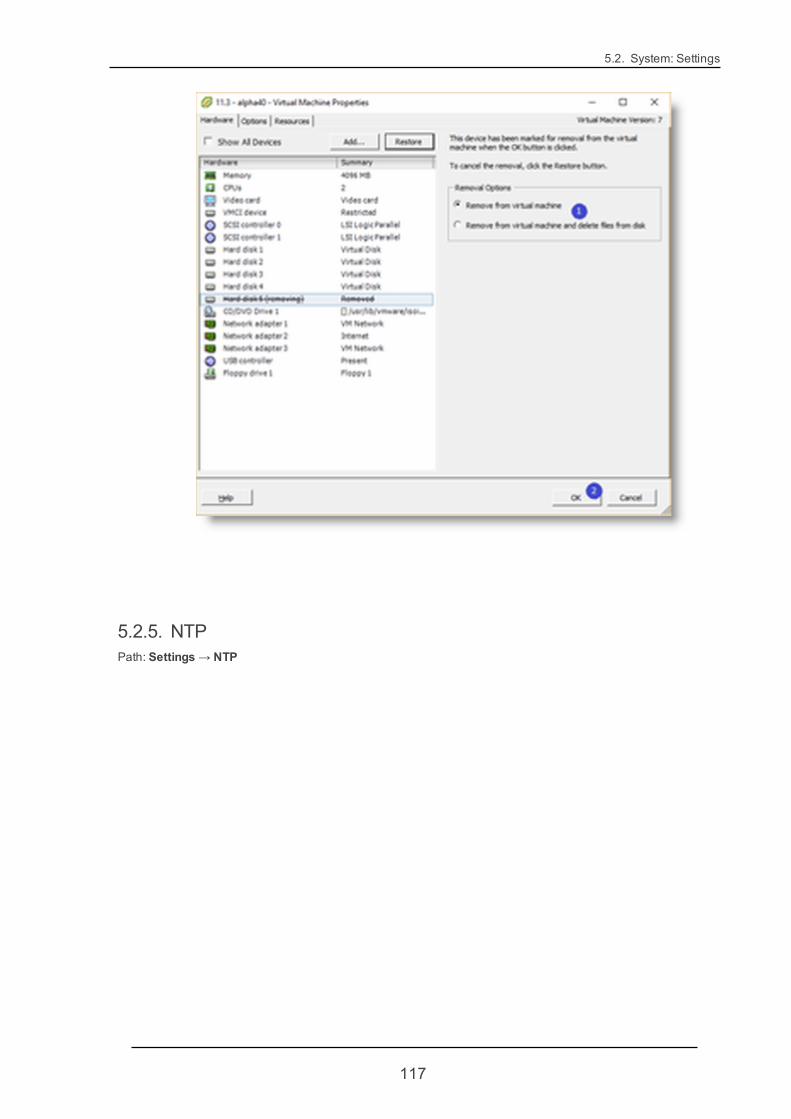
5.2. System: Settings
5.2.5. NTPPath: Settings → NTP
117
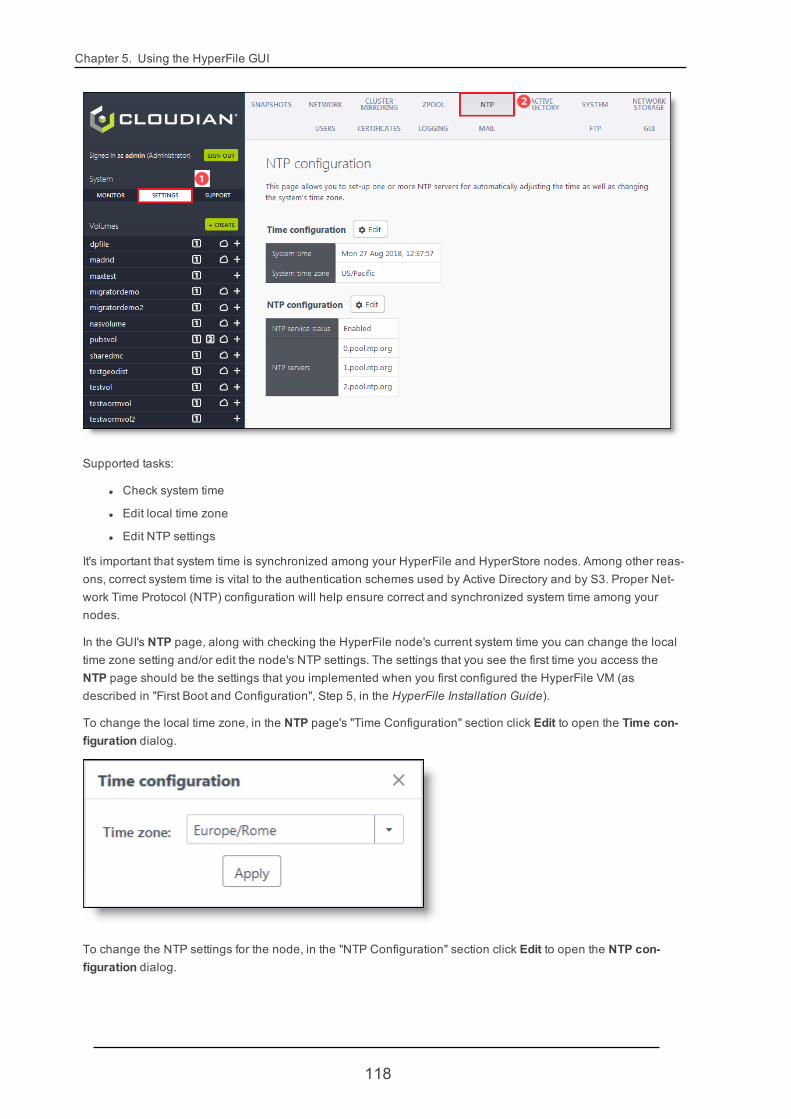
Chapter 5. Using the HyperFile GUI
Supported tasks:
l Check system time
l Edit local time zone
l Edit NTP settings
It's important that system time is synchronized among your HyperFile and HyperStore nodes. Among other reas-ons, correct system time is vital to the authentication schemes used by Active Directory and by S3. Proper Net-work Time Protocol (NTP) configuration will help ensure correct and synchronized system time among yournodes.
In the GUI's NTP page, along with checking the HyperFile node's current system time you can change the localtime zone setting and/or edit the node's NTP settings. The settings that you see the first time you access theNTP page should be the settings that you implemented when you first configured the HyperFile VM (asdescribed in "First Boot and Configuration", Step 5, in the HyperFile Installation Guide).
To change the local time zone, in the NTP page's "Time Configuration" section click Edit to open the Time con-figuration dialog.
To change the NTP settings for the node, in the "NTP Configuration" section click Edit to open the NTP con-figuration dialog.
118
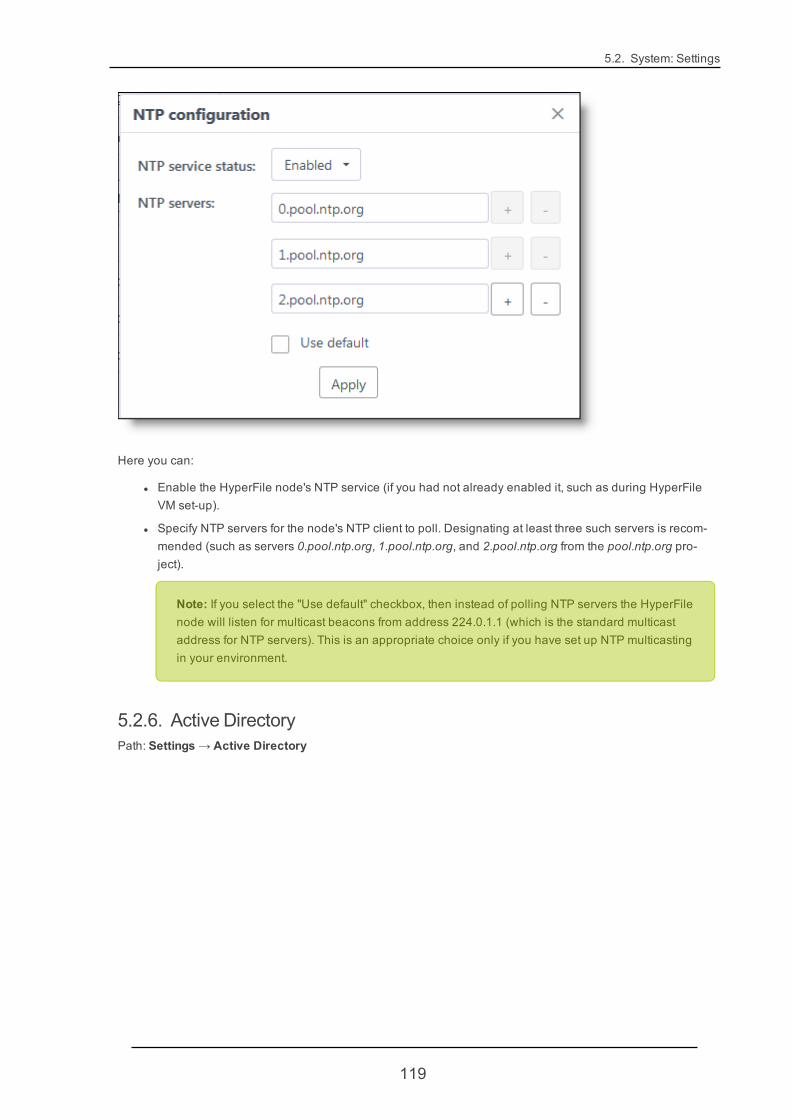
5.2. System: Settings
Here you can:
l Enable the HyperFile node's NTP service (if you had not already enabled it, such as during HyperFileVM set-up).
l Specify NTP servers for the node's NTP client to poll. Designating at least three such servers is recom-mended (such as servers 0.pool.ntp.org, 1.pool.ntp.org, and 2.pool.ntp.org from the pool.ntp.org pro-ject).
Note: If you select the "Use default" checkbox, then instead of polling NTP servers the HyperFilenode will listen for multicast beacons from address 224.0.1.1 (which is the standard multicastaddress for NTP servers). This is an appropriate choice only if you have set up NTP multicastingin your environment.
5.2.6. Active DirectoryPath: Settings → Active Directory
119
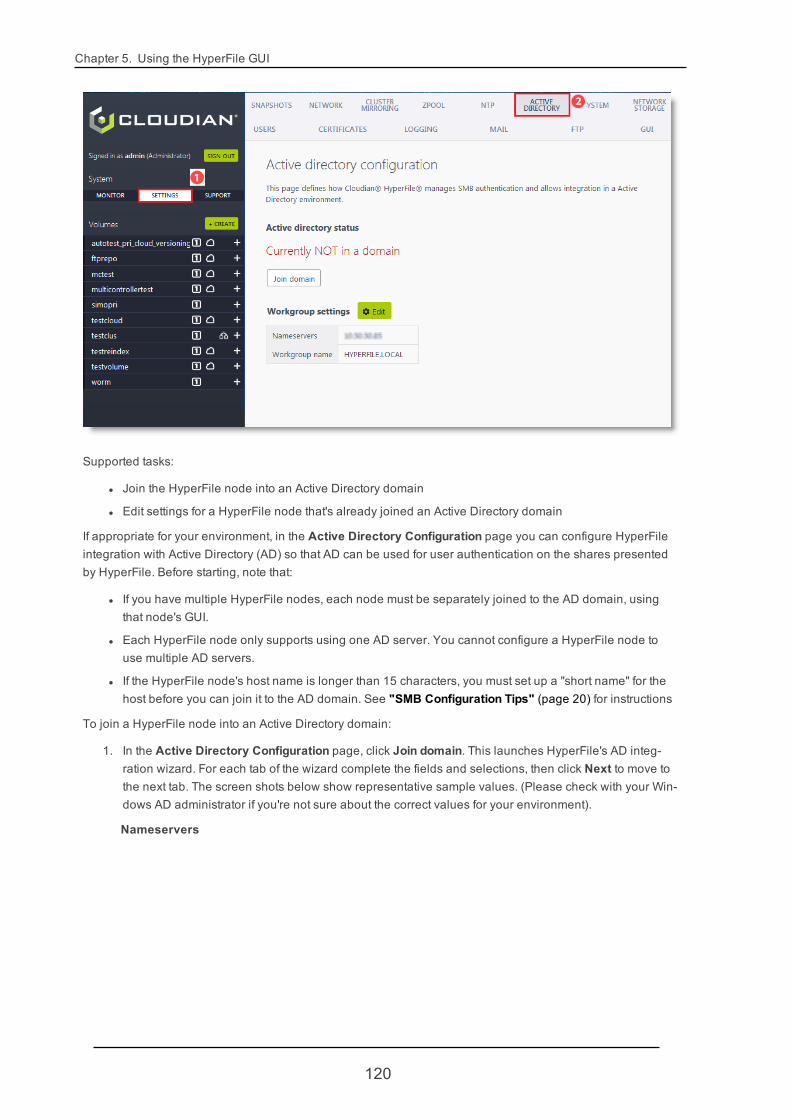
Chapter 5. Using the HyperFile GUI
Supported tasks:
l Join the HyperFile node into an Active Directory domain
l Edit settings for a HyperFile node that's already joined an Active Directory domain
If appropriate for your environment, in the Active Directory Configuration page you can configure HyperFileintegration with Active Directory (AD) so that AD can be used for user authentication on the shares presentedby HyperFile. Before starting, note that:
l If you have multiple HyperFile nodes, each node must be separately joined to the AD domain, usingthat node's GUI.
l Each HyperFile node only supports using one AD server. You cannot configure a HyperFile node touse multiple AD servers.
l If the HyperFile node's host name is longer than 15 characters, you must set up a "short name" for thehost before you can join it to the AD domain. See "SMB Configuration Tips" (page 20) for instructions
To join a HyperFile node into an Active Directory domain:
1. In the Active Directory Configuration page, click Join domain. This launches HyperFile's AD integ-ration wizard. For each tab of the wizard complete the fields and selections, then click Next to move tothe next tab. The screen shots below show representative sample values. (Please check with your Win-dows AD administrator if you're not sure about the correct values for your environment).
Nameservers
120

5.2. System: Settings
AD Info
Note Use FQDNs or domains in the AD Info fields -- not IP addresses.
ID Mapping
121

Chapter 5. Using the HyperFile GUI
Note For ID mapping, make sure that the specified UID range is large enough to accommodateall the current and future groups and users in the AD domain. Also, if users from the AD domainwill access multiple HyperFile nodes, use the same UID range when you configure AD integ-ration on each HyperFile node.
AD User
2. Review your configuration to confirm that it's correct, then click Join domain.
122
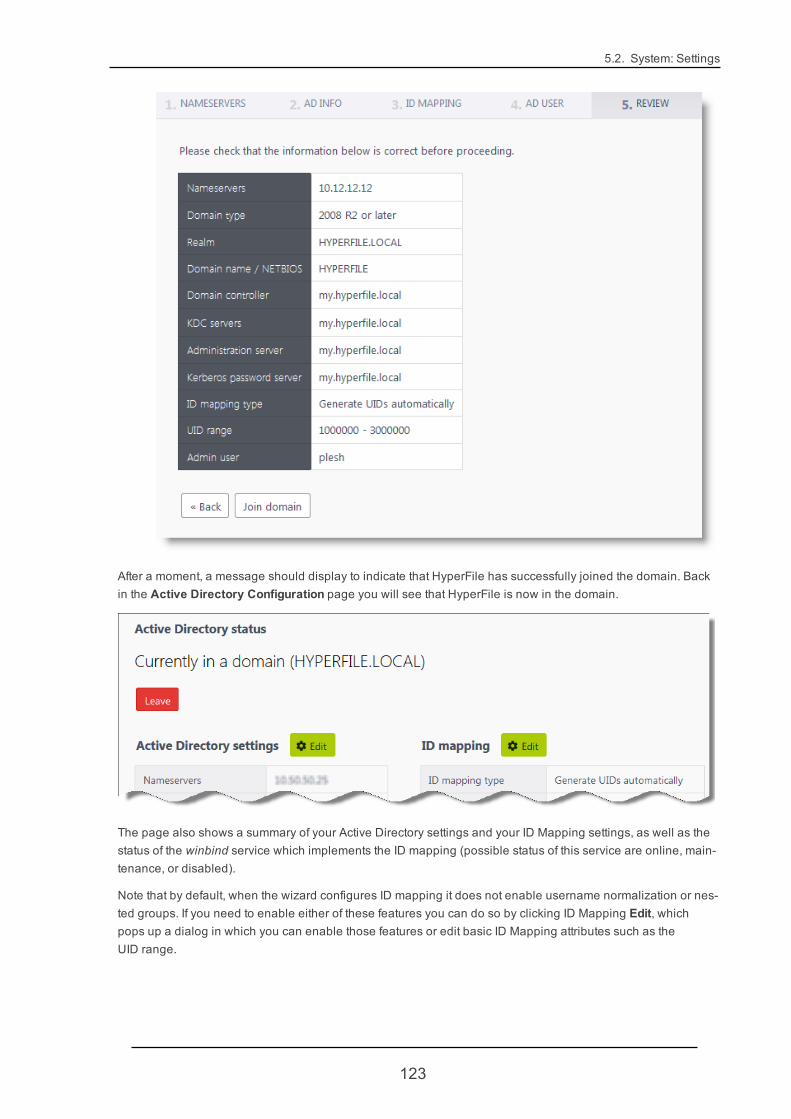
5.2. System: Settings
After a moment, a message should display to indicate that HyperFile has successfully joined the domain. Backin the Active Directory Configuration page you will see that HyperFile is now in the domain.
The page also shows a summary of your Active Directory settings and your ID Mapping settings, as well as thestatus of the winbind service which implements the ID mapping (possible status of this service are online, main-tenance, or disabled).
Note that by default, when the wizard configures ID mapping it does not enable username normalization or nes-ted groups. If you need to enable either of these features you can do so by clicking ID Mapping Edit, whichpops up a dialog in which you can enable those features or edit basic ID Mapping attributes such as theUID range.
123

Chapter 5. Using the HyperFile GUI
Note If you want HyperFile to support AD users who have spaces in their usernames (such as "ScottKelly"), you must enable username normalization. However if you enable username normalization,HyperFile will not be able to support users who have underscores in their usernames (such as "Scott_Kelly").
5.2.6.1. Adding a Trusted Domain
After you've joined the HyperFile node into an Active Directory domain, the Active Directory page displays aTrusted Domains section in which you have the option to add a trusted domain. To do so, click Add. Thisopens the Add trusted domain dialog.
124
5.2. System: Settings
Enter the domain, choose an ID mapping type, and enter a UID range. This range must not overlap with therange that you use for any other domain. When you're done click Apply.
5.2.6.2. Active Directory Integration Troubleshooting
If HyperFile is not able to join the Active Directory domain you will get an error from the GUI. In this case, youcan perform some troubleshooting as described below. If the problem persists, please contact Cloudian Sup-port.
l Check that all names and domains are correct, including case. Name errors are the most commontype of mistake.
o Check the realm, KDC server name(s), and other AD settings you can see in the GUI.
o Rewrite all domains in lowercase letters (they are case sensitive, and usually lowercase; by con-trast Realm is usually in uppercase)
l Go to the NTP page and check that the system date and time are correct (if you have not yet con-figured NTP, you can do so in that page -- NTP is the best way to keep accurate system time).
o Also, if it is not already so, try to set the time zone for HyperFile to be in the same time zone asthe AD server (especially if there is no NTP configured). You can set the time zone in the NTPpage.
l Check HyperFile name resolution
o Check if HyperFile can resolve the AD domain (nslookup <domainname>) and if HyperFile canresolve itself (nslookup `hostname`). Check that the IP address is correct.
o It may help if HyperFile hostnames are in the domain DNS.
o If HyperFile hostnames are not in the domain DNS, check to make sure the IP addresses do notresolve to something different than HyperFile hostnames.
l Check HyperFile networking
o HyperFile should be able to ping the domain controller.
o If using a firewall, confirm that the firewall configuration is not preventing HyperFile from access-ing the AD server ports.
5.2.7. SystemPath: Settings → System or Volumes → Manage All
125
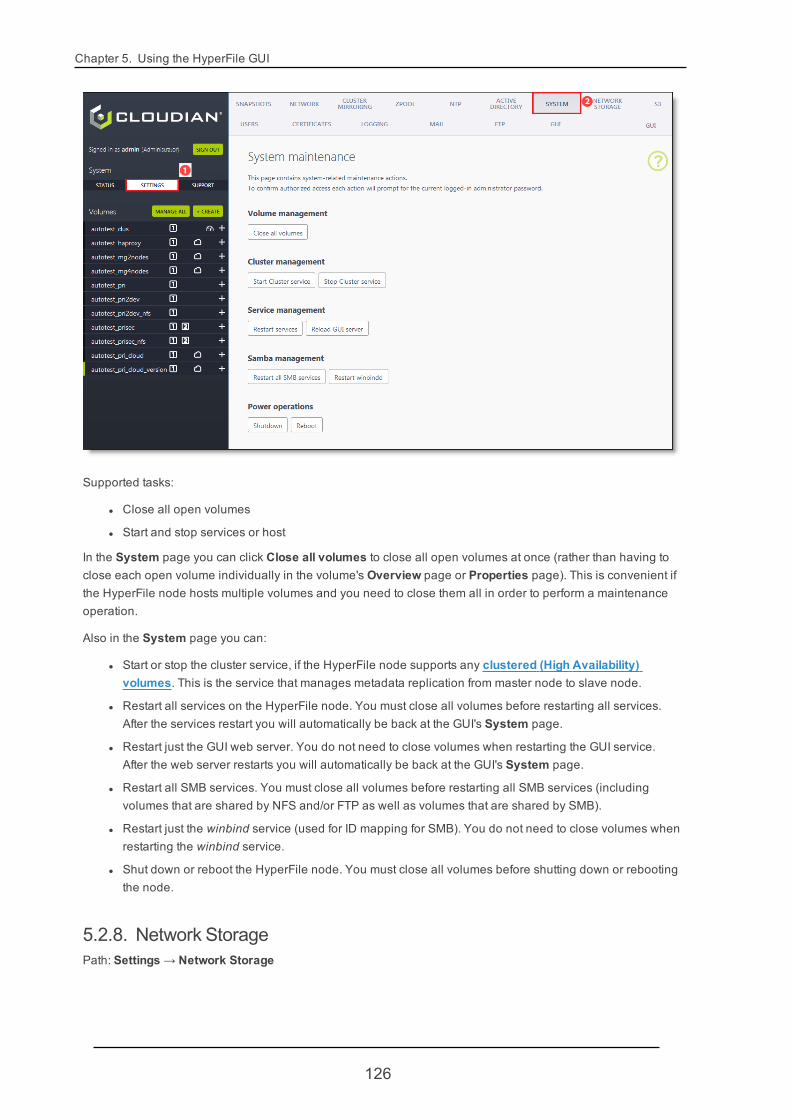
Chapter 5. Using the HyperFile GUI
Supported tasks:
l Close all open volumes
l Start and stop services or host
In the System page you can click Close all volumes to close all open volumes at once (rather than having toclose each open volume individually in the volume's Overview page or Properties page). This is convenient ifthe HyperFile node hosts multiple volumes and you need to close them all in order to perform a maintenanceoperation.
Also in the System page you can:
l Start or stop the cluster service, if the HyperFile node supports any clustered (High Availability)volumes. This is the service that manages metadata replication from master node to slave node.
l Restart all services on the HyperFile node. You must close all volumes before restarting all services.After the services restart you will automatically be back at the GUI's System page.
l Restart just the GUI web server. You do not need to close volumes when restarting the GUI service.After the web server restarts you will automatically be back at the GUI's System page.
l Restart all SMB services. You must close all volumes before restarting all SMB services (includingvolumes that are shared by NFS and/or FTP as well as volumes that are shared by SMB).
l Restart just the winbind service (used for ID mapping for SMB). You do not need to close volumes whenrestarting the winbind service.
l Shut down or reboot the HyperFile node. You must close all volumes before shutting down or rebootingthe node.
5.2.8. Network StoragePath: Settings → Network Storage
126
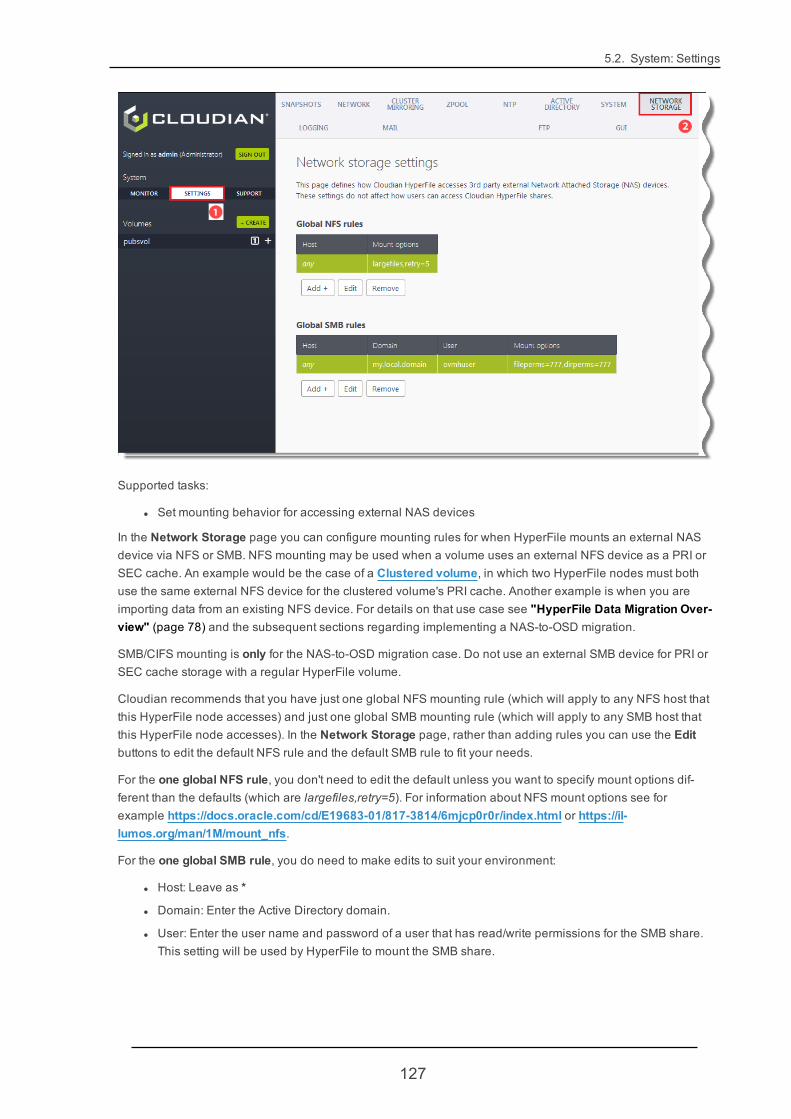
5.2. System: Settings
Supported tasks:
l Set mounting behavior for accessing external NAS devices
In the Network Storage page you can configure mounting rules for when HyperFile mounts an external NASdevice via NFS or SMB. NFS mounting may be used when a volume uses an external NFS device as a PRI orSEC cache. An example would be the case of a Clustered volume, in which two HyperFile nodes must bothuse the same external NFS device for the clustered volume's PRI cache. Another example is when you areimporting data from an existing NFS device. For details on that use case see "HyperFile Data Migration Over-view" (page 78) and the subsequent sections regarding implementing a NAS-to-OSD migration.
SMB/CIFS mounting is only for the NAS-to-OSD migration case. Do not use an external SMB device for PRI orSEC cache storage with a regular HyperFile volume.
Cloudian recommends that you have just one global NFS mounting rule (which will apply to any NFS host thatthis HyperFile node accesses) and just one global SMB mounting rule (which will apply to any SMB host thatthis HyperFile node accesses). In the Network Storage page, rather than adding rules you can use the Editbuttons to edit the default NFS rule and the default SMB rule to fit your needs.
For the one global NFS rule, you don't need to edit the default unless you want to specify mount options dif-ferent than the defaults (which are largefiles,retry=5). For information about NFS mount options see forexample https://docs.oracle.com/cd/E19683-01/817-3814/6mjcp0r0r/index.html or https://il-lumos.org/man/1M/mount_nfs.
For the one global SMB rule, you do need to make edits to suit your environment:
l Host: Leave as *
l Domain: Enter the Active Directory domain.
l User: Enter the user name and password of a user that has read/write permissions for the SMB share.This setting will be used by HyperFile to mount the SMB share.
127
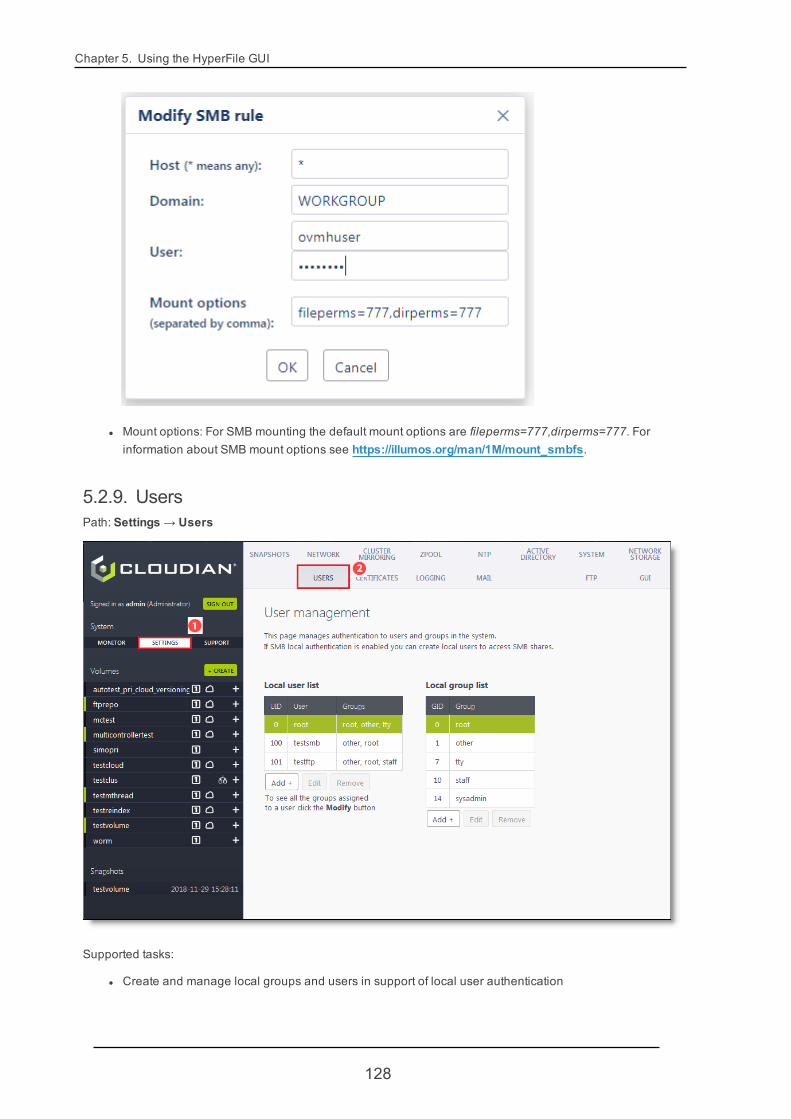
Chapter 5. Using the HyperFile GUI
l Mount options: For SMB mounting the default mount options are fileperms=777,dirperms=777. Forinformation about SMB mount options see https://illumos.org/man/1M/mount_smbfs.
5.2.9. UsersPath: Settings → Users
Supported tasks:
l Create and manage local groups and users in support of local user authentication
128
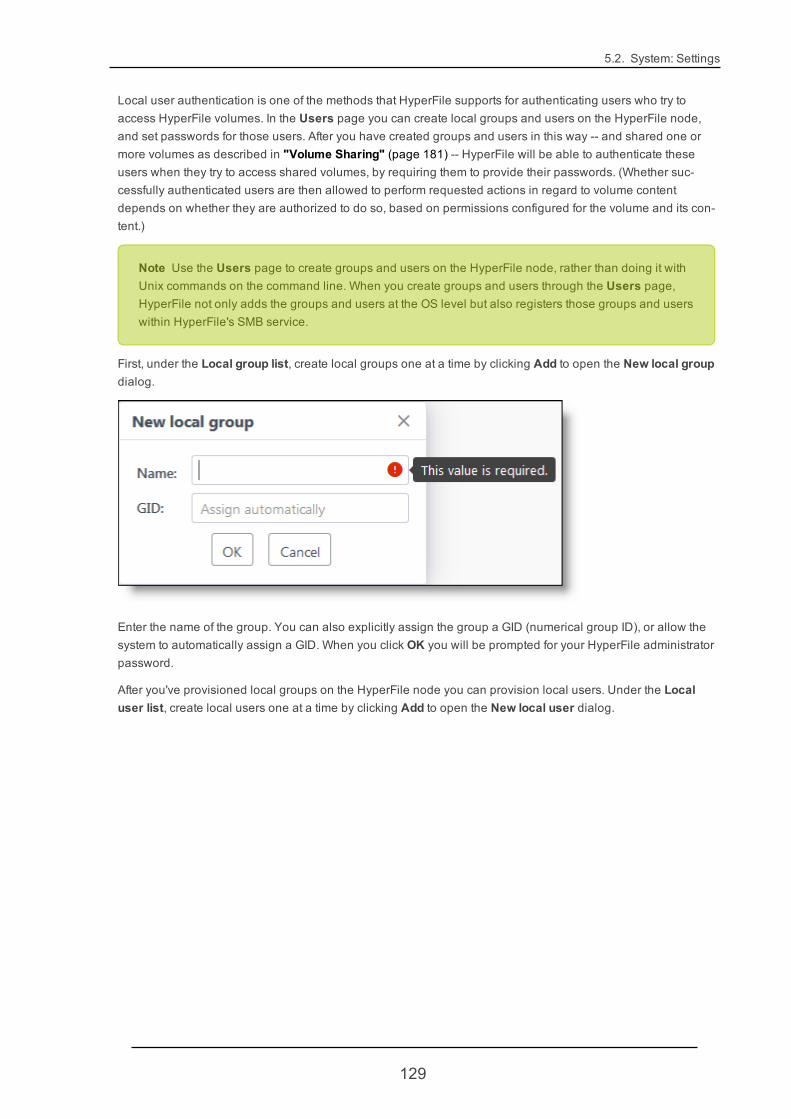
5.2. System: Settings
Local user authentication is one of the methods that HyperFile supports for authenticating users who try toaccess HyperFile volumes. In the Users page you can create local groups and users on the HyperFile node,and set passwords for those users. After you have created groups and users in this way -- and shared one ormore volumes as described in "Volume Sharing" (page 181) -- HyperFile will be able to authenticate theseusers when they try to access shared volumes, by requiring them to provide their passwords. (Whether suc-cessfully authenticated users are then allowed to perform requested actions in regard to volume contentdepends on whether they are authorized to do so, based on permissions configured for the volume and its con-tent.)
Note Use the Users page to create groups and users on the HyperFile node, rather than doing it withUnix commands on the command line. When you create groups and users through the Users page,HyperFile not only adds the groups and users at the OS level but also registers those groups and userswithin HyperFile's SMB service.
First, under the Local group list, create local groups one at a time by clicking Add to open the New local groupdialog.
Enter the name of the group. You can also explicitly assign the group a GID (numerical group ID), or allow thesystem to automatically assign a GID. When you click OK you will be prompted for your HyperFile administratorpassword.
After you've provisioned local groups on the HyperFile node you can provision local users. Under the Localuser list, create local users one at a time by clicking Add to open the New local user dialog.
129
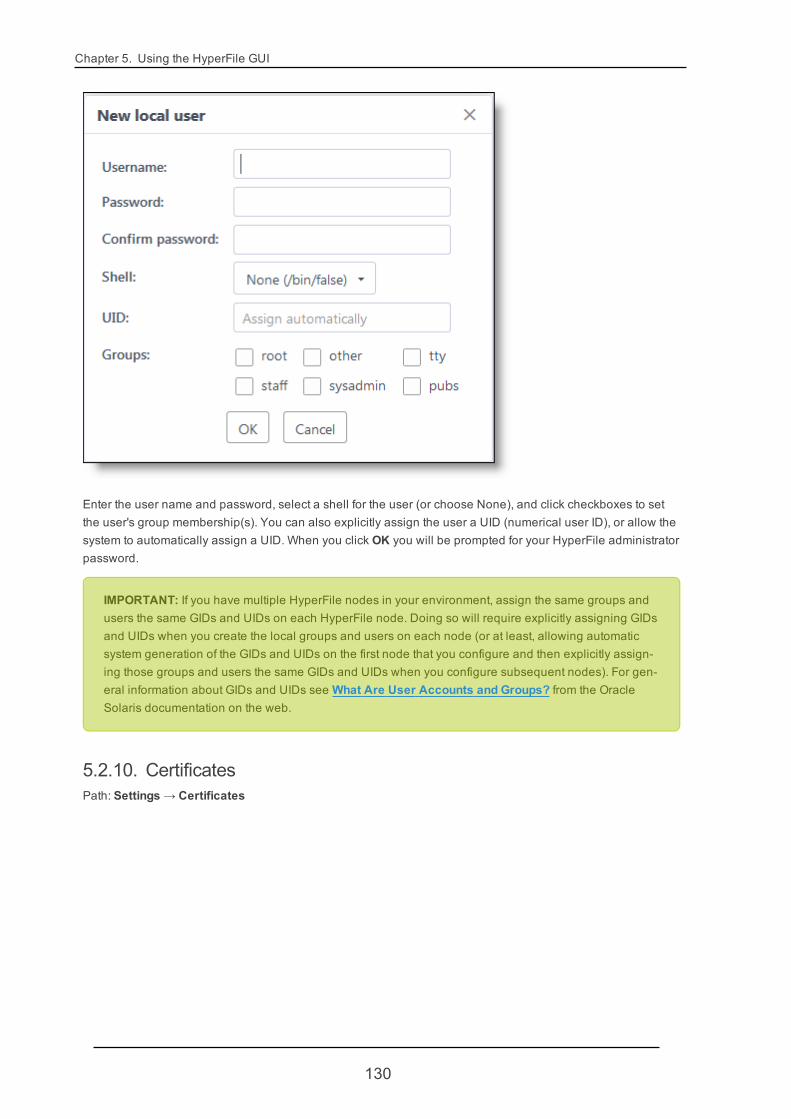
Chapter 5. Using the HyperFile GUI
Enter the user name and password, select a shell for the user (or choose None), and click checkboxes to setthe user's group membership(s). You can also explicitly assign the user a UID (numerical user ID), or allow thesystem to automatically assign a UID. When you click OK you will be prompted for your HyperFile administratorpassword.
IMPORTANT: If you have multiple HyperFile nodes in your environment, assign the same groups andusers the same GIDs and UIDs on each HyperFile node. Doing so will require explicitly assigning GIDsand UIDs when you create the local groups and users on each node (or at least, allowing automaticsystem generation of the GIDs and UIDs on the first node that you configure and then explicitly assign-ing those groups and users the same GIDs and UIDs when you configure subsequent nodes). For gen-eral information about GIDs and UIDs seeWhat Are User Accounts and Groups? from the OracleSolaris documentation on the web.
5.2.10. CertificatesPath: Settings → Certificates
130
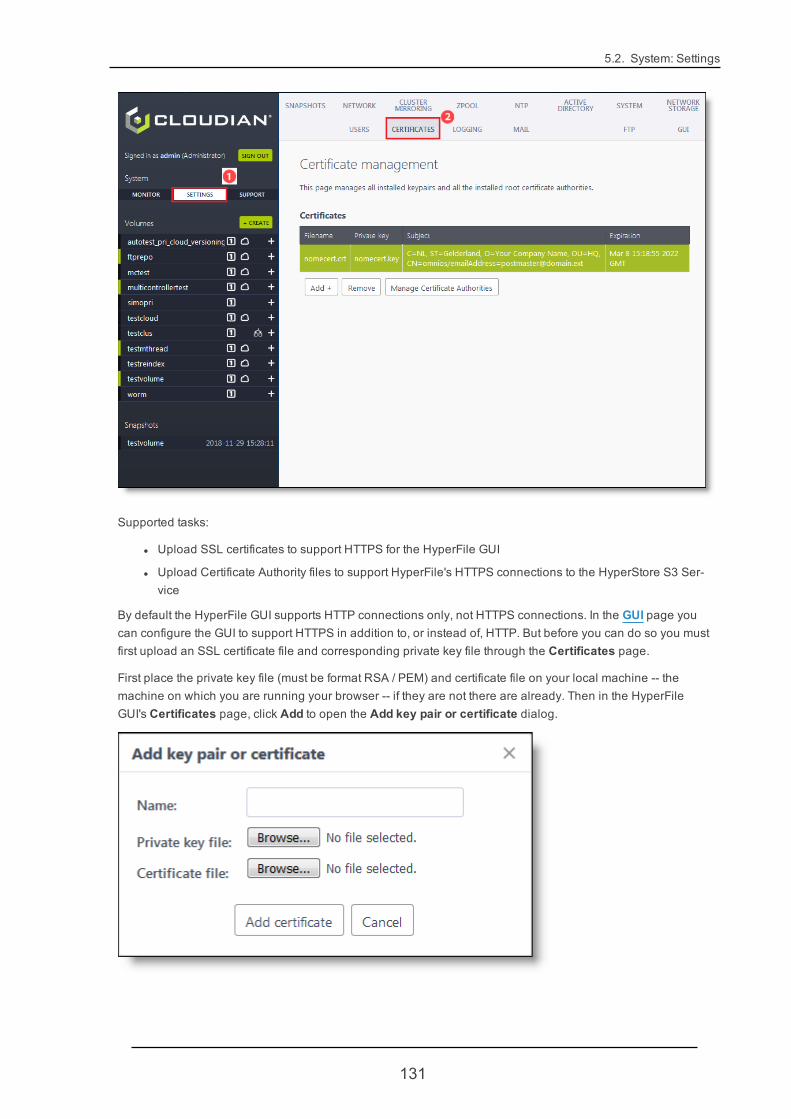
5.2. System: Settings
Supported tasks:
l Upload SSL certificates to support HTTPS for the HyperFile GUI
l Upload Certificate Authority files to support HyperFile's HTTPS connections to the HyperStore S3 Ser-vice
By default the HyperFile GUI supports HTTP connections only, not HTTPS connections. In the GUI page youcan configure the GUI to support HTTPS in addition to, or instead of, HTTP. But before you can do so you mustfirst upload an SSL certificate file and corresponding private key file through the Certificates page.
First place the private key file (must be format RSA / PEM) and certificate file on your local machine -- themachine on which you are running your browser -- if they are not there are already. Then in the HyperFileGUI's Certificates page, click Add to open the Add key pair or certificate dialog.
131

Chapter 5. Using the HyperFile GUI
Enter a certificate name, and browse to the private key file and certificate file on your local machine. Then clickAdd certificate to upload the files to the HyperFile node. You can then go to the GUI page to configure theHyperFile GUI to support HTTPS.
Note You can upload multiple certificates if you wish, one at a time. Each certificate that you uploadwill then be available from a drop-down list of certificates that you can choose from when you configureHTTPS support for the HyperFile GUI, in the GUI page.
The Certificates page also supports an option to Manage Certificate Authorities, in support of HyperFile'sHTTPS connections to the HyperStore S3 Service.
The Manage Certificate Authorities dialog lists the CAs in HyperFile's keystore. If your HyperStore S3 Serviceis using a CA not on the list, upload the CA file.
Subsequently, HyperFile will be able to validate the certificate presented by HyperStore when HyperFilemakes HTTPS connections to the HyperStore S3 Service.
5.2.11. LoggingPath: Settings → Logging
132

5.2. System: Settings
Supported tasks:
l Configure audit log rotation and retention
In the Logging page you can view and edit the settings for rotating and retaining HyperFile audit logs.
The live audit log is named audit and is in the directory /var/adm on the HyperFile node. For more informationabout this log file see Logs.
The current audit file rotation and retention settings display in the Logging page. To change the settings clickEdit to open the Configure LogAdm dialog.
133
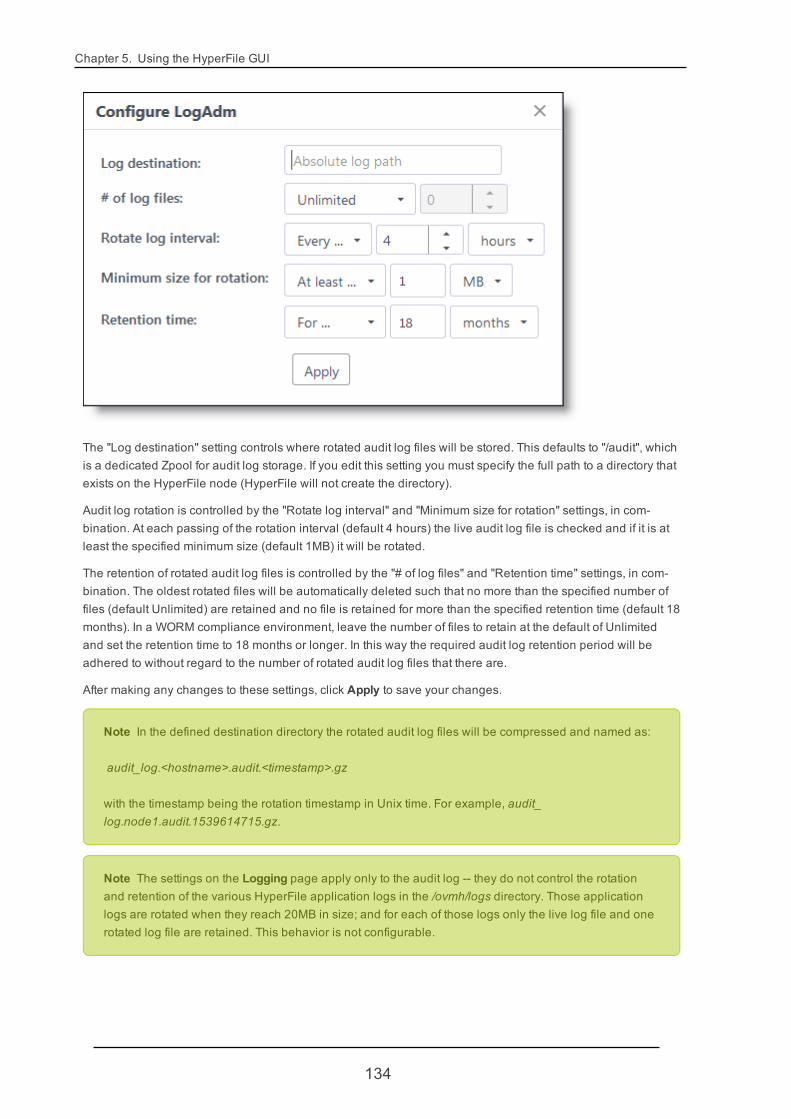
Chapter 5. Using the HyperFile GUI
The "Log destination" setting controls where rotated audit log files will be stored. This defaults to "/audit", whichis a dedicated Zpool for audit log storage. If you edit this setting you must specify the full path to a directory thatexists on the HyperFile node (HyperFile will not create the directory).
Audit log rotation is controlled by the "Rotate log interval" and "Minimum size for rotation" settings, in com-bination. At each passing of the rotation interval (default 4 hours) the live audit log file is checked and if it is atleast the specified minimum size (default 1MB) it will be rotated.
The retention of rotated audit log files is controlled by the "# of log files" and "Retention time" settings, in com-bination. The oldest rotated files will be automatically deleted such that no more than the specified number offiles (default Unlimited) are retained and no file is retained for more than the specified retention time (default 18months). In a WORM compliance environment, leave the number of files to retain at the default of Unlimitedand set the retention time to 18 months or longer. In this way the required audit log retention period will beadhered to without regard to the number of rotated audit log files that there are.
After making any changes to these settings, click Apply to save your changes.
Note In the defined destination directory the rotated audit log files will be compressed and named as:
audit_log.<hostname>.audit.<timestamp>.gz
with the timestamp being the rotation timestamp in Unix time. For example, audit_log.node1.audit.1539614715.gz.
Note The settings on the Logging page apply only to the audit log -- they do not control the rotationand retention of the various HyperFile application logs in the /ovmh/logs directory. Those applicationlogs are rotated when they reach 20MB in size; and for each of those logs only the live log file and onerotated log file are retained. This behavior is not configurable.
134
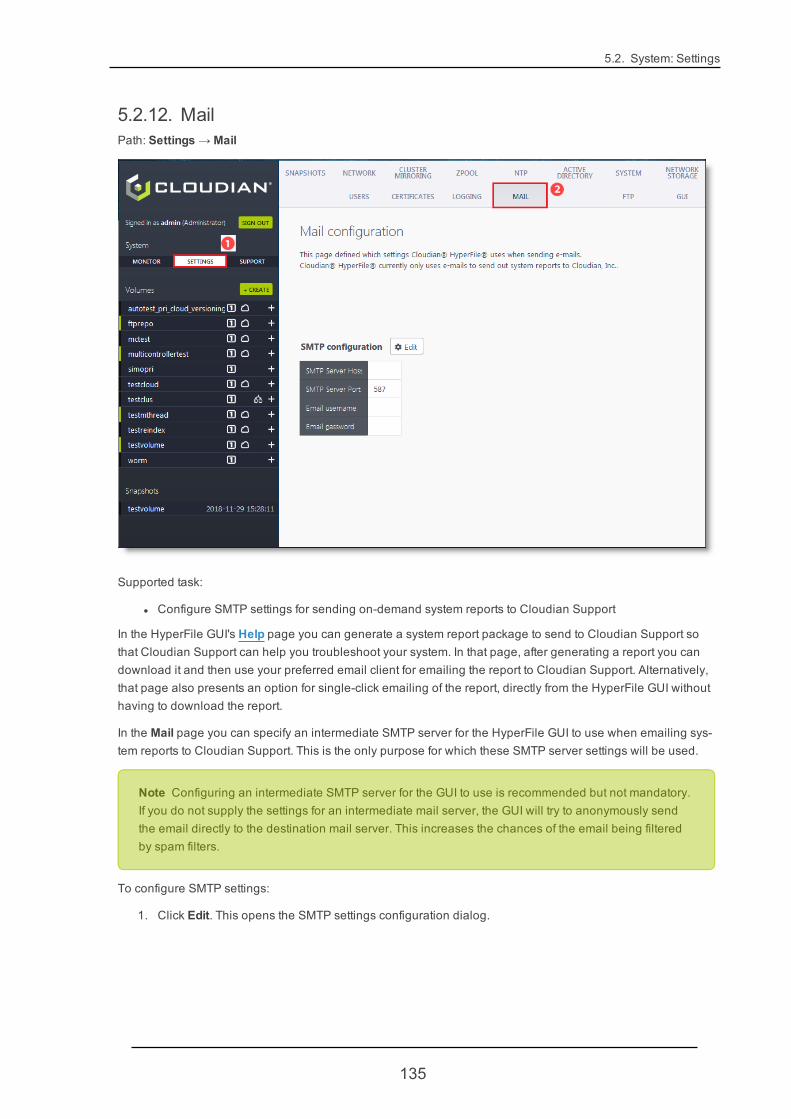
5.2. System: Settings
5.2.12. MailPath: Settings → Mail
Supported task:
l Configure SMTP settings for sending on-demand system reports to Cloudian Support
In the HyperFile GUI's Help page you can generate a system report package to send to Cloudian Support sothat Cloudian Support can help you troubleshoot your system. In that page, after generating a report you candownload it and then use your preferred email client for emailing the report to Cloudian Support. Alternatively,that page also presents an option for single-click emailing of the report, directly from the HyperFile GUI withouthaving to download the report.
In the Mail page you can specify an intermediate SMTP server for the HyperFile GUI to use when emailing sys-tem reports to Cloudian Support. This is the only purpose for which these SMTP server settings will be used.
Note Configuring an intermediate SMTP server for the GUI to use is recommended but not mandatory.If you do not supply the settings for an intermediate mail server, the GUI will try to anonymously sendthe email directly to the destination mail server. This increases the chances of the email being filteredby spam filters.
To configure SMTP settings:
1. Click Edit. This opens the SMTP settings configuration dialog.
135
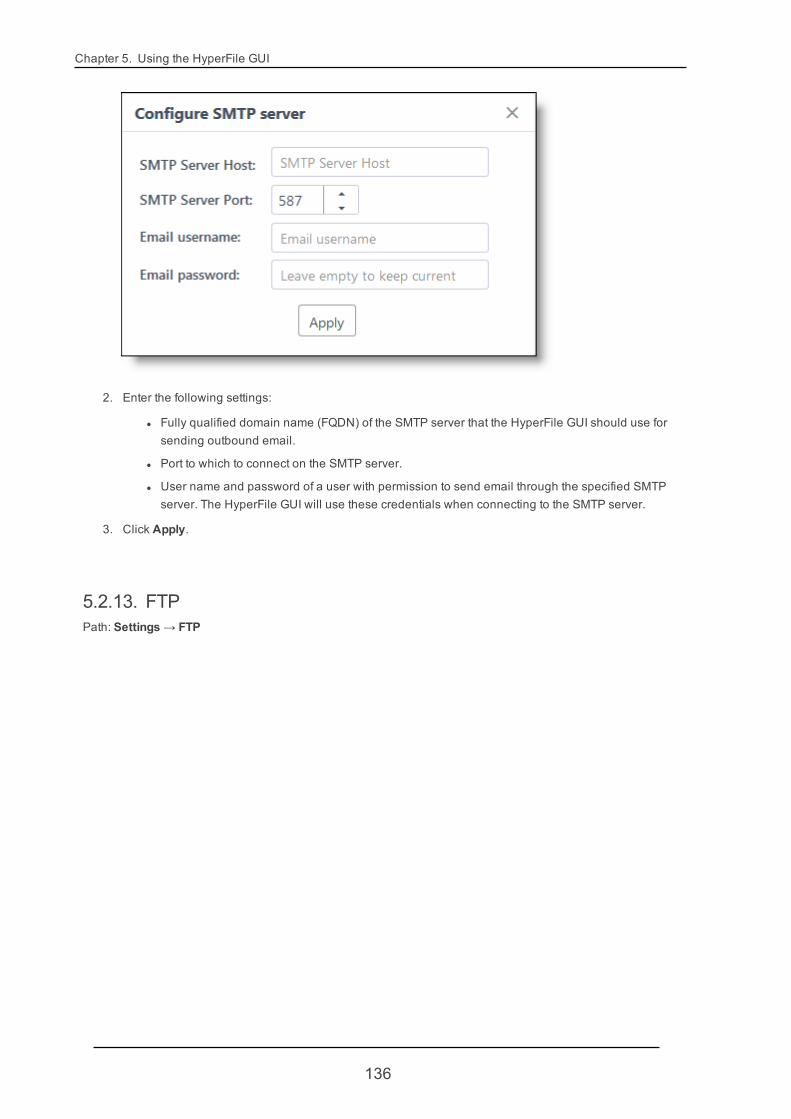
Chapter 5. Using the HyperFile GUI
2. Enter the following settings:
l Fully qualified domain name (FQDN) of the SMTP server that the HyperFile GUI should use forsending outbound email.
l Port to which to connect on the SMTP server.
l User name and password of a user with permission to send email through the specified SMTPserver. The HyperFile GUI will use these credentials when connecting to the SMTP server.
3. Click Apply.
5.2.13. FTPPath: Settings → FTP
136
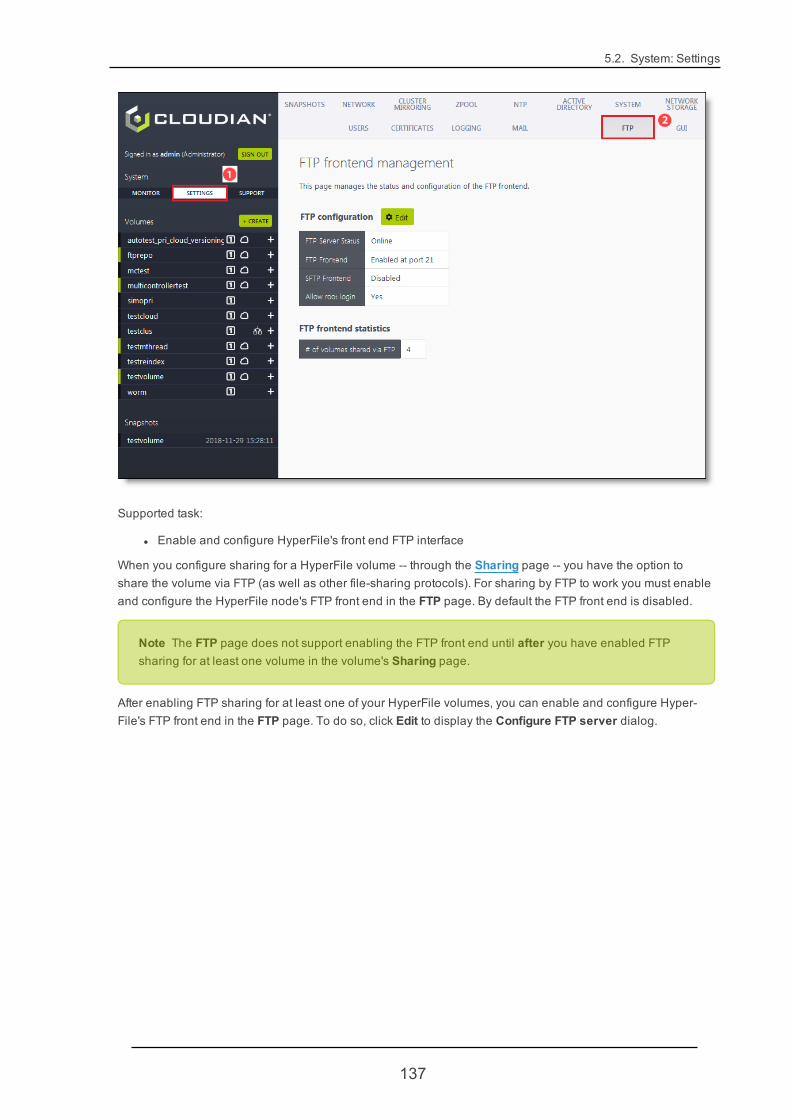
5.2. System: Settings
Supported task:
l Enable and configure HyperFile's front end FTP interface
When you configure sharing for a HyperFile volume -- through the Sharing page -- you have the option toshare the volume via FTP (as well as other file-sharing protocols). For sharing by FTP to work you must enableand configure the HyperFile node's FTP front end in the FTP page. By default the FTP front end is disabled.
Note The FTP page does not support enabling the FTP front end until after you have enabled FTPsharing for at least one volume in the volume's Sharing page.
After enabling FTP sharing for at least one of your HyperFile volumes, you can enable and configure Hyper-File's FTP front end in the FTP page. To do so, click Edit to display the Configure FTP server dialog.
137
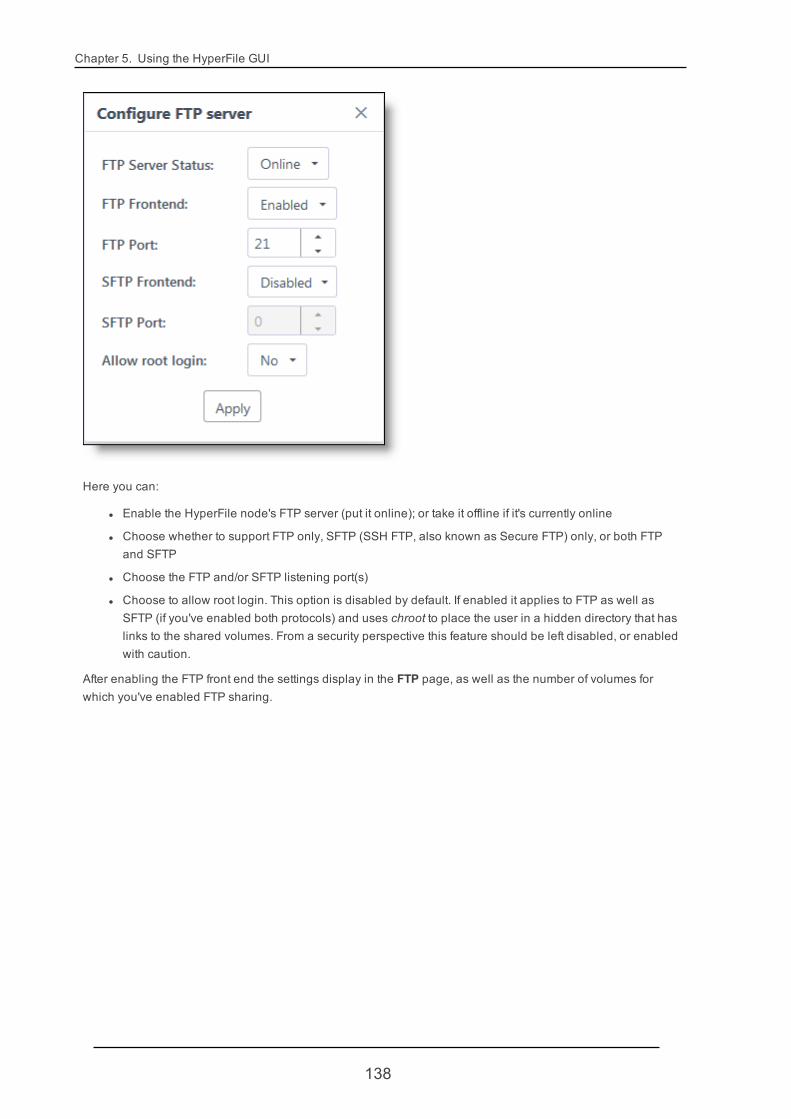
Chapter 5. Using the HyperFile GUI
Here you can:
l Enable the HyperFile node's FTP server (put it online); or take it offline if it's currently online
l Choose whether to support FTP only, SFTP (SSH FTP, also known as Secure FTP) only, or both FTPand SFTP
l Choose the FTP and/or SFTP listening port(s)
l Choose to allow root login. This option is disabled by default. If enabled it applies to FTP as well asSFTP (if you've enabled both protocols) and uses chroot to place the user in a hidden directory that haslinks to the shared volumes. From a security perspective this feature should be left disabled, or enabledwith caution.
After enabling the FTP front end the settings display in the FTP page, as well as the number of volumes forwhich you've enabled FTP sharing.
138

5.2. System: Settings
Note The FTP front end settings that you configure in this page apply in common for all HyperFilevolumes that you are sharing by FTP. HyperFile does not support having different FTP front end set-tings for different volumes that are shared by FTP.
5.2.14. GUIPath: Settings → GUI
139

Chapter 5. Using the HyperFile GUI
Supported tasks:
l Add, edit, or remove HyperFile GUI users
l Edit GUI interface options
5.2.14.1. Adding, Editing, or Removing GUI Users
In the GUI page you can manage the set of users who are allowed to log in to the HyperFile GUI on this node.The GUI supports two types of users:
l ADMIN -- This user type has full access to all HyperFile GUI functions.
l GUEST -- This user type has limited, read-only access to HyperFile GUI functions. When a GUEST useris logged into the GUI:
o In the System section of the GUI only the Monitor Overview page is available.
o In the Volumes section of the GUI, only the Monitor, Properties,Query, Explore, and Per-formance pages are available. In the Properties page, properties can be viewed but not edited.In the Explore page, file names and metadata can be viewed but files cannot be uploaded,downloaded, or deleted. A GUEST user cannot create a new volume.
o In the Volume Storage Tiers sections of the GUI, the Monitor and Properties pages are avail-able, but the properties are read-only. A GUEST user cannot add a storage tier to a volume orremove an existing tier.
By default two GUI users are pre-configured in every HyperFile node:
l An ADMIN type user named "admin", with default password "admin"
l A GUEST type user named "guest", with default password "guest"
To change the GUI login password for either of these users, select the user and click Edit.
140
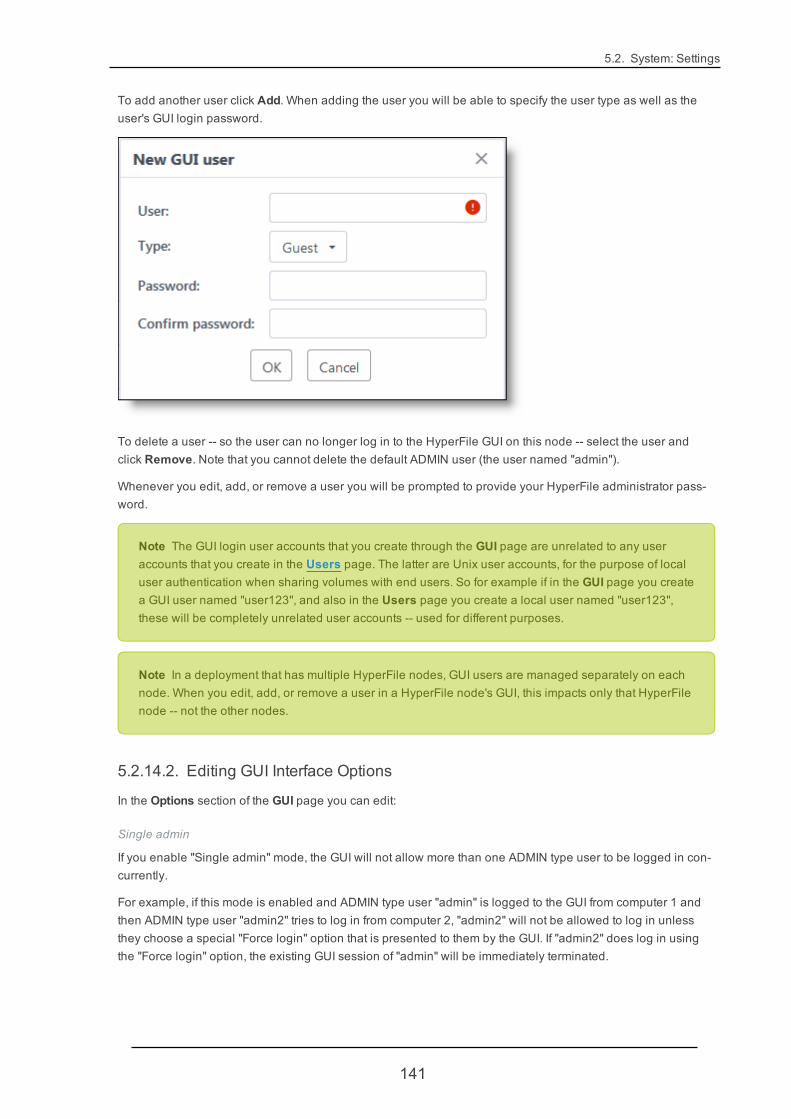
5.2. System: Settings
To add another user click Add. When adding the user you will be able to specify the user type as well as theuser's GUI login password.
To delete a user -- so the user can no longer log in to the HyperFile GUI on this node -- select the user andclick Remove. Note that you cannot delete the default ADMIN user (the user named "admin").
Whenever you edit, add, or remove a user you will be prompted to provide your HyperFile administrator pass-word.
Note The GUI login user accounts that you create through the GUI page are unrelated to any useraccounts that you create in the Users page. The latter are Unix user accounts, for the purpose of localuser authentication when sharing volumes with end users. So for example if in the GUI page you createa GUI user named "user123", and also in the Users page you create a local user named "user123",these will be completely unrelated user accounts -- used for different purposes.
Note In a deployment that has multiple HyperFile nodes, GUI users are managed separately on eachnode. When you edit, add, or remove a user in a HyperFile node's GUI, this impacts only that HyperFilenode -- not the other nodes.
5.2.14.2. Editing GUI Interface Options
In the Options section of the GUI page you can edit:
Single admin
If you enable "Single admin" mode, the GUI will not allow more than one ADMIN type user to be logged in con-currently.
For example, if this mode is enabled and ADMIN type user "admin" is logged to the GUI from computer 1 andthen ADMIN type user "admin2" tries to log in from computer 2, "admin2" will not be allowed to log in unlessthey choose a special "Force login" option that is presented to them by the GUI. If "admin2" does log in usingthe "Force login" option, the existing GUI session of "admin" will be immediately terminated.
141

Chapter 5. Using the HyperFile GUI
The same restriction will apply if the same ADMIN type user (user "admin" for example) tries to log in from twodifferent computers concurrently -- the GUI will not allow this, if "Single admin" mode is enabled.
Language
You can choose to have the GUI text display in English (the default) or Italian.
Protocol and port
By default the HyperFile GUI supports only HTTP connections (not HTTPS), through port 80. To change this,click Change to display the Change GUI protocol settings dialog.
Here you can:
l Choose which types of client connections the HyperFile GUI will support: HTTP only, HTTPS only, orboth HTTP and HTTPS.
l For the HTTP and/or HTTPS listeners, choose whether to have them bind to all interfaces (IPaddresses) on the node or only to a specified IP address
l For the HTTP and/or HTTPS listeners, choose the listening port(s)
l For HTTPS connections (if you want the GUI to support those), from the drop-down list choose theSSL certificate for the GUI server to use. The drop-down list will show certificates that you have pre-viously uploaded through the GUI's Certificates page.
Note: If you have not yet uploaded any SSL certificates through the Certificates page, do thatfirst and then return to the GUI page to complete the HTTPS interface settings for the GUI.
142
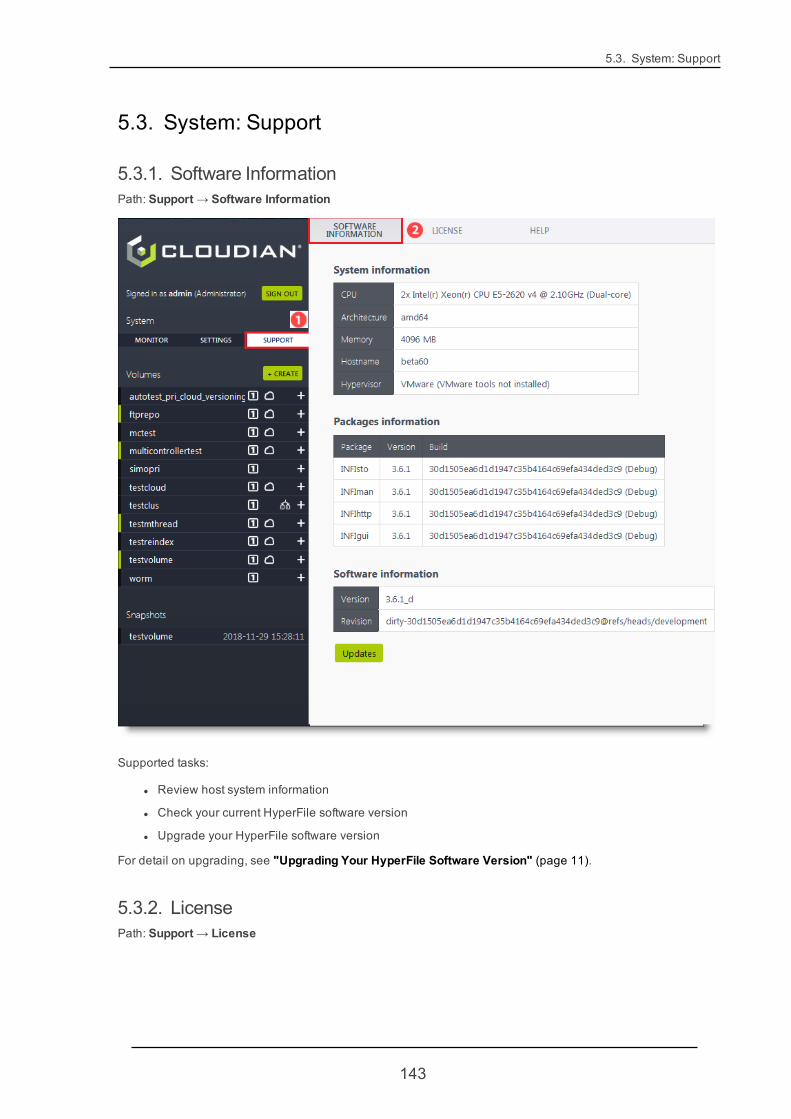
5.3. System: Support
5.3. System: Support
5.3.1. Software InformationPath: Support → Software Information
Supported tasks:
l Review host system information
l Check your current HyperFile software version
l Upgrade your HyperFile software version
For detail on upgrading, see "Upgrading Your HyperFile Software Version" (page 11).
5.3.2. LicensePath: Support → License
143
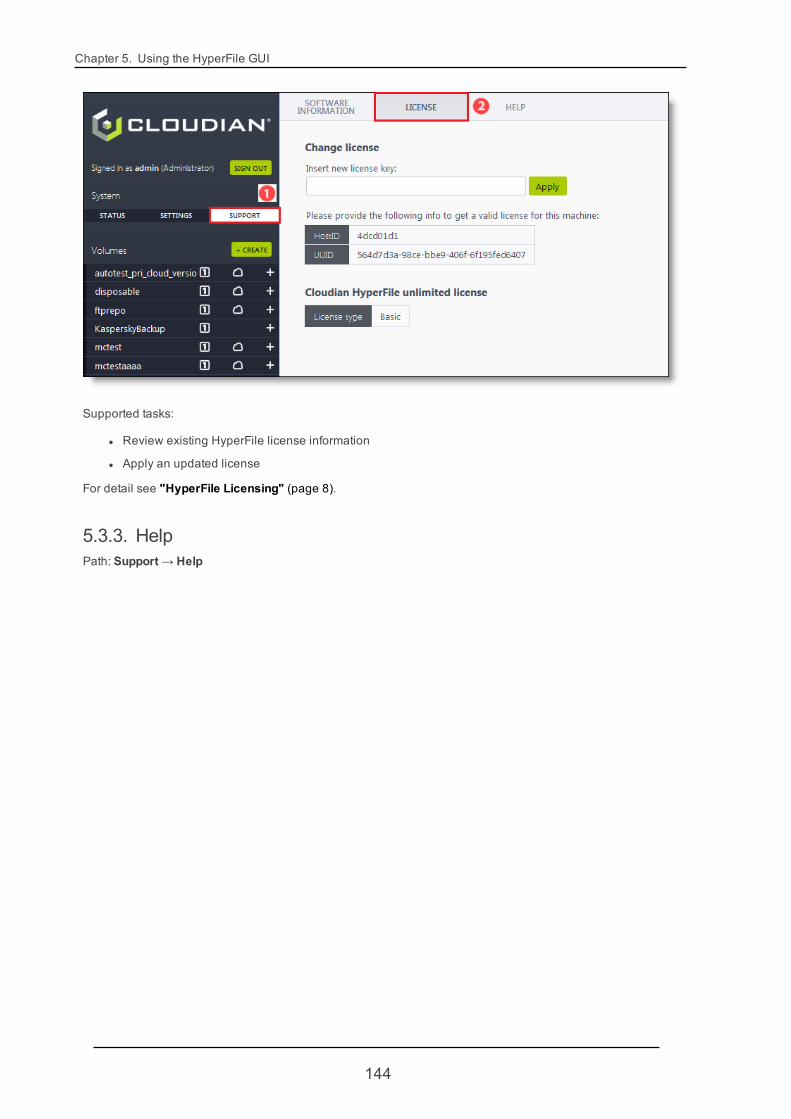
Chapter 5. Using the HyperFile GUI
Supported tasks:
l Review existing HyperFile license information
l Apply an updated license
For detail see "HyperFile Licensing" (page 8).
5.3.3. HelpPath: Support → Help
144
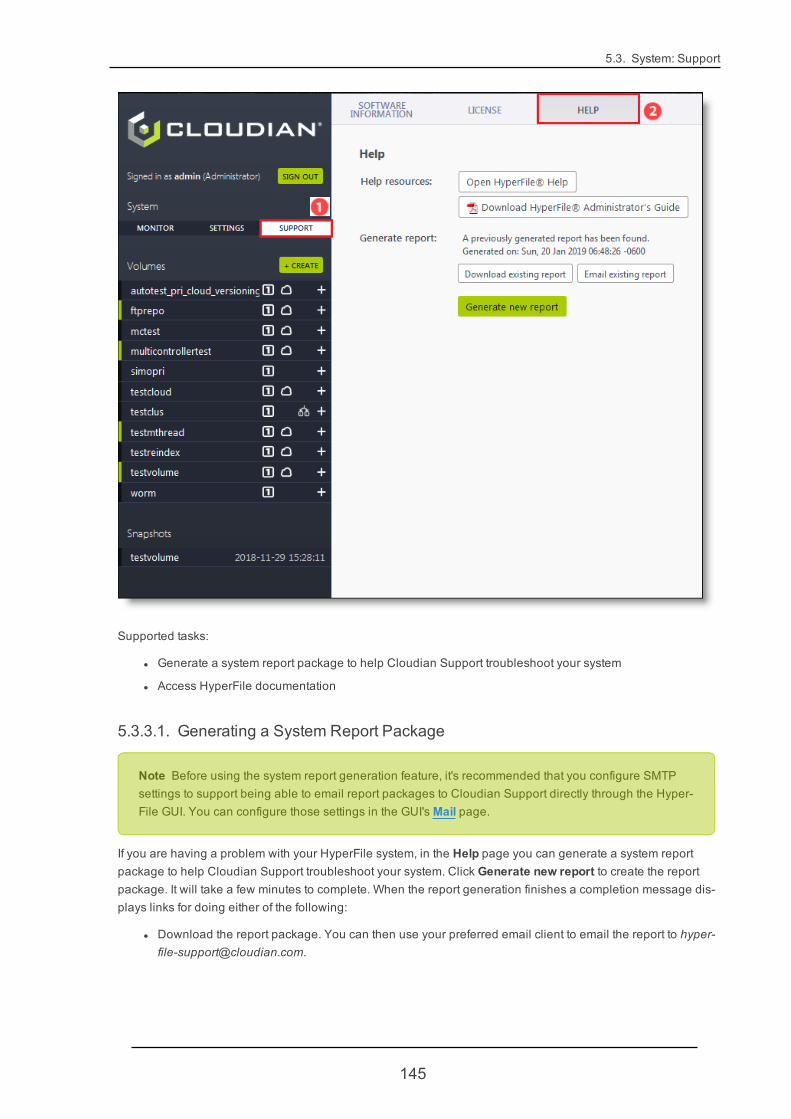
5.3. System: Support
Supported tasks:
l Generate a system report package to help Cloudian Support troubleshoot your system
l Access HyperFile documentation
5.3.3.1. Generating a System Report Package
Note Before using the system report generation feature, it's recommended that you configure SMTPsettings to support being able to email report packages to Cloudian Support directly through the Hyper-File GUI. You can configure those settings in the GUI's Mail page.
If you are having a problem with your HyperFile system, in the Help page you can generate a system reportpackage to help Cloudian Support troubleshoot your system. Click Generate new report to create the reportpackage. It will take a few minutes to complete. When the report generation finishes a completion message dis-plays links for doing either of the following:
l Download the report package. You can then use your preferred email client to email the report to [email protected].
145
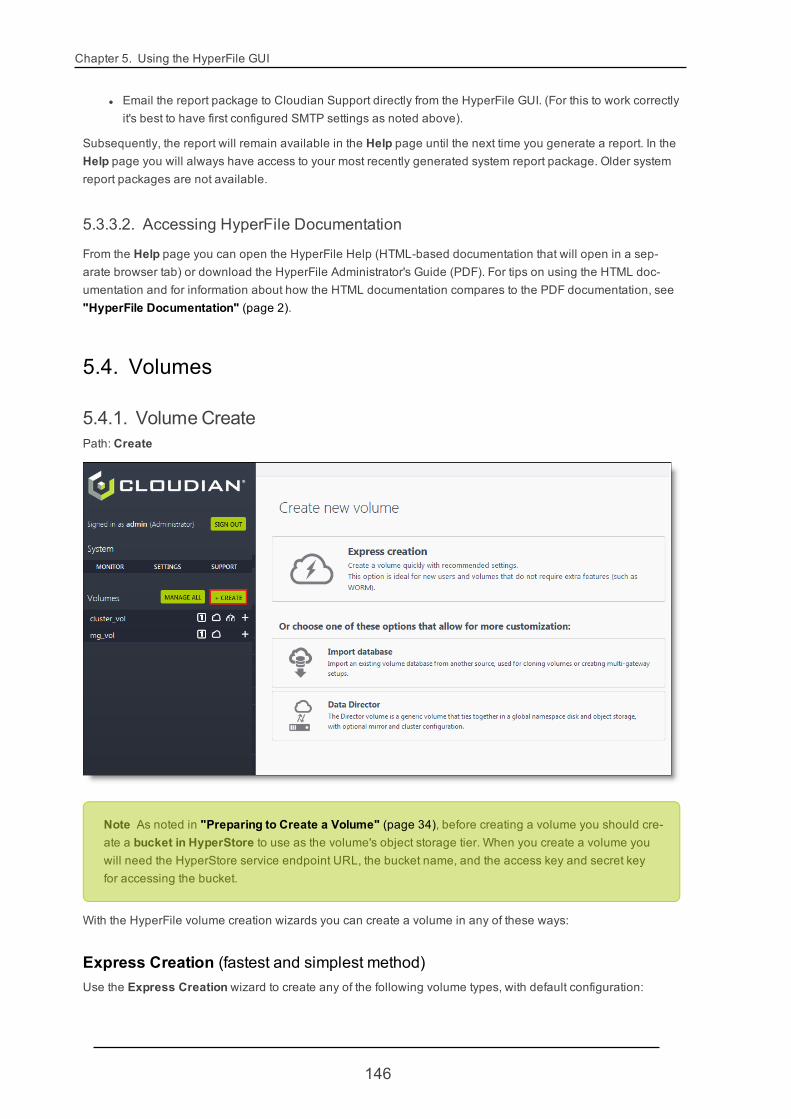
Chapter 5. Using the HyperFile GUI
l Email the report package to Cloudian Support directly from the HyperFile GUI. (For this to work correctlyit's best to have first configured SMTP settings as noted above).
Subsequently, the report will remain available in the Help page until the next time you generate a report. In theHelp page you will always have access to your most recently generated system report package. Older systemreport packages are not available.
5.3.3.2. Accessing HyperFile Documentation
From the Help page you can open the HyperFile Help (HTML-based documentation that will open in a sep-arate browser tab) or download the HyperFile Administrator's Guide (PDF). For tips on using the HTML doc-umentation and for information about how the HTML documentation compares to the PDF documentation, see"HyperFile Documentation" (page 2).
5.4. Volumes
5.4.1. VolumeCreatePath: Create
Note As noted in "Preparing to Create a Volume" (page 34), before creating a volume you should cre-ate a bucket in HyperStore to use as the volume's object storage tier. When you create a volume youwill need the HyperStore service endpoint URL, the bucket name, and the access key and secret keyfor accessing the bucket.
With the HyperFile volume creation wizards you can create a volume in any of these ways:
Express Creation (fastest and simplest method)Use the Express Creation wizard to create any of the following volume types, with default configuration:
146

5.4. Volumes
l A standard single-node HyperFile volume.
l A Multi-Controller volume on a first node (requires an Enterprise license).
l A high-availability Clustered volume. (Before creating this volume type complete the actions in "Pre-paring to Create a Clustered Volume" (page 41). Also, if the clustered volume you are creating is notthe first clustered volume in your HyperFile cluster, then be sure that you are creating this new clusteredvolume on the currentmaster node for your existing clustered volume[s].)
If you want to create a WORM volume, use the Data Director wizard not the Express Creation wizard.
If you want the option to use VMware vOSE as your object storage tier, use the Data Director wizard not theExpress Creation wizard.
Note Combining Multi-Controller and High Availability (Cluster) functionality is an advanced con-figuration that requires assistance from Cloudian Support. If you are interested in using these featuresin combination, contact Cloudian Support.
Express Creation wizard tabs in sequence:
Volume Info
l Volume name (mandatory) -- Name of the volume. The volume name must be unique on the HyperFilenode. Only letters, numbers, underscores, periods, and tildes (~) are allowed.
l Open volume at boot (optional) -- With this option selected (as it is by default), the volume will openautomatically each time the node boots. A volume needs to be open to allow I/O on it. If you don't wantthe volume to be automatically opened when the node boots, deselect this checkbox. You can openand close a volume through the HyperFile GUI, whenever you wish.
l Enable multi-controller (optional) -- Select this option only if you are creating a volume on the firstnode of a Multi-Controller volume ring. Otherwise leave this box unchecked.
147
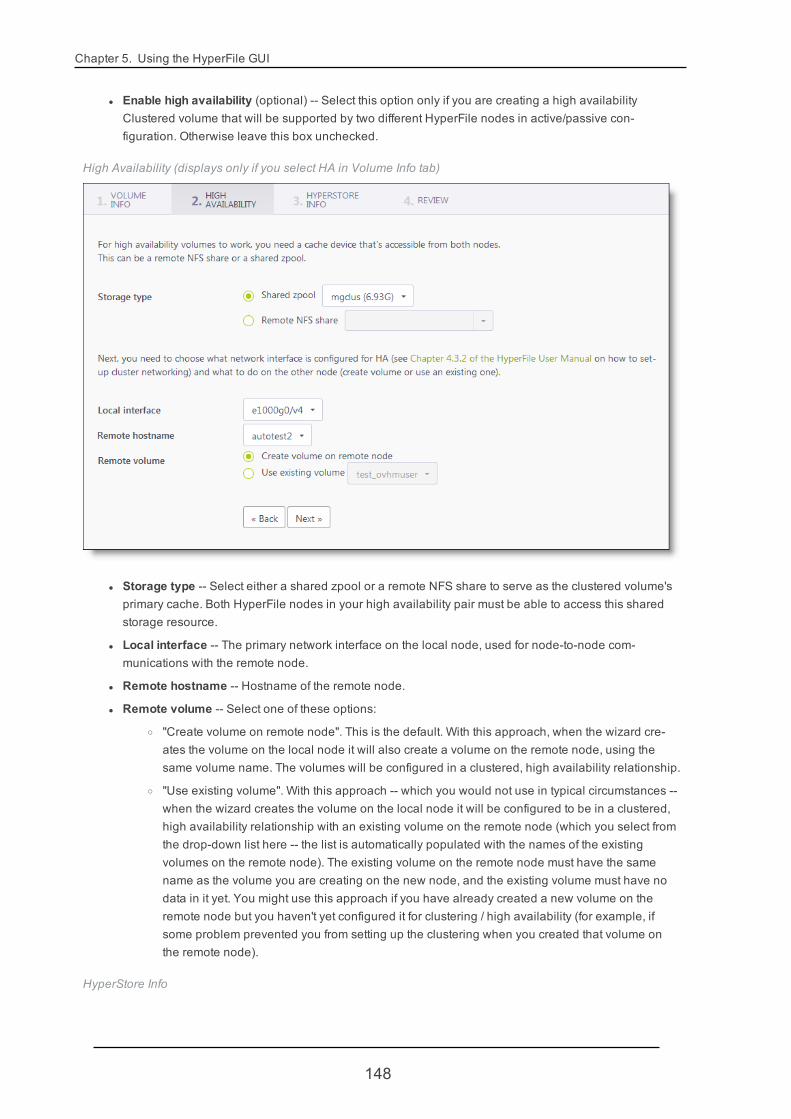
Chapter 5. Using the HyperFile GUI
l Enable high availability (optional) -- Select this option only if you are creating a high availabilityClustered volume that will be supported by two different HyperFile nodes in active/passive con-figuration. Otherwise leave this box unchecked.
High Availability (displays only if you select HA in Volume Info tab)
l Storage type -- Select either a shared zpool or a remote NFS share to serve as the clustered volume'sprimary cache. Both HyperFile nodes in your high availability pair must be able to access this sharedstorage resource.
l Local interface -- The primary network interface on the local node, used for node-to-node com-munications with the remote node.
l Remote hostname -- Hostname of the remote node.
l Remote volume -- Select one of these options:
o "Create volume on remote node". This is the default. With this approach, when the wizard cre-ates the volume on the local node it will also create a volume on the remote node, using thesame volume name. The volumes will be configured in a clustered, high availability relationship.
o "Use existing volume". With this approach -- which you would not use in typical circumstances --when the wizard creates the volume on the local node it will be configured to be in a clustered,high availability relationship with an existing volume on the remote node (which you select fromthe drop-down list here -- the list is automatically populated with the names of the existingvolumes on the remote node). The existing volume on the remote node must have the samename as the volume you are creating on the new node, and the existing volume must have nodata in it yet. You might use this approach if you have already created a new volume on theremote node but you haven't yet configured it for clustering / high availability (for example, ifsome problem prevented you from setting up the clustering when you created that volume onthe remote node).
HyperStore Info
148

5.4. Volumes
l Host (mandatory) -- The S3 service endpoint URL of your HyperStore system. This must start with eitherhttp:// or https:// and must include the port number. For example http://s3-region1.enterprise.com:80.
l Bucket name (mandatory) -- Name of the target HyperStore bucket that will serve as the object storageback-end for this volume.
l Skip certificate validation (optional) -- Select this option to have HyperFile not require a validatedTLS/SSL certificate when connecting to the HyperStore S3 service endpoint.
Note: Skipping certificate validation is automatically selected if your HyperStore "Host" value isin the form of a private IP address. Certificate validation is not supported for a private IP address(this is also the case for most browsers). If you want to use certificate validation in a private net-work, set up a DNS entry instead.
l Access key ID (mandatory) -- Access key, from the security credentials of the owner of the HyperStorebucket.
l Secret access key (mandatory) -- Secret key, from the security credentials of the owner of the Hyper-Store bucket.
Review
After reviewing the volume information and HyperStore information, click Create volume.
149

Chapter 5. Using the HyperFile GUI
Note If you are creating a clustered HA volume you may be prompted for the user name and passwordfor accessing the HyperFile GUI instance on the remote node. After you provide these the clusteredvolume creation will proceed.
After the volume is successfully created, for the next steps see "Next Steps to Take After Creating a Volume"(page 159).
Import Database (import a multi-controller volume to a second or subsequent node)For instructions please see "Importing a Multi-Controller Volume to Additional Nodes" (page 55).
Data Director (create a volume with more customization options)Use the Data Director wizard to create any of the following volume types, with flexible customization options:
l A standard single-node HyperFile volume.
l A Multi-Controller volume on a first node (requires an Enterprise license).
l A high-availability Clustered volume. (Before creating this volume type complete the actions in "Pre-paring to Create a Clustered Volume" (page 41). Also, if the clustered volume you are creating is notthe first clustered volume in your HyperFile cluster, then be sure that you are creating this new clusteredvolume on the currentmaster node for your existing clustered volume[s].)
l A WORM volume (requires an Enterprise license).
l A volume for migrating data from a NAS device to HyperStore. (Before creating this volume type com-plete the actions in "Preparing to Migrate from NAS to Object Storage" (page 78).)
l A volume that uses either Cloudian HyperStore or VMware vOSE as its object storage tier.
Note Combining Multi-Controller and High Availability (Cluster) functionality is an advanced con-figuration that requires assistance from Cloudian Support. If you are interested in using these featuresin combination, contact Cloudian Support.
Data Director volume creation wizard tabs in sequence:
Volume Definition
150

5.4. Volumes
l Volume name (mandatory) -- Name of the volume. Must be unique on the HyperFile node. Only letters,numbers, underscores, periods, and tildes (~) are allowed.
l Open volume at boot (optional) -- With this option selected (as it is by default), the volume will openautomatically each time the node boots. A volume needs to be open to allow I/O on it. If you don't wantthe volume to be automatically opened when the node boots, deselect this checkbox. You can openand close a volume through the HyperFile GUI, whenever you wish.
l Mount path (optional) -- The mount path for the volume. By default this will be derived from the volumename that you supply. To use a non-default path deselect the "Default" checkbox and then enter thepath.
l Database path (optional) -- The path to the volume database. By default this will be derived from thevolume name that you supply. To use a non-default path deselect the "Default" checkbox and thenenter the path.
Note: The volume database size is about 1.5GB per 1 million files in the volume. HyperFilecomes with a pre-configured /db mount point -- which maps to its own dedicated virtual device --
151
Chapter 5. Using the HyperFile GUI
and by default the database path will be /db/<volumename>. The pre-configured db devicecomes with only 20GB, so for large production deployments make sure you expand this deviceor use a different device for volume database storage. In a production environment you will mostlikely have different devices that you have added to the VM (see "Adding a Virtual Disk Deviceto the VM" (page 27)), probably with different underlying physical devices -- so it's important toset an appropriate path for each volume's database, based on requirements for that specificvolume. Sometimes in highly demanding environments, using SSDs for the volume databaseenables HyperFile to substantially increase performance, especially for small files.
l Data retention (optional) -- This setting and the subsidiary ones are disabled by default. If you enabledata retention here the subsidiary retention settings become configurable. This includes:
o The option to use an "Object Lock bucket" in the HyperStore storage tier. Select this option onlyif the bucket that you will specify in HyperStore (when you get to the wizard's Object Storage tab)already has Object Lock enabled and has a default Object Lock configuration that uses "Com-pliance" mode (not "Governance" mode).
IMPORTANT: If you select the "Object Lock bucket" option, set the "Not erasable before"setting to a duration that exactly matches the Object Lock retention period that is con-figured for the bucket in HyperStore. For example, if the bucket in HyperStore is con-figured with a 90 day retention period, set "Not erasable before" to 90 days.
Note:* Configuring a HyperStore bucket to use Object Lock can only be done through Hyper-Store management tools, not through HyperFile. Here in the Volume Definition tab youare only indicating that the volume will use an Object Lock bucket; and then in the ObjectStorage tab you will specify the name of the bucket and other details. But the set-up ofthe bucket itself must be done in HyperStore.* Using an Object Lock bucket as the object storage target will impact performance foroperations such archiving to HyperStore or deleting files.* If you are using an Object Lock bucket, after completing the creation of the volume it isrecommended that you go to the volume's Object Storage configuration advancedproperties and set "Attribute strategy" to "Don't set attributes".* If you are using an Object Lock bucket, after completing the creation of the volume youmay want to reduce the frequency of the automatic database backups, since theseare saved to the HyperStore bucket and will be subject to the Object Lock retentionperiod.
o Whether you want to create the volume in "WORM compliant mode" (to be a"WORM Compliance" volume, rather than a Standard WORM volume). For background inform-ation see "HyperFile WORM Overview" (page 58) and "From WORM to Compliance" (page61). Note that if you choose "WORM compliant" mode you must configure Primary Storage andSecondary Storage tiers for the volume (using the applicable wizard tabs) and you cannot cre-ate an Object Storage tier (you will skip over that tab).
l Case sensitivity (mandatory) -- If you intend to share this volume with Windows users via SMB, set thisto "Case insensitive". Otherwise, if you intend to share the volume with users and applications on Macor Unix, leave this at its default setting which is "Case sensitive". Your choice now in regard to casesensitivity is permanent for the volume -- you cannot change this setting at a later time.
152
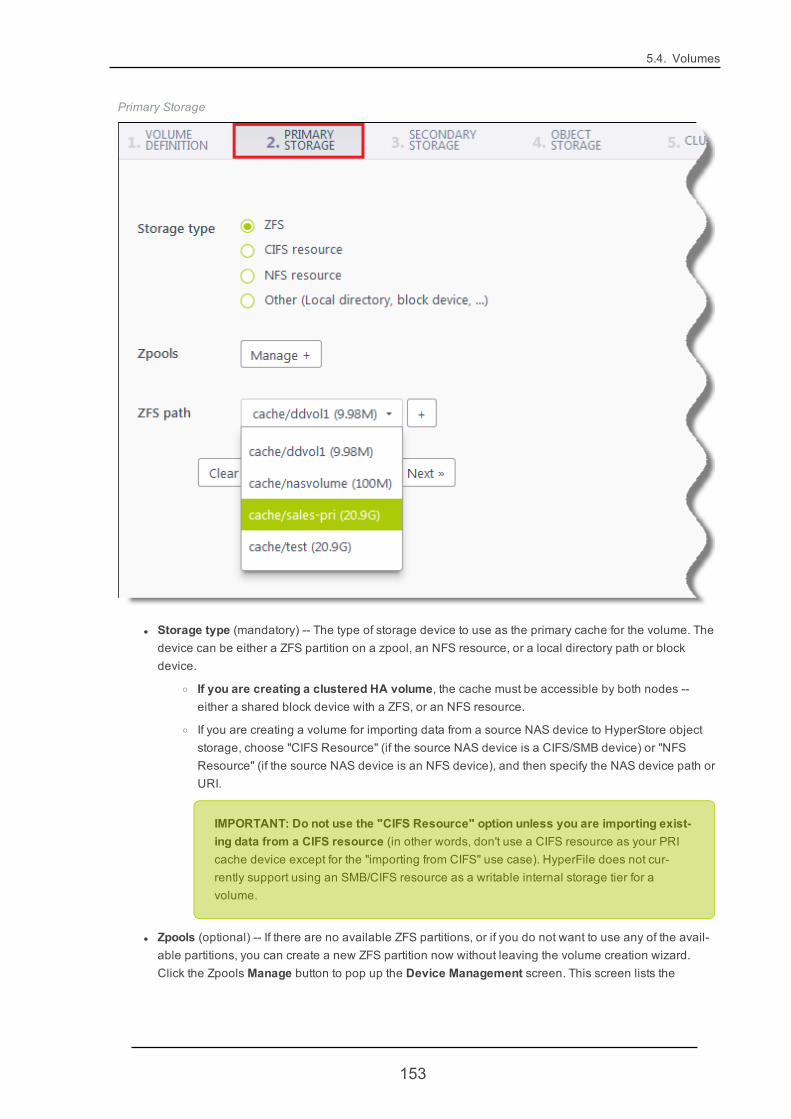
5.4. Volumes
Primary Storage
l Storage type (mandatory) -- The type of storage device to use as the primary cache for the volume. Thedevice can be either a ZFS partition on a zpool, an NFS resource, or a local directory path or blockdevice.
o If you are creating a clustered HA volume, the cache must be accessible by both nodes --either a shared block device with a ZFS, or an NFS resource.
o If you are creating a volume for importing data from a source NAS device to HyperStore objectstorage, choose "CIFS Resource" (if the source NAS device is a CIFS/SMB device) or "NFSResource" (if the source NAS device is an NFS device), and then specify the NAS device path orURI.
IMPORTANT: Do not use the "CIFS Resource" option unless you are importing exist-ing data from a CIFS resource (in other words, don't use a CIFS resource as your PRIcache device except for the "importing from CIFS" use case). HyperFile does not cur-rently support using an SMB/CIFS resource as a writable internal storage tier for avolume.
l Zpools (optional) -- If there are no available ZFS partitions, or if you do not want to use any of the avail-able partitions, you can create a new ZFS partition now without leaving the volume creation wizard.Click the Zpools Manage button to pop up the Device Management screen. This screen lists the
153
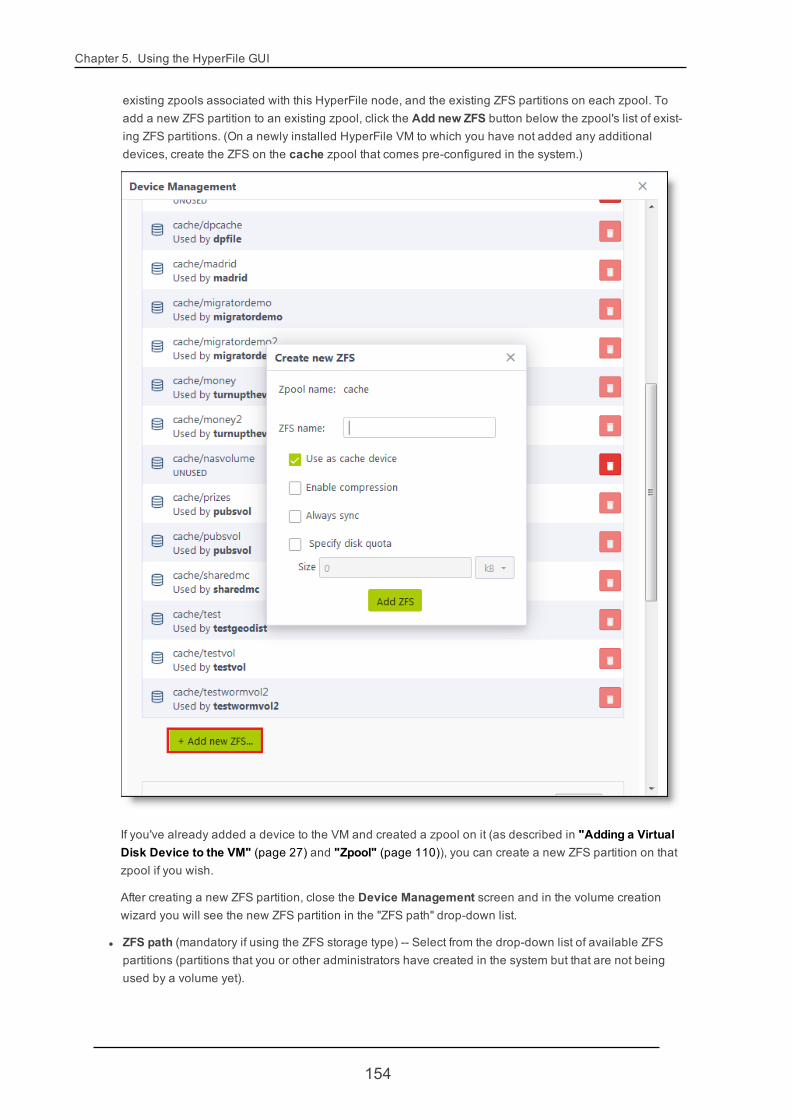
Chapter 5. Using the HyperFile GUI
existing zpools associated with this HyperFile node, and the existing ZFS partitions on each zpool. Toadd a new ZFS partition to an existing zpool, click the Add new ZFS button below the zpool's list of exist-ing ZFS partitions. (On a newly installed HyperFile VM to which you have not added any additionaldevices, create the ZFS on the cache zpool that comes pre-configured in the system.)
If you've already added a device to the VM and created a zpool on it (as described in "Adding a VirtualDisk Device to the VM" (page 27) and "Zpool" (page 110)), you can create a new ZFS partition on thatzpool if you wish.
After creating a new ZFS partition, close the Device Management screen and in the volume creationwizard you will see the new ZFS partition in the "ZFS path" drop-down list.
l ZFS path (mandatory if using the ZFS storage type) -- Select from the drop-down list of available ZFSpartitions (partitions that you or other administrators have created in the system but that are not beingused by a volume yet).
154
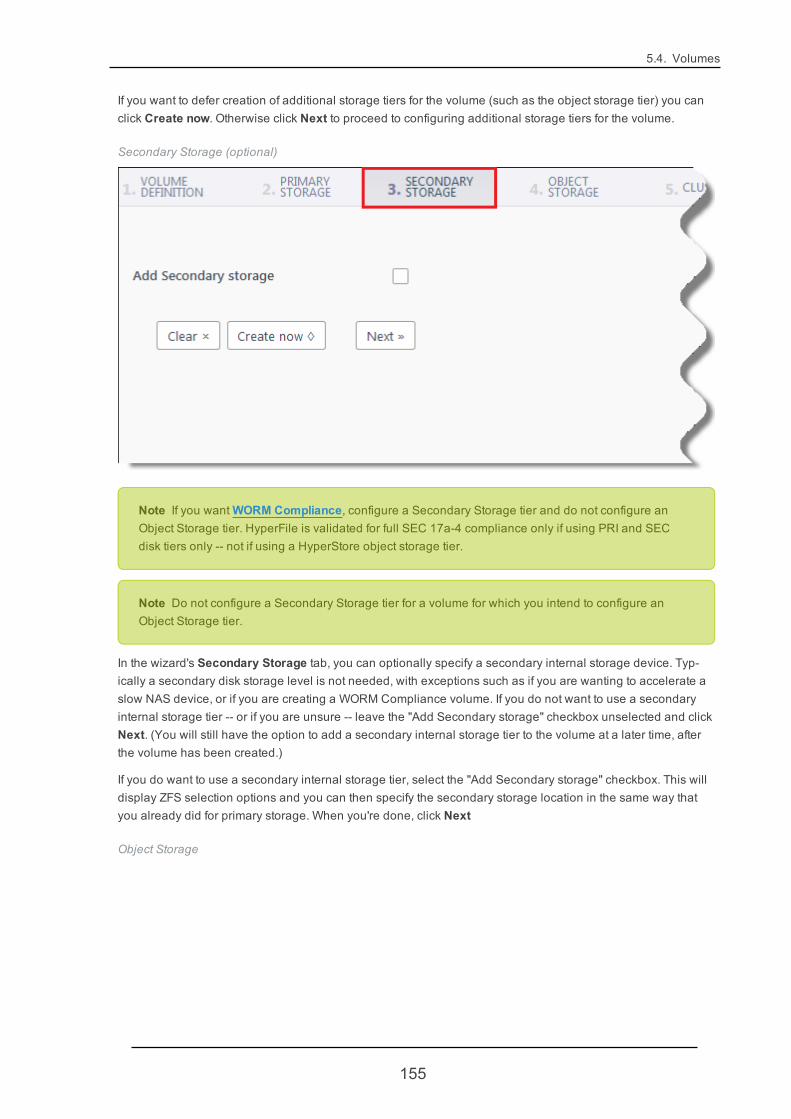
5.4. Volumes
If you want to defer creation of additional storage tiers for the volume (such as the object storage tier) you canclick Create now. Otherwise click Next to proceed to configuring additional storage tiers for the volume.
Secondary Storage (optional)
Note If you wantWORM Compliance, configure a Secondary Storage tier and do not configure anObject Storage tier. HyperFile is validated for full SEC 17a-4 compliance only if using PRI and SECdisk tiers only -- not if using a HyperStore object storage tier.
Note Do not configure a Secondary Storage tier for a volume for which you intend to configure anObject Storage tier.
In the wizard's Secondary Storage tab, you can optionally specify a secondary internal storage device. Typ-ically a secondary disk storage level is not needed, with exceptions such as if you are wanting to accelerate aslow NAS device, or if you are creating a WORM Compliance volume. If you do not want to use a secondaryinternal storage tier -- or if you are unsure -- leave the "Add Secondary storage" checkbox unselected and clickNext. (You will still have the option to add a secondary internal storage tier to the volume at a later time, afterthe volume has been created.)
If you do want to use a secondary internal storage tier, select the "Add Secondary storage" checkbox. This willdisplay ZFS selection options and you can then specify the secondary storage location in the same way thatyou already did for primary storage. When you're done, click Next
Object Storage
155
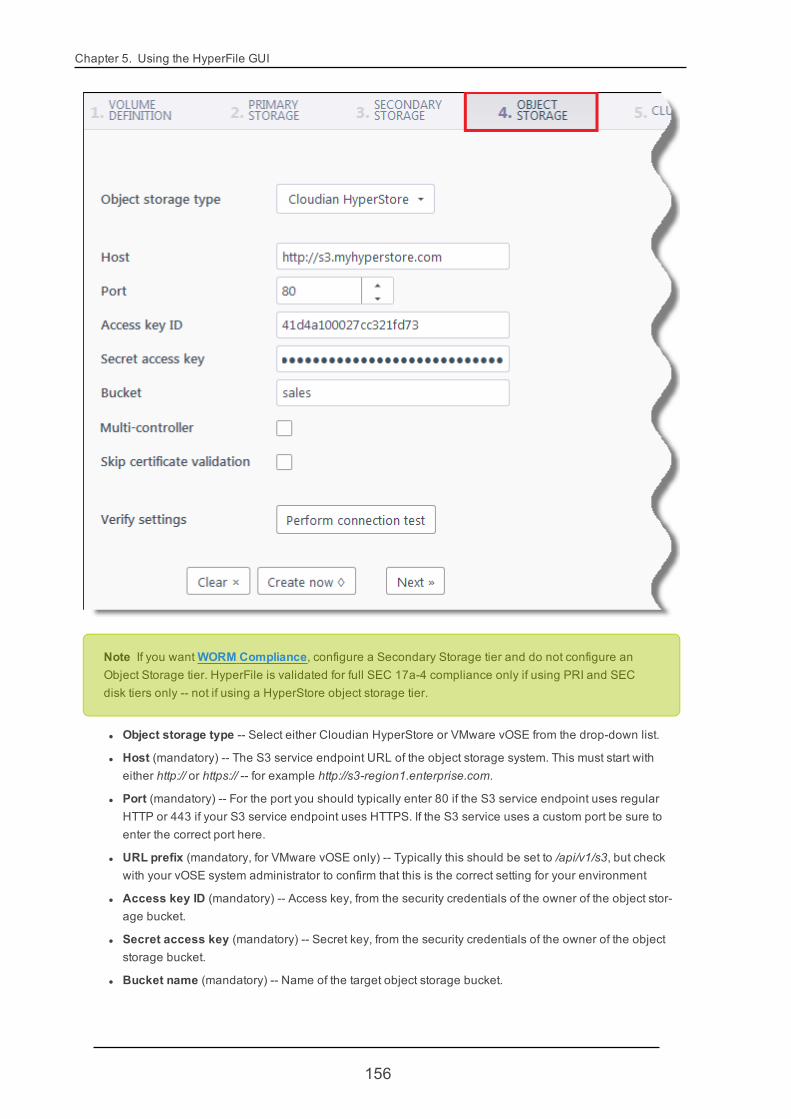
Chapter 5. Using the HyperFile GUI
Note If you wantWORM Compliance, configure a Secondary Storage tier and do not configure anObject Storage tier. HyperFile is validated for full SEC 17a-4 compliance only if using PRI and SECdisk tiers only -- not if using a HyperStore object storage tier.
l Object storage type -- Select either Cloudian HyperStore or VMware vOSE from the drop-down list.
l Host (mandatory) -- The S3 service endpoint URL of the object storage system. This must start witheither http:// or https:// -- for example http://s3-region1.enterprise.com.
l Port (mandatory) -- For the port you should typically enter 80 if the S3 service endpoint uses regularHTTP or 443 if your S3 service endpoint uses HTTPS. If the S3 service uses a custom port be sure toenter the correct port here.
l URL prefix (mandatory, for VMware vOSE only) -- Typically this should be set to /api/v1/s3, but checkwith your vOSE system administrator to confirm that this is the correct setting for your environment
l Access key ID (mandatory) -- Access key, from the security credentials of the owner of the object stor-age bucket.
l Secret access key (mandatory) -- Secret key, from the security credentials of the owner of the objectstorage bucket.
l Bucket name (mandatory) -- Name of the target object storage bucket.
156
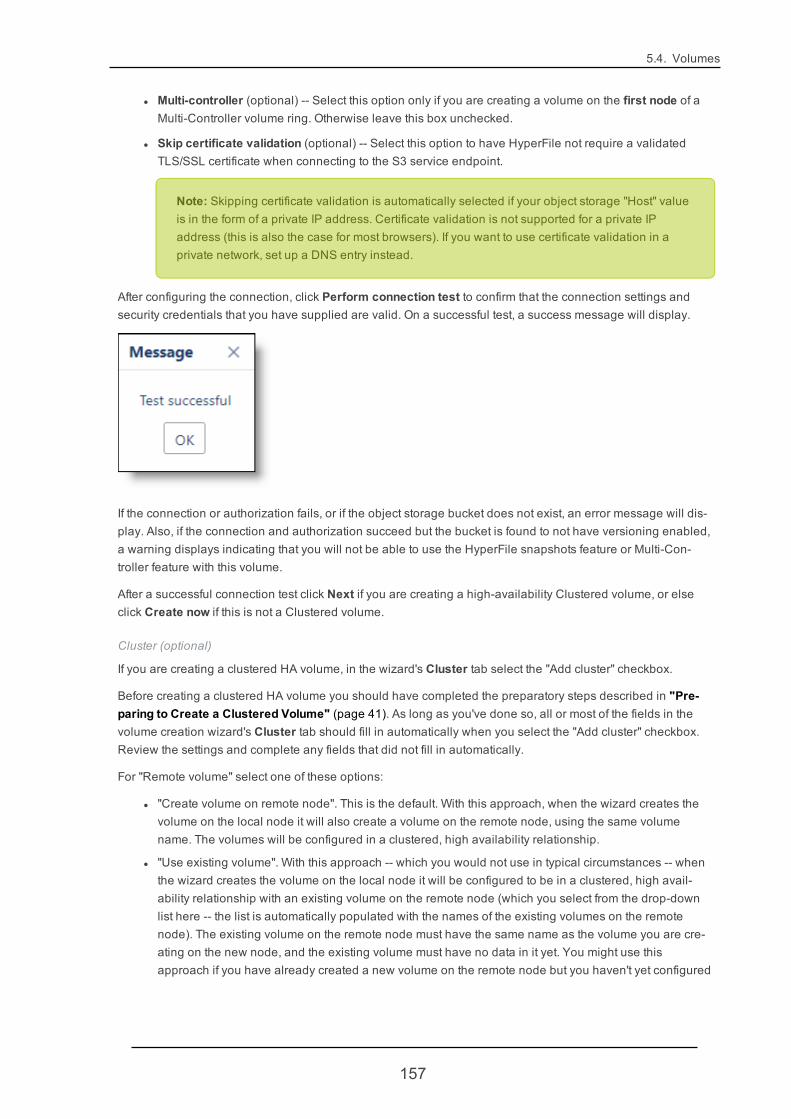
5.4. Volumes
l Multi-controller (optional) -- Select this option only if you are creating a volume on the first node of aMulti-Controller volume ring. Otherwise leave this box unchecked.
l Skip certificate validation (optional) -- Select this option to have HyperFile not require a validatedTLS/SSL certificate when connecting to the S3 service endpoint.
Note: Skipping certificate validation is automatically selected if your object storage "Host" valueis in the form of a private IP address. Certificate validation is not supported for a private IPaddress (this is also the case for most browsers). If you want to use certificate validation in aprivate network, set up a DNS entry instead.
After configuring the connection, click Perform connection test to confirm that the connection settings andsecurity credentials that you have supplied are valid. On a successful test, a success message will display.
If the connection or authorization fails, or if the object storage bucket does not exist, an error message will dis-play. Also, if the connection and authorization succeed but the bucket is found to not have versioning enabled,a warning displays indicating that you will not be able to use the HyperFile snapshots feature or Multi-Con-troller feature with this volume.
After a successful connection test click Next if you are creating a high-availability Clustered volume, or elseclick Create now if this is not a Clustered volume.
Cluster (optional)
If you are creating a clustered HA volume, in the wizard's Cluster tab select the "Add cluster" checkbox.
Before creating a clustered HA volume you should have completed the preparatory steps described in "Pre-paring to Create a Clustered Volume" (page 41). As long as you've done so, all or most of the fields in thevolume creation wizard's Cluster tab should fill in automatically when you select the "Add cluster" checkbox.Review the settings and complete any fields that did not fill in automatically.
For "Remote volume" select one of these options:
l "Create volume on remote node". This is the default. With this approach, when the wizard creates thevolume on the local node it will also create a volume on the remote node, using the same volumename. The volumes will be configured in a clustered, high availability relationship.
l "Use existing volume". With this approach -- which you would not use in typical circumstances -- whenthe wizard creates the volume on the local node it will be configured to be in a clustered, high avail-ability relationship with an existing volume on the remote node (which you select from the drop-downlist here -- the list is automatically populated with the names of the existing volumes on the remotenode). The existing volume on the remote node must have the same name as the volume you are cre-ating on the new node, and the existing volume must have no data in it yet. You might use thisapproach if you have already created a new volume on the remote node but you haven't yet configured
157
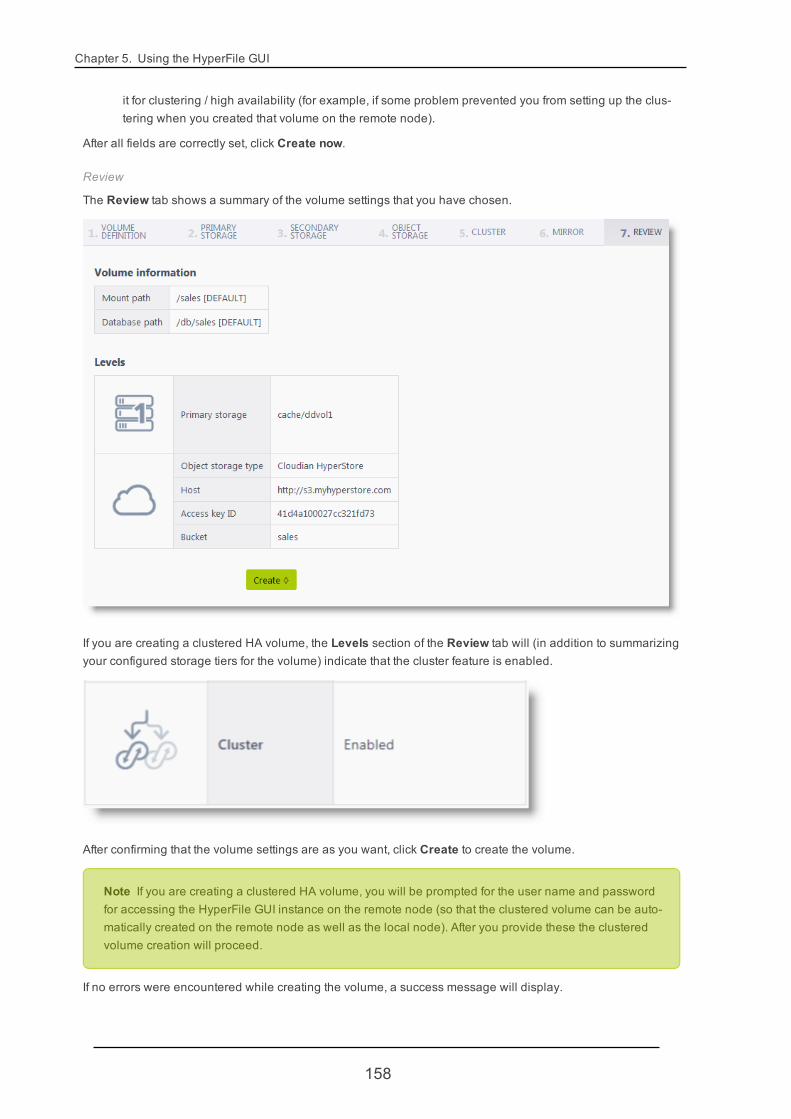
Chapter 5. Using the HyperFile GUI
it for clustering / high availability (for example, if some problem prevented you from setting up the clus-tering when you created that volume on the remote node).
After all fields are correctly set, click Create now.
Review
The Review tab shows a summary of the volume settings that you have chosen.
If you are creating a clustered HA volume, the Levels section of the Review tab will (in addition to summarizingyour configured storage tiers for the volume) indicate that the cluster feature is enabled.
After confirming that the volume settings are as you want, click Create to create the volume.
Note If you are creating a clustered HA volume, you will be prompted for the user name and passwordfor accessing the HyperFile GUI instance on the remote node (so that the clustered volume can be auto-matically created on the remote node as well as the local node). After you provide these the clusteredvolume creation will proceed.
If no errors were encountered while creating the volume, a success message will display.
158
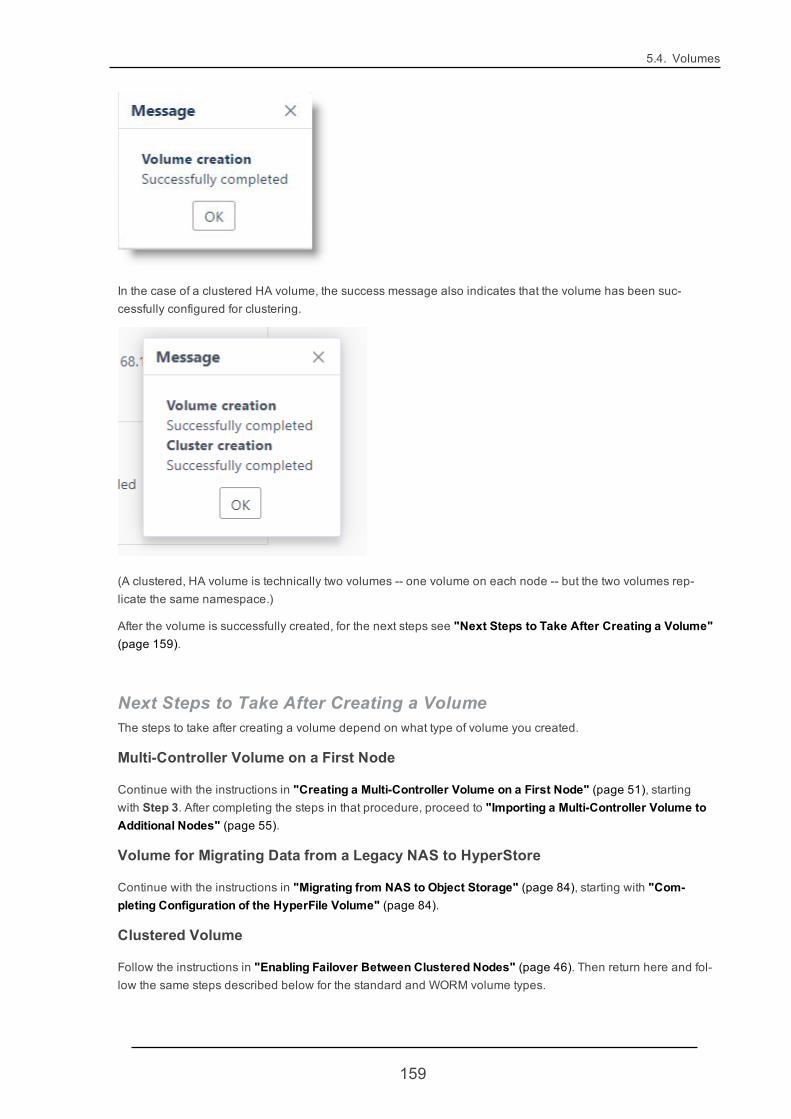
5.4. Volumes
In the case of a clustered HA volume, the success message also indicates that the volume has been suc-cessfully configured for clustering.
(A clustered, HA volume is technically two volumes -- one volume on each node -- but the two volumes rep-licate the same namespace.)
After the volume is successfully created, for the next steps see "Next Steps to Take After Creating a Volume"(page 159).
Next Steps to Take After Creating a VolumeThe steps to take after creating a volume depend on what type of volume you created.
Multi-Controller Volume on a First Node
Continue with the instructions in "Creating a Multi-Controller Volume on a First Node" (page 51), startingwith Step 3. After completing the steps in that procedure, proceed to "Importing a Multi-Controller Volume toAdditional Nodes" (page 55).
Volume for Migrating Data from a Legacy NAS to HyperStore
Continue with the instructions in "Migrating from NAS to Object Storage" (page 84), starting with "Com-pleting Configuration of the HyperFile Volume" (page 84).
Clustered Volume
Follow the instructions in "Enabling Failover Between Clustered Nodes" (page 46). Then return here and fol-low the same steps described below for the standard and WORM volume types.
159

Chapter 5. Using the HyperFile GUI
Standard Volume or WORM Volume
After creating the volume, use the HyperFile GUI to take these next steps:
1. In the volume's Properties page, open the volume, review the volume's default properties, and makeany desired changes to those properties. For detail see "Volume Properties" (page 164).
2. In the volume's PRI cache tier Properties page, review the cache tier's default properties, and makeany desired changes to those properties. For detail see "Volume Cache Tier: Properties" (page 193).
3. Optionally, in the volume's cache tier Removal Rules page, configure rules for removing files from thecache tier (if you want any removal rules beyond the capacity consumption based removal behaviorthat's configured in the cache tier Properties page). For detail see "Volume Cache Tier: RemovalRules" (page 199).
4. Optionally, in the volume's Explore page, experiment with the volume by uploading, downloading, anddeleting files, and confirming volume tiering behavior. For detail see "Volume Explore" (page 178).
5. In the volume's Sharing page, share the volume with users via the SMB, NFS, and/or FTP protocols. Fordetail see "Volume Sharing" (page 181).
6. For a WORM volume, verify the WORM behavior as described in "VerifyingWORM Behavior in aWORM Volume" (page 65). For a WORM Compliance volume you should also verify that your systemconfiguration is compliant as described in "Verifying That System Requirements Are Met for aWORM Compliance Volume" (page 66).
5.4.2. VolumeOverviewPath: <VolumeName> → Overview
160
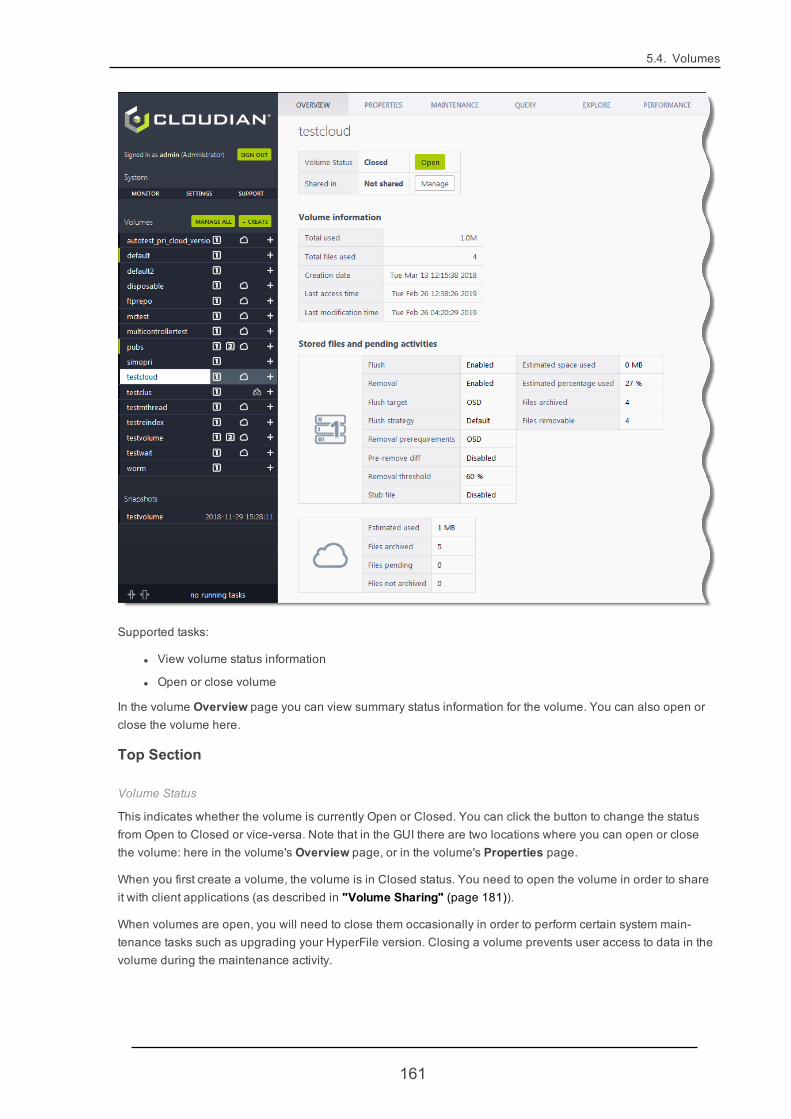
5.4. Volumes
Supported tasks:
l View volume status information
l Open or close volume
In the volume Overview page you can view summary status information for the volume. You can also open orclose the volume here.
Top Section
Volume Status
This indicates whether the volume is currently Open or Closed. You can click the button to change the statusfrom Open to Closed or vice-versa. Note that in the GUI there are two locations where you can open or closethe volume: here in the volume's Overview page, or in the volume's Properties page.
When you first create a volume, the volume is in Closed status. You need to open the volume in order to shareit with client applications (as described in "Volume Sharing" (page 181)).
When volumes are open, you will need to close them occasionally in order to perform certain system main-tenance tasks such as upgrading your HyperFile version. Closing a volume prevents user access to data in thevolume during the maintenance activity.
161

Chapter 5. Using the HyperFile GUI
Note that in the list of volumes in the HyperFile GUI home page a thin green vertical bar appears to the left ofthe names of volumes that are currently open. For example, in the image below the volumes named "new-volume" and "test" are open and the other volumes are closed.
Shared in
This indicates the file sharing protocols for which the volume is currently configured for sharing with clients, ifany. Clicking the Manage button takes you to the volume's Sharing page where you can configure volume shar-ing. For more information see "Volume Sharing" (page 181).
Volume information Section
Total used
For accurate information about storage space consumption associated with this volume, please refer to theper-tier space consumption figures further down the Overview page -- rather than this "Total used" figure.
Total files used
Total number files and directories in the volume.
Note This "Total files used" count includes directories as well as files. In the storage tier sections fur-ther down the Overview page, the "Files archived" counts include only files -- not directories.
Volume timestamps
These fields show the date and time the volume was created, and the date and time that data was last modifiedwithin the volume.
162
5.4. Volumes
Note The "Last access time" is updated by the act of viewing volume status information in the Over-view page, and so will always just show the current time.
Stored files and pending activities Section (Cache Tier)
Flush... Stub file
The items from "Flush" through to "Stub file" are cache tier configuration settings having to do with how files areflushed (copied) from this cache tier to the object storage tier, and potentially removed from this cache tier afterflushing has succeed. Here in the volume Overview page you can view -- but not change -- the cache tier's cur-rent settings. For descriptions of these settings see the Help for the Cache Tier Properties page. In that pageyou can change the settings if you wish.
Note The "Stub file" property is no longer being used and can be ignored.
Estimated space used
Total storage space currently being used in this volume's cache tier. If multiple devices are used within this tier,this figure is the total space used across all of the devices.
Estimated percentage used
The current storage space usage as a percentage of this cache tier's total capacity. If multiple devices are usedwithin this tier, this figure is the total space used as a percentage of the total capacity of the multiple devices.
Files archived
Total number of files currently stored in this volume's cache tier.
Note The "Total files used" count at the top of the volume Overview page includes directories as wellas files. In the storage tier sections, the "Files archived" counts include only files -- not directories.
Files removable
Of the files currently stored in this volume's cache tier, the number of files that are eligible for removal from thistier. Being eligible for removal means that the files have been successfully flushed (copied) from this tier to therequired destination tier(s). In the most common configuration the required destination tier is the object storagesystem.
Once becoming eligible for removal, whether files in this cache tier will be removed or not depends on yourconfigured removal triggers for the tier. By default eligible files start being removed if 60% of the tier's total capa-city is used.
To review or edit a volume's cache tier file removal criteria, go to the Cache Tier Properties page and theCache Tier Removal Rules page.
Stored files and pending activities Section (Object Storage Tier)
Estimated used
Total net storage space currently being used by this volume's files in the object storage tier. "Net" storagespace excludes overhead associated with replication or erasure coding within the object storage tier.
163

Chapter 5. Using the HyperFile GUI
Files archived
Total number of this volume's files currently stored in the object storage tier.
Note The "Total files used" count at the top of the volume Overview page includes directories as wellas files. In the storage tier sections, the "Files archived" counts include only files -- not directories.
Files pending
Number of this volume's files that are currently queued for flushing (copying) from the cache tier to the objectstorage tier.
Files not archived
Number of this volume's files that failed to be flushed (copied) from the cache tier to the object storage tier.
If the volume is a Multi-Controller volume, the Object Storage section will also include these items:
Pending operations (multi-controller)
Number of index operations that the local node needs to process in order to sync up with the other node(s) inthe multi-controller ring. This number will grow when there is activity on the nodes, and should reduce toward 0during the sync-up phase. If this number remains non-zero and constant even when the other node(s) are idle,this could indicate a problem with the sync-up operations.
Multi-controller generic errors
Number of index sync operations that the local node could not process for unknown reasons.
Multi-controller conflict errors
Number of index conflicts that the conflict manager was unable to resolve.
Multi-controller index errors
Number of local index operations that the local node failed to transmit to HyperStore for propagation to theother nodes.
5.4.3. Volume PropertiesPath: <VolumeName> → Properties
164

5.4. Volumes
Supported tasks:
l Open or close volume
l Edit volume properties
In a volume's Properties page you can open or close the volume (by editing the Status property) and reviewand edit volume settings.
Volume Status Section
Status
This property indicates whether the volume is currently Open or Closed. You can click the status value tochange the status from Open to Closed or vice-versa. Note that in the GUI there are two locations where youcan open or close the volume: here in the volume's Properties page, or in the volume's Overview page.
When you first create a volume, the volume is in Closed status. You need to open the volume in order to shareit with client applications (as described in "Volume Sharing" (page 181)).
When volumes are open, you will need to close them occasionally in order to perform certain system main-tenance tasks such as upgrading your HyperFile version. Closing a volume prevents user access to data in thevolume during the maintenance activity.
165
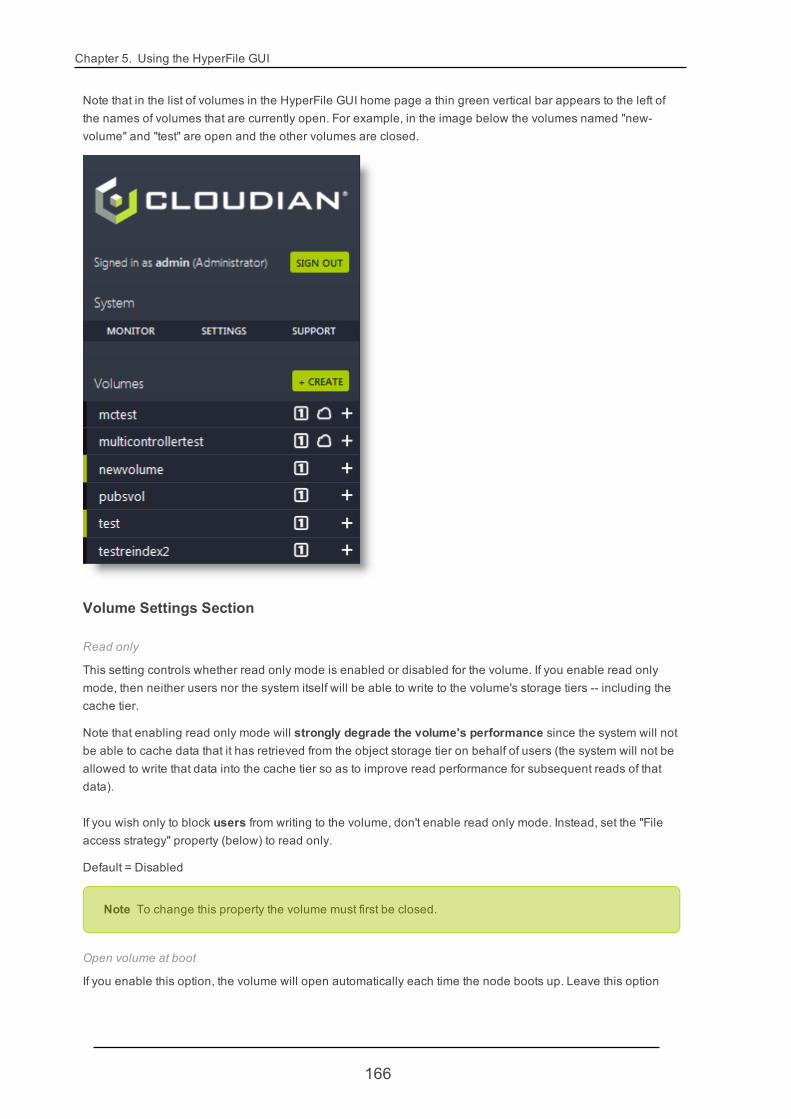
Chapter 5. Using the HyperFile GUI
Note that in the list of volumes in the HyperFile GUI home page a thin green vertical bar appears to the left ofthe names of volumes that are currently open. For example, in the image below the volumes named "new-volume" and "test" are open and the other volumes are closed.
Volume Settings Section
Read only
This setting controls whether read only mode is enabled or disabled for the volume. If you enable read onlymode, then neither users nor the system itself will be able to write to the volume's storage tiers -- including thecache tier.
Note that enabling read only mode will strongly degrade the volume's performance since the system will notbe able to cache data that it has retrieved from the object storage tier on behalf of users (the system will not beallowed to write that data into the cache tier so as to improve read performance for subsequent reads of thatdata).
If you wish only to block users from writing to the volume, don't enable read only mode. Instead, set the "Fileaccess strategy" property (below) to read only.
Default = Disabled
Note To change this property the volume must first be closed.
Open volume at boot
If you enable this option, the volume will open automatically each time the node boots up. Leave this option
166

5.4. Volumes
disabled if you prefer to manually control when a volume is opened.
Default = Disabled
File access strategy
This setting controls whether client access to the volume is Read/Write or Read Only.
From a performance perspective, setting the "File access strategy" property to Read Only is the superior way toprevent users from writing new or modified data to the volume, since this blocks users from writing to thevolume but at the same time allows the system to cache (write to the cache tier) data that it has read from theobject storage tier on behalf of users. By contrast, enabling the "Read only" mode property -- the propertyabove -- blocks the system from caching such data.
Default = Read/Write
ACL
This property enables or disables support for a volume ACL:
l If the "ACL" property is Enabled, the Volume ACL (configurable in the volume's Sharing page) will beapplied by the system.
l If the "ACL" property is Disabled, the Volume ACL will not be applied by the system.
Default = Enabled
Note Close the volume before changing this setting.
Synchronous database
If this property is enabled, all database modifications for the volume are synchronously committed to disk. Thisensures that all volume database modifications are held on disk and not only in memory.
If this property is disabled, database modifications are flushed from memory to disk every 30 seconds.
Disabling this property can improve volume performance for metadata-intensive operations such as creatingnew files, deleting files, renaming files, and setting file attributes. But it does so at the risk of the most recentdatabase modifications (those that haven't yet been flushed from memory to disk) being lost in the event of asystem crash.
Default = Enabled
Advanced SettingsThese settings display on the page only if you select the "Show advanced settings" options. In typical cir-cumstances you should not need to change any of these settings. Use caution with these settings.
Migration
Leave this property at its default value ("Disabled"). To have this property enabled is applicable only to a"Migration volume" which is a special type of volume for migrating data from one NAS device to another NASdevice -- a rare use case that is no longer supported.
(For migrating from NAS to object storage, a standard volume type is used. For more information on NAS-to-object storage migration see "HyperFile Data Migration Overview" (page 78)).
167
Chapter 5. Using the HyperFile GUI
Case sensitivity (read only)
This property is set by the administrator during volume creation and cannot be edited afterwards.
"Case insensitive" is the appropriate setting for a volume that will be shared with Windows users via SMB.
"Case sensitive" is the appropriate setting for a volume that will be shared with users on Unix or Mac machines.
Default = Case sensitive
Legal hold
For a WORM volume, this property if Enabled will put the whole volume in a legal hold status -- meaning thatthe WORM retention phase will last indefinitely until the legal hold is explicitly disabled. An example use caseis when there is a litigation and the whole content of a volume needs to be retained intact until the end of lit-igation.
Default = Disabled
Retention time
For a WORM volume, this property controls the data retention period. For more information on the options see"WORM" (page 58).
Default = Disabled
Note To change this property the volume must first be closed.
Database path
The path to the database for this volume. If you are considering changing the database path for an existingvolume, please consult with Cloudian Support first. Changing this setting for an existing volume could makedata inaccessible to HyperFile clients.
Default = /db/<volumename>
Note To change this property the volume must first be closed.
Mount point
The mount point for the volume. If you are considering changing the mount point for an existing volume, pleaseconsult with Cloudian Support first. Changing this setting for an existing volume could make data inac-cessible to HyperFile clients.
Default = /<volumename>
Note To change this property the volume must first be closed.
Read cache
This setting controls HyperFile's behavior when client applications request to read a file that is currently storedonly in the object storage tier and not in the PRI cache tier (because the file has been removed from cache inaccordance with the volume's cache tier removal settings). Options are:
168
5.4. Volumes
l Always -- This is the default setting. With this setting, when a client application requests to read a filethat is currently stored only in the object storage tier, HyperFile retrieves the whole file from the objectstorage tier, writes it into the PRI cache, and then from the PRI cache the file data is read back to the cli-ent application. The whole file is written from the object storage tier into the PRI cache, even in the casewhere the client application is requesting only a specified range of data within the file.
Note: For a WORM volume, "Always" is the only supported setting.
l Only for files smaller than <size> -- With this setting, HyperFile will use read caching (writing the filefrom the OSD into the PRI cache before returning data to the client) only for files smaller than your spe-cified size. Read caching will be disabled (and the direct pass-through method will be used) for filesthis size and larger.
l Only for files bigger than <size> -- With this setting, HyperFile will use read caching (writing the filefrom the OSD into the PRI cache before returning data to the client) only for files bigger than your spe-cified size. Read caching will be disabled (and the direct pass-through method will be used) for filesthis size and smaller.
l Never (always pass-through) -- With this setting, when a client application requests to read a file thatis currently stored only in the object storage tier, HyperFile retrieves the file data from the object storagetier and passes it directly through to the client application, without writing it into the PRI cache. In thecase where the client application is requesting only a specified range of data within the file, HyperFileretrieves only that specified range of data and passes it directly through to the client application. Notethat in the case where a client application requests a whole file by sequentially requesting a series ofranges from within the file, each such range request will entail a separate S3 request from HyperFile toHyperStore.
Before editing this setting, carefully consider your client applications and use cases for this volume. For addi-tional guidance on whether or not the direct pass-through method may be suitable for your use case, consultwith Cloudian Support.
Default = Always
When no space is available
This property controls how HyperFile handles write requests from client applications if there is no disk spaceavailable in the PRI cache tier. Options are:
l "Wait" -- HyperFile's writing processes will wait indefinitely for enough PRI disk space to be freed by theautomatic removal processes that are configured for the PRI tier. For connected clients attempting toperform writes, during the wait the file service will appear to be hanging.
l "Do not wait" -- HyperFile will immediately return an error response to client applications attempting toperform writes if there is no disk space available in the PRI tier.
Default = Wait
Volume device (read only)
Path to the device file for the volume (for example /dev/ovmh/vol7). This information can be helpful when work-ing with Cloudian Support to troubleshoot volume problems.
Worm compliance mode
For a WORM volume, whether WORM Compliance mode is Enabled or Disabled. This has to with additionalsafeguards are implemented in the system in order to satisfy regulatory requirements, beyond just configuring
169
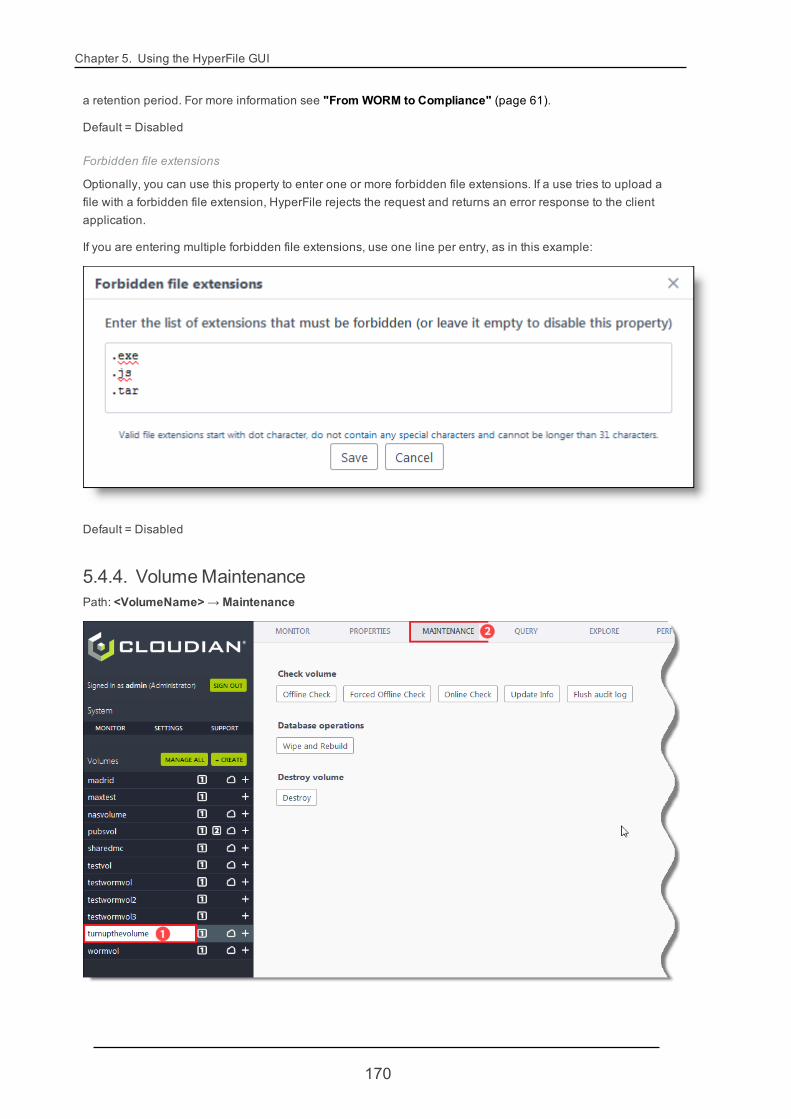
Chapter 5. Using the HyperFile GUI
a retention period. For more information see "From WORM to Compliance" (page 61).
Default = Disabled
Forbidden file extensions
Optionally, you can use this property to enter one or more forbidden file extensions. If a use tries to upload afile with a forbidden file extension, HyperFile rejects the request and returns an error response to the clientapplication.
If you are entering multiple forbidden file extensions, use one line per entry, as in this example:
Default = Disabled
5.4.4. VolumeMaintenancePath: <VolumeName> → Maintenance
170
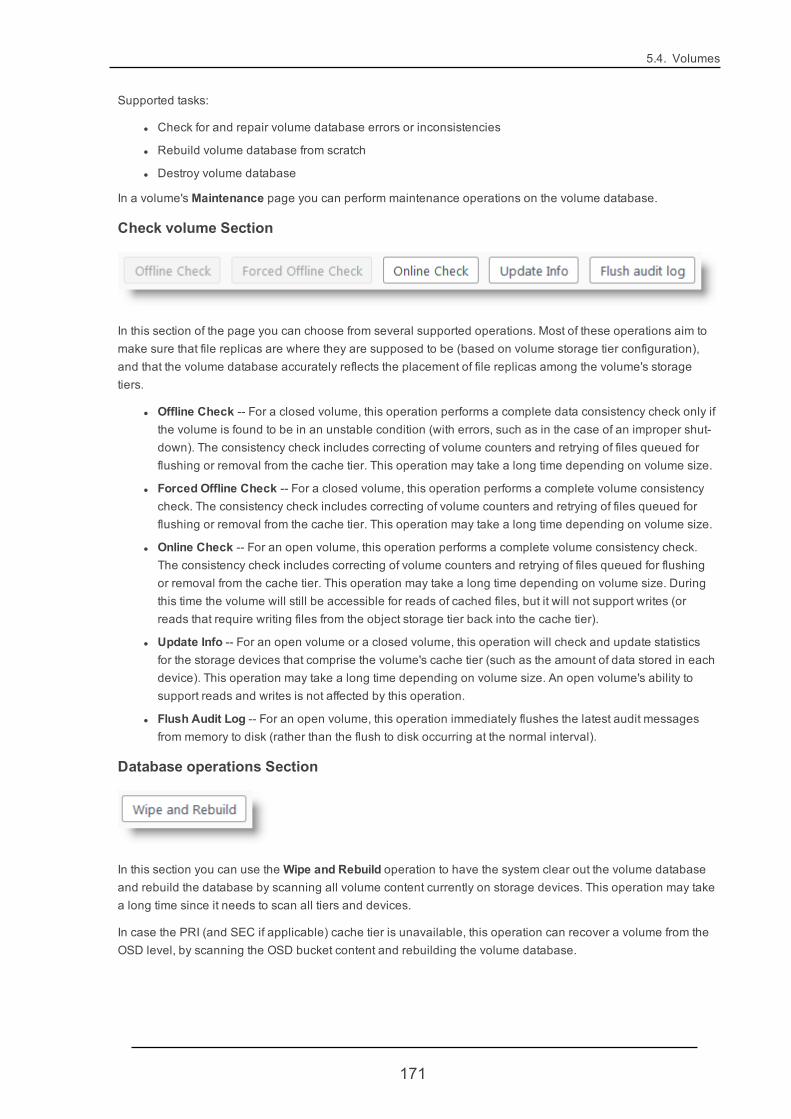
5.4. Volumes
Supported tasks:
l Check for and repair volume database errors or inconsistencies
l Rebuild volume database from scratch
l Destroy volume database
In a volume's Maintenance page you can perform maintenance operations on the volume database.
Check volume Section
In this section of the page you can choose from several supported operations. Most of these operations aim tomake sure that file replicas are where they are supposed to be (based on volume storage tier configuration),and that the volume database accurately reflects the placement of file replicas among the volume's storagetiers.
l Offline Check -- For a closed volume, this operation performs a complete data consistency check only ifthe volume is found to be in an unstable condition (with errors, such as in the case of an improper shut-down). The consistency check includes correcting of volume counters and retrying of files queued forflushing or removal from the cache tier. This operation may take a long time depending on volume size.
l Forced Offline Check -- For a closed volume, this operation performs a complete volume consistencycheck. The consistency check includes correcting of volume counters and retrying of files queued forflushing or removal from the cache tier. This operation may take a long time depending on volume size.
l Online Check -- For an open volume, this operation performs a complete volume consistency check.The consistency check includes correcting of volume counters and retrying of files queued for flushingor removal from the cache tier. This operation may take a long time depending on volume size. Duringthis time the volume will still be accessible for reads of cached files, but it will not support writes (orreads that require writing files from the object storage tier back into the cache tier).
l Update Info -- For an open volume or a closed volume, this operation will check and update statisticsfor the storage devices that comprise the volume's cache tier (such as the amount of data stored in eachdevice). This operation may take a long time depending on volume size. An open volume's ability tosupport reads and writes is not affected by this operation.
l Flush Audit Log -- For an open volume, this operation immediately flushes the latest audit messagesfrom memory to disk (rather than the flush to disk occurring at the normal interval).
Database operations Section
In this section you can use theWipe and Rebuild operation to have the system clear out the volume databaseand rebuild the database by scanning all volume content currently on storage devices. This operation may takea long time since it needs to scan all tiers and devices.
In case the PRI (and SEC if applicable) cache tier is unavailable, this operation can recover a volume from theOSD level, by scanning the OSD bucket content and rebuilding the volume database.
171
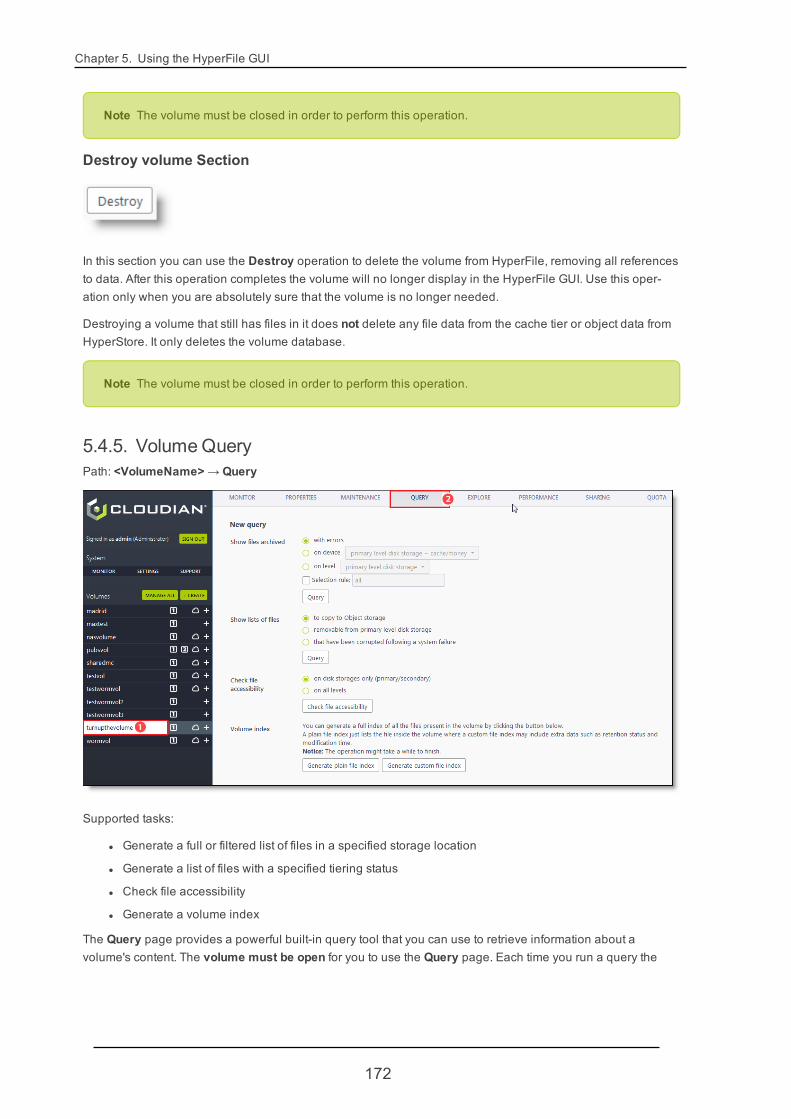
Chapter 5. Using the HyperFile GUI
Note The volume must be closed in order to perform this operation.
Destroy volume Section
In this section you can use the Destroy operation to delete the volume from HyperFile, removing all referencesto data. After this operation completes the volume will no longer display in the HyperFile GUI. Use this oper-ation only when you are absolutely sure that the volume is no longer needed.
Destroying a volume that still has files in it does not delete any file data from the cache tier or object data fromHyperStore. It only deletes the volume database.
Note The volume must be closed in order to perform this operation.
5.4.5. VolumeQueryPath: <VolumeName> → Query
Supported tasks:
l Generate a full or filtered list of files in a specified storage location
l Generate a list of files with a specified tiering status
l Check file accessibility
l Generate a volume index
The Query page provides a powerful built-in query tool that you can use to retrieve information about avolume's content. The volume must be open for you to use the Query page. Each time you run a query the
172

5.4. Volumes
query results report will be listed in the Queries section at the bottom of the page. There, use the Download but-ton to download a Finished report.
When you download and save a query report the report file naming format is as follows:
<volume-name>_<unix-time>_<report-category>.txt
where <report-category> is one of archived, list, checkread, or index. For example:
pubs_1548589909_archived.txt
Back in the Query page's Queries section you can use the Remove button to remove reports that you nolonger wish to have listed there, such as reports that you've downloaded or reports that produced No Results.
5.4.5.1. Generating a Full or Filtered List of Files in a Specified Storage Location
In the Show files archived section you can run queries that generate lists of files in the following categories.For any of these three categories you can optionally filter the query results by specifying a selection rule. Forinformation on selection rule syntax see "Selection Rule Syntax for Filtering Query Results " (page 176)
With errors
Lists files that have been flagged in the volume database as having had errors. Typically when an error isreported for a file on a given device, the file cannot be read from that device.
As currently implemented, this query will detect most but not all error types that may be associated with a file.
On device
List files on a selected disk device. The drop-down list from which you can select will include all of the devicesthat are used by the volume's primary cache tier and (if applicable) secondary cache tier. The drop-down listalso includes the object storage tier.
Note For the object storage tier the query is not directed at a particular disk device but rather at theobject storage tier as a whole. So, choosing the object storage tier here is no different than choosingthe object storage tier as the "On level" option (below).
On level
List files on a selected storage level (tier): primary cache, secondary cache (if applicable to the volume), orobject storage.
5.4.5.2. Generating a List of Files With a Specified Tiering Status
In the Show lists of files section you can run queries that generate lists of files with the following statuses.
173

Chapter 5. Using the HyperFile GUI
To copy to Object storage
Lists files queued for flushing (copying) from the cache tier to the object storage tier.
Typically a file will be in the flush queue for about 20 seconds, though it may be longer in the case of hightraffic or large files.
Removable from primary level disk storage
Lists files that are eligible for removal from the volume's PRI cache tier. Being eligible for removal means thatthe files have been successfully flushed (copied) from this tier to the required destination tier(s). In the mostcommon configuration the required destination tier is the object storage system, although other configurationsare possible.
Once becoming eligible for removal, whether files in the PRI cache tier will be removed or not depends on yourconfigured removal triggers for the tier. By default eligible files start being removed if 60% of the tier's capacityis used.
To review or edit a volume's PRI tier file removal criteria, go to the Cache Tier Properties page and the CacheTier Removal Rules page.
That have been corrupted following a system failure
Lists files corrupted following a system failure that triggers a failover in a clustered HyperFile environment,such as a kernel panic or an unexpected power loss.
If the volume has a SEC cache tier level configured, then these query options are also supported:
To copy to Secondary level disk storage
Lists files queued for flushing (copying) from the PRI cache tier to the SEC cache tier.
Typically a file will be in the flush queue for about 20 seconds, though it may be longer in the case of hightraffic or large files.
Removable from secondary level disk storage
Lists files that are eligible for removal from the volume's SEC cache tier. Being eligible for removal means thatthe files have been successfully flushed (copied) from this tier to the required destination tier(s). In the mostcommon configuration the required destination tier is the object storage system, although other configurationsare possible.
Once becoming eligible for removal, whether files in the SEC cache tier will be removed or not depends onyour configured removal triggers for the tier. By default eligible files start being removed if 60% of the tier'scapacity is used.
To review or edit a volume's SEC tier file removal criteria, go to the Cache Tier Properties page and theCache Tier Removal Rules page.
5.4.5.3. Checking File Accessibility
The queries in the Check file accessibility section check file read accessibility by trying to read 1 byte fromeach file. The query report includes a list of files successfully "read" and indicates whether or not any errorswere encountered.
On disk storages only (primary/secondary)
Checks only the cache tier, and lists files successfully accessed in cache. Also indicates whether or not any
174
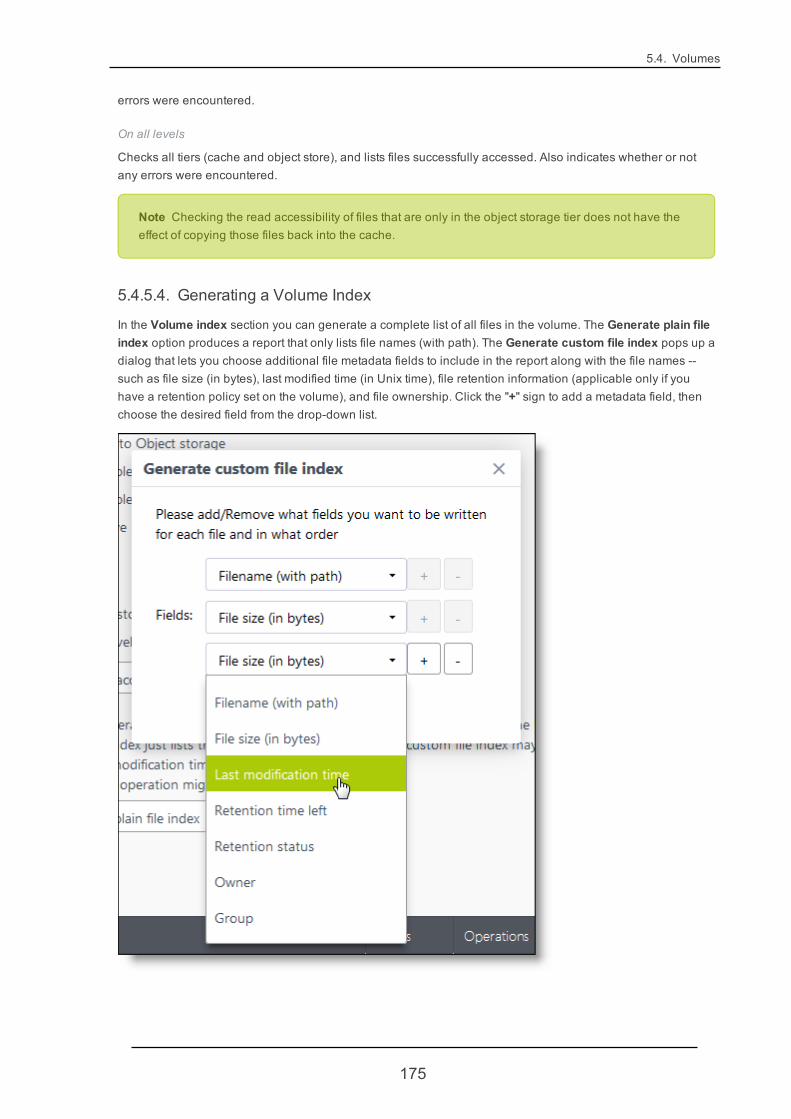
5.4. Volumes
errors were encountered.
On all levels
Checks all tiers (cache and object store), and lists files successfully accessed. Also indicates whether or notany errors were encountered.
Note Checking the read accessibility of files that are only in the object storage tier does not have theeffect of copying those files back into the cache.
5.4.5.4. Generating a Volume Index
In the Volume index section you can generate a complete list of all files in the volume. The Generate plain fileindex option produces a report that only lists file names (with path). The Generate custom file index pops up adialog that lets you choose additional file metadata fields to include in the report along with the file names --such as file size (in bytes), last modified time (in Unix time), file retention information (applicable only if youhave a retention policy set on the volume), and file ownership. Click the "+" sign to add a metadata field, thenchoose the desired field from the drop-down list.
175

Chapter 5. Using the HyperFile GUI
In this query report excerpt the custom index option has been used to include file size, last modified time, andfile ownership:
/pubs/SettingsActiveDirectory_ModifyIdMap.png 47167 1546432911 root root/pubs/SettingsActiveDirectory.png 78970 1546432879 root root/pubs/AddNodeTestPlan-DeepDive.docx 207289 1545128463 root root
5.4.5.5. Selection Rule Syntax for Filtering Query Results
In the Show files archived section of the Queries page you can optionally filter your query results by spe-cifying a selection rule.
The following types of selection rules are supported.
Note Your query reports will only show the file names of the files that meet your selection criteria, andnot the file attributes on which the selection was based. For example, if you specify a selection rulebased on file size, the query report will list the files that match your size criteria but will not show thesize of each of those files.
dir relative_path
Lists files in the specified relative directory path. Do not include the volume mount point when specifying thepath. For example this selection rule would list files in the /video/2019 directory:
dir /video/2019
Note This query returns files directly under your specified directory and also files in sub-directoriesunder your specified directory.
access > | < | = | >= | <= time_interval
Lists files for which the time elapsed since the file's last access (ATIME) is as you specify in the selection rule.For example this selection rule would list files for which more than 24 hours have elapsed since the last fileaccess:
Example:
access > 24h
The time interval can be expressed as <n>s (for seconds), <n>h (for hours), <n>d (for days), <n>w (for weeks),<n>m (for months), or <n>y (for years). Number of minutes is not supported.
176
5.4. Volumes
Note A file's access timestamp is updated whenever the file is either read or modified.
Note If you want to list files for which the time elapsed since last access is equal (=) to a certain timeinterval, specify the interval in seconds.
size > | < | = | >= | <= size
Lists files for which the file size is as you specify in the selection rule. For example this selection rule would listfiles larger than 10MB:
size > 10m
The size can be expressed as <n>b (for bytes), <n>k (for kilobytes), <n>m (for megabytes), or <n>g (for giga-bytes).
Note If you want to list files that are equal (=) to a certain size, specify the size in bytes.
uid = | != uid
Lists files for which the file owner has the UID that you specify in the selection rule. For example this selectionrule would list files owned by UID "0" (root):
uid = 0
gid = | != gid
Lists files for which the file ownership group has the GID that you specify in the selection rule. For example thisselection rule would list files for which the ownership group has GID "1" (other):
gid = 1
mode = | != mode
Lists files for which the file permission mode is you specify in the selection rule. For example this selection rulewould list files for which the permission mode is "rw-r--r--":
mode = rw-r--r--
Note Do not include the leading file type character in your selection rule (such as a leading "-" or "d").
matches regexp
Lists files for which the file name (including full relative path excluding volume mount point) matches againstyour specified regular expression. For example this selection rule would list MP3 files:
matches \.mp3$
And this selection rule would list PNG files:
matches \.png$
And this selection rule would list files for which the file name includes the string "hyperfile":
matches hyperfile
177
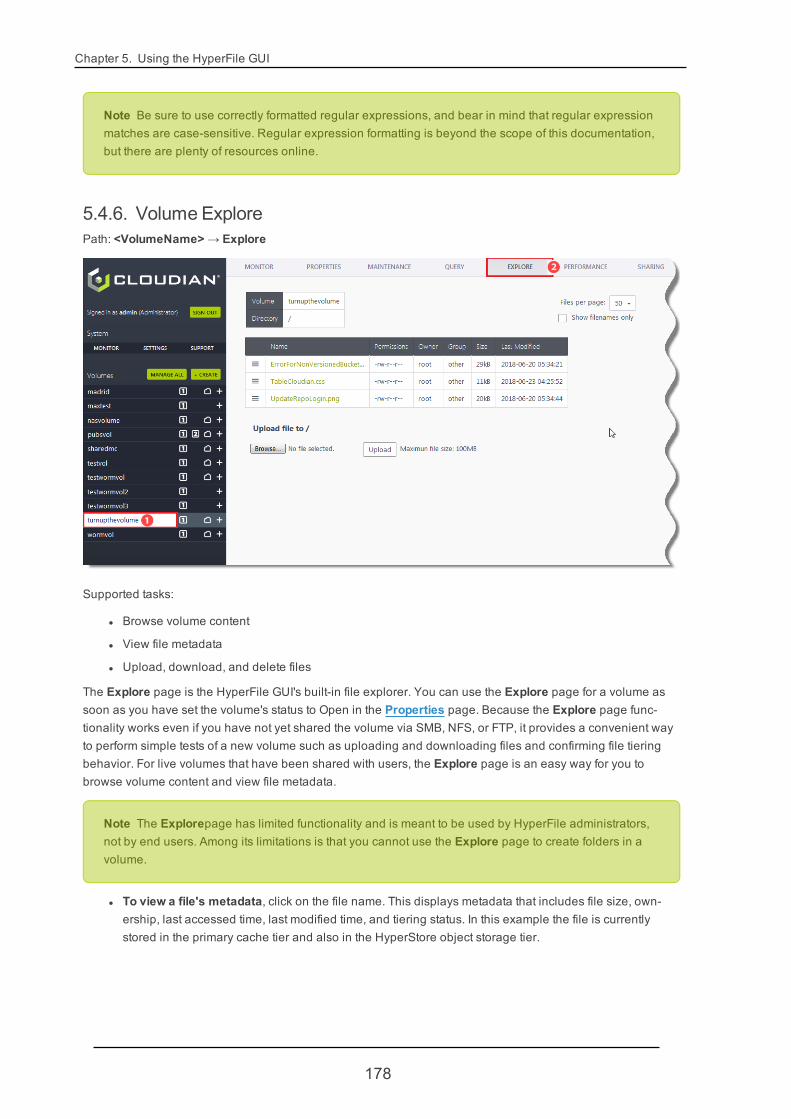
Chapter 5. Using the HyperFile GUI
Note Be sure to use correctly formatted regular expressions, and bear in mind that regular expressionmatches are case-sensitive. Regular expression formatting is beyond the scope of this documentation,but there are plenty of resources online.
5.4.6. Volume ExplorePath: <VolumeName> → Explore
Supported tasks:
l Browse volume content
l View file metadata
l Upload, download, and delete files
The Explore page is the HyperFile GUI's built-in file explorer. You can use the Explore page for a volume assoon as you have set the volume's status to Open in the Properties page. Because the Explore page func-tionality works even if you have not yet shared the volume via SMB, NFS, or FTP, it provides a convenient wayto perform simple tests of a new volume such as uploading and downloading files and confirming file tieringbehavior. For live volumes that have been shared with users, the Explore page is an easy way for you tobrowse volume content and view file metadata.
Note The Explorepage has limited functionality and is meant to be used by HyperFile administrators,not by end users. Among its limitations is that you cannot use the Explore page to create folders in avolume.
l To view a file's metadata, click on the file name. This displays metadata that includes file size, own-ership, last accessed time, last modified time, and tiering status. In this example the file is currentlystored in the primary cache tier and also in the HyperStore object storage tier.
178
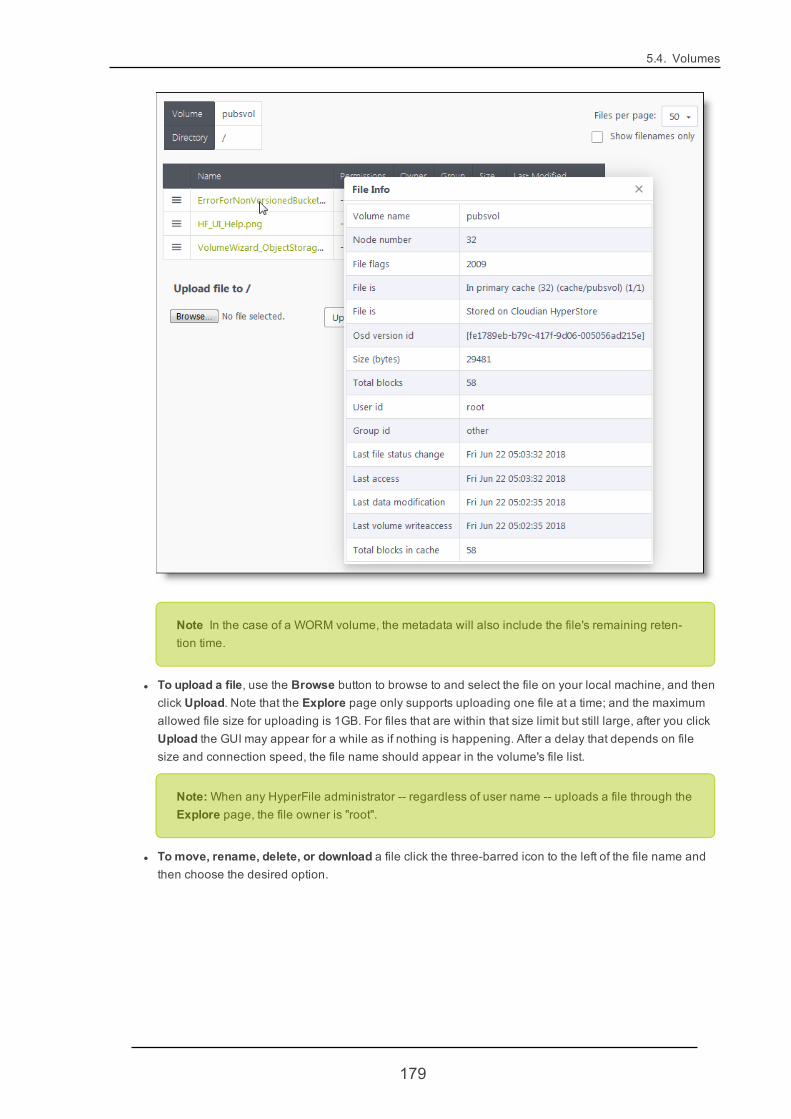
5.4. Volumes
Note In the case of a WORM volume, the metadata will also include the file's remaining reten-tion time.
l To upload a file, use the Browse button to browse to and select the file on your local machine, and thenclick Upload. Note that the Explore page only supports uploading one file at a time; and the maximumallowed file size for uploading is 1GB. For files that are within that size limit but still large, after you clickUpload the GUI may appear for a while as if nothing is happening. After a delay that depends on filesize and connection speed, the file name should appear in the volume's file list.
Note:When any HyperFile administrator -- regardless of user name -- uploads a file through theExplore page, the file owner is "root".
l Tomove, rename, delete, or download a file click the three-barred icon to the left of the file name andthen choose the desired option.
179
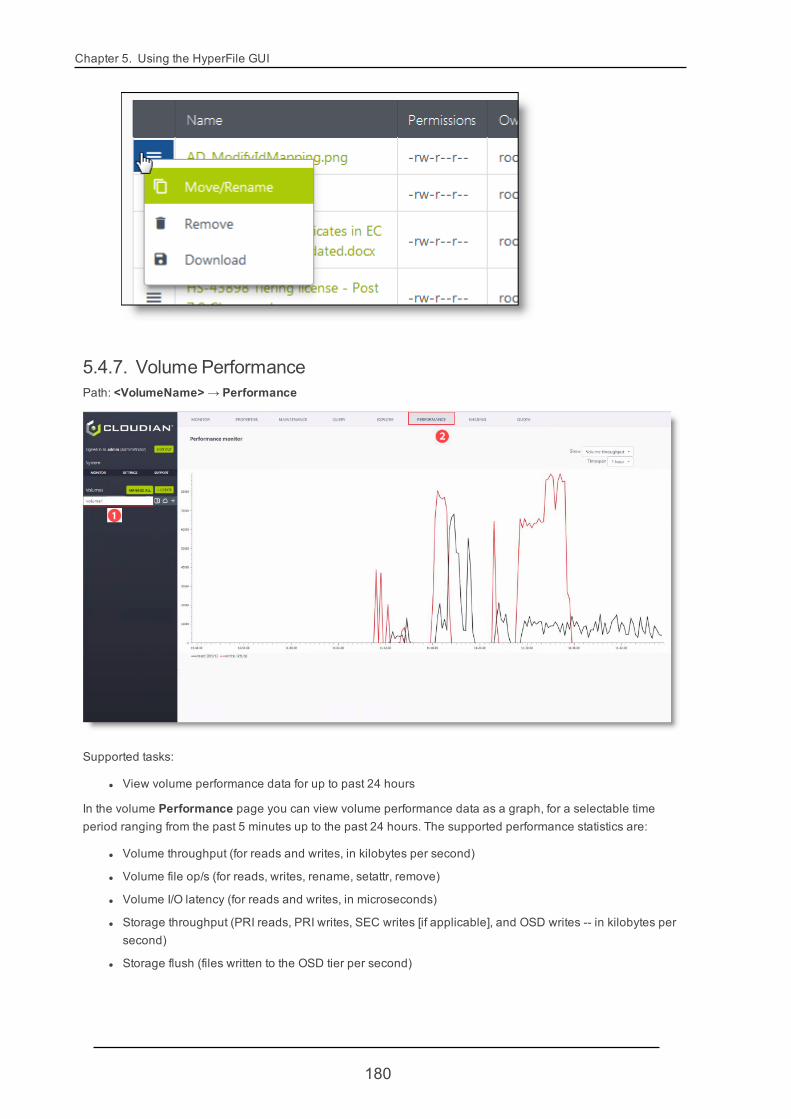
Chapter 5. Using the HyperFile GUI
5.4.7. Volume PerformancePath: <VolumeName> → Performance
Supported tasks:
l View volume performance data for up to past 24 hours
In the volume Performance page you can view volume performance data as a graph, for a selectable timeperiod ranging from the past 5 minutes up to the past 24 hours. The supported performance statistics are:
l Volume throughput (for reads and writes, in kilobytes per second)
l Volume file op/s (for reads, writes, rename, setattr, remove)
l Volume I/O latency (for reads and writes, in microseconds)
l Storage throughput (PRI reads, PRI writes, SEC writes [if applicable], and OSD writes -- in kilobytes persecond)
l Storage flush (files written to the OSD tier per second)
180

5.4. Volumes
Note If there has been no activity in the volume in the past 24 hours the Performance page will dis-play only a message saying "No performance data available".
5.4.8. VolumeWORM CompliancePath: <VolumeName> →WORM Compliance
Background information:
l "HyperFile WORM Overview" (page 58)
l "From WORM to Compliance" (page 61)
Supported task:
l "Verifying That System Requirements Are Met for a WORM Compliance Volume" (page 66)
5.4.9. Volume SharingPath: <VolumeName> → Sharing
181
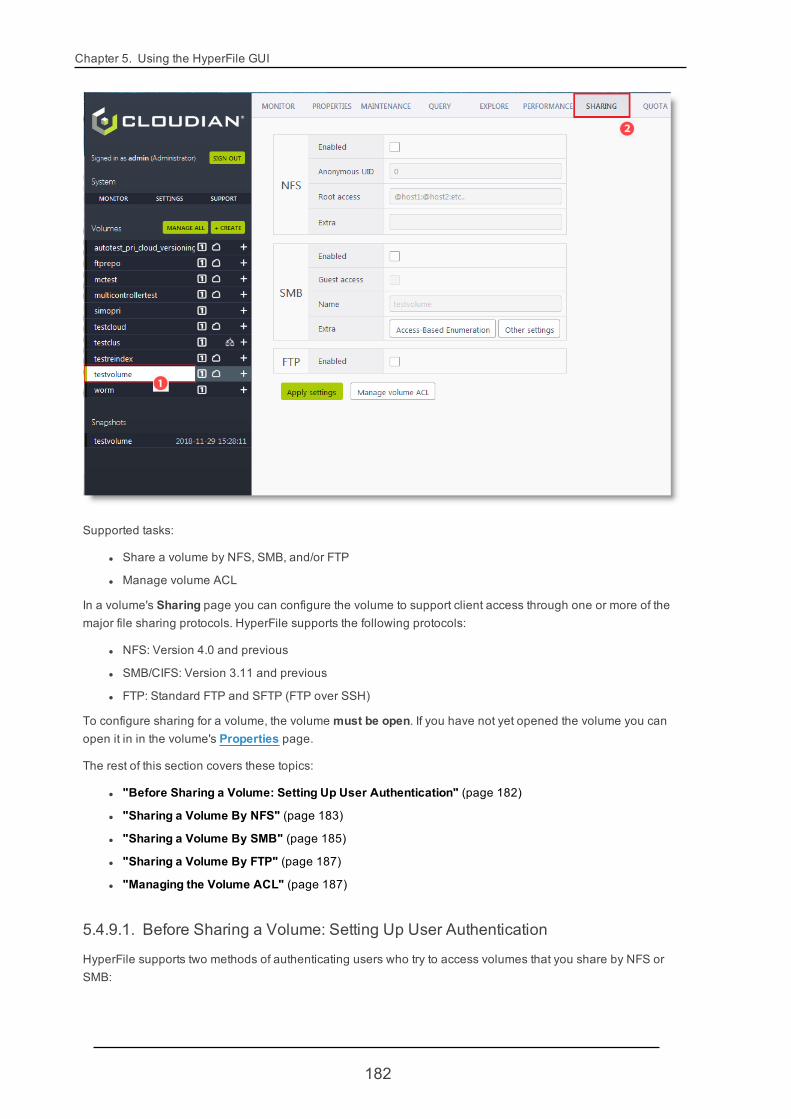
Chapter 5. Using the HyperFile GUI
Supported tasks:
l Share a volume by NFS, SMB, and/or FTP
l Manage volume ACL
In a volume's Sharing page you can configure the volume to support client access through one or more of themajor file sharing protocols. HyperFile supports the following protocols:
l NFS: Version 4.0 and previous
l SMB/CIFS: Version 3.11 and previous
l FTP: Standard FTP and SFTP (FTP over SSH)
To configure sharing for a volume, the volume must be open. If you have not yet opened the volume you canopen it in in the volume's Properties page.
The rest of this section covers these topics:
l "Before Sharing a Volume: Setting Up User Authentication" (page 182)
l "Sharing a Volume By NFS" (page 183)
l "Sharing a Volume By SMB" (page 185)
l "Sharing a Volume By FTP" (page 187)
l "Managing the Volume ACL" (page 187)
5.4.9.1. Before Sharing a Volume: Setting Up User Authentication
HyperFile supports two methods of authenticating users who try to access volumes that you share by NFS orSMB:
182
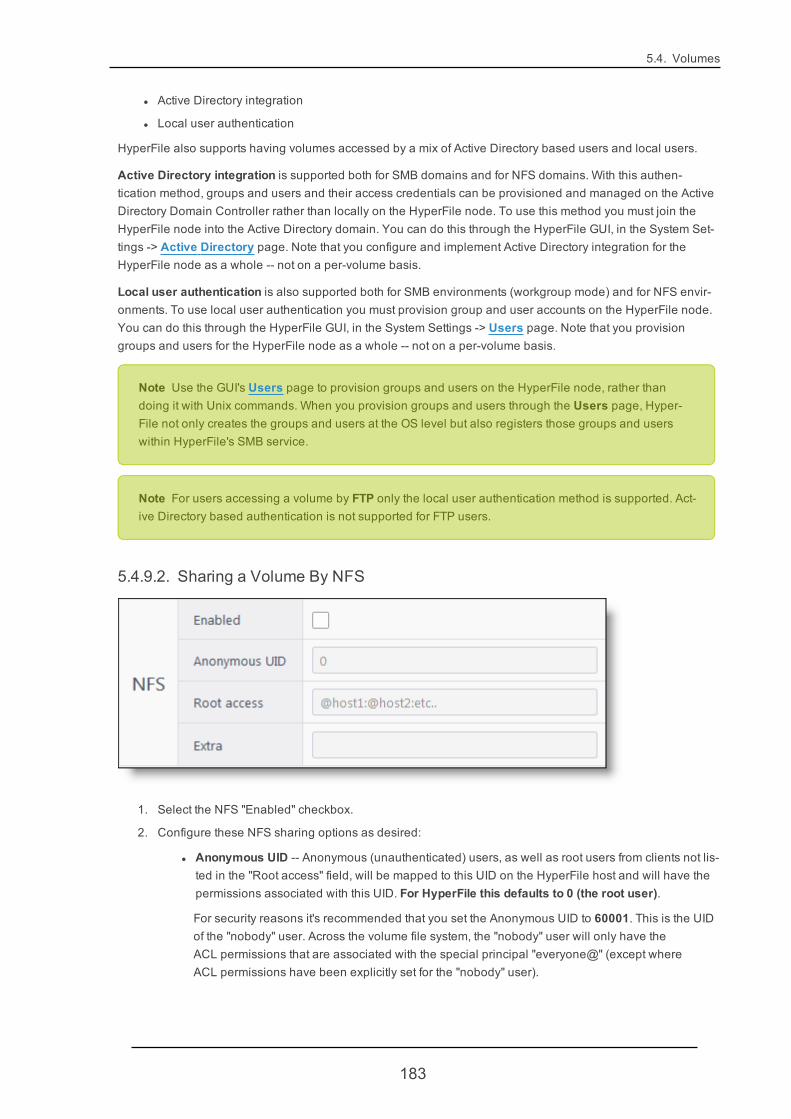
5.4. Volumes
l Active Directory integration
l Local user authentication
HyperFile also supports having volumes accessed by a mix of Active Directory based users and local users.
Active Directory integration is supported both for SMB domains and for NFS domains. With this authen-tication method, groups and users and their access credentials can be provisioned and managed on the ActiveDirectory Domain Controller rather than locally on the HyperFile node. To use this method you must join theHyperFile node into the Active Directory domain. You can do this through the HyperFile GUI, in the System Set-tings -> Active Directory page. Note that you configure and implement Active Directory integration for theHyperFile node as a whole -- not on a per-volume basis.
Local user authentication is also supported both for SMB environments (workgroup mode) and for NFS envir-onments. To use local user authentication you must provision group and user accounts on the HyperFile node.You can do this through the HyperFile GUI, in the System Settings -> Users page. Note that you provisiongroups and users for the HyperFile node as a whole -- not on a per-volume basis.
Note Use the GUI's Users page to provision groups and users on the HyperFile node, rather thandoing it with Unix commands. When you provision groups and users through the Users page, Hyper-File not only creates the groups and users at the OS level but also registers those groups and userswithin HyperFile's SMB service.
Note For users accessing a volume by FTP only the local user authentication method is supported. Act-ive Directory based authentication is not supported for FTP users.
5.4.9.2. Sharing a Volume By NFS
1. Select the NFS "Enabled" checkbox.
2. Configure these NFS sharing options as desired:
l Anonymous UID -- Anonymous (unauthenticated) users, as well as root users from clients not lis-ted in the "Root access" field, will be mapped to this UID on the HyperFile host and will have thepermissions associated with this UID. For HyperFile this defaults to 0 (the root user).
For security reasons it's recommended that you set the Anonymous UID to 60001. This is the UIDof the "nobody" user. Across the volume file system, the "nobody" user will only have theACL permissions that are associated with the special principal "everyone@" (except whereACL permissions have been explicitly set for the "nobody" user).
183

Chapter 5. Using the HyperFile GUI
l Root access -- Root users from the client machines that you list here will have root privileges onthe volume. Root users from client machines that you do not list here will be assigned theUID that you specify for Anonymous UID (above). For guidance on how to format the list, see theinformation regarding authorized client access list formatting further below.
l Extra -- By default the volume will be shared as read-write for all clients. You can optionallyuse the "Extra" field to narrow the sharing permission scope, by entering into that field any com-bination of "ro", "ro=<access list>", "rw", and "rw=<access list>". For example:
o ro -- The volume will be shared as read-only for all clients. No clients will be able to writeto the volume.
o ro=<access list> -- The clients in the specified access list will have read-only per-missions. All other clients will be denied access to the volume.
o rw=<access list> -- The clients in the specified access list will have read-write per-missions. All other clients will be denied access to the volume.
o ro,rw=<access list> -- The clients in the specified access list will have read-write per-missions. All other clients will have read-only permissions.
o rw,ro=<access list> -- The clients in the specified access list will have read-only per-missions. All other clients will have read-write permissions.
o rw=<access list>,ro=<access list> -- The clients in the rw= access list will have read-writepermissions. The clients in the ro= access list will have read-only permissions. All otherclients will be denied access to the volume.
Note If you make entries into both the "Root access" field and the "Extra" field, a hostidentified by your "Root access" entry will be subject to any permission restrictionsimposed on that host by your "Extra" field entry. For example if you want the host to haveread-write permissions, be sure not to configure the "Extra" field in a way that deniesread-write permissions to the host.
Authorized client access list formatting: For the "Root access" and "Extra" fields the authorizedclient access lists must be specified in the standard "access list" format for NFS sharing. Mostcommonly this would be a colon-separated list of:
l Fully qualified hostnames (for example host1.domain:host2.domain:host3.domain)
l Domain names, preceded by a dot (for example .domain1:.domain2)
l Hostnames or IP addresses or IP addresses with /netmasks, preceded by an @ sign (forexample@hostname1:@hostname2:@hostname3 )
For more information about NFS authorized client access list formatting see the man page forthe Solaris/OmniOS command share_nfs.
2. Click Apply settings. When asked to confirm, click OK.
184
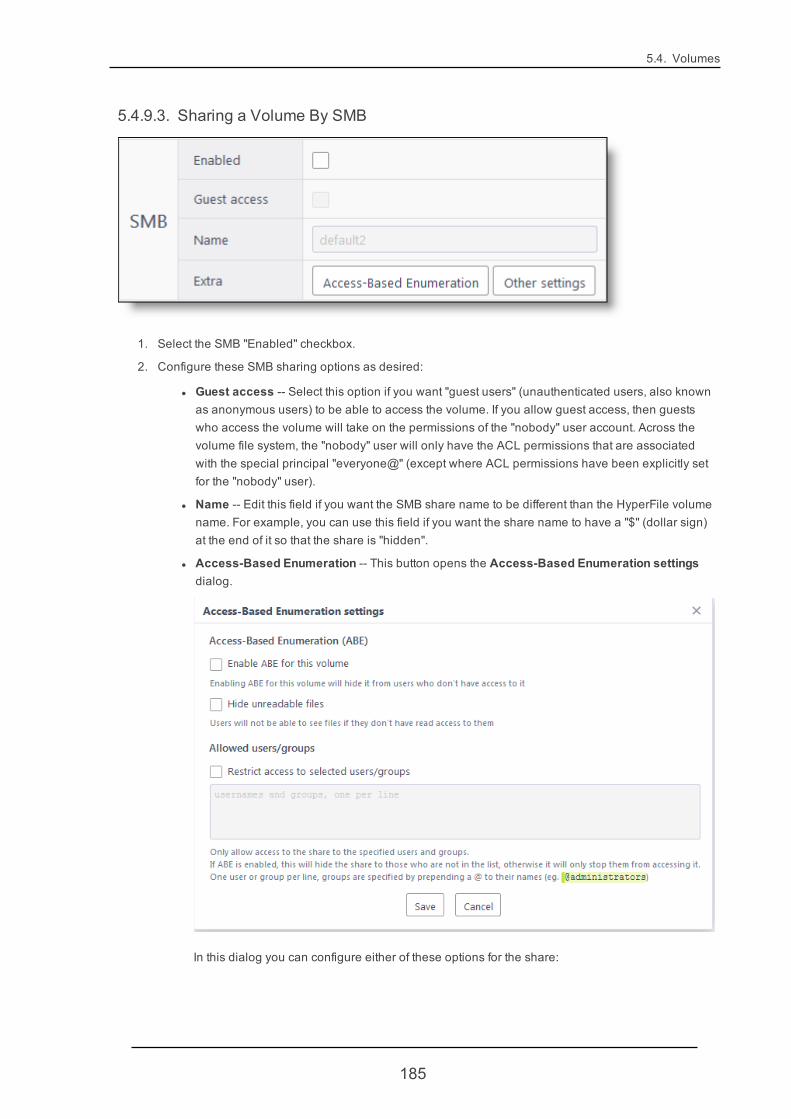
5.4. Volumes
5.4.9.3. Sharing a Volume By SMB
1. Select the SMB "Enabled" checkbox.
2. Configure these SMB sharing options as desired:
l Guest access -- Select this option if you want "guest users" (unauthenticated users, also knownas anonymous users) to be able to access the volume. If you allow guest access, then guestswho access the volume will take on the permissions of the "nobody" user account. Across thevolume file system, the "nobody" user will only have the ACL permissions that are associatedwith the special principal "everyone@" (except where ACL permissions have been explicitly setfor the "nobody" user).
l Name -- Edit this field if you want the SMB share name to be different than the HyperFile volumename. For example, you can use this field if you want the share name to have a "$" (dollar sign)at the end of it so that the share is "hidden".
l Access-Based Enumeration -- This button opens the Access-Based Enumeration settingsdialog.
In this dialog you can configure either of these options for the share:
185
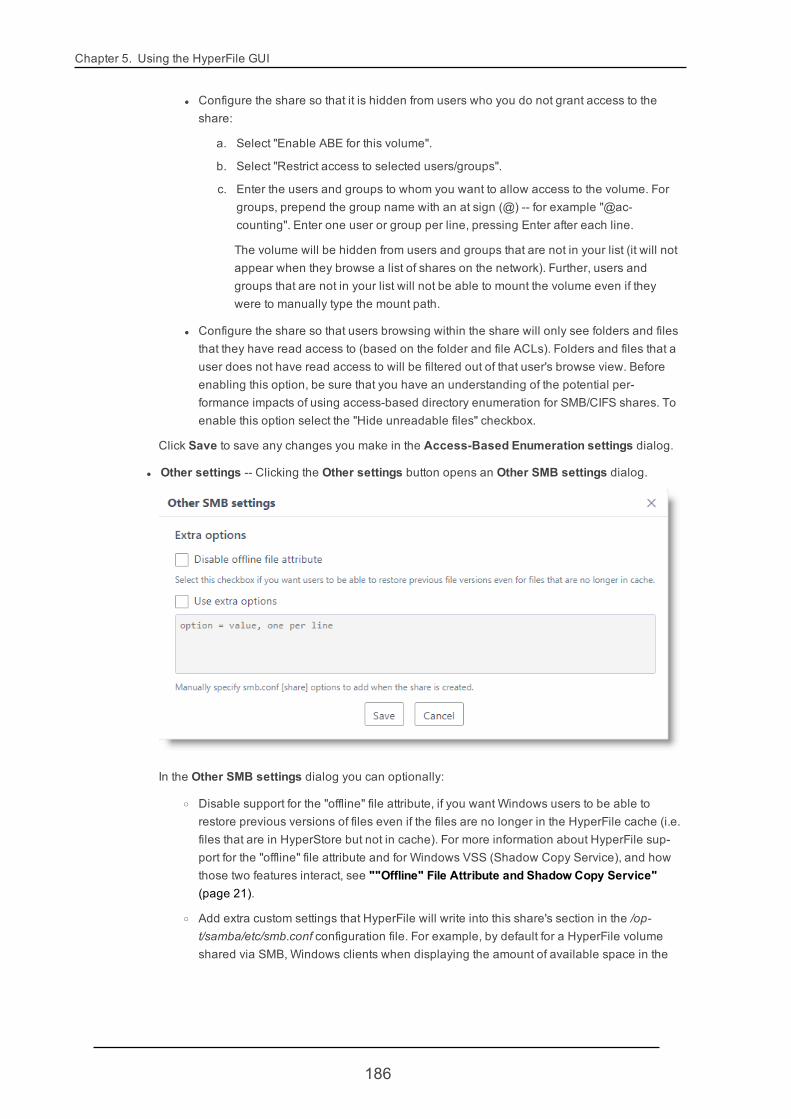
Chapter 5. Using the HyperFile GUI
l Configure the share so that it is hidden from users who you do not grant access to theshare:
a. Select "Enable ABE for this volume".
b. Select "Restrict access to selected users/groups".
c. Enter the users and groups to whom you want to allow access to the volume. Forgroups, prepend the group name with an at sign (@) -- for example "@ac-counting". Enter one user or group per line, pressing Enter after each line.
The volume will be hidden from users and groups that are not in your list (it will notappear when they browse a list of shares on the network). Further, users andgroups that are not in your list will not be able to mount the volume even if theywere to manually type the mount path.
l Configure the share so that users browsing within the share will only see folders and filesthat they have read access to (based on the folder and file ACLs). Folders and files that auser does not have read access to will be filtered out of that user's browse view. Beforeenabling this option, be sure that you have an understanding of the potential per-formance impacts of using access-based directory enumeration for SMB/CIFS shares. Toenable this option select the "Hide unreadable files" checkbox.
Click Save to save any changes you make in the Access-Based Enumeration settings dialog.
l Other settings -- Clicking the Other settings button opens an Other SMB settings dialog.
In the Other SMB settings dialog you can optionally:
o Disable support for the "offline" file attribute, if you want Windows users to be able torestore previous versions of files even if the files are no longer in the HyperFile cache (i.e.files that are in HyperStore but not in cache). For more information about HyperFile sup-port for the "offline" file attribute and for Windows VSS (Shadow Copy Service), and howthose two features interact, see ""Offline" File Attribute and Shadow Copy Service"(page 21).
o Add extra custom settings that HyperFile will write into this share's section in the /op-t/samba/etc/smb.conf configuration file. For example, by default for a HyperFile volumeshared via SMB, Windows clients when displaying the amount of available space in the
186
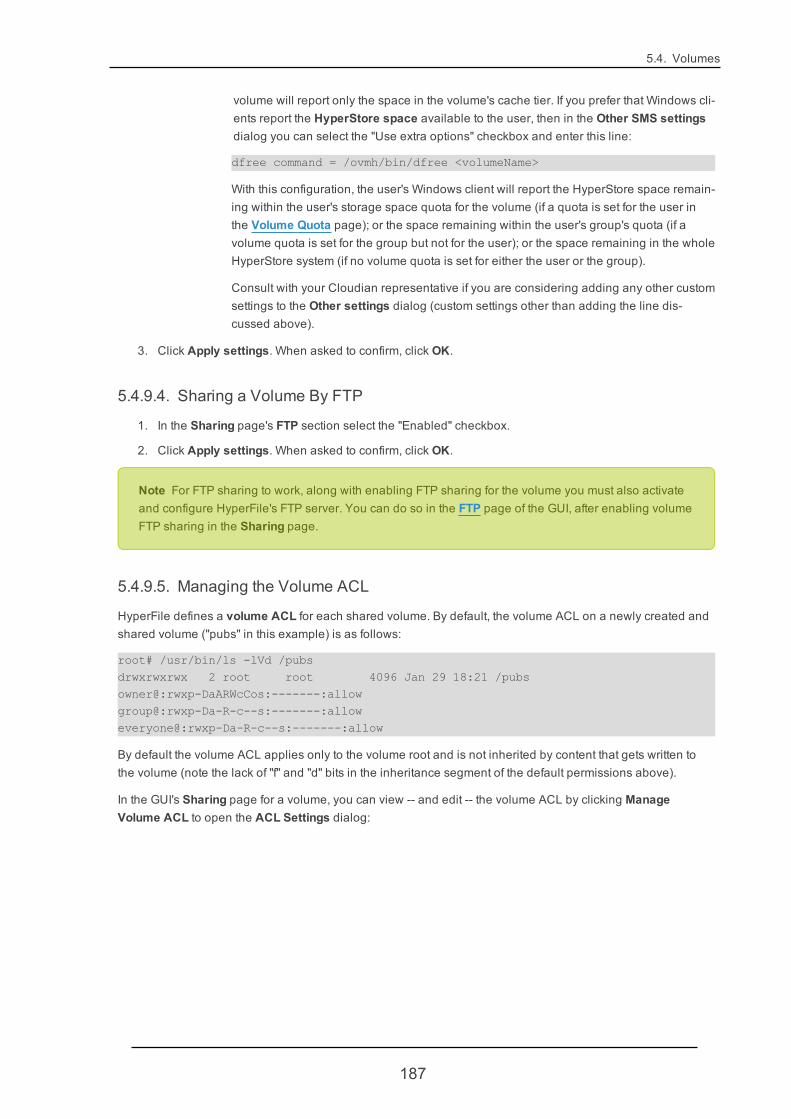
5.4. Volumes
volume will report only the space in the volume's cache tier. If you prefer that Windows cli-ents report the HyperStore space available to the user, then in the Other SMS settingsdialog you can select the "Use extra options" checkbox and enter this line:
dfree command = /ovmh/bin/dfree <volumeName>
With this configuration, the user's Windows client will report the HyperStore space remain-ing within the user's storage space quota for the volume (if a quota is set for the user inthe Volume Quota page); or the space remaining within the user's group's quota (if avolume quota is set for the group but not for the user); or the space remaining in the wholeHyperStore system (if no volume quota is set for either the user or the group).
Consult with your Cloudian representative if you are considering adding any other customsettings to the Other settings dialog (custom settings other than adding the line dis-cussed above).
3. Click Apply settings. When asked to confirm, click OK.
5.4.9.4. Sharing a Volume By FTP
1. In the Sharing page's FTP section select the "Enabled" checkbox.
2. Click Apply settings. When asked to confirm, click OK.
Note For FTP sharing to work, along with enabling FTP sharing for the volume you must also activateand configure HyperFile's FTP server. You can do so in the FTP page of the GUI, after enabling volumeFTP sharing in the Sharing page.
5.4.9.5. Managing the Volume ACL
HyperFile defines a volume ACL for each shared volume. By default, the volume ACL on a newly created andshared volume ("pubs" in this example) is as follows:
root# /usr/bin/ls -lVd /pubsdrwxrwxrwx 2 root root 4096 Jan 29 18:21 /pubsowner@:rwxp-DaARWcCos:-------:allowgroup@:rwxp-Da-R-c--s:-------:alloweveryone@:rwxp-Da-R-c--s:-------:allow
By default the volume ACL applies only to the volume root and is not inherited by content that gets written tothe volume (note the lack of "f" and "d" bits in the inheritance segment of the default permissions above).
In the GUI's Sharing page for a volume, you can view -- and edit -- the volume ACL by clicking ManageVolume ACL to open the ACL Settings dialog:
187

Chapter 5. Using the HyperFile GUI
Note The ACL Settings dialog tries to show the permission model as would apply to Windows clients -- for example it shows the default group@ permission as only being "Read", since the specific volumeACL permissions assigned to group@ by default would not be sufficient to allow writing, for some typesof Windows clients.
In the ACL Settings dialog you can change the permissions that are set for owner@, group@, and [email protected] can also add more users and groups to the volume ACL and set permissions for those users and groups.The users and groups that you enter here can either be Active Directory based users and groups, or localusers and groups, or a mix of both types (see "Before Sharing a Volume: Setting Up User Authentication"(page 182) for background). The dialog also supports removing users or groups from the volume ACL.
In an environment with Windows clients, it's best to change the volume ACL to one that makes use of Active Dir-ectory users and groups rather than the default identifiers owner@, group@ and everyone@. Windows clientstend to behave unpredictably when these default identifiers are used.
Note In the current HyperFile release, when identifying Active Directory based groups in a volume'sACL Settings configuration you cannot use the groupname@realm format -- instead you must use theDOMAIN\groupname format. For identifying Active Directory based users, both formats are supported(username@realm and DOMAIN\username).
188
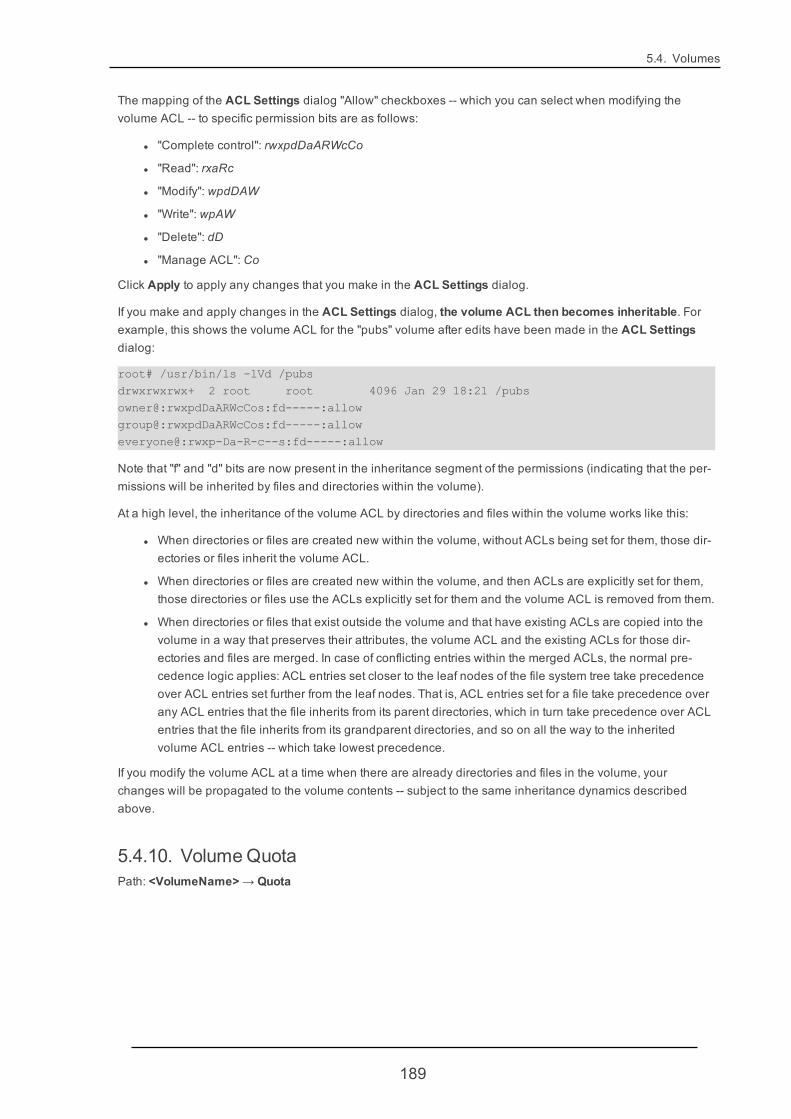
5.4. Volumes
The mapping of the ACL Settings dialog "Allow" checkboxes -- which you can select when modifying thevolume ACL -- to specific permission bits are as follows:
l "Complete control": rwxpdDaARWcCo
l "Read": rxaRc
l "Modify": wpdDAW
l "Write": wpAW
l "Delete": dD
l "Manage ACL": Co
Click Apply to apply any changes that you make in the ACL Settings dialog.
If you make and apply changes in the ACL Settings dialog, the volume ACL then becomes inheritable. Forexample, this shows the volume ACL for the "pubs" volume after edits have been made in the ACL Settingsdialog:
root# /usr/bin/ls -lVd /pubsdrwxrwxrwx+ 2 root root 4096 Jan 29 18:21 /pubsowner@:rwxpdDaARWcCos:fd-----:allowgroup@:rwxpdDaARWcCos:fd-----:alloweveryone@:rwxp-Da-R-c--s:fd-----:allow
Note that "f" and "d" bits are now present in the inheritance segment of the permissions (indicating that the per-missions will be inherited by files and directories within the volume).
At a high level, the inheritance of the volume ACL by directories and files within the volume works like this:
l When directories or files are created new within the volume, without ACLs being set for them, those dir-ectories or files inherit the volume ACL.
l When directories or files are created new within the volume, and then ACLs are explicitly set for them,those directories or files use the ACLs explicitly set for them and the volume ACL is removed from them.
l When directories or files that exist outside the volume and that have existing ACLs are copied into thevolume in a way that preserves their attributes, the volume ACL and the existing ACLs for those dir-ectories and files are merged. In case of conflicting entries within the merged ACLs, the normal pre-cedence logic applies: ACL entries set closer to the leaf nodes of the file system tree take precedenceover ACL entries set further from the leaf nodes. That is, ACL entries set for a file take precedence overany ACL entries that the file inherits from its parent directories, which in turn take precedence over ACLentries that the file inherits from its grandparent directories, and so on all the way to the inheritedvolume ACL entries -- which take lowest precedence.
If you modify the volume ACL at a time when there are already directories and files in the volume, yourchanges will be propagated to the volume contents -- subject to the same inheritance dynamics describedabove.
5.4.10. VolumeQuotaPath: <VolumeName> → Quota
189
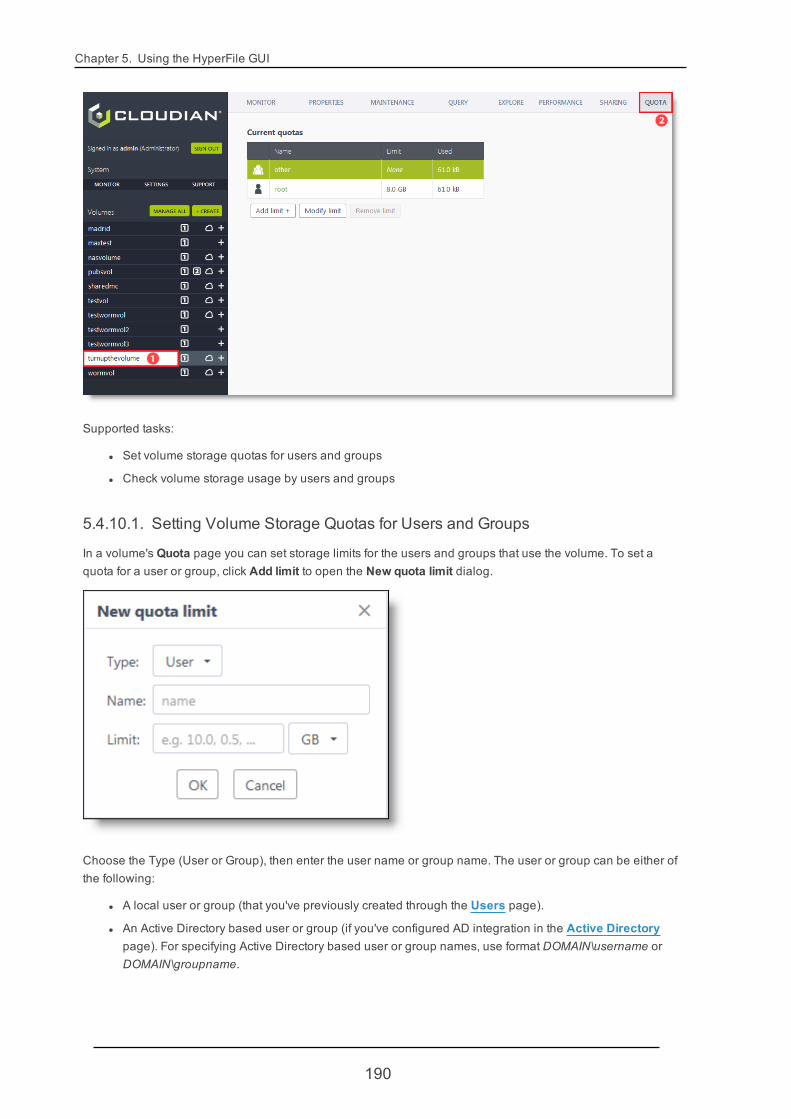
Chapter 5. Using the HyperFile GUI
Supported tasks:
l Set volume storage quotas for users and groups
l Check volume storage usage by users and groups
5.4.10.1. Setting Volume Storage Quotas for Users and Groups
In a volume's Quota page you can set storage limits for the users and groups that use the volume. To set aquota for a user or group, click Add limit to open the New quota limit dialog.
Choose the Type (User or Group), then enter the user name or group name. The user or group can be either ofthe following:
l A local user or group (that you've previously created through the Users page).
l An Active Directory based user or group (if you've configured AD integration in the Active Directorypage). For specifying Active Directory based user or group names, use format DOMAIN\username orDOMAIN\groupname.
190
5.4. Volumes
Then specify the storage limit for the user or group in this volume (in number of KBs, MBs, GBs, or etc.), andclick OK.
The Quota page also lets you select a quota that you have previously set to modify or remove it.
When you apply a storage quota to a user or group, HyperFile will reject a user's request to write a file to thevolume if the user has already exceeded her quota -- or if she belongs to a group that has already exceeded itsquota.
Note If a user is currently below her quota and tries to write a file that would push her storage usageover her quota, HyperFile allows this file to be written. But once in excess of her quota, the user will notbe allowed to write additional new files until she has deleted enough data to fall back below her quota.Within HyperFile, the rejection of such write requests is logged as an EDQUOT error.
5.4.10.2. Checking Volume Storage Usage By Users and Groups
Also in the Quota page, in the user and group table the "Used" column indicates the current usage level foreach user and group that uses the volume. Usage information displays for all users and groups who use thevolume -- not just users and groups for whom you have set a quota.
Note that the current usage level reported for a user -- and accordingly, the comparison of a user's currentusage to a quota that you have set for that user -- is not impacted by the current placement of the user'sdata within the HyperFile storage hierarchy. For example, a 5MB file counts as 5MB of usage for the userregardless of whether the file is currently only stored in the PRI cache, or is stored in both the PRI cache andthe HyperStore object storage tier, or is stored only in the HyperStore object storage tier (having been removedfrom cache as a result of your configured removal rules for the cache).
5.4.11. VolumeCache Tier
5.4.11.1. Volume Cache Tier: Overview
Path: <VolumeName> → [1] or [2] → Overview
191

Chapter 5. Using the HyperFile GUI
Supported task:
l View cache tier status information
In a volume's cache tier Overview page you can view summary status information for the volume's cache tier.
Primary level disk storage information Section
Total size
Total storage capacity of this tier. If you have multiple storage devices supporting this tier, this figure is the sumof the storage capacities of the multiple devices.
Total available
Total storage capacity still available in this tier. If you have multiple storage devices supporting this tier, this fig-ure is the sum of the remaining storage capacities in the multiple devices.
Total used
Total storage space currently used in this tier. If you have multiple storage devices supporting this tier, this fig-ure is the sum of the storage space used on the multiple devices.
Total files used
Total number of files and directories in this tier.
Stored files and pending activities Section
Flush... Stub file
The items from "Flush" through to "Stub file" are cache tier configuration settings having to do with how files are
192
5.4. Volumes
flushed (copied) from this cache tier to the object storage tier, and potentially removed from this cache tier afterflushing has succeed. Here in the cache tier Overview page you can view -- but not change -- the cache tier'scurrent settings. For descriptions of these settings see the Help for the Cache Tier Properties page. In thatpage you can change the settings if you wish.
Note The "Stub file" property is no longer being used and can be ignored.
Estimated space used
Total storage space currently being used in this volume's cache tier. If multiple devices are used within this tier,this figure is the total space used across all of the devices.
Estimated percentage used
The current storage space usage as a percentage of this cache tier's total capacity. If multiple devices are usedwithin this tier, this figure is the total space used as a percentage of the total capacity of the multiple devices.
Files archived
Total number of volume files currently stored in this cache tier.
Note The "Total files used" count in the Primary level disk storage information section of the cachetier Overview page includes directories as well as files. In the Stored files and pending activities sec-tion, the "Files archived" count includes only files -- not directories.
Files removable
Of the files currently stored in this volume's cache tier, the number of files that are eligible for removal from thistier. Being eligible for removal means that the files have been successfully flushed (copied) from this tier to therequired destination tier(s). In the most common configuration the required destination tier is the object storagesystem.
Once becoming eligible for removal, whether files in this cache tier will be removed or not depends on yourconfigured removal triggers for the tier. By default eligible files start being removed if 60% of the tier's total capa-city is used.
To review or edit a volume's cache tier file removal criteria, go to the Cache Tier Properties page and theCache Tier Removal Rules page.
5.4.11.2. Volume Cache Tier: Properties
Path: <VolumeName> → [1] or [2] → Properties
193
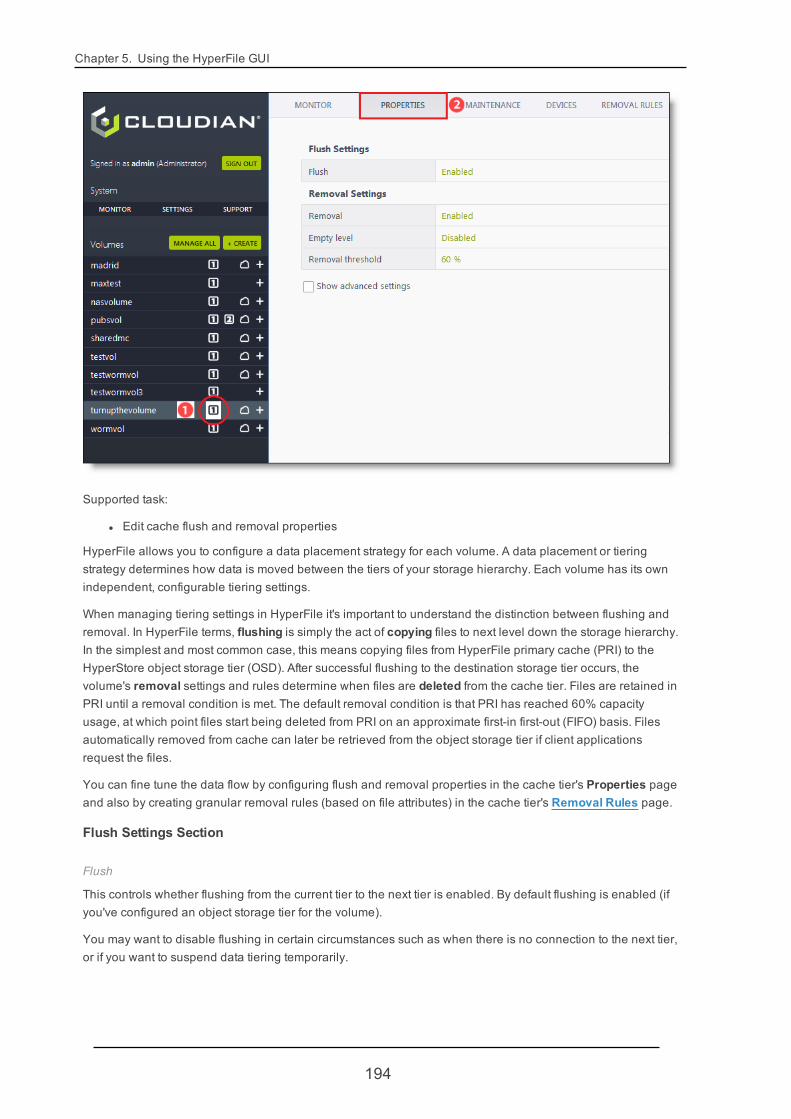
Chapter 5. Using the HyperFile GUI
Supported task:
l Edit cache flush and removal properties
HyperFile allows you to configure a data placement strategy for each volume. A data placement or tieringstrategy determines how data is moved between the tiers of your storage hierarchy. Each volume has its ownindependent, configurable tiering settings.
When managing tiering settings in HyperFile it's important to understand the distinction between flushing andremoval. In HyperFile terms, flushing is simply the act of copying files to next level down the storage hierarchy.In the simplest and most common case, this means copying files from HyperFile primary cache (PRI) to theHyperStore object storage tier (OSD). After successful flushing to the destination storage tier occurs, thevolume's removal settings and rules determine when files are deleted from the cache tier. Files are retained inPRI until a removal condition is met. The default removal condition is that PRI has reached 60% capacityusage, at which point files start being deleted from PRI on an approximate first-in first-out (FIFO) basis. Filesautomatically removed from cache can later be retrieved from the object storage tier if client applicationsrequest the files.
You can fine tune the data flow by configuring flush and removal properties in the cache tier's Properties pageand also by creating granular removal rules (based on file attributes) in the cache tier's Removal Rules page.
Flush Settings Section
Flush
This controls whether flushing from the current tier to the next tier is enabled. By default flushing is enabled (ifyou've configured an object storage tier for the volume).
You may want to disable flushing in certain circumstances such as when there is no connection to the next tier,or if you want to suspend data tiering temporarily.
194

5.4. Volumes
Removal Settings Section
Removal
This controls whether automatic file removal from the current tier is enabled. By default removal is enabled.
If you disable removal, files will not be automatically removed from this tier -- regardless of any otherremoval settings or removal rules. Consequently, this storage tier could become completely full over time.
Empty level
Applicable only when Removal is enabled.
The "Empty level" option is disabled by default. When it is enabled, HyperFile will remove each file from thePRI cache tier as soon as it has been successfully flushed to the flush target tier(s). You may want to enablethis option if you prefer to minimize space consumption on the PRI cache level (for instance if PRI is on a smallSSD).
If you enable this setting it will supersede any other configured removal settings and rules, such as the capa-city usage threshold and any removal rules based on file attributes. In other words, if this setting is enabledfiles will be removed from PRI upon successful flushing, regardless of your other removal-related settings.
Note This option is not supported for a SEC cache level. A SEC cache level, if you have one, shouldbe on a mass storage device. If you are wanting to keep a SEC level near empty, you should considernot using a SEC cache level at all and instead just use PRI and OSD levels.
Removal threshold
Applicable only when Removal is enabled and Empty Level is disabled.
Files will be removed from the current tier when the used space in the tier reaches this percentage of the tier'stotal storage capacity. Default is 60%. When this threshold is reached, the system will begin deleting files fromcache so as to keep cache usage from substantially exceeding this threshold. Files will be removed from cacheon an approximate first-in-first-out (FIFO) basis, although the precise ordering is not guaranteed. Files will beremoved until capacity usage in the tier falls back below the threshold.
Note that the removal threshold is applied across the tier as a whole. For example if you have two devices inthe PRI cache tier, and are using the default 60% removal threshold, removal from the PRI cache will betriggered when the combined amount of used space in the two devices reaches 60% of the combined capacityof the two devices.
Cloudian recommends that you not set the Removal threshold any higher than 90%, so as to leave sufficientspace for incoming data.
Note If in the cache tier's Removal Rules page you configure removal rules based on file attributes,those removal rules will be applied regardless of whether the tier's capacity usage has yet reached itsremoval threshold. You can think of the removal threshold as a safety valve that prevents the cache tierfrom becoming too full.
Advanced SettingsThese settings display on the page only if you select the "Show advanced settings" options. In typical
195
Chapter 5. Using the HyperFile GUI
circumstances you should not need to change any of these settings. Use caution with these settings.
Flush Settings (advanced)
Flush target
Applicable only when Flush is enabled.
The tier(s) to flush to. In the simplest and most common case, this is the object storage tier (with flushing occur-ring from the PRI tier directly to OSD).
Note that you can select multiple flush targets -- for example, flush from PRI to both SEC and OSD. The flushwill occur on the same timing to both targets.
Note In the case where you configure flushing from PRI to both SEC and OSD, when you go to con-figure the SEC cache you will find that flushing is disabled for SEC by default. This is because flushingfrom SEC to OSD is unnecessary, since any files in SEC have already been flushed to OSD directlyfrom PRI.
Flush strategy
Applicable only when Flush is enabled.
This setting defines when to flush (copy) files to the flush target tier(s). The options are:
l Default -- Flush files approximately 20 seconds after they are uploaded to HyperFile. With this strategy,copies of flushed files will exist in the flush target tier and also in the cache tier, until such time as theyare removed from the cache tier as a result of removal settings and rules. After removal from the cachetier they will exist only in the flush target tier.
l On remove -- Flush files only when they need to be removed from the cache tier as a result of removalsettings and rules. With this strategy, files will exist only in the cache tier until they need to be removedfrom the cache tier, and then subsequently they will exist only in the flush target tier.
Removal Settings (advanced)
Removal prerequirements
Applicable only when Removal is enabled.
A file will be removed from this cache tier -- in accordance with removal settings and rules -- only if a copy ofthe file exists in the flush target tier(s) identified by this setting. If the system finds that a file's copy is missingfrom the flush target tier(s), the file will not be removed from cache.
This setting is configured automatically based on your other chosen flush and removal settings. In the mostcommon deployment scenario where a volume uses a PRI cache tier and an OSD tier, the "Removal pre-requirements" setting will be automatically set to "OSD". This means that files in the PRI cache tier will not beeligible for removal until they have been successfully copied to the object storage tier.
Pre-remove diff
Applicable only when Removal is enabled.
The "Pre-remove diff" option is disabled by default. If you enable this option, then before removing any file fromthe current tier the system will compare the file to its copy in the flush target tier in order to verify that the copy inthe flush target tier is not corrupted or otherwise different from the local copy. You can choose between twotypes of diff assessment:
196
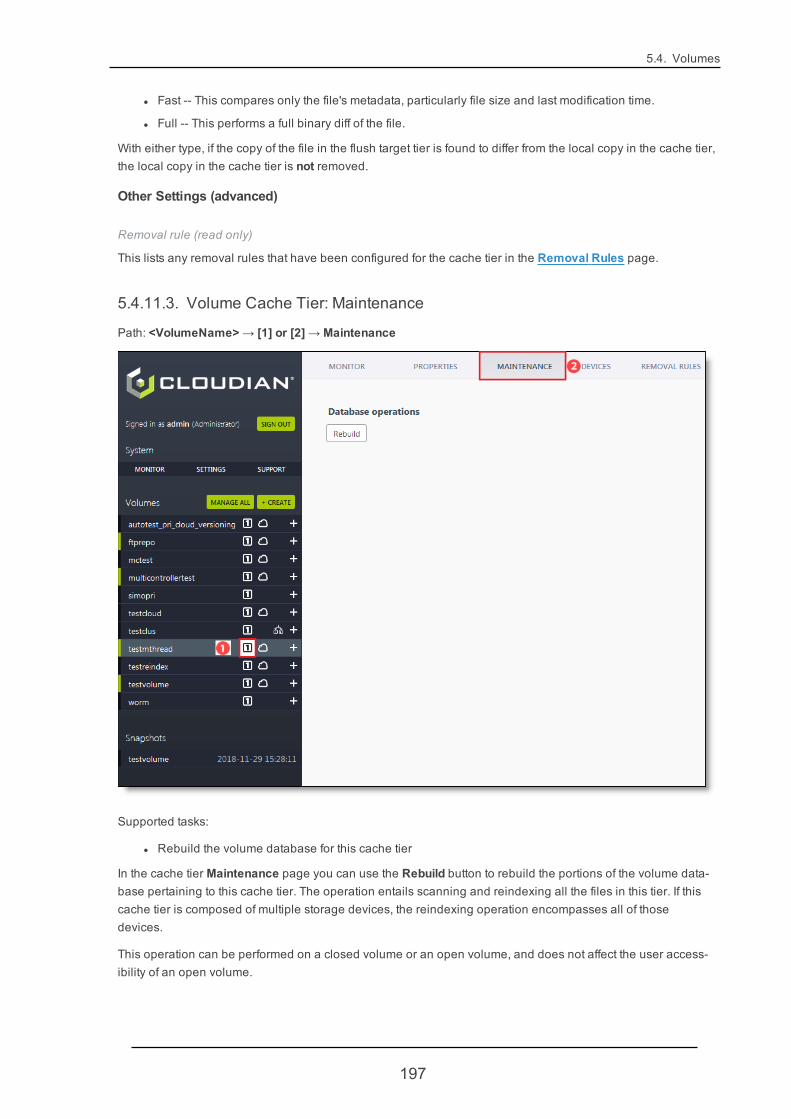
5.4. Volumes
l Fast -- This compares only the file's metadata, particularly file size and last modification time.
l Full -- This performs a full binary diff of the file.
With either type, if the copy of the file in the flush target tier is found to differ from the local copy in the cache tier,the local copy in the cache tier is not removed.
Other Settings (advanced)
Removal rule (read only)
This lists any removal rules that have been configured for the cache tier in the Removal Rules page.
5.4.11.3. Volume Cache Tier: Maintenance
Path: <VolumeName> → [1] or [2] → Maintenance
Supported tasks:
l Rebuild the volume database for this cache tier
In the cache tier Maintenance page you can use the Rebuild button to rebuild the portions of the volume data-base pertaining to this cache tier. The operation entails scanning and reindexing all the files in this tier. If thiscache tier is composed of multiple storage devices, the reindexing operation encompasses all of thosedevices.
This operation can be performed on a closed volume or an open volume, and does not affect the user access-ibility of an open volume.
197
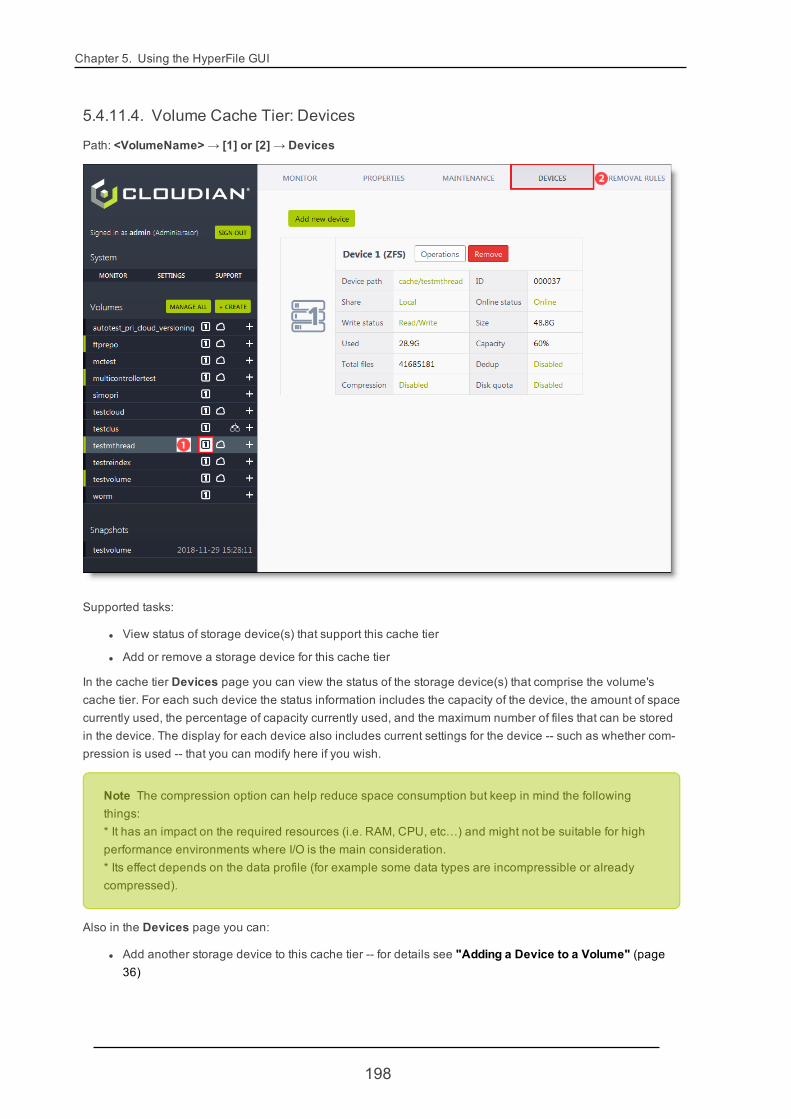
Chapter 5. Using the HyperFile GUI
5.4.11.4. Volume Cache Tier: Devices
Path: <VolumeName> → [1] or [2] → Devices
Supported tasks:
l View status of storage device(s) that support this cache tier
l Add or remove a storage device for this cache tier
In the cache tier Devices page you can view the status of the storage device(s) that comprise the volume'scache tier. For each such device the status information includes the capacity of the device, the amount of spacecurrently used, the percentage of capacity currently used, and the maximum number of files that can be storedin the device. The display for each device also includes current settings for the device -- such as whether com-pression is used -- that you can modify here if you wish.
Note The compression option can help reduce space consumption but keep in mind the followingthings:* It has an impact on the required resources (i.e. RAM, CPU, etc…) and might not be suitable for highperformance environments where I/O is the main consideration.* Its effect depends on the data profile (for example some data types are incompressible or alreadycompressed).
Also in the Devices page you can:
l Add another storage device to this cache tier -- for details see "Adding a Device to a Volume" (page36)
198
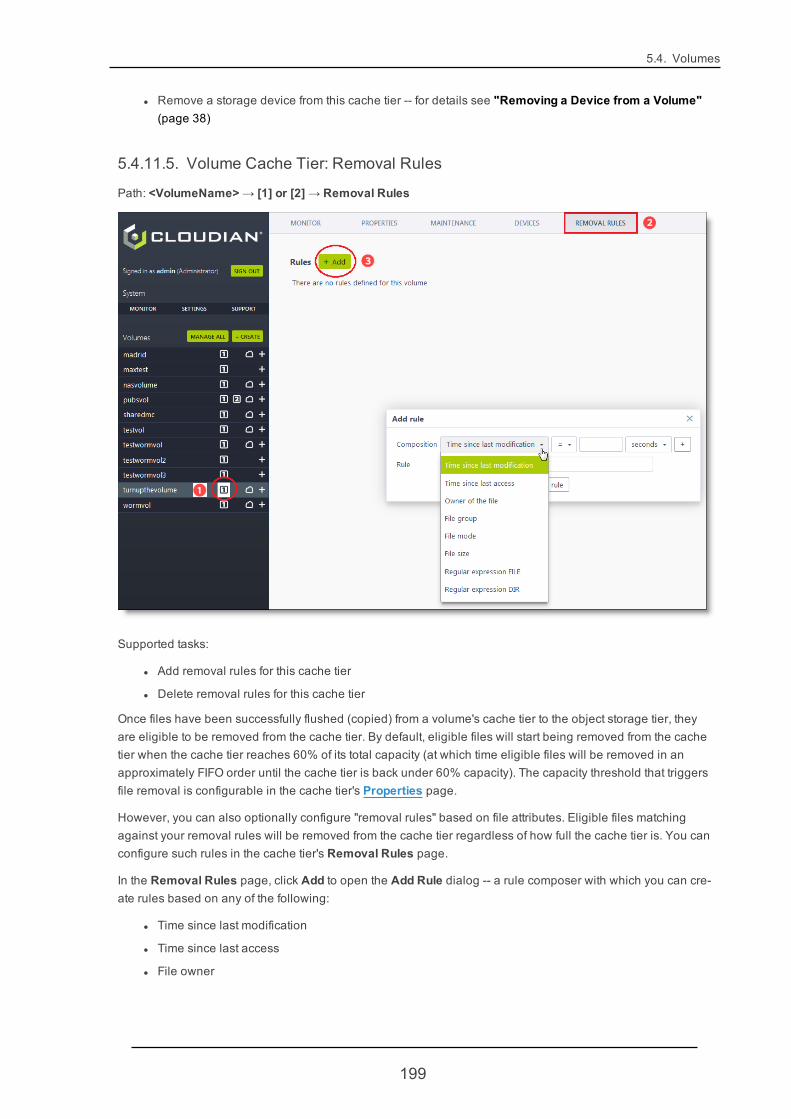
5.4. Volumes
l Remove a storage device from this cache tier -- for details see "Removing a Device from a Volume"(page 38)
5.4.11.5. Volume Cache Tier: Removal Rules
Path: <VolumeName> → [1] or [2] → Removal Rules
Supported tasks:
l Add removal rules for this cache tier
l Delete removal rules for this cache tier
Once files have been successfully flushed (copied) from a volume's cache tier to the object storage tier, theyare eligible to be removed from the cache tier. By default, eligible files will start being removed from the cachetier when the cache tier reaches 60% of its total capacity (at which time eligible files will be removed in anapproximately FIFO order until the cache tier is back under 60% capacity). The capacity threshold that triggersfile removal is configurable in the cache tier's Properties page.
However, you can also optionally configure "removal rules" based on file attributes. Eligible files matchingagainst your removal rules will be removed from the cache tier regardless of how full the cache tier is. You canconfigure such rules in the cache tier's Removal Rules page.
In the Removal Rules page, click Add to open the Add Rule dialog -- a rule composer with which you can cre-ate rules based on any of the following:
l Time since last modification
l Time since last access
l File owner
199
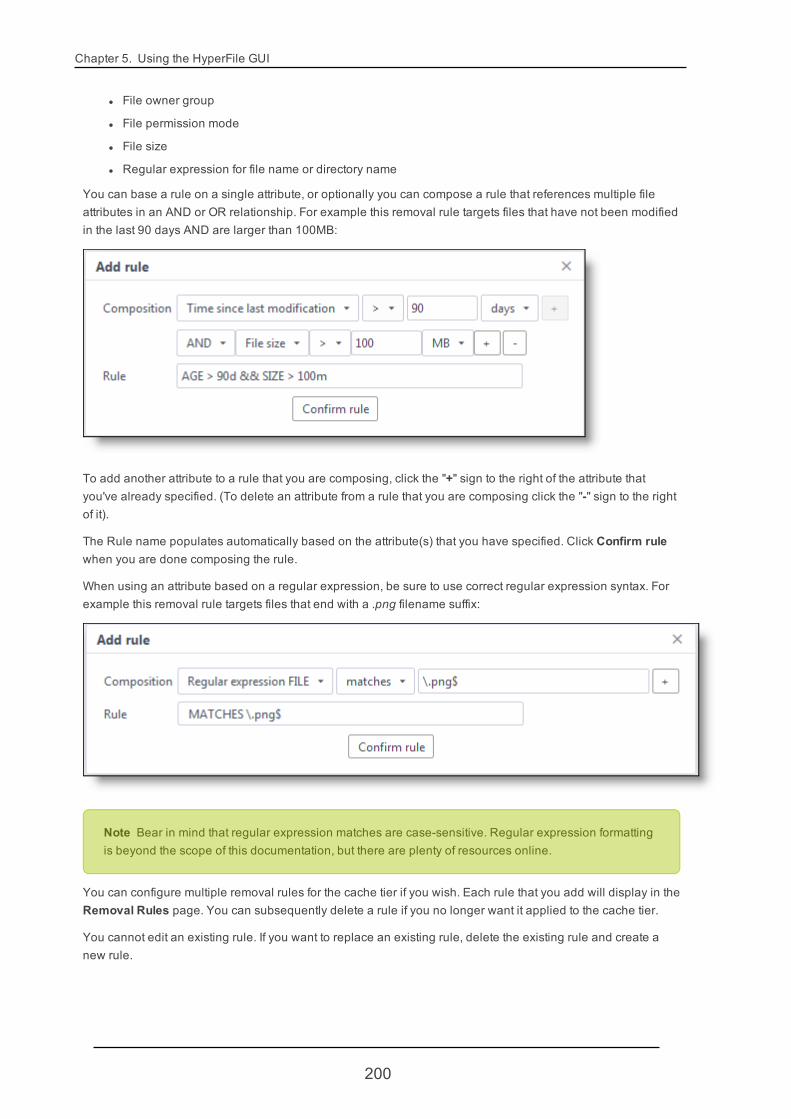
Chapter 5. Using the HyperFile GUI
l File owner group
l File permission mode
l File size
l Regular expression for file name or directory name
You can base a rule on a single attribute, or optionally you can compose a rule that references multiple fileattributes in an AND or OR relationship. For example this removal rule targets files that have not been modifiedin the last 90 days AND are larger than 100MB:
To add another attribute to a rule that you are composing, click the "+" sign to the right of the attribute thatyou've already specified. (To delete an attribute from a rule that you are composing click the "-" sign to the rightof it).
The Rule name populates automatically based on the attribute(s) that you have specified. Click Confirm rulewhen you are done composing the rule.
When using an attribute based on a regular expression, be sure to use correct regular expression syntax. Forexample this removal rule targets files that end with a .png filename suffix:
Note Bear in mind that regular expression matches are case-sensitive. Regular expression formattingis beyond the scope of this documentation, but there are plenty of resources online.
You can configure multiple removal rules for the cache tier if you wish. Each rule that you add will display in theRemoval Rules page. You can subsequently delete a rule if you no longer want it applied to the cache tier.
You cannot edit an existing rule. If you want to replace an existing rule, delete the existing rule and create anew rule.
200
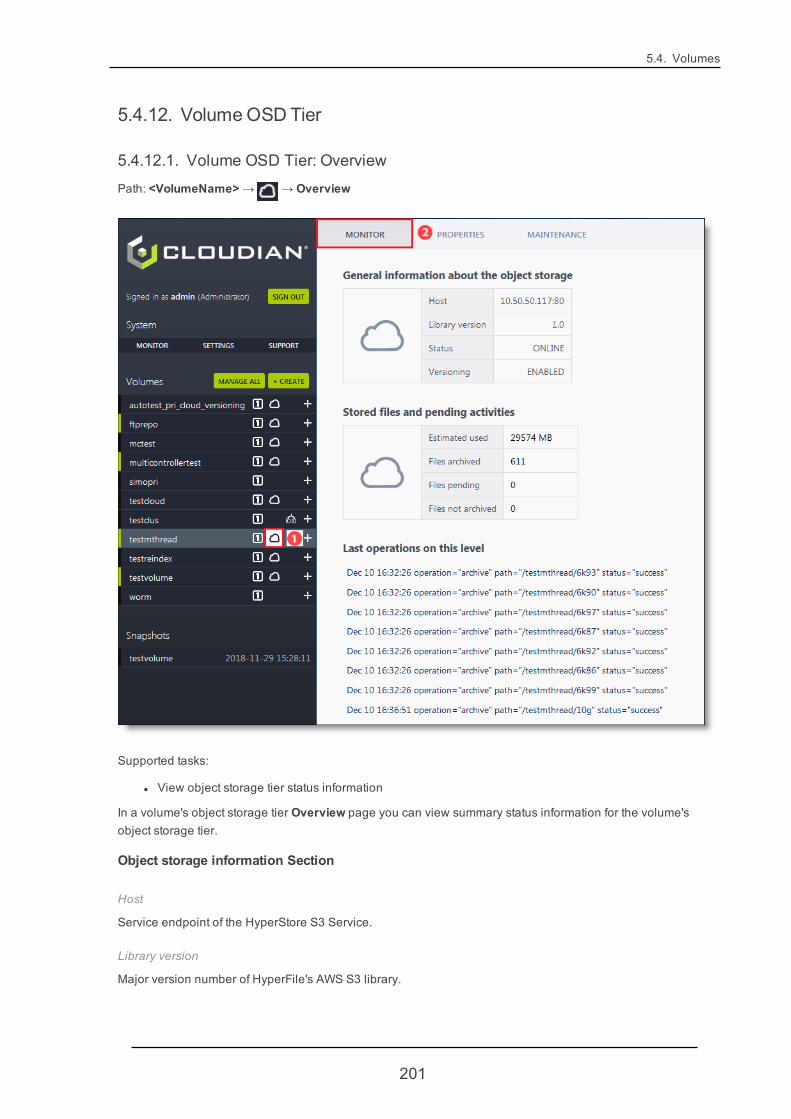
5.4. Volumes
5.4.12. VolumeOSDTier
5.4.12.1. Volume OSD Tier: Overview
Path: <VolumeName> → →Overview
Supported tasks:
l View object storage tier status information
In a volume's object storage tier Overview page you can view summary status information for the volume'sobject storage tier.
Object storage information Section
Host
Service endpoint of the HyperStore S3 Service.
Library version
Major version number of HyperFile's AWS S3 library.
201
Chapter 5. Using the HyperFile GUI
Status
Status of the HyperStore S3 Service -- Online or Offline.
Versioning
Whether versioning is Enabled or Disabled on the bucket that this volume uses for storage in HyperStore. Ver-sioning must be enabled on the bucket if this volume is to use HyperFile's snapshot feature (see "HyperFileSnapshots Overview" (page 67)) or its multi-controller feature (see "HyperFile Multi-Controller Overview"(page 49)).
To enable versioning on a bucket, use your HyperStore product interfaces such as the Cloudian ManagementConsole or the S3 API.
Note If HyperStore is Offline, the bucket versioning status will show as Unknown.
Stored files and pending activities Section
Estimated used
Total net storage space currently being used by this volume's files in the object storage tier. "Net" storagespace excludes overhead associated with replication or erasure coding within the object storage tier.
Files archived
Total number of this volume's files currently stored in the object storage tier.
Files pending
Number of this volume's files that are currently queued for flushing (copying) from the cache tier to the objectstorage tier.
Files not archived
Number of this volume's files that failed to be flushed (copied) from the cache tier to the object storage tier.
If the volume is a multi-controller volume, the "Stored files and pending activities" section will also includethese items:
Pending operations (multi-controller)
Number of index operations that the local node needs to process in order to sync up with the other node(s) inthe multi-controller ring. This number will grow when there is activity on the nodes, and should reduce toward 0during the sync-up phase. If this number remains non-zero and constant even when the other node(s) are idle,this could indicate a problem with the sync-up operations.
Multi-controller generic errors
Number of index sync operations that the local node could not process for unknown reasons.
Multi-controller conflict errors
Number of index conflicts that the conflict manager was unable to resolve.
Multi-controller index errors
Number of local index operations that the local node failed to transmit to HyperStore for propagation to theother nodes.
202
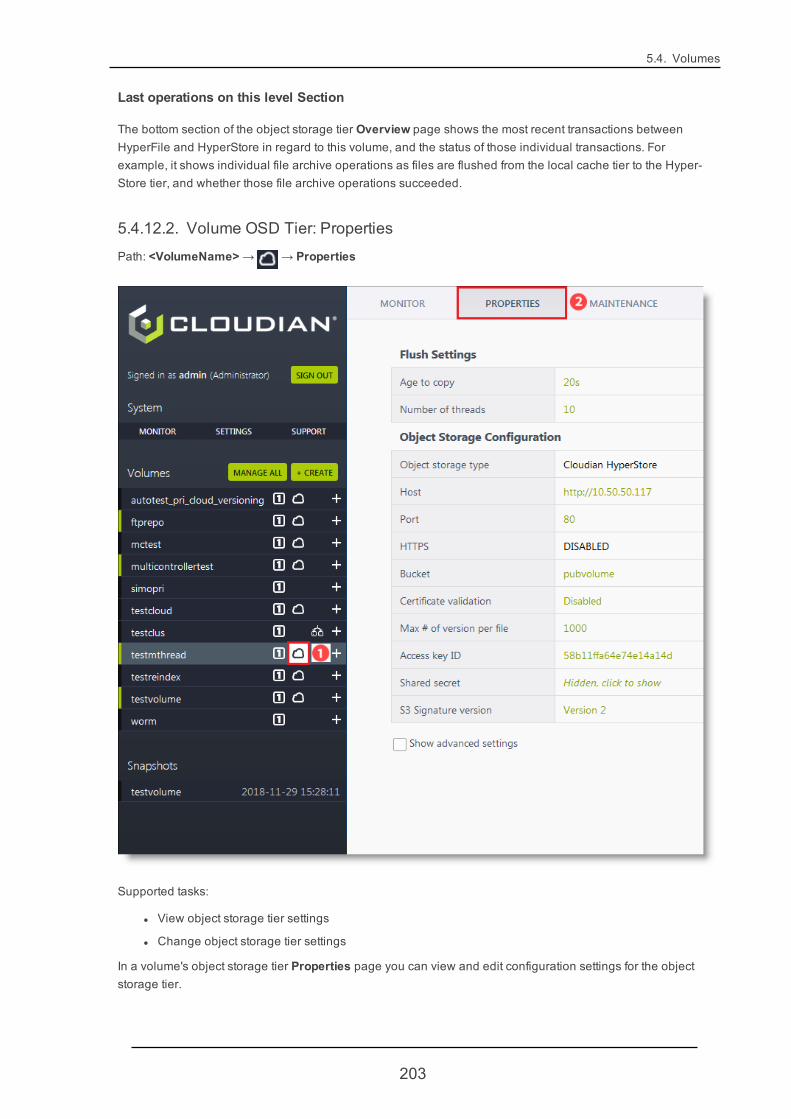
5.4. Volumes
Last operations on this level Section
The bottom section of the object storage tier Overview page shows the most recent transactions betweenHyperFile and HyperStore in regard to this volume, and the status of those individual transactions. Forexample, it shows individual file archive operations as files are flushed from the local cache tier to the Hyper-Store tier, and whether those file archive operations succeeded.
5.4.12.2. Volume OSD Tier: Properties
Path: <VolumeName> → → Properties
Supported tasks:
l View object storage tier settings
l Change object storage tier settings
In a volume's object storage tier Properties page you can view and edit configuration settings for the objectstorage tier.
203
Chapter 5. Using the HyperFile GUI
Flush Settings Section
Age to copy
After this much time, a file written to the cache tier is eligible to be flushed (copied) to the object storage tier.
Default = 20 seconds (this is also the minimum allowed value)
Number of threads
On the HyperFile node, the number of processing threads used for flushing data from the cache tier to theobject storage tier.
Default = 10
Object Storage Configuration Section
Object storage type (read only)
The brand of object storage system serving as the object storage tier. This is always Cloudian HyperStore.
Host
The S3 service endpoint URL of your HyperStore system. This will start with either http:// or https://. For examplehttp://s3-region1.enterprise.com.
The only circumstance where you would change this here is if on your HyperStore system you've changed theS3 service endpoint for some reason, and then you make the corresponding change here so that HyperFilecan continue to connect to the HyperStore S3 service.
Port
The port will typically be 80 if your HyperStore S3 service endpoint uses regular HTTP or 443 if your S3 serviceendpoint uses HTTPS.
HTTPS (read only)
Whether HTTPS connections from HyperFile to HyperStore are enabled or disabled.
Bucket
Name of the target bucket that serves as the object storage back-end for this volume.
Although this is editable, changing the object storage bucket that the volume uses is not recommended ifthere is already data in the volume. Any files that have already been flushed (copied) to the existing bucketwill no longer be readable from the object storage tier if you have the volume start using a different bucket. Andif there are not replicas of such files in the cache -- or if the file replicas are subsequently removed from cacheas a result of your configured removal settings -- then those files will not be readable through HyperFile at all.
If you do change the target bucket that a volume uses, then from that time forward data written to the volumewill be flushed to the new bucket rather than the old bucket.
Certificate validation
If this is Enabled, then HyperFile will require a validated TLS/SSL certificate when connecting to the Hyper-Store S3 service endpoint.
Keep this set to Disabled if your HyperStore "Host" value is in the form of a private IP address. Certificate val-idation is not supported for a private IP address (this is also the case for most browsers). If you want to use cer-tificate validation in a private network, set up a DNS entry instead.
204
5.4. Volumes
Note If HyperStore is using a Certificate Authority that is not included in HyperFile's defaultSSL keystore, you can add the CA to the keystore through the GUI's Certificates page.
Max # of versions per file
If versioning is enabled on the HyperStore bucket that the volume is using as its object storage tier, this settinglimits the number of versions that will be stored per file. Keep in mind that the HyperFile snapshot featurerelies on there being a sufficient history of file versions in HyperStore to meet your data protection and res-toration needs.
If the limit is exceeded for a file, HyperFile will automatically delete the oldest version of the file, to bring thefile's number of versions back within the limit.
Default = 10
Access key ID
Access key ID used when accessing the HyperStore system.
Shared secret
Secret key used when accessing the HyperStore system.
S3 Signature version
The S3 Signature version used accessing the HyperStore system.
Default = Version 2
Advanced SettingsThese settings display on the page only if you select the "Show advanced settings" options. In typical cir-cumstances you should not need to change any of these settings. Use caution with these settings.
Object Storage Configuration (advanced)
Multi-controller
Whether the object storage tier for this volume is supporting geo-distribution (i.e. a multi-controller volume) --Enabled or Disabled. See "HyperFile Multi-Controller Overview" (page 49) and the subsequent sections.
Default = Disabled
Other Settings (advanced)
Usebucketroot
If you set this to Enabled, when files from this volume are flushed to the object storage bucket they will be writ-ten into the root level of the bucket rather than under a directory named for the volume:
l "Usebucketroot" Disabled -- In HyperStore, <bucketname>/<volumename>/<files_go_here>
l "Usebucketroot" Enabled -- In HyperStore, <bucketname>/<files_go_here>
Default = Disabled
205

Chapter 5. Using the HyperFile GUI
IMPORTANT: Do not enable this setting for a HyperFile volume into which users have alreadyuploaded data. Doing so will make that data inaccessible to HyperFile users.
IMPORTANT: Do not enable this setting if multiple HyperFile volumes use this same HyperStorebucket.
Bucketroot (read only)
Within the target bucket in HyperStore, the volume's root folder.
By default the root folder is named after the volume. For example, if a volume named "accounting" is using abucket named "bucket5" in HyperStore, HyperFile by default will automatically create in the "bucket5" bucket afolder named "accounting" and this folder is the bucket root.
Note If you enable the "Usebucketroot" setting, then this field will be empty (and the bucket itself is thebucket root).
Attribute strategy
If this is set to "Set attributes", then each file's attributes and ACL settings are duplicated on the object storagetier.
If this is set to "Don't set attributes", then file attributes and ACL settings are not stored on the object storage tier.
Note If you are using an Object Lock bucket as the HyperStore target for the volume, it is recom-mended to set this property to "Don't set attributes".
Default = Set attributes
Limit
This allows you to set a limit on the amount of data from this volume that will be stored in the target bucket.
Default = Disabled (no limit)
IMPORTANT: Use this setting with caution, if at all. If you set a limit, and the limit is reached, then Hyper-File will stop flushing data from the cache tier to the object storage tier for this volume.
5.4.12.3. Volume OSD Tier: Maintenance
Path: <VolumeName> → →Maintenance
206
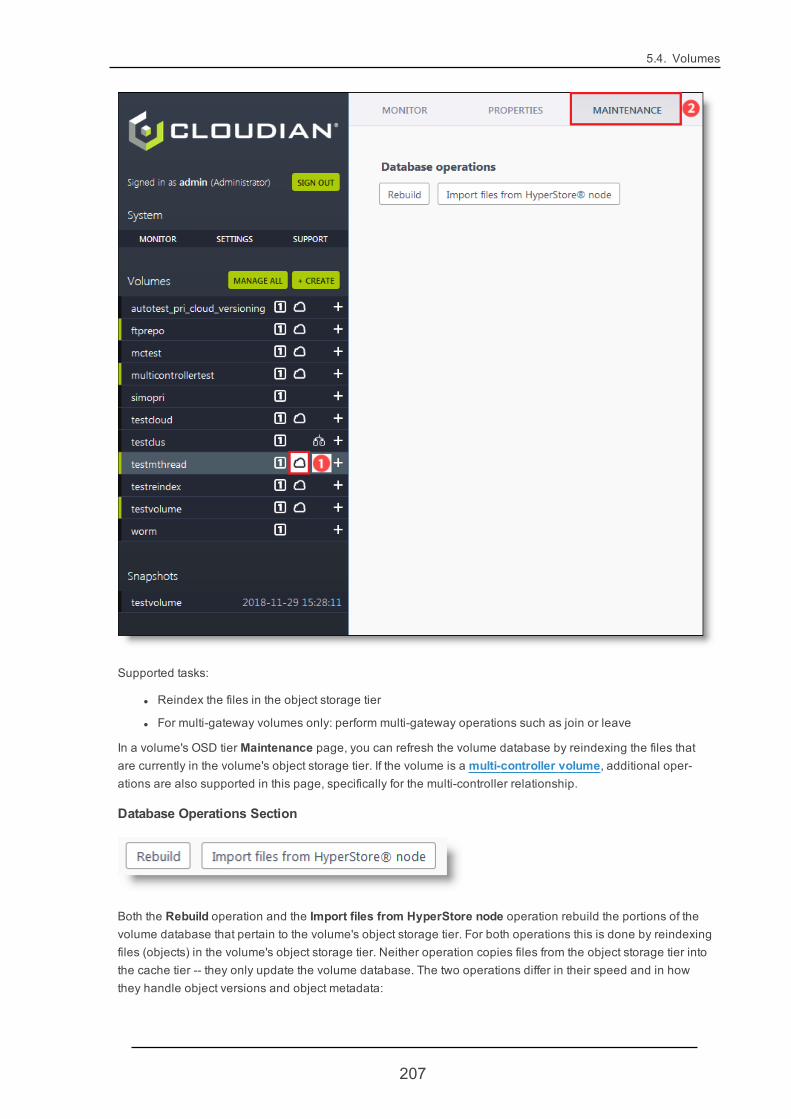
5.4. Volumes
Supported tasks:
l Reindex the files in the object storage tier
l For multi-gateway volumes only: perform multi-gateway operations such as join or leave
In a volume's OSD tier Maintenance page, you can refresh the volume database by reindexing the files thatare currently in the volume's object storage tier. If the volume is a multi-controller volume, additional oper-ations are also supported in this page, specifically for the multi-controller relationship.
Database Operations Section
Both the Rebuild operation and the Import files from HyperStore node operation rebuild the portions of thevolume database that pertain to the volume's object storage tier. For both operations this is done by reindexingfiles (objects) in the volume's object storage tier. Neither operation copies files from the object storage tier intothe cache tier -- they only update the volume database. The two operations differ in their speed and in howthey handle object versions and object metadata:
207
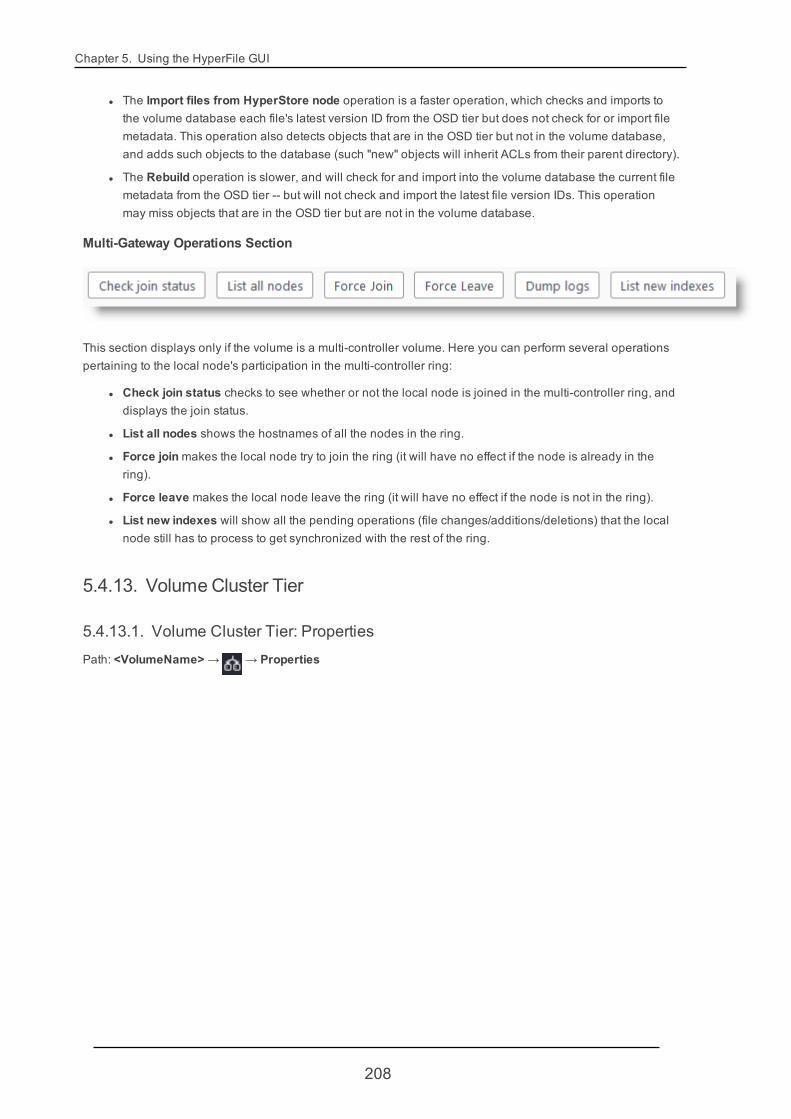
Chapter 5. Using the HyperFile GUI
l The Import files from HyperStore node operation is a faster operation, which checks and imports tothe volume database each file's latest version ID from the OSD tier but does not check for or import filemetadata. This operation also detects objects that are in the OSD tier but not in the volume database,and adds such objects to the database (such "new" objects will inherit ACLs from their parent directory).
l The Rebuild operation is slower, and will check for and import into the volume database the current filemetadata from the OSD tier -- but will not check and import the latest file version IDs. This operationmay miss objects that are in the OSD tier but are not in the volume database.
Multi-Gateway Operations Section
This section displays only if the volume is a multi-controller volume. Here you can perform several operationspertaining to the local node's participation in the multi-controller ring:
l Check join status checks to see whether or not the local node is joined in the multi-controller ring, anddisplays the join status.
l List all nodes shows the hostnames of all the nodes in the ring.
l Force joinmakes the local node try to join the ring (it will have no effect if the node is already in thering).
l Force leave makes the local node leave the ring (it will have no effect if the node is not in the ring).
l List new indexes will show all the pending operations (file changes/additions/deletions) that the localnode still has to process to get synchronized with the rest of the ring.
5.4.13. VolumeCluster Tier
5.4.13.1. Volume Cluster Tier: Properties
Path: <VolumeName> → → Properties
208
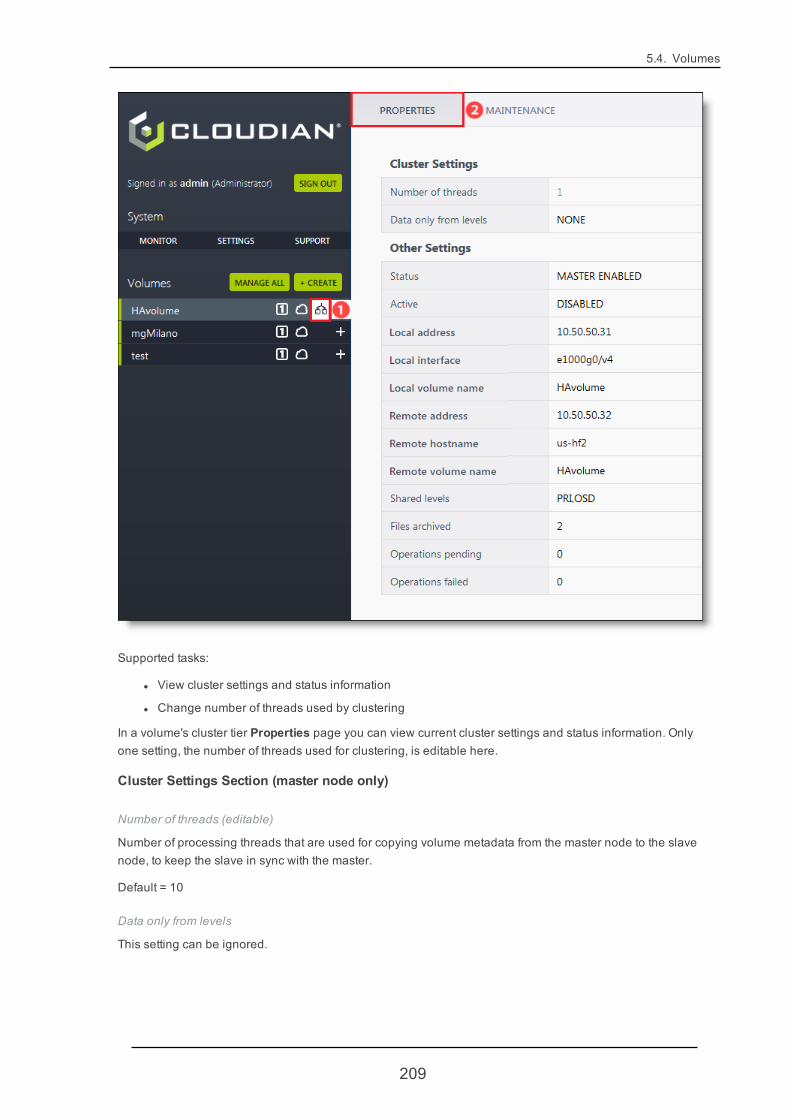
5.4. Volumes
Supported tasks:
l View cluster settings and status information
l Change number of threads used by clustering
In a volume's cluster tier Properties page you can view current cluster settings and status information. Onlyone setting, the number of threads used for clustering, is editable here.
Cluster Settings Section (master node only)
Number of threads (editable)
Number of processing threads that are used for copying volume metadata from the master node to the slavenode, to keep the slave in sync with the master.
Default = 10
Data only from levels
This setting can be ignored.
209
Chapter 5. Using the HyperFile GUI
Other Settings Section
Status
This indicates whether the local HyperFile node is the Master or the Slave in the clustering relationship.
Active
This indicates whether clustering is currently Enabled or Disabled. If clustering is Disabled, then volumemetadata is not being flushed from the master node to the slave node. You can enable or disable clusteringfrom the cluster tier Maintenance page.
Local address
On the local HyperFile node, the IP address.
Local interface
On the local HyperFile node, the network interface being used for node-to-node clustering communications.
Local volume name
On the local HyperFile node, the name of this clustered volume.
Remote address
On the remote HyperFile node in this clustering relationship, the IP address.
Remote hostname
On the remote HyperFile node in this clustering relationship, the hostname.
Remote volume name
On the remote HyperFile node in this clustering relationship, the name of this clustered volume. This would typ-ically be the same as the volume name on the local node.
Shared levels
The storage tiers being shared by the local and remote node in this clustering relationship. This would typicallybe the PRI cache tier and the object storage tier (OSD).
Files archived
Number of files in this clustered volume.
Operations pending (master node only)
Number of files for which metadata is currently queued for flushing from the master node to the slave node.
Operations failed (master node only)
Number of files for which metadata failed to be flushed from the master node to the slave node.
5.4.13.2. Volume Cluster Tier: Maintenance
Path: <VolumeName> → →Maintenance
210
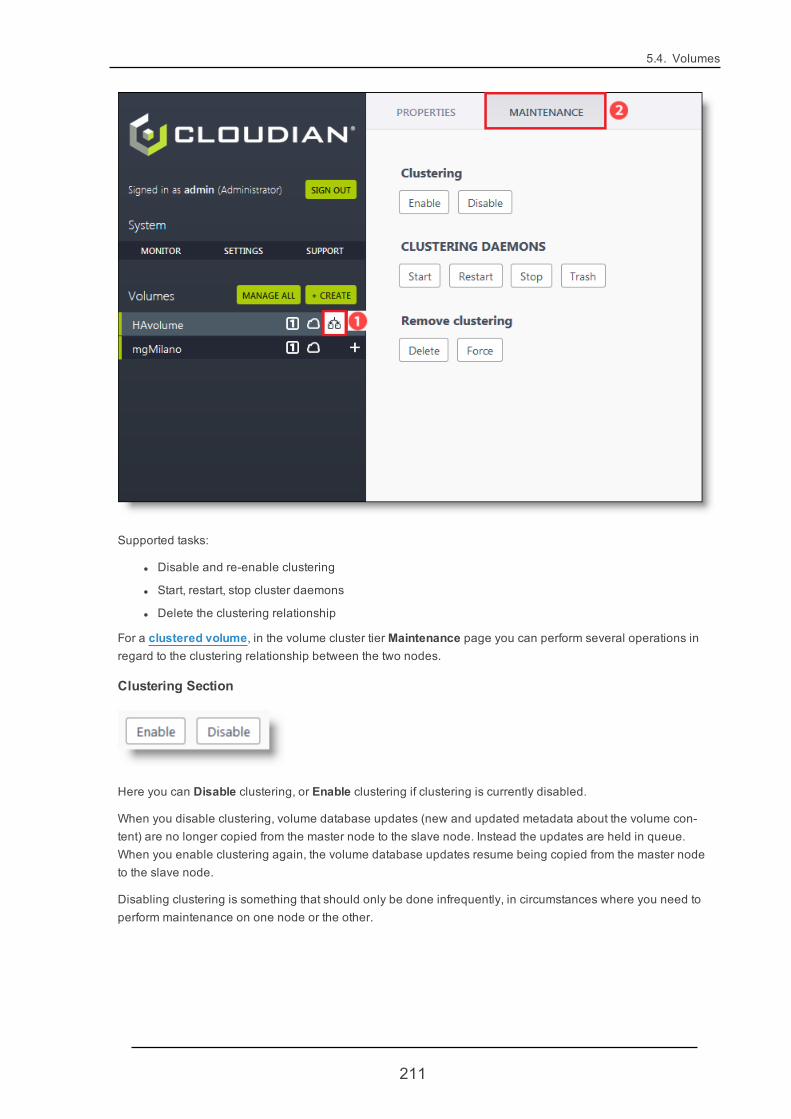
5.4. Volumes
Supported tasks:
l Disable and re-enable clustering
l Start, restart, stop cluster daemons
l Delete the clustering relationship
For a clustered volume, in the volume cluster tier Maintenance page you can perform several operations inregard to the clustering relationship between the two nodes.
Clustering Section
Here you can Disable clustering, or Enable clustering if clustering is currently disabled.
When you disable clustering, volume database updates (new and updated metadata about the volume con-tent) are no longer copied from the master node to the slave node. Instead the updates are held in queue.When you enable clustering again, the volume database updates resume being copied from the master nodeto the slave node.
Disabling clustering is something that should only be done infrequently, in circumstances where you need toperform maintenance on one node or the other.
211

Chapter 5. Using the HyperFile GUI
Note You can disable and enable clustering from the master node's GUI or the slave node's GUI -- theresult is the same either way.
Clustering Daemons Section
Here you can Start or Restart or Stop the clustering daemons on the local node. (While the Stop option shutsdown the daemons gracefully, the Trash option kills the daemons. This option may be useful if the daemonsare "stuck" and won't stop in the normal way.)
Note that closing and reopening the volume will result in the clustering daemons being restarted. If you wantclustering to remain disabled regardless of changes to the volume's closed/opened status, use the Disableoption in the Clustering section -- rather than stopping the daemons.
Remove Clustering Section
If you want to permanently remove the clustering relationship from a clustered volume, you can do so. Thisdeletes the cluster configuration and leaves two independent and functional volumes, one on each node. Notethat the two independent volumes may have the same name but will be on different hosts.
If there is communication between the two nodes, you can use the Delete button to remove the clustering rela-tionship. You can do this on either the master node or the slave node, and the change will propagate to theother node as well.
If there is not communication between the two nodes, use the Force button to remove the clustering rela-tionship. You will need to do this on each node, separately.
5.4.14. Add Volume Storage TierPath: <VolumeName> →
212

5.4. Volumes
Supported task:
l Add a storage tier to an existing volume
By clicking the "+" sign to the right of the volume name you can add a storage tier to the volume. You will beable to choose among any storage tier type that the volume currently lacks -- such as a Secondary cache tier(SEC), an object storage tier, or a cluster tier.
Note This is not the same as adding a new storage device to an existing storage tier (such as youmight do if for example you are wanting to increase the storage capacity of your existing PRI cachetier). For information on that task see "Managing Volume Storage Devices" (page 34).
Based on the storage tier type that you select, you will be prompted to provide configuration information for thenew tier.
For information on configuring a SEC cache tier for a volume, see "Creating a Volume" (page 34) -- Step 2and Step 3 (the configuration information that the volume creation wizard prompts you for if you include a SECtier during volume creation is the same information that you are prompted for if you're adding a SEC tier to anexisting volume).
For information on configuring an object storage tier for a volume, see "Creating a Volume" (page 34) -- Step4.
For clustering, more aspects need to be considered. For complete information on clustering see:
213

Chapter 5. Using the HyperFile GUI
l "HyperFile Clustering Overview" (page 40)
l "Preparing to Create a Clustered Volume" (page 41)
l "Creating a Clustered Volume" (page 46)
l "Enabling Failover Between Clustered Nodes" (page 46)
214
Chapter 6. Acknowledgments of ThirdParty ProductsBelow are the names and licenses of open source products used and/or bundled within HyperFile.
libxml2Copyright (C) 1998-2012 Daniel Veillard. All Rights Reserved.
Permission is hereby granted, free of charge, to any person obtaining a copy
of this software and associated documentation files (the "Software"), to deal
in the Software without restriction, including without limitation the rights
to use, copy, modify, merge, publish, distribute, sublicense, and/or sell
copies of the Software, and to permit persons to whom the Software is fur-
nished to do so, subject to the following conditions:
The above copyright notice and this permission notice shall be included in
all copies or substantial portions of the Software.
THE SOFTWARE IS PROVIDED "AS IS", WITHOUTWARRANTY OF ANY KIND, EXPRESS OR
IMPLIED, INCLUDING BUT NOT LIMITED TO THE WARRANTIES OF MERCHANTABILITY, FIT-
NESS FOR A PARTICULAR PURPOSE AND NONINFRINGEMENT. IN NO EVENT SHALL THE
AUTHORS OR COPYRIGHT HOLDERS BE LIABLE FOR ANY CLAIM, DAMAGES OR OTHER
LIABILITY, WHETHER IN AN ACTION OF CONTRACT, TORT OR OTHERWISE, ARISING FROM,
OUT OF OR IN CONNECTION WITH THE SOFTWARE OR THE USE OR OTHER DEALINGS IN
THE SOFTWARE.
curlCopyright (c) 1996 - 2015, Daniel Stenberg, <[email protected]>.
All rights reserved.
Permission to use, copy, modify, and distribute this software for any purpose
with or without fee is hereby granted, provided that the above copyright
notice and this permission notice appear in all copies.
THE SOFTWARE IS PROVIDED "AS IS", WITHOUTWARRANTY OF ANY KIND, EXPRESS OR
IMPLIED, INCLUDING BUT NOT LIMITED TO THE WARRANTIES OF MERCHANTABILITY,
FITNESS FOR A PARTICULAR PURPOSE AND NONINFRINGEMENT OF THIRD PARTY RIGHTS. IN
NO EVENT SHALL THE AUTHORS OR COPYRIGHT HOLDERS BE LIABLE FOR ANY CLAIM,
DAMAGES OR OTHER LIABILITY, WHETHER IN AN ACTION OF CONTRACT, TORT OR
215

Chapter 6. Acknowledgments of Third Party Products
OTHERWISE, ARISING FROM, OUT OF OR IN CONNECTION WITH THE SOFTWARE OR THE USE
OR OTHER DEALINGS IN THE SOFTWARE.
Except as contained in this notice, the name of a copyright holder shall not
be used in advertising or otherwise to promote the sale, use or other dealings
in this Software without prior written authorization of the copyright holder.
libawsLicensed under the Apache License, Version 2.0 (the “License”); you may
not use this file except in compliance with the License.
You may obtain a copy of the License at:
http://www.apache.org/licenses/LICENSE-2.0
Unless required by applicable law or agreed to in writing, software
distributed under the License is distributed on an “AS IS” BASIS,
WITHOUTWARRANTIES OR CONDITIONS OF ANY KIND, either
express or implied. See the License for the specific language governing
permissions and limitations under the License.
PHP--------------------------------------------------------------------
The PHP License, version 3.01
Copyright (c) 1999 - 2014 The PHP Group. All rights reserved.
--------------------------------------------------------------------
Redistribution and use in source and binary forms, with or without
modification, is permitted provided that the following conditions
are met:
1. Redistributions of source code must retain the above copyright
notice, this list of conditions and the following disclaimer.
2. Redistributions in binary form must reproduce the above copyright
notice, this list of conditions and the following disclaimer in
the documentation and/or other materials provided with the
distribution.
3. The name "PHP" must not be used to endorse or promote products
derived from this software without prior written permission. For
written permission, please contact [email protected].
216

4. Products derived from this software may not be called "PHP", nor
may "PHP" appear in their name, without prior written permission
from [email protected]. You may indicate that your software works in
conjunction with PHP by saying "Foo for PHP" instead of calling
it "PHP Foo" or "phpfoo"
5. The PHP Group may publish revised and/or new versions of the
license from time to time. Each version will be given a
distinguishing version number.
Once covered code has been published under a particular version
of the license, you may always continue to use it under the terms
of that version. You may also choose to use such covered code
under the terms of any subsequent version of the license
published by the PHP Group. No one other than the PHP Group has
the right to modify the terms applicable to covered code created
under this License.
6. Redistributions of any form whatsoever must retain the following
acknowledgment:
"This product includes PHP software, freely available from
<http://www.php.net/software/>".
THIS SOFTWARE IS PROVIDED BY THE PHP DEVELOPMENT TEAM ``AS IS'' AND
ANY EXPRESSED OR IMPLIED WARRANTIES, INCLUDING, BUT NOT LIMITED TO,
THE IMPLIED WARRANTIES OF MERCHANTABILITY AND FITNESS FOR A
PARTICULAR PURPOSE ARE DISCLAIMED. IN NO EVENT SHALL THE PHP
DEVELOPMENT TEAM OR ITS CONTRIBUTORS BE LIABLE FOR ANY DIRECT,
INDIRECT, INCIDENTAL, SPECIAL, EXEMPLARY, OR CONSEQUENTIAL DAMAGES
(INCLUDING, BUT NOT LIMITED TO, PROCUREMENT OF SUBSTITUTE GOODS OR
SERVICES; LOSS OF USE, DATA, OR PROFITS; OR BUSINESS INTERRUPTION)
HOWEVER CAUSED AND ON ANY THEORY OF LIABILITY, WHETHER IN CONTRACT,
STRICT LIABILITY, OR TORT (INCLUDING NEGLIGENCE OR OTHERWISE)
ARISING IN ANY WAY OUT OF THE USE OF THIS SOFTWARE, EVEN IF ADVISED
OF THE POSSIBILITY OF SUCH DAMAGE.
--------------------------------------------------------------------
This software consists of voluntary contributions made by many
individuals on behalf of the PHP Group.
217
Chapter 6. Acknowledgments of Third Party Products
The PHP Group can be contacted via Email at [email protected].
For more information on the PHP Group and the PHP project,
please see <http://www.php.net>.
PHP includes the Zend Engine, freely available at
<http://www.zend.com>.
ApacheLicensed under the Apache License, Version 2.0 (the “License”); you may
not use this file except in compliance with the License.
You may obtain a copy of the License at:
http://www.apache.org/licenses/LICENSE-2.0
Unless required by applicable law or agreed to in writing, software
distributed under the License is distributed on an “AS IS” BASIS,
WITHOUTWARRANTIES OR CONDITIONS OF ANY KIND, either
express or implied. See the License for the specific language governing
permissions and limitations under the License.
EMC Centera* Copyright @ 1991-2, RSA Data Security, Inc. Created 1991.
* All rights reserved.
* License to copy and use this software is granted provided
* that it is identified as the "RSA Data Security, Inc. MD5
* Message-Digest Algorithm" in all material mentioning or
* referencing this software or this function.
* RSA Data Security, Inc. makes no representations concerning
* either the merchantability of this software or the
* suitability of this software for any particular purpose. It
* is provided "as is" without express or implied warranty of any kind.
*
* These notices must be retained in any
* copies of any part of this documentation and/or software.
OpenSSLCopyright OpenSSL 2017
218
Contents licensed under the terms of the OpenSSL license
See http://www.openssl.org/source/license.html for details
LevelDBCopyright (c) 2011 The LevelDB Authors. All rights reserved.
Redistribution and use in source and binary forms, with or without
modification, are permitted provided that the following conditions are
met:
* Redistributions of source code must retain the above copyright
notice, this list of conditions and the following disclaimer.
* Redistributions in binary form must reproduce the above
copyright notice, this list of conditions and the following disclaimer
in the documentation and/or other materials provided with the
distribution.
* Neither the name of Google Inc. nor the names of its
contributors may be used to endorse or promote products derived from
this software without specific prior written permission.
THIS SOFTWARE IS PROVIDED BY THE COPYRIGHT HOLDERS AND CONTRIBUTORS
"AS IS" AND ANY EXPRESS OR IMPLIED WARRANTIES, INCLUDING, BUT NOT
LIMITED TO, THE IMPLIED WARRANTIES OF MERCHANTABILITY AND FITNESS FOR
A PARTICULAR PURPOSE ARE DISCLAIMED. IN NO EVENT SHALL THE COPYRIGHT
OWNER OR CONTRIBUTORS BE LIABLE FOR ANY DIRECT, INDIRECT, INCIDENTAL,
SPECIAL, EXEMPLARY, OR CONSEQUENTIAL DAMAGES (INCLUDING, BUT NOT
LIMITED TO, PROCUREMENT OF SUBSTITUTE GOODS OR SERVICES; LOSS OF USE,
DATA, OR PROFITS; OR BUSINESS INTERRUPTION) HOWEVER CAUSED AND ON ANY
THEORY OF LIABILITY, WHETHER IN CONTRACT, STRICT LIABILITY, OR TORT
(INCLUDING NEGLIGENCE OR OTHERWISE) ARISING IN ANY WAY OUT OF THE USE
OF THIS SOFTWARE, EVEN IF ADVISED OF THE POSSIBILITY OF SUCH DAMAGE.
Keccak Code PackageMost of the source and header files in the KCP are released to the public domain and associated to the CC0deed.
The exceptions are the following:
- Common/brg_endian.h is copyrighted by Brian Gladman and comes with a BSD 3-clause license;
219
Chapter 6. Acknowledgments of Third Party Products
- Tests/genKAT.c is based on SHA-3 contest's code by Larry Bassham, NIST, which he licensed under a BSD3-clause license;
- Tests/timing.h is based on code by Doug Whiting, which he released to the public domain.
MariaDB ConnectorGNU LESSER GENERAL PUBLIC LICENSE
Version 2.1, February 1999
Copyright (C) 1991, 1999 Free Software Foundation, Inc.
51 Franklin Street, Fifth Floor, Boston, MA 02110-1301 USA
Everyone is permitted to copy and distribute verbatim copies
of this license document, but changing it is not allowed.
[This is the first released version of the Lesser GPL. It also counts
as the successor of the GNU Library Public License, version 2, hence
the version number 2.1.]
The full license can be obtained here: https://www.gnu.org/licenses/old-licenses/lgpl-2.1.en.html
GoLang Standard LibraryCopyright (c) 2009 The Go Authors. All rights reserved.
Redistribution and use in source and binary forms, with or without
modification, are permitted provided that the following conditions are
met:
* Redistributions of source code must retain the above copyright
notice, this list of conditions and the following disclaimer.
* Redistributions in binary form must reproduce the above
copyright notice, this list of conditions and the following disclaimer
in the documentation and/or other materials provided with the
distribution.
* Neither the name of Google Inc. nor the names of its
contributors may be used to endorse or promote products derived from
this software without specific prior written permission.
THIS SOFTWARE IS PROVIDED BY THE COPYRIGHT HOLDERS AND CONTRIBUTORS
"AS IS" AND ANY EXPRESS OR IMPLIED WARRANTIES, INCLUDING, BUT NOT
LIMITED TO, THE IMPLIED WARRANTIES OF MERCHANTABILITY AND FITNESS FOR
A PARTICULAR PURPOSE ARE DISCLAIMED. IN NO EVENT SHALL THE COPYRIGHT
220

OWNER OR CONTRIBUTORS BE LIABLE FOR ANY DIRECT, INDIRECT, INCIDENTAL,
SPECIAL, EXEMPLARY, OR CONSEQUENTIAL DAMAGES (INCLUDING, BUT NOT
LIMITED TO, PROCUREMENT OF SUBSTITUTE GOODS OR SERVICES; LOSS OF USE,
DATA, OR PROFITS; OR BUSINESS INTERRUPTION) HOWEVER CAUSED AND ON ANY
THEORY OF LIABILITY, WHETHER IN CONTRACT, STRICT LIABILITY, OR TORT
(INCLUDING NEGLIGENCE OR OTHERWISE) ARISING IN ANY WAY OUT OF THE USE
OF THIS SOFTWARE, EVEN IF ADVISED OF THE POSSIBILITY OF SUCH DAMAGE.
Atmos-CCopyright (c) 2012, Dell Inc.
All rights reserved.
Redistribution and use in source and binary forms, with or without
modification, are permitted provided that the following conditions are met:
* Redistributions of source code must retain the above copyright
notice, this list of conditions and the following disclaimer.
* Redistributions in binary form must reproduce the above copyright
notice, this list of conditions and the following disclaimer in the
documentation and/or other materials provided with the distribution.
* Neither the name of the <organization> nor the
names of its contributors may be used to endorse or promote products
derived from this software without specific prior written permission.
THIS SOFTWARE IS PROVIDED BY THE COPYRIGHT HOLDERS AND CONTRIBUTORS "AS IS" AND
ANY EXPRESS OR IMPLIED WARRANTIES, INCLUDING, BUT NOT LIMITED TO, THE IMPLIED
WARRANTIES OF MERCHANTABILITY AND FITNESS FOR A PARTICULAR PURPOSE ARE
DISCLAIMED. IN NO EVENT SHALL <COPYRIGHT HOLDER> BE LIABLE FOR ANY
DIRECT, INDIRECT, INCIDENTAL, SPECIAL, EXEMPLARY, OR CONSEQUENTIAL DAMAGES
(INCLUDING, BUT NOT LIMITED TO, PROCUREMENT OF SUBSTITUTE GOODS OR SERVICES;
LOSS OF USE, DATA, OR PROFITS; OR BUSINESS INTERRUPTION) HOWEVER CAUSED AND
ON ANY THEORY OF LIABILITY, WHETHER IN CONTRACT, STRICT LIABILITY, OR TORT
(INCLUDING NEGLIGENCE OR OTHERWISE) ARISING IN ANY WAY OUT OF THE USE OF THIS
SOFTWARE, EVEN IF ADVISED OF THE POSSIBILITY OF SUCH DAMAGE.
libiconvGNU LESSER GENERAL PUBLIC LICENSE
221

Chapter 6. Acknowledgments of Third Party Products
Version 2.1, February 1999
Copyright (C) 1991, 1999 Free Software Foundation, Inc.
51 Franklin Street, Fifth Floor, Boston, MA 02110-1301 USA
Everyone is permitted to copy and distribute verbatim copies
of this license document, but changing it is not allowed.
[This is the first released version of the Lesser GPL. It also counts
as the successor of the GNU Library Public License, version 2, hence
the version number 2.1.]
The full license can be obtained here: https://www.gnu.org/licenses/old-licenses/lgpl-2.1.en.html
libexpatCopyright (c) 1998-2000 Thai Open Source Software Center Ltd and Clark Cooper
Copyright (c) 2001-2017 Expat maintainers
Permission is hereby granted, free of charge, to any person obtaining
a copy of this software and associated documentation files (the
"Software"), to deal in the Software without restriction, including
without limitation the rights to use, copy, modify, merge, publish,
distribute, sublicense, and/or sell copies of the Software, and to
permit persons to whom the Software is furnished to do so, subject to
the following conditions:
The above copyright notice and this permission notice shall be included
in all copies or substantial portions of the Software.
THE SOFTWARE IS PROVIDED "AS IS", WITHOUTWARRANTY OF ANY KIND,
EXPRESS OR IMPLIED, INCLUDING BUT NOT LIMITED TO THE WARRANTIES OF
MERCHANTABILITY, FITNESS FOR A PARTICULAR PURPOSE AND NONINFRINGEMENT.
IN NO EVENT SHALL THE AUTHORS OR COPYRIGHT HOLDERS BE LIABLE FOR ANY
CLAIM, DAMAGES OR OTHER LIABILITY, WHETHER IN AN ACTION OF CONTRACT,
TORT OR OTHERWISE, ARISING FROM, OUT OF OR IN CONNECTION WITH THE
SOFTWARE OR THE USE OR OTHER DEALINGS IN THE SOFTWARE.
xxHashxxHash Library
Copyright (c) 2012-2014, Yann Collet
All rights reserved.
222
Redistribution and use in source and binary forms, with or without modification,
are permitted provided that the following conditions are met:
* Redistributions of source code must retain the above copyright notice, this
list of conditions and the following disclaimer.
* Redistributions in binary form must reproduce the above copyright notice, this
list of conditions and the following disclaimer in the documentation and/or
other materials provided with the distribution.
THIS SOFTWARE IS PROVIDED BY THE COPYRIGHT HOLDERS AND CONTRIBUTORS "AS IS" AND
ANY EXPRESS OR IMPLIED WARRANTIES, INCLUDING, BUT NOT LIMITED TO, THE IMPLIED
WARRANTIES OF MERCHANTABILITY AND FITNESS FOR A PARTICULAR PURPOSE ARE
DISCLAIMED. IN NO EVENT SHALL THE COPYRIGHT HOLDER OR CONTRIBUTORS BE LIABLE FOR
ANY DIRECT, INDIRECT, INCIDENTAL, SPECIAL, EXEMPLARY, OR CONSEQUENTIAL DAMAGES
(INCLUDING, BUT NOT LIMITED TO, PROCUREMENT OF SUBSTITUTE GOODS OR SERVICES;
LOSS OF USE, DATA, OR PROFITS; OR BUSINESS INTERRUPTION) HOWEVER CAUSED AND ON
ANY THEORY OF LIABILITY, WHETHER IN CONTRACT, STRICT LIABILITY, OR TORT
(INCLUDING NEGLIGENCE OR OTHERWISE) ARISING IN ANY WAY OUT OF THE USE OF THIS
SOFTWARE, EVEN IF ADVISED OF THE POSSIBILITY OF SUCH DAMAGE.
infimvinfimv contains parts of mv.c from IllumOS.
The contents of this file are subject to the terms of the
Common Development and Distribution License (the "License").
You may not use this file except in compliance with the License.
You can obtain a copy of the license at usr/src/OPENSOLARIS.LICENSE
or http://www.opensolaris.org/os/licensing.
See the License for the specific language governing permissions
and limitations under the License.
When distributing Covered Code, include this CDDL HEADER in each
file and include the License file at usr/src/OPENSOLARIS.LICENSE.
If applicable, add the following below this CDDL HEADER, with the
fields enclosed by brackets "[]" replaced with your own identifying
information: Portions Copyright [yyyy] [name of copyright owner]
/*
* Copyright 2013 Nexenta Systems, Inc. All rights reserved.
223

Chapter 6. Acknowledgments of Third Party Products
*/
/*
* Copyright 2009 Sun Microsystems, Inc. All rights reserved.
* Use is subject to license terms.
*/
/* Copyright (c) 1984, 1986, 1987, 1988, 1989 AT&T */
/* All Rights Reserved */
/*
* University Copyright- Copyright (c) 1982, 1986, 1988
* The Regents of the University of California
* All Rights Reserved
*
* University Acknowledgment- Portions of this document are derived from
* software developed by the University of California, Berkeley, and its
* contributors.
*/
TrademarksAll trademarks and registered trademarks in this documentation are the property of their respective owners.
224
Related Documents