177277/8-17/10146 Table of Contents Administrator Hierarchy .......................... 2 Enterprise Set Up .................................... 3 Group Set Up ......................................... 4 Department Set Up ................................ 7 User Set Up ............................................ 8 Group Services ...................................... 9 Configuration of Group Services ............ 9 Auto Attendant ...................................... 9 Call Park .............................................. 13 Call Pick-Up ......................................... 16 Custom Call Routing (Hunting) ............. 17 Music on Hold ..................................... 23 Account/Authorization Codes .............. 24 Calling Plans ........................................ 26 Meet-Me Conferencing ....................... 28 Utilities.................................................. 30 Shared Call Appearances ................... 31 Ongoing Management of Users .......... 33 Record Greeting/Announcement (.wav files) ............................................ 35 Passcode Rules ................................... 37 User Tags ............................................. 38 Additional Support ............................... 42 TDS ® managedIP Hosted Administrator User Guide

Welcome message from author
This document is posted to help you gain knowledge. Please leave a comment to let me know what you think about it! Share it to your friends and learn new things together.
Transcript
177277/8-17/10146
Table of ContentsAdministrator Hierarchy .......................... 2
Enterprise Set Up .................................... 3
Group Set Up ......................................... 4
Department Set Up ................................ 7
User Set Up ............................................ 8
Group Services ...................................... 9
Configuration of Group Services ............ 9
Auto Attendant ...................................... 9
Call Park .............................................. 13
Call Pick-Up ......................................... 16
Custom Call Routing (Hunting) ............. 17
Music on Hold ..................................... 23
Account/Authorization Codes .............. 24
Calling Plans ........................................ 26
Meet-Me Conferencing ....................... 28
Utilities .................................................. 30
Shared Call Appearances ................... 31
Ongoing Management of Users .......... 33
Record Greeting/Announcement (.wav files) ............................................ 35
Passcode Rules ................................... 37
User Tags ............................................. 38
Additional Support ............................... 42
TDS® managedIP HostedAdministrator User Guide
TDS® managedIP HostedAdministrator User Guide
177277/8-17/10146
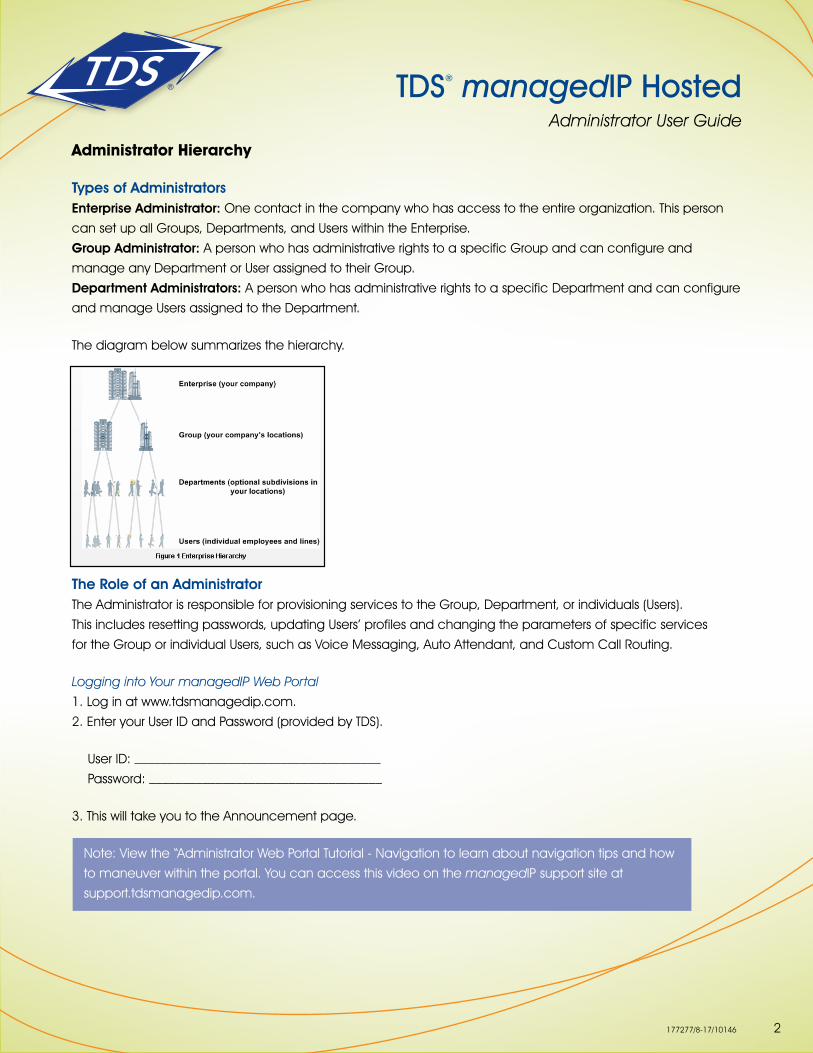
Administrator Hierarchy
Types of AdministratorsEnterprise Administrator: One contact in the company who has access to the entire organization. This person
can set up all Groups, Departments, and Users within the Enterprise.
Group Administrator: A person who has administrative rights to a specific Group and can configure and
manage any Department or User assigned to their Group.
Department Administrators: A person who has administrative rights to a specific Department and can configure
and manage Users assigned to the Department.
The diagram below summarizes the hierarchy.
The Role of an AdministratorThe Administrator is responsible for provisioning services to the Group, Department, or individuals (Users).
This includes resetting passwords, updating Users’ profiles and changing the parameters of specific services
for the Group or individual Users, such as Voice Messaging, Auto Attendant, and Custom Call Routing.
Logging into Your managedIP Web Portal
1. Log in at www.tdsmanagedip.com.
2. Enter your User ID and Password (provided by TDS).
User ID: _____________________________________
Password: ___________________________________
3. This will take you to the Announcement page.
Note: View the “Administrator Web Portal Tutorial - Navigation to learn about navigation tips and how
to maneuver within the portal. You can access this video on the managedIP support site at
support.tdsmanagedip.com.
2

TDS® managedIP HostedAdministrator User Guide
177277/8-17/10146
Enterprise Set Up
Enterprise ProfileThe Enterprise Profile allows you to set up your company information, change your Enterprise Administrator login
password that was assigned to you, view Call Processing Policies, and pull reports to quickly see what users are in
each group or department.
To set up Enterprise Profile Information
1. Hover over Profile and click Contact Information.
2. Enter the company information.
3. Enter the Enterprise Administrator contact information.
4. Click Save.
To change your password:
1. Hover over Profile and click Change Password.
2. Enter the Current Password assigned by TDS.
3. Enter your New Password.
4. Re-type your New Password.
5. Click Save.
Note: For security purposes you will be required to change your default password during your first login.
Please see Passcode Rules section.
Resources and UtilitiesResource and Utilities are both view-only menus. Resources will show the Group and User Services Authorizations
and Service Pack Consumption. Service Descriptions are in alphabetical order and can be very helpful in
learning your new system features and functionality. The Utilities Menu provides a view of all users in your
Enterprise, along with quick links to view detail and create a PDF of Directory information. Answer Confirmation
allows you to create a custom message that will be heard for features using Answer Confirmation.
Accessing GroupsTo access the Group you would like to manage or configure, select the Group name from the dropdown menu.
3
TDS® managedIP HostedAdministrator User Guide
177277/8-17/10146
Group Set Up
Group ProfileUpdate the Group Profile Section with your company information. Typically, each physical business
location is a unique Group.
To set up Group Profile Information
1. Select the Group.
2. Enter the Group company information.
3. Enter the Group Administrator contact information.
4. Click Save.
Note: If you have multiple Groups, be sure to assign a unique name to easily identify between them.
The Group Administrator is the main contact for the specific group however the contact information is for
reference only. To allow administration rights, the main contact would need to be set up as an Administrator
outlined on the next page.
Group Dialing Plan (Location Codes)If you have multiple locations where the last 3 or 4 digits from one employee could potentially be the same
as another employee (e.g., location A and B both have an extension of 2200), assign a location code for
each Group. By assigning a Location Dialing Code—such as 55 for Group A—employees will dial 55 plus the
extension (e.g., 552200) to reach the correct party. If you have all unique 3- or 4-digit extensions for all
employees, this feature will not be needed.
To set up a Location Dialing Code:
1. Select the Group requiring a location code.
2. Scroll down to Group Dialing Plan.
3. Enter a 1 or 2 digit Location Dialing Code.
4. Click Save.
Note: For calls made within a Group (same site location), Users will not dial a location code. Therefore,
the managedIP – Assistant Toolbar Group Directory will only display the Location Dialing Code for other
locations in the Enterprise. Users may need to restart the managedIP Assistant – Toolbar application
before they can view the Location Dialing Codes in the Group Directory.
4
TDS® managedIP HostedAdministrator User Guide
177277/8-17/10146
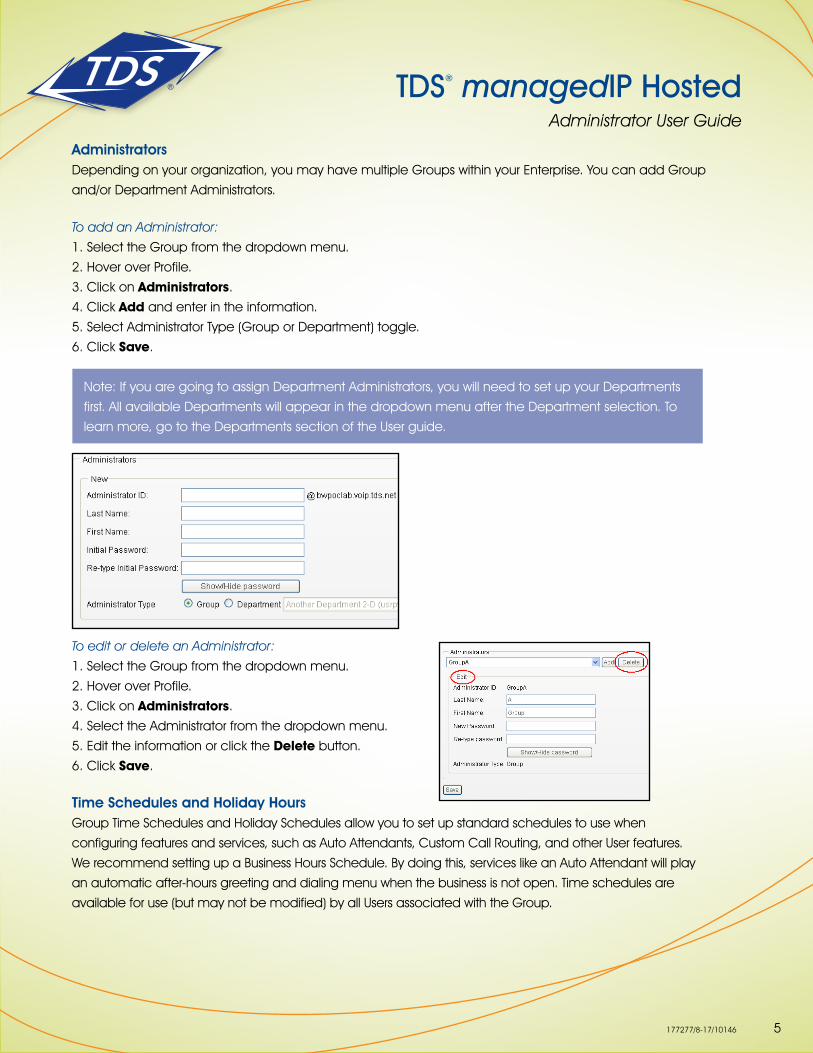
AdministratorsDepending on your organization, you may have multiple Groups within your Enterprise. You can add Group
and/or Department Administrators.
To add an Administrator:
1. Select the Group from the dropdown menu.
2. Hover over Profile.
3. Click on Administrators.
4. Click Add and enter in the information.
5. Select Administrator Type (Group or Department) toggle.
6. Click Save.
Note: If you are going to assign Department Administrators, you will need to set up your Departments
first. All available Departments will appear in the dropdown menu after the Department selection. To
learn more, go to the Departments section of the User guide.
To edit or delete an Administrator:
1. Select the Group from the dropdown menu.
2. Hover over Profile.
3. Click on Administrators.
4. Select the Administrator from the dropdown menu.
5. Edit the information or click the Delete button.
6. Click Save.
Time Schedules and Holiday HoursGroup Time Schedules and Holiday Schedules allow you to set up standard schedules to use when
configuring features and services, such as Auto Attendants, Custom Call Routing, and other User features.
We recommend setting up a Business Hours Schedule. By doing this, services like an Auto Attendant will play
an automatic after-hours greeting and dialing menu when the business is not open. Time schedules are
available for use (but may not be modified) by all Users associated with the Group.
5
TDS® managedIP HostedAdministrator User Guide
177277/8-17/10146
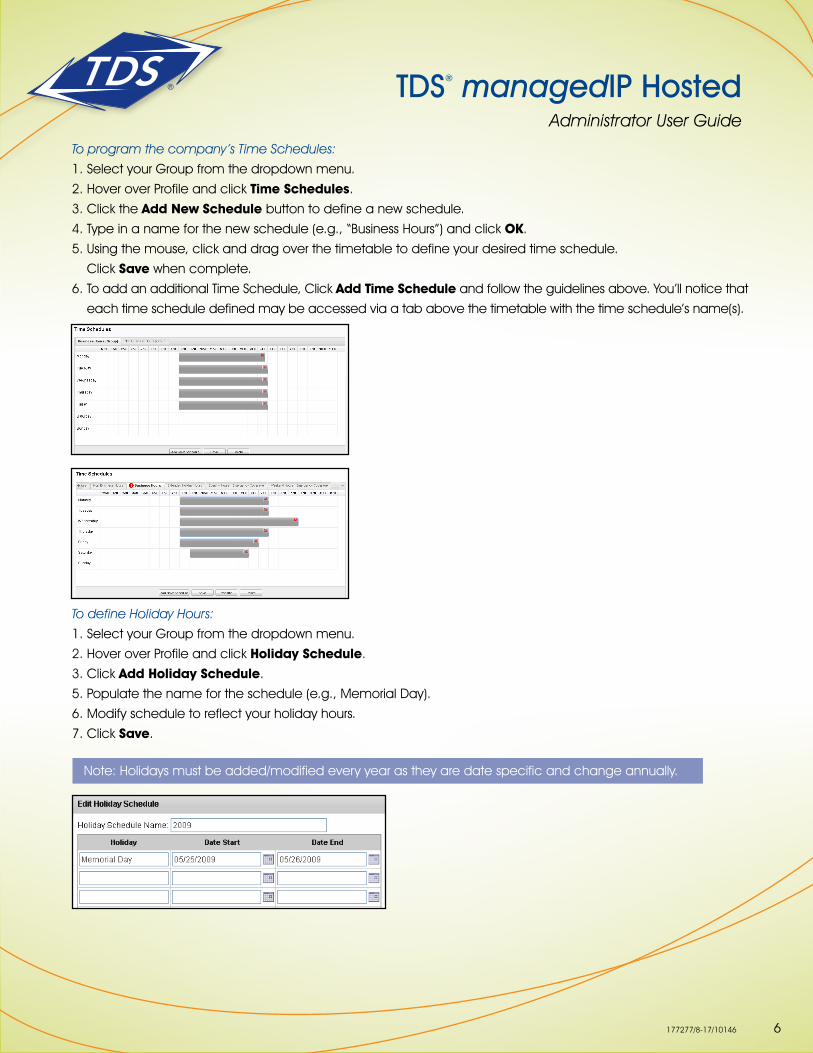
To program the company’s Time Schedules:
1. Select your Group from the dropdown menu.
2. Hover over Profile and click Time Schedules.
3. Click the Add New Schedule button to define a new schedule.
4. Type in a name for the new schedule (e.g., “Business Hours”) and click OK.
5. Using the mouse, click and drag over the timetable to define your desired time schedule.
Click Save when complete.
6. To add an additional Time Schedule, Click Add Time Schedule and follow the guidelines above. You’ll notice that
each time schedule defined may be accessed via a tab above the timetable with the time schedule’s name(s).
To define Holiday Hours:
1. Select your Group from the dropdown menu.
2. Hover over Profile and click Holiday Schedule.
3. Click Add Holiday Schedule.
5. Populate the name for the schedule (e.g., Memorial Day).
6. Modify schedule to reflect your holiday hours.
7. Click Save.
Note: Holidays must be added/modified every year as they are date specific and change annually.
6
TDS® managedIP HostedAdministrator User Guide
177277/8-17/10146
Department Set Up
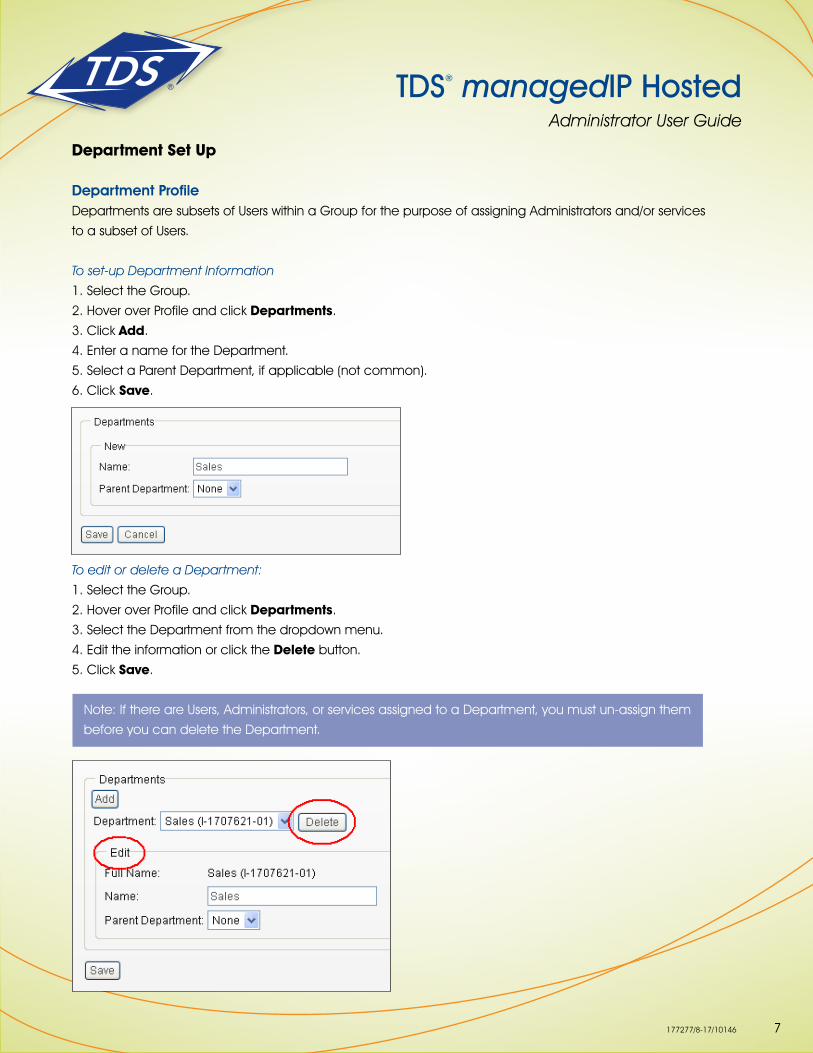
Department Profile Departments are subsets of Users within a Group for the purpose of assigning Administrators and/or services
to a subset of Users.
To set-up Department Information
1. Select the Group.
2. Hover over Profile and click Departments.
3. Click Add.
4. Enter a name for the Department.
5. Select a Parent Department, if applicable (not common).
6. Click Save.
To edit or delete a Department:
1. Select the Group.
2. Hover over Profile and click Departments.
3. Select the Department from the dropdown menu.
4. Edit the information or click the Delete button.
5. Click Save.
Note: If there are Users, Administrators, or services assigned to a Department, you must un-assign them
before you can delete the Department.
7
TDS® managedIP HostedAdministrator User Guide
177277/8-17/10146
User Set Up
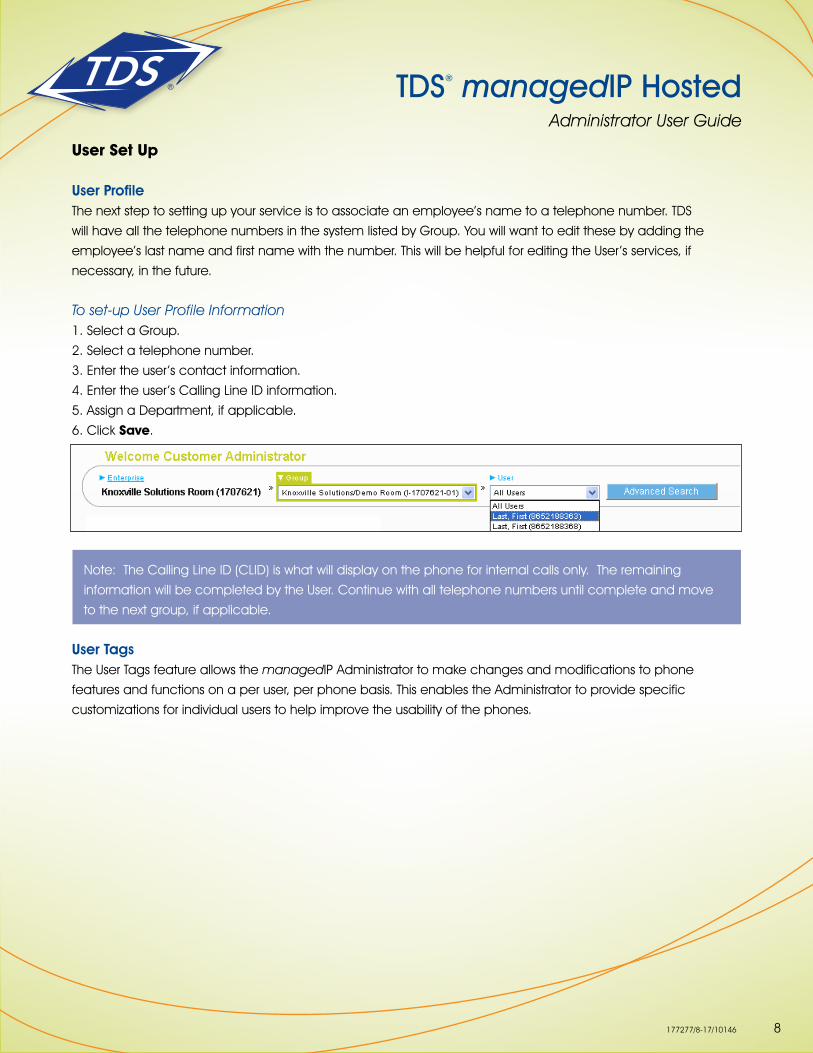
User Profile The next step to setting up your service is to associate an employee’s name to a telephone number. TDS
will have all the telephone numbers in the system listed by Group. You will want to edit these by adding the
employee’s last name and first name with the number. This will be helpful for editing the User’s services, if
necessary, in the future.
To set-up User Profile Information 1. Select a Group.
2. Select a telephone number.
3. Enter the user’s contact information.
4. Enter the user’s Calling Line ID information.
5. Assign a Department, if applicable.
6. Click Save.
Note: The Calling Line ID (CLID) is what will display on the phone for internal calls only. The remaining
information will be completed by the User. Continue with all telephone numbers until complete and move
to the next group, if applicable.
User TagsThe User Tags feature allows the managedIP Administrator to make changes and modifications to phone
features and functions on a per user, per phone basis. This enables the Administrator to provide specific
customizations for individual users to help improve the usability of the phones.
8
TDS® managedIP HostedAdministrator User Guide
177277/8-17/10146
To change a Tag value:
1. Select the Group.
2. Select a telephone number from the User dropdown filter.
3. In the Device section of the Profile page, click Modify Tags. A pop-up window containing
the list of available tags with the current tag value will appear.
4. Locate the tag to be changed and update the new value of the tag. Tag descriptions are available
in the last section of this guide.
5. Click Save.
6. Click Rebuild Device Config File.
7. Verify that the message “Device config file
successfully rebuilt” is displayed.
Note: For the changes to take effect, the phone must be reset. Rebooting the phone will disconnect any call
that may be in progress. Also, different phone models may have different tags available to them. The table
on page 38 has a complete list of all tags and the availability of tags by phone.
Group Services
Group ResourcesResources provide the Administrator with account information on Service Authorizations and Numbers. Service
Authorizations are a summary of the types of Service Packs assigned to the Group, a description of Group and
User Services with limits and allocations, and the telephone numbers assigned and ordered for the Group. This
information is based on the features and services your company has purchased from TDS.
Configuration of Group Services
Auto Attendant Auto Attendant is an automated receptionist that answers incoming calls for the Group, based on Time
Schedules set by the Administrator. It provides your callers with:
• Business and After-Hours Greetings
• Dial-By-Name Directory
• Destination-based Call Routing
9
TDS® managedIP HostedAdministrator User Guide
177277/8-17/10146
ProfileTo modify an Auto Attendant:
1. Select the Group.
2. Hover over Group Services and click Auto Attendant.
3. Select the Auto Attendant you wish to modify from the dropdown filter.
4. In the Profile, enter the “Name” of your Auto Attendant.
• We recommend keeping your naming scheme short (e.g., “Main_AA”)
5. If the service is limited to a Department, assign the Department.
6. From the Business Hours dropdown, select Business Hours Schedule.
• (If Every Day All Day is chosen, the Auto Attendant will not present callers with After Hours Greeting
or options. You must have a Business Hours Time Schedule created; see Time Schedules in this guide).
7. Select your Holiday Schedule, if configured.
8. Select the Scope of Extension Dialing. This determines whether the Auto Attendant can redirect callers by
extension to any User in its Enterprise, Group, or Department.
9. Select the Scope of Name Dialing. This determines whether the Auto Attendant can redirect callers by
name to any User in its Enterprise, Group, or Department.
Note: The extension and name dialing scope defaults to Enterprise. If you want to limit a caller’s options to a
specific Group or Department, select the correct toggle.
10. Select Name Dialing Entries. This determines the format that callers will use for the dial-by-name directory.
11. Click Save.
Business Hours TabThe business hours option allows you to customize your Auto Attendant during Business hours. If you leave
everything set to default, callers will hear a system greeting telling them their call is being answered by an
automated attendant and they will then be presented with the standard Interactive Voice Response (IVR) options.
10

TDS® managedIP HostedAdministrator User Guide
177277/8-17/10146
To configure Business Hours IVR:1. Select either the Default or Personal Greeting button. (If Personal is selected it requires the recording of the
message to be heard by callers.)• Recommended: You can record a custom greeting in your Voice Portal (instructions provided below).• Optional: If you record a greeting (.wav file) using Windows Recorder or another sound recorder, click the
Browse button and select the file.2. Check the Enable First-Level Extension Dialing box if you would like to allow the caller to enter the extension
of the party they wish to reach without selecting a menu option first.
Note: If you enabled first-level extension dialing, you are not able to use the numeric key that is the same as the first digit of your extension dialing range. For example, your extensions range from 4500–4599, so you will not be able to use 4 in the menu options to the caller.
3. Specify the menu options for callers, as stated in the greeting you record or selected. Once complete, click Save.
Your menu options are:Key: List of the keys available on a telephone keypad to which you can assign actions shown in the following table. Description: An optional description for the menu option. Action: A drop box that allows you to select the action to be performed. The following table describes the available actions. This is a required field. Phone Number: When you have selected an action that transfers a call, a number must be specified. For internal calls, enter a 4-digit extension. For outside calls, enter the 10-digit telephone number.
This Chart shows all the possible actions, what the caller will hear, and what happens when a particular action is chosen:
Action Prompt played to caller What happens
Transfer to operator “Please wait while your call is transferred to the operator.”
Call is transferred to the specified number. If the number is not valid, the call ends with the message “Your call cannot be transferred, please try again later, thank you”.
Transfer with prompt“Please wait while your call is transferred.”
Call is transferred to the specified number. If the number is not valid, the call ends with the message “Your call cannot be transferred, please try again later, thank you”.
Transfer without prompt NoneCall is transferred to the specified number. If the number is not valid, the call ends with the message “Your call cannot be transferred, please try again later, thank you”.
Name dialing None Access to name dialing
Extension dialing None Access to extension dialing
End call “Thank you for calling.” Call is released
Repeat menu None Menu greeting is replayed
--- (Indicates no action has been selected.)
Not applicable Menu greeting is replayed
11
TDS® managedIP HostedAdministrator User Guide
177277/8-17/10146
After Hours - Tab After Hours does not require a Time Schedule. The system will automatically route to the After Hours Greetings
any time outside of your Business Hours Time Schedule. In addition, if you established a Holiday Schedule the
After Hours greetings will play during these times. You configure the After Hours IVR selections in the same manner
as your Business Hours.
To configure After Hours IVR:
1. Select After Hours tab.
2. Select either the Default Greeting or Personal Greeting (requires the recording of a message to be
heard by callers).
3. Check Enable first-level extension dialing, if required.
4. Populate the Description, Action, and Phone Number fields for each key option, as appropriate.
5. Click Save.
Sample IVR MenuTo help you think about setting up your Business Hour and After Hour menu options, an example is provided
below:
• Press 0 or wait on the line to reach the Operator
• Press 1 to dial by extension (no information is needed for callers to have this option)
• Press 2 to dial by name (no information is needed for callers to have this option)
• Press 3 to reach the marketing Department (enter “Marketing” in the Description column and the
phone number of the marketing representative or Custom Call Routing number in the Number column)
• Press 4 to reach the customer service Department (enter “Customer Service” in the Description column
and the phone number of the customer service representative in the Number column)
12
TDS® managedIP HostedAdministrator User Guide
177277/8-17/10146
Recording Personal Greetings for Your Auto AttendantTo Record Greetings via the Phone:
1. Dial the Group Voice Portal Number.
2. Enter the 4-digit Voice Portal Extension Number.
Note: This is not the same phone number as the Auto Attendant.
3. Enter your Administrator voice portal default password (Default password will be provided by TDS, to reset or change this
password, hover over Group Services and click Voice Portal scroll down to the Change Administrator Password section)
Voice Portal Number: ____________________________
Password: ______________________________________
Note: If using a managedIP telephone, press the * key to return to the Main Menu before being prompted to enter
your mailbox number. If not, enter the 10-digit telephone number when prompted for the mailbox number. When
initially accessing Voice Messaging, you will be prompted to change your password. The maximum length allowed
for .wav and .mov files is 5 minutes.
Call Park RecallCall Park Recall settings may be modified to determine how parked calls will recall to users after the Call Park Timer expires.
To modify Call Park Recall settings:
1. Select the Group.
2. Hover over Group Services and click Call Park.
3. Select an “Alternate Recall User” from the drop-down list.
4. Select a “Recall To” option.
5. Click Save.
To modify the audible ring pattern for All Parked Calls:
1. Select the Group.
2. Hover over Group Services and click Call Park.
3. Select “Ring Pattern” for Recalled Calls.
13
TDS® managedIP HostedAdministrator User Guide
177277/8-17/10146
4. Select the “Recall Timer”.
5. Select the “Alternate Recall User Wait Time”.
6. Click Save.
Note: Depending on your phone model, all ring patterns may not apply. Recall Timer and Alternate Recall
User Wait Time is between 30–600 seconds. Typically, alternate recall time is longer than recall time, allowing
the parking user to answer the recall prior to an alternate user.
Call Park GroupsThe Call Park Groups feature allows a user to hold or suspend a call for an extended period of time, similar to
Call Park. However, with Call Park Groups, a group of users is established and assigned to a Call Park Group
by the Administrator. When any user in that group parks a call using the Call Park Groups feature access code
(#58), the system will automatically find an available user to park the call against, searching the Call Park Groups
list in the sequence the users are entered. In a busy parking environment, this avoids the need to search for an
available user to park a call against (since only a single call may be parked against any user at a given time).
If the Administrator enables the option Enable Parked Destination Announcement, then a member of the Call
Park group parking the call (using #58) will hear a system announcement stating “The call is parked against
<extension>”. In addition, the phone’s display will update with target’s Caller ID (name and number) for the
period determined by the Call Park Groups Display Timer (2-15 seconds).
To create a new Call Park Group:
1. Select the Group.
2. Hover over Group Services and click Call Park.
3. Select Add.
4. Enter the Call Park Group Name.
5. If desired, select an “Alternate Recall User” from the drop-down menu.
6. Select a “Recall To” option for the Call Park Group.
7. Click Save.
14
TDS® managedIP HostedAdministrator User Guide
177277/8-17/10146
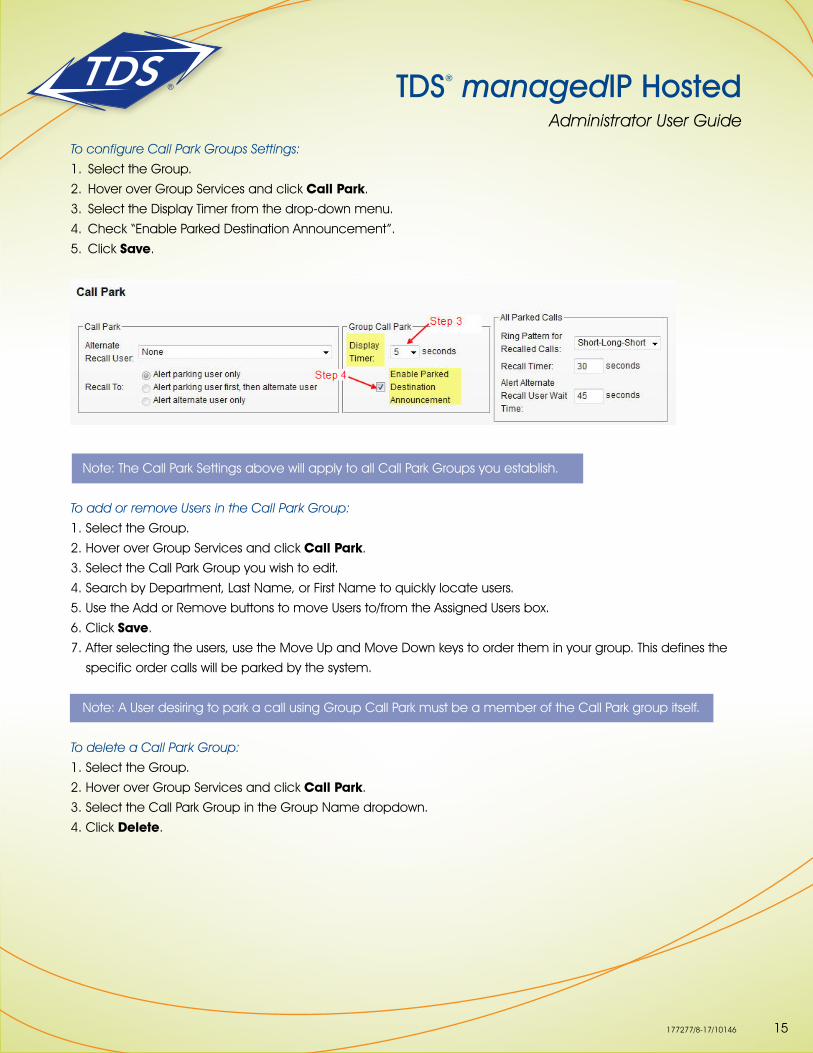
To configure Call Park Groups Settings:
1. Select the Group.
2. Hover over Group Services and click Call Park.
3. Select the Display Timer from the drop-down menu.
4. Check “Enable Parked Destination Announcement”.
5. Click Save.
Note: The Call Park Settings above will apply to all Call Park Groups you establish.
To add or remove Users in the Call Park Group:
1. Select the Group.
2. Hover over Group Services and click Call Park.
3. Select the Call Park Group you wish to edit.
4. Search by Department, Last Name, or First Name to quickly locate users.
5. Use the Add or Remove buttons to move Users to/from the Assigned Users box.
6. Click Save.
7. After selecting the users, use the Move Up and Move Down keys to order them in your group. This defines the
specific order calls will be parked by the system.
Note: A User desiring to park a call using Group Call Park must be a member of the Call Park group itself.
To delete a Call Park Group:
1. Select the Group.
2. Hover over Group Services and click Call Park.
3. Select the Call Park Group in the Group Name dropdown.
4. Click Delete.
15
TDS® managedIP HostedAdministrator User Guide
177277/8-17/10146
Note: Enabling the Parked Destination Announcement does not have any impact on the Call Park service.
Call Park timer functions and destination announcement will be the same for all Call Park Groups. The recall
timer can be set for 30–600 seconds and the default is set for 45. The display timer can be set for 2–15
seconds, with the default set for 5.
Call PickupThe Call Pickup feature allows Users to answer a call that is ringing at another extension within their Call Pickup Group. If more than one phone within the Group is ringing, the phone that has been ringing the longest is the one that gets picked up. Once a call is picked up from another extension, the extension that was ringing is free to receive other calls. To use Call Pickup dial the feature access code assigned for this service. Feature Access Codes can be found by selecting a Group, hover over Utilities and select Feature Access Codes.
To add a Call Pickup Group:1. Select the Group.2. Hover over Group Services, click Call Pickup.3. Click Add.4. Enter the name of your Call Park Group.5. Click Save.
To delete a Call Pickup Group:1. Select the Group.2. Hover over Group Services, click Call Pickup.3. Select the Call Pickup Group in the dropdown menu.4. Click Delete.
To add or remove Users in the Call Pickup Group:1. Select the Group.2. Hover over Group Services, click Call Pickup.3. Select the Call Pickup Group in the dropdown menu.4. Search by Department, Last Name, or First Name to quickly locate users.5. Use the Add or Remove buttons to move users to/from the Assigned Users box.6. Click Save.
Emergency ZonesEmergency Zones allows you to designate one person to receive an email notification when any User in a Group dials 911. It will provide the caller’s telephone number and name along with the time the call is placed.
To activate this feature:1. Select the Group.2. Hover over Group Services, click Emergency Zones.
16
TDS® managedIP HostedAdministrator User Guide
177277/8-17/10146
3. Check the box to activate service.4. Enter the email address.5. Click Save.
Note: The email notification could be delayed and is not for response to an emergency but for tracking outgoing emergency calls made within the Group.
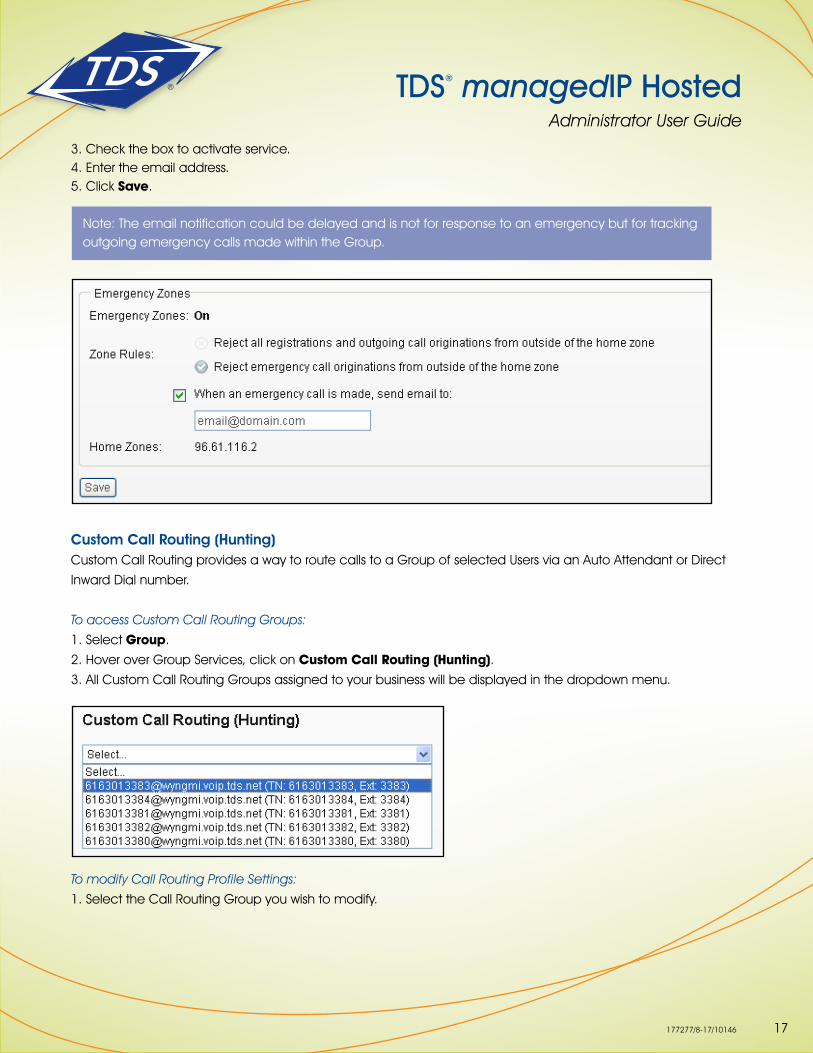
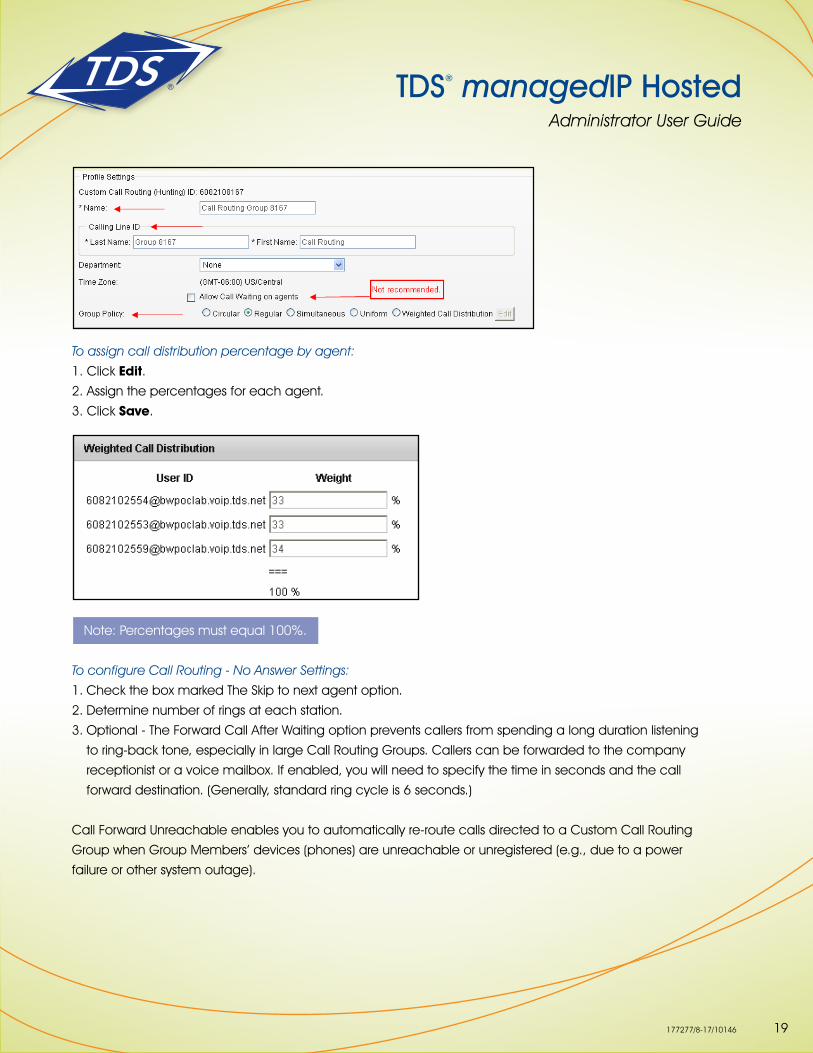
Custom Call Routing (Hunting)Custom Call Routing provides a way to route calls to a Group of selected Users via an Auto Attendant or Direct
Inward Dial number.
To access Custom Call Routing Groups:
1. Select Group.
2. Hover over Group Services, click on Custom Call Routing (Hunting).
3. All Custom Call Routing Groups assigned to your business will be displayed in the dropdown menu.
To modify Call Routing Profile Settings:
1. Select the Call Routing Group you wish to modify.
17
TDS® managedIP HostedAdministrator User Guide
177277/8-17/10146
2. Enter the Call Routing Group Name.
3. Enter the Calling Line ID Last Name and Calling Line ID First Name.
Note: The Calling Line ID First and Last Name will be displayed to Users receiving calls from the Custom Call
Routing Group. We recommend keeping this short (e.g., “CCR_Support”). This will be displayed along with the
originating party’s caller ID (room permitting).
4. Select the Department to assign the Call Routing (if applicable).
5. The Time Zone is a default.
6. We recommend not checking the Allow Call Waiting on Agents box as it could impact customer hold times.
If you desire Call Routing Group members to receive multiple calls at once, check this box.
7. Select the Group Policy determining how calls are routed to agents.
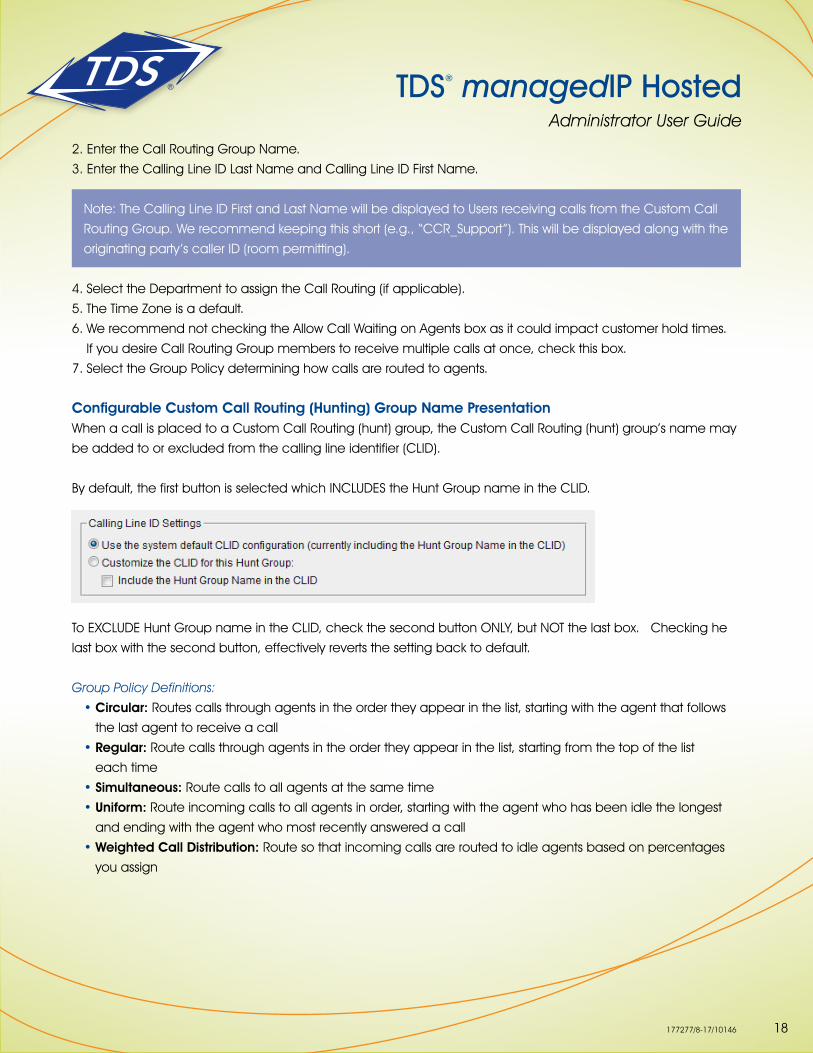
Configurable Custom Call Routing (Hunting) Group Name PresentationWhen a call is placed to a Custom Call Routing (hunt) group, the Custom Call Routing (hunt) group’s name may
be added to or excluded from the calling line identifier (CLID).
By default, the first button is selected which INCLUDES the Hunt Group name in the CLID.
To EXCLUDE Hunt Group name in the CLID, check the second button ONLY, but NOT the last box. Checking he
last box with the second button, effectively reverts the setting back to default.
Group Policy Definitions:
• Circular: Routes calls through agents in the order they appear in the list, starting with the agent that follows
the last agent to receive a call
• Regular: Route calls through agents in the order they appear in the list, starting from the top of the list
each time
• Simultaneous: Route calls to all agents at the same time
• Uniform: Route incoming calls to all agents in order, starting with the agent who has been idle the longest
and ending with the agent who most recently answered a call
• Weighted Call Distribution: Route so that incoming calls are routed to idle agents based on percentages
you assign
18
TDS® managedIP HostedAdministrator User Guide
177277/8-17/10146
To assign call distribution percentage by agent:
1. Click Edit.
2. Assign the percentages for each agent.
3. Click Save.
Note: Percentages must equal 100%.
To configure Call Routing - No Answer Settings:
1. Check the box marked The Skip to next agent option.
2. Determine number of rings at each station.
3. Optional - The Forward Call After Waiting option prevents callers from spending a long duration listening
to ring-back tone, especially in large Call Routing Groups. Callers can be forwarded to the company
receptionist or a voice mailbox. If enabled, you will need to specify the time in seconds and the call
forward destination. (Generally, standard ring cycle is 6 seconds.)
Call Forward Unreachable enables you to automatically re-route calls directed to a Custom Call Routing
Group when Group Members’ devices (phones) are unreachable or unregistered (e.g., due to a power
failure or other system outage).
19
TDS® managedIP HostedAdministrator User Guide
177277/8-17/10146
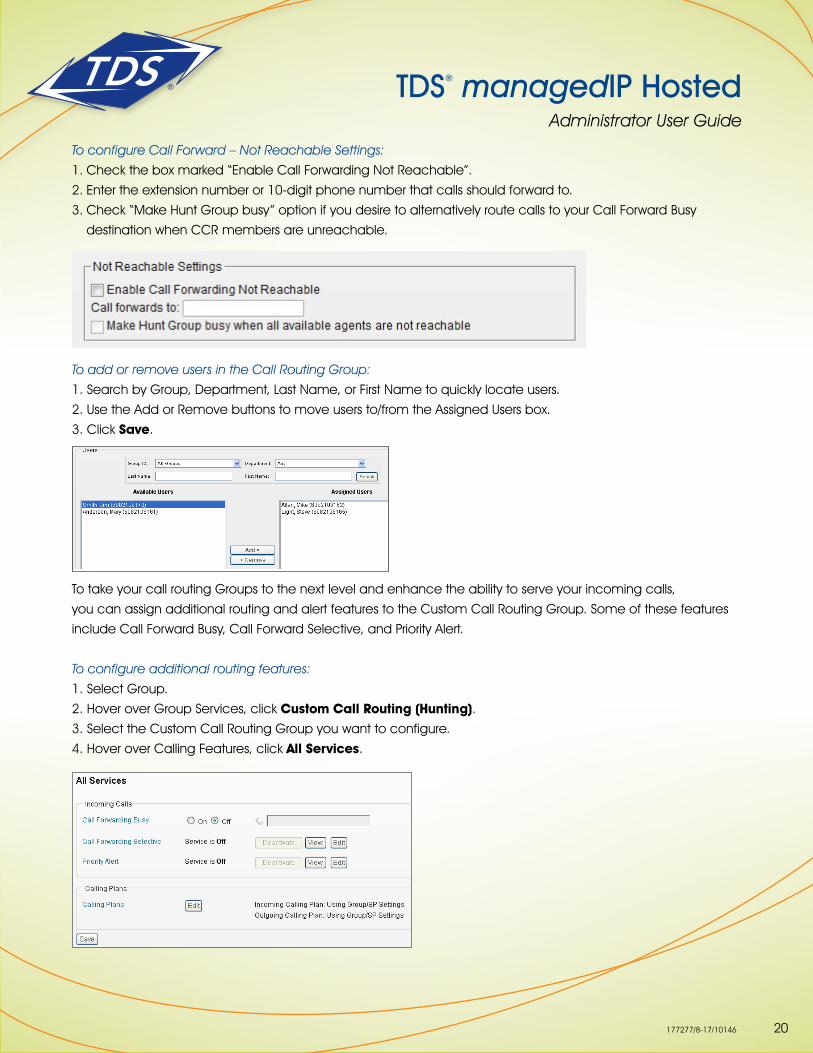
To configure Call Forward – Not Reachable Settings:
1. Check the box marked “Enable Call Forwarding Not Reachable”.
2. Enter the extension number or 10-digit phone number that calls should forward to.
3. Check “Make Hunt Group busy” option if you desire to alternatively route calls to your Call Forward Busy
destination when CCR members are unreachable.
To add or remove users in the Call Routing Group:
1. Search by Group, Department, Last Name, or First Name to quickly locate users.
2. Use the Add or Remove buttons to move users to/from the Assigned Users box.
3. Click Save.
To take your call routing Groups to the next level and enhance the ability to serve your incoming calls,
you can assign additional routing and alert features to the Custom Call Routing Group. Some of these features
include Call Forward Busy, Call Forward Selective, and Priority Alert.
To configure additional routing features:
1. Select Group.
2. Hover over Group Services, click Custom Call Routing (Hunting).
3. Select the Custom Call Routing Group you want to configure.
4. Hover over Calling Features, click All Services.
20
TDS® managedIP HostedAdministrator User Guide
177277/8-17/10146
Call Forward BusyRoute calls when all agents are busy. For example, if everyone is on the phone, you can route callers to another
individual or even another Call Routing Group.
To set up Call Forward Busy:
1. Toggle Call Forward Busy On or Off.
2. Assign a Call forward number.
Note: You can Call Forward to any phone number including an Auto Attendant, another Call Routing Group,
an internal extension, voice mailbox, or a phone number outside your location.
Call Forward SelectiveAssign a time schedule to the Call Routing Group. For example, route calls directly to an Auto Attendant for after-
hour calls or set up time schedules for On Call technical support that automatically forwards calls to someone’s
cell phone at specific times.
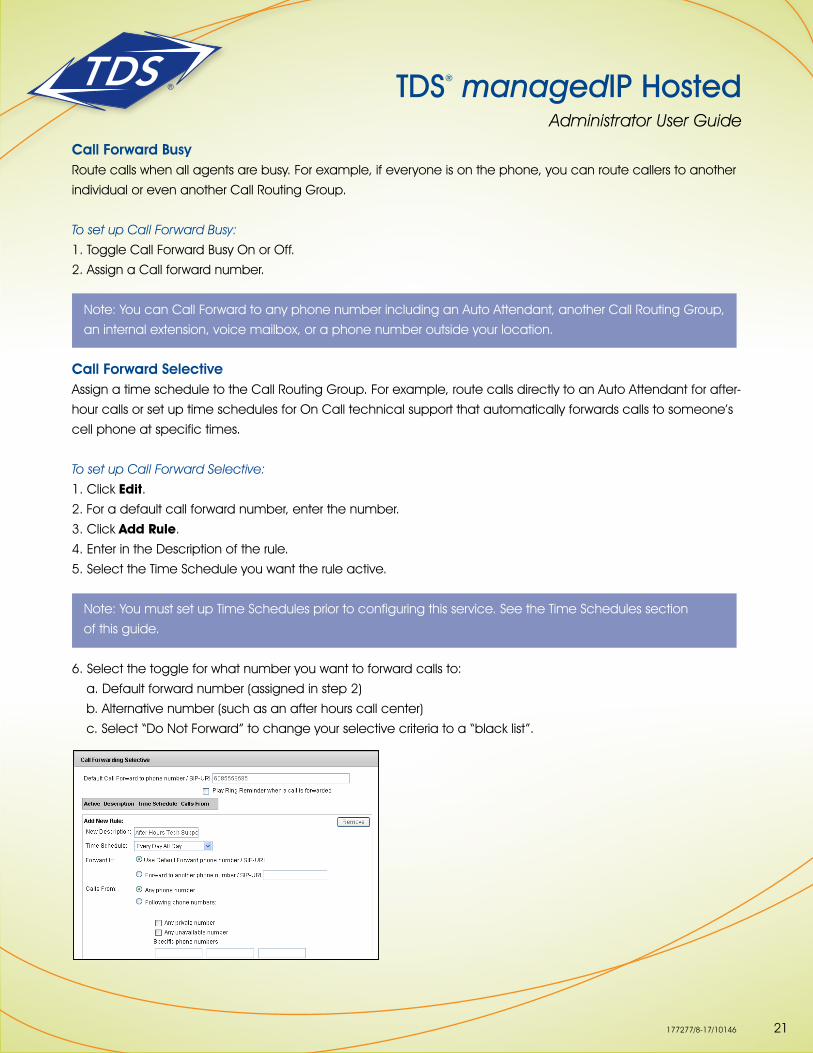
To set up Call Forward Selective:
1. Click Edit.
2. For a default call forward number, enter the number.
3. Click Add Rule.
4. Enter in the Description of the rule.
5. Select the Time Schedule you want the rule active.
Note: You must set up Time Schedules prior to configuring this service. See the Time Schedules section
of this guide.
6. Select the toggle for what number you want to forward calls to:
a. Default forward number (assigned in step 2)
b. Alternative number (such as an after hours call center)
c. Select “Do Not Forward” to change your selective criteria to a “black list”.
21
TDS® managedIP HostedAdministrator User Guide
177277/8-17/10146
Note: When this option is selected, all calls will forward to the designated forward-to number except
those which meet the criteria you define.
7. Establish what incoming number you want to follow this rule:
a. All Incoming number
b. Specific phone numbers, then enter in the specific telephone numbers desired
8. Click Save.
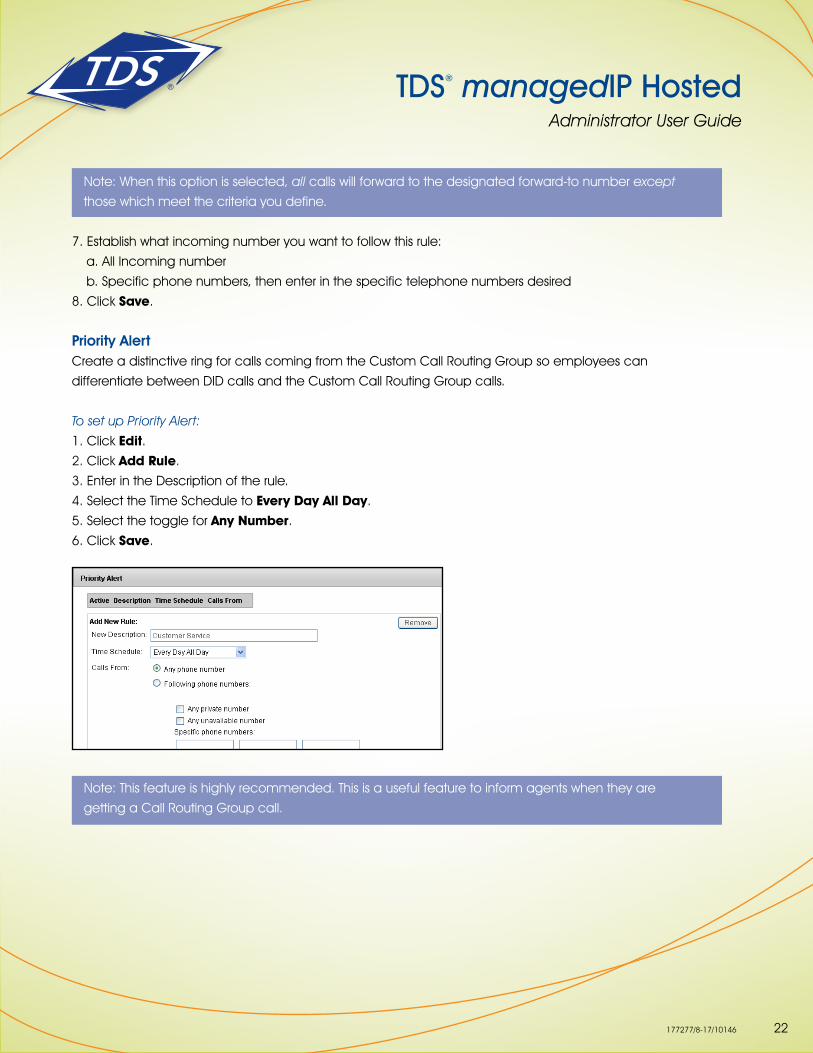
Priority Alert Create a distinctive ring for calls coming from the Custom Call Routing Group so employees can
differentiate between DID calls and the Custom Call Routing Group calls.
To set up Priority Alert:
1. Click Edit.
2. Click Add Rule.
3. Enter in the Description of the rule.
4. Select the Time Schedule to Every Day All Day.
5. Select the toggle for Any Number.
6. Click Save.
Note: This feature is highly recommended. This is a useful feature to inform agents when they are
getting a Call Routing Group call.
22
TDS® managedIP HostedAdministrator User Guide
177277/8-17/10146
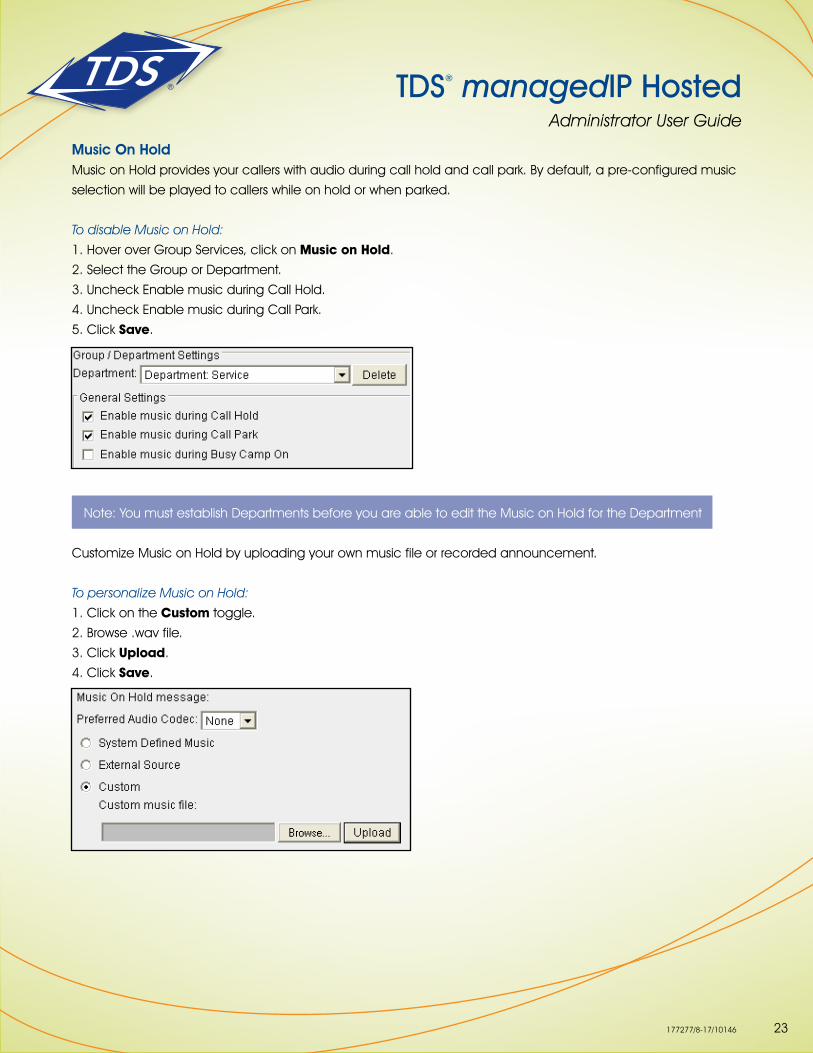
Music On HoldMusic on Hold provides your callers with audio during call hold and call park. By default, a pre-configured music
selection will be played to callers while on hold or when parked.
To disable Music on Hold:
1. Hover over Group Services, click on Music on Hold.
2. Select the Group or Department.
3. Uncheck Enable music during Call Hold.
4. Uncheck Enable music during Call Park.
5. Click Save.
Note: You must establish Departments before you are able to edit the Music on Hold for the Department
Customize Music on Hold by uploading your own music file or recorded announcement.
To personalize Music on Hold:
1. Click on the Custom toggle.
2. Browse .wav file.
3. Click Upload.
4. Click Save.
23

TDS® managedIP HostedAdministrator User Guide
177277/8-17/10146
Account/Authorization Codes
You may select the use of either Account Codes or Authorization Codes for outgoing calls with your managedIP Group.
• Account Codes: Non-validated codes that are entered by a User prior to placing a call. The system ensures that
codes provided by Users contain the required number of digits, but does not validate codes entered. You may
mandate that a User always enters an Account Code prior to placing a call (“Mandatory Usage”) or you may
make this optional, requiring the User to dial a Feature Access Code (FAC) prior to placing the call.
• Authorization Codes: Validated codes which are required prior to placing a call. Calls are not connected unless
a valid code is entered. These mandatory codes are defined as a specific length (2 -14 digits) and have a
specific value, defined by the Administrator.
With the use of both, your business will receive a detailed monthly report, sorting your calls by Account or Authorization
codes. In addition, if you subscribe to Enhanced Call Detail Reporting, your reports will provide the Account Code
entered by the users. Although this feature may be used for both local and toll calls, your monthly report (mailed to
your business) will only include the detail for toll calls.
To configure Account Codes:
1. Select the Group.
2. Click Account/Auth Codes in the left navigation bar.
3. Click Account Code button.
4. Specify the number of digits (length of codes) the User must dial to make/log call.
5. Check the box Allow Local and Toll-Free Calls Without Account/Authorization Code if you choose to allow
Users to make these types of calls without a code.
6. Search by Department, Last Name, or First Name to quickly locate users.
7. Use the Add or Remove buttons to move users to the appropriate box for mandatory or optional usage.
• The Mandatory Usage box will require all users assigned to enter an Account Code before their call can
be placed.
• The Optional Usage box will require users to enter a feature access code prior to making a call to prompt them
to enter an Account Code.
8. Click Save.
24
TDS® managedIP HostedAdministrator User Guide
177277/8-17/10146
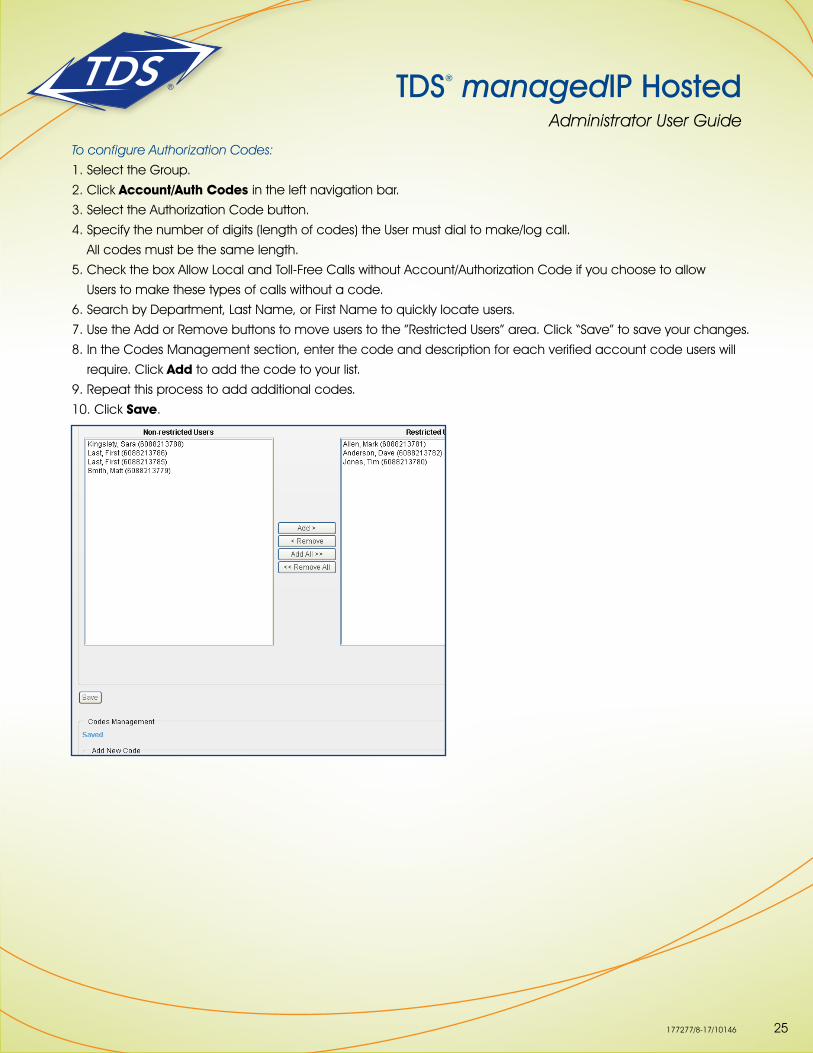
To configure Authorization Codes:
1. Select the Group.
2. Click Account/Auth Codes in the left navigation bar.
3. Select the Authorization Code button.
4. Specify the number of digits (length of codes) the User must dial to make/log call.
All codes must be the same length.
5. Check the box Allow Local and Toll-Free Calls without Account/Authorization Code if you choose to allow
Users to make these types of calls without a code.
6. Search by Department, Last Name, or First Name to quickly locate users.
7. Use the Add or Remove buttons to move users to the ”Restricted Users” area. Click “Save” to save your changes.
8. In the Codes Management section, enter the code and description for each verified account code users will
require. Click Add to add the code to your list.
9. Repeat this process to add additional codes.
10. Click Save.
25
TDS® managedIP HostedAdministrator User Guide
177277/8-17/10146
Calling Plans
PoliciesConfigure and manage calling plans for members in your Group. Plans allow or block specific call types
from being received or placed by all members in the Group, in addition to control over call.
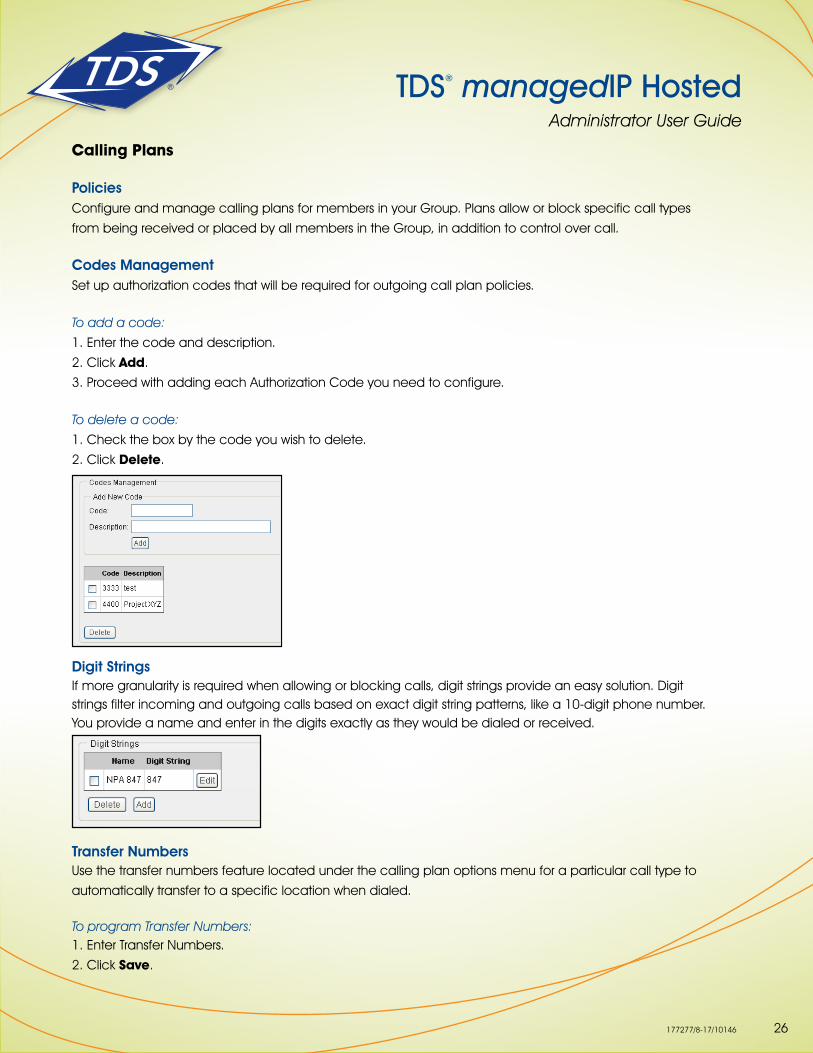
Codes ManagementSet up authorization codes that will be required for outgoing call plan policies.
To add a code:
1. Enter the code and description.
2. Click Add.
3. Proceed with adding each Authorization Code you need to configure.
To delete a code:
1. Check the box by the code you wish to delete.
2. Click Delete.
Digit StringsIf more granularity is required when allowing or blocking calls, digit strings provide an easy solution. Digit strings filter incoming and outgoing calls based on exact digit string patterns, like a 10-digit phone number. You provide a name and enter in the digits exactly as they would be dialed or received.
Transfer NumbersUse the transfer numbers feature located under the calling plan options menu for a particular call type to
automatically transfer to a specific location when dialed.
To program Transfer Numbers:1. Enter Transfer Numbers.
2. Click Save.
26
TDS® managedIP HostedAdministrator User Guide
177277/8-17/10146
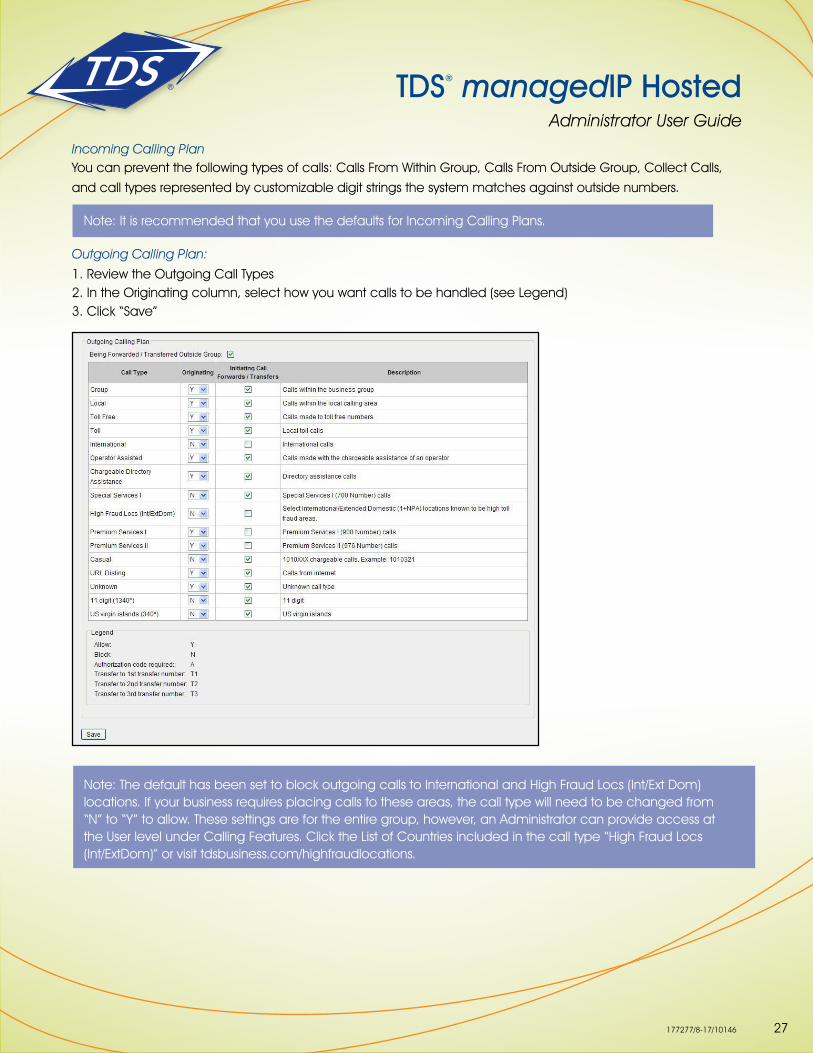
Incoming Calling PlanYou can prevent the following types of calls: Calls From Within Group, Calls From Outside Group, Collect Calls,
and call types represented by customizable digit strings the system matches against outside numbers.
Note: It is recommended that you use the defaults for Incoming Calling Plans.
Outgoing Calling Plan:
1. Review the Outgoing Call Types2. In the Originating column, select how you want calls to be handled (see Legend)3. Click “Save”
Note: The default has been set to block outgoing calls to International and High Fraud Locs (Int/Ext Dom) locations. If your business requires placing calls to these areas, the call type will need to be changed from “N” to “Y” to allow. These settings are for the entire group, however, an Administrator can provide access at the User level under Calling Features. Click the List of Countries included in the call type “High Fraud Locs (Int/ExtDom)” or visit tdsbusiness.com/highfraudlocations.
27
TDS® managedIP HostedAdministrator User Guide
177277/8-17/10146
TDS Meet-Me Conferencing
TDS’ Meet-Me Conferencing service enables your employees to establish reservation-less or scheduled con-
ferences for both internal and external participants.
If you have subscribed to this optional service, you will have one or more Conference Bridges available for
your employees’ use. Each Bridge may accommodate an unlimited number of Conferences, though only
125 participants may be active on a single Bridge at any time with one or more conferences. If this does
not satisfy your conference requirements, you may purchase additional Bridges to accommodate additional
participants.
As an Administrator, you will need to assign users in your Enterprise as conference Hosts in order for those
users to create and schedule conferences with a specific Bridge. However, any user may participate in a
conference without being a Host. If you subscribe to multiple Bridges, users may be assigned as Hosts for one
(or more) Bridge(s). For example, Sales may have access as Hosts to one Bridge, while Customer Service uses
a different Bridge.
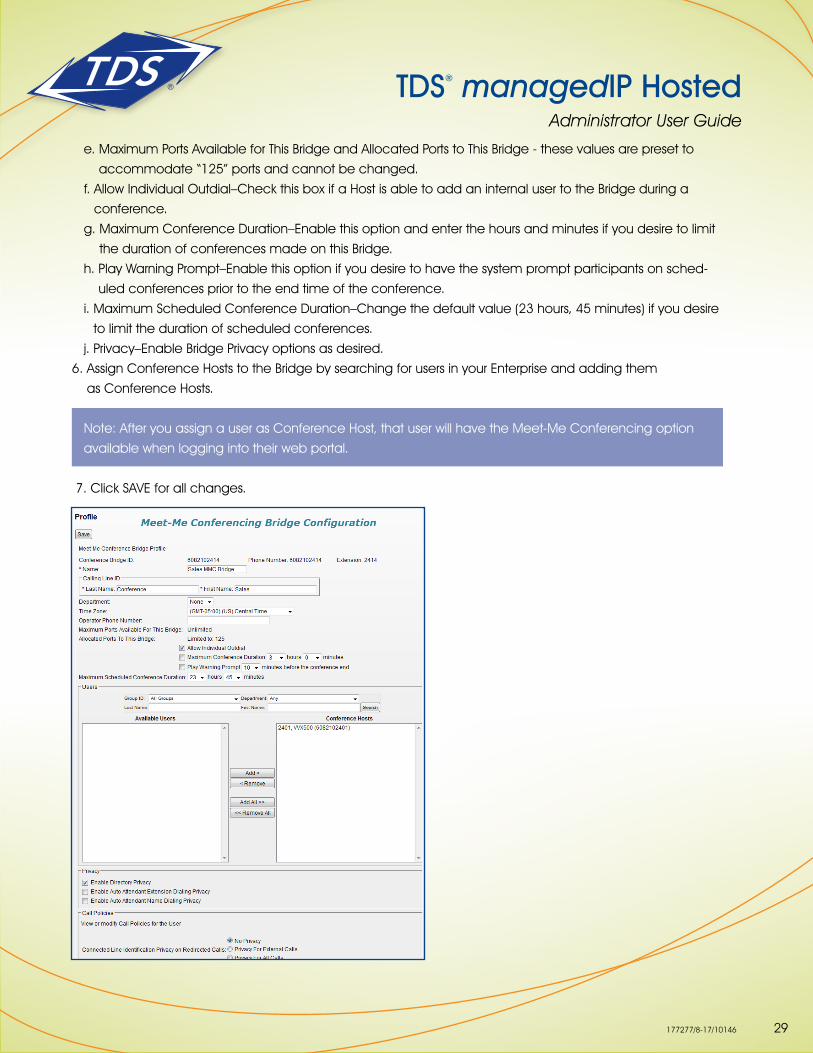
Configuring the Meet-Me Conference Bridge and Assigning Conference Hosts:1. Log in to the managedIP Web Portal with your Enterprise Administrator credentials.2. Navigate to the Group your Meet-Me Conference Bridge is assigned to.3. Under Group Services, select Meet-Me Conferencing.4. From the drop-down menu, select the Bridge you wish to modify and the Bridge’s Profile page will display.5. Populate Meet-Me Conference Bridge Options:
a. Name –Populate a name that you desire to list in the Enterprise Directory.b. Calling Line ID–Enter the First and Last Names that will display on users’ phones when they dial the Bridge
to join a Conference.c. Department and Time Zone–Assign a Department if desired and change your default Time Zone if
appropriate.d. Operator Phone Number–Enter an extension that any participant of any Conference on this Bridge will
be routed to when they dial “0” after pressing the “*” key for help.
Note: Only numbers within your Enterprise are valid Operator numbers.
28
TDS® managedIP HostedAdministrator User Guide
177277/8-17/10146
e. Maximum Ports Available for This Bridge and Allocated Ports to This Bridge - these values are preset to
accommodate “125” ports and cannot be changed.
f. Allow Individual Outdial–Check this box if a Host is able to add an internal user to the Bridge during a
conference.
g. Maximum Conference Duration–Enable this option and enter the hours and minutes if you desire to limit
the duration of conferences made on this Bridge.
h. Play Warning Prompt–Enable this option if you desire to have the system prompt participants on sched-
uled conferences prior to the end time of the conference.
i. Maximum Scheduled Conference Duration–Change the default value (23 hours, 45 minutes) if you desire
to limit the duration of scheduled conferences.
j. Privacy–Enable Bridge Privacy options as desired.
6. Assign Conference Hosts to the Bridge by searching for users in your Enterprise and adding them
as Conference Hosts.
Note: After you assign a user as Conference Host, that user will have the Meet-Me Conferencing option
available when logging into their web portal.
7. Click SAVE for all changes.
29
TDS® managedIP HostedAdministrator User Guide
177277/8-17/10146
Utilities
Most of the Utilities menu selections are view-only or set to default to the best recommended solution. Below
is a brief description of each Utility option available.
Call Detail ReportingEnables access to call history reports of users based on specific criteria such as date ranges or types of calls.
To use this service: 1. Select a user from the User dropdown. 2. Select Sort Options using the Sort By fields.3. Enter a start and end date in the Date range fields.4. Select the type of calls to be included in the report by checking the appropriate box(es) (e.g., Inbound,
Missed, or Outbound).5. To search by specific criteria, enter a complete or partial phone number in the text box to and click
create report. For example, if you enter “756,” all the telephone numbers containing the digits “756” will be included in the report.
6. To email your report, enter an email address and click Submit.7. To export your report to a PDF or CSV, click the appropriate Submit button.
Note: A maximum of 2,000 records may be displayed on your Web browser, or 5,000 records with a PDF or email report. Excel downloads display all records available. However, this may be limited based on the version of Excel you are using.
Item Description
Policies View Group Web and Call Processing Policies.
Group CLIDConfigure the name and/or number of the Group to display on the caller ID for outgoing calls instead of the User who placed the call.
Inventory Report Generate and email a report on the resources used within the Group.
Enterprise Directory At a glance Enterprise Directory in the portal.
Custom Contact DirectoriesCreate a custom contact directory with a subset of members from the Group or Enterprise.
Common Phone ListStore a frequently called numbers list for the Group so they can easily be dialed from the User’s CommPilot Call Manager. You can quickly add to the list by importing a phone list from a CSV file.
Disaster RedirectThis allows an admin to update the entire Group’s Call Forward Not Reachable setting.
Feature Access CodesView feature access codes settings from TDS. Alternate codes are optional and are configured by the Enterprise Administrator.
30
TDS® managedIP HostedAdministrator User Guide
177277/8-17/10146
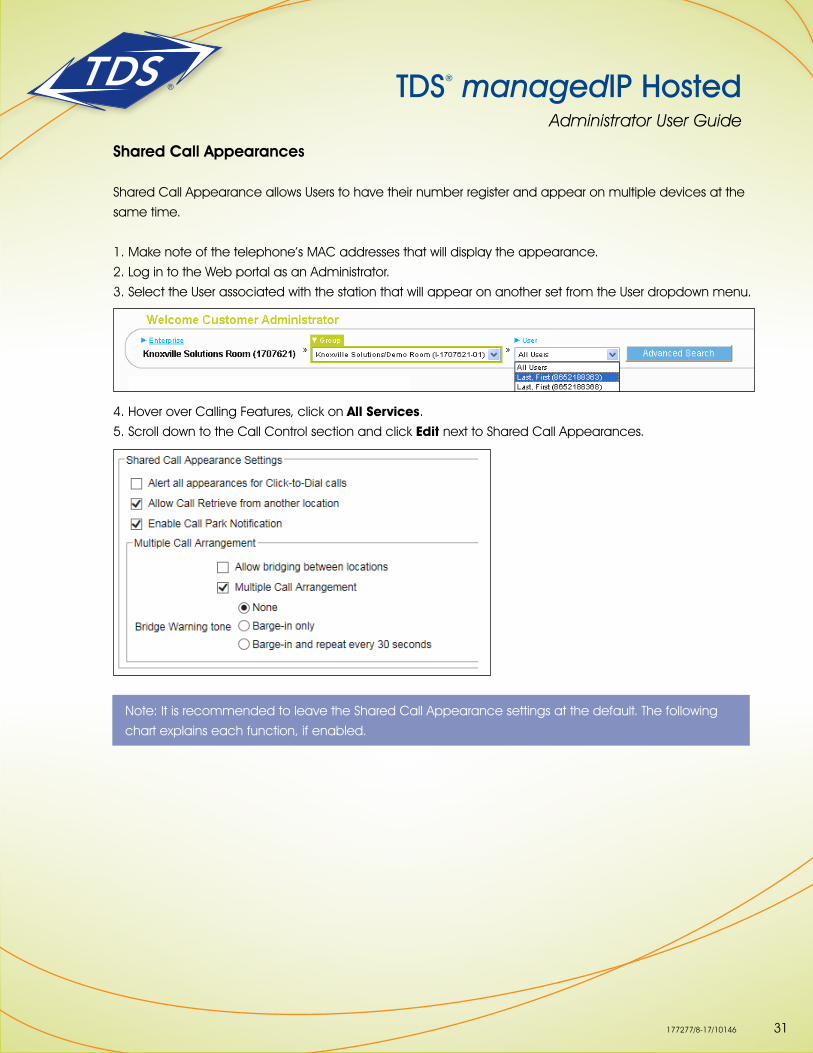
Shared Call Appearances
Shared Call Appearance allows Users to have their number register and appear on multiple devices at the
same time.
1. Make note of the telephone’s MAC addresses that will display the appearance.
2. Log in to the Web portal as an Administrator.
3. Select the User associated with the station that will appear on another set from the User dropdown menu.
4. Hover over Calling Features, click on All Services.
5. Scroll down to the Call Control section and click Edit next to Shared Call Appearances.
Note: It is recommended to leave the Shared Call Appearance settings at the default. The following
chart explains each function, if enabled.
31
TDS® managedIP HostedAdministrator User Guide
177277/8-17/10146
Setting Up Devices the Line Appears On:
1. To add devices click Add.
2. Use the dropdown associated with Identity/Device Profile Name: to find the MAC address for the
phone you want this number to appear on.
3. Remove the check mark from the following boxes if:
• Enable this location: You are only using the appearance to monitor when the phone is in use.
This will display a solid red light next to the appearance when the phone is in use
• Allow Origination from this location: You want to disable the ability to originate calls from the
Shared Call Appearance. This also eliminates the ringing and call waiting tones associated with
the shared appearances
• Allow Termination from this location: You want to disable the ability to terminate calls from the
Shared Call Appearance. This also eliminates the ringing and call waiting tones associated with
the shared appearances
4. Click Save.
Alert all appearances for Click-to-Dial calls
Alerts all stations with Shared Call Appearance by ringing, including the primary phone when the person whose phone number is the shared appearance uses the click-to-dial feature. Any of the stations can pick up and be connected to the number that was clicked to dial.
Allow Call Retrieve from another location
This feature will be checked for all Unified Communications application users and enables users to “pull” calls between devices, e.g. UC Mobile application to Polycom desk phone using “Pull Call” soft key.
Multiple Call Arrangement
Provides the ability for multiple calls to be handled concurrently at different managedIP locations for a User. No single location is considered the active location, so all locations are allowed to originate calls and receive new incoming calls when they have an available call appearance, regardless of the activity at the other locations.
Allow Bridging between locationsAllows for bridging calls between shared call appearance locations to facilitate manager/administrative assistant interactions.
Bridge Warning toneAlerts all Users on a call with a warning tone indicating that the call has been bridged.
32
TDS® managedIP HostedAdministrator User Guide
177277/8-17/10146
Note: When you have added the appearances, you will need to reset the phone displaying an
appearance before the numbers will appear. To do so, unplug the telephone and plug it back in.
Ongoing Management of Users
Change User PasswordsUsers will change and set up their own unique passwords. However, as the Administrator you may need to
reset them from time to time if a User gets locked out of the system or leaves the company. Please see
Passcode Rules listed on the last page of this guide.
To change a User’s password:
1. Select the User from the dropdown menu.
2. At the User Profile screen, click the Change Password button.
3. Enter a pre-defined password or select the button to auto generate.
4. Click Save.
User Services The Administrator has access to User services and can—via the Web portal—activate, deactivate,
and customize these services. Some of the services an Administrator might update for a User include
configuration of Incoming and Outgoing calls, Call Control, Calling Plans, Messaging, and Client
Applications.
The User service pages are a good resource when helping a User who is experiencing issues with their
service. An Administrator can quickly route to how their services are configured. The services available to
Users are dependent on the specific service package purchased for a station.
Call PoliciesCall policies provide users the ability to control how the Calling Line ID (CLID) of their phone is displayed
to others. Connected Line Identification Privacy on Redirected Calls allows the user to determine how the
connected line is presented in the event of a redirected call.
33
TDS® managedIP HostedAdministrator User Guide
177277/8-17/10146
To configure Connected Line Identification Privacy on redirected calls
1. Select the Group.
2. Select the User.
3. In the profile page, scroll down to Call Policies
4. Select the toggle to choose privacy option.
5. Click Save.
Below outlines the connected line identity presented on calls redirected via Calls Transfer and Simultaneous Ring
Call Transfers
• No Privacy – when a user places a consultative transfer to a colleague, the CLID of the caller will be
displayed to the colleague when the transfer is complete.
• Privacy for External Calls (default value) – when a user places a consultative transfer to a colleague
for an internal call, the Caller ID of the caller you transferred will be displayed to your colleague when the
transfer is complete (i.e., the caller is another user on your system).
• Privacy for All Calls – when a user places a consultative transfer to a colleague, the CLID information of an
internal or external call will not be displayed when the transfer is complete.
Note: Blind Transfers will display the CLID of the caller, regardless of the privacy setting.
Simultaneous Ring
• No Privacy – When another managedIP user (within your business or another business) calls a user’s
desk phone and they answer the call on a SIMRING device, the caller will see the Caller ID information
of the device the user answered with. For example, if you answer a SIMRING call on your cell phone, the
managedIP caller will see the CLID of the mobile.
• Privacy for External Calls – When another managedIP user (within your business or another business) calls
your desk phone and you answer the call on a SIMRING device, the caller will see the CLID information of
the device you answer from when you answer the call. For example, if you answer a SIMRING call on your
mobile device, the managedIP caller will be able to identify the Caller ID of your mobile device.
• Privacy for All Calls (default value) – When another managedIP user (within yours or another business)
calls you and you answer the call on a SIMRING device, the caller will not see the Caller ID information of
the device you answer from, but will only see the Caller ID the dialed station. For example, if you answer a
SIMRING call on your mobile device, the managedIP caller will continue to view your managedIP Caller ID
and will not see your SIMRING device Caller ID.
• Service Instance Privacy – These Call Policies can also be applied to the following virtual user types:
1. Call Center (All)
2. Auto Attendant (Basic, Standard)
3. Hunt Groups
4. Voice Messaging (Stand-Alone Users)
5. Meet-Me Conferencing (Future)
34
TDS® managedIP HostedAdministrator User Guide
177277/8-17/10146
To Manage User Services:
1. Select the User from the dropdown menu.
2. Hover over Calling Features and Select All Services.
3. Update any specific User Features.
4. Click Save.
Note: As your employees change, it is important that you go into a User’s profile and delete any special
configurations and reset the passwords for the User.
Record Greeting/Announcement (.wav files)
Below is the procedure to record a personal greeting or announcement using a PC. Instructions are provided
for the following sound recorders:
• Windows 98 Sound Recorder and Windows XP Sound Recorder
• Windows 2000 Sound Recorder
• Windows NT Sound Recorder
If you are using a different sound recording product, the required format for recordings are:
• CCITT u-Law or A-Law
• 8,000 kHz
• 8-bit mono
• .wav file
To record using the Windows 98 Sound Recorder or Windows XP Sound Recorder:
1. In Windows 98, select Start> Programs> Accessories> Multimedia> Sound Recorder from the
Windows task bar.
In Windows XP, select Start> All Programs> Accessories> Entertainment> Sound Recorder.
Note: It is possible that your Sound Recorder is in a different location, or that your default sound recorder is
another product. Please note the required format for your greetings below and follow the instructions for your
specific sound recording product.
2. Make the setting selections. Click Properties from the File menu. The properties for Sound window appears.
3. Click Convert Now and then click OK. The Sound Selection page appears.
4. Select CCITT u-Law from the Format list.
5. Select 8,000 kHz, 8-bit mono under Attributes and click OK. You may want to save this format at this point, so
that you can easily select it in the future.
6. In the Properties for Sound dialog box, click OK.
35
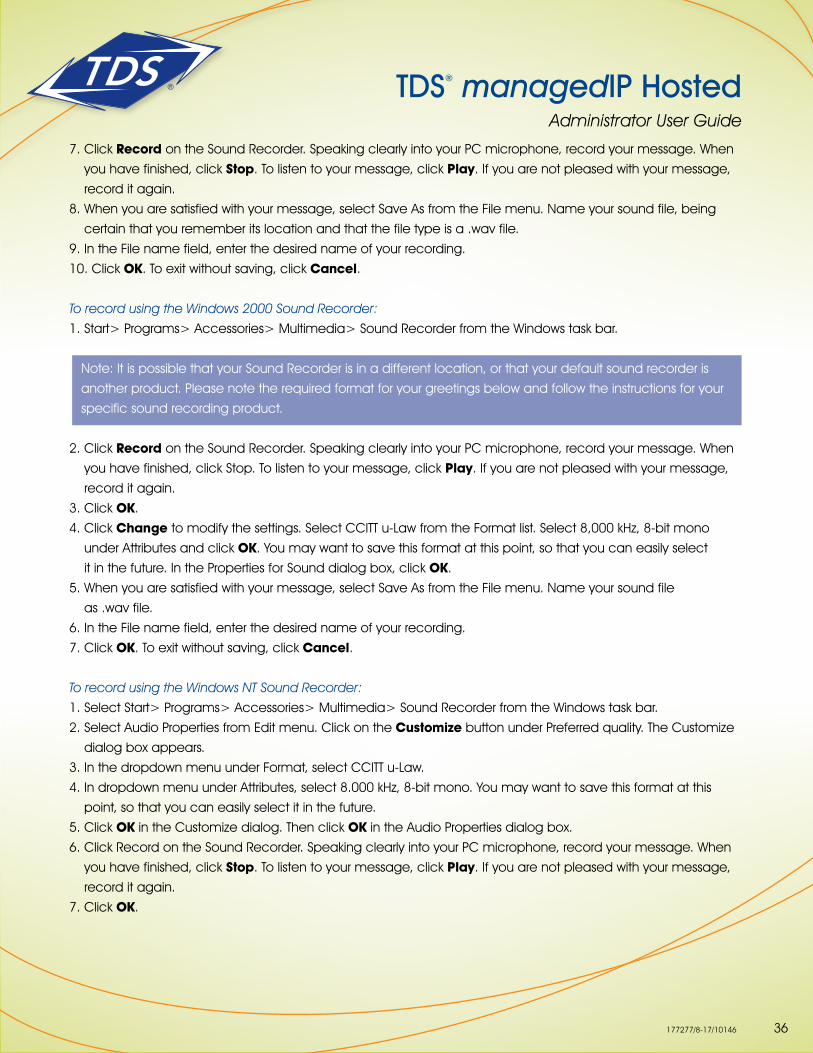
TDS® managedIP HostedAdministrator User Guide
177277/8-17/10146
7. Click Record on the Sound Recorder. Speaking clearly into your PC microphone, record your message. When
you have finished, click Stop. To listen to your message, click Play. If you are not pleased with your message,
record it again.
8. When you are satisfied with your message, select Save As from the File menu. Name your sound file, being
certain that you remember its location and that the file type is a .wav file.
9. In the File name field, enter the desired name of your recording.
10. Click OK. To exit without saving, click Cancel.
To record using the Windows 2000 Sound Recorder:
1. Start> Programs> Accessories> Multimedia> Sound Recorder from the Windows task bar.
Note: It is possible that your Sound Recorder is in a different location, or that your default sound recorder is
another product. Please note the required format for your greetings below and follow the instructions for your
specific sound recording product.
2. Click Record on the Sound Recorder. Speaking clearly into your PC microphone, record your message. When
you have finished, click Stop. To listen to your message, click Play. If you are not pleased with your message,
record it again.
3. Click OK.
4. Click Change to modify the settings. Select CCITT u-Law from the Format list. Select 8,000 kHz, 8-bit mono
under Attributes and click OK. You may want to save this format at this point, so that you can easily select
it in the future. In the Properties for Sound dialog box, click OK.
5. When you are satisfied with your message, select Save As from the File menu. Name your sound file
as .wav file.
6. In the File name field, enter the desired name of your recording.
7. Click OK. To exit without saving, click Cancel.
To record using the Windows NT Sound Recorder:
1. Select Start> Programs> Accessories> Multimedia> Sound Recorder from the Windows task bar.
2. Select Audio Properties from Edit menu. Click on the Customize button under Preferred quality. The Customize
dialog box appears.
3. In the dropdown menu under Format, select CCITT u-Law.
4. In dropdown menu under Attributes, select 8.000 kHz, 8-bit mono. You may want to save this format at this
point, so that you can easily select it in the future.
5. Click OK in the Customize dialog. Then click OK in the Audio Properties dialog box.
6. Click Record on the Sound Recorder. Speaking clearly into your PC microphone, record your message. When
you have finished, click Stop. To listen to your message, click Play. If you are not pleased with your message,
record it again.
7. Click OK.
36

TDS® managedIP HostedAdministrator User Guide
177277/8-17/10146
8. When you are satisfied with your message, select Save As from the File menu. Name your sound
file as .wav file.
9. In the File name field, enter the desired name of your recording.
10. Click OK. To exit without saving, click Cancel.
Passcode Rules
Voice Messaging• Cannot be a single repeated digit
• Cannot be or contain the user’s own extension or phone number
• Cannot be the reverse of the user’s extension or phone number
• Cannot be the old passcode
• Cannot be the reverse of the old passcode
• Cannot be sequential digits in either increasing or decreasing order
• Cannot be repeating sequences (e.g., 123123, 242424, 43214321)
• Must be at least 5 digits, no more than 8 digits
• Expires after 365 days
• Disabled after 5 failed login attempts
Web Portal• Cannot contain your login ID
• Cannot be your old password
• Must contain at least 1 number, 1 uppercase and 2 lowercase alpha characters.
• Cannot be the reverse of an old passcode
• Must be a minimum of 8 characters
• Expires after 180 days
• Disabled after 5 failed login attempts
37

TDS® managedIP HostedAdministrator User Guide
177277/8-17/10146
User Tags Descriptions and Defaults
Note: Tags shown in the web portal are based on the phone model. With the IP650, all tags associated to a line key will appear with 34 options. Lines 7-34 only apply if the phone has an expansion module.
Tag Description Default Options Supported Devices
CALL_CENTER_AGENT_LINE_KEY
The key used to support the Call Center agent sign-in function (special icons used), interworks with Call Center soft keys.
1 1 – 34
VVX Series600, 50X, 41X, 310SoundPoint Series650, 560, 550, 450,33X
CALL_CENTER_AGENT_SIGN_IN_STATE
The state of the Call Center User when signing in to the Call Center queue.
10 = Unavailable1 = Available
VVX Series600, 50X, 41X, 310SoundPoint Series650, 560, 550, 450,33X
CALL_CENTER_SOFT_KEYSFor Call Center agents, this option adds soft keys to the phone enabling agent to Sign In/Out, and change state (Available/Unavailable).
00 = None
1 = Soft keys
VVX Series600, 50X, 41X, 310SoundPoint Series650, 560, 550, 450,33X
CALL_PULL_ENABLED
The “Pull Call” soft key will be displayed and allows the user to “pull” active calls from device to device, e.g. UC Mobile application to Polycom desk phone.
10 = Off1 = On
VVX Series600, 50X, 41X, 310
CALL_RECORDINGThe user will be able to access the local Call Recording feature via the USB port on the phone.
10 = Off1 = On
VVX Series 600, 50X, 411,
CALL_WAITING_TONESpecifies the tone heard on an incoming call when another call is active (i.e. call waiting).
BeepBeepRingSilent
VVX Series600, 50X, 41X, 310SoundPoint Series650, 560, 550, 450,33X
CALLER_ID_NUMBER_ BEFORE_NAME
The phone will display the Caller ID number before the Caller ID Name.
0 0 = Name First
1 = Number First
VVX Series600, 50X, 41X, 310SoundPoint Series650, 560, 550, 450,33X
DATE_TIME_IN_24_ HOUR_FORMAT
Display time in 24-hour “military time” or choose standard AM/PM format.
00 = 12 Hour1 = 24 Hour
VVX Series600, 50X, 41X, 310SoundPoint Series650, 560, 550, 450,33X
38
TDS® managedIP HostedAdministrator User Guide
177277/8-17/10146
Tag Description Default Options Supported Devices
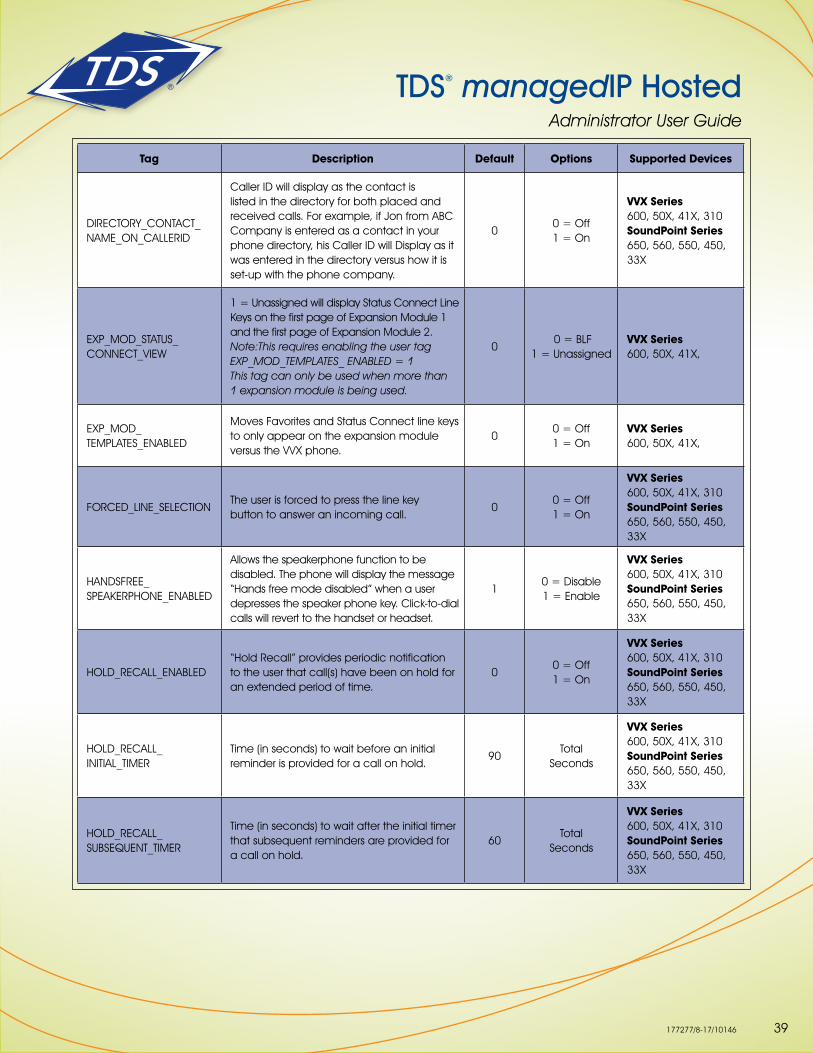
DIRECTORY_CONTACT_NAME_ON_CALLERID
Caller ID will display as the contact is listed in the directory for both placed and received calls. For example, if Jon from ABC Company is entered as a contact in your phone directory, his Caller ID will Display as it was entered in the directory versus how it is set-up with the phone company.
00 = Off1 = On
VVX Series600, 50X, 41X, 310SoundPoint Series650, 560, 550, 450,33X
EXP_MOD_STATUS_CONNECT_VIEW
1 = Unassigned will display Status Connect Line Keys on the first page of Expansion Module 1 and the first page of Expansion Module 2.Note:This requires enabling the user tag EXP_MOD_TEMPLATES_ ENABLED = 1 This tag can only be used when more than 1 expansion module is being used.
0 0 = BLF
1 = UnassignedVVX Series 600, 50X, 41X,
EXP_MOD_ TEMPLATES_ENABLED
Moves Favorites and Status Connect line keys to only appear on the expansion module versus the VVX phone.
00 = Off1 = On
VVX Series 600, 50X, 41X,
FORCED_LINE_SELECTIONThe user is forced to press the line key button to answer an incoming call.
00 = Off1 = On
VVX Series600, 50X, 41X, 310SoundPoint Series650, 560, 550, 450,33X
HANDSFREE_SPEAKERPHONE_ENABLED
Allows the speakerphone function to be disabled. The phone will display the message “Hands free mode disabled” when a user depresses the speaker phone key. Click-to-dial calls will revert to the handset or headset.
10 = Disable1 = Enable
VVX Series600, 50X, 41X, 310SoundPoint Series650, 560, 550, 450,33X
HOLD_RECALL_ENABLED“Hold Recall” provides periodic notification to the user that call(s) have been on hold for an extended period of time.
00 = Off1 = On
VVX Series600, 50X, 41X, 310SoundPoint Series650, 560, 550, 450,33X
HOLD_RECALL_ INITIAL_TIMER
Time (in seconds) to wait before an initial reminder is provided for a call on hold.
90Total
Seconds
VVX Series600, 50X, 41X, 310SoundPoint Series650, 560, 550, 450,33X
HOLD_RECALL_SUBSEQUENT_TIMER
Time (in seconds) to wait after the initial timer that subsequent reminders are provided for a call on hold.
60Total
Seconds
VVX Series600, 50X, 41X, 310SoundPoint Series650, 560, 550, 450,33X
39

TDS® managedIP HostedAdministrator User Guide
177277/8-17/10146
Tag Description Default Options Supported Devices
HOTLINE_ENABLED_FOR_LINE_KEY_<x>
Calls will automatically be placed to the “Hotline Number,” which can be set by completing Tag X.
00 = Off1 = On
VVX Series600, 50X, 41X, 310SoundPoint Series650, 560, 550, 450,33X
HOTLINE_NUMBER_DIALED_FOR_LINE_KEY_<x>
This feature must be enabled to set a predefined number to be automatically dialed. See Tag X to enable this function.
NULL
Any valid internal or externalnumber
VVX Series600, 50X, 41X, 310SoundPoint Series650, 560, 550, 450,33X
MISSED_CALLS_LIST_AND_COUNTER_ENABLED
Missed calls will increment the “Missed Calls” counter on the display and be logged in the “Missed Calls List.”Note: The default is set to line 1 = on; lines 2-34 = off.
10 = Off1 = On
VVX Series600, 50X, 41X, 310SoundPoint Series650, 560, 550, 450,33X
MWI_ENABLED_FOR_LINE_KEY_
The Message Waiting Indicators, both the red LED light at the top of the phone and the envelope icon next to the line key, may be disabled on a per-line key basis. Note: If enabled on a single line key, the MESSAGES key will go directly to Voice Messaging. If enabled for 2+ line keys, the MESSAGES key will present a “Line Select” menu, prompting the user to select the line key they desire to retrieve messages.
10 = Off1 = On
VVX Series600, 50X, 41X, 310SoundPoint Series650, 560, 550, 450,33X
PAGING TAGS – Group Paging is a Polycom phone feature and uses multicast paging protocols and standards to broadcast page announcements on your local area network (LAN). Since the feature is a LAN-based feature, it will only work within a LAN environment, typically limited to a single site or location. Accordingly, if your business has multiple locations in a WAN environment, the paging must be configured independently in each LAN/site. Therefore, users are unable to place or receive pages between different sites.
PAGING_ALLOW_OFF_HOOK_PAGES
The user will receive pages when they are off hook on a call (the call itself will not be interrupted).
00 = Off1 = On
VVX Series 600, 50X, 41X, 310SoundPoint Series670, 650, 560, 550, 450, 33X,7000, 6000, 5000
PAGING_CALL_ WAITING_ENABLED
A page will be received when the user is off hook on a call and will be presented as a waiting call (similar to any waited calls). The user may opt to hold their call and listen to the page broadcast, or ignore the waiting page.
00 = Off1 = On
VVX Series 600, 50X, 41X, 310SoundPoint Series670, 650, 560, 550, 450, 33X,7000, 6000, 5000
40
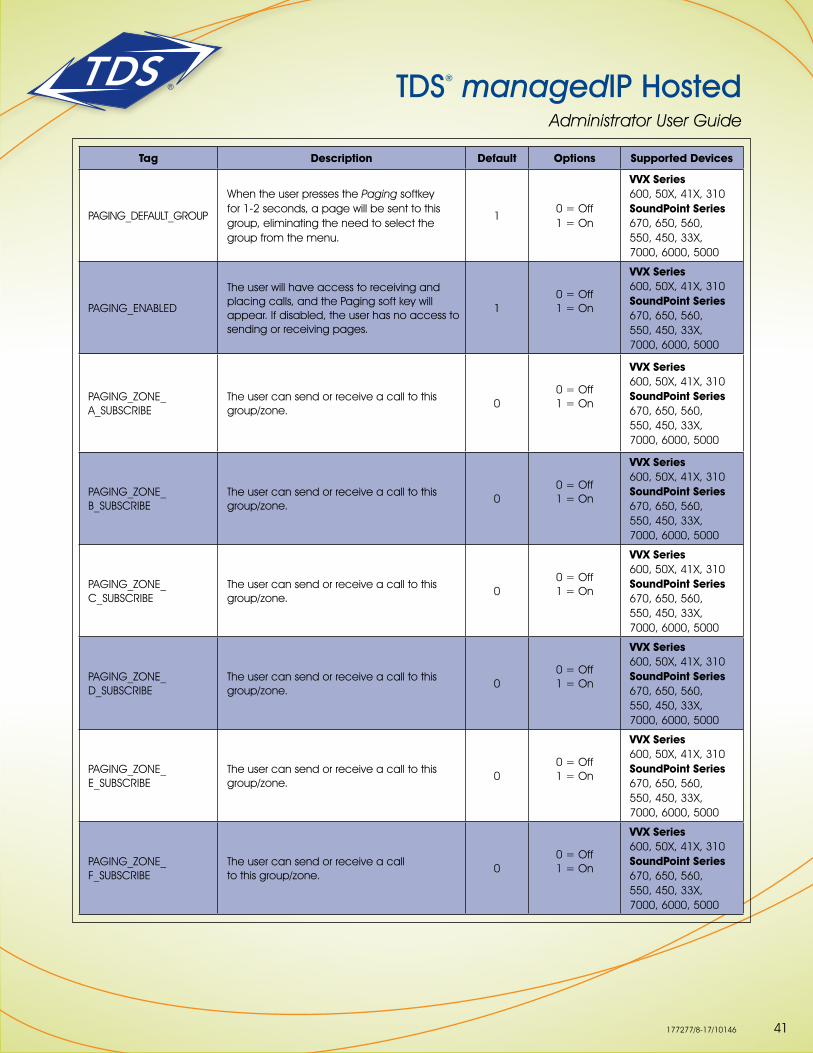
TDS® managedIP HostedAdministrator User Guide
177277/8-17/10146
Tag Description Default Options Supported Devices
PAGING_DEFAULT_GROUP
When the user presses the Paging softkey for 1-2 seconds, a page will be sent to this group, eliminating the need to select the group from the menu.
10 = Off1 = On
VVX Series 600, 50X, 41X, 310SoundPoint Series670, 650, 560, 550, 450, 33X,7000, 6000, 5000
PAGING_ENABLED
The user will have access to receiving and placing calls, and the Paging soft key will appear. If disabled, the user has no access to sending or receiving pages.
10 = Off1 = On
VVX Series 600, 50X, 41X, 310SoundPoint Series670, 650, 560, 550, 450, 33X,7000, 6000, 5000
PAGING_ZONE_ A_SUBSCRIBE
The user can send or receive a call to this group/zone.
0 0 = Off1 = On
VVX Series 600, 50X, 41X, 310SoundPoint Series670, 650, 560, 550, 450, 33X,7000, 6000, 5000
PAGING_ZONE_ B_SUBSCRIBE
The user can send or receive a call to this group/zone.
0 0 = Off1 = On
VVX Series 600, 50X, 41X, 310SoundPoint Series670, 650, 560, 550, 450, 33X,7000, 6000, 5000
PAGING_ZONE_ C_SUBSCRIBE
The user can send or receive a call to this group/zone.
00 = Off1 = On
VVX Series 600, 50X, 41X, 310SoundPoint Series670, 650, 560, 550, 450, 33X,7000, 6000, 5000
PAGING_ZONE_ D_SUBSCRIBE
The user can send or receive a call to this group/zone.
00 = Off1 = On
VVX Series 600, 50X, 41X, 310SoundPoint Series670, 650, 560, 550, 450, 33X,7000, 6000, 5000
PAGING_ZONE_ E_SUBSCRIBE
The user can send or receive a call to this group/zone.
00 = Off1 = On
VVX Series 600, 50X, 41X, 310SoundPoint Series670, 650, 560, 550, 450, 33X,7000, 6000, 5000
PAGING_ZONE_ F_SUBSCRIBE
The user can send or receive a call to this group/zone.
0 0 = Off1 = On
VVX Series 600, 50X, 41X, 310SoundPoint Series670, 650, 560, 550, 450, 33X,7000, 6000, 5000
41
TDS® managedIP HostedAdministrator User Guide
177277/8-17/10146
Tag Description Default Options Supported Devices
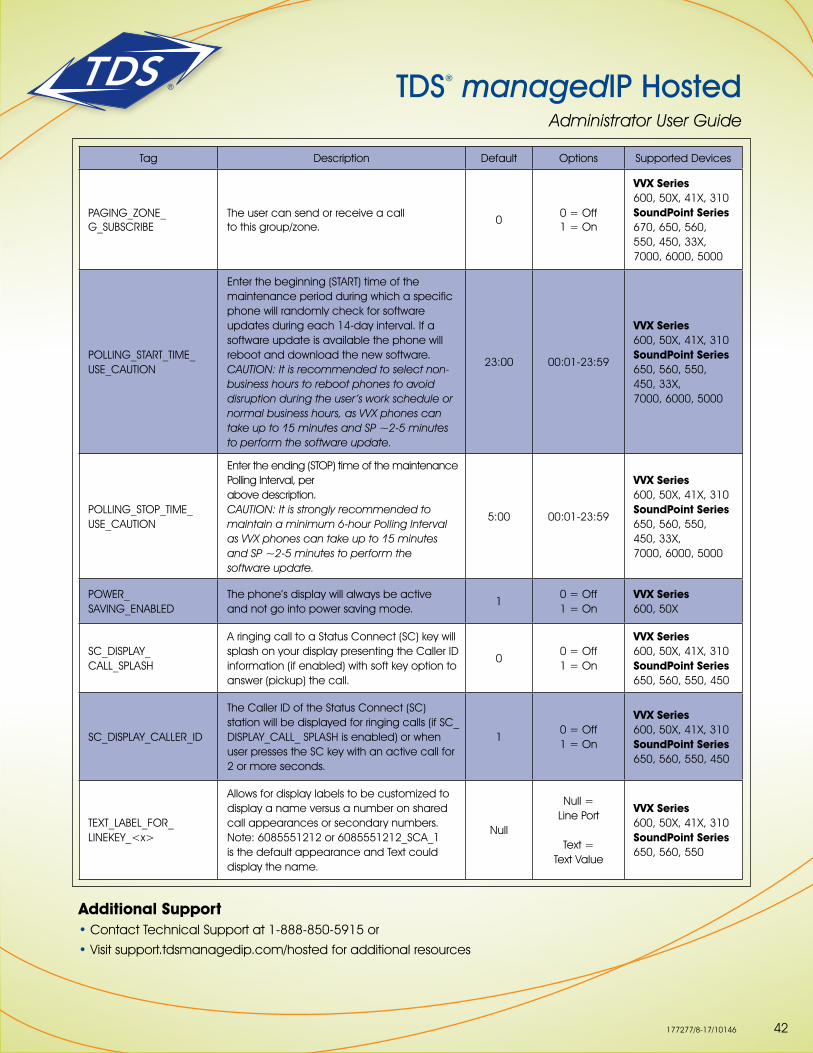
PAGING_ZONE_ G_SUBSCRIBE
The user can send or receive a call to this group/zone.
0 0 = Off1 = On
VVX Series 600, 50X, 41X, 310SoundPoint Series670, 650, 560, 550, 450, 33X,7000, 6000, 5000
POLLING_START_TIME_USE_CAUTION
Enter the beginning (START) time of the maintenance period during which a specific phone will randomly check for software updates during each 14-day interval. If a software update is available the phone will reboot and download the new software. CAUTION: It is recommended to select non-business hours to reboot phones to avoid disruption during the user’s work schedule or normal business hours, as VVX phones can take up to 15 minutes and SP ~2-5 minutes to perform the software update.
23:00 00:01-23:59
VVX Series 600, 50X, 41X, 310SoundPoint Series650, 560, 550, 450, 33X,7000, 6000, 5000
POLLING_STOP_TIME_USE_CAUTION
Enter the ending (STOP) time of the maintenance Polling Interval, per above description. CAUTION: It is strongly recommended to maintain a minimum 6-hour Polling Interval as VVX phones can take up to 15 minutes and SP ~2-5 minutes to perform the software update.
5:00 00:01-23:59
VVX Series 600, 50X, 41X, 310SoundPoint Series650, 560, 550, 450, 33X,7000, 6000, 5000
POWER_ SAVING_ENABLED
The phone’s display will always be active and not go into power saving mode.
10 = Off1 = On
VVX Series 600, 50X
SC_DISPLAY_ CALL_SPLASH
A ringing call to a Status Connect (SC) key will splash on your display presenting the Caller ID information (if enabled) with soft key option to answer (pickup) the call.
00 = Off1 = On
VVX Series600, 50X, 41X, 310SoundPoint Series650, 560, 550, 450
SC_DISPLAY_CALLER_ID
The Caller ID of the Status Connect (SC) station will be displayed for ringing calls (if SC_DISPLAY_CALL_ SPLASH is enabled) or when user presses the SC key with an active call for 2 or more seconds.
10 = Off1 = On
VVX Series600, 50X, 41X, 310SoundPoint Series650, 560, 550, 450
TEXT_LABEL_FOR_LINEKEY_<x>
Allows for display labels to be customized to display a name versus a number on shared call appearances or secondary numbers. Note: 6085551212 or 6085551212_SCA_1 is the default appearance and Text could display the name.
Null
Null = Line Port
Text = Text Value
VVX Series 600, 50X, 41X, 310SoundPoint Series650, 560, 550
Additional Support • Contact Technical Support at 1-888-850-5915 or
• Visit support.tdsmanagedip.com/hosted for additional resources
42
Related Documents