Burnishing By David J. LaBounty, CMC FBHI Why Burnish? Burnishing is a polishi ng and work hardening of a metalli c surface. This process wil l smooth and harden the surface, creating a finish which will last longer than one that hasn’t been burnished. This is a desirable characteristic in clockmaking and watchmaking since the major determining factor in how long a clock or watch will run is the degree to which the bearings will wear over time. Long-lasting bearing surfaces, like pivots and pivot holes, will greatly increase the length of time that a clock or watch will perform as expected. Although this article is prim arily targeting the burnishing process for clocks, the same methods may be applied to watches with the understanding that jewel holes need not, nor can they be, burnished. Why Not Burnish? Modern German movements use plated steels which do not react well to the burnishing process. The pivots in these movements are very soft and it is only the plating that keeps them from wearing out immediately . Once the plating is gone, the only choice is to replace the pivot or replace the whole movement. These pivots can be polished but t he plating is easily damaged. It can come off as a cylinder, after breaking loose at the shoulder, during the polishing p rocess (fig 1). To polish these, it is best to use the square edge of a piece of soft wood, (like the handle of a buff stick) charged with Simichrome 1 . The soft wood won’t damage the plating and the Simichrome is a mild enough abrasive that very little of the plating is removed (fig 2 ). Fig. 1-Burnishing a pl ated pivot will cause the plati ng to flake, as shown here. The plating can b e seen as p articulate s in the o il on the b urnisher .

Welcome message from author
This document is posted to help you gain knowledge. Please leave a comment to let me know what you think about it! Share it to your friends and learn new things together.
Transcript
8/10/2019 Surface Treatment- Burnishing
http://slidepdf.com/reader/full/surface-treatment-burnishing 1/27
BurnishingBy David J. LaBounty, CMC FBHI
Why Burnish?
Burnishing is a polishing and work hardening of a metallic surface. This process will
smooth and harden the surface, creating a finish which will last longer than one thathasn’t been burnished. This is a desirable characteristic in clockmaking and
watchmaking since the major determining factor in how long a clock or watch will run isthe degree to which the bearings will wear over time. Long-lasting bearing surfaces, like
pivots and pivot holes, will greatly increase the length of time that a clock or watch will perform as expected. Although this article is primarily targeting the burnishing process
for clocks, the same methods may be applied to watches with the understanding that jewel holes need not, nor can they be, burnished.
Why Not Burnish?
Modern German movements use plated steels which do not react well to the burnishing process. The pivots in these movements are very soft and it is only the plating that keeps
them from wearing out immediately. Once the plating is gone, the only choice is toreplace the pivot or replace the whole movement.
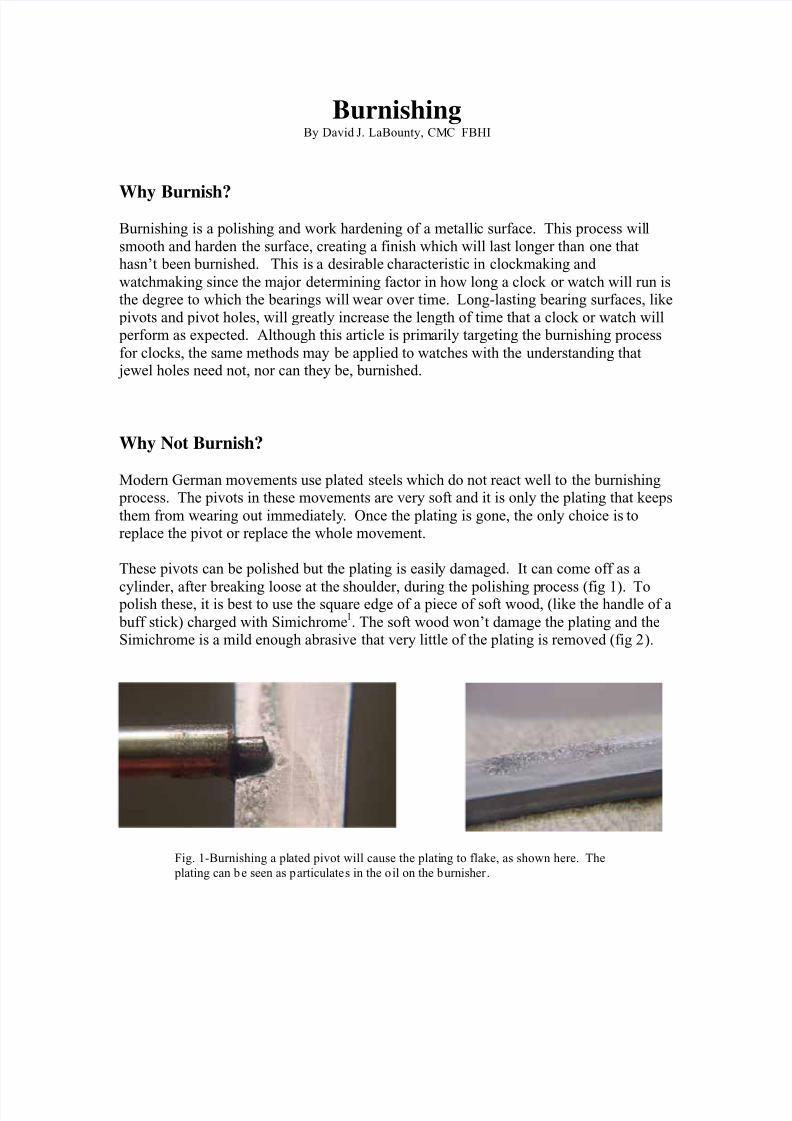
These pivots can be polished but the plating is easily damaged. It can come off as a
cylinder, after breaking loose at the shoulder, during the polishing process (fig 1). To polish these, it is best to use the square edge of a piece of soft wood, (like the handle of a
buff stick) charged with Simichrome1. The soft wood won’t damage the plating and the
Simichrome is a mild enough abrasive that very little of the plating is removed (fig 2).
Fig. 1-Burnishing a plated pivot will cause the plating to flake, as shown here. The
plating can be seen as particulates in the oil on the burnisher.
8/10/2019 Surface Treatment- Burnishing
http://slidepdf.com/reader/full/surface-treatment-burnishing 2/27
So, these pivots can be carefully polished but they cannot be burnished. The burnishing process will cause the thin plating to craze and crack. It may not be visible at the time,
but after about a month’s run, the plating lets go, mixes with the oils or grease, and formsa black ooze.
Burnishing involves applying pressure against the surface of the pivot, stretching and
work hardening it. The hard surface of the plating has no support and is easily damagedin the process. It is like a chocolate covered ice cream bar; thin, hard outside layer
covering a soft interior.
Polishing vs. Burnishing
Even though polishing occurs as a result of burnishing, polishing in itself is not
burnishing. The distinction is that polishing will produce a smooth finish, but not a hard
one. Polishing is more about removing material to obtain the desired finish where as burnishing is a stretching and hardening with minimal material loss.
It is impossible to tell by looking at a pivot whether it has been polished or burnished but burnishing will generally result in a deeper polish than is possible with polishing alone.
A hardness or wear test would be necessary to distinguish between them.
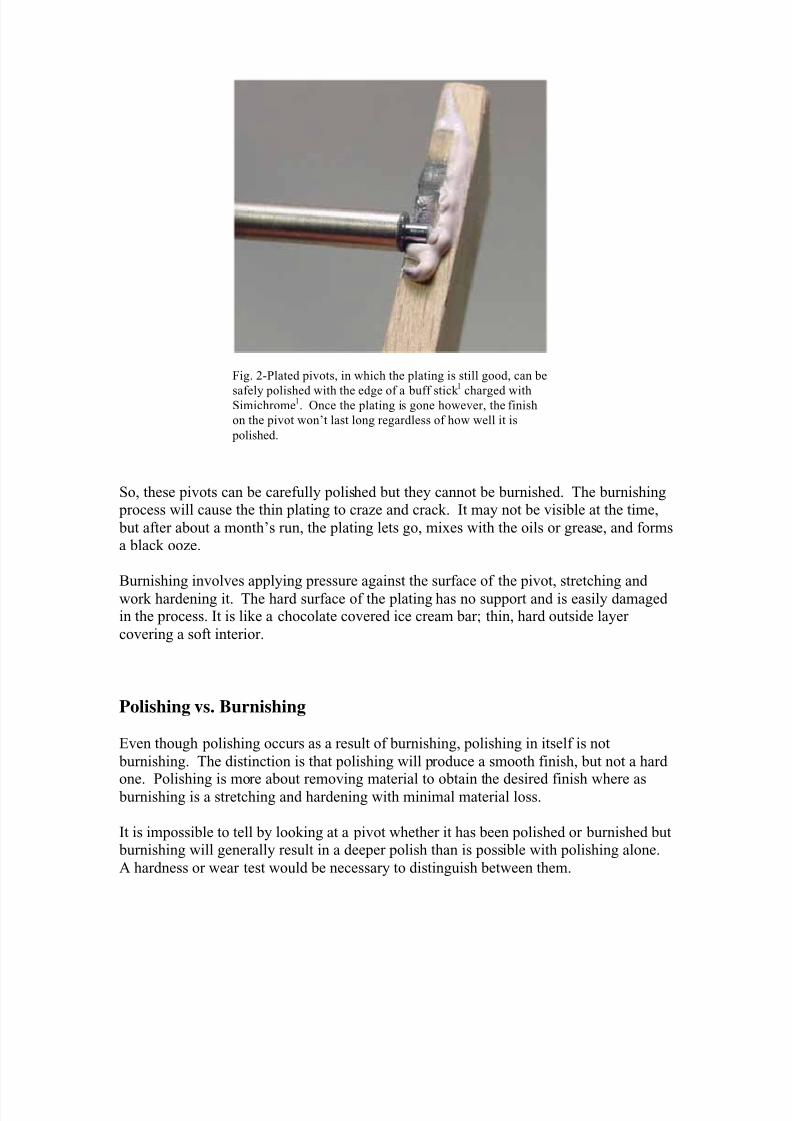
Fig. 2-Plated pivots, in which the plating is still good, can be
safely polished with the edge of a buff stick 1
charged withSimichrome1. Once the plating is gone however, the finish
on the pivot won’t last long regardless of how well it is
polished.
8/10/2019 Surface Treatment- Burnishing
http://slidepdf.com/reader/full/surface-treatment-burnishing 3/27
It will be necessary to use magnification when polishing in order to see the fine details ofthe surface being polished. In addition, it is very important to wear eye protection
when polishing or burnishing.
Polishing is an important first step in the burnishing process and a test of the craftsman’s
ability to bring a pivot to the point it can be burnished. A poor polish will make it verydifficult to bring the pivot to perfection with burnishing alone. For example, it wouldtake a very long time to burnish a groove out of a pivot where a mere touch of the pivot
file will remove the groove very quickly.
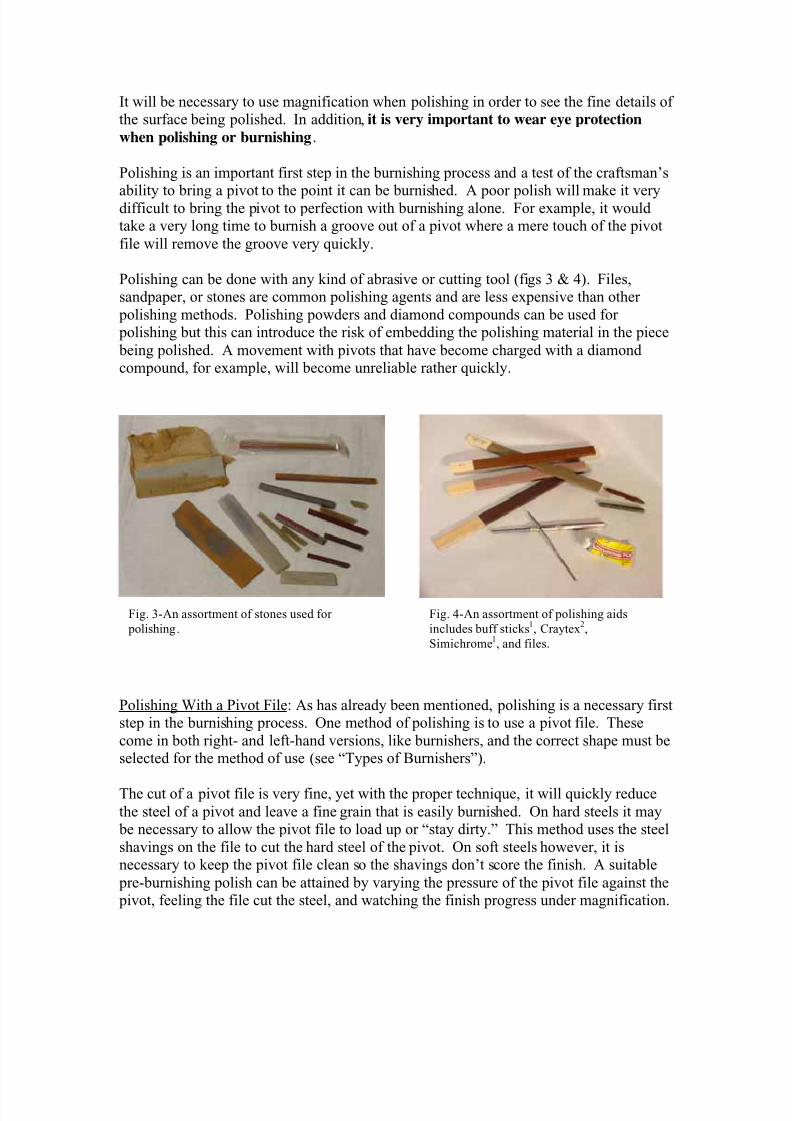
Polishing can be done with any kind of abrasive or cutting tool (figs 3 & 4). Files,sandpaper, or stones are common polishing agents and are less expensive than other
polishing methods. Polishing powders and diamond compounds can be used for polishing but this can introduce the risk of embedding the polishing material in the piece
being polished. A movement with pivots that have become charged with a diamondcompound, for example, will become unreliable rather quickly.
Polishing With a Pivot File: As has already been mentioned, polishing is a necessary firststep in the burnishing process. One method of polishing is to use a pivot file. These
come in both right- and left-hand versions, like burnishers, and the correct shape must beselected for the method of use (see “Types of Burnishers”).
The cut of a pivot file is very fine, yet with the proper technique, it will quickly reduce
the steel of a pivot and leave a fine grain that is easily burnished. On hard steels it may be necessary to allow the pivot file to load up or “stay dirty.” This method uses the steel
shavings on the file to cut the hard steel of the pivot. On soft steels however, it isnecessary to keep the pivot file clean so the shavings don’t score the finish. A suitable
pre-burnishing polish can be attained by varying the pressure of the pivot file against the pivot, feeling the file cut the steel, and watching the finish progress under magnification.
Fig. 3-An assortment of stones used for
polishing.
Fig. 4-An assortment of polishing aids
includes buff sticks1, Craytex
2,
Simichrome1, and files.
8/10/2019 Surface Treatment- Burnishing
http://slidepdf.com/reader/full/surface-treatment-burnishing 4/27
8/10/2019 Surface Treatment- Burnishing
http://slidepdf.com/reader/full/surface-treatment-burnishing 5/27
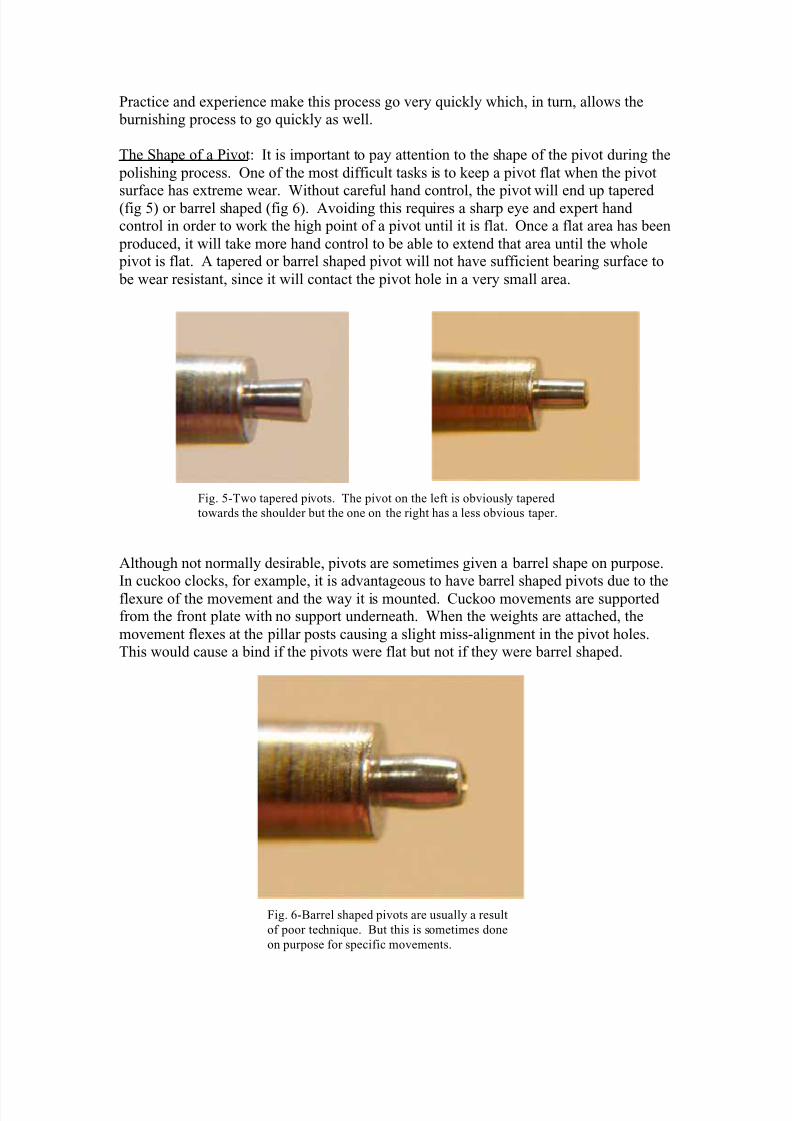
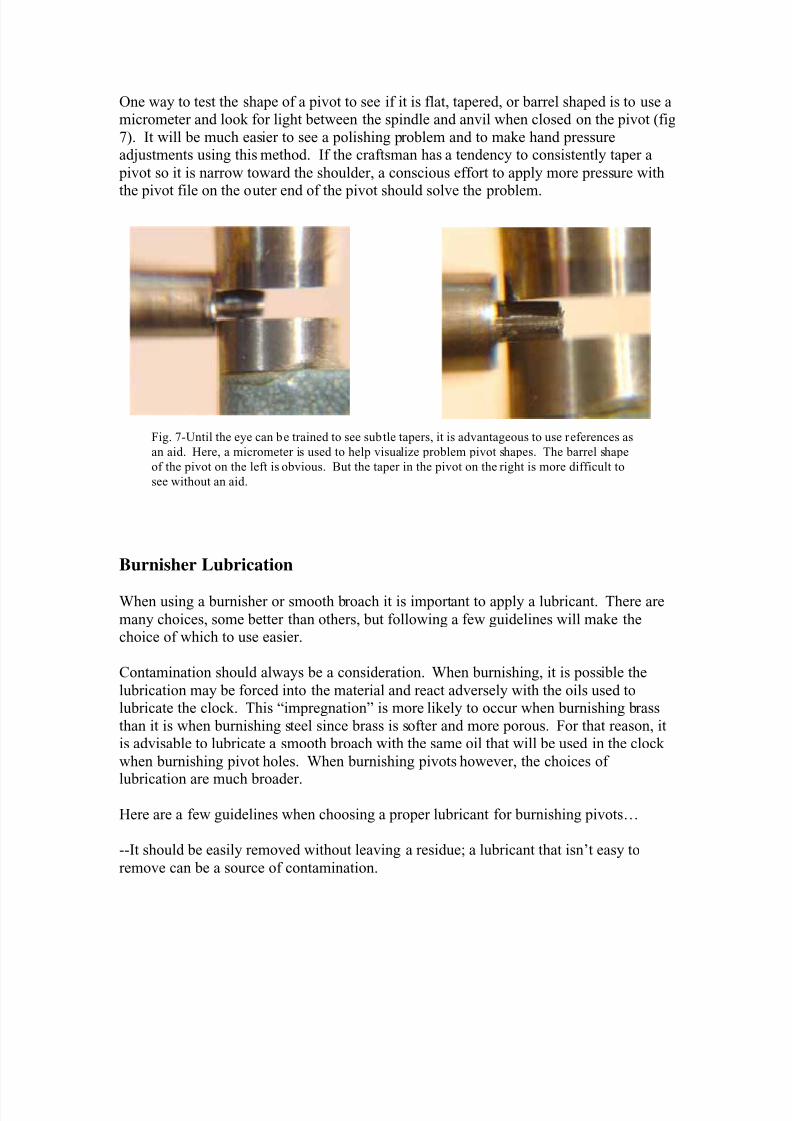
One way to test the shape of a pivot to see if it is flat, tapered, or barrel shaped is to use amicrometer and look for light between the spindle and anvil when closed on the pivot (fig
7). It will be much easier to see a polishing problem and to make hand pressureadjustments using this method. If the craftsman has a tendency to consistently taper a
pivot so it is narrow toward the shoulder, a conscious effort to apply more pressure with
the pivot file on the outer end of the pivot should solve the problem.
Burnisher Lubrication
When using a burnisher or smooth broach it is important to apply a lubricant. There are
many choices, some better than others, but following a few guidelines will make thechoice of which to use easier.
Contamination should always be a consideration. When burnishing, it is possible the
lubrication may be forced into the material and react adversely with the oils used tolubricate the clock. This “impregnation” is more likely to occur when burnishing brass
than it is when burnishing steel since brass is softer and more porous. For that reason, itis advisable to lubricate a smooth broach with the same oil that will be used in the clock
when burnishing pivot holes. When burnishing pivots however, the choices of
lubrication are much broader.
Here are a few guidelines when choosing a proper lubricant for burnishing pivots…
--It should be easily removed without leaving a residue; a lubricant that isn’t easy to
remove can be a source of contamination.
Fig. 7-Until the eye can be trained to see subtle tapers, it is advantageous to use references as
an aid. Here, a micrometer is used to help visualize problem pivot shapes. The barrel shape
of the pivot on the left is obvious. But the taper in the pivot on the right is more difficult to
see without an aid.
8/10/2019 Surface Treatment- Burnishing
http://slidepdf.com/reader/full/surface-treatment-burnishing 6/27
--It should be able to hold particulates away from the work. If the lubricant doesn’t drawsmall particulates into itself, the particulates will collect where the burnisher meets the
surface of the steel. This will cause the particulates to become an abrasive which willmar the finish and negate the burnishing process.
--It must not evaporate when heated. The burnishing process will generate a smallamount of heat at the point where the burnisher meets the metal. If the lubricant has atendency to evaporate under heat, the effect will be the same as if no lubricant was used.
--It should be inexpensive and easy to find. Burnishing a pivot doesn’t require a great
amount of lubrication, but burnishing the pivots on two or three clocks per day could. Acostly or difficult to find lubrication could introduce a tendency to conserve in a process
where too little or too dirty lubrication would hinder burnishing.
My choice of lubricant for burnishing pivots is Hoppe’s no. 9 gun oil which is available
wherever gun supplies are sold. And, as stated above, I use the same oil for burnishing
pivot holes as I’m going to use to lubricate the clock.
Types of Burnishers
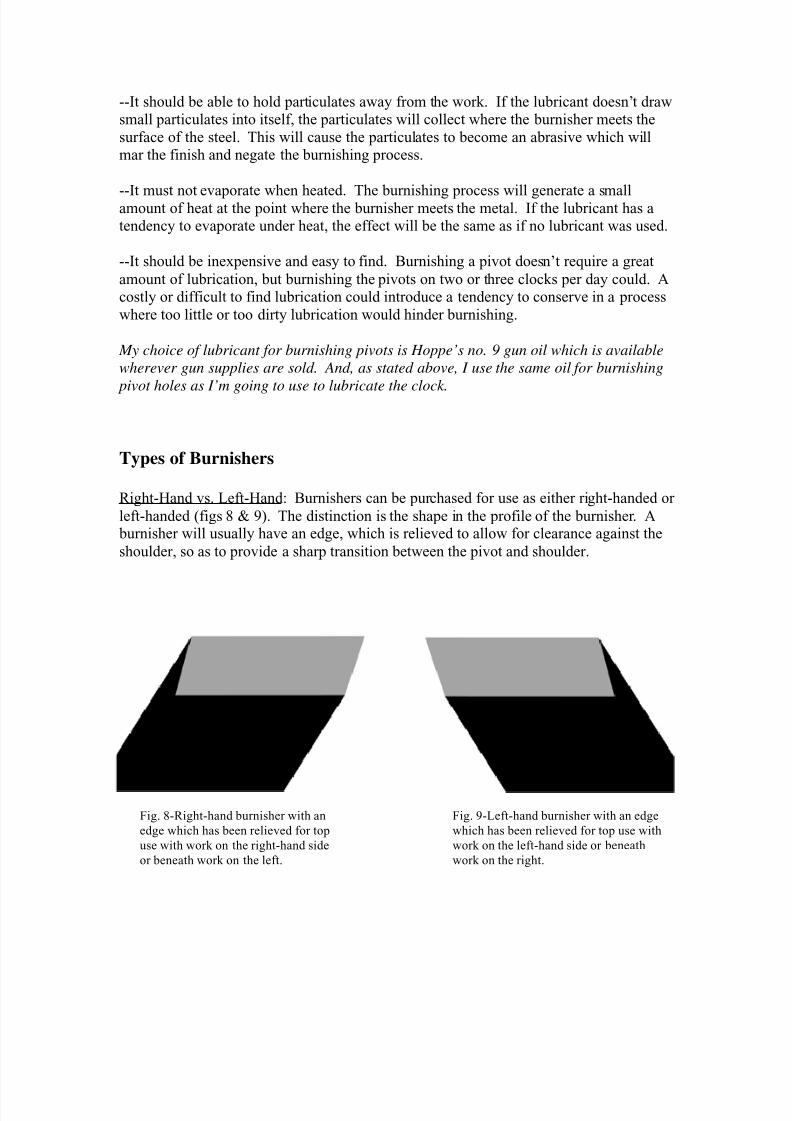
Right-Hand vs. Left-Hand: Burnishers can be purchased for use as either right-handed or
left-handed (figs 8 & 9). The distinction is the shape in the profile of the burnisher. A burnisher will usually have an edge, which is relieved to allow for clearance against the
shoulder, so as to provide a sharp transition between the pivot and shoulder.
Fig. 8-Right-hand burnisher with an
edge which has been relieved for top
use with work on the right-hand side
or beneath work on the left.
Fig. 9-Left-hand burnisher with an edge
which has been relieved for top use with
work on the left-hand side or beneath
work on the right.
8/10/2019 Surface Treatment- Burnishing
http://slidepdf.com/reader/full/surface-treatment-burnishing 7/27
A right-hand burnisher will allow the clockmaker to burnish the pivot from underneathwith the piece being held and rotated from their left. A left-hand burnisher will allow
burnishing from underneath while being held on the right.
If the preference is to burnish from over-the-top, a left-hand burnisher is used with the
piece being held on the left and a right-hand burnisher with it held on the right. This canadd confusion as to which burnisher to purchase. Since most machinists will machinewith the piece being held in a lathe headstock on their left whether they are right- or left-
handed, it should first be decided whether burnishing will be done from underneath orover-the-top.
I prefer burnishing from underneath, since that allows me to see the pivot as well as the
trace it leaves in the oil on the burnisher. Both methods will produce a burnished pivot,
however.
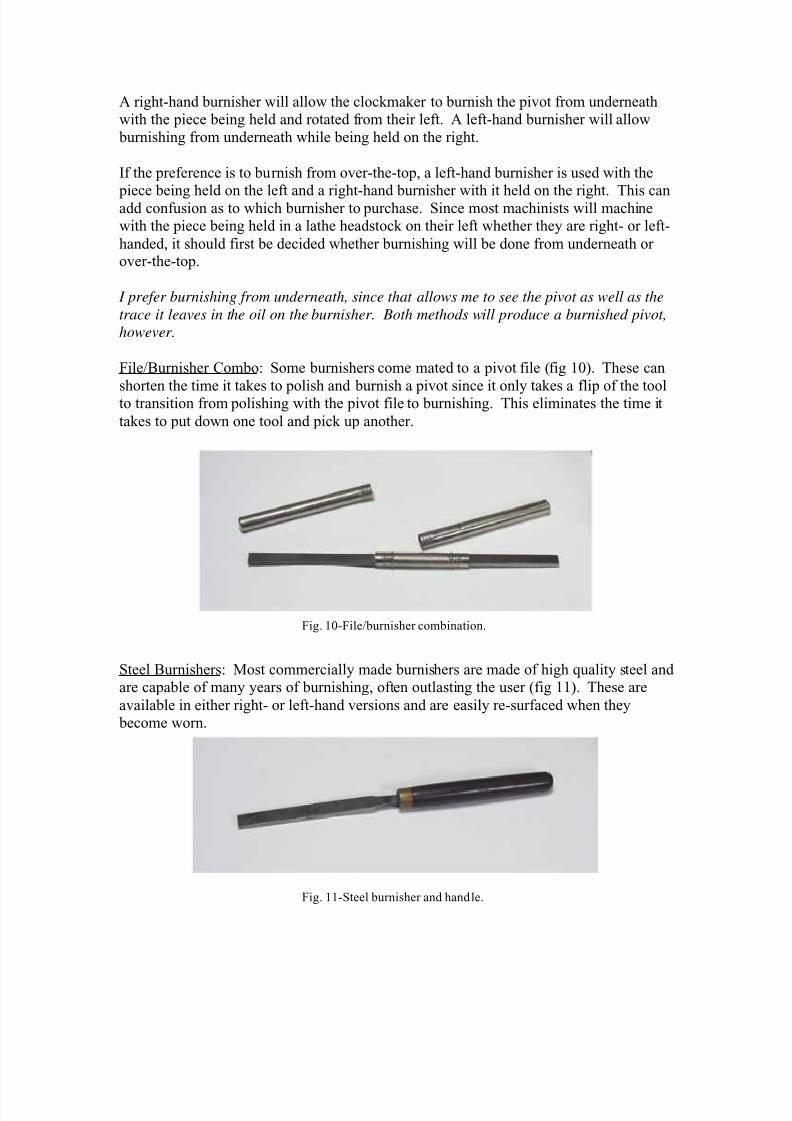
File/Burnisher Combo: Some burnishers come mated to a pivot file (fig 10). These can
shorten the time it takes to polish and burnish a pivot since it only takes a flip of the toolto transition from polishing with the pivot file to burnishing. This eliminates the time it
takes to put down one tool and pick up another.
Steel Burnishers: Most commercially made burnishers are made of high quality steel andare capable of many years of burnishing, often outlasting the user (fig 11). These are
available in either right- or left-hand versions and are easily re-surfaced when they become worn.
Fig. 10-File/burnisher combination.
Fig. 11-Steel burnisher and handle.
8/10/2019 Surface Treatment- Burnishing
http://slidepdf.com/reader/full/surface-treatment-burnishing 8/27
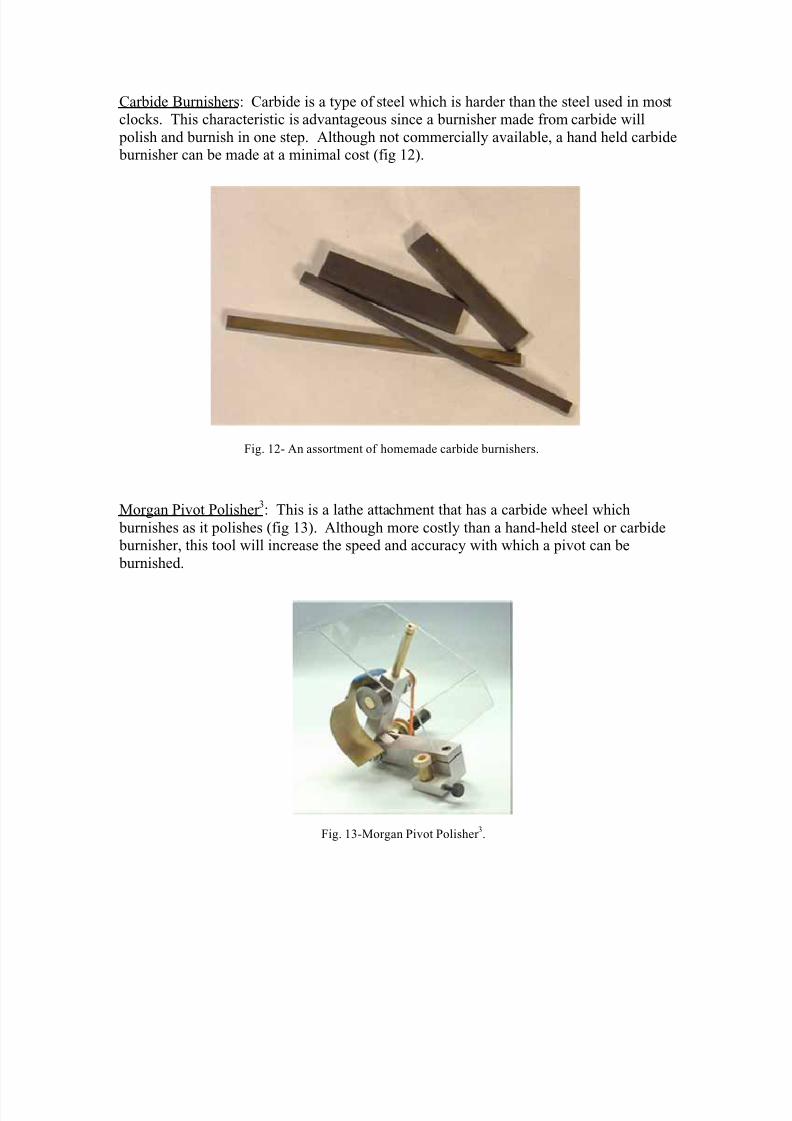
Carbide Burnishers: Carbide is a type of steel which is harder than the steel used in mostclocks. This characteristic is advantageous since a burnisher made from carbide will
polish and burnish in one step. Although not commercially available, a hand held carbide burnisher can be made at a minimal cost (fig 12).
Morgan Pivot Polisher 3: This is a lathe attachment that has a carbide wheel which
burnishes as it polishes (fig 13). Although more costly than a hand-held steel or carbide burnisher, this tool will increase the speed and accuracy with which a pivot can be
burnished.
Fig. 12- An assortment of homemade carbide burnishers.
Fig. 13-Morgan Pivot Polisher 3.
8/10/2019 Surface Treatment- Burnishing
http://slidepdf.com/reader/full/surface-treatment-burnishing 9/27
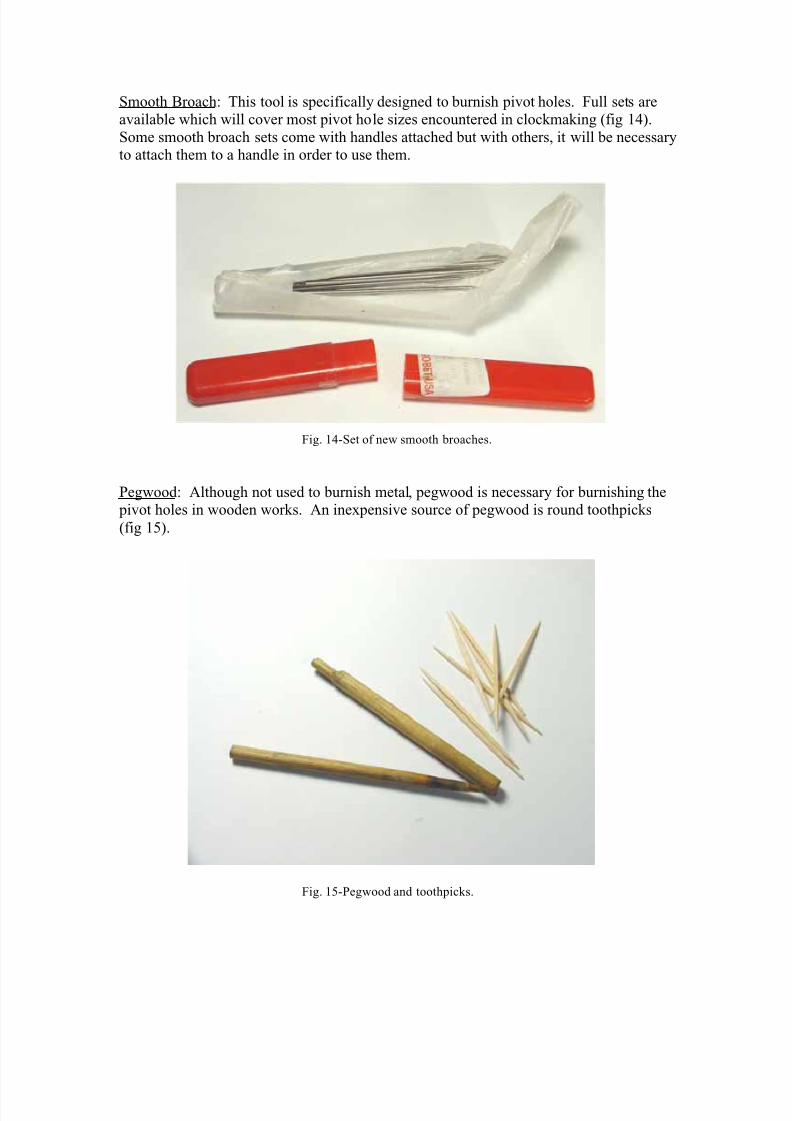
Smooth Broach: This tool is specifically designed to burnish pivot holes. Full sets areavailable which will cover most pivot hole sizes encountered in clockmaking (fig 14).
Some smooth broach sets come with handles attached but with others, it will be necessaryto attach them to a handle in order to use them.
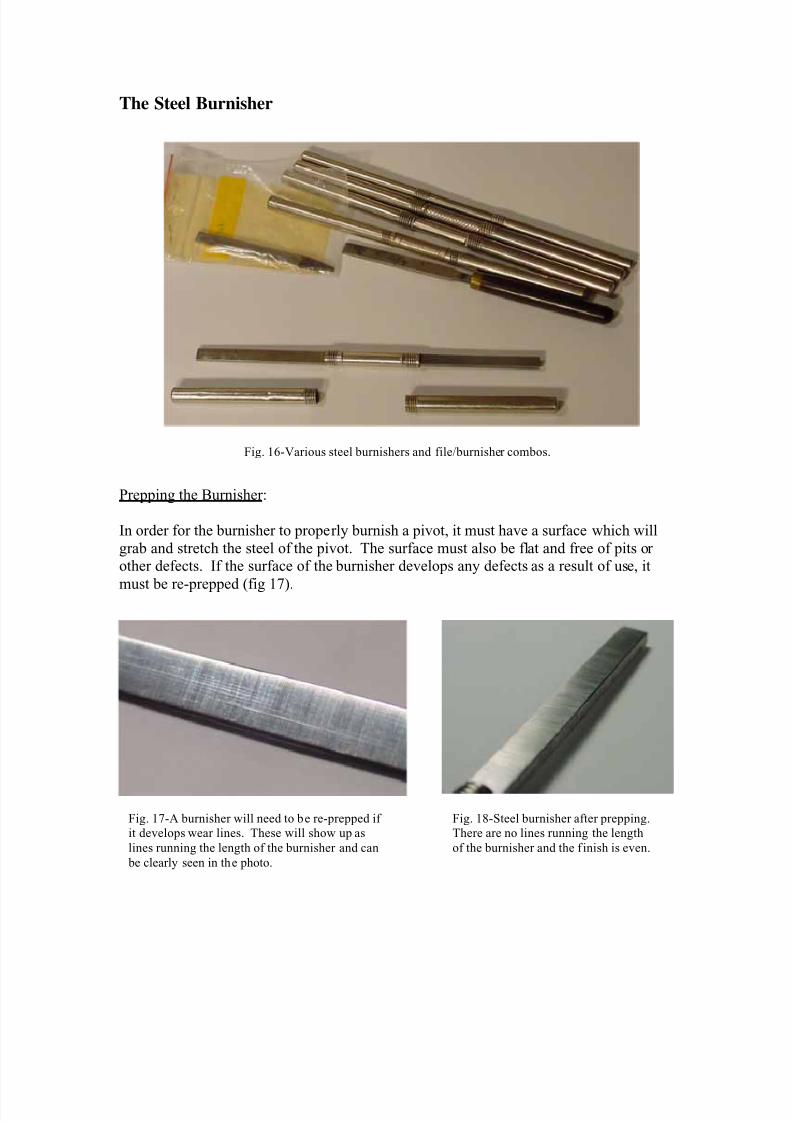
Pegwood: Although not used to burnish metal, pegwood is necessary for burnishing the pivot holes in wooden works. An inexpensive source of pegwood is round toothpicks
(fig 15).
Fig. 14-Set of new smooth broaches.
Fig. 15-Pegwood and toothpicks.
8/10/2019 Surface Treatment- Burnishing
http://slidepdf.com/reader/full/surface-treatment-burnishing 10/27
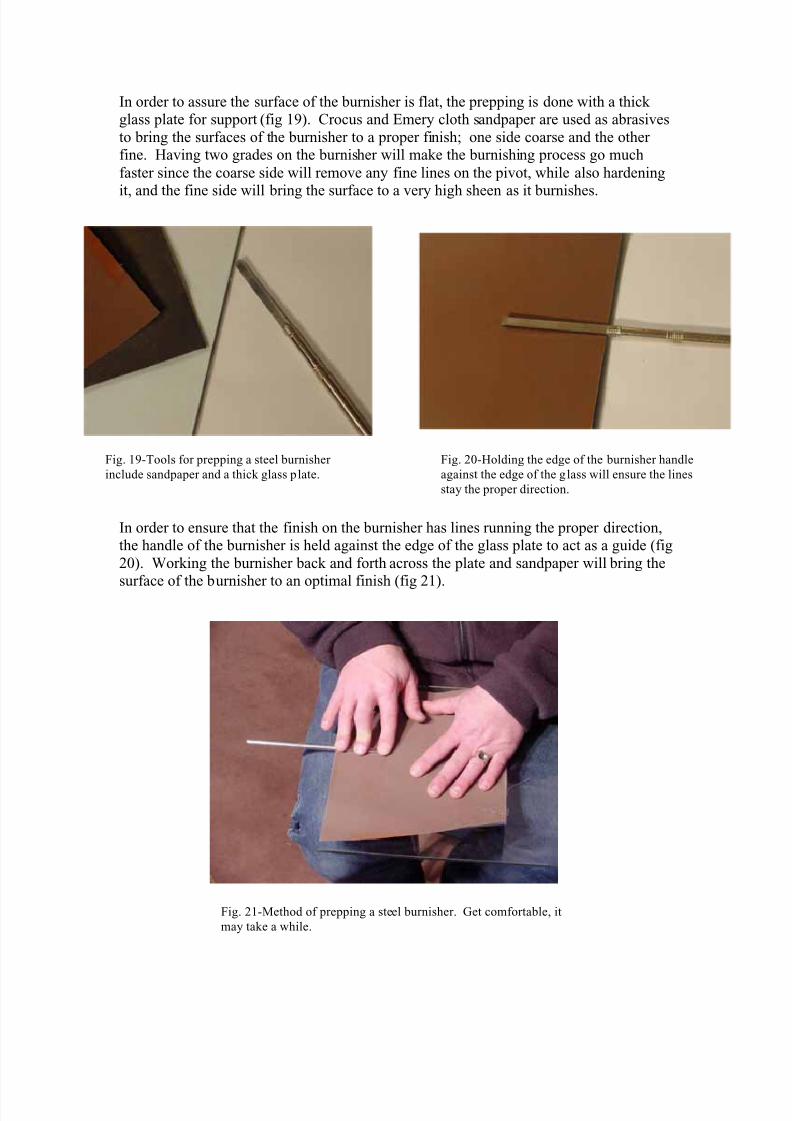
The Steel Burnisher
Prepping the Burnisher:
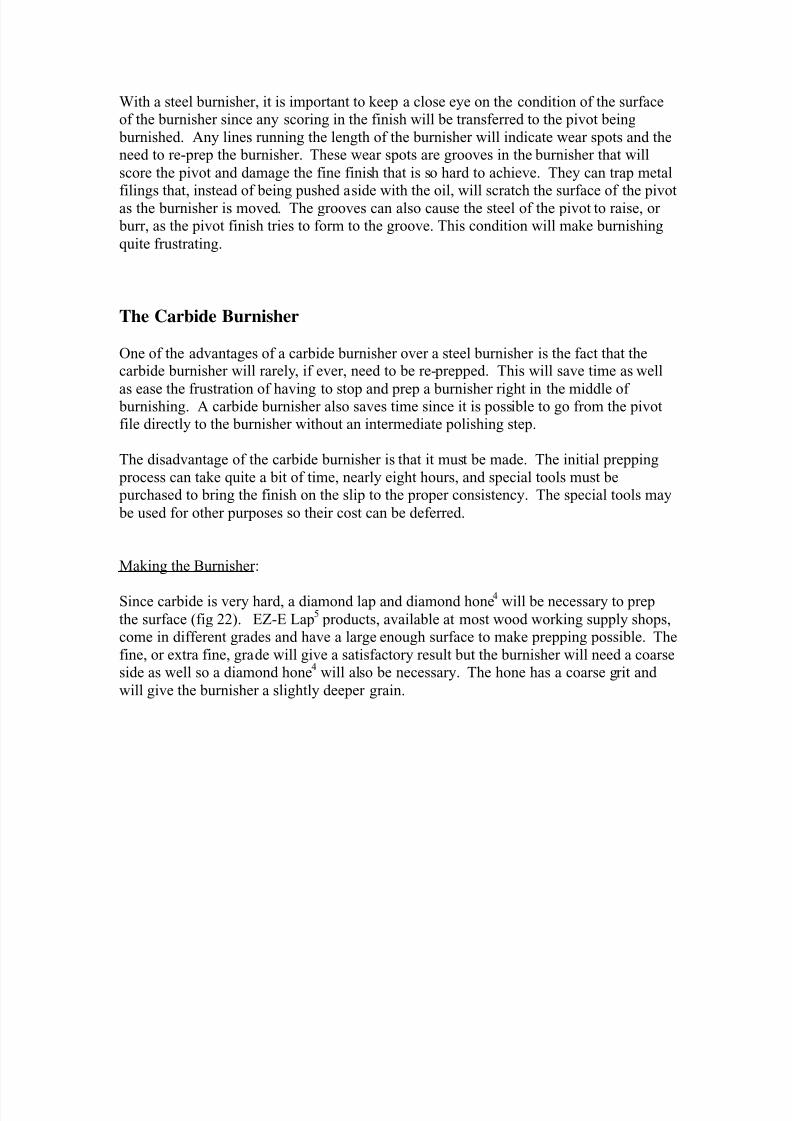
In order for the burnisher to properly burnish a pivot, it must have a surface which will
grab and stretch the steel of the pivot. The surface must also be flat and free of pits orother defects. If the surface of the burnisher develops any defects as a result of use, it
must be re-prepped (fig 17).
Fig. 16-Various steel burnishers and file/burnisher combos.
Fig. 17-A burnisher will need to be re-prepped if
it develops wear lines. These will show up as
lines running the length of the burnisher and can
be clearly seen in the photo.
Fig. 18-Steel burnisher after prepping.
There are no lines running the length
of the burnisher and the f inish is even.
8/10/2019 Surface Treatment- Burnishing
http://slidepdf.com/reader/full/surface-treatment-burnishing 11/27
In order to assure the surface of the burnisher is flat, the prepping is done with a thickglass plate for support (fig 19). Crocus and Emery cloth sandpaper are used as abrasives
to bring the surfaces of the burnisher to a proper finish; one side coarse and the otherfine. Having two grades on the burnisher will make the burnishing process go much
faster since the coarse side will remove any fine lines on the pivot, while also hardening
it, and the fine side will bring the surface to a very high sheen as it burnishes.
In order to ensure that the finish on the burnisher has lines running the proper direction,the handle of the burnisher is held against the edge of the glass plate to act as a guide (fig
20). Working the burnisher back and forth across the plate and sandpaper will bring thesurface of the burnisher to an optimal finish (fig 21).
Fig. 19-Tools for prepping a steel burnisher
include sandpaper and a thick glass plate.
Fig. 20-Holding the edge of the burnisher handle
against the edge of the glass will ensure the lines
stay the proper direction.
Fig. 21-Method of prepping a steel burnisher. Get comfortable, it
may take a while.
8/10/2019 Surface Treatment- Burnishing
http://slidepdf.com/reader/full/surface-treatment-burnishing 12/27
With a steel burnisher, it is important to keep a close eye on the condition of the surfaceof the burnisher since any scoring in the finish will be transferred to the pivot being
burnished. Any lines running the length of the burnisher will indicate wear spots and theneed to re-prep the burnisher. These wear spots are grooves in the burnisher that will
score the pivot and damage the fine finish that is so hard to achieve. They can trap metal
filings that, instead of being pushed aside with the oil, will scratch the surface of the pivotas the burnisher is moved. The grooves can also cause the steel of the pivot to raise, or burr, as the pivot finish tries to form to the groove. This condition will make burnishing
quite frustrating.
The Carbide Burnisher
One of the advantages of a carbide burnisher over a steel burnisher is the fact that thecarbide burnisher will rarely, if ever, need to be re-prepped. This will save time as well
as ease the frustration of having to stop and prep a burnisher right in the middle of burnishing. A carbide burnisher also saves time since it is possible to go from the pivotfile directly to the burnisher without an intermediate polishing step.
The disadvantage of the carbide burnisher is that it must be made. The initial prepping
process can take quite a bit of time, nearly eight hours, and special tools must be purchased to bring the finish on the slip to the proper consistency. The special tools may
be used for other purposes so their cost can be deferred.
Making the Burnisher:
Since carbide is very hard, a diamond lap and diamond hone4 will be necessary to prep
the surface (fig 22). EZ-E Lap5 products, available at most wood working supply shops,
come in different grades and have a large enough surface to make prepping possible. The
fine, or extra fine, grade will give a satisfactory result but the burnisher will need a coarseside as well so a diamond hone
4 will also be necessary. The hone has a coarse grit and
will give the burnisher a slightly deeper grain.
8/10/2019 Surface Treatment- Burnishing
http://slidepdf.com/reader/full/surface-treatment-burnishing 13/27
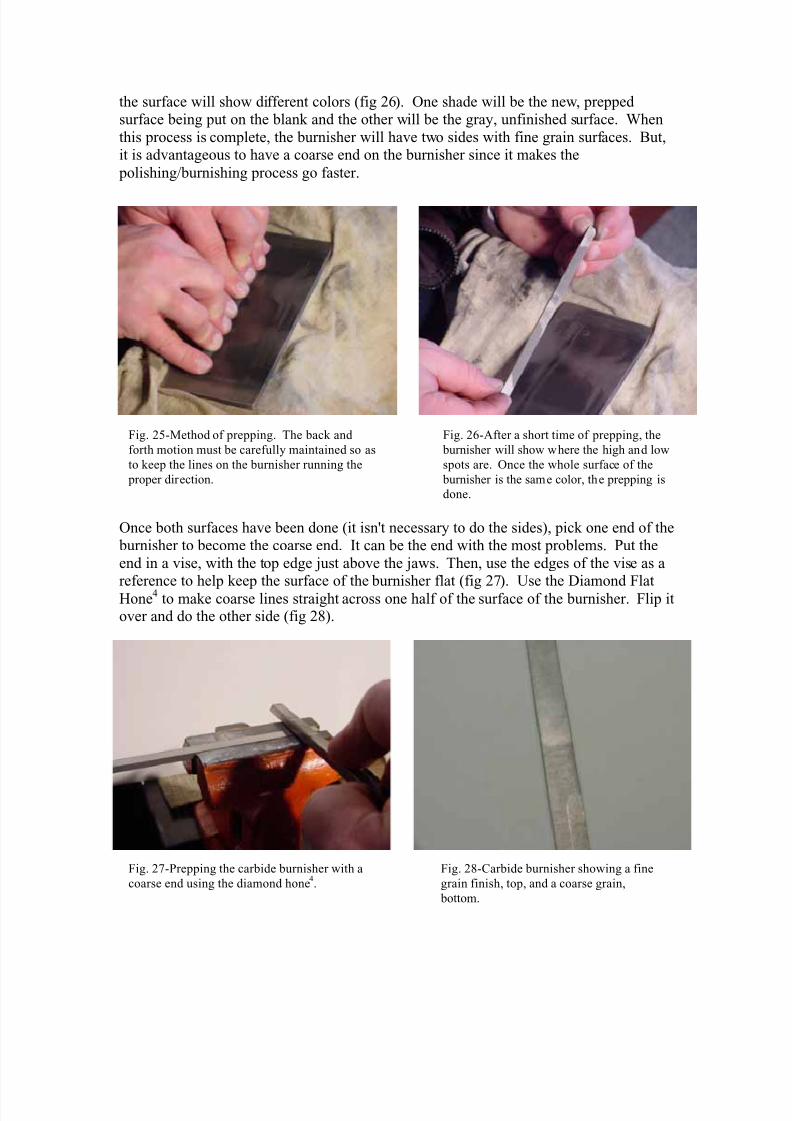
The surface of the carbide slip4, or tool bit, will have a frosted appearance and is
unsuitable for use as-is (fig 23).
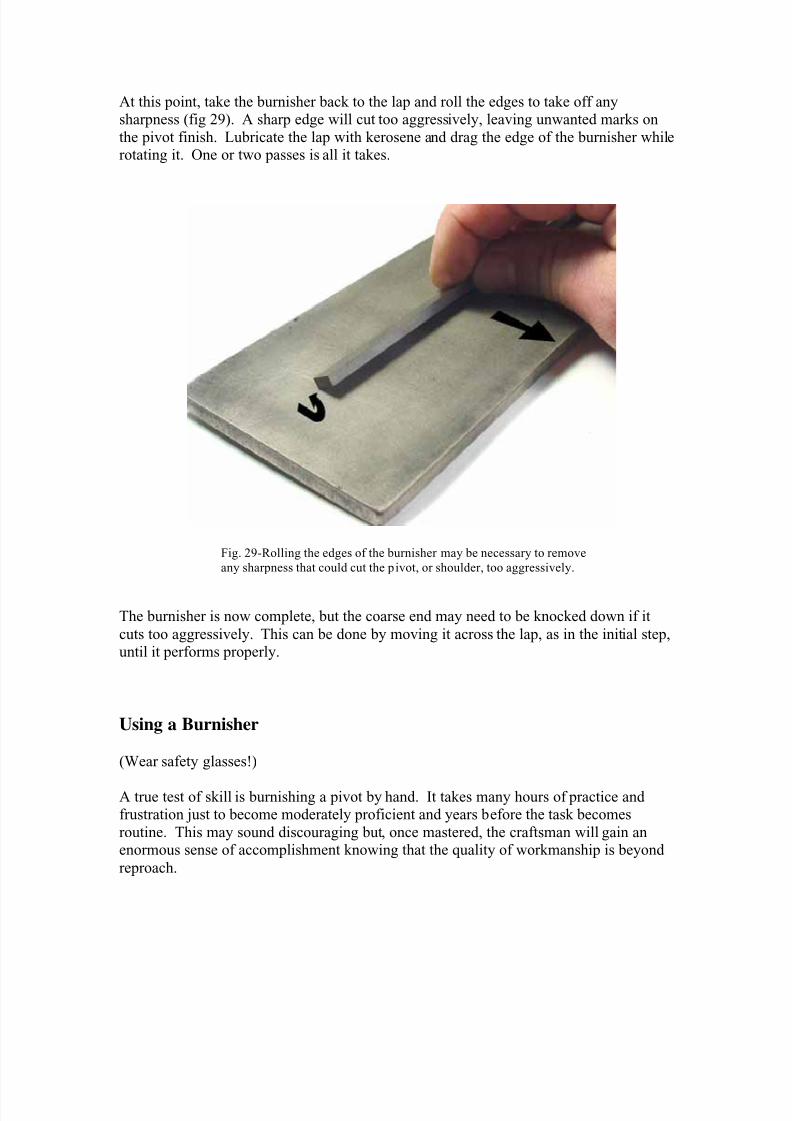
When making a carbide burnisher, start by working the blank over the EZ-E Lap5,
keeping the blank perfectly flat, and moving it so as to produce a cross grain (fig 25). It
is best to use some lubricant, like kerosene. The grain should be perfectly straight acrossthe width of the blank and the finished burnisher should have a flat surface. It will seem
to take forever but work the carbide over the lap until the surface is even. Don’t betempted to rush the process or the finish will suffer. As the prepping process progresses,
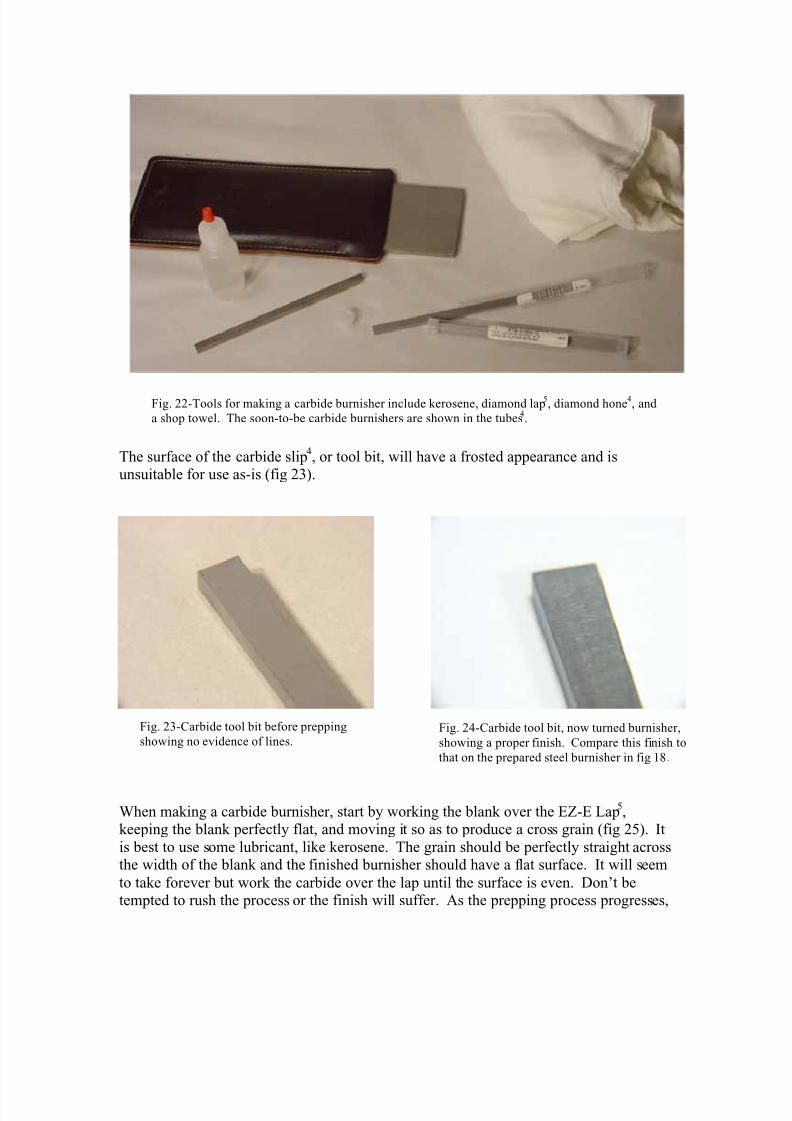
Fig. 22-Tools for making a carbide burnisher include kerosene, diamond lap5, diamond hone
4, and
a shop towel. The soon-to-be carbide burnishers are shown in the tubes4.
Fig. 23-Carbide tool bit before prepping
showing no evidence of lines.Fig. 24-Carbide tool bit, now turned burnisher,
showing a proper finish. Compare this finish to
that on the prepared steel burnisher in fig 18.
8/10/2019 Surface Treatment- Burnishing
http://slidepdf.com/reader/full/surface-treatment-burnishing 14/27
the surface will show different colors (fig 26). One shade will be the new, preppedsurface being put on the blank and the other will be the gray, unfinished surface. When
this process is complete, the burnisher will have two sides with fine grain surfaces. But,it is advantageous to have a coarse end on the burnisher since it makes the
polishing/burnishing process go faster.
Once both surfaces have been done (it isn't necessary to do the sides), pick one end of the burnisher to become the coarse end. It can be the end with the most problems. Put the
end in a vise, with the top edge just above the jaws. Then, use the edges of the vise as areference to help keep the surface of the burnisher flat (fig 27). Use the Diamond Flat
Hone4 to make coarse lines straight across one half of the surface of the burnisher. Flip it
over and do the other side (fig 28).
Fig. 25-Method of prepping. The back and
forth motion must be carefully maintained so as
to keep the lines on the burnisher running the
proper direction.
Fig. 26-After a short time of prepping, the
burnisher will show where the high and low
spots are. Once the whole surface of the
burnisher is the same color, the prepping is
done.
Fig. 27-Prepping the carbide burnisher with a
coarse end using the diamond hone4.
Fig. 28-Carbide burnisher showing a fine
grain finish, top, and a coarse grain,
bottom.
8/10/2019 Surface Treatment- Burnishing
http://slidepdf.com/reader/full/surface-treatment-burnishing 15/27
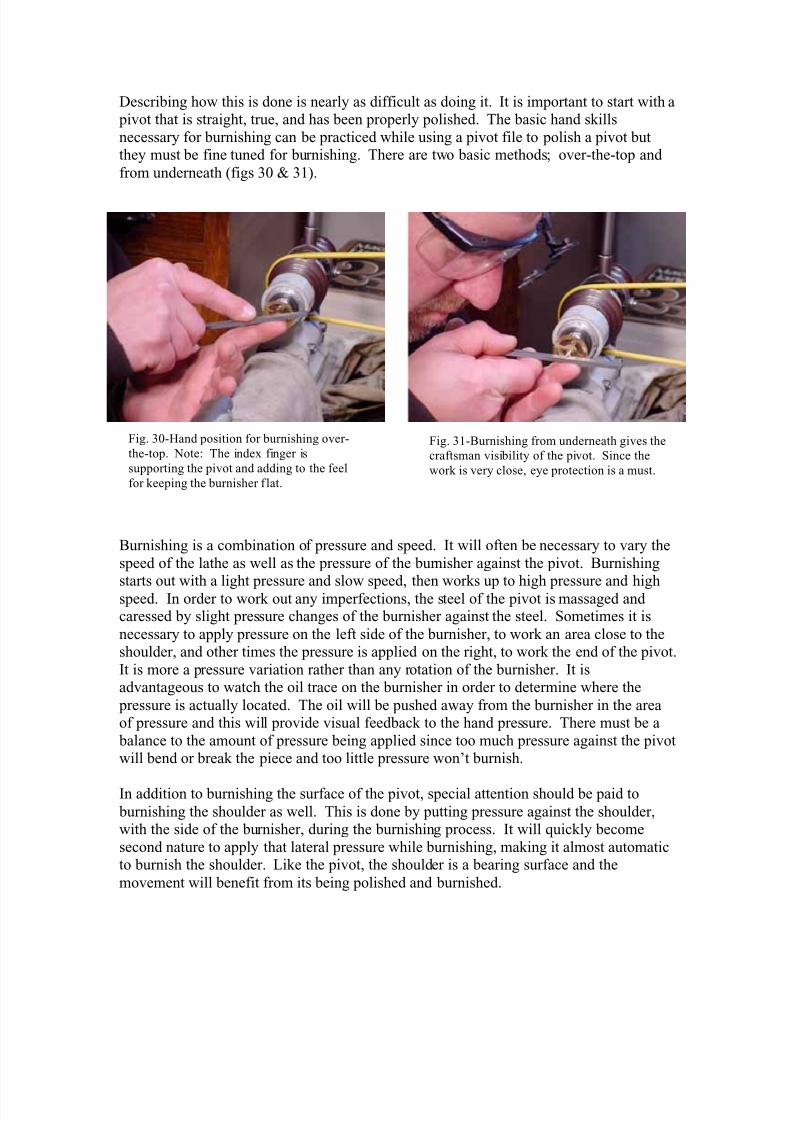
At this point, take the burnisher back to the lap and roll the edges to take off anysharpness (fig 29). A sharp edge will cut too aggressively, leaving unwanted marks on
the pivot finish. Lubricate the lap with kerosene and drag the edge of the burnisher whilerotating it. One or two passes is all it takes.
The burnisher is now complete, but the coarse end may need to be knocked down if it
cuts too aggressively. This can be done by moving it across the lap, as in the initial step,until it performs properly.
Using a Burnisher
(Wear safety glasses!)
A true test of skill is burnishing a pivot by hand. It takes many hours of practice andfrustration just to become moderately proficient and years before the task becomes
routine. This may sound discouraging but, once mastered, the craftsman will gain anenormous sense of accomplishment knowing that the quality of workmanship is beyond
reproach.
Fig. 29-Rolling the edges of the burnisher may be necessary to remove
any sharpness that could cut the pivot, or shoulder, too aggressively.
8/10/2019 Surface Treatment- Burnishing
http://slidepdf.com/reader/full/surface-treatment-burnishing 16/27
Describing how this is done is nearly as difficult as doing it. It is important to start with a pivot that is straight, true, and has been properly polished. The basic hand skills
necessary for burnishing can be practiced while using a pivot file to polish a pivot butthey must be fine tuned for burnishing. There are two basic methods; over-the-top and
from underneath (figs 30 & 31).
Burnishing is a combination of pressure and speed. It will often be necessary to vary the
speed of the lathe as well as the pressure of the burnisher against the pivot. Burnishingstarts out with a light pressure and slow speed, then works up to high pressure and high
speed. In order to work out any imperfections, the steel of the pivot is massaged andcaressed by slight pressure changes of the burnisher against the steel. Sometimes it is
necessary to apply pressure on the left side of the burnisher, to work an area close to theshoulder, and other times the pressure is applied on the right, to work the end of the pivot.
It is more a pressure variation rather than any rotation of the burnisher. It isadvantageous to watch the oil trace on the burnisher in order to determine where the
pressure is actually located. The oil will be pushed away from the burnisher in the areaof pressure and this will provide visual feedback to the hand pressure. There must be a
balance to the amount of pressure being applied since too much pressure against the pivotwill bend or break the piece and too little pressure won’t burnish.
In addition to burnishing the surface of the pivot, special attention should be paid to
burnishing the shoulder as well. This is done by putting pressure against the shoulder,with the side of the burnisher, during the burnishing process. It will quickly become
second nature to apply that lateral pressure while burnishing, making it almost automaticto burnish the shoulder. Like the pivot, the shoulder is a bearing surface and the
movement will benefit from its being polished and burnished.
Fig. 30-Hand position for burnishing over-
the-top. Note: The index finger is
supporting the pivot and adding to the feel
for keeping the burnisher f lat.
Fig. 31-Burnishing from underneath gives the
craftsman visibility of the pivot. Since the
work is very close, eye protection is a must.
8/10/2019 Surface Treatment- Burnishing
http://slidepdf.com/reader/full/surface-treatment-burnishing 17/27
With more experience in burnishing comes a better feel with the burnisher on the steel. Itwill be possible to feel the steel become hard and polished. It will also be possible to feel
when things go wrong, like when a particulate is trapped between the burnisher and the pivot, causing a severe scratch in the finish. That is why it is important to keep the
burnisher free of particulates by frequently wiping it clean and lubricating with fresh,
clean oil.
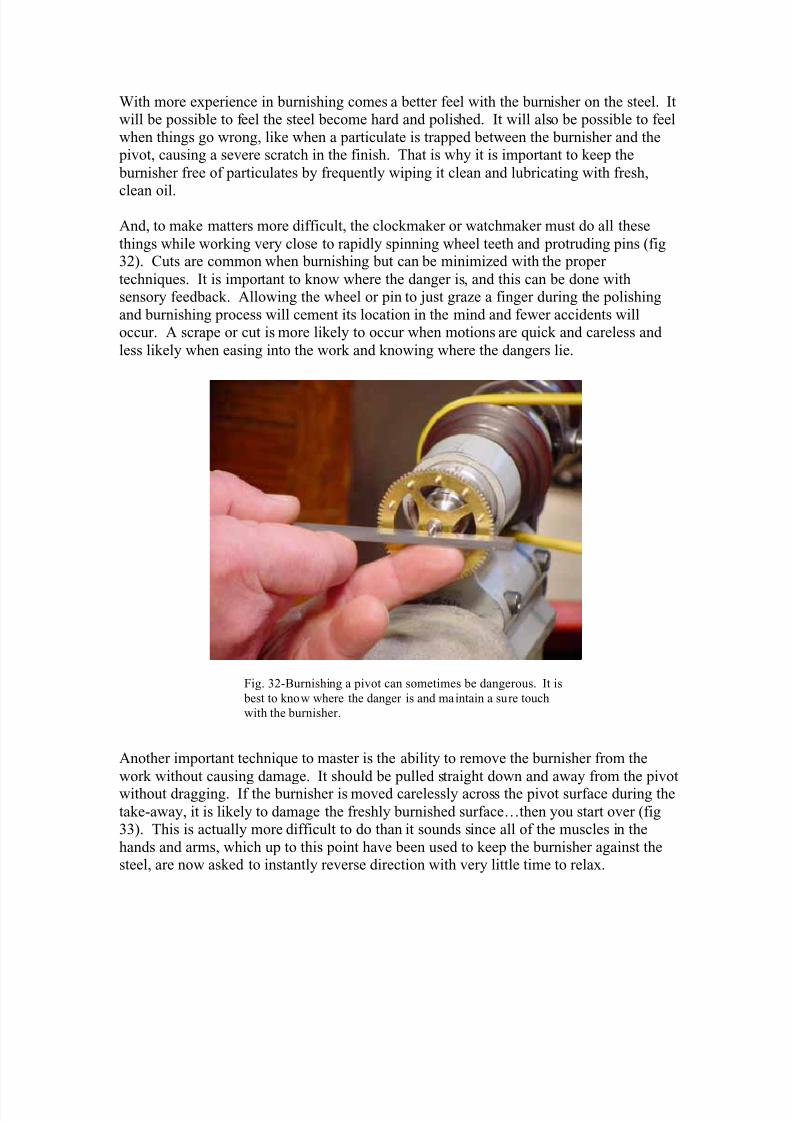
And, to make matters more difficult, the clockmaker or watchmaker must do all these
things while working very close to rapidly spinning wheel teeth and protruding pins (fig32). Cuts are common when burnishing but can be minimized with the proper
techniques. It is important to know where the danger is, and this can be done withsensory feedback. Allowing the wheel or pin to just graze a finger during the polishing
and burnishing process will cement its location in the mind and fewer accidents willoccur. A scrape or cut is more likely to occur when motions are quick and careless and
less likely when easing into the work and knowing where the dangers lie.
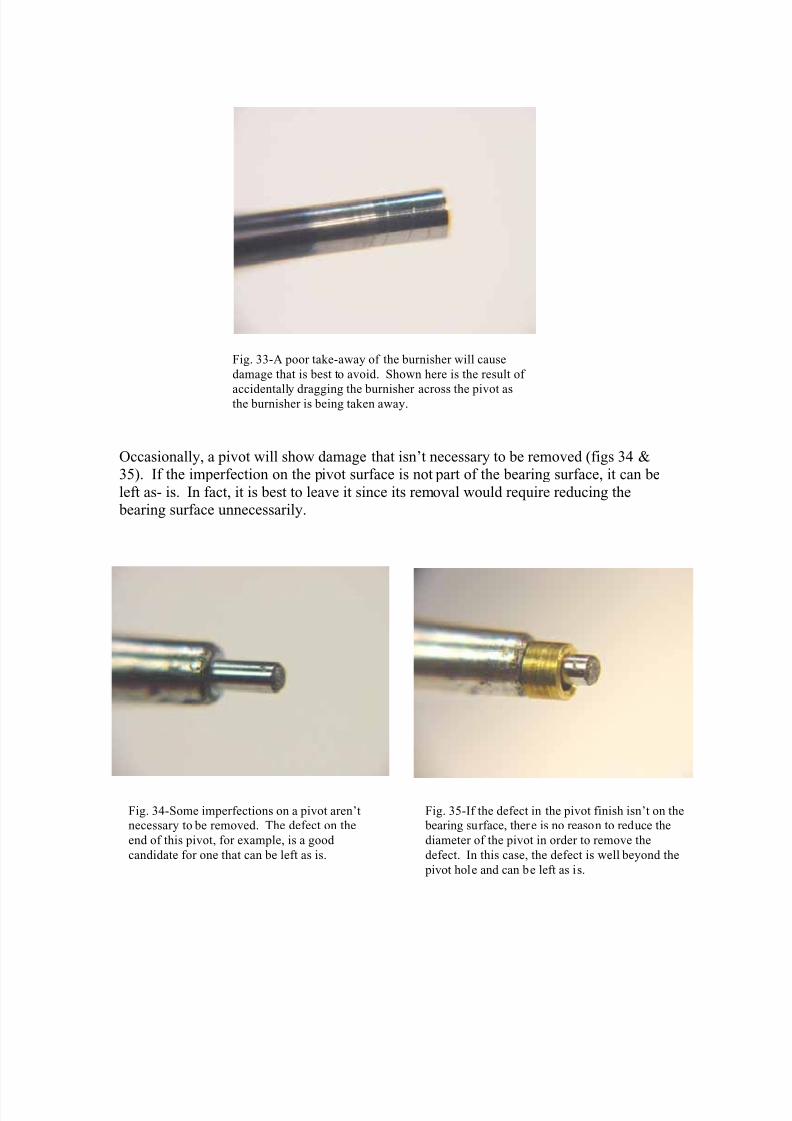
Another important technique to master is the ability to remove the burnisher from the
work without causing damage. It should be pulled straight down and away from the pivotwithout dragging. If the burnisher is moved carelessly across the pivot surface during the
take-away, it is likely to damage the freshly burnished surface…then you start over (fig33). This is actually more difficult to do than it sounds since all of the muscles in the
hands and arms, which up to this point have been used to keep the burnisher against thesteel, are now asked to instantly reverse direction with very little time to relax.
Fig. 32-Burnishing a pivot can sometimes be dangerous. It is
best to know where the danger is and maintain a sure touch
with the burnisher.
8/10/2019 Surface Treatment- Burnishing
http://slidepdf.com/reader/full/surface-treatment-burnishing 18/27
Occasionally, a pivot will show damage that isn’t necessary to be removed (figs 34 &35). If the imperfection on the pivot surface is not part of the bearing surface, it can be
left as- is. In fact, it is best to leave it since its removal would require reducing the bearing surface unnecessarily.
Fig. 34-Some imperfections on a pivot aren’t
necessary to be removed. The defect on the
end of this pivot, for example, is a good
candidate for one that can be left as is.
Fig. 35-If the defect in the pivot finish isn’t on the
bearing surface, there is no reason to reduce the
diameter of the pivot in order to remove the
defect. In this case, the defect is well beyond the
pivot hole and can be left as is.
Fig. 33-A poor take-away of the burnisher will cause
damage that is best to avoid. Shown here is the result of
accidentally dragging the burnisher across the pivot asthe burnisher is being taken away.
8/10/2019 Surface Treatment- Burnishing
http://slidepdf.com/reader/full/surface-treatment-burnishing 19/27
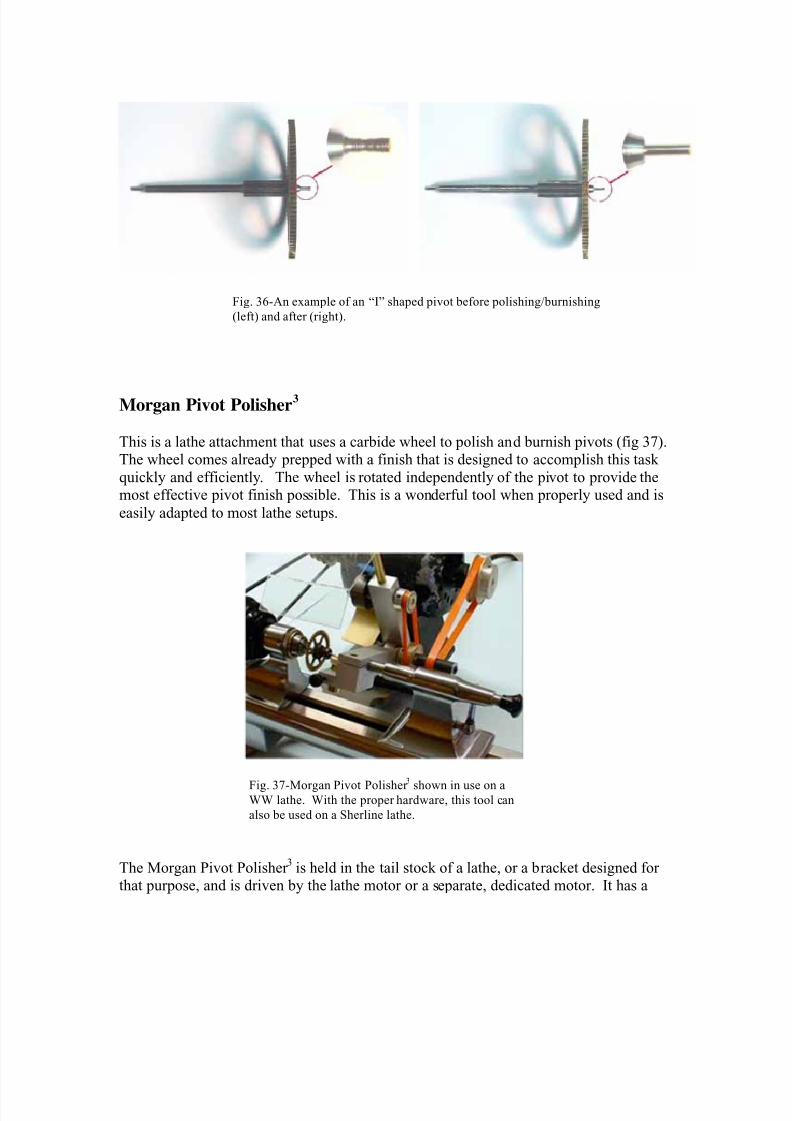
Morgan Pivot Polisher3
This is a lathe attachment that uses a carbide wheel to polish and burnish pivots (fig 37).The wheel comes already prepped with a finish that is designed to accomplish this task
quickly and efficiently. The wheel is rotated independently of the pivot to provide themost effective pivot finish possible. This is a wonderful tool when properly used and is
easily adapted to most lathe setups.
The Morgan Pivot Polisher 3 is held in the tail stock of a lathe, or a bracket designed for
that purpose, and is driven by the lathe motor or a separate, dedicated motor. It has a
Fig. 37-Morgan Pivot Polisher 3
shown in use on aWW lathe. With the proper hardware, this tool can
also be used on a Sherline lathe.
Fig. 36-An example of an “I” shaped pivot before polishing/burnishing
(left) and after (right).
8/10/2019 Surface Treatment- Burnishing
http://slidepdf.com/reader/full/surface-treatment-burnishing 20/27
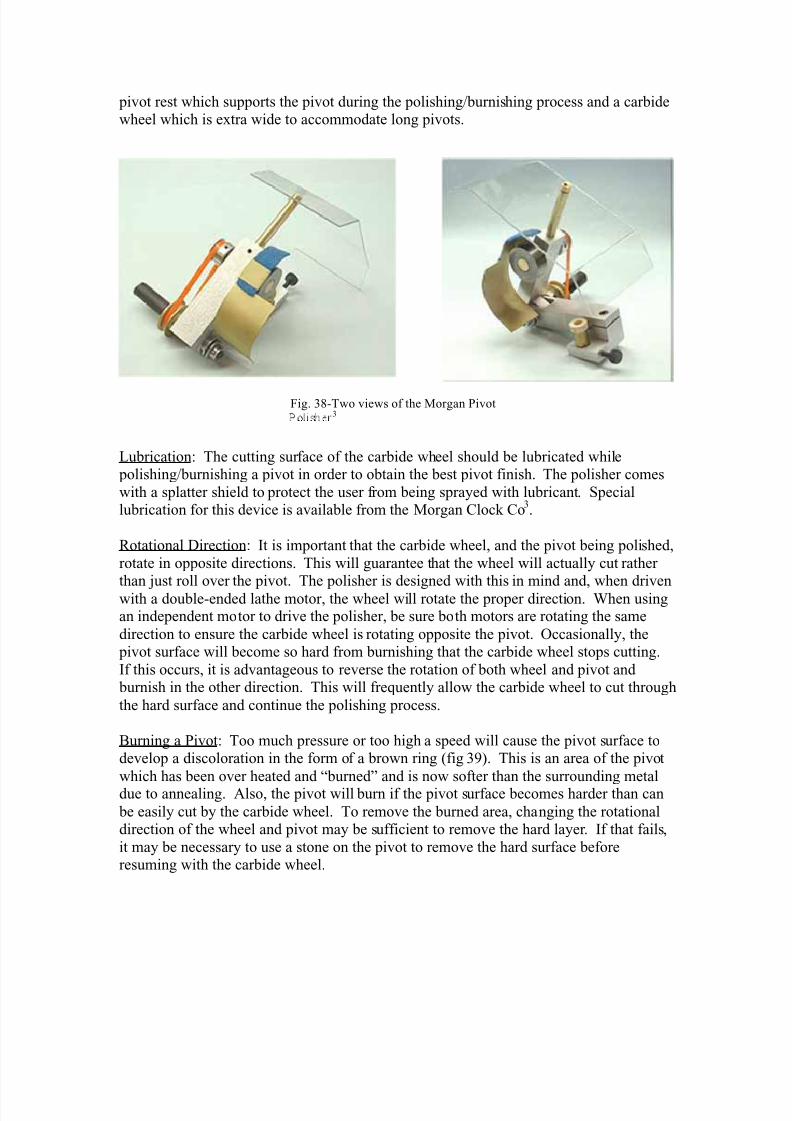
pivot rest which supports the pivot during the polishing/burnishing process and a carbidewheel which is extra wide to accommodate long pivots.
Lubrication: The cutting surface of the carbide wheel should be lubricated while polishing/burnishing a pivot in order to obtain the best pivot finish. The polisher comes
with a splatter shield to protect the user from being sprayed with lubricant. Speciallubrication for this device is available from the Morgan Clock Co
3.
Rotational Direction: It is important that the carbide wheel, and the pivot being polished,
rotate in opposite directions. This will guarantee that the wheel will actually cut ratherthan just roll over the pivot. The polisher is designed with this in mind and, when driven
with a double-ended lathe motor, the wheel will rotate the proper direction. When usingan independent motor to drive the polisher, be sure both motors are rotating the same
direction to ensure the carbide wheel is rotating opposite the pivot. Occasionally, the pivot surface will become so hard from burnishing that the carbide wheel stops cutting.
If this occurs, it is advantageous to reverse the rotation of both wheel and pivot and burnish in the other direction. This will frequently allow the carbide wheel to cut through
the hard surface and continue the polishing process.
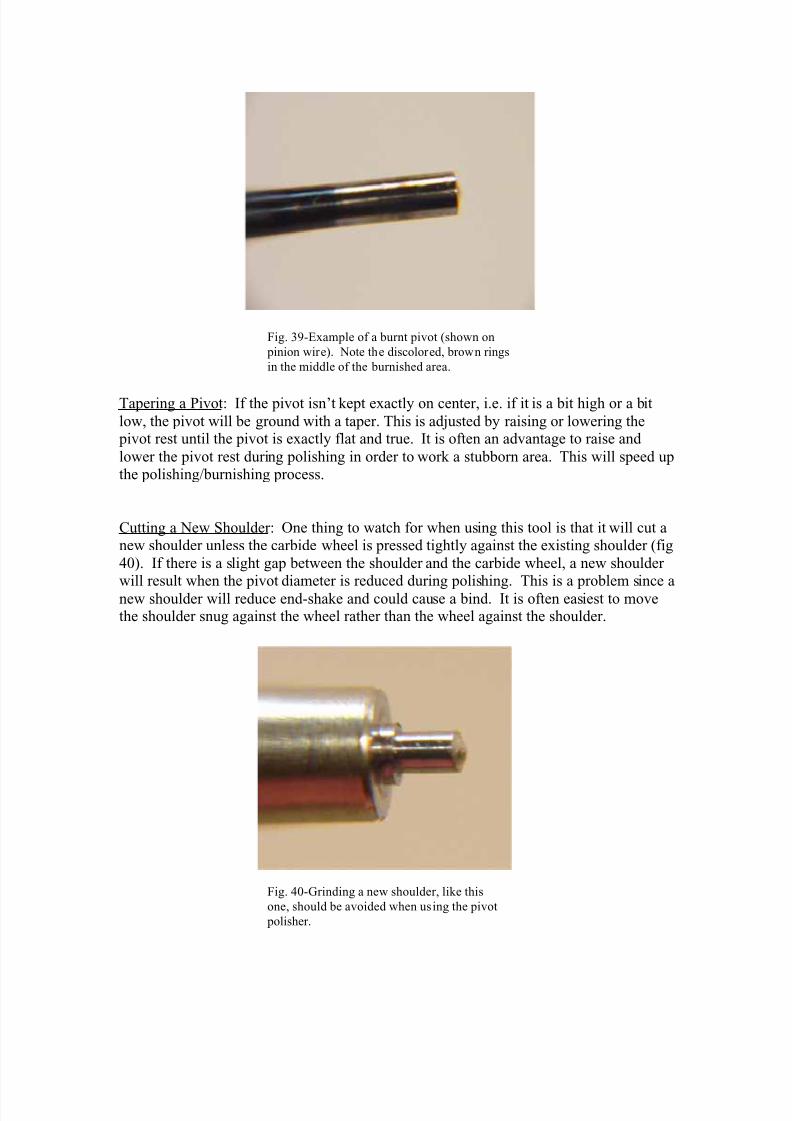
Burning a Pivot: Too much pressure or too high a speed will cause the pivot surface todevelop a discoloration in the form of a brown ring (fig 39). This is an area of the pivot
which has been over heated and “burned” and is now softer than the surrounding metaldue to annealing. Also, the pivot will burn if the pivot surface becomes harder than can
be easily cut by the carbide wheel. To remove the burned area, changing the rotationaldirection of the wheel and pivot may be sufficient to remove the hard layer. If that fails,
it may be necessary to use a stone on the pivot to remove the hard surface beforeresuming with the carbide wheel.
Fig. 38-Two views of the Morgan Pivot3
8/10/2019 Surface Treatment- Burnishing
http://slidepdf.com/reader/full/surface-treatment-burnishing 21/27
Tapering a Pivot: If the pivot isn’t kept exactly on center, i.e. if it is a bit high or a bit
low, the pivot will be ground with a taper. This is adjusted by raising or lowering the pivot rest until the pivot is exactly flat and true. It is often an advantage to raise and
lower the pivot rest during polishing in order to work a stubborn area. This will speed upthe polishing/burnishing process.
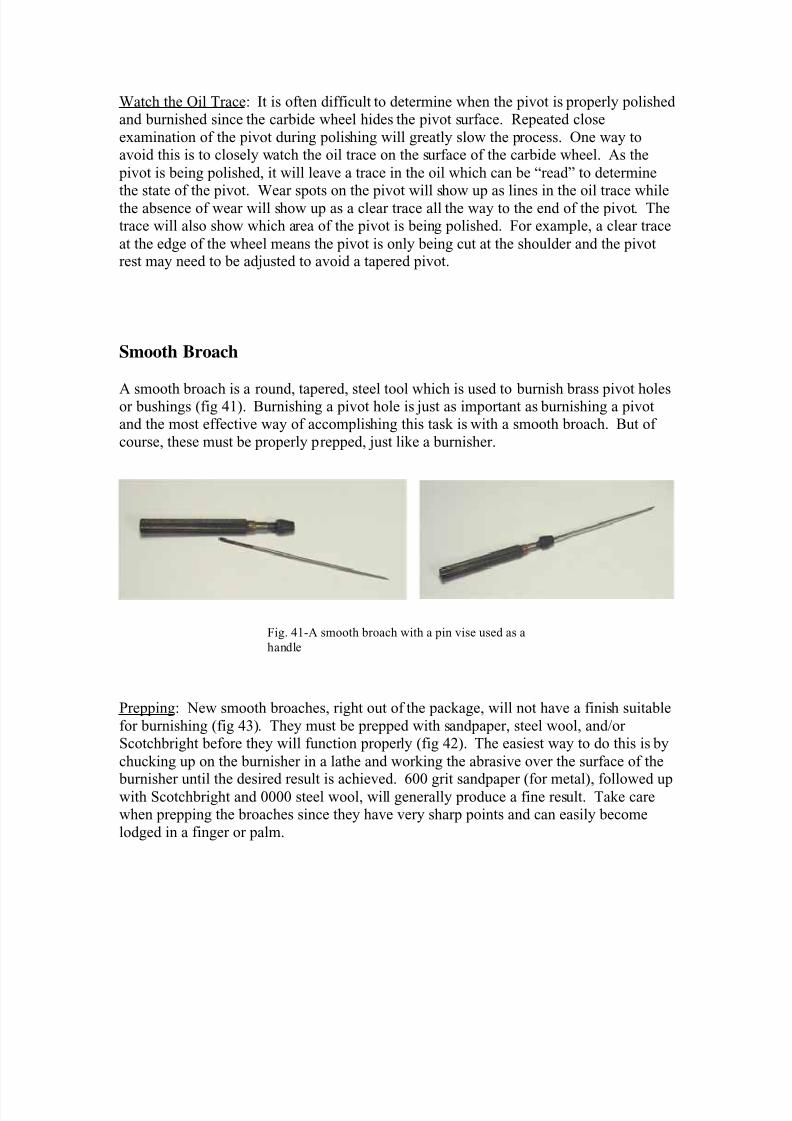
Cutting a New Shoulder: One thing to watch for when using this tool is that it will cut anew shoulder unless the carbide wheel is pressed tightly against the existing shoulder (fig
40). If there is a slight gap between the shoulder and the carbide wheel, a new shoulderwill result when the pivot diameter is reduced during polishing. This is a problem since a
new shoulder will reduce end-shake and could cause a bind. It is often easiest to movethe shoulder snug against the wheel rather than the wheel against the shoulder.
Fig. 39-Example of a burnt pivot (shown on
pinion wire). Note the discolored, brown rings
in the middle of the burnished area.
Fig. 40-Grinding a new shoulder, like this
one, should be avoided when using the pivot
polisher.
8/10/2019 Surface Treatment- Burnishing
http://slidepdf.com/reader/full/surface-treatment-burnishing 22/27
Watch the Oil Trace: It is often difficult to determine when the pivot is properly polishedand burnished since the carbide wheel hides the pivot surface. Repeated close
examination of the pivot during polishing will greatly slow the process. One way toavoid this is to closely watch the oil trace on the surface of the carbide wheel. As the
pivot is being polished, it will leave a trace in the oil which can be “read” to determine
the state of the pivot. Wear spots on the pivot will show up as lines in the oil trace whilethe absence of wear will show up as a clear trace all the way to the end of the pivot. Thetrace will also show which area of the pivot is being polished. For example, a clear trace
at the edge of the wheel means the pivot is only being cut at the shoulder and the pivotrest may need to be adjusted to avoid a tapered pivot.
Smooth Broach
A smooth broach is a round, tapered, steel tool which is used to burnish brass pivot holesor bushings (fig 41). Burnishing a pivot hole is just as important as burnishing a pivotand the most effective way of accomplishing this task is with a smooth broach. But of
course, these must be properly prepped, just like a burnisher.
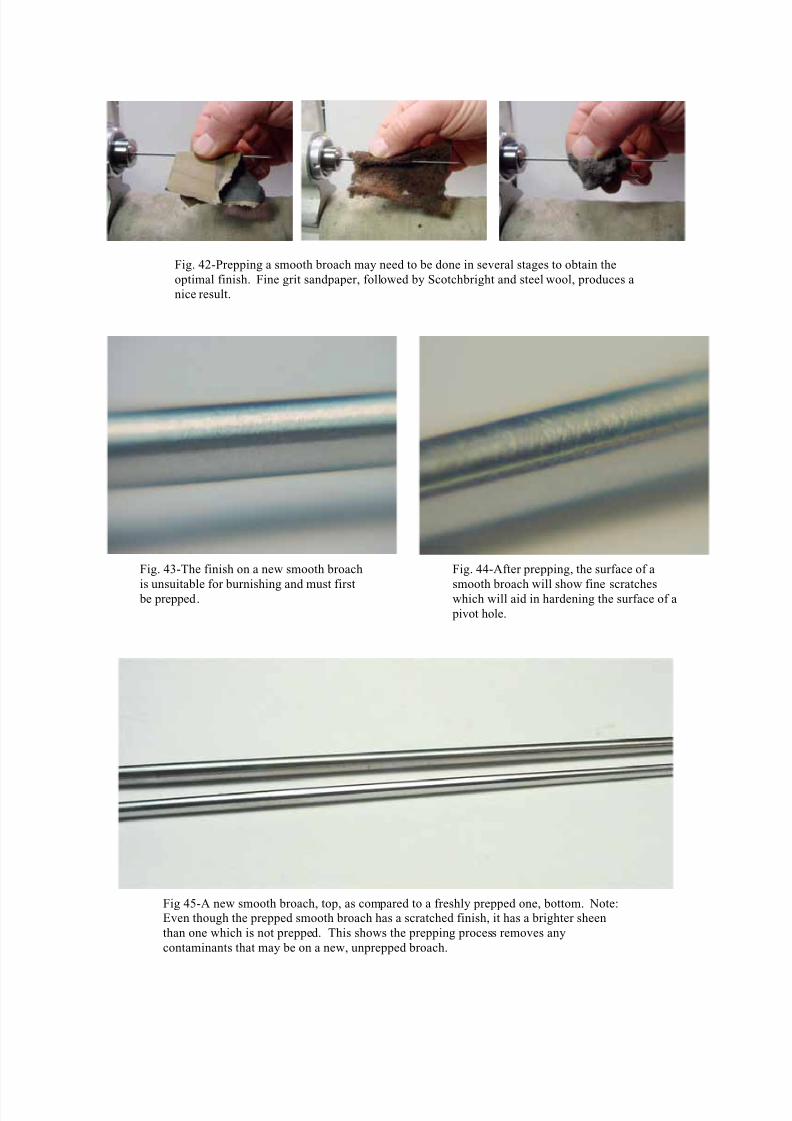
Prepping: New smooth broaches, right out of the package, will not have a finish suitable
for burnishing (fig 43). They must be prepped with sandpaper, steel wool, and/orScotchbright before they will function properly (fig 42). The easiest way to do this is by
chucking up on the burnisher in a lathe and working the abrasive over the surface of the
burnisher until the desired result is achieved. 600 grit sandpaper (for metal), followed upwith Scotchbright and 0000 steel wool, will generally produce a fine result. Take carewhen prepping the broaches since they have very sharp points and can easily become
lodged in a finger or palm.
Fig. 41-A smooth broach with a pin vise used as a
handle
8/10/2019 Surface Treatment- Burnishing
http://slidepdf.com/reader/full/surface-treatment-burnishing 23/27
Fig 45-A new smooth broach, top, as compared to a freshly prepped one, bottom. Note:
Even though the prepped smooth broach has a scratched finish, it has a brighter sheen
than one which is not prepped. This shows the prepping process removes any
contaminants that may be on a new, unprepped broach.
Fig. 43-The finish on a new smooth broach
is unsuitable for burnishing and must first be prepped.
Fig. 44-After prepping, the surface of a
smooth broach will show fine scratcheswhich will aid in hardening the surface of a
pivot hole.
Fig. 42-Prepping a smooth broach may need to be done in several stages to obtain the
optimal finish. Fine grit sandpaper, followed by Scotchbright and steel wool, produces a
nice result.
8/10/2019 Surface Treatment- Burnishing
http://slidepdf.com/reader/full/surface-treatment-burnishing 24/27
8/10/2019 Surface Treatment- Burnishing
http://slidepdf.com/reader/full/surface-treatment-burnishing 25/27
Once the pivot hole has been burnished, rinse or wipe off any excess oil and check for
burrs that may have been raised in the burnishing process. Although more likely to occurwhen sizing a bushing, a burr can form on the edges of the pivot hole due to the pressures
involved when burnishing. These burrs should be removed or they will cause end-shake problems.
The final step in burnishing a pivot hole is cleaning out the hole with pegwood. This will
guarantee a clean, dry, burnished hole with no contaminants. Toothpicks work well forthis process since they are disposable. The pegwood will collect dirt rather quickly and
must be frequently changed. Insert and twist the pegwood into each pivot hole and repeatuntil the pegwood comes out clean, replacing the pegwood (or toothpick) with fresh when
dirty. This will leave small wood particulates behind which should be blown off with ahand bulb. Don’t blow them off with a burst of air from your lungs, as this will introduce
unwanted moisture.
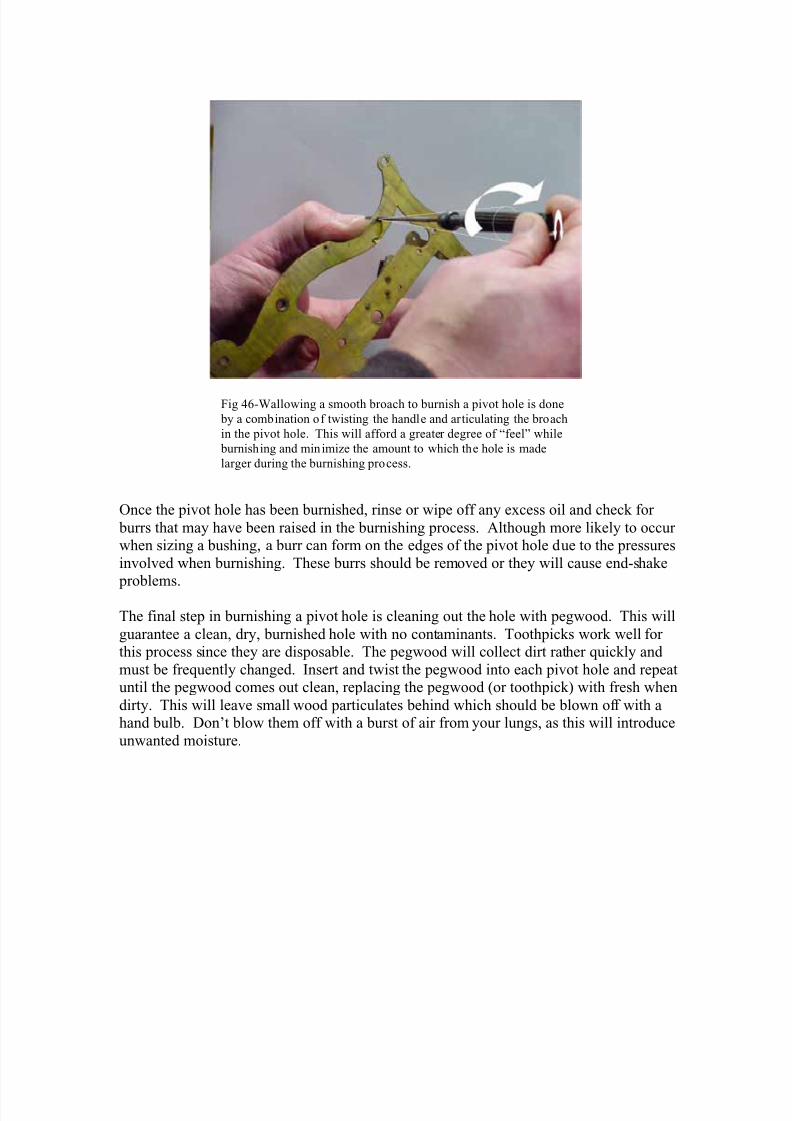
Fig 46-Wallowing a smooth broach to burnish a pivot hole is done
by a combination of twisting the handle and articulating the broach
in the pivot hole. This will afford a greater degree of “feel” while
burnishing and minimize the amount to which the hole is made
larger during the burnishing process.
8/10/2019 Surface Treatment- Burnishing
http://slidepdf.com/reader/full/surface-treatment-burnishing 26/27
Pegwood
Commercially available pegwood is either orange wood or dogwood but good qualityround toothpicks will work. Pegwood is generally used to remove any residual chemicals
or oils from brass pivot holes but can also be used as a burnisher when the pivot hole iswood, as in a wooden movement.
To use pegwood as a burnisher, hold it in a lathe, or Dremel tool, and spin at a fairly high
speed. When turned at high speed, and then inserted into a pivot hole, the pegwood willsqueak as it burnishes the pivot hole and actually become burnished itself. Burnish from
both sides of the plate, and replace or reshape the pegwood when well-used.
Using toothpicks as pegwood is faster, easier, and more cost effective since there is noneed to carve them to shape and toothpicks are very inexpensive. When burnishing, the
toothpick will compress and even become dense enough to burnish oak bushings. Andwhen the toothpick gets worn beyond use, throw it away and use another.
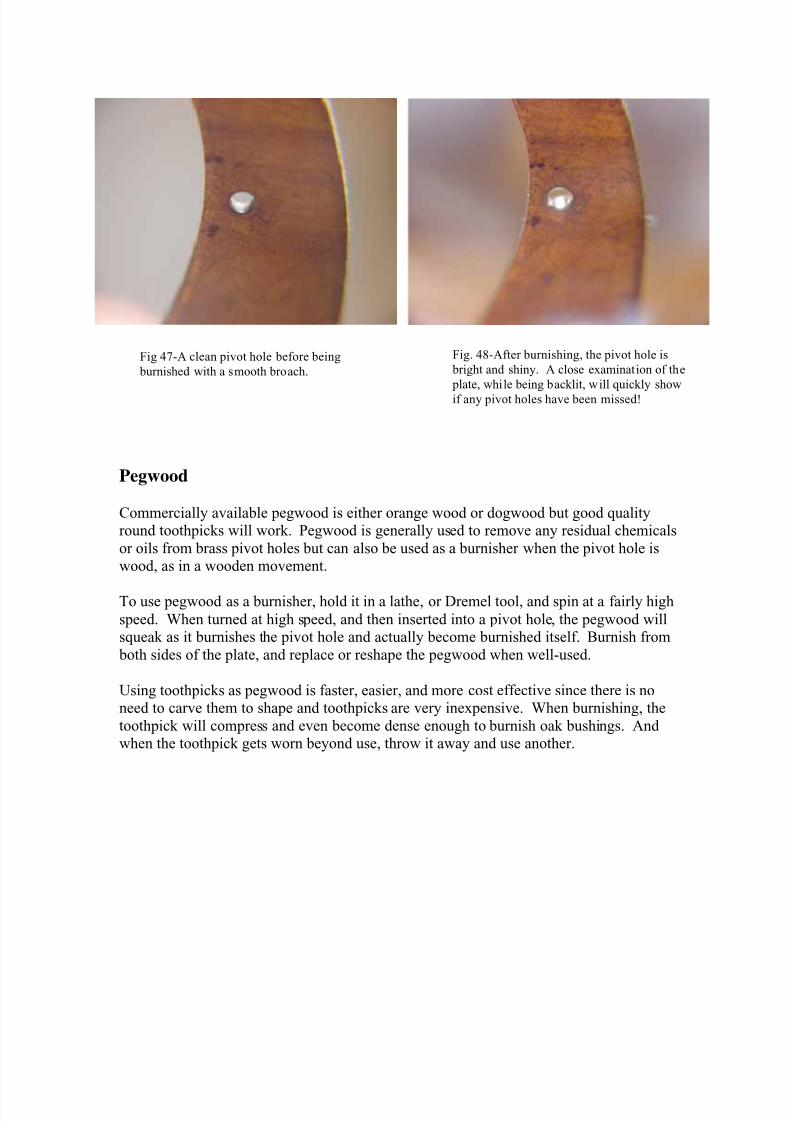
Fig 47-A clean pivot hole before being
burnished with a smooth broach.
Fig. 48-After burnishing, the pivot hole is
bright and shiny. A close examination of the
plate, while being backlit, will quickly show
if any pivot holes have been missed!
8/10/2019 Surface Treatment- Burnishing
http://slidepdf.com/reader/full/surface-treatment-burnishing 27/27
1. Simichrome and buffsticks can be found at many clock supply houses.
2. Craytex is a rubberized abbrasive available in sticks, ”x ”x6”, from KBC Tools.
1-800-521-1740 (USA)
1-888-KBC-TOOL (Canada)www.kbctools.com.
-Part # 1-614-6262XF (extra fine grit)
3. Morgan Pivot Polisher photos used with permission. Dan Morgan, Morgan Clock Co.
Morgan Clock Co.815 Century Dr.
Dubuque, IA 52002Phone (563)583-2220 Fax (563)583-6849
http://www.morganpivotpolisher.com/
4. The carbide blanks and diamond hone are available from J&L Industrial Supply.
1-800-521-9520 (US)http://jlindustrial.com/.
Part numbers:
-1/8 x 1/4 x 6 Carbide Blank no. STB48E-Diamond Flat Hone no. ESE-11000M
5. The EZ-Lap is available from wood workers supply houses like Woodcrafters.
orEZ-E Lap Diamond Stone
Box 20469Carson City, NV 89721
6. And a special “Thank you!” to my son, Seth, for being available to take pictures.
Related Documents