SAP COMMUNITY NETWORK SDN - sdn.sap.com | BPX - bpx.sap.com | BOC - boc.sap.com | UAC - uac.sap.com © 2010 SAP AG 1 Step by Step Guide to Learn Integrated Planning Applies to: BI Integrated Planning in SAP BI. For more information, visit the Business Intelligence homepage . Summary The Document guides to learn Integrated Planning in a step by step manner. It includes steps to create Real- Time Info Cube; Planning Functions like Copy Data, Planning Sequence in a Planning Modeler; Input Ready Query in BEx; Button Group to perform operations like Display/Change Mode, Execute Planning Sequence and Drop Down Box in WAD. Author: Nasarat Anjum Company: Infosys Created on: 20 March 2010 Author Bio Anjum is working at Infosys as a SAP BW developer for the past 3 years. She has SAP BW Skills along with SAP ABAP Knowledge.

Step by Step Guide to Learn Integrated Planning
Dec 01, 2015
text
Welcome message from author
This document is posted to help you gain knowledge. Please leave a comment to let me know what you think about it! Share it to your friends and learn new things together.
Transcript
SAP COMMUNITY NETWORK SDN - sdn.sap.com | BPX - bpx.sap.com | BOC - boc.sap.com | UAC - uac.sap.com
© 2010 SAP AG 1
Step by Step Guide to Learn
Integrated Planning
Applies to:
BI Integrated Planning in SAP BI. For more information, visit the Business Intelligence homepage.
Summary
The Document guides to learn Integrated Planning in a step by step manner. It includes steps to create Real-Time Info Cube; Planning Functions like Copy Data, Planning Sequence in a Planning Modeler; Input Ready Query in BEx; Button Group to perform operations like Display/Change Mode, Execute Planning Sequence and Drop Down Box in WAD.
Author: Nasarat Anjum
Company: Infosys
Created on: 20 March 2010
Author Bio
Anjum is working at Infosys as a SAP BW developer for the past 3 years. She has SAP BW Skills along with SAP ABAP Knowledge.
Step by Step Guide to Learn Integrated Planning
SAP COMMUNITY NETWORK SDN - sdn.sap.com | BPX - bpx.sap.com | BOC - boc.sap.com | UAC - uac.sap.com
© 2010 SAP AG 2
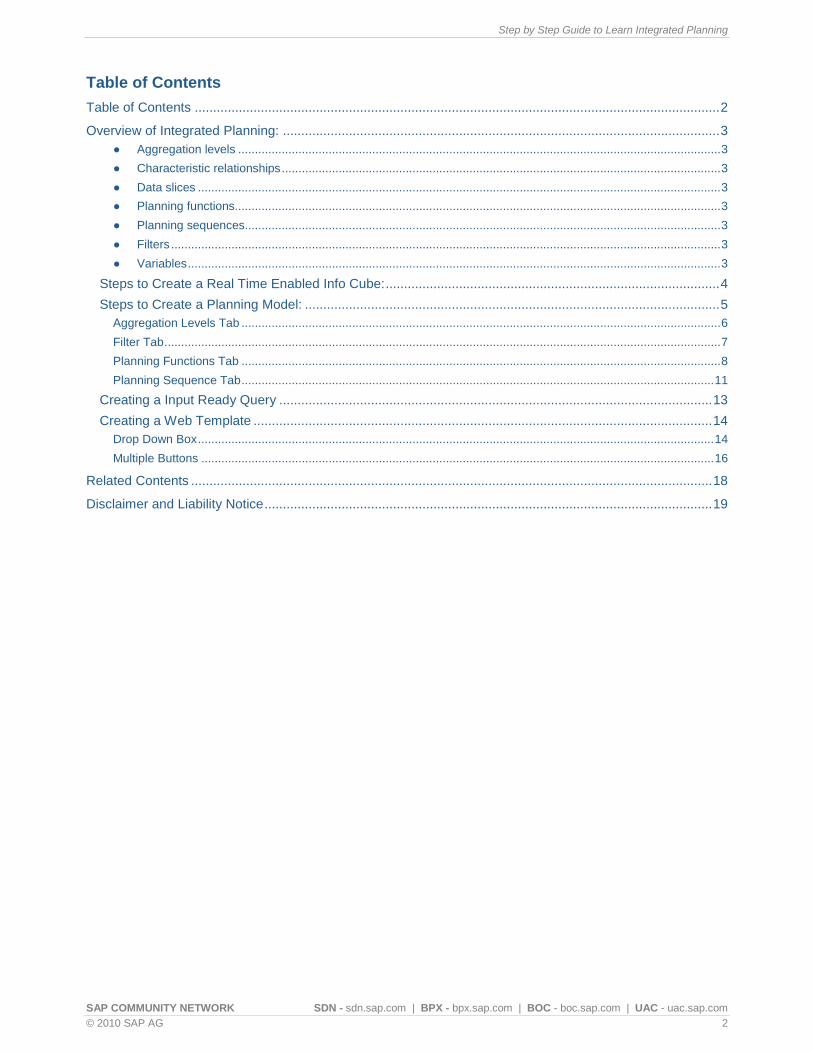
Table of Contents
Table of Contents ............................................................................................................................................... 2
Overview of Integrated Planning: ....................................................................................................................... 3 ● Aggregation levels ................................................................................................................................................ 3
● Characteristic relationships ................................................................................................................................... 3
● Data slices ............................................................................................................................................................ 3
● Planning functions................................................................................................................................................. 3
● Planning sequences.............................................................................................................................................. 3
● Filters .................................................................................................................................................................... 3
● Variables ............................................................................................................................................................... 3
Steps to Create a Real Time Enabled Info Cube: ........................................................................................... 4
Steps to Create a Planning Model: ................................................................................................................. 5 Aggregation Levels Tab ............................................................................................................................................... 6
Filter Tab ...................................................................................................................................................................... 7
Planning Functions Tab ............................................................................................................................................... 8
Planning Sequence Tab ............................................................................................................................................. 11
Creating a Input Ready Query ...................................................................................................................... 13
Creating a Web Template ............................................................................................................................. 14 Drop Down Box .......................................................................................................................................................... 14
Multiple Buttons ......................................................................................................................................................... 16
Related Contents .............................................................................................................................................. 18
Disclaimer and Liability Notice .......................................................................................................................... 19
Step by Step Guide to Learn Integrated Planning
SAP COMMUNITY NETWORK SDN - sdn.sap.com | BPX - bpx.sap.com | BOC - boc.sap.com | UAC - uac.sap.com
© 2010 SAP AG 3
Overview of Integrated Planning:
There are various new terms in Integrated Planning which we should be aware of before actually creating Planning Model.
Let us take a quick overview of the terminology used in Integrated Planning.
Characteristic Relationship
Data Slicing
Aggregation Level
Filter
Planning Function
Planning Sequence
Input Ready Query
In the planning modeler, you have the following objects to edit in the planning model:
● Aggregation levels
To determine the level on which data can be entered or changed (manually through user input or automatically by a planning function), you define an InfoProvider of type aggregation level. An aggregation level consists of a subset of the characteristics and key figures of a MultiProvider or real-time Info Cube. Real-time Info Cubes are used to store data.
● Characteristic relationships
You use characteristic relationships to model semantic relationships between characteristics (such as product group and product). In this way you check, for example, whether a particular combination of characteristics can be generated (if this combination is permitted) or whether a cell is input ready. Characteristic relationships are created for an Info Cube.
● Data slices
You use data slices to protect whole areas of data globally against changes (for example, current values or historic values).
● Planning functions
Planning functions allow system-based processing or generation of data. The BW-BPS function types are provided as standard. Functions can be executed immediately (using the pushbutton) or in the background as a planning sequence. You can also define your own function types.
● Planning sequences
A planning sequence is a sequence of planning functions and manual input templates that are executed sequentially. You can also schedule planning sequences to be processed in the background as a step in a process chain.
● Filters
A filter describes a section of a dataset which is processed, for example, in a query or a planning function. (For example, calendar year 2004 – 2005, customer group XY).
● Variables
Variables can be used in various places; in the filter for selecting characteristic values that can be parameterized, to parameterize planning functions or planning sequences.
Step by Step Guide to Learn Integrated Planning
SAP COMMUNITY NETWORK SDN - sdn.sap.com | BPX - bpx.sap.com | BOC - boc.sap.com | UAC - uac.sap.com
© 2010 SAP AG 4
As we are now familiar with the integrated planning terminology we will now start creating Real-Time Info Cube as this will form the basis for creating Planning models.
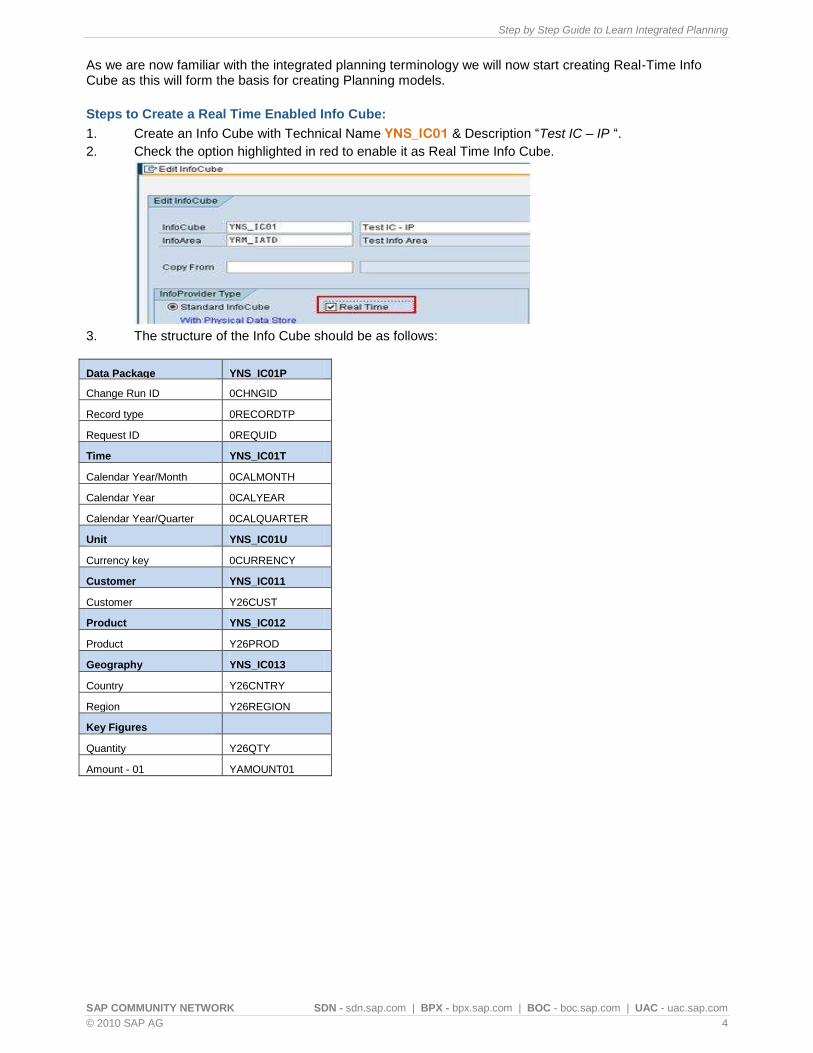
Steps to Create a Real Time Enabled Info Cube:
1. Create an Info Cube with Technical Name YNS_IC01 & Description “Test IC – IP “.
2. Check the option highlighted in red to enable it as Real Time Info Cube.
3. The structure of the Info Cube should be as follows:
Data Package YNS_IC01P
Change Run ID 0CHNGID
Record type 0RECORDTP
Request ID 0REQUID
Time YNS_IC01T
Calendar Year/Month 0CALMONTH
Calendar Year 0CALYEAR
Calendar Year/Quarter 0CALQUARTER
Unit YNS_IC01U
Currency key 0CURRENCY
Customer YNS_IC011
Customer Y26CUST
Product YNS_IC012
Product Y26PROD
Geography YNS_IC013
Country Y26CNTRY
Region Y26REGION
Key Figures
Quantity Y26QTY
Amount - 01 YAMOUNT01
Step by Step Guide to Learn Integrated Planning
SAP COMMUNITY NETWORK SDN - sdn.sap.com | BPX - bpx.sap.com | BOC - boc.sap.com | UAC - uac.sap.com
© 2010 SAP AG 5
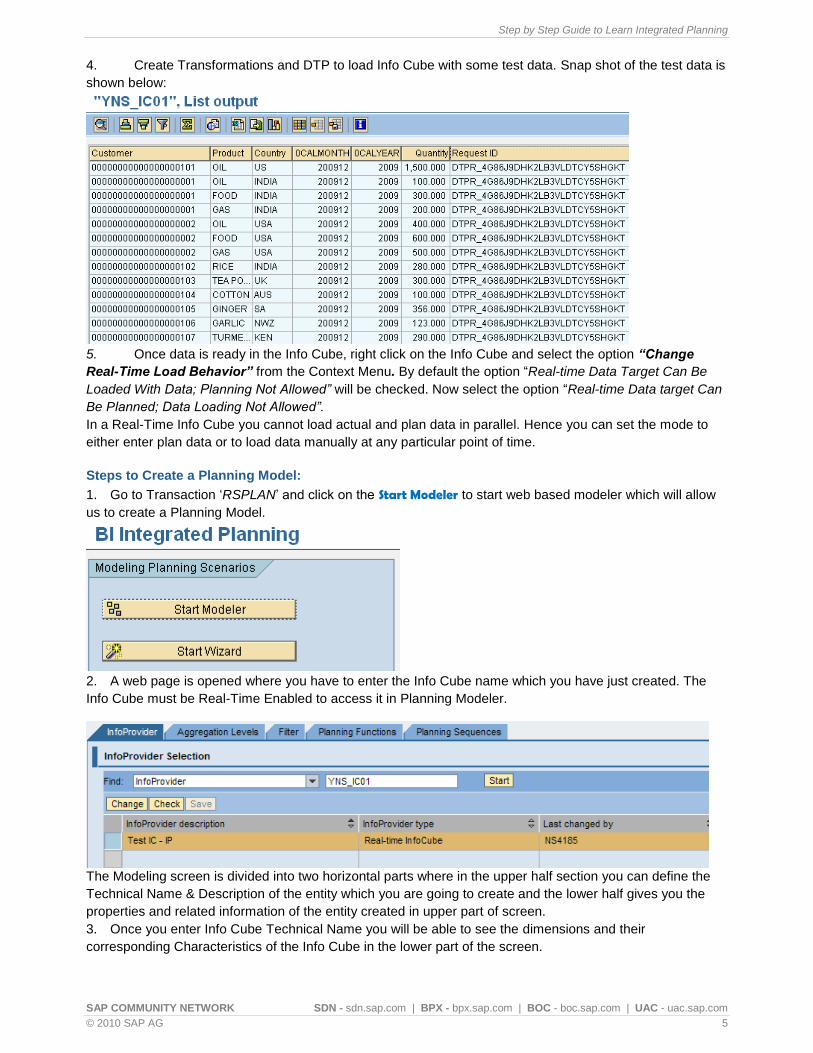
4. Create Transformations and DTP to load Info Cube with some test data. Snap shot of the test data is
shown below:
5. Once data is ready in the Info Cube, right click on the Info Cube and select the option “Change
Real-Time Load Behavior” from the Context Menu. By default the option “Real-time Data Target Can Be
Loaded With Data; Planning Not Allowed” will be checked. Now select the option “Real-time Data target Can
Be Planned; Data Loading Not Allowed”.
In a Real-Time Info Cube you cannot load actual and plan data in parallel. Hence you can set the mode to
either enter plan data or to load data manually at any particular point of time.
Steps to Create a Planning Model:
1. Go to Transaction „RSPLAN‟ and click on the Start Modeler to start web based modeler which will allow
us to create a Planning Model.
2. A web page is opened where you have to enter the Info Cube name which you have just created. The
Info Cube must be Real-Time Enabled to access it in Planning Modeler.
The Modeling screen is divided into two horizontal parts where in the upper half section you can define the
Technical Name & Description of the entity which you are going to create and the lower half gives you the
properties and related information of the entity created in upper part of screen.
3. Once you enter Info Cube Technical Name you will be able to see the dimensions and their
corresponding Characteristics of the Info Cube in the lower part of the screen.

Step by Step Guide to Learn Integrated Planning
SAP COMMUNITY NETWORK SDN - sdn.sap.com | BPX - bpx.sap.com | BOC - boc.sap.com | UAC - uac.sap.com
© 2010 SAP AG 6
4. There are options to create Characteristic relationships on the data in Info Cube. Here you define Valid /
Invalid combinations of data in the Info Cube. By doing this you can make sure invalid combinations of data
is not loaded to Info Cube.
5. Data Slicing is used to lock a set of data against any changes during planning.
6. You also have an option to set the Key Date on which the planning has to be taken place. Here you have
various options to set the Key date to some fixed date or through any variable value.
Now you have defined the Info Provider on which your planning model will be based on. The second tab is
Aggregation Levels.
Aggregation Levels Tab
Create an Aggregation Level by clicking on Create. 1. Enter a Technical Name & Description for the Aggregation level and click on Transfer Button.
In the above figure Technical Name: YNS_PDT; Description: Product Aggregation Level
2. Select the characteristics on which want to plan data from the list of Characteristics seen in the lower
part of screen.
Note: All the characteristics checked here should be mandatorily used in the Planning Query which you will
be creating later.
In this example we have selected
Calendar Year/Month
Quantity
Step by Step Guide to Learn Integrated Planning
SAP COMMUNITY NETWORK SDN - sdn.sap.com | BPX - bpx.sap.com | BOC - boc.sap.com | UAC - uac.sap.com
© 2010 SAP AG 7
Country
Customer
Product.
3. Now Check, Save and Activate the Aggregation Level.
After defining the Aggregation Level, you must specify the Filter value.
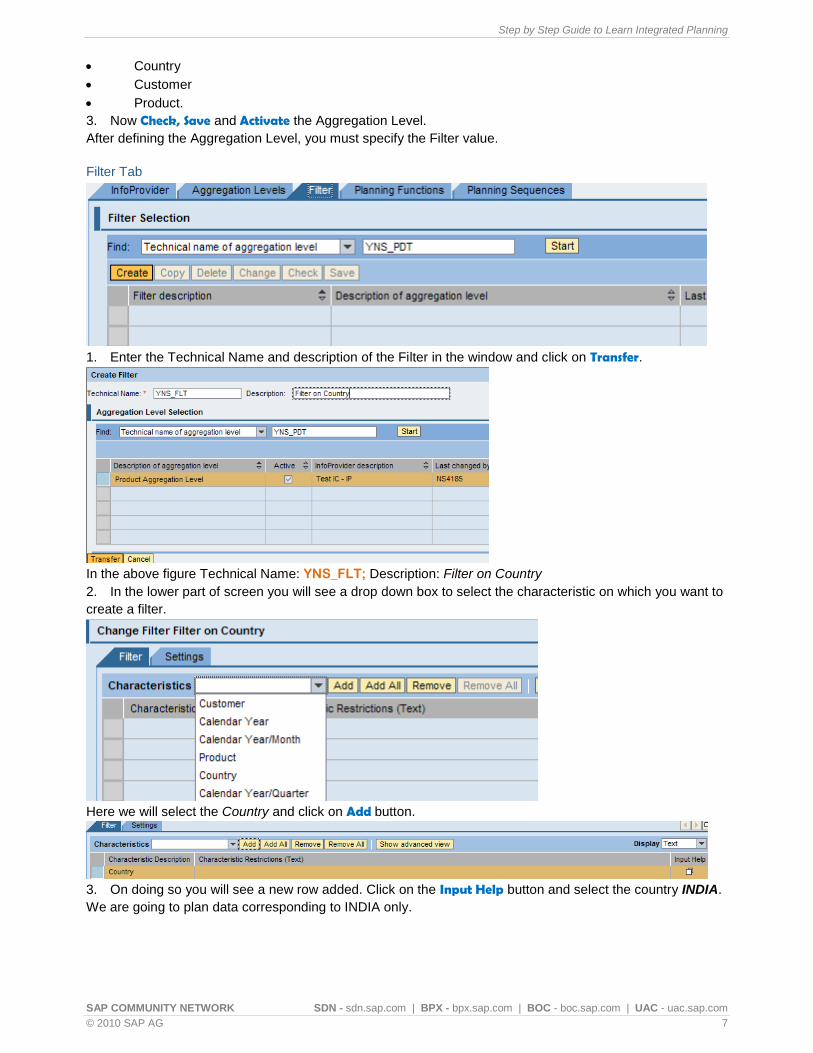
Filter Tab
1. Enter the Technical Name and description of the Filter in the window and click on Transfer.
In the above figure Technical Name: YNS_FLT; Description: Filter on Country
2. In the lower part of screen you will see a drop down box to select the characteristic on which you want to
create a filter.
Here we will select the Country and click on Add button.
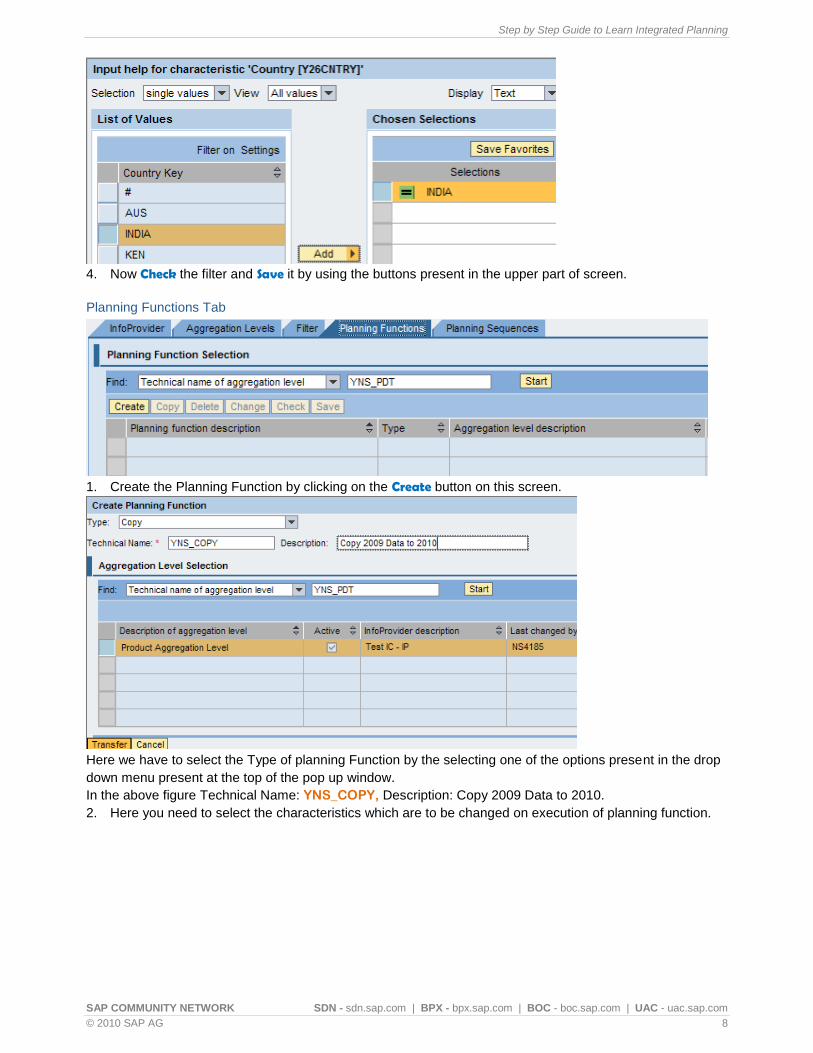
3. On doing so you will see a new row added. Click on the Input Help button and select the country INDIA.
We are going to plan data corresponding to INDIA only.
Step by Step Guide to Learn Integrated Planning
SAP COMMUNITY NETWORK SDN - sdn.sap.com | BPX - bpx.sap.com | BOC - boc.sap.com | UAC - uac.sap.com
© 2010 SAP AG 8
4. Now Check the filter and Save it by using the buttons present in the upper part of screen.
Planning Functions Tab
1. Create the Planning Function by clicking on the Create button on this screen.
Here we have to select the Type of planning Function by the selecting one of the options present in the drop
down menu present at the top of the pop up window.
In the above figure Technical Name: YNS_COPY, Description: Copy 2009 Data to 2010.
2. Here you need to select the characteristics which are to be changed on execution of planning function.
Step by Step Guide to Learn Integrated Planning
SAP COMMUNITY NETWORK SDN - sdn.sap.com | BPX - bpx.sap.com | BOC - boc.sap.com | UAC - uac.sap.com
© 2010 SAP AG 9
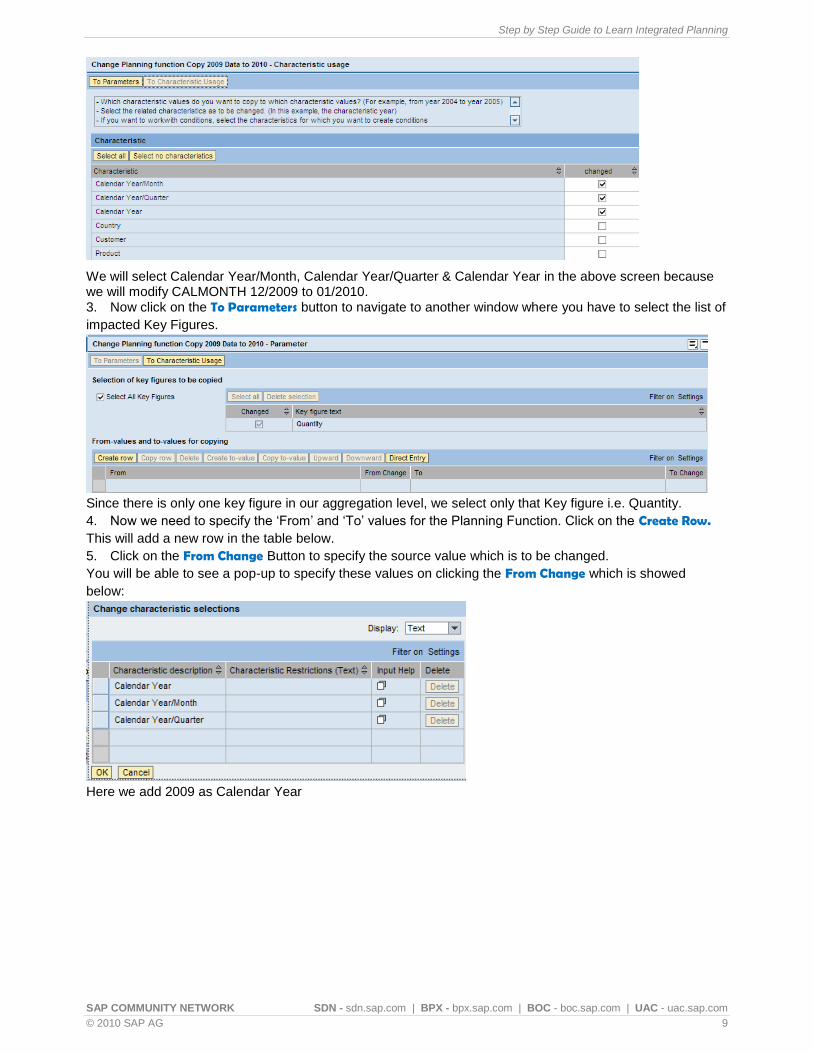
We will select Calendar Year/Month, Calendar Year/Quarter & Calendar Year in the above screen because we will modify CALMONTH 12/2009 to 01/2010. 3. Now click on the To Parameters button to navigate to another window where you have to select the list of
impacted Key Figures.
Since there is only one key figure in our aggregation level, we select only that Key figure i.e. Quantity.
4. Now we need to specify the „From‟ and „To‟ values for the Planning Function. Click on the Create Row. This will add a new row in the table below.
5. Click on the From Change Button to specify the source value which is to be changed.
You will be able to see a pop-up to specify these values on clicking the From Change which is showed
below:
Here we add 2009 as Calendar Year
Step by Step Guide to Learn Integrated Planning
SAP COMMUNITY NETWORK SDN - sdn.sap.com | BPX - bpx.sap.com | BOC - boc.sap.com | UAC - uac.sap.com
© 2010 SAP AG 10
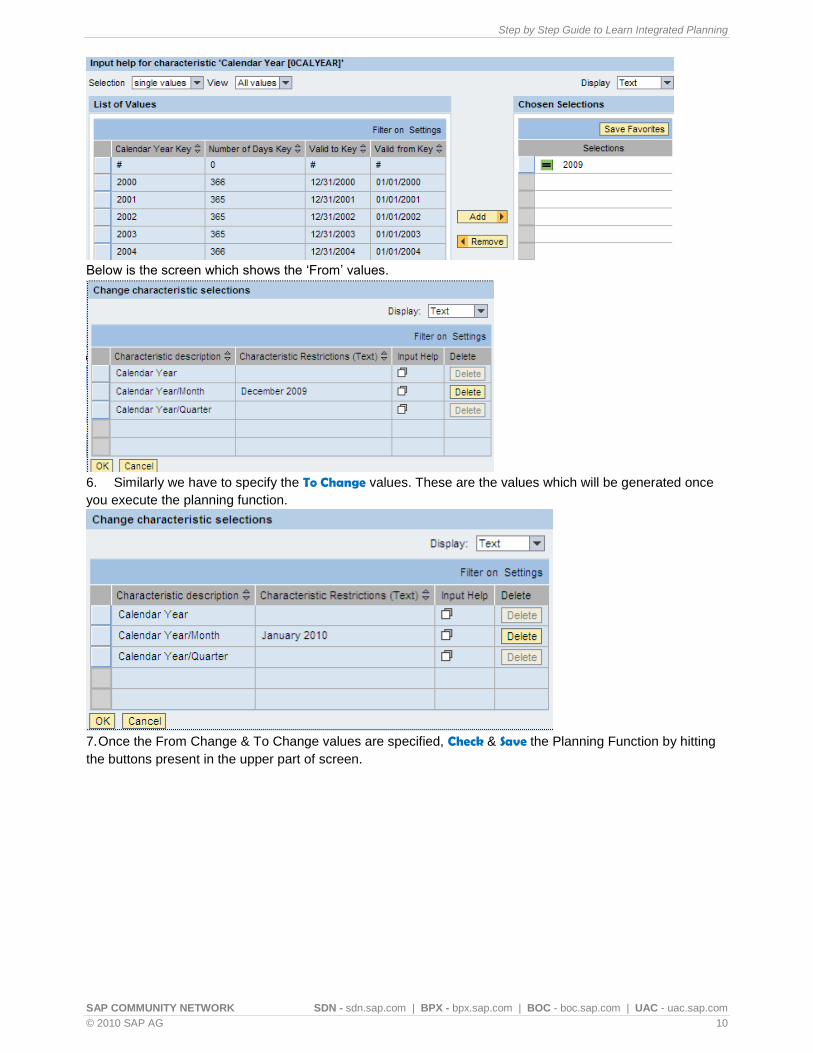
Below is the screen which shows the „From‟ values.
6. Similarly we have to specify the To Change values. These are the values which will be generated once
you execute the planning function.
7. Once the From Change & To Change values are specified, Check & Save the Planning Function by hitting
the buttons present in the upper part of screen.
Step by Step Guide to Learn Integrated Planning
SAP COMMUNITY NETWORK SDN - sdn.sap.com | BPX - bpx.sap.com | BOC - boc.sap.com | UAC - uac.sap.com
© 2010 SAP AG 11
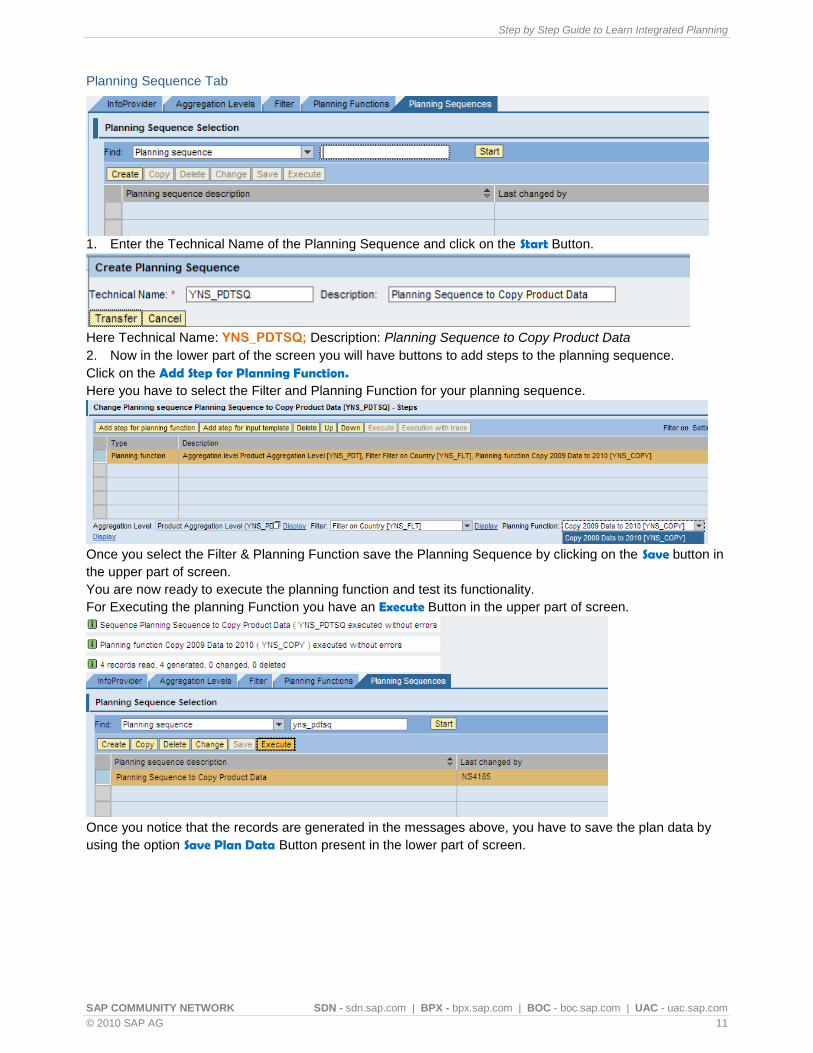
Planning Sequence Tab
1. Enter the Technical Name of the Planning Sequence and click on the Start Button.
Here Technical Name: YNS_PDTSQ; Description: Planning Sequence to Copy Product Data
2. Now in the lower part of the screen you will have buttons to add steps to the planning sequence.
Click on the Add Step for Planning Function. Here you have to select the Filter and Planning Function for your planning sequence.
Once you select the Filter & Planning Function save the Planning Sequence by clicking on the Save button in
the upper part of screen.
You are now ready to execute the planning function and test its functionality.
For Executing the planning Function you have an Execute Button in the upper part of screen.
Once you notice that the records are generated in the messages above, you have to save the plan data by
using the option Save Plan Data Button present in the lower part of screen.
Step by Step Guide to Learn Integrated Planning
SAP COMMUNITY NETWORK SDN - sdn.sap.com | BPX - bpx.sap.com | BOC - boc.sap.com | UAC - uac.sap.com
© 2010 SAP AG 12
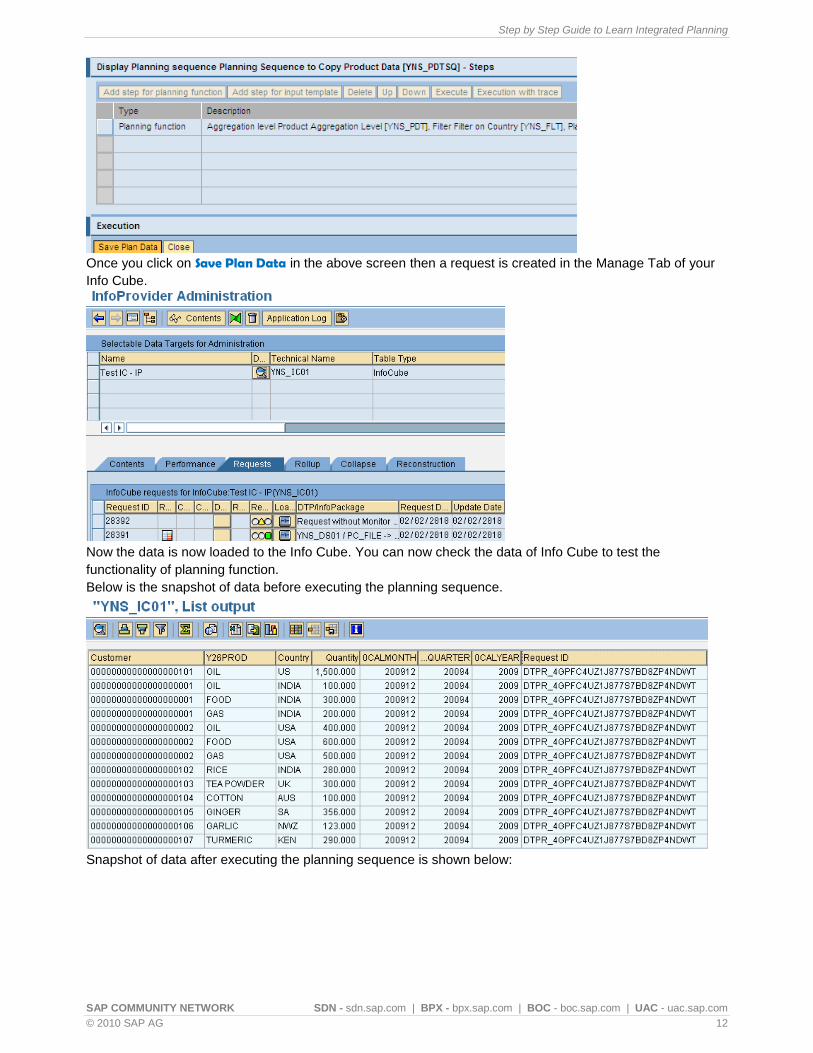
Once you click on Save Plan Data in the above screen then a request is created in the Manage Tab of your
Info Cube.
Now the data is now loaded to the Info Cube. You can now check the data of Info Cube to test the
functionality of planning function.
Below is the snapshot of data before executing the planning sequence.
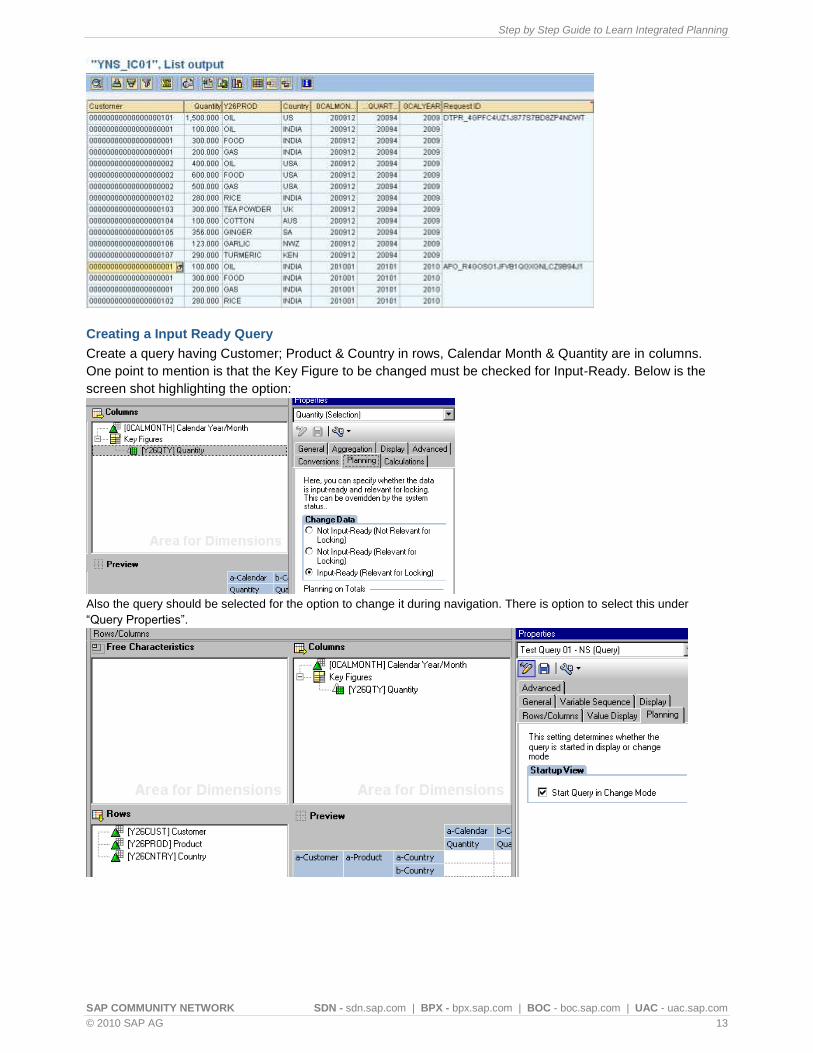
Snapshot of data after executing the planning sequence is shown below:
Step by Step Guide to Learn Integrated Planning
SAP COMMUNITY NETWORK SDN - sdn.sap.com | BPX - bpx.sap.com | BOC - boc.sap.com | UAC - uac.sap.com
© 2010 SAP AG 13
Creating a Input Ready Query
Create a query having Customer; Product & Country in rows, Calendar Month & Quantity are in columns.
One point to mention is that the Key Figure to be changed must be checked for Input-Ready. Below is the
screen shot highlighting the option:
Also the query should be selected for the option to change it during navigation. There is option to select this under
“Query Properties”.
Step by Step Guide to Learn Integrated Planning
SAP COMMUNITY NETWORK SDN - sdn.sap.com | BPX - bpx.sap.com | BOC - boc.sap.com | UAC - uac.sap.com
© 2010 SAP AG 14
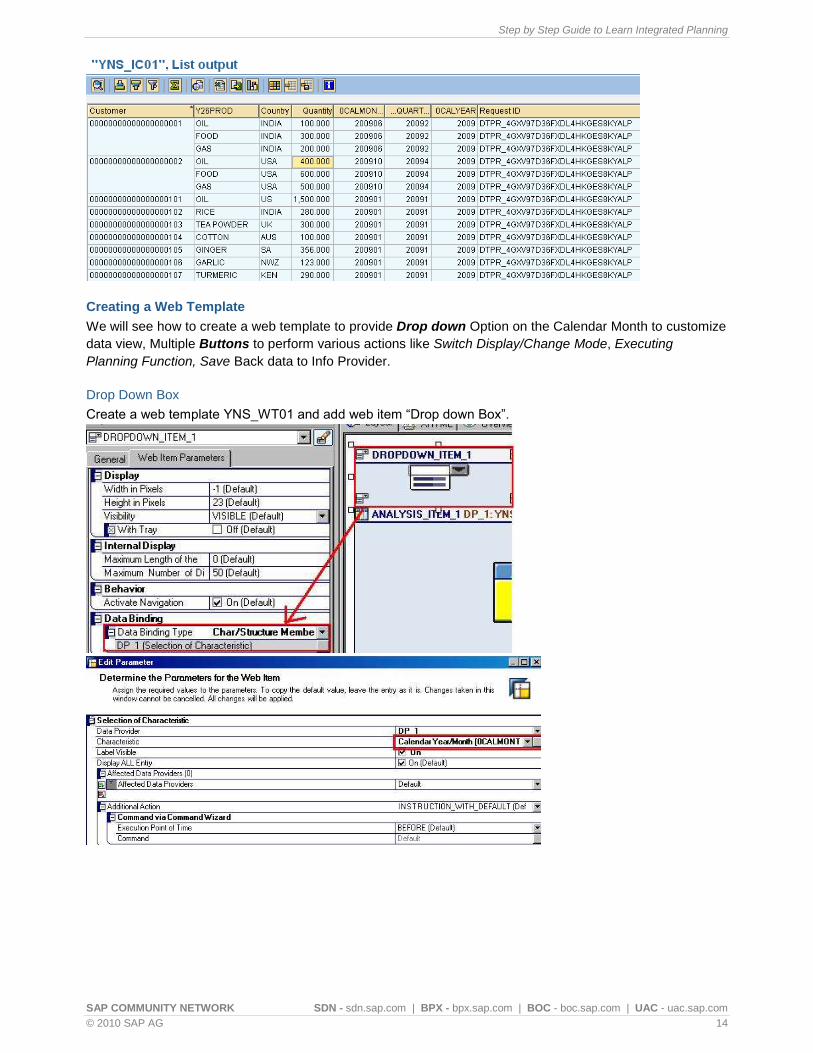
Creating a Web Template
We will see how to create a web template to provide Drop down Option on the Calendar Month to customize
data view, Multiple Buttons to perform various actions like Switch Display/Change Mode, Executing
Planning Function, Save Back data to Info Provider.
Drop Down Box
Create a web template YNS_WT01 and add web item “Drop down Box”.
Step by Step Guide to Learn Integrated Planning
SAP COMMUNITY NETWORK SDN - sdn.sap.com | BPX - bpx.sap.com | BOC - boc.sap.com | UAC - uac.sap.com
© 2010 SAP AG 15
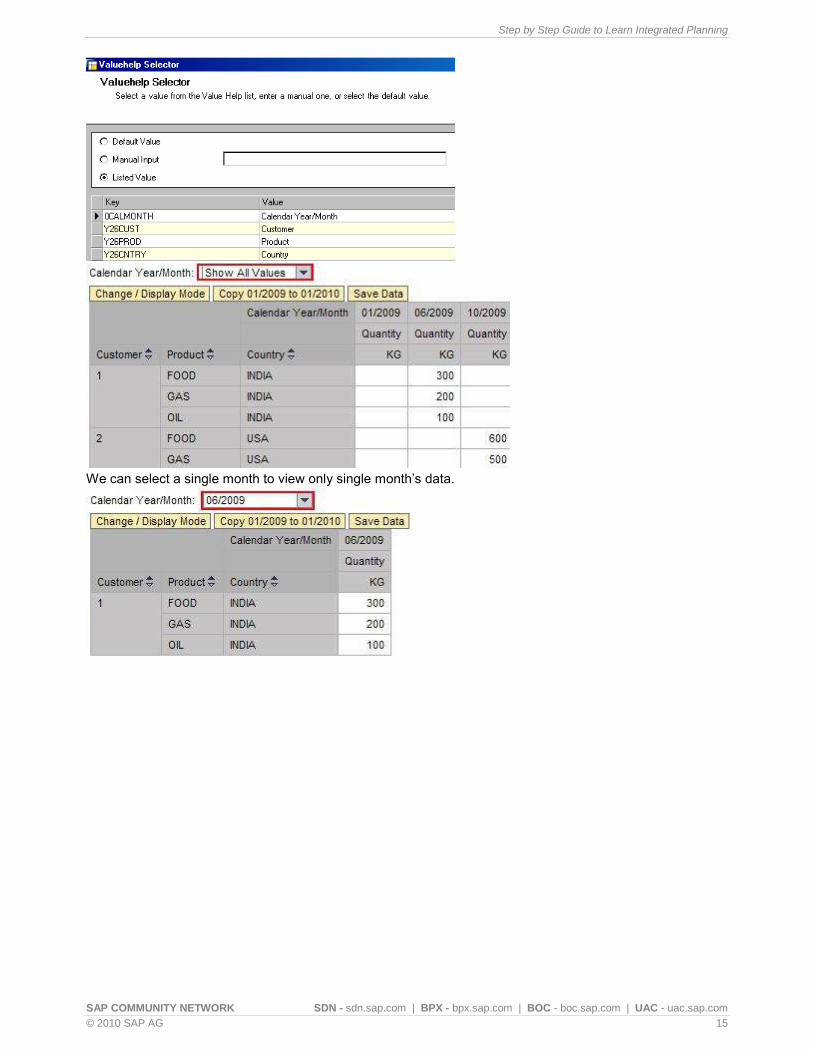
We can select a single month to view only single month‟s data.
Step by Step Guide to Learn Integrated Planning
SAP COMMUNITY NETWORK SDN - sdn.sap.com | BPX - bpx.sap.com | BOC - boc.sap.com | UAC - uac.sap.com
© 2010 SAP AG 16
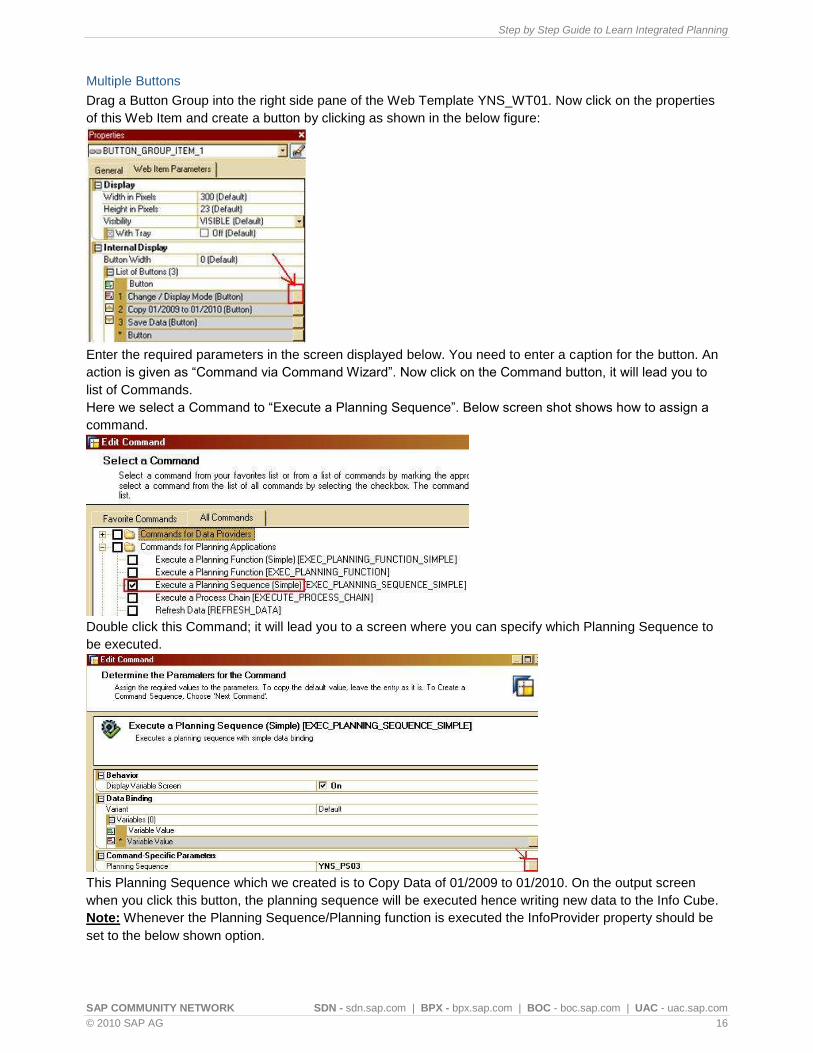
Multiple Buttons
Drag a Button Group into the right side pane of the Web Template YNS_WT01. Now click on the properties
of this Web Item and create a button by clicking as shown in the below figure:
Enter the required parameters in the screen displayed below. You need to enter a caption for the button. An
action is given as “Command via Command Wizard”. Now click on the Command button, it will lead you to
list of Commands.
Here we select a Command to “Execute a Planning Sequence”. Below screen shot shows how to assign a
command.
Double click this Command; it will lead you to a screen where you can specify which Planning Sequence to
be executed.
This Planning Sequence which we created is to Copy Data of 01/2009 to 01/2010. On the output screen
when you click this button, the planning sequence will be executed hence writing new data to the Info Cube.
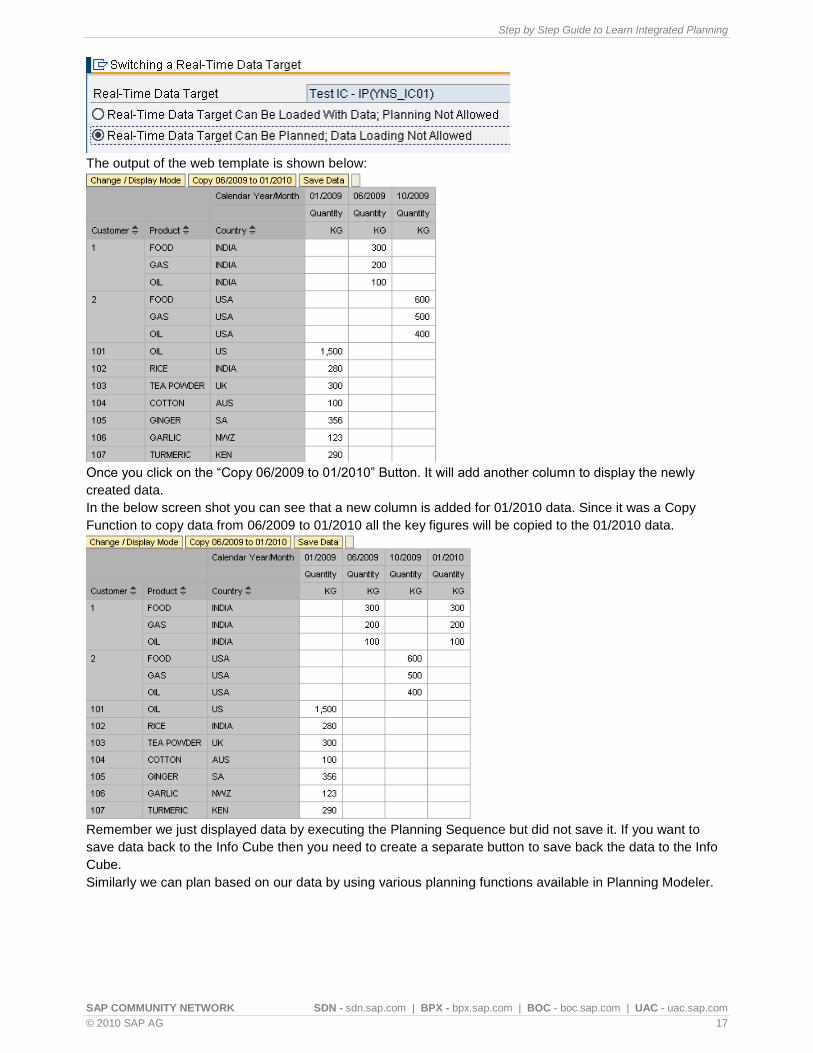
Note: Whenever the Planning Sequence/Planning function is executed the InfoProvider property should be
set to the below shown option.
Step by Step Guide to Learn Integrated Planning
SAP COMMUNITY NETWORK SDN - sdn.sap.com | BPX - bpx.sap.com | BOC - boc.sap.com | UAC - uac.sap.com
© 2010 SAP AG 17
The output of the web template is shown below:
Once you click on the “Copy 06/2009 to 01/2010” Button. It will add another column to display the newly
created data.
In the below screen shot you can see that a new column is added for 01/2010 data. Since it was a Copy
Function to copy data from 06/2009 to 01/2010 all the key figures will be copied to the 01/2010 data.
Remember we just displayed data by executing the Planning Sequence but did not save it. If you want to
save data back to the Info Cube then you need to create a separate button to save back the data to the Info
Cube.
Similarly we can plan based on our data by using various planning functions available in Planning Modeler.
Step by Step Guide to Learn Integrated Planning
SAP COMMUNITY NETWORK SDN - sdn.sap.com | BPX - bpx.sap.com | BOC - boc.sap.com | UAC - uac.sap.com
© 2010 SAP AG 18
Related Contents
www.help.sap.com
Integrated Planning
Planning Functions
For more information, visit the Business Intelligence homepage.
Step by Step Guide to Learn Integrated Planning
SAP COMMUNITY NETWORK SDN - sdn.sap.com | BPX - bpx.sap.com | BOC - boc.sap.com | UAC - uac.sap.com
© 2010 SAP AG 19
Disclaimer and Liability Notice
This document may discuss sample coding or other information that does not include SAP official interfaces and therefore is not supported by SAP. Changes made based on this information are not supported and can be overwritten during an upgrade.
SAP will not be held liable for any damages caused by using or misusing the information, code or methods suggested in this document, and anyone using these methods does so at his/her own risk.
SAP offers no guarantees and assumes no responsibility or liability of any type with respect to the content of this technical article or code sample, including any liability resulting from incompatibility between the content within this document and the materials and services offered by SAP. You agree that you will not hold, or seek to hold, SAP responsible or liable with respect to the content of this document.
Related Documents