Model: MKM2200 Smart Intelli Kitchen Machine Instruction Manual

Welcome message from author
This document is posted to help you gain knowledge. Please leave a comment to let me know what you think about it! Share it to your friends and learn new things together.
Transcript

Model: MKM2200
Smart Intelli Kitchen Machine
Instruction Manual
2
Important SafeguardsWhen using electrical appliances, in order to reduce the risk of fire, electric shock and/or injury, these basic safety precautions should always be followed:
For Your SafetyRead all instructions carefully, even if you arefamiliar with the appliance.
• To protect against the risk of electric shock, DO NOT IMMERSE main body of this appliance, plug or power cord in water or any other liquid.
• The appliance is not intended for used by persons (including children) with reduced physical, sensory or mental capabilities, or lack of experience and knowledge, unless they have been given supervision or instruction concerning use of the appliance by a person responsible for their safety.
• Children should be supervised to ensure that they do not play with the appliance.
• Switch off the power outlet and remove the plug before cleaning or when not in use. To unplug, grasp the plug and pull from the power outlet. Never pull the power cord. Never carry the appliance by the power cord.
• Do not operate any appliance with a damaged power cord or plug; if the appliance malfunctions; or if it is dropped or damaged in any manner.
• Do not allow the power cord to hang over the edge of a table or counter, or touch hot surfaces.
• Do not operate or place any part of the appliance on or near any hot surfaces (such as a hot gas or electric burner, or in a heated oven).
• Do not use this appliance for anything other than its intended use. This product is intended for household use only.
• This appliance is intended to be plugged in a standard domestic power outlet only.
• Do not attempt to repair, disassemble or modify the appliance. There are no user-serviceable parts.
• Do not use outdoors.
• Operate on a dry level surface. Sinks, drainboards or uneven surfaces must be avoided.
• The use of attachments or accessories not recommended or sold by the manufacturer can cause fire, electric shock or injury.
• Never insert utensils into the appliance when the appliance is running.
• Allow to cool before cleaning.
• Do not use with an extension power cord.
• Store the unit indoors in a dry location.
• Do not operate under or near flammable materials, such as curtains, drapes or any other combustible materials.
• Caution should be taken when handling this appliance as some surfaces may be hot during and immediately after boiling. Severe burns may result from misuse.
• Avoid contact with steam from the lid when water is boiling, or just after the steamer has switched off. Take care when opening the lid when the steamer has recently boiled, as steam can burn.
• Extreme caution is necessary when moving any appliance containing hot water. Wait until the appliance has switched off automatically, or switch it off manually before moving it.
• Do not move the appliance containing hot liquids or food.
• Do not touch food inside the bowl directly.
• Do not touch the appliance when it is producing steam. Use a cloth to remove the steam compartment.
• To disconnect, remove plug from wall outlet.
• CAUTION: This appliance generates heat and escaping steam during use. Proper precautions must be taken to prevent the risk of burns, fires or other damage to persons or property.
• Do not touch any moving parts.
• Keep hands and utensils away from cutting blade while chopping food to reduce the risk of injury to persons or damage to the food processor. A plastic or wooden scraper may be used but only when the blender is not running
3
• Never attach the chopping blade without the bowl in place.
• Do not operate the appliance when empty.
• Do not operate any appliance with a damaged power cord or plug after the appliance malfunctions, or is dropped or damaged in any manner.
• Ensure the bowl and lid are fitted correctly before starting appliance.
• Blade must stop completely before removing lid.
• Do not touch the blade when removing food from the bowl or when removing the blade for cleaning as they are sharp.
• Do not attempt to override the cover lock mechanism.
• Do not touch the blade, especially when the appliance is plugged in. The blade are very sharp.
• If the blade get stuck, unplug the appliance before you remove the ingredients blocking the blade.
• The appliance becomes very hot during steaming and may cause burns when touched. Only lift the bowl by its handle.
• Beware of hot steam that comes out of the steam basket during steaming and when you remove its lid.
• Always unplug the appliance and let it cool down before you clean it.
• Never use the bowl or any other part of the appliance in a microwave, as they are not suitable for this use.
• Never sterilise the bowl or any other part of the appliance in a steriliser or in a microwave, as they are not suitable for this use.
• Do not use the appliance if it has fallen or is damaged in any way.
• Make sure that you do not overfill the bowl. Do not exceed the maximum level indicated on bowl.
• When you steam ingredients, make sure that you do not overfill the steam basket.
• When you blend liquids, do not exceed the maximum level indicated on the bowl.
• Never connect this appliance to a timer switch or remote control system in order to avoid a hazardous situation.
• Always check the consistency of baby food. Make sure there are no chunks in the food.
• Turn the Measuring cup to lock position whilst using the master at high speeds or when using the Pulse function.
WarningIf the supply power cord is damaged, the power cord must be replaced by the manufacturer, its service agent or similarly qualified persons in order to avoid a hazard.
This product has not been designed for any usesother than those specified in this booklet.
Save These InstructionsTHIS APPLIANCE IS DESIGNED FOR HOUSEHOLD USE ONLY
Symbol Meanings
CAUTION: HOT SURFACES.The surfaces are liable to get hot during use, do not touch.
The Regulatory Compliance Mark (RCM) shows that a product is safe to supply to the Australia market.
ATTENTION! Danger of getting burned by steam!
Be careful when handling the sharp cutting blades, emptying the bowl and during cleaning.
Be careful if hot liquid is poured into the appliance as it can be ejected out of the appliance due to a sudden steaming.
Switch off the appliance and disconnect from supply before changing accessories or approaching parts that move in use.
Avoid spillage on the connector.
The heating element surface is subject to residual heat after use. CAUTION: To prevent damage to the appliance do not use alkaline cleaning agents when cleaning, use a soft cloth and a mild detergent.

4
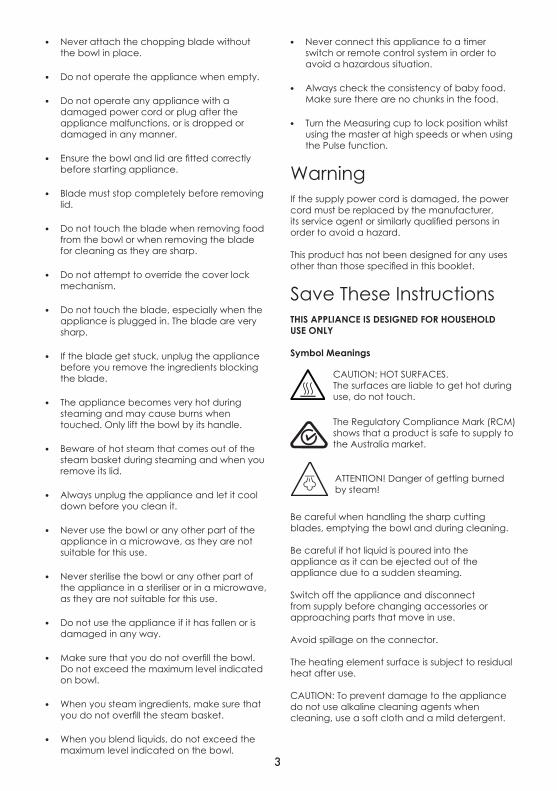
Features of Your Smart Kitchen Machine1
2
3
8
4 5 6 7
18
19
20
25 26
14
15
16
17
21
22
23
24
9
11
12
13
10
1
7
4
3
9
65
2
8
10
max
max
max
5
DESCRIPTION OF THE APPLIANCE
1. Tiltable bowl lid cap
2. Bowl lid
3. Bowl lid seal
4. Whisk
5. Stir paddle
6. Chop blade
7. Steam basket
8. 4.5 Litre stainless steel bowl
(3 litre working capacity)
9. On/Off switch
10. Power cord
11. Housing of the appliance
12. Touch control panel
13. Control knob with START/STOP button
14. Pusher
15. Food processor lid
16. Food processor lid seal
17. Grating/slicing disc
18. Food processor pin
19. Scraper
20. 30 ml measuring cup
21. Steam tray lid
22. Deep steamer (Upper steamer tray)
23. Deep steamer (Lower Steamer tray)
24. Steamer tray seal
25. Drive shaft
26. Shaft lock
6
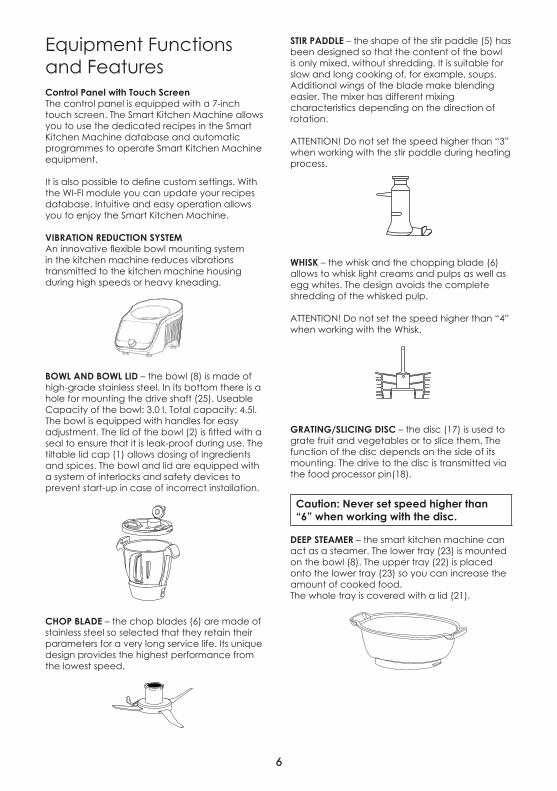
Equipment Functions and FeaturesControl Panel with Touch ScreenThe control panel is equipped with a 7-inch touch screen. The Smart Kitchen Machine allows you to use the dedicated recipes in the Smart Kitchen Machine database and automatic programmes to operate Smart Kitchen Machine equipment.
It is also possible to define custom settings. With the WI-FI module you can update your recipes database. Intuitive and easy operation allows you to enjoy the Smart Kitchen Machine.
VIBRATION REDUCTION SYSTEM An innovative flexible bowl mounting system in the kitchen machine reduces vibrations transmitted to the kitchen machine housing during high speeds or heavy kneading.
BOWL AND BOWL LID – the bowl (8) is made of high-grade stainless steel. In its bottom there is ahole for mounting the drive shaft (25). Useable Capacity of the bowl: 3.0 l. Total capacity: 4.5l. The bowl is equipped with handles for easy adjustment. The lid of the bowl (2) is fitted with a seal to ensure that it is leak-proof during use. The tiltable lid cap (1) allows dosing of ingredients and spices. The bowl and lid are equipped with a system of interlocks and safety devices to prevent start-up in case of incorrect installation.
CHOP BLADE – the chop blades (6) are made of stainless steel so selected that they retain their parameters for a very long service life. Its unique design provides the highest performance from the lowest speed.
STIR PADDLE – the shape of the stir paddle (5) has been designed so that the content of the bowl is only mixed, without shredding. It is suitable for slow and long cooking of, for example, soups.Additional wings of the blade make blending easier. The mixer has different mixing characteristics depending on the direction of rotation.
ATTENTION! Do not set the speed higher than “3” when working with the stir paddle during heating process.
WHISK – the whisk and the chopping blade (6) allows to whisk light creams and pulps as well asegg whites. The design avoids the complete shredding of the whisked pulp.
ATTENTION! Do not set the speed higher than “4” when working with the Whisk.
GRATING/SLICING DISC – the disc (17) is used to grate fruit and vegetables or to slice them. The function of the disc depends on the side of its mounting. The drive to the disc is transmitted via the food processor pin(18).
Caution: Never set speed higher than “6” when working with the disc.
DEEP STEAMER – the smart kitchen machine can act as a steamer. The lower tray (23) is mounted on the bowl (8). The upper tray (22) is placed onto the lower tray (23) so you can increase the amount of cooked food.The whole tray is covered with a lid (21).
7
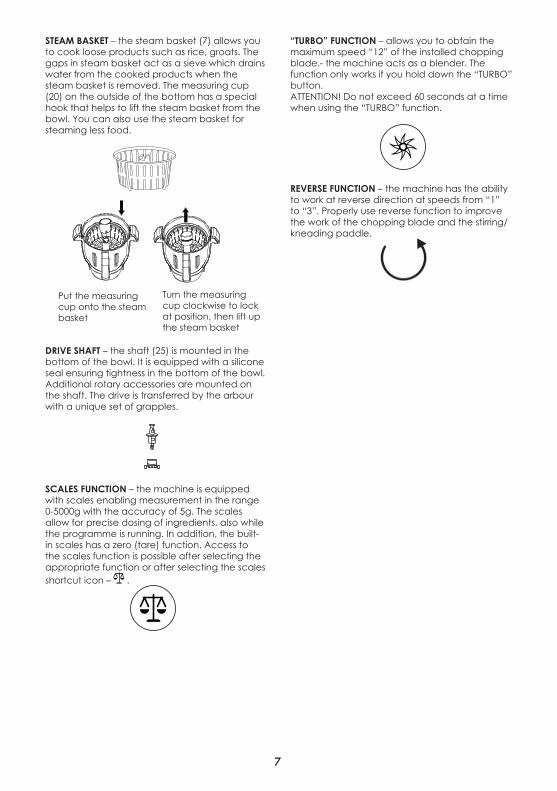
STEAM BASKET – the steam basket (7) allows you to cook loose products such as rice, groats. Thegaps in steam basket act as a sieve which drains water from the cooked products when the steam basket is removed. The measuring cup (20) on the outside of the bottom has a special hook that helps to lift the steam basket from the bowl. You can also use the steam basket for steaming less food.
Put the measuring cup onto the steam basket
Turn the measuring cup clockwise to lockat position, then lift up the steam basket
DRIVE SHAFT – the shaft (25) is mounted in the bottom of the bowl. It is equipped with a silicone seal ensuring tightness in the bottom of the bowl. Additional rotary accessories are mounted on the shaft. The drive is transferred by the arbour with a unique set of grapples.
SCALES FUNCTION – the machine is equipped with scales enabling measurement in the range 0-5000g with the accuracy of 5g. The scales allow for precise dosing of ingredients, also while the programme is running. In addition, the built-in scales has a zero (tare) function. Access to the scales function is possible after selecting the appropriate function or after selecting the scales shortcut icon – .
“TURBO” FUNCTION – allows you to obtain the maximum speed “12” of the installed chopping blade.- the machine acts as a blender. The function only works if you hold down the “TURBO” button.ATTENTION! Do not exceed 60 seconds at a time when using the “TURBO” function.
REVERSE FUNCTION – the machine has the ability to work at reverse direction at speeds from “1” to “3”. Properly use reverse function to improve the work of the chopping blade and the stirring/kneading paddle.

8
Main MenuAfter turn on the machine, the display will show the below home page:
RecipesSelecting the “Recipes” panel we go to the list of recipes available in the appliance.
Manual ModeThe “Manual Mode” panel allows us to use individual operating modes of the appliance.
Automatic ProgrammesUsing the “Automatic Programmes” panel we can select the Programmes defined in theappliance.
Download New RecipesIf there are new recipes available, press this todownload them.
Manual Mode
A B C
D E
Dial for temperature Dial for Time Dial for Speed level
Setting temperature Rotation direction
This number indicates the bowl inner temperature
A – process temperature selection fieldA temperature of 37°C to 130°C is available with a choice of 5°C intervals. The “000” indicates room temperature.The cooking bowl temperature indicator indicates the current temperature in the bowl displayed to the nearest 5°C.
B – process time selection fieldA time of 1 second to 90 minutes is available with a choice every 1 second. Once the process isstarted, the timer counts down the time until the process is complete. The smaller timeindicator above shows the originally set time during the process.
C – speed selection field for accessoriesThere are 12 speeds available, where “1” is the lowest speed (approx. 120 rpm) and “12” is thehighest speed (approx. 5000 rpm). Pressing the Arrow icon changes direction of rotation whichis indicated by the icon . Reverse rotation is only available for speeds “1”, “2”, “3”.
D – process START/PAUSE button.E – process STOP button.
Recipes Panel
The machine has in its database recipes in the form of a cookbook, divided into groups:
1. Dinner salads 2. Salads3. Soups and creamsoups 4. Sauces5. Spread,starters, snacks 6. Vegetarian dishes7. Basic recipes 8. Beverages9. Cakes and desserts 10. Flour dishes11. Breadstuff 12. Steamed dishes13. Meat dishes 14. Breakfast15. Rice Mains
Each recipe includes:• list of ingredients• Instructions for preparation• indicative preparation time• accessories required• information on how many people each dish is for• difficulty level
You can sort the recipe database alphabetically or by group. You can also add selected recipes to the “FAVOURITES” tab. Working with ready- made recipes shortens time and makes it easier to prepare the food. The user will be informed about the possibility of updating the list of recipes through messages displayed on the control panel screen.

9
Automatic Programmes
There are 8 automatic programmes available to speed up and suggest the optimum processingtime for the food. The programmes can be modified, but to a limited extent. In addition, a “TURBO” mode is available, which increases the engine speed to the maximum, as well as a product weight measurement mode.
Programme/Icon Parameters (editing range)
Equipment Notes
Dough kneading
Temp: 000Time: 2minutesSpeed: 2, 3
Kneading paddle
Paddle running in clockwise or anticlockwise
Steaming
Temp.: gradually increasingTime: 20 minutes (1-60 minutes)Speed: 0, 1. 2 or 3
with or without Stirring paddle
Time starts to count when 95°C is exceeded
Slow cooking sous vide
Temp.: 100°C (60°C-100°C)Time: 60 minutes (1-90 minutes)Speed: 1 (1-3)
Stirring paddle
boil
Temp.: 100°C (60°C-100°C)Time: not applicableSpeed: not applicable
Automatically stop operation after the desired temperature reaches.
Grating/slicing
Temp.: not applicableTime: 30 seconds (10-60 seconds)Speed: 5 (4-6)
grating/slicing disc
never set the speed over “6”
Chopping
Temp.: not applicableTime: 10 seconds (10-59 seconds)Speed: 6 (1-12)
chopping blade
TURBO
Temp.: not applicableTime: up to 1 minuteSpeed: 12
chopping blade
Only works while holding down the (TURBO) button
Scales
Scales up to 5000g, accurate to 5g
Tare option available
10
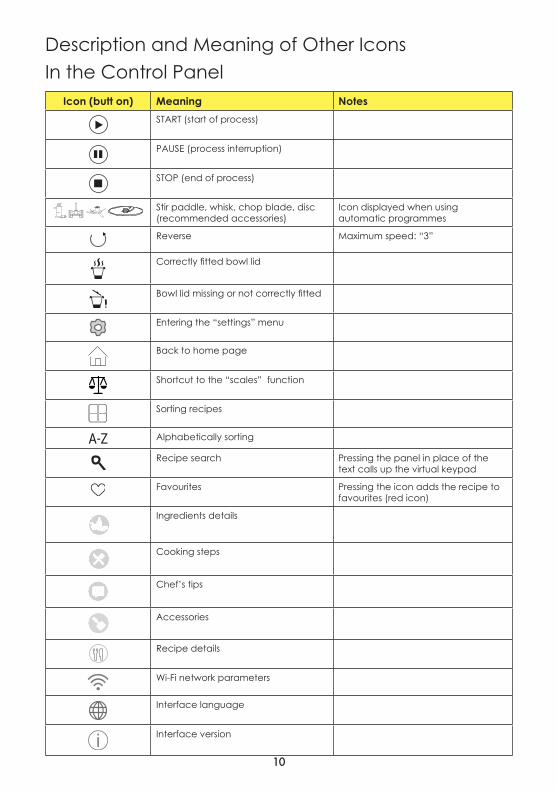
Description and Meaning of Other Icons In the Control Panel
Icon (butt on) Meaning Notes
START (start of process)
PAUSE (process interruption)
STOP (end of process)
Stir paddle, whisk, chop blade, disc (recommended accessories)
Icon displayed when using automatic programmes
Reverse Maximum speed: “3”
Correctly fitted bowl lid
Bowl lid missing or not correctly fitted
Entering the “settings” menu
Back to home page
Shortcut to the “scales” function
Sorting recipes
Alphabetically sorting
Recipe search Pressing the panel in place of the text calls up the virtual keypad
Favourites Pressing the icon adds the recipe to favourites (red icon)
Ingredients details
Cooking steps
Chef’s tips
Accessories
Recipe details
Wi-Fi network parameters
Interface language
Interface version
11
Help
The lid is available to be opened
The lid can not be opened
NOTE: at standby or Pause mode, press the “ ” to enter home page.
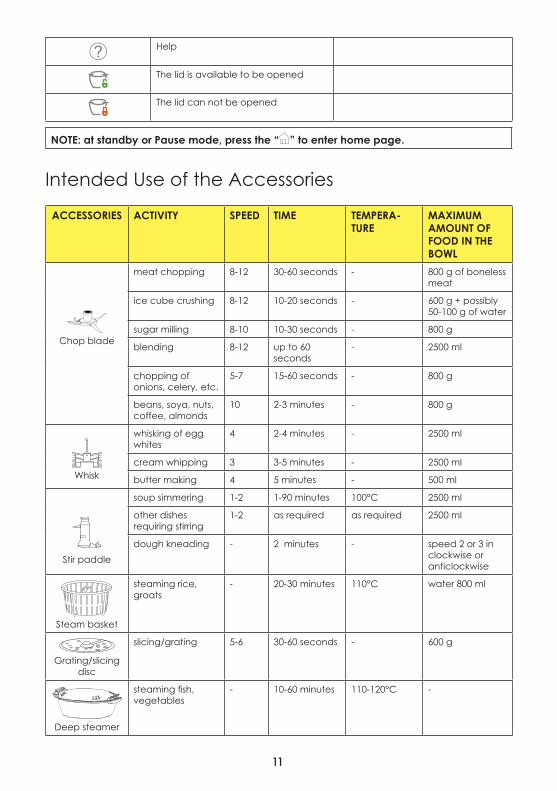
Intended Use of the Accessories
ACCESSORIES ACTIVITY SPEED TIME TEMPERA-TURE
MAXIMUM AMOUNT OF FOOD IN THE BOWL
Chop blade
meat chopping 8-12 30-60 seconds - 800 g of boneless meat
ice cube crushing 8-12 10-20 seconds - 600 g + possibly 50-100 g of water
sugar milling 8-10 10-30 seconds - 800 g
blending 8-12 up to 60 seconds
- 2500 ml
chopping of onions, celery, etc.
5-7 15-60 seconds - 800 g
beans, soya, nuts, coffee, almonds
10 2-3 minutes - 800 g
Whisk
whisking of egg whites
4 2-4 minutes - 2500 ml
cream whipping 3 3-5 minutes - 2500 ml
butter making 4 5 minutes - 500 ml
Stir paddle
soup simmering 1-2 1-90 minutes 100°C 2500 ml
other dishes requiring stirring
1-2 as required as required 2500 ml
dough kneading - 2 minutes - speed 2 or 3 in clockwise or anticlockwise
Steam basket
steaming rice, groats
- 20-30 minutes 110°C water 800 ml
Grating/slicing disc
slicing/grating 5-6 30-60 seconds - 600 g
Deep steamer
steaming fish, vegetables
- 10-60 minutes 110-120°C -
12
Note: if the bowl is not placed correctly at position, a warning message will appear on the display.
4. Put one of the accessories on the installed shaft (25) (Fig.3).
• Stir paddle (5)• Chop blade (6)• Steam basket (7).
Chop blade/stir blade:when put them on the shaft, make sure it sits fully at the bottom.To remove them, lift its upward first, then turn it clockwise or anticlockwise to remove it.
Whisk:the whisk shall be placed onto the chop blade. Put it onto the blade fully, then turn it clockwise or anticlockwise to lock itat position.
Warning: Never set the speed over “4” when using the whisk.
Warning: The chop blades are sharp. Be careful not to get hurt!
5. Make sure that the seal (3) is properly seated in the bowl lid (2). It must be properly seated in the groove for the seal around the entire circumference.
6. Place the bowl lid (2) diagonally on the bowl (8) as shown in Fig. 4, press it down and turn it clockwise so that the handles of the bowl and the lid overlap (the tabs in the lid will take their places in the sockets of the bowl).
7. To remove the bowl from the appliance, follow these steps:
a. Turn the bowl lid (1) slightly anticlockwise so that the tabs in lid slides out of the sockets in the bowl, carefully remove the lid from the bowl.
b. Remove the bowl from the base of the machine.
c. Remove the chop blade from the rotary shaft.
Caution: there is safety lock design, never try to open the lid before the operation completion. There is warning message on the display.
Attention! The bowl may be disassembled only when the lid is removed.
Preparation for Use1. Unpack the appliance from the cardboard,
remove all bags, labels, cardboard and fillers. Check the appliance for any damage that may have occurred during transport. In case of any doubts, please contact the seller.
2. Make sure that the parameters of your mains supply correspond to the technical data on the product rating plate.
3. Thoroughly wash and dry all parts in contact with food following the instructions in the section “Cleaning and Maintenance”.
4. Place the appliance on a dry, flat, stable and horizontal surface.
5. The appliance has a safety system - it can only be switched on if the bowl (8) and the bowl lid (2) are correctly fitted.
Fitting/Removing the Bowl
Caution: Never run an incompletely assembled appliance. Risk of injury!
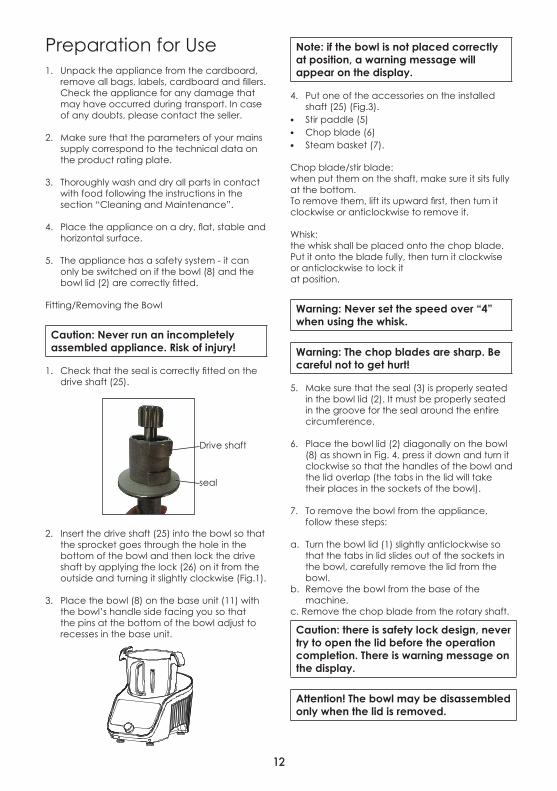
1. Check that the seal is correctly fitted on the drive shaft (25).
Drive shaft
seal
2. Insert the drive shaft (25) into the bowl so that the sprocket goes through the hole in the bottom of the bowl and then lock the drive shaft by applying the lock (26) on it from the outside and turning it slightly clockwise (Fig.1).
3. Place the bowl (8) on the base unit (11) with the bowl’s handle side facing you so that the pins at the bottom of the bowl adjust to recesses in the base unit.
13
FITTING/REMOVING THE DEEP STEAMER
1. Follow the steps described in point 1-3 in the section Fitting/Removing the Bowl.
2. Make sure that the seal (24) is properly seated in the steamer container (23). It must evenly adhere around its entire circumference to the outside of the ring in the container.
3. Place the deep steamer (lower tray) (23)diagonally on the bowl (8) as shown in Fig. 6, and turn it clockwise so that the handles of the bowl and the lid overlap (the tabs in the lid will take their places in the sockets of the bowl). Place the upper tray (22) on the lower tray (23) and cover the lid (21).
4. To remove the deep steamer from the appliance, follow these steps:
a. Remove the lid (21) and the upper tray (22).b. Turn the lower tray (23) slightly anticlockwise
so that the tabs in the container slide out of the sockets in the bowl, carefully remove the lower tray from the bowl.
c. Remove the bowl from the base of the machine.
FITTING/REMOVING THE GRATING/SLICING DISC
1. Follow the steps described in point 1-3 in the section FITTING/REMOVING THE BOWL. Install the food processor pin(18) on the drive shaft (25).
2. Place the grating/slicing disc (17) with the appropriate side facing upwards on the food processor pin(18), depending on the operation (grating/slicing).
3. Make sure that the seal (16) is properly seated in the Food processor lid (15). It must be properly seated in the groove for the seal around the entire circumference.
4. Place the Food processor lid (15) on the bowl (8) as shown in Fig. 7, press it down and turn it so that the handles of the bowl and the lid overlap (the tabs in the lid will take their places in the sockets of the bowl).
5. Place the pusher (14) in the Food processor lid.
6. To remove the disc from the appliance, follow these steps:
a. Turn the lid (15) slightly anticlockwise so that the tabs in the lid slide out of the sockets in the bowl, carefully remove the lid
b. Remove the bowl from the base of the machine.
c. Remove the disc (17) from the food processor pin(18).
d. Remove the food processor pin(18) from the rotary shaft (25).
FITTING/REMOVING THE WHISK
1. Follow the steps described in point 1-3 in the section FITTING/REMOVING THE BOWL.
2. Install chop blade (6) on the drive shaft (25) inside the bowl, place the whisk onto the blade, and turn it clockwise or anticlockwise to lock it at position. The whisk shall (4) can be used only with chop blade (6).
FITTING / REMOVING THE STEAM BASKET
1. Follow the steps described in point 1-3 in the section FITTING/REMOVING THE BOWL.
2. Pls install steam basket (7), (25) inside the bowl.
FITTING / REMOVING THE STIR PADDLE
1. Follow the steps described in point 1-3 in the section FITTING/REMOVING THE BOWL.
2. Pls install stir paddle (5) on the drive shaft (25) inside the bowl.
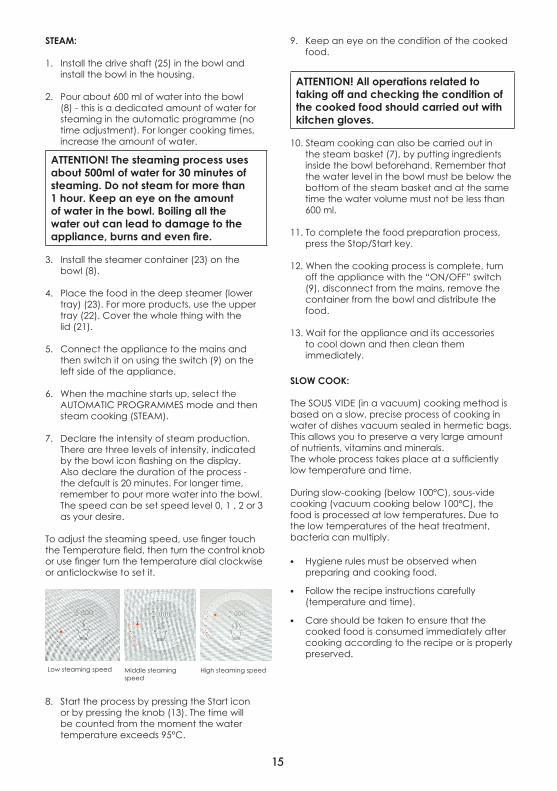
MANUAL MODEL
HOW TO SET THE TEMPERATURE
Use finger touch the temperature field first,
(1) Then put finger on the temperature field, slide the dial clockwise or anticlockwise to adjust the temperature.
or
(2) Turn the control knob clockwise or anticlockwise to adjust the temperature.

14
HOW TO SELECT THE OPERATOIN MODE
At Manual mode, use finger slide the screen rightward or touch the left dot on right-bottom corner of the dispaly to enter Recipe mode. Finger slide slide the screen leftward or touch the right dot on right-bottom corner of the display to enter Automatic Programmes mode.
Touch this dot to enter Recipe mode
Touch this dot to enter AutomaticProgrammes mode
Recipe Mode
After enter the recipe mode, select your desired recipe, then follow the instruction step by step to start the cooking process.
Automatic Programmes Mode
After enter the Automatic Programmes mode, there are 8 program options.
KNEAD:
Place the stir paddle on the drive shaft, then add the ingredients as per recipe into the bowl, press the Start icon, the machine will start kneading at speed level 3 or 2 in clockwise or anticlockwise.
Note: advise kneading the dough at Automatic Programmes mode for good performance. Never set the speed over level ‘3‘ during kneading.
HOW TO SET THE TIME
Set the secondUse finger touch the seconds ‘00‘ field first,
(1) Then put finger on the timer field, slide the dial clockwise or anticlockwise to adjust the seconds.
or
(2) Turn the control knob clockwise or anticlockwise to adjust the seconds.
Set the minutesUse finger touch the minutes ‘00‘ field first,
(3) Then put finger on the timer field, slide the dial clockwise or anticlockwise to adjust the minutes
or
(4) Turn the control knob clockwise or anticlockwise to adjust the minutes.
HOW TO SET THE SPEED
Use finger touch the speed field first,
(1) Then put finger on the speed field, slide the dial clockwise or anticlockwise to adjust the speed.
or
(2) Turn the control knob clockwise or anticlockwise to adjust the speed.
NOTE: if the temperature is set, the speed level can only be set from 1 to 3.
Reverse:If speed level is lower than ‘3’, use finger touch the icon under the level to change the blade to Reverse.
Touch it again to change it to clockwise.
Note: Reverse function is only available for speed level lower than 3.
Touch this icon to change theblade running direction
15
STEAM:
1. Install the drive shaft (25) in the bowl and install the bowl in the housing.
2. Pour about 600 ml of water into the bowl (8) - this is a dedicated amount of water for steaming in the automatic programme (no time adjustment). For longer cooking times, increase the amount of water.
ATTENTION! The steaming process uses about 500ml of water for 30 minutes of steaming. Do not steam for more than 1 hour. Keep an eye on the amount of water in the bowl. Boiling all the water out can lead to damage to the appliance, burns and even fire.
3. Install the steamer container (23) on the bowl (8).
4. Place the food in the deep steamer (lower tray) (23). For more products, use the upper tray (22). Cover the whole thing with the
lid (21).
5. Connect the appliance to the mains and then switch it on using the switch (9) on the left side of the appliance.
6. When the machine starts up, select the AUTOMATIC PROGRAMMES mode and then steam cooking (STEAM).
7. Declare the intensity of steam production. There are three levels of intensity, indicated by the bowl icon flashing on the display. Also declare the duration of the process - the default is 20 minutes. For longer time, remember to pour more water into the bowl.
The speed can be set speed level 0, 1 , 2 or 3 as your desire.
To adjust the steaming speed, use finger touch the Temperature field, then turn the control knob or use finger turn the temperature dial clockwise or anticlockwise to set it.
Low steaming speed Middle steaming speed
High steaming speed
8. Start the process by pressing the Start icon or by pressing the knob (13). The time will be counted from the moment the water temperature exceeds 95°C.
9. Keep an eye on the condition of the cooked food.
ATTENTION! All operations related to taking off and checking the condition of the cooked food should carried out with kitchen gloves.
10. Steam cooking can also be carried out in the steam basket (7), by putting ingredients inside the bowl beforehand. Remember that the water level in the bowl must be below the bottom of the steam basket and at the same time the water volume must not be less than 600 ml.
11. To complete the food preparation process, press the Stop/Start key.
12. When the cooking process is complete, turn off the appliance with the “ON/OFF” switch (9), disconnect from the mains, remove the container from the bowl and distribute the food.
13. Wait for the appliance and its accessories to cool down and then clean them immediately.
SLOW COOK:
The SOUS VIDE (in a vacuum) cooking method is based on a slow, precise process of cooking in water of dishes vacuum sealed in hermetic bags. This allows you to preserve a very large amount of nutrients, vitamins and minerals.The whole process takes place at a sufficiently low temperature and time.
During slow-cooking (below 100°C), sous-vide cooking (vacuum cooking below 100°C), the food is processed at low temperatures. Due to the low temperatures of the heat treatment, bacteria can multiply.
• Hygiene rules must be observed when preparing and cooking food.
• Follow the recipe instructions carefully (temperature and time).
• Care should be taken to ensure that the cooked food is consumed immediately after cooking according to the recipe or is properly preserved.

16
BOIL:
At boil, after set the temperature, press the Start icon to start cooking. It will automatically stop operation after the desired temperature reaches.
FOOD PROCESSOR
1. Install the drive shaft (25) in the bowl and install the bowl in the housing.
2. Mount the food processor pin(18), disc (17) and Food processor lid (15) on the rotary shaft. Make sure to mount the disc with the correct side up depending on the nature of the operation (Grate or Slice).
ATTENTION! The grating and slicing disc is sharp. Be careful not to get hurt!
3. Prepare the food to be processed. Cut the fruit and vegetables into smaller pieces so that they pass through the feed hole in the Food processor lid and remove the stones from them.
4. Connect the appliance to the mains and then switch it on using the switch (9) on the left side of the appliance.
5. When the machine starts up, select the AUTOMATIC PROGRAMMES mode and then select the Food processor mode, make possible time and speed adjustments.
Warning: never set the speed level over “6” when grating or slicing.
6. After selecting the parameters, start the process with the Start button. To stop the process, press the Stop button .
7. Slowly insert the food into the feed hole in the Food processor lid (15) and press down on them with the pusher (14). When working, do not let the bowl fill to the end with the processed food. Periodically turn off the appliance and empty the bowl of the processed food.
ATTENTION: The Food processor lid (15) is not used to cover the bowl during cooking with heat and when using the chop blade and stir paddle.
8. At the end of the programme, turn off the appliance with the switch (9), disconnect it from the mains, empty the bowl and clean the appliance.
CHOP:
Place the chop blade on the drive shaft, place the food into the bowl and close the bowl lid, then press the Start icon to start chopping.
TURBO:
Use finger keep pressing the Turbo icon, the machine will start the operation at speed level ‘12”.
WEIGH:
How to enter Scale mode.(1) At Automatic Programmes mode , press
Weigh to enter Scale mode.
(2) At Standby or Pause model, press the Scale Icon on the left-upper corner of the display to enter Scale mode.
Scale icon on the corner
The integrated scales allow you to weigh all ingredients directly in the mixing bowl and in the Steam Accessory.
Put in the first ingredient and check the quantity on the display. If you wish to add more ingredients push the Tare button again and add the next ingredient. Repeat these steps as often as required to the maximum weight (5 kg).
Note: the scale works from 5g to 5kg (max.) with a increments of 5g.
The display provides you with valuable information when weighing or adding ingredients. if the ingredients is overload 5200g, the display shows OVERWEIGHT after weigh, press End button to exit the Scale mode.

17
PAUSE MODE
Press the Pause button to enter Pause mode during an operation.
At Pause, cannot enter other operaton mode. There is a warning message to remind this point.
There is information on the left-bottom corner of the display to show the current progress, use finger push it, then stop it first to enter other operation.
Use finger push here to exit the current process
LID SAFE LOCK FUNCTIONFor safety reasons, the lid cannot be opened/ removed during operation. There is a bowl icon with a lock in red on the right-upper corner of the display that means the bowl lid can not be opened.
When the timer operation has expired (00.00), after approximately 5 seconds, the lock icon with the bowl icon will become green that means the bowl lid is available to be opened.
Lock in red indicates the bowl lid can not be opened
Lock in green indicatesthe bowl lid can be opened
Ensure that lid is properly locked in position in order to operate the appliance.
WARNING: Do Not attempt to open the lid during operation, if you want to stop the appliance during operation, simply press the Stop button to Stop the operation and only open lid by turning anti-clockwise and remove once the lock with the bowl icon becomes green.

18
How to Use this MachineThe following operating descriptions contain a diagram of how to work with the appliance. You will find detailed recipes for individual dishes, their ingredients, proportions and weight in the machine recipe database.
a. Install the drive shaft (25) in the bowl and install the bowl in the housing.
b. Depending on the nature of the food to be prepared, install the appropriate accessory:S
ATTENTION! The knife blades are very sharp. Be careful not to get hurt.
c. Put the food to be processed in the bowl. Do not exceed the maximum volume of the bowl (max 3000 ml). If you are going to cook food in the steam basket (7), pour enough water (broth, stock) into the bowl to cover the food in the steam basket. When adding the ingredients to the bowl, it is possible to dose them precisely thanks to the scales function (see: “SCALES FUNCTION”). If you will be preparing dishes from recipes, fill the bowl according to the instructions for the recipe.
ATTENTION! Do not fill the bowl over the Max. Level mark on the bowl.
ATTENTION! Be especially careful when cooking food. Do not run the appliance with an empty bowl. When cooking products in the steam basket, take care of the right amount of water in the bowl.
ATTENTION! When inserting and pouring the ingredients into the bowl, take special care not to flood the base of the appliance. Danger of electrocution.
d. Install the bowl lid (2) on the bowl (8).
e. Connect the appliance to the mains and then switch it on using the swith (9) on the left side of the appliance. If you do not take any action within 5 minutes, the appliance will go into sleep mode. Restarting is done by touching the control panel.
f. After starting the machine, select the appropriate mode from the touch control panel.
A red dot at the right-bottom of the display indicates the current operating mode.Recipes – select the appropriate recipe, continue with the displayed instructions.Manual Mode – declare the temperature, time and speed from the touch panel respectively.
Automatic programmes – select the appropriate automatic programme, make possible parameter adjustments.The selection of the range of a given value can be made directly on the touch control panel orby means of the knob (13) after the parameter has been indicated on the panel. Start theprocess by pressing the Start icon . Pressing the knob will also start or stop the process. Thewhite light of the knob indicates that the process is in progress.
ATTENTION! If you have set a temperature, the speed level can not set greater than “3”.ATTENTION! If you have declared a temperature greater than 60°C, do not set the speed greater than “3”. Risk of burns!
ATTENTION! Do not set the mixing speed higher than “3” when using the stir paddle (5).ATTENTION! Do not set the speed higher than “4” when working with the whisk.
ATTENTION! Always use kitchen gloves when cooking or heating the contents of the bowl, adding ingredients and emptying it. RISK OF BURNING!!!! g. Keep an eye on the process, or make adjustments to settings and quantities of ingredients after the machine has stopped working. Smaller ingredients can be added through the hole in the lid when the cap is opened (1).
Note: the setting can not be adjusted during operation. To adjust it, need Pause or Stop first. After adjust the setting, press Start to continue.
ATTENTION! If you notice that when making heavy pulps and doughs, the machine significantly reduces the speed or the speed fluctuates, stop the process immediately. Reduce the amount of food processed.

19
h. When adding the ingredients to the bowl, it is possible to dose them precisely thanks to the scales function (see: “SCALES FUNCTION”) however, the set process must be interrupted earlier (PAUSE).
i. After counting down the time to zero, the action will be completed. You can stop the action at any time using the “STOP” button. If the duration of the action is calculated from zero, it will automatically end after 90 minutes
j. After completing the process, check the condition of the food being prepared, or start a new process with appropriate adjustments to the parameters.
k. Switch off the appliance with button (9), disconnect from the mains. Remove the
bowl lid and the bowl. Use the scraper (19) to empty the contents of the bowl if the nature of the food requires it.
l. Wait for the appliance and its accessories to cool down and then clean them immediately.
Warning: the bowl can not be immerse in water for clean, can not be washed in dishwaher.
PRACTICAL CULINARY TIPS
By following these guidelines you will be able to use your machine in an optimal way and your work will bring the best results.
Always grind products (e.g. vegetables, nuts, dry rolls, coffee and even rice to very small partsor even powder) at higher speeds of level 8-12. It is advisable to start with a lower speedand gradually increase it.
Always perform powdering of products (with a blade without grating disc) at higher mixing speeds (9-12). It is advisable to start with a lower speed and gradually increase it.
Shredding of food (chopping of fruit and vegetables into small chips) is performed at medium mixing speeds (4-6). When shredding cabbage or lettuce it is advisable to add a small amount of water to the bowl.
During the above operations, do not fill the bowl above half of its nominal volume. Carry out these operations using the chop blade (6). Suggested time is a dozen or so seconds, depending on the quality, hardness and quantity of the ingredients being chopped.
Emulsifying food (bringing products into the form of emulsions e.g. mayonnaise, sauces) can be done in two ways:with the whisk (4) (mixing speed 1-4) or without a mixing tip (mixing speed 5-12). The time depends on the ingredients of the dish (from 20 seconds to several minutes).
Whisking (bringing cream or egg white to a firm consistency) is best done using the whisk (4) at mixing speeds (2-4). Due to the freshness of eggs, their size or initial temperature, it is difficult to indicate a specific processing time. You can take 1 minute at the beginning, check the effect, then possibly resume the process.
It is best to knead dough using the dough kneading programme, possibly slightly modifying its parameters. When kneading light pulps (pancake batter, sponge cake) we use the butterfly (4), while for hard pulps (pizza dough,yeast-based dough) we should work on the stir paddle.
Fry by increasing the temperature to 130 °C. Pour the olive oil and wait for it to heat up. For a uniform degree of frying, use the lowest mixing speed. After about 2 minutes, check the frying effect, or extend the process until theproduct is in the right form.For a better chopping or crushing effect with the knife (e.g. meat or vegetables) it is recommended to portion the ingredients. A smaller portion means a more precise chop.
When using the appliance in conjunction with heating function please be aware that recipes containing ingredients with high sugar or dairy contents may leave a thin film of caramelised deposit (Brown staining) on the bottom of the bowl during the cooking process “ This can easily be removed after the use of the appliance by adding equal amounts (approx . 300ml) ofwhite vinegar & water, heating bowl and allowing it to steam for a few minutes, turn the appliance Off and allow mixture to sit overnight, dispose of mixture in the morning and immediately rub with a fine scouring pad and rinse bowl afterwards.
When crushing ice cubes or grinding hard food, select the Turbo button in short bursts until the desired result is achieved.

20
Care and Cleaning
ATTENTION! Before cleaning, unplug the power cord and wait for the appliance to cool down!ATTENTION! Do not immerse the plug, power cord, base unit and bowl in water or any other liquids.
ATTENTION! Before cleaning, dismantle all accessories of the appliance.
ATTENTION! The knife blades are sharp. Be careful not to get hurt.
Clean the appliance and its accessories after each use. This will keep it fully operational.Do not use aggressive detergents, solvents or hard materials that could scratch the surface.Clean the housing of the appliance (Fig.8) by wiping it with a damp, delicate cloth and then wipe it dry. In case of heavy soiling.
You can pre-wash the inside of the bowl by pouring about 0.6l of water with detergent and setting the high speed of the knife for about 30 seconds. This operation allows for a rough cleaning of the interior but the bowl still needs to be washed thoroughly.
If there are signs of scorching at the bottom of the bowl, pour a little bit of a water solution of citric acid and wait a few minutes.
Remove all accessories from the machine and wash in warm water with detergent, rinse and dry thoroughly. You can also wash them in the dishwasher with the exception of the bowl (8) and drive shaft (25) - see Fig. 9.
Pay attention to the cleanliness and correct positioning of the rubber seals (3), (16) and (24). You can dismantle and wash these seals separately, but remember to install them correctly where they belong. The seals have different dimensions and are not interchangeable with each other.
Store the appliance in a dry and sunny place. When storing for a long time, put it in a box.The bowl is equipped with overheating protection. If the temperature in the bowl exceeds a dangerous level, the bowlheating function will not work until the thermal control is reset. The reset button is located on the bottom of the bowl (Fig.10). Use a small screwdriver or pen to press the reset button. Do not use a sharp tool. Resetting the thermal control will cause a characteristic click.
Reset Button
But before you reset the thermal control, remember some important points:A possible cause of overheating is not using the chop blade or stir paddle, cooking after emptying the bowl or cooking the food at an inappropriate high temperature and for too long.
Never let the food burn in the bowl. If the food starts to burn, lower the cooking temperature and add some water or fat.
Empty and cool the bowl before resetting the thermal control.Do not put the bowl in the fridge.
ATTENTION! If the thermal control switches off the bowl heating very often it can mean a technical fault. Do not use a damaged bowl. Contact an authorised service centre.
ATTENTION! Do not use a bowl with a defective thermal control button.
ATTENTION! Do not use sharp objects, abrasive pastes, solvents and other strong chemicals - their use may damage the appliance.
21
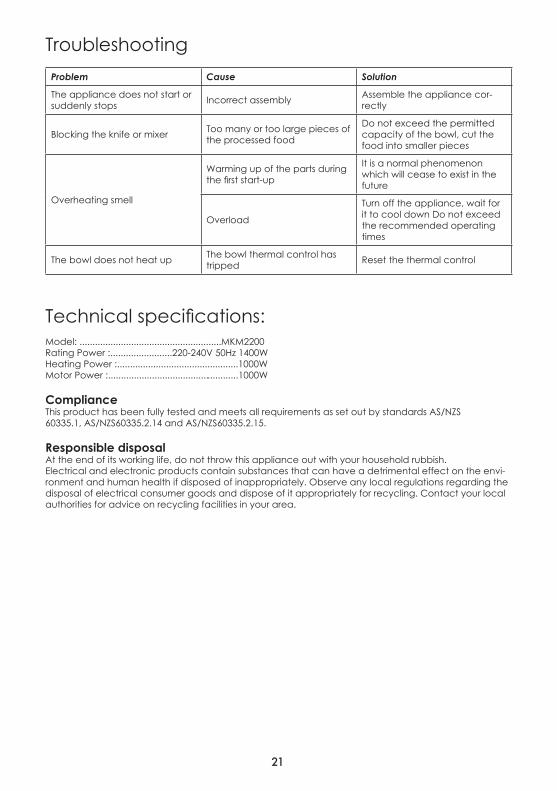
Troubleshooting
Problem Cause Solution
The appliance does not start orsuddenly stops
Incorrect assemblyAssemble the appliance cor-rectly
Blocking the knife or mixerToo many or too large pieces of the processed food
Do not exceed the permitted capacity of the bowl, cut thefood into smaller pieces
Overheating smell
Warming up of the parts during the first start-up
It is a normal phenomenon which will cease to exist in thefuture
Overload
Turn off the appliance, wait for it to cool down Do not exceed the recommended operating times
The bowl does not heat upThe bowl thermal control has tripped
Reset the thermal control
Technical specifications:Model: .......................................................MKM2200Rating Power :........................220-240V 50Hz 1400WHeating Power :...............................................1000WMotor Power :...................................................1000W
ComplianceThis product has been fully tested and meets all requirements as set out by standards AS/NZS60335.1, AS/NZS60335.2.14 and AS/NZS60335.2.15.
Responsible disposalAt the end of its working life, do not throw this appliance out with your household rubbish.Electrical and electronic products contain substances that can have a detrimental effect on the envi-ronment and human health if disposed of inappropriately. Observe any local regulations regarding the disposal of electrical consumer goods and dispose of it appropriately for recycling. Contact your local authorities for advice on recycling facilities in your area.

22
Notes

23
Notes

Cat. No. MKM2200December 2020
GSM Retail Group has a policy of continual improvement throughout the product range. As such the unit contained within may differ slightly from the unit illustrated on the pack.
MADE IN CHINA for GSM Retail GroupMistral is a registered trademark of GSM Retail Group
GSM Retail Group
Gerard Sourcing & Manufacturing
Related Documents