Strictly Private and Confidential SendQuick SMS Messaging Licensing Agreement and User Manual Prepared by TalariaX Pte Ltd 76 Playfair Road #08-01 LHK2 Singapore 367996 Tel: +65 62802881 Fax: +65 62806882 E-mail: [email protected] Web: www.talariax.com Copyright©2009,-2015 TalariaX Pte Ltd 1 SendQuick SMS Messaging User Manual

Welcome message from author
This document is posted to help you gain knowledge. Please leave a comment to let me know what you think about it! Share it to your friends and learn new things together.
Transcript
Strictly Private and Confidential
SendQuick SMS Messaging
Licensing Agreement and
User Manual
Prepared by
TalariaX Pte Ltd76 Playfair Road
#08-01 LHK2Singapore 367996
Tel: +65 62802881Fax: +65 62806882
E-mail: [email protected]: www.talariax.com
Copyright©2009,-2015 TalariaX Pte Ltd 1SendQuick SMS Messaging User Manual
Strictly Private and Confidential
SendQuick ServerSoftware License Agreement
For SOFTWARE PRODUCT, content and software information marked with © TalariaX or ©TalariaX Pte Ltd the following license agreement applies to you:
This is a legal agreement between you, the end user or user corporation, and TalariaX Pte Ltd,Singapore. By purchasing and starting (power-up) the Server with the sendQuick software(SOFTWARE PRODUCT) installed in the Server, you agreed to be bound by the terms of thisagreement. If you do not agree to the terms of this agreement, promptly stop the start-up processby shutting down the system and return the product package to the place you obtained it for a fullrefund (subject to relevant terms and conditions for refund) provided the product package is in itsoriginal condition.
1. Grant of licenseTalariaX Pte Ltd grants you the right to use one copy of the enclosed SOFTWARE PRODUCT -the SOFTWARE - on a single Server that it is being installed in by TalariaX. The SOFTWARE isin use on a computer when it is loaded into memory or installed into permanent memory of thatcomputer. This license is attached with the hardware (Server) that was originally installed byTalariaX.
This license does not permit or allow or warrant any rights to redistribute, duplicate, compile,reverse compile or any acts that will remove or seek to remove the SOFTWARE from the originalserver that it was installed in. The effort for the above stated actions include both software orhardware related including but not exclusive to hard disk duplication, network transfer, networkduplicate or any acts that may cause the removal of the SOFTWARE from the original storageposition. Any of such acts stated herein shall amount to a breach of the copyright and thislicensing agreement and is punishable by the Court of Law in Singapore and your respectivecountries. Duplication, copying or whatsoever acts or intent pertaining to remove theSOFTWARE from this server is strictly prohibited.
2. Additional grant of licenseIn addition to the rights granted in Section 1, TalariaX Pte Ltd grants you a nonexclusive right touse the SOFTWARE in the Server by an unlimited number of users or application servers to sendmessages to an unlimited number of recipients.
3. CopyrightThis software is owned by TalariaX Pte Ltd or its suppliers and is protected by Singapore andinternational copyright laws and treaties. Therefore you must treat the SOFTWARE like anyother copyrighted material. Except that if the SOFTWARE is not copy protected you may eithermake one copy of the SOFTWARE solely for backup purpose or transfer the SOFTWARE to asingle hard disk provided that you keep the original for backup or archive purposes. You may notcopy the product manuals or any written material accompanying the SOFTWARE.
Some of the components that support the SOFTWARE are owned by independent owners anddevelopers. The copyrights of these components are owned by their respective owners anddevelopers and TalariaX does not claim to own or develop these components.
4. Other restrictionsYou may not rent or lease the SOFTWARE, but you may transfer your rights under this licenseagreement on a permanent basis if you transfer all copies of the SOFTWARE with the serverhardware and all written material, and if the recipient agrees to the terms of this agreement.
You may not reverse engineer, de-compile or disassemble the SOFTWARE and any such acts andintent is considered a violation of copyright law in Singapore and your respective countries.
Copyright©2009-2015, TalariaX Pte Ltd 2SendQuick SMS Messaging User Manual
Strictly Private and Confidential
Limited warrantyTalariaX Pte Ltd warrants that the SOFTWARE will perform substantially in accordance with theaccompanying product manual(s) or the online manual for a period of 365 days from the purchasedate. This limited warranty period also applies to the hardware and the GSM modem. TalariaXreserves the right to amend the limited warranty period without prior notice.
Customer remediesTalariaX Pte Ltd entire liability and your exclusive remedy shall be, at TalariaX Pte Ltd’s option,either - a return of the price paid or- repair or replacement of the SOFTWARE that does not meet the limited warranty and which is
returned with a copy of your receipt
The limited warranty is void if failure of the SOFTWARE has resulted from accident, abuse ormisapplication by the user/licensee. Any replacement SOFTWARE will be warranted for theremainder of the original warranty period but at least for 30 days.
No other warrantiesTo the maximum extent permitted by applicable law, TalariaX Pte Ltd disclaims all otherwarranties, either express of implied, including but not limited to implied warranties ofmerchantability and fitness for a particular purpose, with respect to the SOFTWARE, hardware,the accompanying product manual(s) and written materials. The limited warranty containedherein gives you specific legal rights.
No liability for consequential damageTo the maximum extent permitted by applicable law, TalariaX Pte Ltd and its suppliers shall notbe liable for any other damages whatsoever (including, without limitation, damages for loss ofbusiness profits, business interruption, loss of business information, infringement of localregulation, or other pecuniary loss) arising out of the use of or inability to use this SOFTWAREPRODUCT, even if TalariaX Pte Ltd has been advised of the possibility of such damages. In anycase, TalariaX Pte Ltd’s entire liability under any provisions of this agreement shall be limited tothe amount actually paid by you for this SOFTWARE.
TalariaX cannot guarantee that messages sent by using TalariaX's SOFTWARE PRODUCTs forwireless (SMS) messaging reach their addressees. Neither can TalariaX guarantee that theSOFTWARE PRODUCT receives all messages through the used mobile equipment they have beensent to.
TalariaX is not liable for any consequential damages arising from the fact that messages tried tosend by sendQuick Server products do not reach their target addressees (mobile phones, pagers)or that messages sent to the mobile equipment used with the SOFTWARE PRODUCT will berecognized and read by the SOFTWARE PRODUCT.
For any clarifications, please contact:
TalariaX Pte Ltd76 Playfair Road#08-01 LHK2Singapore 367996Tel: 65 – 62802881Fax: 65 – 62806882E-mail: [email protected]: www.talariax.com
Copyright©2009-2015, TalariaX Pte Ltd 3SendQuick SMS Messaging User Manual
Strictly Private and Confidential
sendQuick SMS Messaging
User Manual
TABLE OF CONTENTS
1.0 INTRODUCTION..............................................................................................52.0 SENDQUICK MESSAGING INTERFACE.....................................................5
2.1 Access sendQuick Messaging..................................................................52.2 Main Menu Interface................................................................................62.3 User Management.....................................................................................7
2.3.1 Department Management...................................................................72.3.2 Role Management...............................................................................82.3.3 User Management.............................................................................10
2.4 Address Book.........................................................................................142.4.1 Personal Address Book and Group..................................................142.4.2 Global Address Book and Group.....................................................15
2.5 Send SMS Messages..............................................................................172.6 Message Templates................................................................................202.7 Scheduled SMS......................................................................................212.8 Unsubscribe List.....................................................................................222.9 Common Inbox.......................................................................................222.10 Message Logs Management.................................................................232.11 System Configuration...........................................................................262.12 Quota Management..............................................................................282.13 Personal Details Management..............................................................302.14 Keyword Management.........................................................................302.15 Language Setup....................................................................................33
Copyright©2009,-2015 TalariaX Pte Ltd 4SendQuick SMS Messaging User Manual
Strictly Private and Confidential
SENDQUICK SERVERMESSAGINGING USER MANUAL
1.0 INTRODUCTION
Welcome to sendQuick Messaging User Manual. This document is prepared for the User administratorand Users, as a guide for using sendQuick Messaging Interface for sending and receiving SMS. This is adifferent interface from the sendQuick Server Administration, which is provided in an Administrationmanual.
Before using the sendQuick Messaging Interface, the ServerAdministrator will configure the sendQuickServer for it to work in your company’s network. The Administrator will need to work on the networkconfiguration first, or to assign the Domain Name to the system. Once the IP address (or domain name)had been configured, you can access sendQuick Messaging from any workstations using a web browser.
2.0 SENDQUICK MESSAGING INTERFACE
2.1 Access sendQuick Messaging
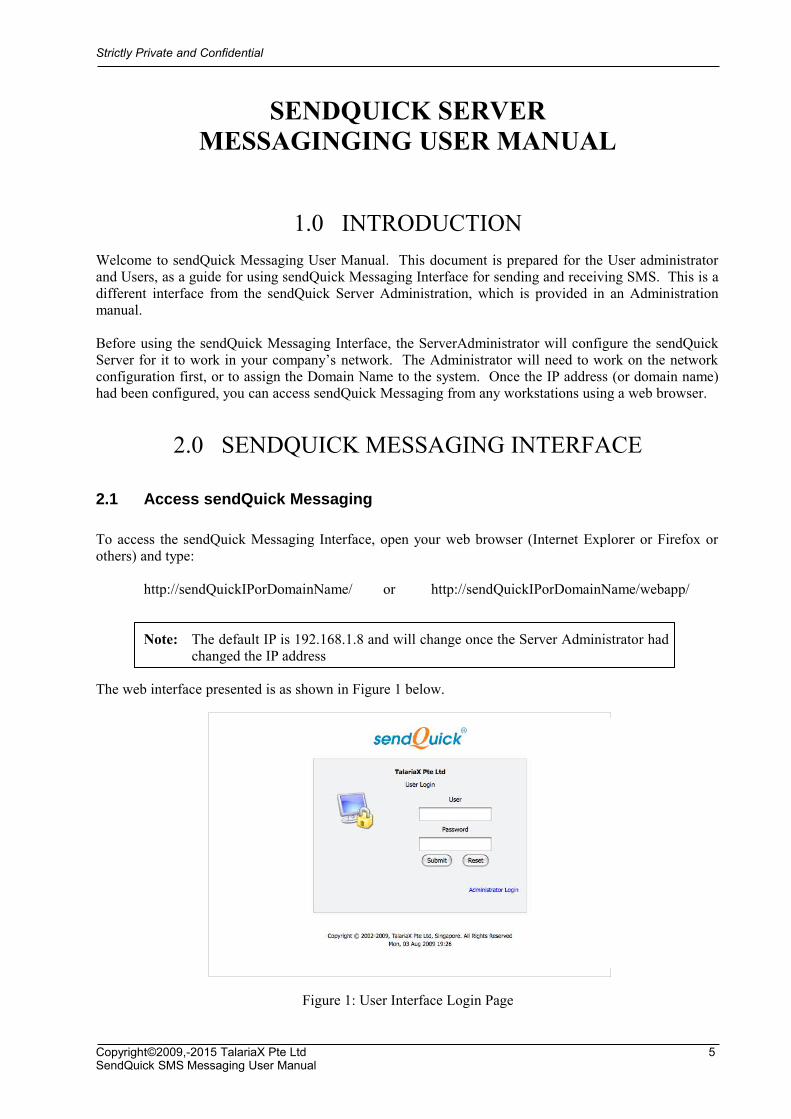
To access the sendQuick Messaging Interface, open your web browser (Internet Explorer or Firefox orothers) and type:
http://sendQuickIPorDomainName/ or http://sendQuickIPorDomainName/webapp/
Note: The default IP is 192.168.1.8 and will change once the Server Administrator hadchanged the IP address
The web interface presented is as shown in Figure 1 below.
Figure 1: User Interface Login Page
Copyright©2009,-2015 TalariaX Pte Ltd 5SendQuick SMS Messaging User Manual
Strictly Private and Confidential
The default User administrator username and password is as below:
User Administrator Login : useradminDefault Password : admin123
You can login and change the password on a later stage.
2.2 Main Menu Interface
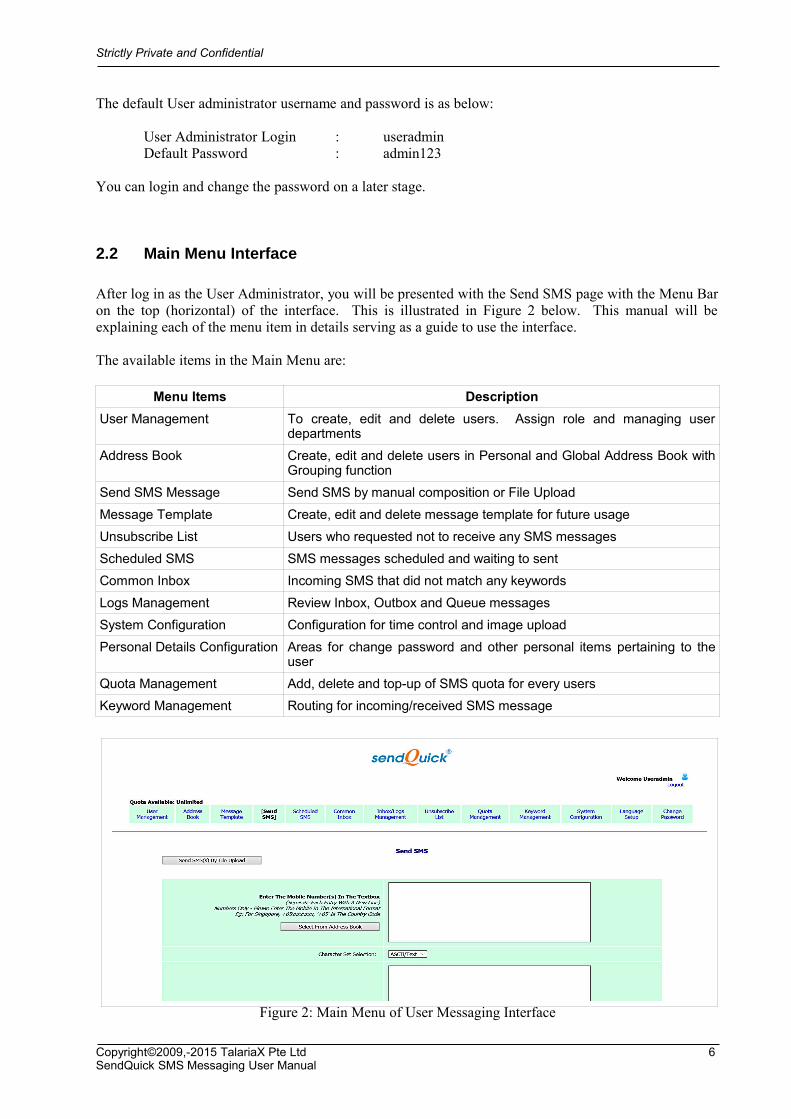
After log in as the User Administrator, you will be presented with the Send SMS page with the Menu Baron the top (horizontal) of the interface. This is illustrated in Figure 2 below. This manual will beexplaining each of the menu item in details serving as a guide to use the interface.
The available items in the Main Menu are:
Menu Items Description
User Management To create, edit and delete users. Assign role and managing userdepartments
Address Book Create, edit and delete users in Personal and Global Address Book withGrouping function
Send SMS Message Send SMS by manual composition or File Upload
Message Template Create, edit and delete message template for future usage
Unsubscribe List Users who requested not to receive any SMS messages
Scheduled SMS SMS messages scheduled and waiting to sent
Common Inbox Incoming SMS that did not match any keywords
Logs Management Review Inbox, Outbox and Queue messages
System Configuration Configuration for time control and image upload
Personal Details Configuration Areas for change password and other personal items pertaining to theuser
Quota Management Add, delete and top-up of SMS quota for every users
Keyword Management Routing for incoming/received SMS message
Figure 2: Main Menu of User Messaging Interface
Copyright©2009,-2015 TalariaX Pte Ltd 6SendQuick SMS Messaging User Manual
Strictly Private and Confidential
While the menu is presented in the system, the list above is not applicable to all products. Some of thefeatures in this manual is applicable for some sendQuick product range only or serve as features forfuture implementation. Some of them may be included as an optional item. The feature exceptions willbe indicated in each individual section description.
Do note that the User Administrator is able to assign different access rights to different users, allowingthe users to view/access to different features in sendQuick (refer to Section 3.3 for more details). Hence,the above Menu is only applicable to an administrator user and not for all users.
If you need clarifications on which is to be included in your product, do consult the partner or contactTalariaX.
The following sections will provide a more in-depth description and explanation into the individualsections of the Main Menu.
2.3 User Management
The User Management section is for the User Administrator (administrator) to create, edit and delete userin the web system. In addition, there is also a department and role management module in the system.The following describes the individual items in the User Management section.
The User Management section will include:
Department Management This section create the departments where the users will be assignedfor their web access.
Role Management Role assignment where each role has different access rights for theusers.
User Management Create users and assign them to the different department with differentaccess rights
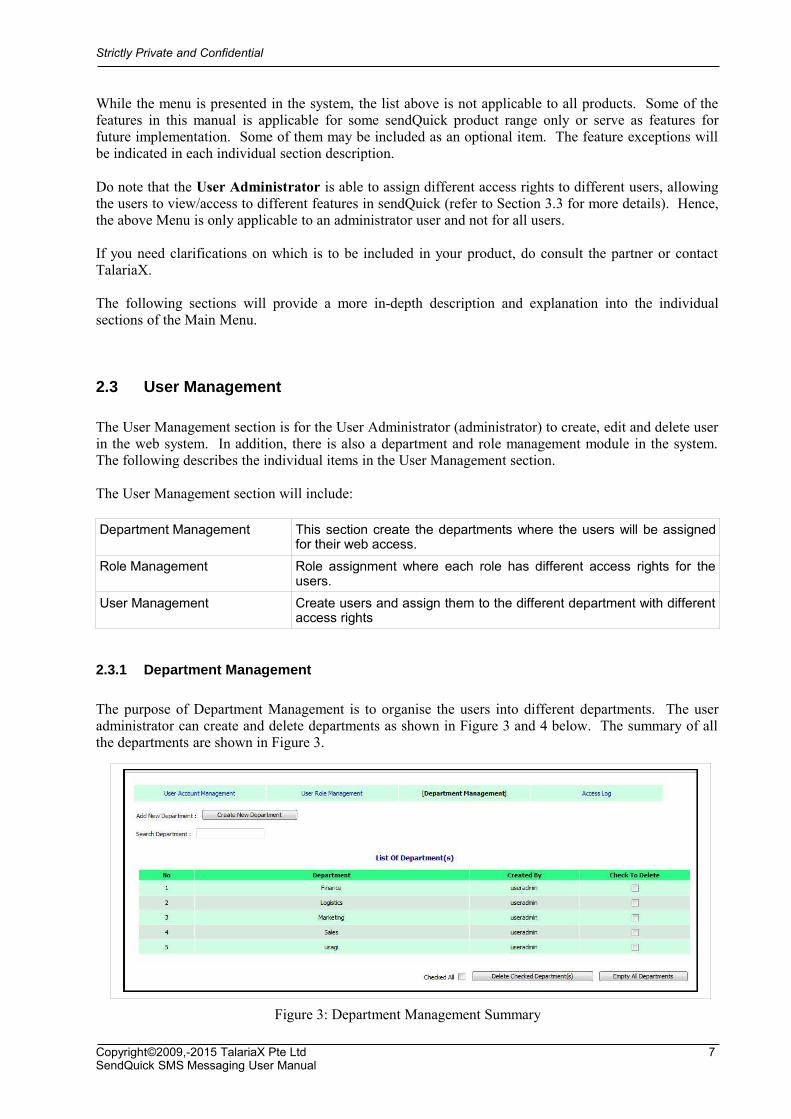
2.3.1 Department Management
The purpose of Department Management is to organise the users into different departments. The useradministrator can create and delete departments as shown in Figure 3 and 4 below. The summary of allthe departments are shown in Figure 3.
Figure 3: Department Management Summary
Copyright©2009,-2015 TalariaX Pte Ltd 7SendQuick SMS Messaging User Manual
Strictly Private and Confidential
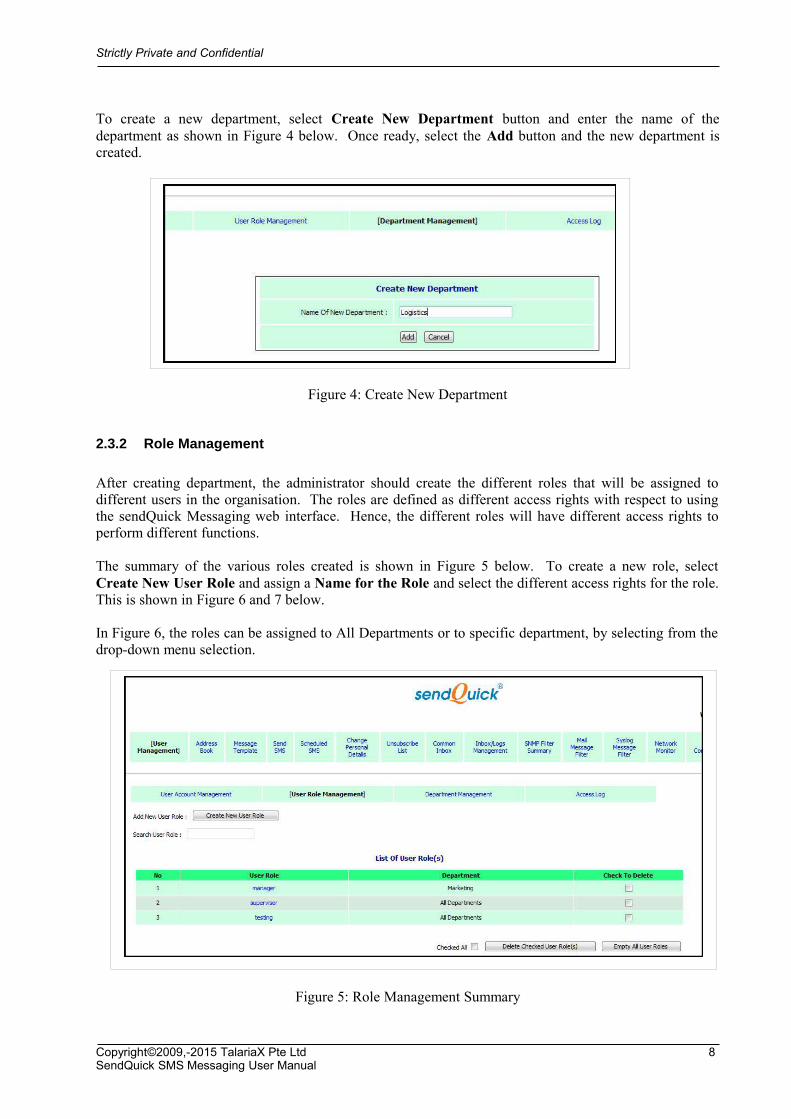
To create a new department, select Create New Department button and enter the name of thedepartment as shown in Figure 4 below. Once ready, select the Add button and the new department iscreated.
Figure 4: Create New Department
2.3.2 Role Management
After creating department, the administrator should create the different roles that will be assigned todifferent users in the organisation. The roles are defined as different access rights with respect to usingthe sendQuick Messaging web interface. Hence, the different roles will have different access rights toperform different functions.
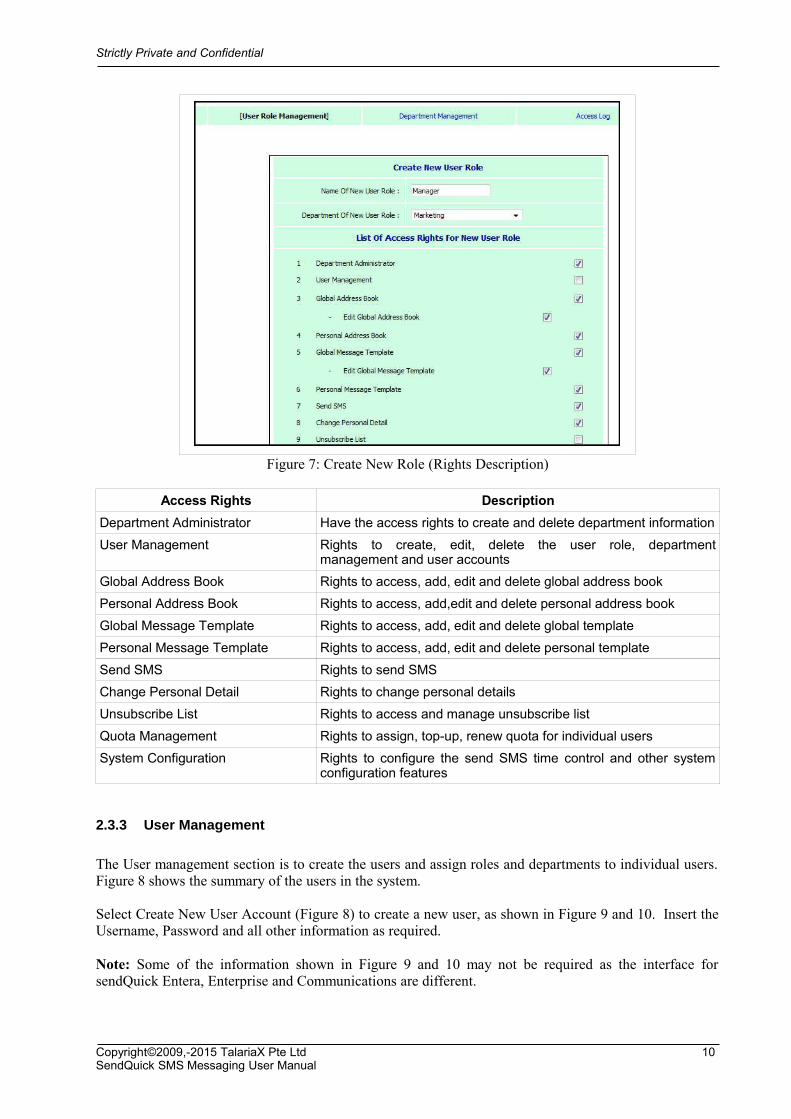
The summary of the various roles created is shown in Figure 5 below. To create a new role, selectCreate New User Role and assign a Name for the Role and select the different access rights for the role.This is shown in Figure 6 and 7 below.
In Figure 6, the roles can be assigned to All Departments or to specific department, by selecting from thedrop-down menu selection.
Figure 5: Role Management Summary
Copyright©2009,-2015 TalariaX Pte Ltd 8SendQuick SMS Messaging User Manual

Strictly Private and Confidential
Figure 6: Create New Role (Assign Rights)
There numerous access rights items that can be assigned/selected for different roles. The different accessrights grouping will differentiate the access rights for the different roles. These can be seen in Figure 6and 7. The table below explains the individual access rights item.
The access rights not select (not provided) under the role will not be shown on the Main Menu bar of theuser. Hence, if the access rights is not assigned, user will not be able to use the feature. This serve as anaccess control function.
Copyright©2009,-2015 TalariaX Pte Ltd 9SendQuick SMS Messaging User Manual
Strictly Private and Confidential
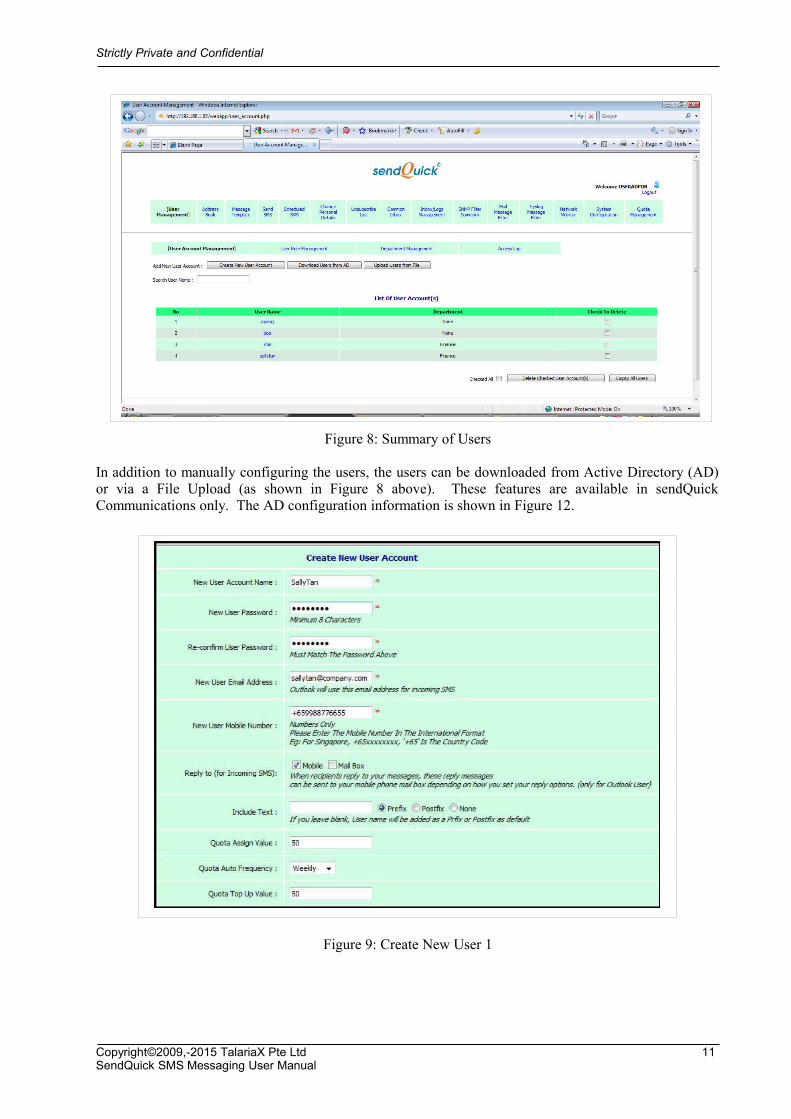
Figure 7: Create New Role (Rights Description)
Access Rights Description
Department Administrator Have the access rights to create and delete department information
User Management Rights to create, edit, delete the user role, departmentmanagement and user accounts
Global Address Book Rights to access, add, edit and delete global address book
Personal Address Book Rights to access, add,edit and delete personal address book
Global Message Template Rights to access, add, edit and delete global template
Personal Message Template Rights to access, add, edit and delete personal template
Send SMS Rights to send SMS
Change Personal Detail Rights to change personal details
Unsubscribe List Rights to access and manage unsubscribe list
Quota Management Rights to assign, top-up, renew quota for individual users
System Configuration Rights to configure the send SMS time control and other systemconfiguration features
2.3.3 User Management
The User management section is to create the users and assign roles and departments to individual users.Figure 8 shows the summary of the users in the system.
Select Create New User Account (Figure 8) to create a new user, as shown in Figure 9 and 10. Insert theUsername, Password and all other information as required.
Note: Some of the information shown in Figure 9 and 10 may not be required as the interface forsendQuick Entera, Enterprise and Communications are different.
Copyright©2009,-2015 TalariaX Pte Ltd 10SendQuick SMS Messaging User Manual
Strictly Private and Confidential
Figure 8: Summary of Users
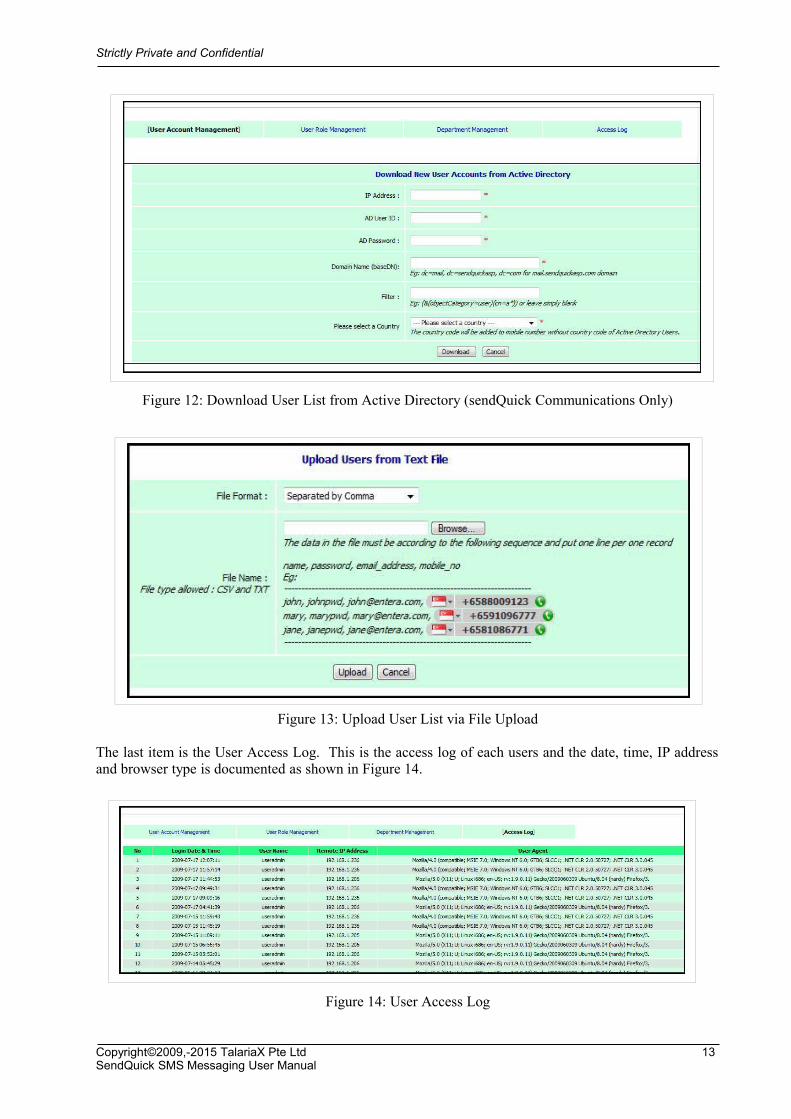
In addition to manually configuring the users, the users can be downloaded from Active Directory (AD)or via a File Upload (as shown in Figure 8 above). These features are available in sendQuickCommunications only. The AD configuration information is shown in Figure 12.
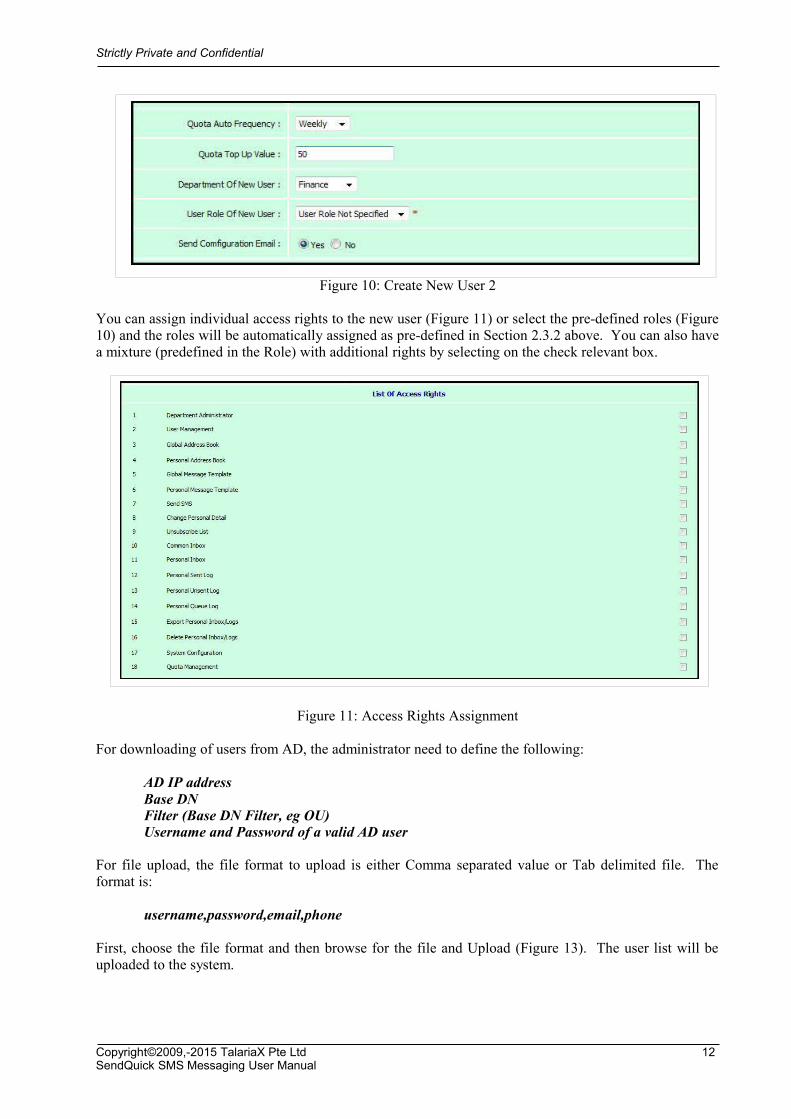
Figure 9: Create New User 1
Copyright©2009,-2015 TalariaX Pte Ltd 11SendQuick SMS Messaging User Manual
Strictly Private and Confidential
Figure 10: Create New User 2
You can assign individual access rights to the new user (Figure 11) or select the pre-defined roles (Figure10) and the roles will be automatically assigned as pre-defined in Section 2.3.2 above. You can also havea mixture (predefined in the Role) with additional rights by selecting on the check relevant box.
Figure 11: Access Rights Assignment
For downloading of users from AD, the administrator need to define the following:
AD IP addressBase DNFilter (Base DN Filter, eg OU)Username and Password of a valid AD user
For file upload, the file format to upload is either Comma separated value or Tab delimited file. Theformat is:
username,password,email,phone
First, choose the file format and then browse for the file and Upload (Figure 13). The user list will beuploaded to the system.
Copyright©2009,-2015 TalariaX Pte Ltd 12SendQuick SMS Messaging User Manual
Strictly Private and Confidential
Figure 12: Download User List from Active Directory (sendQuick Communications Only)
Figure 13: Upload User List via File Upload
The last item is the User Access Log. This is the access log of each users and the date, time, IP addressand browser type is documented as shown in Figure 14.
Figure 14: User Access Log
Copyright©2009,-2015 TalariaX Pte Ltd 13SendQuick SMS Messaging User Manual
Strictly Private and Confidential
2.4 Address Book
The Address Book section consists of Personal and Global Address Book. For both Personal and Global,there is a contact management as well as group management. The address book data can be used whensending SMS, which will be explained in Section 3.5.
Personal Address Book is the contact list that is accessible by the user only. Global Address list is accessby all users but only certain users have the access to add and edit the list, depending on the access rightsgranted.
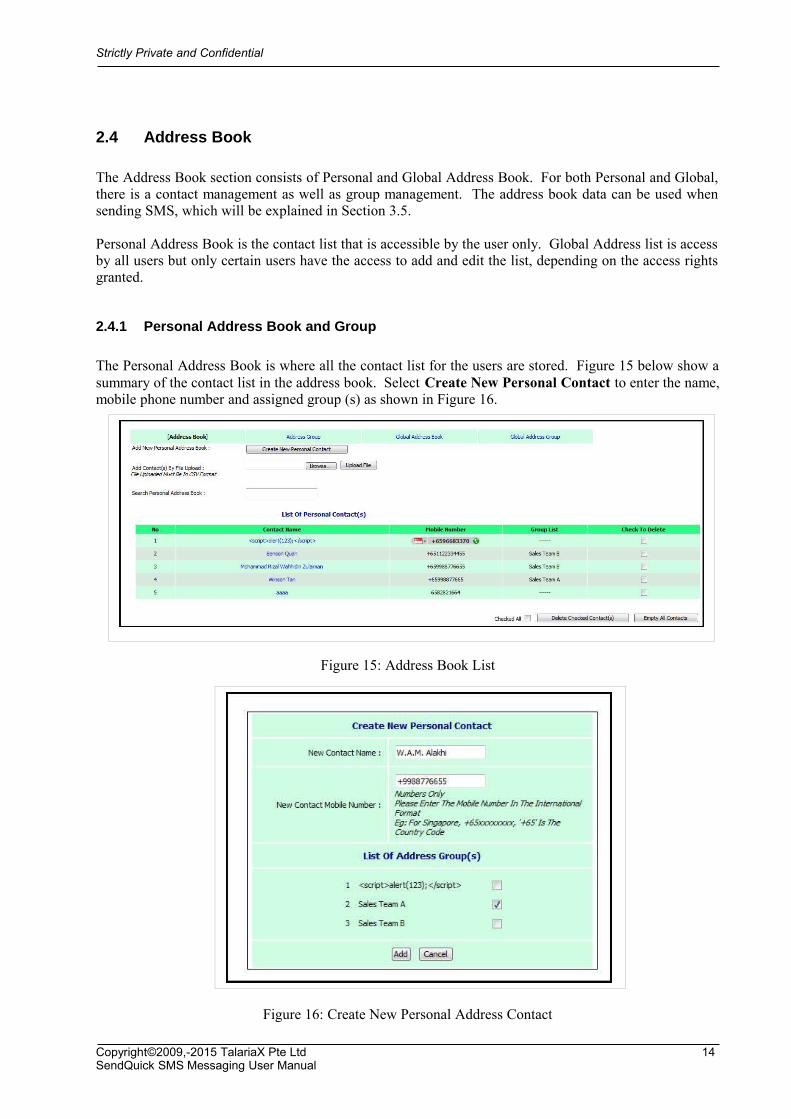
2.4.1 Personal Address Book and Group
The Personal Address Book is where all the contact list for the users are stored. Figure 15 below show asummary of the contact list in the address book. Select Create New Personal Contact to enter the name,mobile phone number and assigned group (s) as shown in Figure 16.
Figure 15: Address Book List
Figure 16: Create New Personal Address Contact
Copyright©2009,-2015 TalariaX Pte Ltd 14SendQuick SMS Messaging User Manual
Strictly Private and Confidential
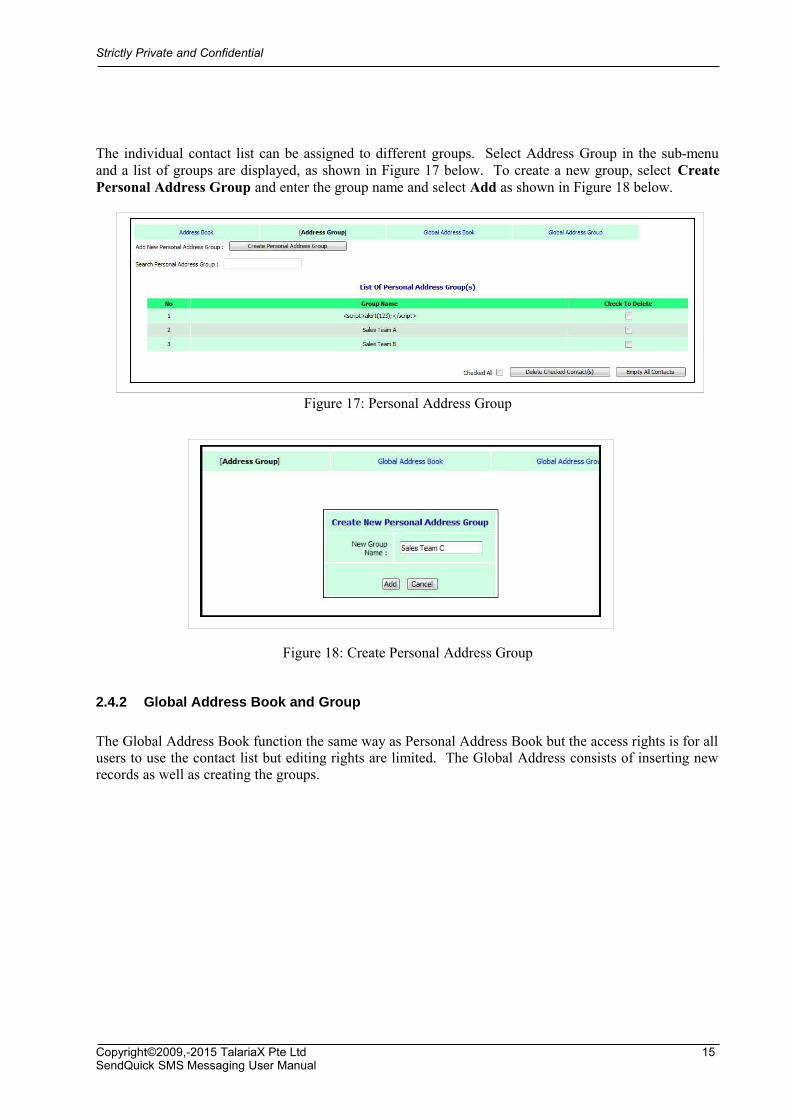
The individual contact list can be assigned to different groups. Select Address Group in the sub-menuand a list of groups are displayed, as shown in Figure 17 below. To create a new group, select CreatePersonal Address Group and enter the group name and select Add as shown in Figure 18 below.
Figure 17: Personal Address Group
Figure 18: Create Personal Address Group
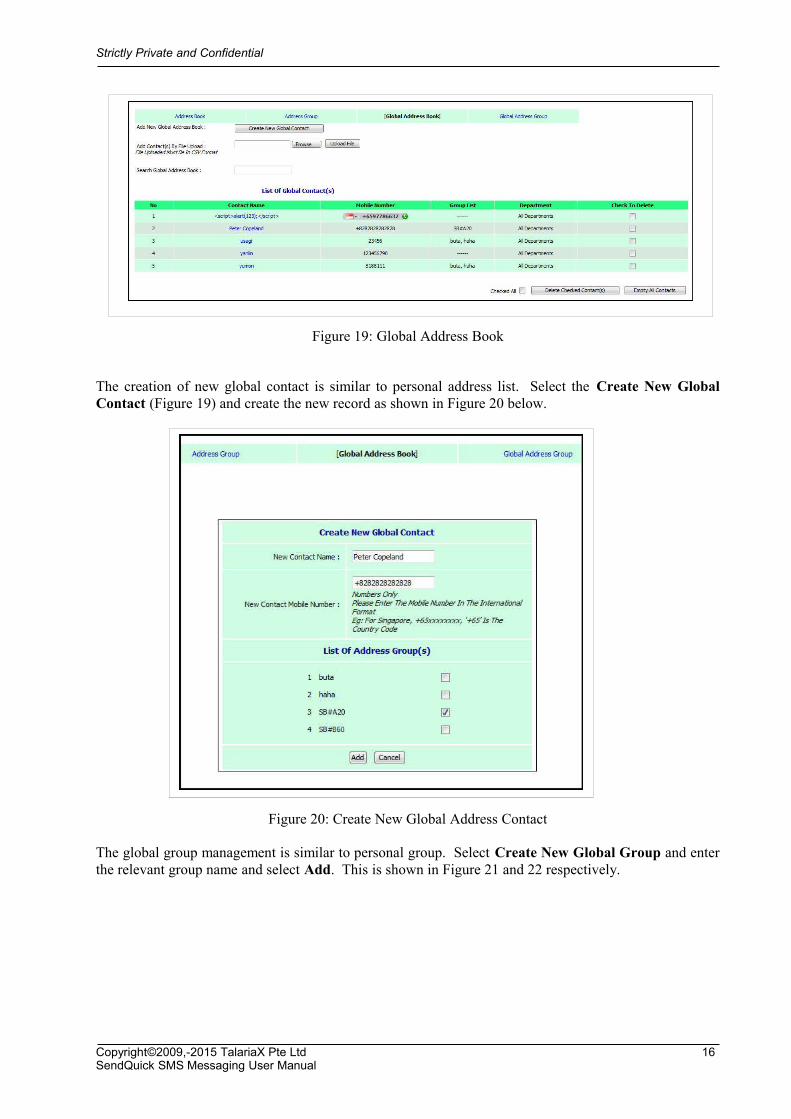
2.4.2 Global Address Book and Group
The Global Address Book function the same way as Personal Address Book but the access rights is for allusers to use the contact list but editing rights are limited. The Global Address consists of inserting newrecords as well as creating the groups.
Copyright©2009,-2015 TalariaX Pte Ltd 15SendQuick SMS Messaging User Manual
Strictly Private and Confidential
Figure 19: Global Address Book
The creation of new global contact is similar to personal address list. Select the Create New GlobalContact (Figure 19) and create the new record as shown in Figure 20 below.
Figure 20: Create New Global Address Contact
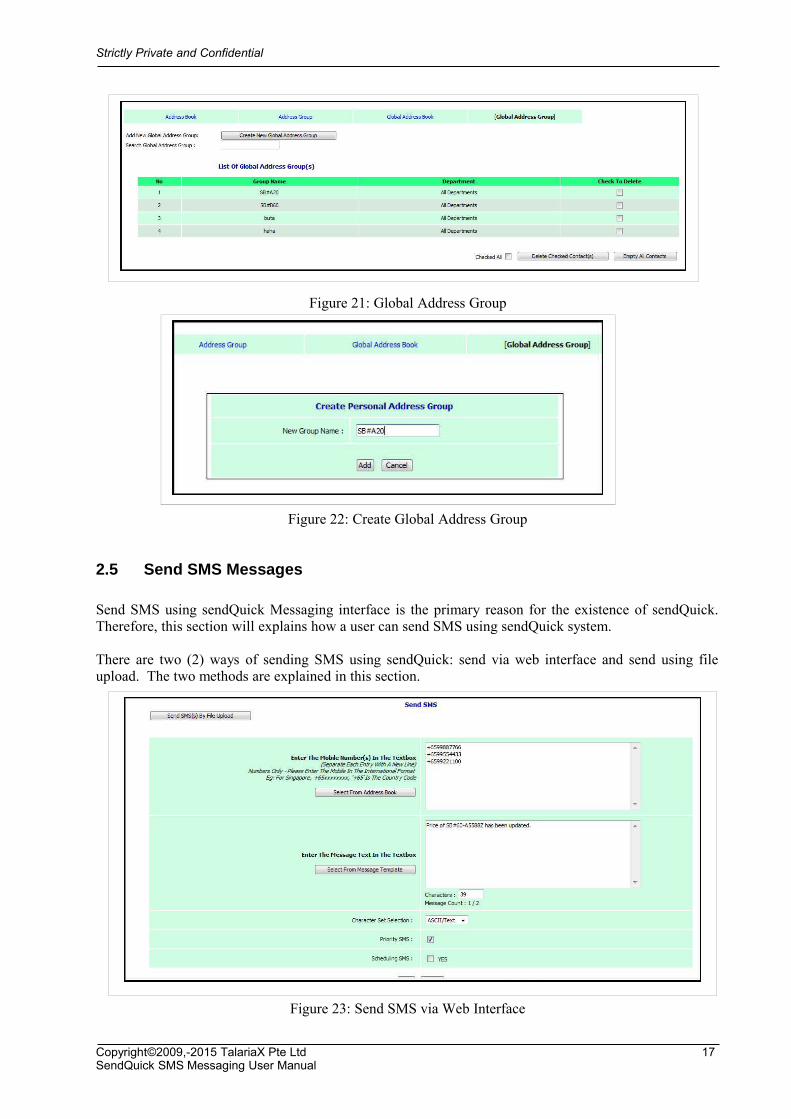
The global group management is similar to personal group. Select Create New Global Group and enterthe relevant group name and select Add. This is shown in Figure 21 and 22 respectively.
Copyright©2009,-2015 TalariaX Pte Ltd 16SendQuick SMS Messaging User Manual
Strictly Private and Confidential
Figure 21: Global Address Group
Figure 22: Create Global Address Group
2.5 Send SMS Messages
Send SMS using sendQuick Messaging interface is the primary reason for the existence of sendQuick.Therefore, this section will explains how a user can send SMS using sendQuick system.
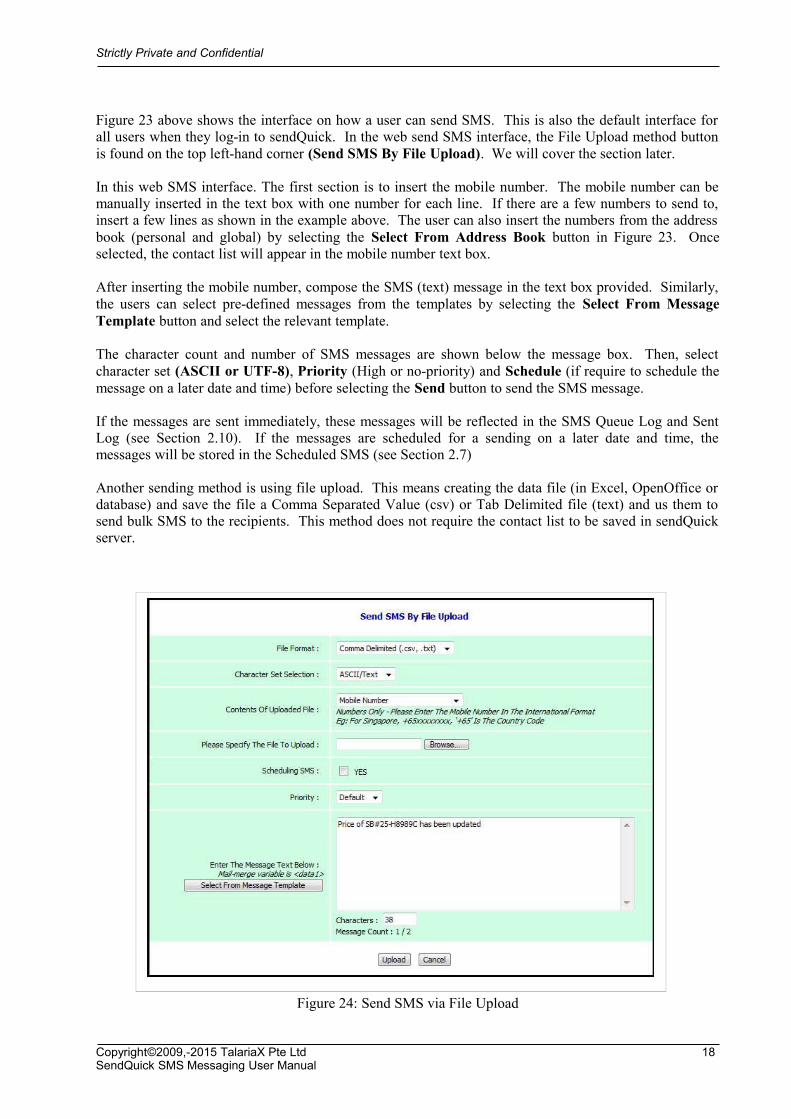
There are two (2) ways of sending SMS using sendQuick: send via web interface and send using fileupload. The two methods are explained in this section.
Figure 23: Send SMS via Web Interface
Copyright©2009,-2015 TalariaX Pte Ltd 17SendQuick SMS Messaging User Manual
Strictly Private and Confidential
Figure 23 above shows the interface on how a user can send SMS. This is also the default interface forall users when they log-in to sendQuick. In the web send SMS interface, the File Upload method buttonis found on the top left-hand corner (Send SMS By File Upload). We will cover the section later.
In this web SMS interface. The first section is to insert the mobile number. The mobile number can bemanually inserted in the text box with one number for each line. If there are a few numbers to send to,insert a few lines as shown in the example above. The user can also insert the numbers from the addressbook (personal and global) by selecting the Select From Address Book button in Figure 23. Onceselected, the contact list will appear in the mobile number text box.
After inserting the mobile number, compose the SMS (text) message in the text box provided. Similarly,the users can select pre-defined messages from the templates by selecting the Select From MessageTemplate button and select the relevant template.
The character count and number of SMS messages are shown below the message box. Then, selectcharacter set (ASCII or UTF-8), Priority (High or no-priority) and Schedule (if require to schedule themessage on a later date and time) before selecting the Send button to send the SMS message.
If the messages are sent immediately, these messages will be reflected in the SMS Queue Log and SentLog (see Section 2.10). If the messages are scheduled for a sending on a later date and time, themessages will be stored in the Scheduled SMS (see Section 2.7)
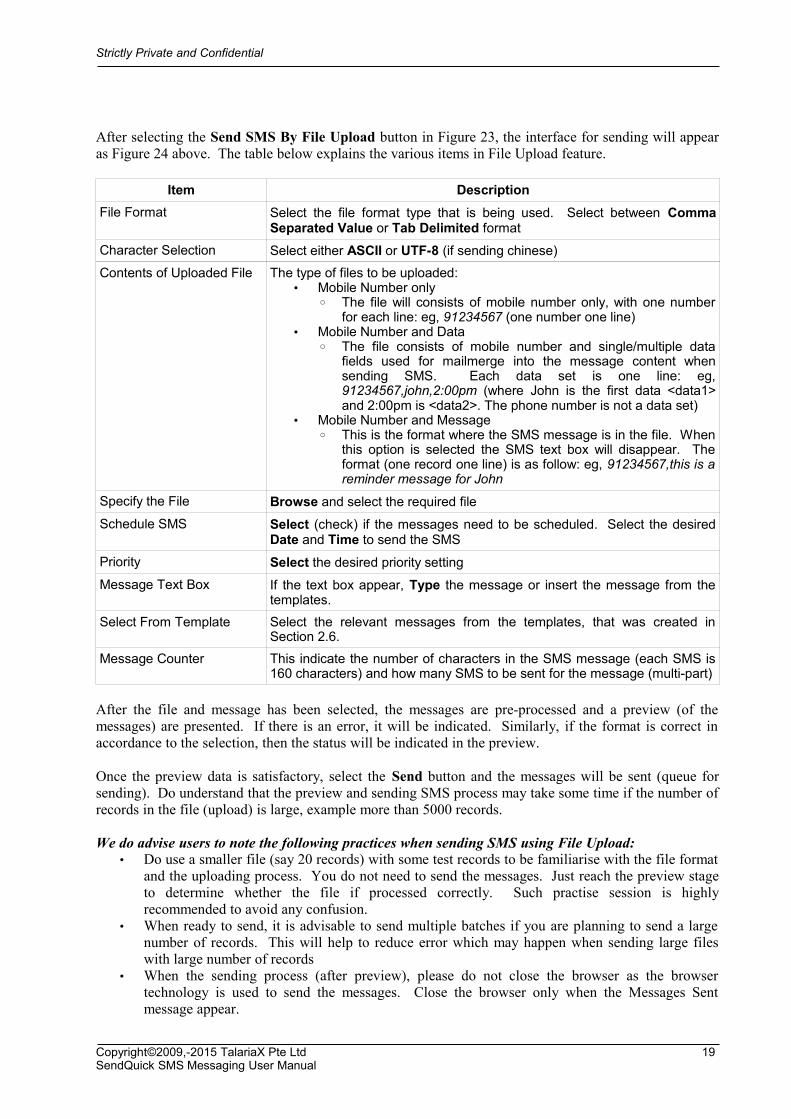
Another sending method is using file upload. This means creating the data file (in Excel, OpenOffice ordatabase) and save the file a Comma Separated Value (csv) or Tab Delimited file (text) and us them tosend bulk SMS to the recipients. This method does not require the contact list to be saved in sendQuickserver.
Figure 24: Send SMS via File Upload
Copyright©2009,-2015 TalariaX Pte Ltd 18SendQuick SMS Messaging User Manual
Strictly Private and Confidential
After selecting the Send SMS By File Upload button in Figure 23, the interface for sending will appearas Figure 24 above. The table below explains the various items in File Upload feature.
Item Description
File Format Select the file format type that is being used. Select between CommaSeparated Value or Tab Delimited format
Character Selection Select either ASCII or UTF-8 (if sending chinese)
Contents of Uploaded File The type of files to be uploaded:• Mobile Number only
◦ The file will consists of mobile number only, with one numberfor each line: eg, 91234567 (one number one line)
• Mobile Number and Data◦ The file consists of mobile number and single/multiple data
fields used for mailmerge into the message content whensending SMS. Each data set is one line: eg,91234567,john,2:00pm (where John is the first data <data1>and 2:00pm is <data2>. The phone number is not a data set)
• Mobile Number and Message◦ This is the format where the SMS message is in the file. When
this option is selected the SMS text box will disappear. Theformat (one record one line) is as follow: eg, 91234567,this is areminder message for John
Specify the File Browse and select the required file
Schedule SMS Select (check) if the messages need to be scheduled. Select the desiredDate and Time to send the SMS
Priority Select the desired priority setting
Message Text Box If the text box appear, Type the message or insert the message from thetemplates.
Select From Template Select the relevant messages from the templates, that was created inSection 2.6.
Message Counter This indicate the number of characters in the SMS message (each SMS is160 characters) and how many SMS to be sent for the message (multi-part)
After the file and message has been selected, the messages are pre-processed and a preview (of themessages) are presented. If there is an error, it will be indicated. Similarly, if the format is correct inaccordance to the selection, then the status will be indicated in the preview.
Once the preview data is satisfactory, select the Send button and the messages will be sent (queue forsending). Do understand that the preview and sending SMS process may take some time if the number ofrecords in the file (upload) is large, example more than 5000 records.
We do advise users to note the following practices when sending SMS using File Upload:• Do use a smaller file (say 20 records) with some test records to be familiarise with the file format
and the uploading process. You do not need to send the messages. Just reach the preview stageto determine whether the file if processed correctly. Such practise session is highlyrecommended to avoid any confusion.
• When ready to send, it is advisable to send multiple batches if you are planning to send a largenumber of records. This will help to reduce error which may happen when sending large fileswith large number of records
• When the sending process (after preview), please do not close the browser as the browsertechnology is used to send the messages. Close the browser only when the Messages Sentmessage appear.
Copyright©2009,-2015 TalariaX Pte Ltd 19SendQuick SMS Messaging User Manual
Strictly Private and Confidential
Please refer to the Messages Log to review the message sent status as explained in Section 3.10.
2.6 Message Templates
Message Templates are messages that are pre-defined for future use. Having message templates allowthe user to easily retrieve the messages, perform some simple edit (or no editing) and use them to sendSMS. Message template can be quickly retrieved in the Send SMS page as shown in Figure 23 above.
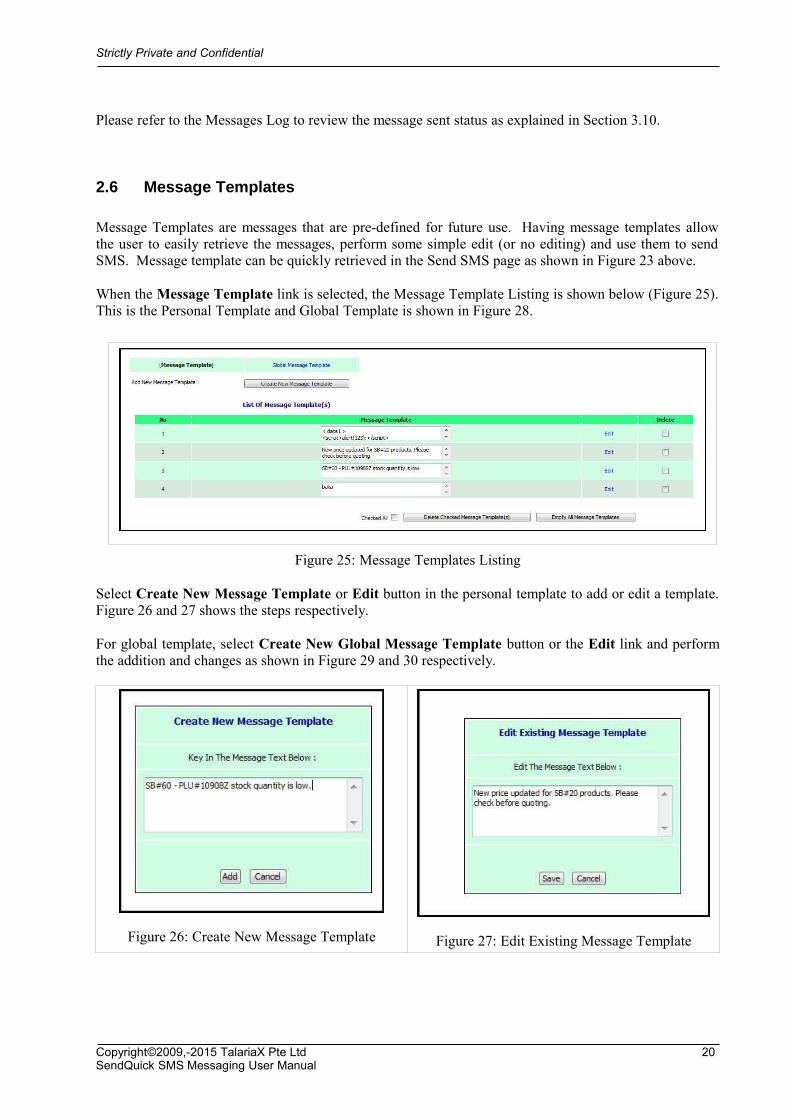
When the Message Template link is selected, the Message Template Listing is shown below (Figure 25).This is the Personal Template and Global Template is shown in Figure 28.
Figure 25: Message Templates Listing
Select Create New Message Template or Edit button in the personal template to add or edit a template.Figure 26 and 27 shows the steps respectively.
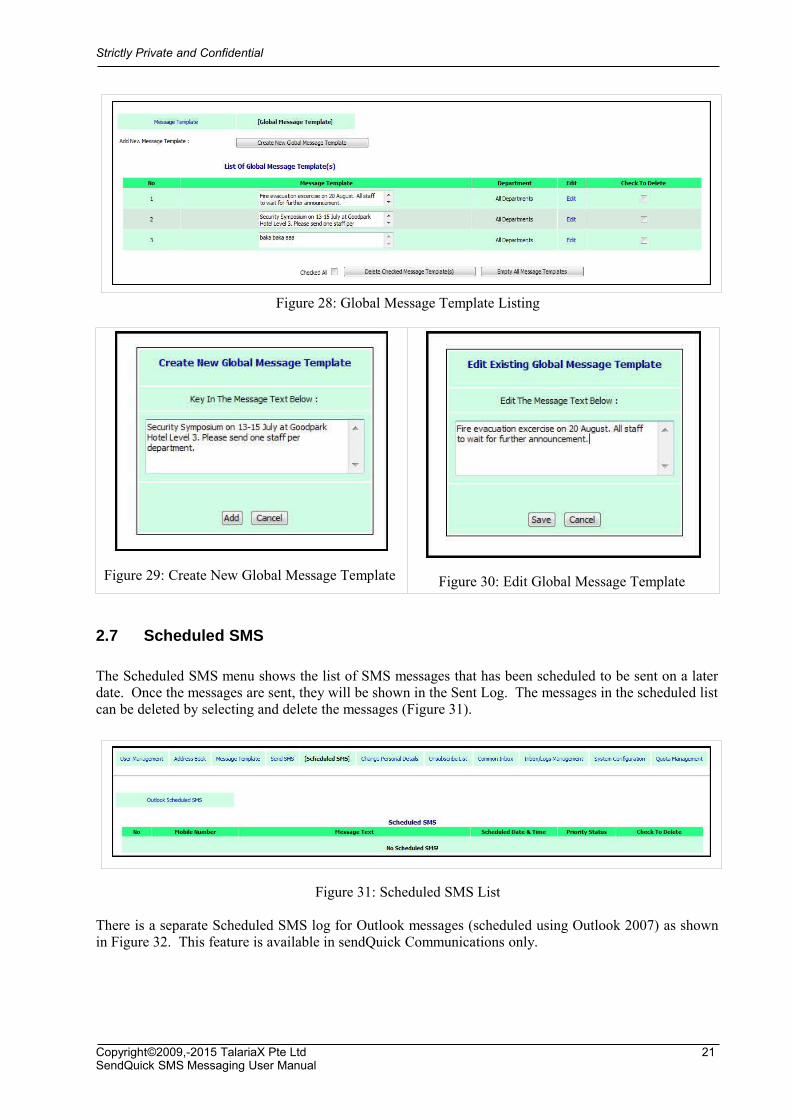
For global template, select Create New Global Message Template button or the Edit link and performthe addition and changes as shown in Figure 29 and 30 respectively.
Figure 26: Create New Message Template Figure 27: Edit Existing Message Template
Copyright©2009,-2015 TalariaX Pte Ltd 20SendQuick SMS Messaging User Manual
Strictly Private and Confidential
Figure 28: Global Message Template Listing
Figure 29: Create New Global Message Template Figure 30: Edit Global Message Template
2.7 Scheduled SMS
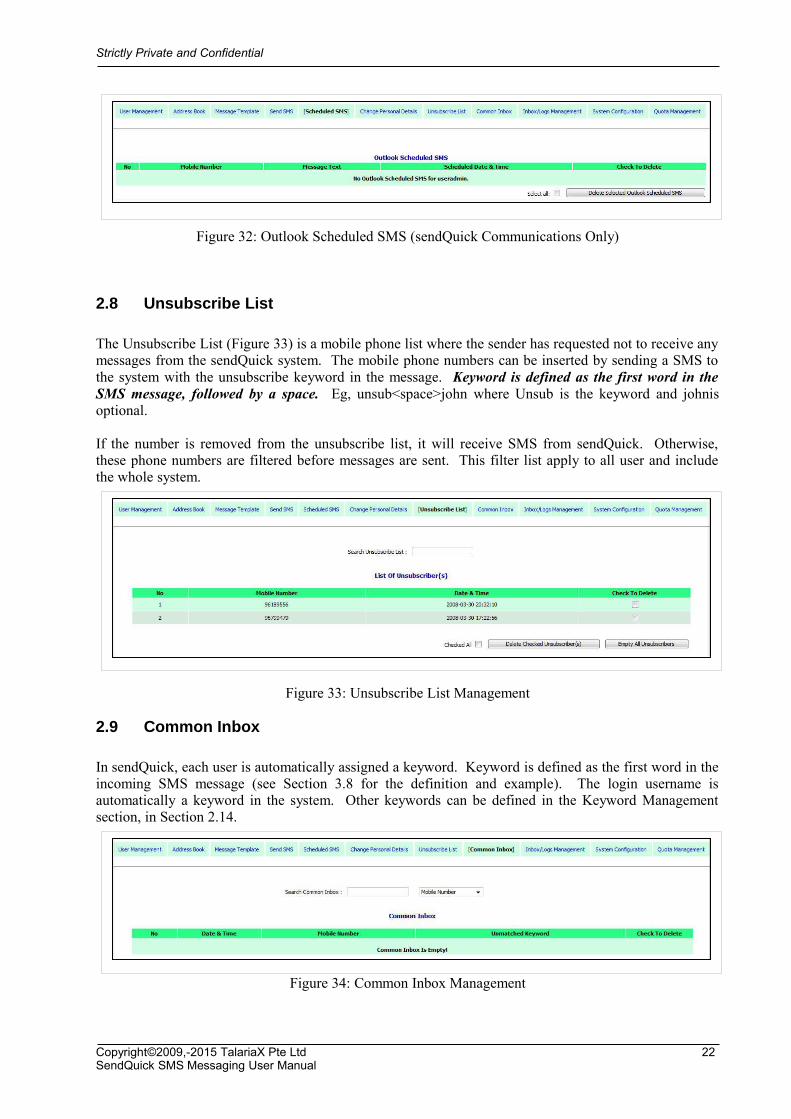
The Scheduled SMS menu shows the list of SMS messages that has been scheduled to be sent on a laterdate. Once the messages are sent, they will be shown in the Sent Log. The messages in the scheduled listcan be deleted by selecting and delete the messages (Figure 31).
Figure 31: Scheduled SMS List
There is a separate Scheduled SMS log for Outlook messages (scheduled using Outlook 2007) as shownin Figure 32. This feature is available in sendQuick Communications only.
Copyright©2009,-2015 TalariaX Pte Ltd 21SendQuick SMS Messaging User Manual
Strictly Private and Confidential
Figure 32: Outlook Scheduled SMS (sendQuick Communications Only)
2.8 Unsubscribe List
The Unsubscribe List (Figure 33) is a mobile phone list where the sender has requested not to receive anymessages from the sendQuick system. The mobile phone numbers can be inserted by sending a SMS tothe system with the unsubscribe keyword in the message. Keyword is defined as the first word in theSMS message, followed by a space. Eg, unsub<space>john where Unsub is the keyword and johnisoptional.
If the number is removed from the unsubscribe list, it will receive SMS from sendQuick. Otherwise,these phone numbers are filtered before messages are sent. This filter list apply to all user and includethe whole system.
Figure 33: Unsubscribe List Management
2.9 Common Inbox
In sendQuick, each user is automatically assigned a keyword. Keyword is defined as the first word in theincoming SMS message (see Section 3.8 for the definition and example). The login username isautomatically a keyword in the system. Other keywords can be defined in the Keyword Managementsection, in Section 2.14.
Figure 34: Common Inbox Management
Copyright©2009,-2015 TalariaX Pte Ltd 22SendQuick SMS Messaging User Manual
Strictly Private and Confidential
If an incoming SMS match the keyword list, the SMS will be deposited in the respective user Inbox andonly the user can read the message. The incoming SMS that does not have a keyword will be depositedin the Common Inbox and can be read by all users (Figure 34).
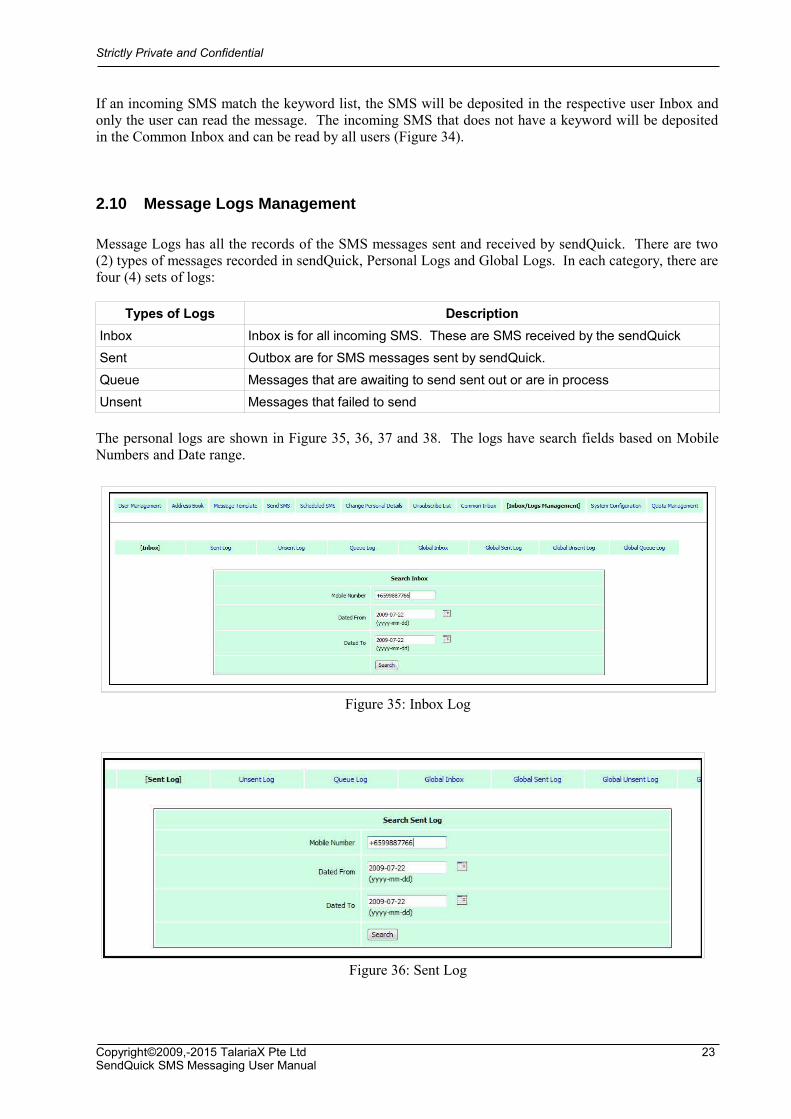
2.10 Message Logs Management
Message Logs has all the records of the SMS messages sent and received by sendQuick. There are two(2) types of messages recorded in sendQuick, Personal Logs and Global Logs. In each category, there arefour (4) sets of logs:
Types of Logs Description
Inbox Inbox is for all incoming SMS. These are SMS received by the sendQuick
Sent Outbox are for SMS messages sent by sendQuick.
Queue Messages that are awaiting to send sent out or are in process
Unsent Messages that failed to send
The personal logs are shown in Figure 35, 36, 37 and 38. The logs have search fields based on MobileNumbers and Date range.
Figure 35: Inbox Log
Figure 36: Sent Log
Copyright©2009,-2015 TalariaX Pte Ltd 23SendQuick SMS Messaging User Manual

Strictly Private and Confidential
Figure 37: Queue Log
Figure 38: Unsent Log
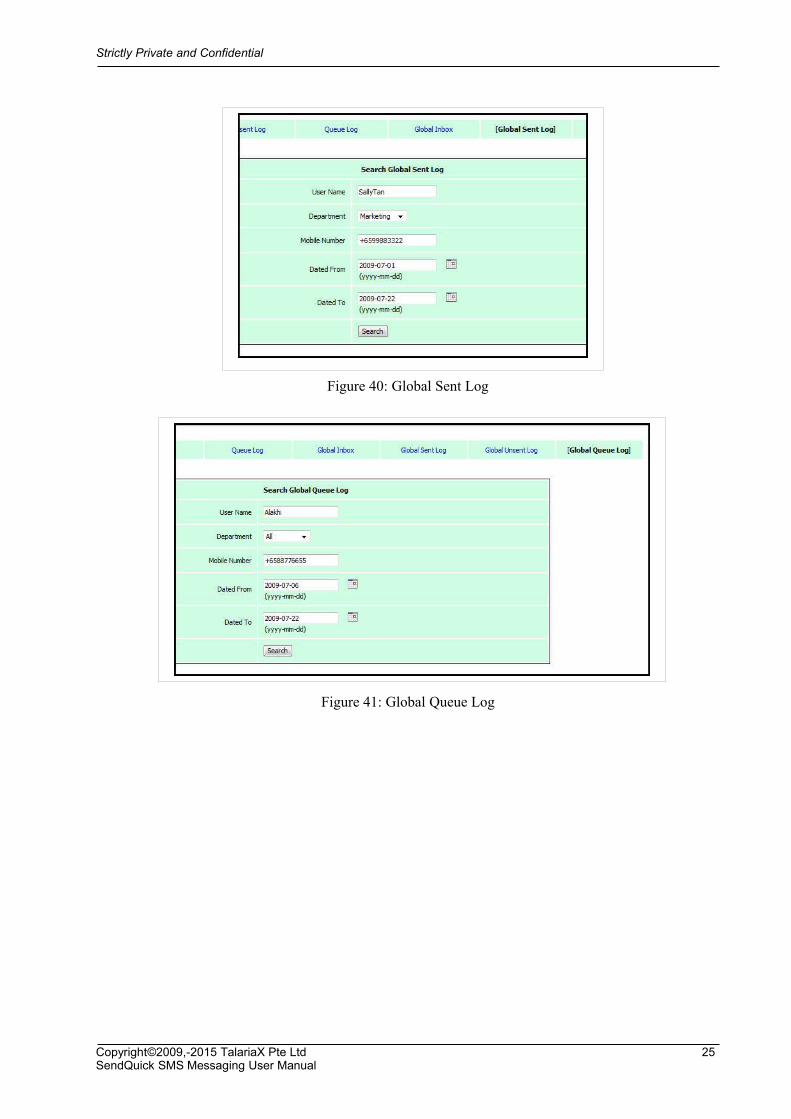
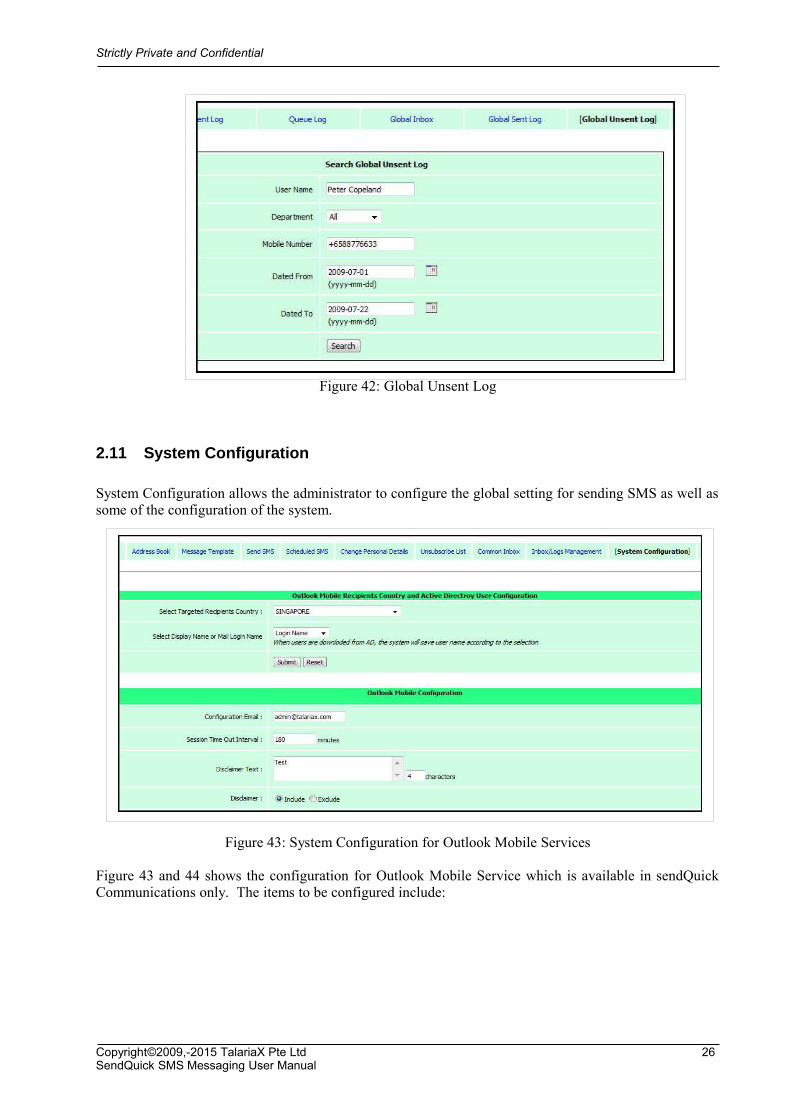
Global Logs are logs for all the users in the sendQuick system. Global Logs may not be available to allusers, depending on the access rights to the users. The logs are shown in Figure 39, 40, 41 and 42respectively.
The search fields for Global Logs more extensive, including keyword, user name, department, mobilenumber and date range. The applicable fields are shown in the figures below.
Figure 39: Global Inbox
Copyright©2009,-2015 TalariaX Pte Ltd 24SendQuick SMS Messaging User Manual
Strictly Private and Confidential
Figure 40: Global Sent Log
Figure 41: Global Queue Log
Copyright©2009,-2015 TalariaX Pte Ltd 25SendQuick SMS Messaging User Manual
Strictly Private and Confidential
Figure 42: Global Unsent Log
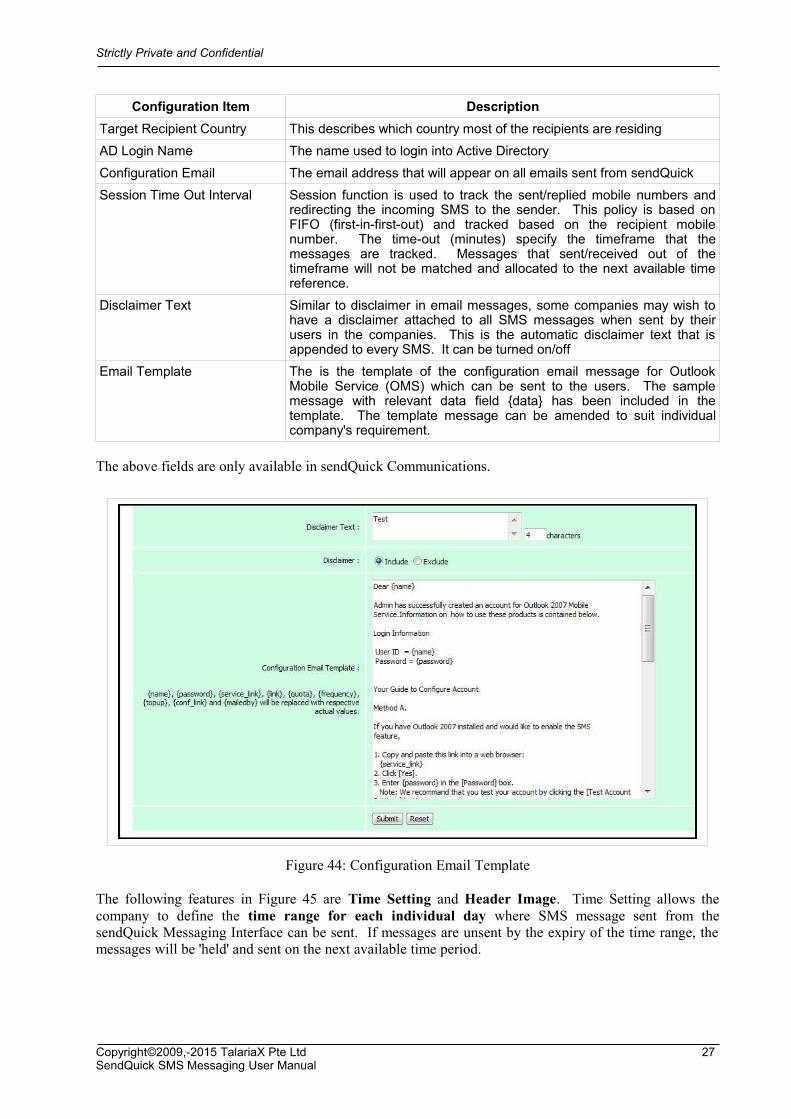
2.11 System Configuration
System Configuration allows the administrator to configure the global setting for sending SMS as well assome of the configuration of the system.
Figure 43: System Configuration for Outlook Mobile Services
Figure 43 and 44 shows the configuration for Outlook Mobile Service which is available in sendQuickCommunications only. The items to be configured include:
Copyright©2009,-2015 TalariaX Pte Ltd 26SendQuick SMS Messaging User Manual
Strictly Private and Confidential
Configuration Item Description
Target Recipient Country This describes which country most of the recipients are residing
AD Login Name The name used to login into Active Directory
Configuration Email The email address that will appear on all emails sent from sendQuick
Session Time Out Interval Session function is used to track the sent/replied mobile numbers andredirecting the incoming SMS to the sender. This policy is based onFIFO (first-in-first-out) and tracked based on the recipient mobilenumber. The time-out (minutes) specify the timeframe that themessages are tracked. Messages that sent/received out of thetimeframe will not be matched and allocated to the next available timereference.
Disclaimer Text Similar to disclaimer in email messages, some companies may wish tohave a disclaimer attached to all SMS messages when sent by theirusers in the companies. This is the automatic disclaimer text that isappended to every SMS. It can be turned on/off
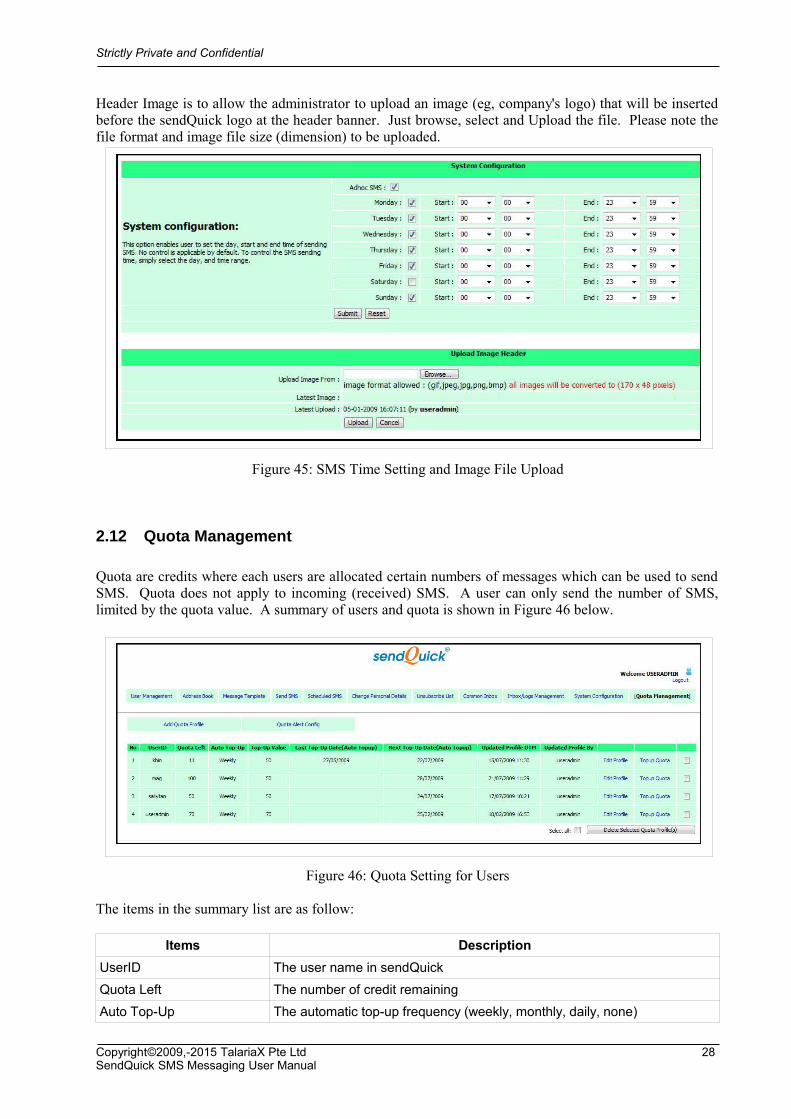
Email Template The is the template of the configuration email message for OutlookMobile Service (OMS) which can be sent to the users. The samplemessage with relevant data field {data} has been included in thetemplate. The template message can be amended to suit individualcompany's requirement.
The above fields are only available in sendQuick Communications.
Figure 44: Configuration Email Template
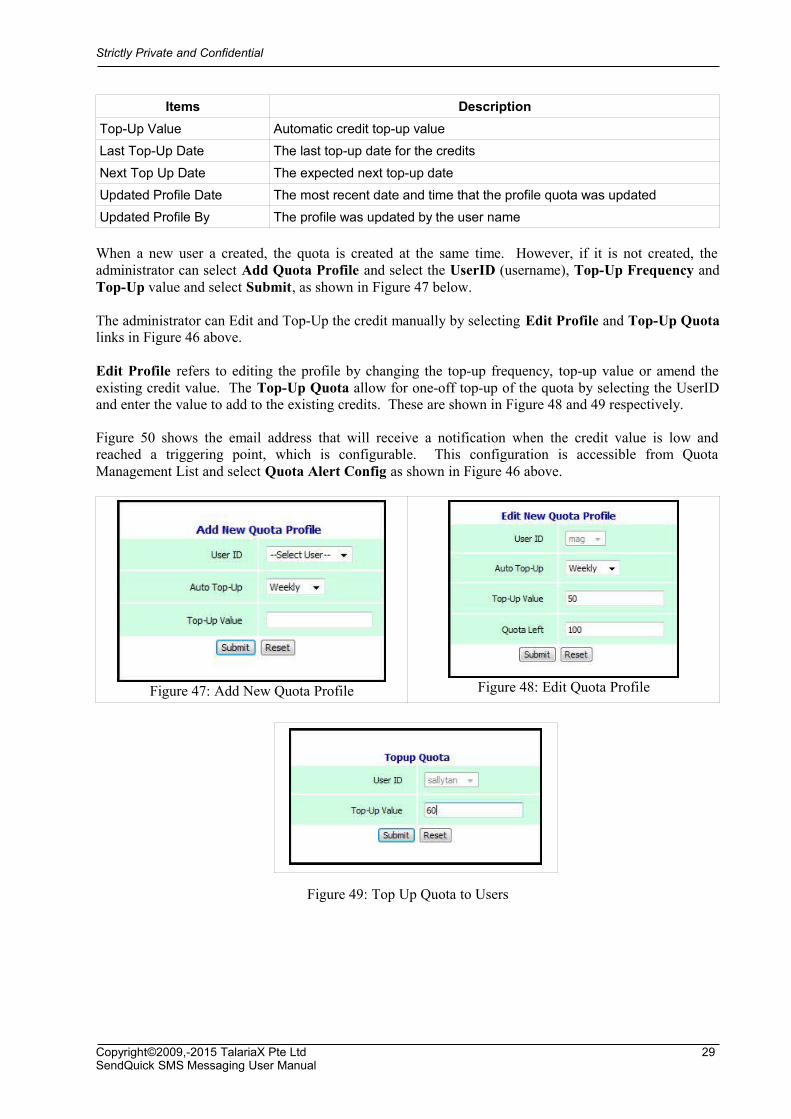
The following features in Figure 45 are Time Setting and Header Image. Time Setting allows thecompany to define the time range for each individual day where SMS message sent from thesendQuick Messaging Interface can be sent. If messages are unsent by the expiry of the time range, themessages will be 'held' and sent on the next available time period.
Copyright©2009,-2015 TalariaX Pte Ltd 27SendQuick SMS Messaging User Manual
Strictly Private and Confidential
Header Image is to allow the administrator to upload an image (eg, company's logo) that will be insertedbefore the sendQuick logo at the header banner. Just browse, select and Upload the file. Please note thefile format and image file size (dimension) to be uploaded.
Figure 45: SMS Time Setting and Image File Upload
2.12 Quota Management
Quota are credits where each users are allocated certain numbers of messages which can be used to sendSMS. Quota does not apply to incoming (received) SMS. A user can only send the number of SMS,limited by the quota value. A summary of users and quota is shown in Figure 46 below.
Figure 46: Quota Setting for Users
The items in the summary list are as follow:
Items Description
UserID The user name in sendQuick
Quota Left The number of credit remaining
Auto Top-Up The automatic top-up frequency (weekly, monthly, daily, none)
Copyright©2009,-2015 TalariaX Pte Ltd 28SendQuick SMS Messaging User Manual
Strictly Private and Confidential
Items Description
Top-Up Value Automatic credit top-up value
Last Top-Up Date The last top-up date for the credits
Next Top Up Date The expected next top-up date
Updated Profile Date The most recent date and time that the profile quota was updated
Updated Profile By The profile was updated by the user name
When a new user a created, the quota is created at the same time. However, if it is not created, theadministrator can select Add Quota Profile and select the UserID (username), Top-Up Frequency andTop-Up value and select Submit, as shown in Figure 47 below.
The administrator can Edit and Top-Up the credit manually by selecting Edit Profile and Top-Up Quotalinks in Figure 46 above.
Edit Profile refers to editing the profile by changing the top-up frequency, top-up value or amend theexisting credit value. The Top-Up Quota allow for one-off top-up of the quota by selecting the UserIDand enter the value to add to the existing credits. These are shown in Figure 48 and 49 respectively.
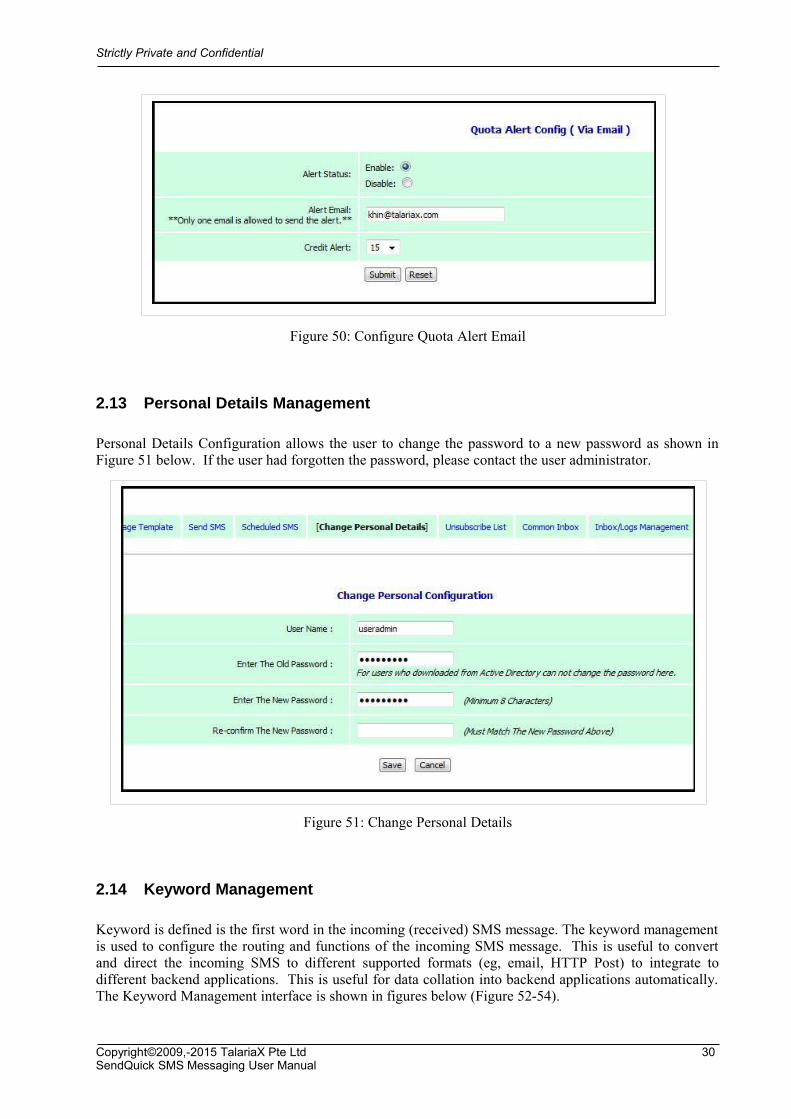
Figure 50 shows the email address that will receive a notification when the credit value is low andreached a triggering point, which is configurable. This configuration is accessible from QuotaManagement List and select Quota Alert Config as shown in Figure 46 above.
Figure 47: Add New Quota Profile Figure 48: Edit Quota Profile
Figure 49: Top Up Quota to Users
Copyright©2009,-2015 TalariaX Pte Ltd 29SendQuick SMS Messaging User Manual
Strictly Private and Confidential
Figure 50: Configure Quota Alert Email
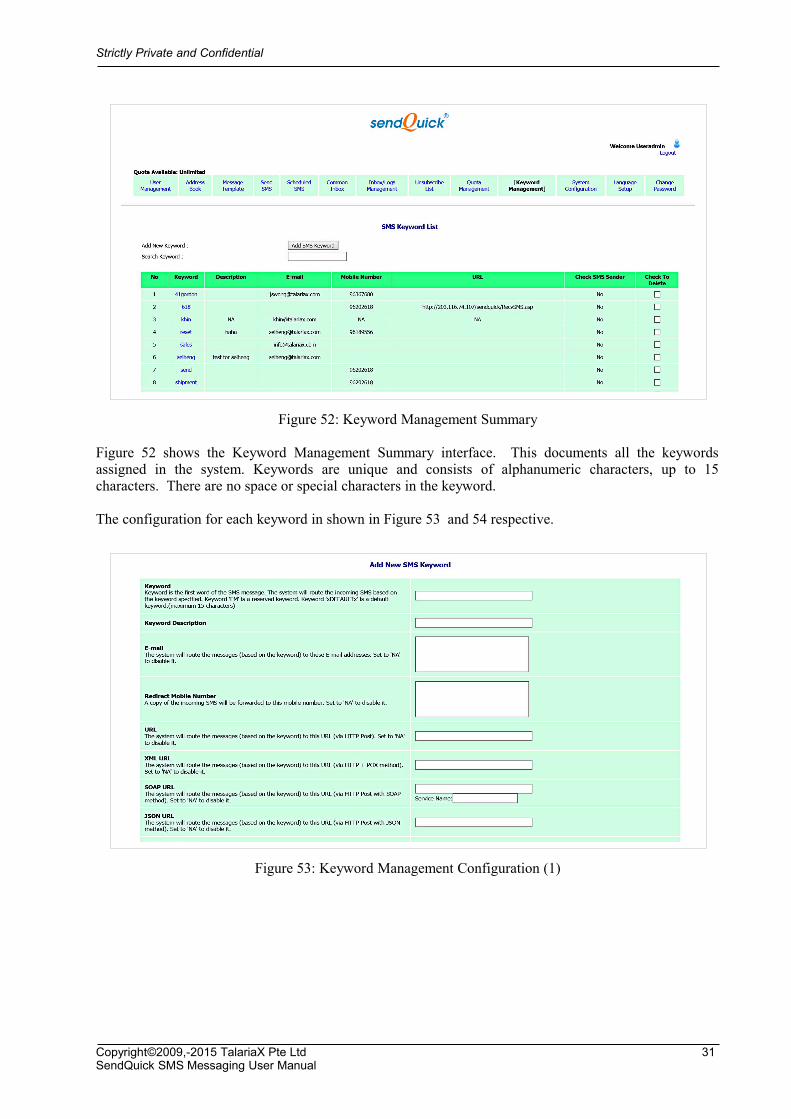
2.13 Personal Details Management
Personal Details Configuration allows the user to change the password to a new password as shown inFigure 51 below. If the user had forgotten the password, please contact the user administrator.
Figure 51: Change Personal Details
2.14 Keyword Management
Keyword is defined is the first word in the incoming (received) SMS message. The keyword managementis used to configure the routing and functions of the incoming SMS message. This is useful to convertand direct the incoming SMS to different supported formats (eg, email, HTTP Post) to integrate todifferent backend applications. This is useful for data collation into backend applications automatically.The Keyword Management interface is shown in figures below (Figure 52-54).
Copyright©2009,-2015 TalariaX Pte Ltd 30SendQuick SMS Messaging User Manual
Strictly Private and Confidential
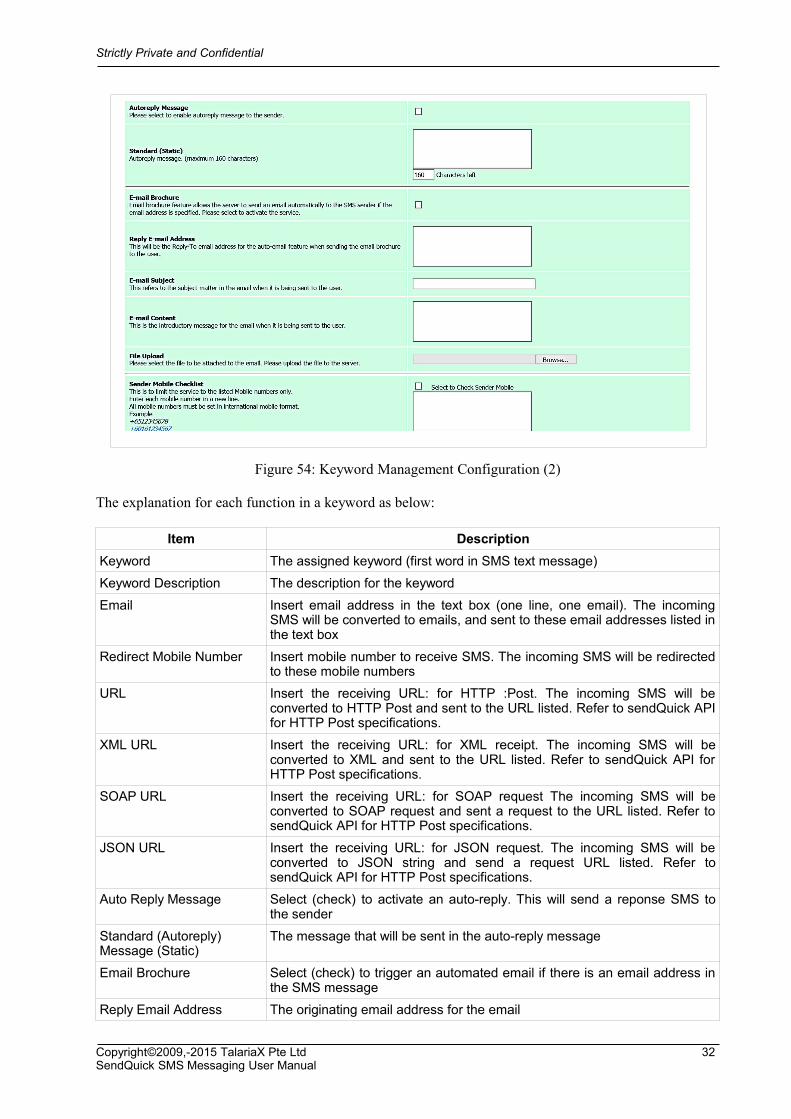
Figure 52: Keyword Management Summary
Figure 52 shows the Keyword Management Summary interface. This documents all the keywordsassigned in the system. Keywords are unique and consists of alphanumeric characters, up to 15characters. There are no space or special characters in the keyword.
The configuration for each keyword in shown in Figure 53 and 54 respective.
Figure 53: Keyword Management Configuration (1)
Copyright©2009,-2015 TalariaX Pte Ltd 31SendQuick SMS Messaging User Manual
Strictly Private and Confidential
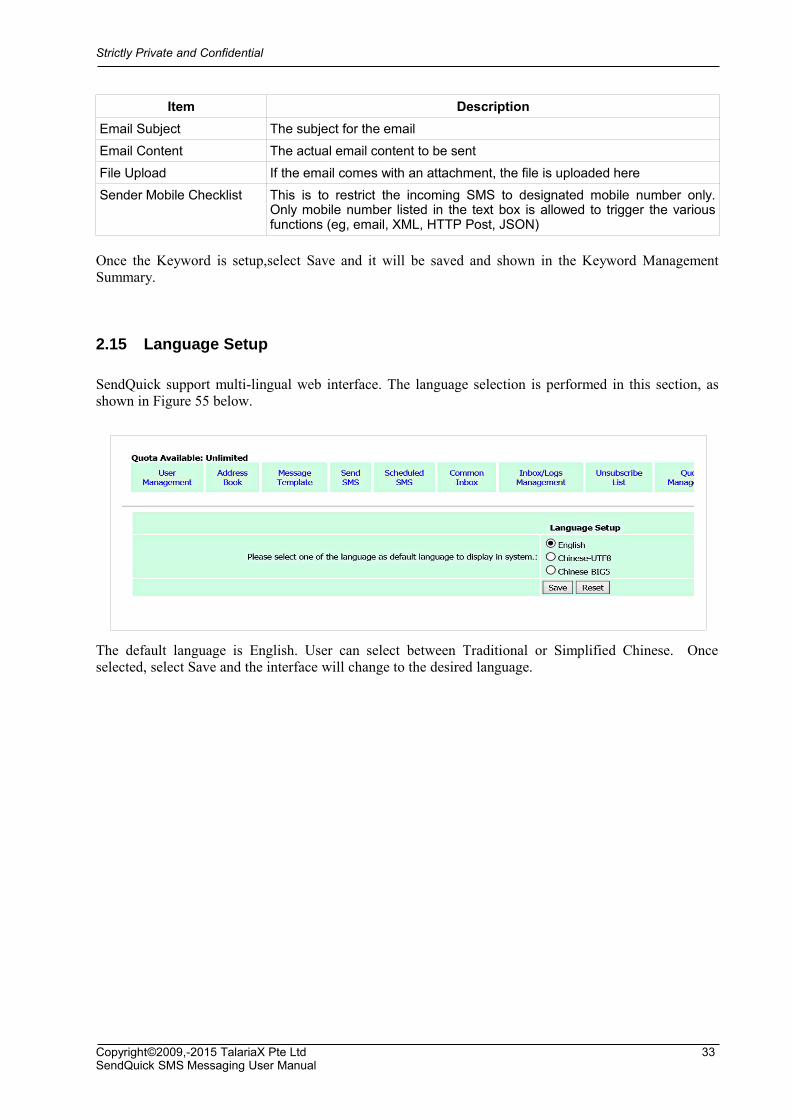
Figure 54: Keyword Management Configuration (2)
The explanation for each function in a keyword as below:
Item Description
Keyword The assigned keyword (first word in SMS text message)
Keyword Description The description for the keyword
Email Insert email address in the text box (one line, one email). The incomingSMS will be converted to emails, and sent to these email addresses listed inthe text box
Redirect Mobile Number Insert mobile number to receive SMS. The incoming SMS will be redirectedto these mobile numbers
URL Insert the receiving URL: for HTTP :Post. The incoming SMS will beconverted to HTTP Post and sent to the URL listed. Refer to sendQuick APIfor HTTP Post specifications.
XML URL Insert the receiving URL: for XML receipt. The incoming SMS will beconverted to XML and sent to the URL listed. Refer to sendQuick API forHTTP Post specifications.
SOAP URL Insert the receiving URL: for SOAP request The incoming SMS will beconverted to SOAP request and sent a request to the URL listed. Refer tosendQuick API for HTTP Post specifications.
JSON URL Insert the receiving URL: for JSON request. The incoming SMS will beconverted to JSON string and send a request URL listed. Refer tosendQuick API for HTTP Post specifications.
Auto Reply Message Select (check) to activate an auto-reply. This will send a reponse SMS tothe sender
Standard (Autoreply) Message (Static)
The message that will be sent in the auto-reply message
Email Brochure Select (check) to trigger an automated email if there is an email address inthe SMS message
Reply Email Address The originating email address for the email
Copyright©2009,-2015 TalariaX Pte Ltd 32SendQuick SMS Messaging User Manual
Strictly Private and Confidential
Item Description
Email Subject The subject for the email
Email Content The actual email content to be sent
File Upload If the email comes with an attachment, the file is uploaded here
Sender Mobile Checklist This is to restrict the incoming SMS to designated mobile number only.Only mobile number listed in the text box is allowed to trigger the variousfunctions (eg, email, XML, HTTP Post, JSON)
Once the Keyword is setup,select Save and it will be saved and shown in the Keyword ManagementSummary.
2.15 Language Setup
SendQuick support multi-lingual web interface. The language selection is performed in this section, asshown in Figure 55 below.
The default language is English. User can select between Traditional or Simplified Chinese. Onceselected, select Save and the interface will change to the desired language.
Copyright©2009,-2015 TalariaX Pte Ltd 33SendQuick SMS Messaging User Manual
Related Documents