Customization, functionality, and complete SAP PS usage details In-depth coverage of all project phases from planning to invoicing, and beyond I ncludes exclusive expert insights on reporting and interfaces Mario Franz

Welcome message from author
This document is posted to help you gain knowledge. Please leave a comment to let me know what you think about it! Share it to your friends and learn new things together.
Transcript
~ Customization, functionality, and complete SAP PS
usage details
~ In-depth coverage of all project phases from planning
to invoicing, and beyond
~ I ncludes exclusive expert insights on reporting
and interfaces
Mario Franz

j
j
j
j
j
j
j
j
j
j
j
j
j
j
j
j
j
j
j
j
j
j
j
j
j
j
j
j
j
j
j
j
j
j
j
j
j
j
j
j
j
I j

Project Management with SAp® Project System
PRESS
SAP PRESS is a joint initiative of SAP and Galileo Press. The know-how
offered by SAP specialists combined with the expertise ofthe publishing house
Galileo Press offers the reader expert books in the field. SAP PRESS features
first-hand information and expert advice, and provides useful skills for profes
sional decision-making.
SAP PRESS offers a variety of books on technical and business related topics
for the SAP user. For further information, please visit our website:
www.sap-press.com.
Karl LiebstGckel
SAP Enterprise Asset Management
2008. approx. 555 pp.
ISBN 978-1-59229-150-2
Othmar Gau
Transportation Management with SAP LES
2008, 574 pp.
ISBN 978-1-59229-169-4
Stephan Kohlhoff
Product Development in the Automotive Industry with SAP
2007. 480 pp.
ISBN 978-1-59229-138-0
Jorg Thomas Dickersbach. Gerhard Keller, Klaus Weihrauch
Production Planning and Control with SAP
2007. 477 pp.
ISBN 978-1-59229-106-9

Mario Franz
Project Management with SAp® Project System
.. ~ ~ . .
Gal i leo Press
Bonn • Boston
ISBN 978-1-59229-125-0
1 st edition 2007
1 st reprint, with corrections 2008
Translation Lemoine I nte'rnational , Inc., Salt Lake City, UT
Acquisitions Editor Eva Tripp
English Edition Editor Frank Paschen
Copy Editor Nancy Etscovitz, UCG, Inc., Boston, MA
Cover Design Silke Braun
Layout Design Vera Brauner
Production Steffi Ehrentraut
Typesetting SatzPro, Krefeld
Printed and bound in Germany
© 2007 by Galileo Press
SAP PRESS is an imprint of Galileo Press,
Boston, MA, USA
Bon!!, Gen-:1dny
German Edition first published 2007 by Galileo Press.
All rights reserved. Neither this publication nor any part of it
may be copied or reproduced in any form or by any means
or translated into another language, without the prior con
sent of Galileo Press, Rheinwerkallee 4, 53227 Bonn, Ger
many.
Galileo Press makes no warranties or representations with
respect to the content hereof and specifically disclaims any
implied warranties of merchantability or fitness for any par
ticular purpose. Galileo Press assumes no responsibility for
any errors that may appear in this publication.
All of the screenshots and graphics reproduced in this book
are subject to copyright 0 SAP AG, Dietmar-Hopp-Allee 16,
69190 Walldorf, Germany.
SAP, the SAP logo, mySAP, mySAP.com, mySAP Business
Suite, SAP NetWeaver, SAP R/3, SAP R/2, SAP B2B, SAPtro
nic, SAPscript, SAP BW, SAP CRM, SAP EarlyWatch, SAP
ArchiveLink, SAP GUt, SAP Business Workflow, SAP Busi
ness Engineer, SAP Business Navigator, SAP Business Frame
work, SAP Business Information Warehouse, SAP inter
enterprise solutions, SAP APO, AcceleratedSAP, InterSAP,
SAPoffice, SApfind, SAPfile, SAPtime, SAPmail, SAP-access,
SAP-EDI, R/3 Retail, Accelerated HR, Accelerated HiTech,
Accelerated Consumer Products, ABAP, ABAP/4, ALEIWEB,
BAPI, Business Framework, BW Explorer, Enjoy-SAP,
mySAP.com e-business platform, mySAP Enterprise Portals,
RIVA, SAPPHIRE, TeamSAP, Webflow and SAP PRESS are
registered or unregistered trademarks of SAP AG, Walldorf,
Germany.
All other products mentioned in this book are registered or
unregistered trademarks of their respective companies.
Contents at a Glance
1 I ntrod uction .................................................. 13
2 Structures and Master Data ........ ..... ............ 17
3 Planning Functions ....................................... 111
4 Budget .......................................................... 223
5 Project Execution Processes ......................... 249
6 Period-End Closing ....................................... 319
7 Reporting ...................................................... 385
8 Integration Scenarios with Other Project Management Tools ....................................... 435
A BAPls in SAP Project System ........................ 453
B Selected Project System Database Tables .... 455
C Transactions and Menu Paths ...................... 457
D The Author .................................................... 475

Contents
• -" ~ ~ ~ 1.~ ~ T '" ~ 'f
1 Intro~uctio.Jf ..... ~~u ... ~ ............ ~.· .. ·;;:'~.~i ... '.:~.~.u .. ~.,............ 13,
2.1 Basic Principles ........................................................... 18
2.2 Work Breakdown Structure ......................................... 22
2.2.1 Structure and Master Data ............................. 23
2.2.2 Structure Customizing of the Work Break-
down Structure .............................................. 33
2.2.3 Standard Work Breakdown Structures ............ 41
2.3 Network ..................................................................... 42
2.3.1 Structure and Master Data ............................. 43
2.3.2 Structure Customizing of the Network ............ 53
2.3.3 Standard Networks ........................................ 61
2.4 Milestones .................................................................. 62
2.4.1 Milestones Assigned to WBS Elements ..... ...... 63
2.4.2 Milestones Assigned to Activities ................... 64
2.5 Documents ................................................................. 67
2.5.1 PS Texts ......................................................... 67
2.5.2 I ntegration with Document Management....... 68
2.6 Statuses ...................................................................... 69
2.7 Editing Functions ........................................................ 73
2.7.1 Project Builder ............................................... 74
2.7.2 Project Planning Board ................................... 78
2.7.3 Special Maintenance Functions ..................... : 83
2.8 Tools for Optimized Master Data Maintenance ........... 85
2.8.1 Field Selection ............................................... 85
2.8.2 Flexible Detail Screens and Table Controls ..... 86
2.8.3 Mass Change .................................................. 88
2.8.4 Substitution ................................................... 90
2.8.5 Validation ...................................................... 92
2.8.6 Variant Configuration with Projects ................ 93
2.8.7 Assembly Processing ...................................... 96
2.9 Versions ..................................................................... 102
2.9.1 Project Versions ............................................. 102
2.9.2 Simulation Versions ........................................ 105
2.10 Archiving Project Structures ........................................ 107
2.11 Summary .................................................................... 110
7
Contents
~'c ,,,~,,.f_> ,V~ '''~. '\~'''I' __ '{ 1 \ '" ,'< _ )
~~ ;~ Rlanning Functions .v .• ,..~.~'.-::'~ ..........• , ............• : ... , •..•.... ' ••.. tI ~ 1 " I' ~ ~ <:' "'o' 'U " • , ~.~, ",~Y, '"' _ ~ ", .. '" ~ ~ _ 0 v "' ~ ~ ~ • _. _ -;,",.' , ':
3.1 Date Scheduling ......................................................... 112
3.1.1 Date Planning with WBS Elements .......... : ..... 114
3.1.2 Scheduling with Networks ............................. 117
3.2 Resource Planning ..................................................... 133
3.2.1 Capacity Planning with Work Centers ............ 133
3.2.2 Workforce Planning ....................................... 141
3.2.3 Capacity Leveling ......................... : ................ 148
3.2.4 External Processing ........................................ 151
3.2.5 Service.......................................................... 154
3.3 Material Planning ....................................................... 157
3.3.1 Assigning Material Components .................... 157
3.3.2 Project Stock . ............. ............... ...... .............. 175
3.3.3 Availability Check .......................................... 179
3.4 Cost Planning .............................................................. 183
3.4.1 Hierarchical Cost Planning ............................. 187
3.4.2 Unit Costing .................................................. 189
3.4.3 Detailed Planning .......................................... 193
3.4.4 Easy Cost Planning .... ......... ........................... 197
3.4.5 Network Costing ........................................... 202
3.4.6 Planned Costs of Assigned Orders ...... ........... 209
3.5 Revenue Planning ...................................................... 211
3.5.1 Hierarchical Planning ..................................... 212
3.5.2 Detailed Planning .......................................... 212
3.5.3 Billing Plan .................................................... 212
3.5.4 Sales Pricing .................................................. 215
3.6 Summary ................................................................... 221
4.1 Budgeting Functions in SAP Project System ................ 224
4.1.1 Original Budget .............. ............................... 225
4.1.2 Budget Updates ............................................. 229
4.1.3 Budget Release .............................................. 231
4.1.4 Budget Carryforward ..................................... 233
4.1.5 Availability Control ........................................ 234
4.2 Integration with Investment Management ................. 241
4.3 Summary ................................................................... 248
8
Contents
5.1 Actual Dates ............................................................... 250
5.1.1 Actual Dates of WBS Elements ....................... 250
5.1.2 Actual Dates of Activities ............................... 251
5.1.3 Actual Dates of Milestones ............................ 253
5.2 Account Assignment of Documents ............................ 254
5.2.1 Commitments Management ........................... 255
5.2.2 Manual ~ccount Assignment .......................... 257
5.2.3 Execution Services .......................................... 258
5.3 Confirmations ............................................................. 261
5.3.1 Individual Confirmations ................................ 268
5.3.2 Collective and Summary Confirmations .......... 269
5.3.3 Cross-Application Time Sheet ......................... 270
5.3.4 Additional Confirmation Options ................... 274
5.4 External Procurement of Services ................................ 275
5.4.1 External Processing ........................................ 275
5.4.2 Service ........................................................... 278
5.5 Material Procurement and Delivery ............................ 279
5.5.1 Material Procurement Processes ..................... 280
5.5.2 Delivery from Project ..................................... 287
5.5.3 ProMan .......................................................... 289
5.6 Billing ......................................................................... 293
5.6.1 Milestone Billing ............................................ 293
5.6.2 Resource-Related Billing ................................ 295
5.7 Project Progress .......................................................... 299
5.7.1 Milestone Trend Analysis ............................... 299
5.7.2 Progress Analysis ............................................ 300
5.7.3 Progress Tracking ........................................... 310
5.8 Claim Management .................................................... 314
5.9 Summary .................................................................... 318
6.1 Processing Types ......................................................... 320
6.2 Revaluation at Actual Prices ........................................ 323
6.2.1 Prerequisites for Revaluation at Actual
Prices ............................................................. 324
6.2.2 Executing the Revaluation at Actual Prices ..... 325
6.2.3 Dependencies of the Revaluation at Actual
Prices ............................................................. 325
9
Contents
6.3 Overhead Rates ......................................................... 326
6.3.1 Prerequisites for the Allocation of Overhead
Rates ............................................................. 326
6.3.2 Executing the Application of Overhead .......... 328
6.4 Template Allocations ................................................. 330
6.4.1 Prerequisites for Template Allocation ............ 330
6.4.2 Executing Template Allocation ...................... 332
6.5 Interest Calculation .................................................... 333
6.5.1 Prerequisites for Interest Calculation for
Projects .... .................... ....................... .......... 334
6.5.2 Executing the Interest Calculation for
Projects ................ .......... ............. .................. 340
6.6 Results Analysis............... ..... ...... ......... .......... ............. 342
6.6.1 Prerequisites for the Results Analysis ............. 347
6.6.2 Executing the Results Analysis ....................... 355
6.7 Project-Related Incoming Orders ............................... 357
6.7.1 Prerequisites for Project-Related Incoming
Order Determination .... ........... ...................... 360
6.7.2 Executing the Project-Related Incoming
Order Determination ..................................... 363
6.8 Cost Forecast ............................................................. 364
6.8.1 Prerequisites for and Restrictions of the
Cost Forecast ................. ..... ........ ............ ....... 367
6.8.2 Executing and Evaluating the Cost Forecast ... 367
6.9 Settlement................................................................. 369
6.9.1 Prerequisites for Project Settlements ............. 370
6.9.2 Executing Project Settlements ....................... 378
6.9.3 Settlement of Investment Projects ................. 381
6.9.4 Project Settlement Dependencies .................. 383
6.10 Summary ................................................................... 384
7.1 Project Information System: Structures ....................... 385
7.1.1 Structure/Project Structure Overview... ......... 389
7.1.2 Individual Overviews ..................................... 394
7.2 Project Information System: Financials ....................... 396
7.2.1 Hierarchy Reports .......................................... 397
7.2.2 Cost Element Reports .................................... 405
7.2.3 Line Item Reports .......................................... 411
7.2.4 PS Cash Management .................................... 413
10

Contents
7.3 Logistical Reports ....................................................... 419
7.3.1 Purchase Requisitions and Purchase Orders
for the Project ................................................ 419
7.3.2 Material Reports ............................................ 421
7.3.3 Capacity Reports ................................ : ........... 422
7.4 Project Summarization ................................................ 429
7.5 Summary .................................................................... 433
~ .. " ~ '" > _ c.."4' • "'jk""~ ~,~'~,,"(')i'l ,N ~, "'
8 Integration 'S,Cie'narios with Other:ProJect' "~ ~' , ' Managemen't ,TObls ..................•... u,. •• :.~~,~ ••• ~.~~ ••• ~.' ..... 435
~ r" ~" ~"I.: ... ~'~J: v ~ " ' 1:" ";::,::i?'[(~::;::':. ~ ~~ 3i- ~ ~, , ,,'
8.1 Open PS for Microsoft Project .................................... 436
8.2 cProjects ..................................................................... 440
8.3 SAP Resource and Portfolio Management ................... 445
8.4 Summary .................................................................... 449
A BAPls in SAP Project System ................................................. 453
B Selected Project System Database Tables ............................... 455
C Transactions and Menu Paths ................................................ 457
C.1 Structures and Master Data ........................................ 457
C.1.1 Transactions in the SAP Menu ........................ 457
C.1.2 Customizing Activities .................................... 458
C.2 Planning Functions ................................................... 461
C.2.1 Transactions in the SAP Menu ........................ 461
C.2.2 Customizing Activities .................................... 463
C.3 Budget ........................................................................ 465
C.3.1 Transactions in the SAP Menu ........................ 465
C.3.2 Customizing Activities .................................... 466
C.4 Project Execution Processes ........................................ 466
C.4.1 Transactions in the SAP Menu ........................ 466
C.4.2 Customizing Activities .................................... 468
C.5 Period-End Closing ..................................................... 469
C.5.1 Transactions in the SAP Menu ........................ 469
C.5.2 Customizing Activities .................................... 470
C.6 Reporting ................................................................... 471
C.6.1 Transactions in the SAP Menu ........................ 471
C.6.2 Customizing Activities .................................... 473
D The Author .............. , ............................................................. 475
Index ........................................................................................... 477
11

1 1 1 1 1 1 1 1 1 1 1 1 1 1 1 1 1 1 1 1 1 1 1 1 1 1 1 1 1 1 1 1 1 1 1 1 1 1 1 1 1 1 1 1 1 1 1 1 1 1 1 1 1 1 1 1 1 1 1 1 1 1 1 1 1 1 1 1 1 1 1 1 1 1 1
This chapter describes the objectives of this book and provides .l1n overview of the contents of the individual chapters.
1 Introduction
Due to the requirement to implement projects successfully within increasingly shorter periods and under continuously rising costs, project management methods and tools are becoming more important in the industry, as well as in the public sector. The various projects range from smaller cost and investment projects to development or plant maintenance projects to large-scale projects in plant engineering, construction, and mechanical engineering.
There is an abundance of project management software on the market that project managers can use for support in planning and implementing their projects. Many companies also use programs they have developed by themselves for individual aspects of project planning and implementation; however, only a few project management tools can map the entire life cycle of a project completely and uniformly. A lack of integration options also frequently results in project data such as cost information or time data, for example, thereby having to be entered several times. All current project-relevant data and documents for project management are therefore only Simultaneously available with most project management tools under certain conditions.
To avoid these problems, companies that already use an SAP ERP system,1 such as an Rl3, Enterprise, or ECC system,2 are now increasingly using SAP Project System to manage their projects and therefore benefit from the close integration of SAP Project System with Accounting, Materials Management, Sales, Production, Human Resources, and so on. Since the early stages of SAP Project System as a Real-time Cost Accounting Project (RCAP) in the Rl2 system, the
1 ERP = Enterprise Resource Planning
2 ECC = ERP Core Component
13
1 I Introduction
Objective of this book
range of functions of SAP Project System, and also the integration options available, has continued to grow. The experiences and requirements of companies from the different branches have been incorporated in this case into the development of SAP Project System.
Since SAP Project System offers functions for managing practically all types of projects (and often even in different ways, depending on requirements), most companies that use SAP Project System only use a small portion of the available functions. Frequently, companies initially only use a few of the SAP Project System tools (for example. to control their project costs) and then gradually use other options in SAP Project System.
The objective of this book is to explain the main functions and integration scenarios of SAP Project System. We will discuss business processes that can be mapped using SAP Project System. and also highlight the required settings that must be made for this purpose in the projects and. in particular. in Customizing of SAP Project System. References to customer enhancements (user exits) and Business AddIns (BAdIs) or to notes addressing modifications indicate additional customizing options of SAP Project System. Although this book is written with Release SAP ECC 6.0 in mind, most of the functions are also already available in earlier Releases. Therefore, this book can also be used by readers who, for example, use Release SAP R/3 4.6 or an Enterprise release. Functions that have been added as of the Enterprise Release will be specifically mentioned in the text.
The range of SAP Project System functions can be used across different project types and industries. This book therefore describes the functions of SAP Project System in the most general sense possible, without restricting itself to specific uses of SAP Project System or to individual project types. Nevertheless, you will note that often only explicit examples and specific screenshots can truly clarify functions and contexts. In these cases. the book uses an IDES scenari03 of an engineer-to-order production of elevators. Readers who can use IDES data can therefore reproduce the specified examples in their own SAP systems.
3 IDES = Internet Demo and Evaluation System
14
Introduction I 1
Based on its objectives, this book is intended for readers, who re- Target audience
quire detailed knowledge of the different settings options of SAP Project System to help them implement this system, such as consult-ants or persons responsible for SAP Project System implementation, or for those who want to broaden or refresh their knowledge, such as project managers, Competence Center employees, or key users of a company. However, this book is also for readers, who are interested in getting an overview of the functions and concepts of SAP Project System, such as decision-makers in a company who are responsible for deciding to implement an SAP Project System, for instance.
As a general prerequisite for using this book, the reader must have basic business knowledge and be familiar with project management methods. Due to its integration with various other SAP components, a basic knowledge of these SAP components is also required to understand many of the functions and processes of SAP Project System. SAP Project System does not contain any organizational units of its own, for example, but instead uses organizational units of financial and Managerial Accounting, Production, Purchasing, Sales and Distribution, and so on. A detailed explanation of all of these organizational units or the integrated components would exceed the scope of this book. Therefore, readers with only a modicum of SAP knowledge should, if reqUired, use the SAP Glossary and SAP Library that are available for free on the Internet under help. sap. com.
The structure of this book reflects the individual phases of managing a project using SAP Project System. Chapter 2, Structures and Master Data, therefore first describes how you can map your projects in the SAP system using suitable structures. These structures and their mas-ter data form the basis for all other planning and execution steps. With the structuring, you already set the course for the other plan-ning and execution functions using profiles and control indicators. To obtain an initial overview of the planning and execution func-tions of SAP Project System from subsequent chapters, readers who want to use this book as an initial introduction to project manage-ment with SAP Project System should therefore skip the details about these profiles and indicators discussed in Chapter 2 when they first read the book.
Chapter 3, Planning Functions, deals with the various functions of SAP Project System available for planning the logistical and relevant
15
Structure of the book
I
I Introduction
accounting aspects of your projects. For many projects, in particular, / cost or investment projects, budgeting takes place in the approval
phase of projects. Chapter 4, Budget, describes the functions of SAP Project System available for budgeting. Chapter .5, Project Execution
Processes, discusses typical processes that can be mapped in the SAP system as part of the execution phase of projects following approval, and the resulting quantity and value flows. The wide range of integrations of SAP Project System with other SAP components is addressed in this chapter. Additional procedures such as calculating overhead costs or project settlement, for example, are carried out periodically. Chapter 6, Period-End Closing, covers the periodic procedures available in SAP Project System for the planned and actual data of your projects.
A key aspect of project management is the analysis of all projectrelated data. The reporting functions of SAP Project System that support you in every phase of your project management process are introduced in Chapter 7, Reporting. Finally, Chapter 8, Integration
Scenarios with Other Project Management Tools, discusses the possible integration of SAP Project System with Microsoft Project (Client), cProjects, and SAP Resource and Portfolio Management (SAP RPM).
The most important database tables of SAP Project System and a list of Business Application Programming Interfaces (BAPIs) available for developing your own interfaces are listed in the Appendices A and B. Appendix C contains tables listing the transaction codes and menu paths of the most important transactions and Customizing activities mentioned in the text.
Special Symbols
To make it easier for you to use this book, we have included special symbols to indicate information that might be particularly important to you.
[ ! ] Attention: This icon warns you of a possible problem. Pay particular attention when tackling this task.
[»] Note: This icon indicates a note. We use this icon to emphasize important information that can facilitate your work.
16
In SAP Project System, structuring projects is the basis for l}ll subsequent project management steps. Therefore, selecting the right structures and an efficient structuring process are critical when managing your projects.
2 Structures and Master Data
A prerequisite of project management using SAP Project System is the mapping of projects in the SAP system via appropriate structures. These structures form the basis for planning, entering, and analyzing all data that is relevant to a project. For this purpose, SAP Project System provides two structures: Work breakdown structures and networks. These two structures differ in the way in which they enable you to structure projects and in the functions provided for them in the SAP system. For example, if you need a hierarchical budget management function for a project, you would want to use a work breakdown structure. If, in addition, you also want to do capacity requirements planning for the same project, you would have to use one or several networks as well.
We begin this chapter with a description of the basic differences between work breakdown structures and networks. Then, we will discuss the essential master data of the two structures, as well as milestones, documentation options, and Customizing activities that are necessary in a structuring process. Statuses playa major role in controlling projects. We will show you the functions that statuses are responsible for in SAP Project System and how you can define your own statuses. We will also introduce you to the transactions and tools you can use for structuring purposes and for processing master data, and versions of SAP Project System that you can use to document the progress of a project and for "what-if" scenario analyses. Lastly, we'll describe the different steps and necessary prerequisites for archiving and deleting project structures.
17
2 I Structures and Master Data
Work breakdown structure
2.1 Basic Principles
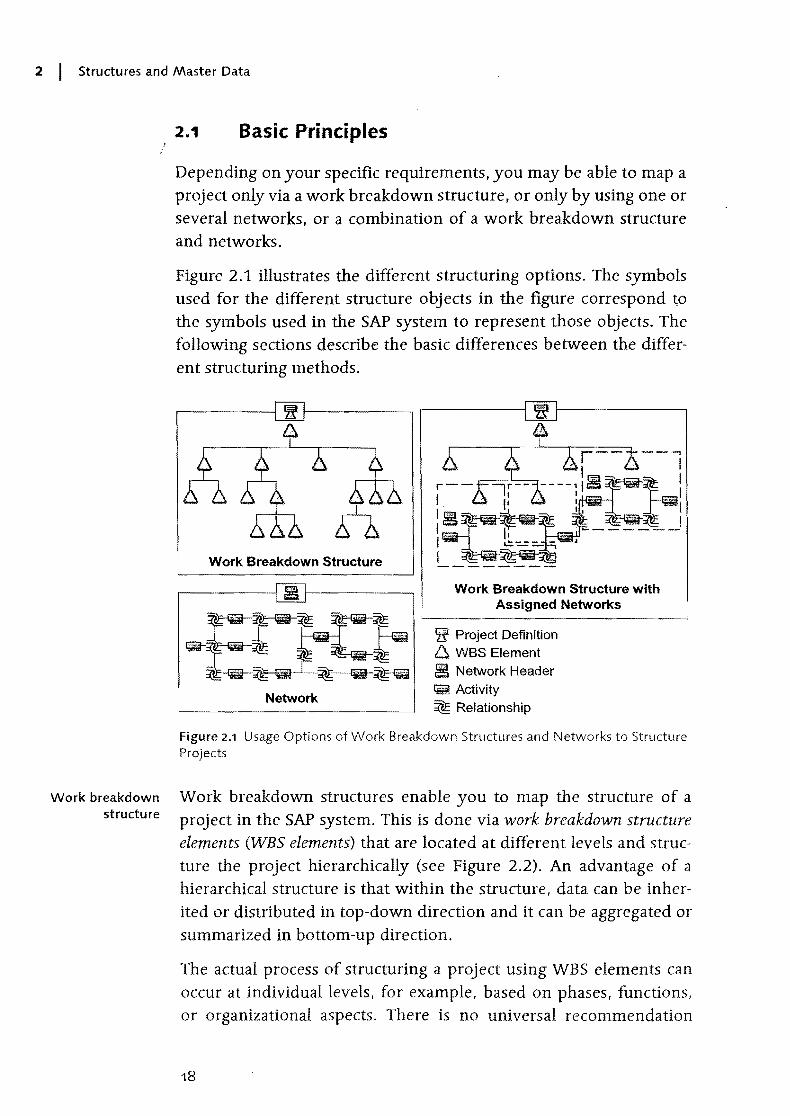
Depending on your specific requirements, you may be able to map a project only via a work breakdown structure. or only by using one or several networks, or a combination of a work breakdown structure and networks.
Figure 2.1 illustrates the different structuring options. The symbols used for the different structure objects in the figure correspond to the symbols used in the SAP system to represent those objects. The following sections describe the basic differences between the different structuring methods .
.-------.......,001------, ,-------......., 8
Work Breakdown Structure
Work Breakdown Structure with Assigned Networks
~ Project Definition 6 WBS Element ~ Network Header Iia Activity
Relationship
Figure 2.1 Usage Options of Work Breakdown Structures and Networks to Structure Projects
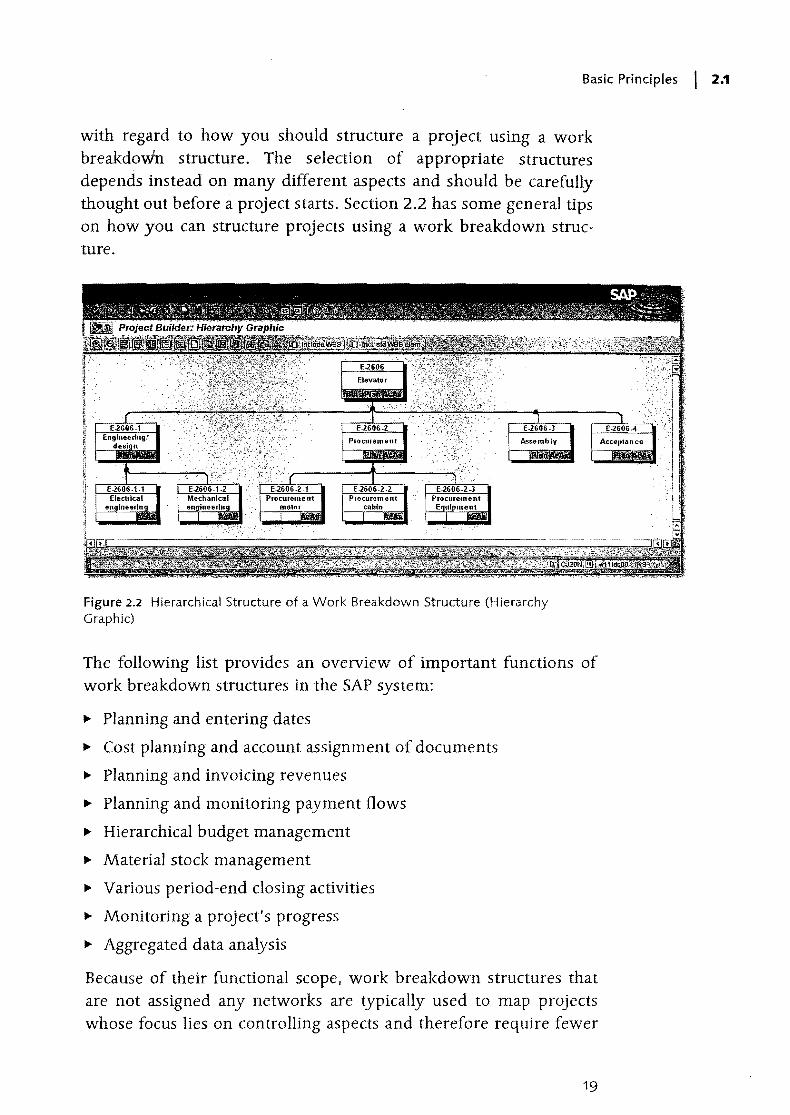
Work breakdown structures enable you to map the structure of a project in the SAP system. This is done via work breakdown structure elements (WBS elements) that are located at different levels and structure the project hierarchically (see Figure 2.2). An advantage of a hierarchical structure is that within the structure, data can be inherited or distributed in top-down direction and it can be aggregated or summarized in bottom-up direction.
The actual process of structuring a project using WBS elements can occur at individual levels, for example, based on phases, functions, or organizational aspects. There is no universal recommendation
18
Basic Principles I 2.1
with regard to how you should structure a project using a work breakdown structure. The selection of appropriate structures depends instead on many different aspects and should be carefully thought out before a project starts. Section 2.2 has some general tips on how you can structure projects using a work breakdown structure.
Figure 2.2 Hierarchical Structure of a Work Breakdown Structure (Hierarchy Graphic)
The following list provides an overview of important functions of work breakdown structures in the SAP system:
Ii>- Planning and entering dates
Ii>- Cost planning and account assignment of documents
Ii>- Planning and invoicing revenues
Ii>- Planning and monitoring payment flows
Ii>- Hierarchical budget management
Ii>- Material stock management
Ii>- Various period-end closing activities
Ii>- Monitoring a project's progress
Ii>- Aggregated data analysis
Because of their functional scope, work breakdown structures that are not assigned any networks are typically used to map projects whose focus lies on controlling aspects and therefore require fewer
19
2 I Structures and Master Data
logistical functions. These kinds of projects usually involve overhead cost or investment projects.1
Network You can use one or several networks to map the flow of a project or of parts of a project in the SAP system. For this purpose, a network maps individual aspects of a project as activities that are linked to each other via relationships (see Figure 2.3).
The relationship between two activities defines the logical sequence of the activities (predecessor-successor relationship) as well as their time-based interdependencies. You can also map project flows across different networks by linking activities of different networks to each other. An essential advantage of the network technique is that SAP systems can automatically determine planned dates for each activity and the entire network on the basis of the duration of individual activities and their chronological sequence. In addition, the system can also determine floats and time-critical activities.
The following list provides an overview of important functions of networks in the SAP system:
... Scheduling
... Resource planning
... Confirmation of work
... External procurement of services
... Material requirements planning, procurement, and delivery
... Network costing
... Various period-end closing activities
... Monitoring a project's progress
Because of their functionality, networks are predominantly used to map projects in which logistical functions such as automatic time scheduling, resource planning, or the procurement of materials are required. You can use networks independently of or in conjunction with a work breakdown structure.
1 Work breakdown structures are also frequently used for smaller projects instead of internal orders in the SAP system, because a WBS enables you to carry out hierarchical project controlling activities. For example, you can distribute a budget to individual parts of a project within a work breakdown structure. This is not possible if you use internal orders.
20
Basic Principles I 2.1
Figure 2.3 Flow Structure of a Network (Network Graphic)
To be able to utilize the functions and benefits of work breakdown structures and networks at the same time, you can assign network activities to WBS elements. A WBS element can be assigned several activities (even different networks, if required); however, an activity can only be assigned to a maximum of one WBS element. Once you have assigned activities to WBS elements, you can exchange data between the work breakdown structure and the activities. For example, activities can inherit statuses from the WBS elements they are assigned to. Conversely, you can total up project activity dates to the WBS elements, or check funds allotted to activities against the budget of the WBS elements. In reporting, you can obtain an aggregated analysis of the data of assigned activities at the level of WBS elements.
In general, the structures available in S.{\P Project System are divided into operative structures (work breakdown structure and network), standard structures (standard work breakdown structure and standard network), and versions (project version and simulation version).
21
Work breakdown structures and networks
Operative structures, standard structures, and versions

2 I Structures and Master Data
While you can use the operative structures for planning and carrying out your projects, that is, for operational project management, the standard structures merely serve as templates for the creation of operative structures or of parts of those structures. Versions can be used to record the status of a project at a specific point in time or at a certain stage in the system. In addition, you can use versions to test changes that are implemented retroactively before including them in your operative project.
The following sections describe the master data of the different structures, as well as methods to create the structures including the associated Customizing settings.
2.2 Work Breakdown Structure
Size of work break- You can subdivide a project into different parts by using the WBS down structures elements of a work breakdown structure. You can further sub-divide
those parts until you have reached the required level of detail. The maximum number of levels available is 99. Technically, you can use any number of WBS elements at each level; however, for performance reasons, a work breakdown structure should not contain more than 10,000 WBS elements.2
A work breakdown structure should map all relevant aspects of a project in order to enable comprehensive planning and analysis of a project in the SAP system. The tasks of the different project parts, in particular of the individual WBS elements, should be defined clearly and unambiguously, and they should be time-dependent and feasible. Furthermore, the tasks should contain criteria that enables you to analyze their progress, which is important for analyzing the progress of the entire project.
Methods of Let's take a brieflook at a sample elevator project in order to demonstructuring strate some possible ways of structuring a work breakdown structure
at a specific leveL
... Phase-based structuring This type of structuring could involve the following WBS elements: engineering, procurement, assembly. This structuring
2 You can find more detailed information on the size of work breakdown structures in Note 206264.
22
Work Breakdown Structure I 2.2
method is particular well suited for time scheduling and a step-bystep execution of project parts.
~ Function-based structuring This structuring method could comprise ,WBS elements for individual assemblies of the elevator, such as motor, elevator shaft, ele
vator cabin. If you use project stocks (see Section 3.3.2), those elements enable you to keep separate stocks for the different assemblies.
~ Structuring based on organizational aspects If this type of structuring is used, individual structures could contain single WBS elements for Sales and Distribution, PurchaSing, and Production, or they could be separated by responSible cost centers. With regard to reporting, this type of structuring allows the direct evaluation of cost portions for the different organizational units.
Figure 2.2 illustrates the structure of the elevator project. We used phase-based structuring for level 2, whereas the structuring type we chose for level 3 is based on functional aspects. The example shows that you can choose different structuring logics for different levels. Note, however, that you should not vary the structuring types at a single level within the work breakdown structure.
When structuring your projects, you should pay particular attention to the question "Based on which aspects do you want to analyze the data in reporting?,,3 Also, the required level of detail in cost planning and budgeting can provide you with additional information regarding how many hierarchy levels you may need. You should also consider which structuring option might be the most appropriate one if you want to settle the project costs at a later stage, or carry out a results analysis (see Chapter 6, Period-End Closing).
2.2.1 Structure and Master Data
A work breakdown structure consists of WBS elements that are located at different levels in order to map the hierarchical structure of a project. Each work breakdown structure is based on a project def-
3 In reporting, you can use different project views and the project summarization function so you can include other evaluation hierarchies as well in your analysis (see Chapter 7).
23
I
2 I Structures and Master Data
inition that serves as a framework for the project and contains parameters that control the properties of the entire project. Furthermore, the project definition contains default values that are passed on to newly created WBS elements. But, it is the WBS elements that actual1y contain the cost, revenue, budget, and scheduling data. The project definition is not a separate controlling object in the SAP system.
[!] Eath:~WBSelement is uniquely assigned to a project definition. ,This assighmen(cannot be changed, tha(:is;yqLi cannot reassign a WBSele~, merit;th~t,hibased on a specific projectcJefinition to another project"pef~ initiob, ...
Project Definition
Identification If you create a project in SAP Project System by using one of the transactions described in Section 2.7, you must first create a project definition (see Figure 2.4).4 During the creation process you must specifY a unique identification for the project definition, which may consist of a maximum of 24 characters. You can also search for an available identification. You can control the structure of the identification via coding masks (see Section 2.2.2).
In addition to the identification, you also specify a short text as a description for your project. If necessary, you can also enter a descriptive long text. Depending on the scheduling settings (see Section 3.1), you must specifY a start or end date for your projects; otherwise, the system will propose to use the current date. Of course, you can change those dates later during the date planning process.
When creating the project definition, you must always specify a project profile. The project profile contains control data and default values for the project. You can store all additional mandatory fields of the project definition as default values in the project profile so that it is usually sufficient to specify the identification and the project profile when creating the project definition. You cannot change the project profile of a project at a later stage. Project profiles can be cre-
4 Some processes require you to first create a WBS element. The project definition is then created automatically when you save the WBS element. Note that once you have saved a WBS element, this element can never exist without an associated project definition.
24

Work Breakdown Structure I 2.2
ated for different project types of an enterprise in the Customizing section ofiSAP Project System (see Section 2.2.2).
Figure 2,4 Basic Data of a Project Definition
You must assign your project to a controlling area at the project definition leveL The assignment to a controlling area is mandatory. It can be proposed via the project profile and cannot be changed after you have saved your project for the first time.
The assignment of a project to a controlling area via the project definition is unique. For this reason, a work breakdown structure cannot comprise several controlling areas.
Although the Company code and Project currency fields are also mandatory, the entries you store in the project definition are merely default values for the WBS elements. Therefore, the assignment to a company code can be changed for each individual WBS element.
Organizational assignments
l!1
I
2 I Structures and Master Data
Object currency The Project currency field has the following purpose. All currencybased data of your projects is managed in three different currencies
the controlling area currency, the transaction currency, that is, the currency of the respective business transactions, and the project or object currency.s You can choose the object currency for each WBS element separately, prOVided you use only one company code in your controlling area. If you cover several company codes in cost accounting, the object currency is automatically derived from the local currency of each company code and cannot be changed manually.
The assignments to other organizational units within financial accounting (Business area, Profit Center) and logistics (Plant, Location) that you can enter in the project definition serve as default values for the WBS elements of the project. However, you should note that the Business area field is also mandatory if business area balance sheets are maintained.
You can also store a responsible person for your project in the project definition as well as an applicant (see Section 2.2.2). These entries are automatically adopted as default values when you create a WBS element.
Partner determina- If you want to enter additional personal data or partner information tion procedure for purely informational purposes, you can enter a partner determi
nation procedure in the project definition (see Section 2.2.2). Once you have specified the partner determination procedure, the system displays an additional tab for the project definition (and all assigned WBS elements) in which you can enter additional responsible persons, personnel numbers, SAP users, or even suppliers and customer IDs, depending on the definition of the partner determination procedure. You may even navigate into the details of all those entries. As of the Enterprise Release, the reporting section provides a separate report for analyzing this partner data.6
5 The controlling area must explicitly allow the update of data in all three currencies. The conversion of currency-based data then occurs automatically when the data is entered and on the basis of the latest exchange rates defined In Customizing.
6 A specific modification (see Note 638 781) enables you to use the partner data of SAP users also for an object-based authorization concept for projects.
Work Breakdown Structure I 2.2
In addition to the partner determination procedure, you can also define the planning profile, budget profile (see Sections 3.4 and 4.1), and the simulation profile (see Section 2.9.2) in the project definition. All other profiles contained in the Control data tab of the project definition are default values for the WBS elements of the project.
Another important setting to be made at the project definition level Project stock
involves the project stock indicators. Section 3.3.2 has details about this setting. However, you should note that you can no longer mod-ify the settings as to whether you want to allow a valuated project stock once you have saved the project definition.
The Sales pricing fields are only relevant if you want to carry out sales pricing exclusively on the basis of your project data, that is, without any relation to a customer inquiry (see Section 3.5.4).
You can control the presentation of the project definition fields using a field selection (see Section 2.8.1). Additional project definition fields can be implemented by using a customer enhancement.
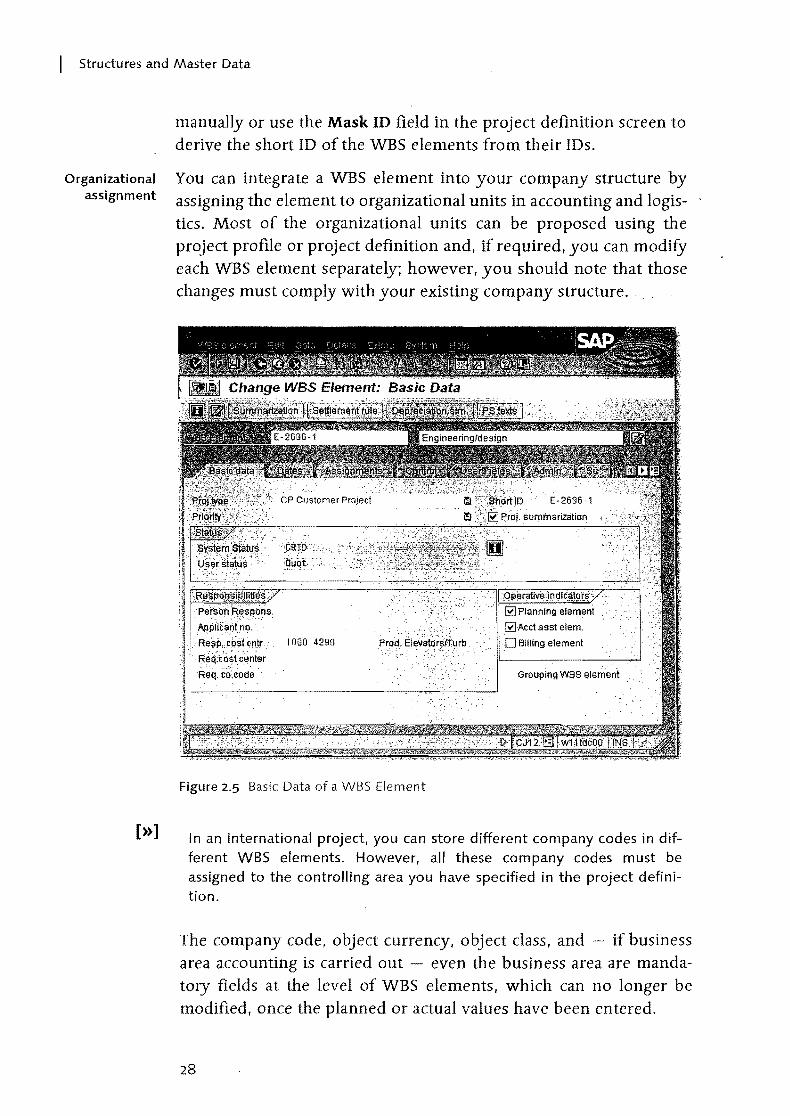
WBS Elements
Figure 2.5 shows the detail screen of a WBS element. Like the project definition, a WBS element also contains a unique external identification that consists of a maximum of 24 characters and can be controlled through a coding mask. 7 Internally, the system assigns another unique number to the WBS element, which allows you to modify the external identification at a later stage.8 In addition to the unique identification and the short text as a description, you can also specify a short identification.
You can use short identifications to save space for displaying the Short identification
WBS elements in tabular displays or in hierarchical cost planning or budgeting. You can either assign a short identification of your choice
7 Because the project definition and WBS elements are different objects, a WBS element can have the same identification as the project definition.
8 You cannot modifY the external identification at a later point in time if you have distributed the work breakdown structure to other systems via Application Link Enabling (ALE), or if the status of a WBS element does not allow for a modification.
27
I
Structures and Master Data
Organizational assignment
[»]
manually or use the Mask ID field in the project definition screen to derive the short ID of the WBS elements from their IDs.
You can integrate a WBS element into your company structure by assigning the element to organizational units in accounting and logistics. Most of the organizational units can be proposed using the project profile or project definition and, if required, you can modify each WBS element separately; however, you should note that those changes must comply with your existing company structure ..
. 10130 4290
Grouping W8S element
Figure 2.5 Basic Data of a WBS Element
In an international project, you can store different company codes in different WBS elements. However, all these company codes must be assigned to the controlling area you have specified in the project definition.
The company code, object currency, object class, and if business area accounting is carried out - even the business area are mandatory fields at the level of WBS elements, which can no longer be modified, once the planned or actual values have been entered.
28
Work Breakdown Structure I 2.2
The WBS elements contain numerous control profiles and indicators. While the profiles are discussed in Sections 6.3, 6.4, 6.6, and 6.9, we would like to describe the control indicators at this time.
The basic data of a WBS element contains the three operative indicators: Planning element, Account assignment element, and Billing element. You can use these indicators to define the controlling properties of the WBS element.
WBS elements for which you want to plan costs manually must be marked as planning elements. If you use the appropriate settings in the planning profile of the project (see Section 3.4), you can even ensure that manual cost planning on a WBS element is only possible if this indicator is set. 9
The Account assignment element indicator determines whether you can assign orders to the WBS element (in particular, activities and networks). It also controls whether you can assign any documents to the WBS element that result in actual or commitment postings to the WBS element. If you don't set this indicator for a WBS element, for example, you cannot assign a purchase requisition or invoice to this WBS element. You can also store this indicator as a default value for all WBS elements in the project profile.
If you want to base revenue planning on a WBS element and post actual revenues to the WBS element at a later stage, you must mark the WBS element as a billing element.
You can define any combination of those indicators for a WBS element, irrespective of the element's hierarchy level. Figure 2.2 shows an example of the operative indicators of a project. The example shown there allows for manual cost planning only on WBS elements of levels 1 and 2. However, the display of actual costs can be more detailed because the account assignment of documents can also be carried out for WBS elements at level 3. In addition, the highest-level WBS element is also responsible for planning and implementing revenues.10
9 Creating planned costs by rolling up planned values of subordinate WBS elements or orders is possible, irrespective of the planning element indicator.
10 Please read also Sections 6.6 and 6.9 with regard to setting the billing element indicator.
29
Operative indicators
Planning elements
Account assignment elements
Billing elements
I
I Structures and Master Data
Statistical WBS elements
Statistical budget monitoring
Another indicator that's also used for. defining the controlling properties of a WBS element is the Statistical flag. If you set this indicator for a WBS element (you can also set it as a default value for all WBS elements in the project profile), the actual costs are only updated statistically for this WBS element under value type 11 (Statistical actual) instead of value type 4 (Actual). This means that when you assign documents to a statistical WBS element, you must specifY on the one hand side the WBS element as an account assignment recipient and otherwise also a "real" account assignment object that serves as a recipient of actual costs. If that element is always a specific cost center, you can store this cost center as a default account assignment in the detail screen of the statistical WBS element.
There are different ways to use statistical WBS elements and statistical projects. Some companies use statistical projects for purely hierarchical analyses. In that case, operational controlling is still carried out at the level of cost centers, internal orders, or cost objects, for example.
Another typical usage of statistical WBS elements consists of indirect budgeting and availability control (see Section 4.1.5) of objects in the SAP system that otherwise are not assigned any budget. For example, in asset accounting, you cannot assign budgets to assets, which means that you cannot use availability control to control direct capitalizations of the asset, that is, to automatically avoid exceeding specific threshold values. But, you can achieve this by entering a statistical WBS element as an account assignment for investment in the master record of the asset. 11 Once the WBS element has been budgeted and the availability control has been activated for the project, each posting to the asset is accompanied by a statistical account aSSignment on the WBS element. This means that the statistical actual costs are automatically validated against the budget of the WBS element.
11 In addition, the existing costs must be defined as a statistical cost type and contain a field status definition that allows for additional account assignment to a WBS element. Moreover, you must activate WBS elements as account assignment objects in asset accounting.
30
Work Breakdown Structure I 2.2
Note that not all at2q~ritiqgJunctions are aVailaQI¢fJ.~t~t~tistical WBS ele- [ ! ] ments. Fqr exampl~f!YR~;<:anriotcarry out any ov~th,ea:iL~ppHcation based on the statisticalacto~r:t~osts~ neither can you pert'. ....'··}:'settlement of the statistical actLJql;c~~irAlthough statisticalyv:~%,~i,~.fu,~Rt$ Can be used for ca!culating iri~er~,~J(,the interest itself must ,~ ... ' 'RcI~ted in a real account assignment qoject (see Section 65). ':.,;."
The Integrated planning indicator refers to a specific function that enables you to pass planned activity inputs of a project as scheduled activities to cost center accounting. Sections 3.4.3 and 3.4.5 provide more detailed information on integrated planning.
You can use the Project summarization indicator in the basic data of a WBS element to control how the WBS element should be treated in an analysis (typically cross-project) using custom evaluation hierarchies (see Section 7.4), In the project profile. you can store this indicator as a default value for all WBS elements, only for account assignment elements, or for the billing elements. If you don't use project summarization, the indicator has no other specific function.
The Grouping WBS element indicator marks a WBS element as relevant for the grouping of requirements and stocks of material components that are maintained in individual requirements inventory. The indicator can be set either manually for selected WBS elements, or automatically for the highest-level WBS element, prOVided that automatic requirements grouping has previously been set in the project definition. Section 3.3.2 contains further details on the possible attributes this indicator can have. as well as on additional prerequisites of requirements grouping.
Detail screens are available for each WBS element for date planning and entering actual dates. In addition, a separate detail screen is available for each WBS element to determine the progress of a project. Sections 3.1.1 and 5.7.2 provide further detailed information on those screens.
Many fields of the WBS elements are pure information fields that don't contain any control functionality. For example, in Customizing, you can define attributes for the fields, Project type, Priority, Scale, Investment reason, or Joint Venture, and store these attributes separately for each WBS element. In addition, the Equipment and Functional Area fields in the Assignments detail screen are
31
Integrated planning
Project summarization
Grouping WBS elements
Project type, priority
I
Structures and Master Data
also used for purely informational purposes, that is, you can analyze all those fields in Reporting, use them to build groups or for filtering purposes in reports, or employ them as selection criteria when selecting objects to be analyzed.
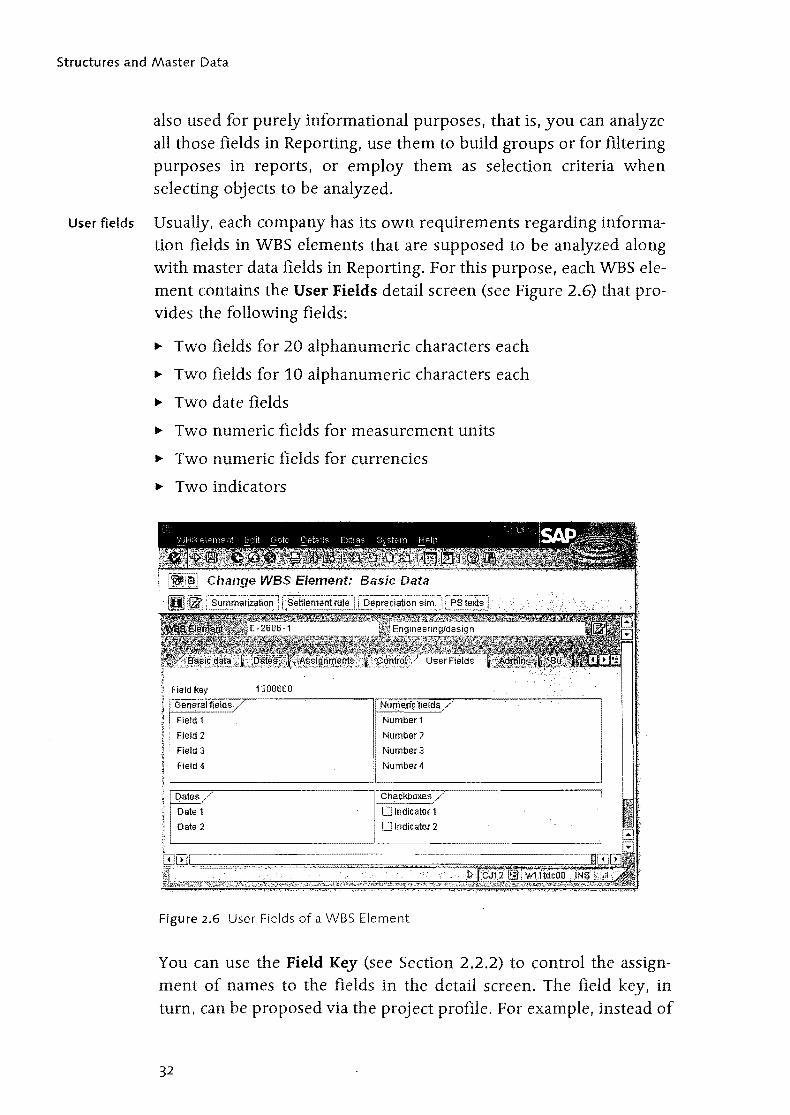
User fields Usually, each company has its own requirements regarding information fields in WBS elements that are supposed to be analyzed along with master data fields in Reporting. For this purpose, each WBS element contains the User Fields detail screen (see Figure 2.6) that provides the folloWing fields:
~ Two fields for 20 alphanumeric characters each
~ Two fields for 10 alphanumeric characters each
~ Two date fields
~ Two numeric fields for measurement units
~ Two numeric fields for currencies
~ Two indicators
! Oen:eral fields./ NUl'j1erfcfields /
I Field 1 Number1
Field 2 Number2
Field 3 Number3
! Field 4 Number4
Figure 2.6 User Fields of a WBS Element
You can use the Field Key (see Section 2.2.2) to control the assignment of names to the fields in the detail screen. The field key, in turn, can be proposed via the project profile. For example, instead of
32
Work Breakdown Structure I 2.2
using the default name. Field 1. you can store the name. Model series. fo~,the first alphanumeric field in the Customizing section of the field key. Using a customer-specific extension would then enable you to implement a validation of the entries. By default. it is not possible to implement an entry tool for the alphanumeric fields. 12
whenwoF~iQg:IWitfoser fields, you sheuldhqi~'th#yeu can set the field [!] key indiyi94~I!Y~f?r~ach WBS element; how~v~r(thismay lead to' cenfu~ sien inR~p'8rtlrj~:lEorexample, if yeu uset~o,,~iff~r~ht field keys in your preject.()rj~,"~t"~hUhcontains the name M()~~r~~~ies .fer the first alpha-. numeric'fi[ld;-Wh1le'the ether ene centainsth~ria:rne Color fer the same' field. tl"tef!~I'~)YClJ~~sare displayed in thes'amer~J>ort celumn in Repertingrirresri~~i~eofJhe fact that WBS elemei'ltfwitp the first field key cen- . taininferrii'~tiohofJ"medel series, whereas th~other WBS elements cen,. tain. COI~(j~t~?:il1~tion. Fer this reasen, yeush~uld either use a uniferm fieldkey'V\ilfhirl a'preject. er use the field key as a selectien criterieniil' yeur evaluat:i()ns.
If the number of available user fields does not meet your requirements, you can use a customized extension to define additional fields for WBS elements. Those additional fields are typically displayed in a separate detail screen.
If necessary. you can log changes to master data as change documents and evaluate those documents at a later stage. As is the case with the project definition. the Field selection option in Customizing allows you to control which fields of the WBS elements you want to hide, display. use for data input. highlight in a specific color, or define as mandatory (see Section 2.8.1).
2.2.2 Structure Customizing of the Work Breakdown Structure
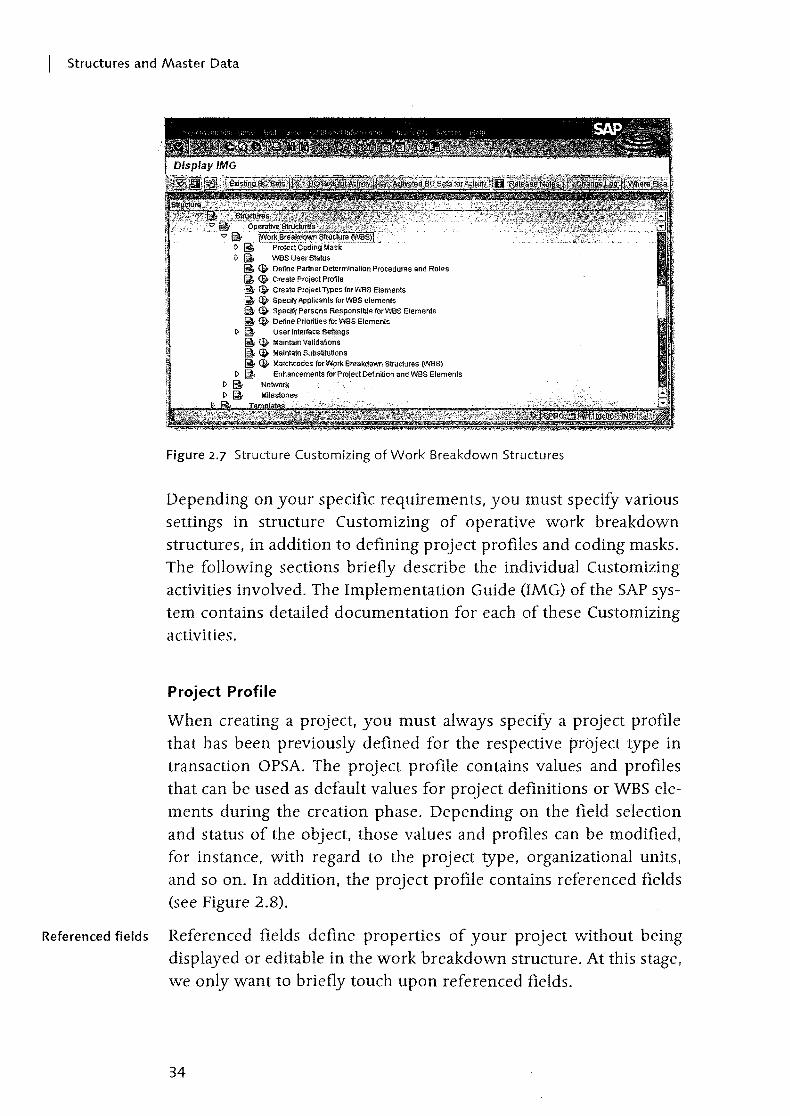
Figure 2.7 shows the different activities in structure Customizing of operative work breakdown structures. Before you can create a WBS. you must create at least one project profile here. Prior to the initial creation of a WBS, you should also consider defining coding masks. Using coding masks is not mandatory, but it has many advantages. If at all possible, you can only create or modify coding masks with many restrictions at a later stage.
12 Apart from the generic name of the user field, you can also adopt the name of exactly one field key as a column header in reports.
33
I
Structures and Master Data
'<7 [j&" . " D ~
~ Iii!J, wes User Status ~ Qil. Define Partner Determination Procedures and Roles ~ <lJ. Creale Project Profile ~ Qil. Create Project Types for wes Elements ~ Qil. Specify Applicants for WBS elemenls [j& Qil. Specjj)' Persons Responsible forWBS Elements ~ <lJ. Define Priorities forWBS Elements
i> ~ User Interface Settings [j& <lJ. Maintain Valldalions ~ Qil. Maintain SubstilUlions ~ <liP Matchcodes fo,Work 8reakdown Slroclures (WBS)
[) ~ Enhancements for ProJect Definition and W8S Elements t> ~ Network [)~ "
Figure 2.7 Structure Customizing of Work Breakdown Structures
Depending on your specific requirements, you must specify various settings in structure Customizing of operative work breakdown structures, in addition to defining project profiles and coding masks. The follOWing sections briefly describe the individual Customizing activities involved. The Implementation Guide (IMG) of the SAP system contains detailed documentation for each of these Customizing activities.
Project Profile
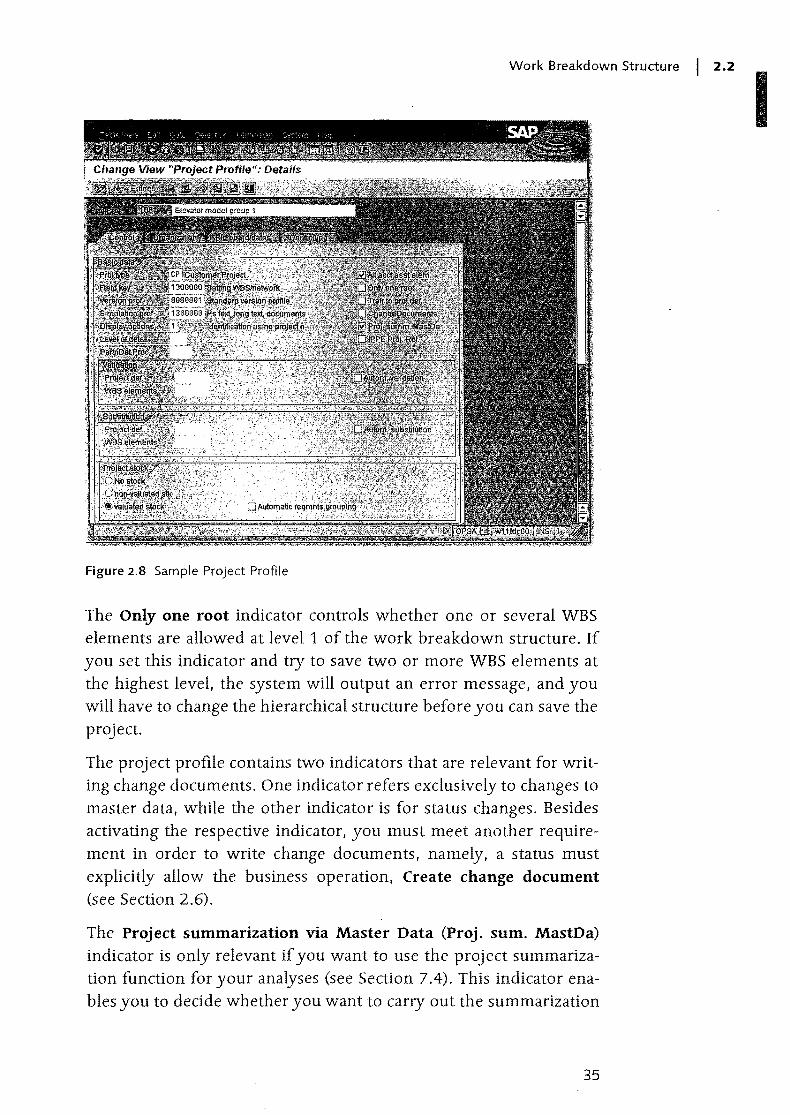
When creating a project, you must always specify a project profile that has been previously defined for the respective project type in transaction OPSA. The project profile contains values and profiles that can be used as default values for project definitions or WBS elements during the creation phase. Depending on the field selection and status of the object, those values and profiles can be modified, for instance, with regard to the project type, organizational units, and so on. In addition, the project profile contains referenced fields (see Figure 2.8).
Referenced fields Referenced fields define properties of your project without being displayed or editable in the work breakdown structure. At this stage, we only want to briefly touch upon referenced fields.
34
Work Breakdown Structure I 2.2
Figure 2.8 Sample Project Profile
The Only one root indicator controls whether one or several WBS elements are allowed at level 1 of the work breakdown structure. If you set this indicator and try to save two or more WBS elements at the highest level, the system will output an error message, and you will have to change the hierarchical structure before you can save the project.
The project profile contains two indicators that are relevant for writing change documents. One indicator refers exclusively to changes to master data, while the other indicator is for status changes. Besides activating the respective indicator, you must meet another requirement in order to write change documents, namely, a status must explicitly allow the business operation, Create change document (see Section 2.6).
The Project summarization via Master Data (Proj. sum. MastDa) indicator is only relevant if you want to use the project summarization function for your analyses (see Section 7.4). This indicator enables you to decide whether you want to carry out the summarization
35
I

2 I Structures and Master Data
process based on the master data or based on a classification of the WBS elements. Particularly with regard to system performance, you should summarize on the basis of master data characteristics. In the project profile, you can mark billing elements, account assignment elements, or all WBS elements of the project as relevant for inheriting master data during project summarization.
The Version profile is responsible for the automatic creation of project versions on the basis of their statuses (see Section 2.9.1). It is referenced via the project profile.
If you specifY Substitutions and Validations and set the Automatic (i.e., Autom. Validation or Autom. Substitution) indicator, you can make sure that logics for setting and checking field values, which you personally have defined, are processed during the save process (see Sections 2.8.4 and 2.8.5).
The specification of status profiles (see Section 2.6) for project definitions and WBS elements is only a default value for the respective objects. However, if a status profile is used to directly set a user status, you can no longer modify the status profile in the object. In that case, the entry of a status profile in the project profile has a referencing character as well. Because the retroactive entry of status profiles in the objects is rather complex and cannot be done via mass changes (see Section 2.8.3), you should store your custom schemas in the project profile right from the start.
You can call a graphical display of WBS element data in hierarchical arrangement via the processing transactions (see Section 2.7), or by using the transactions for cost planning, time scheduling, and budgeting. The graphical presentation of the data is controlled by the graphics profiles that you must store for various purposes in the project profile. If reqUired, you can define your own graphics profiles; but, usually, the default profiles will suffice.
If you set the iPPE Proj. ReI. indicator, the system displays an additional tab for WBS elements, which allows for integration with Integrated Product and Process Engineering (iPPE), see Section 3 .1.
If you enter a Strategy in the Controlling tab of the project profile, you can automatically generate the settlement rules for WBS elements. Section 6.9 provides a detailed description of how to define strategies and how to derive settlement rules.
Work Breakdown Structure I 2.2
Coding Masks
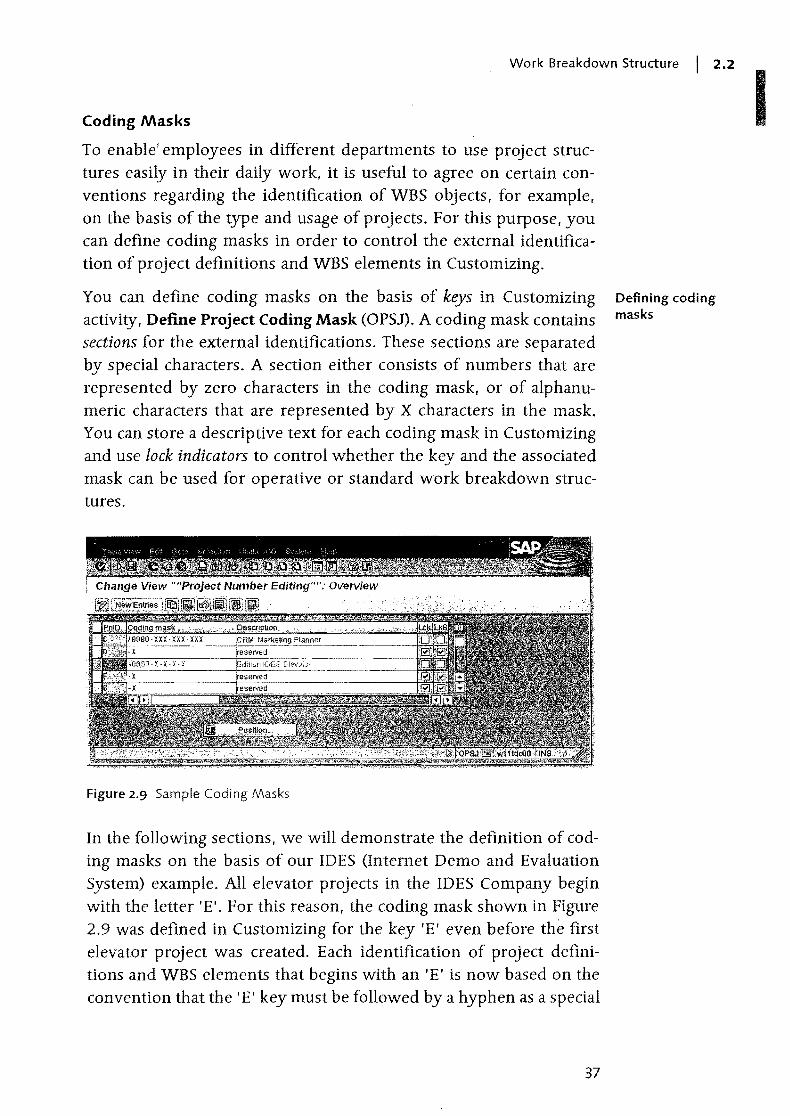
To enable' employees in different departments to use project structures easily in their daily work, it is useful to agree on certain conventions regarding the identification of WBS objects, for example, on the basis of the type and usage of projects. For this purpose, you can define coding masks in order to control the external identification of project definitions and WBS elements in Customizing.
You can define coding masks on the basis of keys in Customizing activity, Define Project Coding Mask (OPSJ). A coding mask contains sections for the external identifications. These sections are separated by special characters. A section either consists of numbers that are represented by zero characters in the coding mask, or of alphanumeric characters that are represented by X characters in the mask. You can store a descriptive text for each coding mask in Customizing and use lock indicators to control whether the key and the associated mask can be used for operative or standard work breakdown structures.
Figure 2.9 Sample Coding Masks
In the following sections, we will demonstrate the definition of coding masks on the basis of our IDES (Internet Demo and Evaluation System) example. All elevator projects in the IDES Company begin with the letter 'E'. For this reason, the coding mask shown in Figure 2.9 was defined in Customizing for the key 'E' even before the first elevator project was created. Each identification of project definitions and WBS elements that begins with an 'E' is now based on the convention that the 'E' key must be followed by a hyphen as a special
37
Defining coding masks
I
2 I Structures and Master Data
character, which, in turn, is followed by a section containing a max-. imum of four characters that may only consist of numbers. If a letter is entered in the first section, the system outputs an error message. In the IDES Company, the first section is used for the sequential numbering of projects. The system supports this in that it provides the option to search for the next available number.
If a longer ID must be assigned to WBS elements, the numerical section must be followed by a second hyphen, which is followed by a one-digit section that may contain an alphanumeric character, and so on. When entering the identification, you can usually omit the special characters as the system automatically inserts the special characters in the prOVided place of the displayed identification once the data has been released.13
Because a lock indicator is neither set for operative nor for standard structures in the example, we can create both operative projects and standard work breakdown structures with identifications for the key 'E'.
[!] Note that you can only create a coding mask for a key as long as no object exists for that key.
You should consider using coding masks when you first implement SAP Project System and before you create the first projects. If necessary, you should define masks for keys as early as possible - even if you want to use them at a later stage - and lock those coding masks. You can further detail those masks at a later point in time and release them for usage, that is, remove the lock indicators.
[ ! ] Coding masks that are already used by objects can only be modified to a certain extent. The only two possible options to change coding masks retroactively consist of adding alphanumeric sections and converting a numeric section into an alphanumeric one of identical length.
When you create or change coding masks, the system carries out several checks; however, not all of the steps involved in those checks are carried out when you transport Customizing settings to coding
13 However, the external identification is stored without special characters in the database table ofthe WBS elements. Note 536471 provides further information on coding masks.
Work Breakdown Structure I 2.2
masks. For this reason, we recommend that you don't transport coding masks.; instead, you should create them manually in the respective systems.
In order to define coding masks in Customizing, you must first enter several settings in Customizing activity Define Special Characters for Projects (OPSK). Here you must first define the length of the keys for the coding masks. Note that the maximum length for a key is five (numeric or alphanumeric) characters. For example, if you enter 3 in the respective field, you can only use keys of a maximum of three characters when defining the coding masks. If you want the keys to be exactly three characters long and no shorter, you must also set the SL indicator (structure length).
You can simplify the tabular creation of WBS elements by entering any character in the ET field (Entry Tool). Instead of always having to enter the complete ID for a new WBS element, which can be prone to errors when you use long IDs, you can simply enter the entry tool character for the part of the ID that is identical to the object on the higher level. When the data is confirmed with enter, the system replaces the character with the identification of the higher-level object.
In the eight Special character fields, you must store the characters you want to use as separators between two sections when defining the coding masks.
By setting the Edit indicator, you can ensure that project definitions and WBS elements can only be created with identifications that are controlled by coding masks, which aren't locked. For example, if you haven't defined a coding mask for the key 'Z', you can't create any projects that begin with 'z' when the Edit indicator is set.
If you enter a character of your choice in the ANo field (automatic number assignment) when creating a WBS element from the template area, the system will automatically propose an ID for that WBS element (see Section 2.7.1). If the system cannot automatically propose a number, it will assign a temporary number that begins with the character you have preViously entered in the ANo field.
39
Defining special characters
Entry tool
I
I Structures and Master Data
Defining partner roles
Languagedependent conversion
Defining partner determination
procedures
Project Typer Priority
'The definition of project types and priorities merely consists of a key and a description. You can enter project types and priorities in the basic data of WBS elements. They are usually used for purely informational purposes, but you can also use them as selection criteria in Reporting. You can store default values for the project type and priority in the project profile.
Partner Determination Procedure
The definition of partner determination procedures consists of three Customizing activities. First you must create the identifications and names for the roles14 you want to assign to projects at a later stage and link the IDs and names with the partner number types provided.
For example, if you want to store the sold-to party as additional information in sales projects, you must create a Sold-to party role and link this role to the Customer type. This allows you to specify a customer number for the Sold-to party role and to view the data of the corresponding customer master record in the project.
In the second Customizing activity, you can translate the name of the roles into other languages. Depending on the logon language, the system will then output the corresponding name.
The final step consists of summarizing the roles you want to be available for selection in your project into a partner determination procedure. When doing so, you can define for each role whether it must be specified in any case, whether an entry for a role can be modified at a later stage, and whether it should be possible to enter several values for a role. You can store a partner determination procedure as default value in the project profile.
Applicants and Responsible Persons
You can use transactions OPS6 and OPS? to create possible responsible persons and applicants for project definitions and WBS elements. The definition of applicants and responsible persons consists of an
14 The term "role" is used in different contexts here. The roles defined here are not related to the roles that are used to assign authorizations, or to the roles that are defined in cProjects projects.
40
Work Breakdown Structure I 2.2
ID that may contain a maximum of eight characters and the name of the corresponding person. You must make these entries manually; you don't need any data from HR for this process.
In addition, you can asign the corresponding SAP users to responsible persons. This type of entry is relevant if you want to notify the user automatically via email in case of budget overruns (see Section 4.1.5).
Field I<eys
You can use field keys to control the names of user fields (see Figure 2.6). Data can only be entered into the fields for which you have stored a name in the field key definition. For the two quantity fields of the user fields, you can create a link to parameters in order to be able to use the quantities in formulas at a later stage (see Section 3.2.1). You can enter a default value for the field key in the project profile.
2.2.3 Standard Work Breakdown Structures
A standard work breakdown structure consists of a standard project definition and standard WBS elements and it can be used as a template for live projects. You can create standard work breakdown structures by using transaction CJ91. You must also have a reference to a project profile. You can also use other standard work breakdown structures or even operative projects as templates.
A standard work breakdown structure may already contain impor- Master data
tant master data. Standard WBS elements can be assigned milestones (see Section 2.4) or PS texts (see Section 2.5.1); however, you cannot store any planning data, such as date information, planned costs or revenues, and settlement rules in the standard WBS. Moreover, you cannot assign document info records in a standard WBS (see Section 2.5.2).
Furthermore, you cannot set any statuses for the standard WBS elements; however, you can store the status profiles for the operative project definition and WBS elements in the standard project definition. In addition, there are three different system statuses available at the level of the standard project definition:
41
I
I Structures and Master Data
Standard II- Standard Created system statuses The system issues a warning message if you want to use the stan
dard work breakdown structure as a template in this initial status.
... Standard Released You can use the standard work breakdown structure as a template without any restrictions. Note that you cannot undo this status.
... Standard Closed You cannot copy the standard work breakdown structure.
You can.t.s~i~eWBS elements of a work breakdown structure to mapa project hiera.r~hically in the SAP system. All WBS elements of a work breakdow~struCture are uniquely assigned to a project definition. In . addition,ybu ~an store data for informational purposes, as well as control profiles and indicators in the master data of those project elements. Standard work breakdown structures can be used as templates for actual projects. Before you can create work breakdown structures, you must define a project profile in the Customizing section of SAP Project System. Moreover, it is useful to also define coding masks in Customizing. which enable you to control the identification of the project elements.
2.3 Network
You can use networks to map the flow of different project activities as activities and relationships in the system. In particular, networks enable you to use various logistical integrations with materials management, production, plant maintenance, purchasing, and capacity reqUirements planning, as well as time scheduling.
Network sizes Networks should not exceed a size of apprOXimately 500 activities, because you usually store only one responsible person per network. This person is referred to as the MRP controller. Another reason for keeping the aforementioned size can be found in the lock logic of networks. Whenever a network object is edited or confirmed, for example, the entire network is locked. The bigger your networks and the higher the number of possible confirmations, the greater the risk that the network gets locked for editing.
42
Structure and Master Data
A network consists of a network header and activities. The activities can be linked to each other via relationships. Activity elements enable you to further detail or complement activities.
You can enter the identification of a WBS element in the header of a network and in the activities and activity elements in order to create an assignment to a work breakdown structure. Based on this assign~ent, you can then exchange data between the network objects and the respective WBS elements.
Network I 2·3
Each network contains a unique ID that consists of a maximum of 12 Identification
characters. Depending on the Customizing settings, you must either enter this ID manually when creating the network, or the ID is auto-matically assigned by the system.15
Technically, networks are implemented as orders so that some of Order category
their functions will probably remind you of production, mainte-nance, or service orders, and to a certain extent, even of internal orders. In the SAP system, the different orders are distinguished by firmly defined order categories. Networks represent order category 20.
The properties of orders are specified within the individual order categories through order types that must be defined in the Customiz-ing section of the respective application. In the context of networks, these order types are referred to as network types. Depending on the network type and the plant in the header of the network, you can define additional network properties in the Customizing section of SAP Project System (see Section 2.3.2).
Network Header
A network header acts as a framework for the various objects of a network. The network header contains control profiles and indicators, as well as default values for the different network objects (see Figure 2.10).
15 For networks assigned to a WBS element, you can also derive the ID from the ID
of the WBS element via a custom extension.
43
I
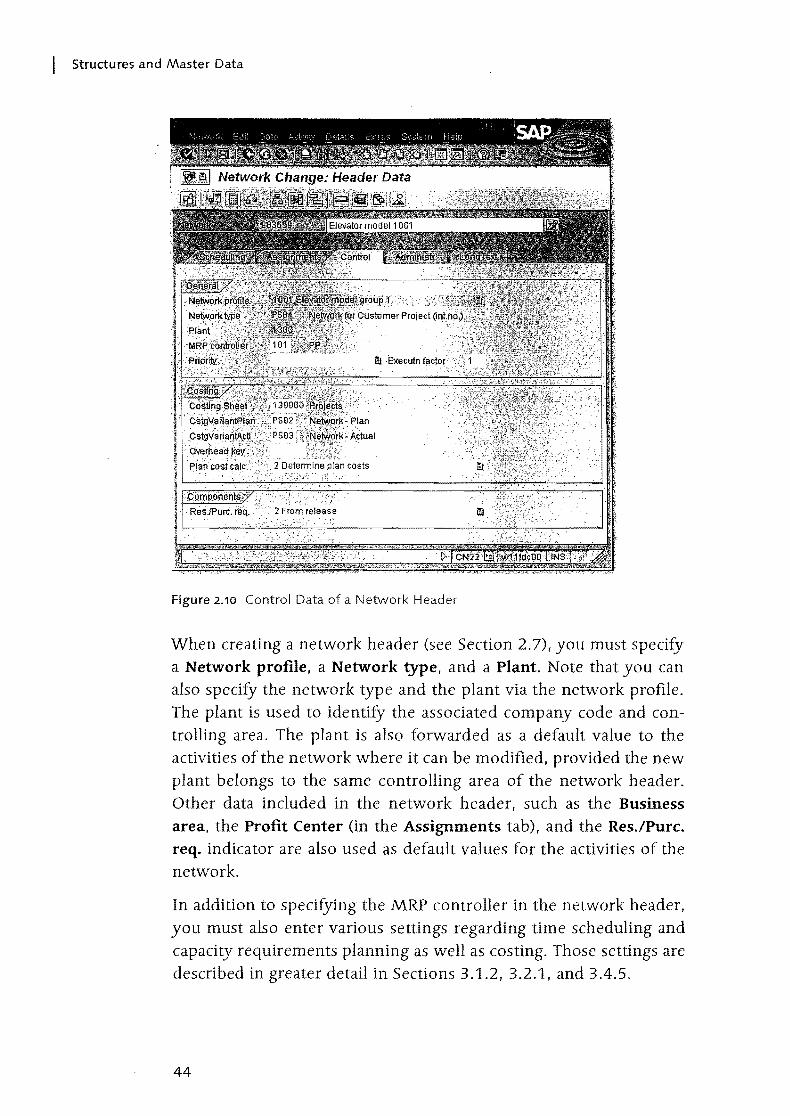
I Structures and Master Data
Figure 2.10 Control Data of a Network Header
When creating a network header (see Section 2.7), you must specify a Network profile, a Network type, and a plant. Note that you can also specify the network type and the plant via the network profile. The plant is used to identify the associated company code and controlling area. The plant is also forwarded as a default value to the activities of the network where it can be modified, provided the new plant belongs to the same controlling area of the network header. Other data included in the network header, such as the Business area, the Profit Center (in the Assignments tab), and the Res./Purc. req. indicator are also used as default values for the activities of the network.
In addition to specifying the MRP controller in the network header, you must also enter various settings regarding time scheduling and capacity requirements planning as well as costing. Those settings are described in greater detail in Sections 3.1.2, 3.2.1, and 3.4.5.
44
Network I 2·3
You can use the Executn factor field to multiply quantity data in the Execution factor
activities, /activity elements, and the assigned material components. If you use an integer as an execution factor and store it in the net-work header, the system automatically multiplies the duration, work, costs, and quantities of activities, as well as the associated activity elements and material components by that factor. However, you should note that only those activities are taken into account, which you have explicitly marked for this multiplication process.
Activities
In the context of networks, we must differentiate from among the following four activity types:
~ Internally processed activities
~ Externally processed activities
~ Services
~ Costs
Each particular type of an activity is defined by the control key of the activity (see Section 2.3.2). You can use the name, long texts, or assigned PS texts and documents (see Section 2.5) to further specifY the purpose of each individual activity.
Within the network, each activity contains a unique identification that consists of four characters so that the activity can be uniquely identified in conjunction with the network ID. When you create a new activity, the system automatically proposes an ID for the new activity, which is based on the highest previous activity number within the network and on the activity increment specified in the network profile.
An internally processed activity - control key PS01 is available by default for this activity type - can be used for planning and entering a service that is rendered by capacities (for example, persons or machines) of your own company. Figure 2.11 shows an example of an internally processed activity, which is used to map a first layout of the elevator in the network.
The Normal duration field enables you to plan the length of time to be considered in time scheduling for rendering the internal service. If you want to plan costs and capacity requirements for the internal
45
Internally processed activities
I
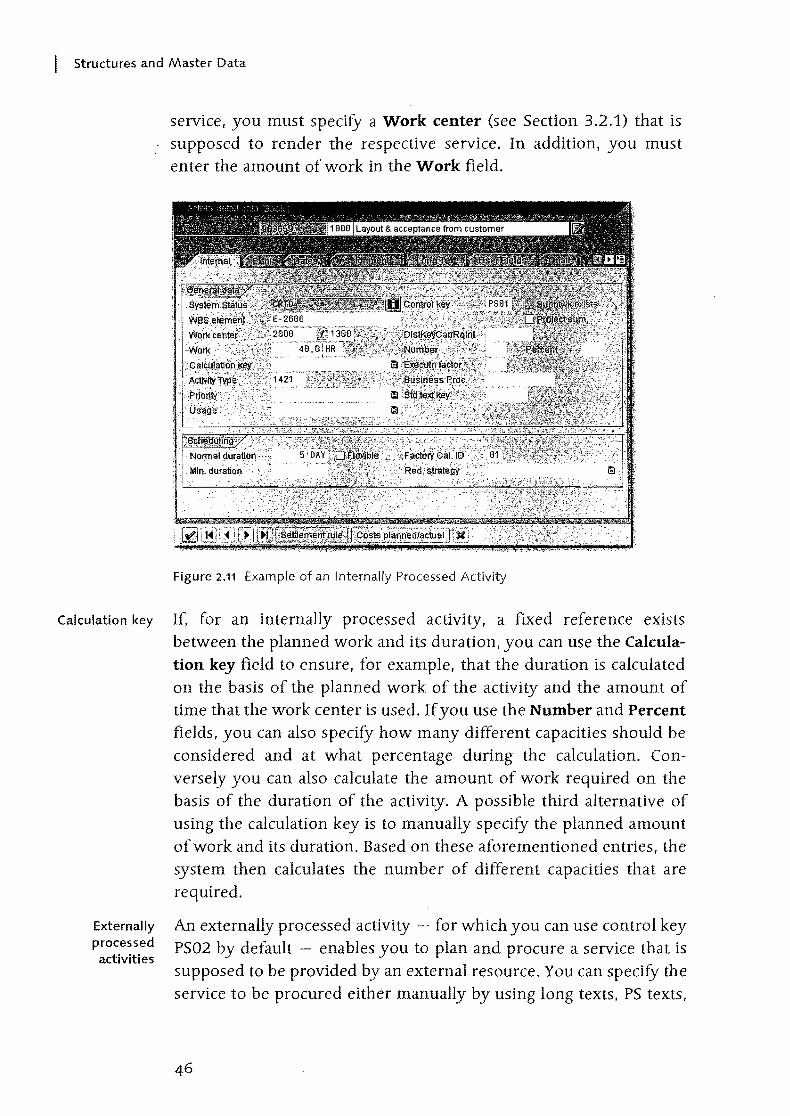
I Structures and Master Data
service, you must specify a Work center (see Section 3.2.1) that is supposed to render the respective service. In addition, you must enter the amount of work in the Work field.
Figure 2.11 Example of an Internally Processed Activity
Calculation key If, for an internally processed activity, a fixed reference exists between the planned work and its duration, you can use the Calculation key field to ensure, for example, that the duration is calculated on the basis of the planned work of the activity and the amount of time that the work center is used. If you use the Number and Percent fields, you can also specify how many different capacities should be considered and at what percentage during the calculation. Conversely you can also calculate the amount of work required on the basis of the duration of the activity. A possible third alternative of using the calculation key is to manually specify the planned amount of work and its duration. Based on these aforementioned entries, the system then calculates the number of different capacities that are required.
Externally processed activities
An externally processed activity - for which you can use control key PS02 by default - enables you to plan and procure a service that is supposed to be provided by an external resource. You can specify the service to be procured either manually by using long texts, PS texts,
or assigned documents, or by specifying appropriate info records or . outline agteements from Purchasing. Figure 2.12 shows an example
of an externally processed activity that is used to procure an external construction service within the network.
Figure 2.12 Example of an Externally Processed Activity
Network I 2·3
Based on your entries regarding the external service, the Planned Res.!Purc.
Delivery Time, the Activity Quantity, the Material Group, and the req. indicator
responsible Purchasing Organization and Purchasing Group, the system can create a purchase requisition. This process depends on the Res./Purc. req. indicator:
II- Immediately, Le., automatically the next time the network is saved
II- From release of the activity and the subsequent save process
II- Never automatically, but at any time during the save process once you have manually set the indicator from Never to Immediately
Like an externally processed activity, you can use a service activity Service activities
(default control key PS05) to plan and procure external services through PurchaSing (see Figure 2.13). Whereas external processing allows you to procure only one specified service, a service activity enables you to plan and procure several services and to enter data for services that has not yet been specified in detail.
47
I
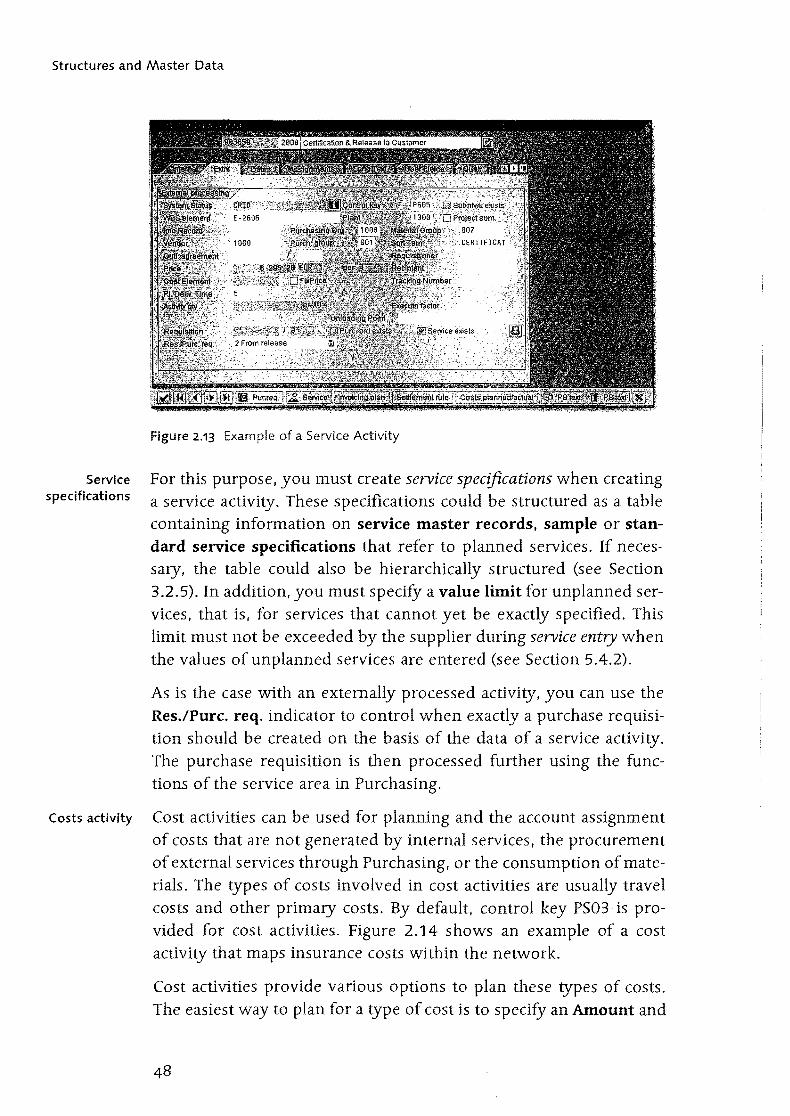
Structures and Master Data
Figure 2.13 Example of a Service Activity
Service For this purpose, you must create service specifications when creating specifications a service activity. These specifications could be structured as a table
containing information on service master records, sample or standard service specifications that refer to planned services. If necessary, the table could also be hierarchically structured (see Section 3.2.5). In addition, you must specify a value limit for unplanned services, that is, for services that cannot yet be exactly specified. This limit must not be exceeded by the supplier during service entry when the values of unplanned services are entered (see Section 5.4.2).
As is the case with an externally processed activity, you can use the Res./Purc. req. indicator to control when exactly a purchase requisition should be created on the basis of the data of a service activity. The purchase requisition is then processed further using the functions of the service area in Purchasing.
Costs activity Cost activities can be used for planning and the account assignment of costs that are not generated by internal services, the procurement of external services through PurchaSing, or the consumption of materials. The types of costs involved in cost activities are usually travel costs and other primary costs. By default, control key PS03· is provided for cost activities. Figure 2.14 shows an example of a cost activity that maps insurance costs within the network.
Cost activities provide various options to plan these types of costs. The easiest way to plan for a type of cost is to specify an Amount and
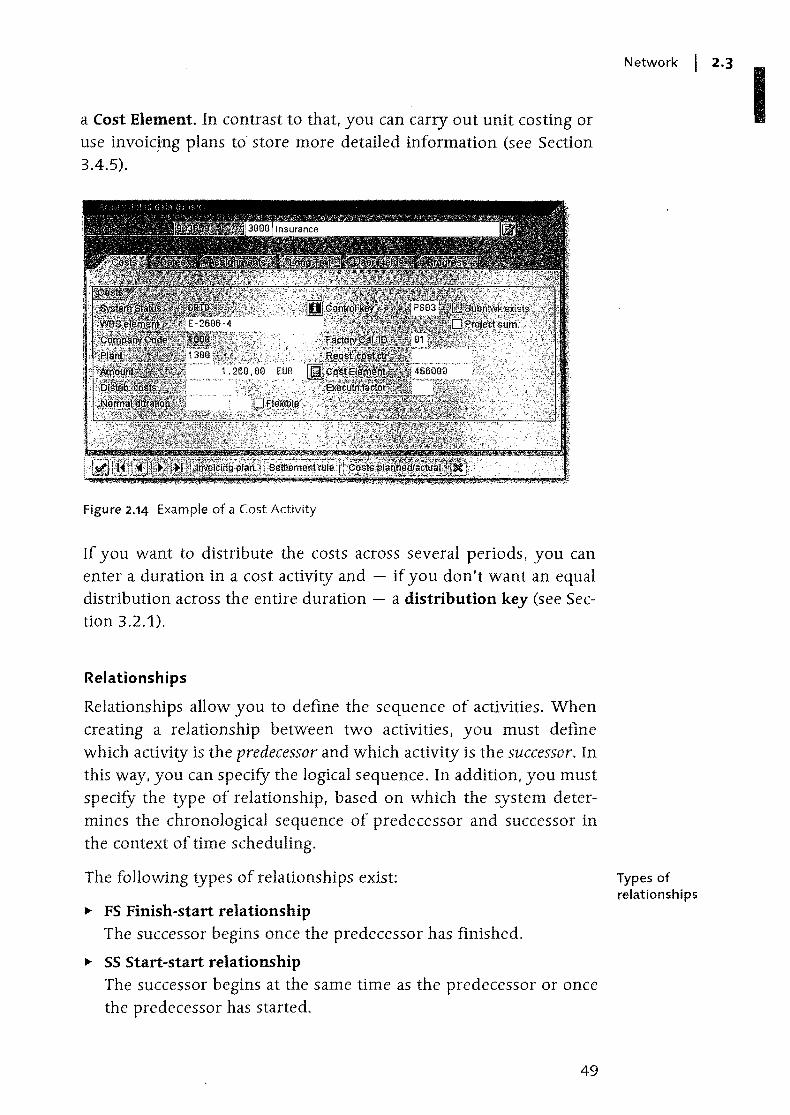
a Cost Element. In contrast to that, you can carry out unit costing or use invoic~ng plans to store more detailed information (see Section 3.4.5).
Figure 2.14 Example of a Cost Activity
If you want to distribute the costs across several periods, you can enter a duration in a cost activity and - if you don't want an equal distribution across the entire duration - a distribution key (see Section 3.2.1).
Relationships
Relationships allow you to define the sequence of activities. When creating a relationship between two activities, you must define which activity is the predecessor and which activity is the successor. In this way, you can specify the logical sequence. In addition, you must specify the type of relationship, based on which the system determines the chronological sequence of predecessor and successor in the context of time scheduling.
The following types of relationships exist:
.... FS Finish-start relationship The successor begins once the predecessor has finished.
.... SS Start-start relationship The successor begins at the same time as the predecessor or once the predecessor has started.
49
Network I 2·3
Types of relationships
I
I Structures and Master Data
... FF Finish-finish relationship The successor ends at the same time as the predecessor, or once the predecessor has ended .
... SF Start-finish relationship The predecessor begins once the successor has finished.
Time interval If you enter a positive time interval in a relationship during time scheduling, you can ensure that the time interval is kept between the activities. Conversely, a negative time interval means that in a finishstart relationship, for example, the activities can overlap by this time interval.
You can enter time intervals as absolute values, such as a number of days, or as a percentage based on the duration of the predecessor or successor. If you want the time intervals to refer exclusively to workdays or the operating time of capacities, you must also enter a factory calendar or work center in the relationship.
You can create relationships for activities in a tabular view. In addition, you can use the connection mode in the network graphic and Project Planning Board to create relationships graphically. Moreover, the Project Planning Board allows you to simply select activities and use the Connect selected activities icon to automatically create finish-start relationships between those activities in the order in which they are listed in the table.
External You can also create relationships between activities of different net-relationships works and therefore map interdependencies between the networks.
The networks that are connected by relationships in such a way may also belong to different projects. Relationships between activities of different networks are also referred to as external relationships.
Activity Elements
There are four different types of activity elements:
... Internal element
... External element
... Service element
... Costs element
As is the case with an activity, an activity element enables you to plan the costs and capacity requirements for internal services, to plan and
50
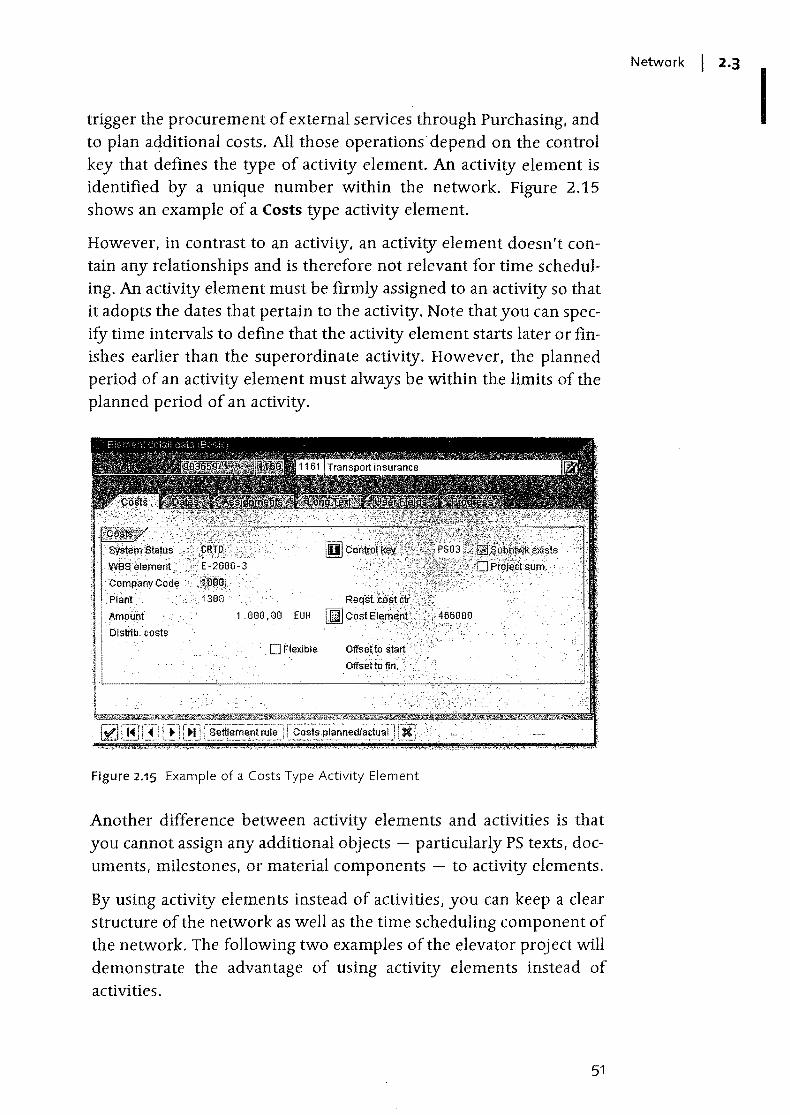
trigger the procurement of external services through Purchasing, and to plan additional costs. All those operations' depend on the control key that defines the type of activity element. An activity element is identified by a unique number within the network. Figure 2.15
shows an example of a Costs type activity element.
However, in contrast to an activity, an activity element doesn't contain any relationships and is therefore not relevant for time scheduling. An activity element must be firmly aSSigned to an activity so that it adopts the dates that pertain to the activity. Note that you can specify time intervals to define that the activity element starts later or finishes earlier than the superordinate activity. However, the planned period of an activity element must always be within the limits of the planned period of an activity .
.. :: 1388 .
AmouOt OistYlb.costs '. .'
Figure 2.15 Example of a Costs Type Activity Element
Another difference between activity elements and activities is that you cannot assign any additional objects particularly PS texts, documents, milestones, or material components to activity elements.
By using activity elements instead of activities, you can keep a clear structure of the network as well as the time scheduling component of the network. The folloWing two examples of the elevator project will demonstrate the advantage of using activity elements instead of activities.
51
Network I 2·3
I
2 I Structures and Master Data
Examples of activity elements
The delivery of elevator components is mapped by the internally ,processed activity, Delivery. For the transport, you want to plan additional insurance costs. To do that, you use a costs element called Transport insurance, which you assign to the Delivery activity. Due to the fixed date assignments between the activity and the activity element, the planned costs of the costs element automatically lie within the scheduled delivery period.
The assembly of an elevator component is carried out by several work centers; a part of this service is rendered by an external supplier. Because the different kinds of work are carried out simultaneously so that a detailed flow plan of the individual activities is not needed, you should use activity elements instead of individual activities for each work center and each external service. This means that you must create an activity with a planned duration for the entire assembly of the component, including the required relationships. Then, you have to assign an activity element to this activity for each work center that is involved, as well as for the required external procurements.
Subnetworks
Subnetworks are networks that are linked to an activity of another network via an assignment at the network header level. Thus, subnetworks can be used to further specif)r the superordinate activity.
Data exchange When assigning a network to a superordinate activity, the system passes activity dates to the subnetwork header. In addition, the subnetwork can carry out the assignment of the activity to WBS elements, organizational data, and the relationships of the activity in the subnetwork. During the assignment of a subnetwork, the Subntwk exists indicator is set in the superordinate activity, and the control key of the activity changes (see Section 2.3.2).
You can also assign several subnetworks to an activity. Furthermore, you can assign subnetworks to the activities of a subnetwork. In plant maintenance or service projects, you can also use plant maintenance or service orders instead of networks as subnetworks. To do this, you must store the assignment to a superordinate network activity in the headers of those orders. Overall, network scheduling (see Section 3.1.2) enables you to Simultaneously schedule the dates of the superordinate network and the subnetworks (including the
52
plant maintenance and service orders that have been assigned as subnetworks) have been assigned as subnetworks).
Instead of creating subnetworks manually, you can also use milestone functions to automatically create networks based on standard networks, and simultaneously assign the networks as subnetworks to activities. The example described in the following sections will demonstrate a possible way of using subnetworks:
At an early planning stage of the elevator project, you want to define a network to roughly map the flow of individual project activities. You can use the network right away to plan dates, costs, and capacity requirements for planning, construction, and assembly of the elevator.
In the context of the detailed project planning, you then want to create new, detailed networks especially for construction and assembly. These networks are assigned separate responsible persons and the network headers are assigned to the Construction and Assembly activities of your first network. The system passes the dates of the activities and the assignment to the work breakdown structure of the elevator project to the two subnetworks.
To avoid the duplication of planned costs and capacity requirements for the construction and assembly for your project in Reporting, you will have had to define in Customizing that the control keys of superordinate activities are automatically modified in such a way that they are no longer relevant for costing and the calculation of capacity reqUirements.
The persons responsible for the subnetworks can then process the subnetworks and add more details without locking the superordinate network. Ifbasic dates of the project or parts of the project must be shifted, you can use overall network scheduling to simultaneously recalculate the dates of the superordinate network and of the subnetworks.
2.3.2 Structure Customizing of the Network
Before you can create operative networks in the SAP system, you must configure several settings in the Customizing section of SAP Project System. In addition to settings in structure Customizing that are described in the follOWing sections, you must define scheduling
53
Network I 2·3
Example of subnetworks
I
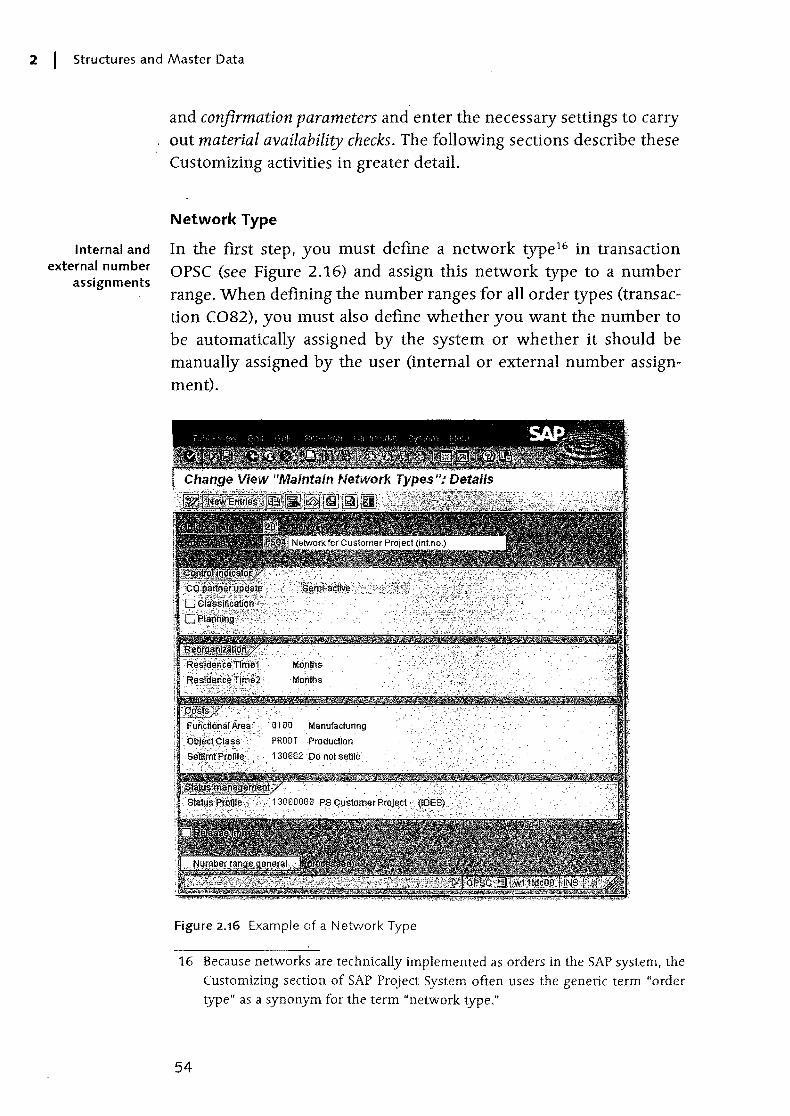
2 I Structures and Master Data
I nternal and external number
assignments
and confirmation parameters and enter the necessary settings to carry out material availability checks. The follOwing sections describe these Customizing activities in greater detail.
Network Type
In the first step, you must define a network type16 in transaction OPSC (see Figure 2.16) and assign this network type to a number range. When defining the number ranges for all order types (transaction C082), you must also define whether you want the number to be automatically assigned by the system or whether it should be manually assigned by the user (internal or external number assignment).
. Manufacturing
Figure 2.16 Example of a Network Type
16 Because networks are technically implemented as orders in the SAP system, the Customizing section of SAP Project System often uses the generic term "order type" as a synonym for the term "network type."
54
Furthermore, you can store default values for the Functional Area, the Objec,t Class, and the Settlement Profile of network objects as well as for the Status Profile of a user (see Section 2.6). If you activate the Release immed. indicator. you can make sure that all network objects are assigned the status Released as initial status, which means that you can enter actual data in the network immediately after you have created the network.
Network I 2·3
Besides control settings that are used for classification and archiving Planning networks
purposes (residence times, see Section 2.10). you can use the plan-ning indicator to determine whether the planned values of the net-work should be validated against the budget of assigned WBS ele-ments during an active availability check (see Section 4.1.5). Networks whose planned costs are not included in the availability check are referred to as planning networks. Planning networks are particularly relevant for projects that utilize a non-valuated project stock (see Section 3.3.2), because contrary to regular networks, plan-ning networks can display planned costs for material components that are stored in the non-valuated project stock.
Network Type Parameters
Once you have defined a network type, you must define the network type parameters for a combination of the plant and the Network type in transaction OPUV (see Figure 2.17). In addition to the default values for the Reduction Strategy (see Section 3.1.2), the planned and actual Costing Variants, and the time of plan Cost Calculation, the network type parameters are assigned only referenced control settings.
These settings comprise parameters for generating settlement rules (see Section 6.9), for writing change documents when master data and statuses are changed (Change document indicator), for automatic determination of alternative bills of materials, and for indicators for external procurement processes (see Section 5.4).
The specification of a Change profile is only relevant if you use the variant configuration of networks (see Section 2.8.6). In this case, the change profile that you can define via transaction OPSG determines how retroactive changes to the configuration should be handled once a network has been released.
55
I
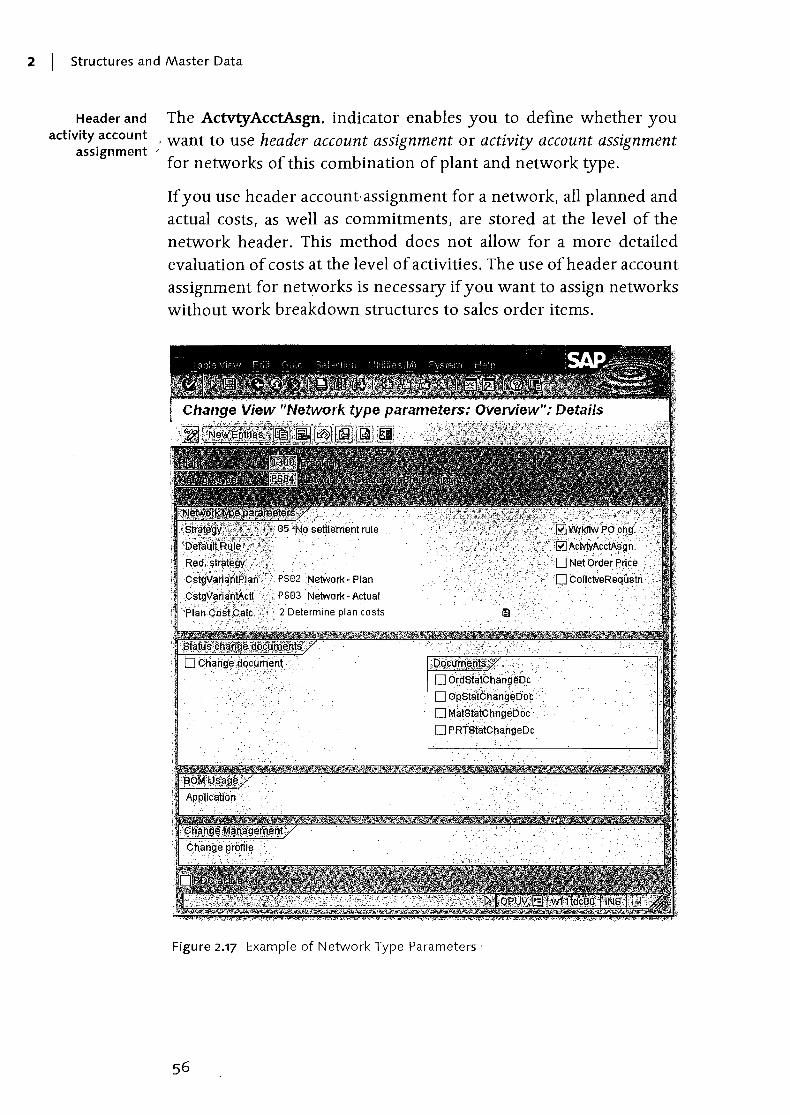
2 Structures and Master Data
Header and activity accou nt
assignment
The ActvtyAcctAsgn. indicator enables you to define whether you , want to use header account assignment or activity account assignment for networks of this combination of plant and network type.
If you use header account· assignment for a network, all planned and actual costs, as well as commitments, are stored at the level of the network header. This method does not allow for a more detailed evaluation of costs at the level of activities. The use of header account assignment for networks is necessary if you want to assign networks without work breakdown structures to sales order items.
Figure 2.17 Example of Network Type Parameters'
.lfYo.'u,use header account(lssigl1m~~ifor networks in combinati&l1;iNith ··\A.lP(~'\b~~,kdown structures.YqA····9tqJ~ not assign the activifies~l,~h~~e ,rlet~dfks to different WBSele, rB~cause the cost informati6r{~is;W,~" .
·/pJ~y~4inaggregated formoh'-!\. ",\~:~Iements that havebe~~'~~!,gr,~~ .tb;~Q~twbrk headers, assigning',>]Vifies of these netwbrkst~;"differe'r1t WBS:¢lements could prove tobe:9@&·~b;nfusing when anaJyzlngJh~'Ci:>sts,.
If you use activity account assignment for networks. the activities and activity elements represent separate account assignment objects. All cost-related information can be analyzed separately in the individual activities and activity elements. Unlike networks that are based on header account assignments, networks for which you use activity account assignments allow you to assign the activities to different WBS elements without any problems.
Network I 2·3
[!l
Y~ucannot use header account assignment and activity account 'assign- [«] rnent in parallel for the same r\e~~ork. Furthermore, you cannotretroac-tively change this property of a ~.e1:work. . .
The plant-dependent definition of the network type parameters enables you to define different parameters in order to use networks in different plants, if that is necessary. The network type parameters you define are determined on the basis of the plant and network type you have specified in the network header during the creation of a network.
Network Profile
To be able to create a network, you also need a network profile that you can define using transaction 0 PUU (see Figure 2.18). In the network profile, you can enter various default values for the fields and the presentation of network headers, activities, activity elements, relationships, and material components.
In particular, you can already store default values for the plant, the network type, and the MRP controller of the network in a network profile so that you only need to specify a network profile when creating a network. If you haven't defined any MRP controllers in Production yet, or if you want other MRP controllers to be responsible for networks, you must first define MRP controllers for your networks in Customizing.
57
I
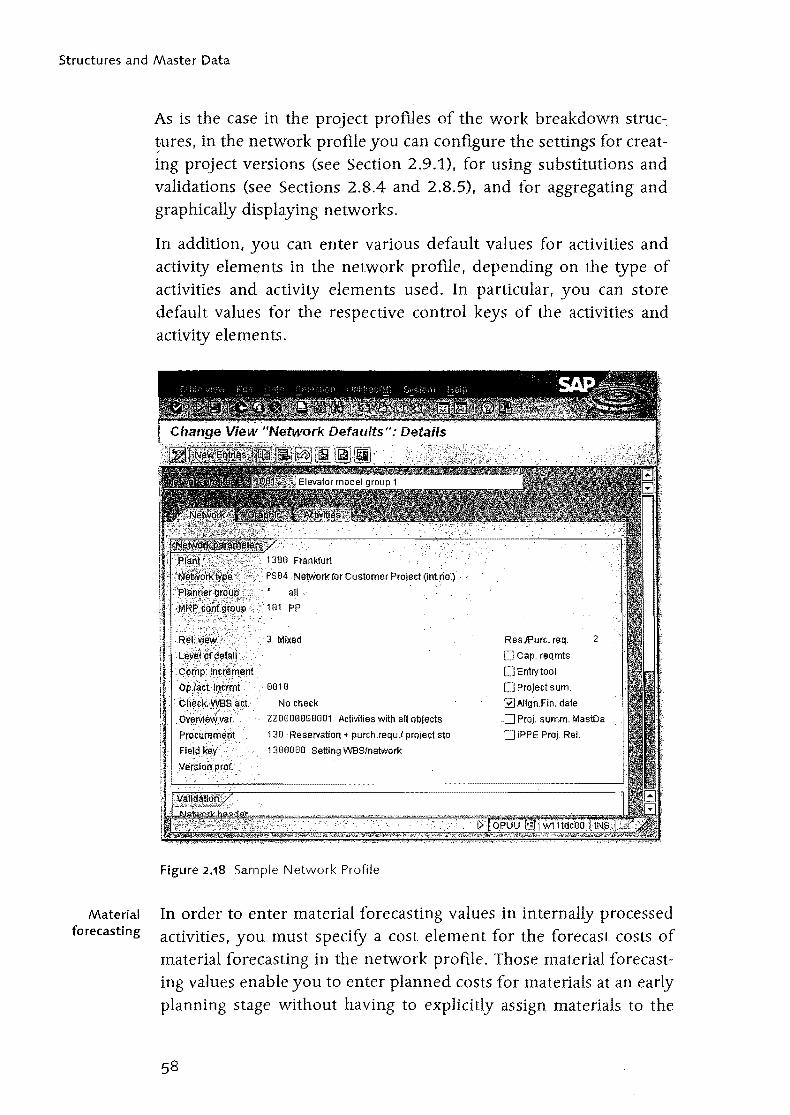
Structures and Master Data
As is the case in the project profiles of the work breakdown struc-: ~ures, in the network profile you can configure the settings for creating project versions (see Section 2.9.1), for using substitutions and validations (see Sections 2.8.4 and 2.8.5), and for aggregating and graphically displaying networks.
In addition, you can enter various default values for activities and activity elements in the network profile, depending on the type of activities and activity elements used. In particular, you can store default values for the respective control keys of the activities and activity elements.
. . PS64 . NetWork for Customer ProjectOnt.rfo.)
all .
181PP
3 Mixed
dO~.rrln:9r~7n~rrt Op,lactjf,lcrmt . 0818
·bfi~dkWEJ8~ct:·· No check
.~~~ie~va{ Prod.irem~i\t .. '. ,"'~.
Fiel4k~y .
.. ZZ0000080081 Activities with all objects
138 Reservation + purch.requ.f project sto
1388800 Setting WBSfnet'l\lork
Figure 2.18 Sample Network Profile
ResJPurc. req. 2
o Cap. reqmts
o En1rytool
o Project sum.
0Align.Fin. date
.0 Proj. summ. MastDa
o iPPE Proj. ReI.
Material In order to enter material forecasting values in internally processed forecasting activities, you must specify a cost element for the forecast costs of
material forecasting in the network profile. Those material forecasting values enable you to enter planned costs for materials at an early planning stage without having to explicitly assign materials to the
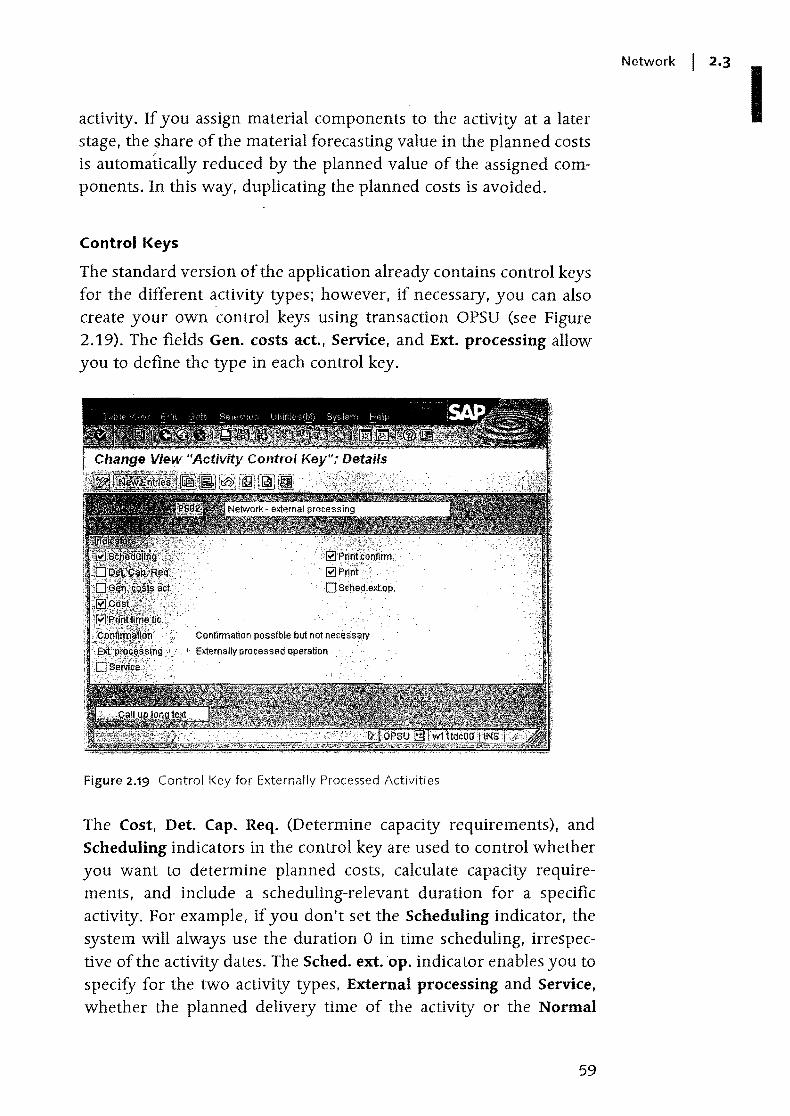
activity. If you assign material components to the activity at a later stage, the share of the material forecasting value in the planned costs is automatically reduced by the planned value of the assigned components. In this way, duplicating the planned costs is avoided.
Control Keys
The standard version of the application already contains control keys for the different activity types; however, if necessary, you can also create your own control keys using transaction OPSU (see Figure 2.19). The fields Gen. costs act., Service, and Ext. processing allow you to define the type in each control key.
. . .
Confirmation possible but not necessan' .
. + Externally processed operation·
Figure 2.19 Control I<ey for Externally Processed Activities
The Cost, Det. Cap. Req. (Determine capacity requirements), and Scheduling indicators in the control key are used to control whether you want to determine planned costs, calculate capacity requirements, and include a scheduling-relevant duration for a specific activity. For example, if you don't set the Scheduling indicator, the system will always use the duration 0 in time scheduling, irrespective of the activity dates. The Sched. ext. ·op. indicator enables you to specify for the two activity types, External processing and Service, whether the planned delivery time of the activity or the Normal
59
Network I 2·3
I
I Structures and Master Data
duration field in the Internal tab should be used for scheduling the activity.
If you set the Confirmation indicator, you can define whether an activity must be confirmed before you can close it, whether confirmations are permitted but not required, or whether the entry of confirmations is not possible for activities with this control key.
Shop papers To be able to print shop papers, that is, completion confirmation slips or time tickets, for an activity, you must permit the printout by setting the respective indicators in the control key. Furthermore, you must first define the print control in the structure Customizing section of the networks. Finally, you must specity the number of shop papers to be printed, as well as the printer in the operative network activities.
Subnetwork Parameters
If you want to use subnetworks, you must enter two settings in the Subnetwork Parameters. These settings depend on the network type of the superordinate network being used and on the network type (or order type in the case of plant maintenance or service orders). First you must specity the control key that must be set automatically for the superordinate activity once a subnetwork has been assigned. Secondly you must specify the dates you want to pass from the activity to the subnetwork header.
In addition, you can define priorities and field keys for user fields in the Customizing section of operative networks. This process is similar to customizing the work breakdown structures (see Section 2.2.2).
[ ! ] Before you can create operative networks, you must first define schedul
ing parameters, confirmation parameters, and - if materials are used in
the network - the material availability check in the Customizing section
of SAP Project System, in addition to the structure Customizing settings.
These settings are described in more detail in Sections 3.1.2,5.3, and 3.3.3.
60

Standard Networks
A standard network consists of a standard network header and standard network activities and you can use it as a template for operative networks. You can create standard networks using ~ransaction CN01. By storing an assignment to standard WBS elements in the standard network header and in the standard network activities, you can directly use both standard structures together as templates (see Section 2.7).
As in an operative network, you can use the four different activity types for structuring purposes in a standard network and create relationships between the activities of the standard network and also with activities of other standard networks. You can use activity elements and milestones to further specify the standard network activities. If you want to document the activities of a standard network, you can use long texts and PS texts, but no document info records.
Unlike networks, standard networks are technically not implemented as orders in the SAP system, but as plans (comparable to the routings that can be used as templates for production orders), For this reason, several essential differences exist between operative networks and standard networks.
To create standard networks, you need standard network profiles that you must have preViously defined in the Customizing section for standard networks in SAP Project System. Standard network profiles contain data that is similar to the data contained in network profiles for operative networks (see Section 2.3.2).
When creating a standard network, you can use another standard network as a template, but you can't use an operative network for this purpose.
A standard network can be identified by an 8-digit key that is based on specific number range intervals for standard networks and an alternative number. This means that you can create different structures for a standard network key, each of which can be distinguished by a different alternative.
You can only specify statuses in the header of the standard network; however, note that you must first create those statuses in the Customizing section of standard networks. When doing so, you can use
61
Network I 2·3
Structure of standard networks
Standard network profiles
I

I Structures and Master Data
a specific indicator to control whether you want the system to issue a warning message when the standard network is used as a template.
A network consists ():ta. ~etwork header anda~ir:~' l:~~ip,at can be linked to each other via.rela,1:ionships in order to mqpJhe~fdiff~rent activities within a projkfDepending on the activitytXR~{:Y9#ian store different data relatt;dtoplamiing and controliingan'~sfix:i~Yin that activity. Activity elements and subnetworks are simply diffet~n!rI)ethods of detailing activities. Youcall~reate standard network{t9'y~~:lr(:!ri1 as templates for operative networks~ Before you can createtleJ®QH<~,you must make various settingsinthe Customizing section of SAP~f'r6J~d System.
2.4 Milestones
In SAP Project System, milestones can be used to map events of particular importance, such as the completion of critical project stages. For this purpose, you can store in a milestone a descriptive short text and, if necessary, a long text as well as the planned date on which the milestone will probably be reached. This information is complemented by data on the milestone's purpose or function. You can document the achievement of a milestone by an actual date.
[»] Note that in SAP Project System, milestones don't control time scheduling for WBS elements and activities.
Standard milestones and
milestone groups
You can create any number of milestones for WBS elements or activities in operative structures and in standard structures. When doing so, the system automatically assigns a unique ID number to each milestone.
If you want to use milestones that are similar to each other on a regular basis, you can create standard milestones as templates via transaction CN11. Moreover, you can assign several milestones as milestone groups to one object. For this purpose, you must first define the relevant milestone groups in Customizing of SAP Project System (transaction OPT6) and then assign standard milestones to those milestone groups.
Depending on whether you want to assign milestones to a WBS element or to an activity, you can use different methods of usage.
62
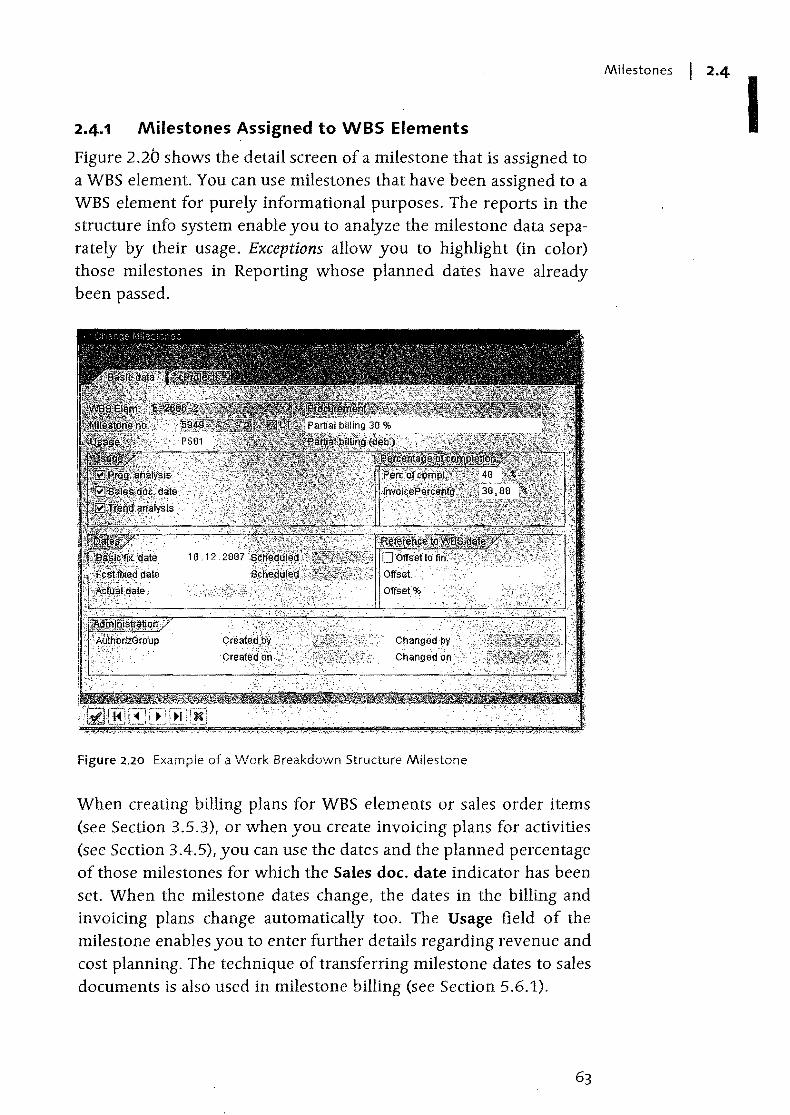
2.4.1 Milestones Assigned to WBS Elements
Figure 2.20 shows the detail screen of a milestone that is assigned to a WBS element. You can use milestones that have been assigned to a WBS element for purely informational purposes. The reports in the structure info system enable you to analyze the milestone data separately by their usage. Exceptions allow you to highlight (in color) those milestones in Reporting whose planned dates have already been passed.
Figure 2.20 Example of a Work Breakdown Structure Milestone
When creating billing plans for WBS elements or sales order items (see Section 3.5.3), or when you create invoicing plans for activities (see Section 3.4.5), you can use the dates and the planned percentage of those milestones for which the Sales doc. date indicator has been set. When the milestone dates change, the dates in the billing and invoicing plans change automatically too. The Usage field of the milestone enables you to enter further details regarding revenue and cost planning. The technique of transferring milestone dates to sales documents is also used in milestone billing (see Section 5.6.1).
Milestones I 2·4
I
I Structures and Master Data
If you use project versions (see Section 2.9.1) and set the Trend analysis indicator for a milestone, you can analyze retroactive changes to milestone dates either in a table or graphically at a later stage via the milestone trend analysis (see Section 5.7.2).
The planned date and planned percentage of completion in the milestone can be used to determine planned percentages of completion (see Section 5.7.1) if you set the Prog. analysis indicator. If you enter an actual date in the milestone, you can also use the percentage of completion as an actual percentage of completion.
Milestone dates You can either specity the planned date of a milestone that is assigned to a WBS element as a fixed date or derive it based on the scheduled date of the WBS element.17 In this context, you can specify whether you want the milestone date to refer to the start date or to the finish date. In addition, you can specify an absolute or percentage time interval (based on the duration of the WBS element). If you use a time reference for the WBS element, then changing the scheduled WBS element date will automatically change the milestone date as well, whereas a fixed date is not affected by date changes in the WBS element.
To document that a milestone of a WBS element has been reached, you must manually enter an actual date into the milestone. You cannot derive that actual date from the actual dates of the WBS element.
2.4.2 Milestones Assigned to Activities
You can use milestones that are assigned to activities in the same way as those that are assigned to WBS elements (see Section 2.4.1). However, milestones assigned to activities provide the following additional milestone functions that can be used in any combination (see also Figure 2.21).
17 Note that the milestone date is derived from the scheduled dates. These scheduled dates are determined in the time scheduling process for the work breakdown structure (see Section 3.1.2), either on the basis of the activities assigned or - if you don't use any networks on the basis of the planned dates of the WBS element.
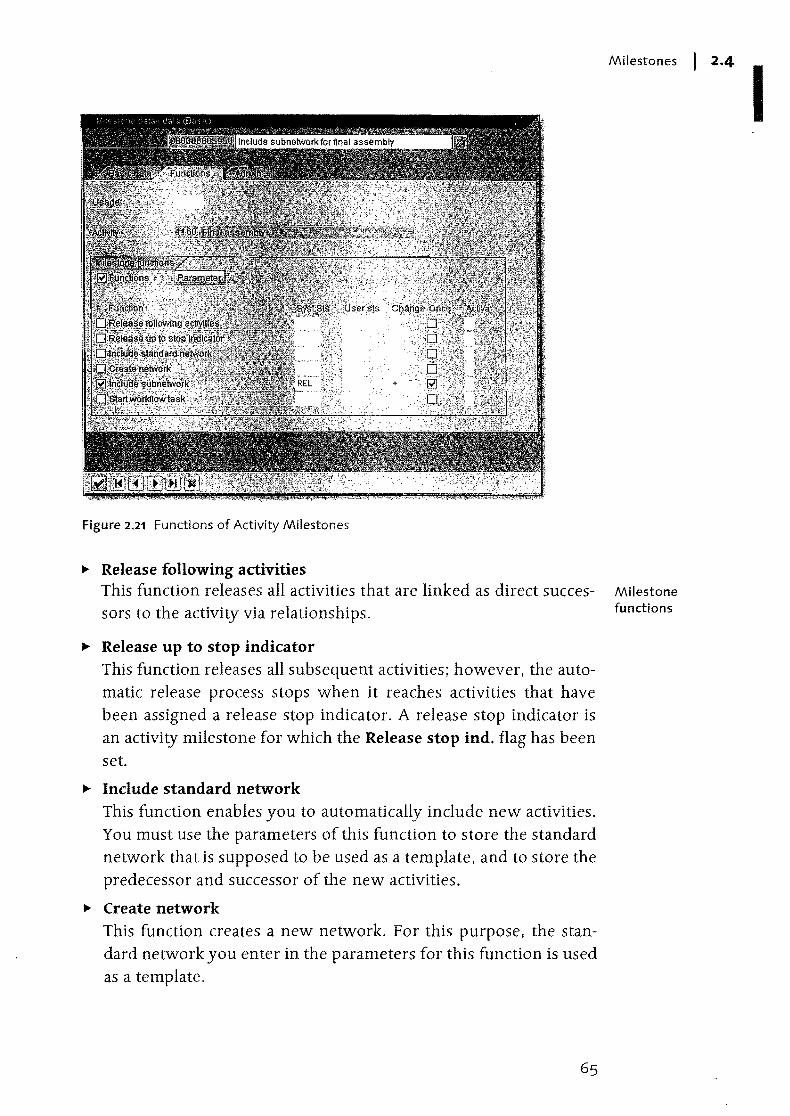
Figure 2.21 Functions of Activity Milestones
... Release following activities This function releases all activities that are linked as direct successors to the activity via relationships.
... Release up to stop indicator This function releases all subsequent activities; however, the automatic release process stops when it reaches activities that have been assigned a release stop indicator. A release stop indicator is an activity milestone for which the Release stop ind. flag has been set.
... Include standard network This function enables you to automatically include new activities. You must use the parameters of this function to store the standard network that is supposed to be used as a template, and to store the predecessor and successor of the new activities.
... Create network This function creates a new network. For this purpose, the standard network you enter in the parameters for this function is used as a template.
Milestones I 2·4
Milestone functions
I
I Structures and Master Data
~ Include subnetwork You must use the parameters of this function to define which activity you want to detail by using a subnetwork and also, which standard network should be used as a template for the subnetwork. When you trigger this function, the system will automatically create a network and links this network to the activity specified. In this context, a dialog window allows you to decide whether you want the relationships of the activity to be adopted by the subnetwork.
~ Start workflow task This function triggers a workflow that you must specifY in the parameters for this function. Note that prior to this, you must define the workflow.
You can use the fields provided for each function in the milestone to define whether a function should be used and if so, when it should be triggered. A milestone function can start automatical1y if the milestone contains an actual date and the status of the activity changes, or if one of these two events occurs. If you use a status change to trigger a function, you must also specify whether setting a status or undoing the status, or if both status changes should be relevant. In addition, you must define which status combinations should be relevant. Lastly, you can use the Once indicator to specify whether you permit multiple triggering of the function or whether you don't want the function to be executed more than once.
Milestone dates As with milestones that are assigned to WBS elements, you can either enter the planned dates of activity milestones manually (fixed dates), or by referencing the dates contained in the activity.
You can enter the actual dates of activity milestones either manually, or derive them from the actual dates contained in activity confirmations (see Section 5.3).
Usage You can define usages in the Customizing section of the milestones and store those usages in milestones that are assigned to WBS elements or activities. On the one hand, a usage serves as a sorting and or filtering criterion in the context of analyses; on the other hand, you can store specific control settings in a usage.
If you enter a Billing/Invoicing Rule in the usage, that rule can be transferred to the billing and invoicing plans along with the date and
66
percentage of a milestone. In this way, the usage of a milestone enables you t9 control, for example, whether a down payment, a partial invoice, or a final invoice is due on the milestone date (see Section 3.5).
By setting the No dialog indicator you can hide dialog windows that are used for informational purposes only when triggering a milestone function.
2.5 Docunlents
Documents I 2·5
You can use long texts to describe objects in greater detail and assign long texts
those long texts to all structure objects of SAP Project System: project definitions, WBS elements, network headers, activities, activity ele-ments, and milestones. The short text of an object always represents the first line of the long text.
However, note that you cannot simply copy long texts from one object to another. Moreover, long texts don't support a languagedependent entry of texts, or any status or version management. For this reason, SAP Project System allows you to use PS texts or documents from document management. 18
2.5.1 PS Texts
You can create PS texts using either transaction CN04 or any other editing transaction of project structures and assign those texts to WBS elements or activities. The SAP Mail System can then be used to send PS texts to other SAP users. A PS text can be identified on the basis of the Text type as well as of the Name, Format, and the Language of the PS text.
The Text type serves as a sorting criterion for your PS texts. You must define appropriate Text types for PS Texts in the Customizing section of SAP Project System.
18 In addition, you can assign any documents to projects by using the generic object services. However, this type of assignment is not explicitly displayed in the editing or reporting transactions of SAP Project System. Instead you must always call it via the Attachment list of the generic object services.
I
I Structures and Master Data
PS text formats You can use the SAPscript format as Text format or one of the followipg formats: DOC, RTF, PPT, and XLS.19 Depending on the format you choose, you can also use the corresponding user interface for creating the PS texts. For example, if you want to create a PS text in DOC format, you can do that in Microsoft Word. This means that you can also include existing MS Word documents or use them as templates.
[»]
PS texts can be created in dif(erent languages. The Language field in the identification of the PS texts will enable you to distinguish the texts at a later stage. The system automatically provides you with the existing PS texts in your logon language. If no PS text is available in your logon language, the system displays a dialog in which you can select a PS text.
You can use PS texts as templates for other PS texts or create references between the texts. If you reference a PS text that has been assigned to a specific object in another object, which may even be located in a different project, changes to the PS text assigned to the former object will also occur in the PS text aSSigned to the other object.
Note that PS texts are stored in the SAP database.
2.5.2 Integration with Document Management
You can assign document info records of SAP Document Management to operative WBS elements and activities and thus directly access the original documents that are managed by the document info records from within editing project transactions.
Depending on the settings in the document management system, you can use virtually any document format in projects. The original documents don't need to be saved in the SAP database and can be stored on separate document servers. In addition, you can use functions such as Status management, Versioning, or Classification for documents. Once you have created an aSSignment to an existing document info record, you can directly navigate to that record from your projects.
19 If you have preViously used PS texts, you cannot use the PPT and XLS formats until you have executed conversion report CN_MIGRATION_PSTX_SOI once via transaction SA38. Note 578106 contains further details on this aspect.
68
In addition, you can use the editing functions for projects to create new docqment info records and check in original documents. At the same time. you can create a link to a WBS element or activity. The Internet service CNW4 enables you to access project documents through the Internet without having to install an SAP GUIon your machine.
Statuses I 2.6
< '·'·.'?(~:S·;,l>'-·~'·
;1\19,,; '. ~t;you can not assign .~hf· \ore~L. ~~n structures andstan#
;i~~flnfo records to stand~r~;W6(J< [«] "prks. . ... ', ~
,.>~.;; < <-.'-
2.6 Statuses
Project definitions. WBS elements. network headers. activities. and Using statuses
activity elements contain statuses. On the one hand. statuses docu-ment the state of an object and therefore serve as information or selection criterion for evaluations. On the other hand. statuses define which business transactions are currently possible for the respective object.
There is a general distinction between system statuses - statuses that are predefined in the system - and user statuses - statuses that you can define in the Customizing section of SAP Project System and then summarize in a user status profile. The 4-digit short forms of up to seven system and user statuses each are already displayed in the basic data of the objects. The detail screens of the statuses contain all active system statuses as well as all user statuses that have been defined within the status profile. including their short forms and short texts (see Figure 2.22).
The detail screen of the statuses also tells you which business processes the current combination of system and user statuses will permit. which ones are forbidden, and which business processes are only permitted with a warning. The Transaction analysis provides information about which statuses are responsible for each situation.
To be able to carry out a business process, there must be at least one active status that permits the process, while no status that prohibits the process or permits it only with a warning can be active at the same time. A warning is issued for a business process when there is at least one active status that permits the process with a warning and when no status is active that prohibits the process.
69
Transaction analysis
I
2 Structures and Master Data
Figure 2.22 Details on System and User Statuses
[»] As soon as there is one active status that prohibits the business process regardless of whether it is a system or a user status - r the process cannot be carried out.
Statuses are either automatically set by the system based on different business processes (such as budgeting or entering actual dates), activated by inheritance,2° or manually assigned by the user.
20 As of the Enterprise Release, you can also pass on user statuses to subordinate project objects that contain the same user status profile by using the Set & Pass On function. Conversely, the Undo & Pass On function enables you to reset user statuses for complete parts of the project.
70
The following list contains some important system statuses for work breakdown structures that you can set manually:
/
to- CRTD Created
Initial stat~s that allows all planning activities and structure changes, but not the entry of actual dates or actual costs.
to- REL Released
Status that allows the entry of actual data. This status is automatically passed on to subordinate project elements and cannot be reset.
to- PREL Partially released This status is automatically assigned by the system when a subordinate object is released. Regarding WBS elements, this status allows the entry of actual start dates.
to- TECO Technically completed . This status is automatically passed on. It does not allow any plan
ning activities, but it does permit the account assignment of costs and revenues.21 It deactivates assets under construction (see Section 6.9).
to- CLSD Closed Not only does this status prohibit planning activities, but also postings of actual costs. The status is automatically passed on. Resetting this status leads to the TECO status.
to- DLFL Deletion Flag
This status prohibits virtually all business processes and is a prereqUisite if you want to archive and delete projects at a later stage. The status can be inherited and reset.
to- FNBL Final billing
This status can be set for billing elements and cannot be inherited. It prohibits additional billing processes, but allows you to post costs.
In addition to the above, you can manually set various system statuses, for instance, to lock cost planning or time scheduling processes, or even the account assignment of documents.
Statuses I 2.6
System statuses
To enhance the functionality of system statuses, you can define your User status profile
own statuses, which are referr<ed to as user statuses. To do that, you
21 Note that the TEeo status deletes the capacity requirements in networks.
71
I
I Structures and Master Data
must first create an ID and a name for a user status profile in Customizing transaction OK02, and then assign those object types to the profile for which you want to use the user status profile. Lastly, you must define user statuses for the status profile. Figure 2.23 shows an example of a user status profile.
User statuses can be divided into statuses with and without status numbers. You can define a sequence for statuses that have a status number. This means that you can set those statuses in the defined sequence (but you should carefully read the Fl help for the Lowest and Highest Status Number fields). Note that only one status with a status number can be active for an object.
Conversely, you can set any number of user statuses without status numbers. The Position and Priority fields enable you to define which user status is displayed in its short form in the basic data of the objects.
Figure 2.23 Example of a User Status Profile
The user statuses that are supposed to be set during the creation of an object or during the assignment of the user status profile must be marked as Initial status. By assigning authorization keys to user sta-
72
Editing Functions I 2·7
tuses, you can assign explicit authorizations for setting and resetting user statu~es. 22
The detail screen of each status enables you to define influences and Next actions for the respective status. You can use the indicat~rs of the Next action columns to define whether you want the user status to be set automatically through a business transaction or whether you want it to be reset. The indicators of the Influence columns allow you to define which business transaction are allowed by the user status, and which ones are allowed with warning, prohibited, or not influenced at all.
You can store user status profiles as default values in project profiles and network types, as well as in standard project definitions. However, once a user status of the user status profile has been active in an object, you cannot enter any other user status profile in that object.
2.7 Editing Functions
Next actions and influences
You can either create operative project structures manually or based Using templates
on templates. For example, you can use standard work breakdown structures, standard networks, and other operative project structures and simulation versions as templates (see Section 2.9.2).
When you create a WBS using a template, the system automatically aligns the first section of the identification with the identification of the new project.23 If you only use parts of the template, you must carry out the alignment of the identification by yourself using the Replace function.
If you want to create projects that consist of a WBS and a network using templates, the following two methods are available:
... Create Project with a Template If you use this function and set the With activities indicator, you
22 If you allow fora user status to be automatically set as a follow-up action of a business process, you can use authorization object B_VSERST_T to indirectly assign the authorization for the business process (e.g., the release) through the authorization key.
23 You can add a customized extension that enables you to align multiple sections of the identification.
73
I
I Structures and Master Data
can control whether you want to copy the networks that have been assigned to the template as well.
~ Create Network with a Template If you use this method, you must first create a network using a template. If the network or standard network you use as a template is aSSigned to a WBS or standard WBS, the system will propose that you also create a new operative work breakdown structure on the basis of a template when you save the new network. This function is typically used for variant configurations with networks (see Section 2.8.6) and for assembly processing (see Section 2.8.7).
Even when editing operative structures, you can always use templates to extend your project structures. The process of creating new project parts by using templates is referred to as inclusion.
SAP Project System provides various transactions for creating, changing, and displaying operative project structures, such as the Project Builder, the Project Planning Board, or the Special Maintenance Functions. To edit your projects, you don't need to decide on using only one transaction. For example, you can create projects in the Project Builder and edit them later in the project planning board.
2.7.1 Project Builder
You can use the Project Builder (transaction CJ20N) to create, modify, and display project structures. Because of its structure and functions, the Project Builder is well suited for structuring projects. You don't need to make any additional settings in Customizing if you want to use the Project Builder. The user-specific options of the Project Builder enable you, for example, to define which objects may be edited in the Project Builder, or how many hierarchy levels of a project should be opened when you launch a project in the Project Builder.
Worklist The user interface of the Project Builder consists of three areas (see Figure 2.24). The Worklist on the lower left-hand side always contains the last five projects you have worked on. However, you can also include other projects or parts of projects in the worklist folders via right-clicking. If you want to edit a project that's contained in the worklist, you can simply double-click on the project.
74
Editing Functions 2.7
Once you have opened a project for editing, the structure of the Templates area
project is/displayed in the Structure tree in the upper left. At the same tim~, the system switches from the worklist to the Templates area in the lower left. You can insert objects from the Templates area, such as new WBS elements or activities, into the structure of the project either by double-clicking on the objects or via drag-and-drop.
Depending on the settings of the Project Builder, the Structure tree Structure tree
displays the project definition, WBS elements, network headers, activities, activity elements, milestones, PS texts, documents, and assigned material components of a project, including its IDs and descriptions. 24 You can change the project structure via drag-and-drop or by right-clicking, for instance, to modify the WBS hierarchy or to create or include new objects. The structure tree also enables you to navigate within the project structure.
, . ,. .. 1>. tia903659 2000 :,.2'::.,.,~2:'LA~.~61)6::1 .... '
~. SP!"CIFICATION ,SPECIFICATION. f>~ DQC PS.IMG-001.000:Engine unit 50 K>N ' [> t:. E-2606-1-1 ;Electncal anglneenng .
. . f> t:. E-2606-1-2 iMach,mlcal eng'lneeriil~ ;:,?'~~~e;2606;2 '... iProcurement" ""
1::19036591020 ;pre-procuremeric~u2ill '" ti. E-2606-2-1 :Procurement molor'
. '", c:J 903659 1060 ; Production maior !ill 0400 E-15008 ; Engine unit 50 KIN
Figure 2.24 Editing a Project in the Project Builder
Basic'
23.07.2007
13,11.2007
E?l SChadUleau!omat.
m 0 Capacity reqmts
24 By right-clicking on the structure tree heading you can change the order in which the IDs and description are displayed.
75
I
I Structures and Master Data
Preview area If you set the Preview last project indicator in the Project Builder options, the project that you had last worked on will be displayed in the Preview area in the structure tree. When you double-click on the project in the preview area, the project opens and can be edited, while the system immediately navigates to the last object you had worked on.
Work area The area on the right in the Project Builder - the work area dis-
Connection mode of the hierarchy
graphic
plays data of the object that you have selected in the structure tree. The upper part of the work area displays the ID and description of the object selected in the structure tree. You can use the icons on top of the work area to toggle between the detail screen of the object, a tabular list of objects of the same type, and a table that lists assigned objects. By right-clicking in the detail screen of an object, you can navigate, for example, to the settlement rule of an object or to billing and invoicing plans, and so on.
From the Project Builder, you can go directly to the Project Planning Board, to Easy Cost Planning, or to the sales pricings that you have created in the Project Builder. In addition, you can call the hierarchy graphic or - if you have selected a network object the network graphic.
Hierarchy Graphic
The hierarchy graphic displays the hierarchical structure of the WBS as a graphic (see Figure 2.2). Depending on the graphics profile stored in the project profile of the project and on your selection under WBS element display, the system can display different data for each WBS element. By default, a hierarchy graphic that you call from within an editing transaction displays the IDs, descriptions, and operative indicators of the WBS elements.
You can change operative indicators by clicking on them, or by calling the detail screen of a WBS element. You can also create new WBS elements in the hierarchy graphic - either with or without using a template and you can even delete WBS elements, provided this is permitted.
The Connection mode enables you to define the hierarchical relationship between two WBS elements by drawing a connection line from the upper-level WBS element to the lower-level one. The Cut
Editing Functions I 2·7
function allows you to delete the hierarchical connection lines of a WBS element.
./
If you use large work breakdown structures, you can show a naviga- Navigation area
tion area in which you can select the project parts you want to dis-play. The Vertically from level function allows you to define that -from a specific level - you no longer want to display WBS elements horizontally but vertically.
Network Graphic
The network graphic provides a graphical display of the activities of one or several networks (see Figure 2.3). In this context, the system arranges the display of activities in accordance with their logical sequence. However, you can change this order via drag-and-drop. In addition, you can group the activities based on the work centers used, or on the WBS elements to which they are assigned. As in the hierarchy graphic, you can also show a navigation area if you use
large network structures.
Depending on the graphics profile stored in the network profile and on your selection under Display activities, the network graphic can display the IDs, descriptions, control keys, duration, planned dates, and floats of the activities. In addition, specific indicators used in the extended display of the activities enable you to determine which objects have been assigned to an activity.
Time-critical activities (with an overall float smaller than or equal to zero) are highlighted in red in the network graphic, while partially confirmed activities are displayed with a Single strikethrough and finally confirmed ones with a double strikethrough (see Sections 3.1.2 and 5.3).
For the display of relationships, you can choose between a timedependent presentation and a presentation as finish-start relationships. If you choose the finish-start relationship presentation, the relationships are always displayed as connection lines between the finish of the predecessor and the start of the successor, irrespective of the relationship type. Contrary to this, the time-dependent presentation displays a start-start relationship, for example, as a connection between the start of the predecessor and the start of the succes-
77
I
I Structures and Master Data
Connection mode of the network
graphic
Cycle analysis
~
sor. The type and, if necessary, fixed time interval of a relationship, I are displayed in the graphical presentation of the relationship.
You can navigate to the detail screen of an activity or relationship by double-clicking on it. Moreover, you can create and delete activities and relationships in the network graphic.
To create relationships in the network graphic, you must draw a connection line between the predecessor and the successor in the connection mode of the network graphic. If you want to create a finishstart relationship, you must connect the finish of the predecessor with the start of the successor. If you want to create a finish-finish relationship, you must connect the finish of the predecessor with the finish of the successor, and so on.
The Loop analysis function of the network graphic enables you to highlight relationships that lead to a cyclical sequence of activities in specific colors. Networks that contain a loop cannot be scheduled.
You can also print out the hierarchy and network graphics of a project. When doing so, you can include additional graphics, such as a company logo, into the graphic as wel1. 25
2.7.2 Project Planning Board
Transactions CJ2?, CJ2B, and CJ2C of the Project Planning Board enable you to create, modify, and display work breakdown structures and assigned networks. In order to open a project in the Project Planning Board, you must specify a planning board profile, provided the project profile does not propose any. The planning board profile controls the display and functions of the project planning board.
The user interface of the Project Planning Board is based on an interactive SAP bar chart in which you can display data related to the project definition, WBS elements, activities, activity elements, and milestones, both as a table and in a diagram (see Figure 2.25). The planning board profile defines which of the aforementioned object types and which table fields are displayed. Note that you can change this setting in the Project Planning Board.
25 You can find further details about the integration of graphicS such as company logos into SAP graphics in Note 39258.
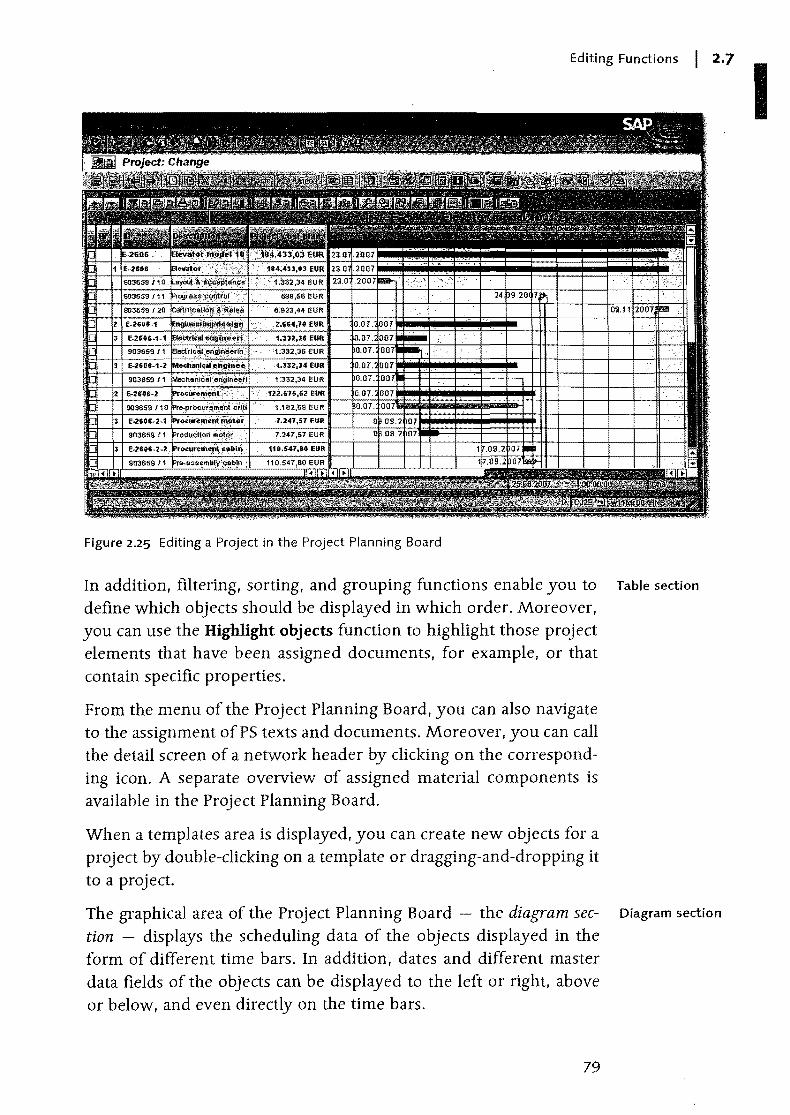
Editing Functions I 2·7
Figure 2.25 Editing a Project in the Project Planning Board
In addition, filtering, sorting, and grouping functions enable you to Table section
define which objects should be displayed in which order. Moreover, you can use the Highlight objects function to highlight those project elements that have been assigned documents, for example, or that contain specific properties.
From the menu of the Project Planning Board, you can also navigate to the assignment ofPS texts and documents. Moreover. you can call the detail screen of a network header by clicking on the corresponding icon. A separate overview of assigned material components is available in the Project Planning Board.
When a templates area is displayed. you can create new objects for a project by double-clicking on a template or dragging-and-dropping it to a project.
The graphical area of the Project Planning Board - the diagram sec- Diagram section
tion - displays the scheduling data of the objects displayed in the form of different time bars. In addition, dates and different master data fields of the objects can be displayed to the left or right. above or below, and even directly on the time bars.
79
I

I Structures and Master Data
Planning board The graphical presentation of the different objects in the table secassistant I tion, and particularly in the diagram section, is controlled by a graph-
Periods displayed
Time scale assistant
Additional overviews of
the Project Planning Board
) ics profile that's stored in the planning board profile. However, you can customize the presentation using the Planning board assistant in the Project Planning Board. A preview area in the planning board assistant allows you to view how your changes will affect the presentation of the objects.
The overall period displayed in the diagram section is referred to as the evaluation period. The evaluation period consists of a preevaluation period, a planning period, and a post-evaluation period. To further clarify these periods, you can display each of them in a different scale. For example, you can choose a greater scale to show project stages that are in the past or are located in the distant future than you choose for project stages that are in the current planning period, for which you may need a presentation in terms of days.
You can control the size and layout of the evaluation period, as well as the presentation of the time scale (color layout, display of the day of week or date, etc.), via using subprofiles of the planning board profile; however, you can customize them using the Options and the time scale assistant.
You can edit an object in the Project Planning Board in a table or in the detail screen, for example, by double-clicking on the object in the table or diagram section. If necessary, you can change scheduled dates graphically by moving, extending, or shortening the respective time bars.
Relationships between activities can be created as tables in the Project Planning Board, graphically in the connection mode, or by using the Connect selected activities function. If you use this function, the system automatically creates finish-start relationships for all selected activities in the order in which the activities are listed in the table section.
Besides the date overview described above, you can show additional overviews for selected objects. All those overviews consist of a table section and a graphical area. For those overviews, you can use a field selection to define which fields should be displayed in the table section. Furthermore, the context menu enables you to open a legend of the objects displayed, as well as additional functions. The following additional overviews are available in the Project Planning Board:
80
Editing Functions I 2.7
~ Component overview The graphical section of this overview displays requirements dates and, if needed, delivery and goods movement dates for assigned material components. You can navigate to the detail screen of a material component by double-clicking on it.
~ Cost overview The graphical section displays planned costs and, if available, planned and actual revenues ofWBS elements as a totals curve.
~ Capacity overview This overview compares the available capacity of work centers assigned to activities with the (total) capacity requirement for different periods as a bar chart or histogram. You can display the work centers by double-clicking on them.
~ plant maintenance overview The graphical section of this overview displays the dates of plant maintenance orders that you have assigned as subnetworks to activities.
Other functions that can be called through the Project Planning Board include the following:
~ Hierarchy graphic and network graphic
~ Planning boards for capacity leveling
~ Workforce planning
~ Milestone trend analysis
~ Cost and capacity reports
~ Overview of direct predecessors and successors of an activity
When exiting the Project Planning Board, you can save the changes to the Project Planning Board that you made using the planning board and time scale assistants and the field selection, as well as some changes to the options of the Project Planning Board. In this way, you can utilize those changes the next time you open a project in the Project Planning Board. The Undo user settings function enables you to delete the changes.26
26 You can use Report RSAPFCJGR to simultaneously reset user-specific settings for multiple users in the project planning board.
81
User-specific changes
I
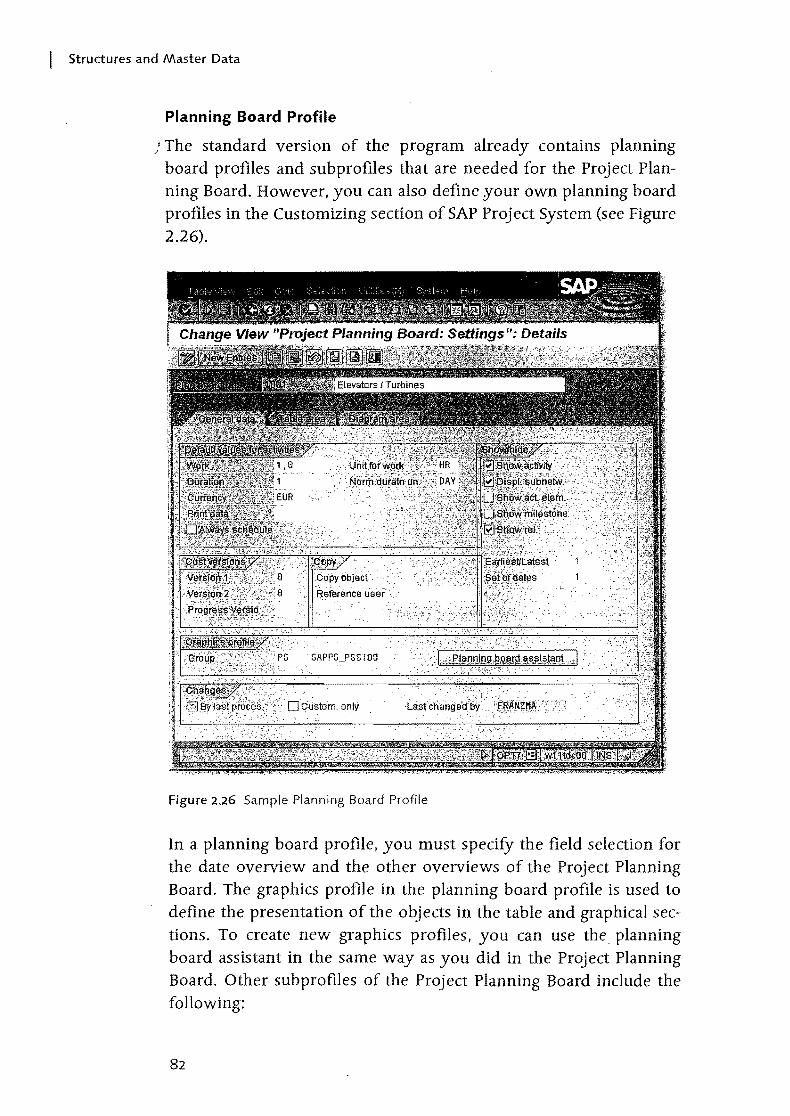
I Structures and Master Data
Planning Board Profile
} The standard version of the program already contains planning board profiles and subprofiles that are needed for the Project Planning Board. However, you can also define your own planning board profiles in the Customizing section of SAP Project System (see Figure 2.26).
Figure 2.26 Sample Planning Board Profile
In a planning board profile, you must specify the field selection for the date overview and the other overviews of the Project Planning Board. The graphics profile in the planning board profile is used to define the presentation of the objects in the table and graphical sections. To create new graphics profiles, you can use the. planning board assistant in the same way as you did in the Project Planning Board. Other sub profiles of the Proj ect Planning Board include the following:
82
Editing Functions I 2·7
~ Time profile This prgfile determines the beginning and end of the evaluation and planning periods. This means that preevaluation and postevaluation periods are defined automatically.27
~ Scale profile This profile enables you to define the scale to be used for the planning period, as well as for the preevaluation and post-evaluation periods.
~ Time scale profile This profile defines the presentation of the different time scales (such as annual. monthly, or daily period splits) and it determines which time scales should be displayed with which scales.
Furthermore, a planning board profile allows you to specify which objects, dates, and floats, and which data should be displayed with the different time bars. You should also note that in order to display cost and progress data, you must define the corresponding CO versions in the planning board profile.
2.7.3 Special Maintenance Functions
The menu for special maintenance functions in SAP Project System provides transactions that enable you to create, change, and display work breakdown structures (transactions CJ01, CJ02, CJ03), networks (transactions CN21, CN22, CN23), and work breakdown structures with networks assigned (transactions CJ2D, CJ20, CJ2A). Figure 2.27 shows, for example, how you use structure planning (transaction CJ20) to edit a project.
All of the above transactions allow you to switch between the detail screen of the project definition or network header and the table views of WBS elements or activities. Conversely, you can navigate from a table view into the detail screen of an object. The menu also enables you to call lists of assigned objects, such as PS texts, documents, or milestones.
You can also call the hierarchy and network graphics from the special maintenance functions and navigate to planning board displays.
27 You can find more information on defining time profiles in Note 207514.
I
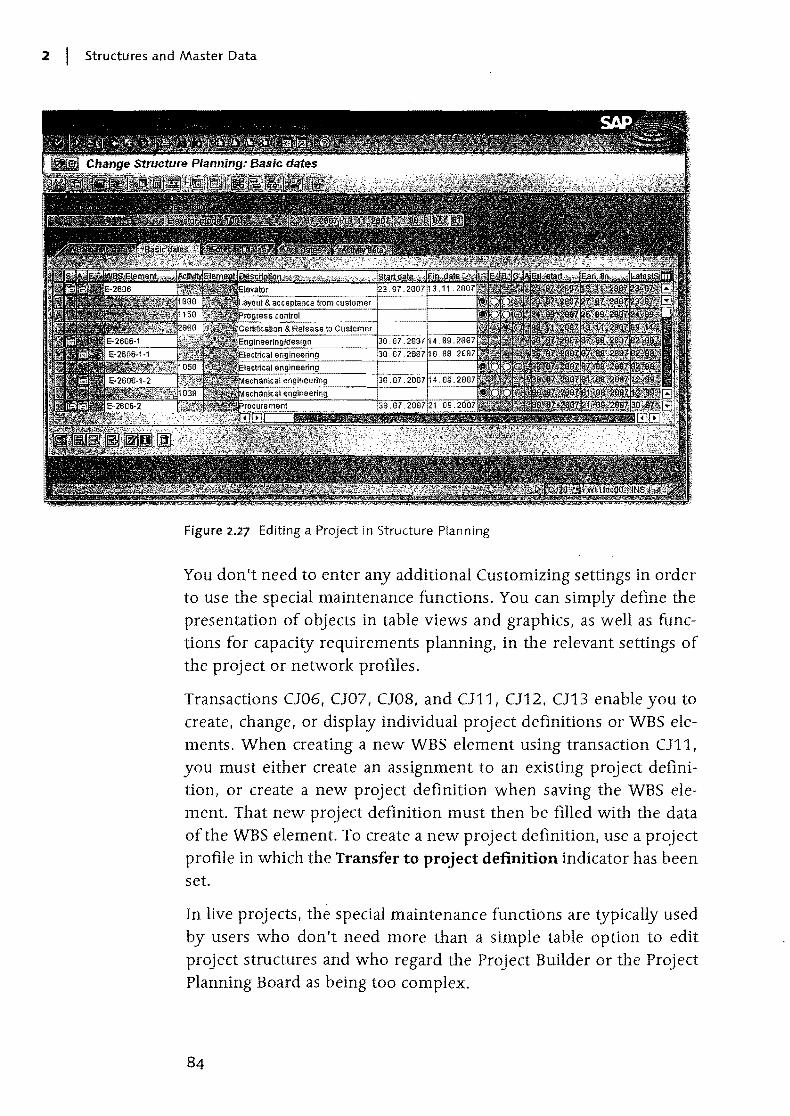
2 I Structures and Master Data
Figure 2.27 Editing a Project in Structure Planning
You don't need to enter any additional Customizing settings in order to use the special maintenance functions. You can simply define the presentation of objects in table views and graphics, as well as functions for capacity requirements planning, in the relevant settings of the project or network profiles.
Transactions CJ06, CJ07, CJ08, and CJ11, CJ12. CJ13 enable you to create, change. or display individual project definitions or WBS elements. When creating a new WBS element using transaction CJ11,
you must either create an assignment to an existing project definition, or create a new project definition when saving the WBS element. That new project definition must then be filled with the data of the WBS element. To create a new project definition, use a project profile in which the Transfer to project definition indicator has been set.
In live projects, the special maintenance functions are typically used by users who don't need more than a simple table option to edit project structures and who regard the Project Builder or the Project Planning Board as being too complex.
Tools for Optimized Master Data Maintenance I 2.8
2.8 Tools for Optirnized Master Data j)l\aintenance
To keep the creation and modification of project structures as simple as possible for its users, you can employ various tools in SAP Project System. On the one hand, you can customize the user interface in various ways to avoid the possibility of users entering incorrect entries and to increase the end users' general acceptance of the different editing transactions. On th~ other hand, you can automate the maintenance of master data where necessary to make it as efficient as possible.
2.8.1 Field Selection
The field selections in structure Customizing of SAP Project System enable you to manipulate fields in project definitions, WBS elements, network headers, activities, and activity elements. You can use a field selection to mark the properties of fields in the following way:
~ Ready for input Data that is contained in this type of field can be modified, provided this is not forbidden by a specific status.
~ Displayed Data contained in this type of field is visible, but cannot be modified in tables or in the detail screen.28
~ Hidden Fields of this type are not displayed.
~ Required field You must enter data in this type of field before you can save the respective object.
~ Highlighted The values of these fields are displayed in a different color than the values of the other fields.
Thus, you can use field selections - in accordance with the requirements of your projects - to completely hide fields that aren't
28 However, note that you can still change display fields via mass changes or via a
substitution.
I
I Structures and Master Data
Flexible detail screens
needed, to display fields that intended to be filled with data only via ! the template or default values in Customizing, or to force certain / entries to be made during the creation of an object.
Although you can define a client-wide field selection, you will usually want to combine field selections with influencing values, such as the project or network profiles or the network type. For example, you can select and control different fields for different project types.
2.8.2 Flexible Detail Screens and Table Controls
Flexible detail screens enable you to control the distribution of the fields to different tabs for WBS elements and activities. By default, each tab displays exactly one detail screen, including the corresponding data. For example, the Dates tab contains the Dates detail screen including all date fields.
The Layout detail screens function allows you to define your own tabs and to integrate up to five detail screens in any sequence in each tab. When doing so, you can define the name of each tab and, if required, select an icon that is supposed to be displayed in conjunction with the name. The First tab page indicator can be used to define which tab should be displayed first when the object is opened. Figure 2.28 shows a sample definition of a tab.
You can either define tabs for all users in the Customizing section of SAP Project System or for individual users in the editing transactions.
You can define tabs in Customizing on the basis of the project or network profile and the activity type (Create, Change, Display, All activities). The Can switch Cust. off indicator allows you to define whether users can switch between the tabs defined in Customizing and the standard tabs.
Authorized users can also create tabs when editing WBS elements or activities on the basis of the respective project or network profile. When doing so, you can manually create new tabs or use the standard tabs or those that have been defined iri Customizing as templates. The definition of those tabs can be used temporarily or stored for each user individually.
86
Tools for Optimized Master Data Maintenance I 2.8
Figure 2.28 Sample Definition of a WBS Element Tab in Customizing
The presentation of all project structure objects in tables is made pos- Table controls
sible by table controls in the editing transactions, with the exception of the Project Planning Board. Table controls allow you to modify the column width and the order of the columns displayed by dragging-and-dropping either the column end or the entire column. The changes you make can then be saved as variants for each user.
When opening a table at a later stage, you can then select a variant that you have defined so you can display the columns according to your requirements. If you select a variant as the default setting, the table is automatically displayed on the basis of that variant.
I
I Structures and Master Data
You can use administrator settings to apply the table control settings Ito all users. The administrator settings also enable you to hide com/ plete columns and to define the number of fixed columns, that is, columns that should always be displayed, irrespective of where you scroll within your table.
2.8.3 Mass Change
If you want to change the field contents of multiple objects simultaneously, you can use the mass change function in SAP Project System. The following objects can be changed via a mass change:
~ Project definitions
~ WBS elements
~ Network headers
~ Activities and activity elements
~ Milestones
~ Relationships
The object types you use will determine which fields can be changed by using the mass change function. Usually, you can only change the master data fields of objects in a mass change; however, in WBS elements, you can also change planned dates, and you can set the Released status for activities. But you cannot change settlement rules or status profiles using a mass change.
If you want to change objects of a single project, you can call the mass change function from within the Project Builder, the Project Planning Board, or the structure planning. If you want to change objects of multiple projects simultaneously, you can trigger the mass change of those projects via the structure information system or using transaction CNMASS. This transaction also allows you to schedule the execution of the mass change as a background job.
If field values are changed using the mass change, the system performs the same checks as in a manual change. In particular, this means that you need to be authorized to change an object in order to change data of that object via a mass change.
Mass change In order to carry out a mass change directly, you must start the mass process change function and select the objects to be changed. Then you must
88
Tools for Optimized Master Data Maintenance I 2.8
select the fields you want to change and enter the new field value. If necessary:~ you can use the previous field value as an additional filtering criterion for the changes. For numerical fields you can also define formulas that calculate the new values on the basis of the original field values.
You can test your changes prior to executing and saving mass changes to objects. In addition. you can use transaction CNMASS to save a log of the changes that have been implemented and analyze that log at any time using transaction CNMASSPROT.
Note that you cannot simply cancel;,~;;c:'~:_b~nge. that is. youcanribt: undo;it.lfnecessary. you mustmaq ';,;_;",e~(changes to field valUes>
:',;<};>:.::~.;-~'.:----',-~'--<'-'- > . <--;,' ... thatha,ye been implemented by incp ;rn'~ssthanges. ' , .
·:'-<-·~:::f;~~«: .
Figure 2.29 Example of a Mass Change of Activities in the Table View
To obtain a higher degree of control when performing mass changes to multiple objects. you can carry: out a tabular mass change besides the direct mass change via transaction CNMASS (see Figure 2.29).
After selecting the objects and fields in a tabular mass change. the
[ ! ]
Tabular mass change
I
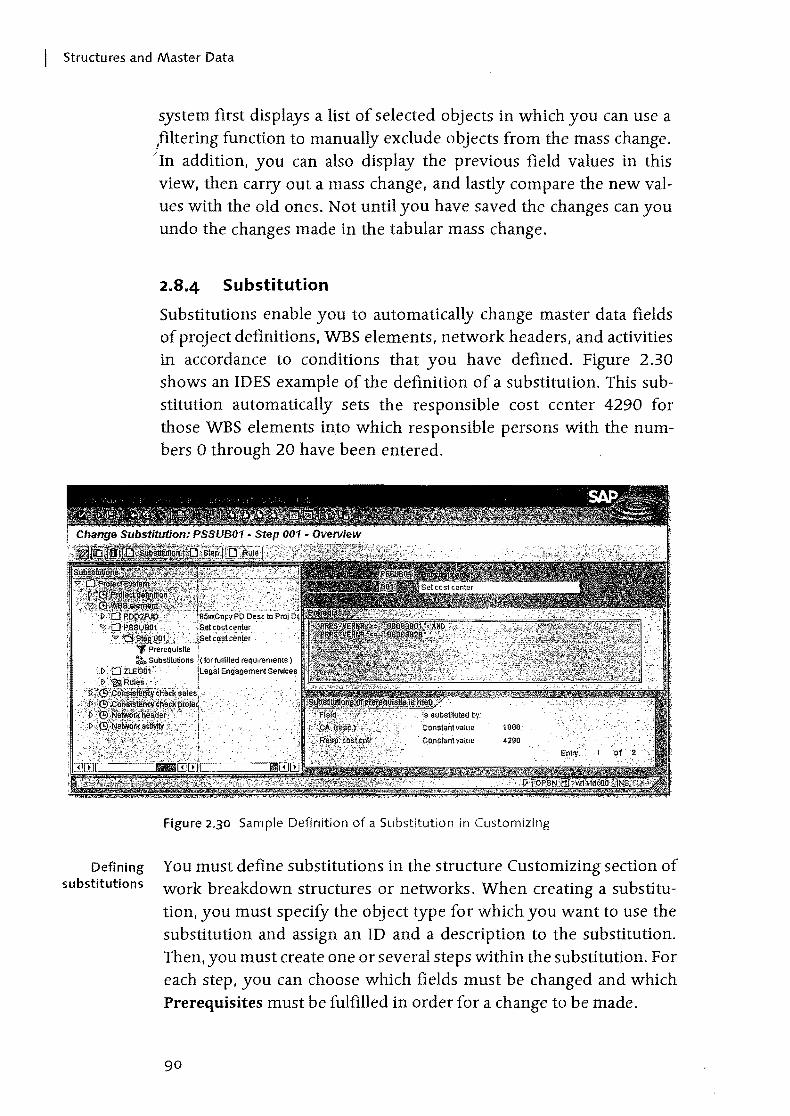
I Structures and Master Data
Defining substitutions
system first displays a list of selected objects in which you can use a lfihering function to manually exclude objects from the mass change. /In addition, you can also display the previous field values in this view, then carry out a mass change, and lastly compare the new values with the old ones. Not until you have saved the changes can you undo the changes made in the tabular mass change.
2.8.4 Substitution
Substitutions enable you to automatical1y change master data fields of project definitions, WBS elements, network headers, and activities in accordance to conditions that you have defined. Figure 2.30 shows an IDES example of the definition of a substitution. This substitution automatical1y sets the responsible cost center 4290 for those WBS elements into which responsible persons with the numbers 0 through 20 have been entered.
Figure 2.30 Sample Definition of a Substitution in Customizing
You must define substitutions in the structure Customizing section of work breakdown structures or networks. When creating a substitution, you must specify the object type for which you want to use the substitution and assign an ID and a description to the substitution. Then, you must create one or several steps within the substitution. For each step, you can choose which fields must be changed and which Prerequisites must be fulfilled in order for a change to be made.
go
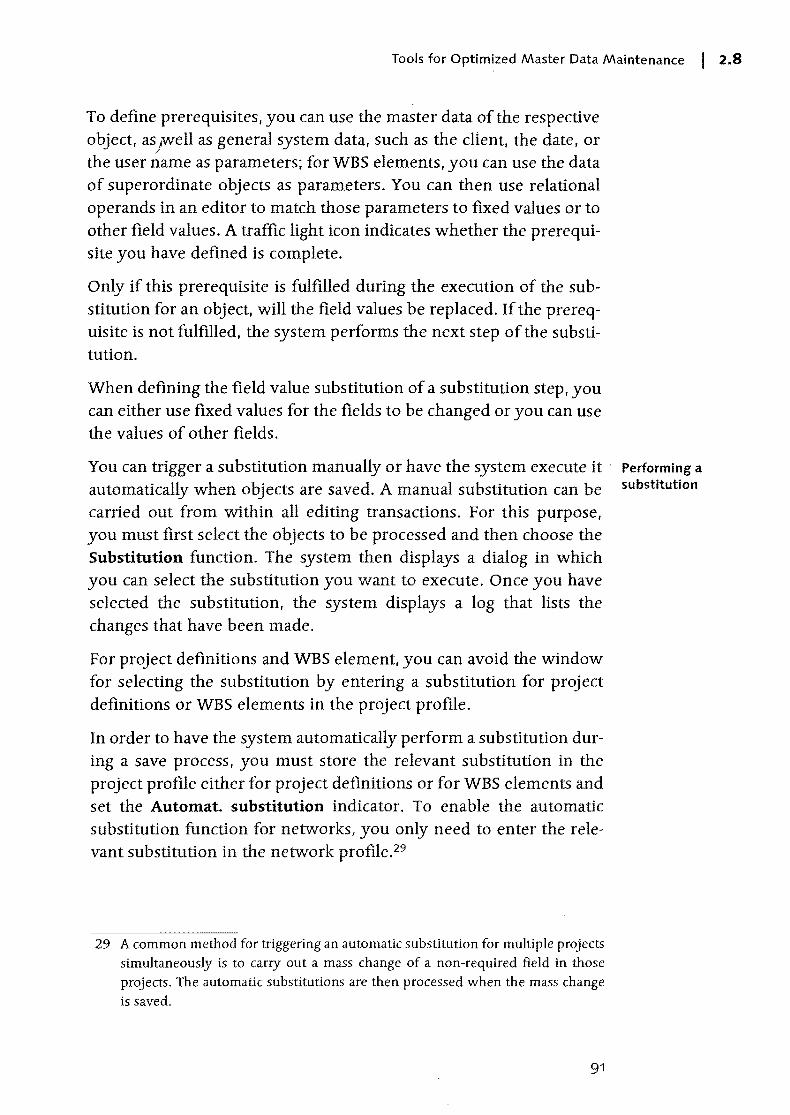
Tools for Optimized Master Data Maintenance I 2.8
To define prerequisites, you can use the master data of the respective object, as Awell as general system data, such as the client, the date, or
7
the user name as parameters; for WBS elements, you can use the data of superordinate objects as parameters. You can then use relational operands in an editor to match those parameters to fixed values or to other field values. A traffic light icon indicates whether the prerequisite you have defined is complete.
Only if this prerequisite is fulfilled during the execution of the substitution for an object, will the field values be replaced. If the prerequisite is not fulfilled, the system performs the next step of the substitution.
When defining the field value substitution of a substitution step, you can either use fixed values for the fields to be changed or you can use the values of other fields.
You can trigger a substitution manually or have the system execute it automatically when objects are saved. A manual substitution can be carried out from within all editing transactions. For this purpose, you must first select the objects to be processed and then choose the Substitution function. The system then displays a dialog in which you can select the substitution you want to execute. Once you have selected the substitution, the system displays a log that lists the changes that have been made.
For project definitions and WBS element, you can avoid the window for selecting the substitution by entering a substitution for project definitions or WBS elements in the project profile.
In order to have the system automatically perform a substitution during a save process, you must store the relevant substitution in the project profile either for project definitions or for WBS elements and set the Automat. substitution indicator. To enable the automatic substitution function for networks, you only need to enter the relevant substitution in the network profile.29
29 A common method for triggering an automatic substitution for multiple projects simultaneously is to carry out a mass change of a non-required field in those projects. The automatic substitutions are then processed when the mass change is saved.
91
Performing a substitution
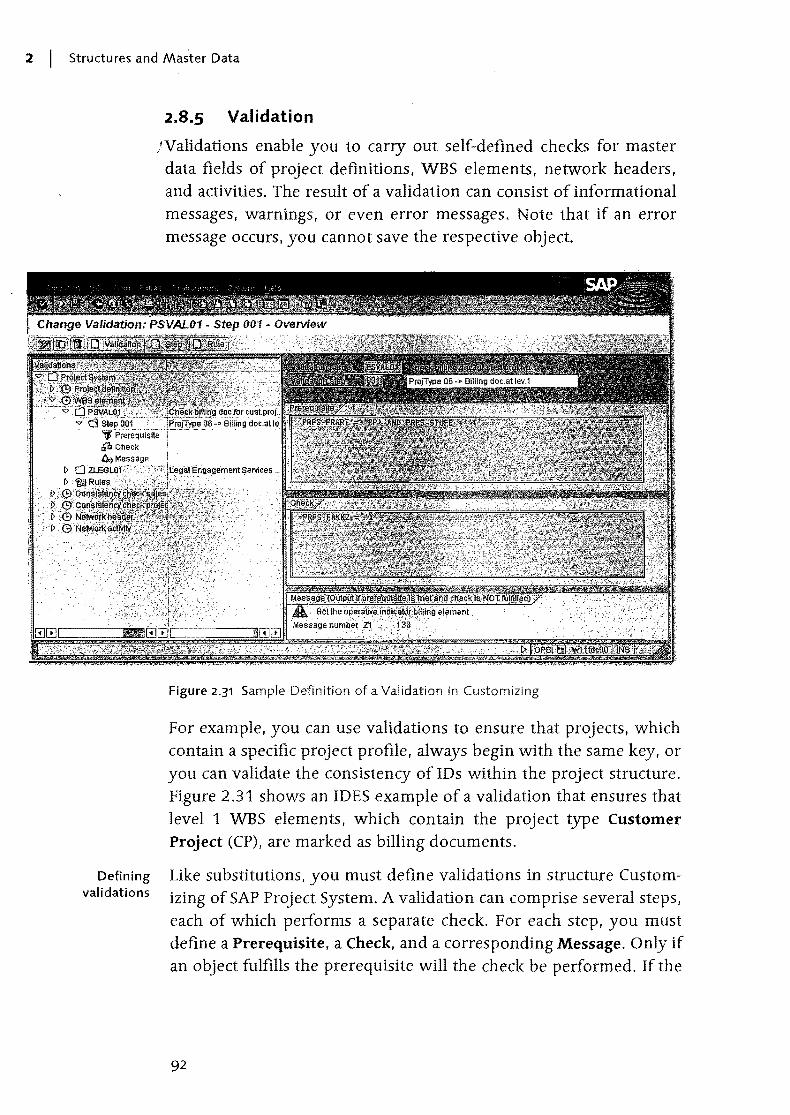
2 I Structures and Master Data
Defining validations
2.8.5 Validation
}Validations enable you to carry out self-defined checks for master data fields of project definitions, WBS elements, network headers, and activities. The result of a validation can consist of informational messages, warnings, or even error messages. Note that if an error message occurs, you cannot save the respective object.
Figure 2.31 Sample Definition of a Validation in Customizing
For example, you can use validations to ensure that projects, which contain a specific project profile, always begin with the same key, or you can validate the consistency of IDs within the project structure. Figure 2.31 shows an IDES example of a validation that ensures that level 1 WBS elements, which contain the project type Customer Project (CP), are marked as billing documents.
Like substitutions, you must define validations in structure Customizing of SAP Project System. A validation can comprise several steps, each of which performs a separate check. For each step, you must define a Prerequisite, a Check, and a corresponding Message. Only if an object fulfills the prerequisite will the check be performed. If the
92

Tools for Optimized Master Data Maintenance I 2.8
condition of the check is fulfilled, the system issues a message; otherwise, thf validation step for the object in question will terminate.
~y
The definition of prerequisites and checks occurs in the same way as the definition of prerequisites in substitutions (see Section 2.8.4). When defining the message, you must first specify whether the message type is an Information, a Warning, an Error, or a Termination. Then you must create a message text for a message number and assign the text to the message. Within the message, you can define fields as variables (e.g., the identification of the object) and include the corresponding field values in your message text.
As is the case with substitutions, you can trigger the execution of validations either manually or automatically during the save process. To enable automatic validations of project definitions or WBS elements, you must enter the relevant validation in the project profile and set the indicator for automatic validation. For network headers and activities, you must store the validations in the network profile only.
Running validations
If bothsubstitutiol'lsa.nd validations are executed during a save process, [«] the substitution steps are first carried out step by step followed by the val-idation steps.
2.8.6 Variant Configuration with Projects
We will now describe the use of variant configuration in project structures on the basis of the IDES example: the engineer-to-order production of elevators. After that we will discuss the necessary prerequisites that must be fulfilled.
The IDES company produces different elevator types in different sizes and variants. In the context of engineer-to-order production, each elevator variant requires different material components and activities. Standard structures are used as template for the creation of the required project structures. Instead of defining a separate standard network - including the required material components and activities, as well as a separate WBS as a template for each potential variant - the company uses only one standard network that can be configured in different ways.
93
Example of a variant configuration
I
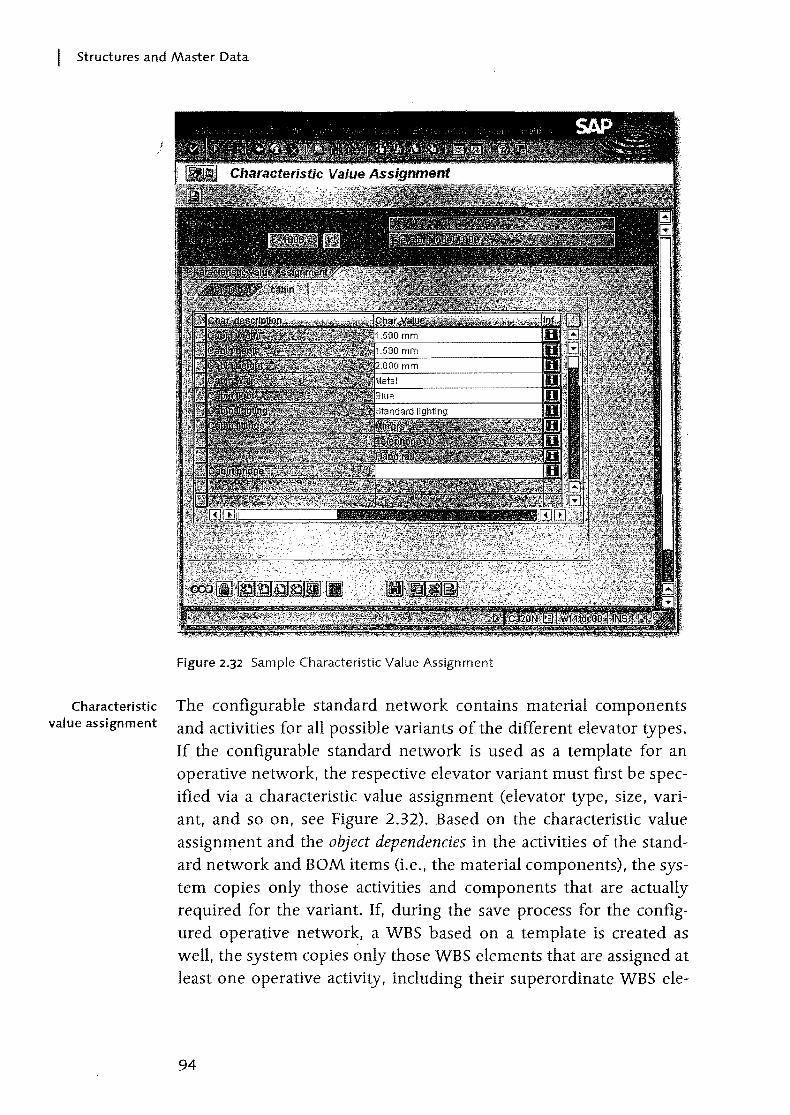
I Structures and Master Data
Figure 2.32 Sample Characteristic Value Assignment
Characteristic The configurable standard network contains material components value assignment and activities for all possible variants of the different elevator types.
If the configurable standard network is used as a template for an operative network, the respective elevator variant must first be specified via a characteristic value assignment (elevator type, size, variant, and so on, see Figure 2.32). Based on the characteristic value assignment and the object dependencies in the activities of the standard network and BOM items (Le., the material components), the system copies only those activities and components that are actually required for the variant. If, during the save process for the configured operative networ~, a WBS based on a template is created as well, the system copies only those WBS elements that are assigned at least one operative activity, including their superordinate WBS ele-
94
Tools for Optimized Master Data Maintenance I 2.8
ments. In this way, the WBS is configured "indirectly," because WBS elements y:annot contain any object dependencies.
To be able to use the variant configuration with project structures, you must first define characteristics in the central logistical functions. These characteristics may include the elevator type, the size of the elevator, and so on, and can be defined using transaction (T04. When doing so, you must specity, among other things, the input format, possible characteristic values. and, if necessary. a default value for each characteristic value. You can then summarize characteristics into classes (transaction (L02) so you can define which of the characteristics should be displayed during the characteristic value assignment process. Note that the classes must belong to a class type that allows variant configuration (by default, this is class type 300).
You can define the necessary object dependencies either directly during the maintenance of standard network activities (local object dependencies) or centrally using transaction (UOl (global object dependencies). Global object dependencies can be used multiple times in different standard networks or BOMs. Note, however, that you cannot modify them there.
The object dependency type selection condition is used to determine whether an object should be copied. The dependency editor that uses a specific syntax (see SAP documentation) is available for the definition of conditions within such an object dependency (e.g., "Should the sides of the elevator be made of glass?") If the condition you define and assign as ,~n object dependency to a BOM item or standard network activity is met in the characteristic value assignment, the object will be copied. You can use the object dependency type procedure to derive field values of material components or activities from the characteristic value aSSignment (e.g., the planned work for an activity).
Finally. you must define the standard structures you want to use as templates (see Sections 2.2.3 and 2.3.3) and link them with the class of characteristics. The standard structures must contain activities, relationships, material components, and, if necessary, WBS elements for all possible variants. The necessary object dependencies must be
. assigned to the relevant standard network activities and BOM items. You can link the standard structures, or rather, the standard net-
95
Characteristics and classes
Object dependencies
Standard structures and configuration profile
I
I Structures and Master Data
Overall change profile
work, with the class of characteristics by using a corifiguration profile ! that you can create in transaction CU41 in SAP Proj ect System.
/
If you want changes to the characteristic value assignment to be possible after you have released the configured operative network, you must define a change profile in the Customizing section of the networks and assign this profile to the respective network type. Depending on the respective statuses, you can use the overall change profile, for example, to c.antrol whether the object changes that are necessary for the new variant should result in error messages or warnings, or whether single changes are even permitted.
In addition, you can use standard workflows in variant configuration, for example, to inform the MRP controller of the network about retroactive changes and to enable the controller to decide whether those changes should be implemented.
If you use configurable subnetworks for structuring purposes, the characteristic value assignment is passed on from the superordinate network, provided its templates have been assigned to the same class. Lastly, you can also combine variant configuration with assembly processing (see Section 2.8.7). In this case, you can carry out the characteristic value assignment directly in the relevant sales document.
2.8.7 Assembly Processing
The concept of assembly processing describes a process in which the creation of a sales document item involves the simultaneous creation of an operative network and, if required, of an operative WBS. The process also involves the exchange of scheduling, quantity. and controlling data between the sales document item and the project.
Data exchange Time scheduling for the network is directly carried out in the sales document on the basis of a customer's desired delivery date and the quantity that is transferred to the network as an execution factor. The system then proposes the calculated finish date of the network as the date for the complete delivery of the item in the sales document. At the same time I the system calculates the network and transfers the calculated costs to the sales document item where they can be used for pricing purposes in accordance with the pricing procedure used.
Tools for Optimized Master Data Maintenance I 2.8
If the project contains milestones that are marked as relevant to sales documen1p, the dates and billing data of those milestones, can also be automatically included in the billing plan of the item.
If an operative WBS is generated when the sales document is saved, the sales document item can be automatically assigned to a WBS element.
The link between the sales document item and the network allows you to use the schedule lines of the item to navigate directly to the network display or, conversely, to navigate directly to the sales document item display via the network header. Furthermore, you can transfer retroactive changes to the sales document directly to the proj ect and vice versa.
If you use sales document that contains multiple items, you can also create a separate operative network for each item through assembly processing. If, in that case, the corresponding standard networks are already linked to each other via relationships, then those external relationships can also be automatically created for the operative networks. The time scheduling process for all networks of the sales document is carried out Simultaneously using overall network scheduling (see Section 3.1.2).
You can create only one WBS per sales document by using assembly processing. If you set the SD/PS assignment indicator in the project definition of the standard WBS, the system will create for each sales document item a separate hierarchy within the project including a separate WBS element at level 1.30 You cannot use assembly processing to create a WBS without using networks.
The identification of a project that is created in the context of assembly processing is automatically derived from the sales document ID. If you have defined a coding mask for the identification of the standard WBS, the ID of the operative project consists of the key of the mask and the sales document number, which is copied into the first section of the project ID. 31 In case of an SD/PS aSSignment, the item
30 Note that coding masks are required for using the SD/PS aSSignment. You must ensure that the Only 0!le root indicator is not set in the project profile.
31 If the first section of the coding mask is shorter than the sales document ID, the system will copy only the last digits of the ID. Therefore, you should ensure that the first section of the respective coding masks is long enough.
97
SD/PS assignment
Project identification in assembly processing
I
2 I Structures and Master Data
number is additionally copied to the second section of the WBS ele! ment ID, If you don't use any coding masks, the project will have the
same ID as the sales document.
Using assembly processing makes sense whenever you want to process sales projects that always contain identical structures and shouldn't be created until a requirement has been generated in sales and distribution (caused by a request, a quotation, or a sales order), and you want to automate the creation of the pn?ject structures, as well as the exchange of data between SAP Project System and the sales and distribution department.
Prerequisites The following list contains the prerequisites that must be fulfilled if you want to use assembly processing:
Requirements type determination
.... Standard structures You must create a standard network and - if a WBS is required as well - a standard WBS that can be used as templates for the operative project structures,
.... Material master record settings You need a material master record whose Item category group (sales view: SalesOrg 2) or Strategy group (MRP view 3) references a requirements class for assembly processing with networks,
.... Assignment between material and standard network Optionally, you can assign the material to a standard network. If you don't create this assignment now, you can still do that when creating the sales document item,
.... Customizing settings In Customizing, you must enter the relevant settings that enable the system to determine an appropriate requirements class based on the sales document type and the material master record data,
The following sections describe the prerequisites in greater detaiL When you create a sales document and enter a material number into an item, the system performs a requirements type determination in the background. The requirements type can be determined in two differ-ent ways ..
On the one hand, the system can use the Strategy group in the material master record to determine a primary strategy which, in turn, is
98

Tools for Optimized Master Data Maintenance I 2.8
used to determine a requirements type.32 On the other hand, the system can qse the Item category group of the material and the Docu-
/'
ment type of the sales document to determine, among other things. an item category that defines the basic properties of the sales document item and that also references a requirements type. Lastly, the settings in Customizing activity Control of Requirements Type Determination for the combination of the item category group and, if available, the MRP type of the material (MRP view 1). decide which of the two requirements types should be used.
The requirements type, in turn, is uniquely assigned to a requirements class. The requirements class (transaction OVZG) ultimately controls the procurement of the material (see Figure 2.33). Regarding assembly processing, the following fields are relevant in this context:
.... Assembly Type and Order Type The Assembly type allows you to define whether you want to carry out assembly processing using networks. The Order type defines the network type of the automatically created operative network .
.... Requirements Transfer and Availability These indicators must be set if you want to exchange scheduling and quantity data between the sales document item and the network.
.... Account Assignment Category The Account Assignment Category in the requirement class refers to the Consumption posting and Special Stock indicators to control the value flows in assembly processing, as well as the inventory management of the finished material.
.... NoMRP Because the network is used for procuring the finished material in assembly processing, you can use the No MRP indicator to define that no MRP should be carried out for this material.
32 If the material master record does not contain a st~ategy group, the system tries to determine a strategy group based on the MRP group of the material. If the material master record doesn't contain an MRP group either, the system tries to derive the MRP group on the basis of the material type.
99
I
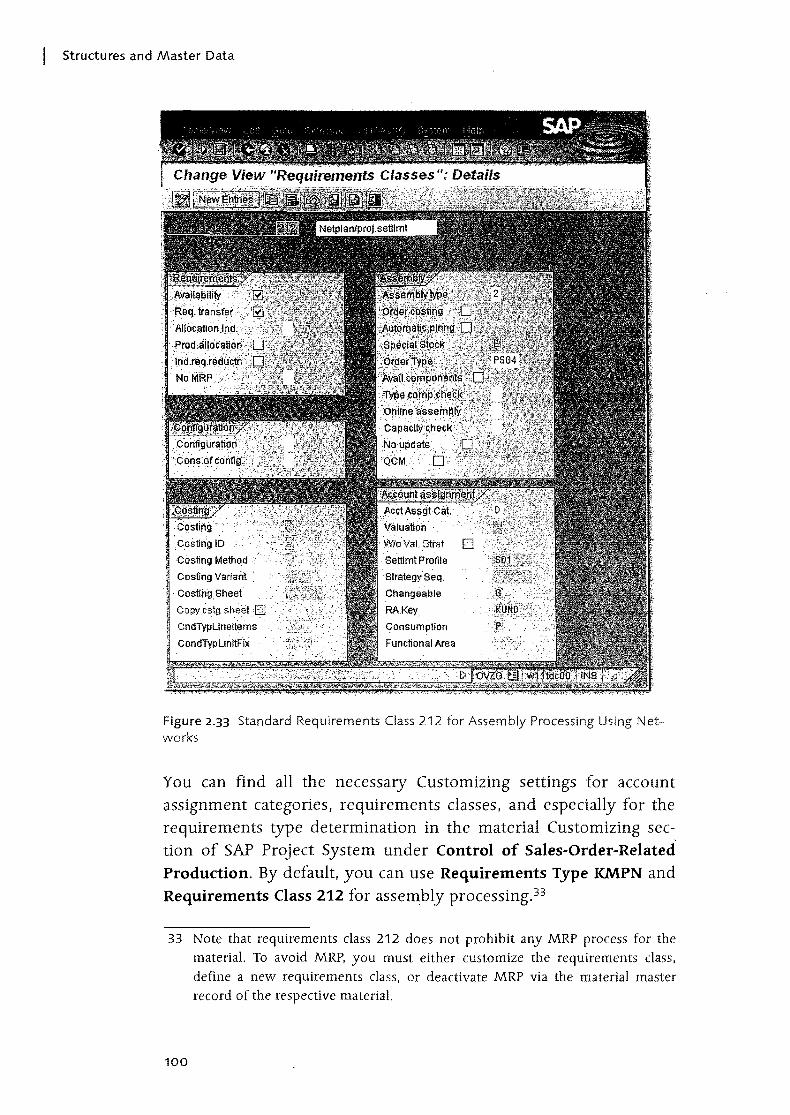
Structures and Master Data
Costing Method,··
Costing Variant .
Costih9.8heef
Copy cstg sheetr;;j
CndTypUneltems .
CondTypUnltFix
Figure 2.33 Standard Requirements Class 212 for Assembly Processing Using Networks
You can find all the necessary Customizing settings for account assignment categories, requirements classes, and especially for the requirements type determination in the material Customizing section of SAP Project System under Control of Sales-Order-Related Production. By default, you can use Requirements Type KMPN and Requirements Class 212 for assembly processing. 33
33 Note that requirements class 212 does not prohibit any MRP process for the material. To avoid MRP, you must either customize the requirements class, define a new requirements class, or deactivate MRP via the material master record of the respective material.
100
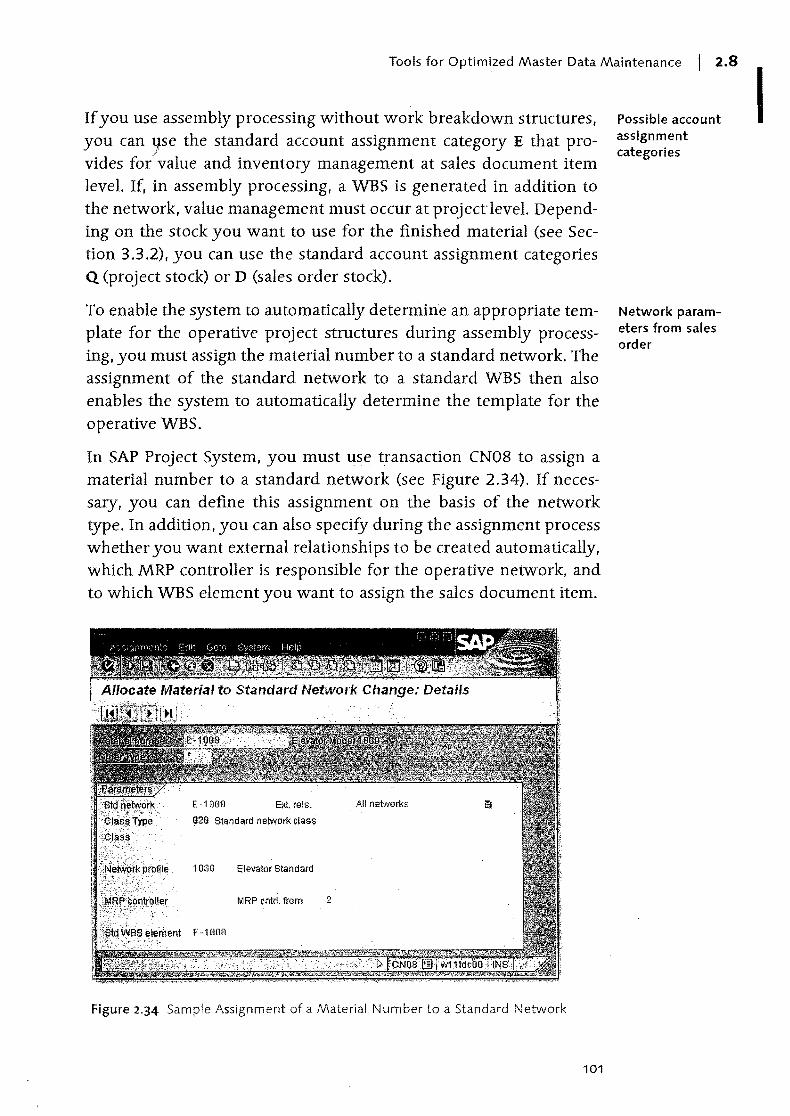
Tools for Optimized Master Data Maintenance I 2.8
If you use assembly processing without work breakdown structures, you can 1.J.se the standard account assignment category E that pro-
i vides for value and inventory management at sales document item level. If, in assembly processing, a WBS is generated in addition to the network, value management must occur at projectlevel. Depending on the stock you want to use for the finished material (see Section 3.3.2), you can use the standard account assignment categories Q (project stock) or D (sales order stock).
To enable the system to automatically determin'e an appropriate template for the operative project structures during assembly processing, you must assign the material number to a standard network. The assignment of the standard network to a standard WBS then also enables the system to automatically determine the template for the operative WBS.
In SAP Project System, you must use transaction eN08 to assign a material number to a standard network (see Figure 2.34). If necessary, you can define this assignment on the basis of the network type. In addition, you can also specify during the assignment process whether you want external relationships to be created automatically, which MRP controller is responsible for the operative network, and to which WBS element you want to assign the sales document item.
E-1GG8 Ext, rels, All networks
92'S standard network class
1 G08 Elevator Standard
M RP cntrl. fro n') 2
Figure 2.34 Sample Assignment of a Material Number to a Standard Network
101
Possible account assignment categories
Network parameters from sales order
I
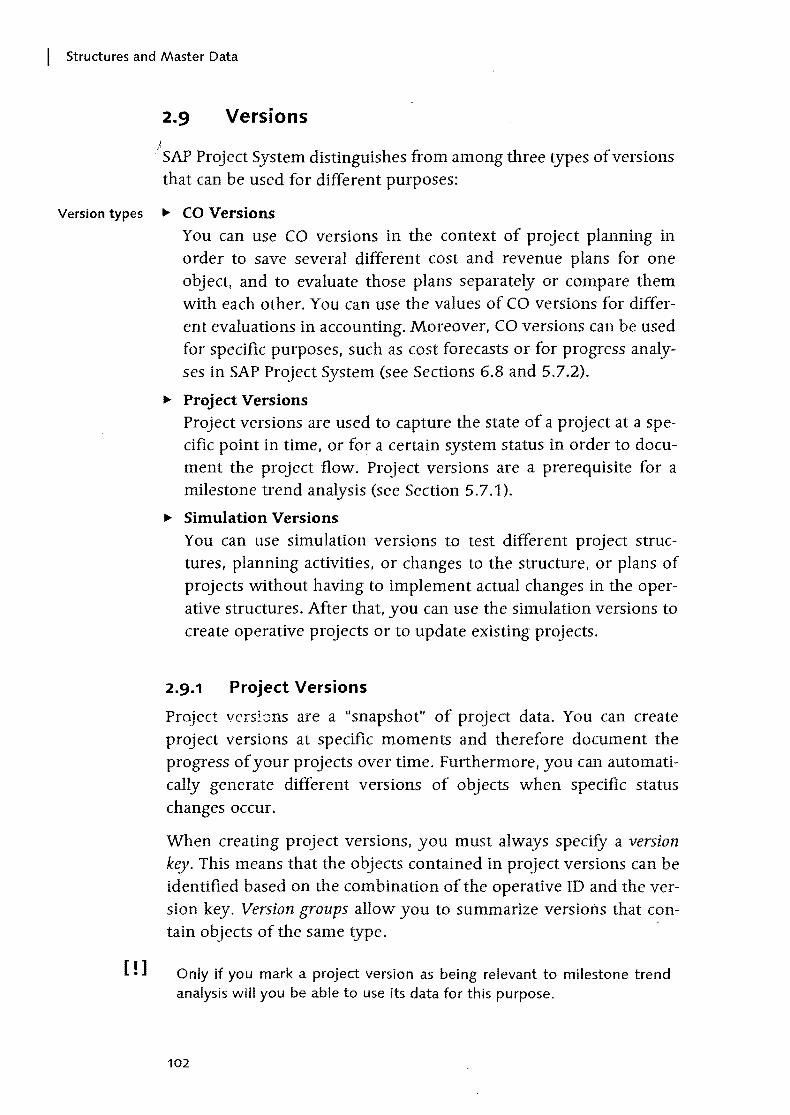
I Structures and Master Data
2.9 Versions .~
;' SAP Project System distinguishes from among three types of versions that can be used for different purposes:
Version types ~ CO Versions You can use CO versions in the context of project planning in order to save several different cost and revenue plans for one object, and to evaluate those plans separately or compare them with each other. You can use the values of CO versions for different evaluations in accounting. Moreover, CO versions can be used for specific purposes, such as cost forecasts or for progress analyses in SAP Project System (see Sections 6.8 and 5.7.2).
~ Project Versions Project versions are used to capture the state of a project at a specific point in time, or for a certain system status in order to document the project flow. Project versions are a prerequisite for a milestone trend analysis (see Section 5.7.1).
~ Simulation Versions You can use simulation versions to test different project structures, planning activities, or changes to the structure, or plans of projects without having to implement actual changes in the operative structures. After that, you can use the simulation versions to create operative projects or to update existing projects.
2.9.1 Project Versions
Project versions are a "snapshot" of project data. You can create project versions at specific moments and therefore document the progress of your projects over time. Furthermore, you can automatically generate different versions of objects when specific status changes occur.
When creating project versions, you must always specify a version key. This means that the objects contained in project versions can be identified based on the combination of the operative ID and the version key. Version groups allow you to summarize versions that contain objects of the same type.
[ ! ] Only if you mark a project version as being relevant to milestone trend analysis will you be able to use its data for this purpose
102
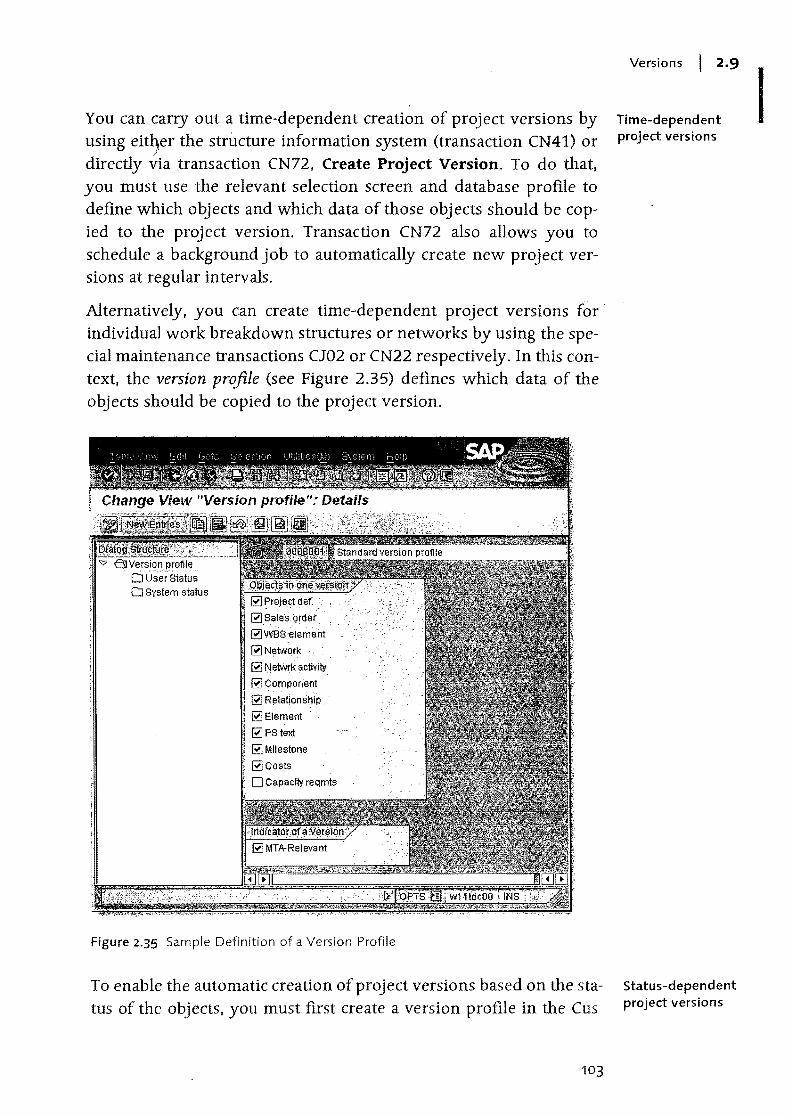
You can carry out a time-dependent creation of project versions by using eitqer the structure information system (transaction CN41) or , directly via transaction CN72, Create Project Version. To do that, you must use the relevant selection screen and database profile to define which objects and which data of those objects should be copied to the project version. Transaction CN72 also allows you to schedule a background job to automatically create new project versions at regular intervals.
Alternatively, you can create time-dependent project versions for' individual work breakdown structures or networks by using the special maintenance transactions CJ02 or CN22 respectively. In this context, the version profile (see Figure 2.35) defines which data of the objects should be copied to the project version.
'V' e Version profile DuserStstus D System status
~wBSelement ~N\>twork
~ ""etwrk activity
~Component
~ Relationship. Element
~ PStext ~Milestone
~Costs
Figure 2.35 Sample Definition of a Version Profile
To enable the automatic creation of project versions based on the status of the objects, you must first create a version profile in the Cus-
103
Versions I 2·9
Time-dependent project versions
Status-dependent project versions
I
I Structures and Master Data
Evaluating project versions
Deleting project versions
tomizing section of SAP Project System (transaction OPTS) and assign } this version profile to the project profile or network profile in ques
tion. The version profile defines whether the object is relevant to the milestone trend analysis and which data should be copied to the project version. In addition. the version profile determines for which status changes a project version should be created and the corresponding version number to be used. The status change can refer to both the system status and the user status.
For example. if you define that the project version with version number Released must be used when an object is released, the system will write a copy of an object to the project version every time an object is released. If you release parts of projects at different times, the project version will be complemented step by step with the newly released objects. What this means is that status-dependent project versions don't necessarily have to reflect the state of a project at a specific point in time.
You can evaluate project versions in the structure information system of SAP Project System and by using hierarchy reports of the controlling information system, provided the database profile or report definition allow the selection of version data (see Section 7.1).
For example, you can compare individual lines of data of multiple project versions, or operative projects with each other in the structure information system. Furthermore, you can use version-dependent exceptions to highlight (in different colors) differences between version data and operative data.
In the financials information system, you can use standard report Project version comparison: Actual/plan to compare version data with actual data.
Project versions that have been created automatically on the basis of the status are archived with the operative project structures and can therefore be deleted simultaneously from the database (see Section 2.10). For time-dependent project versions, you can carry out separate archiving and deletion sessions. However, you can also delete project versions manually at any time using the structure overview (transaction CN41).
104
2·9·2 Simulation Versions
Simulatio}!l. versions enable you to carry out "what-if" analyses for project structures. You can create simulation versions without an existing operative project (e.g., during the quotation phase), and you can generate simulation versions by tramiferring operative projects or other simulation versions.
A simulation version can be identified by a combination of the WBS ID and a version key. Thus, if required, you can simultaneously create, edit, and compare multiple simulation versions for one project identification, which are independent of each other. You can use
input templates in the Customizing section of SAP Project System to define which version keys can be assigned to simulation versions (transaction OPUS).
Versions I 2·9
To manually create and edit simulation versions, you can either use Editing options
the Project Builder (provided that simulation versions are marked as changeable objects in their options) or transaction CJV2, which has the editing options that are also provided in the Project Planning Board.
If you want to plan the costs of simulation versions, you can do that in the context of Easy Cost Planning (see Section 3.4.4) and network costing (see Section 3.4.5). You can only perform revenue planning for simulation versions by using billing plans (see Section 3.5.3).
To create simulation versions via transferring operative projects or other simulation versions and re-transferring them into operative projects, you must use transaction CJV4. This transaction also allows you to test the transfers.
A transfer involves all master data and planned data of work breakdown structures and networks, as well as the milestones and material components assigned to them. In addition, actual data of operative structures is also transferred to the simulation versions for informational purposes; however, this data is not re-transferred into the operative project.
You can define a simulation profile in the Customizing'section of SAP Project System and then store it in the project profile or project definition. A simulation profile enables you to define whether you want to include long texts, PS texts, or the assignment to documents in the document management system in the transfer as well.
105
Transferring simulation versions
I
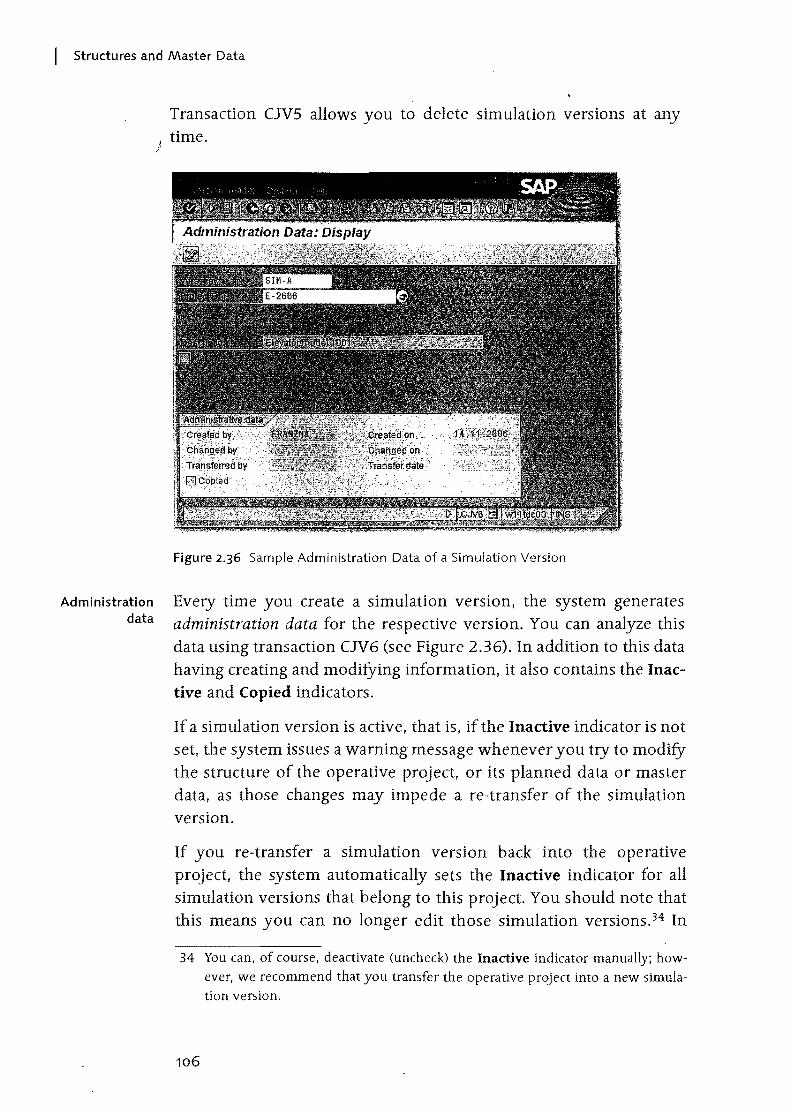
Structures and Master Data
Administration data
Transaction CJV5 allows you to delete simulation versions at any I time.
;/'
Figure 2.36 Sample Administration Data of a Simulation Version
Every time you create a simulation version, the system generates administration data for the respective version. You can analyze this data using transaction CJV6 (see Figure 2.36). In addition to this data having creating and modifying information, it also contains the Inactive and Copied indicators.
If a simulation version is active, that is, if the Inactive indicator is not set, the system issues a warning message whenever you try to modifY the structure of the operative project, or its planned data or master data, as those changes may impede a re-transfer of the simulation version.
If you re-transfer a simulation version back into the operative project, the system automatically sets the Inactive indicator for all simulation versions that belong to this project. You should note that this means you can no longer edit those simulation versions. 34 In
34 You can, of course, deactivate (uncheck) the Inactive indicator manually; however, we recommend that you transfer the operative project into a new simulation version.
106
Archiving Project Structures I 2.10
addition, the simulation version that has been re-transferred is automatically tmarked as copied so that you can use the administration
7
data to determine which version was used for the update process.
Simulation versions can be evaluated in the same way as project versions (see Section 2.9.1). In particular, you can use the version comparison function in the structure information system, for example, to highlight deviations between the simulation version and the operative project in color.
In addition, you can also use a specific capacity report for simulation versions. This report reads the work centers of the activities of the simulation version and determines all capacity requirements of those work centers. But, instead of the requirements of the operative project, the report uses the requirements of the simulation version. In this way, siniulation versions enable you to analyze to what extent possible date and structure changes would affect the capacity utilization of the work centers in your company.
Besides the limited cost and revenue planning options, simulation versions are subject to other restrictions. Simulation versions don't support integration with other components of the SAP system. Objects with a reference to operative objects cannot be deleted in simulation versions; however, you can set the Deletion flag status (see Section 2.6). Apart from that, no other status changes, such as system or user status changes, are possible for simulation versions. Furthermore, you cannot archive simulation versions.
2.10 Archiving Project Structures
You can delete operative work breakdown structures and activities in every editing transaction. A prerequisite for this is that the status of the work breakdown structures and activities is either Created or Released and that no documents have been assigned to them yet. However, once a document has been assigned to a WBS or network, you must first archive the project structure before you can delete the data from the database.
You can delete standard structures, project versions, and simulation versions at any time without having to meet any specific requirements. If you want to archive project data without deleting the data
107
Capacity report for simulation versions
Restrictions for simulation versions
2 I Structures and Master Data
Steps to be carried out when deleting project structures
from the database, you can do this also without meeting any addi/ional requirements. However, if you want to archive operative , projects that have already been assigned documents and delete those projects afterwards, you must carry out various specific steps, each of which must meet certain requirements.
When deleting operative project structures, the first step you must carry out is setting the Deletion flag status. A prerequisite for setting this status is that aSSigned orders have also been flagged for deletion. Another requirement is that no open purchase requisitions or purchase orders can exist for the project. In addition, the project balance must be zero; otherwise, the project might not be subject to settlement (see Section 6.9). When a project is flagged for deletion, almost all business processes are forbidden; however, you should note that you can deactivate the Deletion flag status if required.
The second step involves setting a deletion indicator for the project structures via archiving transactions. A prerequisite for setting this indicator is that the deletion indicator is already active in assigned orders. In order to avoid premature deletions of networks, a certain number of months have to pass between the first two steps. This period is referred to as Residence time 1 and you can define it in the Customizing section of the network type. You can still display and evaluate projects carrying the deletion indicator in all editing and reporting transactions, but you can no longer execute any business processes for those projects.
[ ! ] I\lote that you cannot undo the setting of the deletion indicator.
The final step consists of archiving the project structures and deleting the project data from the SAP database. This is only possible with projects carrying the deletion indicator. Regarding networks, Resi
dence time 2 must have passed between the setting of the deletion indicator and the deletion process itself. This residence time must have been stored in terms of months in the network type.
Archiving object You can carry out all the necessary steps for archiving projects using the general archiving transaction SARA with a reference to archiving object PS_PROJECT. Alternatively, you can use transaction CN80 in SAP Project System, which is specifically provided for this archiving object.
108
Archiving Project Structures I 2.10
The archiving object PS_PROJECT enables you to archive the master data, plaqned data, and actual data of operative work breakdown structures and networks, as well as of project versions. The information and programs reqUired for writing and evaluating the archive files are linked to this archiving object.
Transaction CN80 enables you to carry out the different steps for archiving and deleting project structures continuously. In this way, you can use selection variants to select multiple projects at the same time and, if reqUired, to schedule the execution of the individual steps in the background. In addition, you can store a descriptive text for the archiving session in the selection variant for archiVing structures.
The job monitor enables you to analyze which of the jobs for setting deletion flags, deletion indicators, and for archiving or deleting projects has been carried out successfully, which of them are still active, and which have been terminated due to errors. Logs for individual jobs provide you with additional details. The log that is created when archive files are written contains, among other things, the technical names of the archive files, their size, and the relevant database tables.
The administration data of transaction CN80 enables you to analyze which archiVing sessions have been completed. Traffic lights indicate which sessions have been completed successfully and which of them caused problems. You can view the details of an archiving session by double-clicking on it. Moreover, you can call all relevant Customizing activities regarding the archiving of projects from the overview.
The Retrieval function in transaction CN80 enables you to evaluate the archived data at any time. Note that this is also possible if you use the reports provided by the structure and financials information systems, given that the database profile allows the selection of archive files.
SAP Project System does not allow you to copy archived project data as operative data, or to use archived project structures as templates for new projects.
SAP Project System contains additional archiving objects for standard networks (PS_PLAN), funds reservations (FM_FUNRES), transfer
109
Job monitor
Administration data
Retrieval
[«]
I

2 I Structures and Master Data
Advantages of data archiving
price agreements (CO_FIXEDPR), claims (CM_QMEL), and settleiment documents (CO_KABR). The system does not allow you to
..-
archive simulation versions or standard work breakdown structures.
The archiving of projects and the subsequent deletion of the project data from the SAP database have several advantages. Because you can store archive files in compressed form and on separate servers, you can significantly reduce the database load by deleting the operative data. This, in turn. increases the performance and simplifies the administration of the system. Moreover, the IDs of deleted project structures are no longer included in the search helps so that you can assign them to new projects if you want.
It is also useful to consider archiving aspects before a project starts. especially if you use many projects or large project structures that entail a substantial growth of the data volume over time. Due to the different requirements that must be met to archive or delete projects, you should collaborate with other departments that may be involved.
2.11 Summary
In this chapter, we have described the two structures, WBS and network, that can be used to map projects in the SAP system. In addition to the master data of those structures and different detailing options, for example, using milestones or documents, we discussed the Customizing activities that are necessary for creating the structures, and we introduced transactions and tools that enable you to create, edit, archive. and delete the structures. The follOWing chapter will explain how you can plan your projects on the basis of those structures.
110
Using project planning, you can preview the time flow, the required resources and materials, as well as the cost and reven~es to be expected for the individual project parts. Therefore, project planning constitutes an important aspect of project management.
3 Planning Functions
Once you have properly mapped a project using the work breakdown structure (WBS) and the network structure, you can use various SAP Project System functions to plan the dates of the individual work packages, to estimate the expected costs and revenues, or to provide internal and external resources and material on schedule before the project starts.
Depending on your reqUirements, there are planning functions with different levels of detail. For example r within a quotation or approval phase, you can create a preliminary plan of dates and costs with very little effort and add specifications later, if necessary, using other planning functions or additional structures.
In the implementation phase, the planned data is compared with actual data that is posted to the project structures by different business transactions (see Chapter 5, Project Implementation Processes). In the processing transactions, particularly in the reporting of SAP Project System, you can therefore make a plan/actual comparison later and then monitor the project earned value.
In this chapter, we'll first discuss the various possibilities of time scheduling in SAP Project System, which is the basis of several other planning activities. Then, we'll explain how to use networks to plan internal and external resources, as well as material for projects. Lastly, we'll explore the possibilities available to you for planning costs and revenues of your projects in SAP Project System.
111
I
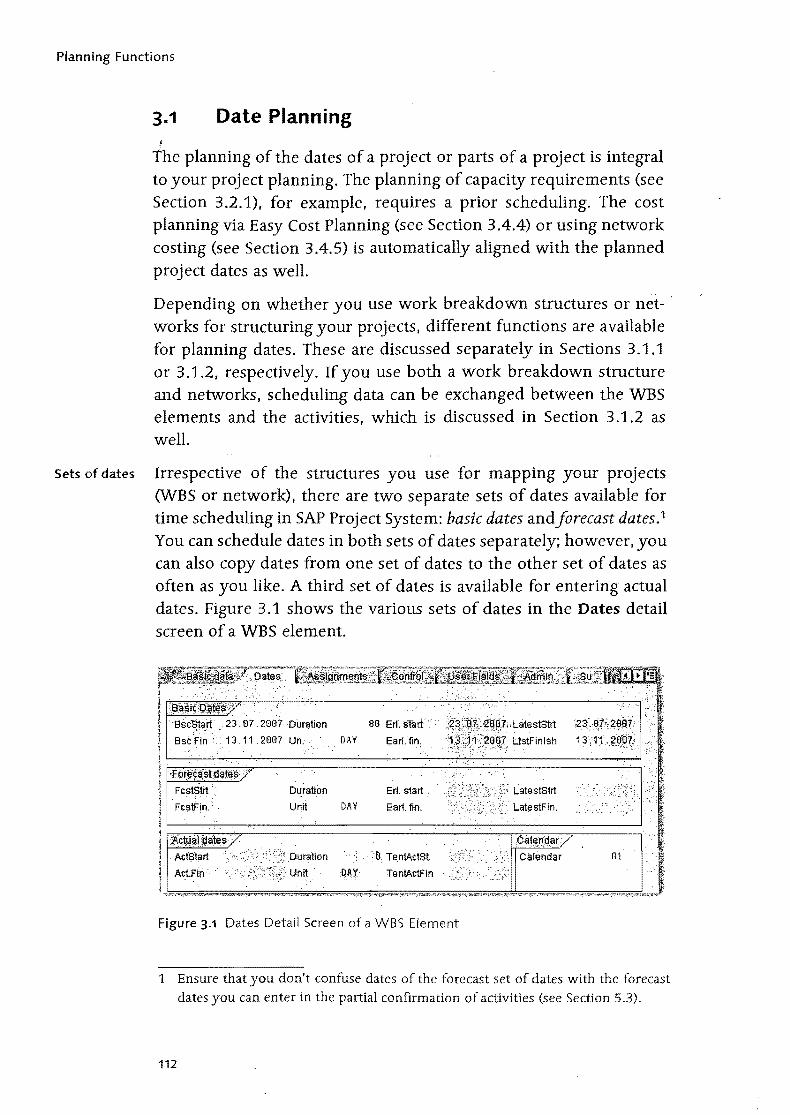
Planning Functions
3.1 Date Planning i
the planning of the dates of a project or parts of a project is integral to your project planning. The planning of capacity requirements (see Section 3.2.1), for example, requires a prior scheduling. The cost planning via Easy Cost Planning (see Section 3.4.4) or using network costing (see Section 3.4.5) is automatically aligned with the planned project dates as well.
Depending on whether you use work breakdown structures or net- . works for structuring your projects, different functions are available for planning dates. These are discussed separately in Sections 3.1.1 or 3.1.2, respectively. If you use both a work breakdown structure and networks, scheduling data can be exchanged between the WBS elements and the activities, which is discussed in Section 3.1.2 as well.
Sets of dates Irrespective of the structures you use for mapping your projects (WBS or network), there are two separate sets of dates available for time scheduling in SAP Project System: basic dates andforecast dates. 1
You can schedule dates in both sets of dates separately; however. you can also copy dates from one set of dates to the other set of dates as often as you like. A third set of dates is available for entering actual dates. Figure 3.1 shows the various sets of dates in the Dates detail screen of a WBS element.
. 8scBtart
8scFln
·I"Qr~la:stdatel'l:
FcstStrt '.
FcstFin.
.2887 Un. DAY
Duration
Unit DAY
Duration
88 Err. starf : .. .,."',,",,".;<1<1.', Earl.fin..
Erl. start
Earl. fin.
Unit 'QfJ,), TentActFin
Figure 3.1 Dates Detail Screen of a WBS Element
1 Ensure that you don't confuse dates of the forecast set of dates with the forecast dates you can enter in the partial confirmation of activities (see Section 5.3).
112
Date Planning I 3·1
Tp~'~i\rQP!ation of capacity requir¢:mehts,the' requirement date()fri1::tt~-: [«] riar> ';"L"nents or, for example, theE,asyGost Planning and t/JeplCi.)lneq ,cA, .J~'lliation using networkcosfillgcu'e·exclusively based onth~dat¢s: orfh,f~aslcset of dates. .. 'h~
Typically, the forecast set of dates is used for baselining, that is, fixing planned dates at a specific planning stage. For this purpose, you copy the dates of the basic set of dates once into the forecast set of dates. Changes to dates that may become necessary at a later stage are made to the basiC set of dates, while keeping dates in the forecast set of dates unchanged. Therefore, you can always read the current status of time scheduling in the basic set of dates while the forecast set of dates reflects your original time schedule. If you want to maintain several stages of time scheduling, you can use project versions (see
Section 2.9.1).
The presentation of forecast dates depends on the respective transaction. The tabular presentation of structure planning contains, for example, separate tabs for the respective sets of dates (see Section 2.7.3), In Project Builder, the WBS elements detail screen shows all sets of dates, while either the basic set of dates or the forecast set of dates is displayed for networks, depending on the settings. In the project planning board, you determine the field selection and the options for which dates are to be listed or graphically displayed. figure 3.2 shows the simultaneous presentation of basic and forecast dates in the project planning board.
Figure 3.2 Basic and Forecast Dates in the Project Planning Board
113
Using the forecast set of dates
I
I Planning Functions
3.1.1 Date Planning with WBS Elements
} When creating a project, you can enter a planned start and end date for the project in the project definition. When you later schedule dates on the WBS elements level, the system notifies you if the WBS element dates are outside of the date range specified in the project definition. If you want, however, start and end dates of the project definition can be adapted to the dates of the WBS elements.
Dates for WBS elements can be scheduled in Project Builder in the WBS elements detail screen, in the project planning board, or via the special maintenance functions, either in a tabular format or, in the project planning board, in a graphical format. Optionally, you can specify both planned start and end dates, or one of the two along with a planned duration for the WBS element. The system then calculates the other date automatically.
Factory calendar In this time scheduling, the system considers the factory calendar of the WBS element, which distinguishes workdays and non-workdays (holidays, weekends, company holidays, etc.). The entered duration in days. for example, is interpreted as the number of workdays; start or end dates on non-workdays cause system warnings.2
The standard version already contains numerous predefined factory calendars. You can also define your own factory calendars in Customizing using the SCAL transaction. Select the factory calendars separately for every WBS element, or enter them as default values in the project definition or in the project profile.
In addition to the manual maintenance of planned dates for WBS elements. there are various functions that - depending on the used transaction - support you in your time scheduling tasks. Using the project planning board as an example. we will explain in detail various time scheduling functions for WBS elements without assigned activities.
Shifting dates Using the shift dates function. you can shift the planned dates of individual WBS elements, or of entire subtrees, or of your entire project. For example, if you select a WBS element and choose the Shift Subtree function, a dialog box opens in which you can either
2 In the project planning board, the maintenance and presentation of non-working times are controlled by the non-working time tag in the options or the planning board profile, respectively.
114
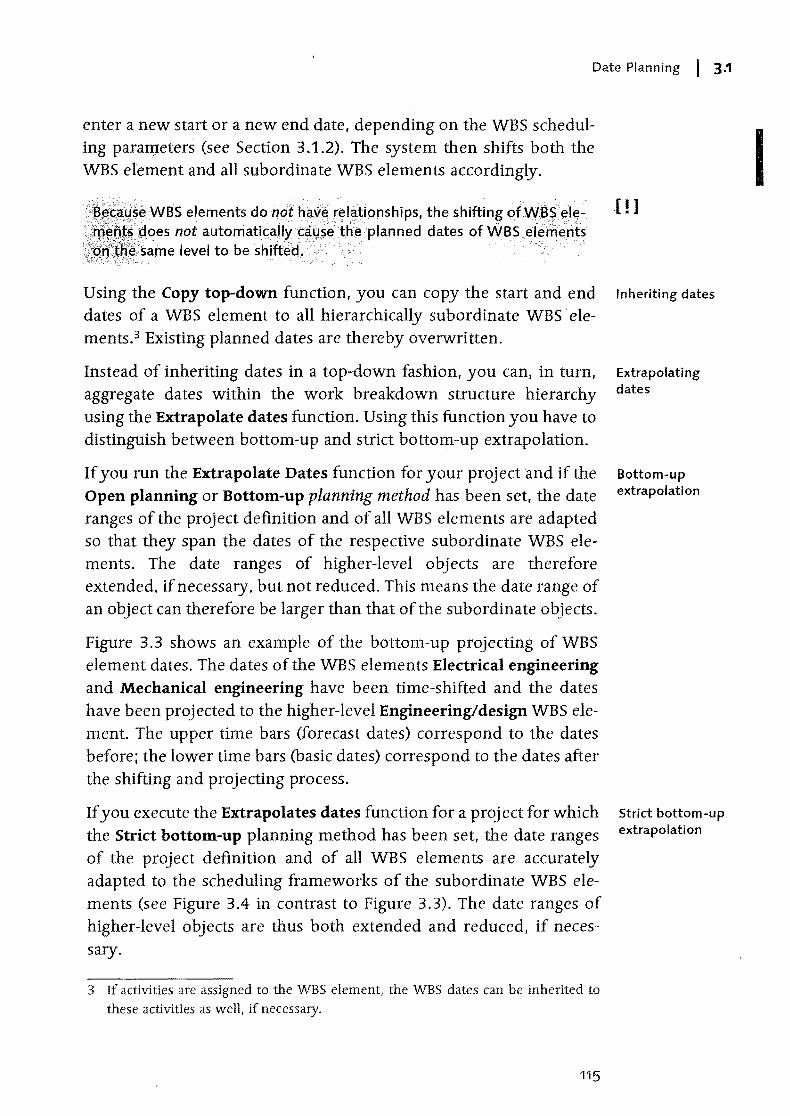
Date Planning I 3.1
enter a new start or a new end date, depending on the WBS schedul-ing para~eters (see Section 3.1.2). The system then shifts both the I WBS element and all subordinate WBS elements accordingly .
. Jls~WBS elements dOf1()th~v¢reliltiQnships. the shiftin&ofvVBSele- .[! ] .;·,[rlt~~fJ~~.4()es not automatica"},f:~lJseih~planned dates of WBS,elerilents ,t~Q:ifffa~same level to beshiffed. ." .' .' •.
Using the Copy top-down function, you can copy the start and end dates of a WBS element to all hierarchically subordinate WBS' elements.3 Existing planned dates are thereby overwritten.
Instead of inheriting dates in a top-down fashion, you can, in turn, aggregate dates within the work breakdown structure hierarchy using the Extrapolate dates function. Using this function you have to distinguish between bottom-up and strict bottom-up extrapolation.
If you run the Extrapolate Dates function for your project and if the Open planning or Bottom-up planning method has been set, the date ranges of the project definition and of all WBS elements are adapted so that they span the dates of the respective subordinate WBS elements. The date ranges of higher-level objects are therefore extended, if necessary, but not reduced. This means the date range of an object can therefore be larger than that of the subordinate objects.
Figure 3.3 shows an example of the bottom-up projecting of WBS element dates. The dates of the WBS elements Electrical engineering and Mechanical engineering have been time-shifted and the dates have been projected to the higher-level Engineering/design WBS element. The upper time bars (forecast dates) correspond to the dates before; the lower time bars (basic dates) correspond to the dates after the shifting and projecting process.
If you execute the Extrapolates dates function for a proj ect for which the Strict bottom-up planning method has been set, the date ranges of the project definition and of all WBS elements are accurately adapted to the scheduling frameworks of the subordinate WBS elements (see Figure 3.4 in contrast to Figure 3.3). The date ranges of higher-level objects are thus both extended and reduced, if necessary.
3 If activities are aSSigned to the WBS element, the WBS dates can be inherited to these activities as well, if necessary.
115
Inheriting dates
Extrapolati ng dates
Bottom-up extrapolati on
Strict bottom-up extrapolation
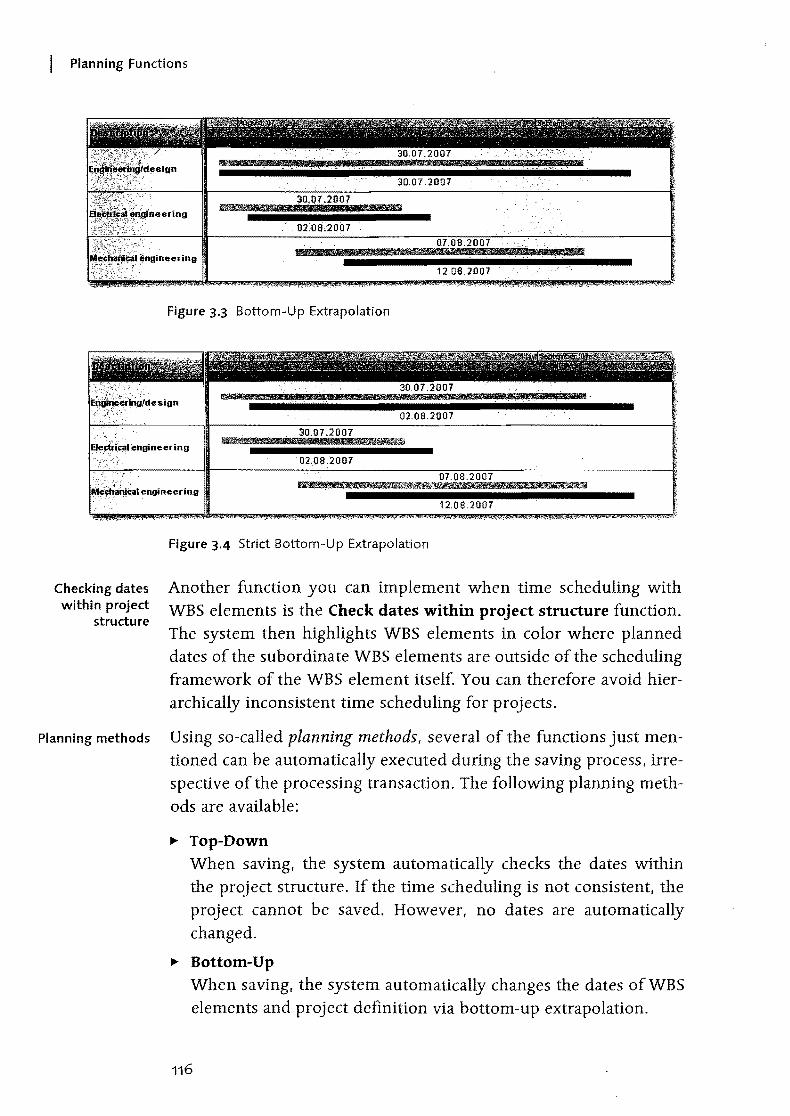
Planning Functions
Figure 3.3 Bottom-Up Extrapolation
02.08.2007
30.07.2007 4§.~
. 02.08.2007
I,¥Clta,,":.alengineering
Checking dates within project
structure
12.08.2007
Figure 3.4 Strict Bottom-Up Extrapolation
Another function you can implement when time scheduling with WBS elements is the Check dates within project structure function. The system then highlights WBS elements in color where planned dates of the subordinate WBS elements are outside of the scheduling framework of the WBS element itself. You can therefore avoid hierarchically inconsistent time scheduling for projects.
Planning methods Using so-called planning methods, several of the functions just mentioned can be automatically executed during the saving process, irrespective of the processing transaction. The folloWing planning methods are available:
~ Top-Down When saving, the system automatically checks the dates within the project structure. If the time scheduling is not consistent, the project cannot be saved. However, no dates are automatically changed.
~ Bottom-Up When saving, the system automatically changes the dates of WBS elements and project definition via bottom-up extrapolation.
116
Date Planning I 3·1
II> Strict Bottom-Up When spving, the system automaticciJly changes the dates of WBS elements and project definition using a strict bottom-up extrapolation.
II> Open Planning The system does not automatically check or change the dates. However, you can manually trigger the Check dates within project structure or Extrapolate dates functions.
You specify the planning method to be used separately for the basic and the forecast set of dates in the project definition. In the project profile, you can store default values for the planning methods of both sets of dates.
If you work with work breakdown structures without assigned networks, the scheduled dates of WBS elements, i.e., their earliest and latest start and end dates (see Figure 3.1), are relevant only if you use milestones, the dates of which are derived from the WBS element dates. Because the dates of milestones are exclusively derived from the scheduled dates, you must run the WBS Scheduling function at least once in this case. For work breakdown structures without assigned networks, the WBS scheduling only causes the planned dates to be accepted as scheduled dates.
3.1.2 Scheduling with Networks
While you enter the planned dates of WBS elements manually or via projecting or inheritance, the planned dates of processes are automatically calculated by the system. This determination of the planned dates of networks is called scheduling. Depending on the transaction from which you trigger the scheduling, you use network scheduling, overall network scheduling, or WBS scheduling.
In network scheduling, only one network is scheduled. All activities of the network are selected and their dates are calculated. If you use overall network scheduling, several networks are scheduled at the same time, provided they are linked via relationships or subnetworks. All activities of these networks are then scheduled. In WBS
scheduling, you select one or more WBS elements or the entire project and trigger the scheduling process. The system now selects
117
I
I Planning Functions
[»]
Forward scheduling
Earliest dates
Backward scheduling
Latest dates
only those activities for scheduling that are assigned to the selected WBS elements and calculates their dates.
;'
Before we elaborate on more differences between the various scheduling methods, we will first describe the scheduling concept, which is the same for all three methods.
In SAP Project System, the scheduling always takes place both in a forward and in a backward direction.
In forward scheduling, the system first determines those activities that - due to their relationships - don't have any predecessors among the selected activities. Beginning with a start date, the system calculates the earliest possible start date for these activities. Depending on the scheduling settings, the start date of forward scheduling can originate from the header of the network or from the assigned WBS elements (work breakdown structure determines dates), or be the current date.
After the earliest start date of these activities has been determined, the system calculates the earliest possible end date of these activities using the scheduling-relevant duration. Then, the system selects the direct successors of these activities and calculates their earliest start and end dates. Each type of relationship (see Section 2.3.1) determines whether the earliest start date must be after the end date of its predecessors (finish-start) or after their start date (start-start), etc.
The scheduling now goes through all selected activities in a forward direction and calculates their earliest possible start and end dates. Forward scheduling results in the earliest dates of activities.
In backward scheduling, the system first determines those activities that - due to their relationships - don't have any more successors among the selected activities. Starting from an end date - depending on the settings of the network header or the aSSigned WBS elements - the system now calculates the latest possible end date of these activities. Based on the scheduling-relevant duration of the activities, the latest start dates of these activities are then calculated.
The system then goes through the network in a backward direction, following the relationships, and thus successively calculates the latest possible start and end dates for all selected activities, considering
118
Date Planning I 3·1
their types of relationship and their durations. Backward scheduling determin9s the latest dates of activities.
The earliest start date and the latest end date of the network activities are forwarded to the network header as the scheduled dates. In WBS scheduling, the activity dates are additionally indicated in an aggregated fashion as scheduled dates at the level of the assigned WBS elements.
This logic of forward and backward scheduling requires a number of additional notes regarding the various influencing factors that are relevant to scheduling.
Without relationships, the result of scheduling in SAP Project System would not be a chronological sequence of the activities. The type of relationship determines how two activities will interact chronologically. If you specified a time interval for a relationship, this will be taken into account during scheduling. This time interval, however, is only interpreted as a minimum time interval, that is, the scheduled time interval between predecessor and successor can be longer than the time interval defined in the relationship.
If the activities selected for scheduling have relationships to activities that are not scheduled at the same time, these relationships are still taken into account. If relationships cannot be met, the system issues warnings that you can analyze in a scheduling log.
The calculation of the scheduling-relevant duration and the consideration of non-working times depend on the respective activity type; however, for all activity types, the control key of the activities must permit scheduling so that a duration unequal to zero is used during the date calculation.
For internally processed activities, the scheduling-relevant duration - as long as no actual dates have been entered (see Section 5.1.2) -is derived from the value of the Normal duration field or, if a work center has been stored in the activity, from an appropriate formula in the scheduling details of the work center. Typically, however, you will store the standard formula SAP004 in the work center, which references the value of the Normal duration field in the activity.
The Unit of the Normal duration field is relevant as well. For example, if you enter a duration of 24 hours, these hours are interpreted
119
Relationships in scheduling
Schedulingrelevant duration
I
I Planning Functions
Non-working times
as working hours. If the scheduling-relevant capacity of the work Jenter has an operating time of eight hours per day, this results in a . scheduling-relevant duration of three (working) days. If you entered a duration of one day, the system would use only one (working) day as the scheduling-relevant duration.
The scheduling of internally processed activities also considers nonworking times. If you maintained a work center in the activity, the system uses only the working times of the scheduling-relevant capacity of the work center for scheduling. Start and end dates are scheduled only for working days. The differentiation between working and non-working days originates from a factory calendar that is determined according to the following priority:
1. Factory calendar in the activity
2. Factory calendar in the work center
3. Factory calendar of the plant in the activity
For externally processed activities and service activities, the system by default uses the planned delivery time as the scheduling-relevant duration without differentiating between working and non-working days. But, if you want to use a deviating duration for scheduling, you can define a control key with the Scheduling external operation indicator and manually enter the scheduling-relevant duration in the Normal duration field of the Internal tab.
For general costs activities, you can manually specify the schedulingrelevant duration via the Normal duration field. Using factory calendars in the costs activities, you can restrict scheduling to working days.
Reduction If necessary, the system can automatically reduce the duration of activities if the scheduled dates are outside of the basic or forecast dates of the network header. The system can therefore automatically adapt the duration of activities to enable the network to be carried out in a given timeframe. This automatic adaptation of activity durations is called reduction. By specifying a minimum duration in an activity, you can ensure that a time interval that is required for processing an activity is not further reduced.
Reduction levels The reduction of the activity durations is performed in several successive stages. In a first stage, for example, the durations could be
120
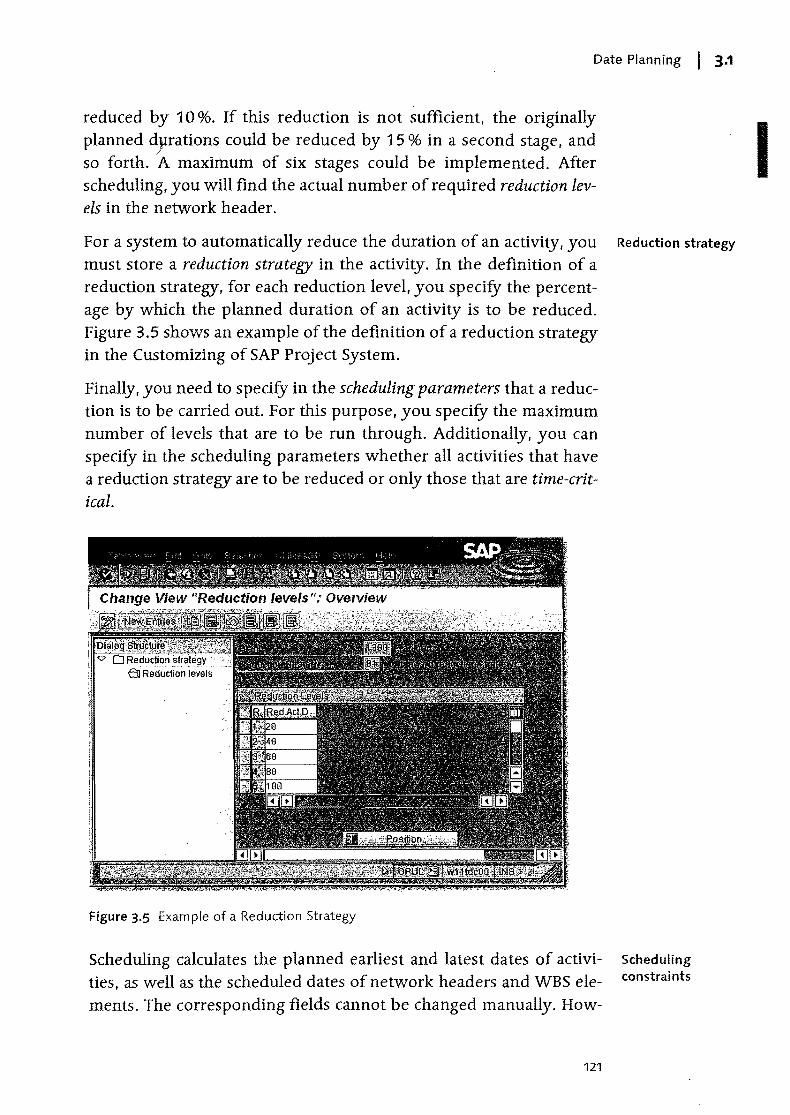
Date Planning I 3.1
reduced by 10%. If this reduction is not sufficient, the originally I planned dyrations could be reduced by 15 % in a second stage, and so forth. A maximum of six stages could be implemented. After scheduling, you will find the actual number of required reduction lev-els in the network header.
For a system to automatical1y reduce the duration of an activity. you Reduction strategy
must store a reduction strategy in the activity. In the definition of a reduction strategy, for each reduction level, you specify the percent-age by which the planned duration of an activity is to be reduced. Figure 3.5 shows an example of the definition of a reduction strategy in the Customizing of SAP Project System.
Finally, you need to specify in the scheduling parameters that a reduction is to be carried out. For this purpose, you specify the maximum number of levels that are to be run through. Additionally. you can specify in the scheduling parameters whether all activities that have a reduction strategy are to be reduced or only those that are time-critical.
Figure 3.5 Example of a Reduction Strategy
Scheduling calculates the planned earliest and latest dates of activities, as well as the scheduled dates of network headers and WBS elements. The corresponding fields cannot be changed manually. How-
121
Scheduling constraints
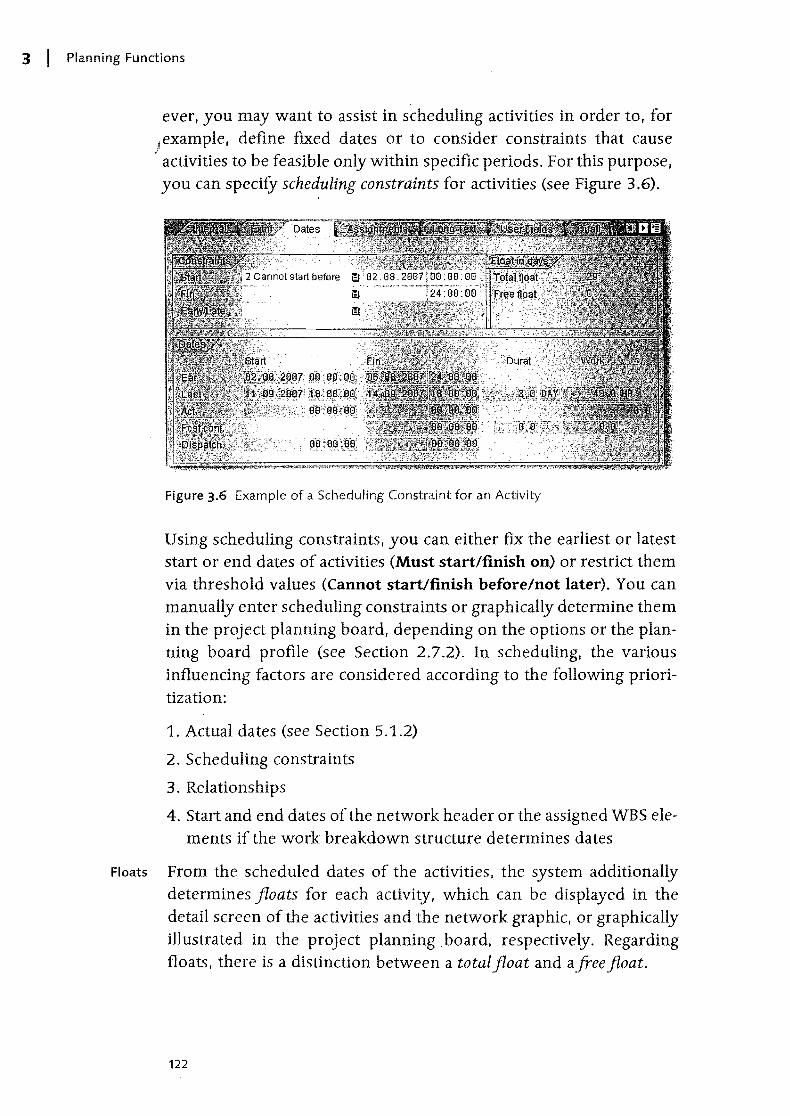
3 I Planning Functions
ever, you may want to assist in scheduling activities in order to, for /example, define fixed dates or to consider constraints that cause
;' activities to be feasible only within specific periods. For this purpose, you can specify scheduling constraints for activities (see Figure 3.6).
Figure 3.6 Example of a Scheduling Constraint for an Activity
Using scheduling constraints, you can either fix the earliest or latest start or end dates of activities (Must start/finish on) or restrict them via threshold values (Cannot start/finish before/not later). You can manually enter scheduling constraints or graphically determine them in the project planning board, depending on the options or the planning board profile (see Section 2.7.2). In scheduling, the various influencing factors are considered according to the following prioritization:
1. Actual dates (see Section 5.1.2)
2. Scheduling constraints
3. Relationships
4. Start and end dates of the network header or the assigned WBS elements if the work breakdown structure determines dates
Floats From the scheduled dates of the activities, the system additionally determines floats for each activity, which can be displayed in the detail screen of the activities and the network graphic, or graphically illustrated in the project planning. board, respectively. Regarding floats, there is a distinction between a total float and afree float.
122
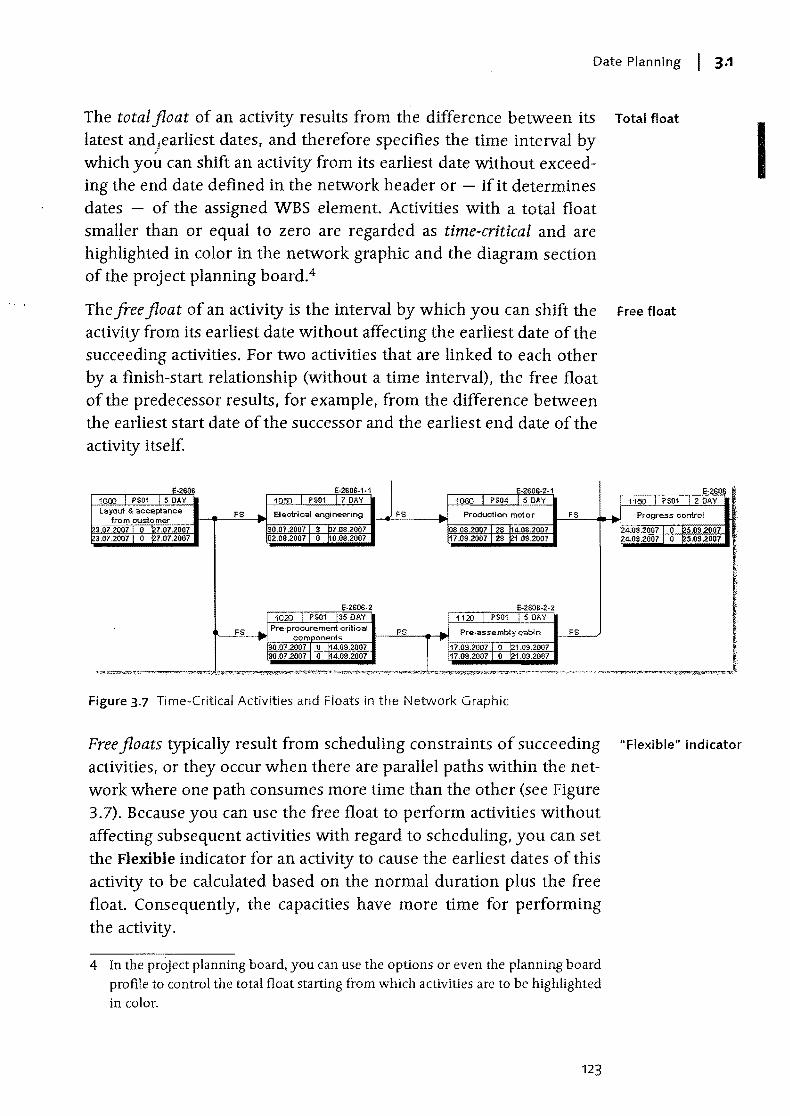
Date Planning I 3.1
The total float of an activity results from the difference between its Total float
latest andAearliest dates, and therefore specifies the time interval by which yo~ can shift an activity from its earliest date without exceed-ing the end date defined in the network header or - if it determines dates - of the assigned WBS element. Activities with a total float smaller than or equal to zero are regarded as time-critical and are highlighted in color in the network graphic and the diagram section of the project planning board.4
The free float of an activity is the interval by which you can shift the Free float
activity from its earliest date without affecting the earliest date of the succeeding activities. For two activities that are linked to each other by a finish-start relationship (without a time interval), the free float of the predecessor results, for example, from the difference between the earliest start date of the successor and the earliest end date of the activity itself.
E·2601 E·28,OS·1·1 E-2S0S·Z-1 1000 PS01 5 DAY 10&l PS01 17 DAY 1060 PSM 5 CAY i11&l I PSOl
E·2606 12 CAY
Layr:>ut 8. acceptance from customer
FS Electrical engineering Ls .. Production mctor FS .. .J Progress control
3.07.2007 o 27.07.2007 30.07.2007 3 1l7.082007 08.082007 28 H4.08.2007 124.0S.2007 o 25.09.2007 3.07.2007 o 127.07.2007 02.08.2007 o ~0.08.2007 17.0S.2007 28 121 ,09.2007 ~4.0S ,2007 I 0 115.09.2007
E-2S0S-2 E-2606·2-2 102:) I PS01 135 DAY 112:) PS01 5 CAY
FS ... Pre~procurement critical FS ... Pre-assembly cabin FS .. components ..
30.07.2007 o M.09.2007 21.09.2007 30.07.2007 o n4.09.2007 121.09.2007
y;~%,,~~~~-:~~~.~ • . = ... ~~~~, ."~~~k4{h&V;V:::;S;::<?".-Q~~''I>i'''fk .• , __ "'l)""l"t'0'f'!""";'~';2::V1~~ ., ~ ~_;--..:.~""., ... ''''7''-=;- v."" ,~·'">'f''' .-~ "~-'-g ~ "'''_'~'''''''''~~ ,
Figure 3.7 Time-Critical Activities and Floats in the Network Graphic
Free floats typically result from scheduling constraints of succeeding "Flexible" indicator
activities, or they occur when there are parallel paths within the net-work where one path consumes more time than the other (see Figure 3.7). Because you can use the free float to perform activities without affecting subsequent activities with regard to scheduling, you can set the Flexible indicator for an activity to cause the earliest dates of this activity to be calculated based on the normal duration plus the free float. Consequently, the capacities have more time for performing the activity.
4 In the project planning board, you can use the options or even the planning board profile to control the total float starting from which activities are to be highlighted in color.
123
I
I I Planning Functions
Dates ,of activity elements
[»]
Dates of activity milestones
Requirement date of material
components
You can supplement activities or add more details (see Section 2.3.1)
via activity elements. Because activity elements don't have a duration ~r relationships, they don't affect the scheduling result. Just like activities, however, activity elements have earliest and latest start and end dates. These dates are derived from the scheduled dates of the activity to which the activity elements are assigned and from the time intervals you may have entered in the activity elements.
The planned dates of the activity elemenJfa,lways fall within the actryJJy dates. Scheduling constraints can bedefifiepcit an activity level, bOCl'lp~) for actl'v"lt'y' elements, ' . . .. ' ::~, '
"' r:':-,~"
For milestones you have assigned to activities, you can either manually enter fixed dates or establish a time riference to the activity. If you use a time reference, you can use appropriate indicators to specify whether the milestone date is to be taken from the earliest or latest date, and the start or the end date of the activity. Furthermore, you can specify a time interval either in absolute terms (e.g., in a number of days), or in terms of percentage based on the duration of the activity. When using a time reference, every date shift of the activity directly affects the milestone date.
Even if you assign material components to an activity (see Section 3.3.1), you can select between a fixed requirement date for the material and a requirement date that is derived from the start or the end of the activity. The scheduling parameters control whether the date reference should refer to the earliest or the latest date of the activity. If necessary, you can also specify an absolute time interval that is considered when deriving the requirement date from the activity date.
Network Scheduling
In network scheduling, all activities of an individual network are scheduled. Whenever you call the scheduling from the specific maintenance function CN22 or from the Project Builder, provided you ,have selected a network header or a network activity in the structure tree, you trigger a network scheduling.
Network schedul- In network scheduling, the scheduling settings are determined from ing parameters the network scheduling parameters, but can also be temporarily
124
Date Planning I 3.1
modified. Figure 3.8 shows an example of defining network scheduling paraIl}eters.
Figure 3.8 Network Scheduling Parameters
Before you can create a network, you must have defined Network Scheduling Parameters for the combination of the plant and the network type of the network header in the Customizing of SAP Project System (transaction OPU6).
In the scheduling parameters, you first store the Scheduling Type. This value is displayed at the network header level and can be changed there, if necessary. The following scheduling types are available in SAP Project System:
~ Forwards The system first performs a forWard and then a backward scheduling. You use this scheduling type if you know the start of the execution, but not its end date.
125
[«]
Scheduling types
I
3 I Planning Functions
[»]
"Adjust basic dates" indicator
~ Backwards !. The system first performs a backward and then a forward schedul-
/
ing. You use this scheduling type if you know the end of the exe-cution (e.g., an agreed delivery date), but not its start date.
~ Current Date Instead of start dates that lie in the past, the system uses the current date for forward scheduling. You can therefore see if the planned period for the execution is still sufficient and which floats may still be available. This also includes both forward and backward scheduling.
~ Only Capacity Requirements The activities use the start and end dates from the network header (or the aSSigned WBS elements, if they determine dates) as the earliest and latest start and end dates. Relationships or the duration of individual activities are not taken into account in this scheduling type. You can implement this scheduling type if you don't want to specifY any details (yet) about the process and duration of individual activities, but want to calculate the capacity requirements for the total runtime (see Section 3.2.1).
In SAP Project System, start and end dates for scheduling can be specified in the network header or the WBS elements to the day only. Scheduling types with a reference to the time of the day can therefore not be implemented in SAP Project System.
Using the Adjust basic dates indicator in the scheduling parameters, you control if the system is to accept the scheduled dates at the network header level as basic or forecast dates. For example, if there is a fixed timeframe for the execution, enter the start and end dates manually in the network header and set the Do not adjust basic dates indicator. Your dates will remain fixed during the scheduling process, and by comparing the scheduled dates, you will be able to determine whether the timeframe is sufficient for the execution. 5
However, if you only know the start date, for example, and want the system to calculate the end date and to adjust it if changes need to be made at a later stage, select the Forwards scheduling type, set the Adjust basic dates indicator and manually enter a start date in the
5 If the scheduled dates are outside of the predefined dates, the scheduling log issues appropriate warnings.
126
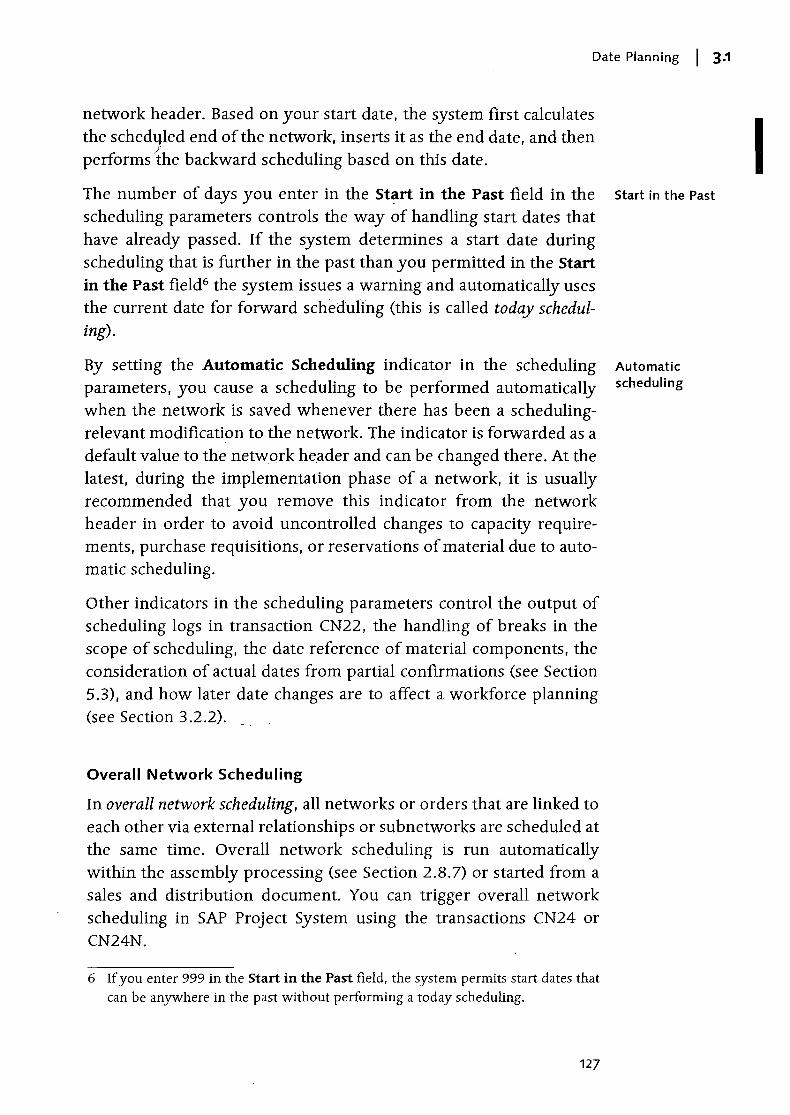
Date Planning I 3·1
network header. Based on your start date, the system first calculates the schedllied end of the network, inserts it as the end date, and then
)'
performs the backward scheduling based on this date.
The number of days you enter in the Start in the Past field in the scheduling parameters controls the way of handling start dates that have already passed. If the system determines a start date during scheduling that is further in the past than you permitted in the Start in the Past field6 the system issues a warning and automatical1y uses the current date for forward scheduling (this is called today scheduling).
By setting the Automatic Scheduling indicator in the scheduling parameters, you cause a scheduling to be performed automatical1y when the network is saved whenever there has been a schedulingrelevant modification to the network. The indicator is forwarded as a default value to the network header and can be changed there. At the latest, during the implementation phase of a network, it is usual1y recommended that you remove this indicator from the network header in order to avoid uncontrolled changes to capacity requirements, purchase requisitions, or reservations of material due to automatic scheduling.
Other indicators in the scheduling parameters control the output of scheduling logs in transaction CN22, the handling of breaks in the scope of scheduling, the date reference of material components, the consideration of actual dates from partial confirmations (see Section 5.3), and how later date changes are to affect a workforce planning (see Section 3.2.2).
Overall Network Scheduling
In overall network scheduling, all networks or orders that are linked to each other via external relationships or subnetworks are scheduled at the same time. Overall network scheduling is run automatically within the assembly processing (see Section 2.8.7) or started from a sales and distribution document. You can trigger overall network scheduling in SAP Project System using the transactions CN24 or CN24N.
6 If you enter 999 in the Start in the Past field, the system permits start dates that can be anywhere in the past without performing a today scheduling.
127
Start in the Past
Automatic scheduling
I
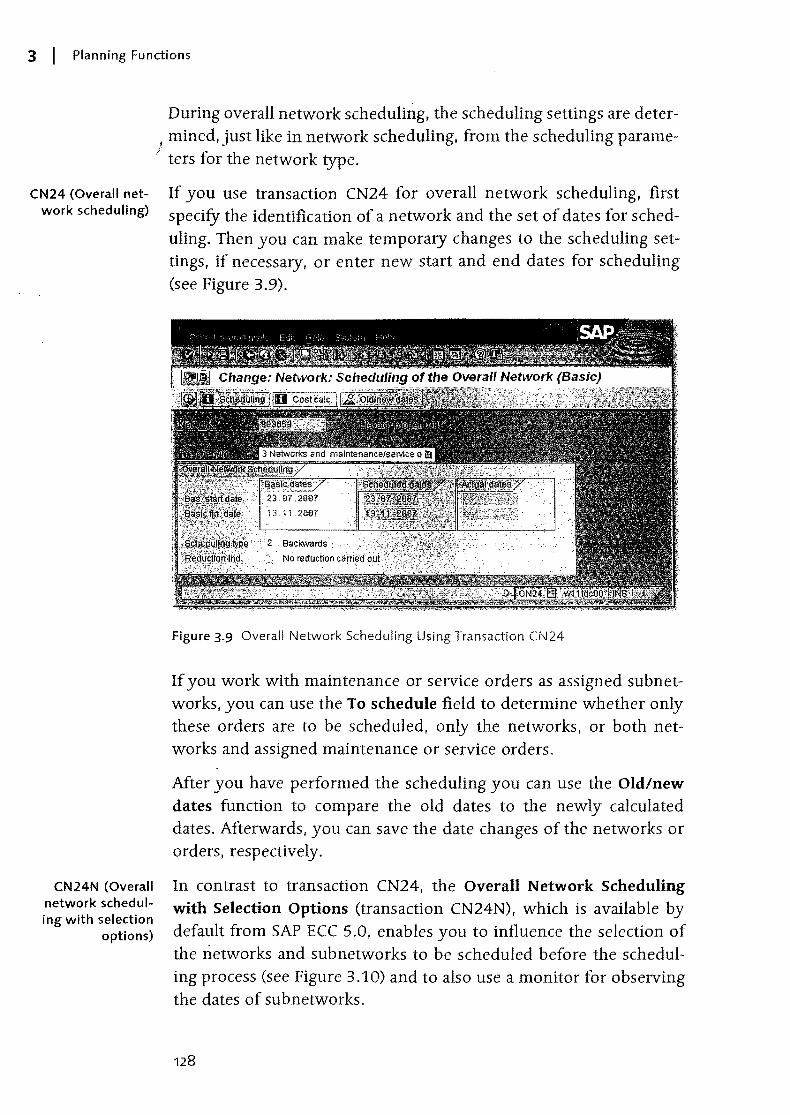
3 I Planning Functions
CN24 (Overall network scheduling)
CN24N (Overall network scheduling with selection
options)
During overall network scheduling. the scheduling settings are deterJ mined. just like in network scheduling. from the scheduling parame-
)"
. ters for the network type.
If you use transaction CN24 for overall network scheduling. first specifY the identification of a network and the set of dates for scheduling. Then you can make temporary changes to the scheduling settings. if necessary, or enter new start and end dates for scheduling (see Figure 3.9).
Figure 3.9 Overall Network Scheduling Using Transaction CN24
If you work with maintenance or service orders as assigned subnetworks, you can use the To schedule field to determine whether only these orders are to be scheduled, only the networks, or both networks and assigned maintenance or service orders.
After you have performed the scheduling you can use the Old/new dates function to compare the old dates to the newly calculated dates. Afterwards, you can save the date changes of the networks or orders, respectively.
In contrast to transaction CN24, the Overall Network Scheduling with Selection Options (transaction CN24N), which is available by default from SAP ECC 5.0, enables you to influence the selection of the networks and subnetworks to be scheduled before the scheduling process (see Figure 3.10) and to also use a monitor for observing the dates of subnetworks.
128
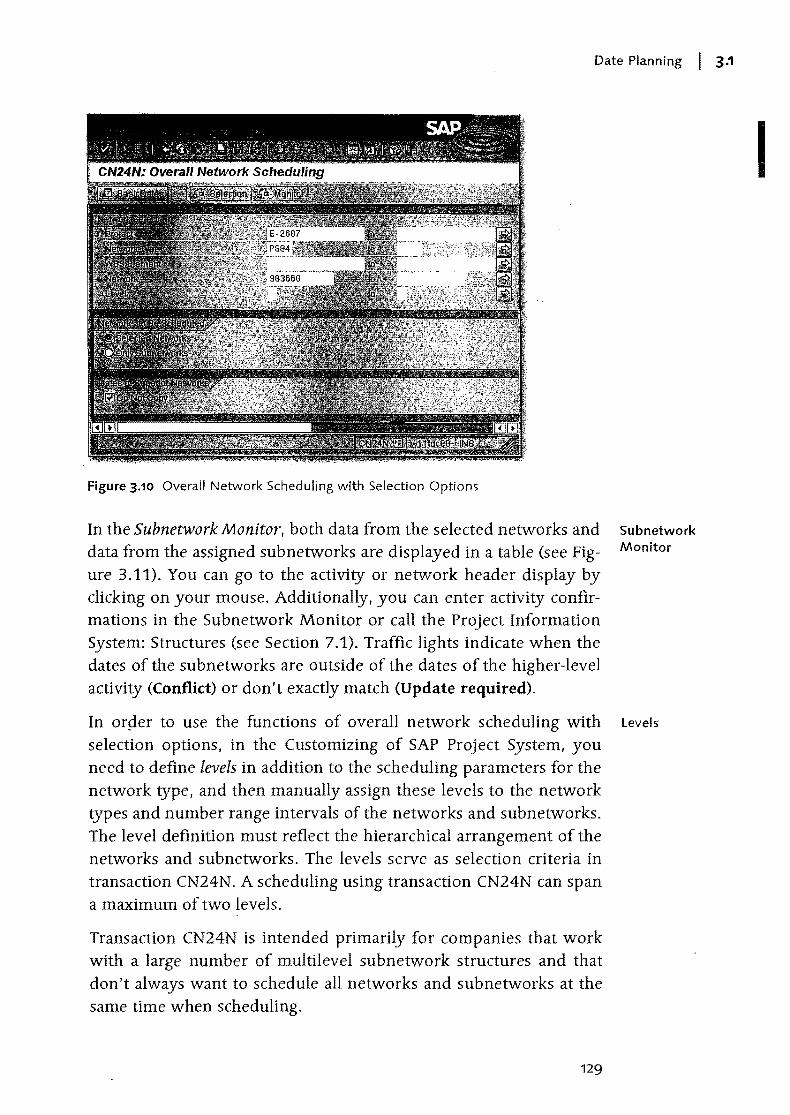
Date Planning I 3·1
Figure 3.10 Overall Network Scheduling with Selection Options
In the Subnetwork Monitor, both data from the selected networks and data from the assigned subnetworks are displayed in a table (see Figure 3.11). You can go to the activity or network header display by clicking on your mouse. Additionally, you can enter activity confirmations in the Subnetwork Monitor or call the Project Information System: Structures (see Section 7.1). Traffic lights indicate when the dates of the subnetworks are outside of the dates of the higher-level activity (Conflict) or don't exactly match (Update required).
In orper to use the functions of overall network scheduling with selection options, in the Customizing of SAP Project System, you need to define levels in addition to the scheduling parameters for the network type, and then manually assign these levels to the network types and number range intervals of the networks and subnetworks. The level definition must reflect the hierarchical arrangement of the networks and subnetworks. The levels serve as selection criteria in transaction CN24N. A scheduling using transaction CN24N can span a maximum of two levels.
Transaction CN24N is intended primarily for companies that work with a large number of multilevel subnetwork structures and that don't always want to schedule all networks and subnetworks at the same time when scheduling.
129
Subnetwork Monitor
levels
I
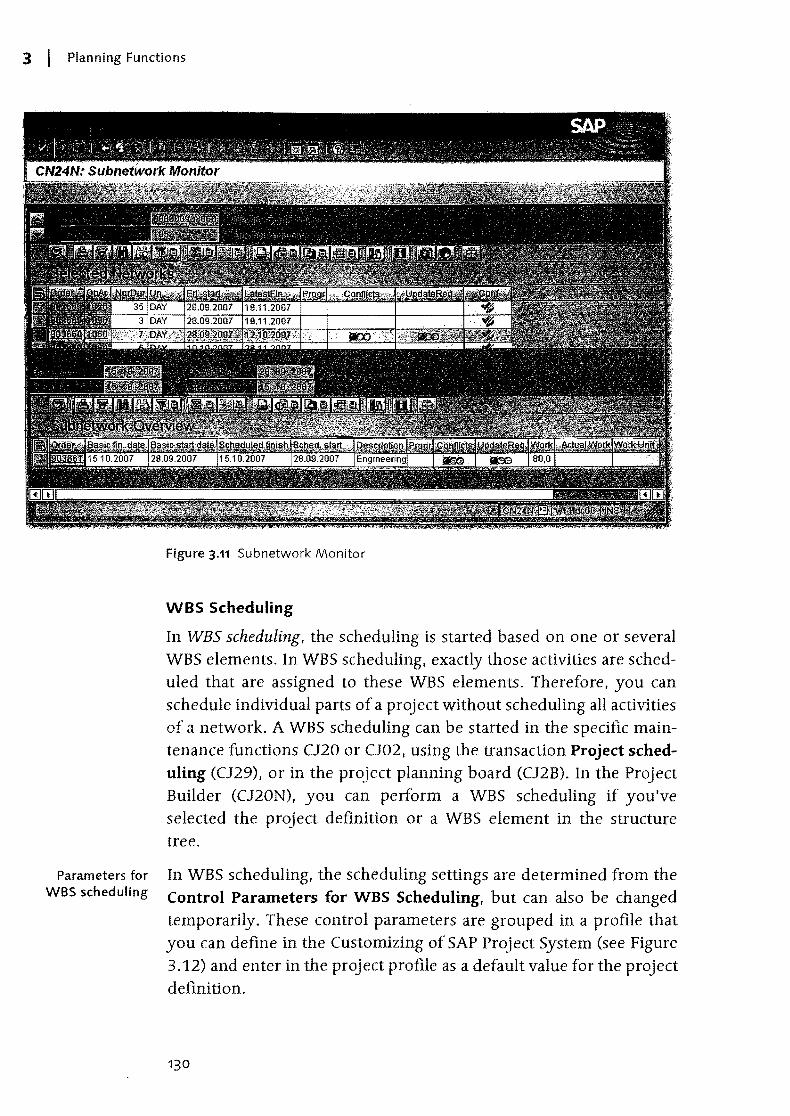
3 I Planning Functions
Parameters for WBS scheduling
Figure 3.11 Subnetwork Monitor
WBS Scheduling
In WBS scheduling, the scheduling is started based on one or several WBS elements. In WBS scheduling, exactly those activities are scheduled that are assigned to these WBS elements. Therefore, you can schedule individual parts of a project without scheduling all activities of a network. A WBS scheduling can be started in the specific maintenance functions C120 or Cl02, using the transaction Project scheduling (C129), or in the project planning board (C12B). In the Project Builder (C120N), you can perform a WBS scheduling if you've selected the project definition or a WBS element in the structure tree.
In WBS scheduling, the scheduling settings are determined from the Control Parameters for WBS Scheduling, but can also be changed temporarily. These control parameters are grouped in a profile that you can define in the Customizing of SAP Project System (see Figure 3.12) and enter in the project profile as a default value for the project definition.
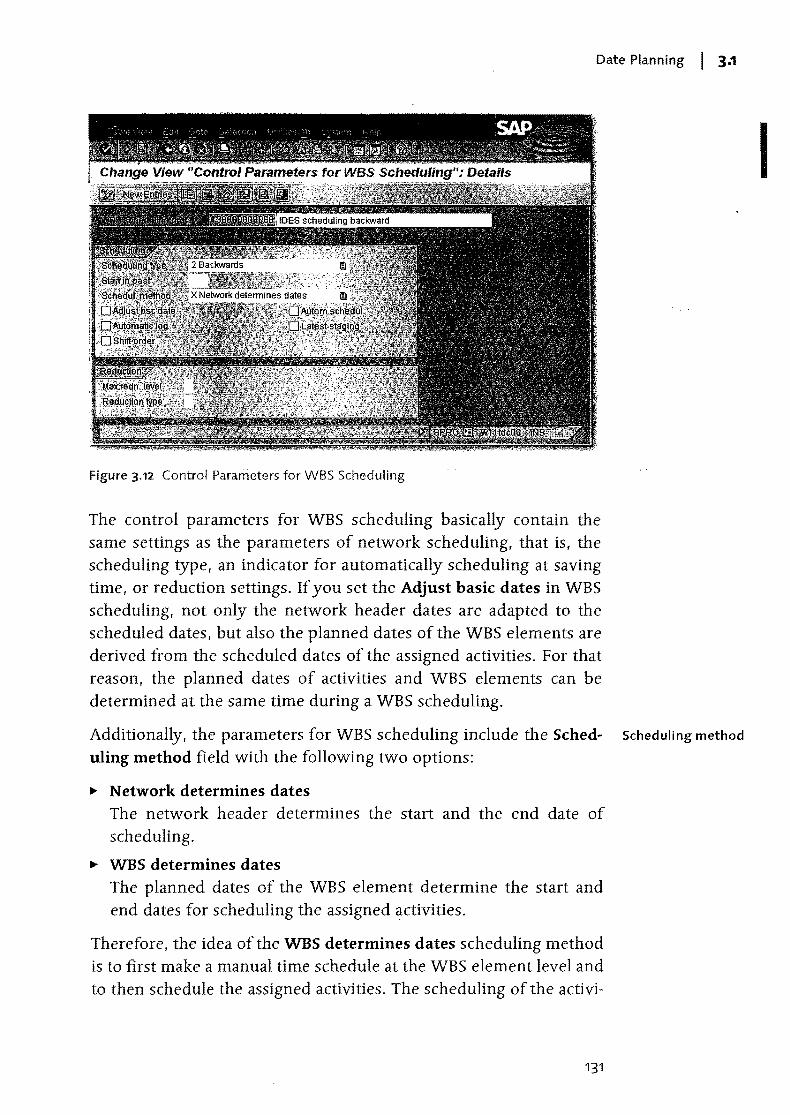
Date Planning I 3.1
Figure 3.12 Control Parameters for WBS Scheduling
The control parameters for WBS scheduling basically contain the same settings as the parameters of network scheduling, that is, the scheduling type, an indicator for automatically scheduling at saving time, or reduction settings. If you set the Adjust basic dates in WBS
scheduling, not only the network header dates are adapted to the scheduled dates, but also the planned dates of the WBS elements are derived from the scheduled dates of the assigned activities. For that reason, the planned dates of activities and WBS elements can be determined at the same time during a WBS scheduling.
Additionally, the parameters for WBS scheduling include the Sched- Scheduling method
uling method field with the following two options:
... Network determines dates The network header determines the start and the end date of scheduling.
... WBS determines dates The planned dates of the WBS element determine the start and end dates for scheduling the assigned activities.
Therefore, the idea of the WBS determines dates scheduling method is to first make a manual time schedule at the WBS element level and to then schedule the assigned activities. The scheduling of the activi-
131
I
3 I Planning Functions
Scheduling scenarios
ties is then based on the manually planned start and end dates of the j WBS elements.
/'
In the time scheduling process using WBS elements and networks, the scheduling parameters controlling the scheduling of the activities and the data exchange with the WBS elements play an important role, and the planning methods controlling the hierarchical exchange of planned dates between WBS elements on different levels. You can define the WBS scheduling parameters in the Customizing and spec-: ify them together with the planning methods for your project. Alternatively, you can also use predefined scheduling scenarios with WBS elements and networks.
If you select a scheduling scenario for scheduling a project, all settings are determined via the scheduling scenario. The following scheduling scenarios exist:
... Bottom-up scenario Based on the basic start date of the network header (which may be anywhere in the past), a forward scheduling and then a backward scheduling are performed. The scheduled dates are used as planned dates at the network header level and the assigned WBS elements. The planned dates of the WBS elements are finally projected in a bottom-up fashion .
... Top-down scenario In this scenario, you first have to make a manual scheduling at the WBS element level. During this process, the system checks the hierarchical consistency of this time scheduling when scheduling or saving. The scheduling of the assigned activities is based on the planned dates of the WBS elements (which may be anywhere in the past).
In both scheduling scenarios, requirements dates for material are derived from the latest date of activities, and reductions are not performed. The settings of both scheduling scenarios, bottom-up and top-down, are predefined and cannot be changed.
If you want to use one of the two scheduling scenarios, you can store the scenario in the project definition or enter it as a default value in the project profile. However, if you want to use different settings, you need to set the Scheduling scenario field to the value Free scheduling and specify the appropriate settings manually.
132
Resource Planning I 3·2
. can have th~~"~~'K'~~;i~f'~~l~f:;?:~il;ii,;;t~:~;ltally ·calcu,a.t~.~~;f~;'~
es and assigned,.... . ..••..•... ¢Il as identify tim~if:'.\ .' "e, activities are'i'~~~1 :,~~~.BS elements,~~~~:~
..•.•. exchanged between~{t YJJfes'and the was~el~~!; " • < O-:".<':>}",:t',. ~-!'(;-~:-":~~ :-(. . " ·_':';:',}7i«;;'.v:~
.you can manuaIlY'R.:;",;,;:" , •.. ~s,·~tthe WBS elem~,o.l>, ... ' " .'. by various:;:f.~Q~~,'2~~},~,~n~~fJor example,;t~14i
apl)la'tIJ~JI1~QfTic::ll8.tE~s or hierarch ical c::9n;~i~t~r~Y.{~hecks:':~'.\; • v:>:,' -:.-, . ", ~ . ",'
3.2 Resource Planning
If you mapped a project using only a work breakdown structure, you can plan costs for internal or external resources (see Section 3.4) and later assign activity allocations, purchase requisitions, purchase orders, goods receipts, and acceptances, for example, to WBS elements and thereby post the costs of the resource usage to the project (see Section 5.2). A logistic resource planning in the sense of a capacity planning, or an automatic data exchange between the project structure and purchasing documents is only possible in SAP Project System if you also implement networks. A manual cost planning for the required resources and a manual assignment of purchasing documents at the WBS element level are not necessary when using networks. The following sections deal with the functions that are available for planning resources via network activities.
3.2.1 Capacity Planning with Work Centers
When structuring your projects, you use internally processed activities or activity elements for specifying services that will be provided by internal resources, for example, machine or personnel resources. Within scheduling, the system has calculated when these services will be performed; however, the scheduling doesn't verify whether there are sufficient internal resources at the planned date. To make statements about the availability of your resources and thus the feasibility of your projects in terms of capacities, you can use the capacity requirements planning in SAP Project System.
The primary function of capacity requirements planning is to determine capacity requirements and to periodically (e.g., on a weekly or daily basis) compare these requirements with the available capacity
133
Capacity requirements planning
I
:I I Planning Functions
[»)
Work center category
Usage
using appropriate reports (see Section 7.3.3). The available capacity js defined using work centers, while the required capacity is derived
"from the activity data of networks or, for example, production or maintenance orders. If you discover that the capacity requirement is higher than the avaifable capacities during a specific period, you will need to make a capacity leveling in order to get your planning in line with the capacities.
A prerequisite. for capacity requirements planning usingnetWbrk~. is the usage of work centers.
Definition of Work Centers and Available Capacity
Work centers are organizational units in the SAP system that define where an activity can be performed and by whom. If you have already defined work centers for production or maintenance, you can use these work centers in networks as well, 'provided that this is permitted by the application of the work centers. If you have not yet defined any work centers in the SAP system, or if you want to use separate work centers for projects, you can create new work centers in SAP Project System (transaction CNR1).
When creating a new work center, in addition to the identification and the plant of the work center, you also specify the Work center category (see Figure 3.13). Among other things, the work center category defines the fields (Field selection) and tabs (Screen sequence) to be displayed in the master record of the work center. By default, you can use the 0006 (Project management) work center category in SAP Project System. If required, you can define additional work center categories (Customizing transaction OP40).
The Usage field in the basic data of the work center determines the task list types and order categories in which the work center can be used. For a work center to be used in standard networks and particularly in operative networks, it must have an usage that is assigned to the task list type 0 (standard network). If the work center is to be exclusively used for networks, you can, for example, enter the application 003 (networks only) in the master record of the work center. If you want, you can use Customizing transaction OP45 to define your own usages and assign them to the relevant task list types.
134
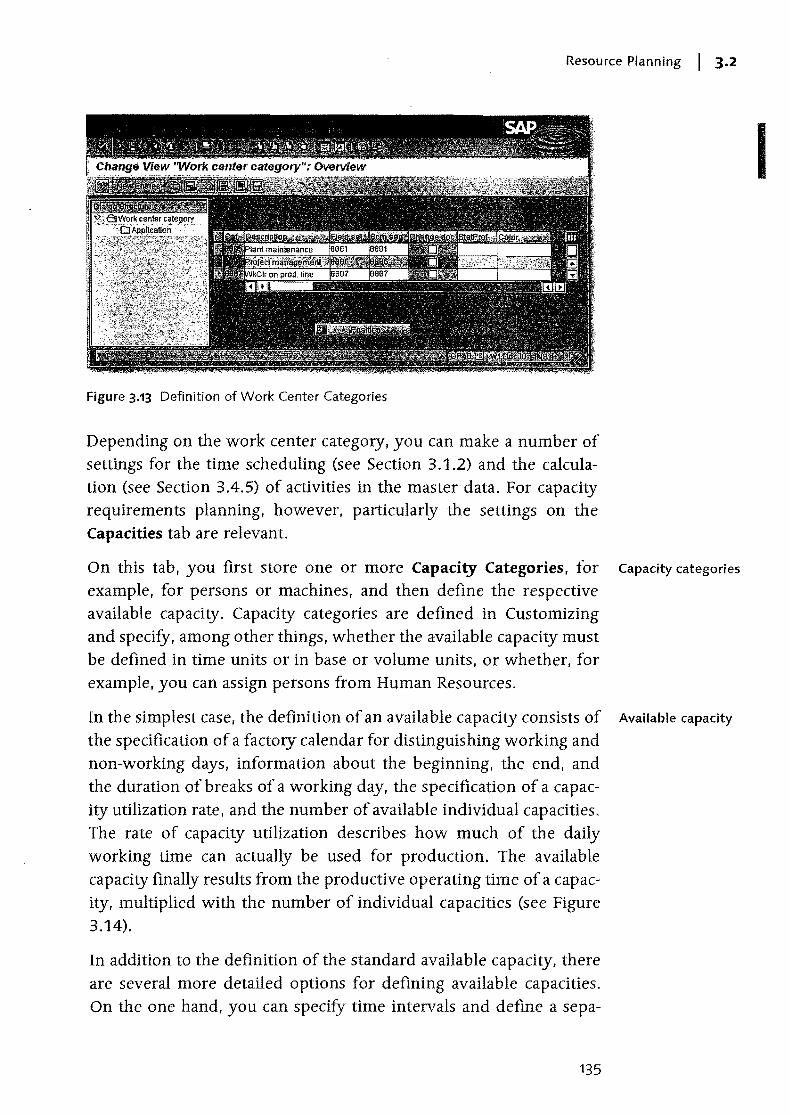
Resource Planning I 3·2
Figure 3.13 Definition of Work Center Categories
Depending on the work center category, you can make a number of settings for the time scheduling (see Section 3.1.2) and the calculation (see Section 3.4.5) of activities in the master data. For capacity requirements planning, however, particularly the settings on the Capacities tab are relevant.
On this tab, you first store one or more Capacity Categories, for Capacity categories
example, for persons or machines, and then define the respective available capacity. Capacity categories are defined in Customizing and specify, among other things, whether the available capacity must be defined in time units or in base or volume units, or whether, for example, you can assign persons from Human Resources.
In the simplest case, the definition of an available capacity consists of Available capacity
the specification of a factory calendar for distinguishing working and non-working days, information about the beginning, the end, and the duration of breaks of a working day, the specification of a capac-ity utilization rate, and the number of available individual capacities. The rate of capacity utilization describes how much of the daily working time can actually be used for production. The available capacity finally results from the productive operating time of a capac-ity, multiplied with the number of individual capacities (see Figure 3.14).
In addition to the definition of the standard available capacity, there are several more detailed options for defining available capacities. On the one hand, you can specify time intervals and define a sepa-
135
I
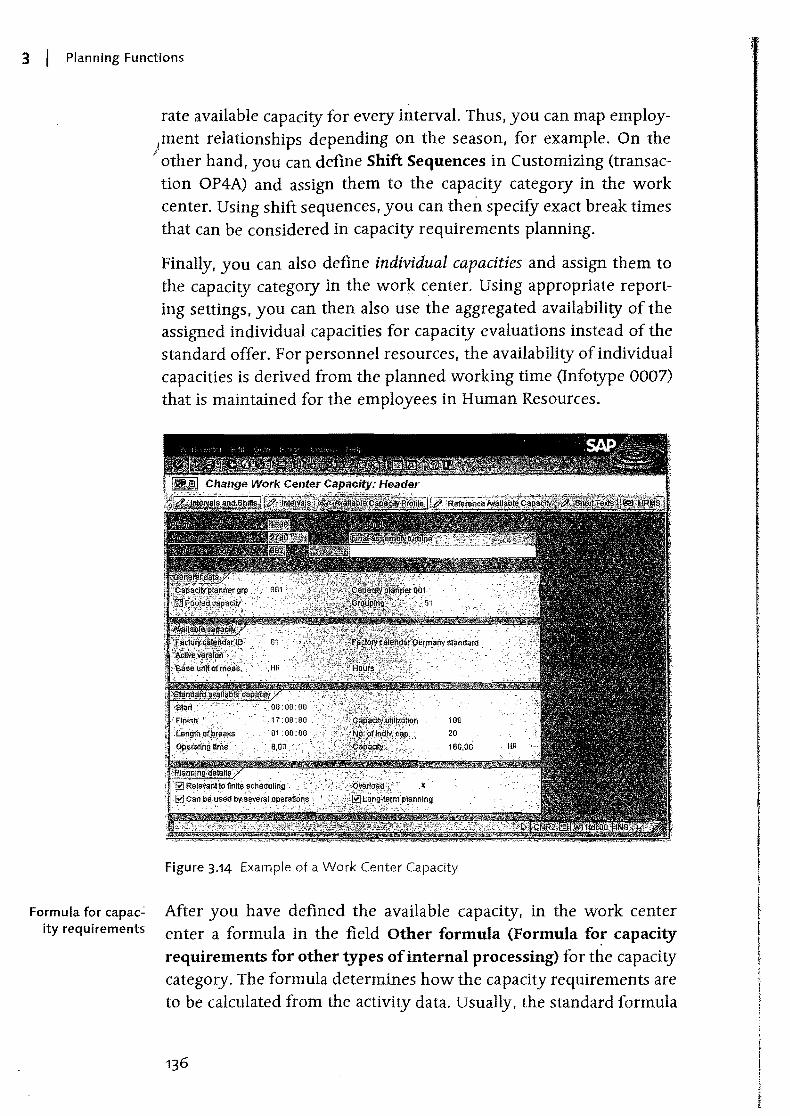
3 I Planning Functions
Formula for capac': ity requirements
rate available capacity for every interval. Thus, you can map employ.Iment relationships depending on the season, for example. On the
7 other hand, you can define Shift Sequences in Customizing (transaction OP4A) and assign them to the capacity category in the work center. Using shift sequences, you can then specify exact break times that can be considered in capacity requirements planning.
Finally, you can also define individual capacities and assign them to the capacity category in the work center. Using appropriate reporting settings, you can then also use the aggregated availability of the assigned individual capacities for capacity evaluations instead of the standard offer. For personnel resources, the availability of individual capacities is derived from the planned working time (Infotype 0007) that is maintained for the employees in Human Resources.
Figure 3.14 Example of a Work Center Capacity
After you have defined the available capacity, in the work center enter a formula in the field other formula (Formula fo~ capacity requirements for other types of internal processing) for the capacity category. The formula determines how the capacity requirements are to be calculated from the activity data. Usually, the standard formula
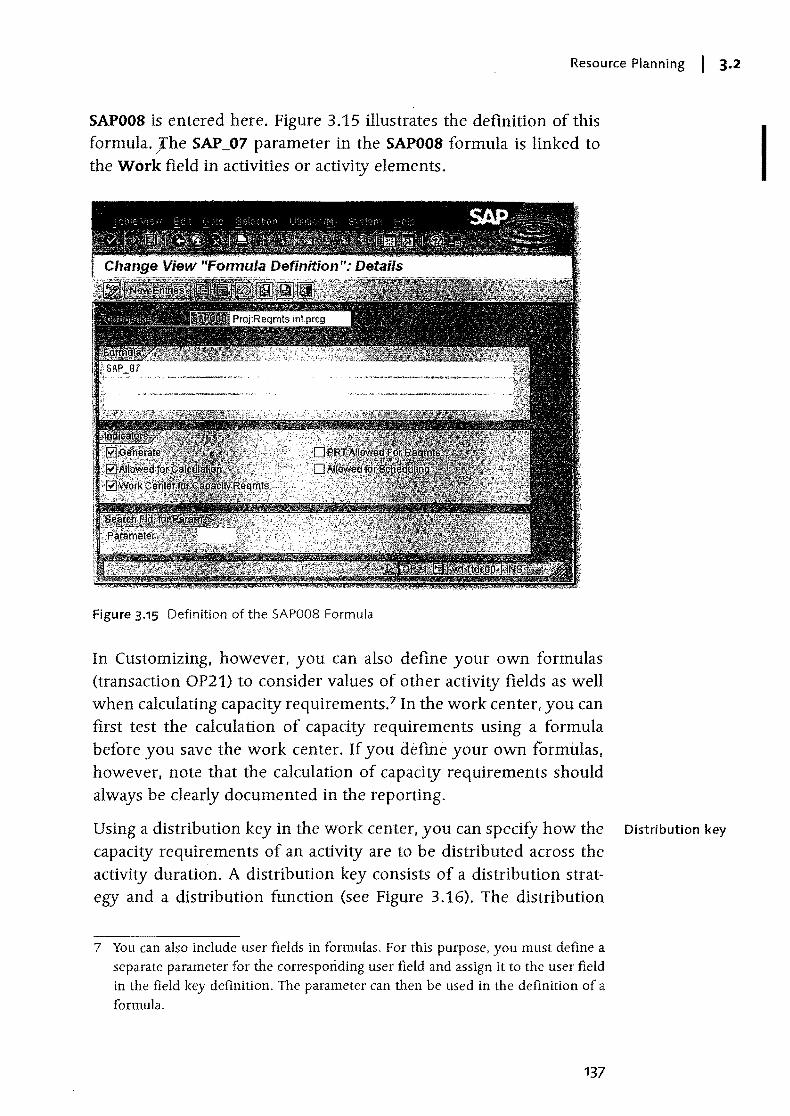
Resource Planning I 3.2
SAP008 is entered here. Figure 3.15 illustrates the definition of this formula.}'he SAP _07 parameter in the SAP008 formula is linked to the Work field in activities or activity elements.
Figure 3.15 Definition of the SAP008 Formula
In Customizing, however, you can also define your own formulas (transaction OP21) to consider values of other activity fields as well when calculating capacity requirements? In the work center, you can first test the calculation of capacity reqUirements using a formula before you save the work center. If you define your own formulas, however, note that the calculation of capacity requirements should always be dearly documented in the reporting.
Using a distribution key in the work center, you can specify how the Distribution key
capacity requirements of an activity are to be distributed across the activity duration. A distribution key consists of a distribution strat-egy and a distribution function (see Figure 3.16). The distribution
7 You can also include user fields in formulas. For this purpose. you must define a separate parameter for the corresporiding user field and assign it to the user field in the field key definition. The parameter can then be used in the definition of a formula.
137
I
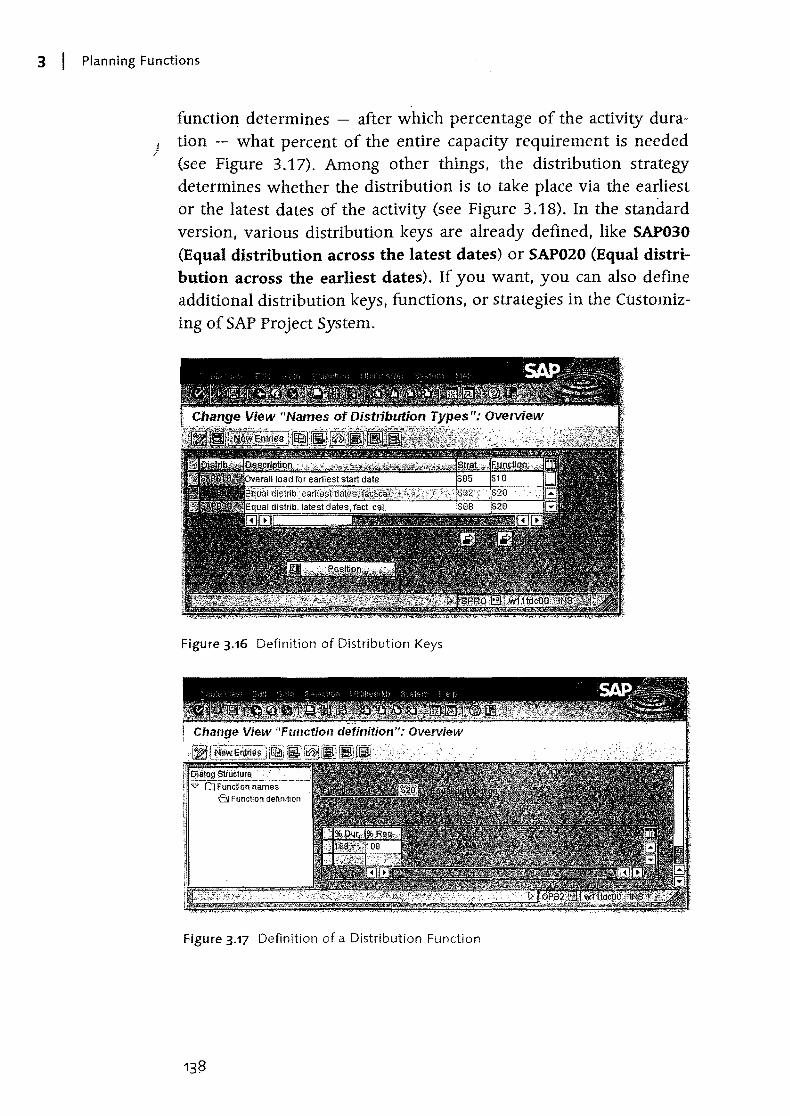
3 I Planning Functions
}
function determines - after which percentage of the activity duration - what percent of the entire capacity requirement is needed (see Figure 3.17). Among other things, the distribution strategy determines whether the distribution is to take place via the earliest or the latest dates of the activity (see Figure 3.18). In the standard version, various distribution keys are already defined. like SAP030 (Equal distribution across the latest dates) or SAP020 (Equal distribution across the earliest dates). If you want, you can also define additional distribution keys. functions, or strategies in the CUstomizing of SAP Project System.
Figure 3.16 Definition of Distribution I<eys
Figure 3.17 Definition of a Distribution Function
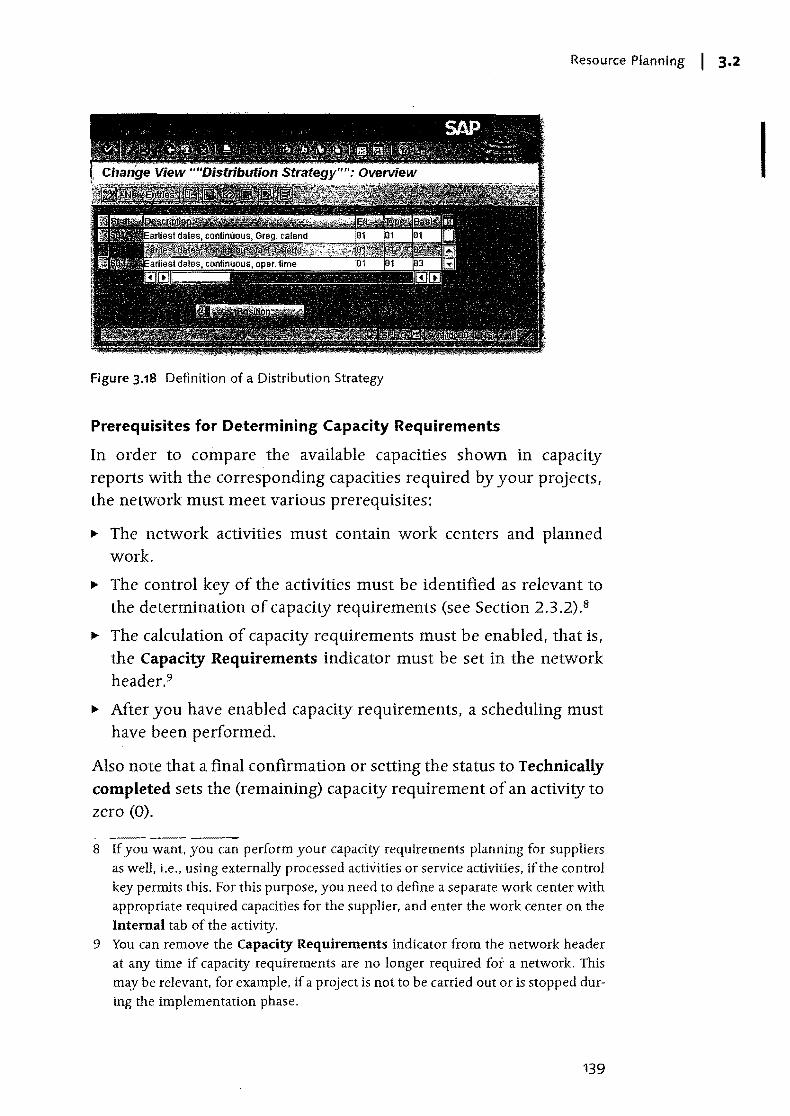
Resource Planning I 3.2
Figure 3.18 Definition of a Distribution Strategy
Prerequisites for Determining Capacity Requirements
In order to compare the available capacities shown in capacity reports with the corresponding capacities required by your projects, the network must meet various prerequisites:
~ The network activities must contain work centers and planned work.
~ The control key of the activities must be identified as relevant to the determination of capacity requirements (see Section 2.3.2).8
~ The calculation of capacity requirements must be enabled, that is, the Capacity Requirements indicator must be set in the network header. 9
~ After you have enabled capacity requirements, a scheduling must have been performed.
Also note that a final confirmation or setting the status to Technically completed sets the (remaining) capacity requirement of an activity to zero (0).
8 If you want, you can perform your capacity requirements planning for suppliers as well, i.e., using externally processed activities or service activities, if the control key permits this. For this purpose, you need to define a separate work center with appropriate reqUired capacities for the supplier, and enter the work center on the Internal tab of the activity.
9 You can remove the Capacity Requirements indicator from the network header at any time if capacity requirements are no longer required for a network. This may be relevant, for example, if a project is not to be carried out or is stopped during the implementation phase.
139
I
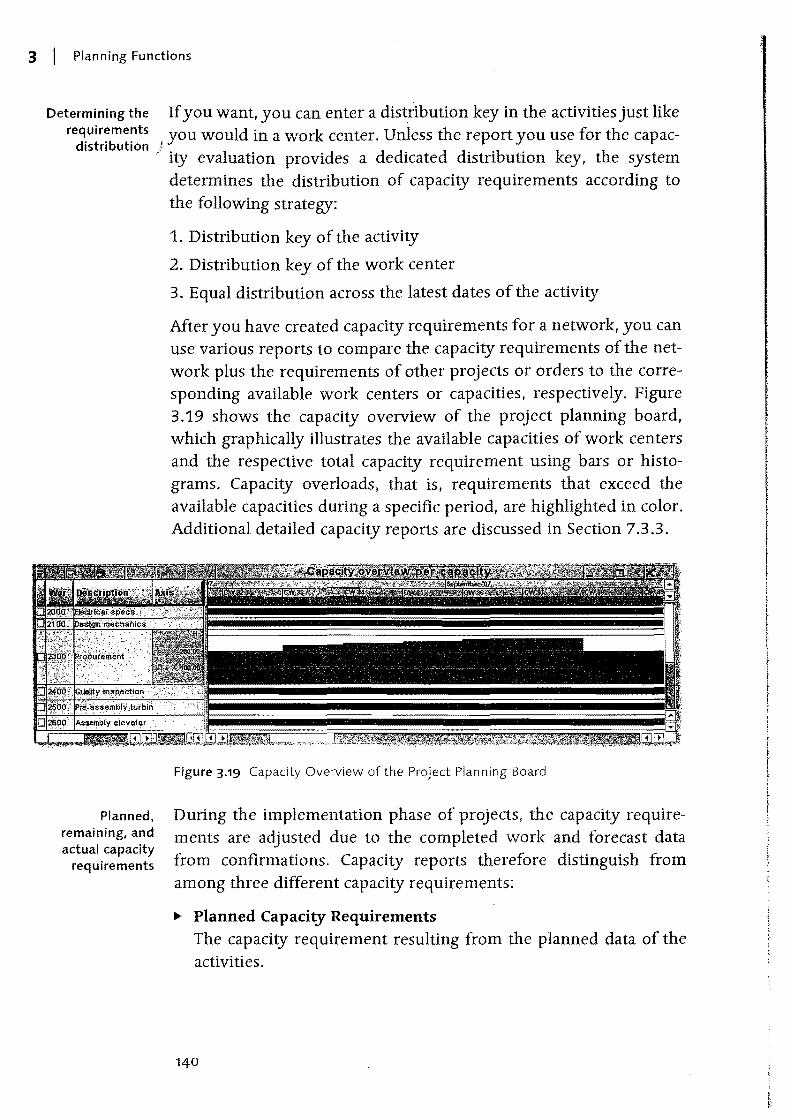
3 I Planning Functions
Determining the If you want, you can enter a distribution key in the activities just like requirements you would in a work center. Unless the report you use for the capac-
distribution }
Planned, remaining, and actual capacity
reqUirements
ity evaluation provides a dedicated distribution key, the system determines the distribution of capacity requirements according to the following strategy:
1. Distribution key of the activity
2. Distribution key of the work center
3. Equal distribution across the latest dates of the activity
After you have created capacity requirements for a network, you can use various reports to compare the capacity requirements of the network plus the requirements of other projects or orders to the corresponding available work centers or capacities, respectively. Figure 3.19 shows the capacity overview of the project planning board, which graphically illustrates the available capacities of work centers and the respective total capacity requirement using bars or histograms. Capacity overloads, that is, requirements that exceed the available capacities during a specific period, are highlighted in color. Additional detailed capacity reports are discussed in Section 7.3.3.
Figure 3.19 Capacity Overview of the Project Planning Board
During the implementation phase of projects, the capacity requirements are adjusted due to the completed work and forecast data from confirmations. Capacity reports therefore distinguish from among three different capacity reqUirements:
II>- Planned Capacity Requirements The capacity requirement resulting from the planned data of the activities.
140
Resource Planning I 3·2
... Remaining Capacity Requirements Thectyrent capacity requirements resulting from the originally planned requirements, the previously confirmed services, and possibly the forecasted remaining work.
... Actual Capacity Requirements The service that has actually been used and has already been confirmed. 10
3.2.2 Workforce Planning
A work center can consist of several available individual capacities; however, if you perform your capacity requirements planning only at the work center level, you won't be able to specify which individual capacity of the work center will provide the respective service. Therefore, you can't create meaningful capacity evaluations for the individual capacities.
For some projects, however, you must plan individual capacities - Capacity splits
particularly as far as personnel resources are concerned - in order to avoid an overload of individuals or to consider employees' quali-fications when planning the project, for example. For this purpose, you can distribute the work via capacity splits, that is, split the planned work of an activity into individual capacities. Capacity splits can be individual machines, organizational units, or positions, for example. Usually, however, the SAP Project System performs a work-force planning, that is, a distribution with a direct reference to personnel numbers. The work distributed to a person can later be used as a default value for the time data recording. using the time sheet CATS (see Section 5.3.3).
Prerequisites for Workforce Planning
A prerequisite for workforce planning is that SAP Project System is HR master data
prOVided with various HR master data. This can either be maintained in the system as HR mini-master records, or originate from an HR
system. The minimum reqUirement is HR master data of the Info-types 0001 (Organizational Assignment) and 0002 (Personal Data).
10 In addition to the relevant settings of the extended capacity reports, it is necessary for an analysis of actual capacity reqUirements that the relevant work centers determine actual capacity reqUirements.
141
I
3 I Planning Functions
[»]
Personnel assignment to work centers
Project organization
If you want to consider the availability of the persons or their quali.1 fications in your planning, you will also need the Infotypes 0007 / (Planned Working Time) or 0024 (Qualifications). Another later use
of the data in the timesheet also requires Infotype 0315 (Default Values Time Sheet).
" ." <. ~'<}~'~~;,:~~-'~~-1,~:~f,:'; >~. . . _< . >: ,-:;::,:.:~~<.~:).:{>:,)~;,.: ~',.-,: '<',' . . ~: .. r :~;,' ;::::~~,~~;~.:.s:t-:;',--;,
Bef~[~;;¥~l!'candistribute the work dfi1~.;g.~[Y:I~¥to individuals, y09,m;q~tJ; ~ay~~;~lr~'fqYcieterm i ned the capacityf~q·~JJ:~[rj~nts.This means YOtrril~~,5; ·at!e~$.ti~ne work center for workforce.,pla"rjrlt!Igas'well..i;0~·;~;.('
' .. ' ~ . :. :' . . ,- ::.:',~' i ; , ,- .,;:->~~:;:-~'
The persons to whom you want to distribute the work do not necessarily have to be assigned to that work center. Depending on the system settings, you can use the following personnel for workforce planning:
.... Persons who are assigned to the work center of the activity
.... Persons of a project organization
.... Any personnel resources
There are two ways of assigning personnel to a work center. First, you can assign an organizational unit or an HR work center to the work center and therefore indirectly assign personnel. Secondly, you can directly assign positions or persons to the work center capacity. The benefit of this option is that you can use the total amount of availabilities of the aSSigned personnel included in capacity reports as the available capacity of the work center instead of the standard availabilities.
Project organization refers to persons, positions, or organizational units that you assign to WBS elements as the default set for a later workforce planning. If you use transaction CMP2 <Workforce planning - Selection Project View), the system always first suggests the persons, positions, or organizational units of the project organization for your workforce planning. If you have not assigned a project organization to a WBS element, transaction CMP2 of the system provides the project organization of the hierarchically superior WBS element for workforce planning. If you only want to store one project organization for the entire project, an assignment at the top project level will suffice. You can assign project organizations to WBS elements in transaction CMP2, or in all processing transactions for work breakdown structures except transaction CJ12 (Change WBS
142
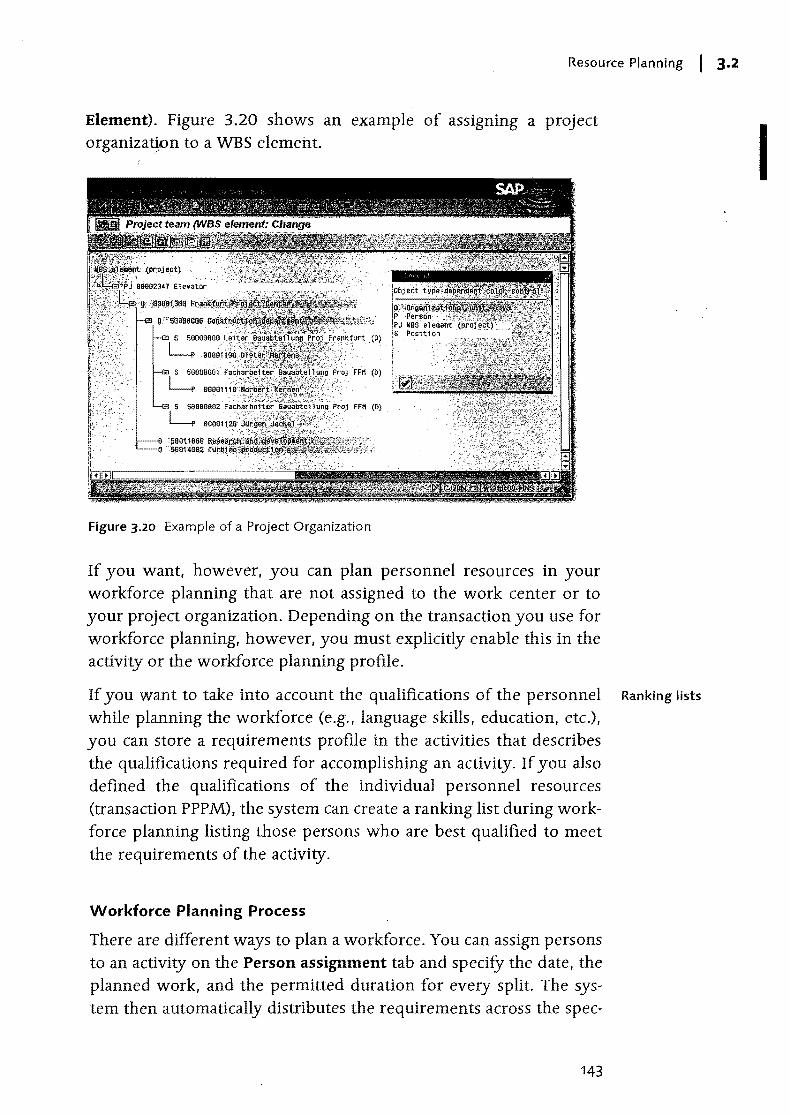
Resource Planning I 3.2
Element). Figure 3.20 shows an example of assigning a project organizatjon to a WBS element.
Figure 3.20 Example of a Project Organization
If you want. however, you can plan personnel resources in your workforce planning that are not assigned to the work center or to your project organization. Depending on the transaction you use for workforce planning, however, you must explicitly enable this in the activity or the workforce planning profile.
If you want to take into account the qualifications of the personnel Ranking lists
while planning the workforce (e.g., language skills, education, etc.), you can store a requirements profile in the activities that describes the qualifications required for accomplishing an activity. If you also defined the qualifications of the individual personnel resources (transaction PPPM), the system can create a ranking list during work-force planning listing those persons who are best qualified to meet the requirements of the activity.
Workforce Planning Process
There are different ways to plan a workforce. You can assign persons to an activity on the Person assignment tab and specify the date, the planned work, and the permitted duration for every split. The system then automatically distributes the requirements across the spec-
143
I
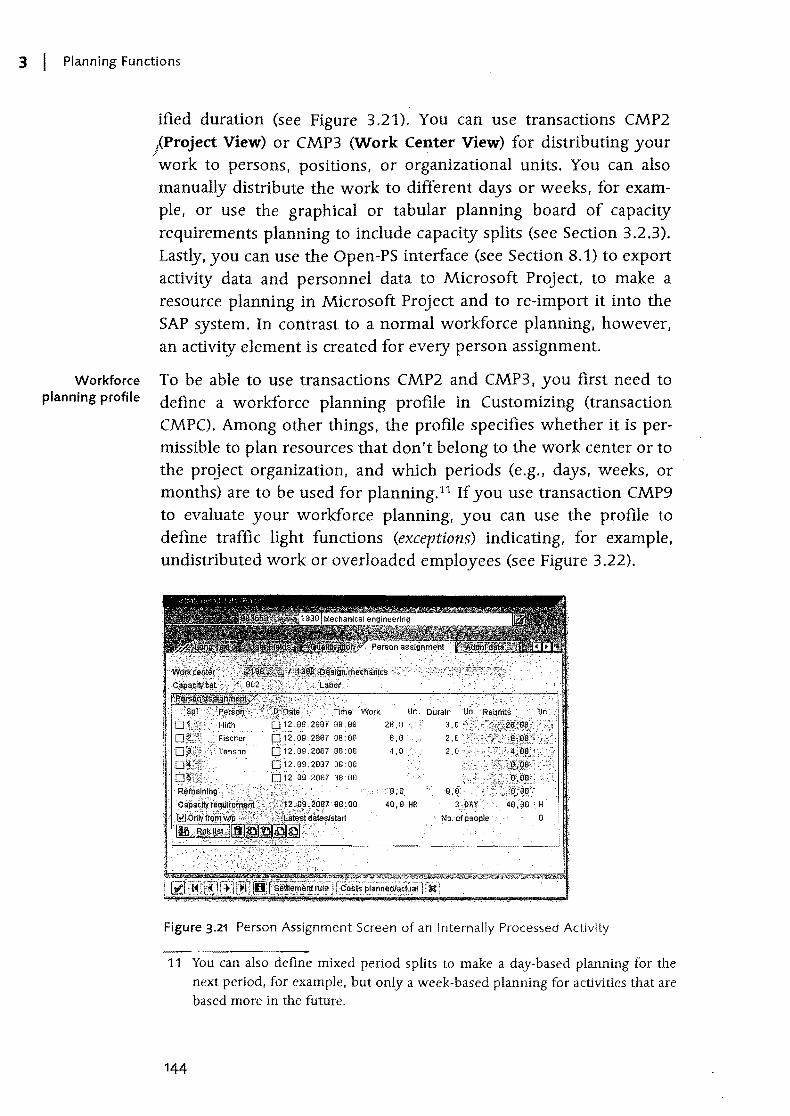
3 I Planning Functions
Workforce planning profile
ified duration (see Figure 3.21). You can use transactions CMP2 j(Project View) or CMP3 (Work Center View) for distributing your
f .
work to persons, positions, or organizational units. You can also manually distribute the work to different days or weeks, for example. or use the graphical or tabular planning board of capacity requirements planning to include capacity splits (see Section 3.2.3). Lastly, you can use the Open-PS interface (see Section 8.1) to export activity data and personnel data to Microsoft Project, to make a resource planning in Microsoft Project and to re-import it into the SAP system. In contrast to a normal workforce planning, however, an activity element is created for every person assignment.
To be able to use transactions CMP2 and CMP3, you first need to define a workforce planning profile in Customizing (transaction CMPC). Among other things, the profile specifies whether it is permissible to plan resources that don't belong to the work center or to the project organization, and which periods (e.g., days, weeks, or months) are to be used for planning.11 If you use transaction CMP9 to evaluate your workforce planning, you can use the profile to define traffic light functions (exceptions) indicating, for example, undistributed work or overloaded employees (see Figure 3.22),
4,0
····e;'1il
48,0 HR .
. .. No.C:fpeoPle· ..
Figure 3.21 Person Assignment Screen of an Internally Processed Activity
11 You can also define mixed period splits to make a day-based planning for the next period, for example, but only a week-based planning for activities that are based more in the future.
144
Resource Planning I 3·2
In a workforce planning using transaction CMP2 (Project View), you CMP2
select thtj activities for workforce planning by specifying one or (Project View)
more projects. WBS elements, or networks. You receive a list of activities for which there are capacity requirements and then can cre-ate an assignment to organizational units. positions, or personnel resources. If there is a project organization, it will be suggested for an assignment; however, you can also use the work center resources and-provided this is permitted by the profile-any other personnel resources.
0,00.$] 99,99
.~; 99,99$; 100,01 0 ~.10a,01 0
Figure 3.22 Example of a Workforce Planning Profile
0,00 _:$J 90, OB
? 90,00 .s;; 120,00
> 120,00
However, the assignment of a resource is not sufficient yet for workforce planning. Additionally, you need to enter the period in which the resource is to accomplish the specified amount of the planned work of the activity. At first, the system only offers the period for distribution that covers the capacity requirements of the activity. If you want, however, you can also use different periods for workforce planning.
145
I
Planning Functions
CMP3 (Work Center
View)
Additionally, you can display the availability (planned working time) 01 the totalload12 of the resources for each period. You can also display details of the activities or show the planned distribution of the activities' capacity requirements. Figure 3.23 shows an example of workforce planning using transaction CMP2.
Figure 3.23 Example of Workforce Planning from the Project View
Some companies don't have just one project manager who uses transaction CMP2 for workforce planning; instead, the persons responsible for specific work centers do this planning. They can use transaction CMP3 (Work Center View) to distribute work to the resources of their work center (see Figure 3.24). Resources and activities are selected by specifying one ore several work centers.
You should note that during workforce planning from a work center view all activities are read that have capacity requirements for the selected work centers in the given period, and that the corre-
12 The total load shows a resource's total work distribution to network activities for a specific period. Work distributions to other order categories are not taken into account.
1
Resource Planning I 3.2
sponding networks are consequently locked. We therefore recommend that you use transaction CMP3 to explicitly specity those networks as filters for which you want to distribute work.
Figure 3.24 Example of Workforce Planning from the Work Center View
After you have performed a workforce planning, you can evaluate it using the individual capacity reports or transaction CMP9. In transaction CMP9, you can use information about projects, work centers, or personnel resources for selecting workforce plannings. In the evaluation, you can use the exceptions defined in the profile to highlight overloaded resources, or activities with work that has not yet been completely distributed (see Figure 3.25).
If activity dates are shifted after a workforce planning has been completed. the Rescheduling indicator in the scheduling parameters for the network type (see Section 3.1.2) decides whether the workforce planning is to be shifted as well, or distributed work outside the new activity dates is to be deleted, for example.
147
CMP9 (Evaluation)
Rescheduling
I
3 I Planning Functions
Capacity planning board
Figure 3.25 Example of an Evaluation of Workforce Planning
3.2.3 Capacity Leveling
If, during your capacity requirements planning, you find that required resources are overloaded, you will need to adjust your planning. This is called capacity leveling. This can be, for example, an adjustment of the time scheduling, that is, a chronological shifting of activities or increasing their duration. Capacity leveling can also include the creation of new activities or activity elements with additional work centers or resources. If necessary, you can also change the control key of an internally processed activity, and therefore the activity category, in order to procure the planned work externally (see Sections 3.2.4 and 3.2.5).
In a stricter sense, however, the term capacity leveling refers to the usage of graphical or tabular capacity planning boards, that is, specific capacity requirements planning tools for a fixed chronological planning of capacity reqUirements. These tools are used primarily in production for planning bottleneck work centers, for example, and are rarely used in compani~s for project planning.
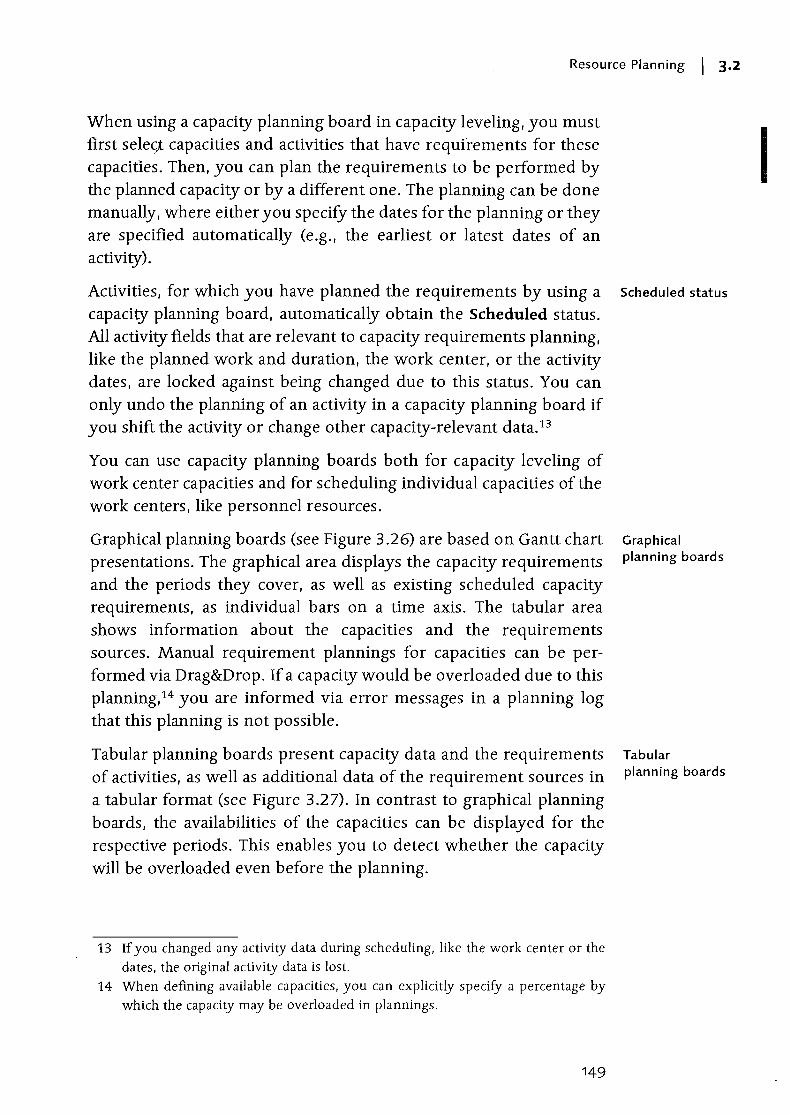
Resource Planning I 3.2
When using a capacity planning board in capacity leveling, you must first sele<;t capacities and activities that have requirements for these capacities. Then, you can plan the requirements to be performed by the planned capacity or by a different one. The planning can be done manually, where either you specify the dates for the planning or they are specified automatically (e.g., the earliest or latest dates of an activity).
Activities, for which you have planned the requirements by using a capacity planning board, automatically obtain the Scheduled status. All activity fields that are relevant to capacity requirements planning, like the planned work and duration, the work center, or the activity dates, are locked against being changed due to this status. You can only undo the planning of an activity in a capacity planning board if you shift the activity or change other capacity-relevant data.13
You can use capacity planning boards both for capacity leveling of work center capacities and for scheduling individual capacities of the work centers, like personnel resources.
Graphical planning boards (see Figure 3.26) are based on Gantt chart presentations. The graphical area displays the capacity requirements and the periods they cover, as well as existing scheduled capacity requirements, as individual bars on a time axis. The tabular area shows information about the capacities and the requirements sources. Manual requirement plannings for capacities can be performed via Drag&Drop. If a capacity would be overloaded due to this planning,14 you are informed via error messages in a planning log that this planning is not possible.
Tabular planning boards present capacity data and the requirements of activities, as well as additional data of the requirement sources in a tabular format (see Figure 3.27). In contrast to graphical planning boards, the availabilities of the capacities can be displayed for the respective periods. This enables you to detect whether the capacity will be overloaded even before the planning.
13 If you changed any activity data during scheduling, like the work center or the dates, the original activity data is lost.
14 When defining available capacities, you can explicitly specify a percentage by which the capacity may be overloaded in plannings.
149
Scheduled status
Graphical planning boards
Tabular planning boards
I
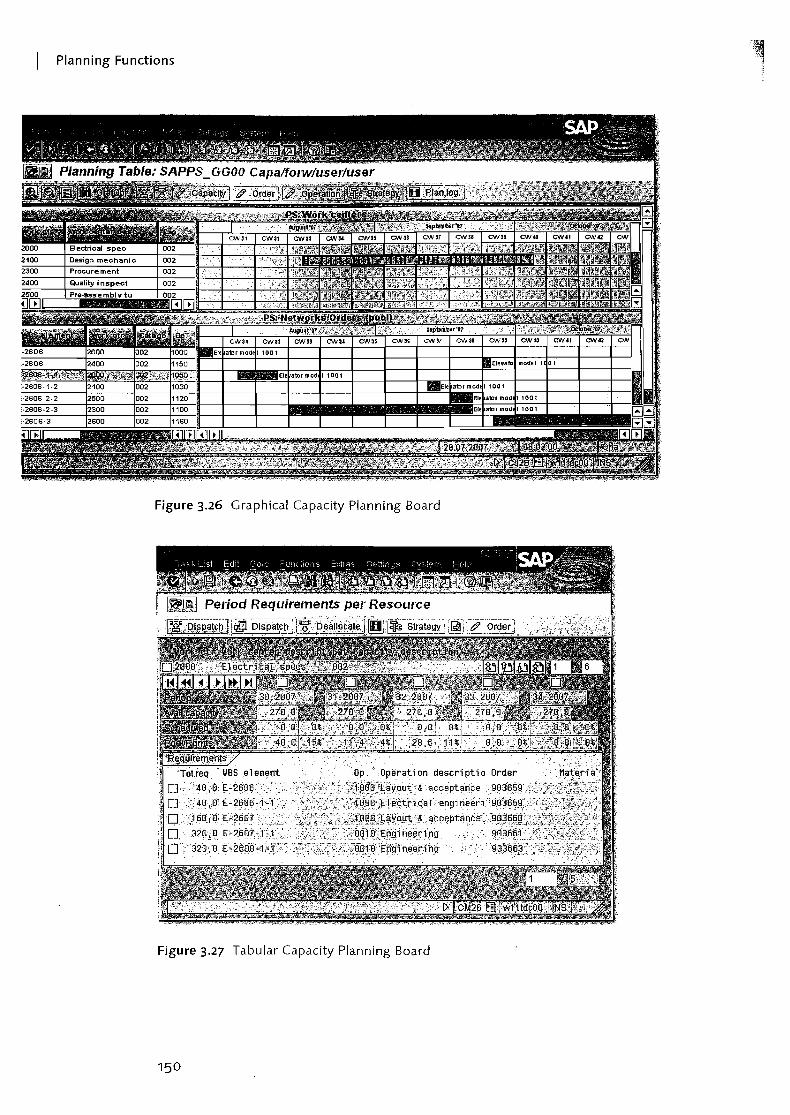
Planning Functions
Figure 3.26 Graphical Capacity Planning Board
Figure 3.27 Tabular Capacity Planning Board
150
Resource Planning I 3·2
3.2.4 External Processing
Often, ndt all services necessary for completing a project can be provided by company-internal resources. Using externally processed activ~ties (or external elements, see Section 2.3.1), you can therefore plan, procure, and monitor services that are to be provided by vendors.
For a manual specification of external activities, you can use describing long texts, documents, or PS texts in SAPscript format, and enter a planned quantity and a unit of measure in an activity. For a cost planning of the external procurement, you can also specify a price per unit, the relevant currency, and a cost element (see Section 3.4.5). To consider the timeframe for the later procurement of the service in the scheduling process, you can store a planned delivery time or duration (see Section 3.1.2) in the activity. You can also specify a preferred vendor.
To be able to automatically create purchase requisitions from the activity data later, you must also store a purchasing organization, a purchaSing group, and the material group of the external activity in the activity. This organizational data, as well as the cost element, currency, and unit of measure, can be entered in the network profile (transaction OPUU) as default values (see Section 2.3.2).
Instead of manually entering specifications of the external activity, a price, a planned delivery time, the material group, and so forth in the activity, as described above, you can also refer to purchaSing info records or outline agreements from purchaSing. If you store an info record for external processing or an outline agreement in an externally processed activity, the activity automatically uses all necessary purchaSing data from these purchaSing information sources. This data - except for the quantity - can no longer be changed manually in the activity.
From the activity data, the system can automatically display a purchase requisition. Depending on the setting of the Res./Purc. req. Field, this can be done even before the activity is released (immediately), automatically by setting the Released (from release) status, or at a later stage. For the last option, first set the indicator to the Never value, and then change the setting to Immediately later. The value of the Res./Purc. req. can be preset via the network profile.
151
Purchasing info records, outline agreements
Automatic creation of purchase requisitions
I
3 I Planning Functions
Displaying purchase requisitions
The purchase requisition is automatically filled with all data relevant ) to the purchase. The system uses the latest end date of the activity as
a delivery date in the purchase requisition. You can use a customer enhancement to influence the creation of a purcha,se requisition from the activity data. If relevant data in the activity is changed, the purchase requisition is adapted automatically. A manual change of the quantity, the material group, and the purchasing group taken from the activity is not possible in the purchase reqUisition.
From an externally processed activity, you can go to the display of the created purchase requisition at any time. Additionally, the Purchase Requisitions for Project report is available in SAP Project System, for example, which enables you to analyze purchase reqUisitions of one or several projects in a tabular form at the same time (see Figure 3.28).15 You can also use the ProMan (see Section 5.5.3) to evaluate quantity or date information of purchase requisitions, for example, and to highlight deviations from your planning using traffic lights.
Vendor selection The automatically created purchase requisitions are also visible directly in purchasing and can be further processed by a responsible purchaser. Unless you referred to a purchasing info record or an outline agreement in the activity, the purchaser also selects the vendor. In purchasing, this can be achieved, for example, via a bidding process or an automatic source determination.
Commitments If a vendor has been selected and aSSigned to the purchase requisition, the data of the purchase reqUisition can be transferred to a purchase order. The purchase order authorizes the vendor to offer the services ordered for your project, prOVided that external activities can later be documented via goods or invoice receipts. All purchasing documents are assigned to the activity so that not only can you analyze the planned costs, but the commitments according to the purchase requisition and purchase order, as well as the actual costs of the external service performed for the activity or the network, respectively. The purchaSing process and the corresponding value flows are discussed in detail in Chapter 5, Project Implementation Processes.
15 From the Purchase Requisitions for Project report. you can also assign vendors or create orders. if necessary; however, these activities are usually handled by PurchaSing.
152
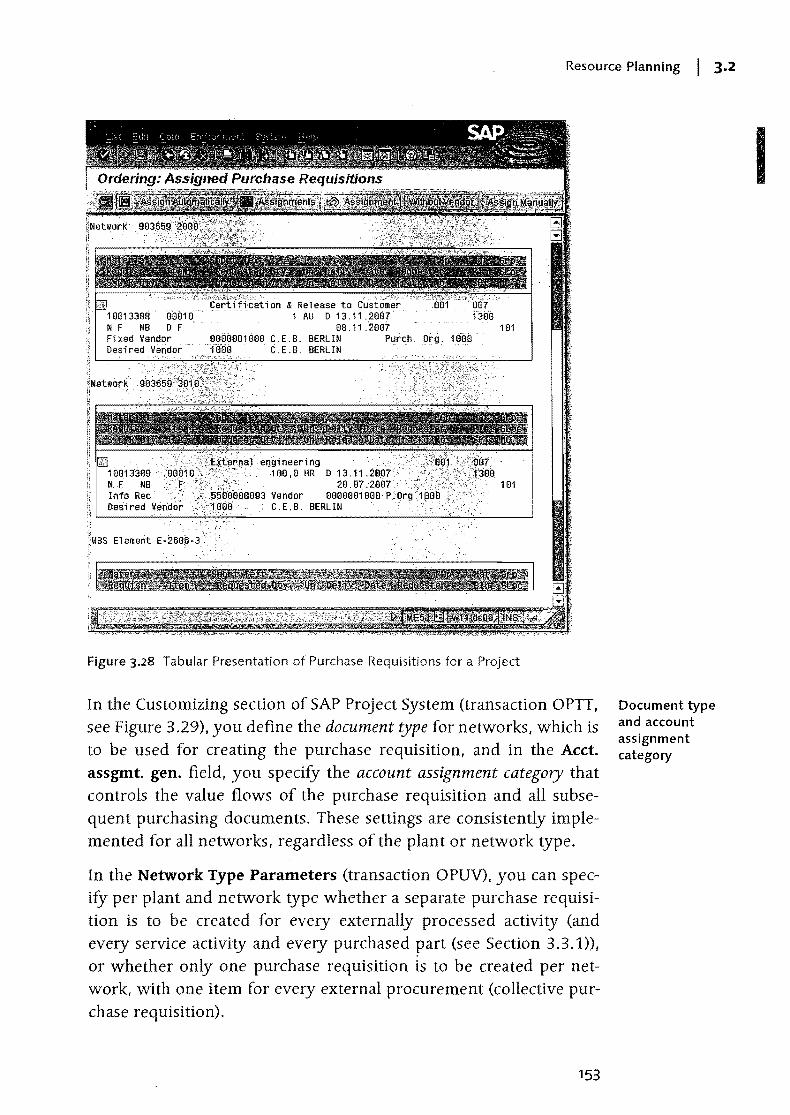
Resource Planning I 3·2
, , .'
1013.13389 ••.... N. F; NB Info Ree .:', Des;red V~ndor
.:}>~IC"'L",r'(I"" en'g; neer; ny.,: . '188, a HR D 13.11.213.07
2a . 137 .2687'·' ~!5aoafllI893 Vendor aaaaoa1aaa
C.E.B. BERLIN
Figure 3.28 Tabular Presentation of Purchase Requisitions for a Project
In the Customizing section of SAP Project System (transaction OPTT, see Figure 3.29), you define the document type for networks, which is to be used for creating the purchase requisition, and in the Acct.
assgmt. gen. field, you specify the account assignment category that controls the value flows of the purchase requisition and all subsequent purchasing documents. These settings are consistently implemented for all networks, regardless of the plant or network type.
In the Network Type Parameters (transaction OPUV), you can specify per plant and network type whether a separate purchase requisition is to be created for every externally processed activity (and every service activity and every purchased part (see Section 3.3 .1», or whether only one purchase requisition is to be created per network, with one item for every external procurement (collective purchase requisition).
153
Document type and account assignment category
I
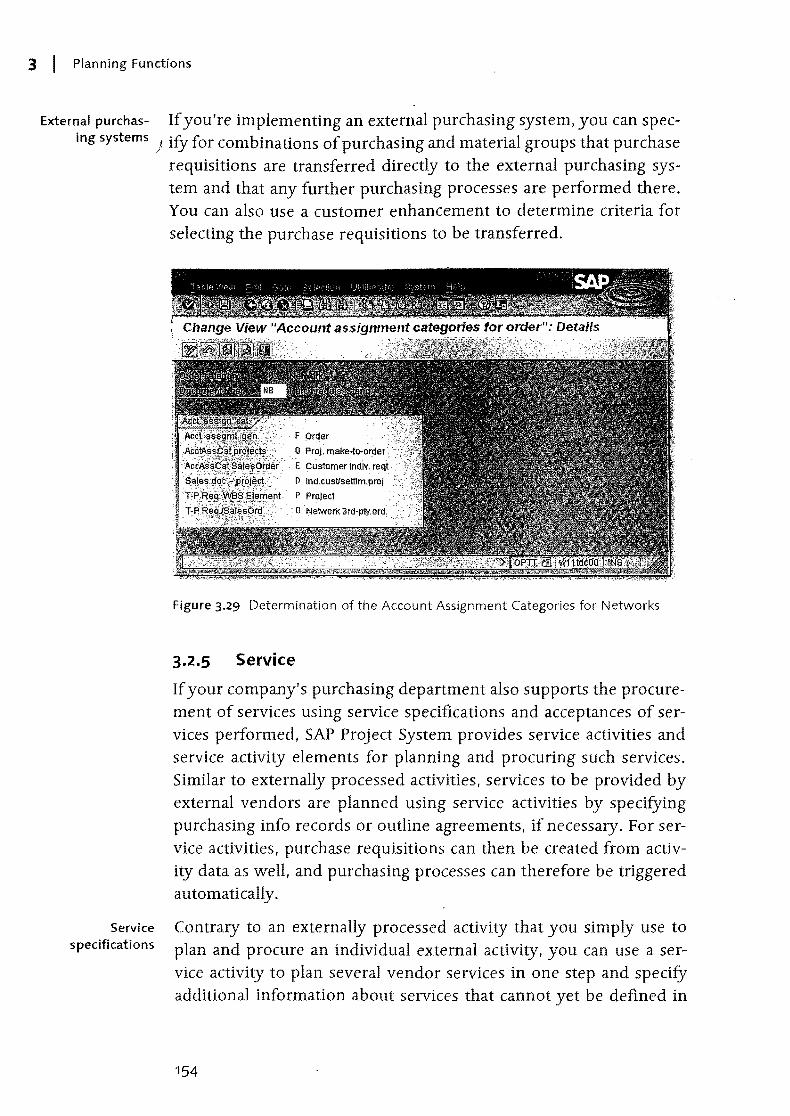
3 I Planning Functions
External purchas- If you're implementing an external purchasing system, you can spec-ing systems ) ify for combinations of purchasing and material groups that purchase
requisitions are transferred directly to the external purchasing system and that any further purchasing processes are performed there. You can also use a customer enhancement to determine criteria for selecting the purchase requisitions to be transferred.
Service specifications
Figure 3.29 Determination of the Account ASSignment Categories for Networks
3.2.5 Service
If your company's purchasing department also supports the procurement of services using service specifications and acceptances of services performed, SAP Project System provides service activities and service activity elements for planning and procuring such services. Similar to externally processed activities, services to be provided by external vendors are planned using service activities by specifying purchasing info records or outline agreements. if necessary. For service activities, purchase requisitions can then be created from activity data as well, and purchaSing processes can therefore be triggered automatically.
Contrary to an externally processed activity that you simply use to plan and procure an individual external activity, you can use a service activity to plan several vendor services in one step and specifY additional information about services that cannot yet be defined in
154
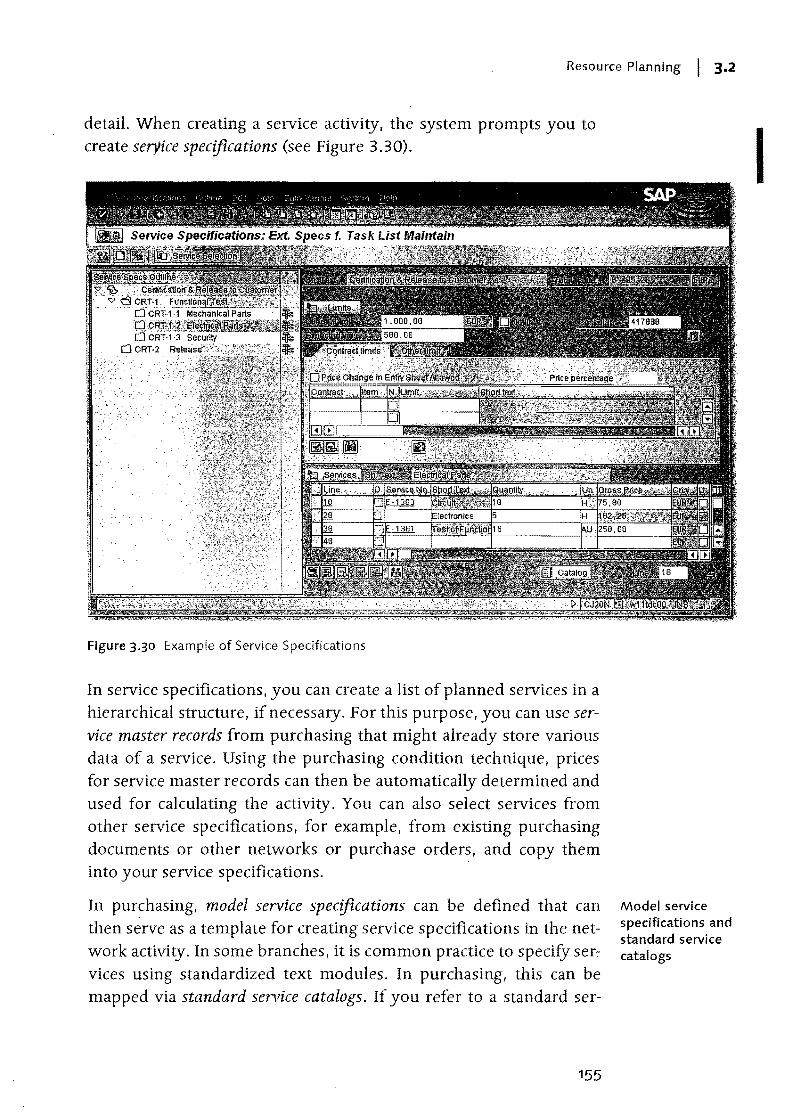
Resource Planning I 3.2
detail. When creating a service activity, the system prompts you to create service specifications (see Figure 3.30).
Figure 3.30 Example of Service Specifications
In service specifications, you can create a list of planned services in a hierarchical structure, if necessary. For this purpose, you can use service master records from purchasing that might already store various data of a service. Using the purchasing condition technique, prices for service master records can then be automatically determined and used for calculating the activity. You can also select services from other service specifications, for example, from existing purchasing documents or other networks or purchase orders, and copy them into your service specifications.
In purchasing, model service specifications can be defined that can then serve as a template for creating service specifications in the network activity. In some branches, it is common practice to specify ser:vices using standardized text modules. In purchasing, this can be mapped via standard service catalogs. If you refer to a standard ser-
155
Model service specifications and standard service catalogs
I
Planning Functions
vice catalog in your service specifications, you can then plan services ;' by selecting individual text modules.
Catalogs
Unplanned services'
limit of values
External services management
As of SAP ECC Release 5.0. you can also call intranet or external Internet catalogs from service specifications to select services from these catalogs, and transfer them to the service speCifications. This is implemented via the Open Catalog Interface (OCI, see Section 3.3.1).
Frequently, not all services can be planned in detail before a project , starts, because the reqUired services may depend on the course of the project, for example. In addition to planned services, you can therefore specify information about unplanned services in the service specifications. To calculate a service activity, you can store an expected value for unplanned services in the service specifications. This value and the total value of planned services add, up to the planned costs of the activity.
Additionally, you can limit the value of unplanned services by entering a limit of values in the service specifications. If the vendor later provides services that you didn't explicitly specity in the service specifications, the value of this unplanned service is checked against the limit of values. If the value of the unplanned services exceeds the specified limit. the entered services cannot be saved.
Another difference between externally processed activities and service activities can be found in further purchasing management. At first, a vendor selection and the purchase order implementation take place for a purchase reqUisition of a service activity in purchasing as well. While, depending on the account assignment category, a goods receipt can be posted to document services for externally processed activities, service activities always require a service entry and an acceptance of services performed. More purchasing management details for service activities are discussed in Section 5.4.2.
Purchase requisitions due to service activities use the same document type and the same account assignment category like externally processed activities (transaction OPTT). Depending on the material and purchasing group of the purchase requisition, a transfer to an external purchasing system can be performed as well. In the network profile (transaction,OPUU), you can store default values for service activities, which cover the cost type of the planned services, the material and purchaSing group, as well as the unit of measure.
Material Planning I 3·3
'U~fng!1 rks, you C(in '~nd external resou " irlgy()~r projects. I .. are planned based (¢4padty requirements ... {' ),ouwant, however. the
. lJ¢'carried out in greaterde~~iluPto:Workforce planning. Usng:"':', ·"To,,,,,,,'! .. , p"~f:essed activities or act:ivJty'#I~ments, respectively, you" '. Li$~bf external resourcesartdtriggertheir procurement viapu ....• c' "
3.3 Material Planning
The completion of many projects requires material. Within the scope of your project planning using SAP Project System, you can plan for material that is reqUired, and its procurement, consumption. and delivery. Using the elevator project as an example. different assemblies like parts of the motor, cabin, or shaft, must be provided for a final assembly of the elevator. If the material is not available in stock, purchasing processes or the in-house production of the material must be triggered. If necessary, the required material needs to be delivered to the construction site or to the customer.
Using WBS elements, you can plan costs for procuring material, as well as assign various documents like material reservations, purchase requisitions, purchase orders, goods receipts, and issues to WBS elements. An integrated material planning where data is automatically exchanged between a project and purchasing or production, however, is only available if you use networks. In this case, a manual costs planning and the manual assignment of documents to WBS elements are no longer necessary.
3.3.1 Assigning Material Components
To plan material via networks, you must assign material components Material
to the network activities. Material components are summaries of spe- components
cific information, like the specification of the material (e .g., by speci-fying a material number), the required amount and the unit of meas-ure, the requirements date, the price per unit or, for purchased parts, the material and purchaSing groups and so on (see Figure 3.31). You can either enter the requirements date of a material component man-uallyas a fixed date, or it can be derived from the dates of the activity to which the component is assigned (see Section 3.1.2).
157
I
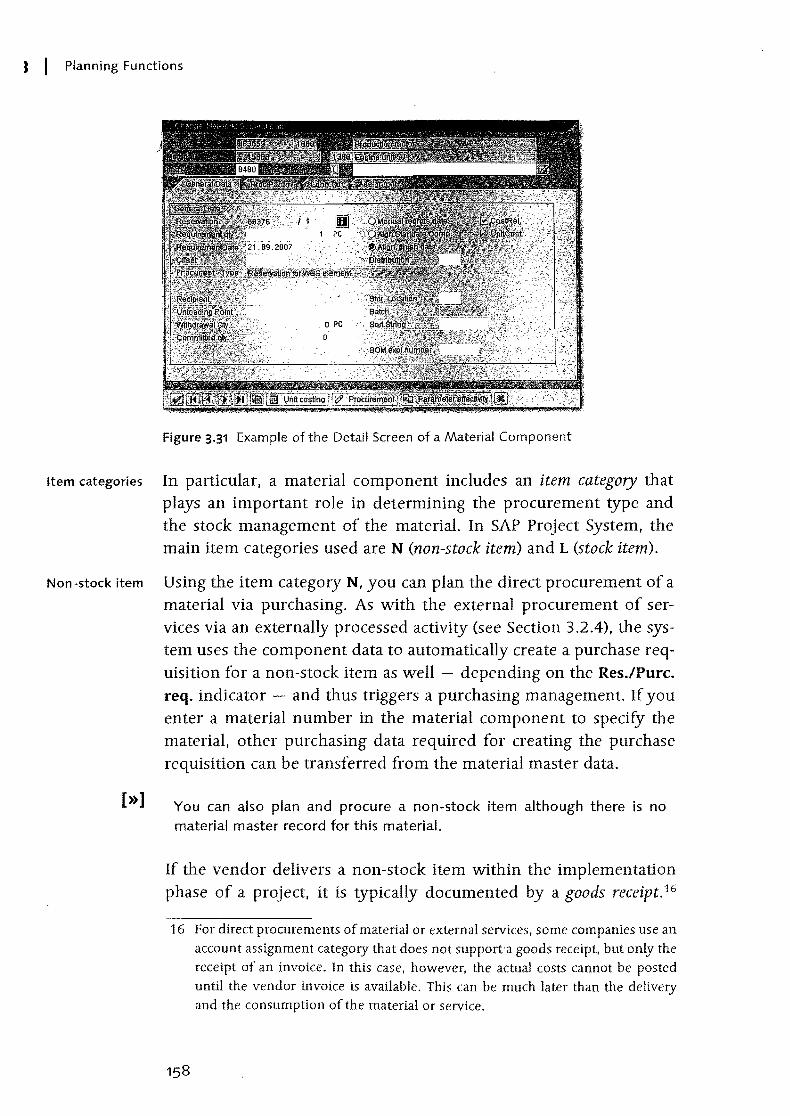
i I Planning Functions
Item categories
Non-stock item
[»]
Figure 3.31 Example of the Detail Screen of a Material Component
In particular, a material component includes an item category that plays an important role in determining the procurement type and the stock management of the materiaL In SAP Project System, the main item categories used are N (non-stock item) and L (stock item).
Using the item category Nt you can plan the direct procurement of a material via purchasing. As with the external procurement of services via an externally processed activity (see Section 3.2.4), the system uses the component data to automatically create a purchase requisition for a non-stock item as well - depending on the Res./Purc. req. indicator - and thus triggers a purchasing management. If you enter a material number in the material component to specify the material, other purchasing data required for creating the purchase requisition can be transferred from the material master data.
You can also plan and procure a non-stock item although there is no material master record for this material.
If the vendor delivers a non-stock item within the implementation phase of a project, it is typically documented by a goods receipt. 16
16 For direct procurements of material or external services, some companies use an account assignment category that does not supporta goods receipt, but only the receipt of an invoice. In this case, however, the actual costs cannot be posted until the vendor invoice is available. This can be much later than the delivery and the consumption of the material or service.
Material Planning I 3·3
When goods are received, however, a non-stock item is not posted to a stock 10fation, that is, no stock is created. Instead, a direct con- I sumptibn posting is performed by the network activity.
A5tq~k,:riianagement for non-stotkite~\s ~iknot possible. Cons~g4~rtIy,< [ ! ] rTj~t~fi~I*!~h1ponents of the iteh1cat~g~:tYi!Ncannot be managEr~JI1;fb'~: pl'a:i~1::#~'~k .. or in an individual stock.:';"" ,,,;c,, ',,;\F~:';':~;;',
All documents - the purchase requisition, the purchase order, the goods and invoice receipt of a non-stock item - are assigned to the activity. Therefore, in an activity-assigned network, you can analyze the planned, commitment, and actual costs for the procurement and the material consumption on activity level (see Section 5.5.1).
In contrast to the non-stock items, a stock management is provided for stock items (item category L). Moreover, stock items are not directly procured via purchasing, but via the material requirements planning of a company.
If you assign a material component with the item category L to an activity, you must always also specify a material number so that the system can derive the control data required for the material requirements planning from the material master record. Stock items can be managed in the plant stock or in individual stocks.
The simplest procurement type for a stock item is the creation of a reservation. Depending on the setting of the Res./Purc. req. field, this can be either immediately, from release, or never, that is, never automatically but only manually after the release. The reservation is displayed in the material requirements planning under a unique reservation number17 as a requirement to provide the material in the planned quantity on the planned requirements date.
The responsible MRP controller then needs to trigger the procurement of the material if it is not available in stock on the requirements date. For purchased parts, the procurement can be effected by purchaSing; for material produced in-house, the procurement can be effected by the company-internal production. After the material has
17 The system issues one reservation number per network. The reservations of the individual material components of a network are distinguished via an up to fourdigit item number within the network reservation number. Therefore, only 9999 material components can be planned per network.
159
Stock item
[«]
Planning Functions
Assemblies
Other item categories
Collective and individual stocks
been procured, it can be posted in a stock. In the last step, a goods
} issue can be posted with a reference to the original reservation. The goods issue documents that the material has been taken from stock and consumed by the network activity.
Even in the project planning phase, you can use the availability check for stock items to determine whether the material can be provided on the requirements date (see Section 3.3.3).
Stock items that you assign with a negative required quantity to an activity are referred to as assemblies. While a positive quantity represents a material requirement, the negative quantity of an assembly documents that the network provides materiaL From the point of view of material requirements planning, assemblies represent planned additions to a stock. You can implement assemblies if you use networks instead of production orders for producing individual materials, and if this requires multilevel· production processes and you want to make the corresponding material movements as transparent as possible in the material requirements planning.
Other item categories you can implement in SAP Project System, in addition to the two item categories Nand L, are T (text item) and R
(variable-size item). Material components of the item category Tare for information only and are used, for example, after a BOM explosion. Material components of the item category R provide similar procurement and stock management options as stock items. The required quantity of variable-size items, the so-called variable-size
quantity, is derived from sizes such as the length, width, and height of a materiaL Therefore, instead of manually entering an individual required quantity directly, you have to specify sizes for material components of the item category R.
Basically, the SAP system provides different options for material stock management. One possibility is the usage of the collective stock,
an anonymous plant stock. All projects and orders requiring a material managed in a collective stock can take this material from the plant stock. A previous assignment of the stocks and stock costs to the consumers is not possible for a collective stock.
Another option of material stock management is the usage of individ
ual stocks. In this case, material stocks are explicitly managed with a reference to a sales order item (sales order stock) or a WBS element
160
Material Planning I 3·3
(project stock). Without a previous transfer, material managed in an individu~J stock can only be taken for the corresponding sales order item or the WBS element, respectively, or objects assigned to these. Depending on the system settings, the value of material in an individual stock can be reported as stock costs on the object keeping stock records (see Section 3.3.2).
After you have assigned a material component to an activity, you need to specify the procurement type. For stock and non-stock items, different procurement types are available. For non-stock items, you can choose between the following two procurement options (see Figure 3.32):
II> Purchase requisition for network A direct procurement of the material is triggered. The material is delivered by the vendor to the company to be consumed by the activity.
II> Third-party order A direct procurement is triggered as well; however, the material is not delivered by the vendor to the company, but instead it is delivered directly to a customer, to another vendor, or to any other delivery address.
Figure 3.32 Selection of the Procurement Type for a Non-Stock Item
Procurement types for non-stock items
If you select the procurement type Third-party order for a non-stock Delivery address
item, you need to specify a delivery address that is transferred together with the other relevant data of the material component to the purchase requisition and later to the purchase order. You can either enter the required address data manually in a delivery address, or reference an address, customer, or vendor number (see Figure 3.33). The system then takes the address data from the central
I
3 I Planning Functions
Procurement types for stock items
address management, from the customer master record of Sales and }Distribution, or from the vendor master record of the Purchasing department. If the same delivery address is to be used frequently for the third-party orders of a project, you can set the Repeat on indicator when you create the first delivery address.
Figure 3.33 Example of a Delivery Address
The following procurement types can generally be used for stock items (see Figure 3.34, procurement types that differ only regarding stock management are listed together in the following overview):
'" Reservation for network/Reservation WBS element/Reservation sales document These three procurement types only create a reservation. If you use the first type, the material component is managed in the collective stock. If you use either of the other two types, the reservation references the project or the sales order stock.
'" Purchase requisition + Reservation WBS element/Purchase requisition + reservation sales document In addition to a reservation, these two procurement types create a
Material Planning I 3.3
purchase requisition at the same time, whether or not a stock exists. You can manage the material component in the project or in the sales order stock. The purchase requisition is assigned to the object holding the stock.
~ 3rd party requisition WBS element/3rd party requisition sales document A third-party order is created. Depending on which of the two types you select, the purchase requisition refere~ces the project or the sales order stock.
~ Preliminary purchase requisition WBS element/Preliminary order/sales document A preliminary procurement of purchased parts via purchasing is triggered with a reference to the project or sales order stock.
~ Planned independent requirements/Planned independent requirements WBS elementlPlannedindependent requirements sales document A preliminary procurement for material produced in-house is triggered with a reference to the plant, project, or sales order stock.
ri/,WBSelement
,;dRln~ind;reqs WBS el
. Rese~,salesdoc. I=I~nd rOd. req 8doc
,()PReq+Res - WBS elem.
Op;r~lim.PReq-WBs el
. OSrd p,sriY teq: WBSel
OPrelirn orderJSDocumt
3rd psrtyreq:8doc.
Figure 3.34 Sefection of the Procurement Type for a Stock Item
The preliminary procurement types listed above require additional explanations. For material with very long replenishment lead times, it may be necessary within the project implementation to trigger its
Preliminary procurement
I
3 I Planning Functions
Prerequisites for procurement types
Procurement indicator
procurement although the actual consumers (Le., an appropriate net-jwork activity or production order) do not yet exist. To do this, assign the required material as a material component with a preliminary procurement type to the project. Once the actual consumers exist, just reassign the material to them, but this time with a simple reservation as a procurement type. By referencing the reservation, you can ensure that the procured material is taken from stock and consumed. For more information regarding the process of preliminary procurements, see Section 5.5.1.
You should note that not all of the procurement types for stock items listed above are always available. In order to create a purchase requisition for a material component, in addition to its reservation, the material must permit external procurement (see the Procurement type field of the MRP 2 view in the material master). To be able to use procurement types with a reference to the plant stock, the material must permit collective stock management. For a procurement to be effected with a reference to a project or sales order stock, the material must permit individual stock management. The stock management options of a material are controlled via the Individual/Collective field of the MRP 4 view in the material master.18
Procurement types with a reference to the project stock are available only if the project definition allows for project stock management (see Sections 2.2.1 and 3.3.2). For you to be able to select a procurement type with a reference to a sales order stock, the network header must be assigned to a sales order item. Additionally, the position type must enable stock management for the sales order item.
You can specify the procurement type of a material component either manually-the system only offers the procurement types that are possible due to the settings in the material master or the BOM item, project definition or sales order item - or you can use a procure
ment indicator.
Procurement indicators are defined in the Customizing of SAP Project System using transaction OPS8 (see Figure 3.35). In a procurement indicator, you can specify the item category. Additionally,
18 For material components that you have transferred from a BOM, you can over
write the material master settings for procurement and stock options in the bill of materials, if necessary.
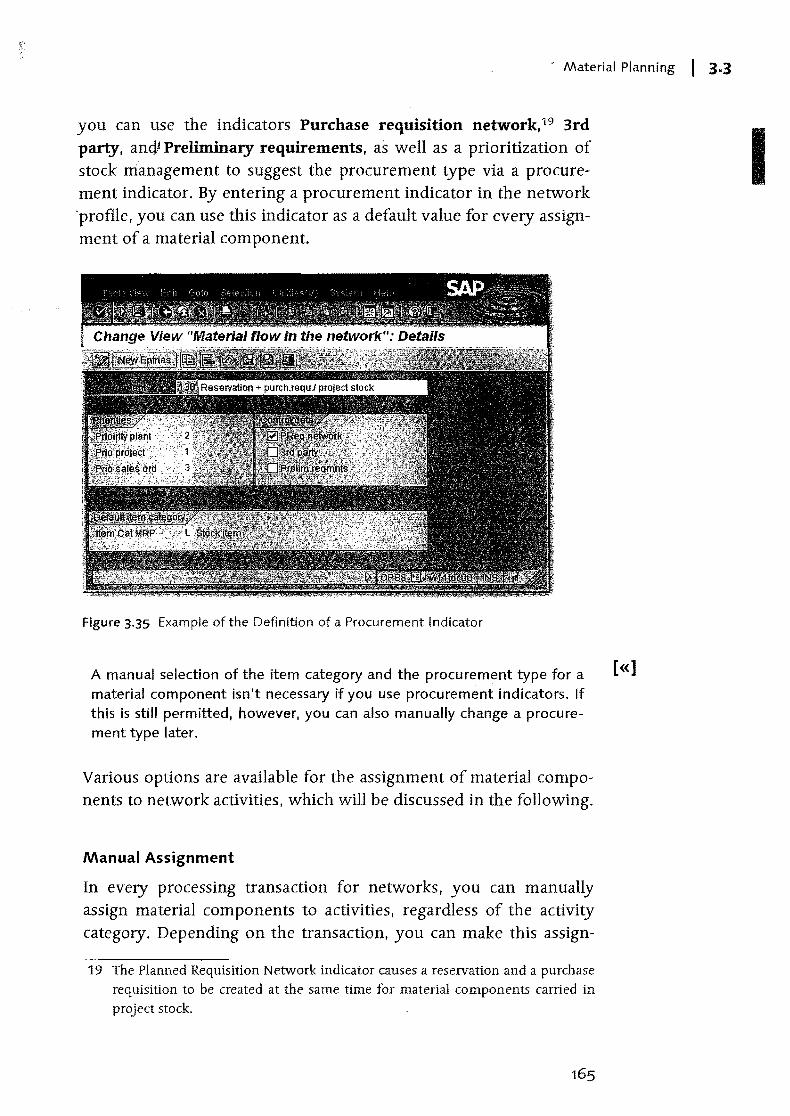
- Material Planning I 3·3
you can use the indicators Purchase requisition network,19 3rd party, and! Preliminary requirements, as well as a prioritization of stock management to suggest the procurement type via a procurement indicator. By entering a procurement indicator in the network 'profile, you can use this indicator as a default value for every assignment of a material component.
Figure 3.35 Example of the Definition of a Procurement Indicator
A manual selection of the item category and the procurement type for a material component isn't necessary if you use procurement indicators. If this is still permitted, however, you can also manually change a procurement type later.
Various options are available for the assignment of material components to network activities, which will be discussed in the following.
Manual Assignment
In every processing transaction for networks, you can manually assign material components to activities, regardless of the activity category. Depending on the transaction, you can make this assign-
19 The Planned Requisition Network indicator causes a reservation and a purchase requisition to be created at the same time for material components carried in project stock.
[«]
I
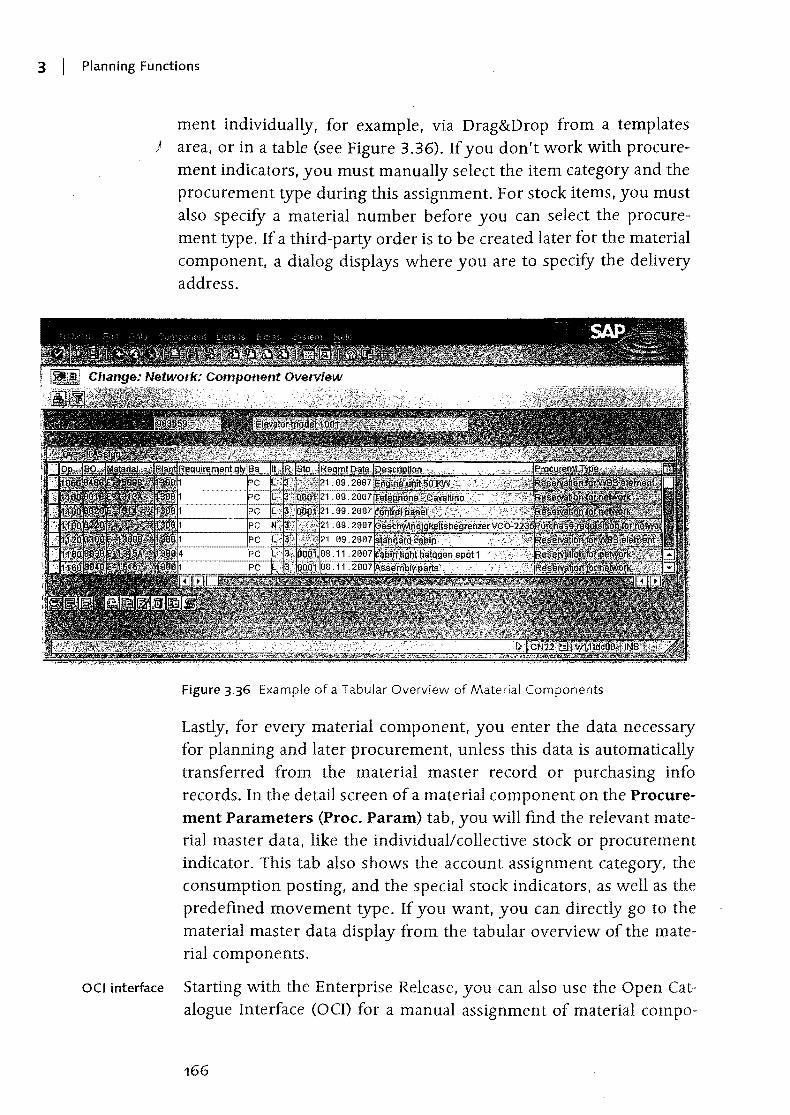
3 I Planning Functions
ment individually, for example, via Drag&Drop from a templates } area, or in a table (see Figure 3.36). If you don't work with procure
ment indicators, you must manually select the item category and the procurement type during this assignment. For stock items, you must also specify a material number before you can select the procurement type. If a third-party order is to be created later for the material component, a dialog displays where you are to specify the delivery address.
Figure 3.36 Example of a Tabular Overview of Material Components
Lastly, for every material component, you enter the data necessary for planning and later procurement, unless this data is automatically transferred from the material master record or purchasing info records. In the detail screen of a material component on the Procurement Parameters (Proc. Param) tab, you will find the relevant material master data, like the individual/collective stock or procurement indicator. This tab also shows the account assignment category, the consumption posting, and the special stock indicators, as well as the predefined movement type. If you want, you can directly go to the material master data display from the tabular overview of the material components.
OCI interface Starting with the Enterprise Release, you can also use the Open Catalogue Interface (OCI) for a manual assignment of material compo-
166
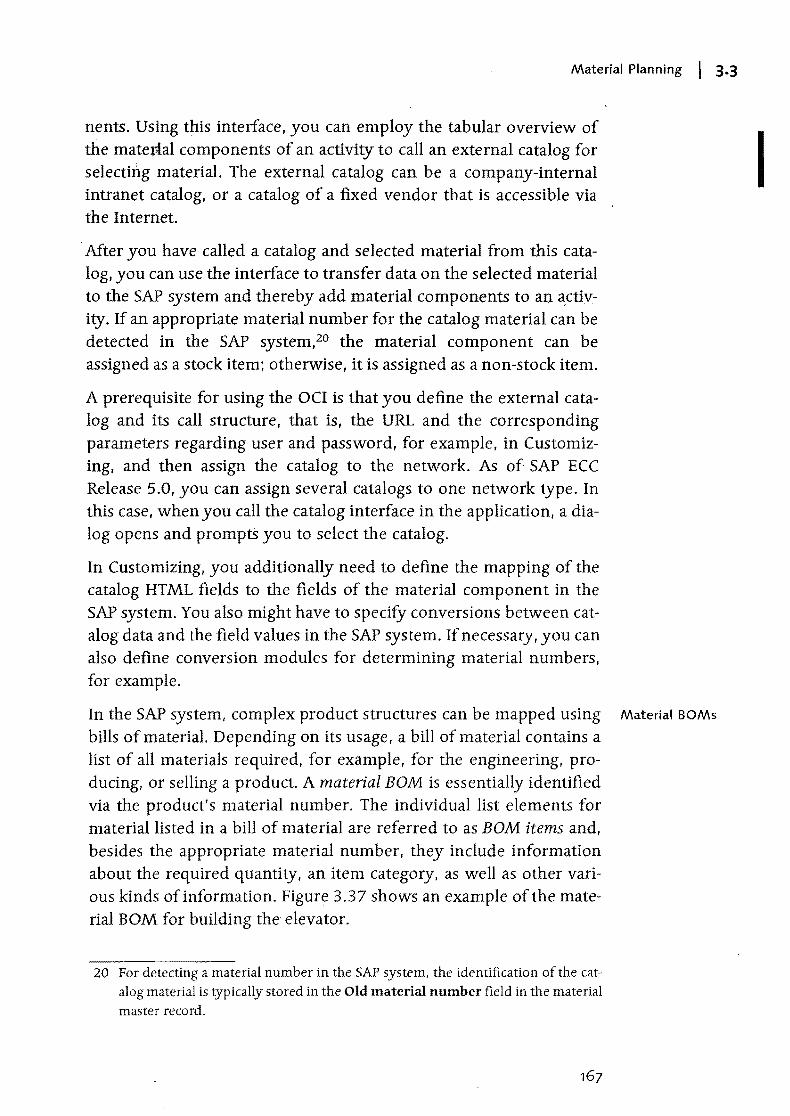
Material Planning I 3.3
nents. Using this interface, you can employ the tabular overview of the mate vial components of an activity to call an external catalog for I selecting material. The external catalog can be a company-internal intranet catalog, or a catalog of a fixed vendor that is accessible via the Internet.
After you have called a catalog and selected material from this catalog, you can use the interface to transfer data on the selected material to the SAP system and thereby add material components to an ~ctiv-:ity. If an appropriate material number for the catalog material can be detected in the SAP system,20 the material component can be assigned as a stock item; otherwise, it is assigned as a non-stock item.
A prereqUisite for using the OCI is that you define the external catalog and its call structure, that is, the URL and the corresponding parameters regarding user and password, for example, in Customizing, and then assign the catalog to the network. As of SAP ECC Release 5.0, you can assign several catalogs to one network type. In this case, when you call the catalog interface in the application, a dialog opens and promptS you to select the catalog.
In Customizing, you additionally need to define the mapping of the catalog HTML fields to the fields of the material component in the SAP system. You also might have to specify conversions between catalog data and the field values in the SAP system. If necessary, you can also define conversion modules for determining material numbers, for example.
In the SAP system, complex product structures can be mapped using Material BOMs
bills of material. Depending on its usage, a bill of material contains a list of all materials reqUired, for example, for the engineering, pro-ducing, or selling a product. A material BOM is essentially identified via the product's material number. The individual list elements for material listed in a bill of material are referred to as BOM items and, besides the appropriate material number, they include information about the reqUired quantity, an item category, as well as other vari-ous kinds of information. Figure 3.37 shows an example of the mate-rial BOM for building the elevator.
20 For detecting a material number in the SAP system, the identification of the catalog material is typically stored in the Old material number field in the material master record.
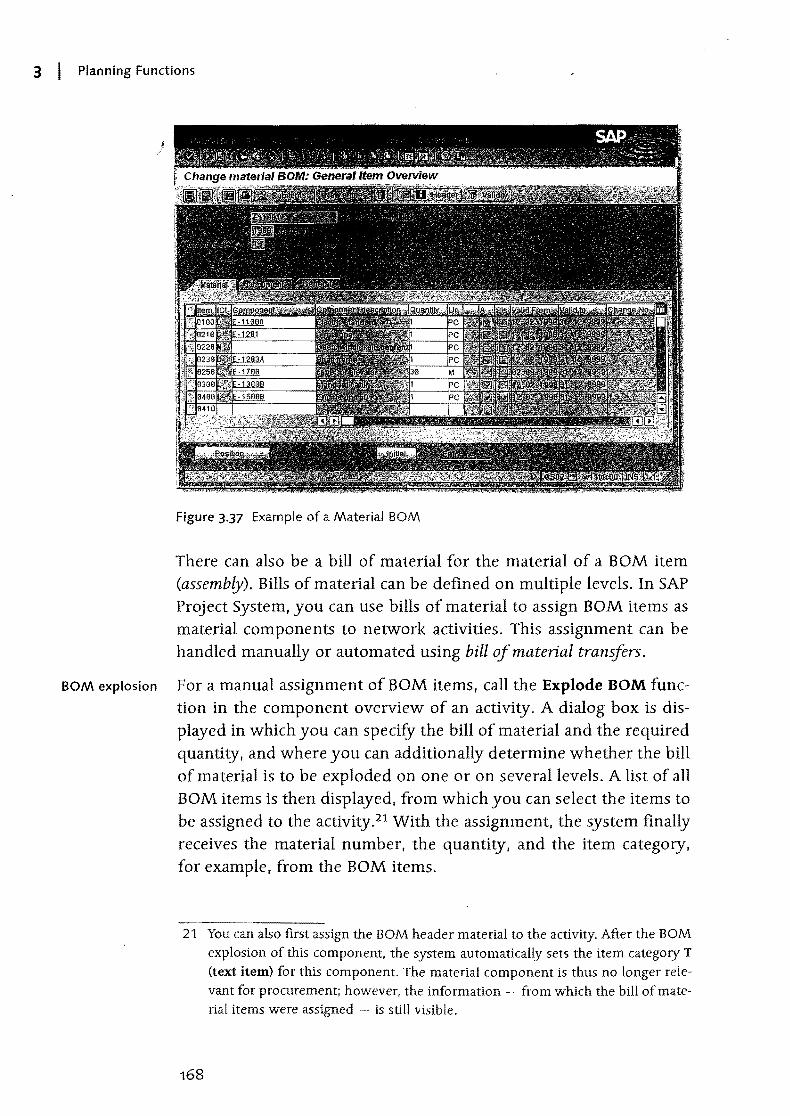
3 I Planning Functions
!. /
Figure 3.37 Example of a Material BOM
There can also be a bill of material for the material of a BOM item (assembly). Bills of material can be defined on multiple levels. In SAP Project System, you can use bills of material to assign BOM items as material components to network activities. This assignment can be handled manually or automated using bill of material tranifers.
BOM explosion For a manual assignment of BOM items, call the Explode BOM function in the component overview of an activity. A dialog box is displayed in which you can specify the bill of material and the required quantity, and where you can additionally determine whether the bill of material is to be exploded on one or on several levels. A list of all BOM items is then displayed, from which you can select the items to be assigned to the activity.21 With the assignment, the system finally receives the material number, the quantity, and the item category, for example, from the BOM items.
21 You can also first assign the BOM header material to the activity. After the BOM explosion of this component, the system automatically sets the item category T (text item) for this component. The material component is thus no longer relevant for procurement; however, the information ~ from which the bill of material items were aSSigned ~ is still Visible.
168
Material Planning I 3·3
A typical characteristic of many projects is their uniqueness. In sales and distri,Pution projects, for example, the list of required material components can vary from one project to another due to the customer-specific requirements. Instead of creating a new bill of material and thus possibly a new material master for every project, you can define work breakdown structure BOMs. A WBS BOM is a bill of material that, in addition to the material number of the header material, is identified via a WBS element number. Therefore, for the same material number, you can create different bills of material that can be distinguished by different WBS element numbers.
When creating WBS BOMs, you can use other bill of material~, for example, material or WBS BOMs, as a template (see Figure 3.38). Then you can adapt the WBS BOM to the requirements of the respective project by deleting items, adding new BOM items, or changing item data like the quantity, for example. You can use WBS BOMs not only for the highest level of a bill of material structure, but you can also define WBS BOMs for inferior levels as well. As with material BOMs, you can assign items from WBS BOMs to activities either manually via the BOM explosion or automatically via the bill of material transfer.
Figure 3.38 Creating a WBS BOM
Bill of Material Transfer
Using the bill of material transfer (transaction CN33), you can automate the assignment of BOM items to network activities. Using the
169
Work breakdown structure BOM I
3 I Planning Functions
I /
Prerequisites for the bill of material
transfer
bill of material transfer particularly makes sense if you need to assign many material components to different activities, or if the bill of material structure might change in the course of project planning and you want to avoid a duplication of changes (on the one hand in the bill of material, on the other hand in the project).
The automated assignment of BOM items to network activities is typically performed via the Reference point field that you can find in internally processed activities on the Assignments tab and in BOM items in the Basic Data detail screen. If the value of the field in the BOM item is identical to the one of the activity. the bill of material transfer can automatically assign the item to the activity.
Reference points The possible values of the Reference point field must first be defined in the Customizing of SAP Project System. To do this, create an alphanumeric key with a maximum of 20 digits, and for every key, specify a descriptive text for information that can later be called via the F4 help when maintaining the reference points in the BOM or the network.
In activities, you can also enter a reference point that represents several reference points of BOM items. You can do this by defining a key that ends with an asterisk (*). The reference point 130* shown in Figure 3.39, for example, represents the reference points 1301 and 1302.
Finally, you need to specify that the values of the Reference point field of BOM items and activities will be compared during a bill of material transfer. For that purpose, in Customizing Transaction CN38, enter the technical name of the Reference point field for the objects BOM items and network activities.22
After you have defined reference points in Customizing, you must enter these in the detail data of the relevant BOM items and activities. If you are already using standard networks as templates, you can enter reference points that are already in the activities of the standard networks.
22 If you want, you can also specify other fields from activities and BOM items as transfer criteria, proVided they have the same data structure. Before the Reference point field has explicitly been introduced for the bill of materials transfer (Release 4.6), for example, the Sort String field of the BOM items and a user field of the activities were often used.
Figure 3.39 Example of the Definition of Reference Points
Figure 3-40 Specification of the "Reference Point" Field as Relevant for the Bill of Material Transfer
Project Definition
WBSElement
Sales Document
Ne~rI<
. E-2606
E-2606
Item
to
To
1301 Transfer multl-Ieval projecl BOM
Validrrom
Figure 3-41 Initial Screen of the Bill of Material Transfer
Material Planning 3.3
I
171
3 I Planning Functions
Process ofthe bill If you call transaction CN33 (Bill of Material Transfer), first select of material transferl the projects to which material components are to be assigned, and
the bill of material items that are to be used for the assignment (see
Figure 3.41). For the bill of material transfer, you can use material, project, or sales order BOMs.23 By specifying parameters for the bill of material transfer, you can control, for example, whether the BaM is to be exploded on multiple levels, or in which stocks the material components are to be managed; or, you can define additional filter criteria for selecting the BaM items (see Figure 3.42). If you want to avoid a manual parameter entry, you can define Bill of material trans-fer profiles in the Customizing of SAP Project System that contains all controlling parameters except for the stock management information.24 The profile can then be selected in the initial screen of the bill of material transfer.
Figure 3.42 Parameters of the Bill of Material Transfer
If you then perform the bill of material transfer, the system now automatically assigns those BaM items to activities that have the same reference point (see Figure 3.43). If you set the All items indi-
23 In addition to a material number. sales order BOMs are identified according to a sales order item.
24 The prioritization of the stock management can be derived via procurement indicators.
172
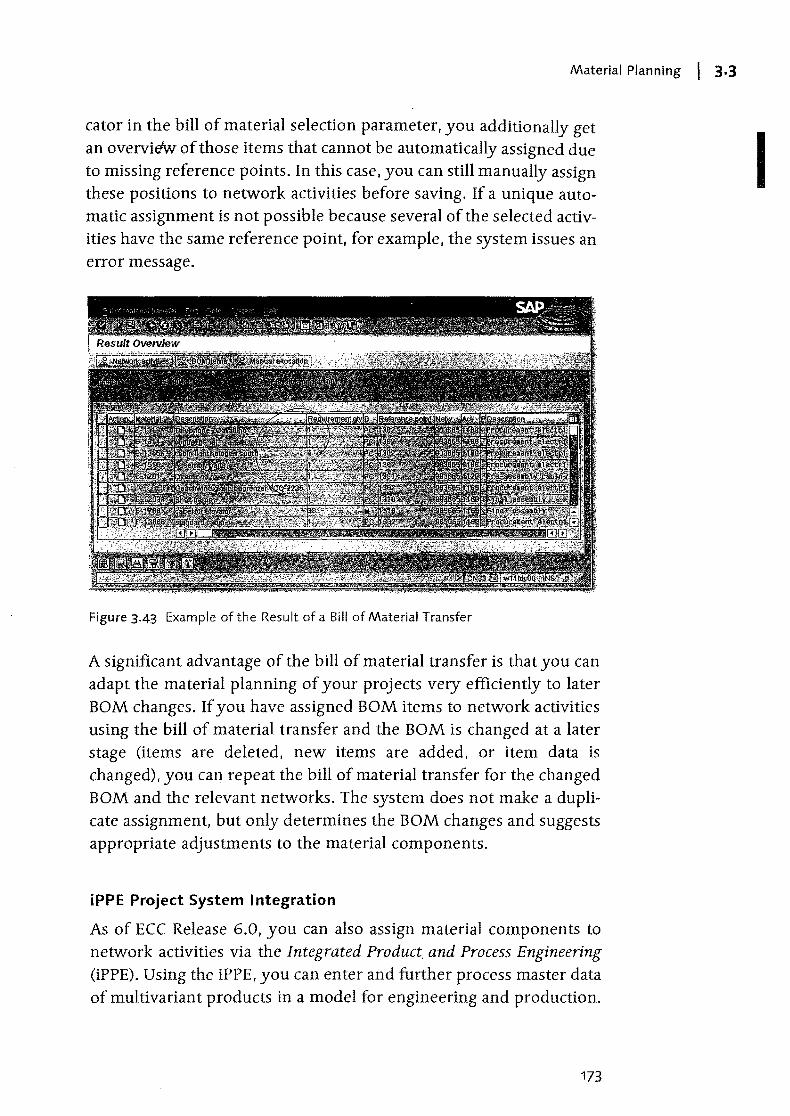
Material Planning I 3·3
cator in the bill of material selection parameter, you additionally get an overvi&w of those items that cannot be automatically assigned due to missing reference points. In this case, you can still manually assign these positions to network activities before saving. If a unique automatic assignment is not possible because several of the selected activities have the same reference point, for example, the system issues an error message.
Figure 3-43 Example ofthe Result of a Bill of Material Transfer
A significant advantage of the bill of material transfer is that you can adapt the material planning of your projects very efficiently to later BOM changes. If you have assigned BOM items to network activities using the bill of material transfer and the BOM is changed at a later stage (items are deleted, new items are added, or item data is changed), you can repeat the bill of material transfer for the changed BOM and the relevant networks. The system does not make a duplicate assignment, but only determines the BOM changes and suggests appropriate adjustments to the material components.
iPPE Project System Integration
As of ECC Release 6.0, you can also assign material components to network activities via the Integrated Product. and Process Engineering
(iPPE). Using the iPPE, you can enter and further process master data of multivariant products in a model for engineering and production.
173
I
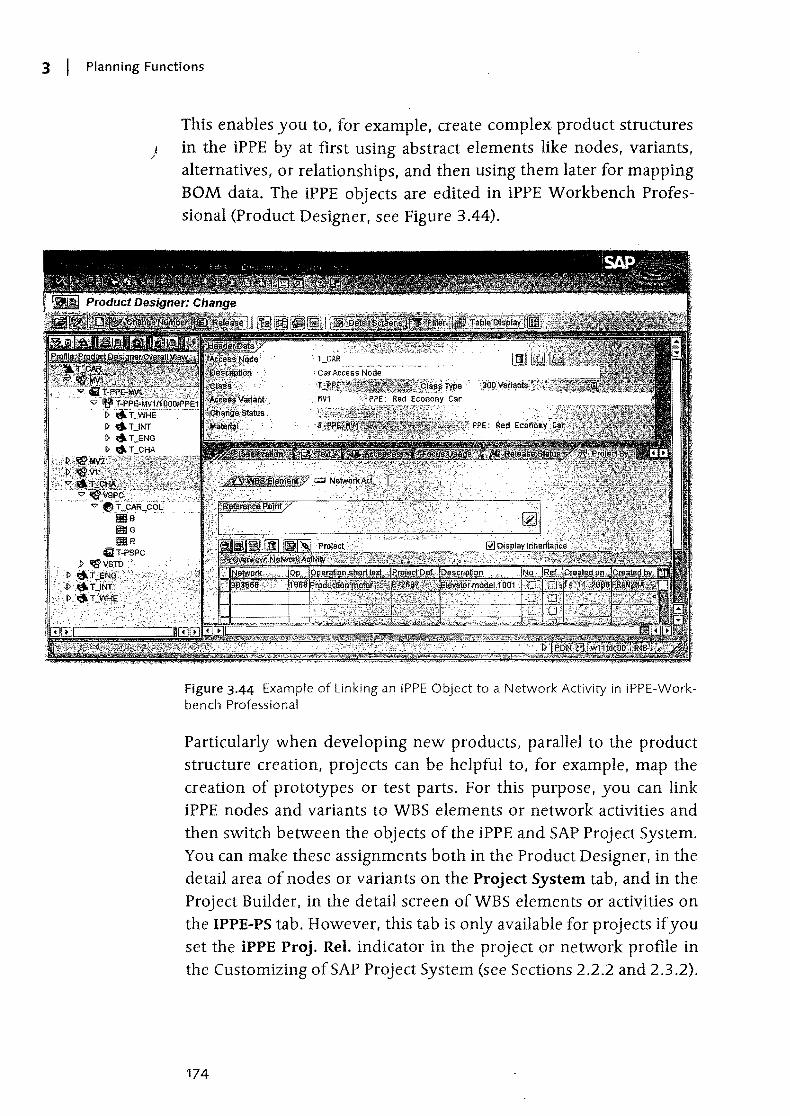
3 I Planning Functions
This enables you to, for example, create complex product structures ) in the iPPE by at first using abstract elements like nodes, variants,
alternatives, or relationships, and then using them later for mapping BOM data. The iPPE objects are edited in iPPE Workbench Professional (Product Designer, see Figure 3.44).
Figure 3.44 Example of Linking an iPPE Object to a Network Activity in iPPE-Workbench Professional
Particularly when developing new products, parallel to the product structure creation, projects can be helpful to, for example, map the creation of prototypes or test parts. For this purpose r you can link iPPE nodes and variants to WBS elements or network activities and then switch between the objects of the iPPE and SAP Project System. You can make these assignments both in the Product Designer, in the detail area of nodes or variants on the Project System tab, and in the Project Builder, in the detail screen ofWBS elements or acti"ities on the IPPE-PS tab. However, this tab is only available for projects if you set the iPPE Proj. ReI. indicator in the project or network profile in the Customizing of SAP Project System (see Sections 2.2.2 and 2.3.2).
174

Material Planning I 3-3
The assignment can also be automated using reference points. Define the refertfI1ce points for the iPPE PS integration in the Customizing of SAP Project System and store them both in the Project System and in the iPPE objects. Note that the reference points of the iPPE PS integration are not identical to the reference points of the bill of ' material transfer.
After assigning iPPE objects to network activities, material can also be transferred from the iPPE product structure to SAP Project System. This takes place in the filter screen of iPPE Workbench Professional by selecting an appropriate initial object and then calling the Transfer to Project System function.
3.3.2 Project Stock
The project stock is a form of individual stock management where material stocks with a reference to WBS elements can be managed as individual stock segments. Using the options Non-valuated stock, Valuated stock, or No project stock in the basic data of the project definition, you specify for a project whether a nonvaluated or a valuated project stock management of material will be possible, or whether individual project stocks cannot be used (see also Section 2.2.1).
When the nonvaluated project stock is used, every WBS element of Nonvaluated
the project represents a separate stock segment from the logistics project stock
point of view. Material movements with a reference to nonvaluated project stock take place without being valuated. For example, when a material managed in a project stock is consumed by a network activity (goods issue for reservation), this does not cause actual costs for the activity, and no postings are made in financial accounting. The calculation of MRP networks determines that no planned costs for material components will be managed in the nonvaluated project stock.25 The stockholding WBS element is debited with the actual costs for the external procurement only when the goods or invoice receipt for purchased parts is posted to the project stock. The cost
25 By implementing planning networks (see Section 2.3.2), you can also determine planned costs for material components managed in the non-valuated stock. Because these planned costs are not relevant to MRP, this prevents duplicate assigned values due to the planned material costs for the activity and the actual costs for the WBS element or production order.
175
I Planning Functions
[I]
Valuated project stock
Requirements grouping
flows in material procurements (in-house production and external procurement) with a reference to the nonvaluated project stock are discussed in detail in Section 5.5.1.
When using a nonva1uated· project stock, the p/anl1~d;a,r1<i~q~~al.costs for the material conslll'nptiOr1are not completely discio:~~C:(Tp:r;'t'he network
.. activities or the assigned production orders. If you ,impl~Hl~htthe nonvaluated project stock,a meaningful cost object conth,.Uiri~J~:~p6ssible only on the level ofthestockhoiding WBS elements orthe'~:n"iireproject after the period-end dosing.. . .. , ...
Due to these disadvantages of the nonvaluated project stock, the valuated project stock was provided as of SAP R13 Release 4.0. When using the valuated project stock, an accounting document reflecting the corresponding value flow is created with every material movement referencing the project stock.
The network costing can determine planned costs for material components to be managed in the valuated project stock. The later consumption of the material by the activity results in actual costs for the activity and in the corresponding postings in financial controlling. Purchasing documents and production orders created in the course of material procurement for the project stock cause commitment, stock, and actual costs for the stockholding WBS element. The value flows for material procurements referencing valuated project stocks are discussed in detail in Section 5.5.1.
Nonvaluated project stocks are used primarily by companies that already implemented project stocks before Release 4.0 and want to stick to them for upwards compatibility. You also need to work with nonvaluated stocks if you want to use a sales order stock of the item category D for the stock management of material components in the project. Normally, however, it is recommended that you implement the valuated project stock if this is permitted by your business processes. Decision support for working with valuated and nonvaluated project stocks can be found in the SAP Library.
Basically, a project stock is an individual stock per WBS element. Therefore, if necessary, you can manage a separate material stock for every subtree and separately valuate the procurement and stock costs for the stockholding WBS elements. While this is certainly positive from the controlling point of view, a stock management per WBS element has disadvantages from the logistics point of view.
Material Planning I 3.3
Because individual stock segments are managed separately from an MRP point 9f view, a material requirements planning process (see Section 5:5.1) creates separate purchase requisitions or planned orders for every stock segment, irrespective of whether there is enough material available in another stock segment. If the same material is also required for other stock segments, however, it may make more sense to create a single purchase requisition or a single planned order covering the entire required quantity instead of triggering separate procurement processes for every stock. segment. This enables you to negotiate better conditions with the vendor, for example, or to optimize the material production. To avoid the logistic disadvantages of individual stock management, you can use requirements grouping in SAP Project System.
In the simplest case, you use requirements grouping by setting the Automatic requirements grouping indicator in the project definition before saving it for the first time, or by storing the indicator in the project profile as a default value already. The top WBS element is then automatically identified in the Basic data as a grouping WBS element.26 Instead of managing a separate stock for every WBS element, automatic grouping causes all requirements and stocks of the project referencing the project stock to be managed exclusively on the level of this grouping WBS element. This means, in material requirements planning, only one WBS element is used as an individual stock segment, and all purchase requisitions, orders, or production orders referencing the project stock are assigned to this WBS element.
If you want to use several WBS elements of a project for a requirements grouping or make a cross-project requirements grouping, you need to use a manual requirements grouping. For a manual requirements grouping, on the Basic data tab you identity those WBS elements for which you want to group requirements as grouping WBS elements. Then, you assign the WBS elements the stocks of which are to be grouped to the various grouping WBS elements. This assignment can be performed individually (transaction GRM4) or, using appropriate selection conditions, for several WBS elements (transaction GRM3).
26 If the requirements grouping is not to take place for the top WBS element, you can also identifY any other WBS element as a grouping WBS element before saving.
177
Automatic grouping
Manual requirements grouping
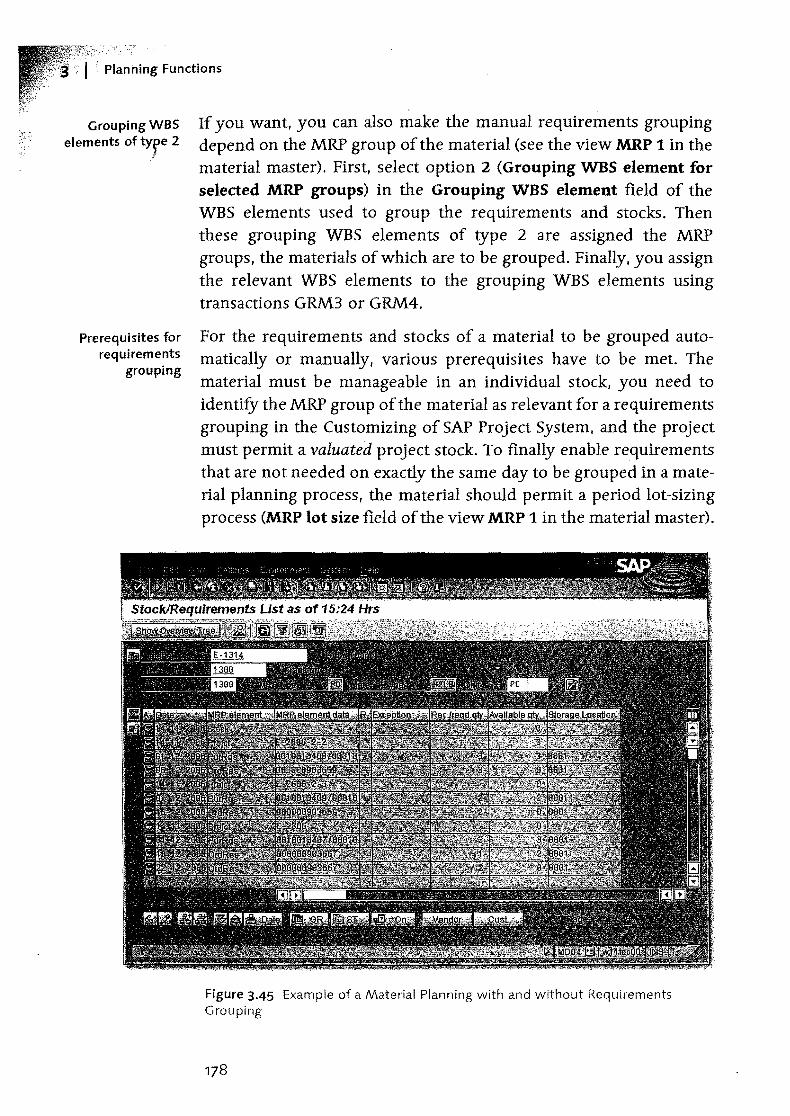
Planning Functions
Grouping WBS elements of tyre 2
"
Prerequisites for requirements
grouping
If you want, you can also make the manual requirements grouping depend on the MRP group of the material (see the view MRP 1 in the material master). First, select option 2 (Grouping WBS element for selected MRP groups) in the Grouping WBS element field of the WBS elements used to group the requirements and stocks. Then these grouping WBS elements of type 2 are assigned the MRP groups, the materials of which are to be grouped. Finally, you assign the relevant WBS elements to the grouping WBS elements using transactions GRM3 or GRM4.
For the reqUirements and stocks of a material to be grouped automatically or manually, various prerequisites have to be met. The material must be manageable in an individual stock, you need to identify the MRP group of the material as relevant for a requirements grouping in the Customizing of SAP Project System, and the project must permit a valuated project stock. To finally enable requirements that are not needed on exactly the same day to be grouped in a material planning process, the material should permit a period lot-sizing process (MRP lot size field of the view MRP 1 in the material master).
Figure 3.45 Example of a Material Planning with and without Requirements Grouping
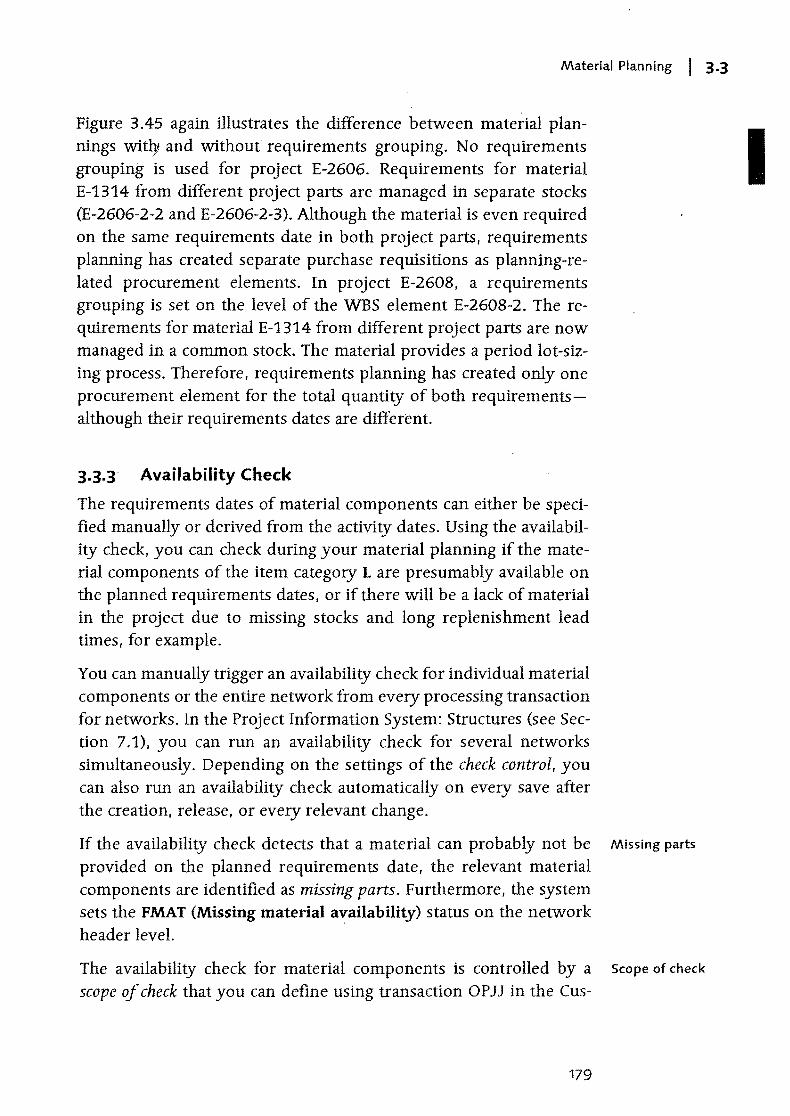
Material Planning I 3.3
Figure 3.45 again illustrates the difference between material plannings widJ' and without requirements grouping. No requirements grouping is used for project E-2606. Requirements for material E-1314 from different project parts are managed in separate stocks (E-2606-2-2 and E-2606-2-3). Although the material is even required on the same requirements date in both project parts, requirements planning has created separate purchase requisitions as planning-related procurement elements. In project E-2608, a requirements grouping is set on the level of the WBS element E-2608-2. The requirements for material E-1314 from different project parts are now managed in a common stock. The material provides a period lot-sizing process. Therefore, requirements planning has created only one procurement element for the total quantity of both requirementsalthough their reqUirements dates are different.
3.3.3 Availability Check
The requirements dates of material components can either be specified manually or derived from the activity dates. Using the availability check, you can check during your material planning if the material components of the item category L are presumably available on the planned requirements dates, or if there will be a lack of material in the project due to missing stocks and long replenishment lead times, for example.
You can manually trigger an availability check for individual material components or the entire network from every processing transaction for networks. In the Project Information System: Structures (see Section 7.1), you can run an availability check for several networks simultaneously. Depending on the settings of the check control, you can also run an availability check automatically on every save after the creation, release, or every relevant change.
If the availability check detects that a material can probably not be Missing parts
provided on the planned reqUirements date, the relevant material components are identified as missing parts. Furthermore, the system sets the FMAT (Missing material availability) status on the network header leveL
The availability check for material components is controlled by a Scope of check
scope of check that you can define using transaction OP]] in the Cus-
179
I
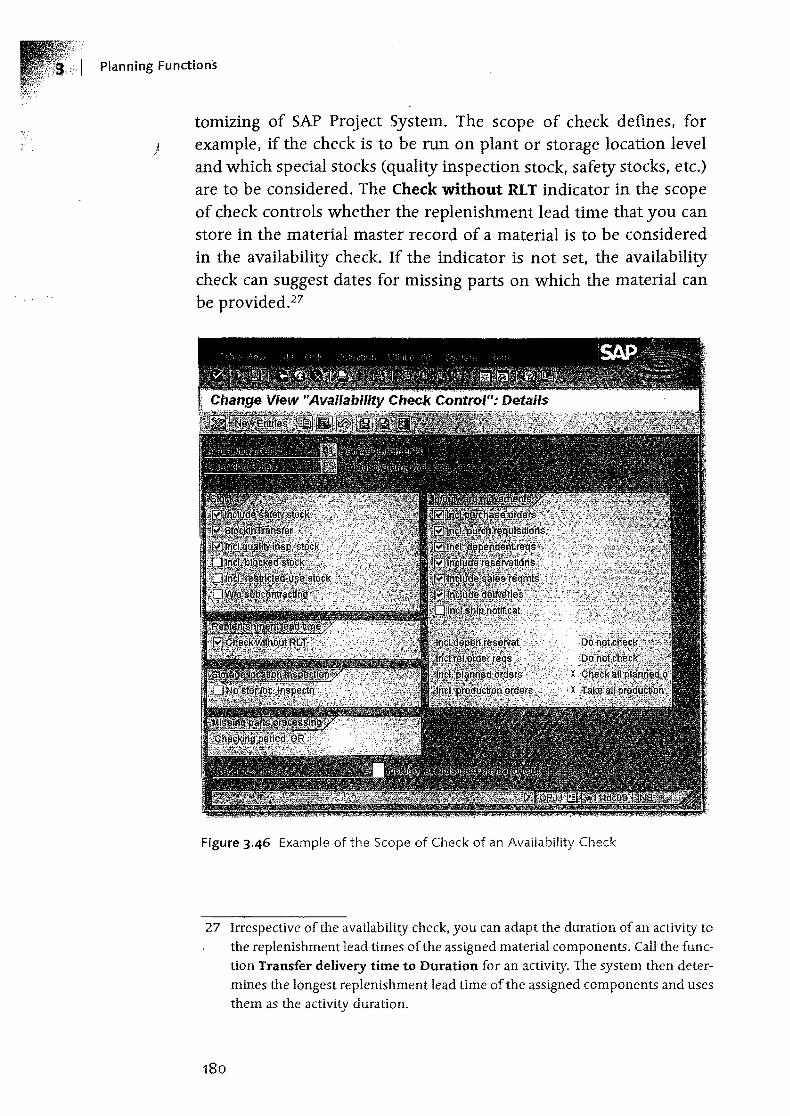
Planning Functions
tomizing of SAP Project System. The scope of check defines, for j example, if the check is to be run on plant or storage location level
and which special stocks (quality inspection stock, safety stocks, etc.) are to be considered. The Check without RLT indicator in the scope of check controls whether the replenishment lead time that you can store in the material master record of a material is to be considered in the availability check. If the indicator is not set, the availability check can suggest dates for missing parts on which the material can be provided.27
Figure 3.46 Example of the Scope of Check of an Availability Check
27 Irrespective of the availability check, you can adapt the duration of an activity to
the replenishment lead times of the assigned material components. Call the function Transfer delivery time to Duration for an activity. The system then determines the longest replenishment lead time of the assigned components and uses them as the activity duration.
180
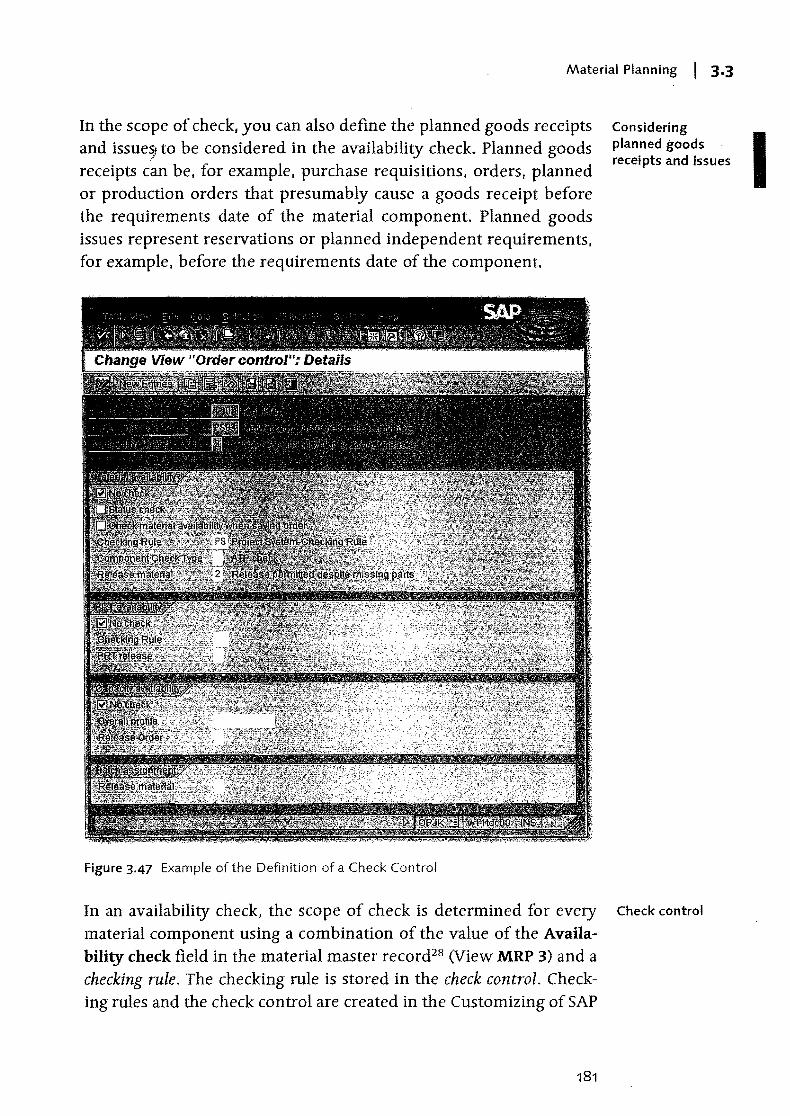
Material Planning I 3.3
In the scope of check, you can also define the planned goods receipts and issue~ to be considered in the availability check. Planned goods receipts can be, for example, purchase requisitions, orders, planned or production orders that presumably cause a goods receipt before the requirements date of the material component. Planned goods issues represent reservations or planned independent requirements. for example. before the requirements date of the component.
Figure 3-47 Example of the Definition of a Check Control
Considering planned goods receipts and issues
In an availability check. the scope of check is determined for every Check control
material component using a combination of the value of the Availa-bility check field in the material master record28 (View MRP 3) and a checking rule. The checking rule is stored in the check control. Check-ing rules and the check control are created in the Customizing of SAP
I
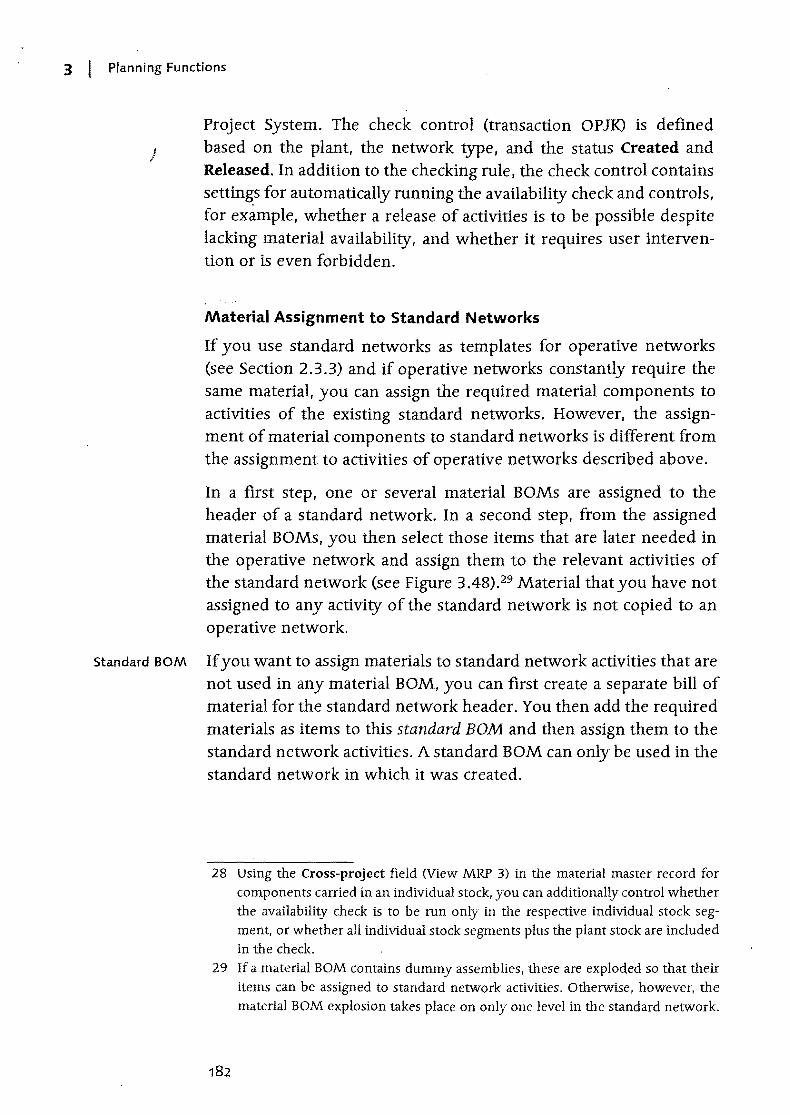
3 I Planning Functions
Project System. The check control (transaction OPJK) is defined } based on the plant, the network type, and the status created and
Released. In addition to the checking rule, the check control contains settin~s for automatically running the availability check and controls, for example, whether a release of activities is to be possible despite lacking material availability. and whether it requires user intervention or is even forbidden.
Material Assignment to Standard Networks
If you use standard networks as templates for operative networks (see Section 2.3.3) and if operative networks constandy require the same material. you can assign the required material components to activities of the existing standard networks. However. the assignment of material components to standard networks is different from the assignment to activities of operative networks described above.
In a first step, one or several material BOMs are assigned to the header of a standard network. In a second step, from the assigned material BOMs, you then select those items that are later needed in the operative network and assign them to the relevant activities of the standard network (see Figure 3.48).29 Material that you have not assigned to any activity of the standard network is not copied to an operative network.
Standard BOM If you want to assign materials to standard network activities that are not used in any material BOM, you can first create a separate bill of material for the standard network header. You then add the required materials as items to this standard BOM and then assign them to the standard network activities. A standard BOM can only be used in the standard network in which it was created.
28 Using the Cross-project field (View MRP 3) in the material master record for components carried in an individual stock, you can additionally control whether the availability check is to be run only in the respective individual stock segment, or whether all individual stock segments plus the plant stock are included in the check.
29 If a material BOM contains dummy assemblies, these are exploded so that their items can be assigned to standard network activities. Otherwise, however, the material BOM exploSion takes place on only one level in the standard network.
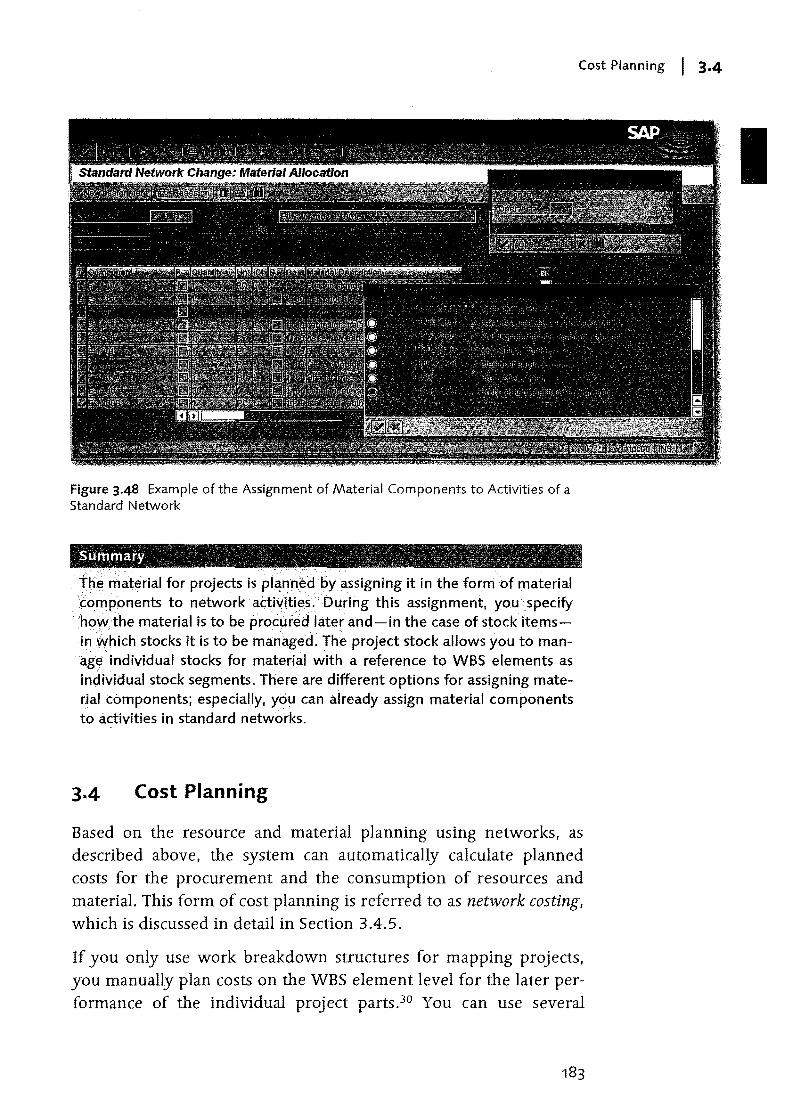
Figure 3.48 Example of the Assignment of Material Components to Activities of a Standard Network
fh~"mah~rial for projects isplan:~~d'byassigning it in the form of material c:o[T!ppnents to network aCtiVit"ies.<During this assignment, you specify 'hovV.the material is to be procured later and-in the case of stock itemsin Which stocks it is to be ma:naged. The project stock allows you to manage individual stocks for material with a reference to WBS elements as individual stock segments. There are different options for assigning material components; especially, you can already assign material components to activities in standard networks.
3-4 Cost Planning
Cost Planning I 3.4
Based on the resource and material planning using networks, as described above, the system can automatically calculate planned costs for the procurement and the consumption of resources and material. This form of cost planning is referred to as network costing, which is discussed in detail in Section 3.4.5.
If you only use work breakdown structures for mapping projects, you manually plan costs on the WBS element level for the later performance of the individual project parts.30 You can use several
3 . I Planning Functions
options that are discussed in Sections 3.4.1 to 3.4.4. A significant dif) ference between these options is the level of detail in the planning.
Cost planning by cost element
[»]
Period Based Cost Planning
[»]
CO versions
Two important criteria for a cost planning's level of detail are the characteristics by cost element and. by date.
If a cost planning references one or several cost elements, this type of cost planning is referred to as a planning by cost element. Cost elements are defined in the Cost Element Accounting of Controlling and correspond to cost-relevant chart of accounts items. Using cost elements, you can structure and classity the consumption of production factors that is valuated with regard to the business purpose. Using cost element reports (see Section 7.2.2) or hierarchy reports (see Section 7.2.1) of Reporting, you can therefore analyze costs planned by cost elements with regard to their business purpose-related usage.
For aco~tJ)lal"lffjQiJ)Yc:ost elements forWBS'~)~w~gt~,YQucan use unit costing (see~S,e~ct:ion3)k2)r detailed planning(s~e/S1;2tio~3.4.3), and Easy Cost Planniqg\(seg'Sedion 3.4.4) in SAP Pr()Je~t:;SY§tem. calculations' using networks(seeSection 3.4.5) are always performed by cost element. as well.
If a cost planning references the period of the projected cost to be incurred, this type of cost planning is referred to as being period based. Cost plannings by date allow you to analyze planned costs specifically for a period (e.g., monthly) in Reporting and to compare them to the actual costs incurred during a period.
Options of cost planning by date in SAP Project System include the detailed planning (see Section 3.4.3) and network costing (see Section 3.4.5). gasy Cost Planning is only conditionally date-specific (see Section 3.4.4); the other cost planning forms in SAP Project System are periodindependent or only reference fiscal years, but not individual periods of a fiscal year.
When you plan costs for WBS elements, you always reference a CO version. CO versions can be defined in Customizing and contain a number of control parameters for their usages in Controlling and in SAP Project System (see Figure 3.49). Depending on the used form of
30 A manual cost planning using WBS elements can also make sense, although you are using networks if these networks are exclUSively used for time scheduling. or if you use cost planning on the WBS element level only for a preliminary planning. for example, and want to detail it later via network costing.
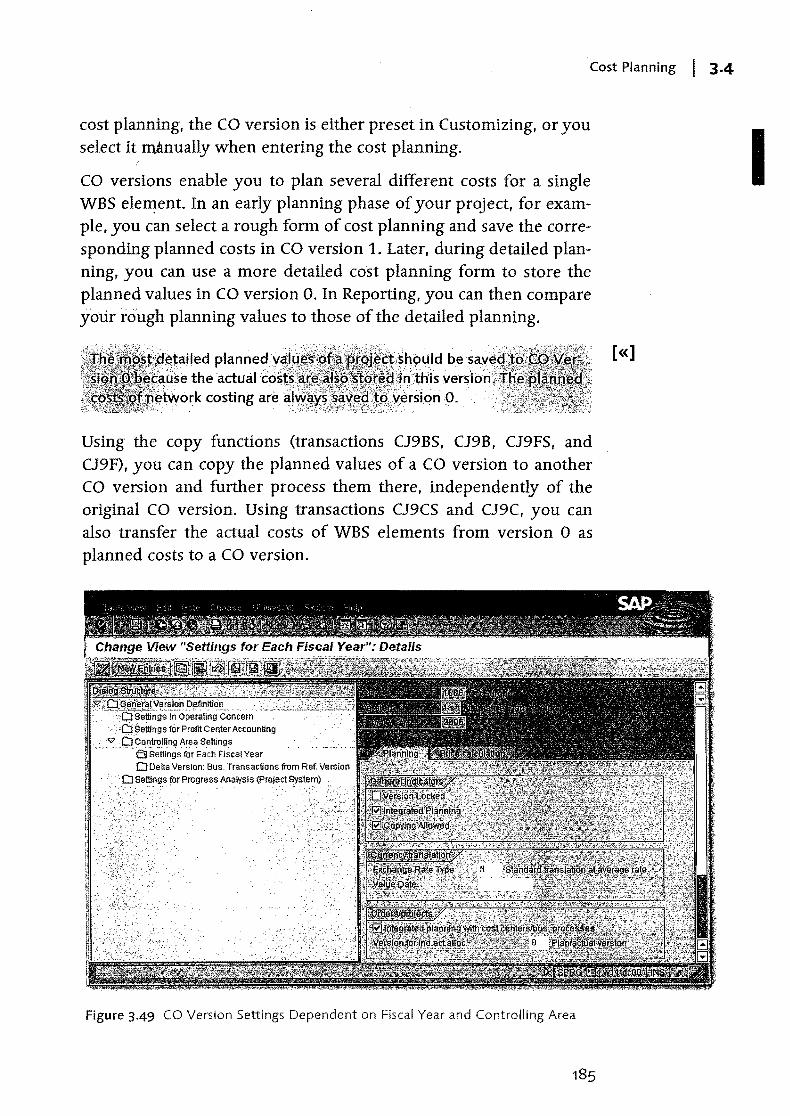
Cost Planning I 3.4
cost planning, the CO version is either preset in Customizing, or you select it mAnually when entering the cost planning.
CO versions enable you to plan several different costs for a single WBS ele~ent. In an early planning phase of your project, for exampIe, you can select a rough form of cost planning and save the corresponding planned costs in CO version 1. Later, during detailed planning. you can use a more detailed cost planning form to store the planned values in CO version O. In Reporting, you can then compare your rough planning values to those of the detailed planning.
WNthls '. ___ :,~,_,c,.,
;.;!;",,; ~~~~~~<:\;;':;0"tl:~,~~rSi0f1 O. ,',
Using the copy functions (transactions CJ9BS, CJ9B, CJ9FS, and CJ9F), you can copy the planned values of a CO version to another CO version and further process them there, independently of the original CO version. Using transactions CJ9CS and CJ9C, you can also transfer the actual costs of WBS elements from version 0 as planned costs to a CO version.
Figure 3.49 CO Version Settings Dependent on Fiscal Year and Controlling Area
[«]
I
3 I Planning Functions
Planning profile The manual cost planning for WBS elements requires the definition of a planning profile in the Customizing of SAP Project System (see
) Figure 3.50). A planning profile contains control parameters for the different cost planning options for WBS elements. The planning profile specifies, for example, if a manual cost planning is' to be permitted only for WBS elements with the operative indicator Planning element set (see Section 2.2.1) or for all WBS elements. The planning profile to be used is entered in the project definition of a project. In the project profile, you can already store a default value for the planning profile of projects.
Figure 3.50 Example of the Definition of a Planning Profile
Depending on the used form of cost planning, more settings are necessary in Customizing. These settings as well as the relevant control parameters of the planning profiles are discussed in the follOWing sections about the different cost planning forms.
186
Cost Planning I 3·4
3.4.1 Hierarchical Cost Planning
The hierarthical cost planning31 on the WBS element level is the roughest form of cost planning. It is not based on cost elements or on dates. On the other hand, a ,hiera~chical cost planning requires the least planning effort of all planning forms. Depending on the planning profile settings, you can use the hierarchical cost planning to plan total values (planned values without a reference to fiscal years) or planned values for individual fiscal years. The planning profile then additionally controls the time horizon to be available for the fiscal year planning. If you want, you can also use the hierarchical cost planning to plan both total values and values referencing fiscal years.
The cost planning itself is carried out by entering total or fiscal year values in the Cost plan column of the table displayed by transaction CJ40 for those WBS elements that permit cost planning (see Figure 3.51). More columns (views) inform you about the hierarchical distribution of planned values, planned costs that were planned via other cost planning forms, or the planned values of the previous fiscal year or the sum of all fiscal year values, respectively.
[I]
The Planned total view shows the total of all planned costs for a WBS Planned total
element in the respective CO version and the corresponding fiscal year, irrespective of the cost planning form via which they were entered. In particular, the planned total also includes planned costs of additive orders (see Section 3.4.6) and networks or network activ-ities (see Section 3.4.5) that are assigned to the WBS element.
If you want, you can transfer view values as hierarchical planned values for selected WBS elements using the Copy view function. You can determine the percentage of these values to be copied and whether they are to be added to the original values or transferred as new val-ues. The Revaluate function enables you to iJ?crease or reduce
31 This cost planning form is sometimes referred to as overall planning or structure planning.
Copy view and Revaluate functions
I
Planning Functions
}
Total up function
Currencies during hierarchical cost
planning
planned values of selected WBS elements by a specific percentage or amount.
Figure 3.51 Example of a Hierarchical Cost Planning
Using the Total up function, you can derive the hierarchical planned values of WBS elements from the total of planned values of the inferior WBS elements.32 By setting the Bottom-up planning indicator in the planning profile, this function can also be automatically run when saving the hierarchical cost planning.
Depending on the planning profile settings, you can use the hierarchical cost planning to plan values in the project controlling area currency, the object currency of the individual WBS elements, or in a freely selectable currency (transaction currency). In the last case, you can store a default value for this currency in the initial screen. When saving, the planned values are automatically converted to the Controlling area and respective object currencies as well, and saved to the database in all three currencies. 33 For total values, conversion details like the exchange rate type are controlled via the planning
32 Note that when totaling up. the hierarchical planned values of the inferior WBS elements, as well as existing values from unit costings or detailed plannings, are added up. Values of assigned orders or networks are not included in this process.
33 In the controlling area definition, you must set the All Currencies indicator.
188
Cost Planning I 3.4
board profile. For annual values, the exchange rate type is determIned from'the fiscal year-dependent settings of the CO version.
You can save the planned values of a hierarchical cost planning without checking them, or you can perform a check first. The check ensures that the total values of the individual WBS elements are at least as high as the total of their annual values, and that the planned values ofWBS elements are higher than or equal to the planned val-ues of the hierarchically inferior WBS elements.
Planned values check
If you want, you can define a user status (see Section 2.6) that per- Plan line items
mits the business process Write plan line items. In this case, after setting this status in the project, every change to the hierarchical cost planning is stored in a separate document (plan line item) together with information about the date and the changing user and can therefore be easily traced later.
3.4.2 U nit Costing
In transaction CJ40, you can also create unit costings for planning costs for WBS elements. With unit costing, you can use prices for material, external and internal services from materials management or purchasing, respectively, for the cost planning of your projects, or refer to Controlling rates for planning costs for internal activities. Unit costing for WBS elements is cost element-specific but not datespecific.
As with the hierarchical cost planning, the planned values of unit costing can be entered based on the planning profile settings either with a reference to individual fiscal years or independently of fiscal years as total values.
When using unit costing for planning costs for WBS elements, a distribu- [!] tion of values to interim periods is also not feasible. For fiscal yeardependent unit costing, the fiscal years are not derived from the planned dates of the projects, but instead must be selected manually.
When you create a unit costing for a WBS element in transaction Item categories
CJ40, you first get an empty list in which you can enter Costing Items line by line (see Figure 3.52). When creating a costing item, you first specify an item category. This item category now determines which data you need to enter for cost planning and which data is
189
I
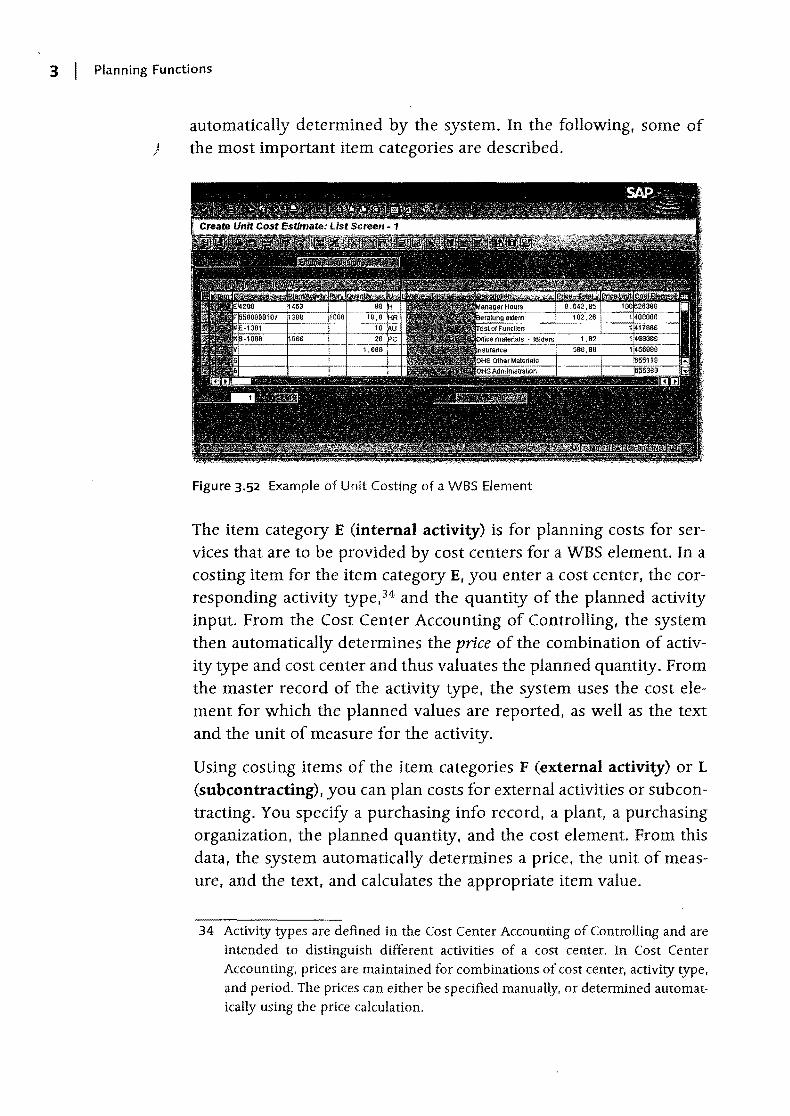
3 I Planning Functions
automatically determined by the system. In the following, some of } the most important item categories are described.
Figure 3.52 Example of Unit Costing of a WBS Element
The item category E (internal activity) is for planning costs for services that are to be provided by cost centers for a WBS element. In a costing item for the item category E, you enter a cost center, the corresponding activity type,34 and the quantity of the planned activity input. From the Cost Center Accounting of Controlling, the system then automatically determines the price of the combination of activity type and cost center and thus valuates the planned quantity. From the master record of the activity type, the system uses the cost element for which the planned values are reported, as well as the text and the unit of measure for the activity.
Using costing items of the item categories F (external activity) or L
(subcontracting), you can plan costs for external activities or subcontracting. You specify a purchasing info record, a plant, a purchasing organization, the planned quantity, and the cost element. From this data, the system automatically determines a price, the unit of measure, and the text, and calculates the appropriate item value.
34 Activity types are defined in the Cost Center Accounting of Controlling and are intended to distinguish different activities of a cost center. In Cost Center Accounting. prices are maintained for combinations of cost center, activity type, and period. The prices can either be specified manually, or determined automatically using the price calculation.
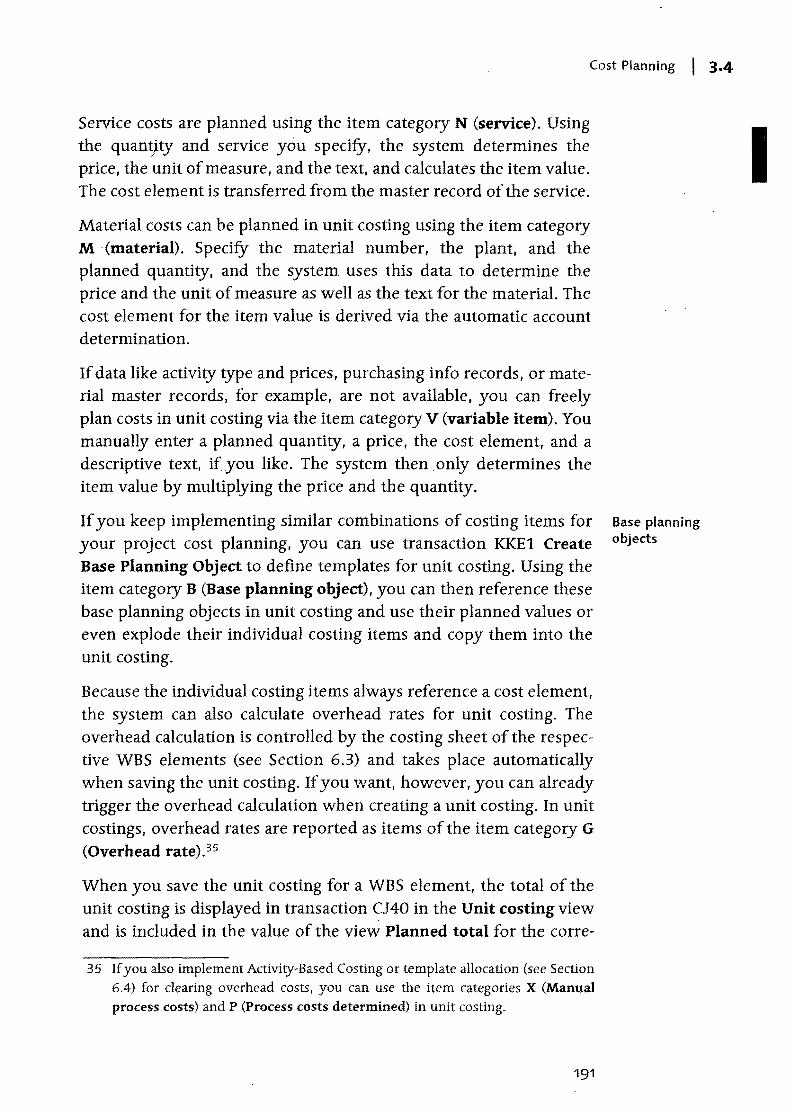
Cost Planning I 3.4
Service costs are planned using the item category N (service). Using the quangty and service you specify, the system determines the price, the unit of measure, and the text, and calculates the item value. The cost element is transferred from the master record of the service.
Material costs can be planned in unit costing using the item category M (material). Specify the material number, the plant, and the planned quantity, and the system uses this data to determine the price and the unit of measure as well as the text for the material. The cost element for the item value is derived via the automatic account determination.
If data like activity type and prices, purchasing info records, or material master records, for example, are not available, you can freely plan costs in unit costing via the item category V (variable item). You manually enter a planned quantity, a price, the cost element, and a descriptive text, if you like. The system then only determines the item value by multiplying the price and the quantity.
If you keep implementing similar combinations of costing items for your project cost planning, you can use transaction KKE1 Create Base Planning Object to define templates for unit costing. Using the item category B (Base planning object), you can then reference these base planning objects in unit costing and use their planned values or even explode their individual costing items and copy them into the unit costing.
Because the individual costing items always reference a cost element, the system can also calculate overhead rates for unit costing. The overhead calculation is controlled by the costing sheet of the respective WBS elements (see Section 6.3) and takes place automatically when saving the unit costing. If you want, however, you can already trigger the overhead calculation when creating a unit costing. In unit costings, overhead rates are reported as items of the item category G
(Overhead rate).35
When you save the unit costing for a WBS element, the total of the unit costing is displayed in transaction CJ40 in the Unit costing view and is included in the value of the view Planned total for the corre-
35 If you also implement Activity-Based Costing or template allocation (see Section 6.4) for clearing overhead costs, you can use the item categories X (Manua] process costs) and P (Process costs determined) in unit costing.
191
Base planning objects
I
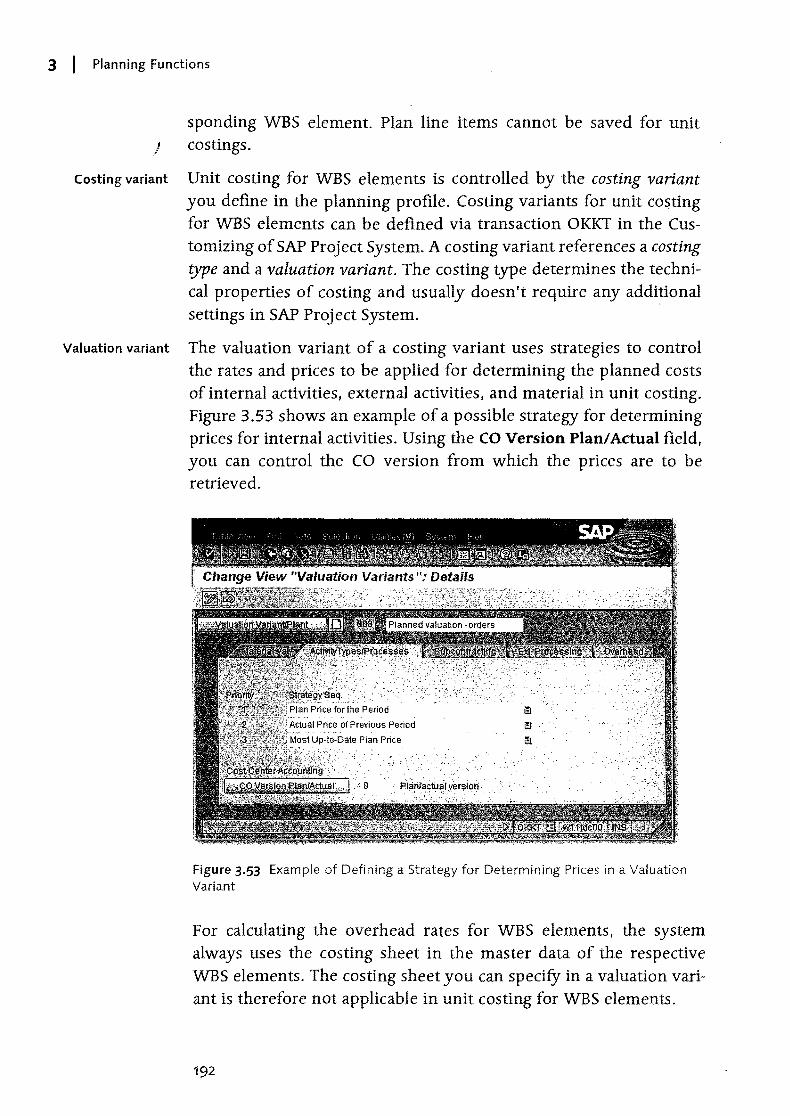
3 I Planning Functions
sponding WBS element. Plan line items cannot be saved for unit } costings.
Costing variant Unit costing for WBS elements is controlled by the costing variant you define in the planning profile. Costing variants for unit co~ting for WBS elements can be defined via transaction OKKT in the Customizing of SAP Project System. A costing variant references a costing type and a valuation variant. The costing type determines the technical properties of costing and usually doesn't reqUire any additional settings in SAP Proj ect System.
Valuation variant The valuation variant of a costing variant uses strategies to control the rates and prices to be applied for determining the planned costs of internal activities, external activities, and material in unit costing. Figure 3.53 shows an example of a possible strategy for determining prices for internal activities. Using the CO Version Plan/Actual field, you can control the CO version from which the prices are to be retrieved.
Figure 3.53 Example of Defining a Strategy for Determining Prices in a Valuation Variant
For calculating the overhead rates for WBS elements, the system always uses the costing sheet in the master data of the respective WBS elements. The costing sheet you can specify in a valuation variant is therefore not applicable in unit costing for WBS elements.
192
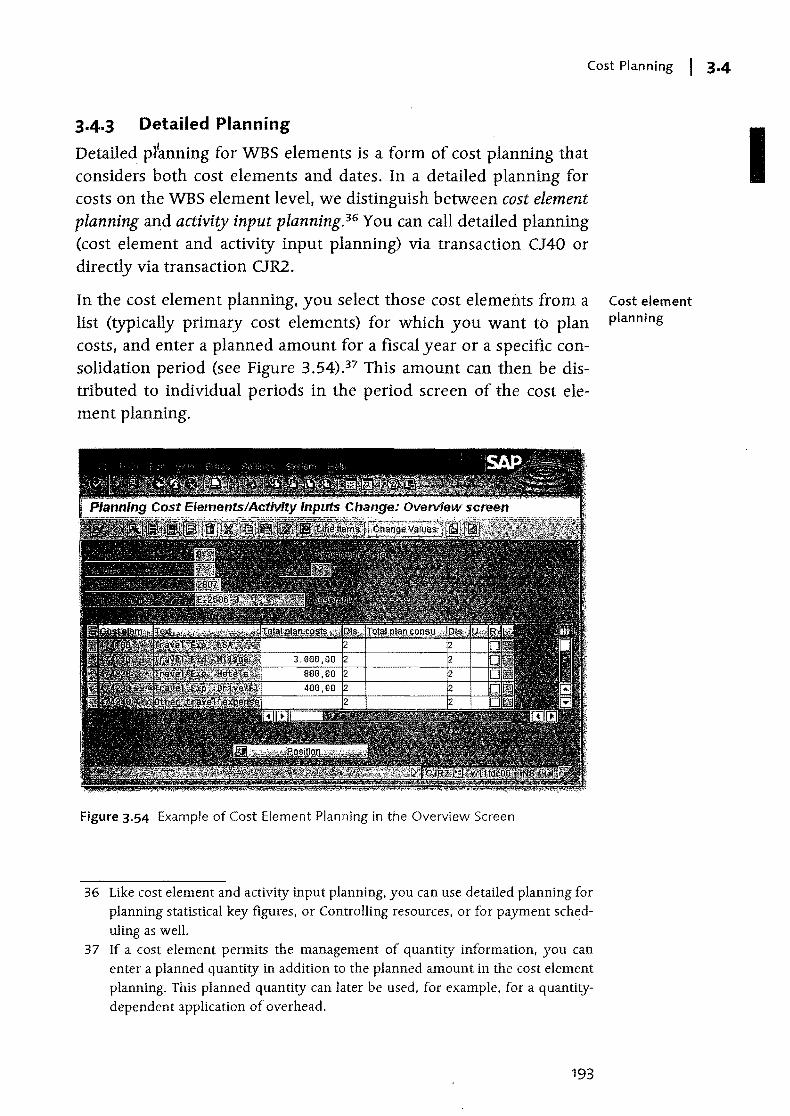
Cost Planning I 3.4
3.4.3 Detailed Planning
Detailed pl'anning for WBS elements is a form of cost planning that considers both cost elements and dates. In a detailed planning for costs on the WBS element level, we distinguish between cost element planning aD:d activity input planning.36 You can call detailed planning (cost element and activity input planning) via transaction CJ40 or directly via transaction OR2.
In the cost element planning, you select those cost elements from a list (typically primary cost elements) for which you want to plan costs, and enter a planned amount for a fiscal year or a specific consolidation period (see Figure 3.54).37 This amount can then be distributed to individual periods in the period screen of the cost element planning.
Figure 3.54 Example of Cost Element Planning in the Overview Screen
36 Like cost element and activity input planning. you can use detailed planning for planning statistical key figures. or Controlling resources. or for payment scheduling as well.
37 If a cost element permits the management of quantity information. you can enter a planned quantity in addition to the planned amount in the cost element planning. This planned quantity can later be used. for example. for a quantitydependent application of overhead.
193
Cost element planning
I
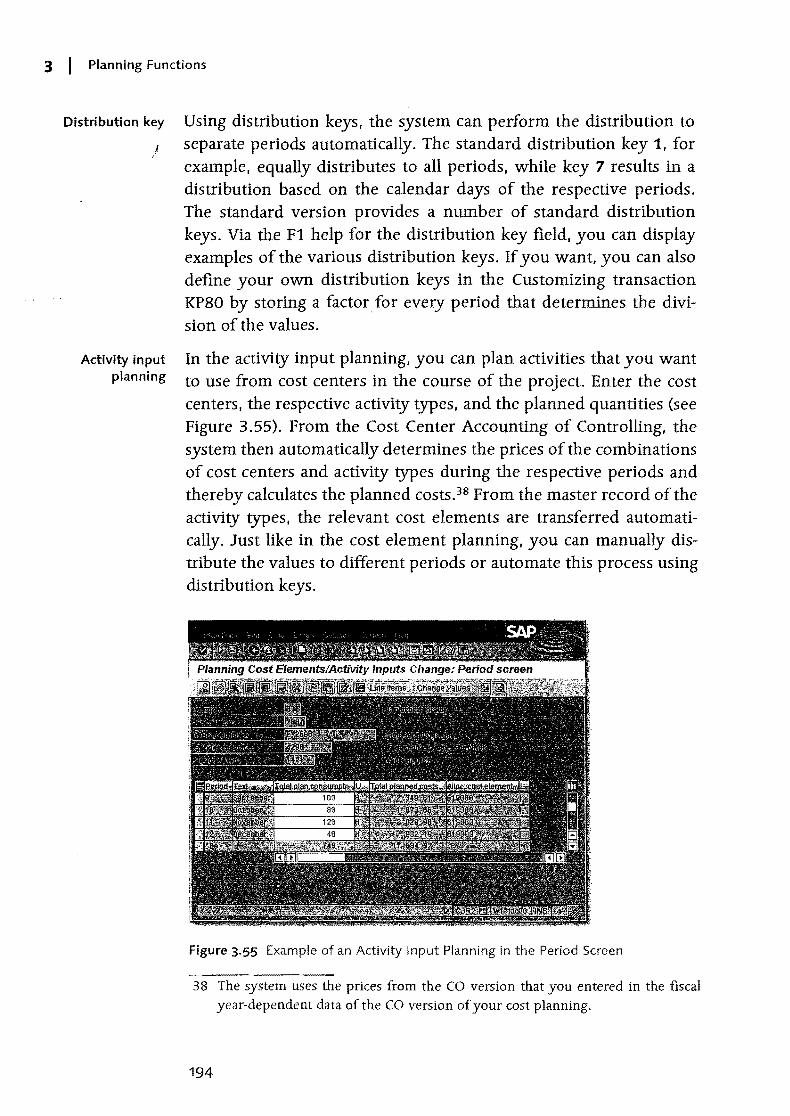
3 I Planning Functions
Distribution key
Activity input planning
Using distribution keys, the system can perform the distribution to separate periods automatically. The standard distribution key 1, for example, equally distributes to all periods, while key 7 results in a distribution based on the calendar days of the respective periods. The standard version provides a number of standard distribution keys. Via the F1 help for the distribution key field, you can display examples of the various distribution keys. If you want, you can also define your own distribution keys in the Customizing transaction KP80 by storing a factor for every period that determines the division of the values.
In the activity input planning, you can plan activities that you want to use from cost centers in the course of the project. Enter the cost centers, the respective activity types, and the planned quantities (see Figure 3.55). From the Cost Center Accounting of Controlling, the system then automatically determines the prices of the combinations of cost centers and activity types during the respective periods and thereby calculates the planned costs.38 From the master record of the activity types, the relevant cost elements are transferred automatically. Just like in the cost element planning. you can manually distribute the values to different periods or automate this process using distribution keys.
Figure 3.55 Example of an Activity Input Planning in the Period Screen
38 The system uses the prices from the CO version that you entered in the fiscal year-dependent data of the CO version of your cost planning.
194
Cost Planning I 3·4
A special function that you can implement when using the activity input planning is the integrated planning. In an integrated planning of activity input, not only are the planned costs determined for the WBS elements, but your planned activity input is immediately reported in Cost Center Accounting as scheduled activities for the affected cost centers and can be factored in your company's cost center planning. You also have the option of a planned settlement for cost centers or business processes if you use an integrated planning. To use an integrated cost planning, you need to set the Integrated Planning indicator in the relevant WBS elements (this can be prede-fined via the project profile), and the CO version must explicitly per-· mit an integrated planning. 39
Because the detailed planning - both as cost element and as activity input planning - always references cost elements, you can also plan overhead rates using the planned data. In contrast to unit costing for WBS elements, this is not handled automatically when saving the cost planning, but must be manually triggered via transaction CJ46 or CJ47. The calculation of the overhead rates is controlled via the costing sheets of the individual WBS elements.
[!]
Integrated planning
Overhead rates
Like in the hierarchical cost planning, plan line items are also written Plan line items
in the detailed planning if this is explicitly permitted by the status of the respective WBS elements. Using these plan line items, you can later analyze every change of the detailed planning separately. In an integrated planning, plane line items are automatically written, whether or not a status permits this business process.
Planning layouts specify the individual entry screens of the detailed Planning layouts
planning. SAP prOVides various planning layouts. If you want, how-ever, you can define your own planning layouts in Customizing. You can use the Report Painter tool to create planning layouts (see also Section 7.2).
39 The indicator Integrated planning with cost centers/business processes relevant for an integrated planning of activity input for WBS elements is located in the detail screen of the fiscal year-dependent CO version data.
195
I
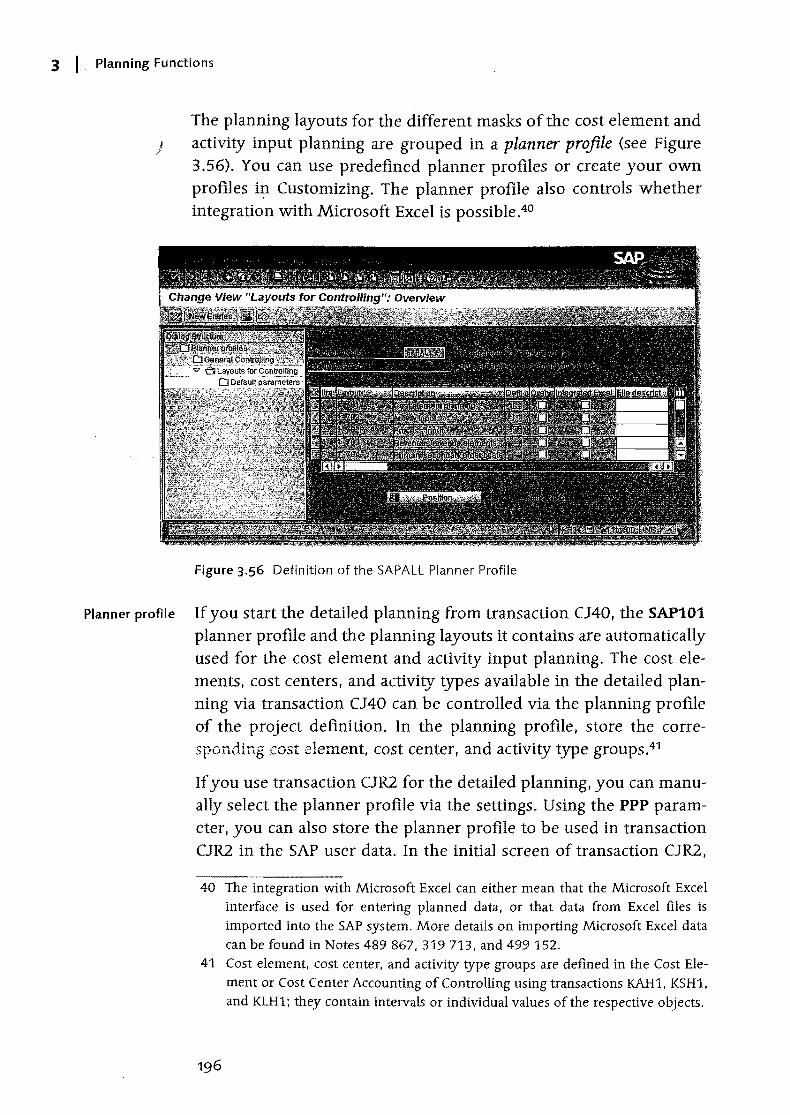
3 I Planning Functions
The planning layouts for the different masks of the cost element and ) activity input planning are grouped in a planner profile (see Figure
3.56). You can use predefined planner profiles or create your own profiles i~ Customizing. The planner profile also controls whether integration with Microsoft Excel is possible.40
Figure 3.56 Definition of the SAPALL Planner Profile
Planner profile If you start the detailed planning from transaction CJ40, the SAP101
planner profile and the planning layouts it contains are automatically used for the cost element and activity input planning. The cost elements, cost centers, and activity types available in the detailed planning via transaction CJ40 can be controlled via the planning profile of the project definition. In the planning profile, store the corresponding cost element, cost center, and activity type groups.41
If you use transaction CJR2 for the detailed planning, you can manually select the planner profile via the settings. Using the PPP parameter, you can also store the planner profile to be used in transaction CJR2 in the SAP user data. In the initial screen of transaction CJR2,
40 The integration with Microsoft Excel can either mean that the Microsoft Excel interface is used for entering planned data. or that data from Excel files is imported into the SAP system. More details on importing Microsoft Excel data can be found in Notes 489867,319713, and 499 152.
41 Cost element, cost center, and activity type groups are defined in the Cost Element or Cost Center Accounting of Controlling using transactions KAH1, KSH1, and KLH1; they contain intervals or individual values of the respective objects.
196
Cost Planning I 3.4
you can now select the planning layout you want to use for the planning. If yoti have not set default parameters in the planner profile, you will have to manually specify information about the CO version, the periods, the cost elements, or the cost centers and activity types of the cost planning later. Additionally, you must specify the WBS elements for which you want to plan costs. Instead of specifying single WBS elements or intervals ofWBS elements, you can also enter a WBS element group if it has been previously defined in transaction CJSG.
3.4.4 Easy Cost Planning
The term Easy Cost Planning refers to another function for planning costs on the WBS elements level. It is available in SAP Project System as of SAP R/3 Release 4.6C. Similar to unit costing for WBS elements, the Easy Cost Planning uses existing Controlling, purchasing, or materials management data in the form of costing items. However, if you want to repeatedly calculate similar costs, the Easy Cost Planning allows you to previously define costing models (planning templates) and thereby considerably simplifies entering the required costing data. Cost planning using the Easy Cost Planning takes into account cost elements.
The E~sYC:Q$t PI~nning determines the period . of the planned costs of a [!] WBSele'met;ltfro;"the basic start date6f th~ WBS element. If the planned duration ofaWBS element spans several periods, the planned costs are not distributed.The planned costs are reported in the period containing the basic start date of the WBS element; If the basic start date of the WBS element.shifts, .you simply need to call the Easy Cost Planning again to automaticaily adapt the period of the planned costs to the period of the new bask· start date.
The Easy Cost Planning for a project can be started from the Project Builder.42 In the left area of the Easy Cost Planning, you will find the costing structure, that is, the hierarchical structure of the work breakdown structure. Depending on the structure tree setting in the Project Builder, the Easy Cost Planning displays the identifications or the names of the WBS elements. If you select a WBS element in the
42 You can also start the Easy Cost Planning directly. However, there is no transaction for this purpose in the SAP Project System menu, so you will have to directly enter the transaction code CJ9ECP.
197
I
3 I Planning Functions
)
Item view
Usage of planning templates
costing structure that permits a cost planning, you can calculate costs for this WBS element in the right area.
There are two different ways of calculation. One option is to display an item view and to create a list of costing items like in unit costing for WBS elements (see Section 3.4.2). Depending on the respective item category, you manually need to specity information about cost centers, activity types, material numbers, purchasing info records, cost elements. etc. When this data is transferred, the system automatically uses the costing sheets in the respective WBS elements to additionally calculate overhead rates and then displays the planned costs in the costing structure.
If the same data continues to be relevant for costing items, you can previously store it in planning templates. Instead of manually creating costing items and specifying cost centers, activity types, and so on, you can simply reference these planning templates in Easy Cost Planning and automatically derive all necessary costing data. The derivation of the costing data is not static but dynamic, using formulas and activation conditions that you can define in the planning template. Therefore, if you have assigned a planning template to a WBS element in Easy Cost Planning, you first need to specity all parameters that are used in the formulas and conditions of the planning template in order to derive the relevant costing items and the quantities contained therein. This parameter specification is referred to as characteristic valuation. If you want, you can also enter a descriptive text for valuating the characteristics.
Figure 3.57 presents an example of using a planning template in Easy Cost Planning. In this example, due to the planning template settings, the valuation of the Internal Labor Hours characteristic with a value of 80 hours causes activities of the cost center 4290 to be automatically planned for two different activity types with the quantities 56 or 24 hours, respectively. The value specified for the Additional costs characteristic is transferred as the price for a variable item. The planning template stored all other necessary data of the variable item, like the cost element, for example.
Using the Subdivide Cost Estimate function, you can assign several planning templates to a WBS element. If you want, you can also manually supplement the costing items derived from the planning templates in the item view with new items. In an Easy Cost Planning
198
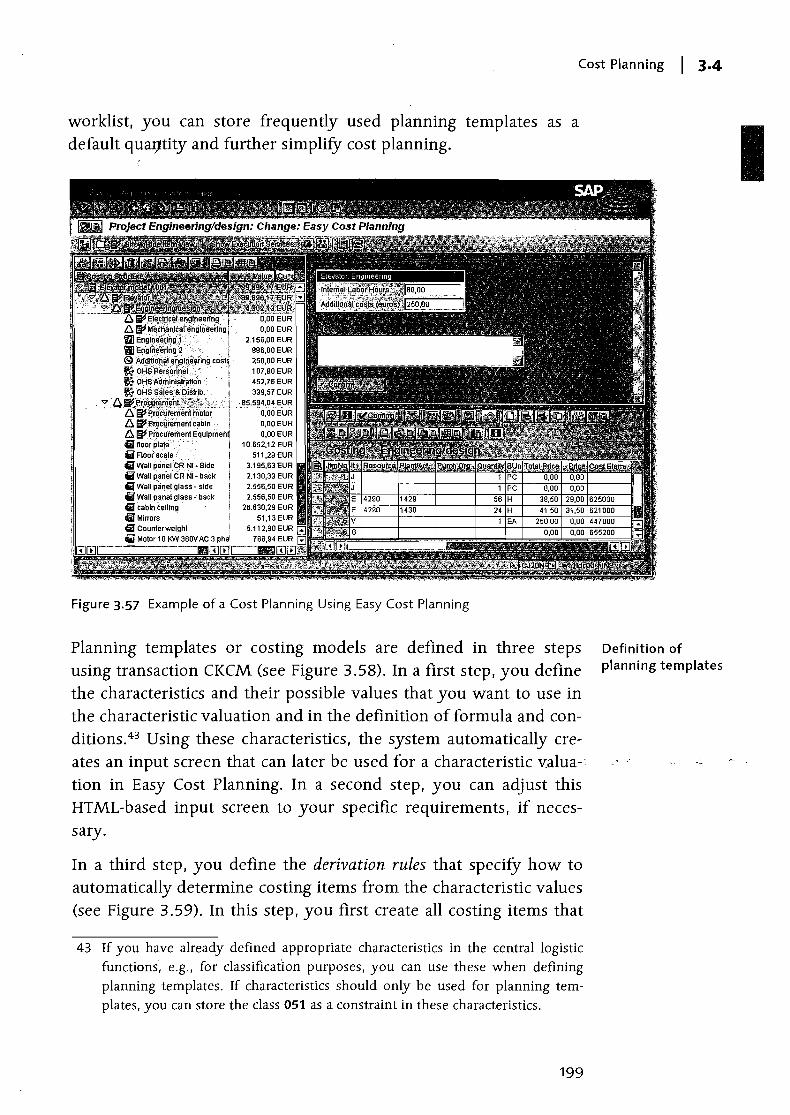
Cost Planning I 3·4
worklist, you can store frequently used planning templates as a I default qual}tity and further simplifY cost planning.
D. Iii fioor plate '0
if Flobisc~le / Iii Wall parielCR NI· Side if Wall panelCR NI· back Q Wall p~nel glass· side QWallp.nel glass· back Qcabln ~elling , IiiilMirrors Q Counter weight Iii Motor 1 0 KW 3aOV AC 3
-:1..,';r-·----
Figure 3.57 Example of a Cost Planning Using Easy Cost Planning
Planning templates or costing models are defined in three steps using transaction CKCM (see Figure 3.58). In a first step, you define the characteristics and their possible values that you want to use in the characteristic valuation and in the definition of formula and conditions. 43 Using these characteristics, the system automatically creates an input screen that can later be used for a characteristic valua-' tion in Easy Cost Planning. In a second step, you can adjust this HTML-based input screen to your specific requirements, if necessary.
In a third step, you define the derivation rules that specify how to automatically determine costing items from the characteristic values (see Figure 3.59). In this step, you first create all costing items that
43 If you have already defined appropriate characteristics in the central logistic functions, e.g., for classification purposes, you can use these when defining planning templates. If characteristics should only be used for planning templates, you can store the class 051 as a constraint in these characteristics.
199
Definition of planning templates

Planning Functions
·can show up in the calculation, and then for every item, you deter-) mine the conditions that should cause the item to actually be
included in a calculation via the Activation field. There is a dedicated editor for defining the conditions. In particular, you can ~se the planning template characteristics for defining the conditions.
Figure 3.58 Definition of Planning Templates for Easy Cost Planning
Figure 3.59 Example of the Definition of a Derivation Rule
Additionally, you specify the item category for the individual costing items and - depending on the item category - the required costing data like cost center, activity type, material number, etc. For the
200
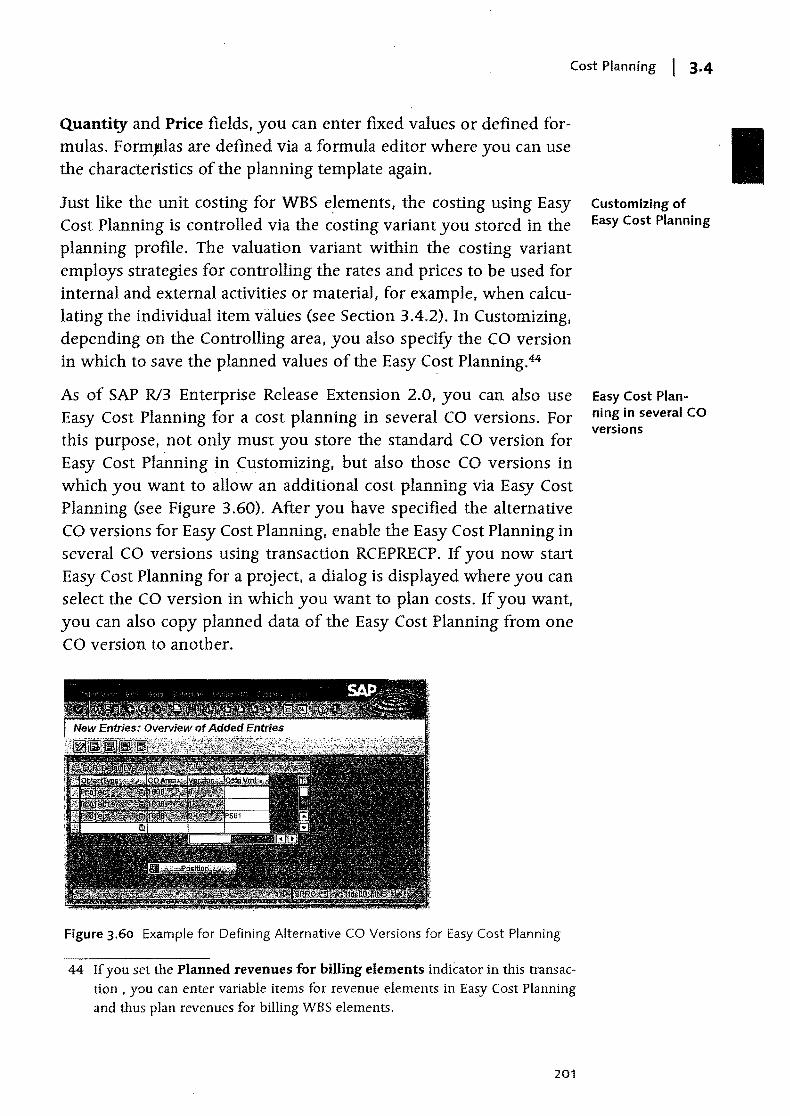
Cost Planning I 3-4
Quantity and Price fields, you can enter fixed values or defined formulas. FormJUlas are defined via a formula editor where you can use the characteristics of the planning template again.
Just like the unit costing for WBS e.lements, the costing using Easy Cost Planning is controlled via the costing variant you stored in the planning profile. The valuation variant within the costing variant employs strategies for controlling the rates and prices to be used for internal and external activities or material, for example, when calculating the individual item vahies (see Section 3.4.2). In Customizing, depending on the Controlling area, you also specify the CO version in which to save the planned values of the Easy Cost Planning. 44
As of SAP Rl3 Enterprise Release Extension 2.0, you can also use Easy Cost Planning for a cost planning in several CO versions. For this purpose, not only must you store the standard CO version for Easy Cost Planning in Customizing. but also those CO versions in which you want to allow an additional cost planning via Easy Cost Planning (see Figure 3.60). After you have specified the alternative CO versions for Easy Cost Planning, enable the Easy Cost Planning in several CO versions using transaction RCEPRECP. If you now start Easy Cost Planning for a project. a dialog is displayed where you can select the CO version in which you want to plan costs. If you want, you can also copy planned data of the Easy Cost Planning from one CO version to another.
Figure 3.60 Example for Defining Alternative CO Versions for Easy Cost Planning
44 If you set the Planned revenues for billing elements indicator in this transaction , you can enter variable items for revenue elements in Easy Cost Planning and thus plan revenues for billing WBS elements.
201
Customizing of Easy Cost Planning
Easy Cost Planning in several CO versions
3 I Planning Functions
Additional functions of Ea~y
Cost Planniflg
[»]
More functions of the Easy Cost Planning that are not available in the other forms of cost planning for WBS elements are:
~ Usage in simulation versions Easy Cost Planning can be implemented for the cost planning of WBS elements in simulation versions.
~ Copying When creating a project using a template of another operative project, the planned data of the Easy Cost Planning can be copied as well if you want.
~ Execution Services During the implementation phase of projects, you can use socalled Execution Services to post activity allocations, purchase requisitions, or goods issues, for example, directly from the Easy Cost Planning. The system suggests the planned data of the Easy Cost Planning for creating the respective documents (see Section 5.2.3).
3.4.5 Network Costing
If you use networks for structuring your projects, the network costing function is available for automatically determining planned costs using the activity. activity element, and material component data. Similar to the unit costing for WBS elements or the Easy Cost Planning. the network costing also uses existing data from Controlling, purchaSing. or material management for calculating the planned costs. The planned costs always reference cost elements and dates, which means that network costing is a cost element- and date-specific type of planning.
During network costing, the periods of the planned costs can be derived automatically from the basic.dates of the activities, activity elements, and requirements dates of material components. If activities or activity elements span several periods, the system can also distribute the planned costs across these periods. If the dates of network objects are shifted, the distributions of the respective planned costs can be automatically adapted as well.
You can trigger network costing manually from every processing transaction for networks. Depending on the network header settings, network costing can be executed automatically on every save after the network creation or the network release if there was a rele-
202
Cost Planning I 3.4
vant change to the network. The network costing can then be fully run' for all petwork objects; otherwise, it only recalculates the changed objects (update).
To calculate several networks simultaneously, SAP Project System provides transaction (J9K. In the initial screen of this transaction, you can select multiple networks and then trigger the calculation of planned costs either directly or via a background job. If the same networks are to be calculated repeatedly, you can save your selection as variants. The usage of asynchronous network costing is particularly necessary if you want to use networks for planning, not only costs but also payments.
The calculation of planned costs will now be described for the different network objects. It is valid for all activities and activity elements that the system only calculates planned costs for these objects if the control key explicitly permits it (Le., if the calculate indicator is set in the respective control key of the activities and activity elements). A similar indicator can also be found in the detail screen of material components. Only if this indicator has been set will the system determine planned costs for the corresponding component during the network costing.
For planning costs for internal activities, you need to store a work center, an activity type, and planned work in an internally processed activity (or an internal element). For the combination of the activity type in the activity and the cost center specified in the costing data of the work center (see Section 3.2.1), the system determines a price for every relevant period. as well as a cost element from the master record of the activity type. The formula in the work center costing data controls the quantity with which to multiply the price for calculating the planned costs. Usually, work centers use the standard formula SAP008 that uses the planned work in the activity for this calculation. The chronological distribution of the costs is determined via the distribution key in the activity or in the work center (see Section 3.2.1). If you haven't stored a distribution key in the activity or in the work center, the system distributes the planned costs equally across the earliest dates of the activity.
In internally processed activities, on the Assignment tab, you will find the Material planning field. During an early project planning phase, you can enter an estimated or empirical value for the later
203
Asynchronous network calculation
Relevancy to costing
Internally processed activities
Material forecasting values
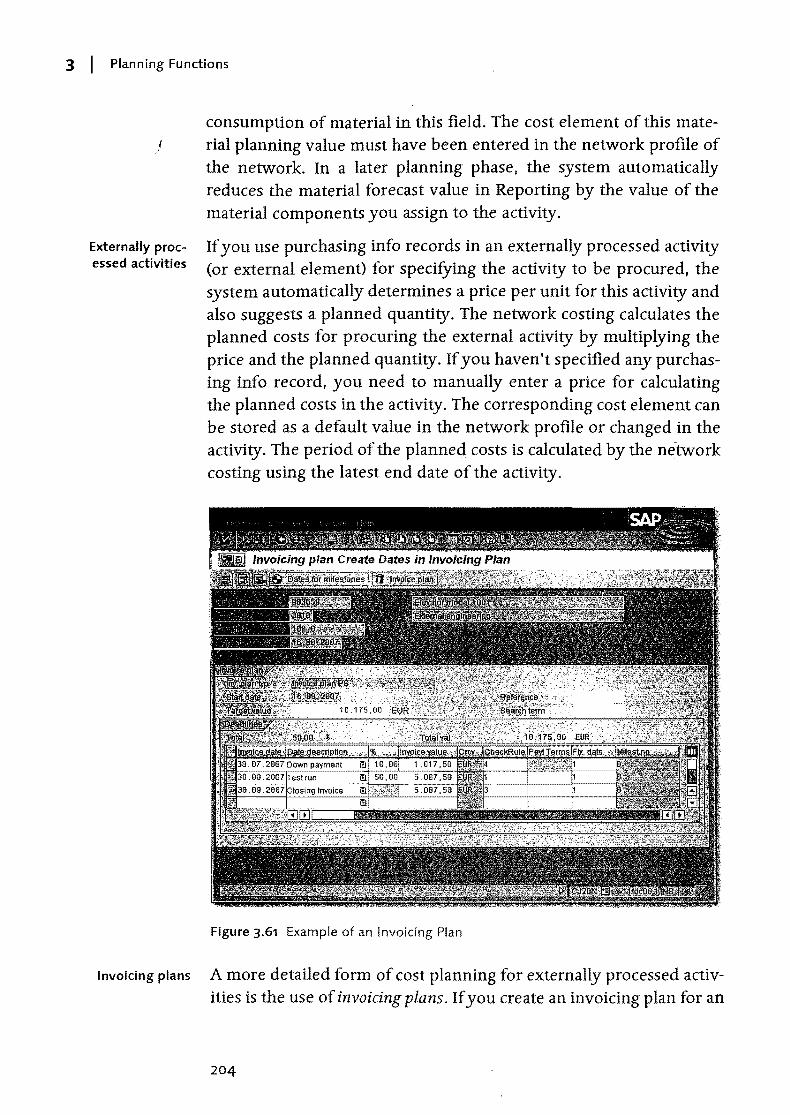
3 I Planning Functions
1 /
Externally processed activities
consumption of material in this field. The cost element of this material planning value must have been entered in the network profile of the network. In a later planning phase, the system automatically reduces the material forecast value in Reporting by the value of the material components you assign to the activity.
If you use purchasing info records in an externally processed activity (or external element) for specitying the activity to be procured, the system automatically determines a price per unit for this activity and also suggests a planned quantity. The network costing calculates the planned costs for procuring the external activity by multiplying the price and the planned quantity. If you haven't specified any purchasing info record, you need to manually enter a price for calculating the planned costs in the activity. The corresponding cost element can be stored as a default value in the network profile or changed in the activity. The period of the planned costs is calculated by the ne-twork costing using the latest end date of the activity.
Figure 3.61 Example of an Invoicing Plan
Invoicing plans A more detailed form of cost planning for externally processed activities is the use of invoicing plans. If you create an invoicing plan for an
204
Cost Planning I 3·4
externally processed activity, you can distribute the planned costs for procuring tjle external activity to different dates and thus to different periods (see Figure 3.61). In particular, you can also plan outgoing payments, for example, down payments, in invoicing plans using the provided invoicing rules. Although payment data is not relevant to costs, in an asynchronous network costing, it is forwarded to the PS Cash Management to the day to serve for a more detailed payment planning (see Section 7.2.4). The individual dates in an invoicing plan, the distribution of costs or payments to the various dates, and the invoicing rules to be used can be specified manually, derived via milestones, or transferred from an invoicing plan template.
For deriving the invoice plan data from milestones, the milestones must have the Sales document date indicator set. During the transfer, the system copies the planned milestone date and the percentage you entered in the milestone to the invoicing plan. If you specified a usage in the milestone, the system can also determine an invoicing rule.45 With every change to the milestone dates, the invoicing plan dates are automatically adapted.
You can also create invoicing plans using a template. For a template, Using templates
you can use invoicing plans of other activities or material compo-nents, or default-invoicing plans defined in the Customizing that the system could derive via the invoicing plan type for the network pro-file. Starting from the earliest end date of the activity, the system cal-culates the individual dates of the inVOicing plan using the start date and the date intervals of the template. If the end date of the activity is shifted, the invoicing plan dates are shifted as well.
If the dates of an invoicing plan are to be fixed (Le., independent of project date shifts), you cannot work with templates or derive the dates from the milestones but must enter the dates manually in the invoicing plan. During network costing, the data in invoicing plans overrides the data of the activity itself.
The planned costs for service activities (or service elements) are typ- Service activities
ically composed of the planned costs of the planned services and the
45 A prerequisite to the automatic determination of the invoicing rule from the milestone usage is that the invoicing plan type and an appropriate date category are stored in the usage definition. In the Customizing of inVOicing plans, you can then specify which invoicing rule is to be used for the combination of invoicing plan type and date category.
205
I
3 I Planning Functions
expected value of the unplanned activities in the service specifica-j tions of the activities. The value of planned activities is calculated
from the service conditions of the specified activities and the planned quantity in the service specifications. The cost element for the planned services is specified in the activities or stored as a default value in the network profile. The system determines the periods of the planned costs from the latest end dates of the service activities. As with externally processed activities, you can implement invoicing plans for a detailed cost or payment planning.
Costs activities Using general costs activities (or cost elements), you can plan additional costs that aren't calculated from the data of other activity categories or assigned material components, like travel costs or primary costs for activities that are not procured via purchasing. In the easiest case, you simply enter an amount and a cost element as a planned value in a general costs activity. The cost element can also be stored as a default value in the network profile.
Unit costing If you want to plan costs for different cost elements using a general costs activity, you can create a unit costing for the activity. As with unit costings for WBS elements (see Section 3.4.2), in a unit costing for the activity, you can create a table of different costing items for a general costs activity. In particular, you can use the item category V
(Variable item) to manually enter cost elements and corresponding planned costs (prices and quantities). The planned costs of unit costing override the costs planned manually in the detail screen of a general costs activity.
Material components
The system automatically determines the periods of the costs planned manually or via unit costing from the basic dates of the general costs activity. If you stored a distribution key in the activity, this key determines the chronological position and the distribution of the planned costs across the duration of the activity. If you haven/t entered a distribution key, the system distributes the planned costs equally across the earliest dates of the activity. For a detailed time scheduling of the cost or payment flows, you can also implement invoicing plans for general costs activities as well. Note, however, that you cannot use an invoicing plan and unit costing simultaneously for a general costs activity.
If you assigned material components to activities, the system can use the component data during network costing to automatically calcu-
206
Cost Planning I 3-4
late planned costs for the later material consumption. The calculation I of material}::osts depends on the item category and the type of stock management for the material components (see Section 3.3).
For non-stock items without a reference to a material master record Non-stock items
or a purchasing info record, you can manually specifY a price per unit. The system then calculates the planned costs by multiplying the price with the planned quantity. If you entered a material number for the non-stock item, the system can retrieve the price from the material master record. If you specified a purchasing info record in the component, the price is determined using this purchasing info record. If you want, you can also create an invoicing plan for a non-stock item for a more detailed planning. The data from invoicing plans overrides the other data of the material components.
For stock items, the network costing calculates the planned costs stock items
from the planned quantity and a price per unit, which is determined from the material master record. For material components managed in the nonvaluated project stock, the system only reports planned costs if you use a planning network. For stock items of a valuated project stock, you can also create a unit costing for a component and therefore calculate the production costs for internally produced material, for example, if no appropriate price for this material is available in the system.
The system determines the period of the planned costs for material components from the requirements date of the components, or from the invoicing plans you assigned to the material components. The cost elements are typically detected automatically via the account determination, or transferred from the unit co stings of the material components.
The planned costs of network costing are always saved to CO version O. If you want, however, you can copy the planned data to another CO version using transaction CJ9F or CJ9FS.
In network costing, the overhead rates are automatically calculated in the plan as welL The calculation is controlled by the costing sheets in the activities (see Section 6.3). Similar to unit costing or Easy Cost Planning, the network costing is controlled via a costing variant. The valuation variant contained in the costing variant uses strategies to define how the prices for internal activities, external activities, and
207
[«]
Costing variants

3 I Planning Functions
}
Header and activity account
assignment
Integrated planning of networks
material that are required for the calculation are to be determined. The costing variants to be used for calculating a planned and an actual network are specified in the network header, or stored as default values in the Network type parameters.
Using the Activity account assignment indicator in the Network type parameters, you decide whether the planned costs - as well as the later actual costs - are separately managed on every single activity or activity element, or whether the planned costs of a network are only reported as a total on the network header level. Normally, it makes sense to use actiVity-assigned networks, because they are conducive to a more detailed analysis of the planned and the actual costs. Additionally, you can assign the activities of activity-assigned networks to different WBS elements and assess the aggregated costs of the assigned activities on the WBS element level. Header-assigned networks are typically used in sales and distribution projects where the Controlling takes place on the sales order item level. The cost integration with networks is achieved via an account assignment to network headers. We don't recommend an activity aSSignment of a header-assigned network to different WBS elements.
No plan line items can be created for planned data from network costings. Therefore, a direct integrated planning or planned settlement is also not possible for networks. From the Enterprise Release, however, it is possible to achieve an indirect integrated planning and planned settlement for networks that are assigned to plan-integrated WBS elements (see Section 3.4.3). You can achieve this indirect integrated planning via using transaction CJ9Q or CJ9QS to roll up the planned costs of networks or network activities to the WBS elements, to which they are assigned. If the WBS elements are plan-integrated, the system writes plan line items for the WBS elements during the rollup, and automatically forwards the planned data for internal activities as scheduled activities to the corresponding cost centers. You can also use the plan line items for a planned settlement on the WBS elements level.
However, note the follOWing restrictions for the integrated planning of networks. The rollup of planned network data cannot be performed in CO version 0, because the planned costs would then be reported doubly on the WBS elements level (see Section 3.4.6). Overhead rates are not rolled up to the WBS elements. However, you
208
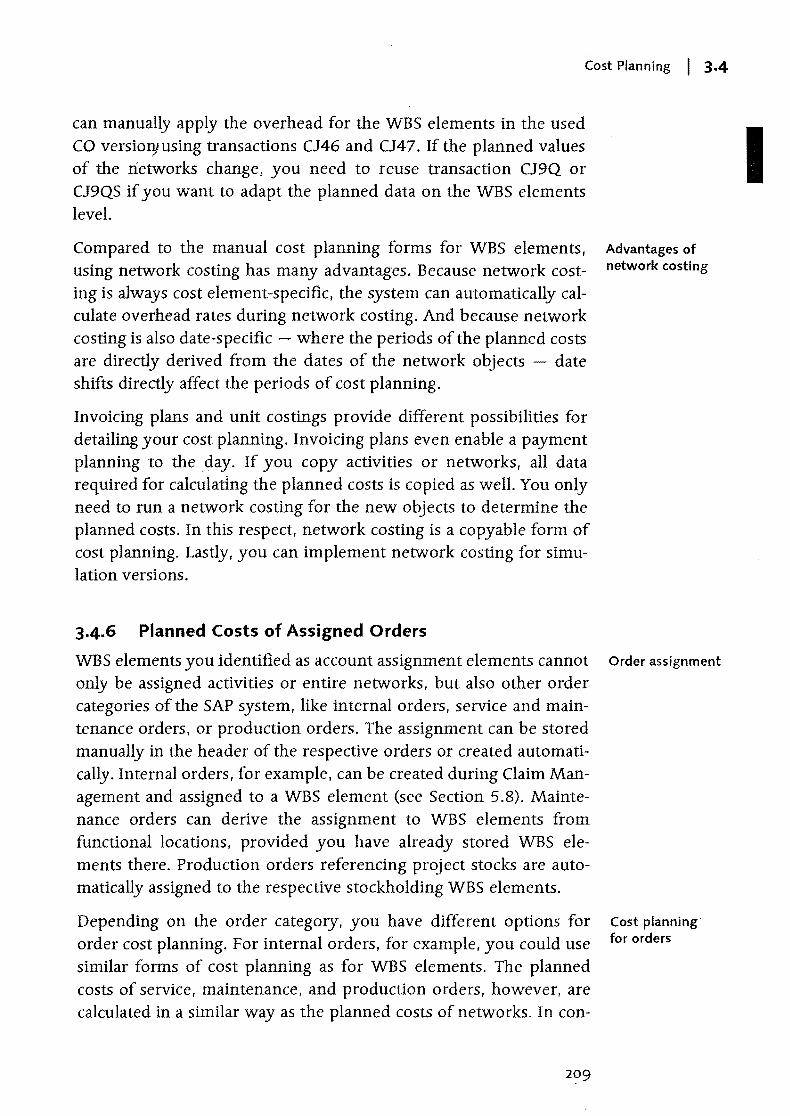
Cost Planning I 3·4
can manually apply the overhead for the WBS elements in the used CO versiOlvusing transactions CJ46 and CJ47. If the planned values of the networks change, you need to reuse transaction CJ9Q or CJ9QS if you want to adapt the planned data on the WBS elements level.
Compared to the manual cost planning forms for WBS elements, using network costing has many advantages. Because network costing is always cost element-specific, the system can automatically calculate overhead rates during network costing. And because network costing is also date-specific - where the periods of the planned costs are directly derived from the dates of the network objects date shifts directly affect the periods of cost planning.
Invoicing plans and unit costings provide different possibilities for detailing your cost planning. Invoicing plans even enable a payment planning to the .day. If you copy activities or networks, all data required for calculating the planned costs is copied as well. You only need to run a network costing for the new objects to determine the planned costs. In this respect, network costing is a copyable form of cost planning. Lastly, you can implement network costing for simulation versions.
3.4.6 Planned Costs of Assigned Orders
WBS elements you identified as account assignment elements cannot only be assigned activities or entire networks, but also other order categories of the SAP system, like internal orders, service and maintenance orders, or prodUction orders. The assignment can be stored manually in the header of the respective orders or created automatically. Internal orders, for example, can be created during Claim Management and aSSigned to a WBS element (see Section 5.8). Maintenance orders can derive the assignment to WBS elements from functional locations, provided you have already stored WBS elements there. Production orders referencing project stocks are automatically assigned to the respective stockholding WBS elements.
Depending on the order category, you have different options for order cost planning. For internal orders, for example, you could use
similar forms of cost planning as for WBS elements. The planned costs of service, maintenance, and production orders, however, are calculated in a similar way as the planned costs of networks. In con-
209
Advantages of network costing
Order assignment
Cost planning for orders
I
3 I Planning Functions
)
Order Value Updating for
Orders for Projects
trast to networks, however, planned costs are always managed on the level of the respective order headers. An assessment on the level of the individual activities within these orders is therefore impossible.
In the Customizing of SAP Project System, you can use transaction OPSV to control how the planned costs of assigned orders are to be handled on the WBS element level (see Figure 3.62). Using the Additive indicator in this table, you specifY whether or not the planned costs for orders are to be added to the planned costs of the WBS elements.
Appended orders If the Additive indicator is set for a specific combination of order category, order type, and controlling area, these are called appended orders. The planned costs of these orders are rolled up additively to the assigned WBS elements and thus increase the planned total of these WBS elements. This setting is particularly relevant if you want to budget the WBS elements, and the planned total is instructive -you have to know how much to budget for - when assigning budgets (see Section 4.1).
Non-appended orders
Figure 3.62 Defini.tion of Sales Order Value Update for the Project
Orders for which the Additive indicator is not set are referred to as non-appended orders. Your planned values are not rolled up to the
210
Revenue Planning I 3.5
assigned WBS elements and thus do not increase their planned totaL If you wor19with budgeting in SAP Project System, you might have to consider the planned costs of non-additive orders manually when assigning budgets. For production orders, for example. using nonappended orders makes sense if the planned costs for production are already reported for assigned activities on the WBS element level due to material components.
The Assign Funds in Plan indicator in the order value updating table for the project controls when values of assigned orders should represent allotments against the budget ofWBS elements. This indicator is discussed in detail in Chapter 4.
f:~'Tequirementsi< .Y()4·;~~:l)j,~ie"different cost planning ?".jnSAP·PrOjectSyste~;)fY9u8v()rk with networks, the
~~'~ii~ally calculate pj~nne'd'cpsts using the data of activi~ ties, . )',y,~fn'~'ril:s; .and materialcorr1p()'rJ~rlts,and report them sepa-rately>, 8t~~iW:b.f;?-ctivity element, respeCtively.
If you ,>~WjiH·.iI\/BS elements only, hierarchical cost planning, unit costing"d~ta:ire~':pla:pning, and Easy Cost Planning represent various manual forms 6f'tdstpl~nhing.
3.5 Revenue Planning
For some project types, particularly for sales and distribution projects, a revenue planning, in addition to the cost planning, is important in order to make assumptions about the later profits or profitability of a project during the planning phase. For projects, you can plan revenues on the WBS elements level or, if you use the integration into Sales and Distribution, using sales and distribution documents linked to projects. WBS elements for which you want to plan revenues must be identified as billing elements (see Section 2.2.1).
A revenue planning on the network level is not possible.
Similar to cost planning using WBS elements, there are different possibilities with different levels of detail for revenue planning as welL If you want, you can also perform several revenue plannings for one billing element and save them in different CO versions.
211
[«]
I
3 I Planning Functions
} 3.5.1 Hierarchical Planning
Using transaction CJ42 , you can perform a hierarchical revenue planning for billing elements of a project. For this purpose, there are similar functions as in the hierarchical cost planning (see Section 3.4.1). This form of revenue planning does not reference any revenue element and is therefore not revenue element-specific. Depending on the planning profile settings of the project, you can plan the revenues as total values or with a reference to individual fiscal years, or both as total values and fiscal year values. A distribution of the revenues to individual periods of a fiscal year is not possible in the hierarchical revenue planning.
3.5.2 Detailed Planning
The detailed planning of revenues enables you to plan values for different revenue elements and to distribute these values to individual periods of a fiscal year either manually or automatically using distribution keys. This form of revenue planning is both revenue elementand date-specific. The periods of planned revenues, however, cannot be derived from the planned dates of the billing elements but must be specified manually.
For the detailed planning of revenues, there are the same functions as for cost element planning (see Section 3.4.3). In particular, this form of revenue planning is again controlled by planning layouts and planner profiles. You can perform the detailed planning of revenues via transaction CJ42 or by calling transaction CJR2. In the planning profile, you determine the revenue element group that is to be available during the detailed planning via transaction CJ42. To be able to plan revenues using transaction CJR2, your user must be assigned to a planner profile with an appropriate planning layout for revenue planning.
3.5.3 Billing Plan
Using a billing plan, you can make a very detailed planning-Similar to invoicing plans. A billing plan always references a revenue element that you must store in the planning profile of the project. If you want, you can also use billing plans for planning incoming payments to the day. The update of planned dates always references co ver-
212 .
Revenue Planning I 3.5
sion O. For simulation versions. billing plans are the only possibility of revenue)planning.
In a billing plan. you distribute a target value (Le., the entire total revenue) to different dates. For this purpose, you create the different items within a billing plan. each including information about the planned date, amount, or percentage, respectively, of the target value, and the billing rule to be used. Using the billing rule, you can control whether an item is revenue-relevant, that is, updated in the revenue plan, or just relevant to down payments. Items that are relevant to down payments are updated to the day, along with the other items in the financial plan of a project in the PS Cash Management (see Section 7.2.4).
You can manually create the items of a billing plan. The dates of the manually created items are handled as fixed dates, that is, changes to dates in the project do not affect the dates of the billing plan in this case. However, you can also create the items automatically by transferring milestone data or referencing a template.
When transferring milestone dates, the system copies the milestone dates and the billing percentage stored in the milestone to the billing plan and might also suggest a billing rule. The billing rule is then determined from the combination of billing plan type and date category stored in the usage of the milestone. If the milestone dates change, the dates of the billing plan are also adapted automatically when saving the project. A prerequisite for transferring milestone dates is that the Sales document date indicator is set in the relevant milestones (see Section 2.4).
If you create a billing plan referencing a template, the system determines the dates and the percentage distribution of the amounts for the billing plan from the item data of the template. The system adjusts the dates to the start date, and the percentage distribution of the amounts to the target value. When dates of the billing element are changed, the dates of the billing plan are automatically adjusted after a scheduling if you worked with a template. You can use other billing plans as templates or define default billing plans in the Customizing of SAP Project System.
In every processing transaction of work breakdown structures, you can assign billing plans to billing elements of a project. If you want,
213
Creating items of a billing plan
Transferring milestone dates
Using templates
Billing plans for WBS elements
I
3 I Planning Functions
you can also implement billing plans in simulation versions for a rev-) enue planning. A special possibility of creating billing plans for WBS
elements is to use sales pricing, which is discussed in Section 3.5.4. The billing plans that you assign to WBS elemen~ are exclusively for planning revenues and possibly payments. They cannot be used for automatic invoice creation.
Billing plans in sales and distribu
tion documents
However, you can create billing plans also in Sales and Distribution for customer quotation or sales order items, prOVided the respective item category permits this (see Figure 3.63). If the sales document item is assigned to a billing element, the planned data of the billing plan is automatically updated to the revenue planning or financial budgeting of the billing element and can therefore be analyzed on the WBS element level. A prerequisite is that you must have enabled the update of data from quotations or orders in the planning profile of the project.
Figure 3.63 Example of a Billing Plan of a Sales Document Item
In contrast to billing plans for WBS elements, the items of a billing plan for a sales document item can also be used for billing during the
214
Revenue Planning I 3.5
project implementation. The actual revenues are then automatically transferre~ to the billing element. If you created items of a billing plan uSIng milestone data, you can use the milestone billing function (see Section 5.6.1).
Even if you didn't create billing plans in a sales document item, you can update planned revenues from the sales document items to the revenue planning of the billing elements to which the items are assigned. The system then determines the value and the revenue element via the conditions of the items, and the billing dates from the respective delivery scheduling data.
t;.t~;t~~r4tW' "~';~~~~n~ ~~:~~:~~~W~~~f~· ·il~\~;eth~,~~~ "'plans forWBS,~ ... ~ :only.for a forecastorci§ ~tefor billing . 'plans in. sales~H'~:}., .•. J~tion documents, y()u;~b8 .. "", .. ir~fore delete th'em after crea:~ih~:{~e.~ppropriate sales anddistrH).U,~iq~iaOC::LJments.
3.5.4 Sales Pricing
Using sales pricing for sales and distribution projects, you can derive and save prices for their services or material produced for the project from the planned data of these projects. Typically, the data of sales pricing is used particularly for the creation of quotations and the revenue planning of sales and distribution projects for which sales prices cannot be determined based on standard prices. If you can use existing standard prices and fixed conditions for sales and distribution projects, sales pricing is usually not required. In this case, the quotation is not created via sales pricing, but directly in Sales and Distribution.
SAP Project System provides two options for creating sales pricings: You can use transaction DP81 to create sales pricings for projects that were created due to a customer inquiry and are linked to this inquiry. Or, you can use the Project Builder or transaction DP82 to create sales pricings for projects that don't reference a customer inquiry. These two options will be explained in the following.
46 Before the SAP Rl3 Release 4.6, the planned values from sales and distribution documents and billing plans for WBS elements were reported additively in the revenue planning of the billing elements.
215
[!l
I
3 I Planning Functions
Sales pricing for project-assigped
customer inquiries
During a pres ales phase, special documents can be created in Sales and Distribution in which customer inquiries about the price or availability of services or material can be saved. These documents are referred to as customer inquiries and are essentially requests for submitting a quotation to the customer. If you created a project for the creation of quotations in SAP Project System, you can assign sales document items to WBS elements of this project and thus establish a link between the sales document items and the project.47 If you now create a sales pricing for the project or a sales document item" via transaction DP81, the system can use both the sales and distribution data in the sales document and the planned data of the project.
During sales pricing, a two-step aggregation of the planned data of the project takes place (planned costs, statistic indicators, planned material and activities, etc.). Which planned data is considered during sales pricing, and how and according to which criteria the data is aggregated, is controlled via a so-called DIP profile (dynamic item processor profile) that must be stored in the detailed data of the sales document items.
Sales price basis The result of the first aggregation step is presented in the sales price basis view. Figure 3.64 shows an example for such a sales price basis view. In this example, the planned costs of a project were aggregated according to their cost elements. In addition to the aggregation itself, the DIP profile controls how the aggregated values (dynamic items) are presented in the upper area of this view. The lower area of the sales price basis view has more details about the aggregated items. In particular, the lower area allows for a manual change to items by an amount, quantity, or percentage. If you change items, the amount transferred to the sales pricing deviates from the original amount.
47 A sales document item can be assigned to an account assignment or billing element of a project. If the account assignment is not performed for a billing element, the system automatically determines the next billing element that is superior in the hierarchy during the sales pricing process. The sales pricing then considers the data of this billing element and its billing structure. A billing structure refers to all inferior WBS elements and activities assigned to them that are not billing elements themselves or that are aSSigned to a different billing element.
216
Revenue Planning I 3.5
Figure 3.64 Example of the Sales Price Basis View of a Sales Pricing
During the second aggregation step, the aggregated and possibly Sales price view
manually changed items of the sales price basis are automatically linked to material numbers. Depending on the DIP profile settings, these can be, for example. material numbers from material compo-nents of the project. or fixed material numbers stored in the DIP pro-file for project activities or for the material to be produced using the project. The material numbers are sorted and grouped into sales doc-ument items. Using the pricing function of Sales and Distribution, the system can now determine a sales price for the individual items using the material numbers and the sales and distribution data of the inquiry (customer number. sales organization, etc.). The sales docu-ment items and the corresponding sales prices are shown in the sales price view. The sales price view corresponds to a customer view of the sales pricing.
Figure 3.65 shows an example of a sales price view. The upper area shows the hierarchy of all sales document items. The lower area lists details about the sales prices of the items, that is, the conditions determined by the system during pricing. If you want, you can adjust
217
3 I Planning Functions
the sales price of an item by adding more conditions. In a sales pric-) ing. you can toggle between the sales price view and the sales price
basis view at any time to implement changes.
Billing plan and quotation creation
Figure 3.65 Example of the Sales Price View of a Sales Pricing
The sales pricing data can be used for different purposes. You can save the data to a document and add a descriptive document text. Thus. you can create and compare several different sales pricings for a project. You can create a billing plan. This billing plan is automatically assigned to the billing element of the billing structure used in the sales pricing. As a target value of this billing plan, the system suggests the total value of sales prices. You can create a customer quotation. The system then automatically uses the link to the inquiry, the account assignment to the project, and particularly the items and sales prices determined using the sales pricing. The quotation can be further processed in Sales and Distribution, and can later serve as a basis for creating a customer quotation.
218
~\ .;: >,
Revenue Planning I 3.5
From the Enterprise Release, you can also perform sales pricings for projects w)thout an inquiry, if necessary. The sales and distribution data required for a sales pricing must then be stored in the project definition. The sales organization, the distribution channel, the division, and the DIP profile can be entered as default values in the project profile or manually in the control parameters of the project definition, if necessary. For specifYing the customer, an appropriate partner determination procedure must be entered on the project definition level that enables you to enter a customer number on the Partner tab of the project definition (see Section 2.2.1). Sales pricings for projects that do not reference any inquiries can be created using the Project Builder or directly via transaction DP82.
During the quotation phase of sales and distribution projects, you can use simulation versions (see Section 2.9.2) to create several structures for a project, to plan different dates, capacity requirements and costs for the later implementation, and to compare these plannings. In particular, you can also use the data of the simulation versions for sales pricings and the creation of quotations. A prerequisite for this is that the project definition and the billing element already exist as operative objects.
Sales pricings are basically controlled by the DIP profile of the sales document items or the project definition. You create DIP profiles in the Customizing of SAP Project System using transaction ODP1. In addition to using DIP profiles for creating sales calculations, they can be used for a resource-related billing (see Section 5.6.2) or a results analysis (see Section 6.6). Therefore, the settings of the DIP profile are specified with a reference {{) one of these usages (see Figure 3.66).
If you use it for controlling the sales pricing, first store the document type using those quotations that can be created from the sales pricing. Then, decide which characteristics are relevant for determining the dynamic items and the material numbers. Also, specify how the first aggregation step is to be performed and presented in the sales price view using these characteristics. Possible characteristics are cost element, object number, cost center, activity type, etc. If you want, however, you can use a customer enhancement to consider additional characteristics as well.
219
Sales pricing for projects without, customer inquiry
Sales pricing for simulation versions
Definition of DIP profiles
I
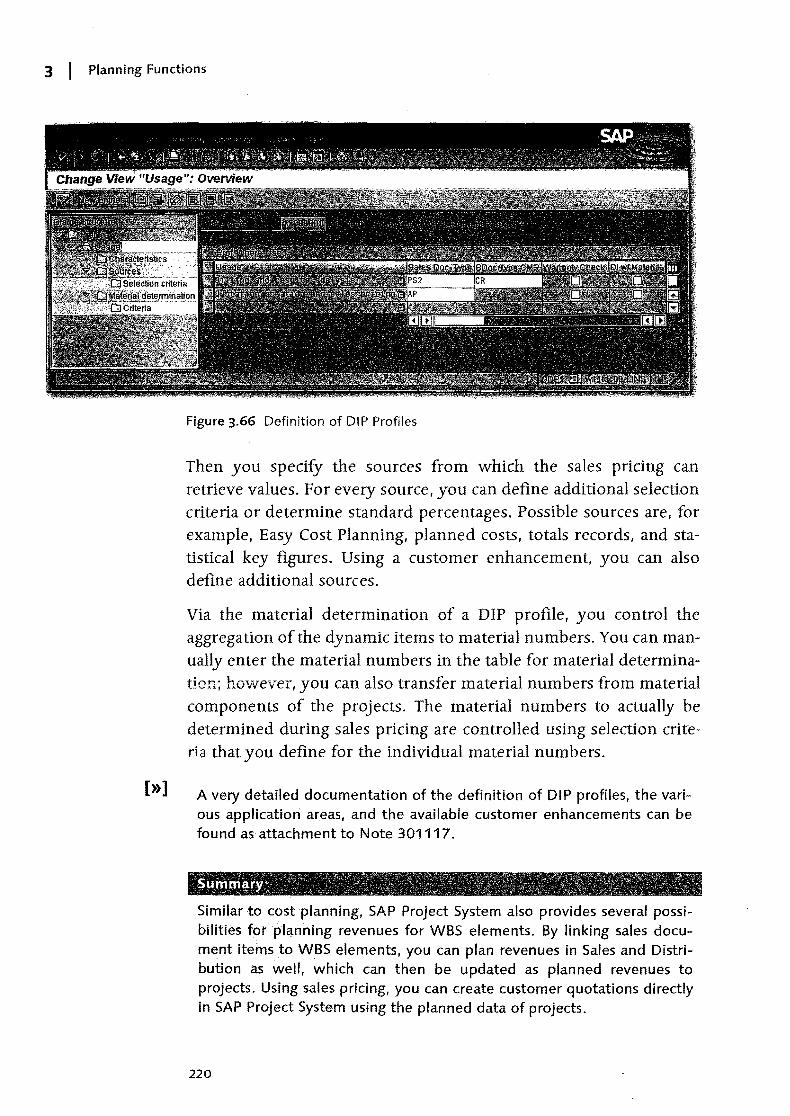
3 I Planning Functions
[»]
Figure 3.66 Definition of DIP Profiles
Then you specity the sources from which the sales pncmg can retrieve values. For every source, you can define additional selection criteria or determine standard percentages. Possible sources are, for example, Easy Cost Planning, planned costs, totals records, and statistical key figures. Using a customer enhancement, you can also define additional sources.
Via the material determination of a DIP profile, you control the aggregation of the dynamic items to material numbers. You can manually enter the material numbers in the table for material determination; however, you can also transfer material numbers from material components of the projects. The material numbers to actually be determined during sales pricing are controlled using selection criteria that you define for the individual material numbers.
A very detailed documentation of the definition of DIP profiles, the various application areas, and the available customer enhancements can be found as attachment to Note 301117.
Similar to cost planning, SAP Project System also provides several possibilith~s fotplanning revenues for WBS elements. By linking sales document items to WBS elements, you can plan revenues in Sales and Distribution as well, which can then be updated as planned revenues to projects. Using sales pricing, you can create customer quotations directly in SAP Project System using the planned data of projects.
220
3.6 Summary )
This chapter dealt with the different project planning functions of SAP Project System. For WBS elements, there are functions for date planning, cost planning, and revenue planning. Networks provide functions for scheduling, resource and material planning as well as for network costing. If you use both WBS elements and networks for structuring projects, planned data can be exchanged between the WBS elements and the assigned networks or network activities.
221
Summary I 3.6
I

)
j
j
j
j
j
j
j
j
j
j
j
j
j
j
j
j
j
j
j
j
j
j
j
j
j
j
j
j
j
j
j
Within the approval phase, funds for the execution of projects are J11.ade available through budgeting. The budget management functionality of SAP Project System enables you to monitor assigned funds and to prevent the exceeding of budgets.
4 Budget
Companies often use the term budget very differently. It therefore makes sense to first explain what we mean by "budget" in the context in which it is used in SAP Project System, and to differentiate it from the terms planned costs and actual costs.
In the planning phase of a project, you can estimate or calculate the costs for the subsequent execution of the project and save these costs as planned costs for the different project objects. Depending on which form of cost planning you use for this purpose, the planned costs in this case are stored as total values, with reference to fiscal years or individual periods, by cost element. or without any reference to a cost element. If required, you can also enter several different planned costs for the same object and store them in different CO versions.
You can compare the planned costs against the actual costs in the execution phase of the project. The actual costs correspond to the funds that are actually reqUired to execute individual parts of the project, based on services used by the cost centers of your own company or by suppliers. materials consumed, overhead costs allocated, and so on. Actual costs are updated into SAP Project System by the account assignment of corresponding documents on project objects. and always refer to cost elements.
You document an approved cost structure for executing the different parts of the project by distributing the budget to work breakdown structure (WBS) elements of a project. A project is typically budgeted in its approval phase, that is, before the project execution is even started. In SAP Project System. budget does not refer to individual
223
Planned costs, actual costs, budget
I
Budget
cost elements and therefore represents the approved framework for ) all costs, including both the primary and secondary costs, of the
project (an exception in this case is exempt cost elements (see Section 4.6.2». Although you can still change the budget values of a project retrospectively, unlike using CO versions for planning costs, there is only one relevant budget value for an object at any time.
In Reporting, you can evaluate the budget values and planned and actual costs together. After you budget a project, you .generally use the availability control function to calculate aSSigned funds automatically against the budget of a WBS element and to prevent budget overruns (see Section 4.6.2). In this sense, budget is not only- an approved cost structure, but also represents a binding budget for a project.
You can perform budgeting and budget monitoring using functions from SAP Project System only, however, you can also use an integration of SAP Project System with Investment Management of your company to manage budgets across projects. These two options are discussed in Sections 4.1 and 4.2.
[»] Note that only WBS elements can have a budget in SAP Project System. Networks cannot be budgeted. However, the costs of networks or network activities, to which WBS elements are assigned, are included in the assigned funds against the budget of the WBS elements and are taken into account for the availability control.
4.1 Budgeting Functions in SAP Project System
Budget profile Depending on your requirements, you can use different functions in SAP Project System to manage your project budgets. In this case, the management of budgets for individual projects is controlled by the budget profile in the project definition of the projects. Figure 4.1 shows an example of defining a budget profile. You can define budget profiles in Customizing of SAP Project System using transaction OPS9 and already store them as default values in project profiles. The individual settings options for a project profile, along with the different functions of budget management, are explained in the following sections .
. 224
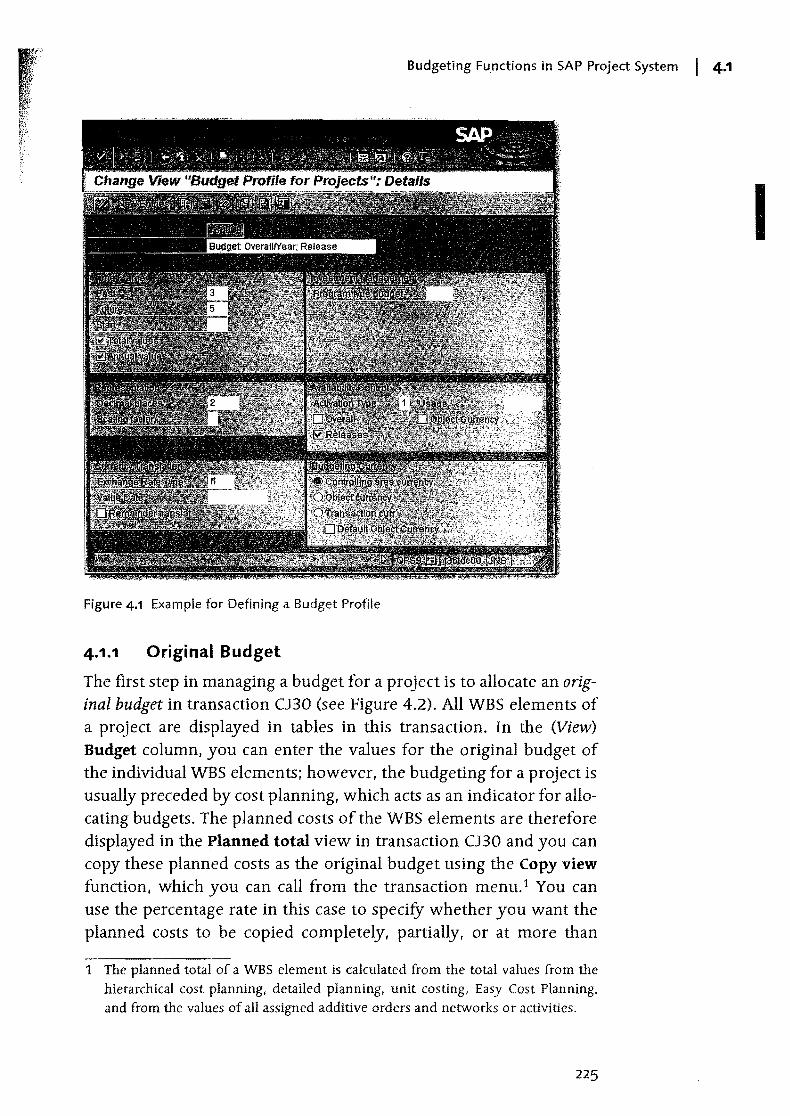
Budgeting Functions in SAP Project System I 4.1
Figure 4.1 Example for Defining a Budget Profile
4.1.1 Original Budget
The first step in managing a budget for a project is to allocate an original budget in transaction CJ30 (see Figure 4.2). All WBS elements of a project are displayed in tables in this transaction. In the (View)
Budget column, you can enter the values for the original budget of the individual WBS elements; however, the budgeting for a project is usually preceded by cost planning, which acts as an indicator for allocating budgets. The planned costs of the WBS elements are therefore displayed in the Planned total view in transaction CJ30 and you can copy these planned costs as the original budget using the Copy view function, which you can call from the transaction menu. 1 You can use the percentage rate in this case to specifY whether you want the planned costs to be copied completely, partially, or at more than
1 The planned total of a WBS element is calculated from the total values from the hierarchical cost planning, detailed planning, unit costing, Easy Cost Planning. and from the values of all aSSigned additive orders and networks or activities.
225
I
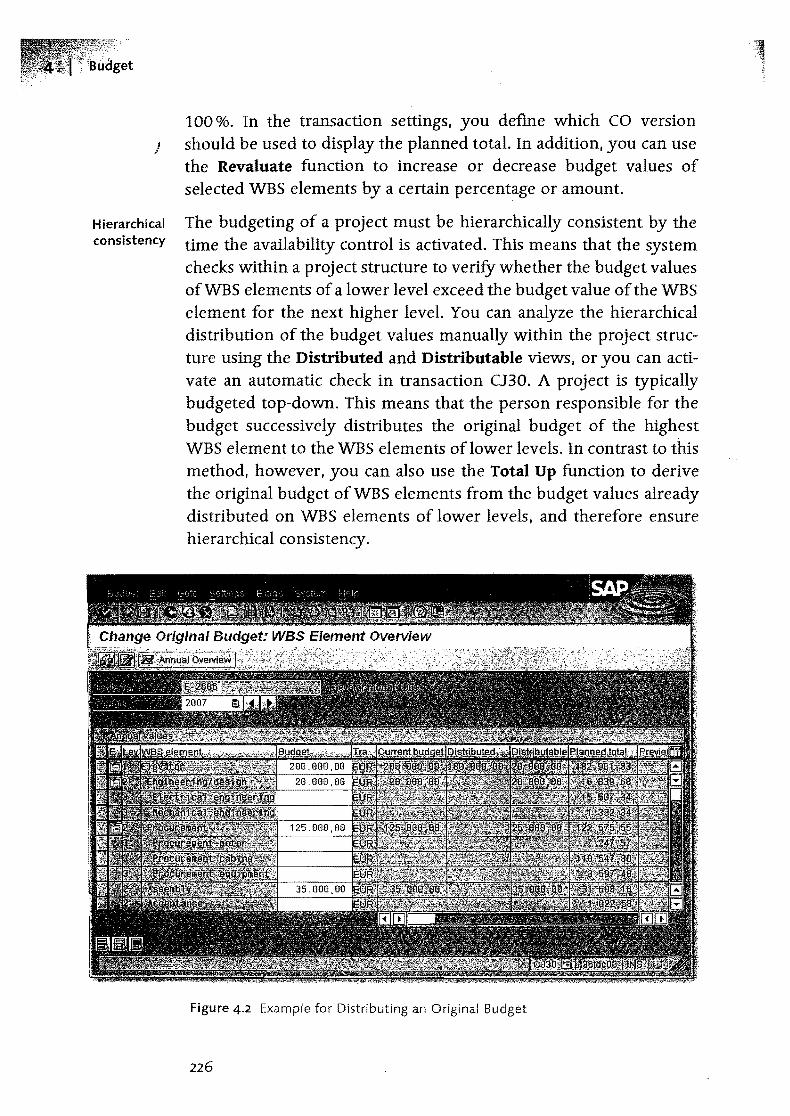
100 %. In the transaction settings, you define which CO version ) should be used to display the planned totaL In addition, you can use
the Revaluate function to increase or decrease budget values of selected WBS elements by a certain percentage or amount.
Hierarchical The budgeting of a project must be hierarchically consistent by the consistency time the availability control is activated. This means that the system
checks within a project structure to verity whether the budget values ofWBS elements of a lower level exceed the budget value of the WBS element for the next higher level. You can analyze the hierarchical distribution of the budget values manually within the project structure using the Distributed and Distributable views, or you can activate an automatic check in transaction CJ30. A project is typically budgeted top-down. This means that the person responsible for the budget successively distributes the original budget of the highest WBS element to the WBS elements of lower levels. In contrast to this method, however, you can also use the Total Up function to derive the original budget of WBS elements from the budget values already distributed on WBS elements of lower levels, and therefore ensure hierarchical consistency.
Figure 4.2 Example for Distributing an Original Budget
226
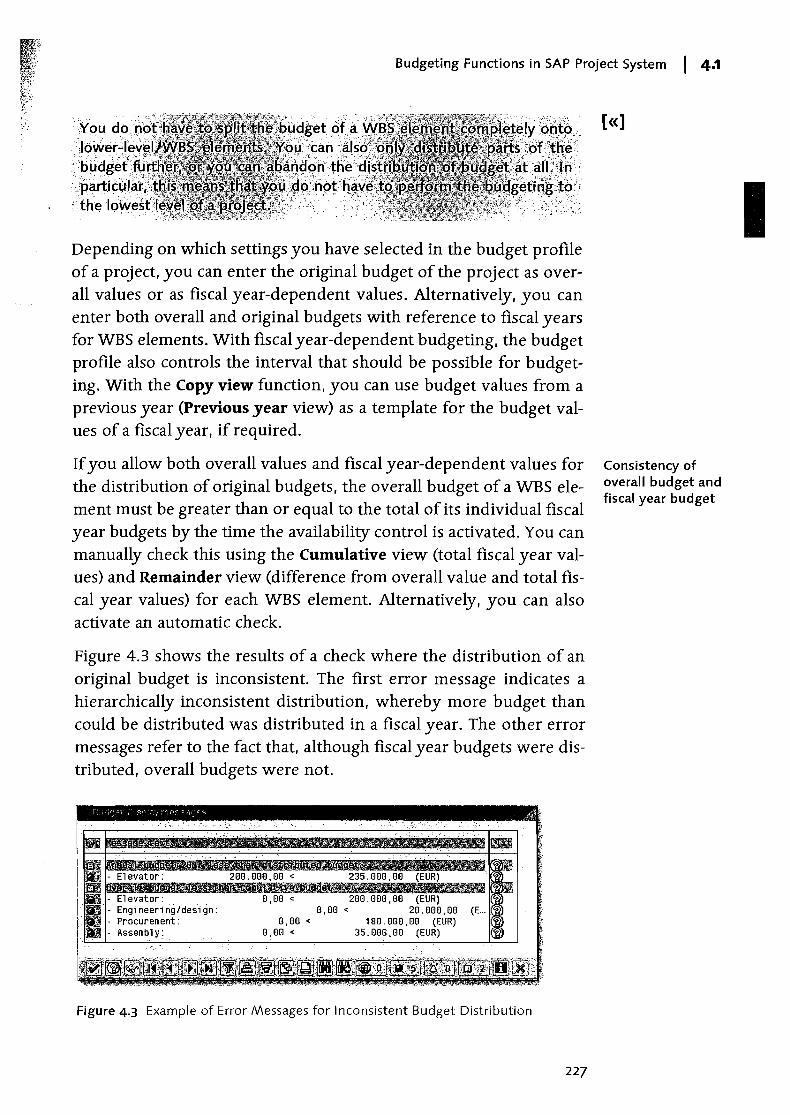
Budgeting Functions in SAP Project System I 4.1
Depending on which settings you have selected in the budget profile of a project, you can enter the original budget of the project as overall values or as fiscal year-dependent values. Alternatively, you can enter both overall and original budgets with reference to fiscal years for WBS elements. With fiscal year-dependent budgeting, the budget profile also controls the interval that should be possible for budgeting. With the Copy view function, you can use budget values from a previous year (Previous year view) as a template for the budget values of a fiscal year, if required.
If you allow both overall values and fiscal year-dependent values for the distribution of original budgets, the overall budget of a WBS element must be greater than or equal to the total of its individual fiscal year budgets by the time the availability control is activated. You can manually check this using the Cumulative view (total fiscal year values) and Remainder view (difference from overall value and total fiscal year values) for each WBS element. Alternatively, you can also activate an automatic check.
Figure 4.3 shows the results of a check where the distribution of an original budget is inconsistent. The first error message indicates a hierarchically inconsistent distribution, whereby more budget than could be distributed was distributed in a fiscal year. The other error messages refer to the fact that, although fiscal year budgets were distributed, overall budgets were not.
Figure 4.3 Example of Error Messages for Inconsistent Budget Distribution
227
[«]
Consistency of overall budget and fiscal year budget
I
4· I Budget·
Budgeting Using the budget profile, you also control the currencies in which the cUrrencij WBS elements can be budgeted. You can allow the uniform control
ling area currency and the object currency of the individual WBS elements in the project, or a transaction currency of your own choice for budgeting. However, the budget values entered are always converted into object and controlling area currencies of the WBS elements. The annual values in this case are converted using the rate type that was defined in the fiscal year-dependent values of CO version O. The total values are converted based on the budget profile settings.
Depending on the budget profile settings as of the Enterprise Release, you can perform the hierarchical consistency check and the cumulative annual values check against the overall budget of a WBS element either in the controlling area currency, or in the object currency of the WBS elements. But, you should note that consistency checks in the object currency can only be run for projects where the object currency within the project structure is uniform.
Budget line items When you save the distribution of the original budget, the system creates a unique document (budget line item) with additional information about the document date and the name of the person who created the document. Before you save the distribution, you can enter more detailed document texts for the entire budget distribution in particular or for individual WBS elements, which you can then evaluate any time later in Reporting or in transaction C130 along with the other data for the budget line items.
BUDG status Provided you don't use the special Save without checking function for saving the budget values, the system also automatically performs the checks for hierarchical consistency and for consistency of the overall value and cumulative values when you save, and thereby prevents inconsistent budget values from being saved. After you save the distribution of the original budget, all budgeted WBS elements are automatically assigned the status BUDG (Budgeted). This status prevents the budgeted WBS elements from being deleted directly and from hierarchical changes to these WBS elements and all lowerlevel objects.
228
Budgeting Functions in SAP Project System I 4.1
4.1.2 Budget Updates
In the cour~e of a project, you may need to change the project budget of individual WBS elements. You can, in turn, use transaction CJ30
for this purpose and adJust the original budget accordingly. When you save the budget, a new budget line item that allows the subsequent change to be analyzed is then created. However, instead of changing the original budget, it generally makes more sense to use budget updates. In this context, a distinction is made between budget supplements, budget . returns, and budget tranifers. Based on the budget updates and the original budget ofWBS elements, the system then calculates a current budget for each WBS element.
When you work with budget updates instead of changing the origirial budget, the initial original budget remains unchanged. You can therefore compare the original budget with the current budget at any time in Reporting. In suitable budget reports, you can analyze how the current budget was achieved based on supplements, returns, or transfers. Since the line item documents of budget updates always contain information on the senders and recipients of budget values, you can also retrospectively trace the flow of budget values. To prevent changes to the original budget values, thereby forcing the use of budget updates, you can define a user status that does not allow the budgeting business transaction, but does allow business transactions for updating a budget (see Section 2.6).
The two transactions CJ36 (To project) and CJ37 (In project) are available in SAP Project System to enter budget supplements. You can enter the amounts for WBS elements, by which the current budget of these WBS elements is to be increased, in both transactions. You can post supplements for individual fiscal years or overall values. When you save the supplements, the system performs corresponding consistency checks, exactly as it does when you distribute an original budget. You can also enter document texts that are then saved in a budget line item with the other data of the budget supplement.
The difference between transactions CJ36 and CJ37 is that, with a Supplement in project (transaction CJ37, see Figure 4.4), the increase in the current budget of a WBS element results in the distributable budget of the higher-level WBS element being reduced accordingly. If there is no more distributable budget available on the
229
Advantages of budget updates
Budget supplements
Supplement in project
I
4 I Budget
higher-level WBS element, you cannot post a supplement on the ) directly lower-level WBS element within the project due to the hier
archical consistency check. With supplements in a project, you can only supplement as much budget as is still available for distribution at the higher level.
Figure 4.4 Example of a Supplement within the Project
Supplement to project
In contrast, with a Supplement to project (CJ36), the increase in the current budget of a WBS element automatically results in the current budget of the hierarchically higher-level WBS element being increased by the same amount. This occurs regardless of whether a distributable budget existed on this WBS element. The distributable budget of the higher-level WBS elements therefore remains constant. A supplement to project therefore results in an additional budget being made available for a project "externally."
Budget returns Like budget supplements, you can also enter budget returns using transactions CJ35 (From project) and CJ38 (In project). You use budget returns to reduce the current budget of WBS elements by a certain amount; however, a budget return must not' impair the consistency of the budget values. When you post a Return in project for a WBS element, this automatically increases the distributable budget of the higher-level WBS element. When you enter a Return from project for a WBS element, the current budgets of the higher-level
230
Budgeting Functions in SAP Project System I 4.1
WBS elements are also automatically reduced, that is, they're extracted froJ11 the entire project budget.
You can use budget transfers for different purposes. For example, Budgettransfers I you can use a transfer to move a budget from ,one WBS element to another WBS element (see Figure 4.5). The WBS elements here can even belong to different projects. If the WBS elements belong to a project, they must nevertheless not be within the same hierarchy branch. The system also automatically makes transfers between WBS elements of lower hierarchy levels to the WBS element of higher hierarchy levels.
Figure 4.5 Example of a Budget Transfer
You can perform transfers for overall values or individual fiscal years. You can also transfer a budget of a WBS element for a fiscal year to another WBS element and another fiscal year, if required. Lastly, you can also transfer budget values of a fiscal year to another fiscal year for a WBS element (advance or carry forward). For each transfer, you can enter a document text that is saved in a budget line item with the relevant data of the transfer.
4.1.3 Budget Release
In some cases, it is useful to separate the distribution of budget values from the actual release of budgets for executing projects or individual parts of a project. This is also frequently necessary if bu~geting with reference to fiscal years is not detailed enough and budgets are to be made available successively within a fiscal year. However,
231
4 I Budget
bear in mind that you need to carty out an additional step to release } budgets when managing project budgets.
In SAP Project System, you can use transaction (132 to enter released budget values for WBS elements of a project. Similar to the distribution of original budgets, you can release overall or fiscal year values, depending on the settings of the budget profile. You can enter amounts manually in the Release column or use the Copy view function to copy values from other views such as the values of the Current budget or Planned total views, for example (see Figure 4.6). In this case, you can select at what percent you want the values to be copied and whether the values are to be added to existing releases, or whether they should overwrite existing values.
Figure 4.6 Example of the Budget Release Using the "Copy view" Function
Consistency checks You can also activate a check manually or automatically for releases when you save them. The check ensures that the releases ofWBS elements don't overrun the releases of the higher-level WBS elements (hierarchical consistency). Each WBS element is also checked to ensure that the released budget does not exceed the current budget. If you're working with both overall values and fiscal year values, the release of the overall values must ultimately be greater than or equal to the total of the annual releases. Each budget release is documented by a budget line item, to which you can enter a descriptive document text before you save the release.
232
Budgeting Functions in SAP Project System I 4.1
As of Release ECC 6.0, you can also enter releases simultaneously for several proJects in transaction IMCBR3. You' can copy the budget or planned (values in full or with a release percentage weighted as a
, released budget. If reqUired, you can perform this mass release for the total values and all fiscal year values Simultaneously or restrict the mass release to an individual fiscal year.
<:'Clriginal . . !~cidition to .
;f~:i=~~-:;:.
4.1.4 Budget Carryforward
In transaction C1CO, you can transfer a budget that was not consumed for a project within one fiscal year into the follOwing fiscal year. The system uses the difference of the fiscal year budget and the distributed values and actual costs to calculate the budget amount that is carried forward from one fiscal year into the next fiscal year for each WBS element. These actual costs include the costs of the WBS element with budget carried forward and the actual costs of all assigned orders and networks, as well as the actual costs of lowerlevel WBS elements without a separate budget. Note that the planned costs of apportioned orders and networks are not deducted from the fiscal year budget when the carryforward is calculated. Budgets are typically carried forward as part of a company's year-end closing. Since commitments are ignored when the budget values to be carried forward are calculated, you should have used a commitment carryforward in transaction C1CF before you carry forward budgets.
You can also carry forward budget for a project several times. If, in the old fiscal year, actual costs were posted on the project at a later stage, a new budget carryforward results in the budget, which was already carried forward into the next year, being posted back to the previous year. However, in this case, only the maximum amount of budget that was preViously carried forward in total into the next year can be posted back to the previous year. If necessary, you can also carry budget forward in the form of a test run and use detailed lists to first analyze the planned carryforwards before you start an actual update run.
233
Mass release of budgets
[«)
I
4 I Budget
Additional budgeting tools
)
other tools available for managing project budgets in SAP Project System as of the Enterprise release include:
... Plan/Budget Consistency Check for Projects (transaction code IMCOC3)
... Transfer plan to Project Budget (transaction code IMCCP3)
... Adjust Plan/Budget to Agree with Assigned Values for Projects (IMPBA3)2
... Currency Recalculation of Plan/Budget for Projects (transaction code IMCRC3)
For more information about the functions of these transactions and each consistency check executed, see the program documentation, which you can call from the transactions.
4.1.5 Availability Control
A main task of managing budgets for projects is to contrast the budget with the individual project parts, that is, their approved cost structures, the planned, commitment, and actual costs based on purchase orders as well as activity inputs or material withdrawals, for example. For this purpose, different standard reports are available in the reporting area of SAP Project System.
However, availability control also enables the system to determine relevant funds automatically in the background and to compare these assigned funds with the corresponding budget values. By doing so, the availability control can warn you of imminent budget overruns before they occur, or even notifY you of the allotment of excess funds on WBS elements at the time they are created.
Availability control As soon as the availability control for a project is active, the system process performs different steps for postings on a WBS element of the
project, or for postings on assigned apportioned orders or networks or network activities.
2 Note that this function ignores statuses that don't allow planning or budgeting to be changed. The transaction for adjusting plans/budgets to assigned values for projects is therefore not available in the SAP menu; you can only start it by calling transaction code IMPBA3 direcdy.
234
Budgeting Functions in SAP Project System I 4.1
The system first determines the relevant WBS elements of the project carrying bw:)get. If a posting is made on a WBS element that does not· have its oWn budget, the system searches successively for a WBS element carrying budget at the higher level.
The system then determines the associated funds for the WBS ele- Assigned values
ments carrying budget. The assigned value of a WBS element carry-ing budget consists of the following:
~ Actual costs or static actual costs on the WBS element carrying budget
~ Actual costs and static actual costs of lower-level WBS elements without their own budget
~ Commitments on the WBS element carrying budget and on lowerlevel WBS elements without their own budget
~ The maximum from the planned and actual costs as well as the commitments of assigned apportioned networks and orders
The individual contributions to the assigned values of a WBS element carrying budget warrants still further explanation. Actual costs based on goods withdrawals and documents from Financial Accounting or Controlling, for example, belong to the actual costs that are included in the calculation of assigned funds. In particular, debits due to settlements are also included in the calculation of the assigned value. Credits caused by settlements are only considered if the settlement took place on a budget-controlled object. Commitments are created due to purchase requisitions, purchase orders, or funds reservations.
Values of assigned orders or networks are either already included in the calculation of assigned values with the Created status, or included once the orders have been released. You can use the Assign Funds in plan indicator in the Define Order Value Updating for Orders for Projects table (transaction OPSV) in Customizing of SAP Project System to determine which of the two statuses you want the values to be included in the assigned funds calculation. In this case, you can implement their setting based on the order category, order type, and controlling area of the orders.3
3 The planned values of material components for valuated individual requirements stock are not included in the total of assigned values.
235
Apportioned orders
I
4 I Budget
[»] )
Exempt cost elements
Availability control actions
'~tl,~~nofplanning netW:"" oeain the calCulat
':. ,,~, ::., <~c>"" ,',
,;va,:,s:~i~:~itvr'~e 4,r,already thepfa' h~sagainst thebl,f
. ':",' ".~; :,> ~" .
If you want to exclude certain costs (e.g., overhead costs) as assigned values, you can enter the corresponding cost elements as exempt cost elements based on the controlling area in transaction OPTK in Customizing of SAP Project System. These exempt cost elements are therefore not checked as assigned funds against the budget of WBS elements. Revenues are generally ignored when assigned values are determined.
After the system has determined the relevant WBS elements carrying budget and calculated the corresponding assigned values due to a posting on a project, a check takes place in the last step of the availability control. This check compares the available budget of WBS elements carrying budget with their aSSigned funds. If the availability control determines that certain tolerance limits you defined are exceeded by assigned values, the system does one of the following three actions:
~ Warning When the user who made the posting on the project saves the data, he or she receives a warning message that refers to the exceeded tolerance limit. The user can now either save the corresponding document, or postpone the document for the time being, if necessary, to consult with the project manager first.
~ Warning and mail to project manager The user who makes the posting receives a warning message and decides whether or not to save the posting document. When the document is saved, the system generates an email to the person responsible for the WBS element carrying budget, for which the limit was exceeded, and to the person responsible specified in the project definition. The email contains information about the WBS element in question, the level by which the tolerance limit has been exceeded, the business transaction that triggered the action, and its document number.
Budgeting Functions in SAP Project System I 4.1
... Error message With thj5 action, documents that would lead to the specified tolerance limits being exceeded are not saved. The user receives a corresponding error message. 4
You define the tolerance limits and the relevant action that the system should take when the tolerance limits are exceeded in the Define Tolerance Limits Customizing transaction based on the budget profile and the business transaction groups (see Figure 4.7). Business transaction groups in this case represent the groupings of business transactions. The business transaction group for Financial accounting document therefore covers postings in Financial Accounting; the business transaction group for Budgeting covers subsequent budget changes, and so on. The business transaction group for Orders for project covers planning cost changes of assigned, apportioned orders and also the assignment of orders with assigned values. Postings on assigned orders (e.g., the account assignment of a purchase order), however, are checked in the business transaction group (Purchase order) provided for the posting.
Figure 4.7 Defining the Tolerance Limits of Availability Control Based on Business Transaction Groups
The business transaction group for All Business Transaction Groups is used to define actions for a tolerance limit for all those business transaction groups, for which you do not explicitly want to imple-
4 First consider which effects the use of the error message action could have internally (e.g., when you enter invoices in Financial Accounting). Generally, the error message action is only used for selected business processes.
237
Business transaction groups
I
4 I Budget
)
[I]
Example for defining tolerance limits
Settings for availability control in budget profile
Currency of availability control
ment other settings. However, if you implement settings for a business transaction group of a tolerance group, these have priority over the settings of the business transaction group for All Business Transaction Groups. 5
On ..
The tolerance limit settings for projects with the budget profile 130001 illustrated in the example in Figure 4.7 result in a warning message (Action 1) being issued each time a purchase requiSition is posted (business transaction group 00), which leads to more than 90 % of the available budget being consumed. If purchase requisitions cause the available budget to be exceeded, the system reacts by issuing an error message and therefore prevents the purchase reqUisitions from being posted (Action 3). All other business transactions only result in a warning message being issued and an email being sent to the corresponding person responsible in the project (Action 2) if the budget is exceeded.
For the availability control. you specify in the budget profile of a project which budget is to be used as the basis for the check, in which currency you want the availability control to be implemented, and when the availability control should actually be activated. Depending on the budget profile settings, you can perform the availability control check against the current, still distributable total or annual budget or, of course (if you are working with budget releases) against the released, overall, or annual budget that can still be distributed.
Exactly like the conSistency checks for budgeting, you can also carty out the availability control either in the controlling area currency of the project or in the object currency of the WBS elements. However, the latter only works if the object currency within the project is uniform; in other words, it is the same for all WBS elements of a project. Using the object currency for the availability control is particularly
5 Although the business transaction of the goods receipt generates assigned values, you should note that it is ignored during the availability control check. Therefore use the purchase order business transaction group for the check and, if necessary, don't allow account assignments to be changed for the goods receipt posting.
Budgeting Functions in SAP Project System I 4.1
relevant if you have also carried out the budgeting in the object currency. The postings on the project will mainly be entered later in the object durencies, or in foreign currencies, and you will have to anticipate widely fluctuating exchange rates between the object and foreign and controlling area currencies.6
You can use two options to activate the availability control for a project. If you select setting 1 (Automatic activation during budget allocation) in the Activation Type field of the budget profile (see also Figure 4.1), the availability control for a project is automatically activated when you enter a relevant budget. If you want the availability control to check funds against the current budget, the activation already takes place when the original budget is distributed. If you want the check to reference the released budget, the availability control is only activated automatically once you have released the budget.?
If you select activation type 2 (Background activation) in the budget profile, you can either manually activate the availability control in the background, or this can be done automatically by the system. You can manually activate the availability control of a project in transaction CJBV. To activate the availability control automatically, define ajob in transaction CJBV for all relevant projects, which regularly checks in the background whether the funds of the projects exceed the usage level specified in the budget profile. If this is the case, the availability control is activated automatically for the corresponding projects.
If you don't want to use the availability control function for managing budgets for projects, you can select activation type 0 (Cannot be activated) in the budget profile. Selecting this setting means that you cannot activate an availability control 'manually or automatically. However, you may also need to deactivate an availability control again that is already active. To do this, you can use transaction CJBW in the menu of SAP Project System. If you only want to exclude indi-
6 For more recommendations on which currency you should use for budgeting and for the availability control for different project scenarios, refer to the SAP Library.
7 Suppose you want to use activation type 1, but also plan on activating the availability control, even though you don't yet want to distribute or release any budget. In this case; perform budgeting or release a budget (the availability control is activated) and then immediately return the budget again (the availability control remains active).
239
Activating the availability control
Deactivating the availability control
I
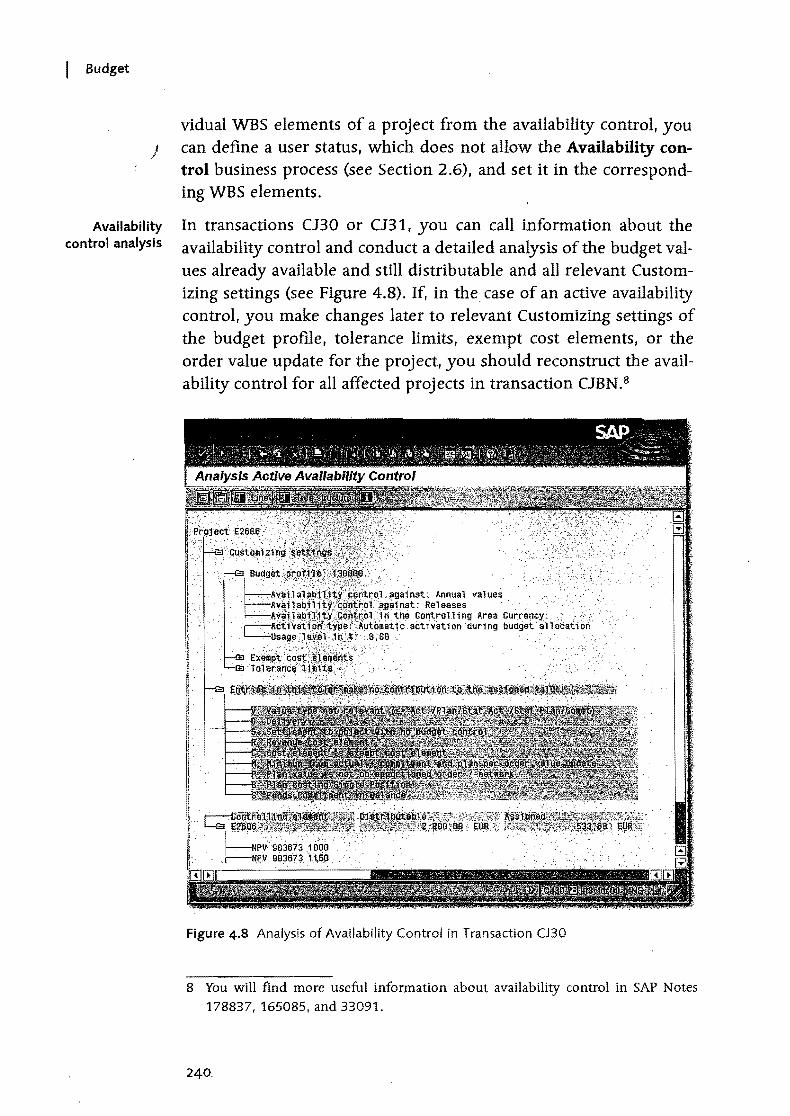
Budget
)
Availability control analysis
vidual WBS elements of a project from the availability control, you can define a user status, which does not allow the Availability control business process (see Section 2.6), and set it in the corresponding WBS elements.
In transactions C130 or C131, you can call information about the availability control and conduct a detailed analysis of the budget values already available and still distributable and all relevant Customizing settings (see Figure 4.8). If, in the case of an active availability control, you make changes later to relevant Customizing settings of the budget profile, tolerance limits, exempt cost elements, or the order value update for the project, you should reconstruct the availability control for all affected projects in transaction C1BN.8
Figure 4.8 Analysis of Availability Control in Transaction CJ30
8 You will find more useful information about availability control in SAP Notes 178837,165085, and 33091.
240.
Integration with Investment Management I 4.2
4.2 Integration with Investment Management
If several projects split budgets, or if you want other plans that are not mapped using projects to be taken into account when budgets are allocated, an isolated consideration of individual project budgets is not sufficient. However, you cannot manage a budget across projects simply by using the aforementioned SAP Project System tools. Nevertheless, by using the integration of SAP Project System with Investment Management in the SAP system. not only can you plan, distribute, and monitor budgets of projects, you can also do this Simultaneously for the budget values for internal or maintenance orders at a higher level.
Investment programs in Investment Management form the basis for Investment
the comprehensive planning and budgeting of costs for a company's programs
plans or investments. When you create investment programs, you make an assignment to a program type in each case, through which the system automatically derives default values and control parame-ters. Investment programs consist of an investment program defini-tion with general specifications and default values for the entire pro-gram and hierarchically arranged investment program pOSitions. You can structure investment programs based on any criteria, such as geographical factors, the size of the plan, or the organizational setup of your company, for example. After you create the structure of an investment program, you can use this structure to plan costs hierar-chically and to allocate budgets. Figure 4.9 shows an example of the structure of an investment program and budget values that were dis-tributed at different levels for the programs involved.
241
I
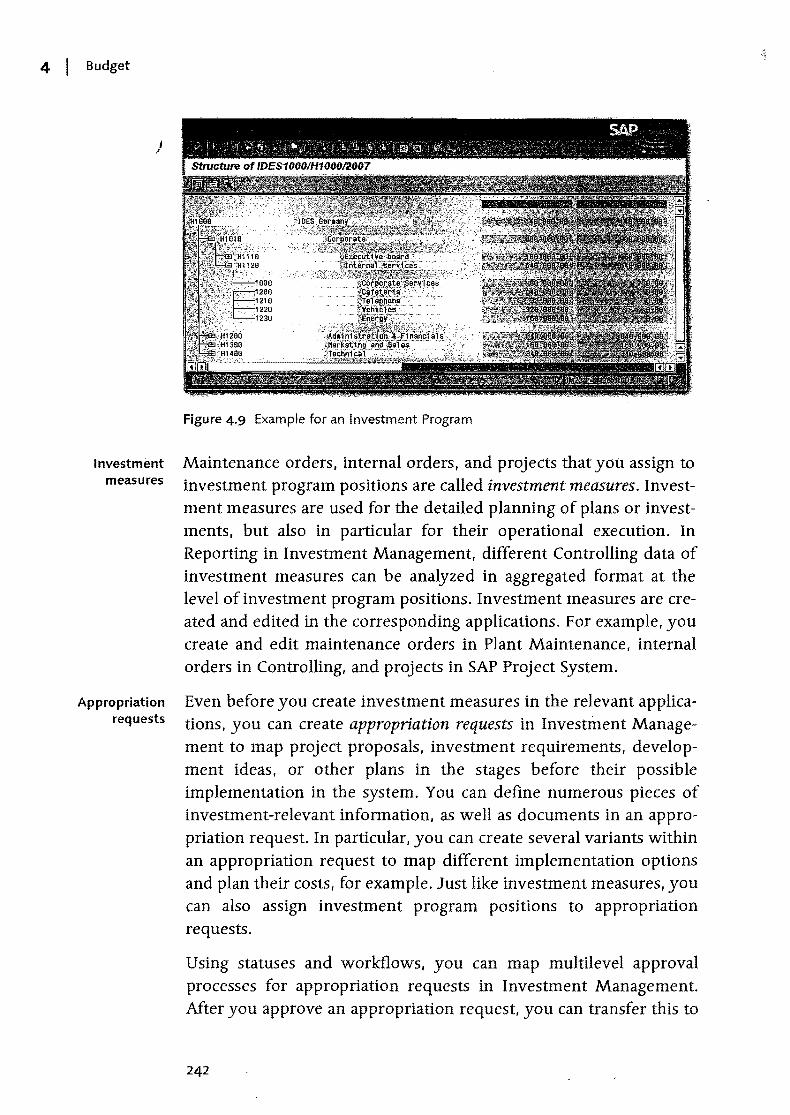
4 I Budget
)
Investment measures
Appropriation requests
Figure 4.9 Example for an Investment Program
Maintenance orders, internal orders, and projects that you assign to investment program positions are called investment measures. Investment measures are used for the detailed planning of plans or investments, but also in particular for their operational execution. In Reporting in Investment Management, different Controlling data of investment measures can be analyzed in aggregated format at the level of investment program positions. Investment measures are created and edited in the corresponding applications. For example, you create and edit maintenance orders in plant Maintenance, internal orders in Controlling, and projects in SAP Project System.
Even before you create investment measures in the relevant applications, you can create appropriation requests in Investment Management to map project proposals, investment requirements, development ideas, or other plans in the stages before their possible implementation in the system. You can define numerous pieces of investment-relevant information, as well as documents in an appropriation request. In particular, you can create several variants within an appropriation request to map different implementation options and plan their costs, for example. Just like investment measures, you can also assign investment program positions to appropriation requests.
Using statuses and workflows, you can map multilevel approval processes for appropriation requests in Investment Management. After you approve an appropriation request, you can transfer this to
242
Integration with Investment Management I 4.2
the investment measure. For projects, you can therefore use appropriation re9llests to enter project proposals, plan their costs, initiate approval processes, and finally create operative projects from the appropriation requests.
After you have assigned appropriation requests and investment measures to investment program positions, you can roll up their planned costs to the relevant investment program positions in transaction IM34 in Investment Management. Therefore, you don't have to plan costs twice (Le., at the level of appropriation requests on the one hand, and at the level of investment program positions on the other). However, you can also plan costs directly on the program positions or change rolled up planned costs (transaction IM35), if required.
The cost planning of investment programs is generally used as the basis for a budgeting process in Investment Management. A first step in this case involves allocating budget values at the level of the different positions of an investment program. A second step entails distributing the budget values of a program position in Investment Management to the assigned investment measures.
You pe-rform the budgeting of program positions in transaction IM32 in Investment Management similarly to the budgeting of projects in SAP Project System.9 Depending on the settings of the investment program, you can distribute the overall values or budget values with reference to fiscal years manually or by copying planned values. This enables the system to ensure the hierarchical consistency of the budget distribution. You can make necessary budget changes of an
9 In Investment Management, contrary to SAP Project System, you can differentiate between budgets according to different budget types (e.g., costs that can be capitalized or additional costs that cannot be capitalized). However, by separately using budget types when managing budgets, you prevent budget values· from being distributed from program positions to aSSigned investment measures, we will not discuss the use of budget values any further in the following sections.
243
[«]
Rollup of planned values on investment programs
Budgeting process in Investment Management
I
4 I Budget
investment program in the form of budget supplements (IM30) or } returns (IM38) (budget updates).
Controlling the budget
distribution
Following the budgeting of the program positions, you can now distribute the budget values of the positions further to each assigned investment measure. You can do this in transaction IM52 in Investment Management. You can distribute the budget values manually. or use the planned values of the individual investment measures as a template. If required, you can also use transaction IM52 to post supplements or returns between investment program positions and the assigned investment measures. In SAP Project System. the budget distributed to a project in this way can now be used to distribute it further to lower-level WBS elements within the project structure (see Section 4.1.1).
The linking of budget values of an investment program position with the budget values of assigned investment measures is controlled by the Budget distribution of overall values and Budget distribution of annual values indicators in the master data of the investment program position. Both indicators have the following significance:
If the Budget distribution of overall values and Budget distribution of annual values indicators are both set in an investment program position, the assigned investment measures can only receive your overall budget and your fiscal year budget through the distribution of budget values of the program position. For projects, the budget values can then be distributed further within the hierarchical project structure.
If only the Budget distribution of overall values indicator is set, the assigned investment measures can only receive your overall budget from the higher-level program position. However, you can distribute the annual budgets at investment measure level (regardless of the fiscal year-dependent values of the program position). Only the Budget distribution of annual values indicator, that is, a distribution of annual budgets without a simultaneous distribution of overall budgets, cannot be set.
If neither of the two indicators is set in an investment program position, you can budget the assigned investment measures separately. Although you can compare the budget values of the program position and the assigned measures with each other in Reporting in
244
Integration with Investment Management I 4.2
Investment Management, an automatic check does not take place to determint;J whether the budget values of the measures exceed the budget of the program position.
In Investment Management, an active availability control (as explained in Section 4.6.2 for WBS elements) is not possible for investment program positions. to However, by setting the Budget distribution of overall values indicator in the master data of a program position, you can ensure that the budget values of the assigned measures in total cannot exceed the budget of the program position. In principal, this therefore corresponds to a type of availability control for investment programs in terms of assigned investment measures.
To ensure that data can be exchanged between maintenance, internal orders and projects on the one hand. and investment programs on the other (rollup of planned costs, budget distribution, aggregated evaluations in Investment Management, etc.), you must create corresponding assignments. Investment program positions are assigned for projects at the level ofWBS elements. You can create assignments between WBS elements and program positions both in Investment Management and SAP Project System in the maintenance transactions for work breakdown structures (see Figure 4.10).
Figure 4.10 Example for Assigning a WBS Element to an Investment Program Position
To create assignments. you must meet several prereqUisites. Program positions must allow an assignment. In the master data of a program position, you can decide whether assignments can be made to appropriation requests, orders, or projects. However, investment measures can only be assigned to end node positions. These are program
10 An active availability control is not necessary for investment program positions. since the operative processing of investments or plans. and therefore also the corresponding postings, are performed at investment measure level and can be monitored there using an active availability control.
245
Assigning projects to investment program positions
I
4 I Budget
positions for which no other program positions are assigned at lower ) level.
Multiple assignments
Assigning several \l'vBS eiements
of a project
A project is typically only assigned to one investment program position. In this case, you make the assignment at the top WBS element level of the project. As part of budget distribution in Investment Management, this WBS element then receives a budget from the higher-level program position. The project manager can then distribute this budget further to the lower-level WBS elements of the project (see Section 4.1.1).
However, you may want a project to receive a budget from different "buckets," which means that it is assigned to several investment program positions. In this case, you can use two options for the assignment.
In the maintenance transactions of SAP Project System, you can assign a WBS element, for example, the top WBS element also, to several different program positions and consequently compare each assignment by specifYing a percentage. But, you only use these types of multiple assignments to ensure that the planned, actual, and budget values of the project (taking into account the weighting percentage rates) can be evaluated on the different program positions along with the values of other assigned investment measures. Nevertheless, if you use a multiple assignment, you cannot distribute budget from the aSSigned investment program positions at a later stage.
If you also want to distribute budget values of different program posltions..onthe project, your second option may be to assign different WBS elements of a project to each program pOSition. These WBS elements do not necessarily have to be WBS elements of the highest level of the project. Furthermore, they don't have to be on the same level within the project structure. However, you can only assign a WBS element to an investment program position if a higher-level or lower-level WBS element is not yet assigned to a program pOSition. If you distribute a budget of different investment program positions to each assigned WBS element, the system automatically rolls up the budget values to the higher-level WBS elements. This ensures that the hierarchical consistency of the budget values is maintained within the project structure. The project manager can then distribute the budget further to lower-level WBS elements, if reqUired.
Integration with Investment Management I· 4.2
If the Budget distribution of overall values indicator, or indeed the Budget distyibution of annual values· indicator, is set in an investment program position, the assigned WBS elements can only receive a budget through the budget distribution of the program position. After you assign the WBS elements. you can therefore no longer assign budgets separately in SAP Project System. As long as the WBS elements have not yet received any budget from the program posi-tion, the lower-level WBS elements cannot yet receive any budget in a hierarchically consistent format either. To prevent a WBS element from receiving a budget in the SAP Project System before it has already been assigned to an investment program position, you can make a mandatory assignment to an investment program position for WBS elements before the first budgeting.
You can do this in two different ways. First, you can control the relevant fields for an assignment as required fields using the field selection for WBS elements (see Section 2.8.1).11 Since you don't want all WBS elements to be assigned to program positions, you must specifY suitable influencing fields and values when you define the field selection. The assignment is generally made at the top WBS element level of a project. Therefore, for this purpose, you specify the Investment program field as the mandatory field in the field selection based on the influencing Level field and the value 1. Second, you can enter a program type in the budget profile of a project (see Figure 4.1). This entry ensures that the project is only budgeted once a WBS element of the project has been aSSigned to an investment program for this program type.
Mandatory assignments
In addition to the pure exchange of data between projects and invest- Investment
ment programs, the integration of SAP Project System with Invest- projects
ment Management can also be used in the project settlement to allo-cate the costs collected on a project to assets under construction (AuC) and also to allocate completed assets from Asset Accounting. You can define investment prcifiles in Investment Management Cus-tomizing for this purpose and enter these profiles in the master data ofWBS elements. WBS elements or projects where investment pro-
11 The fields for assigning investment program positions are not displayed by default in the detail screen of the WBS elements. However, when you define your own tabs (see Section 2.8.2), you can also include these fields in the detail screen ofWBS elements.
247
4 I Budget
files are defined are also called investment projects. Section 6.9 } explains in detail how investment profiles are defined and used, and
discusses in depth the processes for settling projects specifically available for investment projects.
Summary _ ' "
4.3 Summary
By distributing budgets to projects, in addition to the planned costs, you can manage an approved cost structure foryour projects and monitor funds against this cost structure using availability control. In addition to using SAP Project System functions to manage budgets, you can also use the integration with Investment Management to manage budgets across projects.
In the execution phase, you can compare the previously planJled dates, resource and material requirements, and costs and revenues with the corresponding actual data, and thereby monitor the execution and progress of your projects.
5 Project Execution Processes
In the execution phase of projects (depending on the type of project), capacity activities of your company are used, external resources are involved in the execution, material is purchased, produced in-house, consumed and delivered, invoices from suppliers are entered, and invoices are sent to customers, various internal cost allocations are made, and so on. Although many of these processes are triggered in projects, they are processed across different departments.
Due to the integration of SAP Project System into other applications of the SAP system, you can update practically all project-related data automatically on the relevant projects, or evaluate this data in the reporting of the projects, regardless of whether the corresponding documents are created in Purchasing, Production, Sales, or external and internal accounting. Therefore, this data doesn't need to be entered several times. In particular, you can compare the actual data of the project execution with the relevant planning data at the level of the projects. In Reporting, you can use progress analysis or special tools such as ProMan or progress tracking to identify variances in the project planning when needed.
The different aspects and processes for implementing a project are discussed in this chapter. The individual sections are not in any chronological order; rather, they are sorted by topic, since different processes are typically executed in parallel in the execution phase of projects. When constructing an elevator, for example, the engineers can start with the final assembly of the elevator, use materials, and confirm their time data, while missing material is procured in Purchasing and invoices are created in Financial Accounting for materials already delivered.
249
5 I Project Execution Processes
}
Prerequisites for actual dates of WBS elements
Options for entering actual dates
5.1 Actual Dates
You can use actual dates to document the period required to implement a work package in projects. Different functions are available for entering actual dates, depending on whether you use work breakdown structures (WBS) or networks to structure your projects.
5.1.1 Actual Dates of WBS Elements
You can enter actual dates for WBS elements in work breakdown structures. A distinction is made in this case between the actual start and actual finish date of a WBS element. The actual start date documents the time that the execution of the WBS element begins and the actual finish date records the time it ends. The setting of an actual start date for a WBS element is automatically documented by the PCNF (partially confirmed) system status at the level of the WBS element. If you also set an actual finish date, the WBS element is automatically assigned the status CONF (confirmed). If the CONF status is active in a WBS element, a warning is issued each time you make a subsequent change to the actual dates of this WBS element. Provisional actual dates for WBS elements only result from actual dates of assigned activities, and therefore cannot be entered manually for WBS elements.
You must fulfill several prerequisites to enter actual dates for WBS elements. To define an actual start date in a WBS element, the WBS element must have the PREL (partially released) or REL (released) status and no other status can prevent the setting of the actual date. Setting an actual finish date for a WBS element requires the status to be REL and all lower-level WBS elements and, if necessary, aSSigned activities must have the CONF status.
You can use three options to enter actual dates at the level of WBS elements:
.. Manual entry You manually enter actual dates for WBS elements. Similar to the manual planning of dates, you enter the actual dates in a table or, if required, in a graphic in the detail screen of the WBS elements, depending on the relevant editing transaction.
250
~ Extrapolation You use )the Extrapolate dates function to calculate actual dates from the actual dates of lower-level WBS elements.
~ Determination of actual dates You use the Determine actual dates function to derive the actual dates ofWBS elements from the actual dates of the assigned activities.
. WBseletn~'fif~f;!~~( .riting"ContrQ,:nq":
, , ject manag~K elements. ',,'>'
o c;'';;'.~:~~;.'' .. : ,_ _. ,_: __ ' ,:', -~;:-:,\:-:-_-;ji::,'::A~-_:(¢:-:':~:-":'_
be"qerived automatica.I!Y'ifrgh1;\,Bi£3 "asingdocu ments"fqrJ¥,c':;'l·;
.,;,,.~sponsibility of ent¢rin~~~~'i;;H~L
5.1.2 Actual Dates of Activities
Actual dates of activities (or activity elements) are typically entered using confirmations (see Section 5.3). In this case, you differentiate between the actual dates from partial confirmations, which are practically interpreted as provisional actual start dates and actual finish dates, and the actual dates from final confirmations that represent the actual execution period. The actual dates of confirmations for an activity are automatically updated on the activity, 1 provided you have not explicitly prohibited this in the confirmation. If required, you can still also change the actual dates manually at activity leveL Actual dates of activities cannot be derived automatically from material documents or vendor invoices, for example. The REL (Released) status is required for creating confirmations for an activity and therefore also entering actual dates.
Note that the actual dates of network activities can affect subsequent schedulings of the network. If an activity has the CONF system status due to a final confirmation, the system automatically sets the planned dates of the earliest and latest date of the activity on the actual dates of the activity. If the activity has relationships to other activities, the planned dates of these activities would also be adapted accordingly to the scheduling logic if rescheduling were performed (see Section 3.1.2).
1 The actual start date of an activity is determined from the earliest actual start date of all confirmations of the activity. Similarly. the actual finish date is determined from the latest actual finish date of all confirmations.
251
Actual Dates I 5.1
[«] I
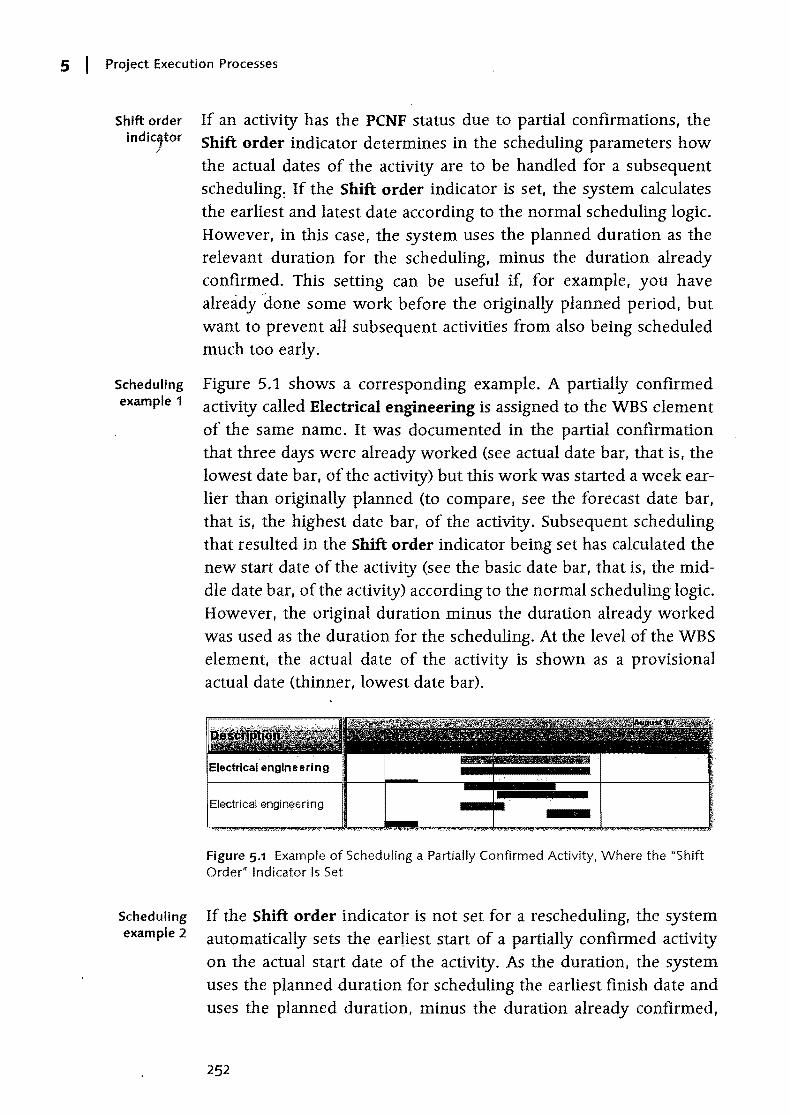
5 I Project Execution Processes
Shift order indic,tor
Scheduling example 1
Scheduling example 2
If an activity has the PCNF status due to partial confirmations, the Shift order indicator determines in the scheduling parameters how the actual dates of the activity are to be handled for a subsequent scheduling: If the Shift order indicator is set, the system calculates the earliest and latest date according to the normal scheduling logic. However, in this case, the system uses the planned duration as the relevant duration for the scheduling, minus the duration already confirmed. This setting can be useful if, for example, you have already done some work before the originally planned period, but want to prevent all subsequent activities from also being scheduled much too early.
Figure 5.1 shows a corresponding example. A partially confirmed activity called Electrical engineering is assigned to the WBS element of the same name. It was documented in the partial confirmation that three days were already worked (see actual date bar, that is, the lowest date bar, of the activity) but this work was started a week earlier than originally planned (to compare, see the forecast date bar, that is, the highest date bar, of the activity. Subsequent scheduling that resulted in the Shift order indicator being set has calculated the new start date of the activity (see the basic date bar, that is, the middle date bar, of the activity) according to the normal scheduling logic. However, the original duration minus the duration already worked was used as the duration for the scheduling. At the level of the WBS element, the actual date of the activity is shown as a provisional actual date (thinner, lowest date bar).
Electrical engineering
Figure 5.1 Example of Scheduling a Partially Confirmed Activity, Where the "Shift Order" Indicator Is Set
If the Shift order indicator is not set for a rescheduling, the system automatically sets the earliest start of a partially confirmed activity on the actual start date of the activity. As the duration, the system uses the planned duration for scheduling the earliest finish date and uses the planned duration, minus the duration already confirmed,
252
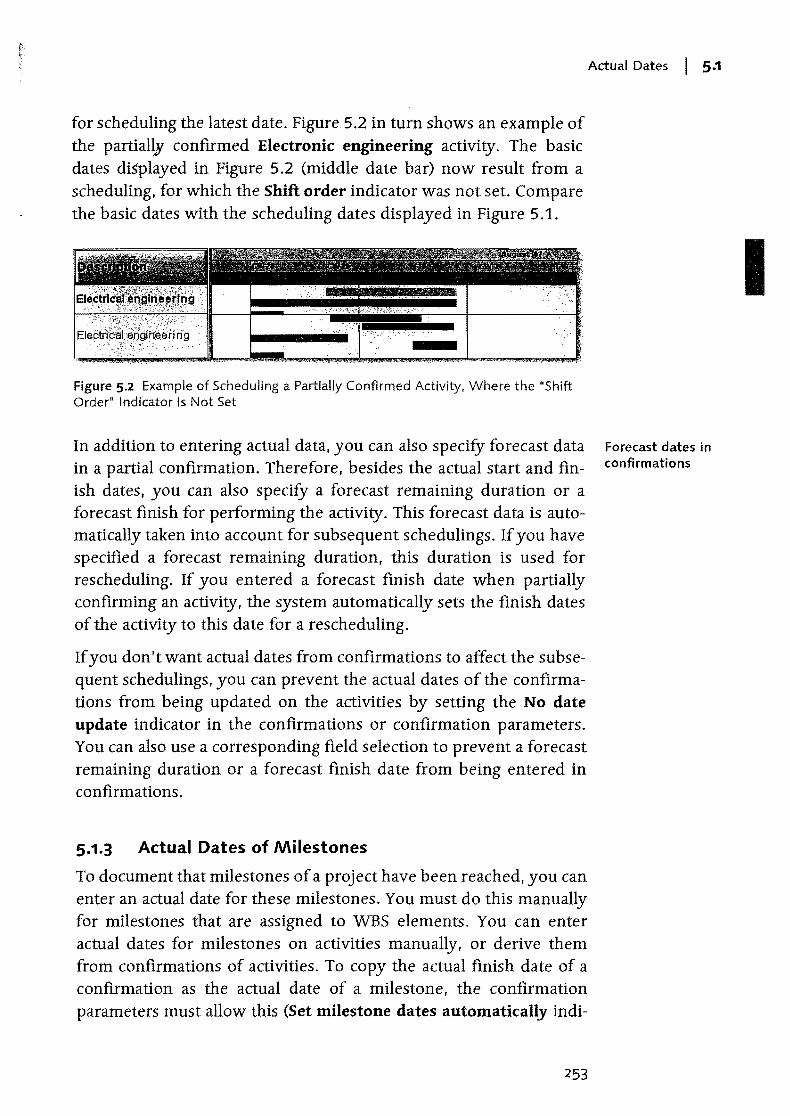
for scheduling the latest date. Figure 5.2 in turn shows an example of the partialw confirmed Electronic engineering activity. The basic dates displayed in Figure 5.2 (middle date bar) now result from a scheduling, for which the Shift order indicator was not set. Compare the basic dates with the scheduling dates displayed in Figure 5.1.
Figure 5.2 Example of Scheduling a Partially Confirmed Activity, Where the "Shift Order" Indicator Is Not Set
In addition to entering actual data, you can also specifY forecast data in a partial confirmation. Therefore, besides the actual start and finish dates, you can also specify a forecast remaining duration or a forecast finish for performing the activity. This forecast data is automatically taken into account for subsequent schedulings. If you have specified a forecast remaining duration, this duration is used for rescheduling. If you entered a forecast finish date when partially confirming an activity, the system automatically sets the finish dates of the activity to this date for a rescheduling.
If you don't want actual dates from confirmations to affect the subsequent schedulings, you can prevent the actual dates of the confirmations from being updated on the activities by setting the No date update indicator in the confirmations or confirmation parameters. You can also use a corresponding field selection to prevent a forecast remaining duration or a forecast finish date from being entered in confirmations.
5.1.3 Actual Dates of Milestones
To document that milestones of a project have been reached, you can enter an actual date for these milestones. You must do this manually for milestones that are assigned to WBS elements. You can enter actual dates for milestones on activities manually, or derive them from confirmations of activities. To copy the actual finish date of a confirmation as the actual date of a milestone, the confirmation parameters must allow this (Set milestone dates automatically indi-
253
Actual Dates I 5·1
Forecast dates in confirmations
I
5 I Project Execution Processes
cator, see Section 5.3), and the degree of processing of the confirma-} tion must be greater than or equal to the percentage of completion
that the milestone represents (Perc of compl. field in the milestone). You can use actual dates of activ~ty milestones to unlock billing items within milestone billing and therefore control the creation of invoices (see Section 5.6.1).
[»] NOjeth~! actualQ4l compaf:i$~ dates (se~,
\dates of milestdh~' k$1bnes. If you ltV'(l~
:~~'dates, you musttJ~~ '\;,c/\);
.;, i'~ '}>~'>' ~- ,-'
'(:tiC~lly set qh;tb.~il ·~·:Pf!3,nned/actu~t·~ '~sioriS or fore~1(,
'~. "<::~' ,,\;
5.2 Account Assignment of Documents
Costs. revenues, or perhaps even payments on projects are updated on WBS elements and network activities, or activity elements using the account assignment of corresponding documents (Le., activity allocations, invoices, goods receipts and issues, billing documents, down payments, etc.). If you have assigned orders such as plant maintenance, production, and internal orders to projects, documents can also be assigned to these orders. In Reporting in SAP Project System, you can analyze the corresponding costs of the assigned orders in an aggregated format at the level of the project, but the project is not updated automatically. However, you can settle the costs of the assigned orders on the project as part of period-end closing (see Section 6.9), if required.
Prerequisites In order to perform the account assignment of documents on WBS elements or network activities, the status of the objects must allow a corresponding account assignment. Although you can assign purchase requisitions or purchase orders by default to projects in the CRTD (Created) system status, you cannot post goods or invoice receipts. For the account assignment of documents that results in actual costs, the status in the relevant account assignment objects of SAP Project System must be REL (released). Furthermore, the master data ofWBS elements must also allow an account assignment of documents. If required, you can use the Account assignment element operative indicator to determine whether you want an account assignment to be possible for each WBS element (see Section 2.2.1),
254
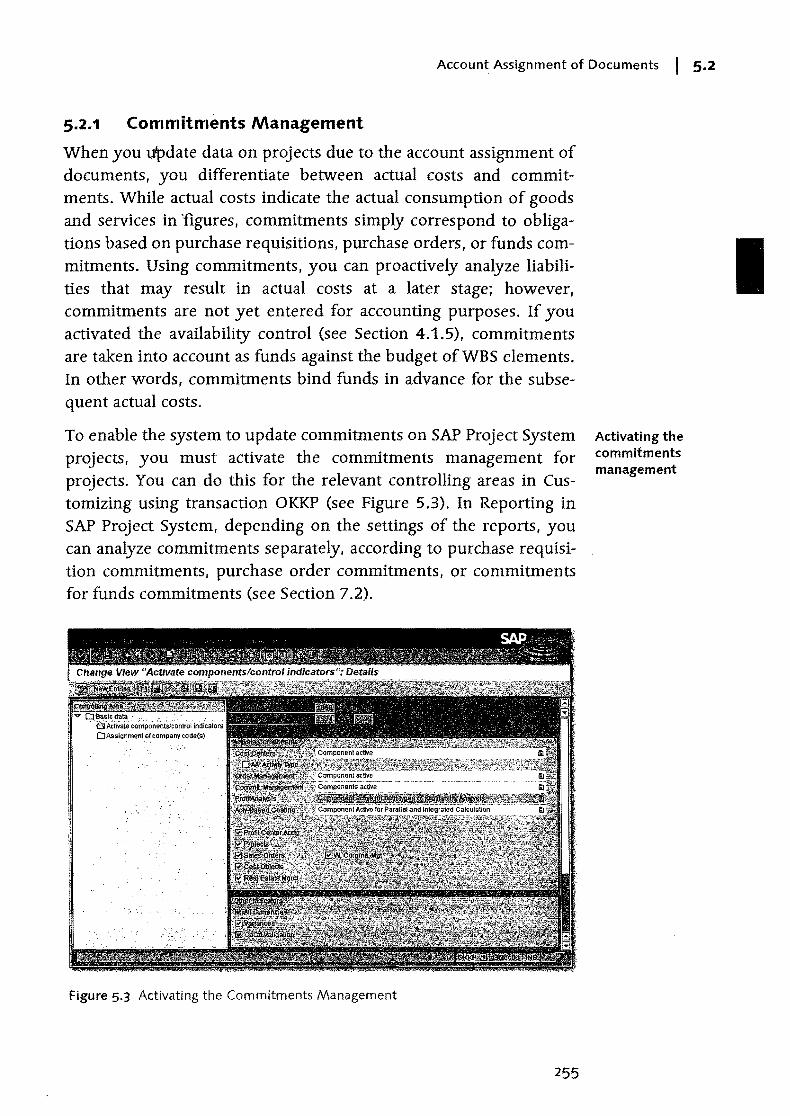
Account Assignment of Documents I 5.2
5.2.1 Commitments Management
When you update data on projects due to the account assignment of documents, you differentiate between actual costs and commitments. While actual costs indicate the actual consumption of goods and services in 'figures, commitments simply correspond to obligations based on purchase reqUisitions, purchase orders, or funds commitments. Using commitments, you can proactively analyze liabilities that may result in actual costs at a later stage; however, commitments are not yet entered for accounting purposes. If you activated the availability control (see Section 4.1.5), commitments are taken into account as funds against the budget ofWBS elements. In other words, commitments bind funds in advance for the subsequent actual costs.
To enable the system to update commitments on SAP Project System projects, you must activate the commitments management for projects. You can do this for the relevant controlling areas in Customizing using transaction OKKP (see Figure 5.3). In Reporting in SAP Project System, depending on the settings of the reports, you can analyze commitments separately, according to purchase reqUisition commitments, purchase order commitments, or commitments for funds commitments (see Section 7.2).
Figure 5.3 Activating the Commitments Management
255
Activating the commitments management
5 I Project Execution Processes
Purchase requisition commitments
)
Purchase order commitments
As soon as a commitments management is active, the system uses the (remaining) quantity and the price for each unit of measure to calculate a purchase requisition commitment for the planned delivery date for each purchase requisition that you assign to a project. The system also updates this purchase requisition commitment on the project. In this case, the purchase requisitions can be created manually in Purchasing and assigned to a WBS element, or they can be created automatically, based on externally processed and service activities or externally procured material components of a network. The purchase requisition commitment is (according to the relevant account assignment) shown separately on the WBS elements, network headers, or activities.2 Purchase requisitions that are automatically created within Materials Requirement Planning (MRP) runs are an exception in this case, that is, they don't lead to corresponding purchase requisition commitments. Only the purchased orders for these purchase requisitions result in the commitments being displayed.
If you create a purchase order for a purchase requisition that is assigned to a project, the purchase requisition commitment is reduced in accordance with the quantity transferred in the purchase order. If the entire quantity of the purchase requisition is copied into the purchase order, the purchase requisition commitment is therefore also reduced completely. Using the value of the purchase order, the system simultaneously determines a purchase order commitment and updates it on the corresponding account assignment objects, where it can be evaluated in the delivery date period of the purchase order.
Based on the Goods issue indicator for the purchase order, the purchase order commitment is reduced and the corresponding actual costs are therefore updated either by posting a goods receipt or the invoice receipt that refers to the purchase order. If only a portion of the quantity or values of the purchase order is posted in this case, a
2 For header-assigned networks. the commitments are displayed on the network header in each case; for activity-assigned networks. they are displayed at the level of individual activities. Commitments for material components are updated on the corresponding network headers or activities for non-stock items. Commitments for stock items can only be displayed in SAP Project System if they are managed in the individual requirements stock. The commitments are then updated on the relevant segments of the individual requirements stock.
Account Assignment of Documents I 5.2
portion of the purchase order commitment will be converted into actual valu,s. The purchase order commitment is reduced entirely if you post a complete goods receipt or invoice receipt, or you manually set a Delivery completed indicator to document that no more deliveries are expected, even though the quantity or value of the purchase order has not yet been reached. As long as you have not yet posted a goods or invoice receipt for the purchase order item, you can lock the item or, in certain circumstances, delete it. In both cases, the purchase order commitment of the item is reduced completely.
You can use transaction FMZ1 in SAP Project System to create funds commitments if you want to reserve funds for later costs, but are still unsure of which business transactions will result in these costs. The amount of a funds commitment is shown as a commitment for funds commitments on the WBS element, network, or activity where you have assigned the funds commitment. In addition, the funds commitment amount is taken into account when the assigned values are being calculated and is therefore included in the availability control of projects. You can either reduce the commitments for funds commitments manually by entering the corresponding reduction amounts in transaction FMZ6, or this can occur automatically when vendor invoices are entered in Financial Accounting if the corresponding funds commitment is specified in the account assignment block of the invoice.
5.2.2 Manual Account Assignment
In contrast to externally processed activities and service activities, or material components in networks, purchaSing documents or documents for settling costs cannot be created automatically for work breakdown structures. Instead, you have to create these documents manually in SAP Project System, Purchasing, Controlling, or financial Accounting, and assign them to WBS elements. For statistical WBS elements (see Section 2.2.1), you must also always specify another account assignment object in these documents in addition to the WBS element, since updating statistical WBS elements is not costeffective and only occurs for information purposes.
The following list contains examples of some transactions from different applications of the SAP system that may be relevant within the execution phase of projects, and that you can use to enter documents
257
Commitments for funds commitments
Examples of documents
I
5 I Project Execution Processes
)
and then assign to WBS elements:
... Create purchase requisition (ME5iN)
... Create purchase order (ME2iN)
... Activity allocation (KB21N)
... Goods movements (MIGO)
... Vendor invoices (FB60)
As of the Enterprise Release, additional functions are available inFinancial Accounting to manage documents relating to a project in the form of debit and credit down payment chains.
Employees can also enter times for WBS elements in the cross-application time sheet (see Section 5.10.1). The transfer of this time data into Controlling then generates an activity allocation between the cost center of the employees and the corresponding WBS elements.
5.2.3 Execution Services
If you used Easy Cost Planning to plan your costs at the level of WBS elements (see Section 3.4.4), you can post different documents such as internal activity allocations, purchase requisitions, or goods issues directly from Easy Cost Planning after you release the WBS elements. The main advantages of this option is that you do not have to know how to use several different transactions to create these documents and you can use the planning data of the various costing items as a template. Consequently, you can reduce the overall time and effort required to create these documents and prevent errors from occurring when you enter the required data.
Posting a document from Easy Cost Planning is called Execution Service.
Depending on which Execution Service you select from the list of available Execution Services in Easy Cost Planning, the system only proposes data from relevant costing items in each case. If you select the Goods issue Execution Service, for example. only data of the items for item category M (M-aterial) is offered, and so on. From the proposed items, you can now only select the specific items, for which you want to perform the Execution Service. If necessary. you can still change the proposed data or supplement missing data before you make a posting.
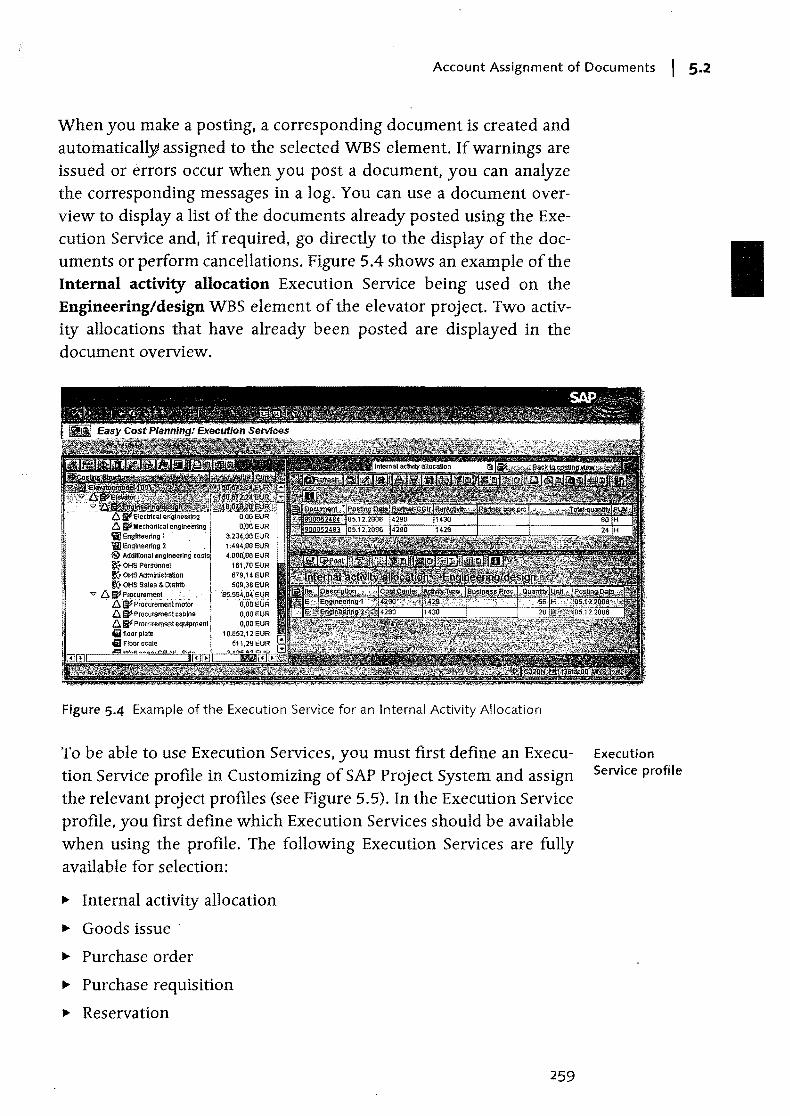
Account Assignment of Documents I 5.2
When you make a posting, a corresponding document is created and automatically assigned to the selected WBS element. If warnings are issued or errors occur when you post a document, you can analyze the corresponding messages in a log. You can use a document overview to display a list of the documents already posted using the Execution Service and, if required, go directly to the display of the documents or perform cancellations. Figure 5.4 shows an example of the Internal activity allocation Execution Service being used on the Engineering/design WBS element of the elevator project. Two activity allocations that have already been posted are displayed in the document overview.
'Il Englne.rlng 1 1IIl Engineering 2 @ Additional engineering '* OHS Personnel ~ OHS AdmlnlslraHon * OHS S.les & Distrlb. I
!, ' '" c:. !i;>1l'oocurement ':, , . I . ' c:. '!i;>1 pro<o;.';;.nl motor ' .c:. ~ Procurement cabins , c:. ~ Procurement equipment i Gi fioor plate ' til Floor scale
Figure 5.4 Example of the Execution Service for an Internal Activity Allocation
To be able to use Execution Services, you must first define an Execution Service profile in Customizing of SAP Project System and assign the relevant project profiles (see Figure 5.5). In the Execution Service profile, you first define which Execution Services should be available when using the profile. The folloWing Execution Services are fully available for selection:
II> Internal activity allocation
II> Goods issue '
II> Purchase order
II> Purchase requisition
II> Reservation
259
Execution Service profile
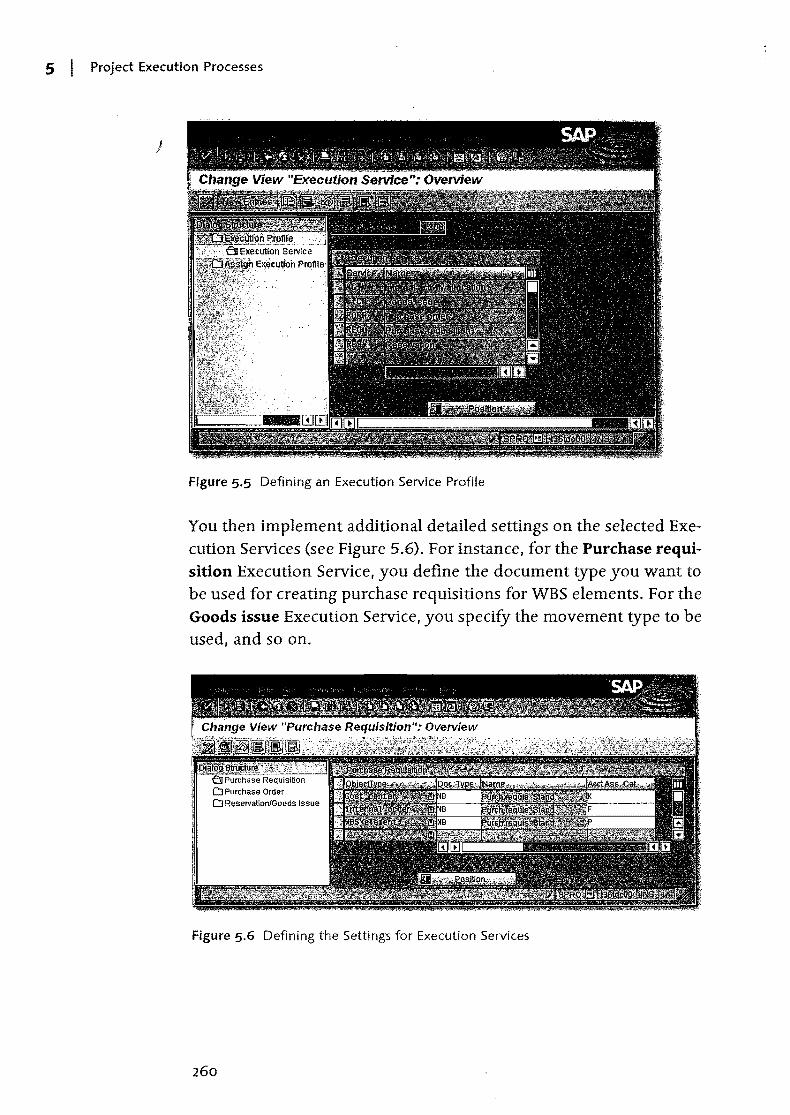
5 Project Execution Processes
Figure 5.5 Defining an Execution Service Profile
You then implement additional detailed settings on the selected Execution Services (see Figure 5.6). For instance, for the Purchase requisition Execution Service, you define the document type you want to be used for creating purchase requisitions for WBS elements. For the Goods issue Execution Service, you specify the movement type to be used, and so on.
D Reservation/Goods Issue
Figure 5.6 Defining the Settings for Execution Services
260
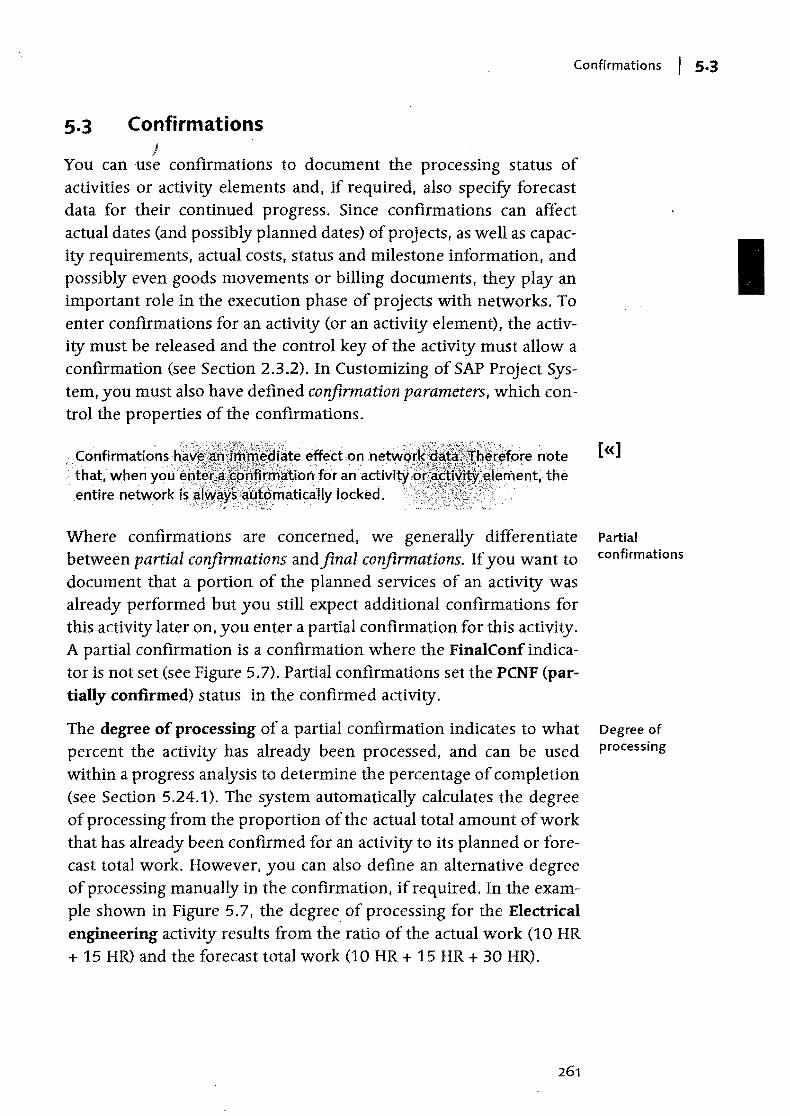
Confirmations I 5·3
5.3 Confirmations }
You can use confirmations to document the processing status of activities or activity elements and, if required, also specify forecast data for their continued progress. Since confirmations can affect actual dates (and pOSSibly planned dates) of projects, as well as capacity reqUirements, actual costs, status and milestone information, and possibly even goods movements or billing documents, they play an important role in the execution phase of projects with networks. To enter confirmations for an activity (or an activity element), the activity must be released and the control key of the activity must allow a confirmation (see Section 2.3.2). In Customizing of SAP Project Sys
tem, you must also have defined confirmation parameters, which control the properties of the confirmations .
Confirn1atio~s h~:'>; 'that, when yqt.i{ "entjre netW9rki~ ~"
"~t~fore note 'l~i~'I11~nt; the
. ' ~i#te effectonnet\V~) ,.
,¥,c,:'$ltiol1 for'an:activiW! i~9n1aticaJly locked.
}-i ~.:;')' --~-' - . . .. ,~'.>./,\\/>: ->~~?~j:,t ;: "
Where confirmations are concerned, we generally differentiate between partial confirmations and final confirmations. If you want to document that a portion of the planned services of an activity was already performed but you still expect additional confirmations for this activity later on, you enter a partial confirmation for this activity. A partial confirmation is a confirmation where the FinalConf indicator is not set (see Figure 5.7). Partial confirmations set the PCNF (partially confirmed) status in the confirmed activity.
The degree of processing of a partial confirmation indicates to what percent the activity has already been processed, and can be used within a progress analysis to determine the percentage of completion (see Section 5.24.1). The system automatically calculates the degree of processing from the proportion of the actual total amount of work that has already been confirmed for an activity to its planned or forecast total work. However, you can also define an alternative degree of processing manually in the confirmation, if reqUired. In the example shown in Figure 5.7 f the degree of processing for the Electrical engineering activity results from the ratio of the actual work (10 HR + 15 HR) and the forecast total work (10 HR + 15 HR + 30 HR).
[«]
Partial confirmations
Degree of processing
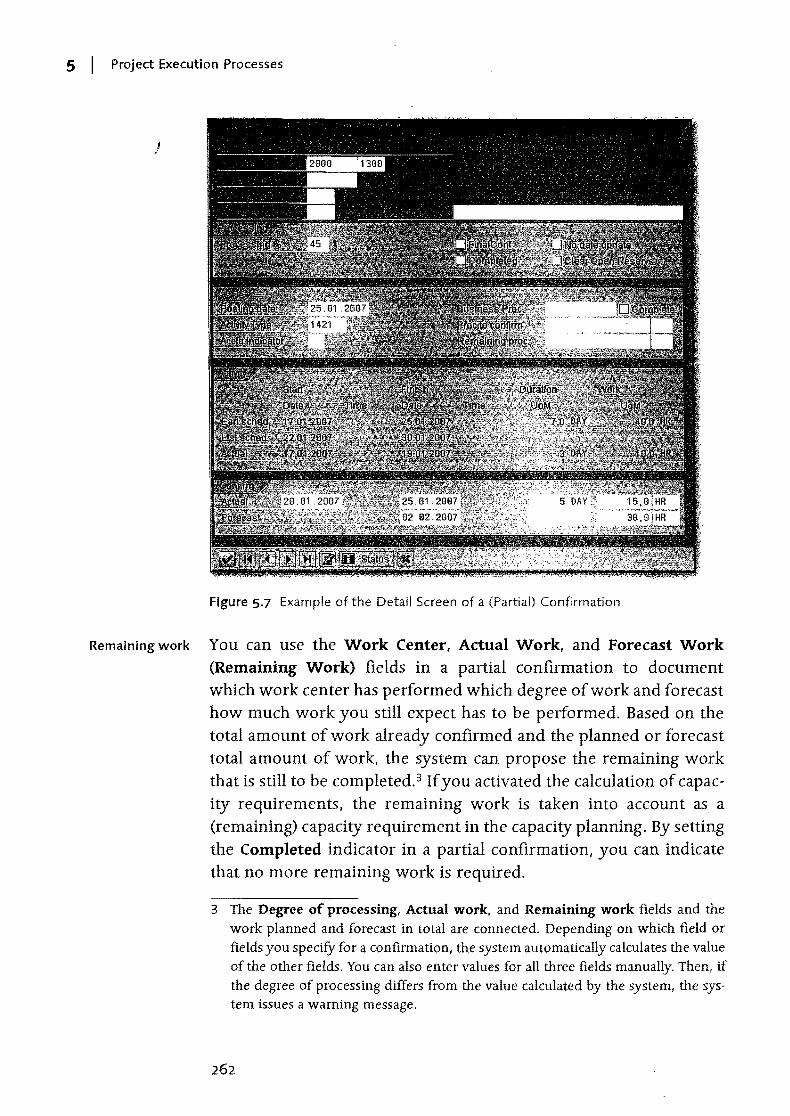
5 I Project Execution Processes
Figure 5.7 Example of the Detail Screen of a (Partial) Confirmation
Remaining work You can use the Work Center, Actual Work, and Forecast Work (Remaining Work) fields in a partial confirmation to document which work center has performed which degree of work and forecast how much work you still expect has to be performed. Based on the total amount of work already confirmed and the planned or forecast total amount of work, the system can propose the remaining work that is still to be completed.3 If you activated the calculation of capacity requirements, the remaining work is taken into account as a (remaining) capacity reqUirement in the capacity planning. By setting the Completed indicator in a partial confirmation, you can indicate that no more remaining work is reqUired.
3 The Degree of processing, Actual work. and Remaining work fields and the work planned and forecast in total are connected. Depending on which field or fields you specify for a confirmation, the system automatically calculates the value of the other fields. You can also enter values for all three fields manually. Then, if the degree of processing differs from the value calculated by the system, the system issues a warning message.
262
Confirmations I 5·3
You specify the execution period of the relevant partial activities in the ActualJStart and Finish fields of a partial confirmation. If you
/
want to document that activities were not only performed on work-days, you can also specify an actual duration. If the No date update indicator is not set in a confirmation, the actual dates are forwarded to the activity. If the activity is assigned to a WBS element, the actual dates are incorporated into the provisional actual dates of the WBS element (see Section 5.1.1). If milestones are assigned to the activity, the milestones can transfer the actual finish date of the confirmation (see Section 5.3.1) and trigger milestone functions (see Section 2.4.2), or unlock billing dates in sales orders (see Section 5.19.1).
The actual dates of the activity are derived from the earliest actual start date and the latest finish date of all confirmations for this activity. Depending on the settings in the scheduling parameters, the actual dates of partially confirmed activities can then have different effects on subsequent schedulings (see Section 5.1.2). In a partial confirmation, you can also forecast a finish date for performing the activity or a residual remaining duration, if required. The forecast data is then taken into account the next time the network is scheduled.
Actual and forecast dates
By setting the FinalConf indicator in a confirmation, you document Final confirmation
that an activity has been processed completely (where the degree of processing is 100%) and you don't expect any more confirmations. However, if another confirmation is entered for an activity that has been finally confirmed, the system issues a warning message. This is controlled by the CONF (confirmed) status that the system automati-cally sets in the activity when a final confirmation is made.
As with a partial confirmation, you can also enter actual work and actual dates in a final confirmation. But, since a final confirmation represents the complete processing of an activity, you cannot (in contrast to partial confirmations) enter forecast data for the continued progress of the activity or for residual remaining work. The final confirmation of an activity results in the scheduled dates of the activity being automatically adjusted on the actual dates (see Section 5.1.2). If a WBS element or milestones are assigned to the activity, the actual dates of the final confirmation can also be transferred to these objects. In addition, the system automatically sets the remaining capacity reqUirement of an activity that has been finally con-
I
5 I Project Execution Processes
}
Reasons for variances
Calculating actual costs based on
confirmations
firmed to zero, even if the work originally planned or forecast may not have been fully confirmed.
You can use short and long texts in partial and final confirmations to enter more detailed descriptions for the confirmed activities. If a variance from the planned performance occurred when the activity was performed, in addition to a corresponding description, you can specity the reason for the variance, for example, machine breakdown, operating errors, and so on. The reason for a variance in a confirmation can be used for evaluation purposes; furthermore, by specifYing the reason for a variance, the user status of the activity is changed automatically and therefore milestone functions of assigned milestones can be triggered. To use variance reasons, you must have already defined this in Customizing of SAP Project System using transaction OPK5. If you want a reason for the variance in order to initiate a status change in the activity, you must specify which system or user status is to be set when defining the variance reason. You can also change the status of an activity in a confirmation manually, without referring to a variance reason, by branching from the confirmation into the status management of the activity and setting the required status.
Based on the confirmations of an activity, actual or forecast dates are not only forwarded to the activity, whose status may be changed and the remaining capacity requirement adjusted, but actual costs of performed work are automatically updated on the activity. To ensure that the system can calculate actual costs for confirmed work, you must specity a work center, activity type, and the corresponding actual work in the confirmation, provided this data is not already proposed based on the planning data. When you save the confirmation, the system uses the combination of the activity type you specified and the cost center of the work center to automatically calculate an activity price that can be used to estimate the confirmed work The actual costing variant of the network controls which strategy is to be used to calculate the price (see Section 3.4.5), After you save the confirmation, the system writes an accounting document that is assigned to an activity. This document results in the actual costs of the confirmed work being added to the activity (price multiplied by the actual work), and the same amount being Simultaneously reduced in the cost center of the work center.
Confirmations I 5·3
If material components are assigned to an activity, you can branch from a confirIJilation for this activity into a list of assigned material components (stock items) and make goods issue postings to docu-ment the consumption of components. When you save a confirma-tion, the system writes a corresponding activity-assigned material document that results in actual costs on the activity.4 The actual costs are calculated from the withdrawn quantities and the price of the rel-evant material. The actual costing variant of the network controls which strategy is to be used to calculate the price (see Section 3.4.5). For material components that were identified for a bacliflush, the sys-tem automatically posts goods issues amounting to the planned quantities for a final confirmation. If you enter a final confirmation and all assigned material components have not yet been withdrawn, the system can automatically clear the reservations that are still open when you set the Clear Open Reservs. indicator in the confirmation.
The accounting documents for posting the actual costs based on confirmed work and the material documents based on material with-drawals are posted with the relevant confirmation document. If errors occur, you can eliminate the reason for the errors or cancel the confirmation. For performance reasons, you can also separate the actual cost calculation and the posting of backflushes from the post-ing of the confirmation document, and perform these later in the background. If problems occur, you must postprocess the incorrect data records. You control the separation of backflushing processes using process controls that you can define in Customizing of SAP Project System and then enter in the confirmation parameters.
You can also specify a personnel number and, if necessary, a wage type, for a confirmation. Your confirmation data can then be transferred to Time Management and subsequently used there for evaluation purposes, or for calculating incentive wages. By setting the No
HR update indicator, you can also prevent confirmation data from being forwarded to Time Management.
Goods movements for confirmations
Process control
If, in addition to having planned activity work at the work center Split confirmations
level of the activity within the capacity planning, you have per-formed a distribution to capacity splits, for example, to individual personnel resources (see Section 3.2.2), you can also confirm the
4 The goods issue for the non-valuated project stock is an exception (see Section 5.5.1).
5 I Project Execution Processes
Cancelling' confirmations
Confirmation parameters
Deviations in confirmed work
or duration
individual capacity splits separately. SAP Note 543362 elaborates on the effects of split confirmations and any additional activity confirmations on the activity data.
If necessary, you can also cancel an entered confirmation again using transaction CN29. If you entered several confirmations, you receive a list of the confirmations, from which you can then select the confirmation that you want to cancel. When you cancel a confirmation, you can enter a long text with details about the reason for the cancellation. With the exception of the set user status, cancelling a confirmation results in all confirmed data being undone at the level of the activity; however, for performance reasons, you can also perform a "vague" cancellation of confirmations. Although the posting of actual costs. actual work, capacity requirements, and material movements is undone consistently. forecast data or statuses are not adjusted. For more information about "vague" cancellations, see SAP Note 304989.
Before you can enter confirmations for activities, activity elements. or capacity splits. you must define confirmation parameters in Customizing of SAP Project System (transaction OPST) for the combination of network type and plant of the relevant networks (see Figure 5.8). You can use confirmation parameters to control which data and controlling indicators you want the system to propose when you create a confirmation. whether confirmation processes are executed online or in the background. and how errors that occur when actual costs and goods movements are posted should be handled. In addition, you use confirmation parameters to control different checks for confirmation data.
You can use the Date in future indicator in the confirmation parameters to specify whether future dates can also be confirmed, or only dates up to the current date in each case. If you set the WrkDev. active indicator in the confirmation parameters. the system issues a warning message each time you want to save a confirmation, whose total from the actual and remaining work exceeds the planned work. If you want to be able to have a limited overrun of the planned work without a warning message being issued, you can enter a percentage amount in me Work deviation field of the confirmation parameters. This is the percentage by which the planned work can be exceeded without a warning message being issued. If a confirmation is saved despite the defined tolerance limits being exceeded and despite a
266
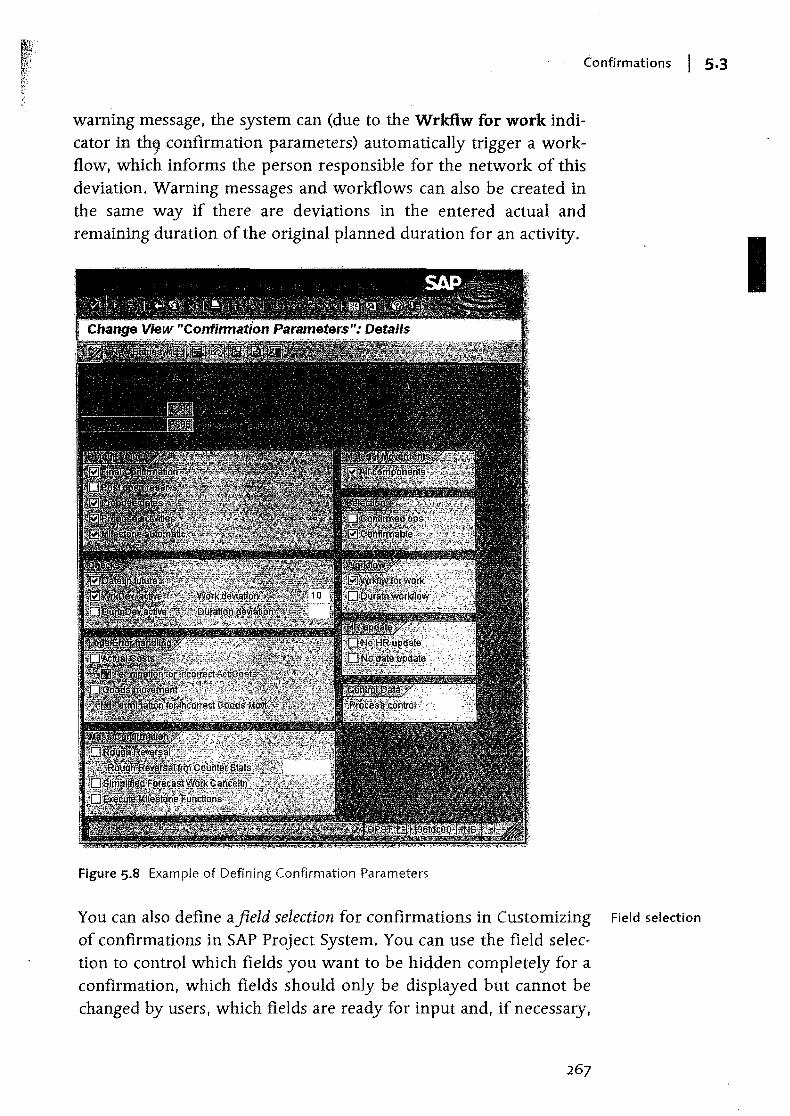
Confirmations I 5·3
warning message, the system can (due to the Wrkflw for work indicator in th9 confirmation parameters) automatically trigger a workflow, which informs the person responsible for the network of this deviation. Warning messages and workflows can also be created in the same way if there are deviations in the entered actual and remaining duration of the original planned duration for an activity.
Figure 5.8 Example of Defining Confirmation Parameters
You can also define a field selection for confirmations in Customizing Field selection
of confirmations in SAP Project System. You can use the field selec-tion to control which fields you want to be hidden completely for a confirmation, which fields should only be displayed but cannot be changed by users, which fields are ready for input and, if necessary,
I
5 I Project Execution Processes
which fields must always be filled before you save the confirmation. } If required, you can make the field selection settings dependent on
the relevant network type, network profile, work center, or control key of the activity.
Internet confirmation
Because confirmations are integral for executing a project with networks, there are many different ways in which you can enter confirmations. The most important options are explained in the following sections.
5.3.1 Individual Confirmations
You can use individual confirmations to create partial or final confirmations for individual activities, activity elements, or capacity splits of a network. You enter these individual confirmations in a detail screen (see Figure 5.7). You can create individual confirmations using transaction CN25. If you only want to specity a network number in the initial screen of this transaction, you receive a selection list of activities or activity elements for the network first. In the confirmation parameters, you can specify whether confirmed activities and confirmable activities should be included in this list. 5
As the person responsible for the network, you can also create individual confirmations in each maintenance transaction for networks, for example, in the Project Builder or project planning board. You can also create individual confirmations using the information system for structures in SAP Project System (see Section 7.1) or in capacity reports (see Section 7.3.3).
You can use the CNW1 Internet service to enter individual confirmations through the Internet or intranet. This enables members of the project team and authorized partners to confirm data online directly from the location of the project execution using just an Internet browser. You can process the confirmation data directly in the SAP system in exactly the same way as an individual confirmation; however, unlike the confirmations that you create directly in the SAP system, you can't enter any long texts for confirmations with the Internet service and you can't change any statuses manually or post goods movements manually.
5 Confirmable activities are activities whose control keys allow, though do not necessarily provide for. confirmations (see Section 2.3.2).
268
Confirmations I 5-3
5.3.2 Collective and Summary Confirmations
If you want confirmations for several activities or different networks to be entered simultaneously (e.g., by a central administrator), collective confirmations are available for this purpose in the SAP Project System. When you use collective confirmations, you enter the confirmation data in tables (see Figure 5.9). You can also branch to the detail screen of a confirmation, if necessary. In the default area of a collective confirmation, you can enter values for the individual columns of the collective confirmation, which the system then transfers to the data entry section as default values for all activities.
Figure 5.9 Example of a Collective Confirmation of Activities
If you have entered activities or activity elements in a table of a collective confirmation, you can save the list for these objects as a pool of confirmations. With subsequent collective confirmations, you can constantly refer to this pool of confirmations and avoid having to enter the activities or activity elements manually each time. You can enter collective confirmations using transaction CN27, through the Internet using the CNW1 Internet service, or also in the information system for structures (see Section 7.1) .
. You can also send confirmation workjlows in the information system for structures. To do this, you select the activities or activity elements that are to be confirmed from a report and you send this list as a pool of confirmations to the project member responsible. The project member then receives a work item for entering the actual data, which he or she can use to branch directly into the collective confirmation of the pool of confirmations.
269
Collective confirmation
Pool of confirmations
Confirmation workflow
I
5 I Project Execution Processes
. Summary confirmations
)
Confirming activities using the
cross-application time sheet
You can use a summary confirmation to simultaneously confirm all activity elements of an activity that have not yet been confirmed manually. To do this, select the corresponding activity in transaction CN25, go to the summary confirmation (F7!, and enter a degree of processing. The degree of processing is forwarded to the assigned activity elements and used to calculate the confirmation data; however, the activity per se is not confirmed by a summary confirmation.
5.3.3 Cross-Application Time Sheet
Many companies use the CATS (cross-application time sheet) as a key transaction for entering the time data of their employees. Each employee, or only particular employees such as cost and work center supervisors or administrators assigned to enter employee time data, can use the cross-application time sheet to enter working times for a group of employees. The time data entered using CATS can then be transferred into other applications such as Controlling or SAP Project System and consequently generate activity allocations or confirmations automatically. To document when and for what purpose work was performed, the working times in the cross-application time sheet must be assigned working time attributes (in particular, account assignment objects) that establish how the data is processed further in the SAP system.
If you have performed work for a network activity, in the crossapplication time sheet, you enter how many working hours you performed on the relevant days and the activity ID (see Figure 5.10). If required, you can add descriptive texts or forecasts for still outstanding remaining work to your details, or you can document that the activity is to be confirmed. Depending on the settings of the crossapplication time sheet, the system can automatically add additional information, such as activity or attendance types, to your details.
The time data entered for the network activity is first saved in a separate CATS database table and cannot be displayed yet in the project. Once the data has been transferred into SAP Project System, the data
. from the cross-application time sheet is used to generate the individual confirmations that refer to the network activity. The individual confirmations result in the creation of a corresponding accounting document and the activity debited with the actual costs of the work.
270
Confirmations I 5·3
Figure 5.10 Example of Entering Time Data Using CATS Classic
You can also enter working times for maintenance orders or service orders in the same way in CATS. The transfer of data into the corresponding target applications results in confirmations for these orders. You can also transfer time data into Human Resources to enter attendances and absences, travel activities, or to create remuneration documents. In addition, you can enter time data or statistical key figures relating to costs centers, costs objects, business processes, internal or sales orders, and particularly WBS elements in the cross-application time sheet. In these cases, the working time data is transferred into Controlling, which leads to the corresponding activity allocations being created. You can also use the cross-application time sheet to enter suppliers' services. This data is then transferred into the services area of Materials Management and service entry sheets are consequently created (see Section 5.13.1).
The data is transferred into the relevant target components using transfer reports. You can use the RCATSTPS report (transaction CATS) to transfer data into SAP Project System and the RCATSTCO report (transaction CAT7) to transfer data into Controlling. In partic-
271
Transferring data into other target applications
I
5 I Project Execution Processes
ular, you can also use the cross-component RCATSTAL report (trans-) action CATA) to transfer common data into Human Resources, Con
trolling, plant maintenance, or customer service, and into SAP Project System.6 The transfer reports are usually scheduled as background jobs, which means that the working time data is transferred automatically to the target components at regular intervals.
Releasing and approving work
ing time data
CATS - application interfaces
Worklist
Depending on the settings of the cross-application time sheet, there may be two additional steps to perform between entering the time data and transferring it: the time data is explicitly released by the person who entered it and the project manager approves it. The approval procedure can be supported by an approval workflow from the cross-application time sheet.
There are different application interfaces you can use to enter time data with the CATS cross-application time sheet. For example, you can use CATS classic (transaction CAT2) or CATS for Service Providers (transactions CATSXT and CATSXT_ADMIN) directly in the SAP system. You can use CATS regular (CATW service) to enter time data through the Internet. Various iViews are also available to integrate CATS into the Enterprise Portal of companies. You can also use CATS notebook locally, for example, installed on a laptop and for entering time data offline. If you later connect CATS notebook with an SAP system, the data from CATS notebook and the cross-application time sheet is synchronized in the SAP system. You can use customer enhancements to make various changes to the different application interfaces.
You can make it easier for -employees to enter time data in the crossapplication sheet by using worklists. A worklist is a default area in the cross-application time sheet where time data and working time attributes are automatically imported and can be copied into the data entry section of the cross-application time sheet using a copy function. The worklist can be filled by account assignment objects or working time attributes that were entered earlier by the employee, by pools of confirmations that you created in SAP Project System, or by capacity requirements on the work center to which the employee is assigned. In particular, data for workforce planning on personnel
6 However, you can only transfer data separately into Materials Management using transaction CATM.
272
Confirmations I 5·3
resources (see Section 3.2.2) can also be copied automatically into the worklist o~the cross-application time sheet of the corresponding people. You;can also use a customer enhancement or a Business AddIn (BAdI) to combine worklists.
Time data is always entered using CATS with reference to a personnel number. Therefore, in order to use the cross-application time sheet, corresponding personnel numbers for internal and external employees, who want to enter working times through CATS, must be available in the SAP system.? You can create the personnel numbers manually in the SAP system as HR mini master records. You need at least infotypes 0001 (Organizational Assignment) and 0002 (Personal Data) for this purpose. We also recommend that you use infotype 0315 (Time Sheet Defaults). If you're using SAP Human Resources Management, you can also copy the required data directly from Human Resources. Asa result, additional data such as the planned working time (infotype 0007) of the employees can then also be used in the cross-application time sheet for information purposes or for performing checks.
Before you can use CATS, you must have defined data entry profiles in Customizing of the cross-application components. Data entry profiles control the interface and functions of the cross-application time sheet (see Figure 5.11). You can manually define the data entry profile together with the personnel number when you access the crossapplication time sheet. However, the initial screen is usually skipped and a personal number and data entry profile are firmly assigned directly to the SAP users using the PER and CVR user parameters.
Depending on the data entry profile, you can also define a field selection in Customizing for the data entry section or the worklist of the cross-application time sheet. You can use the field selection to control which working time attributes the employees can or must enter. You can use various customer enhancements and BAdIs to adapt the interface and functions of the cross-application time sheet to meet your own requirements. Customizing of the cross-application time sheet contains a detailed description of the possible enhancements.
7 External employees who want to enter activities using the cross-application time sheet are normally grouped under one or a few personnel numbers.
273
Prerequisites for CATS
Data entry profile
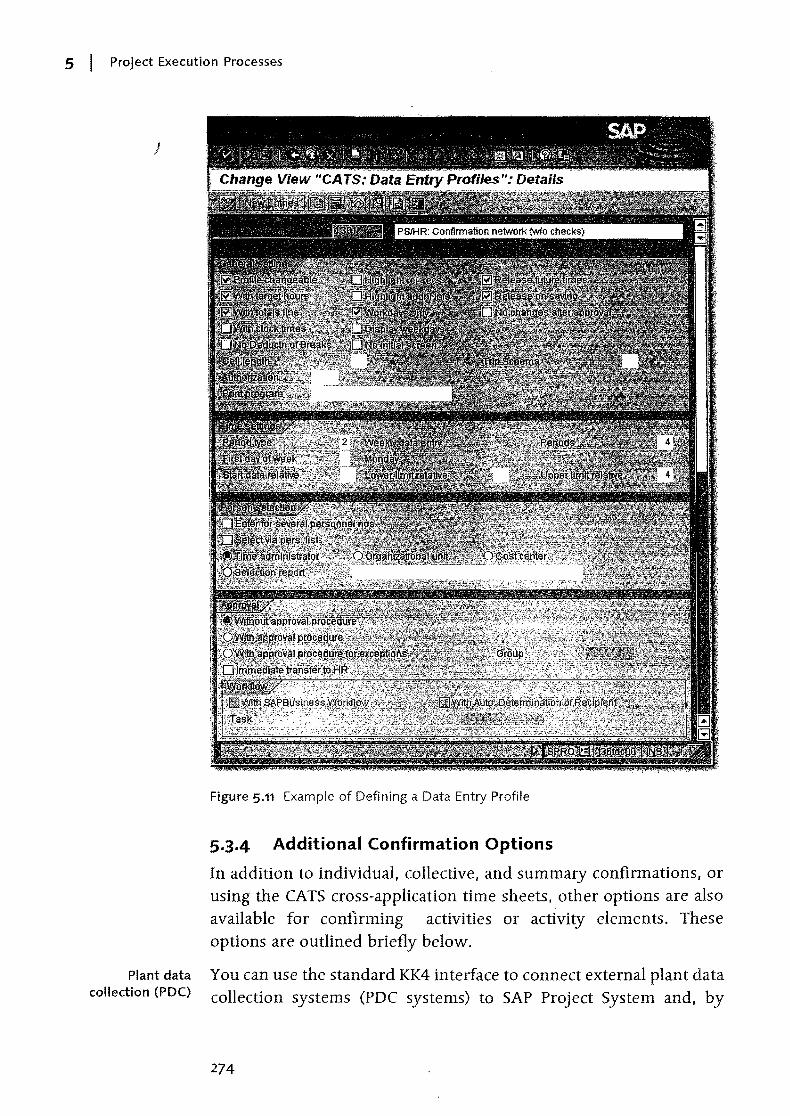
5 I Project Execution Processes
Plant data collection (POe)
Figure 5.11 Example of Defining a Data Entry Profile
5-3-4 Additional Confirmation Options
In addition to individual, collective, and summary confirmations, or using the CATS cross-application time sheets, other options are also available for confirming activities or activity elements. These options are outlined briefly below.
You can use the standard KK4 interface to connect external plant data collection systems (PDC systems) to SAP Project System and, by
274

External Procurement of Services I 5.4
doing so, copy data from external systems into the SAP system for confirmation p}Ilrposes. This interface can also make activity data available in the PDC system for plausibility checks.
You can also use a Remote Function Call (RFC) to copy confirmation data from Microsoft Access into SAP Project System or, conversely, to transfer confirmation and activity data to Microsoft Access.
You can use the Open PS for Palm interface to download activity data to a Palm Pilot, enter confirmation data offline in the Palm Pilot, and transfer it back into SAP Project System at a later stage.
Microsoft Access interface
Open PS for Palm
To import confirmation data into SAP Project System, you can use BAPI
the AddConfirmation Business Application Programming Interface (BAP!). This BAPI can help you to develop your own interfaces for the exchange of data with any other systems.
5.4 External Procurement of Services
This section describes purchasing processes that were automatically triggered due to purchase requisitions of externally processed activities and service activities or elements. Similar processes can be run for WBS elements in Purchasing when you manually assign purchasing documents to WBS elements (see Section 5.2).
5.4.1 External Processing
A purchase requisition can be created automatically for an externally processed activity (and also for an externally processed element) depending on the setting of the Res.lPurc.req. indicator.s In the process, the system checks whether all the data (Le., the material group, purchasing group, unit of measure, etc.) required for creating the purchase requisition can be copied from the activity data. If the data cannot be copied, the system issues an error message and you must add the missing data to the activity. You can use a customer enhancement to make further adjustments automatically to different data of the purchase requisition when you save the purchase requisi-
8 If the Collective Pure. Req. indicator is set in the parameters for the network type, the system generates a purchase requisition for the entire network. Each planned external activity and each externally procured material component results in a separate position within this purchase requisition.
275
5 I Project Execution Processes
J
Determining the source of supply
Purchase order handling
Workflow for purchase orderrelated changes
tion. Subsequent changes to the activity also directly affect the purchase requisition. Due to the purchase requisition, commitments are shown on the activity (or on the network header in the case of a header-assigned network).
You can directly process the purchase requisition further in Purchasing. If you have not already made reference to a purchasing info record or an outline agreement in the activity and you consequently know the supplier. you must first select the supplier. You can do this using an automatic source determination. for example, where the system searches for suitable source list entries, quota arrangements, info records. or outline agreements for the external service and proposes one or several suppliers in this case. You can also carry out bid invitations, if required. In Purchasing, requests for quotations (RFQs) are sent to different suppliers. their bids are entered and compared with one another, and a supplier is ultimately selected. If necessary. you can also assign a fixed supplier to the purchase requisition manually.
The purchase requisition data can then be used by PurchaSing to create a purchase order. The purchase order is also assigned to an activity and, consequently. the purchase requiSition commitment is reduced on the activity and a corresponding purchase order commitment is simultaneously increased (see Section 5.3.2). The Purchase order exists indicator is also automatically set in the activity. Unlike the purchase requisition, which only represents an internal document that cannot be used outside the company. the purchase order is the request directed to an external supplier to deliver an external service by the specified delivery date; consequently, a purchase order also has an external effect. In Purchasing, you can link the added processing of the purchase requisition and the creation of the purchase order to release procedures, which are automated approval processes.
If a purchase order exists for an externally processed activity and if you subsequently make a purchase order-related change to the activity, for example, you change the delivery date, the activity quantity or the activity type, and the purchase order is not adjusted automatically. However, you can activate a workflow in the Parameters for network type (see Section 2.3.2), which you can use each time you make a purchase order-related change to inform the purchaser responsible of this change and to enable the purchaser to change the purchase order directly (see Figure 5.12).
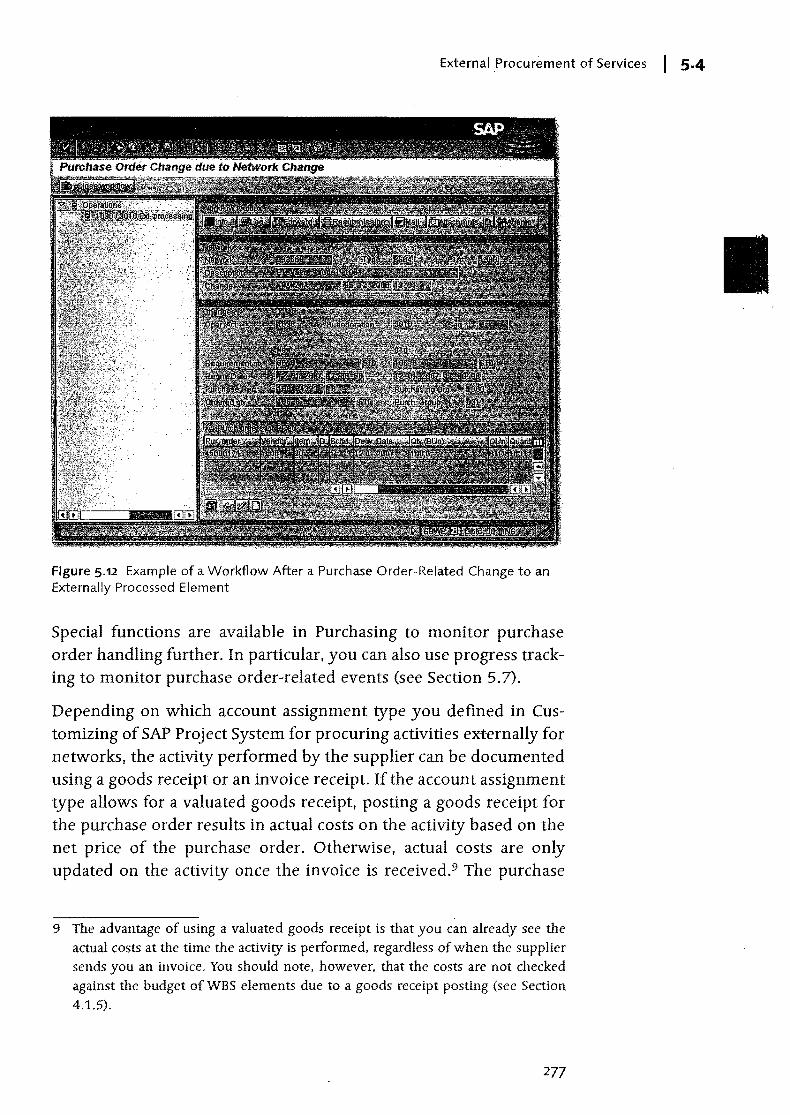
External Procurement of Services I 5.4
Figure 5.12 Example of a Workflow After a Purchase Order-Related Change to an Externally Processed Element
Special functions are available in Purchasing to monitor purchase order handling further. In particular, you can also use progress tracking to monitor purchase order-related events (see Section 5.7).
Depending on which account assignment type you defined in Customizing of SAP Project System for procuring activities externally for networks. the activity performed by the supplier can be documented using a goods receipt or an invoice receipt. If the account assignment type allows for a valuated goods receipt, posting a goods receipt for the purchase order results in actual costs on the activity based on the net price of the purchase order. Otherwise, actual costs are only updated on the activity once the invoice is received.9 The purchase
9 The advantage of using a valuated goods receipt is that you can already see the actual costs at the time the activity is performed, regardless of when the supplier sends you an invoice. You should note, however, that the costs are not checked against the budget of WBS elements due to a goods receipt posting (see Section 4.1.5).
277
5 I Project Execution Processes
order commitment of the activity is reduced accordingly in each case } (see Section 5.3.2). If there are price differences with the purchase
order net price when the invoice is received or checked, the resulting costs can be shown on the activity.
5.4.2 Service
A purchase requisition that was automatically created as a result of a service activity (or service element) (see Section 3.2.5) triggers simi-' lar purchasing processes as the purchase requisitions of an externally processed activity. You can assign suppliers to the purchase reqUisition manually, the system can determine a supplier automatically using the source determination, or you can perform bidding procedures. You can use the purchase requisition data to create a purchase order and consequently commission the services of suppliers. The purchase requisition and purchase order are each assigned to the activity and result in the commitments being increased and decreased accordingly. Subsequent changes to the activity have a direct effect on the purchase requisition, but not on the purchase order. However, if the activity date, amount, or type changes, the purchaser responsible can be automatically informed of these purchase order-related changes.1o
Service entry Unlike purchasing processes for an externally processed activity, a service entry and service acceptance always take place for service activities. In a service entry, an employee or the supplier documents which planned or unplanned services were performed in relation to the purchase order, If the value of the unplanned services exceeds the limit you allowed for in the activity, (see Section 3.2.5), the system issues an error message for the service entry. Service entries are executed using service entry sheets (see Figure 5.13). These entry sheets can be created directly in transaction ML81N or via using the CATS cross-application time sheet and then transferring the data to Materials Management (see Section 5.10.1).
Service acceptance After services have been documented in the service entry sheet, they must be checked and accepted by one or several of the people responsible, depending on the system setting. Once this service has
10 Note that subsequent changes to the services specifications of a service activity don't trigger the standard workflow when purchase order-related changes are implemented.
Material Procurement and Delivery I 5-5
been accepted, the system creates a material document (similar to the goods receipt) posting for externally processed activities), whiCh results in actual costs and a reduction in the purchase order commitment on the activity. An invoice verification can then be performed on the activity for adjustment postings, if necessary.
Figure 5.13 Example of a Service Entry
5.5 Material Procurement and Delivery
Section 3.3.1 described how material components could be assigned to network activities in order to plan the procurement and subsequent consumption of materials in the project. The item category and procurement type for the assignment specified how a material is to be procured and in which stock the stock items are to be managed. The following section explains how the different procurement types are executed and, in particular, the associated value flows for the project.
If material has to be delivered to the customer or construction site during project execution, delivery notes can be created for the required shipping tasks in SAP Project System. This option known as
279
5 I Project Execution Processes
a delivery from project is discussed in Section 5.15.1. Lastly, Section ) 5.17.1 introduces the ProMan, a tool that you can use to monitor
logistical data of all project-related procurement measures.
5.5.1 Material Procurement Processes
Assigning the required material to activities in the form of material components is the starting point for procuring material for network activities. Depending on the setting of the Res./Purc.req. indicator for a material component, the procurement of the material can be triggered automatically if the status is Created, or it can be triggered for a release, or it can be triggered manually at a later stage.
Non-Stock Items
Similar to external processing, purchasing processing is triggered for non-stock items (see Section 5.12.2). Based on the purchase requiSition for the material component, this means that a supplier selection takes place in Purchasing, a purchase order is created, and a goods receipt or invoice receipt are entered. Non-stock items and externally processed activities use, in particular, the same account assignment category to ensure that the value flow is also processed in the same way. Purchase requisitions and purchase orders are therefore assigned to the activity to which the non-stock item is assigned and produce corresponding commitments on the activity (or on the network header for header-assigned networks). The goods or invoice receipts are also assigned to the activity and result in actual costs and a simultaneous reduction of the commitment. Non-stock items are procured directly through Purchasing (direct procurement), and not through Material Requirements Planning (MRP).
[»] Non-stock items are not managed in a stoc;k(either plant stock or individual requirements stock). Therefore, no inventory costs are incurred. The goods and invoice receipt of a non-stock item corresponds directly to the material consumed being posted by the activity.
Stock Items
Many different procurement types are available for stock items, depending on the material master data, the project settings, and so on (see Section 3.3.1), In the simplest scenario, only one reservation
280
Material Procurement and Delivery I 5.5
is created for a stock item in SAP Project System; this reservation represents a reqpest to MRP to procure the material in the required quantity by the planned requirements date. Depending on whether you selected the Reservation for network, Reservation WBS element, or Reservation sales document procurement type, the reservation refers to the plan stock stand, a stock-managing WBS element, or a sales order item as a individual requirements stock segment. The task of Material Requirements Planning is to ensure the availability of the material.
The MRP controller can use a material requirements planning run to calculate material shortages, and for the system to generate procurement proposals automatically if requirements aren't covered by the available stock and the fixed purchasing or the previously planned production receipts.11 Depending on the material and planning run settings, procurement proposals can be purchase requisitions or planned orders (planned procurement elements). Based on the lotsizing procedure selected, you can calculate the quantities and dates of the procurement elements in such a way that you can combine requirements for different dates to optimize the in-house production costs or, because of greater order quantities, improve purchasing conditions. This procurement quantity calculation must be performed separately for each stock segment (see also Section 3.3.2).
If a valid BOM (assembly) exists for a material, this is exploded within a multilevel planning run and procurement proposals are also created for the BOM items (dependent requirements); this action triggers the related procurement. If the assembly is managed in the project stock, the dependent requirements are also managed in this stock (if this is allowed by the settings in the material master and the BOM items). If there is a valid work breakdown structure BOM for the assembly, this is used instead of the material BOM to explode the BOMs.
You can perform planning runs for all stock segments simultaneously, but also separately for individual requirements stock segments
11 If you selected the Purch. requisition + Reservation procurement type for a material component, in addition to creating the reservation, the system generates a purchase requisition for the material (regardless of whether sufficient stock is available), Therefore, an MRP run is generally unnecessary for this procurement type.
Requirements planning
Dependent requirements
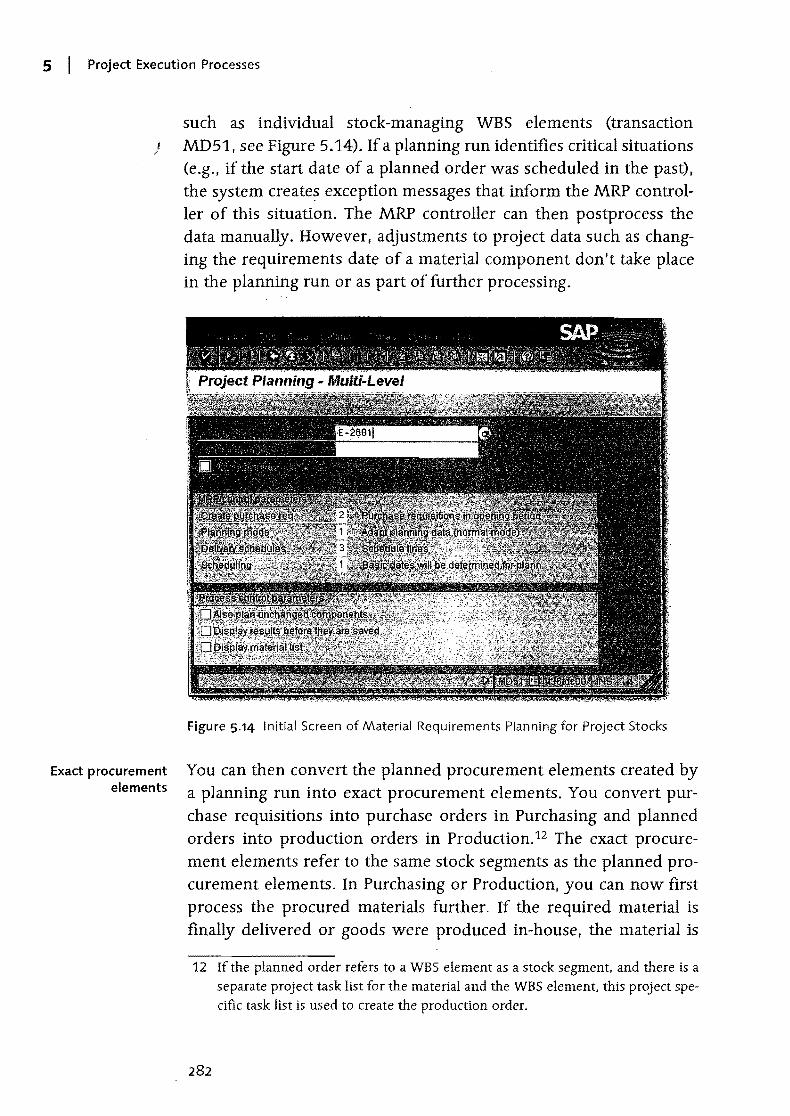
5 I Project Execution Processes
such as individual stock-managing WBS elements (transaction ) MD51, see Figure 5.14). Ifa planning run identifies critical situations
(e.g., if the start date of a planned order was scheduled in the past), the system create~ exception messages that inform the MRP controller of this situation. The MRP controller can then postprocess the data manually. However, adjustments to project data such as changing the requirements date of a material component don't take place in the planning run or as part of further processing.
Exact procurement elements
Figure 5.14 Initial Screen of Material Requirements Planning for Project Stocks
You can then convert the planned procurement elements created by a planning run into exact procurement elements. You convert purchase requisitions into purchase orders in Purchasing and planned orders into production orders in Production.12 The exact procurement elements refer to the same stock segments as the planned procurement elements. In Purchasing or Production, you can now first process the procured materials further. If the required material is finally delivered or goods were produced in-house, the material is
12 If the planned order refers to a WBS element as a stock segment, and there is a separate project task list for the material and the WBS element, this project specific task list is used to create the production order.
282
Material Procurement and Delivery I 5.5
posted into the stock provided and is now available for consumption. In t!J.e last step of this process, the material can be withdrawn by the activity and this withdrawal can be documented using a goods issue that refers to the reservation number of the material component.
The value flow of the procurement process just described above will now be explained in an example of procuring a material produced inhouse using valuated project stock. Based on the assignment of a stock item to an activity that refers to the valuated project stock, the system shows planned costs for the subsequent consumption of the material. The planned costs are calculated within the network cost-ing on the basis of the planned quantity and requirements date of the component (see Section 3.4.5). The costing variant in the network header is used for this calculation. The creation of the reservation for the material component and also the subsequent planning run do not result in any changes to the projects costs.
If a material is to be produced in-house, the planning run creates a planned order that can be converted into a production order. The production order is assigned to the stock-managing WBS element and can therefore be evaluated with the project in Reporting of SAP Project System. The production order contains planned costs for producing the material and a planned increase of the same amount to ensure that a change to the total planned costs does occur on the stock-managing WBS element. Confirmations of work performed on the production order result in actual costs on the order that you can also analyze at aggregated level on the stock-managing WBS element.
Valuated project stock: Value flow for in-house production
If the material production was completed and a goods receipt post- Inventory costs
ing of the material performed in the project stock, the stock-manag-ing WBS element is credited with the costs for the material stock in the form of statistical actual costs (value type 11) and the production order is debited by the same amount.13 The following strategy is used to evaluate the material in the stock and therefore calculate the inventory costs:
13 To enable the inventory costs to be shown on the stock-managing WBS element as stati~tical actual costs, you must create the relevant material stock account of Financial Accounting, as well as the cost element for type 90. The GIL account determination can be controlled separately from the collective stock using separate valuation classes for the project stock in the material master data.
5 I Project Execution Processes
1. If you already posted a goods receipt for the material in the project ) stock, this standard price of the individual requirements stock seg
ment is used.14
Valuated project stock: value flow
for external procurement
2. The evaluation that you make available in customer enhancement COPCP002 is used.
3. The system transfers the evaluation from a marked costing of a sales order item aSSigned to the WBS element, an activated SEIBAN costing, or a unit costing that you have created for the material component in the network.
4. The production order costing is used to calculate the evaluation.
5. The price in the material master determines evaluation.
If there are still variances on the order after the material has been delivered to the project stock and the production order has been reduced accordingly, you can settle these variances on the stockmanaging WBS element, or directly on the profitability analysis during period-end cloSing.
The consumption of the material by the network activity - the goods issue for the reservation ultimately results in the activity being credited with actual costs in accordance with the evaluation of the material, and the inventory costs being simultaneously reduced at the level of the WBS element.
When you externally procure a stock item for the valuated project stock, the purchase requisition, purchase order, and goods receipt of the material are assigned to the stock-managing WBS element, which results in commitments and inventory costs on the WBS element.15
Depending on the price control, the inventory costs are calculated based on the standard price or moving average price. If differences occur with the order value, these can be shown as price differences on the stock-managing WBS element with a corresponding account control. The final consumption of the delivered material by the activity results in actual costs on the activity and reduces the inventory stock at the level of the WBS element accordingly.
14 If required, you can manually change the standard price of the material for the individual requirements stock segment in transaction MR21.
15 If you created the purchase requisition using a planning run, a purchase requisition commitment is not created for performance reasons. In this case, only the purchase order results in a commitment being created on the stock-managing WBS element.
Material Procurement and Delivery I 5.5
If you require dependent requirements for the in-house production of a material ~at is managed in the valuated project stock, these requirements (provided they allow individual requirements management) are also managed in the project stock. The planned costs for the consumption of dt!pendent requirements are shown as planned costs at the level of the production order. Within the framework of procuring individual-requirement dependent requirements, resulting purchase requisitions, purchase orders, production orders, and goods receipts .automatically refer to the stock-managing WBS element and result in commitments and, in particular, inventory costs on the WBS element, as explained above. The consumption of dependent requirements by the production order results in actual costs on the order. The inventory costs for the dependent requirements are Simultaneously reduced at the level of the stock-managing WBS element.
When you use theOvaluated project stock, materialrttpvements for the individual requir~mentsstock are managed basedorrql.lantities and values. Planned and actual costs for the consumption of the material are shown on the consumer (network activity or product jon order) and the inventory costs of the material and, if necessary, commitments for its external procurement are posted on the stock element (WBS element).
The logistical process of procuring material for nonvaluated project stock (external procurement and in-house production) is utterly the same as using valuated project stock.16 But, unlike valuated project stock, material movements are entered based on only quantities, not values. This means that no planned or actual costs are shown for the consumption of individual requirements materials at the level of the consumer (activity or production order).17 If necessary, commitments are posted at the level of the stock element (the WBS element) due to purchase orders. However, the goods receipt of an externally procured material or of a dependent requirement in the nonvaluated project stock does not result in inventory costs; instead, like a direct procurement of material for the WBS element, the goods receipt results in actual costs on the stock-managing WBS element. The
16 Nevertheless, note that you cannot group the requirements of several WBS elements when you use nonvaluated project. stock (see Section 3.3.2).
17 Planned costs for material that is managed in nonvaluated project stock can only be shown on planning networks, because planning networks don't affect planning and therefore prevent aSSigned values from being displayed twice.
Valuated project stock: Dependent reqUirements
[«]
Nonvaluated project stock: Value flows
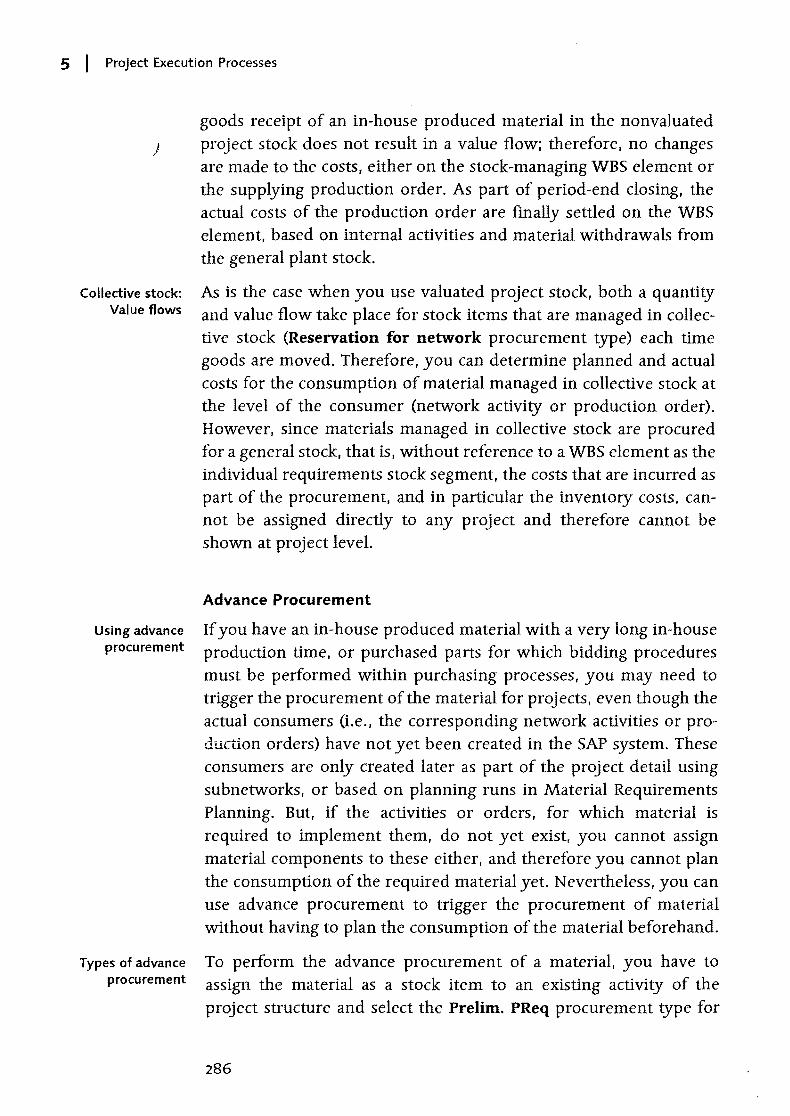
5 I Project Execution Processes
}
Collective stock: Value flows
Using advance procurement
Types of advance procurement
goods receipt of an in-house produced material in the nonvaluated project stock does not result in a value flow; therefore, no changes are made to the costs, either on the stock-managing WBS element or the supplying production order. As part of period-end closing, the actual costs of the production order are finally settled on the WBS element, based on internal activities and material withdrawals from the general plant stock.
As is the case when you use valuated project stock, both a quantity and value flow take place for stock items that are managed in collective stock (Reservation for network procurement type) each time goods are moved. Therefore, you can determine planned and actual costs for the consumption of material managed in collective stock at the level of the consumer (network activity or production order). However, since materials managed in collective stock are procured for a general stock, that is, without reference to a WBS element as the . individual reqUirements stock segment, the costs that are incurred as part of the procurement, and in particular the inventory costs, cannot be assigned directly to any project and therefore cannot be shown at project level.
Advance Procurement
If you have an in-house produced material with a very long in-house production time, or purchased parts for which bidding procedures must be performed within purchasing processes, you may need to trigger the procurement of the material for projects, even though the actual consumers (Le., the corresponding network activities or production orders) have not yet been created in the SAP system. These consumers are only created later as part of the project detail using subnetworks, or based on planning runs in Material ReqUirements Planning. But, if the activities or orders, for which material is required to implement them, do not yet exist, you cannot assign material components to these either, and therefore you cannot plan the consumption of the required material yet. Nevertheless, you can use advance procurement to trigger the procurement of material without having to plan the consumption of the material beforehand.
To perform the advance procurement of a material, you have to assign the material as a stock item to an existing activity of the project structure and select the Prelim. PReq procurement type for
286
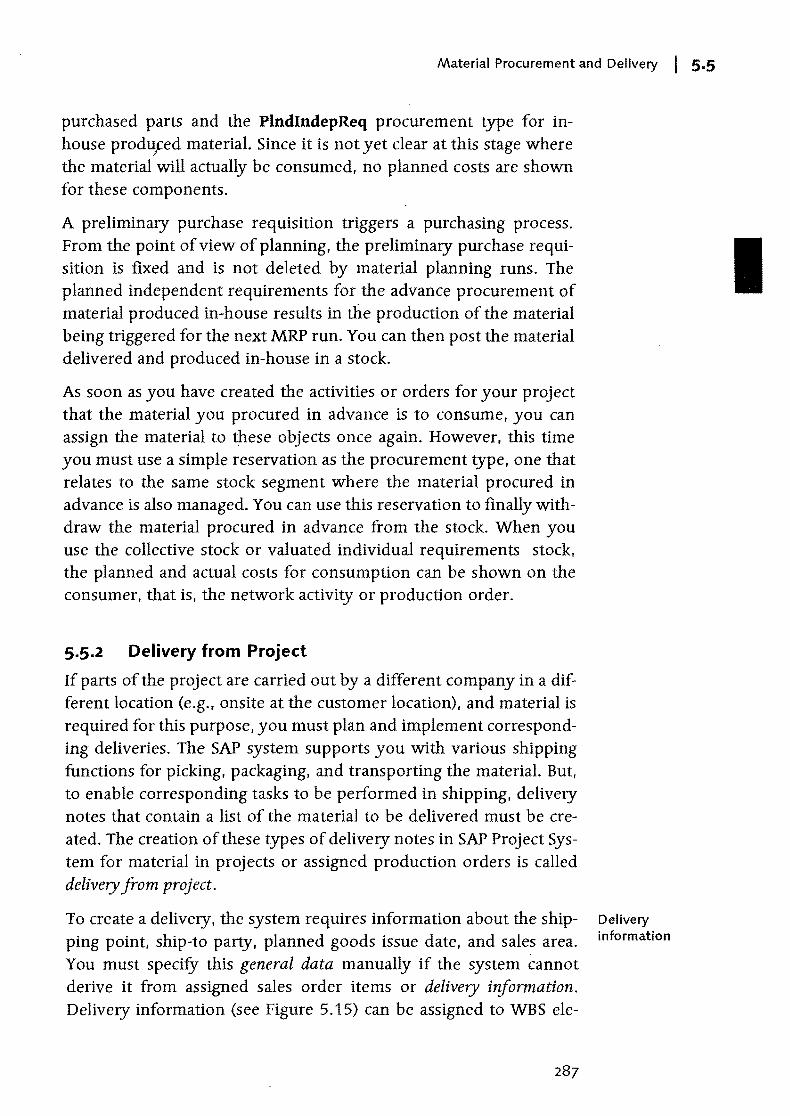
Material Procurement and Delivery I 5.5
purchased parts and the PlndlndepReq procurement type for inhouse produfed materiaL Since it is not yet clear at this stage where the material will actually be consumed, no planned costs are shown for these components.
A preliminary purchase requisition triggers a purchasing process. From the point of view of planning, the preliminary purchase requisition is fixed and is not deleted by material planning runs. The planned independent requirements for the advance procurement of material produced in-house results in the production of the material being triggered for the next MRP run. You can then post the material delivered and produced in-house in a stock.
As soon as you have created the activities or orders for your project that the material you procured in advance is to consume, you can assign the material to these objects once again. However, this time you must use a simple reservation as the procurement type, one that relates to the same stock segment where the material procured in advance is also managed. You can use this reservation to finally withdraw the material procured in advance from the stock. When you use the collective stock or valuated individual requirements stock, the planned and actual costs for consumption can be shown on the consumer, that is, the network activity or production order.
5.5.2 Delivery from Project
If parts of the project are carried out by a different company in a different location (e.g., onsite at the customer location), and material is required for this purpose, you must plan and implement corresponding deliveries. The SAP system supports you with various shipping functions for picking, packaging, and transporting the material. But, to enable corresponding tasks to be performed in shipping, delivery notes that contain a list of the material to be delivered must be created. The creation of these types of delivery notes in SAP Project System for material in projects or aSSigned production orders is called delivery from project.
To create a delivery, the system requires information about the shipping point, ship-to party, planned goods issue date, and sales area. You must specifY this general data manually if the system cannot derive it from assigned sales order items or delivery information. Delivery information (see Figure 5.15) can be assigned to WBS ele-
Delivery information
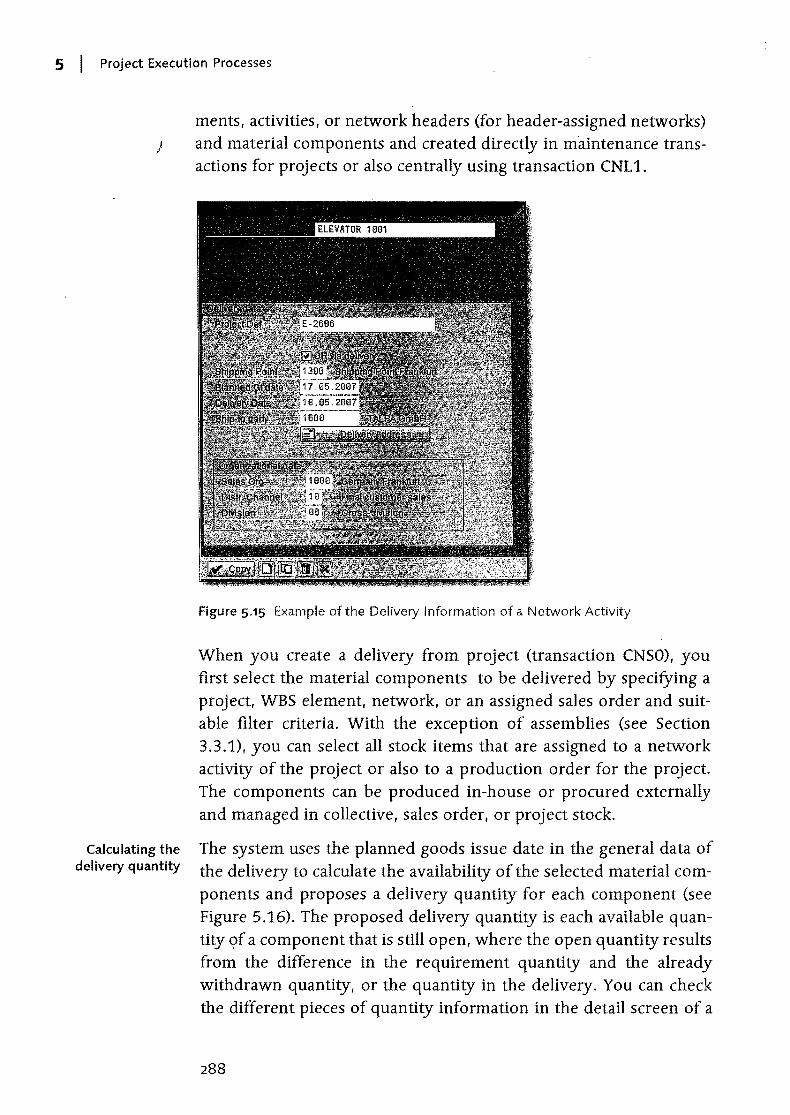
5 I Project Execution Processes
ments, activities, or network headers (for header-assigned networks) j and material components and created directly in maintenance trans
actions for projects or also centrally using transaction CNL 1.
Calculating the delivery quantity
Figure 5.15 Example of the Delivery Information of a Network Activity
When you create a delivery from project (transaction CNSO), you first select the material components to be delivered by specitying a project, WBS element, network, or an assigned sales order and suitable filter criteria. With the exception of assemblies (see Section 3.3.1), you can select all stock items that are assigned to a network activity of the project or also to a production order for the project. The components can be produced in-house or procured externally and managed in collective, sales order, or project stock.
The system uses the planned goods issue date in the general data of the delivery to calculate the availability of the selected material components and proposes a delivery quantity for each component (see Figure 5.16). The proposed delivery quantity is each available quantity of a component that is still open, where the open quantity results from the difference in the requirement quantity and the already withdrawn quantity, or the quantity in the delivery. You can check the different pieces of quantity information in the detail screen of a
288
Material Procurement and Delivery I 5.5
material component for the delivery- As soon as you have saved a delivery froll) project, you can use the document directly in shipping for all other follow-up actions. In SAP Project System, you can analyze deliveries from projects using transaction CNSO, or also in ProMan.
Figure 5.16 Example of Calculating the Delivery Quantity of a Material Component
5.5.3 ProMan
When you use the aforementioned procurement processes just for material or services (including external services) for a project, this results in a whole range of logistical data in SAP Project System, Purchasing, Production, Shipping, and so on. You can use ProMan (transaction CNMM) to evaluate this data centrally in a transaction. Traffic lights in ProM an indicate exceptional situations, for example, overdue purchase orders or missing material stocks. You can also execute different procurement tasks directly in ProMan, if required.
When you call ProMan, you first specify the project whose procurement measures you want to analyze. You can restrict the data selection further by specifying additional filter criteria in the initial screen of ProMan. In the main screen of ProMan, you then see the project structure on the left and the different tabs (views) on the right, where data for the objects selected in the project structure is displayed in tables (see Figure 5.17). In the project structure, you can either select
289
5 I Project Execution Processes
only one object or several similar objects simultaneously, for exam-) pIe, all material components of a network.
Figure 5.17 Project Structure and Component View of ProMan
ProMan views To enable data from documents and orders to be analyzed in ProMan, you must link these objects to the selected project. You can do this by account assigning them automatically or manually to the project, or by assigning them to a stock-managing WBS element. Consequently, data for dependent requirements in production orders can be analyzed in ProMan if these are managed in the project stock. However, if the dependent requirements are managed in collective stock, there is no longer a link to the project and the data for the dependent requirements is therefore not displayed in the ProMan views. The following list contains the different views in ProMan with some selected data in each of these views:
II> Components Reservation number, material number. network activity. requirement quantity. and date
II> Activities/Elements Network activity or activity element. activity quantity, information record. supplier. Purchase requisition exists indicator
290
Material Procurement and Delivery I 5.5
.. Orders/Documents Purchas1 requisition, purchase order, planned and production orders, material documents, Completed, Cancelled, Delivery Completed indicators, and so on
.. Quantities Quantities in purchase requisition, purchase order, planned or production order, and in material documents
.. Dates Requirement date, delivery date in purchase requisition and purchase order, posting date of material documents, scheduled dates of planned and production order
.. stock Unrestricted-use stock, quality inspection stock, and blocked stock of material
.. Deliveries Reservation number, delivery, delivery quantity, material provision date
The display of views in tables enables you to perform different functions and adjustments such as calculate totals or subtotals, print out data, use filter and sort criteria, and so on. You can then store any changes to the interface in your own layouts.
Underlined data in the different views is called a hotspot that enables you to go to the details of the data when you click on it. Examples of hotspots in ProMan are reservations, purchase requisitions, purchase orders, material documents, deliveries, planned and production orders, material masters and project structure data. For more detailed analysis, you can also branch from ProMan to the reqUirements/stock list of the material or to order reports.
In addition to analyzing data, you can also use ProM an to execute different procurement tasks. You can execute the following functions in ProMan (the possible functions here depend on which object you have selected in the project structure and which view you are in at the time):
.. Generate purchase requisitions or reservations
.. Perform planning runs
.. Group purchase requisitions
291
Hotspots
Executable functions of ProMan
I
I Project Execution Processes
~ Create purcha~e orders
/ ~ Post goods receipts and issues
ProMan Customizing
~ Make transfers between stock types
~ Generate deliveries
After you have executed a function in ProMan, you can refresh the views and, then check the result of the function directly in ProMan.
You can use ProMan fully without having to perform any priorCus~ tomizing activities; however, if necessary, you can define ProMan profiles and exception profiles in Customizing. You can use a Pro~ Man profile, which you can select in the initial screen of ProMan, to control which documents and orders are read by the database and which views you want to be displayed in ProMan (see Figure 5.18). In addition, the ProMan profile refers to an exception profile. Excep~ tion profiles define when you want the relevant traffic lights in Pro~ Man to indicate exceptional situations. You can even define the con~ ditions for displaying traffic lights by using the same functions as those used for defining substitutions or validations (see Sections 2.8.4 and 2.8.5).
Figure 5.18 Example of Defining a ProMan Profile
292
5.6 Billing )
You bill a project using corresponding functions from Sales based on sales order items that are assigned to WBS elements of the project. Due to this assignment, the resulting payment flows and actual revenues of billing documents are updated on the billing elements of the project and can therefore be compared to the planned revenues (see Section 3.5). Two functions, with which billing processes can be controlled in Sales using project data, are explained below: the milestone billing and resource-related billing of projects.
5.6.1 Milestone Billing
When you create a billing plan for a sales order item, you can derive the billing date, billing percentage, and the billing rules from the milestones of a project (see Section 3.5.3). As long as the milestones of the project have not yet been reached, the corresponding items of the billing plan are used exclusively for revenue and payment planning. In other words, they are locked for a billing. However, a lock can be automatically released if the milestone of the corresponding invoice date receives an actual date. You can either set this actual date manually in the milestone or (if it is an activity milestone) it can be set automatically due to an activity confirmation (see Section 5.3.1). A billing run in Sales then automatically generates down payment requests or invoices based on the unlocked items in the billing plan. If the sales order item is assigned to a WBS element, the resulting actual revenues or down payment requests are updated on the project. This process is called milestone billing and is illustrated again below using the example of the elevator project.
Let us suppose that the customer agreed to a down payment of 10 %
of the target value of 200,000 Euro (268,400 USD) at the start of the project, a partial invoice of 30 % when an agreed project goal is reached, and a final invoice when the project is completed. Corresponding milestones called down payment, partial payment, and final invoice were defined in the project and copied to the billing plan of the sales order. In SAP Project System, planned revenues of 60,000 Euro (80,534 USD) for the planned date of the partial invoice milestone and additional planned revenues of 140,000 Euro (188,000 USD) for the planned date of the final invoice milestone are shown in revenue reports. In payment reports of PS Cash Man-
293
Billing I 5.6
I
5 I Project Execution Processes
agement (see Section 7.2.4), you can also analyze the planned down ) payment (billing rule 4) of 20,000 Euro (27,000 USD) taking into
account the payment conditions for the planned date of the down payment milestone.
Down payments An activity confirmation creates an actual date in the down payment milestone and consequently documents the fact that the milestone has been reached. The actual date is automatically forwarded to the billing plan of the sales order and unlocks the down payment item. The billing of the sales order in Sales results in a down payment request (FAZ document type) of the agreed amount being automatically created for the unlocked item (see Figure 5.19). The amount is shown as a down payment request in the payment reports in SAP Project System. If the customer's down payment is entered in Financial Accounting for the down payment request, you can also analyze this using the payment reports of SAP Project System. The amount of the down payment request is reduced accordingly.
Figure 5.19 Example of Creating a Down Payment Request
Partial invoices If the partial invoice milestone is also reached during the course of the project, the second item of the billing plan is automatically unlocked due to the actual date of the milestone. The billing of the sales order now creates (controlled by billing rule 1" of the item) a partial invoice. The down payment made by the customer can be settled proportionately or completely (see Figure 5.20). Actual revenues in the amount of the partial invoice are now shown on the billing element of the project in the revenue reports of SAP Project System.
294
You can use payment reports in SAP Project System to track the invoice-rel~ed payment made by the customer that has been entered in FinanCial Accounting.
Figure 5.20 Example of Creating a (Partial) Invoice with Down Payment Settlement
Billing I 5·6
If the last final invoice milestone is also final1y reached in the project Final invoice
and the corresponding item is consequently unlocked in the billing plan, the billing of the sales order creates an invoice where all the down payments of the customer, which have not yet been settled, are deducted from the receivables. Based on this final invoice, the remaining actual revenues are posted on the project and can be ana-lyzed in Reporting. The actual receipt of payment is also shown later in the payment reports of SAP Project System.
5.6.2 Resource-Related Billing
If the required services and materials for implementing the project have not yet been established before the start of the project, you cannot yet agree on any fixed prices for the project processes with the customer. In these cases, you cannot bill fixed amounts in the way you could in the example just illustrated above. Instead, you can create a billing using the actual costs of the project. For the billing, you use billing requests in which you can verify for the customer the services performed, material consumed, and additional costs incurred. This form of billing is called resource-related billing.
295
I
5 I Project Execution Processes
Like sales pricing (see Section 3.5.4), resource-related billing is also ) controlled by a dynamic item processor profile (DIP profile) that is
stored in the sales order item assigned to the project. The DIP profile controls how the actual data of the project or the relevant billing structure for individual items of a billing request are to be summarized.18 When you start the resource-related billing for the sales order item (transaction DP91), you can analyze and, if necessary, still change the two-tier summarization of the actual data in the Expenses view and Sales price view.
Expenses view The Expenses view contains hierarchically structured actual data such as actual costs or statistical key figures entered in the project execution, summarized into dynamic items in accordance with the DIP profile settings. In the Expenses view, you can now decide which of the dynamic items are to be billed or postponed temporarily, or which should not be included in the billing request (see Figure 5.21).
Figure 5.21 Expenses View of a Resource-Related Billing
Sales price view In a second summarization stage, the DIP profile converts the dynamiC items for material numbers. These can be material numbers of the consumed material components of the project, or material
18 For more information about defining DIP profiles, see Section 3.5.4 and SAP Note 301117 in particular.
296
numbers of defined material master records specifically used for the purpose of cpnfirming an activity. Pricing occurs automatically based on these material numbers and. if necessary, saies order data such as the customer number, sales organization and so on. The Sales price view displays the hierarchically structured material numbers that are combined for individual sales document items. In the Sales price view. you can also analyze the conditions of the different sales document items determined using the pricing and change or add additional conditions (see Figure 5.22). You can now create a billing request that includes the summarized items and any items you adapted. The billing of the request in Sales finally posts the corresponding actual revenues on the project.
Figure 5.22 Sales Price View of a Resource-Related Billing
As of the Enterprise Release, you can combine the milestone billing (based on a billing plan in the sales order) and the resource-related
297
Billing I 5·6
Milestone billing and resou rcerelated billing
I

5 I Project Execution Processes
Resource-related billing between company codes
billing of the sales order. Consequently, by using milestones in the project, you can control when resource-related billings are possible and whether resource-related down payment requests (billing rule 4) or billing requests (billing rule 1) are create~ in the process. This includes all combinations of fixed down payments, fixed billing documents, resource-related down payments, and resource-related billing documents.
In international companies, employe~s from different company codes are frequently involved in the project execution. The costs between the company codes are normally settled on a resourcerelated basis. Let's look at the example of a cross-company code process for the elevator project.
The elevator is to be built and sold in Germany, but parts of the construction are also to be carried out by employees in the United States. Therefore, the project structure contains branches for both the company codes of Germany and the United States. In the company code for Germany (the requesting company code), a purchase order is created for the construction and assigned to the corresponding part of the project. In the company code for the United States (the delivering company code), a sales order is created because of the purchase order and assigned to the branch of the project for the United States company code.
In the course of the project execution, the employees in the United States post their activities on the branch of the project prOVided for this purpose. The actual costs that result from these postings can now be hilled on a resource-related basis with reference to the sales order. The billing leads to actual revenues on the branch for the company code for the United States. In contrast, the corresponding invoice receipt in the company code for Germany results in actual costs on the object to which the purchase order was also assigned.
As of the Enterprise Release, the new source Intercompany - Line Items is available for defining DIP profiles (see Section 3.5.4). With this source, you can use an alternative option to the one just e·xplained above to map the resource-related billing of project activities between company codes. In this case, rather than a sales order being created for each individual project, it is only created once (or once for each fiscal year) in the delivering company code, with the requesting company code as the customer. Only structures for the
298
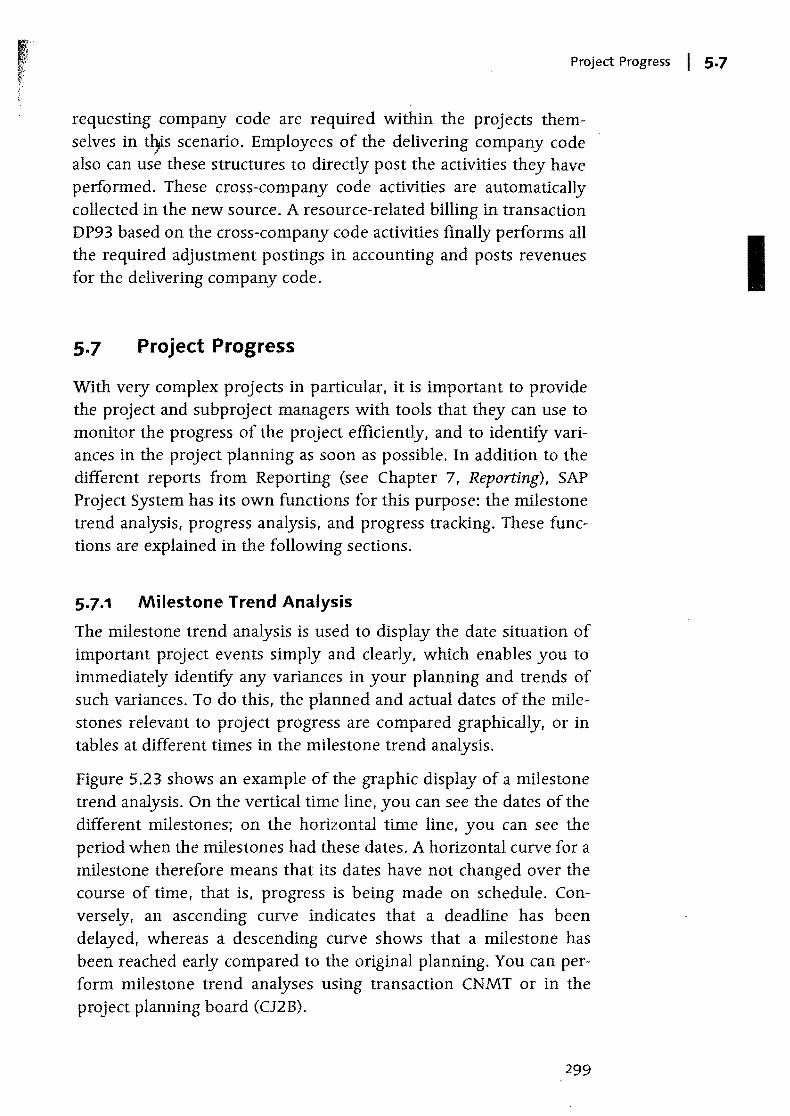
Project Progress I 5.7
requesting company code are required within the projects themselves in tl)is scenario. Employees of the delivering company code also can use these structures to directly post the activities they have performed. These cross-company code activities are automatically collected in the new source. A resource-related billing in transaction DP93 based on the cross-company code activities finally performs all the required adjustment postings in accounting and posts revenues for the delivering company code.
5.7 Project Progress
With very complex projects in particular, it is important to provide the project and subproject managers with tools that they can use to monitor the progress of the project efficiently, and to identity variances in the project planning as soon as possible. In addition to the different reports from Reporting (see Chapter 7, Reporting), SAP Project System has its own functions for this purpose: the milestone trend analysis, progress analysis, and progress tracking. These functions are explained in the following sections.
5.7.1 Milestone Trend Analysis
The milestone trend analysis is used to display the date situation of important project events simply and clearly, which enables you to immediately identity any variances in your planning and trends of such variances. To do this, the planned and actual dates of the milestones relevant to project progress are compared graphically, or in tables at different times in the milestone trend analysis.
Figure 5.23 shows an example of the graphic display of a milestone trend analysis. On the vertical time line, you can see the dates of the different milestones; on the horizontal time line, you can see the period when the milestones had these dates. A horizontal curve for a milestone therefore means that its dates have not changed over the course of time, that is, progress is being made on schedule. Conversely, an ascending curve indicates that a deadline has been delayed, whereas a descending curve shows that a milestone has been reached early compared to the original planning. You can perform milestone trend analyses using transaction CNMT or in the project planning board (CJ2B).
299
I
5· I Project Execution Processes
)
Prerequisites of milestone trend
analyses
Figure 5.23 Example of a Milestone Trend Analysis
To perform a milestone trend analysis. the projects that you want to analyze must contain milestones where the Trend analysis indicator is set or was set at early on the project (see Section 2.4). The Historical curve view of the milestone trend analysis shows the dates over time of the milestones. where the Trend analysis indicator is currently set. The Historical milestones view also displays milestone dates. but where the indicator is not currently set although it was set at an earlier time.
The second prerequisite for the milestone trend analysis is that you must create project versions (see Section 2.9.1) to retain the dates of the milestones for the different times in the system. Note. in this case. that you must set the MTA relevant indicator for the project versions in order to ensure that they can be used for a milestone trend analysis.
5.7.2 Progress Analysis
You can use the progress analysis to compare the actual status of a project with the planned project progress to enable you to determine any schedule or cost variances early on and take any necessary meas-
300
Project Progress I 5.7
ures (i.e., stop the project, allocate more budget, change scheduling, etc.) to contro) the situation. You can analyze the progress for individual parts of the project, or on an aggregated basis for the entire project, whereby the different parts of the project can be weighted very differently.
The progress analysis determines the following key figures for this in both aggregated and nonaggregated form and makes them available in a special progress version:
~ Planned percentage of completion (POC(planned»
~ Actual percentage of completion (POC(actual»
~ Budgeted costs of work scheduled (BCWS)
~ Actual costs of work performed (ACWP)
The earned values are an expression of the value of the relevant percentage of completion in each case and are calculated from the product of a percentage of completion and a reference factor (overall costs) that reflects the total value of the work to be performed. This reference factor can display either the planned costs or the budget. The following therefore applies:
Bews ::;: poe (planned) x overall costs Aewp == poe (actual) x overall costs
In business literature, planned and actual earned values are generally known as BCWS and BCWP values. BCWS stands for Budgeted Costs of Work Scheduled; BCWP stands for Budgeted Costs of Work Per-formed.
To be able to make statements on the cost variances, another key figure is used, namely the actual costs actually incurred. These are frequently called ACWP values (Actual Costs of Work Performed) in the literature within the progress analysis.
Percentage of completion, earned value
SCWS, BCWP, ACWP
You can now calculate schedule variances (SV) and cost variances SV, cv (CV) from these key figures as follows:
SV = Bewp Bews ev = Bewp - Aewp
SV is a measurement for schedule variances in your project. If SV is positive, this means that the value of the current progress exceeds
301
5 I Project Execution Processes
the planned value; therefore, your project is progressing "faster" ) than planned. However, ifSV is negative, there is a scheduling delay
in your project; you have not yet reached the level of progress originally planned by this date.
The CV value reflects costs variances. If CV is positive, this means that the value of the current project progress is greater than the resulting actual costs that were used for it. However, if CV is negative, more actual costs have been incurred in your project than should be the case due to the actual project progress.
CPI, ECV The cost variance can also be expressed by the CPI value index (Cost
Performance Index), where CPI = BCWP/ACWP. This index indicates how the value of your actual project progress behaves in relation to the actual costs. If you adopt a continuous development of a project corresponding to the CPI value, forecasts for the anticipated BCV
(Expected Costs Value) total costs are also made according to ECV = total planned costs/CPI.
Measurement methods
If required, you can also analyze cost and schedule variances separately for different cost elements. This can be useful if you want to look at the development of internal or extern;:tl services or the use of material separately.
The planned and actual degrees of completion are the starting points for calculating cost and schedule variances. You can determine these degrees of completion using measurement methods. The following measurement methods are available by default:
... Start-Finish 0-100
The percentage of completion is 0 % until such time as the finish date of the object has been reached. The value then changes from o to 100 %. The planned finish date is used for the planned percentage of completion and the actual finish date is used for the actual percentage of completion. This method is only useful for objects whose duration is shorter than the period between two progress analyses, and for which a more specific method cannot be used.
... Start-Finish 20-80
When the planned or actual start date is reached, the planned or actual percentage of completion set to 20 %. When the finish date is reached, the percentage of completion increases to 100 %. An
302
Project Progress I 5.7
average value is achieved by using 20 % as the initial value (considered acrpss several evaluation periods). However, you should only use this method if the duration of the object is not too great and a more specific method cannot be used.
Ill> Time Proportionality With this method, the percentage of completion increases in proportion to the duration of the object, taking into account the relevant factory calendar. The system uses the planned start and finish dates for the planned percentage of completion, the actual start and finish dates for the actual percentage of completion or, in the case of a Partially confirmed status, the actual start date and the planned duration of the object. This method is useful if you can assume a linear increase in the progress of the project.
Ill> Milestones The percentage of completion for WBS elements and activities is copied from the corresponding field of assigned milestones that are identified as being relevant for the progress analysis (see Section 2.4). The system takes into account the planned date of the milestone for the planned percentage of completion and the actual date for the actual percentage of completion. The milestone technique can be useful if you can define objective criteria for achieving milestones.
The progress version decides for each of the methods listed above whether the forecast or basic dates are used to determine the planned degrees of completion. Other standard methods include:
Ill> Cost proportional You use this method to calculate the planned percentage of completion of an object from the ratio of cumulative planned costs up to the period of the progress analysis and the overall planned costs of the object. The actual percentage of completion results from the ratio of the actual costs for the overall planned costs. In terms of which co version of the planned costs is to be used, you specifY this in the progress version. You can only use this method in planned data if you have performed a cost planning by date. This method is useful for objects whose progress can be derived from cost development. These can typically be general cost activities, externally processed activities, or assigned production orders.
303
I
:i i : i
i , I ; i
!
': !
d;
I i'
5 I Project Execution Processes
)
.. Quantity proportional You determine the degrees of completion with this method as you do with the cost-proportional method. However, instead' of cost information, you use a statistical key figure here to calculate the degrees of completion. To use this method. you must have defined a suitable statistical key figure of the totals values type and assigned it to the method. In addition, you must perform planning by date for the key figure and post actual values for this key figure within the execution phase. This method is useful if you can derive the progress of an object by preferably using quantities such as the amount of work performed or the number of products completed.
.. Secondary proportionality(apportioned effort) This method copies the percentage of completion of one object from the percentage of completion of another reference object. Therefore, a prerequisite for using this method is that a fixed relationship can be assumed between the progress of the object and the reference object stored in the object (e.g., quality inspection and production).
.. Degree of processing from confirmation This method copies the actual percentage of completion from the degree of processing of confirmed activities or activity elements (see Section 5.3). You can only use this method when you use networks. or to determine actual degrees of completion. Since the degree of processing is usually derived from the confirmed activity, this method is useful if you can measure the progress of the object on the internal activity performed, as this is often the case for internally processed activities .
.. Estimates You manually specify the percentage of completion for individual periods of the object using this method. To prevent an early overestimate of the actual progress when determining estimates, you can store a maximum percentage of completion in this measurement method (generally 80 %) that can only be exceeded once an actual finish date has been entered. This method is often used for WBS elements whose percentage of completion does not increase in a linear direction and. in addition, cannot be derived from assigned activities or milestones.
304
Project Progress I 5·7
.. Actual = planned This me~od, which you can only use for the actual percentage of completion, copies the planned percentage of completion as the actual percentage of completion.
You can use differerit methods to determine the planned and actual degrees of completion. However, it generally makes sense (the Degree of processing method is an exception here) to use the same method in the planned and actual data in order to be able to compare the progress data better.
We recommend that you determine the degrees of completion for WBS elements with assigned activities at the level of the activities and to aggregate these degrees of completion on the WBS elements using suitable weighting factors such as the planned costs of the activities, for example.
When you perform a progress analysis, the system determines the measurement methods to be used for the individual objects according to the following strategy:
1. You determine the method using a BAdL 19
2. You explicitly store one measurement method and one progress version in the object.
3. The progress version involves the planned method being copied as the actual method and vice versa (this is not possible for the Estimates and Secondary proportionality methods).
4. You enter a measurement method in Customizing as the default value for the object type.
5. The system uses the 0-100 method.
You cannot assign measurement methods to assigned orders manually. Instead, you can only store a default value in Customizing.
Settings in Customizing of the Progress Analysis
Corresponding measurement methods, for determining degrees of completion using the methods described above, are already defined in Customizing of SAP Project System in the standard system. You
19 For more information about this BAdI and for a sample execution, see SAP Note 549097.
Defining measurement methods
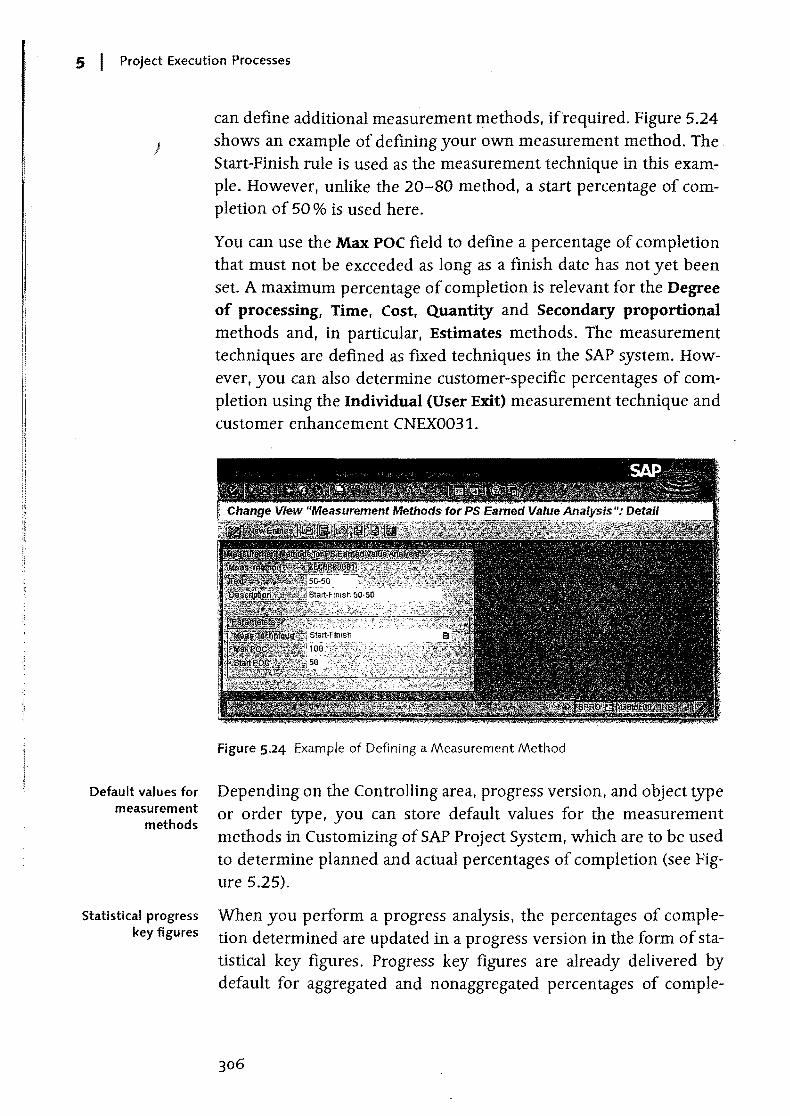
5 I Project Execution Processes
)
Default values for measurement
methods
Statistical progress key figures
can define additional measurement methods, ifrequired. Figure 5.24 shows an example of defining your own measurement method. The Start-Finish rule is used as the measurement technique in this example. However, unlike the 20-80 method, a start percentage of completion of 50 % is used here.
You can use the Max POC field to define a percentage of completion that must not be exceeded as long as a finish date has not yet been set. A maximum percentage of completion is relevant for the Degree of processing, Time, Cost, Quantity and Secondary proportional methods and, in particular, Estimates methods. The measurement techniques are defined as fixed techniques in the SAP system. However, you can also determine customer-specific percentages of completion using the Individual (User Exit) measurement technique and customer enhancement CNEX0031.
Figure 5.24 Example of Defining a Measurement Method
Depending on the Controlling area, progress version, and object type or order type, you can store default values for the measurement methods in Customizing of SAP Project System, which are to be used to determine planned and actual percentages of completion (see Figure 5.25).
When you perform a progress analysis, the percentages of completion determined are updated in a progress version in the form of statistical key figures. Progress key figures are already delivered by default for aggregated and nonaggregated percentages of comple-
306
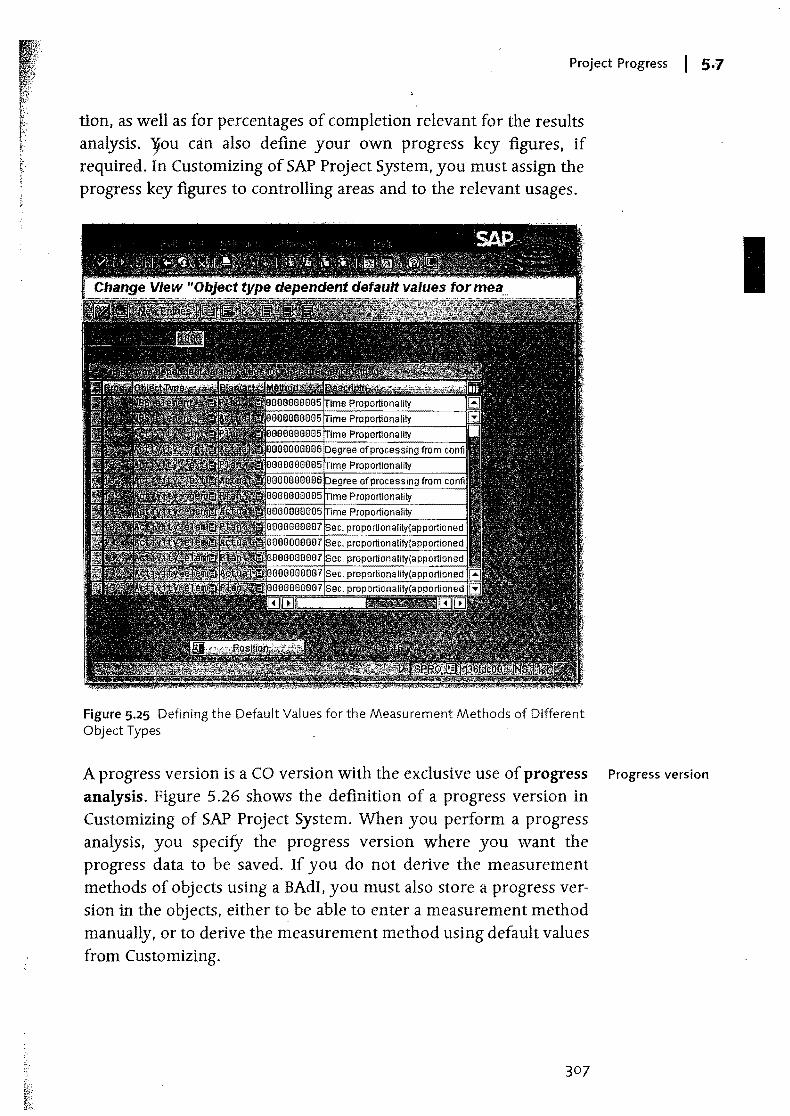
Project Progress I 5·7
tion, as well as for percentages of completion relevant for the results analysis. '?Iou can also define your own progress key figures, if required. In Customizing of SAP Project System, you must assign the progress key figures to controlling areas and to the relevant usages.
Figure 5.25 Defining the Default Values for the Measurement Methods of Different Object Types
A progress version is a CO version with the exclusive use of progress Progress version
analysis. Figure 5.26 shows the definition of a progress version in Customizing of SAP Project System. When you perform a progress analYSiS, you specifY the progress version where you want the progress data to be saved. If you do not derive the measurement methods of objects using a BAdI, you must also store a progress ver-sion in the objects, either to be able to enter a measurement method manually, or to derive the measurement method using default values from Customizing.
307
I
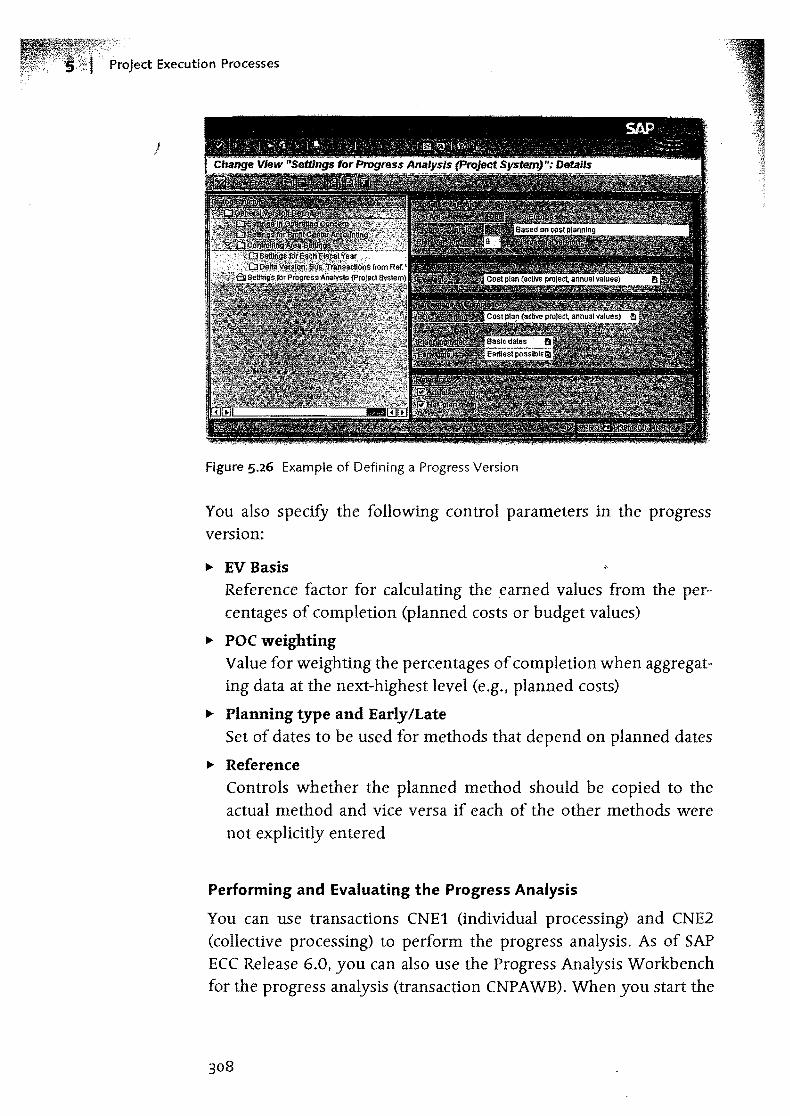
Project Execution Processes
J
Figure 5.26 Example of Defining a Progress Version
You also specify the following control parameters in the progress version:
~ EV Basis Reference factor for calculating the ,earned values from the percentages of completion (planned costs or budget values)
~ poe weighting Value for weighting the percentages of completion when aggregating data at the next-highest level (e.g., planned costs)
~ Planning type and Early ILate
Set of dates to be used for methods that depend on planned dates
~ Reference Controls whether the planned method should be copied to the actual method and vice versa if each of the other methods were not explicitly entered
Performing and Evaluating the Progress Analysis
You can use transactions CNE1 (individual processing) and CNE2 (collective processing) to perform the progress analysis. As of SAP ECC Release 6.0, you can also use the Progress Analysis Workbench for the progress analysis (transaction CNPAWB). When you start the
308
Project Progress I 5-7
progress analysis in individual or collective processing, in addition to selecting the) objects, flow control and progress version in the initial screen, you also specify the periods up to which the actual values are to be taken into account.20 When you perform the progress analysis, the system determines measurement methods for the selected objects, calculates the percentages of completion in nonaggregated and aggregated format for the cost element groups provided, and updates these percentages of completion in the progress version as statistical key figures. The system then calculates the progress values based on the percentages of completion and writes values these into the progress version.
You can also make adjustment postings for past periods (e.g., if planned costs are changed) that, along with the original progress values, will lead to adjusted progress values in the progress version. You can analyze the original progress values and the adjusted values separately. Since the percentages of completion can also be used as part of the results analysis (see Section 6.6), in addition to the aggregated and nonaggregated percentages of completion, a percentage of completion is also updated as a separate statistical key figure for the results analysis.21
After you perform the progress analysis, you can analyze the data in the project planning board using special progress reports, or also in the Progress Analysis Workben~h (se~ Figure 5.27). However, as well as using the Progress Analysis Workbench for the common analysis of progress data, statuses, dates, costs and different master data of projects, you can also use it to change data. Consequently, the many functions you can perform in the Progress Analysis Workbench include confirming activities and activity elements, setting different system and user statuses, entering planned and actual dates of WBS elements, changing user fields and customer-specific fields and, in particular, maintaining percentages of completion in tables. You can also export data from the Progress Analysis Workbench to Microsoft Excel, enter percentages of completion or dates for WBS elements,
20 When you use the Time Proportionality method, you can afso enter a certain date instead of the period to calculate the precise dates of the percentages of completion.
21 SAP Note 189230 contains some information that you may find useful when troubleshooting within your progress analysis.
309

:!, ii i! ,
n Processes
activities, and milestones there, and then import the data back into ) the SAP system.
Figure 5.27 Progress Analysis Workbench
5-7-3 Progress Tracking
The use of progress tracking in SAP Project System is relevant for projects for which the punctual procurement and delivery of material components playa key role for the execution of the project. You can use progress tracking to track in time any events for material components in projects and, if required, enhance these events with status information and additional deadline information.22 The events may have equivalent events in SAP system documents such as a purchase order, goods issue and receipt, for example, but they can also be defined completely independently of the SAP system.
Progress tracking When you perform progress tracking for material component (trans-process action COMPXPD), you first select the material components whose
events you want to process or analyze in the progress tracking. This is a two-step selection process. If you're performing the progress tracking for a component for the first time, you must assign the events whose dates you want to analyze to the material component
22 You can also use progress tracking in Purchasing for monitoring deadlines of purchase orders. Therefore. you can differentiate between the two progress tracking objects of material component and purchase order. There are separate transactions and Customizing activities for each progress tracking object.
310

Project Progress I 5.7
first. To do this, you can create new events for the components directly in ~e progress tracking or use standard events and event scenarios that you already defined in Customizing of SAP Project System. If reqUired, you can also automate the assignment of events using a BAd!.
You can now enter up to four dates for each event of a material component: an original, planned. forecast and actual date. You can enter these dates in progress tracking manually or by using a mass change, copy them from other components using copy functions or calculate them using scheduling in progress tracking. In particular, you can also determine the dates automatically from SAP system documents using a BAd!.
You can then analyze the event dates of the different material components in progress tracking. In this case, traffic lights can indicate if there are any variances (between the planned and forecast dates of an event, for example) or if planned dates have been overrun although a corresponding actual date for the event of a component was not entered (see Figure 5.28).
Figure 5.28 Example of Entering Data in Progress Tracking
311
5 I Project Execution Processes
If you want to analyze the dates of material components in greater ) detail, you can assign subitems to the components and enter event
dates for each subitem. You can also store status information with descriptive texts for each material component.
Customizing of progress tracking
To use progress tracking, you must define a progress tracking profile in Customizing of SAP Project System (see Figure 5.29). You can use this profile, which you must enter in the initial screen of progress tracking, to control which date types (original, planned, forecast, actual) are to be displayed for events, which variances should be highlighted by traffic lights, and the details for scheduling event dates.
You generally also have to define standard events and event scenarios in progress tracking Customizing in order to assign these events to material components in progress tracking at a later stage. In the simplest scenario, a standard event only consists of a key and a text. If you derive the event dates using a BAdI execution, you can also specify whether a derived date in the application should be modifiable for a standard event. After you define a standard scenario, you can define a sequence of standard events for the scenario (see Figure 5.30). You can use time intervals between two events, which you can then use in progress tracking to schedule event dates. If you also want to store status information in progress tracking for material components, you must also define status infotypes in Customizing, which are used to structure the statuses. You can also use these infotypes to conduct an authorization check of the status information.
You can use the EXP _UPDATE BAdI to adapt the functions of progress tracking to meet your own requirements. This BAdI consists of methods that you can use to assign event scenarios or events to components automatically, or to influence the time intervals for scheduling. In particular, you can use a method of this BAdI to derive event dates automatically for material components from purchase reqUisitions, purchase orders, goods movements, and so on.
312
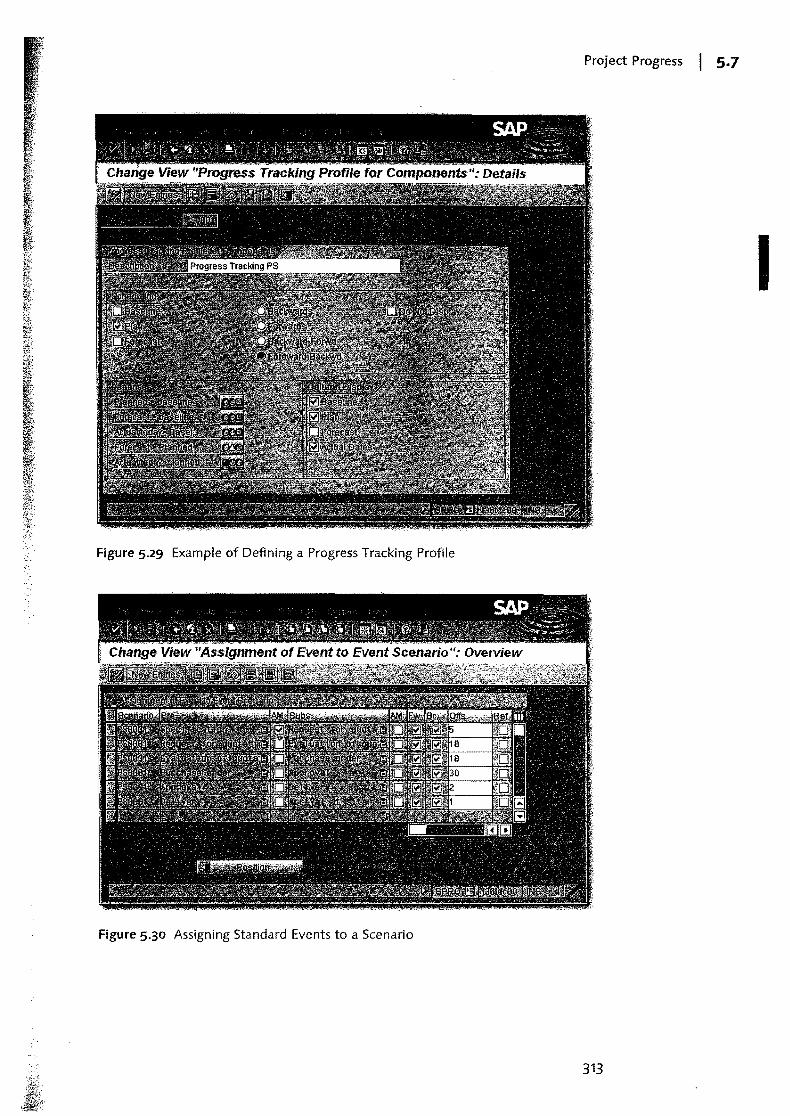
Project Progress I 5.7
I
Figure 5.29 Example of Defining a Progress Tracking Profile
Figure 5.30 Assigning Standard Events to a Scenario
313
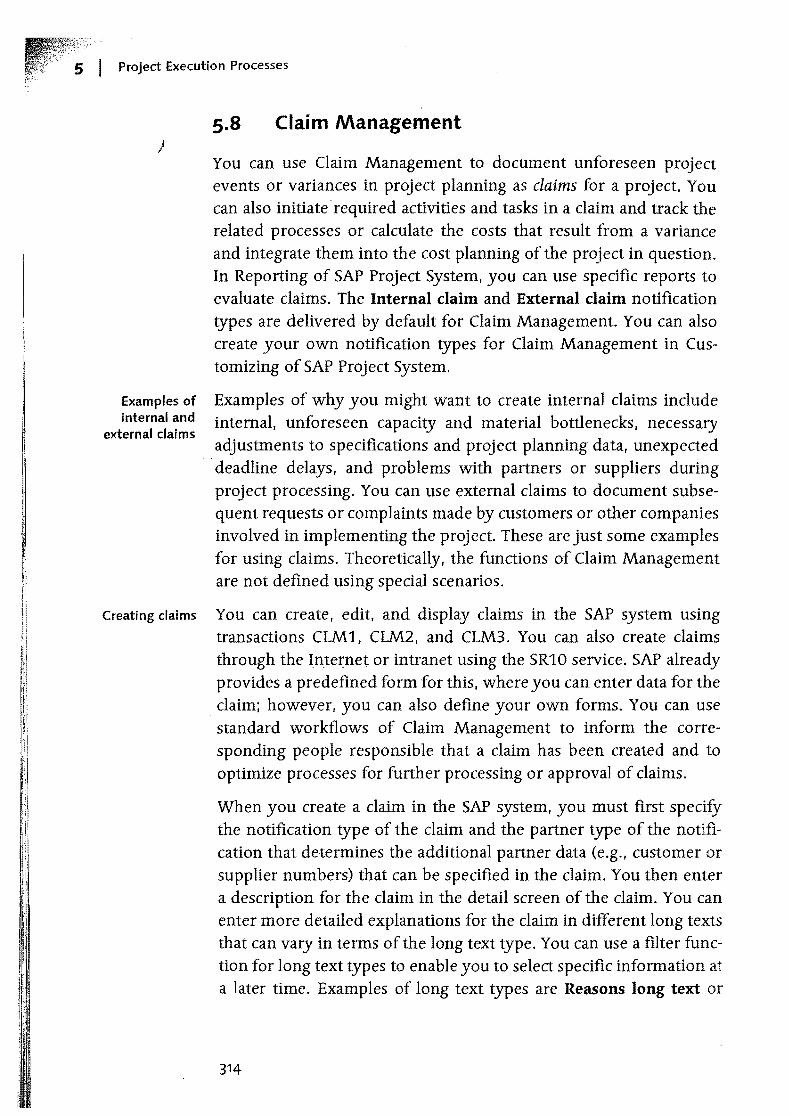
I Project Execution Processes
)
Examples of internal and
external claims
Creating claims
5.8 Claim Management
You can use Claim Management to document unforeseen project events or variances in project planning as claims for a project. You can also initiate' reqUired activities and tasks in a claim and track the related processes or calculate the costs that result from a variance and integrate them into the cost planning of the project in question. In Reporting of SAP Project System, you can use specific reports to evaluate claims. The Internal claim and External claim notification types are delivered by default for Claim Management. You can also create your own notification types for Claim Management in Customizing of SAP Project System.
Examples of why you might want to create internal claims include internal. unforeseen capacity and material bottlenecks, necessary adjustments to specifications and project planning data, unexpected deadline delays, and problems with partners or suppliers during project processing. You can use external claims to document subsequent requests or complaints made by customers or other companies involved in implementing the project. These are just some examples for using claims. Theoretically, the functions of Claim Management are not defined using special scenarios.
You can create, edit, and display claims in the SAP system using transactions CLM1, CLM2, and CLM3. You can also create claims through the In.ternet or intranet using the SR10 service. SAP already proVides a predefined form for this, where you can enter data for the claim; however, you can also define your own forms. You can use standard workflows of Claim Management to inform the corresponding people responSible that a claim has been created and to optimize processes for further processing or approval of claims.
When you create a claim in the SAP system, you must first specify the notification type of the claim and the partner type of the notification that determines the additional partner data (e.g., customer or supplier numbers) that can be specified in the claim. You then enter a description for the claim in the detail screen of the claim. You can enter more detailed explanations for the claim in different long texts that can vary in terms of the long text type. You can use a filter function for long text types to enable you to select specific information at a later time. Examples of long text types are Reasons long text or
314
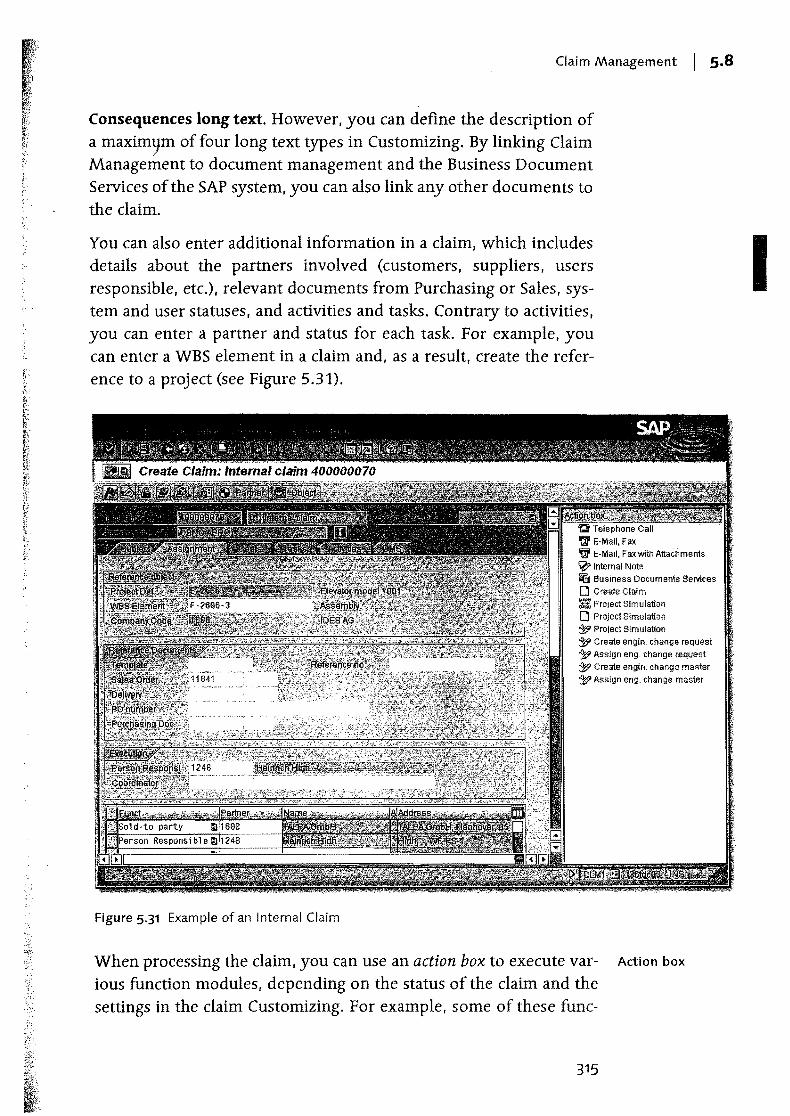
,. f
Claim Management I S.8
Consequences long text. However, you can define the description of a maxim9m of four long text types in Customizing. By linking Claim Management to document management and the Business Document Services of the SAP system, you can also link any other documents to the claim.
You can also enter additional information in a claim, which includes details about the partners involved (customers, suppliers, users responsible, etc.), relevant documents from PurchaSing or Sales, system and user statuses, and activities and tasks. Contrary to activities, you can enter a partner and status for each task. For example, you can enter a WBS element in a claim and, as a result, create the reference to a project (see Figure 5.31).
Figure 5.31 Example of an Internal Claim
Telephone I
~ E-Mail,Fax ~ E-Mail, Faxwlth Attachments ~ Inlernal Note 58 Business Documents Sel'lices D Create Claim ::u: Project Simulation D Project Simulation
::w Project Simulation ::w Create engin. change request ::w Assign eng. change request
::w Create engin. 0hangc ma~ter ::w Assign eng. change rnaster
When processing the claim, you can use an action box to execute var- Action box
ious function modules, depending on the status of the claim and the settings in the claim Customizing. For example, some of these func-
315
I
"
" ,
5 I Project Execution Processes
tion modules could include starting and documenting calls, sending ) faxes and email, or creating other claims or simulation versions (see
Section 2.9.2). The system can automatically log activities that you executed from the action box as an activity or task in the claim. In Customizing. you can adjust the action box to reflect your own needs and add other activities.
Cost integration of claims
You can also store information about the expected costs to be incurred due to a variance. In~e simplest case, you only enter an estimated amount in the claim. Alternatively. you can also create a detailed costing in the claim and copy the calculated total amount as the estimated costs. If you created a costing in the claim, as of the Enterprise Release, you can also integrate this costing into the cost planning of the project in question. This cost integration is technically implemented using a cost collector, that is, an internal order. So, when you save the claim, the system automatically creates an internal order called Notification, followed by the name of the claim, and copies the estimated costs of the claim into the internal order as planned costs. At the same time, the assignment of the claim is also copied to the WBS element in the cost collector and organizational data of the internal order using this assignment is derived. Assigning the internal order to the WBS element means that you can now also analyze the planned costs in Reporting of the project. 23
The MKOS (cost collector created) system status automatically documents the creation of the cost collector in the claim. If the estimated costs subsequently change in the claim, the planned costs of the internal order are also automatically adjusted. If you want to prevent the planned costs of the internal order from being changed manually (Le., regardless of the claim), you must define a user status for the internal order that will not allow the Unit costing planning and PrimaI}' costs planning business processes.24 Setting or undoing the
23 On the cost collector, you can also post actual costs incurred due to a variance; however, in this case, you normally have to perform a settlement run on the internal order. Alternatively, you can also post the actual costs directly on the project. Nevertheless, a planned/actual comparison is then no longer possible at the level of the cost collector; instead, it is only possible at the level of the project.
24 This status does not affect a change to the planned costs caused by changes to the estimated costs of the claim, since for costing the claim the business process primary costs unit costing is used.
316

Claim Management I 5.8
DLFL (deletion flag) status in the claim automatically results in the status also b,ing set or undone in the internal order.
To ensure that the system creates a cost collector when you save a claim, various prereq~isites must be met in the claim and the relevant WBS element. For example, you must enter a WBS in the claim, the estimated costs of the claim must be calculated using a costing, and (if the claim requires approval) the claim must be approved. Furthermore, the WBS element must be an account assignment element and have the PREL (partially released) or REL (released). If the Profit Center Accounting is active and you want to create business area balance sheets in the company code of the WBS element, you must also enter a profit center and business area in the WBS element.
Another prerequisite for creating a cost collector automatically is that you create an implementation of the NOTIF _COST_ CUS_CHECK BAdI and set the E_CREATE_COST_COLLECTOR indicator to X in the CHECK method. If required, you can program additional conditions in the method to create a cost collector. The Controlling properties of the internal order are defined by a Controlling scenario, which you must assign to the relevant notification types in claim-specific Customizing. For this reason, a Controlling scenario is delivered with the standard system. The cost collector is always created as an internal order for the CLOl order type. with the exception of the status profile, you should not make any changes to this order type. In the Define Order Value Updating for Orders for Projects Customizing table. you can use this order type as a reference to decide whether the planned costs of the cost collector should be added to the planned total of the WBS element (see Figure 3.62 in Section 3.4.6).
Customizing of claims entails general notification Customizing and claim-specific Customizing. In general notification Customizing, you can create new notification types or make adjustments to both of the standard Internal and External claim notification types. In terms of a message type, you. can define in general notification customizing which partners, reasons, activities, or tasks can be entered in a claim, or which function modules can be executed from the action box. In addition to the cost collector settings described above, claim-specific Customizing involves defining the long text types that can be used to structure information in the claim. .
317
Prerequisites of cost integration
Customizing of claims
5 I Project Execution Processes
5.9 Summary
In the execution phase of projects, various documents are produced in the SAP system due to project-related business transactions. These documents are assigned to the corresponding projects, which consequently results in commitments, costs, and revenues being updated on the projects. To monitor projects or parts of projects over time, you must enter actual dates for WBS elements and activities and compare these actual dates to the planned dates. Tools for analyzing the progress of proj ects support you in identifying cost and schedule variances in your planning.
_ 318
To determine all relevant data for a period and make it availabl5.for Enterprise Controlling, you need to perform various periodic activities during project planning and execution.
6 Period-End Closing
In Chapter 3, Planning Functions, and Chapter 5, Project Execution Processes, we explained how project costs and revenues could be planned and posted. However, the planning data based on detailed planning, and even the actual project costs based on the direct assignment of activity allocations, material documents, or invoices are usually incomplete. In rnostcases, you have to take into account portions of overhead costs from cost centers that are not direct1y related to the services rendered (e.g., administrative cost centers). Adjustment postings may have to be made for allocated activities due to changed prices. Interest profits and losses may have to be considered as well, particular1y for cost-intensive projects lasting several years. To make your project data available for the relevant Enterprise Controlling analyses, you may also want to add key figures (such as forecast data, etc.) to your data. Last1y, projects often serve to collect costs and revenues on only a temporary basis, and forward the costs and revenues collected in a period to other receivers.
SAP Project System provides various functions for handling all of these activities. These functions are normally executed periodical1y.1 In this chapter. we will discuss several general aspects pertaining to the execution of the relevant functions, before we delve into the various period-end closing activities that must be executed for projects.
1 Planned periodic activities are often referred to as allocations, while actual periodic activities fall under the general term of "period-end closing", Note 701077 (FAQ 2: PS period-end closing) has a range of useful information about periodic activities in SAP Project System.
319
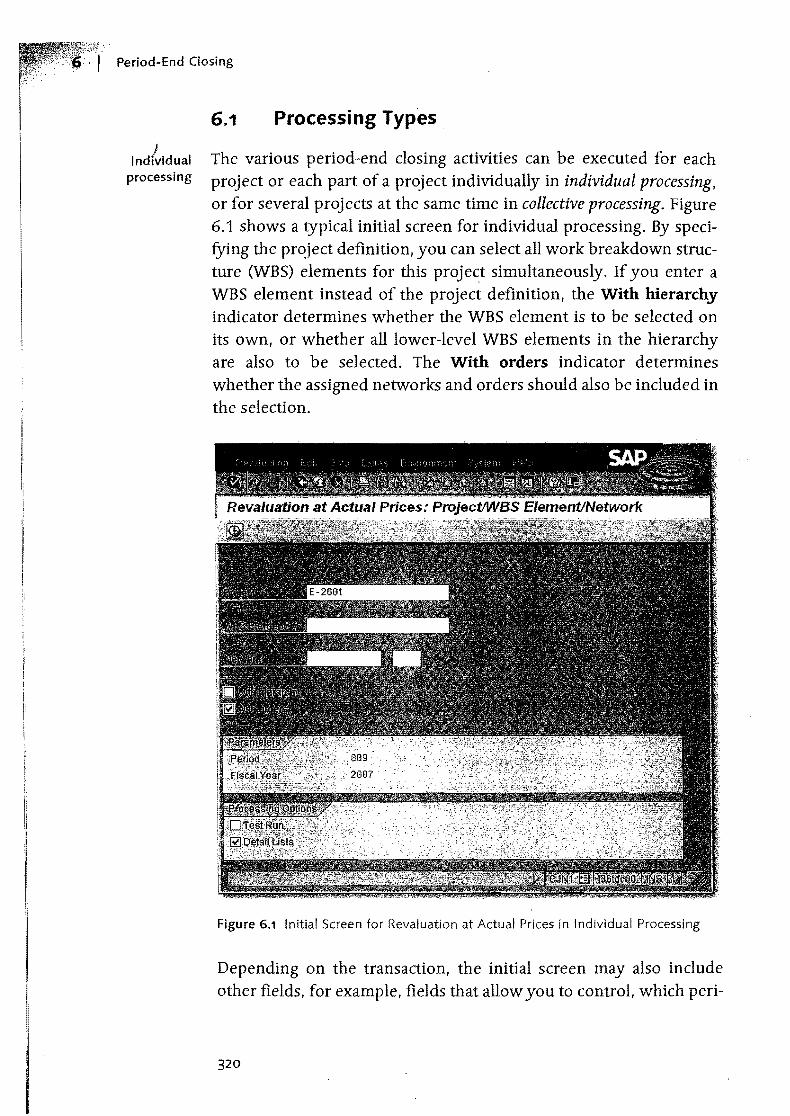
'I Period-End Closing
6.1 Processing Types,
Ind(vidual The various period-end closing activities can be executed for each processing project or each part of a project individually in individual processing,
or for several projects at the same time in collective processing. Figure 6.1 shows a typical initial screen for individual processing. By specifying the project definition, you can select all work breakdown structure (WBS) elements for this project simultaneously. If you enter a WBS element instead of the project definition, the With hierarchy indicator determines whether the WBS element is to be selected on its own, or whether all lower-level WBS elements in the hierarchy are also to be selected. The With orders indicator determines whether the assigned networks and orders should also be included in the selection.
Figure 6.1 Initial Screen for Revaluation at Actual Prices in Individual Processing
Depending on the transaction, the initial screen may also include other fields, for example, fields that allow you to control, which peri-
320

Processing Types I 6.1
ods and parameters are to be used for process control. The settings for process) control allow you to define whether a test run or a detailed list is to be created at the end of execution. for example. With a test run. you can analyze the result of the execution without the data being updated.
To use collective processing. you must first use transaction CJ8V to define selection variants. that is. lists of all projects or parts of projects that should be taken into account. You can also use dynamic selections and status selection profiles as filter criteria for objectselection (see also Section 7.1). In the variant attributes. you must specify at least one meaning for the selection variants before you save.2
As a rule, the period-end closing of projects cannot be viewed in isolation from other periodic activities in your company. Instead, it depends on other business transactions, such as price calculation in Cost Center Accounting. You must adhere to certain sequences. For example, the actual costs must be calculated in Cost Center Accounting before the actual costs of your projects can be revaluated, which, in turn, must happen before you can calculate the overhead costs based on your actual costs.
Collective processing and selection variants
In order to plan and monitor the process of period-end closing. Schedule Manager
which may be a cross-departmental process. you can use the Schedule Manager rather than individual transactions for individual periodic activities. In the Schedule Manager (transaction SCMA), you can use a task list (see Figure 6.2) and a monthly and daily overview to struc-ture the various periodic activities, add explanatory documents if necessary, and schedule and monitor various tasks. You can use a monitor to analyze in detail the execution of tasks, restart tasks if necessary (if errors occur during execution). or navigate to project maintenance, for example, to enter missing master data.
The actual planning and execution of the various periodic activities Flow definition
in the Schedule Manager are based onjlow definitions. which can be
2 Selection variants are a generiC function in SAP systems. which can be used for many purposes (collective proceSSing, calling reports, etc.). You can use the variant attributes to make settings for the display and ready-for-input status of fields. for example. Specifically, you can select certain fields as selection variables. The value of the field is then automatically filled at runtime with variable date calculation (e.g., with the current date), user-specific fixed values or fixed values that you maintain centrally in the TVARVC table.
321
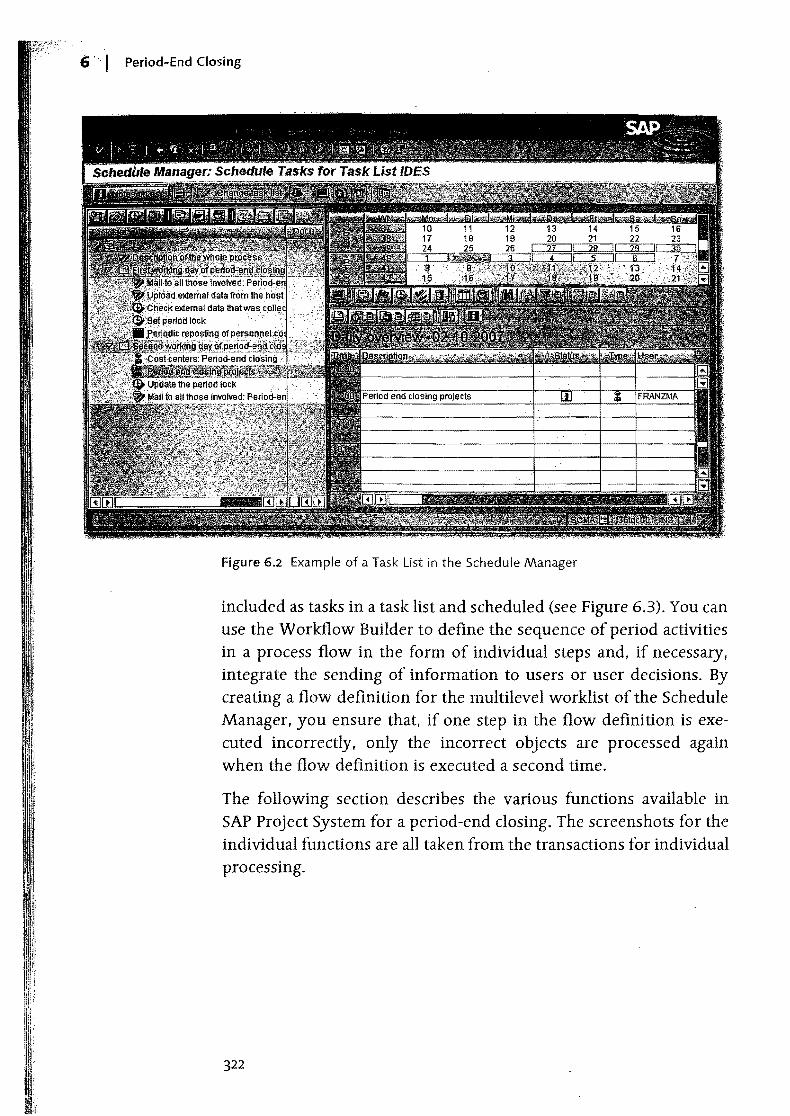
.' , '
«:; " I Period-End Closing
Figure 6.2 Example of a Task List in the Schedule Manager
included as tasks in a task list and scheduled (see Figure 63). You can use the Workflow Builder to define the sequence of period activities in a process flow in the form of individual steps and, if necessary, integrate the sending of information to users or user decisions. By creating a flow definition for the multilevel worklist of the Schedule Manager, you ensure that, if one step in the flow definition is executed incorrectly, only the incorrect objects are processed again when the flow definition is executed a second time.
The following section describes the various functions available in SAP Project System for a period-end closing. The screenshots for the individual functions are all taken from the transactions for individual processing.
322

Revaluation at Actual Prices I 6.2
Figure 6.3 Example of a Flow Definition
6.2 Revaluation at Actual Prices
If your projects incorporate activities of cost centers3 during the project execution phase (e.g., via confirmations or the assignment of activity allocations to WBS elements), relevant prices based on the activity type are used for the revaluation of the activities and the calculation of the corresponding cost flows.
Some companies use actual price calculation to calculate the prices of the individual activity types iteratively for the valuation of actual activities as part of the period-end closing. Actual prices are calculated based on the relationship between the actual costs and the actual service rendered by the cost center. Depending on the procedure used, the costs and activities of the individual periods are analyzed separately (periodically differentiated price), as total values (average price) or as values cumulated up to the analysis period (cumulated price).
3 The same considerations also apply to business processes; however, for reasons of clarity, this section refers only to cost centers rather than cost centers and bUSiness
processes.
323
Actual price calculation
6 I Period-End Closing
)
However, since the actual price calculation is not executed until the period-end closing, the iteratively calculated actual price is not available when the actual activity is posted. Therefore, the activities are normally valuated with planned prices initially. After the actual prices are calculated, you can make the relevant adjustment postings, in other words, execute a revaluation at actual prices for your projects.
6.2.1 Prerequisites for Revaluation at Actual Prices
To use the revaluation at actual prices function, various prerequisites must be fulfilled. Internal activity allocations must have been executed or process costs posted for a project. In Customizing, you must have defined whether and how the revaluation is to be executed using the Revaluation indicator in the fiscal year-dependent parameters of CO version 0 (or the relevant actUal version). The indicator can be set in one of the three follOwing ways:
... 0 No revaluation No revaluation takes place. This usually means that all actual activities are valuated with the planned price.
... 1 Revaluation with separate procedure Revaluations are possible and are executed as differences based on the original allocation with a separate procedure (actual price calculation). The original allocations remain unchanged. As a result, you can trace the deviation between the valuations at the actual price and the planned price.
... 2 Revaluation in the original procedure Revaluations are possible and result in a change to the original allocations. The differences between the valuations at the actual price and the planned price cannot be traced with this setting. Changing the existing allocation records is particularly useful if no planned price exists and, therefore, no valuation has taken place with the original posting.
As a final prerequisite for revaluation at actual prices, an actual cost calculation must be executed in Cost Center Accounting or activitybased costing (transaction KSII or CPH). The actual price calculation is largely controlled by the Methods indicator in the fiscal yeardependent parameters of the CO version and the Price indicator of
324
Revaluation at Actual Prices I 6.2
the actual allocation price, which is copied as a default value from the master data o~the relevant activity type.
6.2.2 Executing the Revaluation at Actual Prices
You can use transactions CJN1 (individual processing) and CJN2 (collective processing) to revaluate work breakdown structures and networks in SAP Project System.
Figure 6.1 shows the initial screen of individual processing. In addition to selecting the objects, you specify the period and the fiscal year for revaluation here, as well as indicators for process controL If you repeat the revaluation for a period, only the differences that arise due to subsequent price changes are posted. If necessary, you can also cancel the revaluations executed in the update run. The original activity allocations remain unchanged.
If no activities were included in the period, if no actual price exists, or if the project was already valuated with the current actual price, no posting occurs. If the status of the project or the cost center to be credited prevents posting, the system issues an error message to that effect.
6.2.3 Dependencies of the Revaluation at Actual Prices
It is generally useful to set period locks in the actual project for the actual activity allocations (RKL) and indirect actual activity allocations (RKIL) activities (transaction OKP1) before you execute the revaluation at actual prices. After you execute the revaluation at actual prices, you can also set a period lock for the revaluation activity (RKLN) if necessary.
Note th(i.t when you use the revaluation at actlJal prices, percentage overhead.rales must not be calculated on the basis of costs for cost element category 43 (internal· activity allocations) as part of the.application of overhead (see Section 6.3). Since the revaluation would lead to changed costs of these cost elements, you would need to execute a new applicationofoverhead, which would lead to changed costs for the credited cost center. Thiswould result in a recursion.
Note also the sequence in which you execute the overhead application, settlement (see Section 6.9), actual price calculation, and revalu-
325
[I]
· :
6 I Period-End Closing
)
ation. You may have to execute settlements again before and after the revaluation at actual prices (or after a reversal of revaluation) to ensure that the settlement receiver receives consistent revaluation data.4
6.3 Overhead Rates
Not all cost centers in a company can allocate their costs to specific projects or other Controlling objects using activity allocations, distributions, or assessments. Administrative cost centers, for example, do not generally have a direct relationship with a project, which means that an activity-related allocation of costs is not possible for these cost centers. Instead, these costs centers are credited and the project is simultaneously debited, usually via applications of overhead. The calculation of overhead rates is based on the costs or quantities that were posted to the project with reference to the relevant cost elements, such as labor or material costs.
6.3.1 Prerequisites for the Allocation of Overhead Rates
Costing sheet The calculation of overhead rates is controlled by a costing sheet, which must be entered in the relevant WBS elements, network activities, or (in the case of header-assigned networks) in the network headers. For WBS elements, you can define a default value for the costing sheet in the project profile. In the network header, the costing sheet is derived from the valuation variant of the costing variant of the network, but it can also be manually changed. If you assign activities to a WBS element, these activities use the same costing sheet of the WBS element. Otherwise, they use the costing sheet of the network header as a default value.
You define costing sheets in the Customizing settings of SAP Project System. A costing sheet consists of a key and a description to which rows are assigned (see Figure 6.4). A row in a costing sheet may contain either a base (base row) or an overhead, together with a credit and an indication of which rows are to be used to calculate the overhead
4 In the SAP Library, you'll find an example of revaluation at actual prices with a repeated settlement. Here, the connection between settlements to cost centers, price calculation, and revaluation is discussed in detail.

Overhead Rates I 6.3
rate and the credit. 5 The rows are processed from top to bottom for the overhead ccyculation.
Figure 6-4 Example of the Definition of a Costing Sheet
You use the base rows within a costing sheet to determine which Calculation base
costs elements are to be used as a basis for calculating the overhead costs. Bases are also defined in Customizing. Depending on the cost-ing area, you can assign individual costs elements or cost element intervals to a base. If necessary, you can also assign individual origins or origin intervals.6
The overhead rate in a row of a costing sheet determines the rate at Overhead rate
which the overhead is applied. An overhead rate may be defined as a percentage, calculated on the basis of the costs of the cost elements to which the overhead is to be applied, or it may be quantity-based if the cost elements of the base rows allow you to enter absolute quan-tities. Percentage or quantity-based overhead rates can be defined on the basis of validity periods, the overhead type (planned, actual, or commitment) or, for example, organizational units and master data belonging to the objects to which the overhead is to be applied (see
5 You can also use totals rows in a costing sheet to give subtotals and sum totals. 6 You can use origins and origin groups to distinguish between the costs of different
materials. For this purpose, an origin must be defined in the costing view of the material masters.
327
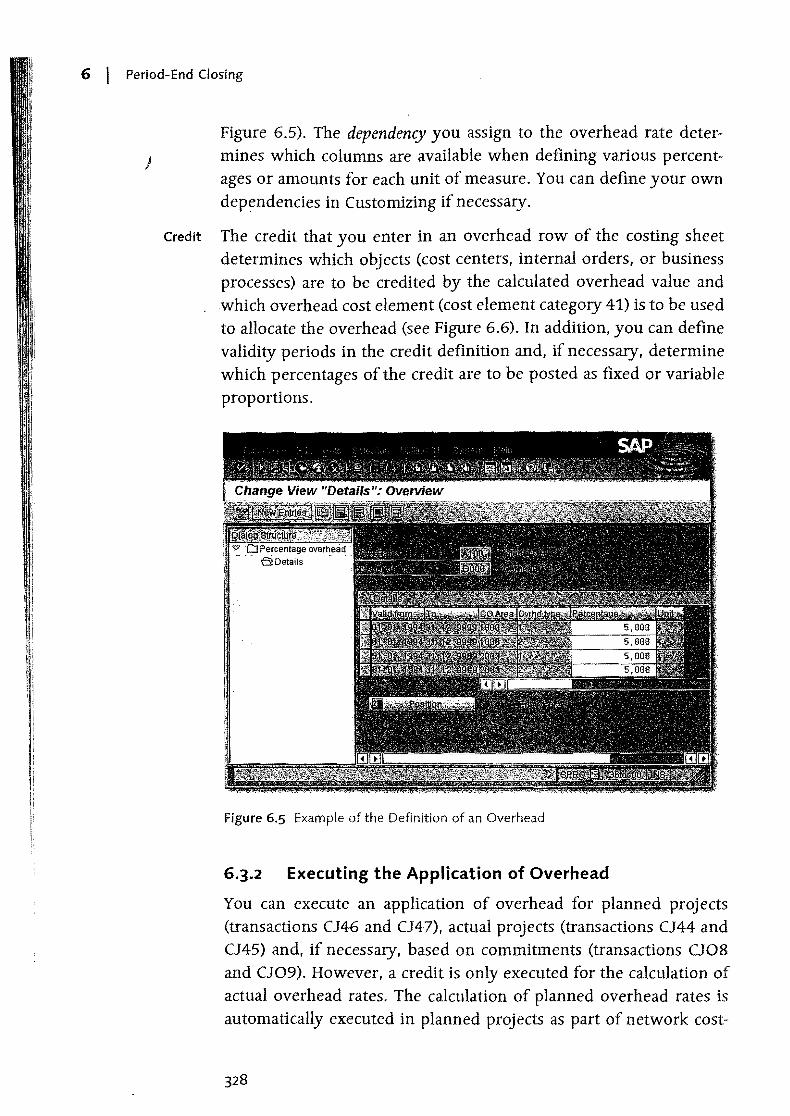
i I
6 I Period-End Closing
Figure 6.5). The dependency you assign to the overhead rate deter-) mines which columns are available when defining various percent
ages or amounts for each unit of measure. You can define your own dependencies in Customizing if necessary.
Credit The credit that you enter in an overhead row of the costing sheet determines which objects (cost centers, internal orders, or business processes) are to be credited by the calculated overhead value and which overhead cost element (cost element category 41) is to be used to allocate the overhead (see Figure 6.6). In addition, you can define validity periods in the credit definition and, if necessary, determine which percentages of the credit are to be posted as fixed or variable proportions.
Figure 6.5 Example of the Definition of an Overhead
6.3.2 Executing the Application of Overhead
You can execute an application of overhead for planned projects (transactions CJ46 and CJ47), actual projects (transactions CJ44 and CJ45) and, if necessary, based on commitments (transactions CJ08 and CJ09). However, a credit is only executed for the calculation of actual overhead rates. The calculation of planned overhead rates is automatically executed in planned projects as part of network cost-
328

Overhead Rates I 6.3
Figure 6.6 Example of the Definition of a Credit
ing, unit costing for WBS elements, or when you use Easy Cost Planning to plan costs.f In the actual project, however, the calculation must be explicitly triggered as part of the period-end closing or scheduled as a regular background job.
In addition to selecting the objects and defining the process control, you must also specity the period for which the application of overhead is to be executed on the initial screen of the overhead calculation. In the actual project, the overhead rates are calculated for the specified period only. In the planned project, you can also specity a range of periods for processing; however, all periods in the range must be within the same fiscal year.
You can repeat the overhead rate calculation for a project any number of times. In this case, the system only determines the differences between the current and previous runs and posts these differences to the object. The difference amount may be a positive or a negative value. If necessary, you can also execute a reversal of the application of overhead.
If errors occur during execution, for example, due to the status of the objects, invalid costing sheets, or missing percentages, you can analyze these sources of errors in an error log. Provided that you have enabled the output of detailed lists in process control, you can also dis'play a list with details of the amounts for each sender and receiver and the overhead cost element used (see Figure 6.7).
329
I
)
[»J
Figure 6.7 Actual Overhead Calculation of Network Activities and Activity Elements
6.4 Template Allocations
With the application of overhead described above, all overhead costs are allocated using quantity-based or percentage overhead rates, based on the quantities or costs of selected cost elements. Template allocation, on the other hand, enables a much more differentiated calculation and allocation of overhead costs. With template allocation, you first use suitable functions to calculate quantities that were used by the senders (Le., the cost centers or business processes) in the project. The costs to be allocated are then calculated by valuating these quantities with the prices that have been defined.
Since you can access practically any function module and table fieldin the SAP system when defining functions for the template allocation. overhead costs can be allocated according to cause when you use template allocation.
6.4.1 Prerequisites for Template Allocation
Template To execute a template allocation for projects. you must first define appropriate templates in Customizing with transaction CPT2. A template contains a list of the senders whose costs are to be allocated, as well as the relevant functions and formulas that determine how the
330
Template Allocations I 6.4
quantities are to be calculated, which are valuated with prices later to allocate <;psts. If necessary, you can use methods (Le., logical conditions) to dynamically control the determination of the senders and the activation of the individual rows of a template. Special editors are provided·in template maintenance to help you define formulas and methods. By specifying an allocation time in a template, you can determine whether costs should be allocated periodically or whether an allocation can only be executed once for the start or end period of th~ object, for example. Figure 6.8 shows an example of a template for the allocation of overhead costs among networks. In this exampIe, the quantity is determined by the number of network activities and the sender is a business process.
Figure 6.8 Sample Definition of a Template
You always create a template with reference to an environment. This Environment
environment contains the functions that you can use to define the template. The two environments 004 (network) and 005 (WBS ele-ment) are provided for the definition of projects. These comprise diverse functions as standard. However, you can also add new func-tions if necessary (transaction CTU6). These may be standard func-tions defined by SAP. Alternatively, you can define your own func-
331
I
6 I Period-End Closing
)
Determination rules and
overhead keys
tions that access table fields of the SAP system, standard function modules. or user-defined ABAP function modules.
After you have defined a template, you must assign it to one or more combinations of costing sheet and overhead key (determination rule) in Customizing transaction KTPF. You also need to define the combination of costing sheet and overhead key in the master data of the relevant WBS elements, activities, or network headers. When you execute a template allocation for a project. the syst~m can then use this combination to automatically determine the relevant template. The overhead key in the master data of the objects and in the determination rule is used exclusively for the assignment of objects with the same costing sheet to various templates. You can define any overhead key in SAP Project System Customizing settings.
To ensure that the template allocation can also calculate the costs to be allocated using the quantities that· were calculated via the functions and formulas of the template, you must also define the prices in accounting with which the quantities are to be valuated. For the allocation of costs from cost centers, you can define the prices based on activity types. for example, with transaction KP26 in the planned project or transaction KBK6 in the actual project. For the allocation of costs from business processes, you can define the prices with transaction CP26 in the planned project and KBC6 in the actual project, for example.
6.4.2 Executing Template Allocation
You can execute a template allocation for planned projects (transactions CPUK and CPUL) and actual projects (transactions CPTK and CPTL). The calculation of the template allocation is automatically executed in planned projects as part of network costing, unit costing for WBS elements, or when you use Easy Cost Planning to plan costs. In actual projects, however, the calculation must be explicitly triggered as part of the period-end closing.
On the initial screen of the template allocation, you select the objects and speCify the periods of a fiscal year for which the allocation is to be executed. You can execute the template allocation for several periods Simultaneously in both the planned project and the actual project.
332
Interest Calculation I 6·5
In the results display of the template allocation, you can analyze the Results display
amount) of the allocated costs and the relevant sender and receiver objects in each case (see Figure 6.9). If you have executed template allocation for several periods, you can navigate to a period screen and display the distribution of. the allocations among the various periods. If problems occur during template allocation, you can navi-gate to a log showing the relevant messages, that is, warning or error messages. If necessary, you can also display the sender and receiver master data or access the ~errtplate evaluation.
Figure 6.9 Result of a Template Allocation for an Actual Project
From the template evaluation, you can branch to all relevant details of the template used. For example, you can find out which functions and formulas were used to execute the quantity calculation, or which method activated an allocation row. If you executed a template allocation for several periods, you can use the template evaluation to analyze each period separately.
6.5 Interest Calculation
In SAP Project System, you can calculate interest based on your cost and revenue data or payment flows and post costs to your projects for interest losses, or revenue for interest profits. The interest calculation function is available in both the planned and actual project.
Both planned and actual interest calculation take the form of a balance interest calculation. With this type of calculation, the balance of costs, revenues, or payment data is first calculated, and then the
333
Template evaluation
I
Period-End Closing
)
Interest profile and interest indicator
interest is calculated in the balancing objects (e.g., certain WBS elements of your project). The interest is cumulated over the interest period and finally posted to the balancing object. Where possible, the balances calculated by the system are accurate up to the day. The relevant date is the posting date of the document or, in the case of payments, the payment date. Because interest is taken into account in balancing, compound interest can also be calculated.
The interest profile used determines which objects are to be consid- . ered as balancing objects. The system uses interest indicators to determine which interest rate is relevant and which accounts are to be used for posting the interest. The combination of interest profile and interest indicator determines which value categories (Le., which cost elements and commitment items) are to be included in the balancing and interest calculation. You can control and evaluate the interest calculation of different value categories (e.g., costs, revenues, and payments) separately.?
The transaction currency of the interest calculation is identical to the controlling area currency, which means that the interest is posted to your projects in the controlling area currency.
6.5.1 Prerequisites for Interest Calculation for Projects
Before you can use the interest rate calculation for projects, you must make some settings in Customizing. If you have additional requirements for planned or actual interest calculation, you can also define customer enhancements, for example, in order to influence the values and line items for which interest is to be calculated and the interest that has actually been calculated.
Interest .Indicators and Interest Rates
Figure 6.10 shows the definition of interest indicators (transaction OPIE) in the Customizing settings of SAP Project System. Interest indicators for projects can only have interest calculation type S (balance interest calculation). Interest calculation type P (item interest
7 This does not apply to investment projects. For WBS elements with an investment profile. all costs. revenues, or payments that are already activated in the asset under construction are taken into account. independent from the individual value categories.
334
Interest Calculation I 6.5
calculation), whereby interest is calculated for each payment item, is not available f09projects.
Figure 6.10 Defining Interest Indicators
With reference to the interest indicators, you create general and time-dependent terms, as well as the interest rate that is to be used for the interest calculation. In the general conditions (transaction GPIB), you define the calendar type (e.g., a banking calendar or the Gregorian calendar) on which the interest calculation is to be based.8
In addition, you can define a minimum amount for the interest (as well as other control data) in the general conditions. An interest calculation will then only be executed as of this minimum amount. In the time-dependent terms, you define which interest rate is to be used based on the interest indicator, currency, transaction type (debit or credit interest) and the Effective from and Amount from fields. The interest rate can be derived from reference interest rates (a discount rate, for example) or defined manually.
Interest Profile
Interest profiles are defined in Customizing and can be defined as a default value in the project profile. When you execute the interest calculation, a logical inheritance of the interest profiles occurs. In
8 The calendar type determines the number of interest days per month and year that are to be used. for example. to calculate a daily interest rate based on an annual interest rate. A banking calendar always consists of 30 days per month. while the Gregorian calendar always uses the exact number of days per month.
335
General and timedependent terms
6 I Period-End Closing
other words, an object that does not have its own interest profile ) uses the interest profile of the higher-level object, and so on. How
ever, if an object has its own interest profile, this interest profile is also used.
Figure 6.11 Sample Definition of an Interest Profile
The interest profile determines which objects are to be included as balancing objects in the interest calculation. Figure 6.11 shows the definition of an interest profile. The settings for (hierarchy) processing in the interest profile have the following effects:
If you select Derive autom. as the processing type in the interest profile, the processing logic depends on the project type.
In the case of WBS elements with an investment profile (investment projects), only the costs that are already activated in an asset under construction are taken into account in the interest calculation. If you want to also take into account the costs of assigned networks and viders, you must first settle their costs to the WBS element. Planned interest calculation is not possible for investment projects.
For projects with billing elements (customer projects), the system takes into account the billing element and all lower-level objects in the billing hierarchy in the interest calculation. Balancing and posting of the calculated interest then takes place in the billing element. But, if the billing element or a lower-level WBS element has an investment profile, the logic of the investment projects applies to these objects.
Interest Calculation I 6.S
With objects that don't have an investment profile and are not subordinate tql a billing element (cost projects), balancing and posting of the interest occurs separately in the individual account assignment objects (WBS elements, network headers or activities, or assigned orders).
When interest is calculated for objects that have an interest profile with the Calc. separately indicator, lower-level objects are ignored. Logical inheritance does not occur with this interest profile. You can also use this indicator to override the automatic derivation of hierarchy processing.
The No int.calc. indicator allows you to do the same thing. Interest is not calculated for objects that have an interest profile in which this indicator is set.
You also make the settings for the Basic values for the interest calculation in the interest profile. The two possible values have the following effects:
.... Line items The interest calculation is exact to the day with reference to the posting or payment date of the line items.9 Postings in periods for which interest has already been calculated (value dates in the past)
and changes to the interest rate within a period (interest rate
changes) can be taken into account with this option.
.... Totals records As a basis for interest calculation, total values are created for each period and dated to the middle of the period in order to calculate the interest. With this setting, the interest calculation is not exact to the day. However, performance is better in this instance than it would be if line items were used as the base values for the interest calculation.
9 Line items are always used for the first actual interest calculation; however. in subsequent interest calculation runs. only the line items of the last four periods before the last run are selected. Depending on the settings in the interest profile, totals records can be used for any periods prior t9 this last run. With the planned interest calculation, line items can only be used for planned payments. But, in order for any line items to be written for planned payments. you must first configure a number range for exact-to-the-day payment planning (activity FIPA) in Customizing (transaction KANK). The system always uses totals records for the interest calculation for planned costs and revenues.
337
I
6 I Period-End Closing
Detailed settings for the intprest
profile
With reference to the interest profile, you must make detailed settings in Customizing. Figure 6.12 shows a screenshot of the relevant transaction, OPIB. In the detailed settings, you create a reference between the interest profile and the interest indicator to be used. You can also define conditions (minimum durations or threshold values) to determine when exactly an interest calculation is to be executed. For investment projects, you also need to define which valuation area should be used as an assessment basis for the interest calculation and,· if applicable, you use period control to determine when compound interest is to be calculated (e.g., once a quarter rather than at each interest calculation run).
Figure 6.12 Example of the Detailed Settings of an Interest Profile
Interest relevance Finally, you must define (in Customizing) which values are to be used as a basis for calculating the interest. To do this, you reqUire value categories, which include all relevant cost and revenue elements and commitment items. For each value category, you can then define the interest relevance, depending on the interest profile and interest indicator in Customizing transaction OPIC.
Update Control
You use update control to determine the cost elements in Controlling in which the interest is to be updated. For technical reasons, an
338
I nterest Calculation I 6.S
update to the profit and loss account in Financial Accounting takes place first, whish is controlled by posting specifications. The definition of cost elements for the relevant GIL accounts ensures that the update to Controlling will occur directly.
Figure 6.13 Definition of Posting Specifications
Figure 6.13 shows the definition of posting specifications. Depending on the two business transactions of interest earned and interest paid posting and, if necessary, depending on the interest indicator, company code, and business area, you define (using account symbols for encryption) which profit and loss accounts in the relevant chart of accounts in Financial Accounting are to be used in each case for debit and credit.1o If you don't require a differentiation based on business areas, for example, you can define the wildcard character U+" in the relevant field.
By defining cost elements for the GIL accounts that are used for the debit posting for interest paid and the credit posting for interest
1 0 If you use PS Cash Management, you must ensure that no commitment items for financial transaction 30 are aSSigned to the GIL accounts in your posting specifications in order to prevent an update to PS Cash Management.
339
Posting specifications
6 I Period-End Closing
earned, you ensure that the interest is posted to these cost elements ) in Controlling.
[!] "the postif,lgsH~gj;;' "givesa'baiantb'\9t , 'qt,'~~;"""
Lastly, you must assign the relevant activities KZRI (actual interest calculation) and KZRP (planned interest calculation) to a number range in Customizing.
6.5.2 Executing the Interest Calculation for Projects
For the interest calculation of projects, you can use transactions ClZ3
and ClZ5 for planned projects and transactions ClZ2 and ClZ1 for actual projects. The initial screens for the actual and planned interest calculation are identical.
With actual interest calculation, you select the relevant objects, specify the parameters for process control, and specify the period up to which the interest calculation is to be executed. You can also select a limit for a specific day from the menu.
With planned interest calculation, you can either specity the period for the interest calculation (which has advantages in terms of performance) or - if you don't select a restriction execute an interest run for the entire period.11 Furthermore, you must specity the CO version that will serve as a basis for the interest calculation on the initial screen.
When you execute the interest calculation, the system proceeds as follows:
1. The system uses hierarchy processing to determine the relevant balancing objects based on the project type and the interest profile
. used. The interest profile may be logically inherited in this case.
11 The start of the period is determined on the base date of the first costs incurred, while the end of the period is determined on the basis of the scheduling data of the objects.
340
Interest Calculation I 6.5
2. Balancing occurs for the relevant periods at the level of the balancing objects f9r the value categories selected as relevant in Customizing. If necessary. subtotals may be created for a specific day or period.
3. The system uses the interest indicator to calculate the interest rate and uses update control to determine the costs elements for updating the interest.
4. The system calculates the interest and posts it to the balancing object. A source document is written, which can be evaluated in the information system.
After the interest calculation is executed, you can display logs for error messages and for the update. After an update run, you can analyze the list of objects and interest-relevant line items that were included in the balancing, as well as the interim balances with information about the interest rate, number of interest days. and calculated interest (see Figure 6.14). You can also cancel the interest runs using the transactions specified above. While all previous interest postings for the specified period are canceled in the planned interest calculation, only the most recent interest run is canceled in the actual interest calculation.
Project Bal an!:i ng ollj ect
..,- .... . . PRJ EC18.41
trlBS E-1841
Interest .postinq cost !!lement807000 .•
17 343,30-15.813,30-55.813,30-35;813,30-
175.813,30-
152
14,25-106,14-344.05-19,62-
1 .156, (13-
1.640,09-
Figure 6.14 Displaying the Interim Balances of an Actual Interest Calculation
341
.~ 'I Period-End Closing
)
Revenue-based method with profit
realization
6.6 Results Analysis
The results analysis revaluates the costs and revenues for your projects. As part of the results analysis, and depending on the method used, inventory values and reserves, as well as the cost of sales and the calculated revenue affecting income, can thus be calculated as part of the results analysis. With the settlement of this results analysis data (see Section 6.9), adjustment postings can be made in Financial Accounting (FI) and in the Profitability Analysis, CO-PA, or the values in FI and CO-PA can be reconciled.
The calculation of the results analysis data depends, on the one hand, on the results analysi~ method (Le., the formula for calculating the results analysis data) and the status of the object in which the results analysis is executed (control of the creation and cancellation of inventories and reserves).
The objective of results analysis and the specified dependencies is illustrated by the simple example below:
A sales and distribution project (e.g., the construction and sale of an elevator) is spread over four periods. The planned costs C(p) are $80,000, as against a planned revenue R(p) of $120,000. The customer has agreed to milestone billing of 50 % of the target revenue for the second period. an additional 25 % for the third period, and a final invoice for the remainder in the fourth period.
At the end of each period, you execute the results analysis with two different methods for different purposes. First, you need to calculate the reserves for unrealized costs or any impending losses. In addition, you should ensure that interim profits are calculated for the planned milestone billings of your project if the revenue exceeds the calculated cost of sales. You therefore select the revenue-based method with profit realization and settle the results analysis values to CO-PA. As a second results analysis method, select the cost-based poe method, which allows you to calculate the revenue affecting net income - which is based on the actual costs and, where relevant, the revenue in excess of billings and to identify unrealized profits.
With the revenue-based method with profit realization, the calculated cost of sales C(c) and the calculated revenue affecting income R(c) are determined as follows:
342
Results Analysis I 6.6
C(c) = C(p) x R(a)/R(p) where R(a)= actual revenue R(c) = R(a))
Capitalized costs C(z) are calculated as follows if the actual costs C(a) are greater than the calculated costs:
C(z) = C(a) - C(c) if C(a) > C(c)
Conversely, if the cost of sales is greater than the actual costs, reserves are calculated as follows for unrealized costs C(u):
C(u) = C(c) - C(a) if C(c» C(ci)'
With the cost-based POC method, the planned costs and revenues are weighted with the ratio of actual to planned costs in order to calculate the costs and revenues affecting income. The folloWing formulas are used:
C(c) = C(a) R(c) = R(p) x C(a)/C(p)
If the actual revenue is less than the calculated revenue, a revenue in excess of billings R(z) is calculated as follows:
R(z) = R(c) - R(a) if R(c) > R(a)
However, if the actual revenue is greater than the calculated revenue, the system calculates a revenue surplus R(r) as follows:
R(r) = R(a) - R(c) if R(a) > R(c)
The use of the formulas and rules of these two results analysis methods are now illustrated using the aforementioned sales and distribution project as an example.
In Period 1, the project is released and actual costs of $20,000 are incurred, but no actual revenue is earned. The revenue-based method with profit realization thus gives a calculated revenue equal to the actual revenue and a calculated cost of sales of zero. The setdement to CO-PA in results analysis version 0 produces the following values in the profitability analysis:
Actual revenue: a Calculated cost of sales: a Result: a
The status released also causes capitalized costs to the order of C(b) =
$20,000 to be created and posted to FI as part of setdement to Co-
343
Cost-based POC method
6 I Period-End Closing
) PA. This produces the following display in the profit and loss statement:
Expense: $20,000 (actual costs) Revenue: $ 20,000 (increased inventory)
With the cost-based POC method, the calculated cost of sales is equal to the actual costs. For the revenue affecting income:
R(c) = $120,000 x $20,000/$80,000 = $30,000
This gives a revenue in excess of billings R(z) of$30,000. If you were to settle the results analysis data to CO-PA (which is a purely hypothetical analysis, since only the data of results analysis version 0 is settled to CO-PA), the following picture would emerge in the profitability analysis and in the profit and loss statement:
Calculated revenue: Cost of sales: Result: Expense: Revenue:
$30,000 $20,000 $10,000 $20,000 (actual costs) + $10,000 (profit) $0 (actual revenue) + $30,000 (revenue in excess of billings)
In Period 2, an additional $30,000 is posted to the project as actual costs, which means that the actual costs have increased to C(a) =
$ 50,000 in total. In addition, the agreed milestone billing is executed in the amount of $ 60,000.
The revenue-based method with profit realization gives the following figures:
C(c) = $ 80,000 x $ 60, 000/$120, 000 = $ 40,000 R(c) = $ 60, 000 C(z) = $50,000 - $40,000 = $10,000
The settlement to CO-PA transfers the difference values compared with the previous period and gives the follOwing new values in the profitability analysis and in the profit and loss statement:
Actual revenue: Calculated cost of sales: Result: Expense: Revenue:
344
$60,000 $40,000 $20,000 $50,000 (actual costs) + $20,000 (profit) $ 60, 000 (actual revenue) + $10,000 (increased inventory)

Results Analysis I 6.6
If you use the cost-based poe method, the following results analysis values are calcul~ted:
C(c) = $50,000 R(c) = $120,000 X $50,000/$80,000 = $75,000 R(z) = $75,000 - $60,000 = $15,000
A hypothetical settlement would give the following values in CO-P A and PI:
Calculated revenue: Calculated cost of sales: Result:
$75,000 $50,000 $25,000
Expense: Revenue:
$50,000 (actual costs) + $25,000 (profit) $60,000 (actual revenue) + $15,000 (revenue in excess of billings)
In Period 3, additional actual costs of just $5,000 arise. The second milestone billing of $ 30,000 results in a total actual revenue of $90,000 in this period.
The revenue-based method then calculates the following values affecting net income:
C(c) = $80,000 x $90,000/$120,000 = $60,000 R(c) = $90,000
Due to the relatively small increase in costs and the second milestone billing, the calculated cost of sales is now higher than the actual costs. Therefore, the capitalized costs are canceled and reserves for unrealized costs are calculated instead:
C(u) = $60,000 - $55,000 = $5,000
The follOwing values are shown in CO-PA and FI after settlement:
Actual revenue: Calculated cost of sales: Result: Expense:
Revenue:
$90,000 $60,000 $30,000 $55,000 (actual costs) + $5,000 (reserves) + $ 30,000 (profit) $90,000 (actual revenue)
The results analysis according to the cost-based poe method produces the following values:
C(c) = $55,000 R(c) = $120,000 X $55,000/$80,000 = $82,500
345
6 I Period-End Closing
In contrast to Period 2, the actual revenue is now greater than the } calculated revenue, which means that a revenue surplus in the form
of reserves is created as follows:
R(r) = $ 90,000 - $ 82,500 = $ 7, 500
A CO-P A settlement would give the following results:
Calculated revenue: Calculated cost of sales: Result: Expense:
Revenue:
$82,500 $55,000 $27,500 $55,000 (actual costs) + $7,500 (revenue surplus) + $ 27,500 (profit) $90,000 (actual revenue)
In Period 4, additional actual costs of $ 30,000 are posted to the project, with the result that the planned costs are exceeded by $ 5,000. The final settlement results in the agreed target revenue of $120,000. You complete the project. Due to the status change, any inventories and reserves are canceled in the results analysis.
Since the actual costs exceed the planned costs, the actual costs are taken as the cost of sales in the revenue-based method. Due to the status, the existing reserves are canceled. After settlement to CO-PA, the folloWing values are shown in the Profitability Analysis in FI:
Actual revenue: Calculated cost of sales: Result: Expense: Revenue:
$120,000 $85,000 $35,000 $85,000 (actual costs) + $35,000 (profit) $120,000 (actual revenue)
In the cost-based poe method, the calculated revenue is now set as equal to the actual revenue. A settlement to CO-PA would produce the same results in CO-PA and FI as the cost-based method.
In addition to the results analysis methods outlined above, a range of other methods is provided in the standard system, which you can also use for results analysis. The selection of a results analysis method depends on various business-related factors, such as the required results analysis data (Le., Are inventory costs and reserves required?) and how is it to be used (Le., for internal information purposes or in the financial statements), as well as the relevant legal requirements.
Results Analysis I 6.6
The results analysis methods provided in the standard system are listed below (yop'll find a detailed description of these methods with explicit examples in the SAP Library):
iii> (01) Revenue-based method with profit realization
iii> (02) Revenue-based method without profit realization
iii> (03) Cost-based pac method
iii> (04) Quantity-based method
iii> (03) Quantity-based pac method
iii> (06) pac method on basis of revenue planned by period
iii> (07) pac method on basis of project progress value determination
iii> (08) Derive cost of sales from "old" resource-related billing of co line items
iii> (09) Completed contract method
iii> (10) Inventory determination, without planned costs, without milestone billing
iii> (11) Inventory determination, without planned costs, with milestone billing
iii> (12) Inventory determination, reserves for follow-up costs, without milestone billing
iii> (13) Inventory determination "WIP at actual costs" for objects not carrying revenue
iii> (14) Derive cost of sales from resource-related billing of dynamic items
iii> (15) Derive revenue from resource-related billing and simulation of dynamic items
6.6.1 Prerequisites for the Results Analysis
The results analysis method, the status dependencies of the inventories and reserves, and other settings to control the results analysis are all found under Valuation Settings in Customizing. The valuation method is determined by the results analysis keys of the relevant. objects and the results analysis version that you specify when you execute the results analysis. Updating of the results analysis data into SAP Project System, CO-PA, and FI is controlled by results analYSis cost elements, line IDs, rules for updating the results analysis costs
347
6 I Period-End Closing
Results analysis keys
Results analysis cost elements
Results analysis version
elements, and posting rules. We will now briefly discuss the relevant Customizing activities.
A valuation can only be determined and a results analysis can only be executed for WBS elements that have a results analysis key. However, the costs of lower-level objects can also be automatically factored in the results analysis in projects. You can use various predefined results analysis keys provided in the standard system. You can also enter results analysis keys manually in WBS elements, define them as a default value in the project profile, or use strategies to derive them along with the settlement rule (see Section 6.26.1).
The values from the results analysis are updated to the analyzed WBS elements using results analysis cost elements, that is, cost elements of cost element type 31. The results analysis data is evaluated in the cost reports of SAP Project System using the relevant results analysis cost elements.
When you execute the results analysis, you specify a results analysis version, into which the data from the results analysis is updated. Since the determination of the valuation method also depends on the results analysis version, you can execute several results analyses with various methods for the same object and save the data from the results analysis to a separate CO version. However, only the values of results analysis version 0 can be settled to the Profitability Analysis.
Figure 6.15 shows an example of the definition of a results analysis version in transaction OKG2 in Customizing.
You can use the Version Relevant to Settlement and Transfer to Financial Accounting indicators in the results analysis version to control the relevance of the results analysis data for settlement and the simultaneous automatic transfer to Financial Accounting.12 In the Extended Control settings of the results analysis version, you can determine whether the version is also to be used for a planned results analysis. Additional indicators are provided in extended control, for example, for defining whether the creation and consumption of inventories or reserves by various cost elements is to be
12 If profit center accounting is active, a posting for the profit center defined in the master data of the settlement object is executed simultaneously, provided that the Transfer to Financial Accounting indicator is set in the results analysis version.

Results Analysis I 6.6
updated, whether line items are to be created during the results analysis,13 or (ifthejIlOnvaluated project stock is used) whether work in process can be calculated separately for assigned orders, depending on their results analysis keys.
Figure 6.15 Example of the Definition of a Results AnalysiS Version
13 For performance reasons, line items are not normally written during the results analysiS.
349
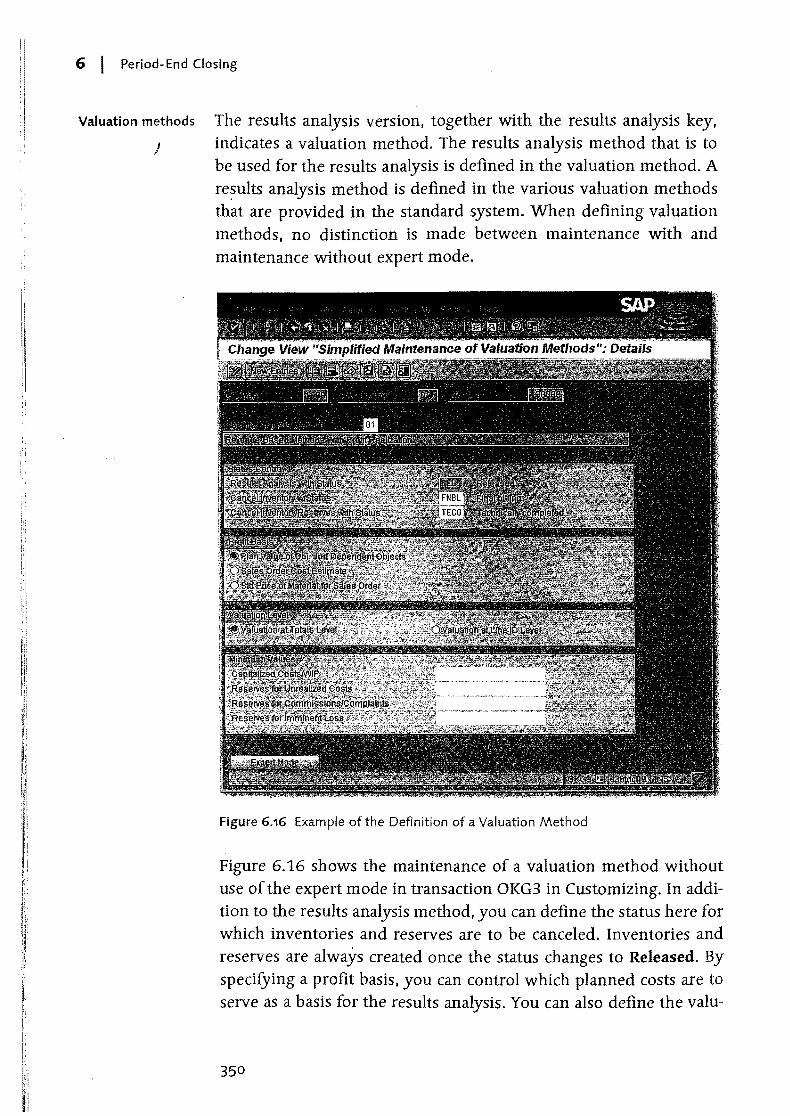
6 I Period-End Closing
Valuation methods The results analysis version. together with the results analysis key. j indicates a valuation method. The results analysis method that is to
be used for the results analySiS is defined in the valuation method. A re~ults analysis method is defined in the various valuation methods that are provided in the standard system. When defining valuation methods. no distinction is made between maintenance with and maintenance without expert mode.
Figure 6.16 Example of the Definition of a Valuation Method
Figure 6.16 shows the maintenance of a valuation method without use of the expert mode in transaction OKG3 in Customizing. In addition to the results analysis method, you can define the status here for which inventories and reserves are to be canceled. Inventories and reserves are always created once the status changes to Released. By specifying a profit basis. you can control which planned costs are to serve as a basis for the results analysis. You can also define the valu-
350
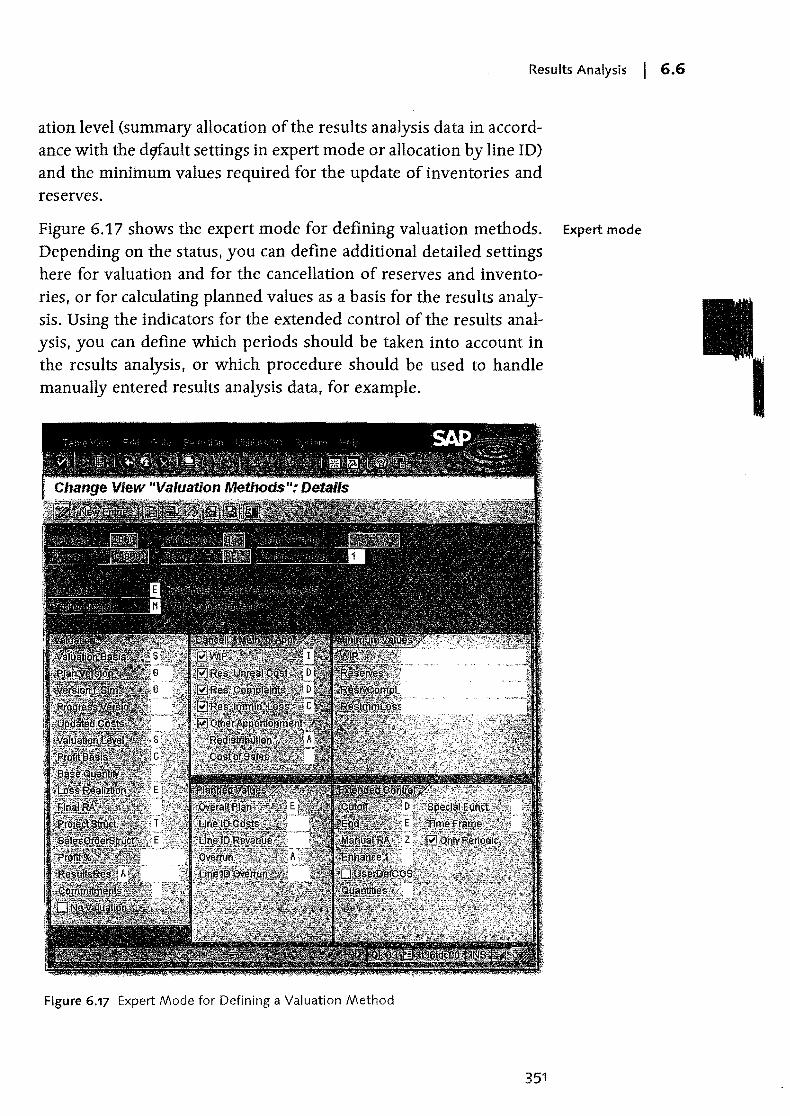
Results Analysis I 6.6
ation level (summary allocation of the results analysis data in accordance with the d¢ault settings in expert mode or allocation by line ID) and the minimum values reqUired for the update of inventories and reserves.
Figure 6.17 shows the expert mode for defining valuation methods. Expert mode
Depending on the status, you can define additional detailed settings here for valuation and for the cancellation of reserves and invento-ries, or for calculating planned values as a basis for the results analy-sis. Using the indicators for the extended control of the results anal-ysis, you can define which periods should be taken into account in the results analysis, or which procedure should be used to handle manually entered results analysis data, for example.
Figure 6.17 Expert Mode for Defining a Valuation Method
351

6 I Period-End Closing
Project structure injicator
[!1
Note in particular the Project Struct. indicator provided in expert mode for the valuation method. The most important values of this indicator are explained below.
Project structure indicator A is used by default, in other words, if you use the simple maintenance option for defining a valuation method.14
When you use this indicator, a results analysis is only possible for billing elements of a project. During the results analysis, the values of all lower-level WBS elements and all assigned networks and orders are automatically summarized at the level of billing elements for the purpose of results analysis. One advantage of this scenario is that you only have to settle the billing elements, because the results analysis data of these WBS elements incorporates the values of all lower-level objects.
rules{g~~>s,e'cti(>n 6.26.1). The project~trLi¢t~:rW-~h6(jld not containotli~r,,~: billing~~'I~n'1entsabove or below the billirig elen,'ents for which youW~~!; to exedutea results analysis. .. . ....
If the project structure also contains billing elements at levels below the highest level and if you are interested in both the overall result of the project and the result of the individual levels, you can use project structure indicator B. In this scenario, results analysis data is updated for each billing element for which a results analysis key is defined. To determine the results analysis data, all planned data and actual data of this element and the lower-level objects are taken into account. Thus, as with indicator A, you have a complete result for the highest billing element in the structure. However, only the difference between the results analysis data of this element and the results analysis data of the lower-level elements is updated in the highest billing element.
For projects with a cross-company code structure, we recommend that you establish separate results analysis data for the billing struc-
14 The value A is used if you don't enter a value for the Project Struct. indicator.
352
Results Analysis I 6.6
tures of each company code. To do this, you can use project structure indicator T in e~pert mode. When you use this indicator, data is similarly summarized in the relevant billing elements. However, in contrast to indicator B, the values of the lower-level billing elements and their assigned WBS elements and orders are ignored in the summarization.
If you want to determine separate results analYSis data for each individual WBS element of a project in isolation, use project structure indicator E. In this case, only the values in the WBS element to be analyzed and the values of the assigned orders are summarized for the results analysis. WBS elements located at lower levels in the hierarchy and their assigned orders are ignored.
Other possible project structure indicators are C, Q, and U. For information about using these indicators, refer, for example, to the F1 help for the Project structure field in a valuation method in expert mode.
Line IDs allow you to classifY results analYSis data in accordance with Line IDs
Financial Accounting requirements. Various line IDs are provided in the SAP standard system. If necessary, you can also create your own line IDs based on the controlling area in Customizing (see Figure 6.18). In transaction OKG5 in Customizing, you must assign to the line IDs all cost elements under which debits and credits are posted and that were already taken into account in the results analysis.
Figure 6.18 Defining Line IDs
353
6 I Period-End Closing
Figure 6.19 shows the relationship between cost elements and line ) IDs. You can make each assignment dependent on the results analy
sis version, fixed and variable portions, the debit and credit indicator, or a validity period, for example. For subs.equent posting in Financial Accounting, you must determine for each assignment whether the cost elements must be capitalized, do not have to be capitalized, or can be capitalized. In addition, you can determine what percentage of each assignment cannot be capitalized and, if necessary, which portion can be capitalized.
Figure 6.19 Assignment of Cost Elements to Line IDs
Update rules The next Customizing activity requires you to define the results analysis cost elements under which the results analysis data is to be updated in transaction OKG4 (see Figure 6.20). First, assign each line ID to a category, which determines how the results analysis data can be grouped, for example, according to inventory, reserve, direct costs, revenue, and so on. Depending on the category, you can then assign various cost element types for each grouping to the line IDs.
Posting rules Finally, use transaction OKG8 in Customizing to define posting rules to control the transfer of the results analysis data to Financial Accounting (see Figure 6.21). A posting rule consists of the assignment of individual results analysis cost elements or entire results analysis categories to a profit and loss account and a balance sheet account. Results analysis categories correspond to the assignments of cost elements to line IDs that you have already made in transaction OKG5, for example, WIP (work in progress, requires capitalizati~n).
354
Results Analysis I 6.6
Figure 6.20 Defining Update Rules
Figure 6.21 Defining Posting Rules
6.6.2 Executing the Results Analysis
Before you execute an actual results analysis for a project, you should set a lock period to ensure that all results analysis data determined up to and including the lock period is not changed by the results analysis. This is of particular relevance if you can no longer make any postings to Financial Accounting for these periods. The standard system is pre configured in such a way that the lock period for all valuation methods is always the prior period of the results analysis period.
355
6 I Period-End Closing
However. you can change this setting if necessary in expert mode ) and define a different lock period in the results analysis version.
You can execute a planned results analysis with transactions KKA2P and KKAJP. For the actual results analysis. use transactions KKA2 and KKAJ.15 On the results analysis initial screen. select the relevant WBS elements. the results analysis period. and the relevant results analysis version. When you execute the results analysis, the system uses the results analysis version and the results analysis key of the objects to determine which valuation method is to be used to analyze the data. The results analysis data is then calculated on the basis of the status of the WBS elements that are to be analyzed.16 Depending on the settings of the valuation method. you may also be able to enter additional results analysis data manually.
With flexible error management, which you can define if necessary in Project System Customizing. you can influence the messages that may be issued when you execute the results analysis. You can, for example, convert the warning message message type into an error message for certain results or vice versa, or suppress messages completely.
Figure 6.22 shows the result of a results analysis.
Remember to save the result. so that the results analysis data is updated. If the controlling area currency differs from the company code currency. the results analysis is executed in both currencies. In this case, you must save the results twice, so that the data is updated. The results analysis data is not posted to the Profitability Analysis or Financial Accounting until project settlement (see Section 6.9).
15 In transaction KKG2, you can also manually enter the cost of sales for a project, depending on the settings.
16 Since the time of the results analysis may differ from the time for which a status that is relevant for the results analysis has been set, the assignment of the results analysis data to the relevant periods may be incorrect in the results analysis. To avoid this potential problem, activate time dependency for the system status in Customizing. The system then stores the date for which the status was set (e.g., for the status "released," "technically completed," or "fully invoiced"), and takes this into account in the results analysis. For the planned results analysis, you can also plan the time of a status change.
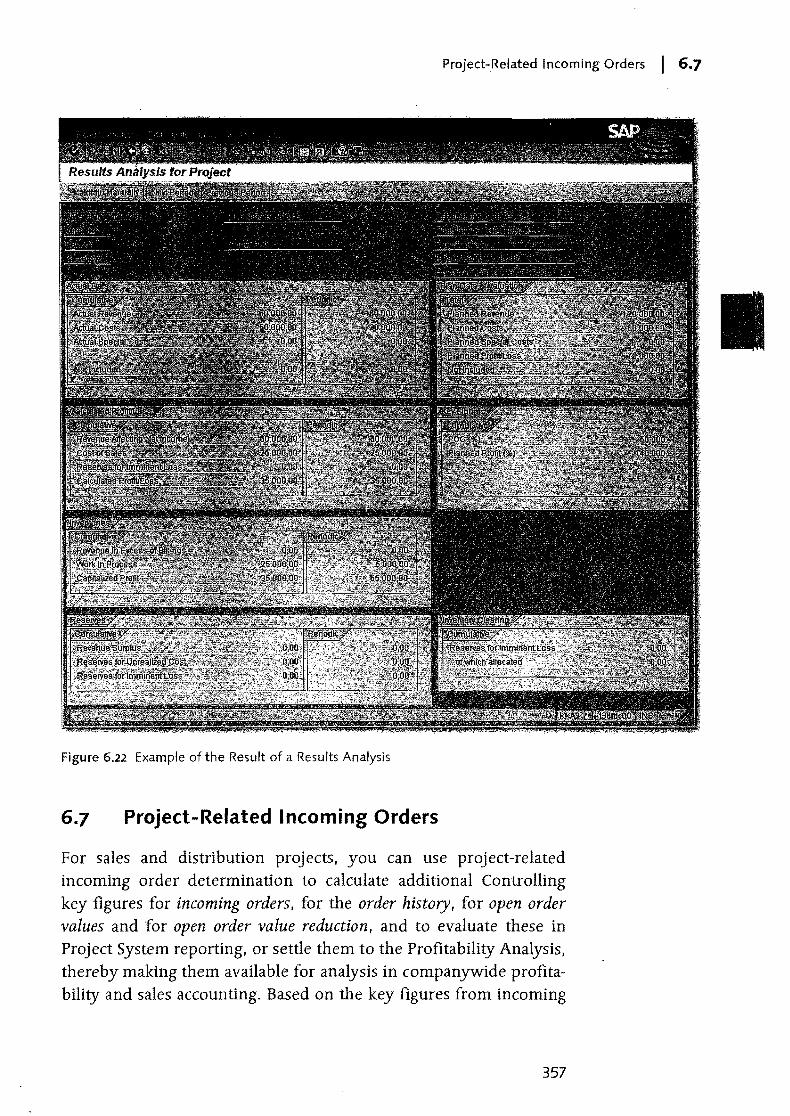
Project-Related Incoming Orders I 6.7
Figure 6.22 Example of the Result of a Results Analysis
6.7 Project-Related Incoming Orders
For sales and distribution projects, you can use project-related incoming order determination to calculate additional Controlling key figures for incoming orders, for the order history, for open order values and for open order value reduction, and to evaluate these in Project System reporting, or settle them to the Profitability Analysis. thereby making them available for analysis in companywide profitability and sales accounting. Based on the key figures from incoming
357
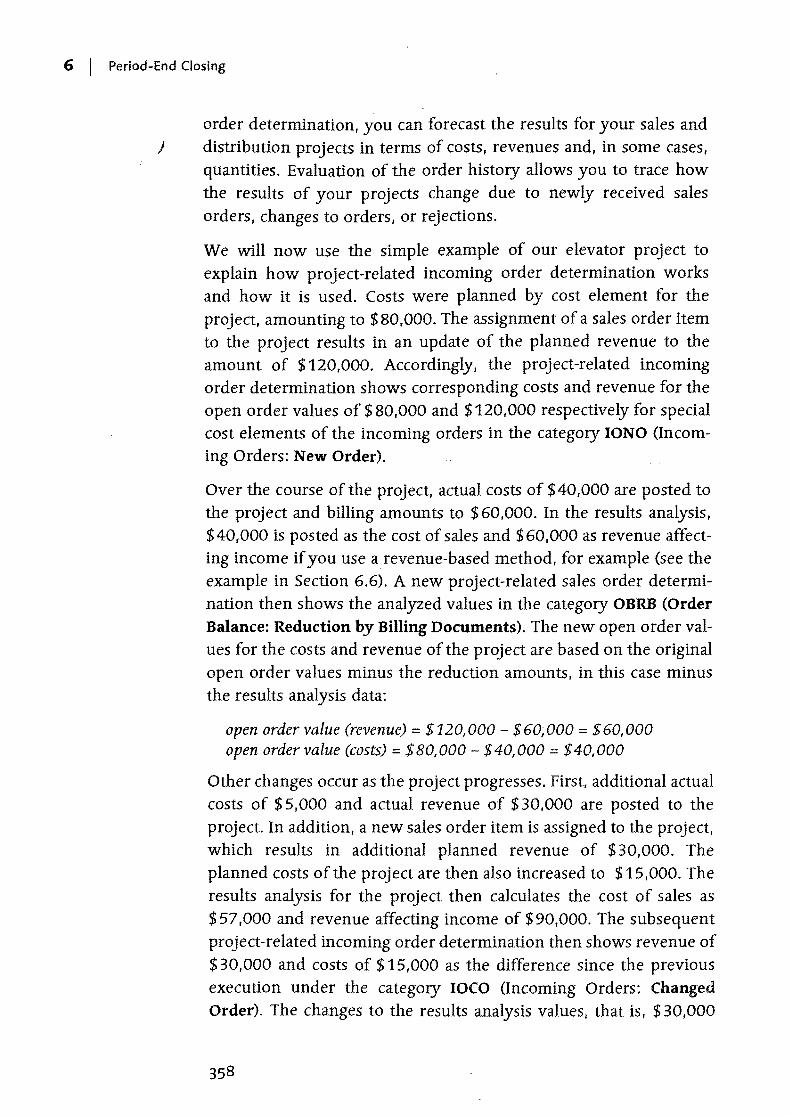
6 I Period-End Closing
order determination, you can forecast the results for your sales and ) distribution projects in terms of costs, revenues and, in some cases,
quantities. Evaluation of the order history allows you to trace how the results of your projects change due to newly received sales orders, changes to orders, or rejections.
We will now use the simple example of our elevator project to explain how project-related incoming order determination works and how it is used. Costs were planned by cost element for the project, amounting to $ 80,000. The assignment of a sales order item to the project results in an update of the planned revenue to the amount of $120,000. Accordingly, the project-related incoming order determination shows corresponding costs and revenue for the open order values of $ 80,000 and $120,000 respectively for special cost elements of the incoming orders in the category 10NO (Incoming Orders: New Order).
Over the course of the project, actual costs of $40,000 are posted to the project and billing amounts to $ 60,000. In the results analysis, $40,000 is posted as the cost of sales and $60,000 as revenue affecting income if you use arevenue-based method, for example (see the example in Section 6.6). A new project-related sales order determination then shows the analyzed values in the category OBRB (Order Balance: Reduction by Billing Documents). The new open order values for the costs and revenue of the project are based on the original open order values minus the reduction amounts, in this case minus the results analysis data:
open order value (revenue) = $120, 000 - $ 60, 000 = $ 60,000 open order value (costs) = $80,000 - $40,000 = $40,000
Other changes occur as the project progresses. First, additional actual costs of $ 5,000 and actual revenue of $ 30,000 are posted to the project. In addition, a new sales order item is assigned to the project, which results in additional planned revenue of $30,000. The planned costs of the project are then also increased to $15,000. The results analysis for the project then calculates the cost of sales as $ 57,000 and revenue affecting income of $ 90,000. The subsequent project-related incoming order determination then shows revenue of $ 30,000 and costs of $ 15,000 as the difference since the previous execution under the category lOCO (Incoming Orders: Changed Order), The changes to the results analysis values, that is, $ 30,000
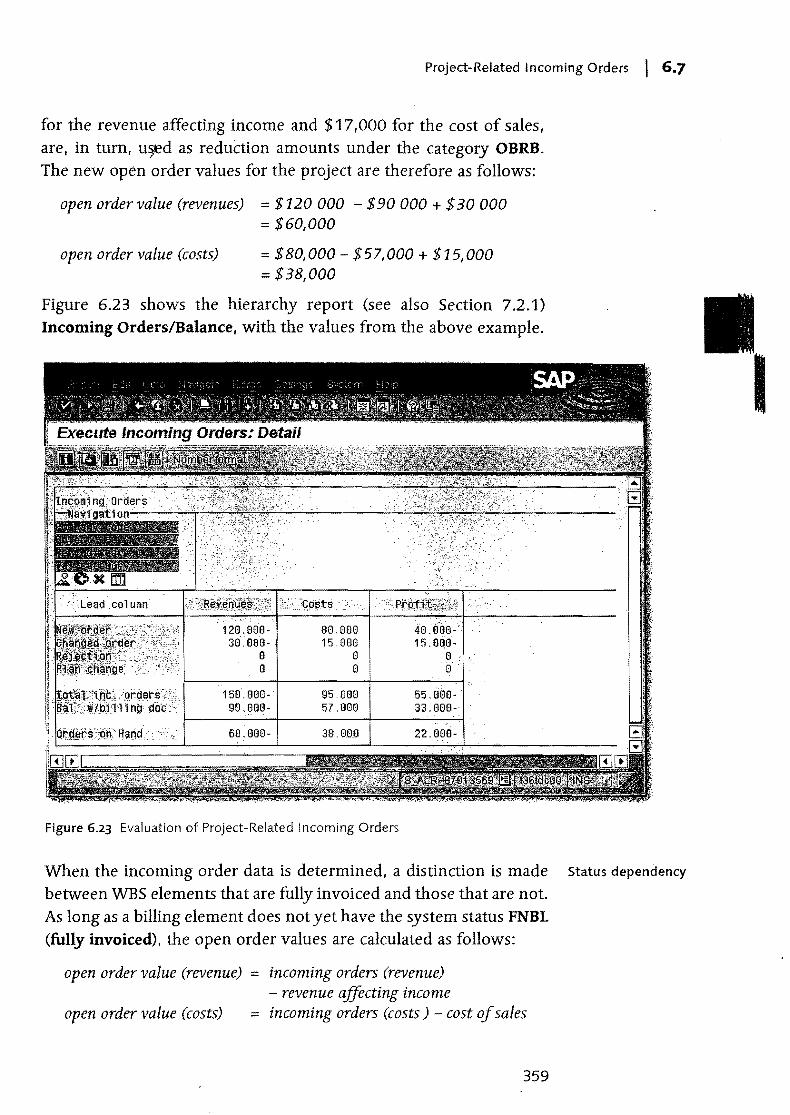
Project-Related Incoming Orders I 6.7
for the revenue affecting income and $17,000 for the cost of sales, are, in turn, u~d as reduction amounts under the category OBRB. The new open order values for the project are therefore as follows:
open order value (revenues) = $120 000 - $90 000 + $ 30 000 = $60,000
open order value (costs) = $80,000 - $57,000 + $15,000 = $38,000
Figure 6.23 shows the hierarchy report (see also Section 7.2.1) Incoming Orders/Balance, with the values from the above example.
150.000- 95.000 90.000- 57.0BO
60.000-
Figure 6.23 Evaluation of Project-Related Incoming Orders
When the incoming order data is determined, a distinction is made Status dependency
between WBS elements that are fully invoiced and those that are not. As long as a billing element does not yet have the system status FNBL
(fully invoiced), the open order values are calculated as follows:
open order value (revenue) = incoming orders (revenue) - revenue affecting income
open order value (costs) = incoming orders (costs) cost of sales
359
6 I Period-End Closing
Incoming orders are determined on the basis of the revenues ) planned by revenue element in the billing element and the costs
planned by cost element in the objects of the billing structure of the WBS element.17 As illustrated above, the reduction amounts for the orders on hand are calculated on the basis of the analyzed actual data of results analysis version O. If you have not yet executed a results analysis, the reduction amount is zero and the open order value are therefore equal to the incoming orders.
Incoming order cost elements
If a billing element has the status fully invoiced, both the incoming orders and the reduction amounts are calculated from the analyzed actual data of results analysis version O. In other words, the reduction amounts are equal to the incoming order data in this case, and the open order value are thus equal to zero.
If the actual revenue exceeds the planned revenue, the incoming order revenue is equal to the actual revenue, regardless of the status of the billing element. Similarly, if the actual costs exceed the planned costs, the incoming order costs are equal to the actual costs.
6.7.1 Prerequisites for Project-Related Incoming Order Determination
As an initial prerequisite for using project-related order determination, you must create secondary cost elements under which costs, revenues, and, if necessary, quantities for incoming orders are to be updated. Use the following cost element categories:
~ 50 Incoming orders: sales revenues
~ 51 Incoming orders: other revenues
~ 52 Incoming orders: costs
If the project-related incoming orders are to be settled in the Profitability Analysis at a later stage, it is often useful to classify the incoming order cost elements in accordance with the value fields in the Profitability Analysis.
17 The quantities of the open order values are based purely on manual revenue planning in the billing element. Quantities cannot be transferred from the sales order items. The reduction quantity of the open order value is derived from the consumption quantities of all objects in the billing structure.
Project-Related Incoming Orders I 6.7
N ext, you must assign the relevant cost elements of the costs and revenues and the JesuIts analysis cost elements to the incoming order cost elements in SAP Project System Customizing settings. You can make this assignment for cost element intervals or cost element groups based on the controlling area and results analysis key (see
Section 6.14.1). For the subsequent evaluation, you must finally assign the incoming order cost elements to corresponding value categories in transaction OPI2 (see Section 7.2.1)
If you want to settle the data from project-related incoming order Settings in CO-PA
determination in the Profitability Analysis (P A). you will reqUire a suitable PA transfer structure, which determines the mapping of the incoming order cost elements to value categories of the Profitability Analysis when settlement occurs (see Section 6.26.1). In addition, the operating concern to which the data is to be settled must include the characteristic SORHIST, and a number range for the I Order-reI. project activity type must be maintained. You can define a number range in transaction KEN1 in the Profitability Analysis Customizing settings. You assign the SORHIST characteristic to an operating con-cern in transaction KEQ3. The indicator has the follOWing four possi-ble categories:
... AENA - New order This category comprises cost element categories 50, 51 and 52, and is created when sales order items are created for billing elements.
... AEGA - Order change This category only contains cost element category 50, and is created if changes are made to conditions or quantities in relevant sales orders.
... AEAB - Cancellation This category comprises cost element categories 50, 51, and 52, and is created when sales order items are cancelled for billing elements.
... AEPA - plan change This category comprises the two cost element categories 51 and 52, and is created when relevant changes are made to the cost structure of the project.
For project-related incoming order determination, you must also make settings in Project System Customizing for the relevant results
Results analysis keys
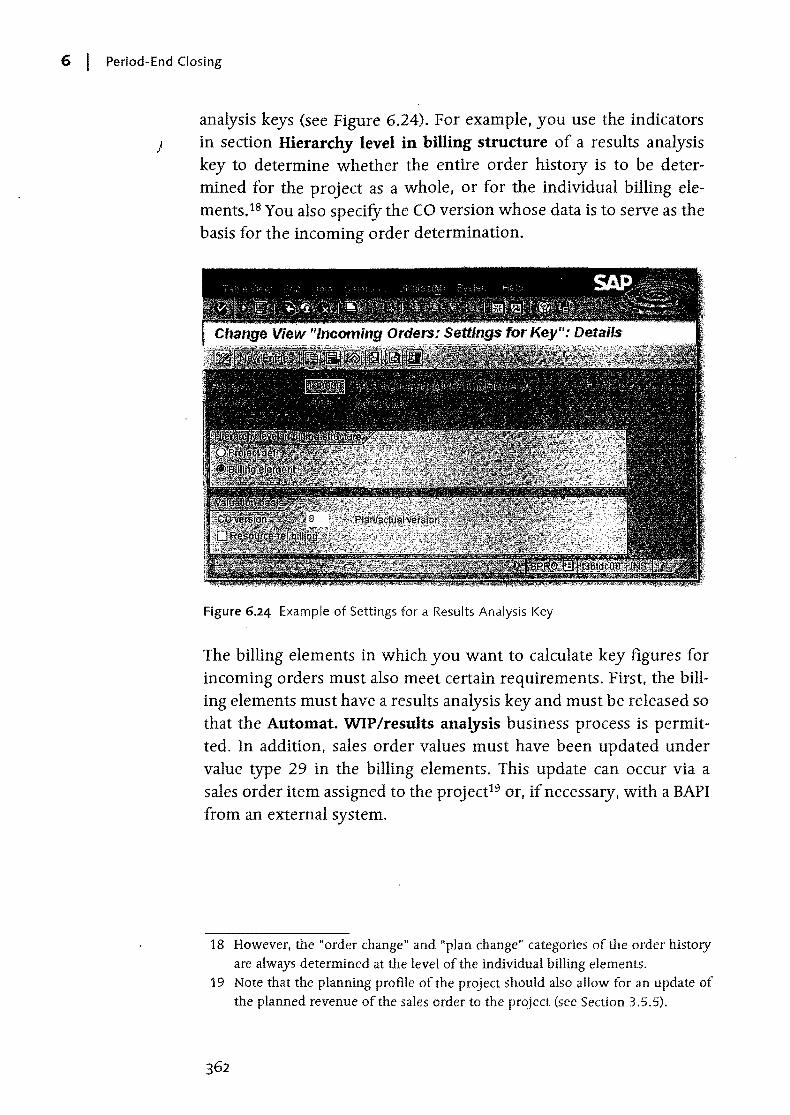
6 I Period-End Closing
analysis keys (see Figure 6.24). For example, you use the indicators j in section Hierarchy level in billing structure of a results analysis
key to determine whether the entire order history is to be determined for the project as a whole, or for the individual billing elements.18 You also specify the CO version whose data is to serve as the basis for the incoming order determination.
Figure 6.24 Example of Settings for a Results Analysis Key
The billing elements in which you want to calculate key figures for incoming orders must also meet certain reqUirements. First. the billing elements must have a results analysis key and must be released so that the Automat. WIP/results analysis business process is permitted. In addition. sales order values must have been updated under value type 29 in the billing elements. This update can occur via a sales order item assigned to the project19 or, if necessary. with a BAPI from an external system.
18 However, the "order change" and "plan change" categories of the order history are always determined at the level of the individual billing elements.
19 Note that the planning profile of the project should also allow for an update of the planned revenue of the sales order to the project (see Section 3.5.5).
Project-Related Incoming Orders I 6.7
6.7.2 Executing the Project-Related Incoming Order Determ)nation
Typically, you execute the determination of project-related sales orders immediately after the results analysis for projects. You can use transactions CJA2and CJA 1 in SAP Project System to do so. On the initial screen, you select the relevant objects by specifying sales orders, projects, or individual WBS elements, and you specify the period for which an order determination is to be executed, as well as process control.
When you execute the project-related incoming order determination, the results analysis key of the billing elements and their status (fully invoiced or not fully invoiced) determine how the Open Order Value and Incoming Orders key figures are calculated.
Figure 6.25 shows the detailed list of a project-related incoming order determination. You can evaluate the calculated key figures in Project System reporting, where the Incoming Orders/Balance hierarchy report is available as standard for this purpose (see Figure 6.23). If necessary, you can also settle the calculated key figures to the Profitability Analysis and then evaluate them using the relevant reports at the operating-concern level.
You can also execute an incoming order determination several times for the same period; however, when the key figures are calculated on the basis of the planning data, generally only the changes since the previous execution are considered.20 If necessary, you can also cancel a project-related incoming order determination. This may be necessary if you want to subsequently delete the billing indicator, or the results analysis key from a WBS element for which you have already determined incoming orders. It might also be useful to cancel the incoming order determination and execute it a second time, if you executed several incoming order determinations within a period but are interested in the overall changes to the key figures when compared with the previous period.
20 Note that when the incoming orders are determined, all incoming orders between the last execution and the current execution are considered, regardless of the period for which the changes were made (see Section 3.5.5).
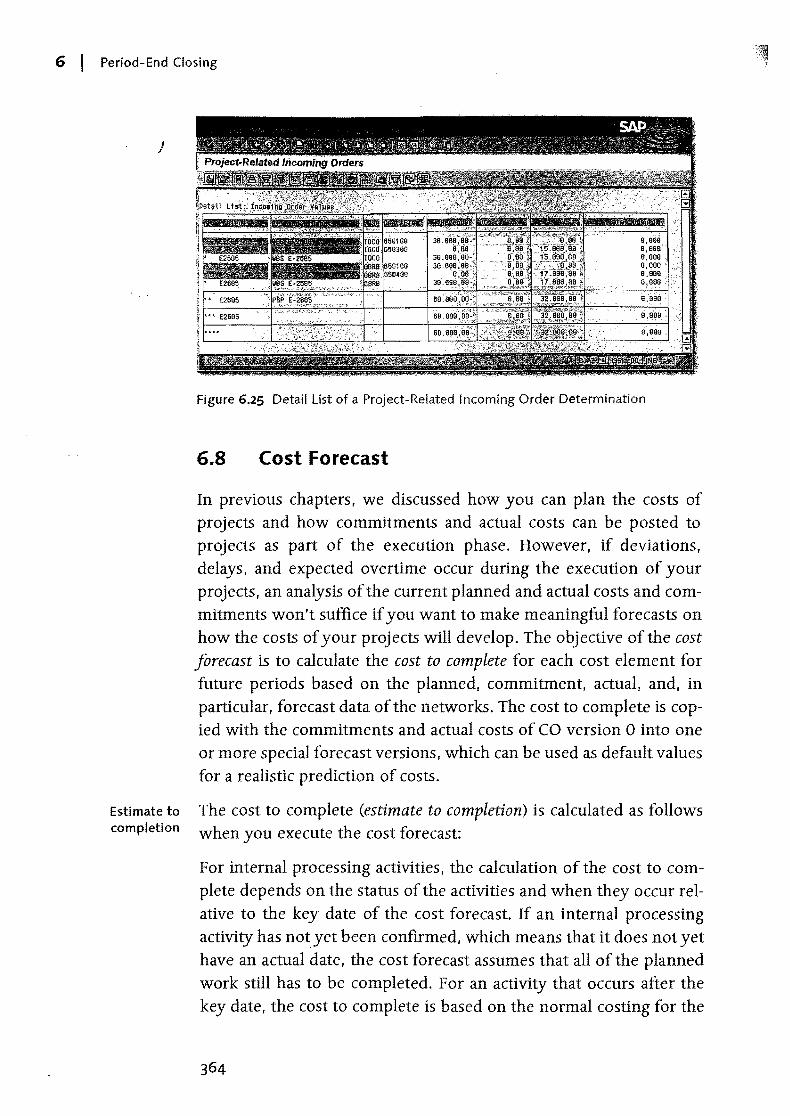
6 I Period-End Closing
)
Figure 6.25 Detail List of a Project-Related Incoming Order Determination
6.8 Cost Forecast
In previous chapters, we discussed how you can plan the costs of projects and how commitments and actual costs can be posted to projects as part of the execution phase. However, if deviations, delays, and expected overtime occur during the execution of your projects, an analysis of the current planned and actual costs and commitments won't suffice if you want to make meaningful forecasts on how the costs of your projects will develop. The objective of the cost
forecast is to calculate the cost to complete for each cost element for future periods based on the planned, commitment, actual, and, in particular, forecast data of the networks. The cost to complete is copied with the commitments and actual costs of CO version 0 into one or more special forecast versions, which can be used as default values for a realistic prediction of costs.
Estimate to The cost to complete (estimate to completion) is calculated as follows completion when you execute the cost forecast:
For internal processing activities, the calculation of the cost to complete depends on the status of the activities and when they occur relative to the key date of the cost forecast. If an internal processing activity has not'yet been confirmed, which means that it does not yet have an actual date, the cost forecast assumes that all of the planned work still has to be completed. For an activity that occurs after the key date, the cost to complete is based on the normal costing for the
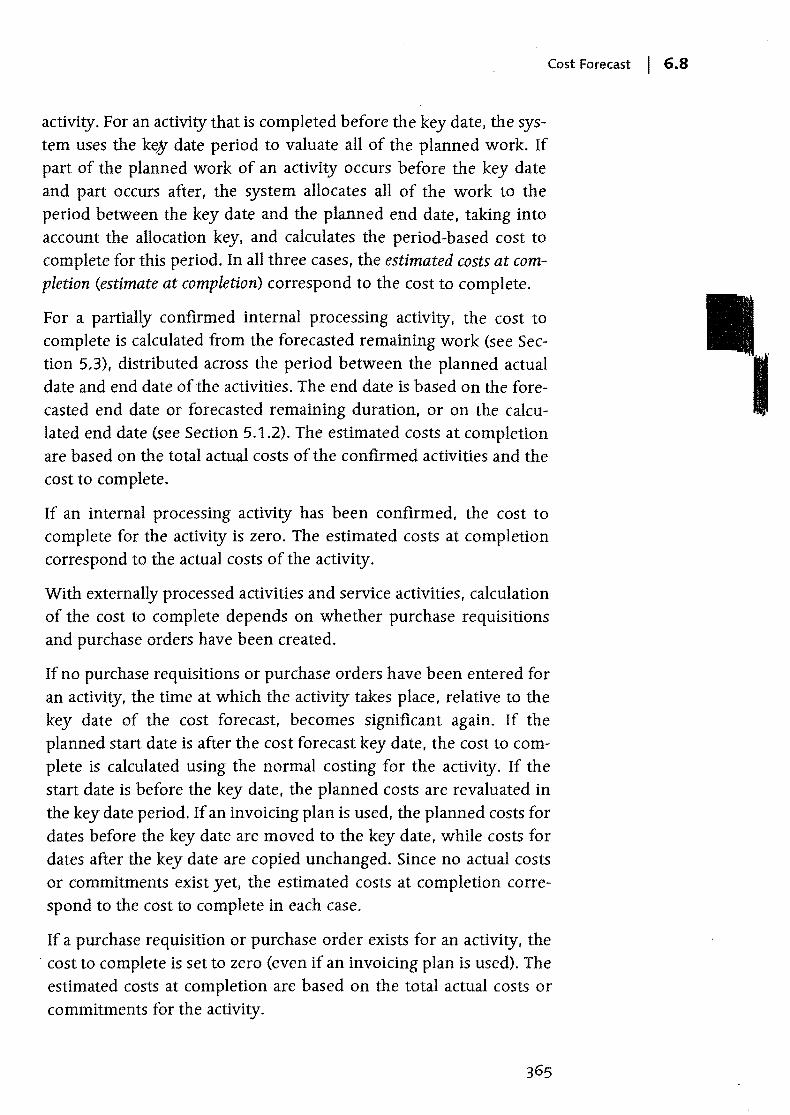
activity. For an activity that is completed before the key date, the system uses the keS date period to valuate all of the planned work. If part of the planned work of an activity occurs before the key date and part occurs after, the system allocates all of the work to the period between the key date and the planned end date, taking into account the allocation key, and calculates the period-based cost to complete for this period. In all three cases, the estimated costs at completion (estimate at completion) correspond to the cost to complete.
Cost Forecast I 6.8
For a partially confirmed internal processing activity, the cost to complete is calculated from the forecasted remaining work (see Section 5.3), distributed across the period between the planned actual date and end date of the activities. The end date is based on the forecasted end date or forecasted remaining duration, or on the calculated end date (see Section 5.1.2). The estimated costs at completion are based on the total actual costs of the confirmed activities and the cost to complete.
If an internal processing activity has been confirmed, the cost to complete for the activity is zero. The estimated costs at completion correspond to the actual costs of the activity.
With externally processed activities and service activities, calculation of the cost to complete depends on whether purchase requisitions and purchase orders have been created.
If no purchase requisitions or purchase orders have been entered for an activity, the time at which the activity takes place, relative to the key date of the cost forecast, becomes Significant again. If the planned start date is after the cost forecast key date, the cost to complete is calculated using the normal costing for the activity. If the start date is before the key date, the planned costs are revaluated in the key date period. If an invoicing plan is used, the planned costs for dates before the key date are moved to the key date, while costs for dates after the key date are copied unchanged. Since no actual costs or commitments exist yet, the estimated costs at completion correspond to the cost to complete in each case.
If a purchase requisition or purchase order exists for an activity, the . cost to complete is set to zero (even if an invoicing plan is used). The estimated costs at completion are based on the total actual costs or commitments for the activity.
6 I Period-End Closing
For general costs activities, the calculation of the cost to complete ) depends on whether actual costs have been posted.
For a general costs activity without actual costs, the calculation of the cost to complete depends on when the activity occurs, relative to the key date of the cost forecast. In this case, the logic used for internal processing activities that have not yet been confirmed is employed. If you used an invoicing plan for cost planning, the planned costs for dates before the key date are set to the key date, while costs for dates after the key date are copied unchanged as the cost to complete. The estimated costs at completion correspond to the cost to complete.
If actual costs have already been posted to a general costs activity, the cost to complete is based on the difference between the planned and actual costs of the activity. The distribution key is used for distribution across the period between the key date of the cost forecast and the end date of the activity. If the actual costs exceed the planned costs, the value of the cost to complete is zero. The estimated costs at completion are based on the total of the actual costs plus the cost to complete.
The calculation of the cost to complete for material components depends on the item category of the component (see Section 3.3.1).
For non-stock items, the planned costs of the component are factored in the calculation of the cost to complete for the activity. If a purchase requisition, purchase order, or goods receipt/invoice receipt exists for the component, only the commitments or actual costs are used for the calculation.
For stock items, you need to distinguish between components for which a goods issue has been posted and those without a goods issue. If a goods issue has not yet been posted. the cost of completion for the activity is calculated from the planned costs of the component. The period for the planned costs determination is based either on the requirements date, if this is after the cost forecast key date or, if not, on the cost forecast key date. The estimated costs at completion for the component correspond to the cost to complete. If a goods issue has been posted for a component, the cost forecast first calculates the difference between the planned quantity and the quantity issued. and then calculates the cost to complete for the open quantity. In this case, the estimated costs at completion are equal to the total of the actual costs and the cost to complete.
6.8.1 Prerequisites for and Restrictions of the Cost Fprecast
It is only useful to use the cost forecast if you use networks and work breakdown structures. The networks must be activity-assigned, and must be both appended and apportioned (Le., planning networks used solely for planning purposes are ignored). Moreover, only the co version 0 values of costing-relevant activities that are assigned to a WBS element are considered.
Cost Forecast I 6.8
The cost,~~;~~~m~t~~'~ct&f;{groJect stOCk-r~,~~';::&':~;;!::l;J;~'i]~t:~;fi\~~i~Ronents can.-, [ !] not b.e calg,y'j~~tti:~~XP~1J:'ofthecost J()n~f' .. ; .~nt.$totk-related stockitern~~'a1¢~~f~~rtrd~dln:tt1e cost fotetasH~1 ';',:7H
., :'.~. ,'":~.:··.;·:Tr~:·~:~f:;<;:Z·.-.:): -"~. <~:"_/' -, ,'~
The planning data of WBS elements is ignored in the cost forecast. However, the commitment costs and actual costs of the WBS elements are copied, together with the values of the assigned networks, into the forecast version and can therefore be taken into account when calculating the estimated costs at completion.
To update the cost to complete and copy the commitments and Forecast version
actual costs, you require a forecast version, which you must specify when you execute the cost forecast. Version 110 is available by default. However, you can also create your own CO versions in Cus-tomizing for the cost forecast (see Section 3.4), which must then have the exclusive usage forecast costs.
In order to factor in date changes due to confirmations, it usually makes sense to execute rescheduling before the cost forecast. The cost of completion is then calculated on the basis of your current time scheduling.
Before you execute the cost forecast, you should also have executed the overhead calculation for the commitment values and actual values, so that all commitments and actual costs are copied into the forecast version. But, you don't have to manually execute a planned application of overhead, because planned overheads are automatically calculated as part of the cost forecast.
6.8.2 Executing and Evaluating the Cost Forecast
You can use transactions CJ9L and CJ9M to execute a cost forecast. Besides selecting the objects and selecting process control, you also
'i
6 I Period-End Closing
)
enter the key date for calculating the cost of completion and the forecast version. When you execute the cost forecast, the system calculates the cost of completion for the selected objects based on the key date, and copies this cost of completion to t~e forecast version. The system also copies the commitments and actual costs to the forecast version, so that they can be used to calculate the estimated costs at completion.
Figure 6.26 shows an example of the result of a cost forecast (as you can see, only the result of an individual activity of a project is displayed in the detailed list of the cost forecast). In this example, planned costs are shown for an internal processing activity for periods 9 to 11. Due to a partial confirmation in period 10 and the remaining duration that is forecast as a result, the cost forecast also calculates a cost to complete for period 12. Also, due to the forecasted remaining work, the estimated costs at completion differ significantly from the planned costs.
2.868,88 B,BB B,OO 8,8B B,OB 1B3,4B a,Ba 0,00 8,00 8,88 434,28 B,B8 0,08 8,8B 8,oe 325,71 a,BB 0,00 0,80 0,88
7.582,65 10.00e,06 8,00 4.609,24 14,609,24 379,13 5ee,Of) 8,00 2313,46 730,46
1.592,36 2.10e,88 8,88 967,94 3.067,94 1 .194,27 1.575,013 0,88 125,96 2.3813,96
689,35 0,00 0,08 5.693,39 5.693,39 34,47 B,80 O,OB 2B~,67 ' 2B4,67
144,76 a,aa 0,80 1 .195,61 1.195,61 188,57 a,08 a,BB 896; 7,1 896,71
a,aa 8,88 0,00 3.797,37 3,797,37 0,00 o,aa 0,00 189,87 189,87 e,aa O,BO B,aa 797,45 797,45 a,aa B,OB 8,aa 598,89 598,89
14.656,95 14.175,88 0,88 19.986,76
Figure 6.26 Example of the Result of a Cost Forecast
The forecast (12CTC1) hierarchy report is available as standard for analysis of the Jost to complete, as well as the commitments and actual costs at the time of the cost forecast. Since the values are calculated by cost element, however, you can also define your own cost element reports to evaluate the cost forecast (see Section 7.2.2).
6.9 Settlement
In general, project structures serve as only temporary cost objects. In other words, the costs that are posted during the execution phase of a project are typically allocated to one or more other receivers as part of the period-end closing, that is, they are settled. The costs are allocated to various receivers in accordance with the purpose of the settlement. Some examples of project settlement are provided below:
~ Settlement to the. Profitability Analysis (CO-PA) You can use the results analysis to calculate inventory costs or reserves for a project, for example (see Section 6.6). The settlement of these analyzed costs to CO-PA means that the information is made available to the Profitability Analysis for detailed Enterprise Controlling, while automatic adjustment postings can be made concurrently in Financial Accounting.
~ Settlement to Asset Accounting For investment projects, cost portions, which can or must be capitalized, can be settled to assets under construction (AUC) or completed assets. In Asset Accounting, you can then use these values for relevant depreciations, for example.
~ Settlement to Cost Centers When you settle the costs of projects to cost centers, you can use these values in Cost Center Accounting, for example, for price calculation.
In addition to the settlement receivers listed above, you can also settle project costs to other orders, projects, cost objects, sales order items, or GIL accounts, for example, depending on your Enterprise Controlling requirements. You use settlement rules to determine which portions of which costs can be settled to which receivers with which amounts. These rules must be defined in the relevant senders, that is, in WBS elements or network activities, for example.
; .~
Settlement I 6·9
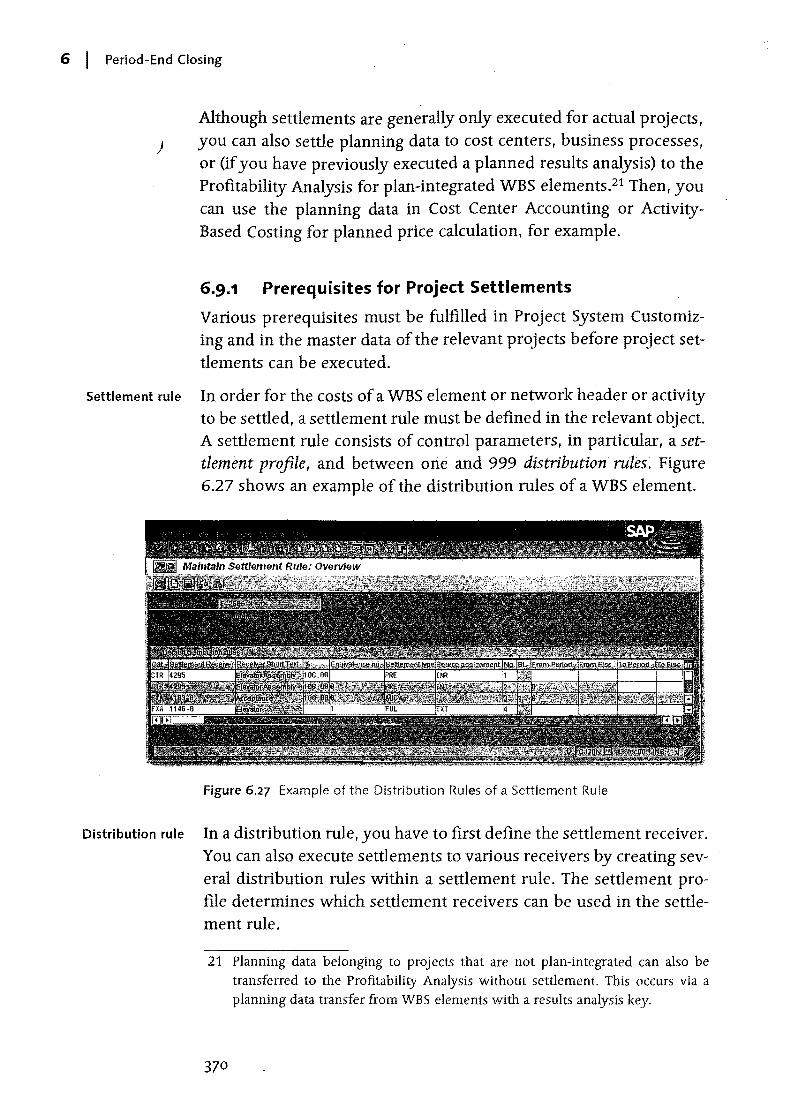
6 I Period-End Closing
Although settlements are generally only executed for actual projects, ) you can also settle planning data to cost centers, business processes,
or (if you have previously executed a planned results analysis) to the Profitability Analysis for plan-integrated WBS elements.21 Then, you can use the planning data in Cost Center Accounting or ActivityBased Costing for planned price calculation, for example.
6.9.1 Prerequisites for Project Settlements
Various prerequisites must be fulfilled in Project System Customizing and in the master data of the relevant projects before project settlements can be executed.
Settlement rule In order for the costs of a WBS element or network header or activity to be settled, a settlement rule must be defined in the relevant object. A settlement rule consists of control parameters, in particular, a settlement profile, and between one and 999 distribution rules. Figure 6.27 shows an example of the distribution rules of a WBS element.
Figure 6.27 Example of the Distribution Rules of a Settlement Rule
Distribution rule In a distribution rule, you have to first define the settlement receiver. You can also execute settlements to various receivers by creating several distribution rules within a settlement rule. The settlement profile determines which settlement receivers can be used in the settlement rule.
21 Planning data belonging to projects that are not plan-integrated can also be transferred to the Profitability Analysis without settlement. This occurs via a planning data transfer from WBS elements with a results analysis key.
370
Next, you can define which portions of the costs are to be settled to the settlement Jeceiver. Costs can be distributed as a percentage, using equivalence numbers, or by amount.22 In addition, costs are often distributed among various receivers based on the specific cost elements. For this purpose, you can define a source aSSignment in a distribution rule (depending on the parameters of the settlement rule), which refers to a cost element interval or cost element group. The distribution rule then applies only to debits for these cost elements. This means that debits, which can or must be capitalized, can be settled to Asset Accounting, while the other cost portions are settled to cost centers for investment projects, for example.23
Settlement I 6·9
The settlement type of a distribution rule controls additional details Settlement type
of the settlement to the receiver. The following settlement types are available:
.... PER (periodic settlement) During settlement, only the costs of the relevant settlement period are settled in accordance with the settlement rule.
.... FUL (full settlement) With full settlement, both the costs of the settlement period and the unsettled costs from previous periods are settled.
For investment projects, that is, for WBS elements with an investment profile, the follOwing additional settlement types are also available:
.... AUC (capitalization of assets under construction) This settlement type is used to settle the costs ofWBS elements to assets under construction. Distribution rules for the AUC settlement type cannot be create manually. Instead, they are automatically created during the first settlement, provided that an AUC exists for the WBS element.
22 With a settlement by amount, the amount rule category determines whether the specified amount is to be settled periodically, or whether the amount simply represents the upper limit for all settlements. In the first case, a negative balance may occur in the object due to the settlement by amount, while, in the second case, o'nly the actual debit is settled periodically as a maximum.
23 In Asset Accounting, valuation areas can be used to make a further distinction between cost portions that can or cannot be capitalized based on the purpose of the valuation. The system posts portions of a valuation area that cannot be capitalized as nonoperating expenses.
371
I
6 I Period-End Closing
~ PRE (preliminary settlement) ) Distribution rules for the PRE settlement type are used for settle
ment before the distribution rules for settlement type AUe. With settlement type PRE, you can therefore settle cost portions that are not to be capitalized.
Settlement rule parameters
Settlement profile
A"ocation structure
If necessary, you can also enter a validity period for distribution rules, which is taken into account when settlement is executed. After a distribution rule is used in a settlement, only the end date of the validity period can be changed.
The parameters for the settlement rule essentially consist of the set
tlement profile, an allocation structure, and, if necessary, a source and PA transfer structure. You must define all of these profiles in advance in SAP Project System Customizing settings.
The settlement profile (see Figure 6.28) is the central profile for settlement. In a settlement profile, you define, for example, which receiver types can or must be used in the settlement rule and how costs are to be distributed. By setting the To Be Settled in Full indicator, you ensure that an object can only be completed or flagged for deletion if its balance is zero. In addition to other control indicators, you can also define default values for the other profiles of the parameters of a settlement rule in a settlement profile.
The allocation structure (also referred to in some cases as settlement structure in Customizing) determines which (source) cost elements are to be settled under which (settlement) cost elements to the relevant receiver types. An allocation structure therefore consists of one or more assignments. Each assignment refers to source cost elements, that is, an interval of cost elements or a cost element group, under which debits may be posted, and to settlement cost elements (see Figure 6.29) under which the debits can be allocated during settlement. Settlement cost elements are defined on the basis of the individual settlement receivers. If necessary. the source cost elements can be retained during the settlement to receivers. For this purpose, set the By cost element indicator for the relevant receiver types in the allocation structure.24
24 For performance reasons, a settlement using a smaller number of settlement t)'pes is preferred to a settlement by cost elements.
372
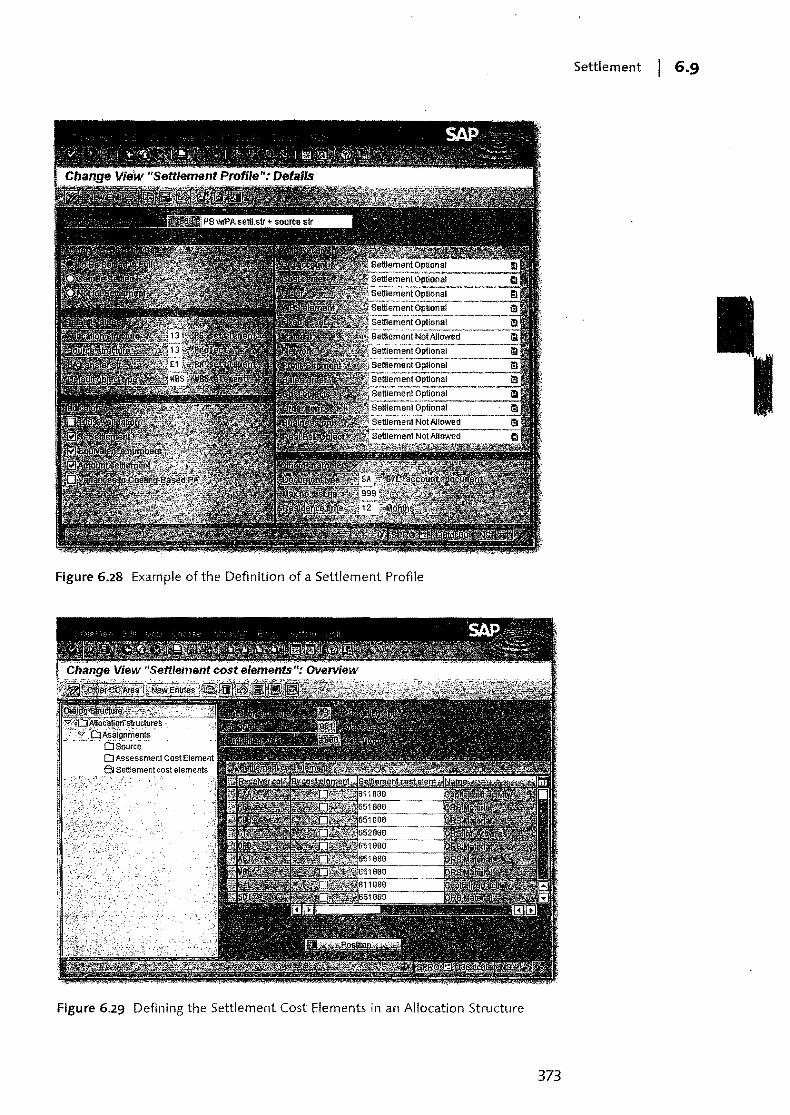
Settlement I 6.9
Figure 6.28 Example of the Definition of a Settlement Profile
Figure 6.29 Defining the Settlement Cost Elements in an Allocation Structure
373

6 I Period-End Closing
[I] )
Source structure
PA transfer structure
[ ! ]
Creating settlement rules
:~8 .. 1'0.:r.ll,ge'~m~ane"'" ;natlsIOucnadtieornwsthr.luCi.cht. ... u.~.ire·.;.:;.~;t~~~~f~i.··'he stru ctu re so .",u . iy .... ".·~sted.and t " fff', c~i()~t elements may ~" :;;~ij~~ within the" strO;~f4te·.;"· "
A source structure consists of one or more source assignments. An assignment includes the debit cost elements that are to be settled in accordance with the same distribution rules during settlement. When you enter a distribution rule, you can restrict its validity to the cost elements in a source assignment by specifYing this assignment. In the example in Figure 6.27. all costs of the INT and INR source assignments are settled to a cost center, while all other costs are settled to the Ave or the completed asset.
You only require a PA transfer structure as part of project settlement if you want to settle costs to the Profitability Analysis. Since data in the Profitability Analysis has a reference to value fields, you use the PA transfer structure to determine which cost elements are to be assigned to which value fields. You have to create one or more assignments in a PA transfer structure for this purpose. Each assignment refers to source cost elements (a cost element interval or cost element group) and to a value field. If necessary. you can also define various value fields within an assignment for fixed and variable portions.
Ifyouex~cute a results analysis before project settlement to Profita'b,iljty Analysis, you must ensure that the PA transfer structure incorporates all relevant results analysis cost elements.
There are various options for creating settlement rules for WBS elements and network headers or activities. You can define the settlement profile and thus also all relevant settlement parameters as default values for WBS elements in the project profile for networks in the network type. If the same distribution rules are to be used for all WBS elements and, if necessary, for all networks in a project, you can define these distribution rules at the project definition level when you create the project (with or without a template). When you save, this settlement rule is accepted by all WBS elements and, depending on the settings in the network parameters, by the aSSigned networks. When you create new WBS elements or networks for the project, the settlement rule from the project definition is also copied to these elements or networks.
374
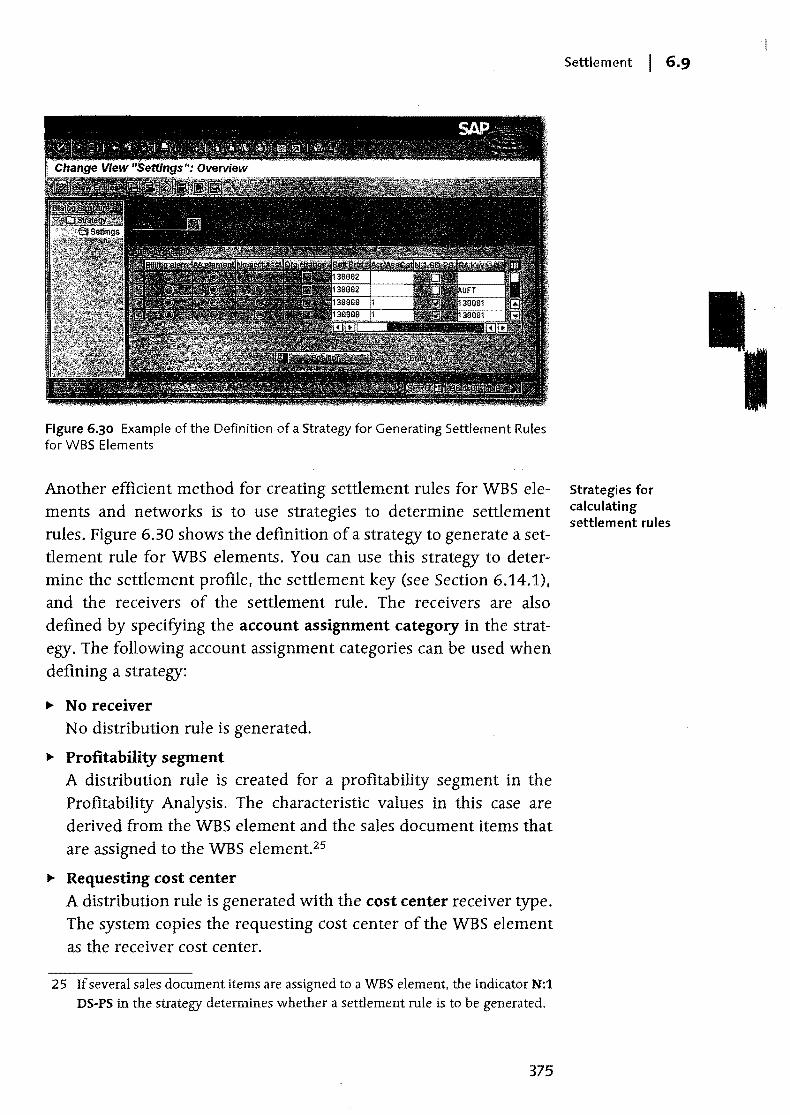
Figure 6.30 Example of the Definition of a Strategy for Generating Settlement Rules for WBS Elements
Another efficient method for creating settlement rules for WBS elements and networks is to use strategies to determine settlement rules. Figure 6.30 shows the definition of a strategy to generate a settlement rule for WBS elements. You can use this strategy to determine the settlement profile, the settlement key (see Section 6.14.1), and the receivers of the settlement rule. The receivers are also defined by specifYing the account assignment category in the strategy. The following account assignment categories can be used when defining a strategy:
.. No receiver No distribution rule is generated.
.. Profitability segment A distribution rule is created for a profitability segment in the Profitability Analysis. The characteristic values in this case are derived from the WBS element and the sales document items that are aSSigned to the WBS element.25
.. Requesting cost center A distribution rule is generated with the cost center receiver type. The system copies the requesting cost center of the WBS element as the receiver cost center.
25 If several sales document items are aSSigned to a WBS element, the indicator N:l
DS-PS in the strategy determines whether a settlement rule is to be generated.
375
Settlement I 6·9
Strategies for calculating settlement rules
I
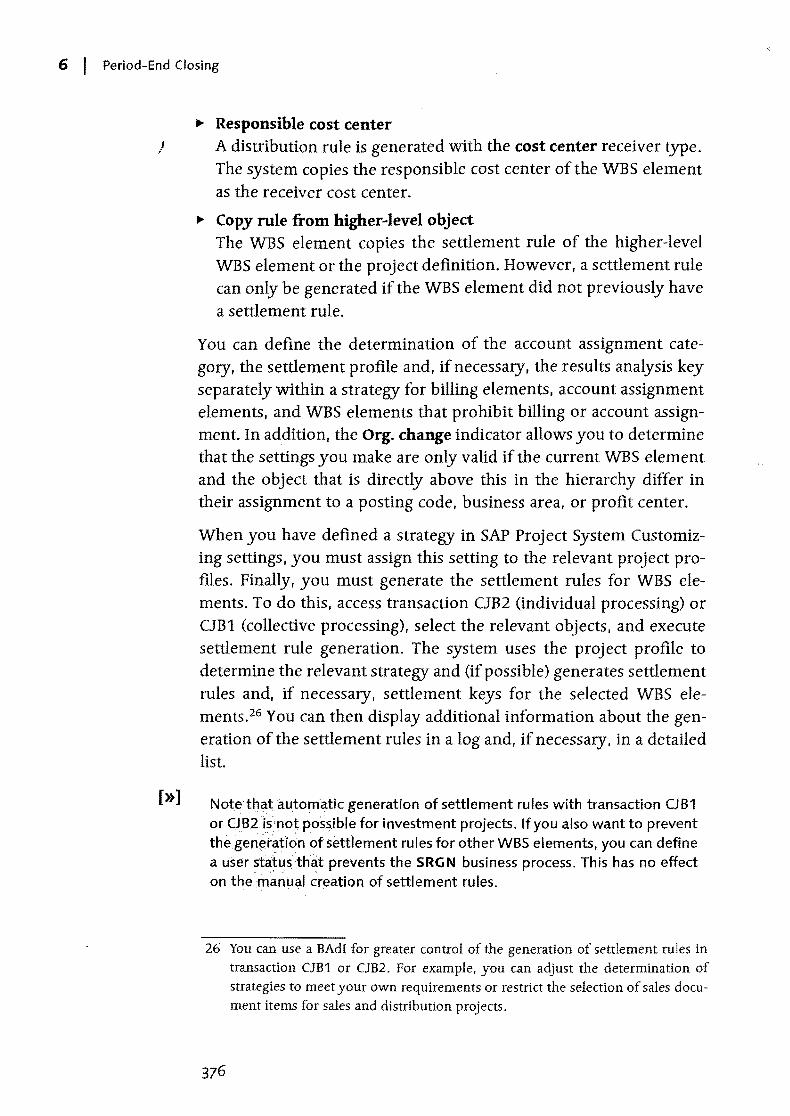
6 I Period-End Closing
... Responsible cost center } A distribution rule is generated with the cost center receiver type.
[»]
The system copies the responsible cost center of the WBS element as the receiver cost center.
... Copy rule from higher-level object The WBS element copies the settlement rule of the higher-level WBS element or the project definition. However, a settlement rule can only be generated if the WBS element did not previously have a settlement rule.
You can define the determination of the account assignment cate:. gory, the settlement profile and, if necessary, the results analySiS key separately within a strategy for billing elements, account assignment elements, and WBS elements that prohibit billing or account assignment. In addition, the Org. change indicator allows you to determine that the settings you make are only valid if the current WBS element and the object that is directly above this in the hierarchy differ in their assignment to a posting code, business area, or profit center.
When you have defined a strategy in SAP Project System Customizing settings, you must assign this setting to the relevant project profiles. Finally, you must generate the settlement rules for WBS elements. To do this, access transaction CJB2 (individual processing) or CJBl (collective processing), select the relevant objects, and execute settlement rule generation. The system uses the project profile to determine the relevant strategy and (if possible) generates settlement rules and, if necessary, settlement keys for the selected WBS elements.26 You can then display additional information about the generation of the settlement rules in a log and, if necessary, in a detailed list.
Notetbat automatic generation of settlement rules with transaction OB1 or OB2:isnotpossible for investment projects. If you also want to prevent thegen~i-ati6nofsettlement rules for other WBS elements, you can define a userstGltusthat prevents the SRGN business process. This has no effect onthe manual creation of settlement rules.
26 You can use a BAdI for greater control of the generation of settlement rules in transaction CJB1 or CJB2. For example. you can adjust the determination of strategies to meet your own reqUirements or restrict the selection of sales document items for sales and distribution projects.
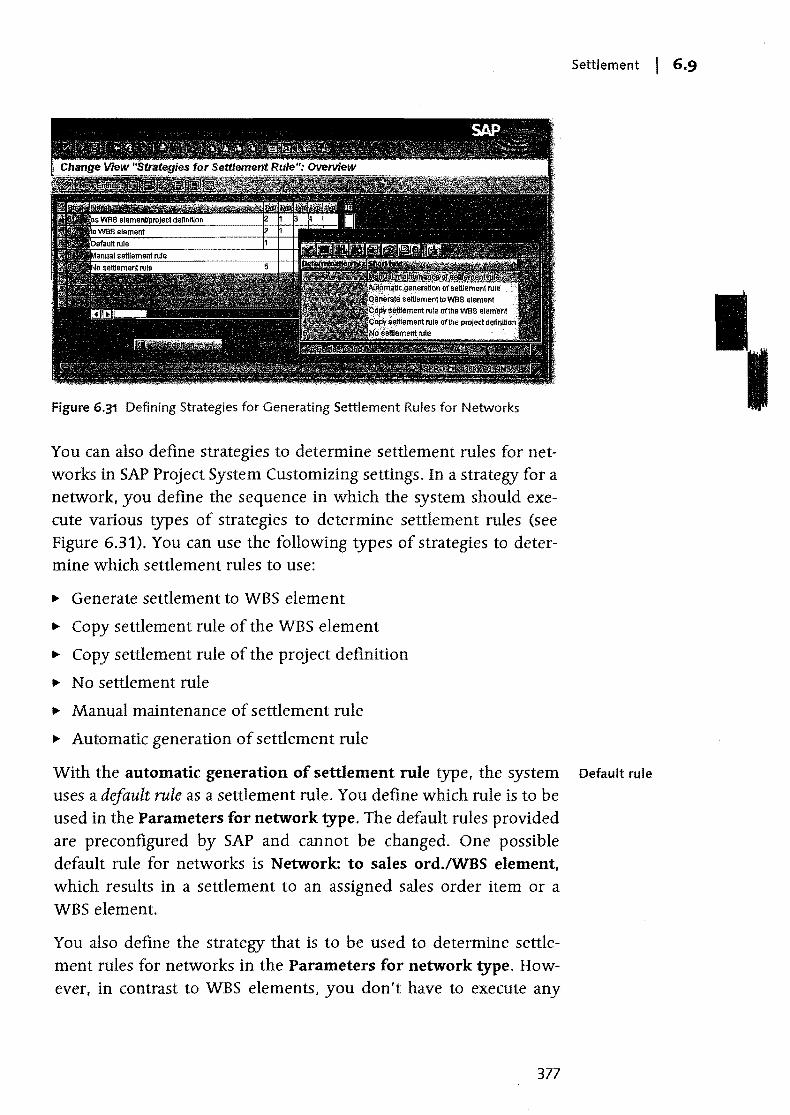
Figure 6.31 Defining Strategies for Generating Settlement Rules for Networks
You can also define strategies to determine settlement rules for networks in SAP Project System Customizing settings. In a strategy for a network, you define the sequence in which the system should execute various types of strategies to determine settlement rules (see Figure 6.31). You can use the following types of strategies to determine which settlement rules to use:
.. Generate settlement to WBS element
.. Copy settlement rule of the WBS element
.. Copy settlement rule of the project definition
.. No settlement rule
.. Manual maintenance of settlement rule
.. Automatic generation of settlement rule
Settlement I 6.9
With the automatic generation of settlement rule type, the system Default rule
uses a difault rule as a settlement rule. You define which rule is to be used in the Parameters for network type. The default rules provided are pre configured by SAP and cannot be changed. One possible default rule for networks is Network: to sales ord.IWBS element, which results in a settlement to an aSSigned sales order item or a WBS element.
You also define the strategy that is to be used to determine settlement rules for networks in the Parameters for network type. However, in contrast to WBS elements, you don't have to execute any
377
6 I Period-End Closing
}
Manual entry of distribution rules
additional transactions to generate the settlement rules for networks using strategies.
Sometimes, it doesn't make sense to enter default distribution rules in the project definition or to generate settlement rules automatically. In this case, you must manually create distribution rules for the relevant operational objects. To do this, you can navigate from the object master data to distribution rule maintenance (see Figure 6.27) and. if necessary, from there to maintenance of the settlement parameters. As soon as a settlement rule exists for an object. it is documented for the object as system status SETC (Settlement rule created).
You can use the RKASELRULES_PR report for an overview of the settlement rules of projects. On the initial screen of this report. you use selection variants to determine which projects are to be analyzed. If necessary. you can use details of the settlement parameters and settlement receivers as additional selection criteria. After you execute the report, it returns a table listing the distribution rules of the selected object. You can then navigate to the master data of the sender and receiver or to the settlement rules display.
6.9.2 Executing Project Settlements
For individual and collective processing of project settlements, you can use transaction CJ9E or CJ9G for planned settlement and transactions CJ88 or CJ8G for actual settlement in SAP Project System. Figure 6.32 shows the initial screen for individual processing of actual project settlement for a project.
In addition to selecting the relevant objects and specifYing process control, you define the period for which you want the settlement to be executed on the initial screen. Depending on the settlement type of the relevant distribution rules, the settlement either takes account of debits from the specified settlement period only, or factors in costs from previous periods. If the settlements are not to be posted to the settlement period. for example. because this period is already locked against posting, you can specify a later period as the posting period, provided that this is still in the same fiscal year as the settlement period.
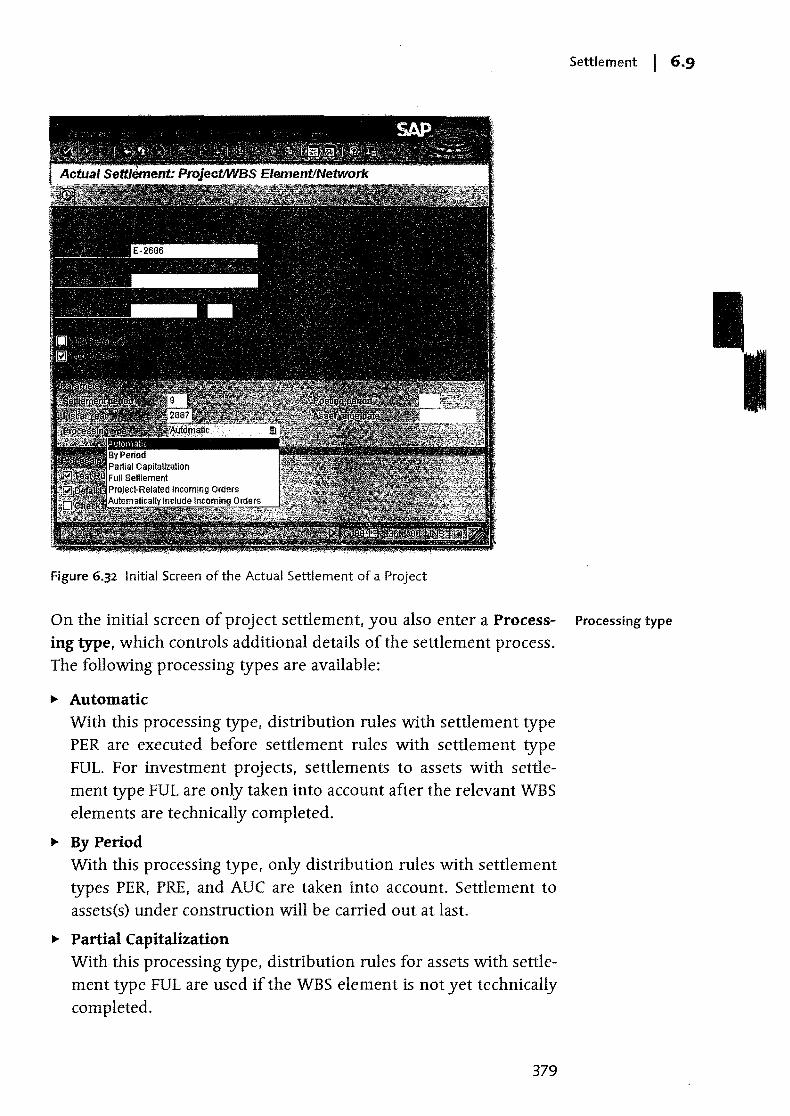
Settlement I 6.9
Figure 6.32 Initial Screen of the Actual Settlement of a Project
On the initial screen of project settlement, you also enter a Process- Processing type
ing type, which controls additional details of the settlement process. The following processing types are available:
~ Automatic With this processing type, distribution rules with settlement type PER are executed before settlement rules with settlement type FUL. For investment projects, settlements to assets with settlement type FUL are only taken into account after the relevant WBS elements are technically completed.
~ By Period With this processing type, only distribution rules with settlement types PER, PRE, and Aue are taken into account. Settlement to assets(s) under construction will be carried out at last.
~ Partial Capitalization With this processing type, distribution rules for assets with settlement type FUL are used if the WBS element is not yet technically completed.
379
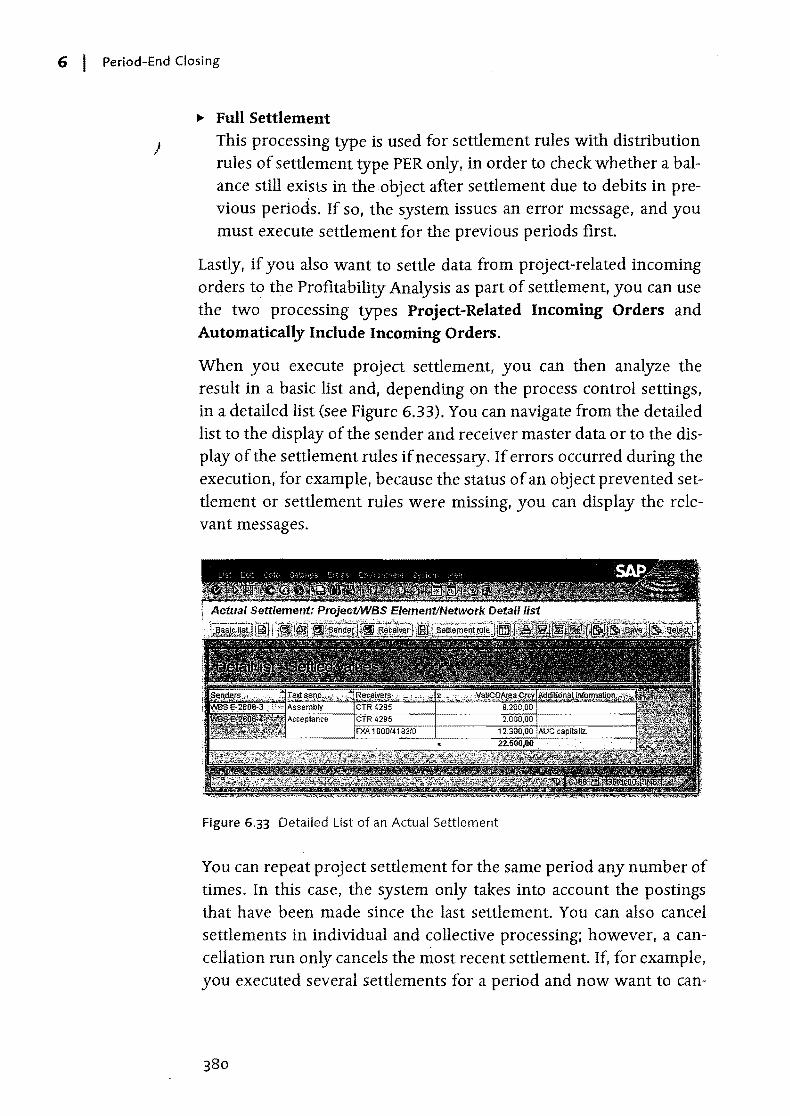
6 I Period-End Closing
... Full Settlement } This processing type is used for settlement rules with distribution
rules of settlement type PER only, in order to check whether a balance still exists in the object after settlement due to debits in previous periods. If so, the system issues an error message, and you must execute settlement for the previous periods first.
Lastly, if you also want to settle data from project-related incoming orders to the Profitability Analysis as part of settlement, you can use the two processing types Project-Related Incoming Orders and Automatically Include Incoming Orders.
When you execute project settlement, you can then analyze the result in a basic list and, depending on the process control settings, in a detailed list (see Figure 6.33). You can navigate from the detailed list to the display of the sender and receiver master data or to the display of the settlement rules if necessary. If errors occurred during the execution, for example, because the status of an object prevented settlement or settlement rules were missing, you can display the relevant messages.
Figure 6.33 Detailed List of an Actual Settlement
You can repeat project settlement for the same period any number of times. In this case, the system only takes into account the postings that have been made since the last settlement. You can also cancel settlements in individual and collective processing; however, a cancellation run only cancels the most recent settlement. If, for example, you executed several settlements for a period and now want to can-
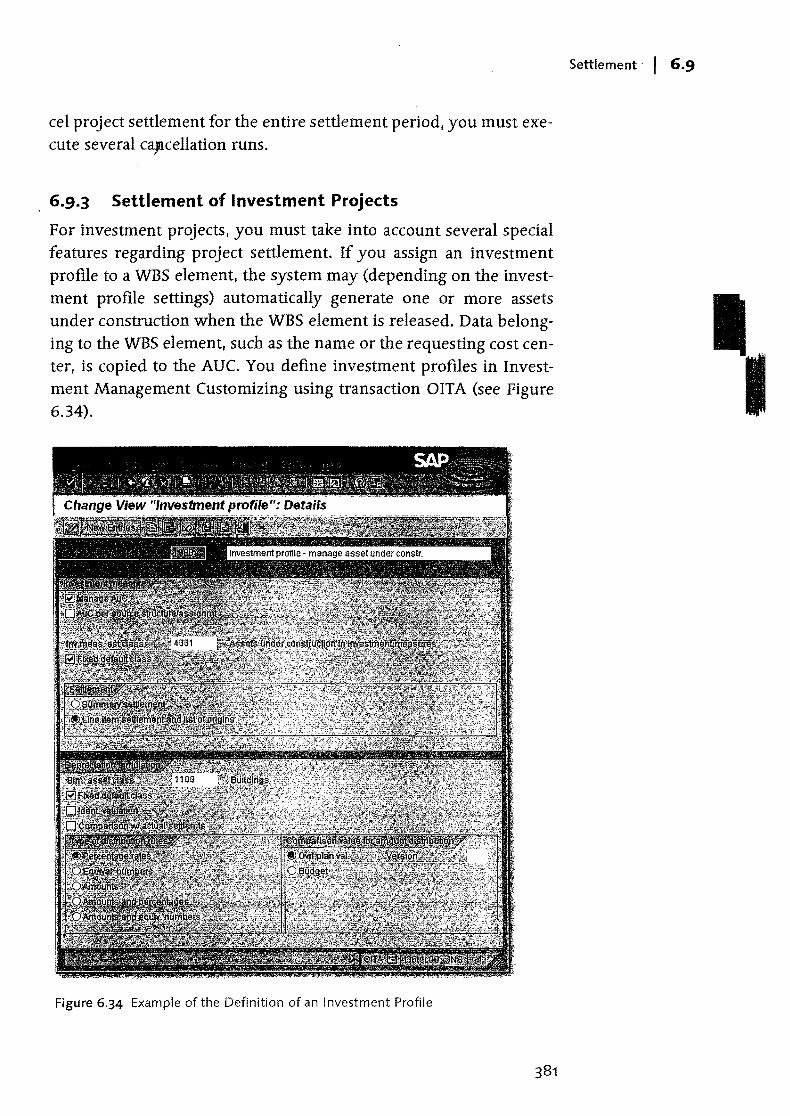
cel project settlement for the entire settlement period, you must execute several caJlcellation runs.
6.9.3 Settlement of Investment Projects
For investment projects, you must take into account several special features regarding project settlement. If you assign an investment profile to a WBS element, the system may (depending on the investment profile settings) automatically generate one or more assets under construction when the WBS element is released. Data belonging to the WBS element, such as the name or the requesting cost center, is copied to the AUC. You define investment profiles in Investment Management Customizing using transaction OITA (see Figure 6.34).
Figure 6.34 Example of the Definition of an I nvestment Profile
Settlement I 6·9
6 I Period-End Closing
With the first settlement of the WBS element, the system automati-) cally generates a distribution rule for settlement type AUC for settle
ment to the assigned asset under construction. If you don't want to settle all costs of the WBS element to this asset under construction, you must manually enter additional distribution rules for the debits to other receivers that are not to be capitalized. Use settlement type PRE to ensure that these distribution rules are taken into account before settlement to assets under construction as part of project settlement. You can use an appropriate source structure to distinguish between the cost portions that are to be capitalized and those that are not (see Figure 6.27).
Line item settlement
Once the asset under construction phase is completed, create a completed asset. You can do this in the Asset Accounting transactions or from WBS maintenance directly. Next, define a distribution rule in the WBS element with settlement type FUL for the cost portions to be capitalized and enter the completed asset as the settlement receiver. Note, however, that this distribution rule is only taken into account in the project settlement if you have selected partial capitalization or automatic as the processing type and technically completed the relevant WBS elements, in other words, if you have set the system status to TABG.
When the WBS elements have been technically completed, the debits that have been settled to the assets under construction are automatically reposted to the completed assets at the same time that the full settlement to the asset takes place. However, other debits can still be posted to the WBS elements. The relevant cost portions are then settled to the asset as part of the next project settlement.
You can also execute line item settlement for investment projects, provided that this is permitted by the investment profile. With line item settlement, you can create a separate, specific distribution rule for each debit posted (I.e., for each line item). Therefore, an exact data origin can be determined for each line item, from the completed asset to the original debit to the investment project. You can also define a general settlement rule in addition to your line item settlement rules. The system then uses this rule for all line items for which no separate settlement rule has been assigned. You· can enter line item distribution rules in transaction CJIe.

While direct settlements are generally used for sales and distribution projects or ov~rhead cost projects, multilevel settlement may be useful for investm'ent projects. With direct settlements, the sender objects settle their debits to the relevant receivers directly. With a multilevel settlement for investment projects, you first settle all costs to the WBS elements with an investment profile, and then settle all debits from these WBS elements to assets under construction, assets, and other receivers.27 This multilevel settlement of investment projects may be necessary, in particular, if you use assigned networks or orders without an investment profile, because these cannot automatically settle their costs to assets under construction. Multilevel settlement may also be useful if you want to archive and delete assigned orders during the asset under construction phase of projects lasting several years. For reasons of traceability, this is not possible if you settle the orders to AUCs directly.
If you use multilevel settlement, look at the dependencies explained in the next section. You should also note the special features regarding the interest calculation for investment projects (see Section 6.5).
6.9.4 Project Settlement Dependencies
To ensure that a project settlement can take into account all debits belonging to a period, you must first execute all relevant period-end closing activities. In particular, you must execute the overhead and template allocation. If you also use revaluation at actual prices, interest calculation, and results analysis, you should also execute these period-end closing activities before project settlement.28 If you determine project-related incoming orders (see Section 6.7), you must execute a separate settlement of this data, based on the processing type you use for settlement.
Consider the particular problems associated with the hierarchically aggregated display of values in Project System reports after a multilevel project settlement. To ensure that no incorrect data is displayed
27 The system uses the settlement rules to automatically determine whether a direct settlement or a multilevel settlement should be executed in each case. This means that you only need to execute o~e settlement run, even in the case of a multilevel settlement.
28 Note that a settlement must be executed before and after revaluation in certain cases (see Section 6.3.3).
Settlement I 6.9
Multilevel settlement
Elimination of internal business volume
6 I Period-End Closing
in a WBS element in the structure overview or in hierarchy reports ) after a multilevel settlement (see Sections 7.1 and 7.2.1), the system
executes an elimination of internal business volume. An elimination of internal business volume means that the system generates int~rnal allocation records that remove the settlements posted in a WBS element. Consequently, no duplicate actual costs from settlement and from the aggregation of values are displayed for this WBS element.
To ensure that values can be displayed correctly in the structure overview and in hierarchy reports with the elimination of internal business volume, note the following points in relation to multilevel settlement:
.... Always settle WBS elements to a higher-level WBS element that is directly above them in the hierarchy, and not to lower-level WBS elements or to WBS elements that are several levels higher.
.... Always settle assigned network headers or activities and orders to the assigned WBS element.
.... Don't subsequently change the hierarchical position of the settled objects.
For more details about the elimination of internal business volume after multilevel settlement, see Note 51971.
6.10 Summary
SAP Project System comprises a range of functions that help you to make adjustment postings based on changed actual prices, applications of overhead, and interest calculations as part of period-end closing for your projects. With the results analysis and determination of project-related incoming orders, you can calculate additional key figures and make these available for Enterprise Controlling. The cost forecast provides information about the expected cost to complete and costs at completion for your projects, and also takes into account the forecast data from confirmations. Lastly, you can use project settlement to allocate the costs and revenue data for your projects to other receivers in the SAP system.
Flexible and clear reporting of all project-related data is integral td project management. SAP Project System provides accounting and logistics reports of different levels of detail for this very purpose.
7 Reporting
To monitor and control projects, you need reports that enable you to provide information about the current cost, revenue, schedule. and capacity situation of your projects. For this purpose, different standard reports are available in Reporting of SAP Project System. If required, you can customize these reports or define your own reports. Reporting in SAP Project System is roughly divided between Project Information System: Structures and Project Information System: Financia Is. Other reports are also available for special logistical evaluations and for analyzing project progress. The following sections of this chapter describe the different evaluation options you can use in SAP Project System.1
7.1 Project Information System: Structures
The focus of Project Information System: Structures is on evaluating master data, schedules, and statuses of project objects; however, it can also show cost and revenue data. In Project Information System: Structures, you differentiate between the structure or project overviews and individual overviews. While individual reports only allow you to evaluate one document or object type at a time (that is, only from WBS elements or only from activities), you can use the structure/project structure overview to evaluate several object types
. Simultaneously. Before we describe the structure/project structure
1 Companies that use Business Information Warehouse (BW) for reporting 'purposes can also use predefined SAP Business Content for SAP Project System. This SAP Business Content consists of different extractors, update rules, characteristics, key figures, InfoCubes, queries, and roles.
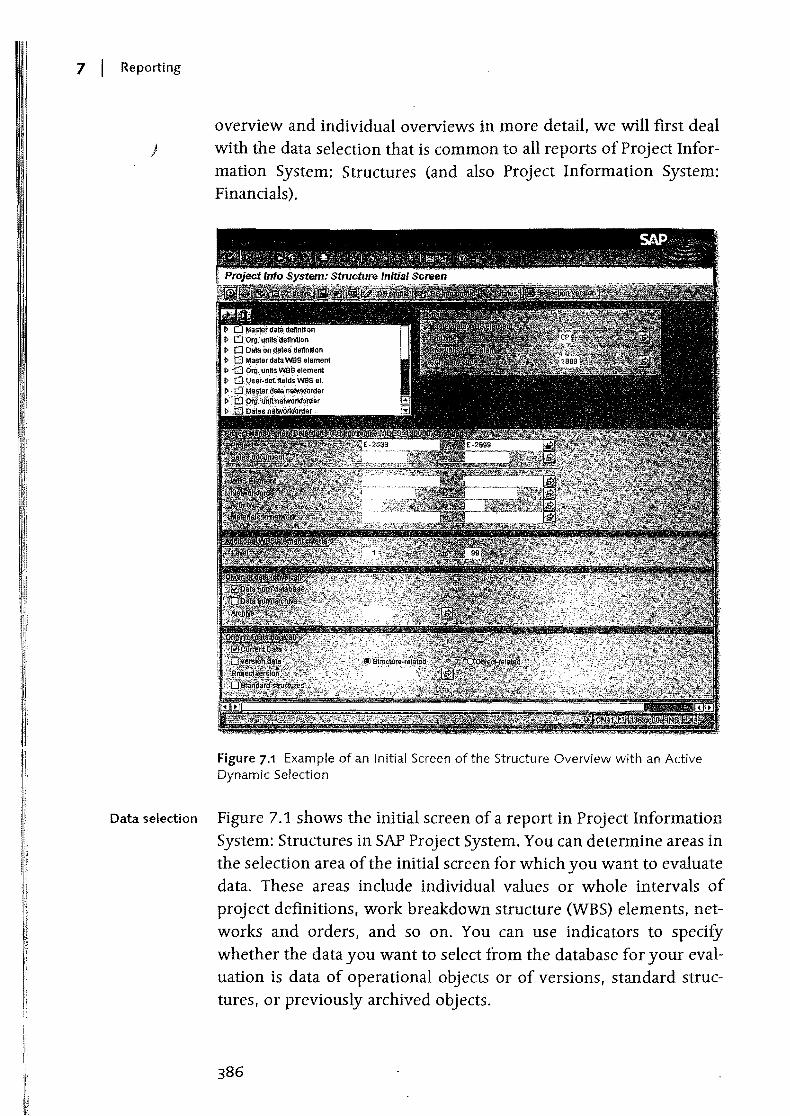
i I 1
7 I Reporting
overview and individual overviews in more detail, we will first deal } with the data selection that is common to all reports of Project Infor
mation System: Structures (and also Project Information System: Financials).
Figure 7.1 Example of an Initial Screen of the Structure Overview with an Active Dynamic Selection
Data selection Figure 7.1 shows the initial screen of a report in Project Information System: Structures in SAP Project System. You can determine areas in the selection area of the initial screen for which you want to evaluate data. These areas include individual values or whole intervals of project definitions, work breakdown structure (WBS) elements, networks and orders, and so on. You can use indicators to specifY whether the data you want to select from the database for your evaluation is data of operational objects or of versions, standard structures, or previously archived objects.
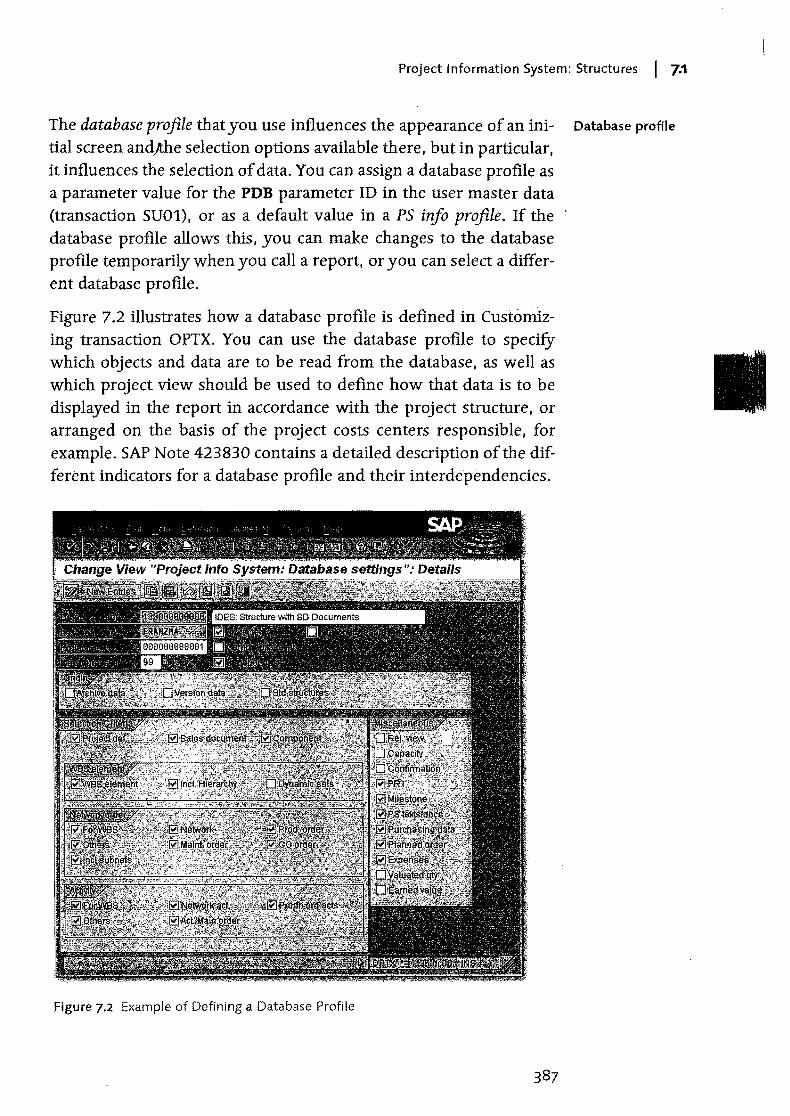
Project Information System: Structures I 7.1
The database profile that you use influences the appearance of an ini- Database profile
tial screen and}the selection options available there, but in particular, it influences the selection of data. You can assign a database profile as a parameter value for the PDB parameter ID in the user master data (transaction SU01), or as a default value in a PS info profile. If the database profile allows this, you can make changes to the database profile temporarily when you call a report, or you can select a differ-ent database profile.
Figure 7.2 illustrates how a database profile is defined in Customizing transaction 0 PTX. You can use the database profile to specify which objects and data are to be read from the database, as well as which project view should be used to define how that data is to be displayed in the report in accordance with the project structure, or arranged on the basis of the project costs centers responsible, for example. SAP Note 423830 contains a detailed description of the different indicators for a database profile and their interdependencies.
Figure 7.2 Example of Defining a Database Profile
7 I Reporting
Dynamic selection
)
[» ]
Status selection profiles
Selection variants
[»]
Selection versions
You can use dynamic selection and status selection profiles to further restrict the object selection you made in the initial screen of a report. Figure 7.1 shows a dynamic selection of the object selection according to the project type and company code of WBS elements. The specifications in dynamic selections act as filters for selecting objects from the database. With a suitable dynamic selection, you can reduce the amount of data selected and thereby influence the performance of the evaluation considerably. You can define which fields should be available for the dynamic selection. In order to do this, you need to create a selection view for the PSJ logical database with the CUS origin in transaction SE36.
.":'; .:;,
Defi.ningYQubPWn selection view for theqYf,latiJifg~l~ction is cross-client?; \~'<'~ :".:'> '.-. ' .,- -" ,', . v~'- •
In addition to the field values of dynamic selection, you can also use statuses as filter criteria for selecting objects. To do this, you must first define a status selection profile in Customizing of SAP Project System using transaction BS42. You store different rows consisting of system or user statuses in a status selection profile (see Section 2.6). You can use NOT, AND, or OR conditions for each row to specifY how you want the combination of these statuses to be used as a filter. In the initial screen of a report, you can then select the status selection profile for the different object types as an additional restriction for selecting data from the database.
If you made more complex selections in the initial screen of a report, you can save these selections as selection variants. When you then call the report again at a later time and you want to make the same selection, you don't have to enter all the selection criteria again manually. Instead, you only need to select the selection variant you saved.
Note that you generally cannot select any other data from the database within the evaluations. In other words, your data selection .determines which data is available for the evaluation. Similarly, you cannot further restrict the amount of data selected within the report; instead, you can only influence the display of this data using field selections or filter functions. This means that the data selection you make in the initial screen o~ a reportals6influences the performance of the evaluation considerably.
You can also save the data of reports of Project Information System: Structures as selection versions. When you call a report, you can then decide whether you want to select the current data from the data-
Project Information System: Structures I 7.1
base, or the data of a selection version for the evaluation. You can create any nuII}ber of selection versions and, if required, assign them a validity period. If the datasets for evaluation are very large, you can also schedule the creation of a selection version in the initial screen of a report as a background job. In this case, the system could automatically execute the data selection at night, for example. When creating a selection version, you can specify a number of days after which the system is to delete the version automatically. You can also delete the selection versions manually.
In addition to using the database profile to control the data selected, Project views
you can use the Project view field of the database profile to deter-mine the hierarchy that will be used to display data when you call hierarchically-arranged reports of Project Information System: Struc-tures and Project Information System: Financials. Some of the fol-lowing project views are delivered in the standard system:
.... Project structure
.... Profit center
.... Cost centers
.... Investment programs
.... Sales view
.... Characteristics hierarchy from summarization (see Section 7.4)
You can also create your own project views for predefined hierarchy types in Customizing transaction OPUR. In addition, you can use a customer enhancement to define a hierarchy structure for project views for hierarchy type 99.
You cannot select any more data from the database in the project view. [«] Instead, you can only define how the data in the information system wtll be displayed. The data in structure reports is hierarchically displayed most effectively when you use the project structure as a project view.
For more information about data selections in reports of SAP Project System, also refer to SAP Notes 107605 and 700697.
7.1.1 Structure/Project Structure Overview
You can use the Structure overview and Project structure overview to Simultaneously evaluate the data of all project objects and orders and
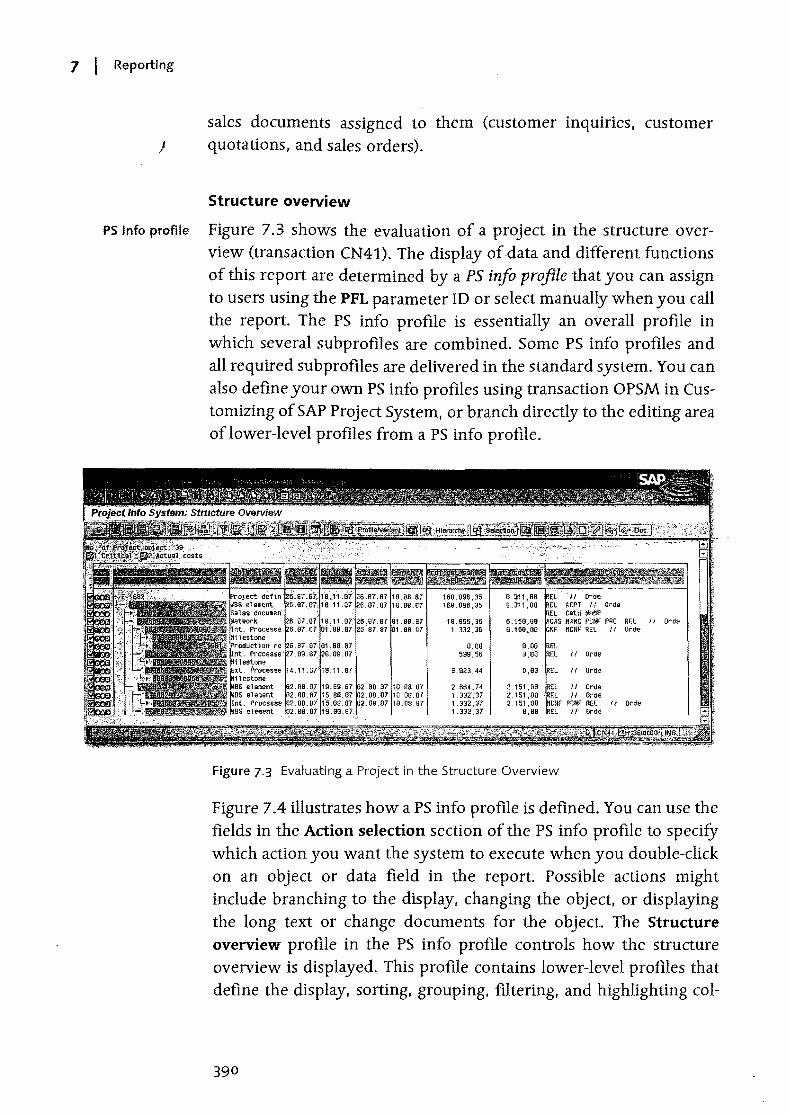
7 I Reporting
sales documents assigned to them (customer inquiries, customer ) quotations, and sales orders),
Structure overview
PS info profile Figure 7.3 shows the evaluation of a project in the structure overview (transaction CN41). The display of data and different functions of this report are determined by a PS info profile that you can assign to users using the PFL parameter ID or select manually when you call the report. The PS info profile is essentially an overall profile in which several subprofiles are combined. Some PS info profiles and all reqUired sub profiles are delivered in the standard system. You can also define your own PS info profiles using transaction OPSM in Customizing of SAP Project System, or branch directly to the editing area oflower-Ievel profiles from a PS info profile.
II Or de
/I Ord.
/I Ord.
/I Ord.
Figure 7.3 Evaluating a Project in the Structure Overview
Figure 7.4 illustrates how a PS info profile is defined. You can use the fields in the Action selection section of the PS info profile to specifY which action you want the system to execute when you double-click on an object or data field in the report. Possible actions might include branching to the display, changing the object, or displaying the long text or change documents for the object. The Structure overview profile in the PS info profile controls how the structure overview is displayed. This profile contains lower-level profiles that define the display, sorting, grouping, filtering, and highlighting col-
390

Project Information System: Structures I 7.1
ors of objects (exceptions). as well as indicators that determine how the data is aggr.egated and displayed.
Figure 7.4 Example of Defining a PS Info Profile
You can change many of the settings in the report itself.
For example, you can use a field selection to determine which fields are to be displayed. change the sequence of field columns and their width with a mouse click. define filter and also sorting. grouping and summarization criteria,2 or determine whether you want the values to be displayed in aggregated or nonaggregated format. Specifically, you can also define exceptions in the report using traffic lights or col-
391
7 I Reporting
) ored highlighting, for example, to indicate that planned dates have been overrun, or to emphasize objects with special characteristics. If the PS info profile or the corresponding subprofiles allow this, you can save changes that you made in the report as changes in the Customizing profiles and also generate new profiles from the report.
Functions of structure overview
In addition to the different options you can use for adjusting data in the report and printing report data, you can use the following functions in the structure overview:
.... Display, change, mass change, and create objects
.... Confirm activities, create and send pools of confirmations
.... Perform availability checks for material components
.... Update data ("Refresh")
.... Graphically display data as structure, hierarchy, network, Gantt chart, and portfolio graphics, or total curves and histogram displays
.... Send report data and export the data into Microsoft Excel, Access, Project formats or as HTML or ASCII files
.... Use periodic displays of costs, commitments, or revenues
.... Branch to individual overviews, reports of Project Information System: Financials, or logistical reports such as capacity reports or reports for displaying reservations, purchase requiSitions, or purchase orders for a selected object.
To be able to compare data better with each other (e.g., planned quantities or amounts with the actual values), you can also select difference columns in the structure overview and consequently display the difference as absolute amounts or percentages. When you evaluate project or simulation versions in the structure overview, you can also compare the version data and the operative data row by row.
[»] Due to the wide range of functions of the structure overview, the option to evaluate structure, schedule,and Controlling data of all project-related objects simultaneously and, in particular, to branch to the editing area of all objects, the structure overview of some companies is used as the main transaction for managing projects.
2 A grouping, sorting, and summarization are only possible in the structure overview if you remove the hierarchical display of objects.
392
Project Information System: Structures I 7.1
Project Structure Overview
Just like in th~ structure overview, in the project structure overview (transaction CN41N), which is available as of SAP ECC Release 6.0, you can simultaneously evaluate data for project definitions, WBS elements, assigned networks and orders as well as different sales documents. While the interface of the structure overview is based on a "classic" display, the SAP List Viewer (ALV) interface is used to display objects and data in the project structure overview (see Figure 7.5).
Figure 7.5 Evaluating a Project in the Project Structure Overview
The advantage of the interface of the project structure overview is that you can make changes to the selection of columns and their sequence and width very easily and save these changes as layouts. You can save as many layouts as you wish and later select which layout you want to use to display the data. When you save a layout and set the User-specific indicator for this layout, only you can select or change this layout; otherwise, all users would be able to use your layout. If you identity a layout as an initial layout, this layout is used instead ofihe standard layout the next time you call the report.
The project structure overview, nevertheless, has nowhere near the range of functions that the structure overview has to offer. The functions of the project structure overview are listed below:
393
Layouts
Functions of the project structure overview
7 I Reporting
) ~ Display with or without hierarchy tree
~ Print preview and print of current view or the complete hierarchy
~ Filter functions
~ Display and change objects, display long texts
~ Update data
~ Graphical display of data as structure, hierarchy, or network graphics
~ Export data to Microsoft Access or as a file to XML in DOC, RTF, TXT, HTML, or HTM format
Note that you cannot evaluate project versions or customer-specific fields in the project structure overview.
7.1.2 . Individual Overviews
You can use individual overviews to evaluate data for individual documents or object types. Like the structure and project structure overviews, two different interfaces are also available for you to use with the individual overviews. You can use enhanced individual over
views that are based on a classic display of data or, as of the Enterprise Release, you can also. use ALV-based individual overviews for your evaluation purposes. The following individual overviews are all available in Project Information System: Structures (the transaction codes shown here refer to the enhanced and ALV-based overviews):
~ Project Definitions (CN42/CN42N)
~ WBS elements (CN43/CN43N)
~ Planned Orders (CN44/CN44N)
~ Orders (CN45/CN45N)
~ Networks (CN46/CN46N)
~ Activities/Elements (CN47/CN47N)
~ Confirmations (CN48/CN48N)
~ Relationships (CN49/CN49N)
~ Capacity Requirements (CN50/CN50N)
~ Production Resources and Tools (CN51/CN51N)
~ Material Components (CN52/CN52N)
~ Milestones (CN53/CN53N)
394
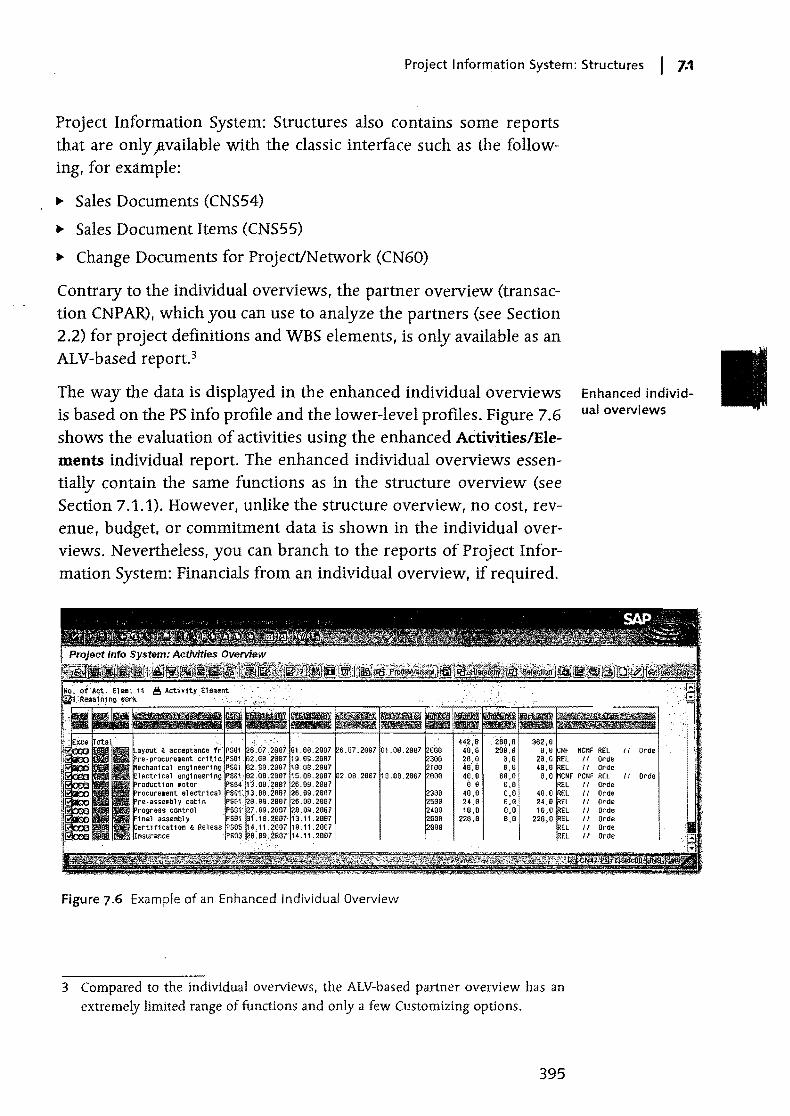
Project Information System: Structures I 7.1
Project Information System: Structures also contains some reports that are only ftvailable with the classic interface such as the following, for example:
.... Sales Documents (CNS54)
.... Sales Document Items (CNS55)
.... Change Documents for Project/Network (CN60)
Contrary to the individual overviews, the partner overview (transaction CNP AR), which you can use to analyze the partners (see Section 2.2) for project definitions and WBS elements, is only available as an ALV-based report. 3
The way the data is displayed in the enhanced individual overviews is based on the PS info profile and the lower-level profiles. Figure 7.6 shows the evaluation of activities using the enhanced Activities/Elements individual report. The enhanced individual overviews essentially contain the same functions as in the structure overview (see Section 7.1.1), However, unlike the structure overview, no cost, revenue, budget, or commitment data is shown in the individual overviews. Nevertheless, you can branch to the reports of Project Information System: Financials from an individual overview, if required.
Figure 7.6 Example of an Enhanced Individual Overview
3 Compared to the individual overviews, the ALV-based partner overview has an extremely limited range of functions and only a few Customizing options.
395
Enhanced individualoverviews
/I Ord. /I Ord. /I Ord.
PCNF REL Ii Ord. 1/ Ord. 1/ Orde /I Ord. /I Orde /I Or de II Or de II Orde
7 I Reporting
ALV-based individ- Figure 7.7 shows the evaluation of the Milestones ALV-based indi-ualovervijWS vidual overview. Just like the project structure overview, you can
customize the interface very easily and save and manage this as layouts (see Section 7.1.1). Compared to the p~oject structure overview, however, you have a great deal more Customizing options available with individual overviews. Some of these options include sorting, direct display in Microsoft Excel or Lotus interfaces, different display options (column optimization, striped pattern, etc.), or the formation of totals, subtotals, mean values or exceptionally high or low values. Similar to the enhanced individual overviews, you can also use filters and exceptions to export data in different file formats, display or change objects, and finally also update the displayed data.
Figure 7.7 Example of an ALV-Based Individual Overview
However, ALV-based individual overviews don't offer all the functions available in enhanced individual overviews. For example, you cannot send the data of these individual overviews to other users by SAP mail; you cannot create any new objects; from Project Information System: Financials, you can only assign hierarchy reports (drilldown reports), but not cost element reports, to the individual overviews; and some settings are deleted when you update the data.4
7.2 Project Information System: Financials
You can use reports of Project Information System: Financials to evaluate planned and actual costs, commitments, budget values, and
4 The SAP Library and SAP Note 353255 contain detailed information about the functions and restrictions of ALV-based individual overviews.
Project Information System: Financials I 7.2
payments. The reports are differentiated by hierarchy, cost element, and line item jeports. These three report types each differ in the functions available for displaying and evaluating data, in the data that can be evaluated and also, in particular, in the level of detail that you can use for your evaluations. The different report types are explained in the following sections.
The common factor for all the reports of Project Information System: Data selection
Financials is that (as with the structure reports) you must define the amount of data to be read from the database. You do this in the initial screen using the selection screen, dynamic selection, status selection profiles, and particularly the database profile (see Section 7.1). Depending on the report, however, you can also specify other selec-tion criteria such as fiscal years, periods, CO versions or cost element intervals, or groups in the initial screen of reports of Project Informa-tion System: Financials. You can save selections that are more com-plex in the form of selection variants that you can use when you call reports at a later stage. When you select large sets of data, you can also execute the reports in the background.
7.2.1 Hierarchy Reports
Hierarchy reports are based on drilldown reporting functions in the SAP system and can therefore also be described as drilldown reports. The RPSCO project information database, where you save all projectrelated controlling and payment data summarized as value categories, forms the basis for evaluations using hierarchy reports. You must implement some settings in the SAP system before you use hierarchy reports for the first time in SAP Project System.
Prerequisites for Using Hierarchy Reports
Value categories are groupings of cost elements or commitment Value categories
items (see Section 7.2.4). Value categories are not only required for evaluations using hierarchy reports, but also are needed for calculat-ing interest on projects (see Section 6.5). You must define suitable value categories and assign these categories to all the relevant cost elements and commitment items, even before you perform postings on projects.
397
, !,; \
7 I Reporting
You can use transaction OPI1 to define value categories. In addition ) to a key and short text, you have to specify the debit type for each
value category, for example, costs and outgoing payments or revenues and incoming payments.5 You can then use transactions OPI2 and OPI4 to assign cost element intervals or groups or commitment item intervals to the value categories. You can finally run a consistency check on your assignments using transaction ClVe.
Instead of creating value categories manually and assigning all relevant cost elements and commitment items in advance, you can also set the Automatic value categories indicator in the update control of the RPSCO project information database. This indicator causes a separate value category with the same name to be created automatically for each newly posted cost element or commitment item; however, you should note that creating value categories automatically can negatively affect performance when you post data (due to the very high number of value categories that may be created) and also evaluate data.
[»]f9:rp~rformance reasons, we r~~o·r.nmend that you combines~veralc()st ·~lern~nts or commitment itemsin vallje categories; however, in this ca,se, 'youcanrtot evaluate dataatthelevel of individual cost elements or (:0111-
rnitrrl~nt items using hier.:irchy r~ports~ If you subsequently change the assignments for value categories, you must then reconstruct the project inforrnation database using transaction OEN.
SAP currently delivers different standard hierarchy reports for evaluating costs, budgets. revenues, project results. and forecast data, or payments that you can import from client 000 using Customizing transaction ClEQ. if necessary. You can also define your own hierarchy reports depending on your reqUirements. A customer enhancement is also available for making your own adjustments. Before we explain the different functions available within hierarchy reports for evaluating project data, we will deal with the technical principles of hierarchy reports first for clarification purposes.
5 You can also use value categories to update quantity information in the RPSQT project information database. You can then use this quantity information for evaluations in progress reports of SAP Project Systems. for example (see Section 5.7.2). To enable quantities to be updated in this database, in addition to the debit type, you must also have assigned a unit of measure to the relevant value categories.
Project Information System: Financials I 7.2
Principles of Hierarchy Reports
You can use ;twb different interfaces (output types) to evaluate data using hierarchy reports: a graphical report output and the display as a classic drilldown report. Depending on the report qefinition, the output type is fixed, or can be selected manually in the initial screen of the report. You usually use classic drilldown reports if you require high performance for evaluating large datasets. You use the graphical report output, especially if you want to display different list types simultaneously or if you want to use your own HTML templates for the report header.
Figure 7.8 shows the graphical report output of the standard Planl ActlCommitlRem.plan/Assigned report.6 The data displayed in a hierarchy report is based on characteristics and key figures. Characteristics are objects, periods, and fiscal years, value categories, currencies, results analysis categories (see Section 6.6), and business transactions. The data of the RPSCO project information database can differ according to the different values of these characteristics. The relevant combinations of characteristic values in the dataset also have specific values. These data values (Le., the planned, budget, commitment, costs, revenue, and financial values, and possibly the values calculated from these values in a report using formulas) are called key figures.
Aform and an assigned report definition7 control how the data (Le., characteristics and key figures) is displayed in a hierarchy report. You use a form for the Two axes (matrix) form type to control the basic structure of rows and columns in a report. You differentiate between displays in the form of a detail list and a drilldown list (list types).
6 The residual order plan is calculated at WBS element level when you call the report and results from the total of the apportioned planned values of assigned orders or networks minus their actual and commitment values (however, this value that is calculated for each order is only factored in the total if the value. is positive).
7 Note that you cannot use ad-hoc reports (Le., reports without a form) in SAP Project System.
399
Output types
Characteristics and key figures
Form
7 Reporting
Detail and drilldown list
Figure 7.8 Example of the Graphical Report Output of a Hierarchy Report
Figure 7.9 shows an example of how a detail list of the 12KST1C standard form is defined. In the detail list of this example, different values of the Fiscal year characteristic are used as rows and key figures are displayed as columns. A (global) variable is used to define the rows here. Fixed values and values calculated based on formulas are used as key figures. For more details about controlling the values displayed in columns, see Section 7.2.2.
I!J 62B~~:~~I~~:;;:'~~ts"'IU.' ~ 030' ~ 04COSTRE,iCostslr<M!Ou., ~ OSF ~ IBKEFlA I!J llERll ~ llERllA lID 11ERUB I
lID 1jERUO lID IIERLle I ~ 11 ERU E t, Pr, 01.,1 ",.ulls ~ IIERllF ~ 12C1CI ~ 12EVAI
12KS11
Figure 7.9 Example of Defining a Detail List of a Form
400
Project Information System: Financials I 7.2
Figure 7.10 shows an example of a drilldown list for the 12KSTCl form. This ddlldoWn list displays characteristics and their values flexibly as rows, whereas the columns are formed by key figures for different characteristic values of the Fiscal year characteristic. The fiscal year here is defined by a variable again.
Figure 7.10 Example of Defining a Drilldown List
[«]
A form only defines the general structure of the detail and drilldown Report definition
lists of a hierarchy report; however, the report definition that was created with reference to the form determines its contents. For this purpose, the report definition specifies which characteristics can be used for the evaluation-(the Object characteristic is always included in this case). You can store fixed values in the report definition, or make entries in the initial screen of the report for local variables that are used in the form. Settings for the output type and other different display options are also specified in the report definition. Figure 7.11 shows the report definition for the 12KST1C form.
Hierarchy reports also allow you to branch to other hierarchy, cost element, or line item reports of SAP Project System for more detailed evaluations.8 The corresponding report-report interfaces must be set
8 Note that you can only branch to reports of the same level of detail or to more detailed reports. For example. you cannot branch to a hierarchy report from a line item report.
401
Report-report interface
7 I Reporting
)
[»]
up for this under the Report Assignment menu path in Customizing of SAP Project System. You can import report-report interfaces for the standard reports from client 000; however, you can also define your own report assignments.
Figure 7.11 Report Definition of a Hierarchy Report
If you want to create your own hierarchy report, you must first create a suitable form and then a report definition for this form. In this case, we recommend that you use the forms and report definitions delivered as templates in the standard system. If required, you can also set up your own suitable report-report interfaces.
You can use transactions C1E4, C1E5 and C1E6 to create, change, and display forms. You can edit forms using Report Painter functions (see also Section 7.2.2). You can use transactions C1E1, C1E2, and C1E3 to create, edit, or display report definitions. In transaction ClEO, you can execute user-defined hierarchy reports directly. You can also integrate your reports into the SAP menu or user menus.
402
Project Information System: Financials I 7.2
Evaluations Using Hierarchy Reports
Figure 7.8 srlows the drilldown list of a hierarchy report where different cost data for the different project objects is displayed in aggregated format. The characteristics assigned to the report definition are displayed in the navigation area. Instead of evaluating the key figures for the Object characteristic, you can also select another characteristic for a drilldown from the navigation area. For example, you can display the distribution of the values to the different value categories or for the period or fiscal year.
When you switch a drilldown, you can either drill down through all Drilldown
the values displayed in the report to a different characteristic, or you can select a specific characteristic value and only do a drilldown switch (drilldown) for the values of this characteristic value. We can illustrate this using the example shown in Figure 7.8. Very high (aggregated) planned costs are shown at the level of the Procurement WBS element. You now only want to evaluate the values of this WBS element further and therefore drill down to the Period/year charac-teristic for the Procurement WBS element. You notice that the high-est planned costs of the WBS element are shown for example for period 9. To determine the value categories that the planned costs of the Procurement WBS element are distributed to in period 9, you drill down to the Va1.category for this period. Figure 7.12 shows the results of this double drilldown.
2.438 33.401
358
.... 70.694
0 0 0 0 0
0 0 September 2007
113.402 0 511
Figure 7.12 Example of a Drilldown in a Hierarchy Report
403
7 I Reporting
)
Other functions of hierarchy reports
In a classic drill down report, you can switch between the drilldown lists and the detail list and call graphics of selected key figures (see
Figure 7.13). In the graphical report output, you can simultaneously display drilldown and detail lists and, if required, a graphic display of key figures depending on the settings of the report definition. Other functions available in hierarchy reports include:
... Export and print out data9
.... Convert values into other currencies
... Highlight (color) data if values exceed or fall short of threshold values (exceptions)
... Sort values in the form of ranking lists and define conditions for displaying values
... Maintain and display comments for the report
... Branch to the master data display of objects and call other reports
Depending on the output type, hierarchy reports also contain other functions. For example, you can send the data of a classic drilldown report directly to other users via SAP mail. The graphical report output allows you to customize the column display and screen layout much more flexibly for this purpose.
Figure 7.13 Detail View cif a Hierarchy Report in the Classical Display
9 You can only print report data from the graphical report output on a limited basis and you do this in the classical display of data, for example.
404
Project Information System: Financials I 7.2
Note that you cannot update data with hierarchy reports. This means Restrictions
that when you thake changes to the data after you call a report, you must exit the report and call it again in order to evaluate the current data. You can also save the data of the report before you exit it. The next time you call the report, you can then choose between a new selection of the current data and an evaluation of the report data you saved. But, unlike the reports of Project Information System: Struc-tures, for example. you can only save one dataset in each case for the report data of hierarchy reports. If you save the data again, the pre-viously saved report data is overwritten. For more information about hierarchy reports, see SAP Note 668240.
7·2.2 Cost Element Reports
You can use cost element reports of SAP Project System to evaluate costs, commitments, and revenues of projects, as well as assigned networks or orders. You define cost element reports in the Report Painter, therefore, they are also referred to as Report Painter reports. Figure 7.14 shows an example of the evaluation of project data using the standard Act/Com/Total/Pian report in controlling area currency.
PRJ E-1882
7.70e,89 611,80
385,60 1.611,88 1.212,75
11.759,68
60.008,80-
1.148,24-
2.811,29 11.898,49
Figure 7.14 Example of Evaluating Project Data Using a Cost Element Report
2.811,29 11.090,40
7.780,eo 611,00
385,00 1.611,Oa 1.212,75
11.759,60
60.0BO,08·
1.148,24-
405
7 I Reporting
[»] )
Prerequisites and Principles of Cost Element Reports
Different cost element reports are delivered in the standard system. If required, you can import these reports from client 000 using Customizing transaction OKSR and then generate them in transaction OKS7. If, for the sake of clarification, in addition to evaluating data at the level of individual cost elements, you want to evaluate subtotals for individual intervals of cost elements, you have to create suitable cost element groups in transaction KAH1. You can arrange cost element groups hierarchically here in the form of nodes, whereby a two-tier structuring of cost element groups will typically suffice. You can then select the cost element group to be evaluated from the initial screen of a cost element report. The report displays a separate row for each cost element and a node of the cost element group, where the total of the cost elements contained there is displayed for this node.
[»] Note that the report only displays values for those cost elements that you specified in the initial screen as a cost element group brcoslelement interval, regardless of whether postings were madef()rQthei' costelements. If you leave the selection of the cost element group or cost element interval blank, all posted cost elements are displayed.
diJ,aries-Evaluations using cost element reports in SAP Project System are technically based on a logical combination of several database tables (COSP, COSS, COEP, etc.). The tables are combined in SAP Project System by the logical CCSS reporting table stored in Table T804E.1o However, the cost element reports use only a subset of, rather than all, characteristics, key figures, and combinations of characteristics and key figures (basic key figures or predefined columns) of this CCSS reporting table. This subset is known as the library. All. Report Painter reports must be assigned to a library and can only use the selected subset on characteristics, key figures, and basic key figures
10 You can view the list of combined database tables using the Data Browser (transaction SE16) by first selecting the T804E table and then the cess reporting table.
406
Project Information System: Financials I 7.2
. of the assigned library. The cost element reports of SAP Project System are as~gned to the 6P3 library by default.
You may want to toggle between different cost element reports Report groups
while evaluating project data. In this case, you can use report groups to avoid having to select data from the database each time. Report groups are collections of reports from one library that access the same data, but display it in different ways.
'~ment reportmY~f~~\!":;';'t6~.pto a library and a rer>ort,gr~q;~~ [«] up can also coht~i,rl. ";t~,, reports; however. theser~:PRf1:' all use the same'HRt~r}",'\:{ ... ,.,
,.~:"' " ..
If you want to evaluate data using a cost element report, you execute the corresponding report group. This simultaneously selects the data from the database for all reports. If several reports are assigned to the report group, you can toggle between the different reports without having to re-select the data each time. The standard Report Painter reports of SAP Project System are assigned to report groups whose ID begins with 6PP.11
_ You can define reports using the Report Painter. Figure 7.15 shows Report Painter
the definition of a report using an example of the standard Act!
ComlTotal/Plan cost element report in Controlling area currency. The Cost element characteristic is used as rows of the report. The col-umns in this example are formed by basic key figures and key figures calculated using formulas.
The display of rows and columns and other display options are controlled by the layout of a report or report section.
When you define columns consisting of key figures with characteristics, the specified values of these characteristics determine which values of the key figures you actually want to be selected for the display (see Figure 7.16). For example, you can use the values of the Value Type characteristic to decide whether planned or actual costs, com-mitments, or statistical actual costs are to be displayed in a column. With the Version characteristic, you can determine the CO version from which the data is to be selected, and so on. Predefined key fig-
11 Cost element reports also exist in SAP Project System for report groups, for example, beginning with 6PO. These are reports that you can edit only with the Report Writer.
407
Key figures with characteristics
I
7 I Reporting
ures that contain useful combinations from a basic key figure and ) one or several characteristics are also delivered in the standard sys
tem.
Figure 7.15 Definition of a Cost Element Report in the Report Painter
Figure 7.16 Definition of the "Actual" Column Using a Basic Key Figure
General selections In addition to defining rows and columns, the general selections of a report define the characteristics to be used for the selection of data for the report. Figure 7.17 shows an example of general selections.
408
Project Information System: Financials I 7.2
Figure 7.17 Example of Defining the General Selections
You can also use the characteristics of general selections for variations (see Figure 7.14). Variation means that you can use the different characteristic values for navigation purposes within the report as part of an evaluation. Depending on which characteristic value or combination of characteristic values you select in the report, only data for these values is displayed.
When you create your own cost element report, you first need to specify the library. You then define the structure of the rows and columns and specify the general selections and, if necessary, any variations. Finally, you must assign the report to a report group. If reqUired, you can also define report-report interfaces for cost element reports. You can use the default reports in the standard system as templates.
You can use Report Painter transactions GRR1, GRR2, and GRR3 to create, change, and display cost element reports.12 In addition, you can use transaction GR51 to create new report groups with reference to a library. In transaction GR55, you can execute user-defined report groups directly. You can also integrate your reports into the SAP menu or user menus.
12 You can also create cost element reports using the Report Writer via transaction GR31.
409
Variations
[«]
I
7 I Reporting
Evaluations Using Cost Element Reports
) Figure 7.14 shows the evaluation of project data using the Act!
[»]
Extracts
ComlTotallplan report in controlling area currency. The variation in the left area, for example, allows you to navigate between the different project objects. Two entries are contained in the variation for some WBS elements. Depending on which entry you select, the system either displays the values that were posted directly on the relevant WBS element or the aggregated values of all lower-level objects and of the WBS element itself. The different values are displayed as totals records for the relevant cost elements. If you used cost element groups for the selection, subtotals would also be displayed. The following functions are also available in cost element reports:
... Print, export, and send data
... Convert values into other currencies
... Use threshold values as filters
... Sort values
... Graphically display data
... Display data using Microsoft Excel or Lotus interfaces
... Call other reports
... Update data using menu options
Note that you can only use some of the functions listed above (in particular, the updating of report data) if you have set the Expert mode indicator in the report options.
When you exit a cost element report, you can also save the report data as an extract. You can save any number of extracts for a selection. The next time you call the report, you can then decide in the initial screen using the Data source function whether the data is to be selected from the database again, or whether you want to use an extract that already exists for your evaluation. You can delete extracts manually or automatically from the system by specifying an expiry date. For more information about cost element reports, see SAP Note 668513.
410
Project Information System: Financials I 7.2
7.2.3 Line Item Reports
While hie!alchy reports only allow you to evaluate project data at the level of value categories, and cost element reports only show totals records for cost elements, you can use line item reports to ev~luate each business transaction that led to a relevant posting.
Prerequisite for Evaluating Data Using Line Item Reports
In order select and evaluate data in line item reports, corresponding line item reports must first actually exist. The follOWing prerequisites must be met for writing line items:
... plan Plan line items are only supported for certain planning functions (see Section 3.4). The object status must also explicitly allow plan line items to be written or integrated planning must be activated .
... Budget Each budget change is documented by a line item.
... Commitment If commitment management is activated (see Section 5.2.1), all commitments are posted as line items .
... Actual A line item is written for each actual posting. Line items are also created for results analysis transactions and settlement transactions .
... Payments Line items for payments are only written in SAP Project System for an activated PS Cash Management (see Section 7.2.4). To be able to write plan line items for payments, you must also assign the FIPA business transaction to a number range.
You use the ALV interface for line item reports. A display variant (layout), which you can select from the initial screen of a line item report, defines the way data is displayed. In addition to the display variants delivered by default, you can also define your own layouts in the reports. Section 7.1 already explained how layouts are defined and managed.
411
Display variants (layouts)
I
I Reporting
Evaluations Using Line Item Reports
) Some of the line item reports available in the standard system include the following:
.... Planned costs/revenues (C114)
.... Hierarchical costs/revenue planning (Cl19)
.... Budget (Cl18)
..... Commitment (Cl15)
.... Actual costs/revenues (Cl13)
.... Results analysis (C1IF)
.... Line item settlement (ClIO)
.... Planned payments (C1IB)
.... Actual payments/payment commitment (C1IA)
Figure 7.18 shows the evaluation of line items of a project using the Actual costs/revenues report. The line items are displayed as a list that you can flexibly customize using AL V functions (column selection, sorting, filtering, totals and subtotals, exceptionally high or low values, display in Microsoft Excel, etc.). The interface also enables you to print, send, or export the report data by default.
Environment A very useful function of line item reports is the ability to branch to documents the line item environment. You can use this function to branch to the
master data of objects and partner objects, or to display the source document of a line item, for example, the confirmation that led to costs on an activity. In particular, you can also use the menu options to evaluate all the cost accounting documents that were created for the relevant business transaction. Depending on the business transaction, these can be cost accounting, Profit Center, or also financial accounting documents (see Figure 7.18).
You can use the reports from Project Information System: Financials to evaluate all project-related accounting data. Depending on the type of reports used, you can use different interfaces, functions, and levels of detail for the evaluation. You can use report-report interfaces to branch from less detailed reports to even more specific report types. For example, you can begin the evaluation of project data in this way using a hierarchy report, evaluate selected data in a cost element report further, branch to a line item report for certain data and, if necessary, display all relevant environment fields from here.
412
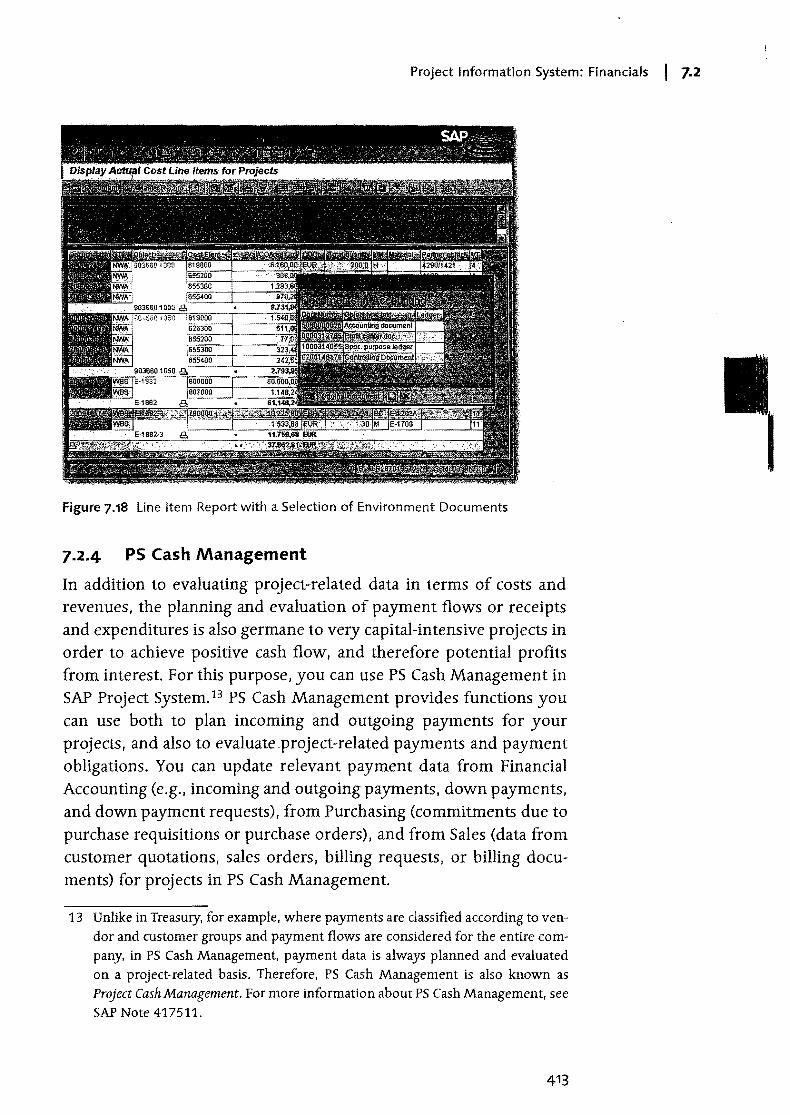
Project Information System: Financials I 7.2
Figure 7.18 Line Item Report with a Selection of Environment Documents
7.2.4 PS Cash Management
In addition to evaluating project-related data in terms of costs and revenues, the planning and evaluation of payment flows or receipts and expenditures is also germane to very capital-intensive projects in order to achieve positive cash flow, and therefore potential profits from interest. For this purpose, you can use PS Cash Management in SAP Project System.13 PS Cash Management provides functions you can use both to plan incoming and outgoing payments for your projects, and also to evaluate project-related payments and payment obligations. You can update relevant payment data from Financial Accounting (e.g., incoming and outgoing payments, down payments, and down payment requests), from Purchasing (commitments due to purchase requisitions or purchase orders), and from Sales (data from customer quotations, sales orders, billing requests, or billing documents) for projects in PS Cash Management.
13 Unlike in Treasury, for example, where payments are classified according to vendor and customer groups and payment flows are considered for the entire company. in PS Cash Management, payment data is always planned and evaluated on a project-related basis. Therefore. PS Cash Management is also known as Project Cash Management. For more information about PS Cash Management. see SAP Note 417511.
413
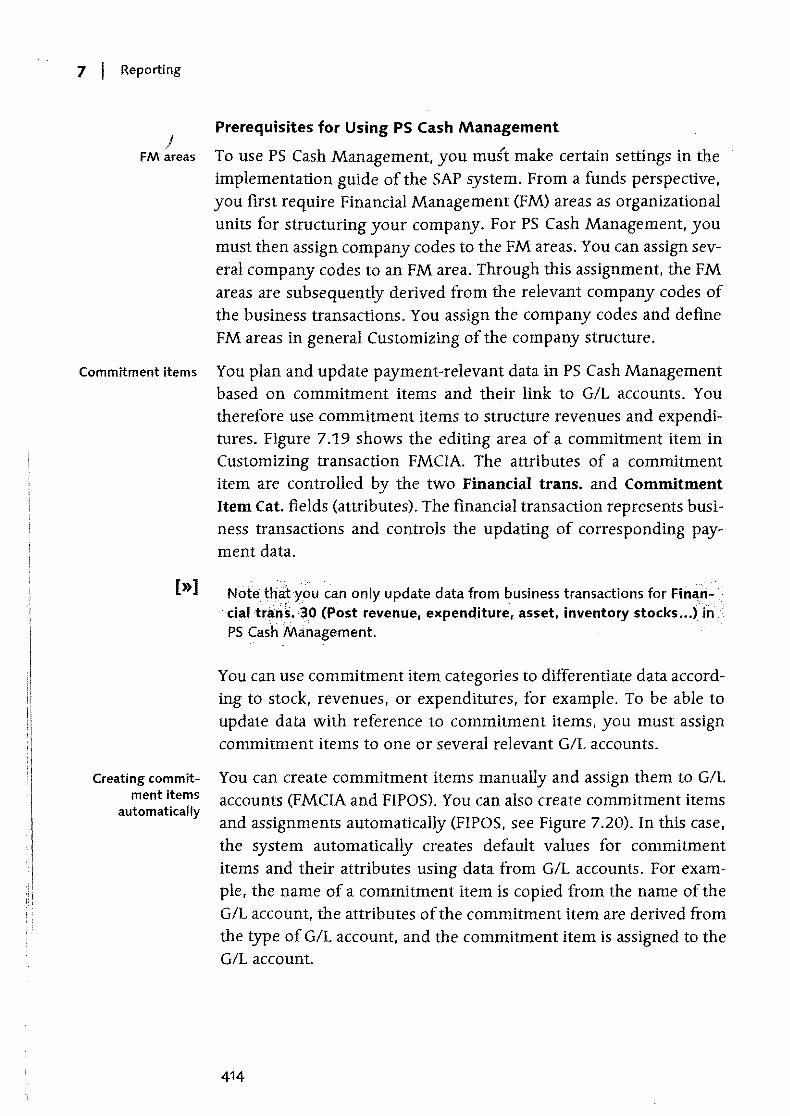
i·
7 I Reporting
) FM areas
Commitment items
Prerequisites for Using PS Cash Management
To use PS Cash Management, you must make certain settings in the implementation guide of the SAP system. From a funds perspective, you first require Financial Management (FM) areas as organizational units for structuring your company. For PS Cash Management, you must then assign company codes to the FM areas. You can assign several company codes to an FM area. Through this assignment, the FM areas are subsequently derived from the relevant company codes of the business transactions. You assign the company codes and define FM areas in general Customizing of the company structure.
You plan and update payment-relevant data in PS Cash Management based on commitment items and their link to GIL accounts. You therefore use commitment items to structure revenues and expenditures. Figure 7.19 shows the editing area of a commitment item in Customizing transaction FMCIA. The attributes of a commitment item are controlled by the two Financial trans. and Commitment Item Cat. fields (attributes). The financial transaction represents business transactions and controls the updating of corresponding payment data.
[»] N()teth~tyoucan only update data from business transactions for FinCl:n. cial tr~~~.3.0(Post revenue, expenditure, asset, inventory stocks ... ) in
PS Cash -Ma.nagement. .
Creating commitment items
automatically
You can use commitment item categories to differentiate data according to stock, revenues, or expenditures, for example. To be able to update data with reference to commitment items, you must assign commitment items to one or several relevant GIL accounts.
You can create commitment items manually and assign them to GIL accounts (FMCIA and FIPOS). You can also create commitment items and assignments automatically (FIPOS, see Figure 7.20). In this case, the system automatically creates default values for commitment items and their attributes using data from GIL accounts. For example, the name of a commitment item is copied from the name of the GIL account, the attributes of the commitment item are derived from the type of GIL account, and the commitment item is assigned to the GIL account.
414
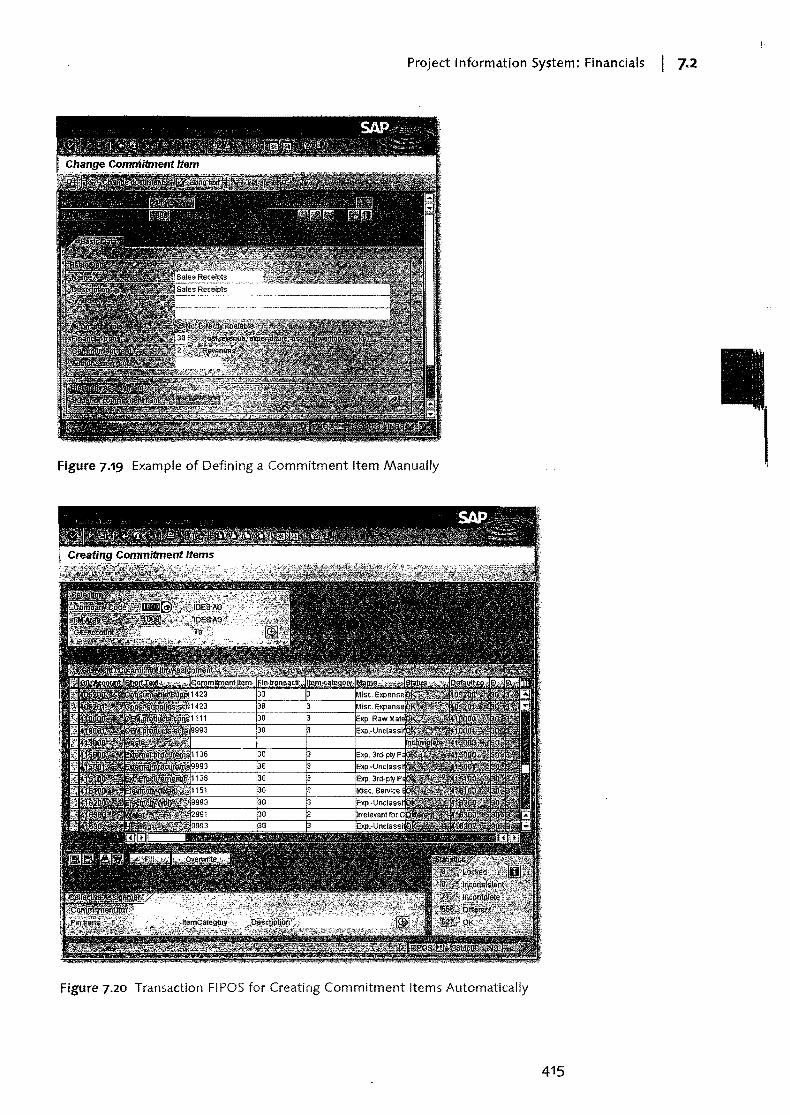
Project Information System: Financials I 7.2
Figure 7.19 Example of Defining a Commitment Item Manually
Figure 7.20 Transaction FIPOS for Creating Commitment Items Automatically
415
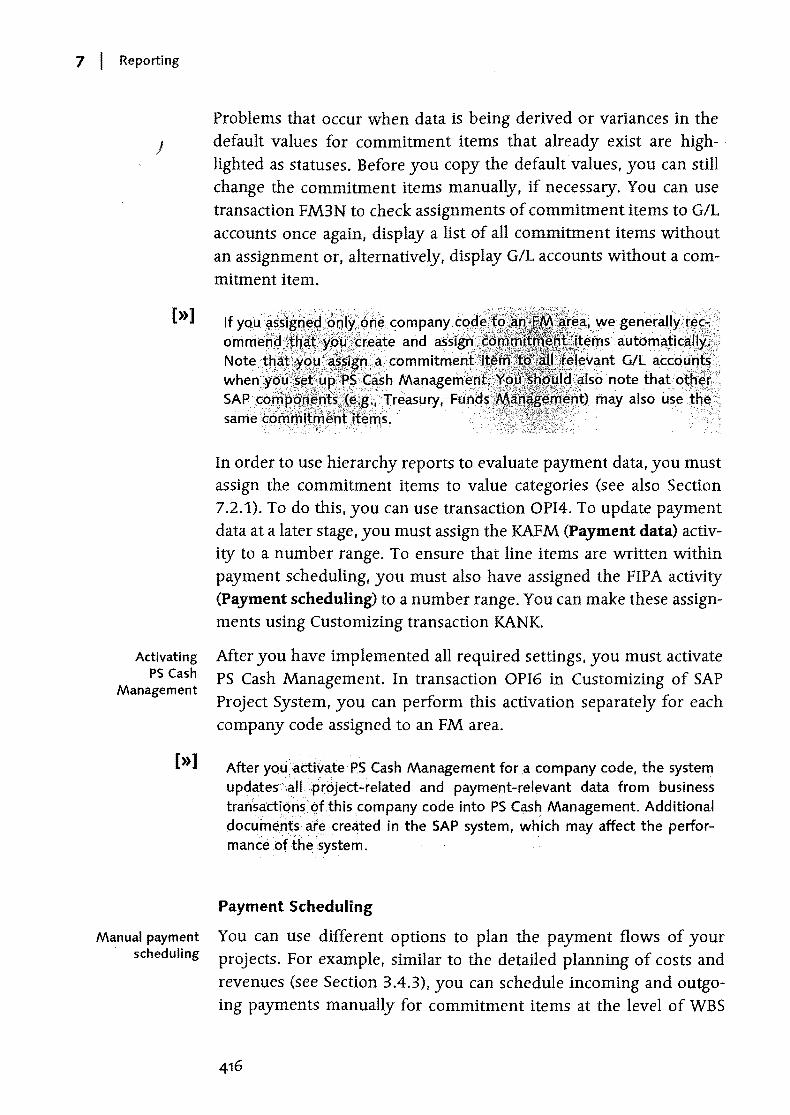
7 I Reporting
Problems that occur when data is being derived or variances in the ) default values for commitment items that already exist are high
lighted as statuses. Before you copy the default values, you can still change the commitment items manually, if necessary. You can use transaction FM3N to check assignments of commitment items to GIL
accounts once again, display a list of all commitment items without an assignment or, alternatively, display GIL accounts without a commitment item.
[»]
Activating PS Cash
Management
[»]
Manual payment . scheduling
;'.~,~(wegenerally}~~/':
.;~~:ta~~~~!~~~·C )lIsb" note thato'ther,~,
In order to use hierarchy reports to evaluate payment data, you must assign the commitment items to value categories (see also Section 7.2.1). To do this, you can use transaction OPI4. To update payment data at a later stage, you must assign the KAFM (Payment data) activity to a number range. To ensure that line items are written within payment scheduling, you must also have assigned the FIP A activity (Payment scheduling) to a number range. You can make these assignments using Customizing transaction KANK.
After you have implemented all required settings, you must activate PS Cash Management. In transaction OPI6 in Customizing of SAP Project System, you can perform this activation separately for each company code aSSigned to an FM area.
AfteryouactivatePS Cash Management fora company code, the system updates'a:II,pr6ject.:.related and payment-relevant data from business transadionsbfthis company code into PS Cash Management. Additional documen~s;Cl.~e created in the SAP system, which may affect the performanceof thesystem.
Payment Scheduling
You can use different options to plan the payment flows of your projects. For example, similar to the detailed planning of costs and revenues (see Section 3.4.3), you can schedule incoming and outgoing payments manually for commitment items at the level of WBS
416
Project Information System: Financials I 7.2
elements. You can use standard layouts to schedule the payments manually (y01,1 may have to import these layouts from client 000 first), or creiate your own layouts and planner profiles in Customizing of SAP Project System. Manual payment scheduling is based on periods, not days.
Planned payments can also be derived from activity data and invoicing plans, billing plans on WBS elements, or from customer quotations or sales orders assigned to a project. These forms of payment scheduling are based on days, where corresponding terms of payment may also be taken into account. Payment data is only updated for networks if you use activity-assigned networks and asynchronous network costing (CJ9K) for determining planning data. Sections 3.4.5 and 3.5.3 provide more details about costing networks, using invoicing and billing plans, and updating planning data from sales documents.
Updating Commitment and Actual Payment Data
Within the implementation phase of projects, if PS Cash Management is activated, payments and payment obligations from Purchasing and Financial Accounting are automatically updated into PS Cash Management, provided the corresponding business transactions refer to commitment items for financial transaction 30 and there is an account assignment to WBS elements, activities, or networks and assigned orders. The following credit and debit business transactions are considered:
~ Purchase requisitions and purchase orders
~ Down payment requests, down payments, and down payment set-tlements
~ Invoice receipts and incoming payments
The data of the different business transactions is updated among different value types.14 Payment obligations are successively reduced by the corresponding payments. In SAP Project System, you can also perform payment transfers in transaction FMWA to correct erroneous account assignments.
14 If PS Cash Management is not activated, down payments can be evaluated in reports using value type 12. If PS Cash Management is activated, value type 61 is used.
417
Automatic payment scheduling
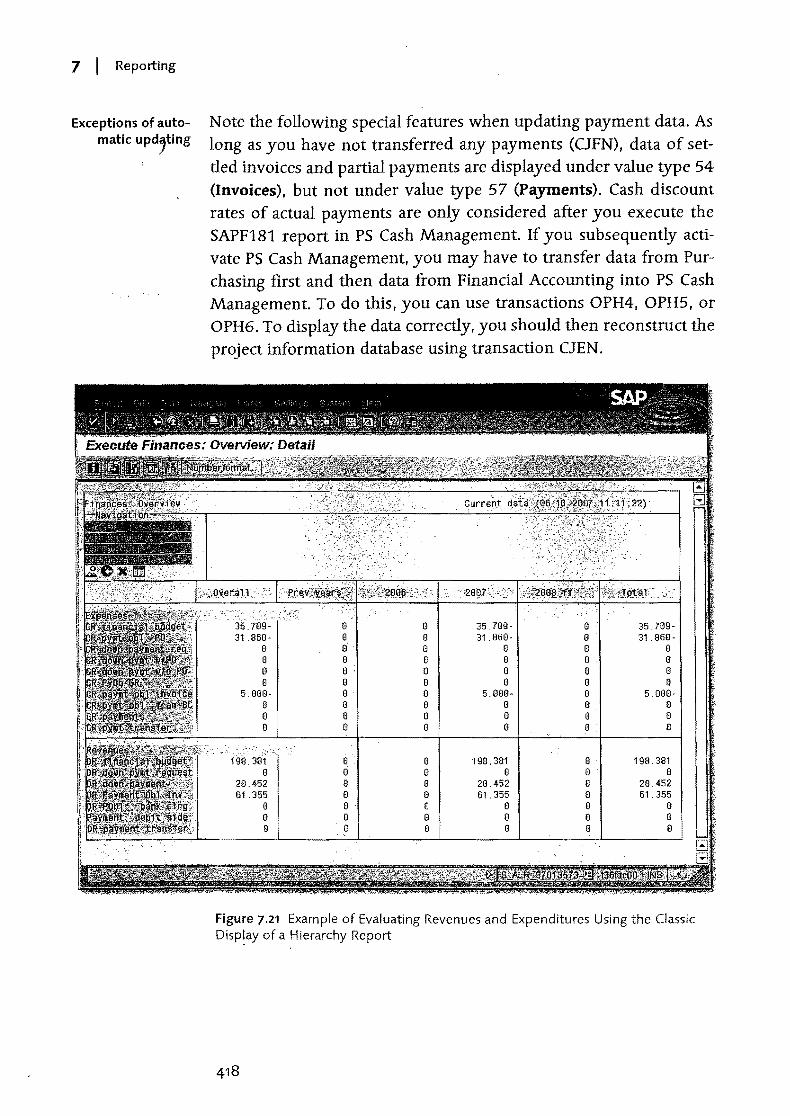
7 I Reporting
Exceptions of automatic upd;ting
Note the following special features when updating payment data. As long as you have not transferred any payments (CJFN). data of settled invoices and partial payments are displayed under value type 54 (Invoices), but not under value type 57 (Payments). Cash discount rates of actual payments are only considered after you execute the SAPF181 report in PS Cash Management. If you subsequently activate PS Cash Management, you may have to transfer data from Purchasing first and then data from Financial Accounting into PS Cash Management. To do this. you can use transactions OPH4, OPH5, or OPH6. To display the data correctly, you should then reconstruct the project information database using transaction CJEN.
8 8 35.789- 35.7B9-31 ,860- 8 0 31.860- 31.868-
8 8 8 8 8 8 8 8 8 8 8 8 8 0 8 8 8 8 8 fl
5,1388- 8 8 5.fl88- 5.880-8 8 B 8 0 0 i 8 8 8 8 0 8 8 8 8
8 ' 0 19B,3B1 8 ' 198,3B1 0 8 8 0 0 a 8 28.452 0 20.452 8 8 61.355 8 61,355 8 8 8 8 B 8 B B B 8 8 0 8 8 B
Figure 7.21 Example of Evaluating Revenues and Expenditures Using the Classic Disp~ay of a Hierarchy Report
Logistical Reports I 7.3
Evaluations of Payment Data
Hierarchy reports and line item reports are available by default in SAP Proje~t System for evaluating project-related payment data. While the line item reports allow you to evaluate the data based on precise days, the evaluation in the hierarchy reports only takes place based on periods. But, you can also go from a hierarchy report to a line item report for selected data and display all relevant environment documents here, if required. Details about hierarchy and line item reports were already discussed in Sections 7.2.1 and 7.2.3. Figure 7.21 shows an example of an evaluation of payment data for a project using the Receipts/Expenditures for all Fiscal Years hierarchy report.
7.3 Logistical Reports
In Section 5.5.3, we introduced ProMan, a tool that enables practically all logistical information for project-related procurements to be evaluated within a transaction. Project Information System: Structures (described in Section 7.1) also contains different reports for evaluating logistical data such as deadline and quantity information or statuses, for example. You can also use progress tracking (see Section 5.7.3) for evaluating dates of material components.
In this section, we will address all additional reports from Reporting of SAP Project System that you can use to evaluate logistical data of purchasing processes and material procurements. Capacity reports, in particular, are also covered, which you can use to compare the available capacities and capacity requirements of work centers and individual capacities, and consequently to evaluate the capacity load utilization.
7.3.1 Purchase Requisitions and Purchase Orders for the Project
Transactions ME51 (Purchase Requisitions for Project) and ME21 (Purchase Orders for Project) are specifically available in Reporting of SAP Project System for evaluating project-related Purchasing documents. In the initial screen of these transactions, you first need to determine the selection of the purchase requisitions or purchase
419

7 I Reporting
orders to be evaluated. You do this by selecting the project objects on ) which the documents must be assigned, perhaps by a dynamic selec
tion and status selection profiles. You can also use information from Purchasing documepts as additional selection criteria. You can save selections that are more complex as variants.
88018 Q
1 'pc D 13,11 .2807 lPC 12.11.2807
4508817117 B0810 dtd 06,12,2086 cabal for elevator 081
Be81 B .' '" , '3811D 13.11.2887 Q ,'3811 12.11.2807
,- .. " ;
4588e1711788B2e ' : dtd 136.12.2886
Figure 7.22 Table Display of Purchase Requisitions for the Project in Transaction ME5J
After you execute the report, data from the selected purchase requisitions or purchase orders is displayed in a list that you can also print out, if required. Figure 7.22 shows an example of a list of purchase requisitions in transaction ME5J. For more information, you can branch to the display of the relevant Purchasing documents. The following functions are also availabl~ in the ME5J report (Purchase Requisitions for Project):
420
logistical Reports I 7.3
.... Branch to the display of material master data, reports for material ME5J functions
stock, outli}le agreements, info records or vendor evaluations
.... Designate purchase requisitions for processing inquiries
.... Assign suppliers manually or automatically
.... Provide an overview of existing assignments and create purchase orders
.... Branch to changes in purchase requisitions and assigned purchase orders
When you use the ME21 report for evaluating purchase orders for your projects, you can use the following functions:
.... Branch to purchase order history and changes in purchase orders ME2J functions
.... Display or maintain schedule lines
.... Display services in service items
Reporting of SAP Project System also contains transactions ME5K (Purchase Requisitions for Account Assignment), ME2K (Purchase Orders for Account Assignment) and ME3K (Outline Agreements) that you can use for general evaluations of Purchasing documents.
7.3.2 Material Reports
Different overviews are already available in Project Information System: Structures for evaluating material-related data (see Section 7.1). You can use the CN52/CN52N (Material components) individual overviews of Project Information System: Structures to evaluate data for material in networks or in assigned orders. You can use the CN44/CN44N and CN45/CN45N individual overviews to evaluate planned and production orders for projects. The following material reports are also available in SAP Project System:
.... Requirement/stock (MD04) This list displays the stock situation of material, as well as requirements and planned activities in the different stock segments (see Figure 3.45) .
.... Valuated project stock (MBBS) You can use this report to evaluate material that is managed in valuated project or sales order stocks.
421
7 I Reporting
~ Missing parts (C024)
) You can use this report to evaluate material components that were identified as missing parts within the availability check (see Section 3.3.3).
~ Pegged requirement (MD09) You can use this report for multilevel production processes to determine the original pegged requirement for selected orders or purchase orders.
~ Reservations (MB25) You can use this report to display a list of the reservations for selection materials.
~ Order report (MD4C) You can use this report to monitor the possible multilevel production of material for projects.
7.3.3 Capacity Reports
You can evaluate planned. actual. and remaining capacity reqUirements of projects using the capacity reqUirements (CN50/CN50N)
individual overviews of Project Information System: Structures (see Section 7.1.2); however, these reports only display the capacity reqUirements of selected objects. You cannot use these reports to compare capacity requirements with the available capacities.
Reports from the SAP application for capacity requirements planning are used in SAP Project System to evaluate the capacity load utilization of capacities required in projects. We differentiate between (simple) capacity evaluations and enhanced capacity evaluations for these reports.
Overall profiles Both report types are controlled using overall profiles that are defined in Customizing of capacity planning. These overall profiles are only combinations oflower-Ievel profiles that determine the data selection, evaiuation interface. and functions of the capacity reports. Different overall profiles are available for evaluation purposes in the standard system and assigned to transactions of the SAP menu. If required. you can make user-specific changes to the assignment of transaction codes for overall profiles using parameters.
However, for the simple capacity evaluations. you can also select a different overall profile from the menu in the initial screen or specify
422
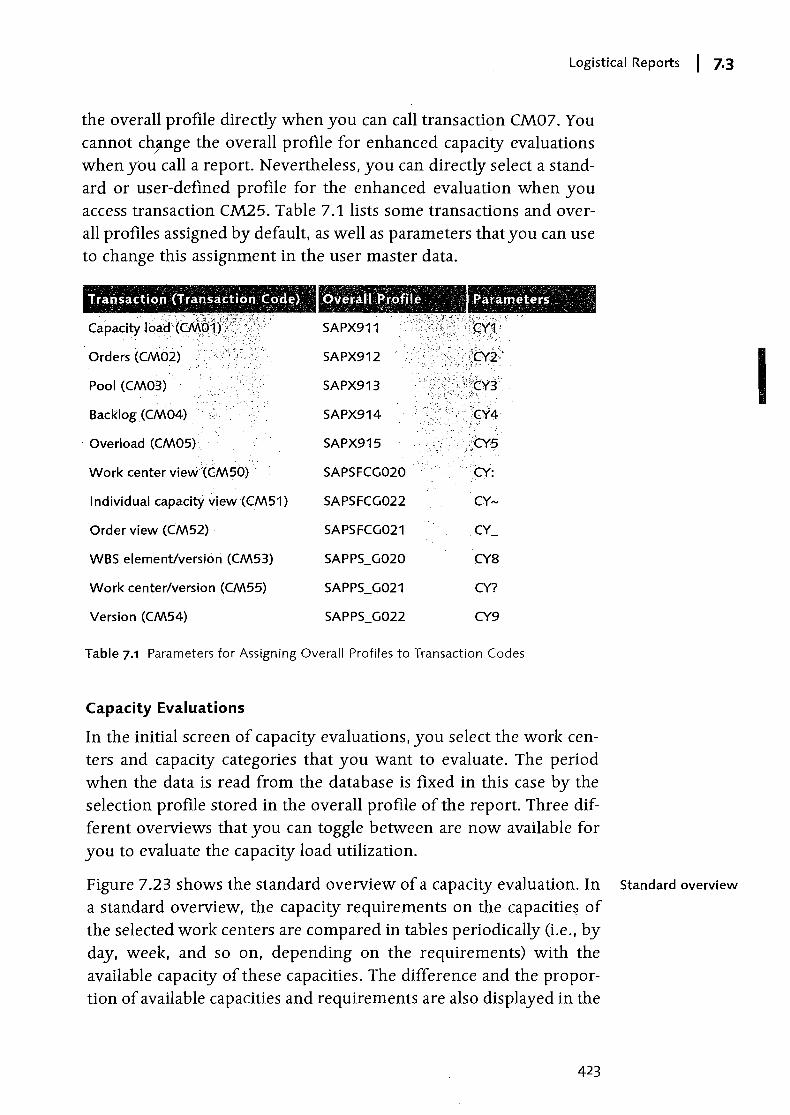
Logistical Reports I 7.3
the overall profile directly when you can call transaction CM07. You cannot ch~nge the overall profile for enhanced capacity evaluations when you call a report. Nevertheless, you can directly select a standard or user-defined profile for the enhanced evaluation when you access transaction CM25. Table 7.1 lists some transactions and overall profiles assigned by default, as well as parameters that you can use to change this assignment in the user master data.
Transaction (Tr'ansaction Code) ~
Capacity I o~d'( t4p:~j~?{?'~"}':'~ '.
Orders (CM02)
Pool (CM03)
Backlog, (CM04)
Overload (CM05)" ; :. :.
Work center view (CM50) "
Individual capacity view (CM51 )
Order view (CM52)
WBS element/version (CM53)
Work center/version (CM55)
Version (CM54)
over~1I "tiiofife ' Parameters , ,
SAPX911
SAPX912
SAPX913
SAPX914
',' .. SAPX915 " ;'CY5
SAPSFCG020 CY:
SAPSFCG022 CY~
SAPSFCG021 CY_
SAPPS_G020 CY8
SAPPS_G021 CY?
SAPPS_G022 CY9
Table 7.1 Parameters for Assigning Overall Profiles to Transaction Codes
Capacity Evaluations
In the initial screen of capacity evaluations, you select the work centers and capacity categories that you want to evaluate. The period when the data is read from the database is fixed in this case by the selection profile stored in the overall profile of the report. Three different overviews that you can toggle between are now available for you to evaluate the capacity load utilization.
Figure 7.23 shows the standard overview of a capacity evaluation. In Standard overview
a standard overview, the capacity requirements on the capacities of the selected work centers are compared in tables periodically (Le., by day, week, and so on, depending on the requirements) with the available capacity of these capacities. The difference and the propor-tion of available capacities and requirements are also displayed in the
423
I
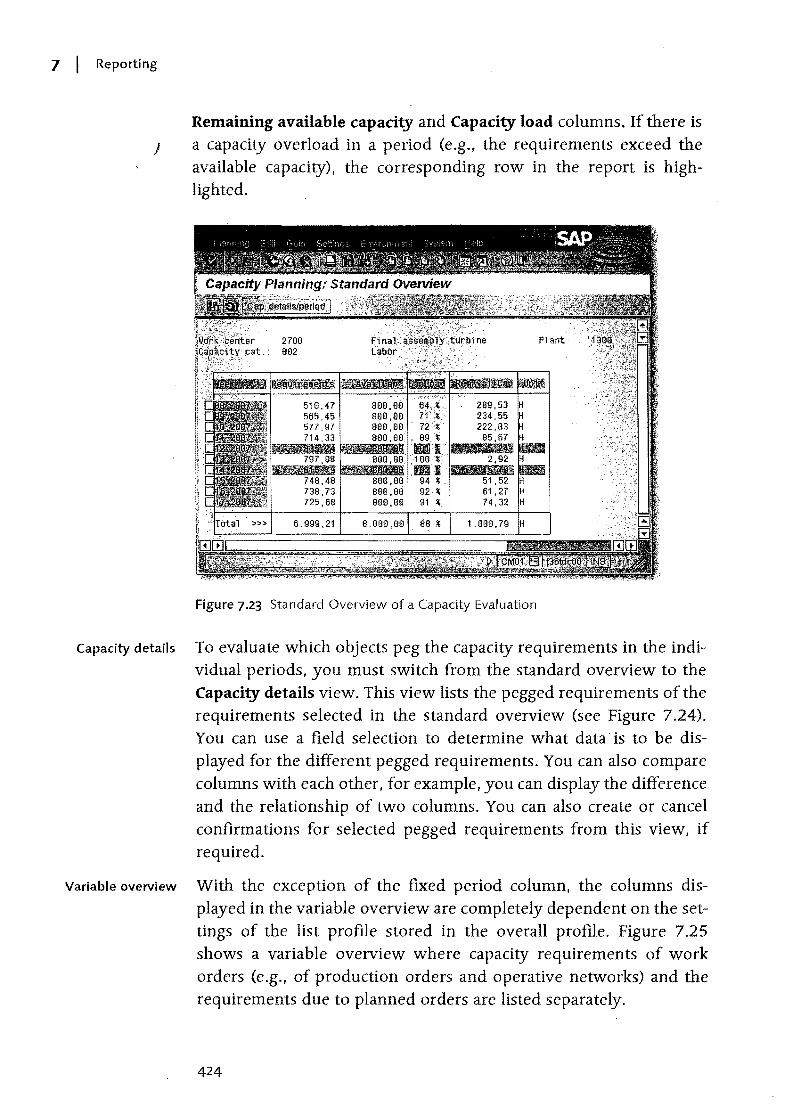
7 I Reporting
Remaining available capacity and Capacity load columns. If there is ) a capacity overload in a period (e.g., the requirements exceed the
available capacity), the corresponding row in the report is highlighted.
Figure 7.23 Standard Overview of a Capacity Evaluation
Capacity details To evaluate which objects peg the capacity requirements in the individual periods, you must switch from the standard overview to the Capacity details view. This view lists the pegged requirements of the requirements selected in the standard overview (see Figure 7.24). You can use a field selection to determine what data is to be displayed for the different pegged requirements. You can also compare columns with each other, for example, you can display the difference and the relationship of two columns. You can also create or cancel confirmations for selected pegged requirements from this view, if required.
Variable overview With the exception of the fixed period column, the columns displayed in the variable overview are completely dependent on the settings of the list profile stored in the overall profile. Figure 7.25 shows a variable overview where capacity requirements of work orders (e.g., of production orders and operative networks) and the requirements due to planned orders are listed separately.
424
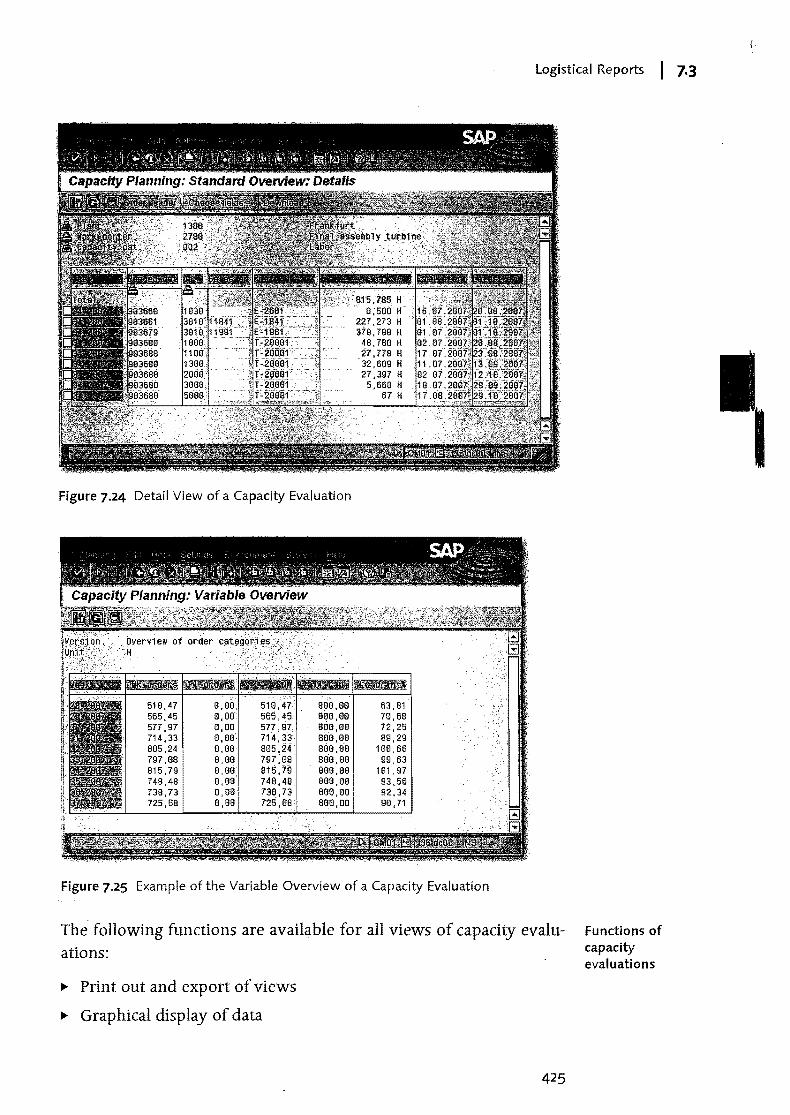
Logistical Reports I 7.3
Figure 7.24 Detail View of a Capacity Evaluation
510,47 518, 81:fO 00 565,45 565:45 880'00 577,97 577 ,91' 880:00 714,33 714, 3~ 800,1l1l 885,24 885,24 888 80 797,08 797;88 aao: ElO 815,79 B15, /'9 BIlO,ao 748,48 748,4B 888,08 738,73 738,73 81l8,80 725,68 725~6B. 8813,00
,iS5. H 0;5aaH
227,273 H 379,788 H
48,780 H 21,778 H 32,609 H 27,391 H
5,660 H 67 H
63,81 70,68 72,25 89,29
100,66 99,63
181,97 93,56 92,34 90,71
Figure 7.25 Example of the Variable Overview of a Capacity Evaluation
The· following functions are available for all views of capacity evaluations:
... Print out and export of views
... Graphical display of data
425
Functions of capacity evaluations

7 I Reporting
~ Refresh report data
) ~ Background processing
Restrictions of capacity
evaluations
~ Branch to different environment information, depending on the relevant view in work centers, capacities, pegged requirements, etc.
In the simple capacity evaluations, you can change the profiles that define the attributes of the report, or you can temporarily change the general settings of the report. Figure 7.26 shows the temporary Customizing options of the report settings. Note in particular the Distribution from work center/operation indicator, which specifies that the distribution of the capacity requirements over the duration of the pegged requirements is controlled by the distribution key of the activity or work center (see Section 3.2.1). If this indicator is not set, the distribution keys of the report determine the distribution of the capacity requirements.
Figure 7.26 Example of the General Settings of a Capacity Evaluation
The simple capacity evaluations also contain different restrictions. For example, you cannot evaluate any actual capacity requirements using these reports. In addition, you cannot evaluate capacity splits
426
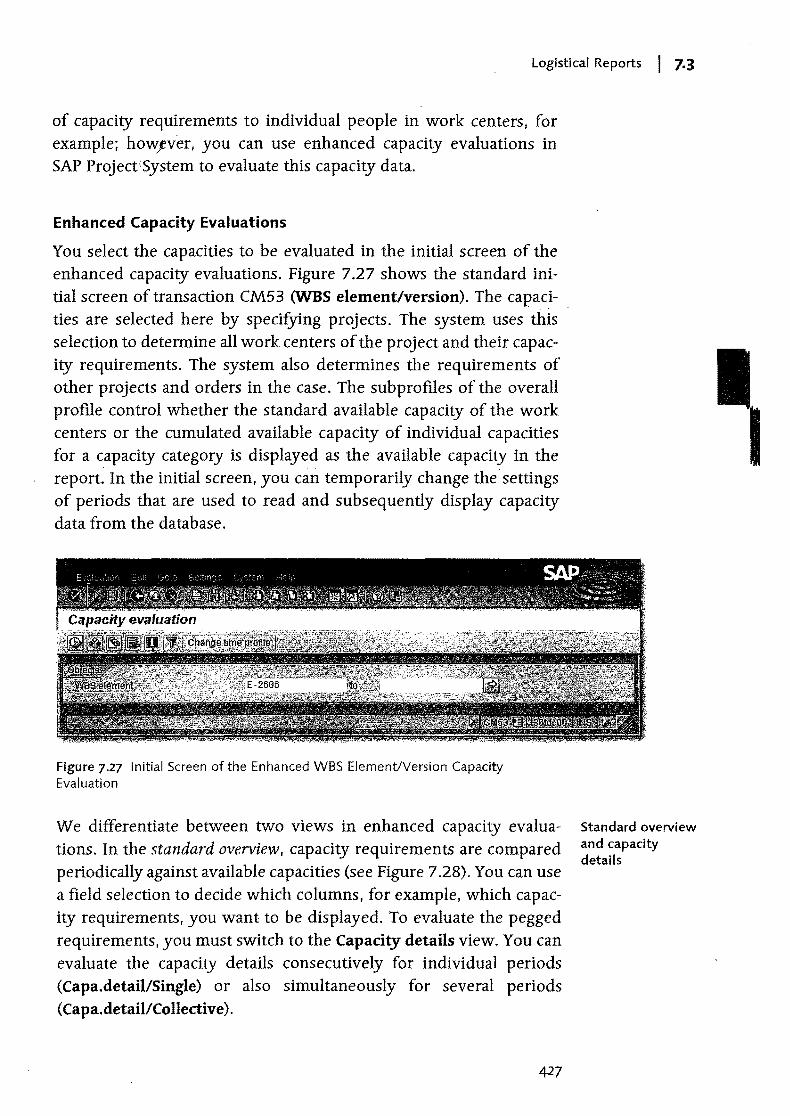
Logistical Reports I 7.3
of capacity requirements to individual people in work centers, for example; howfver, you can use enhanced capacity evaluations in SAP Project;System to evaluate this capacity data.
Enhanced Capacity Evaluations
You select the capacities to be evaluated in the initial screen of the enhanced capacity evaluations. Figure 7.27 shows the standard initial screen of transaction CM53 (WBS element/version). The capac.i- . ties are selected here by specitying projects. The system uses this selection to determine all work centers of the project and their capacity requirements. The system also determines the requirements of other projects and orders in the case. The subprofiles of the overall profile control whether the standard available capacity of the work centers or the cumulated available capacity of individual capacities for a capacity category is displayed as the available capacity in the report. In the initial screen, you can temporarily change the settings of periods that are used to read and subsequently display capacity data from the database.
Figure 7.27 Initial Screen of the Enhanced WBS ElementlVersion Capacity Evaluation
We differentiate between two views in enhanced capacity evaluations. In the standard overview, capacity requirements are compared periodically against available capacities (see Figure 7.28). You can use a field selection to decide which columns, for example, which capacity requirements, you want to be displayed. To evaluate the pegged requirements, you must switch to the Capacity details view. You can evaluate the capacity details consecutively for individual periods (Capa.detail/Single) or also simultaneously for several periods (Capa.detail/ Collective).
427
Standard overview and capacity details
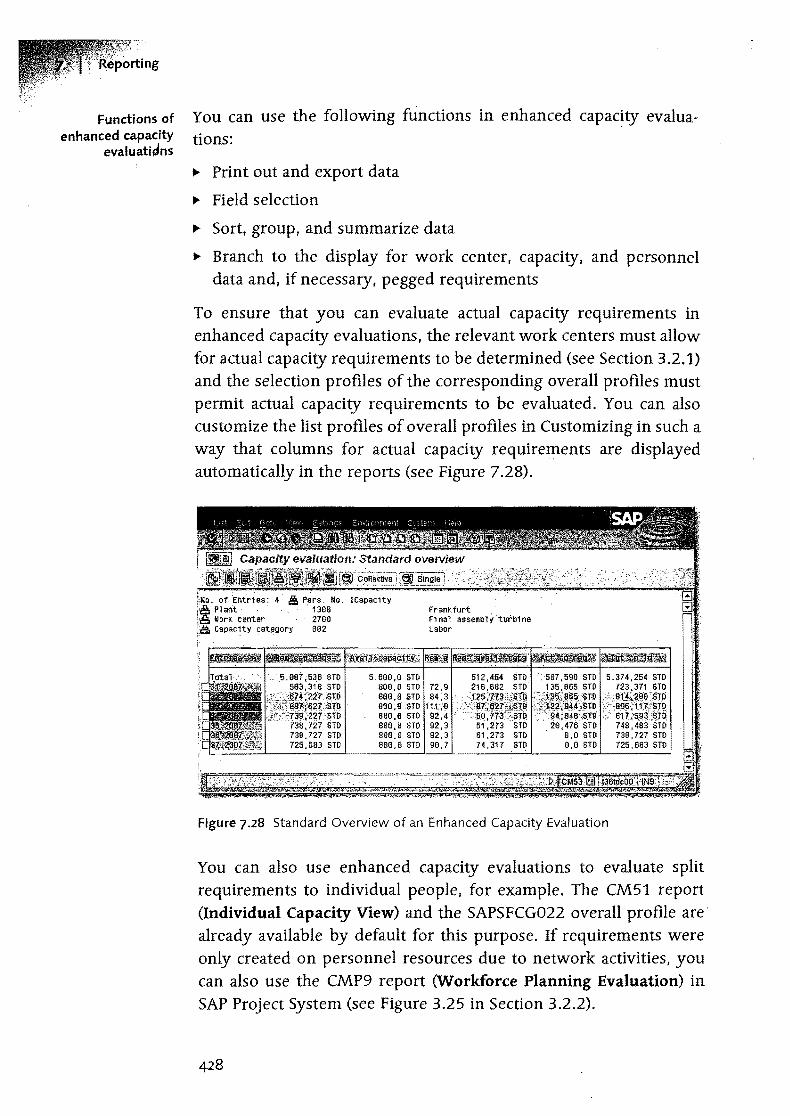
ng
Fundions of You can use the following functions in enhanced capacity evaluaenhanced capacity tions:
evaluati~ns
.. Print out and export data
.. Field selection
.. Sort, group, and summarize data
.. Branch to the display for work center, capacity, and personnel data and. if necessary. pegged requirements
To ensure that you can evaluate actual capacity requirements in enhanced capacity evaluations, the relevant work centers must allow for actual capacity requirements to be determined (see Section 3.2.1) and the selection profiles of the corresponding overall profiles must permit actual capacity requirements to be evaluated. You can also customize the list profiles of overall profiles in Customizing in such a way that columns for actual capacity requirements are displayed automatically in the reports (see Figure 7.28) .
. of Errtr1es: 4 ~ Pers, No. ICapac1ty ,i Pl ant· . 130e . Work center . 2700
Capacity category 002
5.60e,e sm soe, a sm soa,a SID aea~8STD aoa,a srD 80e,0 STD 80e,8 STD 880,0 STD
Frankfurt . Fi nal assembly 'turb1 ne Labor
5,374,254 STD 723,371 STD
··;ar4)2aa.~Tli ;";' 8.ij~"ff:r./Sr!l
'8,V5~:t:~Jli 748 , 483 8m 738,727 sm 725,683 STD
Figure 7.28 Standard Overview of an Enhanced Capacity Evaluation
You can also use enhanced capacity evaluations to evaluate split reqUirements to individual people, for example. The CM51 report (Individual Capacity View) and the SAPSFCG022 overall profile are' already available by default for this purpose. If requirements were only created on personnel resources due to network activities, you can also use the CMP9 report (Workforce Planning Evaluation) in SAP Project System (see Figure 3.25 in Section 3.2.2).
428
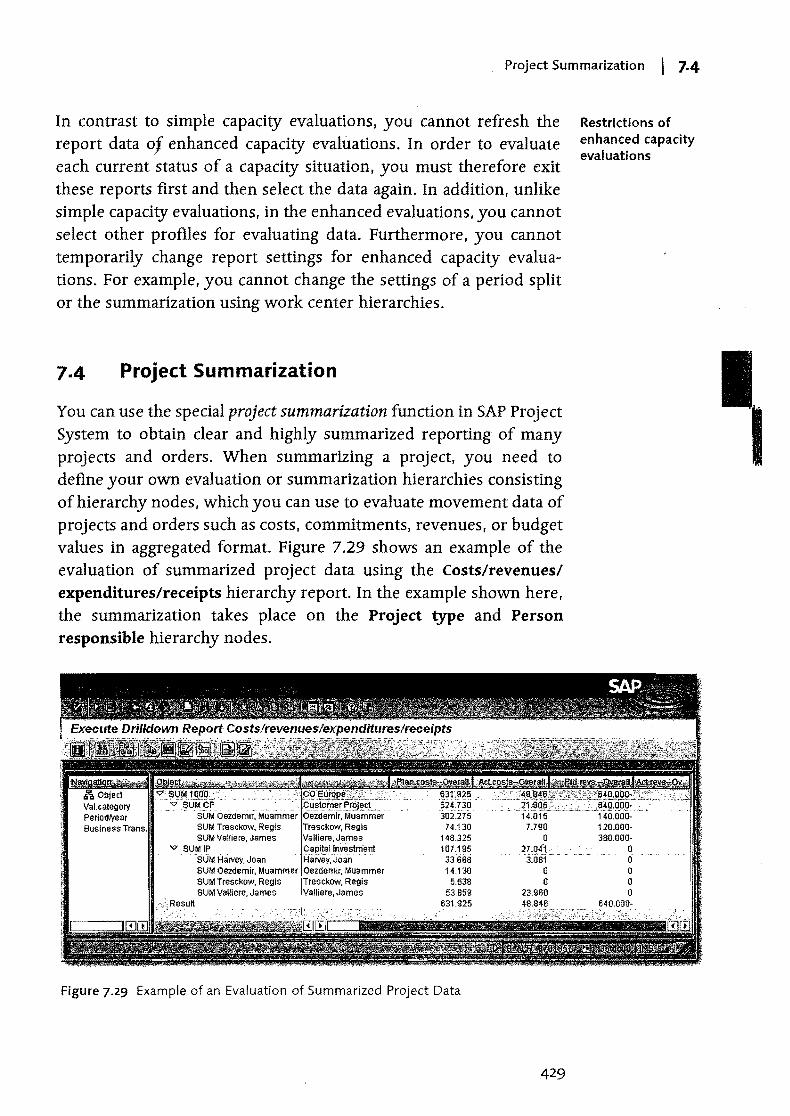
Project Summarization I 7·4
In contrast to simple capacity evaluations, you cannot refresh the report data oj enhanced capacity evaluations. In order to evaluate each current status of a capacity situation, you must therefore exit these reports first and then select the data again. In addition, unlike simple capacity evaluations, in the enhanced evaluations, you cannot select other profiles for evaluating data. Furthermore, you cannot temporarily change report settings for enhanced capacity evaluations. For example, you cannot change the settings of a period split or the summarization using work center hierarchies.
7.4 Project Summarization
You can use the special project summarization function in SAP Project System to obtain clear and highly summarized reporting of many projects and orders. When summarizing a project, you need to define your own evaluation or summarization hierarchies consisting of hierarchy nodes, which you can use to evaluate movement data of projects and orders such as costs, commitments, revenues, or budget values in aggregated format. Figure 7.29 shows an example of the evaluation of summarized project data using the Costs/revenuesl expenditures/receipts hierarchy report. In the example shown here, the summarization takes place on the Project type and Person responsible hierarchy nodes.
. sUM Oezdemii: Muammer SUM Tresckow, Regis SUM Valliere, James
"" SUMIP . . SUM HaNey, Joan
SUM Oezdemir, Muammer SUM Tresckow, Regis ,.,..~~.I,~.,
SUM Valliere, James
631:925 '524.730 302.:.175
74.130 148.325 107.195
33.668 14.130
5.538 53.S59
631.925
Figure 7.29 Example of an Evaluation of Summarized Project Data
429
Restrictions of enhanced capacity evaluations
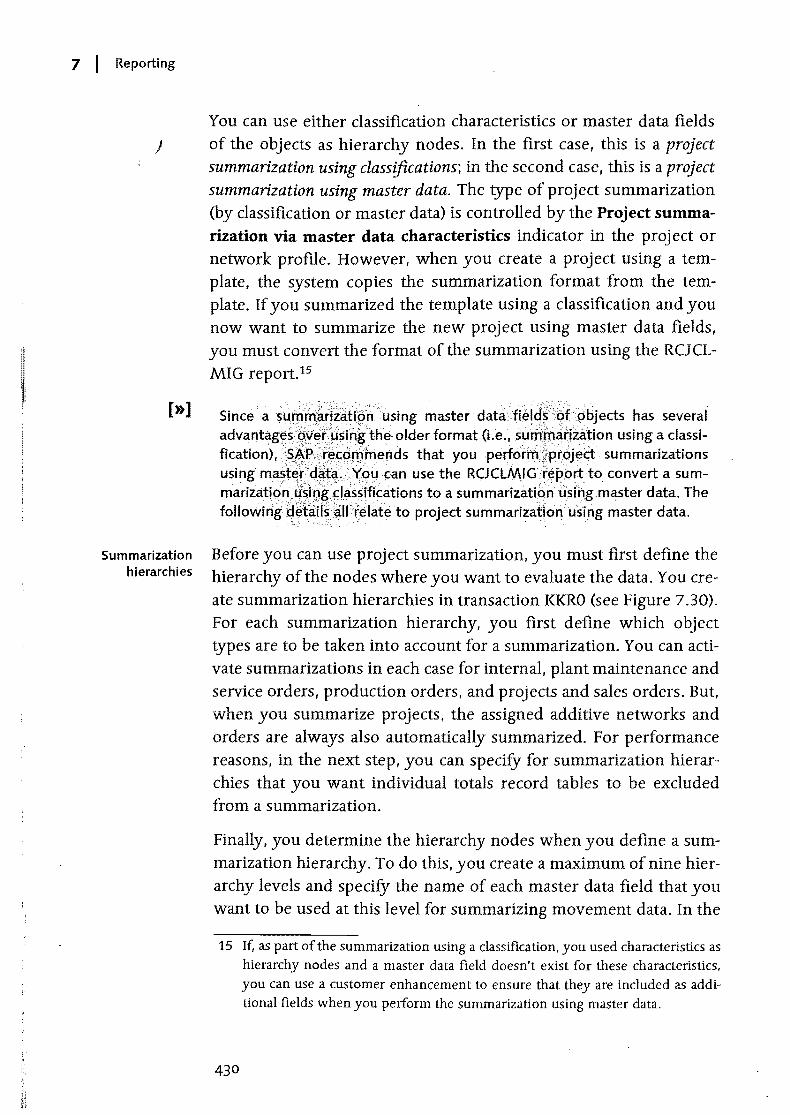
II
I! ,I
7 I Reporting
You can use either classification characteristics or master data fields ) of the objects as hierarchy nodes. In the first case, this is a project
summarization using classifications; in the second case, this is a project summarization using master data. The type of project summarization (by classification or master data) is controlled by the Project summarization via master data characteristics indicator in the project or network profile. However, when you create a project using a template, the system copies the summarization format from the template. If you summarized the template using a classification and you now want to summarize the new project using master data fields, you must convert the format of the summarization using the RCJCLMIG report.i5
[»] Sinceasurnmafita:tiphusing master data\fi~lcr~f()f(>Djects has several advantag~s'9Y~fusing'the, older format (Le., sumrnariza:tion using a dassification),~?~~.le.~pmmends that you perfofrh~p(oJect summarizations using mas,terta:~~~:\Y~ucan use the RCJClMIG:re,portto convert a summarization.4stlJ~,!=las~ifications to a summarizationusil1,g.master data. The followingd~1:::ril~:;all(elateto project summarization using master data.
Summarization hierarchies
Before you can use project summarization, you must first define the hierarchy of the nodes where you want to evaluate the data. You create summarization hierarchies in transaction KKRO (see Figure 7.30). For each summarization hierarchy, you first define which object types are to be taken into account for a summarization. You can activate summarizations in each case for internal, plant maintenance and service orders, production orders, and projects and sales orders. But, when you summarize projects, the aSSigned additive networks and orders are always also automatically summarized. For performance reasons, in the next step, you can specify for summarization hierarchies that you want individual totals record tables to be excluded from a summarization.
Finally, you determine the hierarchy nodes when you define a summarization hierarchy. To do this, you create a maximum of nine hierarchy levels and specify the name of each master data field that you want to be used at this level for summarizing movement data. In the
15 If, as part of the summarization using a classification, you used characteristics as hierarchy nodes and a master data field doesn't exist for these characteristics, you can use a customer enhancement to ensure that they are included as additional fields when you perform the summarization using master data.
430
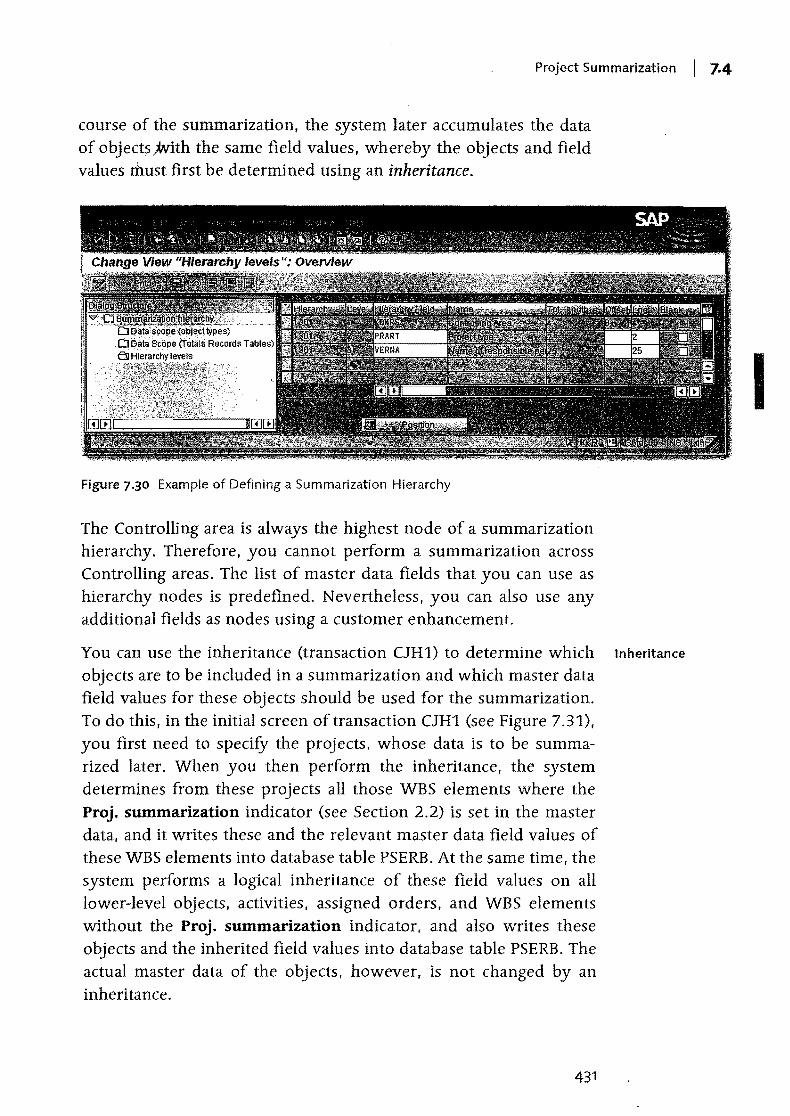
Project Summarization I 7.4
course of the summarization, the system later accumulates the data of objects;With the same field values, whereby the objects and field values rhust first be determined using an inheritance.
Figure 7.30 Example of Defining a Summarization Hierarchy
The Controlling area is always the highest node of a summarization hierarchy. Therefore, you cannot perform a summarization across Controlling areas. The list of master data fields that you can use as hierarchy nodes is predefined. Nevertheless, you can also use any additional fields as nodes using a customer enhancement.
You can use the inheritance (transaction CJH1) to determine which Inheritance
objects are to be included in a summarization and which master data field values for these objects should be used for the summarization. To do this, in the initial screen of transaction CJH1 (see Figure 7.31), you first need to specify the projects, whose data is to be summa-rized later. When you then perform the inheritance, the system determines from these projects all those WBS elements where the Proj. summarization indicator (see Section 2.2) is set in the master data, and it writes these and the relevant master data field values of these WBS elements into database table PSERB. At the same time, the system performs a logical inheritance of these field values on all lower-level objects, activities, assigned orders, and WBS elements without the Proj. summarization indicator, and also writes these objects and the inherited field values into database table PSERB. The actual master data of the objects, however, is not changed by an inheritance.
431
I
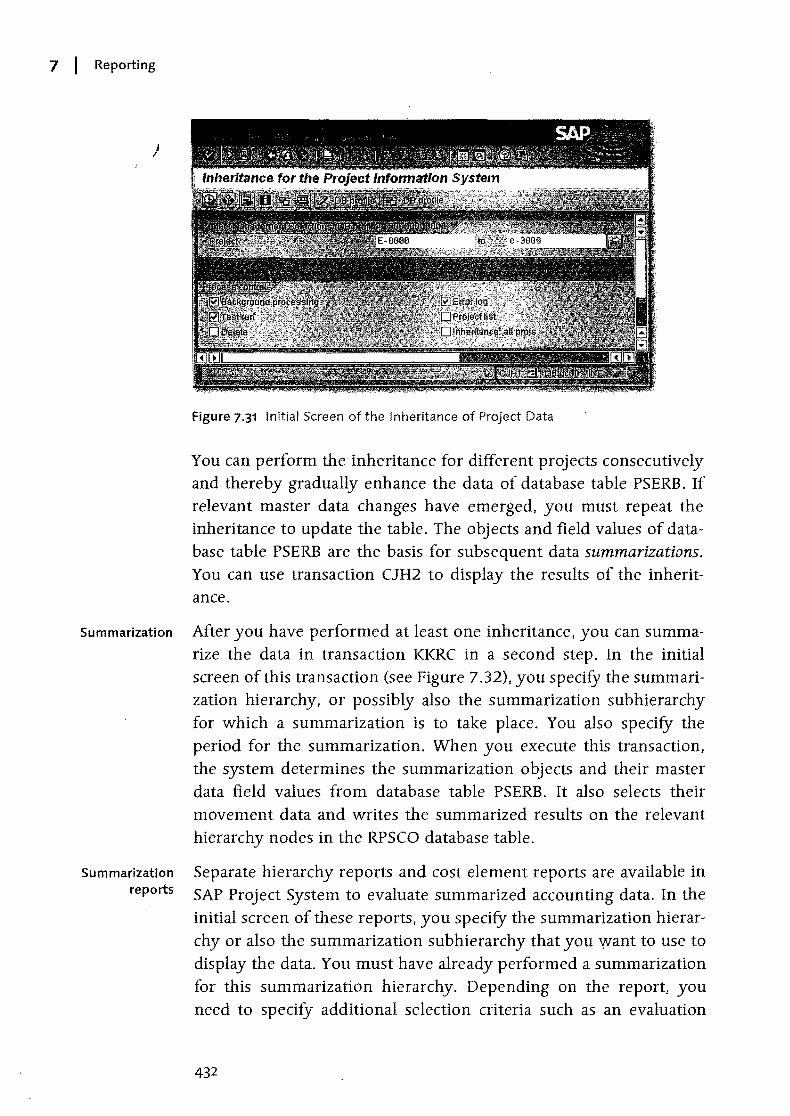
7 I Reporting
)
Figure 7 -31 Initial Screen of the Inheritance of Project Data
You can perform the inheritance for different projects consecutively and thereby gradually enhance the data of database table PSERB. If relevant master data changes have emerged, you must repeat the inheritance to update the table. The objects and field values of database table PSERB are the basis for subsequent data summarizations. You can use transaction CJH2 to display the results of the inheritance.
Summarization After you have performed at least one inheritance, you can summarize the data in transaction KKRC in a second step. In the initial screen of this transaction (see Figure 7.32), you specify the summarization hierarchy, or possibly also the summarization subhierarchy for which a summarization is to take place. You also specify the period for the summarization. When you execute this transaction, the system determines the summarization objects and their master data field values from database table PSERB. It also selects their movement data and writes the summarized results on the relevant hierarchy nodes in the RPSCO database table.
Summarization reports
Separate hierarchy reports and cost element reports are available in SAP Project System to evaluate summarized accounting data. In the initial screen of these reports, you specify the summarization hierarchy or also the summarization subhierarchy that you want to use to display the data. You must have already performed a summarization for this summarization hierarchy. Depending on the report, you need to specify additional selection criteria such as an evaluation
432
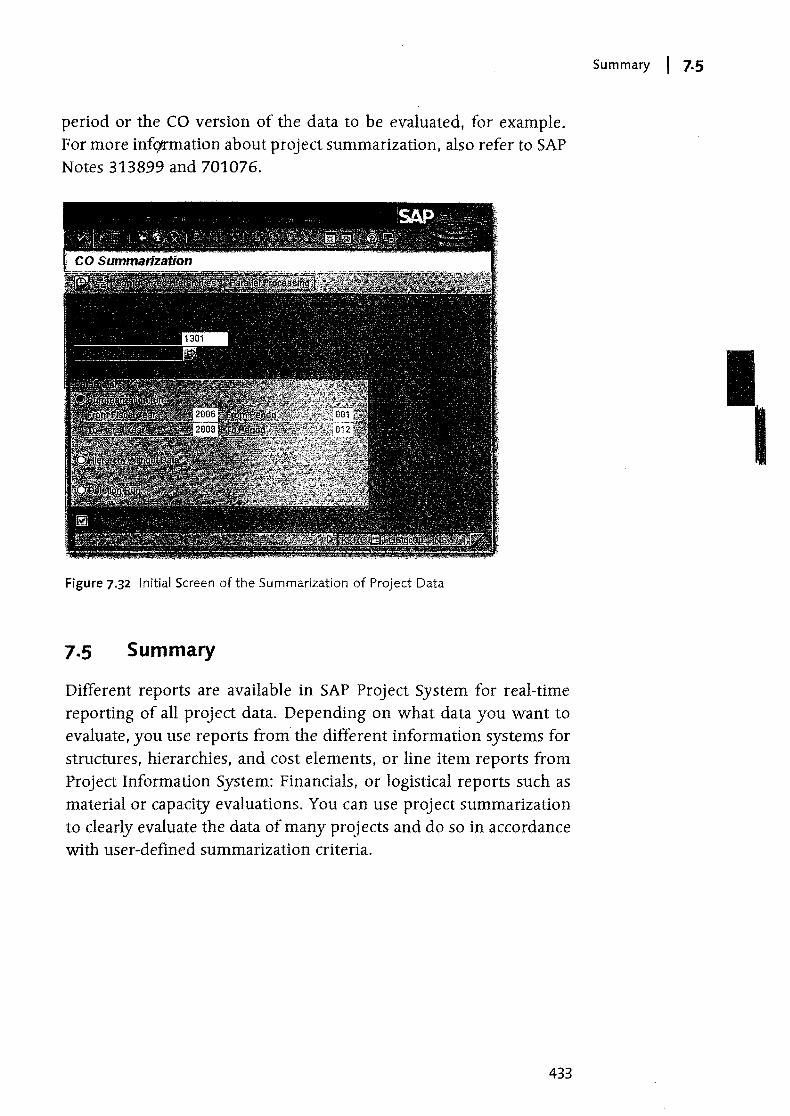
period or the CO version of the data to be evaluated, for example. For more inf9Tmation about project summarization, also refer to SAP Notes 313899 and 701076.
Figure 7.32 Initial Screen of the Summarization of Project Data
7.5 Summary
Different reports are available in SAP Project System for real-time reporting of all project data. Depending on what data you want to evaluate, you use reports from the different information systems for structures, hierarchies, and cost elements, or line item reports from Project Information System: Financials, or logistical reports such as material or capacity evaluations. You can use project summarization to clearly evaluate the data of many projects and do so in accordance with user-defined summarization criteria.
433
Summary I 7-5

1 1 1 1 1 1 1 1 1 1 1 1 1 1 1
) 1 1 1 1 1 1 1 1 1 1 1 1 1 1 1 1 1 1 1 1 1 1 1 1 1 1 1 1 1 1 1 1 1 1 1 1 1 1 1 1 1 1 1 1 1 1 1 1 1 1 1 1 1 1 1
In many enterprises, projects are managed using a variety of progr;ams. This chapter looks at some typical scenarios that illustrate how SAP Project System can be integrated with other programs.
8 Integration Scenarios with Other Project Management Tools
The external project software (EPS) interface is used for bidirectional data exchange with other project management tools or generic external programs from within SAP Project System. Typical uses of this interface include exporting project data for presentation purposes; initial data transfer from legacy systems to SAP Project System; and integrating special tools, which are often developed in-house and deal with individual aspects of project management (Le., creating materials lists, scheduling, and offline object processing). The EPS interface is based on business object types and business application programming interfaces (BAPls).
Business objects are used to structure data from the SAP system into Business objects
individual components, in accordance with business criteria. SAP Project System has the business object types ProjectDifinition, WorkBreakDownStruc, and Network, among others, which are used to encapsulate data for project definitions, work breakdown structures (WBS), and networks.1 Each business object type provides clearly defined methods for communicating with external programs. These methods are referred to as BAPIs. Data exchange that is based on BAPIs between the external programs and a business object can flow in either direction.
The data in business objects is visible to the outside world only via BAPls
BAPls. This separation of data and access methods enables you, with
1 Business object types are similar to classes in object-oriented programming. Therefore, an individual business object. such as a network, corresponds to a specific instance of a class.
435
8 I Integration Scenarios with Other Project Management Tools
the help of BAPIs, to read, modify, and create business objects with-} out having to know all the SAP-specific implementation details of the
relevant business object type. You can use the BAPI transaction to view a list of the business object types, the BAPIs available in each case, and detailed documentation for every BAPI in the SAP system. For a list of the BAPIs for the three business object types in SAP Project System, see Appendix A.
The EPS interface enables acc.ess to the data in SAP Project System; however, to exchange this data with other programs, an additional interface is required that maps SAP Project System data to data fields in the external software and vice-versa. You can develop this interface, if you like, but there already exists an entire range of such interfaces for a variety of standard programs, such as Microsoft Project and Primavera. You can purchase these interfaces from SAP partners or other prOViders. SAP provides its customers and partners with a free interface for data exchange between SAP Project System (SAP PS) and Microsoft Project Client. This interface, known as the Open PS interface for Microsoft Project, is discussed in more detail in the following sections. Then, we address integration scenarios for cProjects and SAP Resource and Portfolio Management.
8.1 Open PS for Microsoft Project
Uses You can use the Open PS for Microsoft Project interface to download projects from SAP Project System to the Microsoft Project Client. You can also use this interface to upload project data to SAP Project System to create new projects or modify existing ones. The ability to download projects to Microsoft Project is particularly important for project team members who need access ~o offline project data - for customer presentations, for example. You can download projects as often as you like. When doing so, you can either create a new project each time in Microsoft Project, or update a preViously downloaded project.
If necessary, you can also modify projects that you downloaded in Microsoft Project - for on-site scheduling arrangerp.ents with business partners, for example - and then transfer your modifications back to the SAP system, or create new projects in Microsoft Project and then use the upload function to create new projects in SAP
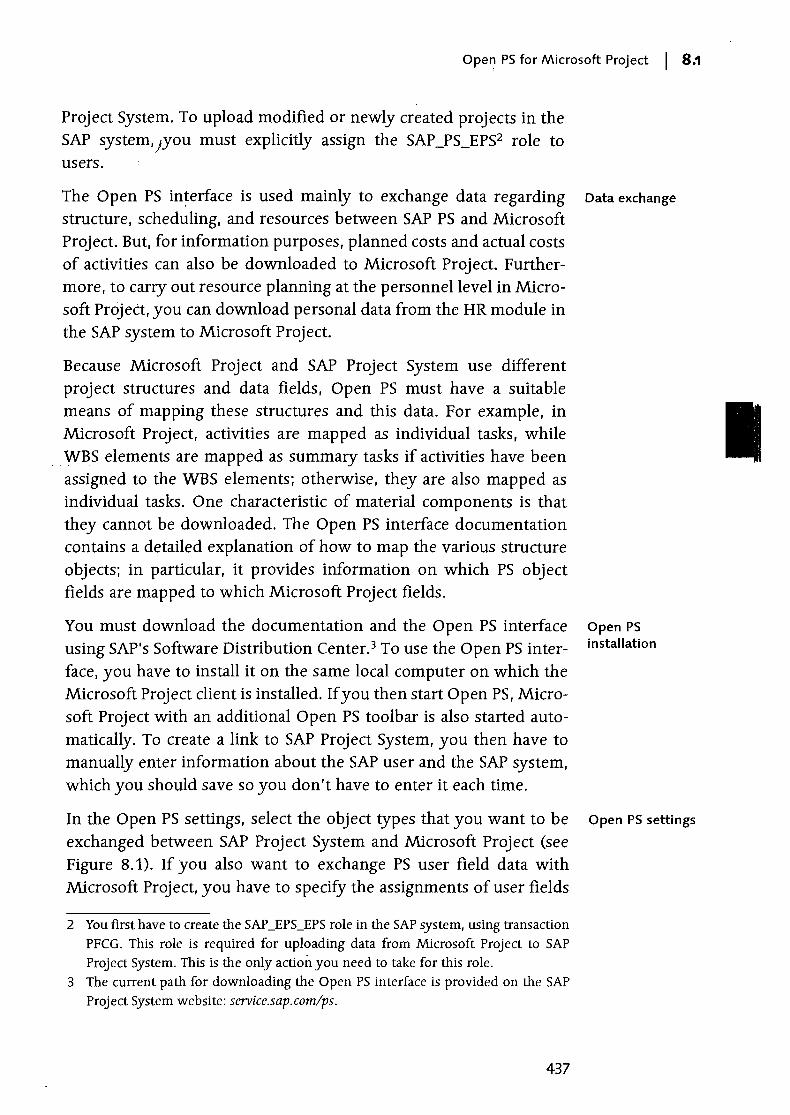
Open PS for Microsoft Project I 8.1
Project System. To upload modified or newly created projects in the SAP system, )you must explicitly assign the SAP _PS_EPS2 role to users.
The Open PS in~erface is used mainly to exchange data regarding Data exchange
structure, scheduling, and resources between SAP PS and Microsoft Project. But, for information purposes, planned costs and actual costs of activities can also be downloaded to Microsoft Project. Further-more, to carry out resource planning at the personnel level in Micro-soft Project, you can download personal data from the HR module in the SAP system to Microsoft Project.
Because Microsoft Project and SAP Project System use different project structures and data fields, Open PS must have a suitable means of mapping these structures and this data. For example, in Microsoft Project, activities are mapped as individual tasks, while WBS elements are mapped as summary tasks if activities have been assigned to the WBS elements; otherwise, they are also mapped as individual tasks. One characteristic of material components is that they cannot be downloaded. The Open PS interface documentation contains a detailed explanation of how to map the various structure objects; in particular, it provides information on which PS object fields are mapped to which Microsoft Project fields.
You must download the documentation and the Open PS interface using SAP's Software Distribution Center. 3 To use the Open PS interface, you have to install it on the same local computer on which the Microsoft Project client is installed. If you then start Open PS, Micro-soft Project with an additional Open PS toolbar is also started auto-matically. To create a link to SAP Project System, you then have to manually enter information about the SAP user and the SAP system, which you should save so you don't have to enter it each time.
In the Open PS settings, select the object types that you want to be exchanged between SAP Project System and Microsoft Project (see Figure 8.1). If you also want to exchange PS user field data with Microsoft Project, you have to specify the assignments of user fields
2 You first have to create the SAP _EPS_EPS role in the SAP system, using transaction PFCG. This role is required for uploading data from Microsoft Project to SAP Project System. This is the only action you need to take for this role.
3 The current path for downloading the Open PS interface is provided on the SAP Project System website: service.sap.com/ps.
437
Open PS installation
Open PS settings
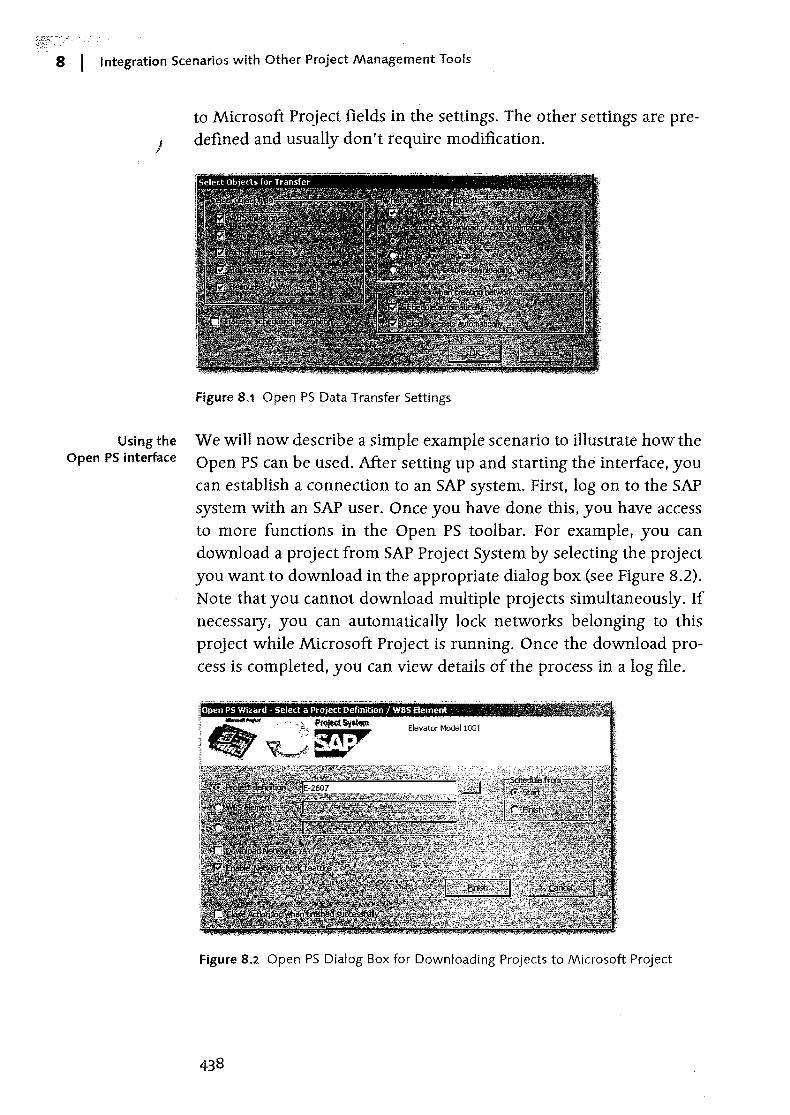
8 I Integration Scenarios with Other Project Management Tools
to Microsoft Project fields in the settings. The other settings are pre-) defined and usually don't require modification.
Using the Open PS interface
Figure 8.1 Open PS Data Transfer Settings
We will now describe a simple example scenario to illustrate how the Open PS can be used. After setting up and starting the interface. you can establish a connection to an SAP system. First, log on to the SAP system with an SAP user. Once you have done this, you have access to more functions in the Open PS toolbar. For example, you can download a project from SAP Project System by selecting the project you want to download in the appropriate dialog box (see Figure 8.2). Note that you cannot download multiple projects simultaneously. If necessary. you can automatically lock networks belonging to this project while Microsoft Project is running. Once the download process is completed, you can view details of the process in a log file.
Elevator ModeIIOO!
Figure 8.2 Open PS Dialog Box for Downloading Projects to Microsoft Project
438
Open PS for Microsoft Project I 8.1
The downloaded project is then displayed in the Open PS screen in Microsoft Project (see Figure 8.3). The work centers of the activities can also be downloaded to Microsoft Project as resources, along with structure and scheduling data, and can then be analyzed there in the Resources screen. If you want to use additional work centers and personnel resources from the SAP system for resource planning in Microsoft Project, you should use Open PS to search for the appropriate resources in the SAP system and to download these as well.
You can now analyze and, if necessary, modify the project in Microsoft Project. For example, you can modify the time scheduling, add new tasks, create relationships, or assign resources to tasks. If you assign more than one resource to a task, especially personnel resources, these are mapped in SAP Project System as activity elements after they are uploaded. For new tasks, you can use an indicator to control whether these tasks can be uploaded to SAP Project System later, or whether they are only to be used for planning in Microsoft Project.
: ::: ;
Figure 8.3 Display in Microsoft Project of a Project Exported Using the Open PS interface
To transfer the modified project data back to SAP Project System, start the project upload process. If you locked certain networks during the download process, you have to unlock these networks before uploading. Open PS now compares the project in Microsoft Project
439
Modifying a project in Microsoft Project
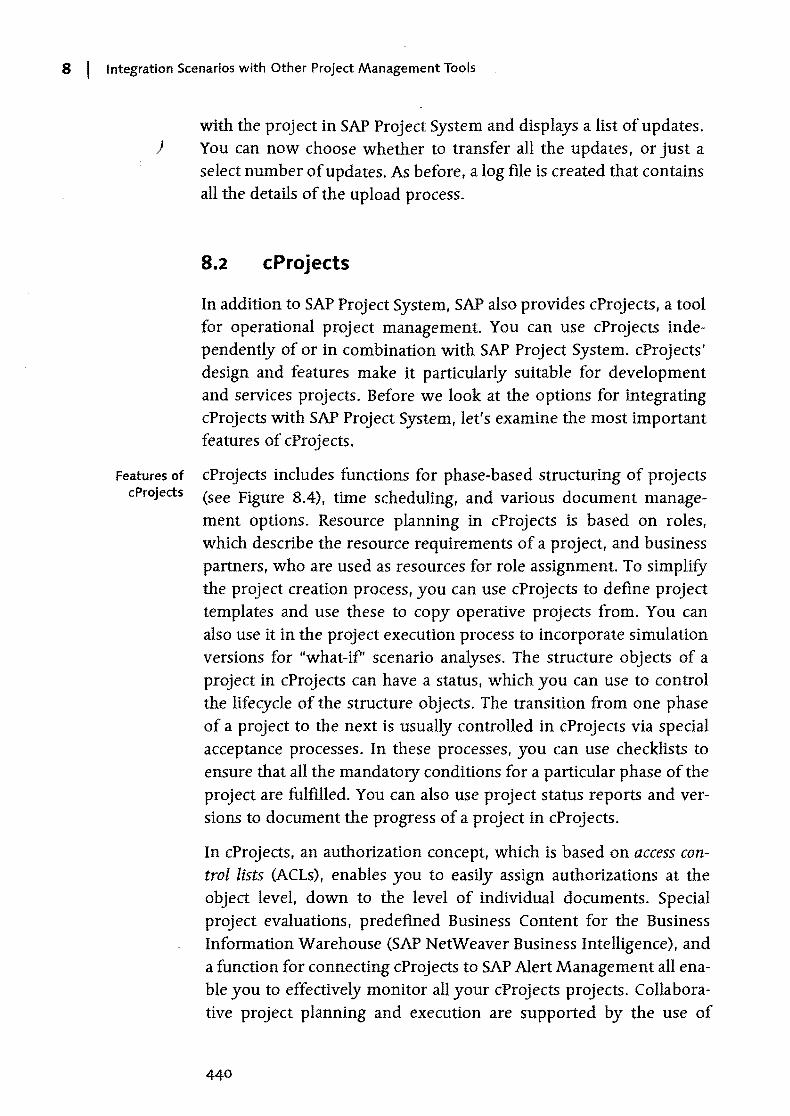
8 I Integration Scenarios with Other Project Management Tools
with the project in SAP Project System and displays a list of updates. ) You can now choose whether to transfer all the updates, or just a
select number of updates. As before, a log file is created that contains all the details of the upload process.
Features of cProjects
8.2 cProjects
In addition to SAP Project System, SAP also provides cProjects, a tool for operational project management. You can use cProjects independently of or in combination with SAP Project System. cProjects' design and features make it particularly suitable for development and services projects. Before we look at the options for integrating cProjects with SAP Project System, let's examine the most important features of cProjects.
cProjects includes functions for phase-based structuring of projects (see Figure 8.4), time scheduling, and various document management options. Resource planning in cProjects is based on roles, which describe the resource reqUirements of a project, and business partners, who are used as resources for role assignment. To simplifY the project creation process, you can use cProjects to define project templates and use these to copy operative projects from. You can also use it in the project execution process to incorporate simulation versions for "what-if' scenario analyses. The structure objects of a project in cProjects can have a status, which you can use to control the lifecycle of the structure objects. The transition from one phase of a project to the next is usually controlled in cProjects via special acceptance processes. In these processes, you can use checklists to ensure that all the mandatory conditions for a particular phase of the project are fulfilled. You can also use project status reports and versions to document the progress of a project in cProjects.
In cProjects, an authorization concept, which is based on access control lists (ACLs), enables you to easily assign authorizations at the object level, down to the level of individual documents. Special project evaluations, predefined Business Content for the Business Information Warehouse (SAP NetWeaver Business Intelligence), and a function for connecting cProjects to SAP Alert Management all enable you to effectively monitor all your cProjects projects. Collaborative project planning and execution are supported by the use of
440
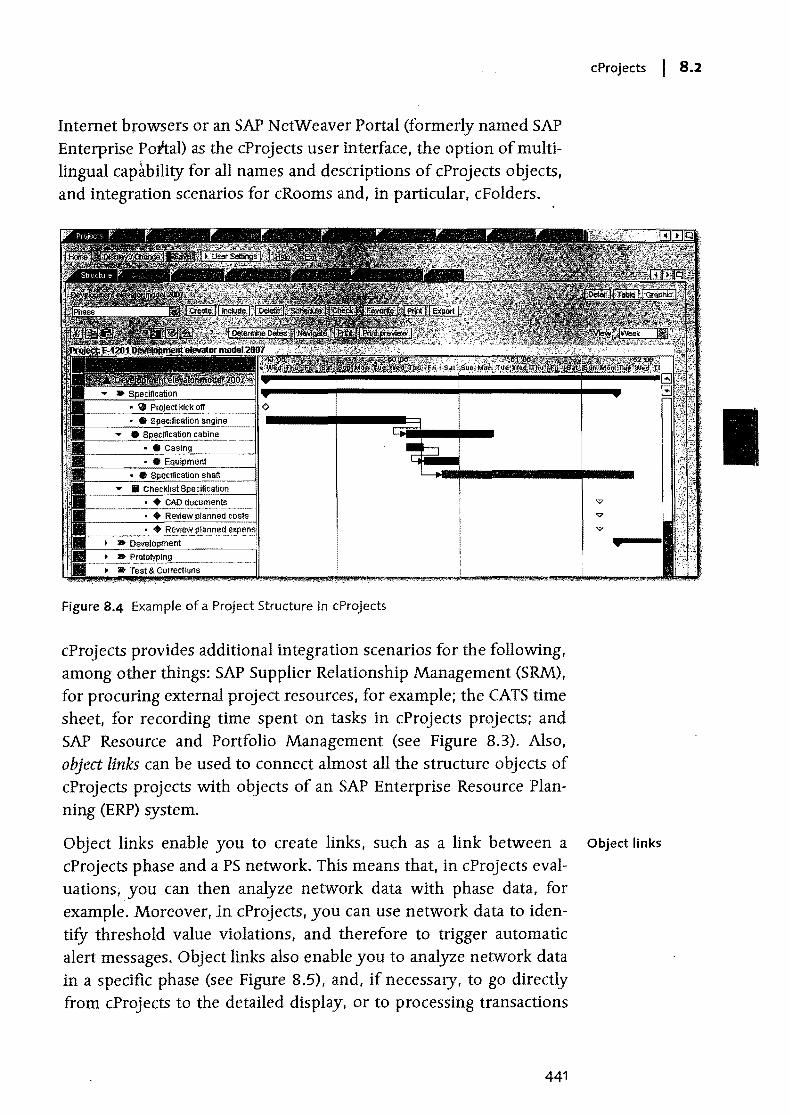
Internet browsers or an SAP NetWeaver Portal (formerly named SAP Enterprise Poltal) as the cProjects user interface, the option of multilingual caplbility for all names and descriptions of cProjects objects, and integration scenarios for cRooms and, in particular, cFolders.
Figure 8.4 Example of a Project Structure in cProjects
cProjects provides additional integration scenarios for the following, among other things: SAP Supplier Relationship Management (SRM), for procuring external project resources, for example; the CATS time sheet, for recording time spent on tasks in cProjects projects; and SAP Resource and Portfolio Management (see Figure 8.3). Also, object links can be used to connect almost all the structure objects of cProjects projects with objects of an SAP Enterprise Resource Planning (ERP) system.
cProjects I 8.2
Object links enable you to create links, such as a link between a Object links
cProjects phase and a PS network. This means that, in cProjects eval-uations; you can then analyze network data with phase data, for example. Moreover, in cProjects, you can use network data to iden-tity threshold value violations, and therefore to trigger automatic alert messages. Object links also enable you to analyze network data in a specific phase (see Figure 8.5), and, if necessary, to go directly from cProjects to the detailed display, or to processing transactions
441
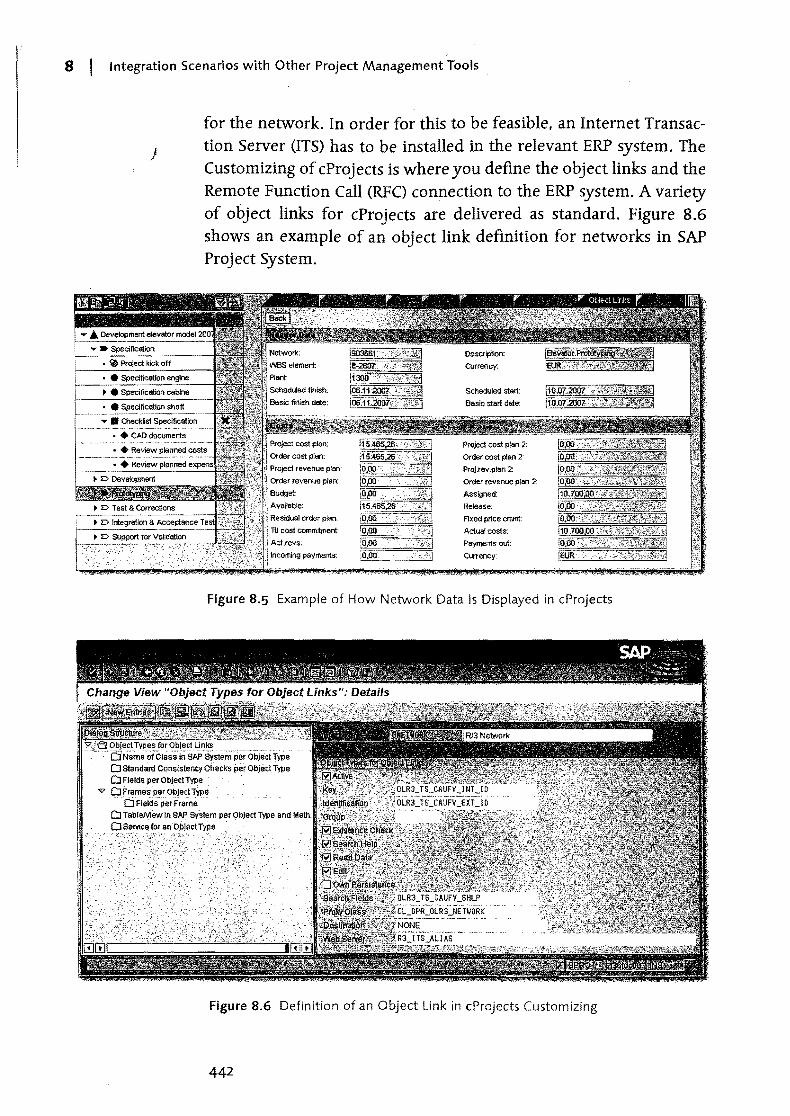
8 Integration Scenarios with Other Project Management Tools
)
for the network. In order for this to be feasible, an Internet Transaction Server (ITS) has to be installed in the relevant ERP system. The Customizing of cProjects is where you define the object links and the Remote Function Call (RFC) connection to the ERP system. A variety of ohject links for cProjects are delivered as standard. Figure 8.6 shows an example of an object link definition for networks in SAP Project System.
Order cost plan 2:
Projlev.plan 2:
Order revenue plan 2:
Assigned:
Release:
FIXed price cmmt:
Actual costs:
Payments out:
Currency:
Figure 8.5 Example of How Network Data Is Displayed in cProjects
Figure 8.6 Definition of an Object Link in cProjects Customizing
442
Special integration scenarios between SAP Project System and cProjects c?-n~e used to exchange .Controlling data. Because cProjects , does not provide any Financials functions (apart from a rudimentary cost and revenue planning function that is based on planned resource requirements), you can run projects in SAP Project System, parallel to your projects in cProjects, which hierarchically map all financial aspects of project planning and execution. Specific information on planned and confirmed services, and their costs and revenue rates, can be transferred from cProjects to SAP Project System for this purpose, and, if necessary, additional cost, revenue, and budget data can be transferred as well. There are various ways, or controlling methods, of linking a cProjects project to a PS project.
iii> Hierarchical controlling (structure element, manually) Manually create a work breakdown structure in SAP Project System, then assign phases, tasks, and subtasks of a cProjects project to the WBS elements.4
iii> Hierarchical controlling (project role, manually) Likewise, create a work breakdown structure in SAP Project System, then assign roles to the various WBS elements in cProjects.
iii> Hierarchical controlling (structure element, automatically) To define a cProjects project, the system automatically creates a project definition and a billing element in SAP Project System. In accordance with the structure of the cProjects project, subordinate WBS elements are created for phases, tasks, and subtasks, and linked to these. You can define the maximum number oflevels by defining a controlling level. All subordinate structure elements of the cProjects project are then assigned to the WBS elements at the lowest leveL
iii> Hierarchical controlling (project role, automatically) A project definition and a billing element are automatically created at the highest level in SAP Project System. Additional WBS elements are created for every role in the cProjects project.
The controlling method is used either on the basis of structure elements or project roles, depending on whether you use the time sheet
4 If you assign a phase to a WBS element. all subordinate tasks are automatically assigned to this WBS element. Also, if you assign a task to a WBS element, all the subordinate tasks are also aSSigned to this element; however, you can manually change these automatic assignments.
443
cProjects I 8.2
Integrating FinandaIs functions
Controlling methods
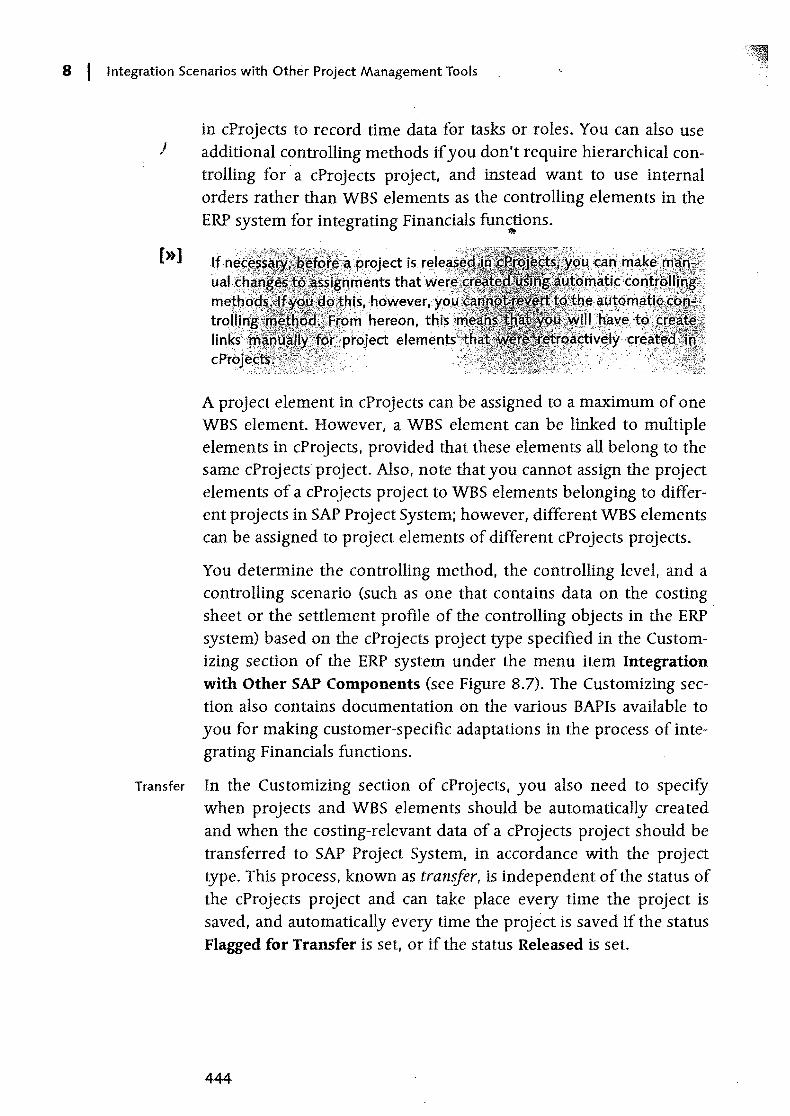
8 I Integration Scenarios with Other Project Management Tools
in cProjects to record time data for tasks or roles. You can also use ) additional controlling methods if you don't require hierarchical con
trolling for· a cProjects project, and instead want to use internal orders rather than WBS elements as the controlling elements in the ERP system for integrating Financials fun~ons.
[» ] Ifne;' "
ualt me,th. trol'li lin~~~
A project element in cProjects can be assigned to a maximum of one WBS element. However, a WBS element can be linked to multiple elements in cProjects, provided that these elements all belong to the same cProjects project. Also, note that you cannot assign the project elements of a cProjects project to WBS elements belonging to different projects in SAP Project System; however, different WBS elements can be assigned to project elements of different cProjects projects.
You determine the controlling method, the controlling level, and a controlling scenario (such as one that contains data on the costing sheet or the settlement profile of the controlling objects in the ERP system) based on the cProjects project type specified in the Customizing section of the ERP system under the menu item Integration with Other SAP Components (see Figure 8.7). The Customizing section also contains documentation on the various BAPIs available to you for making customer-specific adaptations in the process of integrating Financials functions.
Transfer In the Customizing section of cProjects, you also need to specify when projects and WBS elements should be automatically created and when the costing-relevant data of a cProjects project should be transferred to SAP Project System, in accordance with the project type. This process, known as tranifer, is independent of the status of the cProjects project and can take place every time the project is saved, and automatically every time the project is saved if the status Flagged for Transfer is set, or if the status Released is set.
444
SAP Resource and Portfolio Management I 8.3
Figure 8.7 Settings for Fi'1'-incials Integration in the SAP System of the Project System
The technical process of integrating Financials functions is also based on object links. In the standard version, cProjects comes with the object type OFIN_INT_ERP _PS. In this object type, you only have to create the RFC connection to the ERP system of SAP Project System in order to be able to use RFC for object links. As soon as an object link is created between a cProjects project element and a WBS element, you can display various data of the WBS element directly in the cProjects project element or call various Internet services for the WBS element in cProjects.
8.3 SAP Resource and Portfolio Management
While SAP Project System and cProjects can be used for the detailed planning and operational management of projects, SAP Resource and Portfolio Management (SAP RPM) is used for the strategic analysis and control of entire project portfolios in enterprises. Therefore, you can define various portfolios in RPM and hierarchically subdivide these portfolios into portfoliO areas (see Figure 8.8). You can then assign projects, project proposals, and any other plans within the enterprise in the form of portfolio elements to the portfolio areas on the lowest leveL
Fundamental data belonging to these portfolio elements, such as Portfolio elements
structure, scheduling, resource requirements, and cost and revenue information can be acquired from connected FI/CD and project man-agement systems such as Microsoft Project Server or Microsoft
445
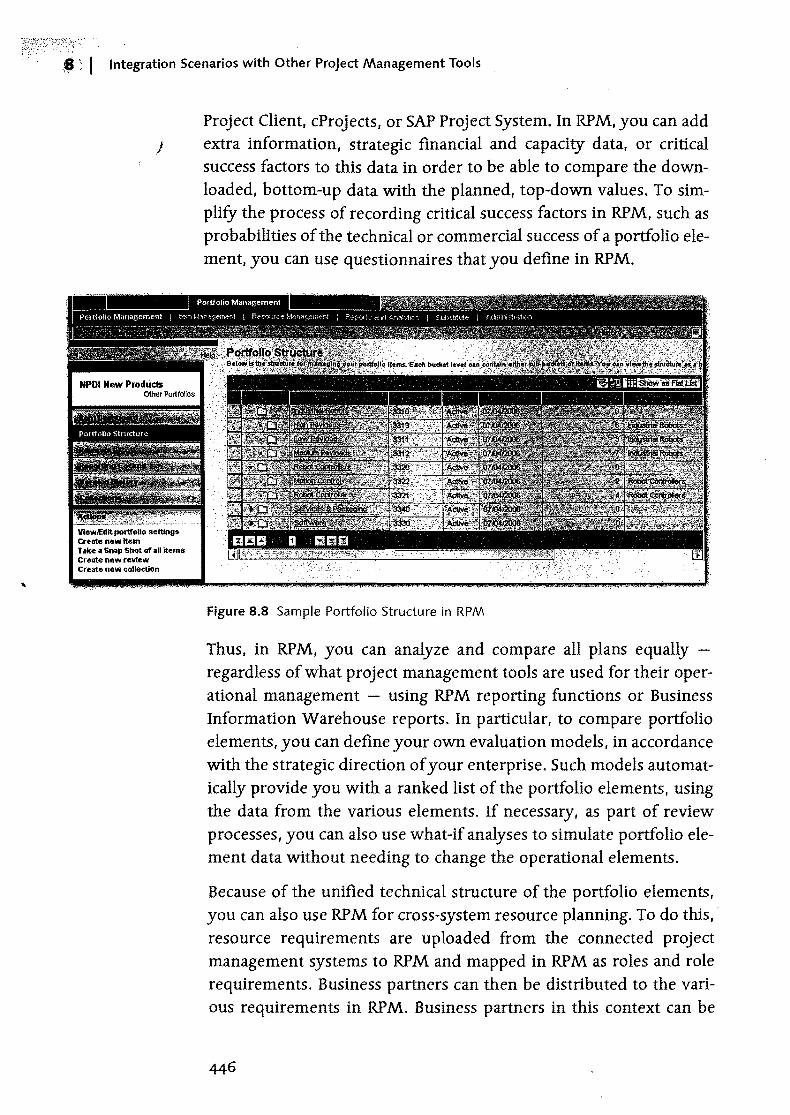
to
:$ I Integration Scenarios with Other Project Management Tools
Project Client, cProjects, or SAP Project System. In RPM, you can add ) extra information, strategic financial and capacity data, or critical
success factors to this data in order to be able to compare the downloaded, bottom-up data with the planned, top-down values. To simplify the process of recording critical success factors in RPM, such as probabilities of the technical or commercial success of a portfolio element, you can use questionnaires that you define in RPM.
VlewlEditportfollo setting", Create new Item Take _ Smp Shot at all items Crellte new review create new collection
Figure 8.8 Sample Portfolio Structure in RPM
Thus, in RPM, you can analyze and compare all plans equally regardless of what project management tools are used for their operational management - using RPM reporting functions or Business Information Warehouse reports. In particular, to compare portfolio elements, you can define your own evaluation models, in accordance with the strategic direction of your enterprise. Such models automatically provide you with a ranked list of the portfolio elements, using the data from the various elements. If necessary, as part of review processes, you can also use what-if analyses to simulate portfolio element data without needing to change the operational elements.
Because of the unified technical structure of the portfolio elements, you can also use RPM for cross-system resource planning. To do this,· resource requirements are uploaded from the connected project management systems to RPM and mapped in RPM as roles and role requirements. Business partners can then be distributed to the various requirements in RPM. Business partners in this context can be
446
SAP Resource and Portfolio Management I 8.3
external resources or internal employees. Via integration with the HR system, QUsiness partners of RPM can also be automatically created on th~ basis of HR data.
In this section, we'll go into more detail on how to integrate SAP Project System with RPM. The link between a portfolio element, or the hierarchical structure of the portfolio element, and a PS project is set up in RPM on the portfolio element level. Based on a portfolio element, you can c~eate a project in SAP Project System using an operative project as a template (download), or link an existing project with the portfolio element and thereby derive portfolio element data and its hierarchical structure from the structure and scheduling dates of the project (upload, see Figure 8.9). A portfolio element can be linked to only one project.
Onc;e you have established a link between a portfolio element and a project, you can manually upload data from SAP Project System, and therefore update the portfolio element data and its structure (this can also be done for multiple portfolio elements simultaneously), or you can do this by scheduling the IRPMlPROJECTS_BATCH_UPLOAD program to run as a background job in RPM at regular intervals. Which structure, scheduling, and capacity data is uploaded to RPM is determined by mapping tables in RPM (see Figure 8.10) and by the options that you select when uploading (see Figure 8.9). To map plants in a project to locations in RPM, you have to make the corresponding assignments in Customizing in advance.
'Upload/Download Project Data
Uploading and downloading project data
:-(oiJ.,ean upload data from or download data tdselelltted system/project bel_. elid< "Save" to confilfuJhe uploiJded/downloaded data
®Upload from Project c: Down~d to Project
• upload I I Save Upload I . . . ..
AfJPlica!ion: •
. Applic8tion System: '
PrOj.ect Name: •
lJplcia'd the Following:
Last Update:
l/pdatedBy:
I SAP Project System
ivitiesfActiv~yEiement;;)l ii;;8')'···.-.. · .. · ...... ·· .... ····· .... ·· .. · .. · .. · .. ····•
mmmI' .. .." ~ : . " '.~"', .:' .".,' .= .,< .. " .:, '" .. _" h " , .," ,', .. ,"" '" " ".:','.; ,
~ ~ ~,_ ~ "-. ~.1" ~, ,;,,"- ~ ~ ~ _, '" "'
Figure 8.9 Uploading a Project from SAP Project System to RPM
447
8 I Integration Scenarios with Other Project Management Tools
Figure 8.10 Example of Mapping Project Definition Fields to Fields in Portfolio Elements
If you don't set the Tasks indicator when uploading, only project definition data is uploaded to RPM. If you do set this indicator, the upload process creates a corresponding hierarchical structure for the RPM portfolio element based on the WBS elements, network headers, activities, activity elements, and milestones in SAP Project System. The Customizing mapping tables in RPM control the data exchange process on the detail level.
If you also set the Roles indicator when uploading, the system automatically creates or updates a role in RPM for every activity and every activity element of the project. Depending on the mapping settings, the planned work can be transferred as requirements or, for example, the activity text could be transferred as a role name. The roles and their requirements can then be used for resource planning in RPM, or they can be compared with the strategically planned capacity data.
Teams For resource planning, you can upload to RPM SAP Project System assignments of persons to work centers using the RP M_ WRKCNTR_ UPLOAD program. In RPM, this program creates what is called a team for a work center. The identity of this team is made up of the plant and the work center ID. If the program finds corresponding business partners in RPM using staff numbers, these business part-
ners are automatical1y assigned to the team. Teams can be used to define resou}ce pools in RPM, among other things.
Besides structure, scheduling, and capacity data. you can also upload budget, costing, commitment,5 and revenue data of PS projects to RPM for information purposes. To do this. execute the RPM_FIN02 program in SAP Project System and then the IRPMlFIN_PLAN_INT6 program in RPM. or schedule them as background jobs. The financial budgeting settings in RPM Customizing control which PS values are mapped to which financial categories, groups, and views in the financial budgeting functions in RPM.
Technically. SAP Project System and RPM are integrated via object links. By default, RPM contains all the object links required to link portfolio elements with PS structure objects. You can use these links as templates for creating your own object links; however, you first have to create a logical system and a suitable RFC connection in RPM for every project system that you want to link to RPM. You can create these connections in the relevant object links and then activate them. Every project system also requires its own object link.
The Intermediate Documents (IDocs) and Application Link Enabling (ALE) technologies are used to exchange Controlling data between SAP Project System and RPM. The message type used in this case is RPMFIF. You must create a suitable distribution model for this message type and distribute it in the RPM or ERP system. You can also automate the process of processing IDocs in each system by defining suitable partner profiles in RPM and the ERP system.
8.4 Summary
SAP Project System provides a range of BAPIs for data exchange with external programs. These BAPIs can be used to export project data out of SAP Project System, modify projects. and create new project objects. SAP provides special interfaces for data exchange with Microsoft Project Client, cProjects, and RPM.
5 Note that in RPM you cannot break down "commitments" into purchase requisition commitments and purchase order commitments or differentiate one from the other, for example.
6 This program assumes that you have already executed the program IRP MlPLAN_ INLPREP in RPM.
449
Summary I 8.4
Controlling integration
Prerequisites of integration

)

Appendix )
A BAPls in SAP Project System 453
B Selected Project System Database Tables .......... ... .......... 455
C Transactions and Menu Paths .................................. ....... 457
D.. The Author ....................................................................... 475

1
1
1
1
1
1
1
1
1
1
1
1
1
) 1
1
1
1
1
1
1
1
1
1
1
1
1
1
1
1
1
1
1
1
1
1
1
1
1
1
1
1
1
1
1
1
1
1
1
1
1
1
1
1
1
1
1
1
1
1
1
1
1
A BAPls in SAP Project System ) c
ProjectDefinition
Description
a project definition ...•.
Table A.1 BAPls for the ProjectDefinition Business Object Type
.
Work B real<downStruct
BAPI
·Si\\~eReplica
Description
Enable~(Yd~t6c:hed~ whether a WBS element~li~~d9'J;CiSts .
. Ena~lesyqut~~ispl~y the detailed inforniation,oDtb~project definition andVVBS elements, and assigned milestones and activities .. . ..
Enables YOlftoedit the project definition, its WBS.elements, andhierarchi~al relationships, and WBS element milestones. It also provides you with the entire functionality oftheMaintain BAPlofBusiness Object Type Network, which, in turn, ena-blesyou to edit networks (see Table 0.3). .
Used internally only as part of ALE business processes provided bySAP for project structure plans.
Table A.2 BAPls for the WorkBreakdownStruct Business Object Type
453 -
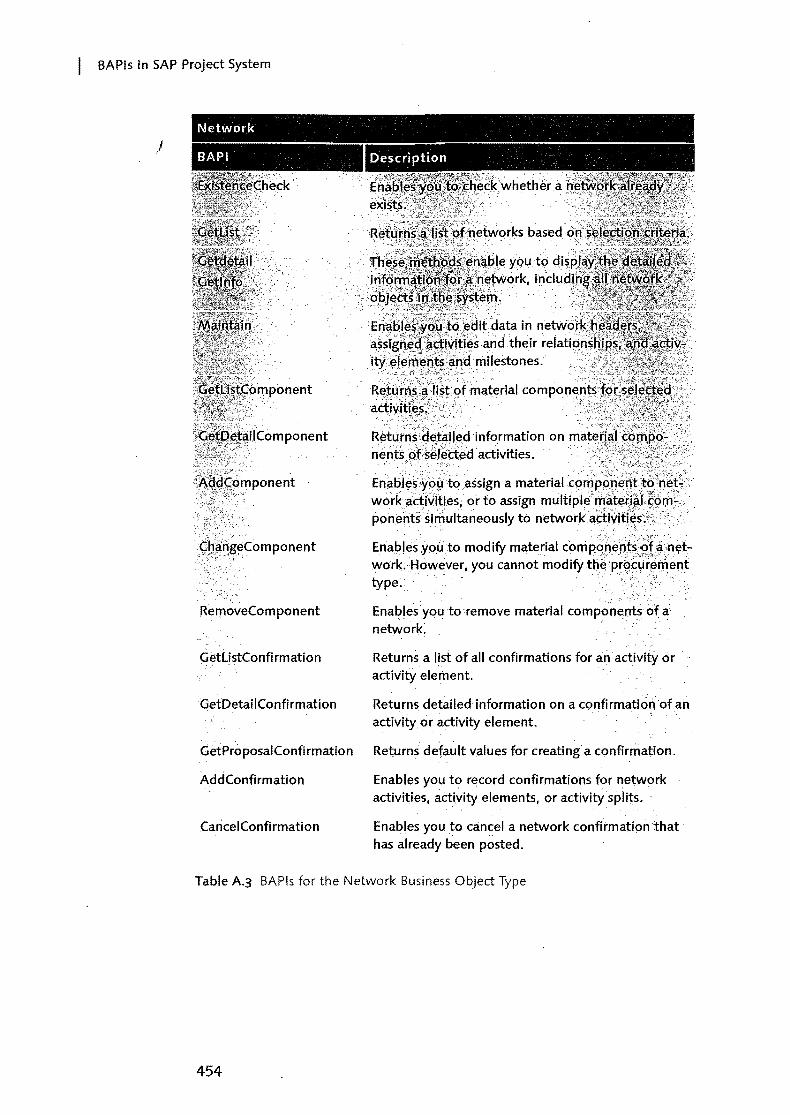
BAPls in SAP Project System
) Network
BAPI
Rer:noveComponent
GetUstConfirmation
GetDetailConfirmation
GetProposalConfirmation
AddConfirmation
CancelConfirmation
Description
l:~~~t'i~~' .', ........ c, . '.'" ' .. vvu ........ .
. a,ssl~M,~,~,Jyjti~s,and their relanon:~n
.ity;~!~ro\~ut~::~~d.· ~ilestones.·
~~1~rr{~~;~,!~t;Qfmaterial com.
R¢tufrii\d~~jledinformation on neh3idf;s~f~ct~d activities. .
Eriables~p&'t~.assign a materialc~~:n', ' .... n"'nT·TI"\'n work~d:ivltiesi or to assign multipl~: ponentssi~uitaneously to n"1hl\""\r~
Enables you to modify material cor:np,qM~Pts.·:Q'f.~;nt?t:" work;However, you cannot modify ih~;prt>,~or~ment type:. i. ,.' ,,',,
Enables you to remove material componentsofa network. . .. ,
Returns a list of all confirmations for anactivity or activity element.
Retu rns detailed information on a confi rmationofah activity or activity element.
Returns default values for creating a confirmation.
Enables you to record confirmations for netw,ork activities, acti.vity elements, or activity splits.
Enables you to cancel a network confirmation that· has already been posted.
Table A.3 BAPls for the Network Business Object Type
454
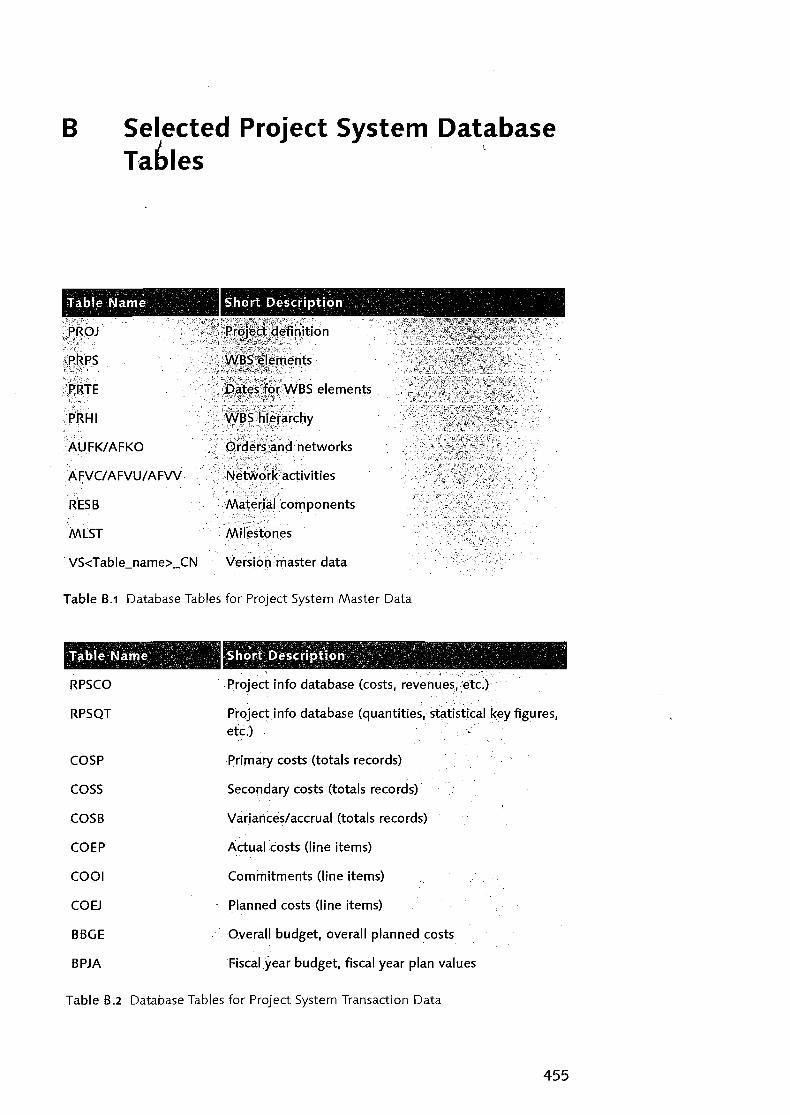
B Selected Project System Database T'ables l
Table Name
'"~RTE
· •. "~.~HI
AUFK/AFKO
.AFVC/ AFVU/ AFW·
'RESB
MLST
Short Description ,
firiitiOn . ""<;: ~'"
.. .. ":;l~! ;~~i~~I~I:~m~n~s ....•.. :~} f!R,~~~t~g:rNJ~s elements
j'&~~S~t~f!irchy ~Qld¢ts;'and networks ::;:~;>,<",,;
'N~Mgfk'activities
.'M~!~(W(components
.. ·Mir~st6nes " :;::':::/':'~:-?~',:;,:, _::-;, ;:-: >:-,0. " "0-; .'
"X<~~X .. '<>"., , ~~'~.:~:..,c .:; ,
.. VS<Table_name> _ CN Versibilmaster data
Table B.1 Database Tables for Project System Master Data
RPSCO
RPSQT
COSP
COSS
COSB
COEP
COOl
COEJ
BBGE
BPJA
Project info database (costs, reveil~~s,~td.
Projectinfo database (quantities, statistical key figures, etc.)
Primary costs (totals records)
Secondary costs (totals records)
Variances/accrual (totals records)
Actual costs (line items)
Commitments (line items)
Planned costs (line items)
Overall budget, overall planned costs
Fiscal year budget, fiscal year plan values
Table B.2 Database Tables for Project System Transaction Data
455
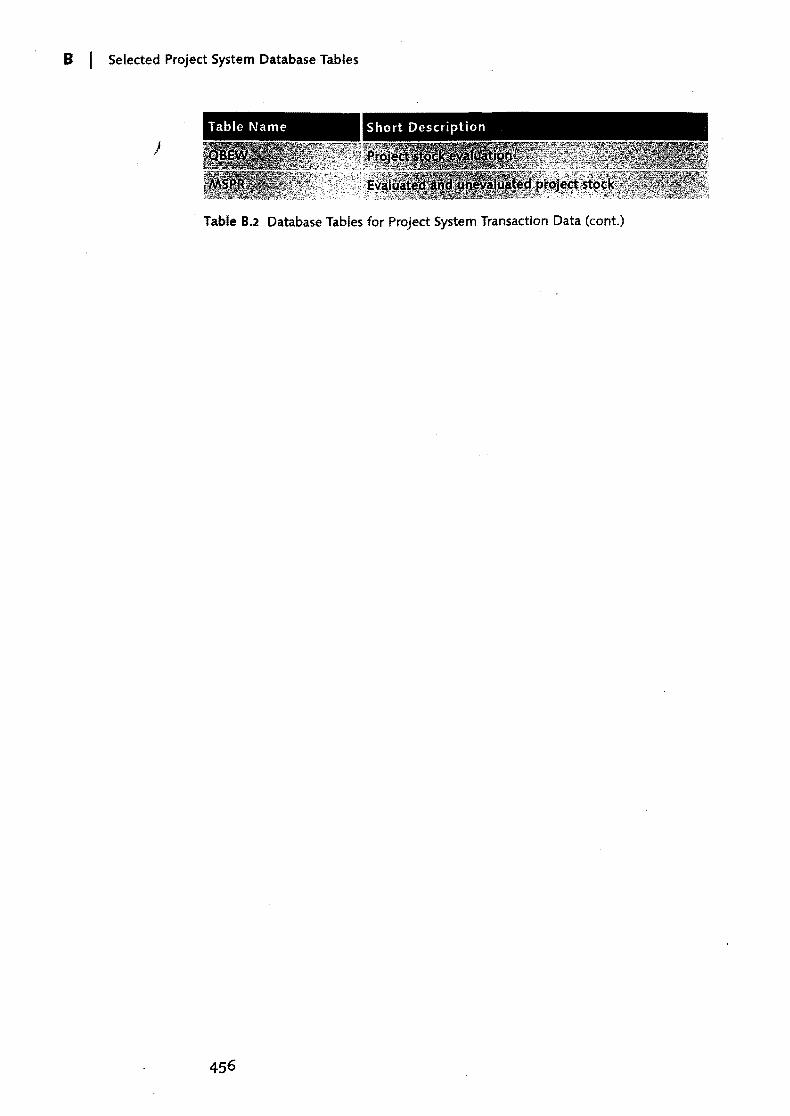
B I Selected Project System Database Tables
)
Table 8.2 Database Tables for Project System Transaction Data (cont.)
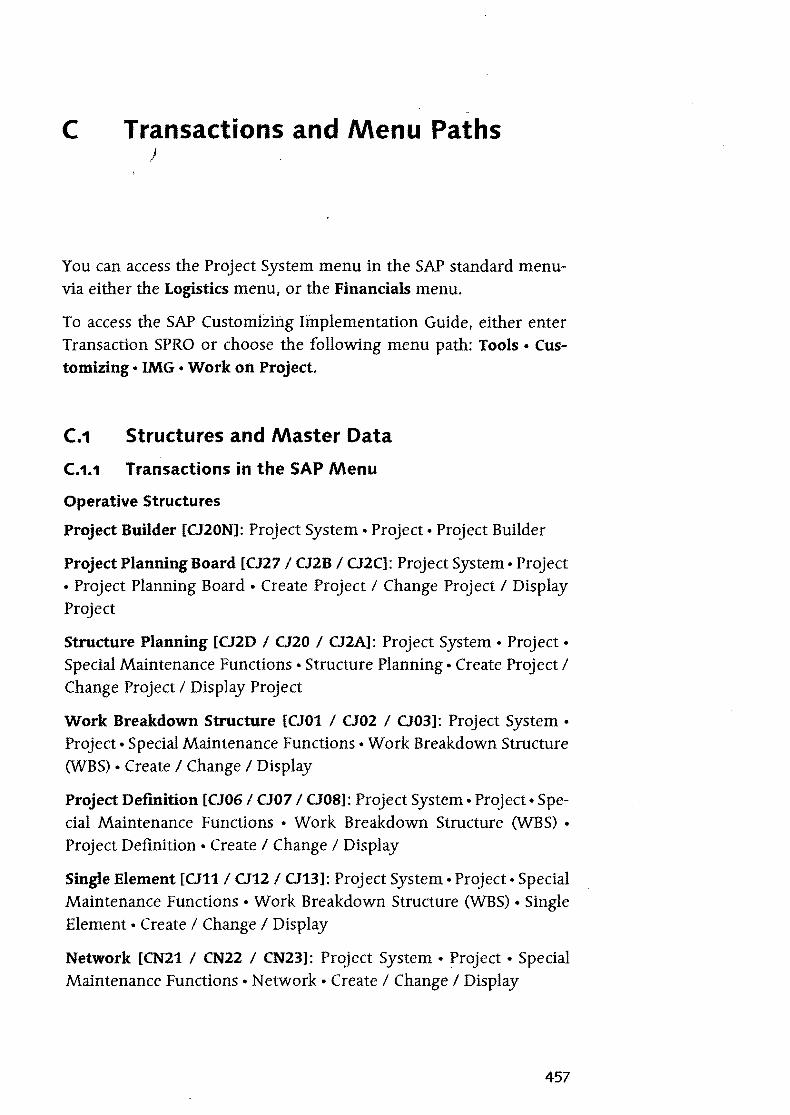
C Transactions and Menu Paths )
You can access the Project System menu in the SAP standard menuvia either the Logistics menu, or the Financials menu.
To access the SAP Customizing Implementation Guide, either enter Transaction SPRO or choose the follOwing menu path: Tools • Customizing • IMG • Work on Project.
C.1 Structures and Master Data
C.1.1 Transactions in the SAP Menu
Operative Structures
Project Builder [CJ20N]: Project System • Project • Project Builder
Project Planning Board [CJ27 / 02B / 02C]: Project System. Project • Project Planning Board • Create Project / Change Project / Display Project
Structure Planning [02D / CJ20 / 02A]: Project System • Project • Special Maintenance Functions • Structure Planning • Create Project / Change Project / Display Project
Work Breakdown Structure [001 / 002 / CJ03]: Project System • Project. Special Maintenance Functions • Work Breakdown Structure (WBS) • Create / Change / Display
Project Definition [CJ06 / 007 / 008]: Project System. Project. Special Maintenance Functions • Work Breakdown Structure (WBS) • Project Definition • Create / Change / Display
Single Element [011/012/013]: Project System. Project. Special Maintenance Functions • Work Breakdown Structure (WBS) • Single Element • Create / Change / Display
Network [CN21 / CN22 / CN23]: Project System • rroject • Special Maintenance Functions· Network· Create / Change / Display
457
I Transactions and Menu Paths
Mass Change [CNMASS]: Project System. Basic Data· Tools • Mass ) Change
Archive Project Structures [CN80]: Project System • Basic Data • Tools • Archiving. Project Structures
Standard Structures and Versions
Standard WBS [091 / 092 / 093]: Project System • Basic Data • Templates. Standard WBS· Create / Change / Display
Standard Network [CNOl / CN02 / CN03 / CN98]: Project System. Basic Data· Templates. Standard Network· Create / Change / Display / Delete
Standard Milestone [CNll / CN12 / CN13]: Project System • Basic Data· Templates. Standard Milestone· Create / Change / Display
Simulation [CJVl / CJV2 / CJV3 / CJV5]: Project System • Project. Simulation • Create / Change / Display / Delete
Transfer Project [CJV4]: Project System. Project. Simulation· Transfer Project
Project Version [CN72]: Project System • Project • Project Version • Create
C.1.2 Customizing Activities
Operative Structures
Create Project Profile [OPSAl: SAP Customizing Implementation Guide • Project System • Structures • Operative Structures • Work Breakdown Structure (WBS) • Create Project Profile
Define Special Characters for Project [OPSK]: SAP Customizing Implementation Guide • Project System • Structures • Operative Structures • Work Breakdown Structure (WBS) • Project Coding Mask • Define Special Characters for Projects
Define Project Coding Mask [OPSJ]: SAP Customizing Implementation Guide. Project System. Structures· Operative Structures· Work Breakdown Structure (WBS) • Project Coding Mask • Define Project Coding Mask
Structures and Master Data I C.1
SpecifY Persons Responsible for WBS Elements [OPS6]: Customizing ImplementatYJn Guide • Project System • Structures • Operative Structures· Work Breakdown Structure (WBS)· Specify Persons Responsible for WBS Elements
Create Status Profile [OK02]: Customizing Implementation Guide • Project System • Structures • Operative Structures • Work Breakdown Structure (WBS) • WBS User Status • Create Status Profile
Maintain Validations [OPSI]: Customizing Implementation Guide • Project System • Structures • Operative Structures • Work Breakdown Structure (WBS) • Maintain Validations
Maintain substitutions [OPSN]: Customizing Implementation Guide • Project System • Structures • Operative Structures • Work Breakdown Structure (WBS) • Maintain Substitutions
Set Up Number Ranges for Network [C082): Customizing Implementation Guide • Project System • Structures • OpeOperative Structures • Network • Settings for Networks • Set Up Number Ranges for Network
Maintain Network Types [OPSC): Customizing Implementation Guide· Project System. Structures· Operative Structures· Network· Settings for Networks • Maintain network types
SpecifY Parameters for Network Type [OPUV): Customizing Implementation Guide • Project System • Structures • OpeOperative Structures. Network· Settings for Networks. Specity Parameters for Network Type
Maintain Network Profiles [OPUU]: Customizing Implementation Guide • Project System • Structures • OpeOperative Structures • Network • Settings for Networks • Maintain network profiles
Define Control Key [OPSU]: Customizing Implementation Guide • Project System • Structures • Operative Structures • Network. Settings for Network Activities • Define control key
Define Parameters for Subnetworks [OPTP]: Customizing Implementation Guide • Project System • Structures • Operative Structures • Network • Define Parameters for Subnetworks
459
c: I Transactions and Menu Paths
Define Milestone Usage: Customizing Implementation Guide • } Project System • Structures • Operative Structures • Milestones •
Define Milestone Usage
Define Profiles for the Project Planning Board [OPT7]: Customizing Implementation Guide • Project System. Structures· Project Planning Board • Define Profiles for the Project Planning Board
Standard Structures and Versions
Set up Number Ranges for Standard Networks [CNNi]: Customizing Implementation Guide • Project System • Structures. • Templates • Standard Network· Set up Number Ranges for Standard Networks
Define Parameters for Standard Network [OP8B]: Customizing Implementation Guide • Project System • Structures • Templates • Standard Network • Define parameters for standard network
Maintain Standard Network Profiles [OPS5]: Customizing Implementation Guide • Project System • Structures • Templates • Standard Network· Maintain Standard Network Profiles
Define Status for Standard Networks [OPUW]: Customizing Implementation Guide· Project System. Structures· Templates· Standard Network • Define status for standard networks
Define Milestone Groups for Standard Milestones [OPT6]: Customizing Implementation Guide • Project System. Structures • Templates • Standard Milestone • Define milestone groups for standard milestones
Stipulate Version Keys for the Simulation [OPUS]: Customizing Implementation Guide • Project System • Simulation • Stipulate Version Keys for the Simulation
Stipulate Simulation Profiles: Customizing Implementation Guide • Project System • Simulation • Stipulate Simulation Profiles
Create Profile for Project Version [OPTS]: Customizing Implementation Guide • Project System • Project Versions • Create. Profile for Project Version
C.2 Planning Functions
C.2.1 rra~sactions in the SAP Menu
Date Planning
Planning Functions I C.2
Basic Dates [021 / CJ22]: Project System. Dates • Change / Display Basic Dates
Forecast Dates [CJ23 / CJ24]: Project System. Dates • Change / Display Forecast Dates
Project Scheduling [029]: Project System • Dates • Project Scheduling
Overall Network Scheduling [024]: Project System. Dates· Overall Network Scheduling
Overall Network Scheduling (New) [024N]: Project System. Dates • Overall Network Scheduling (New)
Resource Planning
(Project) Work Center [CNRl / CNR2 / CNR3]: Project System. Basic Data· Master Data· Work Center· Master Record· Create / Change / Display
Workforce Planning for Personnel Resources [CMP2 / CMP3 /
CMP9]: Project System • Resources • Workforce Planning • Project View / Work Center View / Evaluation
Capacity Leveling [CM32 / CM26]: Project System • Resources • Capacity Requirements Planning • Leveling • Project View • Planning Table (Graphical) / (Tabular)
Material Planning
Single-Level Project Bill of Material [CS71 / CS72 / CS73]: Logistics • Production • Master Data • Bills of Material • Bill of Material • WBS BOM • Single-Level. Create / Change / Display
Multi-Level Project Bill of Material [CS74 / CS75 / CS76 / CSPB]:
Logistics • Production • Master Data • Bills of Material • Bill of Material • WBS BOM • Multilevel • Create / Change / Display / Project Browser
C I Transactions and Menu Paths
) Bill of Material Transfer [CN33]: Project System • Material- Planning • Bill of Material Transfer
iPPE Product Designer [PDN]: Logistics. Production· Master Data. Integrated Produc(Engineering • Product Designer
Assign WBS Elements for Requirements Grouping [GRM4 / GRM3]:
Project System • Material • Planning • Requirements Grouping • Assign WBS Elements Individually / Using List
Assign MRP Groups [GRM5]: Project System • Material • Planning • Requirements Grouping • Assign MRP Groups
Cost and Revenue Planning
Overall Planning [040 /041]: Project System. Financials· Planning • Costs in WBS • Overall values • Change / Display
Cost and Activity Inputs [ORl / OR3]: Project System. Financials· Planning • Costs in WBS • Cost and Activity Inputs • Change / Display
Models for Easy Cost Planning [CKCM]: Project System. Basic Data· Templates- Models for Easy Cost Planning
(Asynchronous) Network Costing [09K]: Project System. Financials • Planning • Network Costing
Payments in WBS [CJ48 / CJ49]: Project System. Financials • Planning • Payments in WBS • Change / Display
Revenues in WBS [042 / 043]: Project System • Financials • Planning. Revenues in WBS· Change / Display
Sales Pricing [DP81 / DP82]: Project System • Financials • Planning • Sales Pricing / Sales Pricing for Project
Copy Costs and Revenues (Indiv.) [09BS / 09CS / CJ9FS]: Project System • Financials - Planning. Copy Costs and Revenues • Copy WBS Plan to Plan / Copy WBS Actual to Plan / Copy Project Costing (Indiv.)
Copy Costs and Revenues (Collective) [09B / 09C / CJ9F]: Project System • Financials • Planning. C~py Costs and Revenues • Copy WBS Plan to Plan / Copy WBS Actual to Plan / Copy Project Costing (Collective)

C.2.2 Customizing Activities
Date Plan;niAg
Planning Functions I C.2
Define Scheduling Types [OPJN]: Customizing Implementation Guide • Project System • Dates • Scheduling • Define Scheduling Types
Specity Parameters for Network Scheduling [OPU6]: Customizing Implementation Guide • Project System • Dates • Scheduling - SpecifY Parameters for Network Scheduling
Define Parameters for WBS Scheduling: Customizing Implementation Guide • Project System • Dates • Date Planning in WBS • Define Parameters for WBS Scheduling
Resource Planning
Specity Work Center Categories [OP40]: Customizing Implementation Guide • Project System • Resources .~ Work Center • Specify work center categories
Define Capacity Categories: Customizing Implementation Guide. Project System - Resources • Define Capacity Categories
Define Profiles for Workforce Planning [CMPC]: Customizing Implementation Guide- Project System • Resources - Define Profiles for Workforce Planning
Account Assignment Categories and Document Types for Purchase Requisitions [OPTT]: Customizing Implementation Guide • Project System - Structures • Operative Structures • Network • Settings for Network Activities • Account Assignment Categories and Document Types for Purchase Requisitions
Material Planning
Define Procurement Indicators for Material Components [OPS8]: Customizing Implementation Guide - Project System • Material • Procurement • Define Procurement Indicators for Material Components
Catalogs (OCI interface): Customizing Implementation Guide • Project System - Material- Interface for Procurement Using Catalogs (OCI)
C I Transactions and Menu Paths
iPPE Reference Points: Customizing Implementation Guide • Project ) System • Material • Integration of the Project System with iPPE •
Define Reference Point for the Integration of the Project System with iPPE
Define Reference Points for BOM Transfer: Customizing Implementation Guide • Project System. Material • Bill of Material Transfer • Define Reference Points for BaM Transfer
Define Fields in BOM and Activity as Reference Point [CN38]: Customizing Implementation Guide • Project System • Material • Bill of Material Transfer • Define Fields in BOM and Activity as Reference Point
Define Profiles for BOM Transfer: Customizing Implementation Guide • Project System • Material • Bill of Material Transfer • Define Profiles for Bill Of Material Transfer
Activate MRP Groups for Requirements Grouping: Customizing Implementation Guide • Project System • Material • Procurement • Activate MRP Groups for Requirements Grouping
Define Checking Control [OPJK]: Customizing Implementation Guide· Project System. Material· Availability Check· Define Checking Control
Costs and Revenue Planning
Create CO Versions: Customizing Implementation Guide • Project System. Costs • Create CO Versions
Create/Change Planning Profile [OPSB]: Customizing Implementation Guide • Project System • Costs • Planned Costs • Manual Cost Planning in WBS • Hierarchical Cost Planning- Create/Change Planning Profile
Create Costing Variant for Unit Costing [OKKT]: Customizing Implementation Guide • Project System • Costs • Planned Costs • Manual Cost Planning in WBS· Unit Costing. Create Costing Variant
Easy Cost Planning: Customizing Implementation Guide • Project System • Costs • Planned Costs • Easy Cost Planning and Execution Services • Easy Cost Planning
Define Costing Variants for Network Costing [OPL1]: Customizing Implementayon Guide • Project System • Costs • Planned Costs· Automatic Costing in Networks/Activities • Costing. Define Costing Variants
Define Order Value Updating for Orders for Projects [OPSV]: Customizing Implementation Guide • Project System • Costs • Planned Costs • Define Order Value Updating for Orders for Projects
DPP Profile [ODP1]: Customizing Implementation Guide • Project System. Revenues and Earnings • Integration with SD Documents • Creating Quotations and Project Billing • Maintain Profiles for Quotations and Billing
C.3 Budget
(.3.1 Transactions in the SAP Menu
Budgeting in the Project System
Original Budget [030/ 031]: Project System. Financials • Budgeting • Original Budget • Change / Display
Supplement [CJ37 / 036]: Project System. Financials • Budgeting. Supplement • In Project / To Project
Return [038 / CJ35]: Project System. Financia1s· Budgeting. Return • In Project / From Project
Transfer [034]: Project System. Financials· Budgeting. Transfer
Release [032 / 033]: Project System. Financials • Budgeting. Release· Change / Display
Mass Release of Budget for Projects [lMCBR3]: Project System • Financials· Budgeting. Tools • Mass Release of Budget for Projects
Availability Control [OBV / CVBW]: Project System • Financials • Budgeting. Tools • Activate / Deactivate Availability Control
Transfer plan to Project Budget [IMCCP3]: Project System • Financia1s • Budgeting. Tools· Transfer Plan to Project Budget
Budget Carryforward lOCO]: Project System. Financia1s • Year-End Closing • Budget CarryfoIWard
Budget I C.3
C I Transactions and Menu Paths
Integration for Investment Management
) plan Proposal [IM34]: Financials • Investment Management • Programs • Program Planning- Plan Proposal
Budget Distribution [IM52 / IM53]: Financials • Investment Management • Programs • Budgeting- Budget Distribution • Edit / Display
C.3.2 Customizing Activities
Budgeting in Project System
Maintain Budget Profiles [OPS9]: Customizing Implementation Guide • Project System • Costs • Budget • Maintain Budget Profiles
Define Tolerance Limits: Customizing Implementation Guide • Project System • Costs • Budget • Define Tolerance Limits
SpecifY Exempt Cost Elements [OPTK]: Customizing Implementation Guide • Project System • Costs • Budget • Specify Exempt Cost Elements
Reconstruct Availability Control [OBN): Customizing Implementation Guide • Project System. Costs • Budget. Reconstruct Availability Control
I ntegration for I nvestment Management
Define Program Types: Customizing Implementation Guide • Investment Management. Investment Programs • Master Data· Define Program Types
C.4 Project Execution Processes
C.4.1 Transactions in the SAP Menu
Account Assignment of Documents. Confirmations. and Procurement Processes
Purchase Requisitions [ME5iN / ME52N / ME53N]: Logistics • Materials Management • Purchasing • Purchase Requisition • Create / Change / Display
Create Purchase Order [ME2iN / ME25 / ME58 / ME 59] : Logistics • Materials Management. Purchasing. Purchase Order. Create· Ven-
Project Execution Processes I C.4
dor/Supplying Plant Known / Vendor Unknown / Via Requisition Assignment List / Automatically via Purchase Requisitions
,
Goods Receipt [MIGO]: Logistics • Materials Management. Purchasing • Purcha~e Order • Follow-an Functions • Goods Receipt
Entry of Services [ML81N]: Logistics • Materials Management • Purchasing. Purchase Order· Follow-an Functions • Service Entry Sheet • Maintain
Activity Allocations [KB21N / KB23N / KB24N]: Project System • Financials • Actual Postings • Activity Allocation • Enter / Display / Cancel
Individual Confirmation [CN25 / CN28 / CN29]: Project System • Progress • Confirmation • Individual Confirmation • Enter / Display / Cancel/reverse
Collective Confirmation [CN27]: Project System • Progress • Confirmation • Collective Confirmation
CATS Classic [CAT2 / CAT3]: Project System. Progress. Confirmation • Time Sheet· CATS Classic. Record / Display Working Times
CATS for Service Providers [CATSXT / CATSXT_ADMIN]: Project System • Progress • Confirmation • Time Sheet • CATS for Service Providers· Record Own Working Times / Record Working Times
Transfer [CATA / CAT7 / CAT6 / CATM / CAT9/ CAT5]: Project System • Progress • Confirmation • Time Sheet • Transfer • All Component / Accounting / Human Resources / External Services / Plant Maintenance/Customer Service / Project System
MRP Run Project Stock [MD51]: Project System. Material. Planning
• MRP Project
Delivery from Project [CNSO]: Project System. Material· Execution. Delivery from Project
ProMan [CNMM]: Project System. Material. Execution· Project-Oriented Procurement (ProMan)
Billing, Project Progress and -Claim Management
Invoice [VF01 / VF02 / VF03 / VF04 / VF11]: Logistics. Sales· Billing • Invoice· Create / Modify / Display / Edit Billing Due List / Cancel
C I Transactions and Menu Paths
} Resource-Related Billing [DP91 / DP96 / DP93]: Logistics • Sales and Distribution • Sales • Order • Subsequent functions • Resource-Related Billing Document / Resource-Related Billing Document (Collective Processing) / Billing Between Company Codes
Milestone Trend Analysis [CNMT]: Project System. Information System • Progress • Milestone Trend Analysis
Progress Determination [CNE1 / CNE2]: Project System • Progress ~
Progress Determination • Individual Processing /. Collective Processing
Progress Analysis Workbench [CNPAWB]: Project System. Progress • Progress Analysis Workbench
Progress Tracking [COMPXPD]: Project System • Progress • Progress Tracking
Claim [CLM1 / CLM2 / CLM3]: Project System. Notifications· Claim • Create / Change / Display
Claim Analyses [CLM10 / CLM11]: Project System. Information Systern· Claim· Overview / Hierarchy
C.4.2 Customizing Activities
Account Assignment of Documents, Confirmations, and
Procurement Processes
Execution Services: Customizing Implementation Guide .. Project System • Costs • Planned Costs • Easy Cost Planning and Execution Services. Execution Services
Define Confirmation Parameters [OPST]: Customizing Implementation Guide • Project System • Confirmation • Define Confirmation Parameters
CATS Time Sheet: Customizing Implementation Guide • Cross-Application Components • Time Sheet
ProMan Profiles: Customizing Implementation Guide· Project Systern· Material· Project-Oriented Procurement (ProMan)
Period-End Closing I C.s
Project Progress and Claim Management
Progress An~lysis: Customizing Implementation Guide • Project System • Progress • Progress Analysis
Progress Tracking: Customizing Implementation Guide • Project Systern. Progress • Progress Tracking
Claim Management: Customizing Implementation Guide • Project System • Claim
C.s Period-End Closing
C.5.1 Transactions in the SAP Menu
Schedule Manager [SCMA]: Project System. Finandals • Period-End Closing. Schedule Manager
Revaluation at Actual Prices [ONl / CJN2]: Project System. Financials • Period-End Closing • Single Functions • Revaluation at Actual Prices • Individual Processing / Collective Processing
Overhead Calculation Commitments and Actual [008/009/044 /045]: Project System. Financials • Period-End Closing. Single Functions • Applied Overhead • Commitments: Individual Processing / Commitments: Collective Processing / Individual Processing, Actual / Collective Processing, Actual
plan Overhead Calculation [046 / CJ47]: Project System. Financials • Planning • Allocations • Overhead • Individual Processing / Collective Processing
Actual Template Allocation [CPTK / CPTL]: Project System • FinandaIs • Period-End Closing. Single Functions • Template Allocation • Individual Processing / Collective Processing
plan Template Allocation [CPUK / CPUL]: Project System. Financials • Planning. Allocations· Template Allocation. Individual Processing / Collective Processing
Actual Interest Calculation [CJZ2 / CJZ1]: Proj ect System • Finandais • Period-End Closing. Single Functions • Interest Calculation • Individual Processing / Collective Processing
C I Transactions and Menu Paths
plan Interest Calculation [CJZ3 / CJZ5]: Project System • Financials • } Planning • Allocations. Interest Calculation • Individual Processing /
Collective Processing
Actual Results Analysis [KKA2 / KKAJ]: Project System • Financials • Period-End Closing • Single Functions • Results Analysis • Proceed • Individual Processing / Collective Processing
plan Results Analysis [KKA2P / KKAJP]: Project System. Financials· Plarming • Allocations • Results Analysis • Proceed • Individual Processing / Collective Processing
Project-Based Incoming Orders [CJA2 / CJA1]: Project System • Financials • Period-End Closing. Single Functions • Incoming Orders • Individual Processing / Collective Processing
Cost Forecast [CJ9L / CJ9M]: Project System. Financials· Period-End Closing • Single Functions • Cost Forecast • Individual Processing / Collective Processing
Settlement Rule [CJB2 / CJB1]: Project System • Financials • PeriodEnd Closing • Single Functions • Settlement Rule • Individual Processing/ Collective Processing
Actual Settlement [CJ88 / CJ8G / CJIC]: Project System. Financials • Period-End ClOSing • Single Functions • Settlement • Individual Processing / Collective Processing / Line Item Apportionment
plan Settlement [CJ9E / CJ9G]: Project System • Financials • Planning • Allocations • Settlement • Individual Processing / Collective Processing
C.5.2 Customizing Activities
Overhead Calculation: Customizing Implementation Guide • Project System • Costs • Automatic and Periodic Allocations • Overhead
Template Allocation: Customizing Implementation Guide • Project System • Costs • Automatic and Periodic Allocations • Template Allocation of Overhead
Interest Calculation: C:ustomizing Implementation Guide • Project System • Costs • Automatic and Periodic Allocations • Interest Calculation
470
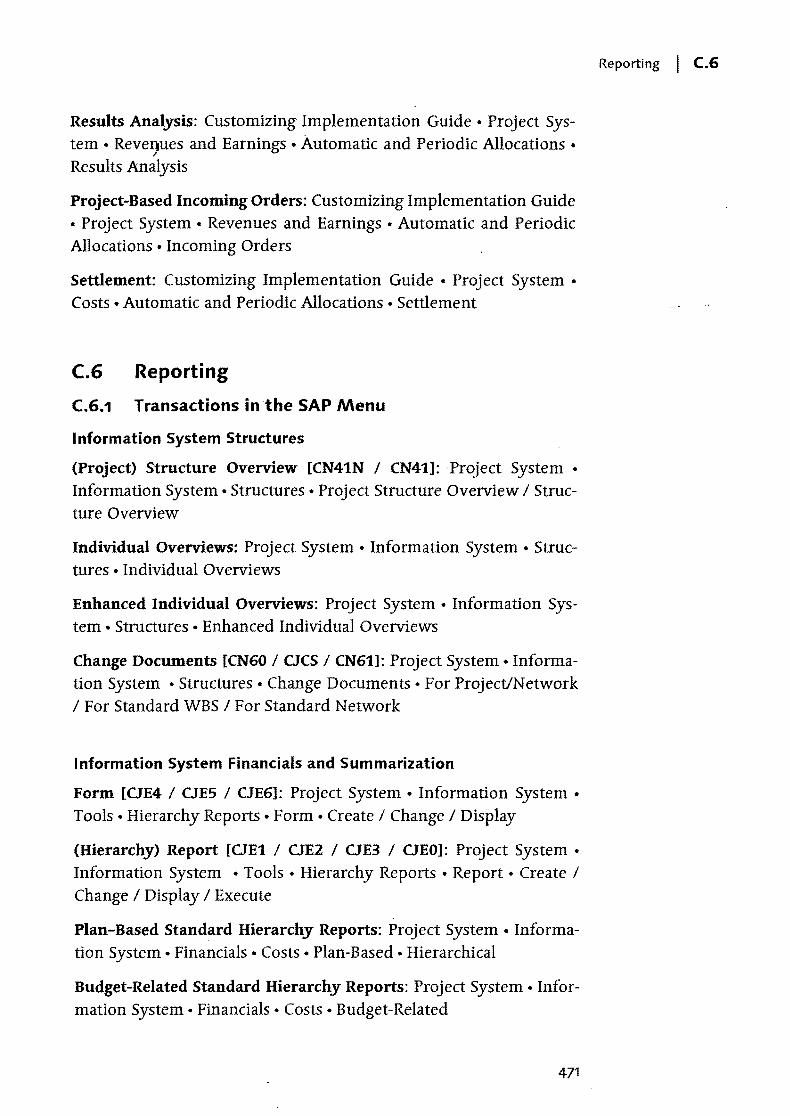
Results Analysis: Customizing Implementation Guide • Project System • Reve9ues and Earnings • Automatic and Periodic Allocations • Results Analysis
Project-Based Incoming Orders: Customizing Implementation Guide • Project System • Revenues and Earnings • Automatic and Periodic Allocations • Incoming Orders
Settlement: Customizing Implementation Guide • Project System • Costs • Automatic and Periodic Allocations • Settlement
C.6 Reporting
C.6.1 Transactions in the SAP Menu
Information System Structures
(Project) Structure Overview [CN41N / CN41]: Project System • Information System • Structures • Project Structure Overview / Structure Overview
Individual Overviews: Project System • Information System • Structures • Individual Overviews
Enhanced Individual Overviews: Project System • Information System • Structures • Enhanced Individual Overviews
Change Documents [CN60 / OCS / CN61]: Project System. Information System • Structures· Change Documents· For Project/Network / For Standard WBS / For Standard Network
Information System Financials and Summarization
Form [OE4/ OES / CJE6]: Project System • Information System • Tools· Hierarchy Reports. Form· Create / Change / Display
(Hierarchy) Report [OE1 / OE2 / OE3 / OEO]: Project System • Information System • Tools • Hierarchy Reports • Report • Create / Change / Display / Execute
Plan-Based Standard Hierarchy Reports: Project System • Information System • Financials • Costs • Plan-Based • Hierarchical
Budget-Related Standard Hierarchy Reports: Project System • Information System. Financials • Costs • Budget-Related
471
Reporting I C.G
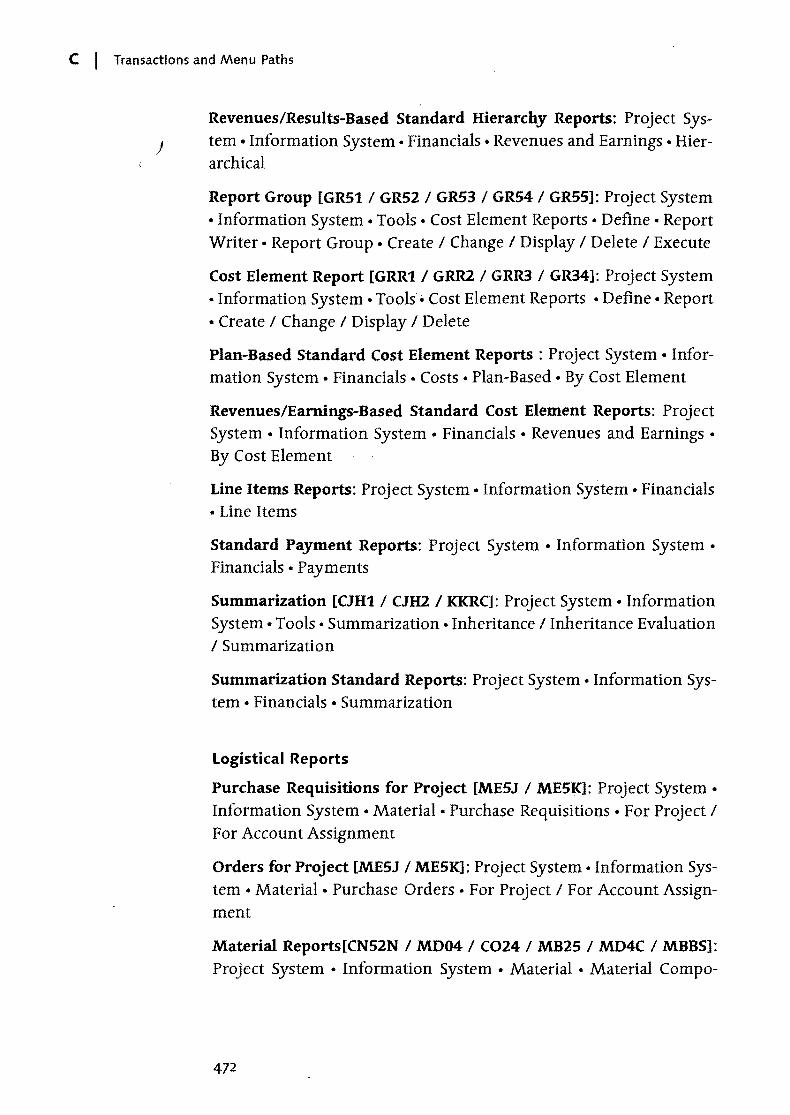
C I Transactions and Menu Paths
Revenues/Results-Based Standard Hierarchy Reports: Project Sys-) tern • Information System • Financials • Revenues and Earnings • Hier
archical
Report Group [GR51 / GR52 / GR53 / GR54 / GR55]: Project System • Information System. Tools· Cost Element Reports· Define· Report Writer • Report Group • Create / Change / Display / Delete / Execute
Cost Element Report [GRR1 / GRR2 / GRR3 / GR34]: Project System • Information System. Tools. Cost Element Reports • Define· Report • Create / Change / Display / Delete
Plan-Based Standard Cost Element Reports: Project System. Information System • Financials • Costs • Plan-Based • By Cost Element
Revenues/Earnings-Based Standard Cost Element Reports: Project System • Information System • Financials • Revenues and Earnings • By Cost Element
Line Items Reports: Project System. Information System. Financials • Line Items
Standard Payment Reports: Project System • Information System • Financials • Payments
Summarization [CJH1 / CJH2 / KKRC]: Project System. Information System. Tools· Summarization. Inheritance / Inheritance Evaluation / Summarization
Summarization Standard Reports: Project System • Information System • Financials • Summarization
Logistical Reports
Purchase Requisitions for Project [ME5J / ME5K]: Project System • Information System • Material • Purchase Requisitions • For Project / For Account Assignment
Orders for Project [ME5J / ME5K]: Project System • Information System • Material • Purchase Orders • For Project / For Account Assignment
Material Reports[CN52N / MD04 / C024 / MB25 / MD4C / MBBS]: Project System • Information System • Material • Material Compo-
472
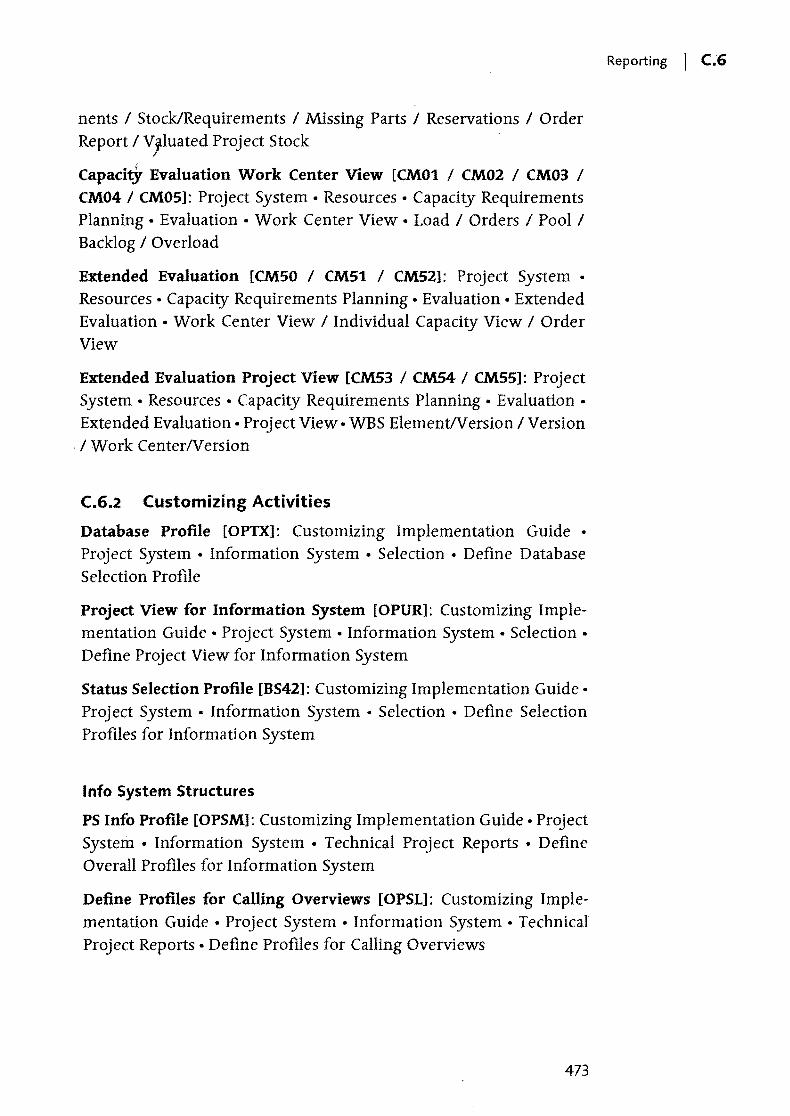
nents / Stock/Requirements / Missing Parts / Reservations / Order Report / VJluated Project Stock
CapacitY Evaluation Work Center View [CMOl / CM02 / CM03 / CM04/ CM05]: Project System. Resources· Capacity Requirements Planning • Evaluation· Work Center View • Load / Orders / Pool / Backlog / Overload
Extended Evaluation [CM50 / CM5l / CM52]: Project System • Resources • Capacity Requirements Planning • Evaluation • Extended Evaluation • Work Center View / Individual Capacity View / Order View
Extended Evaluation Project View [CM53 / CM54/ CM55]: Project System. Resources • Capacity Requirements Planning • Evaluation. Extended Evaluation· Proj ect View· WBS ElementIV ersion / Version
. / Work CenterNersion
C.6.2 Customizing Activities
Database Profile [OPTX]: Customizing Implementation Guide • Project System • Information System • Selection· Define Database Selection Profile
Project View for Information System [OPUR]: Customizing Implementation Guide • Proj ect System • Information System • Selection • Define Project View for Information System
Status Selection Profile [BS42]: Customizing Implementation Guide· Project System. Information System. Selection • Define Selection Profiles for Information System
Info System Structures
PS Info Profile [OPSM]: Customizing Implementation Guide· Project System. Information System. Technical Project Reports. Define Overall Profiles for Information System
Define Profiles for Calling Overviews [OPSL]: Customizing Implementation Guide • Project System • Information System • Technical Project Reports. Define Profiles for Calling Overviews
473
Reporting I C.6
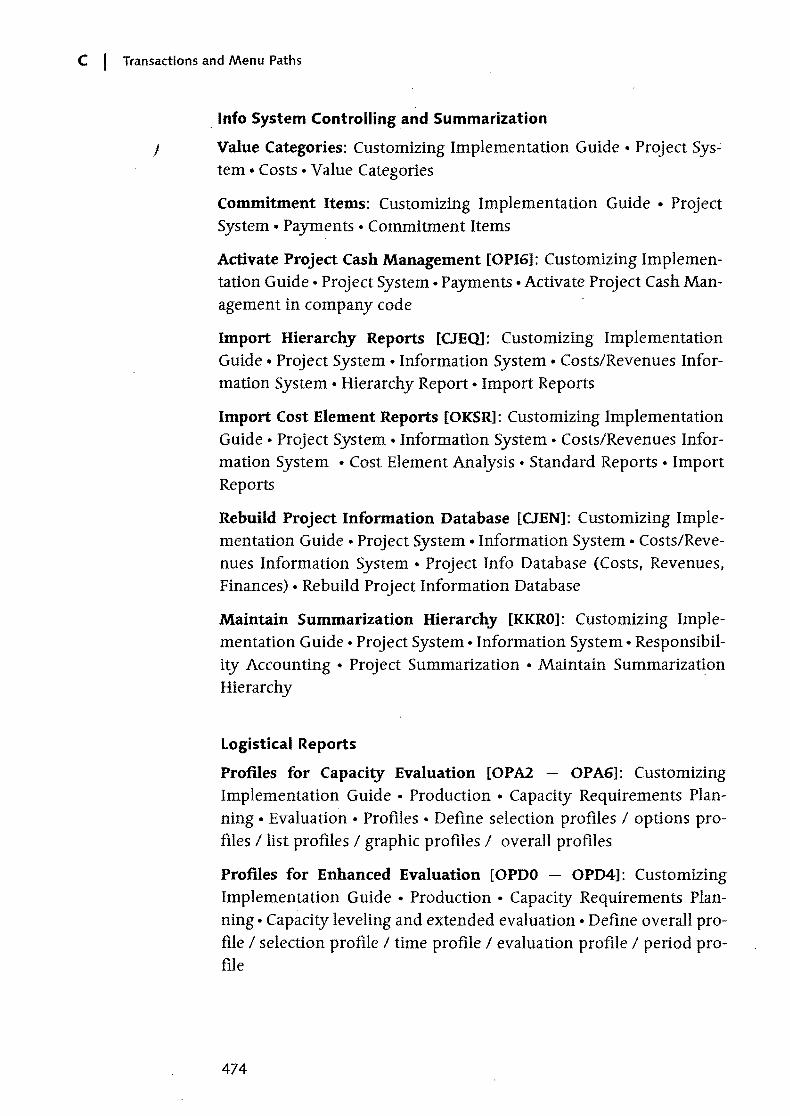
C I Transactions and Menu Paths
. Info System Controlling and Summarization
) Value Categories: Customizing Implementation Guide • Project Sys..: tem· Costs· Value Categories
Commitment Items: Customizing Implementation Guide • Project System • Payments • Commitment Items
Activate Project Cash Management [OPI6]: Customizing Implementation Guide • Project System. Payments • Activate Project Cash Management in company code
Import Hierarchy Reports [OEQ]: Customizing Implementation Guide • Project System • Information System • Costs/Revenues Information System • Hierarchy Report • Import Reports
Import Cost Element Reports [OKSR]: Customizing Implementation Guide • Project System • Information System • Costs/Revenues Information System • Cost Element Analysis • Standard Reports • Import Reports
Rebuild Project Information Database [OEN]: Customizing Implementation Guide. Project System. Information System. Costs/Revenues Information System • Project Info Database (Costs, Revenues, Finances) • Rebuild Project Information Database
Maintain Summarization Hierarchy [KKRO]: Customizing Implementation Guide • Project System • Information System • Responsibility Accounting • Project Summarization • Maintain Summarization Hierarchy
Logistical Reports
Profiles for Capacity Evaluation [OPAl OPA6]: Customizing Implementation Guide • Production • Capacity Requirements Planning • Evaluation • Profiles • Define selection profiles / options profiles /list profiles / graphic profiles / overall profiles
Profiles for Enhanced Evaluation [OPDO OPD4]: Customizing Implementation Guide • Production • Capacity Requirements Planning • Capacity leveling and extended evaluation • Define overall profile / selection profile / time profile / evaluation profile / period profile
474
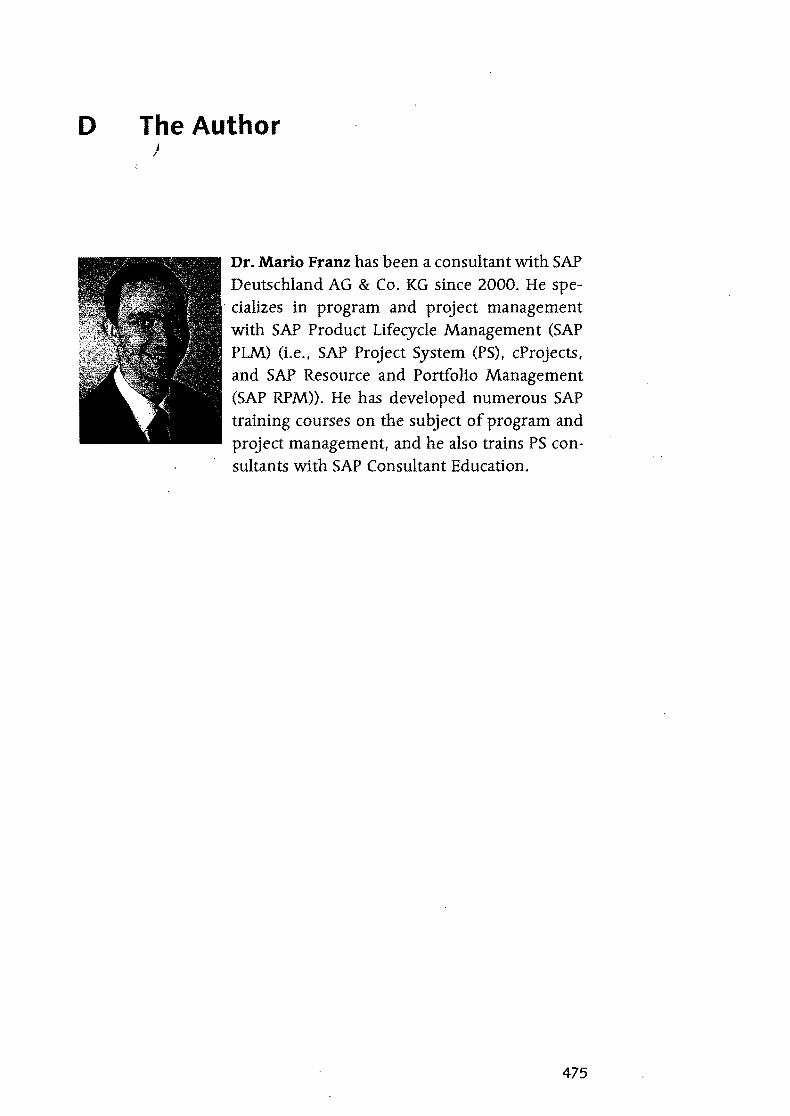
o The Author )
Dr. Mario Franz has been a consultant with SAP Deutschland AG & Co. KG since 2000. He spe-
'cializes in program and project management with SAP Product Lifecycle Management (SAP PLM) (Le., SAP Project System (PS) , cProjects, and SAP Resource and Portfolio Management (SAP RPM». He has developed numerous SAP training courses on the subject of program and project management, and he also trains PS consultants with SAP Consultant Education.
475

)

Index)
A
Account assignment category 99,101, 153,154,156,280
Account assignment type 277 Activities 20,42,43,45,251,261,290,
309,394 Activity account assignment 56, 159,
208 Activity elements 43,50,51, 124.251,
261,290,309,394,439 Activity input planning 193, 194 Actual dates 250,251,253,263,364 Actual prices 323 Advance procurement 286 ALV 394,411 Applicant 40 Appropriation requests 242 Archiving 107,109 Assemblies 160 Assembly processing 96. 127 Asset Accounting 30,369 Availability check 160,179,288 Availability control 30, 224, 226, 234.
239,240.245,257 Available capacity 135
B
BAPI 275,362,435,453 Base planning object 191 Basic dates 112 Bill of material transfer 169, 172 Billing plan 105,212,218,293 Bills of material 167,168,174,182.281 Budget carryforward 233 Budget distribution 247 Budget line item 228· Budget profile 224, 227, 228. 238 Budget release 231,233 Budget return 229, 230, 244 Budget supplement 229,244 Budget transfer 229, 231 Budgeting 210,211,229,231,237,243
c Calculation key 46 Capacity leveling 81,134,148 Capacity planning board 148, 150 Capacity reports 107, 140,268,422 Capacity requirements 113, 126, 134,
137,139,140,262,394,422 Capacity requirements planning 133,
148 Capacity splits 141,265 CATS --+ Cross-application time sheet Change documents 35, 55 Characteristic value assignment 94 Claim Management 314 CO versions 102, 184, 185, 189, 192,
207,208,213,223,226,228,324, 340,348,362,367,397
Coding mask 37,38,98 Collective stock 160,281,286 Commitment items 414 Commitments 152,233,255,276,280,
284,328,364,396,413 Company code 25, 28, 44 Confirmation parameters 261, 266, 268 Confirmations 251,253,261,263,268,
269,270,274,323,365,394,424 Connection mode 50,76,78,80 Consistency check 226, 227, 228, 232 Control key 45,58,59,120,203 Controlling area 25, 44, 431 Cost activities 48,49, 120, 206, 366 Cost element planning 193 Cost element reports 369,405,432 Cos~ forecast 367 Costing sheet 326, 332 Costing variant 55,192,201,207,265,
283 cProjects 440 Cross-application time sheet 141, 258,
270,271 Current budget 229,232 Customer inquiry 217 Customer quotation 214,218,413 Cycle analysis 78
477
Index
DJ
)
Data entry profile 273 Database profile 104. 387, 397 Degree of processing 261. 304 Deletion flag 107.108 Deletion indicator 108 Delivery from project 287. 291 DIP profile 216.219. 220. 296 Direct procurement ~ Non-stock item Distribution key 49.137,138,140,194.
206,426 Document management 68.315 Down payment request 293.294,298,
413,417 Duration 119. 120. 123 Dynamic selection 321,388,397
E
Earned value 301, 308 Easy Cost Planning 105.113,197,198,
201,202,258 Entry tool 30 EPS interface 435 Execution factor 45 Execution Services 202, 258 Exempt cost elements 236 External processing 151, 204, 275, 365 Externally processed activities 46,47,
120
F
Factory calendar 114, 120. 135 Field key 32,33.41 Field selection 27,85.247.253.267.
273.391,424 Flexible detail screens 86 Floats 122 Forecast dates 112. 113. 253, 254. 263 Formulas 41,119.136.137 Free float 123 Funds 224,234,235.236 Funds commitments 235,257 Funds reservations ~ funds commit-
ments
478
G
Goods~sue 160.259,265,283,284 Goods receipt 158,254,256,277,280,
283,284 Grouping WBS element 31. 177, 178
H
Header account assignment 56, 57 Header-assigned networks 208 Hierarchical cost planning 187 Hierarchical revenue planning 212 Hierarchy graphic 76, 81 Hierarchy reports 359,369,397,419,
429.432
Incoming orders 357 Individual overviews 394 Integrated planning 31,195,208 Integration 74 Interest indicator 334 Interest profile 334, 335 Internal activity allocations 258,259,
270,323 Internal processing 203, 364 Internally processed activities 45, 46,
119,133,144 Investment Management 224, 241, 381 Investment measures 242. 244, 245 Investment profiles 247.336,381 Invoice receipt 254, 256, 277, 280 Invoicing plan 204, 206, 207 iPPE 36,173 Item category 158, 160, 164, 167, 189,
198,206,207,366
L
Limit of values 156 Line items 189,195,208.337.382,411 Long texts 67
M
Maintenance orders 128, 242 Mass change 88.89
Material components 113, 124, 157, 164,172,/179,182,206,280,288, 310,366,394,421
Material forecasting 58,203 Material planning 157 Microsoft Project 436 Milestone billing 215,293 Milestone functions 65 Milestone groups 62 Milestone trend analysis 64,81, 102,
299 Milestones 62, 63, 65, 117, 124, 205,
213,253,293,299,303,310,394 Missing parts 179, 422 MRP Controller 42, 57
N
Network 20,42,394,435 Network costing 105,202 Network graphic 21,77,81 Network header 43,44,164,179 Network profile 44,57,58,151,156,
165,204,206 Network scheduling 117, 124 Network type 43, 44, 54 Network type parameters 55, 56, 124,
153,208,377 Non-stock items 158,159,161,207,
235,280,366
o Object currency 26,28,188,228,233,
238 Object links 441,445,449 Open PS 436 Operative indicators 29 Operative structures 21 Order category 43 Orders 43, 177, 181, 209, 235, 237,
271,352,353,383,394,430 Original budget 225, 229 .overall network scheduling 117, 127 Overhead key 332 Overhead rates 191,192,195,198,326
p
Partner determination procedure 26, 40 Percentage of completion 64,253,301,
306 Planned orders 281,291,394 Planned total 187,191,210,211,225,
232 Planner profile 196,212
. flanning board profile 78,82 Planning layout 195,212 Planning methods 116 Planning networks 55, 207 Planning profile 186,187,201,214 Plant maintenance orders 52,81 Preliminary procurement 163 Procurement indicator 164 Procurement type 161,162,286,287 Production orders 282,283,288,291 Progress Analysis 261, 300 Progress Analysis Workbench 308,309 Progress Tracking 310, 312 Progress version 303, 307 Project Builder 74, 75, 105, 197,268 Project currency -7 Object currency Project definition 24, 25, 114, 164, 177,
186,394,435 Project organization 142, 143 Project planning board 78, 79, 80, 105,
113,140,268 Project profile 24,34,35,117,177,186,
224, 376 Project stock 27, 161, 164, 175, 176,
178,207,281,283,285,288,421 Project structure overview 393 Project summarization 31,35,429 Project type 31, 40 Project versions 102,300,401 ProMan 289,292 Provisional actual dates 250,251,252 PS Cash Management 205, 213, 339,
411,413,416 PS info profile 387, 390 PS texts 67 Purchase orders 152,156,177,181,
235,237,254,256,276,278,280, 282,284,291,365,413,417,419
479
Index
Index
Purchase requisitions 151, 153, 156, 158,177,181,235,238,254,256, 275,276,278,280,281,284,291, 365,413,417,419
R
Reduction 55, 120 Reference point 170, 175 Relationships 20,43,49, 50, 78, 119,
394 Requirements class 98, 100 Requirements grouping 176, 177, 179 Reservations 159,181,280,290,422 Residence times 55, 108 Resource planning 133,439 Resource-related billing 293, 295, 298 Responsible person 40 Results analysis 342, 363, 369, 383 Results analysis key 348, 352, 362, 376 Results analysis version 348 RPM 445
s . Sales order 160,214,287, 293, 296,
358,362,375,413 Sales order item 164 Sales pricing 27,215 Schedule Manager 321 Scheduling 112,117,118,148,251,367 Scheduling constraints 122 Scheduling parameters 121, 125, 127,
130,147 Scheduling scenarios 132 Scheduling types 125 Selection variants 388, 397,420 Selection versions 388 Service 47,154,205,278,365 Service acceptance 279 Service activity 48, 120 Service entry 48,271,278 Service specifications 48,154,155,156,
206 Sets of dates 112 Settlement key 375 Settlement profile 372 Settlement rules 369,370,374,377,378 Shop papers 60
Short identifications 27 Simulation profile 105 Simulation versions 102,105,107,202,
209,213,219,401 Special maintenance functions . 83 Standard network profile 61 Standard networks 61,65,69,98,182 Standard structures 21,95,98, 386 Standard work breakdown structures
41,69,98,243 Statistical WBS elements 30, 257 Status 149,151 Status profile 36,41,69,71 Status selection profiles 388, 397 Status selection schema 321 Stock items 158,159,162,207,280,
366 Structure overview 390 Structuring 18,22 Subnetwork Monitor 129, 130 Subnetworks 52,60,66,128,129 Substitution 36, 90 System status 41,69,71,228,235,250,
251,254,261,263,264,309,316, 350,359,378,382
T
Table controls 87 Template 330 Third-partyorders 161 Time sheet 141,443 Total float 123
u Unit costing 189,206,207 User fields 32,33,41,437 User statuses 69, 72, 229, 264, 309, 376
v Validation 36, 92 Valuation method 350 Valuation variant 192, 207 Value limit 48 Variant configuration 93 Version profile 36,103 Versions 21,102

w }
WBS element 18,22, 24, 27, 28, 114, 250,254,257,259,309.394.443
WBS scheduling 117; 130 Work breakdown structure 18.22
Work breakdown structure BOMs 169 Work center 46.119.134,136,141,
142,262,423 Workforce planning 127,141,142,143,
144,146,147,428
Index

1
1
1
1
1
1
1
1
1
1
1
1
) 1
1
1
1
1
1
1
1
1
1
1
1
1
1
1
1
1
1
1
1
1
1
1
1
1
1
1
1
1
1
1
1
1
1
1
1
1
1
1
1
1
1
1
1
1
1
1
Provides managers and consultants w~h a complete guide
. to what SAP CRM is
Teaches about the benefits of using CRM to build profitable customer
relationships
Includes practical insights from customers using SAP CRM successfully
approx. 320 pp., 39.95 Euro I US$ 39.95 ISBN 978-1-59229-173-1. April 2008
.. ~ ~ -.
Srini Katta
~ PRESS
lealo what SAP CRIA i, .11 abo,! and find oul how It an wotk for)lour business
Srioll<3.tta
Discover SAP CRM
In today's competitive market environment,
companies who lose sight of their customer's needs,
lose those customers, and to be successful in
retaining and satisfying customers, companies need
to understand CRM, which is where Discover SAP
CRM comes in. This book helps companies learn
how to use SAP CRM effectively to ensure that
cust9mers are heard and that their needs are met .

1
1
1
1
1
1
1
1
1
1
1
1
) 1
1
1
1
1
1
1
1
1
1
1
1
1
1
1
1
1
1
1
1
1
1
1
1
1
1
1
1
1
1
1
1
1
1
1
1
1
1
1
1
1
1
1
1
1
1
1
1
Provides a,comprehensive overview of the entjre delivery process
Teaches functions, processes, and customization
Covers dangerous goods management. availability checks.
user exits, and much more
approx. 574 pp .• 79.95 Euro I US$ 79.95 ISBN 978+59229-169-4. March 2008
Transportation Management with SAP LES
• •
www.sap-press.com
Othmar Gau
TransportatiDn Management with SAP LES
This in-depth reference provides readers with practical and
detailed knowledge on all aspects of shipping and
transportation with SAP Logistics Execution System (LES).
Using this book, employees in the warehouse and shipping
departments, as well as consultants, can benefit from
proven best practices for working successfully with the
Transportation Management module. The author describes
the entire shipping and delivery process, from the creation
of a delivery in the SAP system, to mapping the internal
supply chain, and from transportation planning to invoicing
and settlement with forwarding agencies - and everything
in between. Plus, readers also learn how to master system
configuration, and much more.

1
1
1
1
1
1
1
1
1
1
1
1
) 1
1
1
1
1
1
1
1
1
1
1
1
1
1
1
1
1
1
1
1
1
1
1
1
1
1
1
1
1
1
1
1
1
1
1
1
1
1
1
1
1
1
1
1
1
1
1
1
Learn about the full functiol1a~ty and technical
configuration issues of SAP SD
Get tips, tricks, and references for important OSS Notes
Explore practical examples and real-world scenarios
545 pp., 2008, 69,95 Euro I US$ 69.95 ISBN 978-1-59229-168-7, Feb 2008
SAP SO: Functionality and Technical Configuration .
.. ~ ~ ..
www.sap-press.com
Kapil Sharma
SAP SD: Functionality and Technical Configuration
This detailed and comprehensive SAP SO
functionality and configuration guide is a must-
have for anyone working on a new or existing SO
implementation. You'll learn about core functionality
and technical configuration issues, explore real-world
tips and scenarios, and find OSS notes that every
SAP SO consultant needs. Use this book to configure
SAP SO based on the unique requirements of your
own company, and deal with your shippi.ng,
transportation, mailing, and customer service issues .

)
Learn how to integrate SA~ S RM with other
cote SAP components
Uncover key insights on strategies, functionalities,
and methodologies
695 pp., 2007, 69,95 Euro / US$ 69.95 ISBN 978+59229-068-0
Enhancing Supplier Relationship Management Using SAP SRM
.. ~ ~ . .
www.sap-press.com
Sachin Sethi
Enhancing Supplier Relationship Management Using SAP SRM
This book will help readers leverage valuable insights
into strategies and methodologies for implementing
SAP SRM to enhance procurement in their
companies.
Tips and tricks, changes brought about by 5.0 and
customization will be woven in throughout the book.
It will provide detailed information on integration
and dependencies of mySAP SRM with core SAP
components like MM, 1M, FI and HR .

1
1
1
1
1
1
1 )
1
1
1
1
1
1
1
1
1
1
1
1
1
1
1
1
1
1
1
1
1
1
1
1
1
1
1
1
1
1
1
Find the tools and techniques you need jto deliver fast and
~uccessful SAP SRM implementations
512 pp., 2008, 79,95 Euro I US$ 79.95 ISBN 978-1-59229-154-0
.. ~ ~ ..
PadmaPrasad Munirathinam,
Ramakrishna Potluri
Consultant's Guide to SAP SRM
Find the tools and techniques you need to deliver
fast and successful SAP SRM implementations
Consultants hold many roles during an SAP implementation,
from business consultant during the blueprint phase, and
product specialist during the realization phase, to trainer
after go-live, and this book provides the information a
consultant needs to hold these roles effectively.
Based on SAP SRM 6.0, each chapter covers a specific
process of supplier relationship management, ensuring that
implementation teams can utilize their time efficiently.
Going beyond standard SRM scenarios, the book arms
consultants with practical tips for enabling complex
customer requirements, and provides insightful
troubleshooting tips and techniques.
The authors use their years of experience implementing SAP
applications to make this a must-have resource for SAP SRM
implementation teams.

1
1
1
1
1
1
1
1
1
1
1
1
) 1
1
1
1
1
1
1
1
1
1
1
1
1
1
1
1
1
1
1
1
1
1
1
1
1
1
1
1
1
1
1
1
1
1
1
1
1
1
1
1
1
1
1
1
1
1
1
1
2nd edition, completely revised and up-to-d~te for SAP ECC 6.0
Gain a comprehensive understanding of SAP MM and
how it works
Learn the basics and then explore the full functionality of each part
of SAP MM
588 pp., 2. edition 2008, 69,95 Euro I US$ 69.95 ISBN 978-1-59229-134-2
SAP MM- Functionality and Technical Configuration
.. ~ ~ -.
www.sap-press.com
Martin Murray
SAP MM- Functionality and Technical Configuration
Fully updated for SAP ERP 6.0, this comprehensive
update of the best-selling original is the ultimate MM
resource. From dealing with Goods Receipt and
Invoice Verification to Balance Sheet Valuation and
the Material Ledger, this book is the ultimate
reference for anyone looking for MM information .

1
1
1
1
1
1
1
1
1
1
1
1
) 1
1
1
1
1
1
1
1
1
1
1
1
1
1
1
1
1
1
1
1
1
1
1
1
1
1
1
1
1
1
1
1
1
1
1
1
1
1
1
1
1
1
1
1
1
1
1
1
Processes and customization ) of SAP PM
Interfaces. controlling, and . new technologies in plant
maintenance
With examples and workshops on DVD
approx. 555 pp., 69,95 Euro I US$ 69.95 ISBN 978-1-59229-150-2, May 2008
.. ~ ~ -.
Karl LiebstOckel
Enterprise Asset Management
This is a must-have guide for anyone interested in
learning about the implementation and customi
zation of SAP EAM. Consultants, managers, and
administrators will learn about the plant maintenance
process, how to evaluate which processes work best
for them, and then go on to review the actual con
figuration steps of these processes. This book inclu
des practical tips and best practices for implemen
tation projects. The companion DVD contains
examples, practice tests, presentations, and more.
This book is up-to-date for SAP ERP 6.0 .

1
1
1
1
1
1
1
1
1
1
1
1
) 1
1
1
1
1
1
1
1
1
1
1
1
1
1
1
1
1
1
1
1
1
1
1
1
1
1
1
1
1
1
1
1
1
1
1
1
1
1
1
1
1
1
1
1
1
1
1

A comprehensive manual for dis~rete manufacturing
using SAP PP
Processes and customizing made easy
All-new 2nd edition-fully updated and extended for mySAP ERP 2005
477 pp., 2007, 69.95 Euro I US$ 69.95 ISBN 978+59229-106-9
Production Planning and Control with SAP
.. ~ ~ . .
www.sap-press.com
J.T. Dickersbach, G. Keller, K. Weihrauch
Production Planning and Control with SAP
Basic principles, processes, and complete
customization details
This book provides readers with a concise and easy
to-follow description of the production planning and
control processes in SAP. Expert insights provided by
the authors help consultants, implementation teams,
and production employees learn how to master the
processes and customizing features of SAP PP
(release mySAP ERP 2005). This comprehensive
reference covers all major production planning and
control aspects as well as key details on mySAP SCM
(APO) integration-all bolstered by volumes of
examples and a complete glossary.

)
Apply SAP SD to your own company's I1usiness model and
'make it work for you
learn all aspects of S D functionality and essential
technical details
365 pp., 69,95 Euro I US$ 69·95 ISBN 978+59229-101-4
.. ~ " ..
D. Rajen Iyer
Effective SAP S D
Get the Most Out of Your SAP SD Implementation
From important functionalities to the technical
aspects of any SD implementation, this book has the
answers. Use it to troubleshoot SD-related problems
and learn how BAdls, BAPls and IDocs work in the
Sales and Distribution area. Understand how SAP SD
integrates with modules like MM, FI, CO, and
Logistics. Whether you're looking for in-depth SD
information or need advice on implementation and
upgrades, this practical guide is an invaluable
reference .

1
1
1
1
1
1
1
1
1
1
1
1
) 1
1
1
1
1
1
1
1
1
1
1
1
1
1
1
1
1
1
1
1
1
1
1
1
1
1
1
1
1
1
1
1
1
1
1
1
1
1
1
1
1
1
1
1
1
1
1
1
Processes and Customization ) made easy
Comprehensive details on the APO Core Interface
Extensive coverage of material requirements planning with
SAP ECC-MRP
336 pp .. 2007. 69.95 Euro I US$ 69.95 ISBN 978-1-59229-113-7
Production Planning
.. ~ ~ ..
with SAP APO-PP/OS www.sap-press.com
J. Balla, F. Layer
Production Planning with SAP APO-PP/DS
This book provides a profound introduction to the functions, usage, and customization of production planning with SAP APO-PP/DS. The authors teach you, step-by-step, how to use the central functions of APO-PP/DS and everything you need to know to optimally set up data exchange using APO (ore Interface «(IF), including extensive details on APO master data. In addition, readers learn how to use the central planning and analysis tools as well as how to create a finite production plan. The book is complemented by a robust appendix, which includes menu paths, SAP Notes, and heuristics, and is guaranteed to be an invaluable reference. The book is based on SAP APO 5.0 but is equally relevant for users of older releases.

1
1
1
1
1
1
) 1
1
1
1
1
1
1
1
1
1
1
1
1
1
1
1
1
1
1
1
1
1
1
1
1
1
1
1
1
1
1

1
1
1
1
1
1
1
1
1
1
1
1
} 1
1
1
1
1
1
1
1
1
1
1
1
1
1
1
1
1
1
1
1
1
1
1
1
1
1
1
1
1
1
1
1
1
1
1
1
1
1
1
1
1
1
1
1
1
1
1
1

-his book provides you with a :omprehensive overview of the
'unctions and customizing options )f SAP Project System, showing 'eaders how best to manage the
=ntire project lifecycle - from start :0 finish.
Based on various typical project phases, each chapter describes in great detail how you can maintain control of your projects from structuring, to planning and budgeting, to monitoring the project progress, to settlement. Topics that are applicable to multiple project phases, such as reporting, are also covered in detail. In addition, you'll uncover
options for integrating SAP Project System with other tools, such as
MS Project, cProjects, and RPM,
The book prOVides consultants,
project leaders who use SAP PS, members of SAP PS implementation
projects, and key users with highly detailed information on the functions and configuration options of SAP Project System. Based on SAP ERP 6.0, the book is also very useful for older releases (4.6C and above),
~ Structures and Master Data Networks, Milestones, Statuses, Editing Functions, Versions
~ Planning Functions Dates, Resources, Materials, Costs, Revenues
~ Budget
~ Project Execution Processes Actual Dates, Confirmations, Procurement, Billing, Project Progress
~ Period-End Closing Overhead Rates, Interest Calculation, Results Analysis, Cost Forecast, Settlement
~ Reporting
.. Integration Scenarios with Other Project Management Tools
The Author Dr. Mario Franz has been working as
a course instructor for SAP PS for six years, During this time he has been involved in the development of var
ious SAP courses on the topic of SAP PS. He also trains PS consultants with SAP Consultant Education,
~ PRESS
SAP business
US $ 69.95
CAN $ 79.95
EUR € 69,95 [D]
ISBN 978-1-59229-125-0
1111111111111111 9 781592 291250
Related Documents