Sage 300 2019 Upgrade Guide July 2018

Welcome message from author
This document is posted to help you gain knowledge. Please leave a comment to let me know what you think about it! Share it to your friends and learn new things together.
Transcript
Sage 300 2019 Upgrade Guide July 2018
This is a publication of Sage Software, Inc.
© 2018 The Sage Group plc or its licensors. All rights reserved. Sage, Sage logos, and Sage product and service names mentioned herein are the trademarks of The Sage Group plc or its licensors. All other trademarks are the property of their respective owners.
Last updated: July 11, 2018
Sage 300 2019 Upgrade Guide Page 3 of 22
Overview ............................................................................................................... 5 System Requirements ........................................................................................................... 5
Server and Workstation Requirements .............................................................................. 5 Creating DSNs for Sage 300 Data on 64-Bit Windows ...................................................... 5 Optional System Requirements ......................................................................................... 6
Version Compatibility ............................................................................................................. 6 Upgrading from Version 5.5 or Earlier .................................................................................... 7 Alerts and Warnings .............................................................................................................. 7
Alert when Running Help ................................................................................................... 7 Alert when Upgrading Sage 300 Intelligence Reporting ..................................................... 8 Alert when Migrating from Pervasive to Microsoft SQL ...................................................... 8
Applying for Activation Codes ................................................................................. 9
Before Upgrading to Sage 300 2019 ...................................................................... 10 Step 1: Make Sure You Have 2019 Versions of All Programs ............................................. 10 Step 2: Run Day End Processing (Optional) ....................................................................... 10 Step 3: Post Batches in Accounts Receivable and Accounts
Payable (Optional) ................................................................................................... 10 Step 4: Save Customized Reports, Macros, and Other
Customizations ........................................................................................................ 10 Step 5: Install and Configure Internet Information Services ................................................. 10
Upgrading to Sage 300 2019 .................................................................................. 14 Step 1: Install Sage 300 Programs ..................................................................................... 14
Installing the Programs .................................................................................................... 14 Entering License Information ........................................................................................... 16
Step 2: Install Product Updates ........................................................................................... 17 Step 3: Activate Your Data for Version 2019 Applications ................................................... 17
After Activating Applications ................................................................................. 19 Bank Services Update Notes ............................................................................................... 19 General Ledger Update Notes ............................................................................................. 19 System Manager Update Notes ........................................................................................... 19 Sage 300 Intelligence Reporting Update Notes ................................................................... 19
Configuring Sage 300 Web Screens ...................................................................... 21 Configuring a Microsoft SQL Server Express Database ....................................................... 22
Contents
Contents
Sage 300 2019 Upgrade Guide Page 4 of 22
Starting the Sage 300 Web Screens .................................................................................... 22 What’s New in Sage 300 2019 ............................................................................................. 22

Sage 300 2019 Upgrade Guide Page 5 of 22
This Upgrade Guide provides instructions for upgrading earlier versions of System Manager and applications to Sage 300 2019. You should review the following sections carefully to ensure that the upgrade proceeds smoothly:
• Minimum System Requirements
• Version Compatibility
• Upgrading from Version 5.5 or Earlier
• Applying for Activation Codes
• Before Upgrading to Sage 300 2019
• Upgrade Steps
• After Activating
• Configuring Sage 300 Web Screens
You should refer to the Sage 300 2019 Release Notes for information about changes and new features in this version, and for supplementary information and information that was not available when this Upgrade Guide was published.
If you will be using Sage CRM with Sage 300, refer to the Sage CRM Integration Guide for system requirements and instructions on integrating Sage CRM with Sage 300.
Depending on your purchase agreement, some features described in this guide may not be available in your product.
System Requirements The information in this section was current when we released Sage 300 2019. If you do not find the information you need, see the Compatibility Guide:
https://support.na.sage.com/selfservice/viewdocument.do?externalId=26777
Server and Workstation Requirements For a complete and up-to-date list of hardware and operating system requirements for workstations and servers, see the Compatibility Guide:
https://support.na.sage.com/selfservice/viewdocument.do?externalId=26777
Creating DSNs for Sage 300 Data on 64-Bit Windows On a 64-bit Windows system, the default ODBC Data Source Administrator (available from the Administrative Tools menu) lets you configure only 64-bit data sources.
Overview

Overview
Sage 300 2019 Upgrade Guide Page 6 of 22
However, Sage 300 is a 32-bit application. To create data sources for Sage 300, you need to browse for the 32-bit version of the ODBC Administrator. You can find the 32-bit ODBC Administrator in the following location:
C:\WINDOWS\SysWOW64\odbcad32.exe
Optional System Requirements
Visual Basic for Applications (VBA)
System Manager 2019 (internally known as version 6.6A) installs and uses Microsoft VBA. This version is compatible with macros created using prior versions of VBA.
Sage 300 Web Screens
Before you install Sage 300 web screens:
• Ensure that Microsoft’s Internet Information Services (IIS) is installed on the server that will host the Sage 300 web screens.
• If IIS is not installed, you must install it before you attempt to install Sage 300 web screens. For detailed instructions, see “Step 5: Install and Configure Internet Information Services.”
• For Windows 7 and Windows 8, ensure that ASP, CGI, ISAPI Extensions, and ISAPI Filters are selected Windows features (under World Wide Web Services’ Application Development Features), as shown here:
Important! Sage 300 web screens support only Microsoft SQL Server database formats. If you are upgrading from Sage ERP Accpac 6.0, you must re-create your portal database using Microsoft SQL Server. For detailed instructions, refer to the Sage 300 Installation and Administration Guide.
Version Compatibility You must upgrade all Sage 300 programs to version 2019 (internally known as 6.6A) at the same time. Sage 300 2019 programs do not work with programs from earlier versions.
Overview
Sage 300 2019 Upgrade Guide Page 7 of 22
In addition, note that:
• You must upgrade all programs that you use with Sage 300 to compatible versions.
• If you are using Sage CRM with Sage 300, see the Sage CRM Integration Guide for important information about version compatibility.
• Sage 300 Payroll 7.3 is compatible with Sage 300 2019. However, it must be installed separately.
Note: Sage Payroll requires Bank Services, Tax Services, and G/L Subledger Services.
Upgrading from Version 5.5 or Earlier If you are using Sage ERP Accpac version 5.5, or earlier versions, you cannot upgrade your data directly to Sage 300 2019.
Warning! You cannot use the 2019 version of System Manager to upgrade Sage ERP Accpac programs from version 5.5, or earlier. Also, you cannot use version 5.6 of System Manager to upgrade Sage ERP Accpac programs from version 5.2, or earlier. Attempting to do so will cause your system to crash, and will corrupt your data.
If you are using Sage ERP Accpac version 5.5, 5.4, or 5.3, you must update your data to version 5.6 before you install the 2019 version of System Manager. See the Upgrade Guide for version 5.6 for information about upgrading to that version.
If you are using Sage ERP Accpac version 5.2, or earlier versions, you must upgrade your database to an intermediate version (version 5.3, 5.4, or 5.5) before you install System Manager version 5.6. See the Upgrade Guide for the intermediate version for information about upgrading to that version.
Alerts and Warnings
Alert when Running Help If you run Windows with your browser security set to High, you may receive the following message about Web page security when you try to open Sage 300 help:

Overview
Sage 300 2019 Upgrade Guide Page 8 of 22
To accept Sage 300 help as a trusted site, click the Add button.
Alert when Upgrading Sage 300 Intelligence Reporting If you were using Sage Accpac Intelligence (SAI) with a previous version of Sage ERP Accpac, do not change the company database ID.
If you change the database ID, and then upgrade to Sage 300 2019 Intelligence Reporting, you may lose all the security roles set up for Intelligence Reporting in the previous version.
Alert when Migrating from Pervasive to Microsoft SQL If you are migrating your database from Pervasive to Microsoft SQL, and your database contains Inventory Control items that use units of measure with the same name but with mixed cases (for example, both “EACH” and “Each,” or another combination), we recommend that you choose a binary collation method for your SQL database. If you try to load data with mixed cases and you use a non-binary collation method, Database Load will fail.
Alternatively, you can repair your data, standardizing on one unit of measure, before using Database Load.
Sage 300 2019 Upgrade Guide Page 9 of 22
You need activation codes to use Sage 300 products, including upgrades. However, you can run Sage 300 for up to 30 days while you await your activation codes.
You can obtain activation codes from the Sage Customer or Partner Portal.
If you are a Sage customer:
1. Log in to your account at https://customers.sagenorthamerica.com/irj/portal/anonymous/login.
If you don’t have an account, use the self-registration tool on the Customer Portal login page to create one.
2. On the Support menu, click Self Service.
3. Click the My Products tab.
4. Follow the instructions on the My Products tab to display and print the Details Sheet.
If you need assistance with the Customer Portal, email [email protected], or call 1-877-828-6372.
If you are a Sage partner:
1. Log in to your account at https://partners.sagenorthamerica.com/irj/portal.
If you don’t have an account, contact the portal administrator at your company, or contact Sage.
2. Click Customers > Details Sheet.
3. Click Show Advanced Search.
4. Enter an account ID, and then click Go.
5. On the Details Sheet, click the Products Details tab to view the customer’s activation codes.
If you need assistance with the Partner Portal, email [email protected], or call 1-877-828-6372.
Applying for Activation Codes
Sage 300 2019 Upgrade Guide Page 10 of 22
Perform the following steps, in order, before upgrading to Sage 300 2019. If you don’t take these steps, you will not be able to activate your software.
For instructions on steps to take after upgrading, see “After Activating Applications” in this guide.
Step 1: Make Sure You Have 2019 Versions of All Programs Make sure you have version 2019, or compatible versions, of all Sage 300 programs and other programs you use with Sage 300.
Warning! You must upgrade all Sage 300 programs at the same time.
Step 2: Run Day End Processing (Optional) Run Day End Processing in Inventory Control or, if you have a standalone Purchase Orders system, run Day End Processing in Purchase Orders.
Step 3: Post Batches in Accounts Receivable and Accounts Payable (Optional) Post all open batches in Accounts Receivable and in Accounts Payable.
Step 4: Save Customized Reports, Macros, and Other Customizations Move customized reports to another folder, or they will be overwritten during the installation process.
For example, if you created customized financial reports in General Ledger, copy them from their current location (for example, GL63A\ENG) to another location, and then copy them to GL64A\ENG after installing the upgrade.
Also, save macros and any other customizations to a new folder.
Step 5: Install and Configure Internet Information Services The Sage 300 web screens require Microsoft Internet Information Services (IIS). If you plan to use the web screens, ensure that IIS is installed before you install Sage 300.
If you need to install IIS, follow the instructions below.
Before Upgrading to Sage 300 2019
Before Upgrading to Sage 300 2019
Sage 300 2019 Upgrade Guide Page 11 of 22
To install and configure IIS for Windows Server 2012 and 2016:
1. From Windows’ Control Panel, click Administrative Tools > Server Manager.
2. In the Server Manager, under Roles, click Add Roles.
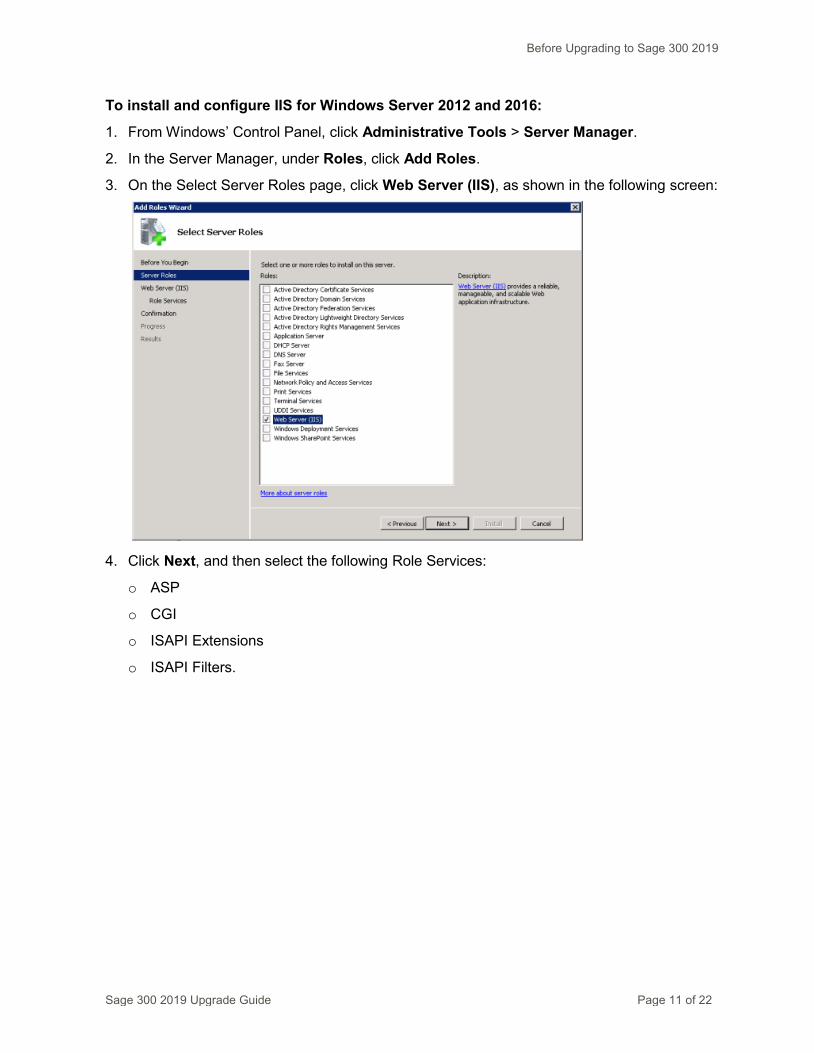
3. On the Select Server Roles page, click Web Server (IIS), as shown in the following screen:
4. Click Next, and then select the following Role Services:
o ASP
o CGI
o ISAPI Extensions
o ISAPI Filters.
Before Upgrading to Sage 300 2019
Sage 300 2019 Upgrade Guide Page 12 of 22
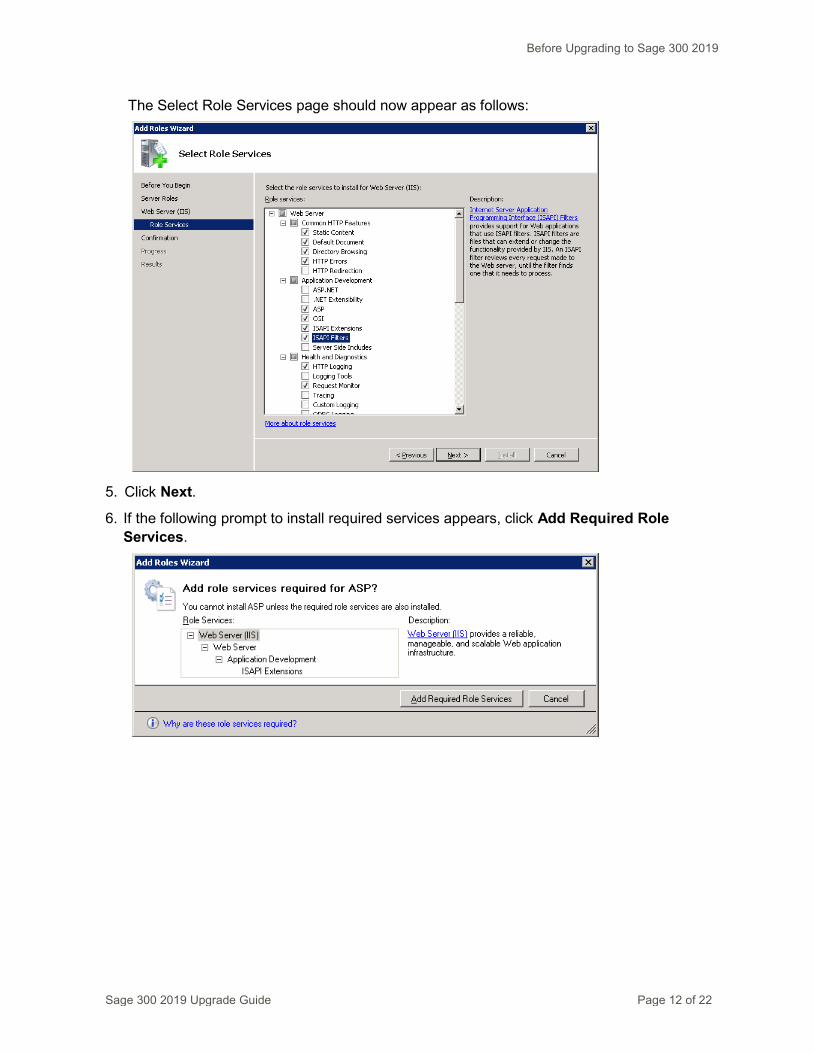
The Select Role Services page should now appear as follows:
5. Click Next.
6. If the following prompt to install required services appears, click Add Required Role Services.
Before Upgrading to Sage 300 2019
Sage 300 2019 Upgrade Guide Page 13 of 22
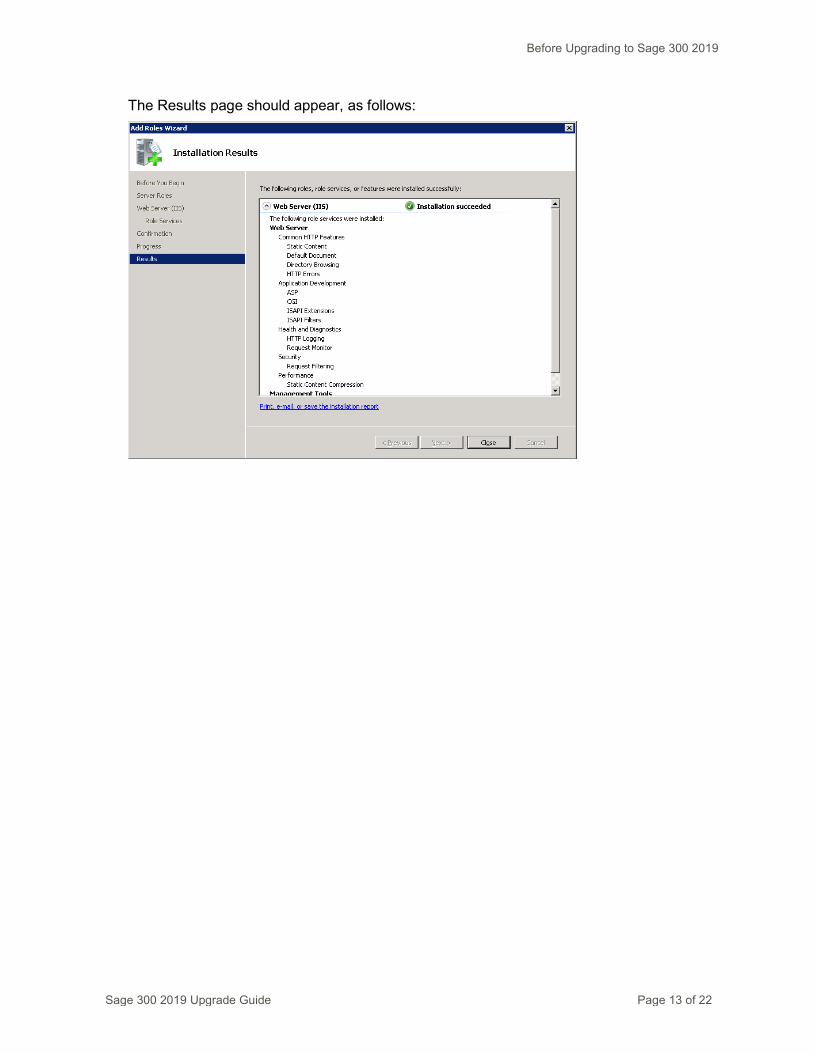
The Results page should appear, as follows:
Sage 300 2019 Upgrade Guide Page 14 of 22
Before you proceed with the steps in this section, we strongly recommend that you:
• Check data integrity in your previous version, and correct any errors.
• Back up your data.
Important! If you are activating a new Sage 300c and/or Sage Payroll subscription, back up all existing Sage 300 program files and data, including all installed Payroll and other modules, before installing new programs and entering license information. If your subscription is terminated, expires, or ends for any reason, you can restore your Sage 300 program files from the backup and continue to use that version of the software.
• Uninstall System Manager before installing the latest version to ensure a clean installation of the new version.
Step 1: Install Sage 300 Programs After you have performed the steps described in the previous section, you can install Sage 300 System Manager, System Manager Components, Sage 300 applications, the Sage 300 web screens, and any desired language packs.
You install Sage 300 components in one continuous process, consisting of two phases:
1. Installing Sage 300.
2. Entering license information.
Installing the Programs 1. Insert the Sage 300 installation DVD into your DVD drive.
If the installation screen does not appear automatically, go to the DVD’s root directory (for example, d:\), and run AUTORUN.EXE.
2. On the installation screen, click Sage 300.
3. On the Sage 300 installation screen, click Sage 300.
4. On the Welcome screen, click Next.
5. Click the option to accept the license agreement, and then click Next.
6. Select the geographical region where you are installing the software, and then click Next.
7. For the client information, enter your 7-digit or 10-digit client ID and the company name to use for registration, and then click Next.
Upgrading to Sage 300 2019
Upgrading to Sage 300 2019
Sage 300 2019 Upgrade Guide Page 15 of 22
8. To provide additional information for registration, enter the names of the company contact, software dealer, and certified consultant, and then click Next.
9. Select the edition of Sage 300 you require, and then click Next.
10. Specify the names and locations of your program and data folders, and then click Next.
Note: To use web screens, you must specify the full path for the shared data folder (do not specify a mapped drive) and a local path for the programs folder (do not specify a mapped drive or a UNC path).
11. On the Select Features screen, select features and applications to install, and then click Next.
When installing the web screens, note that:
o Installing the web screens installs components required to support these screens.
o Before installing the web screens, you must have installed IIS, as described in “Step 6: Install and Configure Internet Information Services,” in the previous section.
Keep in mind that most of the applications require you to install others. All of the applications require core System Manager files.
The following list shows any additional requirements in parentheses for each application:
o Bank Services (Tax Services, G/L Subledger Services)
o General Ledger (Sage 300 Intelligence Reporting)
o Accounts Payable (Bank Services, Tax Services, G/L Subledger Services)
o Accounts Receivable (Bank Services, Tax Services, G/L Subledger Services)
o Inventory Control (G/L Subledger Services)
o Order Entry (Accounts Receivable, Inventory Control, Bank Services, Tax Services, G/L Subledger Services)
o Payment Processing (Accounts Receivable, G/L Subledger Services, Bank Services, Tax Services, Order Entry, Sage Exchange)
o Purchase Orders (Accounts Payable, Bank Services, Tax Services, G/L Subledger Services)
o Project and Job Costing (Accounts Payable, Accounts Receivable, Bank Services, Tax Services, G/L Subledger Services)
12. On the next screen, in the Program Folder field, type the location on the Start menu where you want Sage 300 to appear, and then click Next.
13. Click Install.
Once installation has finished, the License Manager appears. Follow the instructions in the next section to enter license information.
Upgrading to Sage 300 2019
Sage 300 2019 Upgrade Guide Page 16 of 22
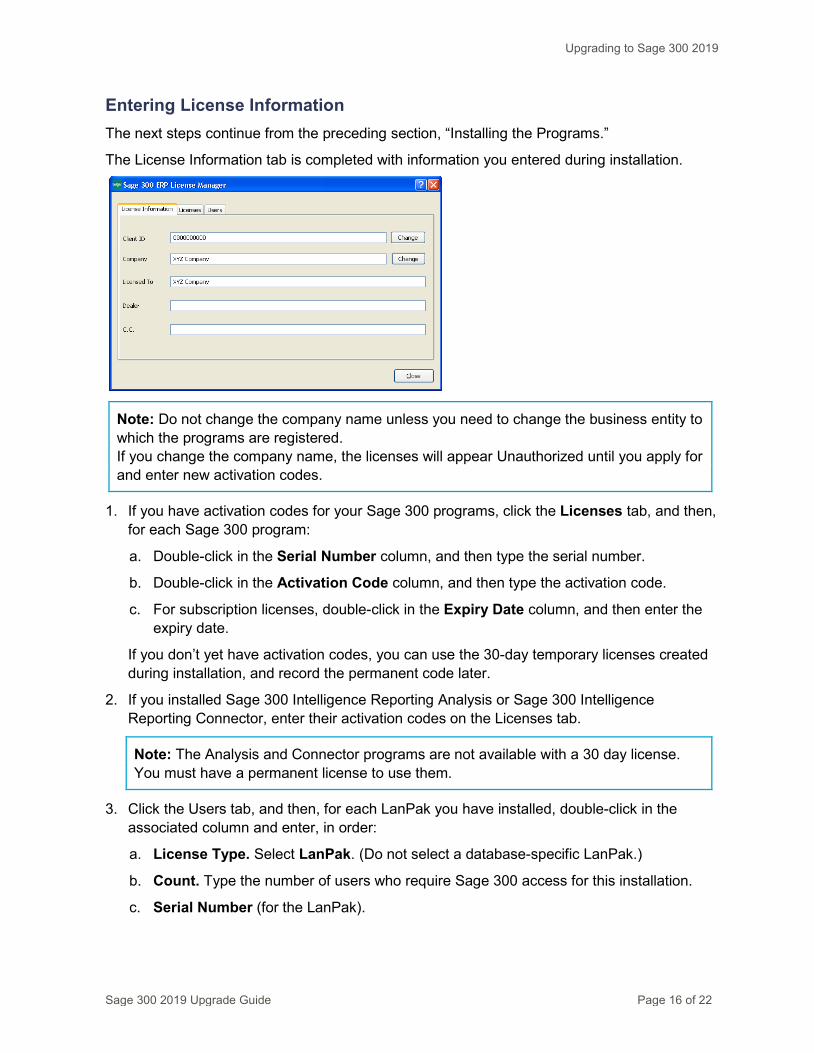
Entering License Information The next steps continue from the preceding section, “Installing the Programs.”
The License Information tab is completed with information you entered during installation.
Note: Do not change the company name unless you need to change the business entity to which the programs are registered. If you change the company name, the licenses will appear Unauthorized until you apply for and enter new activation codes.
1. If you have activation codes for your Sage 300 programs, click the Licenses tab, and then, for each Sage 300 program:
a. Double-click in the Serial Number column, and then type the serial number.
b. Double-click in the Activation Code column, and then type the activation code.
c. For subscription licenses, double-click in the Expiry Date column, and then enter the expiry date.
If you don’t yet have activation codes, you can use the 30-day temporary licenses created during installation, and record the permanent code later.
2. If you installed Sage 300 Intelligence Reporting Analysis or Sage 300 Intelligence Reporting Connector, enter their activation codes on the Licenses tab.
Note: The Analysis and Connector programs are not available with a 30 day license. You must have a permanent license to use them.
3. Click the Users tab, and then, for each LanPak you have installed, double-click in the associated column and enter, in order:
a. License Type. Select LanPak. (Do not select a database-specific LanPak.)
b. Count. Type the number of users who require Sage 300 access for this installation.
c. Serial Number (for the LanPak).
Upgrading to Sage 300 2019
Sage 300 2019 Upgrade Guide Page 17 of 22
d. Activation Code (supplied by Sage).
If no LanPaks are listed on the tab, click in the blank space to create a new line for a temporary license, and then enter the license type, followed by the count.
Important! You must record at least one LanPak license to use Sage 300.
For Sage 300 Intelligence Reporting, one Report Manager license for one user is free with Sage 300. If you have additional licenses for Report Manager and Report Viewer, enter their activation codes in the Activation Code column.
4. Click Close.
5. Click Finish to close the Installation wizard.
Step 2: Install Product Updates Before activating, check for available product updates for version 2019, and install any product updates you have not already installed.
Important! To avoid possible data corruption issues, you must install all released product updates for version 2019 before activating your Sage 300 applications.
Note: After installing a product update, if you use web screens, you must configure the Portal database again. For detailed instructions, see “Configuring the Sage 300 Web Screens.”
Step 3: Activate Your Data for Version 2019 Applications You must use the desktop program to activate Sage 300 applications, as follows:
1. In the Administrative Services folder, double-click Data Activation.
2. When asked whether you are ready to proceed with activation, click Yes.
3. In the Data Activation form that appears, select the check box for each application for which you want to activate data.
Note: If you use Sage 300 Payroll, you require Sage 300 Payroll 7.3. If you have been using an earlier version, you will have to install the current version and reactivate your payroll data.
The activation program automatically selects any applications that must be activated first, and then checks your data to ensure that it can activate them.
Most Sage 300 applications are interdependent. If you clear the selection for an application that others require, the activation program also clears the selection for the dependent applications. For example, if you clear the selection for Accounts Payable, but Purchase Orders and Project and Job Costing are selected, the program also clears the selections

Upgrading to Sage 300 2019
Sage 300 2019 Upgrade Guide Page 18 of 22
for Purchase Orders and Project and Job Costing. (See “Step 1: Install Sage 300 Programs” for information about dependencies.)
Note: Sage 300 Options products are not part of the multi application data activation. If you select Sales Analysis, Ops Inquiry, or a number change program, you are prompted to activate that program immediately.
4. If you receive a message saying that you cannot activate an application at this time:
a. Close the Data Activation form.
b. Correct the problems described in the error message.
c. Reopen the Data Activation form, and continue the process.
5. Once you have finished selecting applications and entering required information, click the Activate button.
Sage 300 2019 Upgrade Guide Page 19 of 22
After activating applications, you should check data integrity for each application to ensure that the upgraded data contains no errors.
In addition, you must perform the tasks described in the next sections.
Bank Services Update Notes If the data integrity check found errors for Bank Services, you must refresh transactions for the affected banks, as follows:
1. Open the Reconcile Statements form.
2. For each affected bank:
a. In the Bank Code field, type the bank code, or use the Finder or the navigation buttons to display it.
b. Click Calculate.
3. Check data integrity for Bank Services again.
General Ledger Update Notes If you have used account groups in version 5.6, note that in version 6.0, we modified the standard account groups that come with Sage 300. Therefore, you may need to reassign some of your existing accounts to new account groups, and assign the groups to the new group categories.
If you have not used account groups previously, note that the Account Groups form appears only if the Use Account Groups option is selected in the G/L Options form.
System Manager Update Notes To let users open Sage 300 using their Windows signon ID, change the authentication method for each user in the Users form.
See the System Manager help for instructions on adding users and setting up security.
Sage 300 Intelligence Reporting Update Notes
Running Intelligence Reporting for the First Time
The first time you run Sage 300 Intelligence Reporting, you must log in as the Windows administrator.
After Activating Applications
After Activating Applications
Sage 300 2019 Upgrade Guide Page 20 of 22
A user with Windows administrator privileges must register the ActiveX component, BICore.exe, that Intelligence Reporting requires. To register this component, open any Sage 300 Intelligence Reporting form. Once the component is registered, other types of users can open these forms.
If you use workstation setup, you must also run Sage 300 Intelligence Reporting workstation setup (located in BX64A\WSSetup) on every workstation where you will view and use Intelligence Reporting screens.
Restoring Customized Reports and Settings from Your Previous Version
If you used Intelligence Reporting (formerly known as Sage Accpac Intelligence) with Sage ERP Accpac 5.6 or 6.0, restore your customized reports and settings by copying the BXDATA folder (backed up before activation) to the Sage 300 program folder.
Then, use the Bulk Import feature to import new reports from newer versions of Sage 300 Intelligence Reporting or from existing reports. Importing the new reports in this way ensures that your existing reports and settings are not deleted.
To import new reports:
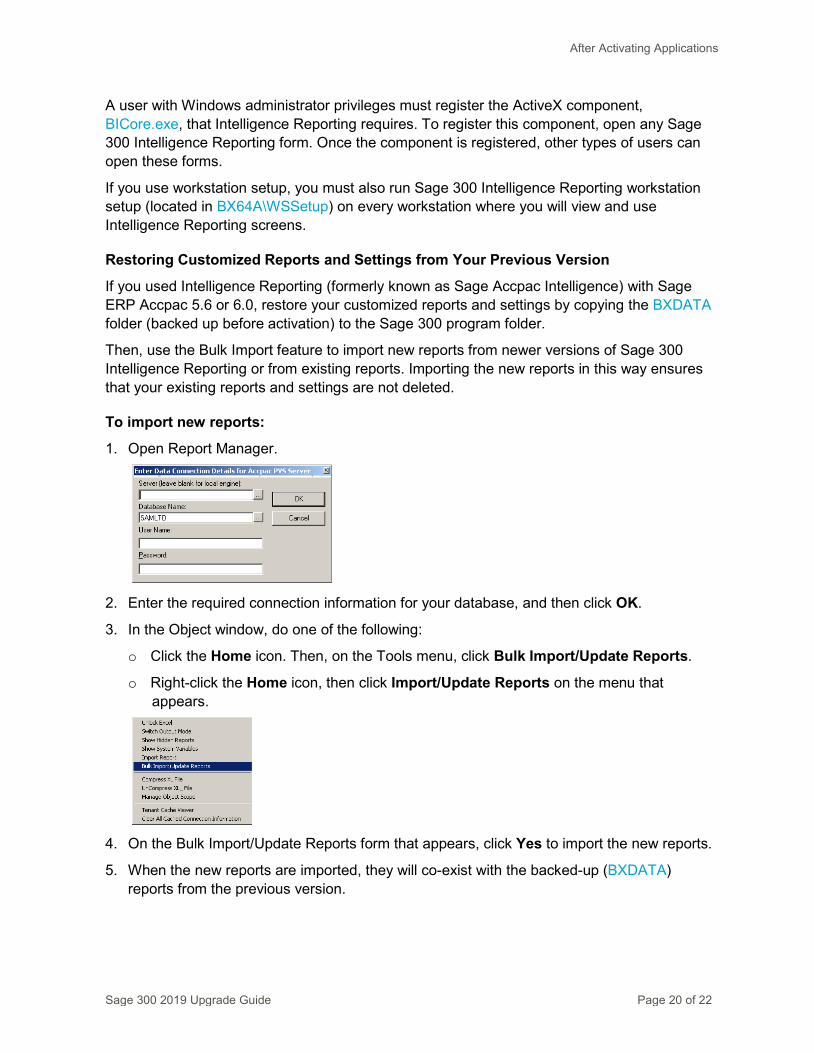
1. Open Report Manager.
2. Enter the required connection information for your database, and then click OK.
3. In the Object window, do one of the following:
o Click the Home icon. Then, on the Tools menu, click Bulk Import/Update Reports.
o Right-click the Home icon, then click Import/Update Reports on the menu that appears.
4. On the Bulk Import/Update Reports form that appears, click Yes to import the new reports.
5. When the new reports are imported, they will co-exist with the backed-up (BXDATA) reports from the previous version.
Sage 300 2019 Upgrade Guide Page 21 of 22
Before you can use the Sage 300 web screens, you must create a portal database using Microsoft SQL software. The portal database stores files used by the Sage 300 web screens.
Note: You must use Microsoft SQL Server (full or Express edition) to create your portal database.
If you are upgrading from Sage ERP Accpac 6.0:
• If you used Pervasive PSQL to create your portal database, you must recreate your portal database in Microsoft SQL Server. To create your portal database, follow the instructions in the Sage 300 Installation and Administration Guide.
• If you used Microsoft SQL Server to create your portal database, your database will be upgraded automatically for use with Sage 300 2019, and all existing settings will be preserved.
Normally, you create the portal database on the same server as your Sage 300 data. The portal database is shared by all companies in a Sage 300 installation, so you configure only one portal database.
Note: If you use SQL Server Express, you must configure a TCP/IP connection manually as described in the section “Configuring a Microsoft SQL Server Express Database.”
To configure the portal database:
1. From Windows’ Start menu, select All Programs > Sage 300 > Database Setup.
2. Click the Portal button to open the Configure Portal form.
3. Enter the following information on the Configure Portal form:
o Server Machine. The default portal server that appears is the name of the machine on which you installed Sage 300. If you created your portal database on a different machine, enter the name of that machine instead.
o Server Port. Enter the TCP/IP port number specified in your database software for your portal database. The server port must be the HTTP port for SQL Server. (The default port number is 1433.)
o Database Name. Enter the name specified for the portal database in your database software.
o User Name and Password. Enter the user name and password specified for your database administrator in your database software. (They are not the credentials for the Sage 300 ADMIN User.)
Configuring Sage 300 Web Screens
Configuring Sage 300 Web Screens
Sage 300 2019 Upgrade Guide Page 22 of 22
Note: For a Microsoft SQL Database, you must supply credentials for SQL authentication. The portal database does not support Windows authentication.
4. Click OK.
Configuring a Microsoft SQL Server Express Database The following instructions apply only to a Microsoft SQL Server Express portal database.
TCP/IP connections are not enabled automatically in SQL Server Express. Because the portal database requires a TCP/IP connection, you must set one up manually, as follows:
1. Open the SQL Server Configuration Manager.
2. Under the SQL Server Network Configuration tree, click Protocols For SQLEXPRESS.
3. For the TCP/IP protocol, select Enabled. (The default setting is Disabled.)
4. Right-click the TCP/IP protocol, click Properties, and then select the IP Addresses tab.
5. On the TCP/IP Properties screen, in the IPAll Section:
a. Clear the TCP Dynamic Ports field.
b. Set the TCP Port to 1433.
6. Restart the SQL Server.
Starting the Sage 300 Web Screens Once you have activated the company data for version 2019 programs and configured the Sage 300 web screens as described in this guide, the web screens are ready to use.
To open web screens in a browser:
1. Visit http://servername/sage300, where servername is the server name or IP address of the server where Sage 300 is installed.
2. Enter your username and password.
3. Select a company.
4. Click Sign In.
What’s New in Sage 300 2019 For detailed information about changes and new features in this version, see the Sage 300 2019 Release Notes, available on the Sage 300 Product Documents page:
http://cdn.na.sage.com/docs/en/customer/300erp/Documentation.htm
Related Documents