Ribbon Connect Direct Routing as a Service PBX Integration 4 SEPTEMBER 2020

Welcome message from author
This document is posted to help you gain knowledge. Please leave a comment to let me know what you think about it! Share it to your friends and learn new things together.
Transcript

Ribbon Connect Direct Routing as a Service
PBX Integration
4 SEPTEMBER 2020

PBX Integration Ribbon Connect Direct Routing as a Service
1 Ribbon Communications Confidential and Proprietary
Table of Contents
1 Introduction ............................................................................................................................................................................................... 2
1.1 About your PBX .................................................................................................................................................. 2
1.2 Audience for this document ................................................................................................................................... 2
1.3 The Configuration Process .................................................................................................................................... 2
2 Enabling Remote Access to your PBX ..................................................................................................................................................... 3
2.1 Important Notes to Network Administrators ................................................................................................................ 3
2.2 Do you have an SBC or SIP Proxy/Gateway? ............................................................................................................ 3
2.3 Connection topology ............................................................................................................................................ 4 2.3.1 Direct Published PBX .................................................................................................................................................................... 5
2.3.2 PBX behind firewall ....................................................................................................................................................................... 5
2.3.3 Proxy or Gateway ......................................................................................................................................................................... 5
2.4 Encryption ......................................................................................................................................................... 5
2.5 Firewall Rules .................................................................................................................................................... 5
2.6 PBX Specific remote access considerations .............................................................................................................. 6 2.6.1 Does your PBX need additional licenses for remote access? ........................................................................................................ 6
2.6.2 Does it need additional licenses for users to have multiple SIP devices (desk phone and Ribbon Connect)? ............................... 6
2.6.3 Does it use different ports for remote users? ................................................................................................................................. 6
2.6.4 Does the PBX have ACLs in addition to the firewall?..................................................................................................................... 6
2.6.5 Public IP presentation ................................................................................................................................................................... 6
2.6.6 Registration timeout ...................................................................................................................................................................... 7
2.6.7 SIP User Agent ............................................................................................................................................................................. 7
3 Test access to your PBX ........................................................................................................................................................................... 8
3.1 Configuring MicroSIP ........................................................................................................................................... 8
4 Ribbon Connect Configuration to Work with Your PBX........................................................................................................................ 10
4.1 Configure the connection to your PBX .................................................................................................................... 10 4.1.1 How to complete the PBX configuration form .............................................................................................................................. 11
5 Creating SIP accounts on your PBX....................................................................................................................................................... 12
5.1 Additional configuration topics .............................................................................................................................. 13 5.1.1 Dialing Limitations ....................................................................................................................................................................... 13
5.2 SIP Registration indicators and error messages ........................................................................................................ 13
6 Initial confidence tests ............................................................................................................................................................................ 14
7 Further testing for full interoperability validation ................................................................................................................................. 14
7.1 Single Calls ..................................................................................................................................................... 15 7.1.1 Single Incoming Call 1 ................................................................................................................................................................ 15
7.1.2 Single Incoming Call 2 ................................................................................................................................................................ 15
7.1.3 Single Outgoing Call 1 ................................................................................................................................................................ 16
7.1.4 Single Outgoing Call 2 ................................................................................................................................................................ 16
7.2 Multiple Calls ................................................................................................................................................... 16 7.2.1 Two incoming calls on different Users ......................................................................................................................................... 16
7.2.2 Two outgoing calls on different Users .......................................................................................................................................... 17

PBX Integration Ribbon Connect Direct Routing as a Service
2 Ribbon Communications Confidential and Proprietary
1 Introduction
Ribbon Connect is a service that bridges between your PBX service and Microsoft Teams on Office 365.
The service is designed to connect to your PBX using the standard ‘SIP Registration’ method, the same
way as a standard VOIP desk phone e.g. Polycom or Yealink.
This standard approach means that virtually all PBX systems can work with Ribbon Connect. In practice,
there may be changes required to your PBX or network to create a successful connection. This
document sets out the process you can run through to configure and validate your PBX connection so
that Ribbon Connect can connect successfully.
1.1 About your PBX
Your phone system is likely to either be
• A hosted service, operating in the datacenters of your provider and already accessible from everywhere, or
• An on-premise system, probably physically located in your offices and accessible from the users in your building.
• Hosted PBX services are normally ready-to-go and require little intervention; on-premise systems
typically need a little more work.
You should consult your service provider or PBX maintenance company for guidance to create and
manage the SIP accounts needed for Ribbon Connect to connect. This document may also be useful to
them.
1.2 Audience for this document
This document is provided for customers to understand and configure their PBX for access by the
Ribbon Connect service.
It is expected the customer will be able to call upon the following resources and experience:
• Networking and firewall configuration
• PBX configuration and management
• SIP device configuration (phone/softphone)
• Microsoft Teams basic configuration (PowerShell skills are not required)
Customers often need to involve the organization or person that maintains and configures their phone
system.
1.3 The Configuration Process
The process of configuring your PBX for use with Ribbon Connect is split into three discrete elements:
1. Enabling remote access (without VPN) to your PBX 2. Test the remote access of the PBX 3. Ribbon Connect interop with your PBX & testing

PBX Integration Ribbon Connect Direct Routing as a Service
3 Ribbon Communications Confidential and Proprietary
2 Enabling Remote Access to your PBX
Ribbon Connect connects to your phone system from the Internet. You should configure access to your
phone system in the same way as you would for mobile or home workers using a standard SIP softphone
(e.g. MicroSIP, CouterPath or Zoiper) to connect to the PBX. If you are using a Cloud PBX service then
there is probably nothing for you to do here, but if you have an on-premise PBX then there may be
configuration changed to your router or firewall to allow the access.
It is outside the scope of this document to go into the configuration of various firewalls and routers but
here are a few guidelines for your IT admin to configure the firewall.
Where it is already understood that the PBX is readily accessible
from the internet this section can be skipped, go to section 4
2.1 Important Notes to Network Administrators
• If your firewall supports SIP ALG, we strongly recommend disabling this.
• Certain network routers and switches may have a problem handling fragmented UDP packets.
Part of this readiness process will test SIP UDP fragmentation and issues may need to be
addressed or the TCP protocol used.
• If the PBX is hosted in Azure or Azure Stack then it will not cope with fragmented UDP so skip
straight to TCP or TLS.
• Although Ribbon Connect uses a relatively static range of IP addresses, all registration and SIP
for all users will emanate from one or two IP addresses, available in the portal. Media will come
from a wider range of addresses
• VPN access to your network is not available for the service.
2.2 Do you have an SBC or SIP Proxy/Gateway?
Some on-premise PBXs are feature limited to restrict external connection from the internet. The vendors
of these platforms will mandate the use of Session Border Controller (SBC) or Border Gateway. For this
document we will refer to this family of appliances or services as ‘Proxy’
Proxies sit at the edge of a customer network and relay voice traffic between the public internet and the
PBX. They provide additional security and management for external connections, acting as a ‘voice
firewall’ and can translate between different variants of the SIP protocol.
If you have a Proxy on your network, then this will need configuring to allow external SIP connection from
our service in the same way as a firewall.

PBX Integration Ribbon Connect Direct Routing as a Service
4 Ribbon Communications Confidential and Proprietary
2.3 Connection topology
PBXInternet
Public IP Address
PBXInternet
Public IP Address
Firewall
Internal Network (private addresses)
PBXInternet
Public IP Address
Firewall
Internal Network (private addresses)
Proxy
Public IP Addressof ProxyProxy communication to PBX
over internal Network
PBX Published directlyon the Internet
PBX on internal network withFirewall redirection
PBX accessed via Proxyor Gateway
There are three main methods of accessing a PBX from the internet:
1. Direct publishing: The PBX has a public IP address on its interface and devices can directly access the PBX by IP address or Hostname.
2. Accessed via Firewall redirection: The PBX is on an internal network and a firewall or router is performing Network Address Translation (NAT) between the public internet address and the internal network addresses. In this case certain traffic types from the internet will be allowed through and redirected to the PBX to allow internet devices to talk to the PBX through the firewall, in the same way as a directly published PBX.
3. Accessed via SBC, Proxy or Gateway: The Proxy is directly accessible from the internet (normally managed by the Firewall). The proxy handles the direct conversation with the connected devices and has a separate communication link with the internal PBX, often using proprietary protocols.

PBX Integration Ribbon Connect Direct Routing as a Service
5 Ribbon Communications Confidential and Proprietary
2.3.1 Direct Published PBX
For PBXs that are directly published, this is seldom a problem as they are by default accessible from
internet-based users.
2.3.2 PBX behind firewall
PBXs behind a firewall will require specific redirections to be set-up to allow connections from internet-
based devices to traverse the firewall and be presented to the PBX. Typically, there are two sets of
redirections required:
SIP Signaling: The standard for this is Protocol = UDP, Port = 5060, but can vary.
MEDIA: This port range is highly dependent on the PBX configuration, but for example 3CX PBXs use
Protocol = UDP, Port range = 9000-10999.
An informative in-depth article on NAT and firewalls can be found here: https://www.3cx.com/blog/voip-
howto/firewall-nat-pat-stun/
2.3.3 Proxy or Gateway
The role of the proxy is to publish the PBX services directly to the internet. Documentation will be
provided by the vendor of the proxy for the setup to allow internet-based devices to connect.
2.4 Encryption
For customers wishing to use encrypted SIP and Media, the PBX will require a real SSL certificate (not
self-signed) and the renewal of this certificate should be managed to avoid future service disruption.
Be sure to publish the required intermediate certificates as well as the main certificate. You can check
the SSL publishing using an online SSL checker site such as sslchecker.com or decoder.link.
2.5 Firewall Rules
If you wish to restrict public access to the PBX then there are two components:
For signaling, the IP addresses and port numbers are shown in the Ribbon Connect portal once the PBX
service has been set up. The firewall should allow traffic from any port on those IP addresses using the
protocol that corresponds to the chosen transport protocol (udp for “UDP” and tcp for “TCP” or “TLS”).

PBX Integration Ribbon Connect Direct Routing as a Service
6 Ribbon Communications Confidential and Proprietary
For media, this should be open to any IP address and port. Consult the PBX manual to determine which
ports is uses for media and allow traffic from any source address.
Note: During the test phase (Section 3) add & allow the public IP of the softphone client you are using.
2.6 PBX Specific remote access considerations
Some PBXs, particularly on-premise PBX platforms require additional configuration or licensing to
support remote access.
2.6.1 Does your PBX need additional licenses for remote access?
Several PBX manufacturers require an additional license to support a generic 3rd party SIP phone. This
is common where the PBX is built to operate with proprietary desk phones and devices. It is important to
check and understand this requirement and procure the needed licenses for remote access for each user
that will be connected to Microsoft Teams.
2.6.2 Does it need additional licenses for users to have multiple SIP devices
(desk phone and Ribbon Connect)?
Where a user will retain their desk phone and have Teams operating alongside, the user will need two
devices attached to their extension. Some PBXs need additional licenses for this arrangement
(sometimes called ‘shared call appearance’) so where a user does need multiple devices, this license
requirement should be checked. Note: A user may have several Teams devices connected to the PBX
via Ribbon Connect, this will only use one device connection to the PBX so just one device should be
provisioned and licensed for the Teams user.
2.6.3 Does it use different ports for remote users?
Some PBX manufacturers use a different network port number for remote user connections, so do not
assume that the port number your desk phone connects to is the same as the port you need to publish
for remote user access.
2.6.4 Does the PBX have ACLs in addition to the firewall?
If the PBX has built-in capability to restrict the network ranges it will allow connections from (Access
Control Lists), then this should be set to allow the external addresses required for the test phase and for
Ribbon Connect to connect.
2.6.5 Public IP presentation
When handling SIP connections to the outside world, it is important that the messages from the PBX
refer to the public IP address of the PBX, or the host name, and not the private LAN address. This way
traffic coming back to the PBX will know the destination address of the PBX.
For the UDP or TCP protocols the public IP address should be used for both SIP and media.
For the TLS protocol the full external hostname should be used for SIP, which must match the SSL
certificate, and the IP address should be used for media.

PBX Integration Ribbon Connect Direct Routing as a Service
7 Ribbon Communications Confidential and Proprietary
If the PBX supports remote access, then it may be labelled as ‘external address’ or similar. If the PBX is
using a proxy or SBC, this is likely to be a configuration parameter on that device.
2.6.6 Registration timeout
SIP devices need to re-register to the PBX from time to time to ensure the connection is maintained to
receive incoming call notifications. Ribbon Connect works best with long timeout and the recommended
timeout setting is 3600 seconds (one hour). Registration timeout is normally dictated by the PBX and
where this can be set, it should not be lower than 600 seconds (10 minutes) for Ribbon Connect.
2.6.7 SIP User Agent
Some PBXs restrict the devices that can attach by the identity contained within some of the messaging
produced by the device. A specific string call ‘SIP User Agent’ commonly identifies the
brand/model/revision of the connecting device and a PBX may be configured to only accept connections
from certain settings. Ensure ‘Rbbnconnect.com’ is in an allowed list (also for testing allow the
‘MicroSIP/3.17.7’ user agent – version number may be different, see the log file)
PBX Integration Ribbon Connect Direct Routing as a Service
8 Ribbon Communications Confidential and Proprietary
3 Test access to your PBX
Following the set up as detailed previously, the PBX will be reachable from outside of the organization
network, we recommend testing the access to your PBX with a generic tool to verify this.
Here is the process you can use to test your network and PBX for external access and the readiness for
Ribbon Connect
1) Download the MicroSIP Lite softphone from www.microsip.org and install on a PC
2) Connect the PC using MicroSIP on an external IP address (i.e. from a PC outside of your
network, perhaps by tethering to a mobile hotspot). This is essential to verify the connection can
be made through your firewall or Proxy, from the outside to the inside.
3) Configure the MicroSIP account to connect to your PBX with default settings. Use the UDP
protocol, unless you have a high security requirement and have set your PBX up for TLS.
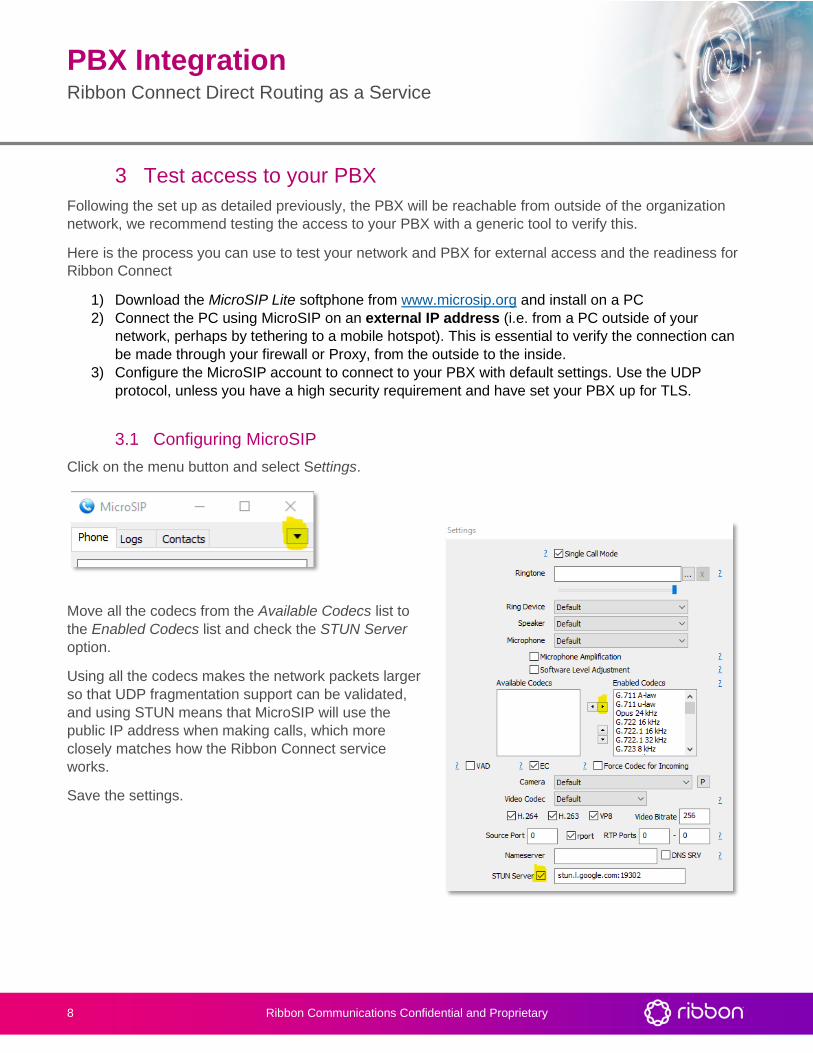
3.1 Configuring MicroSIP
Click on the menu button and select Settings.
Move all the codecs from the Available Codecs list to
the Enabled Codecs list and check the STUN Server
option.
Using all the codecs makes the network packets larger
so that UDP fragmentation support can be validated,
and using STUN means that MicroSIP will use the
public IP address when making calls, which more
closely matches how the Ribbon Connect service
works.
Save the settings.

PBX Integration Ribbon Connect Direct Routing as a Service
9 Ribbon Communications Confidential and Proprietary
Click on the menu button and select Add Account.
Edit the MicroSIP account settings to create a successful
registration of the MicroSIP client. The settings will be required in
the fields outlined on the account form above until the online status
shows Green and Online (if you see green with Online ‘Outgoing’,
this is not fully set up).
There are many permutations for configuring the SIP client, and this
will vary from PBX to PBX. Often, it is helpful to reference guides
for setting up other SIP devices for the PBX to understand how the
SIP config on the PBX has been designed.
Achieving successful external registration for the PBX is essential
for the Ribbon Connect service to operate.
Once the registration is successful, verify calls can be made and
received using the MicroSIP client.
Having a successful MicroSIP account profile will be very helpful
when understanding the fields in the Ribbon Connect portal where
various entries are made for your PBX.

PBX Integration Ribbon Connect Direct Routing as a Service
10 Ribbon Communications Confidential and Proprietary
4 Ribbon Connect Configuration to Work with Your PBX
When the PBX is enabled for remote access and it is understood how to create SIP credentials for users,
the Ribbon Connect service needs to be configured to connect to the PBX.
This requires two areas of configuration:
• A Service-level configuration to define how every user connects to the PBX
• Per-user configuration to allow each user to provide a device registration to the PBX
4.1 Configure the connection to your PBX
In the Ribbon Connect portal the Services tab allows for the overall configuration between Teams and
the PBX.
When selecting the PBX option, there will be a list of available PBX types or services. Select the most
appropriate template for your PBX, if the PBX is not listed, select ‘Custom’ or ‘Not listed’. This will bring
up the all available options for the PBX connection. If you have selected a defined PBX template, then a
subset of these fields will be available in the configuration form.

PBX Integration Ribbon Connect Direct Routing as a Service
11 Ribbon Communications Confidential and Proprietary
4.1.1 How to complete the PBX configuration form
The following field descriptions will assist you in configuring the PBX settings form
Country & State/Province
Ribbon Connect has servers spread globally across multiple continents. Enter the location of PBX here
to ensure the most appropriate service location is configured as the primary note for the PBX to connect
to. This ensures best call quality. The service will configure two nodes for each PBX to ensure high
availability.
SIP Domain
This is usually just the IP address or public host name used to reach the PBX. If your PBX requires you
to use a specific value here, then do so and specify the IP address or public host name in the SIP Proxy
field. Do not enter a port number on the SIP Domain
SIP Proxy
This is usually left blank but can be used to specify the IP address or public host name to reach the PBX
if the PBX requires the SIP domain to be set to a different value.
A port number can be specified by appending a colon and the number to the SIP Proxy field.
Authentication Type
This should be set to ‘Registration’ unless you are deploying an advanced configuration and have been
advised otherwise.
Protocol
‘UDP’ is the most common protocol to use, and the one most likely to be supported particularly on older
PBXs. However, if the network equipment does not handle fragmented UDP packets then ‘TCP’ could be
used.
If end to end encryption is required, then select ‘TLS’.
Encryption Media
This should be set to ‘no’ unless encryption is required, and the ‘TLS’ protocol is configured.
Supports Refer
In most cases this can be set to ‘Yes’. Only if the PBX does not have support for transferring calls should
this be set to ‘No’.
Suppress Contact Data Param
If you have a single-organization PBX using a single public IP address, then you should set this to ‘No’
as the alternative can hinder correct function with some PBXs.

PBX Integration Ribbon Connect Direct Routing as a Service
12 Ribbon Communications Confidential and Proprietary
If you have a multi-tenant or multi-server PBXs then try setting this to ‘Yes’ and if it causes an issue, then
revert to ‘No’.
Outside line prefix
If the PBX required a number to be dialed to reach an outside line, enter this here and it will be
automatically prepended; this means Teams users do not need to specify this when dialing and can
simply dial the destination PSTN number.
E164 Number Format
Teams uses E164 numbering, which is where numbers begin with a ‘+’ followed by the country code.
If the PBX expects localized numbers, then you can specify the mapping here.
e.g. if the PBX expects in-country numbers to start with a ‘0’ and international numbers to start with ‘00’
followed by the country code then enter ‘0’ as the national dialing prefix and ‘00’ as the international
prefix.
5 Creating SIP accounts on your PBX
Typically SIP credentials will contain the following information. PBX systems often refer to SIP devices
rather than users. This is because a user on a phone system may have several devices (e.g. Desk
Phone and Soft Phone) that will be connected to their user extension:
Item Description
SIP Username A per-user or per-device identity. Occasionally the same as the extension number.
SIP Auth Username Not always required; if SIP Username is the user identity then SIP Auth Username is the specific device identity, often more complex than SIP Username and not memorable. If this field is not required, then it can be left blank
SIP Password A per-device/user password setting
The per-user settings are entered into the Ribbon Connect service ‘Users’ tab to map each Microsoft
Teams user to the SIP device credentials created.
A phone number is also required, this may be a full DID number or just an extension. The number must
be unique for each user. The country code for the user is driven from the User’s country setting in the
Office 365 license area – if it is incorrect then alter it in the Office 365 portal and then run another sync
into Ribbon Connect.
SIP Username should not include an @ symbol.

PBX Integration Ribbon Connect Direct Routing as a Service
13 Ribbon Communications Confidential and Proprietary
Note: Remember to
click Sync again once
this user configuration
is done, as this will
perform the Office 365
configuration for those
users.
5.1 Additional configuration topics
5.1.1 Dialing Limitations
There are some dialing rules built into Teams that cannot be circumvented:
• Numbers beginning with ‘0’ are converted to full E164 numbers. If you have extension numbers beginning with ‘0’ then consider changing them so they do not have this prefix
• Many PBXs have feature codes beginning with ‘*’ that can be dialed. Most will work from Teams, but *11, *12 and *13 do not. Microsoft have indicated that they reserve the right to block some other two-digit star codes as they allocate them for new native Teams features, although at the time of writing there is no sign of this. If you make use of these blocked feature codecs then look to see if the PBX can be configured to change the codes to ones that will not be blocked by Teams.
5.2 SIP Registration indicators and error
messages
SIP registration status is shown against users in the Users
tab. This indicator will show green if registration is operating
normally.
If the indicator is Red, the brief reason will be displayed when
you hover the mouse pointer over the indicator. The message
shown varies between PBX vendors, and some of the more
common ones are shown in the table below:

PBX Integration Ribbon Connect Direct Routing as a Service
14 Ribbon Communications Confidential and Proprietary
Message Advice
Unable to resolve URI Either the SIP Proxy (if specified) or SIP Domain is incorrect
No response received after xx seconds The PBX did not respond. Check the firewall and the SIP Proxy/Realm. Specify a port in the SIP Proxy if required.
Authentication Failure
Usually means that the SIP Username, SIP Auth Username (if specified) or SIP Password are incorrect. It could be that the SIP Realm is incorrect if the PBX checks this.
Declined
Forbidden
Invalid password
Not found
Proxy Authentication Required
Unauthorized
User unknown
6 Initial confidence tests
Perform the following tests to verify compatibility with your PBX for standard confidence levels:
1. Ensure there are at least 2 users registered
2. Test users can call out to the PSTN from Teams for a call duration of at least 1 minute
3. Test users can call extension number of other PBX users from Teams
4. Make calls (longer than 1 minute) into Teams users to their DDI from the PSTN
5. Make calls into Teams from the PSTN then have a user transfer the call back out to a PSTN number
7 Further testing for full interoperability validation
The following tests provide full confidence in the interoperability of the PBX and Ribbon Connect.
Create at least 2 users on the PBX and connect to Ribbon Connect. They are called User A and User B.
They should have active DiD numbers.

PBX Integration Ribbon Connect Direct Routing as a Service
15 Ribbon Communications Confidential and Proprietary
7.1 Single Calls
7.1.1 Single Incoming Call 1
Description Expected Result
Step 1 From an external number, dial the User A PBX number
Teams rings for User A The caller-id matches the external number that originated the call
Step 2 Answer the call in Teams 2-way audio is established
Step 3 Speak for 45 seconds The call continues to work
Step 4 Place the call on hold in Teams Caller hears hold music
Step 5 Resume the call in Teams 2-way audio is re-established
Step 6 Blind transfer the call to another external number
The external number rings The caller-id is as expected (either User A’s DiD or the external number that originated the call, depending on how the PBX is configured)
Step 7 Answer the call 2-way audio is established between the two external devices. Teams hangs up.
7.1.2 Single Incoming Call 2
Description Expected Result
Step 1 From an external number, dial the User A PBX number
Teams rings for User A
Step 2 Answer the call in Teams 2-way audio is established
Step 3 Blind transfer the call to User B’s extension number
Teams rings for User B
Step 4 Answer the call 2-way audio is established between the two external devices. External Caller hangs up.

PBX Integration Ribbon Connect Direct Routing as a Service
16 Ribbon Communications Confidential and Proprietary
7.1.3 Single Outgoing Call 1
Description Expected Result
Step 1 From User A’s Teams client, dial an external number
The external number rings.
Step 2 Answer the call 2-way audio is established
Step 3 Speak for 45 seconds The call continues to work
Step 4 Place the call on hold in Teams Caller hears hold music
Step 5 Resume the call in Teams 2-way audio is re-established
Step 6 Blind transfer the call to another external number
The external number rings
Step 7 Answer the call 2-way audio is established between the two external devices. Teams hangs up.
7.1.4 Single Outgoing Call 2
Description Expected Result
Step 1 From User A’s Teams client, dial User B’s extension
User B’s Teams client rings
Step 2 Answer the call 2-way audio is established
Step 3 Speak for 45 seconds The call continues to work User A hangs up.
Step 6 Blind transfer the call to another external number
The external number rings
7.2 Multiple Calls
This step confirms that the PBX can handle multiple users registering from the same IP and port.
7.2.1 Two incoming calls on different Users
Description Expected Result
Step 1 From an external number, dial User A’s DiD
Teams rings for User A
Step 2 From an external number, dial User B’s DiD
Teams rings for User B
Step 3 Both Teams users answer 2-way audio is established on both calls
Step 4 Teams hangs up the first call Both parties see the call hang up
Step 5 External hangs up the second call Both parties see the call hang up
PBX Integration Ribbon Connect Direct Routing as a Service
17 Ribbon Communications Confidential and Proprietary
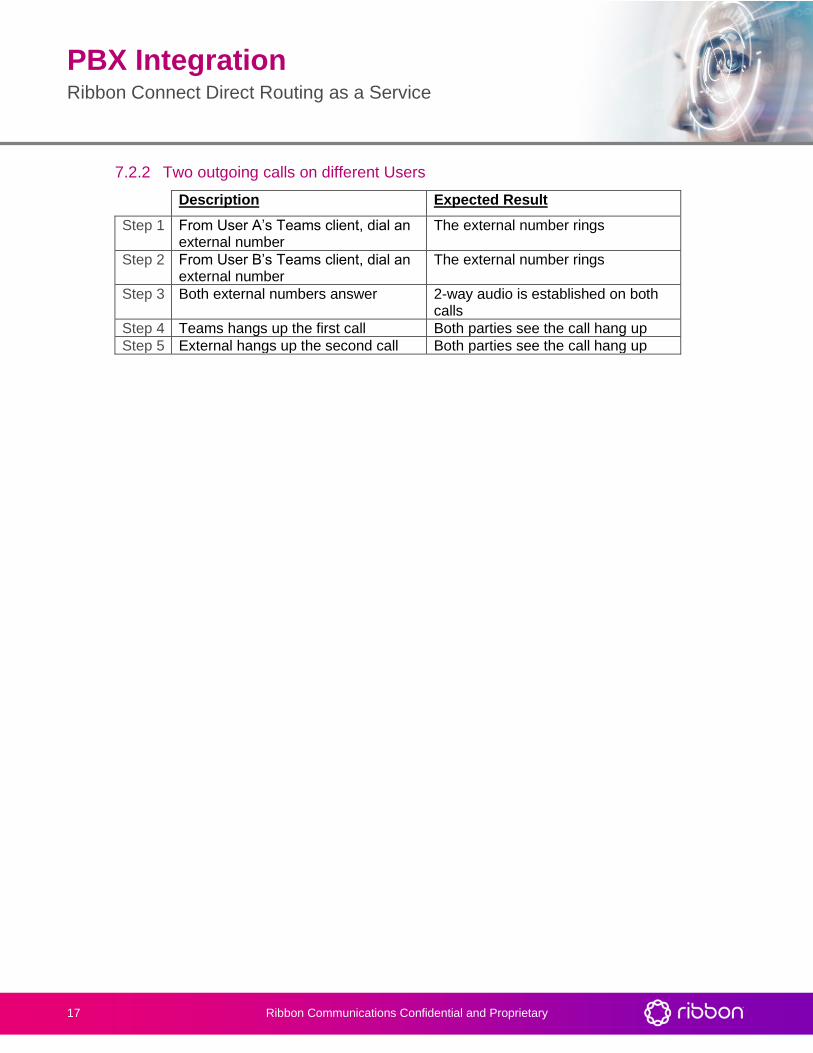
7.2.2 Two outgoing calls on different Users
Description Expected Result
Step 1 From User A’s Teams client, dial an external number
The external number rings
Step 2 From User B’s Teams client, dial an external number
The external number rings
Step 3 Both external numbers answer 2-way audio is established on both calls
Step 4 Teams hangs up the first call Both parties see the call hang up
Step 5 External hangs up the second call Both parties see the call hang up
Related Documents